

Page 1

u s e r ’s m a n u a l
NVR-54XX
NVR-56XX
NVR-58XX
Page 2

NVR-5000 User’s manual ver.1.0
IMPORTANT SAFEGUARDS AND WARNINGS
All rights reserved © AAT HOLDING S.A.
2
EMC (2004/108/EC) and LVD (2006/95/EC ) Directives
CE Marking
Our products are manufactured to comply with requirements of following directives and
national regulations implementing the directives:
Electromagnetic compatibility EMC 2004/108/EC.
Low voltage LVD 2006/95/EC with further amendment. The Directive applies to electrical
equipment designed for use with a voltage rating of between 50VAC and 1000VAC as well
as 75VDC and 1500VDC.
WEEE Directive 2002/96/EC
Information on Disposal for Users of Waste Electrical and Electronic Equipment
This appliance is marked according to the European Directive on Waste Electrical and
Electronic Equipment (2002/96/EC) and further amendments. By ensuring this product is
disposed of correctly, you will help to prevent potential negative consequences for the environment
and human health, which could otherwise be caused by inappropriate waste handling of this product.
The symbol on the product, or the documents accompanying the product, indicates that this
appliance may not be treated as household waste. It shall be handed over to the applicable collection
point for the waste electrical and electronic equipment for recycling purpose. For more information
about recycling of this product, please contact your local authorities, your household waste disposal
service or the shop where you purchased the product.
RoHS Directive 2002/95/EC
Concerning for human health protection and friendly environment, we assure that our
products falling under RoHS Directive regulations, regarding the restriction of the use of
hazardous substances in electrical and electronic equipment, were designed and
manufactured in compliance with mentioned regulation. Simultaneously, we claim that our
products were tested and do not contain hazardous substances exceeding limits which could have
negative impact on human health or natural environment.
Information
The device, as a part of professional CCTV system used for surveillance and control, is not designed for
self installation in households by individuals without technical knowledge.
The manufacturer is not responsible for defects and damages resulted from improper or inconsistent
with user’s manual installation of the device in the system.
ATTENTION!
PRIOR TO UNDERTAKING ANY ACTION THAT IS NOT PROVISIONED FOR THE GIVEN PRODUCT IN ITS
USER’S MANUAL AND OTHER DOCUMENTS DELIVERED WITH THE PRODUCT, OR THAT ARISES FROM
THE NORMAL APPLICATION OF THE PRODUCT, ITS MANUFACTURER MUST BE CONTACTED OR THE
RESPONSIBILITY OF THE MANUFACTURER FOR THE RESULTS OF SUCH AN ACTION SHELL BE
EXCLUDED.
Page 3

NVR-5000 User’s manual ver.1.0
IMPORTANT SAFEGUARDS AND WARNINGS
All rights reserved © AAT HOLDING S.A.
3
1. Prior to undertaking any action please consult the following manual and read all the safety and
operating instructions before starting the device.
2. Please keep this manual for the lifespan of the device in case referring to the contents of this
manual is necessary;
3. All the safety precautions referred to in this manual should be strictly followed, as they have a
direct influence on user’s safety and durability and reliability of the device;
4. All actions conducted by the servicemen and users must be accomplished in accordance with the
user’s manual;
5. The device should be disconnected from power sources during maintenance procedures;
6. Usage of additional devices and components neither provided nor recommended by the producer
is forbidden;
7. You are not allowed to use the device in high humidity environment (i.e. close to swimming pools,
bath tubs, damp basements);
8. Mounting the device in places where proper ventilation cannot be provided (e. g. closed lockers
etc.) is not recommended since it may lead to heat build-up and damaging the device itself as a
consequence;
9. Mounting the device on unstable surface or using not recommended mounts is forbidden.
Improperly mounted device may cause a fatal accident or may be seriously damaged itself. The
device must be mounted by qualified personnel with proper authorization, in accordance with this
user’s manual.
10. Device should be supplied only from a power sources whose parameters are in accordance with
those specified by the producer in the devices technical datasheet. Therefore, it is forbidden to
supply the devices from a power sources with unknown parameters, unstable or not meeting
producer’s requirements;
11. You cannot allow any metal objects get inside the recorder. It might cause serious damage. If a
metal object gets inside the device contact the authorised Novus service immediately.
12. The manufacturer does not bear responsibility for damage or loss of data stored on HDDs or other
media occurred during the usage of the product.
Due to the product being constantly enhanced and optimized, certain parameters and functions
described in the manual in question may change without further notice.
We strongly suggest visiting the www.novuscctv.com website in order to access the newest manual .
Technical changes reserved without prior notice and printing errors possible.
Page 4

NVR-5000 User’s manual ver.1.0
All rights reserved © AAT HOLDING S.A.
4
TABLE OF CONTENTS
TABLE OF CONTEST ............................................................................................. 4
1. NVR MENU ........................................................................................................... 6
1.1. Language change ............................................................................................ 6
1.1. System operations ........................................................................................... 7
1.1. Live monitoring .............................................................................................. 8
1.2. Searching and playing recorded video .......................................................... 10
1.3. Backup ......................................................................................................... 12
1.4. PTZ ............................................................................................................... 13
1.5. Alarm ............................................................................................................ 13
1.6. Capture .......................................................................................................... 14
1.7. File manager ................................................................................................. 14
2. NVR CONFIGURATION ................................................................................... 15
2.1. Device ............................................................................................................ 15
2.1.1. Device info ............................................................................................ 15
2.1.2. Device version ....................................................................................... 16
2.1.3. PTZ setting ............................................................................................ 16
2.1.4. DST setting ........................................................................................... 17
2.1.5. 0 channel setting .................................................................................... 17
2.1.6. QR code ................................................................................................. 18
2.2. Channel .......................................................................................................... 18
2.2.1. Display setting ................................................................................ 18
2.2.2. Video parameters ............................................................................ 19
2.2.3. Schedule recording ........................................................................ 20
2.2.4. Motion ............................................................................................. 21
2.2.5. Video lost ........................................................................................ 22
2.3. Network ......................................................................................................... 23
2.3.1. Network setting ............................................................................... 23
2.3.2. DDNS setting .................................................................................. 24
2.3.3. NTP setting ..................................................................................... 25
2.3.4. E-mail setting .................................................................................. 26
2.3.5. Management platform ..................................................................... 27
Page 5

NVR-5000 User’s manual ver.1.0
All rights reserved © AAT HOLDING S.A.
5
TABLE OF CONTENTS
2.4. Alarm ............................................................................................................. 28
2.4.1. Alarm input ..................................................................................... 28
2.4.2. Alarm output ................................................................................... 29
2.4.3. Exception ....................................................................................... 30
2.5. Account .......................................................................................................... 31
2.5.1. Account setting ............................................................................... 31
2.5.2. User online ...................................................................................... 33
2.6. System ............................................................................................................ 34
2.6.1. Device log ....................................................................................... 34
2.6.2. Stream info ...................................................................................... 34
2.6.3. HDD setting .................................................................................... 35
2.6.4. Update ............................................................................................. 35
2.6.5. Auto reboot ..................................................................................... 36
2.6.6. Recovery configuration................................................................... 37
2.7. Record ............................................................................................................ 38
2.8. Display setting ............................................................................................... 38
2.9. Image setting .................................................................................................. 40
2.10. IP channel setting ......................................................................................... 41
2.10.1. Manual .......................................................................................... 41
2.10.2. Synchronization time .................................................................... 45
2.10.3. Manual synchronization ................................................................ 45
2.10.4. Changing channel sequence .......................................................... 45
3. NETWORK OPERATIONS UTILIZING WEB BROSWER ........................ 46
3.1. Recommended PC specification for web browser connections ..................... 46
3.2. Establishing a connection .............................................................................. 46
3.3. Configuration of remote access. .................................................................... 48
3.4. Live monitoring interface. ............................................................................. 49
3.5. Searching and playing recorded video ........................................................... 51
3.6. Backup .......................................................................................................... 52
3.7. Logs ............................................................................................................... 53
3.8. File. ................................................................................................................ 53
3.9. Config ........................................................................................................... 54
Page 6

NVR-5000 User’s manual ver.1.0
NVR OPERATING
All rights reserved © AAT HOLDING S.A.
6
1. NVR MENU
1.1. Language change
After starting device, the video output default to multi-window output mode.
By default NVR is using English language interface.
To change language please follow the procedure like below:
Move cursor to the top or click the right key of mouse to bring up MAIN MENU
Select START icon and click the LOGIN icon to pop out the login menu:
Select User “admin”, leave password blank and confirm with OK button.
Default login is “admin” / no password.
From the MAIN MENU click DISPLAY icon , following window will be shown:
In LANGUAGE menu select preferred language.
Page 7

NVR-5000 User’s manual ver.1.0
NVR OPERATING
All rights reserved © AAT HOLDING S.A.
7
Save changes by clicking OK button
New confirmation window will appear, choose YES to confirm
Now NVR will start again with new language.
1.2. System operations
To manipulate or access menus of the NVR, you should log in again. Move cursor to the top or click
the right key of mouse to bring up MAIN MENU and select START icon
Next click the LOGIN icon to pop out the login menu:
Select User and enter the password . Use the virtual keyboard to enter the password and confirm with
OK button.
Default login is “admin” / no password. For safety reasons, it is recommended to change default
user name and password.
In order to shutdown NVR you should move cursor to the top or click the right key of mouse and
select START icon . Next click the POWER OFF icon . After that use disable button at rear
panel to turn off the power.
In order to reboot NVR you should move cursor to the top or click the right key of mouse and select
START icon . Next click the REBOOT icon . After NVR will boot again you should log in.
To prevent unauthorized access, it is recommended to log out when you leave the screen. To do that
move cursor to the top or click the right key of mouse and select START icon . Next click the
LOGOUT icon .
Note: When user is not login or has limited rights all inactive icon and menus are greyed out.
CAUTION:
If you turn off the system in an abnormal manner such as removing the power cord while the
system is working, the disk will acquire or increase the numbers of bad sectors, causing data
loss and shortened life cycle of the disk.
Page 8

NVR-5000 User’s manual ver.1.0
NVR MENU
All rights reserved © AAT HOLDING S.A.
8
1.3. Live monitoring
Novus network video recorders features a multilingual OSD menu allowing for adjusting the settings of
the device. Available languages are: English, Polish, and others
As soon as the NVR completes its initialization process, it will enter the real-time monitoring image.
Displaying all cameras simultaneously is the default mode. If you move mouse to the top MENU BAR
will be shown. At the right corner of screen, shows the logged user and alarms status. In the bottom
right corner of each channel image, shows capture and recording icon, zoom mode and alarm icon.
After login in, click the right key of mouse to bring up the MAIN MENU interface. You can also move
mouse cursor to the window top display MENU BAR, which contains basic menu functions.
Click icon to pop out the menu showed below:
VIDEO WINDOW
MENU BAR MAIN MENU
Page 9

NVR-5000 User’s manual ver.1.0
NVR MENU
All rights reserved © AAT HOLDING S.A.
9
Click the right key of mouse to bring the MAIN MENU bar
Click the right key of mouse to bring the MAIN MENU bar
Page 10

NVR-5000 User’s manual ver.1.0
NVR MENU
All rights reserved © AAT HOLDING S.A.
10
4.2. Searching and playing recorded video
To start the PLAYBACK MENU click icon. Then following window appears:
1. From the CHANNEL SELECT tick the channel which you want to search the recording, it will auto
search the recording .
2. Change the date from the calendar and press SEARCH button to find records for selected date.
You can identify the type of the recording data by the color in the bar.
Blue (Continuous) : continuous recording data.
Red (Alarm) : alarm event recording data.
Yellow (Motion) : motion event recording data.
Pink (Motion or Alarm) : motion or alarm event recording data.
Azure (Motion & Alarm) : motion and alarm event (when occurs in the same time) recording
data.
Green : data originating from manual recording.
3. To play the searched data simply double click a desired point on “Timeline” or press PLAY button.
CHANNEL SELECTION VIDEO PLAYBACK WINDOW
GRAPH WITH
RECORDING
PLAYBACK
BUTTONS
SEARCH BUTTON
CALLENDAR
Page 11

NVR-5000 User’s manual ver.1.0
NVR MENU
All rights reserved © AAT HOLDING S.A.
11
Description of playback buttons:
Backward: play backward (using I frame).
Play: play the current playback image.
Pause: pause the current playback image.
Stop: Stop the playing video.
Slow: Slow down the playback speed. (there are: 1/2, 1/4, 1/8, 1/16 times)
Fast: Accelerate playback. (there are: 2, 4, 8, 16 times)
Frame Play: jump single frame forward or backward.
Snapshot: You can capture picture in any playback channel.
Backup: You can backup the recording of any channel.
Fullscreen: expand video window to full screen
Volume: allow to adjust volume
More over while using mouse over graph with records following features are available:
Using mouse scroll wheel allow to expand timeline with recording for more precise navigation.
Right mouse button: using it allow move timeline while is expanded.
Left mouse button include features:
- From - set up beginning of exported data
- To - set up end of exported data
- Backup - open the backup window
Page 12

NVR-5000 User’s manual ver.1.0
NVR MENU
All rights reserved © AAT HOLDING S.A.
12
1.5. Backup
User may copy recordings to external storage devices or through the network. The NVR features the
possibility of copying the recordings to an external HDD connected via the USB, onto Flash
memories. NVRs allow to copy the recordings in following formats: AVI.
To start the BACKUP MENU click icon. Then following window will shown
Insert USB storage device, click Refresh to detect the USB device. If the USB device is recognized
normally, it will be displayed in the list, then select following:
Select a required channels
Select a date range filling FROM and TO range.
Set the desired USB device for the backup.
Choose the required file format.
Press START button, process bar will move forward until reaches 100%.
When it finish press UNMOUNT button and remove USB device.
Page 13

NVR-5000 User’s manual ver.1.0
NVR MENU
All rights reserved © AAT HOLDING S.A.
13
1.6. PTZ
PTZ button opens new window which allows to control the operations of a selected PTZ camera.
To start the PTZ click icon. Then following window will shown
Use it to adjust the pan, tilt, zoom and focus of the camera. You can also run and set Preset etc.
Note: Not every camera model and network protocol allow to control camera remotely.
1.7. Alarm
You can check the alarm log for events of particular interest.
Click ALARM icon to display the “ALARM” window. The list is sorted with the latest events be-
ing on the top.
Use DEFENCE OFF button to disable alarm temporary. CLEAR ALARM button will remove all
alarms from the list.
Page 14

NVR-5000 User’s manual ver.1.0
NVR MENU
All rights reserved © AAT HOLDING S.A.
14
1.8. Capture
If you would like to save some single image from camera click icon at the preview channel can
capture the channel image. Image file will be stored at hard disk.
Note:
Capture works only with cameras supporting this functions.
1.9. File manager
Menu allows to search and watch for the images captured manually, as well as delete or export them
to a storage device. In this menu user can also search the storage device for the archived data and
check the details of it or playback records.
Click FILE MANAGER icon to open following menu:
The default status is to show the capture image stored in the hard disk. To search images, select
required channel, choose the date and press REFRESH button
When need to playback the recording file or image from the external device, please click dropdown
box to select the USB device from the drop-down list and search for files like previously.
The file list column will show the file in the USB and captured image file on the NVR.
Page 15

NVR-5000 User’s manual ver.1.0
NVR CONFIGURATION
All rights reserved © AAT HOLDING S.A.
15
2. NVR CONFIGURATION
Setting menu allow to configure various NVRs parameters.
2.1. Device menu allows to check NVR information and configure the settings of date/time, system
management, and peripheral device.
2.1.1. Device Info - check and modify the basic information of the NVR
Following function are available:
Device name - set device name
Device ID - set up device unique number for remote controller
Sub Stream Record - allow to enable additional recording of second stream
Panel Version - define front panel hardware version, do not modify it.
Remote - enable IR remote controller if supported.
RS 485 - set up functionality of RS485 interface
Device info: contains current system information: Serial number, Channel, Alarm input, Alarm
output, HDD number
Video Format - switch video BNC output between PAL and NTSC
Stream Type - depending on used cameras you have to chose correct mode from the list
For eg. in mode 2x[1920*1080] + 2x[1280*720] + sub[960*576] + 1Ref + 4Play
Channel 1 and 2 support 1920*1080, channel 3 and 4 support 1280*720, channel 1-4 sub
streams support 960*576 resolution. 4Play means that there is possible to playback for 4
channels at once. 1Ref is internal buffer capacity.
Page 16

NVR-5000 User’s manual ver.1.0
NVR CONFIGURATION
All rights reserved © AAT HOLDING S.A.
16
Protocol - enable / disable various IP cameras protocols.
Device Time - set up current time and date, confirm by MODIFY button.
Time and date format - allows to select different time and date formats
2.1.2. System Version - menu contains current system version info and hardware version
2.1.3. PTZ setting - configure the settings of the port for remote controller and peripheral devices.
Page 17

NVR-5000 User’s manual ver.1.0
NVR CONFIGURATION
All rights reserved © AAT HOLDING S.A.
17
2.1.4. DST setting -user can specify the DST (Daylight Saving Time) settings.
To ensure proper operation, set FROM time as last Sunday of March, 1:00 AM UTC. Clocks are
moved forward at time defined in DST Bias. Set the TO time as last Sunday of October, 1:00 UTC.
The clocks are moved back at time defined in DST Bias.
2.1.5. 0 Channel Setting - menu allow to configure mobile stream settings. Following parameters are
available:
Resolution
Bitrate
Frame rate
Page 18

NVR-5000 User’s manual ver.1.0
NVR CONFIGURATION
All rights reserved © AAT HOLDING S.A.
18
5.1.4. QR Code - Menu contains QR code for remote connation using mobile devices and p2p
protocol.
5.2. Channel - menu allow to configure camera settings, recordings parameters, alarm and motion
events.
5.2.1. Display setting - configuration of camera image and display parameters.
After selecting channel following parameters are available:
Local Camera Name: You can modify the name and visibility for the specified channel.
- - - Remote camera settings - - Camera Name: Allow to modify the OSD name and visibility of it remotely in camera,
associated to the selected channel .
Page 19
NVR-5000 User’s manual ver.1.0
NVR CONFIGURATION
All rights reserved © AAT HOLDING S.A.
19
Time and date format - allows to select different time / date formats and enable visibility of it
remotely in camera, associated to the selected channel.
OSD Position: menu allows to select any position for the OSD remotely in associated camera.
Image settings: user can set the brightness, contrast, saturation and hue remotely in associated
camera.
Sensor: set up various parameters remotely in camera, associated to the selected channel.
Note:
Not every camera model and network protocol allow to change all camera settings remotely.
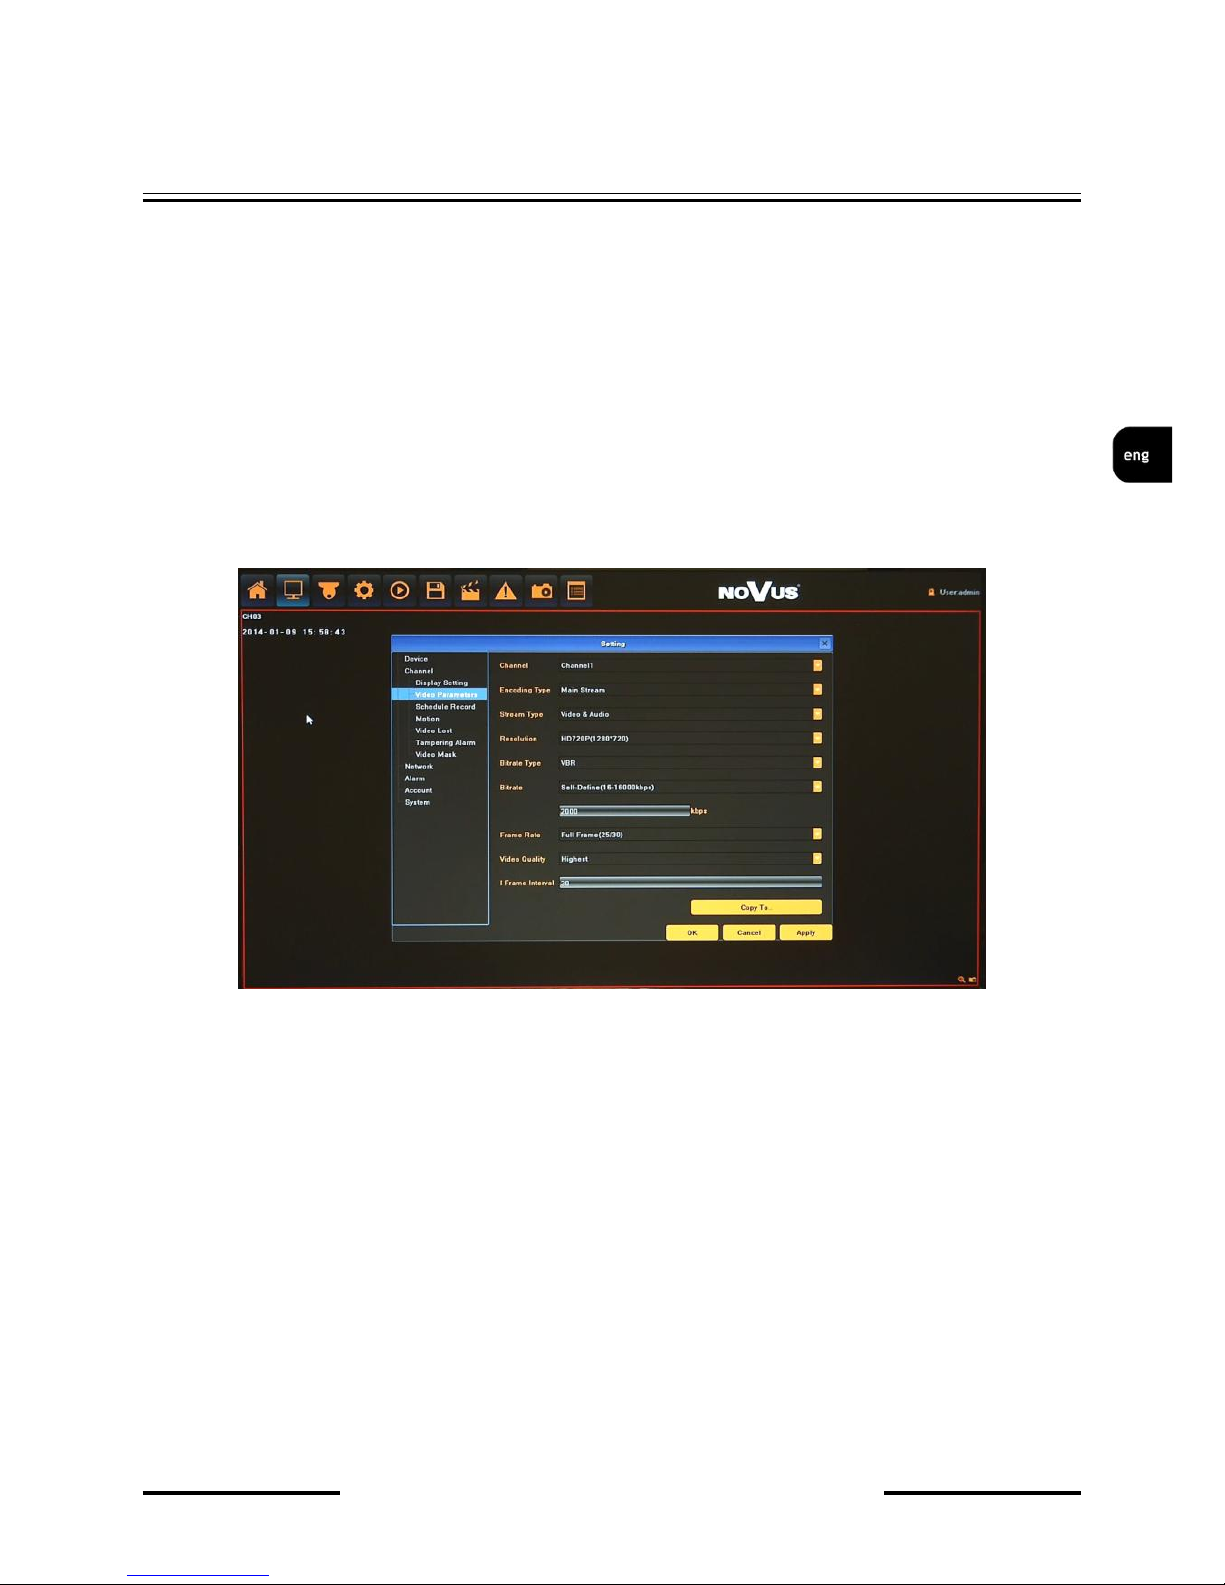
2.2.2. Video Parameters - setting of streams parameters for every channel. Configuration is set up
remotely in camera, associated to the selected channel.
After selecting CHANNEL and ENCODING STREAM following parameters are available:
Stream type: select between Video or Video&Audio.
Resolution: there is list of resolution available for current camera
Bitrate type: select between CBR(constant) and VBR(variable).
Bitrate: compression value for camera’s current stream
Frame Rate: select different value from the drop-down list, the default value is “Full Frame”.
Video Quality: select different image quality as needed (for VBR mode).
I Frame interval: set the amount of frames for each I Frame.
By using COPY TO button you can copy current settings to other required channel.
Note:
Not every camera model and network protocol allow to change all camera settings remotely.
Page 20

NVR-5000 User’s manual ver.1.0
NVR CONFIGURATION
All rights reserved © AAT HOLDING S.A.
20
2.2.3. Schedule Recording - setting of different types of record plan for each channel.
After selecting CHANNEL following parameters are available:
Enable Recording: Tick the checkbox will start recording.
All Day Recording: For using one type of recording tick the checkbox and select one of
following: schedule, motion, alarm, motion or alarm, motion and alarm. It will start all day
recording based of selection you have done.
For using many type of recordings uncheck the checkbox and draw at schedule areas like is needed. It
will start schedule recording based of current schedule. You can setup up to 8 separate time periods
for each day/camera.
Color schedule description.
Blue (Continuous) : The continuous recording is performed on the recording data.
Yellow (Motion) : The motion event recording is performed on the recording data.
Red (Alarm) : The alarm event recording is performed on the recording data.
Pink (Motion or Alarm) : If motion or alarm event occurs then recording is performed on the
recording data.
Azure (Motion & Alarm) :If motion and alarm event occurs in the same time then recording is
performed on the recording data.
Record Time: use it for advanced & precise schedule setting, by selecting days and typing times
manually.
Advanced: You can set the prerecord time and post record time.
By using COPY TO button you can copy current settings to other required channel.
Page 21
NVR-5000 User’s manual ver.1.0
NVR CONFIGURATION
All rights reserved © AAT HOLDING S.A.
21
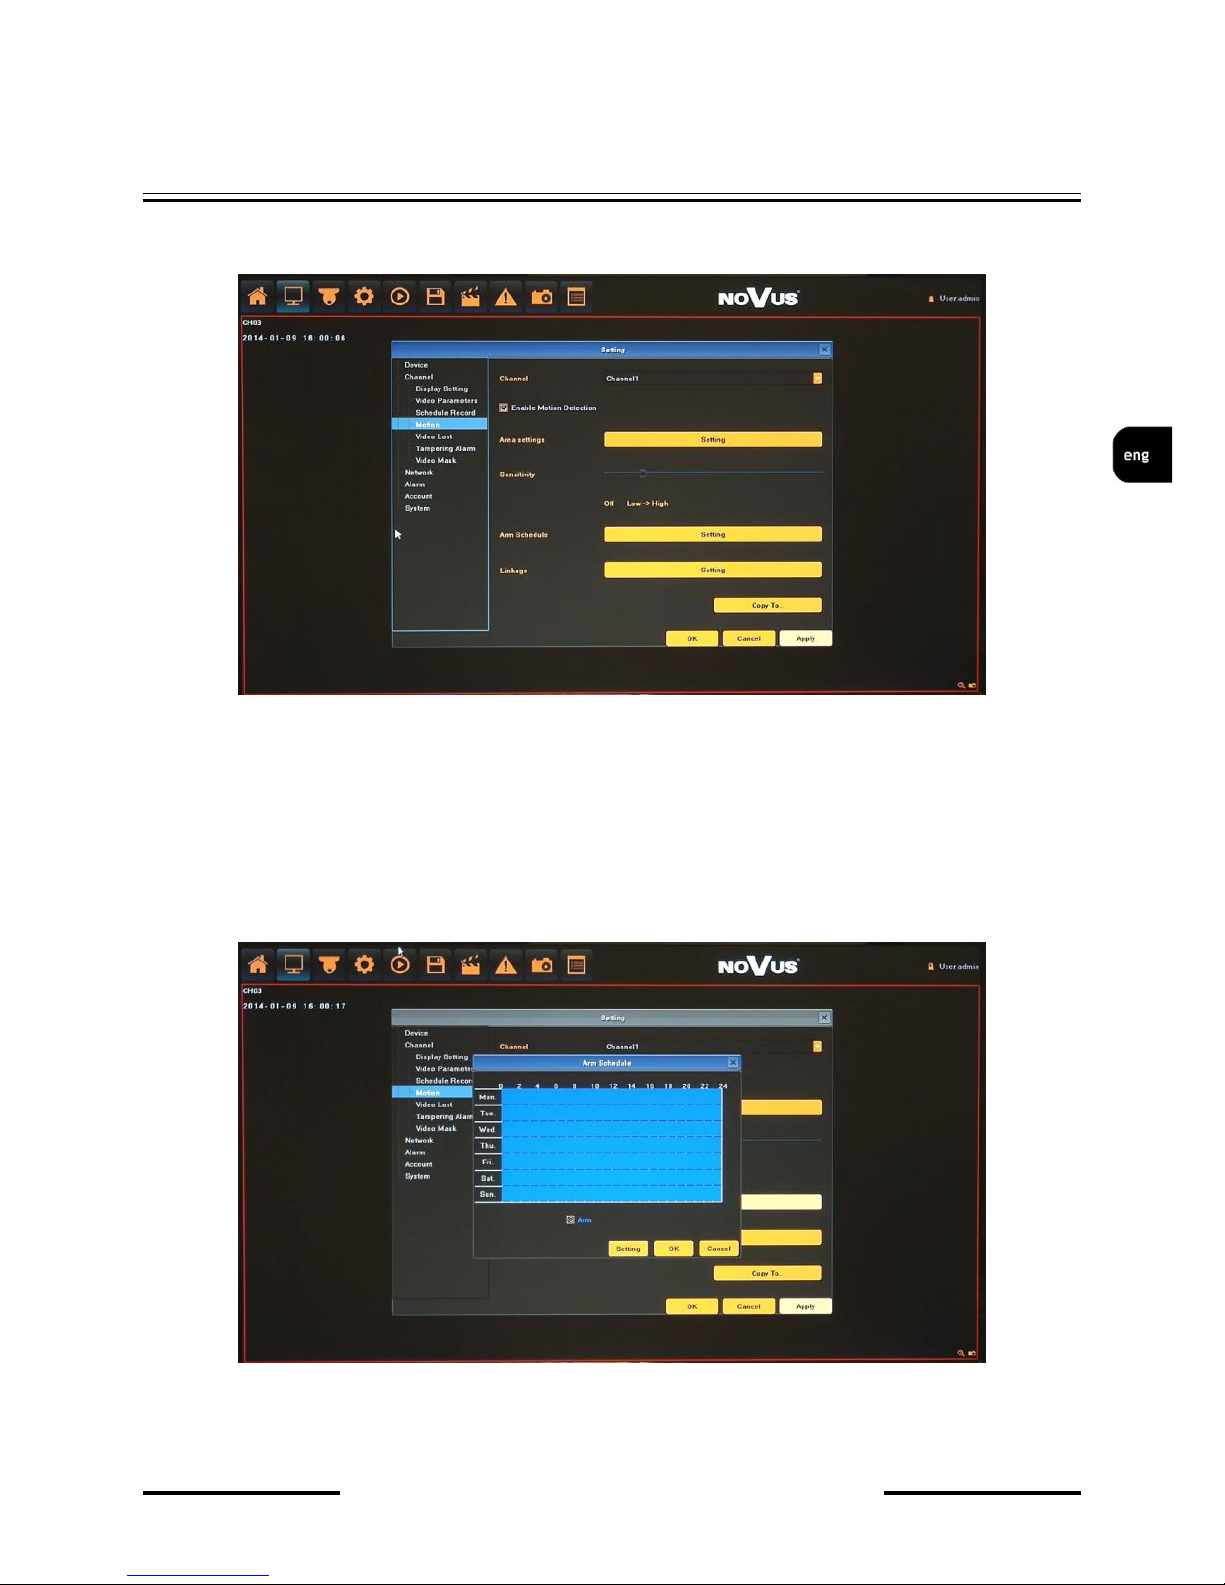
2.2.4. Motion - menu allows to configure the built-in camera motion detection function.
Configuration is set up remotely in camera, associated to the selected channel.
After selecting CHANNEL following parameters are available:
Enable Motion Detection: Tick the checkbox will enable detection functionality.
Area settings: select the motion detection area, press the left mouse button and drag to the area
which you want to set motion detection, click OK.
Sensitivity : set the sensitivity of detection
Arm Schedule: set the time intervals when alarm is active.
Setting: use it for advanced & precise schedule setting, by selecting days and typing times
manually.
Page 22

NVR-5000 User’s manual ver.1.0
NVR CONFIGURATION
All rights reserved © AAT HOLDING S.A.
22
Linkage: select the reaction way for current which you need. Available reaction are: Audio
warning (NVR internals buzzer), Email, Specified alarm output activation, Alarm on monitor
and Alarm List, Trigger recording.
By using COPY TO button you can copy current settings to other required channel.
Note: Not every camera model and network protocol allow to change all camera settings remotely.
2.2.5. Video Lost - menu allows to define response of the NVR to video loss event on one of its video
channels.
Enable Video Lost: Tick the checkbox will enable detection functionality.
Arm Schedule: set the time intervals when alarm is active.
Linkage: select the reaction way for current which you need. Available reaction are: Audio
warning (NVR internal buzzer), Email, Specified alarm output activation, Alarm on monitor and
Alarm List.
For detailed description of Arm Schedule and Linkage please check MOTION chapter.
Page 23
NVR-5000 User’s manual ver.1.0
NVR CONFIGURATION
All rights reserved © AAT HOLDING S.A.
23
2.3. Network - menu allow to configure network parameters of the device including email, DDNS and
NTP setting .
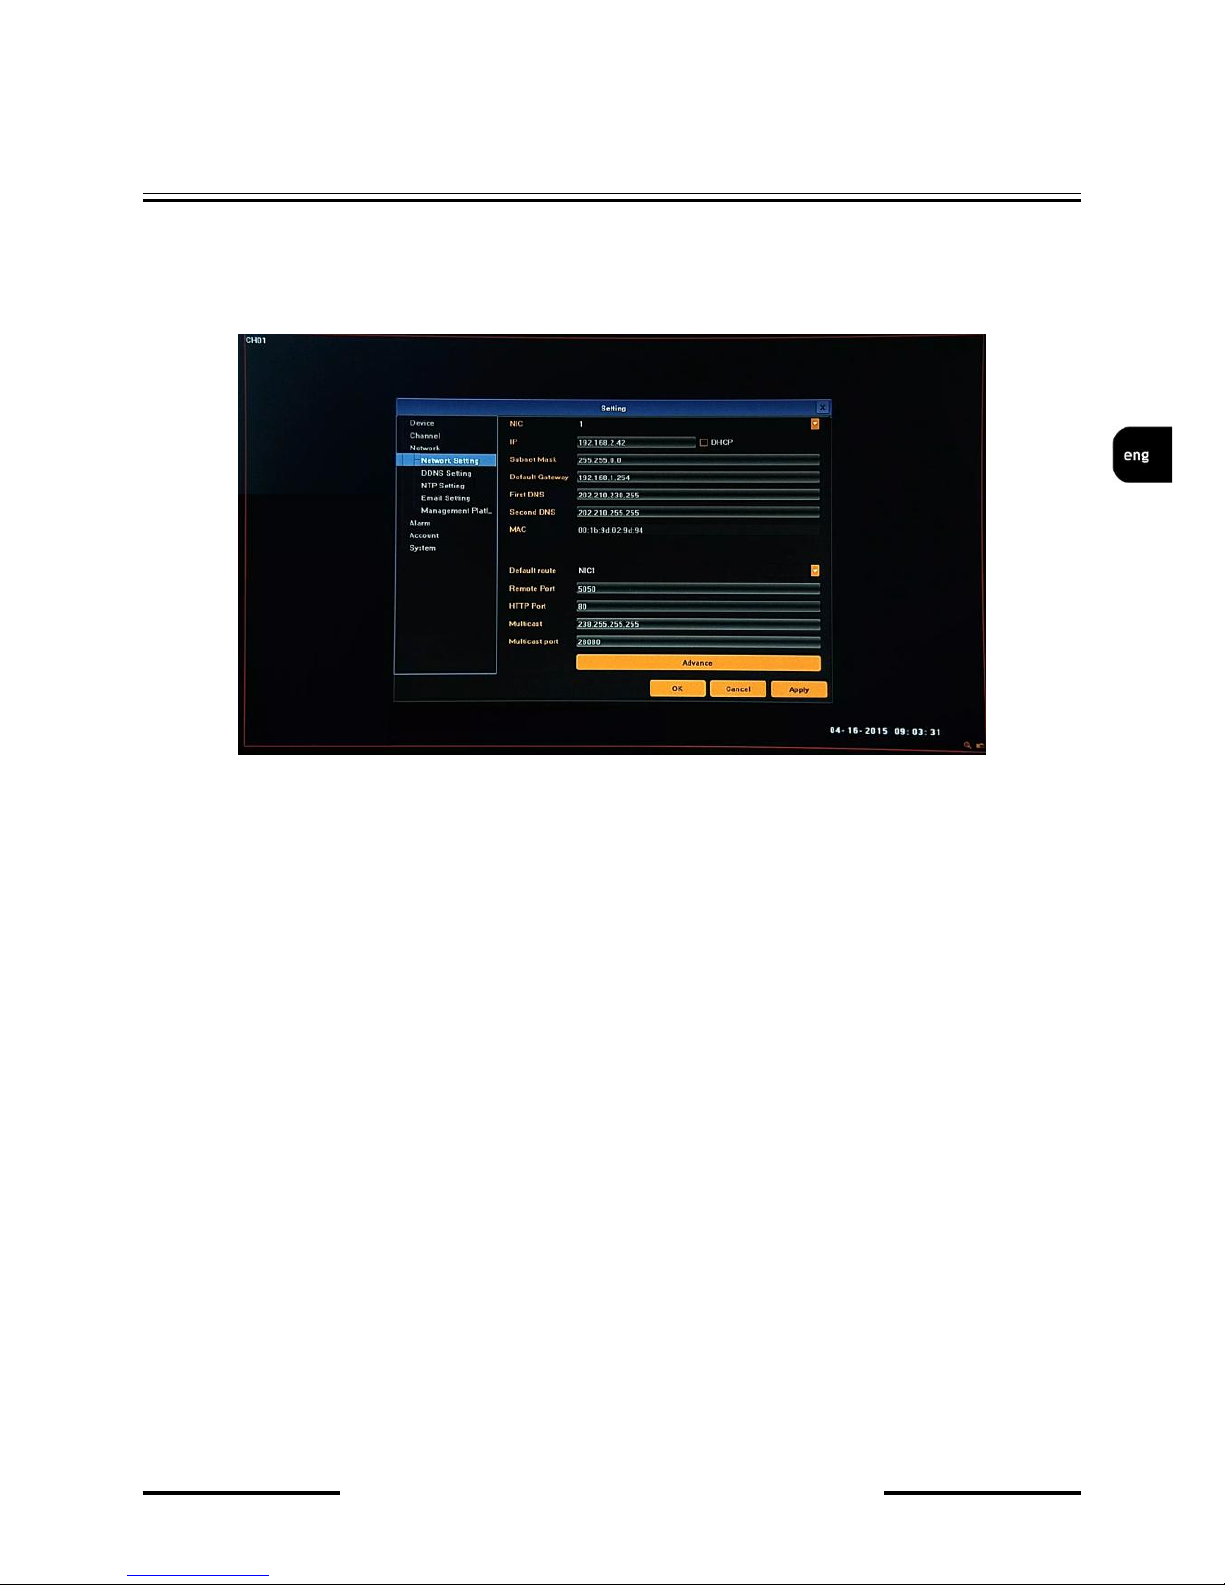
2.3.1. Network setting - configuration of basic network parameters of the device. Following
parameters are available:
NIC Type: selection one of network interface (if additional network interfaces available).
IP: enter the IP address. When the DHCP box is checked, the sub-fields: IP address, gateway,
subnet mask, primary DNS server, secondary DNS server will be filled in automatically. When
DHCP is off, user has to type fixed IP address and fill other network parameters. Using a fixed
IP is recommended in order to achieve stable network operation.
Subnet Mask: Enter the corresponding IP subnet mask.
Default Gateway: Enter the corresponding gateway address.
First/Second DNS: Enter the domain name servers IP address.
MAC: Display the MAC address for current network interface
Default route : chose the default network interface (if additional card available).
Remote Port: enter port number used for sending data to the web browser or client software.
HTTP Port: enter port number used for connecting to the NVR by web browser.
Multicast: enter the corresponding multicast address.
Page 24
NVR-5000 User’s manual ver.1.0
NVR CONFIGURATION
All rights reserved © AAT HOLDING S.A.
24
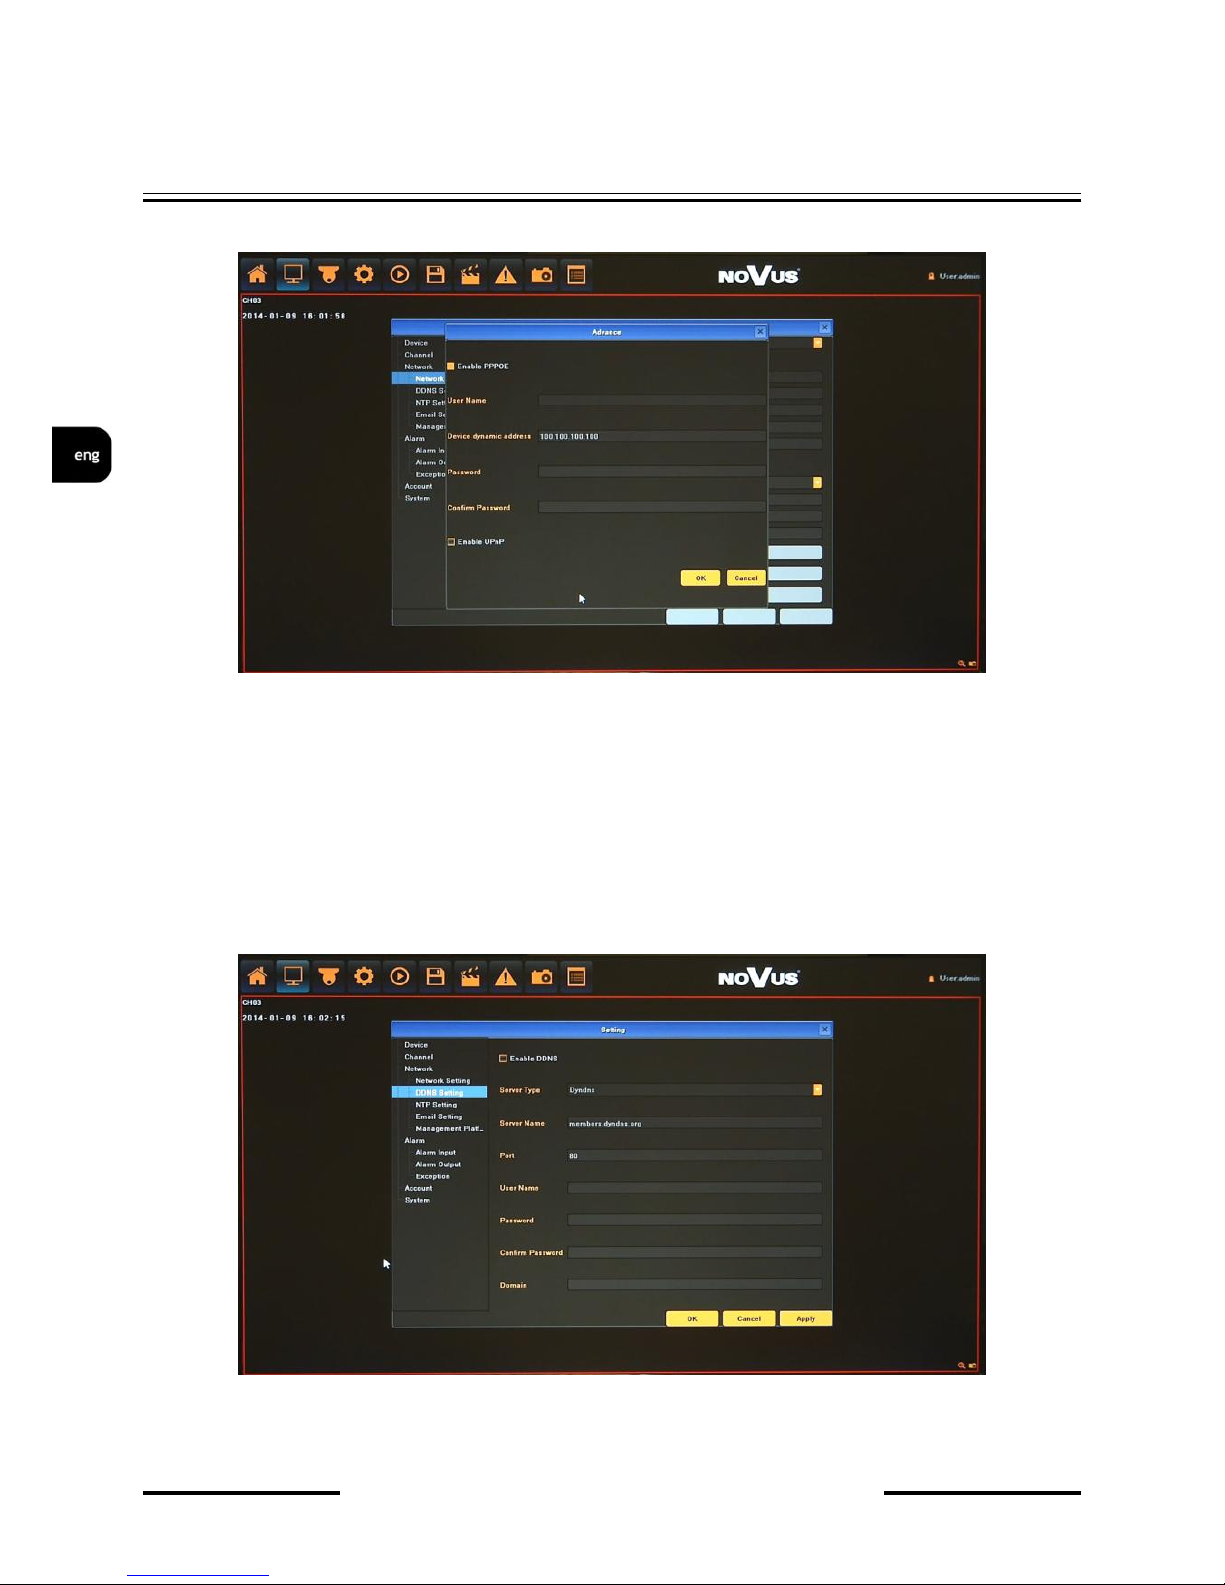
Advance: additional menu contains:
Enable PPPOE: you can enable the PPPOE service: Input the PPPOE user name, password
dynamic address of the device
Enable UPnP feature: will enable UPnP discovery function
Note:
Correct settings of IP address and subnet mask are necessary for proper operation of an IP camera.
Defining gateways and DNS servers is necessary for using the camera outside the local network.
2.3.2. DDNS setting - configuration of Dynamic DNS service
Enable DDNS: Tick the checkbox will enable detection functionality.
Server Type: Allows to select a DDNS server that will be used in the DVR
Page 25

NVR-5000 User’s manual ver.1.0
NVR CONFIGURATION
All rights reserved © AAT HOLDING S.A.
25
Server Name and Port: values are set automatically after selecting Server Type
User Name: requires entering the user’s name registered in the DDNS database.
Password requires entering the DDNS-registered password.
Domain requires entering hostname, that was registered in selected DDNS server.
Note:
Although the DVR supports dynamic IP addresses, it is advised that DDNS support should be
performed at the local router that DVR is connected to.
Prior configuration attempt please register the address in one of the DDNS servers supported by
the device - www.dyndns.org server is advised.
Prior to configuring the DDNS please contact the network administrator in order to obtain
proper network parameters that are entered in this menu.
5.3.3. NTP setting - configuration of network time synchronization
Enable NTP: Tick the checkbox will enable detection functionality.
Server Address: set up required NTP server address
NTP Port: set up required NTP server port (default is 123)
Update Frequency: input the time interval needed to be adjusted
Select Time Zone: choose the time zone valid for yours localization.
GMT: allow to Daylight Saving Time adjustment, select ADJUST to enable.
Page 26
NVR-5000 User’s manual ver.1.0
NVR CONFIGURATION
All rights reserved © AAT HOLDING S.A.
26
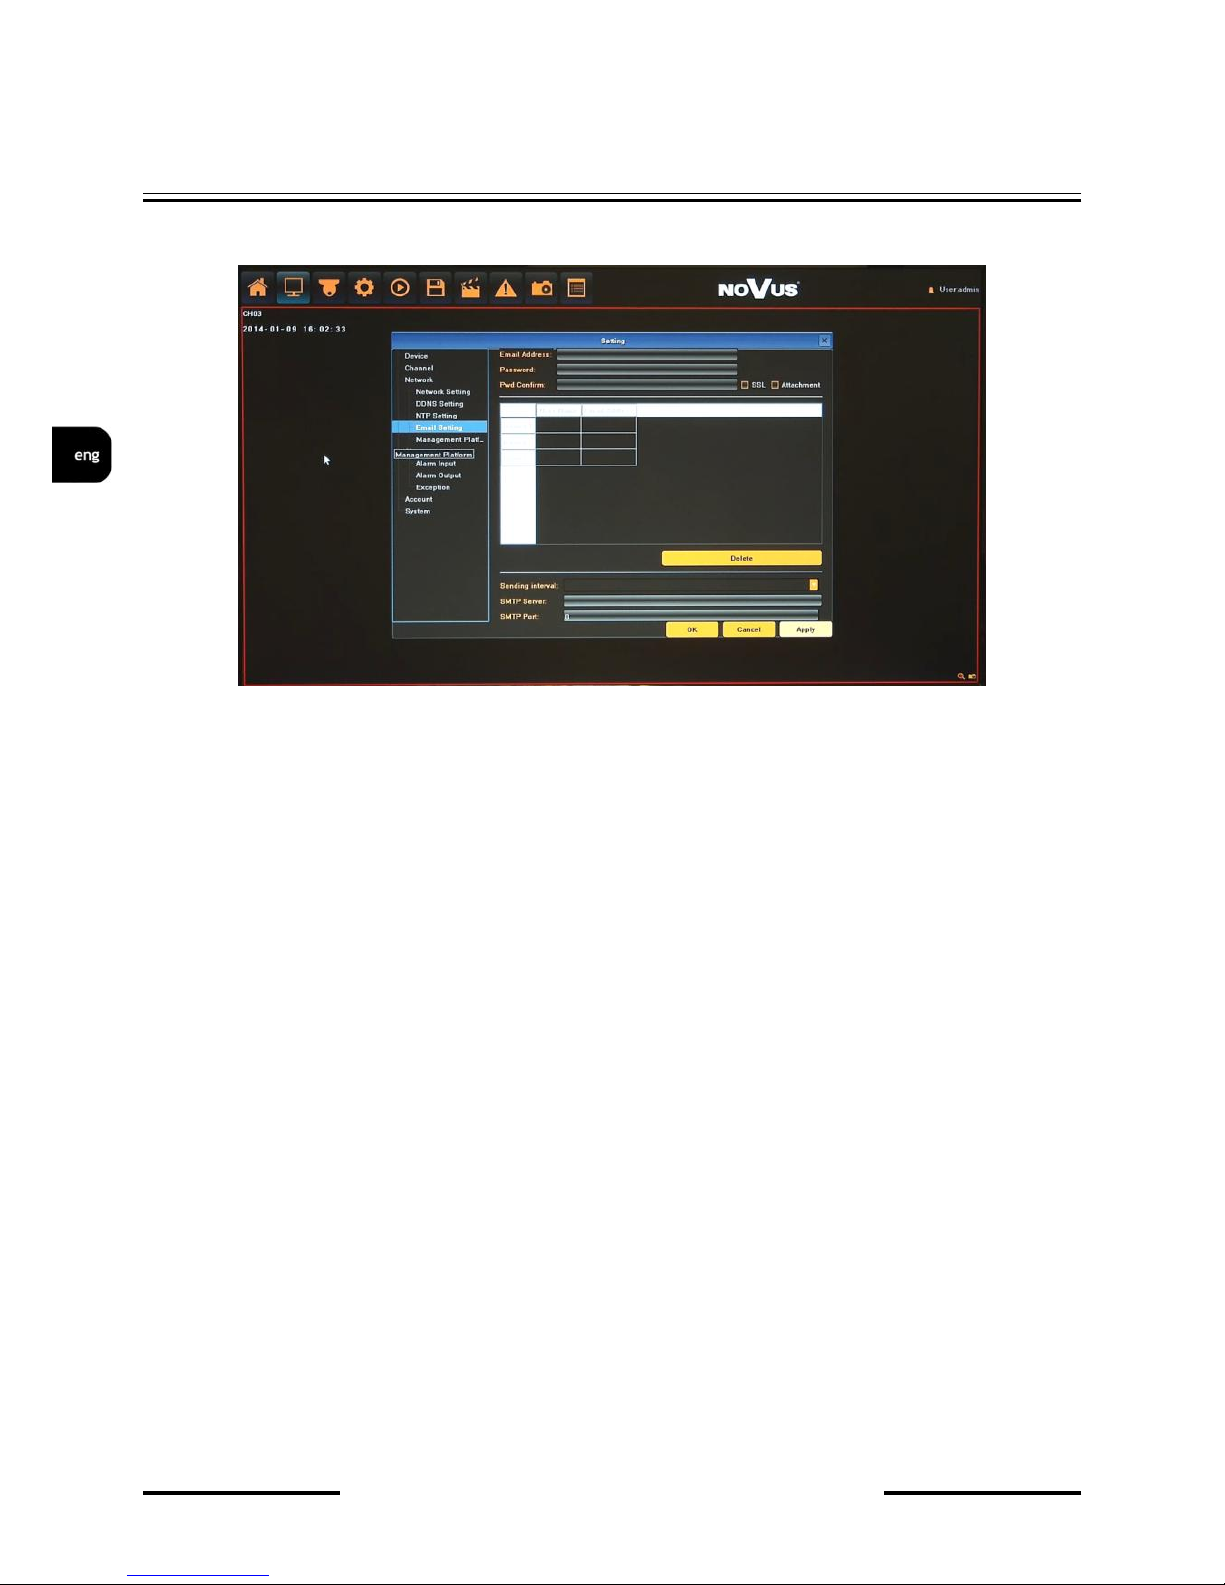
2.3.4. Email setting - menu responsible for Email account configuration
Email Address: input the sender email address.
Password: input the sender email password.
PWD Confirm: confirm the password.
SSL: tick to enable SSL authorization.
Attachment: tic to add an image attachment to the email.
Receiver: double click in selected field and type name and email address of the receivers (max
3).
Delete : button to remove selected user and email address from the list.
Interval: select the minimum time interval for sending emails.
SMTP Server: input the SMTP server address.
Port: input the SMTP server port.
Note:
Some email servers can block the email sending if the email delivery cycle is too short, and classify it
as spam. Contact your email service provider to adjust the minimum delivery cycle so that the server
does not classify the email as spam
Page 27
NVR-5000 User’s manual ver.1.0
NVR CONFIGURATION
All rights reserved © AAT HOLDING S.A.
27
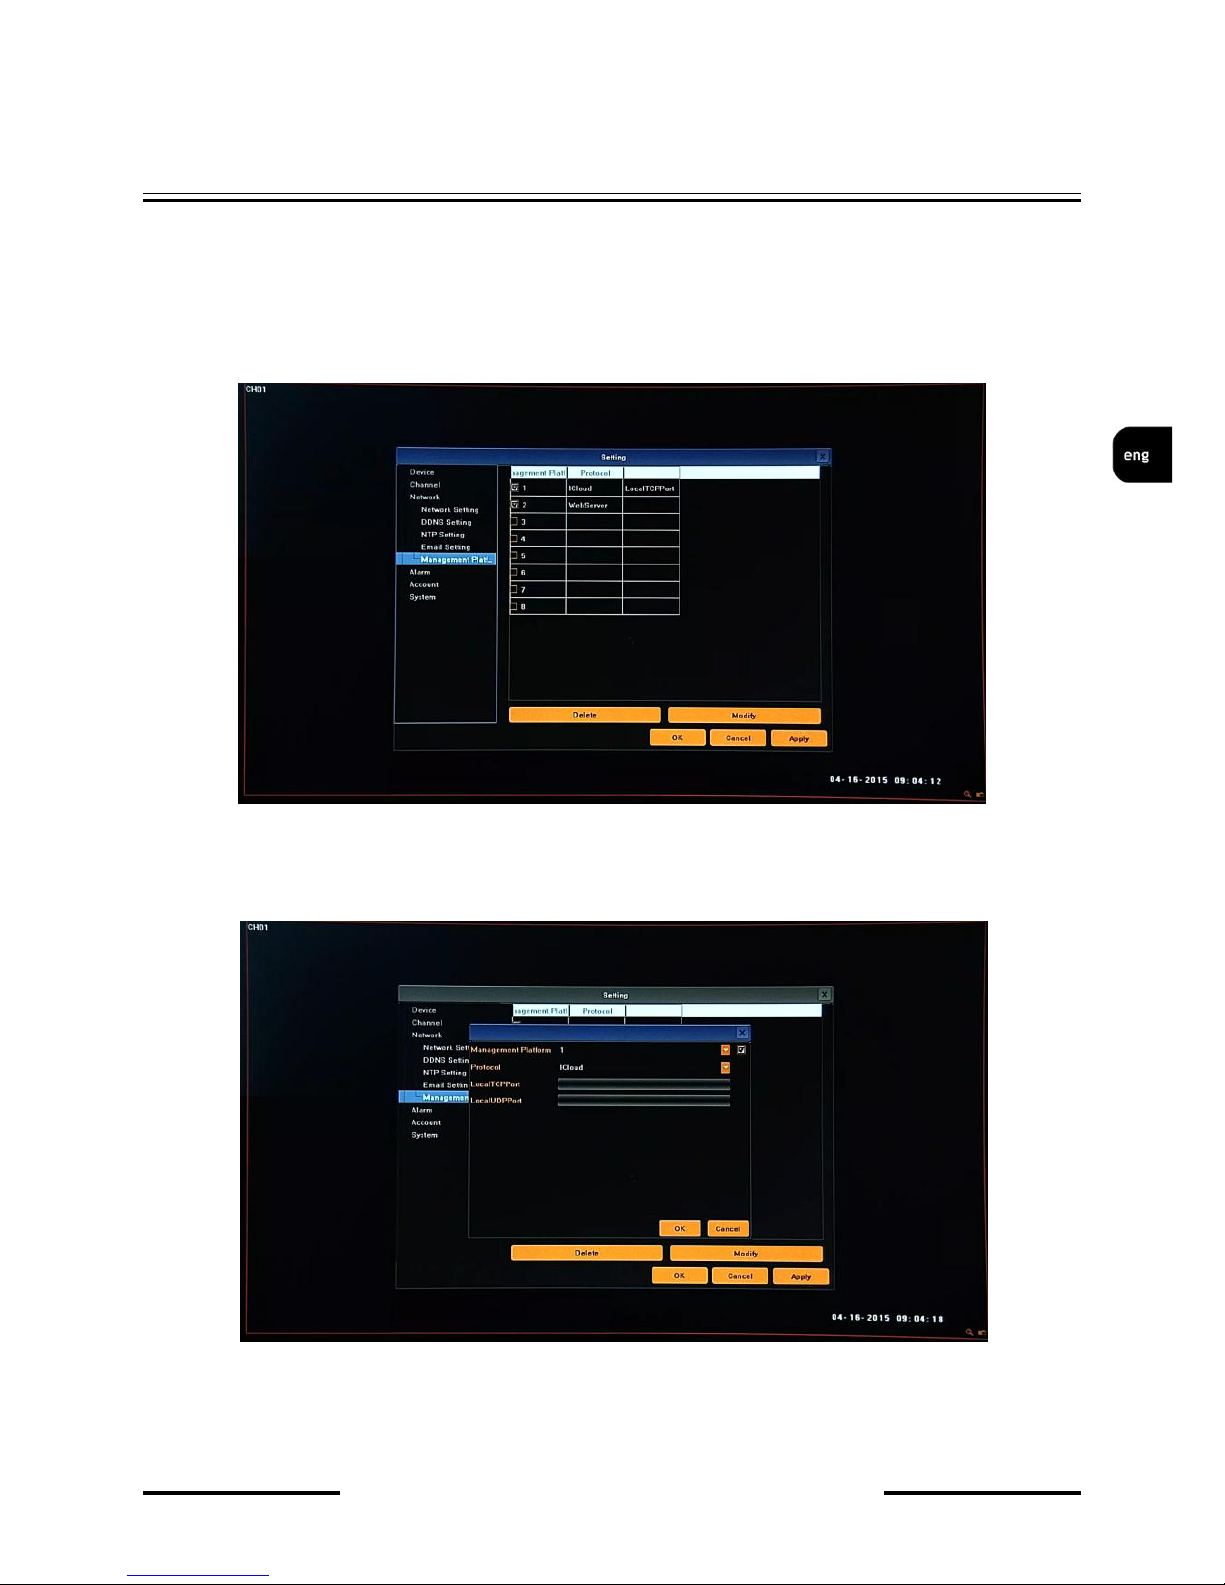
2.3.5. Management platform - menu responsible for configuration of remote management service.
It’s allow to enable or disable services responsible for remote access. Available services are:
WebServer - service of WWW server, allow to remote access by web browser.
ICloud - service of P2P server, allow to get direct connection with NVR by using P2P mobile
application (goolink)
Button Modifi allow to change default configuration.
Button Modify allow to disable selected service.
Page 28
NVR-5000 User’s manual ver.1.0
NVR CONFIGURATION
All rights reserved © AAT HOLDING S.A.
28
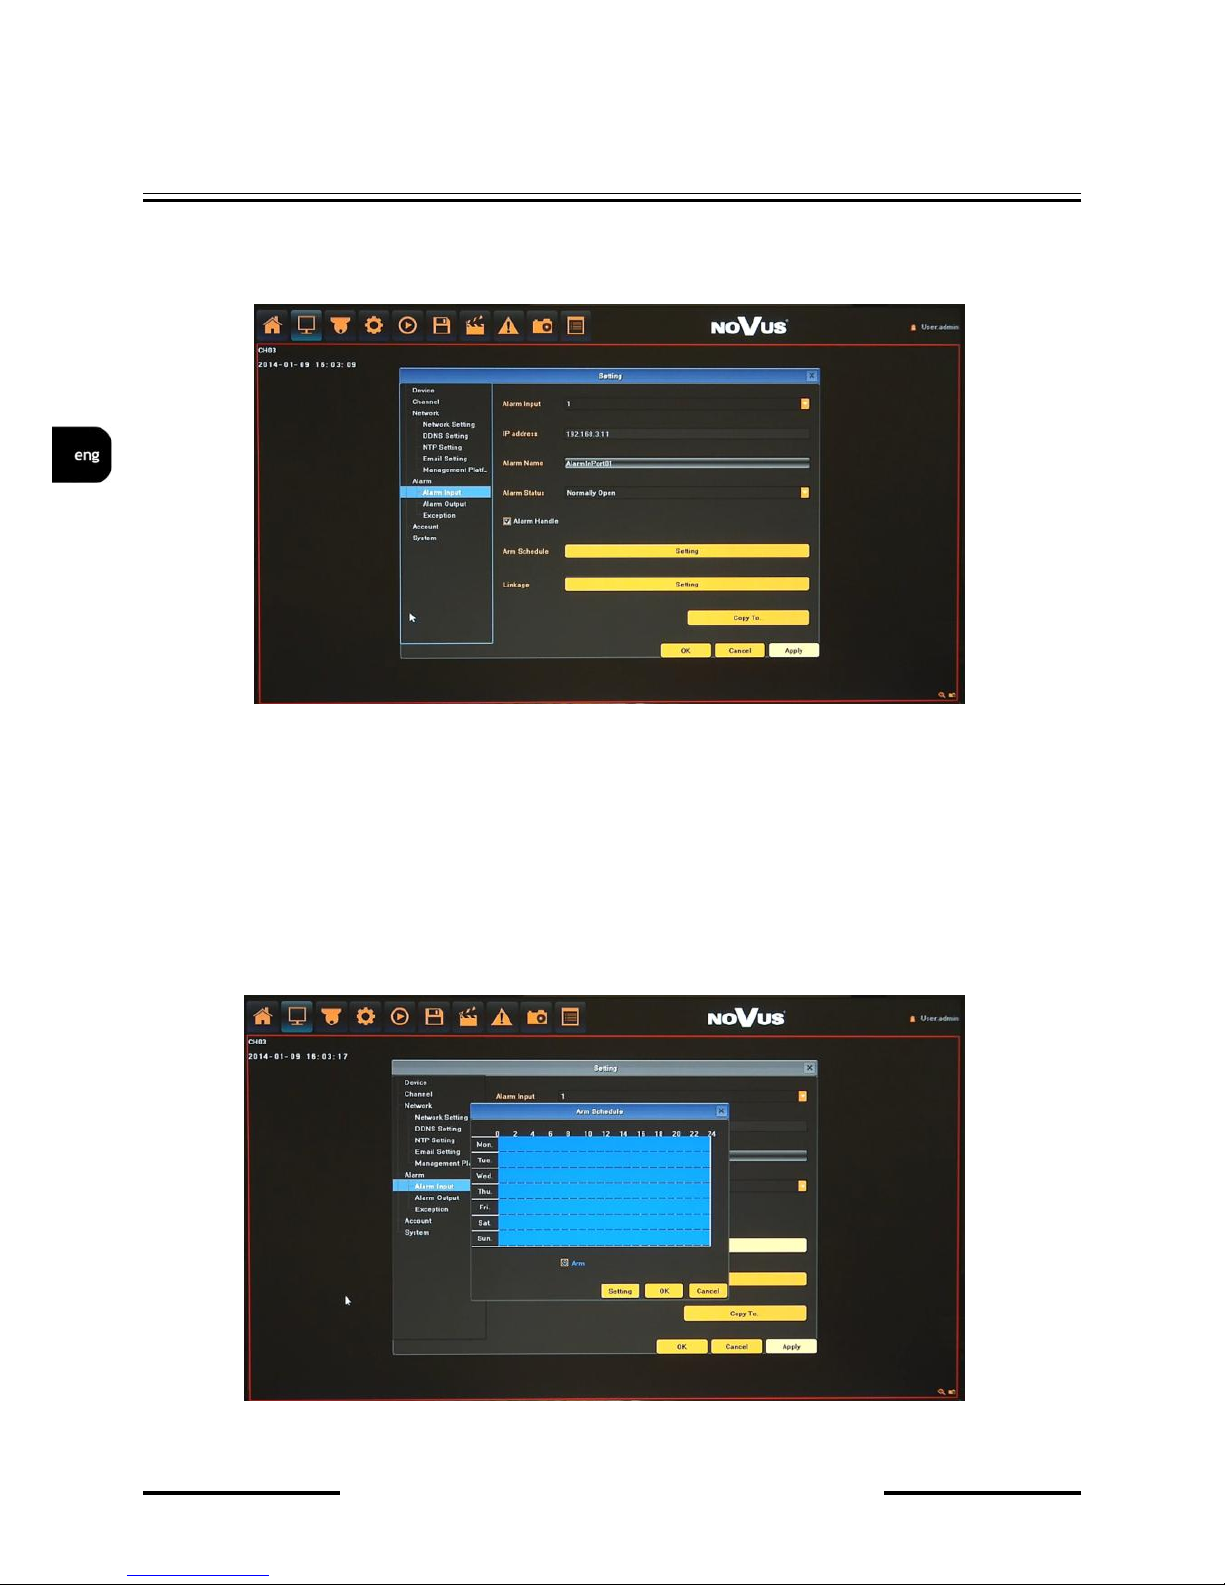
2.4. Alarm - menu allow to define various events, and specify the conditions to notify the user.
2.4.1. Alarm input - configuration of the alarm sensor and specify the operation of the sensor if an
event occurs.
After selecting ALARM INPUT following parameters are available:
IP address: display type of input, local mean internal in NVR, IP address number shows its
camera alarm input.
Alarm Name: you can specify the name of the alarm sensor
Alarm Status: You can specify the type of the alarm sensor, N/O (Normal Open) or N/C
(Normal Close)
Alarm Handle: Tick the checkbox will enable reaction for current sensor.
Arm Schedule: set the time intervals when alarm is active.
Setting: use it for advanced & precise schedule setting, by selecting days and typing times
manually.
Page 29
NVR-5000 User’s manual ver.1.0
NVR CONFIGURATION
All rights reserved © AAT HOLDING S.A.
29
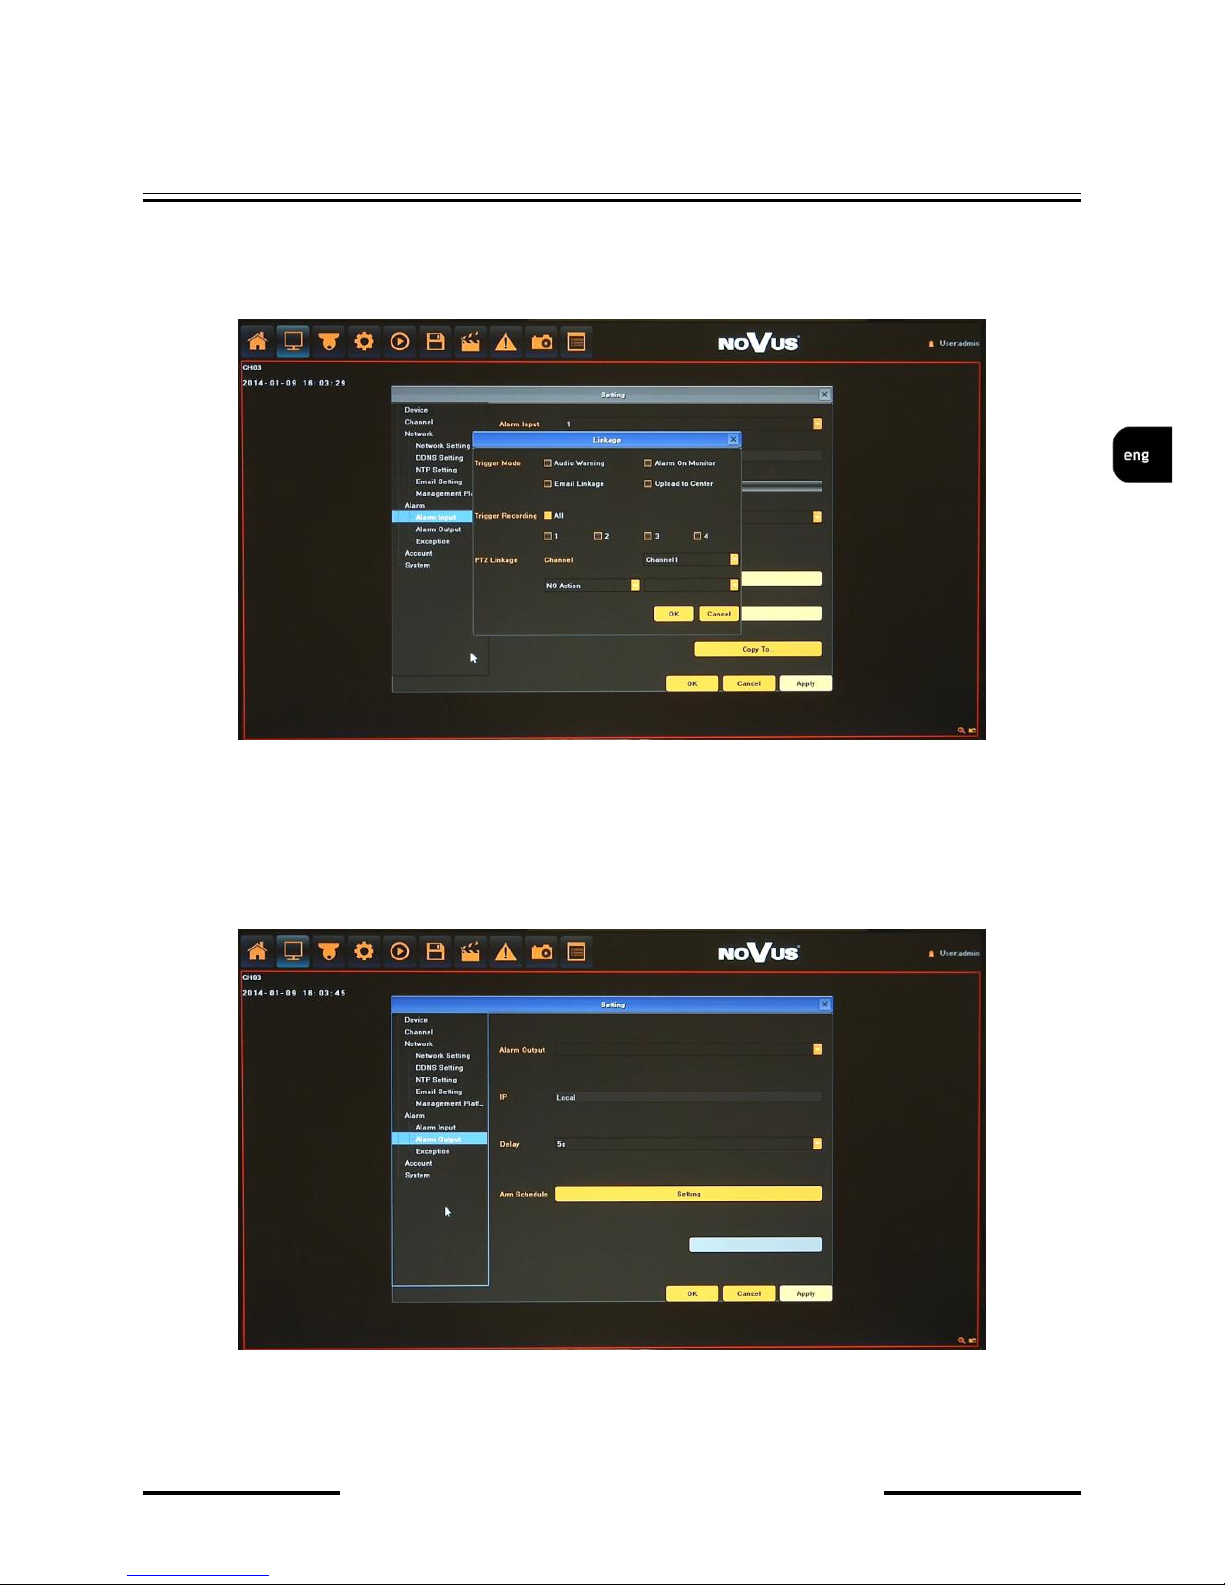
Linkage: select the reaction way for current which you need. Available reaction are: Audio
warning (NVR internals buzzer), Email, Specified alarm output activation, Alarm on monitor
and Alarm List, Trigger recording, PTZ Linkage.
By using COPY TO button you can copy current settings to other required channel.
Note:
Not every camera model and network protocol allow to change all camera settings remotely.
2.4.2. Alarm output - configuration of the alarm output and specify the behaviour of it.
After selecting ALARM OUTPUT following parameters are available:
IP address: allow to assign internal alarm input or external if available.
Page 30

NVR-5000 User’s manual ver.1.0
NVR CONFIGURATION
All rights reserved © AAT HOLDING S.A.
30
Delay: set the time reaction of it.
Arm Schedule: set the time intervals when alarm is active.
For detailed description of Arm Schedule please check Alarm input chapter.
Note: Not every camera model and network protocol allow to change all camera settings remotely.
2.4.3. Exception - configuration of the alarm system events and specify the alarm reaction.
Select EVENT TYPE and configure the reaction way for it which you need. Available types are:
HDD Full: When there is no space in the HDD, it can trigger corresponding linkage type.
HDD Fault: When there is HDD read and write fault alarm
Network Broken: When there is network broken alarm.
IP Address Conflict: When there is network IP conflict alarm.
Illegal Access: When there is illegal access alarm.
Video Signal Exception: When there is video signal abnormality.
Available reaction are: Audio warning (NVR internals buzzer), Specified alarm output activation,
Alarm on monitor and Alarm List.
Page 31
NVR-5000 User’s manual ver.1.0
NVR CONFIGURATION
All rights reserved © AAT HOLDING S.A.
31
2.5. Account - menu allows to configure the settings regarding user management, as well as user and
group permissions
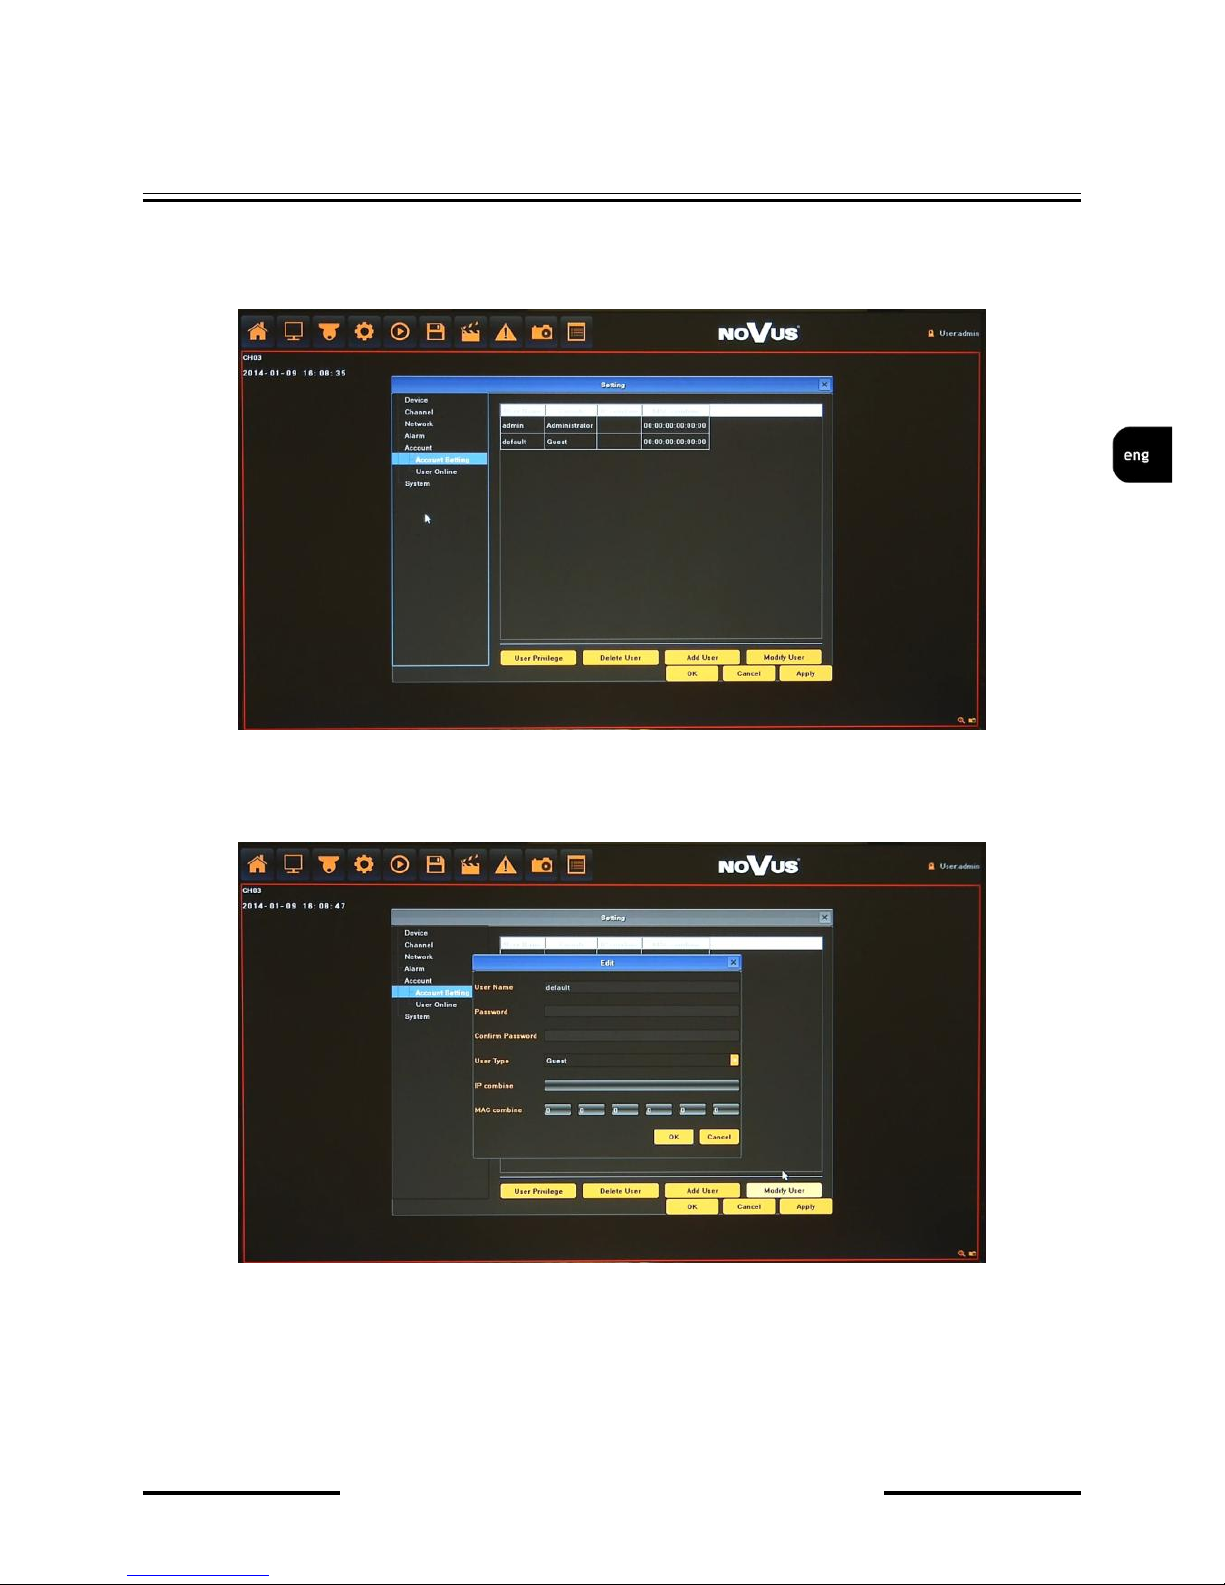
2.5.1. Account Setting - You can add a user accounts and set up various permissions of them.
To add a user account:
Click ADD USER at the bottom of the screen.
In new window please provide following values:
User Name : enter user name.
Password / Confirm Password: enter the password.
User Typa: select a group that user belongs to: OPERATOR, GUEST, NONE.
IP/MAC combine: provide IP address and MAC value for limiting access from network.
When done, click OK.
Page 32

NVR-5000 User’s manual ver.1.0
NVR CONFIGURATION
All rights reserved © AAT HOLDING S.A.
32
To set up a user privilege:
Select user on a list and click USER PRIVILEGE button.
In new window please choose required access values for local and remote operation.
When done, click OK.
To modify a user information:
Select user on a list and click MODIFY USER button.
In new window please modify required values.
When done, click OK.
To delete a user information:
Select user on a list and click DELETE USER button.
In new window please confirm deleting user by YES.
To apply changes, click OK or APPLY button at the bottom of the screen.
Page 33

NVR-5000 User’s manual ver.1.0
NVR CONFIGURATION
All rights reserved © AAT HOLDING S.A.
33
2.5.2. User online - menu display information about local / remote user which are currently logged in.
Page 34

NVR-5000 User’s manual ver.1.0
NVR CONFIGURATION
All rights reserved © AAT HOLDING S.A.
34
2.6. System - menu allows to configure the HDD, system management, and peripheral device.
2.6.1. Device Log - You can search the logs according to different types and different date and time,
as shown in the above picture.
Main Type of Log: there are All Type, Alarm, Exception and Operation for selection.
Sub Type: according to different main types, there are corresponding sub types for selection.
From: and To: you can select start and end time of a log you want to search.
Search: press to display list of logs
Export: allow export the log you have searched.
Navigation buttons: allow to move pages
2.6.2. Stream Info - menu display information about cameras stream parameters
Page 35
NVR-5000 User’s manual ver.1.0
NVR CONFIGURATION
All rights reserved © AAT HOLDING S.A.
35
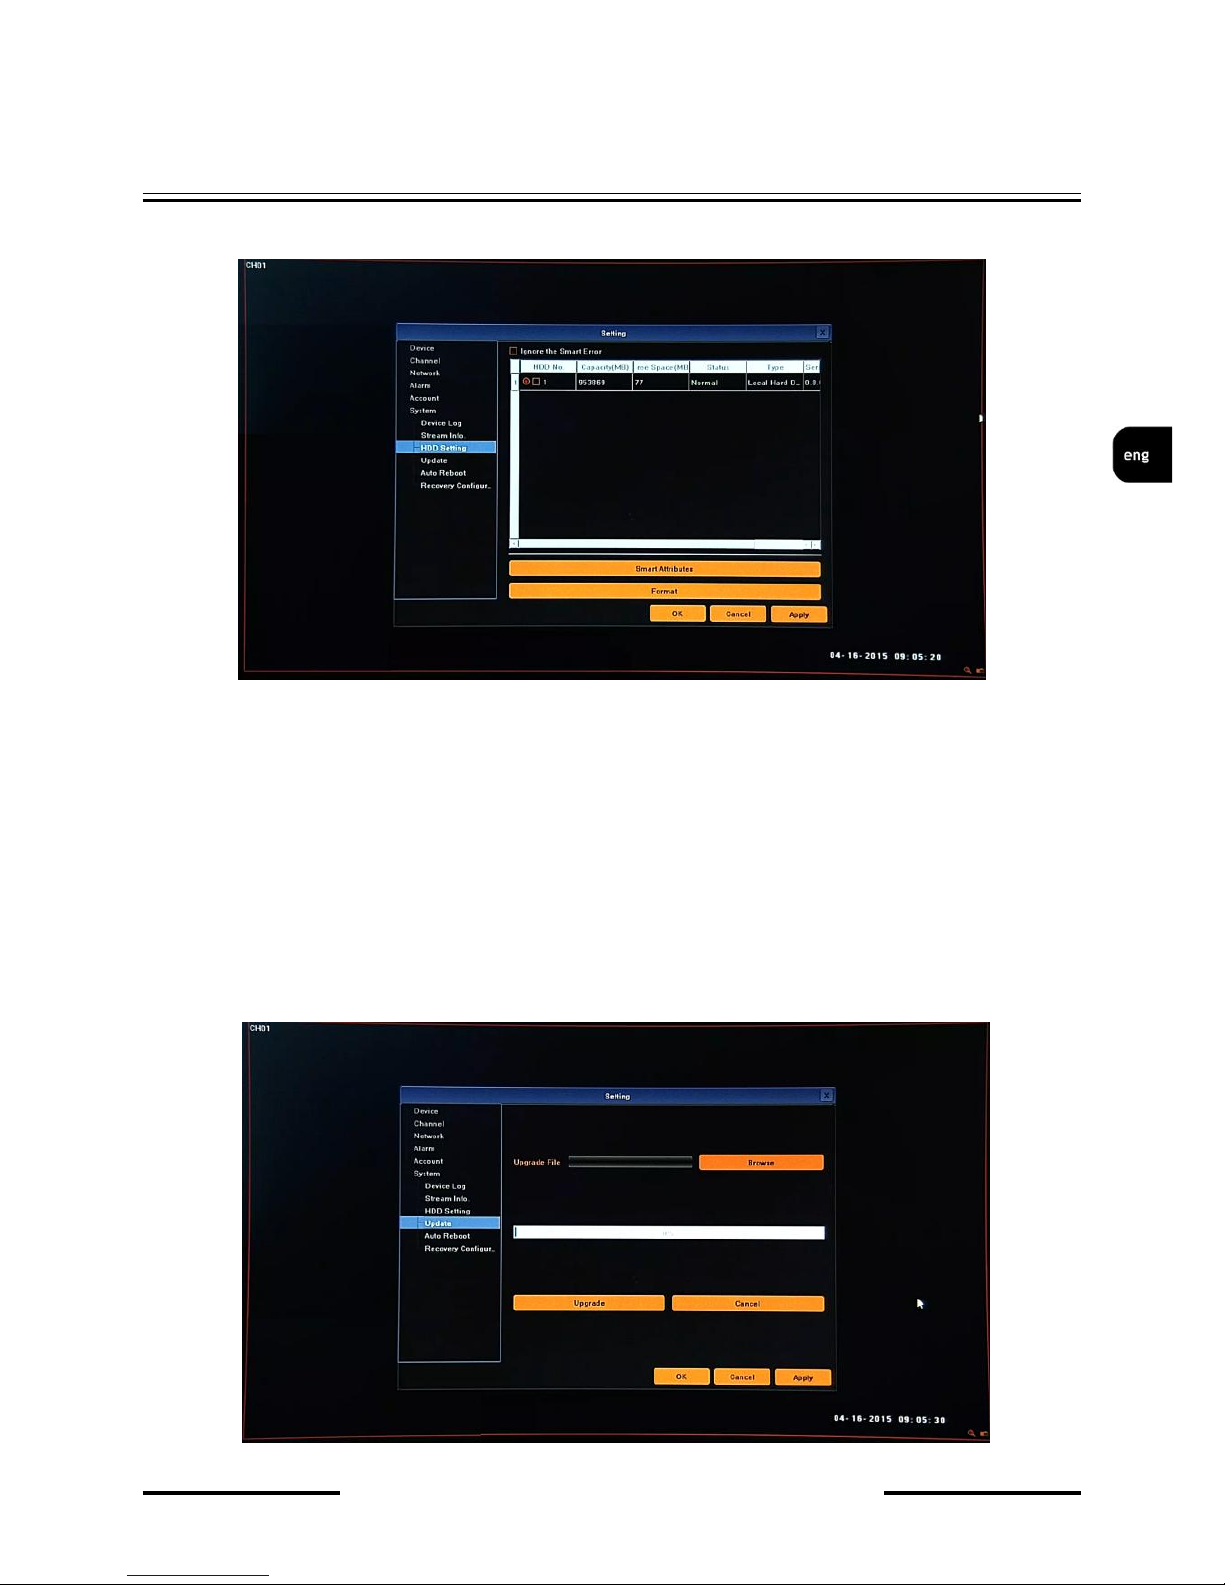
5.6.3. HDD Setting - menu allow to format the HDD and view the HDD capacity, the free space and
status etc
Ignore the SMART Error - will disable checking SMART status (not recommended)
SMART attributes - display SMART details
Format - format the hard disk. Note that formatting the HDD will delete all video data and logs.
5.6.4. Update - menu responsible for upgrading NVR firmware
To update firmware :
Please connect the USB storage device that contains the update files placed in a root directory.
Click BROWSE button.
Select the correct file from the list with “.update” extension.
Page 36

NVR-5000 User’s manual ver.1.0
NVR CONFIGURATION
All rights reserved © AAT HOLDING S.A.
36
Click UPGRADE
The progress bar displays the progress of the firmware upgrade process.
When the upgrade is complete press OK reboot the system.
Caution:
Please contact your local distributor prior to software upgrade.
Power outage, turning the device off or removing the Flash memory during update may result in
damage to the NVR and a necessity of service repair.
The producer isn’t responsible for any data loss resulting from firmware update.
2.6.5. Auto reboot - menu allow to set auto reboot feature, with selected frequency.
Available values are:
Every day: please select hour and minute in MAINTENANCE TIME
Every Week: please select:
- day of weeks in WEEKLY SHEDULE
- hour and minute in MAINTENANCE TIME
Once: please select a specific date and time in MAINTENANCE TIME
Page 37

NVR-5000 User’s manual ver.1.0
NVR CONFIGURATION
All rights reserved © AAT HOLDING S.A.
37
2.6.6. Recovery configuration - menu responsible for saving and restoring default NVR settings
Export Configuration: Save NVR settings to a storage device, connected to the USB port.
Import Configuration: Load settings from a storage device connected to the USB port to the
NVR
Default: Return NVR settings to the factory default.
Page 38

NVR-5000 User’s manual ver.1.0
NVR CONFIGURATION
All rights reserved © AAT HOLDING S.A.
38
2.7. Record - menu allows to quick change of recording behaviour.
From the MAIN MENU click
icon and set following parameters:
Close - disable any recording at each of selected channel.
Manual - enable continuous manual recording at each of selected channel.
Schedule Record - allow to record depending of schedule setting for at each of selected channel.
2.8. Display Setting - Menu allow to select language, adjust screen colors and resolution, etc.
From the MAIN MENU click
icon and set following parameters
Language - allow to select preferred language.
Auto Logout - time interval for auto log out.
Page 39

NVR-5000 User’s manual ver.1.0
NVR CONFIGURATION
All rights reserved © AAT HOLDING S.A.
39
Display - settings of brightest, contrast, saturation and other monitor values.
Resolution - select the resolution most corresponding to the used monitor.
Enable SEQ - tick will enable camera image sequence.
Rotation Interval - time interval of camera image sequence.
Page 40
NVR-5000 User’s manual ver.1.0
NVR CONFIGURATION
All rights reserved © AAT HOLDING S.A.
40
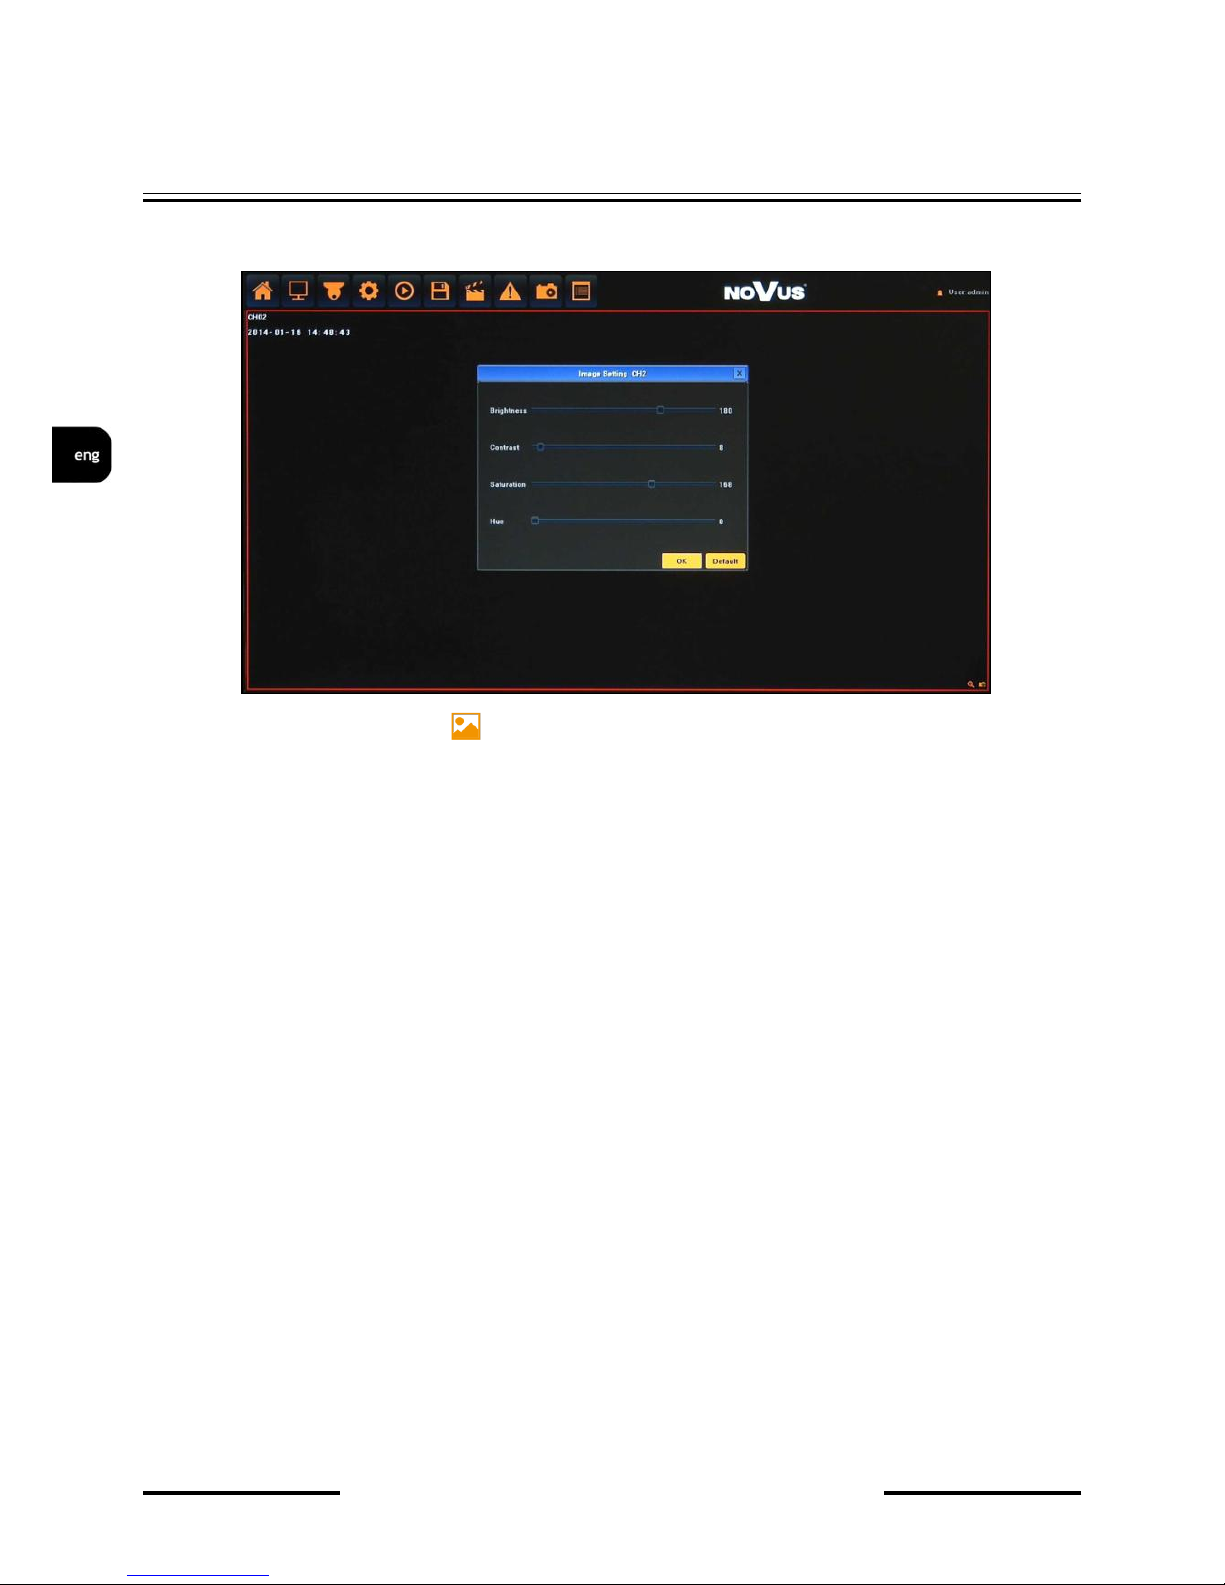
2.9. Image Setting - Menu allow to adjust image parameters for selected channel
From the MAIN MENU click icon and set parameters for selected camera image. Available
parameters are brightest, contrast, saturation and hue.
Note:
Not every camera model and network protocol allow to change all camera settings remotely.
Page 41
NVR-5000 User’s manual ver.1.0
NVR CONFIGURATION
All rights reserved © AAT HOLDING S.A.
41
2.10. IP channel Setting
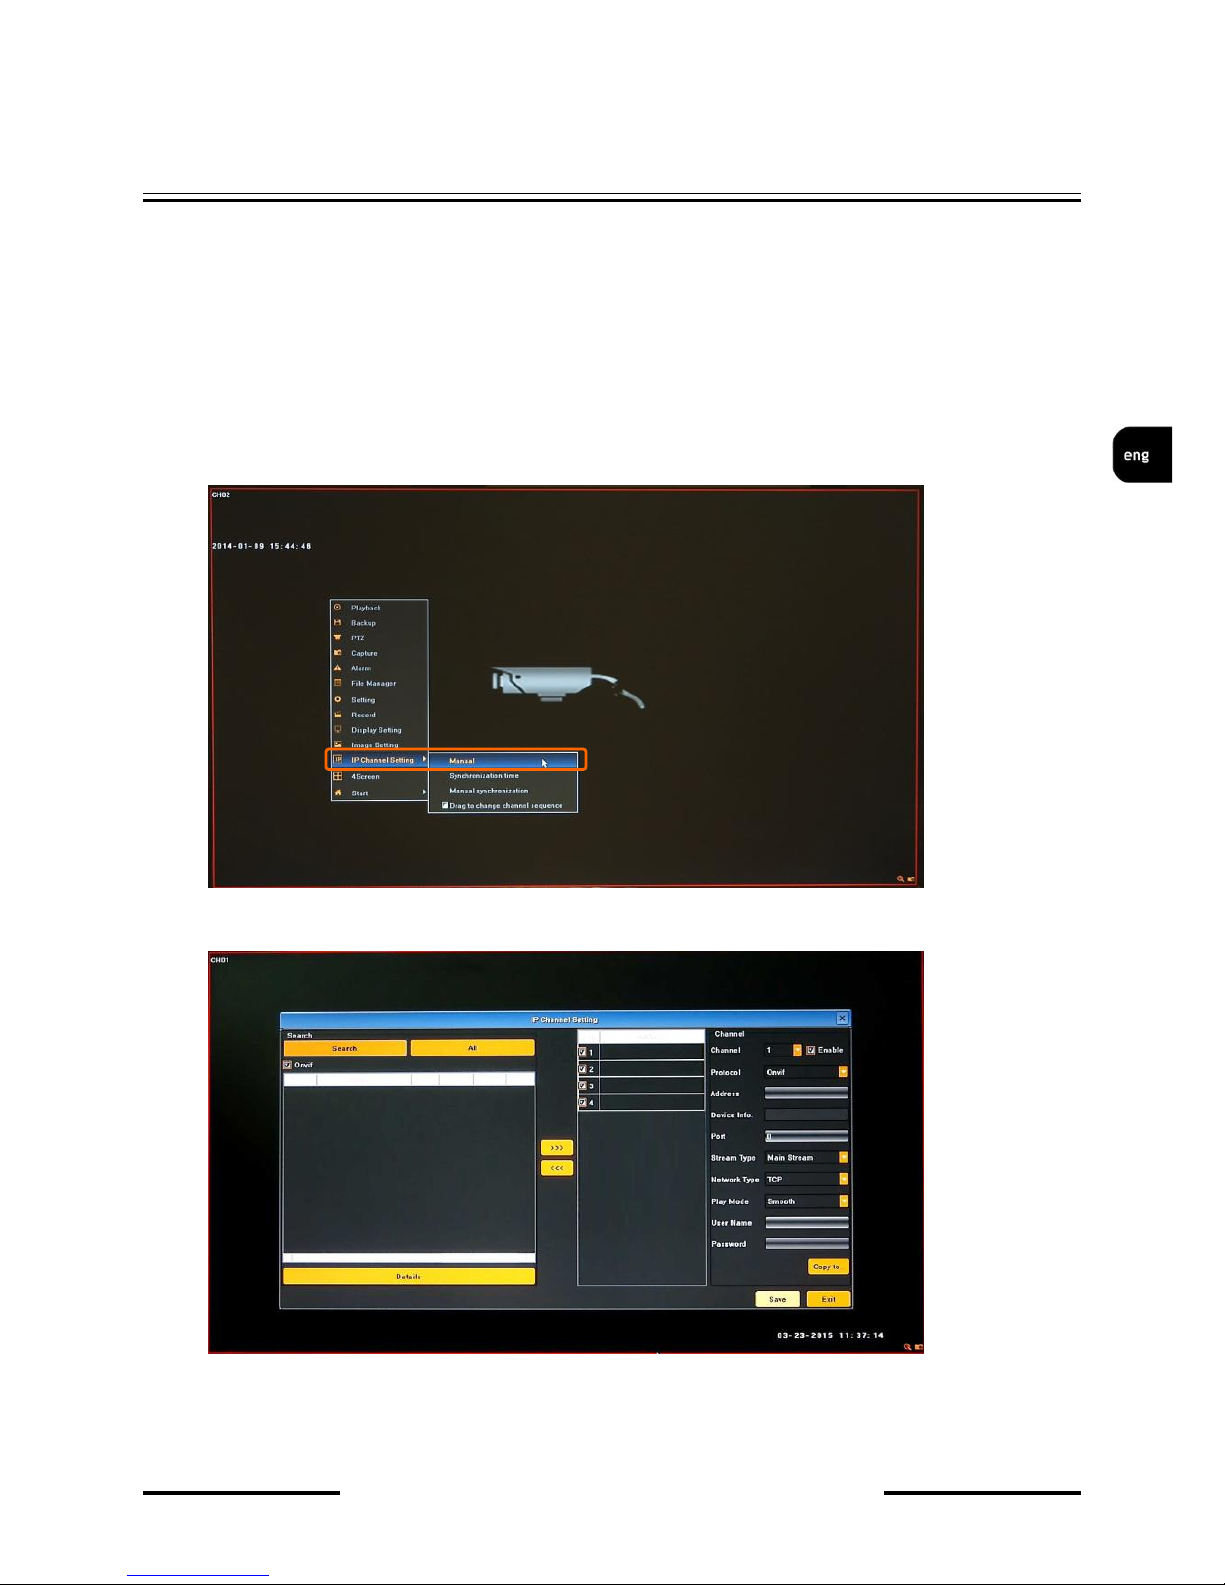
2.10.1. Manual - menu allow to add and manage IP cameras connection.
Note:
For suggested values for IP camera setting please refer to the “Cameras Capability Table - appendix
A" which is an integral part of this manual. If you will set wrong values some problems may appear:
the NVR cannot search the IP camera, the stream cannot be connected, the image is not fluent, the
image quality is bad and so on.
From the main window click the RMB and choose IP CHANNEL SETTING>MANUAL
Then following window appears:
To connect the IP cameras to the NVR you can find them automatically or type IP address manually.
Page 42

NVR-5000 User’s manual ver.1.0
NVR CONFIGURATION
All rights reserved © AAT HOLDING S.A.
42
Press SEARCH button to display all cameras compatible with ONVIF protocol present in the network.
After some time list of cameras appears (as shown below).
To add required camera to the system TICK it on the available cameras list or select it (highlight) and
use >>> button. Selected camera will be added to first empty channel. AVAILABLE CAMERAS
LIST is displayed at left hand side. If you press ALL button, all available channels will be connected
with cameras from the list.
If you would like to remove camera added to one of the channels please select it at CHANNEL
LIST “A” and press remove channels button <<< “B” below:
CHANNEL
LIST
AVAILABLE
CAMERAS
LIST
SEARCH
BUTTON
ADD ALL
BUTTON
CHANNEL
SETTING
WINDOW
ADD/REMOVE
CAMERAS
BUTTONS
A
B
Page 43

NVR-5000 User’s manual ver.1.0
NVR CONFIGURATION
All rights reserved © AAT HOLDING S.A.
43
Next you have to fill user name and password for each camera that you add to the NVR.
Please double click at CHANNEL LIST “A” or select required channel from the CHANNEL dropdown
menu ”B”. Next check if all settings for this channel are correct, fill username and password “C” and
confirm by using SAVE button. Now you can select next channel from the dropdown menu.
If you set up the same user name and password and other parameters for all cameras you can simply
type them and save for first channel, and then press COPY TO button “A”, select required channels at
window “B” to copy them and confirm by OK button. Note that IP address is unique and doesn’t copy.
After finishing following procedure NVR is ready to use.
Additionally you should create user accounts for each operator.
For event recording you should set up motion/alarm setting in the camera and modify SCHEDULE
RECORDING and MOTION in the NVR.
For event notification you should set up motion/alarm setting in the camera, configure NETWORK
SETTING for using Internet and EMAIL SETTING.
B
A
A
B
C
Page 44

NVR-5000 User’s manual ver.1.0
NVR CONFIGURATION
All rights reserved © AAT HOLDING S.A.
44
In case of manual camera adding (without using search feature) or using RTSP paths you have to
modify connection parameters. Available setting are:
-Protocol - select required communication protocol from the list
- IP - IP address of the camera
- Port - Communication port
- For RTSP communication protocol enter IP address, RTSP port and stream PATH for main and
sub stream.
- Stream Type - select basic stream for watching and recording.
- Network Type - select between TCP and UDP
- Play Mode - select between smooth and real time video
- User Name - camera user name
- Password - camera password
Confirm all settings by using SAVE button.
DETAILS button will display additional information about selected camera.
Page 45
NVR-5000 User’s manual ver.1.0
NVR CONFIGURATION
All rights reserved © AAT HOLDING S.A.
45
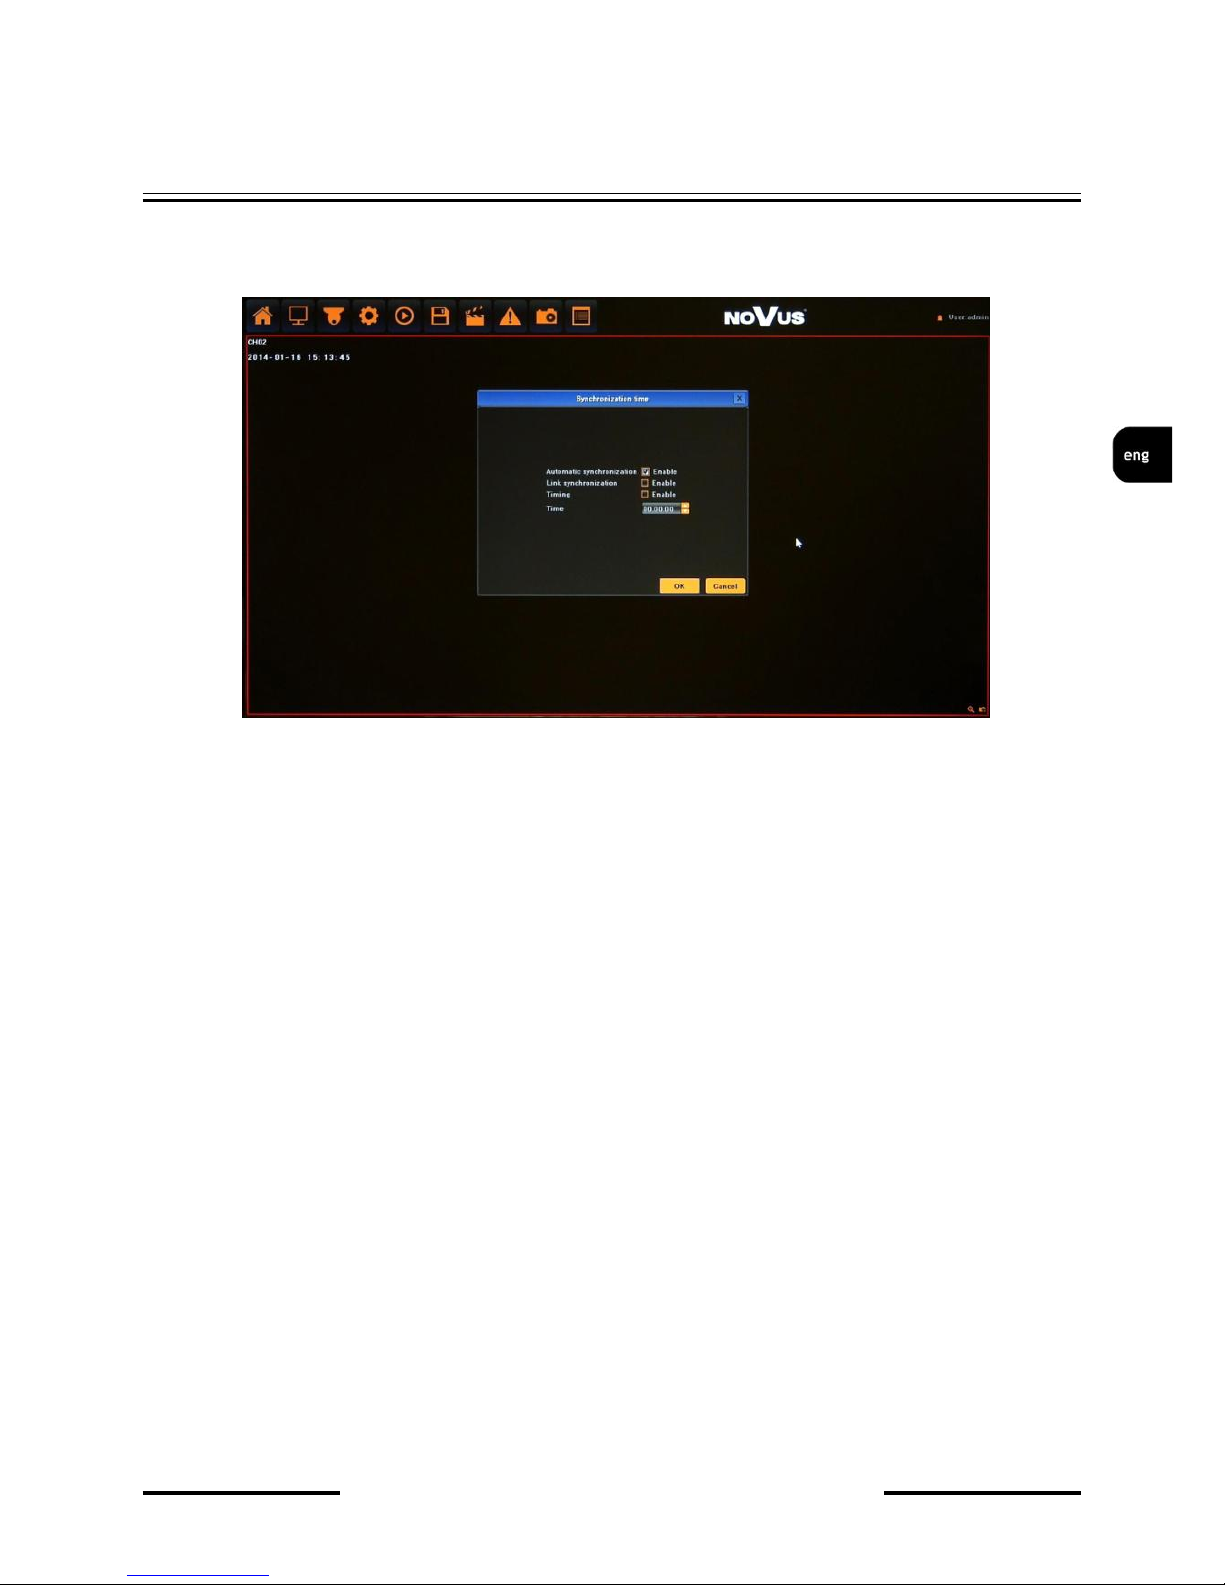
2.10.2. Synchronization time - Menu allows to manage remote camera time synchronisation to the
local NVR time.
Following options are available:
Automatic synchronisation - cameras time will be adjusted each time when necessary.
Link synchronization - cameras time will be adjusted after successfully network link connections.
Timing - cameras time will be adjusted each day at selected hour.
Time - set time for camera synchronisation.
Note:
Not every camera model and network protocol allow to change all camera settings remotely.
2.10.3. Manual synchronization
Function responsible for manual time synchronization. I case of selecting it local time of cameras will
be set up the same like in NVR.
2.10.4. Changing channel sequence
Drag to change channel sequence menu allow to change camera channel list order. TICK to enable
function. Next, at split screen view drag the camera to the other one channel. Then both channels will
be swapped.
After finish remove TICK from the menu
Page 46

NVR-5000 User’s manual ver.1.0
NETWORK OPERATIONS UTILIZING WEB BROSWER
All rights reserved © AAT HOLDING S.A.
46
3. NETWORK OPERATIONS UTILIZING WEB BROSWER
Network Video Recorder features the possibility of controlling video data using network connections
and web browser (Internet Explorer is recommended).
3.1. Recommended PC specification for web browser connections
Requirements below apply to connection with an NVR, assuming smooth image display 4 channel
in 1920x1080 resolution and 25 fps speed.
3.2. Establishing a connection
Open the Internet Explorer browser .
To connect to the NVR check the Network Setting and verify the IP and HTTP Port of the NVR
(by default, IP address is 192.168.1.188).
Enter the address in the address bar (web browser) of the local PC or dedicated software
program in the format: http://IP_address
(Ex : http://192.168.1.188) The web service port is set to 80 by default, if use other type address like:
http://IP_address:web_service_port . From the Network Setting screen, you can change the port
number. If login first time following window will be displayed:
Interface will identify browser type and select corresponding plugin. If not need to do it manually:
Non ActiveX - us it for browser other than Internet Explorer (it is required to have installed
FlashPlaer)
Operating System Windows XP Professional, Vista Home Baisc / Premium, Windows 7
Web browsers:
Internet Explorer 8.0 or later, Google Chrome 41.0 or later, Mozilla
Firefox 32.0 or later
CPU Intel Pentium Core 2 Duo 3,16 GHz or higher
Memory 1024 MB or more
Display min. 16-bit 1280 x 1024 High Color
Hard Disk Drive 50MB (space required for installing the web viewer software)
Page 47

NVR-5000 User’s manual ver.1.0
NETWORK OPERATIONS UTILIZING WEB BROSWER
All rights reserved © AAT HOLDING S.A.
47
IE ActiveX - us it for for Internet Explorer browser, then all necessary plugin will be installed
automatically, like described in next steps.
Installation for Internet Explorer looks like described below:
After open window following message will be displayed
Click the given link and press Install button. If security warning window will be displayed press
Install button. Web browser will download the applet for displaying images from the camera.
After successfully plug in downloading run and install it on a computer.
After successful installation, please reload web browser window, then login window should be
displayed.
If web page will not load properly try to enable “Compatibility View” in Internet Explorer
If the installation fails, changing security settings for the IE browser is required. In order to do that,
please choose: Tools > Internet options > Security tab > Custom level and:
Under Download unsigned ActiveX controls - select either Enable or Prompt
Under Initialize and script ActiveX controls not marked as safe - select Enable or Prompt
Page 48

NVR-5000 User’s manual ver.1.0
NETWORK OPERATIONS UTILIZING WEB BROSWER
All rights reserved © AAT HOLDING S.A.
48
You can also add the camera’s IP address to “trusted zone” and set lowest security level for it.
In addition, when working in Windows Vista/7 the ActiveX applet may be blocked by Windows
Defender or User account control. In such case you should allow to run this applet, or simply disable
these functions.
3.3. Configuration of remote access
If you are going to use Internet to remote connect with the NVR you need to have a Public IP Address
(Static or Dynamic). Check your Network Provider if you don't know it.
More over you have to configure NVRs NETWORK SETTING and Router in right way.
For NVR you have to configure:
IP and Subnet Mask - use value corresponding to your router IP address, check your
Network Provider if you don't know them.
Default Gateway - Yours Internet gateway (router) address, check your Network Provider
if you don't know it.
First and Second DNS - Check your Network Provider to get DNS addresses or use Public
DNS like for eg. 208.67.222.222.
To connect to the device by using Internet you have to create mapping of following ports:
HTTP port: default number 80
Remote port: default number 5050
Remote data port: default number 5051
Remote data port: default number 5052
Mobile device port: default number 5053
In NVRs NETWORK SETTING menu you can configure HTTP and DEVICE PORT. REMOTE
DATA PORTS are always DEVICE PORT value +1 and DEVICE PORT value +2. MOBILE
DEVICE PORT is always DEVICE PORT value + 3.
Depending of used Router Mapping Ports could be also named as Virtual Server or Port Forwarding.
If you have an Dynamic IP Address you have to configure DDNS setting. Go to the DDNS setting
chapter configure NVR like it is described.
After proper configuration of the device you will be able to connect with it remotely. To check it try to
use web browser typing in address: http://your_static_ip:http_port or use your DDNS address:
http://your_ddns_domain:http_port. If everything correct then login window should be appear.
Note:
In case of using P2P connection no need to has Public IP address. Also any port forwarding in router
are unnecessary. You only need to configure the recorder to get connection with Internet, and then
connection will be established automatically, while using P2P connection.
Page 49

NVR-5000 User’s manual ver.1.0
NETWORK OPERATIONS UTILIZING WEB BROSWER
All rights reserved © AAT HOLDING S.A.
49
3.4. Live monitoring interface
After successful logging into a user interface using IE web browser, the following window opens:
Description of interface features:
To enable all channel preview click once on recorder icon
To enable one channel preview click once on required camera icon
Icons symbol shows that current channel is now displayed
Icons symbol shows that current channel is recording at local disc.
Live display stream selection is automatically depending on split screen number, cameras amount and
connection speed. To manually manage streams need to disable AutoStream feature from Local
Setting.
PTZ panel allow to manipulate a PTZ camera, using Prestes, Cruise etc.
VIDEO WINDOW MENU BAR
PTZ MENU CHANNEL LIST
Page 50

NVR-5000 User’s manual ver.1.0
NETWORK OPERATIONS UTILIZING WEB BROSWER
All rights reserved © AAT HOLDING S.A.
50
* Feature available in the future
Menu description:
Page 51

NVR-5000 User’s manual ver.1.0
NETWORK OPERATIONS UTILIZING WEB BROSWER
All rights reserved © AAT HOLDING S.A.
51
3.5. Searching and playing recorded video
To start the playback you have to chose PLAYBACK from main menu. Then following window
appears:
1. From the CHANNEL SELECT tick the channel which you want to search the recording, it will auto
search the recording .
2. Change the date from the calendar and press SEARCH button to find records for selected date.
You can identify the type of the recording data by the color in the bar.
Blue (Continuous) : continuous recording data.
Red (Alarm) : alarm event recording data.
Yellow (Motion) : motion event recording data.
Pink (Motion or Alarm) : motion or alarm event recording data.
Azure (Motion & Alarm) : motion and alarm event (when occurs in the same time) recording
data.
Green : data originating from manual recording.
3. To play the searched data simply double click a desired point on “Timeline” or press PLAY button.
CHANNEL SELECTION
VIDEO PLAYBACK WINDOW
GRAPH WITH
RECORDINGS
PLAYBACK
BUTTONS
SEARCH BUTTON
CALLENDAR
Page 52
NVR-5000 User’s manual ver.1.0
NETWORK OPERATIONS UTILIZING WEB BROSWER
All rights reserved © AAT HOLDING S.A.
52
Description of playback buttons:
Pause/Play: pause the current playback image.
Stop: Stop the playing video.
Slow: Slow down the playback speed. (there are: 1/2, 1/4, 1/8, 1/16 times)
Fast: Accelerate playback. (there are: 2, 4, 8, 16 times)
Snapshot: You can capture picture in any playback channel.
Backup: You can backup the recording of any channel.
Frame: jump one frame forward/backward.
Full screen: expand picture to full screen mode.
Audio: allow to control audio while playback.
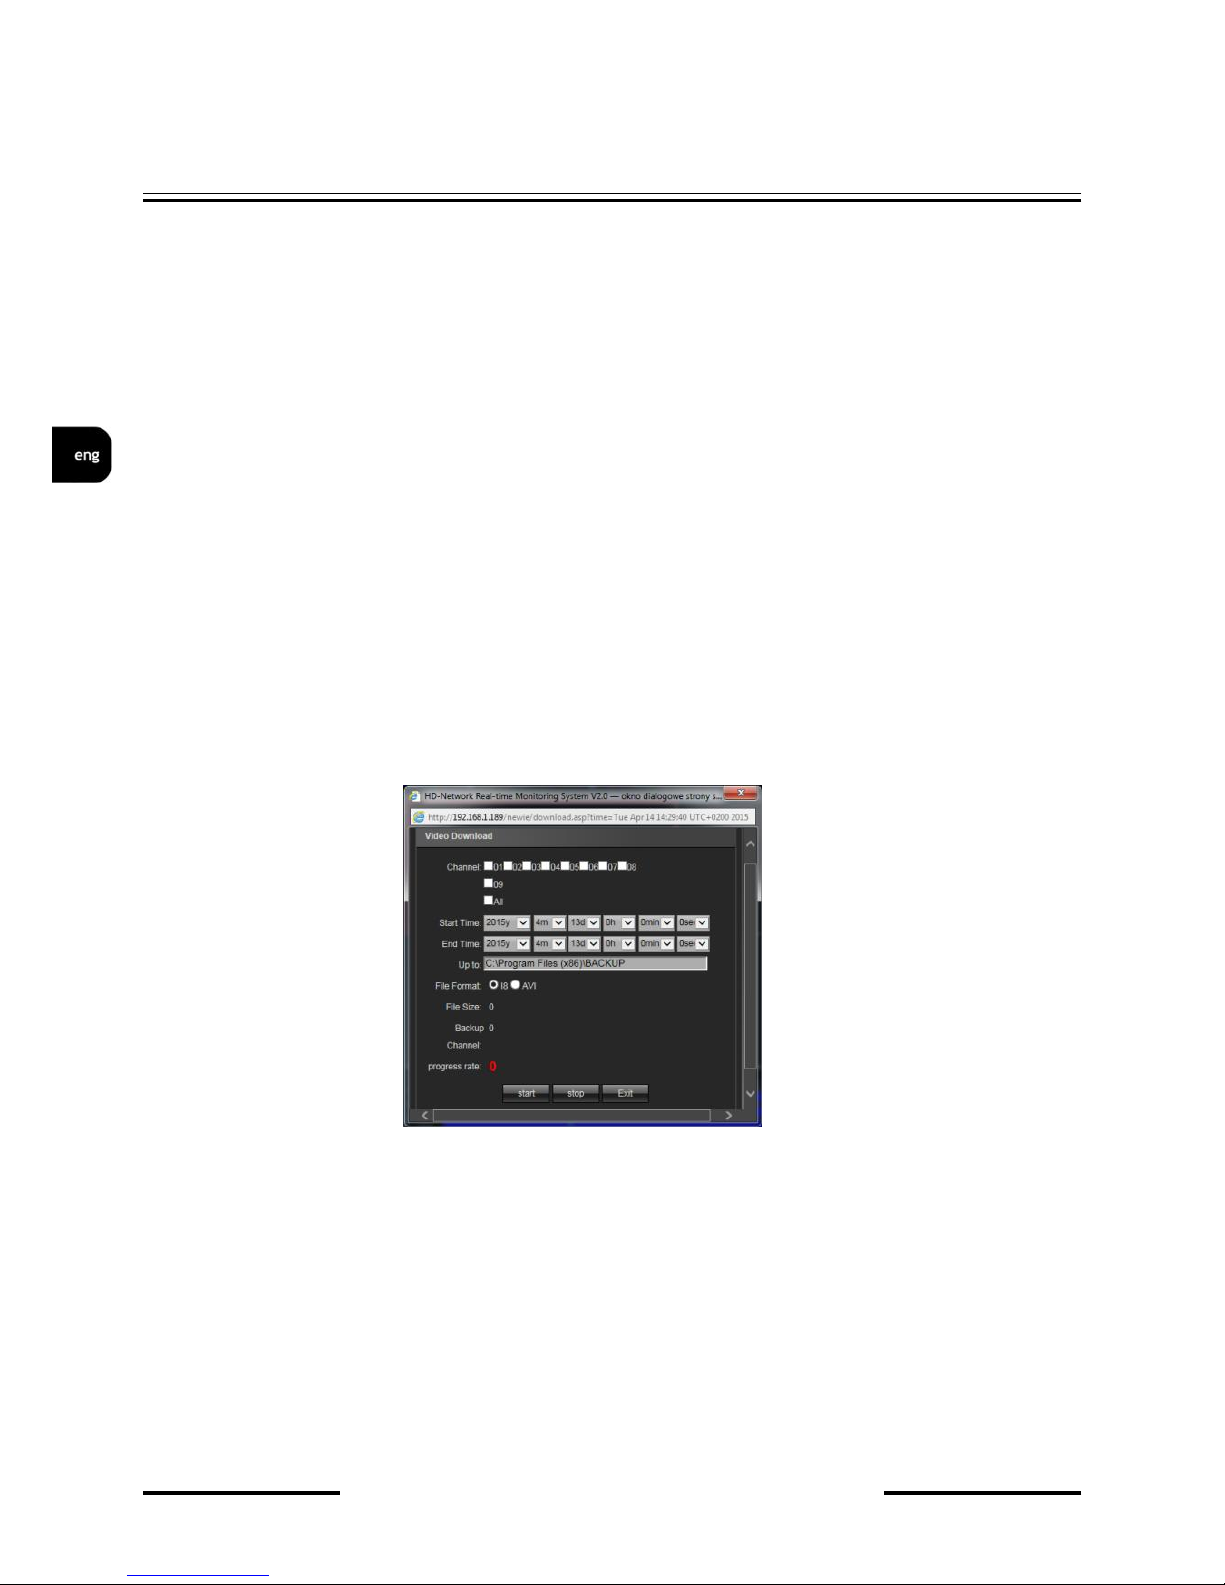
3.6. Backup
User may copy recordings to computer disc or external storage devices. NVRs allow to copy the
recordings in following formats: AVI.
To start the BACKUP MENU go to PAYBACK and choose BACKUP icon. Then following window
will shown
Select a required channels
Select a date range filling START TIME and END TIME.
Select path for saving backup
Choose the required file format.
Press START button, process rate will shown progress of exporting data.
Page 53
NVR-5000 User’s manual ver.1.0
NETWORK OPERATIONS UTILIZING WEB BROSWER
All rights reserved © AAT HOLDING S.A.
53
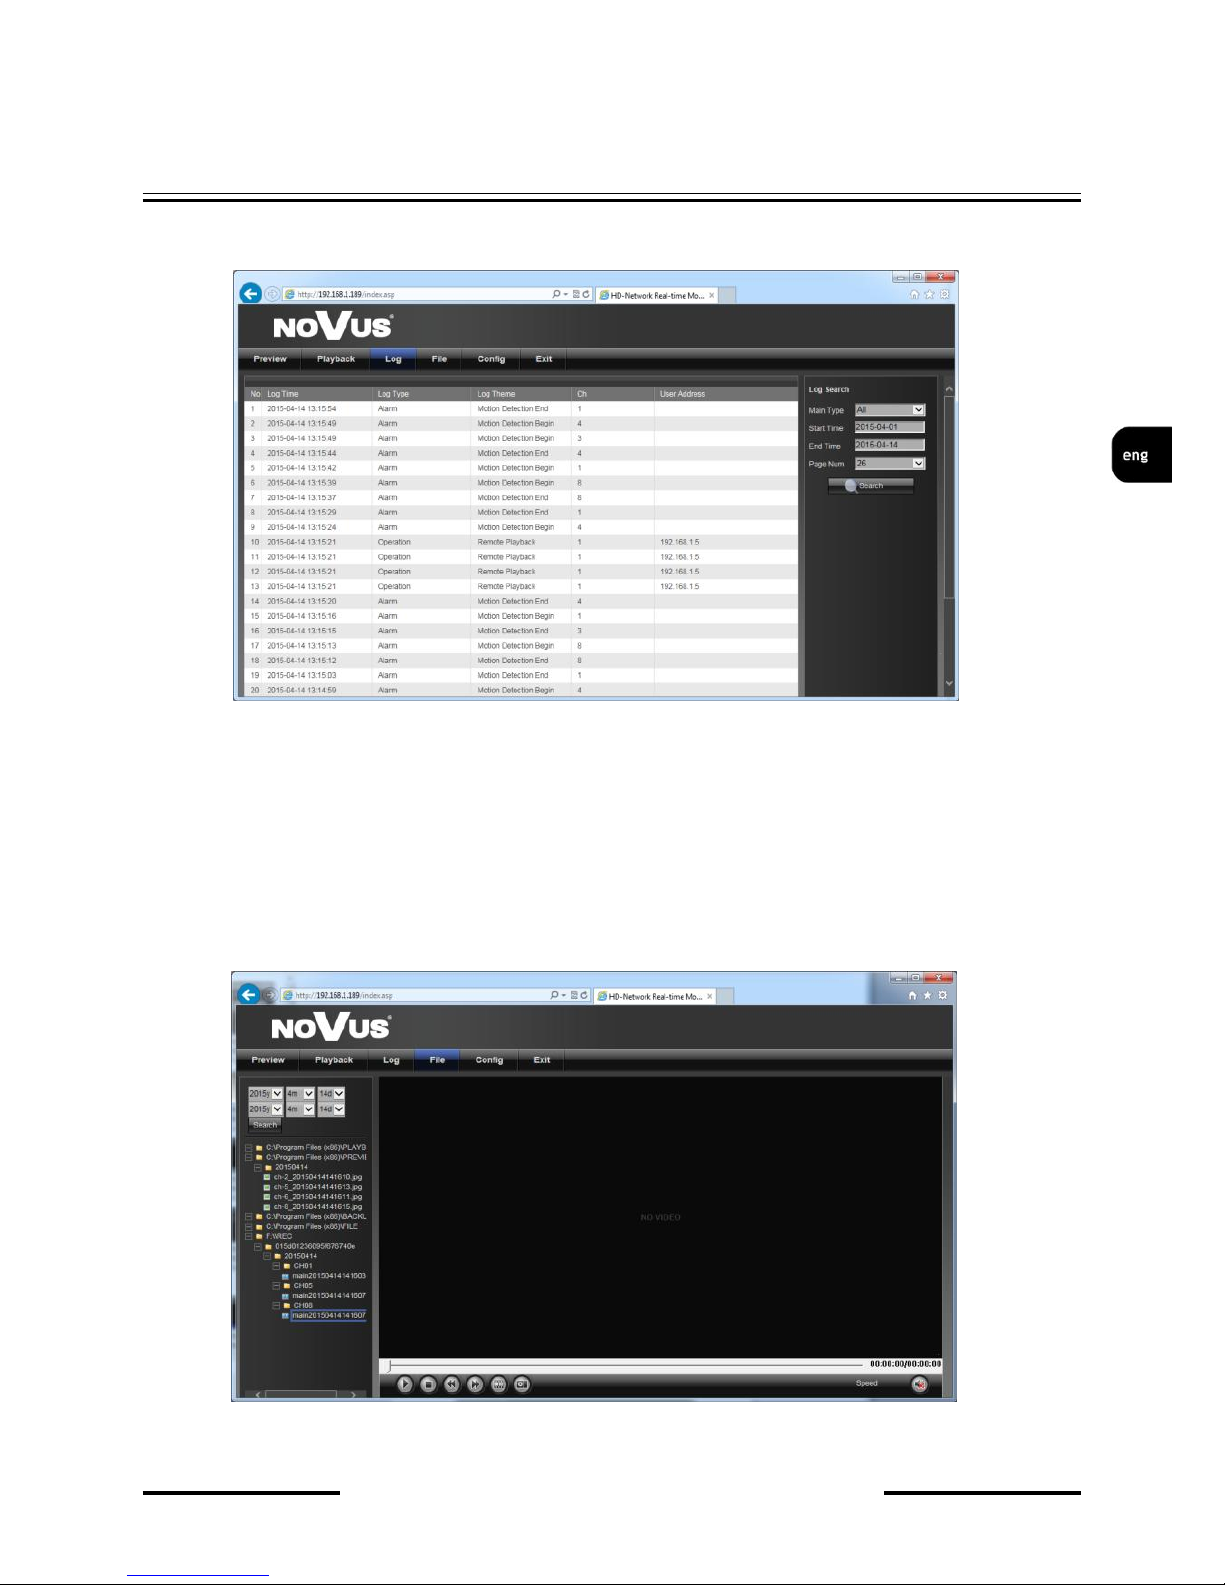
3.7. Log - You can search the logs according to different types and different date and time, as shown
in the above picture.
Main Type of Log: there are All Type, Alarm, Exception and Operation for selection.
Start time End Time: you can select start and end time of a log you want to search.
Search: press to display list of logs
3.8.File
Menu allows to search and watch for the files captured manually to a local device storage. The
default status is to show the capture image stored in the hard disk. To search images, select required
channel, choose the date and press SEARCH button. The file list column will show.
Page 54

NVR-5000 User’s manual ver.1.0
NETWORK OPERATIONS UTILIZING WEB BROSWER
All rights reserved © AAT HOLDING S.A.
54
3.9. System setup
Setup menu contains most of NVR settings. Whole interface is very similar to interface displayed on
NVRs monitor.
LAN Search menu is placed in Chanel Parameters menu.
Local Setting menu is placed in System Management menu.
For detail of each settings please refer “System Setup” description in chapter 2 - NVR
CONFIGURATION.
Page 55

NVR-5000 User’s manual ver.1.0
NETWORK OPERATIONS UTILIZING WEB BROSWER
All rights reserved © AAT HOLDING S.A.
55
Page 56

2015-04-27 AN, MK
AAT Holding sp. z o.o., 431 Pulawska St., 02-801 Warsaw, Poland
tel.: +4822 546 07 00, fax: +4822 546 07 59
www.novuscctv.com
Page 57

i n s t r ukcja obsług i
NVR-54XX
NVR-56XX
NVR-58XX
Page 58

NVR-5000 Instrukcja obsługi wer. 1.0
AAT HOLDING S.A., wszystkie prawa zastrzeżone
2
UWAGI I OSTRZEŻENIA
Dyrektywy EMC (2004/108/EC) i LVD (2006/95/EC). Oznakowanie CE
Nasze produkty spełniają wymagania zawarte w dyrektywach oraz przepisach
krajowych wprowadzających dyrektywy: Kompatybilność elektromagnetyczna EMC
2004/108/EC. Niskonapięciowa LVD 2006/95/EC. Dyrektywa ma zastosowanie do
sprzętu elektrycznego przeznaczonego do użytkowania przy napięciu nominalnym od
50VAC do 1000VAC oraz od 75VDC do 1500VDC.
Dyrektywa WEEE 2002/96/EC. Informacja dla użytkowników o pozbywaniu się urządzeń
elektrycznych i elektronicznych
Niniejszy produkt został oznakowany zgodnie z Dyrektywą WEEE (2002/96/EC) oraz
późniejszymi zmianami, dotyczącą zużytego sprzętu elektrycznego i
elektronicznego. Zapewniając prawidłowe złomowanie przyczyniają się Państwo do
ograniczenia ryzyka wystąpienia negatywnego wpływu produktu na środowisko i
zdrowie ludzi, które mogłoby zaistnieć w przypadku niewłaściwej utylizacji urządzenia.
Symbol umieszczony na produkcie lub dołączonych do niego dokumentach oznacza, że nasz
produkt nie jest klasyfikowany jako odpad z gospodarstwa domowego. Urządzenie należy
oddać do odpowiedniego punktu utylizacji odpadów w celu recyklingu. Aby uzyskać
dodatkowe informacje dotyczące recyklingu niniejszego produktu należy skontaktować się z
przedstawicielem władz lokalnych, dostawcą usług utylizacji odpadów lub sklepem, gdzie
nabyto produkt.
Dyrektywa RoHS 2002/95/EC. Informacja dla użytkowników dotycząca ograniczenia
użycia substancji niebezpiecznych w sprzęcie elektrycznym i elektronicznym.
W trosce o ochronę zdrowia ludzi oraz przyjazne środowisko zapewniamy, że nasze
produkty podlegające przepisom dyrektywy RoHS, dotyczącej użycia substancji
niebezpiecznych w sprzęcie elektrycznym i elektronicznym, zostały zaprojektowane i
wyprodukowane zgodnie z wymaganiami tej dyrektywy. Jednocześnie zapewniamy,
że nasze produkty zostały przetestowane i nie zawierają substancji niebezpiecznych
w ilościach mogących niekorzystnie wpływać na zdrowie człowieka lub środowisko naturalne.
Urządzenie, jako element profesjonalnego systemu telewizji dozorowej służącego do nadzoru
i kontroli, nie jest przeznaczone do samodzielnego montażu w gospodarstwach domowych
przez osoby nie posiadające specjalistycznej wiedzy. Producent urządzenia nie ponosi
odpowiedzialności za wady i uszkodzenia wynikające z niewłaściwej lub niezgodnej z
instrukcją obsługi instalacji urządzenia w systemie.
UWAGA!
ZNAJOMOŚĆ NINIEJSZEJ INSTRUKCJI JAK I PEŁNEJ WERSJI INSTRUKCJI
ZAWARTEJ NA DOŁĄCZONEJ PŁYCIE CD JEST NIEZBĘDNYM WARUNKIEM
PRAWIDŁOWEJ EKSPLOATACJI URZĄDZENIA. PROSIMY O ZAPOZNANIE SIĘ Z NIMI
PRZED PRZYSTĄPIENIEM DO INSTALACJI I OBSŁUGI REJESTRATORA.
NIE WOLNO DOKONYWAĆ ŻADNYCH SAMODZIELNYCH NAP R AW.
WSZYSTKIE NAPRAWY MOGĄ BYĆ REALIZOWANE JEDYNIE PRZEZ
WYKWALIFIKOWANYCH PRACOWNIKÓW SERWISU.
Page 59

NVR-5000 Instrukcja obsługi wer. 1.0
AAT HOLDING S.A., wszystkie prawa zastrzeżone
3
WARUNKI BEZPIECZEŃSTWA
1. Przed zainstalowaniem i rozpoczęciem eksploatacji należy dokładnie zapoznać się z niniejszą
instrukcją obsługi i zawartymi w niej wymogami bezpieczeństwa;
2. Uprasza się o zachowanie instrukcji na czas eksploatacji rejestratora na wypadek konieczności
odniesienia się do zawartych w niej treści;
3. Należy skrupulatnie przestrzegać wymogów bezpieczeństwa opisanych w instrukcji, gdyż mają
one bezpośredni wpływ na bezpieczeństwo użytkowników i trwałość oraz niezawodność
urządzenia;
4. Wszystkie czynności wykonywane przez instalatorów i użytkowników muszą być realizowane
zgodnie z opisem zawartym w instrukcji;
5. W czasie czynności konserwatorskich urządzenie musi być odłączone od zasilania;
6. Nie wolno stosować żadnych dodatkowych urządzeń lub podzespołów nie przewidzianych
i nie zalecanych przez producenta;
7. Nie wolno używać rejestratora w środowisku o dużej wilgotności (np. w pobliżu basenów,
wanien, w wilgotnych piwnicach);
8. Nie należy instalować tego urządzenia w miejscu, gdzie nie można zapewnić właściwej
wentylacji (np. zamknięte szafki, itp.), co powoduje zatrzymanie się ciepła i w konsekwencji
może doprowadzić do uszkodzenia;
9. Nie wolno umieszczać rejestratora na niestabilnych powierzchniach. Rejestrator musi być
instalowany przez wykwalifikowany personel o odpowiednich uprawnieniach według zaleceń
podanych w niniejszej instrukcji;
10. Urządzenie może być zasilane jedynie ze źródeł o parametrach zgodnych ze wskazanymi przez
producenta w danych technicznych kamery. Dlatego też, zabrania się zasilania rejestratora ze
źródeł o nieznanych, niestabilnych lub niezgodnych z wymaganiami określonymi przez
producenta parametrach;
11. Nie wolno dopuścić aby jakiekolwiek metalowe elementy dostały się do wnętrza urządzenia,
może to spowodować uszkodzenie urządzenia. W przypadku dostania się takich elementów do
środka należy niezwłocznie skontaktować się z producentem urządzenia.
12. Wyłączenie odpowiedzialności w przypadku uszkodzenia danych zawartych na dysku lub innych
urządzeniach: Producent nie ponosi odpowiedzialności w razie uszkodzenia lub utraty w trakcie
eksploatacji Produktu danych zawartych na dyskach lub innych urządzeniach.
Przed wykonaniem czynności, która nie jest przewidziana dla danego Produktu w instrukcji obsługi,
innych dokumentach dołączonych do Produktu lub nie wynika ze zwykłego przeznaczenia Produktu,
należy, pod rygorem wyłączenia odpowiedzialności Producenta za następstwa takiej czynności,
skontaktować się z Producentem.
Ponieważ produkt jest stale ulepszany i optymalizowany niektóre parametry i funkcje opisane w załączonej
instrukcji mogły ulec zmianie. Prosimy o zapoznanie się z najnowszą instrukcją obsługi znajdującą się na
stronie www.novuscctv.com Instrukcja obsługi znajdującą się na stronie www.novuscctv.com są zawsze
najbardziej aktualną wersją.
UWAGA !
Producent zastrzega sobie możliwość wystąpienia błędów w druku oraz zmian parametrów
technicznych bez uprzedniego powiadomienia.
Page 60

NVR-5000 Instrukcja obsługi wer. 1.0
AAT HOLDING S.A., wszystkie prawa zastrzeżone
4
SPIS TREŚCI
SPIS TREŚCI ............................................................................................................ 4
1. MENU REJESTRATORA ................................................................................... 6
1.1. Zmiana języka... ............................................................................................. 6
1.2. Obsługa menu... .............................................................................................. 7
1.3. Obserwacja obrazów z kamer ........................................................................ 8
1.4. Wyszukiwanie i odtwarzanie nagrań............................................................ 10
1.5. Archiwizacja nagrań wideo ......................................................................... 12
1.6. PTZ ............................................................................................................... 13
1.7. Alarm ............................................................................................................ 13
1.8. Zdjęcie .......................................................................................................... 14
1.9. Zarządzanie archiwum ................................................................................. 14
2. KONFIGURACJA REJESTRATORA ........................................................... 15
2.1. Urządzenie ..................................................................................................... 15
2.1.1. Ustawienia ogólne ................................................................................ 15
2.1.2. Informacje systemowe .......................................................................... 16
2.1.3. Ustawienia PTZ .................................................................................... 16
2.1.4. Ustawienia czasu letniego .................................................................... 17
2.1.5. Strumień zdalny .................................................................................... 17
2.1.6. Kod QR ................................................................................................. 18
2.2. Kanał ............................................................................................................. 18
2.2.1. Ustawienia wyświetlania ................................................................ 18
2.2.2. Ustawienia strumienia .................................................................... 19
2.2.3. Harmonogram ............................................................................... 20
2.2.4. Detekcja ruchu ............................................................................... 21
2.2.5. Utrata wideo ................................................................................... 22
2.3. Sieć ................................................................................................................ 23
2.3.1. Ustawienia IP ................................................................................. 23
2.3.2. Ustawienia DDNS .......................................................................... 24
2.3.3. Ustawienia NTP ............................................................................ 25
2.3.4. Ustawienia E-mail .......................................................................... 26
2.3.5. Ustawienia dostępu ........................................................................ 27
Page 61

NVR-5000 Instrukcja obsługi wer. 1.0
AAT HOLDING S.A., wszystkie prawa zastrzeżone
5
SPIS TREŚCI
2.4. Alarm ............................................................................................................. 28
2.4.1. Wejścia alarmowe .......................................................................... 28
2.4.2. Wyjścia alarmowe .......................................................................... 29
2.4.3. Alarmy systemowe ........................................................................ 30
2.5. Użytkownik ................................................................................................... 31
2.5.1. Konta użytkowników ..................................................................... 31
2.5.2. Użytkownicy online ....................................................................... 33
2.6. System ........................................................................................................... 34
2.6.1. Logi systemowe ............................................................................. 34
2.6.2. Strumienie wideo ........................................................................... 34
2.6.3. Ustawienia HDD ........................................................................... 35
2.6.4. Aktualizacja .................................................................................... 35
2.6.5. Automatyczny restart ..................................................................... 36
2.6.6. Zarządzanie konfiguracją ............................................................... 37
2.7. Tryb nagrywania ........................................................................................... 38
2.8. Ustawienia wyświetlania ............................................................................... 38
2.9. Ustawienia obrazu kamery ............................................................................ 40
2.10. Konfiguracja kamer IP ................................................................................ 41
2.10.1. Manualnie ..................................................................................... 41
2.10.2. Synchronizacja czasu ................................................................... 45
2.10.3. Synchronizacja ręczna .................................................................. 45
2.10.4. Zmiana kolejności ........................................................................ 45
3. OBSŁUGA REJESTRATORA ZA POMOCĄ PRZEGLĄDARKI .............. 46
3.1. Zalecana konfiguracja komputera PC do połączeń przez przeglądarkę ........ 46
3.2. Połączenie sieciowe ...................................................................................... 46
3.3. Konfiguracja zdalnego dostępu. .................................................................... 48
3.4. Podgląd obrazu z kamer. ............................................................................... 49
3.5. Wyszukiwanie i odtwarzanie nagrań ............................................................ 51
3.6. Archiwizacja nagrań wideo .......................................................................... 52
3.7. Logi .............................................................................................................. 53
3.8. Zarządzanie plikami ...................................................................................... 53
3.9. Konfiguracja systemu ................................................................................... 54
Page 62

NVR-5000 Instrukcja obsługi wer. 1.0
AAT HOLDING S.A., wszystkie prawa zastrzeżone
6
MENU REJESTRATORA
1. MENU REJESTRATORA
1.1. Zmiana języka
Po uruchomieniu rejestratora na ekranie monitora wyświetlane są obrazy z kamer „na żywo”.
Domyślnym językiem urządzenia jest język angielski.
W celu zmiany języka na polski należy wykonać następujące czynności:
Przesunąć kursor do góry ekranu i uruchomić PASEK MENU lub kliknąć prawym przyciskiem
myszy w celu wywołania MENU GŁÓWNEGO.
Wybrać ikonę START i LOGIN , wyświetlone zostanie okno logowania jak poniżej:
Wybrać użytkownika „admin”, hasło pozostawić puste i potwierdzić przyciskiem OK.
Domyślnym kontem użytkownika jest „admin” / bez hasła.
Z MENU GŁÓWNEGO wybrać ikonę UST. WYŚWIETLANIA . Wyświetlone zostanie
następujące okno:
W pozycji opisanej LANGUAGE rozwinąć listę dostępnych języków i wybrać POLSKI.
Page 63

NVR-5000 Instrukcja obsługi wer. 1.0
AAT HOLDING S.A., wszystkie prawa zastrzeżone
7
MENU REJESTRATORA
Po dokonaniu wyboru języka należy wybrać pozycję OK.
Pojawi się okno potwierdzenia operacji w którym należy wybrać YES
Po tych operacja rejestrator zostanie ponownie uruchomiony z polskim językiem interfejsu.
1.2. Obsługa menu
Aby mieć dostęp do menu rejestratora należy się ponownie do niego zalogować. W tym celu należy
przesunąć kursor do góry ekranu i uruchomić PASEK MENU lub kliknąć prawym przyciskiem myszy
w celu wywołania MENU GŁÓWNEGO. Następnie należy wybrać ikonę START i ZALOGUJ .
Wyświetlone zostanie okno logowania jak poniżej:
Należy wybrać właściwego użytkownika, wprowadzić hasło z przy pomocy wirtualnej klawiatury i
potwierdzić przyciskiem OK.
Domyślnym kontem użytkownika jest „admin” / bez hasła. Ze względów bezpieczeństwa
zalecana jest zmiana domyślnego hasła.
Aby wyłączyć rejestrator należy uruchomić PASEK MENU lub MENU GŁÓWNE i wybrać
START a następnie WYŁĄCZ . Po wyświetleniu komunikatu należy wyłączyć zasilanie
przełącznikiem na tylnym panelu urządzenia.
Aby zrestartować rejestrator należy uruchomić PASEK MENU lub MENU GŁÓWNE i wybrać
START a następnie RESTART .
Aby zabezpieczyć przed dostępem do rejestratora osób postronnych zaleca się wylogować po
zakończeniu pracy. Aby to zrobić należy uruchomić PASEK MENU lub MENU GŁÓWNE i wybrać
START a następnie WYLOGUJ .Wówczas dostęp do większości funkcji rejestratora będzie
zablokowany.
Informacja:
Gdy użytkownik nie jest zalogowany wszystkie nieaktywne ikony są szare.
UWAGA:
Nieprawidłowe wyłączanie rejestratora (np. wyjęcie wtyczki z gniazda sieciowego podczas
normalnej pracy urządzenia ) może skutkować pojawieniem się błędów na dysku co efektywnie
przełoży się na skrócenie jego żywotności.
Page 64

NVR-5000 Instrukcja obsługi wer. 1.0
AAT HOLDING S.A., wszystkie prawa zastrzeżone
8
MENU REJESTRATORA
1.3. Obserwacja obrazów z kamer
Rejestratory sieciowe NOVUS posiadają wielopoziomowe menu wyświetlane na ekranie monitora
służące do obsługi i programowania.
Menu urządzenia jest wielojęzyczne i wyświetlane w jednym z następujących języków: angielski,
polski i inne.
Po zakończeniu procesu inicjalizacji na ekranie monitora wyświetlane są obrazy z kamer „na żywo”.
Domyślnym trybem wyświetlania jest największy możliwy podział. Po przemieszczeniu kursora myszy
w górną część ekranu wyświetlony zostanie PASEK MENU. W jego prawym rogu znajduje sie
informacja o zalogowanym użytkowniku oraz status alarmów. Każde okno z podglądem obrazu
zawiera w prawym dolnym rogu ikony: przechwycenie zdjęcia, status nagrywania, tryb zoomu i ikonę
alarmu.
Po zalogowaniu każdorazowe przesunięcie kursora do góry ekranu wyświetli PASEK MENU.
Kliknięcie prawym przyciskiem myszy wywoła MENU GŁÓWNEGO.
Po wybraniu ikony START wyświetlone zostanie menu zawierające następujące pozycje:
OKNO WIDEO
PASEK MENU MENU GŁÓWNE
Nazwa Ikona Opis
Kreator ustawień Włącznie kreatora podstawowych ustawień
Wyłącz Wyłączenie urządzenia
Restartuj Restart urządzenia
Wyloguj/Zaloguj Zalogowanie/Wylogowanie użytkownika
Page 65

NVR-5000 Instrukcja obsługi wer. 1.0
AAT HOLDING S.A., wszystkie prawa zastrzeżone
9
MENU REJESTRATORA
Kliknięcie prawym przyciskiem myszy wywoła MENU GŁÓWNE opisane poniżej:
Nazwa
Ikona Opis
Odtwarzanie
Menu umożliwia wyszukiwanie i odtwarzanie
zarejestrowanych nagrań
Archiwizacja
Przycisk wywołania okna archiwizacji nagrań.
PTZ
Menu sterowania PTZ dla wybranych kamer obrotowych.
Zdjęcie
Przechwytywanie zdjęcia z zaznaczonej kamery.
Lista alarmów
Lista aktualnych alarmów
Zarządzanie
archiwum
Menu zarządzania plikami zdjęć i zawartością pamięci USB
Konfig. systemu
Menu konfiguracji rejestratora
Tryb nagrywania
Menu zmiany trybu nagrywania
Ustaw.
wyświetlania
Menu konfiguracji wyświetlania
Ustaw. obrazu
kamery
Menu ustawień parametrów obrazu wybranej kamery
Konfig. kamer IP
Zawiera menu zarządzania kamerami i aktualizacji czasu
Podziały
Wybór trybu podziału
Start
Menu do obsługi rejestratora
Nazwa Ikona Opis
Zablokuj Zablokowania paska menu żeby był zawsze widoczny
Czas systemowy Włączenie/Wyłączenie wyświetlania czasu systemowego
Głośność Włączenie/Wyłączenie audio
Page 66

NVR-5000 Instrukcja obsługi wer. 1.0
AAT HOLDING S.A., wszystkie prawa zastrzeżone
10
MENU REJESTRATORA
1.4. Wyszukiwanie i odtwarzanie nagrań
Użytkownicy, którzy posiadają uprawnienia do przeglądania zarejestrowanych obrazów po
zalogowaniu się do urządzenia mogą odtwarzać zapisane obrazy. Aby rozpocząć odtwarzanie
zarejestrowanych materiałów należy kliknąć ikonę , wyświetlone zostanie wówczas okno jak
poniżej:
1. Z menu WYBORU KANAŁÓW należy wybrać pożądane kamery.
2. Na kalendarzu należy wybrać pożądaną datę i wcisnąć przycisk SZUKAJ. Na grafie wyświetlone
zostaną nagrania dostępne dla wybranego dnia zaznaczonych kanałów wideo.
Kolory pasków z nagraniami określają typ nagrań zgonie z opisem:
Niebieski - zapis ciągły.
Czerwony - zapis wywołany alarmem zewnętrznym.
Żółty - zapis wywołany detekcją ruchu.
Różowy - zapis wywołany detekcją ruchu lub alarmem zewnętrznym.
Błękitny - zapis wywołany detekcją ruchu i alarmem zewnętrznym (gdy wystąpiły w tym
samym czasie).
Zielony - zapis w trybie ręcznym uruchomiony przez użytkownika.
3. Uruchomienie odtwarzania następuje po naciśnięciu przycisku ODTWARZAJ lub po dwukrotnym
kliknięciu wybranego punktu na grafie.
WYBÓR KANAŁÓW OKNO WIDEO ODTWARZANIA
GRAF ILUSTRUJĄCY
NAGRANIA
PRZYCISKI
NAWIGACYJNE
PRZYCISK WYSZUKIWANIA
KALENDARZ
Page 67

NVR-5000 Instrukcja obsługi wer. 1.0
AAT HOLDING S.A., wszystkie prawa zastrzeżone
11
MENU REJESTRATORA
Przyciski nawigacyjne odtwarzania umożliwiają :
Cofaj: uruchamia odtwarzanie do tyłu (po klatkach bazowych).
Odtwórz: uruchamia odtwarzanie do przodu.
Pauza: wstrzymuje odtwarzanie.
Stop: zatrzymuje całkowicie odtwarzanie.
Wolniej: zmniejsza prędkość odtwarzania. (możliwe wartości to: 1/2, 1/4, 1/8, 1/16 )
Szybciej: zwiększa prędkość odtwarzania. (możliwe krotności to: 2, 4, 8, 16 )
Poklatkowo: przesuwa o pojedynczą klatkę do przodu/tyłu.
Zdjęcie: zapisuje zdjęcie obrazu do pliku.
Archiwizacja: uruchamia archiwizację nagrań.
Pełny ekran: powiększa obraz, pozostawiając tylko przyciski do nawigacji
Głośność: umożliwia regulacje głośności
Dodatkowo po najechaniu kursorem myszy na graf nagrań dostępne są dodatkowe funkcjonalności:
Rolka myszy umożliwia zawężanie przedziału czasowego w celu precyzyjnej regulacji
kursorem na grafie
Prawy przycisk myszy po kliknięciu i przytrzymaniu grafu, umożliwia jego przesuwanie w
wybranym zawężeniu przedziału czasowego.
Lewy przycisk myszy zawiera następujące funkcje :
- zaznaczenie początku (funkcja DO) zakresu archiwizacji nagrań,
- zaznaczenie końca (funkcja DO) zakresu archiwizacji nagrań,
- pozycja archiwizacja uruchamia menu archiwizowania nagrań.
Page 68

NVR-5000 Instrukcja obsługi wer. 1.0
AAT HOLDING S.A., wszystkie prawa zastrzeżone
12
MENU REJESTRATORA
1.5. Archiwizacja nagrań wideo
Menu to pozwala na kopiowanie nagrań wideo na zewnętrzną pamięć lub przez sieć komputerową.
Rejestrator wspiera kopiowanie na zewnętrzną pamięć lub dysk podłączone przez port USB. Dostępne
są następujące formaty archiwizacji nagrań: AVI.
Aby uruchomić menu ARCHIWIZACJA należy z menu głównego kliknąć ikonę .... . Wyświetlone
zostanie okno jak poniżej:
Po włożeniu pamięci USB należy nacisnąć przycisk ODŚWIEŻ. Po wykryci pamięci USB
wyświetlona zostanie na liście. Wówczas należy wybrać następujące parametry archiwizacji
Wybierz wybrać pożądane kamery.
Wybierz datę z kalendarza datę rozpoczęcia archiwum „OD, i zakończenia archiwum „DO”.
Wskaż docelową pamięć USB.
Wybierz pożądany format zapisu pliku
Naciśnięcie przycisku START uruchomi zapis na pamięć USB, pasek postępu będzie informował o
przebiegu kopiowania.
Po zakończeniu kopiowania należy nacisnąć przycisk ODŁĄCZ USB, i wyjąć pamięć z portu USB.
Page 69

NVR-5000 Instrukcja obsługi wer. 1.0
AAT HOLDING S.A., wszystkie prawa zastrzeżone
13
MENU REJESTRATORA
1.6. PTZ
Przycisk PTZ otwiera nowe okno, które pozwala sterować wybraną kamerą.
Aby uruchomić menu PTZ należy z menu głównego kliknąć ikonę . Wyświetlone zostanie okno jak
poniżej:
Dostępne opcje to uchył, obrót, przybliżenie, regulacja ostrości, operacje na presetach itp.
Informacja: Kompatybilność funkcji zdalnych jest uzależniona od modelu kamery i protokołu siecio-
wego.
1.7. Alarm
Funkcja umożliwia sprawdzenie alarmów systemu i wszystkich podłączonych kamer.
Aby uruchomić menu ALARM należy kliknąć ikonę . Wyświetlone zostanie okno jak poniżej:
Przycisk WYŁĄCZ ALARMY blokuje odbieranie alarmów. Przycisk USUŃ ALARMY usuwa zaistniałe alarmy z listy.
Page 70
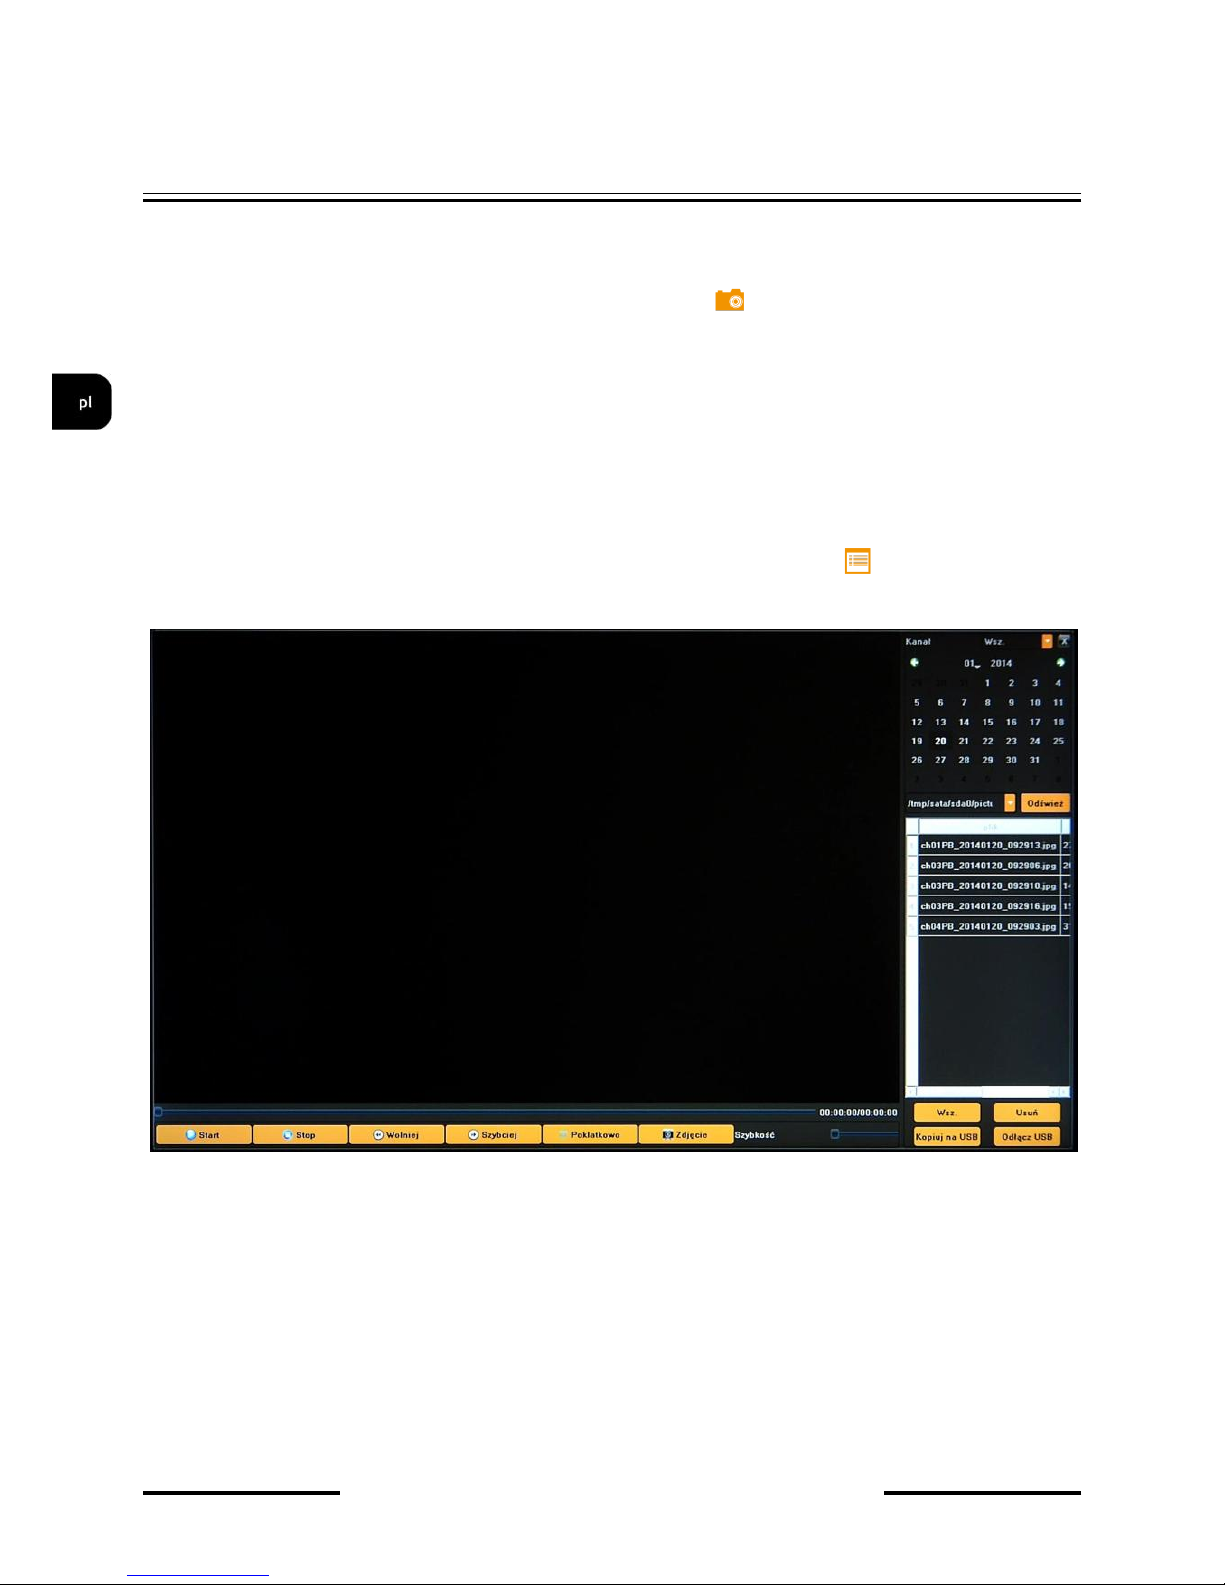
NVR-5000 Instrukcja obsługi wer. 1.0
AAT HOLDING S.A., wszystkie prawa zastrzeżone
14
MENU REJESTRATORA
1.8. Zdjęcie
Menu umożliwia zapisanie aktualnego obrazu z wybranej kamery na dysku
Aby zapisać obraz należy wybrać kamerę i nacisnąć ikonę . Wyświetlony zostanie komunikat
potwierdzający zapis obrazu.
Informacja:
Kompatybilność funkcji zdalnych jest uzależniona od modelu kamery i protokołu sieciowego.
1.9. Zarządzanie archiwum
Menu służy do zarządzania przechowanymi na dysku obrazami, umożliwia podgląd, usuwanie
i export na pamięć USB. Możliwe jest również wyszukiwanie i zarządzanie plikami archiwum nagrań
zapisanymi na pamięci USB.
Aby uruchomić menu ZARZĄDZANIE ARCHIWUM należy kliknąć ikonę . Wyświetlone
zostanie okno jak poniżej:
Aby wyszukać zarchiwizowane na dysku obrazy należy wybrać właściwą datę i nacisnąć ODŚWIEŻ.
Aby przeszukać pliki i nagrania zarchiwizowane na pamięci USB należy wybrać z rozwijanego menu
właściwe urządzenie a następnie użyć przycisku ODŚWIEŻ.
W oknie poniżej zostanie wyświetlona lista dostępnych plików archiwum.
Page 71
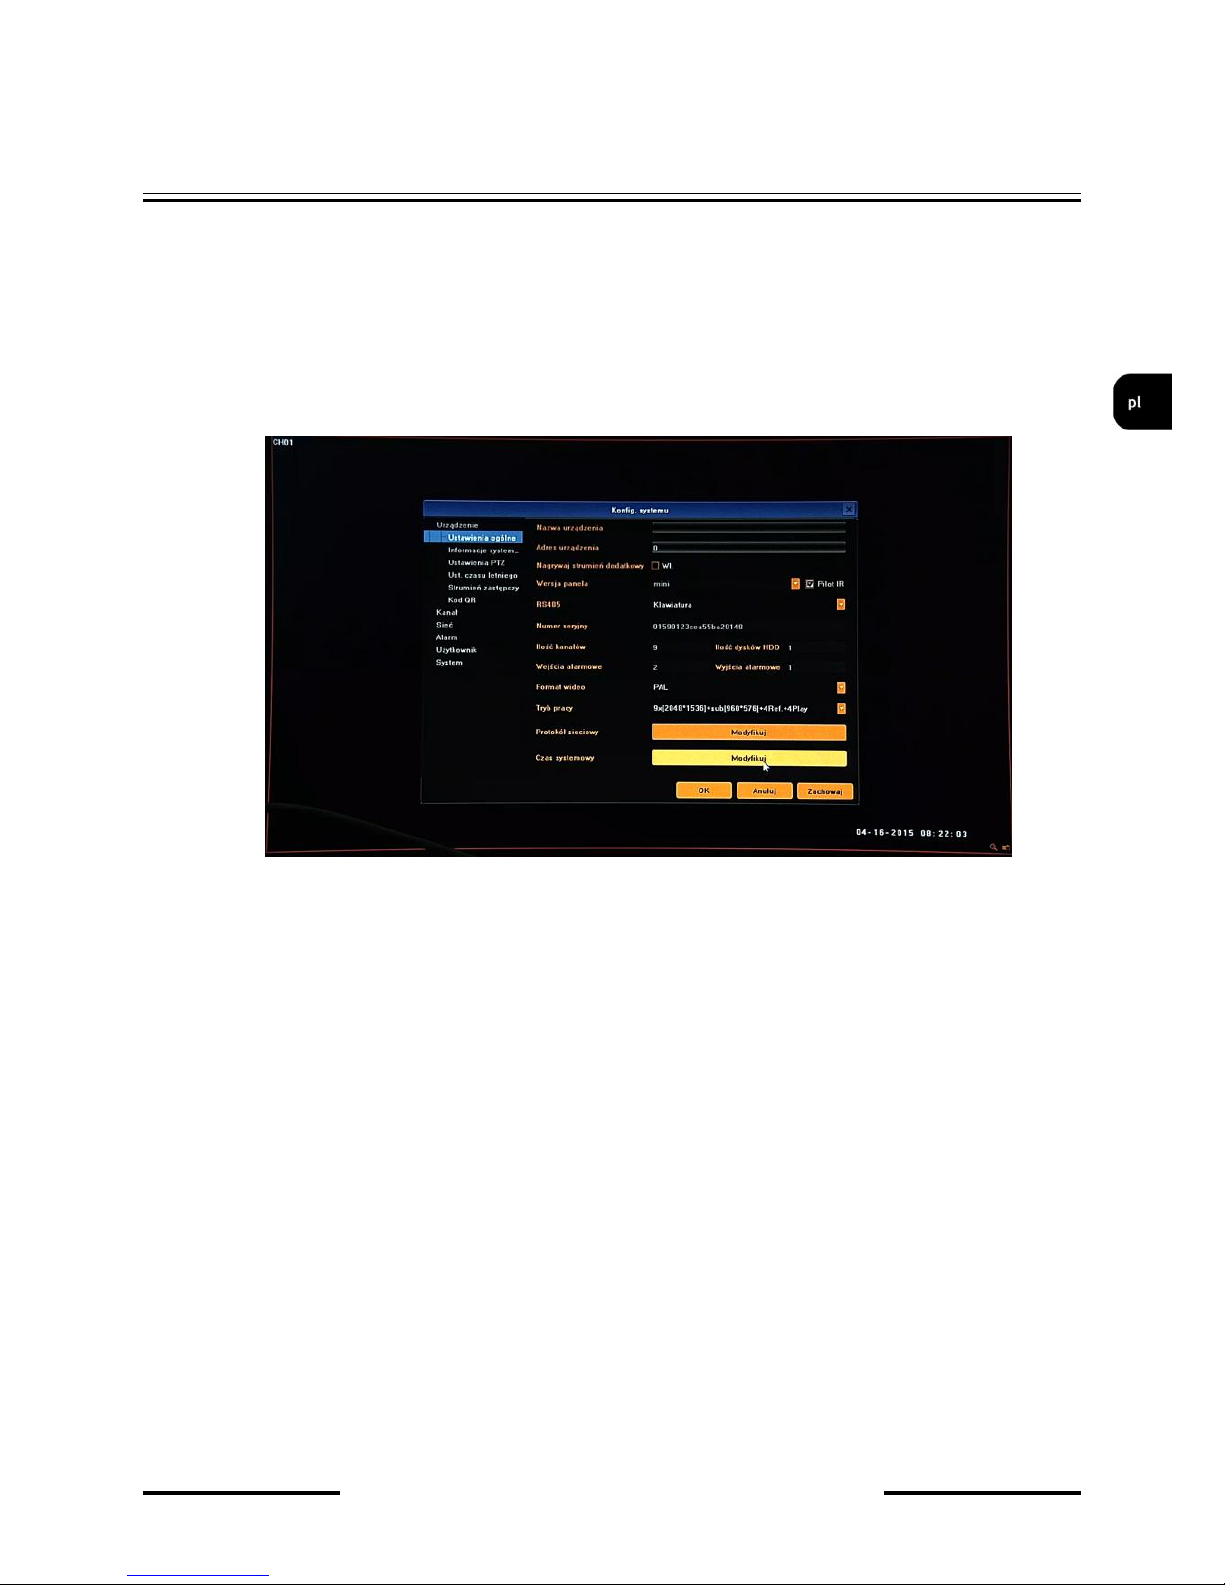
NVR-5000 Instrukcja obsługi wer. 1.0
AAT HOLDING S.A., wszystkie prawa zastrzeżone
15
KONFIGURACJA REJESTRATORA
2. KONFIGURACJA REJESTRATORA
Menu rejestratora zawiera kilka podrzędnych pozycji umożliwiających jego konfigurację.
2.1. Urządzenie - menu umożliwiające ustawienie czasu, zarządzanie konfiguracją i urządzeniami
zewnętrznymi podłączonymi do rejestratora.
2.1.1. Ustawienia ogólne - umożliwia ustawienie podstawowych parametrów urządzenia, tryb pracy
kamer, itp.
Nazwa urządzenia - umożliwia zdefiniowanie nazwy rejestratora.
Adres urządzenia - definiuje unikalny adres urządzenia dla zdalnego sterowania.
Nagrywanie strumienia dodatkowego - umożliwia włączenie równoległego zapisu strumienia
dodatkowego
Wersja panela - informacja o typie panela przedniego.
Pilot IR - umożliwia włączenie obsługi poprzez pilot IR dla modeli wspierających tę funkcję.
RS 485 - konfiguracja trybu pracy portu RS485.
Informacje - wyświetla informacje o rejestratorze takie jaki: Numer seryjny, Ilość kanałów,
Wejścia alarmowe, Wyjścia alarmowe, Ilość dysków HDD.
Format wideo - PAL lub NTSC (wymagane dla poprawnej pracy wyjścia BNC)
Tryb pracy - należy wybrać właściwy tryb pracy pasujący do zastosowanych kamer.
Dla przykładu opis trybu: 2x[1920*1080] + 2x[1280*720] + sub[960*576] + 1Ref + 4Play
Kanały 1 i 2 obsługują kamery o maksymalnej rozdzielczości 1920*1080, kanały 3 i 4 obsługują
kamery o maksymalnej rozdzielczości 1280*720, kanały 1 - 4 obsługują drugi strumień kamer
o maksymalnej rozdzielczości 960*576. 4Play oznacza możliwość odtwarzania 4 kamer
jednocześnie. 1Ref to pojemność wewnętrznego bufora.
Page 72

NVR-5000 Instrukcja obsługi wer. 1.0
AAT HOLDING S.A., wszystkie prawa zastrzeżone
16
KONFIGURACJA REJESTRATORA
Protokół sieciowy - włącza kompatybilność różnych protokołów sieciowych.
Czas systemowy - umożliwia konfigurację czasu, każdą zmianę należy zatwierdzić przyciskiem
OK.
Format czasu i daty - Zmienia tryb wyświetlania daty i czasu
2.1.2. Informacje systemowe - menu zawiera informacje o wersji firmware i wersji sprzętowej
rejestratora
2.1.3. Ustawienia PTZ - konfiguracja parametrów portu RS485 do podłączenia urządzeń
zewnętrznych.
Page 73

NVR-5000 Instrukcja obsługi wer. 1.0
AAT HOLDING S.A., wszystkie prawa zastrzeżone
17
KONFIGURACJA REJESTRATORA
2.1.4. Ustawienia czasu letniego - menu umożliwia ustawienie zmiany czasu letniego.
W ostatnią niedzielę marca o 1:00 czasu uniwersalnego zegary przestawia się o zadany czas do
przodu, a w ostatnią niedzielę października o 1:00 czasu uniwersalnego, o zadany czas. Korekcja
czasu nastąpi o czas zdefiniowany w menu PRZESUNIĘCIE.
2.1.5. Strumień zdalny - menu umożliwia konfigurację parametrów strumienia wykorzystywanego
przez urządzenia mobilne. Dostępne parametry to :
Rozdzielczość
Wielkość strumienia (bitrate)
Ilość klatek
Page 74

NVR-5000 Instrukcja obsługi wer. 1.0
AAT HOLDING S.A., wszystkie prawa zastrzeżone
18
KONFIGURACJA REJESTRATORA
2.1.6. Kod QR - menu zawierające kody QR wykorzystywane do nawiązywania połączenia z
urządzeniami mobilnymi poprzez połączenie bezpośrednie p2p.
2.2. Kanał - menu umożliwia konfigurację parametrów kamer, nagrywania i alarmów zewnętrznych.
2.2.1. Ustawienia wyświetlania - menu umożliwiające konfigurację obrazów z kamer, ich
zachowania i opisów wyświetlanych na ekranie.
Po wybraniu właściwej kamery w menu KANAŁ dostępne są następujące funkcje:
Nazwa kanału: umożliwia zdefiniowanie nazwy wybranego kanału rejestratora.
- - - Funkcje zdalne konfigurowane w kamerze - - -
Nazwa kamery: umożliwia zdefiniowanie zdalnie nazwy kamery przypisanej do wybranego
kanału rejestratora.
Page 75

NVR-5000 Instrukcja obsługi wer. 1.0
AAT HOLDING S.A., wszystkie prawa zastrzeżone
19
KONFIGURACJA REJESTRATORA
Format czasu i daty - Zmienia tryb wyświetlania daty i czasu zdalnie w kamerze przypisanej do
wybranego kanału rejestratora.
Pozycja OSD: konfiguracja opisów OSD zdalnie w kamerze przypisanej do wybranego kanału
rejestratora.
Ustaw. obrazu kamery: ustawienie parametrów jasność, kontrast, barwa, nasycenie
Parametry kamery: konfiguracja parametrów własnych zdalnie w kamerze przypisanej do
wybranego kanału rejestratora.
Informacja:
Kompatybilność funkcji zdalnych jest uzależniona od modelu kamery i protokołu sieciowego.
2.2.2. Ustawienia strumienia - definiuje parametry strumieni poszczególnych kamer. Konfiguracja
odbywa się zdalnie w kamerze przypisanej do wybranego kanału rejestratora.
Po wybraniu właściwego strumienia w menu KANAŁ a następnie STRUMIEN dostępne są funkcje:
Typ strumienia: wybór trybu zapisu: Wideo lub Wideo i Audio.
Rozdzielczość: ustawienie rozdzielczości wybranego strumienia
Typ kodowania: wybór kodowania CBR(stały strumień) i VBR(zmienny strumień).
Wielkość strumienia: ustawienie wielkości bitrate wybranego strumienia
Ilość klatek: ustawienie liczby klatek na sekundę dla wybranego strumienia. Domyślnie
ustawiono PEŁNA PRĘDKOŚĆ.
Jakość obrazu: ustawienie jakości obrazu wybranego strumienia (dla trybu VBR)
Ramki bazowe (I) : ilość obrazów przypadająca dla każdej ramki bazowej.
Przycisk KOPIUJ DO umożliwia szybkie przeniesienie powyższych ustawień do wybranych kanałów.
Informacja:
Kompatybilność funkcji zdalnych jest uzależniona od modelu kamery i protokołu sieciowego.
Page 76

NVR-5000 Instrukcja obsługi wer. 1.0
AAT HOLDING S.A., wszystkie prawa zastrzeżone
20
KONFIGURACJA REJESTRATORA
2.2.3. Harmonogram - menu umożliwia konfigurację harmonogramu i parametrów nagrywania .
Po wybraniu właściwej kamery w menu KANAŁ dostępne są następujące funkcje:
Nagrywanie aktywne: zaznaczenie opcją włącza nagrywanie wybranego kanału.
Nagrywanie dla wszystkich dni: zaznaczenie opcji umożliwia szybką konfigurację nagrywania
dla zgodnie z jednym wybranym typem nagrywania: CIĄGŁE, DETEKCJA RUCHU, ALARM,
RUCH / ALARM, RUCH + ALARM.
W przypadku konieczności nagrywania z kilku trybów nagrywania należy zdefiniować je na
harmonogramie. Po wybraniu pożądanego trybu z menu pod grafem należy zaznaczyć pożądany
przedział czasowy na grafie. Dostępne jest maksymalnie 8 scenariuszy nagrywania dla danego dnia/
kanału.
Opisy kolorów.
Niebieski (ciągłe) : nagrywanie odbywa się w sposób ciągły.
Żółty (detekcja ruchu) : nagrywanie następuje w przypadku detekcji ruchu.
Czerwony (alarm) : nagrywanie następuje w przypadku aktywacji wejścia alarmowego.
Różowy (detekcja lub alarm) : nagrywanie następuje w przypadku detekcji ruchu lub aktywacji
wejścia alarmowego.
Błękitny (detekcja i alarm) : nagrywanie następuje w przypadku detekcji ruchu i aktywacji wejścia
alarmowego jednocześnie.
Konfiguracja zaawansowana: menu umożliwia precyzyjne ustawienie harmonogramu.
Pre/Post alarm: menu definiuje parametry nagrywania przed i po alarmowego.
Przycisk KOPIUJ DO umożliwia szybkie przeniesienie powyższych ustawień do wybranych kanałów.
Page 77

NVR-5000 Instrukcja obsługi wer. 1.0
AAT HOLDING S.A., wszystkie prawa zastrzeżone
21
KONFIGURACJA REJESTRATORA
2.2.4. Detekcja ruchu - menu umożliwia konfigurację ustawieni detekcji ruchu. Konfiguracja
odbywa się zdalnie w kamerze przypisanej do wybranego kanału rejestratora.
Po wybraniu właściwej kamery w menu KANAŁ dostępne są następujące funkcje:
Detekcja ruchu aktywna: włącza wykrywanie detekcji ruchu.
Obszar detekcji: umożliwia konfigurację stref detekcji ruchu zdalnie w kamerze przypisanej do
wybranego kanału.
Czułość: definiuje czułość detekcji ruchu zdalnie w kamerze przypisanej do wybranego kanału.
Harmonogram: definiuje przedziały czasowe aktywacji alarmów detekcji ruchu.
Modyfikuj: menu umożliwia precyzyjne ustawienie harmonogramu.
Page 78

NVR-5000 Instrukcja obsługi wer. 1.0
AAT HOLDING S.A., wszystkie prawa zastrzeżone
22
KONFIGURACJA REJESTRATORA
Powiązania: konfiguracja zdarzeń powiązanych z detekcją ruchu. Dostępne reakcje: Sygnał
dźwiękowy (wewnętrzny buzzer), wiadomość email, aktywacja wyjścia alarmowego, komunikat
na ekranie i liście alarmów, aktywacja nagrywania.
Przycisk KOPIUJ DO umożliwia szybkie przeniesienie powyższych ustawień do wybranych kanałów.
Informacja:
Kompatybilność funkcji zdalnych jest uzależniona od modelu kamery i protokołu sieciowego.
2.2.5. Utrata wideo - menu konfiguracja zdarzeń powiązanych z utratą sygnału wideo z kamer.
Wykrywanie utraty wideo: włącza wykrywanie utraty połączenia/sygnału wideo.
Harmonogram: definiuje przedziały czasowe aktywacji alarmów .
Powiązania: konfiguracja zdarzeń powiązanych z detekcją ruchu. Dostępne reakcje: Sygnał
dźwiękowy (wewnętrzny buzzer), wiadomość email, wybrane wyjście alarmowe, komunikat na
ekranie i liście alarmów.
Page 79
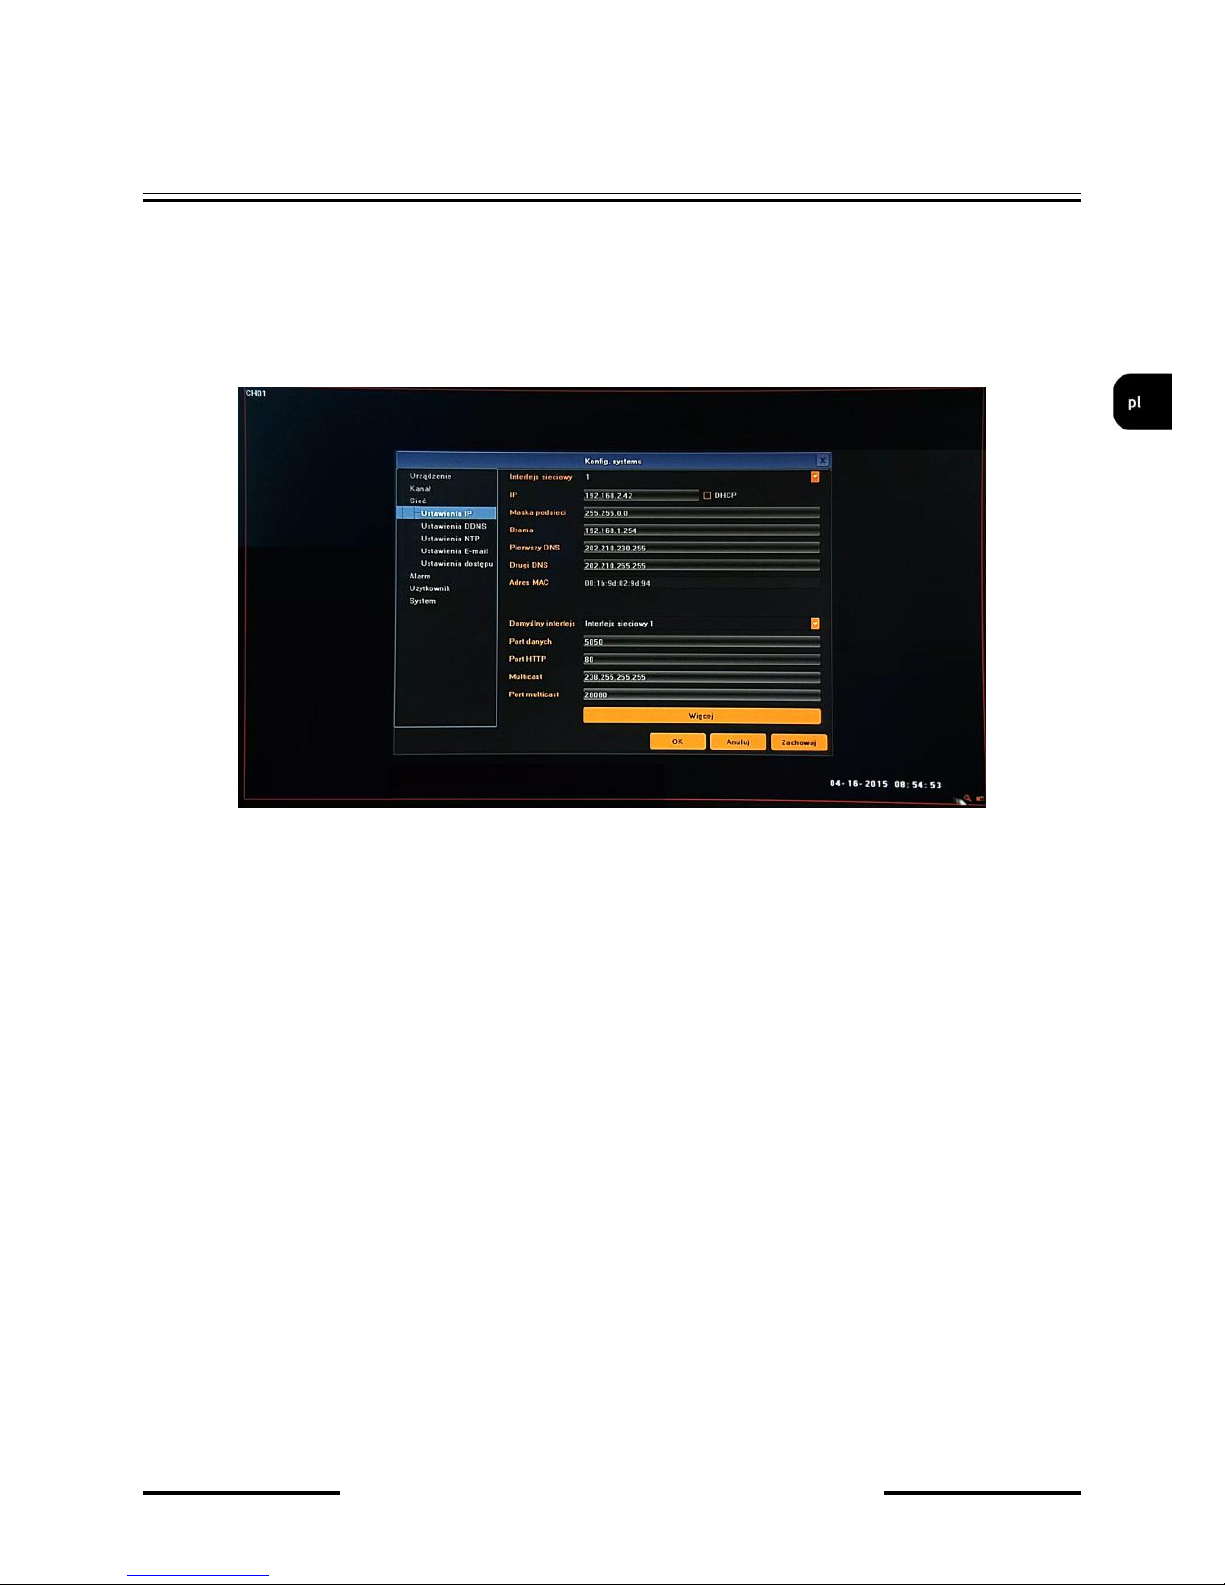
NVR-5000 Instrukcja obsługi wer. 1.0
AAT HOLDING S.A., wszystkie prawa zastrzeżone
23
KONFIGURACJA REJESTRATORA
Ustawienia menu „Harmonogram” i „Powiązania” opisano w rozdziale „Detekcja ruchu”.
2.3. Sieć - menu umożliwia konfigurację ustawień sieciowych rejestratora, DDNS, NTP i E-mail.
2.3.1. Ustawienia IP - definiują parametry dostępu rejestratora do sieci. Dostępne opcje to:
Interfejs sieciowy: wybór interfejsu sieciowego do dalszej konfiguracji (wykorzystywane w
przypadku posiadania dodatkowych interfejsów).
IP: należy wprowadzić adres IP. Gdy pole wyboru DHCP jest zaznaczone wówczas parametry
takie jak adres IP, brama i maska sieciowa oraz adresy DNS są przyznawane automatycznie
przez serwer DHCP. Jeśli opcja DHCP jest wyłączona należy wprowadzić właściwy adres IP i
inne ustawienia sieciowe. W celu zapewnienia stabilności połączenia zalecane jest używanie
statycznego adresu
Maska podsieci: należy wprowadzić właściwą maskę sieciową
Brama: należy wprowadzić adres bramy dostępu do Internetu.
Pierwszy/Drugi DNS: należy wprowadzić adresy serwerów DNS.
MAC: wyświetla adres MAC wybranego interfejsu sieciowego.
Domyślny interfejs : definiuje podstawowy interfejs do połączenia z Internetem.
Port danych: port do przesyłania danych rejestratora do przeglądarki lub aplikacji klienckiej.
Port HTTP : port używany do połączenia z rejestratorem przez przeglądarkę sieciową.
Multicast: adres rozgłaszający dla połączeń multicast.
Page 80

NVR-5000 Instrukcja obsługi wer. 1.0
AAT HOLDING S.A., wszystkie prawa zastrzeżone
24
KONFIGURACJA REJESTRATORA
Więcej: dodatkowe menu zawierające:
PPPOE aktywne: włączenie obsługi PPPOE: należy wprowadzić nazwę użytkownika,
hasło i właściwy adres.
Włącz UPnP : włącza funkcję odnajdywania UPnP
Informacja:
Poprawne ustawienia adresu IP i maski sieciowej są niezbędnie do zdalnego połączenia
z rejestratorem. Ustawienia DNS i bramy sieciowej są konieczne w przypadku korzystania z sieci
Internet.
2.3.2. Ustawienia DDNS - konfiguracja usługi Dynamic DNS
DDNS aktywny: włącza funkcjonalność DDNS.
Typ serwera: wybór jednego z ogólno dostępnych serwerów DDNS.
Page 81

NVR-5000 Instrukcja obsługi wer. 1.0
AAT HOLDING S.A., wszystkie prawa zastrzeżone
25
KONFIGURACJA REJESTRATORA
Adres serwera / Port: wartości automatycznie uzupełniane po wyborze serwera.
Nazwa użytkownika: nazwa użytkownika zarejestrowana w serwisie DDNS.
Hasło: hasło użytkownika zarejestrowana w serwisie DDNS.
Domena: nazwa domeny użytkownika zarejestrowana w serwisie DDNS..
Uwaga!
Pomimo, że rejestrator umożliwia obsługę dynamicznych adresów IP zalecane jest aby obsługę
funkcji DDNS realizować z poziomu routera do którego podłączony jest rejestrator.
Przed przystąpieniem do konfiguracji należy zarejestrować adres w jednym z serwisów DDNS
obsługiwanych przez rejestrator. Zalecanym serwisem jest serwis: www.dyndns.com.
Przed przystąpieniem do konfiguracji funkcji DDNS należy skontaktować się z administratorem
danej sieci w celu uzyskania dozwolonych parametrów, które będą wprowadzone w tym menu.
2.3.3. Ustawienia NTP - konfiguracja ustawień synchronizacji czasu z serwerem NTP
NTP aktywny: włącza funkcję synchronizacji czasu.
Adres serwera: adres serwera NTP
Port NTP: numer portu NTP (domyślnie 123).
Synchronizacja co: częstotliwość synchronizacji (zalecana wartość 1440minut lub więcej)
Strefa czasowa: wybór strefy czasowej odpowiedniej dla danego regionu.
Przesunięcie: korekcja dla czasu letniego, zaznacz pole wyboru REGULUJ, aby aktywować.
Page 82

NVR-5000 Instrukcja obsługi wer. 1.0
AAT HOLDING S.A., wszystkie prawa zastrzeżone
26
KONFIGURACJA REJESTRATORA
2.3.4. Ustawienia E-mail - menu definiuje ustawienia serwera email koniecznego do przesyłania
powiadomień
Adres e-mail: wprowadź nazwę użytkownika.
Hasło/ Potwierdzenie hasła: wprowadź hasło użytkownika.
SSL: włączenie funkcji szyfrowania.
Załącznik: dodawanie załącznika do wiadomości email.
Odbiorca: podwójne kliknięcie pozwala wprowadzić nazwę użytkownika i adres E-mail
odbiorców (maks 3)
Usuń : usuwa zaznaczonego odbiorcę z listy.
Okres wysyłania: wybór minimalnego czasu pomiędzy wysyłaniem wiadomości e-mail.
Serwer SMTP : adres serwera SMTP.
Port SMTP: numer portu serwera SMTP.
Informacja:
Niektóre serwery pocztowe blokują wiadomości email (są traktowane jako spam) jeżeli wysyłane są
one w zbyt krótkich odstępach czasu. Należy sprawdzić minimalne czasy wysyłania wiadomości u
swojego operatora poczty.
Page 83

NVR-5000 Instrukcja obsługi wer. 1.0
AAT HOLDING S.A., wszystkie prawa zastrzeżone
27
KONFIGURACJA REJESTRATORA
2.3.5. Ustawienia dostępu - menu konfiguracji usług zdalnego dostępu. Funkcja umożliwia
aktywacje / dezaktywację usług związanych ze zdalnym dostępem do rejestratora. Dostępne usługi to:
WebSerwer - usługa serwera www umożliwiająca dostęp do rejestratora poprzez przeglądarkę
internetową.
ICloud - usługa serwera p2p umożliwiająca bezpośredni dostęp do rejestratora poprzez
dedykowaną aplikacje p2p (goolink)
Przycisk Modyfikuj umożliwia zmianę opcjonalnej konfiguracji usług.
Przycisk Usuń dezaktywuje zaznaczoną usługę.
Page 84

NVR-5000 Instrukcja obsługi wer. 1.0
AAT HOLDING S.A., wszystkie prawa zastrzeżone
28
KONFIGURACJA REJESTRATORA
2.4. Alarm - menu konfiguracji zachowania rejestratora w przypadku wystąpienia określonych
zdarzeń alarmowych.
2.4.1. Wejścia alarmowe- konfiguracja parametrów wejść alarmowych i reakcji alarmowych
Po wybraniu właściwego wejścia w menu WEJŚCIE ALARMOWE dostępne są następujące funkcje:
Adres IP: wyświetla typ wejścia, Lokalne oznacza wbudowane wejście alarmowe NVRa, adres
IP wskazuje że jest to wejście wybranej kamery IP.
Nazwa portu: definiuje nazwę własną dla wybranego wejścia.
Polaryzacja: umożliwia zdalną konfigurację trybu pracy wejścia, N/O (Normalnie otwarte) lub
N/C (Normalnie zamknięte)
Obsługa alarmu: włączenie umożliwia wywołanie reakcji alarmowych
Harmonogram: definiuje przedziały czasowe aktywacji alarmów.
Modyfikuj: menu umożliwia precyzyjne ustawienie harmonogramu.
Page 85

NVR-5000 Instrukcja obsługi wer. 1.0
AAT HOLDING S.A., wszystkie prawa zastrzeżone
29
KONFIGURACJA REJESTRATORA
Powiązania: konfiguracja zdarzeń powiązanych z alarmem. Dostępne reakcje: Sygnał
dźwiękowy (wewnętrzny buzzer), wiadomość email, aktywacja wyjścia alarmowego, komunikat
na ekranie i liście alarmów, aktywacja nagrywania.
Przycisk KOPIUJ DO umożliwia szybkie przeniesienie powyższych ustawień do wybranych kanałów.
Informacja:
Kompatybilność funkcji zdalnych jest uzależniona od modelu kamery i protokołu sieciowego.
2.4.2. Wyjścia alarmowe - określa zasady pracy wyjścia alarmowego.
Po wybraniu właściwego wejścia w menu WYJŚCIE ALARMOWE dostępne są następujące funkcje:
Adres IP: wyświetla typ wejścia, Lokalne oznacza wbudowane wejście alarmowe NVRa, adres
IP wskazuje że jest to wejście wybranej kamery IP.
Page 86

NVR-5000 Instrukcja obsługi wer. 1.0
AAT HOLDING S.A., wszystkie prawa zastrzeżone
30
KONFIGURACJA REJESTRATORA
Czas aktywności: określa czas trwania alarmu.
Harmonogram: definiuje przedziały czasowe aktywacji alarmów.
Ustawienia menu „Harmonogram” i opisano w rozdziale „Wejścia alarmowe”.
Informacja:
Kompatybilność funkcji zdalnych jest uzależniona od modelu kamery i protokołu sieciowego.
2.4.3. Alarmy systemowe - konfiguracja alarmów systemowych.
Wybierz TYP ZDARZENIA i wprowadź potrzebne ustawienia. Dostępne zdarzenia to:
Zapełnienie dysku: alarm występuje kiedy miejsce na dysku się kończy.
Awaria dysku: alarm występuje kiedy system wykryje awarie zapisu/odczytu dysku.
Uszkodzenie sieci LAN: alarm występuje w przypadku uszkodzenia sieci LAN.
Konflikt adresów IP: alarm występuje w przypadku wykrycia konfliktu adresów IP.
Próba nieautoryzowanego dostępu: alarm występuje przy próbie połączenia użytkownika bez
uprawnień.
Błąd sygnału wideo: alarm występuje gdy sygnał wideo jest niewłaściwy/niezgodny
z ustawieniami rejestratora.
Dostępne są następujące reakcję alarmowe: Sygnał dźwiękowy (wewnętrzny buzzer), aktywacja
wyjścia alarmowego, komunikat na ekranie i liście alarmów.
Page 87

NVR-5000 Instrukcja obsługi wer. 1.0
AAT HOLDING S.A., wszystkie prawa zastrzeżone
31
KONFIGURACJA REJESTRATORA
2.5. Użytkownik - menu pozwalające na konfigurację użytkowników i ich uprawnień.
2.5.1. Konta użytkowników - umożliwia dodawanie i usuwanie użytkowników a także edycję ich
uprawnień.
Aby dodać nowego użytkownika należy:
Wybierz przycisk DODAJ UŻYTKOWNIKA u dołu ekranu.
W nowym oknie podaj wypełnij następujące pola:
Nazwa: należy podać nazwę użytkownika przy pomocy wirtualnej klawiatury.
Hasło/Potwierdzenia hasła: należy podać hasło użytkownika.
Typ: należy zdefiniować przynależność do grupy : OPERATOR, GOŚĆ, BRAK.
Powiązany IP/MAC: wprowadź adres IP / MAC w celu ograniczenia połączeń sieciowych.
Po zakończeniu potwierdź przyciskiem OK.
Page 88
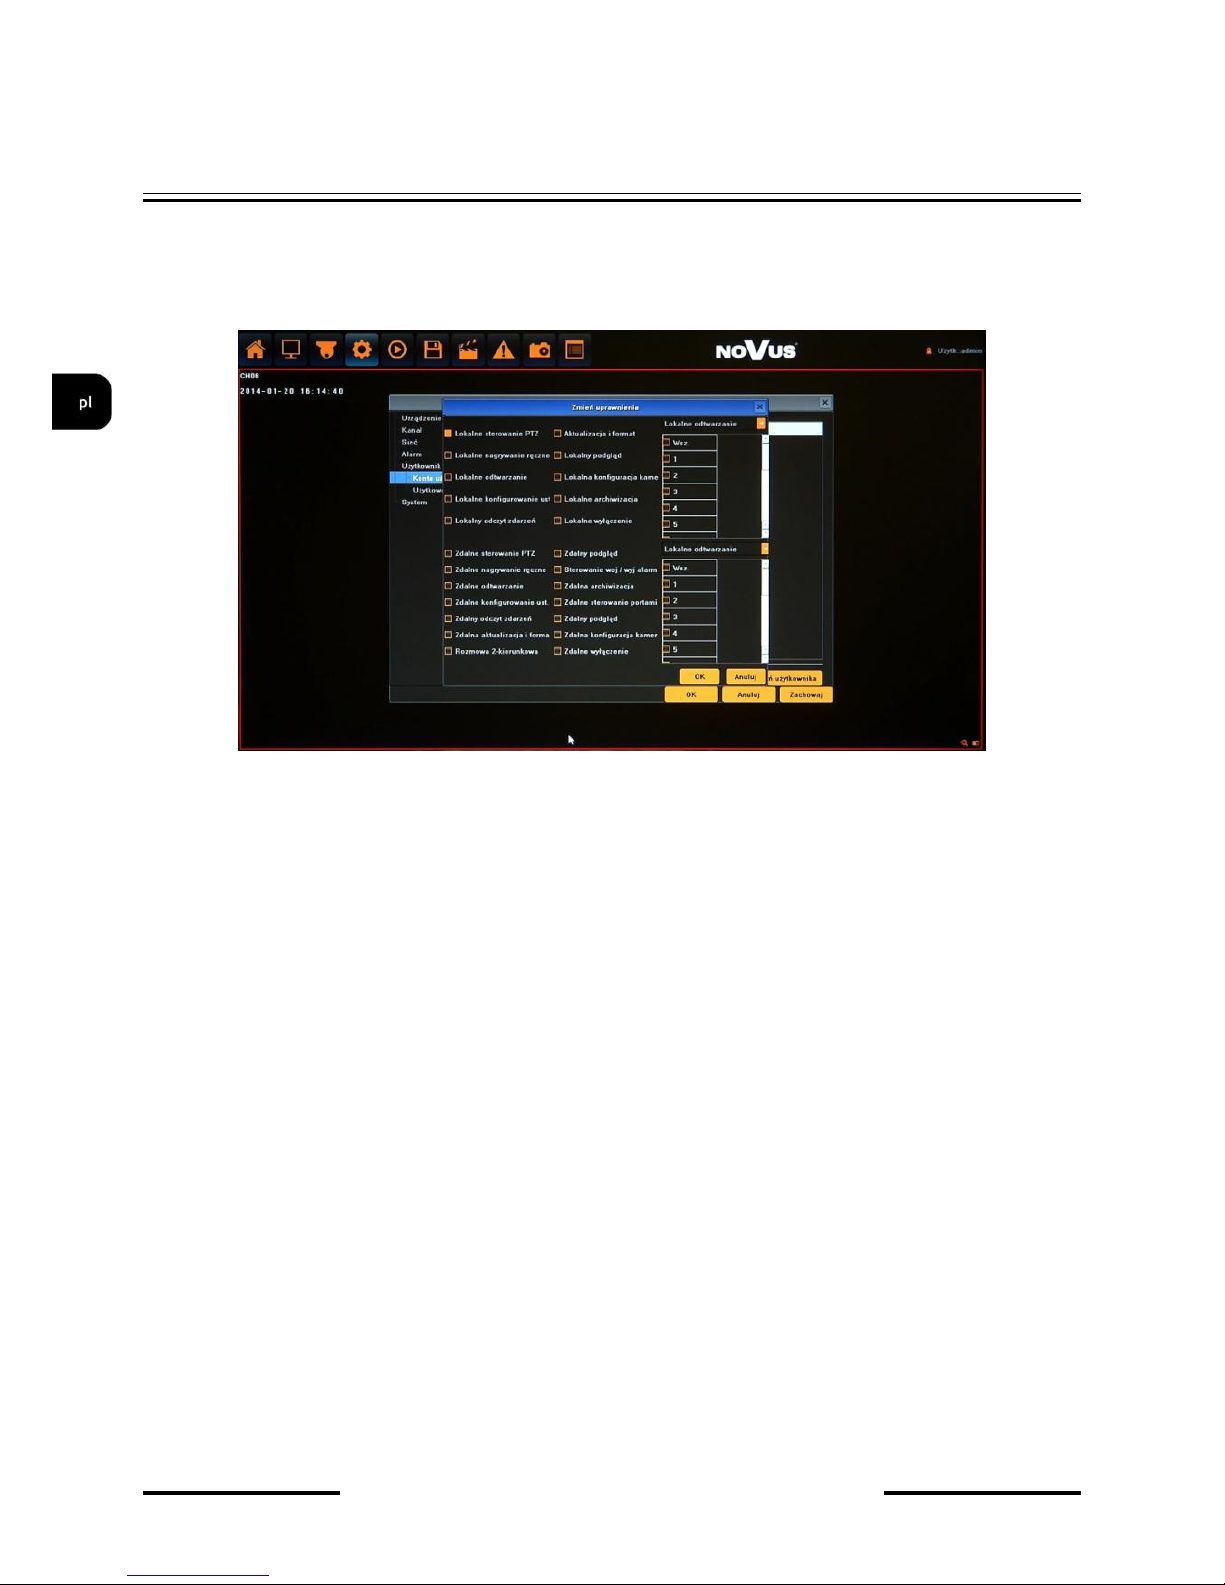
NVR-5000 Instrukcja obsługi wer. 1.0
AAT HOLDING S.A., wszystkie prawa zastrzeżone
32
KONFIGURACJA REJESTRATORA
Aby zdefiniować uprawnienia użytkownika należy:
Wybrać użytkownika z listy i wybrać ZMINEŃ UPRAWNIENIA.
W nowym oknie wybrać parametry dostępu lokalnie i przez sieć.
Po zakończeniu potwierdź przyciskiem OK.
Aby zmienić ustawienia użytkownika należy:
Wybrać użytkownika z listy i wybrać ZMINEŃ UŻYTKOWNIKA.
W nowym oknie zmodyfikować pożądane wartości.
Po zakończeniu potwierdź przyciskiem OK.
Aby usunąć użytkownika należy:
Wybrać użytkownika z listy i wybrać USUŃ UŻYTKOWNIKA.
W nowym oknie potwierdzić usuwanie przyciskiem TAK.
W celu zapisania zmian należy je potwierdzić przyciskiem OK lub ZACHOWAJ u dołu ekranu
Page 89

NVR-5000 Instrukcja obsługi wer. 1.0
AAT HOLDING S.A., wszystkie prawa zastrzeżone
33
KONFIGURACJA REJESTRATORA
2.5.2. Użytkownicy online - menu wyświetla informacje o aktualnie zalogowanych użytkownikach
lokalnych i zdalnych.
Page 90

NVR-5000 Instrukcja obsługi wer. 1.0
AAT HOLDING S.A., wszystkie prawa zastrzeżone
34
KONFIGURACJA REJESTRATORA
2.6. System - menu umożliwiające zarządzenie ustawieniami rejestratora, dysku i urządzeń
zewnętrznych.
2.6.1. Logi systemowe - umożliwia wyszukiwanie logów ze zdarzeń w określonym przedziale czasu.
Typ zdarzeń: wybór kategorii zdarzeń Wszystkie, Alarmy, Uszkodzenia, Obsługa.
Podtyp: wybór wszystkich bądź konkretnego zdarzenia powiązanego z wybraną kategorią.
Od i Do: wybór przedziału czasowego do wyszukiwania zdarzeń.
Szukaj: naciśnięcie przycisku rozpoczyna wyszukiwanie zdarzeń
Eksportuj: menu umożliwia zarchiwizowanie wyników wyszukiwania.
Przyciski nawigacyjne: umożliwiają przełączanie się między stronami z logami.
2.6.2. Strumienie wideo - menu wyświetla informacje o parametrach strumieni i szacowanej zajętości
dysku dla każdego z nich.
Page 91

NVR-5000 Instrukcja obsługi wer. 1.0
AAT HOLDING S.A., wszystkie prawa zastrzeżone
35
KONFIGURACJA REJESTRATORA
2.6.3. Ustawienia HDD - menu obsługi dysków twardych, umożliwia przegląd parametrów i
formatowanie dysków.
Ignoruj błędy SMART - wyłącza weryfikację błędów SMART ( niezalecane)
Parametry smart - wyświetla okno szczegółów SMART dla wybranego dysku
Formatuj - przycisk formatowania dysków. W przypadku formatowania dysków wszystkie dane
zostaną utracone.
2.6.4. Aktualizacja - menu umożliwia aktualizację firmware rejestratora
Aby zaktualizować firmware należy:
Podłączyć pamięć USB z plikiem aktualizacji znajdującym się w katalogu głównym.
Naciśnij przycisk PRZEGLĄDAJ.
Wybierz z listy właściwy plik z rozszerzeniem “.update”.
Page 92

NVR-5000 Instrukcja obsługi wer. 1.0
AAT HOLDING S.A., wszystkie prawa zastrzeżone
36
KONFIGURACJA REJESTRATORA
Naciśnij przycisk URUCHOM AKTUALIZACJE
Pasek postępu będzie wyświetlał aktualny stan aktualizacji.
Po zakończeniu aktualizacji naciśnij OK, system zostanie zrestartowany.
Uwaga:
Przed podjęciem próby aktualizacji oprogramowania należy skontaktować się z dystrybutorem
sprzętu.
Zanik zasilania, wyłączenie urządzenia lub usunięcie pamięci USB w trakcie procesu
aktualizacji oprogramowania skutkuje uszkodzeniem rejestratora i koniecznością naprawy
serwisowej nie podlegającej gwarancji. Producent nie ponosi odpowiedzialności za utratę
danych powstałą w skutek aktualizacji oprogramowania.
2.6.5. Automatyczny restart - menu umożliwia konfigurację zaplanowanych restartów rejestratora.
Dostępne wartości to:
Codziennie: zdefiniuj godzinę o której ma następować restart w polu GODZINA RESTARTU.
Co tydzień: wprowadź następujące wartości określające występowanie restartów:
- DNI TYGODNIA
- GODZINA RESTARTU
Jeden raz: zdefiniuj godzinę o której ma nastąpić restart w polu GODZINA RESTARTU.
Page 93

NVR-5000 Instrukcja obsługi wer. 1.0
AAT HOLDING S.A., wszystkie prawa zastrzeżone
37
KONFIGURACJA REJESTRATORA
2.6.6. Zarządzanie konfiguracją - menu umożliwia zapisanie/wczytanie konfiguracji i przywrócenia
ustawień fabrycznych
Eksport konfiguracji: zapisuje ustawienia rejestratora do pamięci USB.
Import konfiguracji: wczytuje ustawienia z pamięci USB do rejestratora.
Ustawienia fabryczne: przywraca ustawienia fabryczne rejestratora.
Page 94

NVR-5000 Instrukcja obsługi wer. 1.0
AAT HOLDING S.A., wszystkie prawa zastrzeżone
38
KONFIGURACJA REJESTRATORA
2.7. Tryb nagrywania - menu umożliwia szybką zmianę trybu nagrywania.
Z menu głównego należy wybrać ikonę
i ustawić pożądane wartości:
Zatrzymaj - zatrzymuje nagrywanie wybranych kanałów.
Manualnie - uruchamia nagrywanie ręczne wybranych kanałów.
Harmonogram - uruchamia nagrywanie zgodnie z harmonogramem zdefiniowanym w menu.
2.8. Ustawienia wyświetlania - menu umożliwia ustawienie języka, dostosowanie kolorów,
rozdzielczości wyświetlania, itp.
Z menu głównego należy wybrać ikonę
i ustawić pożądane wartości:
Język - wybór preferowanego języka.
Wylogowanie automatyczne - czas po którym nastąpi wylogowanie użytkownika.
Page 95

NVR-5000 Instrukcja obsługi wer. 1.0
AAT HOLDING S.A., wszystkie prawa zastrzeżone
39
KONFIGURACJA REJESTRATORA
Parametry obrazu - ustawienie parametrów wyświetlania takich jak: jasność, kontrast, barwa,
nasycenie
Rozdzielczość - ustawienia rozdzielczości wyjściowej monitora.
Aktywuj sekwencję - modyfikacja ustawień wyświetlania kamer w sekwencji.
Czas sekwencję - konfiguracja czasu sekwencji.
Page 96
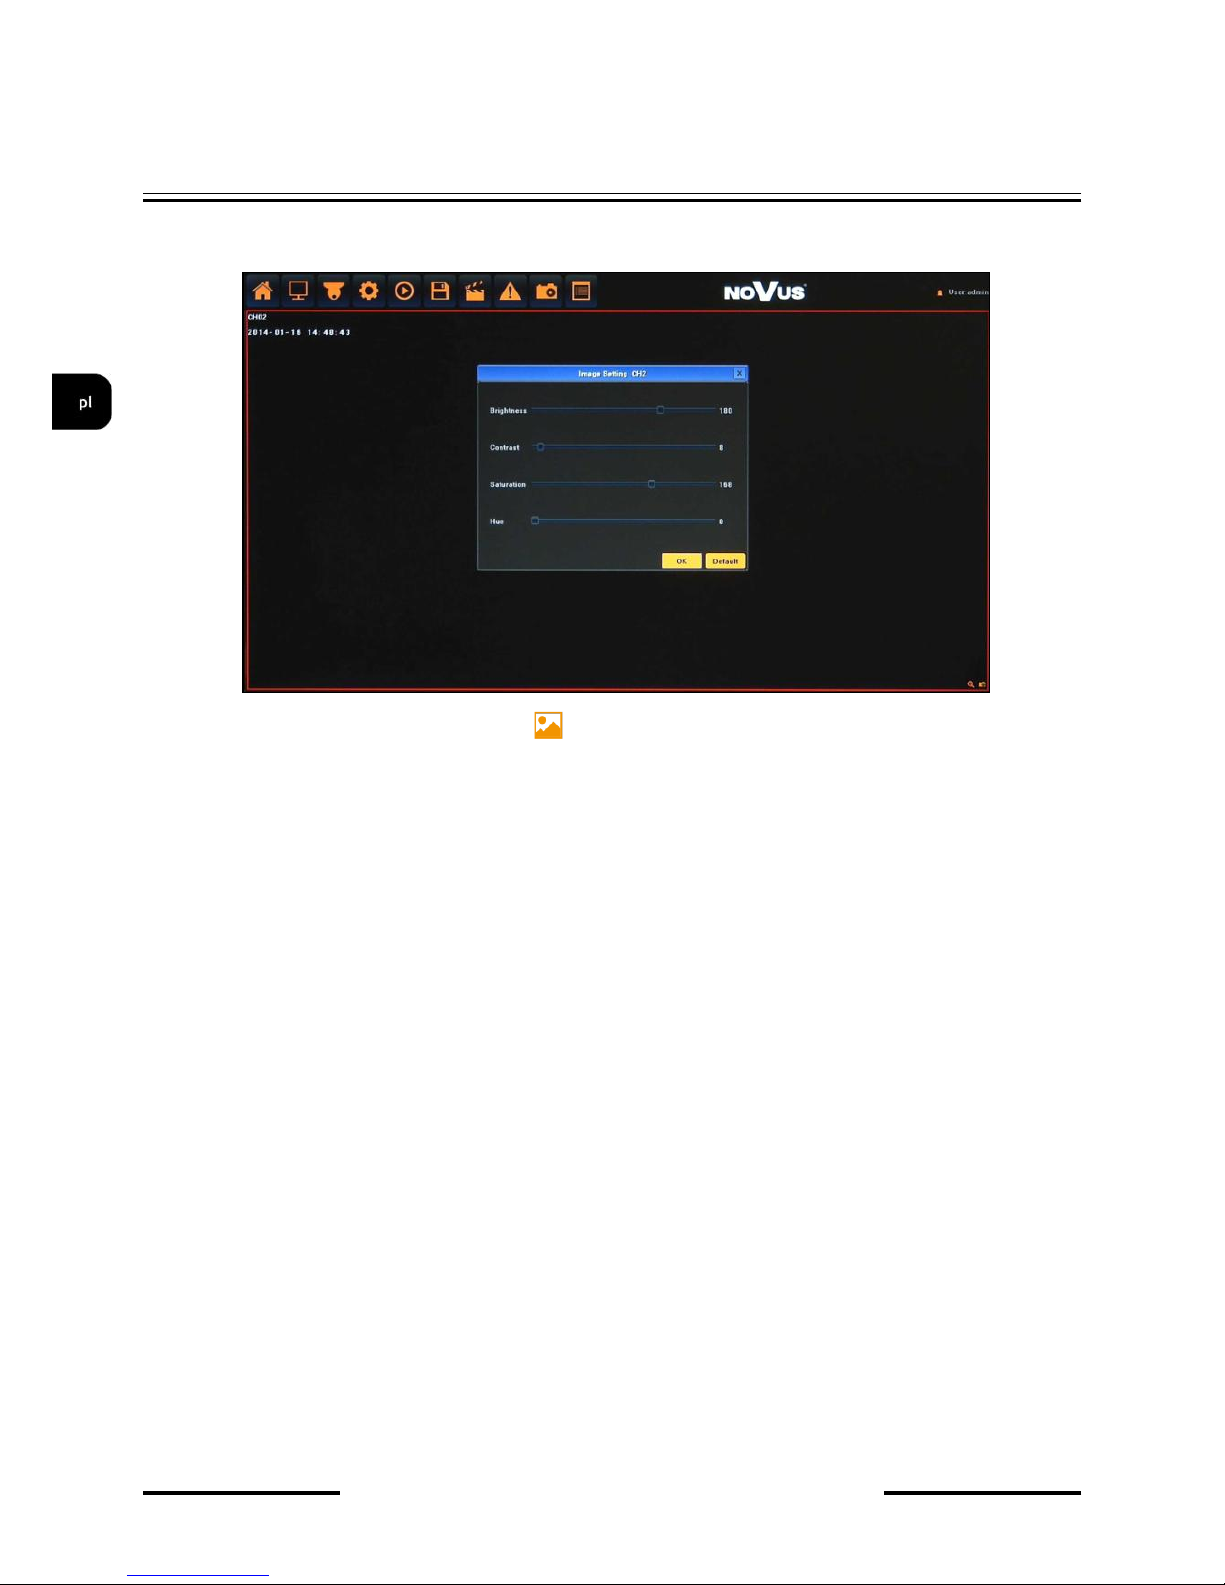
NVR-5000 Instrukcja obsługi wer. 1.0
AAT HOLDING S.A., wszystkie prawa zastrzeżone
40
KONFIGURACJA REJESTRATORA
2.9. Ustawienia obrazu kamery - menu konfiguracji parametrów obrazu dla wybranej kamery.
Z menu głównego należy wybrać ikonę i ustawić zdalnie pożądane wartości obrazu kamery
powiązanej z wybranym kanałem: jasność, kontrast, barwa, nasycenie
Informacja:
Kompatybilność funkcji zdalnych jest uzależniona od modelu kamery i protokołu sieciowego.
Page 97

NVR-5000 Instrukcja obsługi wer. 1.0
AAT HOLDING S.A., wszystkie prawa zastrzeżone
41
KONFIGURACJA REJESTRATORA
2.10. Konfiguracja kamer IP
2.10.1. Manualnie - menu umożliwia dodawanie i konfigurację parametrów połączenia z kamerami.
Informacja:
Zalecane wartości ustawień w kamerach znajdują się w „Tabeli kompatybilności kamer - załącznik
A” który jest integralną częścią pełnej wersji instrukcji obsługi. W przypadku ustawienia
niewłaściwych wartości mogą wystąpić problemy z wyszukaniem, podłączeniem kamer lub uzyskaniem
płynnego obrazu bez zniekształceń.
W oknie wideo należy kliknąć prawym przyciskiem myszy i wybrać KONFIG. KAMER
IP>MANUALNIE
Wyświetlone zostanie okno jak poniżej:
Aby dodać kamery do systemu należy je wyszukać lub ręcznie wprowadzić wartości IP
i portów.
Page 98

NVR-5000 Instrukcja obsługi wer. 1.0
AAT HOLDING S.A., wszystkie prawa zastrzeżone
42
KONFIGURACJA REJESTRATORA
Po naciśnięciu przycisku SZUKAJ uruchomiony zostanie proces wyszukiwania. Po jego zakończeniu
na LIŚCIE DOSTĘNYCH KAMER (przykład poniżej) wyświetlone zostaną wszystkie dostępne w
sieci urządzenia obsługujące protokół ONVIF.
Aby dodać kamerę do LISTY KANAŁÓW należ zaznaczyć pole wyboru znajdujące się przy wybranej
kamerze lub zaznaczyć (podświetlić) pozycję wybranej kamery, a następnie użyć przycisku dodawania
kamer >>> . Kamera ta zostanie wówczas przypisana na pierwszej wolnej pozycji z LISTY
KANAŁÓW. Użycie przycisku WSZ. spowoduje przypisanie wszystkich wyszukanych kamer na
wolne miejsca do LISTY KANAŁÓW.
W celu usunięcia wybranej kamery z LISTY KANAŁÓW, należy ją zaznaczyć (podświetlić) „A”
i wcisnąć przycisk usuwania kamer <<< „B” znajdujący się w środkowej części okna.
LISTA
KANAŁÓW
LISTA
DOSTĘPNYCH
KAMER
PRZYCISK
SZUKAJ
PRZYCISK
DODAJ
WSZYSTKIE
OKNO
USTAWIEN
KAMERY
PRZYCISKI
DODAJ/USUŃ
KAMERY
A
B
Page 99

NVR-5000 Instrukcja obsługi wer. 1.0
AAT HOLDING S.A., wszystkie prawa zastrzeżone
43
KONFIGURACJA REJESTRATORA
Po dodaniu kamer należy wprowadzić użytkownika i hasło niezbędne do połączenia z każdą z nich.
W tym celu należy dwukrotnie kliknąć na wybraną pozycję „A” na LIŚCIE KANAŁÓW, lub wybrać
właściwy kanał z rozwijanej listy „B”. Następnie należy upewnić się że parametry kamery są
poprawne, wprowadzić nazwę użytkownika i hasło „C”
Jeśli kamery mają taką samą nazwę użytkownika, hasło i inne parametry można użyć przycisku
KOPIUJ DO. Po naciśnięci przycisku KOPIUJ DO„A”, wyświetlone zostanie nowe okno „B”
w którym należy zaznaczyć kamery docelowe i potwierdzić kopiowanie przyciskiem OK. Należy
pamiętać że adres IP jest niepowtarzalny dla każdej z kamer i nie będzie skopiowany.
Po zakończeniu konfigurowania rejestrator jest gotowy do pracy. W celach bezpieczeństwa należy
stworzyć użytkowników o ograniczonych uprawnieniach.
Ponadto, aby nagrywać w trybie alarmowym należy skonfigurować w każdej z kamer detekcję ruchu i
ustawić w rejestratorze tryb nagrywania alarmowego HARMONOGRAM oraz wykrywanie detekcji w
menu DETEKCJA RUCHU.
Aby wysyłać powiadomienia o alarmach należy skonfigurować USTAWIENIA IP i EMAIL.
A
B
C
B
A
Page 100

NVR-5000 Instrukcja obsługi wer. 1.0
AAT HOLDING S.A., wszystkie prawa zastrzeżone
44
KONFIGURACJA REJESTRATORA
W przypadku ręcznego dodawania kamer IP(bez użycia wyszukiwarki) bądź strumieni RTSP należy
zdefiniować następujące parametry:
-Protokół sieciowy - wybór protokołu komunikacji
- IP - adres IP kamery
- Port - port komunikacji z kamerą
- Dla protokołu RTSP należy podać adres IP, port RTSP i właściwą ścieżkę strumienia głównego
i dodatkowego kamery.
- Tryb pracy - wybór strumienia do zapisu i podglądu w pełnym oknie.
- Typ sieci - wybór parametrów połączenia TCP lub UDP
- Wyświetlanie - optymalizacja wyświetlania obrazu.
- Nazwa użytkownika - nazwa użytkownika kamery
- Hasło - hasło dostępu do kamery
Po wprowadzeniu zmian należy je zatwierdzić przyciskiem ZAPISZ u dołu ekranu.
Przycisk SZCZEGÓŁY wyświetla dodatkowe informacje aktualnie wybranej kamery.
 Loading...