

Page 1

USER`S MANUAL VER. 1.0
COLOR CAMERA
NVC-230C
NOVUS SECURITY Sp. z o.o.
359 Pulawska Str., 02-801 Warsaw, Poland
tel: +4822-546-0-500; fax: +4822-546-0-519
[email protected]; www.novuscctv.com
© Copyright 2003, NOVUS SECURITY Sp. z o.o.
Page 2

NVC-230C color camera user’s manual, v.1.0
© Copyright 2003, Novus Security Sp. z o.o. All rights reserved.
2
COLOR CCD CAMERA
Operating Instructions
CAUTION
1. Please use correct power adaptor, AC24V (regulated), to operate this unit. The power tolerance of
this unit is AC 24V ± 10% (AC21.6V~26.4V), over maximum AC26.4V power input will damage this
unit.
2. Video output (BNC connector) of this unit can be only connected to monitor. Please check the
wiring of video output before power on. If the power is offered through video output, the unit will be
damaged.
1. Do zasilania kamery należy użyć właściwego zasilacza prądu stałego : AC24V (regulowane).
Tolerancja napięcia dla tej kamery wynosi: 24 VAC ± 10 % (21.6 -26.4 VAC).Przyłożenie do kamery
napięcia większego od dopuszczalnego tj. powyżej 26.4 VAC, może spowodować uszkodzenie kamery.
2. Wyjście wizyjne kamery (BNC) można połączyć wyłącznie z właściwymi wejściami urządzeń CCTV
Przed połączeniem kamery z innymi urządzeniami CCTV należy sprawdzić okablowanie. Jeśli wraz z
wizją zostanie podany inny sygnał, o napięciu większym niż 1 V p-p, kamera może ulec uszkodzeniu.
1. Por favor use el correcto adaptador de energía eléctrica AC24V (regulado) para operar esta
unidad, La tolerancia de energía de esta unidad es de AC24V ± 10% (AC21.6V~26.4V). Sobrepasar el
máximo de AC26.4V de la potencia de entrada dañara esta unidad.
2. La potencia de salida del video (Conector BNC) de esta unidad puede ser solo conectado al
monitor. Por favor revise los cables del video antes de encenderles. Si la energía es dada por la
potencia de salida del video, la unidad se dañara.
1. Bitte schließen Sie das Gerät an das Netzgerät (AC24V) an. Die Toleraz der Stromversorgung ist
24V AC ± 10% (AC21.6V~26.4V). Abweichende Werte können zu Beschädigungen am Gerät führen.
2. Verbinden Sie den Video-Ausgang (BNC-Anschluß) mit dem Video-Eingang des Monitors. Bevor
Sie die Spannungsversorgung einschalten, überprüfen Sie Bitte den korrekten Anschluß des VideoAusgangs. Falsche Anschlußbelegungen können zu Beschädigungen an den Geräten führen.
Page 3
NVC-230C color camera user’s manual, v.1.0
© Copyright 2003, Novus Security Sp. z o.o. All rights reserved.
3
Thank you for choosing this high quality camera, before attempting to connect or operate this product,
please read these instructions completely and carefully.
COLOR CCTV CAMERA OPERATING MANUAL
SPECIFICATIONS
Pick up Element
1/3" Panasonic Color CCD image sensor
Number of Pixel
512(H) x 582(V) <PAL>
Resolution
420 TV lines
Min. Illumination
0.5 Lux / F1.2
S/N Ratio
More than 48dB (AGC off)
Gamma
0.45
Electronic Shutter
1/50 to 1/100,000 sec.
Iris Mode
V.D. / D.D. / AES selectable
Video Output
1.0Vp-p composite,75 Ohm
Lens Mount
C/CS mount changeable
White Balance
Hold / ATW selectable
Back Light Compensation
On / Off
Sharpness
Soft / Sharp selectable
Microphone
Yes
Power Source
AC24V± 10% / 0.2 A
Power Consumption
3 W
Dimension (mm)
118(L) x 62(W) x 50(H)
Weight
370 g
WARNING:
TO PREVENT FIRE OR ELECTRIC SHOCK HAZARD, DO NOT EXPOSE THIS
APPLIANCE TO RAIN OR MOISTURE.
Page 4
NVC-230C color camera user’s manual, v.1.0
© Copyright 2003, Novus Security Sp. z o.o. All rights reserved.
4
GENERAL
This color CCD video camera equipped with a 1/3” Panasonic CCD (charge coupled device)
provides extremely long life and high reliability. The camera provides more than
420TV lines resolution and different view angle of lenses are selectable. Microphone is also
designed for this 24 hours standby surveillance camera.
FEATURES
1. Horizontal resolution of 420 TV lines.
2. Built in Auto Electronic Shutter.
3. Minimum illumination of 0.5Lux/F1.2 .
4. Signal-to-noise ratio of 48dB.
5. Long life and high reliability.
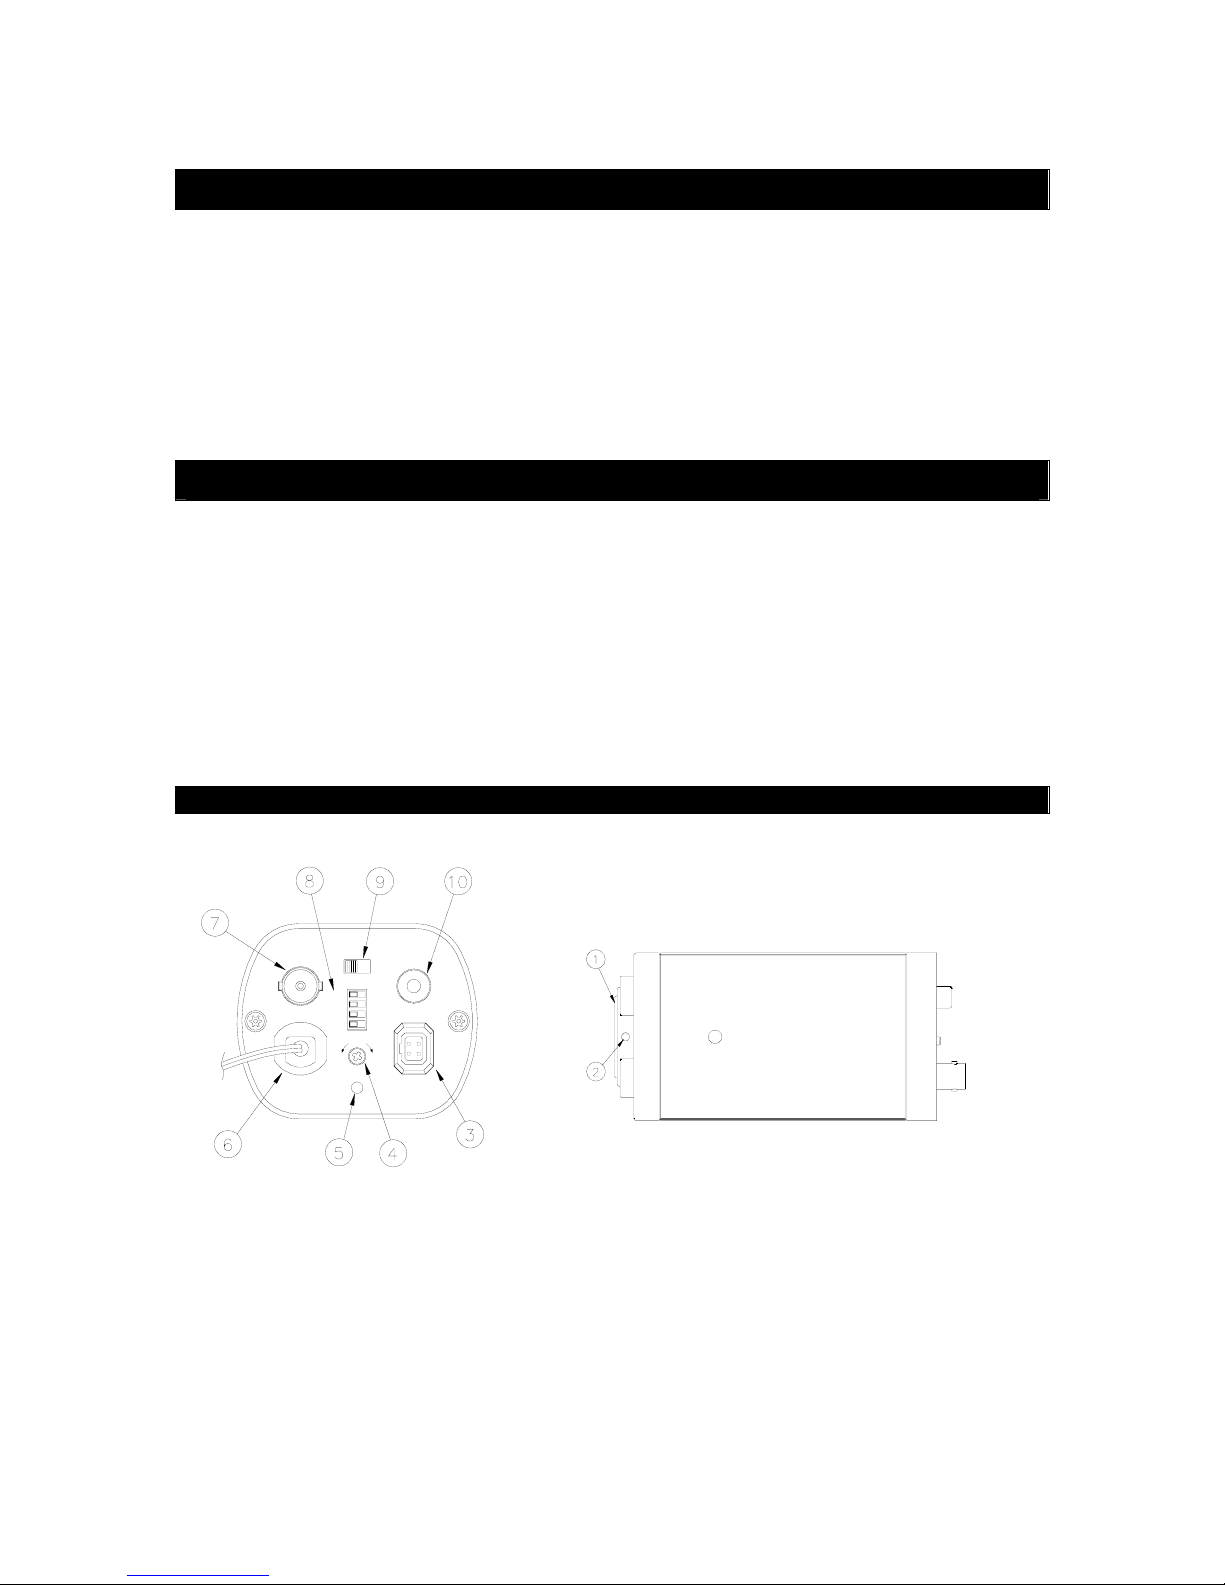
Major Operating Control and Functions
1. Flange Back Adjustment Ring
Suitable for CS-mount lens, When use C-mount lens, please use the CS-C conversion Ring.
2. Back focal lock screw
The camera is set at the standard back focal position. Depending on types of lenses, however slight
adjustment may be necessary. Adjust the lens back-focus by turning the focusing knob.
3. Auto iris Lens Connector Supplies power and control signals to an auto iris lens.
SOFT
HOLD
BLC
AI
SHARP
ATW
OFF
AES
AUTO IRISAC 24V
LH
PL
2
V.D. D.D.
LEVEL
143
VIDEO AUDIO
Page 5

NVC-230C color camera user’s manual, v.1.0
© Copyright 2003, Novus Security Sp. z o.o. All rights reserved.
5
4. DC Drive Level Adjustment
When you use a Direct Drive Lens, you can adjust the DC Drive Level for the bright of video output.
5. Power LED Indicator
The Power LED Indicator indicates normal during operation.
6. AC24V Input Terminal
This terminal is for connecting the 24V AC power supply.
7. Video Output Connector (VIDEO OUT)
This connector is for connecting with the VIDEO IN connector of the video monitor.
8. Selectors: AES/AI, BLC/OFF, SOFT/SHARP, HOLD/ATW
AES/AI Allows you to select the mode according to the lens type that is used with this camera.
AES: Select this mode when a fixed iris lens or manual iris lens is used with this camera.
AI: Select this mode when an auto iris lens is used with this camera.
BLC/ OFF BLC -Back Light Compensation
ON: Allows to enhance the foreground object on strong light condition
OFF: To be used on standard light condition
SOFT/SHARP Allows to choose the view contours sharpness
HOLD/ATW White balance. Two selectable modes.
HOLD: It is advised when the White Balance has to be constant.
ATW: used in most applications
9. IRIS V.D./D.D. Selector
Lets you select the mode according to the lens type that is used with this camera.
V.D.:Select this mode when a VIDEO Drive auto iris lens is used with this camera.
D.D.:Select this mode when a Direct Drive auto iris lens is used with this camera.
10. Audio Output Connector (AUDIO OUT)
This connector is for connecting with the AUDIO IN connector of the video monitor.
CONNECTIONS
1. Mount a lens onto the camera.
2. Set the lens selection switch (AES/AI).
3. Connect a video terminal of the camera (VIDEO) and the video input terminal of the video monitor
with a 75 Ohm coaxial cable.
4. Connect an audio terminal of the camera (AUDIO) and the audio input terminal of the video
monitor.
5. Connect the power terminal of the camera to a 24V AC regulated power supply.
Page 6
NVC-230C color camera user’s manual, v.1.0
© Copyright 2003, Novus Security Sp. z o.o. All rights reserved.
6
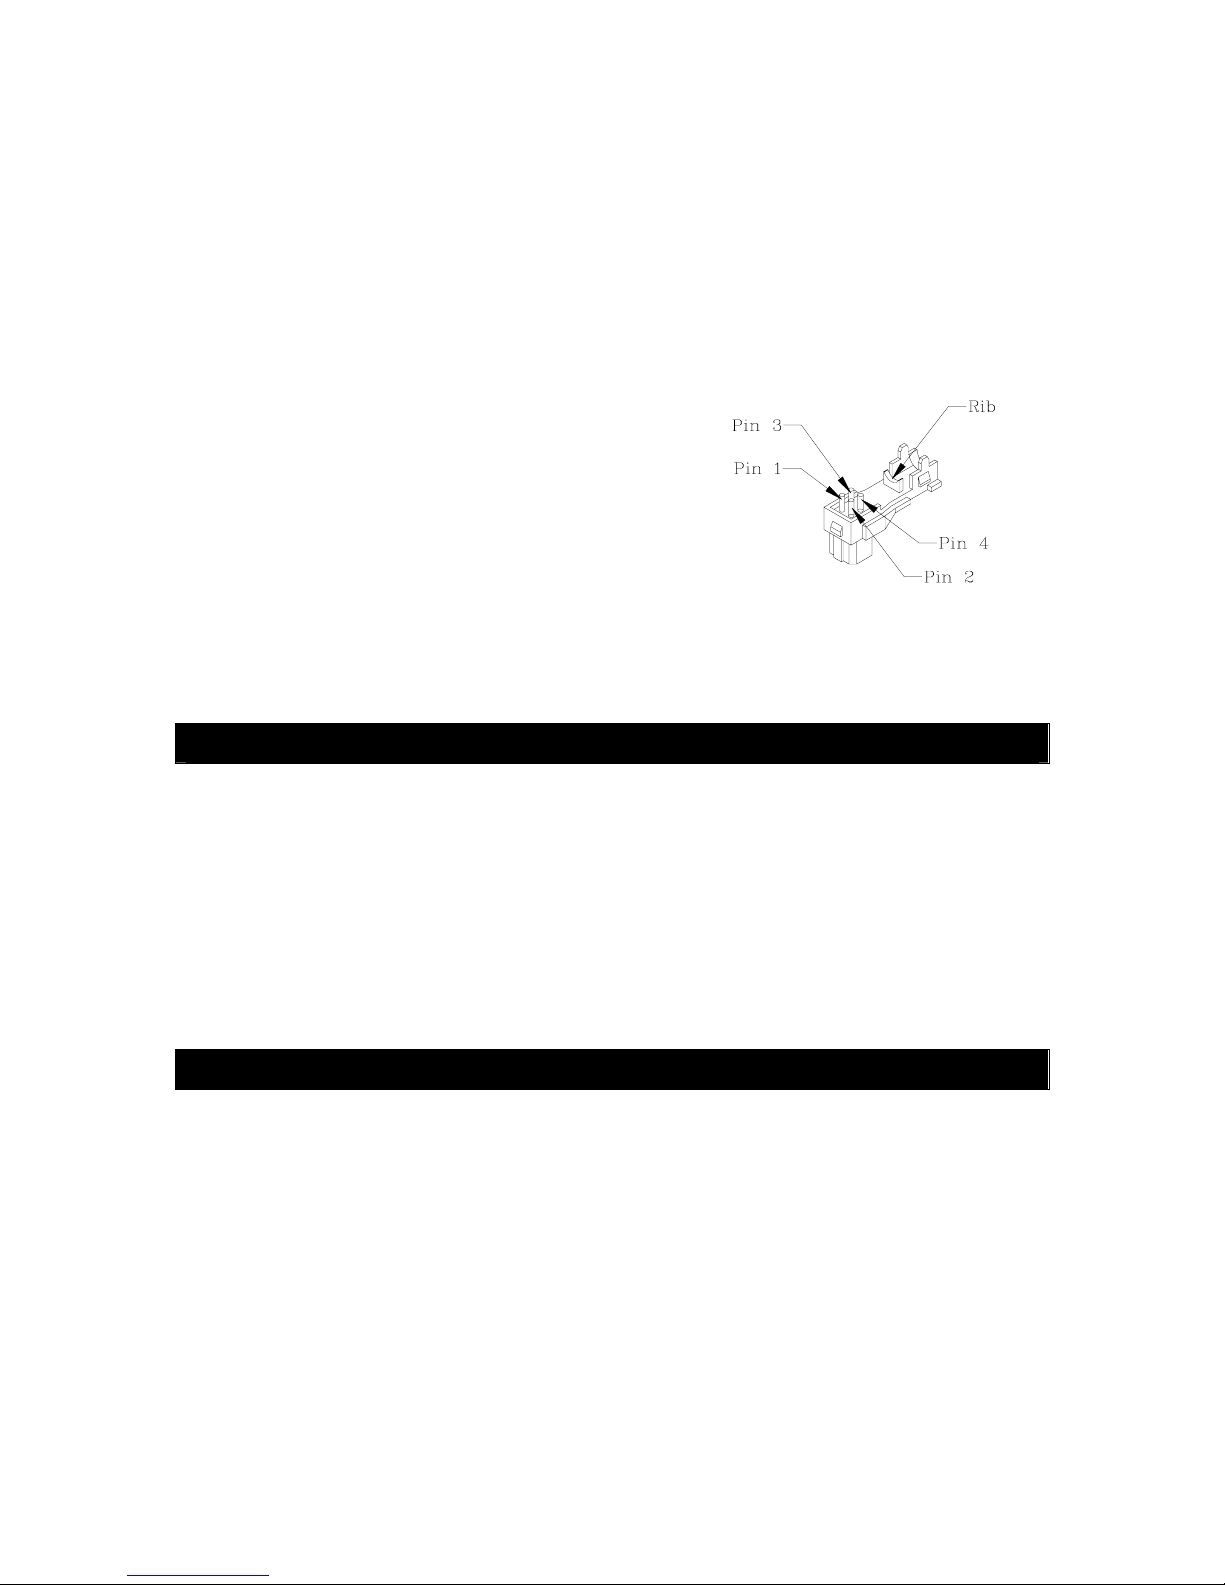
Installation of Auto Iris Lens Connector
Install the lens connector when using a Video drive lens.
The installation should be made by qualified service personnel or system installers
Cut the iris control cable at the edge of the lens connector to remove the existing lens connector and
then remove the outer cable cover of the supplied connector as shown in the diagram.
The pin assignment of the auto iris lens connector is as follows:
VIDEO DC
Pin 1 Power source Damp -
Pin 2 Video signal Damp +
Pin 3 Not used Driver +
Pin 4 Ground, Shield Driver -
Solder the lens cable to the pins of the supplied connector
Focus or Flange-Back Adjustment
The following adjustment should be made by qualified service personnel or system installers.
1. Mount the lens by turning it clockwise on the lens mount of the camera.
2. Loosen the screws on the flange-back adjusting ring.
3. Turn the flange-back adjusting ring to the desired position.
4. Tighten the screws on the flange-back adjusting ring.
Standard Accessories
Main body *1
HEX wrench *1
C mount adaptor ring * 1
Iris header *1
Instruction manual *1
Page 7
All rights reserved © NOVUS SECURITY
NOVUS SECURITY Sp. z o.o.
 Loading...