

Page 1

© EUMETSAT
The copyright of this document is the property of EUMETSAT.
Doc.No.
:
EUM/OPS/MAN/13/736617
Issue
:
v2B e-signed
Date
:
15 February 2016
WBS/DBS
:
Novra S300 DVB Receiver EUMETCast Setup
Guide
EUMETSAT
Eumetsat-Allee 1, D-64295 Darmstadt, Germany
Tel: +49 6151 807-7
Fax: +49 6151 807 555
http://www.eumetsat.int
Page 2

EUM/OPS/MAN/13/736617
v2B e-signed, 15 February 2016
Novra S300 DVB Receiver EUMETCast Setup Guide
Page 2 of 24
Page intentionally left blank
Page 3
EUM/OPS/MAN/13/736617
v2B e-signed, 15 February 2016
Novra S300 DVB Receiver EUMETCast Setup Guide
Page 3 of 24
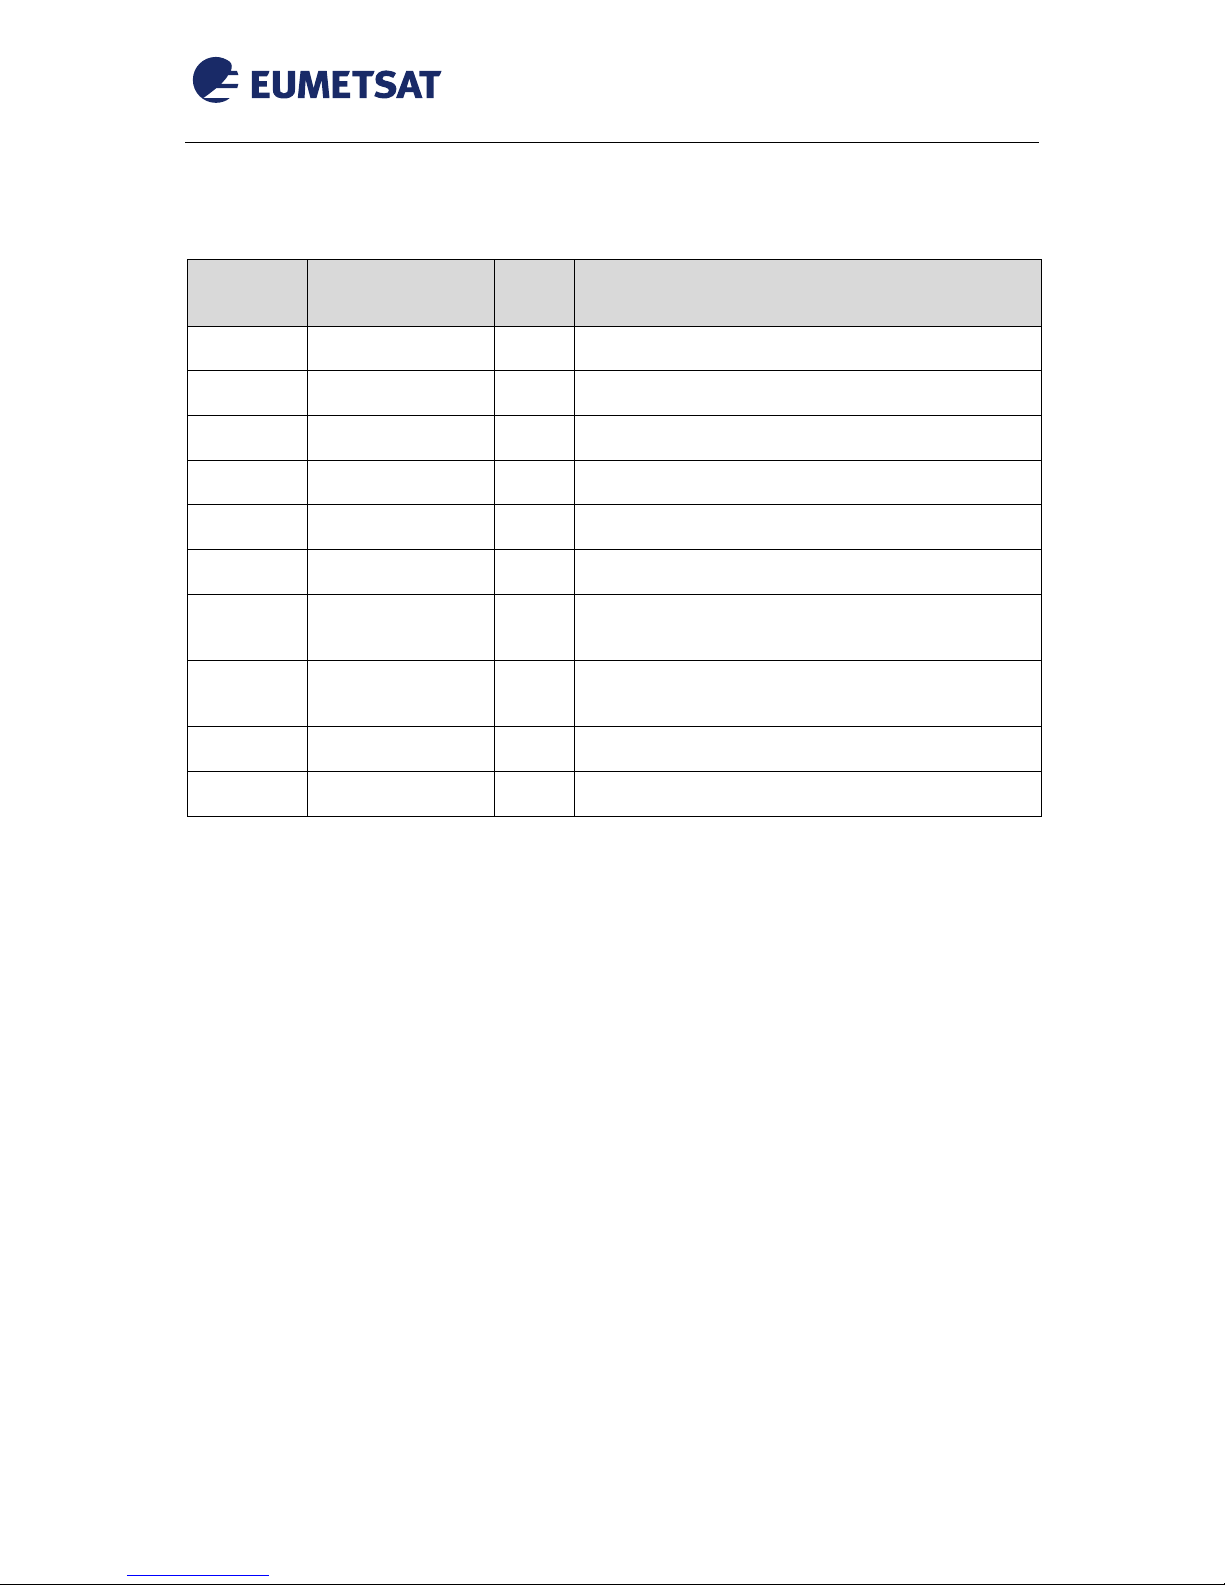
Document Change Record
Issue /
Revision
Date
DCN.
No
Changed Pages / Paragraphs
v1A
15 January 2014
First formal release
v1B
23 January 2014
2nd release
v1C
06 February 2014
3rd release
v1D
02 April 2014
4th release
v1E
26 June 2014
5th release, added DVB-S2 configuration
v1F
08 August 2014
6th Notes how to disable HVS in DVB-S2
v1G
24 November 2014
7th release, added Firewall, Windows Routing Table
Configuration & Command Line Tool, Acronyms
v2
18 December 2014
7th release, Links Updated, DVB-S Ku Band
Configuration Removed
v2A
24 April 2015
RF Frequency changed, Links Updated
v2B
15 February 2016
Updated PID table (§4.3, p13)
Page 4

EUM/OPS/MAN/13/736617
v2B e-signed, 15 February 2016
Novra S300 DVB Receiver EUMETCast Setup Guide
Page 4 of 24
Table of Contents
1 INTRODUCTION .............................................................................................................................. 5
2 PREREQUISITES AND DEVICE VERSIONS ................................................................................. 5
3 PHYSICAL CONNECTIONS ............................................................................................................ 5
3.1 Cables Connections to the receiver ....................................................................................... 5
3.2 Status Indicators .................................................................................................................... 6
4 CONFIGURATION ........................................................................................................................... 7
4.1 Novra’s Console Software and Access to the Receiver ........................................................ 7
4.2 Receiver Configuration ........................................................................................................... 9
4.3 Verify the applied Configuration ........................................................................................... 11
4.4 Disable High Volume Service ............................................................................................... 14
4.5 Verify Signal and Connection ............................................................................................... 15
4.6 Command Line Tool ............................................................................................................. 16
5 TELLICAST AND SYSTEM CONFIGURATION SETUP .............................................................. 20
5.1 Tellicast Setup ...................................................................................................................... 20
5.2 Firewall ................................................................................................................................. 20
5.3 Windows Routing Table ....................................................................................................... 20
5.4 System Configuration Setup under Linux ............................................................................ 21
6 NETWORK SCENARIOS .............................................................................................................. 22
6.1 One EUMETCast reception terminal .................................................................................... 22
6.2 Multiple EUMETCast reception terminals ............................................................................ 22
7 ACRONYMS ................................................................................................................................... 24
Page 5
EUM/OPS/MAN/13/736617
v2B e-signed, 15 February 2016
Novra S300 DVB Receiver EUMETCast Setup Guide
Page 5 of 24
1 INTRODUCTION
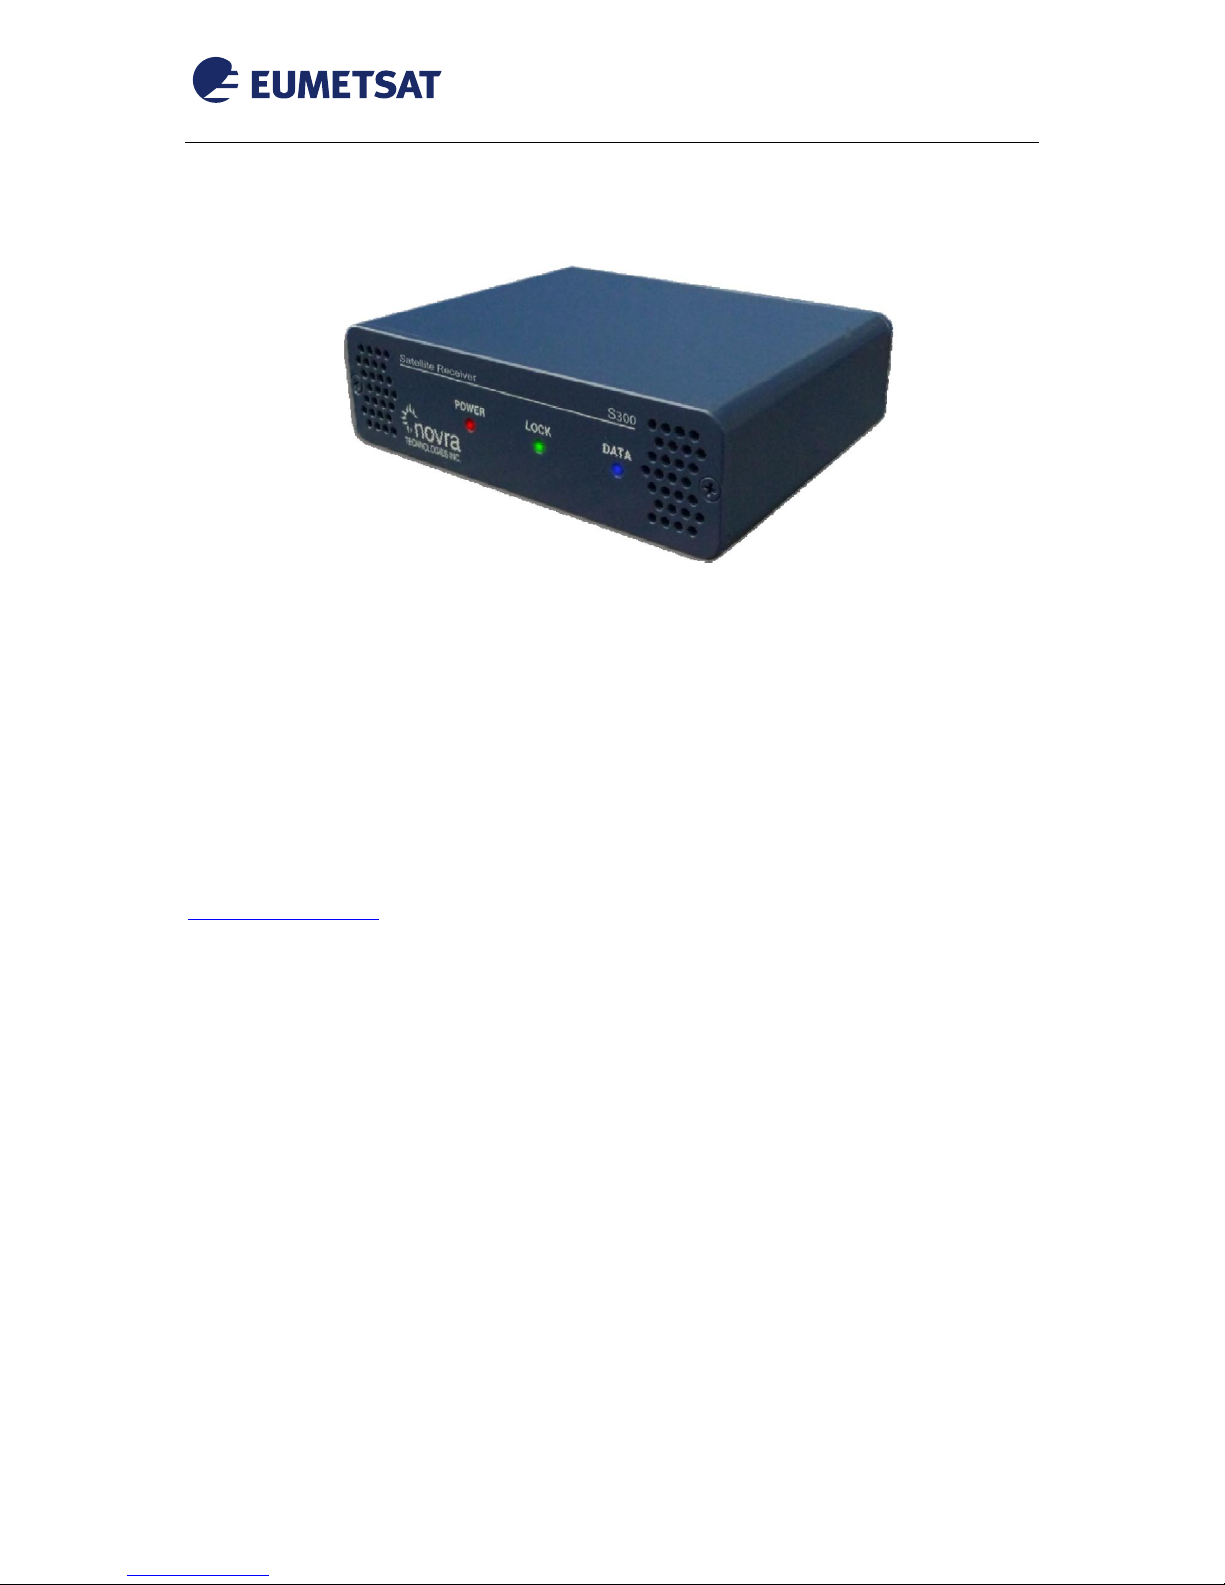
Novra S300 front Panel
The purpose of this manual is to guide a user through the minimum necessary steps to allow the reception of
EUMETCast data (DVB-S and DVB-S2) on the Novra S300N or S300E DVB receivers. The base operating
system used for this procedure is Windows (Win7,Win8, ...).
2 PREREQUISITES AND DEVICE VERSIONS
Note: only the S300E and S300N will work error-free with the new EUMETCast DVB-S2 service.
Please refer also to the corresponding Novra’s Users Manual for more details. The manual can be
downloaded here:
http://novra.com/support/
Before performing the configuration please ensure the following steps have been addressed:
A Windows PC (XP, 2000, Vista or Windows 7) with 10/100/1000Mb Ethernet port is available
for configuring the receiver;
Administrator or Root access to the reception host system is available;
The EUMETCast antenna pointing has been performed correctly EUTELSAT 10A for DVB-S2
reception. (For DVB-S2 reception the antenna pointing and LNB quality is crucial);
An EKU has been obtained from the EUMETSAT user help desk;
The reception host has the latest EUMETCast reception software installed;
The Novra has software version 2.0 or later installed.
3 PHYSICAL CONNECTIONS
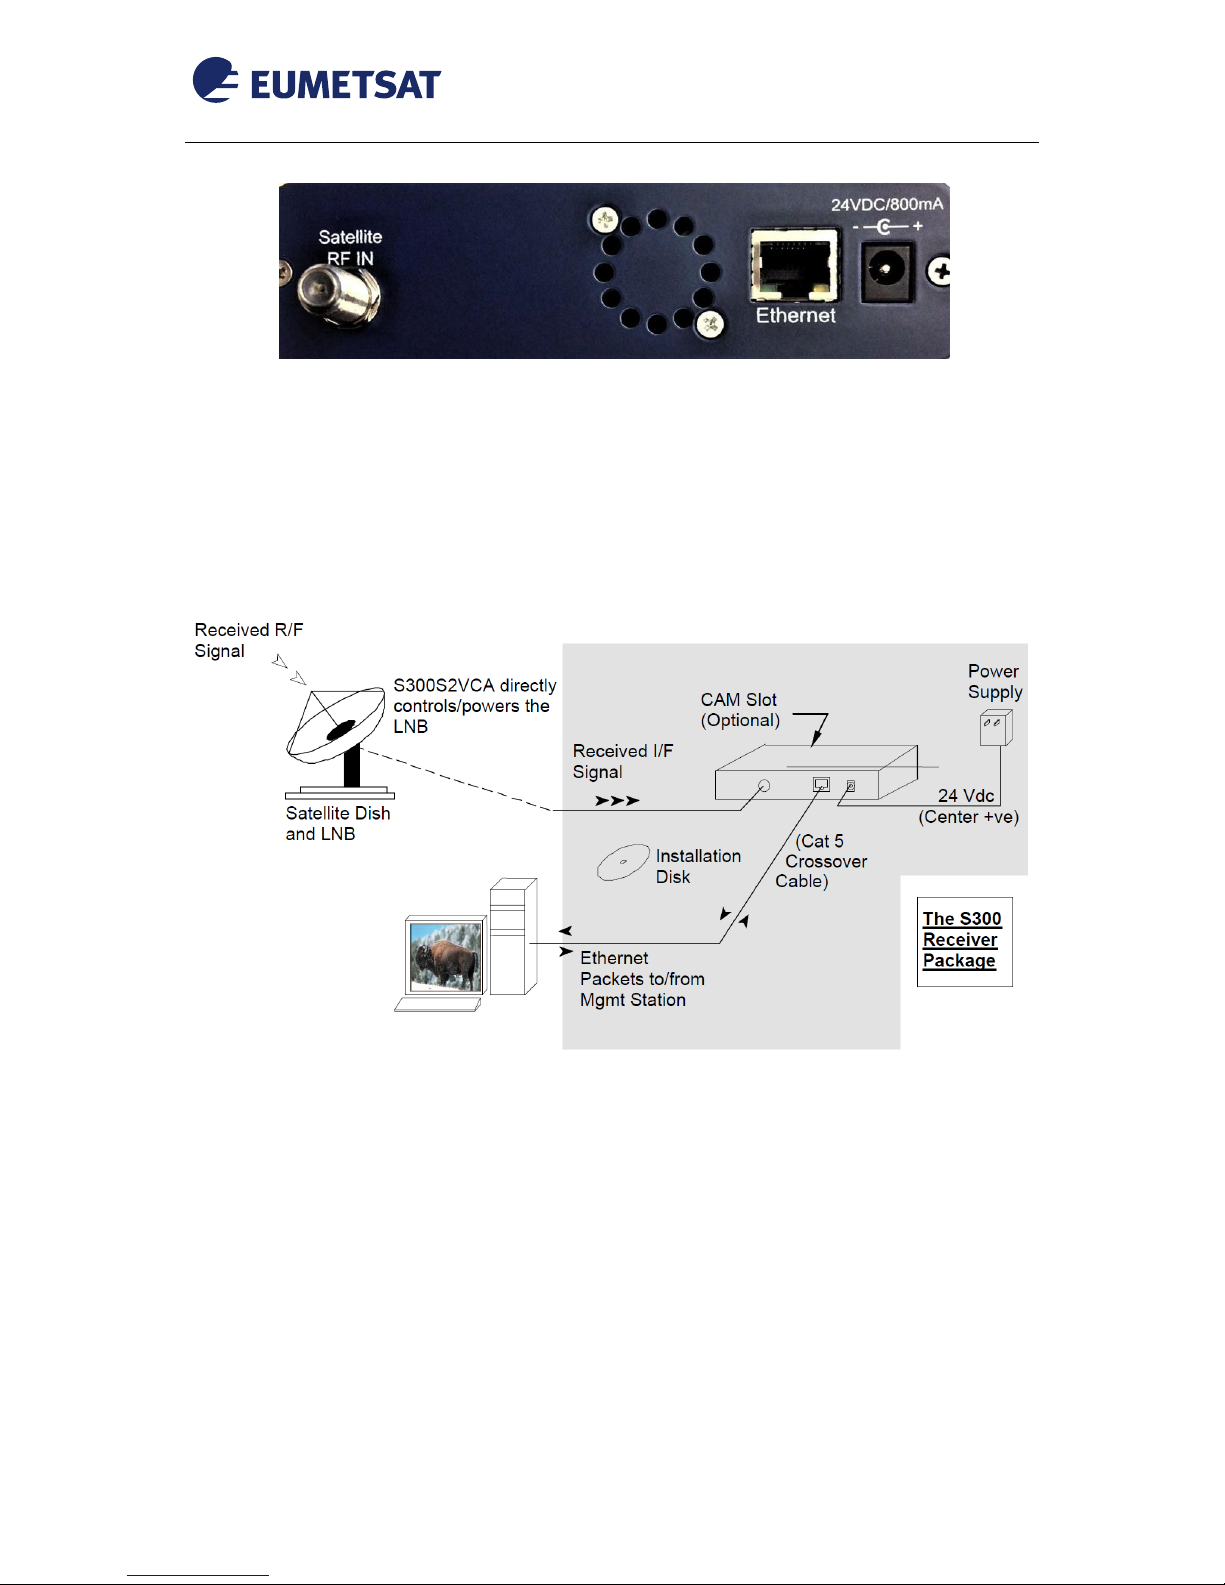
3.1 Cables Connections to the receiver
Connect the Novra power adapter plug into the socket labelled 24VDC/800mA;
Connect the 100 Mbps network cable from the EUMETCast reception station network interface to the
receiver port labelled “Ethernet”;
Connect the antenna cable to the connector labelled “Satellite RF IN”.
Page 6
EUM/OPS/MAN/13/736617
v2B e-signed, 15 February 2016
Novra S300 DVB Receiver EUMETCast Setup Guide
Page 6 of 24
Novra S300 back Panel
3.2 Status Indicators
The status indicators must be as follow:
Power: Red LED
Lock: Green LED
Data: Blue LED (will blink every ½ second if traffic is flowing)
Ethernet Link (green) and Transmit (yellow)
Figure 1 – S300 Typical Installation
Page 7
EUM/OPS/MAN/13/736617
v2B e-signed, 15 February 2016
Novra S300 DVB Receiver EUMETCast Setup Guide
Page 7 of 24
4 CONFIGURATION
4.1 Novra’s Console Software and Access to the Receiver
Console software is provided by Novra and can be used to configure the S300. The S300 Console software
(Novra Mgmt Vx.y) is supplied as a single executable. Therefore, it is easy to install on different systems. All
you need to do is copy the executable to your working directory.
The corresponding GUI can be downloaded here:
http://novra.com/support/
1- Connect the Novra power adapter plug into the socket labelled 24VDC/800mA;
2- Connect the network cable from the EUMETCast reception station network interface to the receiver port;
3- Launch the S300 Console software.
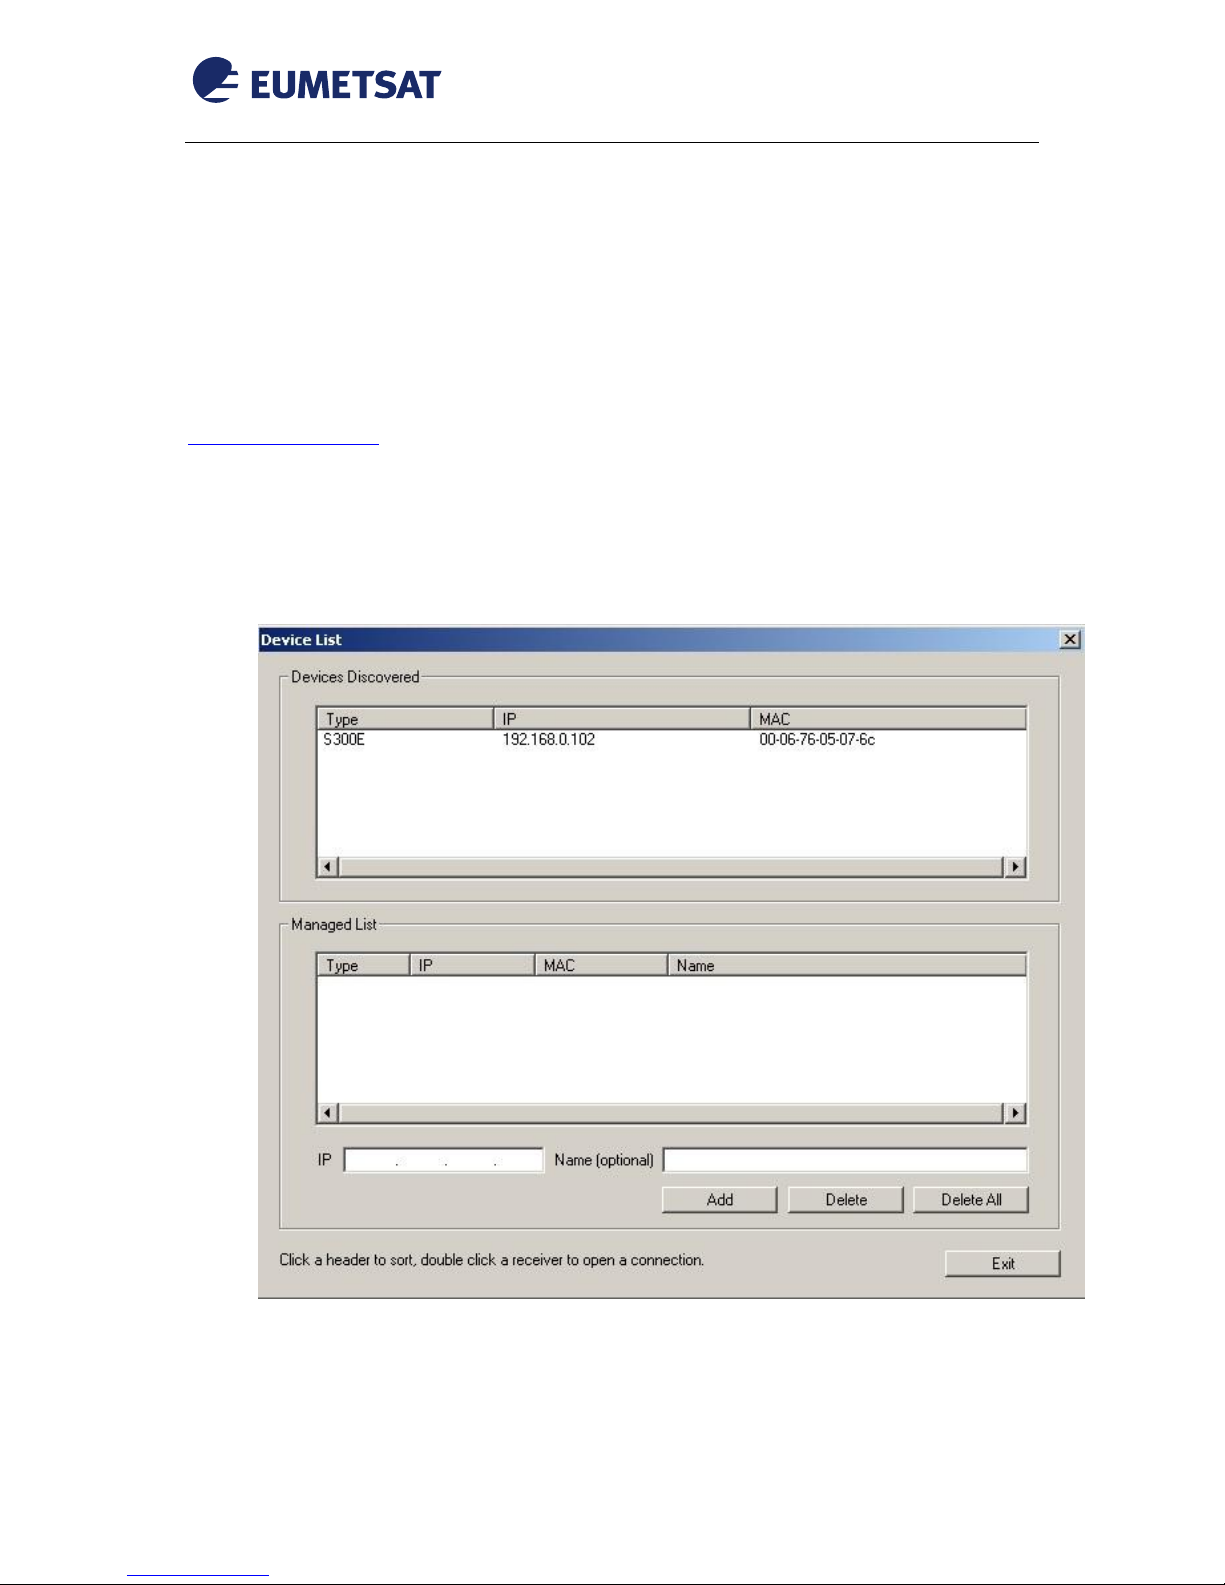
The software will attempt to auto-detect all the receivers currently connected to the LAN. After the auto
detection is complete, a screen showing all discovered devices will be displayed as shown below:
Figure 2 Console
4- You can now select the device you wish to configure by double clicking on the receiver model type in the
“Devices Discovered” listing.
Page 8
EUM/OPS/MAN/13/736617
v2B e-signed, 15 February 2016
Novra S300 DVB Receiver EUMETCast Setup Guide
Page 8 of 24
Notes:
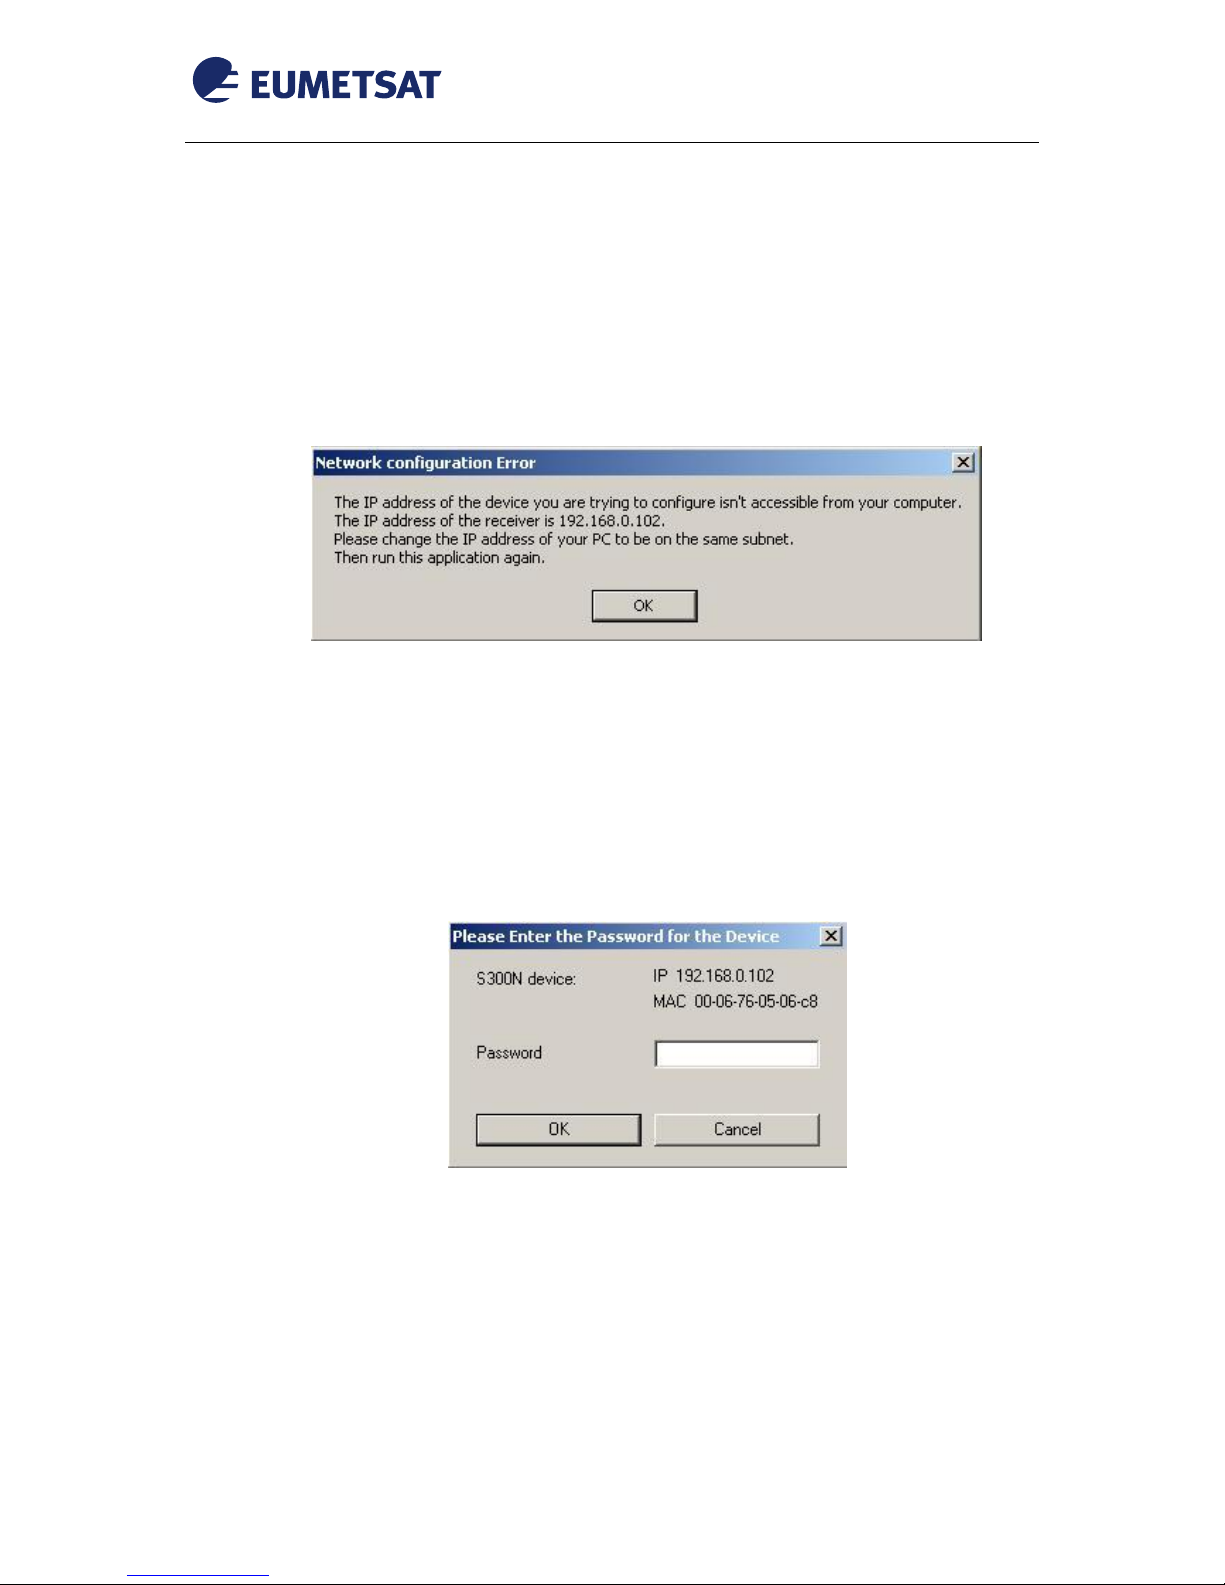
You must ensure that the network settings of the S300 make it accessible from the Windows
management PC. The IP address of the device and the IP address of the management station must
reside on the same subnet, or there must be a route that connects both of them through a router. If this
is NOT the case, you will be prompted with the Change IP Address Screen as shown below in Figure 3
– Change IP Address Screen. You will need to change the IP address of your management PC to be on
the same subnet as the receiver (in this case, change your PC IP address to: 192.168.0.xxx, where xxx
is not equal to 102).
You MUST be logged onto the system as Administrator, for the network settings function to work
properly
Figure 3 Warn, IP address
You can also use the Managed List section of the Device List Screen (reference Figure 2 above) to direct the
S300 Console to connect to a receiver that is available on your network, but not available on your local LAN. In
this case, the auto discovery will not be able to find your receiver (since it is not on your LAN), but you can
enter the routable IP address of your S300 in the IP box shown in the lower left hand corner of the Managed List
screen. Simply click the Add button to add this IP address to your Managed List and then double click on the IP
address to initiate the log in procedure with your receiver.
5- Once you have successfully connected to your receiver, you will be prompted to enter a password (see
Figure 4 below). The default password that you can use with your new receiver is: Novra-S2.
Figure 4 Password prompt
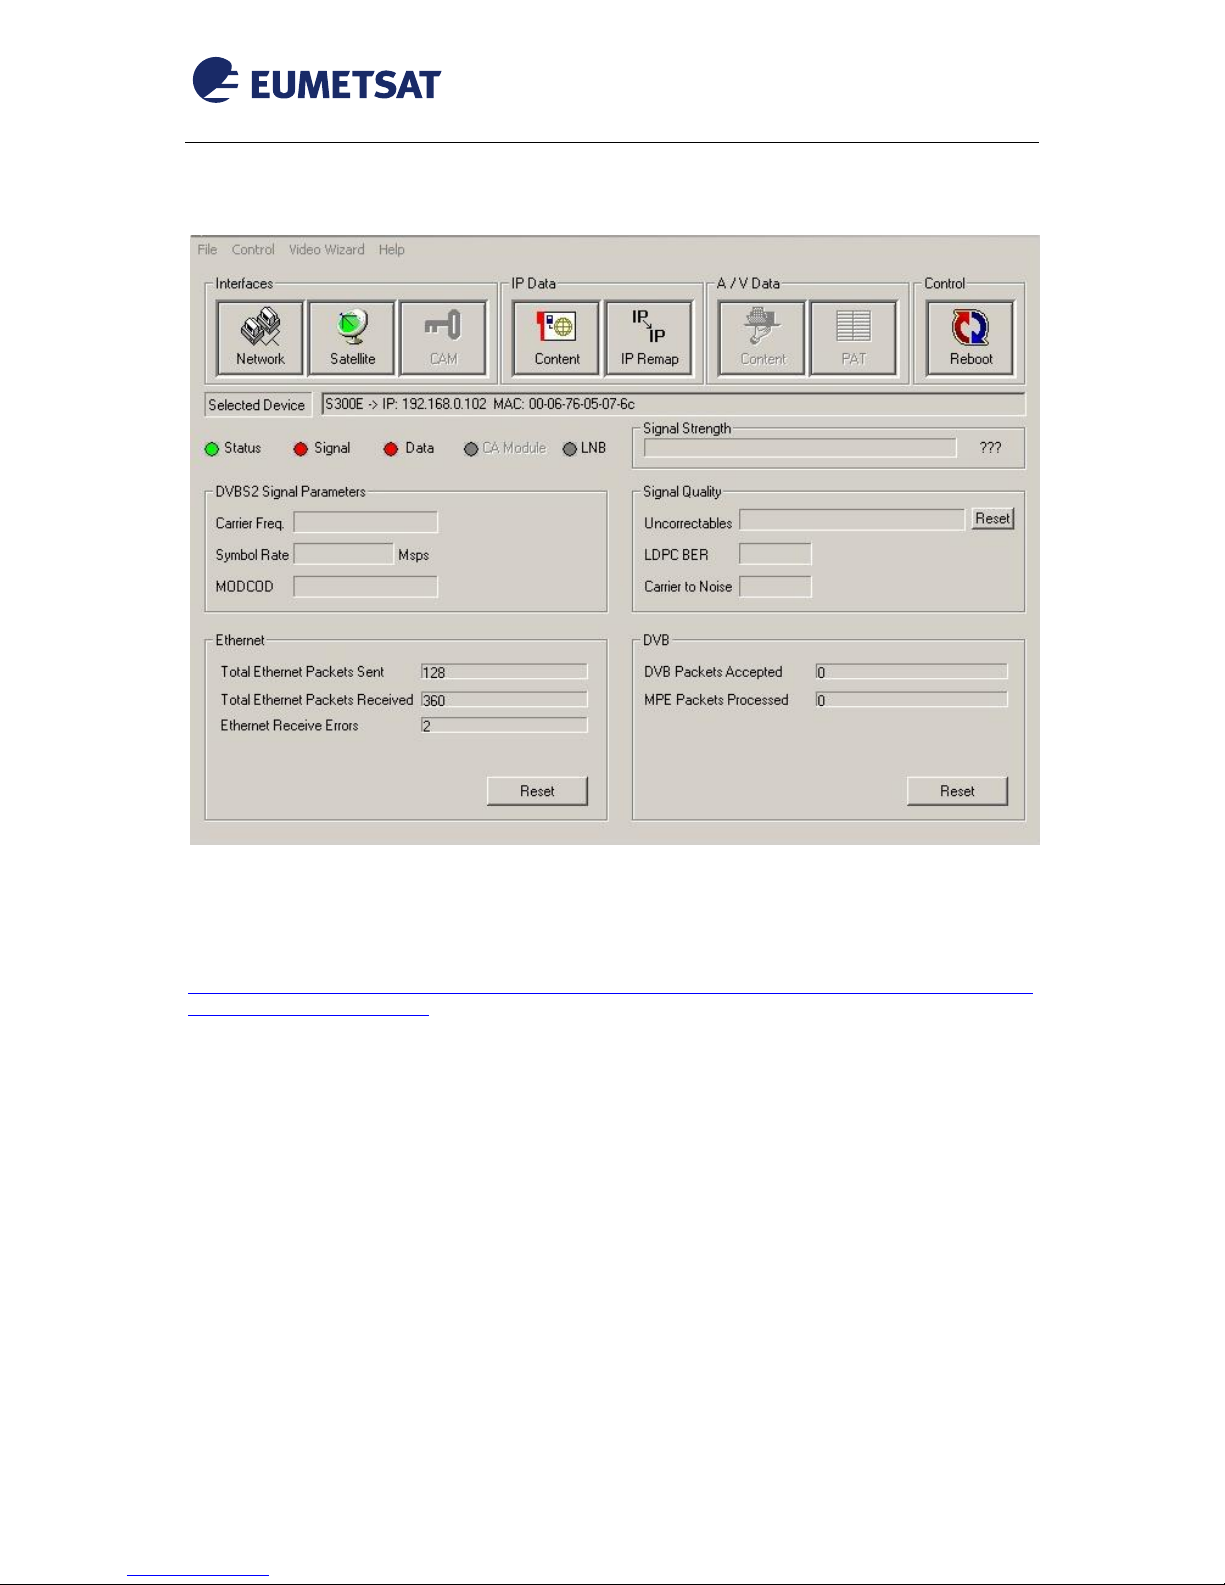
Now you are logged into the receiver and made it to the main screen!
Page 9
EUM/OPS/MAN/13/736617
v2B e-signed, 15 February 2016
Novra S300 DVB Receiver EUMETCast Setup Guide
Page 9 of 24
4.2 Receiver Configuration
Figure 5 Main Menu
6- According to your system and operating needs you can download on your local PC the appropriate
configuration file from
ftp://ftp.eumetsat.int/pub/OPS/out/user/EUMETCast_Support/EUMETCast_Licence_cd/Windows/DVB_device
s/NOVRA/Configuration_Files/
In the above ftp site there are 3 xml configuration files for NOVRA S300 :
EUMETCastDVB_NovraS300N_CFG_DVBS2.xml : NOVRA S300N for DVB-S2 reception
EUMETCastDVB_NovraS300E_CFG_DVBS2.xml : NOVRA S300E for DVB-S2 reception
EUMETCastDVB_NovraS300E_CFG_DVBS2_HVS_DSBL.xml : NOVRA S300E for DVB-S2
reception and HVS DISABLED
EUMETCastDVB_NovraS300E_CFG_DVBS_C_BAND_AFRICA.xml : NOVRA S300E for C-
Band Africa reception
Page 10
EUM/OPS/MAN/13/736617
v2B e-signed, 15 February 2016
Novra S300 DVB Receiver EUMETCast Setup Guide
Page 10 of 24
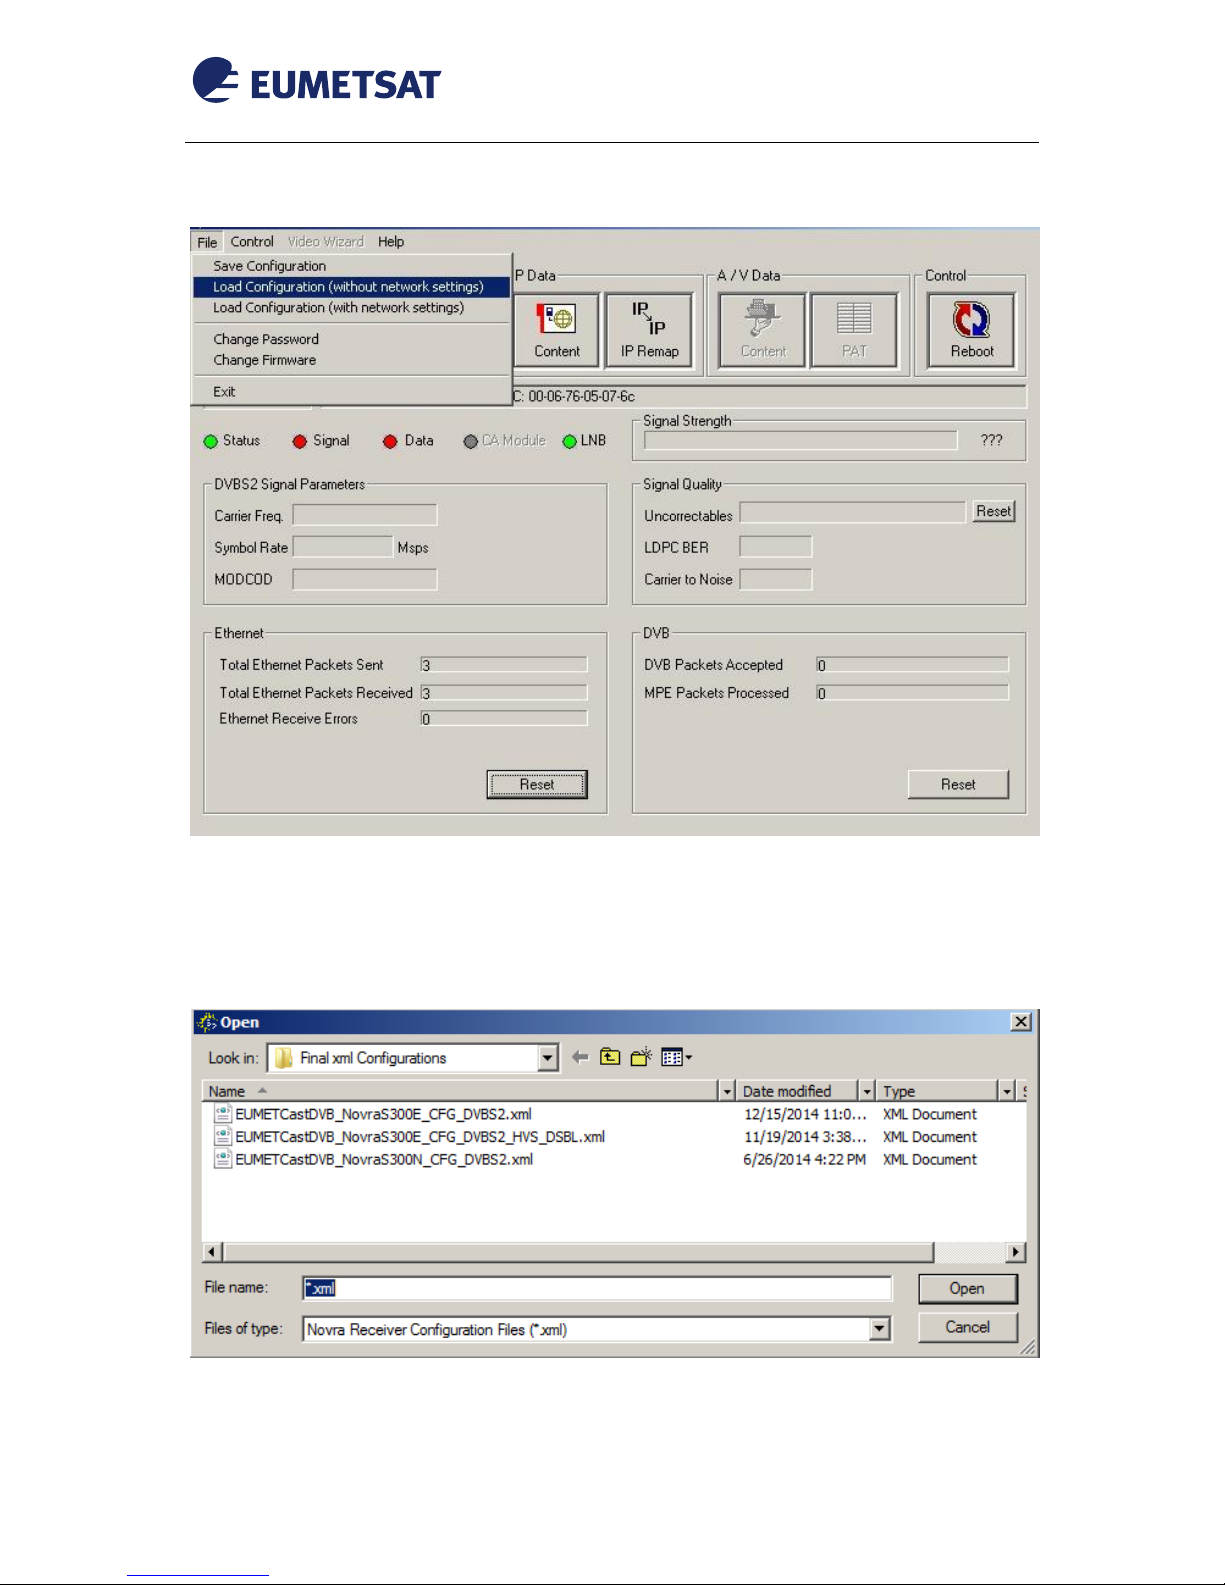
7- Click the file drop down menu then “Load Configuration (without network settings)”:
Figure 6 Load without network settings
Note: The xml configuration file doesn’t contain the network settings session and loading it “with network
settings” will fail.
8- Choose “EUMETCastDVB_NovraS300<E|N>*_CFG.xml” and load it:
Figure 7 Load Configuration
Page 11
EUM/OPS/MAN/13/736617
v2B e-signed, 15 February 2016
Novra S300 DVB Receiver EUMETCast Setup Guide
Page 11 of 24
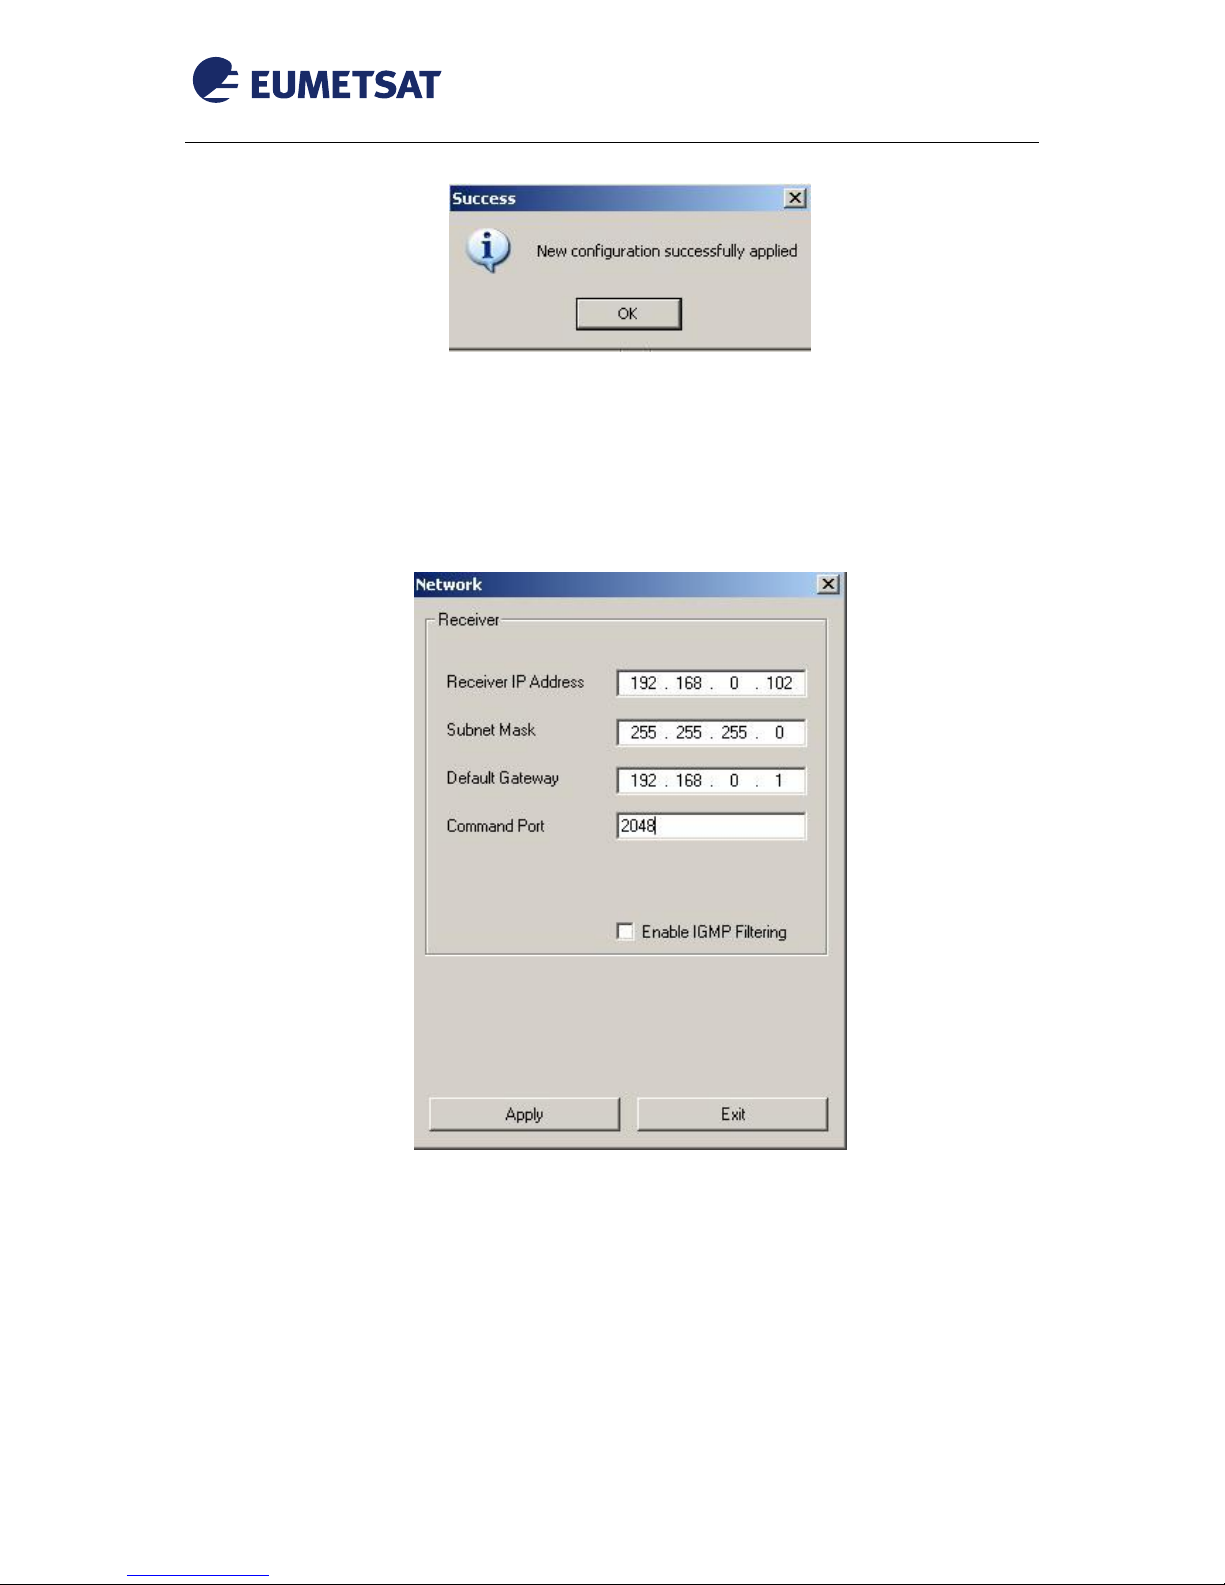
Figure 8 Load Configuration Success Message
4.3 Verify the applied Configuration
The applied configuration must be as follow:
1- From the main menu (see Figure 5) select “Network”:
Figure 9 Network Configuration
Note: the network configuration can be changed to better fit your network scenario; make also reference to the
Novra Users guide indicated above for more information.
Page 12
EUM/OPS/MAN/13/736617
v2B e-signed, 15 February 2016
Novra S300 DVB Receiver EUMETCast Setup Guide
Page 12 of 24
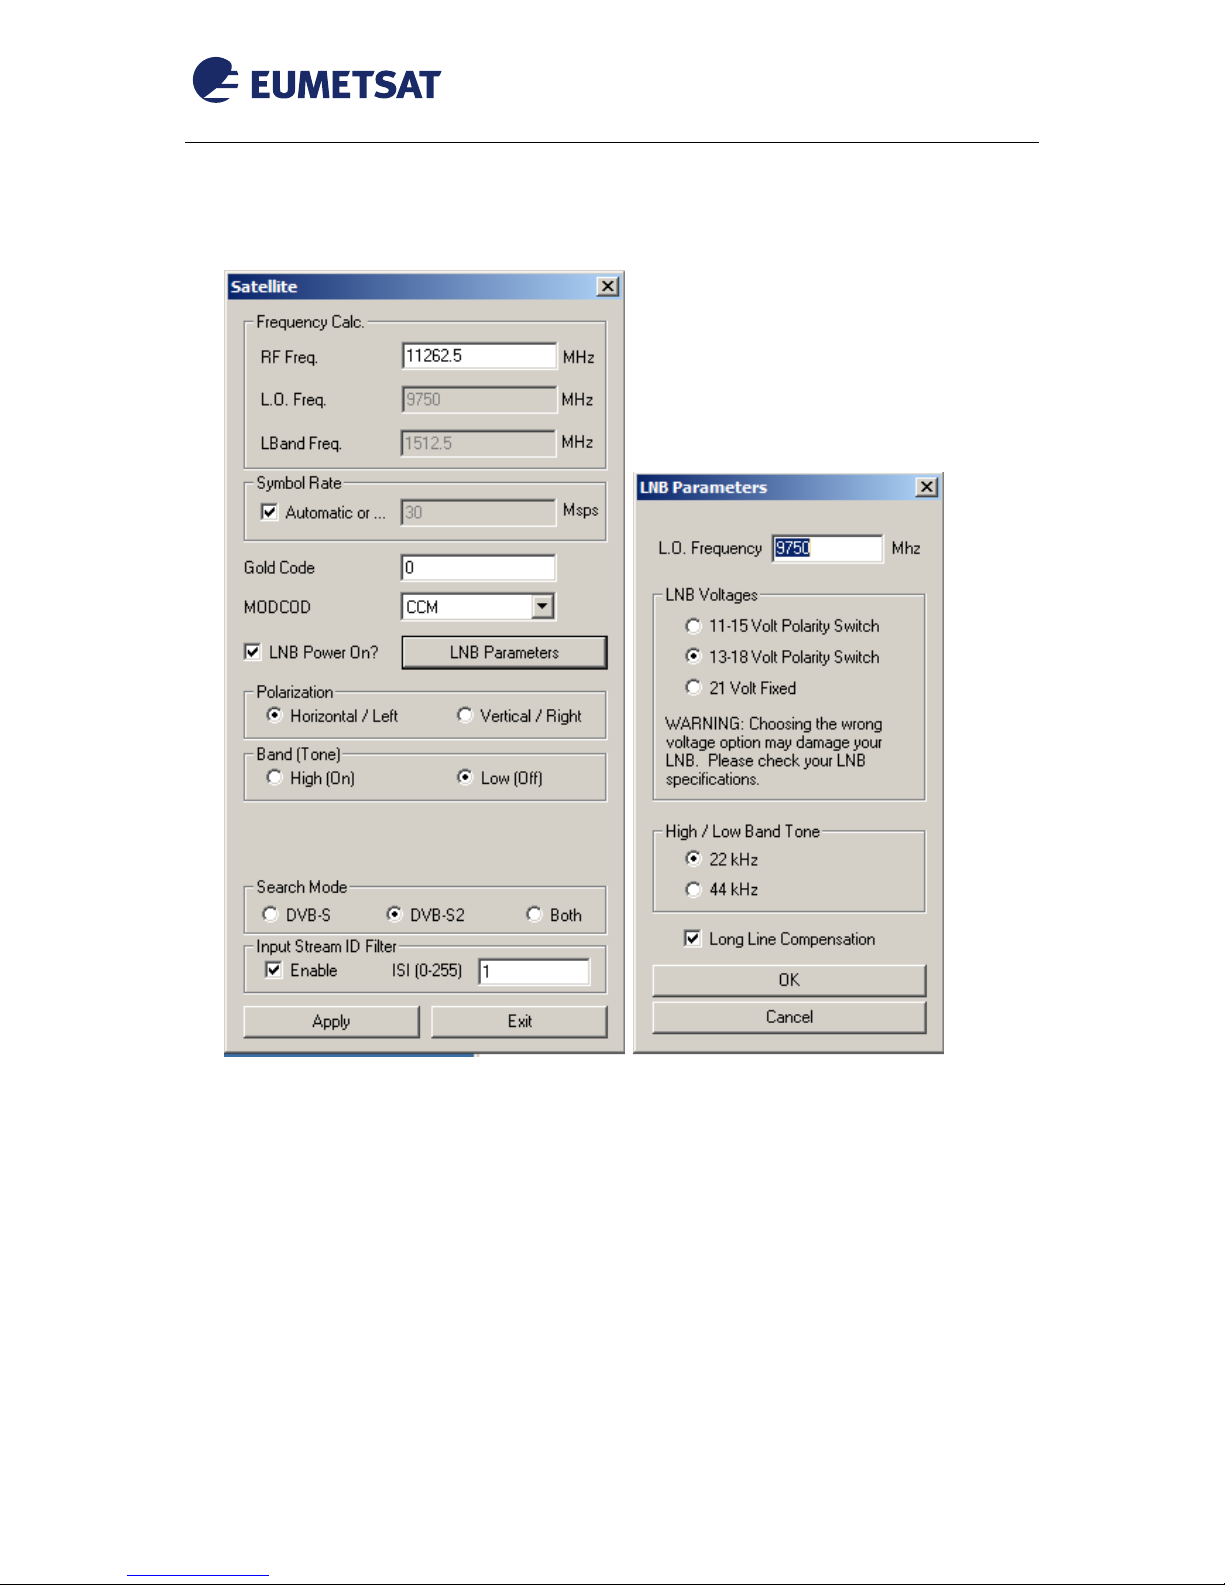
2- From the main menu select “Satellite” then From “Satellite” menu select “LNB parameters”:
Figure 10 Satellite Configuration and LNB parameters for DVB-S2 Reception (Both BS & HVS)
Page 13
EUM/OPS/MAN/13/736617
v2B e-signed, 15 February 2016
Novra S300 DVB Receiver EUMETCast Setup Guide
Page 13 of 24
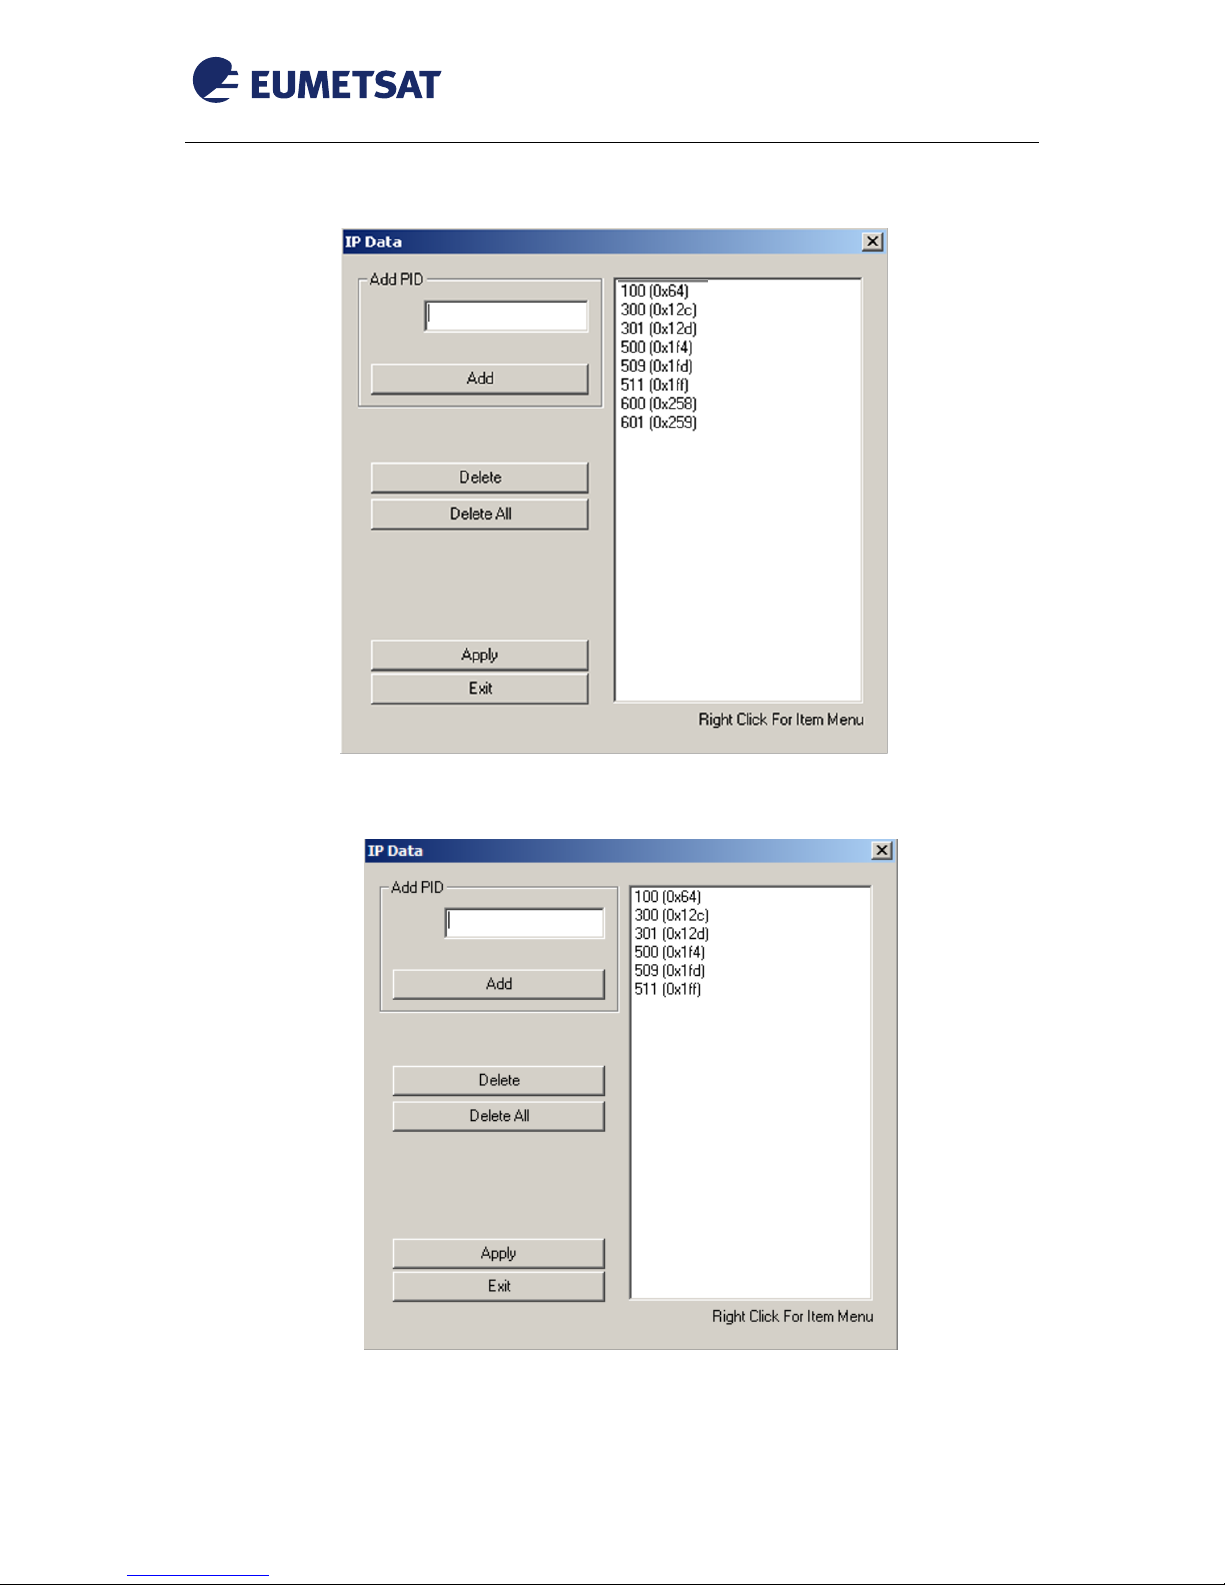
3- From the main menu select “Content”:
Figure 101 The Choosen PIDs for DVB-S2 reception (Both BS & HVS)
Figure 112 The Choosen PIDs for DVB-S2 reception (BS only)
Note: all the parameters shown above can be also manually changed using the above shown menus.
Page 14
EUM/OPS/MAN/13/736617
v2B e-signed, 15 February 2016
Novra S300 DVB Receiver EUMETCast Setup Guide
Page 14 of 24
4.4 Disable High Volume Service
The High Volume Service requires larger antenna sizes with ~4dB higher gain compared to the Basic Service. It
is recommended to disable the High Volume Service if it is not used.
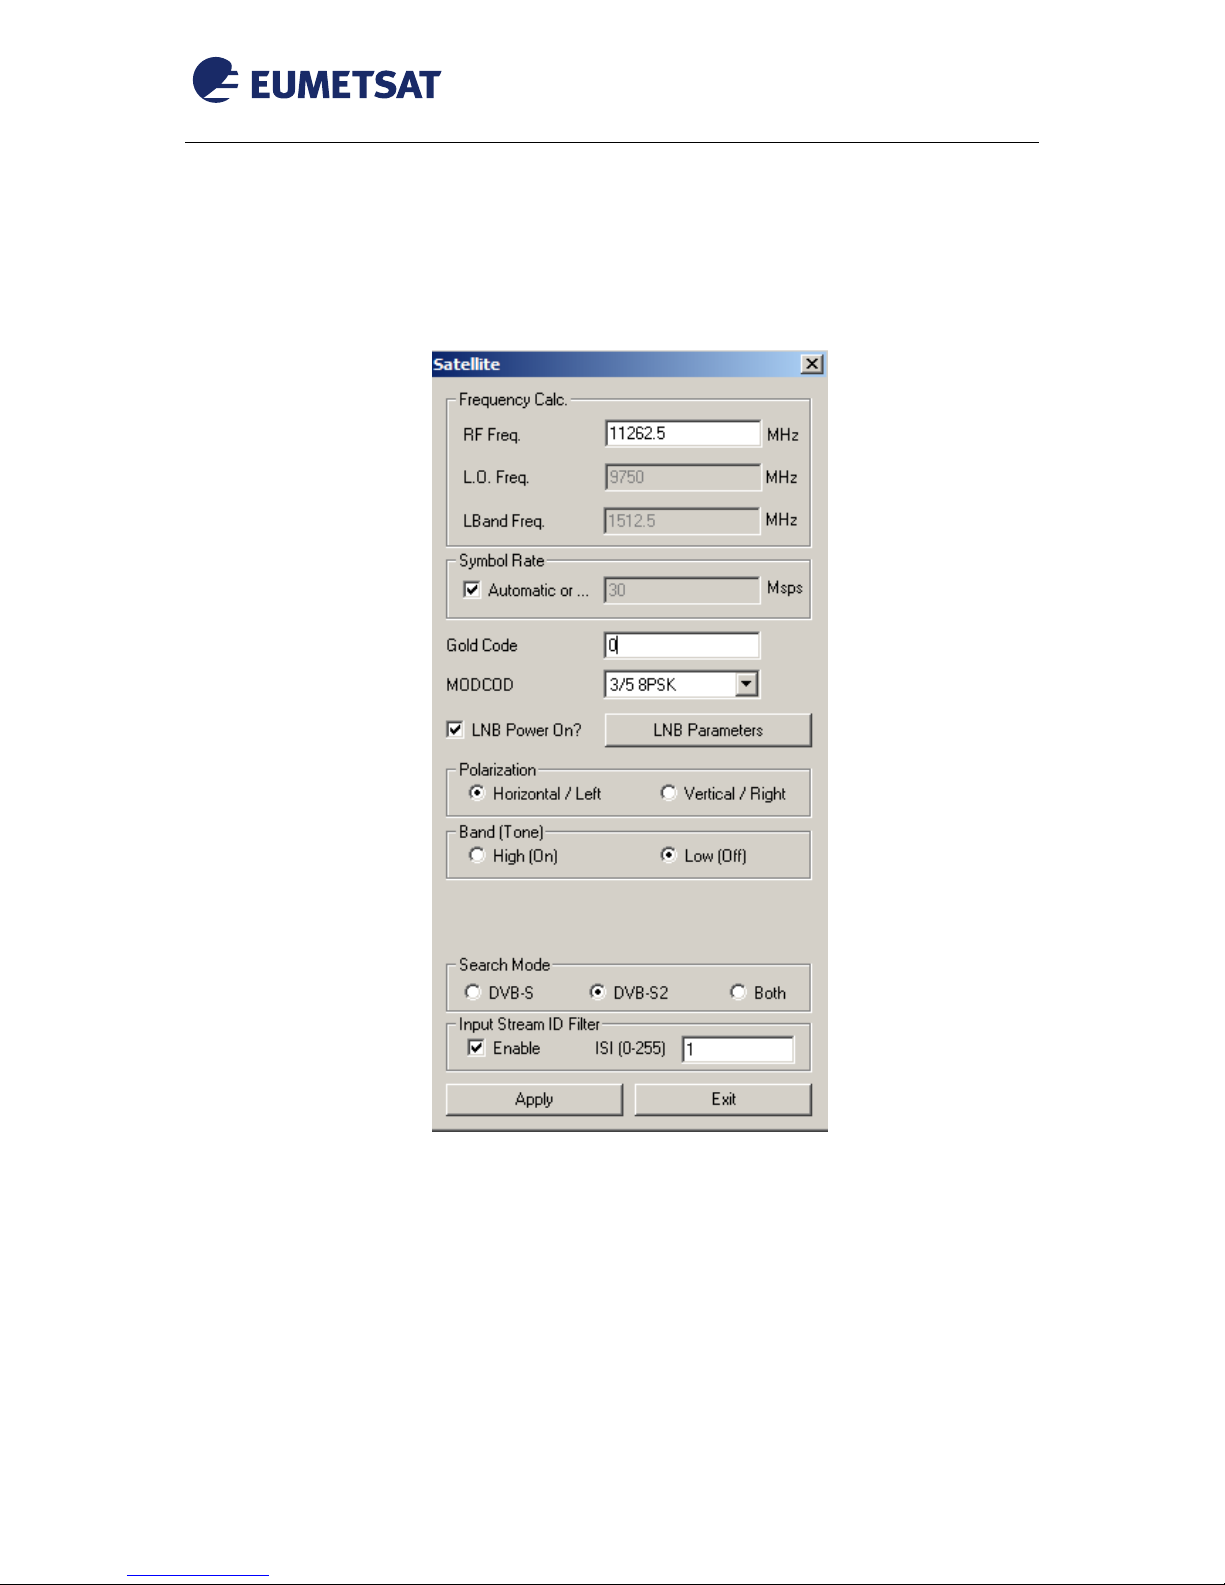
If the user wants to disable the HVS the Satellite Configuration should be as figure 15 :
Figure 13 Satellite Configuration for DVB-S2 Reception, Basic Service only
Page 15
EUM/OPS/MAN/13/736617
v2B e-signed, 15 February 2016
Novra S300 DVB Receiver EUMETCast Setup Guide
Page 15 of 24
4.5 Verify Signal and Connection
Now and after making sure that:
The antenna pointing has been performed correctly to EUTELSAT 10A for DVB-S2.( For DVB-S2
reception the antenna pointing and LNB quality is crucial);
The antenna cable is connected to the receiver;
The receiver is connected via the Ethernet port to the EUMETCast reception host;
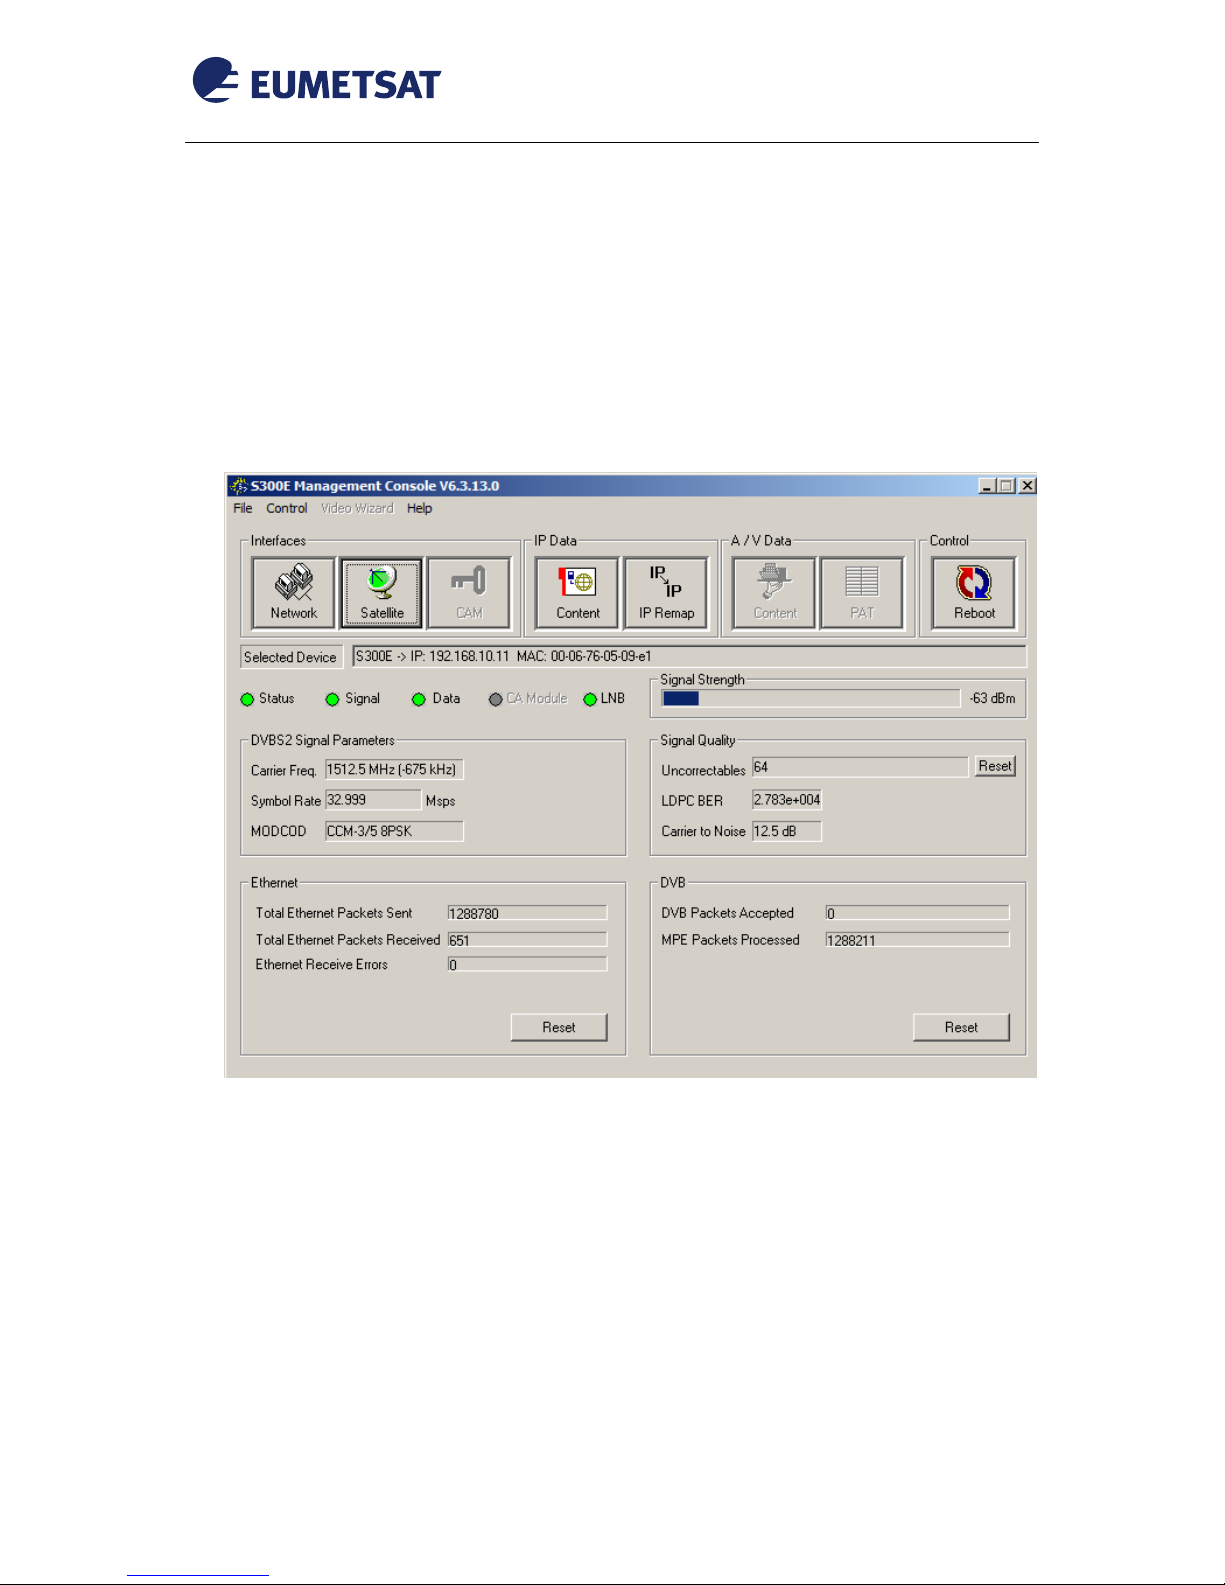
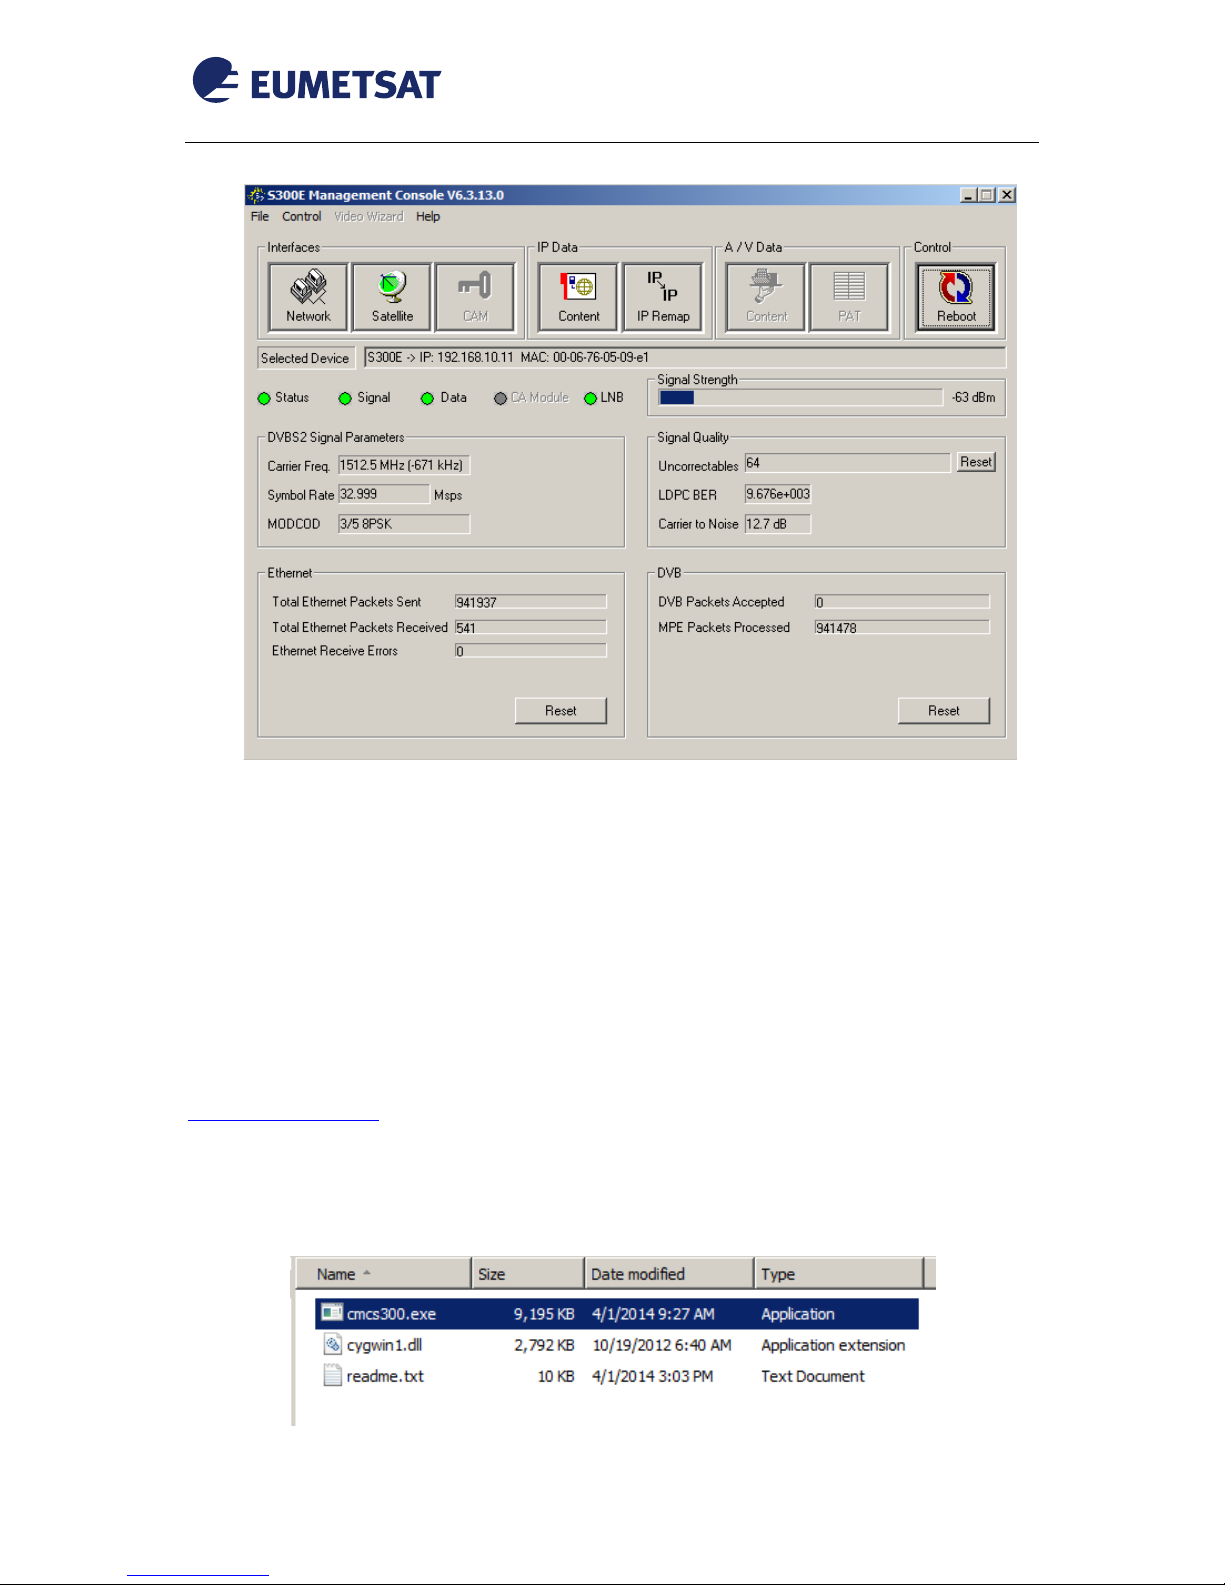
The status can be checked from the main menu, the status, signal, data and LNB indicators must be green:
Figure 124 Status for DVB-S2 reception (Both BS & HVS)
Page 16
EUM/OPS/MAN/13/736617
v2B e-signed, 15 February 2016
Novra S300 DVB Receiver EUMETCast Setup Guide
Page 16 of 24
Figure 135 Status for DVB-S2 reception (BS only)
4.6 Command Line Tool
Command Line Tool is provided by Novra and can be used to monitor the S300. The S300 Command Line Tool
is supplied as a single executable. Therefore, it is easy to install on different systems. All you need to do is
extract the zip file and copy the executable with the cygwin1.dll to your working directory. There is also a
LINUX Version file.
The corresponding files can be downloaded here:
http://novra.com/support/
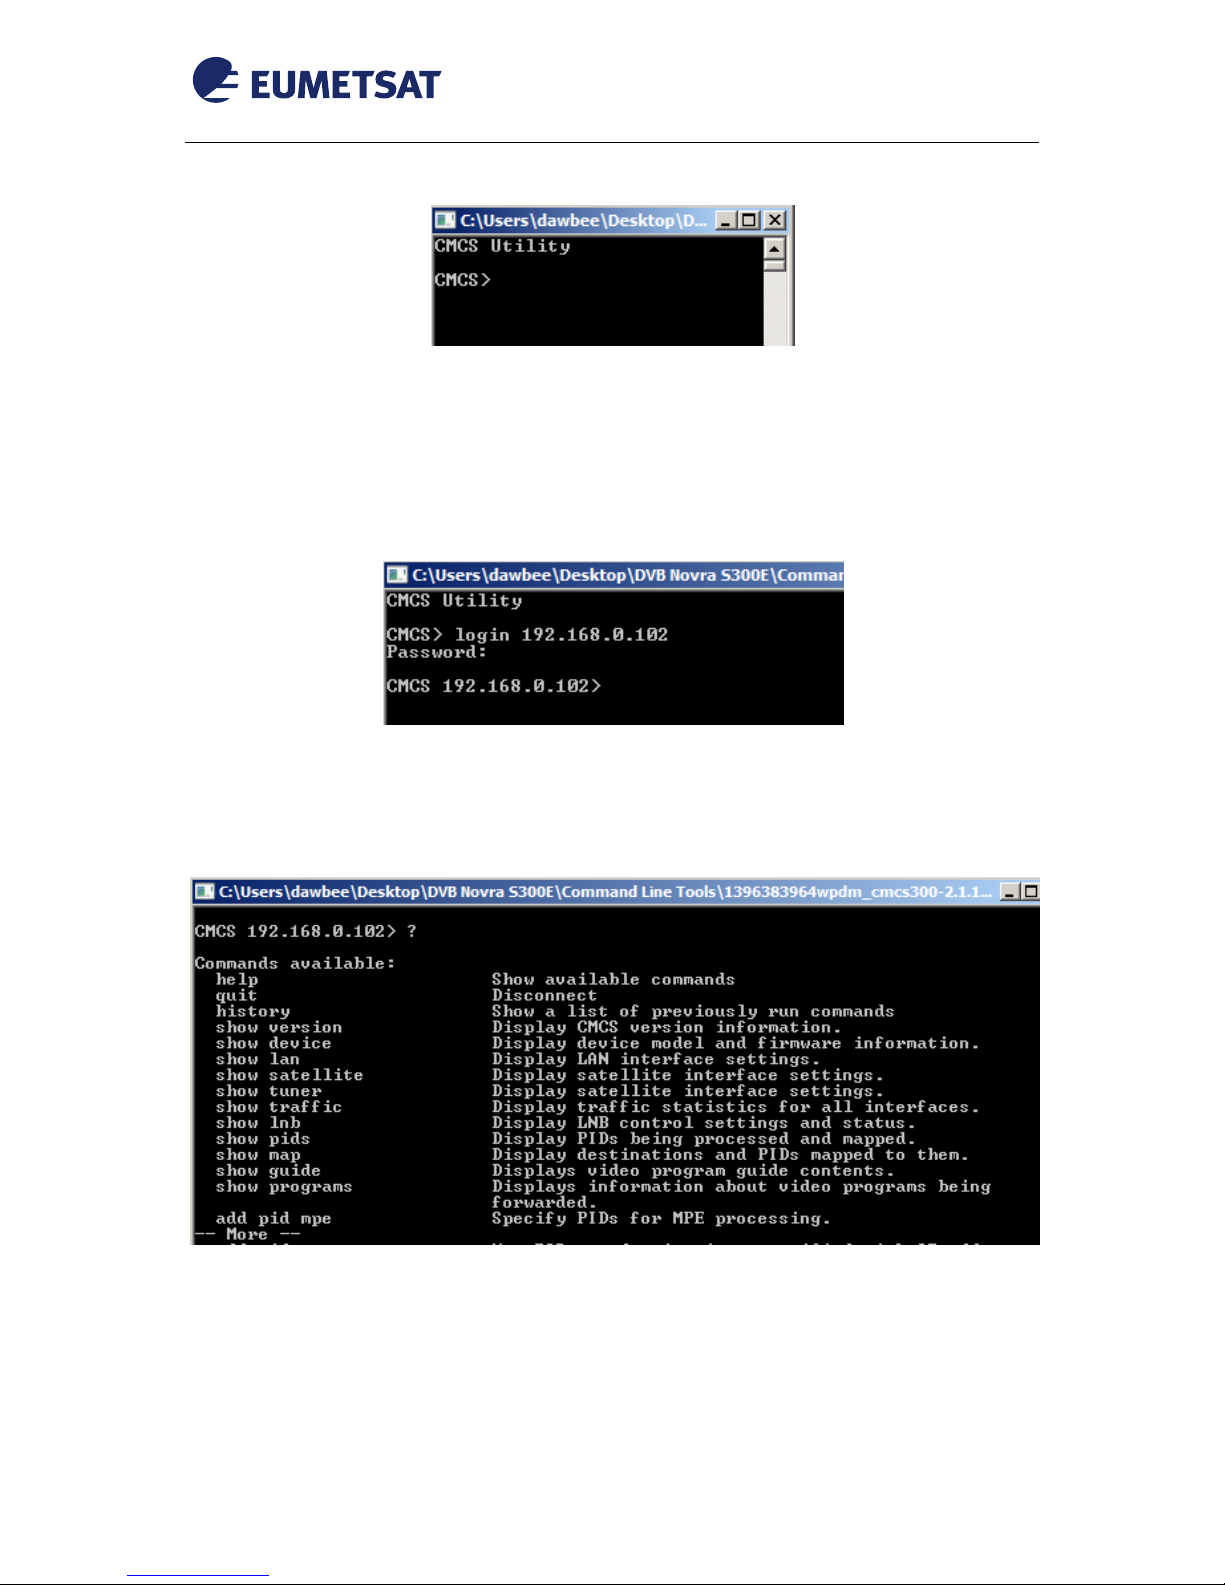
In this guide we are using cmcs300.exe (windows version).
Double click the cmcs300.exe file
Figure 146 Running Command Line Tool
Page 17
EUM/OPS/MAN/13/736617
v2B e-signed, 15 February 2016
Novra S300 DVB Receiver EUMETCast Setup Guide
Page 17 of 24
Figure 17 Command Line Tool Console
To monitor the system you have first to login to the device using the following command:
CMCS> login 192.168.0.102 (this is the NOVRA S300 IP)
Password: (the default is Novra-S2)
Figure 18 Command Line Tool Login
You can see all the available commands by typing
CMCS> ?
Figure 19 Command Line Tool Commands
Page 18
EUM/OPS/MAN/13/736617
v2B e-signed, 15 February 2016
Novra S300 DVB Receiver EUMETCast Setup Guide
Page 18 of 24
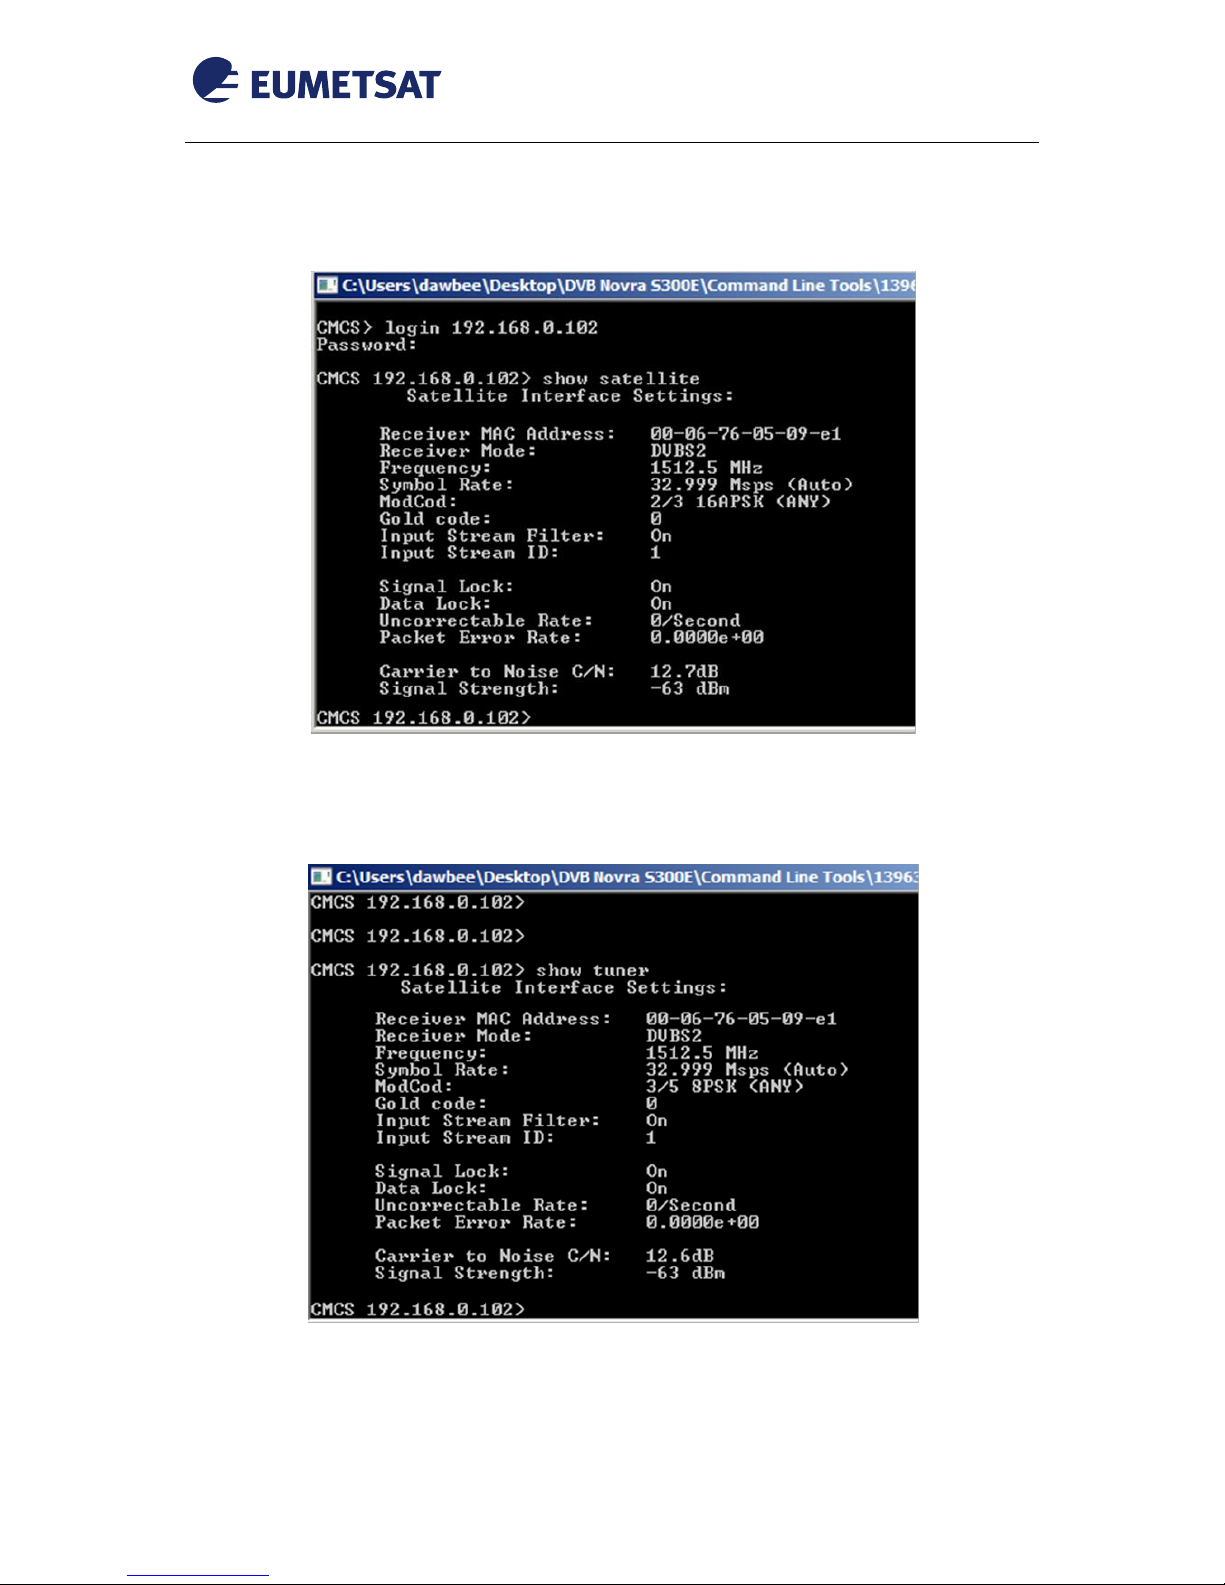
Some useful Commands
a. CMCS 192.168.0.102> show satellite
Figure 20 Command Line Tool “show satellite” Command
b. CMCS 192.168.0.102> show tuner
Figure 21 Command Line Tool “show tuner” Command
Page 19
EUM/OPS/MAN/13/736617
v2B e-signed, 15 February 2016
Novra S300 DVB Receiver EUMETCast Setup Guide
Page 19 of 24
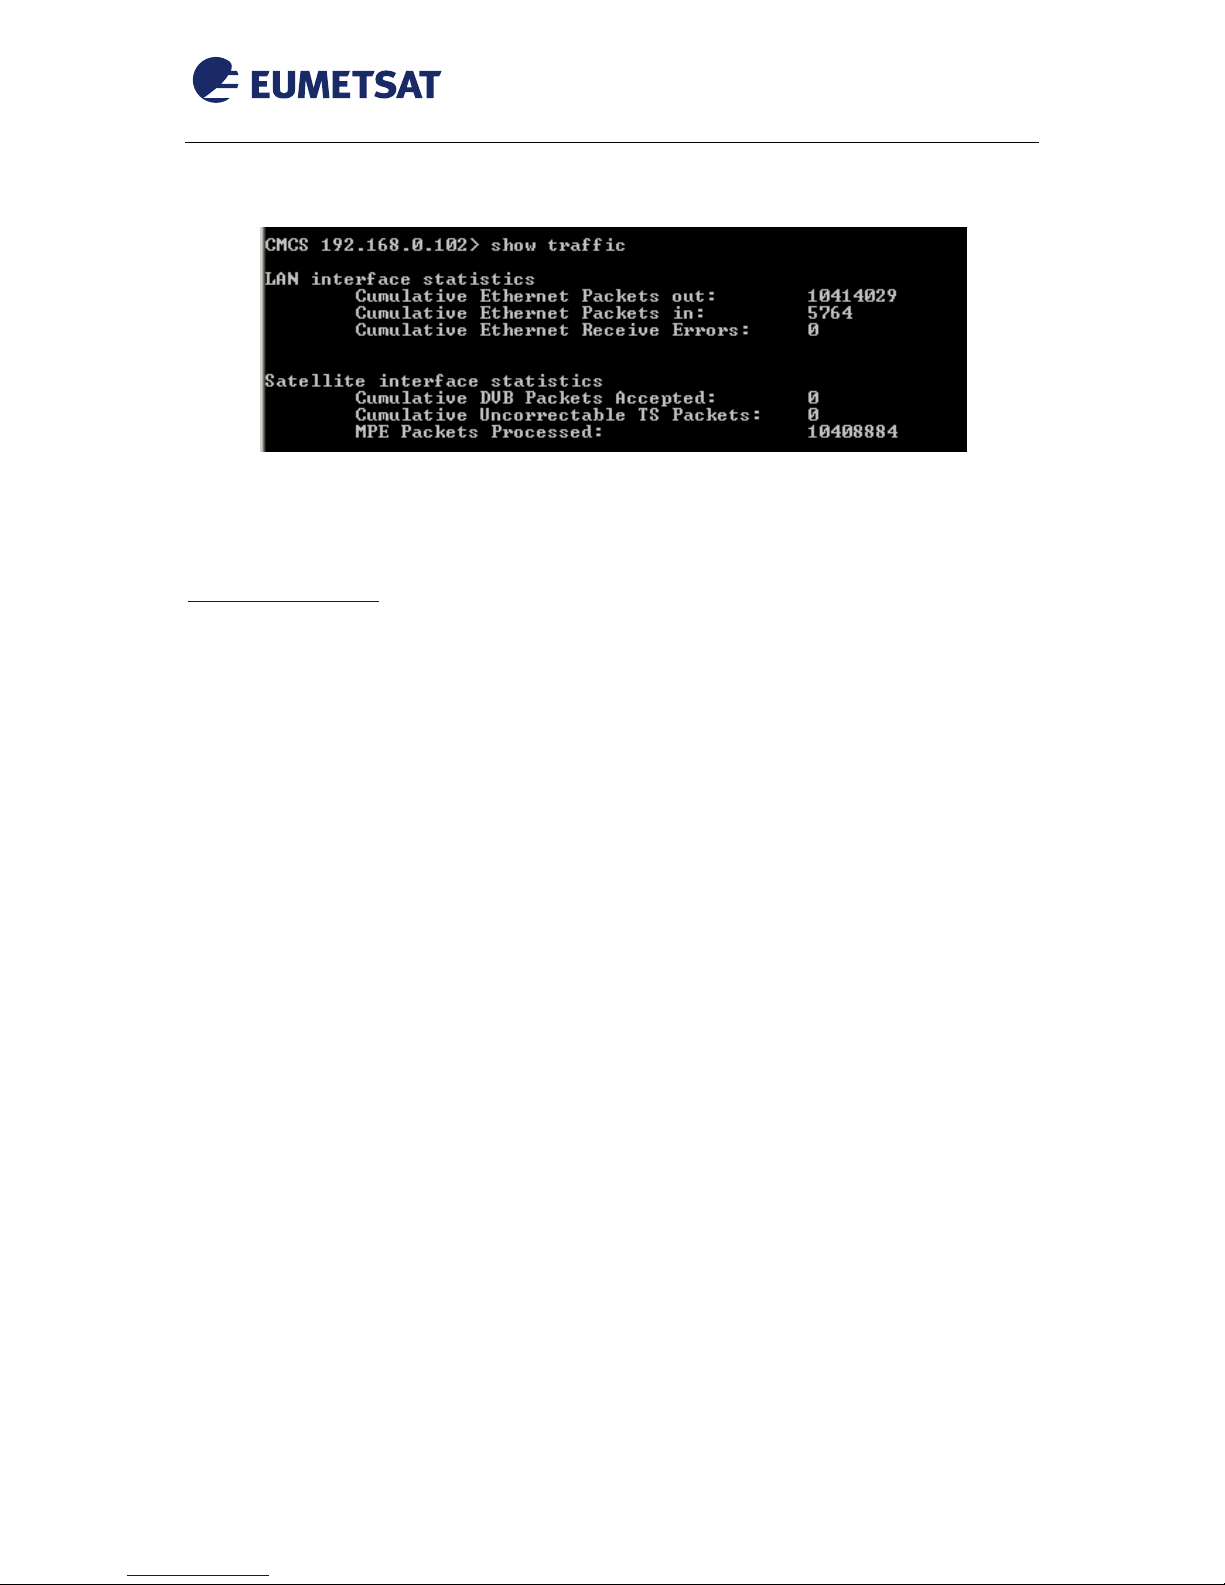
c. CMCS 192.168.0.102> show traffic
Figure 22 Command Line Tool “show traffic” Command
There are also a lot of commands that you can use to configure the NOVRA S300 device. More detailes can be
found in CMCS300 User Manual, which can be downloaded here:
http://novra.com/support/
Page 20

EUM/OPS/MAN/13/736617
v2B e-signed, 15 February 2016
Novra S300 DVB Receiver EUMETCast Setup Guide
Page 20 of 24
5 TELLICAST AND SYSTEM CONFIGURATION SETUP
5.1 Tellicast Setup
After the steps above have been completed, the Tellicast application must be given the fixed IP from which the
data can be taken:
Into the configuration file recv.ini the “interface_address” must be set to the reception host local IP Address:
interface_address=192.168.10.<nnn>
e.g.
interface_address=192.168.10.103
N-B: The interface_address parameter can be commented or deleted from recv.ini and the Tellicast application
will search the multicast data on all the interfaces available on the host; that is not recommended when the
reception host is used to receive another data flow, the Tellicast client application is not able to distinguish
between the flows a priori!
5.2 Firewall
Make sure the firewall allows traffic from the interface address in 5.1!
5.3 Windows Routing Table
If the Tellicast fails to work, being either stuck in the yellow T-icon state or, if the network cable is connected
after the system was working, the icon alternates between the "pink" and "red" states.
This may be related to the default multicast entries in the TCP/IP routing table.
To solve this problem, you need to tell Windows that the addresses handled by Tellicast must always be reached
through the interface_address which you set up in recv.ini file (192.168.10.nnn).
In the Start menu, All Programs, Accessories menu, you will find an item named Command Prompt.
Right-click on this item, and select Run as administrator. Enter the following command (replace IP_address with
the local IP address of 5.1) :
route delete 224.0.0.0 (Please note that this might disable services which use multicast as protocol e.g.
streaming services.
route -p ADD 224.0.0.0 mask 240.0.0.0 IP_address metric 1
e.g., if IP_adrress = 192.168.10.103
route delete 224.0.0.0
route -p ADD 224.0.0.0 mask 240.0.0.0 192.168.10.103 metric 1
Then restart the computer
Page 21

EUM/OPS/MAN/13/736617
v2B e-signed, 15 February 2016
Novra S300 DVB Receiver EUMETCast Setup Guide
Page 21 of 24
5.4 System Configuration Setup under Linux
In order to allow unrestricted multicast from network interfaces under Linux reception station, login as root
and update (if needed) the sysctl parameters as follow:
# vi /etc/sysctl.conf
net.ipv4.conf.default.rp_filter = 0
net.ipv4.conf.all.rp_filter = 0
net.ipv4.ip_forward = 1
net.core.rmem_max = 5500000
net.core.wmem_max = 5500000
Then run :
sysctl -p /etc/sysctl.conf
to refresh the new configuration.
Page 22
EUM/OPS/MAN/13/736617
v2B e-signed, 15 February 2016
Novra S300 DVB Receiver EUMETCast Setup Guide
Page 22 of 24
6 NETWORK SCENARIOS
In order to allow the Tellicast client application to receive the data packets from the Novra, the Ethernet port
must be connected to the reception host, this connection can be direct (by connecting the reception host to The
receiver using a LAN cable) or indirect (using a switch, router, joining a multicasting network...), this leads to
different network scenarios that can be adopted, the reception host network interface and Tellicast’s recv.ini
must be correctly configured, in the section below the most common network scenarios with the related needed
configurations are described.
Please be informed that we cannot describe all the possible scenarios and that some scenarios may be very
complex which require that you contact a networking expert to assist you to operate the receiver.
6.1 One EUMETCast reception terminal
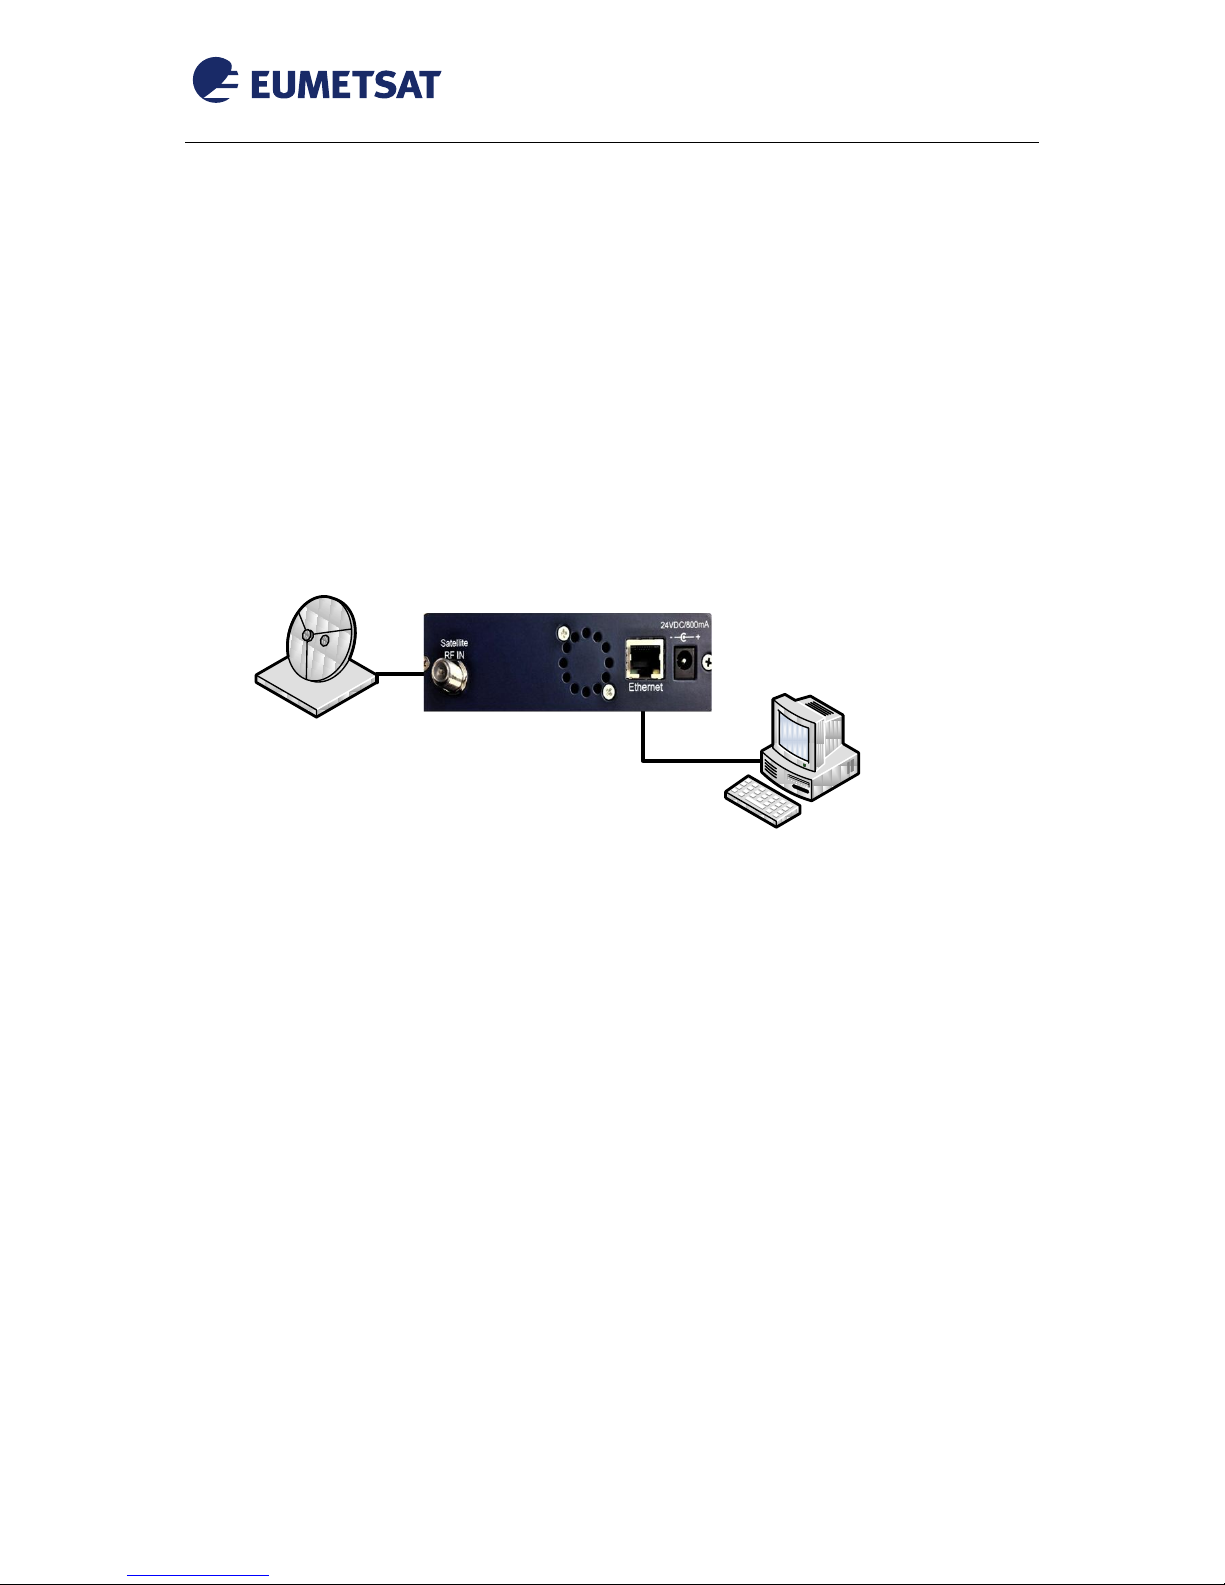
In this scenario one reception host is connected directly to the receiver:
NIC1:
IP: 192.168.0.xxx
Tellicast, recv.ini:
interface_address=192.168.0.xxx
NIC2:
...
Receiver IP:
192.168.0.yyy
EUMETCast
reception host
Figure 23 One reception host
Notes:
In case the host is used for other purposes and a connection to internet or public IPs is needed, another
network interface can be installed on the host and the first NIC remain dedicated to EUMETCast
packets reception;
If the host network interface is configured to automatically obtain the IP and the “interface_address”
into recv.ini is not specified (dropped or commented), the Tellicast will look for all the available
network interfaces on the host and catch the multicast data, but that is not recommended in case the
host is receiving another data stream since the Tellicast application is not able to determine the
EUMETCast flow a priori.
6.2 Multiple EUMETCast reception terminals
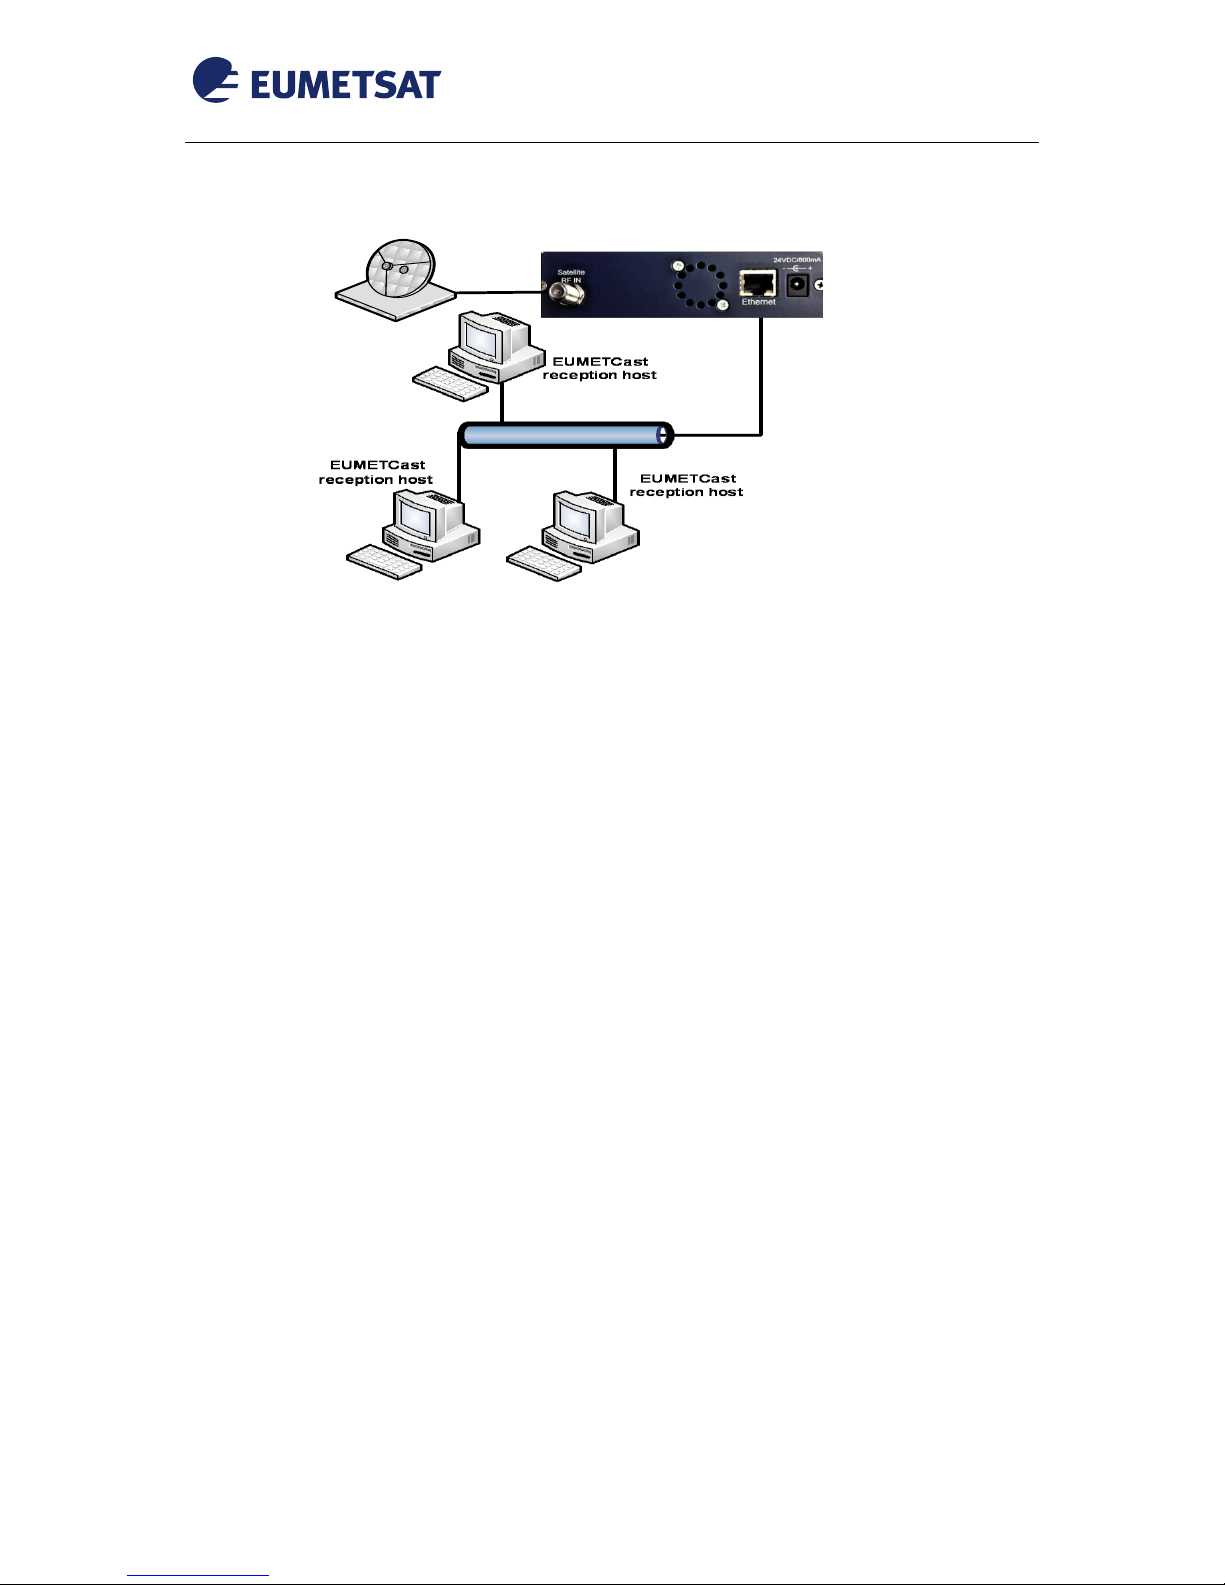
In this scenario more than one reception host are connected to the receiver;
All the EUMETCast reception hosts and the receiver reside on the same subnet.
Page 23
EUM/OPS/MAN/13/736617
v2B e-signed, 15 February 2016
Novra S300 DVB Receiver EUMETCast Setup Guide
Page 23 of 24
Figure 24 Multiple reception hosts
Note: the EUMETCast reception hosts may also belong to different LAN/Net reachable from the receiver
through the configured gateway (see
Figure 9).
Page 24

EUM/OPS/MAN/13/736617
v2B e-signed, 15 February 2016
Novra S300 DVB Receiver EUMETCast Setup Guide
Page 24 of 24
7 ACRONYMS
BS Basic Service
DVB-S, DVB-S2 Digital Video Broadcast, a broadcast standard
CCM Constant Coding and Modulation
CMCS Central Management and Control Software
EUMETCast EUMETSAT multicast based broadcast system
EUMETSAT European Meteorological Satellite Organisation
HVS High Volume Service
ISI Input Stream Identifier
LNB low-noise block downconverter
MODCOD Modulation & Coding
PID Packet IDentification
VCM Variable Coding and Modulation
 Loading...