

User
Manual

Table of Contents
License Agreement 4
Precautions and Notice 6
Checking The Novogo T Series package 7
Identifying The Novogo T Series parts 8
Preparing The Novogo T Series
Preliminary steps
Installing The Novogo T Series in the car
Installing in your automobile
Removing your Novogo T Series and docking kit
Installation Notes
Before You Begin
Calibration
Select Language
10
10
11
12
13
13
13
Main Menu 14
Navigation
Address
Point Of Interest
Select On Map
Favorites or Recent Destinations
15
16
17
18
19
9
9
Home 21
Route Planning 22
Map Screen 23
2

Table of Contents
Settings
User mode
Map information
Route information
Signpost information
Speed limit
Volume
Representation
Touchscreen calibration
Auto mode
Routing options
Itinerary
Time zone
Format
TMC
Home address
Product information
25
25
26
26
27
27
28
28
29
29
30
30
31
31
32
32
Novogo Map Disc
using the novogo map disc
Recover my Map
Switch Language
Backup / Restore
33
33
34
35
36
Safety Notices and Warnings 37
Other Safety Information 38
3

License Agreement
PLEASED READ THIS LICENSE AGREEMENT CAREFULLY BEFORE USING THE PRODUCT ACCOMPANIED WITH THIS DOCUMENT.
BY USING ALL OR ANY PORTION OF THE NOVOGO SOFTWARE AND/OR HARDWARE, YOU ACCEPT ALL THE TERMS OF THIS
AGREEMENT BETWEEN YOU, THE END USER, AND NOVOGO INC.
1) NOVOGO Inc. grants you (Licensee) a limited license (License) to use the NOVOGO Navigation System hardware (Hard-
ware) and software (Software) in the accompanied package acquired with this License. This License is non-exclusive and
non-transferable. Unless otherwise granted by NOVOGO Inc., Licensee may not rent, lease, or lend software to another
person.
2) The License is effective upon, and from the date of, the agreement by Licensee to the terms herein and execution of this
License until the formal release of the licensed product at any place, unless terminated by NOVOGO Inc.
3) Hardware and Software include, but not limited to, NOVOGO GPS Navigator, SD memory card, suction-mount automobile
cradle, Cigarette lighter charger, (optional) remote controller, (optional) carrying case, Map CD/DVD, USB cable, and all
written or electric document from NOVOGO Inc. or its suppliers.
4) Licensee may install the Software on only one computer provided that it is combined with one navigation system. Licensee
may only make one copy of the Software for backup purposes. Downloading the map data and transferring to another
navigation system is explicitly prohibited.
5) The copyrights and other intellectual or proprietary rights to the Software and Hardware are owned by NOVOGO Inc. or
its suppliers. Licensee acknowledges that the Software is the property of NOVOGO Inc. and Licensee is not permitted to
analyze it by decompiling or disassembling (reverse engineering), or to modify it and make software based on the work.
If Licensee needs any information regarding Hardware/Software structure for Licensee’s own purpose, please contact
NOVOGO Inc. at support@novogo.com.
4

License Agreement
6) NOVOGO Inc. reserves the rights to terminate this License Agreement at any time for any reason. Upon termination of
this License Agreement, Licensee shall discontinue using Software and Hardware for any purpose, by any means and in
any form, in whole or in part, unless agreed otherwise by NOVOGO Inc. in written.
7) In addition to the criminal penalties and civil liabilities provided by the Taiwan Copyright Law, Licensee shall be liable for
any damages and losses caused to NOVOGO Inc. in accordance with this License Agreement if Licensee uses the Software
and/or Hardware in breach of any terms in this License.
8) The License is subject to Law of the Republic of China and Taiwan Taipei District Court is the only competent court for
disputes related to this License and the use of NOVOGO Hardware and/or Software.
5

Precautions and Notices
1) The Li-ion battery can not be used above 50'C / 120'F, please do not operate the navigator under high temperature
and use the specified cigarette lighter charger only.
2) When you get off the car, do not leave the Novogo Navigator on the dashboard that is subject to direct sunlight. The
overheating of the battery can cause malfunction and/or danger.
3) If the battery is running out of power or have not been used after a long period of time, it may need to be charged
for 3~5 minutes before you can turn it on.
4) Novogo provides one year warranty of the GPS Navigator and 6 months warranty of the battery. For any warranty
issues or technical supports, please contact with your dealer or visit our website www.novogo.com for more details.
5) GPS is operated by the United States government, which is solely responsible for the performance of GPS. Any change to
the GPS system can affect the accuracy of all GPS equipments.
6) GPS satellite signals cannot pass through solid materials (except glass). When you are inside a tunnel or building, GPS
signals will not be available.
7) A minimum of 3 GPS satellite signals is needed to determine current position. Signal reception can be affected by situa-
tions such as bad weather or dense overhead obstacles (e.g. trees and tall buildings).
8) Other wireless devices in the vehicle might interfere with the reception of satellite signals and cause the reception to be
unstable.
9) A docking kit is needed when using the device in a car. Be sure to place the device in an appropriate place, so as not to
obstruct the driver’s view, and avoid the deployment in front of airbags.
1
0) Use this product prudently. The product is intended to be used only as a navigation aid. It is not for
precise measurement of direction, distance, location or topography.
1
1) The calculated route is for reference only. It is the user’s responsibility to follow the traffic signs and local regulations
along the roads.
2) For your own safety, do not operate the Novogo Navigator while driving.
1
6
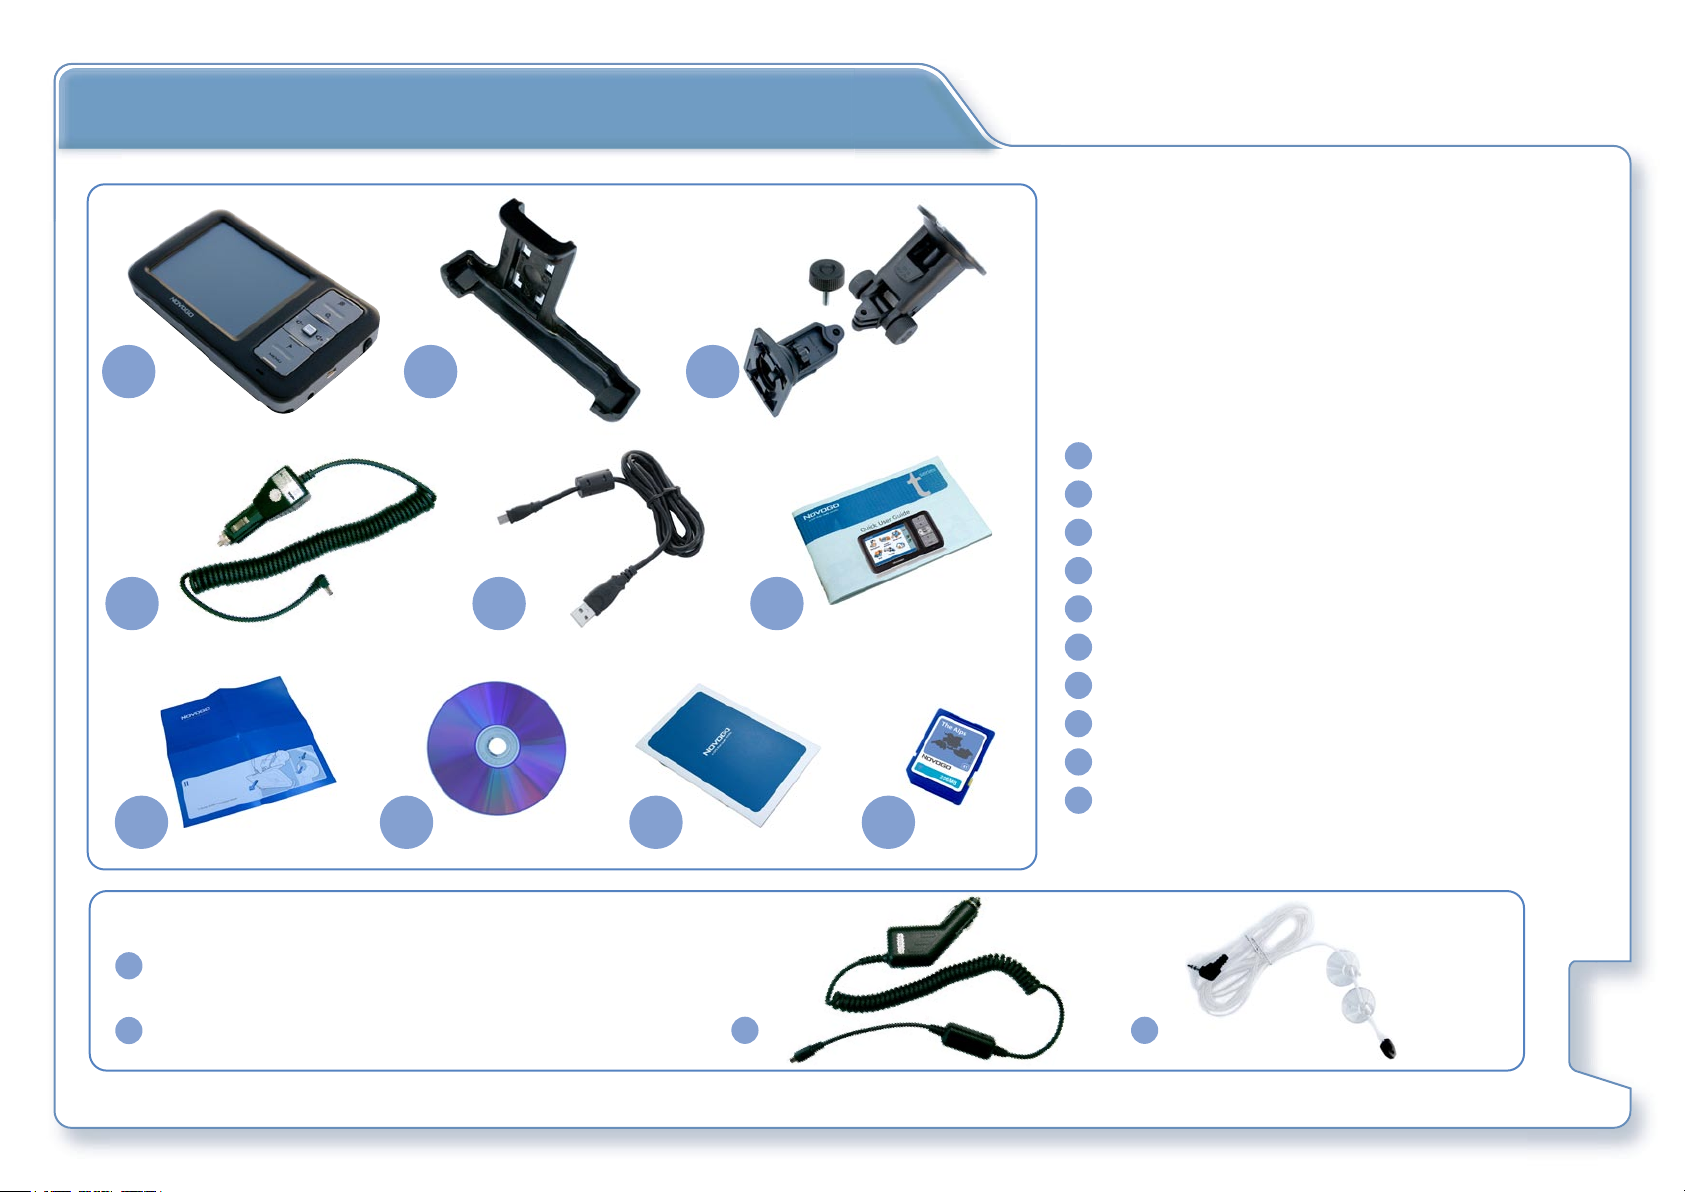
Checking The Novogo T Series Package
1 3
4
7 8
For T50 / T90
2
5
9
6
10
Novogo T series Navigator
1
Docking Station
2
Car Holder
3
Cigarette Lighter Charger
4
5
Mini USB Cable
6
Quick User Guide
7
Hardware Installation Guide
8
Novogo Map CD / DVD
9
Warranty Card
10
SD Memory Card with Map Data pre-loaded
a
Cigarette Lighter Charger with TMC receiving
module integrated
b
TMC antenna
a
b
7
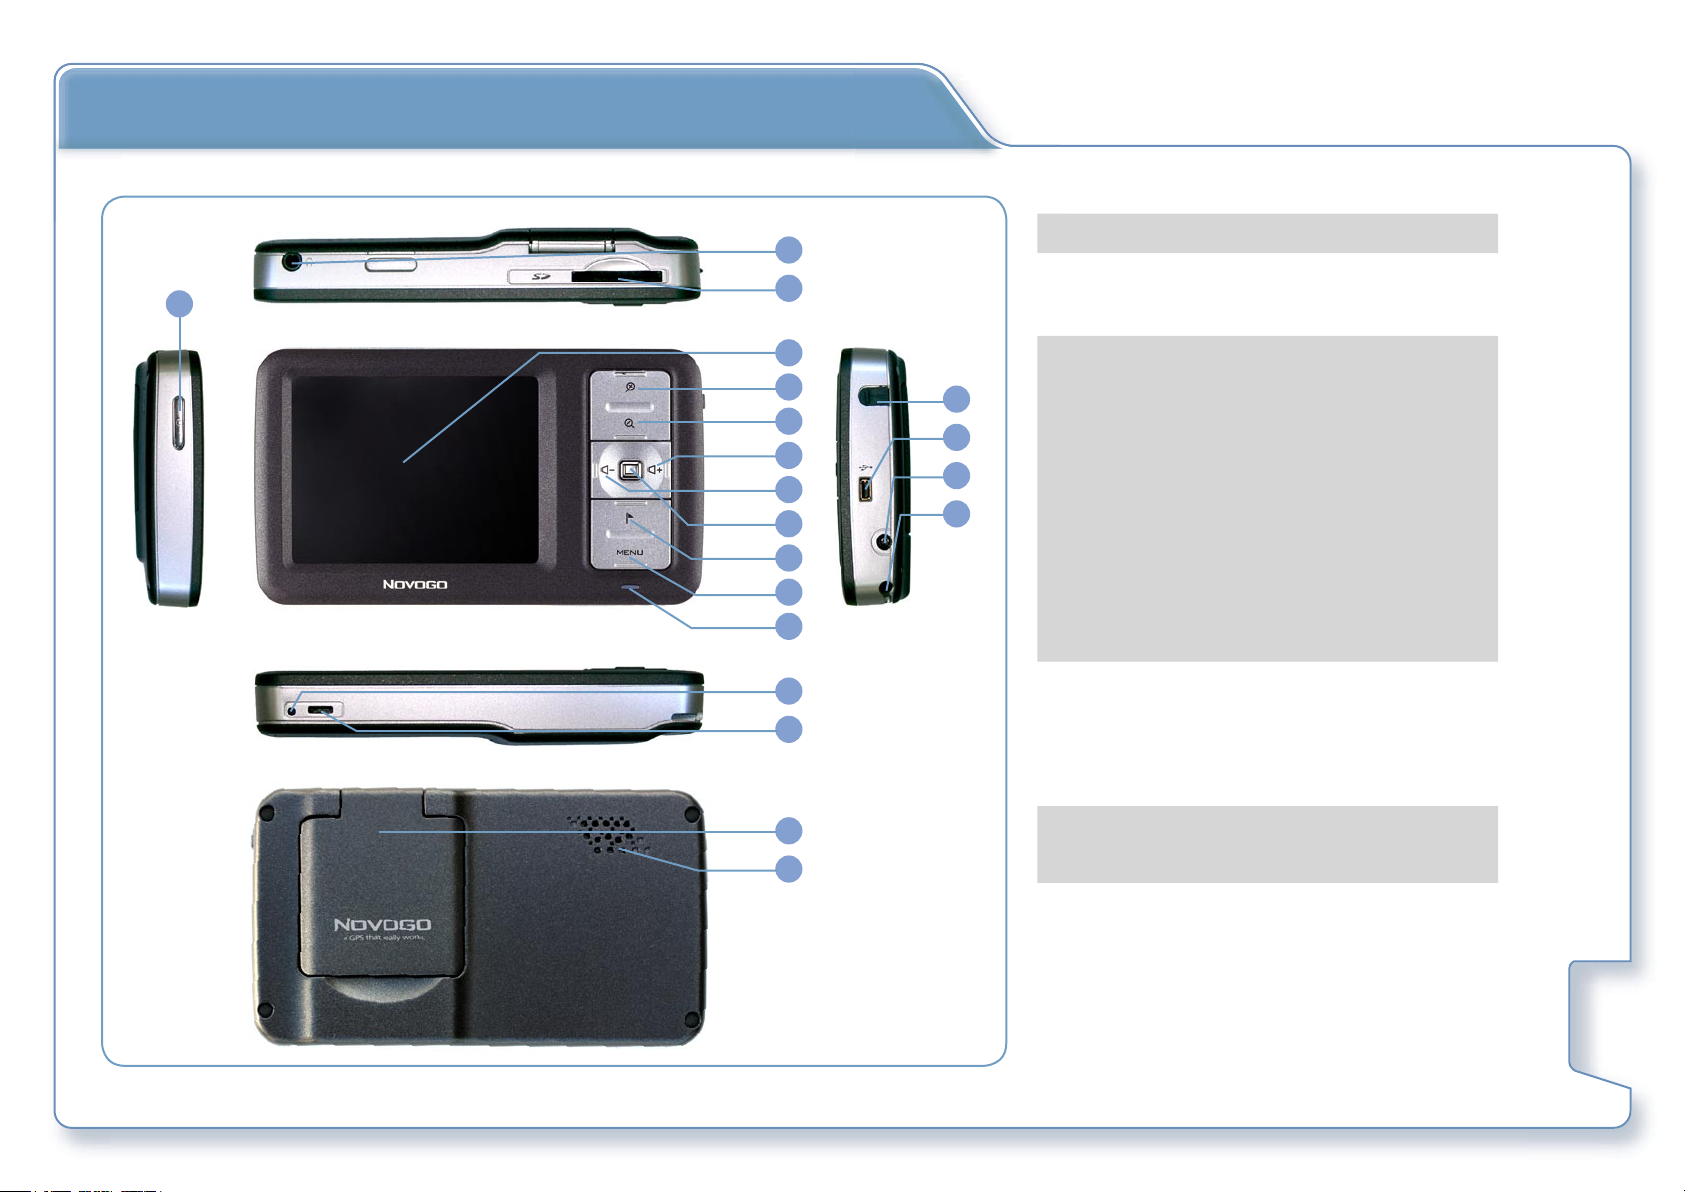
Identifying The Novogo T Series parts
2
1
3
4
1
Power switch
2
Audio jack
3
SD memory card slot
4
3.5 inch touch screen TFT LCD
5
6
7
8
9
10
11
12
13
14
15
16
17
18
19
20
5
Zoom in
6
Zoon out
7
Volume up
8
Volume down
9
Repeat voice instructions
10
GPS status / Save current position
11
Main menu
12
Signal light – Green Orange Red
13
Reset / Switch Language
(Please reset the device occasionally
for better performance.)
14
Hard on/off switch
15
Flip up GPS antenna
16
Speaker
17
External 2nd GPS antenna connecter
18
USB + TMC port
19
20
DC input
Stylus
8
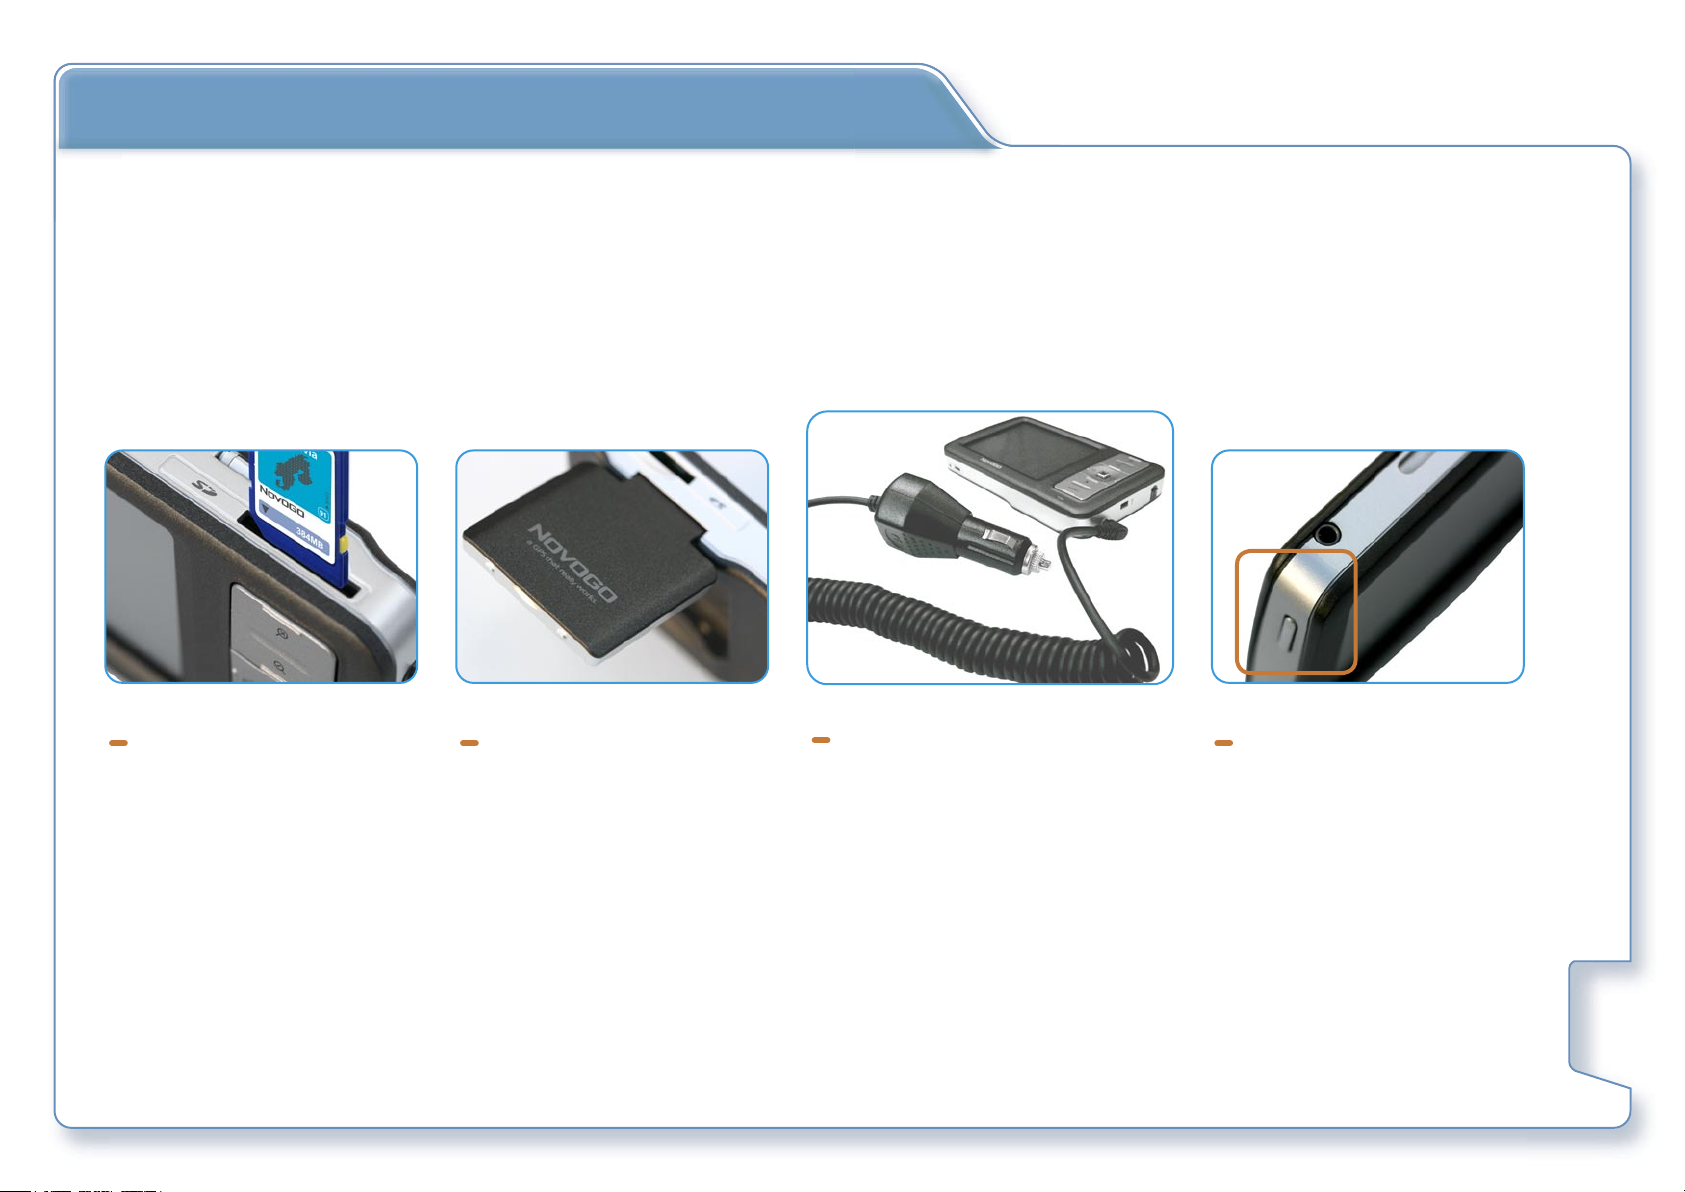
Preparing The Novogo T Series
Insert the SD memory card
with map data pre-loaded
Flip up the GPS antenna
and expose it under open
sky
(It may take few minutes
to receive the GPS signal
for the first time!)
Connect the Novogo T series
with the cigarette lighter
charger in the car.
Switch on the power and
let the fun begin…
9
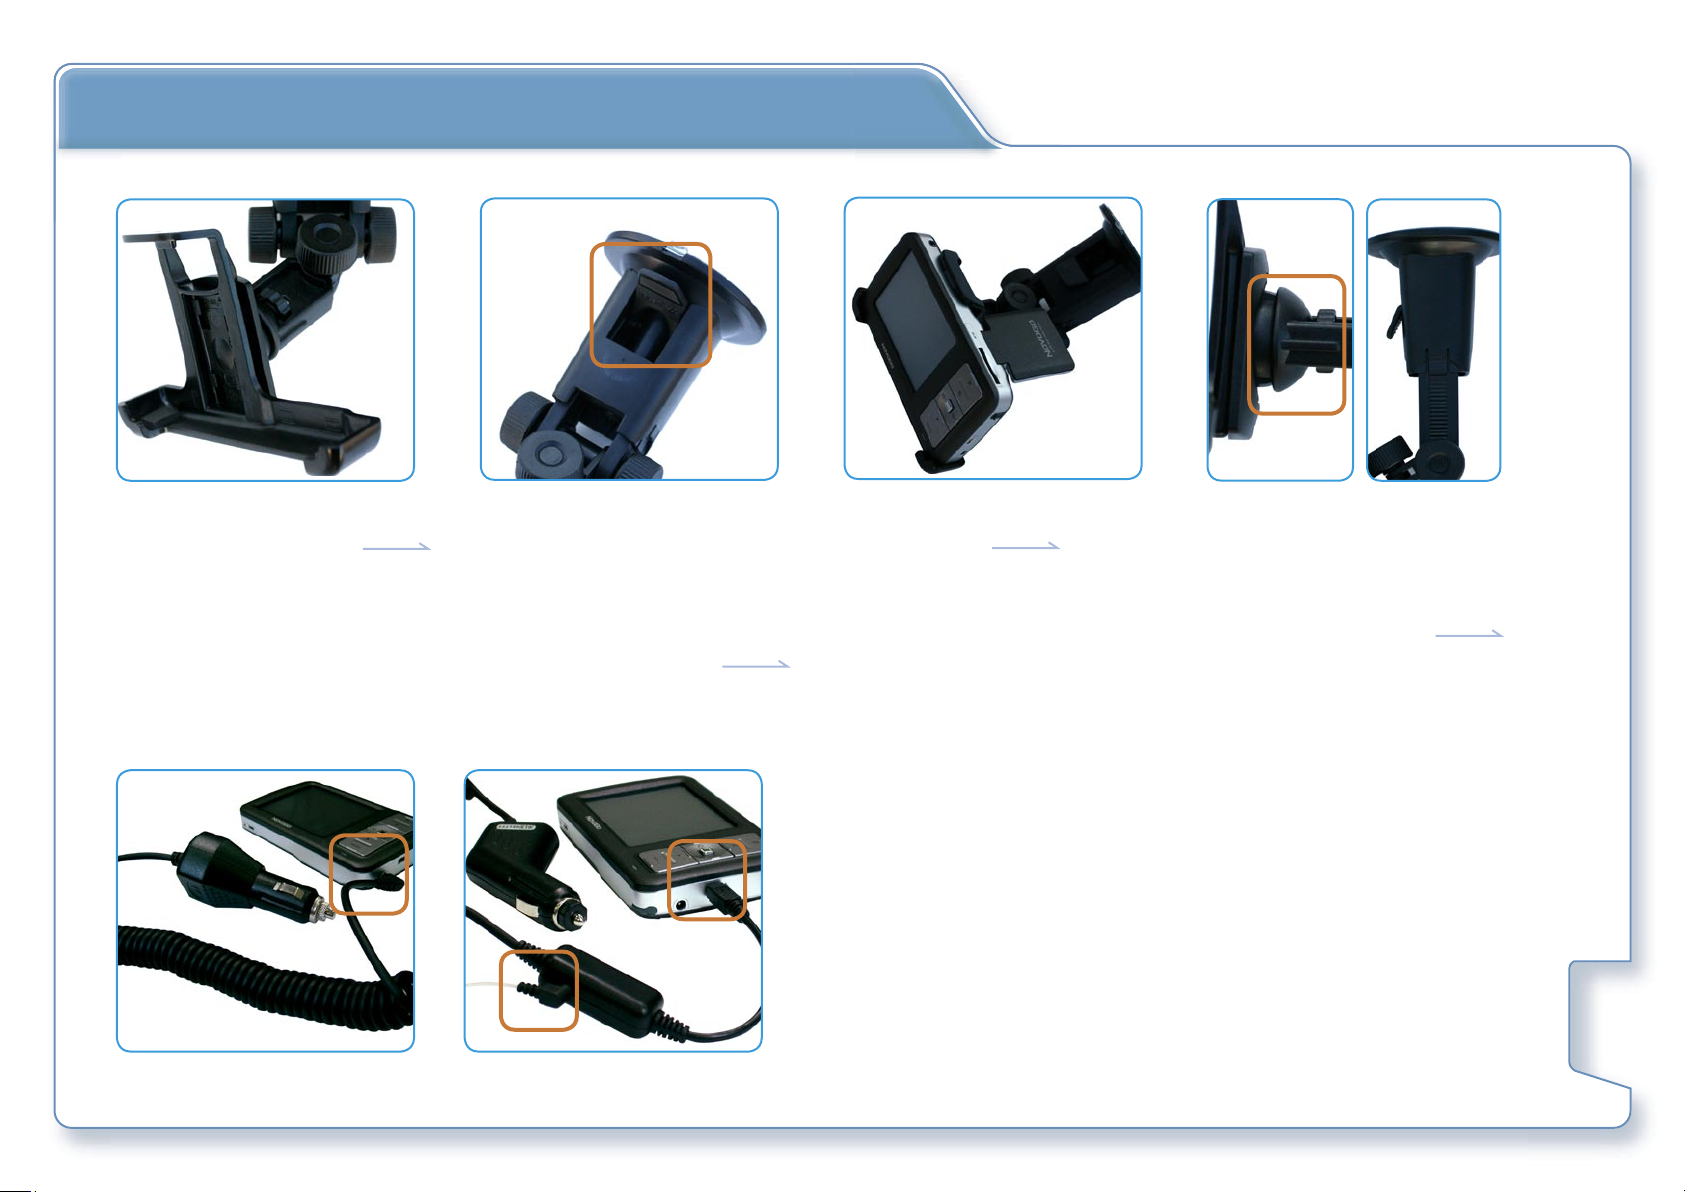
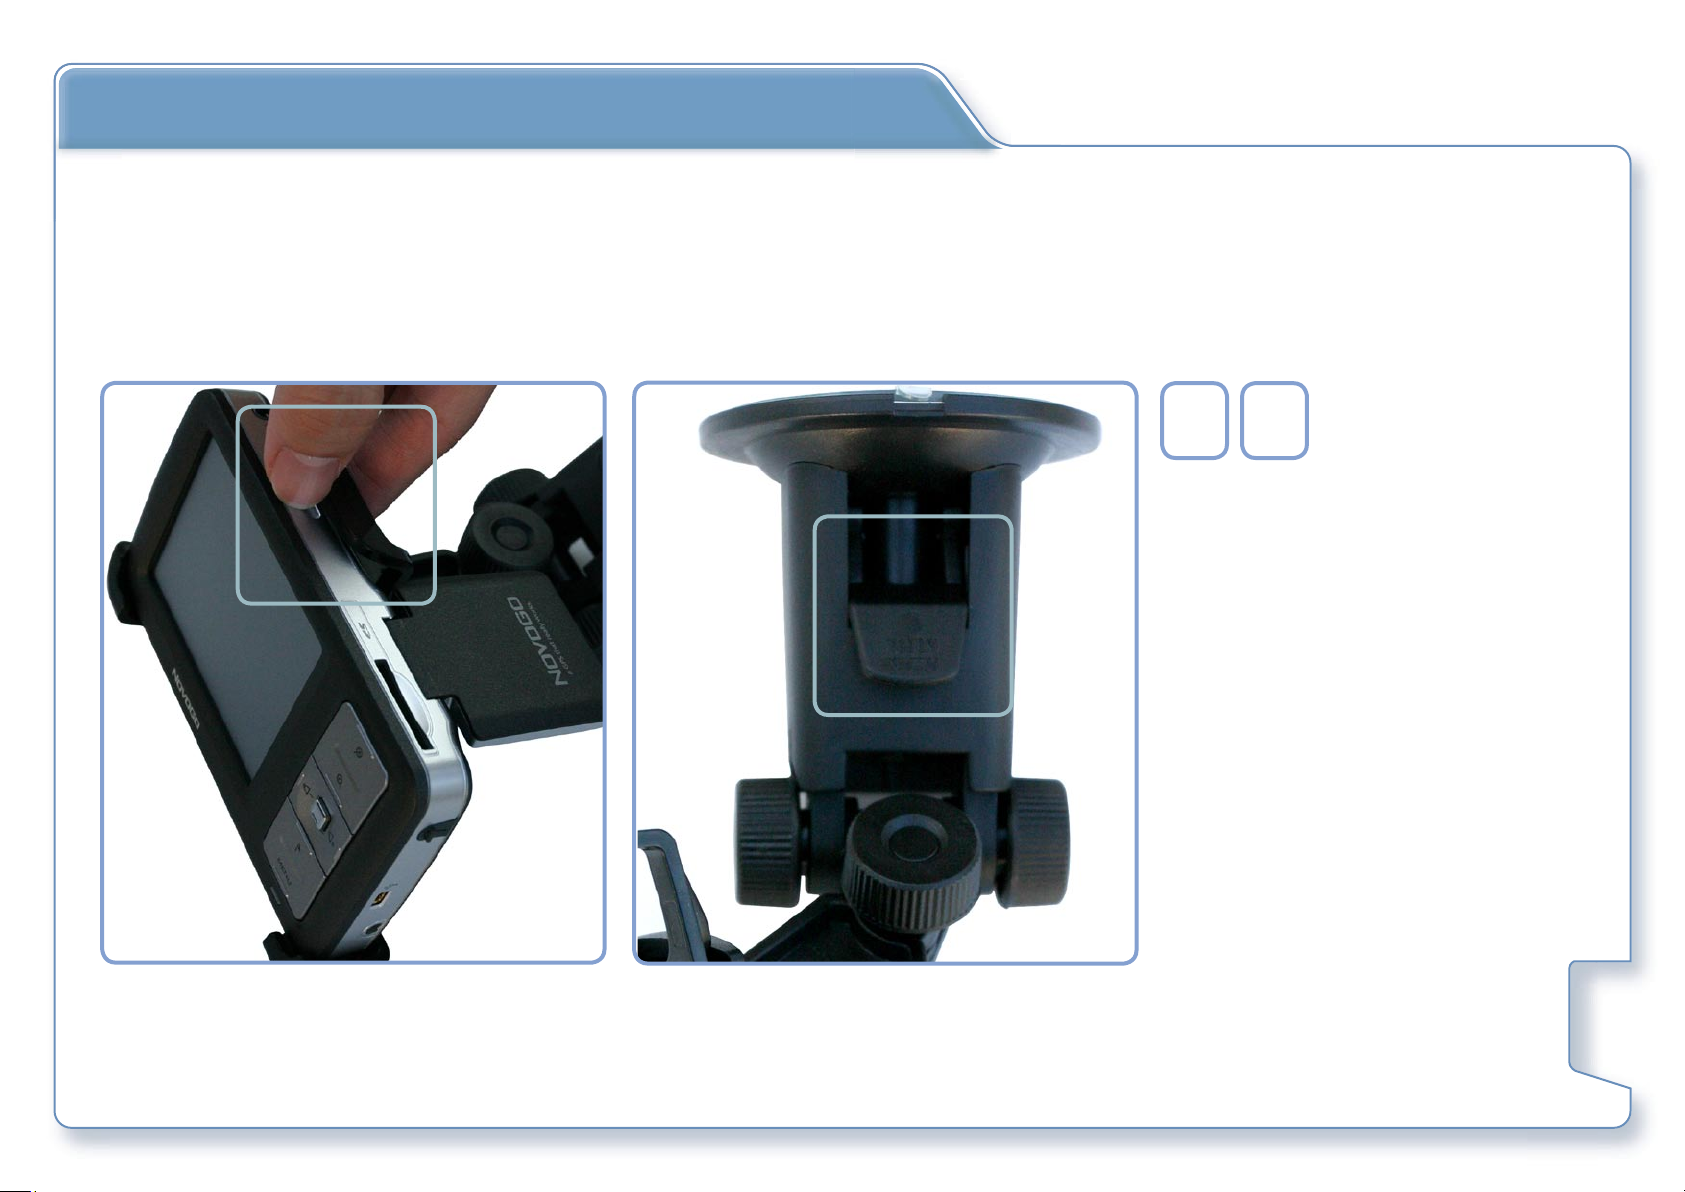
Installing The Novogo T Series in the car
1) Assemble the Docking Sta-
tion with Car Holder
A
2) Attach the suction-mount
Car Holder to an area that
will not obstruct your driving view and push the tab
towards the windshield to
lock the suction cup
B
3) Clip the T series with Dock-
ing Station
5) A For T30 / T70: Plug in the cigarette lighter charger
Connect the other end with the DC input on T series
B For T50 / T90: Plug in the cigarette lighter charger
Connect the other end with the USB port on T series
Plug the TMC antenna into TMC receiving module
4) Adjust the viewing angle
by (1) Stretch the arm,
(2) Loosen the horizontal
screw or (3) Loosen the
360 degree screw.
10
Removing The Novogo T series
A
A
B
B
Release the T series from
the Docking Station
Remove the Car Holder
by pulling the tab towards you and lift the
suction cup away from
the windshield.
11

Installation Notes
• Please attach the Car Holder in the position that will not obstruct your driving view and avoid the deployment in front of
the air bag.
• Under normal journey conditions, the suction mount is perfectly sufficient to hold in position. Note that suction may be lost
over time due to condensation and high/low temperature. For this reason, we recommend cleaning the suction cup and
windshield, and reattaching the suction mount from time to time.
• Some vehicles may have a heat reflective treatment on the windshield which can block GPS signal reception. If this turns out
to be a problem in your vehicle, you may need to purchase and install the External Antenna separately.
• To activate your 12V socket without starting your engine, you may need to set your ignition key in an ‘Accessories’ position.
In addition, The Novogo Navigator contains a rechargeable battery and can be used for up to 2 hours without charging, so
for short journeys it may be possible to do without the DC power lead.
• Your Novogo Navigator does not transmit your location, so others cannot use it to track you while driving.
12

Before You Begin
1) Calibration
Tap on the center of the target
briefly and repeat as the target
moves to calibrate the touch screen
2) Select Language
Select the language you would like
to use.
Reset
Use the stylus to press the Reset
button to clear all settings. You may
select another language again by
pressing the Reset button.
13

Main Menu
1) Navigate to a single destination.
2) Route planning or navigating to multiple
destinations.
3) Browse the map.
4) Change maps.
5) Enter system settings screen.
6) Navigate to your home.
7) Battery level
External power
8) GPS signal ready
No GPS signal
(It may take few minutes to receive the GPS signal
for the first time!)
9)
(with selected models)
Receiving new traffic update from TMC signal
4
1
5
2
6
3
7
8
9
No new message and waiting for the latest
traffic update
14

Navigation
S
elect the country first
1
2
I
ndicate your destination by one of the following methods: Input the Address, Search for
Point of Interest, Select on Map. Or select from Favorites or Recent destinations.
1)
2)
Back to main menu
Back to previous page
15

Navigation
Address
• Input the town name or post code
and then street name.
• Input the house number or intersection road name if available.
Start navigation to your destination (Page.20)
Browse your destination on the
map (Page.18, Page.24)
Save your destination as Favorites
(Page.19)
• You can tap icon to save the
selected destination as Favorites.
16

Navigation
Point of Interest
• Search for the POI around your current position.
• Search for the POI within a country.
• Search for the POI within a town or
city.
• Set the radius for searching or town
name to be searched if needed.
• Select the category of POI.
• Select the POI of your interest.
Start navigation to your destination (Page.20)
Browse your destination on the
map (Page.18, Page.24)
Save your destination as Favorites
(Page.19)
17

Navigation
Select on Map
• Tap icon or draw the
frame directional to zoom in
or zoom out the map.
• Tap icon and drag on the
screen to scroll the map.
• Tap long on a specific point on the
map to indicate the destination.
• You can Start navigation to that
point, Save the point to Favorites or
search for POI around that point.
1
3
5
4
2
1) Start navigation to the indicated point (Page. 20)
2) Save the indicated point as Favorites
3) Search for POI around the indicated point
4) Add the indicated point as Route Point (Page. 22)
5) Add this point as a new destination to your
itinerary
18

Navigation
Favorites or Recent Destinations
• You can load a destination
from Favorites or Recent
destinations.
Start navigation to your destination (Page.20)
Browse your destination on the
map (Page.18, Page.24)
Save your destination as Favorites
19

Navigation
After indicating your destination, tap icon and select
the route option (Page.29) to start navigation.
If this screen appears, it means the GPS signal is not
yet available. Please flip up the GPS antenna and
expose the navigator under open sky for better GPS
signal reception.
For the navigation instructions on the
Map Screen, please refer to page. 23
(map screen)
(It may take few minutes to receive the GPS signal
for the first time!)
20

Home
Set your home address
in Setting / Home address.
Tap icon to automatically
navigate to your home.
21

Route Planning
Route Planning menu
Sort the route points
add route points
Delete route points
Calculate the distance and time of the route
Show the route on the map
Load a previous route
Save this route
Start navigation of this route
• Tap icon to add route points (Page. 15).
• After calculating the route , tap
to show the suggested route on the map
• Tap short randomly on the map to show map settings (Page. 24).
You can run simulation by
or close the map by
22

Map Screen
8 9
1) ETA Estimated time of arrival
2) Remaining time to arrival.
3) Remaining distance to arrival.
4) The lower street field indicates the name of the street you are currently
on.
5) The upper street field indicates the name of the next street to turn on.
6) The distance field indicates the distance to the next turn. When you
approach,the representations changes into a distance bar.
7 1
56
4
2
3
7) The arrow field indicates the next turn to be taken
8) The left part of the map screen shows possible speed limits
9) The upper part of the Map screen displays the signposts on the road
23

Map Screen
Zoom in or zoom out the map
Drag on the screen to scroll the map
Show the map in driving direction or north oriented
Center your current position on the map
Display the whole itinerary and all destinations
Toggle between 2D and 3D map viewing angle
Hide / Show the control panels
Show the GPS satellite status or save curent position
Search for the TMC signal
Repeat the voice instrutions again
1
2
3
4
T
ap short randomly on the map to
show map settings.
5
6
7
8
1) Toggle between Day mode & Night mode
2) Set road block to avoid some road sections ahead
3) Skip current destination and navigate to next destination
4) Enter Settings (Page. 25)
5) Mute the voice instructions
6) Add a new destination to your itinerary (Page. 15)
7) Set up Route options (Page. 29)
8) Quit current navigation
24

Settings
User mode
Standard mode
Easy to use and quick access to the frequently used functions
Extended mode
Complete functionality including route planning, show map and
all of the setting options.
Factory settings
Restore to the extended mode with default settings
Map information
Info bar
Show your current speed, altitude and the compass on the map
Points of interest
Show POI on the map
Street names (2D)
Show street names on the map
25

Settings
Route information
1) Distance remaining to final destination
2) Time remaining to final destination
3) Estimated time of arrival to final destination
4) Distance remaining to next destination
5) Time remaining to next destination
6) Estimated time of arrival to next destination
Signpost information
Show traffic signs
Show the signpost information that corresponds to the roads
26

Settings
Speed limit
Show traffic signs
Show the speed limit of the road
Warning in built-up areas / Warning outside built-up areas
Set the speed tolerance before speeding warning
Volume
Volume
Adjust the volume level
27

Settings
Representation
Skin
Select the theme for your Novogo
Touchscreen Calibration
Start calibration
Calibrate the screen by pressing shortly on the cross
28

Settings
Auto mode
Begin with
Set the default viewing angle to 2D or 3D in navigation
3D Autozoom
Enable or disable autozoom function in 3D navigation
2D Autozoom
Select the zooming level according to the speed in 2D navigation
2D View
Show the map in driving direction of north oriented in 2D navigation
Routing options
Speed profile
Set the vehicle type to car, motorcycle, bike or pedestrian mode
Type of routing
Set the routing type to fast route, short route or dynamic route
according to the latest traffic updates
Motorways
Permit, avoid or forbid the using of motorways
Ferries
Permit, avoid or forbid the using of ferries
Toll roads
Permit, avoid or forbid the using of toll roads
29

Settings
Itinerary
Itinerary
Enable or disable automatic proceeding in multiple destinations
navigation
Time zone
Time zone
Select the time zone of your current position
Daylight saving time
Enable or disable daylight saving time
30

Settings
Format
Time
Select between 12hr or 24hr format
Distance
Select between kilometer or mile format
TMC
Route modification
Re-calculate a new route automatically or with confirmation when
receiving traffic updates from TMC
31

Settings
Home adress
Enter your home address
Set up your home address
Product information
Show intro
Show a brief introduction of Novogo operations and icons
32

Novogo Map Disc
Using the Novogo Map Disc
Insert the Novogo Map Disc into your CD/DVD drive and this menu should appear. If your autorun feature has been disabled onyour computer, launch the
setup file manually by locating the file and double-clicking on the icon.
Novogo Map CD / DVD
1) Recover the map data to your Novogo T series Navigator
2) Choose the language you would like to use on your Novogo T series
3) Backup or Restore My Favorites and Settings to the computer
4) Browse the multi language user manual
5) Install the driver (ActiveSync)
6) Browse Novogo website
33

Novogo Map Disc
Recover my Map
1) Recover the map data to your Novogo T series Navigator
2) Choose the language for your Novogo T series Navigator
3) A Insert your memory card into the card reader and select the card
reader disk drive
Or
{
B Reset your Novogo T series to the “Language Selection Menu” and
connect it to the computer with mini USB cable (You may need to install the driver first). Please reset again when the process is done.
34

Novogo Map Disc
Switch Language
1) Choose the language you would like to use on your Novogo T series
2) A Insert your memory card into the card reader and select the card
reader disk drive
Or
{
B Reset your Novogo T series to the “Language Selection Menu” and
connect it to the computer with mini USB cable (You may need to
install the driver first). Please reset again when the process is done.
35

Novogo Map Disc
Backup / Restore
1) Backup My Favorites and Settings to the computer
2) Restore My Favorites and Settings to your Novogo T series
3) A Insert your memory card into the card reader and select the card reader
disk drive
Or
{
B Reset your Novogo T series to the “Language Selection Menu” and connect
it to the computer with mini USB cable (You may need to install the driver
first). Please reset again when the process is done.
36

Safety Notices and Warnings
1) Global Positioning System
NOVOGO Inc. grants you (Licensee) a limited license (License) to use the NOVOGO Navigation System hardware (Hardware) and software (Software) in the accompanied package acquired with this License. This License is non-exclusive and
non-transferable. Unless otherwise granted by NOVOGO Inc., Licensee may not rent, lease, or lend software to another
person.
2) Use with Care
Use of Novogo portable car navigator for navigation still means that you need to drive with due care and attention.
3) Aircraft and Hospitals
Use of devices with an antenna is prohibited on most aircraft, in many hospitals and in many other locations. Novogo portable car navigator must not be used in these environments.
4) Battery
This product uses a Lithium-Ion battery. Do not use it in a humid, wet and/or corrosive environment. Do not put, store or
leave your product in or near a heat source, in a high temperature location, in strong direct sunlight, in a microwave oven
or in a pressurized container, and do not expose it to temperatures below -10'C(50'F) or over 50'C(120'F). Failure to follow
these guidelines may cause the Lithium-Ion battery to leak acid, become hot, explode or ignite and cause injury and/or
damage. Do not pierce, open or disassemble the battery. If the battery leaks and you come into contact with the leaked
fluids, rinse thoroughly with water and seek medical attention immediately.
THE LITHIUM-ION BATTERY CONTAINED IN THE PRODUCT MUST BE RECYCLED OR DISPOSED OF PROPERLY. USE NOVOGO
PORTABLE CAR NAVIGATOR ONLY WITH THE SUPPLIED DC POWER LEAD AND AC ADAPTER FOR BATTERY CHARGING.
To recycle your Novogo portable car navigator unit, please see your local approved Novogo service center.
37

Other Safety Information
Cautions:
• To protect yourself and others from accidents please do not operate the navigation system while driving!
• You must not look at the display except when it is absolutely safe to do so!
• The road layout and the traffic signs are absolutely prior to the instructions of the navigation system.
GPS Signal reception
When there are no valid signals available, consider the following:
• Make sure that the GPS antenna has a clear view of the sky.
• Note that the GPS reception can be affected by:
1)Bad weather
2)Dense overhead obstacles (e.g. trees and tall buildings)
3)Other wireless device in the car
4)Reflective car window tint
This Document
Constant product development may mean that some information is not entirely up-to-date. The information in this docu-
ment is subject to change without notice.
Novogo shall not be liable for technical or editorial errors or omissions contained herein; nor for incidental or consequen-
tial damages resulting from the performance or use of this material. This document contains information protected by
copyright. No part of this document may be photocopied or reproduced in any form without prior written permission
from Novogo.
© 2005 Novogo, Taiwan. All rights reserved. All other trademarks are the property of their respective owners.
38
 Loading...