

User Guide
Agent Management Center v6.4
02_013N_6.4.2.10
Novell, Inc.
1800 South Novell Place
Provo, UT 84606
Phone: 800.858.4000
www.novell.com
Copyright © 1997-2007 PatchLink® Corporation. ALL RIGHTS RESERVED. U.S. Patent
No. 6,990,660, Other Patents Pending. This manual, as well as the software described in it, is
furnished under license. No part of this manual may be reproduced, stored in a retrieval system, or
transmitted in any form—electronic, mechanical, recording, or otherwise—except as permitted by
such license.
LIMIT OF LIABILITY/DISCLAIMER OF WARRANTY: PATCHLINK® CORPORATION
MAKES NO REPRESENTATIONS OR WARRANTIES IN REGARDS TO THE ACCURACY
OR COMPLETENESS OF THE INFORMATION PROVIDED IN THIS MANUAL.
PATCHLINK® CORPORATION RESERVES THE RIGHT TO MAKE CHANGES TO THE
INFORMATION DESCRIBED IN THIS MANUAL AT ANY TIME WITHOUT NOTICE AND
WITHOUT OBLIGATION TO NOTIFY ANY PERSON OF SUCH CHANGES. THE
INFORMATION PROVIDED IN THE MANUAL IS NOT GUARANTEED OR WARRANTED
TO PRODUCE ANY PARTICULAR RESULT, AND THE ADVICE AND STRATEGIES
CONTAINED MAY NOT BE SUITABLE FOR EVERY ORGANIZATION. NO WARRANTY
MAY BE CREATED OR EXTENDED WITH RESPECT TO THIS MANUAL BY SALES
REPRESENTATIVES OR WRITTEN SALES MATERIALS. PATCHLINK® CORPORATION
SHALL NOT BE LIABLE FOR ANY LOSS OF PROFIT OR ANY OTHER DAMAGES
ARISING FROM THE USE OF THIS MANUAL, INCLUDING BUT NOT LIMITED TO
SPECIAL, INCIDENTAL, CONSEQUENTIAL, OR OTHER DAMAGES
Trademarks:
PatchLink™, PatchLink.com™, securing the enterprise™, WebConsole™, PatchLink
Update™, PatchLink Quarantine™, PatchLink Enterprise Reporting Services™, PatchLink
Scanner Integration Module™, PatchLink Developers Kit™, and their associated logos are
registered trademarks or trademarks of PatchLink® Corporation.
Novell, Novell ZENworks®, Novell ZENworks® Patch Management Server, and Novell Agent
are registered trademarks or trademarks of Novell, Inc.
RSA Secured® is a registered trademark of RSA Security Inc.
Apache is a trademark of the Apache Software Foundation
In addition, other companies' names and products mentioned in this document, if any, may be
either registered trademarks or trademarks of their respective owners.
Feedback:
Your feedback lets us know if we are meeting your documentation needs. E-mail the Novell
Technical Publications department at techpubs@patchlink.com to tell us what you like best,
what you like least, and to report any inaccuracies.
- ii -

Agent Management Center v6.4 - User Guide
Table of Contents
Table of Contents ___________________________________________ iii
Preface ___________________________________________________ v
About This Guide ...................................................................................................v
Document Conventions ......................................................................................... vi
Chapter 1: Installing the Agent Management Center ________________ 1
Installation Pre-requisites .......................................................................................1
Supported Operating Systems ............................................................................1
Minimum Installation Requirements .....................................................................2
Installing the Agent Management Center .................................................................2
Chapter 2: Getting Started with the AMC _________________________ 7
Managing Credentials ............................................................................................9
Adding Credentials to the AMC ............................................................................9
Reassigning Credentials ...................................................................................11
Deleting Credentials ........................................................................................14
Validating Credentials ......................................................................................15
Configuring the AMC ............................................................................................ 16
Chapter 3: Discovering Available Nodes _________________________ 19
Discovering Devices and Installing Agents Using the Wizard ...................................... 19
Using the Wizard to Perform an LDAP Scan ........................................................19
Using the Wizard to Perform an Domain Scan .....................................................26
Using the Wizard to Perform Reverse DNS Lookup ...............................................33
Using the Wizard to Import Devices From a File ..................................................39
Manually Discovering Nodes .................................................................................45
Manually Performing an LDAP Scan ...................................................................45
Manually Performing a Reverse DNS Lookup .......................................................47
Manually Performing a Domain Scan .................................................................. 48
- iii -

Table of Contents
Chapter 4: Installing ZENworks Patch Management Agents __________ 51
Supported Agent Operating Systems .....................................................................51
Determining Device Status ...................................................................................52
Understanding Installation Tests .......................................................................52
Defining the Device Status ............................................................................... 53
Unresponsive Devices ......................................................................................53
Using the Agent Installation Wizard .......................................................................55
Manually Installing Agents ....................................................................................59
Manually Uninstalling Agents ................................................................................61
Working With Offline Agents ................................................................................. 62
Viewing the AMC Activity Logs ..............................................................................63
Appendix A: Index __________________________________________ 65
- iv -

Preface
This Agent Management Center v6.4 User Guide is a resource written for all users of the Novell
Agent Management Center (AMC). This guide defines the concepts and procedures for installing,
implementing, and using the AMC.
About This Guide
This guide contains the following chapters and appendices.
• Chapter 1, “Installing the Agent Management Center” - Walks you through the installation of
the Agent Management Center
• Chapter 2, “Getting Started with the AMC” - Walks you through the configuration and usage of
the Agent Management Center
• Chapter 3, “Discovering Available Nodes” - Defines the various methods to discover nodes
• Chapter 4, “Installing ZENworks Patch Management Agents” - Defines the various methods to
install your ZENworks Patch Management Agents
• Appendix A, “Index”
Agent Management Center v6.4 - User Guide
Tip: This document is updated on a regular basis. To acquire the latest version of this
document please refer to the Novell Support Web site (
www.novell.com/support)
- v -
Preface
Document Conventions
The following conventions are used throughout this document to help you identify various
information types:
Table 0.1 Document Conventions
Convention Usage
bold
italics
UPPERCASE SQL commands and keyboard keys
monospace
Command names, database names, options, wizard names, window and
screen objects (i.e. Click the
New terms, variables, and window and page names
File names, path names, programs, executables, command syntax, and
property names
OK
button)
The icons used throughout this document identify the following types of information:
Table 0.2 Icons Used
Icon Alert Label Description
Identifies paragraphs that contain notes or
Note:
Tip:
Warning:
recommendations.
Identifies paragraphs that contain tips, shortcuts, or other
helpful product information.
Identifies paragraphs that contain vital instructions,
cautions or critical information.
- vi -

Agent Management Center v6.4 - User Guide
1
Installing the Agent Management Center
The Novell ZENworks Patch Management Server features an enterprise-wide agent distribution and
management utility. The Agent Management Center (AMC) utility allows you to perform network
discovery tasks, install and uninstall ZENworks Patch Management Agents, and perform other agent
management functions, such as removing agents from the ZENworks Patch Management Server
database.
The AMC allows you to automatically discover computers through Reverse DNS Lookup, within a
Windows domain, or within an LDAP Organizational Unit. The results of the discovery will then
identify which computers have the ZENworks Patch Management Agent installed, and facilitate the
installation of the agent on those computers which do not.
Installation Pre-requisites
Supported Operating Systems
The AMC is supported on the following operating systems:
Microsoft Windows Server™ 2003, Standard Edition with SP1
Windows Server 2003, Enterprise Edition with SP1
Windows Server 2003 R2, Standard Edition
Windows Server 2003 R2, Enterprise Edition
Microsoft Windows XP Professional with SP2
Note: Microsoft Vista is not a supported platform for the AMC.
- 1 -

Installing the Agent Management Center
Minimum Installation Requirements
Single Intel Pentium 4 (or equivalent) Processor
512 MB of RAM
200 MB of Free Disk Space (During Installation)
100 MB of Disk Space (After Installation)
Single 100 MB NIC with access to the Internet
Local / Domain Administrator or Administrator Equivalent
Microsoft .NET Framework 1.1 with SP1
Installing the Agent Management Center
The Agent Management Center can be installed on your ZENworks Patch Management Server or
any computer that can connect to your Patch Management Server. For performance reasons, we
recommend you install the AMC on a computer other than your Patch Management Server.
Note: The Agent Management Center Installer will detect the existence of Agent
Management Center 6.3 and automatically upgrade to version 6.4.
To Download the Agent Management Center Installer
1. Log on to the target computer as the local
LOCAL_ADMINS
group).
administrator
(or a member of the
2. Launch your web browser.
3. Type your ZENworks Patch Management Server URL in your web browser’s Address field.
Press Enter.
4. Type your User Name in the User name field. Press TAB .
5. Type your password in the Password field.
6. Click OK.
The ZENworks Patch Management Server Home screen opens.
7. Select Devices.
- 2 -

8. Click Install.
The Agent Installers page opens.
Agent Management Center v6.4 - User Guide
Figure 1.1 Agent Installers
9. Select the Agent Management Center Installer download link to start the download.
The Download dialog box opens.
10. Click Save.
The Agent Management Center Installer file downloads to the location you
specify.
11. On the Agent Installers page, click Close.
The Agent Installers page closes.
To install the Agent Management Center
1. From the downloaded location, select the Agent Management Center Installer file
to extract the Agent Management Center InstallShield Wizard.
The Agent Management Center Installation Wizard opens to the Welcome page.
- 3 -
Installing the Agent Management Center
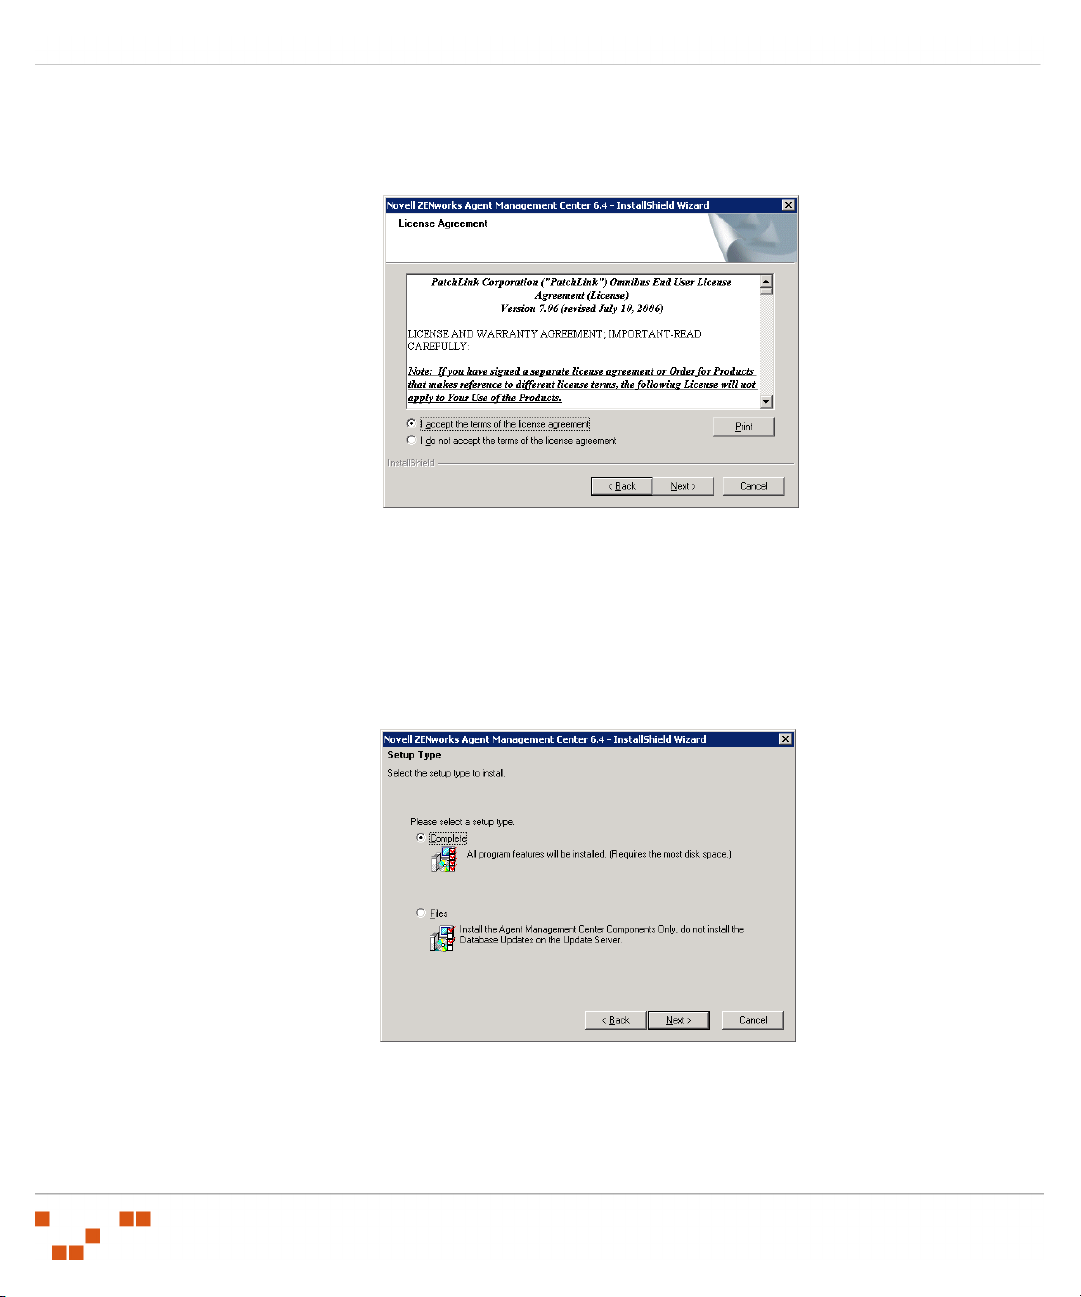
2. Click Next.
The License Agreement page opens.
Figure 1.2 License Agreement page
3. If you agree to the license terms, select the I accept the terms of the End User License
Agreement option
4. Click Next.
The Setup Type page opens.
Figure 1.3 Setup Type page
5. Select one of the following options:
- 4 -
Agent Management Center v6.4 - User Guide
Complete - Installs all Agent Management Center components including the database and
the necessary ZENworks Patch Management Server components.
The first time you install (or upgrade) the AMC you must select this option.
Files - Installs only the local Agent Management Center components.
6. Click Next.
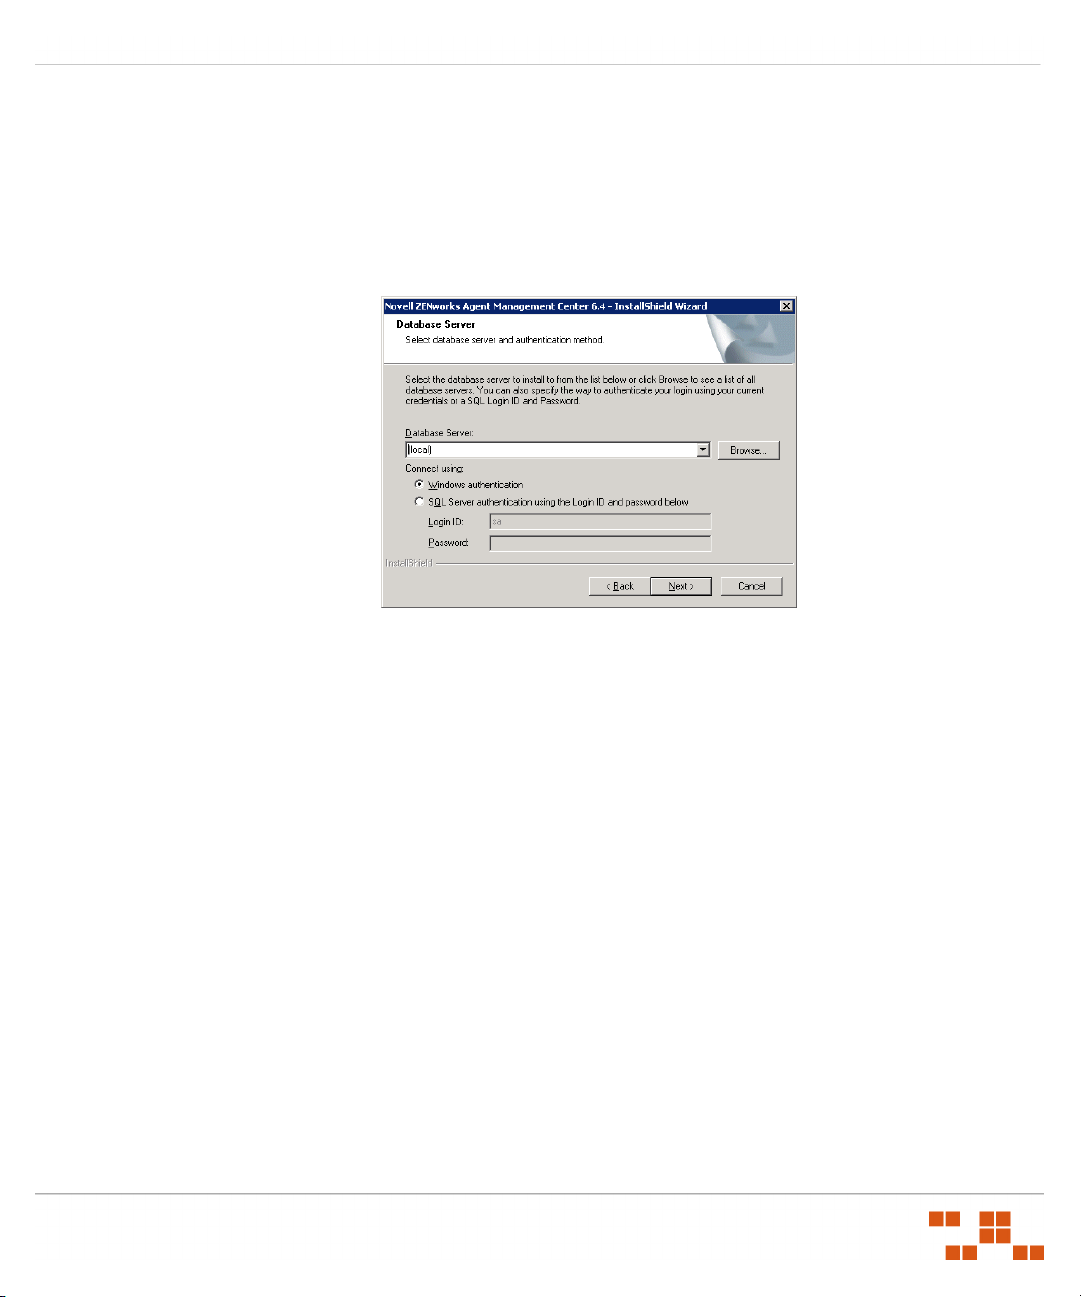
The Database Server Login page opens.
Figure 1.4 Database Server Login page
7. Select the name of your ZENworks Patch Management Server database from the Database
Server drop-down.
If your ZENworks Patch Management Server’s database server is not listed in the Database
Server drop-down you can:
a. Click Browse... to search for the server.
b. Type the name of your ZENworks Patch Management Server’s database server in the
Database Server field.
8. Select to connect to the Database Server using either Windows Authentication or SQL Server
Authentication.
Using SQL Authentication requires that you have a SQL user account on the ZENworks
Patch Management Server which has admin level access to the PLUS, PLUS_Staging,
and PLAMS databases (the PLAMS database is created during a complete installation of
Agent Management Center).
Using Windows Authentication requires that you establish a trusted connection to your
ZENworks Patch Management Server.
- 5 -

Installing the Agent Management Center
9. Click Next.
The Ready to Install page opens.
Figure 1.5 Ready to Install page
10. Click Install to begin the installation.
Following the Installation, the Installation Complete page will display.
Figure 1.6 Installation Complete page
11. Click Finish to exit the Installation Wizard.
- 6 -

Agent Management Center v6.4 - User Guide
2
Getting Started with the AMC
When opening the Agent Management Center (AMC), you will be asked to connect to your
ZENworks Patch Management Server using either Windows Authentication, or SQL
Authentication.
Logging In to the Agent Management Center
1. Launch the AMC by double-clicking the Novell Agent Management Center icon.
The Select an Authentication Mode window opens.
Figure 2.1 Select an Authentication Mode
2. Type the name of your ZENworks Patch Management Server in the Server Name field.
3. Select to Connect using either Windows Authentication or SQL Server Authentication.
If you are using SQL Server Authentication:
a. In the Login name field, type the SQL login.
b. In the Password field, type the SQL password.
- 7 -
Getting Started with the AMC
4. Click OK.
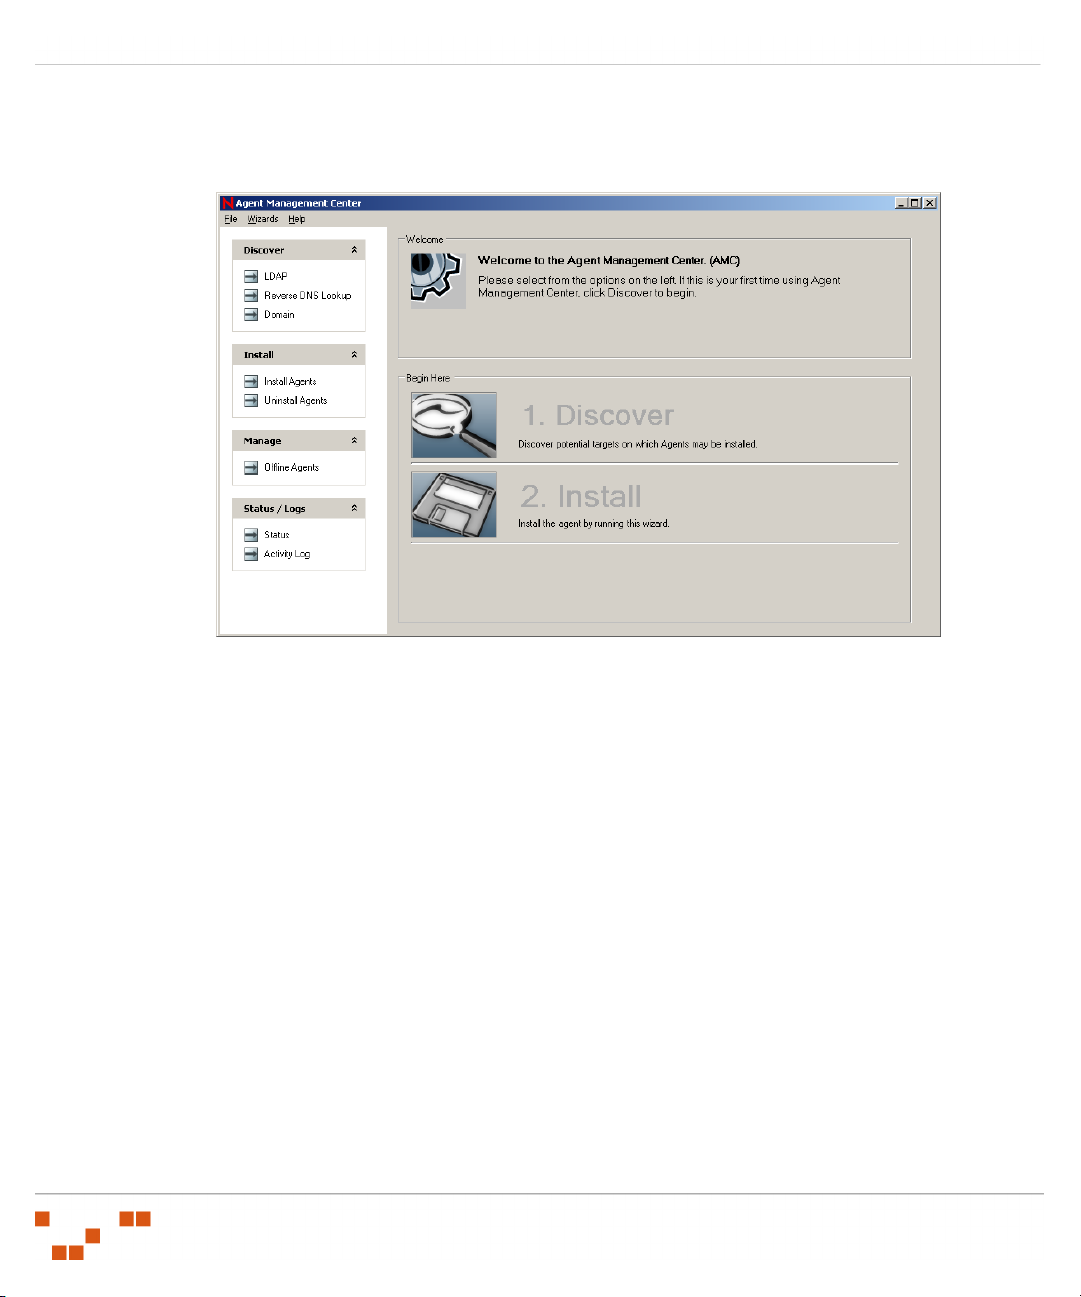
The Agent Management Center Welcome page opens.
Figure 2.2 Agent Management Center Welcome page
The Agent Management Center Welcome page guides you through the steps required to
successfully discover, install and manage your agents.
- 8 -

Managing Credentials
Because installing the ZENworks Patch Management Agent requires administrator level access to
each device, the AMC will prompt you to define the credentials that will facilitate the install. These
credentials will then be validated and re-validated to insure that the credentials are current.
Note: You must add a credential that not only has local administrator privileges but also has
domain or LDAP access.
Adding Credentials to the AMC
To discover devices and install the ZENworks Patch Management Agent you must add a credential
that has both local administrator privileges and Domain or LDAP access.
To Add a New Credential
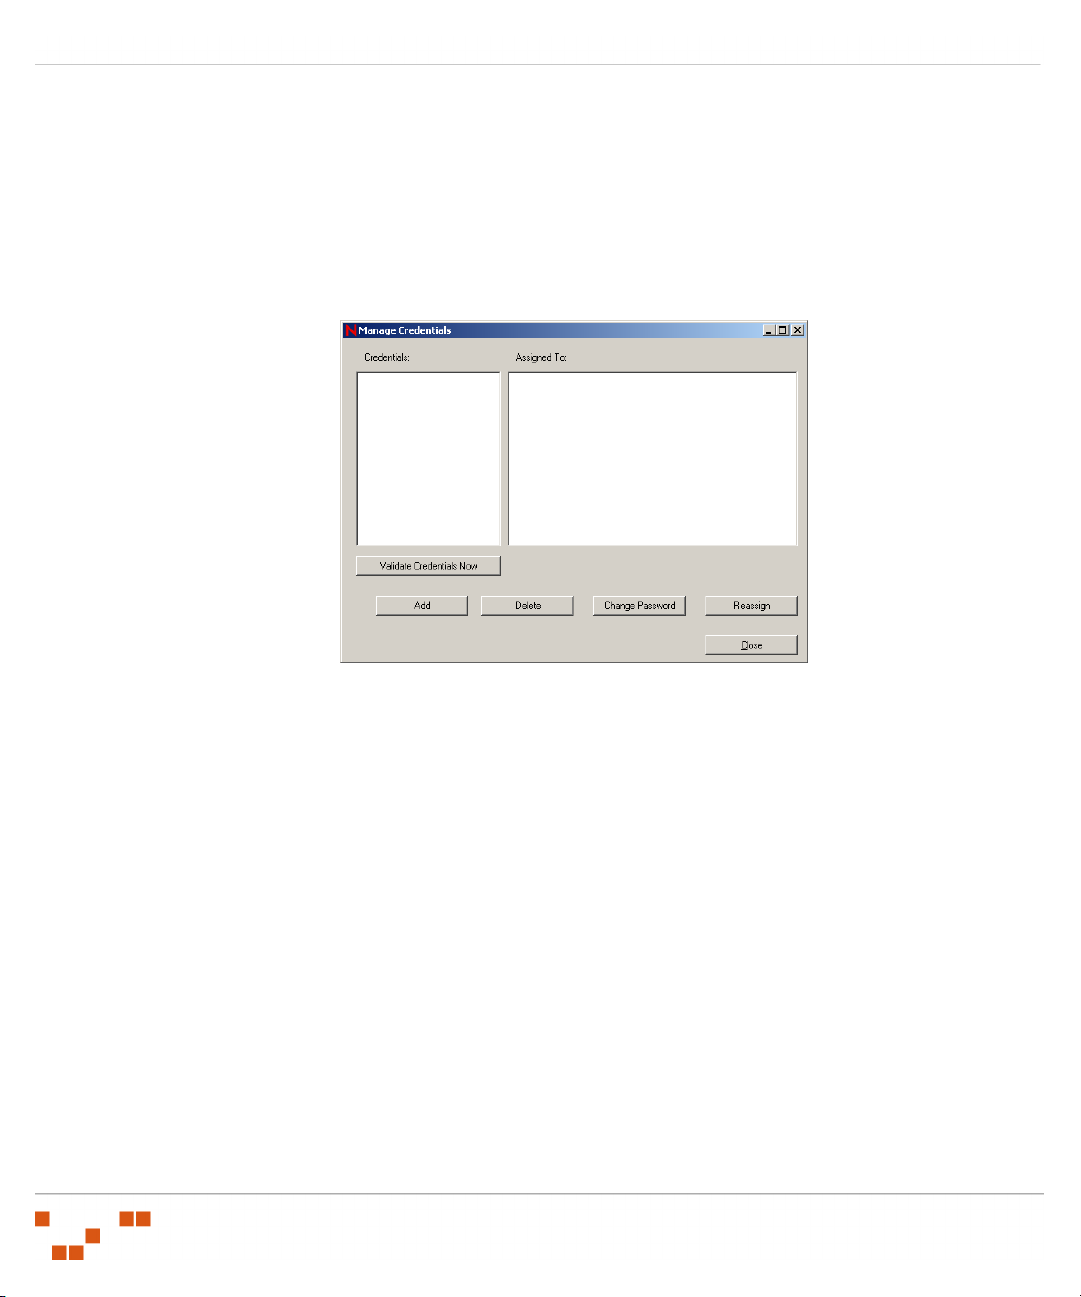
1. Select File > Credentials.
The Manage Credentials window opens.
Agent Management Center v6.4 - User Guide
Figure 2.3 Manage Credentials window
- 9 -
Getting Started with the AMC
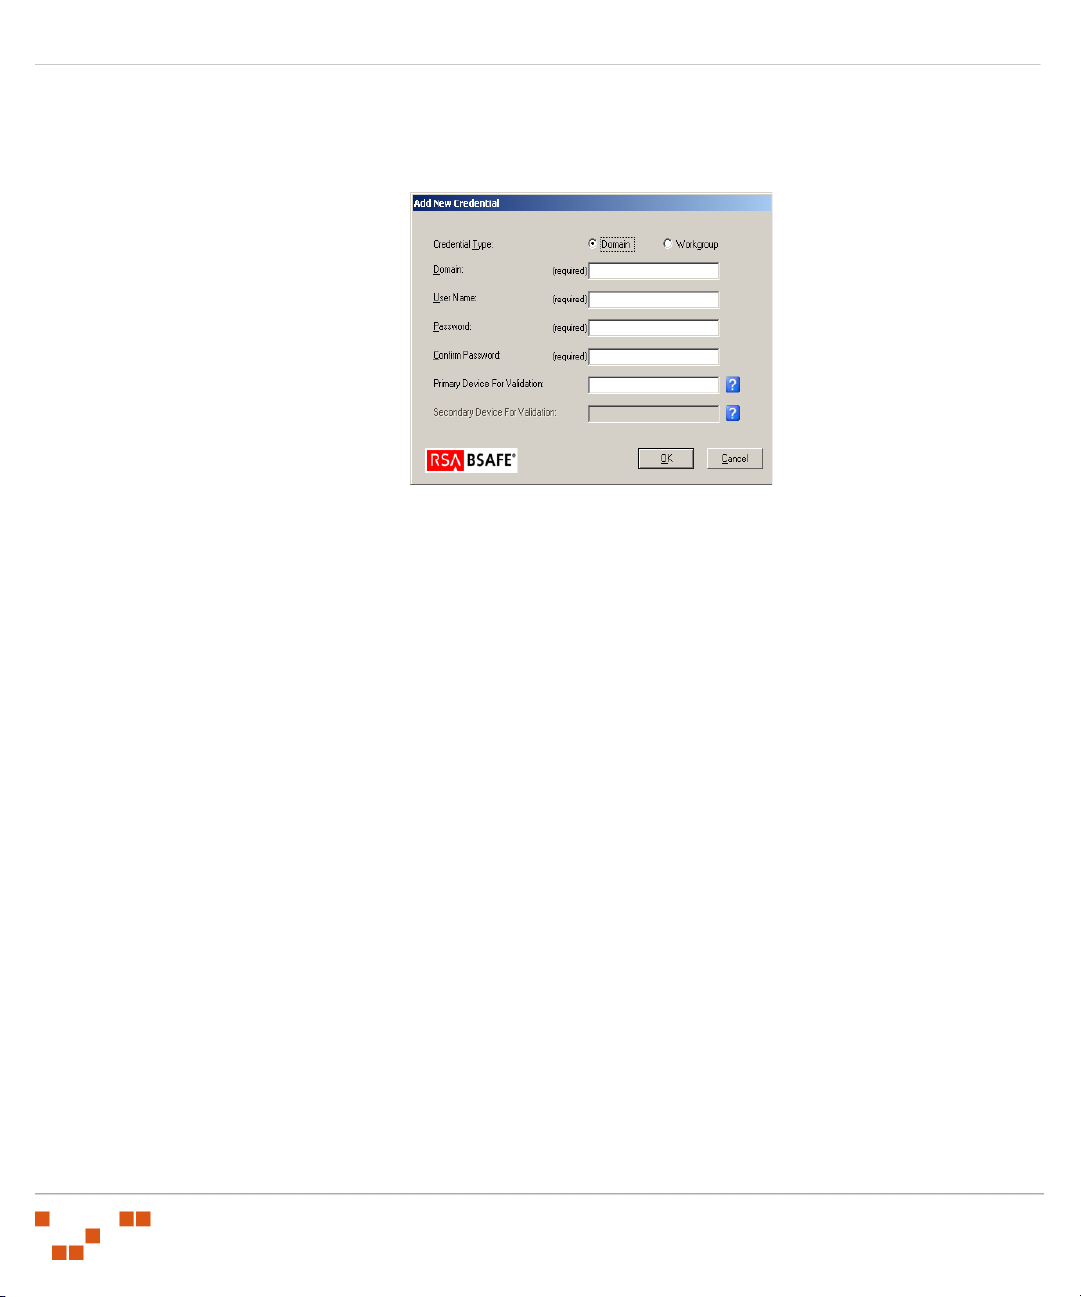
2. Click Add.
The Add New Credential window opens.
3. Select a Credential Type of Domain or Workgroup.
a. If Domain is selected, type the Domain name in the Domain field.
b. If Workgroup is selected, the Domain field will be unavailable.
4. Type a user name in the User Name field.
5. Type the password in the Password and Confirm Password fields.
6. [Optional] If a credential type of Workgroup was selected, type the name of a device, which can
validate the credential, in the Primary Device for Validation and Secondary Device for
Val id at io n fields.
7. Click OK to add the credential.
The Add New Credential window will close.
8. Repeat steps 2 through 7 for any additional credentials.
9. Click Close.
The Manage Credentials window will close.
Figure 2.4 Add New Credentials
- 10 -

Agent Management Center v6.4 - User Guide
Reassigning Credentials
When a network discovery is successful, the credentials used to discover that device are stored as its
default credentials. If required, you can reassign the credentials assigned to one or more devices.
Reassigning Credentials
1. Select File > Credentials.
The Manage Credentials window opens.
Figure 2.5 Manage Credentials window
2. Select the desired credential.
- 11 -
Getting Started with the AMC
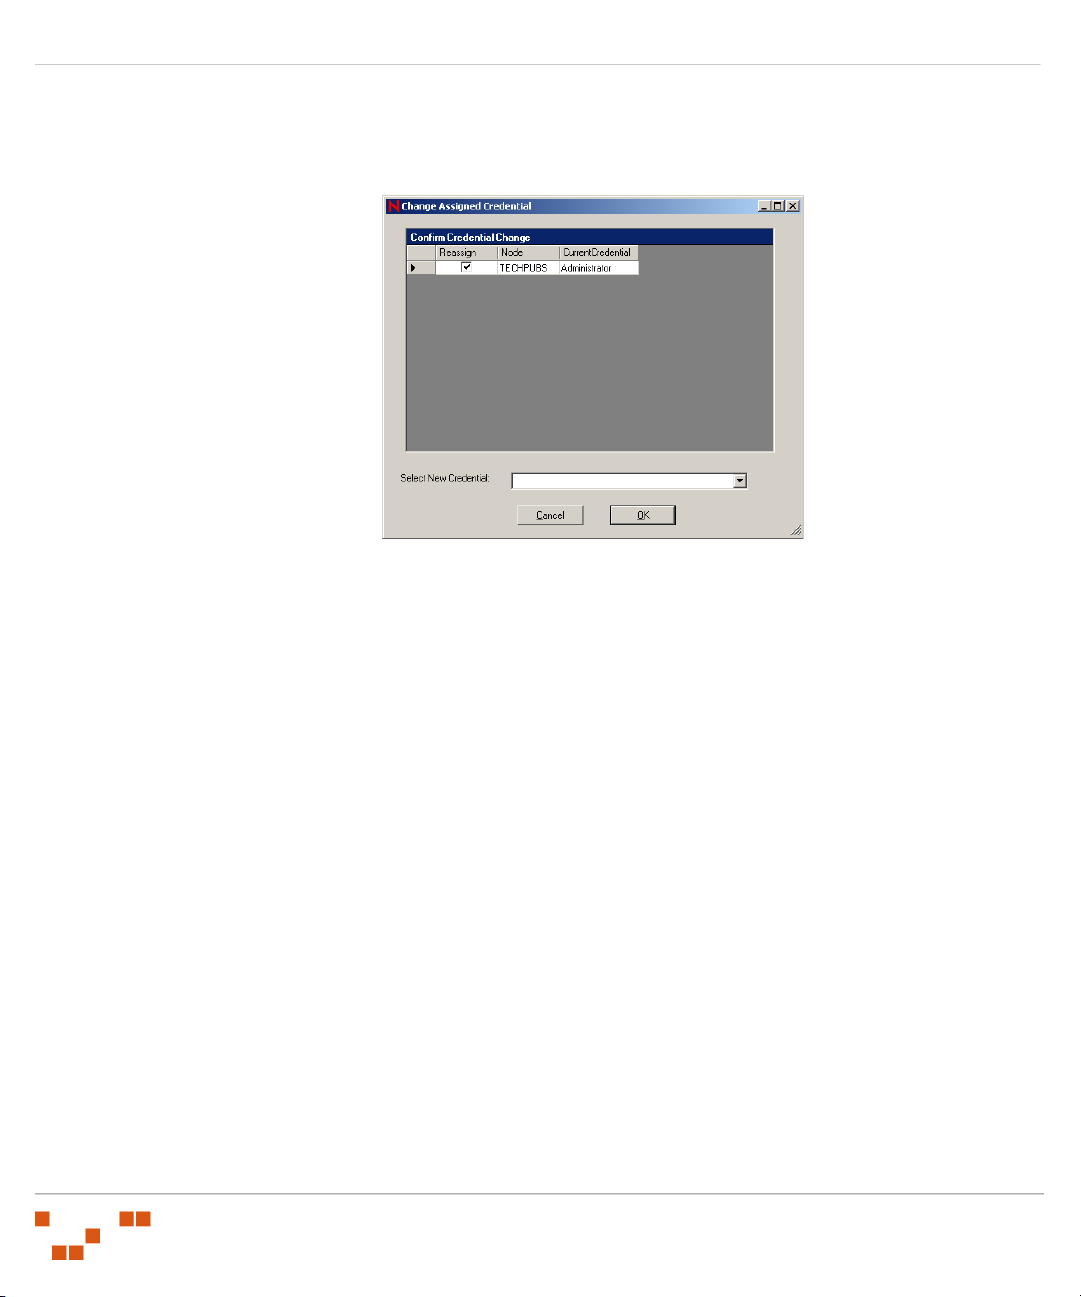
3. Click Reassign.
The Change Assigned Credential window opens.
4. Select the Reassign checkbox next to each of the devices to reassign.
5. Select a new credential from the Select New Credential field.
6. Click OK.
The Change Assigned Credential window closes.
Figure 2.6 Change Credential screen
- 12 -

Agent Management Center v6.4 - User Guide
Reassigning Credentials from the Devices Window
1. From the Install Agents page, right-click on a device and select Change Credential.
Figure 2.7 Right-Mouse Menu -- Install Agents Tree-View
The Change Assigned Credential window opens.
Figure 2.8 Change Assigned Credential
2. Ensure that the Reassign checkbox is selected for each device whose credentials will change.
3. Select a new credential from the Select New Credential field.
4. Click OK.
The Change Assigned Credential window closes.
- 13 -
Getting Started with the AMC
Deleting Credentials
Prior to deleting a credential, you must reassign all of the devices assigned to the credential.
Deleting a Credential
1. Select File > Credentials.
The Manage Credentials window opens.
Figure 2.9 Manage Credentials window
1. Select the credential to delete.
2. Reassign the credential as defined under “Reassigning Credentials”.
3. After reassigning all of the devices associated with the credential, reselect the credential.
4. Click Delete.
A Delete confirmation dialog will display.
5. After confirming the deletion, click Close.
The Manage Credentials window closes.
- 14 -

Agent Management Center v6.4 - User Guide
Validating Credentials
If you select to disable the Verify Credentials option, you can manually validate the credentials using
the Validate Credentials Now function of managing credentials.
Validating Credentials
1. Select File > Credentials.
The Manage Credentials window opens.
Figure 2.10 Manage Credentials window
1. Click Validate Credentials Now.
A Validating Credentials dialog will display.
2. After the credentials are validated, the Validating Credentials dialog will close.
If any credentials fail, the Agent Management Center will automatically reassign those devices
to a different credential whenever possible.
- 15 -
Getting Started with the AMC
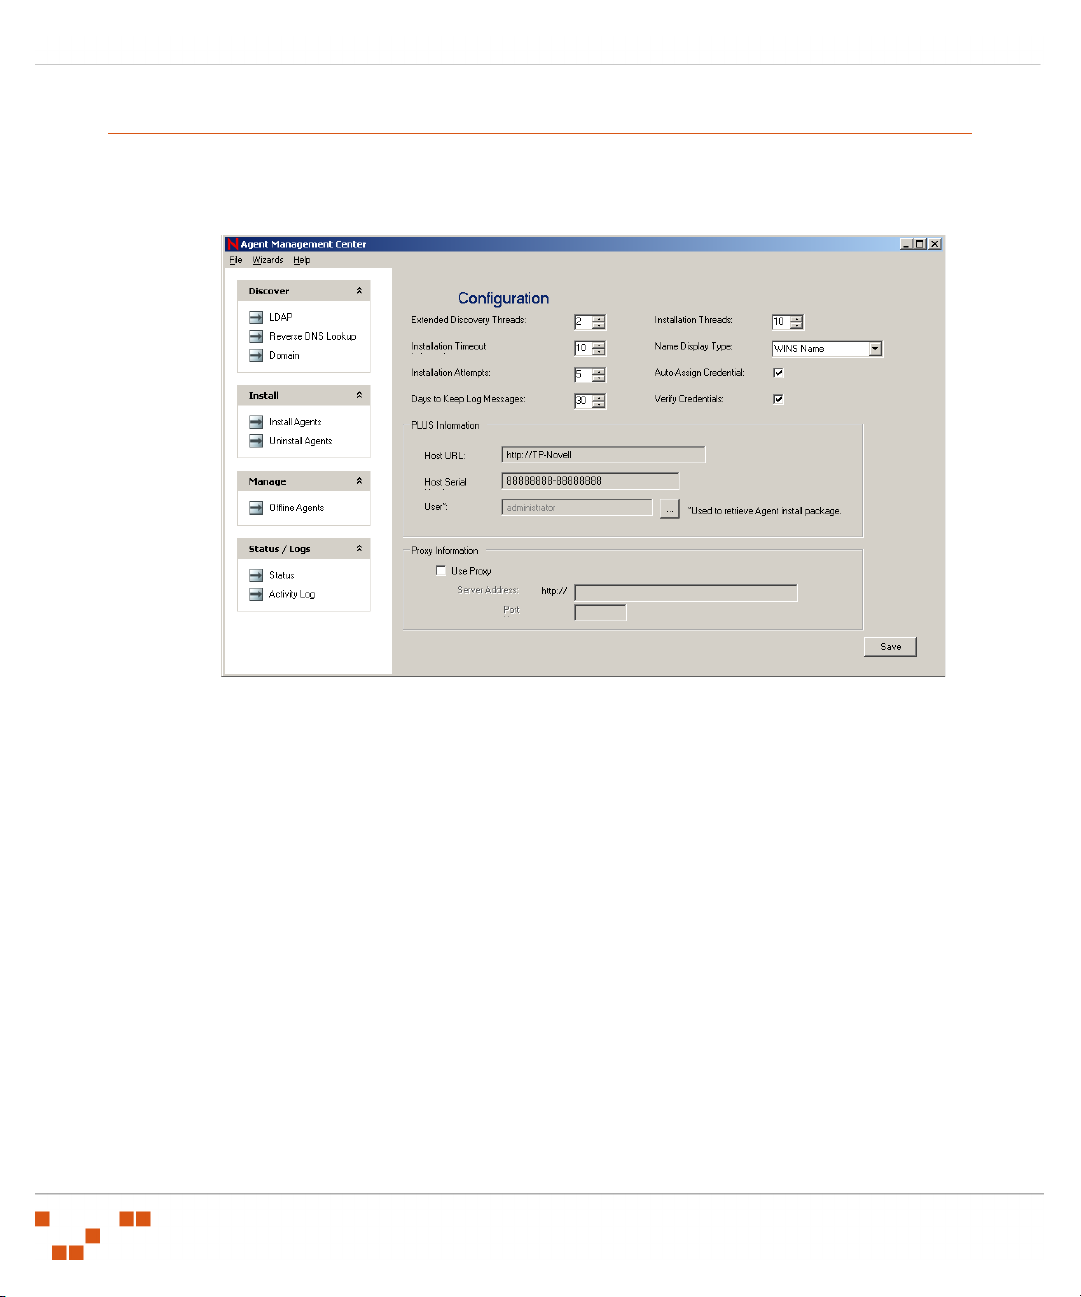
Configuring the AMC
In most cases the default Agent Management Center Configuration will not require modification.
However, if required, these settings can be modified through the Configuration page.
Figure 2.11 Configuration screen
Configuring the Agent Management Center
1. Select File > Configuration.
The Configuration page opens.
2. Define the following configuration options:
- 16 -

Agent Management Center v6.4 - User Guide
Table 2.1 Agent Management Center Configuration Options
Field Description
Extended Discovery
Threads
Install Threads
Install Timeout
Name Display Type
Install Attempts
Auto-Assign Credential
Days to Keep Log
Messages
Allows you to set the maximum number of simultaneous agent
Allows you to define the maximum number of minutes the
Allows you to define how each discovered device will be
Allows you to define the number of times the Agent
The Extended Discovery Thread is a process that attempts to
identify additional information about discovered devices. This
process runs in the background, on a per-device basis.
The Extended Discovery Threads setting, allows you to define
the number of simultaneous threads.
installations. If you are attempting to install more agents than
available threads, all subsequent installation attempts will be
suppressed until an agent completes the installation and
releases a thread.
Warning: A large number of simultaneous installations can
cause performance delays.
Agent Management Center will spend attempting to install an
agent before aborting the installation.
displayed. Available options are:
•WINS Name
• Fully Qualified Domain Name
• IP Address
Management Center will attempt to install an agent.
Automatically assigns device credentials based upon which
credential was used during discovery.
Allows you to define the number of days log messages will be
retained.
Verify Credentials
Forces a credential validation when the Agent Management
Center is opened. Insures that only valid credentials are used to
search for and connect to devices. Clear this check box to
disable the automatic validation of credentials.
- 17 -

Getting Started with the AMC
To ensure that the AMC and your ZENworks Patch Management Agents are able to communicate
with your ZENworks Patch Management Server, confirm that the following settings. Click Save
when complete.
Table 2.2 Agent Management Center Communication Settings
Field Description
PLUS Information
Host URL
Host Serial Number
This is the URL of your ZENworks Patch Management Server.
Your Novell ZENworks Patch Management serial number (as
entered during the installation of ZENworks Patch
Management).
Proxy Information
Use Proxy
Server Address
Port
Select to enable the use of a proxy when the ZENworks Patch
Management Agents communicate with your ZENworks Patch
Management Server. Selection of this check box will enable the
Server Address
This is your Proxy servers URL.
The port which your ZENworks Patch Management Agents will
communicate with your proxy server.
and
Port
fields.
- 18 -

Agent Management Center v6.4 - User Guide
3
Discovering Available Nodes
The AMC allows you to automatically discover devices within a specified Windows Domain, IP
address range, or a LDAP Organizational Unit. The results of this discovery will then tell you
whether the discovered device has the ZENworks Patch Management Agent installed, and allow you
to install or uninstall agents, and remove offline agents.
Discovering Devices and Installing Agents Using the Wizard
The Discovery and Installation Wizard allows you to search for devices within a Windows Domain,
IP range, or LDAP Organizational Unit and install an ZENworks Patch Management Agent on those
devices.
Using the Wizard to Perform an LDAP Scan
If your Agent Management Center is installed on a computer within domain using LDAP, you can
use the Discovery and Installation Wizard to search for other devices within that domain.
Performing an LDAP Scan
1. Select Wizards > Discovery and Agent Installation to open the Discovery and Installation
Wiz ard.
The Welcome page opens.
Figure 3.1 Welcome page
- 19 -

Discovering Available Nodes
2. Click Next.
The Detection Type page opens.
Figure 3.2 Detection Type page
3. Select LDAP and click Next.
The LDAP Type page opens.
Figure 3.3 Select LDAP Type
- 20 -

Agent Management Center v6.4 - User Guide
4. Select Use Active Directory Context.
If you would rather type your own LDAP string, select Custom Context and type a valid
LDAP string in the Custom Context field.
5. Click Next.
The LDAP Filter page opens.
Figure 3.4 Define LDAP Filter
6. Type a valid LDAP object type in the Filter field to apply a filter to your LDAP results.
- 21 -

Discovering Available Nodes
7. Click Next.
The LDAP Detection Credentials page opens.
Figure 3.5 Define LDAP Detection Credentials
8. Type an LDAP context value in the Context field.
9. Type the name of your LDAP Server or Domain in the Preferred Server or Domain field.
10. Select the discovery credentials from the Credential list.
11. Click Next.
The LDAP Context, Server, and Credentials will be validated. If the LDAP verification is
successful you can continue with the discovery.
- 22 -

Agent Management Center v6.4 - User Guide
12. Click Next.
The Select Machines to Install page will open.
Figure 3.6 Select Target Machines
13. Select one or multiple devices on which to install the ZENworks Patch Management Agent.
To Add individually selected computers click the right arrow ( > ) button.
To Add All computers click the double right arrow ( >> ) button.
To Remove a selected computer click the left arrow ( < ) button.
To Remove All selected computers click the double left arrow ( << ) button.
- 23 -

Discovering Available Nodes
14. Click Next.
The Install to All or New Machines page opens.
Figure 3.7 Install to All or New Machines
15. Select whether to install the ZENworks Patch Management Agent on All selected devices, or
only New devices that do not already have an agent installed.
16. Click Next.
The Agent Installation Credentials page opens.
Figure 3.8 Agent Installation Credentials
- 24 -

Agent Management Center v6.4 - User Guide
17. If credentials other than those used during the discovery are required for agent installation, clear
the Use discovered computers’ default credentials option and select the appropriate
credentials from the Credential list.
18. Click Next.
The Agent Installation Results page opens displaying the Agent installation progress in the
Current Status grid.
Figure 3.9 Agent Installation Results
You may cancel the installation on an per device basis, using the Cancel button shown in grid,
or cancel all installations using the Cancel button at the bottom of the page.
The installation results can be exported to a comma separated (csv) file using Export.
Note: It is not necessary to wait for all of the tasks to show as completed prior to exiting the
wizard. If you close the wizard before all tasks have completed, you can see the progress by
selecting to view the AMC Status or Activity Log.
19. To exit the wizard, click Finish.
- 25 -

Discovering Available Nodes
Using the Wizard to Perform an Domain Scan
If your Agent Management Center is installed on a computer within domain, you can use the
Discovery and Installation Wizard to search for other devices within that domain.
Performing a Domain Scan
1. Select Wizards > Discovery and Agent Installation to open the Discovery and Installation
Wiz ard.
The Welcome page opens.
Figure 3.10 Welcome page
- 26 -

2. Click Next.
The Detection Type page opens.
Figure 3.11 Detection Type page
3. Select Domain and click Next.
The Credentials page opens.
Agent Management Center v6.4 - User Guide
Figure 3.12 Domain Credentials
4. Select a credential, with the rights to search your domain, from the User list.
- 27 -

Discovering Available Nodes
5. Click Next.
The Domain Selection page opens.
Figure 3.13 Domain Selection
6. To select from a list of domains:
a. Select the Select from a List of Available Domains option.
b. Click Next.
The Domain Selection page opens.
Figure 3.14 Select From Domain List
- 28 -

Agent Management Center v6.4 - User Guide
c. Select one or multiple domains.
d. Click Next.
The selected domains are searched and the Select Machines to Install page opens
displaying a list of available devices.
Figure 3.15 Select Target Machines
7. To search as specific domain only:
a. Select Enter a Domain to Search.
b. Type the domain name in the Domain to Search field
- 29 -

Discovering Available Nodes
c. Click Next.
The specified domain is searched, and the Select Machines to Install page opens displaying
a list of available devices.
Figure 3.16 Select Target Machines
8. Select one or multiple devices on which to install the ZENworks Patch Management Agent.
To Add individually selected computers click the right arrow ( > ) button.
To Add All computers click the double right arrow ( >> ) button.
To Remove a selected computer click the left arrow ( < ) button.
To Remove All selected computers click the double left arrow ( << ) button.
- 30 -

Agent Management Center v6.4 - User Guide
9. Click Next.
The Install to All or New Machines page opens.
Figure 3.17 Install to All or New Machines
10. Select whether to install the ZENworks Patch Management Agent on All selected devices, or
only New devices that do not already have an agent installed.
11. Click Next.
The Agent Installation Credentials page opens.
Figure 3.18 Agent Installation Credentials
- 31 -

Discovering Available Nodes
12. If credentials other than those used during the discovery are required for agent installation, clear
the Use discovered computers’ default credentials option and select the appropriate
credentials from the Credential list.
13. Click Next.
The Agent Installation Results page opens displaying the Agent installation progress in the
Current Status grid.
Figure 3.19 Agent Installation Results
You may cancel the installation on an per device basis, using the Cancel button shown in grid,
or cancel all installations using the Cancel button at the bottom of the page.
The installation results can be exported to a comma separated (csv) file using Export.
Note: It is not necessary to wait for all of the tasks to show as completed prior to exiting the
wizard. If you close the wizard before all tasks have completed, you can see the progress by
selecting to view the AMC Status or Activity Log.
14. To exit the wizard, click Finish.
- 32 -

Agent Management Center v6.4 - User Guide
Using the Wizard to Perform Reverse DNS Lookup
Whether or not your Agent Management Center is installed on a computer within domain, you can
use the Discovery and Installation Wizard to search for other devices using a reverse DNS scan and
querying your DNS Server.
Performing Reverse DNS Lookup
1. Select Wizards > Discovery and Agent Installation to open the Discovery and Installation
Wiz ard.
The Welcome page opens.
Figure 3.20 Welcome page
- 33 -

Discovering Available Nodes
2. Click Next.
The Detection Type page opens.
Figure 3.21 Detection Type page
3. Select Reverse DNS Lookup and click Next.
The Credentials page opens.
Figure 3.22 Credentials
4. Select a credential, with the rights to search your network, from the User list.
- 34 -

5. Click Next.
The Reverse DNS Lookup page opens.
Figure 3.23 Reverse DNS Lookup
6. Define both a Starting IP and Ending IP value.
7. Click Next.
The DNS Server page opens.
Agent Management Center v6.4 - User Guide
Figure 3.24 DNS Server
8. To use the default DNS Server, select the Use Default DNS option.
- 35 -

Discovering Available Nodes
9. To define a specific DNS Server, select the Use Specified DNS option and type the DNS Server
name in the Specified DNS field.
10. Click Next.
The DNS Server is searched and the Select Machines to Install page opens displaying a list of
available devices.
Figure 3.25 Select Target Machines
11. Select one or multiple devices on which to install the ZENworks Patch Management Agent.
To Add individually selected computers click the right arrow ( > ) button.
To Add All computers click the double right arrow ( >> ) button.
To Remove a selected computer click the left arrow ( < ) button.
To Remove All selected computers click the double left arrow ( << ) button.
- 36 -

Agent Management Center v6.4 - User Guide
12. Click Next.
The Install to All or New Machines page opens.
Figure 3.26 Install to All or New Machines
13. Select whether to install the ZENworks Patch Management Agent on All selected devices, or
only New devices that do not already have an agent installed.
14. Click Next.
The Agent Installation Credentials page opens.
Figure 3.27 Agent Installation Credentials
- 37 -

Discovering Available Nodes
15. If credentials other than those used during the discovery are required for agent installation, clear
the Use discovered computers’ default credentials option and select the appropriate
credentials from the Credential list.
16. Click Next.
The Agent Installation Results page opens displaying the Agent installation progress in the
Current Status grid.
Figure 3.28 Agent Installation Results
You may cancel the installation on an per device basis, using the Cancel button shown in grid,
or cancel all installations using the Cancel button at the bottom of the page.
The installation results can be exported to a comma separated (csv) file using Export.
Note: It is not necessary to wait for all of the tasks to show as completed prior to exiting the
wizard. If you close the wizard before all tasks have completed, you can see the progress by
selecting to view the AMC Status or Activity Log.
17. To exit the wizard, click Finish.
- 38 -

Agent Management Center v6.4 - User Guide
Using the Wizard to Import Devices From a File
Whether or not your Agent Management Center is installed on a computer within a domain, you can
use the Discovery and Installation Wizard to import a list of devices.
Importing a List of Devices
1. Select Wizards > Discovery and Agent Installation to open the Discovery and Installation
Wiz ard.
The Welcome page opens.
Figure 3.29 Welcome page
- 39 -

Discovering Available Nodes
2. Click Next.
The Detection Type page opens.
Figure 3.30 Detection Type page
3. Select Import From File and click Next.
The Credentials page opens.
Figure 3.31 Select Credentials
4. Select a credential from the User list.
- 40 -

Agent Management Center v6.4 - User Guide
5. Click Next.
The Import from File page opens.
Figure 3.32 Import From File
6. Type or paste the device details, or click Browse to open an existing text (txt) file that
contains the list of devices.
Note: You must include either a valid WINS Computer Name, Fully Qualified Domain
Name, or IP Address for each device. In the text (
txt
) file, valid delimiters are commas or
\n (for a newline).
- 41 -

Discovering Available Nodes
7. Click Next.
The Select Machines to Install page will open.
Figure 3.33 Select Target Machines
8. Select one or multiple devices on which to install the ZENworks Patch Management Agent.
To Add individually selected computers click the right arrow ( > ) button.
To Add All computers click the double right arrow ( >> ) button.
To Remove a selected computer click the left arrow ( < ) button.
To Remove All selected computers click the double left arrow ( << ) button.
- 42 -

Agent Management Center v6.4 - User Guide
9. Click Next.
The Install to All or New Machines page opens.
Figure 3.34 Install to All or New Machines
10. Select whether to install the ZENworks Patch Management Agent on All selected devices, or
only New devices that do not already have an agent installed.
11. Click Next.
The Agent Installation Credentials page opens.
Figure 3.35 Agent Installation Credentials
- 43 -

Discovering Available Nodes
12. If credentials other than those used during the discovery are required for agent installation, clear
the Use discovered computers’ default credentials option and select the appropriate
credentials from the Credential list.
13. Click Next.
The Agent Installation Results page opens displaying the Agent installation progress in the
Current Status grid.
Figure 3.36 Agent Installation Results
You may cancel the installation on an per device basis, using the Cancel button shown in grid,
or cancel all installations using the Cancel button at the bottom of the page.
The installation results can be exported to a comma separated (csv) file using Export.
Note: It is not necessary to wait for all of the tasks to show as completed prior to exiting the
wizard. If you close the wizard before all tasks have completed, you can see the progress by
selecting to view the AMC Status or Activity Log.
14. To exit the wizard, click Finish.
- 44 -

Manually Discovering Nodes
The Agent Management Center Discovery and Installation Wizard is only one of the methods in
which to search for devices. Users of the Agent Management Center also have the ability to perform
a search manually.
Manually Performing an LDAP Scan
If your Agent Management Center is installed on a computer within domain using LDAP, you can
perform a manual LDAP scan for devices within that domain.
Manually Performing an LDAP Scan
1. Select LDAP from the Discover section of the left navigation bar.
The LDAP Scan page opens.
Agent Management Center v6.4 - User Guide
Figure 3.37 Manual LDAP Scan
- 45 -

Discovering Available Nodes
2. Type a valid LDAP search string in the Search Root: field or use the LDAP String Builder to
create a LDAP search string.
To use the LDAP String Builder:
a. Click LDAP String Builder.
The Active Directory Browser window opens.
Figure 3.38 Active Directory Browser
b. Type the name of the domain to search in the Domain Name field.
c. Select a credential that has access to the domain from the User list.
d. Click Show Directory.
The LDAP Tree will display.
e. Select the desired LDAP node to populate the Search String field.
f. Click OK.
The Active Directory Browser window closes, returning to the LDAP Scan page.
3. Select a credential that has access to the domain from the User list.
4. If desired, type a valid LDAP object type in the Filter on LDAP Type field to apply a filter to
your LDAP results.
- 46 -

Agent Management Center v6.4 - User Guide
5. Click Search.
The LDAP directory will be searched for valid devices.
6. Following the scan, you can view the discovered devices by opening the Install Agents page and
expanding the LDAP tree.
Manually Performing a Reverse DNS Lookup
Whether or not your Agent Management Center is installed on a computer within a domain, you can
perform a reverse DNS lookup to search your entire network based upon an IP Address range.
Manually Performing a Reverse DNS Lookup
1. Select Reverse DNS Lookup from the Discover section of the left navigation bar.
The Reverse DNS Lookup page opens.
Figure 3.39 Manual Reverse DNS Lookup
2. Type a St arting IP and Ending IP value.
3. Select a credential from the User list.
4. Click Start Scan.
The IP range will be searched for valid devices.
- 47 -

Discovering Available Nodes
5. Following the scan, you can view the discovered devices by opening the Install Agents page and
expanding the IP Network tree.
Manually Performing a Domain Scan
If your Agent Management Center is installed on a computer within a domain, you can perform a
domain scan to search for other devices within the domain.
Manually Performing a Domain Scan
1. Select Domain from the Discover section of the left navigation bar.
the Domain Scan page opens.
Figure 3.40 Manual Domain Scan
2. Select a credential that has access to the domain from the Username list.
3. To search a specific domain:
a. Type a domain name in the Domain field
b. Click Search for Computers.
The domain will be searched for valid devices.
- 48 -

Agent Management Center v6.4 - User Guide
4. To populate the Discovered Domain List and search one or multiple domains:
a. Click Find All Domains.
The discovered domains populate the Discovered Domain List.
b. Select one or multiple domains.
c. Click Search a Domain.
The selected domains will be searched for valid devices.
5. To search all domains:
a. Click Find/Search All without typing or selecting a domain.
All domains, the defined credential can access, will be searched for valid devices.
6. Following the scan, you can view the discovered devices by opening the Install Agents page and
expanding the Domain tree.
- 49 -

Discovering Available Nodes
- 50 -

Agent Management Center v6.4 - User Guide
4
Installing ZENworks Patch Management Agents
A function of the Agent Management Center is installing agents on the devices found within your
network. Agents can be installed on all of the devices found, or only on those devices which do not
already have the ZENworks Patch Management Agent installed.
Supported Agent Operating Systems
The Agent Management Center will install the ZENworks Patch Management Agent on the
following platforms:
• Microsoft Windows XP Professional
• Microsoft Windows XP Professional x64 edition
• Microsoft Windows 2000 Professional
• Microsoft Windows 2000 Server
• Microsoft Windows 2000 Advanced Server
• Microsoft Windows 2000 Datacenter Server
• Microsoft Windows Server™ 2003, Standard Edition
• Microsoft Windows Server 2003, Enterprise Edition
• Microsoft Windows Server 2003, Web Edition
• Microsoft Windows Server 2003, Datacenter Edition
• Microsoft Windows Server™ 2003, Standard x64 Edition
• Microsoft Windows Server 2003, Enterprise x64 Edition
• Microsoft Windows Server 2003, Datacenter x64 Edition
• Microsoft Windows Server 2003 R2, Standard Edition
• Microsoft Windows Server 2003 R2, Enterprise Edition
• Microsoft Windows Server 2003 R2, Datacenter Edition
• Microsoft Windows Server 2003 R2, Standard x64 Edition
• Microsoft Windows Server 2003 R2, Enterprise x64 Edition
• Microsoft Windows Server 2003 R2, Datacenter x64 Edition
Note: The Agent Management Center does not support installing the Novell ZENworks
Patch Management Agent on Microsoft Windows Vista.
- 51 -

Installing ZENworks Patch Management Agents
Determining Device Status
Following the device discovery, the discovered devices will be available from the Install Agents
section. Prior to installing agents using the Agent Management Center, an understanding of how the
AMC determines if the ZENworks Patch Management Agent can be installed on a device is
required.
Figure 4.1 Device Status
Understanding Installation Tests
Following the initial Agent discovery, the Agent Management Center continues to run installation
tests on each of the discovered devices. These tests determine whether the credentials assigned to
the device have the required user rights, and if the device meets the requirements for a remote
installation. These five tests are ran against each discovered device:
Remote Device Connection
Open Remote Registry
Copy Files
Open Service Control Manager
Ping
If any one of these tests fail, the Agent Management Center will not be able to install the ZENworks
Patch Management Agent on that device. Due to the nature of these tests, it is not possible to
determine whether a device failed due to it’s configuration or the use of credentials with insufficient
user rights.
- 52 -

Agent Management Center v6.4 - User Guide
Defining the Device Status
Depending upon the results of the installation tests, each device will display one of the following
icons:
Table 4.1 Device Status Icons
Icon Description
The installation tests have not been run on this device.
The installation tests have ran and were successful. An ZENworks Patch
Management Agent has not been installed on this device.
Note: If you have multiple Patch Management Servers, the AMC could
incorrectly indicate that an agent does not exist if that agent were registered with
a different Patch Management Server.
The installation tests have ran and were successful. An ZENworks Patch
Management Agent is already installed on this device.
The installation tests ran but were unsuccessful. An agent cannot be remotely
installed on this device.
Note: The AMC will continue to run the installation tests against this device.
Therefore, if the cause of the failure is corrected, the agent can be installed at a
later date.
Unresponsive Devices
If a device displays a gray or yellow icon for an extended period of time, it may be because the
device is in off or in a sleep state. If the device’s network card and BIOS have been configured to
respond to a Wake on LAN signal, you may be able to remotely boot or wake the device.
- 53 -

Installing ZENworks Patch Management Agents
Sending a Wake on LAN Signal
1. Select Install Agents from the Install section of the left navigation bar.
The Install Agents page opens.
Figure 4.2 Send Wake on LAN signal
2. Right-click on an unresponsive device.
The Right Mouse Menu displays.
3. Select Send Wake On LAN Signal.
The Wake on LAN signal is sent to the device.
4. If the device both supports Wake on LAN and Wake on LAN is enabled, the device should
resume normal operation.
- 54 -

Using the Agent Installation Wizard
Following the device discovery (either via the Discovery Wizard or manually), you can use the
Agent Installation Wizard to install ZENworks Patch Management Agents on the devices within
your network.
Installing Agents Using the Agent Installation Wizard
1. Select Wizards > Agent Installation to open the Agent Installation Wizard.
The Welcome page opens.
Agent Management Center v6.4 - User Guide
Figure 4.3 Agent Installation Wizard - Welcome page
- 55 -

Installing ZENworks Patch Management Agents
2. Click Next.
The Display Computers or Discovery Type page opens.
Figure 4.4 Display Computers or Discovery Type
3. Select Display all detected computers.
If you would rather filter by network type, select Filter detected computers by network type,
and select the specific network type.
4. Click Next.
The Select Machines to Install page opens.
Figure 4.5 Select Target Machines
- 56 -

Agent Management Center v6.4 - User Guide
5. Select one or multiple devices on which to install the ZENworks Patch Management Agent.
To Add individually selected computers click the right arrow ( > ) button.
To Add All computers click the double right arrow ( >> ) button.
To Remove a selected computer click the left arrow ( < ) button.
To Remove All selected computers click the double left arrow ( << ) button.
6. Click Next.
The Install to All or New Machines page opens.
Figure 4.6 Install to All or New Machines
7. Select whether to install the ZENworks Patch Management Agent on All selected devices, or
only New devices that do not already have an agent installed.
- 57 -

Installing ZENworks Patch Management Agents
8. Click Next.
The Agent Installation Credentials page opens.
Figure 4.7 Agent Installation Credentials
9. If credentials other than those used during the discovery are required for agent installation, clear
the Use discovered computers’ default credentials option and select the appropriate
credentials from the Credential list.
10. Click Next.
The Agent Installation Results page opens displaying the Agent installation progress in the
Current Status grid.
Figure 4.8 Agent Installation Results
- 58 -

You may cancel the installation on an per device basis, using the Cancel button shown in grid,
or cancel all installations using the Cancel button at the bottom of the page.
The installation results can be exported to a comma separated (csv) file using Export.
Note: It is not necessary to wait for all of the tasks to show as completed prior to exiting the
wizard. If you close the wizard before all tasks have completed, you can see the progress by
selecting to view the AMC Status or Activity Log.
11. To exit the wizard, click Finish.
Manually Installing Agents
After discovering the devices within your network, you can manually install ZENworks Patch
Management Agents on those devices.
Warning: If the number of devices selected exceeds the number of available licenses, an
warning message will display and you will be unable to continue the installation.
Agent Management Center v6.4 - User Guide
- 59 -

Installing ZENworks Patch Management Agents
Manually Installing Agents
1. Select Install Agents from the Install section of the left navigation bar.
The Install Agents page opens.
Figure 4.9 Install Agents
2. Select one or multiple devices on which to install the ZENworks Patch Management Agent,
adding them to the from the Selected Devices list.
To add individually selected devices, select the device and click the down arrow button.
You can add entire groups of devices, select the grouping (i.e. IP Network) and click the
down arrow button.
To remove a selected device, select the device and click the up arrow button.
3. To install using credentials other than those used to discover the device, select Use this
credential for all installs, and select a credential from the User list.
4. Select whether to Install on all selected machines, or to Install on new machines only.
5. Click Install.
The Current Status page opens, displaying the installation status.
- 60 -

Manually Uninstalling Agents
In addition to installing agents, the Agent Management Center also supports uninstalling agents on
the devices found within your network.
Uninstalling an ZENworks Patch Management Agent
1. Select Uninstall Agents from the Install section of the left navigation bar.
The Uninstall Agents page opens.
Agent Management Center v6.4 - User Guide
Figure 4.10 Uninstall Agents
2. Select one or multiple devices that will have the agent uninstalled, adding them to the Selected
Devices list.
To add individually selected devices, select the device and click the down arrow button.
You can add entire groups of devices, select the grouping (i.e. IP Network) and click the
down arrow button.
To remove a selected device, select the device and click the up arrow button.
3. To uninstall using credentials other than those used to discover the device, select Use this
credential for all uninstalls, and select a credential from the User list.
4. Click Uninstall.
The Current Status page opens, displaying the uninstallation status.
- 61 -

Installing ZENworks Patch Management Agents
Working With Offline Agents
Viewing Offline agents is one of the functions you can perform using the AMC.
Viewing Offline Agents
1. Select Offline Agents from the Manage section of the left navigation bar.
The Offline Agents page opens.
Figure 4.11 Offline Agents
2. Define the Days Offline value.
3. Click Search.
The agents that have been offline for the defined number of days will display.
4. With the resulting list of Offline Agents you can:
a. Select an agent and click Exclude Selected Agents to remove it from the list.
Note: The Exclude Selected Agents function will remove the agent from this list until the
next time it matches the criteria of the Days Offline search.
- 62 -

b. Click Delete Offline Agents to remove the remaining devices from your Patch
Management Server and release the licenses used by those agents.
Viewing the AMC Activity Logs
The AMC Activity Log page, allows you to view activity within a custom date range.
Viewing the Activity Log
1. Select Activity Log from the Status / Logs section of the left navigation bar.
The Activity Log page opens.
Agent Management Center v6.4 - User Guide
Figure 4.12 Activity Log
2. Click the start date drop-down arrow to select a Start date.
3. Click the end date drop-down arrow to select an End date.
4. Click Get Log.
The activity log for the defined date range displays.
5. Filter the Activity Log by clicking the funnel icon (found at the top of each column) for each
column you want to filter.
6. Clear all filters by clicking Clear Filters.
7. Click Export to export the activity log to an Microsoft Excel Workbook.
- 63 -

Installing ZENworks Patch Management Agents
- 64 -

Agent Management Center v6.4 - User Guide
A
Index
A
agent installation wizard ............... 55
Agent Management Center
install......................................2
upgrade .................................. 2
agents
install.................................... 55
offline ................................... 62
supported operating systems.... 51
uninstall ................................ 61
AMC
activity logs ........................... 63
configuration.......................... 16
installation pre-requisites........... 1
installing ............................. 2–6
supported operating systems...... 1
C
configuration
AMC...................................... 16
proxy .................................... 18
credentials
adding..................................... 9
deleting................................. 14
managing ...........................9–15
reassigning ............................ 11
validating .............................. 15
discover devices
manually ..........................45–49
using wizard......................19–44
discovery and installation wizard19–44
discovery wizard
import from file ...................... 39
I
install
agents................................... 60
manually .......................... 59
using wizard...................... 55
AMC.................................... 2–6
U
uninstall
agents................................... 61
W
wake on LAN ............................... 54
D
device discovery wizard ........... 19–44
domain scan .......................... 26
LDAP scan ............................. 19
reverse DNS lookup ................ 33
device status icons....................... 53
- 65 -

Novell, Inc.
1800 South Novell Place
Provo, UT 84606
www.novell.com
phone: 800.858.4000
© PatchLink Corporation 1997 - 2007. ALL RIGHTS RESERVED. U.S. Patent No. 6,990,660.
02_013N Agent Management Center v6.4 User Guide
 Loading...