


Novell®
www.novell.com
Installation Guide
ZENworks® Network Access Control
novdocx (en) 24 March 2009
AUTHORIZED DOCUMENTATION
5.0
September 22, 2008
Novell ZENworks Network Access Control Installation Guide

Legal Notices
Novell, Inc., makes no representations or warranties with respect to the contents or use of this documentation, and
specifically disclaims any express or implied warranties of merchantability or fitness for any particular purpose.
Further, Novell, Inc., reserves the right to revise this publication and to make changes to its content, at any time,
without obligation to notify any person or entity of such revisions or changes.
Further, Novell, Inc., makes no representations or warranties with respect to any software, and specifically disclaims
any express or implied warranties of merchantability or fitness for any particular purpose. Further, Novell, Inc.,
reserves the right to make changes to any and all parts of Novell software, at any time, without any obligation to
notify any person or entity of such changes.
Any products or technical information provided under this Agreement may be subject to U.S. export controls and the
trade laws of other countries. You agree to comply with all export control regulations and to obtain any required
licenses or classification to export, re-export or import deliverables. You agree not to export or re-export to entities on
the current U.S. export exclusion lists or to any embargoed or terrorist countries as specified in the U.S. export laws.
You agree to not use deliverables for prohibited nuclear, missile, or chemical biological weaponry end uses. See the
Novell International Trade Services Web page (http://www.novell.com/info/exports/) for more information on
exporting Novell software. Novell assumes no responsibility for your failure to obtain any necessary export
approvals.
novdocx (en) 24 March 2009
Copyright © 2008 Novell, Inc. All rights reserved. No part of this publication may be reproduced, photocopied,
stored on a retrieval system, or transmitted without the express written consent of the publisher.
Novell, Inc., has intellectual property rights relating to technology embodied in the product that is described in this
document. In particular, and without limitation, these intellectual property rights may include one or more of the U.S.
patents listed on the Novell Legal Patents Web page (http://www.novell.com/company/legal/patents/) and one or
more additional patents or pending patent applications in the U.S. and in other countries.
Novell, Inc.
404 Wyman Street, Suite 500
Waltham, MA 02451
U.S.A.
www.novell.com
Online Documentation: To access the latest online documentation for this and other Novell products, see
the Novell Documentation Web page (http://www.novell.com/documentation).

Novell Trademarks
For Novell trademarks, see the Novell Trademark and Service Mark list (http://www.novell.com/company/legal/
trademarks/tmlist.html).
Third-Party Materials
All third-party trademarks are the property of their respective owners.
This Novell software product includes open-source software components. Novell conforms to the terms and
conditions that govern the use of the open source components included in this product. Users of this product have
the right to access the open source code and view all applicable terms and conditions governing opens source
component usage. Visit http://www.novell.com/products/zenworks/networkaccesscontrol/opensource to access
open source code, applicable terms and conditions, and related information.
novdocx (en) 24 March 2009

novdocx (en) 24 March 2009
4 Novell ZENworks Network Access Control Installation Guide

Contents
What You Need to Get Started 7
1 Deployment Flexibility 9
1.1 Deploying Novell ZENworks Network Access Control Inline . . . . . . . . . . . . . . . . . . . . . . . . . . 11
1.2 Deploying Novell ZENworks Network Access Control Using DHCP . . . . . . . . . . . . . . . . . . . . 12
1.3 Deploying Novell ZENworks Network Access Control Using 802.1X. . . . . . . . . . . . . . . . . . . . 15
1.4 Installing the Network Interface Cards . . . . . . . . . . . . . . . . . . . . . . . . . . . . . . . . . . . . . . . . . . . 17
1.4.1 Inline . . . . . . . . . . . . . . . . . . . . . . . . . . . . . . . . . . . . . . . . . . . . . . . . . . . . . . . . . . . . . 17
1.4.2 DHCP. . . . . . . . . . . . . . . . . . . . . . . . . . . . . . . . . . . . . . . . . . . . . . . . . . . . . . . . . . . . . 17
1.4.3 802.1X . . . . . . . . . . . . . . . . . . . . . . . . . . . . . . . . . . . . . . . . . . . . . . . . . . . . . . . . . . . . 18
1.4.4 Determining eth0 and eth1 . . . . . . . . . . . . . . . . . . . . . . . . . . . . . . . . . . . . . . . . . . . . 18
1.5 Deploying Novell ZENworks Network Access Control in VPN Mode on a Different Network . 19
2 System Requirements 23
novdocx (en) 24 March 2009
2.1 General System Requirements . . . . . . . . . . . . . . . . . . . . . . . . . . . . . . . . . . . . . . . . . . . . . . . . 23
2.2 Important Browser Settings . . . . . . . . . . . . . . . . . . . . . . . . . . . . . . . . . . . . . . . . . . . . . . . . . . . 24
2.2.1 Pop-up Windows . . . . . . . . . . . . . . . . . . . . . . . . . . . . . . . . . . . . . . . . . . . . . . . . . . . . 24
2.2.2 Active Content . . . . . . . . . . . . . . . . . . . . . . . . . . . . . . . . . . . . . . . . . . . . . . . . . . . . . . 25
2.2.3 Minimum Font Size . . . . . . . . . . . . . . . . . . . . . . . . . . . . . . . . . . . . . . . . . . . . . . . . . . 26
2.2.4 Page Caching . . . . . . . . . . . . . . . . . . . . . . . . . . . . . . . . . . . . . . . . . . . . . . . . . . . . . . 27
2.2.5 Temporary Files. . . . . . . . . . . . . . . . . . . . . . . . . . . . . . . . . . . . . . . . . . . . . . . . . . . . . 28
3 Installing Novell ZENworks Network Access Control 31
3.1 Installing Novell ZENworks Network Access Control for the First Time . . . . . . . . . . . . . . . . . . 31
3.1.1 Downloading the New Install ISO Image . . . . . . . . . . . . . . . . . . . . . . . . . . . . . . . . . . 31
3.1.2 Creating the Installation CD from the Novell ZENworks Network Access Control
Download. . . . . . . . . . . . . . . . . . . . . . . . . . . . . . . . . . . . . . . . . . . . . . . . . . . . . . . . . . 32
3.1.3 Installing Novell ZENworks Network Access Control. . . . . . . . . . . . . . . . . . . . . . . . . 33
4 Configuring Novell ZENworks Network Access Control 53
A Installation and Configuration Check List 55
A.1 Minimum System Requirements . . . . . . . . . . . . . . . . . . . . . . . . . . . . . . . . . . . . . . . . . . . . . . . 55
A.2 Installation Location . . . . . . . . . . . . . . . . . . . . . . . . . . . . . . . . . . . . . . . . . . . . . . . . . . . . . . . . . 56
A.3 Installation Media . . . . . . . . . . . . . . . . . . . . . . . . . . . . . . . . . . . . . . . . . . . . . . . . . . . . . . . . . . . 56
A.4 IP Addresses, Hostname, Logins, and Passwords . . . . . . . . . . . . . . . . . . . . . . . . . . . . . . . . . 56
A.4.1 Single-server Installation . . . . . . . . . . . . . . . . . . . . . . . . . . . . . . . . . . . . . . . . . . . . . . 56
A.4.2 Multiple-server Installations . . . . . . . . . . . . . . . . . . . . . . . . . . . . . . . . . . . . . . . . . . . . 57
A.4.3 Proxy Server . . . . . . . . . . . . . . . . . . . . . . . . . . . . . . . . . . . . . . . . . . . . . . . . . . . . . . . 59
A.5 Agentless Credentials . . . . . . . . . . . . . . . . . . . . . . . . . . . . . . . . . . . . . . . . . . . . . . . . . . . . . . . 59
A.6 Quarantine . . . . . . . . . . . . . . . . . . . . . . . . . . . . . . . . . . . . . . . . . . . . . . . . . . . . . . . . . . . . . . . . 60
A.6.1 802.1X . . . . . . . . . . . . . . . . . . . . . . . . . . . . . . . . . . . . . . . . . . . . . . . . . . . . . . . . . . . . 60
A.6.2 802.1X Devices . . . . . . . . . . . . . . . . . . . . . . . . . . . . . . . . . . . . . . . . . . . . . . . . . . . . . 61
A.6.3 DHCP. . . . . . . . . . . . . . . . . . . . . . . . . . . . . . . . . . . . . . . . . . . . . . . . . . . . . . . . . . . . . 62
A.6.4 Accessible services . . . . . . . . . . . . . . . . . . . . . . . . . . . . . . . . . . . . . . . . . . . . . . . . . . 62
A.7 Notifications . . . . . . . . . . . . . . . . . . . . . . . . . . . . . . . . . . . . . . . . . . . . . . . . . . . . . . . . . . . . . . . 63
Contents 5

A.8 Test Exceptions . . . . . . . . . . . . . . . . . . . . . . . . . . . . . . . . . . . . . . . . . . . . . . . . . . . . . . . . . . . . 64
novdocx (en) 24 March 2009
6 Novell ZENworks Network Access Control Installation Guide

What You Need to Get Started
You need the following prior to installing and running Novell® ZENworks® Network Access
Control:
Minimum system (hardware and software) requirements – See Chapter 2, “System
Requirements,” on page 23
IP addresses you will enter during the set up process – See Appendix A, “Installation and
Configuration Check List,” on page 55
Install CD – See Chapter 3, “Installing Novell ZENworks Network Access Control,” on
page 31
This Installation Guide helps you install and set up Novell ZENworks Network Access Control. The
Novell ZENworks Network Access Control Users Guide (available on the CD in the /docs
directory and through the online help links in Novell ZENworks Network Access Control) provides
Novell ZENworks Network Access Control configuration information and task-based instructions.
novdocx (en) 24 March 2009
What You Need to Get Started 7

novdocx (en) 24 March 2009
8 Novell ZENworks Network Access Control Installation Guide

1
Deployment Flexibility
Novell® ZENworks® Network Access Control v5.0 allows you to deploy multiple Enforcement
servers (ESs) across a network and manage them from one central Management server (MS). You
create logical groups of ESs by joining them to an Enforcement cluster.
The Novell ZENworks Network Access Control MS specifies many aspects of the Enforcement
clusters; for example, the MS specifies the enforcement method (inline, DHCP, or 802.1X), how
often the endpoints are retested, the tests run on the endpoints, and how to control the endpoints’
access.
The Novell ZENworks Network Access Control ESs detect and test endpoints on the network for
compliance.
You can deploy each Novell ZENworks Network Access Control cluster in one of the following
configurations:
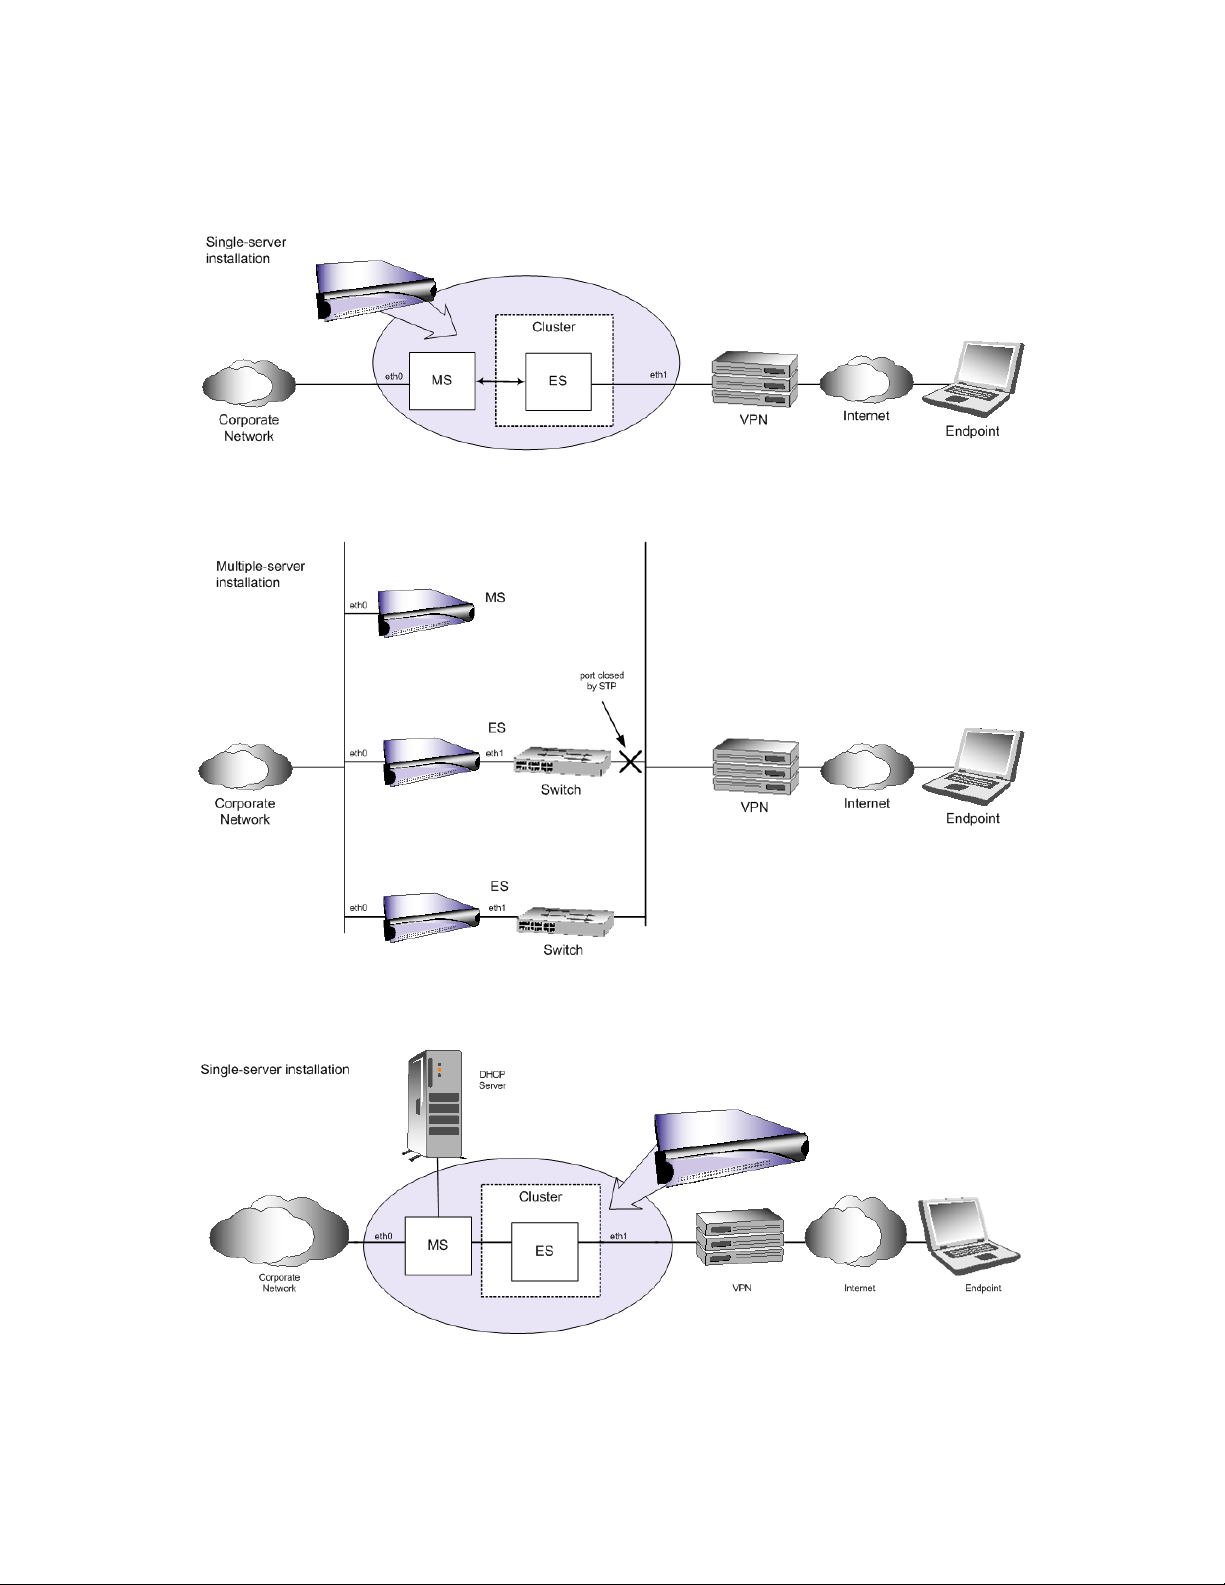
Inline — When deploying Novell ZENworks Network Access Control inline, Novell
ZENworks Network Access Control monitors and enforces all endpoint traffic. When Novell
ZENworks Network Access Control is deployed as a single-server installation, Novell
ZENworks Network Access Control becomes a Layer 2 bridge that requires no changes to the
network configuration settings. When Novell ZENworks Network Access Control is installed
in a multiple-server installation, you might have to configure the switch that connects the
Novell ZENworks Network Access Control Enforcement servers to use Spanning Tree
Protocol (STP) if STP is not already configured. Novell ZENworks Network Access Control
allows endpoints to access the network or blocks endpoints from accessing the network based
on their Internet Protocol (IP) address with a built-in firewall (iptables).
novdocx (en) 24 March 2009
1
DHCP — When deploying Novell ZENworks Network Access Control inline with a Dynamic
Host Configuration Protocol (DHCP) server, all DHCP requests pass through the Novell
ZENworks Network Access Control server Layer 2 bridge. For a quarantined endpoint, Novell
ZENworks Network Access Control distributes the quarantined IP address for the endpoint. If
Novell ZENworks Network Access Control allows the endpoint to have access, Novell
ZENworks Network Access Control allows your real DHCP server to distribute a nonquarantined IP address. Novell ZENworks Network Access Control assigns a DHCP IP address
based on the quarantine area parameters you define during configuration. You can place
restrictions on network access either at the gateway for the endpoint using Access Control Lists
(ACLs), or on the endpoint by removing the endpoint’s gateway and adding static routes for
accessible networks.
802.1X — When deploying Novell ZENworks Network Access Control in an 802.1X
environment, you must install it where it can communicate with the Remote Authentication
Dial-In User Service (RADIUS) server (or, Novell ZENworks Network Access Control has a
built-in RADIUS server that you can use). The RADIUS server communicates with the switch,
which performs the quarantining by moving ports or MAC addresses in and out of virtual local
area networks (VLANs).
Deployment Flexibility
9
The following figures illustrate various deployment methods:
Figure 1-1 Single-server Installation, Quarantine Method, Inline
Figure 1-2 Multiple-server Installation, Quarantine Method, Inline
novdocx (en) 24 March 2009
Figure 1-3 Single-server Installation, Quarantine Method, DHCP, Flat Network
10 Novell ZENworks Network Access Control Installation Guide
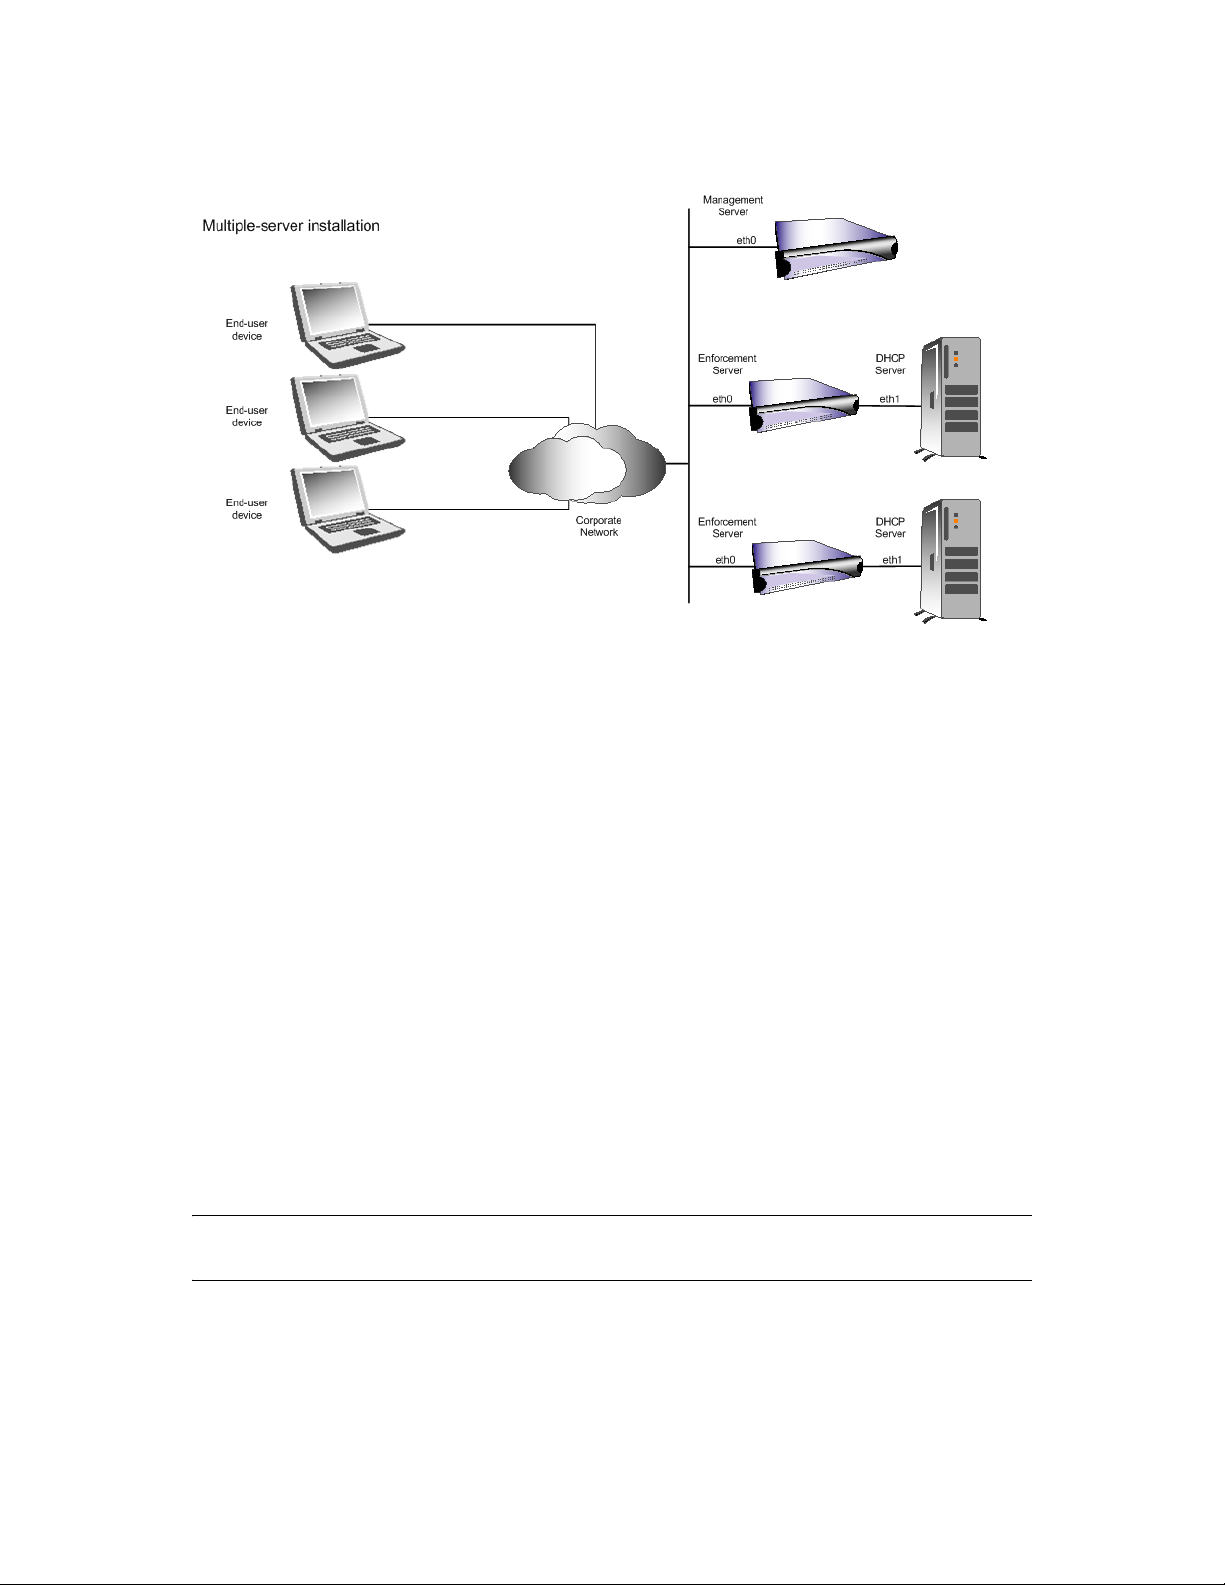
Figure 1-4 Multiple-server Installation, Quarantine Method, DHCP
novdocx (en) 24 March 2009
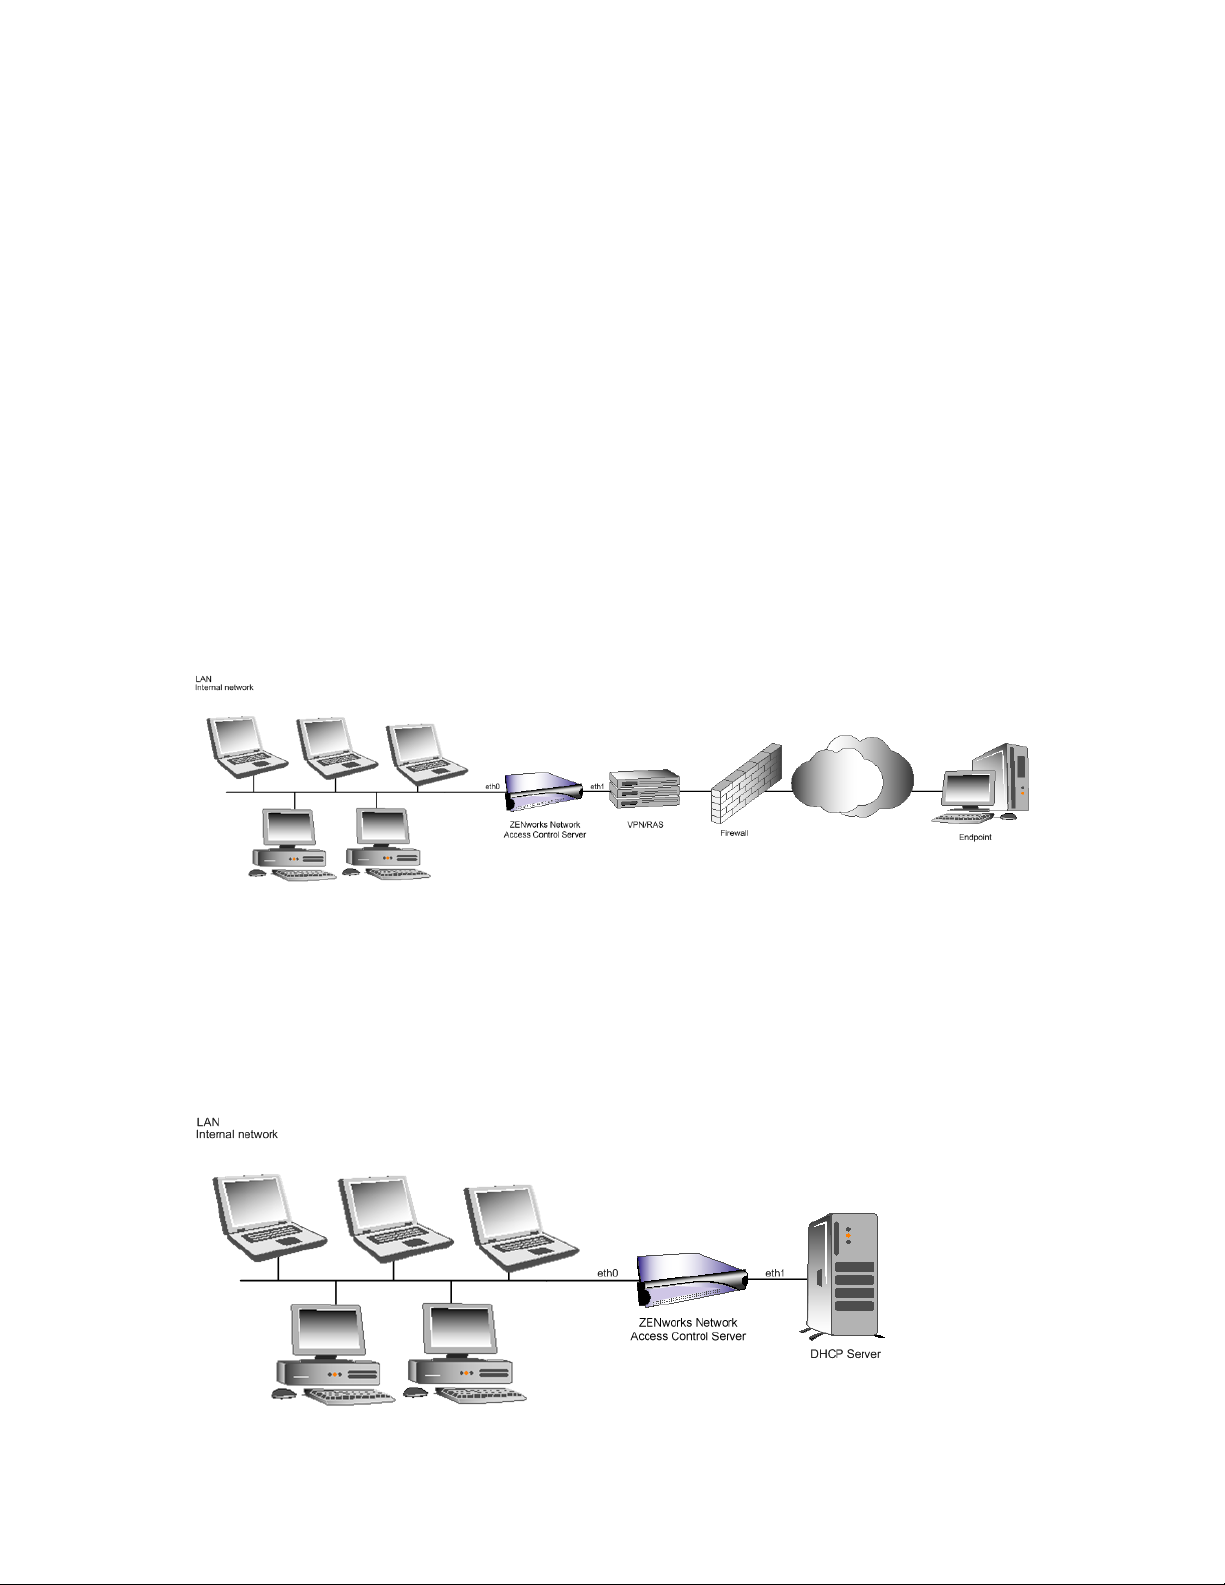
1.1 Deploying Novell ZENworks Network Access Control Inline
The ES’s position in the network is between the endpoints and the rest of the network; acting as a
gateway and only allowing endpoints access to network resources that have met the necessary
security requirements. Novell ZENworks Network Access Control uses two network interfaces to
bridge traffic between endpoints and the rest of the network. Novell ZENworks Network Access
Control uses a high-speed, Layer 2 bridge; network IP address changes are not required. Since
Novell ZENworks Network Access Control itself denies endpoints access to the network, policy
enforcement using internal routers, switches, or other endpoints is not required.
Novell ZENworks Network Access Control utilizes a pass-through authentication feature that
allows it to work with any virtual private network (VPN), remote access server (RAS), and network
authentication protocol or directory.
By default, an onboard firewall blocks all traffic from endpoints. Novell ZENworks Network
Access Control allows network access to only successfully tested endpoints (or when there is a grace
period for failed tests). When a test or tests pass, Novell ZENworks Network Access Control inserts
rules into the onboard firewall to allow all traffic from the endpoint. Novell ZENworks Network
Access Control uses a proprietary method to uniquely identify each endpoint as it connects to the
network, and does not install cookies or software on the end-user’s endpoint.
NOTE: When the MS and ES are installed on the same server (single-server Installation), that
server’s position in the network must be between the endpoints and the rest of the network.
Deployment Flexibility 11

1.2 Deploying Novell ZENworks Network Access Control Using DHCP
When you configure Novell ZENworks Network Access Control with a DHCP quarantine area, the
Novell ZENworks Network Access Control ES must sit inline with your DHCP server. If this is not
possible, you must configure a remote host for Device Activity Capture (DAC) as described in the
User’s Guide, Remote Device Activity Capture with a quarantined endpoint, the ES responds to the
DHCP request and blocks the request from getting to the main DHCP server. When the endpoint is
allowed access, Novell ZENworks Network Access Control does not respond to the DHCP request
and lets the request through to the main DHCP server which responds with normal DHCP settings.
The Novell ZENworks Network Access Control DHCP server can respond to quarantined endpoints
with one of these two types of DHCP settings:
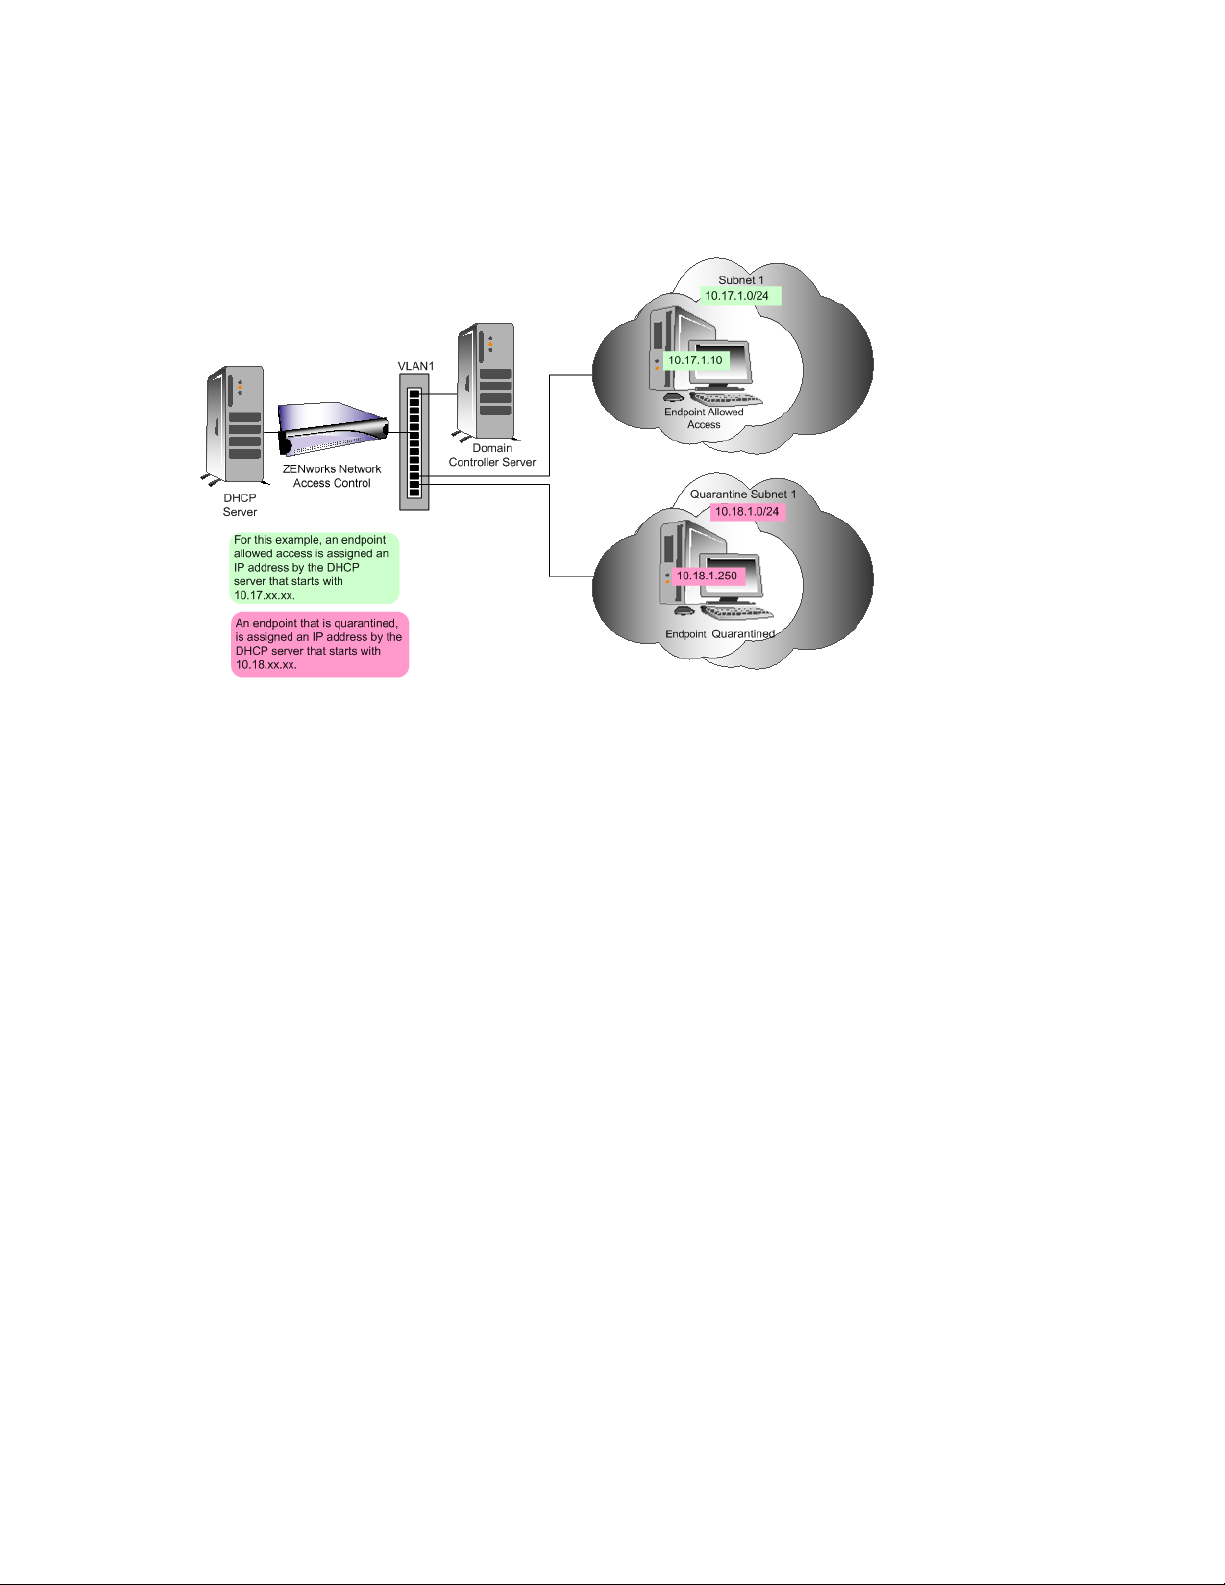
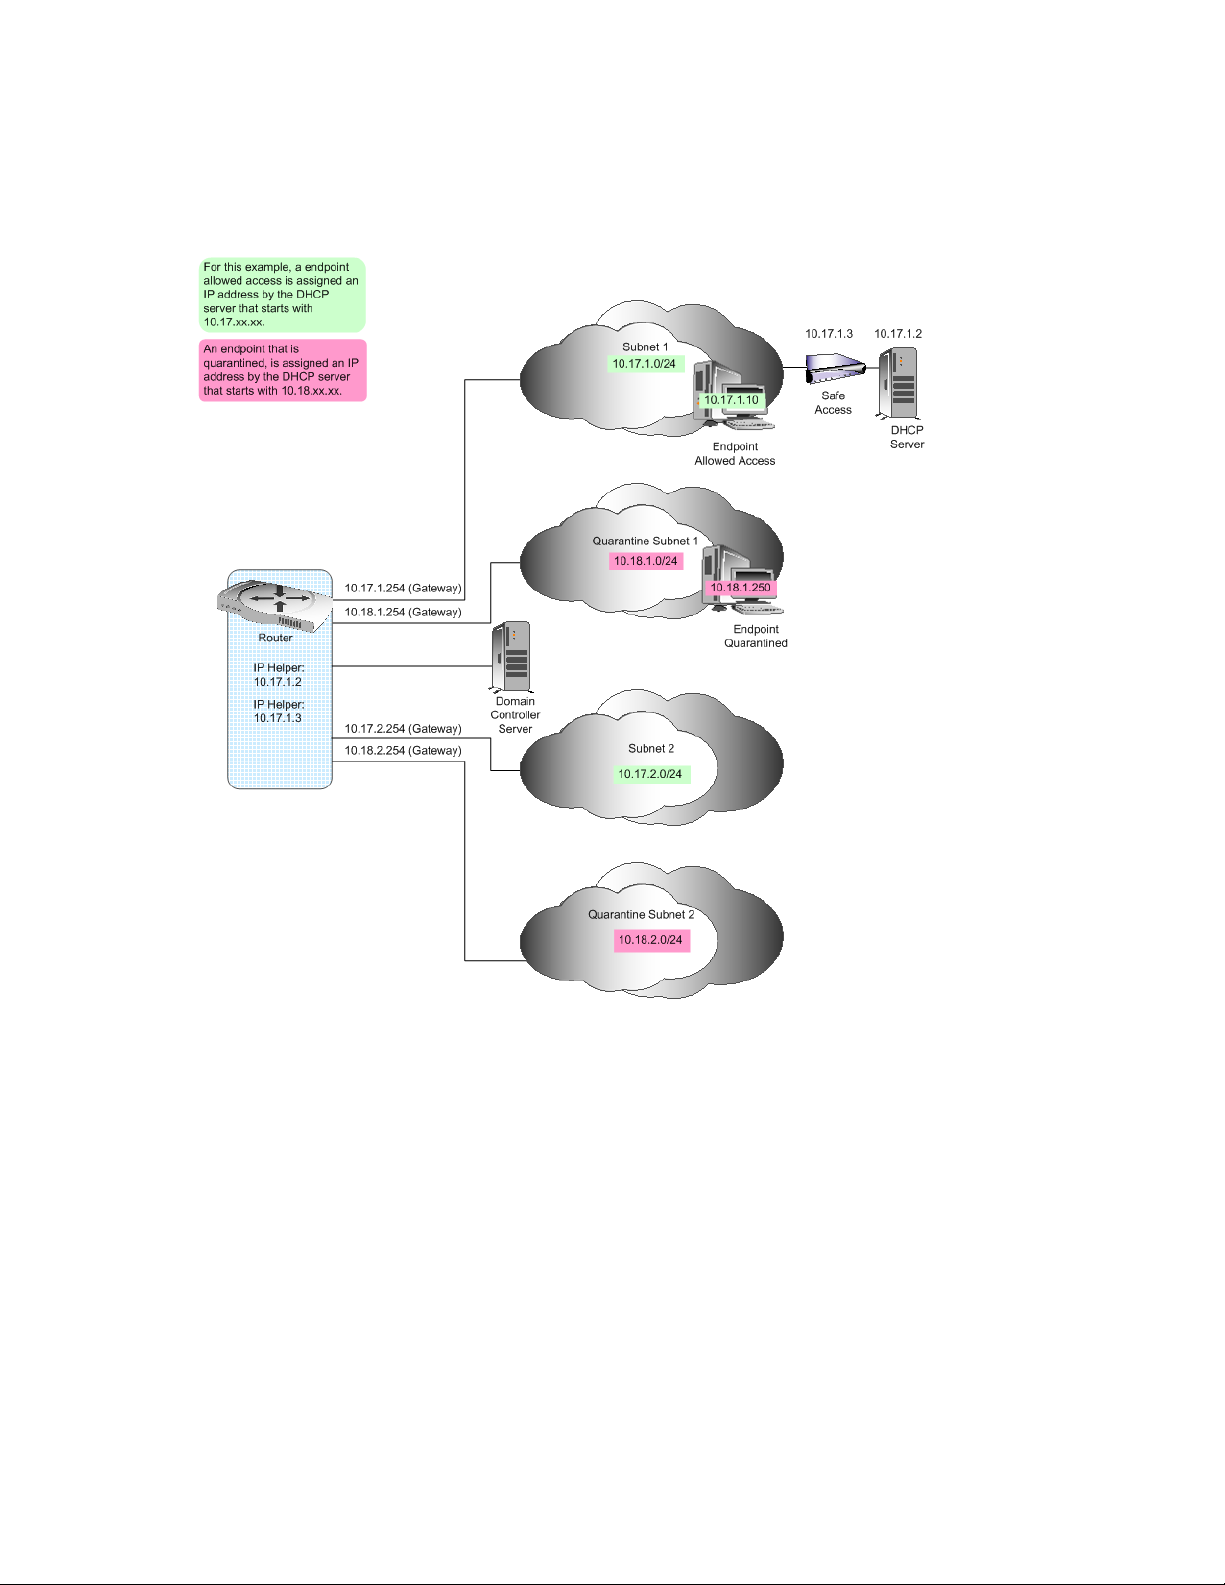
DHCP settings for a separate quarantine subnetwork — In this case, network access is
restricted by adding ACLs to your router between the quarantine subnetwork and all other
networks. You must also add an IP helper address for the Novell ZENworks Network Access
Control ES, and a secondary IP address for the quarantined subnetworks gateway to the router.
DHCP settings using static routes — In this case, network access is restricted by giving the
endpoint a normal IP address but not assigning a gateway. The advantage of this method is that
it requires only one router change to add an IP helper address for the Novell ZENworks
Network Access Control ES. Also, some routers do not like multi-netting, which is required by
the first method and not by this method of DHCP enforcement. The Novell ZENworks
Network Access Control ES uses the following DHCP settings:
novdocx (en) 24 March 2009
Gateway — None
Netmask — 255.255.255.255
DNS — Novell ZENworks Network Access Control ES IP address
Static routes — Configurable list of accessible IP addresses and networks
These DHCP settings effectively restrict all network access except to the IP addresses and networks
specified as static routes in the accessible endpoints and services area. A list of Web sites can also be
configured as accessible. You can access these Web sites through a proxy server, which is built into
the Novell ZENworks Network Access Control ES. The Novell ZENworks Network Access Control
ES responds to DHCP INFO requests to automatically configure the proxy server in the browser.
Once the endpoint is allowed access, the IP address is automatically renewed and the main DHCP
server assigns an IP address in the main LAN.
NOTE: When the MS and ES are installed on the same server (single-server Installation), that
server’s position in the network must be inline with your DHCP server. It is the ES that responds to
the DHCP request and blocks the request from getting to the main DHCP server.
TIP: When using DHCP mode and connecting directly to the DHCP server's network interface, be
sure to use a crossover cable.
12 Novell ZENworks Network Access Control Installation Guide
The following figure shows an example installation scenario for a simple (one LAN) setup with
enforcement using ACLs on a router:
Figure 1-5 Single-server Installation, DHCP Mode, Simple Example
novdocx (en) 24 March 2009
Deployment Flexibility 13
The following figure shows an example installation scenario for a complex (multiple LAN) setup
with enforcement using ACLs on a router:
Figure 1-6 Single-server Installation, DHCP Mode, Complex Example
novdocx (en) 24 March 2009
14 Novell ZENworks Network Access Control Installation Guide
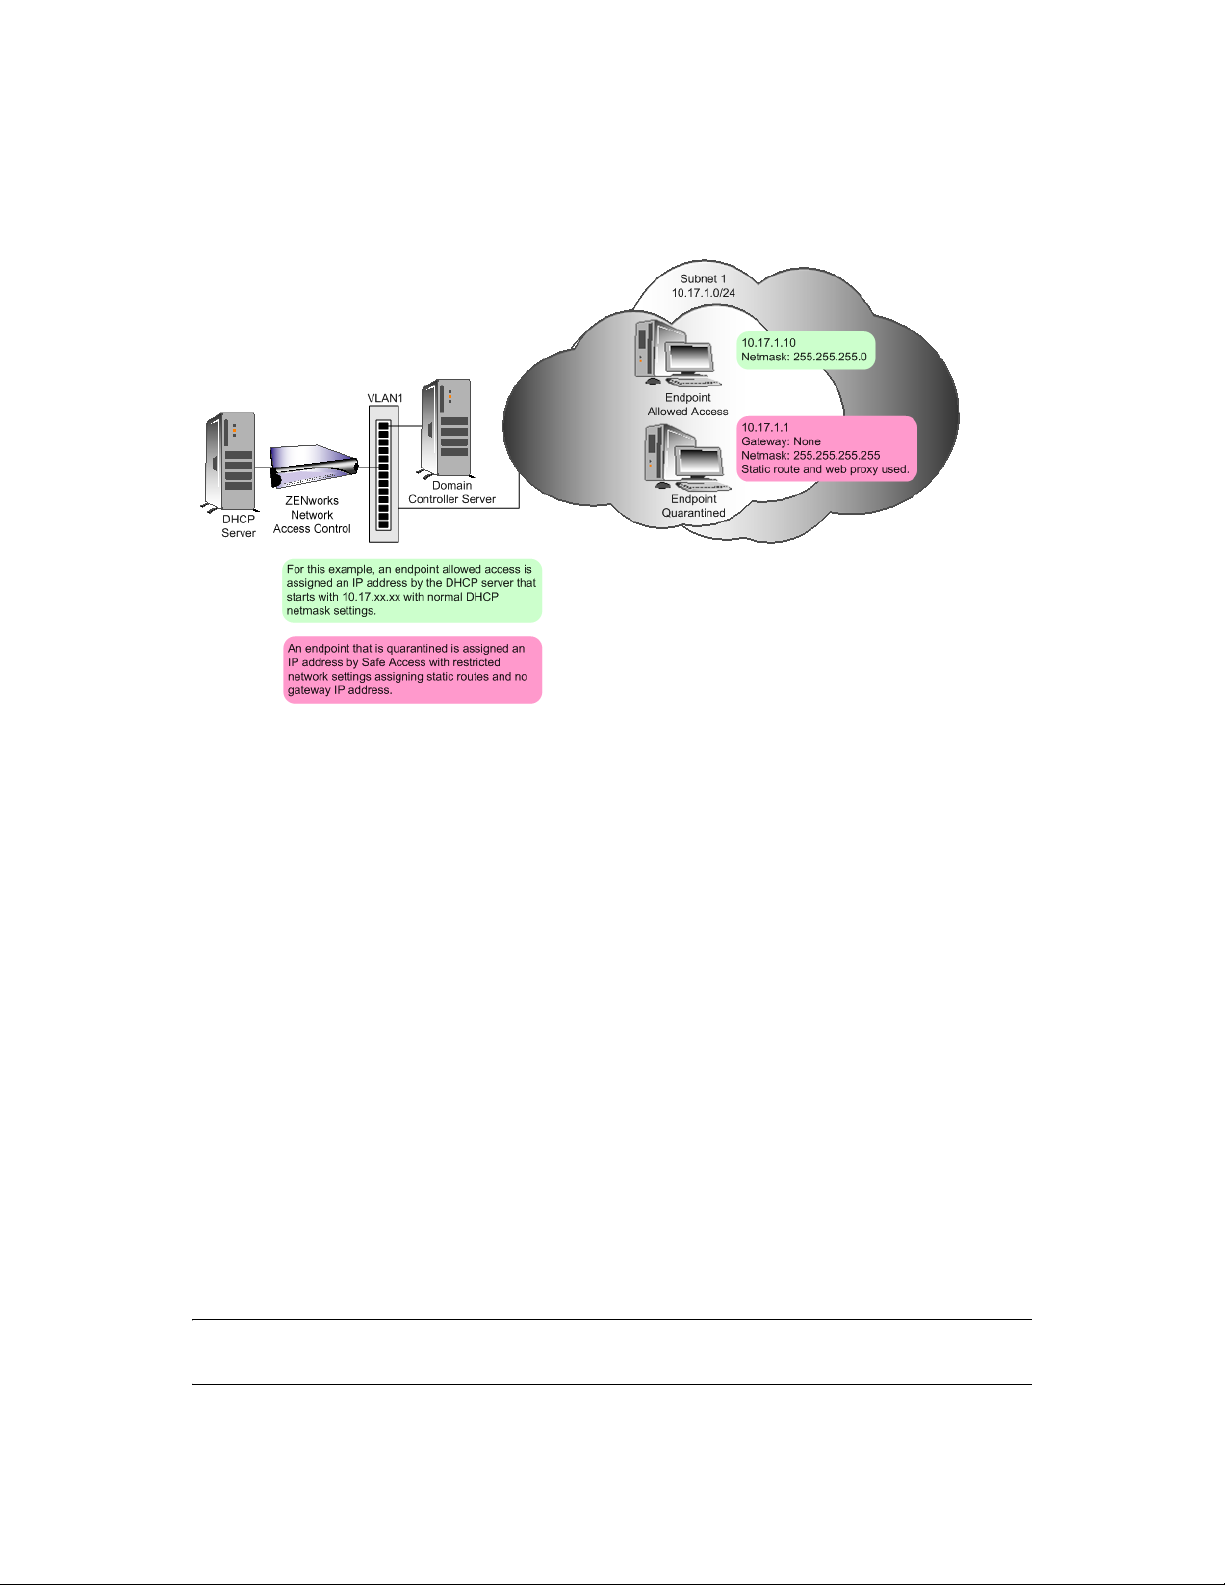
The following figure shows an example installation scenario for a setup with enforcement with static
routes on the endpoint:
Figure 1-7 Single-server Installation, Endpoint Static Route Enforcement
novdocx (en) 24 March 2009
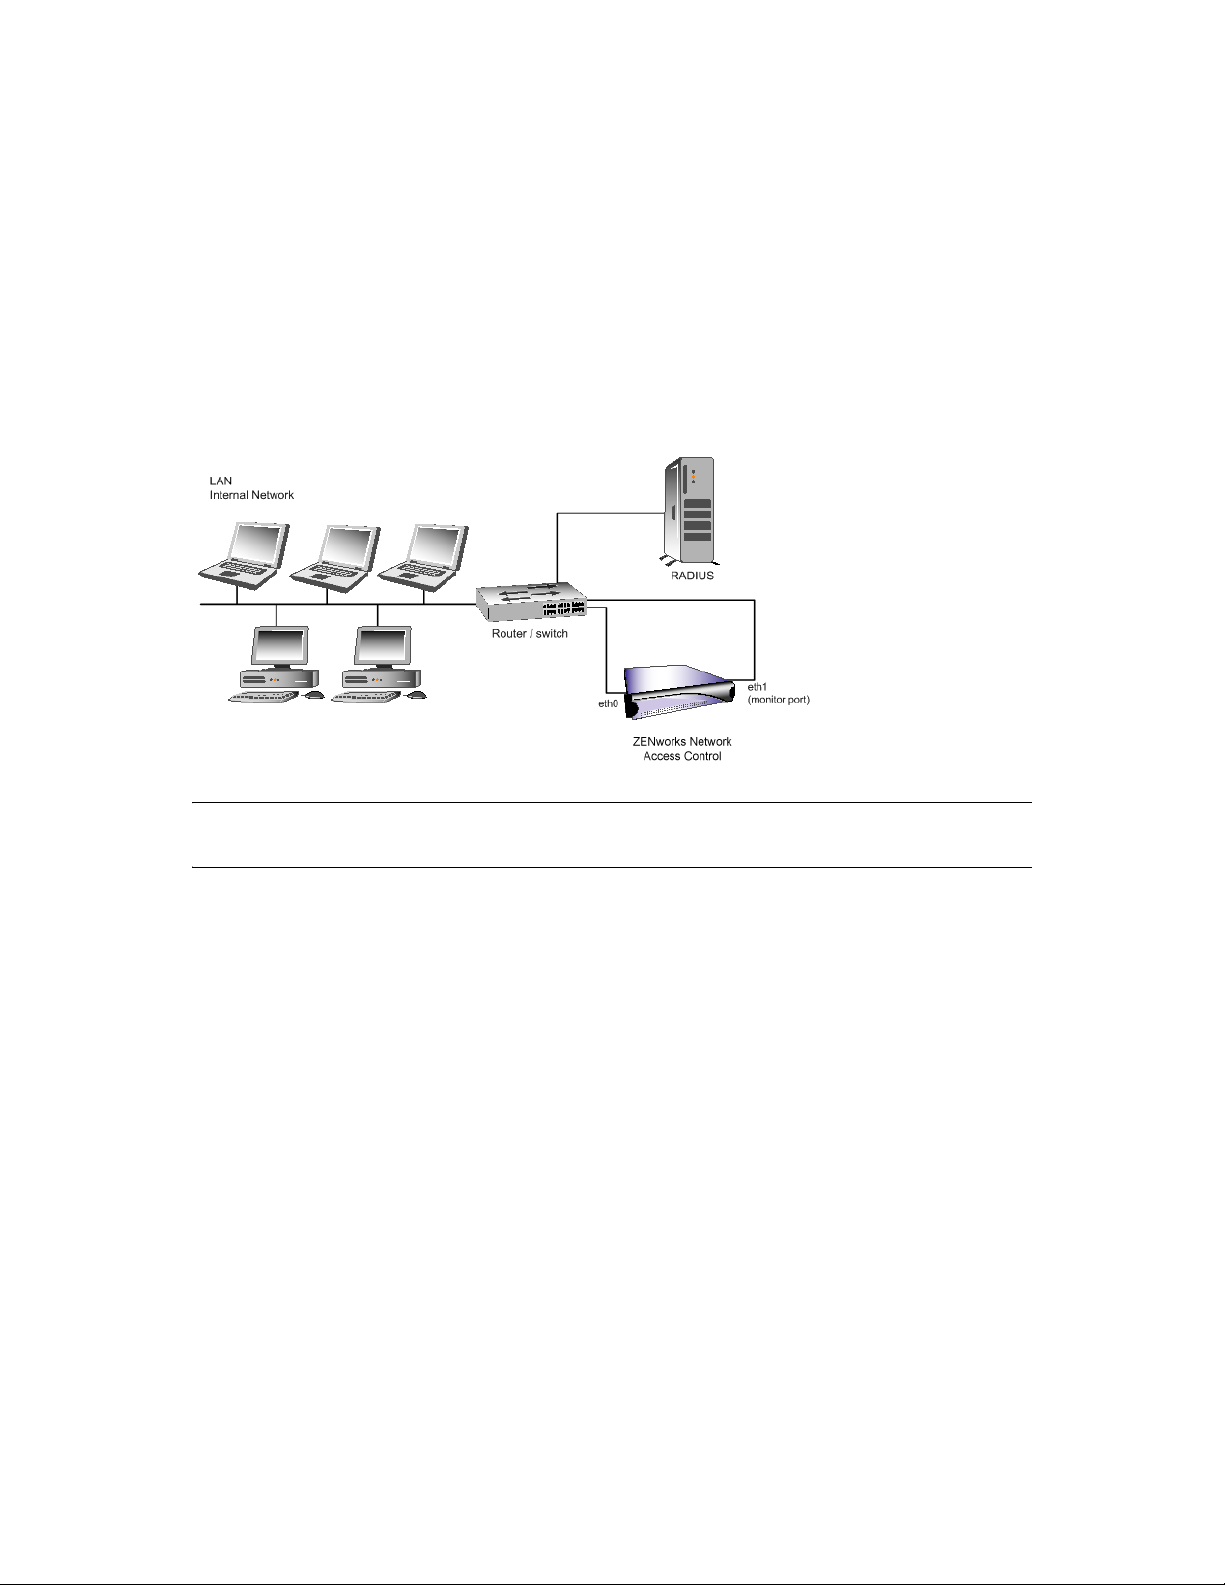
1.3 Deploying Novell ZENworks Network Access Control Using 802.1X
To configure Novell ZENworks Network Access Control as 802.1X-enabled, install it with one of
three different configurations, depending on your network environment (see Figure 1-8 on page 16):
1 Use the built-in Novell ZENworks Network Access Control RADIUS server to proxy to any
other RADIUS server. In this configuration, the switch performs the 802.1X authentication
against the Novell ZENworks Network Access Control RADIUS server, which proxies the
request to another RADIUS server. During the return proxy of the authentication request, the
Novell ZENworks Network Access Control ES instructs the switch in which VLAN is to place
the endpoint based on its test status.
2 Use the built-in Novell ZENworks Network Access Control RADIUS server and user accounts.
In this configuration, the switch performs the 802.1X authentication against the Novell
ZENworks Network Access Control RADIUS server. The Novell ZENworks Network Access
Control ES instructs the switch in which VLAN to place the endpoint, based on its test status.
3 Use the IAS plug-in to integrate with your existing radius server. In this configuration, the
switch performs the 802.1X authentication against the Microsoft Internet Authentication
Service (IAS) RADIUS server. A Novell ZENworks Network Access Control plug-in to the
IAS RADIUS server is available that instructs the switch in which VLAN to place the endpoint
based on its test status.
NOTE: With a single-server Installation, the ES instructs the switch in which VLAN to place the
endpoint.
Deployment Flexibility 15

TIP: If the ES cannot see traffic on a mirrored port on a switch, you must configure a remote host
for Device Activity Capture (DAC) as described in the User’s Guide, Remote Device Activity
Capture.
A sample deployment is shown in the following figure:
Figure 1-8 802.1X Enforcement
novdocx (en) 24 March 2009
16 Novell ZENworks Network Access Control Installation Guide
1.4 Installing the Network Interface Cards
The number of network interface cards (NICs) required depends on the installation method selected
as described in this section.
1.4.1 Inline
The inline installation of Novell ZENworks Network Access Control, where the MS and ES are
installed on a single server, requires two network interface cards (NICs) installed for Novell
ZENworks Network Access Control to operate properly.
The inline installation of Novell ZENworks Network Access Control where the MS and ES are
installed on different servers requires at least three NICs; one for the MS and two for each ES.
novdocx (en) 24 March 2009
The inline installation interfaces form a bridge from one part of your network to another as shown in
the following figure. The Linux
eth0, eth1, and so on). It is very important that you connect the eth0 interface to your local area
network (LAN) side, and eth1 to the Virtual Private Network (VPN) side (for inline mode or for
the main DHCP server in DHCP mode).
Figure 1-9 Single-server Installation, Ethernet Card Installation, Inline
®
operating system assigns each interface a name (for example,
1.4.2 DHCP
A DHCP installation requires two NICs where the MS and ES are installed on the same server (see
Figure 1-10), and at least three NICs where the MS and ES are installed on different servers; one for
the MS and two for each ES.
Figure 1-10 Single-server Installation, Ethernet Card Installation, DHCP
Deployment Flexibility 17
1.4.3 802.1X
802.1X-enabled Novell ZENworks Network Access Control installations require one NIC where the
MS and ES are installed on the same server (see Figure 1-11), and two NICs where the MS and ES
are installed on different servers. In 802.1X mode, eth1 on Novell ZENworks Network Access
Control is used to discover endpoints on the network. To discover endpoints on the local network,
eth1 can simply be plugged into a port on that subnet because it receives broadcast traffic. To
discover endpoints on other networks, eth1 must be connected to a mirrored port or a port that is
part of a tagged VLAN trunk to detect traffic from endpoints on these other networks. Usually,
mirroring the ports in which the DNS and DHCP server resides detects new endpoints sufficiently.
Figure 1-11 Single-server Installation, Ethernet Card Installation, 802.1X
novdocx (en) 24 March 2009
TIP: It is strongly recommended that you use the Intel NIC cards. If you use a different NIC card,
you might be unable to connect, or experience unpredictable results and availability.
1.4.4 Determining eth0 and eth1
To determine which interface is eth0 and which is eth1 using ethtool:
1 After installing Novell ZENworks Network Access Control, plug an Ethernet cable into only
one of the interfaces.
2 Log into the Novell ZENworks Network Access Control MS as root and enter one of the
following commands:
2a ethtool eth0
2b ethtool -p ethn x
Where:
n is the number of the Ethernet interface, for example 0
18 Novell ZENworks Network Access Control Installation Guide

x is the number of seconds to allow the lights to blink
3 The return values are similar to the following, which also indicates that the connected interface
is eth0:
# ethtool eth0
Settings for eth0:
Supported ports: [ MII ]
Supported link modes: 10baseT/Half 10baseT/Full
100baseT/Half 100baseT/Full
1000baseT/Half 1000baseT/Full
Supports auto-negotiation: Yes
Advertised link modes: 10baseT/Half 10baseT/Full
100baseT/Half 100baseT/Full
1000baseT/Half 1000baseT/Full
Advertised auto-negotiation: Yes
Speed: 100Mb/s
Duplex: Full
Port: Twisted Pair
PHYAD: 1
Transceiver: internal
Auto-negotiation: on
Supports Wake-on: g
Wake-on: d
Current message level: 0x000000ff (255)
Link detected: yes
novdocx (en) 24 March 2009
TIP: In normal operation, Novell ZENworks Network Access Control does not respond to Internet
Control Message Protocol (ICMP or ping) echo requests.
1.5 Deploying Novell ZENworks Network Access Control in VPN Mode on a Different Network
When Novell ZENworks Network Access Control is deployed in VPN mode, the eth1 interface on
Novell ZENworks Network Access Control is usually connected directly (either by way of a
crossover cable, isolated switch, or VLAN) to the LAN-facing side of the VPN concentrator. If the
same logical subnet (such as, 10.10.0.0/16) is used for Novell ZENworks Network Access Control,
the concentrator, and the VPN clients, no modifications need be made.
However, problems can arise if the following conditions are all true:
Novell ZENworks Network Access Control is in a different logical subnet than that used by the
VPN concentrator OR the VPN client endpoints.
The router on the LAN (eth0) side of Novell ZENworks Network Access Control is configured
for best-practices egress filtering, and will not route packets that have a source IP address
outside the network segment from which they appear to originate.
See the SANS Egress Filtering FAQ (http://www.sans.org/reading_room/whitepapers/
firewalls/1059.php) for a more thorough discussion of egress filtering.
The most obvious symptom of this situation is that Novell ZENworks Network Access Control will
not be able to redirect endpoint clients (they will get a blank browser page that appears to take
forever to load) but the endpoint browser is able to browse directly to https://<Novell
ZENworks Network Access Control_IP_Address>:89/ and get tested.
Deployment Flexibility 19

For example, for the following IP addresses:
Router IP — 10.1.90.254, on a /24
Novell ZENworks Network Access Control IP — 10.1.90.130, on a /24
VPN concentrator IP — 10.1.90.131, on a /24
VPN client IP range —10.1.105.0/24
The VPN concentrator is configured to hand out IP addresses on the 10.1.105.0/24 subnet, while
Novell ZENworks Network Access Control and the VPN concentrator itself are on the 10.1.90.0/24
subnet. Both Novell ZENworks Network Access Control and the VPN concentrator have a default
route set through 10.1.90.254 which is a router or Layer 3 switch on the LAN (eth0) side of Novell
ZENworks Network Access Control.
Because a connecting VPN endpoint is not on the same subnet as Novell ZENworks Network
Access Control, all of the packets that Novell ZENworks Network Access Control sends (in
response to HTTP requests from the endpoint) go to the router at 10.1.90.254, which knows to send
them (back through the Novell ZENworks Network Access Control bridge) to the VPN concentrator
for a next hop. For normal communication (such as testing traffic) between Novell ZENworks
Network Access Control and an endpoint, this works fine, even if it seems a bit inefficient.
novdocx (en) 24 March 2009
However, when Novell ZENworks Network Access Control redirects an HTTP connection, it first
constructs an HTTP redirect with a source IP address corresponding to the original destination of the
connection.
For example:
1. The endpoint connects to the VPN, and the browser requests www.google.com.
2. Novell ZENworks Network Access Control intercepts the packets addressed to google.com.
3. Novell ZENworks Network Access Control constructs an HTTP redirection to the Novell
ZENworks Network Access Control IP, using packets which have a source IP address of
www.google.com.
4. Novell ZENworks Network Access Control sends the constructed redirect to the VPN endpoint
using the Novell ZENworks Network Access Control default route.
Those packets go to the LAN side router, which in our scenario is configured with best-practices
egress filtering. The router treats those packets as errors (because they are marked with a source IP
address that should not emanate from that network segment) and drops them. This is why testing
works when the endpoint connects directly to emanate—the response packets still go to the LANside router, but it routes them appropriately because they have a valid source address.
The solution is to add a static route to Novell ZENworks Network Access Control so that it knows to
send packets addressed to 10.1.105 via the VPN concentrator instead of the LAN-side router, and it
will redirect correctly.
You also want to make the static route addition permanent across reboots.
To add a permanent static route to the Novell ZENworks Network Access Control
server:
1 Log in as root to the Novell ZENworks Network Access Control server using SSH or directly
with a keyboard.
20 Novell ZENworks Network Access Control Installation Guide

2 Open the following file with a text editor, such as vi.
/etc/rc.local
3 Add something like the following:
#
# explicit routes for VPN subnets should go to the VPN router,
# not the default gateway
#
/sbin/route add -net 10.1.105.0/24 gw 10.1.90.131
Where, for other network configurations or additional VPN profiles you need to add routes
appropriate to the subnet or subnets involved.
novdocx (en) 24 March 2009
Deployment Flexibility 21

novdocx (en) 24 March 2009
22 Novell ZENworks Network Access Control Installation Guide

2
System Requirements
The following sections contain more information:
Section 2.1, “General System Requirements,” on page 23
Section 2.2, “Important Browser Settings,” on page 24
2.1 General System Requirements
The following hardware and software is required to install and operate Novell® ZENworks®
Network Access Control.
Table 2-1 ZENworks Network Access Control System Requirements
Item Minimum Recommended
novdocx (en) 24 March 2009
2
Server — A dedicated server or servers for product installation
with the following minimum system requirements:
Processor Pentium 4 2 GHz Pentium 4 or
RAM 2 GB 4 GB
Disk space 73 GB 146 GB
Multiple-server installation:
MS installation — One server-class network
interface cards (NICs)
and —
ES installation —
DHCP — Two server-class network interface
cards (NICs)
Inline — Two server-class network interface cards
(NICs)
802.1X-enabled installation — One server-class
network interface cards
Single-server installation — Two server-class
network interface cards (NICs)
10/100/1000
(Intel)
higher 2.8 GHz
10/100/1000
(Intel)
Open PCI slot if using HA Bypass card optional optional
CD-ROM drive yes yes
An Internet connection or a web proxy server that
allows outbound HTTPS communications from the
MS.
yes yes
System Requirements
23

Item Minimum Recommended
novdocx (en) 24 March 2009
Workstation — A workstation running one of the following
browsers with 128-bit encryption:
Windows —
Mozilla version 1.7
Mozilla Firefox version 1.5 or later
Internet Explorer 6.0 or later
Linux —
Mozilla version 1.7
Mozilla Firefox version 1.5 or later
Mac OS X —
Mozilla Firefox version 1.5 or later
License — A license key yes yes
Product updates — The latest Novell ZENworks Network Access
Control product updates
yes yes
yes yes
TIP: It is strongly recommended that you use the server-class Intel NIC cards. If you use a different
NIC card, you might be unable to connect, or experience unpredictable results and availability.
NOTE: Your license key is emailed to you. If you did not receive one, contact Novell Support
(http://www.novell.com/support) or call 800-858-4000.
2.2 Important Browser Settings
The following sections contain more information:
Section 2.2.1, “Pop-up Windows,” on page 24
Section 2.2.2, “Active Content,” on page 25
Section 2.2.3, “Minimum Font Size,” on page 26
Section 2.2.4, “Page Caching,” on page 27
Section 2.2.5, “Temporary Files,” on page 28
2.2.1 Pop-up Windows
The Novell ZENworks Network Access Control reports capability uses a pop-up window. In order
for you to run reports on Novell ZENworks Network Access Control, you must allow pop-up
windows from the Novell ZENworks Network Access Control server.
To allow pop-up windows in Internet Explorer:
Internet Explorer browser>>Tools>>Pop-up blocker>>Pop-up blocker settings
1 Enter the IP address or partial IP address of the Novell ZENworks Network Access Control
MS.
24 Novell ZENworks Network Access Control Installation Guide

2 Click Add.
3 Click Close.
To allow pop-up windows in Mozilla:
Mozilla browser>>Edit>>Preferences>>Privacy & Security>>Popup Windows
1 Select the Block unrequested popup windows check box.
2 Click Allowed sites.
3 Enter the IP address or partial IP address of the Novell ZENworks Network Access Control
MS.
4 Click Add.
5 Click OK.
6 Click OK.
To allow pop-up windows in Windows or Linux Firefox:
Firefox browser>>Tools>>Options>>Content
novdocx (en) 24 March 2009
1 Clear the Block Popup Windows check box.
2 Click OK.
To allow pop-up windows in Mac Firefox:
Firefox menu>>Preferences>>Content
1 Clear the Block Popup Windows check box.
2 Close the Content window.
2.2.2 Active Content
If you see the following Active Content message at the top of the browser window when you access
the Novell ZENworks Network Access Control help feature. perform the instructions in this section
to allow Active Content to display.
Figure 2-1 Internet Explorere Security Warning Message
To allow Active Content to display:
1 Click on the message box to display the options (Figure 2-2).
Figure 2-2 IE Security Message Options
System Requirements 25
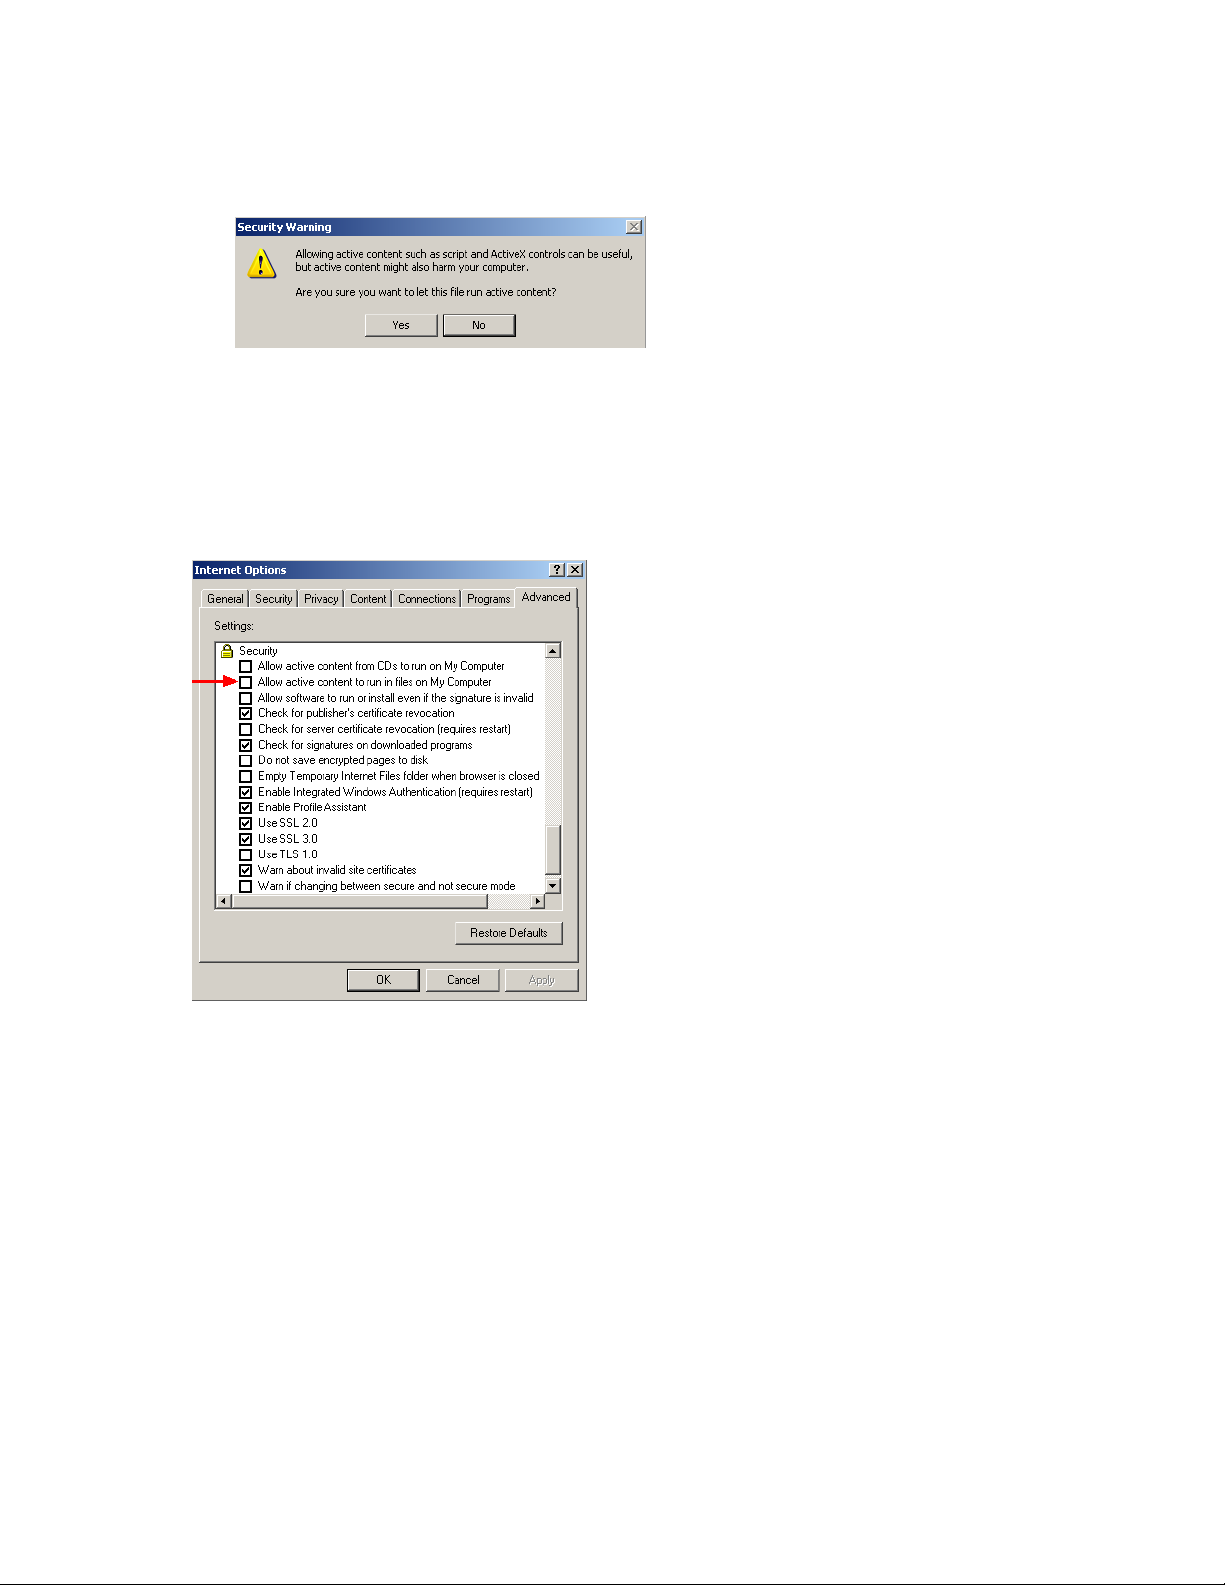
2 Select Allow Blocked Content. The Security Warning window appears:
Figure 2-3 IE Security Warning Pop-up Window
3 Click Yes on the Security Warning window.
To change the Internet Explorer security settings to always allow active content:
IE browser>>Tools>>Internet Options>>Advanced tab
Figure 2-4 IE Internet Options, Advanced Tab
novdocx (en) 24 March 2009
1 In the Internet Options pop-up window, scroll down to the security section.
2 Select the Allow active content to run in files on my computer check
box.
3 Click OK.
2.2.3 Minimum Font Size
In order to properly display the Novell ZENworks Network Access Control user interface, do not
specify the minimum font size.
To clear the Internet Explorer minimum font size:
IE browser>>Tools>>Internet options>>General tab>>Accessibility button
1 Make sure all of the check boxes are cleared on this window.
26 Novell ZENworks Network Access Control Installation Guide

2 Click OK.
3 Click OK.
To clear the Mozilla minimum font size:
Mozilla browser>>Edit>>Preferences>>Appearance>>Fonts
1 Select None from the Minimum font size drop-down list.
2 Click OK.
To clear the Windows or Linux Firefox minimum font size:
Firefox browser>>Tools>>Options>>Content>>Fonts & Colors, Advanced
1 Select None in the Minimum font size drop-down list.
2 Select the Allow pages to choose their own fonts, instead of my
selections above check box.
3 Click OK.
novdocx (en) 24 March 2009
4 Click OK.
To clear the Mac Firefox minimum font size:
Firefox menu>>Preferences>>Content>>Fonts & Colors, Advanced
1 Select None in the Minimum font size drop-down list.
2 Select the Allow pages to choose their own fonts, instead of my
selections above check box.
3 Click OK.
4 Close the Content window.
2.2.4 Page Caching
To set the Internet Explorer page caching options:
Internet Explorer browser>>Tools>>Internet Options
1 Select the General tab
2 Click Settings.
3 In the Check for new versions of stored pages area, select the
Automatically radio button.
4 Click OK.
5 In the Internet Options dialog box, click the Advanced tab.
6 Scroll down to the Security area. Clear the Do not save encrypted pages to
disk check box.
7 Click OK.
System Requirements 27

To set the Mozilla page caching options:
Mozilla browser>>Edit>>Preferences
1 Click the plus (+) symbol next to Advanced to expand the topic.
2 Select Cache.
3 In the Compare the page in the cache to the page on the network area,
select the Every time I view the page radio button.
4 Click OK.
2.2.5 Temporary Files
Periodically delete temporary files from your system to improve browser performance.
To delete temporary files in Internet Explorer:
Internet Explorer>>Tools>>Internet Options>>General tab
1 Click Delete Files.
2 Select the Delete all offline content check box.
novdocx (en) 24 March 2009
3 Click OK.
4 Click OK.
To delete temporary files in Mozilla:
Mozilla browser>>Edit>>Preferences
1 Select the plus (+) symbol next to Advanced to expand the topic.
2 Select Cache.
3 Click Clear Cache.
To delete temporary files in Windows or Linux Firefox:
Firefox browser>>Tools>>Options>>Privacy
1 In the Private Data area, click Settings. The Clear Private Data window
appears.
2 Select the Cache check box.
3 Click OK.
4 Click Clear Now.
5 Click OK.
To delete temporary files in Mac Firefox:
Firefox menu>>Preferences>>Privacy
1 In the Private Data area, click Settings. The Clear Private Data window
appears.
2 Select the Cache check box.
28 Novell ZENworks Network Access Control Installation Guide

3 Click OK.
4 Click Clear Now.
5 Close the Privacy window.
novdocx (en) 24 March 2009
System Requirements 29

novdocx (en) 24 March 2009
30 Novell ZENworks Network Access Control Installation Guide

3
Installing Novell ZENworks
novdocx (en) 24 March 2009
Network Access Control
You have one installation option:
Install Novell
“Installing Novell ZENworks Network Access Control for the First Time,” on page 31)
3.1 Installing Novell ZENworks Network Access Control for the First Time
For first-time installations, use the install CD. Create an install CD from an International
Organization for Standardization (ISO) image downloaded from the Novell Web site, or request one
from Novell. The installation process loads both the Novell ZENworks Network Access Control
application and the custom, hardened operating system (OS) on which Novell ZENworks Network
Access Control runs.
TIP: If you already have a CD, skip to Section 3.1.2, “Creating the Installation CD from the Novell
ZENworks Network Access Control Download,” on page 32.
This section covers the following tasks:
®
ZENworks® Network Access Control for the first time (see Section 3.1,
3
Section 3.1.1, “Downloading the New Install ISO Image,” on page 31
Section 3.1.2, “Creating the Installation CD from the Novell ZENworks Network Access
Control Download,” on page 32
Section 3.1.3, “Installing Novell ZENworks Network Access Control,” on page 33
3.1.1 Downloading the New Install ISO Image
After you download the ISO image, create a CD (see Section 3.1.2, “Creating the Installation CD
from the Novell ZENworks Network Access Control Download,” on page 32Section 3.1.3,
“Installing Novell ZENworks Network Access Control,” on page 33), and then perform the
installation from the CD (see Section 3.1.3, “Installing Novell ZENworks Network Access Control,”
on page 33).
To download the new install ISO using Internet Explorer:
Internet Explorer (IE) or other browser
1 Locate a computer that has a browser installed and is connected to the Internet.
2 Open a browser window and open the Novell Downloads page (http://download.novell.com).
The approximate file size is 450 MB.
3 A pop-up window appears with instructions about saving the file, click Save.
Installing Novell ZENworks Network Access Control
31

4 A pop-up window appears instructing you to select a directory in which to save the file.
Navigate to a location that you will remember when it is time to create the install CD. Click
Save.
5 The download window appears, showing the status of the download process. This download
can take a lot of time, depending on your connection speed.
6 After you download the file (ISO image), you need to create a CD (see Section 3.1.2, “Creating
the Installation CD from the Novell ZENworks Network Access Control Download,” on
page 32), and then you can use that CD to install the Novell ZENworks Network Access
Control software (see Section 3.1.3, “Installing Novell ZENworks Network Access Control,”
on page 33).
NOTE: Downloading an ISO image file and creating an installation CD is not the same process as
just copying a file to a CD.
3.1.2 Creating the Installation CD from the Novell ZENworks Network Access Control Download
novdocx (en) 24 March 2009
TIP: If you already have a Novell ZENworks Network Access Control installation CD, go to
Section 3.1.3, “Installing Novell ZENworks Network Access Control,” on page 33.
You must have a CD to install Novell ZENworks Network Access Control. This section describes
how to create one from the downloaded ISO image.
To create the Novell ZENworks Network Access Control installation CD:
1 For Windows:
1a Most current CD-burning software supports creating CDs from ISO images. Open the ISO
file with your CD-burning software. If it recognizes the ISO file, proceed with the CDburning process.
or
1b Right-click on the ISO file and choose Open with>>Choose program and select your CD-
burning software. After your CD program launches, create the CD using the typical
procedures.
TIP: A Free CD-burning application you can try is CDBurnerXP Pro (http://
www.cdburnerxp.se).
2 For Linux:
Most Linux systems include the cdrecord command; however, cdrecord syntax varies
depending on the specific distribution. Consult your documentation for the correct syntax for
your version.
For example:
cdrecord -v speed=8 dev=0,0,0 /tmp/imagefile.iso
Where 8 is the speed of your burner, and /tmp/imagefile.iso is the path and file name
of the ISO file you wish to copy.
32 Novell ZENworks Network Access Control Installation Guide

3.1.3 Installing Novell ZENworks Network Access Control
When you install the Novell ZENworks Network Access Control software for the first time, you
need to put the Novell ZENworks Network Access Control CD directly into the computer that will
be the Novell ZENworks Network Access Control server (MS or ES). You cannot install any other
software on this computer. Installing the Novell ZENworks Network Access Control software also
installs the operating system (OS) that Novell ZENworks Network Access Control uses. This OS is
hardened making it very secure.
IMPORTANT: Installing third-party software on the Novell ZENworks Network Access Control
server is not supported. If you install additional software on the Novell ZENworks Network Access
Control server, you will have to remove it in order to troubleshoot any Novell ZENworks Network
Access Control issues, and it will likely be partially or fully overwritten during Novell ZENworks
Network Access Control release upgrades or patch installs, compromising the third-party software
functionality. Additionally, installing third-party software and/or modifying the Novell ZENworks
Network Access Control software may violate your license agreement. Please refer to the Novell
EULA, which can be found in the Novell ZENworks Network Access Control Users Guide.
There are two scenarios for Novell ZENworks Network Access Control installation:
novdocx (en) 24 March 2009
Single-server installation — Install Novell ZENworks Network Access Control as a single-
server installation, where the MS and the ES are both on the same server. The ES is
automatically joined to an Enforcement cluster. The high availability (HA) and load balancing
(LB) functions are not available with this installation option.
Multiple-server installation — Install Novell ZENworks Network Access Control as a
multiple-server installation where the MS and the ES or ESs are on different servers. One or
more ESs are joined to a specified Enforcement cluster in the user interface. You must have two
or more ESs joined to an Enforcement cluster for HA or LB functionality.
After you install Novell ZENworks Network Access Control, you need to use a computer (other than
the MS or ES) with a browser for configuration and daily operation tasks.
See the Novell ZENworks Network Access Control Users Guide for more information on HA and
LB.
To install Novell ZENworks Network Access Control:
1 Locate and verify the server hardware (see “Locating and Verifying Server Hardware” on
page 34).
2 Locate the information required during the install process (see “Information Required During
Installation” on page 35).
3 Install the software:
3a Install single-server MS/ES software (see “Creating a Single-server Installation” on
page 36), or
3b Install multiple-server MS software and ES software (see “Creating a Multiple-server
Installation” on page 42)
4 Log in to the Novell ZENworks Network Access Control MS.
Installing Novell ZENworks Network Access Control 33

5 For multiple-server installations:
5a Create clusters (see “Creating an Enforcement Cluster” on page 46).
5b Add enforcement servers to defined clusters (see“Adding an ES to a Cluster” on page 50)
6 Configure Novell ZENworks Network Access Control (see the Novell ZENworks Network
Access Control v5.0 Users Guide).
Locating and Verifying Server Hardware
To verify the server requirements:
1 Locate the computer you will be using for the Novell ZENworks Network Access Control
server.
2 Verify that this computer has the following:
2a Processor — Pentium 4
Linux — To list CPU-related information to the screen on a Linux computer, enter
the following at the command line:
novdocx (en) 24 March 2009
cat /proc/cpuinfo | more
Press the space bar to page down through the listed information
Windows — From the desktop, right click on My Computer and select
Properties. Select the General tab.
2b Processor speed — 2 GHz (or greater).
Linux — To list CPU-related information to the screen on a Linux computer, enter
the following at the command line:
cat /proc/cpuinfo | more
Press the space bar to page down through the listed information.
Windows — From the desktop, right click on My Computer and select
Properties. Select the General tab.
2c Memory — 1 GB RAM
Linux — To list memory-related information to the screen on a Linux computer,
enter the following at the command line:
dmesg | grep Memory
The number returned to the right of the / is the total memory.
Windows — From the desktop, right click on My Computer and select
Properties. Select the General tab.
2d Disk space — 36 GB(or greater)
Linux — To list disk-related information to the screen on a Linux computer, enter
the following at the command line:
For IDE drives:
fdisk -l /dev/hda | more
For SCSI drives:
fdisk -l /dev/sda | more
34 Novell ZENworks Network Access Control Installation Guide

Press the space bar to page down through the listed information. If you don’t know
the drive type, just pick one of the above commands and enter it. If you don’t have
that type of drive, nothing will be returned.
Windows — From the desktop, double-click on My Computer.
2e Ethernet cards — You must know the quarantine (deployment) method you are going to
use when setting up your network, as each method has the following specific Ethernet card
requirements:
Single-server installation — When the MS and ES are installed on the same server, you
need two Ethernet cards.
Multiple-server installation — When the MS and ES are installed on multiple servers,
you need one Ethernet card on the MS, and the following number of Ethernet cards for
each ES:
Inline — You need two Ethernet cards on each ES
DHCP — You need two Ethernet cards on each ES
802.1x — You need one Ethernet card on each ES
Linux – To list Ethernet card information to the screen on a Linux computer, enter
the following at the command line:
novdocx (en) 24 March 2009
ifconfig
Windows – To list Ethernet card information to a DOS (cmd) window on a Windows
computer, enter the following at the command line:
ipconfig
2f CDROM drive — This drive can be a read-only drive and is used for first-time
installation.
NOTE: For more information about deployment options, see Chapter 1, “Deployment Flexibility,”
on page 9.
IMPORTANT: Make sure that your Ethernet cards are 10/100/1000 (Intel) server-class NICs.
Inferior class network cards do not work at all, or work intermittently. You can get the best results
from the Intel PRO-series NICs.
Information Required During Installation
You will be asked for the following information during the installation process (use the Appendix A,
“Installation and Configuration Check List,” on page 55 for easy reference):
Static IP address — The IP address for each server you will use (both MS and ESs). For
example: 10.0.16.180. You must have a static (always the same) (not dynamic—can be
different every time) IP address to use for each server.
Netmask (Network mask) — A number that tells how much of the IP address is reserved for
the network (255) and how much is reserved for the host (0). This must be defined when
servers create subnetworks as part of the installation process. For example: 255.255.0.0.
Default gateway IP address — The IP address of your Internet connection—the IP address of
the network endpoint that knows how to route packets outside of your local network. For
example 10.0.16.1.
Installing Novell ZENworks Network Access Control 35

To find the current Default Gateway:
Linux — Enter route -n at the command line
Windows — Enter ipconfig at the command line
NOTE: Your system may require a different gateway. Check with your network administrator
if you have problems or are unsure of which gateway IP address to use.
Primary nameserver IP address (DNS server) — The IP address of the server that you use to
convert hostnames to IP addresses. For example: 204.74.112.1.
To find the current DNS server:
Linux — Look in the /etc/resolv.conf file for the nameserver entry.
Windows — Enter ipconfig /all at the command line
If you use secondary and tertiary nameservers, you will be asked for those IP addresses as well.
Novell ZENworks Network Access Control hostname — The names you give your Novell
ZENworks Network Access Control servers (MS and ESs). Select names that are short, easy to
remember, have no spaces or underscores, and the first and last character cannot be a dash (-).
novdocx (en) 24 March 2009
NOTE: The Novell ZENworks Network Access Control hostnames must be the fully qualified
domain names (FQDN). The FQDN includes the host and the domain name—including the
top-level domain. For example, waldo.mycompany.com.
Time zone — The time zones where your Novell ZENworks Network Access Control servers
are located. The time zones must be specified for each MS and each ES.
Novell ZENworks Network Access Control server root password — The passwords you
give to your Novell ZENworks Network Access Control servers (MS and ESs) when logging in
as the root user. Note: This is not the Novell ZENworks Network Access Control user
interface administrator password.
Installation type — The type is either MS or ES for multiple-server installations, or Both for
single-server installations.
NTP server IP — The IP address you use for your Network Time Protocol (NTP) server
Creating a Single-server Installation
To install the MS and ES on a single server:
1 Locate the server you are using for the Novell ZENworks Network Access Control installation.
2 Insert the Novell ZENworks Network Access Control CD into the dedicated server and reboot
(for example by pressing [Ctrl]+[Alt]+[Delete] or an appropriate method of reboot). Once the
server reboots, the boot prompt screen appears (Figure 3-1 on page 37).
WARNING: The Novell ZENworks Network Access Control installation CD automatically
reformats the hard drive on the host machine, erasing all existing data. Do not continue if you
need any information that is stored on the hard drive! To abort the installation, press
[Ctrl]+[Alt]+[Delete].
TIP: If the dedicated server is not configured to boot from the CD drive, edit the basic input/
output system (BIOS) options as described in your server’s documentation.
36 Novell ZENworks Network Access Control Installation Guide
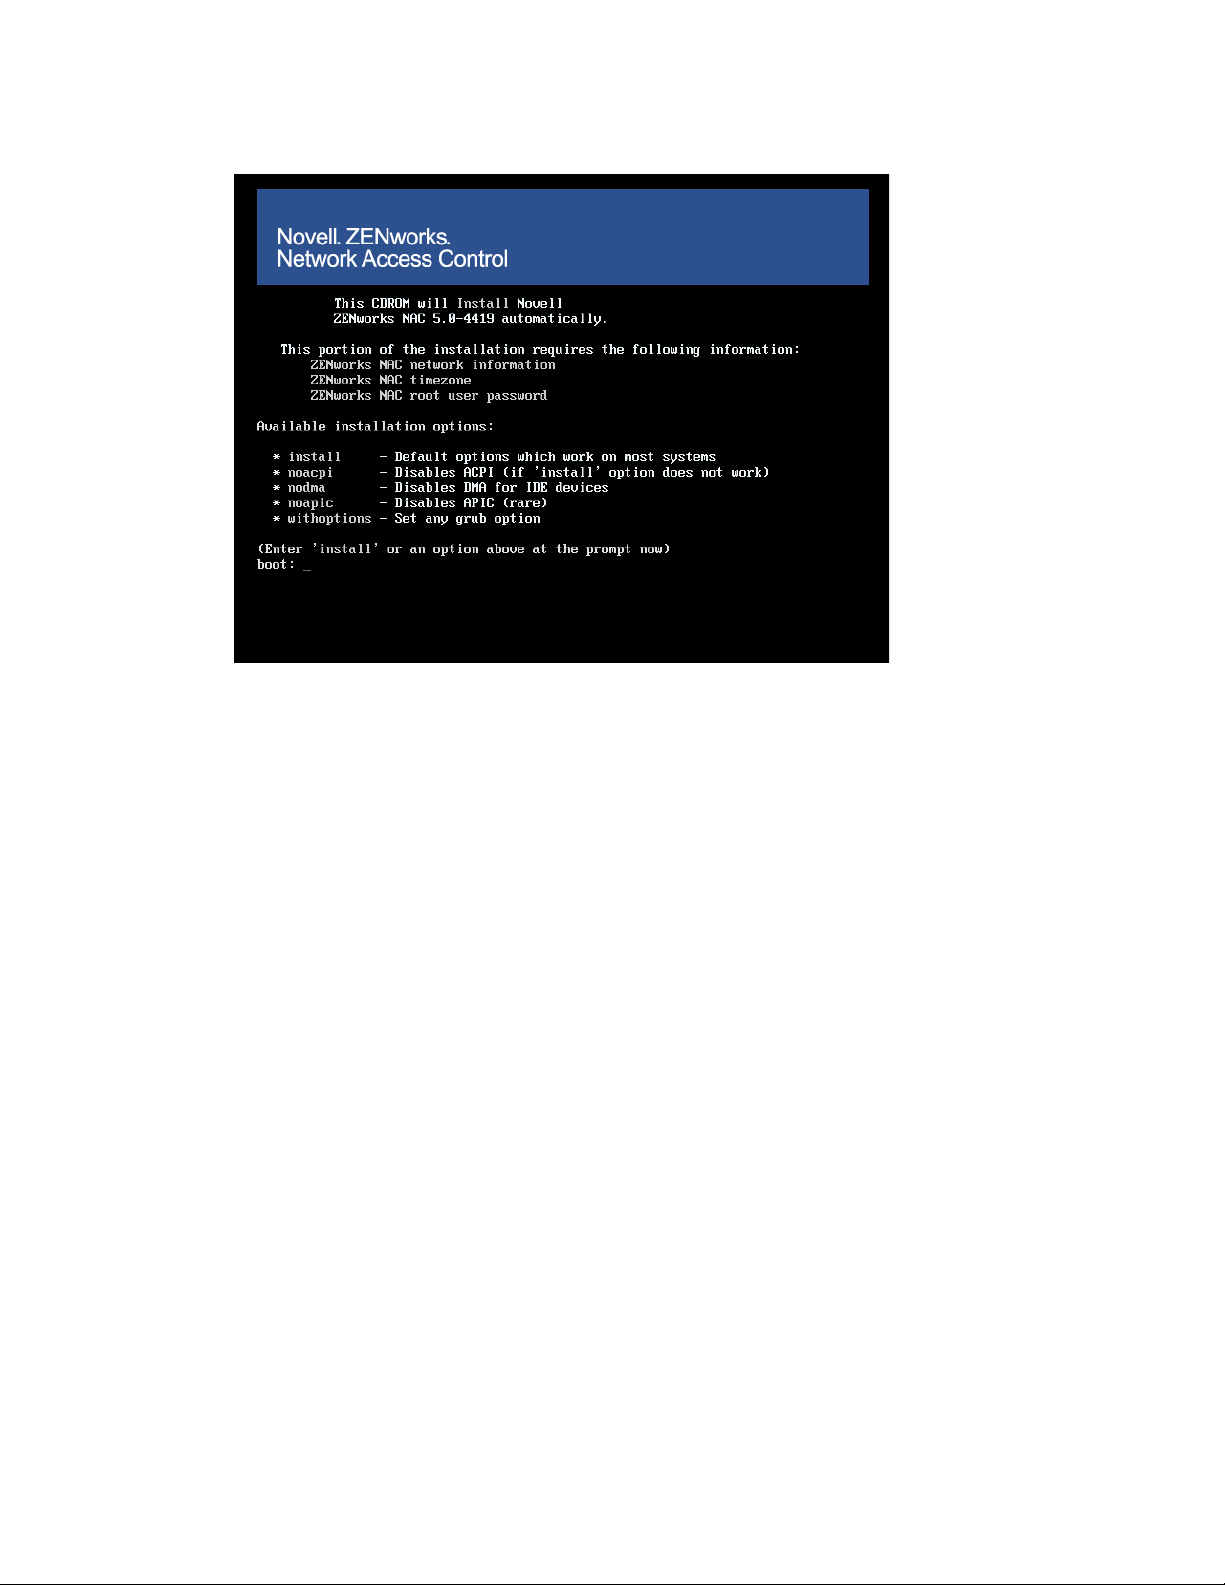
Figure 3-1 Install Screen, Boot Prompt
novdocx (en) 24 March 2009
3 At the boot prompt, type one of the following:
install — This is the default option that works on most systems.
noacpi — If your system hangs shortly after install is entered, use this option which
disables the [Advanced Configuration and Power Interface (ACPI)] allowing the Novell
ZENworks Network Access Control system to use the chroot command.
nodma — If your system (such as some Compaq/HP systems) has problems using [Direct
Memory Access (DMA)] to chip memory, this option disables DMA for the IDE
subsystem.
noapic — If your system BIOS has an upgrade to fix the Advanced Programmable
Interrupt Controller (APIC)] and the system continues to hang shortly after install is
entered, use this option which disables the APIC. This tells the kernel to not make use of
any IOAPICs that may be present in the system.
withoptions — If your system has problems not listed above, use this option to
specify that No additional kernel parameters are passed to the kernel to allow greater
flexibility.
Installing Novell ZENworks Network Access Control 37

4 Press [Enter]. The Installation Confirmation screen appears:.
Figure 3-2 Install Screen, Installation Confirmation
novdocx (en) 24 March 2009
5 On the Installation Confirmation screen, type install and select OK. The Network
Configuration for eth0 screen appears.
TIP: Use the [Tab], [spacebar], and [Enter] keys to navigate between fields and make
selections on the install screens.
6 On the Network Configuration for eth0 screen, enter the IP address of the Novell
ZENworks Network Access Control MS/ES installation, as shown in Figure 3-3 on page 38.
The Netmask value is prepopulated; edit the Netmask value if necessary.
TIP: You must use static IP addresses for Novell ZENworks Network Access Control servers.
Novell ZENworks Network Access Control servers cannot receive DHCP IP addresses.
Figure 3-3 Install Screen, Network Configuration for eth0
38 Novell ZENworks Network Access Control Installation Guide

7 Select OK. The Miscellaneous Network Settings screen appears:
Figure 3-4 Install Screen, Miscellaneous Network Settings
novdocx (en) 24 March 2009
8 On the Miscellaneous Network Settings screen, enter the Gateway and Primary
DNS, (and Secondary DNS and Tertiary DNS if you use them). Select OK. The
Hostname Configuration screen appears:
Figure 3-5 Install Screen, Hostname Configuration
9 On the Hostname Configuration screen, enter the hostname. This name must be the
fully qualified domain name (FQDN). Select OK. The Time Zone Selection screen
appears:
TIP: Select simple names that are short, easy to remember, have no spaces or underscores, and
the first and last character cannot be a dash (-).
Installing Novell ZENworks Network Access Control 39

Figure 3-6 Install Screen, Time Zone Selection
10 On the Time Zone Selection screen, select the time zone. Select OK. The Root
Password screen appears:
novdocx (en) 24 March 2009
TIP: Make sure that you select a root password that is easy for you to remember but difficult
for others to guess.
Figure 3-7 Install Screen, Root Password
40 Novell ZENworks Network Access Control Installation Guide

11 On the Root Password screen, enter a root password for the Novell ZENworks Network
Access Control server. Enter a secure password that you can remember, and retype the
password to confirm it. Select OK. The Novell Novell ZENworks Network Access
Control installation type screen appears:
Figure 3-8 Install Screen, Installation Type
novdocx (en) 24 March 2009
12 On the Novell Novell ZENworks Network Access Control installation
type screen, select Both.
13 Select OK. The Installation progress screen appears (Figure 3-9 on page 41).
Figure 3-9 Install Screen, Installation Progress
14 Wait. Installation can take a few minutes.
15 When installation is complete, remove the CD.
TIP: If the server reboots before you remove the CD, the boot prompt appears again. Remove
the CD and reboot the server to start Novell ZENworks Network Access Control.
Installing Novell ZENworks Network Access Control 41

16 The server reboots and starts Novell ZENworks Network Access Control.
17 Log in to the Novell ZENworks Network Access Control server and perform the initial
configuration as described in “Initial Configuration” on page 42.
Creating a Multiple-server Installation
To install the MS and ES on different servers:
1 Install the MS software:
1a Perform the steps described in “Creating a Single-server Installation” on page 36: Step 1
on page 36 through Step 11 on page 41. The Novell Novell ZENworks Network
Access Control installation type screen appears (Figure 3-8 on page 41).
1b Select Management server.
1c Select ok. The Installation progress screen appears (Figure 3-9 on page 41).
1d Wait. Installation can take a few minutes.
1e When installation is complete, remove the CD.
novdocx (en) 24 March 2009
TIP: If the server reboots before you remove the CD, the boot prompt appears again.
Remove the CD and reboot the server to start Novell ZENworks Network Access Control.
1f The server reboots and starts Novell ZENworks Network Access Control.
2 Install the ES software:
2a Perform the steps described in “Creating a Single-server Installation” on page 36: Step 1
on page 36 through Step 11 on page 41. The Novell Novell ZENworks Network
Access Control installation type screen appears (Figure 3-8 on page 41).
2b Select Enforcement server.
2c Select ok. The Installation progress screen appears (Figure 3-9 on page 41).
2d Wait. Installation can take a few minutes.
2e When installation is complete, remove the CD.
TIP: If the server reboots before you remove the CD, the boot prompt appears again.
Remove the CD and reboot the server to start Novell ZENworks Network Access Control.
2f The server reboots and starts Novell ZENworks Network Access Control.
3 Add as many ESs as your system requires.
4 Go to “Initial Configuration” on page 42.
Initial Configuration
NOTE: If you already have endpoints attached to a switch when you install Novell ZENworks
Network Access Control, you must log in to each switch and send the NAC revalidate command
before the endpoint can be tested and routed properly.
42 Novell ZENworks Network Access Control Installation Guide
To configure the Novell ZENworks Network Access Control MS/ES:
1 Log into a different computer with browser software installed. The following browsers are
supported for this release:
Windows: IE 6.0 or later, Mozilla Firefox v1.5 or later, Mozilla v1.7
Linux: Mozilla Firefox v1.5 or later, Mozilla v1.7
Mac OS X: Mozilla Firefox v1.5 or later
2 Using https://, point your browser to the IP address or host name of the Novell ZENworks
Network Access Control server (for example, https://10.0.64.25).
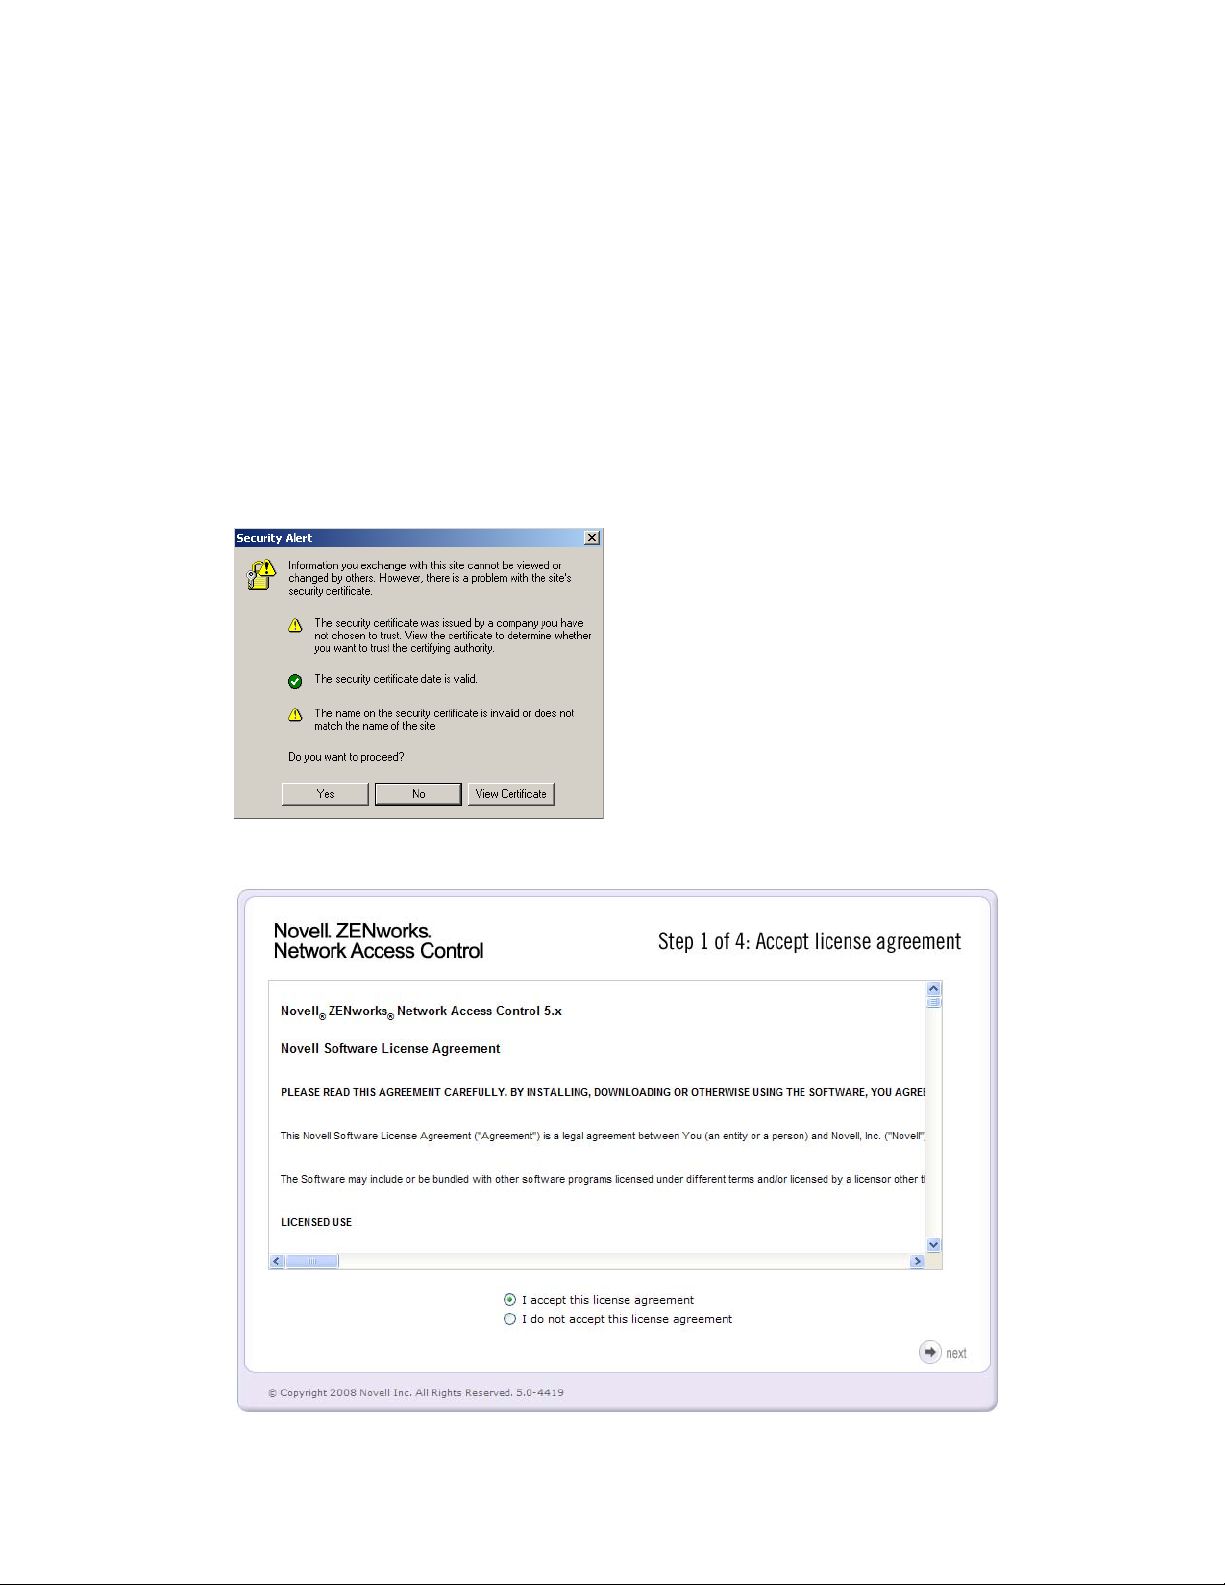
3 You might be prompted with a security alert because Novell ZENworks Network Access
Control uses a secure communication connection (SSL) (Figure 3-10 on page 43). Click Yes.
The Accept license agreement window appears (Figure 3-10 on page 43).
Figure 3-10 Security Alert Window
novdocx (en) 24 March 2009
Figure 3-11 Accespt License Agreement Window
Installing Novell ZENworks Network Access Control 43

4 Accept the license agreement:
4a If you do not wish to accept the license agreement, click I do not accept this
license agreement, or
4b Read the Novell ZENworks Network Access Control End-User License Agreement
(EULA) and select I Accept this license agreement.
4c Click Next. The Enter management server settings window appears.
Figure 3-12 Enter Management Server Settings Window
novdocx (en) 24 March 2009
5 The Date and time area is prepopulated with values entered during the initial installation
process. Change any of the following if necessary:
Region — Select a region from the drop-down list.
Time zone — Select a time zone from the drop-down list.
NTP servers — Enter one or more Network Time Protocol (NTP) servers, separated by
commas. The NTP protocol allows Novell ZENworks Network Access Control to
synchronize its date and time with other endpoints on your network. For example,
time.nist.gov.
6 The Network settings area is prepopulated with values entered during the initial installation
process. Change any of the following if necessary:
Host name — Enter a Fully Qualified Domain Name (FQDN). For example,
crocus.mycompany.com.
DNS IP address — Enter one or more DNS resolver IP addresses, separated by commas,
semicolons, or spaces. For example, 10.0.16.100,10.0.1.1.
44 Novell ZENworks Network Access Control Installation Guide
7 If you use a proxy server, configure it as follows:
7a Select the Use a proxy server for Internet connections check box.
Connecting to the Internet is necessary for updating tests, validating license keys, and
sending support packages.
7b Enter the IP address of the server that will act as the proxy for Internet connections in the
Proxy server IP address text box.
7c Enter the port used for connecting to the proxy server in the Proxy server port text
box. For example, 8080.
7d If your proxy server is authenticated, select the Proxy server is
authenticated check box and enter the following:
1. Select the scheme used to authenticate credentials on the proxy server from the
Authentication method drop-down list. The following methods are supported:
Basic — The original and most compatible authentication scheme for HTTP. It is
also the least secure because it sends the user ID and password to the server
unencrypted.
Digest — Added in the HTTP 1.1 protocol, this scheme is significantly more secure
than basic authentication because it never transfers the actual password across the
network, but instead uses it to encrypt a nonce value sent from the server.
novdocx (en) 24 March 2009
Negotiable — Using this scheme, the client and the proxy server negotiate a scheme
for authentication. Ultimately, either the basic or digest scheme will be used.
2. Enter the ID of a user account on the proxy server in the User name text box.
3. Enter the password of the user account having the ID specified in User ID in the
Password text box.
4. To help confirm accuracy, type the same password you entered into the Password
text box in the Re-enter password text box.
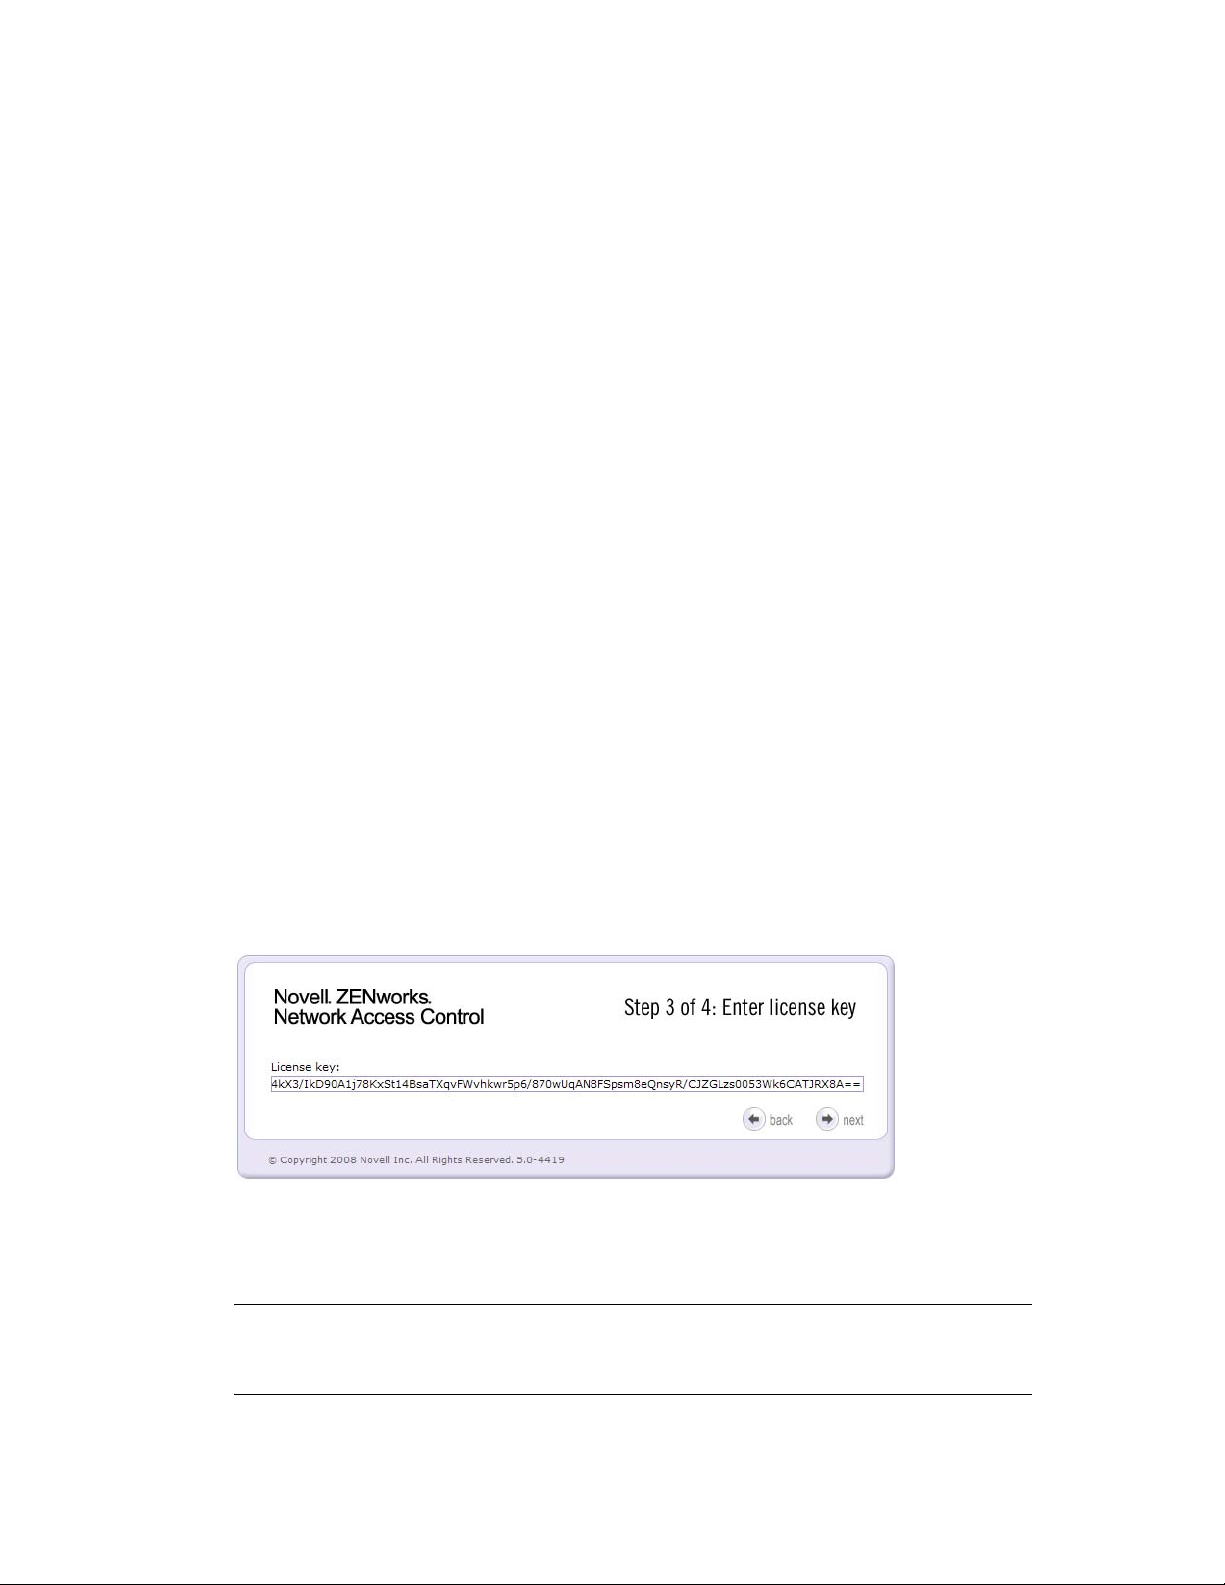
8 Click Next. The Enter license key window appears.
Figure 3-13 Enter License Key Window
9 On the Enter license key window, in the License key field copy and paste your
Novell ZENworks Network Access Control license key, which was emailed to you as a text
file. Click Next. The Create administrator account window appears.
NOTE: An internet connection is required to register/activate the license. The license key is
registered to the server once the activation is complete and cannot be moved to another
machine without first contacting Novell Support (http://www.novell.com/support).
Installing Novell ZENworks Network Access Control 45
TIP: The double-equal sign (==) is part of the license key. Include it with the rest of the key.
IMPORTANT: If you use a proxy server, your license key will not validate from this window
unless you have performed Step 7 on page 45.
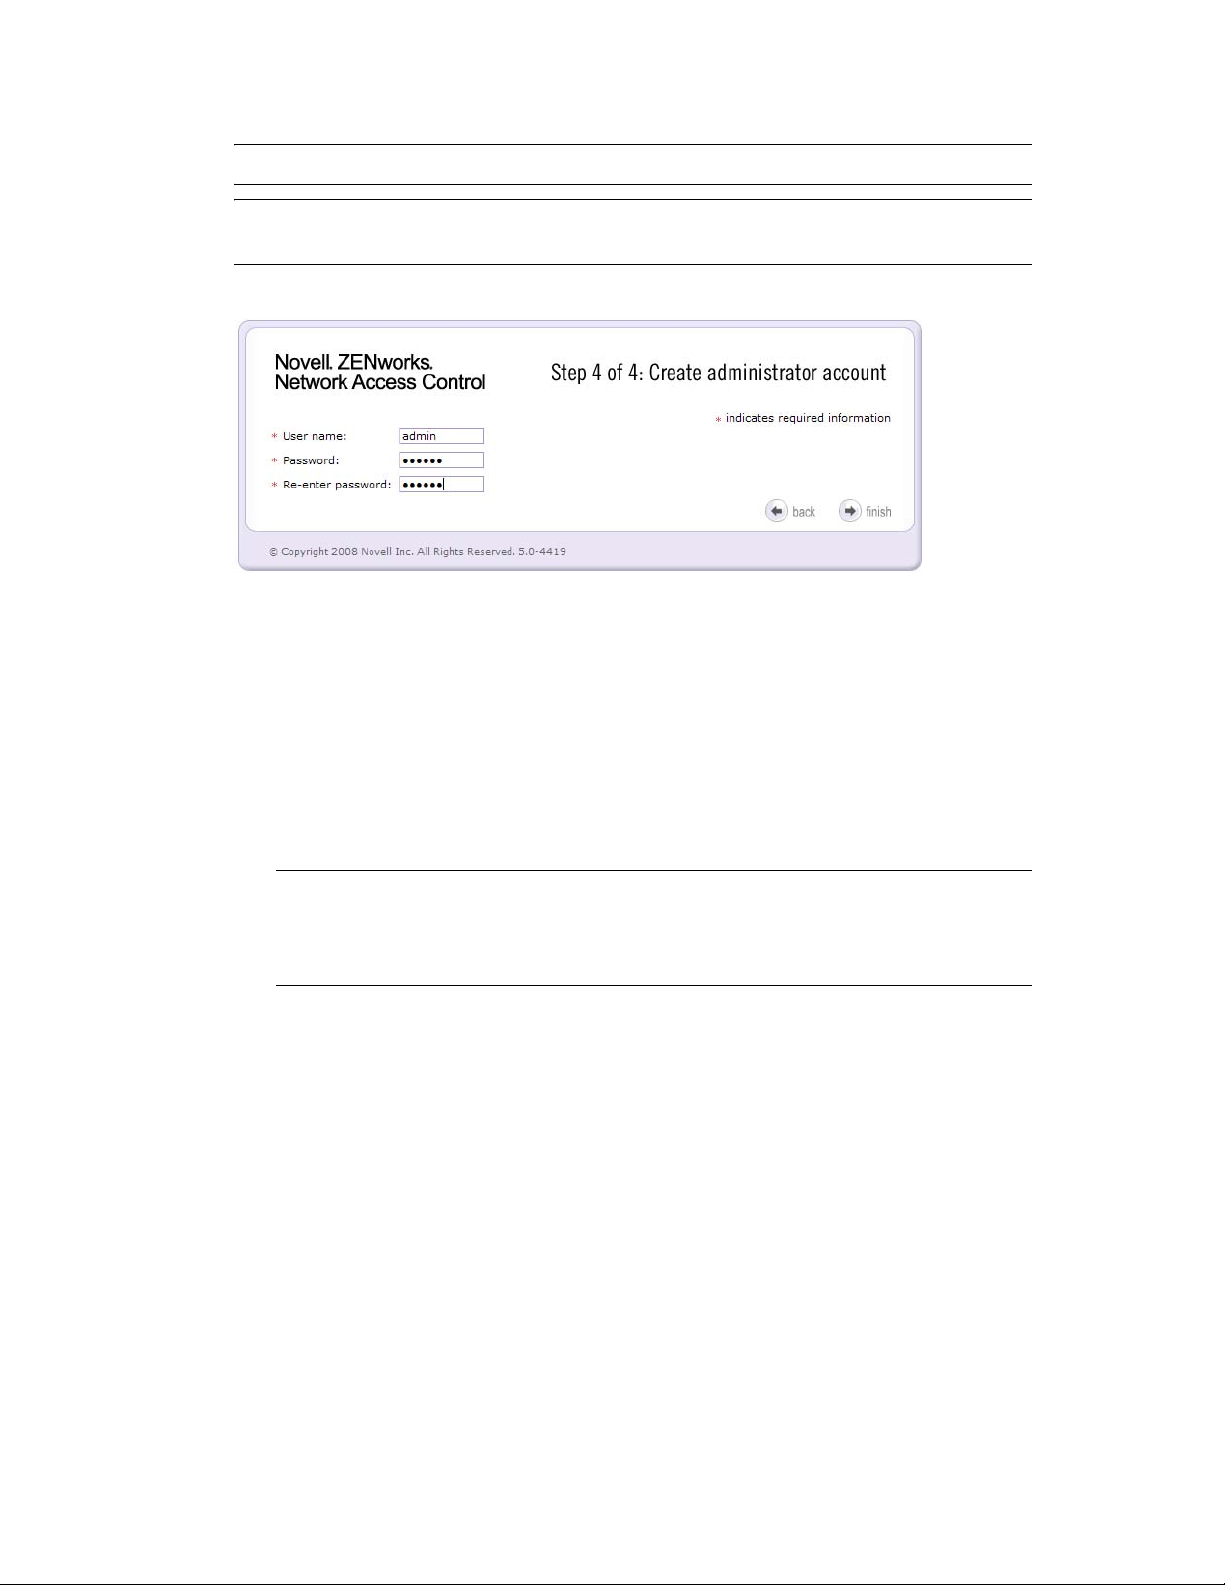
Figure 3-14 Create Administrator Account Window
10 On the Create administrator account window, create the initial Novell ZENworks
Network Access Control administrator account. (This is not the same as the server’s root
account that you created in during installation.)
10a Enter a User ID and Password. We suggest the password be at least eight characters
with a mix of numbers and letters.
novdocx (en) 24 March 2009
10b Click Finish.
10c The final step of creating the single-server installation is to configure the default
Enforcement cluster. See the Novell ZENworks Network Access Control Users Guide for
instructions on editing Enforcement clusters.
TIP: In the case of a single-server installation, the MS and ES are on the same server and
the ES is automatically joined to a default Enforcement cluster. You can change the name
of the Enforcement cluster from the user interface. See the Novell ZENworks Network
Access Control Users Guide for instructions on editing Enforcement clusters.
Creating an Enforcement Cluster
When creating a multiple-server installation (the MS and ES are installed on different servers), you
must create the clusters before you join the ESs to the cluster.
To create (name) the Enforcement cluster:
1 Using https://, point your browser to the IP address or host name of the Novell ZENworks
Network Access Control server (for example, https://10.0.64.25).
46 Novell ZENworks Network Access Control Installation Guide
2 Using the administrator User ID and Password you created in Step 10 on page 46, log in to
the Novell ZENworks Network Access Control user interface. The Novell ZENworks
Network Access Control Home window appears:
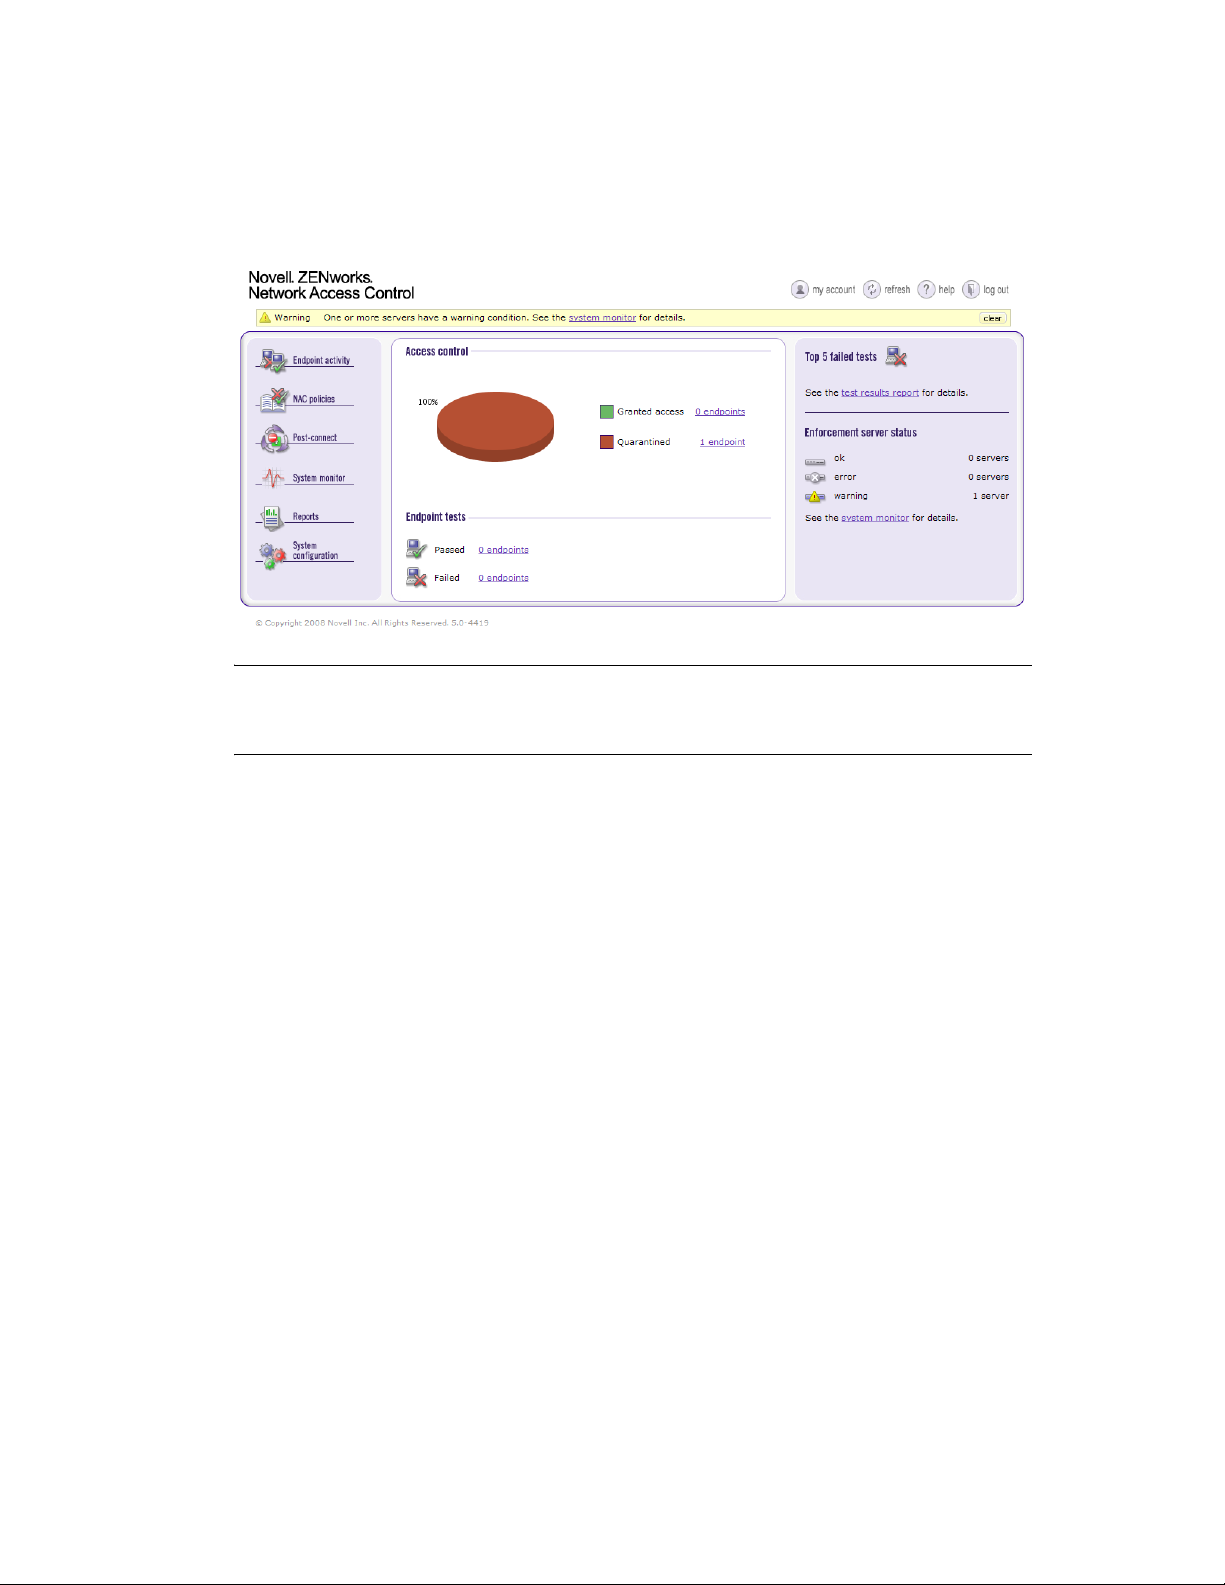
Figure 3-15 Novell ZENworks Network Access Control Home Window
novdocx (en) 24 March 2009
NOTE: The Novell ZENworks Network Access Control home window displays the System
configuration menu option only for users with administrator permissions. You will see different
menu options based on your permissions, which are defined as user roles.
Installing Novell ZENworks Network Access Control 47

3 Select System Configuration. The System configuration, Enforcement
clusters & servers window appears:
Figure 3-16 Enforcement Clusters & Servers
novdocx (en) 24 March 2009
48 Novell ZENworks Network Access Control Installation Guide

4 Click Add an Enforcement cluster. The Add an Enforcement cluster
window appears, with the General menu option selected by default.
Figure 3-17 Add Enforcement Cluster Window
novdocx (en) 24 March 2009
5 In the Add Enforcement cluster window, General area, enter a name for the cluster
in the Cluster name field.
6 On the NAC policy set drop-down list, select Default.
7 Before Novell ZENworks Network Access Control is fully functional, you must select the
operating parameters for each cluster; however, you do not have to do this now. When you are
ready to configure the clusters, refer to the “Adding a cluster” section in the Novell ZENworks
Network Access Control Users Guide.
8 Click ok to save the cluster and return to the System configuration window.
Installing Novell ZENworks Network Access Control 49

Adding an ES to a Cluster
To add an ES to a cluster:
Home window>>System configuration
1 Click add an enforcement server. The Add enforcement server window
appears:
Figure 3-18 Add Enforcement Server Window
novdocx (en) 24 March 2009
2 Select the cluster name for this enforcement server from the Cluster drop-down list.
3 Enter the IP address of this enforcement server in the IP address text box.
4 The SSH user name must be for an account with sufficient privileges to install certificates.
Enter the user name in the SSH User name text box.
5 Enter the SSH password for the SSH username account on this enforcement server in the SSH
Password text box.
6 Re-enter the SSH password for the SSH username account on this enforcement server in the
Re-enter SSH Password text box.
50 Novell ZENworks Network Access Control Installation Guide

7 Click ok to add the server. A progress window appears. It can take a minute or so to add the
server. The System configuration window appears showing the server joined to the
cluster:
Figure 3-19 System configuration, Enforcement Clusters & Servers Window
novdocx (en) 24 March 2009
8 Click ok to return to the Home window.
IMPORTANT: The MS must have the same version of software installed as the ES you are adding
or you will get an exception error. If you are upgrading an existing system, upgrade the MS, then
add new ESs. The upgrade process will automatically upgrade any existing ESs.
Installing Novell ZENworks Network Access Control 51

novdocx (en) 24 March 2009
52 Novell ZENworks Network Access Control Installation Guide

4
Configuring Novell ZENworks
novdocx (en) 24 March 2009
Network Access Control
The System configuration window allows you to set the Novell® ZENworks® Network Access
Control operating parameters
Novell ZENworks Network Access Control Home window>>System configuration
The Novell ZENworks Network Access Control Users Guide provides detailed instructions for
configuring Novell ZENworks Network Access Control.
If you experience problems, or have questions, contact Novell Support (http://www.novell.com/
support) or call (800) 858-4000).
4
Configuring Novell ZENworks Network Access Control
53

novdocx (en) 24 March 2009
54 Novell ZENworks Network Access Control Installation Guide

A
Installation and Configuration
novdocx (en) 24 March 2009
Check List
The following sections contain more information:
Section A.1, “Minimum System Requirements,” on page 55
Section A.2, “Installation Location,” on page 56
Section A.3, “Installation Media,” on page 56
Section A.4, “IP Addresses, Hostname, Logins, and Passwords,” on page 56
Section A.5, “Agentless Credentials,” on page 59
Section A.6, “Quarantine,” on page 60
Section A.7, “Notifications,” on page 63
Section A.8, “Test Exceptions,” on page 64
A.1 Minimum System Requirements
Required fields are indicated by a red asterisk (*).
Dedicated server *
with:
Processor (Pentium 4) *: ___________________________________________________
Speed (1.2 GHz) *: _______________________________________________________
A
Memory (11 GB RAM) *: _________________________________________________
Disk space (36 GB (or greater)) *: ___________________________________________
Two (standard/802.1X) server-quality NIC cards (Intel) *: ________________________
CD-ROM drive *
Internet connection with outbound SSL communications *
NOTE: You must have access to the following:
For license validation and test updates:
http://nacupdate.novell.com port 443 *
For software and operating system updates:
http://nacdownload.novell.com port 80 *
Workstation running one of the following browsers with 128-bit encryption: *
Windows:
Mozilla Firefox 1.5 or later
Mozilla 1.7
Internet Explorer 6.0
Installation and Configuration Check List
55

Linux:
Mozilla Firefox 1.5 or later
Mozilla 1.7
Mac OS X:
Mozilla Firefox 1.5 or later
License key: * (cut and paste from the email you receive from Novell)
A.2 Installation Location
My office(s)
Server room(s)/Data center(s)
Test lab(s)
Production network(s)
I have access to the installation site(s)
I do not have access to the installation site(s)
novdocx (en) 24 March 2009
A.3 Installation Media
Required fields are indicated by a red asterisk (*).
One of the following: *
Install CD
(Request an install CD from Novell
ISO image.)
Upgrade link: (provided to Novell subscribers through email)
®
if you do not have experience creating a CD from an
A.4 IP Addresses, Hostname, Logins, and Passwords
NOTE: This Installation and Configuration Checklist is a list of the items used in Novell
ZENworks
security best practice that you never write down passwords.
A.4.1 Single-server Installation
Required fields are indicated by a red asterisk (*).
The MS and ES are installed on the same physical server.
®
Network Access Control including passwords; however, Novell recommends as a
MS/ES IP address: * __________________________________________________________
MS/ES Netmask IP address (Network mask): * _____________________________________
Cluster name: * ______________________________________________________________
Default gateway IP address: * ___________________________________________________
56 Novell ZENworks Network Access Control Installation Guide

Primary nameserver IP address (DNS server): * ____________________________________
Secondary nameserver IP address (DNS server): ____________________________________
Tertiary nameserver IP address (DNS server): ______________________________________
MS/ES hostname (FQDN): * ___________________________________________________
TIP: Select simple names that are short, easy to remember, have no spaces or underscores, and the
first and last character cannot be a dash (-).
Time zone: * --------------
________________________________________________________________
MS/ES server root password: * __________________________________________________
MS/ES Database password:* ___________________________________________________
Novell ZENworks Network Access Control user interface administrator account name: *
_____________________________
Novell ZENworks Network Access Control user interface administrator account password: *
_________________________
novdocx (en) 24 March 2009
SMTP server IP address: _______________________________________________________
A.4.2 Multiple-server Installations
Required fields are indicated by a red asterisk (*).
The MS is installed on one physical server; each ES is installed on a unique physical server.
Management Server
Required fields are indicated by a red asterisk (*).
Create at least one MS.
MS IP address: * -------------
_____________________________________________________________
MS Netmask IP address (Network mask): * ________________________________________
Default gateway IP address: * ___________________________________________________
Primary nameserver IP address (DNS server): * ____________________________________
Secondary nameserver IP address (DNS server): ____________________________________
Tertiary nameserver IP address (DNS server): ______________________________________
MS hostname (FQDN): * ______________________________________________________
TIP: Select simple names that are short, easy to remember, have no spaces or underscores, and
the first and last character cannot be a dash (-).
Time zone: * ________________________________________________________________
MS server root password: * ____________________________________________________
MS Database password:* ______________________________________________________
Installation and Configuration Check List 57

Novell ZENworks Network Access Control user interface administrator account name: *
___________________________________________________________________________
Novell ZENworks Network Access Control user interface administrator account password: *
___________________________________________________________________________
SMTP server IP address: ______________________________________________________
Enforcement Server 1
Required fields are indicated by a red asterisk (*).
Create at least one ES.
Cluster name 1: * ____________________________________________________________
ES IP address: * _____________________________________________________________
ES Netmask IP address (Network mask): * ________________________________________
Default gateway IP address: * __________________________________________________
Primary nameserver IP address (DNS server): * ____________________________________
novdocx (en) 24 March 2009
Secondary nameserver IP address (DNS server): ____________________________________
Tertiary nameserver IP address (DNS server): ______________________________________
ES hostname (FQDN): * _______________________________________________________
TIP: Select simple names that are short, easy to remember, have no spaces or underscores, and
the first and last character cannot be a dash (-).
Time zone: * ________________________________________________________________
ES server root password: * _____________________________________________________
ES Database password:* _______________________________________________________
Novell ZENworks Network Access Control user interface administrator account name: *
___________________________________________________________________________
Novell ZENworks Network Access Control user interface administrator account password: *
___________________________________________________________________________
Enforcement Server 2
Required fields are indicated by a red asterisk (*).
Create at least one ES.
Cluster name 2: * ____________________________________________________________
ES IP address: * _____________________________________________________________
ES Netmask IP address (Network mask): * ________________________________________
Default gateway IP address: * __________________________________________________
Primary nameserver IP address (DNS server): * ____________________________________
Secondary nameserver IP address (DNS server): ___________________________________
Tertiary nameserver IP address (DNS server): _____________________________________
ES hostname (FQDN): * ______________________________________________________
58 Novell ZENworks Network Access Control Installation Guide

Time zone: * _______________________________________________________________
ES server root password: * ____________________________________________________
ES Database password:* ______________________________________________________
Novell ZENworks Network Access Control user interface administrator account name: *
___________________________________________________________________________
Novell ZENworks Network Access Control user interface administrator account password: *
___________________________________________________________________________
Enforcement Server 3
Required fields are indicated by a red asterisk (*).
Create at least one ES.
Cluster name 3: * ____________________________________________________________
ES IP address: * _____________________________________________________________
ES Netmask IP address (Network mask): * ________________________________________
novdocx (en) 24 March 2009
Default gateway IP address: * __________________________________________________
Primary nameserver IP address (DNS server): * ____________________________________
Secondary nameserver IP address (DNS server): ____________________________________
Tertiary nameserver IP address (DNS server): ______________________________________
ES hostname (FQDN): * _______________________________________________________
Time zone: * ________________________________________________________________
ES server root password: * _____________________________________________________
ES Database password: * ______________________________________________________
Novell ZENworks Network Access Control user interface administrator account name: *
___________________________________________________________________________
Novell ZENworks Network Access Control user interface administrator account password: *
___________________________________________________________________________
A.4.3 Proxy Server
Required fields are indicated by a red asterisk (*).
If you use a proxy server for Internet connections, these fields are required:
Proxy server IP address: * ______________________________________________________
Proxy server port: * ___________________________________________________________
Proxy server authentication method (basic or digest): * _______________________________
Proxy server user ID: * ________________________________________________________
Proxy server password: * ______________________________________________________
A.5 Agentless Credentials
Required fields are indicated by a red asterisk (*).
Installation and Configuration Check List 59

The administrator credentials for endpoints on a domain. Set them globally for all clusters, or
override them on a per-cluster basis.
All clusters:
Windows domain name: * __________________________________________________
Administrator user ID: * ___________________________________________________
Administrator password: * _________________________________________________
Cluster 1:
Windows domain name: * __________________________________________________
Administrator user ID: * ___________________________________________________
Administrator password: * _________________________________________________
Cluster 2:
Windows domain name: * __________________________________________________
Administrator user ID: * ___________________________________________________
Administrator password: * _________________________________________________
Cluster 3:
Windows domain name: * __________________________________________________
novdocx (en) 24 March 2009
Administrator user ID: * ___________________________________________________
Administrator password: * _________________________________________________
Cluster 4:
Windows domain name: * __________________________________________________
Administrator user ID: * ___________________________________________________
Administrator password: * _________________________________________________
A.6 Quarantine
Define quarantine methods and settings for all clusters, or on a per-cluster basis.
A.6.1 802.1X
Required fields are indicated by a red asterisk (*).
Quarantine subnets: ___________________________________________________________
RADIUS server type (local or remote IAS): ________________________________________
Local RADIUS server type end-user authentication method:
Manual: -------------------
________________________________________________________________
Windows domain:
Domain name: *
Administrator user name: *
Administrator password: *
Domain controllers: *
60 Novell ZENworks Network Access Control Installation Guide

Additional credentials user name: *
Additional credentials password: *
Open LDAP:
Server: *
Identity: *
Password: *
Base DN: *
Filter: *
Password attribute: *
End-user credentials user name: *
End-user credentials Password: *
A.6.2 802.1X Devices
Required fields are indicated by a red asterisk (*).
novdocx (en) 24 March 2009
Define 802.1X devices globally for all clusters, or on a per-cluster basis.
802.1X device 1
IP address: * ____________________________________________________________
Shared secret: * __________________________________________________________
Device type: * ___________________________________________________________
802.1X device 2
IP address: * ____________________________________________________________
Shared secret: * __________________________________________________________
Device type: * ___________________________________________________________
802.1X device 3
IP address: * ____________________________________________________________
Shared secret: * __________________________________________________________
Device type: * ___________________________________________________________
802.1X device 4
IP address: * ____________________________________________________________
Shared secret: * __________________________________________________________
Device type: * ___________________________________________________________
802.1X device 5
IP address: * ____________________________________________________________
Shared secret: * __________________________________________________________
Device type: * ___________________________________________________________
Installation and Configuration Check List 61

A.6.3 DHCP
Required fields are indicated by a red asterisk (*).
Define quarantine areas for all clusters, or on a per-cluster basis. Create as many quarantine areas as
you need.
NOTE: If you select DHCP quarantine, you must create at least one area or you will get a process
error.
DHCP quarantine area 1:*
Quarantine area 1 quarantined subnet: * _______________________________________
Quarantine area 1 DHCP IP range: * __________________________________________
Quarantine area 1 quarantined area gateway: * __________________________________
Quarantine area 1 domain suffix: * ___________________________________________
Quarantine area 1 corresponding non-quarantined subnets: * _______________________
DHCP quarantine area 2:
novdocx (en) 24 March 2009
Quarantine area 2 quarantined subnet: ________________________________________
Quarantine area 2 DHCP IP range: * __________________________________________
Quarantine area 2 quarantined area gateway: ___________________________________
Quarantine area 2 domain suffix: * ___________________________________________
Quarantine area 2 corresponding non-quarantined subnets: ________________________
DHCP quarantine area 3:
Quarantine area 3 quarantined subnet: ________________________________________
Quarantine area 3 DHCP IP range: * __________________________________________
Quarantine area 3 quarantined area gateway: ___________________________________
Quarantine area 3 domain suffix: * ___________________________________________
Quarantine area 3 corresponding non-quarantined subnets: ________________________
A.6.4 Accessible services
Accessible services are defined for all clusters or on a per-cluster basis.
Accessible services and endpoints for all clusters:
Web sites: ______________________________________________________________
Hostnames: _____________________________________________________________
IP addresses / ports: ______________________________________________________
Networks: ______________________________________________________________
Windows domain controller: _______________________________________________
Accessible services and endpoints for cluster 1:
Web sites: ______________________________________________________________
Hostnames: _____________________________________________________________
62 Novell ZENworks Network Access Control Installation Guide

IP addresses / ports: ______________________________________________________
Networks: ______________________________________________________________
Windows domain controller: _______________________________________________
Accessible services and endpoints for cluster 2:
Web sites: ______________________________________________________________
Hostnames: _____________________________________________________________
IP addresses / ports: ______________________________________________________
Networks: ______________________________________________________________
Windows domain controller: _______________________________________________
Accessible services and endpoints for cluster 3:
Web sites: ______________________________________________________________
Hostnames: _____________________________________________________________
IP addresses / ports: ______________________________________________________
Networks: ______________________________________________________________
Windows domain controller: _______________________________________________
novdocx (en) 24 March 2009
A.7 Notifications
Notifications are defined for all clusters or on a per-cluster basis.
All clusters
Send information to: ______________________________________________________
SNMP server IP address: __________________________________________________
Email information sent from: _______________________________________________
Cluster 1
Send information to: ______________________________________________________
SNMP server IP address: __________________________________________________
Email information sent from: _______________________________________________
Cluster 2
Send information to: ______________________________________________________
SNMP server IP address: __________________________________________________
Email information sent from: _______________________________________________
Cluster 3
Send information to: ______________________________________________________
SNMP server IP address: __________________________________________________
Email information sent from: _______________________________________________
Installation and Configuration Check List 63

A.8 Test Exceptions
Exceptions are defined for all clusters or on a per-cluster basis.
All cluster endpoint testing exceptions (endpoints that are whitelisted or blacklisted):
MAC addresses: -------------
_________________________________________________________
IP addresses: ____________________________________________________________
NetBIOS names: _________________________________________________________
Cluster 1 endpoint testing exceptions (endpoints that are whitelisted or blacklisted):
MAC addresses: -------------
_________________________________________________________
IP addresses: ____________________________________________________________
NetBIOS names: _________________________________________________________
Cluster 2 endpoint testing exceptions (endpoints that are whitelisted or blacklisted):
MAC addresses: -------------
_________________________________________________________
IP addresses: ____________________________________________________________
NetBIOS names: _________________________________________________________
novdocx (en) 24 March 2009
Cluster 3 endpoint testing exceptions (endpoints that are whitelisted or blacklisted):
MAC addresses: -------------
_________________________________________________________
IP addresses: ____________________________________________________________
NetBIOS names: _________________________________________________________
64 Novell ZENworks Network Access Control Installation Guide
 Loading...