

Page 1

Novell
ZENworks
®
Endpoint Security Management
3.5
July 26, 2007 ADMINISTRATOR’S MANUAL
Page 2

The software described in this book is furnished under a license agreement and may be used only in
accordance with the terms of the agreeme nt .
PN: AM300MWE
Document Version 2.0. - supporting Novell ESM 3.5 and subsequent version 3 releases
Legal Notices
Novell, Inc. makes no representations or warranties with respect to the contents or use of this documentation, and specifically disclaims any express or implied warranties of merchantability or fitness for any particular purpose. Further, Novell, Inc. reserves the
right to revise this publication and to make changes to its content, at any time, without obligation to notify any person or entity of
such revisions or changes.
Further, Novell, Inc. makes no representations or warranties with respect to any software, and specifically disclaims any express or
implied warranties of merchantability or fitness for any particular purpose. Further, Novell, Inc. reserves th e right to make changes
to any and all parts of Novell software, at any time, without any obligation to notify any person or entity of such changes.
Any products or technical information provided under this Agreement may be subject to U.S. export controls and the trade laws of
other countries. You agree to comply with all export control regulat ions and to obtain any required licenses or classification to
export, re-export, or import deliverables. You agree not to export or re-export to entities on the current U.S. export exclusion lists
or to any embargoed or terrorist countries as specified in the U.S. export laws. You agree to not use deliverables for prohibited
nuclear, missile, or chemical biological weaponry end uses. See the Novell International Trade Services Web page (http://
www.novell.com/info/exports/) for more information on exporting Novell software. Novell assumes no responsibility for your fail-
ure to obtain any necessary export approvals.
Copyright © 2007 Novell, Inc. All rights reserved. No part of this publication may be reproduced, photocopied, stored on a
retrieval system, or transmitted without the express written consent of the publisher. Novell, Inc. has intellectual property rights
relating to technology embodied in the product that is described in this document. In particular, and without limitation, these intellectual property rights may include one or more of the U.S. patents listed on the Novell Legal Patents Web page (http://www.nov-
ell.com/company/legal/patents/) and one or more additional patents or pending patent applicat ions in the U.S. and in other
countries.
Novell, Inc.
404 Wyman Street, Suite 500
Waltham, MA 02451
U.S.A.
www.novell.com
Online Documentation: To access the online documentation for this and other Novell products, and to get updates, see the Novell
Documentation Web page (http://www.novell.com/documentation).
Novell Trademarks
For Novell Trademarks , see the Novell Trademark and Service Mark list (http://www.novell.com/company/legal/
trademarks/tmlist.html)
Third-Party Materials
All third-party trademarks are the property of their respective owners.
Page 3

Licenses
FIPS Certified AES Crypto
Compilation Copyright (c) 1995-2003 by Wei Dai. All rights reserved. This copyright applies only to this software distribution package as a compilation, and does not imply a copyright on any particular file in the package.
The following files are copyrighted by their respective original authors:
mars.cpp - Copyright 1998 Brian Gladman.
All other files in this compilation are placed in the public domain by Wei Dai and other contributors.
Permission to use, copy, modify, and distribute this compilation for any purpose, including commercial applications, is
hereby granted without fee, subject to the following restrictions:
1. Any copy or modification of this compilation in any form, except in object code form as part of an application software, must include the above copyright notice and this license.
2. Users of this software agree that any modification or extension they provide to Wei Dai will be considered public
domain and not copyrighted unless it includes an explicit copyright notice.
3. Wei Dai makes no warranty or representation that the operation of the software in this compilation will be error-free,
and Wei Dai is under no obligation to provide any services, by way of maintenance, update, or otherwise. THE SOFTWARE AND ANY DOCUMENTATION ARE PROVIDED "AS IS" WITHOUT EXPRESS OR IMPLIED WARRANTY
INCLUDING, BUT NOT LIMITED TO, THE IMPLIED WARRANTIES OF MERCHANTABILITY AND FITNESS FOR A
PAR TICULAR PURPOSE. IN NO EVENT WILL WEI DAI OR ANY OTHER CONTRIBUT OR BE LIABLE FOR DIRECT,
INCIDENTAL OR CONSEQUENTIAL DAMAGES, EVEN IF ADVISED OF THE POSSIBILITY OF SUCH DAMAGES.
4. Users will not use Wei Dai or any other contributor's name in any publicity or advertising, without prior written consent in each case.
5. Export of this software from the United States may require a specific license from the United States Government. It
is the responsibility of any person or organization contemplating export to obtain such a license before exporting.
6. Certain parts of this software may be protected by patents. It is the users' responsibility to obtain the appropriate
licenses before using those parts.
If this compilation is used in object code form in an application software, acknowledgement of the author is not required
but would be appreciated. The contribution of any useful modifications or extensions to Wei Dai is not required but
would also be appreciated.
Page 4

Contents
Contents . . . . . . . . . . . . . . . . . . . . . . . . . . . . . . . . . . . . . . . . . . . . . . . . . . . . . . . . . . . . . . . . . . . 4
List of Figures . . . . . . . . . . . . . . . . . . . . . . . . . . . . . . . . . . . . . . . . . . . . . . . . . . . . . . . . . . . . . . 6
List of Tables . . . . . . . . . . . . . . . . . . . . . . . . . . . . . . . . . . . . . . . . . . . . . . . . . . . . . . . . . . . . . . . 9
ZENworks Endpoint Security Management. . . . . . . . . . . . . . . . . . . . . . . . . . . . . . . . . . . . . . 10
ESM Overview . . . . . . . . . . . . . . . . . . . . . . . . . . . . . . . . . . . . . . . . . . . . . . . . . . . . . . . . . . . . . . . . . . 11
System Requirements. . . . . . . . . . . . . . . . . . . . . . . . . . . . . . . . . . . . . . . . . . . . . . . . . . . . . . . . . . . . . 12
About the ESM Manuals . . . . . . . . . . . . . . . . . . . . . . . . . . . . . . . . . . . . . . . . . . . . . . . . . . . . . . . . . . . 13
USB/Wireless Security . . . . . . . . . . . . . . . . . . . . . . . . . . . . . . . . . . . . . . . . . . . . . . . . . . . . . . . . . . . . 13
Policy Distribution Service . . . . . . . . . . . . . . . . . . . . . . . . . . . . . . . . . . . . . . . . . . . . . . . . . . . 14
Securing Server Access . . . . . . . . . . . . . . . . . . . . . . . . . . . . . . . . . . . . . . . . . . . . . . . . . . . . . . . . . . . 15
Running the Service . . . . . . . . . . . . . . . . . . . . . . . . . . . . . . . . . . . . . . . . . . . . . . . . . . . . . . . . . . . . . . 16
Management Service. . . . . . . . . . . . . . . . . . . . . . . . . . . . . . . . . . . . . . . . . . . . . . . . . . . . . . . . 17
Securing Server Access . . . . . . . . . . . . . . . . . . . . . . . . . . . . . . . . . . . . . . . . . . . . . . . . . . . . . . . . . . . 18
Running the Service . . . . . . . . . . . . . . . . . . . . . . . . . . . . . . . . . . . . . . . . . . . . . . . . . . . . . . . . . . . . . . 19
Management Console . . . . . . . . . . . . . . . . . . . . . . . . . . . . . . . . . . . . . . . . . . . . . . . . . . . . . . . 20
Task Bar . . . . . . . . . . . . . . . . . . . . . . . . . . . . . . . . . . . . . . . . . . . . . . . . . . . . . . . . . . . . . . . . . . . . . . . 20
Menu Bar. . . . . . . . . . . . . . . . . . . . . . . . . . . . . . . . . . . . . . . . . . . . . . . . . . . . . . . . . . . . . . . . . . . . . . . 22
Permissions Settings. . . . . . . . . . . . . . . . . . . . . . . . . . . . . . . . . . . . . . . . . . . . . . . . . . . . . . . . . . . . . . 24
Configuration Window. . . . . . . . . . . . . . . . . . . . . . . . . . . . . . . . . . . . . . . . . . . . . . . . . . . . . . . . . . . . . 28
Alerts Monitoring. . . . . . . . . . . . . . . . . . . . . . . . . . . . . . . . . . . . . . . . . . . . . . . . . . . . . . . . . . . . . . . . . 33
Reporting. . . . . . . . . . . . . . . . . . . . . . . . . . . . . . . . . . . . . . . . . . . . . . . . . . . . . . . . . . . . . . . . . . . . . . . 37
Generating Custom Reports . . . . . . . . . . . . . . . . . . . . . . . . . . . . . . . . . . . . . . . . . . . . . . . . . . . . . . . . 48
ZENworks Storage Encryption Solution . . . . . . . . . . . . . . . . . . . . . . . . . . . . . . . . . . . . . . . . . . . . . . . 59
Key Management . . . . . . . . . . . . . . . . . . . . . . . . . . . . . . . . . . . . . . . . . . . . . . . . . . . . . . . . . . . . . . . . 60
ZENworks File Decryption Utility. . . . . . . . . . . . . . . . . . . . . . . . . . . . . . . . . . . . . . . . . . . . . . . . . . . . . 62
Override-Password Key Generator. . . . . . . . . . . . . . . . . . . . . . . . . . . . . . . . . . . . . . . . . . . . . . . . . . . 63
USB Drive Scanner. . . . . . . . . . . . . . . . . . . . . . . . . . . . . . . . . . . . . . . . . . . . . . . . . . . . . . . . . . . . . . . 65
Client Location Assurance Service . . . . . . . . . . . . . . . . . . . . . . . . . . . . . . . . . . . . . . . . . . . . 67
Securing Server Access . . . . . . . . . . . . . . . . . . . . . . . . . . . . . . . . . . . . . . . . . . . . . . . . . . . . . . . . . . . 68
Optional Server Configurations. . . . . . . . . . . . . . . . . . . . . . . . . . . . . . . . . . . . . . . . . . . . . . . . . . . . . . 69
Transferring the Public Key to the Management Service . . . . . . . . . . . . . . . . . . . . . . . . . . . . . . . . . . 69
Updating the Encryption Keys. . . . . . . . . . . . . . . . . . . . . . . . . . . . . . . . . . . . . . . . . . . . . . . . . . . . . . . 69
ZENworks Security Client Management . . . . . . . . . . . . . . . . . . . . . . . . . . . . . . . . . . . . . . . . 70
Client Self Defense . . . . . . . . . . . . . . . . . . . . . . . . . . . . . . . . . . . . . . . . . . . . . . . . . . . . . . . . . . . . . . . 71
Upgrading the ZSC . . . . . . . . . . . . . . . . . . . . . . . . . . . . . . . . . . . . . . . . . . . . . . . . . . . . . . . . . . . . . . . 71
Running the ZSC. . . . . . . . . . . . . . . . . . . . . . . . . . . . . . . . . . . . . . . . . . . . . . . . . . . . . . . . . . . . . . . . . 72
ZENworks Security Client Diagnostics Tools . . . . . . . . . . . . . . . . . . . . . . . . . . . . . . . . . . . . . . . . . . . 74
Creating and Distributing ESM Security Policies. . . . . . . . . . . . . . . . . . . . . . . . . . . . . . . . . 83
Creating Security Policies. . . . . . . . . . . . . . . . . . . . . . . . . . . . . . . . . . . . . . . . . . . . . . . . . . . . . . . . . . 87
Custom User Messages . . . . . . . . . . . . . . . . . . . . . . . . . . . . . . . . . . . . . . . . . . . . . . . . . . . . . . . . . . . 88
ZENworks® ESM 3.5 Administrator’s Manual 4
Page 5

Hyperlinks . . . . . . . . . . . . . . . . . . . . . . . . . . . . . . . . . . . . . . . . . . . . . . . . . . . . . . . . . . . . . . . . . . . . . . 89
Global Policy Settings. . . . . . . . . . . . . . . . . . . . . . . . . . . . . . . . . . . . . . . . . . . . . . . . . . . . . . . . . . . . . 90
Wireless Control . . . . . . . . . . . . . . . . . . . . . . . . . . . . . . . . . . . . . . . . . . . . . . . . . . . . . . . . . . . . . . . . . 92
Global Communication Hardware Control. . . . . . . . . . . . . . . . . . . . . . . . . . . . . . . . . . . . . . . . . . . . . . 94
Storage Device Control. . . . . . . . . . . . . . . . . . . . . . . . . . . . . . . . . . . . . . . . . . . . . . . . . . . . . . . . . . . . 95
Data Encryption. . . . . . . . . . . . . . . . . . . . . . . . . . . . . . . . . . . . . . . . . . . . . . . . . . . . . . . . . . . . . . . . . . 98
ZSC Update . . . . . . . . . . . . . . . . . . . . . . . . . . . . . . . . . . . . . . . . . . . . . . . . . . . . . . . . . . . . . . . . . . . 100
VPN Enforcement . . . . . . . . . . . . . . . . . . . . . . . . . . . . . . . . . . . . . . . . . . . . . . . . . . . . . . . . . . . . . . . 101
Locations. . . . . . . . . . . . . . . . . . . . . . . . . . . . . . . . . . . . . . . . . . . . . . . . . . . . . . . . . . . . . . . . . . . . . . 105
Location Settings. . . . . . . . . . . . . . . . . . . . . . . . . . . . . . . . . . . . . . . . . . . . . . . . . . . . . . . . . . . . . . . . 107
Location Components. . . . . . . . . . . . . . . . . . . . . . . . . . . . . . . . . . . . . . . . . . . . . . . . . . . . . . . . . . . . 109
Communication Hardware Settings. . . . . . . . . . . . . . . . . . . . . . . . . . . . . . . . . . . . . . . . . . . . . . . . . . 110
Storage Device Control. . . . . . . . . . . . . . . . . . . . . . . . . . . . . . . . . . . . . . . . . . . . . . . . . . . . . . . . . . . 112
Network Environments . . . . . . . . . . . . . . . . . . . . . . . . . . . . . . . . . . . . . . . . . . . . . . . . . . . . . . . . . . . 113
Wi-Fi Management . . . . . . . . . . . . . . . . . . . . . . . . . . . . . . . . . . . . . . . . . . . . . . . . . . . . . . . . . . . . . . 116
Wi-Fi Security . . . . . . . . . . . . . . . . . . . . . . . . . . . . . . . . . . . . . . . . . . . . . . . . . . . . . . . . . . . . . . . . . . 121
Firewall Settings . . . . . . . . . . . . . . . . . . . . . . . . . . . . . . . . . . . . . . . . . . . . . . . . . . . . . . . . . . . . . . . . 123
TCP/UDP Ports. . . . . . . . . . . . . . . . . . . . . . . . . . . . . . . . . . . . . . . . . . . . . . . . . . . . . . . . . . . . . . . . . 125
Access Control Lists . . . . . . . . . . . . . . . . . . . . . . . . . . . . . . . . . . . . . . . . . . . . . . . . . . . . . . . . . . . . . 128
Application Controls . . . . . . . . . . . . . . . . . . . . . . . . . . . . . . . . . . . . . . . . . . . . . . . . . . . . . . . . . . . . . 132
Integrity and Remediation Rules. . . . . . . . . . . . . . . . . . . . . . . . . . . . . . . . . . . . . . . . . . . . . . . . . . . . 135
Antivirus/Spyware Rules. . . . . . . . . . . . . . . . . . . . . . . . . . . . . . . . . . . . . . . . . . . . . . . . . . . . . . . . . . 136
Advanced Scripting Rules. . . . . . . . . . . . . . . . . . . . . . . . . . . . . . . . . . . . . . . . . . . . . . . . . . . . . . . . . 142
Rule Scripting Parameters . . . . . . . . . . . . . . . . . . . . . . . . . . . . . . . . . . . . . . . . . . . . . . . . . . . . . . . . 146
Sample Scripts . . . . . . . . . . . . . . . . . . . . . . . . . . . . . . . . . . . . . . . . . . . . . . . . . . . . . . . . . . . . . . . . . 195
Compliance Reporting. . . . . . . . . . . . . . . . . . . . . . . . . . . . . . . . . . . . . . . . . . . . . . . . . . . . . . . . . . . . 204
Publishing Security Policies . . . . . . . . . . . . . . . . . . . . . . . . . . . . . . . . . . . . . . . . . . . . . . . . . . . . . . . 206
Exporting a Policy . . . . . . . . . . . . . . . . . . . . . . . . . . . . . . . . . . . . . . . . . . . . . . . . . . . . . . . . . . . . . . . 208
Importing Policies . . . . . . . . . . . . . . . . . . . . . . . . . . . . . . . . . . . . . . . . . . . . . . . . . . . . . . . . . . . . . . . 209
Exporting Policies to Unmanaged Users. . . . . . . . . . . . . . . . . . . . . . . . . . . . . . . . . . . . . . . . . . . . . . 210
Troubleshooting. . . . . . . . . . . . . . . . . . . . . . . . . . . . . . . . . . . . . . . . . . . . . . . . . . . . . . . . . . . 211
Overview. . . . . . . . . . . . . . . . . . . . . . . . . . . . . . . . . . . . . . . . . . . . . . . . . . . . . . . . . . . . . . . . . . . . . . 211
Allowing ASP.NET 1.1 Functions . . . . . . . . . . . . . . . . . . . . . . . . . . . . . . . . . . . . . . . . . . . . . . . . . . . 212
Troubleshooting SQL Server Issues. . . . . . . . . . . . . . . . . . . . . . . . . . . . . . . . . . . . . . . . . . . . . . . . . 221
Acronym Glossary. . . . . . . . . . . . . . . . . . . . . . . . . . . . . . . . . . . . . . . . . . . . . . . . . . . . . . . . . 241
Index . . . . . . . . . . . . . . . . . . . . . . . . . . . . . . . . . . . . . . . . . . . . . . . . . . . . . . . . . . . . . . . . . . . . 243
ZENworks® ESM 3.5 Administrator’s Manual 5
Page 6

List of Figures
Figure 1: Effectiveness of NDIS-layer firewall. . . . . . . . . . . . . . . . . . . . . . . . . . . . . . . . . . . . . . . . . . . . . . 10
Figure 2: ESM Architecture . . . . . . . . . . . . . . . . . . . . . . . . . . . . . . . . . . . . . . . . . . . . . . . . . . . . . . . . . . . . 11
Figure 3: The Management Console. . . . . . . . . . . . . . . . . . . . . . . . . . . . . . . . . . . . . . . . . . . . . . . . . . . . . 20
Figure 4: Menu Bar . . . . . . . . . . . . . . . . . . . . . . . . . . . . . . . . . . . . . . . . . . . . . . . . . . . . . . . . . . . . . . . . . . 22
Figure 5: Management Console Permissions Settings Window . . . . . . . . . . . . . . . . . . . . . . . . . . . . . . . . 25
Figure 6: Permission Settings Organization Table . . . . . . . . . . . . . . . . . . . . . . . . . . . . . . . . . . . . . . . . . . 25
Figure 7: Publish To Settings . . . . . . . . . . . . . . . . . . . . . . . . . . . . . . . . . . . . . . . . . . . . . . . . . . . . . . . . . . 26
Figure 8: Publish To List . . . . . . . . . . . . . . . . . . . . . . . . . . . . . . . . . . . . . . . . . . . . . . . . . . . . . . . . . . . . . . 27
Figure 9: Infrastructure and Scheduling Window. . . . . . . . . . . . . . . . . . . . . . . . . . . . . . . . . . . . . . . . . . . . 28
Figure 10: Authenticating Directories Window. . . . . . . . . . . . . . . . . . . . . . . . . . . . . . . . . . . . . . . . . . . . . . 30
Figure 11: Service Synchronization. . . . . . . . . . . . . . . . . . . . . . . . . . . . . . . . . . . . . . . . . . . . . . . . . . . . . . 32
Figure 12: Alerts Dashboard . . . . . . . . . . . . . . . . . . . . . . . . . . . . . . . . . . . . . . . . . . . . . . . . . . . . . . . . . . . 33
Figure 13: Alerts Configuration Tab. . . . . . . . . . . . . . . . . . . . . . . . . . . . . . . . . . . . . . . . . . . . . . . . . . . . . . 34
Figure 14: Alert Reporting . . . . . . . . . . . . . . . . . . . . . . . . . . . . . . . . . . . . . . . . . . . . . . . . . . . . . . . . . . . . . 35
Figure 15: Alerts Configuration Tab. . . . . . . . . . . . . . . . . . . . . . . . . . . . . . . . . . . . . . . . . . . . . . . . . . . . . . 36
Figure 16: Reports Menu. . . . . . . . . . . . . . . . . . . . . . . . . . . . . . . . . . . . . . . . . . . . . . . . . . . . . . . . . . . . . . 37
Figure 17: Use calendar tool to set the date-range . . . . . . . . . . . . . . . . . . . . . . . . . . . . . . . . . . . . . . . . . . 37
Figure 18: Report Toolbar . . . . . . . . . . . . . . . . . . . . . . . . . . . . . . . . . . . . . . . . . . . . . . . . . . . . . . . . . . . . . 38
Figure 19: Report list icon . . . . . . . . . . . . . . . . . . . . . . . . . . . . . . . . . . . . . . . . . . . . . . . . . . . . . . . . . . . . . 38
Figure 20: No data. . . . . . . . . . . . . . . . . . . . . . . . . . . . . . . . . . . . . . . . . . . . . . . . . . . . . . . . . . . . . . . . . . . 38
Figure 21: Sample Blocked Applications Report. . . . . . . . . . . . . . . . . . . . . . . . . . . . . . . . . . . . . . . . . . . . 41
Figure 22: Sample Location Usage Report . . . . . . . . . . . . . . . . . . . . . . . . . . . . . . . . . . . . . . . . . . . . . . . . 44
Figure 23: Sample Detected Removable Storage Devices report. . . . . . . . . . . . . . . . . . . . . . . . . . . . . . . 45
Figure 24: Sample Wireless Environment History report. . . . . . . . . . . . . . . . . . . . . . . . . . . . . . . . . . . . . . 47
Figure 25: Browse the Reporting Data Source . . . . . . . . . . . . . . . . . . . . . . . . . . . . . . . . . . . . . . . . . . . . . 48
Figure 26: Report Document Properties . . . . . . . . . . . . . . . . . . . . . . . . . . . . . . . . . . . . . . . . . . . . . . . . . . 49
Figure 27: Available Database Fields . . . . . . . . . . . . . . . . . . . . . . . . . . . . . . . . . . . . . . . . . . . . . . . . . . . . 49
Figure 28: Add New Crystal Report. . . . . . . . . . . . . . . . . . . . . . . . . . . . . . . . . . . . . . . . . . . . . . . . . . . . . . 51
Figure 29: Crystal Reports Wizard . . . . . . . . . . . . . . . . . . . . . . . . . . . . . . . . . . . . . . . . . . . . . . . . . . . . . . 52
Figure 30: Access Reporting Service Database . . . . . . . . . . . . . . . . . . . . . . . . . . . . . . . . . . . . . . . . . . . . 52
Figure 31: Select OLE DB Provider. . . . . . . . . . . . . . . . . . . . . . . . . . . . . . . . . . . . . . . . . . . . . . . . . . . . . . 53
Figure 32: Enter Server Information . . . . . . . . . . . . . . . . . . . . . . . . . . . . . . . . . . . . . . . . . . . . . . . . . . . . . 53
Figure 33: Select Source Table or View . . . . . . . . . . . . . . . . . . . . . . . . . . . . . . . . . . . . . . . . . . . . . . . . . . 54
Figure 34: Select the columns to include. . . . . . . . . . . . . . . . . . . . . . . . . . . . . . . . . . . . . . . . . . . . . . . . . . 54
Figure 35: Select Columns to Group . . . . . . . . . . . . . . . . . . . . . . . . . . . . . . . . . . . . . . . . . . . . . . . . . . . . . 55
Figure 36: Select Style . . . . . . . . . . . . . . . . . . . . . . . . . . . . . . . . . . . . . . . . . . . . . . . . . . . . . . . . . . . . . . . 55
Figure 37: Visual Basic Report Builder . . . . . . . . . . . . . . . . . . . . . . . . . . . . . . . . . . . . . . . . . . . . . . . . . . . 56
Figure 38: Setting Up a Filter. . . . . . . . . . . . . . . . . . . . . . . . . . . . . . . . . . . . . . . . . . . . . . . . . . . . . . . . . . . 56
Figure 39: Create Parameter Field . . . . . . . . . . . . . . . . . . . . . . . . . . . . . . . . . . . . . . . . . . . . . . . . . . . . . . 57
Figure 40: Link the Parameter. . . . . . . . . . . . . . . . . . . . . . . . . . . . . . . . . . . . . . . . . . . . . . . . . . . . . . . . . . 57
Figure 41: Specify the Correct Records . . . . . . . . . . . . . . . . . . . . . . . . . . . . . . . . . . . . . . . . . . . . . . . . . . 58
Figure 42: Access Encryption Keys through the tools menu. . . . . . . . . . . . . . . . . . . . . . . . . . . . . . . . . . . 60
Figure 43: Override Password Key Generator . . . . . . . . . . . . . . . . . . . . . . . . . . . . . . . . . . . . . . . . . . . . . 63
Figure 44: USB Drive Scanner . . . . . . . . . . . . . . . . . . . . . . . . . . . . . . . . . . . . . . . . . . . . . . . . . . . . . . . . . 65
Figure 45: Scan for Device Name and Serial Number . . . . . . . . . . . . . . . . . . . . . . . . . . . . . . . . . . . . . . . 66
Figure 46: ZENworks Security Client About Screen . . . . . . . . . . . . . . . . . . . . . . . . . . . . . . . . . . . . . . . . . 75
Figure 47: ZENworks Security Client Diagnostics Screen. . . . . . . . . . . . . . . . . . . . . . . . . . . . . . . . . . . . . 75
Figure 48: Administrator Views . . . . . . . . . . . . . . . . . . . . . . . . . . . . . . . . . . . . . . . . . . . . . . . . . . . . . . . . . 76
Figure 49: View Policy Window. . . . . . . . . . . . . . . . . . . . . . . . . . . . . . . . . . . . . . . . . . . . . . . . . . . . . . . . . 76
Figure 50: Rule Scripting Window . . . . . . . . . . . . . . . . . . . . . . . . . . . . . . . . . . . . . . . . . . . . . . . . . . . . . . . 77
Figure 51: Scripting Variable Window . . . . . . . . . . . . . . . . . . . . . . . . . . . . . . . . . . . . . . . . . . . . . . . . . . . . 78
ZENworks® ESM 3.5 Administrator’s Manual 6
Page 7

Figure 52: Client Driver Status Window. . . . . . . . . . . . . . . . . . . . . . . . . . . . . . . . . . . . . . . . . . . . . . . . . . . 78
Figure 53: ZENworks Security Client Settings Control . . . . . . . . . . . . . . . . . . . . . . . . . . . . . . . . . . . . . . . 79
Figure 54: Logging Window. . . . . . . . . . . . . . . . . . . . . . . . . . . . . . . . . . . . . . . . . . . . . . . . . . . . . . . . . . . . 80
Figure 55: Comment Window . . . . . . . . . . . . . . . . . . . . . . . . . . . . . . . . . . . . . . . . . . . . . . . . . . . . . . . . . . 81
Figure 56: Reporting Overrides. . . . . . . . . . . . . . . . . . . . . . . . . . . . . . . . . . . . . . . . . . . . . . . . . . . . . . . . . 81
Figure 57: Duration Settings, and Make Permanent . . . . . . . . . . . . . . . . . . . . . . . . . . . . . . . . . . . . . . . . . 82
Figure 58: Hold Reports for Diagnostics . . . . . . . . . . . . . . . . . . . . . . . . . . . . . . . . . . . . . . . . . . . . . . . . . . 82
Figure 59: Policy Toolbar. . . . . . . . . . . . . . . . . . . . . . . . . . . . . . . . . . . . . . . . . . . . . . . . . . . . . . . . . . . . . . 84
Figure 60: Select Component Window . . . . . . . . . . . . . . . . . . . . . . . . . . . . . . . . . . . . . . . . . . . . . . . . . . . 84
Figure 61: Show Usage Window . . . . . . . . . . . . . . . . . . . . . . . . . . . . . . . . . . . . . . . . . . . . . . . . . . . . . . . . 85
Figure 62: Error Notification Pane . . . . . . . . . . . . . . . . . . . . . . . . . . . . . . . . . . . . . . . . . . . . . . . . . . . . . . . 86
Figure 63: ESM Security Policy creation process . . . . . . . . . . . . . . . . . . . . . . . . . . . . . . . . . . . . . . . . . . . 87
Figure 64: Custom User Message with a Hyperlink . . . . . . . . . . . . . . . . . . . . . . . . . . . . . . . . . . . . . . . . . 88
Figure 65: Custom Message and Hyperlink Controls . . . . . . . . . . . . . . . . . . . . . . . . . . . . . . . . . . . . . . . . 88
Figure 66: Custom User Message with a Hyperlink . . . . . . . . . . . . . . . . . . . . . . . . . . . . . . . . . . . . . . . . . 89
Figure 67: Custom Message and Hyperlink Controls . . . . . . . . . . . . . . . . . . . . . . . . . . . . . . . . . . . . . . . . 89
Figure 68: Global Policy Settings . . . . . . . . . . . . . . . . . . . . . . . . . . . . . . . . . . . . . . . . . . . . . . . . . . . . . . . 90
Figure 69: Updated Policy Custom Message with Hyperlink. . . . . . . . . . . . . . . . . . . . . . . . . . . . . . . . . . . 91
Figure 70: Uninstall Password Controls . . . . . . . . . . . . . . . . . . . . . . . . . . . . . . . . . . . . . . . . . . . . . . . . . . 91
Figure 71: Policy Components . . . . . . . . . . . . . . . . . . . . . . . . . . . . . . . . . . . . . . . . . . . . . . . . . . . . . . . . . 92
Figure 72: Global Communication Hardware Control . . . . . . . . . . . . . . . . . . . . . . . . . . . . . . . . . . . . . . . . 94
Figure 73: Global Storage Device Control. . . . . . . . . . . . . . . . . . . . . . . . . . . . . . . . . . . . . . . . . . . . . . . . . 95
Figure 74: Verify Local Storage Device Options are set as Disabled . . . . . . . . . . . . . . . . . . . . . . . . . . . . 96
Figure 75: Data Encryption controls . . . . . . . . . . . . . . . . . . . . . . . . . . . . . . . . . . . . . . . . . . . . . . . . . . . . . 98
Figure 76: ZSC Update . . . . . . . . . . . . . . . . . . . . . . . . . . . . . . . . . . . . . . . . . . . . . . . . . . . . . . . . . . . . . . 100
Figure 77: Basic VPN Enforcement. . . . . . . . . . . . . . . . . . . . . . . . . . . . . . . . . . . . . . . . . . . . . . . . . . . . . 101
Figure 78: Advanced VPN Settings. . . . . . . . . . . . . . . . . . . . . . . . . . . . . . . . . . . . . . . . . . . . . . . . . . . . . 103
Figure 79: Location Settings . . . . . . . . . . . . . . . . . . . . . . . . . . . . . . . . . . . . . . . . . . . . . . . . . . . . . . . . . . 105
Figure 80: CLAS location checked . . . . . . . . . . . . . . . . . . . . . . . . . . . . . . . . . . . . . . . . . . . . . . . . . . . . . 108
Figure 81: Location Communication Hardware Control. . . . . . . . . . . . . . . . . . . . . . . . . . . . . . . . . . . . . . 110
Figure 82: Location Storage Device Control . . . . . . . . . . . . . . . . . . . . . . . . . . . . . . . . . . . . . . . . . . . . . . 112
Figure 83: Network Environments . . . . . . . . . . . . . . . . . . . . . . . . . . . . . . . . . . . . . . . . . . . . . . . . . . . . . . 113
Figure 84: Wi-Fi Management. . . . . . . . . . . . . . . . . . . . . . . . . . . . . . . . . . . . . . . . . . . . . . . . . . . . . . . . . 116
Figure 85: Managed Access Points Control . . . . . . . . . . . . . . . . . . . . . . . . . . . . . . . . . . . . . . . . . . . . . . 117
Figure 86: Filtered Access Points Control. . . . . . . . . . . . . . . . . . . . . . . . . . . . . . . . . . . . . . . . . . . . . . . . 118
Figure 87: Prohibited Access Points Control. . . . . . . . . . . . . . . . . . . . . . . . . . . . . . . . . . . . . . . . . . . . . . 118
Figure 88: Signal Strength Control . . . . . . . . . . . . . . . . . . . . . . . . . . . . . . . . . . . . . . . . . . . . . . . . . . . . . 119
Figure 89: Wi-Fi Security. . . . . . . . . . . . . . . . . . . . . . . . . . . . . . . . . . . . . . . . . . . . . . . . . . . . . . . . . . . . . 121
Figure 90: Firewall Settings. . . . . . . . . . . . . . . . . . . . . . . . . . . . . . . . . . . . . . . . . . . . . . . . . . . . . . . . . . . 123
Figure 91: TCP/UDP Ports Settings . . . . . . . . . . . . . . . . . . . . . . . . . . . . . . . . . . . . . . . . . . . . . . . . . . . . 125
Figure 92: Access Control Lists Settings. . . . . . . . . . . . . . . . . . . . . . . . . . . . . . . . . . . . . . . . . . . . . . . . . 128
Figure 93: Application Control Settings . . . . . . . . . . . . . . . . . . . . . . . . . . . . . . . . . . . . . . . . . . . . . . . . . . 132
Figure 94: Antivirus/Spyware Integrity rules . . . . . . . . . . . . . . . . . . . . . . . . . . . . . . . . . . . . . . . . . . . . . . 136
Figure 95: Integrity Tests. . . . . . . . . . . . . . . . . . . . . . . . . . . . . . . . . . . . . . . . . . . . . . . . . . . . . . . . . . . . . 138
Figure 96: Integrity Checks . . . . . . . . . . . . . . . . . . . . . . . . . . . . . . . . . . . . . . . . . . . . . . . . . . . . . . . . . . . 140
Figure 97: Advanced Scripting . . . . . . . . . . . . . . . . . . . . . . . . . . . . . . . . . . . . . . . . . . . . . . . . . . . . . . . . 142
Figure 98: Script Variables . . . . . . . . . . . . . . . . . . . . . . . . . . . . . . . . . . . . . . . . . . . . . . . . . . . . . . . . . . . 144
Figure 99: Script Text Window . . . . . . . . . . . . . . . . . . . . . . . . . . . . . . . . . . . . . . . . . . . . . . . . . . . . . . . . 145
Figure 100: Compliance Reporting . . . . . . . . . . . . . . . . . . . . . . . . . . . . . . . . . . . . . . . . . . . . . . . . . . . . . 204
Figure 101: Publish a Security Policy . . . . . . . . . . . . . . . . . . . . . . . . . . . . . . . . . . . . . . . . . . . . . . . . . . . 206
Figure 102: Open IIS Manager . . . . . . . . . . . . . . . . . . . . . . . . . . . . . . . . . . . . . . . . . . . . . . . . . . . . . . . . 212
Figure 103: Allowing ASP.NET . . . . . . . . . . . . . . . . . . . . . . . . . . . . . . . . . . . . . . . . . . . . . . . . . . . . . . . . 213
Figure 104: Communications Console . . . . . . . . . . . . . . . . . . . . . . . . . . . . . . . . . . . . . . . . . . . . . . . . . . 214
Figure 105: Distribution Service - Client Communication . . . . . . . . . . . . . . . . . . . . . . . . . . . . . . . . . . . . 216
ZENworks® ESM 3.5 Administrator’s Manual 7
Page 8

Figure 106: Distribution Service - Server Communication. . . . . . . . . . . . . . . . . . . . . . . . . . . . . . . . . . . . 217
Figure 107: Management Service - Client Communication. . . . . . . . . . . . . . . . . . . . . . . . . . . . . . . . . . . 217
Figure 108: Management Service - Server Communication . . . . . . . . . . . . . . . . . . . . . . . . . . . . . . . . . . 218
Figure 109: Trace Log. . . . . . . . . . . . . . . . . . . . . . . . . . . . . . . . . . . . . . . . . . . . . . . . . . . . . . . . . . . . . . . 219
Figure 110: Add Counters Dialogue Box. . . . . . . . . . . . . . . . . . . . . . . . . . . . . . . . . . . . . . . . . . . . . . . . . 221
Figure 111: System Monitor Function . . . . . . . . . . . . . . . . . . . . . . . . . . . . . . . . . . . . . . . . . . . . . . . . . . . 222
Figure 112: Database Tracing. . . . . . . . . . . . . . . . . . . . . . . . . . . . . . . . . . . . . . . . . . . . . . . . . . . . . . . . . 229
Figure 113: Trace Sample. . . . . . . . . . . . . . . . . . . . . . . . . . . . . . . . . . . . . . . . . . . . . . . . . . . . . . . . . . . . 230
Figure 114: Example Configuration Table. . . . . . . . . . . . . . . . . . . . . . . . . . . . . . . . . . . . . . . . . . . . . . . . 235
Figure 115: Example Repository Table . . . . . . . . . . . . . . . . . . . . . . . . . . . . . . . . . . . . . . . . . . . . . . . . . . 235
Figure 116: Example Organization Table . . . . . . . . . . . . . . . . . . . . . . . . . . . . . . . . . . . . . . . . . . . . . . . . 236
Figure 117: Example ORG_REP Table. . . . . . . . . . . . . . . . . . . . . . . . . . . . . . . . . . . . . . . . . . . . . . . . . . 236
Figure 118: Example Event Table. . . . . . . . . . . . . . . . . . . . . . . . . . . . . . . . . . . . . . . . . . . . . . . . . . . . . . 237
Figure 119: Example Configuration Table. . . . . . . . . . . . . . . . . . . . . . . . . . . . . . . . . . . . . . . . . . . . . . . . 238
Figure 120: Configuration Form. . . . . . . . . . . . . . . . . . . . . . . . . . . . . . . . . . . . . . . . . . . . . . . . . . . . . . . . 238
Figure 121: Example Organization Table . . . . . . . . . . . . . . . . . . . . . . . . . . . . . . . . . . . . . . . . . . . . . . . . 239
Figure 122: Organization Audit Table . . . . . . . . . . . . . . . . . . . . . . . . . . . . . . . . . . . . . . . . . . . . . . . . . . . 239
Figure 123: Example Publish_Organization_Audit Table . . . . . . . . . . . . . . . . . . . . . . . . . . . . . . . . . . . . 240
ZENworks® ESM 3.5 Administrator’s Manual 8
Page 9

List of Tables
Table 1: System Requirements . . . . . . . . . . . . . . . . . . . . . . . . . . . . . . . . . . . . . . . . . . . . . . . . . . . . . . . . . 12
Table 2: Signal Strength thresholds . . . . . . . . . . . . . . . . . . . . . . . . . . . . . . . . . . . . . . . . . . . . . . . . . . . . 119
Table 3: TCP/UDP Ports . . . . . . . . . . . . . . . . . . . . . . . . . . . . . . . . . . . . . . . . . . . . . . . . . . . . . . . . . . . . . 127
Table 4: Network Address Macros . . . . . . . . . . . . . . . . . . . . . . . . . . . . . . . . . . . . . . . . . . . . . . . . . . . . . 130
Table 5: Application Controls. . . . . . . . . . . . . . . . . . . . . . . . . . . . . . . . . . . . . . . . . . . . . . . . . . . . . . . . . . 133
Table 6: Shell Folder Names. . . . . . . . . . . . . . . . . . . . . . . . . . . . . . . . . . . . . . . . . . . . . . . . . . . . . . . . . . 152
ZENworks® ESM 3.5 Administrator’s Manual 9
Page 10
ZENworks Endpoint Security Management
Novell's ZENworks Endpoint Security Management (ESM) provides complete, centralized
security management for all endpoints in the enterprise. Because ESM applies security at the most
vulnerable point, the endpoint, all security settings are applied and enforced regardless of whether
the user is connecting to the network directly, dialing in remotely, or even not connecting to
corporate infrastructure at all. This is critical to not only protect the data within the corporate
perimeter, but also to protect the critical data that resides on the endpoint device itself.
ESM automatically adjusts security settings and user permissions based on the current network
environment characteristics. A sophisticated engine is used to determine the user's location and
automatically adjusts firewall settings and permissions for applications, adapters, hardware, etc.
Security is enforced through the creation and distribution of ESM security policies. Each location
(Work, Home, Alternate, Airport, etc.) listed in a security policy is assigned to a network
environment (or multiple network environments). A location determines which hardware is
available and the degree of firewall settings that are activated within the network environment.
The firewall settings determine which networking ports, access control lists (ACLs), and
applications are accessible/required. Various integrity checks and scripts can be run at location
change to ensure that all required security software is up to date and running.
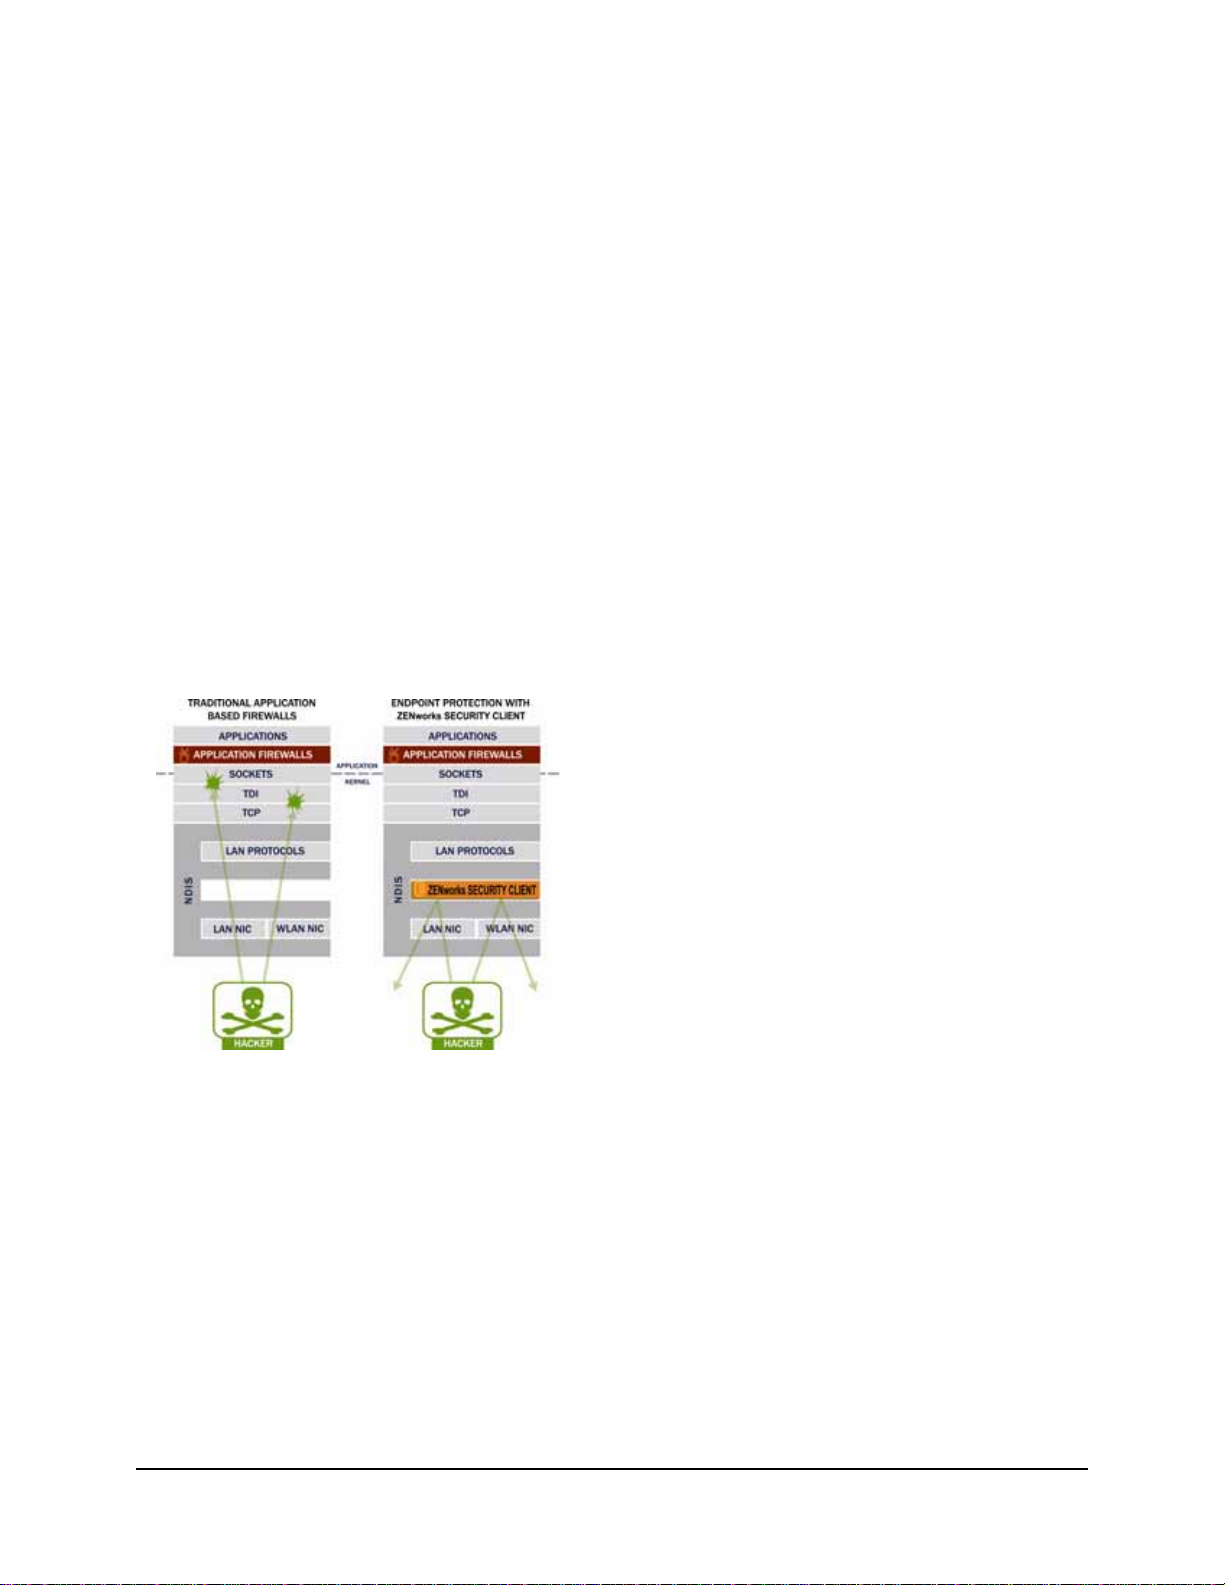
In securing mobile devices, ESM is superior to
typical personal firewall technologies which operate
only in the application layer or as a firewall-hook
driver. ESM client security is integrated into the
Network Driver Interface Specification (NDIS)
driver for each network interface card (NIC),
providing security protection from the moment
traffic enters the PC. Differences between ESM and
application-layer firewalls and filter drivers are
illustrated in Figure 1.
Security decisions and system performance are
optimized when security implementations operate at
the lowest appropriate layer of the protocol stack.
Figure 1 : Effectiveness of NDIS-layer firewall
With ESM's ZENworks Security Client, unsolicited
traffic is dropped at the lowest levels of the NDIS driver stack by means of Adaptive Port
Blocking (stateful packet inspection) technology. This approach protects against protocol-based
attacks including unauthorized port scans, SYN Flood, NetBIOS, and DDOS attacks.
ZENworks® ESM 3.5 Administrator’s Manual 10
Page 11
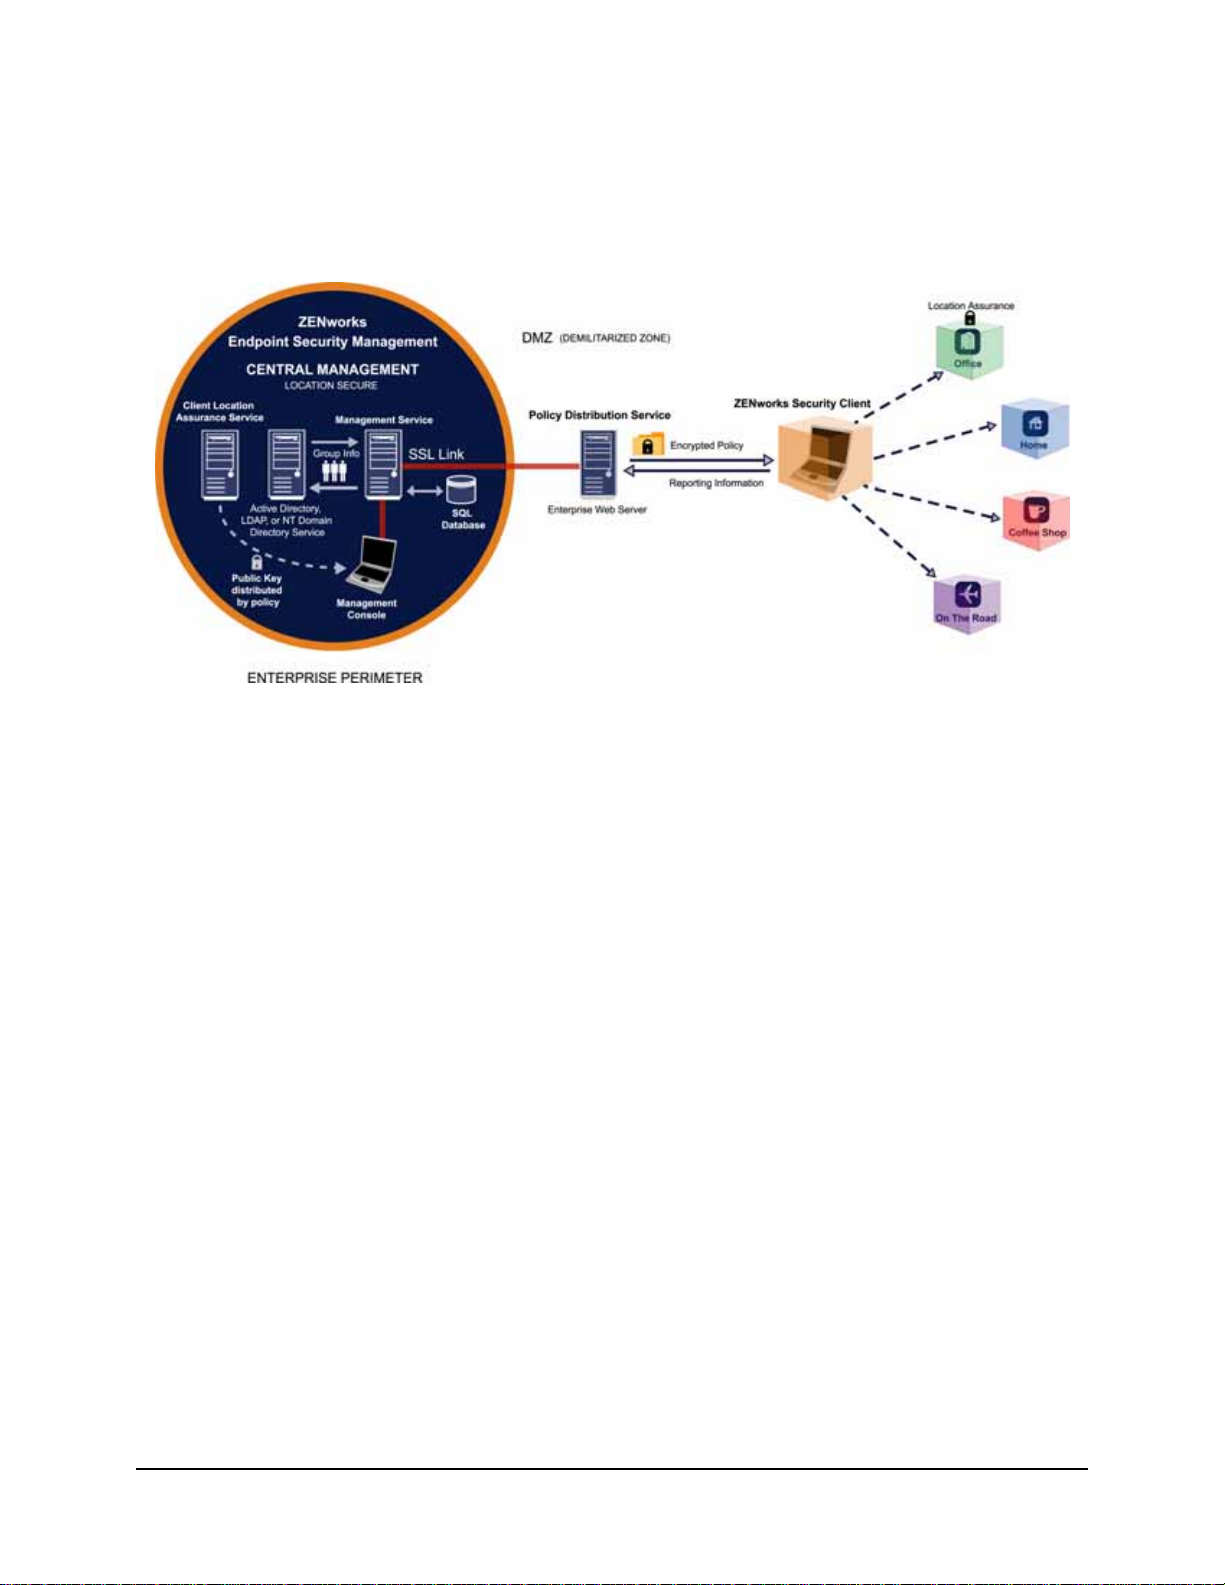
ESM Overview
ESM consists of five high-level functional components: Policy Distribution Service,
Management Service, Management Console, Client Location Assurance Service, and the
ZENworks Security Client. The figure below shows these components in the architecture
Figure 2 : ESM Architecture
The ZENworks Security Client (ZSC) is responsible for enforcement of the distributed security
policies on the endpoint system. When the ZSC is installed on all enterprise PCs, these endpoints
may now travel outside the corporate perimeter and maintain their security , while endpoints inside
the perimeter will receive additional security checks within the perimeter firewall.
Each Central Management component is installed separately, the following components are
installed on servers which are secured inside the corporate perimeter:
• Policy Distribution Service is responsible for the distribution of security policies to
the ZSC, and retrieval of reporting data from the ZSCs. The Policy Distribution Service can be deployed in the DMZ, outside the enterprise firewall, to ensure regular
policy updates for mobile endpoints
• Management Service is responsible for user policy assignment and component
authentication; reporting data retrieval, creation and dissemination of ESM reports;
and security policy creation and storage
• Management Console is a visible user interface, which can run directly on the server
hosting the Management Service or on a workstation residing inside the corporate firewall with connection to the Management Service server . The Management Console is
used to both configure the Management Service and to create and manage user and
group security policies. Policies can be created, copied, edited, disseminated, or
deleted using the editor
• Client Location Assurance Service provides a cryptographic guarantee that ZEN-
works Security Clients are actually in a defined location, as other existing network
environment parameters indicate
ZENworks® ESM 3.5 Administrator’s Manual 11
Page 12

System Requirements
Table 1: System Requirements
Server System Requirements Endpoint System Requirements
Operating Systems:
Microsoft Windows 2000 Server SP4
Microsoft Windows 2000 Advanced Server SP4
Windows 2003 Server
Processor:
3.0 GHz Pentium 4 HT (or greater)
756 MB RAM minimum (1 GB+ Recommended)
Disk Space:
500 MB - Without local Microsoft SQL database
5 GB - With local MS SQL database (SCSI recommended)
Required Software:
Supported RDBMS (SQL Server Standard, SQL
Server Enterprise, Microsoft SQL Server 2000
SP4, or SQL 2005)
Microsoft Internet Information Services (configured for SSL)
Supported Directory Services (eDirectory , Active
Directory, or NT Domains*)
* = NT Domains is only supported when the Management Service is installed on a Windows 2000, or 2000 advanced server
(SP4).
Operating Systems:
Windows XP SP1
Windows XP SP2
Windows 2000 SP4
Processor:
600MHz Pentium 3 (or greater)
Minimum 128 MB RAM (256 MB or greater recommended
Disk Space:
5 MB required, 5 additional MB recommended for
reporting data
Required Software:
Windows 3.1 Installer
All Windows updates should be current
ASP.NET
The Policy Distribution, Management, and Client Location Assurance services require a LOCAL
account of ASP.NET to be enabled. If this is disabled, the services will NOT work correctly.
Reliable Time Stamp
The Novell ESM solution gathers data from multiple sources and collates this data to create a
wide variety of security and audit reports. The utility and probative value of these reports is
greatly diminished if disparate sources disagree as to times, and so it is strongly recommended
that anyone installing ESM provide for enterprise-wide time synchronization (such as that
provided by Active Directory, or through the use of Network Time Protocol).
The ESM Administrator(s) should follow all installation, operation, and maintenance
recommendations provided in this document and the ESM Installation and Quick-Start
guide, in order to ensure a strong security environment.
ZENworks® ESM 3.5 Administrator’s Manual 12
Page 13

About the ESM Manuals
The ZENworks Endpoint Security Management manuals provide three levels of guidance for the
users of the product.
• ESM Administrator's Manual - This guide is written for the ESM Administrators
who are required to manage the ESM services, create security policies for the enterprise, generate and analyze reporting data, and provide troubleshooting for end-users.
Instructions for completing these tasks are provided in this manual
• ESM Installation and Quick-S tart Guide - This guide provides complete installation
instructions for the ESM components and assists the user in getting those components
up and running
• ZENworks Security Client User's Manual - This manual is written to instruct the
end-user on the operation of the ZENworks Security Client (ZSC). This guide may be
sent to all employees in the enterprise to help them understand how to use the ZSC
USB/Wireless Security
ZENworks USB/Wireless Security (UWS) is a simplifed version of the product that provides
comprehensive USB control, connectivity security, and file encryption features; and does not
include some of the additional security features that are available in ESM. If you have purchased
UWS rather than ESM, all functionality described in this manual will be essentially the same,
with only certain policy features unavailable in the Management Console.
The unavailable features have been marked with the following notation on their respective pages:
Note:
This feature is only available in the ESM installation, and cannot be used for UWS security policies.
Features without this notation are available for both ESM and UWS security policies.
To verify which version you are running, open the “About” screen from the Help menu in
Management Console (see “Menu Bar” on page 22).
ZENworks® ESM 3.5 Administrator’s Manual 13
Page 14
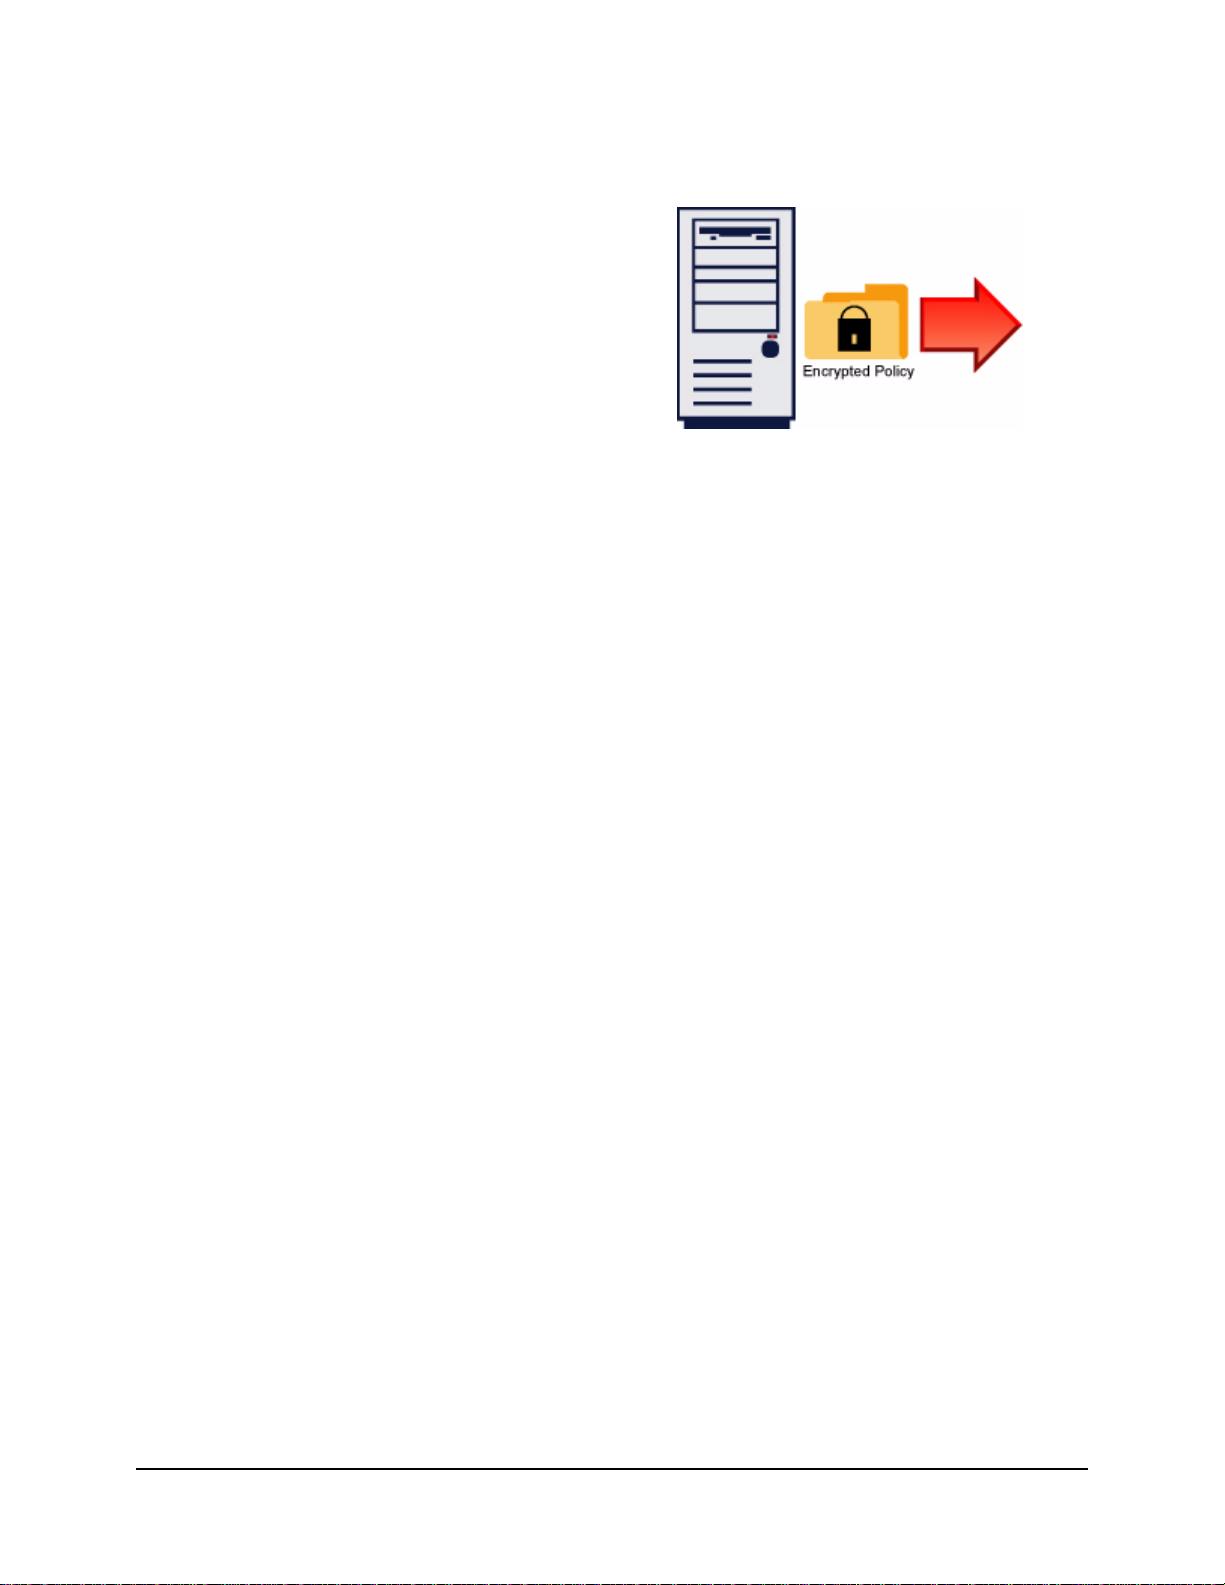
Policy Distribution Service
The Policy Distribution Service is a web service
application that, when requested, distributes security
policies and other necessary data to ZENworks
Security Clients. ESM security policies are created
and edited with the Management Service's
Management Console, then published to the Policy
Distribution Service where they are downloaded by
the client at check-in.
The Policy Distribution Service authenticates
ZENworks Security Clients based on the user ID credentials obtained from the Management
Service, and supplies each client with the designated security policy.
Reporting data is collected by ZENworks Security Clients and passed up to the Policy
Distribution Service. This data is periodically collected by the Management Service and then
deleted from the Policy Distribution Service.
The Policy Distribution Service does not initiate any communications with the other ESM
components, and only responds to others. It does not hold sensitive data in the clear, nor does it
hold the keys needed to decrypt the sensitive data. It does not hold user credentials, or any other
user-specific data.
Server Selection and Installation
Please refer to the Installation and Quick Start guide for selection and installation instructions.
Server Maintenance
It is recommended that regular Disk Cleanup tasks be configured to run on this server to remove
temporary files out of the Windows\temp folder. Under extreme load conditions windows can
generate an inordinate amount of temporary files that needlessly take up disk space.
Upgrading the Software
The ESM Policy Distribution Service software can be upgraded by running the new installation
software.
Uninstall
To uninstall the Policy Distribution Service, use the Add/Remove Programs function in the
Windows Control Panel, or run the installation again from the ESM installation CD.
ZENworks® ESM 3.5 Administrator’s Manual 14
Page 15

Securing Server Access
Physical Access Control
Physical access to the Distribution Service Server should be controlled to prevent access by
unauthorized parties. Measures taken should be appropriate to the risks involved. There are
multiple available standards and guidelines available, including NIST recommendations, HIPAA
requirements, ISO/IEC 17799, and less formal collections of recommendations such as CISSP or
SANS guidelines. Even when a given regulatory frameworks is not applicable, it may still act as a
valuable resource and planning guide.
Likewise, Disaster Recovery and Business Continuity mechanisms to protect the Distribution
Server should be put in place to protect the server if an organizational risk assessment identifies a
need for such steps. The mechanisms best used will depend on the specifics of the organization
and its desired risk profile, and cannot be described in advance. The same standards and
guidelines sources listed above can be helpful in this decision as well.
Network Access Control
The Distribution Server can be further protected from unauthorized access by restricting network
access to it. This may take the form of some or all of the following:
• restricting incoming connection attempts to those ports and protocols from which a
valid access attempt might be expected;
• restricting outgoing connection attempts to those IP addresses to which a valid access
attempt might be expected; and/or
• restricting outgoing connection attempts to those ports and protocols to which a valid
access attempt might be expected.
Such measures can be imposed through the use of standard firewall technology.
High Availability
High Availability mechanisms for the Distribution Server should be put in place if an
organizational risk assessment identifies a need for such steps. There are multiple alternative
mechanisms for building high availability solutions, ranging from the general (DNS roundrobining, layer 3 switches, etc.) to the vendor specific (the Microsoft web site has multiple
resources on high availability web services and clustering issues). Those implementing and
maintaining an ESM solution should determine which class of high availability solution is most
appropriate for their context. It should be kept in mind that the Distribution Server has been
architected to function in non-high-availability situations, and does not require High Availability
to provide its services.
ZENworks® ESM 3.5 Administrator’s Manual 15
Page 16

Running the Service
The Policy Distribution Service launches immediately following installation, with no reboot of
the server required. The Management Console can adjust upload times for the Distribution
Service using the Configuration feature (See “Infrastructure and Scheduling” on page 28). For
other monitoring capabilities see:
• “Server Communication Checks” on page 214
• “System Monitor” on page 221
ZENworks® ESM 3.5 Administrator’s Manual 16
Page 17
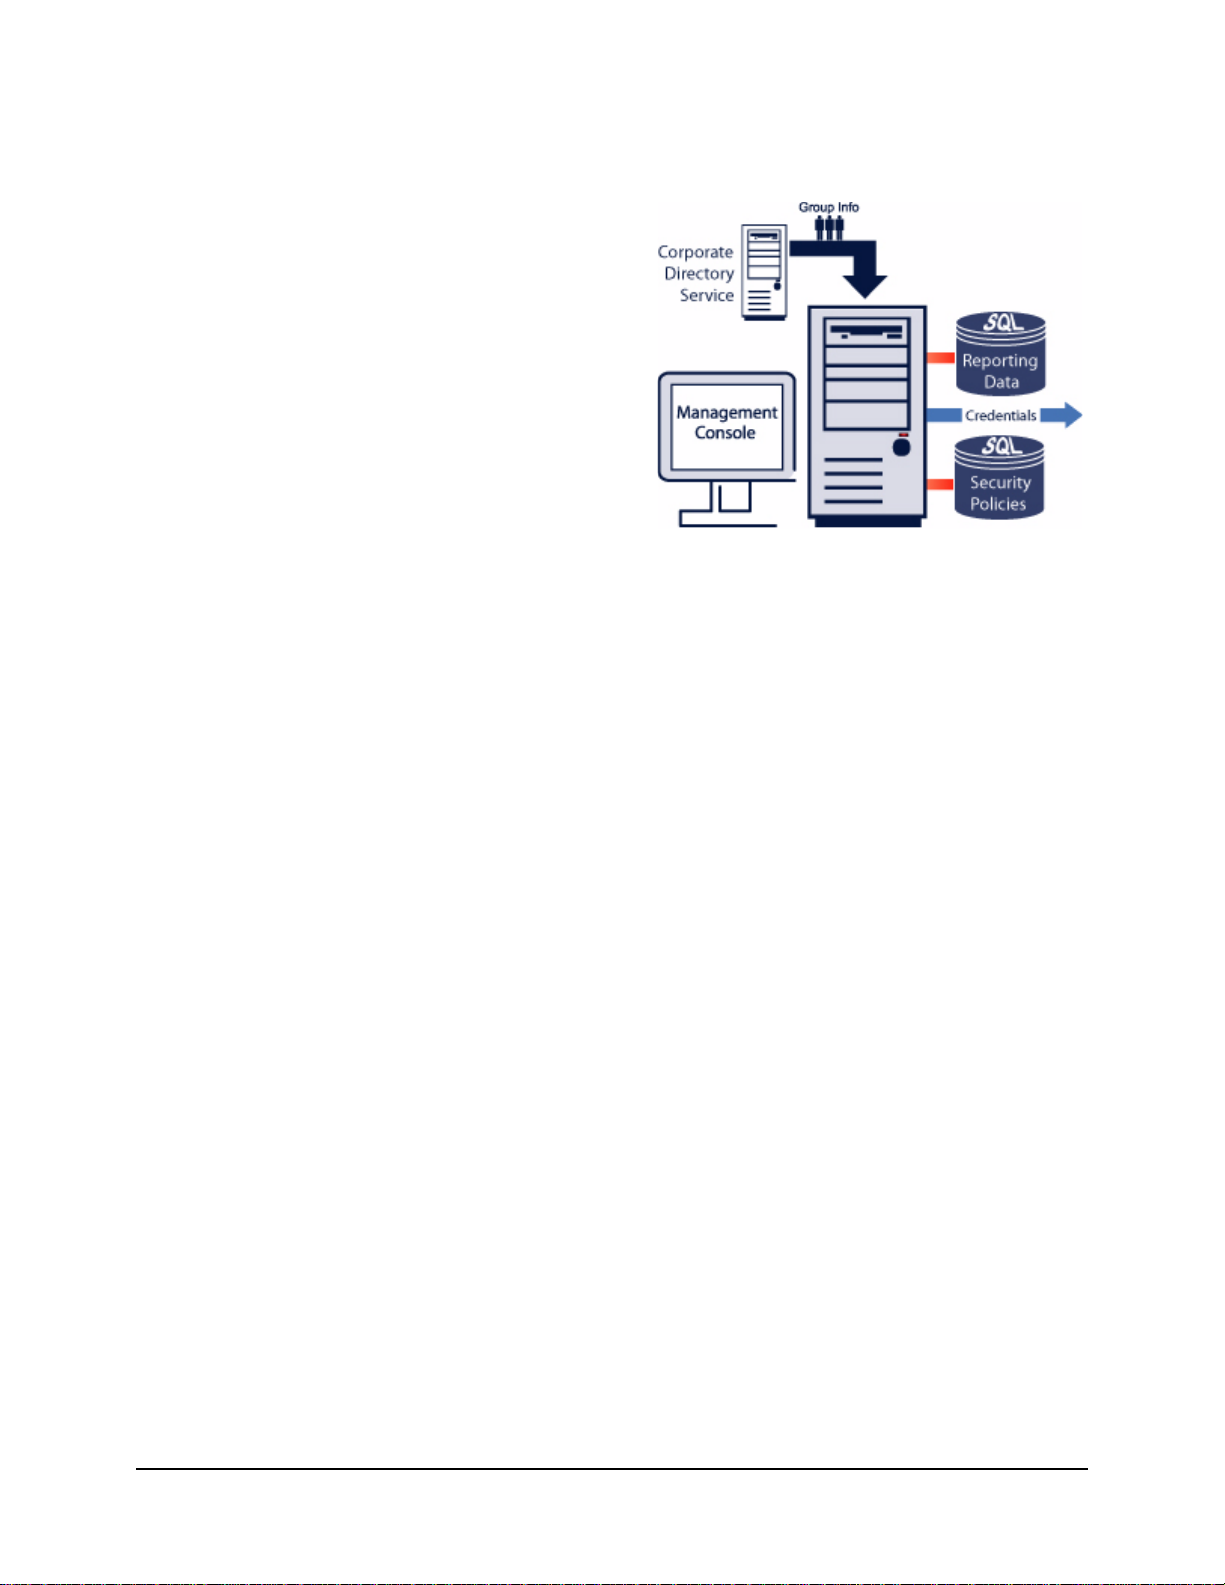
Management Service
The Management Service is the central service for
ESM. It is used to create authentication credentials,
design and store security policies and their
components, and provide remediation through a
robust reporting service. It provides security
policies and user information to the Policy
Distribution Service, as well as providing opaque
credentials to ZENworks Security Clients.
Security policies, credentials, and reports are stored
in an SQL database(s), which may reside on the
same server as the Management Service or on
remote servers.
Server Selection and Installation
Please refer to the Installation and Quick Start guide for selection and installation instructions.
Server Maintenance
It is recommended that regular Disk Cleanup tasks be configured to run on this server to remove
temporary files out of the Windows\temp folder. Under extreme load conditions windows can
generate an inordinate amount of temporary files that needlessly take up disk space.
Upgrading the Software
The ESM Management Service software can be upgraded by running the new installation
software.
Uninstall
To uninstall the Management Service, use the Add/Remove Programs function in the Windows
Control Panel.
To uninstall the Management Console (when run on a separate PC), use the Add/Remove
Programs function in the Windows Control Panel.
ZENworks® ESM 3.5 Administrator’s Manual 17
Page 18

Securing Server Access
Physical Access Control
Physical access to the Management Server should be controlled to prevent access by unauthorized
parties. Measures taken should be appropriate to the risks involved. There are multiple available
standards and guidelines available, including NIST recommendations, HIPAA requirements, ISO/
IEC 17799, and less formal collections of recommendations such as CISSP or SANS guidelines.
Even when a given regulatory frameworks is not applicable, it may still act as a valuable resource
and planning guide.
Disaster Recovery and Business Continuity: Disaster Recovery and Business Continuity
mechanisms to protect the Management Server should be put in place to protect the server if an
organizational risk assessment identifies a need for such steps. The mechanisms best used will
depend on the specifics of the organization and its desired risk profile, and cannot be described in
advance. There are multiple available standards and guidelines available, including NIST
recommendations, HIPAA requirements, ISO/IEC 17799, and less formal collections of
recommendations such as CISSP or SANS guidelines.
Network Access Control
The Management Server can be further protected from unauthorized access by restricting network
access to it. This may take the form of some or all of the following:
• restricting incoming connection attempts to those IP addresses from which a valid
access attempt might be expected;
• restricting incoming connection attempts to those ports and protocols from which a
valid access attempt might be expected;
• restricting outgoing connection attempts to those IP addresses to which a valid access
attempt might be expected; and/or
• restricting outgoing connection attempts to those ports and protocols to which a valid
access attempt might be expected.
Such measures can be imposed through the use of standard firewall technology.
High Availability
High Availability mechanisms for the Management Server should be put in place if an
organizational risk assessment identifies a need for such steps. There are multiple alternative
mechanisms for building high availability solutions, ranging from the general (DNS roundrobining, layer 3 switches, etc.) to the vendor specific (the Microsoft web site has multiple
resources on high availability web services). Those implementing and maintaining an ESM
solution should determine which class of high availability solution is most appropriate for their
context. It should be kept in mind that the Management Server has been architected to function in
non-high-availability situations, and does not require High Availability to provide its services.
ZENworks® ESM 3.5 Administrator’s Manual 18
Page 19

Running the Service
The Management Service launches immediately following installation, with no reboot of the
server required. The Management Console is used to manage the data on the Management
Service. See “Infrastructure and Scheduling” on page 28. for more details.
For other monitoring capabilities see:
• “Server Communication Checks” on page 214
• “System Monitor” on page 221
Distributing ESM Credentials (Key Management Key)
The Management Service automatically distributes credentials to each ZSC when it is installed
and checks-in to the Management Service for the first time. Once this credential is distributed, the
ZSC will be permitted to receive policies from the Policy Distribution Service, and provide
reporting data to the Reporting Service.
Periodic Renewal of the Key Management Key (KMK)
Cryptographic best practices dictate that the KMK be renewed at regular intervals to prevent
certain cryptographic attacks from being practical. This need only take place on a relatively long
cycle: typically on the order of once every year, and should not be done too frequently because the
change-over does involve some effort and bandwidth costs.
To renew the KMK, perform the following steps:
Step 1: Open the Communications Console on the Management Service (Start/Programs/Novell/
Management Service/ESM Communications Console).
Note:
Running the Communications Console will cause the Management Service to lose user and log data,
however, policy data will not be deleted.
Step 2: Allow the Communications Console to run a complete check.
Step 3: Have all end-users authenticate to the Management Service (either via VPN or while inside
the appropriate firewall), by right-clicking the ZSC task-tray icon and selecting “Check
for Policy Update.”
Step 4: The Management Console will automatically pass the new KMK credentials down. In
some cases, the user will have to authenticate to the domain (username and password).
Until the endpoints renew their KMK, they will not be able to communicate with the Policy
Distribution Service.
ZENworks® ESM 3.5 Administrator’s Manual 19
Page 20
Management Console
The Management Console is the central access and control for
the Management Service.
Double-click the Management Console Icon on the desktop to
launch the login window. Log in to the Console by entering the
administrator name and password. The username entered MUST
be an authorized user on the Management Service
(see “Permissions Settings” on page 24).
Note:
It is recommended that the console be closed or minimized when not in use.
Task Bar
The Task-bar on the left provides access to the Management Console tasks (see Figure 3).
Figure 3 : The Management Console
The functions available in the task bar are described on the following page. Click each topic to
view the available tools.
ZENworks® ESM 3.5 Administrator’s Manual 20
Page 21

Policy Tasks
The Primary function of the Management Console is the creation and dissemination of Security
Policies. The Policy Tasks guide the administrator through creating and editing security policies
which are used by the ZENworks Security Client to apply centrally managed security to each
endpoint.
The Policy Tasks are:
• Active Policies - This displays a list of current policies, which can be reviewed and
edited. Click on the policy to open it
• Create Policies - This begins the policy creation process (see below)
• Import Policies - This imports policies created on other Management Services (See
“Importing Policies” on page 209)
Clicking any of the policy tasks will minimize the tasks menu. This can be viewed again by
clicking on the tab on the left side.
See “Creating and Distributing ESM Security Policies” on page 83 to learn about the policy tasks
and how to create and manage security policies.
Resources
The following resources are available to help you:
• Contact Support - This link will launch a browser, and take you to our Support Contact
Page
• Online Technical Support - This link will launch browser, and take you to our Main
Support Page
• Management Console Help - Launches Help
Configuration
The Management Service Configuration window provides controls for both the ESM server
infrastructure and controls for monitoring additional enterprise directory services. See
“Configuration Window” on page 28 for details. This control is not available when running a
"Stand-Alone" Management Console (see ESM Installation and Quick-Start Guide for details).
Endpoint Auditing
Endpoint Auditing gives you access to ESM Reporting and Alerting.
Alerts monitoring ensures that any attempts to compromise corporate security policies are
reported in the Management Console. This allows the ESM Administrator to know of potential
problems and take any appropriate remedial actions. The Alerts dashboard is completely
ZENworks® ESM 3.5 Administrator’s Manual 21
Page 22

configurable, granting total control over when and how frequently alerts are triggered. See “Alerts
Monitoring” on page 33 for details.
Reporting is critical in assessing and implementing strong security policies. Reports may be
accessed through the Management Console by clicking on Reports. The endpoint security
information gathered and reported back is also completely configurable, and can be gathered by
domain, group, or individual user. See “Reporting” on page 37 for details.
Menu Bar
The menu bar gives you access to all functions of the Management Console. As with all W indows
menus, simply click the menu link to display the menu items. The menu items are described
below. .
Figure 4 : Menu Bar
• File - The File menu is used for the creation and management of policies
• New - creates a new policy
• Refresh Policy List - updates the list to display all active policies
• Delete - deletes the selected policy
• Import - imports a policy into the Management Console
• Export - exports a policy and the required SETUP.SEN file to a specified loca-
tion outside of the Management Service database
• Exit - Closes the Management Console software, logging out the user
• Tools - The Tools menu is used to control the Management Service
• Configuration - opens the Configuration window
• Permissions - opens the Permissions window
• View - The View menu gives you an option to change to key policy tasks without
using the task bar
• Policy - when a policy is open, switches the view to that policy
• Policy List - displays the policy list
• Alerts - displays the Alerts dashboard
• Reporting - displays the Reporting dashboard
• Help - The Help menu gives you access to the Management Console Help tool and the
About box
• Help - launches the Management Console Help tool, which can guide you
through policy creation as well as all Management Console tasks (also available by pressing the F1 key on your keyboard)
ZENworks® ESM 3.5 Administrator’s Manual 22
Page 23

• About - launches the About window, which displays the installation type
(ESM or UWS (see “USB/Wireless Security” on page 13) and the current version number for the Management Console. This window is also where the
license key is entered if purchased after installation
ZENworks® ESM 3.5 Administrator’s Manual 23
Page 24

Permissions Settings
This control is found in the Tools menu, and is only accessible by the primary administrator for
the Management Service and/or any whom have been granted "permissions" access by that
administrator. This control is not available when running the "Stand-Alone" Management
Console.
The permissions settings define which user or group of users are permitted access to the
Management Console, Publish Policies, and/or Change Permission Settings.
During the Management Server installation, an administrator or Resource Account name is
entered into the configuration form (see the ESM Installation and Quick-Start Guide). Once a
successful test has been performed and the user information saved, five permissions are
automatically granted to this user (see below).
Once the Management Console is installed, the resource user (defined above) will be the ONLY
user with full permissions, though ALL user groups within the domain will be granted
Management Console Access. The resource user should remove access from all but the groups/
users who should have access. The resource user may set additional permissions for the
designated users. The permissions granted have the following results:
When the Management Console is launched, the permissions are retrieved from the Permission
table. These permissions tell the console whether the user has the rights to log-in to the Console,
Create or Delete policies, change Permissions settings, and whether or not they can Publish
policies, and to whom they are permitted to publish to.
• Management Console Access: the user may view policies and components, and edit
existing policies. Users granted ONLY this privilege will not be permitted to add or
delete polices; the publish and permissions options will be unavailable
• Publish Policy: the user may publish policies ONLY to assigned users/groups
• Change Permission: the user may access and change permissions settings for other
users that have already been defined, or grant permissions to new users
• Create Policies: the user may create new policies in the Management Console
• Delete Policies: the user may delete ANY policy in the Management Console
Note:
For security purposes, it is recommended that only the resource user or very FEW administrators be
granted the Change Permission and Delete Policies permissions.
ZENworks® ESM 3.5 Administrator’s Manual 24
Page 25
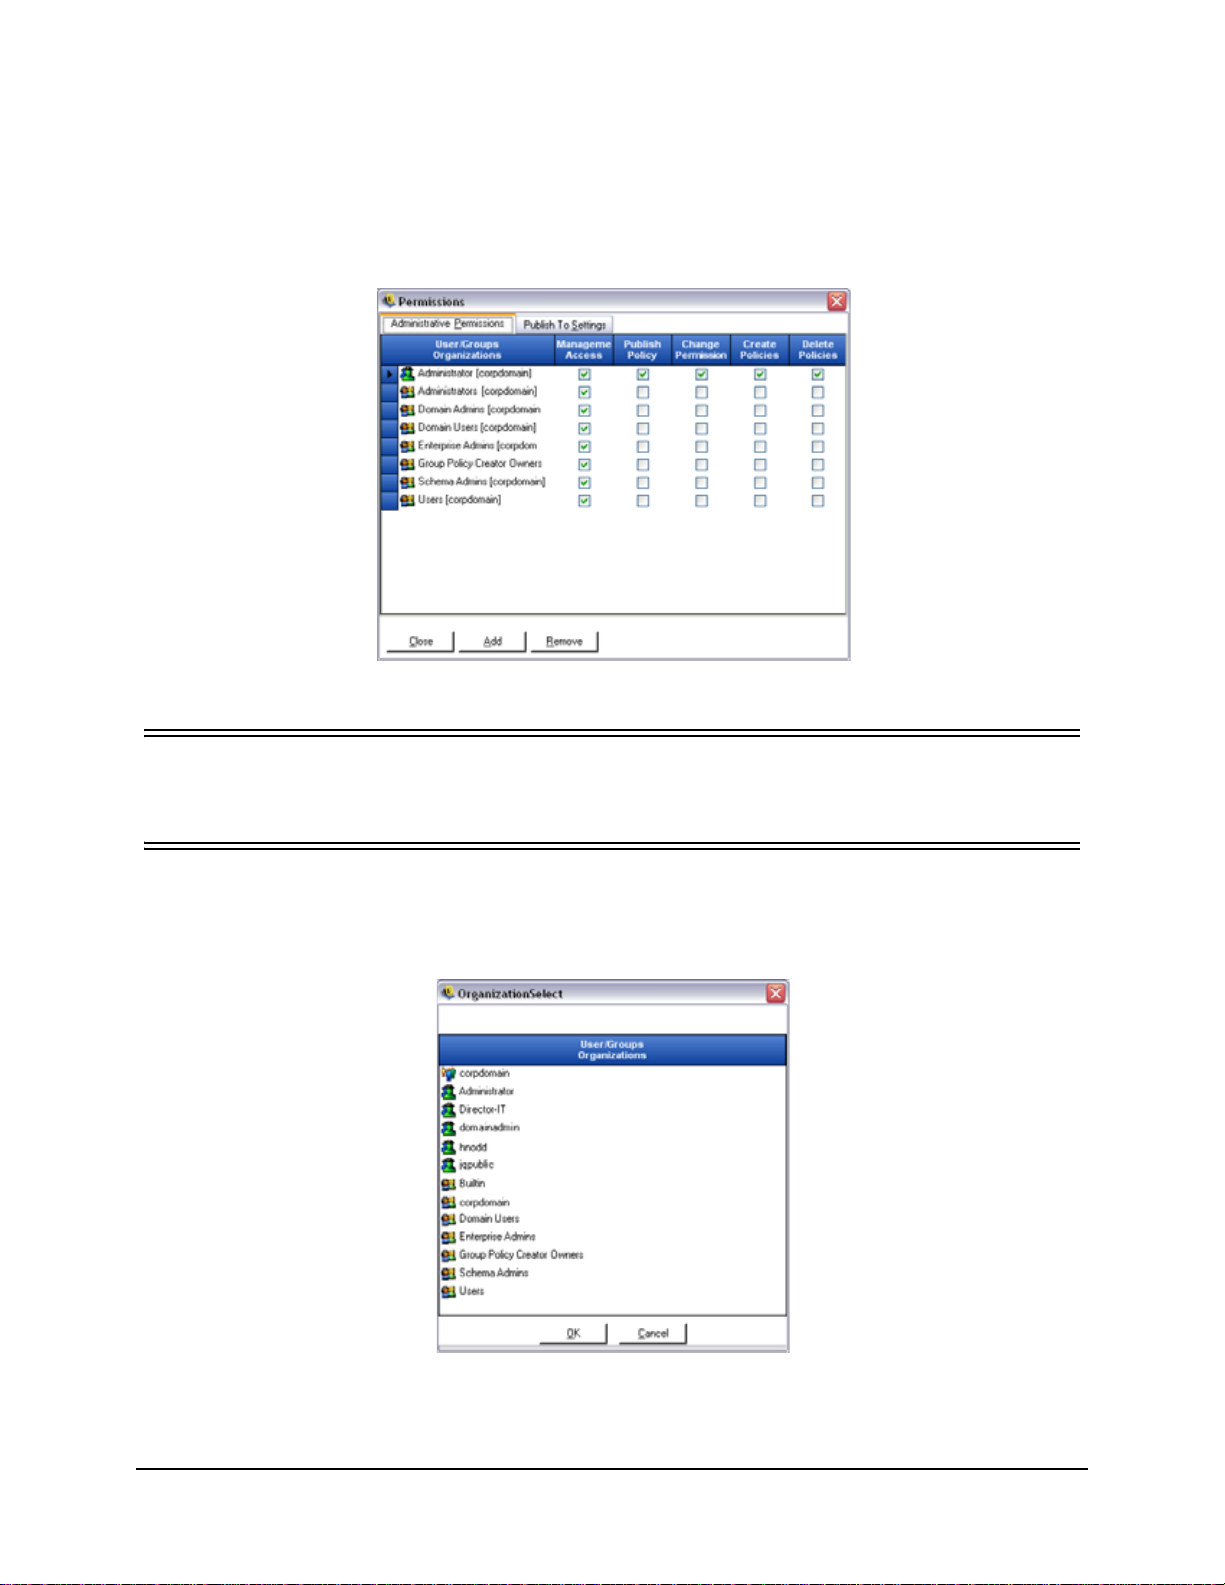
Administrative Permissions
To set the Administrative Permissions, perform the following steps:
Step 1: Open the Tools menu and select Permissions. The groups associated with this domain are
displayed (see Figure 5).
Figure 5 : Management Console Permissions Settings Window
Note:
All groups are granted access to the Management Console by default, though they will be unable to
perform policy tasks. Access to the console can be removed by un-checking the permission.
Step 2: To load users/groups to this list, do the following:
a. Click the Add button on the bottom of the screen, the Organization Table will
display (see Figure 6).
Figure 6 : Permission Settings Organization Table
ZENworks® ESM 3.5 Administrator’s Manual 25
Page 26
b. Select the appropriate users/groups from the list. To select multiple users, select
individually by holding down the CTRL key, or select a series by selecting the
top, then holding down the SHIFT key, then selecting the bottom selection.
c. When all users/groups have been selected, click the OK button. This will add the
users/groups to the grid on the Permissions form.
Step 3: Assign any (or all) permissions to the available users/groups.
Step 4: To remove a selected user/group, highlight the name and click Remove. The selected name
will be moved back to Organization Table
.
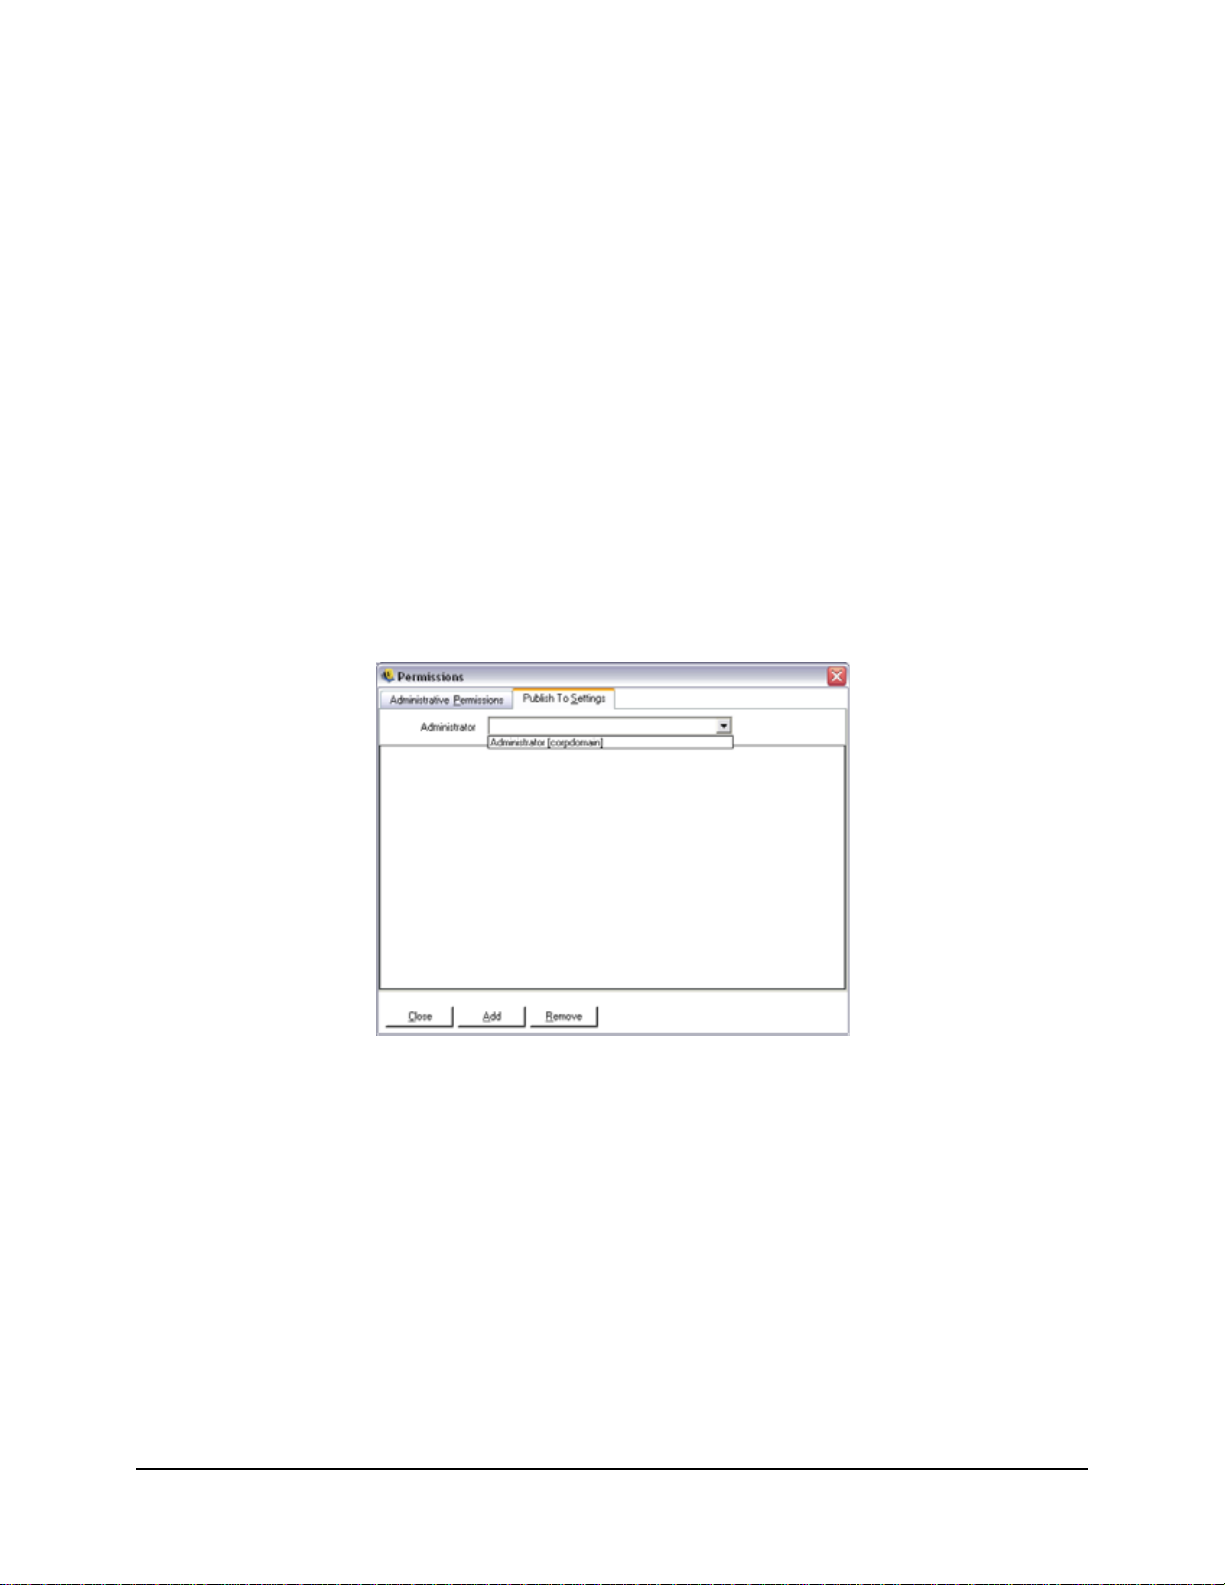
Publish To Settings
Users/Groups who have Publish Policy checked will need to be assigned users and/or groups to
publish to. To set the Publish To Settings, perform the following steps:
Step 1: Click the Publish Settings tab.
Step 2: Select the users/groups granted the Publish permission from the drop-down list (see Figure
7).
Figure 7 : Publish To Settings
Step 3: Assign users/groups to this user/group by:
a. Click the Add button on the bottom of the screen, the Organization Table will
display.
b. Select the appropriate users/groups from the list. To select multiple users, select
individually by holding down the CTRL key, or select a series by selecting the
top, then holding down the SHIFT key, then selecting the bottom selection.
c. When all users/groups have been selected, click the OK button. This will add the
users/groups to the selected name's publish list (see Figure 8).
ZENworks® ESM 3.5 Administrator’s Manual 26
Page 27
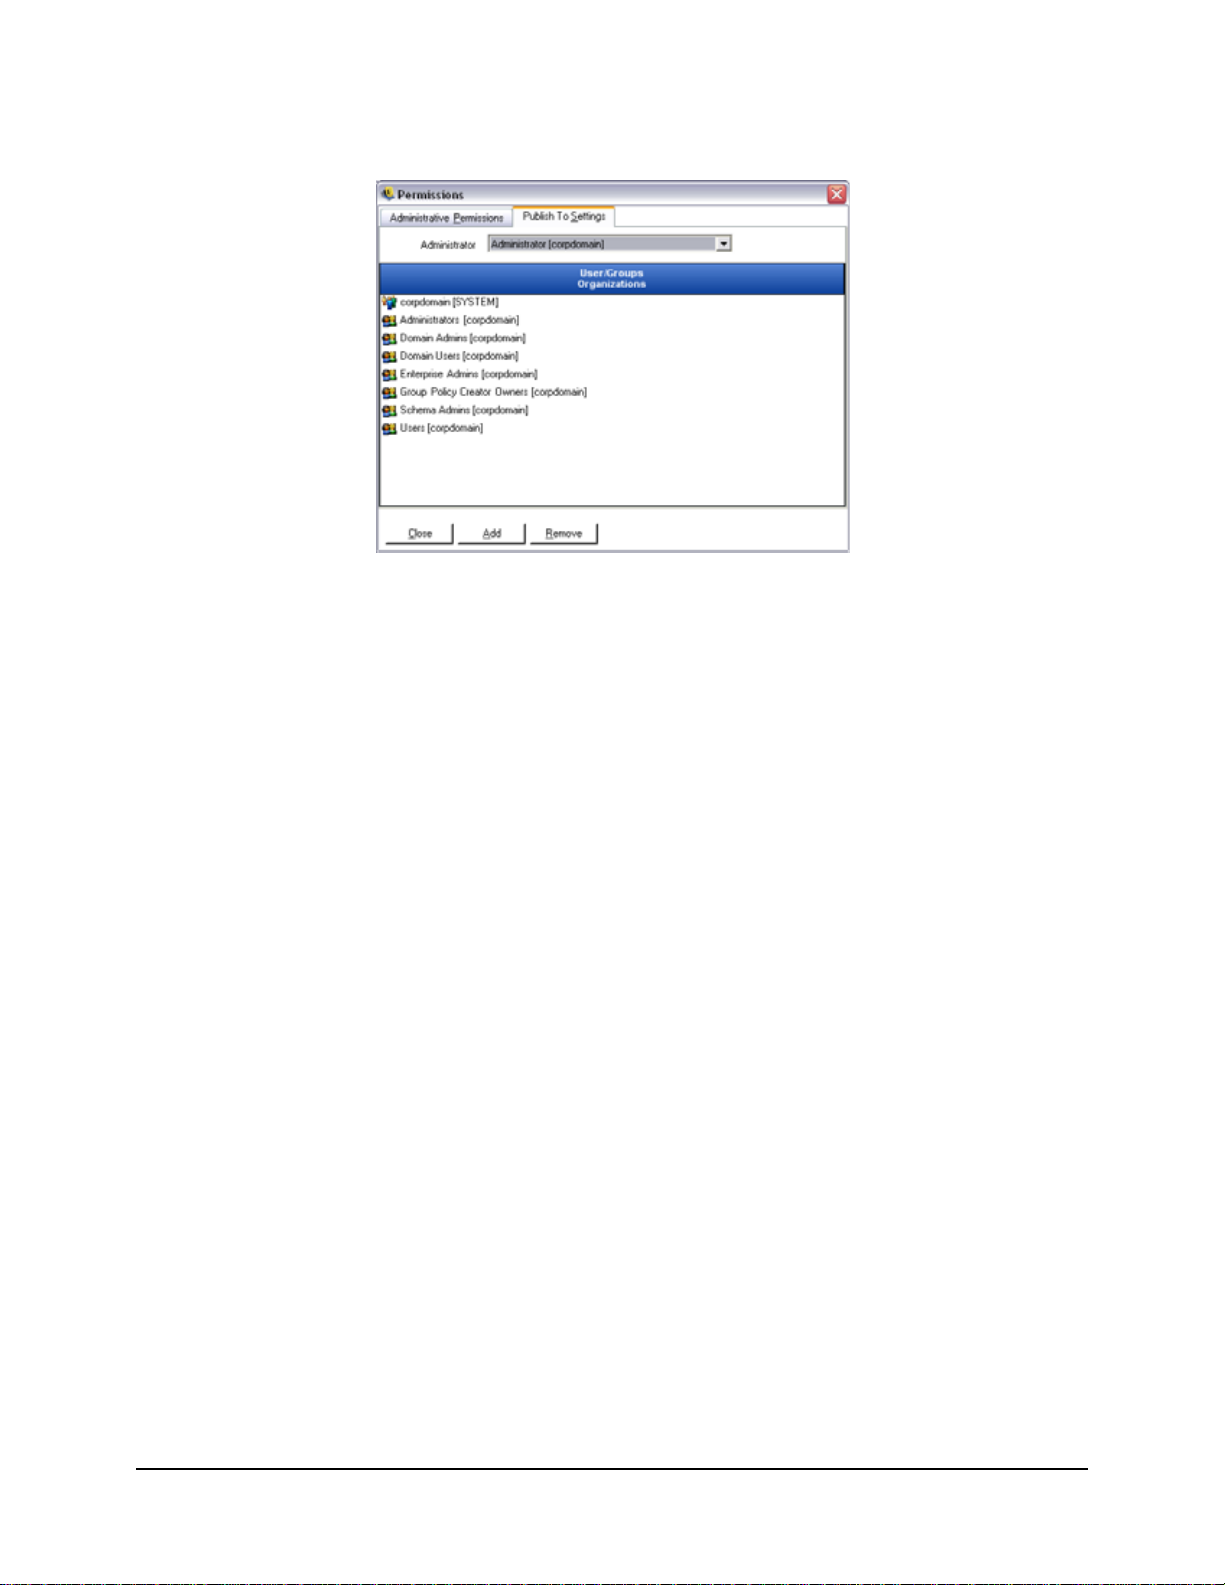
Figure 8 : Publish To List
Step 4: To remove a selected user/group, highlight the name in the list, and click Remove. The
selected name will be moved back to the Organization Table.
The permission sets are immediately implemented, so the administrator only needs to click Close,
and accept the changes to return to the editor.
When a new directory service is added (see Managing and Adding Directory Services on page
34), the Resource Account entered is granted full permissions settings, as described above.
ZENworks® ESM 3.5 Administrator’s Manual 27
Page 28
Configuration Window
The Configuration window gives the ESM Administrator access to the Infrastructure and
Scheduling, Authenticating Directories, and Server Synchronization controls. Click the
Configuration link on the main page, or open the Tools menu and select Configuration. The
Configuration window will display (see Figure 9).
Note:
This function is NOT available if this is a Stand-Alone Management Console.
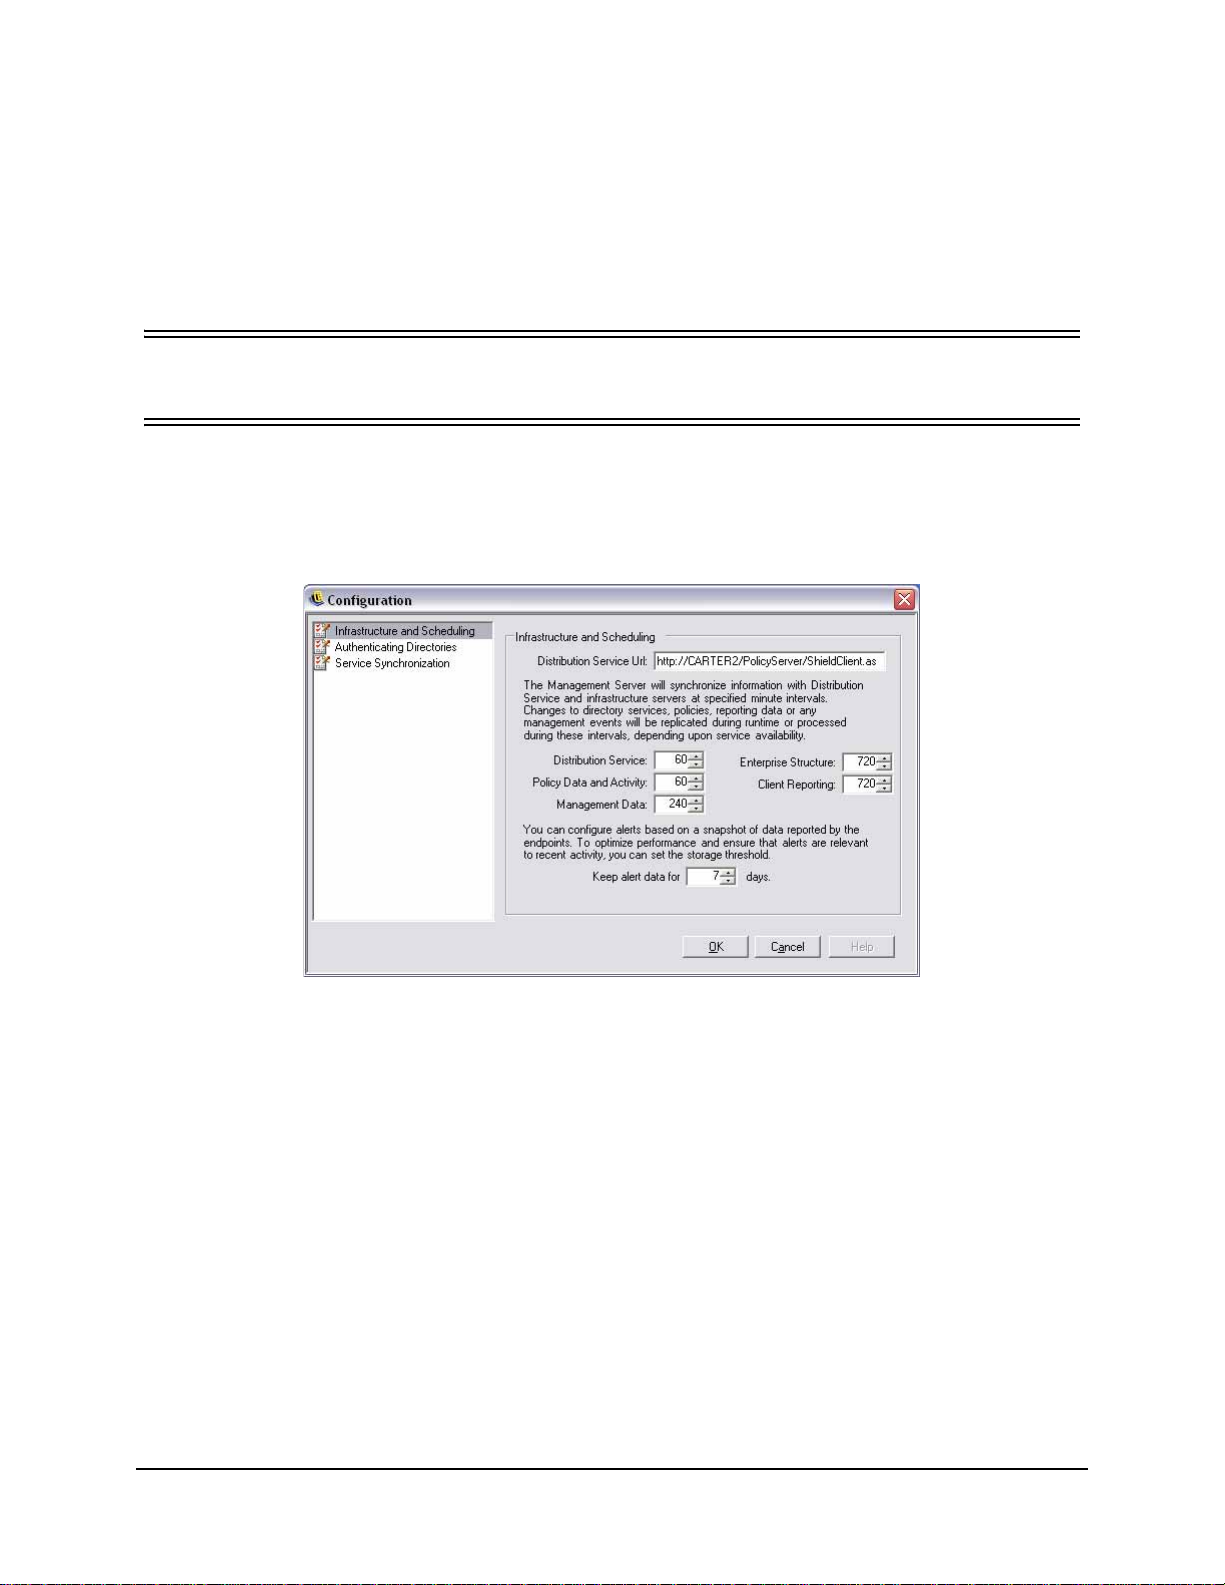
Infrastructure and Scheduling
The infrastructure and scheduling module allows the ESM Administrator to designate and change
the Policy Distribution Service URL and control the synchronization intervals for the ESM
components (see Figure 9).
Figure 9 : Infrastructure and Scheduling Window
Distribution Service URL
This will update the Policy Distribution Service location for both the Management Service and all
ZENworks Security Clients (without requiring them to be reinstalled) if the Policy Distribution
Service is moved to a new server. The URL for the current server is listed in the text field, only
the server name should be changed to point to the new server. DO NOT change any information
after the server name.
ZENworks® ESM 3.5 Administrator’s Manual 28
Page 29

Example:
If the current URL is listed as http:\\ACME\PolicyServer\ShieldClient.asmx and the Policy Distribution
Service has been installed on a new server, ACME 43, the URL should be updated as:
http:\\ACME43\PolicyServer\ShieldClient.asmx
Once the URL has been updated, click OK. This will update all policies and send an automatic
update of the Policy Distribution Service. This will also update the Management Service.
When changing the server URL, it is recommended that the old Policy Distribution Service not be
terminated until the updated policies have a 100% adherence level (see Reporting Service).
Scheduling
The Scheduling components permit the ESM Administrator to designate when the Management
Service will synchronize with other ESM components, to ensure all data and queued jobs match
any recent activity, and to schedule the SQL maintenance jobs. All time increments are in
minutes.
The scheduling is broken down as follows:
• Distribution Service - synchronization schedule with the Policy Distribution Service
• Policy Data and Activity - synchronization schedule with policy updates.
• Management Data - policy synchronization with the Management Service
• Enterprise Structure - synchronization schedule with the enterprise directory service
(eDirectory, Active Directory, NT Domain, and/or LDAP). Changes in the enterprise
directory service are monitored so that corresponding changes in user-policy assignments can be detected and sent to the Policy Distribution Service for Client authentication
• Client Reporting - frequency the Management Service will interrogate for and download reporting data from the Policy Distribution Service
• Keep alert data for: - You can configure alerts based on a snapshot of data reported by
the endpoints. To optimize performance, and ensure that alerts are relevant to recent
activity, you can se the storage threshold based on a number of days.
ZENworks® ESM 3.5 Administrator’s Manual 29
Page 30
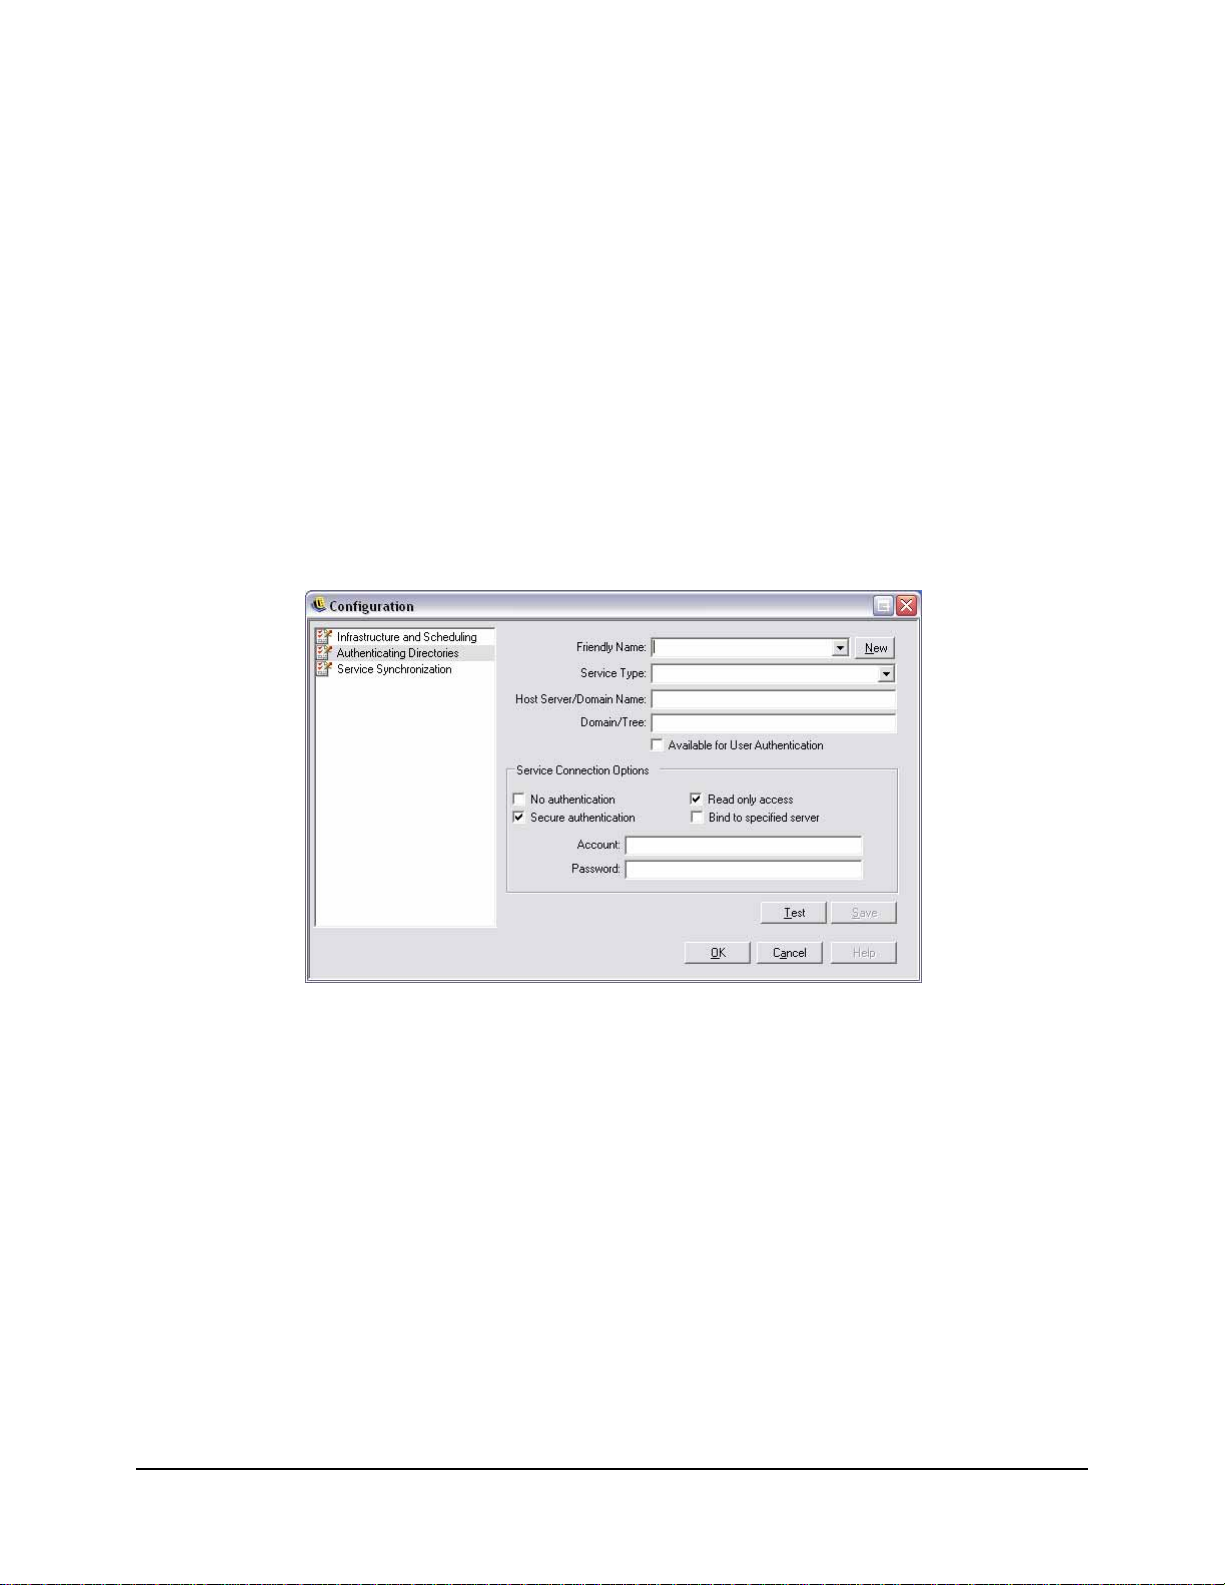
Authenticating Directories
Policies are distributed to end-users by interrogating the Enterprise's existing directory service
(eDirectory, Active Directory, and/or NT Domains*). The Authenticating Directories service, is
responsible for handling end-user credentials and authentication issues for the Policy Distribution
Service.
* = NT Domain is only supported when the Management Service is installed on a Windows 2000, or 2000
advanced server (SP4)
Click Authenticating Directories to display the manager.
Managing and Adding Directory Services
An initial directory service is normally detected and monitored during the Management Service
communication check at installation. Authenticating Directories can, if required, manage users
from multiple directories and multiple directory platforms.
Figure 10 : Authenticating Directories Window
All information, with the exception of the directory type may be updated. To add a new directory
service, perform the following steps:
Step 1: Click New (located next to Friendly Name)
Step 2: Enter a friendly name for the Directory Service and select its Service Type from the pull-
down list.
Step 3: In the Host/DN box enter the hostname of a domain controller and leave the Domain/Tree
box blank (this box will auto populate after a successful test of the user account in Step 7),
unless you are assigning an eDirectory service, in which case enter the tree name.
Step 4: Check Available for User Authentication if this is the domain a Management Service is
installed on to display the domain in the login pull-down menu. If this is a separate
domain, leave unchecked
Step 5: Select a Service Connection Option:
ZENworks® ESM 3.5 Administrator’s Manual 30
Page 31

• No authentication - login and password not required for connection to directory service
• Secure authentication - login and password required for connection to directory service (uncheck if using eDirectory)
• Read only access - Management Service cannot make updates or changes to
the directory service
• Bind to specified server - creates a direct connection to the server hosting the
directory service (machine name [netbios] name must be specified in Step 1).
This will increase the speed and efficiency of the connection between the services
Step 6: Enter the directory service login name under Account and the login password in the
Password field. The login name entered must be a user who has permission to view the
ENTIRE directory tree. It is recommended that this user be either the domain
administrator or an OU administrator.
Use an LDAP format if configuring for eDirectory. Example: "cn=admin,o=acmeserver"
cn is the user and o is the object where the user account is stored.
Note:
The password entered should be set to not expire, nor should this account ever be disabled.
Step 7: Click Test to verify communication to this directory service. If communication cannot be
established, the user is notified of the error. Any inaccurate information will be corrected
(when possible) by the interface during the test.
Step 8: Click Save to update or add a directory service. Click OK or Cancel to exit the
Configuration window and return to the login screen.
Step 9: Click OK or Cancel to exit the Configuration window and return to the Mangement
Console.
ZENworks® ESM 3.5 Administrator’s Manual 31
Page 32

Service Synchronization
This control lets you to force a synchronization of the Management Service and Policy
Distribution Service. This will update all alerting, reporting and policy distribution.
Figure 11 : Service Synchronization
1. To update the current service status, click Refresh.
2. To restart the services and process the currently queued activities, click Synchronize.
ZENworks® ESM 3.5 Administrator’s Manual 32
Page 33

Alerts Monitoring
Alerts monitoring allows the ESM Administrator to effortlessly gauge at a glance the security
state of all ESM managed endpoints throughout the enterprise. Alerts triggers are fully
configurable and can report either a warning, or as a full emergency alert. This tool is accessed
either through Endpoint Auditing on the task bar, or through the View menu. To access Alerts,
select the Alerts icon ( ) (see Figure 12).
Figure 12 : Alerts Dashboard
Alerts monitoring is available for the following areas:
• Client Integrity - notifies of unremediated integrity test results
• Communication Port Security - notifies of potential port scan attempts
• Data Protection - notifies of files that are copied to removable storage devices within
a one day period
• Security Client Configuration - notifies of incorrect security client versions and
incorrect policies
• Security Client Tampering - notifies of user hack attempts, uninstall attempts and
usage of the override password
• Wireless Security - notifies of unsecure access points, both detected and connected to
by the end-user
ZENworks® ESM 3.5 Administrator’s Manual 33
Page 34
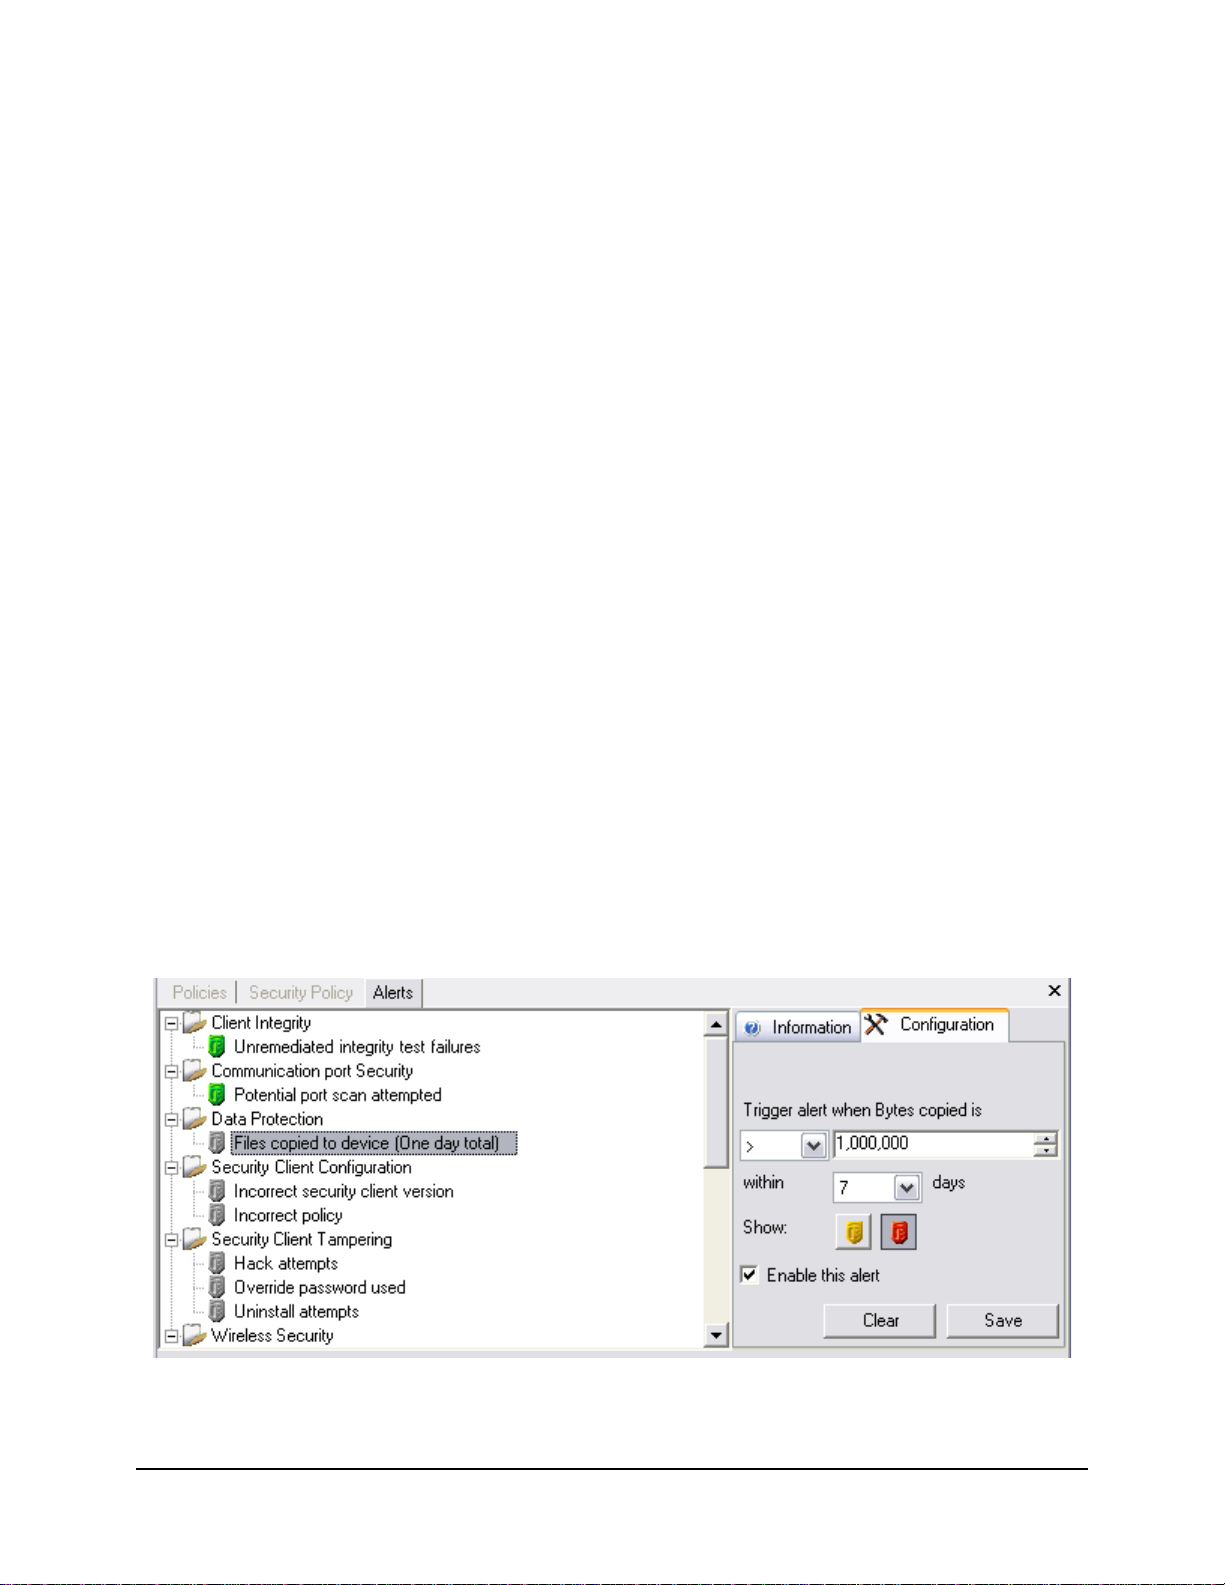
Configuring ESM for Alerts
Alerts monitoring requires reporting data be collected and uploaded at regular intervals to give the
most accurate picture of the current endpoint security environment. Unmanaged ZENworks
Security Clients do not provide reporting data, and will therefore not be included in the Alerts
monitoring.
Activating Reporting
Reporting should be activated in each security policy. See “Compliance Reporting” on page 204
for details on setting up reporting for a security policy . Adjust report send times to a n interval that
will give you consistent updates on endpoint status. Additionally , an alert will not activate without
a report. Any activity you wish to be alerted to, must have an appropriate report assigned to it in
the security policy.
Optimizing Synchronization
By default, the ESM Reporting service syncs every 12 hours. This means that reporting and alerts
data will not be ready until 12 hours have passed from installation. T o adjust this time frame, open
the Configuration tool (see “Scheduling” on page 29), and adjust the Client Reporting time to the
number of minutes appropriate for your needs and your environment.
When data is needed immediately, the Service Synchronization option in the Configuration tool
can immediately lynch the Policy Distribution Service (which collects the reporting data from the
endpoints) and the Reporting Service, which will update all alerts based on the newly collected
data. See “Service Synchronization” on page 32 for details.
Configuring Alert Triggers
Alert triggers can be adjusted to thresholds that fit your corporate security needs. To adjust alerts
from their defaults, perform the following steps:
Step 1: Select an alert from the list and click the Configuration tab on the right (see Figure 13).
Figure 13 : Alerts Configuration Tab
ZENworks® ESM 3.5 Administrator’s Manual 34
Page 35
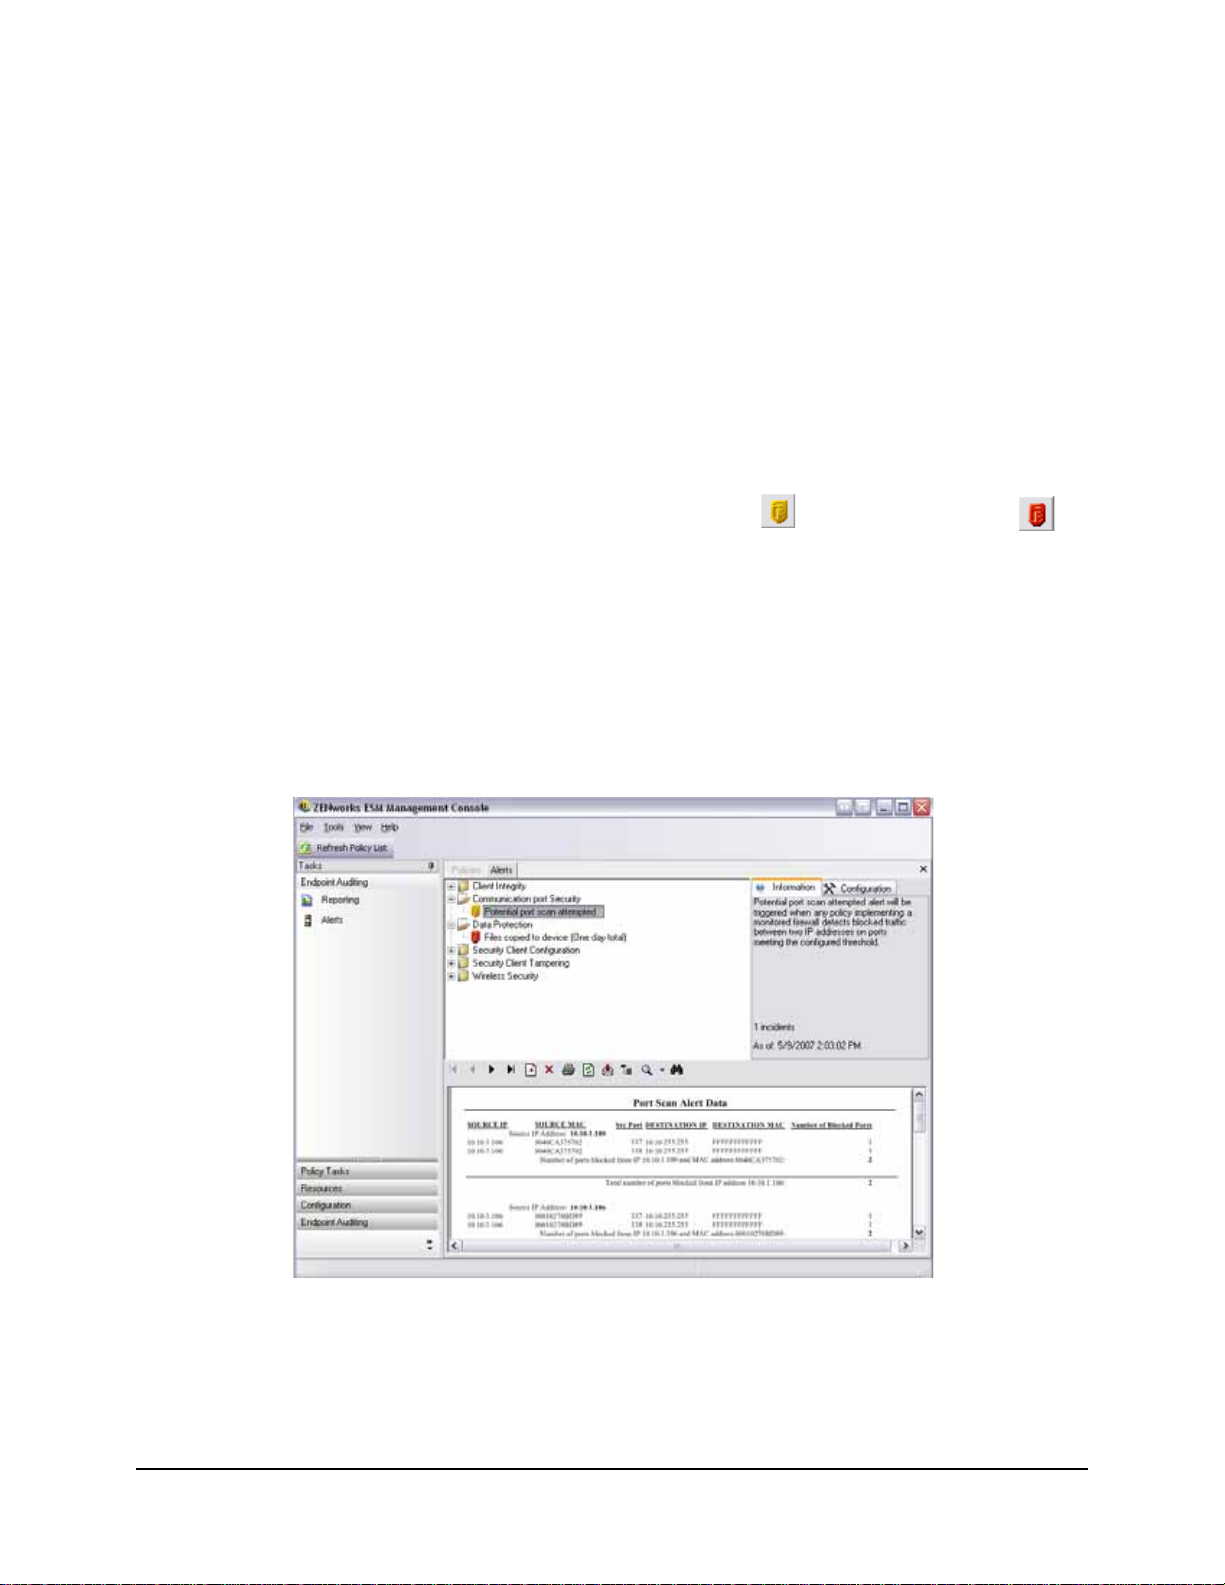
Step 2: Adjust the trigger threshold by first, selecting condition from the drop down list. This
states whether the trigger number is:
• Equal to (=)
• Greater than (<)
• Greater than or equal to (<=)
• Less than (>)
• Less than or equal to (>=)
Step 3: Adjust the trigger number. This number is variant, depending upon the type of alert.
Step 4: Select the number of days that this number must be met.
Step 5: Select the trigger type, whether it’s the warning icon ( ) or the emergency icon ( ).
Step 6: Ensure Enable this alert is checked.
Step 7: Click Save to save the alert.
Managing Alerts
Alerts notify you of issues that need to be remediated within the endpoint security environment.
Remediation is normally handled on a case-by-case and individual or group basis. To help
identify the issue, Alert reports are displayed when the alert is selected (see Figure 14).
Figure 14 : Alert Reporting
This report displays the current trigger results, displaying information by affected user or device.
The data provided here provides the necessary information to take remediation actions to correct
ZENworks® ESM 3.5 Administrator’s Manual 35
Page 36

any potential corporate security issues. Additional information can be found by opening
Reporting.
Once remediation actions have been taken, the alert will remain active until the next reporting
update. To “clear” an alert, perform the following steps:
Step 1: Select an alert from the list and click the Configuration tab on the right (see Figure 15).
Figure 15 : Alerts Configuration Tab
Step 2: Click Clear. This will clear the reporting data from Alerts (this data is still available in the
reporting database), and will not reactivate until new data is received.
ZENworks® ESM 3.5 Administrator’s Manual 36
Page 37
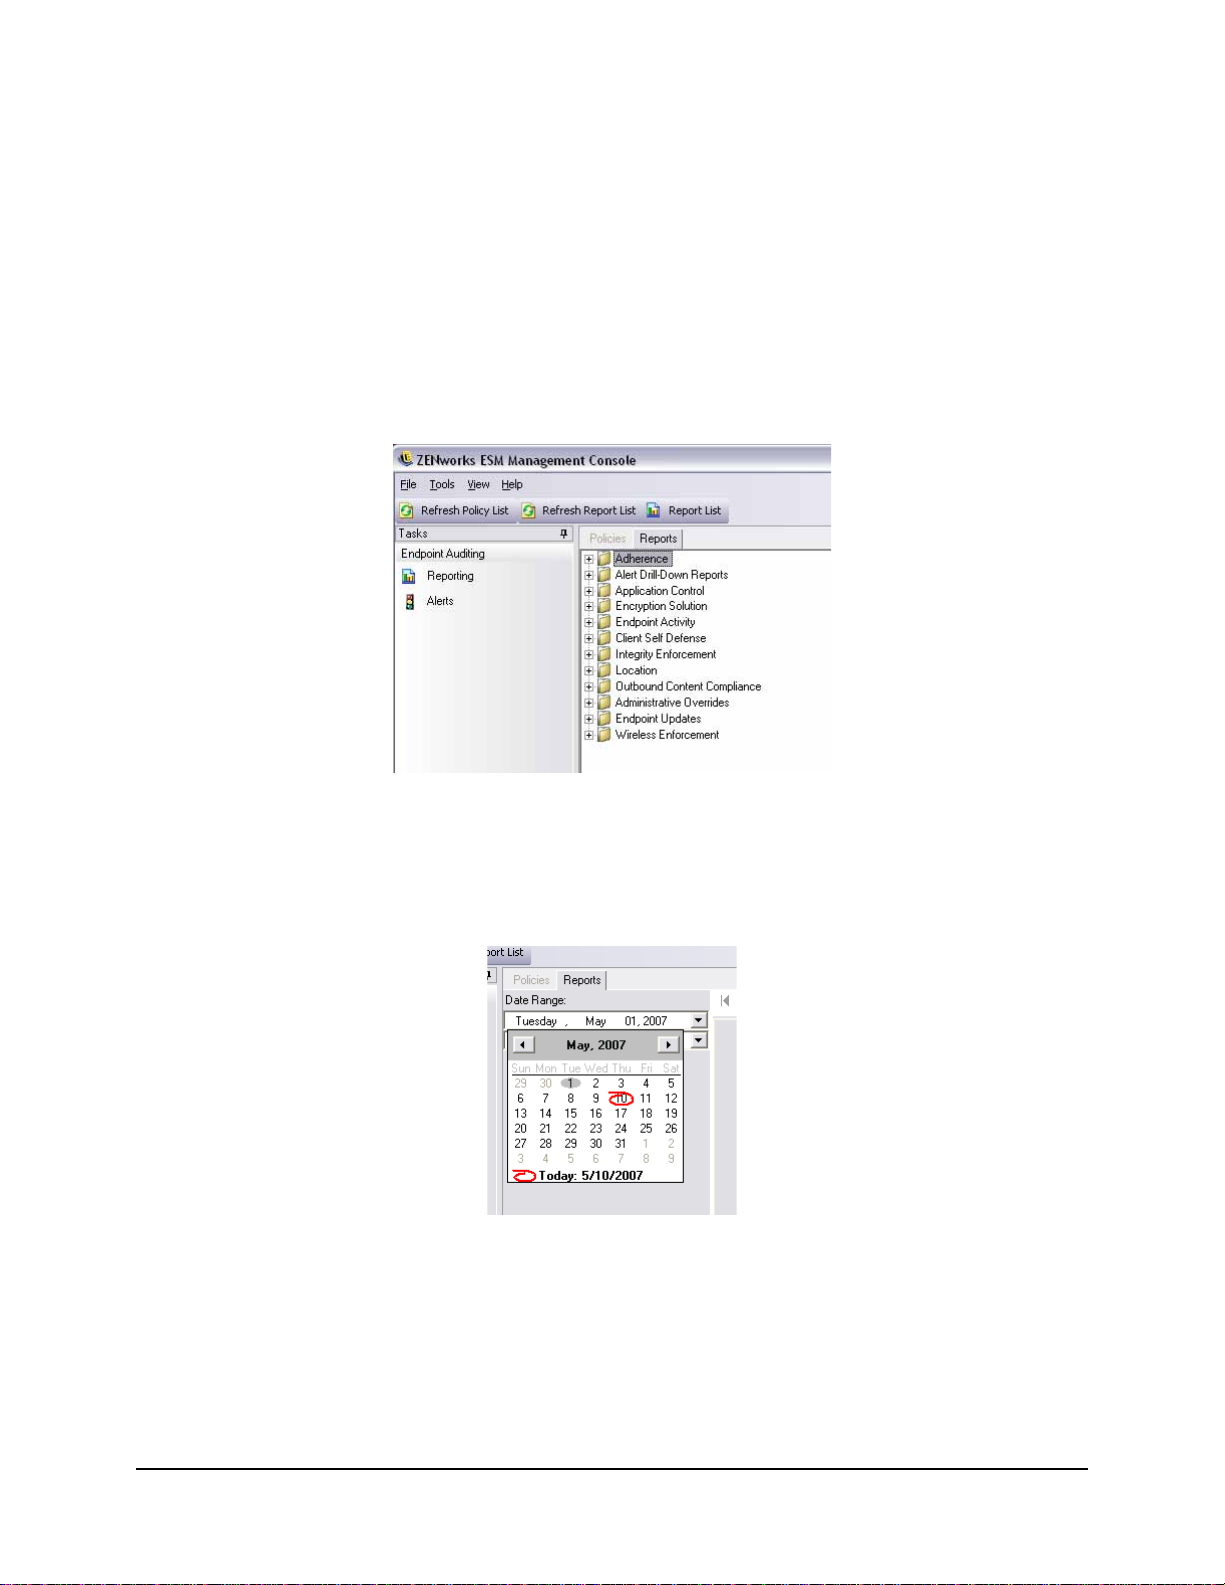
Reporting
The Reporting Service provides Adherence and Status reports for the Enterprise. The available
data is provided for directories and user groups within a directory. Novell reports provide
feedback on the effects individual policy components can have on enterprise endpoints. Requests
for these reports are set in the Security Policy (see “Compliance Reporting” on page 204, for
more information), and can provide useful data to determine policy updates.
Select Reporting from either the Endpoint Auditing task bar, or the View menu. The list of
available reports will display (click on the "plus" sign icons next to each report type to expand the
list - see Figure 16).
Figure 16 : Reports Menu
Reports are configured by identifying the date range and other parameters (i.e., user, location). To
set the dates, click to expand to the calendar view, then select the month and day (be sure to click
on the day to change the date parameter - see Figure 17).
Figure 17 : Use calendar tool to set the date-range
Click View to generate the report.
Once a report is generated it can be viewed through the Management Console, printed, emailed
and/or exported as a.pdf file, using the report toolbar (see Figure 18).
ZENworks® ESM 3.5 Administrator’s Manual 37
Page 38
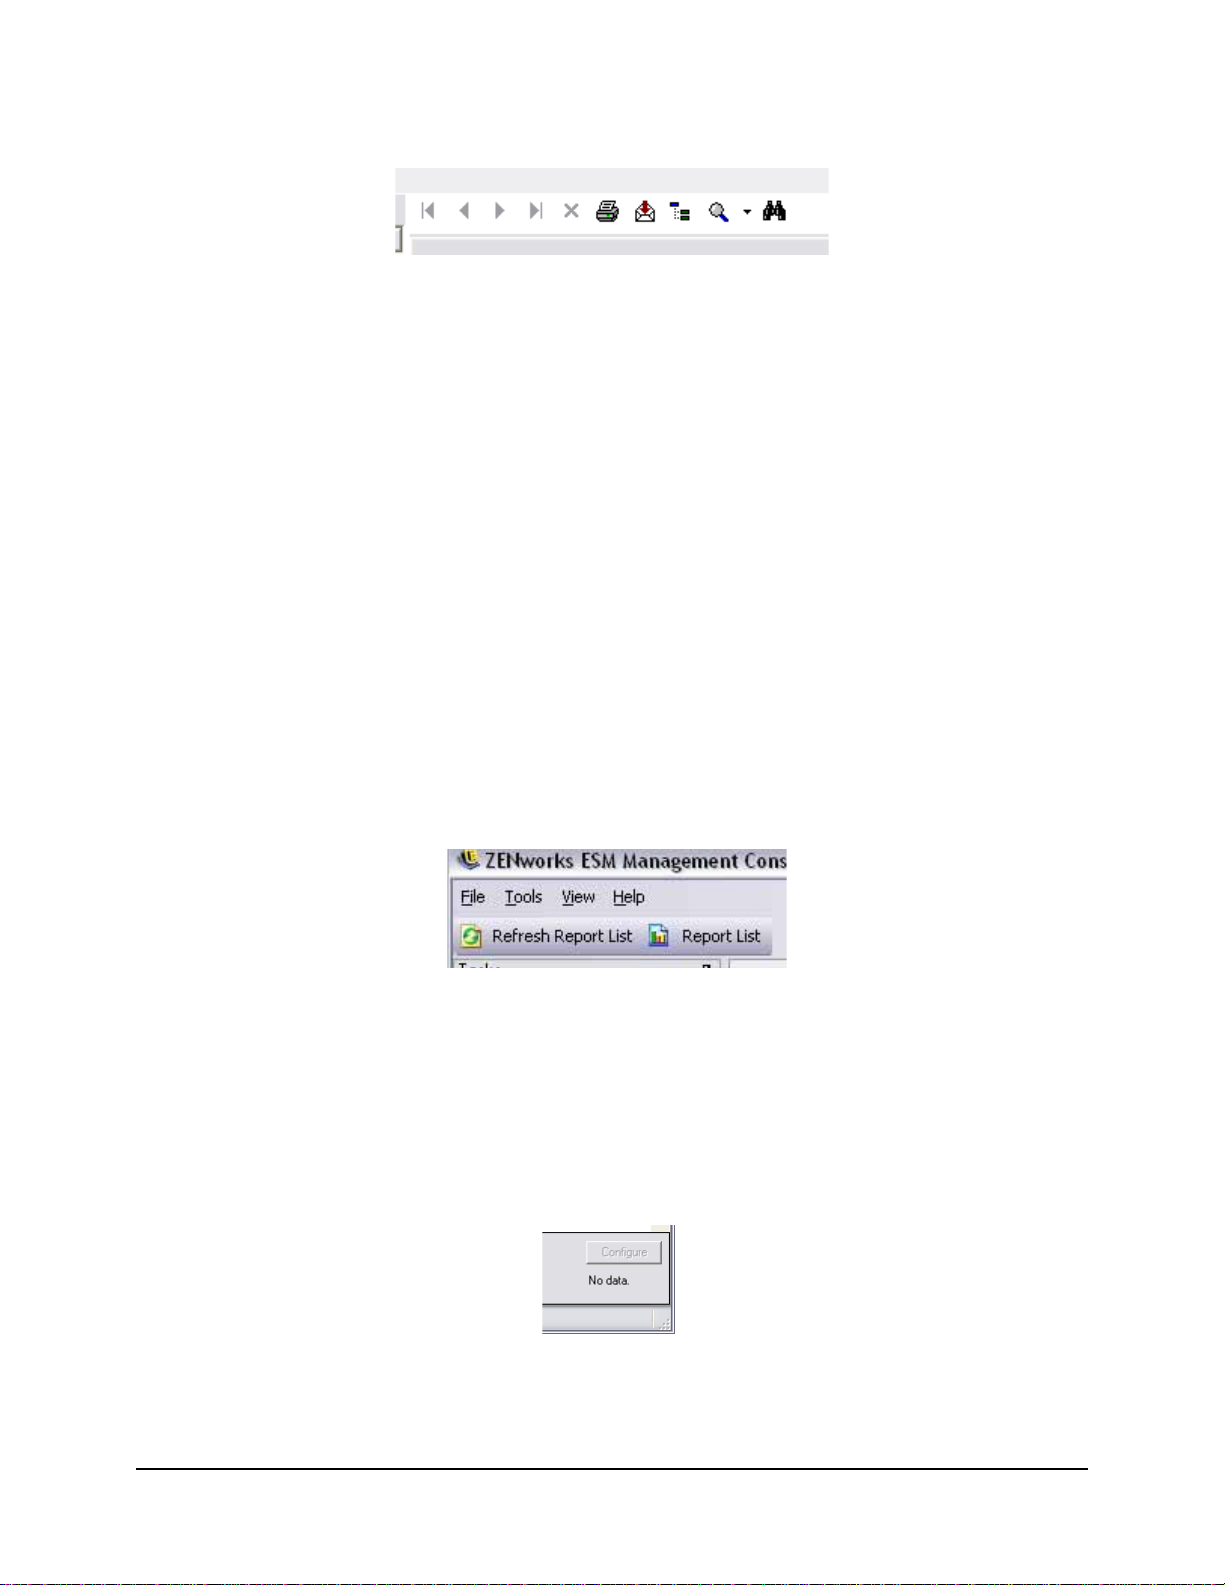
Figure 18 : Report Toolbar
When reviewing reports, the arrow buttons will help you navigate through each page of the report.
Reports will typically have charts and graphs on the first page with the gathered data on the
remaining pages, ordered by date and type.
The printer button will print the full report using the default printer for this computer.
The Export button saves the report as a PDF file, Excel spreadsheet, Word document, or RTF file
for distribution.
The Group Tree button will toggle a list of parameters to the side of the report. Select any of these
parameters to “drill-down” further into the report. Click the Group Tree button to close the sidebar.
The magnifying glass button provides a drop-down menu to adjust the current view size.
The binoculars button opens a search window.
When you mouse over a certain parameter, like a user name or device name, for example, the
mouse will change to a magnifying glass. You can double-click on that particular item and display
a new report for just that object. Click the “X” button to close the current view and return to the
original report.
To return to the report list, click the Report List icon above the report window (see Figure 19).
Figure 19 : Report list icon
Reports are not available until data has been uploaded from the ZENworks Security Clients. By
default, the ESM Reporting service syncs every 12 hours. This means that reporting and alerts
data will not be ready until 12 hours have passed from installation. T o adjust this time frame, open
the Configuration tool (see “Scheduling” on page 29), and adjust the Client Reporting time to the
number of minutes appropriate for your needs and your environment.
Reports that do not have data available will have the “Configure” or “Preview” button grayed out,
with the words No data underneath (see Figure 20).
Figure 20 : No data
ZENworks® ESM 3.5 Administrator’s Manual 38
Page 39

Adherence Reports
Adherence Reports provide compliance information regarding the distribution of security policies
to managed users. A score of 100% adherence indicates that all managed users have "checked in"
and received the current policy.
Endpoint Check-In Adherence
This report gives a summary of the days since check-in by enterprise endpoints, and the age of
their current policy, these numbers are averaged to summarize the report. This report requires no
variables be entered. The report will display the users by name, which policies have been assigned
to them, the days since their last check-in, and the age of their policy.
Endpoint Client Versions
Shows the most recently reported version of the client on each endpoint. Set the date parameters
to generate this report.
Endpoints that Never Checked-In
Lists the user accounts that have registered with the Management Service but have never checked
with the Distribution Service for a policy update. Select one or more groups to generate the report.
Note:
These may be Management Console users that don't have a Security Client installed in their names.
Group Policy Non-Compliance
Shows groups where some users do not have the correct policy . Selections can be made for one or
more groups to generate the report.
Endpoint State History by Machine
This report gives the most recent status (in a given date-range) of ESM-protected endpoints,
grouped by machine name. It displays the logged-on user name, current policy, ESM client
version, and network location. This report requires a range of dates to be entered. The
administrator can drill-down by double-clicking on any entry to see a complete list of status
reports for a particular machine.
Policy Assignment
This report shows which users/groups (accounts) have received the specified policy. Select the
desired policy from the list and click View to run the report.
Endpoint State History by User
This report gives the most recent status (in a given date-range) of ESM-protected endpoints,
grouped by user name. It displays the machine name, current policy, ESM client version, and
network location. This report requires a range of dates to be entered. The administrator can drilldown by double-clicking on any entry to see a complete list of status reports for a particular user.
ZENworks® ESM 3.5 Administrator’s Manual 39
Page 40

Alert Drill-Down Reports
Additional alert information is available in these drill-down reports. These reports will only
display data when an alert has been triggered. Clearing an alert will also clear the alert report,
however, the data will still be available in a standard report.
Client Tampering Alert Data
Displays instances where a user has made an unauthorized attempt to modify or disable the
ZENworks Security Client.
Files Copied Alert Data
Shows accounts that have copied data to removable storage.
Incorrect Client Version Alert Data
Shows the history of the status of the ZSC Update process.
Incorrect Client Policy Alert Data
Shows users who do not have the correct policy.
Integrity Failures Alert Data
Reports on the history of success/failure client integrity checks.
Override Attempts Alert Data
Instances where client self-defense mechanisms have been administratively overridden, granting
privileged control over the ZENworks Security Client.
Port Scan Alert Data
Shows the number of blocked packets on the number of different ports (a large number of ports
may indicate a port scan occurred).
Uninstall Attempt Alert Data
Users that have attempted to uninstall the ZENworks Security Client.
Unsecure Access Point Alert Data
Unsecured access points detected by the ZENworks Security Client.
Unsecure Access Point Connection Alert Data
Unsecured access points connected to by the ZENworks Security Client.
ZENworks® ESM 3.5 Administrator’s Manual 40
Page 41
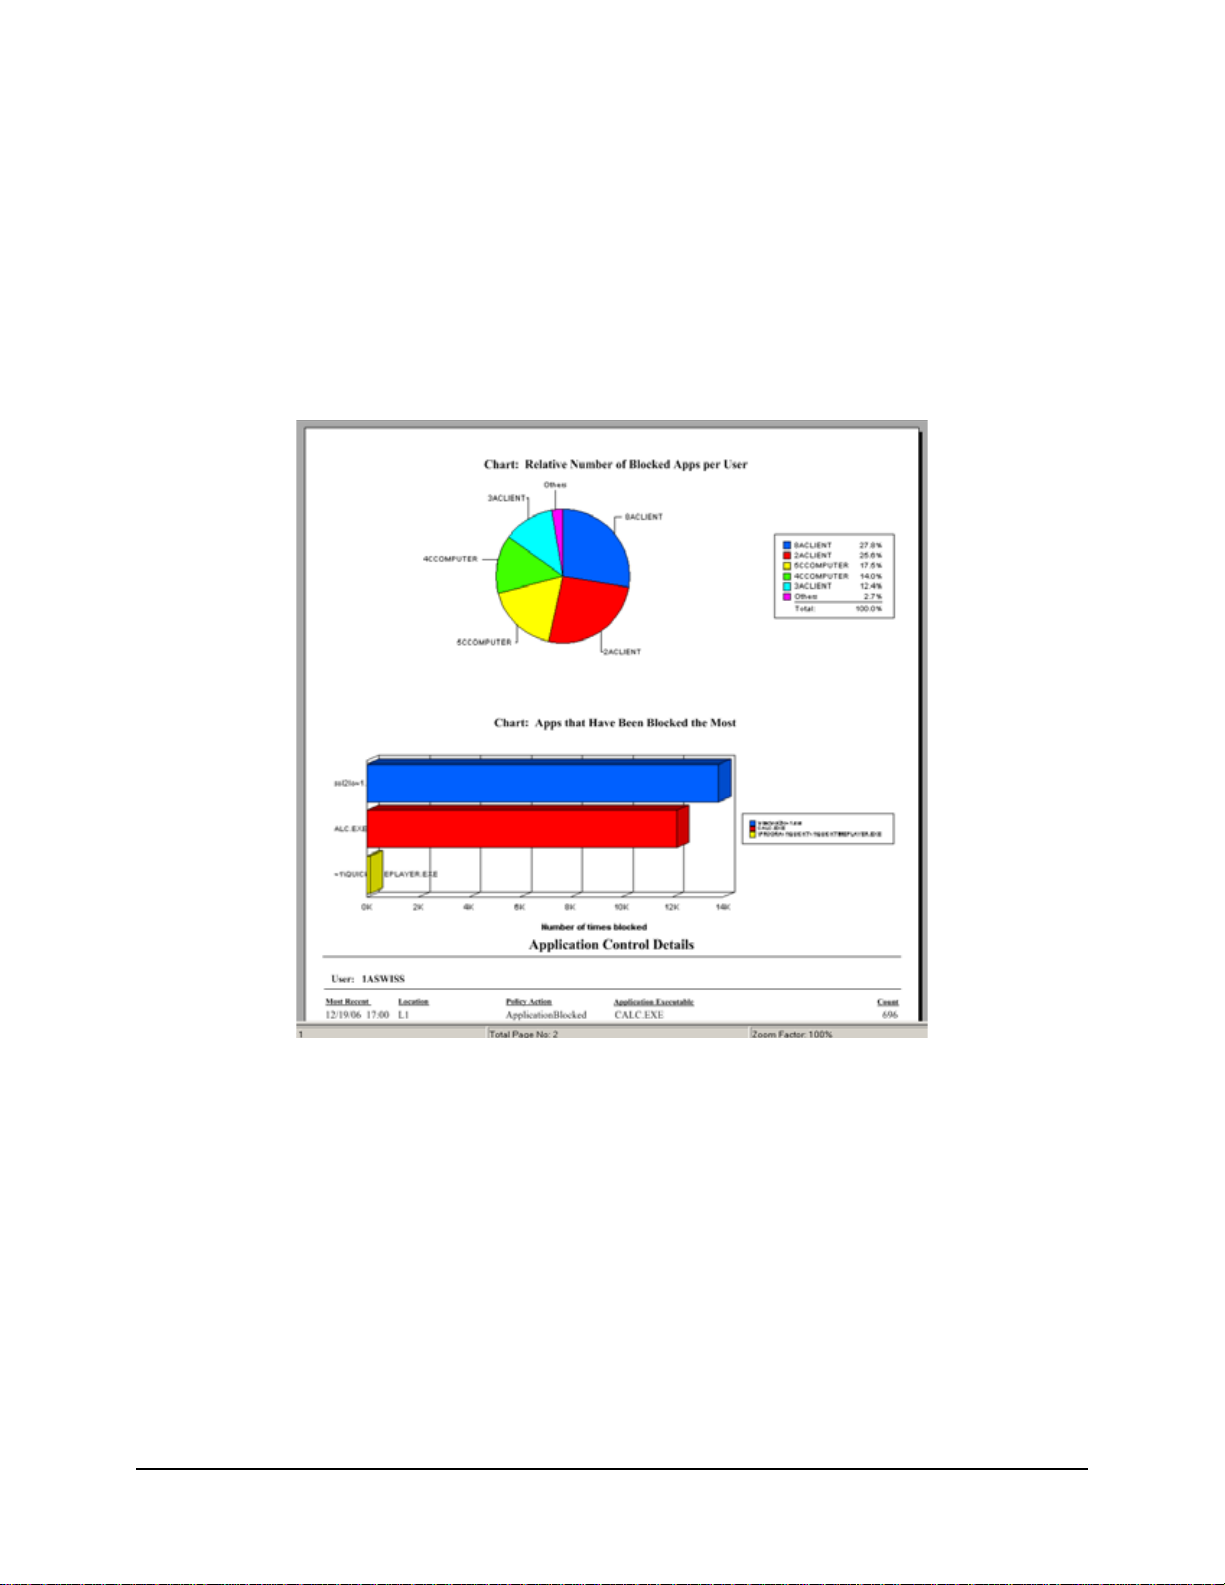
Application Control Report
Reports all unauthorized attempts by blocked applications to access the network or run when not
permitted by the policy.
Application Control Details
This report displays the date, location, the action taken by the ZSC, the application that attempted
run, and the number of times this was attempted. Dates displayed in UTC.
Enter the date parameters, select the application name(s) from the list, select the user accounts,
and click View to run the report (see Figure 21).
Figure 21 : Sample Blocked Applications Report
ZENworks® ESM 3.5 Administrator’s Manual 41
Page 42

Encryption Solution Reports
When endpoint encryption is activated, reports on the transference of files to and from the
encrypted folders is monitored and recorded. The following reports provide information on
encrypted files:
File Encryption Activity
Shows files that have had encryption applied.
Encryption Exceptions
Shows errors from the encryption subsystem (e.g., A protected file could not be decrypted
because the user didn’t have the right keys).
File Encryption Volumes
Shows volumes (e.g., removable drives or hard-disk partitions) that have been managed by the
Novell Encryption Solution.
Endpoint Activity Reports
Endpoint activity reports provide feedback for individual policy components and the effect they
have on the operation of the endpoint.
Blocked Packets by IP Address
Block Packet Report filtered by Destination IP. Dates displayed in UTC.
Select the destination IP from the list and set the date parameters. The report displays the dates,
locations, affected ports, and the name of the blocked packets.
Blocked Packets by User
Block Packet Report filtered by User. Dates displayed in UTC. The data provided is essentially
the same as Blocked Packets by Destination IP, just broken down by user.
Network Usage Statistics by User
Report of packets sent, received or blocked, and network errors, filtered by end-users. This report
requires a range of dates to be entered. Dates displayed in UTC.
Network Usage Statistics by Adapter Type
Report of packets sent, received or blocked, and network errors filtered by adapter type. This
report requires a range of dates to be entered and the Location. Dates displayed in UTC.
Endpoint Updates Report
Shows the status of the ZSC Update process (see “ZSC Update” on page 100). Dates displayed in
UTC.
ZENworks® ESM 3.5 Administrator’s Manual 42
Page 43

Chart Percentage of ZSC Update Failures
Charts the percentage of ZSC Update that have failed (and not been remediated). No parameters
are required to generate this report.
History of ZSC Update Status
Shows the history of the status of the ZSC Update process. Select the date range and click V iew to
run the report. The report displays which users have checked-in and received the update.
Chart Types of Failed ZSC Updates
Shows ZSC Updates that have failed (and not been remediated). Select the date range and click
View to run the report. The report shows which users have checked-in, but had a failed update
installation.
Client Self Defense Report
ZENworks Security Client Hack Attempts
Reports instances where a user has made an unauthorized attempt to modify or disable the
ZENworks Security Client. Dates displayed in UTC.
Enter the date parameters, and click View to run the report.
Integrity Enforcement Report
Provides reporting for antivirus/anti-spyware integrity results.
Client Integrity History
Reports on the success/failure of client integrity checks. Dates displayed in UTC.
Select the date range for the report, integrity rule(s), and user name(s).
Unremediated Integrity Failures by Rule
Reports on integrity rules and tests that have failed and not yet been remediated.
Select the integrity rule(s), and click View to run the report.
Unremediated Integrity Failures by User
Reports on users that have failed integrity tests and not yet remediated.
Select the user names(s), and click View to run the report.
Location Reports
Provides data for common location usage. i.e., what locations are most commonly used by endusers.
Location Usage Data
ZENworks® ESM 3.5 Administrator’s Manual 43
Page 44
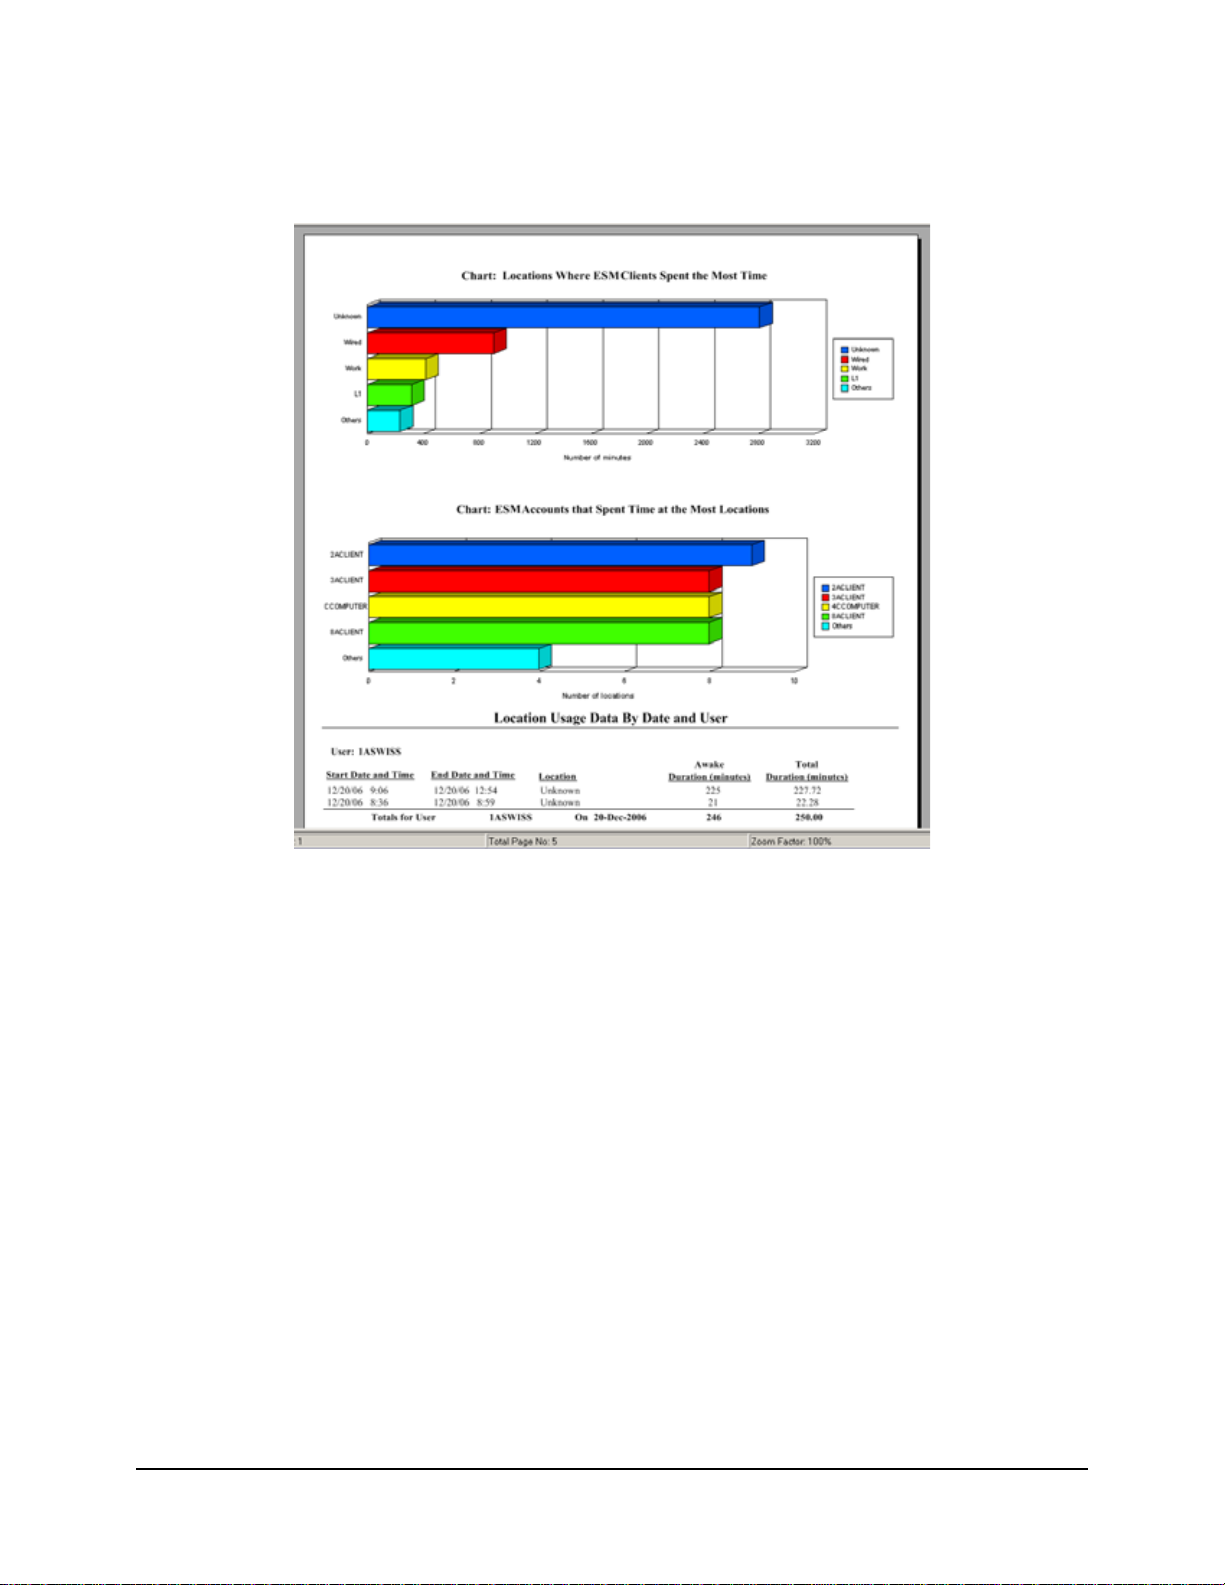
Information gathered from individual clients about what locations are used, and when. Dates
displayed in UTC. The locations displayed are ONLY the locations used by the user. Unused
locations will not be displayed. Select the date range to generate the report (see Figure 22).
Figure 22 : Sample Location Usage Report
ZENworks® ESM 3.5 Administrator’s Manual 44
Page 45
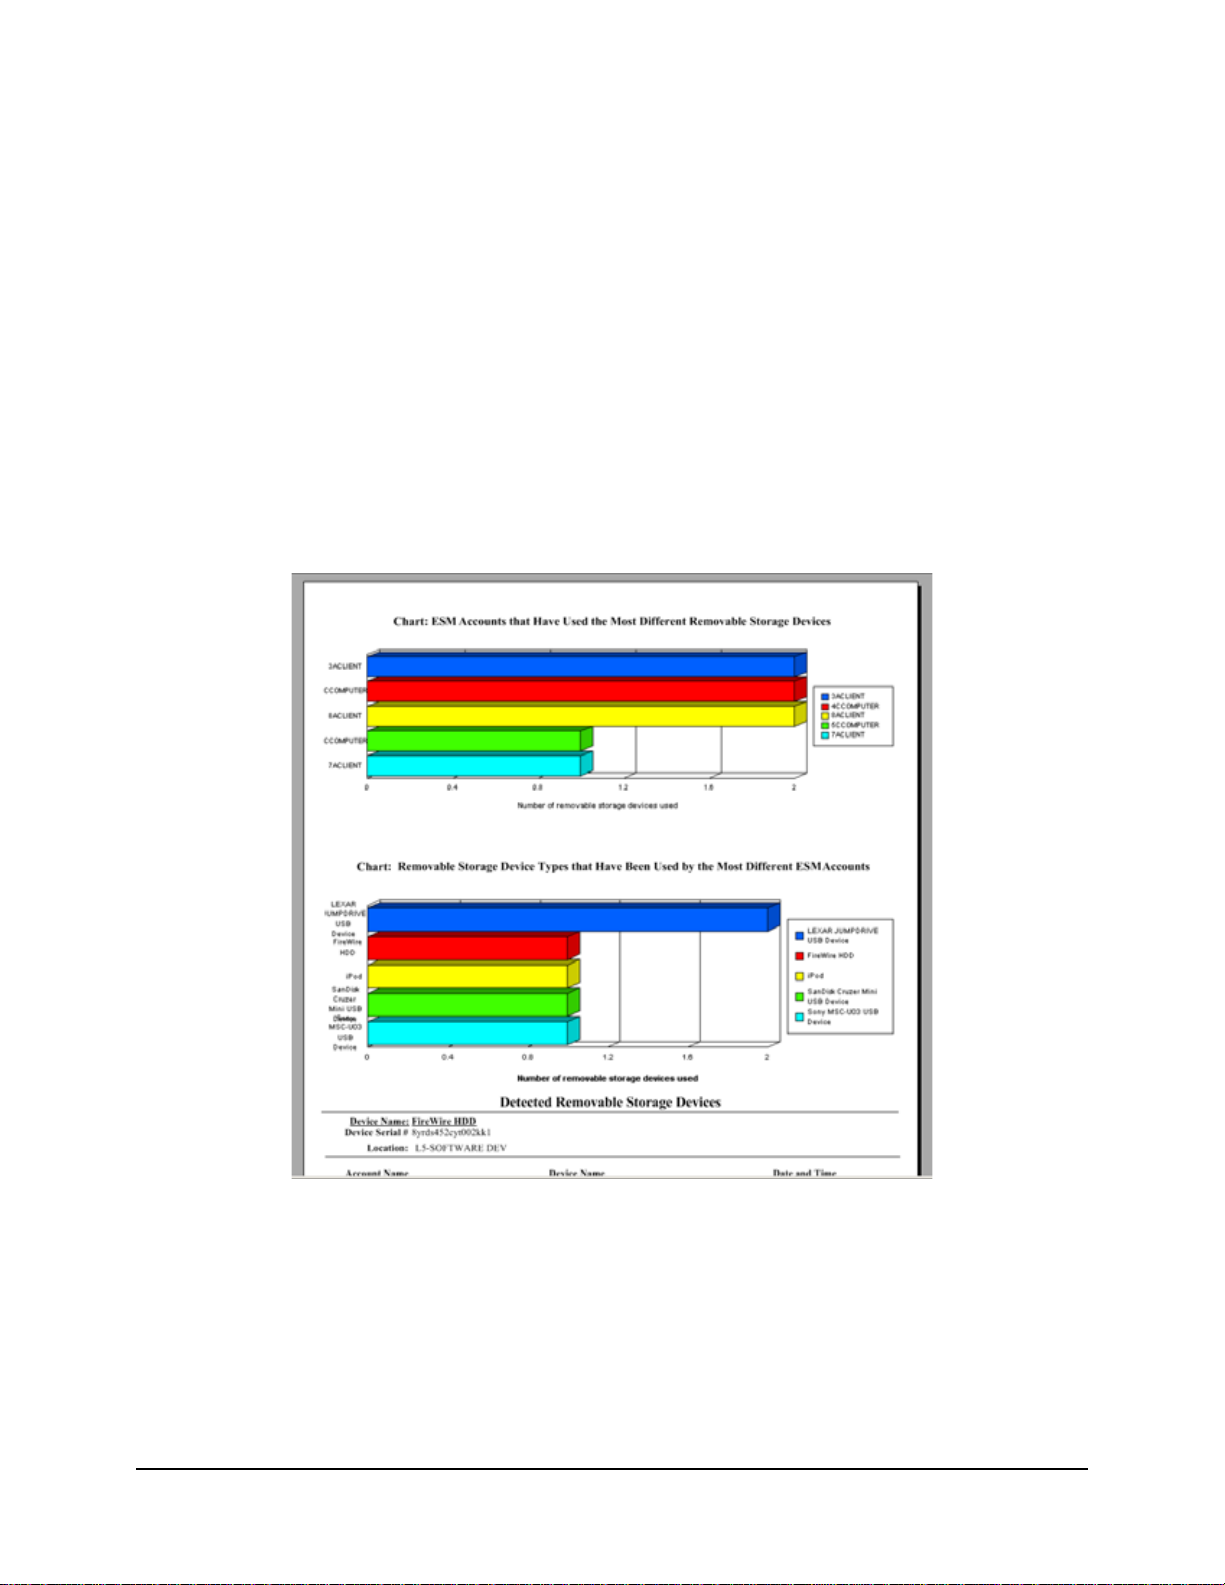
Outbound Content Compliance Reports
Provides information regarding the use of removable drives and identifies which files have been
uploaded to such drives.
Removable Storage Activity by Account
Shows accounts that have copied data to removable storage. No parameters are required to
generate this report.
Removable Storage Activity by Device
Shows removable storage devices to which files have been copied. Select the date range, user
name(s), and location(s) to generate this report.
Detected Removable Storage Devices
Shows removable storage devices that have been detected on the endpoint. Select the date range,
user name(s), and location(s) to generate this report (see Figure 23).
Figure 23 : Sample Detected Removable Storage Devices report
Chart 7 Days of Removable Storage Activity by Account
Chart of accounts that have recently copied data to removable storage. Enter the date range to
generate this report.
ZENworks® ESM 3.5 Administrator’s Manual 45
Page 46

Administrative Overrides Report
Reports instances where client self-defence mechanisms have been administratively overridden,
granting privileged control over the ZENworks Security Client.
ZENworks Security Client Overrides
This report shows successful override attempts by user and date. Dates displayed in UTC.
Select the user and date range, then click View to run the report.
Endpoint Updates Report
Shows the status of the ZSC Update process (see “ZSC Update” on page 100). Dates displayed in
UTC.
History of ZSC Update Status
Shows the history of the status of the ZSC Update process. Select the date range and click V iew to
run the report. The report displays which users have checked-in and received the update.
Wireless Enforcement Reports
Provides reports regarding wi-fi environments the endpoint is exposed to.
Wireless Connection Availability
Displays the access points available for connection by policy and location. Includes the channel,
SSID, MAC address and whether or not the AP was encrypted.
Wireless Environment
The Wireless Environment report provides a survey of all detected access points (APs), regardless
of ownership. Includes the frequency, signal strength and whether or not the AP was encrypted.
Dates displayed in UTC. Select the desired locations(s) and the date range to generate this report
(see Figure 24).
ZENworks® ESM 3.5 Administrator’s Manual 46
Page 47

Figure 24 : Sample Wireless Environment History report
ZENworks® ESM 3.5 Administrator’s Manual 47
Page 48

Generating Custom Reports
Software Requirements
ODBC-compliant reporting tools (i.e., Crystal Reports, Brio, Actuate) may be used to create
custom reports not included in the Novell reports list. These reporting tools can view and query
the reporting information from a common data warehouse, star format.
The reports included with ESM were created using Crystal Reports for V isual Studio .NET (SP2).
This version of Crystal Reports is bundled with V isual Studio .NET and is available as an optional
component. To learn more, visit http://msdn.microsoft.com/vstudio/team/crystalreports/
default.aspx
Creating a ESM Compliant Report
Before you begin, please review the report creation process outlined at: http://
msdn.microsoft.com/vstudio/team/crystalreports/gettingstarted/default.aspx
The first phase implementation of the ESM reporting framework has the following requirements
of every report to be integrated into the system:
• The report may be based on only one data source. That data source must be a single
table or view residing within the source database (see Figure 25).
Figure 25 : Browse the Reporting Data Source
• The report must have a title specified and saved with the report. Optional title, subject,
author and comments will be displayed if specified (see Figure 26).
ZENworks® ESM 3.5 Administrator’s Manual 48
Page 49

Figure 26 : Report Document Properties
• The report may not contain any sub-reports.
• Filtering parameters must be named the same as the tar get columns within the database
fields of the table or view.
Figure 27 : Available Database Fields
What reporting information is available?
The ESM reporting database is designed to closely model the star schema format. What is a star
schema? A single "fact" table containing a compound primary key, with one segment for each
"dimension," and additional columns of additive, numeric facts.
The Reporting Service includes the following two dimension tables:
ORGANIZATION_DIM: The organization table, defining the instances of users, groups,
organizational units, containers and services in a hierarchal relationship. Each row represents one
of these units.
UNIT_MEMBER_DIM: Association of organization units to other organization units. For
example, while a user may be stored within a specific container within Active Directory, he/she
ZENworks® ESM 3.5 Administrator’s Manual 49
Page 50

may also be a member of an organization unit or security groups. Each row represents a
relationship of organization units.
The data source will need to be defined to the reporting tool, typically for most third-party
applications the following steps may be followed:
Step 1: Define an OLEDB ADO connection to the server hosting the Management Service
Step 2: Select the Microsoft OLE DB Provider for SQL Server
Step 3: Enter the Management Service server as the server
Step 4: Enter the SQL account name and password
Step 5: Enter the Reporting Service database name (default name is STRSDB) as the database
The following views are available for report generation:
EVENT_ACCESSPOINT_FACT_VW: This view describes the access points observed by user,
day, policy, location and access point instance.
EVENT_BLOCKEDPACKETS_FACT_VW: This view describes the summarized instances of
port activity that was blocked due to policy configuration by the endpoint. The information is
logged user, day, policy, location and source/destination ip/port.
EVENT_CLIENT ACTIVITY_FACT_VW: This view describes the summarized instances of port
activity at the endpoint. The information is logged user, day, policy, location and device.
EVENT_CLIENTAPPLICATIONS_FACT_VW: This view describes the summarized instances
of application use (duration) by user, day, policy, location and application.
EVENT_CLIENTDEFENSE_HACK_FACT_VW: This view describes the instances of hack
attempts against the endpoint client. Active users, applications and services are included within
the report. The data is grouped by user, day, policy, location and attack result.
EVENT_CLIENTDEFENSE_OVERRIDES_FACT_VW: This view describes the instances of
policy override and the affected devices. The data is grouped by user, day, policy, location and
override type.
EVENT_CLIENTDEFENSE_UNINSTALL_FACT_VW: This view describes the instances of
attempts to remove the endpoint client. The data is grouped by user, day, policy, location and
attack result.
EVENT_CLIENTDEVICE_FACT_VW: This view describes the types of devices in use by an
endpoint. The data is grouped by user, day, policy, location and device type.
EVENT_CLIENTENVIRONMENTS_FACT_VW: This view describes the custom (stamped)
network environments used for location detection. The data is grouped by user, day, policy,
location, device type and environment data.
EVENT_CLIENTINTEGRITY_FACT_VW: This view describes the results of integrity rules
applied at the endpoint. The data is grouped by user, day, policy, location and rule.
EVENT_CLIENTLOCATION_FACT_VW: This view describes the time at location as well as
adapter (configuration and type) used at the location. The data is grouped by user, day, policy and
location.
ZENworks® ESM 3.5 Administrator’s Manual 50
Page 51

EVENT_CLIENTRULE_FACT_VW: This view describes the generic reporting mechanism for
integrity and scripting rules. The data is grouped by user, day, policy, location and rule.
EVENT_COMPONENTACTION_FACT_VW: This view describes the Management Console
activity performed on specific components. For example, you could see when the policy update
interval was changed for a specific location in a policy. The data is grouped by user, day, policy,
component and defines the new and old value.
EVENT_MANGERIO_FACT_VW: This view describes when a component has been created or
edited. The data is grouped by user, day, component and action.
EVENT_ORGANIZATIONACTION_FACT_VW: This view describes the user activity as it
relates to ESM integration with an Enterprise information repository. All user management
activities are reflected within this table.
EVENT_POLICYCOMPONENT_FACT_VW: This view describes the interaction of
components and policies. For example, when a location is added to a policy, an audit row would
reflect that change. The data is grouped by user, day, policy, component and action.
EVENT_PUBLISHACTION_FACT_VW: This view describes the policy and component
assignment to an organization.
EVENT_SERVERACTION_FACT_VW: This view describes the user activity with the
Distribution Service. (Check In, for example)
EVENT_USERACTION_FACT_VW: This view describes the user policy activity with the
Distribution Service. (Policy, Key, EFS Key, Schema downloads.)
So how do I create a report?
The following steps describe the creation of a simple report. The following example uses the
Visual Studio.NET 2003 Enterprise Architect IDE.
Step 1: From the IDE, select Add New Item and add a new Crystal Report (see Figure 28)
Figure 28 : Add New Crystal Report
ZENworks® ESM 3.5 Administrator’s Manual 51
Page 52

Step 2: The simplest method for this example is to create a report using the wizard (see Figure 29)
Figure 29 : Crystal Reports Wizard
Step 3: Define the data source. Access the Management Service reporting service database within
data (see Figure 30)
Figure 30 : Access Reporting Service Database
ZENworks® ESM 3.5 Administrator’s Manual 52
Page 53
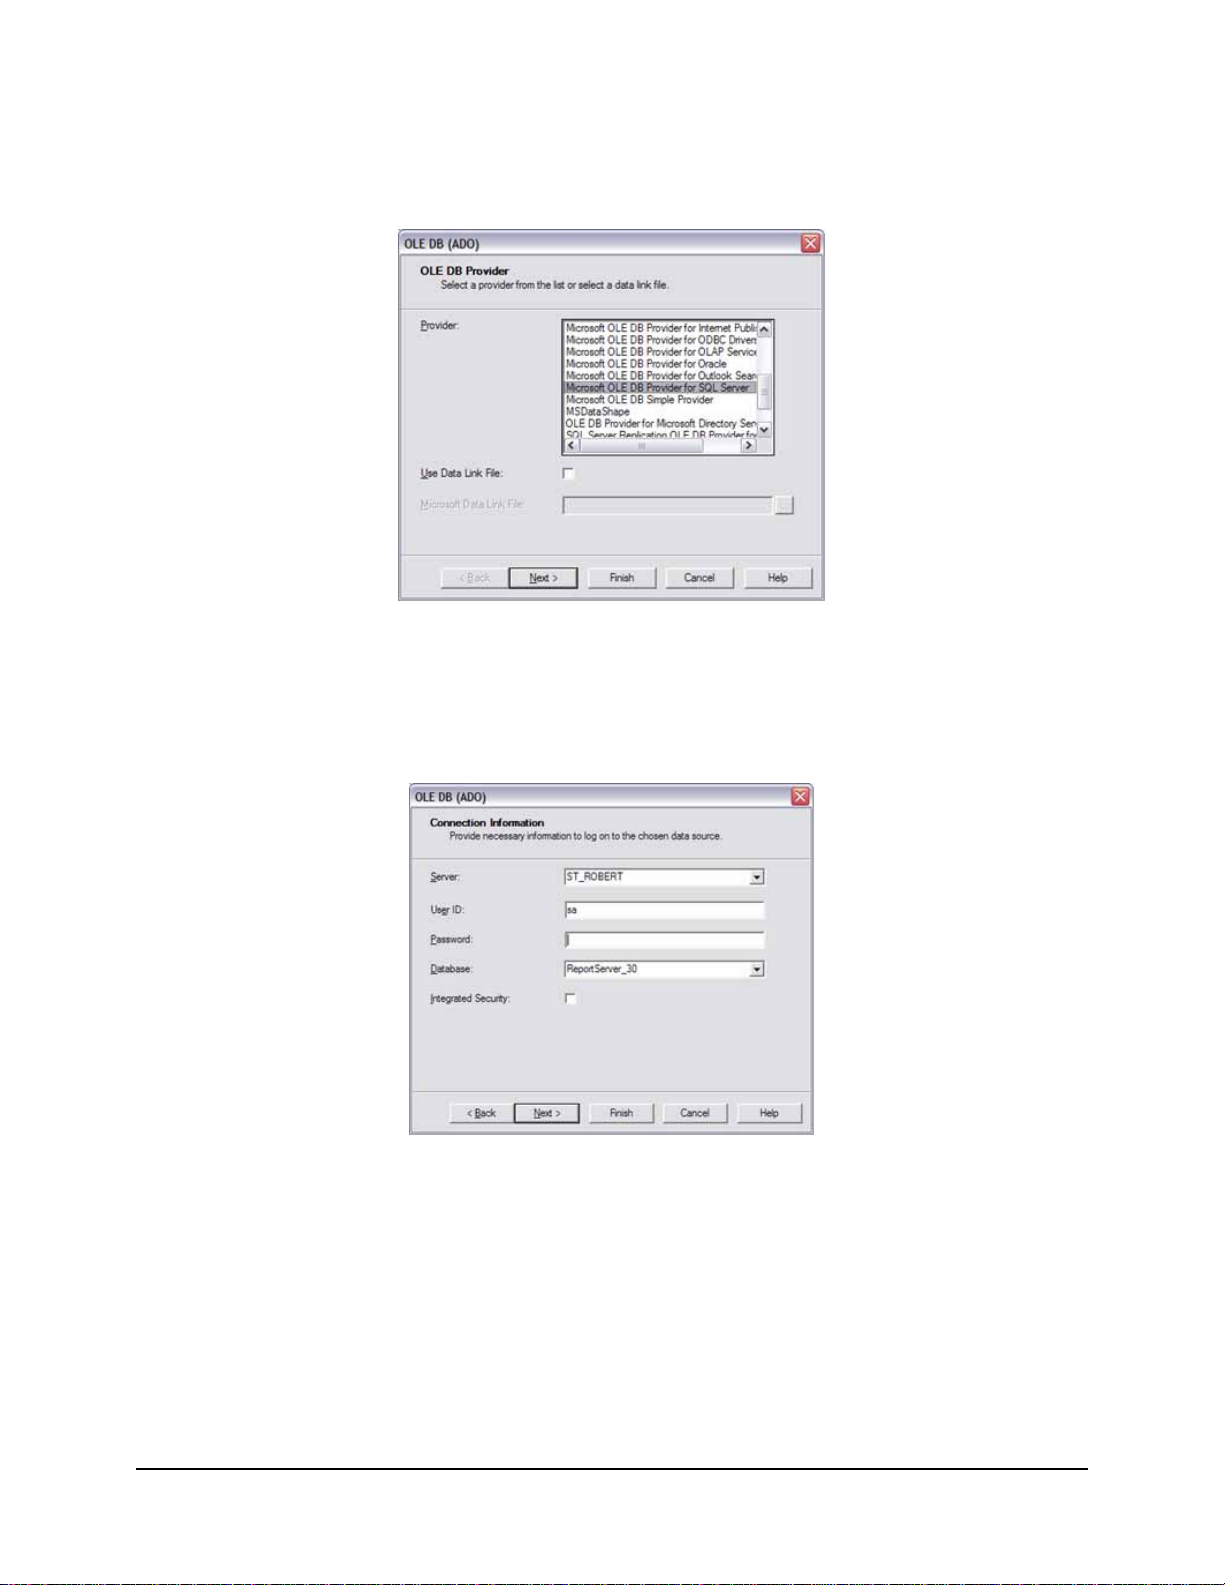
Step 4: Using the connection definition wizard (see Figure 31), define an OLEDB ADO
connection to the Reporting Service database. Select the Microsoft OLE DB Provider for
SQL Server and click Next.
Figure 31 : Select OLE DB Provider
Step 5: Select the Reporting server. Enter the user id, password, and database name for the
Reporting Service (see Figure 32 - refer to the ESM Installation and Quick-Start Guide for
more information) Click Next then Finish.
Figure 32 : Enter Server Information
ZENworks® ESM 3.5 Administrator’s Manual 53
Page 54
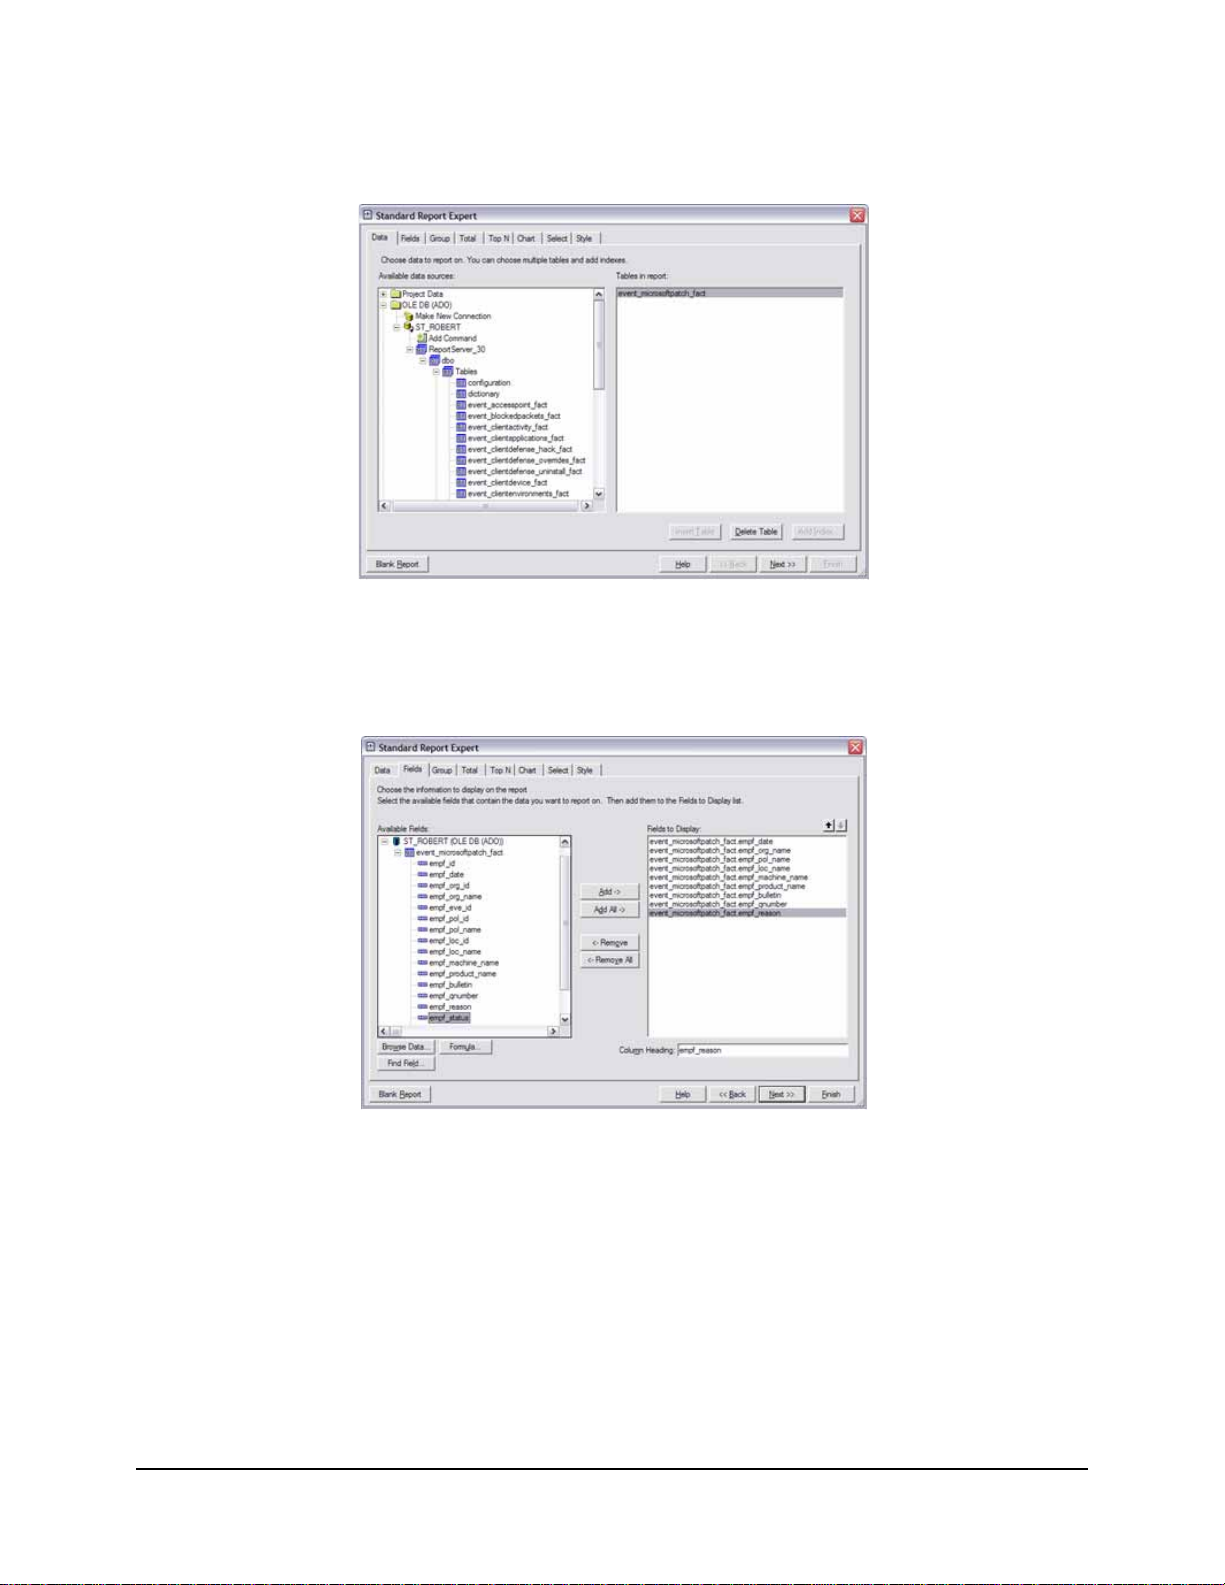
Step 6: Select the source table or view that you will be using for your report by expanding the tree
nodes as shown (see Figure 33)
Figure 33 : Select Source Table or View
Step 7: Under the Fields tab, select the table or view columns that you wish to include within your
report (see Figure 34). Click Next to continue
Figure 34 : Select the columns to include
ZENworks® ESM 3.5 Administrator’s Manual 54
Page 55

Step 8: If you are planning to group or summarize your data, click the Group tab and select the
columns you wish to group by as shown (see Figure 35). Click Next or Select the Style
tab.
Figure 35 : Select Columns to Group
Step 9: Title the report and select the style (see Figure 36). The report builder displays (see Figure
37)
Figure 36 : Select Style
ZENworks® ESM 3.5 Administrator’s Manual 55
Page 56

Figure 37 : Visual Basic Report Builder
Step 10: To set up a filter, right click on the Parameter Fields item in the field explorer and select
New (see Figure 38)
Figure 38 : Setting Up a Filter
ZENworks® ESM 3.5 Administrator’s Manual 56
Page 57
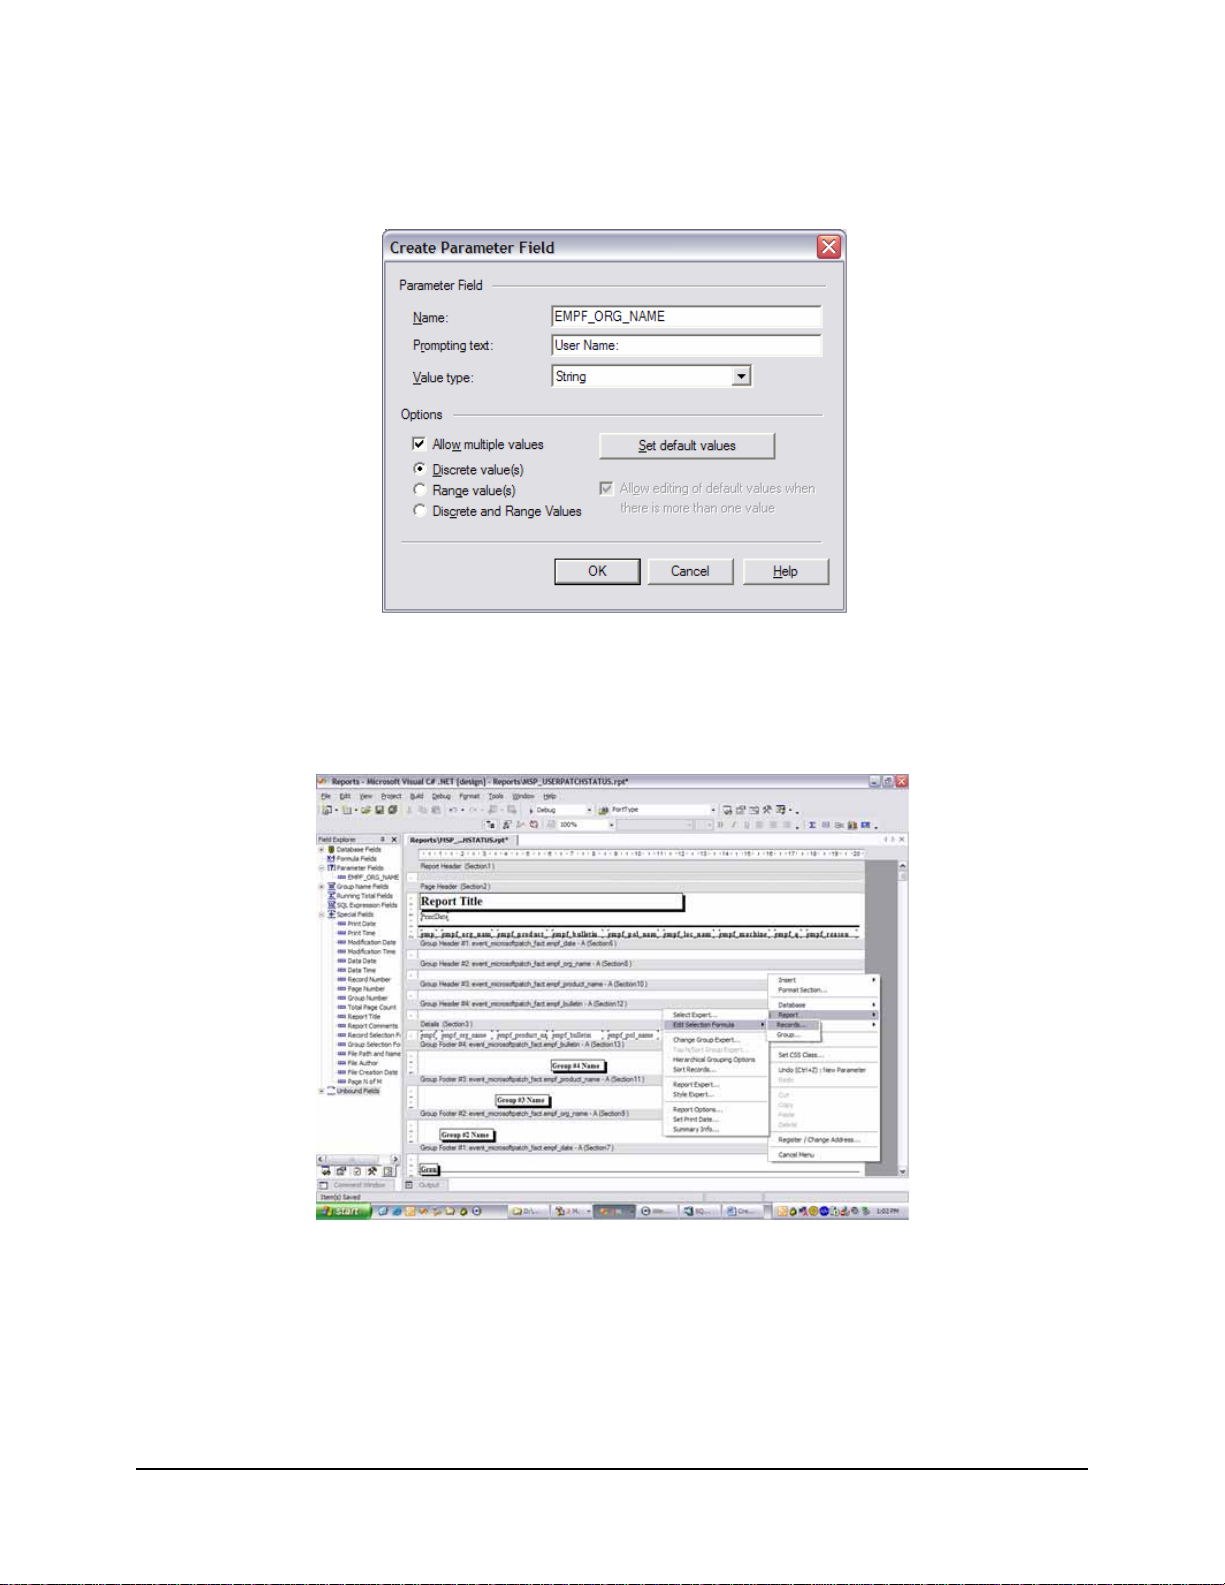
Step 11: The following filter allows you to select multiple users to filter by with the prompting text
of "User Name:" displayed within the UI. Notice, the parameter is named the same as the
column (see Figure 39)
Figure 39 : Create Parameter Field
Step 12: Right click on the report and select Report->Edit Selection Formula->Records (see Figure
40)
Figure 40 : Link the Parameter
ZENworks® ESM 3.5 Administrator’s Manual 57
Page 58

Step 13: So, using the new parameter, specify only the records where the field equals the values
selected in the parameter. Select the column and then a comparison (=) and then the
parameter. Type CTRL-S to save the filter
Figure 41 : Specify the Correct Records
Step 14: Repeat steps 10-13 for each filter. Edit the design of the report and save.
Step 15: After a custom report is generated, the report can be dropped into the \Program
Files\Novell\Management Service\Reports\Reports\ directory on the Management Service
Server. Once there, the new report will display in the reports list in the Reporting Service
web interface (click Refresh List to display the new reports).
ZENworks® ESM 3.5 Administrator’s Manual 58
Page 59

ZENworks Storage Encryption Solution
ZENworks Storage Encryption Solution (SES) provides complete, centralized security
management of all mobile data by actively enforcing a corporate encryption policy on the
endpoint itself.
• Centrally create, distribute, enforce, and audit encryption policies on all endpoints and
removable storage devices
• Encrypt all files saved to, or copied to, a specific directory on all fixed disc partitions
on the hard drive
• Encrypt all files copied to removable storage devices
• Share files freely within an organization while blocking unauthorized access to files
• Share password-protected, encrypted files with people outside the organization
through an available decryption utility
• Easily update, backup, and recover keys via policy without losing data
Understanding Storage Encryption Solution
Data encryption is enforced through the creation and distribution of data encryption security
policies. Sensitive data on the endpoint can be stored in a safe, encrypted folder . The end-user can
access and copy this data outside of the encrypted folder and share the files, h owever while in that
folder, the data will remain encrypted. Attempts to read the data by anyone who is not an
authorized user for that machine will be unsuccessful. When the policy is activated, an encrypted
“Safe Harbor” folder will be added to the root directory of all fixed-disk drives on the endpoint.
Sensitive data placed on a thumbdrive or other removable media device will be immediately
encrypted, and can only be read on the machines in the same policy group. A sharing folder can
optionally be activated, which will allow the user to share the files with persons outside their
policy group via a password (see “Data Encryption” on page 98).
Sharing Encrypted Files
Users within the same policy group (i.e., those users who have received the same security policy),
will have the keys to access data stored on the endpoint, as well as data moved onto thumbdrives
and other removable devices.
Users within a separate policy group (with encryption activated), will be able to access encrypted
data placed in the “Shared Files” folder with an access password. These users will not be able to
read encrypted files that are outside the “Shared Files” folder.
Users who do not have encryption enabled within their policy and users who do not have a
ZENworks Security Client installed on their computer (e.g., outside contractors), will not be able
to read files outside the “Shared Files” folder, and will require the Novell File Decryption Utility
to read the files with password access.
ZENworks® ESM 3.5 Administrator’s Manual 59
Page 60
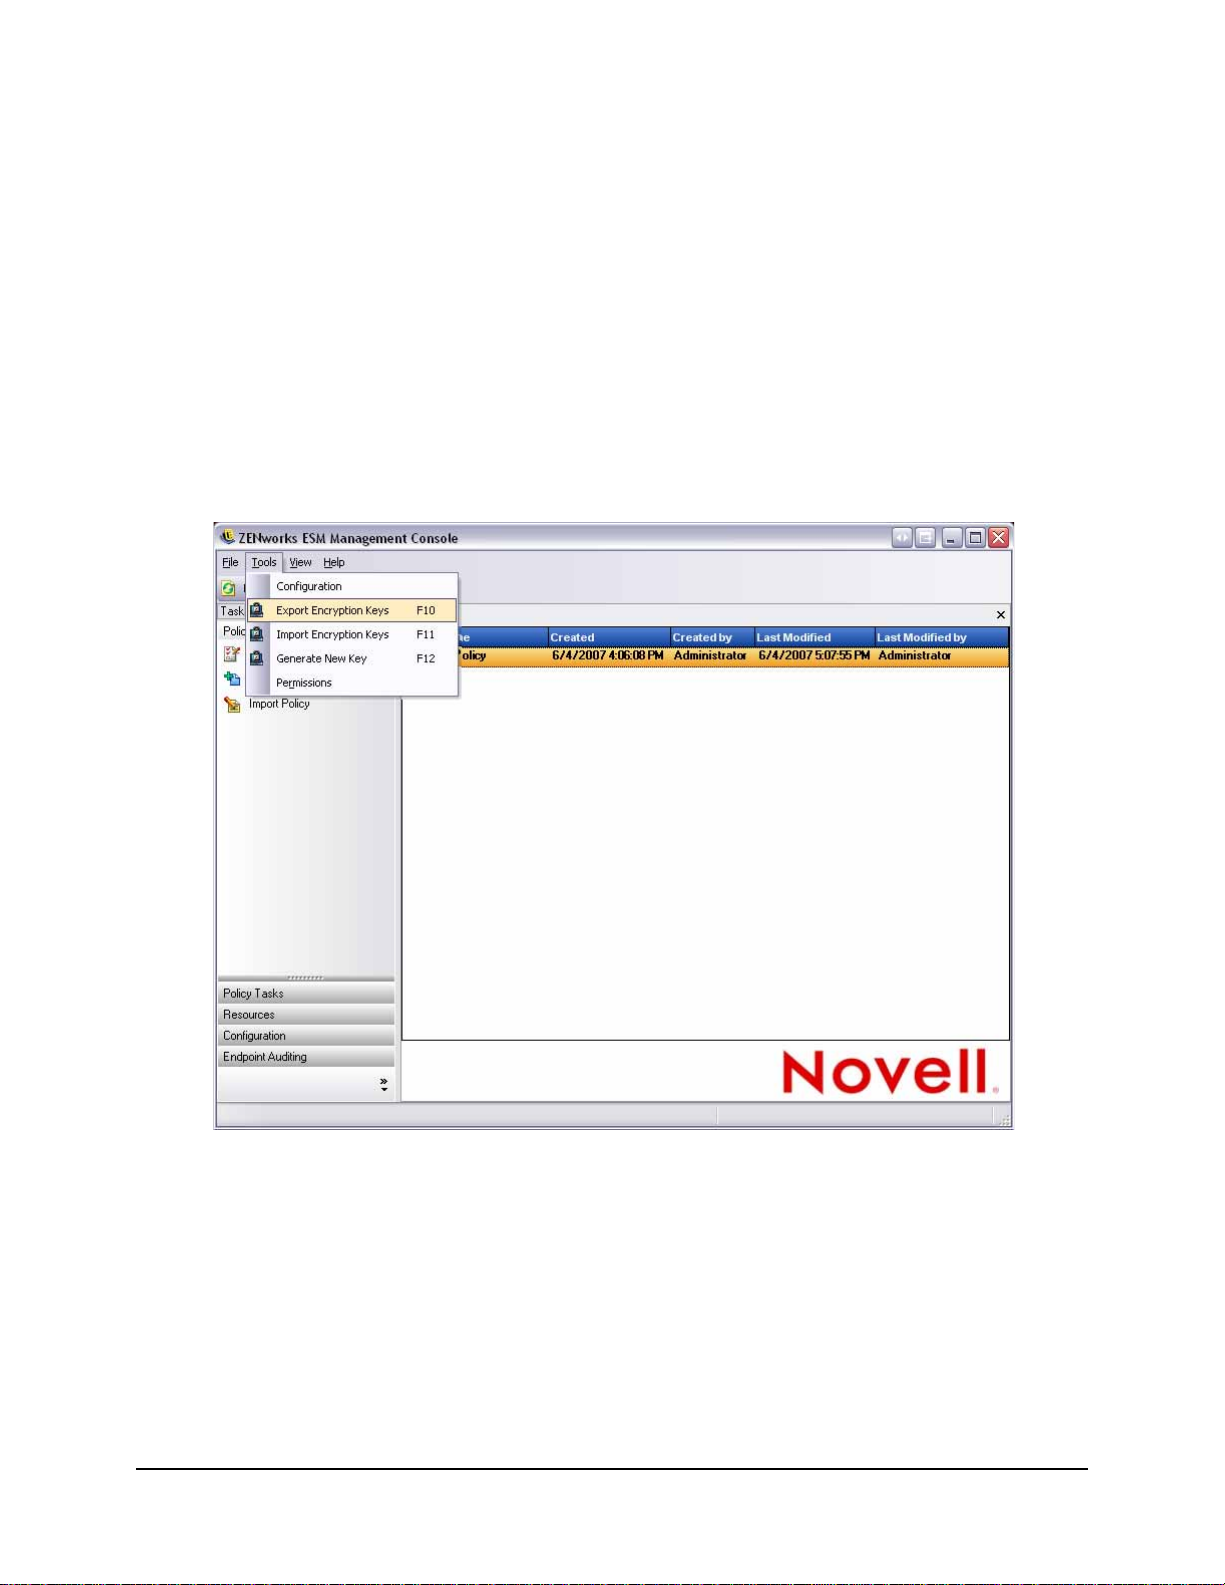
Key Management
Key management permits you to backup, import, and update an encryption key. It is
recommended that encryption keys be exported and saved to ensure that data can be decrypted in
the case of a systems failure, or inadvertent policy change.
The common key is the default encryption key that will be used for all data encryption agents. If
the encryption key is compromised, or as a security precaution, the key can be updated.
Generating a new common key will result in a temporary performance decrease, while managed
content is re-encrypted.
Encryption Key controls are accessed through the tools menu of the management console (see
Figure 42).
Figure 42 : Access Encryption Keys through the tools menu
ZENworks® ESM 3.5 Administrator’s Manual 60
Page 61

Export Encryption Keys
For backup purposes, and to send the key to another Management Service instance, the current
encryption key set may be exported to a designated file location.
Step 1: In the tools menu, select Export Encryption Keys and click it, or press F10 on your
keyboard.
Step 2: Enter the path with a filename in the provided field, or click the “...” button to browse to a
file location.
Step 3: Enter a password in the provided field. The key cannot be imported without this password.
Step 4: Click OK.
All key files in the database will be included in the exported file.
Import Encryption Keys
You can import keys from a backup or another Management Service instance. This allows
endpoints managed by this Management Service to read files protected by other ESM
installations. When importing keys, duplicates will be ignored. Imported keys become part of
your “key set” and do not replace the current common key . All keys are passed down when a new
policy is published.
Step 1: In the tools menu, select Import Encryption Keys and click it, or press F11 on your
keyboard.
Step 2: Enter the file name, including the file location, or click “...” and browse to the key file.
Step 3: Enter the password for the encryption key.
Step 4: Click OK. The encryption key will be imported into the database.
Generate a New Key
To generate a new key, select and click Generate New Key, or press the F12 key on your
keyboard. This will automatically generate a new key. All previous keys are stored in the policy.
ZENworks® ESM 3.5 Administrator’s Manual 61
Page 62

ZENworks File Decryption Utility
The ZENworks File Decryption Utility is used to extract protected data from the Shared Files
folder on encrypted removable storage devices. This simple tool can be provided by the user
(though it cannot be placed on the removable storage device), to a third party so they can access
the files in the Shared Files folder.
Common Use of the File Decryption Utility
To use the File Decryption Utility:
Step 1: Plug the storage device into the appropriate port on your computer.
Step 2: Open the File Decryption Utility.
Step 3: Browse to the storage device’s Shared Files directory and select the desired file.
Step 4: To extract directories (folders) rather than files, click the Advanced button and select
Directories, then browse to the appropriate directory (click Basic to return to the default
view).
Step 5: Browse to the path on the local machine where these files will be stored.
Step 6: Click Extract.
The transaction can be monitored by clicking the Show Progress button.
Administrator Configured Decryption Utility
The File Decryption Utility can also be configured in “administrator mode” with the current key
set, and can extract all data from an encrypted storage device. This configuration is not
recommended, as it can potentially compromise all current keys used by SES. However, in cases
where the data would be unrecoverable otherwise, this configuration may be necessary.
To configure the tool:
Step 1: Create a shortcut of the File Decryption Utility within its current directory.
Step 2: Right-click the shortcut and select Properties.
Step 3: At the end of the target name, and after the quotes, enter -k (example: "C:\Admin
Tools\stdecrypt.exe" -k).
Step 4: Click Apply then OK
Step 5: Open the tool using the shortcut and click Advanced.
Step 6: Click the Load Keys button, the Import Key window will open.
Step 7: In this window, browse for the keys file and enter the password for the keys.
Step 8: All files encrypted with these keys can now be extracted.
ZENworks® ESM 3.5 Administrator’s Manual 62
Page 63

Override-Password Key Generator
Productivity interruptions that a user may experience due to restrictions to connectivity; disabled
software execution; or access to removable storage devices are likely caused by the security
policy the ZSC is enforcing. Changing locations or firewall settings will most often lift these
restrictions and restore the interrupted functionality . However, in some cases the restriction could
be implemented in such a way that they are restricted in all locations and/or all firewall settings,
or that the user is unable to make a location or firewall setting change.
When this occurs, the restrictions in the current policy can be lifted via a password override to
allow productivity until the policy can be modified. This feature allows an administrator to set up
password protected override for specified users and functionality, which temporarily permits the
necessary activities.
Password overrides disable the current security policy (restoring the default, All Open policy) for
a pre-defined period of time, once the time-limit has expired, the current or updated policy will be
restored. The password for a policy is set in the security policy's Global Rules settings.
Password override:
• Overrides application blocking
• Allows user to change locations
• Allows user to change firewall settings
• Overrides hardware control (thumb drivers, CDROM, etc.)
The password entered into the policy should NEVER be issued to an end-user . It is recommended
that the Override-Password Key Generator be used to generate a short-term-use key (see Figure
43).
Figure 43 : Override Password Key Generator
To generate an override key, perform the following steps:
ZENworks® ESM 3.5 Administrator’s Manual 63
Page 64

Step 1: Open the Override-Password Key Generator through Start\All Programs\Novell\ESM
Management Console\Override-Password Generator. The Password Generator will
display. (see Figure 43)
Step 2: Enter the policy password in the Administrator Password field, and confirm it in the next
field
Step 3: Enter the user name the end-user logged-in with
Step 4: Set the amount of time the policy will be disabled
Step 5: Click the Generate Key button to generate an override key
This key can be either read to the end-user during a help-desk call, or it can be copied and pasted
into an email. The end-user will enter the key into their ZSC's Administration window (see ZSC
User's Guide). This key will only be good for that user's policy and ONLY for the specified
amount of time. Once the key has been used, it cannot be used again.
Note:
If the user logs-off or reboots their machine during password override, the password will expire, and a new
one will need to be issued.
If a new policy has been written prior to the time limit expiring, the end-user should be instructed
to “Check for a Policy Update,” rather than clicking the Load Policy button on the ZSC about
box.
ZENworks® ESM 3.5 Administrator’s Manual 64
Page 65

USB Drive Scanner
An authorized USB device list can be generated and imported into a policy using the optional
USB Drive Scanner tool (included with the installation package). See page 95 for details on
implementing an authorized USB Devices list into a Security Policy.
Figure 44 : USB Drive Scanner
To generate an authorized devices list, perform the following steps:
Step 1: Open the USB Drive Scanner application
Note:
This is a separate installation from the Management Service and Management Console. A shortcut to the
tool will display on the desktop.
Step 2: Insert a USB Device into the USB port on the computer. The device MUST have a serial
number
Step 3: Click the "Scan" icon ( ), the name of the device and its serial number will display in the
appropriate fields (see Figure 45)
ZENworks® ESM 3.5 Administrator’s Manual 65
Page 66

Figure 45 : Scan for Device Name and Seri al Number
Step 4: Repeat steps 2 and 3 until all devices have been entered into the list
Step 5: Click the "Save" icon ( ) and save the list (see page 97 for instructions on how to import
the list into a policy)
To edit a saved file, click the "Browse" icon ( ) and open the file.
ZENworks® ESM 3.5 Administrator’s Manual 66
Page 67

Client Location Assurance Service
The Client Location Assurance Service
(CLAS) is an optional feature that provides a
cryptographically-hardened verification that a
pre-defined network environment, identified
by the ZENworks Security Client's location
verification process, is correct. This service is
only reliable in network environments that are
completely and exclusively under the control
of the ESM Administrator. CLAS should
always be installed behind the enterprise
firewall, yet be accessible to any endpoint.
The ZENworks Security Client uses a fixed port to send a challenge to CLAS. CLAS decrypts the
packet and responds to the challenge, proving that it has the private key matching the public key
forming the heart of the digital certificate.
Server Selection and Installation
Please refer to the Installation and Quick Start guide for selection and installation instructions.
Server Maintenance
It is recommended that regular Disk Cleanup tasks be configured to run on this server to remove
temporary files out of the Windows\temp folder. Under extreme load conditions windows can
generate an inordinate amount of temporary files that needlessly take up disk space.
Upgrading the Software
The CLAS software can be upgraded by running the new installation software.
Uninstall
To uninstall CLAS, use the Add/Remove Programs function in the Windows Control Panel.
ZENworks® ESM 3.5 Administrator’s Manual 67
Page 68

Securing Server Access
Physical Access Control
Physical access to the CLAS Server should be controlled to prevent access by unauthorized
parties. Measures taken should be appropriate to the risks involved. There are multiple available
standards and guidelines available, including NIST recommendations, HIPAA requirements, ISO/
IEC 17799, and less formal collections of recommendations such as CISSP or SANS guidelines.
Even when a given regulatory frameworks is not applicable, it may still act as a valuable resource
and planning guide.
Likewise, Disaster Recovery and Business Continuity mechanisms to protect the CLAS Server
should be put in place to protect the server if an organizational risk assessment identifies a need
for such steps. This is very simple to do, as the vast majority of the CLAS server configuration is
generated by the default install process, and all that needs to be backed up (and protected
appropriately) is the private key used for the cryptographic challenge-response mechanism. With
this key, the CLAS server can be recreated from the readily-available install files.
Network Access Control
The CLAS Server should be further protected from unauthorized access by restricting network
access to it. At a minimum, it is critical to the functionality of CLAS that network access to the
CLAS server be restricted to hosts that reside on the location-defining network. To repeat, there
should be no connectivity whatsoever to the CLAS server from devices which are not already in
the policy-defined network location that CLAS is providing location assurance for, and any
deviation from this requirement negates all assurance value of CLAS.
Furthermore, network access restrictions should include:
3. all incoming connection attempts should be restricted to HTTP over port 80; and
4. no outgoing connection attempts should be allowed.
All these measures can be imposed through the use of standard firewall technology.
High Availability
High Availability mechanisms for the CLAS Server are strongly recommended. There are
multiple alternative mechanisms for building high availability solutions, ranging from the general
(DNS round-robining, layer 3 switches, etc.) to the vendor specific (the Microsoft web site has
multiple resources on high availability web services). Those implementing and maintaining an
ESM solution should determine which class of high availability solution is most appropriate for
their context.
ZENworks® ESM 3.5 Administrator’s Manual 68
Page 69

Optional Server Configurations
Multiple CLAS iterations may be installed on servers throughout the enterprise, to either
cryptographically assure additional locations, or to assure that if the primary CLAS server goes
down, the location can still be verified by the ZENworks Security Client.
In the case of the second scenario, the private key is located based on URL, rather than IP address.
Therefore, a block of servers can be set up to share a single URL. CLAS may either be installed
on a single server, then that server's image can be copied to each additional server, or it may be
installed on each server separately , and the private and public keys can be copied over to the other
servers. ALL servers in a URL block MUST have the same private and public keys.
Transferring the Public Key to the Management Service
After installation has completed, the generated public key, which will be transferred via security
policy to the ZSC, is located in the \Program Files\Novell\Novell ESM CLAS directory on the
server. The public key is identified by the filename publickey. This filename can be changed to
any name desired.
The public key file will need to then be copied and transferred to the Management Service
(anywhere on the service), which will allow the Management Console to access and distribute the
key to all ZENworks Security Clients through a security policy.
The public key contains both the matching key information and the CLAS URL information. This
information is imported into the Management Console and sent down through a security policy.
Updating the Encryption Keys
Encryption keys can be periodically updated (recommended) by uninstalling and reinstalling
CLAS. When CLAS is reinstalled, new private and public keys are generated. The public key
should then be transferred to the management service and imported again into the affected
security policies to update all ZENworks Security Clients at their next policy check-in.
ZENworks® ESM 3.5 Administrator’s Manual 69
Page 70
ZENworks Security Client Management
ESM utilizes an installed client application to enforce
complete security on the endpoint itself. This ZENworks
Security Client (ZSC) protects client data by determining
in real-time the network location of the endpoint, and
based on that location:
• Implements policy-based filtering of all incom-
ing and outgoing traffic
• Implements policy-based control over hard-
ware use (such as that of WLAN access points,
removable media and network adapters)
• Validates anti-virus software status
• Collects security-centric statistics and event traps, and passing that information to cen-
tralized servers for collation and analysis; and
• Launches nominated applications in policy-defined situations (for example, the policy
is set that in a certain location a VPN program must be used to access the network, that
program is launched by the ZSC)
If the network environment is not recognized, the ZSC sets the location to a default Unknown
location, and applies the Unknown security policy. Security policies are completely configurable
by the ESM Administrator (see Chapter 7). For ZSC operating instructions, see the ESM
ZENworks Security Client User's Guide.
All ZSC security functionality is determined by the security policy.
Prior to Installing the ZENworks Security Client
• It is recommended ALL anti-virus software be shut down during the installation of the
ZENworks Security Client.
• Verify all Microsoft security patches and updates are current.
For installation instructions, please see the Installation and Quick Start Guide provided with this
software.
Uninstall
To uninstall the ZENworks Security Client, go to start\programs\Novell\ZENworks Security
Client\uninstall ZENworks Security Client.
You can optionally uninstall by:
1. Running setup.exe with /V”STUNINSTALL=1”
2. Running the following command: msiexec.exe /X {C1773AE3-3A47-48EB-93387FF2CDC73E67} STUNINSTALL=1
ZENworks® ESM 3.5 Administrator’s Manual 70
Page 71

Note:
To specify the uninstall password you can also pass this MSI Property: STUIP=\”password goes here\”
It is recommended any wireless card be ejected prior to uninstallation, the Wi-Fi radio be
switched-off, and all software with a network connection be closed (i.e.: VPN or FTP software).
Note:
It is recommended that prior to uninstalling the ZENworks Security Client, that a simple policy be
distributed to those clients. Policies which globally disable Wi-Fi functionality, disable any communication
hardware, and/or storage devices can leave that hardware disabled following uninstallation, requiring that
each device be manually re-enabled.
Client Self Defense
The ZSC is protected from being intentionally or unintentionally uninstalled, shutdown, disabled,
or tampered with in any way that would expose sensitive data to unauthorized users. Each
measure protects the client against a specific vulnerability:
• Normal uninstall is not allowed without an installation password (if implemented, see
ESM Installation and Quick-Start Guide), or an uninstall MSI is pushed down by the
administrator
• Windows Task Manager requests to terminate STEngine.exe and STUser.exe processes are disallowed
• Service Pause/Stop and client uninstall is controlled by password, defined in the policy
• Critical files and registry entries are protected and monitored. If a change is made to
any of the keys or values that are not valid, the registry its immediately changed back
to valid values
• NDIS filter driver binding protection. If the NDIS driver is not bound to each adapter,
STEngine will rebind the NDIS filter driver.
Upgrading the ZSC
The ZENworks Security Client may be upgraded in any of three ways:
• By physically running the new install executable (default name is setup.exe) with the
the STUPGRADE=1 switch activated, on each client machine
• By running an MSI uninstall of the current ZSC and running a new installation (MSI
CANNOT perform upgrades)
• By utilizing the ZSC Update option (RECOMMENDED, see “ZSC Update” on
page 100)
ZENworks® ESM 3.5 Administrator’s Manual 71
Page 72

Setting the Upgrade Switch
Step 1: Open the new installation package for the ZSC and right-click setup.exe.
Step 2: Select Create Shortcut.
Step 3: Right-click the shortcut and select Properties.
Step 4: At the end of the Target field, after the quotes, click the space bar once to enter a space,
then type /V“STUPGRADE=1”
Example: “C:\Documents and Settings\euser\Desktop\CL-Release-3.2.455\setup.exe” /V“STUPGRADE=1”.
Step 5: Click OK.
Step 6: Double-click the shortcut to lauch the upgrade installer.
Running the ZSC
The ZSC will run automatically at system startup. For user operation of the ZSC, see the ZSC
User's Manual.
The User's Manual can be distributed to all users to help them better understand the operation of
their new notebook security software.
Multiple User Support
For machines that have multiple users logging onto them, each user account will have its own,
separate Novell environment - the users can have separate policies and saved network
environments. Each account will need to login to the Management Service separately to receive
its credential in order to download its published policy.
In a case where a user either can't or refuses to login, they will get the initial policy that was
included at ZSC installation. This helps discourage a user from creating a different account to
avoid policy restrictions.
Since only one policy can be enforced at a time, Microsoft's "Fast User Switching" (FUS) is not
supported. The ZSC turns off FUS at installation.
For an unmanaged client, the first policy that is pushed to one of the users will be applied to all
users until the other users drop in their policies.
The users on a single computer must all be managed or unmanaged. If managed, all the users
must use the same Management and Policy Distribution Service.
Machine-Based Policies
The option for using machine-based, rather than user-based policies is set at ZSC installation (see
the ESM Installation and Quick-Start Guide for details). When selected, the machine will be
assigned the policy from the Management Service, and that policy will be applied to ALL users
who log-on to that machine. Users who have a policy assigned to them for use on another machine
will not have that policy transfer over when they log-on to a machine with a machine-based
policy. Rather, the computer-based policy will be enforced.
ZENworks® ESM 3.5 Administrator’s Manual 72
Page 73

Note:
The machine must be a member of the Policy Distribution Service's domain for the first policy sent down.
Occasionally , Microsoft will not generate the SID immediately, which can prevent the ZSC on that machine
from receiving its credential from the Management Service. When this occurs, reboot the machine
following complete ZSC installation to receive the credentials
When switching an ZSC from accepting user-based policies to accepting machine-based policies,
it will continue to enforce/use the LAST policy downloaded by the current user, until credentials
are provided. If multiple users exist on the machine, it will use only the policy assigned to the
currently logged in user. If a new user logs in, and the computer SID is unavailable, it will use the
default policy included at installation, until the computer SID is available. Once the computer SID
is available for the endpoint, all users will have the machine-based policy applied.
Distributing Unmanaged Policies
To distribute polices to unmanaged ZSCs, perform the following steps:
Step 1: Locate and copy the Management Console's setup.sen file to a separate folder.
The setup.sen file is generated at installation of the Management Console, and placed in
\Program Files\Novell\ESM Management Console\
Step 2: Create a policy in the Management Console (see Chapter 7)
Step 3: Use the Export command (see page 116) to export the policy to the same folder containing
the setup.sen file.
All policies distributed MUST be named policy.sen for an unmanaged ZSC to accept
them.
Step 4: Distribute the policy.sen and setup.sen files. These files MUST be copied to the \Program
Files\Novell\ZENworks Security Client\ directory for all unmanaged clients.
The Setup.sen file only needs to be copied to the unmanaged ZSCs once, with the first policy.
Afterwards, only new policies need to be distributed.
ZENworks® ESM 3.5 Administrator’s Manual 73
Page 74

ZENworks Security Client Diagnostics Tools
The ZENworks Security Client features several diagnostics tools which can create a customized
diagnostics package which can then be delivered to Novell Technical Support to resolve any
issues. Optionally, logging and reporting can be activated to provide full details regarding
endpoint usage. Administrators can also view the current policy , add rule scripting, and check the
ZSC driver status.
Each function of the diagnostics tools are discussed in detail below.
Creating a Diagnostics Package
If problems occur due to the ZSC’s presence on the endpoint, administrators can provide fullydetailed diagnostics information packages to Novell Technical Support. This information is vital
in resolution of any issues. The diagnostics package is defined by the following items:
• Bindings - captures the current driver bindings for the endpoint
• Client Status - captures the current client status (displayed on the About window) as
well as other internal status
• Driver Status - captures the current status of all drivers on the endpoint (displayed in
the Driver Status window)
• Group Policy Object - captures the current GPO for the user/endpoint as designated
by your directory service (i.e., Active Directory)
• Log Files - captures the designated logs (see “ Logging” )
• Policy - captures the current policy running on the ZSC (see “ View Policy” )
• Network Environments - captures the current and detected network environments
• Registry Settings - captures the current registry settings
• Reports - captures any reports in the temp directory (see “ Reporting” )
• System Event Logs - captures the current System Event logs
• System Information - captures all system information
ZENworks® ESM 3.5 Administrator’s Manual 74
Page 75

To create a diagnostics package, perform the following steps:
Step 1: Right-click on the ZSC icon and select About. The About screen will display (see Figure
46).
Figure 46 : ZENworks Security Client About Screen
Step 2: Click Diagnostics. The Diagnostics window will display (see Figure 47).
Figure 47 : ZENworks Security Client Diagnostics Screen
Step 3: Select the items to be included in the package (all are checked by default).
Step 4: Click Create Package to generate the package.
Step 5: The generated package (ESSDiagnostics_YYYYMMDD_HHMMSS.zip.enc) will be
available on the desktop. This encrypted zip file can now be sent to Technical Support.
Remove Temporary Files
This setting, ONLY available when password override is active in the policy , can be unchecked to
keep each package component type in a temporary directory. This setting should only be
unchecked when a Novell Professional Services representative is present on-site and wishes to
ZENworks® ESM 3.5 Administrator’s Manual 75
Page 76

check individual logs. Otherwise, the files generated will unnecessarily take up disk space over
time.
Administrator Views
Note:
The Administrator views, like the Remove Temporary Files check-box, will only display when password
override is present in the policy. The first button will require that either the password or temporary
password be entered. After the password is entered it will not need to be entered again, so long as the
diagnostics window remains open.
Figure 48 : Administrator Views
View Policy
The view policy button displays the current policy on the device. The display (see Figure 49)
shows basic policy information and can be used to troubleshoot suspected policy issues.
Figure 49 : View Policy Window
ZENworks® ESM 3.5 Administrator’s Manual 76
Page 77

The policy display divides the policy components into the following tabs:
• General - displays the global and default settings for the policy
• Firewall Settings - displays the Port, ACL, and Application groups available in this
policy
• Firewalls - displays the firewalls and their individual settings
• Adapters - displays the permitted network adapters
• Locations - displays each location, and the settings for each
• Environments - displays the settings for defined network environments
• Rules - displays integrity and scripting rules in this policy
• Misc. - displays assigned reporting, hyperlinks and custom user messages for this pol-
icy
Rule Scripting
This tool allows the administrator to enter a specific script into the ZSC that will run on this
endpoint, only. The scripting window (see Figure 50) can browse for an available script (Note:
Scripts MUST be either jscript or vbscript), or a script can be created using this tool.
Figure 50 : Rule Scripting Window
ZENworks® ESM 3.5 Administrator’s Manual 77
Page 78

Variables are created by clicking Add, which will display a second window (see Figure 51) where
the variable information may be entered.
Figure 51 : Scripting Variable Window
Editing a variable will launch the same window, where you can edit as needed. Delete will
remove the variable. Click Save on the main scripting window once a variable is set.
Driver Status
Displays the current status of all drivers and affected components (see Figure 52).
Figure 52 : Client Driver Status Window
ZENworks® ESM 3.5 Administrator’s Manual 78
Page 79

Settings
Administrators can adjust the settings for the ZENworks Security Client without having to
perform a reinstall of the software. The following actions can be taken using the Settings control,
by checking off the actions you wish to perform and clicking the “Apply” button:
• Disable Self Defense (persistent)
• Clear File Protection
• Reset to Default Policy
• Clear Uninstall Password
• Reset Uninstall Password
Figure 53 : ZENworks Security Client Settings Control
Disable Self Defense
When applied, all protections used to keep the client installed and active on the machine will be
disabled. Disabling should only be used when performing patch fixes to the ZSC.
WARNING:
This must be un-checked and applied again, or Client Self Defense will remain off.
Clear File Protection
This will clear the hashes from the protected files. The current policies and licensing information
will remain. Once the hashes are cleared, the file may be updated. This can only be performed
while Client Self Defense is turned off.
Reset to Default Policy
Restores the original policy to permit check-in when the current policy is blocking access.
Clear Uninstall Password
This clears the password that is required for uninstalling the ZSC. Once cleared, the ZSC can be
uninstalled without a password prompt. Use when the uninstall password is failing, or lost.
ZENworks® ESM 3.5 Administrator’s Manual 79
Page 80
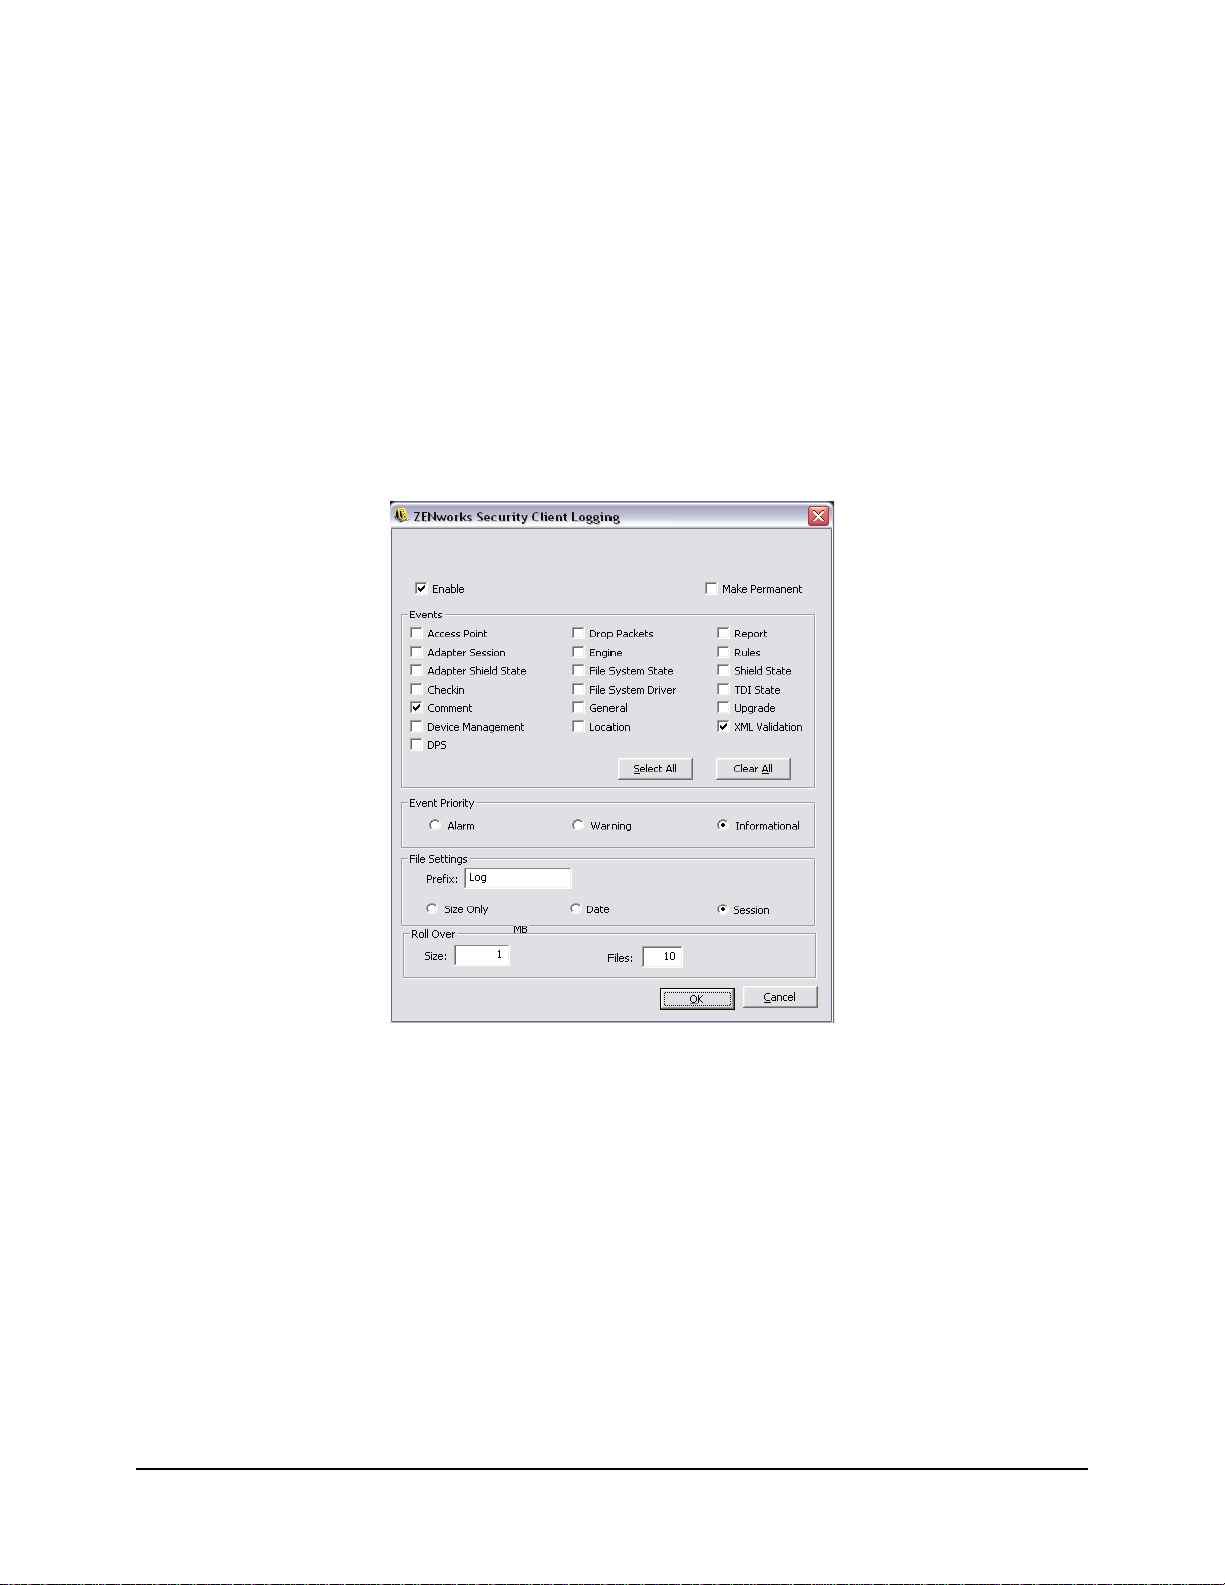
Reset Uninstall Password
Resets the password required to uninstall the ZSC. The administrator will be prompted with a
window to enter the new uninstall password.
Logging
Logging can be turned on for the ZSC, permitting it to log specific system events. The default
logs gathered by the ZSC are XML Validation and Commenting. Additional logs can be selected
from the checklist. When troubleshooting, it is recommended that logging be set according to the
directions of Technical Support and the circumstances that lead to the error be repeated.
Figure 54 : Logging Window
Additionally, the type of log created, file settings and roll over settings can be adjusted, based on
your current needs.
To make the new logs record every time, check the Make Permanent box, otherwise the ZSC will
revert to its default logs at the next reboot.
Add Comment
The option to add a comment to the logs is available on the diagnostics window. Click the Add
Comments button, and the add comment window will display (see Figure 55). Comments will be
included with the next batch of logs.
ZENworks® ESM 3.5 Administrator’s Manual 80
Page 81

Figure 55 : Comment Window
Note:
If the Comments option in logging is unchecked, the Add Comments button will not display.
Reporting
This control allows the addition of reports for this endpoint. Reports may be added and increased
in duration, however they cannot fall below what was already assigned by the policy (i.e., specific
reporting, if activated in the policy, cannot be turned off). See “Compliance Reporting” on
page 204. for descriptions of the report types.
Figure 56 : Reporting Overrides
ZENworks® ESM 3.5 Administrator’s Manual 81
Page 82

The duration settings for each report type are:
• Off - data will not be gathered
• On - data will be gathered based on the set duration
• On - Disregard Duration - the data will be gathered indefinitely
The duration and send interval can be set using the Report Times controls on the right of the
screen.
Figure 57 : Duration Settings, and Make Permanent
Check the Make Permanent box to continue uploading the new reports for just this end-user,
otherwise reporting will revert to the policy default at the next reboot.
Making Reports Available for a Diagnostics Package
To capture reports in the diagnostics package, check the Hold Files box in the Reporting window.
This will hold reports after uploading in the temp directory for the time/space defined in the
Reporting window. These reports can then be bundled in the diagnostics package.
Figure 58 : Hold Reports for Diagnostics
ZENworks® ESM 3.5 Administrator’s Manual 82
Page 83

Creating and Distributing ESM Security Policies
Security Policies are used by the ZENworks Security Client to apply location security to mobile
users. Decisions on networking port availability, network application availability, file storage
device access, and wired or Wi-Fi connectivity are determined by the administrator for each
location.
Security policies can be custom-created for the enterprise, individual user groups, or individual
users/machines. Security policies can allow full employee productivity while securing the
endpoint, or can restrict the employee to only running certain applications and having only
authorized hardware available to them.
To begin a security policy, click New Policy in the File menu of the Management Console
Policy Tabs and Tree
A security policy is written/edited by navigating through the available tabs at the top of the
screen, and the components tree on the left.
The available tabs are:
• Global Policy Settings - Settings which are applied as defaults throughout the policy
• Locations - These policy rules are applied within a specific location type, whether
specified as a single network, or a type of network such as a coffee shop or airport
• Integrity and Remediation Rules - Assures essential software (such as antivirus and
spyware) is running and up-to-date on the device
• Compliance Reporting - Instructs whether reporting data (including the type of data) is
gathered for this particular policy
• Publish -Publishes the completed policy to individual users, directory service user
groups, and/or individual machines.
The Policy Tree displays the available subset components for the tabbed categories. For example,
Global Policy Settings include subsets of Wireless Control, ZSC Update, and VPN Enforcement.
ONLY the items contained on the primary subset page are required to define a category, the
remaining subsets are optional components.
ZENworks® ESM 3.5 Administrator’s Manual 83
Page 84
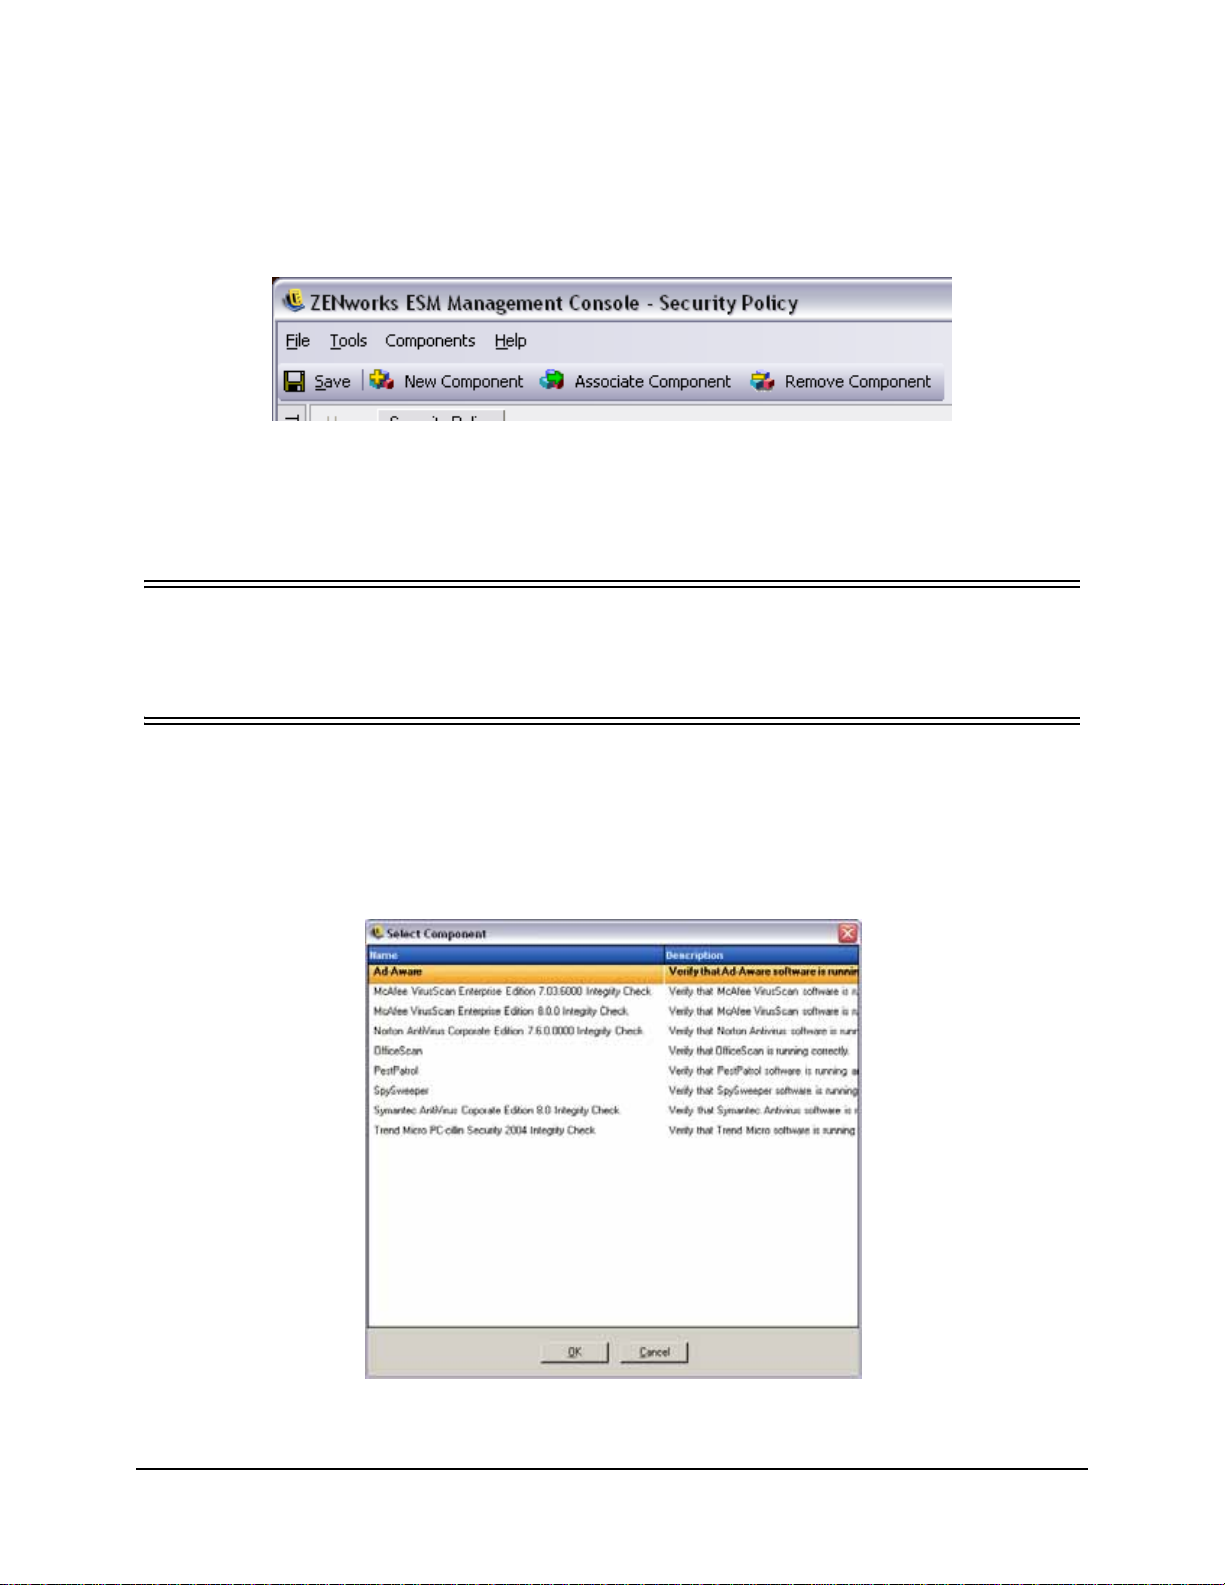
Policy Toolbar
The policy toolbar (see Figure 59) provides four controls. The Save control is available
throughout policy creation, while the component controls are only available under the Locations
and Integrity tabs.
Figure 59 : Policy Toolbar
Explanations of the tools are provided below:
• Save - Saves the policy in its current state
IMPORTANT:
As you complete each component subset, it is HIGHLY recommended you click the Save icon on the
Policy toolbar. If incomplete or incorrect data is entered into a component, the error notification screen will
display - see “Error Notification” on page 86 for more details.
• New Component - Creates a new component in a Location or Integrity subset. Once
the policy is saved, a new component is available to associate in other policies
• Associate Component - This control opens the Select Component screen for the cur-
rent subset (see Figure 60). The available components include any pre-defined components included at installation, and all components created in other policies.
Figure 60 : Select Component Window
ZENworks® ESM 3.5 Administrator’s Manual 84
Page 85

IMPORTANT:
Changes made to associated components will affect all other instances of that component.
Example: You can create a single Location component named "Work," which defines the corporate
network environment and security settings to be applied whenever an endp oint enters that environment.
This component can now be applied to all security policies. Updates to the envir onment or security settings
can be changed in the component in one policy and will update the same component in all other policies
that it's associated to.
Use the Show Usage command to view all other policies associated with this component (see below).
• Remove Component - This control will remove a component from the policy. The
component will still be available for association in this and other policies.
Show Usage
Changes made to shared policy components will affect all policies they are associated with. Prior
to updating or otherwise changing a policy component, it is recommended that you run the Show
Usage command to determine which policies will be affected by the change.
1. Right-click the component and select Show Usage
2. A pop-up window will display , showing each instance of this component in other policies (see
Figure 61).
Figure 61 : Show Usage Window
ZENworks® ESM 3.5 Administrator’s Manual 85
Page 86

Error Notification
When the administrator attempts to save a policy with incomplete or incorrect data in a
component, the Validation pane will display at the bottom of the Management console,
highlighting each error. The errors MUST be corrected before the policy can be saved.
Double-click each validation row to navigate to the screen with the error. Errors are highlighted as
shown in the figure below (see Figure 62).
Figure 62 : Error Notification Pane
ZENworks® ESM 3.5 Administrator’s Manual 86
Page 87

Creating Security Policies
To create a new policy, click Create Policy. The Create Policy window displays. Enter a name for
the policy and click OK. This name can be changed at any time using the primary global settings
(See “Global Policy Settings” on page 90.).
Security policies are built by defining all the Global Settings (default behaviors), then creating/
associating existing components for that policy, such as Locations, Firewalls and Integrity Rules,
and finally establishing Compliance Reporting for the policy.
The components are created either within a “dummy” policy or are associated from other policies .
It is assumed that for your first few policies you will be creating all of the unique locations,
firewall settings and integrity rules for the enterprise. These components will be stored in the
Management Service’s database for possible later use in other policies.
The diagram below shows the components for each level, and a resulting policy taken from the
selections (see Figure 63).
Figure 63 : ESM Security Policy creation process
ZENworks® ESM 3.5 Administrator’s Manual 87
Page 88
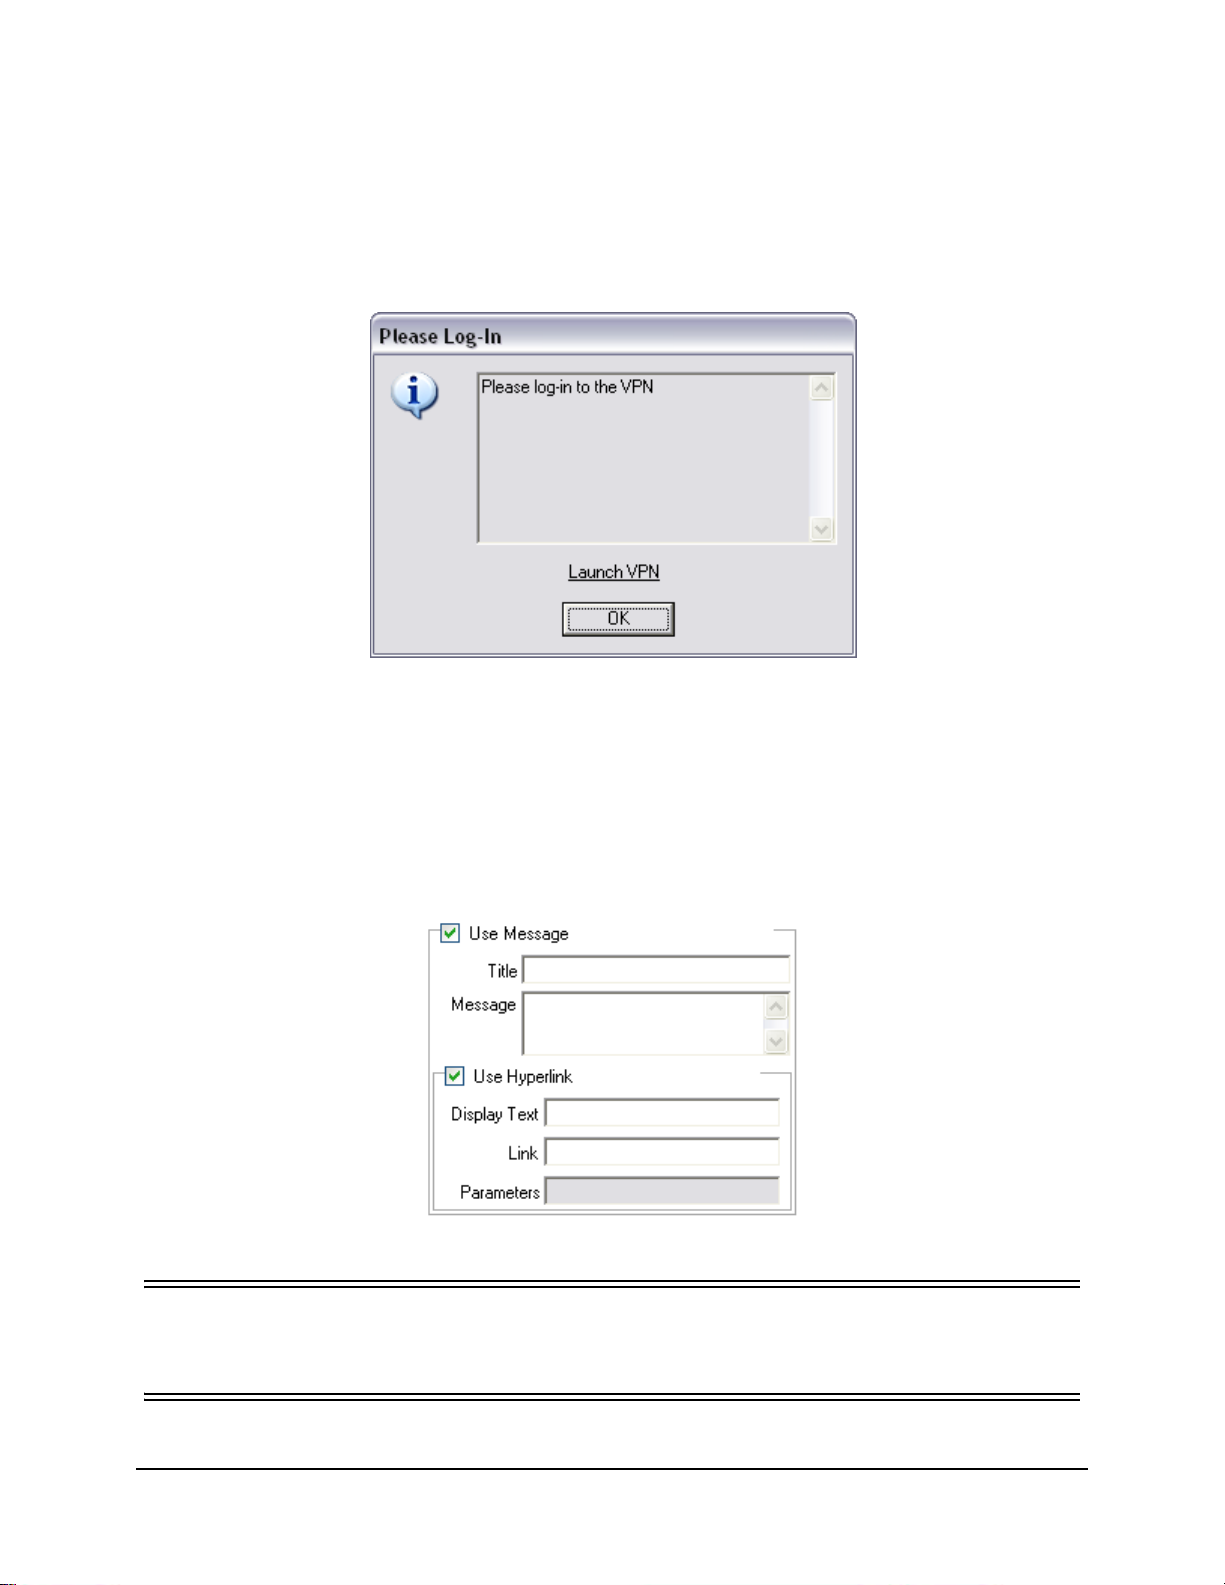
Custom User Messages
Custom User Messages allow the ESM Administrator to create messages which directly answer
security policy questions as the user encounters policy enforced security restrictions, or provide
specific instructions to the user. User messages controls (see Figure 65) are available in various
components of the policy.
Figure 64 : Custom User Message with a Hyperlink
To create a custom user message, perform the following steps (Figure 65 for an example of the
control):
Step 1: Enter a title for the message. This displays on the top bar of the message box (see example
in Figure 64 above)
Step 2: Enter the message. The message is limited to 1000 characters
Step 3: If a hyperlink is required, check the hyperlinks box and enter the necessary
Figure 65 : Custom Message and Hyperlink Controls
Note:
Changing the Message or Hyperlink in a shared component will change in all other instances of that
component. Use the Show Usage command to view all other policies associated with this component.
ZENworks® ESM 3.5 Administrator’s Manual 88
Page 89
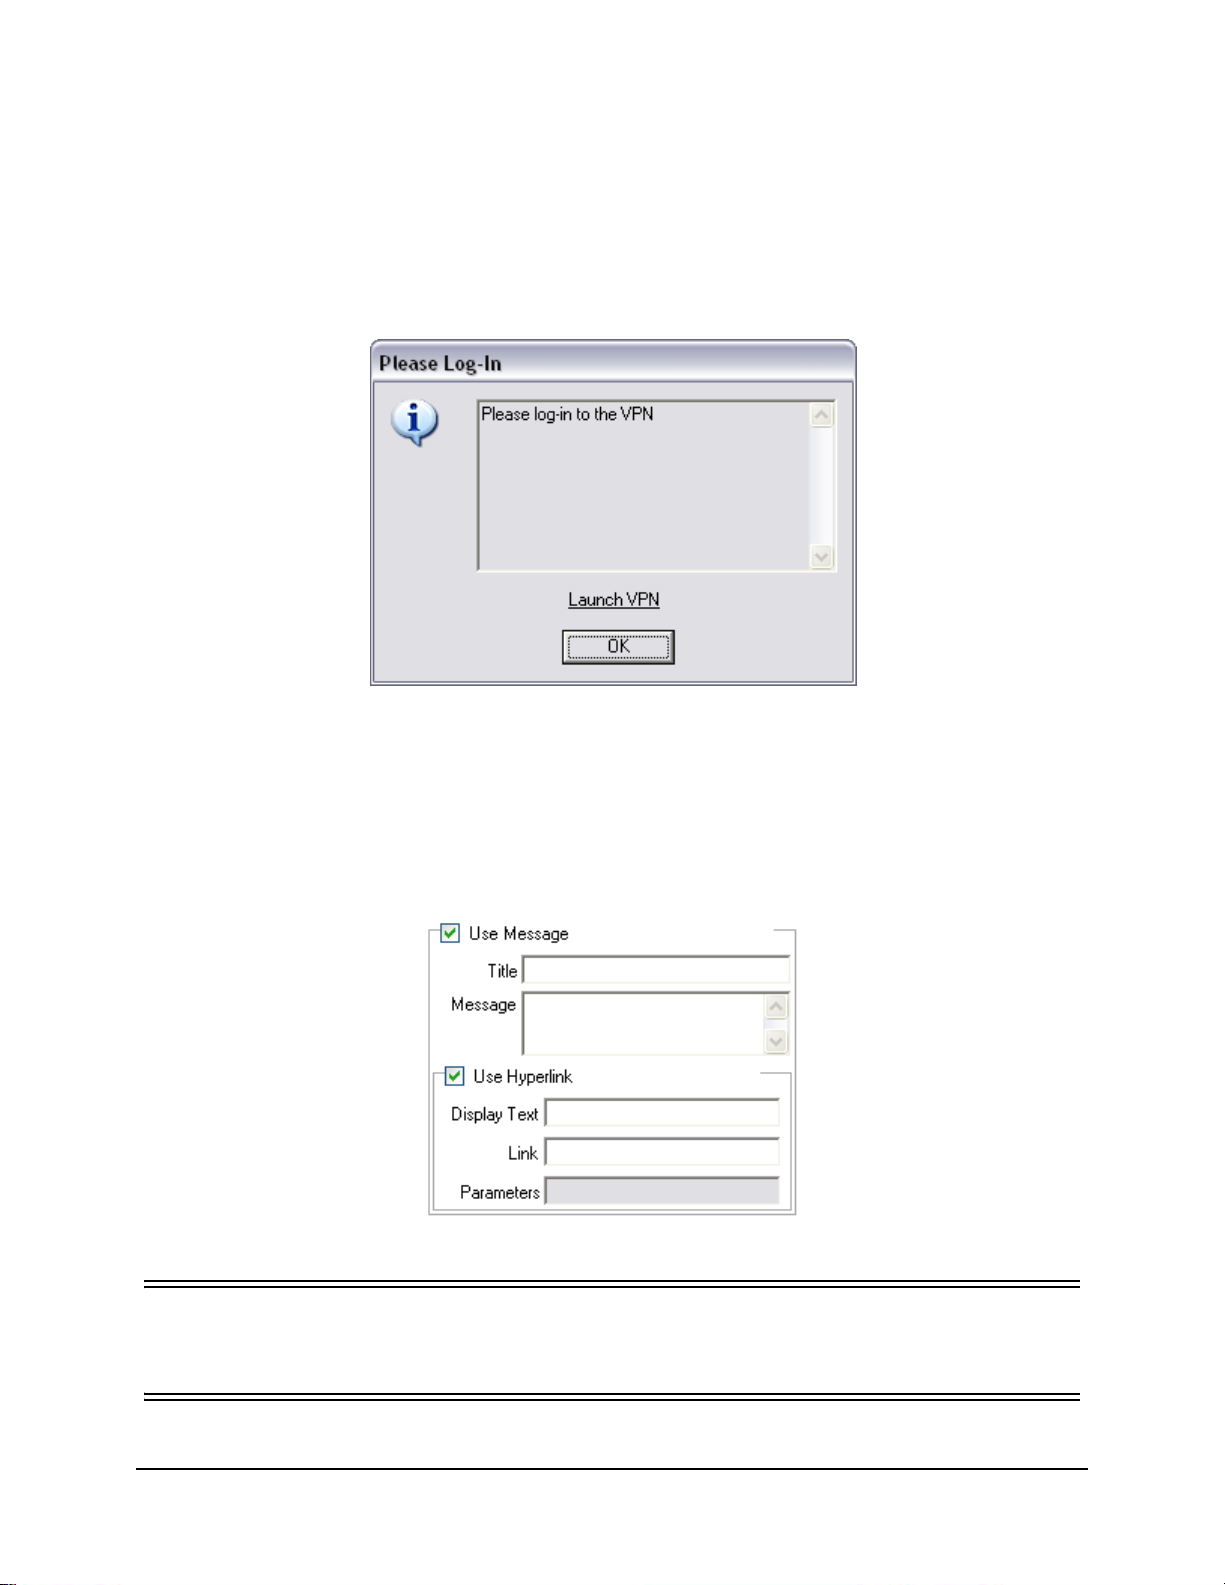
Hyperlinks
An administrator can incorporate hyperlinks in custom messages to assist in explaining security
policies or provide links to software updates to maintain integrity compliance. Hyperlinks are
available in several policy components. A VPN hyperlink can be created which can point to either
the VPN client executable, or to a batch file which can run and fully log the user in to the VPN
(see See “VPN Enforcement” on page 101. for more details).
Figure 66 : Custom User Message with a Hyperlink
To create a hyperlink, perform the following steps (see Figure 67 for an example of the control):
Step 1: Enter a name for the link. This is the name that will display below the message (required
for Advanced VPN hyperlinks as well).
Step 2: Enter the hyperlink
Step 3: Enter any switches or other parameters for the link (use for VPN enforcement)
Figure 67 : Custom Message and Hyperlink Controls
Note:
Changing the Message or Hyperlink in a shared component will change in all other instances of that
component. Use the Show Usage command to view all other policies associated with this component.
ZENworks® ESM 3.5 Administrator’s Manual 89
Page 90

Global Policy Settings
The global policy settings are applied as basic defaults for the policy. To access this control, open
the Global Policy Settings tab and click the Policy Settings icon in the policy tree on the left.
Figure 68 : Global Policy Settings
The primary global settings are:
• Policy Name and Description - The policy name (defined at new policy creation) can
be adjusted here. A description of the policy may also be entered.
• Enable client self defense - Client Self Defense can be enabled or disabled by policy.
Leaving this box checked will ensure that Client Self Defense is active. Unchecking
will deactivate Client Self Defense for all endpoints consuming this policy.
• Password Override - This feature allows an administrator to set up a password over-
ride which can temporarily disable the policy for a specified period of time.
Check the Password Override box and enter the password in the provided field. Enter
the password again in the confirmation field. Use this password in the Override Password Generator to generate the password key for this policy.
WARNING:
It is HIGHLY RECOMMENDED that end-users are NOT given this password, rather the Override
Password Generator should be used to generate a temporary key for them.
ZENworks® ESM 3.5 Administrator’s Manual 90
Page 91

• Policy Update Message - A Custom User Message can be displayed whenever the
policy is updated. Click on the check box, then enter the Message information in the
provided boxes (See “Custom User Messages” on page 88. for more information).
• Use Hyperlink - A hyperlink to additional information, corporate policy, etc. may be
included at the bottom of the custom message (See “Hyperlinks” on page 89. for more
information).
Figure 69 : Updated Policy Custom Message with Hyperlink
• Uninstall Password - It is recommended that every ZENworks Security Client be
installed with an uninstall password, to prevent the user from uninstalling the software. This password is normally configured at installation, however, the password can
now be updated, enabled or disabled via policy.
Figure 70 : Uninstall Password Controls
• The default setting is Use Existing, which will not change the uninstall pass-
word
• Enabled is used to either activate an uninstall password, or to change it. Enter
the new password and confirm it
• Disabled is used to deactivate the uninstall password requirement
ZENworks® ESM 3.5 Administrator’s Manual 91
Page 92
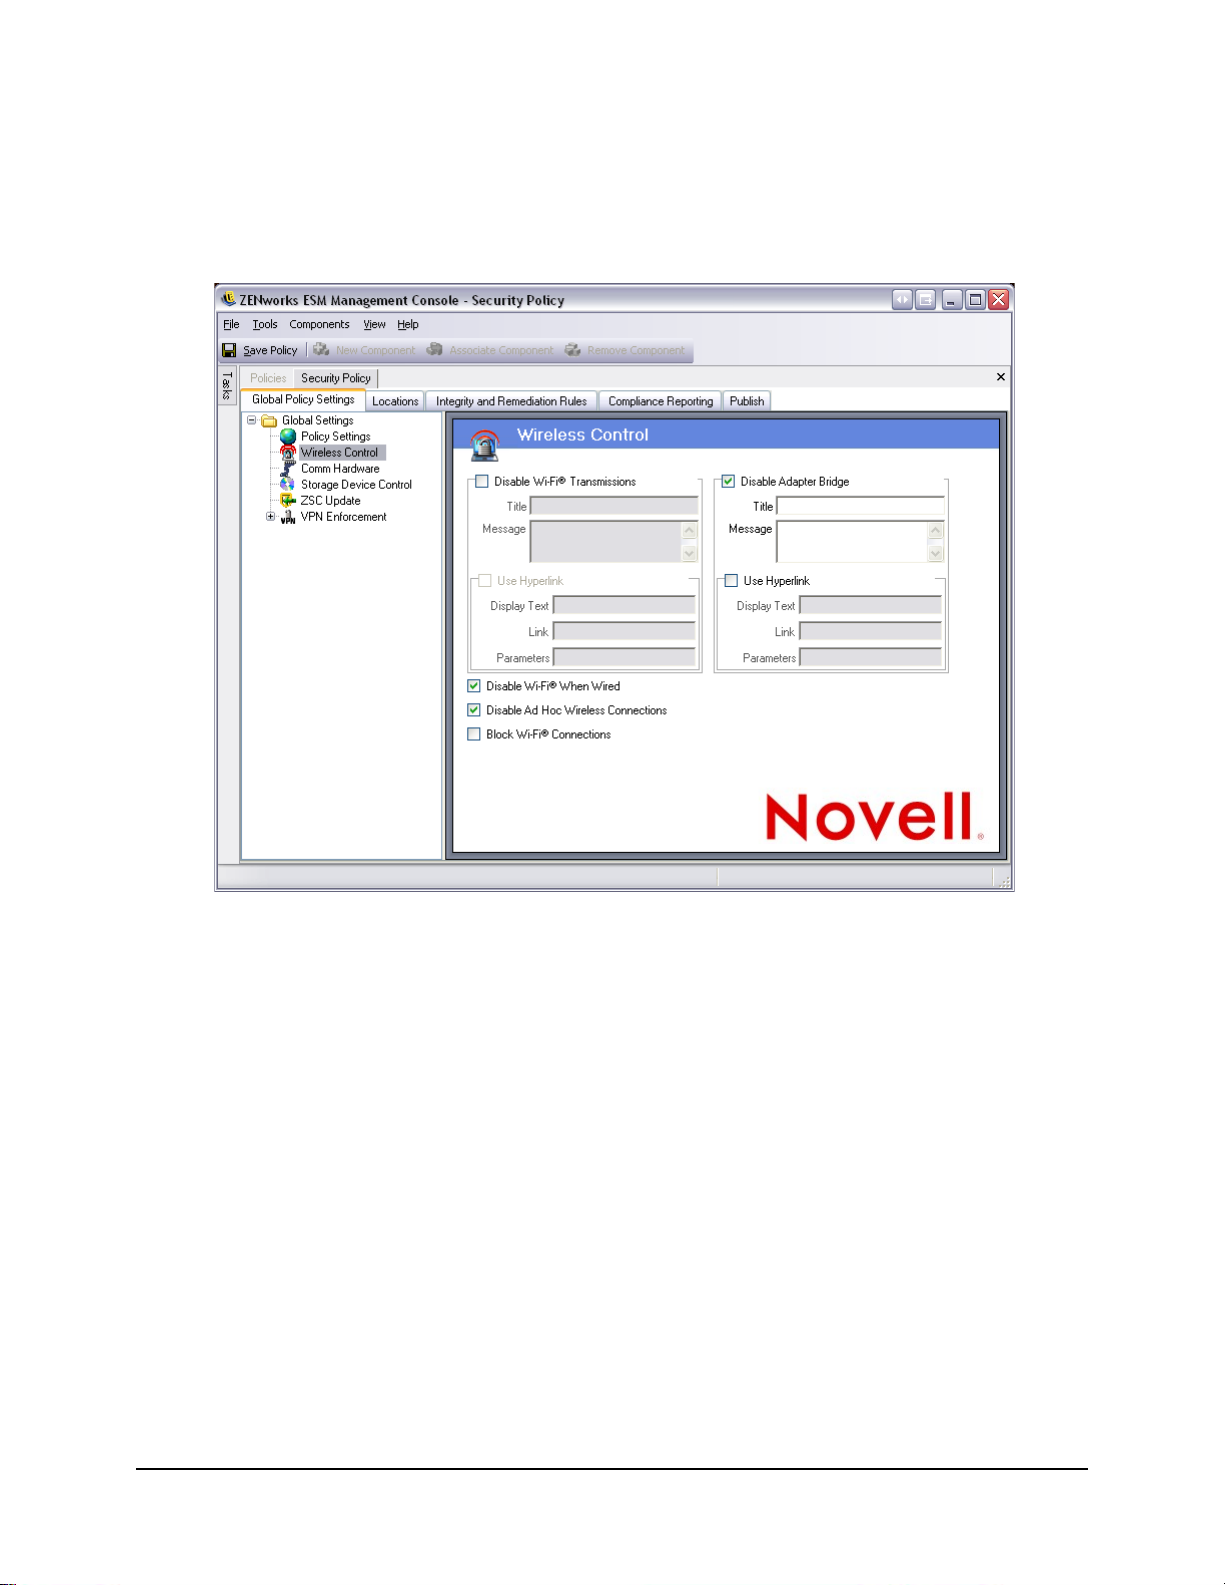
Wireless Control
Wireless Control globally sets adapter connectivity parame ters to secure both the endpoint and the
network. To access this control, open the Global Policy Settings tab and click the Wireless
Control icon in the policy tree on the left.
Figure 71 : Policy Components
• Disable Wi-Fi® Transmissions
This setting globally disables ALL Wi-Fi adapters, up to and including complete
silencing of a built-in Wi-Fi radio.
A Custom User Message and Hyperlink can be displayed when the user attempts to
activate a Wi-Fi connection (See “Custom User Messages” on page 88. for more information).
• Disable Adapter Bridge
This setting disables the networking bridge functionality included with Windows XP,
which allows the user to bridge multiple adapters and act as a hub on the network.
A Custom User Message and Hyperlink can be displayed when the user attempts a WiFi connection (See “Custom User Messages” on page 88. for more information).
• Disable Wi-Fi When Wired
All Wi-Fi Adapters are disabled when the user has a wired (LAN through the NIC)
connection.
ZENworks® ESM 3.5 Administrator’s Manual 92
Page 93

• Disable AdHoc Networks
This setting globally disables all AdHoc connectivity, thereby enforcing Wi-Fi connectivity over a network (i.e., via an Access Point) and restricts all peer-to-peer networking of this type.
• Block Wi-Fi® Connections
This setting will block Wi-Fi connections without silencing the Wi-Fi radio. Use this
setting when you want to disable Wi-Fi connection, but want to use Access Points for
Location Detection (see “Locations” on page 105 for more information).
ZENworks® ESM 3.5 Administrator’s Manual 93
Page 94

Global Communication Hardware Control
This component sets the policy defaults for all communication hardware. To access this control,
open the Global Policy Settings tab and click the Comm Hardware icon in the policy tree on the
left.
Figure 72 : Global Communication Hardware Control
The following communication hardware types may have their default set as either enable or
disable for each type:
• IrDA® (Infrared Data Association) - controls the infrared access port on the endpoint
• Bluetooth® - controls the Bluetooth® access port on the endpoint
• 1394 (FireWire™) - controls the FireWire™ access port on the endpoint
• Serial/Parallel - controls serial and parallel port access on the endpoint
Enable allows complete access to the communication port. Disable denies all access to the
communication port. The driver-level communication hardware on the endpoint (NIC, modem,
and Wi-Fi [card or radio]) are controlled by location, and do not have a global default. See
“Communication Hardware Settings” on page 110 for more details.
ZENworks® ESM 3.5 Administrator’s Manual 94
Page 95

Storage Device Control
This control sets the default storage device settings for the policy, where all external file storage
devices are either allowed to read/write files, function in a read-only state, or be fully disabled.
When disabled, these devices are rendered unable to retrieve any data from the endpoint; while
the hard drive and all network drives will remain accessible and operational.
Note:
ESM Storage Device Control is not permitted when the Storage Encryption Solution is activated.
T o access this control, open the Global Policy Settings tab and click the Storage Device Control
icon in the policy tree on the left.
Figure 73 : Global Storage Device Control
Storage Device Control is differentiated between Removable Storage (USB "thumb-drives",
Flash memory cards, and SCSI PCMCIA memory cards, along with traditional zip, floppy, and
external CDR drives) and the CD/DVD drives (including CD-ROM, CD-R/RW, DVD, DVD R/
RW). The hard drive and network drives (when available) will always be allowed.
To set the policy default for storage devices, select the global setting for both types from the dropdown lists:
• Enable - The device type is allowed by default
ZENworks® ESM 3.5 Administrator’s Manual 95
Page 96

• Disable - The device type is disallowed. When users attempt to access files on a
defined storage device, they receive an error message from the operating system, or
the application attempting to access the local storage device, that the action has failed
• Read-Only - the device type is set as Read-Only. When users attempt to write to the
device, they receive an error message from the operating system, or the application
attempting to access the local storage device, that the action has failed
Note:
If you wish to disable or set as "Read-Only" the CD-Rom drives and/or the floppy drives on a group of
endpoints, the Local Security Settings (passed down thr ough a d irector y ser vice gro up policy o bject) mu st
have both Devices: Restrict CD-ROM access to locally logged-on user only and Devices: Restrict floppy
access to locally logged-on user only set as Disabled. To verify this, open either the group p olicy object, or
open Administrative Tools on a machine. Look in Local Security Settings - Security Options, and verify both
devices are disabled (see Figure 74). Disabled is the default.
Figure 74 : Verify Local Storage Device Options are set as Disabled
ZENworks® ESM 3.5 Administrator’s Manual 96
Page 97

Preferred Devices
Preferred Removable Storage Devices may be optionally entered into a list, permitting only the
authorized devices access when the global setting is used at a location (see “Storage Device
Control” on page 112 for more details). Devices entered into this list MUST have a serial number.
To enter a preferred device, perform the following steps:
Step 1: Insert the device into the USB port on the machine that the Management Console is
installed on.
Step 2: Once the device is ready, click the Scan button. If the device has a serial number, its
Description and Serial Number will display on the list.
Step 3: Select a setting from the drop-down list (the Global Removable Device setting will not be
applied for this policy):
• Enable - The devices on the preferred list are permitted full read/write capabil-
ity, all other USB and other external storage devices are disabled
• Read-Only - The devices on the preferred list are permitted read-only capabil-
ity, all other USB and other external storage devices are disabled
Repeat steps 1 and 2 for each device that will be permitted in this policy . All devices will have the
same setting applied.
Note:
Location-based Storage Device Control settings will override the global settings. For example, you may
define that at the Work location, all external storage devices are permitted, while allowing only the global
default at all other locations, limiting users to the devices on the preferred list.
Importing Device Lists
The Novell USB Drive Scanner Application generates a list of devices and their serial numbers
(See “USB Drive Scanner” on page 65.). To import this list, click Import and browse to the list.
The list will populate the Description and Serial Number fields.
ZENworks® ESM 3.5 Administrator’s Manual 97
Page 98
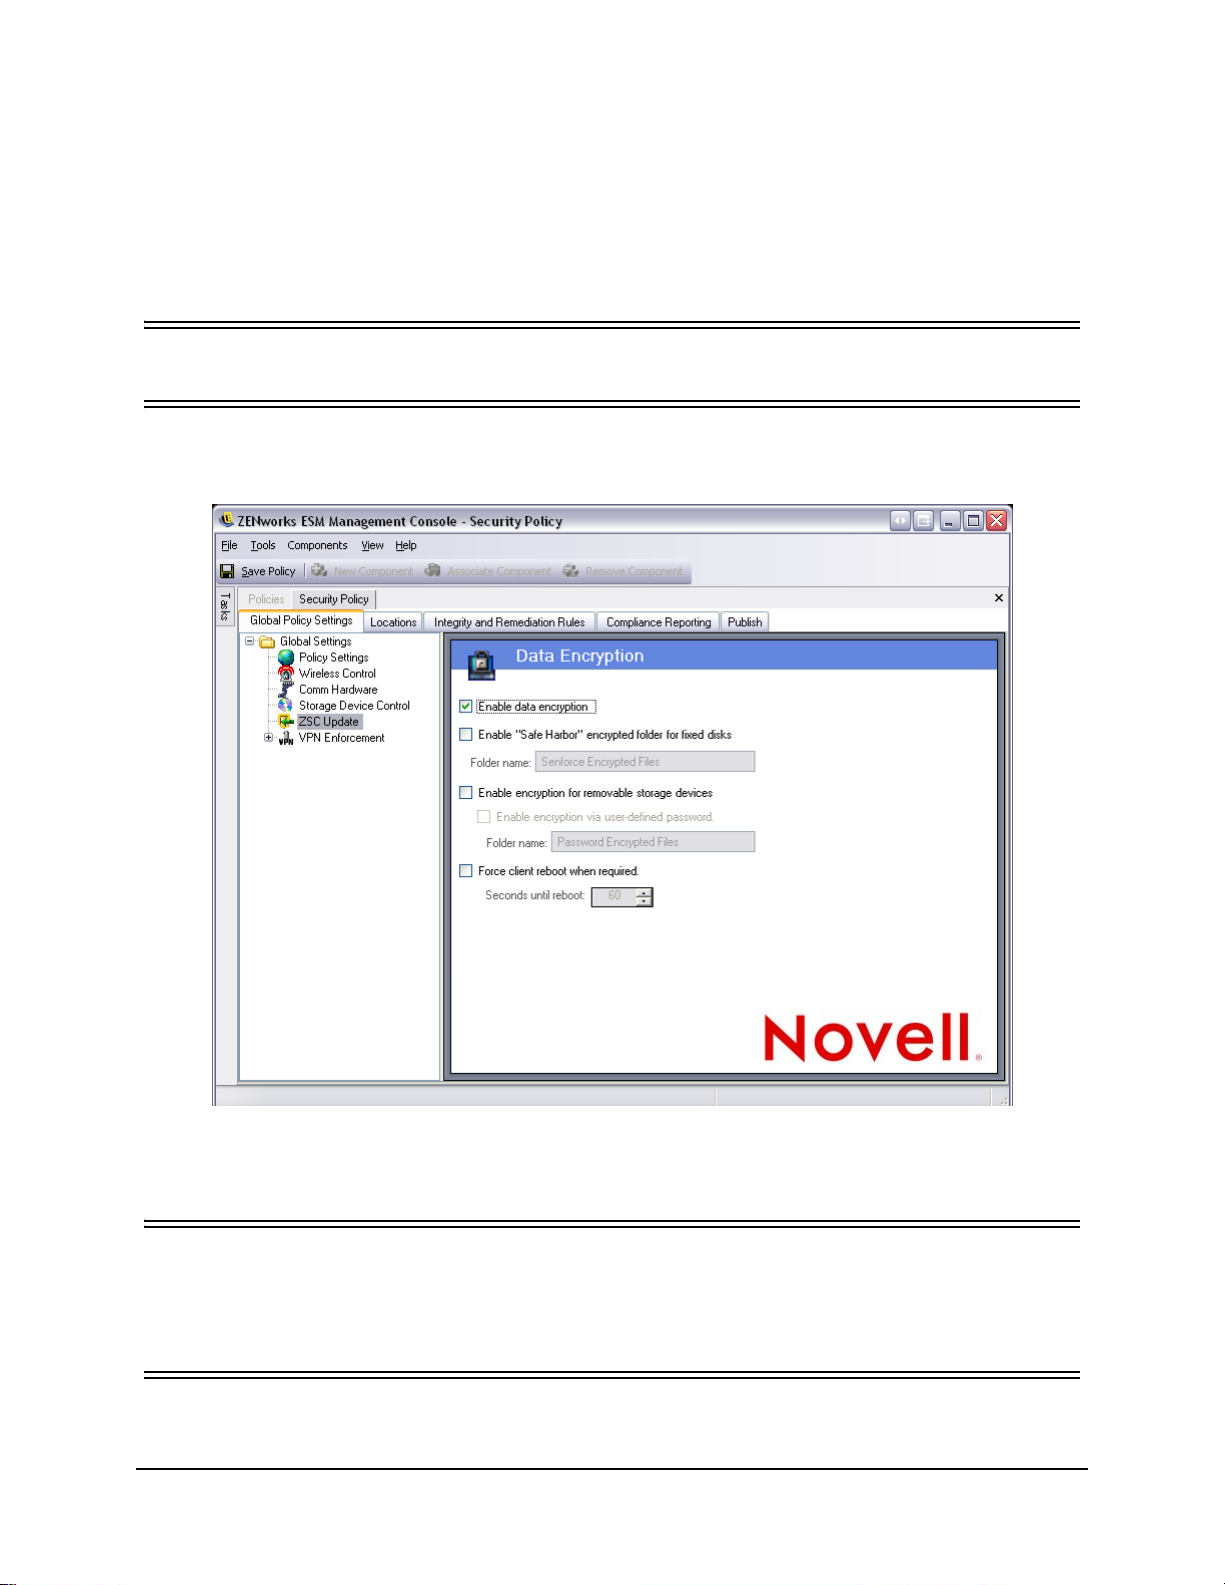
Data Encryption
Data Encryption determines whether file encryption will be enforced on the endpoint, and what
type of encryption will be available. Data can be encrypted to permit file sharing (with password
protection) or can set encrypted data to be read only on computers running the Storage Encryption
Solution.
Note:
ESM Storage Device Control is not permitted when the Storage Encryption Solution is activated.
T o access this control, open the Global Policy Settings tab and click the Data Encryption icon in
the policy tree on the left
Figure 75 : Data Encryption controls
To activate, click to check Enable Encryption.
Note:
Encryption keys will be distributed to all machines that receive policies from the Policy Distribution Service,
regardless of whether data encryption is activated or not, however, this control instructs the ZSC to
activate its encryption drivers, which will allow a user to read files sent to them without requiring the File
Decryption Utility (see “ZENworks File Decryption Utility” on page 62 for more details).
ZENworks® ESM 3.5 Administrator’s Manual 98
Page 99

Determine what levels of encryption will be permitted by this policy:
• Enable “Safe Harbor” encrypted folder for fixed disks
This generates a folder at the root of all fixed disk drives on the endpoint, named
“Encryption Protected Files.” All files placed in this folder, will be encrypted and
managed by the ZENworks Security Client. Data placed in this folder is automatically
encrypted and can only be accessed by authorized users on this machine.
The folder name can be changed by clicking in the Folder Name field, highlighting the
current text, and entering the name you desire.
WARNING
Before disabling data encryption, ensure that all data stored in this folder has been extracted by the user
and stored in another location.
• Enable encryption for removable storage devices
All data written to removable storage devices from an endpoint protected by this policy will be encrypted. Users with this policy on their machines will be able to read the
data, therefore file sharing via removable storage device within a policy group is available. Users outside this policy group will not be able to read the files encrypted on the
drive, and will only be able to access files within the Shared Files folder (if activated)
with a provided password.
• Allow user password protected folder
This setting gives the user the ability to store files in a Shared Files folder on the
removable storage device (this folder will be generated automatically when this setting
is applied). The user can specify a password when files are added to this folder, which
is then used by users who are not in the current policy group to extract the files.
The folder name can be changed by clicking in the Folder Name field, highlighting the
current text, and entering the name you desire.
WARNING
Before disabling data encryption, ensure that all data stored on removable storage devices has been
extracted by the user and stored in another location.
• Force client reboot when required
When encryption is added to a policy, it will not become active until the endpoint is
rebooted. This setting forces the required reboot by displaying a countdown timer,
warning the user that the machine will reboot in “x” seconds. The user has that amount
of time to save their work before their machine reboots.
Reboots are recommended when encryption is first activated in a policy, and when
either “Safe Harbor” or removable storage encryption is activated (if activated separately from encryption activation).
ZENworks® ESM 3.5 Administrator’s Manual 99
Page 100

ZSC Update
Patches to repair any minor defects in the ZENworks Security Client are made available with
regular ESM updates. rather than providing a new installer, which will need to be distributed
through MSI to all endpoints, ZSC Update allows the administrator to dedicate a zone on the
network which will distribute update patches to end-users when they associate to that network
environment.
To access this control, open the Global Policy Settings tab and click the ZSC Update icon in the
policy tree on the left
Figure 76 : ZSC Update
To facilitate simple and secure distribution of these patches to all ZSC users, perform the
following steps:
Step 1: Check Enable to activate the screen and the rule
Step 2: Select the location where the ZSC will look for the updates. Due to the recommendations
in the next step, the location associated with the enterprise environment (i.e.: the "Work"
location) is the recommended candidate
Step 3: Enter the URI where the patch has been stored (Note: This will need to point to the patch
file, which can be either the setup.exe file for the ZENworks Security Client, or an MSI
file created from the .exe). For security purposes, it is recommended that these files be
stored on a secure server behind the corporate firewall
Step 4: Enter the version information for this file in the provided fields. Version information is
found by installing the ZENworks Security Client and opening the About screen (see the
ESM ZENworks Security Client User's Guide for details). The version number for
STEngine.exe is the version number you will want to use in the fields
Each time the user enters the assigned location, the ZSC will check the URI for an update that
matches that version number. If an update is available the ZSC will download and install it.
ZENworks® ESM 3.5 Administrator’s Manual 100
 Loading...