

Page 1

AUTHORIZED DOCUMENTATION
Installation Guide
Novell®
ZENworks® Endpoint Security Management
novdocx (en) 17 September 2009
3.5
July 31, 2009
www.novell.com
ZENworks Endpoint Security Management Installation Guide
Page 2

Legal Notices
Novell, Inc., makes no representations or warranties with respect to the contents or use of this documentation, and
specifically disclaims any express or implied warranties of merchantability or fitness for any particular purpose.
Further, Novell, Inc., reserves the right to revise this publication and to make changes to its content, at any time,
without obligation to notify any person or entity of such revisions or changes.
Further, Novell, Inc., makes no representations or warranties with respect to any software, and specifically disclaims
any express or implied warranties of merchantability or fitness for any particular purpose. Further, Novell, Inc.,
reserves the right to make changes to any and all parts of Novell software, at any time, without any obligation to
notify any person or entity of such changes.
Any products or technical information provided under this Agreement may be subject to U.S. export controls and the
trade laws of other countries. You agree to comply with all export control regulations and to obtain any required
licenses or classification to export, re-export or import deliverables. You agree not to export or re-export to entities
on the current U.S. export exclusion lists or to any embargoed or terrorist countries as specified in the U.S. export
laws. You agree to not use deliverables for prohibited nuclear, missile, or chemical biological weaponry end uses.
See the Novell International Trade Services Web page (http://www.novell.com/info/exports/) for more information
on exporting Novell software. Novell assumes no responsibility for your failure to obtain any necessary export
approvals.
novdocx (en) 17 September 2009
Copyright © 2007-2009 Novell, Inc. All rights reserved. No part of this publication may be reproduced, photocopied,
stored on a retrieval system, or transmitted without the express written consent of the publisher.
Novell, Inc., has intellectual property rights relating to technology embodied in the product that is described in this
document. In particular, and without limitation, these intellectual property rights may include one or more of the U.S.
patents listed on the Novell Legal Patents Web page (http://www.novell.com/company/legal/patents/) and one or
more additional patents or pending patent applications in the U.S. and in other countries.
Novell, Inc.
404 Wyman Street, Suite 500
Waltham, MA 02451
U.S.A.
www.novell.com
Online Documentation: To access the latest online documentation for this and other Novell products, see
the Novell Documentation Web page (http://www.novell.com/documentation).
Page 3

Novell Trademarks
For Novell trademarks, see the Novell Trademark and Service Mark list (http://www.novell.com/company/legal/
trademarks/tmlist.html).
Third-Party Materials
All third-party trademarks are the property of their respective owners.
novdocx (en) 17 September 2009
Page 4

novdocx (en) 17 September 2009
4 ZENworks Endpoint Security Management Installation Guide
Page 5

Contents
About This Guide 7
1 ZENworks Endpoint Security Management Overview 9
1.1 System Requirements . . . . . . . . . . . . . . . . . . . . . . . . . . . . . . . . . . . . . . . . . . . . . . . . . . . . . . . 10
1.2 About the ZENworks Endpoint Security Management Manuals. . . . . . . . . . . . . . . . . . . . . . . . 11
2 Installing ZENworks Endpoint Security Management 13
2.1 Pre-installation Information . . . . . . . . . . . . . . . . . . . . . . . . . . . . . . . . . . . . . . . . . . . . . . . . . . . 13
2.2 Installation Packages . . . . . . . . . . . . . . . . . . . . . . . . . . . . . . . . . . . . . . . . . . . . . . . . . . . . . . . . 13
2.2.1 About the Master Installer Program . . . . . . . . . . . . . . . . . . . . . . . . . . . . . . . . . . . . . . 13
2.3 Installation Options. . . . . . . . . . . . . . . . . . . . . . . . . . . . . . . . . . . . . . . . . . . . . . . . . . . . . . . . . . 14
2.4 Installation Order . . . . . . . . . . . . . . . . . . . . . . . . . . . . . . . . . . . . . . . . . . . . . . . . . . . . . . . . . . . 14
2.5 Before Installing ZENworks Endpoint Security Management. . . . . . . . . . . . . . . . . . . . . . . . . . 14
novdocx (en) 17 September 2009
3 Performing a Single-Server Installation 19
3.1 Installation Steps . . . . . . . . . . . . . . . . . . . . . . . . . . . . . . . . . . . . . . . . . . . . . . . . . . . . . . . . . . . 20
3.2 Starting the Service . . . . . . . . . . . . . . . . . . . . . . . . . . . . . . . . . . . . . . . . . . . . . . . . . . . . . . . . . 21
4 Performing a Multi-Server Installation 23
5 Performing the Policy Distribution Service Installation 25
5.1 Installation Steps . . . . . . . . . . . . . . . . . . . . . . . . . . . . . . . . . . . . . . . . . . . . . . . . . . . . . . . . . . . 26
5.1.1 Typical Installation . . . . . . . . . . . . . . . . . . . . . . . . . . . . . . . . . . . . . . . . . . . . . . . . . . . 27
5.1.2 Custom Installation . . . . . . . . . . . . . . . . . . . . . . . . . . . . . . . . . . . . . . . . . . . . . . . . . . 29
5.2 Starting the Service . . . . . . . . . . . . . . . . . . . . . . . . . . . . . . . . . . . . . . . . . . . . . . . . . . . . . . . . . 32
6 Performing the Management Service Installation 33
6.1 Installation Steps . . . . . . . . . . . . . . . . . . . . . . . . . . . . . . . . . . . . . . . . . . . . . . . . . . . . . . . . . . . 34
6.1.1 Typical Installation . . . . . . . . . . . . . . . . . . . . . . . . . . . . . . . . . . . . . . . . . . . . . . . . . . . 35
6.1.2 Custom Installation . . . . . . . . . . . . . . . . . . . . . . . . . . . . . . . . . . . . . . . . . . . . . . . . . . 39
6.2 Starting the Service . . . . . . . . . . . . . . . . . . . . . . . . . . . . . . . . . . . . . . . . . . . . . . . . . . . . . . . . . 43
7 Performing the Management Console Installation 45
7.1 Installation Steps . . . . . . . . . . . . . . . . . . . . . . . . . . . . . . . . . . . . . . . . . . . . . . . . . . . . . . . . . . . 45
7.1.1 Typical Installation . . . . . . . . . . . . . . . . . . . . . . . . . . . . . . . . . . . . . . . . . . . . . . . . . . . 46
7.1.2 Custom Installation . . . . . . . . . . . . . . . . . . . . . . . . . . . . . . . . . . . . . . . . . . . . . . . . . . 46
7.2 Starting the Console. . . . . . . . . . . . . . . . . . . . . . . . . . . . . . . . . . . . . . . . . . . . . . . . . . . . . . . . . 49
7.2.1 Adding eDirectory Services . . . . . . . . . . . . . . . . . . . . . . . . . . . . . . . . . . . . . . . . . . . . 49
7.2.2 Configuring the Management Console’s Permissions Settings . . . . . . . . . . . . . . . . . 50
7.2.3 Publishing a Policy. . . . . . . . . . . . . . . . . . . . . . . . . . . . . . . . . . . . . . . . . . . . . . . . . . . 54
Contents 5
Page 6

8 Endpoint Security Client 3.5 Installation 55
8.1 Basic Endpoint Security Client 3.5 Installation . . . . . . . . . . . . . . . . . . . . . . . . . . . . . . . . . . . . . 55
8.2 MSI Installation. . . . . . . . . . . . . . . . . . . . . . . . . . . . . . . . . . . . . . . . . . . . . . . . . . . . . . . . . . . . . 57
8.2.1 Command-line Variables . . . . . . . . . . . . . . . . . . . . . . . . . . . . . . . . . . . . . . . . . . . . . . 60
8.2.2 Distributing a Policy with the MSI Package . . . . . . . . . . . . . . . . . . . . . . . . . . . . . . . . 61
8.2.3 User Installation of the Endpoint Security Client 3.5 from MSI . . . . . . . . . . . . . . . . . 62
8.3 Running the Endpoint Security Client 3.5 . . . . . . . . . . . . . . . . . . . . . . . . . . . . . . . . . . . . . . . . 62
9 Endpoint Security Client 4.0 Installation 63
9.1 Basic Endpoint Security Client 4.0 Installation . . . . . . . . . . . . . . . . . . . . . . . . . . . . . . . . . . . . . 63
9.2 MSI Installation. . . . . . . . . . . . . . . . . . . . . . . . . . . . . . . . . . . . . . . . . . . . . . . . . . . . . . . . . . . . . 66
9.2.1 Using the Master Installer . . . . . . . . . . . . . . . . . . . . . . . . . . . . . . . . . . . . . . . . . . . . . 66
9.2.2 Using the Setup.exe File . . . . . . . . . . . . . . . . . . . . . . . . . . . . . . . . . . . . . . . . . . . . . . 66
9.2.3 Completing the Installation . . . . . . . . . . . . . . . . . . . . . . . . . . . . . . . . . . . . . . . . . . . . 67
9.2.4 Command Line Variables . . . . . . . . . . . . . . . . . . . . . . . . . . . . . . . . . . . . . . . . . . . . . 68
9.2.5 Distributing a Policy with the MSI Package . . . . . . . . . . . . . . . . . . . . . . . . . . . . . . . . 69
9.3 Running the Endpoint Security Client 4.0 . . . . . . . . . . . . . . . . . . . . . . . . . . . . . . . . . . . . . . . . 70
9.4 Features Not Supported In the Endpoint Security Client 4.0 . . . . . . . . . . . . . . . . . . . . . . . . . . 70
novdocx (en) 17 September 2009
10 ZENworks Endpoint Security Management Unmanaged Installation 71
10.1 Unmanaged Endpoint Security Client Installation . . . . . . . . . . . . . . . . . . . . . . . . . . . . . . . . . . 71
10.2 Stand-Alone Management Console . . . . . . . . . . . . . . . . . . . . . . . . . . . . . . . . . . . . . . . . . . . . . 71
10.3 Distributing Unmanaged Policies . . . . . . . . . . . . . . . . . . . . . . . . . . . . . . . . . . . . . . . . . . . . . . . 72
11 Upgrading 73
A Documentation Updates 75
A.1 July 31, 2009 . . . . . . . . . . . . . . . . . . . . . . . . . . . . . . . . . . . . . . . . . . . . . . . . . . . . . . . . . . . . . . 75
A.2 January 5, 2009 . . . . . . . . . . . . . . . . . . . . . . . . . . . . . . . . . . . . . . . . . . . . . . . . . . . . . . . . . . . . 75
6 ZENworks Endpoint Security Management Installation Guide
Page 7

About This Guide
This Novell® ZENworks® Endpoint Security Management Installation Guide provides complete
installation instructions for the ZENworks Endpoint Security Management components and assists
administrators in getting those components up and running.
The information in this guide is organized as follows:
Chapter 1, “ZENworks Endpoint Security Management Overview,” on page 9
Chapter 2, “Installing ZENworks Endpoint Security Management,” on page 13
Chapter 3, “Performing a Single-Server Installation,” on page 19
Chapter 4, “Performing a Multi-Server Installation,” on page 23
Chapter 5, “Performing the Policy Distribution Service Installation,” on page 25
Chapter 6, “Performing the Management Service Installation,” on page 33
Chapter 7, “Performing the Management Console Installation,” on page 45
Chapter 8, “Endpoint Security Client 3.5 Installation,” on page 55
Chapter 9, “Endpoint Security Client 4.0 Installation,” on page 63
novdocx (en) 17 September 2009
Chapter 10, “ZENworks Endpoint Security Management Unmanaged Installation,” on page 71
Audience
This guide is written for the ZENworks Endpoint Security Management administrators.
Feedback
We want to hear your comments and suggestions about this manual and the other documentation
included with this product. Please use the User Comments feature at the bottom of each page of the
online documentation, or go to the Novell Documentation Feedback site (http://www.novell.com/
documentation/feedback.html) and enter your comments there.
Additional Documentation
ZENworks Endpoint Security Management is supported by other documentation (in both PDF and
HTML formats) that you can use to learn about and implement the product. For additional
documentation, see the ZENworks Endpoint Security Management 3.5 documentation Web site
(http://www.novell.com/documentation/zesm35).
About This Guide 7
Page 8

novdocx (en) 17 September 2009
8 ZENworks Endpoint Security Management Installation Guide
Page 9
1
ZENworks Endpoint Security
novdocx (en) 17 September 2009
Management Overview
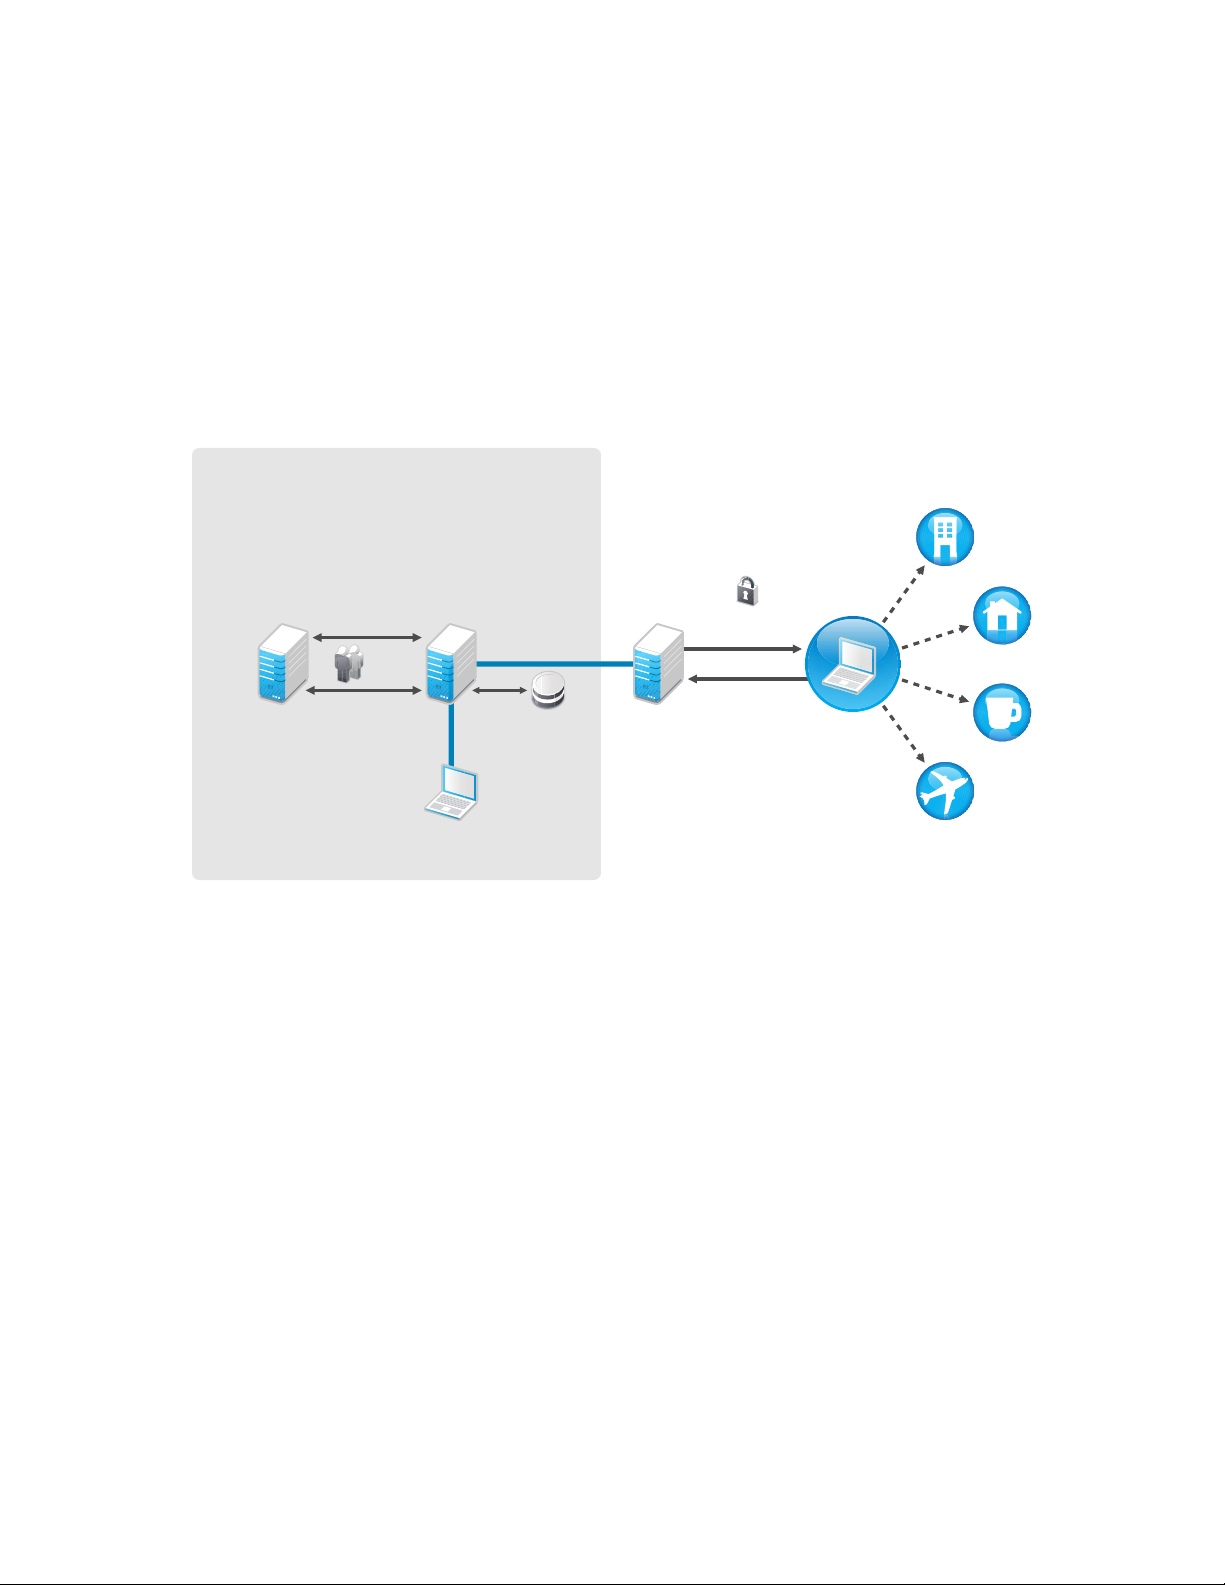
Novell® ZENworks® Endpoint Security Management consists of four high-level functional
components: the Policy Distribution Service, the Management Service, the Management Console,
and the Endpoint Security Client. The figure below shows these components in the architecture:
Figure 1-1 ZENworks Endpoint Security Management Architecture
Endpoint Security Management
Central Management
Location Secure
Active Directory,
LDAP, or NT Domain
Directory Service
ZENworks
Management
Group
Info
Service
SSL Link
SQL
Database
Policy
Distribution
Service
Enterprise
Web Server
DMZ
(Demilitarized Zone)
Encrypted
Policy
Reporting
Information
ZENworks
Security
Client
Office
Home
Coffee
Shop
1
Management
Console
Enterprise Perimeter
On The
Road
The Endpoint Security Client is responsible for enforcement of the distributed security policies on
the endpoint system. When the Endpoint Security Client is installed on all enterprise PCs, these
endpoints can now travel outside the corporate perimeter and maintain their security; endpoints
inside the perimeter receive additional security checks within the perimeter firewall.
The following components are installed on servers that are secured inside the corporate perimeter:
Policy Distribution Service: Responsible for the distribution of security policies to the
Endpoint Security Client and retrieval of reporting data from the Endpoint Security Client. The
Policy Distribution Service can be deployed in the DMZ, outside the enterprise firewall, to
ensure regular policy updates for mobile endpoints.
Management Service: Responsible for user policy assignment and component authentication,
reporting data retrieval, creation and dissemination of ZENworks Endpoint Security
Management reports, and security policy creation and storage.
Management Console: The visible user interface, which runs directly on the server hosting the
Management Service or on a workstation residing inside the corporate firewall with connection
to the Management Service server. The Management Console is used to both configure the
Management Service and to create and manage user and group security policies. Policies are
created, copied, edited, disseminated, and deleted using the Management Console.
ZENworks Endpoint Security Management Overview
9
Page 10

1.1 System Requirements
Table 1-1 Server Requirements
Item Requirement
Operating System Microsoft* Windows* 2003 Server (32-bit)
Processor Determined by operating system
Disk Space 500 MB if the Microsoft SQL database is not installed locally
5 GB if the Microsoft SQL database is local; a SCSI drive is
recommended
Software One of the following relational database management systems
(RDBMS): SQL Server Standard, SQL Server Enterprise, Microsoft
SQL Server 2000 SP4, SQL 2005; server authentication must be set
to mixed mode to allow both SQL Server and Windows
Authentication mode authentication
novdocx (en) 17 September 2009
Microsoft Internet Information Services (configured for SSL)
Directory Services: eDirectory
.NET framework 3.5
Table 1-2 Standalone Management Console Requirements
Item Requirement
Software One of the following relational database management systems
(RDBMS): SQL Server Standard, SQL Server Enterprise, Microsoft
SQL Server 2000 SP4, SQL 2005, SQL Express, SQL Server 2008;
server authentication must be set to mixed mode to allow both SQL
Server and Windows Authentication mode authentication
Table 1-3 Client Requirements
Item Requirement
Operating System for Endpoint
Security Client 3.5
Windows XP SP1
Windows XP SP2
Windows 2000 SP4
TM
or Active Directory*
The operating system must have Windows Installer 3.1 installed and
all operating system updates applied
Operating System for Endpoint
Security Client 4.0
Processor Determined by operating system
Disk Space 5 MB required, 5 additional MB recommended for reporting data
Windows Vista SP1 (32-bit)
10 ZENworks Endpoint Security Management Installation Guide
Page 11

1.2 About the ZENworks Endpoint Security Management Manuals
The ZENworks Endpoint Security Management manuals provide three levels of guidance for the
users of the product.
Installation Guide: This guide provides complete installation instructions for the ZENworks
Endpoint Security Management components and assists administrators in getting those
components up and running. This is the guide that you are currently reading.
ZENworks Endpoint Security Management Administration Guide: This guide is written for the
administrators who are required to manage the services, create security policies for the
enterprise, generate and analyze reporting data, and provide troubleshooting for users.
Instructions for completing these tasks are provided in this manual.
ZENworks Endpoint Security Client 3.5 User Guide: This guide is written to instruct the user
on the operation of the Endpoint Security Client. This guide can be sent to all employees in the
enterprise to help them understand how to use the Endpoint Security Client.
novdocx (en) 17 September 2009
ZENworks Endpoint Security Management Overview 11
Page 12

novdocx (en) 17 September 2009
12 ZENworks Endpoint Security Management Installation Guide
Page 13

2
Installing ZENworks Endpoint
novdocx (en) 17 September 2009
Security Management
The following sections contain additional information about installing Novell® ZENworks®
Endpoint Security Management:
Section 2.1, “Pre-installation Information,” on page 13
Section 2.2, “Installation Packages,” on page 13
Section 2.3, “Installation Options,” on page 14
Section 2.4, “Installation Order,” on page 14
Section 2.5, “Before Installing ZENworks Endpoint Security Management,” on page 14
2.1 Pre-installation Information
The ZENworks Endpoint Security Management installation software should be physically protected
to prevent any tampering or unauthorized use. Likewise, administrators should review the guidelines
for pre-installation and installation to ensure that the ZENworks Endpoint Security Management
system can function without interruption, or be made vulnerable by inadequate hardware protection.
The administrator installing this software must be the primary administrator for the servers and the
domain. If using enterprise SSL certificates, you must also use the same username to create the SSL
Root Security certificate.
2
2.2 Installation Packages
When installing from the DVD, a master installer program launches that utilizes a simple user
interface that guides the ZENworks Endpoint Security Management administrator through the
installation process. Load the installation DVD on each machine to access the master installer
program to install the desired components.
2.2.1 About the Master Installer Program
At launch, the master installer program displays two menu options: Products and Documentation.
The Products link opens the installation menu. The menu items on this screen launch the designated
installer for each component. In the case of the Endpoint Security Client 3.5 or Endpoint Security
Client 4.0, an additional option is available to launch the installation in Administrator Mode, which
helps the ZENworks Endpoint Security Management administrator create an MSI package for easy
distribution (see Chapter 8.2, “MSI Installation,” on page 57).
For information on the complete operation of the ZENworks Endpoint Security Management
components, see the ZENworks Endpoint Security Management Administration Guide, available
through the Documentation link.
Installing ZENworks Endpoint Security Management
13
Page 14

2.3 Installation Options
ZENworks Endpoint Security Management back-end components can be installed as either SingleServer or Multi-Server installations. Single-Server installations are ideal for small deployments that
do not require regular policy updates. Multi-Server installations are ideal for large deployments that
require regular policy updates. Consult with Novell Professional Services to determine which
installation type is right for you.
The Endpoint Security Client can operate (when needed) without connectivity to the Policy
Distribution Service. Likewise, a Stand-Alone Management Console can be optionally installed for
evaluation purposes. The installation for this Unmanaged mode of operation is described in
Chapter 10, “ZENworks Endpoint Security Management Unmanaged Installation,” on page 71.
2.4 Installation Order
ZENworks Endpoint Security Management should be installed in the following order:
1. Single-Server Installation or Multi-Server Installation
Policy Distribution Service
novdocx (en) 17 September 2009
Management Service
2. Management Console
3. Endpoint Security Client 3.5 or Endpoint Security Client 4.0
2.5 Before Installing ZENworks Endpoint Security Management
There are a few questions the ZENworks Endpoint Security Management administrator needs to
consider prior to beginning installation:
How will your users receive their ZENworks Endpoint Security Management security
policies?
The options for policy distribution center around whether users should be able to receive a policy
update anywhere, including outside the central network, or if they should receive them only when
they are in (or connected via VPN) a secured network. For organizations planning to frequently
update their ZENworks Endpoint Security Management security policies, a Multi-Server installation
is recommended that places the Policy Distribution Service on a Web server outside the DMZ.
What type of server deployments are available to you?
If your organization only has a few servers available, then a Single-Server installation deployment
may be necessary. If server availability isn't an issue, then the size of your client deployment and the
number of users operating outside the firewall should be taken into consideration.
What is your available SQL Server deployment?
ZENworks Endpoint Security Management creates three SQL databases at installation. If your
deployment is small, you can install the SQL database server on the same server as the Management
Service. For larger deployments, a separate SQL database server should be employed to receive the
data from the Policy Distribution and Management Services.
14 ZENworks Endpoint Security Management Installation Guide
Page 15
The following RDBMS types are allowed:
SQL Server 2005 and 2008 Standard
SQL Server 2005 and 2008 Enterprise
Microsoft SQL Server 2000 SP4
If you are using Microsoft SQL Server 2005 or Microsoft SQL Server 2008, you need to configure
your SQL server to support ZENworks Endpoint Security Management. The screenshots in the
following procedure are for 2005, but the configuration steps are the same for 2008.
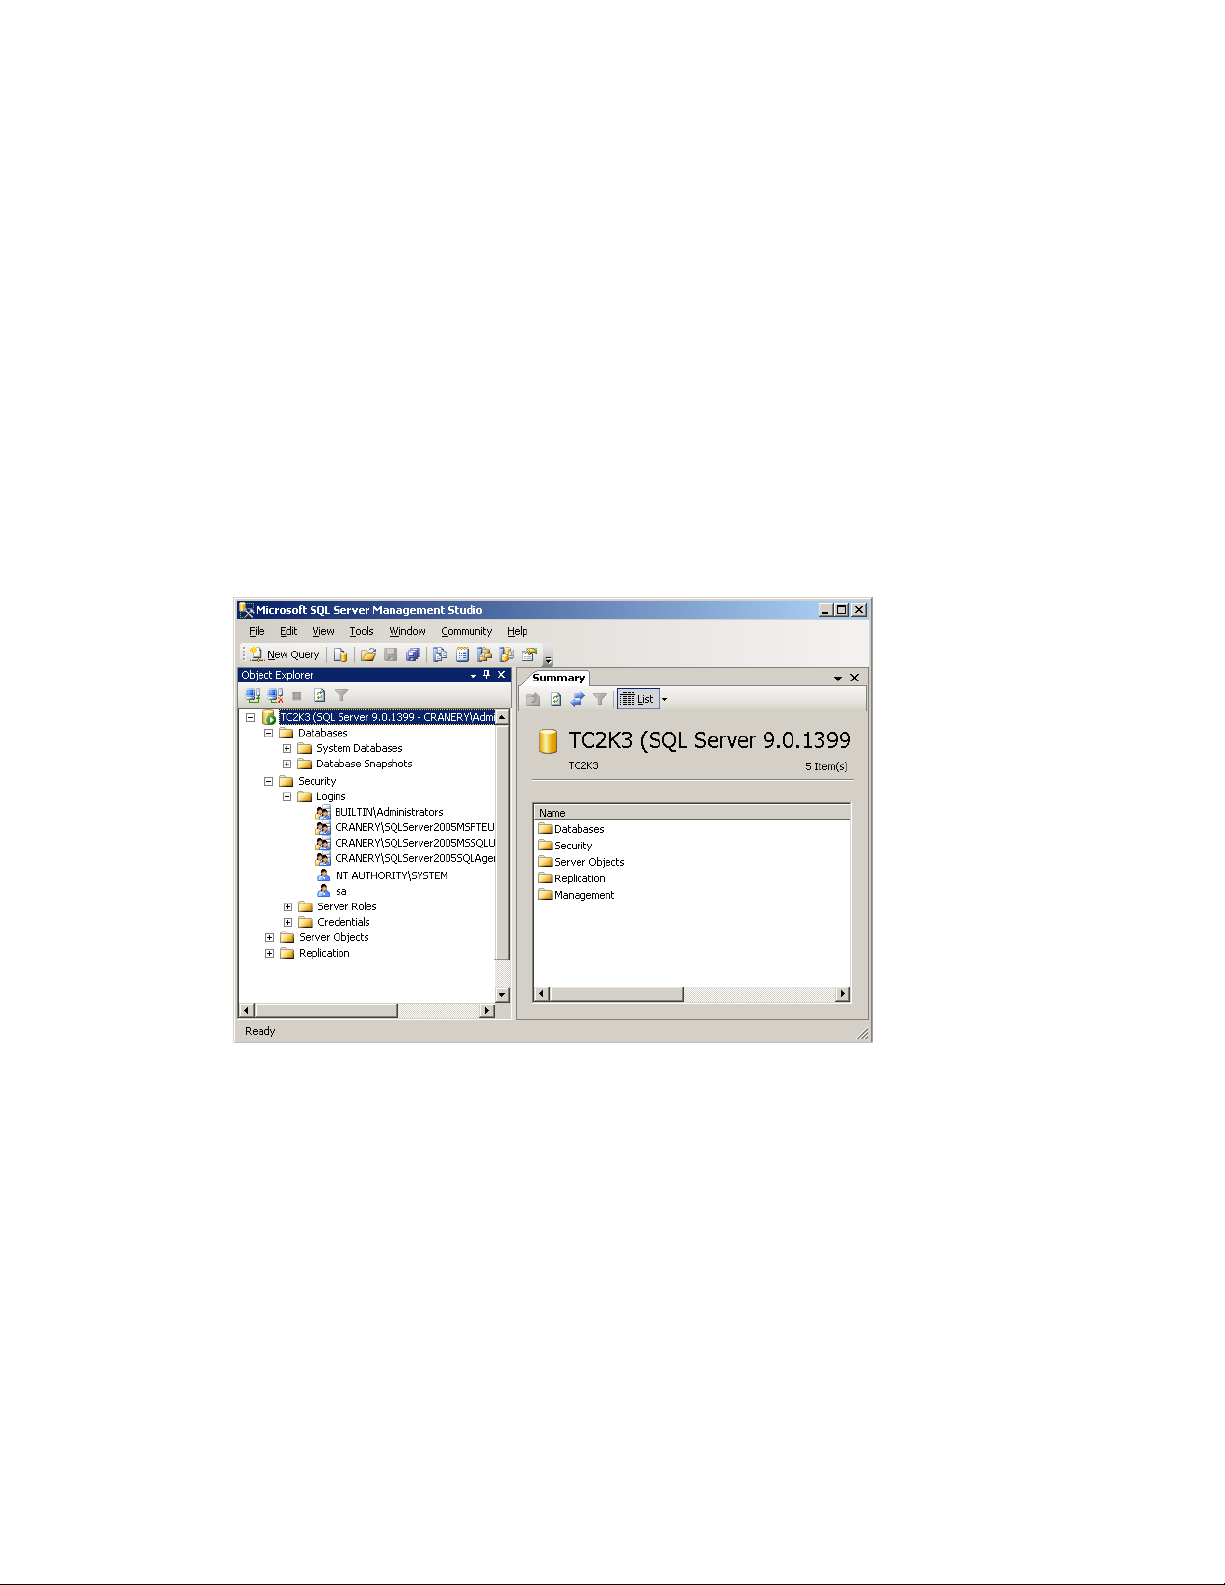
1 Make sure you have Microsoft SQL Server Management Studio.
Management Studio is included with the Standard and Enterprise editions. If you are using the
Express edition (for an evaluation installation), you can download Management Studio Express
from the Microsoft Download Center (http://www.microsoft.com/Downloads/
details.aspx?FamilyID=c243a5ae-4bd1-4e3d-94b8-5a0f62bf7796&displaylang=en).
2 Launch Management Studio (Start menu > All Programs > Microsoft SQL Server 2005 (or
2008) > SQL Server Management Studio).
novdocx (en) 17 September 2009
3 Right-click your SQL server (TC2K3 in the above screen shot), then click Properties.
Installing ZENworks Endpoint Security Management 15
Page 16
novdocx (en) 17 September 2009
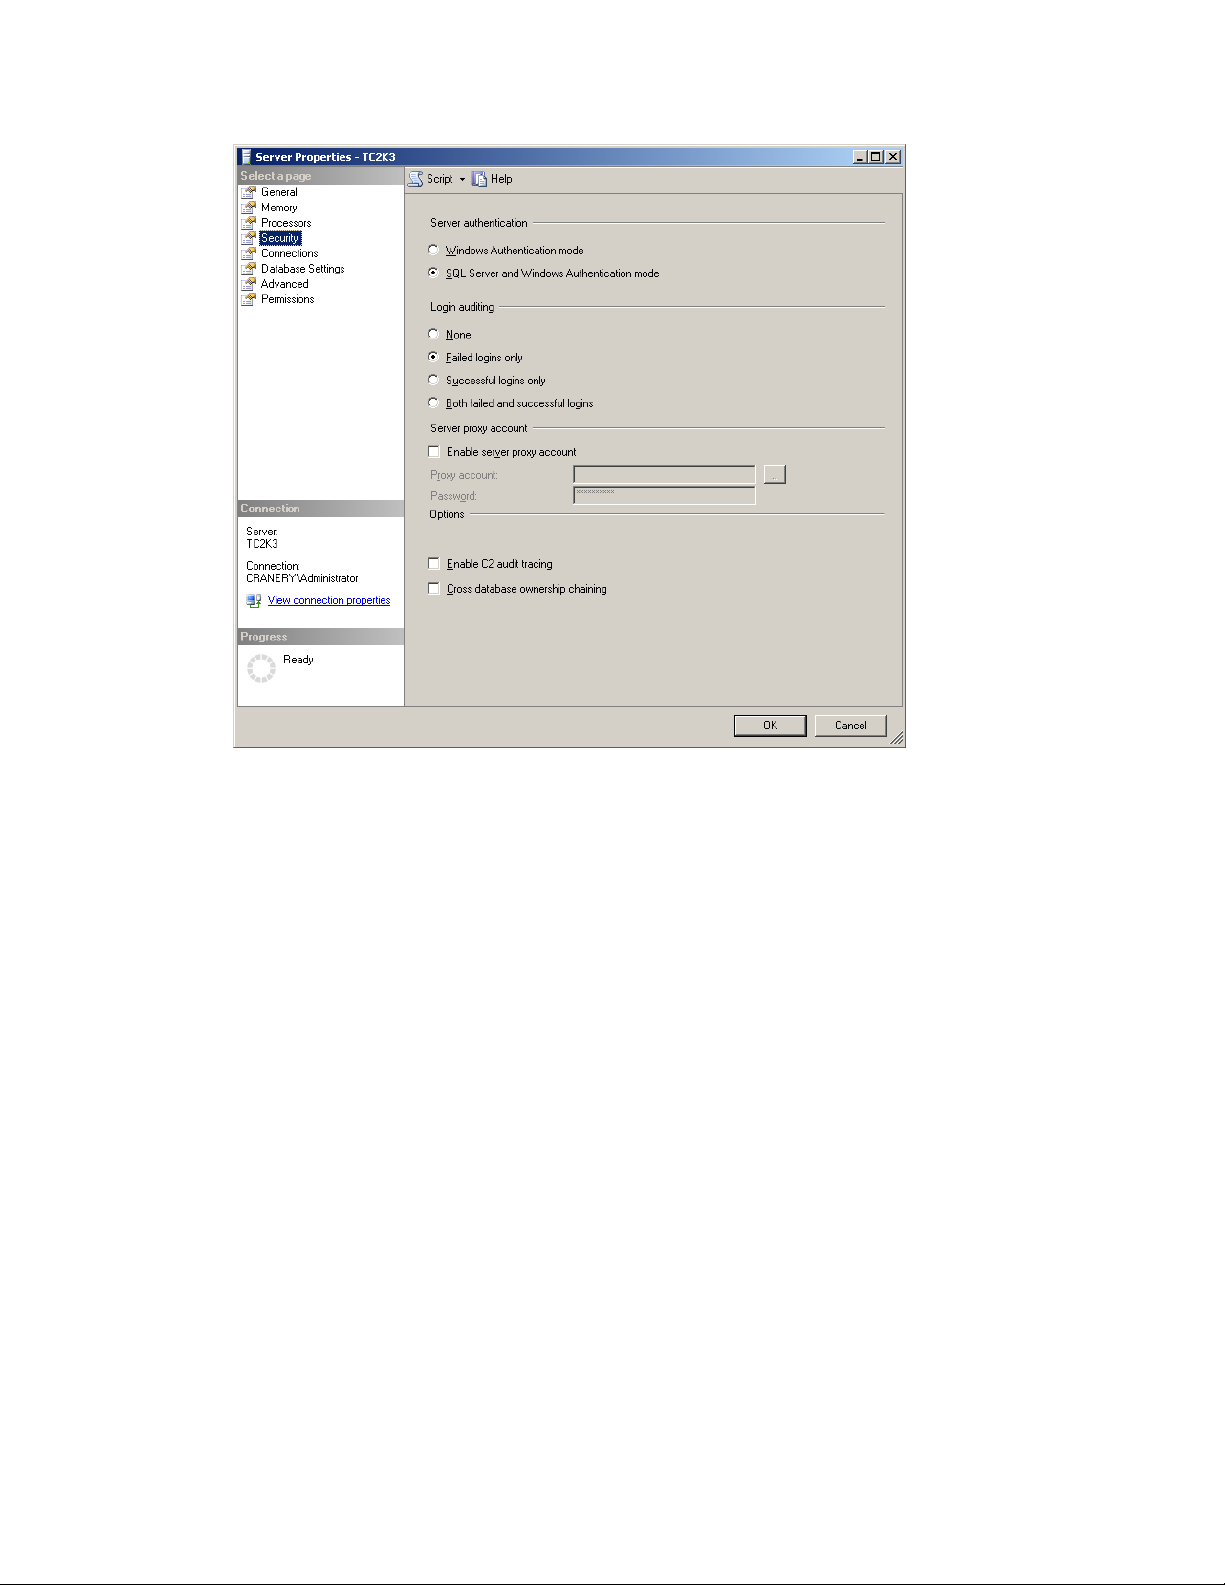
4 Select Security, then make sure that Server Authentication is set to SQL Server and Windows
Authentication mode.
5 Click OK, then exit Management Studio.
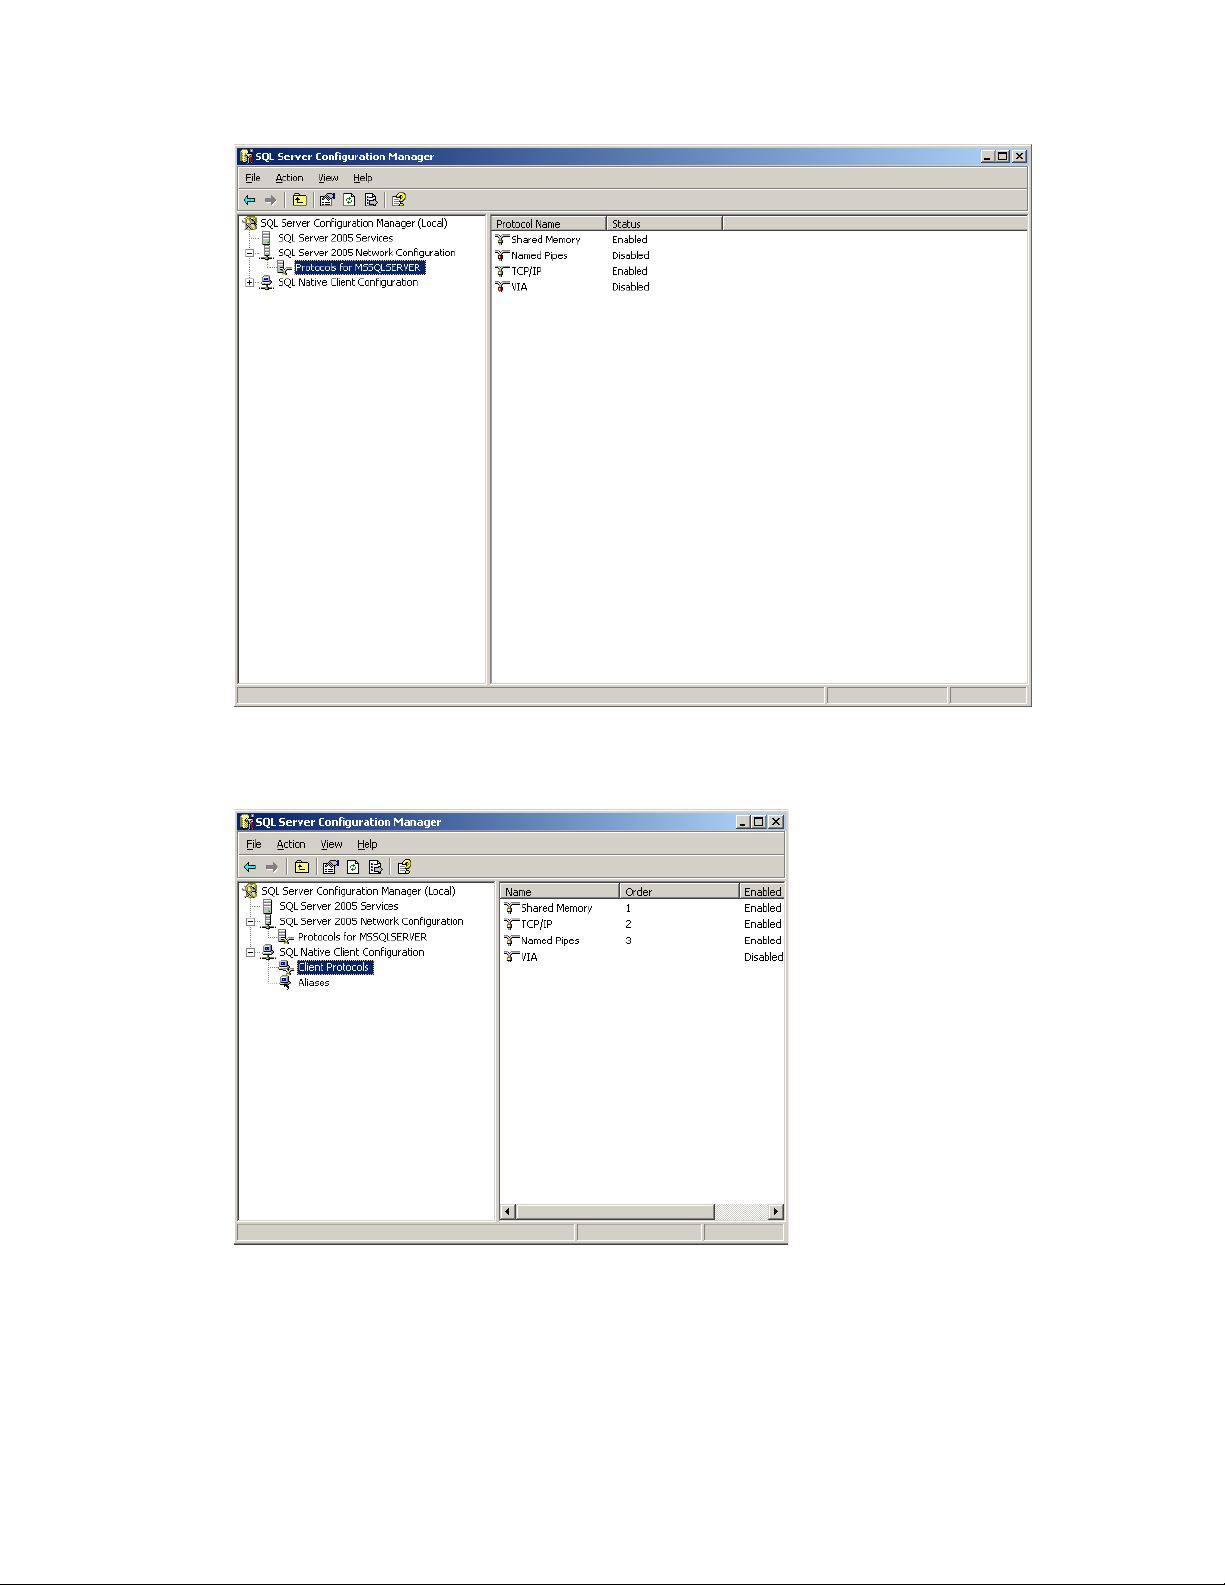
6 Launch SQL Server Configuration Manager (Start menu > All Programs > Microsoft SQL
Server 2005 (or 2008) > Configuration Tools > SQL Server Configuration Manager).
7 Expand the SQL Server Network Configuration section, select Protocols for MSSQLSERVER
(where MSSQLSERVER is your server), then make sure that TCP/IP is enabled as shown
below.
16 ZENworks Endpoint Security Management Installation Guide
Page 17
novdocx (en) 17 September 2009
8 Expand the SQL Native Client Configuration section, select Client Protocols, then make sure
that TCP/IP is enabled as shown below.
9 Exit SQL Server Configuration Manager.
Installing ZENworks Endpoint Security Management 17
Page 18

Will you use existing certificates to establish SSL communication, or will you use
Novell Self-Signed Certificates?
For disaster recovery and failover designs, you should use enterprise, or otherwise-issued,
Certificate Authority (VeriSign, GeoTrust, Thawte, and so forth) SSL certificates for full
deployments of ZENworks Endpoint Security Management. When using your own certificates, the
Web service certificate and root CA should be created on the machine designated as the Policy
Distribution Service, then distributed to the appropriate machines. To create an Enterprise
Certificate Authority, see the step-by-step instructions for securely setting up a certificate authority,
available at on the Microsoft Web site.
For evaluations or small deployments (fewer than 100 users), you can use ZENworks Endpoint
Security Management self-signed certificates. Novell SSL Certificates are installed onto the servers
when running the typical installation.
How will you deploy your Endpoint Security Clients?
The Endpoint Security Client software can be deployed either individually onto each endpoint or
through an MSI push. Instructions on creating an MSI package can be found in Chapter 8.2, “MSI
Installation,” on page 57.
novdocx (en) 17 September 2009
Do you want policies to be machine-based or user-based?
Policies can be distributed to a single machine, where every user who logs on receives the same
policy, or policies can be set for individual users or groups.
Each installation has several pre-requisites. It is recommended that each check list of prerequisites
be complete before running the installation for any component. Please review the lists on the
following pages:
Chapter 3, “Performing a Single-Server Installation,” on page 19
Chapter 5, “Performing the Policy Distribution Service Installation,” on page 25
Chapter 6, “Performing the Management Service Installation,” on page 33
Chapter 7, “Performing the Management Console Installation,” on page 45
Chapter 8, “Endpoint Security Client 3.5 Installation,” on page 55
18 ZENworks Endpoint Security Management Installation Guide
Page 19

3
Performing a Single-Server
novdocx (en) 17 September 2009
Installation
ZENworks® Endpoint Security Management Single-Server Installation (SSI) allows both the Policy
Distribution Service and the Management Service to co-exist on the same server, which is not
possible without using this installation option. The server must be deployed inside the firewall for
security purposes, requiring users to receive policy updates only when they are inside the corporate
infrastructure or connected via a VPN.
Deployment of the Single-Server Installation on a Primary Domain Controller (PDC) is not
supported for both security and functionality reasons.
NOTE: It is recommended that the SSI Server be configured (hardened) so as to deactivate all
applications, services, accounts, and other options not necessary to the intended functionality of the
server. The steps involved in doing so depend upon the specifics of the local environment, and so
cannot be described in advance. Administrators are advised to consult the appropriate section of the
Microsoft Technet security webpage (http://www.microsoft.com/technet/security/default.mspx).
Additional access control recommendations are provided in the ZENworks Endpoint Security
Management Administration Guide.
To protect access to only trusted machines, the virtual directory and IIS can be set up to have ACLs.
Reference the articles below:
3
Granting and Denying Access to Computers (http://www.microsoft.com/technet/prodtechnol/
windows2000serv/default.mspx)
Restrict Site Access by IP Address or Domain Name (http://support.microsoft.com/
default.aspx?scid=kb%3BEN-US%3BQ324066)
IIS FAQ: 2000 IP address and domain name restrictions (http://www.iisfaq.com/
default.aspx?View=A136&P=109)
Working With IIS Packet Filtering (http://www.15seconds.com/issue/011227.htm)
For security purposes, it is highly recommended that the following default folders be removed from
any IIS installation:
IISHelp
IISAdmin
Scripts
Printers
We also recommend using the IIS Lockdown Tool 2.1 available at microsoft.com (http://
www.microsoft.com/technet/security/tools/locktool.mspx).
Version 2.1 is driven by supplied templates for the major IIS-dependent Microsoft products. Select
the template that most closely matches the role of this server. If in doubt, the Dynamic Web server
template is recommended.
Performing a Single-Server Installation
19
Page 20

Ensure that the following prerequisites are in place prior to beginning the installation:
novdocx (en) 17 September 2009
Ensure access to a supported directory service (eDirectory
If you are deploying using an eDirectory service, create an account password that never
TM
or Active Directory).
changes to use for Management Console authentication (see Section 7.2.1, “Adding eDirectory
Services,” on page 49).
For Endpoint Security Client to Single Server server name resolution, validate that the target
computers (where the Endpoint Security Client is installed) can ping the SSI server name. If
unsuccessful, you must resolve this before continuing with the installation. (Change the SSI
server name to FQDN/NETBIOS, change AD to use FQDN/NETBIOS, change DNS
configurations, modifying the local host file on the target computers to include the correct MS
information, and so forth).
Enable or install Microsoft Internet Information Services (IIS) and configure it to accept Secure
Socket Layer (SSL) Certificates.
IMPORTANT: Do not enable the Require secure channel (SSL) check box on the Secure
Communictions page (in the Microsoft Computer Management utility, expand Services and
Applications > expand Internet Information Services (ISS) Manager > expand Web Sites >
right-click Default Web Site > click Properties > click the Directory Security tab > click the
Edit button in the Secure communications group box). Enabling this option breaks the
communication between the ZENworks Endpoint Security Management server and the
ZENworks Endpoint Security client on the endpoint.
If you are using your own SSL certificates, ensure that the Web service certificate and root CA
are loaded on the machine and that server name validated in the previous steps (whether
NETBIOS or FQDN) matches the Issued to value for the certificate configured in IIS.
If you are using your own certificates or have already installed the Novell Self Signed
Certificate, you can validate SSL as well by trying the following URL from a machine that has
the Endpoint Security Client installed:
AuthenticationServer/UserService.asmx
https://SSI_SERVER_NAME/
(where SSI_SERVER_NAME is the server
name). This should return valid data (an html page) and not certificate warnings. Any
certificate warnings must be resolved before installation, unless you opt to use Novell Self
Signed Certificates instead.
Ensure access to a supported RDBMS (Microsoft SQL Server 2000 SP4, SQL Server Standard,
SQL Server Enterprise). Set the database to Mixed mode.
3.1 Installation Steps
Select Single Server Installation from the master installer menu. This installation combines the
installations for the Policy Distribution Service and the Management Service. For more information,
see Chapter 5, “Performing the Policy Distribution Service Installation,” on page 25 and Chapter 6,
“Performing the Management Service Installation,” on page 33.
Like their individual installations, the Typical setting installs the services' defaults and the Novell
self-signing SSL certificates. Custom Installation permits the administrator to determine the
directory paths and permits the use of an enterprise-owned certificate authority.
20 ZENworks Endpoint Security Management Installation Guide
Page 21

3.2 Starting the Service
The combined Distribution and Management Service launches immediately following installation,
with no reboot of the server required. The Management Console is used to manage both the
Distribution and Management Services using the Configuration feature. For more information, see
ZENworks Endpoint Security Management Administration Guide.
After this installation is complete, the Management Console can be installed on this server. If you
want to install the Management Console on a separate machine, copy the ZENworks Endpoint
Security Management Setup Files folder to the designated Management Console machine to
complete the installation.
Continue with Chapter 5, “Performing the Policy Distribution Service Installation,” on page 25.
novdocx (en) 17 September 2009
Performing a Single-Server Installation 21
Page 22

novdocx (en) 17 September 2009
22 ZENworks Endpoint Security Management Installation Guide
Page 23

4
Performing a Multi-Server
novdocx (en) 17 September 2009
Installation
Multi-Server installation is recommended for large deployments or when the Policy Distribution
Service should be placed outside the corporate firewall to ensure that users receive regular policy
updates when they are outside the perimeter. Multi-Server installation must be done on at least two
separate servers. If you attempt to install the separate Policy Distribution Service and the
Management Service on the same server, the installation fails. For more information, see Chapter 3,
“Performing a Single-Server Installation,” on page 19 for a single-server installation.
Multi-Server installation should begin with the Policy Distribution Service installation on a secured
server either outside or inside the corporate firewall. For more information, see Chapter 5,
“Performing the Policy Distribution Service Installation,” on page 25.
After the Policy Distribution Service is installed, the Management Service installation should
follow. For more information, see Chapter 6, “Performing the Management Service Installation,” on
page 33.
It is recommended the Management Console also be installed on this server. For more information,
see Chapter 7, “Performing the Management Console Installation,” on page 45.
Continue with Chapter 5, “Performing the Policy Distribution Service Installation,” on page 25.
4
Performing a Multi-Server Installation
23
Page 24

novdocx (en) 17 September 2009
24 ZENworks Endpoint Security Management Installation Guide
Page 25

5
Performing the Policy Distribution
novdocx (en) 17 September 2009
Service Installation
The server hosting the ZENworks® Endpoint Security Management Policy Distribution Service
should always be reachable by your users, whether within the network or out in the DMZ. Ensure
that the required software is installed on the server prior to installation (see “System Requirements”
on page 10). After the server is selected, note the server name, both the NETBIOS and Fully
Qualified Domain Name (FQDN).
Deployment of the Policy Distribution Service on a Primary Domain Controller (PDC) is not
supported for both security and functionality reasons.
NOTE: It is recommended that the SSI Server be configured (hardened) so as to deactivate all
applications, services, accounts, and other options not necessary to the intended functionality of the
server. The steps involved in doing so depend upon the specifics of the local environment, and so
cannot be described in advance. Administrators are advised to consult the appropriate section of the
Microsoft Technet security webpage (http://www.microsoft.com/technet/security/default.mspx).
Additional access control recommendations are provided in the ZENworks Endpoint Security
Management Administration Guide.
To protect access to only trusted machines, the virtual directory and IIS can be set up to have ACLs.
Reference the articles below:
5
Granting and Denying Access to Computers (http://www.microsoft.com/technet/prodtechnol/
windows2000serv/default.mspx)
Restrict Site Access by IP Address or Domain Name (http://support.microsoft.com/
default.aspx?scid=kb%3BEN-US%3BQ324066)
IIS FAQ: 2000 IP address and domain name restrictions (http://www.iisfaq.com/
default.aspx?View=A136&P=109)
Working With IIS Packet Filtering (http://www.15seconds.com/issue/011227.htm)
For security purposes, it is highly recommended that the following default folders be removed from
any IIS installation:
IISHelp
IISAdmin
Scripts
Printers
We also recommend using the IIS Lockdown Tool 2.1 available at microsoft.com (http://
www.microsoft.com/technet/security/tools/locktool.mspx).
Version 2.1 is driven by supplied templates for the major IIS-dependent Microsoft products. Select
the template that most closely matches the role of this server. If in doubt, the Dynamic Web server
template is recommended.
Performing the Policy Distribution Service Installation
25
Page 26

Please check off the following prerequisites prior to beginning the installation:
Ensure Management Service (MS) to Policy Distribution Service (DS) server name resolution:
make sure that the target computer where the MS is installed can ping the DS server name
(NETBIOS if the DS is configured inside the network firewall or FQDN if installed outside in
the DMZ).
If successful, this is the server name to enter during installation. If unsuccessful, you must
resolve this issue before continuing with the installation.
Ensure Endpoint Security Client to DS server name resolution: validate that the endpoint
clients (where the Endpoint Security Client is installed) can ping the same DS server name used
above. If unsuccessful, you must resolve this issue before continuing with the installation.
Enable or install Microsoft Internet Information Services (IIS), ensure that ASP.NET is
enabled, and configure it to accept Secure Socket Layer (SSL) Certificates.
IMPORTANT: Do not enable the Require secure channel (SSL) check box on the Secure
Communictions page (in the Microsoft Computer Management utility, expand Services and
Applications > expand Internet Information Services (ISS) Manager > expand Web Sites >
right-click Default Web Site > click Properties > click the Directory Security tab > click the
Edit button in the Secure communications group box). Enabling this option breaks the
communication between the ZENworks Endpoint Security Management server and the
ZENworks Endpoint Security client on the endpoint.
novdocx (en) 17 September 2009
If you are using your own SSL certificates, ensure that the Web service certificate is loaded on
the machine and that server name validated in the previous steps (whether NETBIOS or
FQDN) matches the Issued to value for the certificate configured in IIS.
If you are using your own SSL certificates, validate the SSL from the MS server to the DS
server: open a Web browser on the Management Service and enter the following URL:
https://DSNAME
and not certificate warnings (valid data may be "Page under Construction"). Any certificate
warnings must be resolved before installation, unless you opt to use Novell Self Signed
Certificates instead.
Ensure access to a supported RDBMS (Microsoft SQL Server 2000 SP4, SQL Server Standard,
SQL Server Enterprise, SQL Server 2005). Set the database to Mixed mode. This database
should be either hosted on the Management Service server or on a shared server secured behind
the enterprise firewall.
(where DSNAME is the server name of the DS). This should return valid data
5.1 Installation Steps
Click Policy Distribution Service Installation from the Installation interface menu. The Policy
Distribution Service installation begins.
At launch, the installer verifies that all required software is present on the server. If any software is
absent, it is installed automatically before the installation continues to the Welcome Screen (license
agreements for the additional software might need to be accepted). If Microsoft Data Access
Components (MDAC) 2.8 need to be installed, the server must reboot following that installation
before ZENworks Endpoint Security Management installation can continue. If you are using
Windows 2003 Server, ASP.NET 2.0 is configured to run by the installer.
After Policy Distribution Service installation begins, perform the following steps:
26 ZENworks Endpoint Security Management Installation Guide
Page 27

NOTE: The following steps outline what you, the administrator, need to do to complete the
installation process. Internal processes displays throughout the installation, and are not documented
here unless there is a specific action or information that you will need for installation to be
successful.
1 Click Next on the Welcome screen to continue.
2 Accept the Licensing Agreement, then click Next.
3 Select either a Typical or Custom installation.
Figure 5-1 Select Typical or Custom Installation
novdocx (en) 17 September 2009
Both installation paths are presented below:
Section 5.1.1, “Typical Installation,” on page 27
Section 5.1.2, “Custom Installation,” on page 29
5.1.1 Typical Installation
A typical installation places the Policy Distribution Service software files in the default directory:
\Program Files\Novell\ESM Policy Distribution Service
assigned as STDSDB. The three SQL database files (data, index, and log) are placed in:
Files\Microsoft SQL Server\mssql\Data
.
1 Novell SSL Certificates are created for the installation. If you want to use your own SSL
certificates, use Custom Installation. These certificates must be distributed to all users.
Performing the Policy Distribution Service Installation 27
. The SQL database name is
\Program
Page 28

2 The installer detects the available SQL databases on the machine and network. Select a secured
SQL database for the Policy Distribution Service and enter the database administrator's name
and password (if the password is zero characters, the installer warns of the potential security
issue). The username and password cannot be a domain user; it must be a SQL user with
SysAdmin rights.
Figure 5-2 Select SQL Server
novdocx (en) 17 September 2009
3 Specify the password for the Policy Distribution Service agent. This is the username and
password the service uses to log in to its SQL database.
Figure 5-3 Distribution Service SQL Password
28 ZENworks Endpoint Security Management Installation Guide
Page 29
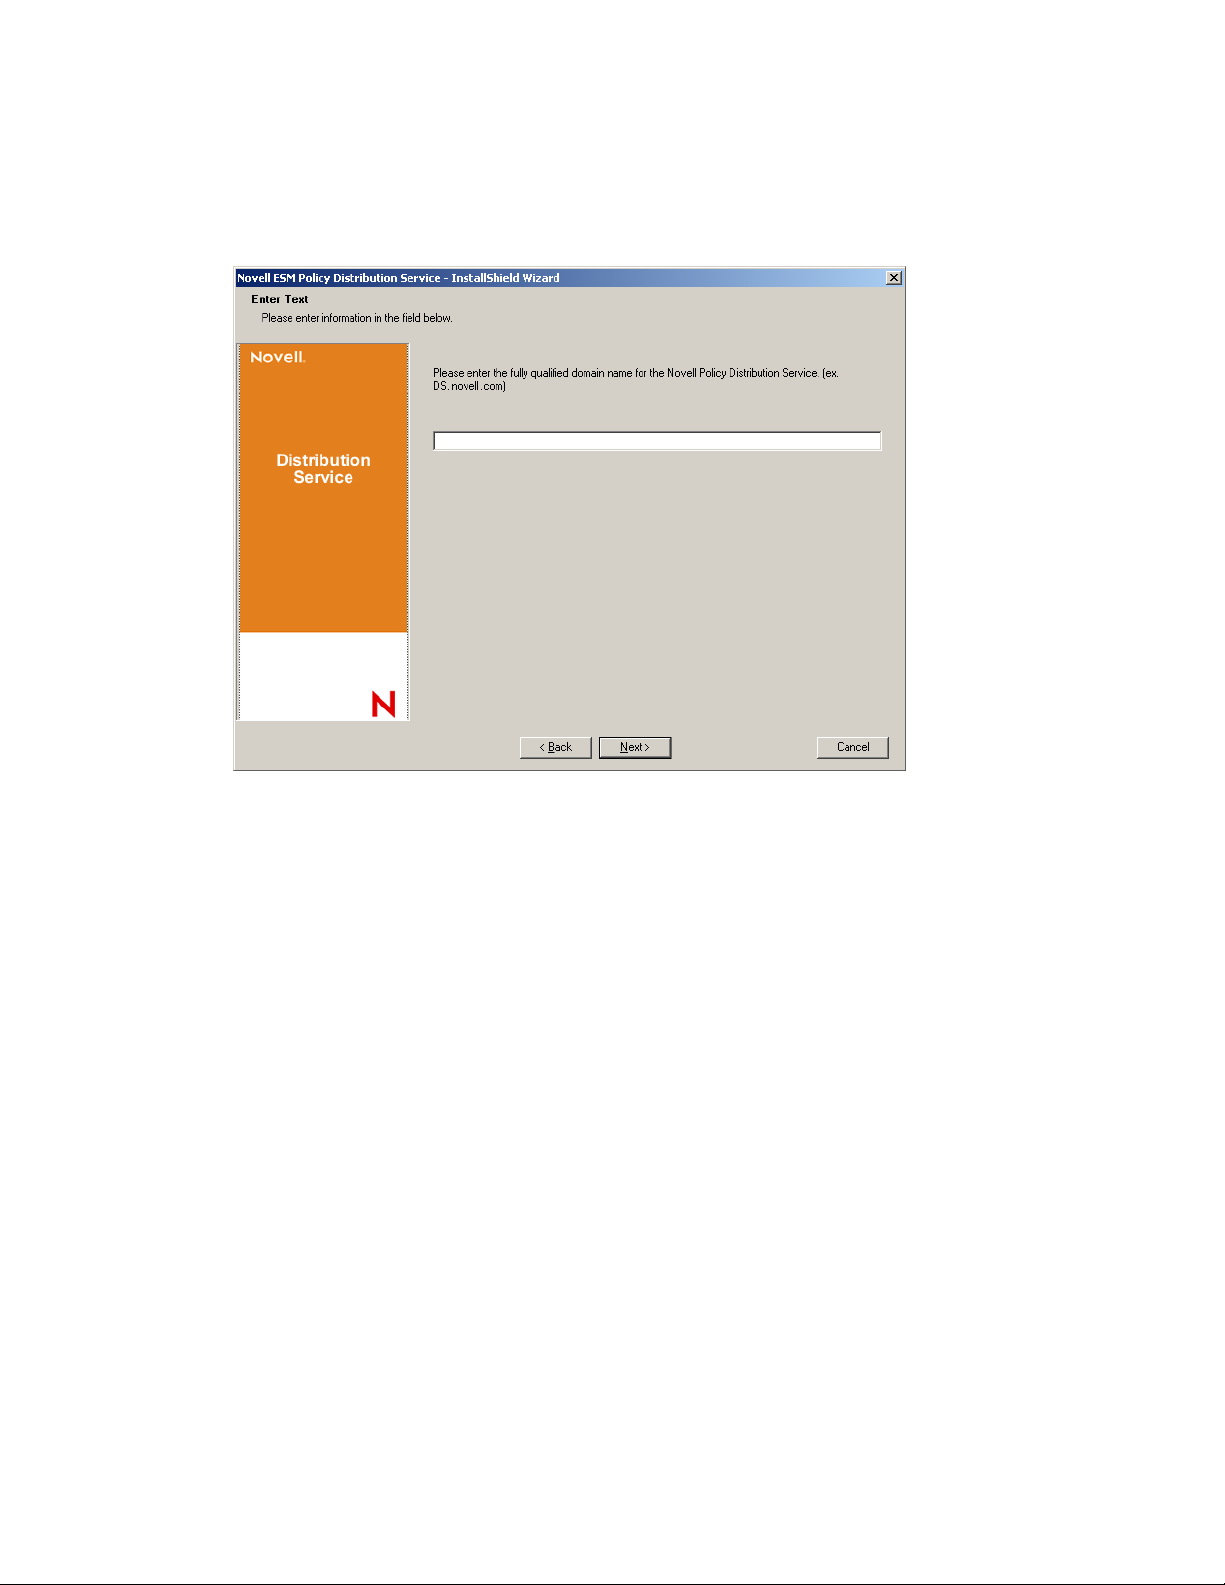
4 Specify the Policy Distribution Service domain name. This must be the fully qualified domain
name if the server resides outside the corporate firewall. Otherwise, only the NETBIOS name
for the server is required.
Figure 5-4 Enter Policy Distribution Service Domain Name
novdocx (en) 17 September 2009
5 At the Copy Files screen, click Next to begin the installation.
6 An
ESM Setup Files
file and the
ID
ESM-DS.cer
folder is generated in the installation directory. This contains a
file (Novell self-signing SSL certificate) required by the
Setup
Management Service. Copy this file directly onto the machine designated as the host for the
Management Service, either via a netshare or by saving the file to a disk or thumb drive and
hand-loading it onto the server installation directory.
7 The Policy Distribution Service is now installed, click Finish to close the installation program
to launch the performance monitor.
5.1.2 Custom Installation
A custom installation displays the defaults used in the typical installation and permits the
administrator to specify, or browse to, a different directory to place the software files.
The administrator can select either to install a Novell self-signed SSL certificate or use one of their
own.
1 An SSL Certificate is required for secure communication between the Policy Distribution
Service and the Management Service, and between the DS and all Novell Security Clients. If
you already have a certificate authority, click Use the existing certificate IIS is configured for.
If you need a certificate, click Allow Novell to create, install, and use its own self-signed root
certificate. The installer creates the certificates and the signing authority. Regardless of the
certificate type, these certificates must be distributed to all users.
Performing the Policy Distribution Service Installation 29
Page 30

Figure 5-5 Setup Trusted Root
novdocx (en) 17 September 2009
2 The installer detects the available SQL databases on the machine and network. Select the
secured SQL database for the Policy Distribution Service and enter the database administrator's
name and password (if the password is zero characters, the installer warns of the potential
security issue). The username and password cannot be a domain user; it must be a SQL user
with SysAdmin rights.
Figure 5-6 Select SQL Server
3 Set the database name (default is entered as STDSDB).
30 ZENworks Endpoint Security Management Installation Guide
Page 31

4 Specify the password for the Policy Distribution Service agent. This is the username and
password the service uses to log in to its SQL database.
Figure 5-7 Distribution Service SQL Password
novdocx (en) 17 September 2009
5 Specify the Policy Distribution Service domain name. This must be the fully qualified domain
name if the server resides outside the corporate firewall. Otherwise, only the NETBIOS name
for the server is required.
Figure 5-8 Enter Policy Distribution Service Domain Name
Performing the Policy Distribution Service Installation 31
Page 32

6 At the Copy Files screen, click Next to begin the installation.
7 Specify the file paths for the data, index, and log files.
8 An
ESM Setup Files
file and the
ID
ESM-DS.cer
folder is generated in the installation directory. This contains a
file (Novell self-signing SSL certificate, if selected) required by
the Management Service. Use Browse to designate where this file should be saved on the server
(default = installation directory).
Figure 5-9 Save Setup Files
novdocx (en) 17 September 2009
Setup
9 If you chose to use an enterprise SSL certificate, place a copy of this file into the
folder.
Files
10 Copy the entire
ESM Setup Files
directly onto the machine designated as the host for the
ESM Setup
Management Service, either via a netshare or by saving the file to a disk or thumb drive and
hand-loading it into the server installation directory.
11 The Policy Distribution Service is now installed, click Finish to close the installation program
to launch the performance monitor.
5.2 Starting the Service
The Policy Distribution Service launches immediately following installation, with no reboot of the
server required. The Management Console is used to adjust upload times for the Distribution Service
using the Configuration tool. For more information, see the ZENworks Endpoint Security
Management Administration Guide.
Continue with Chapter 6, “Performing the Management Service Installation,” on page 33.
32 ZENworks Endpoint Security Management Installation Guide
Page 33

6
Performing the Management
novdocx (en) 17 September 2009
Service Installation
The Management Service should be installed on a secure server behind the firewall, and it cannot
share the same server as the Policy Distribution Service (with the exception of a single server
installation, see Chapter 3, “Performing a Single-Server Installation,” on page 19). The
Management Service should not be installed outside the network firewall, for security reasons. After
the server is selected, note the server name, both the NETBIOS and Fully Qualified Domain Name
(FQDN). Deployment of the Management Service on a Primary Domain Controller (PDC) is not
supported for both security and functionality reasons.
NOTE: It is recommended that the SSI Server be configured (hardened) so as to deactivate all
applications, services, accounts, and other options not necessary to the intended functionality of the
server. The steps involved in doing so depend upon the specifics of the local environment, and so
cannot be described in advance. Administrators are advised to consult the appropriate section of the
Microsoft Technet security webpage (http://www.microsoft.com/technet/security/default.mspx).
Additional access control recommendations are provided in the ZENworks Endpoint Security
Management Administration Guide.
To protect access to only trusted machines, the virtual directory and IIS can be set up to have ACLs.
Reference the articles below:
Granting and Denying Access to Computers (http://www.microsoft.com/technet/prodtechnol/
windows2000serv/default.mspx)
Restrict Site Access by IP Address or Domain Name (http://support.microsoft.com/
default.aspx?scid=kb%3BEN-US%3BQ324066)
6
IIS FAQ: 2000 IP address and domain name restrictions (http://www.iisfaq.com/
default.aspx?View=A136&P=109)
Working With IIS Packet Filtering (http://www.15seconds.com/issue/011227.htm)
For security purposes, it is highly recommended that the following default folders be removed from
any IIS installation:
IISHelp
IISAdmin
Scripts
Printers
We also recommend using the IIS Lockdown Tool 2.1 available at microsoft.com (http://
www.microsoft.com/technet/security/tools/locktool.mspx).
Version 2.1 is driven by supplied templates for the major IIS-dependent Microsoft products. Select
the template that most closely matches the role of this server. If in doubt, the Dynamic Web server
template is recommended.
Performing the Management Service Installation
33
Page 34

Ensure that the following prerequisites are in place prior to beginning the installation:
Ensure access to a supported directory service (eDirectory or Active Directory).
If you are deploying using an eDirectory
TM
service, create an account password that never
changes to use for Management Console authentication (see Section 7.2.1, “Adding eDirectory
Services,” on page 49).
Ensure Endpoint Security Client to MS server name resolution: validate that the target
computers (where the Endpoint Security Client is installed) can ping the MS server name. If
successful, this is the value entered in the installation. If unsuccessful, you must resolve this
before continuing with the installation.
Enable or install Microsoft Internet Information Services (IIS), ensure ASP.NET is enabled,
and configure it to accept Secure Socket Layer (SSL) Certificates.
IMPORTANT: Do not enable the Require secure channel (SSL) check box on the Secure
Communictions page (in the Microsoft Computer Management utility, expand Services and
Applications > expand Internet Information Services (ISS) Manager > expand Web Sites >
right-click Default Web Site > click Properties > click the Directory Security tab > click the
Edit button in the Secure communications group box). Enabling this option breaks the
communication between the ZENworks Endpoint Security Management server and the
ZENworks Endpoint Security client on the endpoint.
novdocx (en) 17 September 2009
If you are using your own SSL certificates, ensure that the root CA is loaded on the machine
and that server name validated in the previous steps (whether NETBIOS or FQDN) matches the
Issued to value for the certificate configured in IIS.
If you are using your own certificates, or you have already installed the Novell Self Signed
Certificate, you can validate SSL as well by trying the following URL from a machine that has
the Endpoint Security Client installed:
AuthenticationServer/UserService.asmx
https://MS_SERVER_NAME/
(where MS_SERVER_NAME is the server
name). This should return valid data (an html page) and not certificate warnings. Any
certificate warnings must be resolved before installation.
Ensure access to a supported RDBMS (Microsoft SQL Server 2000 SP4, SQL Server Standard,
SQL Server Enterprise, SQL 2005). Set database to Mixed mode.
Copy the
ESM Setup Files
directory that contains the Policy Distribution Service Setup ID
and Root SSL Certificate for the Policy Distribution Service into the installation directory of
this server.
6.1 Installation Steps
Click Management Service Installation from the installation interface menu. The Management
Service installation begins.
At launch, the installer verifies that all required software is present on the server. If any software is
absent, it is installed automatically before the installation continues to the Welcome Screen (license
agreements for the additional software might need to be accepted). If Microsoft Data Access
Components (MDAC) 2.8 need to be installed, the server must reboot following that installation
before ZENworks Endpoint Security Management installation can continue. If using Windows 2003
Server, ASP.NET 2.0 must be configured to run by the installer.
After Management Service installation begins, perform the following steps:
34 ZENworks Endpoint Security Management Installation Guide
Page 35

NOTE: The following steps outline what you, the administrator, need to do to complete the
installation process. Internal processes display throughout the installation and are not documented
here unless there is a specific action or information that you need for installation to be successful.
1 Click Next on the Welcome screen to continue.
2 Accept the Licensing Agreement, then click Next.
3 Select either a Typical or Custom installation.
Figure 6-1 Select Typical or Custom
novdocx (en) 17 September 2009
Both installation paths are presented below:
Section 6.1.1, “Typical Installation,” on page 35
Section 6.1.2, “Custom Installation,” on page 39
6.1.1 Typical Installation
A typical installation places the Management Service software files in the default directory:
\Program Files\Novell\ESM Management Service
STMSDB. The three SQL database files (data, index, and log) are placed in:
Files\Microsoft SQL Server\mssql\Data
.
1 Specify the Policy Distribution Service's agent password that was created during the Policy
Distribution installation.
. The SQL database name is assigned as
\Program
Performing the Management Service Installation 35
Page 36

Figure 6-2 Enter SQL password
novdocx (en) 17 September 2009
2 Specify the name of the server to host the Management Service.
Figure 6-3 Enter MS Server Name
3 Novell SSL Certificates are created for the installation. If you want to use your own SSL
certificates, perform a Custom Installation. These certificates must be distributed to all users.
36 ZENworks Endpoint Security Management Installation Guide
Page 37

4 The installer detects the available SQL databases on the machine and network. Select the SQL
database for the Management Service and specify the database administrator's username and
password (if the password is zero characters, the installer warns of the potential security issue).
The username and password cannot be a domain user; it must be a SQL user with SysAdmin
rights.
Figure 6-4 Select MS SQL Database
novdocx (en) 17 September 2009
5 Select the SQL database for the Reporting Service and specify the database administrator's
password for that database. If you plan to capture and store a large number of reports, it is
recommended that the Reporting Service database be given its own SQL server.
Figure 6-5 Select Reporting Service Database
Performing the Management Service Installation 37
Page 38

6 If ZENworks Endpoint Security Management has already been purchased, a separate license
file is provided. Copy the license file to this server and browse for it (see the instructions page
included with your License file for more details). If you have not yet purchased a ZENworks
Endpoint Security Management license, select 60-Day Evaluation License to continue.
Figure 6-6 Browse for Novell License File
novdocx (en) 17 September 2009
7 At the Copy Files screen, click Next, to begin the installation.
8 The Management Service runs a communication check to both SQL databases and the Policy
Distribution Service. If communication cannot be verified, the installer notifies you of the
issue. All boxes must be checked for installation to succeed.
Figure 6-7 Communication Verification
9 The Management Service is now installed, click Close to close the communication checks, then
click Finish to close installation program.
10 Continue with Section 6.2, “Starting the Service,” on page 43.
38 ZENworks Endpoint Security Management Installation Guide
Page 39

6.1.2 Custom Installation
A custom installation displays the defaults used in the typical installation and permits the
administrator to enter, or browse to, a different location.
1 Specify the Policy Distribution Service's agent password, created during Policy Distribution
installation.
Figure 6-8 Enter SQL password
novdocx (en) 17 September 2009
2 Select the SSL Certificate type used for the Policy Distribution Service installation. If you used
your existing (enterprise) certificate authority, click The Novell Distribution Service Used a
certificate IIS was already configured with. If the Distribution Service installer created a Novell
certificate, click The Novell Distribution Service installed a Novell self signed root certificate.
3 Specify the name of the server to host the Management Service.
Performing the Management Service Installation 39
Page 40

Figure 6-9 Enter MS Server Name
novdocx (en) 17 September 2009
4 An SSL Certificate is required for secure communication between the Management Service
and all Endpoint Security Clients. If you already have a certificate authority, click Use the
existing certificate IIS is configured for.If you need a certificate, click Allow Novell to create,
install, and use its own self-signed root certificate. The installer creates the certificates and the
signing authority. Regardless of the certificate type, these certificates must be distributed to all
users.
5 When selecting Novell certificates, select where the certificate can be saved for easy
distribution (default is the installation directory).
6 The installer detects the available SQL databases on the machine and network. Select the SQL
database for the Management Service and specify the database administrator's username and
password (if the password is zero characters, the installer warns of the potential security issue).
The username and password cannot be a domain user; it must be a SQL user with SysAdmin
rights.
40 ZENworks Endpoint Security Management Installation Guide
Page 41
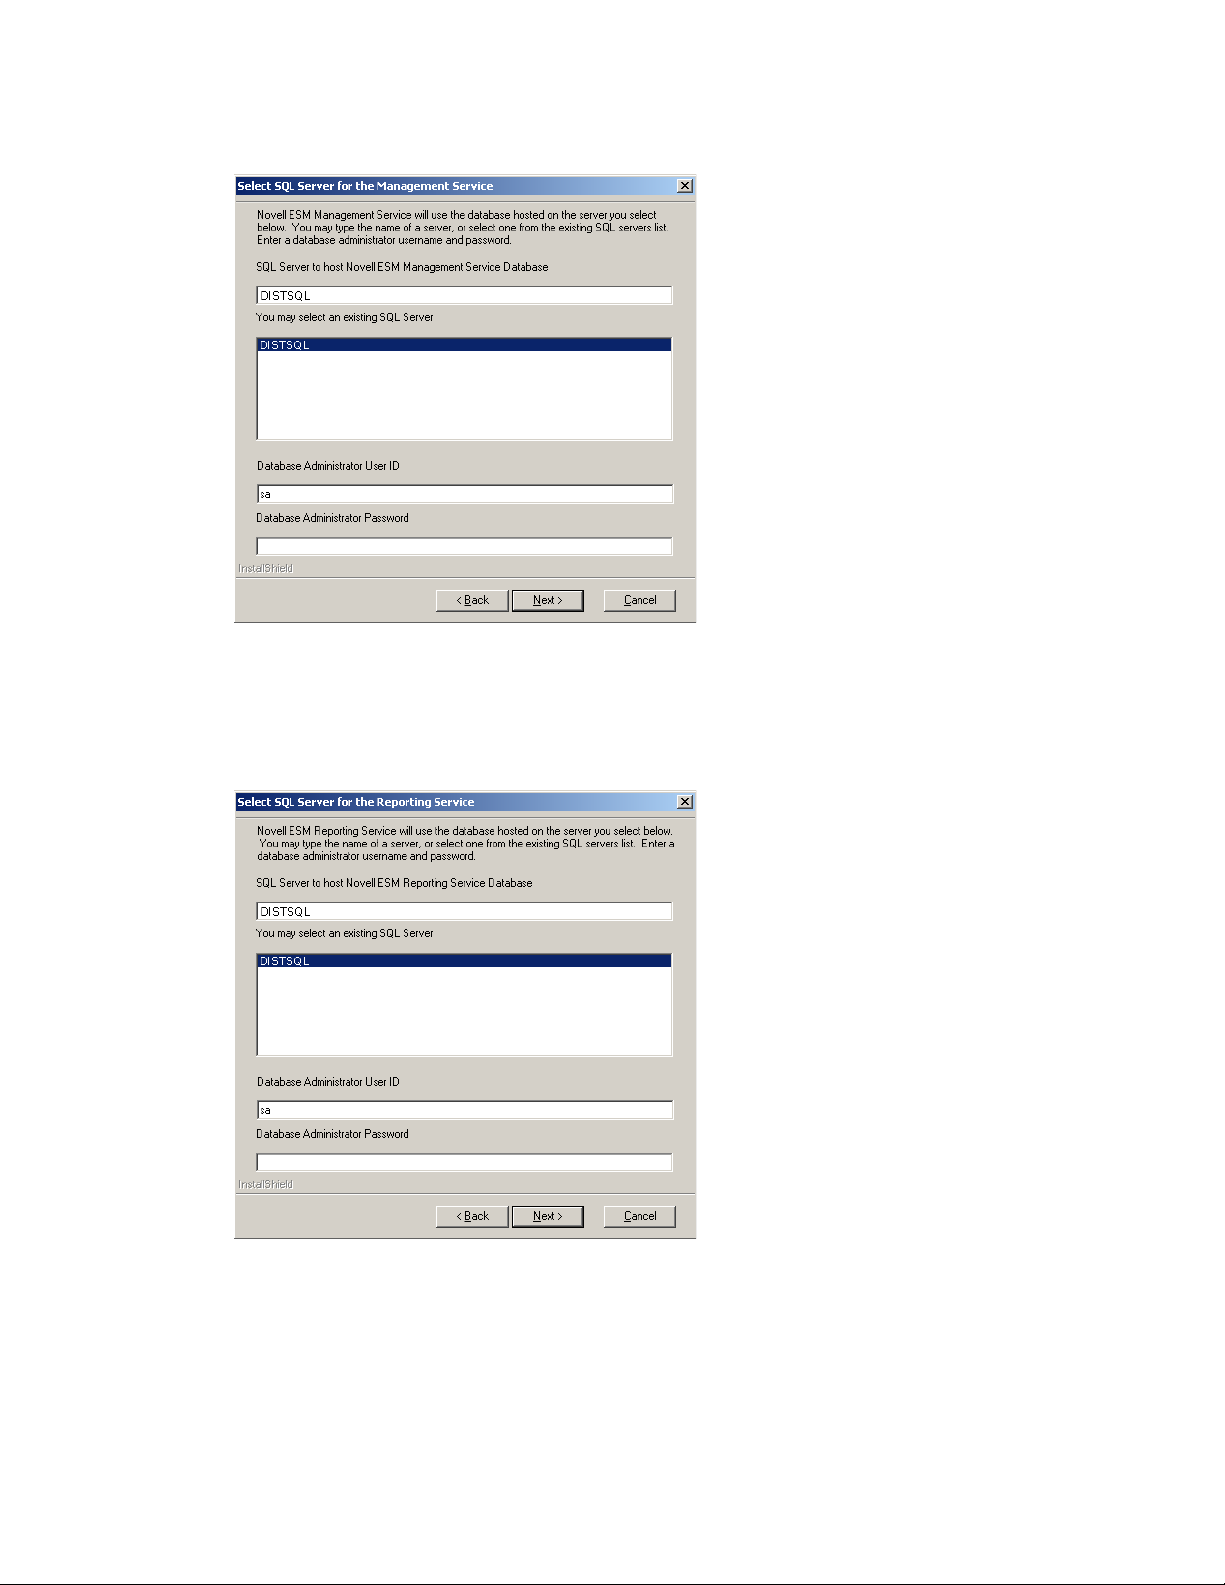
Figure 6-10 Select MS SQL Database
novdocx (en) 17 September 2009
7 Set the database name (default is entered as STMSDB).
8 Select the SQL database for the Reporting Service and specify the database administrator's
password for that database.
Figure 6-11 Select Reporting Service Database
9 Set the database name (default is entered as STRSDB)
10 If ZENworks Endpoint Security Management has already been purchased, a separate license
file is provided. Copy the license file to this server and browse for it (see the instructions page
included with your License file for more details). If you have not yet purchased a ZENworks
Endpoint Security Management license, select 60-Day Evaluation License to continue.
Performing the Management Service Installation 41
Page 42

Figure 6-12 Browse for Novell License File
novdocx (en) 17 September 2009
11 At the Copy Files screen, click Next to begin the installation.
12 Select the file paths for the Management Service database’s data, index, and log files.
13 Select the file paths for the Reporting Service database’s data, index, and log files.
14 The Management Service run sa communication check to both SQL databases and the Policy
Distribution Service. If communication cannot be verified, the installer notifies you of the
issue. All boxes must be checked for installation to succeed.
Figure 6-13 Communication Verification
15 The Management Service is now installed, click Close to close the communication checks, then
click Finish to close installation program.
16 Continue with Section 6.2, “Starting the Service,” on page 43.
42 ZENworks Endpoint Security Management Installation Guide
Page 43

6.2 Starting the Service
The Management Service launches immediately following installation, with no reboot of the server
required. The Management Console is used to manage the data on the Management Service (see the
ZENworks Endpoint Security Management Administration Guide).
Novell recommends installing the Management Console on this server. If you are installing the
Management Console on a separate machine, copy the
netshare or by saving the file to a disk or thumb drive, to the machine to host the Management
Console.
Continue with Chapter 7, “Performing the Management Console Installation,” on page 45.
ESM Setup Files
directory, either via a
novdocx (en) 17 September 2009
Performing the Management Service Installation 43
Page 44

novdocx (en) 17 September 2009
44 ZENworks Endpoint Security Management Installation Guide
Page 45

7
Performing the Management
novdocx (en) 17 September 2009
Console Installation
The Management Console can be installed on the Management Service server or on a secure PC that
has direct communication with the Management Service server. Multiple Management Console
installations can be configured to communicate with a single Management Service; however, it is
highly recommended that access to the Management Console be limited to select users.
For security reasons, we recommend that the Management Console be installed directly on the
Management Service’s server.
If you want to install the Management Console on a separate workstation, ensure that the following
prerequisites are in place before beginning the installation:
Ensure that the device on which you want to install the Management Console meets the
following requirements:
Windows XP SP1, Windows XP SP2, or Windows 2000 SP4.
A 1.0 GHz processor is recommended with a minimum of 256 MB of RAM and 100 MB
of disk space available.
Copy the
Distribution Service and the Management Service, along with the
the PC.
ESM Setup Files
folder that contains the SSL Root Certificates for the Policy
STInstParam.id
file, onto
7
If you are installing the Management Console on the Management Service server, verify that
the version of Microsoft Internet Explorer is 5.5 or greater.
7.1 Installation Steps
Click Management Console Installation from the installation interface menu.
At launch, the installer verifies that both the required .NET Framework 3.5 and WSE 2.0 SP2 are
present on the machine. If one or both are absent, they will be installed automatically before the
installation continues to the Welcome Screen (the license agreement for .NET 3.5 will need to be
accepted).
To install the Management Consoles:
1 Click Next to continue.
2 Accept the Licensing Agreement, then click Next.
3 Select either a Typical or Custom installation.
Performing the Management Console Installation
45
Page 46
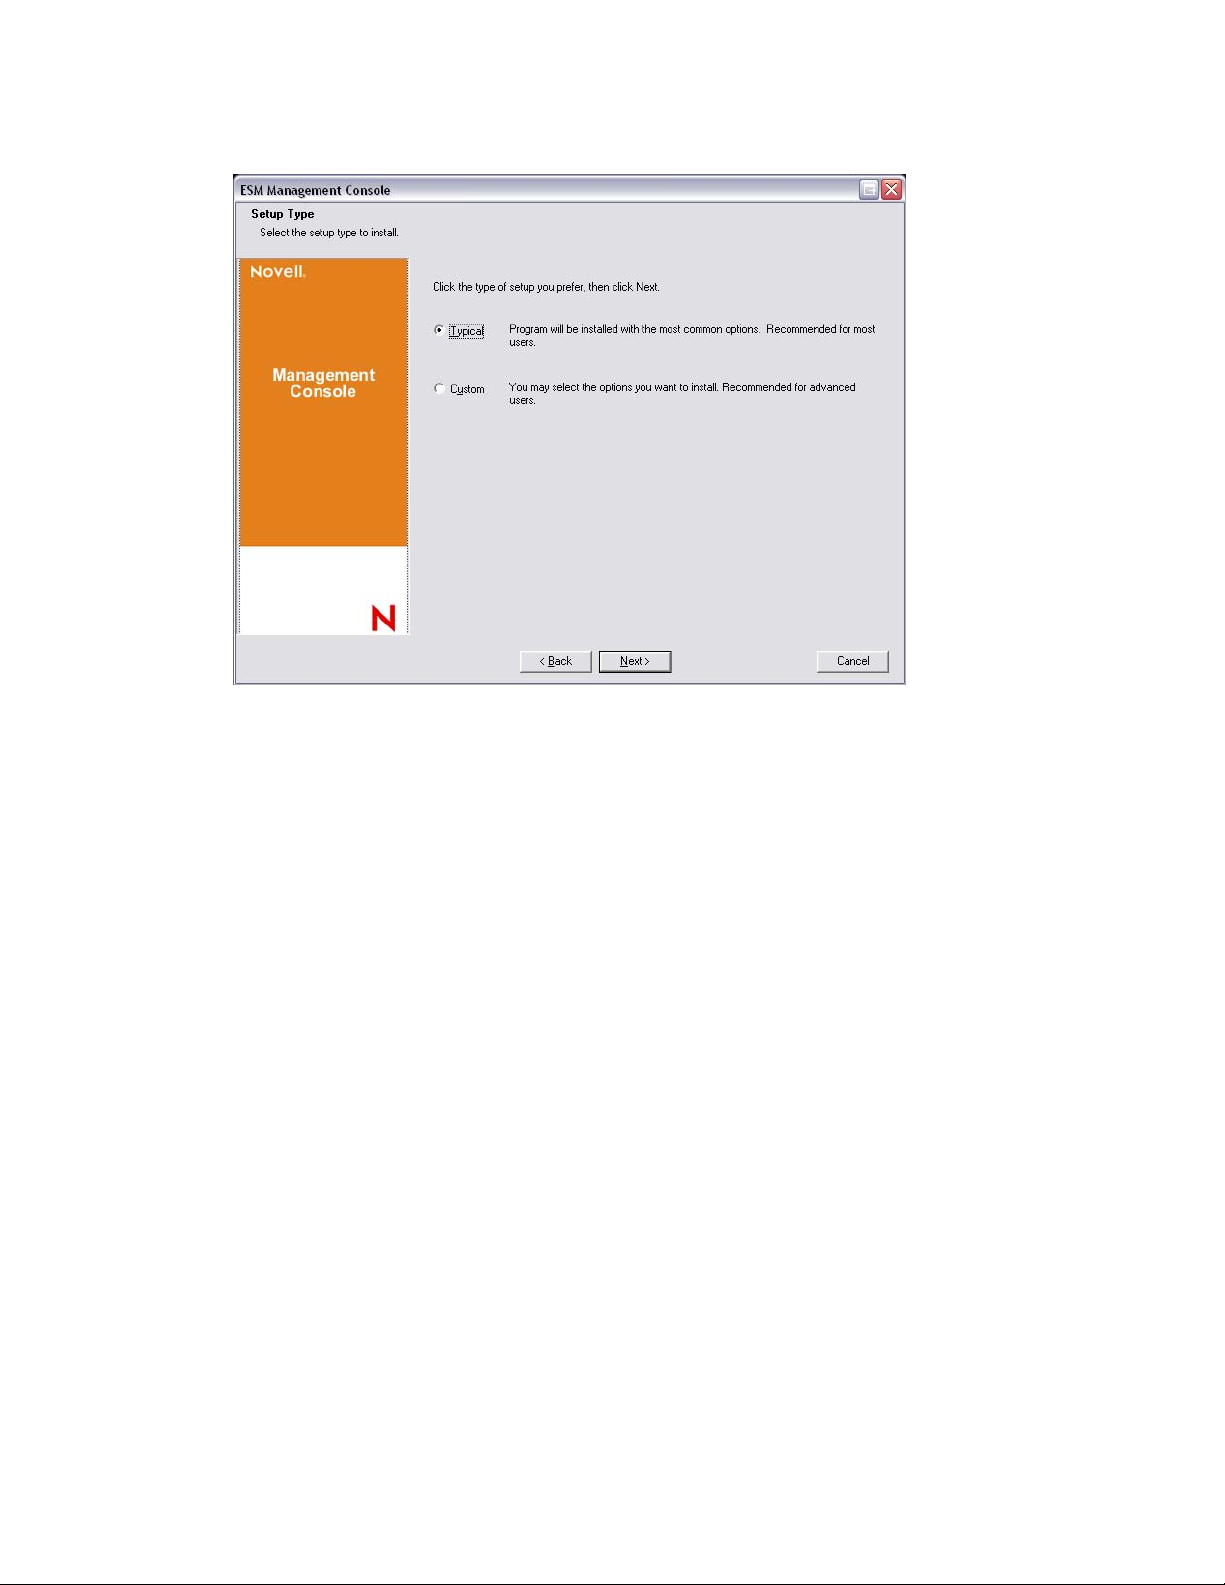
Figure 7-1 Select Typical or Custom
novdocx (en) 17 September 2009
Both installation paths are presented below:
Section 7.1.1, “Typical Installation,” on page 46
Section 7.1.2, “Custom Installation,” on page 46
7.1.1 Typical Installation
A typical installation uses all the default server and SSL information contained in the
STInstParam.id
Console
the
. No additional selections need to be made for Management Console installation, providing
ESM Setup Files
file and uses the default directory:
directory is on the machine.
\Program Files\Novell\ESM Management
7.1.2 Custom Installation
A custom installation displays the
permits the administrator to change that information.
1 Specify the Policy Distribution Service's hostname (this must be the fully-qualified domain
name if the Distribution server is deployed outside the enterprise firewall).
STInstParam.id
defaults used in the typical installation and
46 ZENworks Endpoint Security Management Installation Guide
Page 47

Figure 7-2 Enter Distribution Service Host Name
novdocx (en) 17 September 2009
2 Specify the Management Service hostname.
3 Specify the Management Service SQL database hostname.
4 Specify the Management Service SQL database name.
Figure 7-3 Enter MS SQL database name
Performing the Management Console Installation 47
Page 48

5 Specify the SQL SA username and password identified during Management Service
installation.
6 Select the type of SSL Certificate installed on the Policy Distribution Service and the
Management Service.
Figure 7-4 Select Server Certificates
novdocx (en) 17 September 2009
7 Select the directory where the Management Console is installed. The default location is
\Program Files\Novell\ESM Management Console
.
After you install ZENworks Endpoint Security Management, you must create and configure a
directory service before you can start managing devices in your system.
The New Directory Service Configuration Wizard lets you create a directory service configuration
that defines the scope of your Endpoint Security Client installations. The new configuration uses
your existing directory service to define the logical boundary for your user-based and computerbased client installations.
The wizard guides you through the process of selecting the directory service and the contexts where
current and future client accounts reside.
The wizard also lets you synchronize the directory entries included in the new configuration. This
synchronization is performed in the background so you can immediately begin using your new
configuration.
After installing ZENworks Endpoint Security Management, the New Directory Service
Configuration Wizard automatically displays. For more information about creating and configuring
the directory service, see “Configuring the Directory Service” in the ZENworks Endpoint Security
Management Administration Guide.
48 ZENworks Endpoint Security Management Installation Guide
Page 49

7.2 Starting the Console
To launch the Management Console login window, click Start > All Programs > Novell > ESM
Management Console > Management Console.
Log in to the Management Console by entering the administrator name and password. Before you
can enter the username and password, you must be connected to the directory service's domain (see
Section 7.2.1, “Adding eDirectory Services,” on page 49). The username must be a user on the
Management Service domain.
Figure 7-5 Login to ZENworks Endpoint Security Management Management Console
novdocx (en) 17 September 2009
7.2.1 Adding eDirectory Services
The following steps provide information for using Novell eDirectory as the directory service. For
information about using Microsoft Active Directory, see “Configuring the Directory Service” in the
ZENworks Endpoint Security Management Administration Guide.
1 Click the Options button on the login screen to display the Configuration window.
Figure 7-6 Authenticating Directories
2 Enter a friendly name for the Directory Service and select eDirectory from the Service Type
drop-down list.
3 In the Host/DN field, specify the IP address of the eDirectory server and specify the tree name
under the Domain tree.
4 Check Available for User Authentication to display the domain in the login drop-down menu.
Performing the Management Console Installation 49
Page 50

5 Uncheck Secure Authentication in the Service Connection options.
6 Specify the Account name using LDAP format. For example, in "cn=admin,o=acmeserver" cn
is the user and o is the object where the user account is stored.
7 Specify the password for the account.
NOTE: The password should be set to not expire and this account should never be disabled.
8 Click Test to verify communication to the directory service. If communication cannot be
established, the user is notified of the error. Any inaccurate information is corrected, where
possible. by the interface during the test.
Figure 7-7 Completed Directory Screen
novdocx (en) 17 September 2009
9 Click Save to add this directory service to the database, then click New to add another directory
service to the database.
10 Click OK or Cancel to exit the Configuration window and return to the login screen.
7.2.2 Configuring the Management Console’s Permissions Settings
Permissions is found on the Tools menu of the Management Console and is accessible only by the
primary administrator for the Management Service and any other users who have been granted
permissions access by that administrator. This control is not available when running the Stand-Alone
Management Console. See Chapter 10, “ZENworks Endpoint Security Management Unmanaged
Installation,” on page 71 for more details.
The permissions settings define which user or group of users are permitted access to the
Management Console, Publish Policies, and Change Permission Settings.
During the Management Server installation, an administrator or Resource Account name is entered
into the configuration form. After a successful test has been performed and the user information is
saved, the permissions are automatically granted to this user.
50 ZENworks Endpoint Security Management Installation Guide
Page 51

After the Management Console is installed, all user groups within the domain are granted full
permissions. The resource user should remove permissions from all but the groups and users who
should have access. The resource user can set additional permissions for the designated users. The
permissions granted have the following results:
Management Console Access: The user can view policies and components, and edit existing
policies. Users granted only this privilege are not permitted to add or delete polices and the
publish and permissions options are unavailable.
Publish Policy: The user can publish policies only to assigned users and groups.
Change Permission: The user can access and change permissions settings for other users that
have already been defined, or grant permissions to new users.
Create Policies: The user can create new policies in the Management Console.
Delete Policies: The user can delete any policy in the Management Console.
NOTE: For security purposes, only the resource user or very few administrators should be granted
the Change Permission and Delete Policies permissions.
The following sections contain more information:
novdocx (en) 17 September 2009
“Configuring Administrative Permissions” on page 51
“Configuring Publish To Settings” on page 52
Configuring Administrative Permissions
1 Click Tools > Permissions.
The groups associated with this domain are displayed.
Figure 7-8 Management Console Permissions Settings Window
NOTE: All groups are granted full permissions in the Management Console by default.
Administrators should immediately uncheck any and all policy tasks from unauthorized groups.
Access to the console can be removed by unchecking that permission.
Performing the Management Console Installation 51
Page 52

2 (Optional) To load users and new groups to this list:
2a Click the Add button on the bottom of the screen to display the Organization table.
Figure 7-9 Permission Settings Organization Table
novdocx (en) 17 September 2009
2b Select the appropriate users and groups from the list. Use the Ctrl or Shift keys to select
multiple users.
2c When all users and groups have been selected, click OK button to add the users and
groups to the grid on the Permissions form.
3 Assign permissions to the available users and groups.
To remove a selected user or group, select the name, then click Remove.
Configuring Publish To Settings
Users and groups who have Publish Policy checked must be assigned users or groups to publish to.
To set the Publish To Settings:
1 Click the Publish To Settings tab.
2 From the drop-down list, select the users and groups granted the Publish permission.
52 ZENworks Endpoint Security Management Installation Guide
Page 53

Figure 7-10 Publish To Settings
3 To assign users and groups to this user or group:
3a Click the Add button on the bottom of the screen to display the Organization table.
3b Select the appropriate users and groups from the list. Use the Ctrl and Shift keys to select
multiple users.
3c When all users/groups have been selected, click the OK button.
novdocx (en) 17 September 2009
Figure 7-11 Publish To List
To remove a selected user or group, select the name in the list, then click Remove.
The permission sets are immediately implemented, so the administrator only needs to click Close
and accept the changes to return to the editor.
When a new directory service is added, the Resource Account is granted full permissions settings, as
described above.
Performing the Management Console Installation 53
Page 54

7.2.3 Publishing a Policy
To Publish a security policy with the default settings:
1 Click Create New Policy.
2 Specify a name for the policy, then click Create.
3 Save the policy, then click the Publish tab.
4 Because Endpoint Security Client users must check in to display in the tree, select the top of the
tree on the left, then double-click to populate the publishing field with all current groups and
users.
5 Click Publish to send the policy to the Policy Distribution Service.
The policy generated in this manner has the following characteristics:
A single location (Unknown) is created.
CD/DVD ROM drives are allowed.
Removable storage devices are allowed.
All communications ports (including Wi-Fi) are permitted.
The Firewall Setting, All Adaptive (all outbound traffic over networking ports is allowed;
unsolicited inbound traffic over networking ports is disallowed) is included.
novdocx (en) 17 September 2009
For information on creating a more robust security policy, please see the ZENworks Endpoint
Security Management Administration Guide.
54 ZENworks Endpoint Security Management Installation Guide
Page 55

8
Endpoint Security Client 3.5
novdocx (en) 17 September 2009
Installation
Use the Novell ZENworks Endpoint Security Client 3.5 for Windows XP (SP1 and SP2) and
Windows 2000 SP4 clients. Click the appropriate ZENworks Security Client installer from the
Installation Interface menu. The Endpoint Security Client installation begins. The following pages
outline the installation process for both Basic and MSI installation.
Basic Installation installs the Endpoint Security Client 3.5 only on the current machine.
MSI Installation launches the installer in Administrative mode (
Package of the software. This package can then be pushed down or otherwise made available at
a specified network location with the required user inputs pre-configured. This allows
individual users to install the software with the pre-defined server values.
8.1 Basic Endpoint Security Client 3.5 Installation
This procedure install the Endpoint Security Client 3.5 on the current machine only.
Verify that all security patches for Microsoft and anti-virus software are installed and up to date.
Install the Management Service SSL Root Certificates onto the local machine (
enterprise certificate)
/a
) and creates an MSI
ESM-MS.cer
, or the
8
NOTE: We recommend that antivirus/spyware software that is interacting with valid registry
functions be shut down during the installation of the Endpoint Security Client 3.5.
1 Click Next on the Welcome screen to continue.
2 Accept the Licensing Agreement, then click Next.
3 Enter an installation password. This prevents the user from uninstalling the Endpoint Security
Client 3.5 through Add/Remove programs (recommended).
Endpoint Security Client 3.5 Installation
55
Page 56

Figure 8-1 Uninstall Password
4 Select how policies will be received (from Distribution Service for managed clients or retrieved
locally for an unmanaged configuration [see Chapter 10, “ZENworks Endpoint Security
Management Unmanaged Installation,” on page 71 for unmanaged details]).
novdocx (en) 17 September 2009
Figure 8-2 Management Settings
5 Specify the Management Service information.
6 Select whether policies should be received for users or for the machine (machine-based
policies).
56 ZENworks Endpoint Security Management Installation Guide
Page 57

Figure 8-3 User or Machine-based policies
7 Click Install.
novdocx (en) 17 September 2009
After the software is installed, the user is prompted to restart the machine.
NOTE: You can optionally copy the certificate for the Management Service into a folder co-located
setup.exe
with
machine (for example, for all users). This process can also be done with the Novell license.
prior to running the installation. This automatically installs the certificate onto the
dat
file.
8.2 MSI Installation
This procedure creates a MSI Package for the Endpoint Security Client 3.5. This package is used by
a system administrator to publish the installation to a group of users via an Active Directory policy,
or through other software distribution methods.
To create the MSI package;:
If you are installing from the CD or ISO master installer and if you’re not planning to run any
command-line variables (see Section 8.2.1, “Command-line Variables,” on page 60):
1 Insert the CD and wait for the master installer to launch.
2 Click Product Installation.
3 Click Security Client.
4 Click Create ZSC MSI Package.
If you are using just the
D:\ESM32\ZSC
under
), begin with the following:
setup.exe
file for installation (the executable can be found on the CD
1 Right-click
setup.exe
.
2 Select Create Shortcut.
3 Right-click the shortcut, then click Properties.
4 At the end of the Target field, after the quotes, click the space bar once, then type
Endpoint Security Client 3.5 Installation 57
/a
.
Page 58

novdocx (en) 17 September 2009
For example: “
3.2.455\setup.exe" /a
C:\Documents and Settings\euser\Desktop\CL-Release-
Several command-line variables are available for MSI installation, see Section 8.2.1,
“Command-line Variables,” on page 60 for more details.
5 Click OK.
6 Double-click the shortcut to launch the MSI installer.
When installation begins:
1 Click NEXT on the Welcome screen to continue.
2 Accept the Licensing Agreement, then click Next.
3 Select whether an Uninstall Password is required (recommended) and enter the password.
4 Select how policies will be received (from Distribution Service for managed clients, retrieved
locally for an unmanaged configuration). If managed is selected:
Specify the Management Service information (FQDN or NETBIOS name depending upon
how it was entered during Management Service installation).
Select if policies will be user-based or machine-based policies.
5 (Optional) Specify an e-ail address in the provided field to notify you if installation fails.
6 Specify the network location where the MSI image is created, or browse to that location by
clicking the Change button.
Figure 8-4 Select Network Location for MSI Image
7 Click Install to create the MSI image.
8 Browse to the created MSI image and open the
Security Client\"
folder
9 Copy the Management Service SSL certificate (
"\program files\Novell\ZENworks
ESM-MS.cer
, or the enterprise certificate) and
the Novell License Key into this folder, replacing the default 0 KB files currently in the folder.
The ESM-MS SSL certificate is available in the
Management Setup Files
folder. The license key is e-mailed separately (if using the 30-day
ZENworks Endpoint Security
evaluation, no license key is necessary at this time).
58 ZENworks Endpoint Security Management Installation Guide
Page 59

Figure 8-5 Replace the Default Files in the MSI Package
novdocx (en) 17 September 2009
To set the MSI package to be pushed down to user groups like a Group Policy:
1 Open Administrative Tools - Active Directory Users and Computers, and open either Root
Domain or OU Properties.
Figure 8-6 Open Properties in either Root Domain or OU
2 Click the Group Policy tab, then click Edit.
3 Add the MSI Package to Computer Configuration.
Endpoint Security Client 3.5 Installation 59
Page 60

Figure 8-7 Select the MSI package to add
novdocx (en) 17 September 2009
8.2.1 Command-line Variables
Command-line variable options are available for MSI installation. These variables must be set in the
executable shortcut that is set to run in administrator mode. To use a variable, the following
command-line must be entered in the MSI shortcut:
“...\setup.exe” /a /V"variables"
marks. Separate multiple variables with a single space.
Example:
setup.exe /a /V"STDRV=stateful STBGL=1"
Endpoint Security Client 3.5 will boot in All Stateful with strict white-listing enforced.
NOTE: Booting in stateful can cause some interoperability issues (DHCP address delays, Novell
network interop issues, and so forth).
The following command line variables are available:
Table 8-1 Command Line Variables
Command Line Variable Description Notes
STDRV=stateful NDIS driver all stateful at boot time. Changes the default state of the
. Enter any of the commands below between the quotation
creates an MSI package where the
NDIS driver from All Open to All
Stateful permitting all network traffic
at boot time, until the Endpoint
Security Client 3.5 has determined its
location.
/qn Quiet install. Use to suppress the typical MSI
60 ZENworks Endpoint Security Management Installation Guide
Installation process. Endpoint
Security Client 3.5 will activate at next
user reboot.
Page 61

Command Line Variable Description Notes
STRBR=ReallySuppress No reboot after install completes. Security enforcement and client self
defense are not fully functional until
after the first reboot.
novdocx (en) 17 September 2009
STBGL=1 Strict white list enforcement on
application control.
STUPGRADE=1 Upgrade the Endpoint Security Client
3.5.
STUNINSTALL=1 Uninstall the Endpoint Security Client
3.5.
STUIP=password Uninstall with password Use when an uninstall password is
STNMS=”MS Name” Change the Management Service
name.
POLICYTYPE=1 Change Endpoint Security Client 3.5
to machine-based policies.
POLICYTYPE=2 Change Endpoint Security Client 3.5
to user-based policies.
A policy MUST be created that
identifies the application on the white
list, and distributed with this policy.
Use when upgrading the Endpoint
Security Client 3.5.
Use when uninstalling the Endpoint
Security Client 3.5. For detailed
uninstall instructions, see
“Uninstalling the Endpoint Security
Client 3.5” in the ZENworks Endpoint
Security Management Administration
Guide.
active.
Changes the Management Service
name for the Endpoint Security Client
3.5.
Use to change MSI-installed Endpoint
Security Clients to accept machinebased, rather than user-based
policies.
Use to change MSI-installed Endpoint
Security Clients to accept userbased, rather than machine-based
policies.
STVA=”Adapter name” Add Virtual Adapter. Use to activate policy control over a
virtual adapter
/L*v c:\log.txt Turn on logging. Use to activate logging at installation.
If not, this will have to be done
through the Endpoint Security Client
Diagnostics tools (see Administrator’s
Manual).
8.2.2 Distributing a Policy with the MSI Package
The default policy included at MSI installation can be replaced with an enterprise-configured policy.
To push down a specific policy with the MSI image:
1 Create a policy to be distributed to all users through the Management Console (see the
ZENworks Endpoint Security Management Administration Guide for details on Policy
Creation).
2 Export the policy, then it as
policy.sen
.
Endpoint Security Client 3.5 Installation 61
Page 62

novdocx (en) 17 September 2009
NOTE: All policies distributed in this manner (unmanaged) must be named
order for the Endpoint Security Client 3.5 to accept them. Policies not named
not implemented by the Endpoint Security Client 3.5.
3 Open the folder the policy was exported into and copy the
4 Browse to the created MSI image and open the
Security Client\"
5 Paste the
policy.sen
policy.sen
and
folder.
and
setup.sen
setup.sen
files into the folder. This will replace the default
files.
"\program files\Novell\ZENworks
policy.sen
policy.sen
policy.sen
and
setup.sen
in
are
files.
8.2.3 User Installation of the Endpoint Security Client 3.5 from MSI
When the user re-authenticates to the domain (through a reboot of the machine), the MSI installation
package runs prior to logging in. After the MSI installation completes, the machine reboots and the
user is permitted to log in to the machine. The Endpoint Security Client 3.5 is installed and running
on the machine.
8.3 Running the Endpoint Security Client 3.5
The Endpoint Security Client 3.5 runs automatically at system startup. For more information about
the Endpoint Security Client 3.5, see the ZENworks Endpoint Security Client 3.5 User Guide.
The User Guide can be distributed to all users to help them better understand the operation of their
new endpoint security software.
62 ZENworks Endpoint Security Management Installation Guide
Page 63

9
Endpoint Security Client 4.0
novdocx (en) 17 September 2009
Installation
The Novell® ZENworks® Endpoint Security Client 4.0 is a client release to support Microsoft
Windows Vista with Support Pack 1 running in 32-bit mode. The Endpoint Security Client 4.0 uses
the ZENworks Endpoint Security Management 3.5 Server and Management Console. You can now
manage Windows XP with the 3.5 client and Windows Vista with the 4.0 client.
The following pages outline the installation process for both Basic and MSI installation.
Basic Installation installs the Endpoint Security Client 4.0 only on the current machine.
/a
MSI Installation launches the installer in Administrative mode (
the software. This package can then be pushed down or otherwise made available at a specified
network location with the required user inputs preconfigured. This allows individual users to install
the software with predefined server values.
Section 9.1, “Basic Endpoint Security Client 4.0 Installation,” on page 63
Section 9.2, “MSI Installation,” on page 66
Section 9.3, “Running the Endpoint Security Client 4.0,” on page 70
Section 9.4, “Features Not Supported In the Endpoint Security Client 4.0,” on page 70
) and creates an MSI package of
9
9.1 Basic Endpoint Security Client 4.0 Installation
This procedure installs the ZENworks Endpoint Security Client 4.0 on the current machine only.
Before You Begin:
Verify that all security patches for Microsoft and anti-virus software are installed and up to
date. The Endpoint Security Client 4.0 software can be installed on Windows Vista running
Support Pack 1.
Novell recommends that antivirus/spyware software that is interacting with valid registry
functions be shut down during the installation of the Endpoint Security Client 4.0.
The Managed Endpoint Security Client requires SSL communication to the ZENworks
Endpoint Security Management Service component. If you selected “self signed certificates”
during the Management Service or the Single Server installation, the endpoint running the
Security Client must have the certificate installed in the proper context (preferably in the local
computer context).
To do this automatically, place the
Security Client installer’s
folder from the Management Service installation (or Single Server installation) into the
Files
folder with the Endpoint Security Client installer
ESM Setup Files
in the
automatically installs the certificate onto the machine (for example, for all users). This process
can also be done with the Novell license.
Setup.exe
folder and the folder is named
ESM-MS.cer
file. Optionally, you can copy the entire
file in the folder along with the Endpoint
dat
Setup.exe
file.
(ensure that the
ESM Setup Files
ESM Setup
ESM-MS.cert
). This
is
Endpoint Security Client 4.0 Installation
63
Page 64
Select the appropriate ZENworks Security Client installer directory from the Installation Interface
menu.
novdocx (en) 17 September 2009
1 Double-click
Setup.exe
to begin the installation process.
2 Choose the language you want for this installation, then click OK.
Language choices include:
Chinese Simplified
Chinese Traditional
English (the default)
French
German
Italian
Japanese
Portuguese
Spanish Traditional
3 Endpoint Security Client 4.0 requires that you have Microsoft Web Services Enhancements
(WSE) 2.0 with Service Pack 3 and Microsoft Visual C++ 2008 installed on your computer
prior to installing the client. If the installation process does not detect these components, you
see this screen. Click Install to install these requirements.
4 If you haven’t already done so, turn off anti-virus and anti-spyware software before pressing
Next at the Welcome screen.
5 Accept the Licensing Agreement, then click Next.
6 Select Require an uninstall password. This prevents the user from uninstalling the Endpoint
Security Client 4.0 (recommended).
64 ZENworks Endpoint Security Management Installation Guide
Page 65

7 Add an uninstall password and confirm the password, then click Next.
novdocx (en) 17 September 2009
8 Select a policy type (either a User Based Policy, where each user has an individual policy, or a
Computer Based Policy, where one policy is used for all users). Click Next.
NOTE: Select User Based Policy if your network uses eDirectory as its Directory Service.
eDirectory does not support computer based policies.
Endpoint Security Client 4.0 Installation 65
Page 66

9 Select how policies are to be received (managed through ESM servers for managed clients or
retrieved locally for an unmanaged (standalone) configuration. Click Next.
For details about an unmanaged installation, see Chapter 10, “ZENworks Endpoint Security
Management Unmanaged Installation,” on page 71.
10 (Optional) If you selected Manage through ESM servers in Step 9, type the name of the server
supporting the Management service.
The server name you enter must match the “Issued To” name that is provided in the trusted root
certificate used on the server where you installed the ZENworks Endpoint Management
Service or Single Server. This will either be the NETBIOS name or the Fully Qualified Domain
Name (FQDN) of the server running the ZENworks Endpoint Management Service
component. Once entered, click Next.
11 Click Install to begin the installation.
12 After the software is installed, restart the machine when you are prompted to do so.
For a list of features that are not available for the 4.0 Client for Vista, see Section 9.4, “Features
Not Supported In the Endpoint Security Client 4.0,” on page 70.
novdocx (en) 17 September 2009
9.2 MSI Installation
This procedure creates an MSI package for the Endpoint Security Client 4.0. This package is used
by a system administrator to publish the installation to a group of users via an Active Directory
policy, or through other software distribution methods.
Section 9.2.1, “Using the Master Installer,” on page 66
Section 9.2.2, “Using the Setup.exe File,” on page 66
Section 9.2.3, “Completing the Installation,” on page 67
Section 9.2.4, “Command Line Variables,” on page 68
Section 9.2.5, “Distributing a Policy with the MSI Package,” on page 69
9.2.1 Using the Master Installer
If you are installing from the CD or ISO master installer and if you’re not planning to run any
command line variables:
1 Insert the CD and wait for the master installer to launch.
2 Click Product Installation.
3 Click Security Client.
4 Click Create ZSC MSI Package.
5 Continue with Section 9.2.3, “Completing the Installation,” on page 67.
9.2.2 Using the Setup.exe File
If you are using just the
1 Right-click
The executable can be found on the CD under
2 Select Create Shortcut.
66 ZENworks Endpoint Security Management Installation Guide
setup.exe
setup.exe
.
file for installation:
D:\ESM32\ZSC
.
Page 67

3 Right-click the shortcut, then click Properties.
4 At the end of the Target field, after the quotes, press the Spacebar once to insert a space, then
/a
type
For example: “
3.2.455\setup.exe" /a
.
C:\Documents and Settings\euser\Desktop\CL-Release-
Several command line variables are available for MSI installation. See Section 8.2.1,
“Command-line Variables,” on page 60 for more details.
5 Click OK.
6 Double-click the shortcut to launch the MSI installer.
7 Continue with Section 9.2.3, “Completing the Installation,” on page 67.
9.2.3 Completing the Installation
Complete either Using the Master Installer or Using the Setup.exe File, then use this procedure to
finish installing the client.
1 Click NEXT on the Welcome screen to continue.
2 Select Require an uninstall password (recommended) and enter the password. Click Next.
novdocx (en) 17 September 2009
NOTE: If you uninstall the Endpoint Security Client through an MSI package, you must
specify the uninstall password through the MSI properties (see Table 9-1 on page 68).
3 Select a policy type (either a User Based Policy, where each user has an individual policy, or a
Computer Based Policy, where one policy is used for all users). Click Next.
NOTE: Select User Based Policy if your network uses eDirectory as its Directory Service.
eDirectory does not support computer based policies.
4 Select how policies are to be received (managed through ESM servers for managed clients or
retrieved locally for an unmanaged (standalone) configuration.
5 (Optional) If you selected Manage through ESM servers in Step 4:
The server name you enter must match the “Issued To” name that is provided in the
trusted root certificate used on the server where you installed the ZENworks Endpoint
Management Service or Single Server. This will either be the NETBIOS name or the Fully
Qualified Domain Name (FQDN) of the server running the ZENworks Endpoint
Management Service component.
6 (Optional) Specify an e-mail address in the provided field to notify you if the installation fails.
7 Specify the network location where you want to create the MSI image, or browse to and select
that location by clicking the Change button.
Endpoint Security Client 4.0 Installation 67
Page 68

8 Click Install to create the MSI image. Click Finish to close the setup program.
9 Browse to the location where you created the MSI image and open the
Files\Novell ZENworks\Endpoint Security Client\
10 Copy the Management Service SSL certificate (
ESM-MS.cer
folder.
, or the enterprise certificate) and
\Program
the Novell license key into this folder, replacing the default 0 KB files currently in the folder.
novdocx (en) 17 September 2009
The ESM-MS SSL certificate is available in the
Management Setup Files
folder. The license key is e-mailed separately. If you are using the
ZENworks Endpoint Security
60-day evaluation, no license key is necessary at this time.
9.2.4 Command Line Variables
Command Line variable options are available for an MSI installation. These variables must be set in
the executable shortcut that is set to run in administrator mode. To use a variable, the following
command line must be entered in the MSI shortcut:
“...\setup.exe” /a /V"variables"
marks. Separate multiple variables with a single space.
The following command line variables are available:
Table 9-1 Command Line Variables
Command Line Variable Description Notes
/qn Quiet install. Suppresses the typical MSI
. Enter any of the commands below between the quotation
Installation process. The Endpoint
Security Client will activate at the next
user reboot.
SESMSG=1 Shows a message to the end user
that files in “Safe Harbors” cannot
automatically have encryption
removed if an Encryption Policy is
deployed.
68 ZENworks Endpoint Security Management Installation Guide
The default value is 0 (don’t display
messages) in order to make the
uninstall “silent.”
Page 69

Command Line Variable Description Notes
STRBR=ReallySuppress No reboot after the install completes. Security enforcement and client self
defense are not fully functional until
after the first reboot.
novdocx (en) 17 September 2009
STUPGRADE=1 Upgrade the Endpoint Security Client
4.0.
STUNINSTALL=1 Uninstall the Endpoint Security Client
4.0.
STUIP=password Uninstall with password Use this variable when an uninstall
STNMS=”MS Name” Change the Management Service
name.
POLICYTYPE=1 Change Endpoint Security Client 4.0
to machine-based policies.
POLICYTYPE=2 Change Endpoint Security Client 4.0
to user-based policies.
Upgrades the Endpoint Security
Client 4.0.
Uninstalls the Endpoint Security
Client 4.0.
For detailed uninstall instructions, see
“Uninstalling the Endpoint Security
Client 3.5” in the ZENworks Endpoint
Security Management Administration
Guide.
password is active.
Changes the Management Service
name for the Endpoint Security Client
4.0.
Changes MSI-installed Endpoint
Security Clients to accept machinebased policies instead of user-based
policies.
Changes MSI-installed ZENworks
Security 4.0 Clients for Vista to
accept user-based policies instead of
machine-based policies.
STVA=”Adapter name” Add a virtual adapter. Activates policy control over a virtual
adapter
/L*v c:\log.txt Turn on logging. Activates logging at installation. If you
do not use this variable, logging must
be done through the Endpoint
Security Client Diagnostics tools.
9.2.5 Distributing a Policy with the MSI Package
The default policy included at MSI installation can be replaced with an enterprise-configured policy.
To push down a specific policy with the MSI image:
1 Create a policy to be distributed to all users through the Management Console (see the
ZENworks Endpoint Security Management Administration Guide for details on Policy
Creation).
2 Export the policy, then rename it to be
policy.sen
All policies distributed in this manner (unmanaged) must be named
the Endpoint Security Client 4.0 to accept them. Policies not named
implemented by the Endpoint Security Client 4.0.
3 Open the folder the policy was exported into and copy the
.
policy.sen
policy.sen
policy.sen
and
setup.sen
in order for
are not
files.
Endpoint Security Client 4.0 Installation 69
Page 70

novdocx (en) 17 September 2009
4 Browse to the created MSI image and open the
ZENworks\Endpoint Security Client\
5 Paste the
policy.sen
policy.sen
and
setup.sen
and
setup.sen
files into the folder. This will replace the default
files.
\Program Files\Novell
folder.
9.3 Running the Endpoint Security Client 4.0
The Endpoint Security Client 4.0 runs automatically at system startup. For more information about
the Endpoint Security Client 4.0, see the ZENworks Endpoint Security Client 4.0 User Guide.
The User Guide can be distributed to all users to help them better understand the operation of their
new endpoint security software.
9.4 Features Not Supported In the Endpoint Security Client 4.0
The features that are not supported or are partially supported with Endpoint Security Client 4.0
include:
Client Self Defense.
Modem support.
Scripting.
Manually changing firewalls in a location.
Having multiple firewalls visible in a location. Only the default firewall is available.
Integrity rules.
Application blocking.
Mouse-over notification area icon information has changed. The icon only shows Policy and
Location information.
USB connectivity.
Wi-Fi key management.
Wired connections are not valued above wireless connections.
Endpoint Security Client updates (by policy).
VPN authentication timeout.
Autoplay for storage device control.
Phonebook entries in the network environment.
70 ZENworks Endpoint Security Management Installation Guide
Page 71

10
ZENworks Endpoint Security
novdocx (en) 17 September 2009
Management Unmanaged
Installation
An enterprise can run the ZENworks® Security Client and Management Console in an Unmanaged
mode (without connection to the Policy Distribution Service, or the Management Service). This is
available as an installation option, primarily intended for setting up simple evaluations. This option
is also ideal for enterprises with little or no server space, or with basic security needs. However,
quick policy updates and Compliance Reporting are not available in this configuration.
10.1 Unmanaged Endpoint Security Client Installation
To install an unmanaged Endpoint Security Client, follow the instructions on Chapter 8, “Endpoint
Security Client 3.5 Installation,” on page 55, and select the Not Connected to ZENworks Endpoint
Security Management Servers (policies received as files) option. The installation bypasses the
questions regarding the names of the servers and installs the Endpoint Security Client onto this
machine (an MSI package can also be created for an Unmanaged Endpoint Security Client).
Figure 10-1 Select “Not Connected to ZENworks Endpoint Security Management Servers”
10
10.2 Stand-Alone Management Console
This configuration allows a ZENworks Endpoint Security Management Management Console to be
installed and create policies without connecting to an outside Management Service, or distributing
policies through the Policy Distribution Service. Select Stand-Alone Management Console
Installation from the Master Installer menu, then follow the instructions on Chapter 7, “Performing
the Management Console Installation,” on page 45 for installation.
ZENworks Endpoint Security Management Unmanaged Installation
71
Page 72

At the start of the installation, a SQL database is installed (if one exists on the machine, the installer
will set up the appropriate databases instead). After the database is installed, the installation stops.
The machine must be restarted to activate the SQL database. Following the reboot, activate the
installation again to continue.
Most policy functionality is available for deployment, with the exception of Reporting. All exported
policy files must be distributed to a Endpoint Security Client's
Files\Novell\ZENworks Security Client\
directory.
\Program
10.3 Distributing Unmanaged Policies
To distribute unmanaged polices:
novdocx (en) 17 September 2009
1 Locate and copy the Management Console's
setup.sen
The
\Program Files\Novell\ESM Management Console\
file is generated at installation of the Management Console, and placed in the
setup.sen
file to a separate folder.
directory.
2 Create a policy in the Management Console (for more information, see the ZENworks Endpoint
Security Management Administration Guide).
3 Use the Export command to export the policy to the same folder containing the
All policies distributed must be named
policy.sen
for the Endpoint Security Client to accept
setup.sen
file.
them.
4 Distribute the
Files\Novell\ZENworks Security Client\
setup.sen
The
policy.sen
and
setup.sen
files. These files must be copied to the
\Program
directory for all unmanaged clients.
file only needs to be copied to the unmanaged devices once, with the first
policy. Afterwards, only new policies need to be distributed.
If an Unmanaged Endpoint Security Client is installed on the same machine as the Stand Alone
Management Console, the
Files\Novell\ZENworks Security Client\
setup.sen
file must also be copied to the
directory. If the Unmanaged Endpoint Security
\Program
Client is installed on the machine after the Stand Alone Editor, the file must be transferred manually
as described above.
Clicking the Publish button immediately publishes the policy to that machine's unmanaged Endpoint
Security Client. To provide policies to multiple, unmanaged users, use the Export feature as
described above.
72 ZENworks Endpoint Security Management Installation Guide
Page 73

11
Upgrading
To upgrade your software from one release to another, complete the following process:
1 Export all policies. For instructions, see “Exporting a Policy” in the ZENworks Endpoint
Security Management Administration Guide.
2 Export all encryption keys. For instructions, see “Managing Keys” in the ZENworks Endpoint
Security Management Administration Guide.
You do not have to export the encryption keys if you exported your encryption policies. Each
encryption policy includes all encryption keys. However, it is best practice to export the keys
regularly to back up the keys, so we recommend that you do it at this time.
3 Uninstall the Management Service, Policy Distribution Service, and Management Console. To
do so, use the Windows Add/Remove Programs feature.
You can uninstall the components in any order. Make sure you also remove the databases.
4 Reinstall the components in the following order:
novdocx (en) 17 September 2009
11
Policy Distribution Service
Management Service
Management Console
If you are installing the Policy Distribution Service and Management Service on the same
machine, see Chapter 3, “Performing a Single-Server Installation,” on page 19 for instructions.
If you are installing them on separate machines, see Chapter 4, “Performing a Multi-Server
Installation,” on page 23.
For Management Console installation instructions, see Chapter 7, “Performing the
Management Console Installation,” on page 45.
5 Import the policies using the Management Console. For instructions, see “Importing Policies”
in the ZENworks Endpoint Security Management Administration Guide.
6 Import the encryption keys. For instructions, see “Managing Keys” in the ZENworks Endpoint
Security Management Administration Guide.
If you’ve already imported your encryption policies, this step is not necessary. However, it
doesn’t harm your system and ensures that your system contains all of the encryption keys.
7 Uprade the Security clients. For instructions, see “Upgrading the Endpoint Security Client 3.5”
in the ZENworks Endpoint Security Management Administration Guide.
Typically, the new certificates for the Management Service and Policy Distribution Service
work with the Security clients existing certificates. If you encounter problems with Security
clients communicating with the services, redistribute the new certificates as part of the client
upgrade.
8 Republish the policies.
Upgrading
73
Page 74

novdocx (en) 17 September 2009
74 ZENworks Endpoint Security Management Installation Guide
Page 75

A
Documentation Updates
This section contains information on documentation content changes that were made in this Novell
ZENworks Endpoint Security Management Installation Guide after its initial release for version 3.5.
The changes are listed according to the date they were published.
The documentation for this product is provided on the Web in two formats: HTML and PDF. The
HTML and PDF documentation are both kept up-to-date with the changes listed in this section.
If you need to know whether a copy of the PDF documentation that you are using is the most recent,
the PDF document includes a publication date on the title page.
The documentation was updated on the following dates:
Section A.1, “July 31, 2009,” on page 75
Section A.2, “January 5, 2009,” on page 75
novdocx (en) 17 September 2009
A
A.1 July 31, 2009
Updates were made to the following sections:
Location Update
Chapter 11, “Upgrading,” on
page 73
Added this section explaining the process for upgrading from one release
to another.
A.2 January 5, 2009
Updates were made to the following sections:
Location Update
All sections The name of the client was changed throughout the guide. Formally it is
now called Novell ZENworks Endpoint Security Client. In its respective
chapters, the clients are called Endpoint Security Client 3.5 (for Windows
XP) and Endpoint Security Client 4.0 (for Windows Vista).
Section 1.1, “System
Requirements,” on page 10
Chapter 8, “Endpoint
Security Client 3.5
Installation,” on page 55
Added system requirements for the new Vista client and standalone
Management Console.
Added information and name change indicating that the Endpoint Security
Client 3.5 is for Windows XP.
Chapter 9, “Endpoint
Security Client 4.0
Installation,” on page 63
Added a chapter on Endpoint Security Client 4.0 (for Windows Vista).
Documentation Updates
75
Page 76

novdocx (en) 17 September 2009
76 ZENworks Endpoint Security Management Installation Guide
 Loading...