

Page 1

Novell®
www.novell.com
AUTHORIZED DOCUMENTATION
Endpoint Security Client 4.0 User Guide
ZENworks® Endpoint Security Management
novdocx (en) 13 May 2009
4.0
March 31, 2009
ZENworks Endpoint Security Client 4.0 User Guide
Page 2

Legal Notices
Novell, Inc., makes no representations or warranties with respect to the contents or use of this documentation, and
specifically disclaims any express or implied warranties of merchantability or fitness for any particular purpose.
Further, Novell, Inc., reserves the right to revise this publication and to make changes to its content, at any time,
without obligation to notify any person or entity of such revisions or changes.
Further, Novell, Inc., makes no representations or warranties with respect to any software, and specifically disclaims
any express or implied warranties of merchantability or fitness for any particular purpose. Further, Novell, Inc.,
reserves the right to make changes to any and all parts of Novell software, at any time, without any obligation to
notify any person or entity of such changes.
Any products or technical information provided under this Agreement may be subject to U.S. export controls and the
trade laws of other countries. You agree to comply with all export control regulations and to obtain any required
licenses or classification to export, re-export or import deliverables. You agree not to export or re-export to entities on
the current U.S. export exclusion lists or to any embargoed or terrorist countries as specified in the U.S. export laws.
You agree to not use deliverables for prohibited nuclear, missile, or chemical biological weaponry end uses. See the
Novell International Trade Services Web page (http://www.novell.com/info/exports/) for more information on
exporting Novell software. Novell assumes no responsibility for your failure to obtain any necessary export
approvals.
novdocx (en) 13 May 2009
Copyright © 2007-2009 Novell, Inc. All rights reserved. No part of this publication may be reproduced, photocopied,
stored on a retrieval system, or transmitted without the express written consent of the publisher.
Novell, Inc., has intellectual property rights relating to technology embodied in the product that is described in this
document. In particular, and without limitation, these intellectual property rights may include one or more of the U.S.
patents listed on the Novell Legal Patents Web page (http://www.novell.com/company/legal/patents/) and one or
more additional patents or pending patent applications in the U.S. and in other countries.
Novell, Inc.
404 Wyman Street, Suite 500
Waltham, MA 02451
U.S.A.
www.novell.com
Online Documentation: To access the latest online documentation for this and other Novell products, see
the Novell Documentation Web page (http://www.novell.com/documentation).
Page 3

Novell Trademarks
For Novell trademarks, see the Novell Trademark and Service Mark list (http://www.novell.com/company/legal/
trademarks/tmlist.html).
Third-Party Materials
All third-party trademarks are the property of their respective owners.
novdocx (en) 13 May 2009
Page 4

novdocx (en) 13 May 2009
4 ZENworks Endpoint Security Client 4.0 User Guide
Page 5

About This Guide
This Novell® ZENworks® Endpoint Security Client 4.0 User Guide is written to instruct the end-user
on the operation of the Endpoint Security Client 4.0 for Microsoft Windows* Vista*.
The information in this guide is organized as follows:
Chapter 1, “Introduction,” on page 9
Chapter 2, “Endpoint Security Client 4.0 Overview,” on page 11
Chapter 3, “Using the Endpoint Security Client 4.0,” on page 15
Audience
This guide can be sent to all employees in the enterprise to help them understand how to use the
Endpoint Security Client.
novdocx (en) 13 May 2009
Feedback
We want to hear your comments and suggestions about this manual and the other documentation
included with this product. Please use the User Comments feature at the bottom of each page of the
online documentation, or go to the Novell Documentation Feedback site (http://www.novell.com/
documentation/feedback.html) and enter your comments there.
Additional Documentation
ZENworks Endpoint Security Management is supported by other documentation (in both PDF and
HTML formats) that you can use to learn about and implement the product. For additional
documentation, see the ZENworks Endpoint Security Management 3.5 documentation Web site
(http://www.novell.com/documentation/zesm35).
Documentation Conventions
In Novell documentation, a greater-than symbol (>) is used to separate actions within a step and
items in a cross-reference path.
®
A trademark symbol (
trademark.
When a single pathname can be written with a backslash for some platforms or a forward slash for
other platforms, the pathname is presented with a backslash. Users of platforms that require a
forward slash, such as Linux*, should use forward slashes as required by your software.
, TM, etc.) denotes a Novell trademark. An asterisk (*) denotes a third-party
About This Guide 5
Page 6

novdocx (en) 13 May 2009
6 ZENworks Endpoint Security Client 4.0 User Guide
Page 7

Contents
About This Guide 5
1 Introduction 9
1.1 Security Enforcement for Mobile Computers . . . . . . . . . . . . . . . . . . . . . . . . . . . . . . . . . . . . . . . 9
1.2 NDIS Layer Firewall Protection . . . . . . . . . . . . . . . . . . . . . . . . . . . . . . . . . . . . . . . . . . . . . . . . 10
2 Endpoint Security Client 4.0 Overview 11
2.1 ESM Terminology. . . . . . . . . . . . . . . . . . . . . . . . . . . . . . . . . . . . . . . . . . . . . . . . . . . . . . . . . . . 11
2.2 Logging In to the Endpoint Security Client 4.0 . . . . . . . . . . . . . . . . . . . . . . . . . . . . . . . . . . . . . 12
3 Using the Endpoint Security Client 4.0 15
3.1 Moving Among Network Environments . . . . . . . . . . . . . . . . . . . . . . . . . . . . . . . . . . . . . . . . . . 15
3.2 Changing Locations . . . . . . . . . . . . . . . . . . . . . . . . . . . . . . . . . . . . . . . . . . . . . . . . . . . . . . . . . 16
3.3 Data Encryption . . . . . . . . . . . . . . . . . . . . . . . . . . . . . . . . . . . . . . . . . . . . . . . . . . . . . . . . . . . . 16
3.3.1 Managing Files on Non-System Volumes . . . . . . . . . . . . . . . . . . . . . . . . . . . . . . . . . 16
3.3.2 Managing Files on Removable Storage. . . . . . . . . . . . . . . . . . . . . . . . . . . . . . . . . . . 16
3.4 Updating Policies . . . . . . . . . . . . . . . . . . . . . . . . . . . . . . . . . . . . . . . . . . . . . . . . . . . . . . . . . . . 21
3.5 Viewing Help . . . . . . . . . . . . . . . . . . . . . . . . . . . . . . . . . . . . . . . . . . . . . . . . . . . . . . . . . . . . . . 22
3.6 Overriding a Password. . . . . . . . . . . . . . . . . . . . . . . . . . . . . . . . . . . . . . . . . . . . . . . . . . . . . . . 22
3.7 Diagnostics. . . . . . . . . . . . . . . . . . . . . . . . . . . . . . . . . . . . . . . . . . . . . . . . . . . . . . . . . . . . . . . . 23
novdocx (en) 13 May 2009
Contents 7
Page 8

novdocx (en) 13 May 2009
8 ZENworks Endpoint Security Client 4.0 User Guide
Page 9

1
Introduction
The Novell® ZENworks® Endpoint Security Client 4.0 is a client release to support Microsoft
Windows Vista with Support Pack 1 running in 32-bit mode. The Endpoint Security Client 4.0 uses
the ZENworks Endpoint Security Management 3.5 Server and Management Console.
Novell ZENworks Endpoint Security Management (ESM) is designed to protect corporate data
assets, through a centrally managed tool called the ZENworks Security Client. The ZENworks
Endpoint Security Client 4.0 is installed on Windows Vista enterprise computers and enforces
security policies written and sent down through the ESM management and distribution system. This
allows large enterprises and small businesses to create, deploy, enforce, and monitor computer
security policies on computers inside and outside of the corporate security perimeter.
The following sections contain additional information:
Section 1.1, “Security Enforcement for Mobile Computers,” on page 9
Section 1.2, “NDIS Layer Firewall Protection,” on page 10
novdocx (en) 13 May 2009
1
1.1 Security Enforcement for Mobile Computers
Security is enforced both globally and by network location. Each location listed in a security policy
determines the user's permissions in that network environment and determines which firewall
settings are activated. The firewall settings determine which networking ports, network addresses,
and applications are granted network access and how that access is permitted.
Figure 1-1 ESM Adjusts Security Settings Based on the Detected Network Environment
Normal operations of the Endpoint Security Client 4.0 are transparent to the user, after the network
environments have been defined. Occasionally, Endpoint Security Client 4.0 protective measures
can interrupt normal operation; when this occurs, messages and hyperlinks display to notify the user
about the security policy, what protective steps have been taken, and refer them to additional
information to help correct the issue.
Introduction
9
Page 10

1.2 NDIS Layer Firewall Protection
In securing mobile devices, ESM is superior to typical personal firewall technologies that operate
only in the application layer or as a firewall-hook driver. ESM client security is integrated into the
Network Driver Interface Specification (NDIS) driver for each network interface card (NIC),
providing security protection from the moment traffic enters the computer. Differences between
ESM and application-layer firewalls and filter drivers are illustrated in Figure 1-2, “Effectiveness of
an NDIS-Layer Firewall,” on page 10.
Figure 1-2 Effectiveness of an NDIS-Layer Firewall
novdocx (en) 13 May 2009
Security decisions and system performance are optimized when security implementations operate at
the lowest appropriate layer of the protocol stack. With the Endpoint Security Client 4.0 , unsolicited
traffic is dropped at the lowest levels of the NDIS driver stack by means of Adaptive Port Blocking
(stateful packet inspection) technology. This approach protects against protocol-based attacks,
including unauthorized port scans, SYN Flood attacks, and others.
It is recommended that you follow all operation and maintenance recommendations in this
document, in order to ensure that the endpoint security environment is protected.
10 ZENworks Endpoint Security Client 4.0 User Guide
Page 11

2
Endpoint Security Client 4.0
novdocx (en) 13 May 2009
Overview
The ZENworks® Security Client secures computers from data invasion attacks at home, at work,
and while traveling, through the enforcement of security policies created by the enterprise Endpoint
Security Management (ESM) administrator. The firewall settings assigned at individual locations
are automatically adjusted when laptop users move from the corporate network to their home
networks or go on the road and log on to a public or open network.
Security levels are applied to various user locations without requiring user expertise or
understanding of network security, port configurations, hidden shared files, or other technical
details. Immediate information on which locations and policies are available by simply mousing
over the taskbar icon to view the Endpoint Security Client ToolTip (see Figure 2-1).
Figure 2-1 Endpoint Security Client ToolTip
2
The following sections contain additional information:
Section 2.1, “ESM Terminology,” on page 11
Section 2.2, “Logging In to the Endpoint Security Client 4.0,” on page 12
2.1 ESM Terminology
The following terms are frequently used in this documentation:
Locations: Locations are simple definitions that help users identify the network environment they
are in, provide immediate security settings (defined by the administrator), and permit the user to
save the network environment and change the applied firewall settings.
Each location is given unique security settings, denying access to certain network functionality and
hardware in more hostile network environments, and permitting broader access within trusted
environments. Locations define the following information:
How often the Endpoint Security Client checks for a policy update in this location
The location management permissions granted to a user
The firewall settings that are used at this location
The communication hardware that is permitted to connect
At what level the user is permitted to use removable storage devices (such as thumb drives and
memory cards) and to use CD/DVD-RW drives
Any network environments that can help to define the location
Endpoint Security Client 4.0 Overview
11
Page 12

Firewall Settings: Firewall settings control the connectivity of all networking ports (1-65535),
network packets (ICMP, ARP, etc.), network addresses (IP or MAC), and which network
applications (file sharing, instant messenger software, etc.) are permitted to get a network
connection when the setting is applied. Three firewall settings are included as defaults for ESM, and
can be implemented at a location. The ESM Administrator can also create specific firewall settings,
which cannot be listed here.
All Adaptive: This firewall setting sets all networking ports as stateful (all unsolicited inbound
network traffic is blocked; all outbound network traffic is allowed). ARP and 802.1x packets
are permitted, and all network applications are permitted a network connection.
All Open: This firewall setting sets all networking ports as open (all network traffic is
allowed). All packet types are permitted. All network applications are permitted a network
connection.
All Closed: This firewall setting closes all networking ports, and restricts all packet types.
Adapters: Refers to three communication adapters normally found on an endpoint:
Wired Adapters (LAN connections)
Wi-Fi Adapters (PCMCIA Wi-Fi cards, and built-in Wi-Fi radios)
novdocx (en) 13 May 2009
Also refers to other communication hardware that might be included on a computer, such as
infrared, Bluetooth*, FireWire*, and serial and parallel ports.
Storage Devices: Refers to external storage devices that can pose a security threat when data is
copied to, or introduced from, these devices on an endpoint. USB thumb drives, flash memory cards,
and SCSI PCMCIA memory cards, along with traditional Zip*, floppy, and external CDR drives and
the installed CD/DVD drives (including CD-ROM, CD-R/RW, DVD, DVD R/RW), can all be
blocked, permitted, or rendered to Read-Only at a single location.
Network Environments: A network environment is the collection of network services and service
addresses required to identify a network location.
2.2 Logging In to the Endpoint Security Client 4.0
If you are a member of the corporate Active Directory domain, the Endpoint Security Client 4.0 uses
your Windows* username and password to log you in to the Policy Distribution Service (no pop-up
window displays). If you are member of a Novell eDirectory tree, the Endpoint Security Client 4.0
prompts you for your username and password for the tree (see Figure 2-2).
NOTE: With Novell eDirectory, the user receives a pop-up login window once after the Endpoint
Security Client 4.0 installs. This allows you to provide your username and password for the tree.
If you are not a member of the domain that the Policy Distribution Service is hosted on, the
Endpoint Security Client 4.0 prompts you for your username and password for that domain (see
Figure 2-2).
12 ZENworks Endpoint Security Client 4.0 User Guide
Page 13

Figure 2-2 Endpoint Security Client 4.0 Login
Enter your username and password for the domain or for the eDirectory tree, then click OK.
novdocx (en) 13 May 2009
The Directory Service Configuration Name needs to match the directory services you are
authenticating to. Use the drop-down menu to see if you have more than one service available.
NOTE: It is not necessary to log in to the Endpoint Security Client when the Endpoint Security
Client is running as standalone. The ESM Administrator has a different method to deliver policies to
standalone users.
Endpoint Security Client 4.0 Overview 13
Page 14

novdocx (en) 13 May 2009
14 ZENworks Endpoint Security Client 4.0 User Guide
Page 15

3
Using the Endpoint Security Client
novdocx (en) 13 May 2009
4.0
The following sections contain additional information about actions that you can perform using the
®
Novell
NOTE: The actions listed above can be restricted by the administrator at any location.
3.1 Moving Among Network Environments
Each network an end user travels to might require different security measures. The Endpoint
Security Client 4.0 provides security and protection in locations identified by available network
connections. The Endpoint Security Client 4.0 detects the network environment parameters and
switches to the appropriate location, applying the needed protection levels according to the current
security policy.
ZENworks® Endpoint Security end-user application, the Endpoint Security Client 4.0:
Section 3.1, “Moving Among Network Environments,” on page 15
Section 3.2, “Changing Locations,” on page 16
Section 3.3, “Data Encryption,” on page 16
Section 3.4, “Updating Policies,” on page 21
Section 3.5, “Viewing Help,” on page 22
Section 3.6, “Overriding a Password,” on page 22
Section 3.7, “Diagnostics,” on page 23
3
Network environment information is either stored or preset within a location. This allows the
Endpoint Security Client 4.0 to switch to a location automatically when the environment parameters
are detected.
Preset Environment: Defined by the enterprise ESM Administrator through a published
security policy.
When the user enters a new network environment, the client compares the detected network
environment to any stored and preset values in the security policy. If a match is found, the Endpoint
Security Client 4.0 activates the assigned location. When the detected environment cannot be
identified as a stored or preset environment, the client activates the default Unknown location.
The Unknown location has the following presets:
Change Locations = Permitted
Update Policy = Permitted
Default Firewall settings = All Open
By default, all adapter types (wired, Wi-Fi, and modem) are permitted in the Unknown location.
This allows the computer to interface peripherally with its network environment, and attempt to
associate a location policy as described above.
Using the Endpoint Security Client 4.0
15
Page 16

3.2 Changing Locations
At startup, the Endpoint Security Client 4.0 switches to the Unknown location. It then attempts to
detect the current network environment and to change the location automatically. If the network
environment is either unrecognized, or has not been preset, the location must be changed manually.
If you cannot perform the following steps, your ZENworks Endpoint Security administrator might
have prevented you from changing locations manually.
To change a location:
1 Right-click the Endpoint Security Client 4.0 icon in the taskbar to display a menu of choices.
novdocx (en) 13 May 2009
2 Click the appropriate location.
3.3 Data Encryption
When activated by policy, the Endpoint Security Client 4.0 manages the encryption of files placed in
a specific directory on the endpoint and placed in removable storage devices.
The following instructions will assist you in using ZENworks Endpoint Security on the endpoint.
Section 3.3.1, “Managing Files on Non-System Volumes,” on page 16
Section 3.3.2, “Managing Files on Removable Storage,” on page 16
3.3.1 Managing Files on Non-System Volumes
Fixed disks are defined as all non-system volume drives installed on the computer, as well as any
partitions of a hard-disk drive. Each fixed disk on the endpoint has a “Safe Harbor” folder (by
default the folder is called
the root directory. All files placed in this folder are encrypted, using the current encryption key. Only
authorized users on the computer can decrypt these files.
When saving a file, select the Safe Harbor folder from the available folders on the desired drive.
Encrypted Files
3.3.2 Managing Files on Removable Storage
) and exists on each non-system volume or drive off
Removable storage is defined as any storage device that is “connected” to a computer. This includes
(but is not limited to) USB thumb drives, flash memory cards, and PCMCIA memory cards, along
with traditional Zip, floppy, and external CDR drives, digital cameras with storage capacity, and
MP3 players.
16 ZENworks Endpoint Security Client 4.0 User Guide
Page 17

When you are running ZENworks Endpoint Security, files stored on these devices are encrypted as
they are accessed by the operating system or the user. Files copied to the device are immediately
encrypted. When the removable storage device is connected to a computer not managed by the
ZENworks Endpoint Security system, the files remain encrypted and cannot be decrypted.
Encryption of removable storage occurs at the insertion of the device (see “What If I Don’t Want the
Device Encrypted?” on page 18). However, files added to an encrypted removable storage device on
another machine are not encrypted, and must be encrypted manually.
The following sections contain more information:
“Encrypting Files” on page 17
“What If I Don’t Want the Device Encrypted?” on page 18
“Password Encrypting Files” on page 19
“Changing the Password to Files in the Shared Files Folder” on page 19
“Using the File Decryption Utility” on page 20
Encrypting Files
novdocx (en) 13 May 2009
To encrypt added files on a removable storage device:
1 Plug the storage device into the appropriate port on your computer.
2 Right-click the Endpoint Security Client icon in the taskbar.
3 Select Encryption from the menu.
4 Click Encrypt RSD. This encrypts all files on the removable storage device with the current
encryption key.
Using the Endpoint Security Client 4.0 17
Page 18

novdocx (en) 13 May 2009
The amount of time needed to encrypt the files depends upon the amount of data stored on the
device.
What If I Don’t Want the Device Encrypted?
When you insert a removable storage device, the Endpoint Security Client prompts, asking if you
want the drive encrypted, or if you prefer to remove it and not encrypt all files.
Figure 3-1 Encryption Warning when a New Device is Inserted
18 ZENworks Endpoint Security Client 4.0 User Guide
Page 19

WARNING: To prevent encryption, remove the drive before clicking Continue. Click Continue to
either encrypt the drive or to close the window after removing the device.
Password Encrypting Files
Your administrator can enable the Security client to create a Password Encrypted Files folder on any
removable device that connects to your computer. This folder is named by your administrator;
therefore, it might be named Password Encrypted Files or some other name.
When you add files to this folder, they are encrypted with a password that you supply. You can then
access the files from any device that is not running the Security client. To decrypt the files, you need
the ZENworks File Decryption utility and the encryption password. You must get the utility from
your administrator.
For example, assume that you are working on encrypted files at work. You want to take the files
home to work on them, but your home computer does not have the Security client installed. You
copy the files to the Password Encrypted Files folder on your USB thumb drive, take the files home,
then access them using the ZENworks File Decryption utility you got from your administrator.
novdocx (en) 13 May 2009
To use the Password Encrypted Files folder:
1 Move or save a file to the folder.
2 At the password prompt, enter a password and confirmation password.
3 Enter a hint for the password.
The Security client remembers the password and applies it to any new files that you add to the folder
until you reboot your computer. Any time your computer reboots, the first time you add a file to the
folder you are again prompted to supply a password.
Changing the Password to Files in the Shared Files Folder
You can use the Encryption control to change passwords for files added to the Password Encrypted
Files folder. This does not change any existing passwords, just the password for future files.
To change the password:
1 Plug the storage device into the appropriate port on your computer.
2 Right-click the Endpoint Security Client icon in the taskbar.
3 Select Encryption from the menu.
4 Click Clear Password.
Using the Endpoint Security Client 4.0 19
Page 20

novdocx (en) 13 May 2009
5 Drag a file to the
Shared Files
folder and enter the new password and hint.
All new files added to the folder now require the new password for access.
Using the File Decryption Utility
To use the File Decryption utility:
1 Plug the storage device into the appropriate port on your computer.
2 Open the File Decryption Utility (
stdecrypt.exe
).
3 Click the Advanced button.
4 In the Source panel, select Password Protected Only.
5 In the Source panel, click Browse, navigate to the storage device’s Password Encrypted Files
directory, select the desired file, then click Save.
or
To decrypt the entire Password Encrypted Files directory rather than a single file, select
Directories, then browse to and select the appropriate directory.
6 In the Destination panel, click Browse to select the folder on the local machine where the
decrypted files will be stored.
7 Click Decrypt.
8 Enter the password to decrypt the file.
If you selected the entire directory, not all files may have the same password. You are prompted
each time the utility attempts to open a file that has a different password.
The transaction can be monitored by clicking the Show Progress button.
20 ZENworks Endpoint Security Client 4.0 User Guide
Page 21
3.4 Updating Policies
New security policies are released to managed users as they are published. The Endpoint Security
Client automatically receives updates at intervals determined by the ESM administrator. However,
the managed user can check for policy updates anytime if the policy allows it.
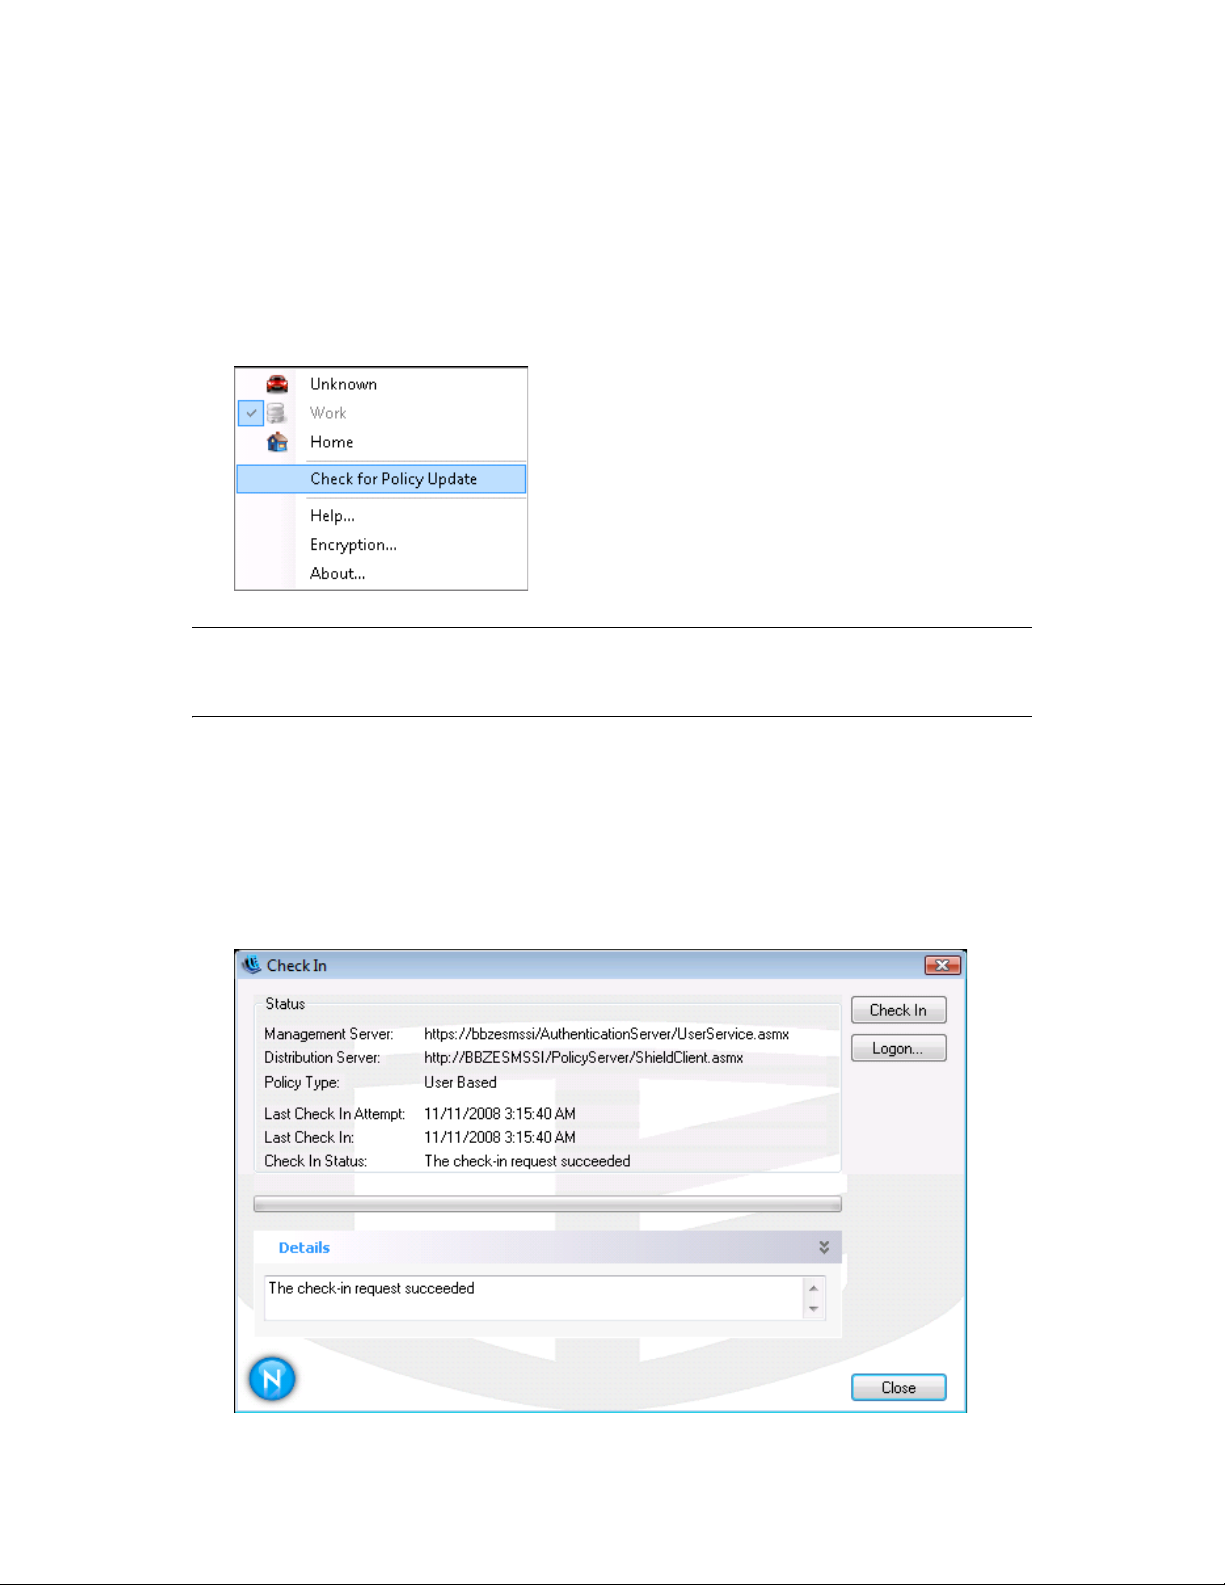
1 Right-click the Endpoint Security Client icon in the taskbar to display the menu.
2 Click Check for Policy Update.
novdocx (en) 13 May 2009
NOTE: Automatic updates and checking for policy updates are not available features when the
Endpoint Security Client is running as standalone. The ESM Administrator has a different method to
deliver policy updates to these users.
The Endpoint Security Client notifies you if the policy has been updated.
You can also manually check in if your ZENworks Endpoint Security administrator allows you this
feature.
1 Right-click the Endpoint Security Client icon in the taskbar to display the menu, then click
About, or double-click the Endpoint Security Client icon.
2 Click Check In.
Using the Endpoint Security Client 4.0 21
Page 22

If you do not have rights to perform a check in, the Check In button is greyed out.
The Check In window displays the current state of the check in process. It shows the
management and distribution servers if this is a managed client, the policy type, the last time a
check in was attempted and the last time it succeeded, and the check in status.
3 To perform a manual check in, click the Manual Check In button. The information in the Check
In window updates accordingly.
The Logon button lets you log into the Policy Distribution Service. For details, see Section 2.2,
“Logging In to the Endpoint Security Client 4.0,” on page 12.
3.5 Viewing Help
1 Right-click the Endpoint Security Client icon in the taskbar to display the menu.
2 Click Help.
novdocx (en) 13 May 2009
3.6 Overriding a Password
Productivity interruptions that a user might experience because of restrictions to connectivity,
software, or thumb drives are probably caused by the security policy the Endpoint Security Client
4.0 is enforcing. Changing locations or firewall settings usually lifts these restrictions and restores
the interrupted functionality. However, in some cases the restriction could be implemented in such a
way that it affects all locations and firewall settings. When this is the case, the restrictions must be
temporarily lifted to allow productivity.
The Endpoint Security Client 4.0 is equipped with a Password Override feature that temporarily
disables the current security policy to permit the necessary activity. The Security Administrator
distributes a single-use password key only when needed, and should be informed of any problems
with a security policy. After the password key’s time limit has expired (set by the administrator), the
security policy protecting the endpoint is restored. Rebooting the endpoint also restores the security
settings.
To activate the password override:
1 Contact your company's ESM Administrator to get the password key
2 Right-click the Endpoint Security Client icon in the taskbar to display the menu, then click
About, or double-click the Endpoint Security Client icon.
22 ZENworks Endpoint Security Client 4.0 User Guide
Page 23
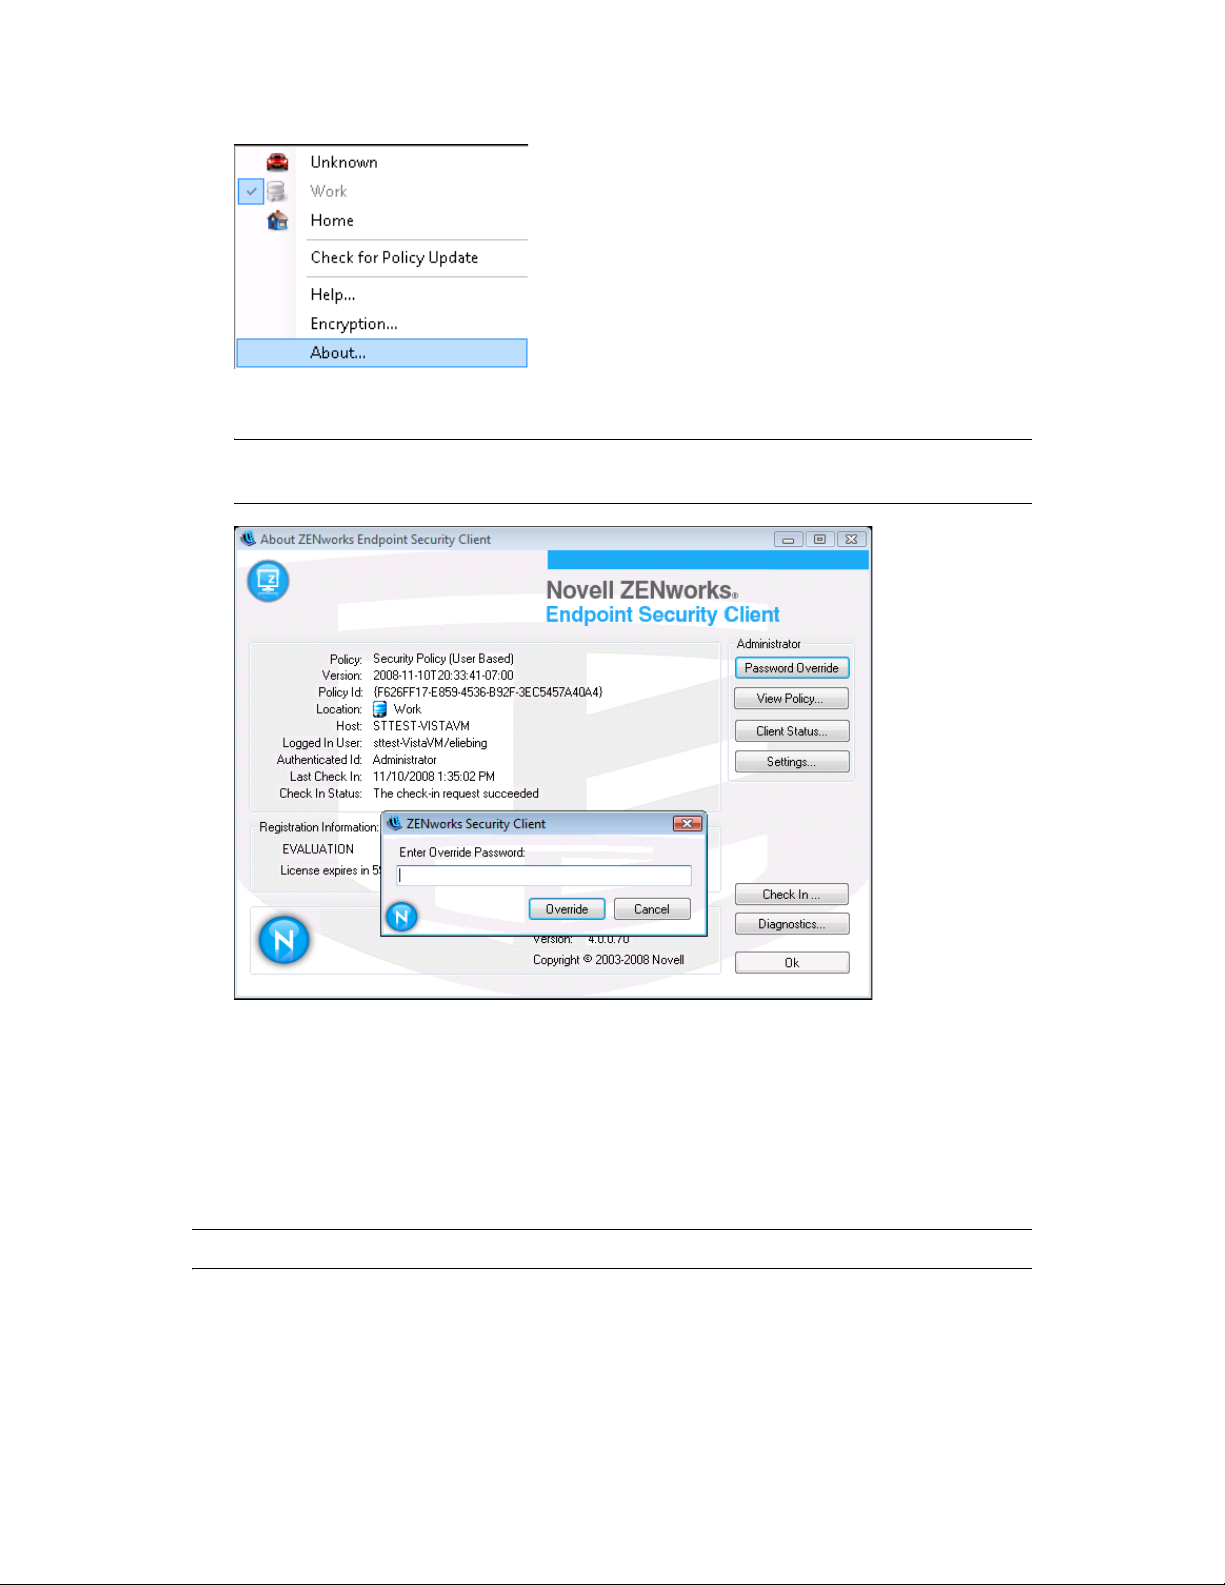
3 Click Password Override to display the password window.
NOTE: If the Password Override button is not displayed on this screen, your current policy
does not have a password override.
novdocx (en) 13 May 2009
4 Type the password key provided by your ZENworks Endpoint Security administrator.
5 Click OK. The current policy will be replaced with a default, All Open policy for the
designated time.
Clicking Load Policy (which replaces the Password Override button) in the About window restores
the previous policy. If your administrator has updated your policy to resolve existing issues, you
should instead use Check for Policy Update to download the new policy immediately.
WARNING: Encryption services are never overridden.
3.7 Diagnostics
Novell provides diagnostics tools to allow the administrator to troubleshoot Endpoint Security
Client issues. Your ZENworks Endpoint Security administrator will guide you through the
diagnostics process. Contact Novell Support for further questions.
Using the Endpoint Security Client 4.0 23
Page 24

You might be asked for a diagnostics package. Your ZENworks Endpoint Security administrator will
tell you what to include in it. To create a diagnostics package:
1 Right-click the Endpoint Security Client icon in the taskbar to display the menu, then click
About, or double-click the Endpoint Security Client icon.
2 Click the Diagnostics button.
novdocx (en) 13 May 2009
3 Check everything in the Diagnostics Package pane, or check only the items that your
ZENworks Endpoint Security administrator requests, then click Create Package.
The ZENworks Endpoint Security client creates a
zesmdiagnostics*.enc
file on your
desktop, which you can then send to the ZENworks Endpoint Security administrator.
24 ZENworks Endpoint Security Client 4.0 User Guide
 Loading...