

Page 1

Novell®
www.novell.com
Reference
ZENworks® 10 Patch Management SP3
novdocx (en) 16 April 2010
AUTHORIZED DOCUMENTATION
10.3
August 26, 2010
ZENworks 10 Patch Management Reference
Page 2

Legal Notices
Novell, Inc. makes no representations or warranties with respect to the contents or use of this documentation, and
specifically disclaims any express or implied warranties of merchantability or fitness for any particular purpose.
Further, Novell, Inc. reserves the right to revise this publication and to make changes to its content, at any time,
without obligation to notify any person or entity of such revisions or changes.
Further, Novell, Inc. makes no representations or warranties with respect to any software, and specifically disclaims
any express or implied warranties of merchantability or fitness for any particular purpose. Further, Novell, Inc.
reserves the right to make changes to any and all parts of Novell software, at any time, without any obligation to
notify any person or entity of such changes.
Any products or technical information provided under this Agreement may be subject to U.S. export controls and the
trade laws of other countries. You agree to comply with all export control regulations and to obtain any required
licenses or classification to export, re-export or import deliverables. You agree not to export or re-export to entities on
the current U.S. export exclusion lists or to any embargoed or terrorist countries as specified in the U.S. export laws.
You agree to not use deliverables for prohibited nuclear, missile, or chemical biological weaponry end uses. See the
Novell International Trade Services Web page (http://www.novell.com/info/exports/) for more information on
exporting Novell software. Novell assumes no responsibility for your failure to obtain any necessary export
approvals.
novdocx (en) 16 April 2010
Copyright © 2007-2010 Novell, Inc. All rights reserved. No part of this publication may be reproduced, photocopied,
stored on a retrieval system, or transmitted without the express written consent of the publisher.
Novell, Inc.
404 Wyman Street, Suite 500
Waltham, MA 02451
U.S.A.
www.novell.com
Online Documentation: To access the latest online documentation for this and other Novell products, see
the Novell Documentation Web page (http://www.novell.com/documentation).
Page 3

Novell Trademarks
For Novell trademarks, see the Novell Trademark and Service Mark list (http://www.novell.com/company/legal/
trademarks/tmlist.html).
Third-Party Materials
All third-party trademarks are the property of their respective owners.
novdocx (en) 16 April 2010
Page 4

novdocx (en) 16 April 2010
4 ZENworks 10 Patch Management Reference
Page 5

Contents
About This Guide 7
1 Getting Started with ZENworks 10 Patch Management 9
1.1 Downloading Patches . . . . . . . . . . . . . . . . . . . . . . . . . . . . . . . . . . . . . . . . . . . . . . . . . . . . . . . . 9
1.2 Deploying a Patch . . . . . . . . . . . . . . . . . . . . . . . . . . . . . . . . . . . . . . . . . . . . . . . . . . . . . . . . . . . 9
1.3 Setting a Baseline . . . . . . . . . . . . . . . . . . . . . . . . . . . . . . . . . . . . . . . . . . . . . . . . . . . . . . . . . . . 9
1.4 Dashboard . . . . . . . . . . . . . . . . . . . . . . . . . . . . . . . . . . . . . . . . . . . . . . . . . . . . . . . . . . . . . . . . 10
1.5 Patch Download Status . . . . . . . . . . . . . . . . . . . . . . . . . . . . . . . . . . . . . . . . . . . . . . . . . . . . . . 11
2 Patch Management Overview 13
2.1 Product Overview. . . . . . . . . . . . . . . . . . . . . . . . . . . . . . . . . . . . . . . . . . . . . . . . . . . . . . . . . . . 13
2.2 Patch Management Process . . . . . . . . . . . . . . . . . . . . . . . . . . . . . . . . . . . . . . . . . . . . . . . . . . 14
2.3 Features of Patch Management. . . . . . . . . . . . . . . . . . . . . . . . . . . . . . . . . . . . . . . . . . . . . . . . 15
novdocx (en) 16 April 2010
3 Using Patch Management 17
3.1 Viewing Subscription Service Information . . . . . . . . . . . . . . . . . . . . . . . . . . . . . . . . . . . . . . . . 17
3.2 Configuring HTTP Proxy Details . . . . . . . . . . . . . . . . . . . . . . . . . . . . . . . . . . . . . . . . . . . . . . . 20
3.3 Configuring Subscription Download Details . . . . . . . . . . . . . . . . . . . . . . . . . . . . . . . . . . . . . . . 22
3.4 Configuring Mandatory Baseline Settings . . . . . . . . . . . . . . . . . . . . . . . . . . . . . . . . . . . . . . . . 25
3.5 Patch Management Licensing . . . . . . . . . . . . . . . . . . . . . . . . . . . . . . . . . . . . . . . . . . . . . . . . . 27
4 Using the Patch Management Tab 31
4.1 Viewing Patches. . . . . . . . . . . . . . . . . . . . . . . . . . . . . . . . . . . . . . . . . . . . . . . . . . . . . . . . . . . . 31
4.2 Dashboard . . . . . . . . . . . . . . . . . . . . . . . . . . . . . . . . . . . . . . . . . . . . . . . . . . . . . . . . . . . . . . . . 32
4.3 Status . . . . . . . . . . . . . . . . . . . . . . . . . . . . . . . . . . . . . . . . . . . . . . . . . . . . . . . . . . . . . . . . . . . 34
4.3.1 Status. . . . . . . . . . . . . . . . . . . . . . . . . . . . . . . . . . . . . . . . . . . . . . . . . . . . . . . . . . . . . 35
4.3.2 Cache Status . . . . . . . . . . . . . . . . . . . . . . . . . . . . . . . . . . . . . . . . . . . . . . . . . . . . . . . 35
4.4 Using the Patches Page. . . . . . . . . . . . . . . . . . . . . . . . . . . . . . . . . . . . . . . . . . . . . . . . . . . . . . 35
4.4.1 Patches . . . . . . . . . . . . . . . . . . . . . . . . . . . . . . . . . . . . . . . . . . . . . . . . . . . . . . . . . . . 36
4.4.2 Patch Information. . . . . . . . . . . . . . . . . . . . . . . . . . . . . . . . . . . . . . . . . . . . . . . . . . . . 42
4.4.3 Searching for a Patch . . . . . . . . . . . . . . . . . . . . . . . . . . . . . . . . . . . . . . . . . . . . . . . . 43
4.4.4 Patch Management . . . . . . . . . . . . . . . . . . . . . . . . . . . . . . . . . . . . . . . . . . . . . . . . . . 45
4.5 Patch Management BOE Reports . . . . . . . . . . . . . . . . . . . . . . . . . . . . . . . . . . . . . . . . . . . . . . 46
5 Using the Deploy Remediation Wizard 49
5.1 Creating a Deployment Schedule . . . . . . . . . . . . . . . . . . . . . . . . . . . . . . . . . . . . . . . . . . . . . . 49
5.2 Confirm Devices. . . . . . . . . . . . . . . . . . . . . . . . . . . . . . . . . . . . . . . . . . . . . . . . . . . . . . . . . . . . 50
5.2.1 Confirm Devices: All Non-patched Devices . . . . . . . . . . . . . . . . . . . . . . . . . . . . . . . . 51
5.2.2 Confirm Devices: Select Applicable Devices . . . . . . . . . . . . . . . . . . . . . . . . . . . . . . . 51
5.2.3 Confirm Devices: Select Devices, Folders, and Groups . . . . . . . . . . . . . . . . . . . . . . 52
5.3 License Agreement . . . . . . . . . . . . . . . . . . . . . . . . . . . . . . . . . . . . . . . . . . . . . . . . . . . . . . . . . 53
5.4 Remediation Schedule . . . . . . . . . . . . . . . . . . . . . . . . . . . . . . . . . . . . . . . . . . . . . . . . . . . . . . . 54
5.4.1 Remediation Schedule: Now . . . . . . . . . . . . . . . . . . . . . . . . . . . . . . . . . . . . . . . . . . . 55
5.4.2 Remediation Schedule: Date Specific . . . . . . . . . . . . . . . . . . . . . . . . . . . . . . . . . . . . 55
Contents 5
Page 6

5.4.3 Remediation Schedule: Recurring . . . . . . . . . . . . . . . . . . . . . . . . . . . . . . . . . . . . . . . 57
5.5 Deployment Order and Behavior . . . . . . . . . . . . . . . . . . . . . . . . . . . . . . . . . . . . . . . . . . . . . . . 61
5.6 Remediation Options . . . . . . . . . . . . . . . . . . . . . . . . . . . . . . . . . . . . . . . . . . . . . . . . . . . . . . . . 62
5.7 Advanced Remediation Options. . . . . . . . . . . . . . . . . . . . . . . . . . . . . . . . . . . . . . . . . . . . . . . . 63
5.8 Pre Install Notification Options . . . . . . . . . . . . . . . . . . . . . . . . . . . . . . . . . . . . . . . . . . . . . . . . 65
5.9 Notification and Reboot Options . . . . . . . . . . . . . . . . . . . . . . . . . . . . . . . . . . . . . . . . . . . . . . . 67
5.10 Deployment Summary . . . . . . . . . . . . . . . . . . . . . . . . . . . . . . . . . . . . . . . . . . . . . . . . . . . . . . . 68
6 Using Mandatory Baselines 71
6.1 About Mandatory Baselines . . . . . . . . . . . . . . . . . . . . . . . . . . . . . . . . . . . . . . . . . . . . . . . . . . . 71
6.1.1 Viewing Mandatory Baselines . . . . . . . . . . . . . . . . . . . . . . . . . . . . . . . . . . . . . . . . . . 71
6.1.2 Using the Mandatory Baseline Page . . . . . . . . . . . . . . . . . . . . . . . . . . . . . . . . . . . . . 73
6.2 Working with Mandatory Baselines . . . . . . . . . . . . . . . . . . . . . . . . . . . . . . . . . . . . . . . . . . . . . 74
6.2.1 Assigning or Managing a Mandatory Baseline . . . . . . . . . . . . . . . . . . . . . . . . . . . . . 75
6.2.2 Removing a Mandatory Baseline. . . . . . . . . . . . . . . . . . . . . . . . . . . . . . . . . . . . . . . . 77
6.2.3 Using Update Cache . . . . . . . . . . . . . . . . . . . . . . . . . . . . . . . . . . . . . . . . . . . . . . . . . 78
7 Patch Management for a Device 79
novdocx (en) 16 April 2010
7.1 Accessing the Patches Tab for a Device . . . . . . . . . . . . . . . . . . . . . . . . . . . . . . . . . . . . . . . . . 79
7.2 Using the Patches Tab for a Device. . . . . . . . . . . . . . . . . . . . . . . . . . . . . . . . . . . . . . . . . . . . . 81
7.2.1 Patches . . . . . . . . . . . . . . . . . . . . . . . . . . . . . . . . . . . . . . . . . . . . . . . . . . . . . . . . . . . 82
7.2.2 Patch Name . . . . . . . . . . . . . . . . . . . . . . . . . . . . . . . . . . . . . . . . . . . . . . . . . . . . . . . . 82
7.2.3 Total Number of Patches Available . . . . . . . . . . . . . . . . . . . . . . . . . . . . . . . . . . . . . . 83
7.2.4 Patch Impacts . . . . . . . . . . . . . . . . . . . . . . . . . . . . . . . . . . . . . . . . . . . . . . . . . . . . . . 83
7.2.5 Patch Statistics . . . . . . . . . . . . . . . . . . . . . . . . . . . . . . . . . . . . . . . . . . . . . . . . . . . . . 84
7.2.6 Action Menu Items . . . . . . . . . . . . . . . . . . . . . . . . . . . . . . . . . . . . . . . . . . . . . . . . . . . 84
7.2.7 Searching Patches. . . . . . . . . . . . . . . . . . . . . . . . . . . . . . . . . . . . . . . . . . . . . . . . . . . 85
7.2.8 Patch Information. . . . . . . . . . . . . . . . . . . . . . . . . . . . . . . . . . . . . . . . . . . . . . . . . . . . 87
7.2.9 Workstation Device Patches . . . . . . . . . . . . . . . . . . . . . . . . . . . . . . . . . . . . . . . . . . . 88
8 Patch Management for a Device Group 91
8.1 Using the Patches Tab within a Server Group . . . . . . . . . . . . . . . . . . . . . . . . . . . . . . . . . . . . . 91
8.2 Using the Patches Tab within a Workstation Group. . . . . . . . . . . . . . . . . . . . . . . . . . . . . . . . . 93
A Troubleshooting Patch Management 95
A.1 Patch Management Issues. . . . . . . . . . . . . . . . . . . . . . . . . . . . . . . . . . . . . . . . . . . . . . . . . . . . 95
A.2 Configuration Issues . . . . . . . . . . . . . . . . . . . . . . . . . . . . . . . . . . . . . . . . . . . . . . . . . . . . . . . . 98
B Documentation Updates 101
B.1 August 26, 2010: SP3 (10.3) . . . . . . . . . . . . . . . . . . . . . . . . . . . . . . . . . . . . . . . . . . . . . . . . . 101
B.2 March 30, 2010: SP3 (10.3) . . . . . . . . . . . . . . . . . . . . . . . . . . . . . . . . . . . . . . . . . . . . . . . . . . 101
6 ZENworks 10 Patch Management Reference
Page 7

About This Guide
This Patch Management Reference includes information to help you successfully install a Novell
ZENworks 10 Patch Management system. The information in this guide is organized as follows:
Chapter 1, “Getting Started with ZENworks 10 Patch Management,” on page 9
Chapter 2, “Patch Management Overview,” on page 13
Chapter 3, “Using Patch Management,” on page 17
Chapter 4, “Using the Patch Management Tab,” on page 31
Chapter 5, “Using the Deploy Remediation Wizard,” on page 49
Chapter 6, “Using Mandatory Baselines,” on page 71
Chapter 7, “Patch Management for a Device,” on page 79
Chapter 8, “Patch Management for a Device Group,” on page 91
Appendix A, “Troubleshooting Patch Management,” on page 95
Appendix B, “Documentation Updates,” on page 101
novdocx (en) 16 April 2010
Audience
This guide is intended for ZENworks administrators.
Feedback
We want to hear your comments and suggestions about this manual and the other documentation
included with this product. Please use the User Comments feature at the bottom of each page of the
online documentation, or go to the Novell Documentation Feedback site (http://www.novell.com/
documentation/feedback.html) and enter your comments there.
Additional Documentation
ZENworks 10 Configuration Management is supported by other documentation (in both PDF and
HTML formats) that you can use to learn about and implement the product. See the ZENworks 10
Configuration Management SP3 documentation Web site (http://www.novell.com/documentation/
beta/zcm10).
About This Guide 7
Page 8

novdocx (en) 16 April 2010
8 ZENworks 10 Patch Management Reference
Page 9

1
Getting Started with ZENworks 10
novdocx (en) 16 April 2010
Patch Management
Patch Management is a fully integrated feature of Novell ZENworks 10 that provides the same
agent-based patch, vulnerability patch, and compliance management solution that was used in prior
versions.
The ZENworks Server schedules a Discover Applicable Updates (DAU) task for all ZENworks
managed devices (servers and workstations) and compiles information on the operating system,
hardware, and software.
The results of the scan are sent to the ZENworks Server and can be viewed anytime in the Patches
section under the Patch Management tab or in the Devices tab even if a workstation is disconnected
from your network.
Based on the above information, it is determined whether the patches are applicable for each device.
If applicable, the ZENworks Adaptive Agent performs another scan by using the patch fingerprints
incorporated into each patch to determine the device’s patch status (Patched or Not Patched) in
relation to that patch. The results of the scan are posted under the Patch Management tab of the
ZENworks Control Center, for review by an administrator.
After patch status is established, the ZENworks administrator can deploy the desired patch to each
applicable device on the network.
1
The following features are included in ZENworks 10 Patch Management SP3:
Section 1.1, “Downloading Patches,” on page 9
Section 1.2, “Deploying a Patch,” on page 9
Section 1.3, “Setting a Baseline,” on page 9
Section 1.4, “Dashboard,” on page 10
Section 1.5, “Patch Download Status,” on page 11
1.1 Downloading Patches
Before you start downloading a patch, configure the downloading options in the Configuration tab.
For more information, see Section 3.3, “Configuring Subscription Download Details,” on page 22.
1.2 Deploying a Patch
To deploy a patch, you can use the Deploy Remediation Wizard. For more information, see
Chapter 5, “Using the Deploy Remediation Wizard,” on page 49.
1.3 Setting a Baseline
To set a baseline, you must ensure that a group of devices is protected and that all the devices in the
group are patched consistently. For more information, see Chapter 6, “Using Mandatory Baselines,”
on page 71.
Getting Started with ZENworks 10 Patch Management
9
Page 10
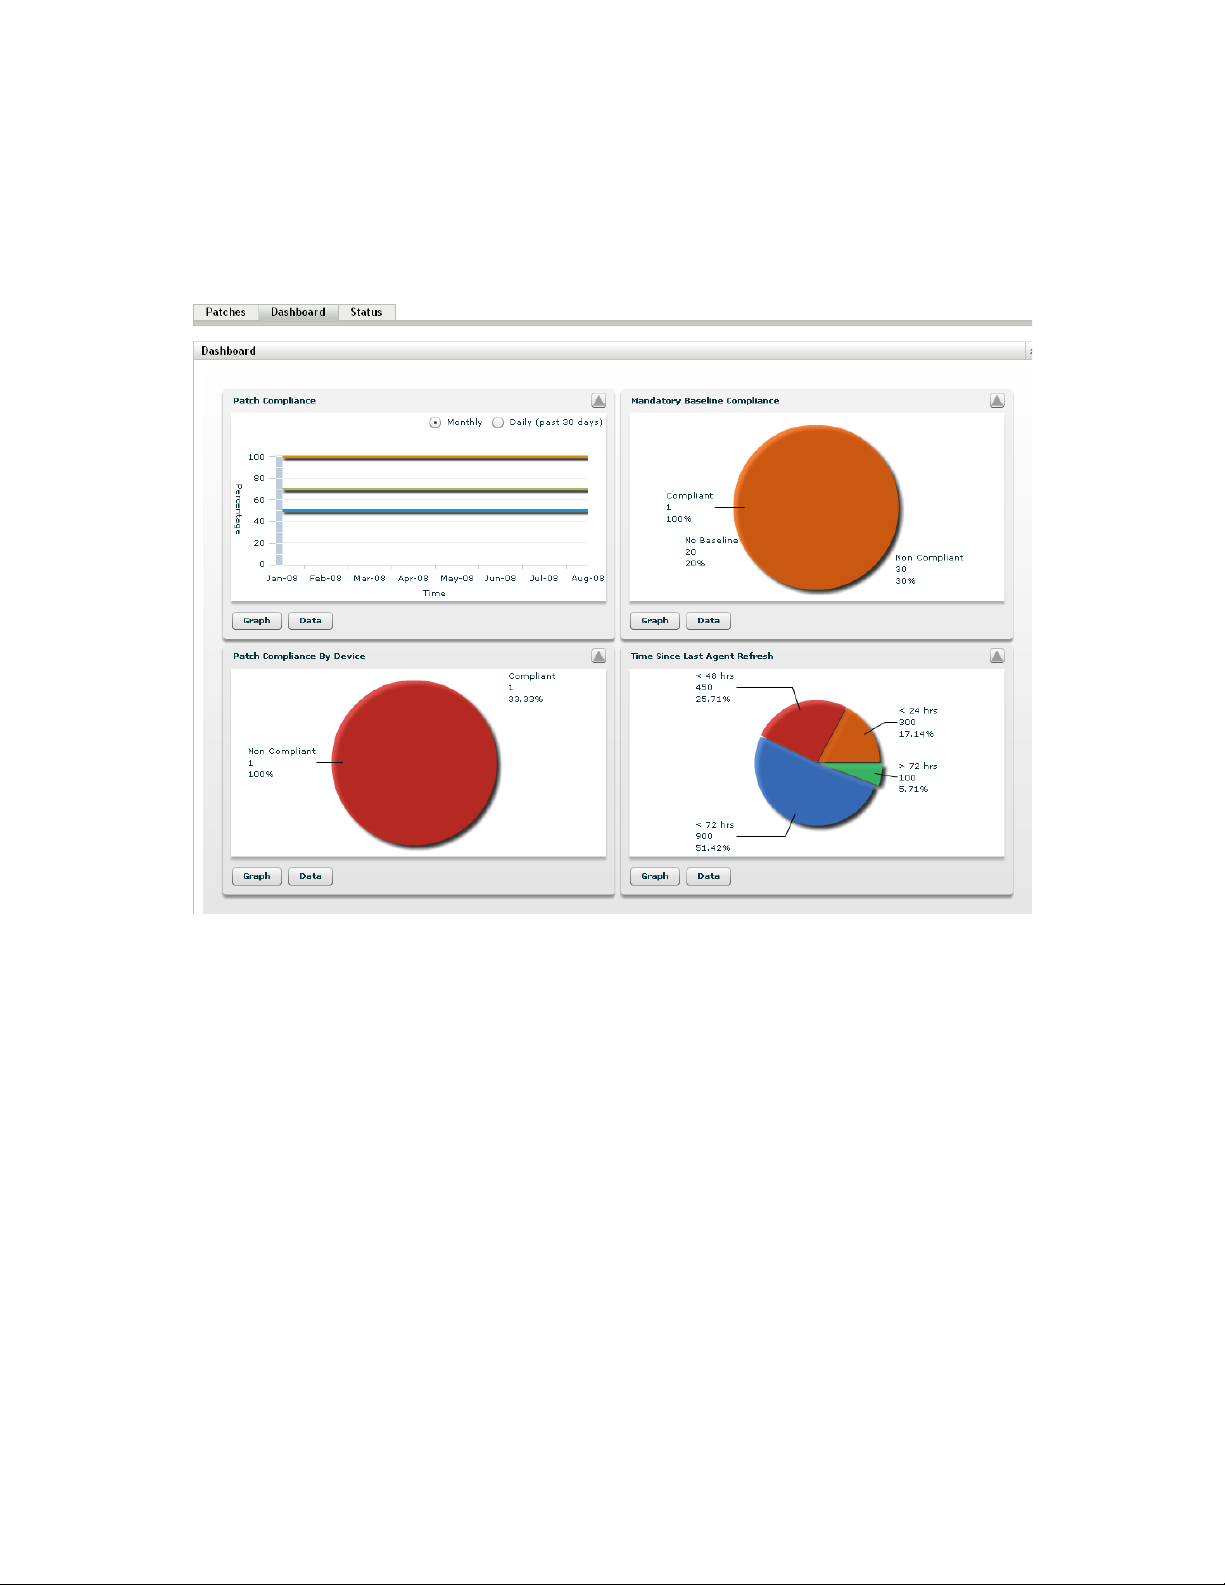
1.4 Dashboard
The Dashboard tab contains graphs that allow users a direct overview of the devices in the network.
For more information, see Section 4.2, “Dashboard,” on page 32.
Figure 1-1 Dashboard Page
novdocx (en) 16 April 2010
10 ZENworks 10 Patch Management Reference
Page 11
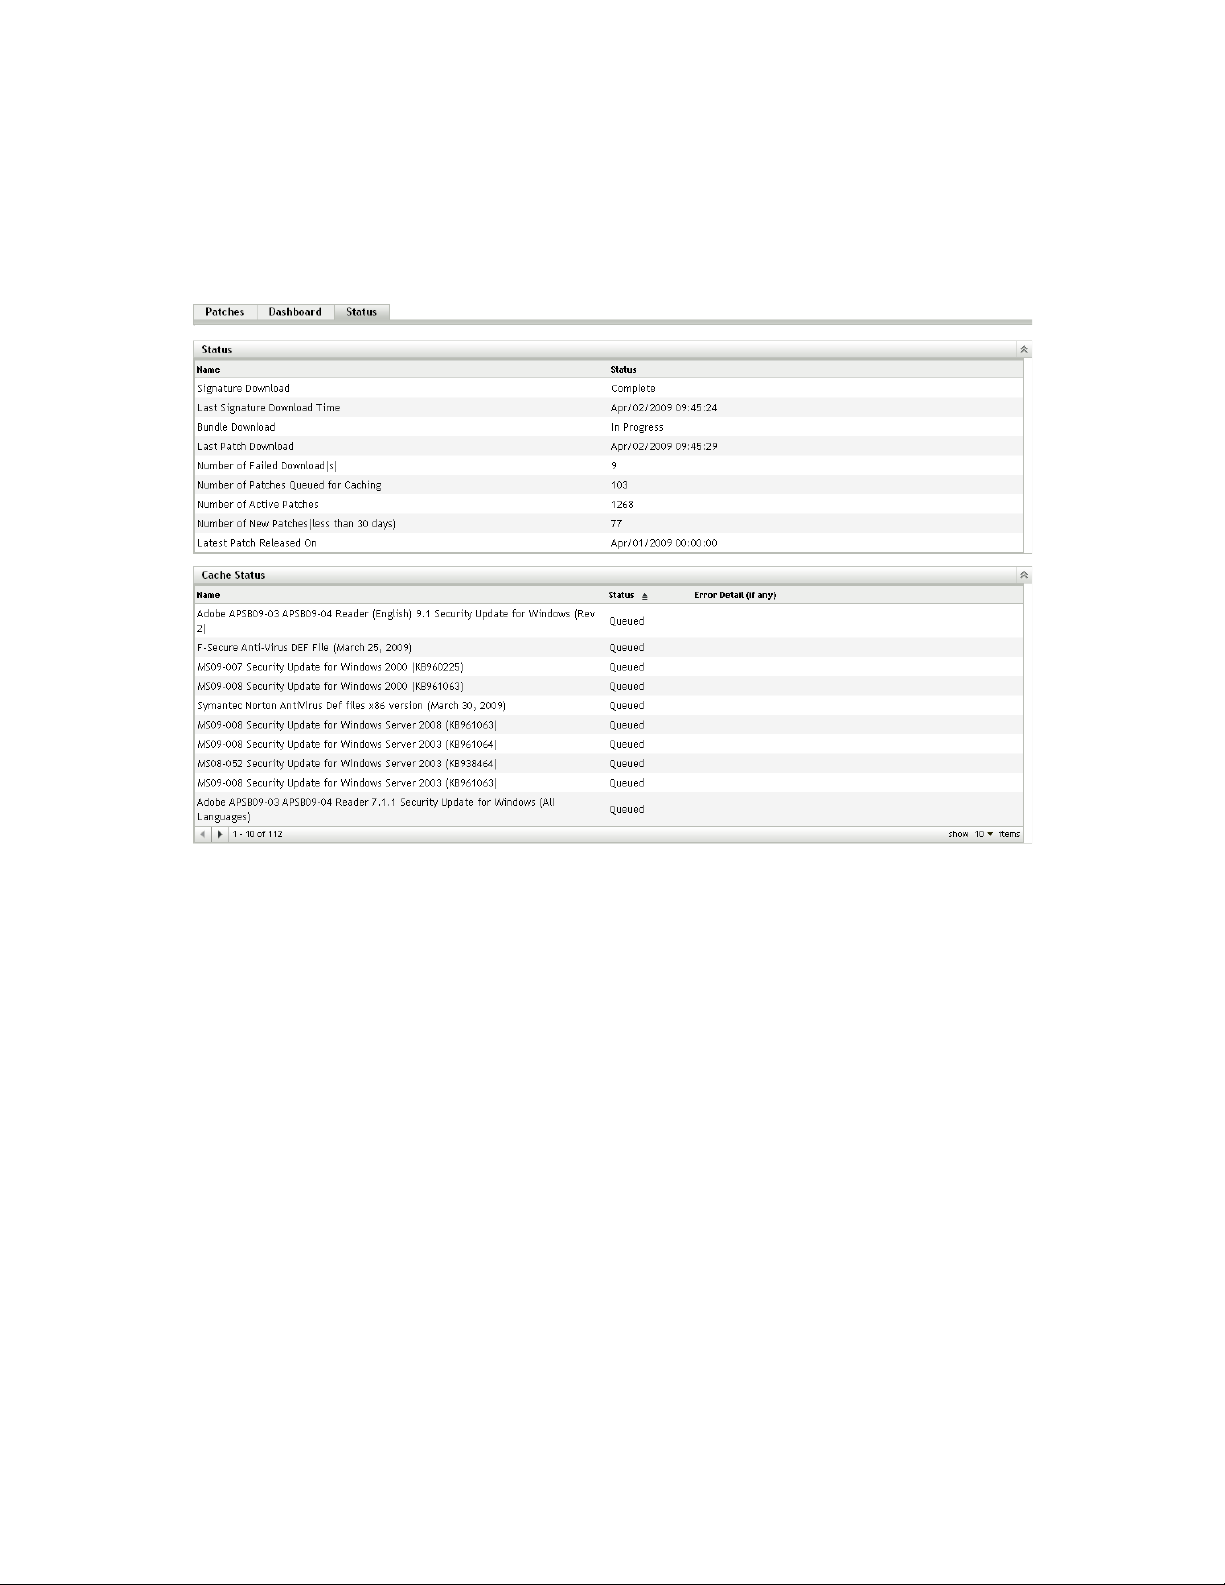
1.5 Patch Download Status
The Status page consists of the system and cache statuses, which show the overall patch
information. For more information, see Section 4.3, “Status,” on page 34.
Figure 1-2 Status Page
novdocx (en) 16 April 2010
Getting Started with ZENworks 10 Patch Management 11
Page 12

novdocx (en) 16 April 2010
12 ZENworks 10 Patch Management Reference
Page 13

2
Patch Management Overview
Novell ZENworks 10 Patch Management is a part of the ZENworks 10 product line that provides a
fully integrated version of leading patch and patch management solutions for medium and large
enterprise networks. Patch Management enables customers to easily translate their organizational
security patch policies into automated and continuous protection against more than 90% of
vulnerabilities that threaten today’s enterprise networks. By providing the most accurate and timely
vulnerability assessment and patch management available, Patch Management ensures that policy
measurement and security audits are a true representation of network security status.
Section 2.1, “Product Overview,” on page 13
Section 2.2, “Patch Management Process,” on page 14
Section 2.3, “Features of Patch Management,” on page 15
2.1 Product Overview
novdocx (en) 16 April 2010
2
Patch Management is a fully integrated feature of the configuration management suite that provides
the same agent-based patch, vulnerability patch, and compliance management solution that was used
in prior stand-alone versions such as ZENworks Patch Management 6.4.
Patch Management provides rapid patch remediation, allowing you to proactively manage threats by
automating the collection, analysis, and delivery of patches throughout your heterogeneous
enterprise to secure end points.
The ZENworks Server has a Web-based management user interface known as ZENworks Control
Center. Its Patch Management feature allows you to monitor and maintain patch compliance
throughout the entire enterprise. The ZENworks 10 Configuration Management Primary Server can
deploy a ZENworks Adaptive Agent on every client system in the target network, ensuring that all
systems are protected with the latest security patches, software updates, and service packs.
The Patch Management feature stays current with the latest patches and fixes by regular
communication with the ZENworks Patch Subscription Network through a secure connection. After
the initial 60-day free trial period, the Patch Management feature requires a paid subscription to
continue its daily download of the latest patch and vulnerability information.
When a new patch is released into the ZENworks Patch Subscription Network, it is downloaded
automatically to the ZENworks Server and an e-mail is sent to the administrator. When the
administrator logs in to the ZENworks Control Center, the list of devices and the new patches that
require deployment can easily be viewed along with the description and business impact. At this
time, the administrator can choose to deploy the patch to a device or disregard the patch.
Patch Management Overview
13
Page 14
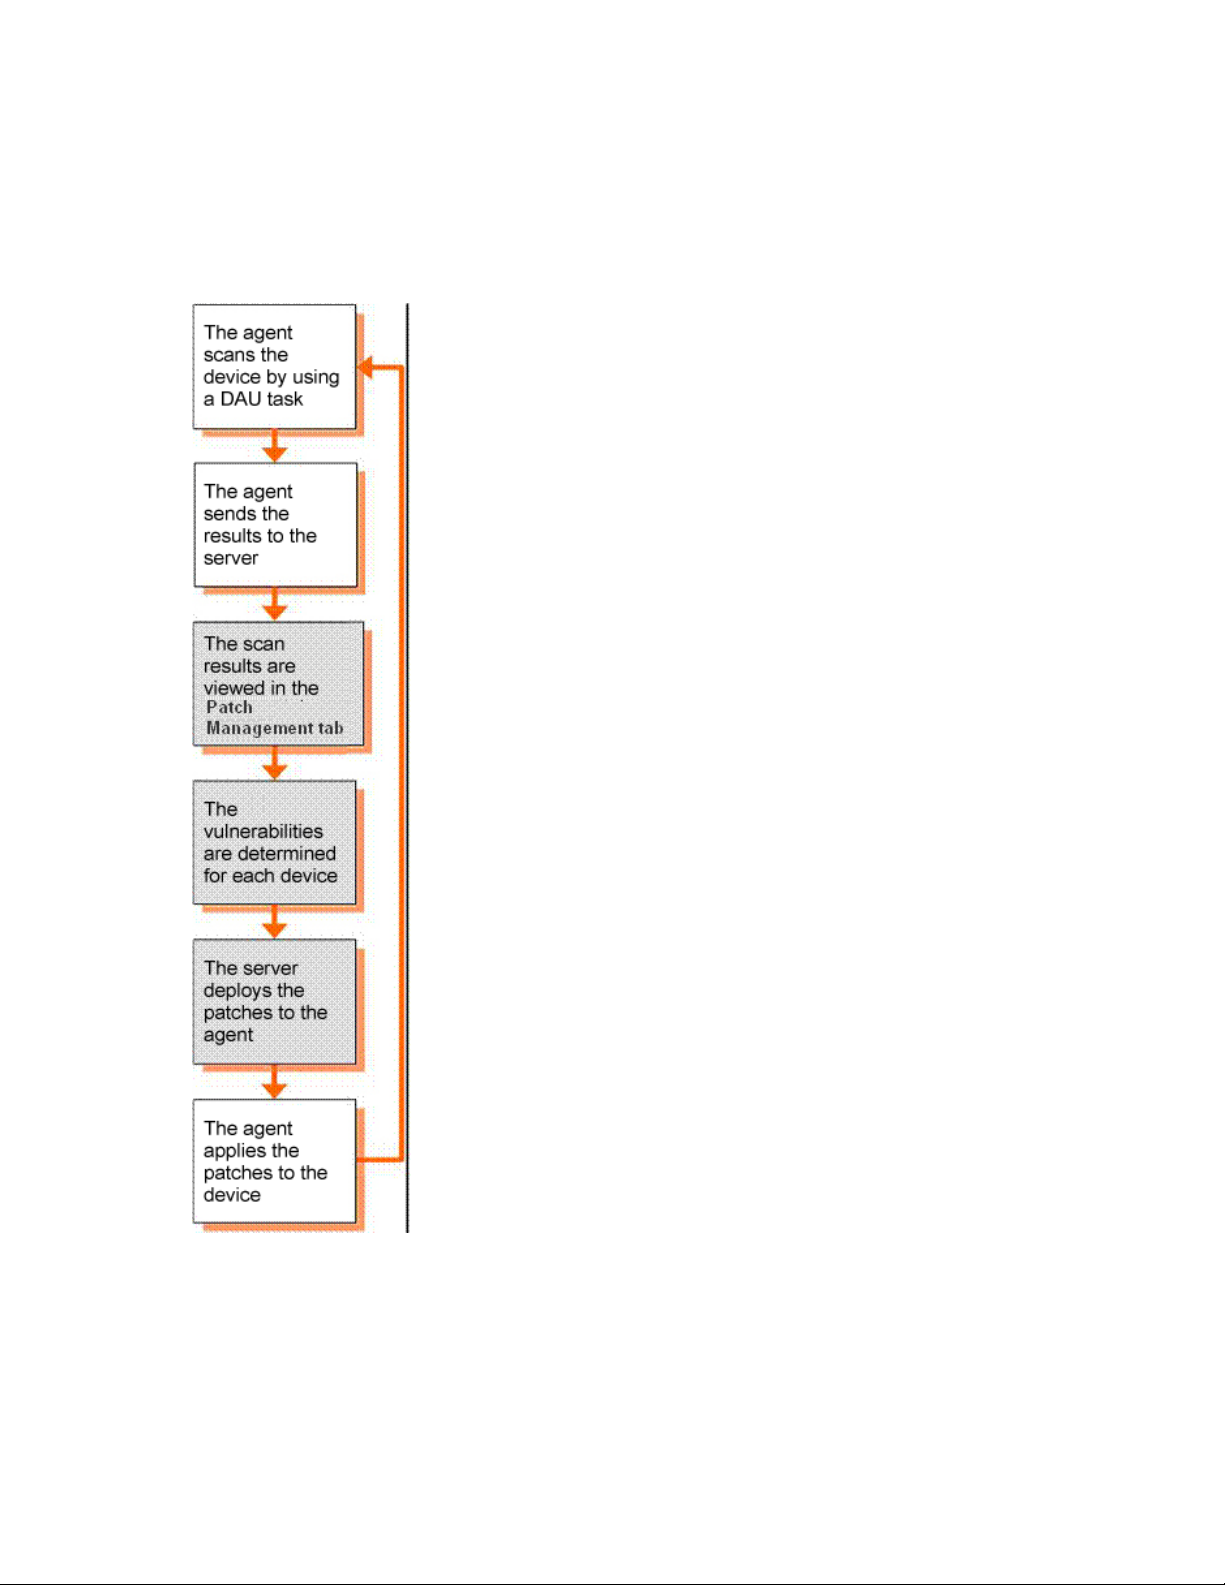
2.2 Patch Management Process
The following process map demonstrates how patch information is communicated between the
ZENworks Server and the ZENworks Adaptive Agent:
Figure 2-1 Process Map
novdocx (en) 16 April 2010
The patch detection cycle begins each day at the ZENworks Server where a Discover Applicable
Updates (DAU) task is scheduled for all ZENworks managed devices (servers and workstations).
For all patches in the DAU task, the ZENworks Adaptive Agent performs patch detection by using
the patch fingerprints incorporated into each individual patch, which determines the status (Patched,
Not Patched, or Not Applicable) of that patch.
14 ZENworks 10 Patch Management Reference
Page 15

The results of the patch detection scan are sent to the ZENworks Server and can be viewed anytime
in the Patches section under the Patch Management tab or in the Devices tab, even if a workstation
is disconnected from your network.
After completion of the patch detection cycle, the ZENworks administrator can deploy the desired
patches to each applicable device on the network.
2.3 Features of Patch Management
Patch Management has the world's largest repository of automated patches, including patches for all
major operating systems and various third-party applications. Patch Management features an agentbased architecture, patch package pre-testing, highly scalable software, and easy-to-use features that
allow customers to patch 13 times faster than the industry average.
Its patented Digital Fingerprinting Technology provides a highly accurate process for patch and
vulnerability assessment, remediation and monitoring—leaving no systems open to attack.
Remediation is fast and accurate with wizard-based patch deployments, support for phased rollouts,
rapid verification of patch installations, and more. Patch Management continuously monitors end
points to ensure that they achieve patch compliance quickly and then stay patched over time.
novdocx (en) 16 April 2010
With Patch Management, you can be sure that your systems are effectively patched and compliant
for successful IT and regulatory audits. Patch Management creates a Patch Fingerprint Profile that
includes all missing patches for that machine, ensuring the continued compliance of each end point.
Each end point is then continually monitored to make sure it stays patched. Administrators can also
establish a mandatory baseline to automatically remediate end points that do not meet defined patch
levels, which is a key aspect of regulatory compliance. In addition, because many organizations
need to demonstrate patch compliance, Patch Management provides standard reports that document
changes and demonstrate progress toward internal and external audit and compliance requirements.
The following table describes the important features of Patch Management:
Table 2-1 Patch Management Features
Feature Description
Patented multi-platform patch management Enables security of all operating systems and
applications within heterogeneous networks,
including Windows (32-bit and 64-bit) and Linux
distributions. US Pat #6999660.
World's largest automated patch repository Provides the largest repository of tested patches to
support all major operating systems and
applications used in the enterprise.
Extensive pre-testing Reduces the amount of development and testing
required prior to patch deployment.
Agent-based architecture Protects laptop and mobile devices that are often
disconnected from the network, and reduces
network bandwidth usage.
Automatic notifications Distributes e-mail alerts directly to administrators
for proactive security and administrative
management.
Patch Management Overview 15
Page 16

Feature Description
Patch fingerprint accuracy Ensures the highest level of accuracy in the
detection of security patches.
Multi-patch deployments Delivers multiple patches to multiple computers in
one distribution to increase IT productivity.
Flexible application reporting Audits and reports on the status of the
organization's security.
Policy-based administration Ensures that all systems meet a mandatory
baseline policy, which is a key aspect of regulatory
compliance.
novdocx (en) 16 April 2010
16 ZENworks 10 Patch Management Reference
Page 17
3
Using Patch Management
Novell ZENworks 10 Patch Management provides current information about your subscription
status and allows you to activate and configure your subscription.
The following sections further introduce you to the capabilities of Patch Management:
Section 3.1, “Viewing Subscription Service Information,” on page 17
Section 3.2, “Configuring HTTP Proxy Details,” on page 20
Section 3.3, “Configuring Subscription Download Details,” on page 22
Section 3.4, “Configuring Mandatory Baseline Settings,” on page 25
Section 3.5, “Patch Management Licensing,” on page 27
3.1 Viewing Subscription Service Information
novdocx (en) 16 April 2010
3
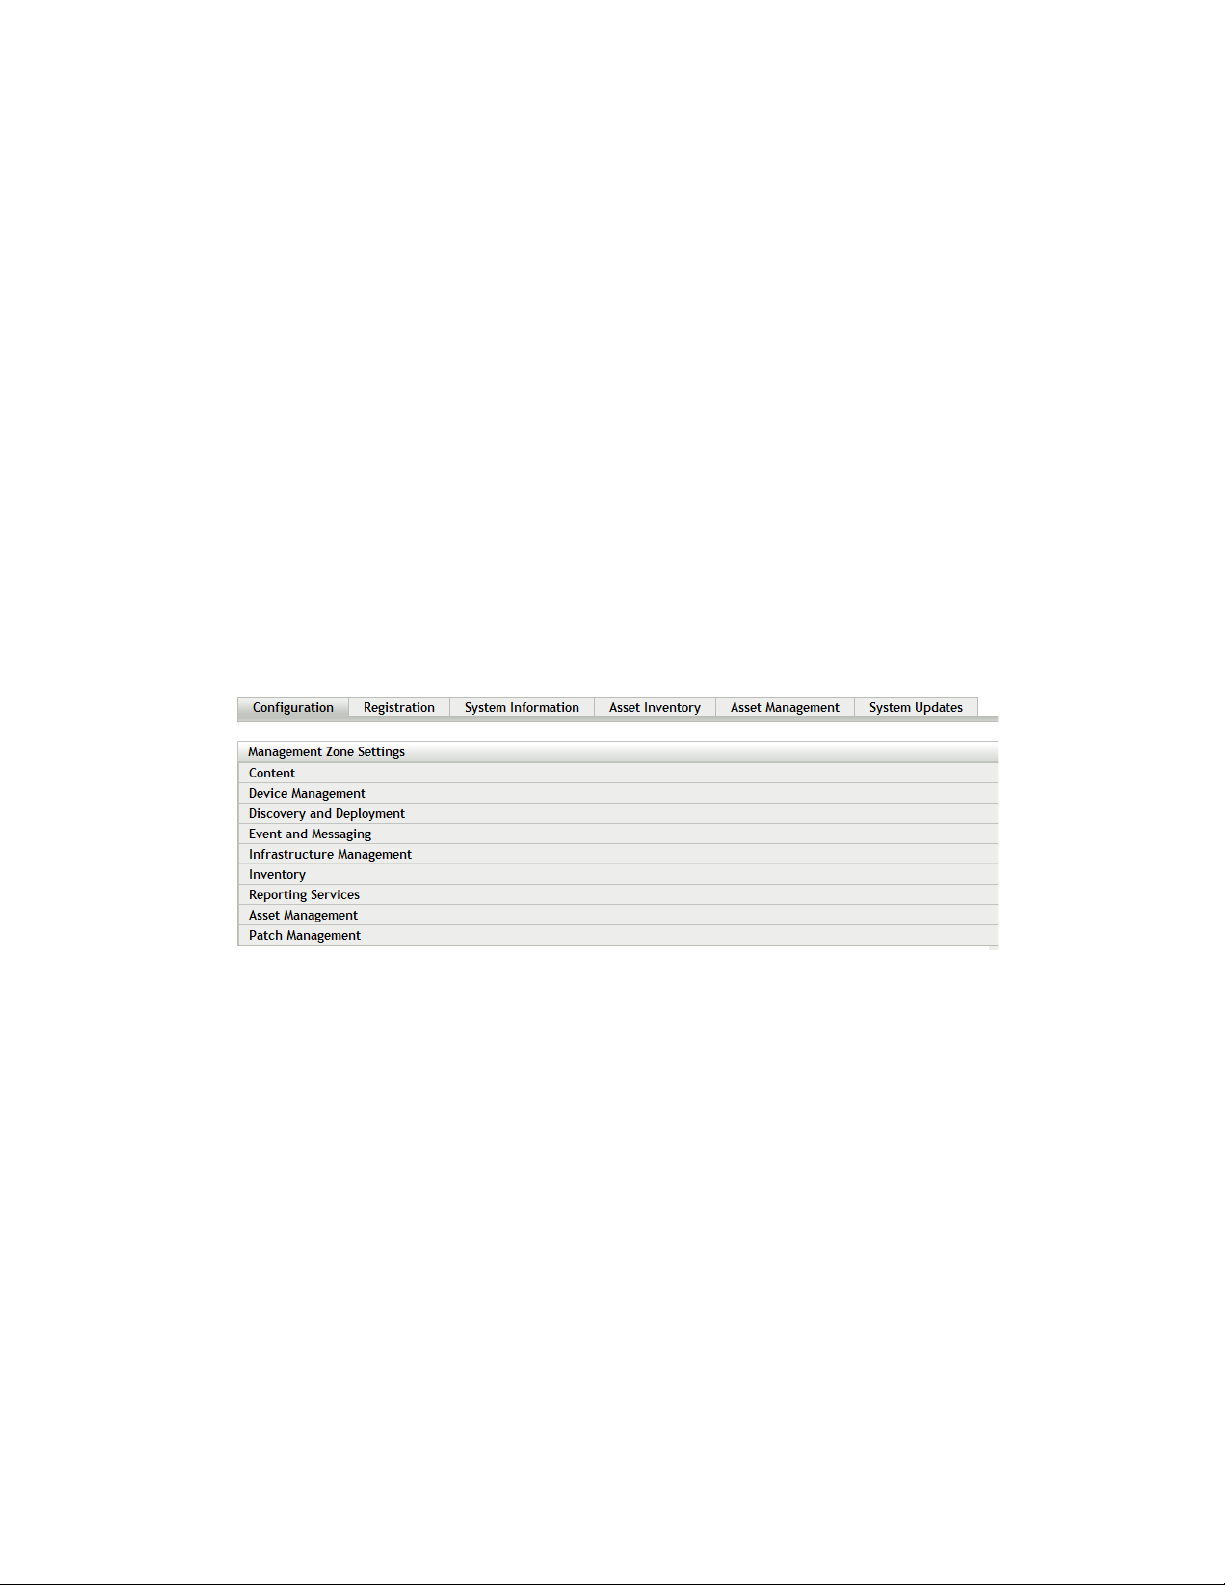
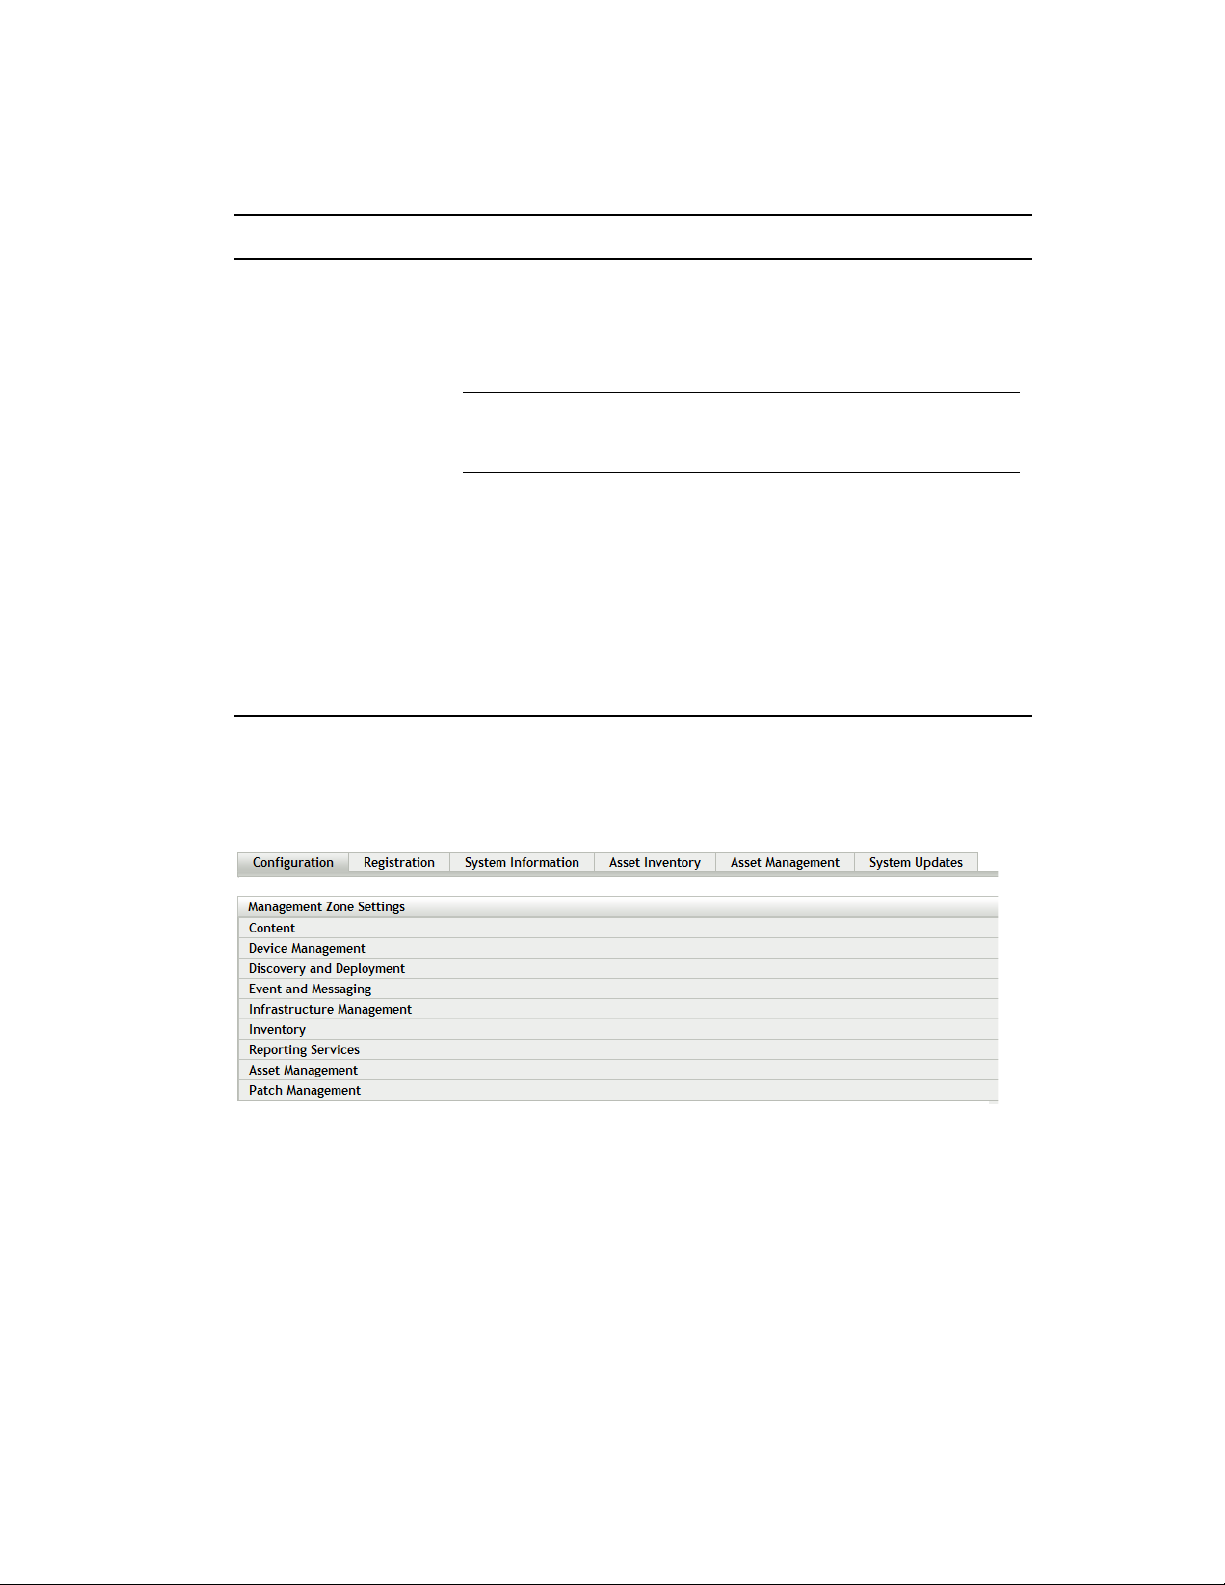
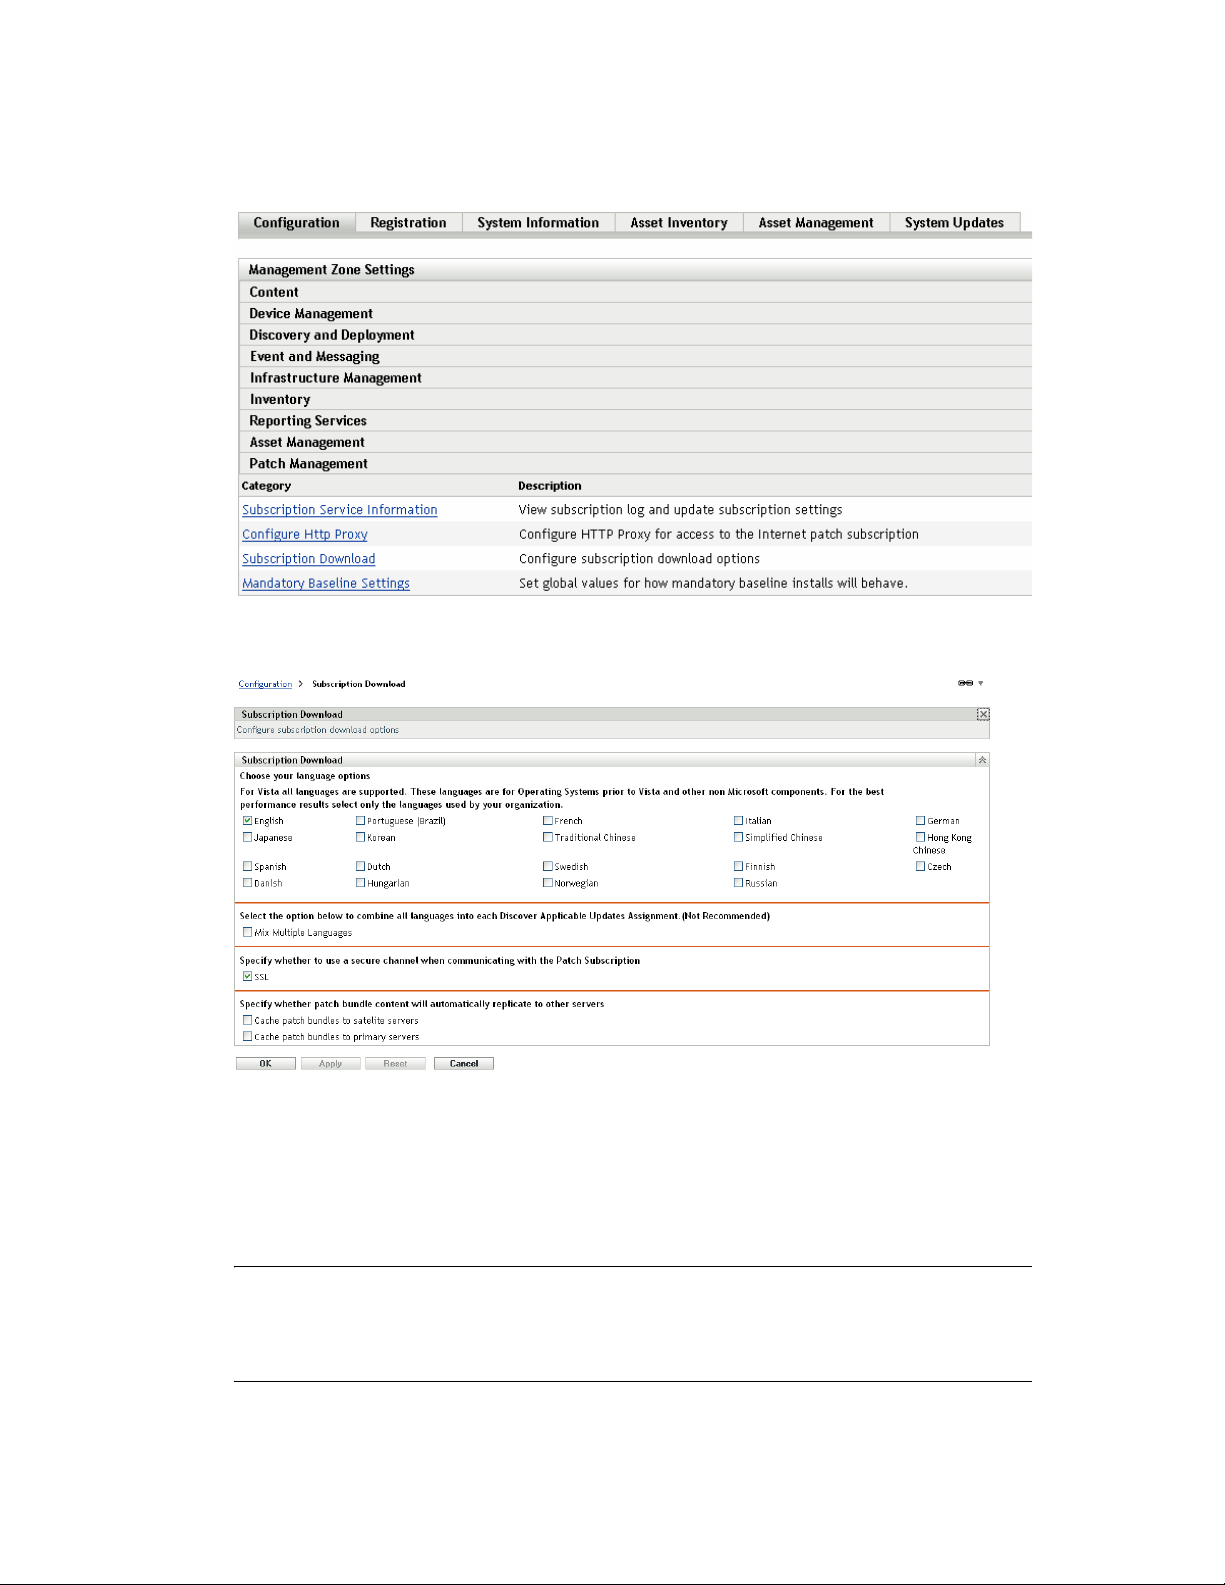
1 Click the Configuration tab in the left panel.
The Configuration page appears as shown in the following figure:
2 Click Patch Management.
Using Patch Management
17
Page 18
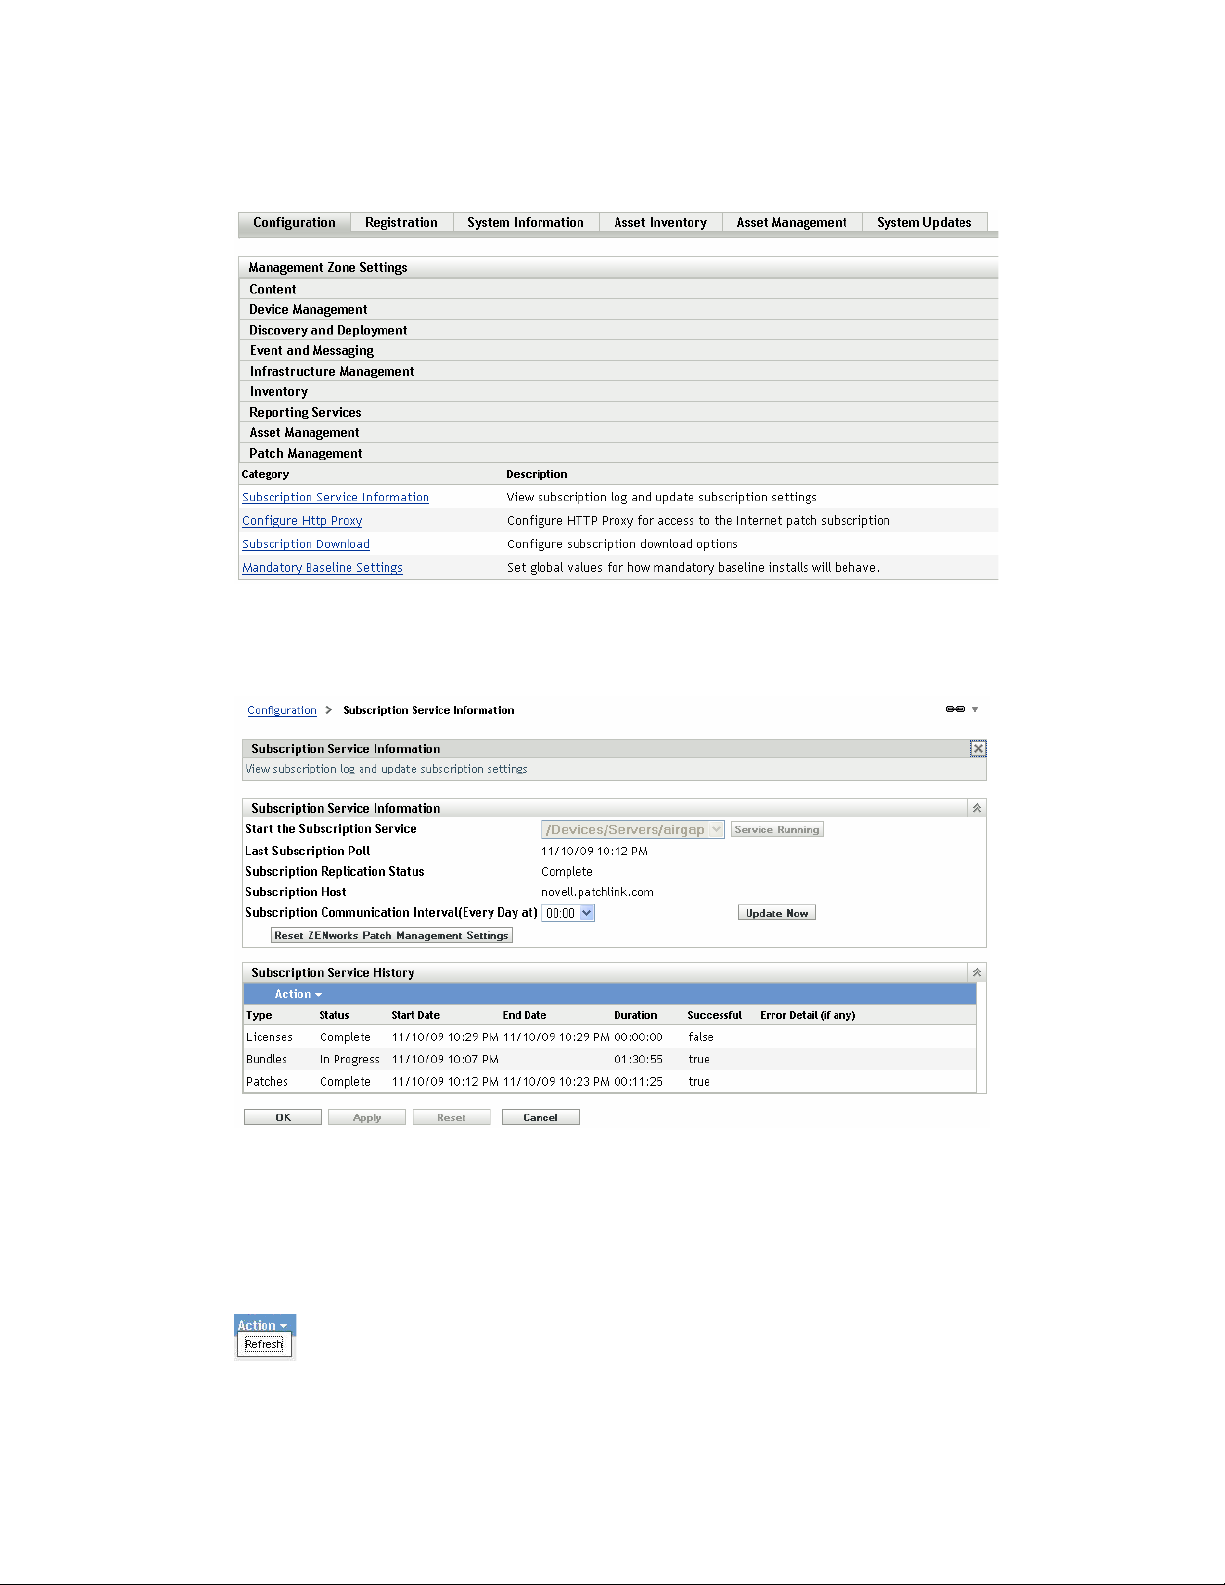
Four links—Subscription Service Information, Configure HTTP Proxy, Subscription Download
and Mandatory Baseline Settings—are displayed:
novdocx (en) 16 April 2010
3 Click the Subscription Service Information link.
The Subscription Service Information page appears, as shown in the following figure:
The Subscription Service Information page displays all the information about your
subscription, including the status. You can also update your subscription settings on this page.
You can refresh the subscription information by clicking the Action drop-down list on the
Subscription Information page and selecting the Refresh option, as shown in the following
figure:
18 ZENworks 10 Patch Management Reference
Page 19

The following table describes each status item featured on the Subscription Service
Information page:
Status Item Definition
Start the Subscription Service Enables you to select a server from multiple servers in your
management zone. You select a server from the drop-down
list and click the Start button to start the subscription service.
After the subscription service starts running, the Start
button reads Service Running.
If there are multiple ZENworks Servers in your
management zone, you can select any one of them to
be the Patch Management Server.
The Patch Management Server selected will download new
patches and updates daily, so it should have good
connectivity to the Internet.
NOTE: Selecting the Patch Management Server can be done
only once per zone in this release.
novdocx (en) 16 April 2010
Last Subscription Poll The date and time of the last successful update.
Subscription Replication Status The latest status of the process of patch subscription
replication.
Subscription Host The DNS name of the Patch Management licensing server
(http://novell.patchlink.com).
Subscription Communication
Interval (Every Day at)
Reset ZENworks Patch
Management Settings
The time at which the ZENworks Server will communicate
with the ZENworks Patch Subscription Network to retrieve
new patches and updates.
Enables you to set all Patch Management settings, including
deployments, back to the default state.
The following table describes the action of each button on the page:
Button Action
OK Enables you to go back to the Configuration page.
Apply Enables you to save the changes made to the Subscription Communication
Interval.
Reset Enables you to reset the replication status and initiate a complete replication
with the ZENworks Patch Subscription Network.
Update Now Initiates replication of the ZENworks Server with the ZENworks Patch
Subscription Network and forces an immediate download of the patch
subscription.
Cancel Enables you to cancel the last action performed.
Using Patch Management 19
Page 20
The Subscription Service History section displays the activity log of the subscription activities.
The following table describes each item featured in this section.
Item Definition
Type Subscription type defined for your account: Patches (Subscription
Replication), Bundles (Subscription Replication), and Licenses.
Status Status of the replication. When replication begins, the status reads In
Progress. When replication ends, the status reads Complete.
NOTE: If the replication process is interrupted, the status reads
Resetting. This indicates that the replication process has continued
from the point where it was interrupted.
Start Date The date and time when replication started.
End Date The date and time when replication ended.
Duration The length of time the replication has been going on.
Successful Indicates whether the replication was successful or not. True indicates
successful replication and False indicates incomplete or failed
replication.
novdocx (en) 16 April 2010
Error Detail (if any) Details of any error encountered during the patch download process.
3.2 Configuring HTTP Proxy Details
1 Click the Configuration tab in the left panel to display the Configuration page:
20 ZENworks 10 Patch Management Reference
Page 21
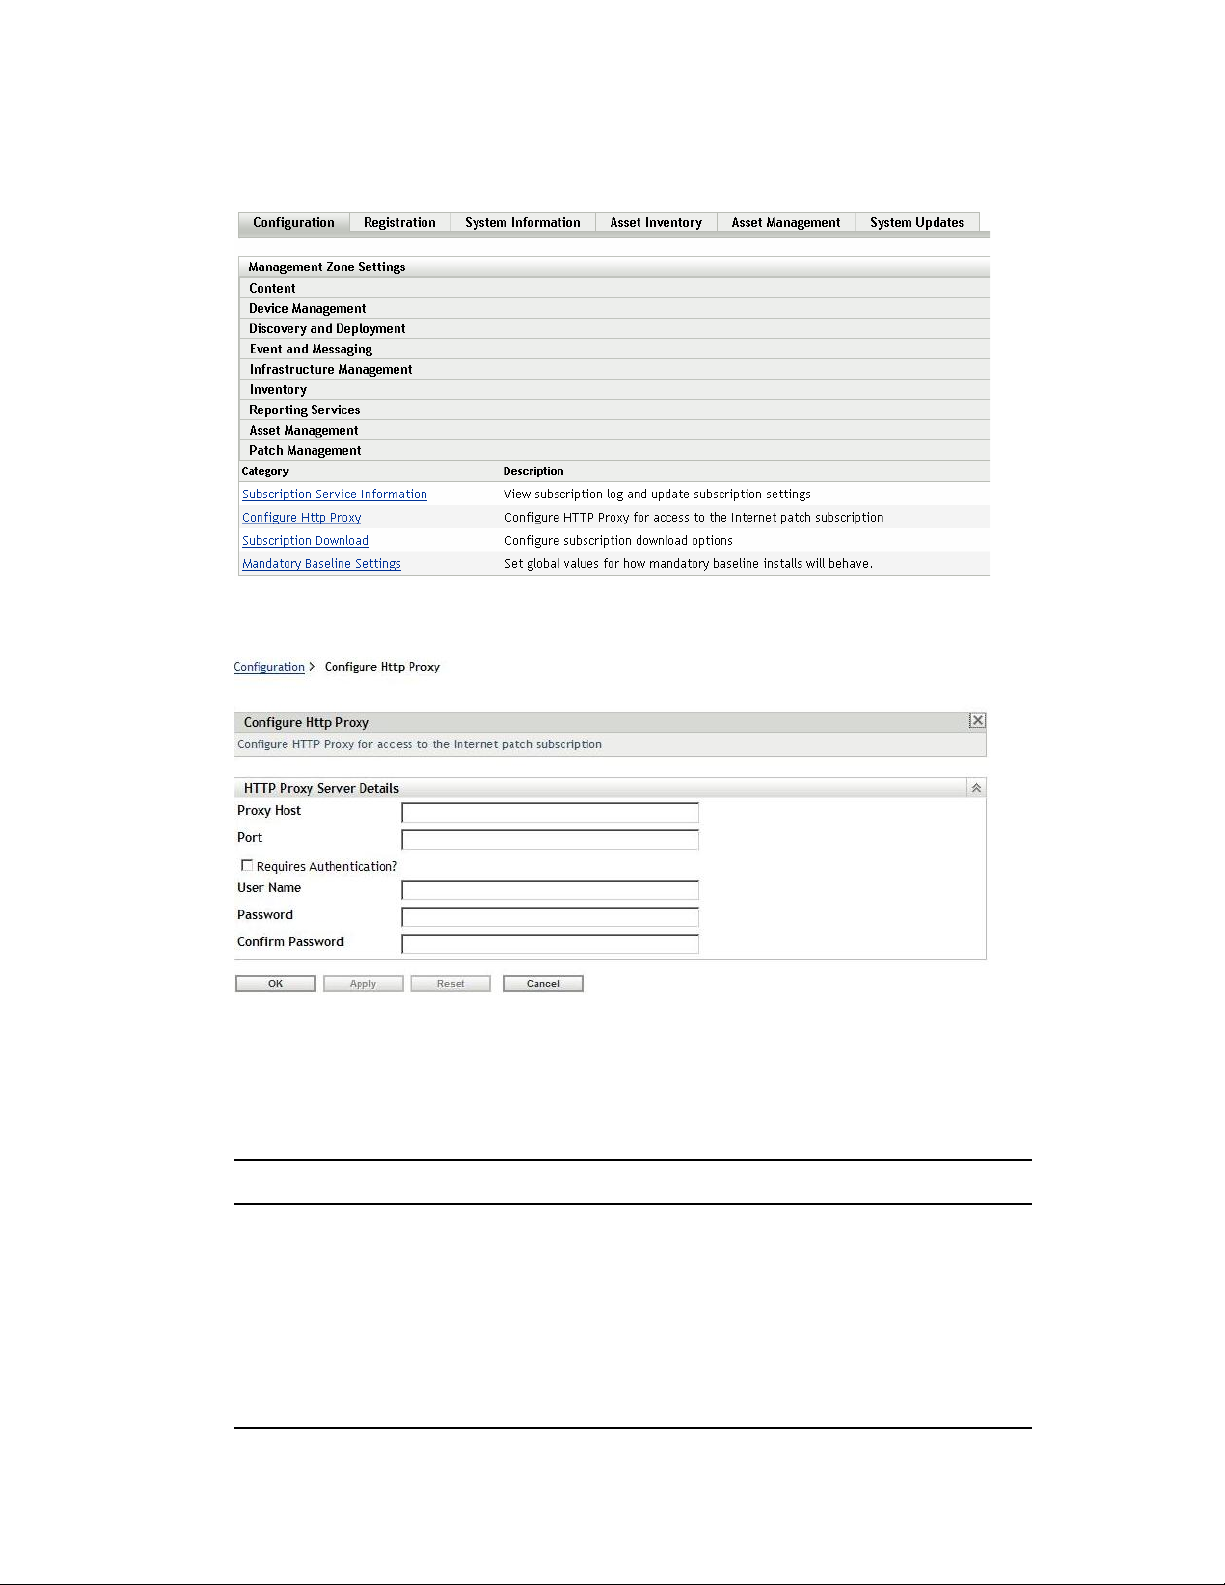
2 Click Patch Management to display the four links (Subscription Service Information,
Configure HTTP Proxy, Subscription Download and Mandatory Baseline Settings):
novdocx (en) 16 April 2010
3 Click the Configure HTTP Proxy link. The Proxy Server Details page appears:
The Proxy Server Details page enables you to configure an HTTP proxy for access to Internet
patch subscriptions. The HTTP proxy server allows Patch Management to download the
subscription service over the Internet.
The following table describes each field on the Proxy Server Details page:
Item Description
Proxy Host The proxy address used to connect to the ZENworks Patch
Subscription Network.
Port The proxy port used to connect to ZENworks Patch
Subscription Network.
Requires Authentication Selecting this check box ensures that the Proxy server can
be used only after user authentication. If you select the
check box, the User Name and Password fields are
enabled.
Using Patch Management 21
Page 22
Item Description
User Name User’s name used for authentication.
Password User’s password used for authentication.
Confirm Password User’s password for confirmation.
The following table describes the action of each button on the page:
Button Action
OK Enables you to go back to the Configuration page.
Apply Enables you to save the data entered in the text fields.
Reset Enables you to reset the data entered in the text fields.
Cancel Enables you to cancel the last action performed.
3.3 Configuring Subscription Download Details
novdocx (en) 16 April 2010
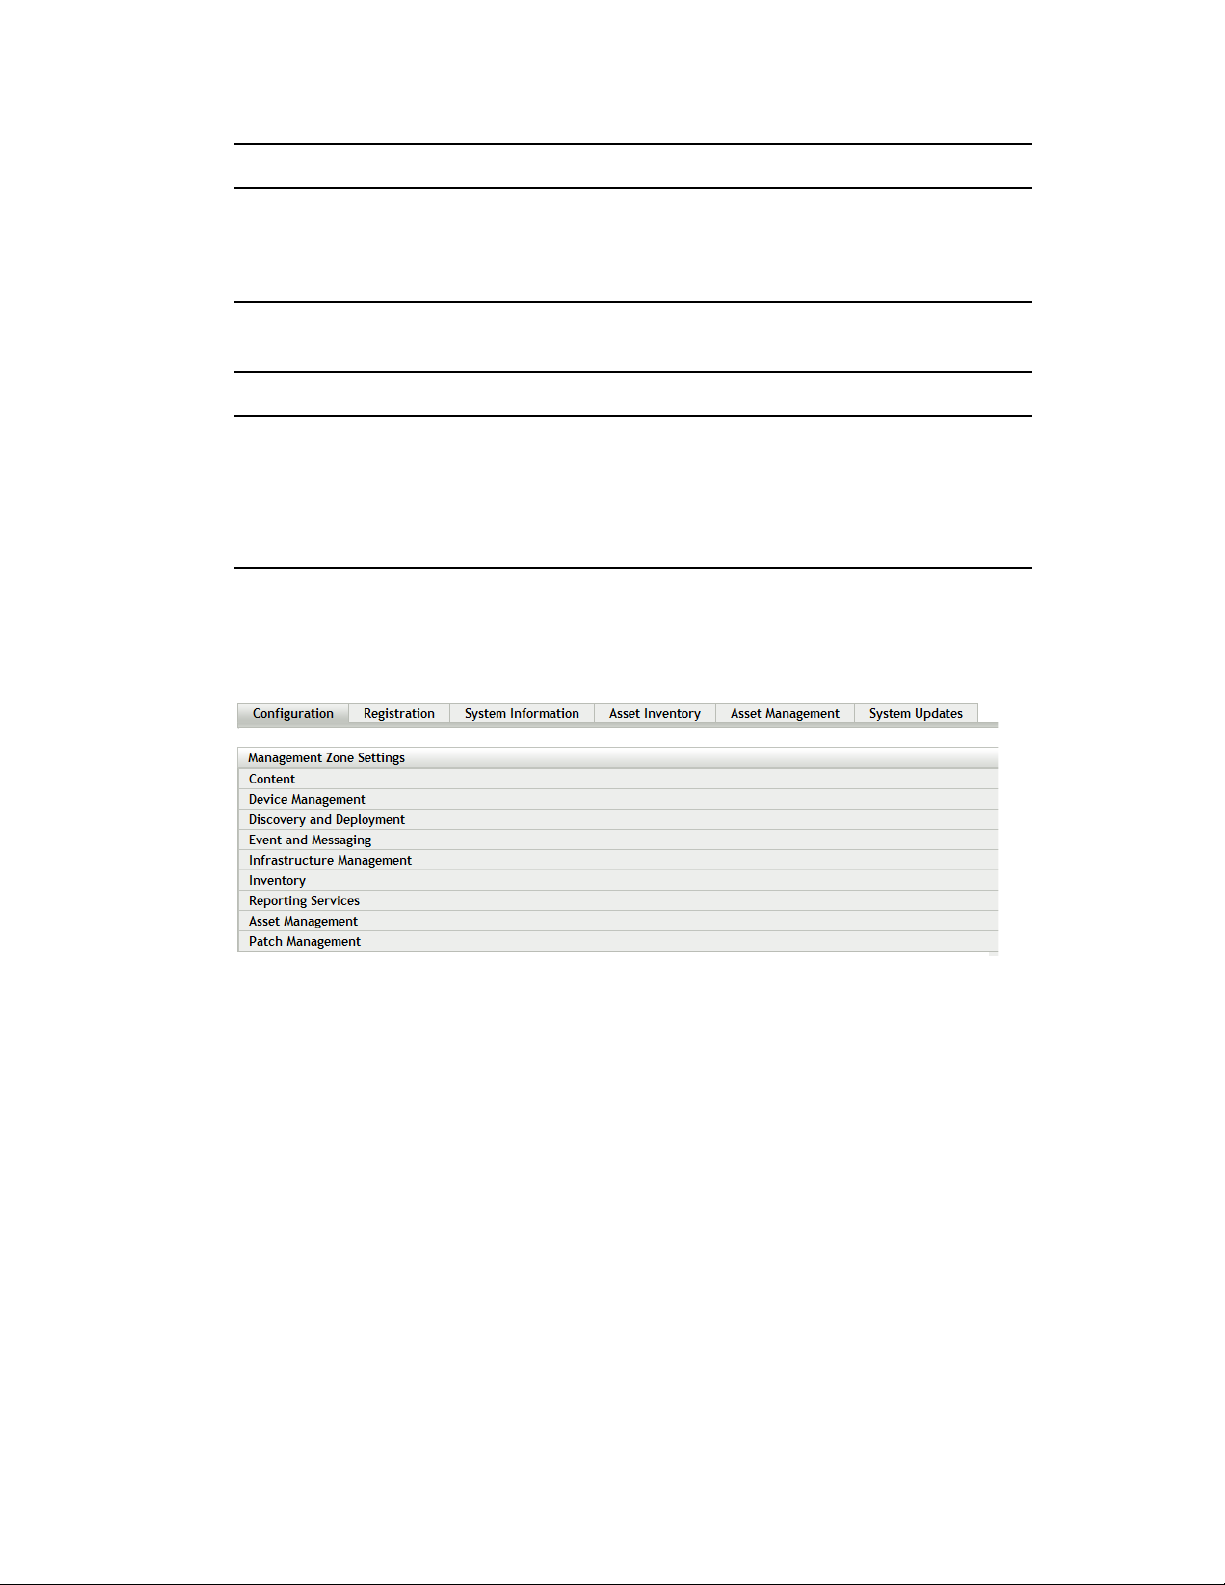
1 Click the Configuration tab in the left panel to display the Configuration page:
22 ZENworks 10 Patch Management Reference
Page 23
2 Click Patch Management to display the four links (Subscription Service Information,
Configure HTTP Proxy, Subscription Download and Mandatory Baseline Settings):
novdocx (en) 16 April 2010
3 Click the Subscription Download link to display the Subscription Download Options page:
The Subscription Download Options page allows you to configure the subscription download
options for the Patch Management Server. You can select the languages that are used within
your network to ensure that you only download the patches that are most applicable for your
organization. The next time patch replication occurs, only those patches specific to the selected
languages are downloaded, thereby saving download time and disk space on your Patch
Management Server.
NOTE: Novell does not recommend selecting all languages because each language can
represent hundreds of patches. Downloading unnecessary languages can result in thousands of
unused patch definitions within your ZENworks Primary Server database that would then need
to be disabled in the Patch Management tab.
Using Patch Management 23
Page 24

The following table describes each option on the Subscription Download Options page:
Item Description
Choose your language options Enables you to select the language of patches you
want to download. For example, if you select the
French check box, only French language patches are
downloaded.
Mix Multiple Languages Enables you to combine all languages into each
Discover Applicable Updates Assignment (not
recommended).
SSL Enables you to turn secured downloading of patch list
information on or off. The recommended setting is On.
Cache patch bundles to satellites Enables you to cache patch bundles to the servers or
workstations that are managed by Primary Servers.
Cache patch bundles to primary servers Enables you to cache patch bundles to Primary
Servers only.
novdocx (en) 16 April 2010
IMPORTANT: Customers with larger network environments should select both Cache Patch
Bundles to Satellites and Cache Patch Bundles to Primary Servers for optimal distribution of
patches and the daily Discover Applicable Updates task within their environment. Not selecting
these options could cause very slow and inefficient delivery of these patch bundles within a
highly distributed WAN environment.
Within an enterprise network environment, the customer usually installs more than one
ZENworks 10 Configuration Management Primary Server. Although only one of these servers
can be used to download patches, every Primary Server has a cache of patch bundle content for
distribution to the agents that are closest to it within the zone. Thus, when an agent wants to get
a bundle, it can get the bundle directly from its closest Primary Server rather than the Primary
Server where the patches were downloaded.
In addition, the satellites that are installed within the customer network can also serve as a
cache for bundle content. If an agent is at a remote branch office with a satellite, it can get its
content directly from the satellite rather than the Primary Server where patches were
downloaded.
The following table describes the action of each button on the page:
Button Action
OK Enables you to go back to the Configuration page.
Apply Enables you to save the changes made to the page.
Reset Enables you to reset the selected options.
Cancel Enables you to cancel the last action performed.
24 ZENworks 10 Patch Management Reference
Page 25
Best practices recommendations for using the patch subscription:
Customers should always disable patches that they no longer require, because this minimizes
the volume of patch scan data stored each day, as well as the time taken to scan each of the
endpoint devices.
We highly recommend that customers cache only the patches they need. When a patch is
cached to the Primary Server where patches are downloaded, it needs to be copied to all
Primary Servers and satellites within the zone. Downloading all patches wastes space and
bandwidth within the ZENworks 10 Configuration Management content distribution network.
3.4 Configuring Mandatory Baseline Settings
1 Click the Configuration tab in the left panel to display the Configuration page:
novdocx (en) 16 April 2010
2 Click Patch Management to display the four links (Subscription Service Information,
Configure HTTP Proxy, Subscription Download, and Mandatory Baseline Settings):
Using Patch Management 25
Page 26
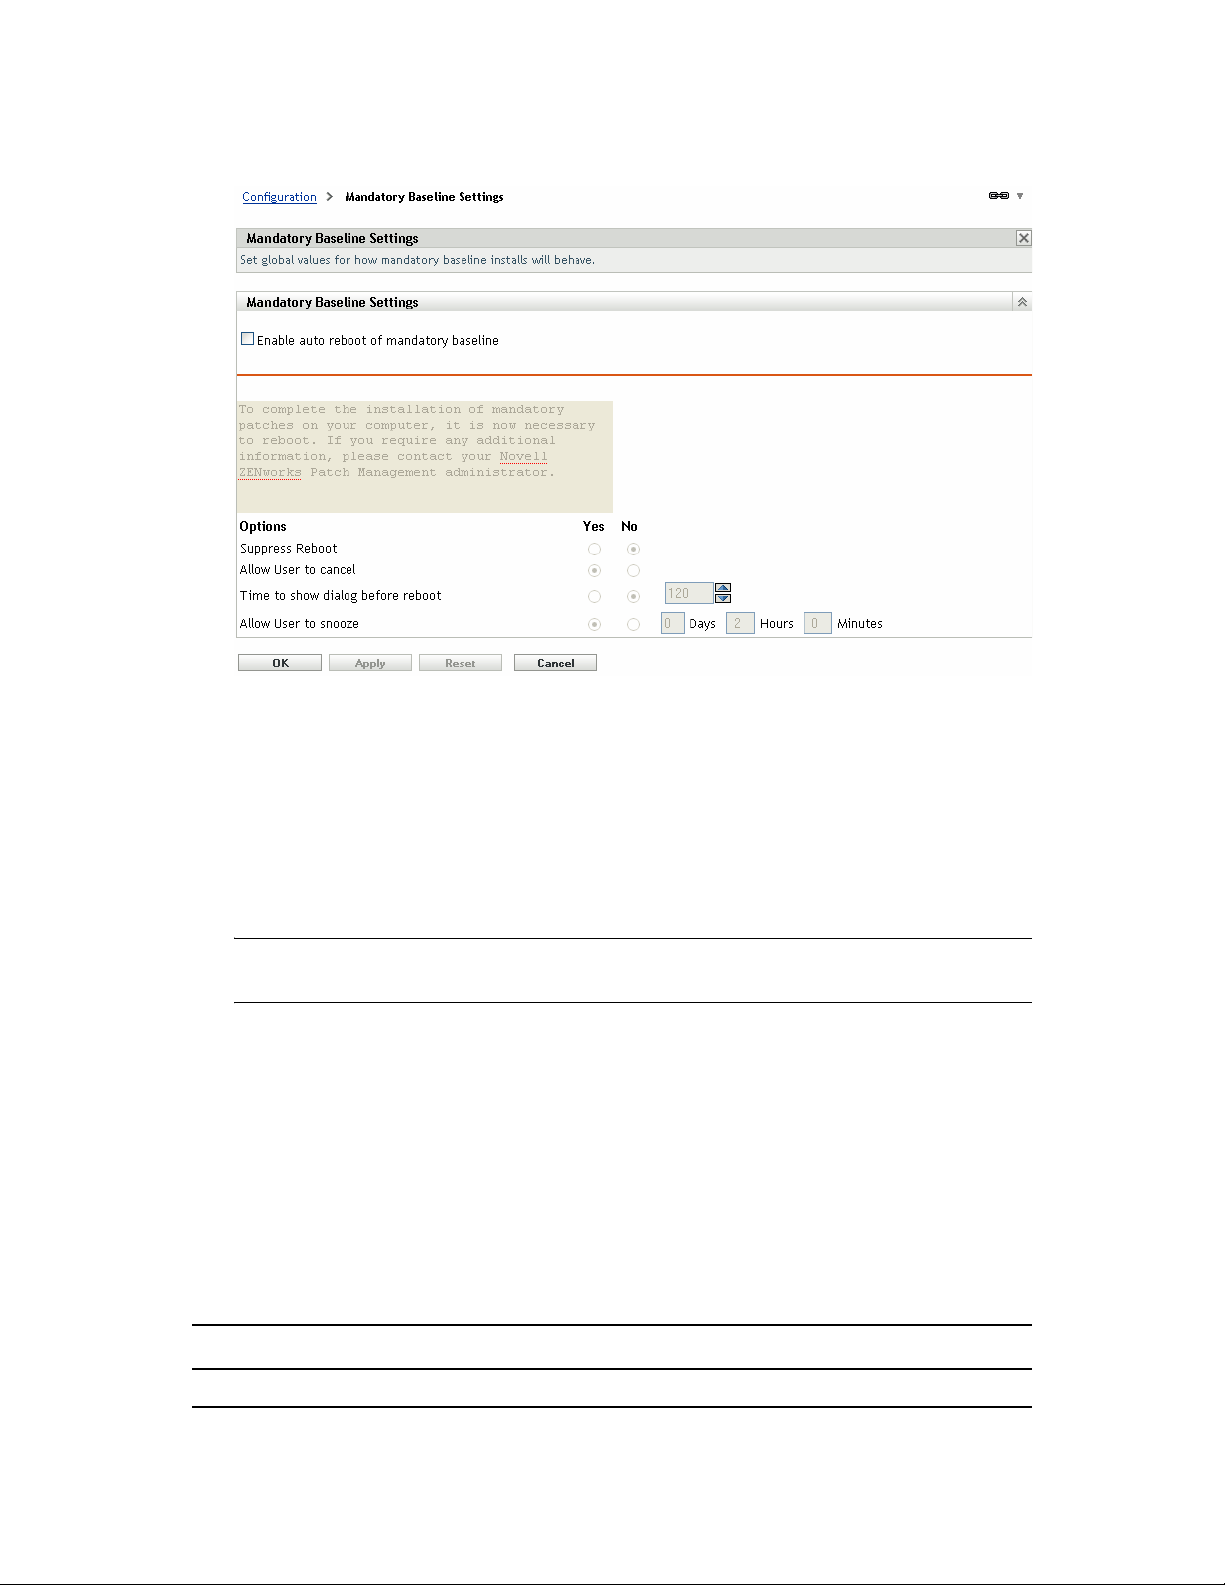
3 Click the Mandatory Baseline Settings link to open the Mandatory Baseline Settings page.
novdocx (en) 16 April 2010
The Mandatory Baseline Settings page allows you to completely control deployment of mandatory
baseline patches. For example, you can decide whether or not to automatically reboot the machine
when a baseline patch is applied. The page also enables you to set global options for installation of
mandatory baseline patches.
The page displays the following options:
Enable auto reboot of mandatory baseline: Select this option to enable an automatic reboot
of the machine when a mandatory baseline patch is applied.
NOTE: The auto reboot option is not applied to patches that do not require rebooting after
installation.
Message Box: The text of the notification message.
Options: When you define auto reboot options, you can specify whether to use the values in
the default settings or the custom settings. There are four options:
Suppress Reboot: Allows the user to prevent rebooting after installation of a patch.
Allow User to cancel: Allows the user to cancel the reboot process.
Time to show dialog before reboot: The time in seconds for users to choose whether to
reboot the machine after installation of a patch.
Allow User to snooze: This option allows the user to snooze the reboot.
The page also contains the following buttons:
Button Action
OK Takes you back to the Configuration page.
26 ZENworks 10 Patch Management Reference
Page 27
Button Action
Apply Saves the changes made to the page.
Reset Resets the selected options.
Cancel Cancels the last action.
3.5 Patch Management Licensing
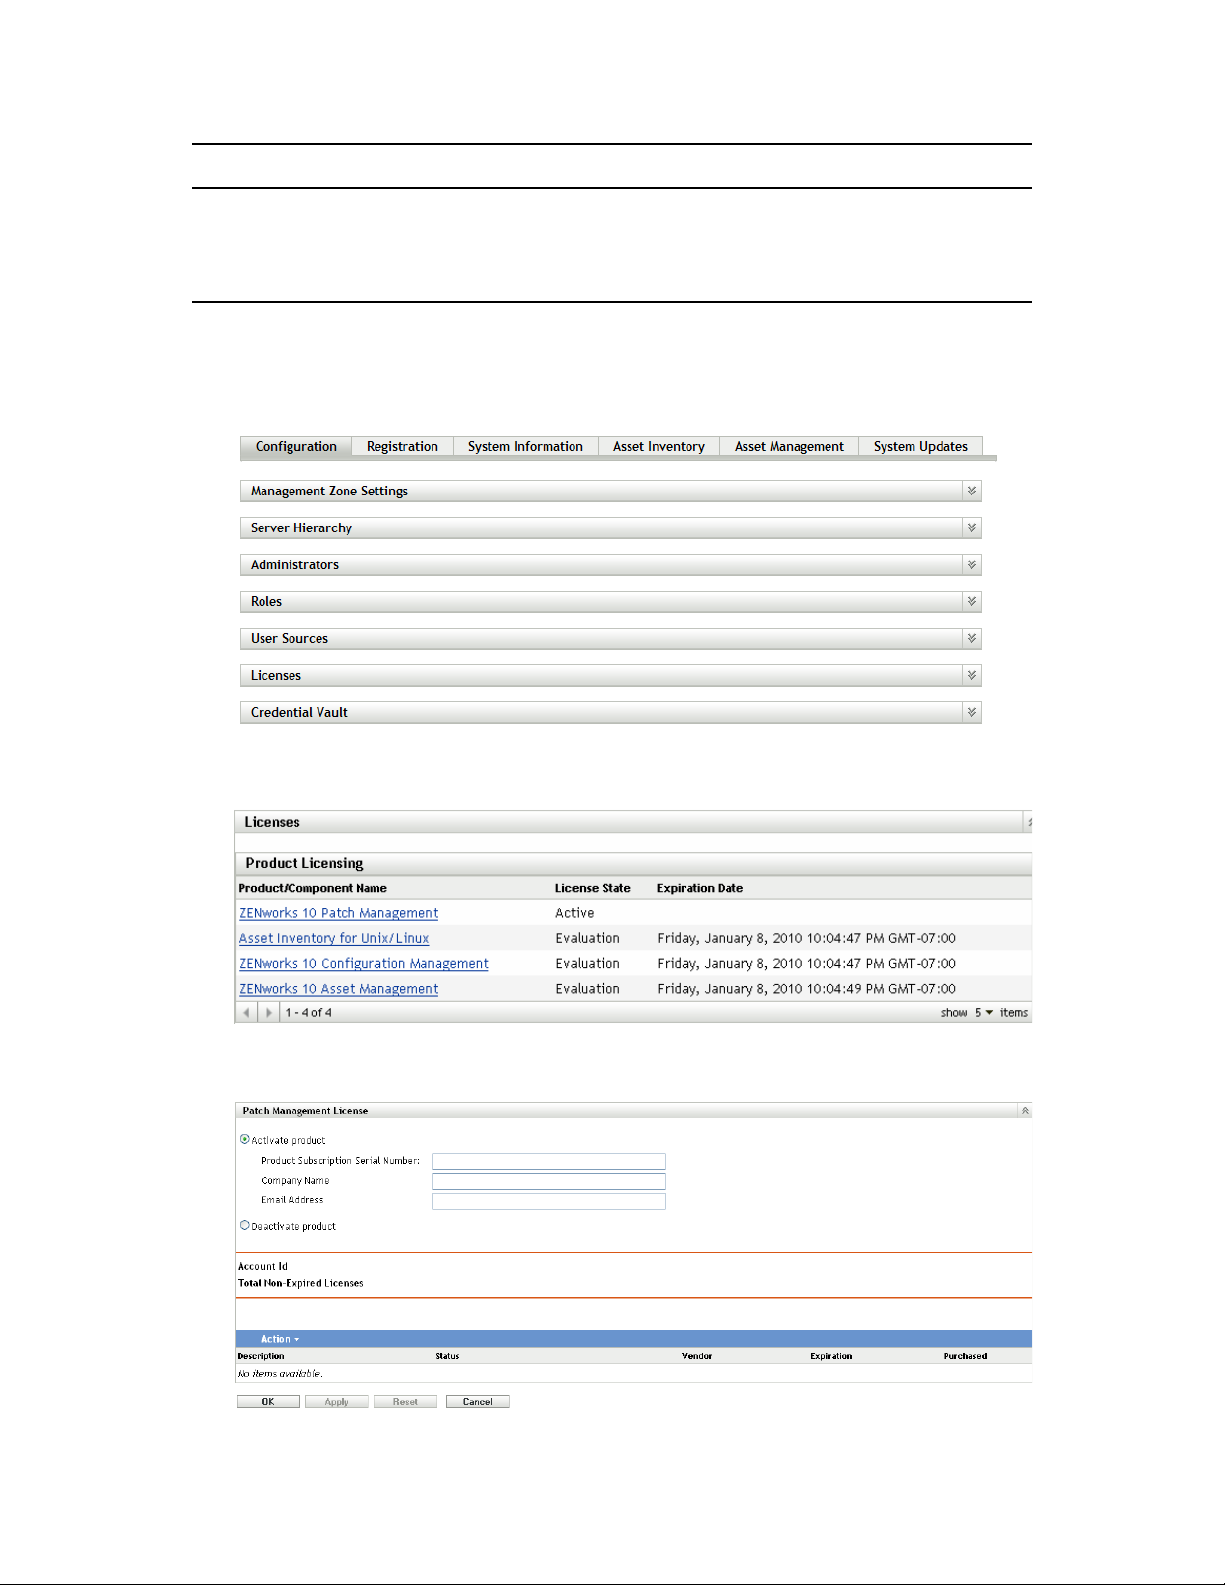
1 Click the Configuration tab in the left panel to display the Configuration page:
novdocx (en) 16 April 2010
2 If necessary, expand the Licenses section:
3 Click ZENworks 10 Patch Management.
Using Patch Management 27
Page 28

The Patch Management License page allows you to view and verify the patch management
subscription for the ZENworks Primary Server. The page also allows you to activate or renew your
paid subscription if it has expired, and provides a summary of all subscription elements that are part
of your patch management activities. This information is updated after each replication with the
Patch Management Subscription Service.
IMPORTANT: If you are upgrading from a prior version of Patch Management, you can use your
existing Patch Management subscription serial number after your Patch Management 10.1 server
has been uninstalled.
Patch Management provides a 60-day free trial period. You do not need to enter a serial number
unless you have purchased the product or the 60-day free trial has expired.
To continue using the patch management features of the ZENworks Control Center after your 60day free trial has ended:
1 Enter a valid subscription serial number for Patch Management along with the company name
and e-mail address.
2 Revalidate the subscription serial number.
novdocx (en) 16 April 2010
The license record is now valid, and displays its description, purchase date, vendor, effective date,
and expiration date.
To validate the serial number and obtain the authorization to download patches, the Primary Server
on which patch subscription is being downloaded must have port 443 (HTTPS) access to https://
novell.patchlink.com/update.
The Patch Management content distribution network is a global cache infrastructure with many
servers. Downloading patches from this network requires port 80 (HTTP) access to http://
novell.cdn.lumension.com/novell/baretta.xml. For security reasons, it is also recommended that SSL
access to the internet should be allowed. The SSL option is enabled by default and downloads the
lists of patches from a secure and trusted site.
You should use nslookup to discover the local IP address for your nearest content distribution node.
The content distribution network has over 40,000 cache distribution servers worldwide, plus
multiple redundant cache servers in each geographic location. It is important to allow access to a
range of addresses through the firewall.
The following table describes each field on the Subscription Serial Number page:
Table 3-1 Patch Management License Items
Item Definition
Activate product Activates the patch management service. The Patch Management
tab is restored in the main panel and the Patch Management
section is restored in the Configuration panel.
Deactivate product Deactivates the patch management service. The Patch
Management tab is removed from the main panel and the Patch
Management section is removed from the Configuration page.
Product Subscription Serial Number Patch Management license number (serial number).
28 ZENworks 10 Patch Management Reference
Page 29

Item Definition
Company Name Name of the company that Patch Management Service is
registered to.
Email Address E-mail address that you can use for receiving alerts and for future
communications.
Account ID Key created by the ZENworks Server, which is passed to the Patch
Management Subscription Service and used to validate the update
request.
Total Non-Expired Licenses Total number of active licenses. Each registered device requires
one license.
Description The description of the license or the name of the license.
Status Status of license verification. When verification begins, the status
reads Initializing Verification. When replication ends, the status
reads Completed.
Vendor The source where the license was purchased.
novdocx (en) 16 April 2010
Expiration The date the licenses expire. Typically, licenses expire one
calendar year from the date of purchase.
Purchased The total number of licenses purchased with the product.
The Patch Management serial number can be entered only once. When you have entered the serial
number, you can verify the license by clicking the Action drop-down list on the Patch Management
License page and selecting Verify License. To start the license verification process, click Apply.
Automatic verification of the license happens every day with the replication process.
Figure 3-1 Verify License option
To start the license verification process, click Apply.
Figure 3-2 Verify License message box
The Veri f y Li ce nse message box indicates that the verification of the subscription license is complete
or the license has expired.
NOTE: You can check the resultant license verification status under the Subscription Service
History panel on the Subscription Service Information page. When verification begins, the status
column reads Initializing Verification. When verification ends, the status column reads Completed.
The Successful column indicates whether the verification was successful or not. True indicates
successful verification and False indicates incomplete or failed verification.
Using Patch Management 29
Page 30

The following table describes the action of each button on the Patch Management License page:
Table 3-2 Buttons on the Patch Management License Page
Button Action
OK Enables you to go back to the Configuration page.
Apply Enables you to start the license verification process.
Reset Enables you to reset the data entered in the text fields.
Cancel Enables you to cancel the last action performed.
novdocx (en) 16 April 2010
30 ZENworks 10 Patch Management Reference
Page 31

4
Using the Patch Management Tab
The following sections provide more information on the Patches page:
Section 4.1, “Viewing Patches,” on page 31
Section 4.2, “Dashboard,” on page 32
Section 4.3, “Status,” on page 34
Section 4.4, “Using the Patches Page,” on page 35
Section 4.5, “Patch Management BOE Reports,” on page 46
4.1 Viewing Patches
A patch consists of a description, signatures, and fingerprints required to determine whether the
patch is applied or not patched. A patch also consists of associated patch bundles for deploying the
patch.
novdocx (en) 16 April 2010
4
The Patches page displays a complete list of all known patches reported by various software
vendors. After they are reported and analyzed, the patches are registered for distribution to your
ZENworks Server through the ZENworks Patch Subscription Network. The ZENworks Adaptive
Agent should be installed on each device to check for known patches. A patch bundle called
Discover Applicable Updates (DAU) is then assigned to run on each device on a daily basis to scan
for known patches. This task returns the results that are displayed on the Patches page. The results
are presented in a table of patch status. The total number of patches is displayed below the table in
the bottom left corner.
To view the patches in Patch Management, click the Patch Management tab on the left panel, as
shown in the following figure:
Figure 4-1 Patch Management Tab
Using the Patch Management Tab
31
Page 32

The patches are displayed, as shown in the following figure:
Figure 4-2 Patches listed on the Patches page
novdocx (en) 16 April 2010
4.2 Dashboard
The Dashboard addresses operational, management, and compliance reporting needs with a
graphical dashboard and four standard reports that document patches, patch deployments, patch
status, trends, inventory and more, at individual machine or aggregated levels. This provides a
unified view to demonstrate progress toward internal and external audit and compliance
requirements. You can update the dashboard by clicking the Update Dashboard Report in the Action
menu of the Patch Management tab.
The dashboard reporting thread captures daily statistics concerning the overall percentage of
enabled patches that are actually patched on a given day. It will take at least 24 hours for the initial
dashboard reports to be generated.
NOTE: To use patch management effectively, customers should disable the patches that are
irrelevant to their environment, so that the daily compliance statistics are based only on patches
relevant to their network of devices, giving the percentage of enabled patches actually applied on a
given day.
32 ZENworks 10 Patch Management Reference
Page 33

Following is an illustration of the Dashboard page:
Figure 4-3 Dashboard Page
novdocx (en) 16 April 2010
Patch Compliance: Displays the monthly/daily trend of overall compliance for each patch
impact category.
Patch Management best practices recommend that an organization should monitor compliance
over time to ensure that the intended patches are deployed regularly and the patch management
solution is being used correctly. Mouse over the trend lines to see the actual calculated
percentages for each impact category (Critical, Software, or Optional). Detailed information
that shows the individual patched/not patched totals per patch is seen on the Patches tab of
Patch Management.
Monthly/Daily: Time period for the compliance trend data.
Critical Patched: Percentage of Critical patches that are applied.
Optional Patched: Percentage of Recommended and Informational patches that are
applied.
Software Patched: Percentage of Software patches that are applied
Mandatory Baseline Compliance: Displays the percentage of device groups that are currently
in mandatory baseline compliance.
Using the Patch Management Tab 33
Page 34

Establishing a mandatory baseline policy allows the administrator to auto-deploy patches to
device groups quickly and easily, and to ensure that known vulnerabilities do not return when a
new computer is purchased or re-imaged. Each group is only evaluated as being in mandatory
baseline compliance if all enabled baseline patches for that group are currently in a patched
status for all group member devices.
Status: Compliant, Non-Compliant, or No Baseline.
Group Count: Number of groups in each state.
Patch Compliance By Device: Displays the overall patch compliance of the devices that Patch
Management is monitoring.
Each device is evaluated as compliant only if it has a patched status for all of the active patches
currently available within Patch Management. Patches that are not applicable should always be
disabled within Patch Management so that this metric can be tracked only on the relevant
patches for the managed network of devices.
Status: Compliant or Non-Compliant.
Device Count: Total number of devices in each state.
Time Since Last Agent Refresh: Displays the elapsed time since the last DAU cycle for all
managed devices within the network.
Within a patch management system, it is vital to ensure that all devices are regularly scanned
for missing patches. Even with a regular daily DAU cycle, it is very likely that some laptops or
workstations are offline during any given day.
Elapsed Time: < 24 hrs, < 48 hrs, < 72 hrs, > 72 hrs.
novdocx (en) 16 April 2010
Device Count: Total number of devices in each category.
The following table describes the action of each button on the page:
Button Name Action
Graph Displays the details graphically.
Data Displays the details in tabular form.
Zoom Control Enlarges or reduces a single graph into the full page size or restores it to the
original size.
When you click the button, the corresponding graph is in full page size mode; when you click the
button, the corresponding graph is restored to its former size.
4.3 Status
This page displays the download status for patches and bundles in table form, and also displays the
details of patch caching and queuing status.
Section 4.3.1, “Status,” on page 35
Section 4.3.2, “Cache Status,” on page 35
34 ZENworks 10 Patch Management Reference
Page 35

4.3.1 Status
Table 4-1 Status Table Items
Item Name Item Status
Signature Download Indicates whether downloading of the signature has finished or is in progress.
novdocx (en) 16 April 2010
Last Signature
Download Time
Bundle Download Indicates whether the patch bundle download is finished or is in progress.
Last Patch Download Indicates the last time the local server contacted and downloaded a patch from
Number of Failed
Download(s)
Number of Patches
Queued for Caching
Number of Active
Patches
Number of New
Patches (less than 30
days)
Latest Patch Released OnIndicates the time when the latest patches were released.
Indicates the last time the local server contacted and downloaded the signature
from the Patch Subscription server.
the Patch Subscription server.
Indicates the number of patches that failed to download from the Patch
Subscription server.
Indicates the number of patches that are queued for download from the Patch
Subscription server.
Indicates the number of patches that are available for download from the Patch
Subscription server.
Indicates the number of patches that have been uploaded to the Patch
Subscription server in the last 30 days and are available for download.
4.3.2 Cache Status
Table 4-2 Cache Status Table Column Headings
Item Definition
Name The name of a patch.
Status Whether the patch has been successfully downloaded.
Error Detail (if any) Details of any error that occurred during the download process.
4.4 Using the Patches Page
The following sections provide more information on the Patches page:
Section 4.4.1, “Patches,” on page 36
Section 4.4.2, “Patch Information,” on page 42
Section 4.4.3, “Searching for a Patch,” on page 43
Section 4.4.4, “Patch Management,” on page 45
Using the Patch Management Tab 35
Page 36

4.4.1 Patches
This section of the Patches page provides the following information about patches:
Name of the patch
Total number of patches available
Impact of the patch
Statistics of the patch
This section features the Action menu, which enables you to perform any of the five actions related
to patches: Deploy Remediation, Enable, Disable, Update Cache, and Update Dashboard Report.
For more information on these actions, see “Action Menu Items” on page 41.
The section also features the show items drop-down list that enables you to select the number of
items to be displayed in this section, as shown in the following image:
Figure 4-4 Show Items Drop-Down List
novdocx (en) 16 April 2010
The following sections explain the information on the Patches page:
“Patch Name” on page 36
“Total Patches Available” on page 37
“Patch Impacts” on page 37
“Patch Statistics” on page 38
“Action Menu Items” on page 41
Patch Name
This is the name that identifies a patch. This name typically includes the vendor or manufacturer of
the patch, the specific application, and version information.
An example of a patch name is shown as follows. It indicates that Adobe is the vendor, Acrobat
Reader is the application, and 6.0.6 is the version information:
Figure 4-5 Example of a Patch Name
All Microsoft security patches are titled with their Microsoft Security Bulletin number in the
format MS0x-yyy, where 0x indicates the year the patch was released and yyy indicates the
sequential number of the released patch. These patches are critical and must be installed as
soon as possible.
36 ZENworks 10 Patch Management Reference
Page 37

Names of all Microsoft non-security patches include the Knowledge Base (KB) article number.
These patches can be installed at your discretion.
The names of Microsoft service packs and third-party patches do not usually contain a KB
number, and never a Microsoft Security Bulletin number. Test these service packs thoroughly
to ensure that they have the expected results.
For more information on the naming conventions for patches, refer to Comprehensive Patches and
Exposures (CVE) (http://cve.mitre.org/), which is a list of standardized names for patches and other
information exposures. Another useful resource is the National Patch Database (http://nvd.nist.gov/
), which is the U.S. government repository of standards-based patch management data.
Total Patches Available
The total number of patches that are available for deployment is displayed in the bottom left corner
of the table. In the following figure, the total number of available patches is 979:
Figure 4-6 Show Items Drop-down List
novdocx (en) 16 April 2010
Patch Impacts
The type of patch defined on the basis of the severity of the patch; the type can be Critical,
Recommended, Informational, or Software Installers. Each impact is described as follows:
Critical: Novell has determined that this type of patch is critical, and should be installed as
soon as possible. Most of the recent security updates fall in this category. ZENworks Server
automatically downloads and saves the patches that have critical impact.
Recommended: Novell has determined that this patch, although not critical or security related,
is useful and should be applied to maintain the health of your computers. You should install
patches that fall into this category.
Software Installers: These types of patches are software applications. Typically, this includes
software installers. The patches show Not Patched if the application has not been installed on a
machine.
Informational: This type of patch detects a condition that Novell has determined is
informational. Informational patches are used for information only. There is no actual patch to
be installed.
Patch Management impact terminology for its patch subscription service closely follows the vendor
impact terminology for patch criticality. Each operating system has a vendor-specific impact rating
and that impact is mapped to a Novell rating as described in this section. Patch Management,
following the recommendations of Lumension Security, increases or steps up the severity of the
impact rating. For example, Microsoft classifications for Critical, Important, and Moderate patches
are all classified as Critical by Novell.
Using the Patch Management Tab 37
Page 38

The following table lists the mapping between Novell and Microsoft patch classification
terminology:
Table 4-3 Novell and Microsoft Patch Impact Mapping
Novell Patch Impacts Windows Other
novdocx (en) 16 April 2010
Critical Critical Security
Important
Moderate
Recommended Recommended
Low
Example: Microsoft Outlook 2003 Junk
E-mail Filter Update
Software Installers Software Distribution
Example: Microsoft Windows Malicious
Software Removal Tool (Virus Removal)
Informational NA NA
NA
NA
Adobe 8.1 software installer
Source: Lumension Security
Patch Statistics
Patch statistics show the relationship between a specific patch and the total number of devices (or
groups) within ZENworks Server that meet a specific status. The patch statistics appear in two
columns on the far right side of the Patches page. Each column status is described as follows:
Patched: Displays a link indicating the total number of devices to which the corresponding
patch has been applied.
Clicking this link displays a page that lists the patched devices.
If a patch does not support uninstallation, the Remove option in the Action menu is disabled.
The Patched page provides the following information about the devices to which a patch has
been applied.
38 ZENworks 10 Patch Management Reference
Page 39

Item Definition
Device Name The name of the device registered with Novell
ZENworks 10 Patch Management to which the
patch is to be deployed.
Status The status of the device. The status can be
offline or online.
Platform The operating system of the device.
DNS The name of the DNS server.
IP Address The IP address of the device.
You can uninstall the patch by using the Remove option in the Action menu.
Not Patched: Displays a link indicating the total number of devices to which the
corresponding patch has not been applied.
Clicking this link displays a page that lists these devices.
novdocx (en) 16 April 2010
The Not Patched page provides the following information about the devices to which a patch
has been applied.
Item Definition
Device Name The name of the device registered with Novell
ZENworks 10 Patch Management to which the
patch is to be deployed.
Status The status of the device. The status can be
offline or online.
Platform The operating system of the device.
DNS The name of the DNS server.
IP Address The IP address of the device.
You can deploy the patch to these devices by using the Deploy Remediation option in the
Action menu.
Information: The Information page displays detailed information for a selected patch.
Using the Patch Management Tab 39
Page 40

novdocx (en) 16 April 2010
You can view the following information for a patch:
Property Name Definition
Name The name of the patch.
Impact The impact of the patch as determined by Novell.
See Patch Impacts.
Status Status of the patch; can be Enabled, Disabled
(Superseded) or Disabled (By User).
Vendor The name of the vendor.
Released on The date the patch was released by the vendor.
Vendor Product ID The ID number given to the product by the
vendor.
Description The description of the patch; includes detailed
information concerning the defect or issue
resolved by this patch, deployment notes, and
the prerequisites for deployment.
Number of Devices Patched The number of devices to which the patch has
been applied.
Number of Devices Not Patched The number of devices to which the patch has
not been applied.
Number of Devices Not Applicable The number of devices to which the patch does
40 ZENworks 10 Patch Management Reference
not apply.
Page 41

The patches shown in the Patches page have different icons indicating their current status. The
following table describes the icons for each patch:
Table 4-4 Patch Icons
Patch Icon Significance
Indicates the patches that are disabled.
Disabled patches are hidden by default. Use the Include Disabled filter in the Search panel
to show these items.
Indicates that only the fingerprint information for the patch has been brought down from the
ZENworks Patch Subscription Network. This icon represents the patches that are not
cached.
Indicates that a download process for the bundles associated with the selected patch is
pending.
Indicates that a download process for the bundles associated with the selected patch has
started. This process caches those bundles on your ZENworks Server.
novdocx (en) 16 April 2010
Indicates that the fingerprints and remediation patch bundles that are necessary to address
the patch have been cached in the system. This icon represents the patches that are cached
and ready for deployment.
Indicates that an error has occurred while trying to download the bundle associated with the
selected patch.
Action Menu Items
The Patches section also features an Action menu, which enables you to perform one of five actions
on the patches listed on the page. The following figure shows the five options in the Action menu:
The Action menu consists of the following five options:
Deploy Remediation: Enables you to deploy a patch. To use this option, select the check
boxes for the patches you want to deploy and select Deploy Remediation from the Action menu
options to open the Deploy Remediation Wizard. For more information, see Chapter 5, “Using
the Deploy Remediation Wizard,” on page 49.
Enable: Allows you to enable a disabled patch.
Disable: Allows you to disable a patch. To use this option, select the check box for the desired
patch and select Disable. The selected patch is removed from the list.
Disabling a patch also disables all the bundles associated with it.
Update Cache: Initiates the download process for the bundles associated with the selected
patch and caches those bundles on your ZENworks Server.
The remediation patch bundles must be cached before they are installed on the target device.
Using the Patch Management Tab 41
Page 42

To use this option:
Select one or more patches in the patches list.
In the Action menu, click Update Cache.
The patch icon changes to . While the download is in progress, the icon changes to .
When caching is complete, the color of the patch icon changes to green. This indicates that
the patch remediation is ready to be deployed.
You can sort the patches in ascending and descending alphabetical order. To sort, click the
arrow in the column heading Patch Name as shown below.
Figure 4-7 Patch Name Column
Update Dashboard Report: Enables you to update the dashboard report with the latest
statistics.
NOTE: To know when a patch was downloaded, view the Message Log panel for that patch in the
Bundles section.
novdocx (en) 16 April 2010
4.4.2 Patch Information
You can view detailed information for a selected patch in the Patch Information section. Clicking
the name of a patch displays the details of that patch.
For example, if you select the patch called Windows Malicious Software Removal Tool- February
2009 (KB890830) from the list of patches, the Patch Information section displays the result of a
patch analysis for the selected patch, as shown in the following figure:
Figure 4-8 Patch Information for a Selected Patch
42 ZENworks 10 Patch Management Reference
Page 43

The following table defines each property name in the Patch Information section:
Table 4-5 Property Names in the Patch Information Section
Property Name Definition
Name The name of the patch.
Impact The impact of the patch as determined by Novell. See Patch
Impacts.
Status Status of the patch; can be Enabled, Disabled (Superseded), or
Disabled (By User).
Vendor The name of the vendor or manufacturer.
Released on The date the patch was released by the vendor.
Vendor Product ID The ID number given to the product by the vendor.
Description The description of the patch; it includes the advantages of
deploying the patch and the prerequisites for deployment.
novdocx (en) 16 April 2010
Requires Reboot Whether a reboot is required after patch deployment
Supports Uninstall Whether the patch supports an uninstall after installation
4.4.3 Searching for a Patch
The Search section on the Patches page offers extensive search and data filtering options that allow
you to search for specific patches and filter result sets based on the status and impact of the patches.
Searching and filtering can be performed independently of each other or can be combined to provide
extensive drill-down capabilities. The following figure shows the Search section:
Figure 4-9 Search Section on the Patches Page
To search for a patch:
1 Type all or part of the patch name in the Patch Name text box.
2 Select the desired check box under Status and Impact.
Using the Patch Management Tab 43
Page 44

3 Select the vendor in the Vendor drop-down list.
4 Select the cache status in the Cache Status drop-down list.
5 Click Search.
NOTE: Click Reset to return to the default settings.
The following table describes the result of selecting each filter option under Status:
Table 4-6 Status Filters in Search
Status Filter Result
Patched Search results include all the patches in the patch list that have
been applied to one or more devices.
Not Patched Search results include all the patches in the patch list that have not
been applied to any device.
Not Applicable Search results include all the patches in the patch list that do not
apply to the device.
novdocx (en) 16 April 2010
Include Disabled Search results include all the patches in the patch list that have
been disabled by the administrator.
The following table describes the result of selecting each filter option under Impact:
Table 4-7 Impact Filters in Search
Impact Filter Result
Critical Search results include all the patches in the patch list that are
classified as Critical by Novell.
Recommended Search results include all the patches in the patch list that are
classified as Recommended by Novell.
Informational Search results include all the patches in the patch list that are
classified as Informational by Novell.
Software Installers Search results include all the patches in the patch list that are
classified as Software Installers by Novell.
Table 4-8 Vendor Filters and Cache Status Filter in Search
Filter Result
Vendor Search results include all the patches relevant to the vendor in the
patch list.
Cache Status Search results include all the patches relevant to their cache status
on the local server.
44 ZENworks 10 Patch Management Reference
Page 45

4.4.4 Patch Management
The following sections provide more information on the different options in the Patch Management
pane:
“Deploy Remediation” on page 45
“Export Patches” on page 45
“View Patch” on page 46
Deploy Remediation
This option enables you to deploy a patch. To use this option, select the check boxes for the patches
you want to deploy and click the Deploy Remediation link to open the Deploy Remediation Wizard.
For more information, see Chapter 5, “Using the Deploy Remediation Wizard,” on page 49.
Export Patches
Details such as the status and impact of all patches can be exported into a comma-separated value
(CSV) file. You can choose to save the file in a different file format after opening it from the
download option.
novdocx (en) 16 April 2010
1 Click the Export Patches link in the left pane.
This exports all data results, not just selected results. However, some data might not export or
.csv
translate into
format in a readable format.
2 In the Export Patches dialog box, click Export.
3 In the File Download dialog box, select from the available options:
Open: Creates the file and opens it in your Web browser. From the browser, you can save
to a variety of file formats, including CSV, XML, text, and numerous spreadsheet
applications.
Save: Creates the file and saves it to a local folder. The file is saved in Microsoft Office
Excel CSV format. The file is named
ZPMPatchesList.csv
by default.
Using the Patch Management Tab 45
Page 46

Cancel: The report is not created or saved.
View Patch
Select a patch and click the View Pat ch link to display a page that provides details for that patch. The
page provides three tabs as follows:
novdocx (en) 16 April 2010
Patched: Displays the patched devices for that patch.
Not Patched: Displays all the devices that are not patched for that patch.
Information: Displays detailed information for that patch.
4.5 Patch Management BOE Reports
Business Objects Enterprise (BOE) reports are available to customers who install ZENworks
Reporting Services (ZRS) inside ZENworks 10 Configuration Management. The following
predefined reports are included for Patch Management:
Mandatory Baseline Details: Displays the applicable device names and patch statuses for the
patches within the selected mandatory baseline. This report also helps you to monitor and
communicate the compliance level for mandatory patches in the environment.
Mandatory Baseline Summary: Displays the applicable device names and patch statuses for
the patches. It also displays the criticality and the percentage of patched and not patched
devices.
Vulnerability Analysis: Displays the criticality level for patches that are applicable in an
enterprise. It also displays the number of devices applicable to the patch, and the percentage of
patched devices. This report is designed to assist in showing adherence to various compliances
that require a level of patching efforts.
NOTE: On a Linux server, the Vulnerability Analysis and the Mandatory Baseline Summary
reports display blank columns even though the reports have data. To view the data, modify the
reports and set the text color to black in the Formatting toolbar, then save the reports. You need
to do this only once.
Patch Assessment Report: Displays the patches released by vendors, and the number of
patched, not patched, and not applicable devices.
Patch Release Report: Displays the number of patches released by vendors. The details
section displays the patch name and percentage patched by impact and vendor.
46 ZENworks 10 Patch Management Reference
Page 47

Top 10 Not Patched Critical Patches: Displays the 10 most critical patches that have not
been applied to any device.
Patch Bundle Assignment Summary
Summary Report: Displays the patched, not patched, not applicable, and patch
percentage statuses by bundle name and patch name.
Detail Report: Displays the devices, device patch status, and deployment state by Bundle
and Patch.
Patch Analysis
Dashboard: Displays the patch status by vendor for the selected deployment status and
impact.
Detail Page: Displays the patch name, release date, impact, deployment state, and patch
status.
Patch Detail Report: Displays the devices and patch status for the selected vendors, patches,
impact, and patch status.
novdocx (en) 16 April 2010
Using the Patch Management Tab 47
Page 48

novdocx (en) 16 April 2010
48 ZENworks 10 Patch Management Reference
Page 49

5
Using the Deploy Remediation
novdocx (en) 16 April 2010
Wizard
The Deploy Remediation Wizard provides an interface to create or edit patch deployment schedules
for multiple recipients or devices. The wizard assists in selecting devices, scheduling deployment of
patches, and if required, setting recurrence.
You can access the Deploy Remediation Wizard from the Devices or Patch Management tab.
If you select multiple patches in the Deployment Remediation Wizard, the wizard automatically
selects all the applicable devices and packages. If any device is selected, the wizard automatically
selects all patches that are applicable for that device. If a group is selected, the wizard includes all
patches applicable for the devices in that particular group.
The following sections provide more information on each step of the wizard:
Section 5.1, “Creating a Deployment Schedule,” on page 49
Section 5.2, “Confirm Devices,” on page 50
Section 5.3, “License Agreement,” on page 53
Section 5.4, “Remediation Schedule,” on page 54
Section 5.5, “Deployment Order and Behavior,” on page 61
Section 5.6, “Remediation Options,” on page 62
Section 5.7, “Advanced Remediation Options,” on page 63
Section 5.8, “Pre Install Notification Options,” on page 65
5
Section 5.9, “Notification and Reboot Options,” on page 67
Section 5.10, “Deployment Summary,” on page 68
5.1 Creating a Deployment Schedule
To create a deployment schedule for a patch for one or more devices:
1 Click the Patch Management tab and select the patch that you want to deploy to one or more
devices.
2 Select Deploy Remediation from the Action menu on the Patches page, as shown in the
following figure. Alternatively, you can click the Deploy Remediation link in the Patch
Management pane on the left side of the Patches page:
Using the Deploy Remediation Wizard
49
Page 50

5.2 Confirm Devices
The Confirm Devices page allows you to select and confirm the devices for which you need to
schedule a deployment. Confirming the device is the first step in scheduling a deployment for a
selected patch.
Figure 5-1 Confirm Devices Page
The page indicates the total number of devices to which the selected patch will be deployed. In the
following example, two devices will receive the patch:
novdocx (en) 16 April 2010
Figure 5-2 Total Number of Devices
You can choose the total number of items to be displayed on the page by using the show items dropdown list:
Figure 5-3 Show Items
1 Select the devices for deployment, then click the Next button to open the License Agreement
page.
2 Select one of the following options to determine the devices to which the patches are to be
deployed.
Choose All non-patched devices to deploy the patch to those devices that are in a non-
patched state, then continue with Section 5.2.1, “Confirm Devices: All Non-patched
Devices,” on page 51.
Choose Select applicable devices to deploy the patch to specific devices, then continue
with Section 5.2.2, “Confirm Devices: Select Applicable Devices,” on page 51.
Choose Select devices, folders and groups to deply the patch to specific devices, folders,
or groups that are in a non-patched state. Then, continue with Section 5.2.3, “Confirm
Devices: Select Devices, Folders, and Groups,” on page 52.
50 ZENworks 10 Patch Management Reference
Page 51

5.2.1 Confirm Devices: All Non-patched Devices
Selecting this option deploys the patch to all the devices that are not patched. This option is enabled
by default.
5.2.2 Confirm Devices: Select Applicable Devices
When you select Select applicable devices, the Confirm Devices page appears as shown in the
following figure:
Figure 5-4 Confirm Devices Page for the Select Applicable Devices Type
novdocx (en) 16 April 2010
Selecting this option deploys the patch to the devices you select from the devices list. You can
deploy a patch to a device regardless of its existing patch status, which can be patched or not
patched.
NOTE: If you deploy a patch from the Patch Management page, the list of devices that appears is
based on the patch Status filter you choose.
Table 5-1 Confirm Devices Page Column Headings
Column Heading Description
Device Name The name of the device.
Status The status of the device. The status can be offline or online.
Platform The operating system of the device.
DNS The name of the DNS server.
IP Address The IP address of the device.
Using the Deploy Remediation Wizard 51
Page 52

5.2.3 Confirm Devices: Select Devices, Folders, and Groups
When you select Select devices, folders and groups, the Confirm Devices page appears as shown in
the following figure:
Figure 5-5 Confirm Devices Page for the Select Devices, Folders and Groups Type
novdocx (en) 16 April 2010
To select a device, folder, or group for deployment:
1 Click the Add menu item on the Confirm Devices page. The following window appears:
2 Click the arrow next to the Devices option on the left side of the window to display the
available devices, folders, and groups.
3 Click the desired device to add it to the Selected panel on the right side of the window.
or
To remove a device from the panel, click the Delete button in the Remove column for that
device.
52 ZENworks 10 Patch Management Reference
Page 53

4 Click OK to confirm device selection.
The window closes and the Confirm Devices page displays the selection.
You can remove a device from the list by selecting it and clicking the Remove menu item.
5.3 License Agreement
The License Agreement page displays all the third-party licensing information associated with the
selected patches. Accepting or declining the license agreement of the patch is the second step in
scheduling a deployment for a selected patch.
Figure 5-6 License Agreement Page
novdocx (en) 16 April 2010
Select Accept for the license agreements you want to accept. To view the license agreement details,
click the name of the patch.
NOTE: All license agreements must be accepted before the deployment wizard allows you to
proceed.
Click the Next button to open the Remediation Schedule page. Click the Back button to return to the
previous page. Click Cancel to exit the wizard.
Using the Deploy Remediation Wizard 53
Page 54

5.4 Remediation Schedule
The Remediation Schedule page allows you to select how a patch is scheduled and deployed for
selected devices. Setting various deployment options for a selected patch is the third step in
scheduling a deployment for the selected patch.
Figure 5-7 Remediation Schedule Page
novdocx (en) 16 April 2010
To start setting the remediation schedule, you need to select the schedule type. Patch Management
offers three types of schedules to determine when the patches are actually applied to the target
device:
Select Now to schedule the deployment to your selected devices immediately after you
complete all the steps in the Deployment Remediation Wizard.
Select Date Specific to schedule the deployment to your selected devices according to the
selected date.
Select Recurring to start the deployment on the selected day at a selected time, repeat the
deployment every day/week/month, and if defined, end on a specific date.
By default, the Device Refresh Schedule is set to twice a day. For testing and demonstration
purposes, you could increase the frequency to once every five to fifteen minutes.
The following sections provide more information on schedule types:
Section 5.4.1, “Remediation Schedule: Now,” on page 55
Section 5.4.2, “Remediation Schedule: Date Specific,” on page 55
Section 5.4.3, “Remediation Schedule: Recurring,” on page 57
54 ZENworks 10 Patch Management Reference
Page 55

5.4.1 Remediation Schedule: Now
When you select Now, the Remediation Schedule page appears as shown in the following figure:
Figure 5-8 Remediation Schedule Page for the Now Schedule Type
novdocx (en) 16 April 2010
In this page, you can directly schedule deployment after completing the remaining steps in the
Deployment Remediation Wizard.
5.4.2 Remediation Schedule: Date Specific
When you select Date Specific, the Remediation Schedule page appears as shown in the following
figure:
Figure 5-9 Remediation Schedule Page for the Date Specific Schedule Type
Using the Deploy Remediation Wizard 55
Page 56

Use this page to set the following deployment options:
Start Date: Enables you to pick the date when you need to start the deployment. To do so,
click the icon to open the calendar and pick the date. To remove the selected date, click the
icon.
Run event every year: Ensures that the deployment starts on a selected date at a selected time,
repeats every year, and if defined, ends on a specific date.
Process immediately if device unable to execute on schedule: Ensures that the deployment
starts immediately if the device could not execute on the selected schedule.
Select when schedule execution should start: There are two options to enable you to select
the start time of the schedule execution namely:
Start immediately at Start Time: Deactivates the End Time panel and starts the
deployment at the start time specified. In this option, you must set the start time in the
Start Time panel:
Start at a random time between Start Time and End Times: Activates the End Time
panel next to the Start Time panel. You can specify the end time and the start time so that
the deployment occurs at a random time between them. The End Time panel appears as
follows:
novdocx (en) 16 April 2010
In both time panels, the first drop-down list enables you to select the hour, the second dropdown list enables you to select the minute, and the third drop-down list enables you to select
am and pm.
Selecting the Use Coordinated Universal Time check box enables you to schedule the
deployment of all devices at the same time, regardless of time zone differences. Coordinated
Universal Time (UTC), also known as World Time, Z Time, or Zulu Time, is a standardized
measurement of time that is not dependent upon the local time zone. Deselecting UTC
schedules the distribution at the local time.
Click the Next button to open the Deployment Order and Behavior page. Click the Back button to
return to the previous page. Click Cancel to exit the wizard.
56 ZENworks 10 Patch Management Reference
Page 57

5.4.3 Remediation Schedule: Recurring
When you select Recurring, the Remediation Schedule page appears as shown in the following
figure:
Figure 5-10 Remediation Schedule Page for the Recurring Schedule Type
novdocx (en) 16 April 2010
NOTE: By default, the bundle install frequency is set to Install once per device. For a recurring
deployment, change it to Install always.
To change the schedule:
1 Click the Actions tab for the particular patch bundle assignment.
2 Click Options. This opens the Install Options window.
3 Select Install always and click OK.
4 Click Apply.
In this page, you can set the following options for a recurring deployment:
“When a Device Is Refreshed” on page 58
“Days of the Week” on page 58
“Monthly” on page 59
“Fixed Interval” on page 60
Using the Deploy Remediation Wizard 57
Page 58

When a Device Is Refreshed
This option enables you to schedule a recurring deployment whenever the device is refreshed. In this
option, you can choose to delay the next deployment until after a specific time.
To set the delay, select the Delay execution after refresh check box as shown in the following image,
and specify the days, hours, and minutes of the time to delay the deployment:
Figure 5-11 Delay Execution After Refresh Check Box
NOTE: The device is refreshed based on the settings in the Device Management tab under the
Configuration tab. Click the Device Refresh Schedule link under the Device Management tab to
open the page displaying the option for either a Manual Refresh or Timed Refresh. Alternatively, you
can refresh the device by selecting a device under the Devices tab and clicking the Refresh Device
option under the Quick Tasks menu.
Days of the Week
novdocx (en) 16 April 2010
This option enables you to schedule the deployment on selected days of the week:
Figure 5-12 Weekly Deployment Options - Default
To set the day of deployment, select the Days of the week button, select the required day of the
week, and set the start time of deployment.
If you click the More Options link, additional deployment options appear as shown in the
following figure. Click the Hide Options link to hide the additional deployment options and
show only the default deployment options:
58 ZENworks 10 Patch Management Reference
Page 59

Selecting the Use Coordinated Universal Time check box enables you to schedule the
deployment of all devices at the same time, regardless of time zone differences. Coordinated
Universal Time (UTC), also known as World Time, Z Time, or Zulu Time, is a standardized
measurement of time that is not dependent upon the local time zone. Deselecting UTC
schedules the distribution at local time.
Selecting the Start at a random time between Start Time and End Times check box activates the
End Time panel in addition to the Start Time panel. You can specify the end time and the start
time so that the deployment occurs at any random time between the start and end times.
The Restrict schedule execution to the following date range option enables you to schedule a
recurring deployment at the selected time, repeat the deployment on the days specified, and, if
defined, end at the specific time. This option also enables you to restrict the deployment to the
period between the start date and the end date. To set this option, select the Restrict schedule
execution to the following date range check box and click the icon to open the calendar and
pick a start date or end date. Click the Close button when you have finished selecting the date.
Monthly
This option enables you to specify the monthly deployment options:
novdocx (en) 16 April 2010
Figure 5-13 Monthly Deployment Options – Default
In the Monthly deployment option, you can specify the following:
Days of the month: Enables you to schedule the deployment on a specific day of the
month. You can specify any number between 1 and 31.
Last day of the month: Enables you to schedule the deployment on the last day of the
month.
Particular days of the month: Enables you to schedule the deployment on specific days
of every month. The valid options for the day are first, second, third, fourth, and fifth. The
valid options for the weekday are Sunday through Saturday. To select one particular day of
the month, use the drop-down arrows. An example is shown as follows.
To select an additional day of the month, click the icon and use the drop-down arrows in
the second row shown as follows.
NOTE: To remove a particular day from the list, click the icon.
Using the Deploy Remediation Wizard 59
Page 60

If you click the More Options link, additional deployment options appear as shown in the
following figure. Clicking the Hide Options link hides the additional deployment options
and shows only the default deployment options:
NOTE: The Restrict schedule execution to the following date range option enables you to
schedule a recurring deployment at the selected time, repeat the deployment on the days
specified, and, if defined, end on the specific time. This option also enables you to restrict
the deployment to the period between the Start Date and the End Date. To set this option,
select the Restrict schedule execution to the following date range check box and click the
icon to open the calendar and pick a start date or end date. Click the Close button when
you have finished selecting the date.
novdocx (en) 16 April 2010
Fixed Interval
This option enables you to schedule a recurring deployment that runs after a fixed duration on a
regular basis. You can choose the number of months, weeks, days, hours, and minutes of the interval
and the start date for the deployment schedule, as shown in the following figure:
Figure 5-14 Fixed Interval Deployment Options - Default
60 ZENworks 10 Patch Management Reference
Page 61

If you click the More Options link, additional deployment options appear as shown in the following
figure. Clicking the Hide Options link hides the additional deployment options and shows only the
default deployment options:
Figure 5-15 Fixed Interval Deployment Options - All
5.5 Deployment Order and Behavior
The Deployment Order and Behavior page of the Deploy Remediation Wizard enables you to set the
order and behavior for each deployment schedule. Setting the order and behavior of deployment for
a selected patch is the fourth step in scheduling a deployment for a selected patch.
novdocx (en) 16 April 2010
Figure 5-16 Deployment Order and Behavior Page
The Deployment Order and Behavior page features the following:
Package Name: The name of the patch that has been selected for deployment.
Order: The order of execution of the deployment. The arrow appearing next to the column
heading enables you to sort in ascending or descending order.
Reboot: The reboot settings applicable for the corresponding patch.
The following table describes the actions of the various buttons in the Deployment Order and
Behavior page:
Table 5-2 Buttons in the Deployment Order and Behavior Page
Button Action
Moves the patch to the top of all non-chained deployments
Using the Deploy Remediation Wizard 61
Page 62

Button Action
Moves the patch up one place
Moves the patch down one place
Moves the patch to the bottom of the listing
NOTE: Chained patches can be moved only after removing their chained status.
Click the Next button to open the Remediation Options page. Click the Back button to return to the
previous page. Click Cancel to exit the wizard.
5.6 Remediation Options
The Remediation Options page enables you to select the required remediation option for each
deployment schedule. Setting the remediation options for a selected patch is the fifth step in
scheduling a deployment for a selected patch.
novdocx (en) 16 April 2010
NOTE: The Advanced option enables you to specify individual patch flags for each remediation.
Figure 5-17 Remediation Options Page
The following table describes the functionality of each option available in the Remediation Options
page:
Table 5-3 The Remediation Options
Remediation Option Functionality
Auto Reboot (silent install with
optional reboot)
Automatically sets all possible patches to deploy with QChain
enabled. Allows the administrator to set the patch deployment
flags as desired, using the default QChain (http://
articles.techrepublic.com.com/5100-10878_11-1048774.html) and
reboot settings defined for each patch.
No Reboot (silent install, never
reboot)
Automatically sets all possible patches to deploy with QChain
enabled. All necessary reboots must be performed manually.
62 ZENworks 10 Patch Management Reference
Page 63

Remediation Option Functionality
novdocx (en) 16 April 2010
Advanced (individually set all
possible deployment options)
Allows the administrator to set the patch deployment flags as
desired, using the default QChain and reboot settings defined for
each patch.
Click the Next button to open the Advanced Remediation Options page. Click the Back button to
return to the previous page. Click Cancel to exit the wizard.
5.7 Advanced Remediation Options
The Advanced Remediation Options page enables you to set patch flags for each remediation.
Setting the patch flags for a selected patch is the sixth step in scheduling a deployment for the
selected patch. The icons displayed on the page represent the patch flags that can be set for each
package.
Figure 5-18 Advanced Remediation Options Page
The following table describes the functionality of each icon on the Advanced Remediation Options
page:
Table 5-4 The Advanced Remediation Options Page
Icon Name Functionality
Uninstall Uninstalls the packages.
Force Shutdown Forces all applications to close if the package causes a reboot.
Do Not Back Up Does not back up files for uninstalling.
Suppress Reboot Prevents the computer from rebooting after installation of the
package.
Quiet Mode Sets the installer to function in quiet mode. Quiet mode
suppresses any user interfaces (if a user is logged in) during the
remediation.
Unattended Setup Installs the packages in the Unattended Setup mode.
Using the Deploy Remediation Wizard 63
Page 64

Icon Name Functionality
List Hot Fixes Returns a list of the hot fixes installed on the target computers.
Force Reboot Forces the computer to reboot regardless of package
requirements.
Reboot is Required Indicates that this package requires a reboot prior to completing
the installation.
Selecting this option reboots the device even if the specific
bundle does not require a reboot.
Chain Packages Sets the package as chainable (if the package supports
chaining).
This option cannot be modified in this release; the package is
always installed with the “chain” option.
Suppress Chained Reboot Suppress the reboot, allowing other chained packages to be
sent following this package
You should suppress the final reboot for all chained packages,
then send a reboot deployment when all packages are finished.
novdocx (en) 16 April 2010
Repair File Permissions Repairs file permissions after package installation.
Download Only Distributes the package without running the package installation
script.
Suppress Notification Suppresses any user notifications during installations.
Debug Mode Runs the package installation in debug mode.
Do Not Repair Permissions Suppresses the repair of filename permissions after the reboot.
May Reboot Allows the package to force a reboot if required.
Multi-User Mode Performs the installation in Multi-User mode.
Single-User Mode Performs the installation in Single-User mode.
Restart Service Restarts the service following the deployment.
Do Not Restart Service Does not restart the service following the deployment.
Reconfigure Performs the system reconfigure task following the deployment.
Do Not Reconfigure Does not perform the system reconfigure task following the
64 ZENworks 10 Patch Management Reference
deployment.
Page 65

NOTE: Depending on the type of patch you select, the icons displayed in Table 5-4 on page 63
change dynamically, so you might not be able to select some of the options described in the table.
Click the Next button to open the Pre Install Notification Options page. Click the Back button to
return to the previous page. Click Cancel to exit the wizard.
5.8 Pre Install Notification Options
The Pre Install Notification Options page of the Deploy Remediation Wizard allows you to define
whether users receive any notification when patches are downloaded and installed, and to customize
the notification. Setting the notification and allowing users to cancel options is the seventh step in
scheduling a deployment for a selected patch.
Figure 5-19 Pre Install Notification Options Page
novdocx (en) 16 April 2010
The page provides the following options:
Notify Users Of Patch Install: Select this option to notify the user prior to the installation of
the patch. There are two options:
Prompt before download: Select this option to notify the user when the patch download
process begins.
Prompt before install: Select this option to notify the user when the patch installation
process begins.
Message Box: The text of the notification message.
Use values assigned to system variables or defaults: Select this option to use the default
settings for each agent. This option disables all other installation and notification options.
Using the Deploy Remediation Wizard 65
Page 66

TIP: System variables or defaults are defined to configure the agent settings at the system level
in the properties file, such as pre-install notification options. If the Use values assigned to
system variables or defaults option is selected, the settings for the current agent are taken
directly from system variables or defaults; otherwise, the settings customized by the user take
effect only for the current agent.
The following table describes system variables or defaults for pre-install notification options:
System Variable Variable Value
Notify Users of Patch Install Not selected
Prompt before download Not selected
Prompt before install Selected
Message box of Patch Install The download and installation of patches is ready to
begin. If you require any additional information,
please contact your Novell ZENworks Patch
Management administrator.
novdocx (en) 16 April 2010
Allow User to cancel No
Time to show dialog before install No
120 seconds
Allow User to snooze Yes
0 Days 2 Hours 0 Minutes
Override Settings: Select this option to use the settings chosen by users for each agent.
Selecting this option enables all other notification options and enables you to edit the default
settings.
Options: When defining installation options, you can specify whether to use the values in the
default settings (the Use values assigned to system variables or defaults check box) or the
custom settings. There are three options:
Allow User to cancel: Allows the user to cancel the installation.
Time to show dialog before install: The time in seconds for users to choose whether to
download and install patch.
Allow User to snooze: This option allows the user to snooze the installation.
Click the Next button to proceed to the Notification and Reboot Options page. Click the Back button
to return to the previous page. Click Cancel to exit the wizard.
66 ZENworks 10 Patch Management Reference
Page 67

5.9 Notification and Reboot Options
The Notification and Reboot Options page of the Deploy Remediation Wizard allows you to define
whether users receive notification of patch deployments and reboots, and to customize the
notification. Setting the notification and reboot options is the eighth step in scheduling a deployment
for a selected patch.
Figure 5-20 Notification and Reboot Options Page
novdocx (en) 16 April 2010
The page provides the following options:
Notify Users Of Patch Install: Select this option to notify the user prior to the installation of
the patch.
Message Box: The text of the notification message.
Use values assigned to system variables or defaults: Select this option to use the default
settings for each agent. This option disables all other reboot notification options.
The following table describes system variables or defaults for notification and reboot options:
System Variable Variable Value
Notify Users of Patch Install Selected
Message box of Patch Install To complete the installation of patches to your
computer, it is now necessary to reboot. If you
require any additional information, please contact
your Novell ZENworks Patch Management
administrator.
Suppress Reboot No
Allow User to cancel No
Using the Deploy Remediation Wizard 67
Page 68

System Variable Variable Value
Time to show dialog before reboot No
120 seconds
Allow User to snooze Yes
0 Days 2 Hours 0 Minutes
Override Settings: Select this option to use the settings chosen by users for each agent.
Selecting this option enables all other notification options and enables you to edit the default
settings.
Options: When defining reboot options, you can specify whether to use the values in the
default settings (the Use values assigned to system variables or defaults check box) or in the
custom settings. There are four options:
Suppress Reboot: Prevents a reboot even if the patch bundle requires a reboot.
Allow User to cancel: Allows the user to cancel the reboot.
Time to show dialog before reboot: The time in seconds that allows user to choose
whether to reboot after installation of a patch.
Allow User to snooze: Allows the user to snooze the reboot.
novdocx (en) 16 April 2010
Click the Next button to proceed to the Deployment Summary page. Click the Back button to return
to the previous page. Click Cancel to exit the wizard.
5.10 Deployment Summary
The Deployment Summary page of the Deploy Remediation Wizard displays the summary of the
deployment you have scheduled in the previous steps. Summarizing the important points of the
deployment is the last and ninth step in scheduling a deployment for a selected patch.
Figure 5-21 Deployment Summary Page
The Deployment Summary page displays the following details about the deployment you have
scheduled:
Schedule: The schedule selected for the deployments as defined on the Remediation Schedule
page.
Total Selected Packages: The total number of patches selected for deployment.
68 ZENworks 10 Patch Management Reference
Page 69

Order: The order of deployment of the patches as defined on the Deployment Order and
Behavior page.
Package Name: The name of the patch you have selected for deployment.
Reboot: The reboot setting of the selected patch as defined in the Deployment Order and
Behavior page.
Click the Finish button to complete the process of scheduling the deployment of a selected patch.
Click the Back button to return to the previous page. Click Cancel to exit the wizard.
novdocx (en) 16 April 2010
Using the Deploy Remediation Wizard 69
Page 70

novdocx (en) 16 April 2010
70 ZENworks 10 Patch Management Reference
Page 71

6
Using Mandatory Baselines
Establishing a mandatory baseline ensures that a group of devices is protected and that all devices in
the group are patched consistently.
Section 6.1, “About Mandatory Baselines,” on page 71
Section 6.2, “Working with Mandatory Baselines,” on page 74
6.1 About Mandatory Baselines
A mandatory baseline is a user-defined compliance level for a group of devices. If a device falls out
of compliance, a mandatory baseline ensures that the device is patched back into compliance.
IMPORTANT: Mandatory baselines are an automatic enforcement method based on the most
recent discovery scan results, so there is no control over the deployment time or order for patches
applied in this manner. Unless a stringent Content Blackout Schedule is in effect, do not apply
mandatory baselines to groups of mission-critical servers or other devices where unscheduled patch
deployments would disrupt daily operations.
novdocx (en) 16 April 2010
6
The Content Blackout Schedule panel lets you define times when content (bundles, policies,
configuration settings, etc.) will not be delivered to the devices.
When a mandatory baseline is created or modified:
The ZENworks Server automatically schedules a daily Discover Applicable Updates (DAU)
task for all devices in that group.
Every few hours, depending on the results of the DAU task, the ZENworks Server determines
the devices that are applicable and out of compliance (based upon the patches added to the
baseline).
Necessary bundles, as defined in the baseline, are then deployed as soon as possible for each
device.
After patches have been deployed, it might be necessary to reboot those devices for them to be
detected as patched.
The baseline function does not auto-reboot devices that have been patched.
NOTE: Some patches, such as MDAC and IE, require both a reboot and an administrator level login
to complete. If these or similar patches are added to a baseline, the deployment stops until the login
occurs.
The following sections provide more information on mandatory baselines:
Section 6.1.1, “Viewing Mandatory Baselines,” on page 71
Section 6.1.2, “Using the Mandatory Baseline Page,” on page 73
6.1.1 Viewing Mandatory Baselines
1 Click the Devices tab in the left panel.
Using Mandatory Baselines
71
Page 72

A page displaying the root folders for each type of device appears, as shown in the following
figure:
The Servers folder is the root folder for all managed servers and the Workstations folder is the
root folder for all managed workstations in the network.
2 Click the Servers or Workstations link.
A list of server or workstation groups classified on the basis of their operating systems appears.
The following figure shows a list of server groups:
novdocx (en) 16 April 2010
3 On the Servers or Workstation page (in this case, it is the Servers page), select any group.
A page displaying the general details of the group and the members in the group appears. The
following figure shows such a page that appears when a Dynamic Server Group called
Windows Server 2003 is selected:
72 ZENworks 10 Patch Management Reference
Page 73

4 Click the Patches tab.
The patches applicable to the member devices of the selected group are displayed. If the
selected group is Windows Server 2003, the Patches tab displays all the patches applicable to
the member devices within the group Windows Server 2003, as shown in the following figure:
novdocx (en) 16 April 2010
A patch that has been assigned to the baseline (also called the mandatory baseline patch) has
the icon displayed next to its name, as shown in the above figure.
Alternatively, you can view the baseline patches by using the Search panel on the Patches page
to search for mandatory baseline patches.
For detailed information on Patches and Patches Information panels, refer to Chapter 4, “Using
the Patch Management Tab,” on page 31.
6.1.2 Using the Mandatory Baseline Page
You can use the Search panel on the Mandatory Baseline page to view the baseline patches.
The Search panel on the Device Group Patches page, as shown in Figure 6-1, enables you to search
for mandatory baseline patches. The Search panel also enables you to search for other patches based
on the status and impact of the patches.
Using Mandatory Baselines 73
Page 74

Figure 6-1 Mandatory Baseline Search
novdocx (en) 16 April 2010
You can search for the mandatory baseline patches based on the following filter options:
All Patches: Displays all patches, including mandatory baseline items.
Baseline Only: Displays only those patches that are marked as “mandatory baseline” for the
group.
6.2 Working with Mandatory Baselines
The Action menu on the Device Group Patches page enables you to perform various actions
concerning mandatory baseline patches. The Action menu options also assist you in managing and
deploying patches in a consistent and uniform manner across groups. The following figure shows
the various menu options that help you work with mandatory baselines:
Figure 6-2 Action Menu Items
The Deploy Remediation option enables you to deploy a patch. To use this option, select the
check boxes for the patches you want to deploy and select Deploy Remediation from the Action
menu options to open the Deploy Remediation Wizard.
The Enable option allows you to enable a disabled patch.
The Disable option enables you to disable a patch. To use this option, select the check box for
the required patch and select Disable. The selected patch is removed from the list.
The Update Cache option initiates a download process for the bundles associated with a
selected patch and caches those bundles on your ZENworks Server. See Section 6.2.3, “Using
Update Cache,” on page 78.
74 ZENworks 10 Patch Management Reference
Page 75

The Assign to Baseline option enables you to assign a baseline to a patch. For more
information, see Section 6.2.1, “Assigning or Managing a Mandatory Baseline,” on page 75.
The Remove from Baseline option enables you to remove a patch from a baseline. See
Section 6.2.2, “Removing a Mandatory Baseline,” on page 77 for more information.
The Export option enables you to export details such as the status and impact of selected
patches into a comma-separated value (CSV) file. You can choose to save the file in a different
file format after opening it from the download option.
The Recalculate Baseline option enables you to start the thread that normally runs
automatically about every four hours, which, in turn, creates baseline deployments to the
relevant devices without waiting for four hours.
The following sections provide more information on mandatory baselines:
Section 6.2.1, “Assigning or Managing a Mandatory Baseline,” on page 75
Section 6.2.2, “Removing a Mandatory Baseline,” on page 77
Section 6.2.3, “Using Update Cache,” on page 78
6.2.1 Assigning or Managing a Mandatory Baseline
novdocx (en) 16 April 2010
Mandatory baselines can be applied only to groups, and each group can have only one mandatory
baseline applied to it. However, a single device can be a member of multiple groups, each of which
could have a different mandatory baseline.
To create or manage a mandatory baseline:
1 Click the Devices tab in the left panel.
A page displaying the root folders for each type of device appears, as shown in the following
figure:
The Servers folder is the root folder for all managed servers and the Workstations folder is the
root folder for all managed workstations in the network.
2 Click the Servers or Workstations link.
Using Mandatory Baselines 75
Page 76

A list of server or workstation groups classified on the basis of their operating systems appears.
The following figure shows a list of server groups:
3 On the Servers or Workstation page (in this case, it is the Servers page), select any group.
A page displaying the general details of the group and the members in the group appears. The
following figure shows such a page that appears when a Dynamic Server Group called
Windows Server 2003 is selected:
novdocx (en) 16 April 2010
4 Select the required patch and choose Assign to Baseline from the Action menu. An icon appears
next to the patch, indicating that it has been assigned to the baseline.
After a patch has been assigned to the baseline, the following process takes place:
1. The ZENworks Server automatically schedules a daily Discover Applicable Updates task for
all devices in that group.
2. Every few hours, depending on the results of the DAU task, the ZENworks Server determines
the devices that are applicable and out of compliance (based upon the patches added to the
baseline).
3. Necessary bundles, as defined in the baseline, are deployed as soon as possible for each device.
4. After patches have been deployed, it might be necessary to reboot those devices for them to be
detected as patched.
NOTE: The baseline function does not auto-reboot devices that have been patched.
76 ZENworks 10 Patch Management Reference
Page 77

6.2.2 Removing a Mandatory Baseline
1 Click the Devices tab in the left panel to display the Devices page, which shows the root folders
for each type of device:
The Servers folder is the root folder for all managed servers and the Workstations folder is the
root folder for all managed workstations in the network.
2 Click the Servers or Workstations link.
A list of server or workstation groups classified on the basis of their operating systems appears.
The following figure shows a list of server groups:
novdocx (en) 16 April 2010
3 On the Servers or Workstation page (in this case, it is the Servers page), select any group.
A page displaying the general details of the group and the members in the group appears. The
following figure shows such a page that appears when a Dynamic Server Group called
Windows Server 2003 is selected:
Using Mandatory Baselines 77
Page 78

4 Select the mandatory baseline item (the patch that has been assigned to baseline) and select the
Remove from Baseline option from the Action menu.
The patch is removed from the baseline.
NOTE: The Remove from Baseline menu option is enabled for a patch only if the patch has been
added to the baseline.
6.2.3 Using Update Cache
The Action menu Update Cache option (see Figure 6-2 on page 74) initiates a download process for
the bundles associated with a selected patch and caches those bundles on your ZENworks Server.
NOTE: The remediation bundles must be cached before they are installed on the target device.
To update caching of patch data:
1 In the Patches list, select one or more patches.
2 In the Action menu, click Update Cache.
novdocx (en) 16 April 2010
The icon changes to . While the download is in progress, the icon changes to . When the
caching is complete, the color of the patch icon changes to green. This indicates that the patch
remediation is ready to be deployed.
78 ZENworks 10 Patch Management Reference
Page 79

7
Patch Management for a Device
Device patches are the patches associated with a selected device (a server or a workstation). The
patches listed for a specific device are the ones that are applicable only for that device. The
following sections describe device patch information for Novell ZENworks 10 Patch Management:
Section 7.1, “Accessing the Patches Tab for a Device,” on page 79
Section 7.2, “Using the Patches Tab for a Device,” on page 81
7.1 Accessing the Patches Tab for a Device
To view the patches for a specific server device:
1 Click the Device tab on the left panel.
A page displaying the root folders for each type of device appears, as shown in the following
figure:
novdocx (en) 16 April 2010
7
The Servers folder is the root folder for all managed servers and the Workstations folder is the
root folder for all managed workstations.
2 Click the Servers link.
A list of server groups classified on the basis of their operating systems appears, as shown in
the following figure:
Patch Management for a Device
79
Page 80

You see the following icons on the Servers page:
Icon Status
Message Status: Normal
Device Status: Bundle and policy enforcement successful
Message Status: Warning
Device Status: Bundle and policy enforcement successful
Message Status: Error
Device Status: Bundle and policy enforcement successful
Message Status: Error
Device Status: Bundle and/or policy enforcement failed on one or more
bundles or policies.
Devices can also be found by searching. The following filters are available:
novdocx (en) 16 April 2010
Filter Item Result
Name Searches for devices with a particular name.
Type Searches for devices of a specific type.
Operating System Searches for devices running a particular operating system.
Message Status Searches for devices that display a particular message status.
Compliance Status Searches for devices based on their compliance status, such as
Yes or No.
Device Status Searches for devices based on the device status.
Include subfolders The search is also executed in the subfolders.
80 ZENworks 10 Patch Management Reference
Page 81

3 Click the required group (Server or Dynamic Server Group) to view details of the group and the
members of the group. Alternatively, you can click the managed device.
A page displaying details about the managed device or member is displayed, as shown in the
following figure, where the name
network administrator decides the name of the managed device.
zpms2k3ssp1
for the managed device is an example. The
novdocx (en) 16 April 2010
4 Click the Patches tab to display the patches associated with the server device:
7.2 Using the Patches Tab for a Device
Section 7.2.1, “Patches,” on page 82
Patch Management for a Device 81
Page 82

Section 7.2.2, “Patch Name,” on page 82
Section 7.2.3, “Total Number of Patches Available,” on page 83
Section 7.2.4, “Patch Impacts,” on page 83
Section 7.2.5, “Patch Statistics,” on page 84
Section 7.2.6, “Action Menu Items,” on page 84
Section 7.2.7, “Searching Patches,” on page 85
Section 7.2.8, “Patch Information,” on page 87
Section 7.2.9, “Workstation Device Patches,” on page 88
7.2.1 Patches
This section of the Patches page provides the following information about patches:
Name of the patch
Total number of patches available
Impact of the patch
Statistics of the patch
novdocx (en) 16 April 2010
This section features the Action menu, which enables you to perform any of the following actions
related to patches: Deploy Remediation, Enable, Disable, Scan Now, Update Cache, and Export. For
more information on these actions, see Section 7.2.6, “Action Menu Items,” on page 84.
The Patches section also features the show items option that enables you to select the number of
items to be displayed in this section:
Figure 7-1 Show Items drop-down List
7.2.2 Patch Name
The patch name typically includes the vendor or manufacturer of the patch, the specific application,
and version information.
An example of a patch name is shown in the following figure, where patch name is given, Adobe is
the vendor, Acrobat Reader is the application, and 6.0.6 is the version information:
Figure 7-2 Example of a Patch Name
82 ZENworks 10 Patch Management Reference
Page 83

7.2.3 Total Number of Patches Available
The total number of available patches is displayed in the bottom left corner of the table. In the
following example, there are 979 patches available:
Figure 7-3 Total Number of Patches
7.2.4 Patch Impacts
Based on the release date and impact, a patch can be classified as Critical, Recommended,
Informational, or Software Installers:
Critical: Novell has determined that this type of patch is critical, and should be installed as
soon as possible. Most of the recent security updates fall into this category. ZENworks Server
automatically downloads and saves the patches that have critical impact.
Recommended: Novell has determined that this patch, although not critical or security related,
is useful and should be applied to maintain the health of your computers. Therefore, Novell
recommends that you implement patches that fall in this category.
Informational: This type of patch detects a condition that Novell has determined as
informational. Informational patches are used for information only. There is no actual patch to
be installed.
Software Installers: These types of patches are software applications. Typically, they include
installers. The patches show Not Patched if the application has not been installed on a machine.
novdocx (en) 16 April 2010
Patch Management impact terminology for its patch subscription closely follows the vendor impact
terminology for patch criticality. Each operating system has a vendor-specific impact rating and that
impact is mapped to a Novell rating as described in this section. Patch Management, following the
recommendations of Lumension Security, increases or steps up the severity of the impact rating. For
example, Microsoft classifications for “Critical,” “Important,” and “Moderate” patches are all
classified as “Critical” by Novell.
The following table lists the mapping between Novell and Microsoft patch classification
terminology:
Table 7-1 Novell and Microsoft Patch Impact Mapping
Novell Patch Impacts Windows Other
Critical Critical Security
Important
Moderate
Recommended Recommended
Low
Example: Microsoft Outlook 2003 Junk
E-mail Filter Update
NA
NA
Patch Management for a Device 83
Page 84

Novell Patch Impacts Windows Other
novdocx (en) 16 April 2010
Software Installers Software Distribution
Example: Microsoft Windows Malicious
Software Removal Tool (Virus Removal)
Informational NA NA
Adobe 8.1 software installer
Source: Lumension Security
7.2.5 Patch Statistics
Patch statistics show the relationship between a specific patch and the selected device. The patch
statistics appear in the Patched column on the far right side of the Patch page. This column indicates
whether the selected device has been successfully patched or not. If the device has been patched, this
column shows Ye s; if the device has not been patched, this column shows No.
7.2.6 Action Menu Items
The Action menu on the Patches page for a selected device consists of the following six options:
Figure 7-4 Action Menu
Deploy Remediation: Enables you to deploy a patch. To use this option, select the check box
for the patch you want to deploy and select Deploy Remediation to open the Deploy
Remediation Wizard.
Enable: Allows you to enable a disabled patch. To use this option, select it from the Action
menu.
Disable: Enables you to disable a patch. To use this option, select the check box for the
required patch and select Disable. The selected patch is removed from the list.
NOTE: Disabling a patch also disables all the bundles associated with it.
Update Cache: Initiates a download process for the bundles associated with the selected patch
and caches those bundles on your ZENworks Server.
NOTE: The remediation bundles must be cached before they are installed on the target device.
To use this option:
1. Select one or more patches in the patches list.
2. In the Action menu, click Update Cache.
The patch icon changes to . While the download is in progress, the icon changes to .
When the caching is complete, the color of the patch icon changes to green. This indicates
that the patch remediation is ready to be deployed.
84 ZENworks 10 Patch Management Reference
Page 85

Export: Enables you to export the details such as the status and impact of selected patches into
a comma-separated value (CSV) file. You can choose to save the file in a different file format
after opening it from the download option.
7.2.7 Searching Patches
The Search section on the Patches page offers extensive search and data filtering options that allow
you to search for specific patches and filter result sets based on the status and impact of the patches.
Searching and filtering can be performed independently of each other or can be combined to provide
extensive drill-down capabilities. The following figure shows the Patch Search section:
Figure 7-5 Search Section on the Patches Page
novdocx (en) 16 April 2010
To search for a patch:
1 Type all or part of the patch name in the Patch Name text box.
2 Select the desired check box under Status and Impact.
3 Select the vendor in the Vendor drop-down list.
4 Select the cache status in the Cache Status drop-down list.
5 Click Search.
Clicking Reset enables you to return to the default settings.
The following table describes the result of selecting each filter option under Status:
Table 7-2 Status Filters in Search
Status Filter Result
Patched Search results include all the patches in the patch list that have
been applied to one or more devices.
Not Patched Search results include all the patches in the patch list that have
not been applied to any device.
Patch Management for a Device 85
Page 86

Status Filter Result
Not Applicable Search results include all the patches in the patch list that do not
apply to the device.
Include Disabled Search results include all the patches in the patch list that have
been disabled by the administrator.
The following table describes the result of selecting each filter option under Impact:
Table 7-3 Impact Filters in Search
Impact Filter Result
Critical Search results include all the patches in the patch list that are
classified as Critical by Novell.
Recommended Search results include all the patches in the patch list that are
classified as Recommended by Novell.
novdocx (en) 16 April 2010
Informational Search results include all the patches in the patch list that are
classified as Informational by Novell.
Software Installers Search results include all the patches in the patch list that are
classified as Software Installers by Novell.
Table 7-4 Vendor Filters and Cache Status Filter in search
Filter Result
Vendor Search results include all the patches relevant to the vendor.
Cache Status Search results include all the patches that have been cached or
not been cached on the local server.
86 ZENworks 10 Patch Management Reference
Page 87

7.2.8 Patch Information
You can view detailed information for a selected patch in the Patch Information section. Clicking
the name of a patch displays the details of that patch.
For example, if you select the patch called Adobe Acrobat Reader 6.0.6 Update from the list of
patches, the Patch Information section displays the result of a patch analysis for the selected patch,
as shown in the following figure:
Figure 7-6 Patch Information for a Selected Patch
novdocx (en) 16 April 2010
The following table defines each property name in the Patch Information section:
Table 7-5 Property Names in the Patch Information Section
Property Name Definition
Name The name of the patch.
Impact The impact of the patch as determined by Novell. See Section 7.2.4,
“Patch Impacts,” on page 83.
Status Status of the patch; can be Enabled, Disabled (Superseded) or
Disabled (By User).
Vendor The name of the vendor or manufacturer.
Released on The date the patch was released.
Vendor Product ID The ID number given to the product by the vendor.
Description The description of the patch; it includes the advantages of deploying
the patch and the prerequisites for deployment.
Requires Reboot Whether a reboot is required after patch deployment.
Patch Management for a Device 87
Page 88

Property Name Definition
Supports Uninstall Whether the patch supports uninstallation.
7.2.9 Workstation Device Patches
To view the patches for a specific workstation device:
1 Click the Workstation link on the Devices page.
A list of workstation groups classified on the basis of their operating systems appears, as shown
in the following figure:
novdocx (en) 16 April 2010
You see the following icons on the Workstations page:
Icon Status
Message Status: Normal
Device Status: Bundle and policy enforcement successful
Message Status: Warning
Device Status: Bundle and policy enforcement successful
Message Status: Error
Device Status: Bundle and policy enforcement successful
Message Status: Error
Device Status: Bundle and/or policy enforcement failed on one or more
bundles or policies.
Devices can also be found by using Search (see section “Filter Item” on page 80).
2 Click the required group (Workstation or Dynamic Workstation Group) to view the details of
the group and its members.
88 ZENworks 10 Patch Management Reference
Page 89

3 Click the required member or workstation device.
A page displaying the member’s details is displayed. The following figure shows the page
displaying details for the workstation device w2adxpsp2:
novdocx (en) 16 April 2010
4 Click the Patches tab.
The patches associated with the workstation device appear as shown in the following figure:
Patch Management for a Device 89
Page 90

novdocx (en) 16 April 2010
90 ZENworks 10 Patch Management Reference
Page 91

8
Patch Management for a Device
novdocx (en) 16 April 2010
Group
Device group patches refers to the patches that have been assigned to members of the server group
or the workstation group of devices in the network and displays the status of each patch for the
devices. This view displays only the patches applicable to the member devices of the selected group.
Section 8.1, “Using the Patches Tab within a Server Group,” on page 91
Section 8.2, “Using the Patches Tab within a Workstation Group,” on page 93
8.1 Using the Patches Tab within a Server Group
This view displays the patches applicable to the member devices of the selected server group.
1 Click the Devices tab on the left panel.
A page displaying the root folders for each type of device appears, as shown in the following
figure:
8
The Servers folder is the root folder for all managed servers and the Workstations folder is the
root folder for all managed workstations in the network.
2 Click the Servers link.
A list of server groups classified on the basis of their operating systems appears, as shown in
the following figure:
Patch Management for a Device Group
91
Page 92

3 Click the required group (Server or Dynamic Server Group).
A page displaying the general details of the group and the members in the group appears. The
following figure shows the page that appears when the Windows Server 2003 type is selected:
novdocx (en) 16 April 2010
4 Click the Patches tab.
The patches applicable to the member devices of the selected group are displayed. If the
selected group is Windows Server 2003, the Patches tab displays all the patches applicable to
the member devices within the group Windows Server 2003, as shown in the following figure:
For information on the features of the Device Group Patches page for the selected server group,
see “About Mandatory Baselines” on page 71.
92 ZENworks 10 Patch Management Reference
Page 93

8.2 Using the Patches Tab within a Workstation Group
This view displays the patches applicable to the member devices of the selected workstation group.
1 Click the Devices tab on the left panel.
A page displaying the root folders for each type of device appears
2 Click the Workstations link.
A list of workstation groups classified on the basis of their operating systems appears, as shown
in the following figure:
novdocx (en) 16 April 2010
3 Click the required group (Workstation or Dynamic Workstation Group).
A page displaying the general details of the group and the members in the group appears. The
following figure shows the page that appears when the Dynamic Workstation Group called
Windows XP Workstations is selected:
Patch Management for a Device Group 93
Page 94

4 Click the Patches tab.
The patches applicable to the member devices of the selected group are displayed. If the
selected group is Windows XP Workstations, the Patches tab displays all the patches applicable
to the member devices within the group Windows XP Workstations, as shown in the following
figure:
novdocx (en) 16 April 2010
For information on the features of the Device Group Patches page for the selected workstations
group, see “About Mandatory Baselines” on page 71.
94 ZENworks 10 Patch Management Reference
Page 95

A
Troubleshooting Patch
novdocx (en) 16 April 2010
Management
The following sections contain detailed explanations of the error messages you might receive or
problems you might encounter when using Novell ZENworks 10 Patch Management.
Section A.1, “Patch Management Issues,” on page 95
Section A.2, “Configuration Issues,” on page 98
A.1 Patch Management Issues
“Patches are unavailable because of the CDN switch to Akamai for ZENworks Patch
Management” on page 95
“No patches are shown in the Patches tab” on page 97
“Patches do not seem to be deployed on the target device” on page 97
“The Cancel button disappears in the Reboot Required dialog box” on page 97
“Superseded patches are shown as NOT APPLICABLE” on page 98
“Patch deployment might not start when scheduled” on page 98
“Microsoft System Installer (MSI) might need to be updated for some patches” on page 98
A
Patches are unavailable because of the CDN switch to Akamai for ZENworks Patch
Management
Source: ZENworks 10 Configuration Management; Patch Management.
Explanation: In the week of 18 February 2008, the hosting infrastructure for the patch
content Web site used by ZENworks 10 Patch Management was migrated to
Akamai as the new host provider. This switch was done through a global DNS
change.
Action: Follow the steps below:
1 Open access to the following Web sites:
PLHOST licensing servers (https://novell.patchlink.com)
Akamai patch download (http://novell.cdn.lumension.com)
Microsoft patch Web site (http://
www.download.windowsupdate.com)
2 Turn off SSL Download on the Configuration page (see “Configuring
Subscription Download Details” on page 22).
Troubleshooting Patch Management
95
Page 96

3 Test your connectivity to the new hosting provider from your ZENworks
Primary Server that the Patch Management feature is currently running
on:
Ping test:
Log in to the server console, and launch a command prompt or shell
window:
ping novell.cdn.lumension.com
If your server is able to connect to the Akamai hosting network
without a problem, you see a response similar to the one shown
below:
Pinging a1533.g.akamai.net [12.37.74.25] with 32
bytes of data:
Replyfrom 12.37.74.25: bytes=32 time=14ms TTL=55
Reply from 12.37.74.25: bytes=32 time=14ms TTL=55
Reply from 12.37.74.25: bytes=32 time=14ms TTL=55
Reply from 12.37.74.25: bytes=32 time=13ms TTL=55
Ping statistics for 12.37.74.25:
Packets: Sent = 4, Received = 4, Lost = 0 (0% loss),
Approximate round trip times in milli-seconds:
Minimum = 13ms, Maximum = 14ms, Average = 13ms
The ping command shows you the address of the nearest AKAMAI
server to your current location.
If you receive the following message:
Ping request could not find host
novell.cdn.lumension.com. Please check the name and
try again.
The firewall administrator needs to open access to the Akamai
network for both ping and HTTP (TCP port 80) traffic.
Browser test:
Using a Web browser, type in the following URL:
http://novell.cdn.lumension.com/novell/pulsar.xml
The browser should display formatted output from the Web site, as
shown in the figure below:
novdocx (en) 16 April 2010
96 ZENworks 10 Patch Management Reference
Page 97

If your browser cannot access the XML file, you experience a
browser timeout and receive some kind of error message. If the ping
test succeeds and the browser test fails, this indicates that the
firewall administrator has limited access to the Akamai network, but
that the HTTP (TCP port 80) is blocked.
The license server is still using the same address as in ZENworks
Patch Management 6.4. If you want to enter a serial number to
register your Patch Management usage, you need to leave the IP
addresses of our old servers in your firewall rules.
Firewall information for ZENworks 10 Configuration Management:
ZENworks 10 Patch Management license replication goes to the
following servers:
206.16.247.2
206.16.45.34
Port 443
ZENworks 10 Patch Management content replication goes to the
following DNS name:
http://novell.cdn.lumension.com/novell
To find out what IP your specific server is using, ping
novell.cdn.lumension.com
from several machines and enter the
applicable address range into your firewall rules.
novdocx (en) 16 April 2010
No patches are shown in the Patches tab
Source: ZENworks 10 Configuration Management; Patch Management.
Possible Cause: The server has just been installed.
Action: You need to start the patch subscription download, and then wait twenty
minutes or more for patches to be downloaded automatically from
novell.patchlink.com.
Patches do not seem to be deployed on the target device
Source: ZENworks 10 Configuration Management; Patch Management.
Possible Cause: The ZENworks administrator hasn’t deployed the patches into the applicable
devices in the ZENworks server, or the patches have been deployed in the
server but the device refresh schedule hasn’t been triggered in the ZENworks
adaptive agent.
Actions: Check to see if the Device Refresh Schedule option is set as Manual Refresh or
Timed Refresh on the Configuration tab, and wait for the specified interval.
The Cancel button disappears in the Reboot Required dialog box
Source: ZENworks 10 Configuration Management; Patch Management.
Explanation: When two or more patches are deployed, if the Allow User to Cancel option is
set as No on the Pre Install Notification Options page and the Notification and
Reboot Options page of the server, the Cancel button disappears in the Reboot
Required dialog box for all patches of the agent.
Troubleshooting Patch Management 97
Page 98

Action: None necessary.
Superseded patches are shown as NOT APPLICABLE
Source: ZENworks 10 Configuration Management; Patch Management.
Explanation: In earlier releases of Patch Management, a patch showed its status as
PATCHED or NOT PATCHED, regardless of whether the patch was new or
outdated. This often caused many more patches to show as NOT PATCHED
than were actually necessary for deployment to a given target device. This
issue has been addressed in many of the new advanced content patches
provided with the ZENworks 10 Configuration Management SP3:
When a patch is superseded, it is automatically disabled.
If the patch is re-enabled and detected, in most cases the patch shows as
NOT APPLICABLE because it has been replaced by a more recent patch.
Although this is inconsistent with the behavior of earlier versions of Patch
Management, this change is an improvement because only the patches that
currently need to be installed are reported or analyzed on each device.
novdocx (en) 16 April 2010
Action: None necessary.
Patch deployment might not start when scheduled
Source: ZENworks 10 Configuration Management; Patch Management.
Possible Cause: If the deployment schedule type includes both the Recurring and Process
Immediately If the Device Is Unable to Execute options, when the device
becomes active, the deployment of the patch does not start on the first of its
scheduled recurring dates. However, the patch is deployed when the next
recurring date occurs.
Action: Instead of selecting a recurring schedule, select a date-specific schedule so that
the patch is applied when the device becomes active.
Microsoft System Installer (MSI) might need to be updated for some patches
Source: ZENworks 10 Configuration Management; Patch Management.
Explanation: Deployment of certain .NET patches might require that the latest MSI is
installed. Otherwise, you might receive errors when deploying those patches.
Action: Prior to deploying .NET patches, verify whether an MSI version is a
prerequisite. If necessary, create a bundle to deploy the latest MSI (version 3.1
or later) to your systems. MSIs are available from Microsoft (http://
www.microsoft.com/downloads/details.aspx?familyid=889482fc-5f56-4a38b838-de776fd4138c&displaylang=en).
A.2 Configuration Issues
“Deploying patches with Auto Reboot causes the device to shut down” on page 98
Deploying patches with Auto Reboot causes the device to shut down
Source: ZENworks 10 Configuration Management; Patch Management.
98 ZENworks 10 Patch Management Reference
Page 99

Possible Cause: Trying to deploy patches with auto-reboot might shut down the machine
instead of rebooting. It might also fail to report patch results to the ZENworks
Server.
Action: Perform reboots with a Quick Task rather than using the Auto Reboot option.
novdocx (en) 16 April 2010
Troubleshooting Patch Management 99
Page 100

novdocx (en) 16 April 2010
100 ZENworks 10 Patch Management Reference
 Loading...