

Page 1

Novell®
www.novell.com
AUTHORIZED DOCUMENTATION
ZENworks Migration Guide
ZENworks® 10 Configuration Management SP3
novdocx (en) 16 April 2010
10.3
March 30, 2010
ZENworks 10 Configuration Management ZENworks Migration Guide
Page 2

Legal Notices
Novell, Inc., makes no representations or warranties with respect to the contents or use of this documentation, and
specifically disclaims any express or implied warranties of merchantability or fitness for any particular purpose.
Further, Novell, Inc., reserves the right to revise this publication and to make changes to its content, at any time,
without obligation to notify any person or entity of such revisions or changes.
Further, Novell, Inc., makes no representations or warranties with respect to any software, and specifically disclaims
any express or implied warranties of merchantability or fitness for any particular purpose. Further, Novell, Inc.,
reserves the right to make changes to any and all parts of Novell software, at any time, without any obligation to
notify any person or entity of such changes.
Any products or technical information provided under this Agreement may be subject to U.S. export controls and the
trade laws of other countries. You agree to comply with all export control regulations and to obtain any required
licenses or classification to export, re-export or import deliverables. You agree not to export or re-export to entities on
the current U.S. export exclusion lists or to any embargoed or terrorist countries as specified in the U.S. export laws.
You agree to not use deliverables for prohibited nuclear, missile, or chemical biological weaponry end uses. See the
Novell International Trade Services Web page (http://www.novell.com/info/exports/) for more information on
exporting Novell software. Novell assumes no responsibility for your failure to obtain any necessary export
approvals.
novdocx (en) 16 April 2010
Copyright © 2007 - 2010 Novell, Inc. All rights reserved. No part of this publication may be reproduced,
photocopied, stored on a retrieval system, or transmitted without the express written consent of the publisher.
Novell, Inc.
404 Wyman Street, Suite 500
Waltham, MA 02451
U.S.A.
www.novell.com
Online Documentation: To access the latest online documentation for this and other Novell products, see
the Novell Documentation Web page (http://www.novell.com/documentation).
Page 3

Novell Trademarks
For Novell trademarks, see the Novell Trademark and Service Mark list (http://www.novell.com/company/legal/
trademarks/tmlist.html).
Third-Party Materials
All third-party trademarks are the property of their respective owners.
novdocx (en) 16 April 2010
Page 4

novdocx (en) 16 April 2010
4 ZENworks 10 Configuration Management ZENworks Migration Guide
Page 5

Contents
About This Guide 9
1 Migration Process 11
2 Differences between ZENworks 10 Configuration Management and Traditional
ZENworks 13
2.1 Architecture . . . . . . . . . . . . . . . . . . . . . . . . . . . . . . . . . . . . . . . . . . . . . . . . . . . . . . . . . . . . . . . 13
2.1.1 Traditional ZENworks Architecture . . . . . . . . . . . . . . . . . . . . . . . . . . . . . . . . . . . . . . 13
2.1.2 The Next Generation ZENworks Architecture . . . . . . . . . . . . . . . . . . . . . . . . . . . . . . 15
2.1.3 More Detail on the Architectural Changes . . . . . . . . . . . . . . . . . . . . . . . . . . . . . . . . . 17
2.2 System Management . . . . . . . . . . . . . . . . . . . . . . . . . . . . . . . . . . . . . . . . . . . . . . . . . . . . . . . . 20
2.3 Workstations . . . . . . . . . . . . . . . . . . . . . . . . . . . . . . . . . . . . . . . . . . . . . . . . . . . . . . . . . . . . . . 21
2.4 Inventory . . . . . . . . . . . . . . . . . . . . . . . . . . . . . . . . . . . . . . . . . . . . . . . . . . . . . . . . . . . . . . . . . 22
2.5 Imaging . . . . . . . . . . . . . . . . . . . . . . . . . . . . . . . . . . . . . . . . . . . . . . . . . . . . . . . . . . . . . . . . . . 22
2.6 Remote Management. . . . . . . . . . . . . . . . . . . . . . . . . . . . . . . . . . . . . . . . . . . . . . . . . . . . . . . . 22
2.7 Application Management . . . . . . . . . . . . . . . . . . . . . . . . . . . . . . . . . . . . . . . . . . . . . . . . . . . . . 23
2.8 Additional Features . . . . . . . . . . . . . . . . . . . . . . . . . . . . . . . . . . . . . . . . . . . . . . . . . . . . . . . . . 24
novdocx (en) 16 April 2010
3 Planning Your Migration to ZENworks Configuration Management 25
3.1 Migration Candidates . . . . . . . . . . . . . . . . . . . . . . . . . . . . . . . . . . . . . . . . . . . . . . . . . . . . . . . . 25
3.2 Installing the ZENworks Migration Utility . . . . . . . . . . . . . . . . . . . . . . . . . . . . . . . . . . . . . . . . . 25
3.3 What the ZENworks Migration Utility Does . . . . . . . . . . . . . . . . . . . . . . . . . . . . . . . . . . . . . . . 26
3.3.1 Migrated. . . . . . . . . . . . . . . . . . . . . . . . . . . . . . . . . . . . . . . . . . . . . . . . . . . . . . . . . . . 26
3.3.2 Not Migrated . . . . . . . . . . . . . . . . . . . . . . . . . . . . . . . . . . . . . . . . . . . . . . . . . . . . . . . 27
3.3.3 Other Software. . . . . . . . . . . . . . . . . . . . . . . . . . . . . . . . . . . . . . . . . . . . . . . . . . . . . . 27
3.4 Planning Your Migration. . . . . . . . . . . . . . . . . . . . . . . . . . . . . . . . . . . . . . . . . . . . . . . . . . . . . . 27
3.4.1 Coexistence of the ZENworks Systems. . . . . . . . . . . . . . . . . . . . . . . . . . . . . . . . . . . 28
3.4.2 LDAP Authentication . . . . . . . . . . . . . . . . . . . . . . . . . . . . . . . . . . . . . . . . . . . . . . . . . 28
3.4.3 PXE Devices and Server Referral Lists . . . . . . . . . . . . . . . . . . . . . . . . . . . . . . . . . . . 29
3.4.4 Incremental Migration . . . . . . . . . . . . . . . . . . . . . . . . . . . . . . . . . . . . . . . . . . . . . . . . 30
3.4.5 Migration Order . . . . . . . . . . . . . . . . . . . . . . . . . . . . . . . . . . . . . . . . . . . . . . . . . . . . . 30
3.4.6 Management Zone Settings. . . . . . . . . . . . . . . . . . . . . . . . . . . . . . . . . . . . . . . . . . . . 31
3.4.7 Migrating Workstations . . . . . . . . . . . . . . . . . . . . . . . . . . . . . . . . . . . . . . . . . . . . . . . 31
3.4.8 Identifying Users . . . . . . . . . . . . . . . . . . . . . . . . . . . . . . . . . . . . . . . . . . . . . . . . . . . . 32
3.4.9 Folder Usage in Configuration Management . . . . . . . . . . . . . . . . . . . . . . . . . . . . . . . 32
3.4.10 Migration Modeling . . . . . . . . . . . . . . . . . . . . . . . . . . . . . . . . . . . . . . . . . . . . . . . . . . 33
3.4.11 What’s Next? . . . . . . . . . . . . . . . . . . . . . . . . . . . . . . . . . . . . . . . . . . . . . . . . . . . . . . . 34
4 Migrating to ZENworks Configuration Management 35
4.1 Prerequisites . . . . . . . . . . . . . . . . . . . . . . . . . . . . . . . . . . . . . . . . . . . . . . . . . . . . . . . . . . . . . . 35
4.2 Starting the ZENworks Migration Utility . . . . . . . . . . . . . . . . . . . . . . . . . . . . . . . . . . . . . . . . . . 37
4.3 Selecting the Migration Source . . . . . . . . . . . . . . . . . . . . . . . . . . . . . . . . . . . . . . . . . . . . . . . . 39
4.4 Selecting the Migration Destination . . . . . . . . . . . . . . . . . . . . . . . . . . . . . . . . . . . . . . . . . . . . . 40
4.5 Migrating Applications . . . . . . . . . . . . . . . . . . . . . . . . . . . . . . . . . . . . . . . . . . . . . . . . . . . . . . . 42
4.6 Migrating Images . . . . . . . . . . . . . . . . . . . . . . . . . . . . . . . . . . . . . . . . . . . . . . . . . . . . . . . . . . . 48
4.7 Migrating Policies . . . . . . . . . . . . . . . . . . . . . . . . . . . . . . . . . . . . . . . . . . . . . . . . . . . . . . . . . . . 52
Contents 5
Page 6

4.8 Migrating Management Zone Settings . . . . . . . . . . . . . . . . . . . . . . . . . . . . . . . . . . . . . . . . . . . 55
4.9 Migrating Workstations. . . . . . . . . . . . . . . . . . . . . . . . . . . . . . . . . . . . . . . . . . . . . . . . . . . . . . . 57
4.10 Migrating Associations . . . . . . . . . . . . . . . . . . . . . . . . . . . . . . . . . . . . . . . . . . . . . . . . . . . . . . . 61
4.11 Setting Up Migrated Workstations to be Managed . . . . . . . . . . . . . . . . . . . . . . . . . . . . . . . . . . 66
4.12 Make an Image of the Migrated Workstations . . . . . . . . . . . . . . . . . . . . . . . . . . . . . . . . . . . . . 66
4.13 Managing Your Traditional ZENworks Installation . . . . . . . . . . . . . . . . . . . . . . . . . . . . . . . . . . 67
A Migration Data 69
A.1 Applications . . . . . . . . . . . . . . . . . . . . . . . . . . . . . . . . . . . . . . . . . . . . . . . . . . . . . . . . . . . . . . . 69
A.2 Images . . . . . . . . . . . . . . . . . . . . . . . . . . . . . . . . . . . . . . . . . . . . . . . . . . . . . . . . . . . . . . . . . . . 72
A.3 Policies. . . . . . . . . . . . . . . . . . . . . . . . . . . . . . . . . . . . . . . . . . . . . . . . . . . . . . . . . . . . . . . . . . . 72
A.4 Management Zone Settings . . . . . . . . . . . . . . . . . . . . . . . . . . . . . . . . . . . . . . . . . . . . . . . . . . . 74
A.5 Workstations . . . . . . . . . . . . . . . . . . . . . . . . . . . . . . . . . . . . . . . . . . . . . . . . . . . . . . . . . . . . . . 76
A.6 Associations . . . . . . . . . . . . . . . . . . . . . . . . . . . . . . . . . . . . . . . . . . . . . . . . . . . . . . . . . . . . . . . 77
B Migration Options 79
B.1 Using the Migration Utility to Configure Migration Options. . . . . . . . . . . . . . . . . . . . . . . . . . . . 79
B.1.1 General . . . . . . . . . . . . . . . . . . . . . . . . . . . . . . . . . . . . . . . . . . . . . . . . . . . . . . . . . . . 80
B.1.2 Applications . . . . . . . . . . . . . . . . . . . . . . . . . . . . . . . . . . . . . . . . . . . . . . . . . . . . . . . . 80
B.1.3 Associations. . . . . . . . . . . . . . . . . . . . . . . . . . . . . . . . . . . . . . . . . . . . . . . . . . . . . . . . 81
B.1.4 Imaging . . . . . . . . . . . . . . . . . . . . . . . . . . . . . . . . . . . . . . . . . . . . . . . . . . . . . . . . . . . 81
B.1.5 Policies . . . . . . . . . . . . . . . . . . . . . . . . . . . . . . . . . . . . . . . . . . . . . . . . . . . . . . . . . . . 82
B.1.6 Zone Settings. . . . . . . . . . . . . . . . . . . . . . . . . . . . . . . . . . . . . . . . . . . . . . . . . . . . . . . 82
B.1.7 Workstations . . . . . . . . . . . . . . . . . . . . . . . . . . . . . . . . . . . . . . . . . . . . . . . . . . . . . . . 82
B.1.8 Web Client Configuration . . . . . . . . . . . . . . . . . . . . . . . . . . . . . . . . . . . . . . . . . . . . . . 82
B.2 Using the Registry Editor to Configure Additional Options for Migrating MSI Applications . . . 82
novdocx (en) 16 April 2010
C Understanding the Migration Utility 85
C.1 Migration Tasks . . . . . . . . . . . . . . . . . . . . . . . . . . . . . . . . . . . . . . . . . . . . . . . . . . . . . . . . . . . . 86
C.2 Migration Source/Destination. . . . . . . . . . . . . . . . . . . . . . . . . . . . . . . . . . . . . . . . . . . . . . . . . . 86
C.3 Migrate Now Button . . . . . . . . . . . . . . . . . . . . . . . . . . . . . . . . . . . . . . . . . . . . . . . . . . . . . . . . . 86
C.4 Cancel Button. . . . . . . . . . . . . . . . . . . . . . . . . . . . . . . . . . . . . . . . . . . . . . . . . . . . . . . . . . . . . . 87
C.5 Exit . . . . . . . . . . . . . . . . . . . . . . . . . . . . . . . . . . . . . . . . . . . . . . . . . . . . . . . . . . . . . . . . . . . . . . 87
C.6 Select Tab . . . . . . . . . . . . . . . . . . . . . . . . . . . . . . . . . . . . . . . . . . . . . . . . . . . . . . . . . . . . . . . . 87
C.6.1 Source eDir Tree . . . . . . . . . . . . . . . . . . . . . . . . . . . . . . . . . . . . . . . . . . . . . . . . . . . . 87
C.6.2 Destination Zone . . . . . . . . . . . . . . . . . . . . . . . . . . . . . . . . . . . . . . . . . . . . . . . . . . . . 88
C.7 Items to Migrate Tab . . . . . . . . . . . . . . . . . . . . . . . . . . . . . . . . . . . . . . . . . . . . . . . . . . . . . . . . 89
C.8 Migration History Tab. . . . . . . . . . . . . . . . . . . . . . . . . . . . . . . . . . . . . . . . . . . . . . . . . . . . . . . . 90
C.9 What’s New Icon . . . . . . . . . . . . . . . . . . . . . . . . . . . . . . . . . . . . . . . . . . . . . . . . . . . . . . . . . . . 90
C.10 Options Icon . . . . . . . . . . . . . . . . . . . . . . . . . . . . . . . . . . . . . . . . . . . . . . . . . . . . . . . . . . . . . . . 90
C.11 Overall Progress . . . . . . . . . . . . . . . . . . . . . . . . . . . . . . . . . . . . . . . . . . . . . . . . . . . . . . . . . . . 90
D Troubleshooting 91
E Best Practices 95
E.1 Running the Migration Utility on a Windows Vista device . . . . . . . . . . . . . . . . . . . . . . . . . . . . 95
E.2 Selecting a Migration Option . . . . . . . . . . . . . . . . . . . . . . . . . . . . . . . . . . . . . . . . . . . . . . . . . . 95
E.3 Uploading Objects to the Content Server. . . . . . . . . . . . . . . . . . . . . . . . . . . . . . . . . . . . . . . . . 95
E.4 Migrating Applications as Actions or MSI . . . . . . . . . . . . . . . . . . . . . . . . . . . . . . . . . . . . . . . . . 96
6 ZENworks 10 Configuration Management ZENworks Migration Guide
Page 7

E.5 Using Network Files . . . . . . . . . . . . . . . . . . . . . . . . . . . . . . . . . . . . . . . . . . . . . . . . . . . . . . . . . 96
E.6 Listing the Associations in the Migration Utility . . . . . . . . . . . . . . . . . . . . . . . . . . . . . . . . . . . . 96
E.7 Listing Application Objects with the AppFsRights attribute in the Migration Utility. . . . . . . . . . 97
E.8 Specifying the File Upload HTTP Port and Web Service Port to Log In to the Migration
Destination Management Zone . . . . . . . . . . . . . . . . . . . . . . . . . . . . . . . . . . . . . . . . . . . . . . . . 97
E.9 Migrating Group Policies . . . . . . . . . . . . . . . . . . . . . . . . . . . . . . . . . . . . . . . . . . . . . . . . . . . . . 97
F Documentation Updates 99
F.1 March 30, 2010: SP3 (10.3) . . . . . . . . . . . . . . . . . . . . . . . . . . . . . . . . . . . . . . . . . . . . . . . . . . . 99
novdocx (en) 16 April 2010
Contents 7
Page 8

novdocx (en) 16 April 2010
8 ZENworks 10 Configuration Management ZENworks Migration Guide
Page 9

About This Guide
novdocx (en) 16 April 2010
This Novell ZENworks 10 Configuration Management ZENworks Migration Guide contains the
information, steps, and processes that you need to move from traditional Novell
Novell ZENworks 10 Configuration Management SP3, the next generation of ZENworks. The
information in this guide is organized as follows:
Chapter 1, “Migration Process,” on page 11
Chapter 2, “Differences between ZENworks 10 Configuration Management and Traditional
ZENworks,” on page 13
Chapter 3, “Planning Your Migration to ZENworks Configuration Management,” on page 25
Chapter 4, “Migrating to ZENworks Configuration Management,” on page 35
Appendix A, “Migration Data,” on page 69
Appendix B, “Migration Options,” on page 79
Appendix C, “Understanding the Migration Utility,” on page 85
Appendix D, “Troubleshooting,” on page 91
Appendix E, “Best Practices,” on page 95
Appendix F, “Documentation Updates,” on page 99
Audience
This guide is intended for ZENworks Configuration Management administrators.
®
ZENworks® to
Feedback
We want to hear your comments and suggestions about this manual and the other documentation
included with this product. Please use the User Comments feature at the bottom of each page of the
online documentation, or go to the Novell Documentation Feedback site (http://www.novell.com/
documentation/feedback.html) and enter your comments there.
Additional Documentation
ZENworks 10 Configuration Management is supported by other documentation (in both PDF and
HTML formats) that you can use to learn about and implement the product. For additional
documentation, see the ZENworks 10 Configuration Management SP3 documentation (http://
www.novell.com/documentation/zcm10/)
Documentation Conventions
In Novell documentation, a greater-than symbol (>) is used to separate actions within a step and
items in a cross-reference path.
®
A trademark symbol (
trademark.
, TM, etc.) denotes a Novell trademark. An asterisk (*) denotes a third-party
About This Guide 9
Page 10

When a single pathname can be written with a backslash for some platforms or a forward slash for
other platforms, the pathname is presented with a backslash. Users of platforms that require a
forward slash, such as Linux*, should use forward slashes as required by your software.
novdocx (en) 16 April 2010
10 ZENworks 10 Configuration Management ZENworks Migration Guide
Page 11

1
Migration Process
Novell® ZENworks® 10 Configuration Management introduces architecture that is different from
previous versions of ZENworks. To leverage the power and new features of ZENworks 10, you need
to migrate from existing systems rather than perform a typical upgrade.
To migrate to Novell ZENworks 10 Configuration Management, do the following:
1. Review Chapter 2, “Differences between ZENworks 10 Configuration Management and
Traditional ZENworks,” on page 13 to gain an understanding of how Configuration
Management is different from traditional ZENworks.
2. (Optional) For an overview of Configuration Management, see “Product Overview” in the
ZENworks 10 Configuration Management Enterprise Edition Getting Started Guide. (Similar
information is contained in the Standard and Advanced editions of the Getting Started Guide.)
3. Install ZENworks 10 Configuration Management to at least one server to establish the
Management Zone where traditional ZENworks information can be migrated. For installation
instructions, see the ZENworks 10 Configuration Management Installation Guide.
novdocx (en) 16 April 2010
1
4. Migrate your traditional ZENworks installation to Configuration Management by using the
instructions in:
Chapter 3, “Planning Your Migration to ZENworks Configuration Management,” on
page 25
Chapter 4, “Migrating to ZENworks Configuration Management,” on page 35
5. (Optional) Migrate your traditional ZENworks Asset Management installation to Configuration
Management by using the instructions in the Novell ZENworks 10 Asset Management
Migration Guide.
6. (Optional) Install other software included in the various editions of Configuration Management
by using the following guides:
AdminStudio 9.5 ZENworks Edition Installation Guide (http://www.novell.com/
documentation/zcm10/pdfdoc/adminstudio/AS95ZENInstallGuide.pdf)
Allows you to continue to standardize the way that you package, test, distribute, and
manage your applications and patches.
Endpoint Security Suite Installation Guide (http://www.novell.com/documentation/
zesm35/install/index.html?page=/documentation/zesm35/install/data/bookinfo.html)
(Enterprise Edition only)
Simplifies endpoint security by combining security policy enforcement for data, devices,
and connectivity under a single management console, allowing organizations to manage,
control, and enforce security policies for Removable Storage, Wireless Communications
including MESH and WiMAX, Application Control, Machine Posture/Integrity, Data
Encryption, and Advanced Personal Firewall.
USB/Wireless Security Installation Guide (http://www.novell.com/documentation/zesm35/
install/index.html?page=/documentation/zesm35/install/data/bookinfo.html) (Advanced
Edition only)
Provides administrators control over the use of local optical media (CD-R/W, DVD+/-R/
W) and all attached storage devices (USB thumb drives, floppy drives, flash memory
cards, ZIP drives, SCSI PCMCIA cards, and other removable media types), providing
Migration Process
11
Page 12

policy-based restrictions on device access privileges, protecting the integrity and
confidentiality of data on the endpoints, while simultaneously protecting the endpoint
from the introduction of malware and any other unauthorized activities.
ZENworks Linux Management Installation Guide (http://www.novell.com/documentation/
zlm72/lm7install/data/front.html) (Enterprise Edition only)
ZENworks Configuration Management directly manages only Windows* devices.
Therefore, if you want to manage Linux devices (servers or workstations), you must use
Novell ZENworks Linux Management, which is available as part of the ZENworks 10
Configuration Management Enterprise Edition, or you can purchase Linux Management
separately if you are installing the Standard or Advanced editions of Configuration
Management.
ZENworks Handheld Management Installation Guide (http://www.novell.com/
documentation/zenworks7/hm7install/data/a20gkue.html) (Enterprise Edition only)
Provides comprehensive management of handheld devices.
7. Get started in Configuration Management with the ZENworks 10 Configuration Management
Administration Quick Start, which shows how to perform tasks to get you up and running.
novdocx (en) 16 April 2010
12 ZENworks 10 Configuration Management ZENworks Migration Guide
Page 13

2
Differences between ZENworks 10
novdocx (en) 16 April 2010
Configuration Management and
Traditional ZENworks
To migrate to Novell® ZENworks® 10 Configuration Management, you should first understand how
Configuration Management is different from traditional ZENworks, then migrate the traditional data
to your new Configuration Management installation.
The following sections describe what is new or different in ZENworks 10 Configuration
Management:
Section 2.1, “Architecture,” on page 13
Section 2.2, “System Management,” on page 20
Section 2.3, “Workstations,” on page 21
Section 2.4, “Inventory,” on page 22
Section 2.5, “Imaging,” on page 22
Section 2.6, “Remote Management,” on page 22
Section 2.7, “Application Management,” on page 23
Section 2.8, “Additional Features,” on page 24
2
2.1 Architecture
Like previous versions of ZENworks Desktop Management, ZENworks 10 Configuration
Management provides comprehensive management of Windows servers and workstations. However,
its underlying architecture has changed extensively.
The following sections explain the architectural differences:
Section 2.1.1, “Traditional ZENworks Architecture,” on page 13
Section 2.1.2, “The Next Generation ZENworks Architecture,” on page 15
Section 2.1.3, “More Detail on the Architectural Changes,” on page 17
For additional information about the new architecture, see “System Architecture” in the ZENworks
10 Configuration Management Enterprise Edition Getting Started Guide. This information is also
contained in both the Standard and Advanced editions of the Getting Started Guide.
2.1.1 Traditional ZENworks Architecture
Your existing Novell ZENworks solution is powerful because:
It is flexible: The logic is in the object store, making it simple to move content and services
around without having to perform major architectural overhauls.
It is simple: Services fit together very easily, and the architecture is very easy for
administrators to understand, deploy, and manage.
Differences between ZENworks 10 Configuration Management and Traditional ZENworks
13
Page 14
It is scalable: No other systems management product on the market scales to the level of
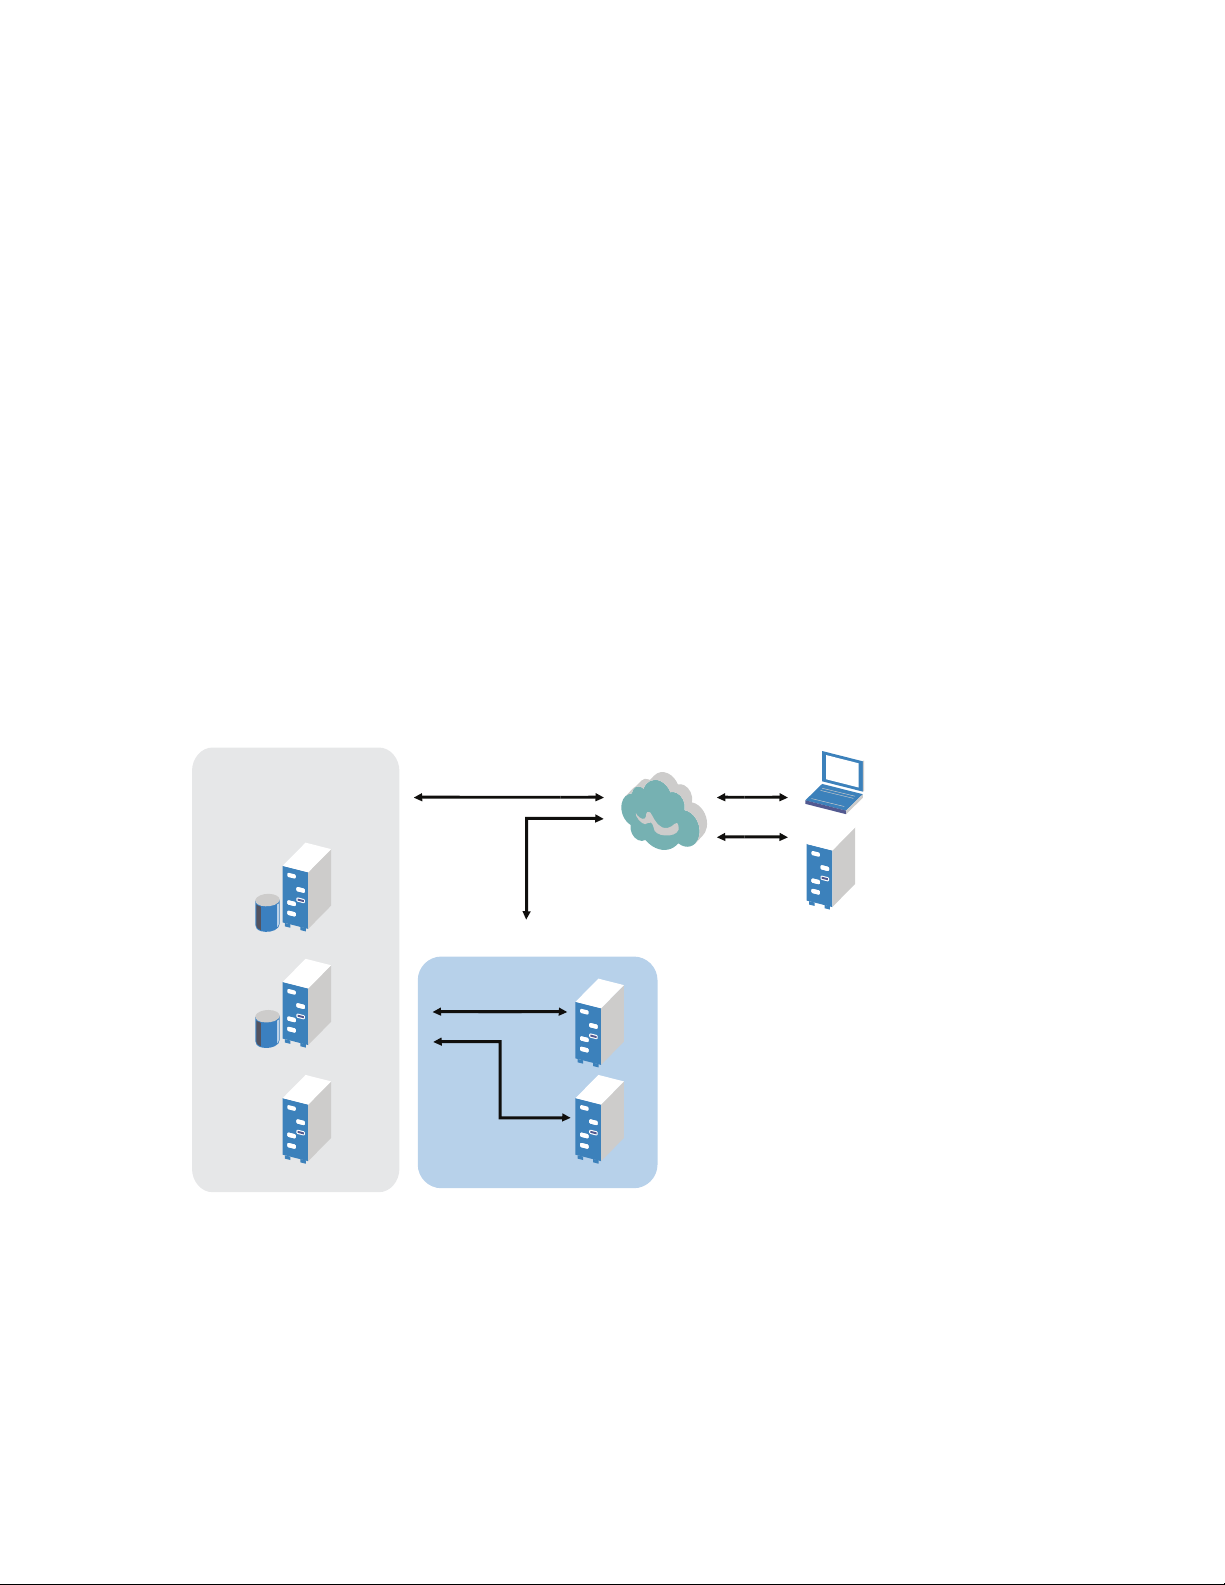
Middle-Tier Servers
eDirectory Replication
and Tiered Electronic
Distribution
Within the Firewall
Managed DevicesBack-End Servers
Outside
the Firewall
ZENworks (in fact, there are no known limits to how many users a single ZENworks system
can manage).
You will want your new infrastructure to be as flexible, simple, and scalable as your existing
environment. Thus, it’s helpful to have a solid understanding of the architectural differences
between existing versions of ZENworks 10 Configuration Management and earlier versions of
Novell ZENworks.
Novell ZENworks 7.x is the final release patterned after traditional ZENworks architecture.
Traditional ZENworks architecture is two-tiered and relies on direct access to the object store
TM
(Novell eDirectory
TM
Client32
installed or Middle tier configured in order to access ZENworks services—specifically
) for configuration information. Every workstation was required to have Novell
object information, or logic, stored in the directory.
In traditional ZENworks, it is important to note that the bulk of the logic and processing is done on
the client side in the form of policy searching, launcher refreshing, and so on. In other words, the
client does most of the work. This setup has a dramatic effect on the scalability of the product.
Instead of one server doing all of the work for 100 clients, the total workload is spread across all 100
clients.
novdocx (en) 16 April 2010
Figure 2-1 illustrates the traditional architecture for Novell ZENworks Desktop Management:
Figure 2-1 ZENworks Desktop Management Architecture
Traditional ZENworks architecture is characterized as follows:
The ZENworks Management Agent is installed on every workstation
Client32 is required in a NetWare
The use of the middle-tier server is required when the Novell Client
®
environment
the managed devices
14 ZENworks 10 Configuration Management ZENworks Migration Guide
TM
is not installed on
Page 15
eDirectory is the key requirement as the object store for all users’ workstations and ZENworks
Database
Data
Model
Persistence
Business Logic
Web Services
Identities File System
objects
Novell ConsoleOne
All access to the eDirectory environment is via the NetWare Core Protocol
The product is cross-platform and supports services running on Linux, NetWare, and Windows
®
is required to manage the ZENworks infrastructure
TM
(NCPTM)
2.1.2 The Next Generation ZENworks Architecture
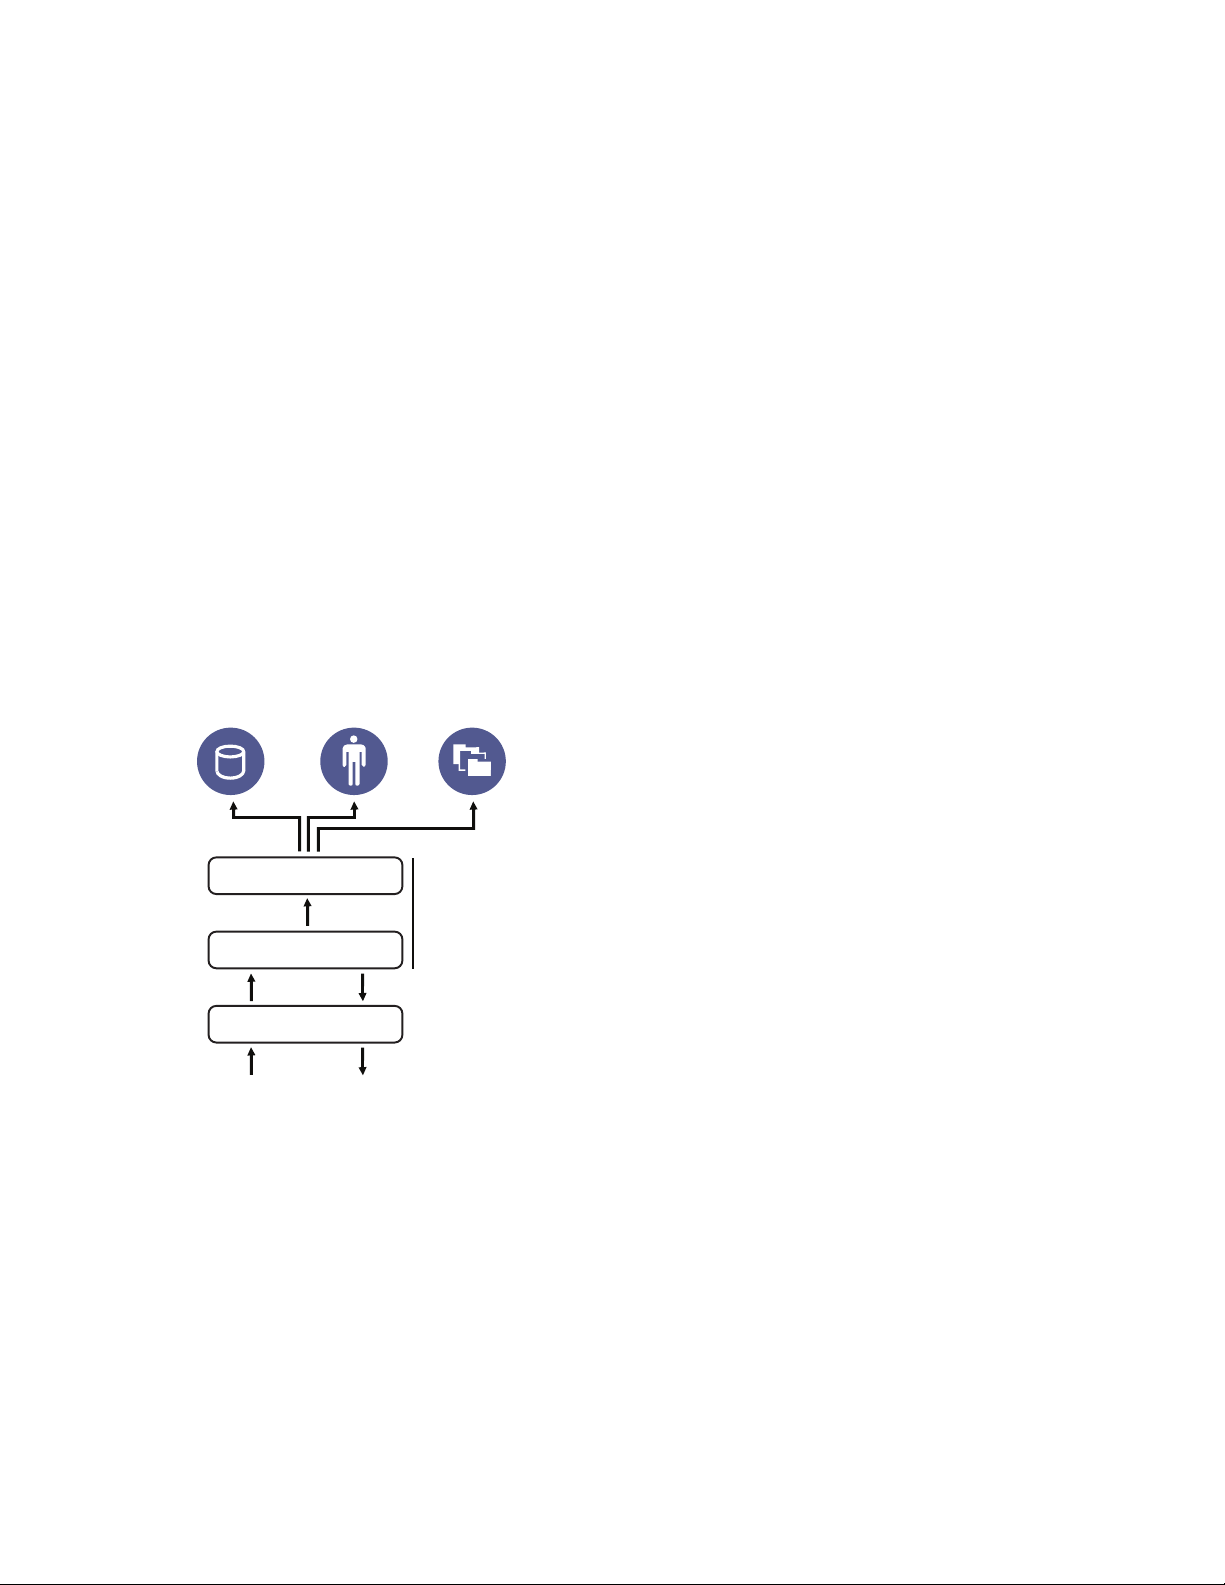
Novell ZENworks 10 Configuration Management features a three-tier architecture, commonly
known as Services-Oriented Architecture (SOA). This architecture separates the components,
making the product far more modular. Now the various tiers can be updated independently, making
it easier to change business logic or add new modules.
With Novell ZENworks 10 Configuration Management, the server-side infrastructure consists of
two tiers (see Figure 2-2). The first is the data model, and the second comprises the file system (to
store actual files), the database (for storing ZENworks information), and the optional identity store,
which allows user-based resource management. With the release of ZENworks 10 Configuration
Management, Novell eDirectory and Microsoft* Active Directory* are supported natively as user
sources for user identity information.
novdocx (en) 16 April 2010
Figure 2-2 ZENworks 10 Three-Tier Architecture
In the new architecture, Novell ZENworks 10 Configuration Management has been decoupled from
eDirectory, which is no longer a key requirement for the product to function. You no longer need to
manage a directory in order to provide systems management services. This does not mean that you
cannot benefit from integrating ZENworks 10 Configuration Management with your existing
eDirectory environment. In fact, you can continue to use your existing directory infrastructure for
user identity information, but you do not need to extend the schema or install the product on a server
that runs eDirectory.
Another major architectural change is the way that the client and server communicate with each
other (see Figure 2-3). You continue to run a Novell ZENworks agent (ZENworks Adaptive Agent)
on the managed device, but the bulk of the work (logic and workload) happens on the server side. As
seen in Figure 2-3, the client initiates communications with the server side (the Web server on the
ZENworks 10 Configuration Management Primary Server), but the server can also communicate
Differences between ZENworks 10 Configuration Management and Traditional ZENworks 15
Page 16
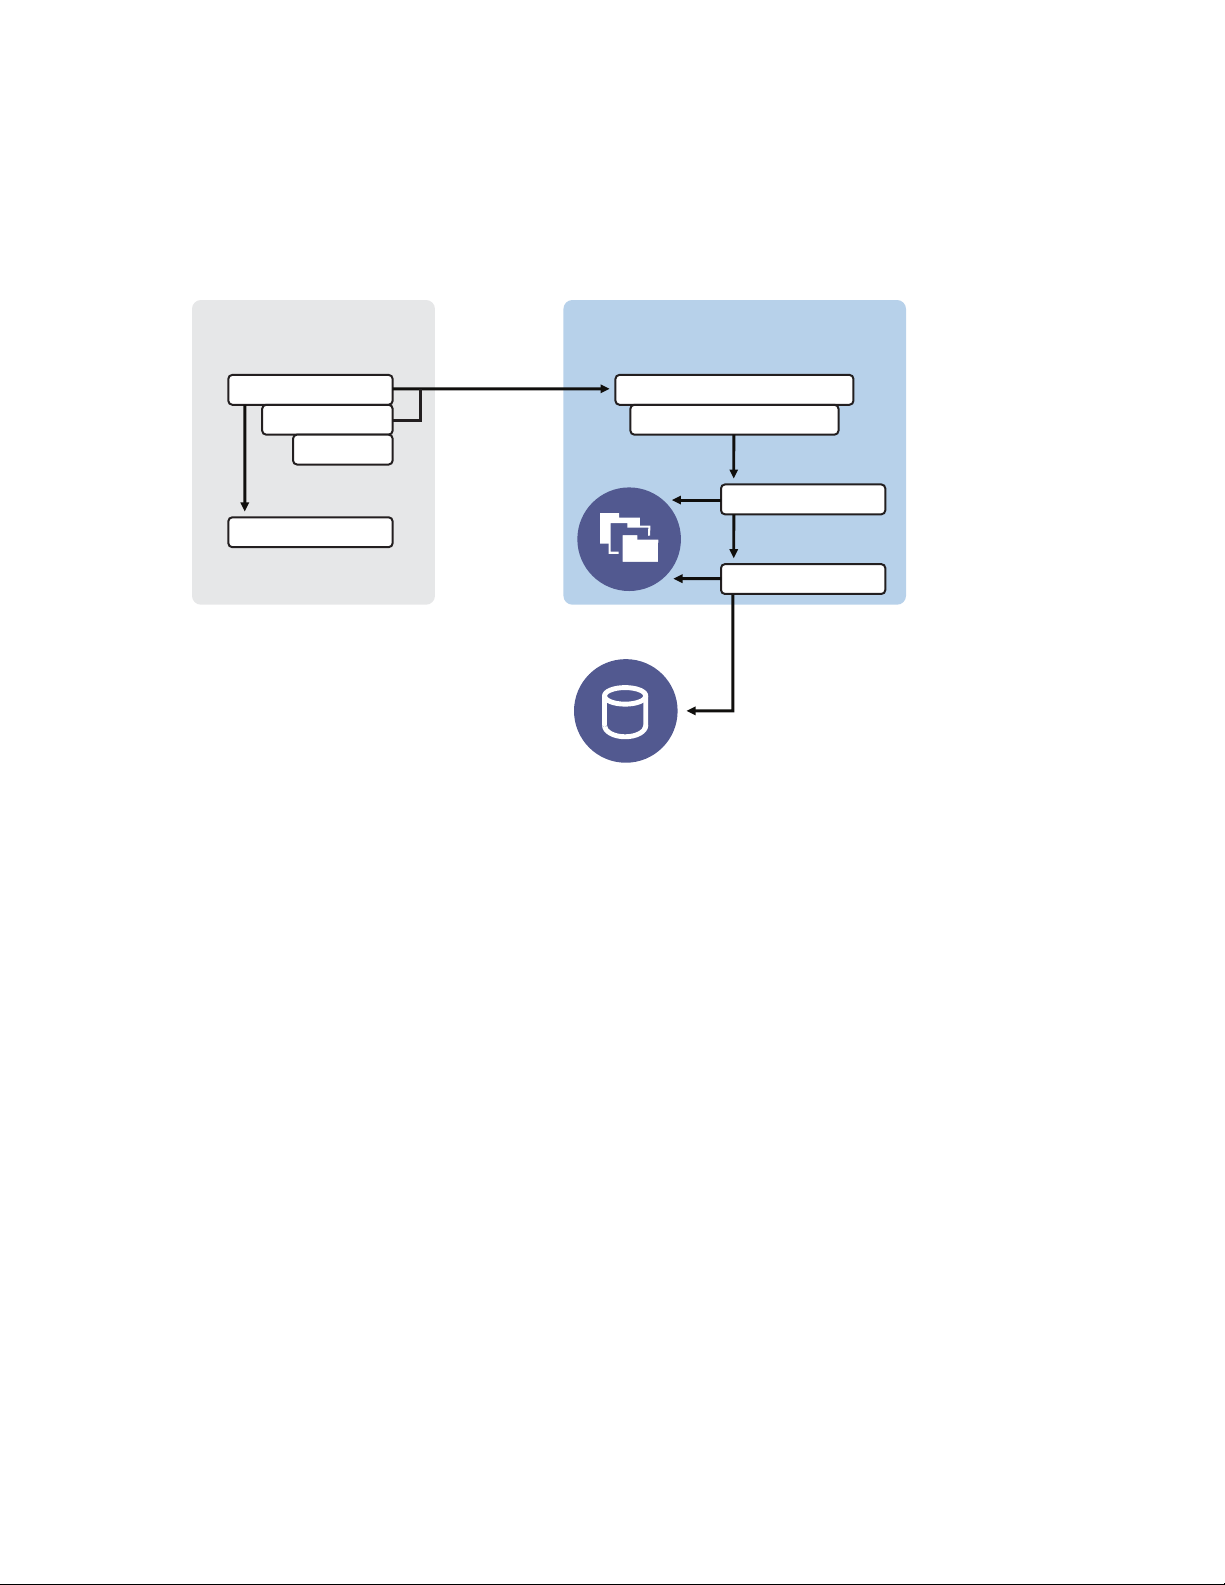
directly with the client. The client and server use industry-standard protocols, such as HTTP,
Primary Agent
Core ZENworks
Tomcat Server
WSSDK
Extensions
Handlers
Web Services
Data Abstraction
File System
RDBMS
ZENworks Managed
Device
ZENworks Server
HTTPS, SOAP, CIFS, and LDAP. The client communicates with the server over HTTP or HTTPS,
and the server communicates with the Adaptive Agent via SOAP (Simple Object Access Protocol)
over HTTPS.
Figure 2-3 ZENworks 10 Client-Server Architecture
novdocx (en) 16 April 2010
From an architectural perspective, the managed device communicates with the server back-end Web
service, and the Primary Server tells the client what to do and where to obtain content (see Figure 2-
4). In effect, the server sends instructions to the client, and the client uses the required handler to
perform the task, such as installing software, applying a policy, managing systems remotely, and so
on.
From an identity perspective, the user of a managed device authenticates directly to the identity store
where user's object is stored, either Novell eDirectory or Microsoft Active Directory. The only
identity-related information stored in the Novell ZENworks object store is a reference object
pointing back to the actual identity, which increases the efficiency of user-based resource
management.
16 ZENworks 10 Configuration Management ZENworks Migration Guide
Page 17
Figure 2-4 ZENworks 10 Architecture
ZENworks Servers
Managed Devices
Distribution Point
Database
Primary
Server
LDAP
Directory
novdocx (en) 16 April 2010
The new Novell ZENworks 10 Configuration Management architecture includes the following
important characteristics:
Installation of the ZENworks Adaptive Agent on every managed device
Three-tier SOA
Additional Primary Servers for computing tasks, which removes the workload from the
managed device
No more specific requirement for Novell eDirectory
No more requirement for Novell Client32 to be installed on either the managed device or the
server
A new Web-based administrative console (ZENworks Control Center) to manage all
ZENworks objects, configurations, and functions
Native support for both Novell eDirectory and Microsoft Active Directory
Based on industry-standard protocols
Direct, one-time server installation, then managed devices are deployed from the server
through ZENworks Control Center
Installation of Primary Server software on either Windows Server 2003, Windows Server 2008,
®
or SUSE
2.1.3 More Detail on the Architectural Changes
Linux Enterprise Server
The following sections provide further detail on the architectural differences:
“Management Console” on page 18
“Software Repository” on page 18
Differences between ZENworks 10 Configuration Management and Traditional ZENworks 17
Page 18

“Novell eDirectory” on page 18
“Object Management” on page 19
“User Management” on page 19
“Client Agents” on page 20
“Middle Tier Server” on page 20
Management Console
ZENworks Control Center, a Web-based management console is used as a graphical management
interface for Configuration Management and it replaces ConsoleOne that is used in tradional
ZENworks:
Administrator Roles: ZENworks Control Center provides robust administrator roles unique to
its new architectural design. For more information, see “Administrators” in the ZENworks 10
Configuration Management System Administration Reference.
Watch Lists: ZENworks Control Center provides watch lists on a Home page where you can
see the current status of selected devices and bundles, as well as overall Management Zone
statistics. For more information, see “Creating a Watch List” in the ZENworks 10
Configuration Management Administration Quick Start.
iManager: If you already use Novell iManager to manage other Novell products, you can
configure the ZENworks Control Center to be launched from iManager. For more information,
see “Accessing ZENworks Control Center through Novell iManager” in the ZENworks 10
Configuration Management System Administration Reference.
novdocx (en) 16 April 2010
Software Repository
Every Primary Server in the Management Zone contains the same content, providing redundancy for
all managed devices in the zone. For more information, see “Content Repository” in the ZENworks
10 Configuration Management System Administration Reference.
In Configuration Management, content replication and closest server rules replace the traditional
load balancing techniques for fault tolerance. For more information, see both “Content Replication”
and “Closest Server Rules” in the ZENworks 10 Configuration Management System Administration
Reference.
Novell eDirectory
Novell eDirectory is no longer required for data storage. Instead, the ZENworks Configuration
Management database is used. This is different from traditional ZENworks in several ways:
ZENworks Database: A new ZENworks database replaces the old ZENworks database and all
eDirectory tree object information stores. Instead of eDirectory containers and contexts,
Configuration Management uses database folders and the inheritance functionality relevant to
folder/object hierarchy. The new database is the content repository for all Configuration
Management data.
For more information on which databases can be used with Configuration Management, see
“Database Requirements” in the ZENworks 10 Configuration Management Installation Guide.
For more information on maintaining your selected database, see“Database Management” in
the ZENworks 10 Configuration Management System Administration Reference.
18 ZENworks 10 Configuration Management ZENworks Migration Guide
Page 19

No Schema Extensions: Because Configuration Management stores all the data in the
ZENworks database, it does not impact your Novell eDirectory schema. Any access to
eDirectory is read-only for the purpose of referencing user information.
User Sources: You can use eDirectory and Active Directory as the source for users. To do this,
you define a read-only LDAP link to a directory and specify the contexts where users reside.
ZENworks creates references to the users in its own database that allow for ZENworks
management activities to occur completely within the ZENworks database rather than in the
directory. If you only plan to manage devices through device assignments rather than user
assignments, user sources are not needed. For more information, see “User Management” on
page 19.
Management Zone: Primary Servers and managed devices are organized into a Management
Zone, replacing the organization provided by the eDirectory tree.
Object Management
Configuration Management uses ZENworks Control Center objects instead of eDirectory objects.
The following describes some of the differences:
Dynamic Groups: This is a new feature in Configuration Management. Both groups and
dynamic groups are available. From the perspective of software and policy assignments, groups
and dynamic groups have the same function. The only difference between the two types of
groups is the way that devices are added to the group. With a group, you must manually add
devices. With a dynamic group, you define criteria that a device must meet to be a member of
the group, and then devices that meet the criteria are automatically added.
novdocx (en) 16 April 2010
Several dynamic groups are predefined, but you can define your own.
For more information, see “Groups” in the ZENworks 10 Configuration Management
Administration Quick Start.
Inheritance: You can set configurations in several ways:
Globally for all ZENworks Control Center objects (devices or bundles) in the
Management Zone
For all objects in a folder and its subfolders
For a group of objects (predefined, user-defined, and dynamic groups are available)
For an individual object
For more information, see “Organizing Devices: Folders and Groups” in the ZENworks 10
Configuration Management Administration Quick Start.
Associations: In Configuration Management, ZENworks Control Center objects are assigned
to each other (such as bundles to devices), instead of being associated with eDirectory objects.
The differences between assignments and associations should be considered when migrating to
Configuration Management. For more information, see Section 4.10, “Migrating
Associations,” on page 61.
User Management
Configuration Management references existing LDAP user sources, in either eDirectory or Active
Directory. Users are not migrated to Configuration Management. This way, ZENworks knows
immediately of any changes done natively to user objects. For more information, see “User Sources”
in the ZENworks 10 Configuration Management System Administration Reference.
Differences between ZENworks 10 Configuration Management and Traditional ZENworks 19
Page 20

Client Agents
The ZENworks Adaptive Agent replaces the ZENworks Desktop Management Agent. The
differences include the following:
Deployment: You can use the ZENworks Control Center to deploy the Adaptive Agent to any
workstation whose IP address or LDAP directory context you know (or have discovered using
the network discovery of LDAP directory discovery technologies included in ZENworks).
Functionality: All functionality (software distribution, imaging, remote management,
policies) is automatically included with the installation of the Adaptive Agent. The only
functionality you can choose to remove from the agent installation is remote management.
No Network Client: The Adaptive Agent does not require network clients (Novell Client or
Microsoft Client) to retrieve content (applications, etc.) from Primary Servers. The Adaptive
Agent uses HTTP and Web services requests to retrieve the content.
NOTE: The latest version of the Novell client must be installed on the managed device before
a Dynamic Local User policy or a Roaming Profile Policy that has Store User Profile in User’s
Home Directory enabled is enforced on the device. To obtain the latest version of Novell
ClientTM, see the Novell Download Web site (http://download.novell.com/index.jsp).
novdocx (en) 16 April 2010
Integrated Interface: The separate client programs (Workstation Manager, Remote Control,
etc.) have been replaced with a common interface called the ZENworks Icon. The ZENworks
Icon is displayed in the notification area at the bottom of the desktop. The NAL Window and
NAL Explorer views are still available.
Configuration Settings The Adaptive Agent behavior is now controlled through a
combination of configuration settings and policy settings (ZENworks Explorer Configuration
policy) rather than through the Launcher Configuration settings only. This allows for greater
flexibility in determining which devices receive specific settings.
Inventory-Only Module: If you have workstations that don’t meet the requirements for
installing the Adaptive Agent (see “Managed Device Requirements” in the ZENworks 10
Configuration Management Installation Guide), you can still receive inventory information
from these workstations by installing the Inventory-only module. For more information, see
“Deploying the Inventory-Only Module” in the ZENworks 10 Configuration Management
Discovery and Deployment Reference.
For more information, see “ZENworks Adaptive Agent Deployment” in the ZENworks 10
Configuration Management Discovery and Deployment Reference.
Middle Tier Server
The Middle Tier Server does not exist in Configuration Management. Instead, the ZENworks
Adaptive Agent communicates directly with the Primary Server through Web services and HTTP
requests.
2.2 System Management
Configuration Management provides several methods for managing ZENworks:
ZENworks Control Center: This is the main Configuration Management administration
interface. For more information, see “ZENworks Control Center” in the ZENworks 10
Configuration Management System Administration Reference.
20 ZENworks 10 Configuration Management ZENworks Migration Guide
Page 21

Command Line Utilities: You can administer Configuration Management by using the zman
and zac command line utilities. For more information, see the ZENworks 10 Configuration
Management Command Line Utilities Reference.
Errors and Messages: Traditional error messages and message logs have been replaced with
the centralized Message Logging feature. For more information, see the ZENworks 10
Configuration Management Message Logging Reference and “Viewing System Messages” in
the ZENworks 10 Configuration Management Administration Quick Start.
Software Updating: The process of updating the ZENworks software is now automated in
Configuration Management with the System Updates feature. For more information, see
“Introduction to ZENworks System Updates” in the ZENworks 10 Configuration Management
System Administration Reference.
Reporting: Configuration Management has totally new reporting capabilities:
ZENworks infrastructure reporting is performed by using BusinessObjects* Enterprise XI.
For more information, see ZENworks 10 Configuration Management System Reporting
Reference.
Reporting on your inventoried assets is performed using Asset Inventory’s reporting
capabilities. For more information, see ZENworks 10 Configuration Management Asset
Inventory Reference.
novdocx (en) 16 April 2010
2.3 Workstations
Traditional workstation management using policies and importing into eDirectory is replaced by
managed devices in Configuration Management.
Devices in Configuration Management include both Primary Servers, managed devices (Primary
Servers and workstations), and inventoried-only devices. For Configuration Management, only
Windows devices can be managed. Linux devices can be only Primary Servers and inventoried-only
devices. For more information, see “System Requirements” in the ZENworks 10 Configuration
Management Installation Guide.
Managing workstations is done in the following ways
Workstations are imported into the Management Zone by using the new discovery and
deployment feature. Devices are discovered on the network, registered in the Management
Zone, and have software deployed to them. For more information, see “Discovering Network
Devices” in the ZENworks 10 Configuration Management Administration Quick Start, and also
see the ZENworks 10 Configuration Management Discovery, Deployment, and Retirement
Reference.
.csv
To manually import devices, you can use a
Devices from CSV Files” in the ZENworks 10 Configuration Management Discovery,
Deployment, and Retirement Reference.
Servers become a member of the Management Zone when you install Configuration
Management on them. For more information, see the ZENworks 10 Configuration Management
Installation Guide.
file. For more information, see “Importing
Registration rules and keys replace workstation importing and policies. For more information,
see “Registering Devices” in the ZENworks 10 Configuration Management Administration
Quick Start.
Differences between ZENworks 10 Configuration Management and Traditional ZENworks 21
Page 22

You can determine a device’s status in ZENworks Control Center. For more information, see
“ZENworks Icon” in the ZENworks 10 Configuration Management Software Distribution
Reference.
Asset Management has been configured to work with ZENworks 10. For more information, see
the ZENworks 10 Asset Management Reference.
Many policies are essentially the same between traditional ZENworks and Configuration
Management. However, some have been discontinued, some moved to become Management
Zone configurations, and a new policy has been added. For more information, see the
ZENworks 10 Configuration Management Policy Management Reference.
2.4 Inventory
Asset Inventory replaces Workstation Inventory. This is a completely new feature that is based on
the Configuration Management content model. For more information, see ZENworks 10
Configuration Management Asset Inventory Reference.
Primary Servers can be hierarchically organized in the Management Zone so that all database
information can be rolled efficiently to the one Primary Server that hosts the ZENworks database.
However, the database can reside externally on a server that is not a Primary Server in the zone. For
more information, see “Server Hierarchy” in the ZENworks 10 Configuration Management System
Administration Reference.
novdocx (en) 16 April 2010
2.5 Imaging
In Configuration Management, automated imaging is performed using bundles, instead of using
traditional policies and eDirectory imaging objects. However, the ZENworks Imaging engine is
.zmg
much the same, and the file type for images continues to be
Some improvements have been made to the imaging software, but it’s essentially the same. You
simply perform automated imaging differently. Manual imaging is similar, but enhanced.
The basic repository for image files is hard-coded, but you can create subfolders for organizing your
images.
For more information, see the ZENworks 10 Configuration Management Preboot Services and
Imaging Reference.
.
2.6 Remote Management
This feature has been enhanced, including the use of Virtual Network Computing (VNC). For more
information, see ZENworks 10 Configuration Management Remote Management Reference.
22 ZENworks 10 Configuration Management ZENworks Migration Guide
Page 23

2.7 Application Management
In ZENworks 10 Configuration Management, new software distribution functionality replaces much
of the traditional ZENworks Application Management functionality.
Bundles: A bundle is a package of files and information, similar to an Application Object and
its files but with far greater power and flexibility. A bundle wizard lets you create a bundle,
configure the actions associated with a bundle, and then assign bundles to devices or users.
There are four types of bundles: Windows, Directive, File, and Imaging. For more information,
see the ZENworks 10 Configuration Management Software Distribution Reference.
Actions and Action Sets: A bundle contains actions to perform with its content. All actions
are divided into six categories, referred to as action sets: Install, Launch, Verify, Uninstall,
Terminate, and Preboot. You can identify your actions at the time you create the bundle, and
you can also add or subtract the actions later in ZENworks Control Center. For more
information, see “Actions” in the ZENworks 10 Configuration Management Software
Distribution Reference.
Content: Applications and files, along with policy files, are referred to as content. Content is
stored in a directory structure, called the content repository, on the Primary Server. The Primary
Server and ZENworks Adaptive Agent (running on the managed device) communicate via
standard Web protocols to provide access to the content. Unless you configure your system
differently, content is automatically replicated among Primary Servers to ensure that it is
available from all Primary Servers. For more information, see “Content Delivery” in the
ZENworks 10 Configuration Management System Administration Reference.
Cache: Each managed device still uses a cache directory. However, the cache location has
moved from
drive_root\nalcache
cache directory before installation. By default, this copy occurs when the bundle is first
launched on the device.
Forced Caching: You can use a distribution schedule to force cache a bundle so that it is
immediately available for installation when the user launches it. The schedule can initiate an
immediate distribution of the bundle, or delay distribution to a future time.
Forced Running: You can use a launch schedule to force an application to run. For example,
run the application immediately or when the device refreshes. For more information, see
“Launching a Bundle” in the ZENworks 10 Configuration Management Software Distribution
Reference.
to
zenworks_home\cache
. All bundles are copied to the
novdocx (en) 16 April 2010
Distribution Points: To improve content access for a group of devices without creating
another Primary Server, you can create a Content Distribution Point on any managed device.
Distribution Points are useful in slow WAN configurations. For more information, see
Understanding the Satellite Roles in the ZENworks 10 Configuration Management System
Administration Reference.
Dependencies: Dependencies are now created automatically whenever you select specific
types of actions for a bundle. For more information, see “Creating a Bundle with Content and
Dependency on Another Bundle” in the ZENworks 10 Configuration Management Software
Distribution Reference.
Proximity and Load Balancing: Site lists (proximity) and source lists (workload) are replaced
by a feature called Closest Server Rules. These are rules that you create to direct managed
devices to the Primary Server from which they will receive content and configuration
information. For more information, see “Closest Server Rules” in the ZENworks 10
Configuration Management System Administration Reference.
Differences between ZENworks 10 Configuration Management and Traditional ZENworks 23
Page 24

2.8 Additional Features
Depending on the edition of Configuration Management (Standard, Advanced, or Enterprise), the
following other software features are provided with Configuration Management:
Additional Security: New for ZENworks 10.
Endpoint Security (Enterprise Edition). For more information on Endpoint Security, see
the Endpoint Security Suite User Guide (http://www.novell.com/documentation/zesm35/
userguide/index.html?page=/documentation/zesm35/userguide/data/bookinfo.html).
USB/Wireless Security (Advanced Edition). For more information on USB/Wireless
Security, see the USB/Wireless Security Reference (http://www.novell.com/documentation/
zesm35/admin/index.html?page=/documentation/zesm35/admin/data/bookinfo.html).
Patch Management: You can continue to automate patch application to minimize
vulnerabilities and compliance issues. For more information, see the ZENworks 10 Patch
Management Reference.
For a synopsis, see “Patching Software ” in the ZENworks 10 Configuration Management
Administration Quick Start.
For the Standard Edition, Patch Management is provided as 60-day evaluation-only software.
Asset Management: You can continue to monitor software license compliance, track software
usage, manage contracts, and manage licenses. For more information, see the ZENworks 10
Asset Management Reference. Also see “Monitoring License Compliance” in the ZENworks 10
Configuration Management Administration Quick Start.
novdocx (en) 16 April 2010
For the Standard and Advanced Editions, Asset Management is provided as 60-day evaluationonly software.
AdminStudio: You can continue to standardize the way that you package, test, distribute, and
manage your applications and patches. For more information, see the AdminStudio 9.5
ZENworks Edition Installation Guide (http://www.novell.com/documentation/zcm10/pdfdoc/
adminstudio/AS95ZENInstallGuide.pdf) (PDF only).
Personality Migration: You can migrate the personality settings of one or more users on a
Windows managed device. For more information, see the ZENworks 10 Personality Migration
Reference.
ZENworks Linux Management: (Enterprise Edition only) You can continue to manage Linux
workstations by using ZENworks Linux Management. For more information, see the
ZENworks 7.2 Linux Management Installation Guide (http://www.novell.com/documentation/
zlm73/lm7install/data/front.html) and the ZENworks 7.2 Linux Management Administration
Guide (http://www.novell.com/documentation/zlm73/lm7admin/data/front.html).
ZENworks Handheld Management: (Enterprise Edition only) You can continue to manage
handheld devices by using ZENworks Handheld Management. For more information, see the
ZENworks 7 Handheld Management Installation Guide (http://www.novell.com/
documentation/zenworks7/hm7install/data/a20gkue.html) and the ZENworks 7 Handheld
Management Administration Guide (http://www.novell.com/documentation/zenworks7/
hm7admin/data/a20gkue.html).
24 ZENworks 10 Configuration Management ZENworks Migration Guide
Page 25

3
Planning Your Migration to
novdocx (en) 16 April 2010
ZENworks Configuration
Management
Novell® ZENworks® Configuration Management provides the ZENworks Migration Utility that
allows you to migrate your traditional ZENworks Novell eDirectory
ZENworks Configuration Management database. Because Configuration Management uses a
different architecture than previous versions of ZENworks, migrating your traditional ZENworks
data is the only method for upgrading to Configuration Management.
The Migration Utility allows you to migrate eDirectory objects in batches so that you can migrate
incrementally. You can queue and migrate several hundred objects at a time. The utility provides
modeling, object selection, simple raw attribute viewing, migration, and error reporting.
You cannot install AdminStudio 9.5 ZENworks Edition and the Migration Utility on the same
device. However, you can install AdminStudio 9.5 ZENworks Edition and the Migration Utility on
different devices in the same Management Zone.
The following sections provide concepts on migrating to Configuration Management:
Section 3.1, “Migration Candidates,” on page 25
Section 3.2, “Installing the ZENworks Migration Utility,” on page 25
Section 3.3, “What the ZENworks Migration Utility Does,” on page 26
Section 3.4, “Planning Your Migration,” on page 27
TM
objects and attributes into the
3
3.1 Migration Candidates
The following ZENworks product can be migrated to ZENworks 10 Configuration Management:
ZENworks for Desktops 4.0.1
ZENworks Desktop Management 6.5
ZENworks 7.x Desktop Management
Migration of other ZENworks products will be added in a future version of Configuration
Management.
3.2 Installing the ZENworks Migration Utility
Perform the following steps to download and install the ZENworks Migration Utility executable to
the Windows device where you will be running the utility
1 (Conditional) If an earlier version of the utility is already installed on the device, then uninstall
it before installing the latest version.
2 In your Web browser, access the following URL:
http://zenworks_primary_server_id/zenworks-setup/?pageId=tools
Planning Your Migration to ZENworks Configuration Management
25
Page 26

novdocx (en) 16 April 2010
and download
ZENmigration.exe
to a temporary location.
Because the ZENworks Migration Utility saves its work files locally, you should plan to always
run this utility from the same workstation in order to provide migration history information that
you can use in both planning and during migration. These work files are not transferable to
other workstations where you might install the utility. You will have disjointed histories if you
use multiple workstations to perform the migration.
IMPORTANT: Novell strongly recommends that you do not run the Migration Utility from
the Primary Server. The Migration Utility’s processes are CPU intensive and can noticeably
slow down the server.
Also, Novell’s license from Macrovision prohibits installing the utility on more than one device
per Management Zone.
Therefore, install the utility on a supported management workstation.
3 Run ZENmigration.exe to install it on your workstation.
3.3 What the ZENworks Migration Utility Does
The ZENworks Migration Utility is provided with Configuration Management (see Step 5 on
page 36 in Section 4.1, “Prerequisites,” on page 35). You copy and install it to your workstation
from an executable file that resides on your Primary Server. The utility consists of a migration
screen where you can model and perform the migration.
The following sections explain what is or is not migrated:
Section 3.3.1, “Migrated,” on page 26
Section 3.3.2, “Not Migrated,” on page 27
Section 3.3.3, “Other Software,” on page 27
3.3.1 Migrated
The ZENworks Migration Utility does the following:
Allows you to model your migration before performing it.
Provides a unique view of assignments created from traditional ZENworks associations.
Copies eDirectory objects and their attributes and associations to the ZENworks database,
leaving eDirectory untouched in the process.
Prompts you to resolve duplicates from site listed applications.
Provides a status log of non-migrated attributes for your traditional ZENworks system’s
eDirectory objects that do not exist in Configuration Management.
Converts Novell Application Launcher
bundles.
MSI and AOT applications that have streams (files) associated with them are migrated to MSIs
by using the AdminStudio Repackager, which is included with the ZENworks Migration
Utility.
TM
(NAL) applications into Configuration Management
26 ZENworks 10 Configuration Management ZENworks Migration Guide
Page 27

3.3.2 Not Migrated
The ZENworks Migration Utility does not migrate the following:
User Objects: These are not migrated. Instead, in ZENworks Control Center, you simply point
to their user sources. Therefore, any change to a user in eDirectory or Active Directory is
immediately known in ZENworks Control Center.
Inventory Data: Your traditional inventory data and the related eDirectory attributes are not
migrated by this utility. For how to migrate ZENworks Asset Management inventory data, see
Section 3.3.3, “Other Software,” on page 27.
For details on what is not migrated and what is changed during migration, see Appendix A,
“Migration Data,” on page 69.
3.3.3 Other Software
The following are upgraded or migrated with other methods:
Inventory Data: The ZENworks Asset Management Migration Utility can migrate your
traditional inventory data, including inventory history, from ZENworks 7 to ZENworks
Configuration Management. To access and run this utility:
novdocx (en) 16 April 2010
1. In your Web browser, access the following URL:
http://zenworks_primary_server_id/zenworks-setup/?pageId=tools
and download
2. Run
3. To run the utility on a supported Windows device, click Start > All Programs > Novell
PatchLink: PatchLink* Update is automatically installed with its latest patches as part of the
installation of ZENworks Configuration Management.
AdminStudio: AdminStudio ZENworks Edition is provided on the Novell ZENworks
Configuration Management CD. It is an optional installation. The portion of AdminStudio that
is needed by the ZENworks Migration Utility for migrating Novell Application Launcher
applications is automatically installed with the Migration Utility.
ZAMmigration.exe
ZENworks > ZENworks Asset Management Migration Utility.
ZAMmigration.exe
to install it on your workstation.
to a temporary location.
3.4 Planning Your Migration
To upgrade your traditional ZENworks to Configuration Management, you simply need to
determine which eDirectory objects and associations to migrate from your traditional ZENworks
system. You do not need to migrate all of them, or organize them the same way as they are organized
in eDirectory.
Consider the following as you plan your migration:
Section 3.4.1, “Coexistence of the ZENworks Systems,” on page 28
Section 3.4.2, “LDAP Authentication,” on page 28
Section 3.4.3, “PXE Devices and Server Referral Lists,” on page 29
Section 3.4.4, “Incremental Migration,” on page 30
Section 3.4.5, “Migration Order,” on page 30
Planning Your Migration to ZENworks Configuration Management 27
Page 28

Section 3.4.6, “Management Zone Settings,” on page 31
Section 3.4.7, “Migrating Workstations,” on page 31
Section 3.4.8, “Identifying Users,” on page 32
Section 3.4.9, “Folder Usage in Configuration Management,” on page 32
Section 3.4.10, “Migration Modeling,” on page 33
Section 3.4.11, “What’s Next?,” on page 34
3.4.1 Coexistence of the ZENworks Systems
When you introduce Configuration Management into your environment, the following takes place:
Installation: Configuration Management is installed to a Primary Server in a Configuration
Management Zone. This server cannot be running traditional ZENworks software.
Installation sets up a Management Zone and a ZENworks database. The first Primary Server
installed hosts the database if you are not using an external database on another server.
Migration: eDirectory data is migrated to the ZENworks database on the Primary Server by
using read-only access.
Migration to Configuration Management consists of reading eDirectory data to create similar
objects, attributes, and assignments in the ZENworks database. Users are not migrated to
Configuration Management. Configuration Management simply uses eDirectory for a user
source, if you have user associations to be migrated.
You must create the user source in ZENworks Control Center before migrating user
associations.
Managed Devices: The ZENworks Adaptive Agent is installed on each device to be managed
by Configuration Management, such as workstations and Primary Servers in the Management
Zone.
Installing the Adaptive Agent also deletes the traditional ZENworks Agent software from the
managed device, so there are no managed device conflicts.
novdocx (en) 16 April 2010
Certain considerations affect coexistence:
The Configuration Management software cannot be running on the same server as your
traditional ZENworks software.
Configuration Management uses its own database, not eDirectory.
The Adaptive Agent replaces the traditional ZENworks Agent on managed devices.
Because of these things, the Configuration Management and traditional ZENworks systems can run
concurrently in your environment without conflicts. The Configuration Management and traditional
ZENworks systems do coexist but are not interoperable. They remain as separate management
software for the devices where their respective agents are running.
3.4.2 LDAP Authentication
The ZENworks Migration Utility authenticates to both the source eDirectory tree by using LDAP
and the destination ZENworks Management Zone by using Web services, and both rely on SSL for
security over TCP/IP. LDAP must be enabled, which is the default for eDirectory trees.
28 ZENworks 10 Configuration Management ZENworks Migration Guide
Page 29

For eDirectory login, you must provide a fully distinguished user name that has sufficient rights to
read eDirectory. Writing to eDirectory is not required because the migration process only reads
.zmg
eDirectory. If you are migrating images, the migration user must also have rights to read
imaging files.
For reading information from eDirectory, the default port for LDAP SSL is 636. The default nonLDAP SSL port is 389.
TM
Although you can migrate without Novell Client32
the migration utility, Client32 might be necessary to access files on NetWare
running on the device where you are running
®
volumes.
Authentication to the ZENworks Management Zone is done using the administrator login name and
password that you established when installing Configuration Management. If you added other
administrator logins in ZENworks Control Center after installation, these are also valid, provided
they have the necessary Read rights to eDirectory and Write rights to the ZENworks Configuration
Management database.
For writing to the zone’s database, the default port for SSL is 443.
3.4.3 PXE Devices and Server Referral Lists
novdocx (en) 16 April 2010
If you have both Configuration Management and ZENworks Linux Management systems running
concurrently, the following information might apply:
PXE Devices: When a PXE device boots, it makes a broadcast request on the network for PXE
services. The ZENworks Proxy DHCP server (the
novell-proxydhcp
daemon) responds to
this request with information that includes the IP address of an imaging server where the device
can send requests for assigned preboot work.
Because PXE devices can exist in an environment with both newer and traditional ZENworks
systems running concurrently, the device can fail to determine its assigned preboot work if it
cannot find the imaging server for its own ZENworks version.
In ZENworks Configuration Management, devices can exist in multiple Management Zones. It
is essential that the PXE device contact PXE services associated with its home zone so that it
can correctly determine if there is any preboot work assigned to it. When there is only a single
Management Zone, this is easy to do because all Proxy DHCP servers provide addresses to
services that belong to the same zone. Any device can request preboot work from any imaging
server in the same zone and get the same response.
The PXE device’s initial request for PXE services is sent as a broadcast to the network, and all
Proxy DHCP servers respond with information pertaining to their respective zones (in
ZENworks Configuration Management and ZENworks Linux Management) or Proxy DHCP
servers in their trees (in traditional ZENworks versions using Windows or NetWare imaging
servers). Because it is impossible to determine which Proxy DHCP server responds first (if
multiple Proxy DHCP servers respond), or which server’s response is used by the device, it is
impossible to ensure that each PXE device contacts servers in its home zone or tree.
Server Referral Lists: For a ZENworks environment that has PXE services, the Server
Referral List configuration section provides a method for getting PXE devices to connect with
their proper imaging servers. Server referral lists are only used by PXE devices, and in
ZENworks Configuration Management only one Management Zone needs to have an active
Proxy DHCP server and server referral list. Because you can only have one referral list active
Planning Your Migration to ZENworks Configuration Management 29
Page 30

in a network segment, if you have ZENworks Linux Management running with a referral list
configured, you need to disable the Proxy DHCP service for Linux Management. This allows
the Configuration Management referral list to be used by all PXE devices.
A server referral list allows you to ensure that all devices contact their home zone or tree for
preboot work assignments. The list should contain the IP address of an imaging server in each
known Management Zone or traditional ZENworks system’s tree. When a device requests
preboot work from a server, the server first determines if the device belongs to the same zone or
tree as the server. If it does not, that server refers the request to each server in its server referral
list until it finds the device’s home zone or tree. The device is then instructed to send all future
requests to the correct
If two server referral lists are active, do the following:
1 Install ZENworks Configuration Management.
For instructions, see the ZENworks 10 Configuration Management Installation Guide.
2 Configure a server referral list in your Configuration Management system.
3 Disable the Proxy DHCP service in your Linux Management system.
novell-proxydhcp
daemon.
novdocx (en) 16 April 2010
3.4.4 Incremental Migration
The migration screen’s design provides granularity that allows you to migrate one item or thousands
of items at a time. Therefore, you can migrate any number of items in a session and you can use as
many sessions as you need.
Because traditional ZENworks and Configuration Management can run concurrently, but are not
interoperable, you can migrate eDirectory objects incrementally, such as by department or
geographical region.
When migrating, the ZENworks Migration Utility preserves GUIDs and version numbers, but cache
is not used. Therefore, we recommend when you migrate Workstation objects that you migrate all
eDirectory associations related to those workstations before you register the workstations in
Configuration Management.
3.4.5 Migration Order
The following list represents what can be migrated and shows the suggested migration order.
However, you can migrate in any order, including any subsets of these migration types:
1. Applications
2. Images
3. Policies
4. Zone Settings
5. Workstations
6. Associations
This order is recommended because of possible dependencies, such as associations that require their
applications and associated objects to already exist in order to re-create those associations in
Configuration Management.
30 ZENworks 10 Configuration Management ZENworks Migration Guide
Page 31

3.4.6 Management Zone Settings
You can migrate the following eDirectory information for Novell Application LauncherTM
configuration settings and for the Imaging policies; they become Management Zone settings in
ZENworks Configuration Management:
Table 3-1 ZENworks Management Zone Settings for Migration from eDirectory
ZENworks Management Zone Setting eDirectory Source
Default Gateway Imaging policies
Device Imaging Assignment Rules Imaging policies
DNS Suffix Imaging policies
Full Refresh Frequency Launcher configuration setting for workstations
For users, these are migrated to the ZENworks
Explorer Configuration policy in Configuration
Management.
novdocx (en) 16 April 2010
Name Servers Imaging policies
PXE Menu Settings Imaging policies
Random Refresh Max Time to Wait Launcher configuration setting for workstations
Refresh Manually Launcher configuration setting for workstations
Subnet Mask Imaging policies
Unassigned Days to Uninstall Launcher configuration setting for workstations
IP Configuration Imaging policies
Workgroup Imaging policies
Computer Name Prefix Imaging policies
Only the launcher configuration settings for workstations that are listed above are migrated as zone
settings, and launcher configuration settings for users are migrated as ZENworks Explorer
Configuration policy in ZENworks Configuration Management. For more information, see
Section A.4, “Management Zone Settings,” on page 74.
Only the Imaging policies information listed above is migrated to ZENworks Configuration
Management.
3.4.7 Migrating Workstations
There are two different ways you can set up your workstations as managed devices in the ZENworks
Management Zone:
Use the Migration Utility to migrate them, then use ZENworks Control Center to deploy the
Adaptive Agent to them.
This maintains any eDirectory associations that you have between the workstations and other
eDirectory objects.
Planning Your Migration to ZENworks Configuration Management 31
Page 32

This also maintains GUIDs that are established in the eDirectory objects for your workstations.
Use ZENworks Control Center to discover them and deploy the Adaptive Agent to them.
Established eDirectory associations and GUIDs are not maintained, so you must use ZENworks
Control Center to make new assignments to the workstations.
Determine whether you want to maintain associations to Workstation objects and whether you have
GUIDs that you want to maintain for the workstations. If so, migrate your workstations by using the
Migration Utility and use ZENworks Control Center to deploy the Adaptive Agent to them. If not,
use ZENworks Control Center to discover them and deploy the Adaptive Agent to them, thus
skipping the workstation step in the Migration Utility.
3.4.8 Identifying Users
Users are not migrated to Configuration Management; their eDirectory objects are simply pointed to
from Configuration Management. Then, any changes that you make to user objects in eDirectory are
immediately known in Configuration Management.
You should first configure your user source in ZCC, then migrate the object types in the
recommended order. Dependencies on users are more easily resolved during migration if the user
sources are known by Configuration Management.
novdocx (en) 16 April 2010
IMPORTANT: The user source and the associated objects that you are migrating must be in the
same tree.
Active Directory users are utilized in Configuration Management in the same manner as eDirectory
users. However, traditional ZENworks systems do not have directory objects in Active Directory to
migrate. If Active Directory is configured in ZENworks Control Center and eDirectory and Active
Directory are synchronized by using Novell Identity Manager or any similar utility, then the
eDirectory user associations can be migrated to the Active Directory users.
3.4.9 Folder Usage in Configuration Management
In a way that is similar to using contexts to organize your objects in eDirectory, Configuration
Management uses folders. You should plan how to organize your migrated data in Configuration
Management by defining a folder structure.
Keep in mind the following when creating folders in Configuration Management:
Configuration Management does not have an accessible root directory where you can place
folders, such as the eDirectory tree name context. Instead, Configuration Management provides
certain basic root-level folders for the different Configuration Management components, which
provide default starting paths for where you can migrate the objects. For example, all migrated
policies are placed under a Policies folder. Then in ZCC, your migrated policies are displayed
on the Policies page.
You can migrate eDirectory contexts to Configuration Management. They are converted to
folders for the ZENworks database. Everything downstream in the context applicable to the
current type you are migrating is also queued for migration.
For example, if you are migrating applications, all application objects under the container are
added to the queue, including any application objects found in all of its subcontainers. Before
migrating, you can delete unwanted objects in any queued folder.
32 ZENworks 10 Configuration Management ZENworks Migration Guide
Page 33

You can use the migration screen to create new folders in Configuration Management. These
folders can be nested in any fashion. You can then drag eDirectory objects into these folders no
matter where they resided in eDirectory.
You don’t need to maintain the same organization in Configuration Management that you have
in eDirectory. However, because of possible associations to containers, we recommend that
when you have eDirectory objects grouped in containers, that you migrate those contexts
instead of the individual objects contained in them.
Before you drag and drop eDirectory objects into new Configuration Management folders, you
can migrate the empty folders to create the directory structure that you want in Configuration
Management. For migration purposes, this might be faster to do from the ZENworks Migration
Utility than in ZCC because of navigational differences.
When migrating image objects, the imaging information contained in the objects is migrated as
the imaging bundle information in the ZENworks Configuration Management database.
.zmg
However, the actual image files (
) are copied to an imaging directory on the imaging
server. You do not have control over this placement.
3.4.10 Migration Modeling
novdocx (en) 16 April 2010
The migration screen is designed so that you can model your migration, then perform the migration
after you have refined your model. The modeling data is automatically saved on your workstation so
that you can revise it over time. Therefore, you can use the modeling capability of this utility to help
you in visually planning your migration.
To use the migration screen to model, just select the objects, contexts, and associations from your
eDirectory tree view and drag them into the Configuration Management Zone’s view to queue them
for migration. These items (objects, contexts, and associations) are represented in the destination
panel’s listing as Configuration Management objects, folders, and associations. Their icons and texts
are dimmed to distinguish them from items in Configuration Management that have already been
migrated (teal-colored text). Items in black text were originally created in Configuration
Management or migrated from a different workstation, because migration history files are kept on
the workstation where you run the utility.
The teal color is persistent so that you can always know what has previously been migrated from the
workstation. The listings of both your eDirectory tree and the ZENworks database content maintain
the teal color for migrated items. This can be helpful for knowing what has been migrated from the
eDirectory perspective.
To migrate, you simply use the migration screen to queue what you want migrated, resolving any
issues that the utility might identify as you queue them, then click a button to migrate your
eDirectory data to the ZENworks database. Therefore, in addition to planning your migration on
paper, you can use this modeling capability of the migration screen to visualize your migration
before actually performing it.
The migration screen works by migration task. The tasks described in Section 3.4.5, “Migration
Order,” on page 30 are each a migration session. A selected task is migrated when you click the
Migrate Now button. Therefore, at a minimum, you must plan to migrate your eDirectory data in
several separate clicks of the Migrate Now button. However, you can model an incremental
migration consisting of many sessions per migration task.
Planning Your Migration to ZENworks Configuration Management 33
Page 34

3.4.11 What’s Next?
In addition to planning your migration on paper, you can use the migration screen to model your
migration. To get started with using the migration screen, continue with Chapter 4, “Migrating to
ZENworks Configuration Management,” on page 35.
novdocx (en) 16 April 2010
34 ZENworks 10 Configuration Management ZENworks Migration Guide
Page 35

4
Migrating to ZENworks
novdocx (en) 16 April 2010
Configuration Management
Do the following tasks in the order listed to migrate your traditional ZENworks® software to
Configuration Management:
1. Section 4.1, “Prerequisites,” on page 35
2. Section 4.2, “Starting the ZENworks Migration Utility,” on page 37
3. Section 4.3, “Selecting the Migration Source,” on page 39
4. Section 4.4, “Selecting the Migration Destination,” on page 40
5. Section 4.5, “Migrating Applications,” on page 42
6. Section 4.6, “Migrating Images,” on page 48
7. Section 4.7, “Migrating Policies,” on page 52
8. Section 4.8, “Migrating Management Zone Settings,” on page 55
9. Section 4.9, “Migrating Workstations,” on page 57
10. Section 4.10, “Migrating Associations,” on page 61
11. Section 4.11, “Setting Up Migrated Workstations to be Managed,” on page 66
12. Section 4.12, “Make an Image of the Migrated Workstations,” on page 66
13. Section 4.13, “Managing Your Traditional ZENworks Installation,” on page 67
4
4.1 Prerequisites
To fulfill the prerequisites for migrating to Configuration Management:
1 Make sure that the version of ZENworks you are migrating from is one of the following:
ZENworks for Desktops 4.0.1
ZENworks Desktop Management 6.5
ZENworks 7.x Desktop Management
IMPORTANT: For your current installation of a traditional ZENworks system, you must have
a Novell
eDirectory objects listed in the tree. The ZENworks Migration Utility cannot be used to create
new objects or attributes in Configuration Management that do not exist in your traditional
version of ZENworks, but you can use the utility to create new folders in Configuration
Management.
2 Install the Configuration Management software to at least one Primary Server with the
ZENworks Configuration Management database in order to establish the Management Zone
and to provide the target ZENworks database for migrating the eDirectory data.
For more information, see the ZENworks 10 Configuration Management Installation Guide.
®
eDirectoryTM tree with the ZENworks schema installed and have ZENworks
Migrating to ZENworks Configuration Management
35
Page 36

3 Use ZENworks Control Center to configure the user source for your users so that the
eDirectory items that they are associated with allows for a successful migration. For more
information on configuring the user source, see “User Sources” in ZENworks 10 Configuration
Management System Administration Reference.
If you want to continue using eDirectory as the user source in ZENworks Configuration
Management, you must update the version of eDirectory to meet the minimum requirements.
For more information on the minimum eDirectory requirements in ZENworks Configuration
Management, see “Authoritative user source” in the ZENworks 10 Configuration Management
Installation Guide.
However, a user source is not required if you do not have any user associations with traditional
ZENworks objects in eDirectory.
4 If you are running a version of eDirectory that is 8.7 or lower, or you have upgraded from
Starter Pack 1.0, you should make sure that the LDAP attributes listed in Step 4b are properly
mapped because LDAP is used to read existing application attributes during migration.
Newer versions of eDirectory automatically map spaces and colons to the newer attribute
names. If you have multiple versions of an attribute in your version of eDirectory (one using
the colon, and another using a space), it is possible that the automatic mapping functionality
will provide the Migration Utility with the version that uses only spaces. However, attributes
using colons are the preferred versions for migration.
To configure attribute mapping for migrating applications to Configuration Management:
4a In ConsoleOne, select your LDAP Group object, then click the Attribute Mapping tab.
novdocx (en) 16 April 2010
4b Locate the following attributes and map them to the correct name:
Old Attribute Name New Attribute Name
App:Path appPath
App:Icon appIcon
App:Contacts appContacts
App:Working Directory appWorkingDirectory
App:Drive Mappings appDriveMappings
App:Printer Ports appPrinterPorts
App:Parameters appParameters
App:Flags appFlags
App:Startup Script appStartupScript
App:Shutdown Script appShutdownScript
4c Save the changes.
5 Download and install the ZENworks Migration Utility executable to the Windows device
where you will be running the utility. For more information, see Section 3.2, “Installing the
ZENworks Migration Utility,” on page 25.
6 Plan your migration.
36 ZENworks 10 Configuration Management ZENworks Migration Guide
Page 37

You can use the ZENworks Migration Utility as a modeling tool to help in your planning. For
more information, see Section 3.4, “Planning Your Migration,” on page 27.
7 Continue with Section 4.2, “Starting the ZENworks Migration Utility,” on page 37.
4.2 Starting the ZENworks Migration Utility
The ZENworks Migration Utility can run on the following devices:
Windows* Server 2003 SP1
Windows 2000 SP4 workstation
Windows XP SP2
Windows XP SP3
Windows Vista*
Windows Vista SP1
Windows Server 2008
Also, Microsoft .NET 2.0 or later is required.
novdocx (en) 16 April 2010
The ZENworks Migration Utility is not backward compatible. Whenever you upgrade the
ZENworks server, copy and install the latest version of the Migration Utility from the ZENworks
server. For more information, see Step 5 on page 36.
To start the ZENworks Migration Utility:
1 On a supported Windows device, click Start > Programs > Novell ZENworks > ZENworks
Configuration Management Migration Utility > Launch.
2 (Conditional) By default, What’s New window appears for the first time. If you do not want the
window to appear every time you start the utility, select the Do not show this message again
option.
3 Click OK.
Migrating to ZENworks Configuration Management 37
Page 38

Figure 4-1 ZENworks Configuration Management Migration Utility
novdocx (en) 16 April 2010
NOTE: To launch the What’s New window, click on the top right-hand corner of the utility.
4 Continue with Section 4.3, “Selecting the Migration Source,” on page 39.
38 ZENworks 10 Configuration Management ZENworks Migration Guide
Page 39

4.3 Selecting the Migration Source
To identify and log into your migration source Novell eDirectory tree:
Figure 4-2 Migration Source
novdocx (en) 16 April 2010
1 Fill in the following fields to authenticate to your migration source eDirectory tree:
Tree: This field is not displayed the first time that you access the eDir Login dialog box.
On the second and subsequent logins, any tree that you previously logged into by using this
dialog box is available from the drop-down list.
Each time you use this dialog box, the last tree that you logged into is displayed here.
To add an eDirectory tree that is not listed, select the <New Tree> default option, fill in the
other fields, then click OK. Thereafter, the tree is available in the drop-down list.
Username: Specify the LDAP username.
For example,
If this is the first time you have logged into this tree through the Migration utility, nothing is
displayed; otherwise, the last username you used is displayed.
If you select an eDirectory tree in the Tree field, this field is automatically populated with the
username you last used for that tree.
NOTE: To migrate objects, you must be configured in eDirectory as a Trustee of the container
containing those objects with atleast Read and Compare rights. For more information on adding
Trustees, see the ConsoleOne User Guide (http://www.novell.com/documentation/consol13).
Password: Specify the password. This must be entered every time to authenticate.
cn=readonlyuser,ou=container,o=organization
.
Migrating to ZENworks Configuration Management 39
Page 40

Server: For the server hosting the eDirectory tree, specify either its DNS name or IP address.
This field is automatically populated when you select an eDirectory tree in the Tre e field.
LDAP Port: Specify your LDAP port. The default port of 636 for SSL or 389 for non-SSL is
displayed. We recommend SSL for password protection across the wire. This field is
automatically populated when you select an eDirectory tree in the Tree field.
Use SSL: If you are using SSL, select this check box. This field is automatically set to the
previous selection when you select an item in the Tree field.
2 Click OK.
The Source eDir Tree section shows all available eDirectory information and initially displays
the organizations contained at that level. The Migration Source field also displays the tree
name.
3 To select the migration destination, continue with Section 4.4, “Selecting the Migration
Destination,” on page 40.
4.4 Selecting the Migration Destination
To identify and log into your migration destination Novell ZENworks Configuration Management
Management Zone:
novdocx (en) 16 April 2010
Figure 4-3 Migration Destination
1 Fill in the following fields to authenticate to your destination Management Zone:
Zone: This field is not displayed the first time that you access the Zone Login dialog box.
On the second and subsequent logins, any zone that you previously logged into using this
dialog box is available from the drop-down list.
40 ZENworks 10 Configuration Management ZENworks Migration Guide
Page 41

Each time you use this dialog box, the last zone that you logged into is displayed here.
To add a Management Zone that is not listed, select the <New Zone> default option, fill in the
other fields, then click OK. Thereafter, the zone is available in the drop-down list.
Username: Specify the username for the zone. Administrator is normally used.
For example, if the administrator is an LDAP user named admin1@tree1 who has been granted
Super Administrator rights through ZENworks Control Center, specify the username based on
the following criteria:
If there is no other administrator created in ZENworks Control Center with the same name
as admin1, you can specify the username as admin1 or admin1@tree1.
If there are other administrators created in ZENworks Control Center with the same name,
such as admin1@tree2, admin1@tree3, or admin1, you must specify the complete
username: admin1@tree1.
If this is the first time you have logged into this zone through the Migration utility, nothing is
displayed; otherwise, the last username you used is displayed.
If you select a Management Zone in the Zone field, this field is automatically populated with
the username you last used in the migration tool to log into that zone.
Password: Specify the password. This must be entered every time to authenticate.
Server: For the server hosting the Management Zone database, specify either its DNS name or
IP address. This field is automatically populated when you select a Management Zone in the
Zone field.
Web Service Port: Specify the Web service port. The default port of 443 is displayed. This
field is automatically populated when you select a Management Zone in the Zone field.
However, if the port configured on the server is different from the default port, ensure that you
specify the port as configured on the server.
novdocx (en) 16 April 2010
Use SSL: Select whether you are using SSL.
File Upload HTTP Port: Specify the HTTP port. The default port of 80 is displayed. This
field is automatically populated when you select a Management Zone in the Zone field.
However, if the port configured on the server is different from the default port, ensure that you
specify the port as configured on the server.
2 Click OK.
The Destination Zone panel uses teal-colored text to show anything that was previously
migrated, as does the Migration History tab. It also uses black text to show anything originally
created in ZENworks Control Center and never migrated. If you previously used the ZENworks
Migration Utility on the current workstation to model your migration, items not yet migrated
are displayed as dimmed.
3 To select items to migrate, continue with the appropriate sections:
1. Section 4.5, “Migrating Applications,” on page 42
2. Section 4.6, “Migrating Images,” on page 48
3. Section 4.7, “Migrating Policies,” on page 52
4. Section 4.9, “Migrating Workstations,” on page 57
5. Section 4.10, “Migrating Associations,” on page 61
The above list represents the suggested migration order because of possible dependencies.
However, you can migrate in any order, including any subsets.
Migrating to ZENworks Configuration Management 41
Page 42

4.5 Migrating Applications
To migrate applications from eDirectory to Configuration Management:
1 Click (the Migration Tool Settings icon), then do the following:
®
1a To overwrite existing Application objects in the ZENworks
select the Overwrite objects that already exist option.
WARNING: This overwrites any existing Application objects in the database, including
those that were previously migrated.
If you choose to remigrate an application to ZENworks Configuration Management with
the Overwrite objects that already exist option enabled, you must ensure that the version
of the application you want to remigrate is higher by one than the version of the existing
ZENworks Configuration Management bundle. This is required to avoid inconsistent
results on the managed device when the bundle is assigned to it.
The Skip saving/loading history option allows you to dramatically improve performance
on large migrations by not storing the local history.
1b To access the options available for migrating applications, click Applications, then
configure the desired settings.
database, click General, then
novdocx (en) 16 April 2010
42 ZENworks 10 Configuration Management ZENworks Migration Guide
Page 43

Setting Description
Migrate failed MSI builds The Migrate failed MSI builds option forces application
migration when the utility fails to migrate one or more
attributes to the MSI.
An MSI bundle is considered failed when a warning is
produced while converting an AOT Application object to
an MSI. These MSI builds can often be migrated
successfully in spite of the warning. For example, the
warning might be produced because a Windows*
shortcut link contained in the AOT is no longer valid.
If you enable this option, the warning messages are not
presented. You can review the migration log for
information on which attributes were not migrated.
novdocx (en) 16 April 2010
Preserve created MSI and
temporary files
Upload applications to content
server
The Preserve created MSI and temporary files option
means the application is created and migrated, but the
directory holding the temporary files and new MSI file is
not automatically deleted. This allows you to have
access to the newly created MSI before it is
incorporated into the content service in Configuration
Management.
The Upload applications to content server option lets
you upload content to the content server. This option is
selected by default.
The applications are migrated as Install MSI action to
the ZENworks Configuration Management server and
also uploaded to the content server if the Upload
applications to content server option is selected and the
source path of the file is resolved to a local path or UNC
path at the time of migration.
The applications are migrated as bundles with Install
Network MSI action to the ZENworks Configuration
Management server and are not uploaded to the content
server in the following scenarios:
The Upload applications to content server option is
deselected.
The Upload applications to content server option is
selected but the source path of the file is not
resolved to a local path or UNC path at the time of
migration, or the file is not found.
Migrating to ZENworks Configuration Management 43
Page 44

Setting Description
novdocx (en) 16 April 2010
Migrate distribution options as
individual actions
The Migrate distribution options as individual actions
option lets you migrate the distribution options in
applications as individual actions such as Edit INI action,
Registry Edit action, or Run Script action that can be
edited. By default, it is selected. Deselect the Migrate
distribution options as individual actions option to
migrate the distribution options in applications as MSI.
If the Migrate distribution options as individual actions
option is enabled, then the applications are migrated as
bundles with specific actions:
An application having Registry changes is
migrated as a bundle with Registry Edit action.
An application having INI settings is migrated as a
bundle with Edit INI File action.
An application having Text file changes is migrated
as a bundle with an Edit Text File action.
An application having icons or shortcuts is
migrated as a Windows bundle with a Run Script
action or File Removal action.
An application having application files changes are
migrated as bundles with the following actions:
Files as Copy Files or Install Files action.
Directory as a Copy Directory, Install
Directory, or Create/Delete Directory action.
Deletion of files as a File Removal action
Deletion of directory as a Create/ Delete
Directory action.
If the Migrate distribution options as individual actions
option is disabled, then the application is migrated as
bundle with as Install MSI action. But, the Edit Text File
action, Copy Directory, Install Directory, File Removal
are not a part of this Install MSI action.
Working Directory The Working Directory option allows you to place the
temporary migration files in a different location than the
default users %TEMP% directory. If you migrate an
application with a very deep path (greater than 256
characters), this option enables you to make the
temporary path short, such as
c:\temp
.
1c Click Save Settings to exit the dialog box.
2 Click Step 1: Applications in the Migration Tasks field.
NOTE: The migration utility now supports migration of all complex combinations of
Distribution Rules.The Distibution Rules including the New Group in traditional ZENworks,
are migrated as a combination of filters and filter sets in ZENworks Configuration
Management.
44 ZENworks 10 Configuration Management ZENworks Migration Guide
Page 45

3 To model the migration, do the following:
3a In the Source eDir Tree panel, navigate the eDirectory contexts to locate the Application
objects to be queued for migration. To stop listing of the objects in the Source eDir Tree,
click .
The eDirectory information that is displayed is filtered according to the type of
information that you are migrating. Therefore, you only need to browse through the
contexts and objects that can be migrated for the selected type.
3b If necessary, right-click anywhere in the Destination Zone panel to create a folder for the
objects to be queued for migration, then select New folder.
You can create as many folders as needed, including nesting them. This structure is
created in the ZENworks database and is viewable as folders in ZENworks Control
Center; however, the folders are not created until you click the Migrate Now button.
You might want to determine the folder structure for your Application objects, and create
and migrate those folders before queueing Application objects to them.
You can also migrate existing eDirectory containers and all of their Application objects
(including subcontainers). The containers are converted into folders containing all of the
Application objects that exist in eDirectory under them. If you select a container in the
Source eDir Tree panel and drag it to the Destination Zone panel, all subcontainers and
their Application objects are also placed in the Destination Zone panel in their respective
folders.
After queueing a container in the Destination Zone panel, you can individually delete
queued items that you don’t want to migrate by selecting the items, right-clicking them,
then selecting Delete selected items. You are asked to confirm the deletion.
3c In the Source eDir Tree panel, select the Application objects or containers to be migrated
and drag them into the Destination Zone panel.
This queues the items for migration.
You can use the Ctrl and the arrow keys or Shift and the arrow keys to select multiple
items.
As you drag items from one panel to the other, the items listed in the Destination Zone
panel are automatically sorted.
novdocx (en) 16 April 2010
If you drag an item multiple times, it is only queued once.
If you drag a site listed application that has a duplicate already queued, you are asked to
resolve them during queueing by selecting which one to migrate. You can right-click an
item and select View attributes for information that might help you in determining which
item to migrate.
If you migrate incrementally, you should queue only the objects that you want to migrate
at this time because all items that are queued in the Destination Zone panel are migrated
when you click the Migrate Now button.
On the Items to Migrate tab, the number of items you are migrating (copied to the
Destination Zone panel) is represented in parentheses on the tab’s label.
The Migration Status field on the Items to Migrate tab displays information related to the
items selected for migration. For example, the ZENworks Migration Utility might adjust
the object name in Configuration Management because of characters in the eDirectory
name that cannot be used in Configuration Management, such as a colon (:), which is
replaced with an underscore (_) character.
Migrating to ZENworks Configuration Management 45
Page 46

4 Repeat Step 3 as necessary to locate and queue all of the Application objects that you want to
model for migration at this time.
IMPORTANT: Every Application object that you queue in the Destination Zone panel is
migrated when you click the Migrate Now button.
5 Review your selections in the Destination Zone panel.
You can navigate the folders to view the Application objects that are queued for migration.
In the Items to Migrate tab, chained applications are listed individually, but in the Destination
Zone panel on the Select tab they are listed hierarchically under their parent application.
6 To delete items from the migration queue before migrating, do one of the following:
Select the items and click the icon.
Right-click the selected items and click Delete selected items
This can be done from both the Items to Migrate tab and the Destination Zone panel on the
Select tab
You can use the Ctrl and the arrow keys or Shift and the arrow keys to select multiple items for
deletion.This selection includes the folders and their contents.
novdocx (en) 16 April 2010
Items queued for migration have their icons and texts dimmed. If you select dimmed items for
deletion, they are only deleted from the queue.
WARNING: If you select colored items (with teal or black text), they are deleted from the
Configuration Management database and are no longer available in ZENworks Control Center.
7 To migrate all of the dimmed items displayed in the Destination Zone panel, including all
dimmed items contained in subfolders, click the Migrate Now button.
The following information applies to the Migration Utility during or after the migration
process:
Focus is immediately moved to the Items to Migrate tab, where you can view the
sequential progress of the migration.
The Step column displays a progress bar for each item being migrated. The overall
progress bar is located at the bottom of the Migration Utility.
If you drag a site listed application that has a duplicate already queued for migration in the
destination zone panel, you are prompted to choose which one to migrate. You can rightclick an item and select View attributes for information that might help you in determining
which item to migrate.
The Migration History tab displays all of the items that were migrated. This list is updated
dynamically as the items are migrated. You can click back and forth between the Items to
Migrate and Migration History tabs during the migration process. You can also right-click
anywhere in the tab’s panel and select Refresh to refresh the view with items that might
not yet be displayed, but are migrated.
The Select tab displays all of the migrated objects, with their texts in teal color after being
migrated, in both the Source eDir Tree and Destination Zone panels.
The teal color persists, so the next time you open the Migration Utility and navigate the
Source eDir Tree contexts and Destination Zone folders, you can see what you have
previously migrated.
Objects that failed migration continue to be displayed with their icons dimmed.
46 ZENworks 10 Configuration Management ZENworks Migration Guide
Page 47

Instructions for handling failed migration items are covered in Step 8.
Chained applications are displayed individually on the Migration History tab, but the
Migration Log column displays a GUID rather than a log for them. Only the main
Application object to which the others are chained displays a Vi ew Log button in that
column.
During migration, a temporary working folder is created on the workstation for each
application being migrated. These folders are deleted as each application is successfully
migrated.
While migrating INI settings, the distribution options for the INI settings in traditional
ZENworks are mapped to the nearest available options in ZENworks Configuration
Management. The following table illustrates the mapping:
novdocx (en) 16 April 2010
Distibution Option for the INI Setting in Traditional ZENworks
Create Always Add keys
Create If Does Not Exist Add a key if not found
Create or Add to Existing Section Add a key even if key exists
Create If Exists Replace value of a key
Delete Delete keys
Create or Append to Existing Value Add or append value
Delete or Remove from Existing Value Delete or remove value
Mapped Options In ZENworks
Configuration Management
8 After the migration has completed, do the following as needed:
8a Review the teal-colored items in both of the Select panels to determine whether you need
to queue any other items for migration or delete any previously migrated items from the
Destination Zone panel.
You can also use the Migration History tab to discover this information.
If you discover other items to migrate, repeat Step 3 through Step 7.
To delete any items listed in the Destination Zone panel, select them and click .
WARNING: The Destination Zone panel displays both previously migrated data
with teal-colored text and items with black-colored text that were either created in
ZENworks Control Center or migrated from a different workstation. The delete
option ( ) can be used on both. Therefore, it is possible to delete previously existing
items from Configuration Management that were never migrated. This includes
folders in ZENworks Control Center and all data contained under them.
8b On the Items to Migrate tab, click the Failed - View Log button for each item that failed to
migrate, and determine the best course of action. You can either fix the problem and
migrate the item, or you can delete it from the Items to Migrate tab, which also deletes it
from the queue in the Destination Zone panel.
To view only those items that failed, right-click anywhere in the panel and select Delete
successful to filter the listed items. This listing is maintained only for the current task.
Migrating to ZENworks Configuration Management 47
Page 48

8c If you have failed items that you do not want to migrate, you can delete only those that are
queued (still dimmed) from the queue in the Destination Zone panel. Right-click
anywhere on the Items to Migrate tab and select Delete all items.
This empties the Items to Migrate tab listing. It also deletes only the queued items not yet
migrated from the Destination Zone panel listing.
WARNING: If you select Delete all items in the Destination Zone panel instead, this
deletes all listed items from both the Destination Zone panel and the Migration History
tab, as well as from the ZENworks database, effectively removing them from ZENworks
Control Center. To delete only the queued (not yet migrated) items by using Delete all
items, it is safest to do so from the Items to Migrate tab.
While migrating applications, the following system requirements conditions are not
migrated:
The processor is a Pentium* Pro, Pentium 1, Pentium 2, Pentium 3, or Pentium 4.
The processor rule in traditional ZENworks is set to <, >,<=, or >=.
The operating system is not Windows XP or Windows 2000.
The operating system version is set to less than 5.
Remote Access
Terminal Server
novdocx (en) 16 April 2010
NOTE: After a Windows bundle is migrated to ZENworks Configuration Management, if
you assign the bundle to a managed device, the bundle is reinstalled on the managed
device.
9 When you are satisfied with the migration results, continue with one of the following:
To migrate other applications, continue with Step 3 on page 45.
To migrate images, click Step 2: Imaging in the Migration Tasks field.
To migrate policies, click Step 3: Policies in the Migration Tasks field.
To migrate zone settings, click Step 4: Zone Settings in the Migration Tasks field.
To migrate workstations, click Step 5: Workstations in the Migration Tasks field.
To migrate associations, click Step 6: Associations in the Migration Tasks field.
If you have completed all eDirectory object and association migrations, clean up your
traditional ZENworks installation by continuing with Section 4.13, “Managing Your
Traditional ZENworks Installation,” on page 67.
4.6 Migrating Images
If you plan to re-image your migrated workstations after installing the ZENworks Adaptive Agent
(which replaces the traditional ZENworks agent), you do not need to migrate images. If you want to
use previous images, you need to migrate them.
1 Click (the Migration Tool Settings icon), then do the following:
1a To overwrite existing Image objects in the ZENworks
select the Overwrite objects that already exist option.
48 ZENworks 10 Configuration Management ZENworks Migration Guide
®
database, click General, then
Page 49

WARNING: This overwrites any existing Image objects in the database, including those
that were previously migrated.
The Skip saving/loading history option allows you to dramatically improve performance
on large migrations by not storing the local history.
1b To overwrite the existing image file on the content server, click Imaging, then select the
Overwrite the existing image file on the content server option.
When you are migrating an image object whose image file already exists in the content
server, select the Overwrite the existing image file on the content server option to
overwrite the image file. This option is disabled by default.
1c Click Save Settings to exit the dialog box.
2 Click Step 2: Imaging in the Migration Tasks field.
3 To model the migration, do the following:
3a In the Source eDir Tree panel, navigate the eDirectory contexts to locate the imaging
objects to be migrated. To stop listing of the objects in the Source eDir Tree, click .
Only the contexts containing valid imaging objects are displayed for browsing. Valid
images are for standard, scripted, and multicast session images. Add-on images are not
migrated.
3b If necessary, right-click anywhere in the Destination Zone panel to create a folder for the
objects to be queued for migration, then select New folder.
.zmg
The actual
image files are copied to an imaging directory on the imaging server (the
current Primary Server) when you migrate the eDirectory imaging information. The
folders you create here are for the eDirectory information that is used to create the
imaging bundles in Configuration Management.
novdocx (en) 16 April 2010
IMPORTANT: The administrator performing the migration of images must have
sufficient file rights to read the imaging files.
You can create as many folders as needed, including nesting them. This structure is
created in the ZENworks database and is viewable as folders in ZENworks Control
Center; however, the folders are not created until you click the Migrate Now button.
You might want to determine the folder structure for your imaging objects, and create and
migrate those folders before queueing imaging objects to them.
You can also migrate existing eDirectory containers and all of their imaging objects
(including subcontainers). The containers are converted into folders holding all of the
imaging objects that exist in eDirectory under them. If you select a container in the Source
eDir Tree panel and drag it to the Destination Zone panel, all subcontainers and their
imaging objects are also placed in the Destination Zone panel in their respective folders.
After queueing a container in the Destination Zone panel, you can individually delete
queued items that you don’t want to migrate by selecting the items, right-clicking them,
then selecting Delete selected items. You are asked to confirm the deletion.
3c In the Source eDir Tree panel, select the imaging objects or containers to be migrated and
drag them into the Destination Zone panel.
This queues the items for migration.
You can use the Ctrl and the arrow keys or Shift and the arrow keys to select multiple
items.
Migrating to ZENworks Configuration Management 49
Page 50

As you drag items from one panel to the other, the items listed in the Destination Zone
panel are automatically sorted.
If you drag an item multiple times, it is only queued once.
If you migrate incrementally, you should queue only the objects that you want to migrate
at this time because all items that are queued in the Destination Zone panel are migrated
when you click the Migrate Now button.
On the Items to Migrate tab, the number of items you are migrating (copied to the
Destination Zone panel) is represented in parentheses on the tab’s label.
The Migration Status field on the Items to Migrate tab displays information related to the
items selected for migration. For example, the ZENworks Migration Utility might adjust
the object name in Configuration Management because of characters in the eDirectory
name that cannot be used in Configuration Management, such as a colon (:), which is
replaced with an underscore (_) character.
4 Repeat Step 3 as necessary to locate and queue all of the imaging objects that you want to
migrate at this time.
IMPORTANT: Every imaging object that you queue in the Destination Zone panel is migrated
when you click the Migrate Now button.
novdocx (en) 16 April 2010
5 Review your selections in the Destination Zone panel.
You can navigate the folders to view the imaging objects that are queued for migration.
6 To delete items from the migration queue, select the items and click the icon.
You can use the Ctrl and the arrow keys or Shift and the arrow keys to select multiple items for
deletion. This includes folders and their contents.
Items queued for migration have their icons and texts dimmed. If you select dimmed items for
deletion, they are only deleted from the queue.
WARNING: If you select colored items (with teal or black text), they are deleted from the
ZENworks database and are no longer available in ZENworks Control Center.
7 To migrate all of the dimmed items displayed in the Destination Zone panel, including all
dimmed items contained in subfolders, click the Migrate Now button.
The following information applies to the Migration Utility during or after the migration
process:
Focus is immediately moved to the Items to Migrate tab, where you can view the
sequential progress of the migration.
The Step column displays a progress bar for each item being migrated. The overall
progress bar is at the bottom of the screen.
The Migration History tab displays all of the items that were migrated. This list is updated
dynamically as the items are migrated. You can click back and forth between the Items to
Migrate and Migration History tabs during the migration process. You can also right-click
anywhere in the tab’s panel and select Refresh to refresh the view with items that might
not yet be displayed, but are migrated.
The Select tab displays all of the migrated objects, with their texts in teal color after being
migrated, in both the Source eDir Tree and Destination Zone panels.
50 ZENworks 10 Configuration Management ZENworks Migration Guide
Page 51

The teal color persists, so the next time you open the Migration Utility and navigate the
Source eDir Tree contexts and Destination Zone folders, you can see what you have
previously migrated.
Objects that failed migration continue to be displayed with their icons dimmed.
Instructions for handling failed migration items are covered in Step 8.
During migration, a temporary working folder is created on the workstation for each
image being migrated. These folders are deleted as each image is successfully migrated.
8 After the migration has completed, do the following as needed:
8a Review the teal-colored items in both of the Select panels to determine whether you need
to queue any other items for migration or delete any previously migrated items from the
Destination Zone panel.
You can also use the Migration History tab to discover this information.
If you discover other items to migrate, repeat Step 3 through Step 7.
To delete any items listed in the Destination Zone panel, select them and click .
WARNING: The Destination Zone panel displays both previously migrated data
with teal-colored text and items with black-colored text that were either created in
ZENworks Control Center or migrated from a different workstation. The delete
option ( ) can be used on both. Therefore, it is possible to delete previously existing
items from Configuration Management that were never migrated. This includes
folders in ZENworks Control Center and all data contained under them.
novdocx (en) 16 April 2010
8b On the Items to Migrate tab, click the Failed - View Log button for each item that failed to
migrate, and determine the best course of action. You can either fix the problem and
migrate the item, or you can delete it from the Items to Migrate tab, which also deletes it
from the queue in the Destination Zone panel.
To view only those items that failed, right-click anywhere in the panel and select Delete
successful to filter the listed items. This listing is maintained only for the current task.
8c If you have failed items that you do not want to migrate, you can delete only those that are
queued (still dimmed) from the queue in the Destination Zone panel. Right-click
anywhere on the Items to Migrate tab and select Delete all items.
This empties the Items to Migrate tab listing. It also deletes only the queued items not yet
migrated from the Destination Zone panel listing.
WARNING: If you select Delete all items in the Destination Zone panel instead, this
deletes all listed items from both the Destination Zone panel and the Migration History
tab, as well as from the ZENworks database, effectively removing them from ZENworks
Control Center. To delete only the queued (not yet migrated) items by using Delete all
items, it is safest to do so from the Items to Migrate tab.
9 When you are satisfied with the migration results, continue with one of the following:
To migrate other images, continue with Step 3 on page 49.
To migrate policies, click Step 3: Policies in the Migration Tasks field.
To migrate zone settings, click Step 4: Zone Settings in the Migration Tasks field.
To migrate workstations, click Step 5: Workstations in the Migration Tasks field.
Migrating to ZENworks Configuration Management 51
Page 52

To migrate associations, click Step 6: Associations in the Migration Tasks field.
If you have completed all eDirectory object and association migrations, clean up your
traditional ZENworks installation by continuing with Section 4.13, “Managing Your
Traditional ZENworks Installation,” on page 67.
NOTE: After migrating to ZENworks 10 Configuration Management, you must use the novellproxydhcp service to perform Imaging operations in the PXE mode. If you use the BOOTP
parameters, 66 and 67, to perform Imaging operations, the operation fails with an error. For more
information, see “Unable to connect to Preboot Server. The Product license might have expired” in
the ZENworks 10 Configuration Management Preboot Services and Imaging Reference.
4.7 Migrating Policies
Before migrating Windows Group policy, ensure that the folder specified in the Network location of
existing/new Group Policies does not contain any file other than the group policy files.
To migrate policies from eDirectory to Configuration Management:
1 Click (the Migration Tool Settings icon), then do the following:
novdocx (en) 16 April 2010
1a To overwrite existing Policy objects in the ZENworks database, select the General option,
then select the Overwrite objects that already exists option.
WARNING: This overwrites any existing Policy objects in the database, including those
that were previously migrated.
The Skip saving/loading history option allows you to dramatically improve performance
on large migrations by not storing the local history.
1b To skip assignment creation for the Launcher Configuration policy, select the Policies
option, then select the check box to enable the option.
When you migrate Launcher Configuration settings from eDirectory, these settings are
converted into a Launcher Configuration policy in Configuration Management. During
migration, an assignment from the identity object to the new Launcher Configuration
policy is automatically created unless you turn off this function in the Options dialog box
by selecting to skip the assignment.
1c Click Save Settings to exit the dialog box.
2 Click Step 3: Policies in the Migration Tasks field.
3 To model the migration, do the following:
3a In the Source eDir Tree panel, navigate the eDirectory contexts to locate the Policy objects
to be migrated. To stop listing of the objects in the Source eDir Tree, click .
The eDirectory information that is displayed is filtered according to the type of
information that you are migrating. Therefore, you only need to browse through the
contexts and objects that can be migrated for the selected type.
3b If necessary, right-click anywhere in the Destination Zone panel to create a folder for the
objects to be queued for migration, then select New folder.
You can create as many folders as needed, including nesting them. This structure is
created in the ZENworks database and is viewable as folders in ZENworks Control
Center; however, the folders are not created until you click the Migrate Now button.
52 ZENworks 10 Configuration Management ZENworks Migration Guide
Page 53

You might want to determine the folder structure for your Policy objects, and create and
migrate those folders before queueing Policy objects to them.
You can also migrate existing eDirectory containers and all of their Policy objects
(including subcontainers). The containers are converted into folders containing all of the
Policy objects that exist in eDirectory under those contexts. If you select a container in the
Source eDir Tree panel and drag it to the Destination Zone panel, all subcontainers and
their Policy objects are also placed in the Destination Zone panel in their respective
folders.
After queueing a container in the Destination Zone panel, you can individually delete
queued items that you don’t want to migrate by selecting the items, right-clicking them,
then selecting Delete selected items. You are asked to confirm the deletion.
3c In the Source eDir Tree panel, select the Policy objects, packages, or containers to be
migrated and drag them into the Destination Zone panel.
This queues the items for migration.
You can use the Ctrl and the arrow keys or Shift and the arrow keys to select multiple
items.
As you drag items from one panel to the other, the items listed in the Destination Zone
panel are automatically sorted.
novdocx (en) 16 April 2010
If you drag an item multiple times, it is only queued once.
If you migrate incrementally, you should queue only the objects that you want to migrate
at this time because all items that are queued in the Destination Zone panel are migrated
when you click the Migrate Now button.
On the Items to Migrate tab, the number of items you are migrating (copied to the
Destination Zone panel) is represented in parentheses on the tab’s label.
The Migration Status field on the Items to Migrate tab displays information related to the
items selected for migration. For example, the ZENworks Migration Utility might adjust
the object name in Configuration Management because of characters in the eDirectory
name that cannot be used in Configuration Management, such as a colon (:), which is
replaced with an underscore (_) character.
When you drag a policy package into the queue, only its policies are queued in the
Destination Zone panel. Policy packages are not used in Configuration Management.
Instead, policies are grouped by type.
When migrating Launcher Configuration settings from eDirectory, these settings are
converted into a Launcher Configuration policy in Configuration Management. During
migration, an assignment from the identity object to the new Launcher Configuration
policy is automatically created unless you turn off this function in the Options dialog box
by selecting to skip the assignment (see Step 1b).
4 Repeat Step 3 as necessary to locate and queue all of the Policy objects that you want to
migrate at this time.
IMPORTANT: Every Policy object that you queue in the Destination Zone panel is migrated
when you click the Migrate Now button.
5 Review your selections in the Destination Zone panel.
You can navigate the folders to view the Policy objects that are queued for migration.
6 To delete items from the migration queue, select the items and click the icon.
Migrating to ZENworks Configuration Management 53
Page 54

You can use the Ctrl and the arrow keys or Shift and the arrow keys to select multiple items for
deletion. This includes folders and their contents.
Items queued for migration have their icons and texts dimmed. If you select dimmed items for
deletion, they are only deleted from the queue.
WARNING: If you select colored items (with teal or black text), they are deleted from the
ZENworks database and are no longer available in ZENworks Control Center.
7 To migrate all of the dimmed items displayed in the Destination Zone panel, including all
dimmed items contained in subfolders, click the Migrate Now button.
The following information applies to the Migration Utility during or after the migration
process:
Focus is immediately moved to the Items to Migrate tab, where you can view the
sequential progress of the migration.
Policies that were part of a policy package in eDirectory are queued and migrated
separately into their respective Configuration Management types.
The Step column displays a progress bar for each item being migrated. The overall
progress bar is at the bottom of the screen.
The Migration History tab displays all of the items that were migrated. This list is updated
dynamically as the items are migrated. You can click back and forth between the Items to
Migrate and Migration History tabs during the migration process. You can also right-click
anywhere in the tab’s panel and select Refresh to refresh the view with items that might
not yet be displayed, but are migrated.
novdocx (en) 16 April 2010
The Select tab displays all of the migrated objects, with their texts in teal color after being
migrated, in both the Source eDir Tree and Destination Zone panels.
The teal color persists, so the next time you open the Migration Utility and navigate the
Source eDir Tree contexts and Destination Zone folders, you can see what you have
previously migrated.
Objects that failed migration continue to be displayed with their icons dimmed.
Instructions for handling failed migration items are covered in Step 8.
During migration, a temporary working folder is created on the workstation for each
policy being migrated. These folders are deleted as each policy is successfully migrated.
8 After the migration has completed, do the following as needed:
8a Review the teal-colored items in both of the Select panels to determine whether you need
to queue any other items for migration or delete any previously migrated items from the
Destination Zone panel.
You can also use the Migration History tab to discover this information.
If you discover other items to migrate, repeat Step 3 through Step 7.
To delete any items listed in the Destination Zone panel, select them and click .
WARNING: The Destination Zone panel displays both previously migrated data
with teal-colored text and items with black-colored text that were either created in
ZENworks Control Center or migrated from a different workstation. The delete
option ( ) can be used on both. Therefore, it is possible to delete previously existing
items from Configuration Management that were never migrated. This includes
folders in ZENworks Control Center and all data contained under them.
54 ZENworks 10 Configuration Management ZENworks Migration Guide
Page 55

8b On the Items to Migrate tab, click the Failed - View Log button for each item that failed to
migrate, and determine the best course of action. You can either fix the problem and
migrate the item, or you can delete it from the Items to Migrate tab, which also deletes it
from the queue in the Destination Zone panel.
To view only those items that failed, right-click anywhere in the panel and select Delete
successful to filter the listed items. This listing is maintained only for the current task.
8c If you have failed items that you do not want to migrate, you can delete only those that are
queued (still dimmed) from the queue in the Destination Zone panel. Right-click
anywhere on the Items to Migrate tab and select Delete all items.
This empties the Items to Migrate tab listing. It also deletes only the queued items not yet
migrated from the Destination Zone panel listing.
WARNING: If you select Delete all items in the Destination Zone panel instead, this
deletes all listed items from both the Destination Zone panel and the Migration History
tab, as well as from the ZENworks database, effectively removing them from ZENworks
Control Center. To delete only the queued (not yet migrated) items by using Delete all
items, it is safest to do so from the Items to Migrate tab.
9 When you are satisfied with the migration results, continue with one of the following:
To migrate other policies, continue with Step 3 on page 52.
novdocx (en) 16 April 2010
To migrate zone settings, click Step 4: Zone Settings in the Migration Tasks field.
To migrate workstations, click Step 5: Workstations in the Migration Tasks field.
To migrate associations, click Step 6: Associations in the Migration Tasks field.
If you have completed all eDirectory object and association migrations, clean up your
traditional ZENworks installation by continuing with Section 4.13, “Managing Your
Traditional ZENworks Installation,” on page 67.
4.8 Migrating Management Zone Settings
When settings are migrated to management zone settings in ZENworks Configuration Management,
all of the zone settings except the name servers of the DNS settings are overwritten. The name
servers migrated from traditional ZENworks are appended to the existing entries in the Name
Servers list of ZENworks Configuration Management.
To migrate data from eDirectory to the Management Zone settings in Configuration Management:
1 To overwrite existing Management Zone settings in the ZENworks database, click (the
Migration Tool Settings icon), select the General option, select the Overwrite objects that
already exists option, then click Save Settings to exit the dialog box.
WARNING: This overwrites any existing Management Zone settings in the database,
including those that were previously migrated.
The Skip saving/loading history option allows you to dramatically improve performance on
large migrations by not storing the local history.
There are currently no global migration options specific to Management Zone settings.
2 Click Step 4: Zone Settings in the Migration Tasks field.
Migrating to ZENworks Configuration Management 55
Page 56

3 To model the migration, go to the Source eDir Tree panel, then navigate the eDirectory contexts
to locate the information to be migrated. To stop listing of the objects in the Source eDir Tree,
click .
IMPORTANT: The individual components of the Novell Application LauncherTM settings or
Imaging policies are displayed so that you can selectively migrate them, instead of migrating
all of the settings or policy information.
4 Repeat Step 3 as necessary to locate and queue all of the information to zone settings that you
want to migrate at this time.
IMPORTANT: Every item that you queue in the Destination Zone panel is migrated when you
click the Migrate Now button.
5 Review your selections in the Destination Zone panel.
6 To delete items from the migration queue, select the items and click the icon.
You can use the Ctrl and the arrow keys or Shift and the arrow keys to select multiple items for
deletion.
Items queued for migration have their icons and texts dimmed. If you select dimmed items for
deletion, they are only deleted from the queue.
novdocx (en) 16 April 2010
WARNING: If you select colored items (with teal or black text), they are deleted from the
ZENworks database and are no longer available in ZENworks Control Center.
7 To migrate all of the dimmed items displayed in the Destination Zone panel, click the Migrate
Now button.
The following information applies to the Migration Utility during or after the migration
process:
Focus is immediately moved to the Items to Migrate tab, where you can view the
sequential progress of the migration.
The Step column displays a progress bar for each item being migrated. The overall
progress bar is at the bottom of the screen.
The Migration History tab displays all of the items that were migrated. This list is updated
dynamically as the items are migrated. You can click back and forth between the Items to
Migrate and Migration History tabs during the migration process. You can also right-click
anywhere in the tab’s panel and select Refresh to refresh the view with items that might
not yet be displayed, but are migrated.
The Select tab displays all of the migrated objects, with their texts in teal color after being
migrated, in both the Source eDir Tree and Destination Zone panels.
The teal color persists, so the next time you open the Migration Utility and navigate the
Source eDir Tree contexts and Destination Zone folders, you can see what you have
previously migrated.
Objects that failed migration continue to be displayed with their icons dimmed.
Instructions for handling failed migration items are covered in Step 8.
8 After the migration has completed, do the following as needed:
8a Review the teal-colored items in both of the Select panels to determine whether you need
to queue any other items for migration or delete any previously migrated items from the
Destination Zone panel.
56 ZENworks 10 Configuration Management ZENworks Migration Guide
Page 57

You can also use the Migration History tab to discover this information.
If you discover other items to migrate, repeat Step 3 through Step 7.
To delete any items listed in the Destination Zone panel, select them and click .
WARNING: The Destination Zone panel displays both previously migrated data
with teal-colored text and items with black-colored text that were either created in
ZENworks Control Center or migrated from a different eDirectory object. The delete
option ( ) can be used on both. Therefore, it is possible to delete previously existing
items from Configuration Management that were never migrated.
8b On the Items to Migrate tab, click the Failed - View Log button for each item that failed to
migrate, and determine the best course of action. You can either fix the problem and
migrate the item, or you can delete it from the Items to Migrate tab, which also deletes it
from the queue in the Destination Zone panel.
To view only those items that failed, right-click anywhere in the panel and select Delete
successful to filter the listed items. This listing is maintained only for the current task.
8c If you have failed items that you do not want to migrate, you can delete only those that are
queued (still dimmed) from the queue in the Destination Zone panel. Right-click
anywhere on the Items to Migrate tab and select Delete all items.
This empties the Items to Migrate tab listing. It also deletes only the queued items not yet
migrated from the Destination Zone panel listing.
novdocx (en) 16 April 2010
WARNING: If you select Delete all items in the Destination Zone panel instead, this
deletes all listed items from both the Destination Zone panel and the Migration History
tab, as well as from the ZENworks database, effectively removing them from ZENworks
Control Center. To delete only the queued (not yet migrated) items by using Delete all
items, it is safest to do so from the Items to Migrate tab.
9 When you are satisfied with the migration results, continue with one of the following:
To migrate other information to Management Zone settings, continue with Step 3 on
page 58.
To migrate associations, click Step 6: Associations in the Migration Tasks field.
If you have completed all eDirectory object and association migrations, clean up your
traditional ZENworks installation by continuing with Section 4.13, “Managing Your
Traditional ZENworks Installation,” on page 67.
4.9 Migrating Workstations
If you do not have associations to workstations or workstation GUIDs to preserve from Novell
eDirectory, and you want to set up your workstations as managed devices in the ZENworks
Management Zone by using ZENworks Control Center to discover them and deploy the Adaptive
Agent to them, then skip the migration of workstations.
If you migrate workstations to preserve associations to workstations or workstation GUIDs and if
you previously created images of those workstations, re-image them after installing the Adaptive
Agent to them. For more information, see Section 4.12, “Make an Image of the Migrated
Workstations,” on page 66.
Migrating to ZENworks Configuration Management 57
Page 58

To migrate workstations from eDirectory to Configuration Management:
1 To overwrite existing Workstation objects in the ZENworks database, click (the Migration
Tool Settings icon), select the General option, select the Overwrite objects that already exists
option, then click Save Settings to exit the dialog box.
WARNING: This overwrites any existing Workstation objects in the database, including those
that were previously migrated.
The Skip saving/loading history option allows you to dramatically improve performance on
large migrations by not storing the local history.
There are currently no global migration options specific to workstations.
2 Click Step 5: Workstations in the Migration Tasks field.
3 To model the migration, do the following:
3a In the Source eDir Tree panel, navigate the eDirectory contexts to locate the Workstation
objects to be migrated. To stop listing of the objects in the Source eDir Tree, click .
The eDirectory information that is displayed is filtered according to the type of
information that you are migrating. Therefore, you only need to browse through the
contexts and objects that can be migrated for the selected type.
novdocx (en) 16 April 2010
3b If necessary, right-click anywhere in the Destination Zone panel to create a folder for the
objects to be queued for migration, then select New folder.
You can create as many folders as needed, including nesting them. This structure is
created in the ZENworks database and is viewable as folders in ZENworks Control
Center; however, the folders are not created until you click the Migrate Now button.
You might want to determine the folder structure for your Workstation objects, and create
and migrate those folders before queueing Workstation objects to them.
IMPORTANT: We recommend that you migrate existing eDirectory containers and all of
their Workstation objects (including subcontainers). This allows you to maintain GUIDs
for device associations.
eDirectory containers that you queue are converted into folders containing all of the
Workstation objects that exist in eDirectory under those contexts. If you select a container
in the Source eDir Tree panel and drag it to the Destination Zone panel, all subcontainers
and their Workstation objects are also placed in the Destination Zone panel in their
respective folders.
After queueing a container in the Destination Zone panel, you can individually delete
queued items that you don’t want to migrate by selecting the items, right-clicking them,
then selecting Delete selected items. You are asked to confirm the deletion.
3c In the Source eDir Tree panel, select the Workstation objects or containers to be migrated
and drag them into the Destination Zone panel.
This queues the items for migration.
You can use the Ctrl and the arrow keys or Shift and the arrow keys to select multiple
items.
As you drag items from one panel to the other, the items listed in the Destination Zone
panel are automatically sorted.
If you drag an item multiple times, it is only queued once.
58 ZENworks 10 Configuration Management ZENworks Migration Guide
Page 59

If you migrate incrementally, you should queue only the objects that you want to migrate
at this time because all items that are queued in the Destination Zone panel are migrated
when you click the Migrate Now button.
On the Items to Migrate tab, the number of items you are migrating (copied to the
Destination Zone panel) is represented in parentheses on the tab’s label.
The Migration Status field on the Items to Migrate tab displays information related to the
items selected for migration. For example, the ZENworks Migration Utility might adjust
the object name in Configuration Management because of characters in the eDirectory
name that cannot be used in Configuration Management, such as a colon (:), which is
replaced with an underscore (_) character.
4 Repeat Step 3 as necessary to locate and queue all of the Workstation objects that you want to
migrate at this time.
IMPORTANT: Every Workstation object that you queue in the Destination Zone panel is
migrated when you click the Migrate Now button.
5 Review your selections in the Destination Zone panel.
You can navigate the folders to view the Workstation objects that are queued for migration.
6 To delete items from the migration queue, select the items and click the icon.
You can use the Ctrl and the arrow keys or Shift and the arrow keys to select multiple items for
deletion. This includes folders and their contents.
Items queued for migration have their icons and texts dimmed. If you select dimmed items for
deletion, they are only deleted from the queue.
novdocx (en) 16 April 2010
WARNING: If you select colored items (with teal or black text), they are deleted from the
ZENworks database and are no longer available in ZENworks Control Center.
7 To migrate all of the dimmed items displayed in the Destination Zone panel, including all
dimmed items contained in subfolders, click the Migrate Now button.
The following information applies to the Migration Utility during or after the migration
process:
Focus is immediately moved to the Items to Migrate tab, where you can view the
sequential progress of the migration.
The Step column displays a progress bar for each item being migrated. The overall
progress bar is at the bottom of the screen.
The Migration History tab displays all of the items that were migrated. This list is updated
dynamically as the items are migrated. You can click back and forth between the Items to
Migrate and Migration History tabs during the migration process. You can also right-click
anywhere in the tab’s panel and select Refresh to refresh the view with items that might
not yet be displayed, but are migrated.
The Select tab displays all of the migrated objects, with their texts in teal color after being
migrated, in both the Source eDir Tree and Destination Zone panels.
The teal color persists, so the next time you open the Migration Utility and navigate the
Source eDir Tree contexts and Destination Zone folders, you can see what you have
previously migrated.
Objects that failed migration continue to be displayed with their icons dimmed.
Migrating to ZENworks Configuration Management 59
Page 60

Instructions for handling failed migration items are covered in Step 8.
During migration, a temporary working folder is created on the workstation for each
workstation being migrated. These folders are deleted as each workstation is successfully
migrated.
IMPORTANT: The migrated workstations do not immediately display in the Workstations
section on the Devices tab in ZENworks Control Center. They are listed in the Deployable
Devices panel in ZENworks Control Center and must have the adaptive agent deployed to them
in order to be displayed on the Devices tab. For more information on deploying the adaptive
agent to the migrated workstations, see Section 4.11, “Setting Up Migrated Workstations to be
Managed,” on page 66.
8 After the migration has completed, do the following as needed:
8a Review the teal-colored items in both of the Select panels to determine whether you need
to queue any other items for migration or delete any previously migrated items from the
Destination Zone panel.
You can also use the Migration History tab to discover this information.
If you discover other items to migrate, repeat Step 3 through Step 7.
To delete any items listed in the Destination Zone panel, select them and click .
novdocx (en) 16 April 2010
WARNING: The Destination Zone panel displays both previously migrated data
with teal-colored text and items with black-colored text that were either created in
ZENworks Control Center or migrated from a different workstation. The delete
option ( ) can be used on both. Therefore, it is possible to delete previously existing
items from Configuration Management that were never migrated. This includes
folders in ZENworks Control Center and all data contained under them.
8b On the Items to Migrate tab, click the Failed - View Log button for each item that failed to
migrate, and determine the best course of action. You can either fix the problem and
migrate the item, or you can delete it from the Items to Migrate tab, which also deletes it
from the queue in the Destination Zone panel.
To view only those items that failed, right-click anywhere in the panel and select Delete
successful to filter the listed items. This listing is maintained only for the current task.
8c If you have failed items that you do not want to migrate, you can delete only those that are
queued (still dimmed) from the queue in the Destination Zone panel. Right-click
anywhere on the Items to Migrate tab and select Delete all items.
This empties the Items to Migrate tab listing. It also deletes only the queued items not yet
migrated from the Destination Zone panel listing.
WARNING: If you select Delete all items in the Destination Zone panel instead, this
deletes all listed items from both the Destination Zone panel and the Migration History
tab, as well as from the ZENworks database, effectively removing them from ZENworks
Control Center. To delete only the queued (not yet migrated) items by using Delete all
items, it is safest to do so from the Items to Migrate tab.
9 When you are satisfied with the migration results, continue with one of the following:
To migrate other workstations, continue with Step 3 on page 58.
60 ZENworks 10 Configuration Management ZENworks Migration Guide
Page 61
To migrate associations, click Step 6: Associations in the Migration Tasks field.
If you have completed all eDirectory object and association migrations, clean up your
traditional ZENworks installation by continuing with Section 4.13, “Managing Your
Traditional ZENworks Installation,” on page 67.
4.10 Migrating Associations
You can migrate user associations and workstation associations for bundles, user associations and
workstation associations for policies, and workstation associations for images.
1 Click (the Migration Tool Settings icon), then do the following:
1a To overwrite existing associations in the ZENworks database, select the General option,
then select the Overwrite objects that already exists option.
WARNING: This overwrites any existing associations in the database, including those
that were previously migrated.
The Skip saving/loading history option allows you to dramatically improve performance
on large migrations by not storing the local history.
1b To access the options available for migrating associations, click Associations, then
configure the desired settings.
novdocx (en) 16 April 2010
Migrating to ZENworks Configuration Management 61
Page 62

Setting Description
novdocx (en) 16 April 2010
If an associated object does not exist,
stop the migration and prompt for
redirection to the appropriate migration
task to create the object
Specify the context in the destination
user source to search for the matching
entities
Stops the migration when an object to be associated
does not exist in the ZENworks database and
prompts you to be redirected to the appropriate
Migration Tasks step to migrate the object.
After migrating the needed object, you can return to
Step 6: Associations and click Migrate Now to
resume migrating the associations.
This option is useful for when you are migrating just a
few items and want to deal with association failures
on the spot.
If you want to perform an unattended migration, do
not select this option.
Lets you specify the context to search for the
matching entities in the destination user source
during the migration of the groups and container
associations.
For example, if the destination user source is
migration.orgunit.org.com
the context as
looks for matching entities in
migration.orgunit.org.com/OU1/OU2/
users
.
OU1/OU2/users
and you specify
, then the utility
If you do not specify the context, then the search is
performed in the entire destination user source, that
is
migration.orgunit.org.com
.
1c Click Save Settings to exit the dialog box.
2 Click Step 6: Associations in the Migration Tasks field.
3 To model the migration, do the following:
3a Select the desired options in the Display objects that are and the and also are drop-down
lists.
This option combination determines which associations are displayed for dragging to the
Destination Zone panel and whether you want a warning displayed for ineligible
associations. Warnings are displayed in a column on the Items to Migrate tab and the
Migration History tab.
Associations that can be migrated depend on whether their related eDirectory objects were
migrated previously. You can display only those that are eligible for migration, as well as
those that are both eligible or ineligible, with or without a warning about the ineligible
associations.
Display Objects That Are: These options allow you to choose which associations you
want to search for at this time in the Source eDir Tree panel. You can continue to add
associations to the Destination Zone panel as you change from one Display objects that
are option to another, or you can migrate different groups of associations at a time. To stop
listing of the objects in the Source eDir Tree, click
62 ZENworks 10 Configuration Management ZENworks Migration Guide
Page 63

The following options determine what associations are displayed:
Option Purpose
Bundles <--> users Displays only the associations existing in eDirectory for
bundles and users or user groups.
A user source must be configured in ZENworks Control
Center before you migrate these associations.
Bundles <--> workstations Displays only the associations existing in eDirectory for
bundles, workstations, workstation groups, images, and
workstations.
Policies <--> users Displays only the associations existing in eDirectory for
policies and users or user groups.
A user source must be configured in ZENworks Control
Center before you migrate these associations.
Policies <--> workstations Displays only the associations existing in eDirectory for
policies, workstations, and workstation groups.
novdocx (en) 16 April 2010
Policies, bundles, users, <-->
workstations
Displays all existing eDirectory associations for policies,
bundles, users, user groups, workstations, workstation
groups, and images.
A user source must be configured in ZENworks Control
Center before you migrate any user-related associations.
And Also Are: These options do the following with respect to the combination that you
select in the Display objects that are field:
Option Purpose
Either eligible or ineligible for
migration (No Warning)
Eligible for migration Displays only the associations between the selected
For associations between the selected objects, this
combination displays both the eligible and ineligible
associations without any warning.
This is the fastest method because no checking is required
and it provides an unattended migration process.
objects that are eligible for migration.
If the migration source and user source are the same, then
this is the slowest method because the utility must validate
each item as it is queued. We recommend that you simply
review the logs of the failed items to resolve why they did
not migrate.
Either eligible or ineligible for
migration (Show Warning)
For associations between the selected objects, this
combination displays both the eligible and ineligible
associations with a warning.
If the migration source and user source are the same, then
this is a slower method because checking is required for
each item queued and you need to monitor the migration
to respond to the warnings.
Migrating to ZENworks Configuration Management 63
Page 64

Destination User Source: Lists the user sources available in ZENworks Configuration
Management. By default, the user source that is listed as the migration source is selected.
3b In the Source eDir Tree panel, navigate the eDirectory contexts to locate the objects to be
associated and drag them into the Destination Zone panel.
Specify the range of associations to be listed in the Listing Range option. The range is
specified as 1-100 by default.
This queues the items for migration.
You can use the Ctrl and the arrow keys or Shift and the arrow keys to select multiple
items.
As you drag items from one panel to the other, the items listed in the Destination Zone
panel are automatically sorted.
If you drag an item multiple times, it is only queued once.
If you migrate incrementally, you should queue only the objects that you want to migrate
at this time because all items that are queued in the Destination Zone panel are migrated
when you click the Migrate Now button.
On the Items to Migrate tab, the number of items you are migrating (copied to the
Destination Zone panel) is represented in parentheses on the tab’s label.
The Migration Status field on the Items to Migrate tab displays information related to the
items selected for migration. For example, the ZENworks Migration Utility might adjust
the object name in Configuration Management because of characters in the eDirectory
name that cannot be used in Configuration Management, such as a colon (:), which is
replaced with an underscore (_) character.
4 Repeat Step 3 as necessary to locate and queue all of the associations that you want to migrate
at this time.
novdocx (en) 16 April 2010
IMPORTANT: Every association that you queue in the Destination Zone panel is migrated
when you click the Migrate Now button.
5 Review your selections in the Destination Zone panel.
Specify the range of associations to be listed in the Listing Range option. The range is specified
as 1-10 by default.
In the Name column, the associations are represented with the association name that you
queued, the <--> characters to represent an association, then the name of the object it’s
associated with in eDirectory. This information is repeated in the Unique Identifier column
with the fully distinguished object names.
If the objects for the association (as determined by your selections in the Display objects that
are and the and also are fields; see Step 3) do not each exist in the ZENworks database, the
association cannot be migrated. If you selected in Step 1b to be prompted to resolve this during
migration, you can take care of those instances now; otherwise the migration continues and you
can discover them on the Items to Migrate tab.
6 To delete items from being associated, select the items and click the icon.
You can use the Ctrl and the arrow keys or Shift and the arrow keys to select multiple items for
deletion. This includes folders and their contents.
Items queued for migration have their icons and texts dimmed. If you select dimmed items for
deletion, they are only deleted from the queue.
64 ZENworks 10 Configuration Management ZENworks Migration Guide
Page 65

WARNING: If you select colored items (with teal or black text), they are deleted from the
ZENworks database and are no longer available in ZENworks Control Center.
7 To migrate all of the dimmed items displayed in the Destination Zone panel, including all
dimmed items contained in subfolders, click the Migrate Now button.
The following information applies to the Migration Utility during or after the migration
process:
Focus is immediately moved to the Items to Migrate tab, where you can view the
sequential progress of the migration.
The Step column displays a progress bar for each item being migrated. The overall
progress bar is at the bottom of the screen.
The Migration History tab displays all of the items that were migrated. This list is updated
dynamically as the items are migrated. You can safely click back and forth between the
Items to Migrate and Migration History tabs during the migration process. You can also
right-click anywhere in the tab’s panel and select Refresh to refresh the view with items
that might not yet be displayed, but are migrated.
The Select tab displays all of the migrated associations, with their texts in teal color after
being migrated, in both the Source eDir Tree and Destination Zone panels.
The teal color persists, so the next time you open the Migration Utility and navigate the
Source eDir Tree contexts and Destination Zone folders, you can see what you have
previously migrated.
Associations that failed migration because their associated objects are not present in
Configuration Management continue to be displayed with their icons dimmed.
Instructions for handling failed migration items are covered in Step 8.
During migration, a temporary working folder is created on the workstation for each
association being migrated. These folders are deleted as each association is successfully
migrated.
During migration of groups and container associations, if there are more than one
matching entity for the groups and containers in the destination user source, then you are
prompted to select the entity to which you want to migrate the association.
8 After the migration has completed, do the following as needed:
novdocx (en) 16 April 2010
8a Review the teal-colored items in both of the Select panels to determine whether you need
to queue any other items for migration or delete any previously migrated items from the
Destination Zone panel.
You can also use the Migration History tab to discover this information.
If you discover other items to migrate, repeat Step 3 through Step 7.
To delete any items listed in the Destination Zone panel, select them and click .
WARNING: The Destination Zone panel displays both previously migrated data
with teal-colored text and items with black-colored text that were either created in
ZENworks Control Center or migrated from a different workstation. The delete
option ( ) can be used on both. Therefore, it is possible to delete previously existing
items from Configuration Management that were never migrated. This includes
folders in ZENworks Control Center and all data contained under them.
Migrating to ZENworks Configuration Management 65
Page 66

8b On the Items to Migrate tab, click the Failed - View Log button for each item that failed to
migrate, and determine the best course of action. You can either fix the problem and
migrate the item, or you can delete it from the Items to Migrate tab, which also deletes it
from the queue in the Destination Zone panel.
To view only those items that failed, right-click anywhere in the panel and select Delete
successful to filter the listed items. This listing is maintained only for the current task.
8c If you have failed items that you do not want to migrate, you can delete only those that are
queued (still dimmed) from the queue in the Destination Zone panel. Right-click
anywhere on the Items to Migrate tab and select Delete all items.
This empties the Items to Migrate tab listing. It also deletes only the queued items not yet
migrated from the Destination Zone panel listing.
WARNING: If you select Delete all items in the Destination Zone panel instead, this
deletes all listed items from both the Destination Zone panel and the Migration History
tab, as well as from the ZENworks database, effectively removing them from ZENworks
Control Center. To delete only the queued (not yet migrated) items by using Delete all
items, it is safest to do so from the Items to Migrate tab.
9 If you have completed all eDirectory object and association migrations, clean up your
traditional ZENworks installation by continuing with Section 4.13, “Managing Your
Traditional ZENworks Installation,” on page 67.
novdocx (en) 16 April 2010
4.11 Setting Up Migrated Workstations to be Managed
If you migrated workstation objects in order to manage them in ZENworks Configuration
Management, you must install the ZENworks Adaptive Agent on them.
For information on installing the Adaptive Agent on migrated workstations, see “ZENworks
Adaptive Agent Deployment” in the ZENworks 10 Configuration Management Administration
Quick Start.
To re-image the workstations where you updated the agent to the ZENworks Adaptive Agent, see
Section 4.12, “Make an Image of the Migrated Workstations,” on page 66.
If you have completed all eDirectory object and association migrations, clean up your traditional
ZENworks installation by continuing with Section 4.13, “Managing Your Traditional ZENworks
Installation,” on page 67.
4.12 Make an Image of the Migrated Workstations
If you migrate workstations that contain the traditional ZENworks agent, you should take a image of
these workstations after installing the Adaptive Agent
For information on imaging the updated workstations, see “Imaging Devices” in the ZENworks 10
Configuration Management Preboot Services and Imaging Reference.
If you have completed all eDirectory object and association migrations, clean up your traditional
ZENworks installation by continuing with Section 4.13, “Managing Your Traditional ZENworks
Installation,” on page 67.
66 ZENworks 10 Configuration Management ZENworks Migration Guide
Page 67

4.13 Managing Your Traditional ZENworks Installation
After completing your migration, you can remove your traditional ZENworks software as you see
fit. Consult your traditional ZENworks documentation for information on uninstalling those
versions of ZENworks.
novdocx (en) 16 April 2010
However, if you need users for Configuration Management because you migrated associations to
them, or you need users for the Novell Client
eDirectory with your user objects.
ZENworks Configuration Management does not provide eDirectory cleanup.
TM
, you need to retain a working installation of
Migrating to ZENworks Configuration Management 67
Page 68

novdocx (en) 16 April 2010
68 ZENworks 10 Configuration Management ZENworks Migration Guide
Page 69

A
Migration Data
The following sections provide details on what is or is not migrated for each migration type:
Section A.1, “Applications,” on page 69
Section A.2, “Images,” on page 72
Section A.3, “Policies,” on page 72
Section A.4, “Management Zone Settings,” on page 74
Section A.5, “Workstations,” on page 76
Section A.6, “Associations,” on page 77
A.1 Applications
Applications are migrated to ZENworks Configuration Management as bundles with specific
actions. For example, an application having Registry changes is migrated as a bundle with Registry
Edit action.
novdocx (en) 16 April 2010
A
Some features are migrated, some are not, and some are replaced by new features. Table A-1 on
page 69 lists the features that are not migrated. The Comment column explains why not and whether
an alternative to the traditional feature exists in Configuration Management.
TM
For Novell Application Launcher
“Policies,” on page 72.
Table A-1 Application Features Not Migrated to Configuration Management
Feature Comment
ACL Configuration Management uses a new security model for access control.
Auto Start feature This feature caused Novell Application Launcher to add itself to the start
menu so that it could automatically start when the user logged in. This is now
handled by the ZENworks
Availability schedule This is migrated when associations are migrated. In other words, for every
schedule on an application, there is now a specific schedule for every direct
association to that application.
BITS support BITS is not supported in Configuration Management. Administrators can
manually turn on throttling.
Capturing printer ports This can be done in a launch script. You can uncapture the port in a
termination script.
Configuration settings that are not migrated, see Section A.3,
®
Adaptive Agent.
Copy directory You must manually create this action in ZENworks Control Center by using
the Copy Directory category in a File bundle.
Deframe Settings Configuration Management supports only simple RDP and ICA sessions.
Migration Data
69
Page 70

Feature Comment
Disconnectable This feature allowed the administrator to not show the application on the
desktop if the workstation was disconnected. Use the equivalent system
requirement in Configuration Management.
Display folder list This feature allowed the administrator to put the shortcut for the application in
multiple display folders. Configuration Management only allows the
placement of the shortcut in one folder. Therefore, Configuration
Management migrates only the first folder.
Drive mappings This can now be done in a launch script. You can unmap the drive in a
termination script.
Fault tolerance The new content system does this automatically on a whole zone basis.
novdocx (en) 16 April 2010
Force run as user when
Not supported in Configuration Management.
workstation associated
Force run wait This feature is replaced by application chaining.
Granular install file control This feature allowed the administrator to control which files were copied
during an installation, based on how they were marked in ConsoleOne
®
example, you could tell Novell Application Launcher to only copy files marked
“Request Confirm.”. Because MSI does not allow a granular (file-by-file)
setting, this feature cannot be migrated if the application is migrated as a
bundle with Install MSI action.
Granular uninstall file
control
This feature allowed the administrator to control which files were removed
during an uninstallation, based on how they were marked in ConsoleOne.
For example, you could tell Novell Application Launcher to only uninstall files
marked “Request Confirm.” Because MSIs do not allow a granular (file-byfile) setting, this feature cannot be migrated.
Granular install registry
control
This feature allowed the administrator to control which registry settings were
created during an installation, based on how they were marked in
ConsoleOne. For example, you could tell Novell Application Launcher to only
create registry settings marked “Registry Append.” Because MSIs do not
allow a granular (registry-setting-by-registry-setting) control, this feature
cannot be migrated.
Granular uninstall registry
control
This feature allowed the administrator to control which registry settings were
removed during an uninstallation, based on how they were marked in
ConsoleOne. For example, you could tell Novell Application Launcher to only
uninstall registry settings marked “Registry Append.” Because MSIs do not
allow a granular (registry-setting-by-registry-setting) control, this feature
cannot be migrated.
. For
Granular install.INI
control
This feature allowed the administrator to control which INI file entries were
crated during an installation, based on how they were marked in
ConsoleOne. For example, you could tell Novell Application Launcher to
create INI entries marked “create add to section.” Because MSIs do not allow
a granular (INI-entry-by-INI-entry) control, this feature cannot be migrated.
Granular uninstall.INI
control
This feature allowed the administrator to control which INI file entries were
removed during an uninstallation, based on how they were marked in
ConsoleOne. For example, you could tell Novell Application Launcher to only
uninstall INI entries marked “create add to section.” Because MSIs do not
allow a granular (INI-entry-by-INI-entry) control, this feature cannot be
migrated.
70 ZENworks 10 Configuration Management ZENworks Migration Guide
Page 71

Feature Comment
Icon order Configuration Management does not control the order in which icons are
displayed. Use application chaining to control the order of application
installation.
Load balancing The new content system does this automatically on a whole zone basis. By
default, all the Primary Servers in the Management Zone replicate their
content among each other.
MSI admin path Because MSI package information is no longer stored in the metadata, you
longer need access to the actual MSI file in ZENworks Control Center. Also,
most MSIs are uploaded into the content system.
novdocx (en) 16 April 2010
MSI option install paths
random
MSI package description MSI Package information is no longer stored in the metadata. This makes it
MSI package identifier MSI package information is no longer stored in the metadata. This makes it
MSI package size MSI package information is no longer stored in the metadata. This makes it
Novell Licensing Service
(NLS)
On Demand Configuration Management supports only simple RDP and ICA sessions.
RDP color depth Color depth must be 256, 32768, 65536, or 16777216.
Remote alternate
application
Reporting Configuration Management has a global reporting system, so reporting is no
Run 16-bit applications in
a separate session
Site List This feature allowed users to use the closest matching applications source
Replaced by the new content system that does load balancing automatically.
easier to update MSI packages without touching the MSI bundle itself.
easier to update MSI packages without touching the MSI bundle itself.
easier to update MSI packages without touching the MSI bundle itself.
Configuration Management does not supports NLS.
The ZENworks Adaptive Agent runs the same inside or outside the firewall. It
doesn't make a distinction, so this feature is no longer supported.
longer configured on an application-by-application basis.
Configuration Management does not support 16-bit operating systems.
path to install the application to their workstation. The new content system
does this automatically.
Thin client settings Configuration Management only supports a subset of the features Novell
Application Launcher used to support. The following attributes have been
dropped:
Thin client user name (no credentials are passed to the terminal server)
Thin client password (no credentials are passed to the terminal server)
Thin client protocol
Thin client compress
Thin client seamless
Uninstall prompt for
reboot
This feature is no longer supported.
for each uninstallation. Most of this functionality is handled by adding
parameters to the MSIExec command line.
Msiexec.exe
now handles rebooting
Migration Data 71
Page 72

Feature Comment
Volume file system rights Configuration Management does not automatically assign rights to any file
system.
A.2 Images
The administrator performing image file migration must have sufficient file rights to read the image
.zmg
files (
The following can be migrated:
Standard image
Scripted image
Multicast session image
Migrated imaging files are not modified because ZENworks Configuration Management imaging is
backward compatible with traditional ZENworks imaging file format.
).
novdocx (en) 16 April 2010
The following are not migrated:
Add-on images
Because of significant changes in the local workstation cache, add-on images cannot be
migrated. You can re-create them in ZENworks Control Center on a bundle’s Summary page.
Imaging Server and Workstation policies
These policies are instead migrated to Management Zone settings through the Step 4: Zone
Settings migration task because there are no equivalent policies in Configuration Management.
A.3 Policies
Policies that cannot be migrated are filtered so that they are not displayed for migration. The
following policies are migrated:
Dynamicy Local User (DLU)
Group
Imaging Server
Imaging Workstation
iPrint
Remote Control
Roaming Profile
SNMP Trap Target
72 ZENworks 10 Configuration Management ZENworks Migration Guide
Page 73

The following are not migrated:
Table A-2 Policy Features Not Migrated to Configuration Management
Feature Comment
novdocx (en) 16 April 2010
Computer Extensible
Policies
Group Policy The following settings are not migrated:
Extensible policies do not exist in Configuration Management.
Cache User Configuration: Does not exist in Configuration
Management.
Group Policies Remain in Effect on User Logout: Does not exist in
Configuration Management.
Group Policy Loopback Support: This is a policy infrastructure option
that is now defined for any Group policy when it is assigned to a device.
Persist Workstation Settings: Does not exist in Configuration
Management.
Scheduled Action Policy These policies contain scheduled launches of an executable. This
functionality is duplicated by using simple applications to perform the same
functionality. Therefore, no equivalent policy is created in Configuration
Management. Instead, you can create a Directive bundle in ZENworks
Control Center to duplicate this functionality.
User Extensible Policies Extensible policies do not exist in Configuration Management.
Workstation Inventory All ZENworks Asset Management inventory data migration is handled by the
ZENworks Asset Management migration tool. The traditional pre-ZENworks
Asset Management Workstation Inventory data is not migrated because of
major differences in database schema.
zendmSearchPolicy Similar to applications, policies are now assigned to folders, users, and
devices, thus eliminating the need for a Search policy.
zenimgWorkstationPolicy A per-workstation Management Zone setting is not available in Configuration
Management for this policy.
zeninvDictionaryUpdateP
olicy
zeninvRollUpPolicy The new ZENworks Asset Management inventory system has no equivalent
zenlocDatabaseLocation
Policy
zenlocSMTPHostPolicy Configuration Management has no equivalent policy.
zenlocXMLTargetPolicy This policy dealt with reporting in ZENworks 6.5 and ZENworks 7.x. There is
The new ZENworks Asset Management inventory system has no equivalent
policy in Configuration Management.
policy in Configuration Management. Roll-up is configurable in ZENworks
Control Center for the Management Zone’s Primary Servers.
This policy deals with locating the database for reporting and inventory to
write to it. Configuration Management uses a different database for both
reporting and inventory, so this policy is not migrated.
no equivalent policy or setting in Configuration Management because
reporting is not sent through XML.
Migration Data 73
Page 74

Feature Comment
zenwmWorkstationImport Although it is technically possible to migrate a workstation import policy to a
Management Zone setting, it is simply easier to set the few global zone
settings manually in ZENworks Control Center to migrate them. In
Configuration Management, you can set a registration rule on any folder level
hierarchically, but in ZENworks 7.x you had to set a Workstation Import policy
on a Server Package that was associated to one or more servers. There is
not a simple one-to-one mapping for these relationships. It is easier for the
administrator to define these rules manually.
novdocx (en) 16 April 2010
zenwmWorkstationRemo
val
zenwmZENConfigPolicy This policy applies to the previous ZENworks agent. The new ZENworks
Dynamic Local User
Policy
There is no policy for workstation removal in Configuration Management.
Adaptive Agent is controlled by new Management Zone settings and behave
differently.
The Volatile User Cache setting is not migrated. You can edit the migrated
policy in ZENworks Control Center to do the following:
1. Select the Enable Volatile User Cache option.
2. In the Cache Volatile User for Time Period option, specify the number of
days to cache the volatile user account on the device.
For more information on editing the policy, see “Editing Policies” in the
ZENworks 10 Configuration Management Policy Management Reference.
A.4 Management Zone Settings
The following two eDirectory objects contain attributes that can be migrated as Management Zone
settings:
Imaging Server policy settings
Workstation Launcher Configuration settings
When one of these eDirectory objects is displayed in the view on the left, each attribute that can be
migrated is listed below it, so that you can select individual attributes for migration. The view on the
right shows the subset of Management Zone settings that can be migrated. An attribute migrated
from eDirectory overwrites the existing target setting in the zone.
Traditional ZENworks stored its launcher configuration settings directly on the User, Device, or
Container object. Configuration Management stores these settings in a new policy called the
ZENworks Explorer Configuration policy.
The migration tool only migrates a small subset of the previous system’s settings to a new
ZENworks Explorer Configuration policy. For various reasons, most of the launcher configuration
settings are not used in the new ZENworks Explorer Configuration policy in Configuration
Management. Many have become global Management Zone settings where there is only one setting
for the whole zone.
Launcher configuration settings for workstations are migrated to Management Zone settings, and
launcher configuration settings for users are migrated to the ZENworks Explorer Configuration
policy.
74 ZENworks 10 Configuration Management ZENworks Migration Guide
Page 75

Because there are multiple launcher configuration settings in any given tree, it is easier for the
administrator to manually set the one set of Management Zone settings in ZENworks Control
Center.
The following launcher configuration settings can be migrated to the new ZENworks Explorer
Configuration policy:
Display icon on the Desktop (becomes the root folder name)
Enable folder view
Enable manual refresh
Expand folder view on startup
Name icon on the Desktop
The following launcher configuration settings can be migrated to Management Zone settings:
Enable timed refresh (workstation)
Set refresh frequency (workstation)
Set the random refresh spread
Unassociated days to uninstall (workstation)
novdocx (en) 16 April 2010
The following launcher configuration settings cannot be migrated:
Allow user to override BITS transfer
Allow users to exit
Always evaluate referrals
Attempt to go online during refresh (User)
Attempt to go online during refresh (Workstation)
Auto-start Application Launcher
Bring all popup windows to the front
Close Application Launcher on browser exit
Configure remote access detection method
Display system tray icon
Enable automatic icon cleanup
Enable BITS (User)
Enable BITS (Workstation)
Enable [All] folder
Enable helper (Workstation)
Enable Middle Tier login
Enable login
Enable personal folders
Enable reading from removable cache (User)
Enable reading from removable cache (Workstation)
Enable the Checkpoint Restart Postpone button
Migration Data 75
Page 76

Enable timed refresh (User)
Enable writing to the cache (user)
Enable writing to the cache (workstation)
Read groups for applications (User)
Read groups for applications (Workstation)
Save window size and position
Set application inheritance level (user)
Set application inheritance level (workstation)
Set refresh frequency (User)
Specify E-mail attribute
Top obje c t
Unassociated days to uninstall (User)
Watermark display property
Watermark source path
novdocx (en) 16 April 2010
A.5 Workstations
Configuration Management currently supports only the migration of Windows 2000 Support Pack 4,
Windows XP SP2 workstations, and Windows XP SP3 workstations. Workstation Groups can also
be migrated. The following workstation object attributes are migrated:
Table A-3 Workstation Features Migrated to Configuration Management
Feature Comment
wmnamecomputer The workstation's name.
wmnamedns The Domain Name Service (DNS) name of the workstation.
wmnameos The operating system of the workstation.
wmnameuser The owner of the workstation. This is migrated only if an authoritative user
source has been defined that points to the same tree that the workstation is
being migrated from.
wmnetworkaddress Usually the IP address of the workstation.
zenwmid The unique ID of the workstation.
zenwmmacaddress The network card MAC Address.
zenwmsubnetmask Subnet mask that is a matching pair to the IP address.
Launcher Configuration settings are migrated with policies. Application associations are migrated
with associations. Group Memberships are migrated with workstation groups. All other workstation
attributes are not migrated because there are no similar attributes in Configuration Management.
76 ZENworks 10 Configuration Management ZENworks Migration Guide
Page 77

If you plan to migrate associations to containers that contain Workstation objects, you should
migrate the container in the Workstation task. This is the only migration task that preserves the
Unique ID of the container so that the associations to the container are preserved. For user
associations, this is not an issue because the Unique ID is always the same as in the old ZENworks
system because Configuration Management relies on User Sources to point to the same User object.
A.6 Associations
The Migration tool displays and migrates only direct associations. Configuration Management has
the same concept of indirect associations that previous ZENworks products have. An indirect
association is created when you associate an object to a container and everything inside that
container becomes associated to the object by virtue of its existence inside that container. If all of the
direct associations are migrated and the migrated objects are placed in the same folder structure,
then all of the indirect associations should be automatically migrated.
The association task is purposely listed as the last step on the migration screen. This is because the
inherent nature of an association (an assignment in Configuration Management) is to simply
establish a one-to-one relationship between two objects, such as “App A is assigned to User 1.”
There is no view of direct associations in ConsoleOne, which can cause some ZENworks
environments to become rather complex. The Migration Utility attempts to break down this
complexity by relying on display filters to show a subset of the existing associations in eDirectory.
Each object is presented based on the selected container and the selected filter. Below each object
you should see all of that object’s associations. Each association has a two-way arrow <--> overlay
icon on its object type icon. Multiple associations can be selected and dragged to the right side, or
the whole object can be dragged, causing all of its associations to be put in the Items to Migrate
queue. The view on the right simply displays all of the existing associations based on the selected
filter.
novdocx (en) 16 April 2010
The Migration Utility adds two extra filters to this view to help speed up the display of associations.
The first filter forces the display to only show various combinations that you can select for bundles,
users, workstations, containers, and policies. Or you can simply select the last option to show all
object types. The second filter shows all objects, either ineligible or eligible, or shows you only the
eligible associations. Eligible associations are eligible because both of the objects that the
association points to exist in Configuration Management. Calculating which associations are eligible
can take several minutes, so this option is not the default. The filter is called Show both ineligible
and eligible (show warning), and it causes the utility to determine which associations are ineligible
and display a reason in the last display column. All eligible associations are also shown.
The actual migration of an association is simple. Configuration Management creates a new
Assignment object that points to both objects. For applications, Configuration Management also
migrates its Location Mask and Availability Schedule during the migration process.
Migration Data 77
Page 78

novdocx (en) 16 April 2010
78 ZENworks 10 Configuration Management ZENworks Migration Guide
Page 79
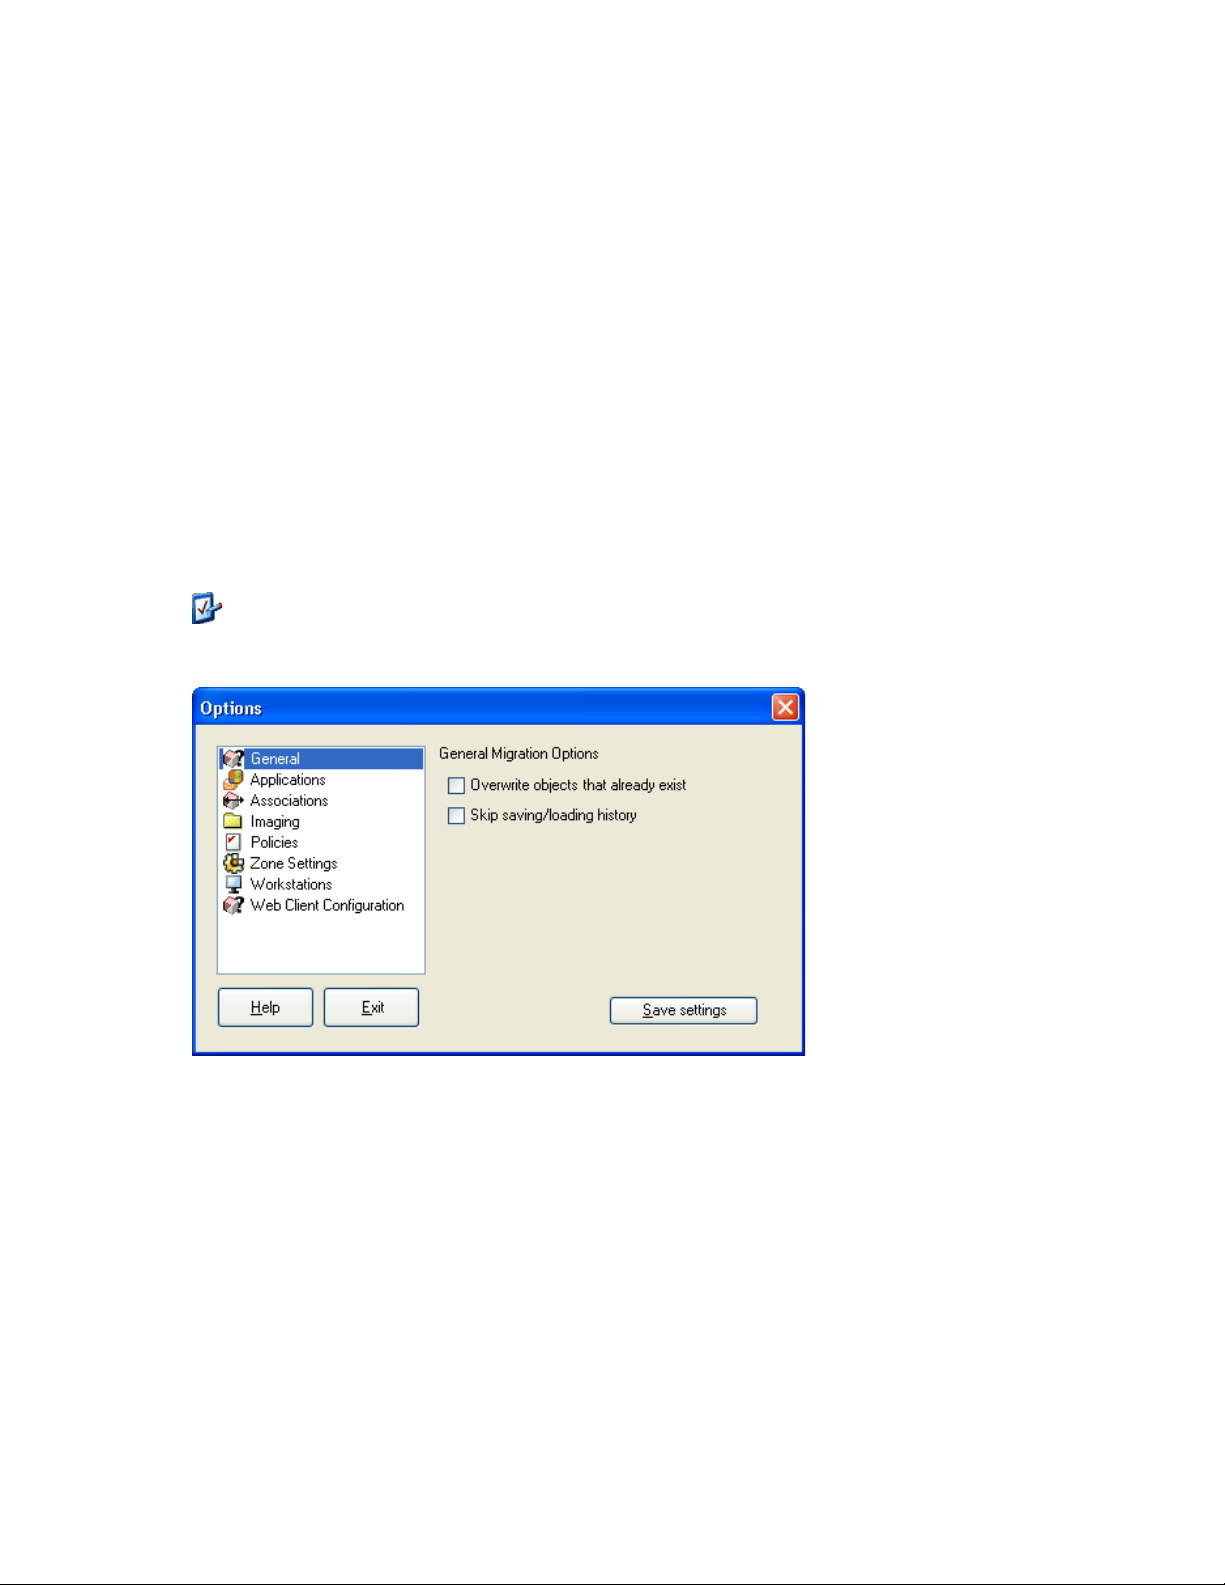
B
Migration Options
Before migrating objects to ZENworks Configuration Management you can choose to configure
various settings. The following sections provide more information on configuring the migration
options:
Section B.1, “Using the Migration Utility to Configure Migration Options,” on page 79
Section B.2, “Using the Registry Editor to Configure Additional Options for Migrating MSI
Applications,” on page 82
B.1 Using the Migration Utility to Configure Migration Options
You can use the Options windows of the Migration utility to configure certain options before
migrating objects to ZENworks Configuration Management To launch the Options window, click
on the top right corner of the utility.
novdocx (en) 16 April 2010
B
Figure B-1 Global Migration Options
Review the following sections for more information on the configuring the migration options by
using the Migration Utility:
Section B.1.1, “General,” on page 80
Section B.1.2, “Applications,” on page 80
Section B.1.3, “Associations,” on page 81
Section B.1.4, “Imaging,” on page 81
Section B.1.5, “Policies,” on page 82
Section B.1.6, “Zone Settings,” on page 82
Section B.1.7, “Workstations,” on page 82
Section B.1.8, “Web Client Configuration,” on page 82
Migration Options
79
Page 80

B.1.1 General
When you are migrating an object that already exists in ZENworks Configuration Management, you
can use the Overwrite objects that already exist option to cause the latest object being migrated to be
used instead. The existing object is overwritten with the new migration object in the ZENworks
Configuration Management database.
NOTE: If you choose to remigrate an application to ZENworks Configuration Management with
the Overwrite objects that already exist option enabled, you must ensure that the version of the
application you want to remigrate is higher by one than the version of the existing ZENworks
Configuration Management bundle. This is required to avoid inconsistent results on the managed
device when the bundle is assigned to it.
The Skip saving/loading history option allows you to dramatically improve performance on large
migrations by not storing the local history.
®
B.1.2 Applications
The Migrate failed MSI builds option forces application migration when the utility fails to migrate
one or more attributes to the MSI.
novdocx (en) 16 April 2010
An MSI bundle is considered to be failed when a warning is produced while converting an AOT
Application object to an MSI. These bundles can often be migrated successfully in spite of the
warning. For example, the warning might be produced because a Windows shortcut link contained
in the AOT is no longer valid.
If you enable this option, the warning messages are not presented. You can review the migration log
for information on what attributes were not migrated.
The Preserve Created MSI and Temporary Files option means the application is created and
migrated, but the directory holding the temporary files and new MSI file is not automatically
deleted. This allows you to have access to the newly created MSI before it is incorporated into the
content service in Configuration Management.
The Upload applications to content server option lets you upload content to the content server. This
option is selected by default.
The applications are migrated as Install MSI action to the ZENworks Configuration Management
server and also uploaded to the content server if the Upload applications to content server option is
selected and the source path of the file is resolved to a local path or UNC path at the time of
migration.
The applications are migrated as Install Network MSI action to the ZENworks Configuration
Management server and are not uploaded to the content server in the following scenarios:
The Upload applications to content server option is deselected.
The Upload applications to content server option is selected but the source path of the file is
not resolved to a local path or UNC path at the time of migration, or the file is not found.
The Migrate distribution options as individual actions option lets you migrate the distribution
options in applications as individual actions such as Edit INI action, Registry Edit action, or Run
Script action that can be edited. By default, it is selected. Deselect the Migrate distribution options
as individual actions option to migrate the distribution options in applications as MSI.
80 ZENworks 10 Configuration Management ZENworks Migration Guide
Page 81

If the Migrate distribution options as individual actions option is enabled, then the applications are
migrated as specific actions:
An application having registry changes is migrated as a bundle with Registry Edit action.
An application having INI settings is migrated as a bundle with an Edit INI File action.
An application having text file changes is migrated as a bundle with an Edit Text File action.
An application having icons or shortcuts is migrated as a Windows bundle with a Run Script
action or File Removal action.
An application having application files changes is migrated as follows:
Files as Copy Files or Install Files action.
Directory as a Copy Directory, Install Directory, or Create/Delete Directory action.
Deletion of files as a File Removal action
Deletion of directory as a Create/ Delete Directory action.
If the Migrate distribution options as individual actions option is disabled, then the application is
migrated as an Install MSI action. But, the Edit Text File action, Copy Directory, Install Directory,
File Removal are not a part of this Install MSI action.
novdocx (en) 16 April 2010
The Working Directory option allows you to place the temporary migration files in a different
location than the default users %TEMP% directory. If you migrate an application with a very long
path (longer than 256 characters), this option enables you to make the temporary path short, such as
c:\temp
.
B.1.3 Associations
The If an associated object does not exist, stop the migration and prompt for redirection to the
appropriate migration task to create the object option prompts for redirection to the appropriate
migration task when you migrate the associations for an object that is not yet migrated. After
migrating the object, you can return to Associations and click Migrate Now to resume migrating the
associations. This option is useful if you are migrating just a few items and want to deal with
association failures on the spot. If you want to perform an unattended migration, do not select this
option.
The Specify the context in the destination user source to search for the matching entities option
enables you to specify the context to search for the matching entities in the destination user source
during migration of the groups and container associations. If you do not specify the context, then the
search is performed in the entire destination user source.
For example, if the destination user source is
context as
migration.orgunit.org.com/OU1/OU2/users
OU1/OU2/users
, the utility looks for matching entities in
migration.orgunit.org.com
.
and you specify the
If you do not specify the context, the search is performed in the entire destination user source, which
migration.orgunit.org.com
is
.
B.1.4 Imaging
When you are migrating an image object whose image file already exists in the content server, you
can use the Overwrite the existing image files on the content servers option to overwrite the image
file. This option is disabled by default.
Migration Options 81
Page 82

B.1.5 Policies
When you are migrating Launcher Configuration settings from Novell® eDirectoryTM, select the Skip
assignment creation for launcher configuration policies option to convert the settings into a
Launcher Configuration policy in Configuration Management. During migration, an assignment
from the identity object to the new Launcher Configuration policy is automatically created unless
you turn off this function in the Options dialog box by selecting to skip the assignment.
B.1.6 Zone Settings
No global migration options are currently defined for Management Zone settings.
B.1.7 Workstations
No global migration options are currently defined for workstations.
B.1.8 Web Client Configuration
novdocx (en) 16 April 2010
Web Client Configuration allows you to configure the settings for uploading files to the content
server.
The Send data in chunks option uploads data in chunks.This option is selected by default. Migration
might fail when a proxy is enabled on the device hosting the migration utility. To perform the
migration, disable the Send data in chunks option.
The Keep connection alive option establishes a persistent connection with the ZENworks
Configuration Management Server.
The Read/Write timeout option allows you specify the timeout period for the read or write operation.
By default, this option is set to None.
The Get response timeout option allows you specify the timeout period to receive the response from
the ZENworks Configuration Management Server. By default, this option is set to None.
To restore the default settings, click Restore Defaults.
B.2 Using the Registry Editor to Configure Additional Options for Migrating MSI Applications
When you install the Migration utility on a device, registry keys with the values specified in the
following table are created under
values determine how much of the user interface to display during the installation of the migrated
MSI application.
HKLM\Software\Novell\ZCM\Migration\MSIOptions\
. The
82 ZENworks 10 Configuration Management ZENworks Migration Guide
Page 83

Table B-1 Additional Options For Migrating MSI Applications
Key Value Description
Default /qb- Displays an appropriate user interface level (as chosen by the
Windows Installer)
Silent /qn Displays no user interface
Progress /qb! Displays simple progress information and error messages/
prompts
Reduced /qr Displays a full user interface with wizard dialog boxes
suppressed
Full /qf Displays a full user interface (Wizard dialog boxes, progress
information, error messages and prompts, and so forth)
MigrateWithParentOptions 0 MSPs are migrated in Silent mode
You can choose to edit the value of the keys to specify how much amount of the user interface to
display on the device during the installation of the migrated MSI application.
novdocx (en) 16 April 2010
For example:
Assume that you have an MSI application with the User Interface Level set as Silent. To display
simple progress information and error messages or prompts during the installation of this application
on a device, perform the following steps before you migrate the application:
1 Open the Registry Editor.
2 Go to
HKLM\Software\Novell\ZCM\Migration\MSIOptions\
.
3 Right-click Silent and click Modify.
4 In the Edit String dialog box, specify
/qb!
in the Val u e d a t a option.
5 Click OK.
By default, the MSPs are migrated in Silent mode. To migrate the MSPs with the same parameter as
that of the parent MSI:
1 Open the Registry Editor.
2 Go to
3 Set the value of
HKLM\Software\Novell\ZCM\Migration\MSIOptions
MigrateWithParentOptions
to 1.
.
Migration Options 83
Page 84

novdocx (en) 16 April 2010
84 ZENworks 10 Configuration Management ZENworks Migration Guide
Page 85

C
Understanding the Migration
novdocx (en) 16 April 2010
Utility
The ZENworks Migration Utility consists of a migration screen where you can model and perform
the migration:
Figure C-1 ZENworks Migration Utility
C
Review the following sections for more information on the Migration Utility’s organization and its
functions:
Section C.1, “Migration Tasks,” on page 86
Section C.2, “Migration Source/Destination,” on page 86
Section C.3, “Migrate Now Button,” on page 86
Section C.4, “Cancel Button,” on page 87
Section C.5, “Exit,” on page 87
Section C.6, “Select Tab,” on page 87
Section C.7, “Items to Migrate Tab,” on page 89
Section C.8, “Migration History Tab,” on page 90
Understanding the Migration Utility
85
Page 86

Section C.9, “What’s New Icon,” on page 90
Section C.10, “Options Icon,” on page 90
Section C.11, “Overall Progress,” on page 90
C.1 Migration Tasks
There are several types of Novell® eDirectoryTM data that you can migrate. You can model all types
in one session or more (because the modeling information is saved); however, you can only migrate
one type at a time. The type you have selected in the Migration Tasks field is migrated when you
click the Migrate Now button.
The options displayed in the Migration Tasks field are filters that determine what is displayed on the
Select tab. When you select a migration task, the fields (and their data) change appropriately in the
Select tab’s two panels (Source eDir Tree and Destination Zone). For example, when you select Step
1: Applications, only the paths, fields, and data applicable to applications are displayed in both
panels. For the Source eDir Tree panel, you see what is in your eDirectory tree. For the Destination
Zone panel, you see what currently exists in the ZENworks database, and is viewable in ZENworks
Control Center.
novdocx (en) 16 April 2010
The numbering for the Migration Tasks options represents the suggested migration sequence
because of possible dependencies, such as associations that require their applications and associated
objects to already exist in order to re-create those associations in Configuration Management.
Therefore, you would migrate the applications first, then later migrate the associations. However,
you can migrate eDirectory data in any order, including any subsets of a type. This can be useful for
an incremental migration, such as migrating your various departments’ applications at different
times.
You can also delete any item from the Destination Zone panel, which deletes it from the ZENworks
database so it is no longer viewable in ZENworks Control Center.
C.2 Migration Source/Destination
The Migration Source and Migration Destination fields display the current selections. If these fields
are blank, or if you want to change the source or destination, click the or icons to display the
eDir Login or Zone Login dialog boxes, then authenticate to those entities.
C.3 Migrate Now Button
After you select a migration type and select the items to be migrated (you have copied them from the
Source eDir Tree panel into the Destination Zone panel to complete your modeling of the migration
type), click this button to perform the migration. All of the items listed on the Items to Migrate tab
are migrated one at a time. They are displayed with dimmed icons until they are migrated.
If you drag a site listed application that has a duplicate already queued, you are asked to resolve
them during queueing by selecting which one to migrate. You can right-click an item and select Vie w
attributes for information that might help you in determining which item to migrate.
86 ZENworks 10 Configuration Management ZENworks Migration Guide
Page 87

C.4 Cancel Button
This button can be clicked at any time during a migration to stop the process. Items already migrated
remain migrated; items yet to be migrated continue to be displayed in the Destination Zone panel
with dimmed icons and text.
C.5 Exit
Closes the Migration Utility. Any modeling you have done is saved for future sessions.
The saved migration information is based on a source and destination pairing. Therefore, the saved
modeling information displayed in the Destination Zone panel depends on which source and
destination pairing you select. The saved modeling files are kept in subdirectories (located where
you run the utility from) that are based on the source and destination pairing. Keep this in mind
when you are modeling migrations from multiple eDirectory trees to one Management Zone.
C.6 Select Tab
This tab displays the Source eDir Tree and Destination Zone panels. In both panels, the text of the
migrated entries is teal-colored after you migrate the items. This is helpful in viewing which items
have been migrated and which have not, even when you run the utility at a later date. If any entries
are not migrated because of an error, their icons remain dimmed.
novdocx (en) 16 April 2010
Section C.6.1, “Source eDir Tree,” on page 87
Section C.6.2, “Destination Zone,” on page 88
C.6.1 Source eDir Tree
After you log in to the eDirectory tree, the Source eDir Tree panel is populated with the applicable
information, starting at the root of the tree. For example, if you select Step 1: Applications, only
Application objects are displayed in the tree as you navigate it.
To select something to migrate that is listed in the Source eDir Tree panel, simply select the item,
then drag it into the Destination Zone panel. You can use the Ctrl and the arrow keys or Shift and the
arrow keys to select multiple items.
IMPORTANT: Selecting, dragging, and migrating objects does nothing to your eDirectory tree.
Migration is only a read and copy operation. The eDirectory tree is left unchanged. So, you can
perform migration by logging in to the eDirectory tree as a read only user also.
The Source eDir Tree field displays the full path of the currently selected context in the tree.
You can click the following icons to navigate the tree:
Table C-1 Source eDir Tree Icons
Navigate Up One Level: Moves the focus up one level from the current context.
Refresh: Refreshes the view. For example, when you first authenticate to the tree, you
receive the current state of the tree. If changes are made in the tree after that, you can
click Refresh to capture them in the Migration Utility for migration.
Understanding the Migration Utility 87
Page 88
Stop Listing of Objects in the Source eDir Tree: Stops listing the objects in the Source
eDir Tree field.
If you right-click an item in the list, you have two options:
View Attributes: Displays attributes for the selected object in the Generic Attributes dialog
box. This is useful for troubleshooting and support calls.
Add to Migration Queue: Copies the item to list of items queued for migration in the
Destination Zone panel and the Items to Migrate tab
Because these options can apply to selected items or to the panel as a whole, right-click the item for
options applicable only to specific items. Right-click anywhere in the panel for an option applicable
to all items.
If you select a container for migration that has different types of objects in it, such as both
Workstation and Application objects, only the objects related to the active Migration Tasks selection
are copied into the Destination Zone panel.
If you drag an item that was previously queued in the Destination Zone and it hasn’t been migrated
yet, no action takes place because the item is already there.
novdocx (en) 16 April 2010
C.6.2 Destination Zone
The Destination Zone panel displays items to be migrated with dimmed icons, and items that were
either already migrated or originally created in ZENworks Control Center are displayed with
colored icons.
The Destination Zone field displays the full path of the selected destination of the migrated object in
the Management Zone. A default location is displayed.
You can click the following icons to navigate the zone or to modify the selected items:
Table C-2 Destination Zone Icons
Navigate Up One Level: Moves the focus up one level from the current folder.
Refresh: Refreshes the view. For example, when you first authenticate to the zone, you
see the current state of the zone. If changes are made in the zone after that, you can click
Refresh to update them in the Migration Utility.
Create New Folder: You can change the Configuration Management folder structure
displayed in ZENworks Control Center to suit your management needs by adding new
folders. For example, if you add a folder (such as
folder is displayed under Bundles in ZENworks Control Center, which contains all bundles
that are created for the eDirectory objects that you copied there.
Modeled folders are not added into ZENworks Control Center until you migrate them.
However, you can model folders that are empty and add them to Configuration
Management by clicking Migrate Now. This is useful for setting up your folder structures
before migrating the objects.
Files
) under
/~bundles~
, that
File
88 ZENworks 10 Configuration Management ZENworks Migration Guide
Page 89

Delete Selected Object: Deletes the item that has a dimmed icon from the list, not from
eDirectory or the ZENworks database. If the item has a colored icon, it was either
previously migrated or it was originally created in ZENworks Control Center. If you select
the Delete Selected Object icon, it deletes the item from the ZENworks database and it is
no longer viewable in ZENworks Control Center.
IMPORTANT: Because both migrated items and items originally created in ZENworks
Control Center are displayed, be aware of this fact when you choose to delete items that
have colored icons.
If you right-click an item in the list, you have the following options:
Delete Selected Items: Deletes the selected item from the list in this view. However, if the item
hasn’t been migrated yet, then the selected item is deleted from both this view and on the Items
to Migrate tab.
New Folder: Allows you to insert a new folder at the current level. This folder is not created in
ZENworks Control Center until you perform the migration. You can create a folder structure to
be migrated, including placing items within the folders.
View Zone Settings: Displays the ZENworks Management Zone settings for the selected
object.
novdocx (en) 16 April 2010
View Attributes: Displays attributes for the selected object in the Generic Attributes dialog
box. This is useful for troubleshooting and support calls.
Because these options can apply to selected items or to the panel as a whole, right-click the item for
options applicable only to specific items. Right-click anywhere in the panel for an option applicable
to all items.
The Unique Identifier column provides you with a way to differentiate multiple objects of the same
name because the identifier provides the full context from where it will be migrated. The ZENworks
Migration Utility automatically prevents duplicate items from being added. However, this applies to
the unique identifier, not the item’s name in the Name column.
C.7 Items to Migrate Tab
This tab displays the items to be migrated. This is the active view while the migration is underway.
The top panel displays migration progress in the Step column as an item is migrated. If problems are
encountered, they are indicated in the Step column.
The Migration Status panel displays the migration log being written as its data is migrated. This is
also the content of the migration log file that is created after migrating the item. The log file is
accessible by clicking the View Log button in the Step column. It can also be accessed from the same
option in the Migration Log column on the Migration History tab.
If you right-click items in the list, or anywhere in the view, you have three options:
Delete Selected Items: Deletes the selected items from the list of those to be migrated, both in
this view and in the list under Destination Zone on the Select tab.
Delete All: Deletes all of the listed items from the migration listing, whether selected or not,
including all of them in the list under Destination Zone on the Select tab.
Understanding the Migration Utility 89
Page 90

Delete Successful: All items that were originally in the list before clicking Migrate Now
remain in the list, showing their migration status. This option allows you to delete all
successfully migrated items, leaving those that were unsuccessful for review and handling.
Because these options can apply to selected items or to the panel as a whole, right-click the item for
options applicable only to specific items. Right-click anywhere in the panel for an option applicable
to all items.
C.8 Migration History Tab
This tab displays all items that have been migrated, according to which migration type you selected
in the Migration Tasks panel.
If you right-click items in the list, or anywhere in the view, you have the following options:
Delete Selected Items: Deletes the selected items from the list of those that were migrated, but
does not change the fact that they were migrated. This is useful for reducing the listing.
Delete All Items: Deletes all of the listed items from the migration listing, but does not change
the fact that they were migrated. This is useful for clearing the listing.
novdocx (en) 16 April 2010
Refresh: Refreshes the listing.
Migration Log: The migration data is logged to an RTF log file. The migration log file is
always available by double-clicking anywhere on a row. The log file is also accessible in the
\log
directory created where the ZENworks Migration Utility executable resides. However, its
filename uses a GUID, so the Management Utility is usually the best way to access the
migration log files.
C.9 What’s New Icon
The icon accesses the What’s New window, which lists the new features in ZENworks 10
Configuration Management with SP3. Select the Do not show this message again option if you do
not want the What’s New window to be displayed while starting the Migration Utility.
C.10 Options Icon
The icon accesses the Options dialog box, where you can specify global options related to the
types of eDirectory data that you are migrating. Some types might not have global options. The
migration options are enforced during migration, and might also affect the display of information
during modeling.
C.11 Overall Progress
This field, located at the bottom of the screen, shows the progress of the migration as a bar graph.
On the Items to Migrate tab, you can also view the progress bar for individual items as they are
being migrated.
90 ZENworks 10 Configuration Management ZENworks Migration Guide
Page 91

D
Troubleshooting
novdocx (en) 16 April 2010
D
The following sections explains the scenarios that you might encounter while migrating your
traditional ZENworks
“Application versions might not be migrated” on page 91
“The schedule of an application is not correctly migrated” on page 91
“Application icons might not be available after migration” on page 92
“Migration Utility hangs during migration” on page 92
“Unable to migrate the iPrint policy” on page 92
“Unable to migrate a Group policy” on page 92
“A registry action migrated with certain options fails on the managed device” on page 92
“Unable to migrate objects that should be uploaded to the content server” on page 93
“Unable to install the migrated Adobe MSI” on page 93
“A manually created user is unable to perform migration” on page 94
“Unable to view the user associations in the Migration Utility” on page 94
“How do I to enable debug logs” on page 94
“Unable to use the migrated add-on images” on page 94
“Migration of applications is slow on a Windows Vista device” on page 94
“Migration of the PXE Menu settings configured in the traditional ZENworks Imaging Server
Policy fails” on page 94
®
software to Novell® ZENworks® 10 Configuration Management.
Application versions might not be migrated
Explanation: When migrating applications, the application version might not be migrated.
Possible Cause: Windows .NET Framework 2.0 patch KB928365 was applied on the device
being used for migrating.
Action: To migrate applications, use only a Windows device where the KB928365
patch, has not yet been applied.
The schedule of an application is not correctly migrated
Explanation: If an application with an availability schedule configured during daylight
saving time is migrated, the schedule is not migrated correctly. For example, if
you specify the Start Date as 2/11/08 and the End Date as 10/11/08, the
application is migrated with the Start Date as 1/11/08 and the End Date as 9/
11/08.
Action: After the migration is completed, use ZENworks Control Center to manually
edit the schedule.
Troubleshooting
91
Page 92

Application icons might not be available after migration
Explanation: If an application object is migrated as an MSI bundle to ZENworks
Configuration Management, some of the application icons might not be
available and the following error is displayed in the logs:
ISDEV : error -1024: message string.
This error does not impact the functionality of the bundle in the managed
device and the migration is still successful.
Action: Ignore the error.
Migration Utility hangs during migration
Explanation: While migrating AOT applications with more than 500 INI sections to
ZENworks Configuration Management, the Migration Utility tool hangs.
Action: None.
Unable to migrate the iPrint policy
novdocx (en) 16 April 2010
Explanation: The iPrint policy configured with the
to ZENworks Configuration Management because
nipp.exe
client installer is not migrated
nipp.exe
silent installation.
Action: In traditional ZENworks, configure the iPrint policy to use the
nipp.zip
client installer and then migrate.
Unable to migrate a Group policy
Explanation: If you configure a Group policy in traditional ZENworks by providing the
UNC path of the shared folder that requires authentication, then migrate the
policy to ZENworks Configuration Management by using the Migration
Utility installed on a Windows Vista SP1 device, the migration fails because
the Vista device is unable to access the network folder.
Action: Do the following:
1. Click Start > Run. Specify
2. Right-click
3. Enter
cmd.exe
explorer
, then select Run as administrator.
at the command prompt to launch the Explorer window.
system32
, then click OK.
4. In the Explorer window, click Too l s > Map Network Drive to map the
network location.
5. Provide the user credentials, then migrate the policy or application
configured with that path.
does not support
nipp-s.exe
or
A registry action migrated with certain options fails on the managed device
Explanation: If an application with only registry and INI changes and with options such as
Create if exists, Delete, Append if existing otherwise create, or Prepend if
existing otherwise create configured under the distribution options is migrated
as an MSI, the options fail on the managed device.
92 ZENworks 10 Configuration Management ZENworks Migration Guide
Page 93

Action: Perform the following steps to migrate the application as an individual action
instead of an MSI:
1. Launch the Migration Utility.
2. Click the Migration Tool Settings icon, then click Application.
3. Select the Migrate distributions options as individual actions option.
4. Migrate the application that has the registry changes to the destination
zone. The application is migrated as a Windows Bundle with a Regedit
action.
Unable to migrate objects that should be uploaded to the content server
Explanation: While migrating objects that should be uploaded to the content server, the
Migration Utility might encounter an error resulting in the failure of migration.
Possible Cause: The Proxy enabled on the device that is hosting the Migration Utility might not
be configured to send data in chunks or establish a persistent connection with
the server while uploading files to the content server.
Action: Use the Web Client Configuration option to configure the settings for
uploading files to the content server and try migrating again. For more
information, see the Section B.1.8, “Web Client Configuration,” on page 82.
novdocx (en) 16 April 2010
Possible Cause: The connection to the remote server might have failed.
Action: Ensure that the File Upload Http Port specified while logging in to the
migration destination zone is the same as the port configured on the ZENworks
Configuration Management server.
Unable to install the migrated Adobe MSI
Possible Cause: The Adobe* Flash* Player plug-in is installed on the device.
Action: Perform the following steps on the managed device before deploying the
bundle to the device:
1 Open the command prompt.
2 Navigate to the Flash Player plug-in installation directory. The default
installation directory is
C:\WINDOWS\system32\Macromed\Flash
3 Do the following to unlock the registry entries of the existing Flash files:
If the
uninstfl.exe
file is available, execute the following
command:
uninstfl.exe -u
If a file with a name matching
NPFSW32_FlashUtil.exe,
*FlashUtil.exe
is available, execute the following
command:
*FlashUtil.exe -uninstallUnlock -u
.
, such as
4 Deploy the bundle on the managed device.
Troubleshooting 93
Page 94

A manually created user is unable to perform migration
Possible Cause: The user is not configured in eDirectory
TM
as a Trustee of the container
containing the migration objects.
Action: In addition to providing administrator rights, the user must also be configured
as a Trustee of the container containing the objects to migrate. For more
information on adding trustees, see the ConsoleOne User Guide (http://
www.novell.com/documentation/consol13/).
Unable to view the user associations in the Migration Utility
Explanation: If an application is associated to a user container, the Migration Utility lists the
the association at the container level. However, the association applies to the
individual users within the container. If you migrate the association, the
association for all the individual users within the container is migrated.
Action: None.
How do I to enable debug logs
novdocx (en) 16 April 2010
Action: To enable the logs, see TID 3418069 in the Novell Support Knowledgebase.
(http://support.novell.com/search/kb_index.jsp).
Unable to use the migrated add-on images
Explanation: Add-on images that are created by exporting applications in traditional
ZENworks are not valid in ZENworks Configuration Management. If these
add-on images are migrated in combination with a base image or otherwise,
they should be deleted.
Action: Manually delete the add-on image from ZENworks Configuration
Management.
Migration of applications is slow on a Windows Vista device
Explanation: Migration of AOT or AXT applications to MSI applications is comparatively
slower on a Windows Vista device.
Action: None.
Migration of the PXE Menu settings configured in the traditional ZENworks Imaging
Server Policy fails
Action: After migrating the traditional ZENworks Imaging Server policy to ZENworks
10 Configuration Management, manually configure the PXE Menu settings:
1 In ZENworks Control Center, click the Configuration tab.
2 In the Management Zone Settings panel, click Device Management >
Preboot Services.
3 Configure the desired PXE options.
4 Click OK.
94 ZENworks 10 Configuration Management ZENworks Migration Guide
Page 95

E
Best Practices
novdocx (en) 16 April 2010
E
The following sections contain information on the best practices to follow while migrating your
traditional ZENworks
Section E.1, “Running the Migration Utility on a Windows Vista device,” on page 95
Section E.2, “Selecting a Migration Option,” on page 95
Section E.3, “Uploading Objects to the Content Server,” on page 95
Section E.4, “Migrating Applications as Actions or MSI,” on page 96
Section E.5, “Using Network Files,” on page 96
Section E.6, “Listing the Associations in the Migration Utility,” on page 96
Section E.7, “Listing Application Objects with the AppFsRights attribute in the Migration
Utility,” on page 97
Section E.8, “Specifying the File Upload HTTP Port and Web Service Port to Log In to the
Migration Destination Management Zone,” on page 97
Section E.9, “Migrating Group Policies,” on page 97
®
software to Novell® ZENworks® 10 Configuration Management
E.1 Running the Migration Utility on a Windows Vista device
If you migrate traditional ZENworks application objects as MSI files through the Migration Utility
running on a Windows Vista device, the performance might degrade. For improved performance,
run the Migration Utility on Windows XP SP2 or Windows XP SP3 device.
E.2 Selecting a Migration Option
Migration is based on the migration options configured through the Migration Utility. Before
migrating objects, scan through all the available migration options in order to select the most
suitable option for migration. For more information on the various migration options, see
Appendix B, “Migration Options,” on page 79.
E.3 Uploading Objects to the Content Server
While migrating applications that require the content to be uploaded to the content server, the
migration might fail. Ensure that the port specified in the File Upload Http Port option while
logging in to the migration destination zone matches the port configured while installing the
ZENworks Configuration Management server. For information on configuring the port while
installing the ZENworks Configuration Management server, see “Performing the Installation”.
Best Practices
95
Page 96

While migrating large applications that should be uploaded to the content server, the
connection to the server might be lost, resulting in failure of the migration. Ensure that Get
response timeout in the Web Client Configuration is set to None in order to establish a
persistent connection with the server. For more information, see Section B.1.8, “Web Client
Configuration,” on page 82.
While migrating applications, deselect the Upload to content server option if you do not want
to upload the applications to the content server. Deselecting the option migrates the MSI
applications as bundles with an Install Network MSI action, which installs the MSI from a
network path. By default, the Upload to content server option is enabled. For more information
on the option, see Section B.1.2, “Applications,” on page 80
E.4 Migrating Applications as Actions or MSI
If you use tools such as Snapshot Manager in traditional ZENworks to create complex
application objects with multiple changes such as Registry, INI, and File Copy, you should
migrate the applications as MSI by disabling the Migrate distribution options as individual
actions option. For more information on the migration options, see Section B.1.2,
“Applications,” on page 80.
If you use tools such as Snapshot Manager in traditional ZENworks to create application
objects with single changes such as Registry, INI, or File Copy, or if the application object must
be edited at a later point of time, then you should migrate the application as actions by enabling
the Migrate distribution options as individual actions option.
novdocx (en) 16 April 2010
If an application is dependent on other applications, review the applications on which the
dependency exists and migrate them as MSI or actions based on the requirement, then migrate
the dependent applications.
E.5 Using Network Files
If the traditional ZENworks application objects use files that are hosted on the network share,
you should map the network share on the device hosting the migration tool.
By default, the applications are uploaded to the content server during the migration. If the
application files are located on a shared network and you want to continue using the network
files, deselect the Upload to content server option. For more information on the option, see
Section B.1.2, “Applications,” on page 80.
E.6 Listing the Associations in the Migration Utility
If there are too many associations to be listed in the Migration Utility, select the Either eligible or
ineligible for migration (No warning) option to reduce the time taken by the utility in listing the
associations.
96 ZENworks 10 Configuration Management ZENworks Migration Guide
Page 97

E.7 Listing Application Objects with the AppFsRights attribute in the Migration Utility
Application objects that have the AppFsRights attribute set in eDirectoryTM are not listed in the
Migration Utility. To list such applications for the migration, remove the AppFsRights attribute. For
more information on removing attributes, search for LDAP Attribute Remover article at Novell Cool
Solutions Community (http://www.novell.com/communities/coolsolutions).
E.8 Specifying the File Upload HTTP Port and Web Service Port to Log In to the Migration Destination Management Zone
To log in to the migration destination Management Zone, ensure that you specify the File Upload
HTTP Port and the Web Service Port as configured on the server. By default, the File Upload HTTP
port is 80 and Web Service Port is 443.
In the Zone Login dialog box, the File Upload HTTP Port and Web Service Port fields are
automatically populated with the default ports when you select a Management Zone in the Zone
field. However, if the ports configured on the server are different from the default ports, ensure that
you specify the ports as configured on the server.
novdocx (en) 16 April 2010
For more information on logging in to the migration destination Management Zone, see Section 4.4,
“Selecting the Migration Destination,” on page 40.
E.9 Migrating Group Policies
Before migrating Windows Group policy, ensure that the folder specified in the Network location of
existing/new Group Policies does not contain any file other than the group policy files.
Best Practices 97
Page 98

novdocx (en) 16 April 2010
98 ZENworks 10 Configuration Management ZENworks Migration Guide
Page 99

F
Documentation Updates
novdocx (en) 16 April 2010
F
This section contains information on documentation content changes that were made in this
ZENworks Migration Guide after the initial release of Novell
Management SP3. The information can help you to keep current on updates to the documentation.
The documentation for this product is provided on the Web in two formats: HTML and PDF. The
HTML and PDF documentation are both kept up-to-date with the changes listed in this section.
If you need to know whether a copy of the PDF documentation that you are using is the most recent,
the PDF document includes a publication date on the title page.
The following updates were made to the document:
Section F.1, “March 30, 2010: SP3 (10.3),” on page 99
®
ZENworks® 10 Configuration
F.1 March 30, 2010: SP3 (10.3)
Updates were made to the following sections:
Location Update
Entire Guide Replaced all instances of AdminStudio 9.0 ZENworks Edition Installation
Guide with AdminStudio 9.5 ZENworks Edition Installation Guide because
ZENworks 10 Configuration Management SP3 currently supports
AdminStudio 9.5.
Section B.1.1, “General,” on
page 80
Added the section on using the registry editor to configure the migration
options.
Section B.2, “Using the
Registry Editor to Configure
Additional Options for
Migrating MSI Applications,”
on page 82
Appendix D,
“Troubleshooting,” on
page 91
Added the section on using the registry editor to configure the migration
options.
NOTE: If you choose to remigrate an application to ZENworks
Configuration Management with the Overwrite objects that already exist
option enabled, you must ensure that the version of the application you
want to remigrate is higher by one than the version of the existing
ZENworks Configuration Management bundle. This is required to avoid
inconsistent results on the managed device when the bundle is assigned
to it.
Updated the section.
Documentation Updates
99
Page 100

novdocx (en) 16 April 2010
100 ZENworks 10 Configuration Management ZENworks Migration Guide
 Loading...