


Novell®
www.novell.com
AUTHORIZED DOCUMENTATION
Upgrade Guide
ZENworks® 10 Configuration Management
novdocx (en) 7 January 2010
10.3
March 30, 2010
ZENworks 10 Configuration Management Upgrade Guide

Legal Notices
Novell, Inc., makes no representations or warranties with respect to the contents or use of this documentation, and
specifically disclaims any express or implied warranties of merchantability or fitness for any particular purpose.
Further, Novell, Inc., reserves the right to revise this publication and to make changes to its content, at any time,
without obligation to notify any person or entity of such revisions or changes.
Further, Novell, Inc., makes no representations or warranties with respect to any software, and specifically disclaims
any express or implied warranties of merchantability or fitness for any particular purpose. Further, Novell, Inc.,
reserves the right to make changes to any and all parts of Novell software, at any time, without any obligation to
notify any person or entity of such changes.
Any products or technical information provided under this Agreement may be subject to U.S. export controls and the
trade laws of other countries. You agree to comply with all export control regulations and to obtain any required
licenses or classification to export, re-export or import deliverables. You agree not to export or re-export to entities on
the current U.S. export exclusion lists or to any embargoed or terrorist countries as specified in the U.S. export laws.
You agree to not use deliverables for prohibited nuclear, missile, or chemical biological weaponry end uses. See the
Novell International Trade Services Web page (http://www.novell.com/info/exports/) for more information on
exporting Novell software. Novell assumes no responsibility for your failure to obtain any necessary export
approvals.
novdocx (en) 7 January 2010
Copyright © 2008-2010 Novell, Inc. All rights reserved. No part of this publication may be reproduced, photocopied,
stored on a retrieval system, or transmitted without the express written consent of the publisher.
Novell, Inc.
404 Wyman Street, Suite 500
Waltham, MA 02451
U.S.A.
www.novell.com
Online Documentation: To access the latest online documentation for this and other Novell products, see
the Novell Documentation Web page (http://www.novell.com/documentation).

Novell Trademarks
For Novell trademarks, see the Novell Trademark and Service Mark list (http://www.novell.com/company/legal/
trademarks/tmlist.html).
Third-Party Materials
All third-party trademarks are the property of their respective owners.
novdocx (en) 7 January 2010

novdocx (en) 7 January 2010
4 ZENworks 10 Configuration Management Upgrade Guide

Contents
About This Guide 7
1What’s New 9
1.1 Support for New Platforms . . . . . . . . . . . . . . . . . . . . . . . . . . . . . . . . . . . . . . . . . . . . . . . . . . . . . 9
1.2 Support for New Versions of Administration Browsers. . . . . . . . . . . . . . . . . . . . . . . . . . . . . . . . 9
1.3 General Enhancements . . . . . . . . . . . . . . . . . . . . . . . . . . . . . . . . . . . . . . . . . . . . . . . . . . . . . . 10
1.4 Asset Management . . . . . . . . . . . . . . . . . . . . . . . . . . . . . . . . . . . . . . . . . . . . . . . . . . . . . . . . . 10
1.4.1 User-Based Licensing . . . . . . . . . . . . . . . . . . . . . . . . . . . . . . . . . . . . . . . . . . . . . . . . 10
1.4.2 ZENworks Control Center Enhancements. . . . . . . . . . . . . . . . . . . . . . . . . . . . . . . . . 10
1.5 Authentication . . . . . . . . . . . . . . . . . . . . . . . . . . . . . . . . . . . . . . . . . . . . . . . . . . . . . . . . . . . . . 11
1.6 Content. . . . . . . . . . . . . . . . . . . . . . . . . . . . . . . . . . . . . . . . . . . . . . . . . . . . . . . . . . . . . . . . . . . 11
1.7 Imaging . . . . . . . . . . . . . . . . . . . . . . . . . . . . . . . . . . . . . . . . . . . . . . . . . . . . . . . . . . . . . . . . . . 11
1.8 New Bundle Right and Policy Right . . . . . . . . . . . . . . . . . . . . . . . . . . . . . . . . . . . . . . . . . . . . . 11
1.9 Patch Management . . . . . . . . . . . . . . . . . . . . . . . . . . . . . . . . . . . . . . . . . . . . . . . . . . . . . . . . . 12
1.10 Remote Management. . . . . . . . . . . . . . . . . . . . . . . . . . . . . . . . . . . . . . . . . . . . . . . . . . . . . . . . 12
1.11 Reporting . . . . . . . . . . . . . . . . . . . . . . . . . . . . . . . . . . . . . . . . . . . . . . . . . . . . . . . . . . . . . . . . . 12
1.12 Upgrading. . . . . . . . . . . . . . . . . . . . . . . . . . . . . . . . . . . . . . . . . . . . . . . . . . . . . . . . . . . . . . . . . 12
1.13 ZENworks Appliance . . . . . . . . . . . . . . . . . . . . . . . . . . . . . . . . . . . . . . . . . . . . . . . . . . . . . . . . 13
novdocx (en) 7 January 2010
2 Upgrading from ZENworks Configuration Management 10.0.x to SP3 (10.3) 15
2.1 Pre-Upgrade Tasks for BusinessObjects Enterprise Server . . . . . . . . . . . . . . . . . . . . . . . . . . 15
2.1.1 Uninstalling BusinessObjects Enterprise . . . . . . . . . . . . . . . . . . . . . . . . . . . . . . . . . . 16
2.1.2 Installing ZENworks Reporting Server . . . . . . . . . . . . . . . . . . . . . . . . . . . . . . . . . . . . 17
2.2 Upgrading to ZENworks Configuration Management 10.3. . . . . . . . . . . . . . . . . . . . . . . . . . . . 17
2.3 Post-Upgrade Tasks . . . . . . . . . . . . . . . . . . . . . . . . . . . . . . . . . . . . . . . . . . . . . . . . . . . . . . . . 18
2.3.1 Reinstalling the Novell File Upload Extension . . . . . . . . . . . . . . . . . . . . . . . . . . . . . . 18
2.3.2 Rebuilding the Embedded or External Sybase Database . . . . . . . . . . . . . . . . . . . . . 19
3 Upgrading from ZENworks Configuration Management 10.1.x to SP3 (10.3) 21
3.1 Understanding What the Upgrade Does Not Do . . . . . . . . . . . . . . . . . . . . . . . . . . . . . . . . . . . 21
3.2 Upgrading to ZENworks Configuration Management 10.3. . . . . . . . . . . . . . . . . . . . . . . . . . . . 21
3.3 Post-Upgrade Tasks . . . . . . . . . . . . . . . . . . . . . . . . . . . . . . . . . . . . . . . . . . . . . . . . . . . . . . . . 22
3.3.1 Reinstalling the Novell File Upload Extension . . . . . . . . . . . . . . . . . . . . . . . . . . . . . . 23
3.3.2 Uploading WAIK . . . . . . . . . . . . . . . . . . . . . . . . . . . . . . . . . . . . . . . . . . . . . . . . . . . . 23
3.3.3 Installing ZENworks Reporting Server . . . . . . . . . . . . . . . . . . . . . . . . . . . . . . . . . . . . 23
3.3.4 Rebuilding the Embedded or External Sybase Database . . . . . . . . . . . . . . . . . . . . . 24
4 Upgrading from ZENworks Configuration Management 10.2.x to SP3 (10.3) 25
4.1 Upgrading to ZENworks Configuration Management 10.3. . . . . . . . . . . . . . . . . . . . . . . . . . . . 25
4.2 Post-Upgrade Tasks . . . . . . . . . . . . . . . . . . . . . . . . . . . . . . . . . . . . . . . . . . . . . . . . . . . . . . . . 26
4.2.1 Upgrading ZENworks Reporting Server . . . . . . . . . . . . . . . . . . . . . . . . . . . . . . . . . . 26
4.2.2 Reinstalling the Novell File Upload Extension . . . . . . . . . . . . . . . . . . . . . . . . . . . . . . 27
4.2.3 Uploading WAIK . . . . . . . . . . . . . . . . . . . . . . . . . . . . . . . . . . . . . . . . . . . . . . . . . . . . 27
4.2.4 Installing Sysinfo . . . . . . . . . . . . . . . . . . . . . . . . . . . . . . . . . . . . . . . . . . . . . . . . . . . . 27
4.2.5 Rebuilding the Embedded or External Sybase Database . . . . . . . . . . . . . . . . . . . . . 28
Contents 5

4.2.6 Redefining Additional LDAP Servers for a ZENworks Server . . . . . . . . . . . . . . . . . . 28
A Reinstalling the Novell File Upload Extension 29
B ZENworks 10 Configuration Management Upgrade Paths Quick Reference 31
novdocx (en) 7 January 2010
6 ZENworks 10 Configuration Management Upgrade Guide

About This Guide
This guide includes information about new enhancements in Novell® ZENworks® 10 Configuration
Management SP3 and information to help you successfully upgrade to this release.
The information in this guide is organized as follows:
Chapter 1, “What’s New,” on page 9
Chapter 2, “Upgrading from ZENworks Configuration Management 10.0.x to SP3 (10.3),” on
page 15
Chapter 3, “Upgrading from ZENworks Configuration Management 10.1.x to SP3 (10.3),” on
page 21
Chapter 4, “Upgrading from ZENworks Configuration Management 10.2.x to SP3 (10.3),” on
page 25
Appendix A, “Reinstalling the Novell File Upload Extension,” on page 29
Appendix B, “ZENworks 10 Configuration Management Upgrade Paths Quick Reference,” on
page 31
novdocx (en) 7 January 2010
Audience
This guide is intended for ZENworks administrators.
Feedback
We want to hear your comments and suggestions about this manual and the other documentation
included with this product. Please use the User Comments feature at the bottom of each page of the
online documentation, or go to the Novell Documentation Feedback site (http://www.novell.com/
documentation/feedback.html) and enter your comments there.
Additional Documentation
ZENworks 10 Configuration Management is supported by other documentation (in both PDF and
HTML formats) that you can use to learn about and implement the product. For additional
documentation, see the ZENworks 10 Configuration Management documentation Web site (http://
www.novell.com/documentation/zcm10/index.html).
Documentation Conventions
In Novell documentation, a greater-than symbol (>) is used to separate actions within a step and
items in a cross-reference path.
®
A trademark symbol (
trademark.
, TM, etc.) denotes a Novell trademark. An asterisk (*) denotes a third-party
When a single pathname can be written with a backslash for some platforms or a forward slash for
other platforms, the pathname is presented with a backslash. Users of platforms that require a
forward slash, such as Linux*, should use forward slashes as required by your software.
About This Guide 7

novdocx (en) 7 January 2010
8 ZENworks 10 Configuration Management Upgrade Guide

1
What’s New
The following sections describe the new features in Novell® ZENworks® 10 Configuration
Management SP3:
Section 1.1, “Support for New Platforms,” on page 9
Section 1.2, “Support for New Versions of Administration Browsers,” on page 9
Section 1.3, “General Enhancements,” on page 10
Section 1.4, “Asset Management,” on page 10
Section 1.5, “Authentication,” on page 11
Section 1.6, “Content,” on page 11
Section 1.7, “Imaging,” on page 11
Section 1.8, “New Bundle Right and Policy Right,” on page 11
Section 1.9, “Patch Management,” on page 12
Section 1.10, “Remote Management,” on page 12
novdocx (en) 7 January 2010
1
Section 1.11, “Reporting,” on page 12
Section 1.12, “Upgrading,” on page 12
Section 1.13, “ZENworks Appliance,” on page 13
1.1 Support for New Platforms
ZENworks 10 Configuration Management SP3 provides the following new features or
enhancements:
Support for Windows* Server* 2008 R2 as a Primary Server
Support for Windows 7 as a managed device
NOTE: Windows 7 is also supported as a managed device (except for Personality Migration)
in Update for ZENworks 10 Configuration Management SP2 (10.2.2) or later.
For more information, see “System Requirements” in the ZENworks 10 Configuration Management
Installation Guide.
1.2 Support for New Versions of Administration Browsers
The ZENworks Control Center now supports the following additional browser versions:
Mozilla* Firefox* 3.5
What’s New
9

1.3 General Enhancements
The following general enhancements have been made:
Coexistence support for ZENworks 10 and ZENworks 7.x Desktop Management (ZDM 7).
Migration of devices with ZENworks 7.x Desktop Management and ZENworks 7.5 Asset
Management to ZENworks 10 devices.
Added Authentication as a Primary Server function for which you can establish Closest Server
Rules.
User source connections can be added and removed through the zman utility.
Support for failover of user source connections for Novell eDirectory
TM
.
1.4 Asset Management
The following enhancements have been made to Asset Management.
Section 1.4.1, “User-Based Licensing,” on page 10
Section 1.4.2, “ZENworks Control Center Enhancements,” on page 10
novdocx (en) 7 January 2010
1.4.1 User-Based Licensing
Asset Management now includes support for user-based license models.
With user-based license models, licensed users are associated with devices, which are associated
with software product installations. A license is consumed only if a software product installation is
found on a device associated with the user. If multiple installations of the product are installed on
multiple devices associated with the user, a single license is consumed.
Two user-based license models are supported: Per-User and Per-Named User.
The Per-User license model covers all users except those you specifically exclude (excluded users).
Any user associated with a product installation consumes a license. Product installations associated
with excluded users are either covered by other license entitlements (if Per-Installation entitlements
exist that cover the same product) or reported as unresolved installations.
The Per-Named User license model covers only those users you specifically include (covered users).
Any covered user associated with a product installations consumes a license. Product installations
associated with non-covered users are either covered by other entitlements (if Per-Installation
Entitlements exist that cover the same product) or reported as unresolved installations.
1.4.2 ZENworks Control Center Enhancements
Enhancements have been made to various Asset Management features in ZENworks Control Center
to increase usability:
On a document’s Relationship page, you can now add the document to existing contracts,
entitlements, and purchase summary records.
10 ZENworks 10 Configuration Management Upgrade Guide

On a purchase record’s Purchase Details page, you can now create a catalog product and add it
to a purchase detail record.
On a license’s Compliance Status page, the columns in the Compliance Status panels have been
changed to more clearly identify each license entitlement, its license model, and its covered
product versions.
1.5 Authentication
ZENworks 10 Configuration Management SP3 provides the following new features:
Authentication Mechanisms: Allows you to use smart card to log in to the user source and
subsequently in to ZENworks. You can use the Kerberos* authentication mechanism to log in
to Active Directory* and use the Shared Secret mechanism to log in to eDirectory.
Authentication Satellite Devices: Satellite devices with the Authentication role can now
speed the authentication process by spreading the workload among various devices and by
locally performing authentication to managed devices. You can have multiple Satellite devices
with the Authentication role. In addition, each Satellite with the Authentication role can have
multiple user sources configured and each Satellite can have multiple connections to each user
source to provide failover.
novdocx (en) 7 January 2010
1.6 Content
The following enhancements have been made for managing content:
Replicating specific content types to Satellites. Includes throttle rates and duration settings.
Enhanced support for content replication schedules.
Enhanced bundle actions for better control while distributing bundle content to devices.
1.7 Imaging
Imaging in ZENworks 10 Configuration Management SP3 provides the following new features or
enhancements:
Support of Window Automated Installation Kit (WAIK) 3.0 for third-party imaging.
Support for imaging operations from ZENworks 7.x Desktop Management (ZDM 7) for the
devices on which the ZDM 7 agent and the ZENworks Adaptive Agent with Asset
Management coexist.
Support for replicating or distributing the imaging content for Satellites with the Imaging role
based on the content replication settings such as throttling and schedule.
For more information, see Adding and Configuring Satellite Devices in the ZENworks 10
Configuration Management System Administration Reference.
1.8 New Bundle Right and Policy Right
The following rights have been added:
Assign Bundles: This new bundle right allows or denies the administrator the rights necessary
to assign the bundles listed in the contexts panel of the Bundle Rights dialog box to the user or
device objects.
What’s New 11

Assign Policies: This new policy right allows or denies the administrator the rights necessary
to assign the policies listed in the contexts panel of the Policy Rights dialog box to the user or
device objects.
If you upgrade from ZENworks 10 Configuration Management SP2 to ZENworks 10 Configuration
Management SP3, the existing Administrator accounts get the following rights in addition to the
rights they already have:
Assign Bundles and Assign Policies rights for the specified context
Assign Bundles right for the Bundles context
Assign Policies right for the Policies context
For more information, see Rights Descriptions in the System Administration Reference.
1.9 Patch Management
ZENworks 10 Patch Management SP3 provides the following new features or enhancements:
You can now control the deployment of mandatory baseline patches from the Configuration tab
in ZENworks Control Center.
You can deploy a patch to all non-patched devices or choose specific devices, folders, or groups
for patch deployment in the Deployment Wizard.
The Event schedule type in the Remediation Schedule page of the Deployment Wizard has been
replaced with Now.
novdocx (en) 7 January 2010
1.10 Remote Management
ZENworks 10 Configuration Management SP3 provides support for a remote management proxy on
the following platforms:
SUSE
SUSE Linux Enterprise Server 11
Open Enterprise Server 2 (OES Linux) SP1
®
Linux Enterprise Server 10 SP2
1.11 Reporting
You can use the User Details report in ZENworks Reporting to report user details such as the
username and e-mail address from the LDAP user sources configured in ZENworks Control Center.
You can also link the ZENworks reports with the User Details reports.
1.12 Upgrading
You can upgrade the Primary Server or managed devices directly to ZENworks 10 Configuration
Management SP3 from the following versions by using the ZENworks System Update feature:
ZENworks 10 Configuration Management SP2 (10.2)
Update for ZENworks 10 Configuration Management (10.2.1)
Update for ZENworks 10 Configuration Management (10.2.2)
12 ZENworks 10 Configuration Management Upgrade Guide

1.13 ZENworks Appliance
ZENworks 10 Configuration Management SP3 is now available as a software appliance that can be
deployed to the supported virtual infrastructure. This software appliance is built on the customized
SUSE Linux Enterprise Server 10 SP2 (SLES 10 SP2) and is preinstalled with ZENworks 10
Configuration Management SP3 Server and ZENworks 10 Configuration Management SP3
ZENworks Reporting Server.
For more information, see the ZENworks 10 Configuration Management Appliance Deployment and
Administration Reference.
novdocx (en) 7 January 2010
What’s New 13

novdocx (en) 7 January 2010
14 ZENworks 10 Configuration Management Upgrade Guide

2
Upgrading from ZENworks
novdocx (en) 7 January 2010
Configuration Management 10.0.x
to SP3 (10.3)
This section contains information about upgrading from Novell® ZENworks® Configuration
Management 10.0.x to ZENworks Configuration Management SP3 (10.3).
To upgrade from ZENworks 10 Configuration Management 10.0.x to ZENworks 10 Configuration
Management SP3 (10.3), devices must meet the requirements described in “System Requirements”
in the ZENworks 10 Configuration Management Installation Guide.
Because of changes in the ZENworks architecture, ZENworks servers and managed devices cannot
be upgraded from version 10.0.x directly to version 10.3. However, you can use a combination of
ZENworks System Update and the installation media to go from 10.0.x to 10.3.
You cannot use the ZENworks 10 Configuration Management SP3 installation media to upgrade
from version 10.0.x to 10.3. You must follow the directions in this section.
IMPORTANT: Because the upgrade process uses different versions of ZENworks Configuration
Management, you must use different versions of the documentation to perform the upgrade. Ensure
that you follow directions in the appropriate version of each guide referenced below.
2
Perform the tasks in the following sections to upgrade to ZENworks 10 Configuration Management
SP3:
Section 2.1, “Pre-Upgrade Tasks for BusinessObjects Enterprise Server,” on page 15
Section 2.2, “Upgrading to ZENworks Configuration Management 10.3,” on page 17
Section 2.3, “Post-Upgrade Tasks,” on page 18
2.1 Pre-Upgrade Tasks for BusinessObjects Enterprise Server
This section is applicable only if BusinessObjects* Enterprise is installed on ZENworks 10
Configuration Management Primary Server. If BusinessObjects Enterprise is not installed on the
ZENworks 10 Configuration Management Primary Server, continue with Section 2.2, “Upgrading to
ZENworks Configuration Management 10.3,” on page 17.
If BusinessObjects Enterprise is installed on the ZENworks 10 Configuration Management Primary
Server, BusinessObjects Enterprise ceases to work when you upgrade the server to ZENworks 10
Configuration Management SP3.
Upgrading from ZENworks Configuration Management 10.0.x to SP3 (10.3)
15

To continue to create and generate ZENworks Reports, perform the following tasks in the order
listed:
1. Uninstall the BusinessObjects Enterprise Server that is installed on the ZENworks 10
Configuration Management Primary Server. For more information, see Section 2.1.1,
“Uninstalling BusinessObjects Enterprise,” on page 16.
2. Install ZENworks Reporting Server. For more information, see Section 2.1.2, “Installing
ZENworks Reporting Server,” on page 17.
2.1.1 Uninstalling BusinessObjects Enterprise
1 Upgrade the ZENworks 10 Configuration Management Primary Server to Update for
ZENworks Configuration Management (10.1.1). For more information, see “Introduction to
ZENworks System Updates” in the ZENworks 10 Configuration Management System
Administration Reference.
2 Uninstall the BusinessObjects Enterprise Server from the Primary Server:
On Windows: Do the following:
1. Log in as an administrator.
novdocx (en) 7 January 2010
2. On the desktop, click Start > Settings > Control Panel.
3. Double-click Add or Remove Programs and uninstall BusinessObjects Enterprise
Server.
4. At the command prompt, go to the
%ZENWORKS_HOME%\share\pmrboecleanup
directory.
5. Run the
(Conditional) Do not run the
pmrboecleanup.bat
pmrboecleanup.bat
file.
or
pmrboecleanup.sh
bundled with Update for ZENworks Configuration Management (10.1.1) on the
Primary Server that has the Reporting Server installed. If you run the file, the
Reporting Server is removed from the Primary Server. To resolve this issue, upgrade
to Update for ZENworks Configuration Management (10.1.2). The Reporting Server
is not removed from the Primary Server when you subsequently run the
pmrboecleanup.bat
or
pmrboecleanup.sh
file.
6. To view the log information, go to
%ZENWORKS_HOME%\logs\pmrboepostuninstall.log
On Linux: Do the following:
1. Log in as
root
.
.
2. Stop the BusinessObjects Enterprise services by running the following command:
/etc/init.d/BobjEnterprise115 stop
3. Uninstall the BusinessObjects Enterprise Server by running the following command:
/opt/novell/zenworks/share/boe/bobje/uninstallBOBJE.sh
file
4. Navigate to the
5. Run the
pmrboecleanup.sh
(Conditional) Do not run the
/opt/novell/zenworks/share/pmrboecleanup
script file.
pmrboecleanup.bat
bundled with Update for ZENworks Configuration Management (10.1.1) on the
Primary Server that has the Reporting Server installed. If you run the file, the
Reporting Server is removed from the Primary Server. To resolve this issue, upgrade
16 ZENworks 10 Configuration Management Upgrade Guide
directory.
or
pmrboecleanup.sh
file

to Update for ZENworks Configuration Management (10.1.2). The Reporting Server
is not removed from the Primary Server when you subsequently run the
pmrboecleanup.bat
6. To view the log information, go to
pmrboepostuninstall.log
or
pmrboecleanup.sh
/var/opt/novell/log/zenworks/
.
file.
2.1.2 Installing ZENworks Reporting Server
Install ZENworks Reporting Server either on the same Primary Server from which you have
uninstalled the BusinessObjects Enterprise Server, or on a different server. For more information on
installing the Reporting Server, see the ZENworks 10 Configuration Management Reporting Server
Installation Guide.
2.2 Upgrading to ZENworks Configuration Management 10.3
1 Make sure that you have completed the steps in Section 2.1, “Pre-Upgrade Tasks for
BusinessObjects Enterprise Server,” on page 15.
novdocx (en) 7 January 2010
2 Use System Update to upgrade ZENworks Servers and managed devices from ZENworks
Configuration Management 10.0.x to 10.0.3.
For more information about System Update, see “ZENworks System Updates” in the
ZENworks 10 Configuration Management System Administration Reference.
3 Use the ZENworks 10.1 installation media to upgrade all Primary Servers from 10.0.3 to
10.1.0.
For more information on how to install ZENworks 10 Configuration Management SP1
(10.1.0), see the Novell ZENworks 10 Configuration Management SP1 Installation Guide
(http://www.novell.com/documentation/zcm10/pdfdoc/zcm101.zip).
4 Use System Update to upgrade the 10.0.3 managed devices to Update for ZENworks 10
Configuration Management SP1 (10.1.0).
For more information about System Update, see “ZENworks System Updates” in the
ZENworks 10 Configuration Management System Administration Reference.
5 Use System Update to update 10.1.x Primary Servers and managed devices to 10.2.
The ZENworks 10 Configuration Management SP2 (10.2) update is cumulative, meaning that
you can upgrade Primary Servers and managed devices directly to version 10.2 from the
following versions:
ZENworks 10 Configuration Management SP1 (10.1.0)
Update for ZENworks 10 Configuration Management (10.1.1)
Update for ZENworks 10 Configuration Management (10.1.1c)
Update for ZENworks 10 Configuration Management (10.1.2a)
Update for ZENworks 10 Configuration Management (10.1.3)
IMPORTANT: Before applying version 10.2, you should remove the earlier updates for
ZENworks 10 Configuration Management from ZENworks Control Center.
Upgrading from ZENworks Configuration Management 10.0.x to SP3 (10.3) 17

To upgrade to 10.2:
5a (Conditional) Update the Primary Server hosting the ZENworks internal database from
10.1.x to 10.2.
5b Update all other Primary Servers in the Management Zone from 10.1.x to 10.2 (order does
not matter).
5c Update managed devices from 10.1.x to 10.2.
For more information about System Update, see “ZENworks System Updates” in the
ZENworks 10 Configuration Management System Administration Reference.
6 Use System Update to upgrade ZENworks Servers and managed devices from ZENworks
Configuration Management 10.2.x to 10.3.
The ZENworks 10 Configuration Management SP3 (10.3) update is cumulative, meaning that
you can upgrade Primary Servers and managed devices directly to version 10.3 from the
following versions:
ZENworks 10 Configuration Management SP2 (10.2)
Update for ZENworks 10 Configuration Management (10.2.1)
Update for ZENworks 10 Configuration Management (10.2.2)
novdocx (en) 7 January 2010
IMPORTANT: Before applying version 10.3, you should remove the earlier updates for
ZENworks 10 Configuration Management from ZENworks Control Center.
To upgrade to 10.3:
6a (Conditional) Update the Primary Server hosting the ZENworks internal database from
10.2 to 10.3.
6b Update all other Primary Servers in the Management Zone from 10.2 to 10.3 (order does
not matter).
6c Update managed devices from 10.2 to 10.3.
For more information about System Update, see “ZENworks System Updates” in the
ZENworks 10 Configuration Management System Administration Reference.
IMPORTANT: After upgrading to ZENworks 10 Configuration Management SP3 (10.3), you
cannot install a ZENworks Primary Server from a previous version of ZENworks Configuration
Management in your SP3 Management Zone.
2.3 Post-Upgrade Tasks
Section 2.3.1, “Reinstalling the Novell File Upload Extension,” on page 18
Section 2.3.2, “Rebuilding the Embedded or External Sybase Database,” on page 19
2.3.1 Reinstalling the Novell File Upload Extension
If the ZENworks 10 Configuration Management File Upload extension is already installed on the
server that is running ZENworks Control Center, you must reinstall the Novell File Upload
Extension before performing any third-party Imaging operations. For detailed information on how to
reinstall the Novell File Upload Extension, see Appendix A, “Reinstalling the Novell File Upload
Extension,” on page 29.
18 ZENworks 10 Configuration Management Upgrade Guide

2.3.2 Rebuilding the Embedded or External Sybase Database
If you have an embedded or external Sybase* database installed, it is recommended to rebuild the
database so that is runs on the updated version of the Sybase database engine. For more information
on how to rebuild the database, see “Rebuilding the Embedded or External Sybase Database ” in the
ZENworks 10 Configuration Management System Administration Reference.
novdocx (en) 7 January 2010
Upgrading from ZENworks Configuration Management 10.0.x to SP3 (10.3) 19

novdocx (en) 7 January 2010
20 ZENworks 10 Configuration Management Upgrade Guide

3
Upgrading from ZENworks
novdocx (en) 7 January 2010
Configuration Management 10.1.x
to SP3 (10.3)
This section contains information about upgrading from Novell® ZENworks® Configuration
Management 10.1.x to ZENworks Configuration Management SP3 (10.3). For information about
upgrading from ZENworks Configuration Management 10.0.x, see Chapter 2, “Upgrading from
ZENworks Configuration Management 10.0.x to SP3 (10.3),” on page 15.
To upgrade from Novell ZENworks 10 Configuration Management 10.1.x to ZENworks 10
Configuration Management SP3 (10.3), devices must meet the requirements described in “System
Requirements” in the ZENworks 10 Configuration Management Installation Guide.
Because of changes in the ZENworks architecture, ZENworks servers and managed devices cannot
be upgraded from version 10.1.x directly to version 10.3. However, you can use a combination of
ZENworks System Update and the installation media to go from 10.1.x to 10.3.
You cannot use the ZENworks 10 Configuration Management SP3 installation media to upgrade
from version 10.1.x to SP3. You must follow the directions in this section.
Perform the tasks in the following sections to upgrade to ZENworks 10 Configuration Management
SP3:
3
Section 3.1, “Understanding What the Upgrade Does Not Do,” on page 21
Section 3.2, “Upgrading to ZENworks Configuration Management 10.3,” on page 21
Section 3.3, “Post-Upgrade Tasks,” on page 22
3.1 Understanding What the Upgrade Does Not Do
You cannot migrate the custom reports created in ZENworks 10 Configuration Management with
SP1 (10.1) to ZENworks 10 Configuration Management with SP3 (10.3). You must re-create these
reports on the ZENworks Reporting Server.
3.2 Upgrading to ZENworks Configuration Management 10.3
1 Make sure that you have completed the steps in Section 2.1, “Pre-Upgrade Tasks for
BusinessObjects Enterprise Server,” on page 15.
2 Use System Update to upgrade ZENworks Servers and managed devices from ZENworks
Configuration Management 10.1.x to 10.2.
The ZENworks 10 Configuration Management SP2 (10.2) update is cumulative, meaning that
you can upgrade Primary Servers and managed devices directly to version 10.2 from the
following versions:
ZENworks 10 Configuration Management SP1 (10.1)
Upgrading from ZENworks Configuration Management 10.1.x to SP3 (10.3)
21

Update for ZENworks 10 Configuration Management (10.1.1)
Update for ZENworks 10 Configuration Management (10.1.1c)
Update for ZENworks 10 Configuration Management (10.1.2a)
Update for ZENworks 10 Configuration Management (10.1.3)
IMPORTANT: Before applying version 10.2, you should remove the earlier updates for
ZENworks 10 Configuration Management from ZENworks Control Center.
To upgrade to 10.2:
2a (Conditional) Update the Primary Server hosting the ZENworks internal database from
10.1 to 10.2.
2b Update all other Primary Servers in the Management Zone from 10.1 to 10.2 (order does
not matter).
2c Update managed devices to 10.2.
For more information about System Update, see “ZENworks System Updates” in the
ZENworks 10 Configuration Management System Administration Reference.
3 Use System Update to upgrade ZENworks Servers and managed devices from ZENworks
Configuration Management 10.2.x to 10.3.
The ZENworks 10 Configuration Management SP3 (10.3) update is cumulative, meaning that
you can upgrade Primary Servers and managed devices directly to version 10.3 from the
following versions:
ZENworks 10 Configuration Management SP2 (10.2)
Update for ZENworks 10 Configuration Management (10.2.1)
novdocx (en) 7 January 2010
Update for ZENworks 10 Configuration Management (10.2.2)
IMPORTANT: Before applying version 10.3, you should remove the earlier updates for
ZENworks 10 Configuration Management from ZENworks Control Center.
To upgrade to 10.3:
3a (Conditional) Update the Primary Server hosting the ZENworks internal database from
10.2 to 10.3.
3b Update all other Primary Servers in the Management Zone from 10.2 to 10.3 (order does
not matter).
3c Update managed devices from 10.2 to 10.3.
For more information about System Update, see “ZENworks System Updates” in the
ZENworks 10 Configuration Management System Administration Reference.
IMPORTANT: After upgrading to ZENworks 10 Configuration Management SP3 (10.3), you
cannot install a ZENworks Primary Server from a previous version of ZENworks Configuration
Management in your SP3 Management Zone.
3.3 Post-Upgrade Tasks
Section 3.3.1, “Reinstalling the Novell File Upload Extension,” on page 23
Section 3.3.2, “Uploading WAIK,” on page 23
22 ZENworks 10 Configuration Management Upgrade Guide

Section 3.3.3, “Installing ZENworks Reporting Server,” on page 23
Section 3.3.4, “Rebuilding the Embedded or External Sybase Database,” on page 24
3.3.1 Reinstalling the Novell File Upload Extension
If the ZENworks 10 Configuration Management File Upload extension is already installed on the
server that is running ZENworks Control Center, you must reinstall the Novell File Upload
Extension before performing any third-party Imaging operations. For detailed information on how to
reinstall the Novell File Upload Extension, see Appendix A, “Reinstalling the Novell File Upload
Extension,” on page 29.
3.3.2 Uploading WAIK
If you are upgrading from ZENworks 10 Configuration Management SP1 (10.1) to ZENworks 10
Configuration Management SP3, and if WAIK was already uploaded prior to the upgrade, you must
upload WAIK (
SP3. For more information on how to upload WAIK, see the ZENworks 10 Configuration
Management Preboot Services and Imaging Reference.
winpe.wim
) again after upgrading to ZENworks 10 Configuration Management
novdocx (en) 7 January 2010
3.3.3 Installing ZENworks Reporting Server
If ZENworks Reporting Server is installed on the ZENworks 10 Configuration Management (10.1)
Primary Server, ZENworks Reporting Server ceases to work when you upgrade the server to
ZENworks 10 Configuration Management SP3.
You need to install a new instance of ZENworks Reporting Server either on the same Primary
Server, or on a different server:
“Installing ZENworks Reporting Server on the Same Primary Server” on page 23
“Installing ZENworks Reporting Server on a Different Server” on page 23
Installing ZENworks Reporting Server on the Same Primary Server
1 Uninstall the existing instance of ZENworks Reporting Server.
For more information on how to uninstall ZENworks Reporting Server, see “Uninstalling
ZENworks Reporting Server” in the ZENworks 10 Configuration Management Reporting
Server Installation Guide.
2 Install ZENworks Reporting Server.
For more information on how to install ZENworks Reporting Server, see the ZENworks 10
Configuration Management Reporting Server Installation Guide.
Installing ZENworks Reporting Server on a Different Server
1 Decommission the earlier instance of ZENworks Reporting Server, then perform the new
installation.
For more information on how to decommission ZENworks Reporting Server, see
“Decommissioning an Existing Instance of ZENworks Reporting Server” in the ZENworks 10
Configuration Management Reporting Server Installation Guide.
Upgrading from ZENworks Configuration Management 10.1.x to SP3 (10.3) 23

2 (Optional) After the new installation of ZENworks Reporting Server installation is complete,
uninstall the earlier instance of ZENworks Reporting Server (that you decommissioned) from
the former Primary Server.
For more information on how to uninstall ZENworks Reporting Server, see the “Uninstalling
ZENworks Reporting Server” in the ZENworks 10 Configuration Management Reporting
Server Installation Guide.
3.3.4 Rebuilding the Embedded or External Sybase Database
If you have an embedded or external Sybase database installed, it is recommended to rebuild the
database so that is runs on the updated version of the Sybase database engine. For more information
on how to rebuild the database, see “Rebuilding the Embedded or External Sybase Database ” in the
ZENworks 10 Configuration Management System Administration Reference.
novdocx (en) 7 January 2010
24 ZENworks 10 Configuration Management Upgrade Guide

4
Upgrading from ZENworks
novdocx (en) 7 January 2010
Configuration Management 10.2.x
to SP3 (10.3)
This section contains information about upgrading from Novell® ZENworks® Configuration
Management 10.2.x to ZENworks Configuration Management SP3 (10.3).
To upgrade from Novell ZENworks 10 Configuration Management 10.2.x to ZENworks 10
Configuration Management SP3 (10.3), devices must meet the requirements described in “System
Requirements” in the ZENworks 10 Configuration Management Installation Guide.
The ZENworks 10 Configuration Management SP3 (10.3) update is cumulative, meaning that you
can upgrade Primary Servers and managed devices directly to version 10.3 from the following
versions:
ZENworks 10 Configuration Management SP2 (10.2)
Update for ZENworks 10 Configuration Management (10.2.1)
Update for ZENworks 10 Configuration Management (10.2.2)
You cannot use the ZENworks 10 Configuration Management SP3 installation media to upgrade
from version 10.2.x to SP3. You must follow the directions in this section.
4
Perform the tasks in the following sections to upgrade to ZENworks 10 Configuration Management
SP3:
Section 4.1, “Upgrading to ZENworks Configuration Management 10.3,” on page 25
Section 4.2, “Post-Upgrade Tasks,” on page 26
4.1 Upgrading to ZENworks Configuration Management 10.3
IMPORTANT: Before applying version 10.3, it is recommended to remove the earlier updates for
ZENworks 10 Configuration Management from ZENworks Control Center.
If you have more than one Primary server in the Management Zone, you must upgrade all the
servers from version 10.2.x to 10.3 before you modify the user source.
To directly upgrade from version 10.2.x to 10.3:
1 Use System Update to update Primary Servers and managed devices to 10.3:
1a (Conditional) Update the Primary Server hosting the ZENworks internal database.
1b Update all other Primary Servers in the Management Zone (order doesn’t matter).
1c Update managed devices.
For more information about System Update, see “ZENworks System Updates” in the ZENworks 10
Configuration Management System Administration Reference.
Upgrading from ZENworks Configuration Management 10.2.x to SP3 (10.3)
25

IMPORTANT: After upgrading to ZENworks 10 Configuration Management SP3 (10.3), you
cannot install a ZENworks Primary Server from a previous version of ZENworks Configuration
Management in your SP3 Management Zone.
If you have any ZENworks 10 Configuration Management SP2 (10.2) Satellites with Imaging role in
the Management Zone, you must upgrade the Satellites to ZENworks 10 Configuration Management
SP3 (10.3) to successfully perform Imaging operations such as take an image or restore an image
from the Satellites. To upgrade the ZENworks 10 Configuration Management SP2 (10.2) Satellites
to ZENworks 10 Configuration Management SP3 (10.3), perform Step 1 on page 25.
4.2 Post-Upgrade Tasks
Section 4.2.1, “Upgrading ZENworks Reporting Server,” on page 26
Section 4.2.2, “Reinstalling the Novell File Upload Extension,” on page 27
Section 4.2.3, “Uploading WAIK,” on page 27
Section 4.2.4, “Installing Sysinfo,” on page 27
Section 4.2.5, “Rebuilding the Embedded or External Sybase Database,” on page 28
Section 4.2.6, “Redefining Additional LDAP Servers for a ZENworks Server,” on page 28
novdocx (en) 7 January 2010
4.2.1 Upgrading ZENworks Reporting Server
If you have ZENworks Reporting Server installed on ZENworks 10 Configuration Management
(10.2) Primary Server, then upgrading the Primary Server to ZENworks 10 Configuration
Management SP3 (10.3) automatically upgrades ZENworks Reporting Server.
However, if you have ZENworks Reporting Server that was installed on ZENworks 10
Configuration Management (10.1) on your Primary Server, you need to uninstall it, then install a
new instance of ZENworks Reporting Server either on the same Primary Server, or on a different
server.
“Installing ZENworks Reporting Server on the Same Primary Server” on page 26
“Installing ZENworks Reporting Server on a Different Server” on page 26
Installing ZENworks Reporting Server on the Same Primary Server
1 Uninstall the existing instance of ZENworks Reporting Server.
For more information on how to uninstall ZENworks Reporting Server, see “Uninstalling
ZENworks Reporting Server” in the ZENworks 10 Configuration Management Reporting
Server Installation Guide.
2 Install ZENworks Reporting Server.
For more information on how to install ZENworks Reporting Server, see the ZENworks 10
Configuration Management Reporting Server Installation Guide.
Installing ZENworks Reporting Server on a Different Server
1 Decommission the earlier instance of ZENworks Reporting Server, then perform the new
installation.
26 ZENworks 10 Configuration Management Upgrade Guide

For more information on how to decommission ZENworks Reporting Server, see
“Decommissioning an Existing Instance of ZENworks Reporting Server” in the ZENworks 10
Configuration Management Reporting Server Installation Guide.
2 (Optional) After the new installation of ZENworks Reporting Server installation is complete,
uninstall the earlier instance of ZENworks Reporting Server (that you decommissioned) from
the former Primary Server.
For more information on how to uninstall ZENworks Reporting Server, see the “Uninstalling
ZENworks Reporting Server” in the ZENworks 10 Configuration Management Reporting
Server Installation Guide.
4.2.2 Reinstalling the Novell File Upload Extension
If the ZENworks 10 Configuration Management File Upload extension is already installed on the
server that is running ZENworks Control Center, you must reinstall the Novell File Upload
Extension before performing any third-party Imaging operations. For detailed information on how to
reinstall the Novell File Upload Extension, see Appendix A, “Reinstalling the Novell File Upload
Extension,” on page 29
novdocx (en) 7 January 2010
4.2.3 Uploading WAIK
If you are upgrading from ZENworks 10 Configuration Management SP2 (10.2) to ZENworks 10
Configuration Management SP3, and if WAIK was already uploaded prior to the upgrade, you must
upload WAIK (
SP2. For more information on how to upload WAIK, see the ZENworks 10 Configuration
Management Preboot Services and Imaging Reference.
winpe.wim
) again after upgrading to ZENworks 10 Configuration Management
4.2.4 Installing Sysinfo
If you upgrade the Primary Server from ZENworks 10 Configuration Management SP2 (10.2.x) to
ZENworks 10 Configuration Management SP3, you must install Sysinfo that is packaged with the
Inventory-Only module on the existing Linux*, HP-UX*, AIX*, and Solaris* inventory-only
devices.
To install Sysinfo, perform the following tasks on the inventory-only device:
1 Uninstall the existing version of Sysinfo by running the following command:
/opt/novell/zenworks/sysinfo/setup --uninstall --confirm
2 Depending upon the inventory-only device platform, download the appropriate Inventory-Only
.tar
module (
For more information on how to download the Inventory-Only module from the ZENworks
Server, see “Downloading the Module from a ZENworks Server” in the ZENworks 10
Configuration Management Discovery, Deployment, and Retirement Reference.
3 Extract the
inventory-only_package.tar
directory on a Linux device.
) from the ZENworks Server.
inventory-only_package.tar
file is extracted to the
file to a temporary location. Assume that the
/opt/novell/zenworks/tmp
inventory-only_package.tar
The
Inventory-Only module package.
mcsysinfo-noui-9-H12-linux-x86.sh
Upgrading from ZENworks Configuration Management 10.2.x to SP3 (10.3) 27
file includes the Sysinfo installer specific to the
(for Linux)

mcsysinfo-noui-9-hpux-parisc.sh
mcsysinfo-noui-9-H11-aix-powerpc.sh
mcsysinfo-noui-9-H14-solaris-sparc.sh
4 Run the following command:
novdocx (en) 7 January 2010
(for HP-UX)
(for AIX)
(for Solaris)
extracted_directory_.tar/
licensefile inventory-only_package.tar_extracted_directory /tscunix.kb -installdir /opt/novell/zenworks/sysinfo --packages
base,config,snmp,sdl,sid --confirm
For example, if the
zenworks/tmp
/
opt/novell/zenworks/tmp/mcsysinfo-noui-9-H12-linux-x86.sh --nowin -- -acceptlicense --licensefile /opt/novell/zenworks/tmp/tscunix.kb -installdir /opt/novell/zenworks/sysinfo --packages
base,config,snmp,sdl,sid --confirm
directory on a Linux device, run the following command:
The Sysinfo package is installed to the
Sysinfo_Setup_filename --nowin -- --acceptlicense --
inventory-only_package.tar
/opt/novell/zenworks/sysinfo
file is extracted to the
/opt/novell/
directory.
4.2.5 Rebuilding the Embedded or External Sybase Database
If you have an embedded or external Sybase database installed, it is recommended to rebuild the
database so that is runs on the updated version of the Sybase database engine. For more information
on how to rebuild the database, see “Rebuilding the Embedded or External Sybase Database ” in the
ZENworks 10 Configuration Management System Administration Reference.
4.2.6 Redefining Additional LDAP Servers for a ZENworks Server
If additional LDAP servers have been specified in the
alt-servers.properties
file of Novell
ZENworks 10 Configuration Management 10.2.x and you want to continue using these additional
LDAP servers in ZENworks 10 Configuration Management 10.3, you must manually redefine the
LDAP servers by using ZENworks Control Center or the zman command line utility. For more
information on how to redefine the additional LDAP servers for the ZENworks Server, see
“Providing LDAP Load Balancing and Fault Tolerance” in ZENworks 10 Configuration
Management System Administration Reference.
28 ZENworks 10 Configuration Management Upgrade Guide

A
Reinstalling the Novell File Upload
novdocx (en) 7 January 2010
Extension
If the ZENworks® 10 Configuration Management File Upload extension is already installed on the
server that is running ZENworks Control Center, you must reinstall the Novell File Upload
Extension before performing any third-party Imaging operations:
1 Uninstall the Novell File Upload extension.
On Internet Explorer: Perform the following steps:
1. Close all instances of the Internet Explorer* browser.
2. Start a new instance of the browser.
3. Click To ol s > Internet Options > General.
4. In the Browsing History panel, click Settings.
5. In the Temporary Internet Files and History Settings window, click View Objects.
6. In the Downloaded Program Files window, right-click NFileUpload Class, then click
Remove.
On Firefox: Perform the following steps:
1. Click To ol s > Add-ons.
2. In the Add-ons window, click Novell ZENworks File Upload Extension 10.2.x, then click
Uninstall.
3. Close the Firefox browser.
A
4. Locate the
npzenworks.dll
5. Restart Firefox.
2 Install the ZENworks 10 Configuration Management SP3 File Upload extension.
The next time you use ZENworks Control Center to browse for file paths and upload files, you
are prompted to install the latest Novell File Upload Extension. Follow the prompts to install
the Novell File Upload extension.
Firefox_Install_directory/plugins
and
nsINZENScriptablePlugin.xpt
directory and delete the
files from the directory.
Reinstalling the Novell File Upload Extension
29

novdocx (en) 7 January 2010
30 ZENworks 10 Configuration Management Upgrade Guide
B
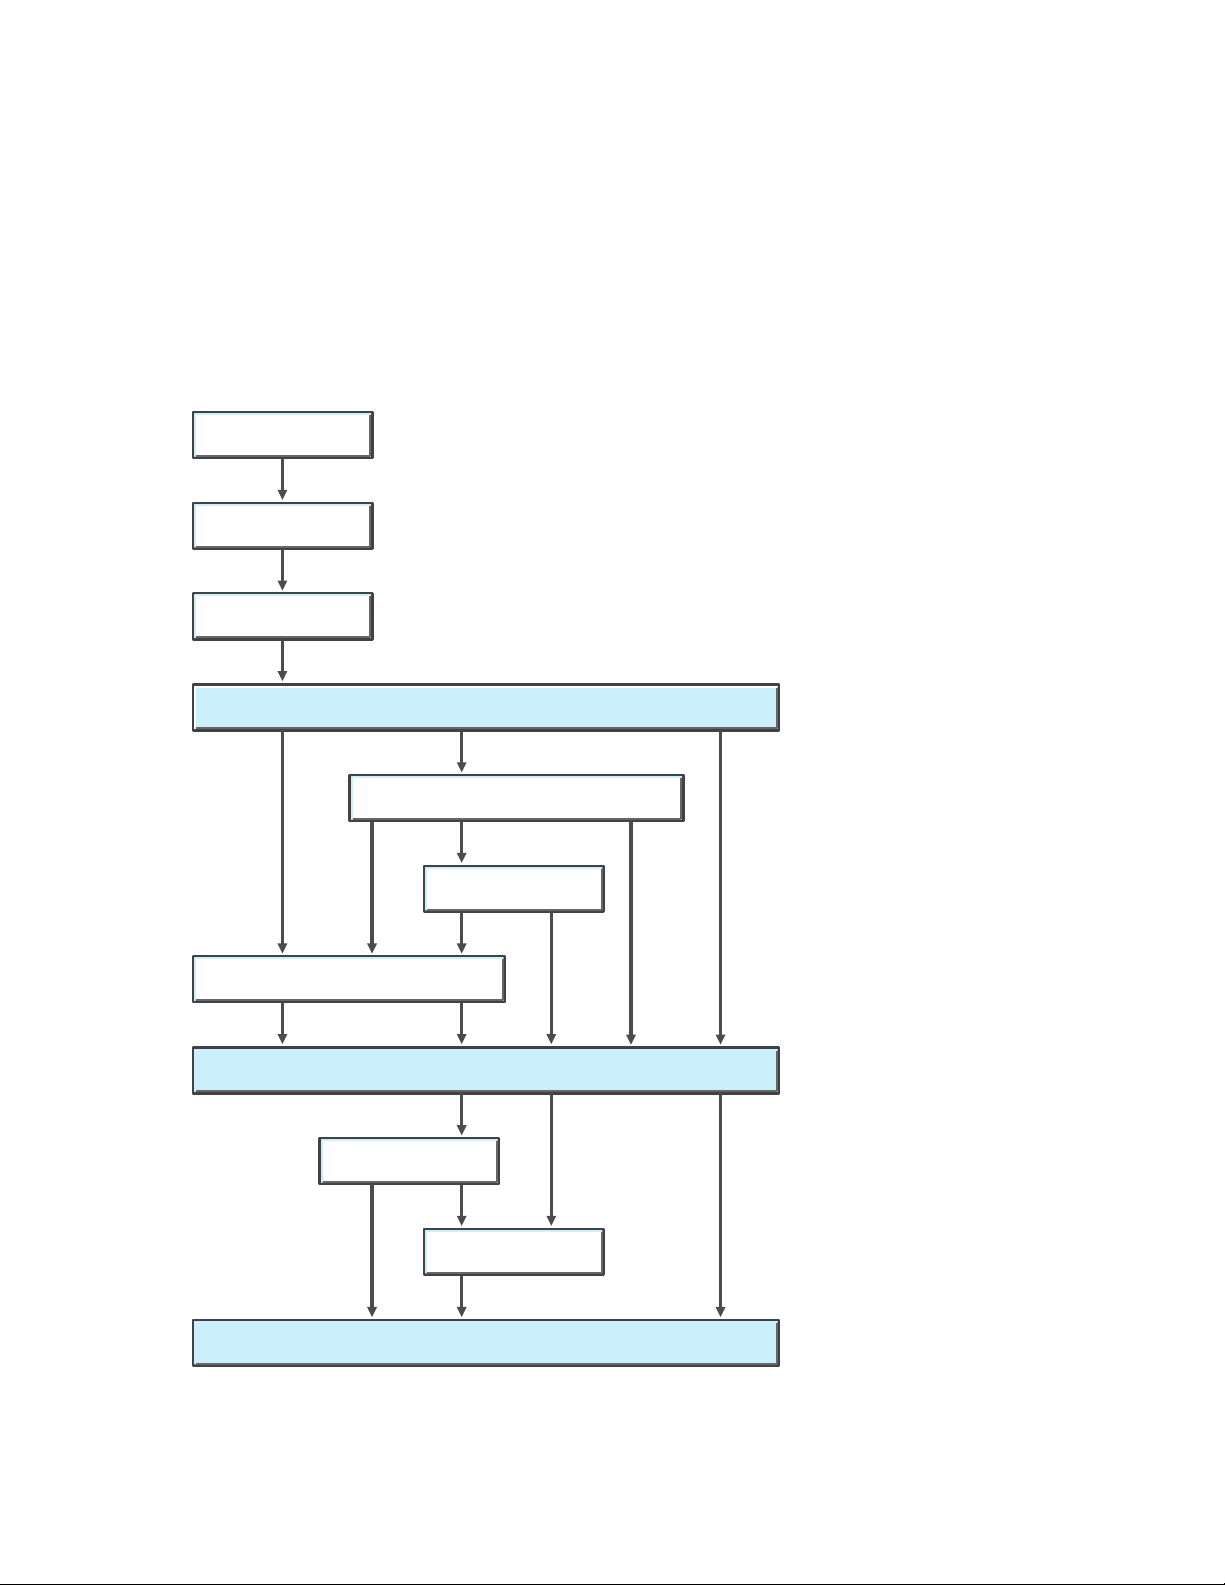
SU
SU
SU
SU
SU
SU
SU
SU
SU
SU
SU
SU
SU
SUSU
SU
ZCM 10.0.1 Legend: SU = System Update
ZCM 10.0.2
ZCM 10.0.3
ZCM10.1
ZCM 10.1.1 or ZCM 10.1.1c
ZCM 10.1.2
ZCM 10.1.3
ZCM 10.2
SU
SU
ZCM 10.3
ZCM 10.2.1
ZCM 10.2.2
ZCM 10.1 Installation Media
ZENworks 10 Configuration
novdocx (en) 7 January 2010
Management Upgrade Paths Quick
Reference
Figure B-1 Upgrading to ZENworks 10 Configuration Management SP3
B
ZENworks 10 Configuration Management Upgrade Paths Quick Reference
31

novdocx (en) 7 January 2010
32 ZENworks 10 Configuration Management Upgrade Guide
 Loading...