


Novell®
www.novell.com
AUTHORIZED DOCUMENTATION
Software Distribution Reference
ZENworks® 10 Configuration Management SP3
novdocx (en) 16 April 2010
10.3
March 30, 2010
ZENworks 10 Configuration Management Software Distribution Reference

Legal Notices
Novell, Inc., makes no representations or warranties with respect to the contents or use of this documentation, and
specifically disclaims any express or implied warranties of merchantability or fitness for any particular purpose.
Further, Novell, Inc., reserves the right to revise this publication and to make changes to its content, at any time,
without obligation to notify any person or entity of such revisions or changes.
Further, Novell, Inc., makes no representations or warranties with respect to any software, and specifically disclaims
any express or implied warranties of merchantability or fitness for any particular purpose. Further, Novell, Inc.,
reserves the right to make changes to any and all parts of Novell software, at any time, without any obligation to
notify any person or entity of such changes.
Any products or technical information provided under this Agreement may be subject to U.S. export controls and the
trade laws of other countries. You agree to comply with all export control regulations and to obtain any required
licenses or classification to export, re-export or import deliverables. You agree not to export or re-export to entities on
the current U.S. export exclusion lists or to any embargoed or terrorist countries as specified in the U.S. export laws.
You agree to not use deliverables for prohibited nuclear, missile, or chemical biological weaponry end uses. See the
Novell International Trade Services Web page (http://www.novell.com/info/exports/) for more information on
exporting Novell software. Novell assumes no responsibility for your failure to obtain any necessary export
approvals.
novdocx (en) 16 April 2010
Copyright © 2007 - 2010 Novell, Inc. All rights reserved. No part of this publication may be reproduced,
photocopied, stored on a retrieval system, or transmitted without the express written consent of the publisher.
Novell, Inc.
404 Wyman Street, Suite 500
Waltham, MA 02451
U.S.A.
www.novell.com
Online Documentation: To access the latest online documentation for this and other Novell products, see
the Novell Documentation Web page (http://www.novell.com/documentation).

Novell Trademarks
For Novell trademarks, see the Novell Trademark and Service Mark list (http://www.novell.com/company/legal/
trademarks/tmlist.html).
Third-Party Materials
All third-party trademarks are the property of their respective owners.
novdocx (en) 16 April 2010

novdocx (en) 16 April 2010
4 ZENworks 10 Configuration Management Software Distribution Reference

Contents
About This Guide 9
1 Basic Concepts 11
1.1 Bundles . . . . . . . . . . . . . . . . . . . . . . . . . . . . . . . . . . . . . . . . . . . . . . . . . . . . . . . . . . . . . . . . . . 11
1.2 Assigning Bundles to Devices vs. Users . . . . . . . . . . . . . . . . . . . . . . . . . . . . . . . . . . . . . . . . . 12
1.3 Packaging Considerations . . . . . . . . . . . . . . . . . . . . . . . . . . . . . . . . . . . . . . . . . . . . . . . . . . . . 12
1.4 Dependency Bundles . . . . . . . . . . . . . . . . . . . . . . . . . . . . . . . . . . . . . . . . . . . . . . . . . . . . . . . . 13
1.4.1 Primary Applications vs. Dependent Applications . . . . . . . . . . . . . . . . . . . . . . . . . . . 13
1.4.2 Bundle Chains . . . . . . . . . . . . . . . . . . . . . . . . . . . . . . . . . . . . . . . . . . . . . . . . . . . . . . 14
1.4.3 Distributing, Installing, and Launching a Bundle That Has Dependencies . . . . . . . . 15
1.5 Content. . . . . . . . . . . . . . . . . . . . . . . . . . . . . . . . . . . . . . . . . . . . . . . . . . . . . . . . . . . . . . . . . . . 16
1.5.1 Content Replication . . . . . . . . . . . . . . . . . . . . . . . . . . . . . . . . . . . . . . . . . . . . . . . . . . 16
1.5.2 Content Delivery . . . . . . . . . . . . . . . . . . . . . . . . . . . . . . . . . . . . . . . . . . . . . . . . . . . . 16
novdocx (en) 16 April 2010
2 Creating Bundles 19
2.1 Creating Directive Bundles. . . . . . . . . . . . . . . . . . . . . . . . . . . . . . . . . . . . . . . . . . . . . . . . . . . . 19
2.2 Creating File Bundles. . . . . . . . . . . . . . . . . . . . . . . . . . . . . . . . . . . . . . . . . . . . . . . . . . . . . . . . 23
2.3 Creating Imaging Bundles . . . . . . . . . . . . . . . . . . . . . . . . . . . . . . . . . . . . . . . . . . . . . . . . . . . . 31
2.4 Creating Windows Bundles . . . . . . . . . . . . . . . . . . . . . . . . . . . . . . . . . . . . . . . . . . . . . . . . . . . 31
2.5 Creating Bundles by Using the zman Command Line Utility . . . . . . . . . . . . . . . . . . . . . . . . . . 39
2.5.1 Creating a Bundle without Content or Dependency on Another Bundle . . . . . . . . . . 39
2.5.2 Creating a Bundle with Content and Dependency on Another Bundle . . . . . . . . . . . 40
2.5.3 Understanding the zman Bundle XML File Format . . . . . . . . . . . . . . . . . . . . . . . . . . 42
3 Managing Bundles 45
3.1 Creating Bundles . . . . . . . . . . . . . . . . . . . . . . . . . . . . . . . . . . . . . . . . . . . . . . . . . . . . . . . . . . . 45
3.2 Assigning Existing Bundles to Devices . . . . . . . . . . . . . . . . . . . . . . . . . . . . . . . . . . . . . . . . . . 46
3.3 Assigning Existing Bundles to Users . . . . . . . . . . . . . . . . . . . . . . . . . . . . . . . . . . . . . . . . . . . . 48
3.4 Adding a Bundle to a Group. . . . . . . . . . . . . . . . . . . . . . . . . . . . . . . . . . . . . . . . . . . . . . . . . . . 51
3.5 Renaming, Copying, or Moving Bundles . . . . . . . . . . . . . . . . . . . . . . . . . . . . . . . . . . . . . . . . . 53
3.6 Adding System Requirements for a Bundle . . . . . . . . . . . . . . . . . . . . . . . . . . . . . . . . . . . . . . . 53
3.6.1 Filter Conditions. . . . . . . . . . . . . . . . . . . . . . . . . . . . . . . . . . . . . . . . . . . . . . . . . . . . . 54
3.6.2 Filter Logic . . . . . . . . . . . . . . . . . . . . . . . . . . . . . . . . . . . . . . . . . . . . . . . . . . . . . . . . . 58
3.7 Copying a Bundle’s System Requirements . . . . . . . . . . . . . . . . . . . . . . . . . . . . . . . . . . . . . . . 59
3.8 Managing Bundle Settings . . . . . . . . . . . . . . . . . . . . . . . . . . . . . . . . . . . . . . . . . . . . . . . . . . . . 59
3.9 Managing Bundle Variables . . . . . . . . . . . . . . . . . . . . . . . . . . . . . . . . . . . . . . . . . . . . . . . . . . . 60
3.10 Deleting a Bundle . . . . . . . . . . . . . . . . . . . . . . . . . . . . . . . . . . . . . . . . . . . . . . . . . . . . . . . . . . . 62
3.11 Incrementing a Bundle’s Version Number . . . . . . . . . . . . . . . . . . . . . . . . . . . . . . . . . . . . . . . . 62
3.11.1 Using the Action menu. . . . . . . . . . . . . . . . . . . . . . . . . . . . . . . . . . . . . . . . . . . . . . . . 62
3.11.2 Editing the Bundle . . . . . . . . . . . . . . . . . . . . . . . . . . . . . . . . . . . . . . . . . . . . . . . . . . . 62
3.12 Installing a Bundle . . . . . . . . . . . . . . . . . . . . . . . . . . . . . . . . . . . . . . . . . . . . . . . . . . . . . . . . . . 63
3.13 Launching a Bundle . . . . . . . . . . . . . . . . . . . . . . . . . . . . . . . . . . . . . . . . . . . . . . . . . . . . . . . . . 63
3.14 Copying a Bundle to a Content Server. . . . . . . . . . . . . . . . . . . . . . . . . . . . . . . . . . . . . . . . . . . 64
3.15 Preventing a Bundle from Being Deployed . . . . . . . . . . . . . . . . . . . . . . . . . . . . . . . . . . . . . . . 66
3.16 Enabling a Bundle to Be Deployed . . . . . . . . . . . . . . . . . . . . . . . . . . . . . . . . . . . . . . . . . . . . . 67
3.17 Enabling a Bundle to Be Uninstalled . . . . . . . . . . . . . . . . . . . . . . . . . . . . . . . . . . . . . . . . . . . . 67
Contents 5

3.18 Uninstalling a Bundle . . . . . . . . . . . . . . . . . . . . . . . . . . . . . . . . . . . . . . . . . . . . . . . . . . . . . . . . 68
3.18.1 Bundle . . . . . . . . . . . . . . . . . . . . . . . . . . . . . . . . . . . . . . . . . . . . . . . . . . . . . . . . . . . . 69
3.18.2 Devices . . . . . . . . . . . . . . . . . . . . . . . . . . . . . . . . . . . . . . . . . . . . . . . . . . . . . . . . . . . 69
3.19 Modifying Action Set Options . . . . . . . . . . . . . . . . . . . . . . . . . . . . . . . . . . . . . . . . . . . . . . . . . . 70
3.19.1 Install Action Set Options. . . . . . . . . . . . . . . . . . . . . . . . . . . . . . . . . . . . . . . . . . . . . . 70
3.19.2 Launch Action Set Options . . . . . . . . . . . . . . . . . . . . . . . . . . . . . . . . . . . . . . . . . . . . 71
3.19.3 Uninstall Action Set Options . . . . . . . . . . . . . . . . . . . . . . . . . . . . . . . . . . . . . . . . . . . 72
3.19.4 Terminate Action Set Options . . . . . . . . . . . . . . . . . . . . . . . . . . . . . . . . . . . . . . . . . . 74
3.20 Show Bundle Activity on the Managed Device. . . . . . . . . . . . . . . . . . . . . . . . . . . . . . . . . . . . . 74
3.21 Viewing the Predefined Reports. . . . . . . . . . . . . . . . . . . . . . . . . . . . . . . . . . . . . . . . . . . . . . . . 74
4 Managing Bundle Groups 77
4.1 Creating Bundle Groups. . . . . . . . . . . . . . . . . . . . . . . . . . . . . . . . . . . . . . . . . . . . . . . . . . . . . . 77
4.2 Renaming or Moving Bundle Groups . . . . . . . . . . . . . . . . . . . . . . . . . . . . . . . . . . . . . . . . . . . . 78
4.3 Copying a Bundle Group’s System Requirements. . . . . . . . . . . . . . . . . . . . . . . . . . . . . . . . . . 79
4.4 Deleting a Bundle Group . . . . . . . . . . . . . . . . . . . . . . . . . . . . . . . . . . . . . . . . . . . . . . . . . . . . . 79
4.5 Assigning a Bundle Group to Devices . . . . . . . . . . . . . . . . . . . . . . . . . . . . . . . . . . . . . . . . . . . 79
4.6 Assigning a Bundle Group to Users . . . . . . . . . . . . . . . . . . . . . . . . . . . . . . . . . . . . . . . . . . . . . 81
4.7 Adding a Bundle to a Group. . . . . . . . . . . . . . . . . . . . . . . . . . . . . . . . . . . . . . . . . . . . . . . . . . . 84
4.8 Copying a Bundle Group to a Content Server . . . . . . . . . . . . . . . . . . . . . . . . . . . . . . . . . . . . . 84
novdocx (en) 16 April 2010
5 Managing Folders 85
5.1 Creating Folders. . . . . . . . . . . . . . . . . . . . . . . . . . . . . . . . . . . . . . . . . . . . . . . . . . . . . . . . . . . . 85
5.2 Renaming or Moving Folders . . . . . . . . . . . . . . . . . . . . . . . . . . . . . . . . . . . . . . . . . . . . . . . . . . 85
5.3 Deleting a Folder . . . . . . . . . . . . . . . . . . . . . . . . . . . . . . . . . . . . . . . . . . . . . . . . . . . . . . . . . . . 86
6 Managing Bundles by using the ZENworks Adaptive Agent 87
6.1 Bundles vs. Applications . . . . . . . . . . . . . . . . . . . . . . . . . . . . . . . . . . . . . . . . . . . . . . . . . . . . . 87
6.2 User-Assigned vs. Device-Assigned Bundles . . . . . . . . . . . . . . . . . . . . . . . . . . . . . . . . . . . . . 88
6.3 Accessing Bundles. . . . . . . . . . . . . . . . . . . . . . . . . . . . . . . . . . . . . . . . . . . . . . . . . . . . . . . . . . 88
6.3.1 ZENworks Window . . . . . . . . . . . . . . . . . . . . . . . . . . . . . . . . . . . . . . . . . . . . . . . . . . 88
6.3.2 ZENworks Explorer . . . . . . . . . . . . . . . . . . . . . . . . . . . . . . . . . . . . . . . . . . . . . . . . . . 90
6.3.3 ZENworks Icon . . . . . . . . . . . . . . . . . . . . . . . . . . . . . . . . . . . . . . . . . . . . . . . . . . . . . 91
6.4 Understanding Bundle Icons . . . . . . . . . . . . . . . . . . . . . . . . . . . . . . . . . . . . . . . . . . . . . . . . . . 92
6.5 Launching a Bundle . . . . . . . . . . . . . . . . . . . . . . . . . . . . . . . . . . . . . . . . . . . . . . . . . . . . . . . . . 93
6.6 Postponing a Bundle Download . . . . . . . . . . . . . . . . . . . . . . . . . . . . . . . . . . . . . . . . . . . . . . . . 93
6.7 Verifying a Bundle . . . . . . . . . . . . . . . . . . . . . . . . . . . . . . . . . . . . . . . . . . . . . . . . . . . . . . . . . . 93
6.8 Viewing a Bundle’s Properties . . . . . . . . . . . . . . . . . . . . . . . . . . . . . . . . . . . . . . . . . . . . . . . . . 94
6.9 Uninstalling a Bundle . . . . . . . . . . . . . . . . . . . . . . . . . . . . . . . . . . . . . . . . . . . . . . . . . . . . . . . . 94
A Install, Uninstall, and Repair Parameters 95
A.1 Install Parameters . . . . . . . . . . . . . . . . . . . . . . . . . . . . . . . . . . . . . . . . . . . . . . . . . . . . . . . . . . 95
A.1.1 Restart Options . . . . . . . . . . . . . . . . . . . . . . . . . . . . . . . . . . . . . . . . . . . . . . . . . . . . . 96
A.1.2 Display Options . . . . . . . . . . . . . . . . . . . . . . . . . . . . . . . . . . . . . . . . . . . . . . . . . . . . . 96
A.1.3 Install Options . . . . . . . . . . . . . . . . . . . . . . . . . . . . . . . . . . . . . . . . . . . . . . . . . . . . . . 96
A.1.4 Command Line Parameters . . . . . . . . . . . . . . . . . . . . . . . . . . . . . . . . . . . . . . . . . . . . 97
A.2 Uninstall Parameters . . . . . . . . . . . . . . . . . . . . . . . . . . . . . . . . . . . . . . . . . . . . . . . . . . . . . . . . 97
A.2.1 Restart Options . . . . . . . . . . . . . . . . . . . . . . . . . . . . . . . . . . . . . . . . . . . . . . . . . . . . . 98
A.2.2 Display Options . . . . . . . . . . . . . . . . . . . . . . . . . . . . . . . . . . . . . . . . . . . . . . . . . . . . . 98
A.2.3 Command Line Parameters . . . . . . . . . . . . . . . . . . . . . . . . . . . . . . . . . . . . . . . . . . . . 98
6 ZENworks 10 Configuration Management Software Distribution Reference

A.3 Repair Parameters . . . . . . . . . . . . . . . . . . . . . . . . . . . . . . . . . . . . . . . . . . . . . . . . . . . . . . . . . . 99
A.3.1 Restart Options . . . . . . . . . . . . . . . . . . . . . . . . . . . . . . . . . . . . . . . . . . . . . . . . . . . . . 99
A.3.2 Display Options . . . . . . . . . . . . . . . . . . . . . . . . . . . . . . . . . . . . . . . . . . . . . . . . . . . . 100
A.3.3 Repair Options . . . . . . . . . . . . . . . . . . . . . . . . . . . . . . . . . . . . . . . . . . . . . . . . . . . . . 100
A.3.4 Command Line Parameters . . . . . . . . . . . . . . . . . . . . . . . . . . . . . . . . . . . . . . . . . . . 101
B Authentication Hook 103
C Novell File Upload Extension 105
C.1 Installing the Novell File Upload Extension . . . . . . . . . . . . . . . . . . . . . . . . . . . . . . . . . . . . . . 105
C.1.1 On Mozilla Firefox . . . . . . . . . . . . . . . . . . . . . . . . . . . . . . . . . . . . . . . . . . . . . . . . . . 105
C.1.2 On Microsoft Internet Explorer. . . . . . . . . . . . . . . . . . . . . . . . . . . . . . . . . . . . . . . . . 106
C.2 Reinstalling the Novell File Upload Extension . . . . . . . . . . . . . . . . . . . . . . . . . . . . . . . . . . . . 106
D Bundle Schedules Types 109
D.1 Date Specific . . . . . . . . . . . . . . . . . . . . . . . . . . . . . . . . . . . . . . . . . . . . . . . . . . . . . . . . . . . . . 109
D.2 Event . . . . . . . . . . . . . . . . . . . . . . . . . . . . . . . . . . . . . . . . . . . . . . . . . . . . . . . . . . . . . . . . . . . 110
D.3 Now . . . . . . . . . . . . . . . . . . . . . . . . . . . . . . . . . . . . . . . . . . . . . . . . . . . . . . . . . . . . . . . . . . . . 111
D.4 Recurring . . . . . . . . . . . . . . . . . . . . . . . . . . . . . . . . . . . . . . . . . . . . . . . . . . . . . . . . . . . . . . . . 111
novdocx (en) 16 April 2010
E Actions 115
E.1 Action - Apply Personality . . . . . . . . . . . . . . . . . . . . . . . . . . . . . . . . . . . . . . . . . . . . . . . . . . . 116
E.2 Action - Copy Directory . . . . . . . . . . . . . . . . . . . . . . . . . . . . . . . . . . . . . . . . . . . . . . . . . . . . . 117
E.3 Action - Copy Files . . . . . . . . . . . . . . . . . . . . . . . . . . . . . . . . . . . . . . . . . . . . . . . . . . . . . . . . . 119
E.4 Action - Create/Delete Directory . . . . . . . . . . . . . . . . . . . . . . . . . . . . . . . . . . . . . . . . . . . . . . 121
E.5 Action - Delay. . . . . . . . . . . . . . . . . . . . . . . . . . . . . . . . . . . . . . . . . . . . . . . . . . . . . . . . . . . . . 122
E.6 Action - Display Message. . . . . . . . . . . . . . . . . . . . . . . . . . . . . . . . . . . . . . . . . . . . . . . . . . . . 123
E.7 Action - Distribute Files . . . . . . . . . . . . . . . . . . . . . . . . . . . . . . . . . . . . . . . . . . . . . . . . . . . . . 124
E.8 Action - Edit INI File . . . . . . . . . . . . . . . . . . . . . . . . . . . . . . . . . . . . . . . . . . . . . . . . . . . . . . . . 124
E.8.1 Filename . . . . . . . . . . . . . . . . . . . . . . . . . . . . . . . . . . . . . . . . . . . . . . . . . . . . . . . . . 124
E.8.2 Encoding . . . . . . . . . . . . . . . . . . . . . . . . . . . . . . . . . . . . . . . . . . . . . . . . . . . . . . . . . 125
E.8.3 Create File, If Does Not Exist . . . . . . . . . . . . . . . . . . . . . . . . . . . . . . . . . . . . . . . . . 125
E.8.4 INI Changes . . . . . . . . . . . . . . . . . . . . . . . . . . . . . . . . . . . . . . . . . . . . . . . . . . . . . . . 125
E.8.5 Advanced Options . . . . . . . . . . . . . . . . . . . . . . . . . . . . . . . . . . . . . . . . . . . . . . . . . . 127
E.9 Action - Edit Text File . . . . . . . . . . . . . . . . . . . . . . . . . . . . . . . . . . . . . . . . . . . . . . . . . . . . . . . 128
E.10 Action - End Process . . . . . . . . . . . . . . . . . . . . . . . . . . . . . . . . . . . . . . . . . . . . . . . . . . . . . . . 130
E.11 Action - File Removal . . . . . . . . . . . . . . . . . . . . . . . . . . . . . . . . . . . . . . . . . . . . . . . . . . . . . . . 130
E.12 Action - Install Bundle . . . . . . . . . . . . . . . . . . . . . . . . . . . . . . . . . . . . . . . . . . . . . . . . . . . . . . 132
E.13 Action - Install Directory . . . . . . . . . . . . . . . . . . . . . . . . . . . . . . . . . . . . . . . . . . . . . . . . . . . . . 132
E.14 Action - Install Files . . . . . . . . . . . . . . . . . . . . . . . . . . . . . . . . . . . . . . . . . . . . . . . . . . . . . . . . 135
E.15 Action - Install MSI . . . . . . . . . . . . . . . . . . . . . . . . . . . . . . . . . . . . . . . . . . . . . . . . . . . . . . . . . 137
E.16 Action - Install MSP . . . . . . . . . . . . . . . . . . . . . . . . . . . . . . . . . . . . . . . . . . . . . . . . . . . . . . . . 140
E.17 Action - Install Network MSI . . . . . . . . . . . . . . . . . . . . . . . . . . . . . . . . . . . . . . . . . . . . . . . . . . 142
E.18 Action - Launch Bundle . . . . . . . . . . . . . . . . . . . . . . . . . . . . . . . . . . . . . . . . . . . . . . . . . . . . . 145
E.19 Action - Launch Java Application . . . . . . . . . . . . . . . . . . . . . . . . . . . . . . . . . . . . . . . . . . . . . . 146
E.20 Action - Launch URL . . . . . . . . . . . . . . . . . . . . . . . . . . . . . . . . . . . . . . . . . . . . . . . . . . . . . . . 148
E.21 Action - Launch Executable . . . . . . . . . . . . . . . . . . . . . . . . . . . . . . . . . . . . . . . . . . . . . . . . . . 149
E.21.1 General . . . . . . . . . . . . . . . . . . . . . . . . . . . . . . . . . . . . . . . . . . . . . . . . . . . . . . . . . . 149
E.21.2 Advanced. . . . . . . . . . . . . . . . . . . . . . . . . . . . . . . . . . . . . . . . . . . . . . . . . . . . . . . . . 150
E.21.3 Launch Options . . . . . . . . . . . . . . . . . . . . . . . . . . . . . . . . . . . . . . . . . . . . . . . . . . . . 152
Contents 7

E.22 Action - Launch Windows Thin Client Application . . . . . . . . . . . . . . . . . . . . . . . . . . . . . . . . . 153
E.22.1 ICA Session . . . . . . . . . . . . . . . . . . . . . . . . . . . . . . . . . . . . . . . . . . . . . . . . . . . . . . . 153
E.22.2 RDP Session . . . . . . . . . . . . . . . . . . . . . . . . . . . . . . . . . . . . . . . . . . . . . . . . . . . . . . 154
E.23 Action - Prompt User . . . . . . . . . . . . . . . . . . . . . . . . . . . . . . . . . . . . . . . . . . . . . . . . . . . . . . . 156
E.24 Action - Reboot/Shutdown . . . . . . . . . . . . . . . . . . . . . . . . . . . . . . . . . . . . . . . . . . . . . . . . . . . 157
E.25 Action - Registry Edit . . . . . . . . . . . . . . . . . . . . . . . . . . . . . . . . . . . . . . . . . . . . . . . . . . . . . . . 159
E.25.1 Registry Tree . . . . . . . . . . . . . . . . . . . . . . . . . . . . . . . . . . . . . . . . . . . . . . . . . . . . . . 160
E.25.2 Advanced Settings. . . . . . . . . . . . . . . . . . . . . . . . . . . . . . . . . . . . . . . . . . . . . . . . . . 163
E.26 Action - Run Script . . . . . . . . . . . . . . . . . . . . . . . . . . . . . . . . . . . . . . . . . . . . . . . . . . . . . . . . . 164
E.26.1 Specify a File on a Managed Device . . . . . . . . . . . . . . . . . . . . . . . . . . . . . . . . . . . . 164
E.26.2 Define Your Own Script . . . . . . . . . . . . . . . . . . . . . . . . . . . . . . . . . . . . . . . . . . . . . . 166
E.26.3 Select From This Device . . . . . . . . . . . . . . . . . . . . . . . . . . . . . . . . . . . . . . . . . . . . . 168
E.27 Action - Start/Stop Service . . . . . . . . . . . . . . . . . . . . . . . . . . . . . . . . . . . . . . . . . . . . . . . . . . . 170
E.28 Action - Store Personality. . . . . . . . . . . . . . . . . . . . . . . . . . . . . . . . . . . . . . . . . . . . . . . . . . . . 171
E.29 Action - Terminate Application . . . . . . . . . . . . . . . . . . . . . . . . . . . . . . . . . . . . . . . . . . . . . . . . 172
E.30 Action - Terminate Application Prompt. . . . . . . . . . . . . . . . . . . . . . . . . . . . . . . . . . . . . . . . . . 173
E.31 Action - Undo Install Actions . . . . . . . . . . . . . . . . . . . . . . . . . . . . . . . . . . . . . . . . . . . . . . . . . 174
E.32 Action - Uninstall Bundle . . . . . . . . . . . . . . . . . . . . . . . . . . . . . . . . . . . . . . . . . . . . . . . . . . . . 174
E.33 Action - Verify Bundle. . . . . . . . . . . . . . . . . . . . . . . . . . . . . . . . . . . . . . . . . . . . . . . . . . . . . . . 175
E.34 Action - Verify Install Actions . . . . . . . . . . . . . . . . . . . . . . . . . . . . . . . . . . . . . . . . . . . . . . . . . 176
novdocx (en) 16 April 2010
F Troubleshooting 177
G Best Practices 183
G.1 Changing the Look and Feel of the Start Menu on a Windows Vista Device . . . . . . . . . . . . . 183
G.2 Pinning Applications to the Start Menu on a Windows Vista Device . . . . . . . . . . . . . . . . . . . 183
G.3 Assigning Bundles to a Device or User . . . . . . . . . . . . . . . . . . . . . . . . . . . . . . . . . . . . . . . . . 183
G.4 ZENworks Explorer Folder Naming Convention. . . . . . . . . . . . . . . . . . . . . . . . . . . . . . . . . . . 184
H Macros 185
H.1 Windows Macros . . . . . . . . . . . . . . . . . . . . . . . . . . . . . . . . . . . . . . . . . . . . . . . . . . . . . . . . . . 185
H.2 Login Script Macros . . . . . . . . . . . . . . . . . . . . . . . . . . . . . . . . . . . . . . . . . . . . . . . . . . . . . . . . 187
I Documentation Updates 189
I.1 March 30, 2010: SP3 (10.3) . . . . . . . . . . . . . . . . . . . . . . . . . . . . . . . . . . . . . . . . . . . . . . . . . . 189
8 ZENworks 10 Configuration Management Software Distribution Reference

About This Guide
novdocx (en) 16 April 2010
This ZENworks 10 Configuration Management Software Distribution Reference includes conceptual
®
and task-based information to help you effectively manage software distribution in your Novell
®
ZENworks
Chapter 1, “Basic Concepts,” on page 11
Chapter 2, “Creating Bundles,” on page 19
Chapter 3, “Managing Bundles,” on page 45
Chapter 4, “Managing Bundle Groups,” on page 77
Chapter 5, “Managing Folders,” on page 85
Chapter 6, “Managing Bundles by using the ZENworks Adaptive Agent,” on page 87
Appendix A, “Install, Uninstall, and Repair Parameters,” on page 95
Appendix B, “Authentication Hook,” on page 103
Appendix C, “Novell File Upload Extension,” on page 105
Appendix D, “Bundle Schedules Types,” on page 109
Appendix E, “Actions,” on page 115
Appendix F, “Troubleshooting,” on page 177
Appendix G, “Best Practices,” on page 183
Appendix H, “Macros,” on page 185
Appendix I, “Documentation Updates,” on page 189
10 Configuration Management SP3 system. This guide is organized as follows:
Audience
This guide is intended for ZENworks Configuration Management administrators.
Feedback
We want to hear your comments and suggestions about this manual and the other documentation
included with this product. Please use the User Comments feature at the bottom of each page of the
online documentation, or go to the Novell
®
Documentation Feedback site (http://www.novell.com/
documentation/feedback.html) and enter your comments there.
Additional Documentation
ZENworks Configuration Management is supported by other documentation (in both PDF and
HTML formats) that you can use to learn about and implement the product. For additional
documentation, see the ZENworks 10 Configuration Management SP3 documentation (http://
www.novell.com/documentation/zcm10/).
Documentation Conventions
In Novell documentation, a greater-than symbol (>) is used to separate actions within a step and
items in a cross-reference path.
About This Guide 9

A trademark symbol (®, TM, etc.) denotes a Novell trademark. An asterisk (*) denotes a third-party
trademark.
When a single pathname can be written with a backslash for some platforms or a forward slash for
other platforms, the pathname is presented with a backslash. Users of platforms that require a
forward slash, such as Linux*, should use forward slashes as required by your software.
novdocx (en) 16 April 2010
10 ZENworks 10 Configuration Management Software Distribution Reference

1
Basic Concepts
Novell® ZENworks® Configuration Management provides great flexibility in distributing software.
You can distribute applications and individual files, or simply make modifications to existing files
on a device.
The following sections contain additional information that is important as you begin creating and
managing bundles:
Section 1.1, “Bundles,” on page 11
Section 1.2, “Assigning Bundles to Devices vs. Users,” on page 12
Section 1.3, “Packaging Considerations,” on page 12
Section 1.4, “Dependency Bundles,” on page 13
Section 1.5, “Content,” on page 16
novdocx (en) 16 April 2010
1
1.1 Bundles
Software is distributed through the use of bundles. A bundle consists of all the files, configuration
settings, installation instructions, and so forth required to deploy and manage the application or files
on a device. There are four types of bundles you can create:
Directive Bundle: Performs one or more actions on a device. For example, you can use a
Directive bundle to edit a Windows* INI file or text file. You can run a script, start or stop a
service, or delete a file. In addition, the bundle includes creating various other actions and
personality actions such as Store Personality and Apply Personality actions.
File Bundle: Copies or installs files or directories to a device. For example, you can use a File
bundle to include configuration files or data files. A File bundle is useful to distribute files that
are not part of a Windows bundle.
Imaging Bundle: Performs operations before the operating system boots. The various Imaging
bundle types let you install images on one or more devices, or run ZENworks scripts containing
any commands that you can issue from the imaging bash prompt.
Windows Bundle: Distributes a Microsoft* Windows Installer (MSI) package, Microsoft
Windows Software Patch (MSP) package, thin-client application, or other Windows-based
applications to a Windows device.
The software included with a bundle is uploaded to the ZENworks Server repository. This enables
the ZENworks Server and ZENworks Adaptive Agent to distribute the software without requiring
access to any other network locations.
To create a software bundle, you use the Create New Bundle Wizard in ZENworks Control Center or
by using the zman command line utility. For more information on Creating Bundle using ZENworks
Control Center, see Chapter 2, “Creating Bundles,” on page 19 and for Creating Bundle using zman
command line utility, see “ZENworks Command Line Utilities” in the ZENworks 10 Configuration
Management Command Line Utilities Reference.
The sections in this guide provide conceptual and task-based information to help you effectively
manage software distribution in your ZENworks system. You can also use the online Help system
for information about creating bundles.
Basic Concepts
11

1.2 Assigning Bundles to Devices vs. Users
You can assign bundles to both users and devices. There are differences between the two assignment
types that you need to be aware of. When you assign a bundle to users, the bundle is available to all
assigned users regardless of the device they log on to. When you assign a bundle to a device, the
bundle is available to all users who log on to the assigned device.
1.3 Packaging Considerations
Because of the way that ZENworks Configuration Management handles bundle packaging, be aware
of the following when you create bundles:
Time Required for Packaging: Creating large MSI and MSP bundles might take several
hours to package before they are available on ZENworks content servers (ZENworks Servers
and Content Distribution Points) in your Management Zone.
Large application files are compressed and encrypted, resulting in smaller bundles that reduce
bandwidth during transmission and provide greater security during transmission and on the
content server. The encrypted bundles cannot be removed from the content server and
inappropriately used.
Space Required for Packaging: Creating bundles that contain content temporarily requires up
to twice the amount of disk space as the original files. The bundle creation process uploads
copies of the original files from the local machine to a temporary directory on the ZENworks
content server. The process then packages those files as encrypted, compressed ZENworks
content files. After the ZENworks content files are created, the original uploaded files are
automatically deleted.
If you are using ZENworks Control Center to create the bundle, and if for some reason you do
not log out correctly (you close your browser before completing the Create New Bundle
Wizard, you browse to somewhere else, or your machine crashes), the temporary directory
mentioned above is automatically cleared after the session time-out is reached (30 minutes, by
default).
novdocx (en) 16 April 2010
In some circumstances (the ZENworks Server goes down during processing, for example), the
bundle creation process is unable to delete these temporary files. You can manually delete these
temporary files, as needed.
Depending on the operating system and the utility used to create the bundle, the temporary files
are located in the following directories:
Table 1-1 Location of Temporary Files for Windows
Utility Used to Create Bundle Location of Temporary Files
ZENworks Control Center
zman (command line utility)
ZENworks Migration Utility
12 ZENworks 10 Configuration Management Software Distribution Reference
zenworks_home\share\tomcat\temp
zenworks_home\work\content-repo\tmp
zenworks_home\work\collection\datamodel

Table 1-2 Location of Temporary Files for Linux
Utility Used to Create Bundle Location of Temporary Files
novdocx (en) 16 April 2010
ZENworks Control Center
zman (command line utility)
ZENworks Migration Utility
/opt/novell/zenworks/share/tomcat/temp/
/var/opt/novell/zenworks/content-repo/tmp/
/var/opt/novell/zenworks/collection/datamodel/
1.4 Dependency Bundles
When you create the following actions for a bundle, you create bundle dependencies:
Action - Install Bundle
Action - Launch Bundle
Action - Uninstall Bundle
Action - Verify Bundle
A bundle’s Dependency Bundles tree shows the chaining information of that bundle and the action
sets that each dependency is in. To view the Dependency Bundles tree in ZENworks Control Center,
click the Bundles tab, click a bundle that has dependent bundles, then on the Summary tab, click the
Display Bundle Dependencies link in the Dependency Bundles row. If the selected bundle does not
have dependent bundles, the link displays None instead of Display Bundle Dependencies.
The following sections contain additional information:
Section 1.4.1, “Primary Applications vs. Dependent Applications,” on page 13
Section 1.4.2, “Bundle Chains,” on page 14
Section 1.4.3, “Distributing, Installing, and Launching a Bundle That Has Dependencies,” on
page 15
1.4.1 Primary Applications vs. Dependent Applications
When working with bundle dependencies, the primary bundle is the bundle for which you are
establishing dependencies. The bundles that are defined as dependencies are called the dependent
bundles. The following illustration shows this relationship. Application A as the primary bundle
with Applications B, C, and D as dependent bundles.
Figure 1-1 Dependency Bundle Tree
A primary bundle can have one dependent application or, as shown in the above example, it can
have multiple dependent applications.
Basic Concepts 13

In addition, a bundle can be both a primary bundle and a dependent bundle, as shown in the
following illustration. Application A as the primary bundle, with Applications B, B1, B2, C, and D
as dependent bundles.
Figure 1-2 Dependency Bundle Tree
In the above example, Application B is one of Application A's dependent bundles. At the same time,
Application B has dependencies on two bundles, Application B1 and Application B2.
1.4.2 Bundle Chains
novdocx (en) 16 April 2010
A bundle chain is two or more bundles linked together by dependencies. In its simplest form, a
application chain consists of two levels, as shown in the following illustration.
Figure 1-3 Dependency Bundle Tree
However, when bundle dependencies are nested, a bundle chain can grow to include many levels. In
the following example, Application A has a dependency on Application B. Application B, in turn,
has dependencies on Application B1 and Application B2. As a result, all three bundles (B, B1, B2),
in addition to applications C and D, must be present in order for Application A to run.
Figure 1-4 Dependency Bundle Tree
In some cases, a bundle might belong to more than one bundle chain, as in the following example
where Application D is a dependent application for both Application A and Application E.
14 ZENworks 10 Configuration Management Software Distribution Reference

1.4.3 Distributing, Installing, and Launching a Bundle That Has Dependencies
When setting up bundle dependencies, you should be aware of the following:
Bundle Assignment: A dependent bundle does not need to be assigned to devices or users. The
primary bundle, however, must be assigned to one or more devices or users for it to function
properly.
novdocx (en) 16 April 2010
Distribution and Installation: If dependent bundles have not already been distributed to or
installed on the user's workstation, when a user launches or installs a bundle, ZENworks Adaptive
Agent distributes and installs them. ZENworks Adaptive Agent distributes a dependent bundle only
once, unless the dependent bundle’s version is updated or the distribution or installation is
unsuccessful. If ZENworks Adaptive Agent is unable to distribute or install a dependent bundle (for
example, the user’s workstation does not meet the dependent bundle’s system requirements), the
primary bundle is not launched or installed.
Distribution Through an Add-On Image: If you distribute a bundle through an image add-on, its
dependent bundles must be included as another image add-on. Otherwise, the distribution of the
primary bundle fails.
Distribution to Disconnected Workstations: For disconnected workstations, the bundles must be
force cached to the workstation before it becomes disconnected. If changes are made to dependent
bundles after the bundles have been cached to workstations, the version number of the primary
bundle must be updated in order to force a re-cache of the bundles.
Launch: Each time a bundle is launched, ZENworks Adaptive Agent performs any launch
operations, such as other actions, defined for its dependent bundles.
Reboot/Shutdown: Ensure that the dependent bundle does not include a Reboot / Shutdown action.
Redeploying a Bundle to Refresh Its Dependencies: If you change the dependencies of a bundle
that has already been replicated to content servers, you must redeploy the bundle. This ensures that
each content server has all of the dependencies required by the bundle.
To redeploy the bundle from the Bundles tab, locate and click the bundle to display its details, then
click the Content Servers tab. In the Primary Server Replication Status list, select the check box next
to the Primary Servers, then click Include to replicate the bundle to the servers. Repeat this
procedure for Satellite devices as necessary.
Basic Concepts 15

To redeploy the bundle from the Devices tab, locate and click the appropriate device to display its
details, then click the Content tab. In the Replication Settings list, select the check box next to the
bundles, then click Include to replicate the bundle.
The bundle will be redeployed according to your Content Replication settings. For more
information, see “Content Replication” in the ZENworks 10 Configuration Management System
Administration Reference.
1.5 Content
When you create bundles containing content, the content is copied to content servers (ZENworks
Servers or Content Distribution Points), replicated to other content servers, and delivered to
managed devices.
The following sections contain additional information:
Section 1.5.1, “Content Replication,” on page 16
Section 1.5.2, “Content Delivery,” on page 16
novdocx (en) 16 April 2010
1.5.1 Content Replication
Content Replication lets you determine how often content (bundle and policy files) is updated on the
ZENworks (primary) Servers and Content Distribution Points. ZENworks Servers and Content
Distribution Points are collectively referred to as content servers when discussing them in their roles
of hosting content.
When a bundle or policy that contains content is added to the Management Zone, the ZENworks
database is updated to reflect the addition of the content. Content servers are responsible for
periodically reading the ZENworks database to discover new content. Each content server that does
not have the content then retrieves the content from a content server where it resides.
If content has been removed from the Management Zone, each content server also removes the
obsolete content during the periodic update.
For more information, see “Content Replication” in the ZENworks 10 Configuration Management
System Administration Reference.
1.5.2 Content Delivery
Content delivery, or distribution, refers to the process of transferring bundle and policy content from
a content server (ZENworks Server or Content Distribution Point) to a managed device.
There are a variety of settings you can use to determine how content is delivered to managed
devices. You can:
Set up Closest Server rules that determine from which content server a managed device
downloads its content.
Schedule times, referred to as delivery blackout dates, when content cannot be downloaded by
managed devices.
Decide how often you want managed devices to look for new content to download.
16 ZENworks 10 Configuration Management Software Distribution Reference

For information about performing these tasks, see “Content Delivery” in the ZENworks 10
Configuration Management System Administration Reference.
novdocx (en) 16 April 2010
Basic Concepts 17

novdocx (en) 16 April 2010
18 ZENworks 10 Configuration Management Software Distribution Reference

2
Creating Bundles
A bundle consists of all the files, configuration settings, installation instructions, and so forth
required to deploy and manage the application or files on a device.
®
Novell
Control Center or by using the zman command line utility.
The following sections contain step-by-step instructions about creating bundles by using ZENworks
Control Center:
The following section explains how to create bundles by using the zman command line utility:
ZENworks® Configuration Management lets you create bundles by using ZENworks
Section 2.1, “Creating Directive Bundles,” on page 19
Section 2.2, “Creating File Bundles,” on page 23
Section 2.3, “Creating Imaging Bundles,” on page 31
Section 2.4, “Creating Windows Bundles,” on page 31
novdocx (en) 16 April 2010
2
Section 2.5, “Creating Bundles by Using the zman Command Line Utility,” on page 39
2.1 Creating Directive Bundles
A Directive bundle lets you perform one or more actions on one or more devices, regardless of
platform. For example, you can use a Directive bundle to edit a Windows INI file or text file. You
can run a script, start or stop a service, delete a file, and more. In addition, the bundle includes
various other actions and personality actions such as Store Personality and Apply Personality.
You can use ZENworks Control Center or the zman command line utility to create bundles. The
following procedure explains how to create a bundle using ZENworks Control Center. If you prefer
the zman command line utility, see “Bundle Commands” in “ZENworks Command Line Utilities”.
To create a Directive bundle:
1 In ZENworks Control Center, click the Bundles tab.
2 In the Bundle list, click New, then click Bundle to display the Select Bundle Type page.
Creating Bundles
19

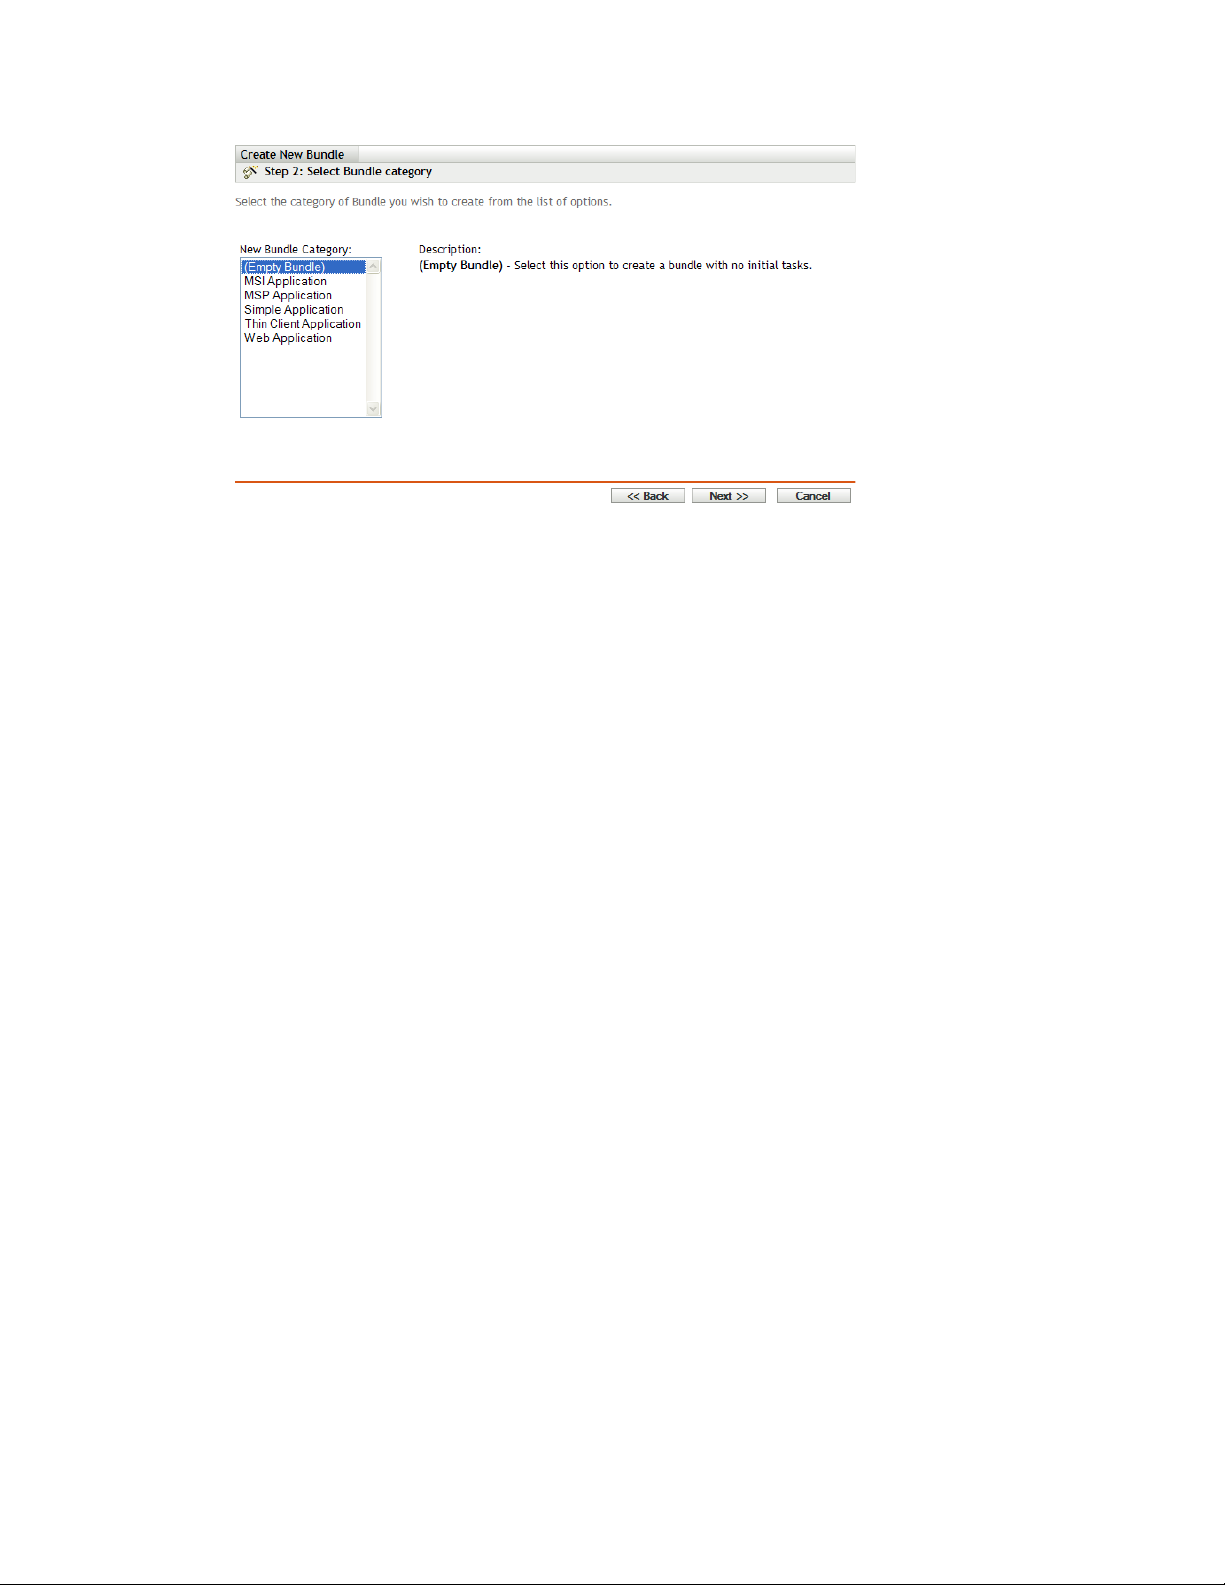
3 Select Directive Bundle, then click Next to display the Select Bundle Category page.
novdocx (en) 16 April 2010
4 Select the desired bundle category:
Empty Bundle: A bundle with no initial tasks. This bundle category is useful to quickly create
a bundle without performing all of the tasks in the Create New Bundle Wizard. After you create
the empty bundle, you can edit its details to add assignments, actions, and so forth, at a later
time.
Action Bundle: A bundle with one or more actions.
Apply Personality: A bundle that applies the personality of one or more users on the managed
device from a personality file stored on the local or network path.
Store Personality: A bundle that stores the personality of one or more users on the managed
device to a personality file on the local or network path. The personality files are not uploaded
to the ZENworks content repository.
5 Click Next to display the Define Details page, then fill in the fields.
Bundle Name: Provide a name for the bundle. The bundle name must be different than the
name of any other item (bundle, group, folder, and so forth) that resides in the same folder. The
name you provide displays in ZENworks Control Center and the ZENworks Adaptive Agent
(on managed devices).
20 ZENworks 10 Configuration Management Software Distribution Reference

For more information, see “Naming Conventions in ZENworks Control Center”.
Folder: Type the name or browse to and select the ZENworks Control Center folder where you
want the bundle to reside. The default is
/bundles
, but you can create additional folders to
organize your bundles.
Icon: ZENworks Configuration Management lets you select an icon that users see during
installation of a particular bundle. This icon applies only to the icon displayed by the
ZENworks Adaptive Agent on the managed device. ZCC uses default icons to represent the
different bundles (Directive, File, Imaging, and Windows).
To select an icon, click Browse, then browse to and select the icon you want to display on
managed devices.
If the desired icon is embedded in a
.exe, .dll
, or
.ico
file that has multiple icons from
which to choose, you must install additional items before you can browse to and select the
desired icon.
For Mozilla Firefox*, if you have not already installed the Novell File Upload extension on this
device, you must do so before you can download and install the download plug-in or browse to
and upload the icon. For more information, see “Novell File Upload Extension” on page 105.
After you install the Novell File Upload extension, you must also install the download plug-in.
To do so, click the Click here to download plugin message box that displays in the Select Icon
dialog box (if you have already installed the plug-in on this device, the plug-in box does not
display), click Manual Install, then click Install Now.
For Microsoft Internet Explorer*, you must install the Novell File Upload ActiveX* control
only; there is no download plug-in for Internet Explorer. For more information, see “Novell
File Upload Extension” on page 105.
After you have downloaded and installed the necessary extensions and plug-in, click to
browse to and select the icon you want the ZENworks Adaptive Agent to display to represent
the bundle. If the icon is embedded in a
.exe, .dll
, or
.ico
file that contains multiple icons,
an additional dialog box displays to let you select the desired icon.
novdocx (en) 16 April 2010
If you do not specify an icon, a default icon is used.
Description: Provide a short description of the bundle's contents. This description displays in
ZENworks Control Center and in the ZENworks Adaptive Agent.
6 Click Next, then skip to the appropriate step, depending on which bundle category you chose in
Step 4:
Action Bundle: Continue with Step 7.
Apply Personality: Continue with Step 8.
Store Personality: Skip to Step 9.
7 (Conditional) If you are creating an Action bundle, follow the wizard prompts until you reach
the Summary page, then skip to Step 10.
Click Help for information about each page or refer to the following table:
Wizard Page and Field Details
Add Actions page > Add Click Add, then click an action. Fill in the options in the dialog
box that displays. Click the Help button if you need additional
information.
Add Actions page > Remove Select the check box next to the action (or actions) you want to
remove. Click Remove
Creating Bundles 21

Wizard Page and Field Details
Add Actions page > Move Up Select the check box next to the action (or actions) you want to
move up. Click Move Up.
Add Actions page > Move Down Select the check box next to the action (or actions) you want to
move down. Click Move Down.
Add Actions page > Enable Select the check box next to the action (or actions) you want to
enable. Click Enable.
Add Actions page > Disable Select the check box next to the action (or actions) you want to
disable. Click Disable.
Add Actions page > Options Click Options. Modify the desired settings, then click OK to
return to the Add Actions page. Click the Help button if you need
additional information.
novdocx (en) 16 April 2010
Add Actions page > Continue on
Failure
Select the check box next to the action (or actions) if you want
to continue performing the remaining actions in the set on failure
of the selected action. Select the check box in the Continue on
Failure column, then click Apply.
8 (Conditional) If you are creating an Apply Personality action, follow the wizard prompts until
you reach the Summary page, then skip to Step 10.
Click Help for information about each page or refer to the following table:
Wizard Page and Field Details
Apply Personality page >
Upload a template from this
device field
Apply Personality page >
Specify a template on the
managed device field
Apply Personality page >
Path from where the PNP file
is to be loaded field
Apply Personality page >
Password to decrypt the PNP
file
Select this option and click to display the Upload Content dialog
box. Browse to and select the template to upload.
Select this option to specify the path of the personality migration
template file on the managed device. You can also specify the UNC
path of the file.
Specify the path of the PNP file containing the migration settings
and data on the managed device. You can also specify the UNC
path of the file.
Select this check box to enter the password to decrypt the PNP file.
If you spanned the PNP file, be sure to keep the spanned files and
the PNP file in the same folder.
9 (Conditional) If you are creating a Store Personality action, follow the wizard prompts until
you reach the Summary page, then skip to Step 10.
Click Help for information about each page or refer to the following table:
Wizard Page and Field Details
Store Personality page >
Upload a template from this
device field
Select this option and click to display the Upload Content dialog
box. Browse to and select the template to upload.
22 ZENworks 10 Configuration Management Software Distribution Reference

Wizard Page and Field Details
novdocx (en) 16 April 2010
Store Personality page >
Specify a template file on the
managed device field
Store Personality page >
Path where the PNP file is to
be created field
Store Personality page >
Password to encrypt the PNP
file
Store Personality page >
Span to multiple files
Select this option to specify the path of the personality migration
template file on the managed device. You can also specify the UNC
path of the file.
Specify the path of the PNP file on the managed device for storing
the migration settings and data. You can also specify the UNC path
of the file.
Select this check box to enter a password to protect the PNP file.
In the Re-enter the password field, re-enter the password to confirm
it.
Select this option to span the personality migration data across
multiple files to enable you to store data in removable media.
Select the Never Span option to migrate personalities without
spanning the files.
Select the Span at the size option to specify a span size for the files.
The default span size is 650 MB.
10 Review the information on the Summary page, making any changes to the bundle settings by
using the Back button as necessary.
11 (Conditional) Select the Define Additional Properties check box to display the bundle’s
Summary page after the wizard completes. You can use the various tabs to edit the bundle’s
assignments, system requirements, actions, settings, and content replication settings.
12 Click Finish to create the bundle as configured according to the settings on the Summary page.
When you click Finish, the bundle is created but it does not have users or devices assigned,
schedules, and group membership. At some point, you need to configure additional options for
the bundle by continuing with Section 3.2, “Assigning Existing Bundles to Devices,” on
page 46 or Section 3.3, “Assigning Existing Bundles to Users,” on page 48.
2.2 Creating File Bundles
A File bundle lets you copy or install files or directories to a device. For example, you can use a File
bundle to include configuration files or data files. A File bundle is useful to distribute files that are
not part of a Windows bundle.
You can use ZENworks Control Center or the zman command line utility to create bundles. The
following procedure explains how to create a bundle using ZENworks Control Center. If you prefer
the zman command line utility, see “Bundle Commands” in “ZENworks Command Line Utilities”.
For important information about creating File bundles, see Section 1.3, “Packaging Considerations,”
on page 12.
To create a File bundle:
1 In ZENworks Control Center, click the Bundles tab.
2 In the Bundle list, click New, then click Bundle to display the Select Bundle Type page.
Creating Bundles 23

3 Select File Bundle, then click Next to display the Select Bundle Category page.
novdocx (en) 16 April 2010
4 Select the desired bundle category:
Empty Bundle: A bundle with no initial tasks. This bundle category is useful to quickly create
a bundle without performing all of the tasks in the Create New Bundle Wizard. After you create
the empty bundle, you can edit its details to add assignments, actions, and so forth, at a later
time.
Copy Directory: Copies a directory (folder) onto a managed device (or from the device to
somewhere else). The directory is copied from one location to another at the time this bundle is
launched on the managed device. The directory is not uploaded to the ZENworks content
system.
Copy Files: Copies one or more files onto a managed device (or from the device to somewhere
else). The files are copied from one location to another at the time this bundle is launched on
the managed device. The files are not uploaded to the ZENworks content system.
Create/Delete Directory: Creates or deletes a directory on the managed device.
Install Directory: Uploads the contents of a directory and all of its subdirectories to the
ZENworks content system and then installs them to the destination path on the managed
device. The content (by default) is replicated to all primary servers.
24 ZENworks 10 Configuration Management Software Distribution Reference

Install Files: Uploads selected files to the ZENworks content system and then installs them to
the destination path on the managed device. The content (by default) is replicated to all primary
servers.
NOTE: Copying a file or directory copies the file or directory from one location to another
without uploading the files into the ZENworks content repository. Copying a file or directory is
described as copying without using content. When copying a file or directory, the managed
device performs the copy operation and must be able to resolve both the source and destination
paths. Also, when copying a file or directory, the file or directory is not cached on the managed
device.
Installing a file or directory uploads the file or directory to the ZENworks content repository
before it is distributed to assigned devices. Installing a file or directory is described as copying
using content. When installing a file or directory, the file or directory is cached on the managed
device.
Installing an executable file does not launch or execute the file. To launch or execute the file,
you must add a launch executable action (Launch Windows Executable, Launch Java
Application, and so forth) to the bundle. For more information, see Appendix E, “Actions,” on
page 115.
novdocx (en) 16 April 2010
5 Click Next to display the Define Details page, then fill in the fields:
Bundle Name: Provide a name for the bundle. The bundle name must be different than the
name of any other item (bundle, group, folder, and so forth) that resides in the same folder. The
name you provide displays in ZENworks Control Center and the ZENworks Adaptive Agent
(on managed devices).
For more information, see “Naming Conventions in ZENworks Control Center”.
Folder: Type the name or browse to and select the ZENworks Control Center folder where you
want the bundle to reside. The default is
/bundles
, but you can create additional folders to
organize your bundles.
Icon: ZENworks Configuration Management lets you select an icon that users see during
installation of a particular bundle. This icon applies only to the icon displayed by ZENworks
Adaptive Agent on the managed device. ZCC uses default icons to represent the different
bundles (Directive, File, Imaging, and Windows).
To select an icon, click Browse, then browse to and select the icon you want to display on
managed devices.
If the desired icon is embedded in a
.exe, .dll
, or
.ico
file that has multiple icons from
which to choose, you must install additional items before you can browse to and select the
desired icon.
For Mozilla Firefox, if you have not already installed the Novell File Upload extension on this
device, you must do so before you can download and install the download plugin or browse to
and upload the icon. For more information, see “Novell File Upload Extension” on page 105.
After you install the Novell File Upload extension, you must also install the download plugin.
To do so, click the Click here to download plugin message box that displays in the Select Icon
dialog box (if you have already installed the plugin on this device, the plugin box does not
display), click Manual Install, then click Install Now.
For Microsoft Internet Explorer, you must install the Novell File Upload ActiveX control only;
there is no download plugin for Internet Explorer. For more information, see “Novell File
Upload Extension” on page 105.
Creating Bundles 25

After you have downloaded and installed the necessary extensions and plugin, click to
browse to and select the icon you want ZENworks Adaptive Agent to display to represent the
bundle. If the icon in embedded in a
.exe, .dll
, or
.ico
file that contains multiple icons, an
additional dialog box displays to let you select the desired icon.
If you do not specify an icon, a default icon is used.
Description: Provide a short description of the bundle's contents. This description displays in
ZENworks Control Center and in the ZENworks Adaptive Agent.
6 Click Next, then skip to the appropriate step, depending on which bundle category you chose in
Step 4:
Copy Directory: Continue with Step 7 on page 26.
Copy Files: Skip to Step 8 on page 27.
Create/Delete Directory: Skip to Step 9 on page 28.
Install Directory: Skip to Step 10 on page 29.
Install Files: Skip to Step 11 on page 29.
7 (Conditional) If you are creating a Copy Directory bundle, follow the wizard prompts until you
reach the Summary page, then skip to Step 12 on page 30.
Click Help for information about each page or refer to the following table:
novdocx (en) 16 April 2010
Wizard Page and Field Details
Select Directory page >
Source Directory field
Select Directory page >
Install the Novell File Upload
extension link
Select Directory page >
Destination Directory field
Select Directory page >
Hidden check box
Select Files page > Read-
only check box
Specify the source directory. The path must be resolvable by the
device on which the bundle is run.
If you have not installed the Novell File Upload extension on this
device, you must do so before you can browse to and upload files.
For more information, see Appendix C, “Novell File Upload
Extension,” on page 105.
Specify the destination directory on the device in which you want to
copy the directory. The path must be resolvable by the device on
which the bundle is run.
Select the Hidden check box to specify that the directory is hidden
after installation.
Select the Read-only check box to specify that the directory is readonly after installation.
26 ZENworks 10 Configuration Management Software Distribution Reference

Wizard Page and Field Details
novdocx (en) 16 April 2010
Select Files page > Copy
Option list
Select a copy option from the list:
Copy Always: Copies the contents of the directory regardless of
whether the files currently exists on the workstation.
Copy If Exists: Copies the contents of the directory only if the files
currently exists on the workstation.
Copy If Does Not Exist: Copies the contents of the directory only if
the files does not currently exist on the workstation
Copy If Newer: Copies the contents of the directory only if the
modified date and time of the file is newer than the existing file’s
date and time, or if the files does not currently exist on the
workstation.
Copy If Newer and Exists: Copies the contents of the directory
only if it already exists on the workstation and the date and time of
the file is newer than the existing file’s date and time.
Copy if Newer Version: Copies the contents of the directory only if
the internal version of the file is newer than the existing file’s version
(if version information is present).
Request Confirmation: Prompts the user to verify that the contents
of the directory should be copied.
Copy If Different: Copies the contents of the directory if the
creation date, creation time, or size of the file is different than the
existing file’s date, time, or size.
8 (Conditional) If you are creating a Copy Files bundle, follow the wizard prompts until you
reach the Summary page, then skip to Step 12 on page 30.
Click Help for information about each page or refer to the following table:
Wizard Page and Field Details
Select Files page > File field Click Add to display the Select File dialog box. Click Browse to
browse and select the file you want to copy to the device, then click
OK. Repeat these steps as many times as necessary to copy the
desired files. The path must be resolvable by the device on which
the bundle is run.
Select Files page > Install the
Novell File Upload extension
link
Select Files page >
Destination Directory field
Select Files page > Create
Shortcuts for Source Files
check box
If you have not installed the Novell File Upload extension on this
device, you must do so before you can browse to and upload files.
For more information, see Appendix C, “Novell File Upload
Extension,” on page 105.
Specify the destination directory on the device in which you want to
copy the file. The path must be resolvable by the device on which
the bundle is run.
Select the Create Shortcuts for Source Files option to create
shortcut icons for the source file on the destination directory. The
source files are not copied to the destination directory.
Creating Bundles 27

Wizard Page and Field Details
novdocx (en) 16 April 2010
Select Files page > Hidden
check box
Select Files page > Read-
only check box
Select Files page > Copy
Option list
Select the Hidden check box to specify that the file is hidden after
installation.
Select the Read-only check box to specify that the file is read-only
after installation.
Select a copy option from the list:
Copy Always: Copies the file regardless of whether the file
currently exists on the workstation.
Copy If Exists: Copies the file only if the file currently exists on the
workstation.
Copy If Does Not Exist: Copies the file only if the file does not
currently exist on the workstation.
Copy If Newer: Copies the file only if its date and time are newer
than the existing file’s date and time, or if the file does not currently
exist on the workstation.
Copy If Newer and Exists: Copies the file only if it already exists
on the workstation and the date and time of the file is newer than the
existing file’s date and time.
Copy if Newer Version: Copies the file only if its internal version is
newer than the existing file’s version (if version information is
present).
Request Confirmation: Prompts the user to verify that the file
should be copied.
Copy If Different: Copies the file if its date, time, or size is different
than the existing file’s date, time, or size.
9 (Conditional) If you are creating a Create/Delete Directory bundle, follow the wizard prompts
until you reach the Summary page, then skip to Step 12 on page 30.
Click Help for information about each page or refer to the following table:
Wizard Page and Field Details
Select Directory page >
Create Directory field
Select Files page > Install the
Novell File Upload extension
link
Select Directory page >
Delete Directory field
Select Directory page >
Directory Name
Select Create Directory option to create a directory on the managed
device.
If you have not installed the Novell File Upload extension on this
device, you must do so before you can browse to and upload files.
For more information, see Appendix C, “Novell File Upload
Extension,” on page 105.
Select Delete Directory option to delete a directory on the managed
device.
Click Browse to browse and select the directory you want to create
or delete on the managed device. You can also specify the directory
name. The path must be resolved by the device on which the bundle
is run.
28 ZENworks 10 Configuration Management Software Distribution Reference

10 (Conditional) If you are creating an Install Directory Files bundle, follow the wizard prompts
until you reach the Summary page, then skip to Step 12 on page 30.
Click Help for information about each page or refer to the following table:
Wizard Page and Field Details
novdocx (en) 16 April 2010
Select Directory page >
Source Directory field
Select Files page > Install the
Novell File Upload extension
link
Select Directory page >
Destination Directory field
Select Directory page >
Hidden check box
Select Directory page >
Read-only check box
Select Directory page > Copy
Option list
Click to display the Select Directory dialog box. Browse to and
select the file to upload. The Status field displays each file’s upload
status.
If you have not installed the Novell File Upload extension on this
device, you must do so before you can browse to and upload files.
For more information, see Appendix C, “Novell File Upload
Extension,” on page 105.
Specify the destination directory in which you want to install the
directory. The path must be resolvable by the device on which the
bundle is run.
Select the Hidden check box to specify that the directory is hidden
after installation.
Select the Read-only check box to specify that the directory is readonly after installation.
Select a copy option from the list:
Copy Always: Installs the directory regardless of whether the
directory currently exists on the workstation.
Copy If Exists: Installs the directory only if the directory currently
exists on the workstation.
Copy If Does Not Exist: Installs the directory only if the directory
does not currently exist on the workstation.
Copy If Newer: Installs the directory only if its date and time are
newer than the existing directory’s date and time, or if the file does
not currently exist on the workstation.
Copy If Newer and Exists: Installs the directory only if it already
exists on the workstation and the time of the directory is newer than
the existing file’s date and time.
Copy if Newer Version: Installs the directory only if its internal
version is newer than the existing directory’s version (if version
information is present).
Request Confirmation: Prompts the user to verify that the
directory should be installed.
Copy If Different: Installs the directory if its date, time, or size is
different than the existing directory’s date, time, or size.
11 (Conditional) If you are creating a Install Files bundle, follow the wizard prompts until you
reach the Summary page, then skip to Step 12 on page 30.
Click Help for information about each page or refer to the following table:
Creating Bundles 29

Wizard Page and Field Details
Select Files page > File field Click Add to display the Select File dialog box. Click Add to browse
and select the file you want to install on the device, then click OK.
Repeat these steps as many times as necessary to copy the desired
files.
You can click Clear to remove all the files from the list.
novdocx (en) 16 April 2010
Select Files page > Install the
Novell File Upload extension
link
Select Directory page >
Destination Directory field
Select Files page > Hidden
check box
Select Files page > Read-
only check box
Select Files page > Copy
Option list
If you have not installed the Novell File Upload extension on this
device, you must do so before you can browse to and upload files.
For more information, see Appendix C, “Novell File Upload
Extension,” on page 105.
Specify the destination directory in which you want to install the file.
The path must be resolvable by the device on which the bundle is
run.
Select the Hidden check box to specify that the file is hidden after
installation.
Select the Read-only check box to specify that the file is read-only
after installation.
Select a copy option from the list:
Copy Always: Copies the file regardless of whether the file
currently exists on the workstation.
Copy If Exists: Copies the file only if the file currently exists on the
workstation.
Copy If Does Not Exist: Copies the file only if the file does not
currently exist on the workstation.
Copy If Newer: Copies the file only if its date and time are newer
than the existing file’s date and time, or if the file does not currently
exist on the workstation.
Copy If Newer and Exists: Copies the file only if it already exists
on the workstation and the time of the file is newer than the existing
file’s date and time.
Copy if Newer Version: Copies the file only if its internal version is
newer than the existing file’s version (if version information is
present).
Request Confirmation: Prompts the user to verify that the file
should be copied.
Copy If Different: Copies the file if its date, time, or size is different
than the existing file’s date, time, or size.
12 Review the information on the Summary page, making any changes to the bundle settings by
using the Back button as necessary.
13 (Conditional) Select the Define Additional Properties check box to display the bundle’s
Summary page after the wizard completes. You can use the various tabs to edit the bundle’s
assignments, system requirements, actions, settings, and content replication settings.
30 ZENworks 10 Configuration Management Software Distribution Reference

14 Click Finish to create the bundle as configured per settings on the Summary page.
When you click Finish, the bundle is created but it does not have users or devices assigned,
schedules, and group membership. At some point in the future, you need to configure
additional options for the bundle by continuing with Section 3.2, “Assigning Existing Bundles
to Devices,” on page 46 or Section 3.3, “Assigning Existing Bundles to Users,” on page 48.
2.3 Creating Imaging Bundles
Imaging bundles let you performs operations before the operating system boots. The various
Imaging bundle types let you install images on one or more devices, or run ZENworks scripts
containing any commands that you can issue from the imaging bash prompt.
For more information about Imaging bundles, see the ZENworks 10 Configuration Management
Preboot Services and Imaging Reference.
2.4 Creating Windows Bundles
A Windows bundle lets you distribute a Microsoft* Windows Installer (MSI) package, Microsoft
Windows Software Patch (MSP) package, thin-client application, or other Windows-based
applications to a Windows device.
novdocx (en) 16 April 2010
You can use ZENworks Control Center or the zman command line utility to create bundles. The
following procedure explains how to create a bundle using ZENworks Control Center. If you prefer
the zman command line utility, see “Bundle Commands” in “ZENworks Command Line Utilities”.
To create a Windows bundle:
1 In ZENworks Control Center, click the Bundles tab.
2 In the Bundle list, click New, then click Bundle to display the Select Bundle Type page.
3 Select Windows Bundle, then click Next to display the Select Bundle Category page.
Creating Bundles 31
4 Select the desired bundle category:
Empty Bundle: A bundle with no initial tasks. This bundle category is useful to quickly create
a bundle without performing all of tasks in the Create New Bundle Wizard. After you create the
empty bundle, you can edit its details to add assignments, actions, and so forth, at a later time.
MSI Application: An application that is packaged as a
.msi
file so that it can be installed by
the Microsoft Windows Installer program.
For important information about creating MSI Application bundles, see Section 1.3,
“Packaging Considerations,” on page 12.
novdocx (en) 16 April 2010
.msp
MSP Application: An application patch that is packaged as a
file so that it can be applied
by the Microsoft Windows Installer program.
For important information about creating MSP Application bundles, see Section 1.3,
“Packaging Considerations,” on page 12.
Simple Application: An example of a Simple Application would be launching Windows
Notepad. Typically, Simple Applications requires ZENworks Adaptive Agent to copy a few
files to the workstation or make a few changes to the workstations registry, INI files,
environment variables, and so forth.
If you have a non-MSI application that is more complex than this, we recommend that you use
ZENworks Software Packaging, powered by AdminStudio ZENworks Edition, to create an
MSI package for the application and then use the MSI Application option to create a bundle.
For more information on installing AdminStudio, see AdminStudio 9.5 ZENworks Edition
Installation Guide (http://www.novell.com/documentation/zcm10/pdfdoc/adminstudio/
AS95ZENInstallGuide.pdf).
For more information on the Software Packaging, see AdminStudio 9.5 ZENworks Edition
User Guide (http://www.novell.com/documentation/zcm10/pdfdoc/adminstudio/
AS95UserGuide.pdf).
Thin-Client Application: An application, running on a terminal server, that is accessed
through a terminal server client session (either RDP or ICA).
Web Application: An application that is launched by using a URL in a Web browser.
5 Click Next to display the Define Details page, then fill in the fields:
32 ZENworks 10 Configuration Management Software Distribution Reference

Bundle Name: Provide a name for the bundle. The bundle name must be different than the
name of any other item (bundle, group, folder, and so forth) that resides in the same folder. The
name you provide displays in ZENworks Control Center and the ZENworks Adaptive Agent
(on managed devices).
For more information, see “Naming Conventions in ZENworks Control Center”.
Folder: Type the name or browse to and select the ZENworks Control Center folder where you
want the bundle to reside. The default is
/bundles
, but you can create additional folders to
organize your bundles.
Icon: ZENworks Configuration Management lets you select an icon that users see during
installation of a particular bundle. This icon applies only to the icon displayed by ZENworks
Adaptive Agent on the managed device. ZCC uses default icons to represent the different
bundles (Directive, File, Imaging, and Windows).
To select an icon, click Browse, then browse to and select the icon you want to display on
managed devices.
If the desired icon is embedded in a
.exe, .dll
, or
.ico
file that has multiple icons from
which to choose, you must install additional items before you can browse to and select the
desired icon.
For Mozilla Firefox, if you have not already installed the Novell File Upload extension on this
device, you must do so before you can download and install the download plugin or browse to
and upload the icon. For more information, see “Novell File Upload Extension” on page 105.
After you install the Novell File Upload extension, you must also install the download plugin.
To do so, click the Click here to download plugin message box that displays in the Select Icon
dialog box (if you have already installed the plugin on this device, the plugin box does not
display), click Manual Install, then click Install Now.
novdocx (en) 16 April 2010
For Microsoft Internet Explorer, you must install the Novell File Upload ActiveX control only;
there is no download plugin for Internet Explorer. For more information, see “Novell File
Upload Extension” on page 105.
After you have downloaded and installed the necessary extensions and plugin, click to
browse to and select the icon you want ZENworks Adaptive Agent to display to represent the
bundle. If the icon in embedded in a
.exe, .dll
, or
.ico
file that contains multiple icons, an
additional dialog box displays to let you select the desired icon.
If you do not specify an icon, a default icon is used.
Description: Provide a short description of the bundle's contents. This description displays in
ZENworks Control Center and in the ZENworks Adaptive Agent.
6 Click Next, then skip to the appropriate step, depending on which bundle category you chose in
Step 4:
MSI Application: Continue with Step 7 on page 33.
MSP Application: Skip to Step 8 on page 36.
Simple Application: Skip to Step 9 on page 37.
Thin Client Application: Skip to Step 10 on page 37.
Web Application: Skip to Step 11 on page 38.
7 (Conditional) If you are creating an MSI Application bundle, follow the wizard prompts until
you reach the Summary page, then skip to Step 12 on page 38.
Click Help for information about each page or refer to the following table:
Creating Bundles 33
Wizard Page and Field Details
novdocx (en) 16 April 2010
Select .msi File page >
Upload .msi file for normal
install field
Select .msi File page >
Enter UNC path of .msi file
for network install field
Use this option if you want the
Server and then distributed from the ZENworks Server to assigned
users and devices. This is referred to a normal install because
ZENworks Adaptive Agent copies the
device’s local drive and then the Microsoft Windows Installer program
installs the application from the local
NOTE: By default, ZENworks Control Center has a 30-minute timeout
value. If you leave ZENworks Control Center idle on your computer for
more than 30 minutes, you are prompted to log in again before
continuing. Because the upload process can take considerable time for
a large
.msi
file, the default timeout value does not apply for this page.
Use this option if you want the Microsoft Windows Installer program to
install the application from the
must specify the complete path to the
during distribution to the workstation.
You can use a mapped drive or UNC path. If you use a drive mapping,
you must ensure that all workstations have the same drive mapped to
the source location. For this reason, we recommend that you specify a
UNC path.
After you create the MSI bundle, you cannot change the
filename; however, you can change the path to the
change the
.msi
filename, the installation fails.
.msi
file copied to the ZENworks
.msi
file to the managed
.msi
file.
.msi
file on a network location. You
.msi
file to use as the source file
.msi
.msi
file. If you
Select .msi File page >
Install the Novell File
Upload extension link
Select .msi File page >
Install Parameters field
Select .msi File page >
Unistall Parameters field
Select .msi File page >
Repair Parameters field
If you have not installed the Novell File Upload extension on this
device, you must do so before you can browse to and upload files. For
more information, see Appendix C, “Novell File Upload Extension,” on
page 105.
Click to display the Install Parameters dialog box, then specify the
desired parameters. For more information, click the Help button or see
Section A.1, “Install Parameters,” on page 95.
Click to display the Uninstall Parameters dialog box, then specify
the desired parameters. For more information, click the Help button or
see Section A.2, “Uninstall Parameters,” on page 97.
Click to display the Repair Parameters dialog box, then specify the
desired parameters. For more information, click the Help button or see
Section A.3, “Repair Parameters,” on page 99.
34 ZENworks 10 Configuration Management Software Distribution Reference

Wizard Page and Field Details
novdocx (en) 16 April 2010
Select .msi File page >
Select Transforms File
field
Select .msi File page >
MSI Properties field
Click Add to browse to and select the desired transform file. You can
upload the transform file or you can specify its location.
Different groups within an organization often use the same application,
but that doesn’t mean they require the same feature set. One of the
benefits of Windows Installer is that if you have 10 groups needing 10
different feature sets or other alterations for the same application, you
can deploy the same MSI package to all 10 user groups, but with a
different transform file (MST) applied for each group.
A transform file is a collection of changes applied to an MSI installation.
It contains all modification information, such as whether features are
installed; how they are installed; which files, shortcuts, and registry
entries are included; and Add/Remove Programs applet information.
If you have vendor-supplied MSI packages, you can use AdminStudio
9.5 ZENworks Edition to create and manage transforms.
The MSI package contains the property values that were defined
during the administrative installation of the application. These property
values determine the way the Microsoft Windows Installer installs the
application to the workstation. In some cases, you might want to
change one or more of the property values. For example, a property
value might define the default location for a user’s work files. By adding
the property to the list and changing the property’s value, you can
override the default location defined in the MSI package.
If necessary, you can add public properties that were not included in
the MSI package. When doing so, you should be careful to add only
those properties that are valid for the package.
To override a property value, you change the property value and add
the property to the Properties list so that Application Launcher knows to
use that property value rather than the one defined in the MSI package.
To do so, click Add to display the MSI Properties dialog box. In the
Name field, select the property whose value you want to override,
specify the new value in the Value field, then click OK to add the
property to the MSI Properties list.
To modify a property that is in the MSI Properties list, select the
property, click Edit, modify the value data, then click OK.
To remove a property from the MSI Properties list, select the property,
then click Remove. Deleting the property causes future installations of
the application to use the property value defined in the MSI package.
Creating Bundles 35

Wizard Page and Field Details
novdocx (en) 16 April 2010
Select Command page >
Executable to run field
The Select Command page lets you specify an optional executable to
.msi
run after the
the executable to run.
If the executable is installed in the
managed device, you must use macros as follows:
On 32-bit managed device:
On 64-bit managed device:
If you have not installed the Novell File Upload extension on this
device, you must do so before you can browse to and upload files. For
more information, see Appendix C, “Novell File Upload Extension,” on
page 105.
file installs. Click Browse to browse for and select
Program Files
%ProgramFiles%\filename
directory on the
.
%ProgramFiles32%\filename
.
8 If you are creating an MSP Application bundle, follow the wizard prompts until you reach the
Summary page, then skip to Step 12 on page 38.
Click Help for information about each page or refer to the following table:
Wizard Page and Field Details
Select .msp File page >
Upload .msp file for normal
install field
Use this option if you want the
Server and then distributed from the ZENworks Server to assigned
users and devices. This is referred to a normal install because
ZENworks Adaptive Agent copies the
device’s local drive and then it is installed from the local
.msp
file copied to the ZENworks
.msp
file to the managed
.msp
file.
Select .msp File page > Enter
UNC path of .msp file for
network install field
Select .msp File page >
Install the Novell File Upload
extension link
Select .msp File page >
Command Line Parameters
field
Use this option if you want to install from the
location. You must specify the complete path to the
as the source file during distribution to the workstation.
You can use a mapped drive or UNC path. If you use a drive
mapping, you must ensure that all workstations have the same drive
mapped to the source location. For this reason, we recommend that
you specify a UNC path.
After you create the MSP bundle, you cannot change the
filename; however, you can change the path to the
.msp
change the
If you have not installed the Novell File Upload extension on this
device, you must do so before you can browse to and upload files.
For more information, see Appendix C, “Novell File Upload
Extension,” on page 105.
After you select the
is automatically populated, for example /p patch_package /qn where
/p
designates a patch file,
and
/qn
specifies an installation with no user interface (silent
installation). To install a
option.
You can, however, specify additional options. For more information,
see the MSDN Web site (http://msdn2.microsoft.com/en-us/library/
aa372866.aspx).
filename, the installation fails.
.msp
file, the Command Line Parameters field
patch_package
.msp
file, you should normally use the
.msp
file on a network
.msp
.msp
specifies the
file to use
.msp
file. If you
.msp
file,
/qn
36 ZENworks 10 Configuration Management Software Distribution Reference

9 If you are creating Simple Application bundle, follow the wizard prompts until you reach the
Summary page, then skip to Step 12 on page 38.
Click Help for information about each page or refer to the following table:
Wizard Page and Field Details
novdocx (en) 16 April 2010
Enter the Command to Run
page > Command field
Enter the Command to Run
page > Install the Novell File
Upload extension link
Enter the Command to Run
page > Command Line
Parameters field
Specify the command to launch the application. You should include
the full path to the executable in case the executable is not in the
device’s search path. This path, whether the application is on the
device’s local drive or a network resource, must be relative to the
device.
For example, if the executable file is on the device’s local drive, you
would specify something like
executable file is on a network resource, you would specify
something like
mapped to the location) or
j:\apps\notepad.exe
\\server1\vol1\apps\notepad.exe
If you have not installed the Novell File Upload extension on this
device, you must do so before you can browse to and upload files.
For more information, see Appendix C, “Novell File Upload
Extension,” on page 105.
Specify any command line parameters that need to be passed to the
executable.
ZENworks Adaptive Agent passes the parameters exactly as they
are specified. Therefore, the parameter syntax you use must exactly
match the syntax the executable requires. For example, if
word.exe
spaces to be enclosed in quotation marks, you would specify the
following:
has a
/f=filepath
c:\winnt\notepad.exe
(if all users will have J:
.
parameter that requires paths with
. If the
/f="c:\my docs\sample.doc"
Enter the Command to Run
page > Working Directory
field
Specify the path to the directory you want the application to use for
its working files.
10 If you are creating a Thin Client Application bundle, follow the wizard prompts until you reach
the Summary page, then skip to Step 12 on page 38.
Click Help for information about each page or refer to the following table:
Wizard Page and Field Details
Configure Thin Client Details
page > ICA Session:
Published Application Name
field
Configure Thin Client Details
page > ICA Session: Servers
Hosting the Application field
Type the published application name exactly as it is defined in
Citrix*.
Add the Citrix servers that host the application. To add a server,
specify the server’s IP address or hostname, then click Add.
The order in which the servers are listed is the preferred order for
launching. You can use the Move Up and Move Down buttons to
change the order if necessary.
Creating Bundles 37

Wizard Page and Field Details
novdocx (en) 16 April 2010
Configure Thin Client Details
page > RDP Session:
Terminal Server Address field
Configure Thin Client Details
page > RDP Session: Server
Port field
Configure Thin Client Details
page > RDP Session: Server
Domain field
Configure Thin Client Details
page > RDP Session:
Application Path field
Configure Thin Client Details
page > RDP Session:
Application Working Directory
field
Configure Thin Client Details
page > RDP Session: Color
Depth field
Configure Thin Client Details
page > RDP Session: Screen
Size field
Type the terminal server’s IP address or hostname.
If the terminal server is not using the default port 3389, specify the
correct port number.
If the terminal server is part of a Windows NT* domain or an Active
Directory* domain, enter the domain name. If the user’s name and
password in the domain matches the user name and password in
Novell eDirectoryTM, the user is not prompted to log in to the terminal
server when launching the application.
Specify the path to the application’s executable file from the
perspective of the terminal server.
Specify the path to the directory you want the application to use for
its working files.
Select the number of colors for the RDP client session. You can
select 256 Colors, High Color (15 bits), High Color (16 bits), or True
Color (24 bits). The default is True Color (24 bits).
If you want the RDP client session to use the entire desktop area,
select Operate in full screen mode. Otherwise, select Use specified
screen size and manually set the width and height (in pixels).
11 If you are creating a Web Application bundle, follow the wizard prompts until you reach the
Summary page, then skip to Step 12 on page 38.
Click Help for information about each page or refer to the following table:
Wizard Page and Field Details
Enter URL page > URL field Specify the location (URL) of the Web application. The URL should
point to the primary file for the Web application or to a Web page
that allows access to the Web application.
Click the Test URL button to test the URL.
12 Review the information on the Summary page, making any changes to the bundle settings by
using the Back button as necessary.
13 (Conditional) Select the Define Additional Properties check box to display the bundle’s
Summary page after the wizard completes. You can use the various tabs to edit the bundle’s
assignments, system requirements, actions, settings, and content replication settings.
14 Click Finish to create the bundle as configured per settings on the Summary page.
When you click Finish, the bundle is created but it does not have users or devices assigned,
schedules, and group membership. At some point in the future, you need to configure
additional options for the bundle by continuing with Section 3.2, “Assigning Existing Bundles
to Devices,” on page 46 or Section 3.3, “Assigning Existing Bundles to Users,” on page 48.
38 ZENworks 10 Configuration Management Software Distribution Reference

2.5 Creating Bundles by Using the zman Command Line Utility
ZENworks Configuration Management allows you to create different types of bundles, such as
Windows bundle, File bundle, Directive bundle, and Imaging bundle. Each bundle has its own set of
data and configuration settings. Because it is complex to pass the data as arguments in the command
line, the zman utility takes XML files as an input to create bundles. To use the zman command line
utility to create a bundle, you must have a bundle of the same type already created through
ZENworks Control Center and export it to XML. For more information on creating bundles by using
ZENworks Control Center, see Chapter 2, “Creating Bundles,” on page 19. You can use the exported
XML file as a template to create bundles by using zman.
For example, you can export a File bundle already created through ZENworks Control Center into
an XML file, then use it to create another File bundle with zman.
A bundle can have file content associated with it. For example, an MSI file to be installed is a file
content associated with a Windows MSI Bundle.
Bundles can also have dependencies on other bundles.
novdocx (en) 16 April 2010
Review the following sections to create a bundle by using the zman command line utility:
Section 2.5.1, “Creating a Bundle without Content or Dependency on Another Bundle,” on
page 39
Section 2.5.2, “Creating a Bundle with Content and Dependency on Another Bundle,” on
page 40
Section 2.5.3, “Understanding the zman Bundle XML File Format,” on page 42
2.5.1 Creating a Bundle without Content or Dependency on Another Bundle
1 Create a bundle in ZENworks Control Center.
For example, use ZENworks Control Center to create a Web Application bundle called google,
which launches the Google Web site (http://www.google.com).
2 Export the bundle to an XML file by using the following command:
zman bundle-export-to-file bundle_name bundle_filename.xml
For example, export the google bundle to
to-file google google.xml
If you want to create a new bundle with new data, continue with Step 3. If you want to create a
new bundle with the same data as the google bundle, skip to Step 4.
3 Modify the XML file according to your requirements.
command.
google.xml
by using the
zman bundle-export-
<URL>
from
For example, change the value of
in the
www.yahoo.com
as shown below.
<ns2:ActionSets>
<Id>104e5d74804052eb7ddc4a2f54358d97</Id>
<Type>Launch</Type>
<Version>1</Version>
Launch URL Action
http://www.google.com
section of
Launch ActionSet
to
http://
in the XML file
Creating Bundles 39

<Modified>false</Modified>
<Data>
<ns1:Launch/>
</Data>
<Actions>
<Id>2ef5c645774759e9868ba2c157301949</Id>
<Type>Launch URL Action</Type>
<Data>
<ns1:LaunchUrlActionData>
<URL>http://www.yahoo.com</URL>
<WaitForExit>false</WaitForExit>
</ns1:LaunchUrlActionData>
</Data>
<ContinueOnFailure>false</ContinueOnFailure>
<Enabled>true</Enabled>
<Properties />
</Actions>
</ns2:ActionSets>
4 Create a new bundle by using the following command:
zman bundle-create new_bundle_name bundle_xml_filename.xml
For example, to create the yahoo bundle, enter the
zman bundle-create yahoo google.xml
command at the console prompt.
novdocx (en) 16 April 2010
2.5.2 Creating a Bundle with Content and Dependency on Another Bundle
1 Create two bundles in ZENworks Control Center.
For example, use ZENworks Control Cener to create two MSI application bundles called
officeXP and officeXPSP1. The officeXP bundle installs Microsoft Office XP through an MSI.
The officeXPSP1 bundle installs the Service Pack 1 for Microsoft Office XP. In the officeXP
bundle, add an Install Bundle action to install officeXPSP1.
2 Export the bundle, which has the dependency on another bundle, to an XML file by using the
following command:
zman bundle-export-to-file bundle_name bundle_filename.xml
This creates
files.
For example, export the officeXP bundle to
export-to-file officeXP officeXP.xml
officeXP_ActionContentInfo.xml
Sample
/opt/novell/zenworks/share/zman/samples/bundles
at
"%ZENWORKS_HOME%\Novell\Zenworks\share\zman\samples\bundles
server. For more information about
“Understanding the zman Bundle XML File Format,” on page 42.
bundle_filename.xml
xml
format templates,
and
bundle_filename_ActionContentInfo.xml
officeXP.xml
command. The
files are created.
WindowsMSIBundle.xml
ActionContentInfo.xml
by using the
officeXP.xml
and
ActionInfo.xml
zman bundle-
on a Linux server and in
, see Section 2.5.3,
and
, are available
on a Windows
40 ZENworks 10 Configuration Management Software Distribution Reference

If you want to create a new bundle with new data, continue with Step 3. If you want to create a
new bundle with the same data as the officeXP bundle, skip to Step 4.
3 Modify the
officeXP.xml
and
officeXP_ActionContentInfo.xml
files according to your
requirements.
For example, to create a new bundle to install ApplicationX and its support pack, do the
following:
novdocx (en) 16 April 2010
Change all references of
officeXP_ActionContentInfo.xml
officeXP.msi
file.
to
ApplicationX.msi
in the
Create another bundle called as ApplicationX-SP1 that installs the support pack for
Application X.
Change the path of the dependent OfficeXPSP1 bundle to ApplicationX-SP1 in the
officeXP_ActionContentInfo.xml
A sample
<ActionInformation>
<ActionSet type="Install">
<Action name="Install MSI" index="1">
<Content>
<ContentFilePath includeAllFilesinFolder="false"
includeAllFilesinSubFolders="false">E:\files\ApplicationX.msi</
ContentFilePath>
</Content>
</Action>
<Action name="Install Bundle" index="2">
<DependentBundlePath>bundlefolder/ApplicationX-SP1</
DependentBundlePath>
</Action>
</ActionSet>
<ActionSet type="Uninstall">
<Action name="Undo Install Actions" index="1">
<Content>
<ContentFilePath includeAllFilesinFolder="false"
includeAllFilesinSubFolders="false">E:\files\ApplicationX.msi</
ContentFilePath>
</Content>
</Action>
</ActionSet>
</ActionInformation>
officeXP_ActionContentInfo.xml
to install both ApplicationX and its support pack.
is as follows:
4 Create a bundle by using the following command:
zman bundle-create new_bundle_name bundle_xml_filename.xml bundle_location
--actioninfo bundle_name_ActionContentInfo.xml
If you do not specify the location of the bundle creation, the bundle is created in the root folder
/Bundles
(
) by default.
For example, use the following command to create a bundle called ApplicationX in the root
folder (
/Bundles
):
Creating Bundles 41

zman bundle-create ApplicationX officeXP.xml --actioninfo
officeXP_ActionContentInfo.xml
You can also specify the folder in which the bundle should be created.
For example, use the following command to create a bundle called ApplicationY in the
Software folder under the root folder (
zman bundle-create ApplicationY officeXP.xml /Bundles/Software -actioninfo officeXP_ActionContentInfo.xml
/Bundles/Software
):
2.5.3 Understanding the zman Bundle XML File Format
The
bundle-export-to-file
database, into an XML file. Each bundle contains actions that are grouped into action sets such as
Install and Launch. An exported bundle XML file contains information for the bundle, such as UID,
Name, Path, PrimaryType, SubType, Category, System Requirements, and information on all
ActionSets and their actions. The file does not include information about assignment of the bundle
to devices or users, and add-on images for the bundle.
command serializes the bundle information, which is stored in the
novdocx (en) 16 April 2010
A sample XML format template,
zenworks/share/zman/samples/bundles
"%ZENWORKS_HOME%\Novell\Zenworks\share\zman\samples\bundles
WindowsMSIBundle.xml
on a Linux server and in
, is available at
/opt/novell/
on a Windows server.
NOTE: If the exported XML file contains extended ASCII characters, you must open it in an editor
by using UTF-8 encoding instead of ANSI encoding, because ANSI encoding displays the extended
ASCII characters as garbled.
When you create a bundle from the XMLfile, zman uses the information specified in the
<Description>, <SubType>,<Category>, <ActionSets>
, and
<SysReqs>
elements of the file.
The values for the Name and Parent Folder are taken from the command line. For the remaining
elements, the default value is used.
Follow the guidelines listed below to work with the XML file:
If you want to create a bundle without file content or dependency on another bundle, you need
only the bundle XML file to create a bundle.
If you want to create a bundle with content or dependency on another bundle, you must provide
an additional XML file, which contains the path of the content file or the dependent bundle, as
an argument to the
--actioninfo
A sample XML format template,
share/zman/samples/bundles
"%ZENWORKS_HOME%\Novell\Zenworks\share\zman\samples\bundles
option of the
ActionInfo.xml
bundle-create
, is available at
on a Linux server and in
command.
/opt/novell/zenworks/
on a Windows
server.
If you want to modify the
<Data>
element of actions in the exported XMLfile, ensure that the
new data is correct and that it conforms to the schema. The zman utility does a minimal
validation of the data and does not check for the errors in the data. Hence, the bundle might be
successfully created, but with invalid data. Such a bundle fails when deployed on a managed
device.
File content or bundle dependencies are associated with a particular action in
The Action Content Information XML file should contain the path of the file to which the file
content is to be associated and the index of the action in the
42 ZENworks 10 Configuration Management Software Distribution Reference
<ActionSet>
<ActionSet>
.
.

For example, the MSI file to be installed when you create the Windows MSI Bundle is
associated to the first Install MSI action in the Install action set of the created Windows MSI
Bundle.
The
<ActionSet>
is specified by the
type
attribute. It should be the same as the Action Set
type of the bundle XML file.
The
<Action>
element has a name attribute, which is optional, for user readability.
novdocx (en) 16 April 2010
The
Each action can have multiple
index
attribute is mandatory. It specifies the action to which the content or dependency
should be associated. The index value of the first action in
element. The
<Content>
<ContentFilePath>
elements, each containing a
element contains the path of the file content to be
<ActionSet>
<ContentFilePath>
is 1.
associated with the Action. Ensure that the filename is the same as the filename specified in the
bundle XML file in
Ensure that the order of the
<Data>
for that action.
<Content>
elements is in accordance with the order in the bundle
XML file. For example, the Windows MSI bundle should have the MSI file in the first
<Content>
order specified in
For creating Windows MSI bundles, you can include all the files in the folder or subfolders by
setting the
element, followed by
<Data>
includeAllFilesinFolder
for that action.
<Content>
elements with the path to the MST files in the
and
includeAllFilesinSubFolders
attributes to
True. The dependency to another bundle can be specified by giving the bundle path as a value
of the <
to
<ActionSet type="Install">
<Action name="Install MSI" index="1">
<Content>
<ContentFilePath includeAllFilesinFolder="false"
includeAllFilesinSubFolders="false">E:\files\ApplicationX.msi</
ContentFilePath>
</Content>
<Content>
<ContentFilePath includeAllFilesinFolder="false"
includeAllFilesinSubFolders="false">E:\files\ApplicationX_MST1.mst</
ContentFilePath>
</Content>
</Action>
<Action name="Install Bundle" index="2">
<DependentBundlePath>bundlefolder/ApplicationX-SP1</DependentBundlePath>
</Action>
</ActionSet>
To get the UID of an object, use the
DependentBundlePath>
/Bundles
as shown below.
element. The path of the bundle specified should be relative
object-get-GUID
command. You must manually edit the
object UIDs in the bundle XML file in the following scenarios:
In the Bundle Installed system requirement, the path and the UID of the bundle must be
changed in the
In the Imaging bundle, the UID of the server containing the
<BundleInstalledReq>
element under the
<SysReqs>
.img
element.
file must be manually
changed in the ZENworks Image and Multicast Image Set actions. Also, the UID of the
linked application bundle must be manually changed in the Linked Application Bundle
Creating Bundles 43

and Multicast Image Set actions. Ensure that the linked bundle already has an add-on
image that was created manually, because it is not automatically created when the bundle
is linked to the image bundle.
novdocx (en) 16 April 2010
44 ZENworks 10 Configuration Management Software Distribution Reference

3
Managing Bundles
The Novell® ZENworks® Configuration Management Software Management features let you
effectively manage software and content in your ZENworks system.
For information about creating Directive, File, Imaging, and Windows bundles, see Chapter 2,
“Creating Bundles,” on page 19. For information about creating Imaging bundles, see the ZENworks
10 Configuration Management Preboot Services and Imaging Reference.
The following sections contain information to help you manage existing bundles:
Section 3.1, “Creating Bundles,” on page 45
Section 3.2, “Assigning Existing Bundles to Devices,” on page 46
Section 3.3, “Assigning Existing Bundles to Users,” on page 48
Section 3.4, “Adding a Bundle to a Group,” on page 51
Section 3.5, “Renaming, Copying, or Moving Bundles,” on page 53
novdocx (en) 16 April 2010
3
Section 3.6, “Adding System Requirements for a Bundle,” on page 53
Section 3.7, “Copying a Bundle’s System Requirements,” on page 59
Section 3.8, “Managing Bundle Settings,” on page 59
Section 3.9, “Managing Bundle Variables,” on page 60
Section 3.10, “Deleting a Bundle,” on page 62
Section 3.11, “Incrementing a Bundle’s Version Number,” on page 62
Section 3.12, “Installing a Bundle,” on page 63
Section 3.13, “Launching a Bundle,” on page 63
Section 3.14, “Copying a Bundle to a Content Server,” on page 64
Section 3.15, “Preventing a Bundle from Being Deployed,” on page 66
Section 3.16, “Enabling a Bundle to Be Deployed,” on page 67
Section 3.17, “Enabling a Bundle to Be Uninstalled,” on page 67
Section 3.18, “Uninstalling a Bundle,” on page 68
Section 3.19, “Modifying Action Set Options,” on page 70
Section 3.20, “Show Bundle Activity on the Managed Device,” on page 74
Section 3.21, “Viewing the Predefined Reports,” on page 74
3.1 Creating Bundles
For step-by-step instructions on creating Directive, File, and Windows bundles, see Chapter 2,
“Creating Bundles,” on page 19. For more information about creating Imaging bundles, see the
ZENworks 10 Configuration Management Preboot Services and Imaging Reference.
Managing Bundles
45

3.2 Assigning Existing Bundles to Devices
When you create bundles, the object is created without assigning devices or users to it, or specifying
distribution, launch, or availability schedules. Before the bundle can be used on assigned devices,
you must complete the steps in this procedure.
You can use ZENworks Control Center or the zman command line utility to assign bundles. The
following procedure explains how to assign a bundle using ZENworks Control Center. If you prefer
the zman command line utility, see the “Bundle Commands” in “ZENworks Command Line
Utilities”.
1 In ZENworks Control Center, click the Bundles tab.
2 Select the desired bundle in the Bundles list by clicking the box next to its name, click Action,
then click Assign to Device.
or
Click the desired bundle, click Relationships. In the Device Assignments panel, click Add.
novdocx (en) 16 April 2010
A bundle must be assigned to devices and users before it can be distributed to them.
You can assign the bundle to individual devices, users, folders, or groups. Assigning a bundle
to a folder or group is the preferred method of assigning bundles. This allows for easier
management of the bundle assignments and can decrease the possibility of high server
utilization caused by assigning the bundle to a large number of items (for example, more than
250).
3 In the Select Objects dialog box, browse to and select the objects to which you want to assign
the bundle.
The Select Objects dialog box opens with the
Servers
created in the
Browse for and select the devices or users, groups, and folders to which you want to assign the
bundle. To do so:
3a Click next to a folder (for example, the
and
Workstations
Devices
navigate through the folders until you find the device, group, or folder you want to select.
If you are looking for a specific item, such as a Workstation or a Workstation Group, you
can use the Items of type list to limit the types of items that are displayed. If you know the
name of the item you are looking for, you can also use the Item name box to search for the
item.
folders are displayed along with any custom folders that you have
folder.
Devices
folder as the root folder. By default, the
Workstations
folder or
Servers
folder) to
46 ZENworks 10 Configuration Management Software Distribution Reference

3b Click the underlined link in the Name column to select the device, group, or folder and
display its name in the Selected list box.
3c Click OK to add the selected devices, folders, and groups to the Devices list.
4 Specify the bundle’s shortcut location.
You can use the Shortcut Location assignments to specify the locations on the managed device
where ZENworks Adaptive Agent displays the bundle’s icon. The possible locations include
the following:
Application Window: Places the icon in the Application window. This location is selected by
default.
Quick Launch: Places the icon on the Quick Launch area of the Windows taskbar.
Desktop: Places the icon on the device’s desktop.
System Tray: Places the icon in the system tray (notification area) of the Windows taskbar.
Start Menu: Places the icon on the Start menu on all Windows devices except for Windows
Vista*. On Windows Vista, it places the icon in Start > All Programs.
On a Windows Vista device, if you want to change the look and feel of the Start menu or pin
applications to the Start menu, see Appendix G, “Best Practices,” on page 183.
5 Click Next to display the Schedules page, then select the schedules you want to define:
Distribution Schedule: Defines the dates and times when the content of the bundle is
distributed from the ZENworks Server to the managed device or user. If you do not establish a
schedule, the bundle’s content is distributed to the device or user when it is first launched.
However, the schedule does not define the date and time when the action in the bundle runs.
novdocx (en) 16 April 2010
Launch Schedule: Defines the dates and times when the ZENworks Adaptive Agent
automatically launches the bundle. If you do not establish a schedule, the bundle is launched
only when the user launches it. Before launching the bundle, the ZENworks Adaptive Agent
checks if the bundle is distributed and installed. If the bundle is not yet distributed, the agent
first distributes the bundle, performs the bundle’s install actions to install the bundle, then
performs the bundle’s launch actions to launch it.
Availability Schedule: Defines the dates and times when the bundle is available to the device
or user. The ZENworks Adaptive Agent displays the bundle icon only during the times defined
by the schedule. If you do not establish a schedule, the bundle is available at all times.
6 (Conditional) If you selected Distribution Schedule in Step 5, click Next to display the Bundle
Distribution Schedule page.
The distribution schedule defines the dates and times when the bundle is distributed from the
ZENworks Server to the managed device. The default schedule (no schedule) causes the bundle
to be distributed to the device when it is first launched.
7 In the Schedule Type field, select one of the following schedules, then fill in the fields. For
detailed information, click the Help button on the wizard page or see the following sections:
Section D.1, “Date Specific,” on page 109
Section D.4, “Recurring,” on page 111
Section D.2, “Event,” on page 110
8 Select the following options as desired:
Wake on LAN: If the device is not on at the scheduled time, ZENworks attempts to use Wake
on LAN (WoL) technology to power on the device. The device must support Wake on LAN.
Managing Bundles 47

Install Immediately After Distribution: Performs any installation actions immediately after
the bundle is distributed to the device.
Launch Immediately After Installation: Performs any launch actions immediately after the
bundle is installed. This option is available only if the Install Immediately After Distribution
option is enabled.
9 (Conditional) If you selected Launch Schedule in Step 5, click Next to display the Bundle
Launch Schedule page.
The launch schedule determines the dates and times when ZENworks Adaptive Agent
automatically launches the bundle. The default schedule (no schedule) results in the bundle
only being launched if the user launches it.
10 In the Schedule Type field, select one of the following schedules, then fill in the fields. For
detailed information, click the Help button on the wizard page or see the following sections:
Section D.1, “Date Specific,” on page 109
Section D.4, “Recurring,” on page 111
Section D.2, “Event,” on page 110
11 (Conditional) If you selected Availability Schedule in Step 5, click Next to display the Bundle
Availability Schedule page.
The availability schedule defines the dates and times when the bundle is available on the
managed device. ZENworks Adaptive Agent displays the bundle icon only during the times
defined by the schedule. The default schedule (no schedule) makes the bundle available at all
times.
novdocx (en) 16 April 2010
The schedule applies regardless of whether or not the bundle is installed. For example, if a user
has not yet installed the bundle, it is only available for installation at the times specified by the
schedule. If a user has already installed the bundle, it is only available for running during the
scheduled times.
12 In the Schedule Type field, select one of the following schedules, then fill in the fields. For
detailed information, click the Help button on the wizard page or see the following sections:
Section D.1, “Date Specific,” on page 109
Section D.4, “Recurring,” on page 111
13 Click Next to display the Finish page, review the information and, if necessary, use the Back
button to make changes to the information.
14 Click Finish.
3.3 Assigning Existing Bundles to Users
When you create bundles, the object is created without assigning devices or users to it, or specifying
distribution, launch, or availability schedules. Before the bundle can be used on assigned devices,
you must complete the steps in this procedure.
You can use ZENworks Control Center or the zman command line utility to assign bundles. The
following procedure explains how to assign a bundle using ZENworks Control Center. If you prefer
the zman command line utility, see the “Bundle Commands” in “ZENworks Command Line
Utilities”.
1 In ZENworks Control Center, click the Bundles tab.
48 ZENworks 10 Configuration Management Software Distribution Reference
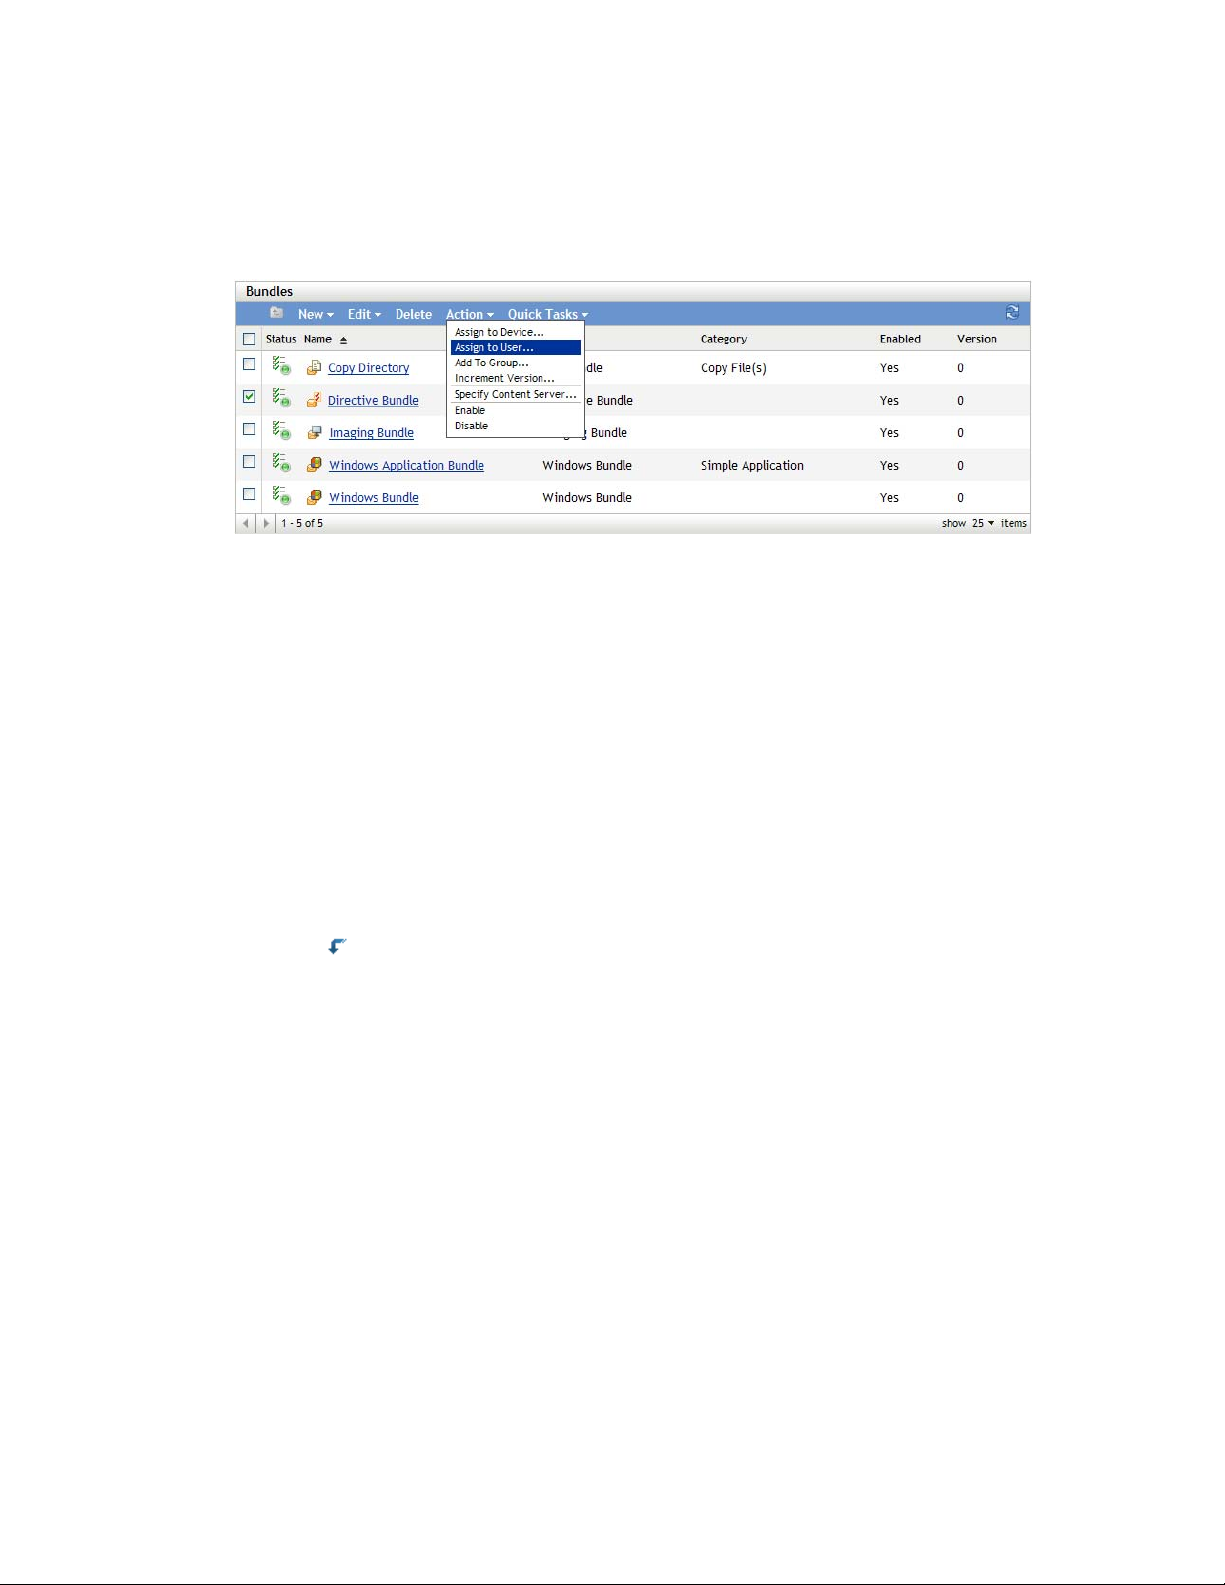
2 Select the desired bundle in the Bundles list by clicking the box next to its name, click Action,
then click Assign to User.
or
Click the desired bundle, click Relationships. In the Device Assignments panel, click Add.
A bundle must be assigned to devices and users before it can be distributed to them.
You can assign the bundle to individual devices, users, folders, or groups. Assigning a bundle
to a folder or group is the preferred method of assigning bundles. This allows for easier
management of the bundle assignments and can decrease the possibility of high server
utilization caused by assigning the bundle to a large number of items (for example, more than
250).
3 In the Select Objects dialog box, browse to and select the objects to which you want to assign
the bundle.
Users
The Select Objects dialog box opens with the
folder as the root folder. By default, the
user sources that have been defined are displayed, as well as the ZENworks User Groups
folder.
Browse for and select the users, groups, and folders to which you want to assign the bundle. To
do so:
3a Click next to a folder to navigate through the folders until you find the user, group, or
folder you want to select.
novdocx (en) 16 April 2010
If you are looking for a specific item, such as a User or a User Group, you can use the
Items of type list to limit the types of items that are displayed. If you know the name of the
item you are looking for, you can also use the Item name box to search for the item.
3b Click the underlined link in the Name column to select the user, group, or folder and
display its name in the Selected list box.
3c Click OK to add the selected users, folders, and groups to the Devices list.
4 Specify the bundle’s shortcut location.
You can use the Shortcut Location assignments to specify the locations on the managed device
where ZENworks Adaptive Agent displays the bundle’s icon. The possible locations include
the following:
Application Window: Places the icon in the Application window. This location is selected by
default.
Quick Launch: Places the icon on the Quick Launch toolbar area of the Windows taskbar.
Desktop: Places the icon on the device’s desktop.
Managing Bundles 49

System Tray: Places the icon in the system tray (notification area) of the Windows taskbar.
Start Menu: Places the icon on the Start menu on all Windows devices except for Windows
Vista. On Windows Vista, it places the icon in Start > All Programs.
On Windows Vista device, if you want to change the look and feel of the Start menu or pin
applications to the Start menu, see Appendix G, “Best Practices,” on page 183.
5 Click Next to display the Schedules page, then select the schedules you want to define:
Distribution Schedule: Defines the dates and times when the content of the bundle is
distributed from the ZENworks Server to the managed device or user. If you do not establish a
schedule, the bundle’s content is distributed to the device or user when it is first launched.
However, the schedule does not define the date and time when the action in the bundle runs.
Launch Schedule: Defines the dates and times when the ZENworks Adaptive Agent
automatically launches the bundle. If you do not establish a schedule, the bundle is launched
only when the user launches it. Before launching the bundle, the ZENworks Adaptive Agent
checks if the bundle is distributed and installed. If the bundle is not yet distributed, the agent
first distributes the bundle, performs the bundle’s install actions to install the bundle, then
performs the bundle’s launch actions to launch it.
Availability Schedule: Defines the dates and times when the bundle is available to the device
or user. The ZENworks Adaptive Agent displays the bundle icon only during the times defined
by the schedule. If you do not establish a schedule, the bundle is available at all times.
6 (Conditional) If you selected Distribution Schedule in Step 5, click Next to display the Bundle
Distribution Schedule page.
novdocx (en) 16 April 2010
The distribution schedule defines the dates and times when the bundle is distributed from the
ZENworks Server to the managed device. The default schedule (no schedule) causes the bundle
to be distributed to the device when it is first launched.
7 In the Schedule Type field, select one of the following schedules, then fill in the fields. For
detailed information, click the Help button on the wizard page or see the following sections:
Section D.1, “Date Specific,” on page 109
Section D.4, “Recurring,” on page 111
Section D.2, “Event,” on page 110
8 Select the following options as desired:
Wake on LAN: If the device is not on at the scheduled time, ZENworks attempts to use Wake
on LAN (WoL) technology to power on the device. The device must support Wake on LAN.
Install Immediately After Distribution: Performs any installation actions immediately after
the bundle is distributed to the device.
Launch Immediately After Installation: Performs any launch actions immediately after the
bundle is installed. This option is available only if the Install Immediately After Distribution
option is enabled.
9 (Conditional) If you selected Launch Schedule in Step 5, click Next to display the Bundle
Launch Schedule page.
The launch schedule determines the dates and times when ZENworks Adaptive Agent
automatically launches the bundle. The default schedule (no schedule) results in the bundle
only being launched if the user launches it.
50 ZENworks 10 Configuration Management Software Distribution Reference

10 In the Schedule Type field, select one of the following schedules, then fill in the fields. For
detailed information, click the Help button on the wizard page or see the following sections:
Section D.1, “Date Specific,” on page 109
Section D.4, “Recurring,” on page 111
Section D.2, “Event,” on page 110
11 (Conditional) If you selected Availability Schedule in Step 5, click Next to display the Bundle
Availability Schedule page.
The availability schedule defines the dates and times when the bundle is available on the
managed device. ZENworks Adaptive Agent displays the bundle icon only during the times
defined by the schedule. The default schedule (no schedule) makes the bundle available at all
times.
The schedule applies regardless of whether or not the bundle is installed. For example, if a user
has not yet installed the bundle, it is only available for installation at the times specified by the
schedule. If a user has already installed the bundle, it is only available for running during the
scheduled times.
12 In the Schedule Type field, select one of the following schedules, then fill in the fields. For
detailed information, click the Help button on the wizard page or see the following sections:
Section D.1, “Date Specific,” on page 109
novdocx (en) 16 April 2010
Section D.4, “Recurring,” on page 111
13 Click Next to display the Finish page, review the information and, if necessary, use the Back
button to make changes to the information.
14 Click Finish.
If you assign bundles to Active Directory users, the assignments are available to the users only if the
ZENworks server is able to resolve the DNS name of the Active Directory.
3.4 Adding a Bundle to a Group
You can add the bundle to any bundle groups that already exist or you can create a new bundle group
as part of the assignment process. The bundle inherits the group’s assignments and schedules, which
means that you save time by managing one bundle group rather than each individual bundle. Adding
a bundle to a group is not the same as assigning a bundle to a group (user or device). For more
information on assigning bundles to devices, see Assigning Existing Bundles to Devices and
assigning bundles to users, see Assigning Existing Bundles to Users.
1 In ZENworks Control Center, click the Bundles tab.
2 In the Bundles list, select the check box next to the bundle (or bundles).
3 Click Action > Add to Group.
Managing Bundles 51
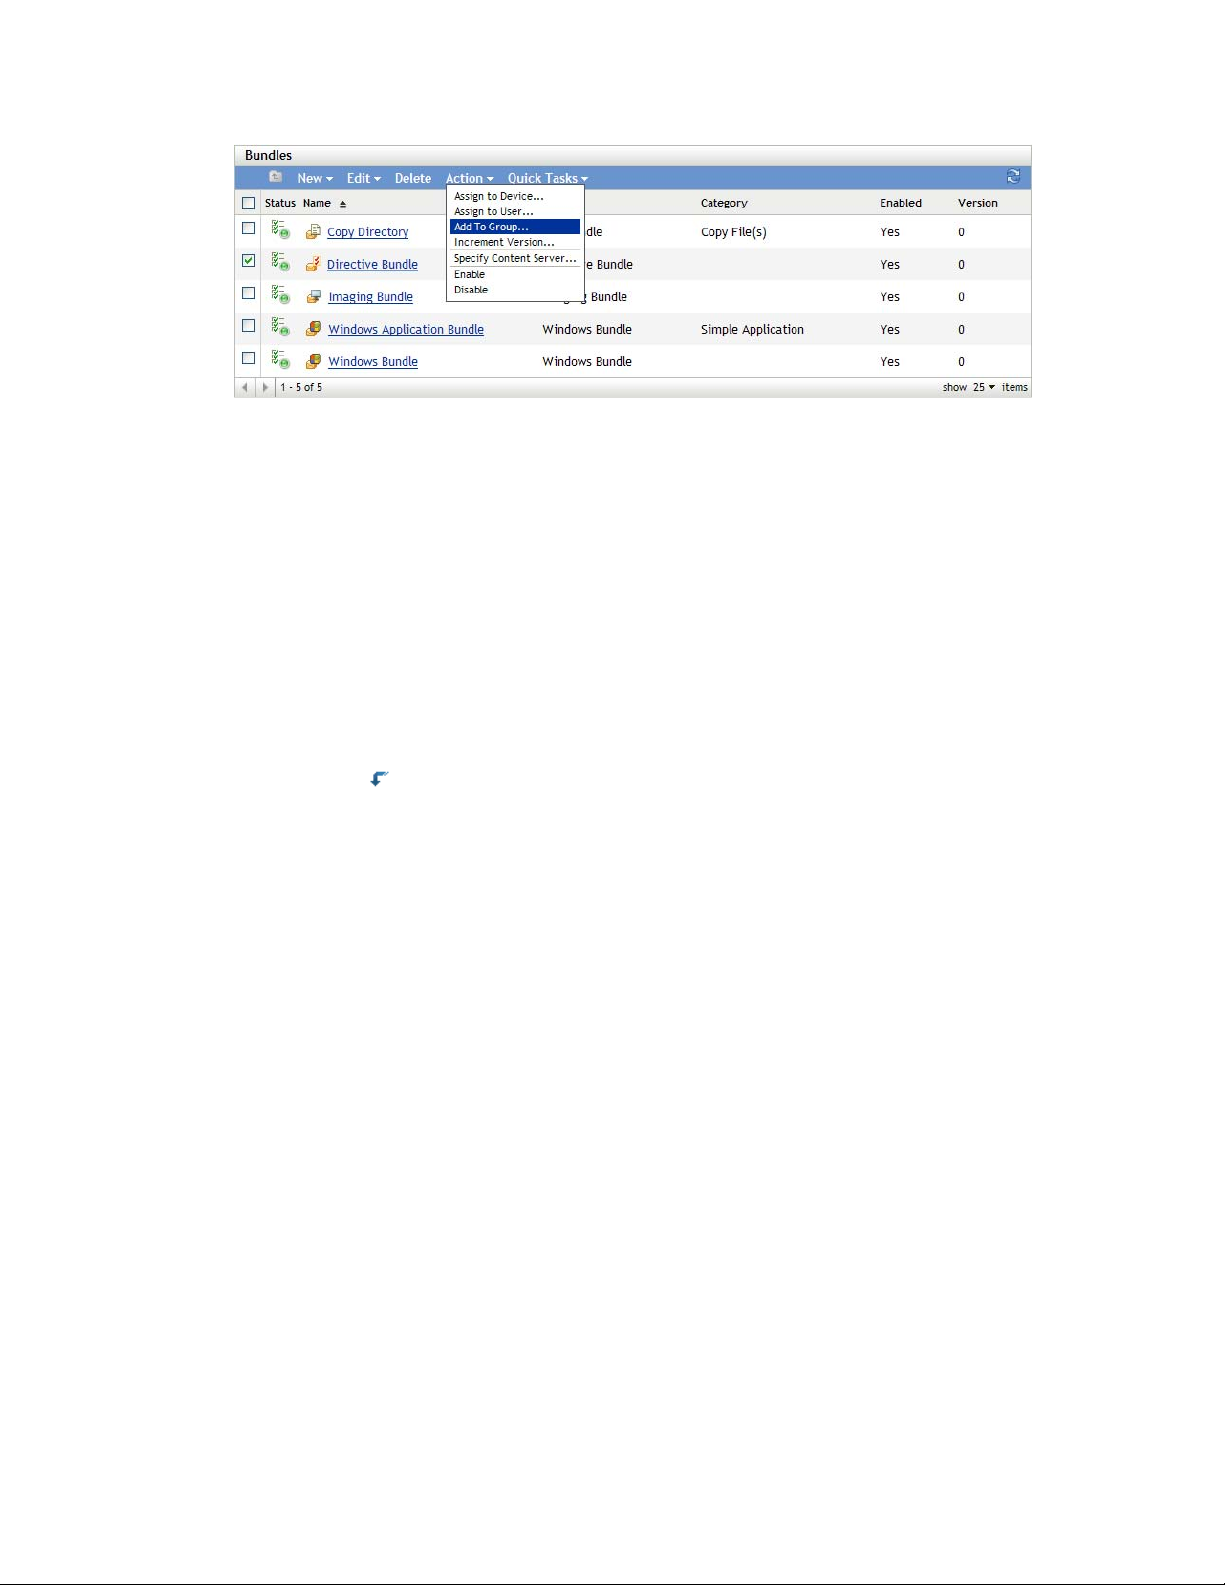
4 Select Add selected items to an existing group if the group to which you want to add the objects
already exists.
or
Select Create a new group to contain the selected items if you need to create a new group for
the selected objects.
5 (Conditional) If you chose Add selected items to an existing group in Step 4, click Next to
display the Targets page.
The Targets page lets you select the groups to which you want to add the objects (users,
devices, bundles, policies).
novdocx (en) 16 April 2010
5a Click Add to display the Select Groups dialog box.
5b Browse for and select the groups to which you want to add the objects. To do so:
5b1 Click next to a folder to navigate the folders until you find the group you want to
select.
If you know the name of the group you are looking for, you can also use the Item
name box to search for the group.
5b2 Click the underlined link in the Name column to select the group and display its name
in the Selected list.
5b3 Repeat Step 5b1 and Step 5b2 to add additional groups to the Selected list.
5b4 When you are finished selecting groups, click OK.
6 (Conditional) If you chose Create a new group to contain the selected items in Step 4, click
Next to display the Basic Information page, then fill in the fields:
Name: Provide a name for the group. The group name must be different than the name of any
other object (group, folder, device, user, bundle, policy, and so forth) that resides in the same
folder and must conform to the ZENworks object naming conventions.
For more information on naming conventions, see “Naming Conventions in ZENworks Control
Center” in ZENworks 10 Configuration Management System Administration Reference.
Folder: By default, the group is created in the current folder. If you want to create the group in
another folder, browse to and select the folder.
Description: Provide a short description of the group’s purpose or contents.
7 Click Next to display the Summary page, review the information and, if necessary, use the Back
button to make changes to the information.
8 Click Finish to add the selected objects to the group.
52 ZENworks 10 Configuration Management Software Distribution Reference
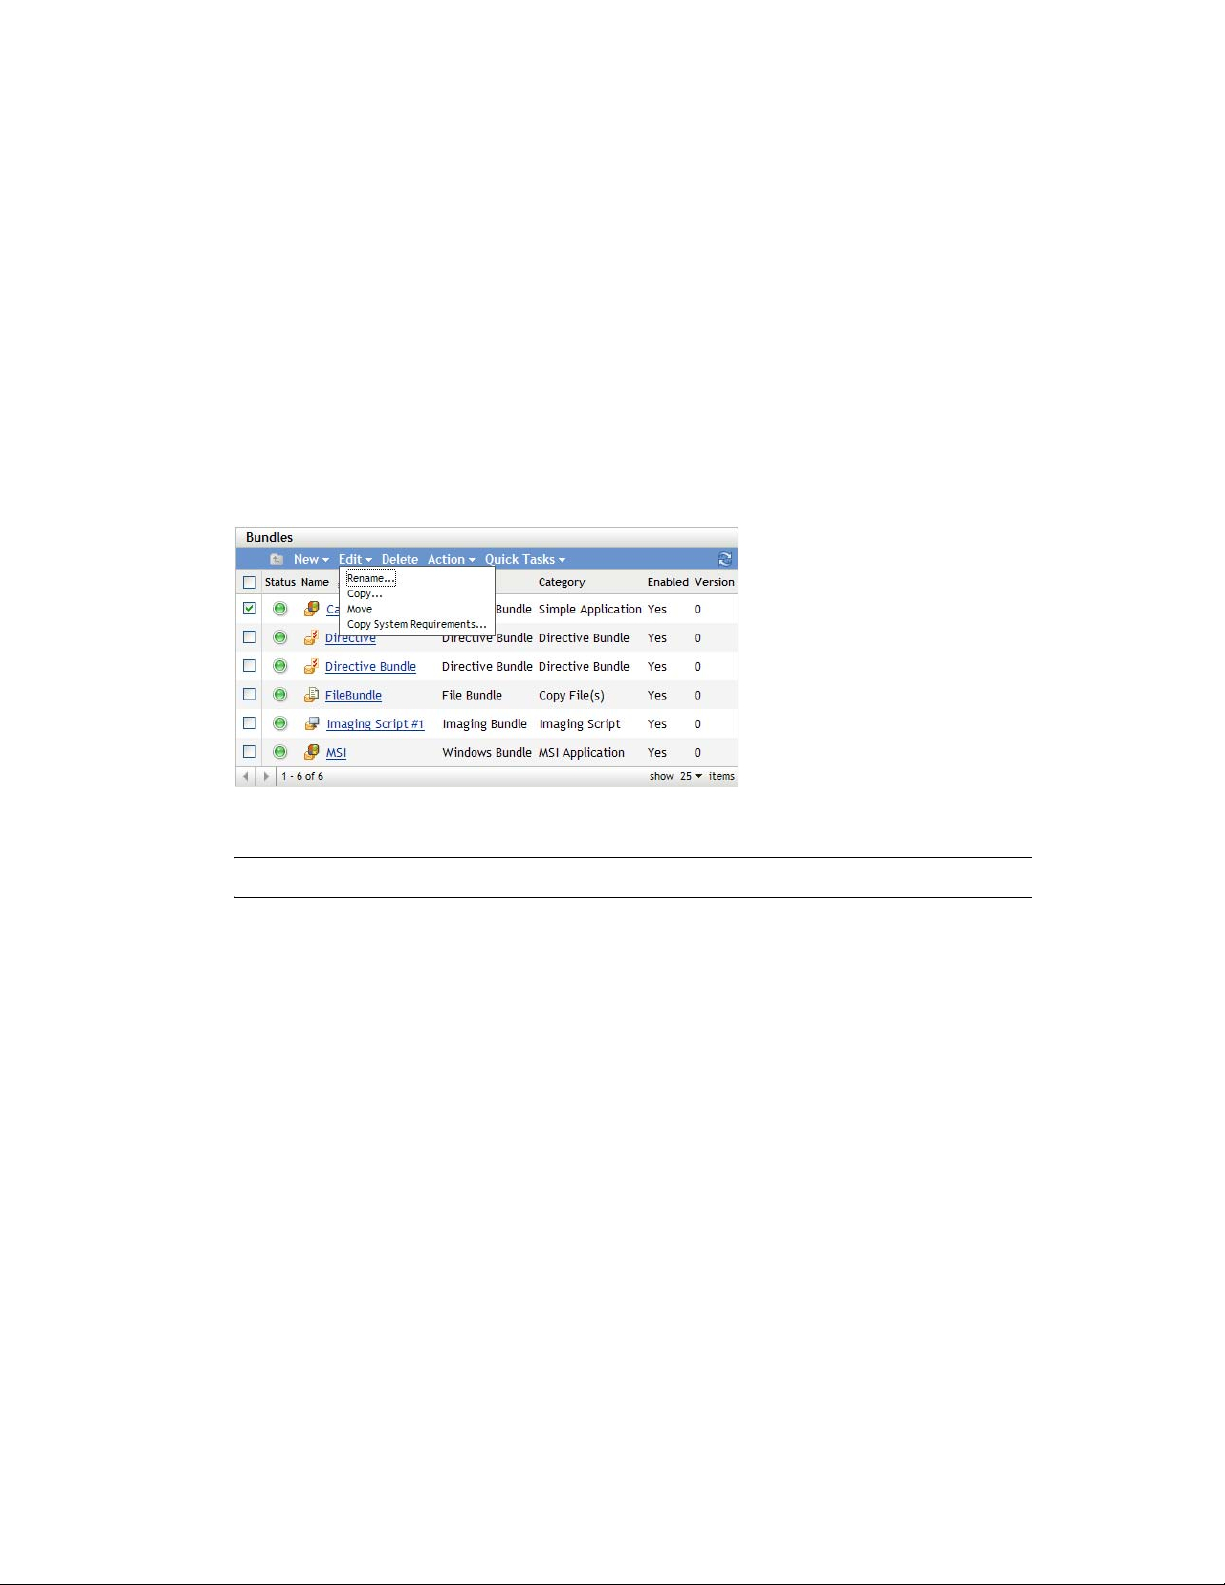
3.5 Renaming, Copying, or Moving Bundles
Use the Edit drop-down list on the Bundles page to edit an existing object. To access the Edit dropdown list, you must select an object by clicking the check box next to the object's name in the list.
Depending on the type of object you select, you can rename, copy, or move the selected object. For
example, if you select a Bundle object, you can rename, copy, and move the bundle. If you select a
Bundle Group object, you can rename or move the Bundle Group object, but not copy it. If the
option is dimmed, that option is not available for the selected object type.
Some actions cannot be performed on multiple objects. For example, if more than one check box is
selected, the Rename option is not available from the Edit menu.
1 In ZENworks Control Center, click the Bundles tab.
2 In the Bundles list, select the box next to the bundle's name, click Edit, then click an option:
novdocx (en) 16 April 2010
Rename: Click Rename, provide a new name for the bundle, then click OK.
IMPORTANT: Do not rename Windows MSP bundles.
Copy: Click Copy, provide a new name for the copy, then click OK.
The copy option is useful to create a new bundle that is similar to an existing bundle. You can
copy a bundle and then edit the new bundle's settings.
Move: Click Move, select a destination folder for the selected objects, then click OK.
If you rename or move a bundle, its assignments are still in place and ZENworks Configuration
Management does not redistribute the bundle to devices or users because of the name or
location change.
3.6 Adding System Requirements for a Bundle
The System Requirements panel lets you define specific requirements that a device must meet for
the bundle to be distributed to it.
You define requirements through the use of filters. A filter is a condition that must be met by a
device in order for the bundle to be applied. For example, you can add a filter to specify that the
device must have exactly 512 MB of RAM in order for the bundle to be applied, and you can add
another filter to specify that the hard drive be at least 20 GB in size.
Managing Bundles 53
To specify system requirements for a bundle:
1 In ZENworks Control Center, click the Bundles tab.
2 Click the underlined link for the desired bundle to display the bundle’s Summary page.
3 Click the Requirements tab.
4 Click Add Filter, select a filter condition from the drop-down list, then fill in the fields.
As you construct filters, you need to know the conditions you can use and how to organize the
filters to achieve the desired results. For more information, see Section 3.6.1, “Filter
Conditions,” on page 54 and Section 3.6.2, “Filter Logic,” on page 58.
5 (Conditional) Add additional filters and filter sets.
6 Click Apply to save the settings.
NOTE: After defining a bundle’s system requirements, you can copy its requirements and apply it
to other bundles or policies. To do so, click the Bundles tab, select the check box in front of the
bundle, click Edit, click Copy System Requirements, select Bundles or Policies, then click Add to
select the bundles or policies to which you want to copy the selected bundle’s system requirements.
novdocx (en) 16 April 2010
3.6.1 Filter Conditions
You can choose from any of the following conditions when creating a filter. Place your mouse
pointer over fields that require input to display a tooltip containing example usage.
Architecture: Determines the architecture of Windows* running on the device. The condition you
use to set the requirement includes a property, an operator, and a property value. The possible
operators are equals (=) and does not equal (<>). For example, if you set the condition to
architecture = 32
requirement.
Associated On: Determines the number of users or devices to which the bundle is assigned. The
possible operators are equals (=) and does not equal (<>). The possible values are Users and
Devices. For example, if you set the condition to
to meet the requirement.
Bundle Installed: Determines if a specific bundle is installed. After specifying the bundle, the two
conditions you can use to set the requirement are Yes and No. If you select Yes , the specified bundle
must already be installed to meet the requirement. If you select No, the bundle must not be installed.
If you click to browse to specify a bundle, you are not allowed to select any of the existing
directive bundles because directive bundles cannot be installed on the managed device.
Connected: Determines if the device is connected to the network. The two conditions you can use
to set the requirement are Yes and No. If you select Yes , the device must be connected to the network
to meet the requirement. If you select No, it must not be connected.
, the device’s Windows operating system must be 32-bit to meet the
=100 users
, the total number of users must be 100
Connection Speed: Determines the speed of the device’s connection to the network. The condition
you use to set the requirement includes an operator and a value. The possible operators are equals
(=), does not equal (<>), is greater than (>), is greater than or equal to (>=), is less than (<), and is
less than or equal to (<=). The possible values are bits per second (bps), kilobits per second (Kbps),
megabits per second (Mbps), and gigabits per second (Gbps). For example, if you set the condition
>= 100 Mbps
to
, the connection speed must be greater than or equal to 100 megabits per second to
meet the requirement.
54 ZENworks 10 Configuration Management Software Distribution Reference

Disk Space Free: Determines the amount of free disk space on the device. The condition you use to
set the requirement includes a disk designation, an operator, and a value. The disk designation can
be a local drive map (for example, c: or d:). The possible operators are equals (=), does not equal
(<>), is greater than (>), is greater than or equal to (>=), is less than (<), and is less than or equal to
(<=). The possible values are bytes (Bytes), kilobytes (KB), megabytes (MB), and gigabytes (GB).
For example, if you set the condition to
c: >= 80 MB
, the free disk space must be greater than or
equal to 80 megabytes to meet the requirement.
Disk Space Total: Determines the amount of total disk space on the device. The condition you use
to set the requirement includes a disk designation, an operator, and a value. The disk designation can
be a local drive map (for example, c: or d:). The possible operators are equals (=), does not equal
(<>), is greater than (>), is greater than or equal to (>=), is less than (<), and is less than or equal to
(<=). The possible values are bytes (Bytes), kilobytes (KB), megabytes (MB), and gigabytes (GB).
For example, if you set the condition to
c: >= 40 GB
, the total disk space must be greater than or
equal to 40 gigabytes to meet the requirement.
Disk Space Used: Determines the amount of used disk space on the device. The condition you use
to set the requirement includes a disk designation, an operator, and a value. The disk designation can
be a local drive map (for example, c: or d:). The possible operators are equals (=), does not equal
(<>), is greater than (>), is greater than or equal to (>=), is less than (<), and is less than or equal to
(<=). The possible values are bytes (Bytes), kilobytes (KB), megabytes (MB), and gigabytes (GB).
For example, if you set the condition to
c: <= 10 GB
, the used disk space must be less than or equal
to 10 gigabytes to meet the requirement.
novdocx (en) 16 April 2010
Environment Variable Exists: Determines if a specific environment variable exists on the device.
After specifying the environment variable, the two conditions you can use to set the requirement are
Ye s and No. If you select Ye s, the environment variable must exist on the device to meet the
requirement. If you select No, it must not exist.
Envi r onme n t Variab l e Value : Determines if an environment variable value exists on the device.
The condition you use to set the requirement includes the environment variable, an operator, and a
variable value. The environment variable can be any operating system supported environment
variable. The possible operators are equal to, not equal to, contains, and does not contain. The
possible variable values are determined by the environment variable. For example, if you set the
condition to
c:\windows\system32
the
Path contains c:\windows\system32
path to meet the requirement.
, the Path environment variable must contain
File Date: Determines the date of a file. The condition you use to set the requirement includes the
filename, an operator, and a date. The filename can be any filename supported by the operating
system. The possible operators are on, after, on or after, before, and on or before. The possible dates
are any valid dates. For example, if you set the condition to
app1.msi
file must be dated 6/15/2007 or later to meet the requirement.
app1.msi on or after 6/15/07
, the
File Exists: Determines if a file exists. After specifying the filename, the two conditions you can
use to set the requirement are Yes and No. If you select Yes, the specified file must exist to meet the
requirement. If you select No, the file must not exist.
File Size: Determines the size of a file. The condition you use to set the requirement includes the
filename, an operator, and a size. The filename can be any file name supported by the operating
system. The possible operators are equals (=), does not equal (<>), is greater than (>), is greater
than or equal to (>=), is less than (<), and is less than or equal to (<=). The possible sizes are
designated in bytes (Bytes), kilobytes (KB), megabytes (MB), and gigabytes (GB). For example, if
you set the condition to
doc1.pdf <= 3 MB
, the
doc1.pdf
file must be less than or equal to 3
megabytes to meet the requirement.
Managing Bundles 55

File Version: Determines the version of a file. The condition you use to set the requirement
includes the filename, an operator, and a version. The filename can be any file name supported by
the operating system. The possible operators are equals (=), does not equal (<>), is greater than (>),
is greater than or equal to (>=), is less than (<), and is less than or equal to (<=).
Be aware that file version numbers contain four components: Major, Minor, Revision, and Build.
For example, the file version for
calc.exe
might be 5.1.2600.0. Each component is treated
independently. For this reason, the system requirements that you set might not provide your
expected results. If you do not specify all four components, wildcards are assumed.
novdocx (en) 16 April 2010
For example, if you set the condition to
calc.exe <= 5
, you are specifying only the first
component of the version number (Major). As a result, versions 5.0.5, 5.1, and 5.1.1.1 also meet the
condition.
However, because each component is independent, if you set the condition to
calc.exe
the
file must be less than or equal to version 5.1 to meet the requirement.
calc.exe <= 5.1
,
IP Segment: Determines the device’s IP address. After specifying the IP segment name using CIDR
(Classless Inter-Domain Routing) format, the two conditions you can use to set the requirement are
Ye s and No. If you select Ye s, the device’s IP address must match the IP segment. If you select No,
the IP address must not match the IP segment.
You must specify the IP address using CIDR format. With CIDR, the dotted decimal portion of the
IP address is interpreted as a 32-bit binary number that has been broken into four 8-bit bytes. The
number following the slash (/n) is the prefix length, which is the number of shared initial bits,
counting from the left side of the address. The /n number can range from 0 to 32, with 8, 16, 24, and
32 being commonly used numbers. Examples:
123.45.67.12/16
123.45.67.12/24
: Matches all IP addresses that start with 123.45.
: Matches all IP addresses that start with 123.45.67.
Logged on to Primary Workstation: Determines whether the user is logged on to his or her
primary workstation. The two conditions you can use to set the requirement are Yes and No. If you
select Yes, the user must be logged on to his or her primary workstation to meet the requirement. If
you select No, if no user is logged on to the workstation, the requirement is not met. However, if a
user other than the primary user is logged on to the workstation, the requirement is met.
Memory: Determines the amount of memory on the device. The condition you use to set the
requirement includes an operator and a memory amount. The possible operators are equals (=), does
not equal (<>), is greater than (>), is greater than or equal to (>=), is less than (<), and is less than
or equal to (<=). The memory amounts are designated in megabytes (MB) and gigabytes (GB). For
example, if you set the condition to
>= 2 GB
, the device must have at least 2 gigabytes of memory to
meet the requirement.
Novell Client Installed: Determines if the device is using the Novell
connection. The two conditions you can use to set the requirement are Yes and No. If you select Yes ,
the device must be using the Novell Client to meet the requirement. If you select No, it must not be
using the Novell Client.
Operating System - Windows: Determines the service pack level, server type, and version of
Windows* running on the device. The condition you use to set the requirement includes a property,
an operator, and a property value. The possible properties are service pack, server type, and version.
The possible operators are equals (=), does not equal (<>), is greater than (>), is greater than or
56 ZENworks 10 Configuration Management Software Distribution Reference
®
ClientTM for its network

equal to (>=), is less than (<), and is less than or equal to (<=). The property values vary depending
on the property. For example, if you set the condition to
version = Windows XP Versions
, the
device’s Windows version must be XP to meet the requirement.
NOTE: Be aware that operating system version numbers contain four components: Major, Minor,
Revision, and Build. For example, the Windows 2000 SP4 release’s number might be
5.0.2159.262144. Each component is treated independently. For this reason, the system
requirements that you set might not provide your expected results.
For example, if you specify Operating System - Windows in the first field, Version in the second
field, > in the third field, and 5.0 -Windows 2000 Versions in the last field, you are specifying only
the first two components of the version number: Major (Windows) and Minor (5.0). As a result, for
the requirement evaluated to true, the OS will have to be at least 5.1 (Windows XP). Windows 2003
is version 5.2, so specifying > 5.2 will also evaluate to true.
However, because each component is independent, if you specify the version > 5.0, Windows 2000
SP4 evaluates to false because the actual version number might be 5.0.2159.262144. You can type
5.0.0 to make the requirement evaluate as true because the actual revision component is greater than
0.
novdocx (en) 16 April 2010
When you select the OS version from the drop-down, the Major and Minor components are
populated. The Revision and Build components must be typed in manually.
Primary User Is Logged In: Determines if the device’s primary user is logged in. The two
conditions you can use to set the requirement are Yes and No. If you select Yes , the primary user must
be logged in to meet the requirement. If you select No, the user must not be logged in.
Processor Family: Determines the device’s processor type. The condition you use to set the
requirement includes an operator and a processor family. The possible operators are equals (=) and
does not equal (<>). The possible processor families are Pentium, Pentium Pro, Pentium II,
Pentium III, Pentium 4, Pentium M, WinChip, Duron, BrandID, Celeron, and Celeron M. For
example, if you set the condition to
<> Celeron
, the device’s processor can be any processor family
other than Celeron* to meet the requirement.
Processor Speed: Determines the device’s processor speed. The condition you use to set the
requirement includes an operator and a processor speed. The possible operators are equals (=), does
not equal (<>), is greater than (>), is greater than or equal to (>=), is less than (<), and is less than
or equal to (<=). The possible processor speeds are hertz (Hz), kilohertz (KHz), megahertz (MHz),
and gigahertz (GHz). For example, if you set the condition to
>= 2 GHz
, the device’s speed must be
at least 2 gigahertz meet the requirement.
Registry Key Exists: Determines if a registry key exists. After specifying the key name, the two
conditions you can use to set the requirement are Yes and No. If you select Yes , the specified key
must exist to meet the requirement. If you select No, the key must not exist.
Registry Key Value: Determines if a registry key value meets a defined condition. The condition
you use to set the requirement includes the key name, the value name, an operator, a value type, and
a value data. The key and value names must identify the key value you want to check. The possible
operators are equals (=), does not equal (<>), is greater than (>), is greater than or equal to (>=), is
less than (<), and is less than or equal to (<=). The possible value types are Integer Type and Sting
Type . The possible value data is determined by the key, value name, and value type.
If the value type is String Type, ZCM compares only those values in the registry if the actual type in
the registry is REG_STRING or REG_EXPANDED_STRING.
Managing Bundles 57

If the value type is Integer, ZCM compares only those values in the registry if the actual type in the
registry is REG_DWORD.
Leave the key value field blank to use the default value. The default value of a registry key has no
name and is displayed in regedit as
Registry Key and Value Exists: Determines if a registry key and value exist. After specifying the
key name and value, the two conditions you can use to set the requirement are Yes and No. If you
select Yes, the specified key and value must exist to meet the requirement. If you select No, the key
and value must not exist.
Service Exists: Determines if a service exists. After specifying the service name, the two conditions
you can use to set the requirement are Yes and No. If you select Ye s, the service must exist to meet
the requirement. If you select No, the service must not exist.
Specified Devices: Determines if the device is one of the specified devices. After specifying the
devices, the two conditions you can use to set the requirement are Yes and No. If you select Yes, the
device must be included in the specified devices list to meet the requirement (an inclusion list). If
you select No, the device must not be included in the list (an exclusion list).
(Default)
.
novdocx (en) 16 April 2010
3.6.2 Filter Logic
You can use one or more filters to determine whether the bundle should be distributed to a device. A
device must match the entire filter list (as determined by the logical operators that are explained
below) for the bundle to be applied to the device.
There is no technical limit to the number of filters you can use, but there are practical limits, such as:
Designing a filter structure that is easy to understand
Organizing the filters so that you do not create conflicting filters
Filters, Filter Sets, and Logical Operators
You can add filters individually or in sets. Logical operators, either AND or OR, are used to combine
each filter and filter set. By default, filters are combined using OR (as determined by the Combine
Filters Using field) and filter sets are combined using AND. You can change the default and use
AND to combined filters, in which case filter sets are automatically combined using OR. In other
words, the logical operator that is to combine individual filters (within in a set) must be the opposite
of the operator that is used between filter sets.
You can easily view how these logical operators work. Click both the Add Filter and Add Filter Set
options a few times each to create a few filter sets, then switch between AND and OR in the
Combine Filters Using field and observe how the operators change.
As you construct filters and filter sets, you can think in terms of algebraic notation parentheticals,
where filters are contained within parentheses, and sets are separated into a series of parenthetical
groups. Logical operators (AND and OR) separate the filters within the parentheses, and the
operators are used to separate the parentheticals.
For example, “(u AND v AND w) OR (x AND y AND z)” means “match either uvw or xyz.” In the
filter list, this looks like:
58 ZENworks 10 Configuration Management Software Distribution Reference
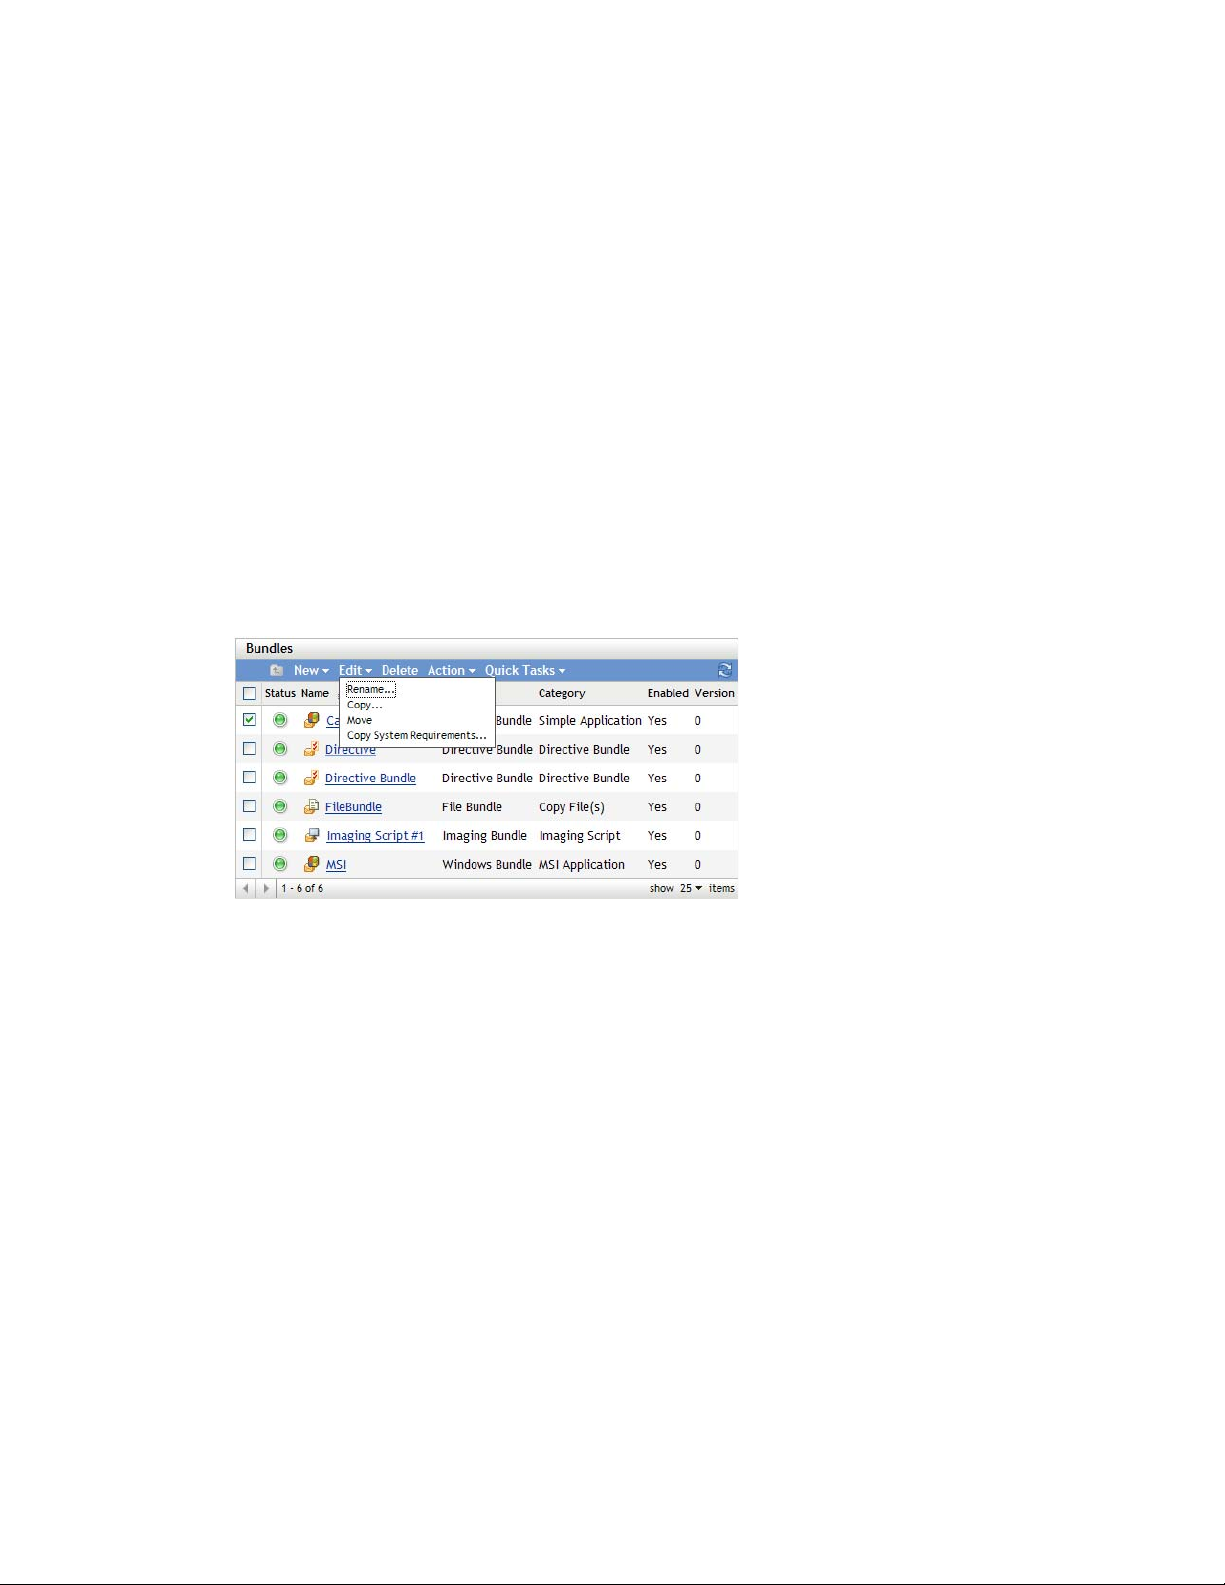
u AND
v AND
w
OR
x AND
y AND
z
Nested Filters and Filter Sets
Filters and filter sets cannot be nested. You can only enter them in series, and the first filter or filter
set to match the device is used. Therefore, the order in which they are listed does not matter. You are
simply looking for a match to cause the bundle to be applied to the device.
3.7 Copying a Bundle’s System Requirements
1 In ZENworks Control Center, click the Bundles tab.
2 In the Bundles list, select the check box next to the bundle.
3 Click Edit > Copy System Requirements.
novdocx (en) 16 April 2010
If more than one check box is selected, the Copy System Requirements option is not available
on the Edit menu.
4 Select Bundles or Policies, then click Add to select the bundles or policies to which you want to
copy the selected bundle’s system requirements.
3.8 Managing Bundle Settings
The Settings page lets you manage bundle settings, including the variables that are available for use
on bundles and content replication settings for ZENworks
Settings can be inherited from the following locations:
(System): The bundle is inheriting the setting established for the Management Zone
(Configuration tab > Management Zone Settings).
Folder: The bundle is inheriting the setting established for one of its parent folders.
Device: The bundle is not inheriting the setting, but the setting is configured directly on the
bundle.
®
Primary Servers and Satellite devices.
Managing Bundles 59

---: The bundle is not inheriting the setting and the setting is not configured directly on the
bundle. In other words, the setting is not configured at the system level, the folder level, or the
bundle level.
To configure a setting for the bundle:
1 Click Bundle Management.
2 Click the setting name.
3 If the setting is configured at the system or folder level, click Override settings to enable you to
configure the setting at the bundle level.
4 Fill in the fields.
To get information about the fields, click the Help button or select the appropriate topic from
the following list:
System Variables: Lets you manage the variables that are available for use on devices,
including those inherited from the Management Zone and new variables that you define.
For more information on content replication, see Section 3.9, “Managing Bundle
Variables,” on page 60.
Primary Server Replication: Lets you manage content replication to Primary Servers.
You can specify whether or not new Primary Servers added to the system are assigned to
host the bundle. You can also specify that the bundle is included or excluded from being
hosted on a specified Primary Server.
For more information on content replication, see “Content Replication” in ZENworks 10
Configuration Management System Administration Reference
Satellite Server Replication: Lets you manage content replication to Satellite devices.
You can specify whether or not new Satellites added to the system are assigned to host the
bundle. You can also specify that the bundle is included or excluded from being hosted on
a specified Satellite.
For more information on content replication, see “Content Replication” in ZENworks 10
Configuration Management System Administration Reference
novdocx (en) 16 April 2010
3.9 Managing Bundle Variables
The Bundles Settings page lets you manage the variables that are available for use on bundles.
The Inherited Variables panel displays all system variables that are inherited from the ZENworks
Management Zone or parent folders. You cannot delete or modify inherited variables. However, if
you add the same system variable, but give it a different value, the new variable value overrides the
inherited variable value.
When specifying the variable in a field, use the following syntax:
${VAR_NAME}
Replace
The System Variables panel lets you define variables that can be used to replace paths, names, and
so forth as you enter information.
60 ZENworks 10 Configuration Management Software Distribution Reference
VAR_NAME
with the name of the variable.
®

You can define system variables at three levels:
Management Zone: The system variables are inherited by the following: device folders,
devices, and bundles.
Device Folder: The system variables are inherited by all devices contained within the folder or
its subfolders.
Device or Bundle: The system variables apply only to the device or bundle for which they are
configured.
The following table lists the tasks you can perform to manage the system variables:
Task Steps Additional Details
novdocx (en) 16 April 2010
Add a variable 1. If you are configuring system
variables for an object (not for the
entire Management Zone), click
Override settings to activate the
System Variables panel.
2. Click Add, provide the name and
value for the variable, then click
OK.
3. Click Apply.
Remove a variable 1. Select the check box next to the
variable (or variables).
2. Click Remove.
3. Click Apply.
Edit a variable 1. Select the check box next to the
variable.
2. Click Edit.
3. Modify the Name and Value fields
as desired, then click OK.
4. Click Apply.
When configuring system variables for
an object, you can override an inherited
variable by defining a new variable with
the same name but a different value.
For example, if
you can override it by defining
Var1=d:\
Variable names cannot include spaces
and must be unique at the level where
they are defined. For example, you
cannot have two variables named Var1
defined at the device level (unless one
is inherited, in which case the device
level variable overrides the inherited
variable).
Variable values cannot include the
characters & and <.
Variable names cannot include spaces
and must be unique at the level where
they are defined. For example, you
cannot have two variables named Var1
defined at the device level (unless one
is inherited, in which case the device
level variable overrides the inherited
variable).
Var1=c:\
.
is inherited,
Use a variable 1. Use the following syntax:
${VAR_NAME}
Replace
of the variable.
VAR_NAME
with the name
Variable values cannot include the
characters & and <.
Managing Bundles 61

3.10 Deleting a Bundle
Deleting a bundle removes the bundle content from the ZENworks content servers but does not
uninstall it from devices where it has already been installed. To uninstall it from devices, you should
use the Uninstall options before deleting the bundle.
1 In ZENworks Control Center, click the Bundles tab.
2 In the Bundles list, select the check box next to the bundle (or bundles).
3 Click Delete.
3.11 Incrementing a Bundle’s Version Number
Incrementing a bundle’s version number causes the bundle to be redeployed to managed devices and
recopied to content servers.
NOTE: If you change the dependencies of a bundle that has already been replicated to content
servers, you must redeploy the bundle to ensure that each content server has all of the dependencies
required by the bundle. This process is different than incrementing a bundle’s version number. For
more information, see “Redeploying a Bundle to Refresh Its Dependencies:” on page 15.
novdocx (en) 16 April 2010
3.11.1 Using the Action menu
1 In ZENworks Control Center, click the Bundles tab.
2 In the Bundles list, select the check box next to the bundle (or bundles).
3 Click Action > Increment Version.
4 In the Confirm Version Increment dialog box, click Yes .
3.11.2 Editing the Bundle
1 In ZENworks Control Center, click the Bundles tab.
2 In the Bundles list, click a bundle’s underlined link in the Name column to display its Summary
page.
3 Click Increment Version.
4 In the Confirm Version Increment dialog box, click Yes .
62 ZENworks 10 Configuration Management Software Distribution Reference

3.12 Installing a Bundle
The Install Bundle option in the Bundle Tasks list in the left navigation pane of ZENworks Control
Center lets you immediately install a bundle to one or more devices.
1 In ZENworks Control Center, click the Bundles tab.
2 In the Bundles list, select the check box next to the bundle (or bundles).
3 In the Bundle Tasks list in the left navigation pane, select Install Bundle.
4 In the Devices section, click Add to select the devices where you want to install the bundle.
5 In the Select Objects dialog box, browse to and select the objects on which you want to install
the bundle.
The Select Objects dialog box opens with the
Servers
created in the
Browse for and select the devices, groups, and folders to which you want to assign the bundle.
To do so:
and
Workstations
Devices
folders are displayed along with any custom folders that you have
folder.
Devices
folder as the root folder. By default, the
novdocx (en) 16 April 2010
5a Click next to a folder (for example, the
navigate through the folders until you find the device, user, group, or folder you want to
select.
If you are looking for a specific item, such as a Workstation or a Workstation Group, you
can use the Items of type list to limit the types of items that are displayed. If you know the
name of the item you are looking for, you can also use the Item name box to search for the
item.
5b Click the underlined link in the Name column to select the device, group, or folder and
display its name in the Selected list box.
5c Click OK to add the selected devices, folders, and groups to the Devices list.
6 Click OK.
If the bundle has not already been assigned to a device, then the bundle’s icon is placed in the
application window of the device.
Workstations
folder or
Servers
folder) to
3.13 Launching a Bundle
The Launch Bundle option lets you immediately launch a bundle to one or more devices. If the
bundle is not already installed, it is installed and then launched.
1 In ZENworks Control Center, click the Bundles tab.
2 In the Bundles list, select the check box next to the bundle (or bundles).
3 Click Quick Tasks > Launch Bundle.
Managing Bundles 63
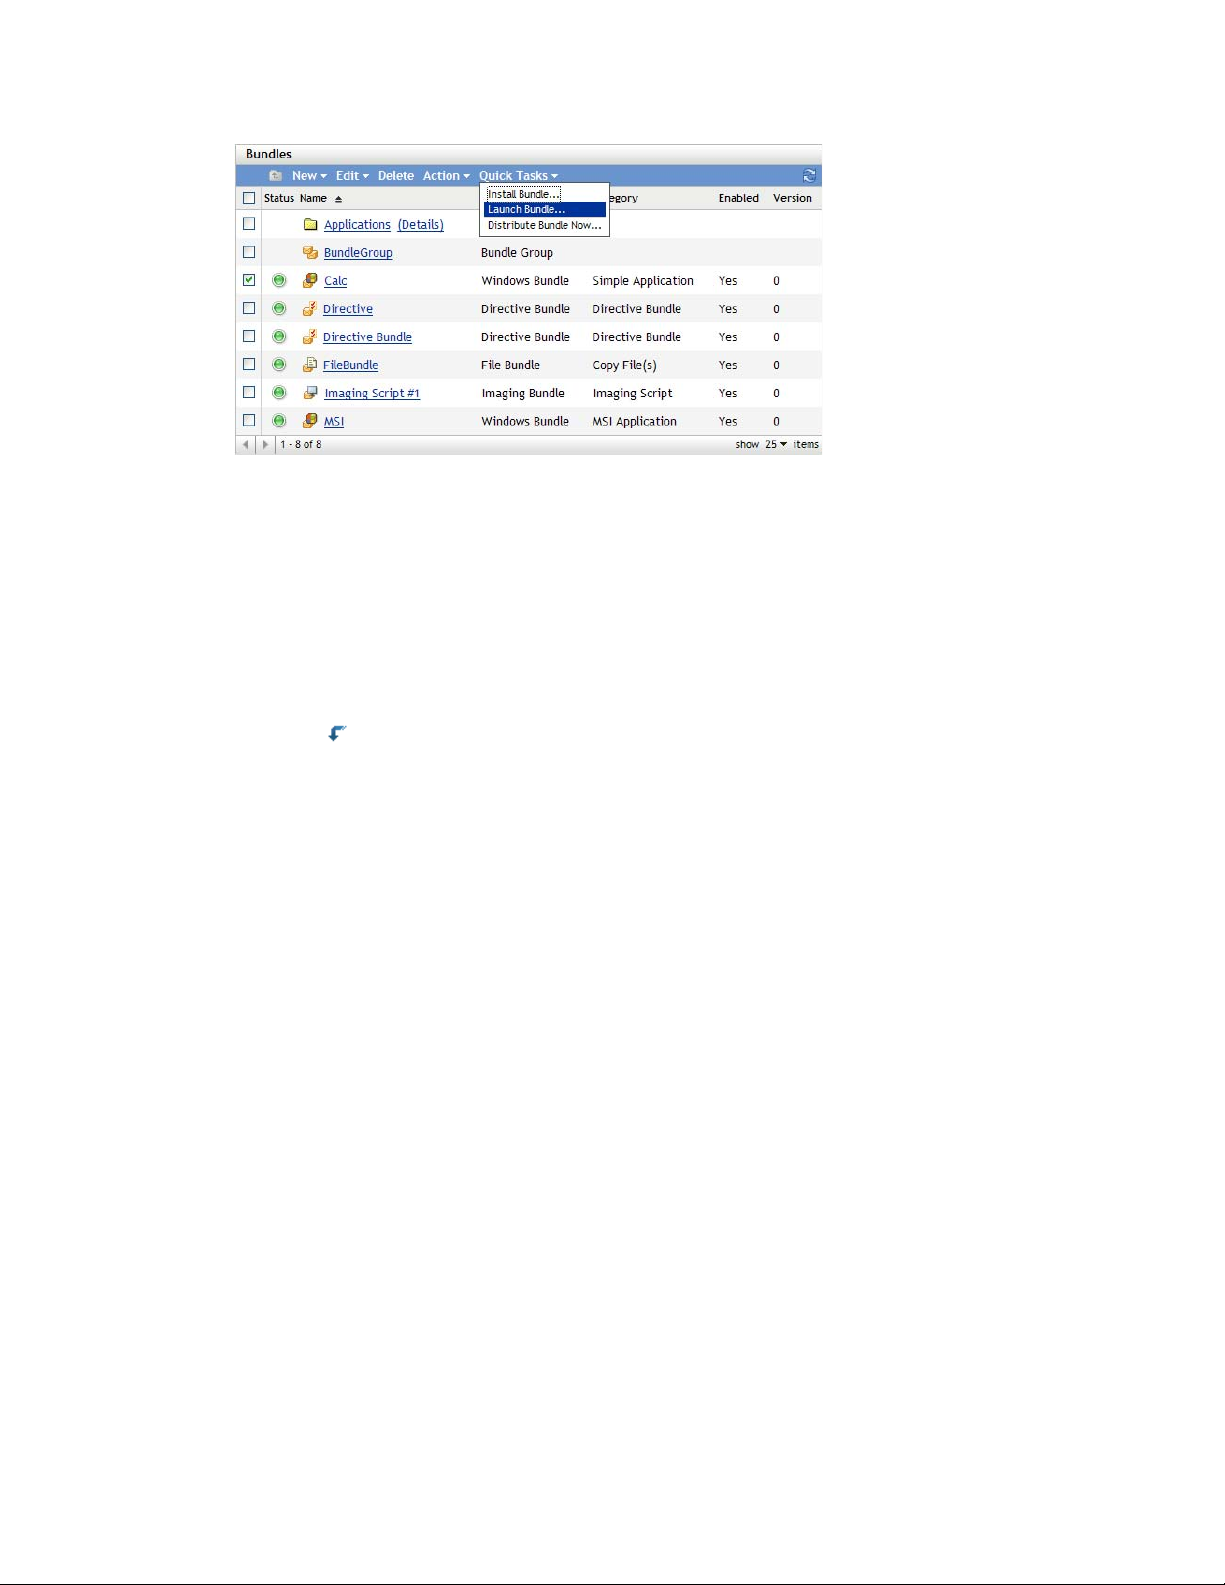
4 In the Devices section, click Add to select the devices where you want to launch the bundle.
5 In the Select Objects dialog box, browse to and select the objects on which you want to launch
the bundle.
novdocx (en) 16 April 2010
The Select Objects dialog box opens with the
Servers
created in the
Browse for and select the devices, groups, and folders to which you want to assign the bundle.
To do so:
5a Click next to a folder (for example, the
5b Click the underlined link in the Name column to select the device, group, or folder and
5c Click OK to add the selected devices, folders, and groups to the Devices list.
6 Click OK.
If the bundle has not earlier been assigned to a device, then the bundle’s icon is placed in the
application window of the device.
and
Workstations
Devices
navigate through the folders until you find the device, user, group, or folder you want to
select.
If you are looking for a specific item, such as a Workstation or a Workstation Group, you
can use the Items of type list to limit the types of items that are displayed. If you know the
name of the item you are looking for, you can also use the Item name box to search for the
item.
display its name in the Selected list box.
folders are displayed along with any custom folders that you have
folder.
Devices
folder as the root folder. By default, the
Workstations
folder or
Servers
folder) to
3.14 Copying a Bundle to a Content Server
By default, a bundle is copied to each content server. If you specify certain content servers as hosts,
the bundle is hosted on only those content servers; it is not copied to all content servers. You can
also specify whether the selected bundle is replicated to new content servers (ZENworks Servers
and satellite servers) that are added to the Management Zone.
To specify a content server:
1 In ZENworks Control Center, click the Bundles tab.
2 In the Bundles list, select the check box next to the bundle (or bundles).
3 Click Action > Specify Content Server to display the New Content Replication Rules page.
64 ZENworks 10 Configuration Management Software Distribution Reference

4 Specify the default replication behavior for new servers added to the system:
New Primary Servers Will: Specify the default replication behavior for new ZENworks
Primary Servers added to the system:
novdocx (en) 16 April 2010
Include This Content: Replicates the content to any servers created in the future.
Exclude This Content: Excludes the content from being replicated to any servers
created in the future.
New Satellite Servers Will: Specify the default replication behavior for new ZENworks
satellite servers added to the system:
Include This Content: Replicates the content to any servers created in the future.
Exclude This Content: Excludes the content from being replicated to any servers
created in the future.
Be aware that any content replication relationships previously set between the content and
servers are lost upon completion of this wizard.
5 Click Next to display the Include or Exclude Primary Servers/Satellite Servers page:
Managing Bundles 65
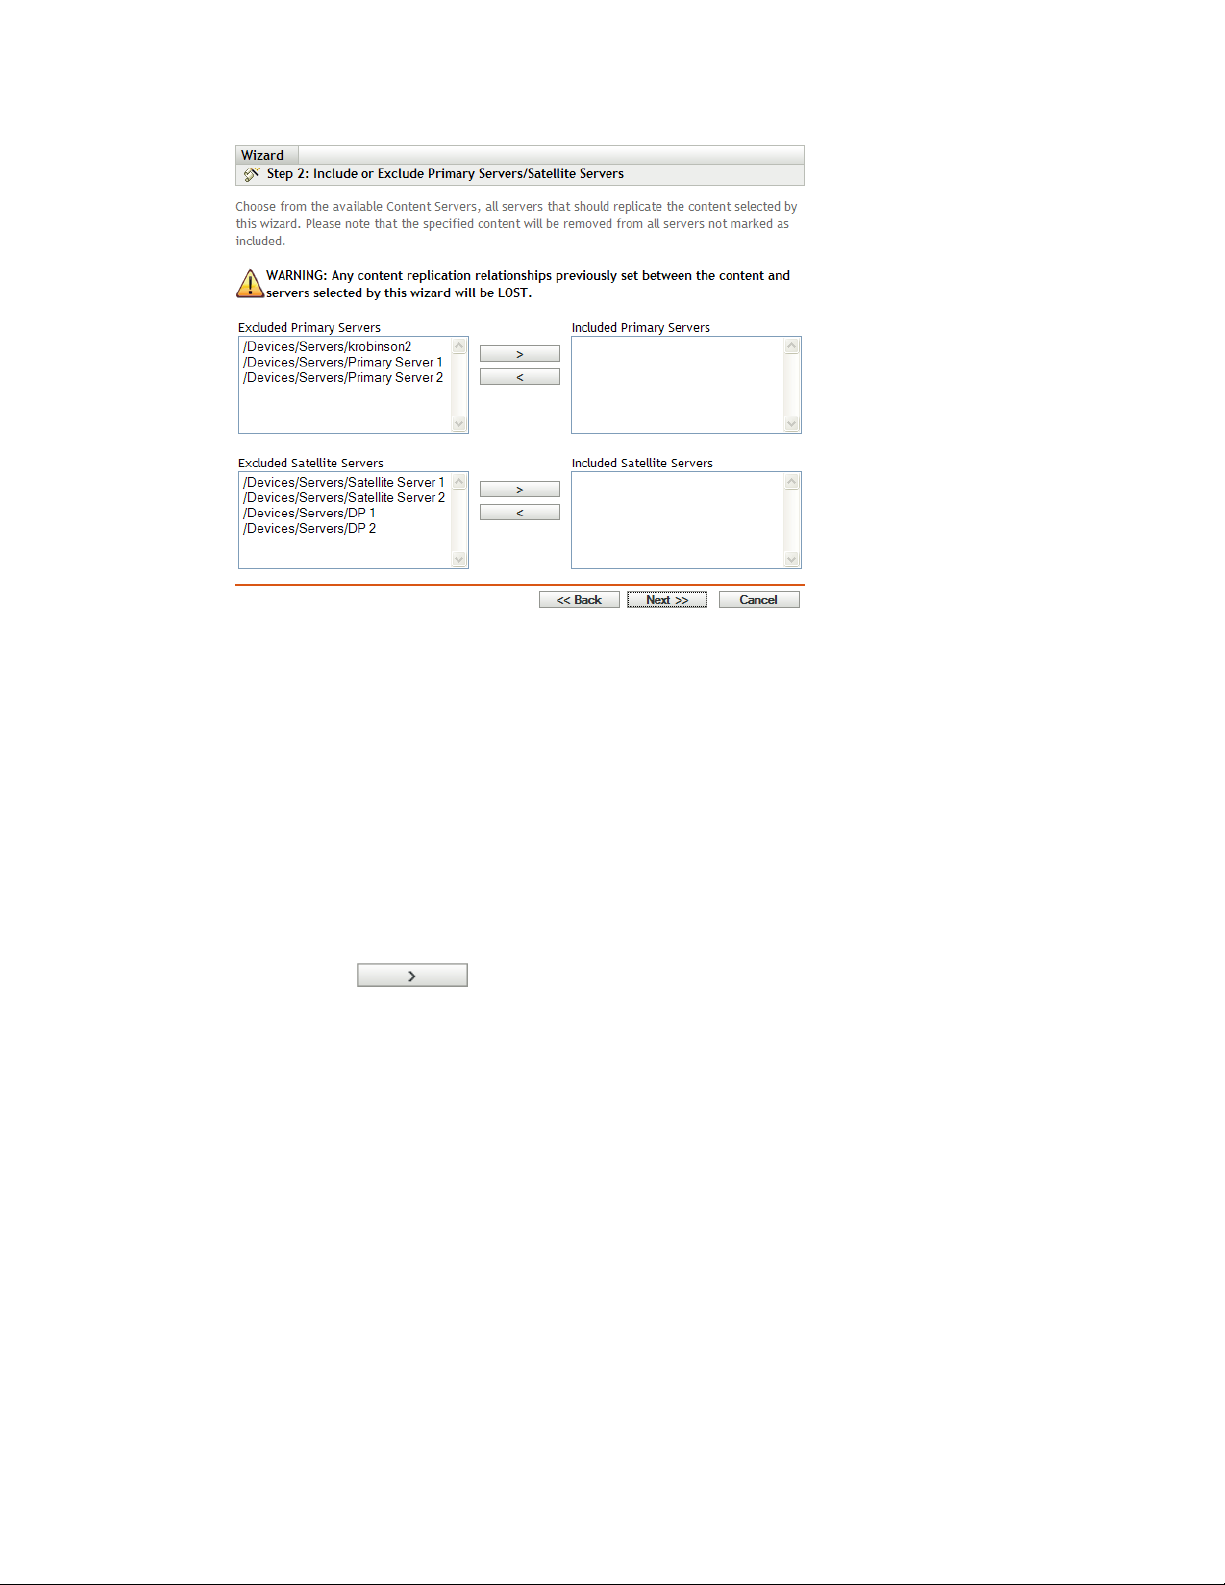
novdocx (en) 16 April 2010
This page lets you specify on which content servers (ZENworks Servers and satellite servers)
the content is hosted.
The relationships between content and content servers that you create using this wizard
override any existing relationships. For example, if Bundle A is currently hosted on Server 1
and Server 2 and you use this wizard to host it on Server 1 only, Bundle A is excluded from
Server 2 and is removed during the next scheduled replication.
5a In the Excluded Primary Servers or Excluded Satellite Servers list, select the desired
content server.
You can use Shift+click and Ctrl+click to select multiple content servers.
You cannot include content on a satellite server without including it on the satellite
server’s parent ZENworks Server. You must select both the satellite server and its parent.
5b Click the button to move the selected content server to the Included Primary
Servers or Included Satellite Servers list.
6 Click Next to display the Finish page, then review the information and, if necessary, use the
Back button to make changes to the information.
7 Click Finish to create the relationships between the content and the content servers. Depending
on the relationships created, the content is replicated to or removed from content servers during
the next scheduled replication.
3.15 Preventing a Bundle from Being Deployed
A disabled bundle is not deployed to new managed devices or content servers. It remains on any
devices and content servers to which it has already been deployed.
1 In ZENworks Control Center, click the Bundles tab.
2 In the Bundles list, select the check box next to the bundle (or bundles).
66 ZENworks 10 Configuration Management Software Distribution Reference
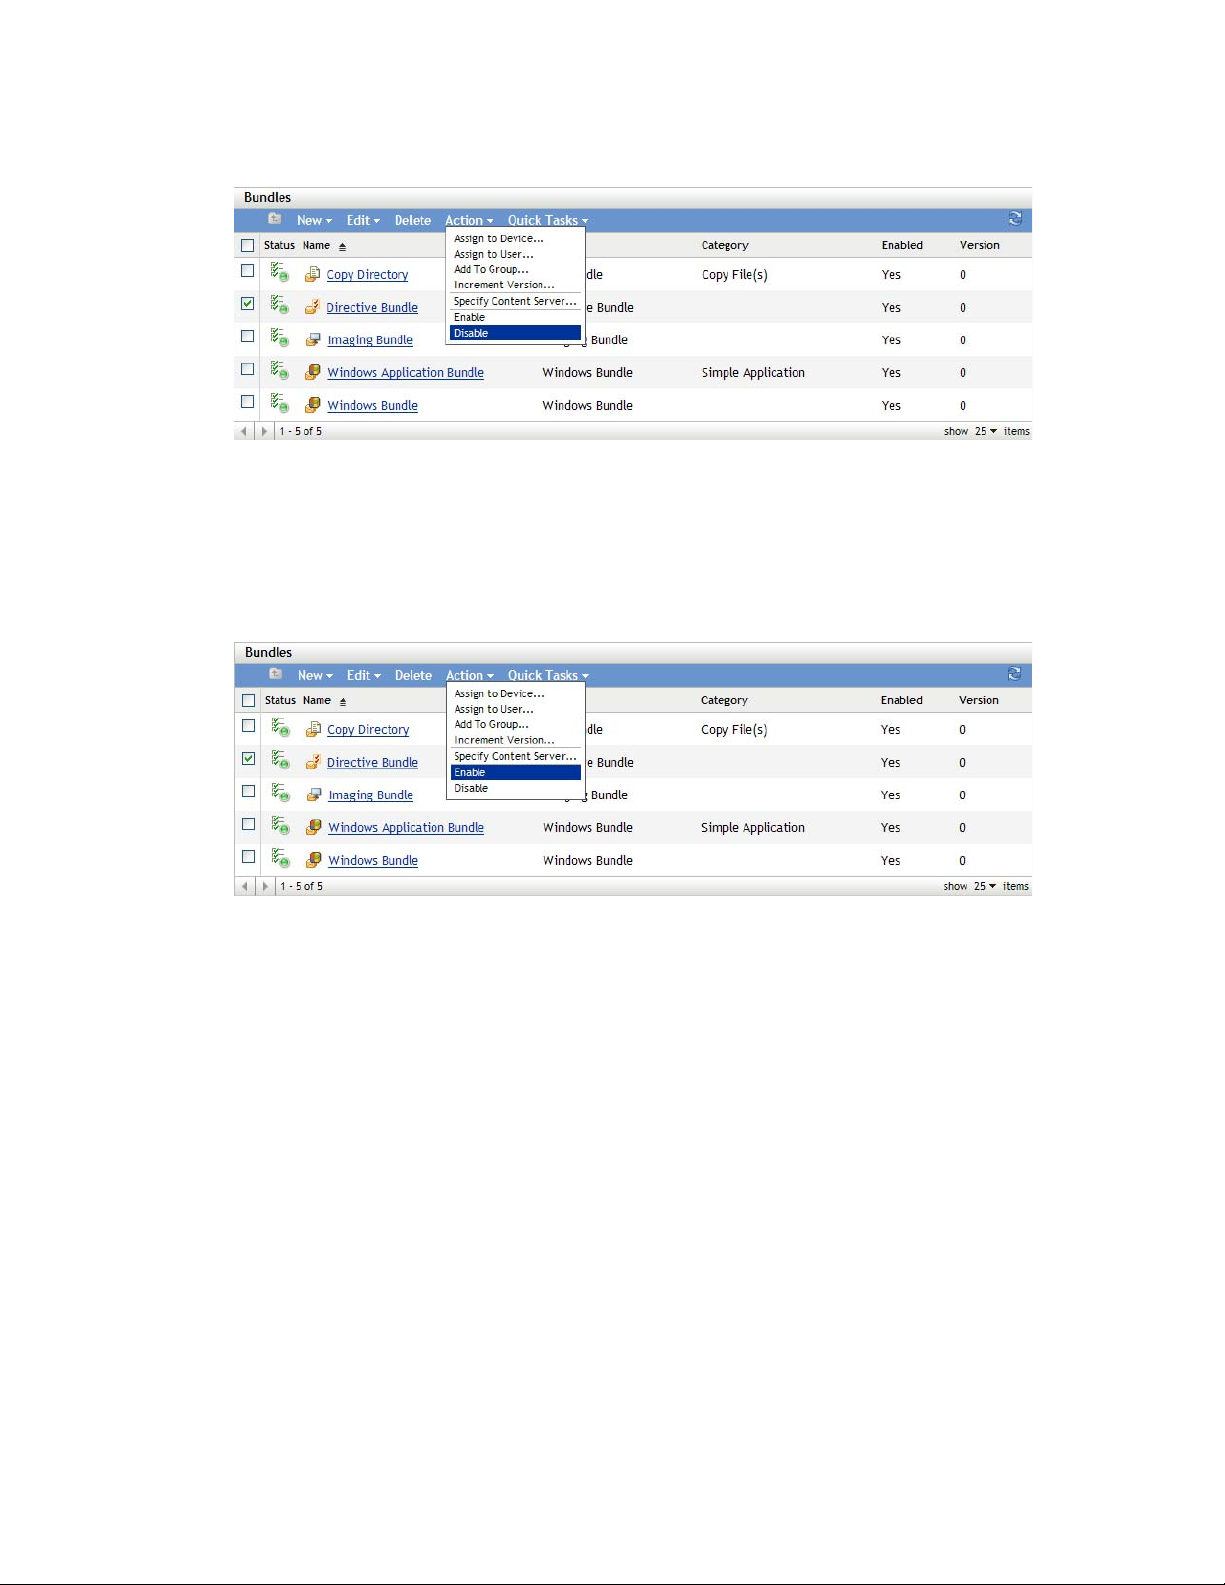
3 Click Action > Disable.
3.16 Enabling a Bundle to Be Deployed
1 In ZENworks Control Center, click the Bundles tab.
2 In the Bundles list, select the check box next to the bundle (or bundles).
3 Click Action > Enable.
novdocx (en) 16 April 2010
3.17 Enabling a Bundle to Be Uninstalled
When you create a bundle, the Undo Install action is enabled by default; however, the Uninstall
Action Set is not enabled. Therefore, in order for any actions in the action set to run (including the
Undo Install action), you must enable the action set.
1 In the ZENworks Control Center, click the Bundles tab.
2 In the Bundles list, click the bundle’s underlined link in the Name column to display its
Summary page.
3 Click the Actions tab, then click the Uninstall tab.
4 Click Options to display the Uninstall Options dialog box.
Managing Bundles 67
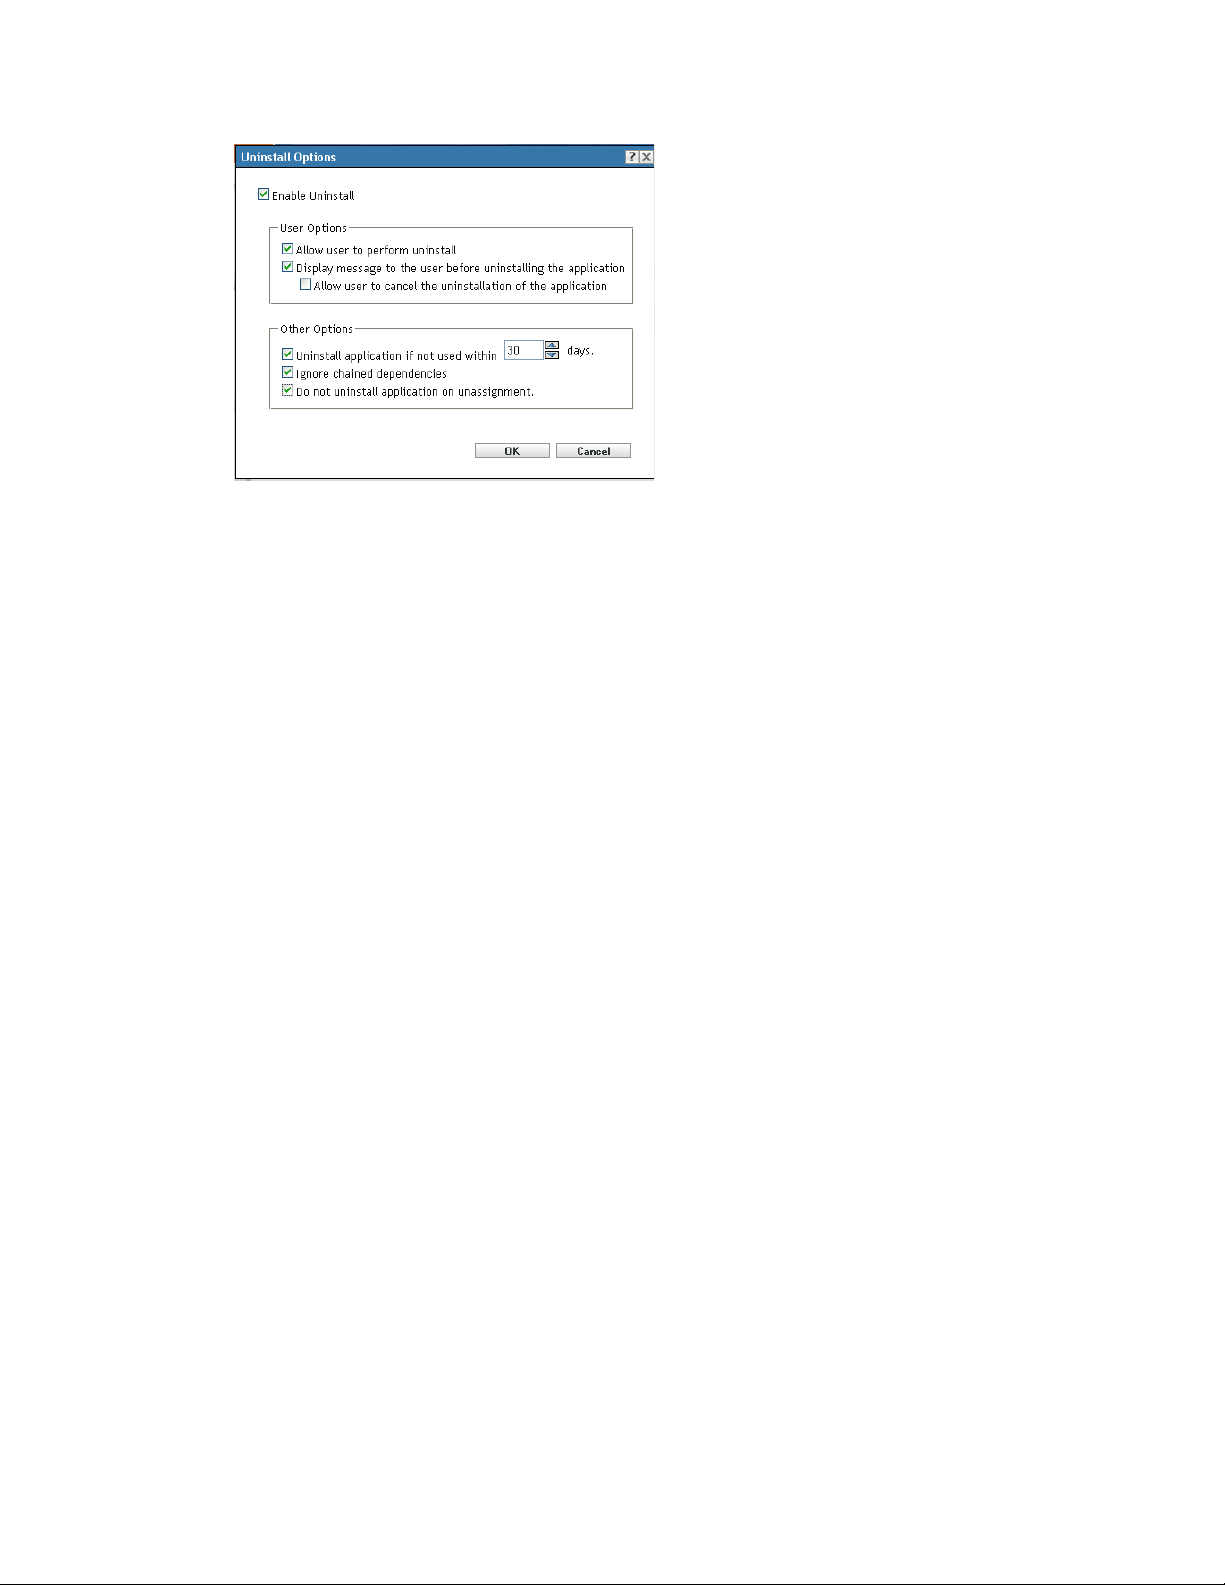
5 Select the Enable Uninstall option. The following uninstall options are available only if Enable
Uninstall option is selected:
User Options:
Specify whether the user should be allowed to uninstall or cancel the uninstallation of an
application from a device:
novdocx (en) 16 April 2010
Allow User to perform uninstall: Select this option to enable users to remove the application
from their devices.
Display message to the user before uninstalling the application: Select this option to
specify that a message warning the user that the application is going to be uninstalled from the
device is displayed.
Allow user to cancel the uninstallation of the application: Select this option to specify
whether the user can cancel the uninstallation of the application. You can enable this option
only if the Display message to the user before uninstalling the application option is enabled.
Other Options:
Specify additional options to enable the uninstallation of the application from the device:
Uninstall application if not used within _ days: Select this option to automatically remove
the application if the user has not run it within the specified number of days (the default is 30).
Ignore Chained Dependencies: Select this option to enable the uninstallation of a dependent
application that is referenced by two or more applications. For example, consider three
applications (A, B, and C), where C is the dependent application. Assume application A installs
application C, and application B uninstalls application C. Application C is uninstalled only if
Ignore Chained Dependencies is selected.
Do not uninstall application on unassignment: Select this option to prevent the application
from being uninstalled after it is unassigned from the device or user.
6 Click OK, then click Apply.
3.18 Uninstalling a Bundle
The Uninstall Bundle quick task lets you uninstall a bundle from one or more devices. Uninstalling
a bundle does not, however, remove its assignments nor prevent the bundle from being reinstalled.
68 ZENworks 10 Configuration Management Software Distribution Reference

NOTE: To use the Uninstall Bundle quick task, you must enable the bundle’s uninstall options
(which are disabled by default), increment the bundle’s version, and refresh the device. For more
information, see Section 3.17, “Enabling a Bundle to Be Uninstalled,” on page 67 and Section 3.11,
“Incrementing a Bundle’s Version Number,” on page 62.
To uninstall a bundle:
1 In ZENworks Control Center, click the Bundles tab.
2 In the Bundles list, select the check box next to the bundle (or bundles).
3 Click Quick Tasks > Uninstall Bundle.
4 In the Bundles section, click to browse to and select the desired bundle (if necessary).
5 In the Devices section, click Add to select the devices where you want to uninstall the bundle.
6 In the Select Objects dialog box, browse to and select the objects on which you want to
uninstall the bundle.
The Select Objects dialog box opens with the
Servers
created in the
and
Workstations
Devices
folders are displayed along with any custom folders that you have
folder.
Devices
folder as the root folder. By default, the
Browse for and select the devices, groups, and folders to which you want to assign the bundle.
To do so:
novdocx (en) 16 April 2010
6a Click next to a folder (for example, the
Workstations
folder or
Servers
folder) to
navigate through the folders until you find the device, user, group, or folder you want to
select.
If you are looking for a specific item, such as a Workstation or a Workstation Group, you
can use the Items of type list to limit the types of items that are displayed. If you know the
name of the item you are looking for, you can also use the Item name box to search for the
item.
6b Click the underlined link in the Name column to select the device, group, or folder and
display its name in the Selected list box.
6c Click OK to add the selected devices, folders, and groups to the Devices list.
7 Click OK, then click Apply.
If ZENworks Control Center shows that the uninstall fails, examine the device’s log file for more
information.
3.18.1 Bundle
Click to browse to and select the desired bundle (if necessary).
3.18.2 Devices
Select the devices from which you want to remove the bundle. You can browse to and select a device
that the bundle is not currently assigned to because the bundle may have been assigned to and
installed on that device previously.
1 In the Devices section, click Add.
Managing Bundles 69

Because you are removing the bundle from devices, the Add Assignments dialog box opens
with the
are displayed along with any custom folders that you have created in the
2 Browse for and select the devices, device groups, and device folders from which you want to
remove the bundle. To do so:
2a Click next to a folder (for example, the
2b Click the underlined link in the Name column to select the device, group, or folder and
2c Click OK to add the selected devices, folders, and groups to the Devices list.
Devices
navigate through the folders until you find the device, group, or folder you want to select.
If you are looking for a specific item, such as a Workstation or a Workstation Group, you
can use the Items of type list to limit the types of items that are displayed. Also, if you
know the name of the item you are looking for, you can also use the Item name box to
search for the item.
display its name in the Selected list box.
folder as the root folder. By default, the
Workstations
Servers
folder or
and
Workstations
Devices
Servers
folders
folder.
folder) to
3.19 Modifying Action Set Options
novdocx (en) 16 April 2010
When you create a bundle, all actions are enabled by default, meaning that after you add them to a
action set, they run according to the action set’s options. However, not all action sets are enabled by
default. The Install, Launch, and Terminate action sets are enabled, meaning that after you add an
action, it runs on assigned devices according to its action set’s options. The Uninstall action set is
not enabled by default.
The following sections contain information about modifying action set options and enabling the
Uninstall action set:
Section 3.19.1, “Install Action Set Options,” on page 70
Section 3.19.2, “Launch Action Set Options,” on page 71
Section 3.19.3, “Uninstall Action Set Options,” on page 72
Section 3.19.4, “Terminate Action Set Options,” on page 74
3.19.1 Install Action Set Options
The Install Options dialog box lets you specify the how often the bundle’s install actions are
performed on managed devices and to specify if users can postpone the bundle’s installation.
1 In the ZENworks Control Center, click the Bundles tab.
2 In the Bundles list, click a bundle’s underlined link in the Name column to display its Summary
page.
3 Click the Actions tab, then click the Install tab.
4 Click Options to display the Install Options dialog box.
70 ZENworks 10 Configuration Management Software Distribution Reference
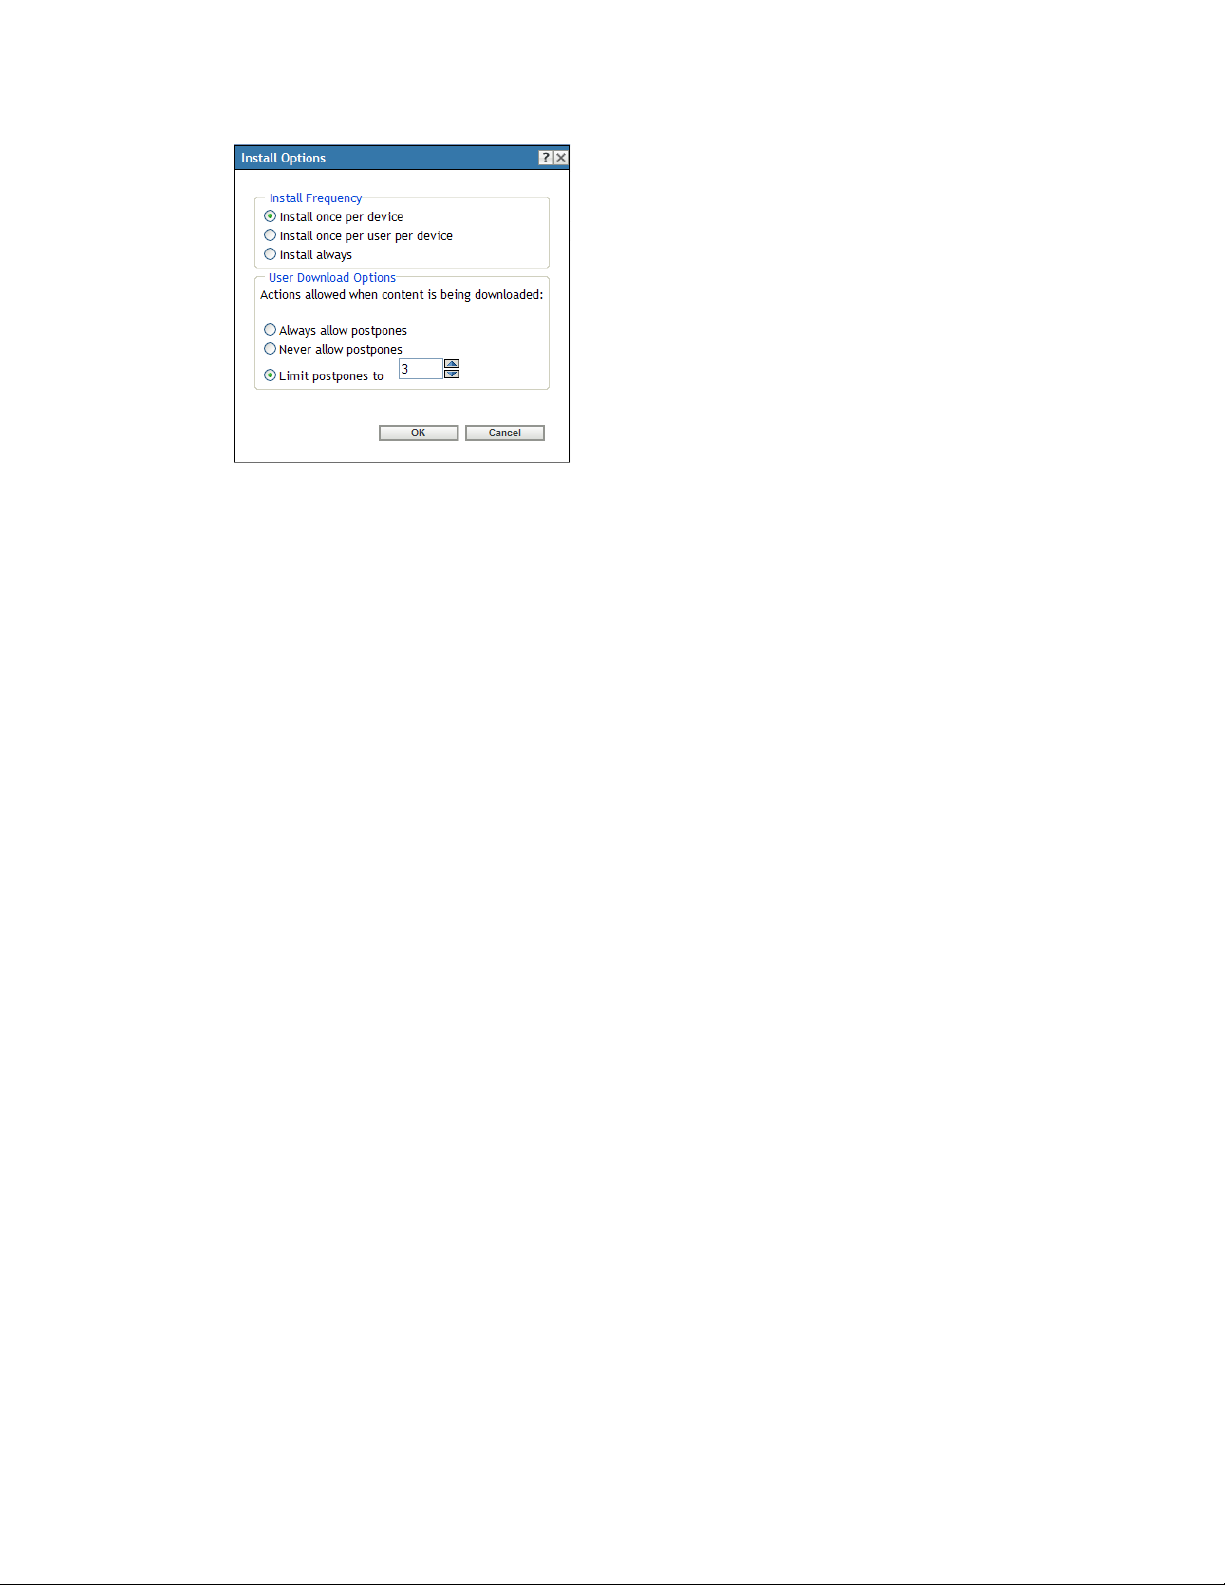
5 Specify how often you want the bundle’s install actions performed:
Install once per device: Performs the bundle’s install actions once on each managed device.
Install once per user per device: Performs the bundle’s install actions once for each user on
each managed device.
Install always: Performs the bundle’s install action each time the bundle is run on the managed
device.
novdocx (en) 16 April 2010
6 Specify whether to allow users to postpone performing the bundle’s install actions and specify
the number of postpones to allow.
Always allow postpones: Allow the user to postpone the installation an unlimited number of
times.
Never allow postpones: Do not allow the user to postpone the installation.
Limit postpones to: Specify the number of times that the user can postpone the installation.
7 Click OK, then click Apply.
3.19.2 Launch Action Set Options
The Launch Options dialog box lets you configure how often the bundle’s launch actions are
performed on managed devices. By default, the launch actions are performed according to the
bundle’s schedule or when the user launches the bundle using its shortcut (from the Application
Window, desktop, and so forth).
1 In the ZENworks Control Center, click the Bundles tab.
2 In the Bundles list, click a bundle’s underlined link in the Name column to display its Summary
page.
3 Click the Actions tab, then click the Launch tab.
4 Click Options to display the Launch Options dialog box.
Managing Bundles 71

5 Fill in the fields:
Run Once: Select this option to configure the bundle’s launch actions, then select one of the
following options. If you do not select this option (the default), the launch actions are
performed each time a user launches the application contained in the bundle.
For each device: Launches the bundle’s actions once on each managed device.
For the first user that logs in: Launches the bundle’s actions once on each managed
device when the first user logs in to that device. If subsequent users log in to the device,
the action set is not launched. If you select this option, the bundle’s icon is removed from
the device’s Application Window, desktop, and so forth.
novdocx (en) 16 April 2010
For every user that logs in: Launches the bundle’s actions for every user that logs in to
the device.
6 Click OK, then click Apply.
3.19.3 Uninstall Action Set Options
The Uninstall Options dialog box lets you enable the application to be uninstalled, allow the user to
perform the uninstall, and specify that the application is uninstalled if it is not used with in a
specified number of days.
When you create a bundle, the Undo Install action is enabled by default; however, the Uninstall
Action Set is not enabled. Therefore, in order for any actions in the action set to run (including the
Undo Install action), you must enable the action set.
1 In the ZENworks Control Center, click the Bundles tab.
2 In the Bundles list, click the bundle’s underlined link in the Name column to display its
Summary page.
3 Click the Actions tab, then click the Uninstall tab.
4 Click Options to display the Uninstall Options dialog box.
72 ZENworks 10 Configuration Management Software Distribution Reference

5 Select the Enable Uninstall option. The following uninstall options are available only if Enable
Uninstall option is selected:
User Options:
Specify whether the user should be allowed to uninstall or cancel the uninstallation of an
application from a device:
novdocx (en) 16 April 2010
Allow User to perform uninstall: Select this option to enable users to remove the application
from their devices.
Display message to the user before uninstalling the application: Select this option to
specify that a message warning the user that the application is going to be uninstalled from the
device is displayed.
Allow user to cancel the uninstallation of the application: Select this option to specify
whether the user can cancel the uninstallation of the application. You can enable this option
only if the Display message to the user before uninstalling the application option is enabled.
Other Options:
Specify additional options to enable the uninstallation of the application from the device:
Uninstall application if not used within _ days: Select this option to automatically remove
the application if the user has not run it within the specified number of days (the default is 30).
Ignore Chained Dependencies: Select this option to enable the uninstallation of a dependent
application that is referenced by two or more applications. For example, consider three
applications (A, B, and C), where C is the dependent application. Assume application A installs
application C, and application B uninstalls application C. Application C is uninstalled only if
Ignore Chained Dependencies is selected.
Do not uninstall application on unassignment: Select this option to prevent the application
from being uninstalled after it is unassigned from the device or user.
6 Click OK, then click Apply.
Managing Bundles 73

3.19.4 Terminate Action Set Options
The Terminate Options dialog box lets you specify that the bundle’s actions can be terminated. This
setting is used if a bundle has an availability schedule. For example, if a bundle can be installed only
between 1 p.m. and 5 p.m. and the bundle is in the process of being installed at 5 p.m., the
installation process terminates.
1 In the ZENworks Control Center, click the Bundles tab.
2 In the Bundles list, click the bundle’s underlined link in the Name column to display its
Summary page.
3 Click the Actions tab, then click the Term inat e tab.
4 Click Options to display the Terminate Options dialog box.
5 Select or deselect the Enable Terminate check box.
6 Click OK, then click Apply.
3.20 Show Bundle Activity on the Managed Device
novdocx (en) 16 April 2010
You can display the bundle activity indicator window during the distribution, installation,
verification, and uninstallation of a bundle on the managed device.
1 In ZENworks Control Center, click the Bundles tab.
2 In the Bundles list, click the bundle’s underlined link in the Name column to display its
Summary page.
3 In the General panel, click Yes for Show Bundle Activity.
4 Click Increment Version to increment the version of the bundle.
5 In the Confirm Version Increment dialog box, click Ye s.
The activity indicator is used to notify the user on the managed device that some ZENworks
activities such as downloading files or installing an MSI are being performed on the device. The
user on the managed device cannot close this bundle activity indicator window.
On Windows 2000 devices, the control that indicates the progress of the bundle execution on the
managed device is not displayed in the bundle activity indicator window.
3.21 Viewing the Predefined Reports
You must have installed ZENworks Reporting Server to view the predefined reports. For more
information on how to install ZENworks Reporting Server, see the ZENworks 10 Configuration
Management Reporting Server Installation Guide.
To view the predefined reports for bundles:
1 In ZENworks Control Center, click the Reports tab.
2 In the ZENworks Reporting Server Reporting panel, click ZENworks Reporting Server
InfoView to launch the ZENworks Reporting Server InfoView.
3 Navigate to the Novell ZENworks Reports > Predefined Reports > Bundles and Policies folder.
74 ZENworks 10 Configuration Management Software Distribution Reference

4 The following predefined reports are included for bundles:
Assigned Bundles and Policies by Device: Displays information on all the bundles and
policies that are assigned to a particular device.
Bundle Deployment Status: Prompts for the device name, deployment status, and bundle
name and displays the deployment details of the bundle.
Bundle Information: Displays the bundle's details such as name, type, path, version, and
the information of the device to which it is assigned.
Content By Server: Displays the content information for the selected server. The
information includes the content name, content type, replication state, and the disk space.
Content By Bundles and Policies: Displays the content information for the bundles. This
information includes the content server, content type, replication state, and disk space.
For more information on creating and managing reports, see the ZENworks 10 Configuration
Management System Reporting Reference documentation.
novdocx (en) 16 April 2010
Managing Bundles 75

novdocx (en) 16 April 2010
76 ZENworks 10 Configuration Management Software Distribution Reference

4
Managing Bundle Groups
A bundle group lets you group bundles to ease administration and to provide easier assigning and
scheduling of the bundles in the bundle group.
®
You can use ZENworks
This section explains how to perform this task using the ZENworks Control Center. If you prefer the
zman command line utility, see “Bundle Commands” in “ZENworks Command Line Utilities”.
The following sections contain more information:
Section 4.1, “Creating Bundle Groups,” on page 77
Section 4.2, “Renaming or Moving Bundle Groups,” on page 78
Section 4.3, “Copying a Bundle Group’s System Requirements,” on page 79
Section 4.4, “Deleting a Bundle Group,” on page 79
Section 4.5, “Assigning a Bundle Group to Devices,” on page 79
Control Center or the zman command line utility to create bundle groups.
novdocx (en) 16 April 2010
4
Section 4.6, “Assigning a Bundle Group to Users,” on page 81
Section 4.7, “Adding a Bundle to a Group,” on page 84
Section 4.8, “Copying a Bundle Group to a Content Server,” on page 84
4.1 Creating Bundle Groups
1 In ZENworks Control Center, click the Bundles tab.
2 Click New > Bundle Group.
3 Fill in the fields:
Group Name: Provide a name for the bundle group. The name must be different than the name
of any other item (bundle, group, folder, and so forth) that resides in the same folder. The name
you provide displays in ZENworks Control Center.
For more information, see “Naming Conventions in ZENworks Control Center”.
Managing Bundle Groups
77

Folder: Type the name or browse to and select the ZENworks Control Center folder where you
want the bundle to reside. The default is
organize your bundles.
If you want to create the group in another folder, browse to and select the folder. By default, the
group is created in the current folder.
Description: Provide a short description of the bundle group's contents. This description
displays in ZENworks Control Center.
4 Click Next to display the Add Group Members page, then specify bundles to be members for
the group.
You can add any number of bundles to the group. You cannot add other bundle groups to the
group.
4a Click Add to display the Select Members dialog box.
Because you are adding bundles to the group, the Select Members dialog box opens with
Bundles
the
4b Browse for and select the bundles you want to add to the group. To do so:
4b1 Click next to a folder to navigate the folders until you find the bundle you want to
select.
If you know the name of the bundle you are looking for, you can also use the Item
name box to search for the bundle.
4b2 Click the underlined link in the Name column to select the bundle and display its
name in the Selected list.
folder displayed.
/bundles
, but you can create additional folders to
novdocx (en) 16 April 2010
4b3 (Optional) Repeat Step 4a and Step 4b to add additional bundles to the Selected list.
4b4 Click OK to add the selected bundles to the group.
5 Click Next to display the Summary page, review the information and, if necessary, use the Back
button to make changes to the information.
6 (Optional) Select the Define Additional Properties option to display the group’s properties page
after the group is created. You can then configure additional bundle properties.
7 Click Finish to create the group.
Before the bundle group’s contents are distributed to devices or users, you must continue with
Section 4.5, “Assigning a Bundle Group to Devices,” on page 79 or Section 4.6, “Assigning a
Bundle Group to Users,” on page 81.
4.2 Renaming or Moving Bundle Groups
Use the Edit drop-down list on the Bundles page to edit an existing object. To access the Edit dropdown list, you must select an object by clicking the check box next to the object's name in the list.
Depending on the type of object you select, you can rename, copy, or move the selected object. For
example, if you select a Bundle object, you can rename, copy, and move the bundle. If you select a
Bundle Group object, you can rename or move the Bundle Group object, but not copy it. If the
option is dimmed, that option is not available for the selected object type.
Some actions cannot be performed on multiple objects. For example, if more than one check box is
selected, the Rename option is not available from the Edit menu.
1 In ZENworks Control Center, click the Bundles tab.
78 ZENworks 10 Configuration Management Software Distribution Reference

2 In the Bundles list, select the box next to the bundle group’s name, click Edit, then click an
option:
Rename: Click Rename, provide a new name for the folder, then click OK.
Move: Click Move, select a destination folder for the selected objects, then click OK.
4.3 Copying a Bundle Group’s System Requirements
1 In ZENworks Control Center, click the Bundles tab.
2 In the Bundles list, select the check box next to the bundle group.
3 Click Edit > Copy System Requirements.
If more than one check box is selected, the Copy System Requirements option is not available
on the Edit menu.
4 Select Bundles or Policies, then click Add to select the bundles or policies to which you want to
copy the selected bundle group’s system requirements.
novdocx (en) 16 April 2010
4.4 Deleting a Bundle Group
Deleting a bundle group does not delete its bundles. It also does not uninstall the bundles from
devices where they have already been installed. To uninstall the bundles from devices, you should
use the Uninstall option for each bundle before deleting the bundle group.
1 In ZENworks Control Center, click the Bundles tab.
2 In the Bundles list, select the check box next to the bundle group (or bundle groups).
3 Click Delete.
4.5 Assigning a Bundle Group to Devices
1 In ZENworks Control Center, click the Bundles tab.
2 In the Bundles list, select the check box next to the bundle group (or bundle groups).
3 Click Action > Assign to Device.
Managing Bundle Groups 79

4 Browse for and select the devices, device groups, and device folders to which you want to
assign the group. To do so:
4a Click next to a folder (for example, the
Workstations
folder or
Servers
folder) to
navigate through the folders until you find the device, group, or folder you want to select.
If you are looking for a specific item, such as a Workstation or a Workstation Group, you
can use the Items of type list to limit the types of items that are displayed. If you know the
name of the item you are looking for, you can use the Item name box to search for the
item.
4b Click the underlined link in the Name column to select the device, group, or folder and
display its name in the Selected list box.
4c Click OK to add the selected devices, folders, and groups to the Devices list.
5 Specify the locations on the managed device where ZENworks Adaptive Agent displays the
bundle group’s icons. The possible locations are:
Application Window: Places the icons in the Application window.
Desktop: Places the icons on the device’s desktop.
Quick Launch: Places the icons on the Quick Launch area of the Windows taskbar.
Start Menu: Places the icons on the Start menu.
System Tray: Places the icons in the system tray (notification area) of the Windows taskbar.
novdocx (en) 16 April 2010
6 Click Next to display the Schedules Page, then select the schedules you want to define:
Distribution Schedule: Defines the dates and times when the bundle is distributed from
the ZENworks Server to the managed device or user. If you do not establish a schedule,
the bundle is distributed to the device or user when it is first launched.
Launch Schedule: Defines the dates and times when the ZENworks Adaptive Agent
automatically launches the bundle. If you do not establish a schedule, the bundle is
launched only when the user launches it.
Availability Schedule: Defines the dates and times when the bundle is available to the
device or user. The ZENworks Adaptive Agent displays the bundle icon only during the
times defined by the schedule. If you do not establish a schedule, the bundle is available at
all times.
7 (Conditional) If you selected Distribution Schedule in Step 6, click Next to display the Bundle
Distribution Schedule page.
The distribution schedule defines the dates and times when the bundle is distributed from the
ZENworks Server to the managed device. The default schedule (no schedule) causes the bundle
to be distributed to the device when it is first launched.
8 In the Schedule Type field, select one of the following schedules, then fill in the fields. For
detailed information, click the Help button on the wizard page or see the following sections:
Section D.3, “Now,” on page 111
Section D.1, “Date Specific,” on page 109
Section D.4, “Recurring,” on page 111
Section D.2, “Event,” on page 110
9 Select the following options as desired:
Wake on LAN: If the device is not on at the scheduled time, ZENworks attempts to use Wake
on LAN (WOL) technology to power on the device. The device must support Wake on LAN.
80 ZENworks 10 Configuration Management Software Distribution Reference

Install Immediately After Distribution: Performs any installation actions immediately after
the bundle is distributed to the device.
Launch Immediately After Installation: Performs any launch actions immediately after the
bundle is installed. This option is available only if the Install Immediately After Distribution
option is enabled.
10 (Conditional) If you selected Launch Schedule in Step 6, click Next to display the Bundle
Launch Schedule page.
The launch schedule determines the dates and times when ZENworks Adaptive Agent
automatically launches the bundle. The default schedule (no schedule) results in the bundle
only being launched if the user launches it.
11 In the Schedule Type field, select one of the following schedules, then fill in the fields. For
detailed information, click the Help button on the wizard page or see the following sections:
Section D.1, “Date Specific,” on page 109
Section D.4, “Recurring,” on page 111
Section D.2, “Event,” on page 110
12 (Conditional) If you selected Availability Schedule in Step 6, click Next to display the Bundle
Availability Schedule page.
The availability schedule defines the dates and times when the bundle is available on the
managed device. ZENworks Adaptive Agent displays the bundle icon only during the times
defined by the schedule. The default schedule (no schedule) makes the bundle available at all
times.
novdocx (en) 16 April 2010
The schedule applies regardless of whether or not the bundle is installed. For example, if a user
has not yet installed the bundle, it is only available for installation at the times specified by the
schedule. If a user has already installed the bundle, it is only available for running during the
scheduled times.
13 In the Schedule Type field, select one of the following schedules, then fill in the fields. For
detailed information, click the Help button on the wizard page or click the following links:
Section D.1, “Date Specific,” on page 109
Section D.4, “Recurring,” on page 111
14 Click Next to display the Finish page, review the information and, if necessary, use the Back
button to make changes to the information.
15 Click Finish.
4.6 Assigning a Bundle Group to Users
1 In ZENworks Control Center, click the Bundles tab.
2 In the Bundles list, select the check box next to the bundle group (or bundle groups).
3 Click Action > Assign to User.
Managing Bundle Groups 81

4 Browse for and select the user, user groups, and user folders to which you want to assign the
group. To do so:
4a Click next to a folder to navigate through the folders until you find the user, group, or
folder you want to select.
If you are looking for a specific item, such as a User or a User Group, you can use the
Items of type list to limit the types of items that are displayed. If you know the name of the
item you are looking for, you can use the Item name box to search for the item.
4b Click the underlined link in the Name column to select the user, group, or folder and
display its name in the Selected list box.
4c Click OK to add the selected devices, folders, and groups to the Users list.
5 Specify the locations on the managed device where ZENworks Adaptive Agent displays the
bundle group’s icons. The possible locations are:
Application Window: Places the icons in the Application window.
Desktop: Places the icons on the device’s desktop.
novdocx (en) 16 April 2010
Quick Launch: Places the icons on the Quick Launch area of the Windows taskbar.
Start Menu: Places the icons on the Start menu.
System Tray: Places the icons in the system tray (notification area) of the Windows taskbar.
6 Click Next to display the Schedules Page, then select the schedules you want to define:
Distribution Schedule: Defines the dates and times when the bundle is distributed from
the ZENworks Server to the managed device or user. If you do not establish a schedule,
the bundle is distributed to the device or user when it is first launched.
Launch Schedule: Defines the dates and times when the ZENworks Adaptive Agent
automatically launches the bundle. If you do not establish a schedule, the bundle is
launched only when the user does so.
Availability Schedule: Defines the dates and times when the bundle is available to the
device or user. The ZENworks Adaptive Agent displays the bundle icon only during the
times defined by the schedule. If you do not establish a schedule, the bundle is available at
all times.
7 (Conditional) If you selected Distribution Schedule in Step 6, click Next to display the Bundle
Distribution Schedule page.
82 ZENworks 10 Configuration Management Software Distribution Reference

The distribution schedule defines the dates and times when the bundle is distributed from the
ZENworks Server to the managed device. The default schedule (no schedule) causes the bundle
to be distributed to the device when it is first launched.
8 In the Schedule Type field, select one of the following schedules, then fill in the fields. For
detailed information, click the Help button on the wizard page or see the following sections:
Section D.3, “Now,” on page 111
Section D.1, “Date Specific,” on page 109
Section D.4, “Recurring,” on page 111
Section D.2, “Event,” on page 110
9 Select the following options as desired:
Wake on LAN: If the device is not on at the scheduled time, ZENworks attempts to use Wake
on LAN (WoL) technology to power on the device. The device must support Wake on LAN.
Install Immediately After Distribution: Performs any installation actions immediately after
the bundle is distributed to the device.
Launch Immediately After Installation: Performs any launch actions immediately after the
bundle is installed. This option is available only if the Install Immediately After Distribution
option is enabled.
10 (Conditional) If you selected Launch Schedule in Step 6, click Next to display the Bundle
Launch Schedule page.
The launch schedule determines the dates and times when ZENworks Adaptive Agent
automatically launches the bundle. The default schedule (no schedule) results in the bundle
only being launched if the user launches.
11 In the Schedule Type field, select one of the following schedules, then fill in the fields. For
detailed information, click the Help button on the wizard page or see the following sections:
novdocx (en) 16 April 2010
Section D.1, “Date Specific,” on page 109
Section D.4, “Recurring,” on page 111
Section D.2, “Event,” on page 110
12 (Conditional) If you selected Availability Schedule in Step 6, click Next to display the Bundle
Availability Schedule page.
The availability schedule defines the dates and times when the bundle is available on the
managed device. ZENworks Adaptive Agent displays the bundle icon only during the times
defined by the schedule. The default schedule (no schedule) makes the bundle available at all
times.
The schedule applies regardless of whether or not the bundle is installed. For example, if a user
has not yet installed the bundle, it is only available for installation at the times specified by the
schedule. If a user has already installed the bundle, it is only available for running during the
scheduled times.
13 In the Schedule Type field, select one of the following schedules, then fill in the fields. For
detailed information, click the Help button on the wizard page or click the following links:
Section D.1, “Date Specific,” on page 109
Section D.4, “Recurring,” on page 111
Managing Bundle Groups 83
14 Click Next to display the Finish page, review the information and, if necessary, use the Back
button to make changes to the information.
15 Click Finish.
4.7 Adding a Bundle to a Group
For more information, see Section 3.4, “Adding a Bundle to a Group,” on page 51
4.8 Copying a Bundle Group to a Content Server
By default, a bundle is copied to each content server. If you specify certain content servers as hosts,
the bundle is hosted on only those content servers; it is not copied to all content servers.
1 In ZENworks Control Center, click the Bundles tab.
2 In the Bundles list, select the check box next to the bundle group (or bundle groups).
3 Click Action > Specify Content Server.
4 On the Content Servers/Distribution Points Where Content Will Be Specifically Included page,
select the content servers.
This page lets you identify the content servers (ZENworks Servers and Distribution Points) that
you want to host the previously selected content (bundles and policies). The content is hosted
only on the content servers you select; it is excluded from all other content servers.
The relationships between content and content servers that you create using this wizard
override any existing relationships. For example, if Bundle A is currently hosted on Server 1
and Server 2 and you use this wizard to include it on Server 1 only, Bundle A is no longer
available on Server 2.
novdocx (en) 16 April 2010
4a In the Available list, select the desired ZENworks Servers and Distribution Points.
You can use Shift+click and Ctrl+click to select multiple bundles or policies.
You cannot include content on a Distribution Point without including it on the Distribution
Point’s parent ZENworks Server. You must select both the Distribution Point and its
parent.
4b Click the button to move the selected content servers to the Selected list.
5 Click Next to display the Finish page, then review the information and, if necessary, use the
Back button to make changes to the information.
6 Click Finish to create the relationships between the content and the content servers. Depending
on the relationships created, the content is replicated to or removed from content servers during
the next scheduled replication.
84 ZENworks 10 Configuration Management Software Distribution Reference
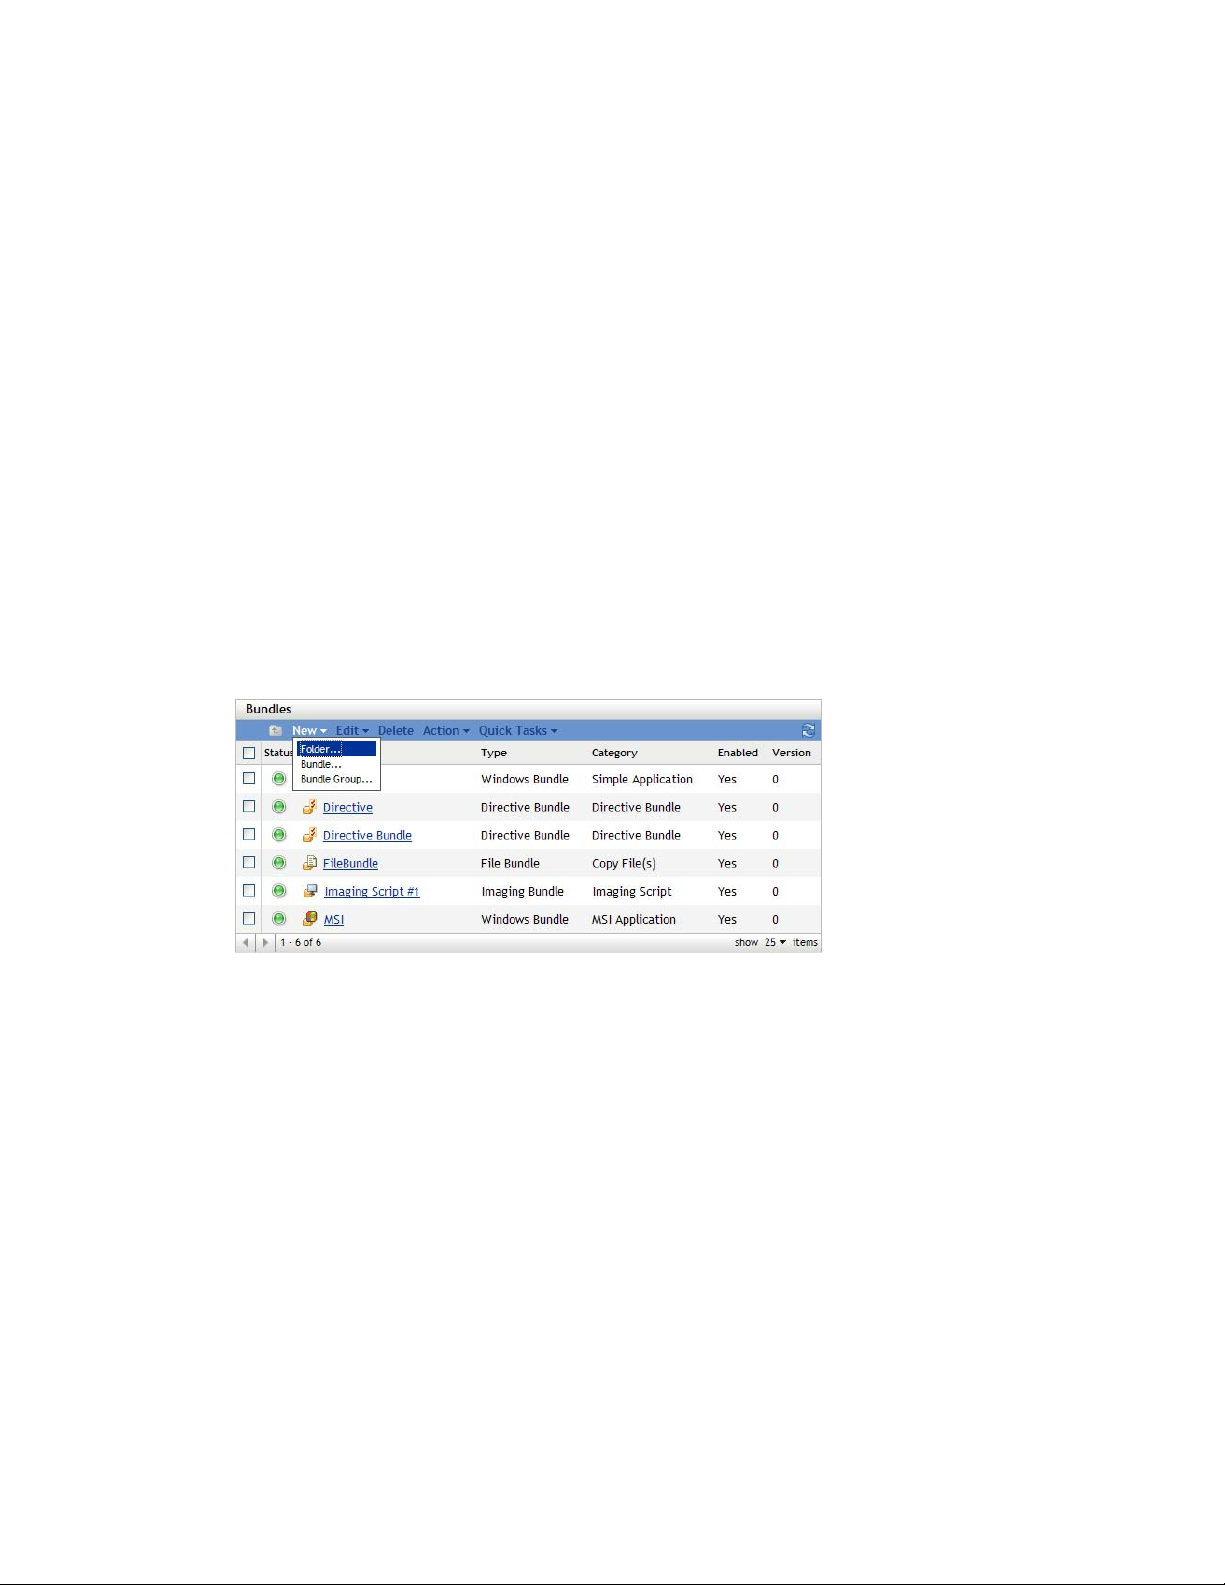
5
Managing Folders
novdocx (en) 16 April 2010
5
A folder is an organizational object. You can use folders to structure your bundles and bundle groups
into a manageable hierarchy for your ZENworks
each type of bundle (Directive Bundles folder, Windows Bundles folder, File Bundles folder, and so
forth), or, if applications are department-specific, you might want a folder for each department
(Accounting Department folder, Payroll Department folder, and so forth).
The following sections contain additional information:
Section 5.1, “Creating Folders,” on page 85
Section 5.2, “Renaming or Moving Folders,” on page 85
Section 5.3, “Deleting a Folder,” on page 86
®
system. For example, you might want a folder for
5.1 Creating Folders
1 In ZENworks Control Center, click the Bundles tab.
2 Click New > Folder.
3 Provide a unique name for your folder. This is a required field.
When you name an object in ZENworks Control Center (folders, bundles, bundle groups,
catalogs, and so forth), ensure that the name adheres to the naming conventions not all
characters are supported. For more information on naming conventions, see “Naming
Conventions in ZENworks Control Center” in ZENworks 10 Configuration Management
System Administration Reference.
4 Type the name or browse to and select the folder that contains this folder in the ZENworks
Control Center interface. This is a required field.
5 Provide a short description of the folder's contents.
6 Click OK.
5.2 Renaming or Moving Folders
Use the Edit drop-down list on the Bundles page to edit an existing object. To access the Edit dropdown list, you must select an object by clicking the check box next to the object's name in the list.
Managing Folders
85
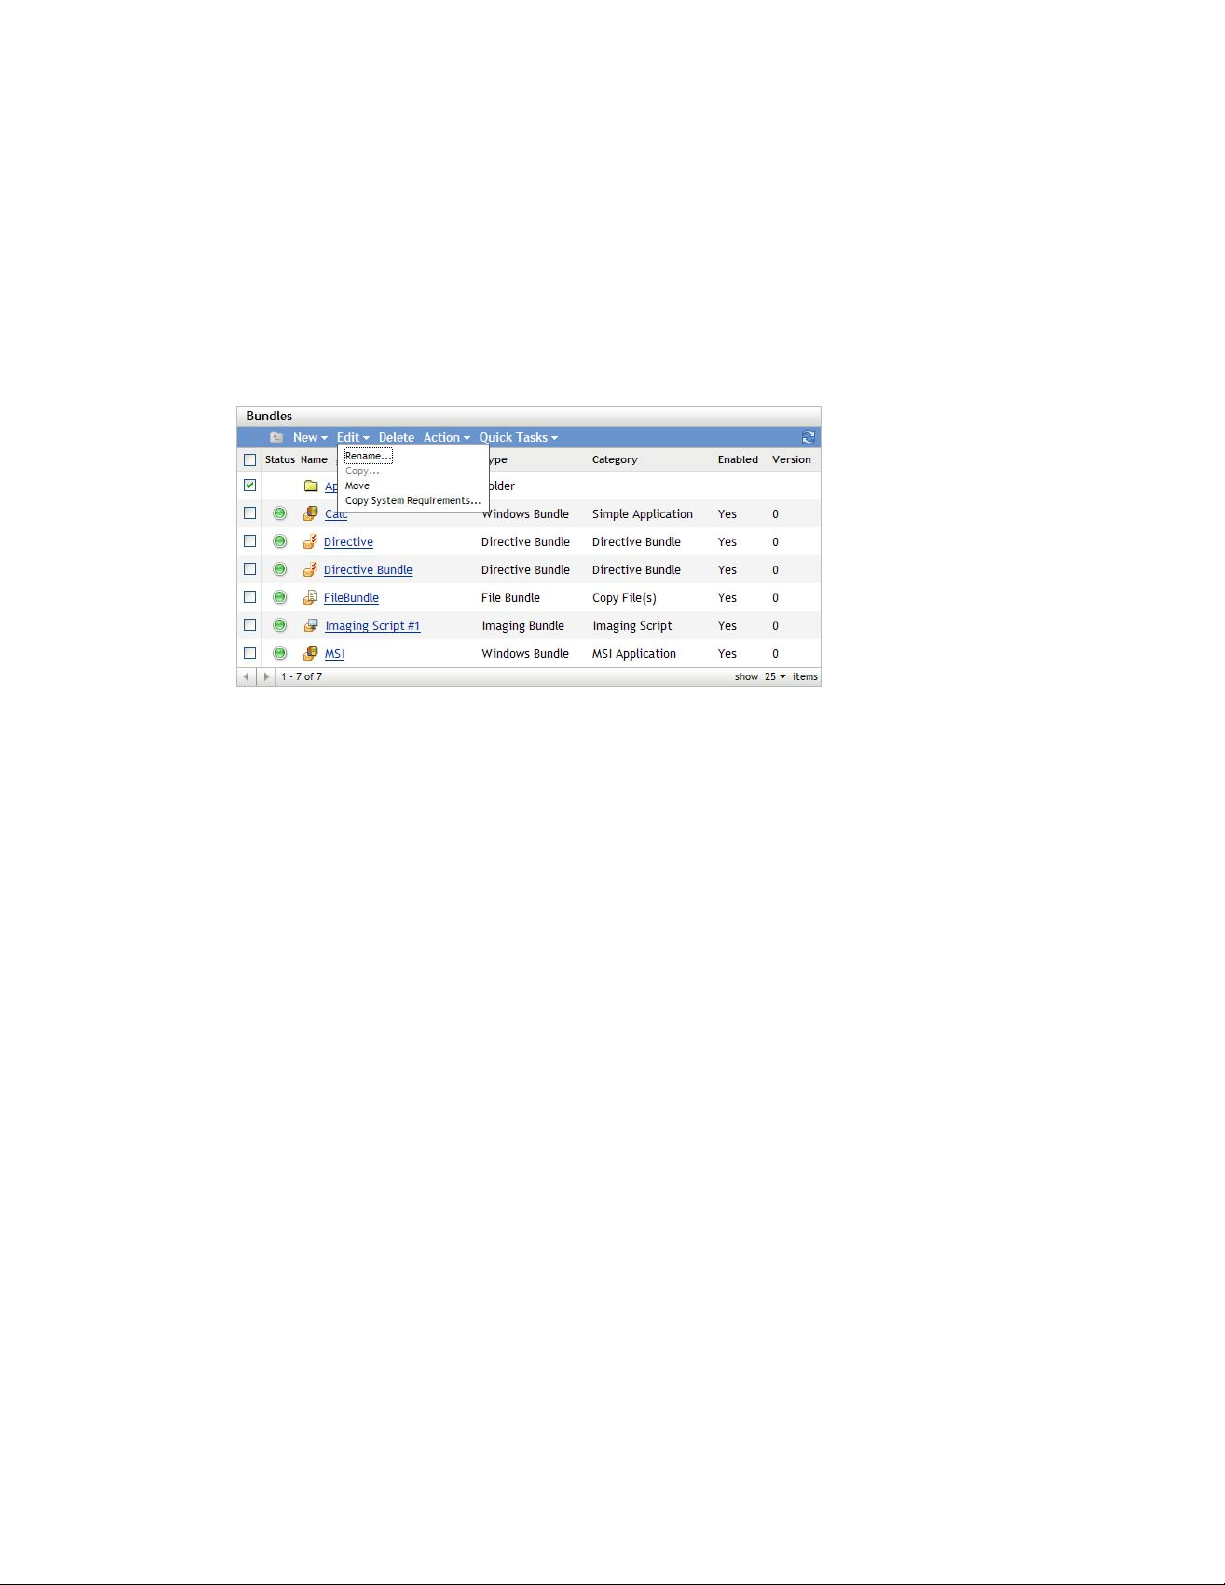
Depending on the type of object you select, you can rename, copy, or move the selected object. For
example, if you select a Bundle object, you can rename, copy, and move the bundle. If you select a
Folder object, you can rename or move the Folder object, but not copy it. If the option is dimmed,
that option is not available for the selected object type.
Some actions cannot be performed on multiple objects. For example, if more than one check box is
selected, the Rename option is not available from the Edit menu.
1 In ZENworks Control Center, click the Bundles tab.
2 In the Bundles list, select the box next to the folder’s name, then click Edit.
novdocx (en) 16 April 2010
3 Select an option:
Rename: Click Rename, provide a new name for the folder, then click OK.
Move: Click Move, choose a destination folder for the selected objects, then click OK.
5.3 Deleting a Folder
Deleting a folder also deletes all of its contents (bundles, bundle groups, subfolders).
1 In ZENworks Control Center, click the Bundles tab.
2 In the Bundles list, select the check box next to the folder (or folders).
3 Click Delete.
86 ZENworks 10 Configuration Management Software Distribution Reference

6
Managing Bundles by using the
novdocx (en) 16 April 2010
ZENworks Adaptive Agent
The ZENworks® Adaptive Agent is part of the Novell® ZENworks Configuration Management
software that lets your administrator manage devices over the network.
NOTE: This section contains information from the Adaptive Agent online Help system and is
written from the perspective of the end-user.
The ZENworks Adaptive Agent, commonly referred to as the Adaptive Agent, provides services
that help your administrator do the following without visiting devices:
Deliver software, patches, and other files to your device
Manage policies that determine the behavior of your device.
Take inventory of your device’s hardware and software.
Access your device from a remote location to troubleshoot and fix problems with hardware and
software.
Software applications and other files are distributed to your device as bundles. A bundle contains all
of the content (files, etc.) and instructions (registry modifications, shortcut information, etc.)
required to install the software on the device.
6
The following information discusses how to manage bundles by using the ZENworks Adaptive
Agent:
Section 6.1, “Bundles vs. Applications,” on page 87
Section 6.2, “User-Assigned vs. Device-Assigned Bundles,” on page 88
Section 6.3, “Accessing Bundles,” on page 88
Section 6.4, “Understanding Bundle Icons,” on page 92
Section 6.5, “Launching a Bundle,” on page 93
Section 6.6, “Postponing a Bundle Download,” on page 93
Section 6.7, “Verifying a Bundle,” on page 93
Section 6.8, “Viewing a Bundle’s Properties,” on page 94
Section 6.9, “Uninstalling a Bundle,” on page 94
6.1 Bundles vs. Applications
Bundles are different than standard applications, such as Windows Notepad, that already reside on
your device. When you double-click a bundle to launch it, the ZENworks Adaptive Agent might
first complete a variety of distribution tasks before the application is launched, including installing
the application files, running scripts, and changing the device’s registry, specific INI files, or
environment variables. These tasks are all configured by your administrator to ensure that the
application runs correctly on your device.
Managing Bundles by using the ZENworks Adaptive Agent
87
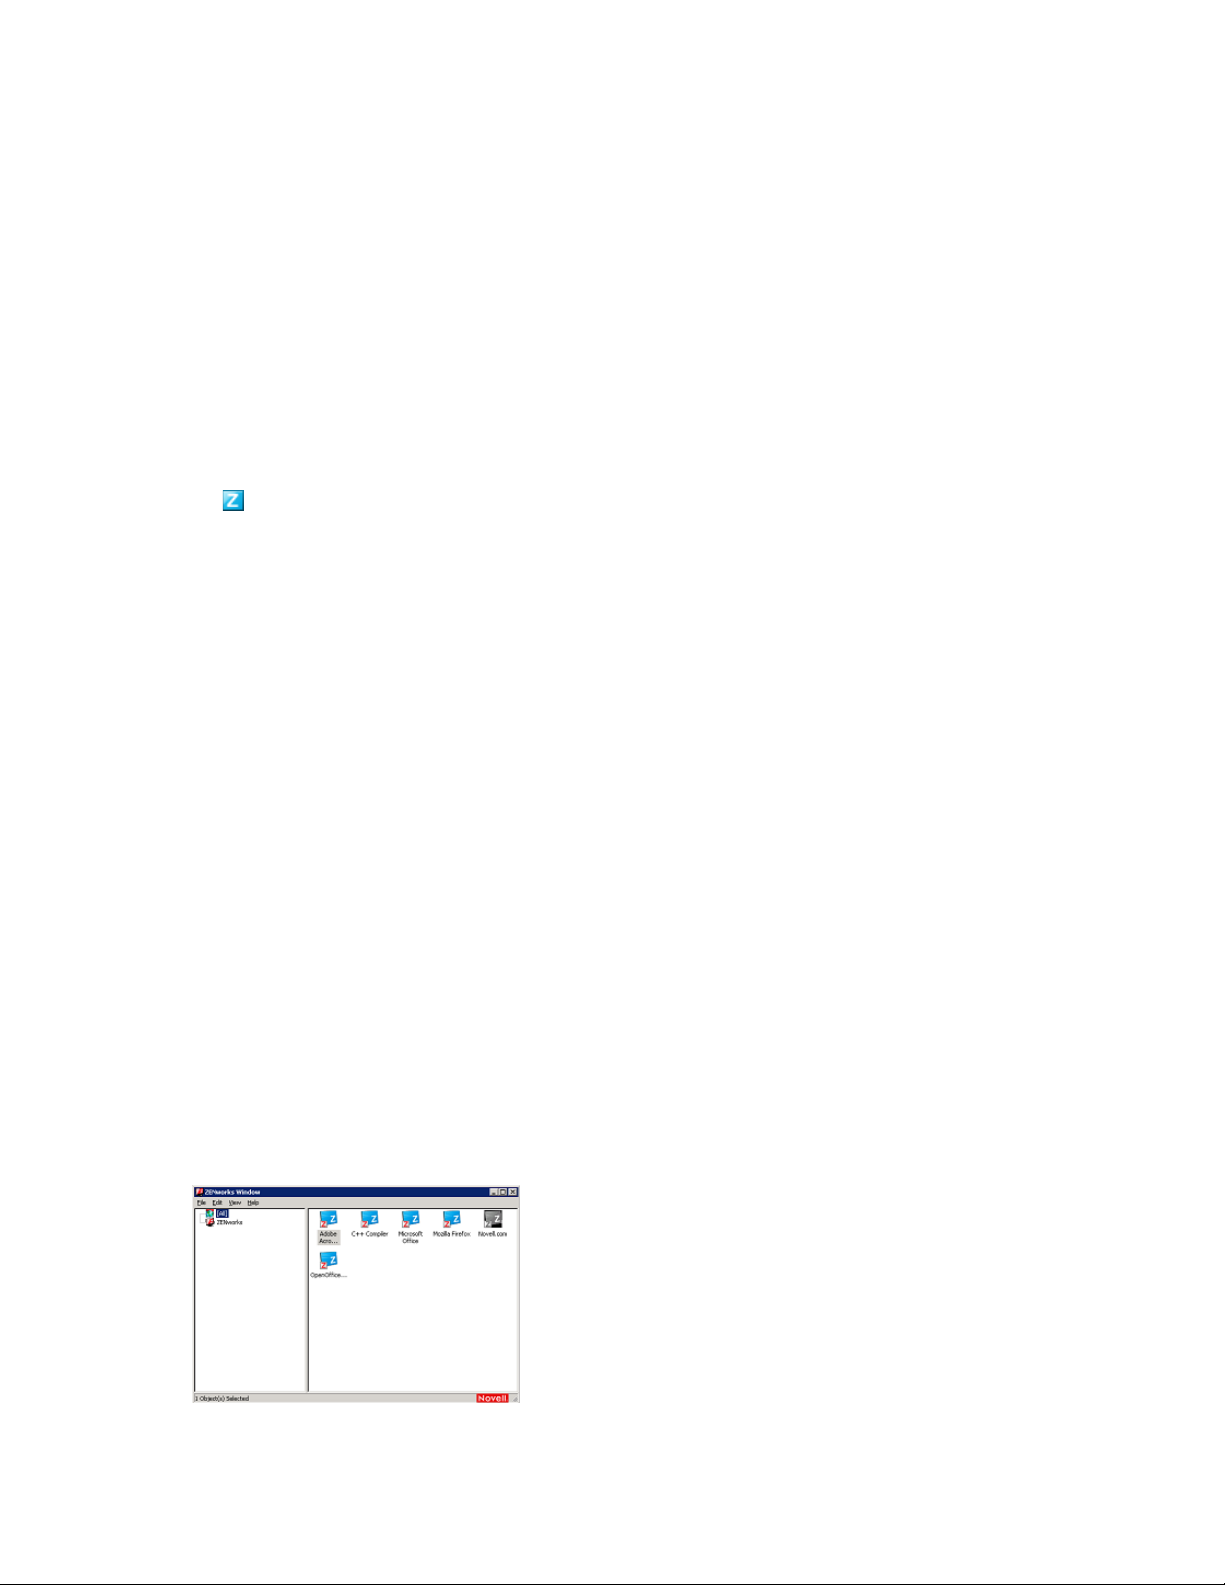
In some instances, a bundle’s icon appears dimmed or grayed out. This indicates that your device
does not meet the requirements that the administrator defined for the application, or the bundle is not
scheduled to be available to you at that time. The Adaptive Agent does not distribute the application
to your device until the requirements are met or the schedule is appropriate.
6.2 User-Assigned vs. Device-Assigned Bundles
The bundles that you see on your device might be assigned to you or they might be assigned to the
device. Bundles assigned to you are referred to as user-assigned bundles, and bundles assigned to
your device are referred to as device-assigned bundles.
novdocx (en) 16 April 2010
The ZENworks Adaptive Agent displays your user-assigned bundles only when you are logged in to
your user directory (Microsoft Active Directory or Novell
you can log in through the ZENworks Configuration Management login screen. To do so, right-click
the icon in the notification area, then click Login.
The Adaptive Agent always displays the device-assigned bundles regardless of whether or not you
are logged in. Device-assigned bundles can be launched by anyone who uses your device.
®
eDirectoryTM). If you are not logged in,
6.3 Accessing Bundles
The ZENworks Adaptive Agent provides three ways for you to access the bundles that are assigned
to you:
Section 6.3.1, “ZENworks Window,” on page 88
Section 6.3.2, “ZENworks Explorer,” on page 90
Section 6.3.3, “ZENworks Icon,” on page 91
6.3.1 ZENworks Window
The ZENworks Window is a standalone window that you can launch from the Start menu or the
command prompt.
“Using the Start Menu” on page 88
“Using the Command Prompt” on page 89
“Using the ZENworks Window as the Windows Shell” on page 90
Using the Start Menu
1 Click Start > Programs > Novell ZENworks > ZENworks Application Window
88 ZENworks 10 Configuration Management Software Distribution Reference

The ZENworks Window left pane displays the following:
[All] folder: Contains all bundles that have been distributed to you, regardless of the folder in
which they are located.
ZENworks folder: Contains all bundles that have not been assigned to a different folder. The
ZENworks folder is the default folder for bundles; however, your administrator can create
additional folders to organize bundles, and can even rename the ZENworks folder.
When you select a folder in the left pane, the right pane displays the bundles that are contained
within the folder. You can:
Install a bundle or launch an application for an already installed bundle.
View the properties of a bundle. The properties include a description of the bundle, information
about people to contact for help with the bundle, the times when the bundle is available for use,
and the system requirements established for the bundle.
Repair an installed application.
Uninstall an application. This is an administrator-controlled feature that might not be enabled.
Using the Command Prompt
novdocx (en) 16 April 2010
1 Open the command prompt and execute the following command:
nalwin
The following command line switches can be used when starting the Application Window using
nalwin
Table 6-1 Application Window Command Line Switches
Switch Description
:
EXAMPLE:
/?
EXAMPLE:
/
EXAMPLE:
c="%Username%'s Apps"
.
nalwin :
nalwin /?
c="window_title"
nalwin /
Hides the initial splash screen.
Displays the help.
Uses the specified text as the title for the Application Window. The
default window title is “ZENWorks Window for User,” where User is
the distinguished name of the user.
The text specified can contain macros (variables) to display
eDirectory information. The example,
substitutes the user's common name in the title (for example,
JSmith's Apps).
c="%Username%'s Apps"
/max
EXAMPLE:
nalwin /max
NOTE: The quotation marks are required only if a space is used in
the window title.
Displays the Application Window maximized when first loaded,
overriding the window state (size and position) that was saved
when exiting the previous Application Window session.
Managing Bundles by using the ZENworks Adaptive Agent 89

Switch Description
novdocx (en) 16 April 2010
/min
EXAMPLE:
/r
EXAMPLE:
/s
EXAMPLE:
nalwin /min
nalwin /r
nalwin /s
Displays the Application Window minimized when first loaded,
overriding the window state (size and position) that was saved
when exiting the previous Application Window session.
Resets the Application Launcher launch flag to 0. This occurs
automatically when Application Launcher terminates normally.
However, if Application Launcher terminates abnormally (for
example, a user uses Ctrl+Alt+Del to shut down
launch flag is not reset and Application Launcher cannot be
restarted until the workstation is rebooted or this switch is used.
Makes the Application Window act like the Windows shell. For
example, on the File menu, the Exit Application Launcher option
changes to Shutdown and gives the user the standard Windows
shutdown options.
This is not a true replacement for the Windows shell. If users
minimize the Application Window, they have access to the normal
desktop.
nalwin.exe
), the
Using the ZENworks Window as the Windows Shell
If the ZENworks Window is used as a Windows shell, only the ZENworks Window is visible on the
device. You do not have access to the device desktop so the Start menu, Quick Launch toolbar, and
the ZENworks Icon are also not visible.
Using the ZENworks Window as a Windows shell is useful in scenarios where you want to restrict
the user on the managed device to access only the applications displayed in the ZENworks Window.
For example, if you want the user to access only applications such as Notepad and Calculator, ensure
that the ZENworks Windows displays only these applications. To shut down the device, click File >
Shutdown.
To use the ZENworks Window as a shell on a Windows 2000/XP device:
1 On the Windows 2000/XP workstation, run
HKEY_LOCAL_MACHINE\SOFTWARE\Microsoft\Windows NT\CurrentVersion\Winlogon
2 Change the SHELL value from
c:\program files\novell\zenworks\nalwin.exe
explorer.exe
regedit.exe
to:
If you want the ZENworks Window to be maximized when it comes up, add the
nalwin.exe
3 Close
(for example,
regedit.exe
nalwin.exe /max
.
).
and locate the following setting:
/max
switch to
4 Restart Windows.
6.3.2 ZENworks Explorer
ZENworks Explorer is an extension to Windows Explorer that enables bundles to be displayed in
Windows Explorer, on the desktop, on the Start menu, on the Quick Launch toolbar, and in the
notification area.
90 ZENworks 10 Configuration Management Software Distribution Reference
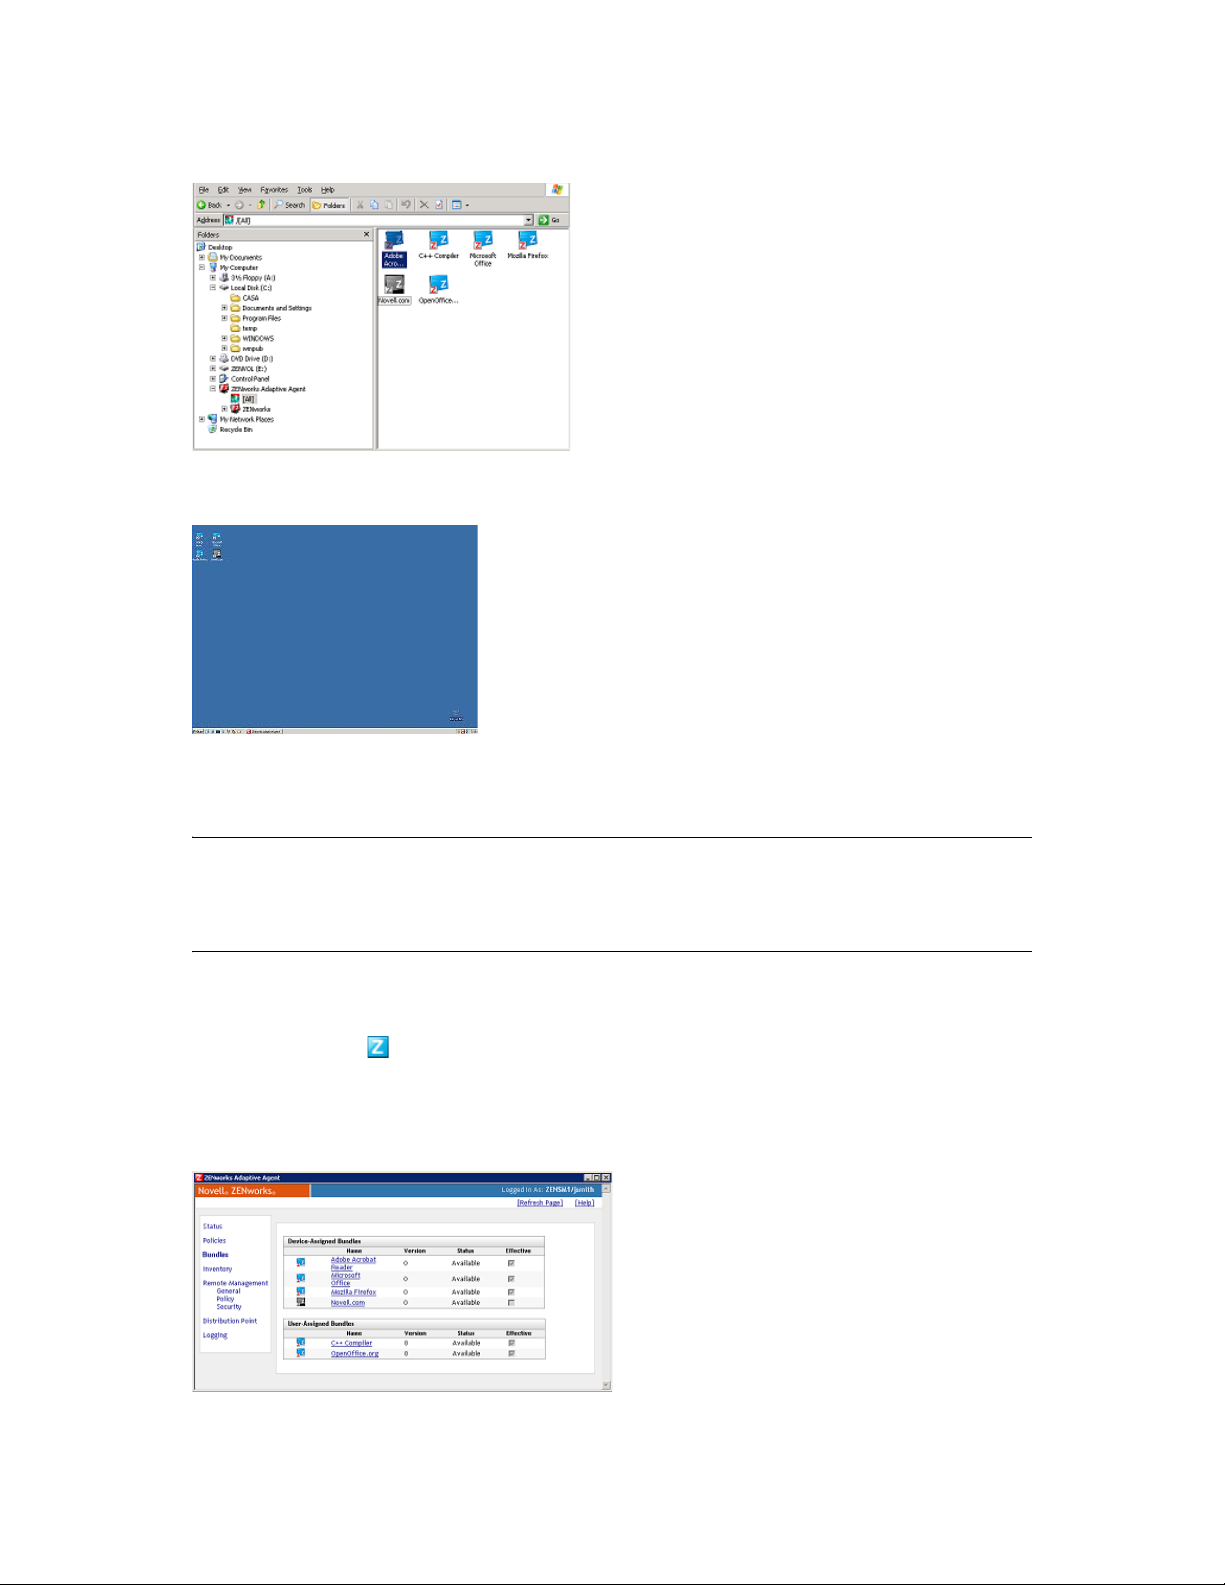
Figure 6-1 Bundles Displayed in Windows Explorer
Figure 6-2 Bundles Displayed on the Desktop
novdocx (en) 16 April 2010
You can perform the same tasks on the bundles in the ZENworks Explorer as you can in the
ZENworks Window.
NOTE: Windows does not allow certain characters in folder paths ( \ / : * ? “< > | ). If you use any
of these characters as part of the name of the ZENworks Explorer folder path, each character
displays as an underscore ( _ ) in the Start menu. The characters display correctly in the ZENworks
Window.
6.3.3 ZENworks Icon
The ZENworks Icon is located in the Windows notification area. You can double-click the icon to
display the ZENworks Adaptive Agent properties. Located in the left navigation pane, the Bundles
link lets you view the bundles that are assigned to you and to your device.
Figure 6-3 ZENworks Adaptive Agent
Managing Bundles by using the ZENworks Adaptive Agent 91

The bundle list includes the following information:
Name: Displays the name of the bundle. Click the name to display the properties for the
bundle, including such information as the version, folder and icon locations, and help contacts.
Status: Displays the installation status for the bundle.
Effective: Displays whether or not the bundle can be used on the device. If the Effective box is
selected, the bundle meets all system requirements and schedule constraints to be used. You can
click the bundle icon to launch the bundle.
If the box is not selected, it cannot be used; to find out why, click the bundle name to display
the system requirements and schedule properties.
6.4 Understanding Bundle Icons
A bundle icon changes to reflect the current status of the bundle. The following table shows the
bundle icons with the default light blue background icon. Your administrator might choose to use a
different background icon; however, the status icons such as and , remain the same.
Icon Status Description
novdocx (en) 16 April 2010
Available The bundle is available on the device. You can launch the bundle. Installed
bundles can be verified. To verify the bundle, right-click the icon and click
Verify. For more information on verifying the bundle, see Verifying a Bundle.
Unavailable You cannot launch the bundle. Either the device does not meet the system
requirements established for the bundle or the bundle is not scheduled to be
available at the current time.
Downloading The bundle is downloading from the network location where it is stored.
Installing The bundle is installing to the device.
Running The bundle is currently running.
Uninstalling The bundle is being removed from the device.
Not Installed The bundle failed to install or is not yet installed.
92 ZENworks 10 Configuration Management Software Distribution Reference

6.5 Launching a Bundle
By default, the ZENworks Adaptive Agent does not distribute (download and install) a bundle to
your device until the first time you launch it. The distribution process might include installing the
bundle’s files, running scripts, and changing the device’s registry, specific INI files, or environment
variables. Or, the process might include nothing more than providing a shortcut to the application's
executable file on your local device or a network server.
To launch a bundle:
1 Access the bundle in one of the following locations:
ZENworks Window: From the Start menu, click Programs > Novell ZENworks > ZENworks
Window.
ZENworks Explorer: Open Windows Explorer and find the ZENworks Adaptive Agent
entry. Depending on how your ZENworks administrator configured the bundle, the bundle icon
might also be displayed on the desktop, Start menu, Quick Launch toolbar, or notification area.
ZENworks Icon: In the notification area, double-click the icon, then click Bundles.
2 Double-click the bundle icon.
novdocx (en) 16 April 2010
NOTE: You must not launch multiple personality migration bundles at the same time. If you do so,
the bundles are not launched correctly, and the logs of only the bundle that was launched first is
stored in the
bundle that was launch first is deleted. The dynamic administrator user profiles of the remaining
bundles must be manually deleted.
personalitylog.xml
file. Also, the dynamic administrator user profile of only the
6.6 Postponing a Bundle Download
If, after you launch a bundle, it begins to download and you need to stop the download, you can
postpone the download to a later time. When you resume the download, it continues from the point
where it previously stopped.
1 Access the bundle in one of the following locations:
ZENworks Window: From the Start menu, click Programs > Novell ZENworks > ZENworks
Window.
ZENworks Explorer: Open Windows Explorer and find the ZENworks Adaptive Agent
entry. Depending on how your ZENworks administrator configured the bundle, the bundle icon
might also be displayed on the desktop, Start menu, Quick Launch toolbar, or notification area.
2 Right-click the bundle icon, then click Postpone.
6.7 Verifying a Bundle
If an installed application is not functioning correctly or you think it might be outdated, you can
verify that the application’s bundle information is still correct. If it is not, the ZENworks Adaptive
Agent reinstalls the bundle to your workstation.
1 Access the bundle in one of the following locations:
ZENworks Window: From the Start menu, click Programs > Novell ZENworks > ZENworks
Window.
Managing Bundles by using the ZENworks Adaptive Agent 93

ZENworks Explorer: Open Windows Explorer and find the ZENworks Adaptive Agent
entry. Depending on how your ZENworks administrator configured the bundle, the bundle icon
might also be displayed on the desktop, Start menu, Quick Launch toolbar, or notification area.
2 Right-click the bundle icon, then click Verify.
6.8 Viewing a Bundle’s Properties
You can view a bundle’s properties to see its version number, current installation status, and help
contacts. In addition, if the bundle is unavailable, you can see if it is unavailable because of system
requirements or schedule restrictions.
1 Access the bundle in one of the following locations:
ZENworks Window: From the Start menu, click Programs > Novell ZENworks > ZENworks
Window.
ZENworks Explorer: Open Windows Explorer and find the ZENworks Adaptive Agent
entry. Depending on how your ZENworks administrator configured the bundle, the bundle icon
might also be displayed on the desktop, Start menu, Quick Launch toolbar, or notification area.
2 Right-click the bundle icon, then click Properties.
novdocx (en) 16 April 2010
6.9 Uninstalling a Bundle
Uninstall is an administrator-controlled feature. By default, uninstall is not enabled, which means
that you can only uninstall bundles if your administrator has enabled the feature. Uninstall is
enabled on a per-bundle basis. Depending on what your administrator enables, you might be able to
uninstall some bundles but not others.
When you uninstall a bundle, the ZENworks Adaptive Agent removes all files from your device and
undoes all configuration settings made to your device during the bundle installation. Only files that
the Adaptive Agent installs specifically for the bundle are removed. For example, the Adaptive
Agent does not remove any shared files (files used by another application) or any user-created files
such as word processing documents or spreadsheets.
After you uninstall a bundle, the bundle’s icon remains on your device. This enables you to install
the bundle again whenever necessary.
To uninstall a bundle:
1 Access the bundle in one of the following locations:
ZENworks Window: From the Start menu, click Programs > Novell ZENworks > ZENworks
Window.
ZENworks Explorer: Open Windows Explorer and find the ZENworks Adaptive Agent
entry. Depending on how your ZENworks administrator configured the bundle, the bundle icon
might also be displayed on the desktop, Start menu, Quick Launch toolbar, or notification area.
2 Right-click the bundle icon, then click Uninstall.
94 ZENworks 10 Configuration Management Software Distribution Reference
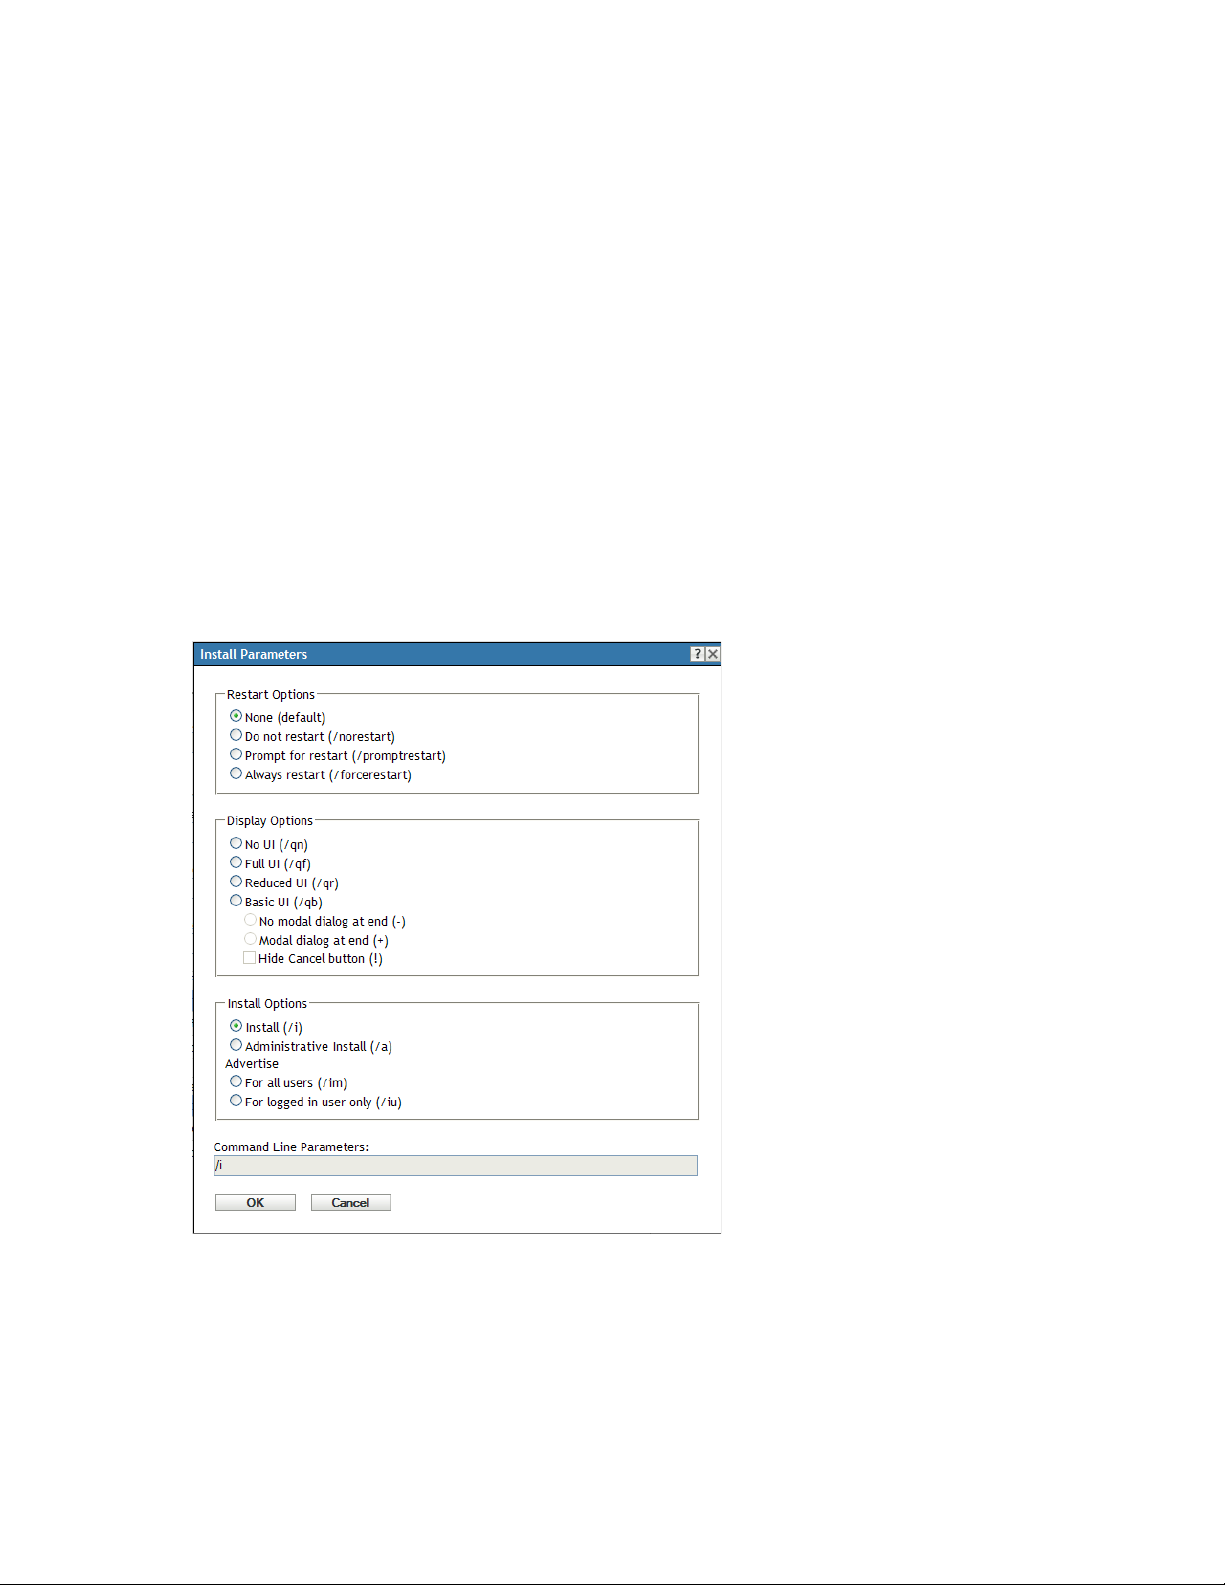
A
Install, Uninstall, and Repair
novdocx (en) 16 April 2010
Parameters
While creating Windows MSI bundles, you can select install, uninstall, and repair parameters. The
following sections contain information to help you select the desired options:
Section A.1, “Install Parameters,” on page 95
Section A.2, “Uninstall Parameters,” on page 97
Section A.3, “Repair Parameters,” on page 99
A.1 Install Parameters
The Install Parameters dialog box lets you specify the desired parameters.
Figure A-1 Install Parameters Dialog Box
A
The following sections contain additional information:
Section A.1.1, “Restart Options,” on page 96
Section A.1.2, “Display Options,” on page 96
Section A.1.3, “Install Options,” on page 96
Section A.1.4, “Command Line Parameters,” on page 97
Install, Uninstall, and Repair Parameters
95

A.1.1 Restart Options
In some cases, installing an application requires restarting the workstation.
In the Install Parameters dialog box, select the desired Restart option:
novdocx (en) 16 April 2010
None (default): Uses the MSI application’s settings to determine whether or not a restart occurs.
ZENworks
Do Not Restart (/norestart): Never restarts the workstation during the install process. The
installation is not completed until the next time the workstation starts.
Prompt For Restart (/promptrestart): Prompts users before restarting the workstation. If users
answer No, the installation is not completed until the next time they manually restart.
Always Restart (/forcerestart): Forces the workstation to restart without prompting users.
®
does not force a Restart option.
A.1.2 Display Options
In the Install Parameters dialog box, select the desired Display options. You can choose to perform
the installation with or without a user interface, whether to display a modal dialog box at the end of
the install process (a modal dialog box demands a response from the user before the installation is
complete), or to hide the Cancel button so that users cannot cancel the installation.
No UI (/qn): Installs the application with no user interface (silent installation).
NOTE: This is the default installation option. If you want users to be aware that ZENworks
Configuration Management is installing an application to help prevent them from rebooting or
calling the help desk, change the display options to Basic UI (/qb) with No modal dialog at end (-)
and Hide Cancel button (!).
You can select the options in the dialog box or you can type
Parameters field.
Full UI (/qf): Installs the application with the full user interface and a modal dialog box displayed at
the end of the installation.
Reduced UI (/qr): Installs the application with a reduced user interface and a modal dialog box
displayed at the end of the installation.
Basic UI (/qb): Installs the application with a basic user interface consisting of a progress bar. The
following settings are available with this option:
No modal dialog at end (-): Displays a basic user interface with no modal dialog box
displayed at the end of the installation.
Modal dialog at end (+): Displays a basic user interface with a modal dialog box displayed at
the end of the installation.
Hide Cancel button (!): Displays a basic user interface without a Cancel button, so the user
cannot cancel the installation process.
/i /qb-!
in the Command Line
A.1.3 Install Options
In the Install Parameters dialog box, select the desired Install options:
96 ZENworks 10 Configuration Management Software Distribution Reference
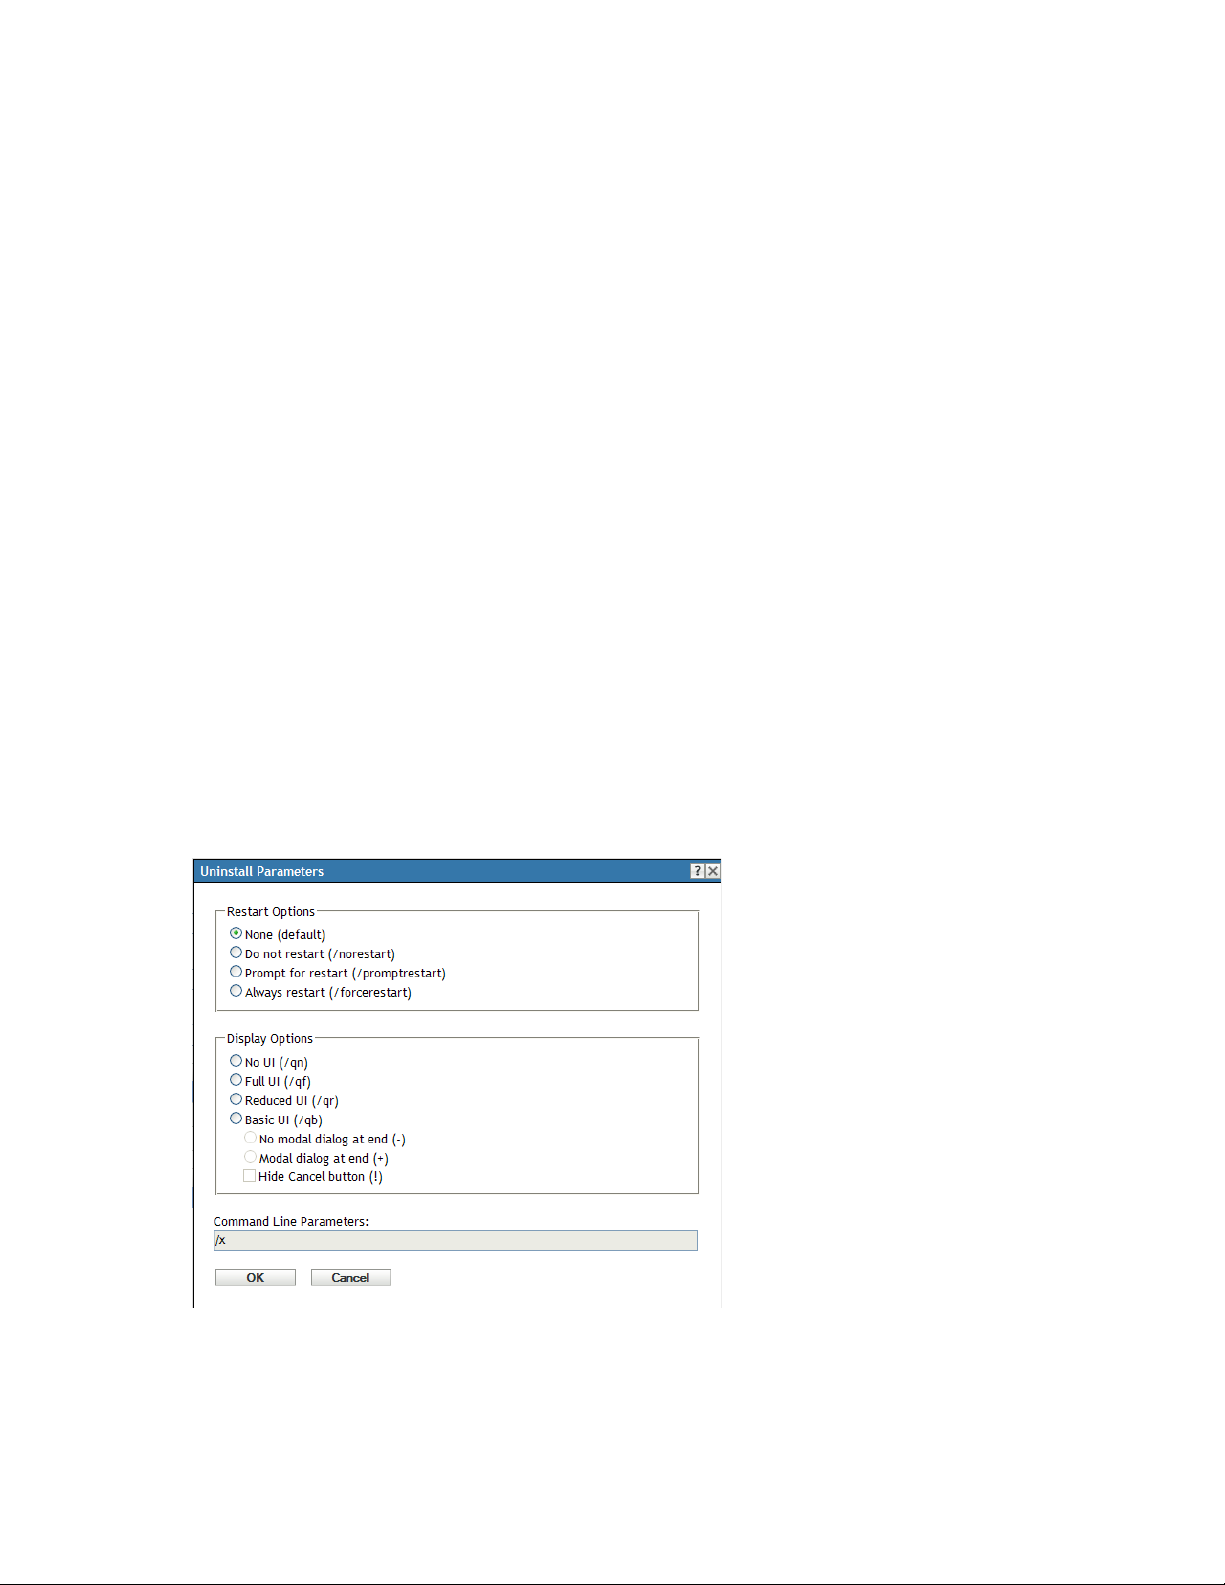
Install (/i): Installs the application.
Administrative Install (/a): Creates an administrative installation point for the application. This
option is useful for a network installation.
For All Users (/im): Advertises the application on the computer and installs the application for all
users on first use.
For Logged In User Only (/iu): Advertises the application on the computer for the logged-in
(current) user and installs the application on first use. Do not use this option when performing a
System installation or when using a dynamic administrator to install the application.
A dynamic administrator is an administrator account that is created on the fly to perform certain
procedures, such as installing applications. Using a dynamic administrator is helpful when installing
applications (some MSI applications, for example) that cannot be installed in the system space.
When you select this action, the dynamic administrator is created, it performs the required tasks, and
then the account is deleted.
A.1.4 Command Line Parameters
novdocx (en) 16 April 2010
Displays the install command line parameters used during the application’s installation. As you
select Restart, Display, and Install options, the command line parameters in this field are
automatically populated.
A.2 Uninstall Parameters
The Uninstall Parameters dialog box lets you specify the desired parameters.
Figure A-2 Uninstall Parameters Dialog Box
The following sections contain additional information:
Section A.2.1, “Restart Options,” on page 98
Install, Uninstall, and Repair Parameters 97

Section A.2.2, “Display Options,” on page 98
Section A.2.3, “Command Line Parameters,” on page 98
A.2.1 Restart Options
In some cases, uninstalling an application requires restarting the workstation.
SIn the Uninstall Parameters dialog box, select the desired Restart option:
None (default): Uses the MSI application’s settings to determine whether or not a restart occurs.
ZENworks does not force a Restart option.
Do Not Restart (/norestart): Never restarts the workstation during the uninstall process. The
uninstallation is not completed until the next time the workstation starts.
Prompt For Restart (/promptrestart): Prompts users before restarting the workstation. If users
answer No, the uninstallation is not completed until the next time they manually restart.
Always Restart (/forcerestart): Forces the workstation to restart without prompting users.
novdocx (en) 16 April 2010
A.2.2 Display Options
In the Uninstall Parameters dialog box, select the desired Display options. You can choose to
perform the uninstallation with or without a user interface, whether to display a modal dialog box at
the end of the uninstallation process (a modal dialog box demands a response from the user before
the uninstallation is complete), or to hide the Cancel button so that users cannot cancel the
uninstallation.
No UI (/qn): Uninstalls the application with no user interface (silent uninstallation).
Full UI (/qf): Uninstalls the application with the full user interface and a modal dialog box
displayed at the end of the uninstallation.
Reduced UI (/qr): Uninstalls the application with a reduced user interface and a modal dialog box
displayed at the end of the uninstallation.
Basic UI (/qb): Uninstalls the application with a basic user interface consisting of a progress bar.
The following settings are available with this option:
No modal dialog at end (-): Displays a basic user interface with no modal dialog box
displayed at the end of the uninstallation.
Modal dialog at end (+): Displays a basic user interface with a modal dialog box displayed at
the end of the uninstallation.
Hide Cancel button (!): Displays a basic user interface without a Cancel button, so the user
cannot cancel the uninstallation process.
A.2.3 Command Line Parameters
Displays the command line parameters used during the application’s uninstallation. As you select
Restart and Display options, the command line parameters in this field are automatically populated.
98 ZENworks 10 Configuration Management Software Distribution Reference
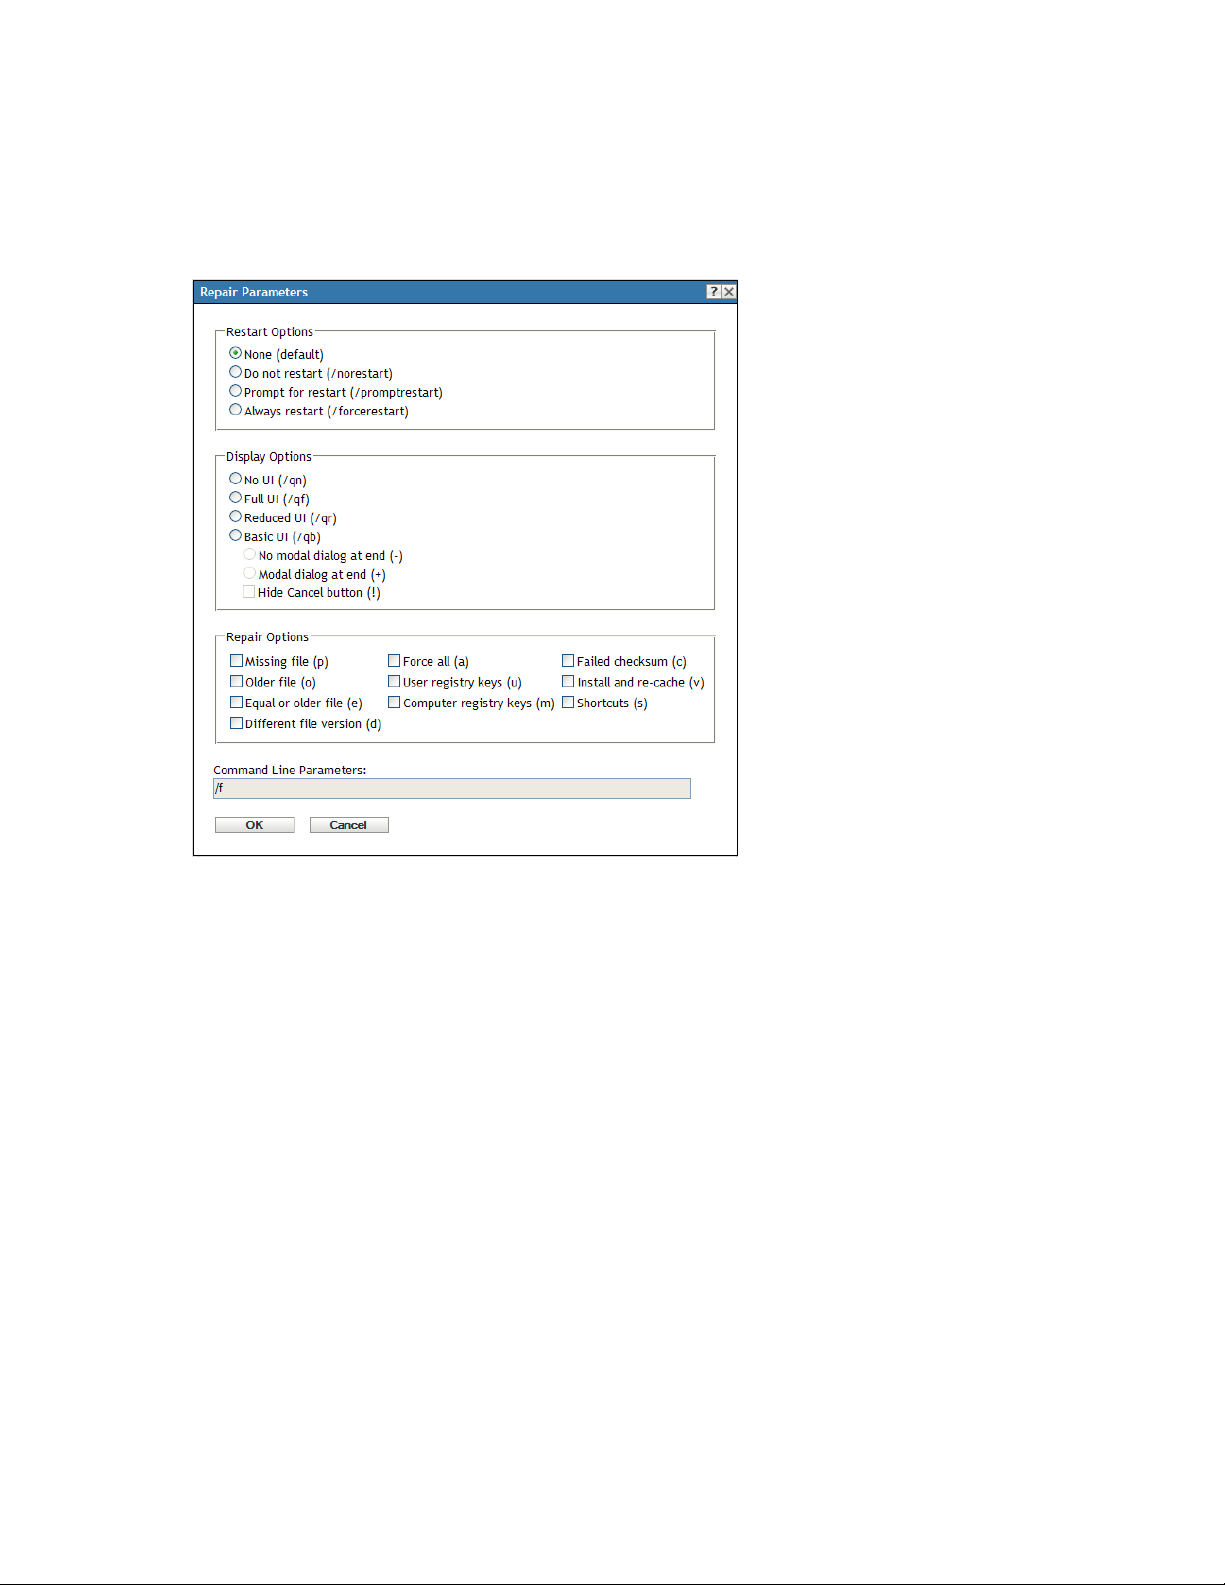
A.3 Repair Parameters
The Repair Parameters dialog box lets you specify the desired parameters.
Figure A-3 Repair Parameters Dialog Box
novdocx (en) 16 April 2010
The following sections contain additional information:
Section A.3.1, “Restart Options,” on page 99
Section A.3.2, “Display Options,” on page 100
Section A.3.3, “Repair Options,” on page 100
Section A.3.4, “Command Line Parameters,” on page 101
A.3.1 Restart Options
In some cases, repairing an application requires restarting the workstation.
In the Repair Parameters dialog box, select the desired Restart option:
None (default): Uses the MSI application’s settings to determine whether or not a restart occurs.
ZENworks does not force a Restart option.
Do Not Restart (/norestart): Never restarts the workstation during the repair process. The repair
process is not completed until the next time the workstation starts.
Prompt For Restart (/promptrestart): Prompts users before restarting the workstation. If users
answer No, the repair process is not completed until the next time they manually restart.
Install, Uninstall, and Repair Parameters 99

Always Restart (/forcerestart): Forces the workstation to restart without prompting users.
A.3.2 Display Options
In the Repair Parameters dialog box, select the desired Display options. You can choose to perform
the repair process with or without a user interface, whether to display a modal dialog box at the end
of the repair process (a modal dialog box demands a response from the user before the repair process
is complete), or to hide the Cancel button so that users cannot cancel the repair process.
No UI (/qn): Repairs the application with no user interface (silent repair process).
Full UI (/qf): Repairs the application with the full user interface and a modal dialog box displayed
at the end of the repair process.
Reduced UI (/qr): Repairs the application with a reduced user interface and a modal dialog box
displayed at the end of the repair process.
Basic UI (/qb): Repairs the application with a basic user interface consisting of a progress bar. The
following settings are available with this option:
novdocx (en) 16 April 2010
No modal dialog at end (-): Displays a basic user interface with no modal dialog box
displayed at the end of the repair process.
Modal dialog at end (+): Displays a basic user interface with a modal dialog box displayed at
the end of the repair process.
Hide Cancel button (!): Displays a basic user interface without a Cancel button, so the user
cannot cancel the repair process.
A.3.3 Repair Options
In the Repair Parameters dialog box, select the desired Repair options:
Missing File (p): Instructs Windows Installer to repair a file only if it is missing.
Older File (o): Instructs Windows Installer to repair a file if it is missing or if the installed file’s
version is older than the file in the MSI package.
Equal or Older File (e): Instructs Windows Installer to repair a file if it is missing or if the installed
file’s version is the same as or older than the file in the MSI package.
Different File Version (d): Instructs Windows Installer to repair a file if it is missing or if the
installed file’s version is not exactly the same as the file in the MSI package.
Force All (a): Instructs Windows Installer to repair all files.
User Registration Keys (u): Instructs Windows Installer to repair all per-user entries from the MSI
package to the Windows system registry. Per-user entries are those entries contained in the
HKEY_CURRENT_USER
and
HKEY_USERS
registry hives.
Computer Registry Keys (m): Instructs Windows Installer to repair all per-machine entries from
the MSI package to the Windows system registry. Per-machine entries are those entries contained in
HKEY_LOCAL_MACHINE
the
100 ZENworks 10 Configuration Management Software Distribution Reference
and
HKEY_CLASSES_ROOT
registry hives.
 Loading...