


Novell®
www.novell.com
AUTHORIZED DOCUMENTATION
System Administration Reference
ZENworks® 10 Configuration Management SP3
novdocx (en) 16 April 2010
10.3
April 16, 2010
ZENworks 10 Configuration Management System Administration Reference

Legal Notices
Novell, Inc., makes no representations or warranties with respect to the contents or use of this documentation, and
specifically disclaims any express or implied warranties of merchantability or fitness for any particular purpose.
Further, Novell, Inc., reserves the right to revise this publication and to make changes to its content, at any time,
without obligation to notify any person or entity of such revisions or changes.
Further, Novell, Inc., makes no representations or warranties with respect to any software, and specifically disclaims
any express or implied warranties of merchantability or fitness for any particular purpose. Further, Novell, Inc.,
reserves the right to make changes to any and all parts of Novell software, at any time, without any obligation to
notify any person or entity of such changes.
Any products or technical information provided under this Agreement may be subject to U.S. export controls and the
trade laws of other countries. You agree to comply with all export control regulations and to obtain any required
licenses or classification to export, re-export or import deliverables. You agree not to export or re-export to entities on
the current U.S. export exclusion lists or to any embargoed or terrorist countries as specified in the U.S. export laws.
You agree to not use deliverables for prohibited nuclear, missile, or chemical biological weaponry end uses. See the
Novell International Trade Services Web page (http://www.novell.com/info/exports/) for more information on
exporting Novell software. Novell assumes no responsibility for your failure to obtain any necessary export
approvals.
novdocx (en) 16 April 2010
Copyright © 2007-2010 Novell, Inc. All rights reserved. No part of this publication may be reproduced, photocopied,
stored on a retrieval system, or transmitted without the express written consent of the publisher.
Novell, Inc.
404 Wyman Street, Suite 500
Waltham, MA 02451
U.S.A.
www.novell.com
Online Documentation: To access the latest online documentation for this and other Novell products, see
the Novell Documentation Web page (http://www.novell.com/documentation).

Novell Trademarks
For Novell trademarks, see the Novell Trademark and Service Mark list (http://www.novell.com/company/legal/
trademarks/tmlist.html).
Third-Party Materials
All third-party trademarks are the property of their respective owners.
novdocx (en) 16 April 2010

novdocx (en) 16 April 2010
4 ZENworks 10 Configuration Management System Administration Reference

Contents
About This Guide 15
Part I ZENworks Control Center 17
1 ZENworks Control Center 19
1.1 Accessing ZENworks Control Center. . . . . . . . . . . . . . . . . . . . . . . . . . . . . . . . . . . . . . . . . . . . 19
1.2 Accessing ZENworks Control Center through Novell iManager. . . . . . . . . . . . . . . . . . . . . . . . 20
1.3 Navigating ZENworks Control Center . . . . . . . . . . . . . . . . . . . . . . . . . . . . . . . . . . . . . . . . . . . 21
1.4 Changing the Default Login Disable Values. . . . . . . . . . . . . . . . . . . . . . . . . . . . . . . . . . . . . . . 22
1.5 Changing the Timeout Value for ZENworks Control Center. . . . . . . . . . . . . . . . . . . . . . . . . . . 22
1.6 Using the Config.xml File to Modify ZENworks Control Center Settings . . . . . . . . . . . . . . . . . 23
1.7 Bookmarking ZENworks Control Center Locations . . . . . . . . . . . . . . . . . . . . . . . . . . . . . . . . . 24
1.8 Troubleshooting ZENworks Control Center . . . . . . . . . . . . . . . . . . . . . . . . . . . . . . . . . . . . . . . 25
novdocx (en) 16 April 2010
2 Administrators 27
2.1 Managing Administrator Accounts . . . . . . . . . . . . . . . . . . . . . . . . . . . . . . . . . . . . . . . . . . . . . . 27
2.1.1 Creating Administrators . . . . . . . . . . . . . . . . . . . . . . . . . . . . . . . . . . . . . . . . . . . . . . . 28
2.1.2 Deleting Administrators . . . . . . . . . . . . . . . . . . . . . . . . . . . . . . . . . . . . . . . . . . . . . . . 29
2.1.3 Renaming Administrators . . . . . . . . . . . . . . . . . . . . . . . . . . . . . . . . . . . . . . . . . . . . . 29
2.1.4 Changing Administrator Passwords. . . . . . . . . . . . . . . . . . . . . . . . . . . . . . . . . . . . . . 29
2.2 Managing Administrator Rights . . . . . . . . . . . . . . . . . . . . . . . . . . . . . . . . . . . . . . . . . . . . . . . . 30
2.2.1 Assigning Super Administrator Rights . . . . . . . . . . . . . . . . . . . . . . . . . . . . . . . . . . . . 30
2.2.2 Assigning Additional Rights . . . . . . . . . . . . . . . . . . . . . . . . . . . . . . . . . . . . . . . . . . . . 30
2.2.3 Modifying Assigned Rights . . . . . . . . . . . . . . . . . . . . . . . . . . . . . . . . . . . . . . . . . . . . 31
2.2.4 Removing Assigned Rights . . . . . . . . . . . . . . . . . . . . . . . . . . . . . . . . . . . . . . . . . . . . 31
2.3 Rights Descriptions . . . . . . . . . . . . . . . . . . . . . . . . . . . . . . . . . . . . . . . . . . . . . . . . . . . . . . . . . 31
2.3.1 Administrator Rights . . . . . . . . . . . . . . . . . . . . . . . . . . . . . . . . . . . . . . . . . . . . . . . . . 32
2.3.2 Bundle Rights . . . . . . . . . . . . . . . . . . . . . . . . . . . . . . . . . . . . . . . . . . . . . . . . . . . . . . 32
2.3.3 Contract Management Rights . . . . . . . . . . . . . . . . . . . . . . . . . . . . . . . . . . . . . . . . . . 33
2.3.4 Credential Rights . . . . . . . . . . . . . . . . . . . . . . . . . . . . . . . . . . . . . . . . . . . . . . . . . . . . 34
2.3.5 Deployment Rights . . . . . . . . . . . . . . . . . . . . . . . . . . . . . . . . . . . . . . . . . . . . . . . . . . 34
2.3.6 Device Rights. . . . . . . . . . . . . . . . . . . . . . . . . . . . . . . . . . . . . . . . . . . . . . . . . . . . . . . 34
2.3.7 Discovery Rights . . . . . . . . . . . . . . . . . . . . . . . . . . . . . . . . . . . . . . . . . . . . . . . . . . . . 35
2.3.8 Document Rights . . . . . . . . . . . . . . . . . . . . . . . . . . . . . . . . . . . . . . . . . . . . . . . . . . . . 35
2.3.9 Inventoried Device Rights . . . . . . . . . . . . . . . . . . . . . . . . . . . . . . . . . . . . . . . . . . . . . 36
2.3.10 LDAP Import Rights . . . . . . . . . . . . . . . . . . . . . . . . . . . . . . . . . . . . . . . . . . . . . . . . . . 37
2.3.11 License Management Rights . . . . . . . . . . . . . . . . . . . . . . . . . . . . . . . . . . . . . . . . . . . 37
2.3.12 Patch Management Rights . . . . . . . . . . . . . . . . . . . . . . . . . . . . . . . . . . . . . . . . . . . . 37
2.3.13 Policy Rights . . . . . . . . . . . . . . . . . . . . . . . . . . . . . . . . . . . . . . . . . . . . . . . . . . . . . . . 38
2.3.14 Quick Task Rights . . . . . . . . . . . . . . . . . . . . . . . . . . . . . . . . . . . . . . . . . . . . . . . . . . . 39
2.3.15 Remote Management Rights . . . . . . . . . . . . . . . . . . . . . . . . . . . . . . . . . . . . . . . . . . . 39
2.3.16 Reporting Rights . . . . . . . . . . . . . . . . . . . . . . . . . . . . . . . . . . . . . . . . . . . . . . . . . . . . 40
2.3.17 User Rights . . . . . . . . . . . . . . . . . . . . . . . . . . . . . . . . . . . . . . . . . . . . . . . . . . . . . . . . 40
2.3.18 ZENworks User Group Rights . . . . . . . . . . . . . . . . . . . . . . . . . . . . . . . . . . . . . . . . . . 41
2.3.19 Zone Rights . . . . . . . . . . . . . . . . . . . . . . . . . . . . . . . . . . . . . . . . . . . . . . . . . . . . . . . . 41
2.4 Managing Administrator Roles . . . . . . . . . . . . . . . . . . . . . . . . . . . . . . . . . . . . . . . . . . . . . . . . . 42
2.4.1 Understanding Administrator Roles . . . . . . . . . . . . . . . . . . . . . . . . . . . . . . . . . . . . . . 43
2.4.2 Creating a Role . . . . . . . . . . . . . . . . . . . . . . . . . . . . . . . . . . . . . . . . . . . . . . . . . . . . . 45
Contents 5

2.4.3 Assigning Roles . . . . . . . . . . . . . . . . . . . . . . . . . . . . . . . . . . . . . . . . . . . . . . . . . . . . . 47
2.4.4 Editing a Role . . . . . . . . . . . . . . . . . . . . . . . . . . . . . . . . . . . . . . . . . . . . . . . . . . . . . . 51
2.4.5 Renaming a Role . . . . . . . . . . . . . . . . . . . . . . . . . . . . . . . . . . . . . . . . . . . . . . . . . . . . 54
2.4.6 Deleting a Role . . . . . . . . . . . . . . . . . . . . . . . . . . . . . . . . . . . . . . . . . . . . . . . . . . . . . 54
3 ZENworks News 55
3.1 Managing ZENworks News Alerts . . . . . . . . . . . . . . . . . . . . . . . . . . . . . . . . . . . . . . . . . . . . . . 55
3.1.1 Deleting the News Alerts . . . . . . . . . . . . . . . . . . . . . . . . . . . . . . . . . . . . . . . . . . . . . . 55
3.1.2 Updating the News Alerts . . . . . . . . . . . . . . . . . . . . . . . . . . . . . . . . . . . . . . . . . . . . . 56
3.1.3 Displaying the News Alerts Based on the Selected Category . . . . . . . . . . . . . . . . . . 56
3.1.4 Viewing the News . . . . . . . . . . . . . . . . . . . . . . . . . . . . . . . . . . . . . . . . . . . . . . . . . . . 56
3.1.5 Sorting the News Alerts . . . . . . . . . . . . . . . . . . . . . . . . . . . . . . . . . . . . . . . . . . . . . . . 56
3.2 Configuring ZENworks News Settings . . . . . . . . . . . . . . . . . . . . . . . . . . . . . . . . . . . . . . . . . . . 56
3.2.1 Dedicated News Server . . . . . . . . . . . . . . . . . . . . . . . . . . . . . . . . . . . . . . . . . . . . . . . 57
3.2.2 Schedule Type. . . . . . . . . . . . . . . . . . . . . . . . . . . . . . . . . . . . . . . . . . . . . . . . . . . . . . 58
4 System Variables 61
4.1 Understanding System Variables. . . . . . . . . . . . . . . . . . . . . . . . . . . . . . . . . . . . . . . . . . . . . . . 61
4.2 Adding System Variables . . . . . . . . . . . . . . . . . . . . . . . . . . . . . . . . . . . . . . . . . . . . . . . . . . . . . 62
4.3 Removing System Variables . . . . . . . . . . . . . . . . . . . . . . . . . . . . . . . . . . . . . . . . . . . . . . . . . . 63
4.4 Editing System Variables . . . . . . . . . . . . . . . . . . . . . . . . . . . . . . . . . . . . . . . . . . . . . . . . . . . . . 63
4.5 Using System Variables . . . . . . . . . . . . . . . . . . . . . . . . . . . . . . . . . . . . . . . . . . . . . . . . . . . . . . 63
novdocx (en) 16 April 2010
5 Credential Vault 65
5.1 Adding a Credential . . . . . . . . . . . . . . . . . . . . . . . . . . . . . . . . . . . . . . . . . . . . . . . . . . . . . . . . . 65
5.2 Creating a Folder for Credentials . . . . . . . . . . . . . . . . . . . . . . . . . . . . . . . . . . . . . . . . . . . . . . . 66
5.3 Assigning Credential Rights . . . . . . . . . . . . . . . . . . . . . . . . . . . . . . . . . . . . . . . . . . . . . . . . . . . 67
5.4 Editing a Credential . . . . . . . . . . . . . . . . . . . . . . . . . . . . . . . . . . . . . . . . . . . . . . . . . . . . . . . . . 68
5.5 Renaming a Credential . . . . . . . . . . . . . . . . . . . . . . . . . . . . . . . . . . . . . . . . . . . . . . . . . . . . . . 68
5.6 Moving a Credential to Another Folder . . . . . . . . . . . . . . . . . . . . . . . . . . . . . . . . . . . . . . . . . . 68
5.7 Removing a Credential. . . . . . . . . . . . . . . . . . . . . . . . . . . . . . . . . . . . . . . . . . . . . . . . . . . . . . . 68
Part II ZENworks Servers and Satellite Devices 69
6 ZENworks Server 71
6.1 ZENworks Services on a Windows Server. . . . . . . . . . . . . . . . . . . . . . . . . . . . . . . . . . . . . . . . 71
6.1.1 Checking the Status of a ZENworks Service . . . . . . . . . . . . . . . . . . . . . . . . . . . . . . . 72
6.1.2 Starting a ZENworks Service. . . . . . . . . . . . . . . . . . . . . . . . . . . . . . . . . . . . . . . . . . . 72
6.1.3 Stopping a ZENworks Service . . . . . . . . . . . . . . . . . . . . . . . . . . . . . . . . . . . . . . . . . . 72
6.2 ZENworks Services on a Linux Server. . . . . . . . . . . . . . . . . . . . . . . . . . . . . . . . . . . . . . . . . . . 73
6.2.1 Checking the Status of a ZENworks Service . . . . . . . . . . . . . . . . . . . . . . . . . . . . . . . 74
6.2.2 Starting the ZENworks Services . . . . . . . . . . . . . . . . . . . . . . . . . . . . . . . . . . . . . . . . 74
6.2.3 Stopping the ZENworks Services . . . . . . . . . . . . . . . . . . . . . . . . . . . . . . . . . . . . . . . 74
6.2.4 Restarting the ZENworks Services . . . . . . . . . . . . . . . . . . . . . . . . . . . . . . . . . . . . . . 75
6.3 Configuring Additional Access to a ZENworks Server . . . . . . . . . . . . . . . . . . . . . . . . . . . . . . . 75
6.3.1 Addressing Non-Detectable IP Address Conditions . . . . . . . . . . . . . . . . . . . . . . . . . 75
6.3.2 Addressing Non-Detectable DNS Name Conditions . . . . . . . . . . . . . . . . . . . . . . . . . 75
6.4 Determining the ZENworks Software Version Installed on Servers . . . . . . . . . . . . . . . . . . . . . 76
6.5 Uninstalling a ZENworks Server . . . . . . . . . . . . . . . . . . . . . . . . . . . . . . . . . . . . . . . . . . . . . . . 76
6.6 Deleting a ZENworks Primary Server. . . . . . . . . . . . . . . . . . . . . . . . . . . . . . . . . . . . . . . . . . . . 76
6 ZENworks 10 Configuration Management System Administration Reference

6.7 ZENworks Server Reports . . . . . . . . . . . . . . . . . . . . . . . . . . . . . . . . . . . . . . . . . . . . . . . . . . . . 77
7 Satellites 79
7.1 Understanding the Satellite Roles . . . . . . . . . . . . . . . . . . . . . . . . . . . . . . . . . . . . . . . . . . . . . . 80
7.1.1 Understanding the Authentication Role . . . . . . . . . . . . . . . . . . . . . . . . . . . . . . . . . . . 80
7.1.2 Understanding the Collection Role . . . . . . . . . . . . . . . . . . . . . . . . . . . . . . . . . . . . . . 80
7.1.3 Understanding the Content Role . . . . . . . . . . . . . . . . . . . . . . . . . . . . . . . . . . . . . . . . 81
7.1.4 Understanding the Imaging Role . . . . . . . . . . . . . . . . . . . . . . . . . . . . . . . . . . . . . . . . 81
7.2 Adding and Configuring Satellite Devices . . . . . . . . . . . . . . . . . . . . . . . . . . . . . . . . . . . . . . . . 82
7.2.1 Authentication Role . . . . . . . . . . . . . . . . . . . . . . . . . . . . . . . . . . . . . . . . . . . . . . . . . . 83
7.2.2 Collection Role. . . . . . . . . . . . . . . . . . . . . . . . . . . . . . . . . . . . . . . . . . . . . . . . . . . . . . 84
7.2.3 Content Role . . . . . . . . . . . . . . . . . . . . . . . . . . . . . . . . . . . . . . . . . . . . . . . . . . . . . . . 84
7.2.4 Imaging Role . . . . . . . . . . . . . . . . . . . . . . . . . . . . . . . . . . . . . . . . . . . . . . . . . . . . . . . 86
7.3 Removing the Roles from a Satellite . . . . . . . . . . . . . . . . . . . . . . . . . . . . . . . . . . . . . . . . . . . . 88
7.4 Removing Satellites from the Server Hierarchy . . . . . . . . . . . . . . . . . . . . . . . . . . . . . . . . . . . . 88
7.5 Specifying Content to Be Hosted . . . . . . . . . . . . . . . . . . . . . . . . . . . . . . . . . . . . . . . . . . . . . . . 89
7.6 Manually Replicating Content from a Primary Server to Satellite Devices. . . . . . . . . . . . . . . . 90
7.7 Moving a Satellite from One Primary Server to Another Primary Server . . . . . . . . . . . . . . . . . 90
7.8 Specifying a Different Repository for the Content Role Satellite (Windows Only) . . . . . . . . . . 91
7.9 Removing a Satellite Device . . . . . . . . . . . . . . . . . . . . . . . . . . . . . . . . . . . . . . . . . . . . . . . . . . 92
7.10 Refreshing a Satellite . . . . . . . . . . . . . . . . . . . . . . . . . . . . . . . . . . . . . . . . . . . . . . . . . . . . . . . . 92
7.11 Troubleshooting Satellites . . . . . . . . . . . . . . . . . . . . . . . . . . . . . . . . . . . . . . . . . . . . . . . . . . . . 92
novdocx (en) 16 April 2010
8 Server Hierarchy 95
8.1 Primary Servers: Peer Versus Parent/Child Relationships . . . . . . . . . . . . . . . . . . . . . . . . . . . 95
8.2 Satellite Role Relationships . . . . . . . . . . . . . . . . . . . . . . . . . . . . . . . . . . . . . . . . . . . . . . . . . . . 95
8.2.1 Authentication Role Sever Relationships. . . . . . . . . . . . . . . . . . . . . . . . . . . . . . . . . . 96
8.2.2 Content Role Server Relationships . . . . . . . . . . . . . . . . . . . . . . . . . . . . . . . . . . . . . . 96
8.2.3 Collection Role Server Relationships . . . . . . . . . . . . . . . . . . . . . . . . . . . . . . . . . . . . 96
8.2.4 Imaging Role Server Relationships . . . . . . . . . . . . . . . . . . . . . . . . . . . . . . . . . . . . . . 96
8.3 Changing the Parent-Child Relationships of Primary Servers . . . . . . . . . . . . . . . . . . . . . . . . . 96
8.3.1 Making a Primary Server a Child . . . . . . . . . . . . . . . . . . . . . . . . . . . . . . . . . . . . . . . . 96
8.3.2 Making a Primary Server a Peer . . . . . . . . . . . . . . . . . . . . . . . . . . . . . . . . . . . . . . . . 97
9 Closest Server Rules 99
9.1 Understanding Closest Server Rules . . . . . . . . . . . . . . . . . . . . . . . . . . . . . . . . . . . . . . . . . . . . 99
9.1.1 ZENworks Server Functions . . . . . . . . . . . . . . . . . . . . . . . . . . . . . . . . . . . . . . . . . . 100
9.1.2 Mapping Devices to Servers . . . . . . . . . . . . . . . . . . . . . . . . . . . . . . . . . . . . . . . . . . 100
9.1.3 Effective Rules. . . . . . . . . . . . . . . . . . . . . . . . . . . . . . . . . . . . . . . . . . . . . . . . . . . . . 100
9.2 Configuring the Closest Server Default Rule . . . . . . . . . . . . . . . . . . . . . . . . . . . . . . . . . . . . . 101
9.3 Creating Closest Server Rules. . . . . . . . . . . . . . . . . . . . . . . . . . . . . . . . . . . . . . . . . . . . . . . . 108
9.4 Backing Up Closest Server Rules . . . . . . . . . . . . . . . . . . . . . . . . . . . . . . . . . . . . . . . . . . . . . 117
10 Backing Up and Restoring the ZENworks Server and Certificate Authority 119
10.1 Backing Up a ZENworks Server. . . . . . . . . . . . . . . . . . . . . . . . . . . . . . . . . . . . . . . . . . . . . . . 119
10.2 Restoring a ZENworks Server . . . . . . . . . . . . . . . . . . . . . . . . . . . . . . . . . . . . . . . . . . . . . . . . 120
10.3 Backing Up the Certificate Authority . . . . . . . . . . . . . . . . . . . . . . . . . . . . . . . . . . . . . . . . . . . 121
10.4 Restoring the Certificate Authority . . . . . . . . . . . . . . . . . . . . . . . . . . . . . . . . . . . . . . . . . . . . . 121
Contents 7

11 Disaster Recovery 123
11.1 Replacing the First Primary Server with the Second Primary Server. . . . . . . . . . . . . . . . . . . 123
11.2 Replacing an Existing Primary Server with a New Primary Server . . . . . . . . . . . . . . . . . . . . 126
11.3 Re-Creating Certificates . . . . . . . . . . . . . . . . . . . . . . . . . . . . . . . . . . . . . . . . . . . . . . . . . . . . . 128
11.3.1 Changing the Internal Certificate to an External Certificate on a Primary Server . . 128
11.3.2 Changing the IP Address of the Primary Server after Installing ZENworks 10
Configuration Management . . . . . . . . . . . . . . . . . . . . . . . . . . . . . . . . . . . . . . . . . . . 132
11.3.3 Changing the DNS Name or the IP Address and DNS Name of the Primary Server after
Installing ZENworks 10 Configuration Management . . . . . . . . . . . . . . . . . . . . . . . . 133
Part III ZENworks Adaptive Agent 139
12 Viewing the Version of the Adaptive Agent Software and Modules on a Device141
13 Searching for Devices that Have a Specified Version of the Adaptive Agent 143
14 Configuring Adaptive Agent Settings after Deployment 145
novdocx (en) 16 April 2010
14.1 Configuring Agent Settings on the Management Zone Level. . . . . . . . . . . . . . . . . . . . . . . . . 145
14.2 Configuring Agent Settings on the Device Folder Level. . . . . . . . . . . . . . . . . . . . . . . . . . . . . 147
14.3 Configuring Agent Settings on the Device Level . . . . . . . . . . . . . . . . . . . . . . . . . . . . . . . . . . 147
14.4 ZENworks Agent Settings . . . . . . . . . . . . . . . . . . . . . . . . . . . . . . . . . . . . . . . . . . . . . . . . . . . 148
14.4.1 General . . . . . . . . . . . . . . . . . . . . . . . . . . . . . . . . . . . . . . . . . . . . . . . . . . . . . . . . . . 148
14.4.2 Agent Features . . . . . . . . . . . . . . . . . . . . . . . . . . . . . . . . . . . . . . . . . . . . . . . . . . . . 150
15 Configuring ZENworks Explorer 157
15.1 Configuring ZENworks Explorer Settings on the Management Zone Level . . . . . . . . . . . . . . 157
15.2 Configuring ZENworks Explorer Settings on the Device Folder Level . . . . . . . . . . . . . . . . . . 158
15.3 Configuring ZENworks Explorer Settings on the Device Level . . . . . . . . . . . . . . . . . . . . . . . 159
15.4 ZENworks Explorer General Settings . . . . . . . . . . . . . . . . . . . . . . . . . . . . . . . . . . . . . . . . . . 160
16 Removing the ZENworks Pre-Agent from a Device 161
17 Configuring the System Update Behavior of the ZENworks Adaptive Agent 163
18 Troubleshooting the Adaptive Agent 165
Part IV ZENworks System Updates 169
19 Introduction to ZENworks System Updates 171
20 Configuring Updates 173
20.1 Configuring System Update Settings . . . . . . . . . . . . . . . . . . . . . . . . . . . . . . . . . . . . . . . . . . . 173
20.1.1 Check for Updates Schedule . . . . . . . . . . . . . . . . . . . . . . . . . . . . . . . . . . . . . . . . . . 173
20.1.2 Download Schedule. . . . . . . . . . . . . . . . . . . . . . . . . . . . . . . . . . . . . . . . . . . . . . . . . 175
20.1.3 E-Mail Notification . . . . . . . . . . . . . . . . . . . . . . . . . . . . . . . . . . . . . . . . . . . . . . . . . . 177
20.1.4 Proxy Server Settings . . . . . . . . . . . . . . . . . . . . . . . . . . . . . . . . . . . . . . . . . . . . . . . 178
20.1.5 Dedicated Server Settings . . . . . . . . . . . . . . . . . . . . . . . . . . . . . . . . . . . . . . . . . . . . 179
8 ZENworks 10 Configuration Management System Administration Reference

20.1.6 Stage Timeout Settings . . . . . . . . . . . . . . . . . . . . . . . . . . . . . . . . . . . . . . . . . . . . . . 180
20.1.7 Reboot Behavior . . . . . . . . . . . . . . . . . . . . . . . . . . . . . . . . . . . . . . . . . . . . . . . . . . . 181
20.2 Creating Deployment Stages . . . . . . . . . . . . . . . . . . . . . . . . . . . . . . . . . . . . . . . . . . . . . . . . . 182
20.2.1 Understanding Stages . . . . . . . . . . . . . . . . . . . . . . . . . . . . . . . . . . . . . . . . . . . . . . . 182
20.2.2 Creating and Populating a Deployment Stage. . . . . . . . . . . . . . . . . . . . . . . . . . . . . 184
20.2.3 Modifying the Stage Timeout . . . . . . . . . . . . . . . . . . . . . . . . . . . . . . . . . . . . . . . . . . 185
20.2.4 Modifying Staging Behavior . . . . . . . . . . . . . . . . . . . . . . . . . . . . . . . . . . . . . . . . . . . 186
20.2.5 Modifying Reboot Behavior . . . . . . . . . . . . . . . . . . . . . . . . . . . . . . . . . . . . . . . . . . . 187
20.2.6 Modifying the Membership of a Deployment Stage . . . . . . . . . . . . . . . . . . . . . . . . . 187
20.2.7 Renaming a Deployment Stage . . . . . . . . . . . . . . . . . . . . . . . . . . . . . . . . . . . . . . . . 188
20.2.8 Deleting a Deployment Stage . . . . . . . . . . . . . . . . . . . . . . . . . . . . . . . . . . . . . . . . . 189
20.2.9 Rearranging the Order in Which Stages Start . . . . . . . . . . . . . . . . . . . . . . . . . . . . . 189
21 Managing Update Downloads 191
21.1 Understanding Available Updates . . . . . . . . . . . . . . . . . . . . . . . . . . . . . . . . . . . . . . . . . . . . . 191
21.2 Downloading Updates . . . . . . . . . . . . . . . . . . . . . . . . . . . . . . . . . . . . . . . . . . . . . . . . . . . . . . 192
21.2.1 Scheduling Update Downloads . . . . . . . . . . . . . . . . . . . . . . . . . . . . . . . . . . . . . . . . 192
21.2.2 Manually Checking for Updates. . . . . . . . . . . . . . . . . . . . . . . . . . . . . . . . . . . . . . . . 193
21.2.3 Manually Downloading Updates . . . . . . . . . . . . . . . . . . . . . . . . . . . . . . . . . . . . . . . 193
21.2.4 Manually Importing Updates to Servers without Internet Connectivity. . . . . . . . . . . 194
21.3 Downloading and Installing the PRU . . . . . . . . . . . . . . . . . . . . . . . . . . . . . . . . . . . . . . . . . . . 194
21.4 Canceling or Deleting a System Update . . . . . . . . . . . . . . . . . . . . . . . . . . . . . . . . . . . . . . . . 195
novdocx (en) 16 April 2010
22 Deploying Updates 197
22.1 Understanding Deploying Updates . . . . . . . . . . . . . . . . . . . . . . . . . . . . . . . . . . . . . . . . . . . . 197
22.2 Deploying Updates . . . . . . . . . . . . . . . . . . . . . . . . . . . . . . . . . . . . . . . . . . . . . . . . . . . . . . . . . 199
22.3 Starting a Pending Stage . . . . . . . . . . . . . . . . . . . . . . . . . . . . . . . . . . . . . . . . . . . . . . . . . . . . 206
22.4 Rescheduling a Deployment . . . . . . . . . . . . . . . . . . . . . . . . . . . . . . . . . . . . . . . . . . . . . . . . . 206
22.4.1 Rescheduling a Deployment for the All Stages Status . . . . . . . . . . . . . . . . . . . . . . 206
22.4.2 Rescheduling a Deployment for the Other Statuses . . . . . . . . . . . . . . . . . . . . . . . . 206
22.5 Bypassing Staging . . . . . . . . . . . . . . . . . . . . . . . . . . . . . . . . . . . . . . . . . . . . . . . . . . . . . . . . . 207
22.6 Canceling a Deployment . . . . . . . . . . . . . . . . . . . . . . . . . . . . . . . . . . . . . . . . . . . . . . . . . . . . 207
22.7 Clearing an Error to Retry a Deployment . . . . . . . . . . . . . . . . . . . . . . . . . . . . . . . . . . . . . . . . 207
22.8 Viewing Status by Device. . . . . . . . . . . . . . . . . . . . . . . . . . . . . . . . . . . . . . . . . . . . . . . . . . . . 207
22.8.1 Understanding Device Statuses . . . . . . . . . . . . . . . . . . . . . . . . . . . . . . . . . . . . . . . 208
22.8.2 Viewing a Device’s Properties . . . . . . . . . . . . . . . . . . . . . . . . . . . . . . . . . . . . . . . . . 209
22.8.3 Viewing Information on a Device’s Status . . . . . . . . . . . . . . . . . . . . . . . . . . . . . . . . 209
22.8.4 Toggling Ignored Devices . . . . . . . . . . . . . . . . . . . . . . . . . . . . . . . . . . . . . . . . . . . . 209
22.8.5 Redeploying Updates to Devices. . . . . . . . . . . . . . . . . . . . . . . . . . . . . . . . . . . . . . . 210
22.8.6 Rescheduling Updates to Devices . . . . . . . . . . . . . . . . . . . . . . . . . . . . . . . . . . . . . . 210
22.8.7 Refreshing Devices . . . . . . . . . . . . . . . . . . . . . . . . . . . . . . . . . . . . . . . . . . . . . . . . . 211
23 Deleting Updates 213
24 Reviewing the Content of an Update 215
24.1 Viewing the Release Details Page . . . . . . . . . . . . . . . . . . . . . . . . . . . . . . . . . . . . . . . . . . . . . 215
24.2 Update Release Details . . . . . . . . . . . . . . . . . . . . . . . . . . . . . . . . . . . . . . . . . . . . . . . . . . . . . 215
24.3 Deployment History . . . . . . . . . . . . . . . . . . . . . . . . . . . . . . . . . . . . . . . . . . . . . . . . . . . . . . . . 216
24.3.1 Understanding Deployment History Details . . . . . . . . . . . . . . . . . . . . . . . . . . . . . . . 217
24.3.2 Performing Deployment History Tasks . . . . . . . . . . . . . . . . . . . . . . . . . . . . . . . . . . 218
Contents 9

25 Update Statuses 219
26 Configuring the System Update Behavior of the ZENworks Adaptive Agent 221
Part V Zone Administration 223
27 Management Zone Configuration Settings 225
27.1 Accessing Configuration Settings . . . . . . . . . . . . . . . . . . . . . . . . . . . . . . . . . . . . . . . . . . . . . 225
27.1.1 Modifying Configuration Settings at the Zone . . . . . . . . . . . . . . . . . . . . . . . . . . . . . 225
27.1.2 Modifying Configuration Settings on a Folder . . . . . . . . . . . . . . . . . . . . . . . . . . . . . 226
27.1.3 Modifying Configuration Settings on a Device . . . . . . . . . . . . . . . . . . . . . . . . . . . . . 227
27.2 Content Settings. . . . . . . . . . . . . . . . . . . . . . . . . . . . . . . . . . . . . . . . . . . . . . . . . . . . . . . . . . . 228
27.3 Device Management Settings . . . . . . . . . . . . . . . . . . . . . . . . . . . . . . . . . . . . . . . . . . . . . . . . 229
27.4 Discovery and Deployment Settings . . . . . . . . . . . . . . . . . . . . . . . . . . . . . . . . . . . . . . . . . . . 230
27.5 Event and Messaging Settings. . . . . . . . . . . . . . . . . . . . . . . . . . . . . . . . . . . . . . . . . . . . . . . . 230
27.6 Infrastructure Management Settings . . . . . . . . . . . . . . . . . . . . . . . . . . . . . . . . . . . . . . . . . . . 230
27.7 Inventory Settings . . . . . . . . . . . . . . . . . . . . . . . . . . . . . . . . . . . . . . . . . . . . . . . . . . . . . . . . . 231
27.8 Reporting Services Settings . . . . . . . . . . . . . . . . . . . . . . . . . . . . . . . . . . . . . . . . . . . . . . . . . . 232
27.9 Asset Management Settings . . . . . . . . . . . . . . . . . . . . . . . . . . . . . . . . . . . . . . . . . . . . . . . . . 232
27.10 Patch Management Services Settings . . . . . . . . . . . . . . . . . . . . . . . . . . . . . . . . . . . . . . . . . . 233
novdocx (en) 16 April 2010
Part VI Content 235
28 Content Repository 237
28.1 Changing the Location of the Content Repository on a Windows Server . . . . . . . . . . . . . . . 237
28.2 Changing the Location of the Content Repository on a Linux Server . . . . . . . . . . . . . . . . . . 239
28.2.1 Mounting a Share . . . . . . . . . . . . . . . . . . . . . . . . . . . . . . . . . . . . . . . . . . . . . . . . . . 239
28.2.2 Unmounting a Share . . . . . . . . . . . . . . . . . . . . . . . . . . . . . . . . . . . . . . . . . . . . . . . . 240
28.2.3 Creating a Permanent Mount. . . . . . . . . . . . . . . . . . . . . . . . . . . . . . . . . . . . . . . . . . 240
28.2.4 Moving Existing Content to the New Repository . . . . . . . . . . . . . . . . . . . . . . . . . . . 240
28.3 Mounting the Content Repository on a Linux Server to an NSS Volume . . . . . . . . . . . . . . . . 240
29 Content Replication 243
29.1 Configuring Content Replication at the Management Zone Level . . . . . . . . . . . . . . . . . . . . . 244
29.1.1 Manually Configuring the Web Service Tim e o u t A d v a n c e d C o n t e n t R e p l i c a t i o n
Setting . . . . . . . . . . . . . . . . . . . . . . . . . . . . . . . . . . . . . . . . . . . . . . . . . . . . . . . . . . . 245
29.2 Replicating Content to New Content Servers. . . . . . . . . . . . . . . . . . . . . . . . . . . . . . . . . . . . . 245
29.3 Manually Replicating Content from a Primary Server to Satellite Devices. . . . . . . . . . . . . . . 246
29.4 Including or Excluding Content . . . . . . . . . . . . . . . . . . . . . . . . . . . . . . . . . . . . . . . . . . . . . . . 246
29.4.1 Managing a Single Piece of Content on Multiple Content Servers . . . . . . . . . . . . . 247
29.4.2 Managing Content on the Folder Level . . . . . . . . . . . . . . . . . . . . . . . . . . . . . . . . . . 247
29.4.3 Managing Multiple Pieces of Content on a Single Content Server . . . . . . . . . . . . . 248
29.4.4 Managing Multiple Pieces of Content on Multiple Content Servers . . . . . . . . . . . . . 248
30 Content Delivery 251
30.1 Setting Up Closest Server Rules . . . . . . . . . . . . . . . . . . . . . . . . . . . . . . . . . . . . . . . . . . . . . . 251
30.2 Scheduling Delivery Blackout Dates . . . . . . . . . . . . . . . . . . . . . . . . . . . . . . . . . . . . . . . . . . . 251
30.3 Setting the Device Refresh Schedule . . . . . . . . . . . . . . . . . . . . . . . . . . . . . . . . . . . . . . . . . . 252
10 ZENworks 10 Configuration Management System Administration Reference

Part VII Users 255
31 User Sources 257
31.1 Prerequisites . . . . . . . . . . . . . . . . . . . . . . . . . . . . . . . . . . . . . . . . . . . . . . . . . . . . . . . . . . . . . 257
31.2 Managing User Sources. . . . . . . . . . . . . . . . . . . . . . . . . . . . . . . . . . . . . . . . . . . . . . . . . . . . . 258
31.2.1 Adding User Sources. . . . . . . . . . . . . . . . . . . . . . . . . . . . . . . . . . . . . . . . . . . . . . . . 258
31.2.2 Deleting User Sources. . . . . . . . . . . . . . . . . . . . . . . . . . . . . . . . . . . . . . . . . . . . . . . 262
31.2.3 Editing User Sources . . . . . . . . . . . . . . . . . . . . . . . . . . . . . . . . . . . . . . . . . . . . . . . . 262
31.2.4 Adding a Container from a User Source . . . . . . . . . . . . . . . . . . . . . . . . . . . . . . . . . 263
31.3 Managing User Source Connections . . . . . . . . . . . . . . . . . . . . . . . . . . . . . . . . . . . . . . . . . . . 263
31.3.1 Creating User Source Connections . . . . . . . . . . . . . . . . . . . . . . . . . . . . . . . . . . . . . 264
31.3.2 Editing User Source Connections . . . . . . . . . . . . . . . . . . . . . . . . . . . . . . . . . . . . . . 264
31.3.3 Removing User Source Connections. . . . . . . . . . . . . . . . . . . . . . . . . . . . . . . . . . . . 265
31.3.4 Updating a Certificate for a User Source . . . . . . . . . . . . . . . . . . . . . . . . . . . . . . . . . 265
31.4 Managing Primary Server Connections for User Sources . . . . . . . . . . . . . . . . . . . . . . . . . . . 266
31.5 Managing Authentication Server Connections for User Sources . . . . . . . . . . . . . . . . . . . . . . 267
31.5.1 Assigning a Connection to an Authentication Server. . . . . . . . . . . . . . . . . . . . . . . . 267
31.5.2 Removing a Connection . . . . . . . . . . . . . . . . . . . . . . . . . . . . . . . . . . . . . . . . . . . . . 268
31.5.3 Reordering Connections . . . . . . . . . . . . . . . . . . . . . . . . . . . . . . . . . . . . . . . . . . . . . 268
31.6 Providing LDAP Load Balancing and Fault Tolerance . . . . . . . . . . . . . . . . . . . . . . . . . . . . . . 268
31.6.1 Using ZENworks Control Center to Define Additional LDAP Servers for a ZENworks
Server . . . . . . . . . . . . . . . . . . . . . . . . . . . . . . . . . . . . . . . . . . . . . . . . . . . . . . . . . . . 269
31.6.2 Using the zman Command Line Utility to Define Additional LDAP Servers for a
ZENworks Server. . . . . . . . . . . . . . . . . . . . . . . . . . . . . . . . . . . . . . . . . . . . . . . . . . . 270
novdocx (en) 16 April 2010
32 User Authentication 271
32.1 User Source Authentication . . . . . . . . . . . . . . . . . . . . . . . . . . . . . . . . . . . . . . . . . . . . . . . . . . 271
32.2 Authentication Mechanisms . . . . . . . . . . . . . . . . . . . . . . . . . . . . . . . . . . . . . . . . . . . . . . . . . . 272
32.2.1 Kerberos (Active Directory only) . . . . . . . . . . . . . . . . . . . . . . . . . . . . . . . . . . . . . . . 272
32.2.2 Shared Secret . . . . . . . . . . . . . . . . . . . . . . . . . . . . . . . . . . . . . . . . . . . . . . . . . . . . . 274
32.2.3 Username/Password (eDirectory and Active Directory). . . . . . . . . . . . . . . . . . . . . . 276
32.3 Credential Storage . . . . . . . . . . . . . . . . . . . . . . . . . . . . . . . . . . . . . . . . . . . . . . . . . . . . . . . . . 277
32.4 Disabling ZENworks User Authentication. . . . . . . . . . . . . . . . . . . . . . . . . . . . . . . . . . . . . . . . 277
32.5 Troubleshooting User Authentication . . . . . . . . . . . . . . . . . . . . . . . . . . . . . . . . . . . . . . . . . . . 278
Part VIII ZENworks 10 Product Licensing 283
33 ZENworks 10 Product Licensing 285
33.1 Evaluating a Product . . . . . . . . . . . . . . . . . . . . . . . . . . . . . . . . . . . . . . . . . . . . . . . . . . . . . . . 285
33.2 Extending the Evaluation Period of a Product . . . . . . . . . . . . . . . . . . . . . . . . . . . . . . . . . . . . 286
33.3 Activating a Product . . . . . . . . . . . . . . . . . . . . . . . . . . . . . . . . . . . . . . . . . . . . . . . . . . . . . . . . 286
33.4 Deactivating a Product . . . . . . . . . . . . . . . . . . . . . . . . . . . . . . . . . . . . . . . . . . . . . . . . . . . . . . 286
33.5 Possible License State Changes . . . . . . . . . . . . . . . . . . . . . . . . . . . . . . . . . . . . . . . . . . . . . . 287
33.6 Using ZENworks 10 Asset Management with ZENworks 7 Desktop Management . . . . . . . . 288
33.7 Viewing the Predefined Reports. . . . . . . . . . . . . . . . . . . . . . . . . . . . . . . . . . . . . . . . . . . . . . . 288
Part IX Database Management 291
34 Embedded Database Maintenance 293
34.1 Retrieving and Storing the Credentials of the Embedded Sybase SQL Anywhere Database 293
Contents 11

34.2 Changing the Ports Used by the Embedded Sybase SQL Anywhere Database . . . . . . . . . . 293
34.3 Backing Up the Embedded Sybase SQL Anywhere Database . . . . . . . . . . . . . . . . . . . . . . . 295
34.3.1 Backing Up the Embedded Sybase SQL Anywhere Database on a Windows or Linux
Server . . . . . . . . . . . . . . . . . . . . . . . . . . . . . . . . . . . . . . . . . . . . . . . . . . . . . . . . . . . 295
34.3.2 Backing up the Embedded Sybase SQL Anywhere Database Running on a Windows
Server to a Network Location on a Remote Windows Machine. . . . . . . . . . . . . . . . 297
34.3.3 Backing up the Embedded Sybase SQL Anywhere Database Running on a Linux
Server to a Network Location on a Remote Linux Machine. . . . . . . . . . . . . . . . . . . 299
34.4 Restoring the Embedded Sybase SQL Anywhere Database . . . . . . . . . . . . . . . . . . . . . . . . . 301
34.4.1 Restoring the Embedded Sybase SQL Anywhere Database on a Windows Server 301
34.4.2 Restoring the Embedded Sybase SQL Anywhere Database on a Linux Server . . . 302
34.5 Moving the Data from an Embedded Sybase Database to an External Sybase Database . . 302
34.5.1 Preparing to Move the Data. . . . . . . . . . . . . . . . . . . . . . . . . . . . . . . . . . . . . . . . . . . 303
34.5.2 Moving the Data from the Internal Sybase to the External Sybase . . . . . . . . . . . . . 303
34.6 Migrating the Data from an Embedded Sybase SQL Anywhere to an External Oracle
Database . . . . . . . . . . . . . . . . . . . . . . . . . . . . . . . . . . . . . . . . . . . . . . . . . . . . . . . . . . . . . . . . 304
34.6.1 Preparing to Move the Data. . . . . . . . . . . . . . . . . . . . . . . . . . . . . . . . . . . . . . . . . . . 305
3 4 . 6 . 2 M i g r a t i n g t h e D a t a f r o m t h e S y b a s e S Q L A n y w h e r e D a t a b a s e t o a n O r a c l e
Database . . . . . . . . . . . . . . . . . . . . . . . . . . . . . . . . . . . . . . . . . . . . . . . . . . . . . . . . . 306
34.6.3 Post-Migration Tasks . . . . . . . . . . . . . . . . . . . . . . . . . . . . . . . . . . . . . . . . . . . . . . . . 308
34.6.4 Troubleshooting Database Migration . . . . . . . . . . . . . . . . . . . . . . . . . . . . . . . . . . . . 309
34.6.5 Reverting to the Sybase Database . . . . . . . . . . . . . . . . . . . . . . . . . . . . . . . . . . . . . 311
novdocx (en) 16 April 2010
35 External Database Maintenance 313
35.1 Backing Up the External Sybase Database . . . . . . . . . . . . . . . . . . . . . . . . . . . . . . . . . . . . . . 313
35.1.1 Backing Up the External Sybase Database on a Windows or Linux Server . . . . . . 313
35.1.2 Backing up the External Sybase Database Running on a Windows Server to a Network
Location on a Remote Windows Machine . . . . . . . . . . . . . . . . . . . . . . . . . . . . . . . . 316
35.1.3 Backing up the External Sybase Database Running on a Linux Server to a Network
Location on a Remote Linux Machine . . . . . . . . . . . . . . . . . . . . . . . . . . . . . . . . . . . 319
35.2 Restoring the External Sybase Database . . . . . . . . . . . . . . . . . . . . . . . . . . . . . . . . . . . . . . . 322
3 5 . 3 M o v i n g t h e D a t a f r o m O n e E x t e r n a l S y b a s e D a t a b a s e t o a n o t h e r E x t e r n a l S y b a s e
Database . . . . . . . . . . . . . . . . . . . . . . . . . . . . . . . . . . . . . . . . . . . . . . . . . . . . . . . . . . . . . . . . 323
35.3.1 Preparing to Move the Data. . . . . . . . . . . . . . . . . . . . . . . . . . . . . . . . . . . . . . . . . . . 323
35.3.2 Moving the Data from One External Sybase to Another External Sybase. . . . . . . . 324
3 5 . 4 M o v i n g t h e D a t a f r o m a n E x t e r n a l O E M S y b a s e D a t a b a s e t o a n E m b e d d e d S y b a s e
Database . . . . . . . . . . . . . . . . . . . . . . . . . . . . . . . . . . . . . . . . . . . . . . . . . . . . . . . . . . . . . . . . 325
35.4.1 Preparing to Move the Data. . . . . . . . . . . . . . . . . . . . . . . . . . . . . . . . . . . . . . . . . . . 325
35.4.2 Moving the Data from the External Sybase to the Embedded Sybase . . . . . . . . . . 325
35.5 Configuring the ZENworks Server to Point to the New MS SQL Database Containing Data Moved
from Another MS SQL Database . . . . . . . . . . . . . . . . . . . . . . . . . . . . . . . . . . . . . . . . . . . . . . 327
35.5.1 Preparing to Move the Data. . . . . . . . . . . . . . . . . . . . . . . . . . . . . . . . . . . . . . . . . . . 327
35.5.2 Configuring the ZENworks Server to Point to the New MS SQL Database . . . . . . . 328
35.6 Configuring the ZENworks Server to Point to the New Oracle Database Containing Data Moved
from Another Oracle Database . . . . . . . . . . . . . . . . . . . . . . . . . . . . . . . . . . . . . . . . . . . . . . . 328
35.6.1 Preparing to Move the Data. . . . . . . . . . . . . . . . . . . . . . . . . . . . . . . . . . . . . . . . . . . 328
35.6.2 Configuring the ZENworks Server to Point to the New Oracle Database . . . . . . . . 329
36 Database Best Practices and Tips 331
36.1 Database Best Practices . . . . . . . . . . . . . . . . . . . . . . . . . . . . . . . . . . . . . . . . . . . . . . . . . . . . 331
36.1.1 Rebuilding the Embedded or External Sybase Database . . . . . . . . . . . . . . . . . . . . 331
36.2 Database Tips . . . . . . . . . . . . . . . . . . . . . . . . . . . . . . . . . . . . . . . . . . . . . . . . . . . . . . . . . . . . 334
36.2.1 Changing the Backup Location and Schedule of the Embedded Sybase Database
Subsequent to the Initial Backup . . . . . . . . . . . . . . . . . . . . . . . . . . . . . . . . . . . . . . . 334
12 ZENworks 10 Configuration Management System Administration Reference

36.2.2 Changing the Backup Schedule and Location of the External Sybase Database
Subsequent to the Initial Backup . . . . . . . . . . . . . . . . . . . . . . . . . . . . . . . . . . . . . . . 335
Part X Message Logging 339
37 Overview 341
37.1 Functionalities of Message Logger . . . . . . . . . . . . . . . . . . . . . . . . . . . . . . . . . . . . . . . . . . . . 341
37.2 Message Severity. . . . . . . . . . . . . . . . . . . . . . . . . . . . . . . . . . . . . . . . . . . . . . . . . . . . . . . . . . 341
37.3 Message Format . . . . . . . . . . . . . . . . . . . . . . . . . . . . . . . . . . . . . . . . . . . . . . . . . . . . . . . . . . 342
38 Configuring Message Logger Settings 343
38.1 Configuring the Message Logger Settings at the Zone Level . . . . . . . . . . . . . . . . . . . . . . . . 343
38.1.1 Local Device Logging . . . . . . . . . . . . . . . . . . . . . . . . . . . . . . . . . . . . . . . . . . . . . . . 343
38.1.2 Centralized Message Logging . . . . . . . . . . . . . . . . . . . . . . . . . . . . . . . . . . . . . . . . . 344
38.2 Configuring the Message Logger Settings at the Folder Level . . . . . . . . . . . . . . . . . . . . . . . 347
38.3 Configuring the Message Logger Settings at the Device Level . . . . . . . . . . . . . . . . . . . . . . 347
38.4 Turning on the Debug Messages . . . . . . . . . . . . . . . . . . . . . . . . . . . . . . . . . . . . . . . . . . . . . . 347
novdocx (en) 16 April 2010
39 Managing Messages 349
39.1 Understanding Message Formats . . . . . . . . . . . . . . . . . . . . . . . . . . . . . . . . . . . . . . . . . . . . . 349
39.1.1 Local Log File Format . . . . . . . . . . . . . . . . . . . . . . . . . . . . . . . . . . . . . . . . . . . . . . . 349
39.1.2 E-Mail Format . . . . . . . . . . . . . . . . . . . . . . . . . . . . . . . . . . . . . . . . . . . . . . . . . . . . . 350
39.1.3 SNMP Message Format . . . . . . . . . . . . . . . . . . . . . . . . . . . . . . . . . . . . . . . . . . . . . 350
39.1.4 UDP Payload Format. . . . . . . . . . . . . . . . . . . . . . . . . . . . . . . . . . . . . . . . . . . . . . . . 351
39.2 Viewing the Message Status . . . . . . . . . . . . . . . . . . . . . . . . . . . . . . . . . . . . . . . . . . . . . . . . . 352
39.2.1 Message Summary . . . . . . . . . . . . . . . . . . . . . . . . . . . . . . . . . . . . . . . . . . . . . . . . . 352
39.2.2 Device Hot List. . . . . . . . . . . . . . . . . . . . . . . . . . . . . . . . . . . . . . . . . . . . . . . . . . . . . 353
39.3 Viewing the Messages . . . . . . . . . . . . . . . . . . . . . . . . . . . . . . . . . . . . . . . . . . . . . . . . . . . . . . 353
39.3.1 Message Log . . . . . . . . . . . . . . . . . . . . . . . . . . . . . . . . . . . . . . . . . . . . . . . . . . . . . . 353
39.3.2 System Message Log . . . . . . . . . . . . . . . . . . . . . . . . . . . . . . . . . . . . . . . . . . . . . . . 354
39.4 Acknowledging Messages . . . . . . . . . . . . . . . . . . . . . . . . . . . . . . . . . . . . . . . . . . . . . . . . . . . 355
39.4.1 Acknowledging a Message . . . . . . . . . . . . . . . . . . . . . . . . . . . . . . . . . . . . . . . . . . . 355
39.4.2 Acknowledging Multiple Messages . . . . . . . . . . . . . . . . . . . . . . . . . . . . . . . . . . . . . 355
39.4.3 Acknowledging Messages Logged During a Specified Time . . . . . . . . . . . . . . . . . 356
39.5 Deleting Messages. . . . . . . . . . . . . . . . . . . . . . . . . . . . . . . . . . . . . . . . . . . . . . . . . . . . . . . . . 357
39.5.1 Deleting a Message . . . . . . . . . . . . . . . . . . . . . . . . . . . . . . . . . . . . . . . . . . . . . . . . . 357
39.5.2 Deleting Multiple Messages . . . . . . . . . . . . . . . . . . . . . . . . . . . . . . . . . . . . . . . . . . . 357
39.5.3 Deleting Messages Logged During a Specified Time . . . . . . . . . . . . . . . . . . . . . . . 358
39.6 Viewing the Predefined Reports. . . . . . . . . . . . . . . . . . . . . . . . . . . . . . . . . . . . . . . . . . . . . . . 358
A Naming Conventions in ZENworks Control Center 361
B Schedule Types 363
B.1 Date Specific . . . . . . . . . . . . . . . . . . . . . . . . . . . . . . . . . . . . . . . . . . . . . . . . . . . . . . . . . . . . . 363
B.2 Event . . . . . . . . . . . . . . . . . . . . . . . . . . . . . . . . . . . . . . . . . . . . . . . . . . . . . . . . . . . . . . . . . . . 364
B.3 Now . . . . . . . . . . . . . . . . . . . . . . . . . . . . . . . . . . . . . . . . . . . . . . . . . . . . . . . . . . . . . . . . . . . . 365
B.4 Recurring . . . . . . . . . . . . . . . . . . . . . . . . . . . . . . . . . . . . . . . . . . . . . . . . . . . . . . . . . . . . . . . . 365
Contents 13

C Customizing the Look and Feel of the ZENworks Icon 369
C.1 Replacing the Default ZENworks Icons with the New Customized Icons. . . . . . . . . . . . . . . . 369
C.2 Replacing the Customized Icons with the Default ZENworks Icons. . . . . . . . . . . . . . . . . . . . 370
D Documentation Updates 371
D.1 April 16, 2010 . . . . . . . . . . . . . . . . . . . . . . . . . . . . . . . . . . . . . . . . . . . . . . . . . . . . . . . . . . . . . 371
D.2 March 30, 2010: SP3 (10.3) . . . . . . . . . . . . . . . . . . . . . . . . . . . . . . . . . . . . . . . . . . . . . . . . . . 371
novdocx (en) 16 April 2010
14 ZENworks 10 Configuration Management System Administration Reference

About This Guide
novdocx (en) 16 April 2010
This System Administration Reference provides information about general administrative tasks
required to manage your Novell
information in this guide is organized as follows:
Part I, “ZENworks Control Center,” on page 17
Part II, “ZENworks Servers and Satellite Devices,” on page 69
Part III, “ZENworks Adaptive Agent,” on page 139
Part IV, “ZENworks System Updates,” on page 169
Part V, “Zone Administration,” on page 223
Part VI, “Content,” on page 235
Part VII, “Users,” on page 255
Part VIII, “ZENworks 10 Product Licensing,” on page 283
Part IX, “Database Management,” on page 291
Part X, “Message Logging,” on page 339
Appendix A, “Naming Conventions in ZENworks Control Center,” on page 361
Appendix B, “Schedule Types,” on page 363
Appendix C, “Customizing the Look and Feel of the ZENworks Icon,” on page 369
Appendix D, “Documentation Updates,” on page 371
®
ZENworks® 10 Configuration Management SP3 system. The
Audience
This guide is intended for ZENworks administrators.
Feedback
We want to hear your comments and suggestions about this manual and the other documentation
included with this product. Please use the User Comments feature at the bottom of each page of the
online documentation, or go to the Novell Documentation Feedback site (http://www.novell.com/
documentation/feedback.html) and enter your comments there.
Additional Documentation
ZENworks 10 Configuration Management is supported by other documentation (in both PDF and
HTML formats) that you can use to learn about and implement the product. For additional
documentation, see the ZENworks 10 Configuration Management documentation (http://
www.novell.com/documentation/zcm10/index.html).
Documentation Conventions
In Novell documentation, a greater-than symbol (>) is used to separate actions within a step and
items in a cross-reference path.
About This Guide 15

A trademark symbol (®, TM, etc.) denotes a Novell trademark. An asterisk (*) denotes a third-party
trademark.
When a single pathname can be written with a backslash for some platforms or a forward slash for
other platforms, the pathname is presented with a backslash. Users of platforms that require a
forward slash, such as Linux*, should use forward slashes as required by your software.
novdocx (en) 16 April 2010
16 ZENworks 10 Configuration Management System Administration Reference

I
ZENworks Control Center
This section contains information about using ZENworks® Control Center (ZCC) to configure
system settings and perform management tasks in your Management Zone.
Chapter 1, “ZENworks Control Center,” on page 19
Chapter 2, “Administrators,” on page 27
Chapter 3, “ZENworks News,” on page 55
Chapter 4, “System Variables,” on page 61
Chapter 5, “Credential Vault,” on page 65
novdocx (en) 16 April 2010
ZENworks Control CenterI17

novdocx (en) 16 April 2010
18 ZENworks 10 Configuration Management System Administration Reference
1
ZENworks Control Center
You use ZENworks® Control Center to configure system settings and perform management tasks in
your Management Zone.
ZENworks Control Center is installed on all ZENworks Servers in the Management Zone. You can
perform all management tasks on any ZENworks Server.
Section 1.1, “Accessing ZENworks Control Center,” on page 19
Section 1.2, “Accessing ZENworks Control Center through Novell iManager,” on page 20
Section 1.3, “Navigating ZENworks Control Center,” on page 21
Section 1.4, “Changing the Default Login Disable Values,” on page 22
Section 1.5, “Changing the Timeout Value for ZENworks Control Center,” on page 22
Section 1.6, “Using the Config.xml File to Modify ZENworks Control Center Settings,” on
page 23
Section 1.7, “Bookmarking ZENworks Control Center Locations,” on page 24
Section 1.8, “Troubleshooting ZENworks Control Center,” on page 25
novdocx (en) 16 April 2010
1
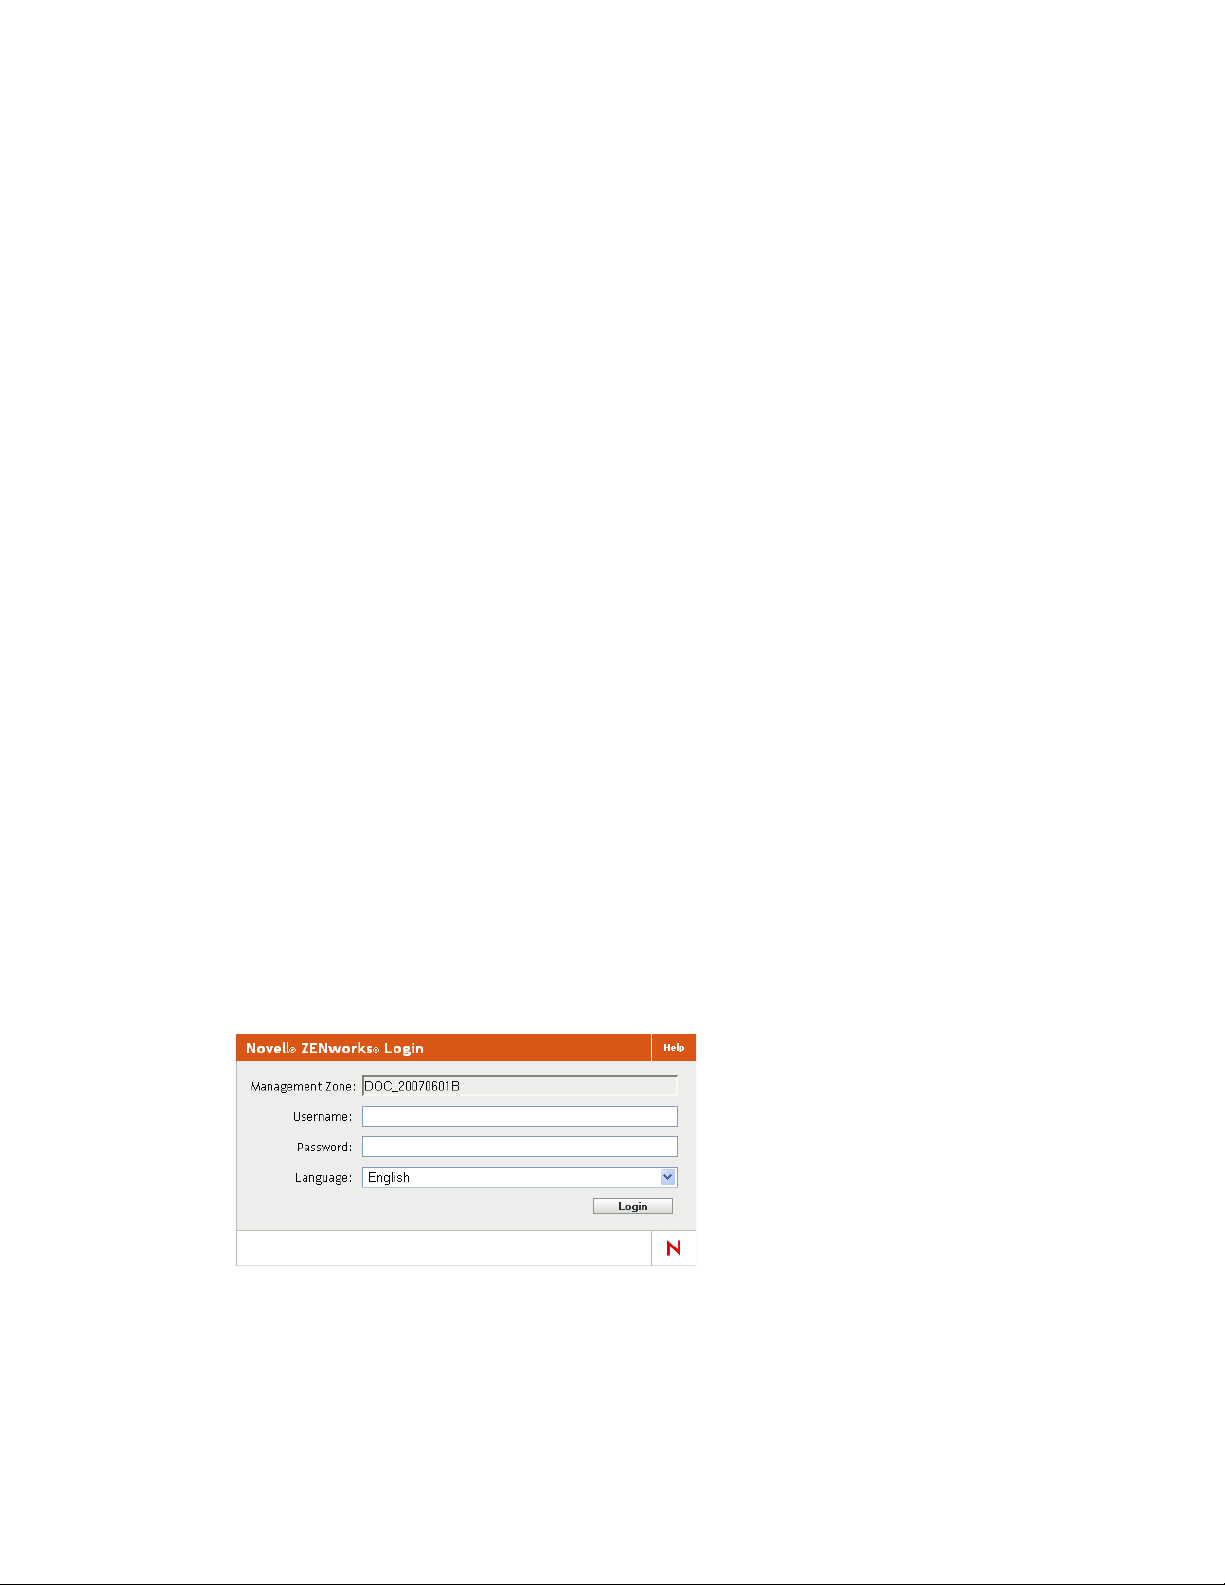
1.1 Accessing ZENworks Control Center
1 Using a Web browser that meets the requirements listed in “Administration Browser
Requirements” in the ZENworks 10 Configuration Management Installation Guide, enter the
following URL:
https://ZENworks_Server_Address:port
Replace ZENworks_Server_Address with the IP address or DNS name of the ZENworks
Server. You only need to specify the port if you are not using one of the default ports (80 or
443). ZENworks Control Center requires an HTTPS connection; HTTP requests are redirected
to HTTPS.
The login dialog box is displayed.
2 In the Username field, type
previously created in ZENworks Control Center.
Administrator
(the default) or an administrator name that you
ZENworks Control Center
19

3 In the Password field, do one of the following:
If you are logging in through the default Administrator account, specify the Administrator
password that you created during installation.
Specify the password for the administrator name that you created in ZENworks Control
Center.
To prevent unauthorized users from gaining access to ZENworks Control Center, the
administrator account is disabled after three unsuccessful login attempts, and a 60-second
timeout is enforced before you can attempt another login. To change these default values, see
Section 1.4, “Changing the Default Login Disable Values,” on page 22.
4 Click Login to display ZENworks Control Center.
To log in again as a different administrator, click the Logout option in the upper right corner of the
ZENworks Control Center window, then when the login dialog box is displayed, log in as a different
administrator.
The Logout option includes the name of the administrator who is logged in as part of the option. For
example, Logout John.
novdocx (en) 16 April 2010
1.2 Accessing ZENworks Control Center through Novell iManager
ZENworks 10 Configuration Management includes a Novell® plug-in module (
use to access ZENworks Control Center from Novell iManager, which is a management console
used by many Novell products.
The ZENworks Control Center plug-in supports iManager 2.7 only. It does not support iManager 2.6
or 2.5; it will install to these versions but does not work.
To install the ZENworks Control Center plug-in for iManager:
1 On the server where iManager is located (or on a device that has access to the iManager server),
open a Web browser to the ZENworks download page:
https://server/zenworks-setup
where server is the DNS name or IP address of a ZENworks Server.
2 In the left navigation pane, click Administrative Tools.
3 Click zcc.npm and save the file to a location on the iManager server.
4 Follow the instructions in the Novell iManager 2.7 Administration Guide (http://
www.novell.com/documentation/imanager27/imanager_admin_27/data/b8qrsg0.html) to
install and configure the plug-in module.
5 Log into iManager.
6 Click the ZENworks icon at the top of the page.
7 Enter the ZENworks Control Center URL:
.npm
) that you can
https://ZENworks_Server_Address:port
Replace ZENworks_Server_Address with the IP address or DNS name of the ZENworks
Server. You only need to specify the port if the ZENworks server is not using the default port
(80 or 443).
8 Click the ZENworks icon to launch ZENworks Control Center.
20 ZENworks 10 Configuration Management System Administration Reference
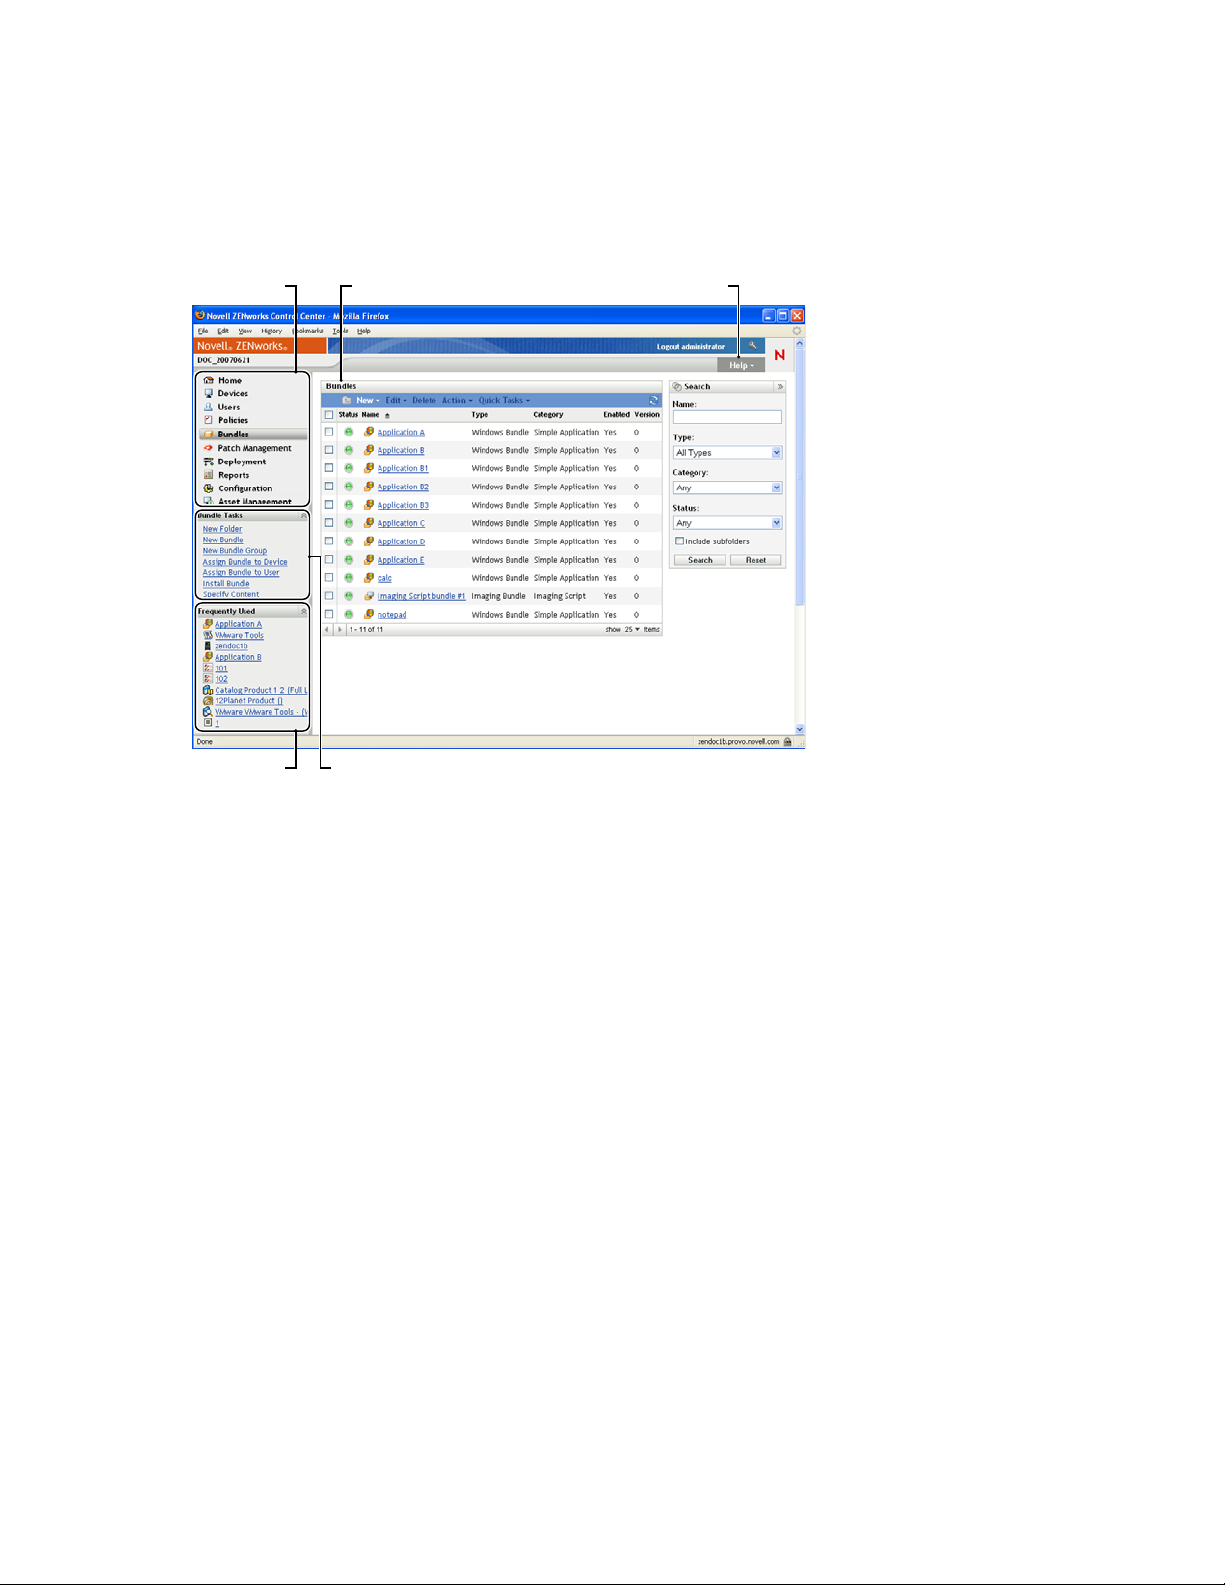
1.3 Navigating ZENworks Control Center
Help Information
Work PanelNavigation Tabs
Frequently Used
Objects
Task List
The following Servers page represents a standard view in ZENworks Control Center:
Figure 1-1 ZENworks Control Center
novdocx (en) 16 April 2010
Navigation Tabs: The tabs in the left pane let you navigate among the functional areas of
ZENworks. For example, the Servers page shown above lets you manage tasks associated with
servers.
Task List: The task list in the left pane provides quick access to the most commonly performed
tasks for the current page. The task list changes for each page. For example, the task list on the
Bundles page displays bundle-related tasks and the task list on the Devices page displays devicerelated tasks.
Frequently Used Objects: The Frequently Used list in the left pane displays the 10 objects that you
have accessed most often, from most used to least used. Clicking an object takes you directly to the
details page for the object.
Wor k Panel: The work panels are where you monitor and manage your ZENworks system. The
panels change depending on the current page. In the above example, there are two work panels:
Devices and Search. The Devices panel lists the servers, folders, server groups, and dynamic server
groups that have been created; you use this panel to manage the servers. The Search panel lets you
filter the Devices panel based on criteria such as a device’s name, operating system, or status.
Help Information: The Help button links to Help topics that provide information about the current
page. The Help button links change depending on the current page.
ZENworks Control Center 21

1.4 Changing the Default Login Disable Values
By default, an administrator’s account is disabled for 60 seconds after he or she unsuccessfully
attempts to log in three times. You can change the number of login tries and the timeout length by
editing a configuration file. The changes are only applied to the instance of ZENworks Control
Center being run from the server where you open and modify the configuration file. To make the
change applicable to all ZENworks Primary Servers, you must make the same change in each
server’s copy of this file.
IMPORTANT: Login attempts per administrator account are maintained in the ZENworks
database, and there is only one ZENworks database per Management Zone. Therefore, if a particular
administrator unsuccessfully attempts to log in to one Primary Server, that administrator is locked
out of all Primary Servers in the zone. The lockout period is determined by the configuration on the
server where the login attempts failed.
To modify the login tries and timeout values:
1 In a text editor, open the following file:
Windows:
Linux:
installation_location\novell\zenworks\conf\datamodel\zdm.xml
/etc/opt/novell/zenworks/datamodel/zdm.xml
novdocx (en) 16 April 2010
2 Add the following lines to the file:
<entry key="allowedLoginAttempts">5</entry>
<entry key="lockedOutTime">300</entry>
The 5 in this example represents the number of retries before disabling login, and 300
represents the number of seconds (the default is 60 seconds, or 1 minute).
Keep in mind that the longer the delay before allowing a re-login after the configured number
of failures (such as 5), the longer your authorized administrators must wait to access ZENworks
Control Center.
IMPORTANT: If you enter 0 as the login attempts value, the lockout functionality is disabled,
allowing unlimited attempts at logging in.
3 Save the file, then restart the zenloader and zenserver services on the Primary Server to make
the changes effective.
For instructions on restarting the services, see Section 6.2.4, “Restarting the ZENworks
Services,” on page 75.
1.5 Changing the Timeout Value for ZENworks Control Center
By default, ZENworks Control Center has a 30-minute timeout value, so if you leave ZENworks
Control Center idle on your computer for more than 30 minutes, you are prompted to log in again to
continue.
The purpose of the timeout is to clear memory resources. The larger the timeout value, the longer
ZENworks Control Center retains the memory resources, which might have a negative impact on the
long-term performance of the device from which you have launched ZENworks Control Center,
including the ZENworks Server if you have it running locally on it.
22 ZENworks 10 Configuration Management System Administration Reference

To increase or decrease the timeout value, you modify two XML files on the ZENworks Server. The
change applies only to that server’s ZENworks Control Center. Therefore, any devices that launch
ZENworks Control Center from that server experience the same timeout value.
You can make the ZENworks Control Center timeout value different on each ZENworks Server in
the Management Zone.
To change the ZENworks Control Center timeout value on a ZENworks Server:
novdocx (en) 16 April 2010
1 On the ZENworks Server, open the
Windows:
INF\config.xml
Linux:
config.xml
2 Locate the
\Novell\ZENworks\share\tomcat\webapps\zenworks\WEB-
/opt/novell/zenworks/share/tomcat/webapps/zenworks/WEB-INF/
<setting id="timeout">
config.xml
entry.
file in a text editor.
3 Increase or decrease the timeout value, as needed.
Specify the timeout value in minutes.
4 Save the
5 Open the
config.xml
custom-config.xml
file.
file in a text editor.
This file allows you to maintain customizations of ZENworks Control Center because
information contained in this file overrides any corresponding information in the
file. Therefore, changes made in this file are not lost when the
config.xml
file is overwritten
during software updates or upgrades.
The
custom-config.xml
Windows:
INF\custom-config.xml
Linux:
custom-config.xml
6 Locate the
\Novell\ZENworks\share\tomcat\webapps\zenworks\WEB-
/opt/novell/zenworks/share/tomcat/webapps/zenworks/WEB-INF/
<setting id="timeout">
7 Set the timeout value to the same number as you entered in the
file is located in the same directory as the
entry.
config.xml
config.xml
file.
config.xml
file:
8 Remove the comments surrounding the
9 Save the
custom-config.xml
file.
<setting id=”timeout”>
entry (<!-- and -->).
10 Restart the ZENworks Server by restarting the zen-server service.
For instructions, see Chapter 6, “ZENworks Server,” on page 71.
1.6 Using the Config.xml File to Modify ZENworks Control Center Settings
In addition to enabling you to configure the timeout value for the ZENworks Control Center (see
Section 1.5, “Changing the Timeout Value for ZENworks Control Center,” on page 22), the
config.xml
exception of the timeout value, you should not need to modify the
1 On the ZENworks Server, open the
file lets you control several additional configuration settings. However, with the
Windows server path:
zenworks\WEB-INF\config.xml
\Novell\ZENworks\share\tomcat\webapps\
config.xml
config.xml
file in a text editor.
settings.
ZENworks Control Center 23

novdocx (en) 16 April 2010
Linux server path:
WEB-INF/config.xml
2 Modify the desired setting. All settings begin with
timeout: Specify the timeout value in minutes. The larger the timeout value, the longer
ZENworks Control Center retains the memory resources, which might have a negative impact
on the long-term performance of the device where you have launched ZENworks Control
Center. If you change this value, you must also change the timeout entry in the
config.xml
Center,” on page 22).
debug.enabled: Change the value to false if you do not want any messages written to the
ZENworks Control Center log files. The default value, true, causes messages to be written to
the log files.
debug.tags: These settings control debug information. You should not change them unless
instructed by Novell Support.
debug.log.viewstate: This setting controls debug information. You should not change it unless
instructed by Novell Support.
hideGettingStarted: Suppresses the Getting Started page. This setting is not functional at this
time. To manually suppress the page, open the ZENworks Control Center, display the Getting
Started page, then select Do not show me this again.
noQuickTaskAutoRefresh: This setting disables automatic refreshing of the QuickTask status
dialog box. It is used to discover issues with QuickTask status updates. You should not change
this setting unless instructed by Novell Support.
3 Save the
4 Restart the ZENworks Server by restarting the zen-server service. See Chapter 6, “ZENworks
Server,” on page 71 for instructions.
file. See Section 1.5, “Changing the Timeout Value for ZENworks Control
config.xml
opt/novell/zenworks/share/tomcat/webapps/zenworks/
<setting id=
file.
.
custom-
1.7 Bookmarking ZENworks Control Center Locations
The Bookmark feature allows you to use your Web browser to manage direct access to the various
locations in ZENworks Control Center, instead of performing the usual navigation clicks. You can
also use this feature to bookmark hard-to-find locations.
You can create bookmarks for your Web browser to locations within the following sections of
ZENworks Control Center:
Managed tab on the Devices tab
Policies tab
Bundles tab
Management Zone Settings on the Configuration tab
The locations you can bookmark include such items as lists, details of objects, and configuration
settings.
Wherever the Link icon ( ) is displayed, you can create a bookmark. The icon is located in the
upper right of the page. If it is not displayed, a bookmark cannot be created for that location.
24 ZENworks 10 Configuration Management System Administration Reference

If you are logged in to ZENworks Control Center when you click a bookmark, the location is
immediately displayed.
If you are not logged in to ZCC when you click a bookmark, the Login dialog box is displayed. After
you enter valid credentials, the location is immediately displayed.
To create bookmarks:
1 In ZENworks Control Center, navigate to a location where you want to create a bookmark.
2 Click .
This opens the following dialog box, where the URL to the current location is already selected:
novdocx (en) 16 April 2010
3 Press Ctrl+C to copy the URL, then click OK to close the dialog box.
4 Paste the URL as a new bookmark in your Web browser.
1.8 Troubleshooting ZENworks Control Center
“An HTTP request is not redirected to HTTPS if IIS is running on the Primary Server” on
page 25
An HTTP request is not redirected to HTTPS if IIS is running on the Primary Server
Source: ZENworks 10 Configuration Management; ZENworks Control Center.
Explanation: During installation, the setup checks to see if the default HTTP port (80) and
HTTPS port (443) are in use. If the ports are in use by another application
(such as IIS), you are prompted to use alternative ports. In this case, you must
access ZENworks Control Center via the port it is using and not access IIS.
Action: Although http://Primary_Server_IP_address works if ZENworks Control
Center is using port 80, http://Primary_Server_IP_address:### (where ### is
the port Tomcat is using) always works.
ZENworks Control Center 25

novdocx (en) 16 April 2010
26 ZENworks 10 Configuration Management System Administration Reference

2
Administrators
During installation, a default ZENworks® administrator account (named Administrator) is created.
This account, called a Super Administrator account, provides full administrative rights to the
Management Zone.
Typically, you should create administrator accounts for each person who will perform administrative
tasks. You can define these accounts as Super Administrator accounts, or you can define them as
administrator accounts with restricted rights. For example, you could give a user an administrator
account that only enables him or her to discover and register devices in the Management Zone. Or
the account could only enable the user to assign bundles to devices, or could limit the user to
performing asset management tasks such as contract, license, and document management.
IMPORTANT: In addition to the default Administrator account, you should make sure that you
have at least one other Super Administrator account. This provides redundancy in case the password
for the Administrator account is forgotten or lost. For information on how to create a Super
Administrator account, see Section 2.2.1, “Assigning Super Administrator Rights,” on page 30. If
you need any further help, contact Novell® Support (http://www.novell.com/support).
novdocx (en) 16 April 2010
2
In some cases, you might have multiple administrator accounts that require the same administrative
rights. Rather than assign rights to each account individually, you can create an administrator role,
assign the administrative rights to the role, and then add the accounts to the role. For example, you
might have a Help Desk role that provides administrative rights required by several of your
administrators.
You can use ZENworks Control Center (ZCC) or the zman command line utility to create and
modify administrator accounts and assign roles. The following procedures explain how to perform
these tasks by using ZCC. If you prefer the zman command line utility, see “Administrator
Commands” in the ZENworks 10 Configuration Management Command Line Utilities Reference.
Section 2.1, “Managing Administrator Accounts,” on page 27
Section 2.2, “Managing Administrator Rights,” on page 30
Section 2.3, “Rights Descriptions,” on page 31
Section 2.4, “Managing Administrator Roles,” on page 42
2.1 Managing Administrator Accounts
The following sections help you create and manage administrator accounts:
Section 2.1.1, “Creating Administrators,” on page 28
Section 2.1.2, “Deleting Administrators,” on page 29
Section 2.1.3, “Renaming Administrators,” on page 29
Section 2.1.4, “Changing Administrator Passwords,” on page 29
Administrators
27
2.1.1 Creating Administrators
To create an administrator account:
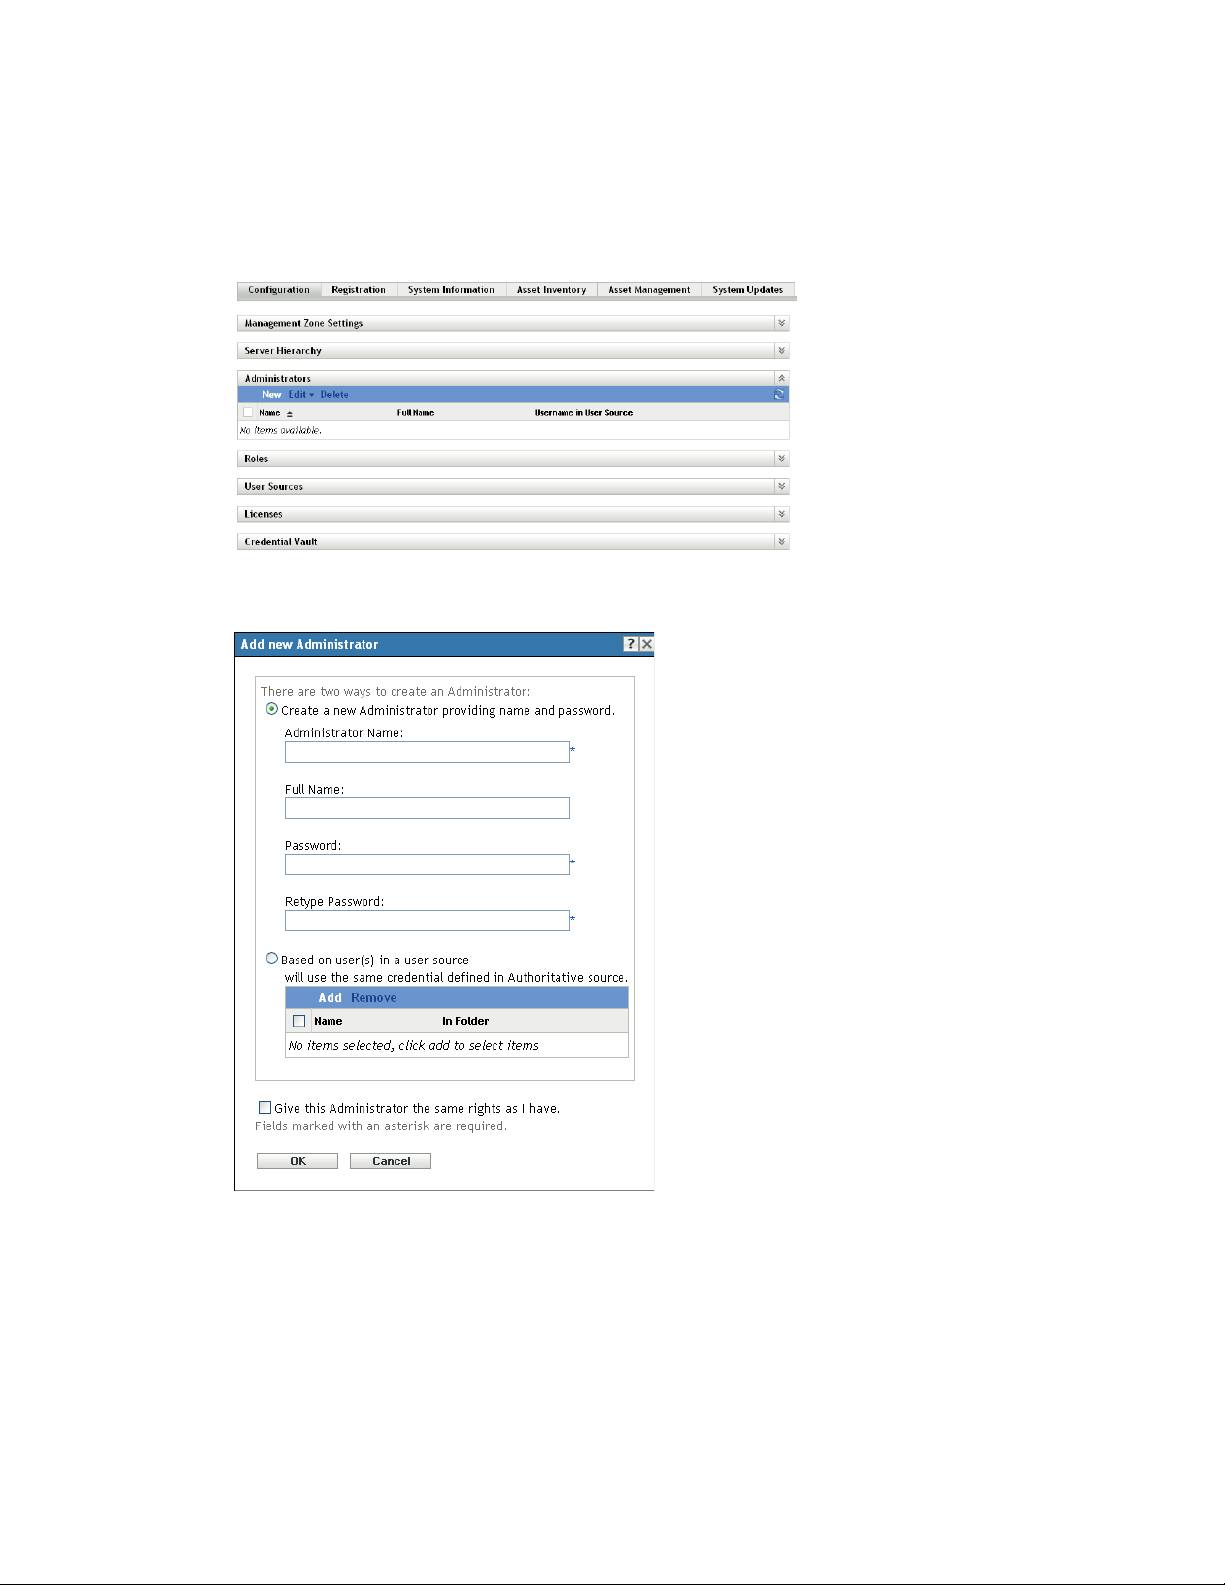
1 In ZENworks Control Center, click the Configuration tab.
2 In the Administrators panel, click New to display the Add New Administrator dialog box.
novdocx (en) 16 April 2010
The Add New Administrator dialog box lets you create a new administrator account by
providing a name and password, or you can create a new administrator based on an existing
user in the user source. Optionally, you can give the new administrator the same rights that the
logged-in administrator has.
3 Fill in the fields:
Create a New Administrator by Providing Name, Password: Select this option if you want
to create a new administrator account by manually specifying the name and password.
28 ZENworks 10 Configuration Management System Administration Reference

Administrator login names with Unicode* characters are case-sensitive. Make sure that you use
the correct case for each character in the login name when it contains Unicode characters.
The new administrator can change the password the first time he or she logs in by clicking the
key icon located next to the Logout link in the upper right corner of ZENworks Control Center.
Based on User(s) in a User Source: Select this option if you want to create a new
administrator account based on information from your user source. To do so, click Add, then
browse for and select the user you want.
The newly created administrator account is granted View rights to all objects in the
Management Zone. To grant additional rights, or to limit the administrator's rights to specific
folders only, you need to modify the rights.
Give this Administrator the Same Rights as I Have: Select this option if you want to assign
the new administrator the same rights that you have as the currently-logged in administrator.
4 When you have finished filling in the fields, click OK to add the new administrator.
novdocx (en) 16 April 2010
You can also use the
information, see “Administrator Commands” in the ZENworks 10 Configuration Management
Command Line Utilities Reference.
admin-create
command in zman to create an administrator account. For more
2.1.2 Deleting Administrators
1 In ZENworks Control Center, click the Configuration tab.
2 In the Administrators panel, select the check box next to the administrator’s name, then click
Delete.
You can also use the
information, see “Administrator Commands” in the ZENworks 10 Configuration Management
Command Line Utilities Reference.
admin-delete
command in zman to delete an administrator account. For more
2.1.3 Renaming Administrators
1 In ZENworks Control Center, click the Configuration tab.
2 In the Administrators panel, select the check box next to the administrator’s name, click Edit,
then click Rename.
3 Specify the new name, then click OK.
You can also use the
more information, see “Administrator Commands” in the ZENworks 10 Configuration Management
Command Line Utilities Reference.
admin-rename
command in zman to rename an administrator account. For
2.1.4 Changing Administrator Passwords
To change the password for any administrator account other than the default Administrator account:
1 In ZENworks Control Center, click the Configuration tab.
2 In the Administrators panel, select the check box next to the administrator, click Edit, then click
Set Password to display the Change Administrator Password Dialog box.
3 Fill in the fields, then click OK.
Administrators 29

To change the password for the currently logged-in administrator:
1 In ZENworks Control Center, click the icon located next to the Logout Administrator option
in the top right corner.
The Change Administrator Password dialog box is displayed.
2 Fill in the fields, then click OK.
To change the password for the default Administrator account:
1 Log in using the Administrator account.
2 Click the icon located next to the Logout Administrator option in the top right corner.
The Change Administrator Password dialog box is displayed.
3 Fill in the fields, then click OK.
2.2 Managing Administrator Rights
The following sections help you manage existing administrator accounts and their assigned rights:
novdocx (en) 16 April 2010
Section 2.2.1, “Assigning Super Administrator Rights,” on page 30
Section 2.2.2, “Assigning Additional Rights,” on page 30
Section 2.2.3, “Modifying Assigned Rights,” on page 31
Section 2.2.4, “Removing Assigned Rights,” on page 31
2.2.1 Assigning Super Administrator Rights
A Super Administrator has all rights to perform all actions in ZENworks Control Center. For more
information about all of the rights that a Super Administrator has, see Section 2.3, “Rights
Descriptions,” on page 31. If you grant an administrator Super Administrator rights, any assigned
rights that have been allowed, denied, or not set are overridden.
1 In ZENworks Control Center, click the Configuration tab.
2 In the Administrators panel, click the administrator’s name.
3 Select the Super Administrator check box.
4 Click Apply.
2.2.2 Assigning Additional Rights
1 In ZENworks Control Center, click the Configuration tab.
2 Click the administrator in the Name column of the Administrators panel.
3 In the Assigned Roles panel, click Add, then select the rights you want to assign.
4 Fill in the fields.
For more information, see Section 2.3, “Rights Descriptions,” on page 31.
5 Click OK.
You can also use the
administrator account. For more information, see “Administrator Commands” in the ZENworks 10
Configuration Management Command Line Utilities Reference.
30 ZENworks 10 Configuration Management System Administration Reference
admin-rights-set
command in zman to assign additional rights for an

2.2.3 Modifying Assigned Rights
1 In ZENworks Control Center, click the Configuration tab.
2 Click the administrator in the Name column of the Administrators panel.
3 In the Assigned Rights panel, select the check box next to the assigned right.
4 Click Edit, then modify the settings.
For more information, see Section 2.3, “Rights Descriptions,” on page 31.
5 Click OK.
2.2.4 Removing Assigned Rights
1 In ZENworks Control Center, click the Configuration tab.
2 Click the administrator in the Name column of the Administrators pane.
3 Select the check box next to the assigned right.
4 Click Delete.
novdocx (en) 16 April 2010
You can also use the
administrator account. For more information, see “Administrator Commands” in the ZENworks 10
Configuration Management Command Line Utilities Reference.
admin-rights-delete
command in zman to delete assigned rights for an
2.3 Rights Descriptions
When you create additional administrator accounts you can provide full access to your zone or you
can create accounts with limited rights. For example, you could create an administrator account that
enables the administrator to assign bundles to devices but doesn’t allow the administrator to create
bundles. Or you could create an administrator account that allows access to all management tasks
except those pertaining to Management Zone configuration (user sources, registration, configuration
settings, and so forth). For information about creating additional administrators, see “Creating
Administrators” on page 28.
For Administrator roles only, a third column of rights options is added to each rights assignment
dialog box: Unset, which allows rights set elsewhere in ZENworks to be used for the role.
The most restrictive right set in ZENworks prevails. Therefore, if you select the Deny option, the
right is denied for any administrator assigned to that role, even if the administrator is granted that
right elsewhere in ZENworks.
If you select the Allow option and the right has not been denied elsewhere in ZENworks, the
administrator has that right for the role.
If you select the Unset option, the administrator is not granted the right for the role unless it is
granted elsewhere in ZENworks.
You can also add, modify, or remove the assigned rights for an existing administrator. For more
information, see Section 2.2.2, “Assigning Additional Rights,” on page 30, Section 2.2.3,
“Modifying Assigned Rights,” on page 31, or Section 2.2.4, “Removing Assigned Rights,” on
page 31.
The following sections contain additional information about the various rights that you can assign:
Section 2.3.1, “Administrator Rights,” on page 32
Administrators 31

Section 2.3.2, “Bundle Rights,” on page 32
Section 2.3.3, “Contract Management Rights,” on page 33
Section 2.3.4, “Credential Rights,” on page 34
Section 2.3.5, “Deployment Rights,” on page 34
Section 2.3.6, “Device Rights,” on page 34
Section 2.3.7, “Discovery Rights,” on page 35
Section 2.3.8, “Document Rights,” on page 35
Section 2.3.9, “Inventoried Device Rights,” on page 36
Section 2.3.10, “LDAP Import Rights,” on page 37
Section 2.3.11, “License Management Rights,” on page 37
Section 2.3.12, “Patch Management Rights,” on page 37
Section 2.3.13, “Policy Rights,” on page 38
Section 2.3.14, “Quick Task Rights,” on page 39
Section 2.3.15, “Remote Management Rights,” on page 39
Section 2.3.16, “Reporting Rights,” on page 40
novdocx (en) 16 April 2010
Section 2.3.17, “User Rights,” on page 40
Section 2.3.18, “ZENworks User Group Rights,” on page 41
Section 2.3.19, “Zone Rights,” on page 41
2.3.1 Administrator Rights
The Administrator Rights dialog box lets you allow the selected administrator to grant rights to other
administrators and to create or delete administrator accounts for your Management Zone.
The following rights are available:
Grant Rights: Allow or deny the administrator the rights necessary to grant rights to other
administrators.
Create/Delete: Allow or deny the administrator the rights necessary to create or delete
administrator accounts.
2.3.2 Bundle Rights
The Bundle Rights dialog box lets you select folders containing bundles, then modify the rights
associated with those folders.
“Contexts” on page 32
“Privileges” on page 33
Contexts
To select the folder that contains the bundles for which you want to assign rights, click Add to
display the Contexts dialog box, then browse for and select the folders for which you want to assign
rights.
32 ZENworks 10 Configuration Management System Administration Reference

Privileges
The Privileges section lets you grant the selected administrator rights to create or modify bundles,
groups, and folders listed in the Contexts section.
The following rights are available:
Modify: Allow or deny the administrator the rights necessary to modify bundles.
Create/Delete: Allow or deny the administrator the rights necessary to create or delete
bundles.
Modify Groups: Allow or deny the administrator the rights necessary to modify the name or
the description of the bundle groups.
Create/Delete Groups: Allow or deny the administrator the rights necessary to create or delete
groups.
Modify Group Membership: Allow or deny the administrator the rights necessary to modify
the list of bundles contained in bundle groups.
Modify Folder: Allow or deny the administrator the rights necessary to modify folders.
Create/Delete Folders: Allow or deny the administrator the rights necessary to create or delete
folders.
Modify Settings: Allow or deny the administrator the rights necessary to modify settings.
Assign Bundles: Allow or deny the administrator the rights necessary to assign bundles to the
devices or users.
novdocx (en) 16 April 2010
2.3.3 Contract Management Rights
The Contract Management Rights dialog box lets you select folders containing contracts, then
modify the rights associated with contracts and folders.
“Contexts” on page 33
“Privileges” on page 33
Contexts
To select the folder that contains the contracts for which you want to assign rights, click Add to
display the Contexts dialog box, then browse for and select the folders for which you want to assign
rights.
Privileges
The Privileges section lets you grant the selected administrator rights to contracts and folders listed
in the Contexts section.
Modify: Allow or deny the administrator the rights necessary to modify the contracts.
Create/Delete: Allow or deny the administrator the rights necessary to create or delete
contracts.
Modify Folder: Allow or deny the administrator the rights necessary to modify folders.
Create/Delete Folders: Allow or deny the administrator the rights necessary to create or delete
folders.
Administrators 33

2.3.4 Credential Rights
The Credential Rights dialog box lets you select folders containing credentials, then modify the
rights associated with those folders.
“Contexts” on page 34
“Privileges” on page 34
Contexts
Click Add to select the folder that contains the credentials for which you want to assign rights.
Privileges
The Privileges section lets you grant the selected administrator rights to create or modify credentials,
groups, and folders listed in the Contexts section.
The following rights are available:
Modify: Allow or deny the administrator the rights necessary to modify credentials.
Create/Delete: Allow or deny the administrator the rights necessary to create or delete
credentials.
novdocx (en) 16 April 2010
Modify Folders: Allow or deny the administrator the rights necessary to modify folders.
Create/Delete Folders: Allow or deny the administrator the rights necessary to create or
delete folders.
For more information about the tasks you can perform on credentials, see Chapter 5, “Credential
Vault,” on page 65.
2.3.5 Deployment Rights
The Deployment Rights dialog box lets you allow or deny the administrator the rights necessary to
perform deployment operations.
Deployment lets you discover network devices and deploy the ZENworks Adaptive Agent to them
so that they become managed devices in your Management Zone. For more information, see
“ZENworks Adaptive Agent Deployment” in the ZENworks 10 Configuration Management
Discovery, Deployment, and Retirement Reference.
2.3.6 Device Rights
The Device Rights dialog box lets you select folders containing devices, then modify the rights
associated with those folders.
“Contexts” on page 35
“Privileges” on page 35
34 ZENworks 10 Configuration Management System Administration Reference

Contexts
To select the folder that contains the devices for which you want to assign rights, click Add to
display the Contexts dialog box, then browse for and select the folders for which you want to assign
rights.
Privileges
The Privileges section lets you grant the selected administrator rights to work with devices,
including device groups and folders listed in the Contexts section.
The following rights are available:
Modify: Allow or deny the administrator the rights necessary to modify the device objects.
Create/Delete: Allow or deny the administrator the rights necessary to create or delete device
objects.
Modify Groups: Allow or deny the administrator the rights necessary to modify groups.
Create/Delete Groups: Allow or deny the administrator the rights necessary to create or delete
groups.
novdocx (en) 16 April 2010
Modify Group Membership: Allow or deny the administrator the rights necessary to modify
the list of devices contained in device groups.
Modify Folder: Allow or deny the administrator the rights necessary to modify folders.
Create/Delete Folders: Allow or deny the administrator the rights necessary to create or delete
folders.
Modify Settings: Allow or deny the administrator the rights necessary to modify device
settings.
Assign Policies: Allow or deny the administrator the rights necessary to assign policies to
devices.
Assign Bundles: Allow or deny the administrator the rights necessary to assign bundles to
devices.
2.3.7 Discovery Rights
The Discovery Rights dialog box lets you allow or deny the administrator the rights necessary to
perform discovery operations.
The following rights are available:
Discovery: Allow or deny the administrator the right necessary to perform discovery.
Edit Discovered Device: Allow or deny the administrator the rights necessary to edit a
discovered device.
2.3.8 Document Rights
The Document Rights dialog box lets you select folders containing documents, then modify the
rights associated with documents and folders.
“Contexts” on page 36
“Privileges” on page 36
Administrators 35

Contexts
To select the folder that contains the documents for which you want to assign rights, click Add to
display the Contexts dialog box, then browse for and select the folders for which you want to assign
rights.
Privileges
The Privileges section lets you grant the selected administrator rights to create or modify documents
and their folders listed in the Contexts section.
Modify: Allow or deny the administrator the rights necessary to reassign documents.
Create/Delete: Allow or deny the administrator the rights necessary to import or delete
documents.
Modify Folder: Allow or deny the administrator the rights necessary to modify folders.
Create/Delete Folders: Allow or deny the administrator the rights necessary to create or delete
folders.
novdocx (en) 16 April 2010
2.3.9 Inventoried Device Rights
The Inventoried Device Rights dialog box lets you select folders containing devices, then modify the
rights associated with those folders.
“Contexts” on page 36
“Privileges” on page 36
Contexts
To select the folder that contains the inventoried devices for which you want to assign rights, click
Add to display the Contexts dialog box, then browse for and select the folders for which you want to
assign rights.
Privileges
The Privileges section lets you grant the selected administrator rights to work with inventoried
devices, including device groups and folders listed in the Contexts section.
The following rights are available:
Modify: Allow or deny the administrator the rights necessary to modify inventoried device
objects.
Create/Delete: Allow or deny the administrator the rights necessary to create or delete
inventoried device objects.
Modify Groups: Allow or deny the administrator the rights necessary to modify device
groups.
Create/Delete Groups: Allow or deny the administrator the rights necessary to create or delete
device groups.
Modify Group Membership: Allow or deny the administrator the rights necessary to modify
the list of devices contained in device groups.
Modify Folder: Allow or deny the administrator the rights necessary to modify folders.
36 ZENworks 10 Configuration Management System Administration Reference

Create/Delete Folders: Allow or deny the administrator the rights necessary to create or delete
folders.
Modify Settings: Allow or deny the administrator the rights necessary to modify inventoried
device settings.
2.3.10 LDAP Import Rights
The LDAP Import Rights dialog box lets you allow or deny importing of LDAP information.
2.3.11 License Management Rights
The License Management Rights dialog box lets you select folders containing licenses, then modify
the rights associated with licenses and folders.
“Contexts” on page 37
“Privileges” on page 37
Contexts
novdocx (en) 16 April 2010
To select the folder that contains the licenses for which you want to assign rights, click Add to
display the Contexts dialog box, then browse for and select the folders for which you want to assign
rights.
Privileges
The Privileges section lets you grant the administrator rights to work with the software license
components associated with the contexts (folders) you selected in the Contexts section
Modify: Allow or deny the administrator the rights necessary to modify the licenses.
Create/Delete: Allow or deny the administrator the rights necessary to create or delete
licenses.
Modify Folder: Allow or deny the administrator the rights necessary to modify folders.
Create/Delete Folders: Allow or deny the administrator the rights necessary to create or delete
folders.
2.3.12 Patch Management Rights
The Patch Management Rights dialog box lets you determine which patch management functions an
administrator can have.
The following rights are available:
Patch Deploy: Allow or deny the administrator the rights necessary to deploy patches.
Patch Enable: Allow or deny the administrator the rights necessary to enable a disabled patch.
Patch Disable: Allow or deny the administrator the rights necessary to disable a patch.
Patch Update Cache: Allow or deny the administrator the rights necessary to cache patches.
Assign to Baseline: Allow or deny the administrator the rights necessary to assign a patch to
the baseline.
Administrators 37

Remove from Baseline: Allow or deny the administrator the rights necessary to remove a
patch that was assigned to the baseline.
View Patch Details: Allow or deny the administrator the rights necessary to view patch
details.
Export Patch: Allow or deny the administrator the rights necessary to export patches.
Scan Now: Allow or deny the administrator the rights necessary to start a scan.
Remove Patch: Allow or deny the administrator the rights necessary to remove a patch.
Recalculate Baseline: Allow or deny the administrator the rights necessary to recalculate the
baseline.
Configure: Allow or deny the administrator the rights necessary to configure the patch.
2.3.13 Policy Rights
The Policy Rights dialog box lets you select folders containing policies, then modify the rights
associated with those folders.
“Contexts” on page 38
“Privileges” on page 38
novdocx (en) 16 April 2010
Contexts
To select the folder that contains the policies for which you want to assign rights, click Add to
display the Contexts dialog box, then browse for and select the folders for which you want to assign
rights.
Privileges
The Privileges section lets you grant the selected administrator rights to work with policies,
including policy groups and folders listed in the Contexts section
The following rights are available:
Modify: Allow or deny the administrator the rights necessary to modify the policies.
Create/Delete: Allow or deny the administrator the rights necessary to create or delete
policies.
Modify Groups: Allow or deny the administrator the rights necessary to modify groups.
Create/Delete Groups: Allow or deny the administrator the rights necessary to create or delete
policy groups.
Modify Group Membership: Allow or deny the administrator the rights necessary to modify
the list of policies contained in policy groups.
Modify Folders: Allow or deny the administrator the rights necessary to modify folders.
Create/Delete Folders: Allow or deny the administrator the rights necessary to create or delete
folders.
Assign Policies: Allow or deny the administrator the rights necessary to assign policies to the
devices or users.
38 ZENworks 10 Configuration Management System Administration Reference

2.3.14 Quick Task Rights
The Quick Tasks Rights dialog box lets you select folders containing devices, then modify the Quick
Task rights associated with those folders.
Quick Tasks are tasks that appear in ZENworks Control Center task lists (for example, Server Tasks,
Workstation Tasks, Bundles Tasks, and so forth). When you click a task, either a wizard launches to
step you through the task or a dialog box appears in which you enter information to complete the
task.
You can use the Quick Tasks Rights dialog box to allow or deny the selected administrator the rights
to perform certain tasks by using Quick Tasks.
“Contexts” on page 39
“Privileges” on page 39
Contexts
To select the folder that contains the device for which you want to assign rights, click Add to display
the Contexts dialog box, then browse for and select the folders for which you want to assign rights.
novdocx (en) 16 April 2010
Privileges
The Privileges section lets you grant the administrator rights to modify the Quick Task rights
associated with the contexts (folders) you selected in the Contexts section.
The following rights are available:
Shutdown/Reboot/Wake Up Devices: Specify whether the administrator can shut down,
reboot, or wake up the devices in the folders you selected in the list.
Execute Processes: Allow or deny the administrator the rights necessary to execute processes
on the devices.
Refresh ZENworks Adaptive Agent: Allow or deny the administrator the rights necessary to
refresh the ZENworks Adaptive Agent on devices.
Install/Launch Bundles: Allow or deny the administrator the rights necessary to install or
launch bundles. The administrator must also have Assign Bundles rights for devices to install
or launch bundles using Quick Task options.
Inventory: Allow or deny the administrator the rights necessary to inventory devices.
Apply Image: Allow or deny the administrator the rights necessary to apply an image to
devices.
Take I m age: Allow or deny the administrator the rights necessary to take an image of a device.
2.3.15 Remote Management Rights
The Remote Management Rights dialog box lets you select folders containing devices and users,
then modify the Remote Management rights associated with those folders. Granting Remote
Execute rights allows the administrator to execute processes in the system space.
“Contexts” on page 40
“Privileges” on page 40
Administrators 39

Contexts
To select the folder that contains the devices and users for which you want to assign rights, click Add
to display the Contexts dialog box, then browse for and select the folders for which you want to
assign rights.
Privileges
The Privileges section lets you grant the administrator rights to modify the Remote Management
rights associated with the contexts (folders) you selected in the Contexts section.
The following rights are available:
Remote Control: Allow or deny the administrator the rights necessary to remotely control
devices.
Remote View: Allow or deny the administrator the rights necessary to remotely view devices.
Transfer files: Allow or deny the administrator the rights necessary to transfer files to or from
devices.
Remote Execute: Allow or deny the administrator the rights necessary to remotely execute
processes on devices.
Remote Diagnostics: Allow or deny the administrator the rights necessary to perform remote
diagnostic procedures on devices.
novdocx (en) 16 April 2010
Unblock Remote Management Service: Allow or deny the administrator the rights necessary
to unblock the Remote Management Service.
2.3.16 Reporting Rights
The Reporting Rights dialog box lets you allow or deny the administrator the rights to create, delete,
execute, or publish reports.
2.3.17 User Rights
The User Rights dialog box lets you select folders containing users, then modify the rights
associated with those folders.
“Contexts” on page 40
“Privileges” on page 40
Contexts
To select the folder that contains the users for which you want to assign rights, click Add to display
the Contexts dialog box, then browse for and select the folders for which you want to assign rights.
Privileges
The Privileges section lets you grant the selected administrator rights to work with users and folders
listed in the Contexts section.
40 ZENworks 10 Configuration Management System Administration Reference

The following rights are available:
Modify ZENworks Group Membership: Allow or deny the rights necessary to modify
ZENworks group membership. If you select this option, you must also grant rights to Modify
ZENworks Group Membership under ZENworks User Group Rights.
Assign Policies: Allow or deny the administrator the rights necessary to assign policies to
users.
Assign Bundles: Allow or deny the administrator the rights necessary to assign bundles to
users.
2.3.18 ZENworks User Group Rights
The ZENworks User Group Rights dialog box lets you allow or deny the administrator the rights to
create, delete, or modify groups and to modify group membership.
The following rights are available:
Modify Groups: Allow or deny the administrator the rights necessary to modify existing user
groups.
novdocx (en) 16 April 2010
Create/Delete Groups: Allow or deny the administrator the rights necessary to create or delete
user groups.
Modify ZENworks Group Membership: Allow or deny the administrator the rights
necessary to modify the ZENworks group membership. If you select this option, you must also
grant rights to Modify ZENworks Group Membership under User Rights.
Assign Policies: Allow or deny the administrator the rights necessary to modify the list of
policies contained in policy groups.
Assign Bundles: Allow or deny the administrator the rights necessary to modify the list of
bundles contained in policy groups.
2.3.19 Zone Rights
The Zone Rights dialog box lets you modify the administrator’s rights to administer settings in your
ZENworks Management Zone.
The following rights are available:
Modify User Sources: Allow or deny the administrator the rights necessary to modify user
sources.
A user source is an LDAP directory that contains users that you want to reference in your
ZENworks Management Zone. When you define a user source, you also define the source
containers from which you want to read users and user groups.
Modifying user sources includes adding, removing, or renaming user sources and assigning
policies or bundles to user sources.
Create/Delete User Sources: Allow or deny the administrator the rights necessary to create or
delete user sources.
Modify Settings: Allow or deny the administrator the rights necessary to modify your
Management Zone settings.
Administrators 41

The Management Zone settings let you manage the global configuration settings for your
Management Zone. These global configuration settings are inherited by other objects (devices,
users, and folders) within your Management Zone and remain in effect unless they are
overridden on those objects.
Modify Zone Infrastructure: Allow or deny the administrator the rights necessary to modify
Zone infrastructure. This right includes the rights to perform the following actions in the Server
Hierarchy section of the Configuration tab:
Specify content for a device
Move the device in the hierarchy
Configure a Satellite
Add a Satellite
Remove a Satellite
Other actions can be taken in the Server Hierarchy section. However, rights for those actions
must be specified individually. They are not automatically included in the Modify Zone
Infrastructure right. These are:
Delete ZENworks Server
Refresh Device
Configure Registration: Allow or deny the administrator the rights necessary to configure
device registration.
Registration lets you manage the various configuration settings for registering devices as
managed devices in the Management Zone. It also lets you create registration keys or
registration rules to help you register devices. A registration key lets you apply group and
folder assignments to devices as they register. A registration rule lets you apply group and
folder assignments to folders if the device meets the rule criteria.
novdocx (en) 16 April 2010
Delete News Alerts: Allow or deny the administrator the rights necessary to delete the news
alerts.
Update News Alerts: Allow or deny the administrator the rights necessary to update the news
alerts.
2.4 Managing Administrator Roles
Perform the following tasks to manage administrator roles in the Management Zone:
Section 2.4.1, “Understanding Administrator Roles,” on page 43
Section 2.4.2, “Creating a Role,” on page 45
Section 2.4.3, “Assigning Roles,” on page 47
Section 2.4.4, “Editing a Role,” on page 51
Section 2.4.5, “Renaming a Role,” on page 54
Section 2.4.6, “Deleting a Role,” on page 54
42 ZENworks 10 Configuration Management System Administration Reference

2.4.1 Understanding Administrator Roles
The roles feature allows you to specify rights that can be assigned as roles for ZENworks
administrators. You can create a specialized role, then assign administrators to that role to allow or
deny them the ZENworks Control Center rights that you specify for that role. For example, you
could create a Help Desk role with the ZENworks Control Center rights that you want help desk
operators to have.
The following sections explain the different locations in ZENworks Control Center where you can
manage roles:
“Roles Panel” on page 43
“Role Settings Page” on page 44
“Administrator Settings Page” on page 45
Roles Panel
The Roles panel displays the following information:
Figure 2-1 Roles Panel
novdocx (en) 16 April 2010
Name: You specified this when you created the role. You can rename the role here. You can
also click a role name to edit its rights configuration.
Type s: Lists each ZENworks Control Center rights type that is configured for the role.
Allow: For each type listed, abbreviations are displayed to indicate the rights that are allowed
for that role.
Deny: For each type listed, abbreviations are displayed to indicate the rights that are denied for
that role.
If a right is configured as Unset, its abbreviation is not listed in either the Allow or Deny column.
In the Roles panel, you can add, assign, edit, rename, and delete a role.
Administrators 43

Role Settings Page
If you click a role in the Name column on the Roles panel, the Role Settings page is displayed with
the following information:
Figure 2-2 Role Settings Page
novdocx (en) 16 April 2010
General panel: Displays the ZENworks Control Center object type (Role), its GUID, and a
description that you can edit here.
Rights panel: Displays the ZENworks Control Center rights configured for the role. You can
add, edit, and delete the rights in this panel.
Assigned Administrators panel: Lists the administrators assigned to this role. You can add,
edit, or delete the administrators in this panel.
44 ZENworks 10 Configuration Management System Administration Reference

Administrator Settings Page
If you click an administrator in the Administrator column on the Roles Settings page, the
Administrator Settings page is displayed with the following information:
Figure 2-3 Administrator Settings Page
novdocx (en) 16 April 2010
General panel: Displays the administrator’s full name and provides the option to specify the
administrator as a Super Administrator, which grants all ZENworks Control Center rights to
that administrator, regardless of what is configured for the role.
Rights panel: Lists the rights that are assigned to the administrator, independent of rights
granted or denied by any roles assigned to the administrator. The rights listed in this panel
override any rights assigned by a role. You can add, edit, and delete rights in this panel.
Assigned Roles panel: Lists the roles assigned to this administrator. You can add, edit, and
delete roles in this panel.
2.4.2 Creating a Role
A role can include one or more rights types. You can configure as many roles as you need. To
configure the role’s function:
1 In ZENworks Control Center, click Configuration in the left pane, click the Configuration tab,
then in the Roles panel, click New to open the Add New Role dialog box:
Administrators 45

novdocx (en) 16 April 2010
2 Specify a name and description for the role.
3 To configure the rights for the role, click Add and select a rights type from the drop-down list:
4 In the following dialog box, select whether each privilege should be allowed, denied, or left
unset.
46 ZENworks 10 Configuration Management System Administration Reference

The most restrictive right set in ZENworks prevails. If you select the Deny option, the right is
denied for any administrator assigned to that role, even if the administrator is granted that right
elsewhere in ZENworks.
If you select the Allow option and the right has not been denied elsewhere in ZENworks, the
administrator has that right for the role.
If you select the Unset option, the administrator is not granted the right for the role unless it is
granted elsewhere in ZENworks.
5 Click OK to continue.
6 To add another rights type to the role, repeat Step 3 through Step 5.
7 Click OK to exit the Add New Role dialog box.
The role is now displayed in the Roles panel. To assign it to administrators, see Section 2.4.3,
“Assigning Roles,” on page 47.
2.4.3 Assigning Roles
You can assign roles to administrators, or administrators to roles:
novdocx (en) 16 April 2010
“Assigning Roles to Administrators” on page 47
“Assigning Administrators to Roles” on page 49
Assigning Roles to Administrators
Rights can be set in multiple locations in ZENworks Control Center, including for administrators.
Administrators can be assigned to multiple roles.
If an administrator has rights conflicts because different conditions are set for a particular right in
ZENworks Control Center, the Deny option is used if it is set anywhere for the administrator. In
other words, Deny always supersedes Allow when there are rights conflicts.
To assign roles to an administrator:
1 In ZENworks Control Center, click Configuration in the left pane, click the Configuration tab,
then in the Administrators panel, click an administrator name in the Name column to open the
administrator’s settings page:
Administrators 47

novdocx (en) 16 April 2010
2 In the Assigned Roles panel, click Add to display the Select Role dialog box.
48 ZENworks 10 Configuration Management System Administration Reference

3 Browse for and select the roles for the administrator, then click OK to display the Add Role
Assignment dialog box:
The Add Role Assignment dialog box is displayed so that you can define the contexts for the
role types included in the role. A context allows you to limit where granted rights can be used.
For example, you can specify that the administrator’s Quick Task Rights role is limited to the
Devices folder in ZENworks Control Center.
Contexts are not required. However, if you do not specify a context, the right is not granted
because it has no information about where it can be applied.
novdocx (en) 16 April 2010
Zone
Rights that are global automatically display
as the context.
4 If necessary, assign contexts to role types where they are missing:
4a In the Types column, click a role type.
Role types that are designated with the Zone context are not clickable because they are
generally available.
4b In the subsequent Select Context dialog box, click Add and browse for a ZENworks
Control Center context.
While browsing, you can select multiple contexts in the Browse dialog box.
4c When you are finished selecting the contexts for a particular role, click OK to close the
Select Contexts dialog box.
4d Repeat Step 4a through Step 4c as necessary to assign contexts to the roles.
4e When you are finished, click OK to close the Add Role Assignment dialog box.
5 To add another administrator, repeat Step 2 and Step 4.
6 Click Apply to save the changes.
Assigning Administrators to Roles
Rights can be set in multiple locations in ZENworks Control Center. Administrators can be assigned
to multiple roles.
If an administrator has rights conflicts because different conditions are set for a particular right in
ZENworks Control Center, the Deny option is used if it is set anywhere for the administrator. In
other words, Deny always supersedes Allow when there are rights conflicts.
1 In ZENworks Control Center, click Configuration in the left pane, click the Configuration tab,
then in the Roles panel, click a role name in the Name column to open the role’s settings page:
Administrators 49
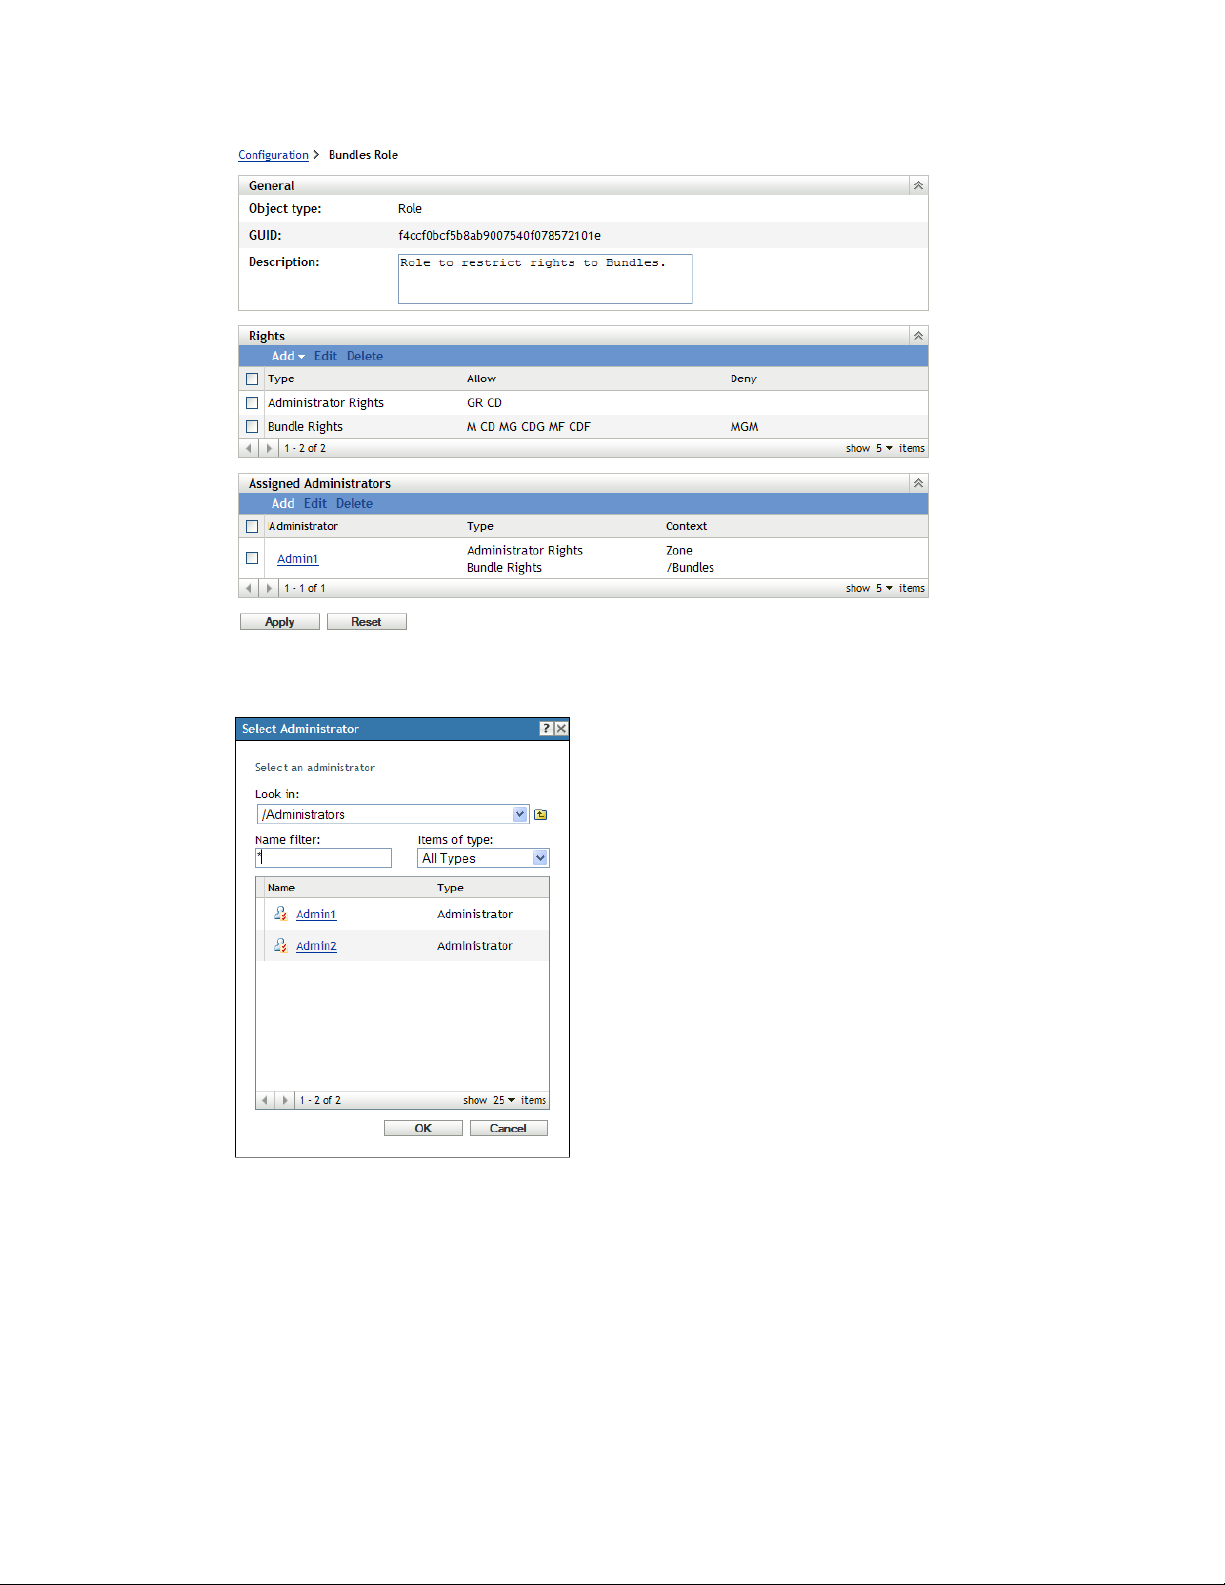
novdocx (en) 16 April 2010
2 In the Assigned Administrators panel, click Add to display the Select Administrator dialog box:
50 ZENworks 10 Configuration Management System Administration Reference
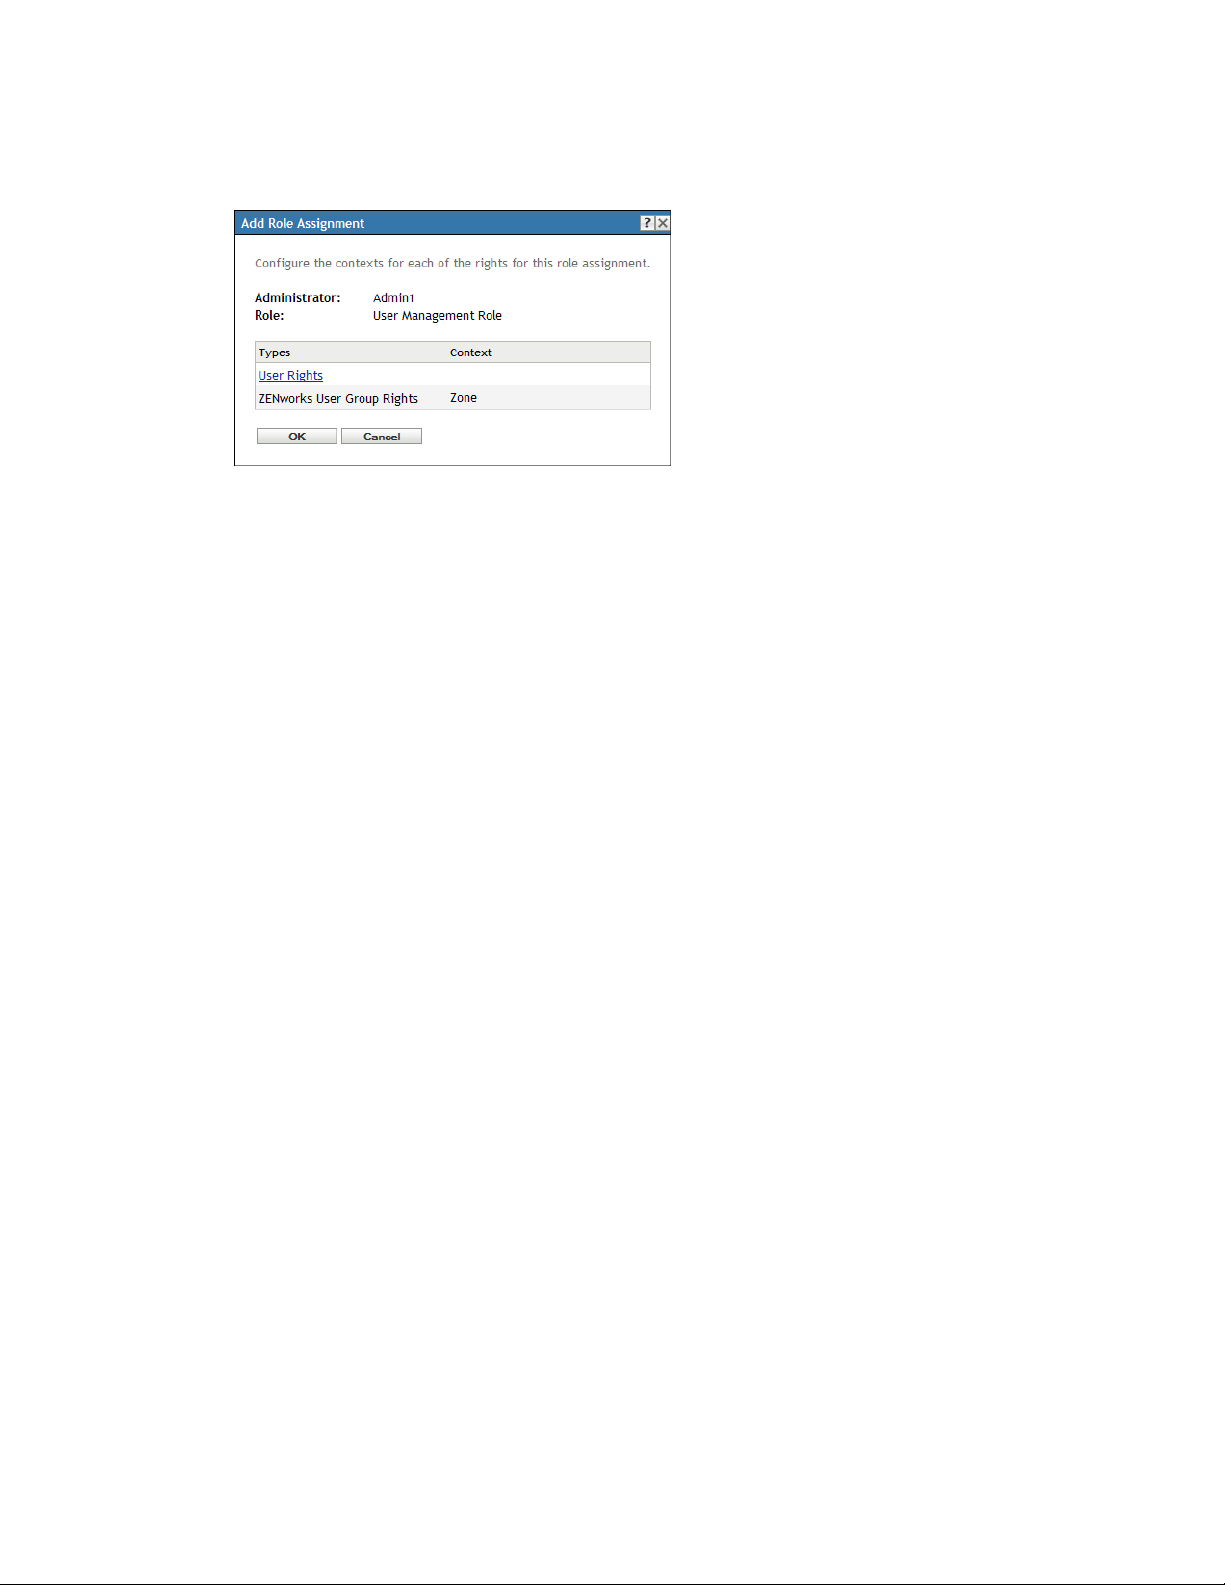
3 Browse for and select the administrators for the role, then click OK to display the Add Role
Assignment dialog box:
The Add Role Assignment dialog box is displayed so that you can define the contexts for the
role types included in the role. A context allows you to limit where granted rights can be used.
For example, you can specify that the administrator’s Quick Task Rights role is limited to the
Devices folder in ZENworks Control Center.
Contexts are not required. However, if you do not specify a context, the right is not granted
because it has no information about where it can be applied.
novdocx (en) 16 April 2010
Zone
Rights that are global automatically display
4 If necessary, assign contexts to role types where they are missing:
4a In the Types column, click a role type.
Role types that are designated with the Zone context are not clickable because they are
generally available.
4b In the subsequent Select Context dialog box, click Add and browse for a ZENworks
Control Center context.
While browsing, you can select multiple contexts in the Browse dialog box.
4c When you are finished selecting the contexts for a particular role, click OK to close the
Select Contexts dialog box.
4d Repeat Step 4a through Step 4c as necessary to assign contexts to the roles.
4e When you are finished, click OK to close the Add Role Assignment dialog box.
5 To add another role, repeat Step 2 and Step 4.
6 Click Apply to save the changes.
as the context.
2.4.4 Editing a Role
You can edit a role’s configuration at any time. After you apply the edited role, its changes are then
effective for any assigned administrator.
1 In ZENworks Control Center, click Configuration in the left pane, click the Configuration tab,
then in the Roles panel, click Edit to open the Edit Role dialog box:
Administrators 51
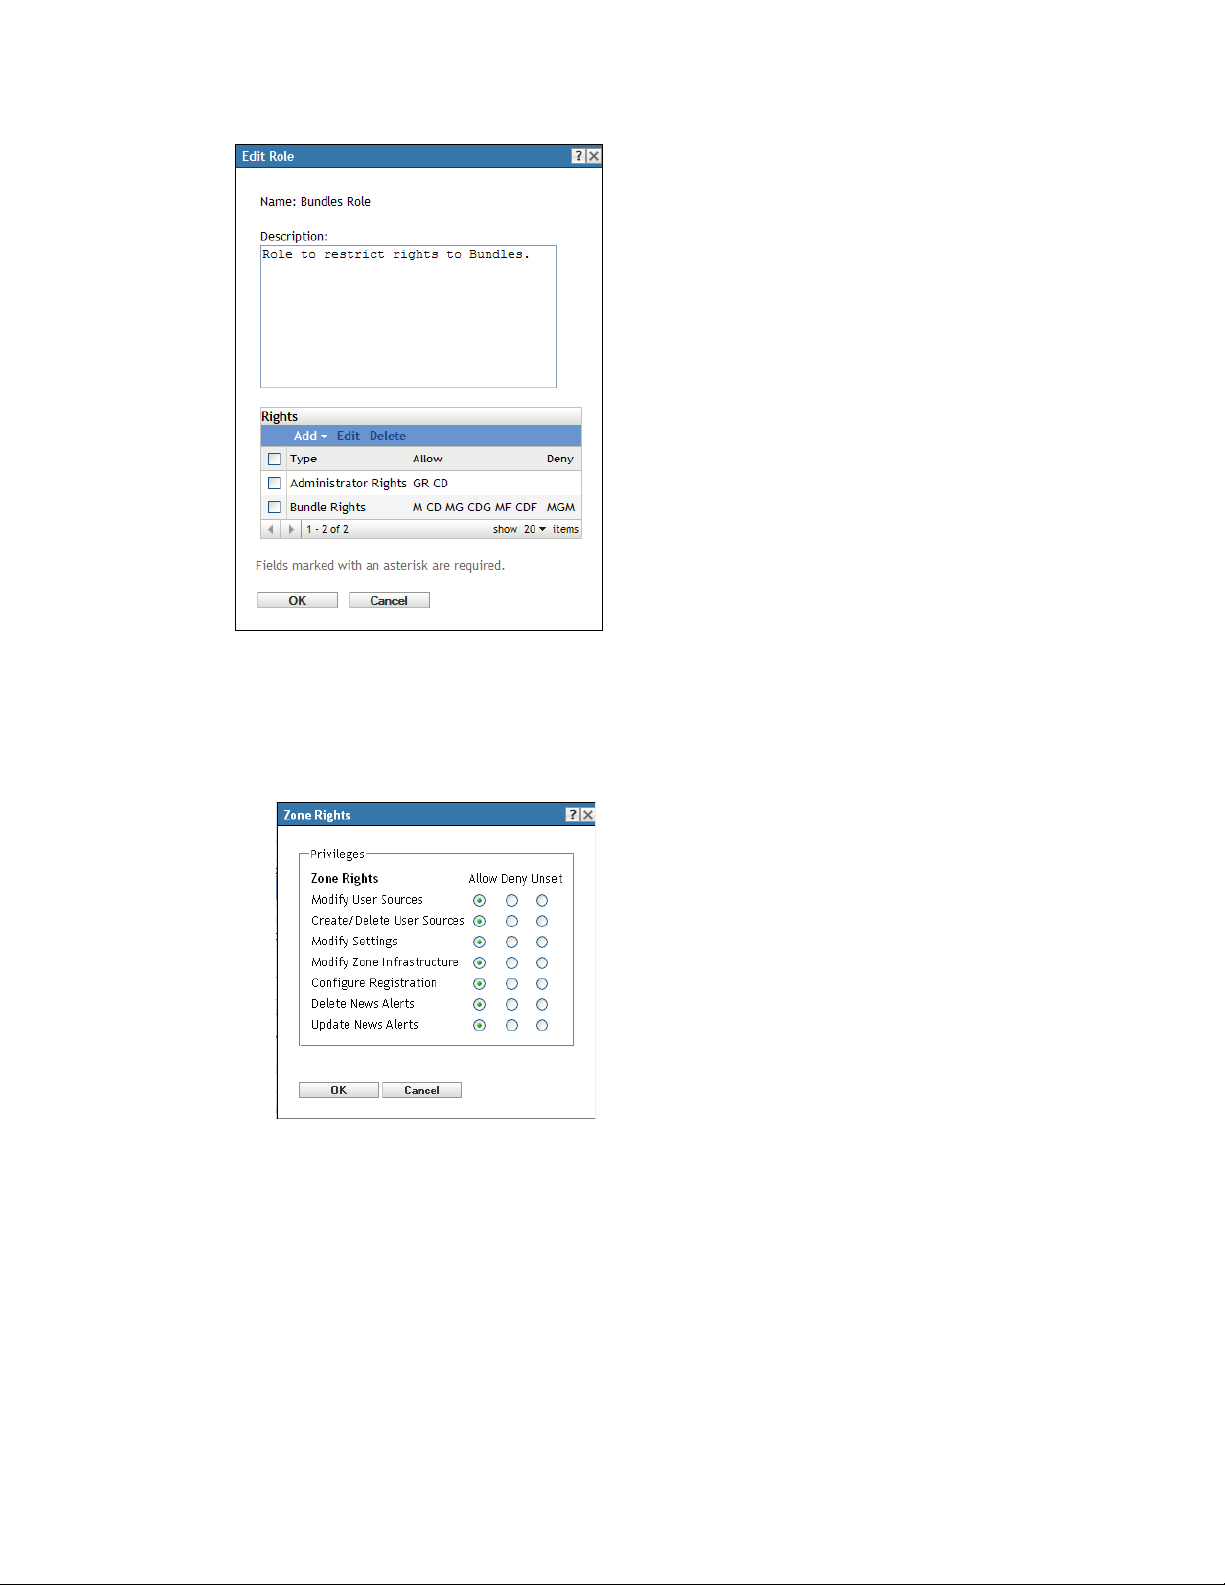
novdocx (en) 16 April 2010
2 To edit the description, make the changes directly in the Description field.
3 To edit existing rights, do the following:
3a In the Rights panel, select the check box for a rights type, then click Edit to open the
following dialog box:
3b For each privilege, select whether it should be allowed, denied, or left unset.
The most restrictive right set in ZENworks prevails. If you select the Deny option, the
right is denied for any administrator assigned to that role, even if the administrator is
granted that right elsewhere in ZENworks.
If you select the Allow option and the right has not been denied elsewhere in ZENworks,
the administrator has that right for the role.
If you select the Unset option, the administrator is not granted the right for the role unless
it is granted elsewhere in ZENworks.
52 ZENworks 10 Configuration Management System Administration Reference
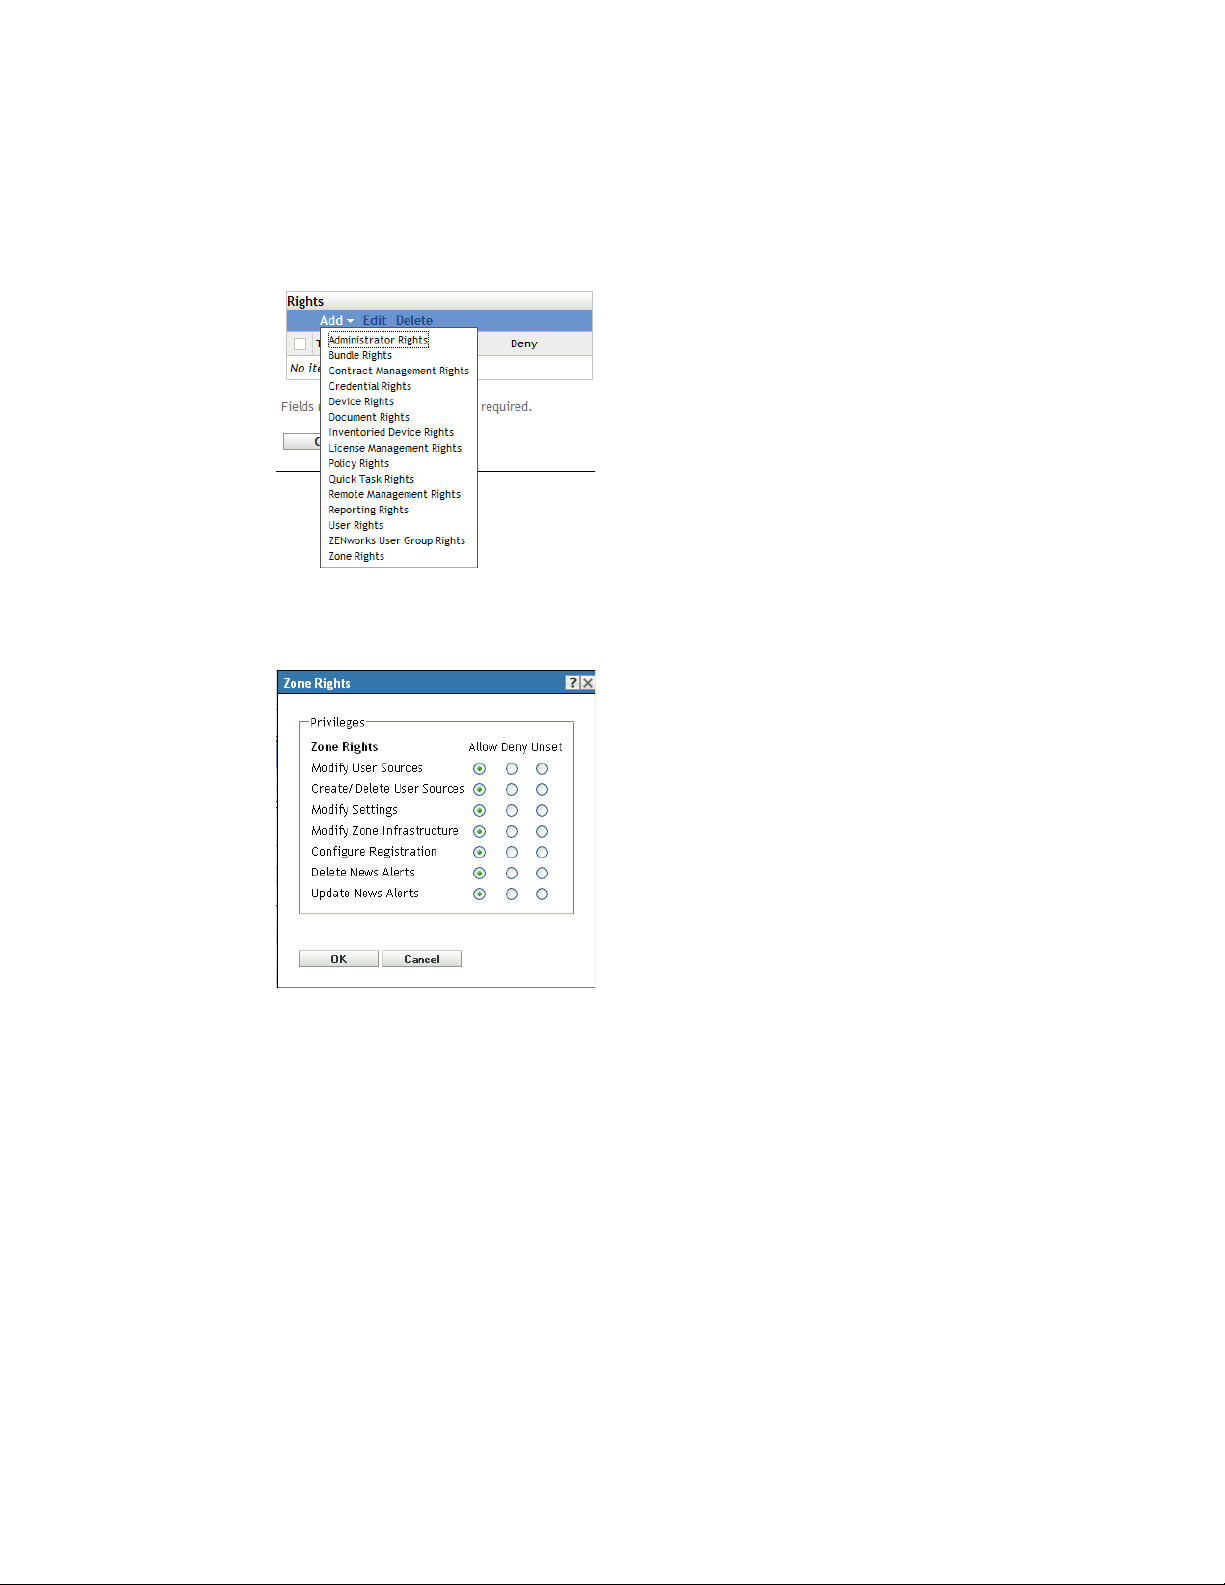
3c Click OK to continue.
3d To edit another existing role, repeat Step 3a through Step 3c.
4 (Optional) To add new rights:
4a In the Rights panel, click Add, then select one of the rights types from the drop-down list:
4b In the Rights dialog box, select whether each privilege should be allowed, denied, or left
unset.
novdocx (en) 16 April 2010
The most restrictive right set in ZENworks prevails. If you select the Deny option, the
right is denied for any administrator assigned to that role, even if the administrator is
granted that right elsewhere in ZENworks.
If you select the Allow option and the right has not been denied elsewhere in ZENworks,
the administrator has that right for the role.
If you select the Unset option, the administrator is not granted the right for the role unless
it is granted elsewhere in ZENworks.
4c Click OK to continue.
4d To add another rights type to the role, repeat Step 4a through Step 4c.
5 To exit the dialog box and save your changes to the role, click OK.
Administrators 53
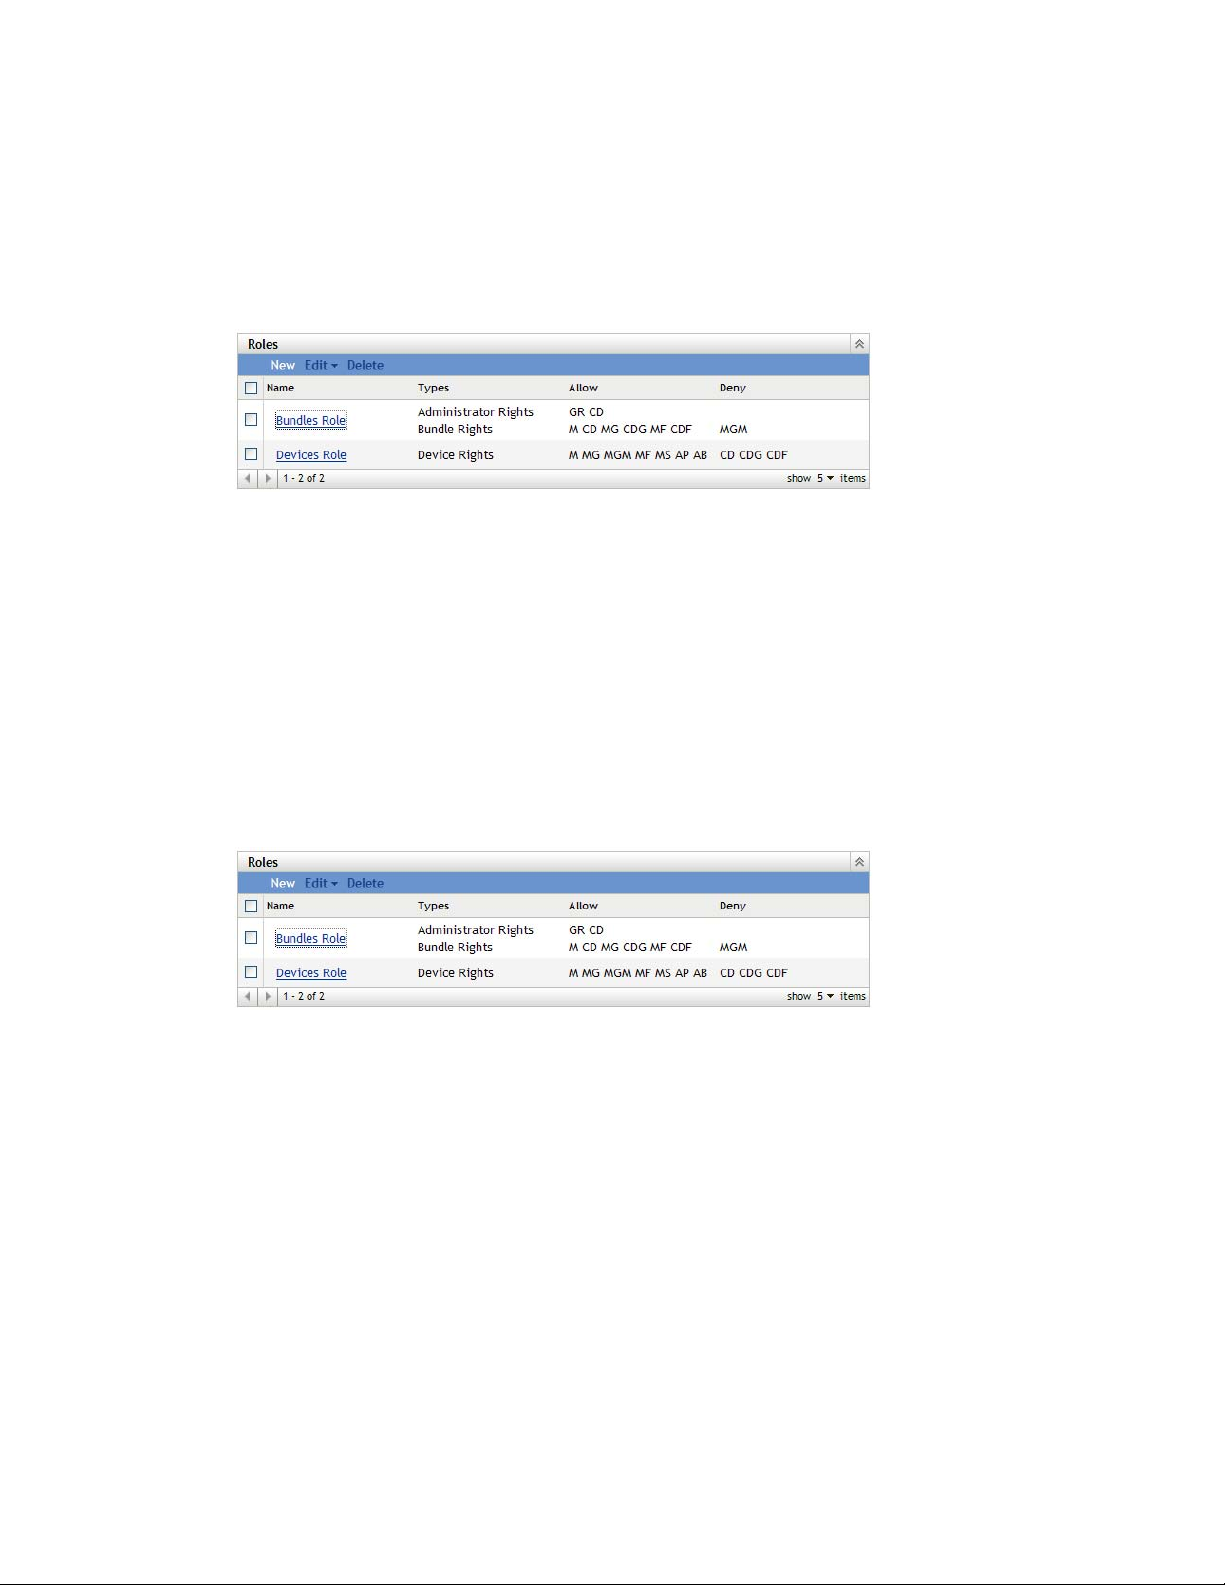
2.4.5 Renaming a Role
Role names can be changed at any time. The changed role name is automatically replicated
wherever it is displayed in ZENworks Control Center.
1 In ZENworks Control Center, click Configuration in the left pane, click the Configuration tab,
then in the Roles panel, select the check box for the role to be renamed.
2 Click Edit > Rename to open the Rename Role dialog box:
3 Specify the new role name, then click OK.
novdocx (en) 16 April 2010
2.4.6 Deleting a Role
When you delete a role, its rights configurations are no longer applicable to any administrator that
was assigned to the role.
Deleted roles cannot be recovered. You must re-create them.
1 In ZENworks Control Center, click Configuration in the left pane, click the Configuration tab,
then in the Roles panel, select the check box for the role to be deleted.
2 Click Delete, then confirm that you want to delete the role.
54 ZENworks 10 Configuration Management System Administration Reference
3
ZENworks News
Novell® ZENworks® 10 Configuration Management displays information from Novell about
current top issues, news updates, promotions, and so forth on the home page of ZENworks Control
Center.
The following sections provide information on deleting, updating, and sorting the news alerts, and
on viewing the news. You can also configure the server and the schedule for downloading the news.
Section 3.1, “Managing ZENworks News Alerts,” on page 55
Section 3.2, “Configuring ZENworks News Settings,” on page 56
3.1 Managing ZENworks News Alerts
Figure 3-1 ZENworks News Alerts
novdocx (en) 16 April 2010
3
Review the following sections to manage the ZENworks News Alerts:
Section 3.1.1, “Deleting the News Alerts,” on page 55
Section 3.1.2, “Updating the News Alerts,” on page 56
Section 3.1.3, “Displaying the News Alerts Based on the Selected Category,” on page 56
Section 3.1.4, “Viewing the News,” on page 56
Section 3.1.5, “Sorting the News Alerts,” on page 56
3.1.1 Deleting the News Alerts
1 In ZENworks Control Center, click Home.
ZENworks News
55

2 In ZENworks News Alerts panel, select the check box next to the news alerts you want to
delete.
3 Click Delete.
3.1.2 Updating the News Alerts
1 In ZENworks Control Center, click Home.
2 In ZENworks News Alerts panel, click Update Now.
The latest ZENworks news updates downloaded by the Primary Server are displayed in the
ZENworks News Alerts panel. This might take some time.
3.1.3 Displaying the News Alerts Based on the Selected Category
1 In ZENworks Control Center, click Home.
2 In ZENworks News Alerts panel, select a category in the drop-down list next to Show Category
to display all the news alerts based on the selected category.
novdocx (en) 16 April 2010
3.1.4 Viewing the News
1 In ZENworks Control Center, click Home.
2 In ZENworks News Alerts panel, click the news alert to display the news in a new browser
window.
3.1.5 Sorting the News Alerts
By default, the news alerts are sorted by the publication date. You can also sort the news alerts
alphabetically by the title or category.
1 In ZENworks Control Center, click Home.
2 In ZENworks News Alerts panel, click News Alert to sort the news alerts alphabetically.
or
Click Category to sort the news alerts by category.
or
Click Date to sort the news alerts by date.
3.2 Configuring ZENworks News Settings
The ZENworks News Settings page lets you configure a dedicated news server and a schedule to
download the ZENworks news. By default, the news is downloaded at midnight by the Primary
Server of the Management Zone.
56 ZENworks 10 Configuration Management System Administration Reference
Figure 3-2 News Download Schedule
Review the following sections to configure the settings to download the news:
novdocx (en) 16 April 2010
Section 3.2.1, “Dedicated News Server,” on page 57
Section 3.2.2, “Schedule Type,” on page 58
3.2.1 Dedicated News Server
By default, any available server in the Management Zone can be used to download the news
updates. However, you can specify one ZENworks Server to be dedicated to handle the news
downloads. The server that you select should have access to the Internet, either directly or through a
proxy server.
The following sections contain more information:
“Specifying a Dedicated News Server” on page 57
“Clearing a Dedicated News Server” on page 58
Specifying a Dedicated News Server
1 In ZENworks Control Center, click Configuration in the left pane.
2 On the Configuration tab, expand the Management Zone Settings section (if necessary), click
Infrastructure Management, then click ZENworks News Settings to display the News
Download Schedule panel.
3 In the Dedicated News Server field, browse for and select a server, then click OK.
The server’s identification is displayed in the Dedicated News Server field.
4 (Conditional) If you need to revert to the last saved dedicated server setting, click Reset.
This resets the dedicated server to the last saved setting, such as when you last clicked Apply or
OK.
5 Click Apply to make the changes effective.
6 Either click OK to close the page, or continue with configuring the schedule type.
If you did not click Apply to make your changes effective, clicking OK does so. Clicking
Cancel also closes the page, but loses your unapplied changes.
ZENworks News 57

Clearing a Dedicated News Server
Clearing a dedicated update server causes the news updates to be retrieved randomly from any
server in the Management Zone.
1 In ZENworks Control Center, click Configuration in the left pane.
2 On the Configuration tab, expand the Management Zone Settings section (if necessary), click
Infrastructure Management, then click ZENworks News Settings to display the News
Download Schedule panel.
3 Click to remove the dedicated server from the Dedicated News Server field.
4 (Conditional) If you need to revert to the last saved dedicated server setting, click Reset.
This resets the dedicated server to the last saved setting, such as when you last clicked Apply or
OK.
5 Click Apply to make the change effective.
3.2.2 Schedule Type
You can configure the schedule for downloading the news:
novdocx (en) 16 April 2010
1 In ZENworks Control Center, click Configuration in the left pane, then click the Configuration
tab.
2 Click Management Zone Settings to expand its options, click Infrastructure Management to
expand its options, then select ZENworks News Settings.
3 (Conditional) To exclude scheduled checking for news updates, click the down-arrow in the
Schedule Type field, select No Schedule, click Apply to save the schedule change, then skip to
Step 6.
With this option selected, you must download the news updates manually. For more
information, see “Updating the News Alerts” on page 56.
4 (Conditional) To set a recurring schedule for checking for the news updates, click the down-
arrow in the Schedule Type field, then select Recurring.
5 Fill in the fields:
5a Select one or more check boxes for the days of the week when you want to check for news
updates.
5b Use the Start Time box to specify the time of day for checking to occur.
5c (Optional) Click More Options, then select the following options as necessary:
Process Immediately if Device Unable to Execute on Schedule: Causes checking
for news updates to occur as soon as possible if the checking cannot be done
according to schedule. For example, if a server is down at the scheduled time,
checking for news updates occurs immediately after the server comes back online.
Use Coordinated Universal Time: Causes the schedule to interpret the times you
specify as UTC instead of local time.
Start at a Random Time Between Start and End Times: Allows checking for
news updates to occur at a random time between the time you specify here and the
time you specified in Step 5b. Fill in the End Time fields.
Restrict Schedule Execution to the Following Date Range: In addition to the
other options, you can specify a date range to check for the news updates.
58 ZENworks 10 Configuration Management System Administration Reference

5d (Conditional) If you need to revert to the last saved schedule, click Reset at the bottom of
the page.
This resets all data to the last saved state, such as when you last clicked Apply or OK.
5e When you have finished configuring the recurring schedule, click Apply to save the
schedule change.
6 To exit this page, click OK when you are finished configuring the schedule.
If you did not click Apply to make your changes effective, clicking OK does so. Clicking
Cancel also closes the page, but loses your unapplied changes.
novdocx (en) 16 April 2010
ZENworks News 59

novdocx (en) 16 April 2010
60 ZENworks 10 Configuration Management System Administration Reference

4
System Variables
novdocx (en) 16 April 2010
4
System variables let you define variables that can be used to replace paths, names, and so forth as
you enter information in ZENworks
You can define system variables at three levels:
Management Zone: The system variables are inherited by all device folders, devices, and
bundles.
Device Folder: The system variables are inherited by all devices contained within the folder or
its subfolders.
Device or Bundle: The system variables apply only to the device or bundle for which they are
configured.
The following sections contain more information:
Section 4.1, “Understanding System Variables,” on page 61
Section 4.2, “Adding System Variables,” on page 62
Section 4.3, “Removing System Variables,” on page 63
Section 4.4, “Editing System Variables,” on page 63
Section 4.5, “Using System Variables,” on page 63
®
Control Center.
4.1 Understanding System Variables
The following examples illustrate some uses of system variables:
Specifying Paths and Filenames in Actions: When you create an Edit INI File action, for
.ini
example, you specify a
the creation process, you can specify the full path to the file (for example,
Files\OpenOffice.org 2.0\program\setup.ini
Instead of specifying the entire path and filename, you can create a system variable. For
example, the name of the variable can be OpenOffice INI and the value can be the full path to
the file. Now, instead of specifying the full path and filename when you create the action, you
can type
An advantage of using a system variable rather than typing the full path and filename is that
you can specify this particular
location of the
path in the system variable and all the actions still point to the correct path.
You can generalize the path even more by creating a system variable named ProgramFiles with
the value of
${ProgramFiles}
${ProgramFiles}\OpenOffice 2.0\program\setup.ini
C:\program files
system variable, rather than in each bundle that uses that location in a path.
${OpenOffice INI}
.ini
file changes. Instead of editing the path in each action, you can edit the
C:\program files
and then specify the remaining path to the specific file. For example,
directory changes in the future, you only need to change the path in the
file and configure the changes to be performed on that file. During
C:\Program
).
in the Filename field.
.ini
file in many different types of actions. Suppose that the
. In the future, when you specify a path, you can type
. Again, if the path to the
System Variables
61

Overriding Inherited Settings: When configuring system variables for a folder, device, or
bundle, you can override an inherited variable by defining a new variable with the same name
but a different value. For example, if
you can override it by defining
ProgramFiles=D:\
ProgramFiles=C:\
is defined at the Management Zone,
at the device folder level or at the device
or bundle.
You can use a system variable when creating a bundle. Depending on the location of the
targeted device object in the folder hierarchy, the value can be different.
For example, suppose that all of your applications are installed in
for specific applications used by the accounting department, which are installed in
. You define the ProgramFiles variable at the Management Zone level to point to
files
C:\program files
Accounting Department
value for the ProgramFiles variable to
. For the accounting applications, you create a device folder called
to contain the devices in the accounting department. You can set the
D:\program files
C:\program files
except
D:\program
on the Accounting Department
device folder level. When the same bundle is applied to devices, the path to the program files
C:\
directory is on the
drive for all targeted devices except for those contained in the
Accounting Department device folder. For those devices, the program files directory points to
D:\
the
drive.
novdocx (en) 16 April 2010
4.2 Adding System Variables
1 In ZENworks Control Center, click the Configuration tab.
2 In the Management Zone Settings list, click Device Management.
3 Click System Variables.
4 Click Add, provide the name and value for the variable, then click OK.
When configuring system variables for a folder, device, or bundle, you can override an
inherited variable by defining a new variable with the same name but a different value. For
example, if
Var1=c:\
is inherited, you can override it by defining
Variable names cannot include spaces and must be unique at the level where they are defined.
For example, you cannot have two variables named Var1 defined at the device level (unless one
is inherited, in which case the device-level variable overrides the inherited variable).
62 ZENworks 10 Configuration Management System Administration Reference
Var1=d:\
.

Variable values cannot include the characters & and <.
5 Click Apply.
4.3 Removing System Variables
1 In ZENworks Control Center, click the Configuration tab.
2 In the Management Zone Settings list, click Device Management.
3 Click System Variables.
4 Select the check box next to the variable (or variables).
5 Click Remove.
6 Click Apply.
4.4 Editing System Variables
1 In ZENworks Control Center, click the Configuration tab.
2 In the Management Zone Settings list, click Device Management.
3 Click System Variables.
novdocx (en) 16 April 2010
4 Select the check box next to the variable, then click Edit.
5 Modify the Name and Va l ue fields as desired, then click OK.
6 Click Apply.
4.5 Using System Variables
1 Use the following syntax:
${VAR_NAME}
Replace
VAR_NAME
with the name of the variable.
System Variables 63

novdocx (en) 16 April 2010
64 ZENworks 10 Configuration Management System Administration Reference
5
Credential Vault
The Credential Vault stores the credentials used by Novell® ZENworks® 10 Configuration
Management actions and tasks that require authentication to access a particular resource.
For example, if you want to create a third-party Imaging bundle by using the image files stored in a
shared-network image repository that requires authentication, you can add a credential that includes
the login name and password for the repository in the credential vault. During the creation of the
third-party Imaging bundle, you can specify the credential name to access the repository.
Currently, third-party imaging uses credentials stored in the credential vault.
You can use ZENworks Control Center or the zman command line utility to manage credentials. The
procedures in this section explain how to manage credentials by using ZENworks Control Center. If
you prefer the zman command line utility, see “Credential Commands” in the ZENworks 10
Configuration Management Command Line Utilities Reference.
Currently, third-party imaging uses credentials stored in the credential vault.
novdocx (en) 16 April 2010
5
The following sections contain information to help you manage credentials:
Section 5.1, “Adding a Credential,” on page 65
Section 5.2, “Creating a Folder for Credentials,” on page 66
Section 5.3, “Assigning Credential Rights,” on page 67
Section 5.4, “Editing a Credential,” on page 68
Section 5.5, “Renaming a Credential,” on page 68
Section 5.6, “Moving a Credential to Another Folder,” on page 68
Section 5.7, “Removing a Credential,” on page 68
5.1 Adding a Credential
1 In ZENworks Control Center, click the Configuration tab.
Credential Vault
65
2 In the Credential Vault panel, click New > Credential to display the Add Credential dialog box.
3 Fill in the fields.
novdocx (en) 16 April 2010
If you need help, click the Help button.
5.2 Creating a Folder for Credentials
1 In ZENworks Control Center, click the Configuration tab.
2 In the Credential Vault panel, click New > Folder to display the New Folder dialog box.
66 ZENworks 10 Configuration Management System Administration Reference

3 In the Name field, specify a unique name for the folder.
The folder cannot have the same name as any folders or credentials that already exist in the
folder where you are creating it.
4 In the Folder field, click to browse for and select the folder where you want the new folder
created.
novdocx (en) 16 April 2010
5 Type a description for the new folder, if desired.
6 Click OK to create the folder.
5.3 Assigning Credential Rights
1 In ZENworks Control Center, click the Configuration tab.
2 In the Administrators section, click the underlined link for the administrator for which you
want to change rights.
3 In the Assigned Rights section, click Add > Credential Rights.
Credential Vault 67

4 Click Add to select folders containing credentials, then modify the rights associated with those
folders.
If you need help, click the Help button.
5.4 Editing a Credential
1 In ZENworks Control Center, click the Configuration tab.
2 In the Credential Vault panel, select the check box next to the credential.
3 Click Edit.
4 Edit the fields.
If you need help, click the Help button.
5 Click OK.
5.5 Renaming a Credential
1 In ZENworks Control Center, click the Configuration tab.
2 In the Credential Vault panel, select the check box next to the credential.
novdocx (en) 16 April 2010
3 Click Edit > Rename.
4 Type the new name for the credential.
5 Click OK.
5.6 Moving a Credential to Another Folder
1 In ZENworks Control Center, click the Configuration tab.
2 In the Credential Vault panel, select the check box next to the credential.
3 Click Edit > Move.
4 In the Folder field, click to browse for and select the folder where you want the credential
moved.
5 Click OK.
5.7 Removing a Credential
1 In ZENworks Control Center, click the Configuration tab.
2 In the Credential Vault panel, select the check box next to the credential.
3 Click Delete.
68 ZENworks 10 Configuration Management System Administration Reference

II
ZENworks Servers and Satellite
novdocx (en) 16 April 2010
Devices
This section contains information about configuring the ZENworks® Servers and Satellite devices.
Chapter 6, “ZENworks Server,” on page 71
Chapter 7, “Satellites,” on page 79
Chapter 8, “Server Hierarchy,” on page 95
Chapter 9, “Closest Server Rules,” on page 99
Chapter 10, “Backing Up and Restoring the ZENworks Server and Certificate Authority,” on
page 119
Chapter 11, “Disaster Recovery,” on page 123
II
ZENworks Servers and Satellite Devices
69

novdocx (en) 16 April 2010
70 ZENworks 10 Configuration Management System Administration Reference

6
ZENworks Server
The ZENworks® Server is the backbone of the ZENworks system. It communicates with the
ZENworks Adaptive Agent on managed devices to perform management tasks. It stores content to
be delivered to devices and images to be used for imaging devices. It communicates with other
ZENworks Servers and ZENworks Satellites to replicate or receive content, software and hardware
inventory, and messages throughout the Management Zone.
The following sections provide additional information about the ZENworks Server:
Section 6.1, “ZENworks Services on a Windows Server,” on page 71
Section 6.2, “ZENworks Services on a Linux Server,” on page 73
Section 6.3, “Configuring Additional Access to a ZENworks Server,” on page 75
Section 6.4, “Determining the ZENworks Software Version Installed on Servers,” on page 76
Section 6.5, “Uninstalling a ZENworks Server,” on page 76
Section 6.6, “Deleting a ZENworks Primary Server,” on page 76
Section 6.7, “ZENworks Server Reports,” on page 77
novdocx (en) 16 April 2010
6
6.1 ZENworks Services on a Windows Server
When it is running on a Windows* server, a ZENworks Server includes the services listed in the
following table. All services are always installed regardless of the ZENworks 10 products
(Configuration Management, Asset Management, and Patch Management) you have licensed and
activated. If a service is not required for your product, it is disabled.
Table 6-1 ZENworks Services on Windows
Service Service Name Description
Proxy DHCP Service novell-proxydhcp Used with a standard DHCP server to
inform PXE-enabled devices of the IP
address of the Novell
TFTP Service novell-tftp Used by PXE-enabled devices to
request files that are needed to perform
imaging tasks.
ZENworks Agent Service zenworkswindowsservice
novell-zmd
ZENworks Datastore dbsrv10 Embedded database used for storing
ZENworks Loader zenloader Used for loading and controlling the
Used to enable the server as a managed
device.
ZENworks objects and resources.
Java* services that perform ZENworks
Server tasks.
®
TFTP server.
ZENworks Preboot Policy Service novell-zmgprebootpolicy Used by PXE-enabled devices to check
for assigned preboot policies and work.
ZENworks Server
71

Service Service Name Description
ZENworks Preboot Service novell-pbserv Used to provide imaging services to a
device. This includes sending and
receiving image files, discovering
assigned Preboot bundles, acting as
session master for multicast imaging,
and so forth.
ZENworks Remote Management nzrwinvnc Used to enable remote management of
the server.
ZENworks Server zenserver Used for communicating with the
ZENworks Agent.
ZENworks Services Monitor zenwatch Used to monitor the status of the
ZENworks services.
ZENworks Imaging Agent ziswin Used to save and restore image-safe
data on the server (as a managed
device). Only runs when launched by the
ZENworks Agent.
novdocx (en) 16 April 2010
The services reside in the
\novell\zenworks\bin
directory on a ZENworks Server. Refer to the
following sections for instructions to help you control the ZENworks services:
Section 6.1.1, “Checking the Status of a ZENworks Service,” on page 72
Section 6.1.2, “Starting a ZENworks Service,” on page 72
Section 6.1.3, “Stopping a ZENworks Service,” on page 72
6.1.1 Checking the Status of a ZENworks Service
1 On the server, click Start, select Administrative Tools > Services, then review the status of the
services listed in Table 6-1 on page 71.
6.1.2 Starting a ZENworks Service
1 On the server, click Start, select Administrative Tools > Services.
2 Select the service you want to start (see Table 6-1 on page 71), then click Start the service.
The ZENworks services start when the ZENworks Server is booted and should not normally
need to be restarted. If you need to frequently restart the services, ensure that your server
hardware meets the ZENworks minimum requirements. If the server does not have adequate
RAM, ZENworks services might not continue running. For more information, see “Primary
Server Requirements” in the ZENworks 10 Configuration Management Installation Guide.
6.1.3 Stopping a ZENworks Service
1 On the server, click Start, then select Administrative Tools > Services.
2 Select the service you want to stop (see Table 6-1 on page 71), then click Stop the service.
72 ZENworks 10 Configuration Management System Administration Reference

6.2 ZENworks Services on a Linux Server
When it is running on a Linux server, the ZENworks Server includes the services listed in the
following table. All services are always installed regardless of the ZENworks 10 products
(Configuration Management, Asset Management, and Patch Management) you have licensed and
activated. If a service is not required for your product, it is disabled
Table 6-2 ZENworks Services on Linux
Service Service Name Description
Proxy DHCP Service novell-proxydhcp Used with a standard DHCP server to
inform PXE-enabled devices of the IP
address of the Novell TFTP server.
TFTP Service novell-tftp Used by PXE-enabled devices to
request files that are needed to perform
imaging tasks.
ZENworks Agent Service novell-zmd Used to enable the server as a managed
device.
novdocx (en) 16 April 2010
ZENworks Datastore sybase-asa Used to run the embedded SQL
Anywhere* database.
ZENworks Loader novell-zenloader Used for loading and controlling the Java
services that perform ZENworks Server
tasks.
ZENworks Preboot Policy Service novell-zmgprebootpolicy Used by PXE-enabled devices to check
for assigned preboot policies and work.
ZENworks Preboot Service novell-pbserv Used to provide imaging services to a
device. This includes sending and
receiving image files, discovering
assigned Preboot bundles, acting as
session master for multicast imaging,
and so forth.
ZENworks Server novell-zenserver Used for communicating with the
ZENworks Adaptive Agent.
ZENworks Services Monitor novell-zenmntr Used to monitor the status of the
ZENworks services.
ZENworks Imaging Agent novell-zenagent Used to save and restore image-safe
data on the server (as a managed
device). Only runs when launched by the
ZENworks Adaptive Agent.
The services reside in the
/etc/init.d
directory. Refer to the following sections for instructions to
help you control the ZENworks services:
Section 6.2.1, “Checking the Status of a ZENworks Service,” on page 74
Section 6.2.2, “Starting the ZENworks Services,” on page 74
ZENworks Server 73

Section 6.2.3, “Stopping the ZENworks Services,” on page 74
Section 6.2.4, “Restarting the ZENworks Services,” on page 75
6.2.1 Checking the Status of a ZENworks Service
1 At the server prompt, enter the following command:
/etc/init.d/servicename status
Replace servicename with the name of the service as listed in Table 6-2 on page 73.
6.2.2 Starting the ZENworks Services
Do one of the following:
To start a ZENworks server, enter the following command at the server prompt:
/etc/init.d/servicename start
Replace servicename with the name of the service as listed in Table 6-2 on page 73.
To start all the ZENworks services:
1. Execute the following command at the server prompt:
novdocx (en) 16 April 2010
/opt/novell/zenworks/bin/novell-zenworks-configure -c Start
By default the
Start
option is selected.
2. Press Enter.
The ZENworks services start when the ZENworks Server is booted and should not normally need to
be restarted. If you need to frequently restart the services, ensure that your server hardware meets
the minimum ZENworks requirements. If the server does not have adequate RAM, ZENworks
services might not continue running. For more information, see “Primary Server Requirements” in
the ZENworks 10 Configuration Management Installation Guide.
6.2.3 Stopping the ZENworks Services
Do one of the following:
To stop a service, use the following command:
/etc/init.d/servicename stop
Replace servicename with the name of the service as listed in Table 6-2 on page 73.
To stop all the ZENworks services:
1. Execute the following command at the server prompt:
/opt/novell/zenworks/bin/novell-zenworks-configure -c Start
2. Enter the number next to the
Stop
action.
74 ZENworks 10 Configuration Management System Administration Reference

6.2.4 Restarting the ZENworks Services
Do one of the following:
To restart a service that is already running, use the following command:
/etc/init.d/servicename restart
Replace servicename with the name of the service as listed in Table 6-2 on page 73.
To restart all the ZENworks services:
1. Execute the following command at the server prompt:
/opt/novell/zenworks/bin/novell-zenworks-configure -c Start
2. Enter the number next to the
Restart
action.
6.3 Configuring Additional Access to a ZENworks Server
If you have managed devices that are unable to authenticate to the IP address or DNS name of a
ZENworks Server, such as devices outside the firewall or devices using a proxy server, you can
specify additional IP addresses or DNS names for the ZENworks Server that can be used by the
devices for access to the server.
novdocx (en) 16 April 2010
Section 6.3.1, “Addressing Non-Detectable IP Address Conditions,” on page 75
Section 6.3.2, “Addressing Non-Detectable DNS Name Conditions,” on page 75
6.3.1 Addressing Non-Detectable IP Address Conditions
The Non-Detectable IP Addresses panel lets you specify the addresses that can be used to access the
ZENworks Server when the server’s IP address cannot be found by a device.
1 In ZENworks Control Center, click Devices in the left pane, select Servers in the Devices
panel, select a server object, click the Settings tab, click Infrastructure Management, then select
Non-detectable IP Addresses.
2 Fill in the field:
IP Address: Standard dotted-decimal notation. For example,
3 Click Add to add the address to the list.
4 Repeat Step 1 to Step 3 to add additional IP addresses.
5 If necessary, use the Move Up and Move Down buttons to reorder the list.
The IP addresses are used in the order listed, from top to bottom.
6 When you are finished adding addresses, click Apply or OK to save the addresses.
123.45.167.100.
6.3.2 Addressing Non-Detectable DNS Name Conditions
The Additional DNS Names panel lets you specify additional names that can be used to access the
ZENworks Server when the server’s DNS name cannot be found by a device.
The DNS names added in this panel are distributed to all managed devices for them to use in
connecting to the server.
ZENworks Server 75

To add a DNS name:
1 In ZENworks Control Center, click Devices in the left pane, select Servers in the Devices
panel, select a server object, click the Settings tab, click Infrastructure Management, then select
Additional DNS Names.
2 In the List of Server DNS Names field, specify the DNS name for the IP address of the server
(such as a proxy server) that the devices can access.
3 Click Add to add the DNS name to the list.
4 If necessary, use the Move Up and Move Down buttons to reorder the list.
The DNS names are used in the order listed, from top to bottom.
5 When you are finished adding addresses, click Apply or OK to save the addresses.
6.4 Determining the ZENworks Software Version Installed on Servers
For upgrading and troubleshooting purposes, you use ZENworks Control Center to determine which
versions of ZENworks Configuration Management (ZCM), ZENworks Asset Management (ZAM),
and ZENworks Patch Management (ZPM) are running on ZENworks Primary Servers in your
Management Zone.
novdocx (en) 16 April 2010
To see ZENworks version information for a specific Primary Server in your Management Zone:
1 In ZENworks Control Center, click the Devices tab.
2 Click Servers, then click the desired Primary Server.
3 View the version number in the ZENworks Configuration Management Version, ZENworks
Asset Management Version, and ZENworks Patch Management Version rows.
4 (Optional) Click the underlined version number next to ZENworks Configuration Management
Version to see a list of installed packages.
To see ZENworks version information for all Primary Servers in your Management Zone:
1 In ZENworks Control Center, click the Configuration tab.
2 In the Server Hierarchy panel, view the version information in the ZCM Version, ZAM Version,
and ZPM Version columns for each server.
6.5 Uninstalling a ZENworks Server
Instructions for uninstalling a ZENworks Server are provided in “Uninstalling ZENworks Software”
in the ZENworks 10 Configuration Management Installation Guide.
6.6 Deleting a ZENworks Primary Server
If you cannot run the uninstallation program to uninstall a ZENworks Primary Server, you can delete
it from the Server Hierarchy panel.
WARNING: Use extreme caution when deleting a ZENworks Primary Server from your ZENworks
system.
76 ZENworks 10 Configuration Management System Administration Reference

Deleting a ZENworks Primary Server is irreversible. The preferred way to decommission a Primary
Server is to run the uninstallation program from the Server. Deleting a Primary Server should only
be used if the uninstallation program cannot be run (for example, if the Primary Server experiences a
hard drive failure). For more information about running the uninstallation program, see
“Uninstalling ZENworks Software” in the ZENworks 10 Configuration Management Installation
Guide.
If you remove a Primary Server that hosts an internal ZENworks Sybase database, your entire
ZENworks Management Zone becomes inoperable.
If you remove a Primary Server on which the Patch Management subscription service is configured
to run, you must reset the Patch Management settings before deleting the server. For more
information on how to reset the Patch Management settings, see “Viewing Subscription Service
Information” in the ZENworks 10 Patch Management Reference.
Deleting a ZENworks Server completely removes the ZENworks Server from the Management
Zone. There is no recovery.
You can delete managed server and workstation devices by using the options on the Devices tab, as
explained in “Deleting Devices from Your ZENworks System” in the ZENworks 10 Configuration
Management Discovery, Deployment, and Retirement Reference.
novdocx (en) 16 April 2010
To remove a ZENworks Primary Server from your Management Zone:
1 In ZENworks Control Center, click the Configuration tab.
2 In the Server Hierarchy section, select the check box next to the Primary Server (you can select
multiple devices).
3 Click Action > Delete ZENworks Server.
6.7 ZENworks Server Reports
You must have installed ZENworks Reporting Server to view the predefined reports. For more
information on how to install ZENworks Reporting Server, see the ZENworks 10 Configuration
Management Reporting Server Installation Guide.
To view a predefined report for the ZENworks Server:
1 In ZENworks Control Center, click the Reports tab.
2 In the ZENworks Reporting Server panel, click ZENworks Reporting Server InfoView to launch
the ZENworks Reporting Server InfoView.
3 Navigate to the Novell ZENworks Reports folder > Predefined Reports > ZENworks System
folder.
The following predefined report is included for the ZENworks Server:
ZENworks Server Statistics: Displays server statistics such as database, disk space, CPU usage,
and various connection details that include total connections per day and average connections per
day.
For more information on creating and managing reports, see the ZENworks 10 Configuration
Management System Reporting Reference documentation.
ZENworks Server 77

novdocx (en) 16 April 2010
78 ZENworks 10 Configuration Management System Administration Reference

7
Satellites
A Satellite is a managed device that can perform some of the roles that a ZENworks® Primary
Server normally performs, including authentication, information collection, content distribution, and
imaging. A Satellite can be any managed Windows device (server or workstation), but not a Primary
Server. A Satellite can also be an unmanaged Linux device (server or workstation) that has the
ZENworks Agent for Linux installed. For more information, see “Satellite Requirements” in the
ZENworks 10 Configuration Management Installation Guide and “Deploying the ZENworks
Adaptive Agent” in the ZENworks 10 Configuration Management Discovery, Deployment, and
Retirement Reference.
When you configure a Satellite, you specify which roles it performs (Authentication, Collection,
Content, or Imaging). A Satellite can also perform roles that might be added by third-party products
that are snap-ins to the ZENworks 10 Configuration Management framework.
NOTE: The Imaging Satellite role is not supported for Windows 2000.
novdocx (en) 16 April 2010
7
You might, for example, create a Satellite in a location across a slow WAN link and create Closest
Server rules to offload one or more roles from the Primary Server to the newly created Satellite to
improve the performance of your ZENworks system.
NOTE: For information about Satellites from the perspective of an end user using the ZENworks
Adaptive Agent, see “Satellite Roles” in the Novell ZENworks Adaptive Agent Help.
The following sections contain more information:
Section 7.1, “Understanding the Satellite Roles,” on page 80
Section 7.2, “Adding and Configuring Satellite Devices,” on page 82
Section 7.3, “Removing the Roles from a Satellite,” on page 88
Section 7.4, “Removing Satellites from the Server Hierarchy,” on page 88
Section 7.5, “Specifying Content to Be Hosted,” on page 89
Section 7.6, “Manually Replicating Content from a Primary Server to Satellite Devices,” on
page 90
Section 7.7, “Moving a Satellite from One Primary Server to Another Primary Server,” on
page 90
Section 7.8, “Specifying a Different Repository for the Content Role Satellite (Windows
Only),” on page 91
Section 7.9, “Removing a Satellite Device,” on page 92
Section 7.10, “Refreshing a Satellite,” on page 92
Section 7.11, “Troubleshooting Satellites,” on page 92
Satellites
79

7.1 Understanding the Satellite Roles
A Satellite is a device that can perform some of the roles that a ZENworks Primary Server normally
performs, including authentication, information collection, content distribution, and imaging. The
following sections contain more information about each role:
Section 7.1.1, “Understanding the Authentication Role,” on page 80
Section 7.1.2, “Understanding the Collection Role,” on page 80
Section 7.1.3, “Understanding the Content Role,” on page 81
Section 7.1.4, “Understanding the Imaging Role,” on page 81
7.1.1 Understanding the Authentication Role
When users logged in to previous versions of ZENworks, they were authenticated to the
Management Zone by contacting the ZENworks Primary Server, which in turn contacted the user
source that contains the users.
Satellite devices with the Authentication role can now speed the authentication process by spreading
the workload among various devices and by performing authentication locally to managed devices.
You can have multiple Satellite devices with the Authentication role. In addition, each Satellite with
the Authentication role can have multiple user sources configured and each Satellite can have
multiple connections to each user source to provide failover.
novdocx (en) 16 April 2010
When a managed device uses a Satellite for authentication, the Satellite issues a certificate to the
managed device so that it can authenticate to the Management Zone using SSL.
On the managed device, the Authentication module is inactive until you promote the managed
device to be a Satellite with the Authentication role or until the Authentication role is added to an
existing Satellite.
NOTE: If a Satellite device performing the Authentication role is a member of a domain, all
managed devices authenticating to that Satellite must be members of the same domain.
7.1.2 Understanding the Collection Role
If you want to improve information roll-up access for a group of devices to minimize traffic to the
ZENworks Primary Server that is hosting the ZENworks database, you can enable the Collection
role on a device. For example, if you have devices that are rolling up information to a Primary
Server outside of their network segment, you can minimize network traffic by enabling the
Collection role on a device within the network segment to accept the information from the other
devices in that segment. That Collection role device is then the only device from that segment that is
rolling up information to the Primary Server.
You can enable the Collection role on any managed device. The Collection role requires only the
Collection role module that is installed with the ZENworks Adaptive Agent. The module is inactive
until you enable the Collection role on the managed device.
80 ZENworks 10 Configuration Management System Administration Reference

When you enable a Collection role on a device, you can assign any ZENworks Primary Server as its
parent server. The Collection role device uploads information only to its parent Primary Server. If
the parent Primary Server is not a child of another Primary Server, it writes the information directly
to the database. If the parent Primary Server is a child of another Primary Server, it passes the
information up to its parent Primary Server, which writes the information to the database.
A Satellite with the Collection role collects inventory information, messages (errors, warning,
informational, and so forth), and policy and bundle statuses, then rolls that information up to its
parent Primary Server, which in turn either writes to the database directly or passes the information
to its parent Primary Server, which does the database writing. The role includes a roll-up schedule
that you can edit.
On the managed device, the Collection module is inactive until you promote the managed device to
be a Satellite with the Collection role or until the Collection role is added to an existing Satellite.
7.1.3 Understanding the Content Role
Content consists of bundles, policies, system updates (ZENworks Server and Adaptive Agent), and
patches.
novdocx (en) 16 April 2010
If you want to improve content access for a group of devices without creating another Primary
Server, you can create the Content role on a device. For example, if you have devices that are
accessing a Primary Server outside of their network segment, you can create the Content role on a
device within the network segment to service those devices.
The Content role provides the same content delivery service as a Primary Server but requires only
the Content role module that is installed with the ZENworks Adaptive Agent. The module is
inactive until you enable it on the managed device.
When you enable the Content role on a device, you assign a Primary Server as its parent content
server. The Content role Satellite downloads content only from its parent Primary Server. Therefore,
any content you want hosted on a Content role Satellite must also be hosted on its parent Primary
Server.
On the managed device, the Content module is inactive until you promote the managed device to be
a Satellite with the Content role or until the Content role is added to an existing Satellite.
7.1.4 Understanding the Imaging Role
The Imaging role installs the Imaging services and adds the Imaging role to the device. With this
role, the device can be used as an Imaging server to perform all Imaging operations, such as taking
an image and applying an image within or across subnets by using unicast or multicast imaging.
The Imaging role can be used to achieve load balancing for the Primary Server, and also to support
cross-subnet imaging. The Satellite uses ZENworks Control Center to communicate with the
Primary Server for Imaging operations in the Auto mode.
On the managed device, the Imaging module is inactive until you promote the managed device to be
a Satellite with the Imaging role or until the Imaging role is added to an existing Satellite. This
activates the Imaging services on the device, and enables you to perform the Imaging operations in
auto and maintenance mode. The Imaging services installed on the device include TFTP, Preboot
policy, pbserv, and proxy DHCP. All services, except for proxy DHCP, are automatically started.
You can manually start or stop the proxy DHCP service from ZENworks Control Center.
Satellites 81
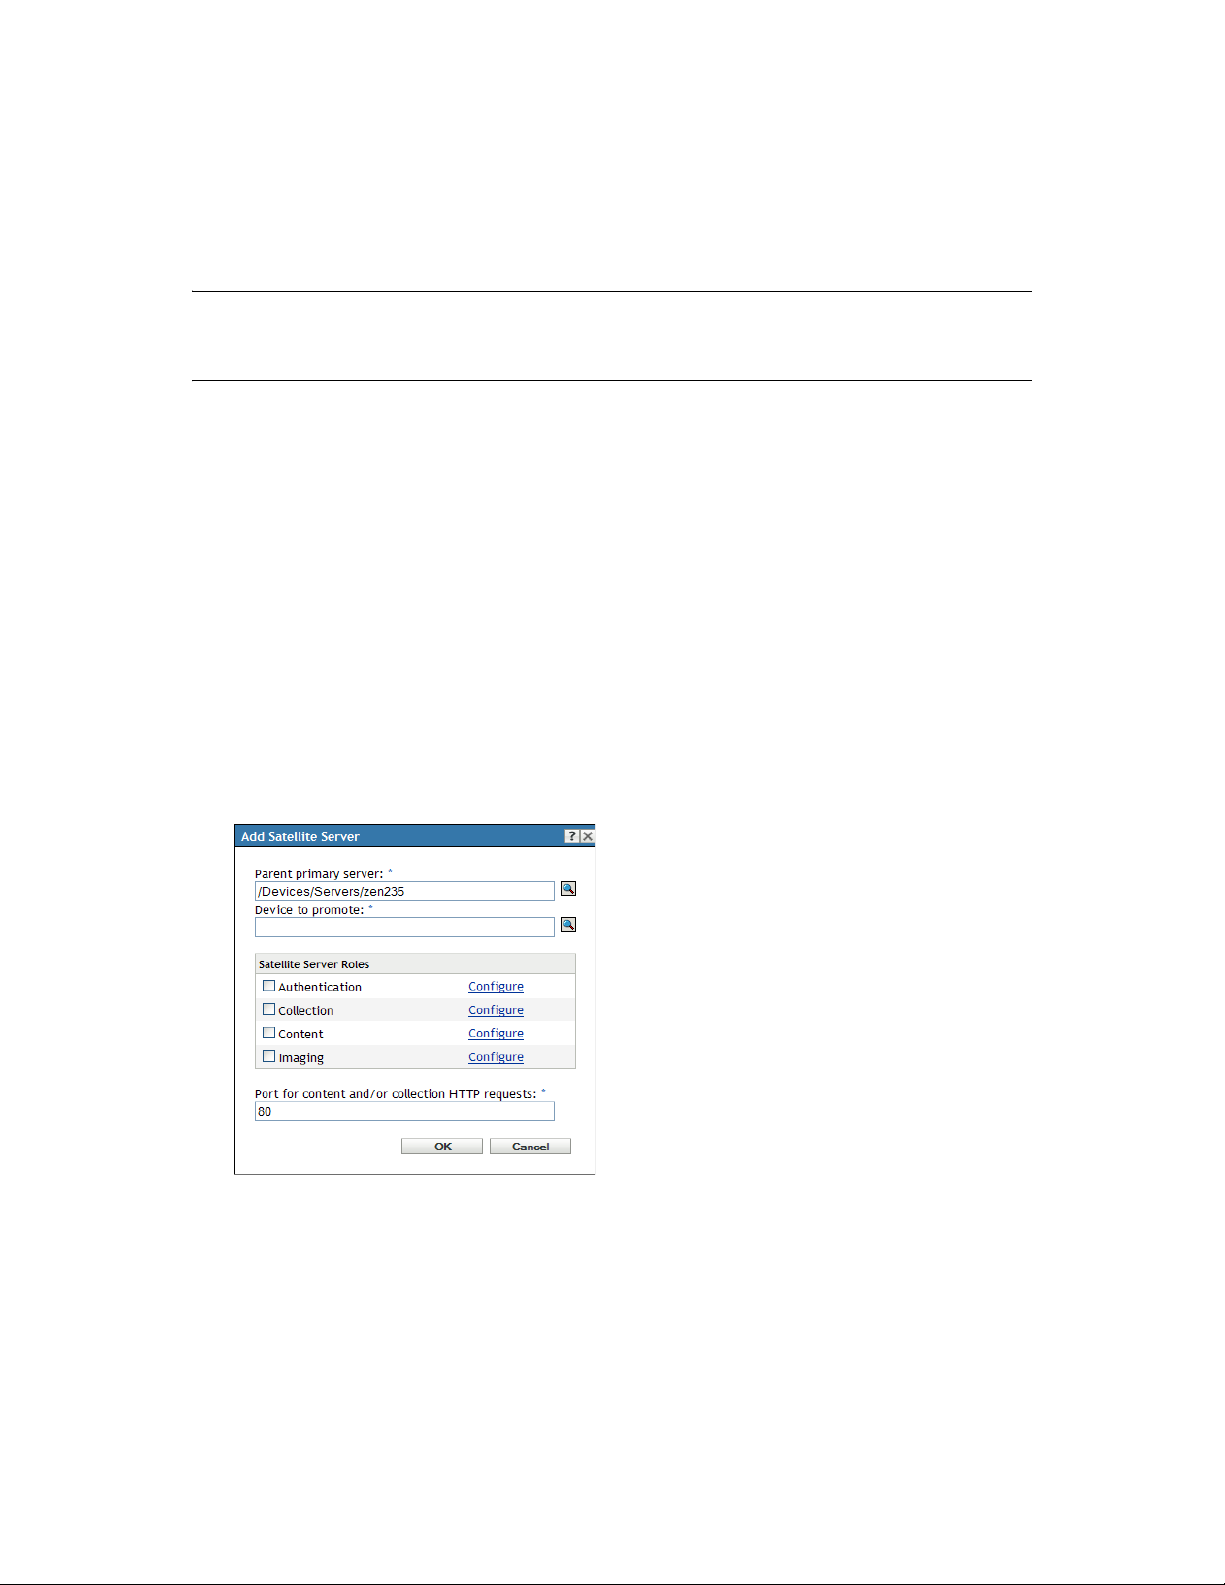
7.2 Adding and Configuring Satellite Devices
You can create a new Satellite device or configure an existing Satellite with the Authentication,
Content, Imaging, and Collection roles, change its default port, and adjust the schedules for the
roles. You can also remove roles from an existing Satellite.
IMPORTANT: Before promoting a managed device as Satellite, ensure that the ZENworks 10
Configuration Management version installed on the managed device is same as that of the Primary
Server.
1 To add a new Satellite into the Server Hierarchy panel, in ZENworks Control Center, click the
Configuration tab. In the Server Hierarchy panel, select the check box next to the desired
Primary Server, click Action, then click Add Satellite Server.
or
To configure an existing Satellite from the Server Hierarchy panel, in ZENworks Control
Center, click the Configuration tab. In the Server Hierarchy panel, select the check box next to
the Satellite that you want to configure, click Action, then click Configure Satellite Server.
You can only configure one Satellite at a time.
novdocx (en) 16 April 2010
or
To configure an existing Satellite from the device view, in ZENworks Control Center, click the
Devices tab, then on the Managed tab, click either Servers or Workstations. In the Servers or
Workstations panel, select the check box for the Satellite that you want to configure, click
Action, then click Configure Satellite Server.
You can only configure one Satellite at a time.
Depending on whether you are adding a new Satellite device or configuring an existing device,
the title of the dialog box is different (Add Satellite Server or Configure Satellite Server). The
settings and options on each page are similar.
2 (Conditional) To remove Satellite roles from a device, uncheck the desired role in the Satellite
Server Roles section, then click OK.
You can also use the
from a Satellite. For more information, see “Satellite Commands” in the ZENworks 10
Configuration Management Command Line Utilities Reference.
82 ZENworks 10 Configuration Management System Administration Reference
zman satellite-server-delete (ssd)
command to remove roles

3 (Conditional) To add a role to a Satellite, select the desired role in the Satellite Server Roles
section.
If the Configure link is disabled for any role, that role is disabled for this device. For example,
if the Satellite’s parent Primary Server does not have the Collection role, the Satellite’s
Collection role is disabled and cannot be configured. Non-configurable roles that a managed
device performs are also listed in the dialog box but cannot be edited.
See the following sections for more information about each role:
Section 7.2.1, “Authentication Role,” on page 83
Section 7.2.2, “Collection Role,” on page 84
Section 7.2.3, “Content Role,” on page 84
Section 7.2.4, “Imaging Role,” on page 86
4 (Optional) In the Port for Content and/or Collection HTTP Requests field, specify the port
number.
The default port is 80. Content and Collection servers share the same Web server and the same
port. Make sure that the specified port is not in use.
5 (Optional) In the Port for authentication Secure HTTPS requests field, specify the port number.
The default port is 443. This is the port on which the Satellite device listens while
communicating with the managed devices. Make sure that the specified port is not in use.
novdocx (en) 16 April 2010
6 Click OK to save your changes and exit the dialog box.
7 Repeat the previous steps to configure other Satellites.
7.2.1 Authentication Role
This role helps speed the authentication process by spreading the workload among various devices
and by performing authentication locally to managed devices.
NOTE: If you are using an external certificate for the Satellite device, you must import the
certificate by using the
zac import-authentication-cert (iac)
the Authentication role.
1 (Optional) To configure the Authentication role on a Satellite, select the check box next to
Authentication, click Configure to display the Configure Authentication dialog box.
2 Specify the authentication port.
3 Select a user source from the User Source drop-down list.
4 Click Add to display the Add User Source Connections dialog box.
Fill in the fields:
Connection Name: (Optional) Specify all or part of the name for the connection to the LDAP
directory, then click Filter to display the list of connections that match the criteria.
If you have many connections in your ZENworks Management Zone, you can use the
Connection Name field to display only those connections that match the criteria. For example,
to display all connections that contain the word “London,” type
Name field, then click Filter.
command before configuring
London
in the Connection
Satellites 83

Connection Address: (Optional) Specify part of the IP address or DNS hostname of the
connection to the LDAP directory, then click Filter to display all connections with that IP
address.
If you have many connections in your ZENworks Management Zone, you can use the
Connection Address field to display only those connections that match the criteria. For
example, to search for and display all connections that have an IP address starting with 172,
type 172 in the Connection Address field, then click Filter.
User Source Connections: Select the check box next to the connection you want to add.
5 Click OK to return to the Configure Authentication dialog box.
6 (Optional) Reorder the connections in the User Source Connection list by selecting a
connection’s check box, then clicking Move Up or Move Down.
The device uses the connections in the order they are listed to authenticate the device to the
ZENworks Management Zone.
7 Click OK to return to the Add Satellite Server or Configure Satellite Server dialog box.
8 Continue with Step 4 on page 83.
novdocx (en) 16 April 2010
7.2.2 Collection Role
This role causes the device to collect inventory information, messages (errors, warning,
informational, and so forth), and policy and bundle statuses, then rolls that information up to its
parent Primary Server, which in turn either writes to the database directly or passes the information
to its parent Primary Server, which does the database writing.
1 Select the check box next to Collection, then click Configure.
2 Fill in the field:
Collection Roll-Up Schedule: Specify the number of days, hours, and minutes for how often
you want the collected data to be rolled up from the devices that use it as a collection server.
The Collection Roll-Up schedule determines how often the collected inventory information is
rolled up to the parent Primary Server for inclusion in the ZENworks database. When the
information is in the database, it is viewable in ZENworks Control Center.
To specify the devices that use the Collection Roll-Up role, configure the Closest Server Rules
setting in the Management Zone settings on the Configuration page.
3 Click OK.
4 Continue with Step 4 on page 83.
7.2.3 Content Role
This role enables the managed device to distribute content (bundles, policies, system updates, and
patches) to other devices.
When you set up a device to function with a Content role, you must specify a Primary Server as its
parent. The device with the Content role receives all content from its parent Primary Server. Any
content you want hosted on a Satellite with the Content role must also be hosted on its parent
Primary Server. If the content is not hosted on the new Primary Server, it is added.
84 ZENworks 10 Configuration Management System Administration Reference

To specify the devices that need content from this Satellite, configure the Closest Server Rules
setting in the Management Zone settings on the Configuration page.
1 Select the check box next to Content, click Configure, then click Add.
Fill in the fields:
Content Type: Select a Content Type (for example, Policy, Non-Patch Bundles, or System
Update Server).
NOTE: If you choose Imaging as the Content Type and configure the settings to replicate the
Imaging content, these settings are automatically reflected in the Configure Imaging Content
Replication dialog box invoked while configuring the Imaging role to the device. Similarly, the
Imaging content replication settings configured while configuring the Imaging role to a device
are automatically reflected in the Configure Content Type Replication dialog box invoked
while configuring the Content role with the Imaging content type to the device.
Throttle (in KB/sec): Select the throttle rate. This rate specifies the maximum rate at which
content is replicated. The actual rate can be lower, depending on other factors, including the
number of downloads.
Duration: Click the up-arrow or down-arrow to set the content update duration period in
minutes. Depending on the Schedule Type and its options you select, you need to be aware of
the following:
The End Time setting in all three scheduling types (Days of the Week, Month, and Fixed
Interval) is not the true end time when the content update stops processing. The end time
specifies the end of the time period during which an update can start.
If you select Days of the Week or Month and set a random start and end time, the update
starts between these times and continues for the specified duration. For example, if the
Duration is set at the default of 60 minutes and the update starts 10 minutes before the
specified end time, content is updated for the entire 60 minutes. The same concept applies
for the Fixed Interval schedule. If Duration is set at the default of 60 minutes and the end
time does not allow enough time for the specified duration, content is updated for the
entire 60 minutes.
novdocx (en) 16 April 2010
If the Primary Server contains too much content to update during the specified duration,
the update continues at the next regularly scheduled time. Content that already exists on
the Satellite device is not updated again. Content that was not updated during the previous
update and any new content added to the Primary Server is updated.
Schedule Type: Select a schedule for how often you want the Satellite’s content to be updated
from the parent Primary Server:
No Schedule: If you select No Schedule, content is never automatically updated from the
parent Primary Server. To manually replicate the content run the
zac wake-cdp (cdp)
command on the Satellite.
Recurring: Select Days of the Week, Monthly, or Fixed Interval, then fill in the fields. For
more information, see Section B.4, “Recurring,” on page 365.
Be aware that the cleanup action for content occurs every night at midnight.
If you do not set a schedule for a particular type of content, the <Default> schedule applies to
all content of that type.
2 Click OK twice to return to the Add Satellite Server or Configure Satellite Server dialog box.
3 Continue with Step 4 on page 83.
Satellites 85

4 (Optional) Specify the content to host on the Content Server. For more information, see
Section 29.4, “Including or Excluding Content,” on page 246.
If you want to specify the content that the Satellite hosts, you can include or exclude content
from being replicated to it.
If you want to include content that its parent Primary Server does not have, you must first add
the content to the parent Primary Server.
7.2.4 Imaging Role
Selecting this option installs the Imaging services and adds the Imaging role to the device. With this
role, the device can be used as an Imaging server to perform all the Imaging operations, such as
taking an image, applying an image, and multicasting an image. However, the ZENworks images are
not replicated from the Primary Server to Imaging Satellites.
NOTE: The Imaging role is tied to the state of your ZENworks Configuration Management license.
If your license state is deactivated, the Imaging role is disabled. For example, if you have a licensed
copy of ZENworks Asset Management and you are evaluating ZENworks Configuration
Management, the Imaging role is disabled if your ZENworks Configuration Management license
expires. For more information, see Section 33.5, “Possible License State Changes,” on page 287.
novdocx (en) 16 April 2010
1 Select the check box next to Imaging, then click Configure.
2 (Conditional) Select the check box next to Enable PXE Services to automatically start the
Proxy DHCP service on the device to which the Imaging Server role has been assigned.
To check whether the Proxy DHCP service has been started on the device, review the message
log of the device (Devices tab > Workstations folder > click the workstation > Summary >
Message Log panel).
3 (Conditional) Select the check box next to Delete Image Files from the Server if Imaging Role
is Removed if you want the ZENworks image files to be automatically deleted from the device
when the Imaging role is removed from the device.
The messages are logged in the Message Log panel if the severity level of the local file and the
system log is set to Information and Above on the Local Device Logging page. (Configuration
tab > Device Management > Local Device Logging).
This option is available only when you want to remove the Imaging Server role from the
device.
4 Click Options next to Configure Imaging Content Replication to launch the Configure Imaging
Content Replication dialog box.
The Configure Imaging Content dialog box lists a default configuration that applies to the
imaging content, with a fixed interval schedule of every five minutes, no throttling, and a 60minute content replication period.
5 Configure the Imaging content replication settings.
5a Select a throttle rate (in KB/sec). This rate specifies the maximum rate at which content is
replicated. The actual rate can be lower, depending on other factors, including the number
of downloads.
5b Select the duration of the content replication.
86 ZENworks 10 Configuration Management System Administration Reference

When you set the duration, be aware of the following:
The End Time setting in all three scheduling options in the Recurring schedule type
(Days of the Week, Month, and Fixed Interval) is not the end time when the content
stops replicating. The start and end time settings specify the time period during which
a replication can start.
If you select Days of the Week or Month and set a random start and end time, the
replication starts between these times and continues for the specified duration. For
example, if the Duration is set at the default of 60 minutes and replication starts 10
minutes before the specified end time, content is replicated for the entire 60 minutes.
The same concept applies for the Fixed Interval schedule. If Duration is set at the
default of 60 minutes and the end time does not allow enough time for the specified
duration, content is replicated for the entire 60 minutes.
If the Primary Server contains too much content to replicate during the specified
duration, the replication continues at the next regularly scheduled time. Content that
already exists on the Satellite device is not replicated again. Content that was not
replicated during the previous replication session and any new content added to the
Primary Server is replicated.
5c Select a schedule (No Schedule or Recurring.
novdocx (en) 16 April 2010
The Imaging Content Replication schedule determines how often the imaging content is
sent down from the parent Primary Server to its child Satellite. Be aware that the cleanup
action for content occurs every night at midnight.
If you do not set a schedule, the <Default> schedule applies to the Imaging content.
5d Click OK to save the changes.
NOTE: You can also configure the Imaging content replication settings while configuring
the Content role to a device. These settings are automatically reflected in the Configure
Imaging Content Replication dialog box invoked while configuring the Imaging role to
the device. Similarly, the Imaging content replication settings configured while
configuring the Imaging role to a device are automatically reflected in the Configure
Content Type Replication dialog box invoked while configuring the Content role with
Imaging content type to the device.
6 Click OK.
7 (Conditional) If you configure the Imaging role, the role is immediately added to the device. If
the role is not immediately added, it is added only during the next device refresh schedule. If
you want to immediately apply the role to the device, manually refresh the device in one of the
following ways:
In the Configuration tab > the Server Hierarchy, select the check box next to the devices
you want to refresh, then click Action > Refresh Device.
On the Windows managed device, right-click the icon, then click Refresh.
On the Linux unmanaged device, open a terminal, change your current working directory
/opt/novell/zenworks/bin/
to
, and execute
./zac ref
.
To check whether the Proxy DHCP service has been started on the device, review the message
log of the device (Devices tab > Workstations folder > click the workstation > Summary >
Message Log panel or Devices tab > Servers folder > click the server > Summary > Message
Log panel).
Satellites 87

The messages are logged in the Message Log panel only if the severity level of the local file
and the system log is set to Information and Above on the Local Device Logging page.
(Configuration tab > Device Management > Local Device Logging).
8 (Conditional) If the Linux Satellite has the Imaging role configured, turn off the firewall on the
device before performing imaging operations.
7.3 Removing the Roles from a Satellite
You can choose to remove one or more roles from a Satellite. However, the Satellite must have at
least one role configured for it to continue to perform the Satellite function. If you remove all the
roles, the Satellite is demoted to be only managed device.
Removing a Satellite role does not remove the device from any of the non-default Closest Server
rules. The device is removed from the non-default Closest Server rules only when it is no longer a
Satellite.
To remove one or more roles from a Satellite:
1 In ZENworks Control Center, click the Configuration tab.
novdocx (en) 16 April 2010
2 In the Server Hierarchy panel, select the check box next to the Satellite from which you want to
remove the role.
3 Click Actions > Configure Satellite Server.
4 In the Configure Satellite Server dialog box, deselect the check box next to the Satellite role
you want to remove.
5 Click OK.
7.4 Removing Satellites from the Server Hierarchy
You can remove a Satellite from the Server Hierarchy listing when that device is no longer needed to
perform Satellite functions. The device’s object isn’t removed from ZENworks; it is just removed
from the Server Hierarchy listing. However, removing a Satellite from the hierarchy listing does
cause the content, imaging, or collection roll-up information to be removed from the device.
When you remove a Satellite, the managed devices that used it must be reconfigured to use another
server for content and collection purposes. For more information, see Chapter 9, “Closest Server
Rules,” on page 99.
You cannot use this option to remove a Primary Server from the listing.
To remove a Satellite:
1 For the Satellite that you want to remove, make a note of all devices that are using it for content
and collection information roll-up.
2 In ZENworks Control Center, click the Configuration tab.
3 In the Server Hierarchy panel, select the check box next to the Satellite that you want to remove
from the zone.
4 Click Action > Remove Satellite Server.
88 ZENworks 10 Configuration Management System Administration Reference

5 To confirm the removal, click OK.
6 As necessary, reconfigure the managed devices that used the Satellite so that they can continue
to receive content and roll up collection information.
For more information, see Chapter 9, “Closest Server Rules,” on page 99.
7 (Conditional) The Imaging role is immediately removed from the device. If the role is not
immediately removed, it is removed only during the next device refresh schedule. If you want
to immediately remove the role from the device, manually refresh the device in one of the
following ways:
In the Configuration tab > the Server Hierarchy, select the check box next to the devices
you want to refresh, then click Action > Refresh Device.
On the Windows managed device, right-click the icon, then click Refresh.
On the Linux unmanaged device, open a terminal, change your current working directory
/opt/novell/zenworks/bin/
to
, and execute
./zac ref
.
novdocx (en) 16 April 2010
7.5 Specifying Content to Be Hosted
Because Content role devices retrieve their content from their parent Primary Servers, any content
that you want hosted on a Satellite must also be hosted on its parent Primary Server.
You can specify the content that is included or excluded on specific Primary Servers or Satellites
performing the Content role.
When you create relationships between content and content servers (ZENworks Primary Servers and
Satellites) by using the Select Content to Update Wizard, these relationships override any existing
relationships. For example, assume that you want Bundle A and Policy B to be hosted on Server 1
but not on Server 2. Currently, the content is hosted on both servers. You select Bundle A and Policy
B, then use the Select Content to Update Wizard to include the content on Server 1 and exclude it
from Server 2. During the next scheduled replication, Bundle A and Policy B are removed from
Server 2.
To specify the content to be hosted:
1 In ZENworks Control Center, click the Configuration tab. In the Server Hierarchy section,
select the check boxes next to the Satellites with the Content role that you want to designate as
the hosts for one or more pieces of content.
2 Click Action > Specify Content to launch the Select Content to Update Wizard.
Satellites 89

3 In the Available Content list, select the desired content.
You can use Shift+click and Ctrl+click to select multiple bundles or policies.
4 Click to move the selected content to the Selected Content list.
5 Click Next.
6 Click Finish to create the relationships between the content and the content servers.
novdocx (en) 16 April 2010
Depending on the relationships created, the content is replicated to or removed from content servers
during the next scheduled replication.
7.6 Manually Replicating Content from a Primary Server to Satellite Devices
You can export content from a ZENworks Primary Server’s content repository and then manually
import that content into a Satellite device’s content repository. This process is sometimes called
offline content replication.
For more information about exporting content from the content repository, see the
satellite-server-export-content (ssec)
ZENworks 10 Configuration Management Command Line Utilities Reference. After you export the
content, you can copy it to a network drive or to a storage device and then manually import the
content into the Satellite device’s content repository.
For more information about importing the content into a Satellite device’s content repository, see the
zac cdp-import-content (cic)
ZENworks 10 Configuration Management Command Line Utilities Reference.
You cannot manually export content from one ZENworks Primary Server and then import that
content into another Primary Server. For information about replicating content between Primary
Servers, see Chapter 29, “Content Replication,” on page 243.
command under “Content Distribution Commands” in the
command under “Satellite Commands” in the
zman
7.7 Moving a Satellite from One Primary Server to Another Primary Server
You can move a Satellite from its parent Primary Server to another Primary Server.
1 In ZENworks Control Center, click the Configuration tab.
90 ZENworks 10 Configuration Management System Administration Reference

2 In the Server Hierarchy panel, select the check box next to the Satellite that you want to move,
then click Move.
3 Select the Primary Server you want to be the Satellite’s new parent, then click OK.
Any content (bundles, policies, and patches) you want hosted on a Satellite with the Content role
must also be hosted on its parent Primary Server. If the content is not hosted on the new Primary
Server, it is added.
7.8 Specifying a Different Repository for the Content Role Satellite (Windows Only)
The content repository is located in the following default path on Windows Satellites:
installation_path\zenworks\work\content-repo
To change the default path to another location accessible to the server:
1 Make sure that the disk drive you want to use is attached to the Satellite and is properly
formatted.
novdocx (en) 16 April 2010
You do not need to specify a drive letter, but the server must recognize the hardware.
2 Make sure that there is no content in the default location
installation_path\zenworks\work\content-repo
(
If the
If you need to save the content that is now in this directory, rename the existing directory
content-repo
directory in that path.
repo
directory is not present in the path given above, create the
and create a new empty directory named
content-repo
) by doing one of the following:
content-
.
You can later copy the content from the renamed directory to the new content repository
location (see Step 9).
If you do not need any of the content in the existing
directory and re-create the
An empty
content-repo
content-repo
directory must exist to act as the pointer to the new content
directory.
content-repo
directory, delete the
repository location for the Satellite.
3 Click Start, right-click the My Computer icon, then select Manage.
You can also click Start, then enter
compmgmt.msc
at the Run command line.
4 Select Disk Management under the Storage section in the left pane.
The disk drive you selected in Step 1 should be displayed.
5 Right-click the partition of the disk drive that you want to use as your content repository on the
Satellite, then select Change Driver Letter and Paths.
This is the disk drive (see Step 1) that you will mount to the
content-repo
directory.
6 Click Add.
This displays the Add Drive Letter or Path dialog box.
7 Select Mount in the Following Empty NTFS Folder, then browse for and select the
directory:
repo
installation_path\zenworks\work\content-repo
8 Click OK as necessary to exit and save the configuration change.
content-
Satellites 91

novdocx (en) 16 April 2010
9 If necessary (see Step 2), move the files from the old renamed
content-repo
new
This copies the files to the hard drive that you have selected for your new content repository.
directory.
content-repo
directory to the
7.9 Removing a Satellite Device
You can remove any Satellite from the Management Zone that is listed in the Server Hierarchy
panel. When you remove a Satellite, the roles of this device are removed, but the device is still a
managed device in your ZENworks Management Zone.
For more information about deleting a Primary Server, see Section 6.6, “Deleting a ZENworks
Primary Server,” on page 76.
1 In ZENworks Control Center, click the Configuration tab. In the Server Hierarchy section,
select the check box next to the Satellite device that you want to delete.
2 Click Action > Remove Satellite Server.
3 Confirm that you want to completely delete the server, then click OK.
7.10 Refreshing a Satellite
You can refresh a device so that any pending actions take place immediately.
1 Select the check box next to the Satellite that you want to refresh.
2 Click Action > Refresh Device.
The QuickTask Status box is displayed while the action is in progress.
3 (Optional) To close the status dialog box, click Hide.
The refresh action continues in the background.
4 (Optional) To cancel the refresh action, click the check box for the device, click Stop, then click
Hide to close the dialog box.
7.11 Troubleshooting Satellites
The following section provides solutions to the problems you might encounter while working with
Satellites:
“Unable to add a Satellite with the Imaging role to a Windows managed device by using the
zman ssc command” on page 93
“Unable to remove a Satellite with the Imaging role from a Windows device by using the zman
ssd command” on page 93
“The managed device is not promoted to the Imaging Satellite role even though the role has
been assigned to it” on page 93
“Updated Imaging statistics are not displayed on the ZENworks icon when a Windows Vista
SP2 managed device is promoted to be a Satellite with the Imaging role” on page 93
“Editing the Content Replication schedule that is set to “No Schedule” results in Null Pointer
Exception if the ZENworks database is running on Oracle” on page 94
92 ZENworks 10 Configuration Management System Administration Reference

Unable to add a Satellite with the Imaging role to a Windows managed device by
using the zman ssc command
Source: ZENworks 10 Configuration Management; Satellite.
Action: To promote a Windows managed device to be a Satellite with the Imaging role,
use the
zman ssaimg
command.
novdocx (en) 16 April 2010
For more information about the
page (
man zman
) on the ZENworks Server or see “Satellite Commands” in the
zman ssaimg
command, view the zman man
ZENworks 10 Configuration Management Command Line Utilities Reference.
Unable to remove a Satellite with the Imaging role from a Windows device by using
the zman ssd command
Source: ZENworks 10 Configuration Management; Satellite.
Action: To remove the Imaging Satellite role from a Windows managed device, use the
zman ssrimg
command.
This command does not remove other Satellite roles such as Content or
Collection if they are assigned to the device.
For more information about the
page (
man zman
) on the ZENworks Server or see “Satellite Commands” in the
zman ssrimg
command, view the zman man
ZENworks 10 Configuration Management Command Line Utilities Reference.
The managed device is not promoted to the Imaging Satellite role even though the
role has been assigned to it
Source: ZENworks 10 Configuration Management; Satellite.
Possible Cause: The managed device is unable to contact the Primary Server because of the
firewall settings configured on the managed device.
Action: Do the following on the managed device:
1 Disable the firewall settings.
2 Ping the Primary Server to make sure that the managed device can contact
the server.
3 Refresh the information on the icon by right-clicking the icon, then
clicking Refresh.
Updated Imaging statistics are not displayed on the ZENworks icon when a Windows
Vista SP2 managed device is promoted to be a Satellite with the Imaging role
Source: ZENworks 10 Configuration Management; Satellite.
Explanation: When you promote a Windows Vista SP2 managed device to be a Satellite
with the Imaging role, any updated Imaging statistics are not displayed on the
icon (Show Properties > Satellite > Imaging)
Action: To view the latest Imaging statistics on the Satellite:
1 At the console prompt, go to
ZENworks_installation_directory\novell\zenworks\bin\prebo
.
ot
Satellites 93

2 Run the following command:
zmgmcast -status -i Satellite_IP_address
Editing the Content Replication schedule that is set to “No Schedule” results in Null
Pointer Exception if the ZENworks database is running on Oracle
Source: ZENworks 10 Configuration Management; Satellite.
Explanation: If ZENworks database is running on Oracle, and the Content Replication
schedule for a satellite is set to No Schedule, you would encounter the Null
Pointer Exception when you edit the schedule by using ZENworks Control
Center.
novdocx (en) 16 April 2010
Action: To edit the Content Replication schedule, use the
For more information about the zman ssucrs command, see “Satellite
Commands” in the ZENworks 10 Configuration Management Command Line
Utilities Reference
zman ssucrs
command.
94 ZENworks 10 Configuration Management System Administration Reference

8
Server Hierarchy
Your Management Zone’s server hierarchy determines the relationships among the ZENworks®
Primary Servers and Satellites. These relationships control the flow of content and information
within the zone. Proper configuration can help you to minimize network traffic between network
segments connected by slow links.
Section 8.1, “Primary Servers: Peer Versus Parent/Child Relationships,” on page 95
Section 8.2, “Satellite Role Relationships,” on page 95
Section 8.3, “Changing the Parent-Child Relationships of Primary Servers,” on page 96
8.1 Primary Servers: Peer Versus Parent/Child Relationships
By default, each Primary Server that you add to the system is created as a peer to all other Primary
Servers. Being in a peer relationship enables a Primary Server to:
novdocx (en) 16 April 2010
8
Have direct write access to the ZENworks database so that it can add information (inventory,
messages, and status).
Retrieve device configuration information directly from the database.
Pull content (bundles, policies, system updates, and patches)from any Primary Server.
Direct write access to the ZENworks database requires a JDBC*/ODBC connection. If a Primary
Server is located on the network so that it cannot effectively access the ZENworks database via a
JDBC/ODBC connection, you can configure the Primary Server to be a child of another Primary
Server that does have direct write access to the database. However, you should try to maintain peer
relationships between your Primary Servers unless your network connections do not allow it.
Being in a child relationship instructs a Primary Server to use HTTP to roll up inventory, message,
and status information to its parent Primary Server, which then writes the information to the
database. However, the child Primary Server still retrieves configuration information from the
database and passes configuration information back up to the database. For this reason, the child
Primary Server must have a direct connection to the ZENworks database.
We do not recommend having a Primary Server across a WAN link from the ZENworks database
because this causes increased traffic across the network. We recommend that you use a Satellite
device across a WAN link. For more information, see Section 8.2, “Satellite Role Relationships,” on
page 95.
8.2 Satellite Role Relationships
A Satellite is a device that can perform certain roles that a ZENworks Primary Server normally
performs. A Satellite can be any managed Windows device (server or workstation), but not a
Primary Server. A Satellite can also be an unmanaged Linux device (server or workstation). When
you configure a Satellite, you specify which roles it performs (Authentication, Collection, Content
or Imaging). A Satellite can also perform roles that might be added by third-party products that are
snap-ins to the ZENworks 10 Configuration Management framework. For more information about
the tasks you can perform on Satellites, see Chapter 7, “Satellites,” on page 79.
Server Hierarchy
95

The following sections contain more information:
Section 8.2.1, “Authentication Role Sever Relationships,” on page 96
Section 8.2.2, “Content Role Server Relationships,” on page 96
Section 8.2.3, “Collection Role Server Relationships,” on page 96
Section 8.2.4, “Imaging Role Server Relationships,” on page 96
8.2.1 Authentication Role Sever Relationships
An Authentication role identifies a managed device that is able to authenticate devices to the
ZENworks Management Zone. When you set up a device to function with a Authentication role, you
must specify a Primary Server as its parent.
8.2.2 Content Role Server Relationships
A Content role identifies a managed device that is able to distribute content (bundles, policies,
system updates, and patches) to other devices. When you set up a device to function with a Content
role, you must specify a Primary Server as its parent. The device with the Content role receives all
content from its parent Primary Server.
novdocx (en) 16 April 2010
8.2.3 Collection Role Server Relationships
A Collection role causes a managed device to collect inventory information, messages (errors,
warning, informational, and so forth), and policy and bundle statuses, then rolls that information up
to its parent Primary Server, which in turn either writes to the database directly or passes the
information on to its parent Primary Server, which does the database writing.
8.2.4 Imaging Role Server Relationships
An Imaging role causes a managed device to take and restore images within as well as across
subnets by using unicast or multicast imaging.
8.3 Changing the Parent-Child Relationships of Primary Servers
You can move a Primary Server to be a peer or child of other Primary Servers:
Section 8.3.1, “Making a Primary Server a Child,” on page 96
Section 8.3.2, “Making a Primary Server a Peer,” on page 97
8.3.1 Making a Primary Server a Child
You can place a Primary Server as a child of another Primary Server. This child Primary Server no
longer writes collection data directly to the ZENworks database; instead, it passes its information on
to its parent Primary Server, which does the database writing. However, the child Primary Server
still retrieves configuration information from the database and passes configuration information
back up to the database. For this reason, the child Primary Server must have a direct connection to
the ZENworks database
96 ZENworks 10 Configuration Management System Administration Reference

To make a Primary Server a child of another server:
1 In ZENworks Control Center, click the Configuration tab.
2 In the Server Hierarchy panel, select the check box next to the Primary Server you want to
make a child.
3 Click Move to display the Move Device dialog box.
4 Select the Primary Server that you want to be its parent server.
5 Click OK.
8.3.2 Making a Primary Server a Peer
This places the Primary Server back to the first level of the hierarchy, or moves it to be a child of
another Primary Server if it is nested more than one level deep.
If you move a Primary Server back to the first level, it writes directly to the ZENworks database.
1 In ZENworks Control Center, click the Configuration tab.
2 In the Server Hierarchy panel, select the check box next to the Primary Server you want to
make a peer.
novdocx (en) 16 April 2010
3 Click Move to display the Move Device dialog box.
4 Do one of the following:
Select None to move it up to the first level of servers in the listing.
Select another Primary Server to be the parent server.
5 Click OK.
Server Hierarchy
97

novdocx (en) 16 April 2010
98 ZENworks 10 Configuration Management System Administration Reference

9
Closest Server Rules
When you have multiple ZENworks Servers (Primary Servers and Satellites) in your environment,
you can use Closest Server rules to determine which ZENworks Server a managed device contacts
to perform the following functions:
Collection
Content
Configuration
Authentication
Closest Server rules help you improve load balancing between ZENworks Servers, perform failover,
and improve performance when there is a slow link between the managed devices and Servers.
The Closest Server rules let you map devices to ZENworks Servers based on network addresses
(DNS names and IP addresses).
novdocx (en) 16 April 2010
9
For example, you can create a rule that maps all devices to Server1 that fall within the IP address
range of 123.45.67.1 to 123.45.67.100.
The following sections provide information and instructions for setting up Closest Server rules:
Section 9.1, “Understanding Closest Server Rules,” on page 99
Section 9.2, “Configuring the Closest Server Default Rule,” on page 101
Section 9.3, “Creating Closest Server Rules,” on page 108
Section 9.4, “Backing Up Closest Server Rules,” on page 117
9.1 Understanding Closest Server Rules
When your ZENworks Management Zone includes more than one server (Primary Servers and
Satellites), devices need to know which server to contact. The Closest Server Rules panel lets you
create rules to determine which servers a device contacts.
With respect to Closest Server rules, devices that are configured as Satellites are considered as
servers and can be listed for selection in the Collection Servers, Content Servers and Authentication
Servers lists.
The following sections provide information you should understand before you start creating Closest
Server rules:
Section 9.1.1, “ZENworks Server Functions,” on page 100
Section 9.1.2, “Mapping Devices to Servers,” on page 100
Section 9.1.3, “Effective Rules,” on page 100
Closest Server Rules
99

9.1.1 ZENworks Server Functions
There following are basic functions for which devices contact a server:
Collection: Inventory and message log information is collected from each device, to be viewed
in ZENworks Control Center and output to reports. Each ZENworks Primary Server and any
Satellite can act as a collection server.
Content: Content is provided to managed devices. Each ZENworks Primary Server and any
Satellite can act as a content server.
Configuration: Configuration settings and registration information are applied to devices.
Only ZENworks Primary Servers can act as configuration servers.
Authentication: Managed devices contact a ZENworks Server to authenticate to the
Management Zone. Each ZENworks Primary Server and any Satellite can act as an
authentication server.
A device can contact the same server for all functions, or it can contact different servers for each
function.
novdocx (en) 16 April 2010
9.1.2 Mapping Devices to Servers
A Closest Server rule maps devices with specific network addresses to the following lists:
Collection Server list
Content Server list
Configuration Server list
Authentication Server list
For example, assume that you want to create a rule for devices that fall within the IP address range
of 123.45.678.1 to 123.45.678.100. You specify the IP address range, then create the following lists:
Collection Server List Content Server List Configuration Server List Authentication Server List
Server 1 Server 3 Server 1 Server 2
Server 2 Server 1 Server 3 Server 3
Server 3 Server 2 Server 1
Based on the lists, any device whose IP address falls within the range contacts Server 1 for
collection, Server 3 for content, Server 1 for configuration, and Server 2 for authentication. If any of
these servers are unavailable, the device contacts the next server in the list.
9.1.3 Effective Rules
You can configure Closest Server rules at three levels:
Management Zone: The rules are inherited by all device folders and devices.
Device Folder: The rules are inherited by all devices contained within the folder or its
subfolders. They override the Management Zone settings.
100 ZENworks 10 Configuration Management System Administration Reference
 Loading...