

Page 1

Red-Paper: POS/Retail Project
SUSE LINUX Retail Solution 8
(SLRS 8)
Admin Guide
F. Balzer, S. Duehr, T. Franke, R. Oertel,
G. Rieger, M. Schaefer, A. Schmidt
SUSE LINUX AG, Nuernberg
May 3, 2006
Revision: 1275
Page 2

Page 3

Contents
1 Introduction 7
2 Architectural Overview 9
2.1 Administration Server . . . . . . . . . . . . . . . . . . . . . . . 9
2.2 Branch Server . . . . . . . . . . . . . . . . . . . . . . . . . . . . 14
2.3 Cash Register . . . . . . . . . . . . . . . . . . . . . . . . . . . . 16
3 Quick Start Guide 21
3.1 Installation Process . . . . . . . . . . . . . . . . . . . . . . . . . 22
3.2 Installation of the Administration Server . . . . . . . . . . . . . 23
3.3 Installation of the Branch Server . . . . . . . . . . . . . . . . . 31
3.4 Test your SLRS System Environment . . . . . . . . . . . . . . . 38
4 Server Structure 43
4.1 Requirements . . . . . . . . . . . . . . . . . . . . . . . . . . . . 43
4.2 Architecture . . . . . . . . . . . . . . . . . . . . . . . . . . . . . 44
4.3 LDAP Structure . . . . . . . . . . . . . . . . . . . . . . . . . . . 44
4.4 Server Configuration and Server Services . . . . . . . . . . . . . 47
4.5 POS Scripts . . . . . . . . . . . . . . . . . . . . . . . . . . . . . 48
4.6 Cash Register Images . . . . . . . . . . . . . . . . . . . . . . . . 50
5 Setting up Administration and Branch Servers 55
5.1 Installation of the Administration Server . . . . . . . . . . . . . 55
5.2 Installation of the Branch Server . . . . . . . . . . . . . . . . . 61
5.3 Installation of the Highly Available Branch Servers . . . . . . . 65
6 Server Commands 71
6.1 posInitLdap.sh . . . . . . . . . . . . . . . . . . . . . . . . . . 72
6.2 posInitBranchserver.sh . . . . . . . . . . . . . . . . . . . . . 73
6.3 possyncimages.pl . . . . . . . . . . . . . . . . . . . . . . . . . 74
6.4 posldap2crconfig.pl . . . . . . . . . . . . . . . . . . . . . . . 75
6.5 posleases2ldap.pl . . . . . . . . . . . . . . . . . . . . . . . . 75
6.6 posldap2dns.pl . . . . . . . . . . . . . . . . . . . . . . . . . . 76
6.7 posldap2dhcp.pl . . . . . . . . . . . . . . . . . . . . . . . . . . 77
6.8 posReadPassword.pl . . . . . . . . . . . . . . . . . . . . . . . . 77
6.9 poscheckip.pl . . . . . . . . . . . . . . . . . . . . . . . . . . . 78
3
Page 4

Contents
7 PosAdmin 79
7.1 Basic Command Line Options . . . . . . . . . . . . . . . . . . . 79
7.2 Basic Actions . . . . . . . . . . . . . . . . . . . . . . . . . . . . 80
7.3 Managing Hardware . . . . . . . . . . . . . . . . . . . . . . . . 92
7.4 Managing Images . . . . . . . . . . . . . . . . . . . . . . . . . . 95
8 The imageBuilder 99
8.1 Overview of the POS_Image Packages . . . . . . . . . . . . . . . 99
8.2 Operating System Images . . . . . . . . . . . . . . . . . . . . . 101
8.3 Installing imageBuilder . . . . . . . . . . . . . . . . . . . . . . . 101
8.4 Copying the SLRS CDs into a Central Archive . . . . . . . . . . 102
8.5 Configuring the imageBuilder . . . . . . . . . . . . . . . . . . . 102
8.6 Prebuilt Standard Images . . . . . . . . . . . . . . . . . . . . . 103
9 The Boot Process of a Cash Register System 105
10 The scr tool 107
11 Creating Operating System Images 111
11.1 List All Image Descriptions . . . . . . . . . . . . . . . . . . . . . 112
11.2 Creating a Standard Image . . . . . . . . . . . . . . . . . . . . . 112
11.3 Creating a New Image Description Tree . . . . . . . . . . . . . . 113
11.4 Extending an Image . . . . . . . . . . . . . . . . . . . . . . . . 117
11.5 Manually Extending an Image . . . . . . . . . . . . . . . . . . . 119
11.6 Configuring an Image . . . . . . . . . . . . . . . . . . . . . . . 120
11.7 Distributing New Images . . . . . . . . . . . . . . . . . . . . . . 123
12 Preparing a CD-ROM Boot Image 125
12.1 Preparing the CR CD-ROM Boot Image . . . . . . . . . . . . . . 125
12.2 Creating the CD ISO Image . . . . . . . . . . . . . . . . . . . . 128
12.3 Booting the CR CD-ROM Boot Image . . . . . . . . . . . . . . . 129
13 Automatic Branch Server Installation 131
13.1 Server Preparation . . . . . . . . . . . . . . . . . . . . . . . . . 131
13.2 LDAP Data for the Branch Server . . . . . . . . . . . . . . . . . 132
13.3 XML Template File . . . . . . . . . . . . . . . . . . . . . . . . . 133
13.4 Tools . . . . . . . . . . . . . . . . . . . . . . . . . . . . . . . . . 134
13.5 Creating the Boot Media . . . . . . . . . . . . . . . . . . . . . . 135
14 Best Practices 137
14.1 Backup and Restore . . . . . . . . . . . . . . . . . . . . . . . . . 137
14.2 Access Control . . . . . . . . . . . . . . . . . . . . . . . . . . . 139
15 Advanced Topics 141
15.1 Operating System and Boot Image Details . . . . . . . . . . . . 141
15.2 Standard Images . . . . . . . . . . . . . . . . . . . . . . . . . . 142
15.3 Boot Images . . . . . . . . . . . . . . . . . . . . . . . . . . . . . 142
15.4 Naming and Storing Images . . . . . . . . . . . . . . . . . . . . 143
4
Page 5

Contents
15.5 Creating Images . . . . . . . . . . . . . . . . . . . . . . . . . . . 144
15.6 Booting the Cash Registers . . . . . . . . . . . . . . . . . . . . . 146
15.7 Thin Client Adminstration . . . . . . . . . . . . . . . . . . . . . 154
16 Troubleshooting 157
16.1 Server Infrastructure . . . . . . . . . . . . . . . . . . . . . . . . 157
16.2 Operating . . . . . . . . . . . . . . . . . . . . . . . . . . . . . . 159
A Installation RPM Lists 163
A.1 RPM Lists for Minimal Installations . . . . . . . . . . . . . . . . 163
A.2 RPM Lists for Default Installations . . . . . . . . . . . . . . . . 164
Index 177
5
Page 6

Contents
6
Page 7

1 Introduction
The SUSE LINUX Retail Solution 8 (SLRS 8) for Point of Sale (POS) Retail
Systems is based on the SUSE LINUX Enterprise Server 8 (SLES 8) and provides a complete SUSE LINUX operating system and management solution
for POS Cash Register Systems (CR). The SLRS architecture was designed to
use a central administration server for deployment and management and a
branch server infrastructure in each branch (office) for preinstall or in-store
deployment.
The administration server provides the following features:
• Central LDAP directory to manage POS terminals and servers
• Global and default parameters and application configuration
• POS Image creation and release management
The branch server provides the following features:
• Software transport for OS and application updates
• Multicast boot infrastructure for POS terminals
• Diskless and diskful POS clients
• AutoYaST installation and online update for server OS
• Option: Two-node high availability cluster with replicated data
Because this document comprises conceptual and user information, the following list of topics is provided for the reader:
• Architectural Overview — Chapter 2: The purpose of this chapter is
to provide an overview of the concept of the SLRS and the interaction of
the several components.
• Quick Start Guide — Chapter 3: Best point to start with the SLRS.
• All about Servers — Chapters 4, 6, and 7: The topics of these chap-
ters are the server structure, the SLRS LDAP directory service, the POSrelated server commands, and the PosAdmin commands for manipulating the LDAP directory entries.
7
Page 8

1 Introduction
• Building and Maintaining POS Images — Chapters 8, 10, 11 and
12 These chapters summarize all information about how to build and
distribute custom POS images.
• Autobuild Branch Server — Chapter 13: Description for SLRS experts
of how to prepare a CD boot media for automatic branch server installation.
• Maintaining SLRS — A View Inside SLRS — Chapters 14 and 15:
Further expert information for sysadmins can be found in these chapters.
8
Page 9

2 Architectural Overview
Contents
2.1 Administration Server . . . . . . . . . . . . . . . . . . . . . 9
2.1.1 LDAP Directory . . . . . . . . . . . . . . . . . . . . . 11
2.1.2 Tools . . . . . . . . . . . . . . . . . . . . . . . . . . . 11
2.2 Branch Server . . . . . . . . . . . . . . . . . . . . . . . . . 14
2.2.1 Functionality . . . . . . . . . . . . . . . . . . . . . . 14
2.2.2 Operating System . . . . . . . . . . . . . . . . . . . . 14
2.2.3 Administration . . . . . . . . . . . . . . . . . . . . . 15
2.2.4 Clustering . . . . . . . . . . . . . . . . . . . . . . . . 15
2.2.5 Accessing the POS Terminals . . . . . . . . . . . . . 15
2.3 Cash Register . . . . . . . . . . . . . . . . . . . . . . . . . . 16
2.3.1 Requirements . . . . . . . . . . . . . . . . . . . . . . 16
2.3.2 Operating System . . . . . . . . . . . . . . . . . . . . 16
2.3.3 SLRS Boot System . . . . . . . . . . . . . . . . . . . 17
2.3.4 Boot Process . . . . . . . . . . . . . . . . . . . . . . 18
2.3.5 Graphical Display Configuration . . . . . . . . . . . . 19
2.3.6 Hard Disk Installation . . . . . . . . . . . . . . . . . 19
2.3.7 CD Boot Installation . . . . . . . . . . . . . . . . . . 19
The SLRS provides a system platform for the cash registers and in-store servers,
a scalable deployment infrastructure, and a centralized management system.
The CRs are implemented in a variety of hardware forms, with the main difference being whether they are equipped with hard drives (diskless vs. diskful).
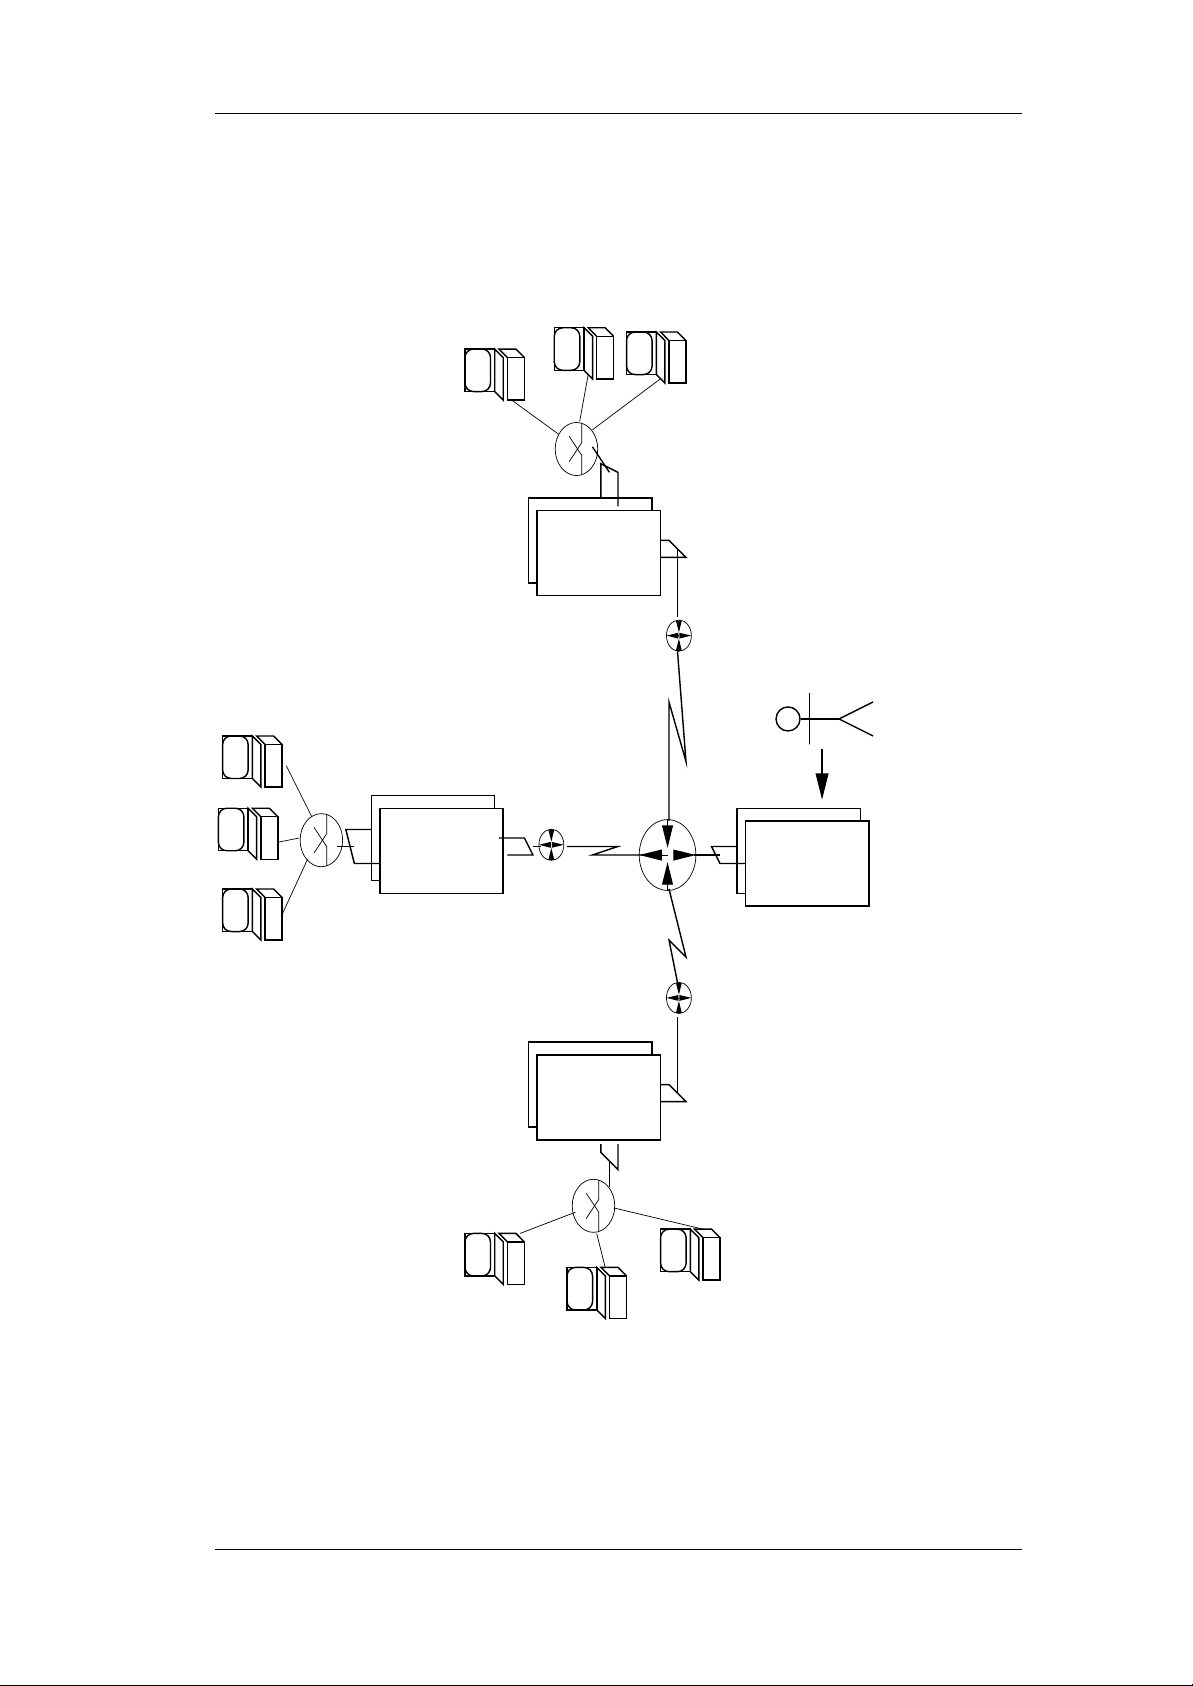
Figure 2.1 describes the system architecture: one centralized administration
server (AS) controls a large number of branch servers (BS), which in turn provide the local infrastructure for the cash register point of sales (POS) systems.
All servers are intended to be set up as highly available two-node failover
cluster systems.
2.1 Administration Server
All system management for BS and POS systems (CR) is done on the central
administration server (AS). It provides the following services:
9
Page 10
2 Architectural Overview
100 MBit
Ethernet
Cash
Register (CR)
Administrator
Admin
Server (AS)
Branch
Server (BS)
WAN
100 MBit Ethernet
AS
BS
BS
BS
Router
Router
Switch
Figure 2.1: System Architecture of the SUSE LINUX POS/Retail Solution
10
Page 11
2.1 Administration Server
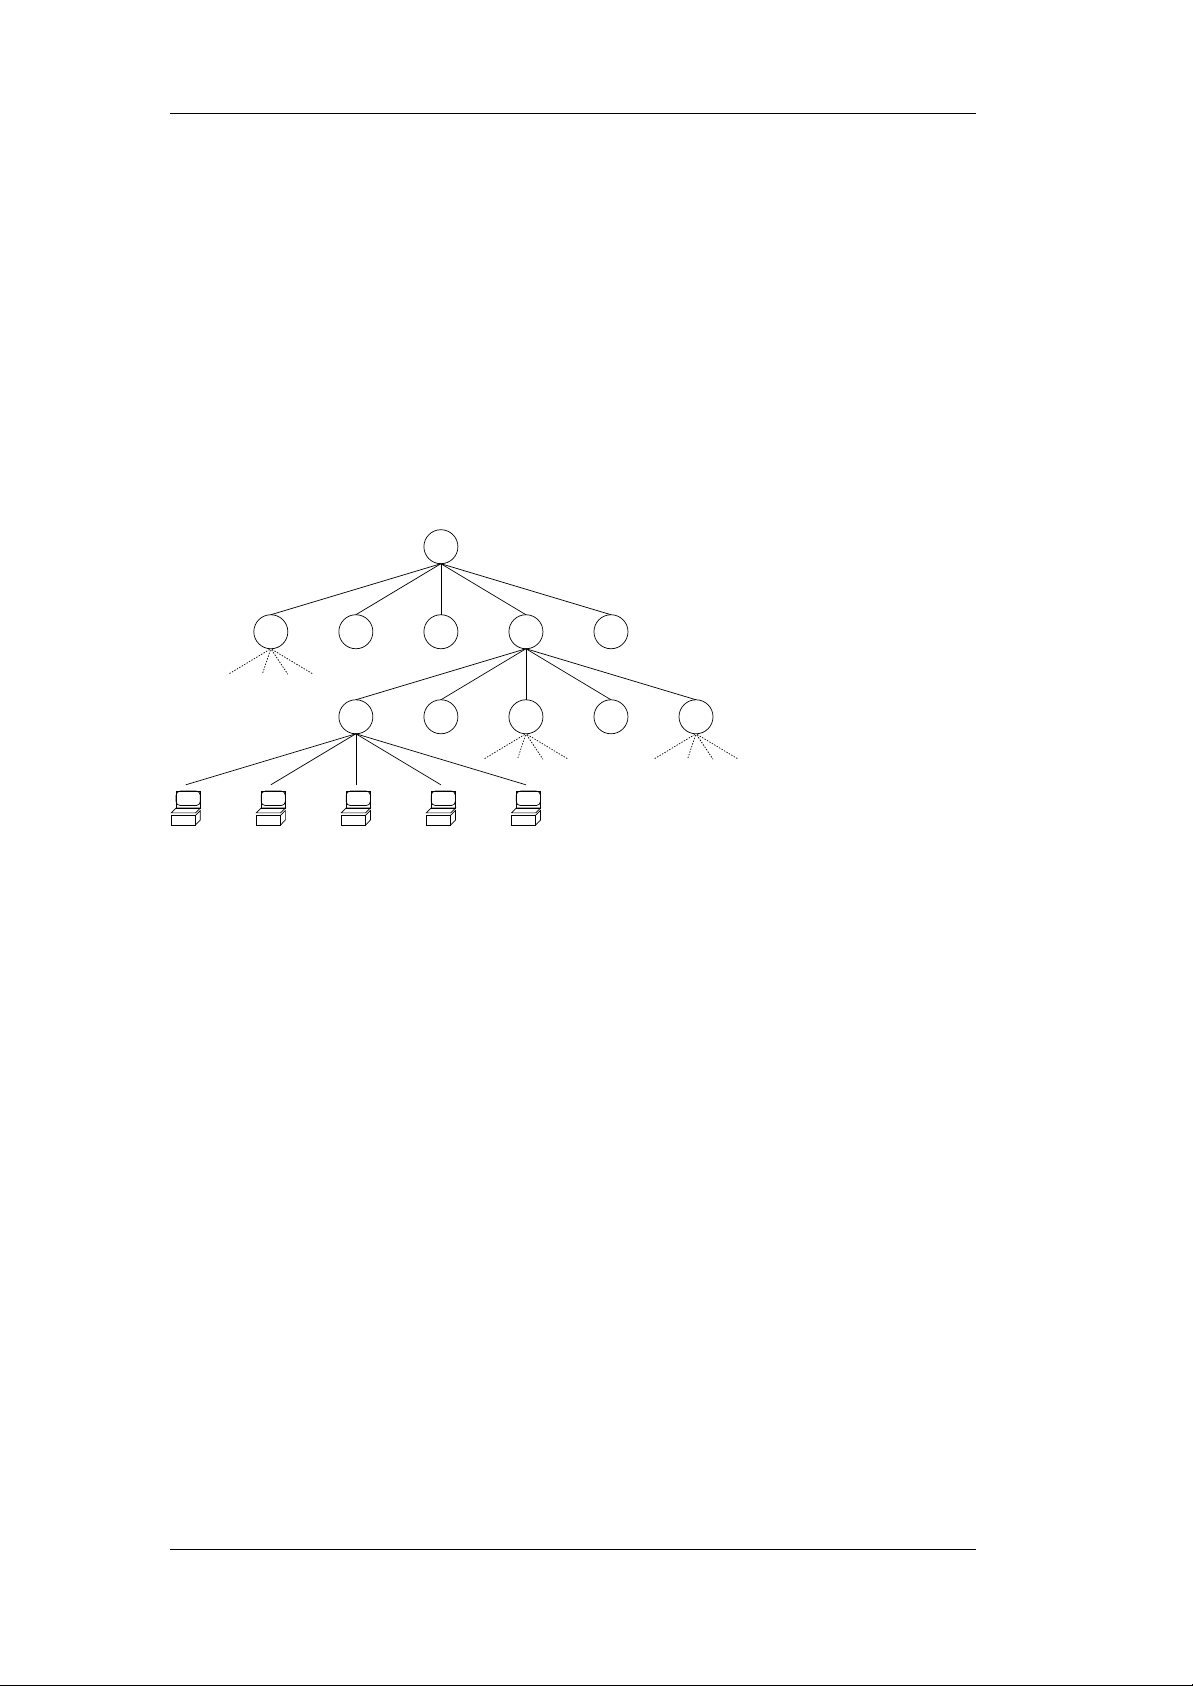
LDAP directory root node
Corporate Entity level
Branch Level (BS)
CR Configuration Entries
RSYNC: An rsync server is used for software distribution and provides the
POS system images and software updates to the BS systems.
LDAP: The AS is the master LDAP directory server for the BS systems.
XNTP: The BS xntp system can access the AS for time synchronization
SYSLOG: The AS consolidates the syslog output from the BS.
DNS: Name resolution for the local network, branch servers, and stand-alone
POS systems in small branches.
Figure 2.2: LDAP Directory Layout for the POS Administration Server
2.1.1 LDAP Directory
The LDAP directory is structured in three tiers. Under the topmost “company
root” node, the different organizational units are listed. Each unit has its
branches with the BS configuration. Each branch has its POS entries. Figure
2.2 describes the directory tree layout. Entity definitions and more detailed
information can be found in Chapter 4.3 on page 44.
2.1.2 Tools
The tools use the LDAP directory for navigation, are stored in /opt/SLES/POS/bin,
and are programmed in Perl using the Net::LDAP module. The following tools
exist on the AS:
POS/BS Management
The posAdmin software (refer to Section 7 on page 79), which is part of the
SLRS, provides a tool for managing the POS LDAP structure, the directory
service running on the administration server holding the data of the branch
11
Page 12

2 Architectural Overview
servers, cash registers, and network infrastructure. Using posAdmin, the following POS Data LDAP entries can be managed:
• organizational unit
• branch
• hardware type
• MAC address
• IP address (optional)
• debug mode
• OS Image name
Cash registers can be created, deleted, and assigned specific operating system
images. Additional parameters, like debug mode, can be set.
Using posAdmin the following BS Data LDAP entries can be managed:
• organizational unit
• branch
• IP addresses
• LAN IP network address
• host name
• domain name
• router address
• debug mode
Branches and the corresponding branch servers can be created and deleted.
Parameters, like debug mode, can be set. Each BS has its own password and
LDAP identity for accessing the LDAP directory.
Package Update
Loads updated software packages and configuration tables for the image creation from the SUSE maintenance servers.
Reports
Simple report generation tools are available that extract data from the LDAP
directory.
12
Page 13
2.1 Administration Server
Packages
Configuration List
Local Configuration List
boot
CR
Application Image
Application Start cmd
Script
Image
Image
RPM
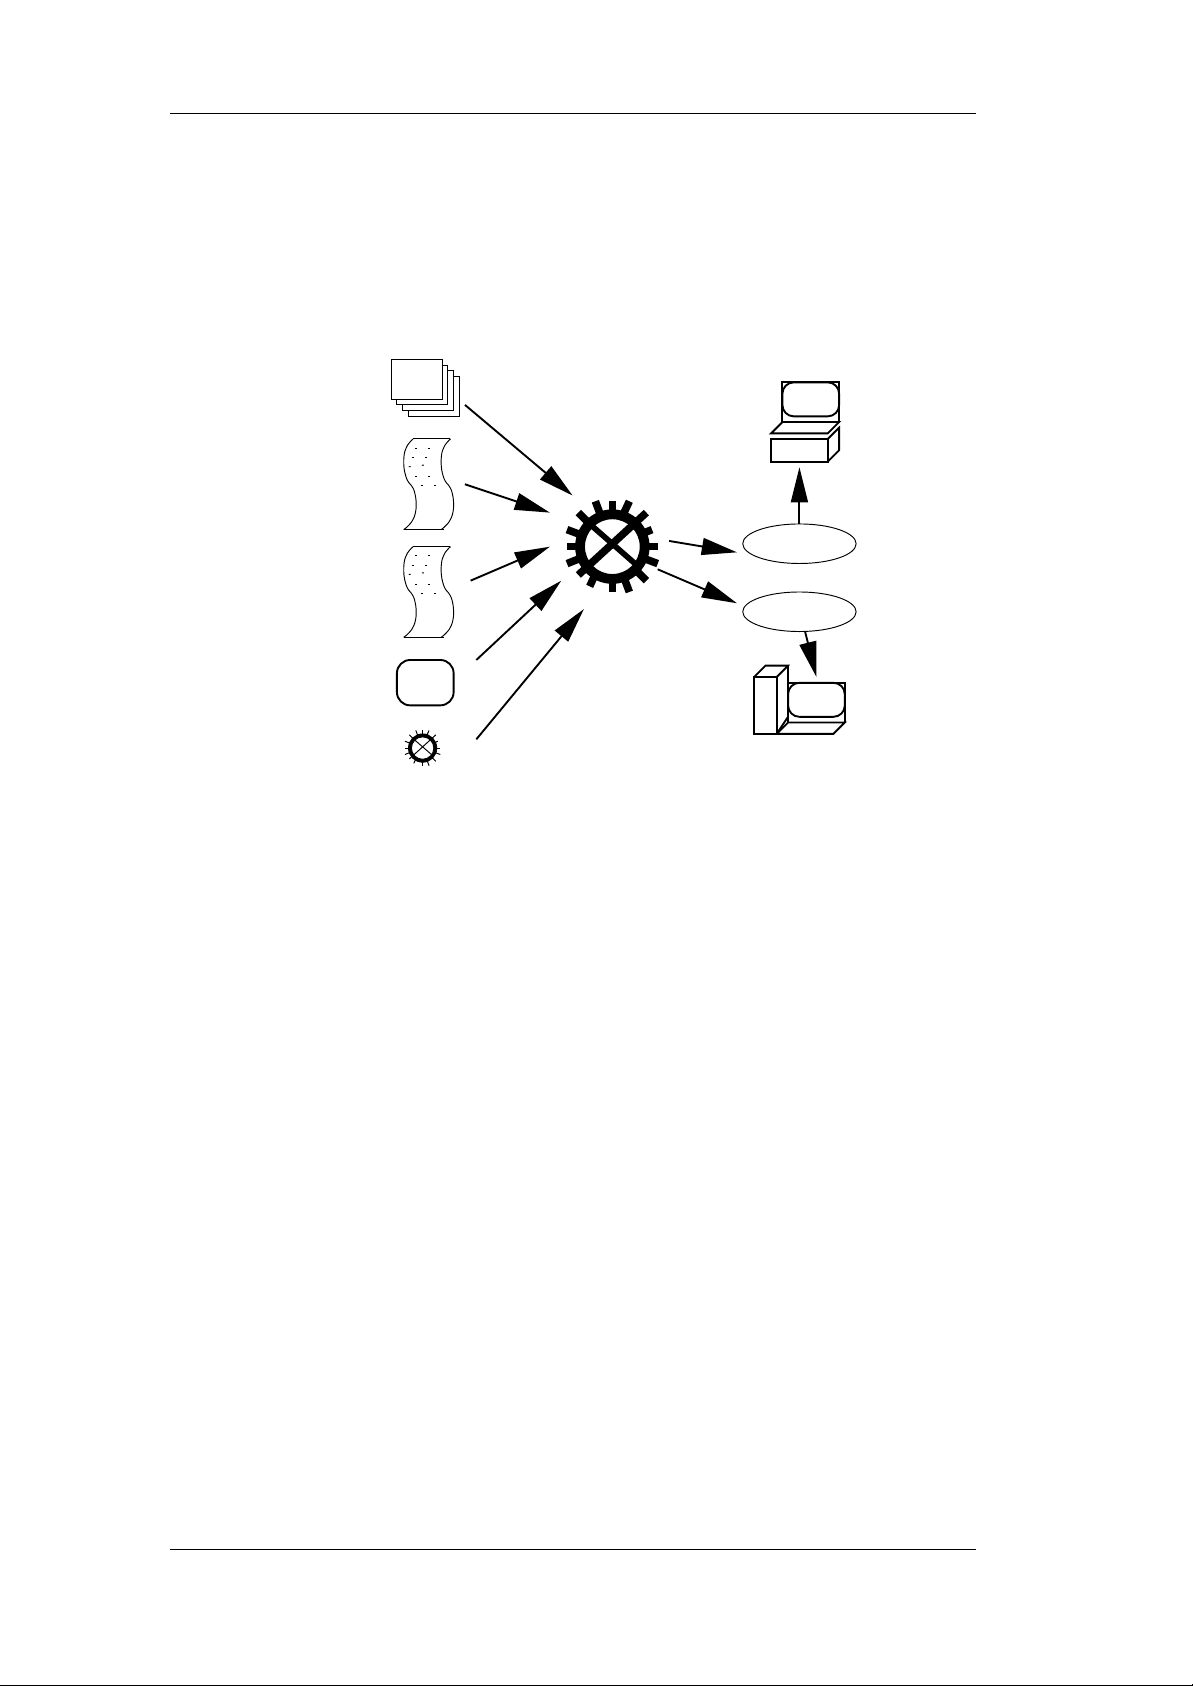
POS Image Creation
Images are created from SLRS or SLES standard packages and additional Service Pack packages using the SLRS imageBuilder software. For more detailed
information, refer to Chaper 8 on page 99. Figure 2.3 describes the image
creation process.
Images are created with a time stamp in the file name. Old images are kept on
the server. POS applications are integrated by specifying one or more package
files (RPM or root-relative tarballs) and one start script name. Additional
packages from the SLRS or SLES distribution can be added to the image by
the customer to extend the functionality of the operating system.
For the integration of more complex software, the image building process can
be split into two parts: first the system is set up in a directory on the AS,
second the directory is packaged into the appropriate file system images. The
purpose is that the customer can modify the system between the two steps,
for example, for installing software that needs the runtime environment of the
AS for installation.
Here is a summary of the information needed by the imageBuilder for the
image creation process:
Figure 2.3: POS Image Creation
• System RPM: Packages from SLRS, SLES, and Service Packs.
• Image Type: It defines the image functionality and contents (minimal,
java, browser, etc.).
• Machine Type: It describes the machine hardware, necessary driver
modules, and additional scripts.
• Configuration Lists: It describes the standard set of packages and scripts
for the specific image type in its default configuration for the different
hardware types.
13
Page 14

2 Architectural Overview
• Local Package Lists: It defines site and customer–specific packages
from SLRS and SLES that are added to the POS system image.
• Application: Packages and start command.
2.2 Branch Server
The branch server (BS) provides the network boot and system management
infrastructure for the POS systems as well as a generic system platform for instore applications, like database systems and back-ends for the cash register
applications.
2.2.1 Functionality
The BS provides the following services:
DHCP: Controls the network boot process.
TFTP: Provides PXE control files, operating system images, and configuration
files.
XNTP: NTP server for time synchronization.
SYSLOG: The logging target for the cash register systems.
SNMP: Standard MIB2 monitoring is set up with net-snmp.
DNS: Name resolution for the local network.
The BS has a software distribution mechanism based on rsync and is able to
pull new POS operating system images from the administration server. Configuration data is taken from an LDAP directory system on the AS. For large
branches, the corresponding LDAP subtree can be replicated to the BS.
2.2.2 Operating System
The BS is built from a standard SLRS or SLES operating system. An AutoYaST2 control file is provided for the basic setup, together with detailed documentation and tools to configure the server easily. If only the functionality
for running the POS infrastructure is necessary (no additional applications),
the branch server can also be deployed as a control terminal running on POS
hardware.
14
Page 15

2.2 Branch Server
2.2.3 Administration
No system administration other than emergency handling is necessary on the
BS. All administrative tasks are controlled from the central AS and are executed regularly by scripts run by the cron scheduler. For emergencies and
debugging, all functionality can be triggered locally or via SSH login by calling scripts with no or few command line parameters. The functionalities are
described in the following sections.
POS CR Setup
Set up all or one single cash register and local service configuration files (PXE
configuration, /etc/syslog.conf, etc.) and image files for the boot process of
the cash registers. The following functions are provided:
• Boot configuration: Create the DHCP entry and PXE configuration file
for cash registers.
• DNS: Create the zone file and configuration file for BIND name server.
• Config Files: Create configuration files for download by the POS sys-
tems.
Image Update
Trigger the rsync update process of downloading new image files from the
administration server.
Software Layering
All SLRS tools for the BS and the AS consist of a high-level script (“call wrapper”) that combines defaults, command line parameters, and environment
variables, reads data from LDAP, then calls low-level scripts.
2.2.4 Clustering
The BS systems are two-node heartbeat clusters. The configuration data (dhcp
leases) and application data (cash register application database back-end tables) is synchronized with DRBD. Software transport “pull” procedures from
the AS run on both cluster nodes.
2.2.5 Accessing the POS Terminals
It is possible to distribute SSH public keys to the authorized_keys files of the
POS terminals root user. By default, no keys are distributed, disabling login to
the POS terminals.
15
Page 16

2 Architectural Overview
2.3 Cash Register
The cash registers (POS) are specialized systems based on an x86 32-bit architecture. Some are diskless systems and some have internal hard drives or
other persistent media (flash drive or other) that can be used for application
data or the operating system.
2.3.1 Requirements
The capability to boot from the network via PXE is required for the POS.
2.3.2 Operating System
The operating system is a minimal operating environment for the specialized
POS application. Different functionality level systems exist, from an extremely
small console-based system to a feature-rich java and browser capable system
and a system with a customized desktop environment.
A set of standard prebuilt POS images are provided with the SLRS. The system
images can be created on an administration server by system administrators
using the SLRS imageBuilder to provide new releases of POS images or to
extend the default POS images for new or customized features.
Each POS terminal gets a system image based on the branch in which it is
located and its hardware type or its individual configuration. If no image is
specified for the model type and the individual POS terminal, a global default
image is loaded.
The cash register applications are integrated into the images. Customization
is performed by loading local configuration files into the file systems over the
network during boot time. The actual operating system images contain a set
of common components (specified in the section about the common operating
system base) and additional features for the different requirements of the
applications.
Common Operating System Base
All system images are built from a common operating system base. This platform is created from standard SLRS and SLES packages. The POS system
image contains the following components:
• Kernel modules for hardware, file system, and network support
• GLIBC and STDLIBC++ libraries
• Bash and base file handling utility
• xntp client for time synchronization
• Multicast TFTP capable TFTP client (atftp)
16
Page 17

2.3 Cash Register
Minimal Operating System "Image 1"
The minimal image only contains the runtime environment for native code applications (e.g., C, C++) and the “ncurses” library for user interface support.
Java-capable Operating System "Image 2"
In addition to the minimal system, the capability to run java programs in a
Java2 runtime environment is provided.
• Java2 JRE with Swing GUI libraries
• X11 server and configuration
Java and Browser–capable System "Image 3"
In addition to the Java system, a web browser (Mozilla) is available. This
image will be available for diskful systems first and may be made available for
diskless and netboot systems later.
Desktop Operating System "Image 4"
A "fat client" system that cannot be booted from the network and contains
a full graphical user interface (KDE or GNOME). This system is available for
diskful systems only.
2.3.3 SLRS Boot System
A special boot system performs the boot process, especially the loading of the
more substantial system and application images. The boot system contains:
• Kernel modules for hardware and network support, cramfs, and file sys-
tem modules
• GLIBC library
• Busybox-based shell environment for scripting and system control
• Multicast TFTP–capable TFTP client (atftp)
• linuxrc script for sytem setup and synchronization
Busybox provides a simple shell, scripting tools (sed, md5sum), kernel module
handling tools, and a syslog daemon. For security and space reasons, no login
capability is provided, neither locally nor over the network.
17
Page 18

2 Architectural Overview
2.3.4 Boot Process
The POS operating system may consist of several images. The file systems
that may be mounted read-only can be stored in cramfs-compressed RAM file
systems to save POS RAM resources. A special CR configuration file, which
contains information like image name and BS IP address for the application,
is loaded from the BS server TFTP directory.
On booting, each cash register performs the following procedure:
1. run model-type
2. look up model type in a table to determine the right network module
3. get IP address and PXE image via DHCP
4. get PXE first stage image via TFTP
5. get PXE config file via TFTP
6. get kernel and initrd via TFTP
7. start kernel, mount initrd, start linuxrc
8. load network modules
9. get IP address via DHCP
10. get synchronization and parameter file via TFTP, wait for synchronization
11. get (one or more) operation system images via MTFTP1and store into
RAM disk
12. (optional) compare MD5 checksum to parameter file entries
13. get local configuration files (/etc/resolv.conf, /etc/ntp.conf, /etc/syslog.conf,
etc.) via MTFTP into file system mounted from RAM disk
14. exit linuxrc, continue booting into mounted RAM disk
15. start init process
16. load hardware kernel modules (RS485 etc).
17. start applications
1
Multicast TFTP
18
Page 19

2.3 Cash Register
2.3.5 Graphical Display Configuration
The graphics controller depends on the model type, so it can be derived from
static tables. Displays that can be probed for their capabilities can be attached
to POS terminals with different model types.
Each POS terminal and each model type has an LDAP entry that can specify
the XF86Config file to download at boot time. A default is provided for the
model types and can be modified by the customer.
Specific POS terminal models can use multihead X configurations. The corresponding XF86Config files are POS hardware manufacturer-specific and will
not be provided by the SLRS.
If no XF86Config file is specified in LDAP, but the system image contains an X
server, an attempt to probe the display type is made. Probing must be defined
by the POS hardware manufacturer.
2.3.6 Hard Disk Installation
A system that has a hard disk can be set up to use it to store the image on a
disk partition instead of a RAM disk and also to boot from the hard disk if it
cannot boot over the network.
2.3.7 CD Boot Installation
For system installation without a network, the system can also be installed
from an IDE CD-ROM drive.
19
Page 20

2 Architectural Overview
20
Page 21

3 Quick Start Guide
Contents
3.1 Installation Process . . . . . . . . . . . . . . . . . . . . . . 22
3.2 Installation of the Administration Server . . . . . . . . . . 23
3.2.1 Updating the SLRS Base Software . . . . . . . . . . . 25
3.2.2 Configuration of the Administration Server . . . . . 26
3.2.3 Install the OEM Hardware Vendor CD . . . . . . . . 27
3.2.4 Adding a New Branch to LDAP . . . . . . . . . . . . 29
3.2.5 Adding Cash Register Systems to LDAP . . . . . . . . 29
3.2.6 Managing the POS Images . . . . . . . . . . . . . . . 29
3.3 Installation of the Branch Server . . . . . . . . . . . . . . . 31
3.3.1 Updating the SLRS Base Software . . . . . . . . . . . 33
3.3.2 Install the OEM Hardware Vendor CD . . . . . . . . 34
3.3.3 Configuration of the Branch Server . . . . . . . . . . 36
3.3.4 Managing the POS Images . . . . . . . . . . . . . . . 36
3.3.5 Starting the Core Script Process . . . . . . . . . . . . 37
3.4 Test your SLRS System Environment . . . . . . . . . . . . 38
This section allows a quick start to the SLRS without reading the complete
SLRS Admin Guide. The text assumes a technical knowledge of installing software on servers and some basic knowledge about the command line and networking. Some experience with the SUSE LINUX Enterprise Server (SLES) is
helpful, but is not required to proceed with the step-by-step SLRS installation.
References to the more technical, detailed chapters of the Admin Guide are
provided to give Linux experts easy access to details of the SLRS software.
These articles are marked in boldface starting with "Expert" and may be
skipped.
21
Page 22

3 Quick Start Guide
3.1 Installation Process
To install the SLRS, complete the following tasks:
• Install the administration server (AS)
• Install the OEM Hardware vendor CD (AS)
• Configure the central LDAP directory (AS)
• Add store and branch information to LDAP (AS)
• Enable the POS Images on the AS
• Install the branch server (BS) for each store
• Configure the BS
• Transfer (rsync) the POS Images to BS
• Test your SLRS system environment by booting a POS client attached to
BS
These tasks are described in the following sections. The picture below shows
an overview of the SLRS system architecture.
22
Page 23
3.2 Installation of the Administration Server
3.2 Installation of the Administration Server
The SLRS software contains 7 CDs, 2 SLRS CD, 3 CDs for United Linux and
2 Service Pack CDs. The installation starts, booting from the first CD (SLRS
CD1). SUSE YaST2 (Yet another Setup Tool) is a powerful graphical system
assistant, which safely guides you through the installation procedure. In many
cases, a few clicks are all that is needed to install SUSE LINUX Retail Solution
on your server.
Note: SUSE recommends to use SLRS CD1 for the installation of the SLRS
software. In some cases, the installation will fail. One problem could arise,
while booting new servers with unsupported SCSI/Raid controllers. For further information refer to Section 16.1.1 on page 157.
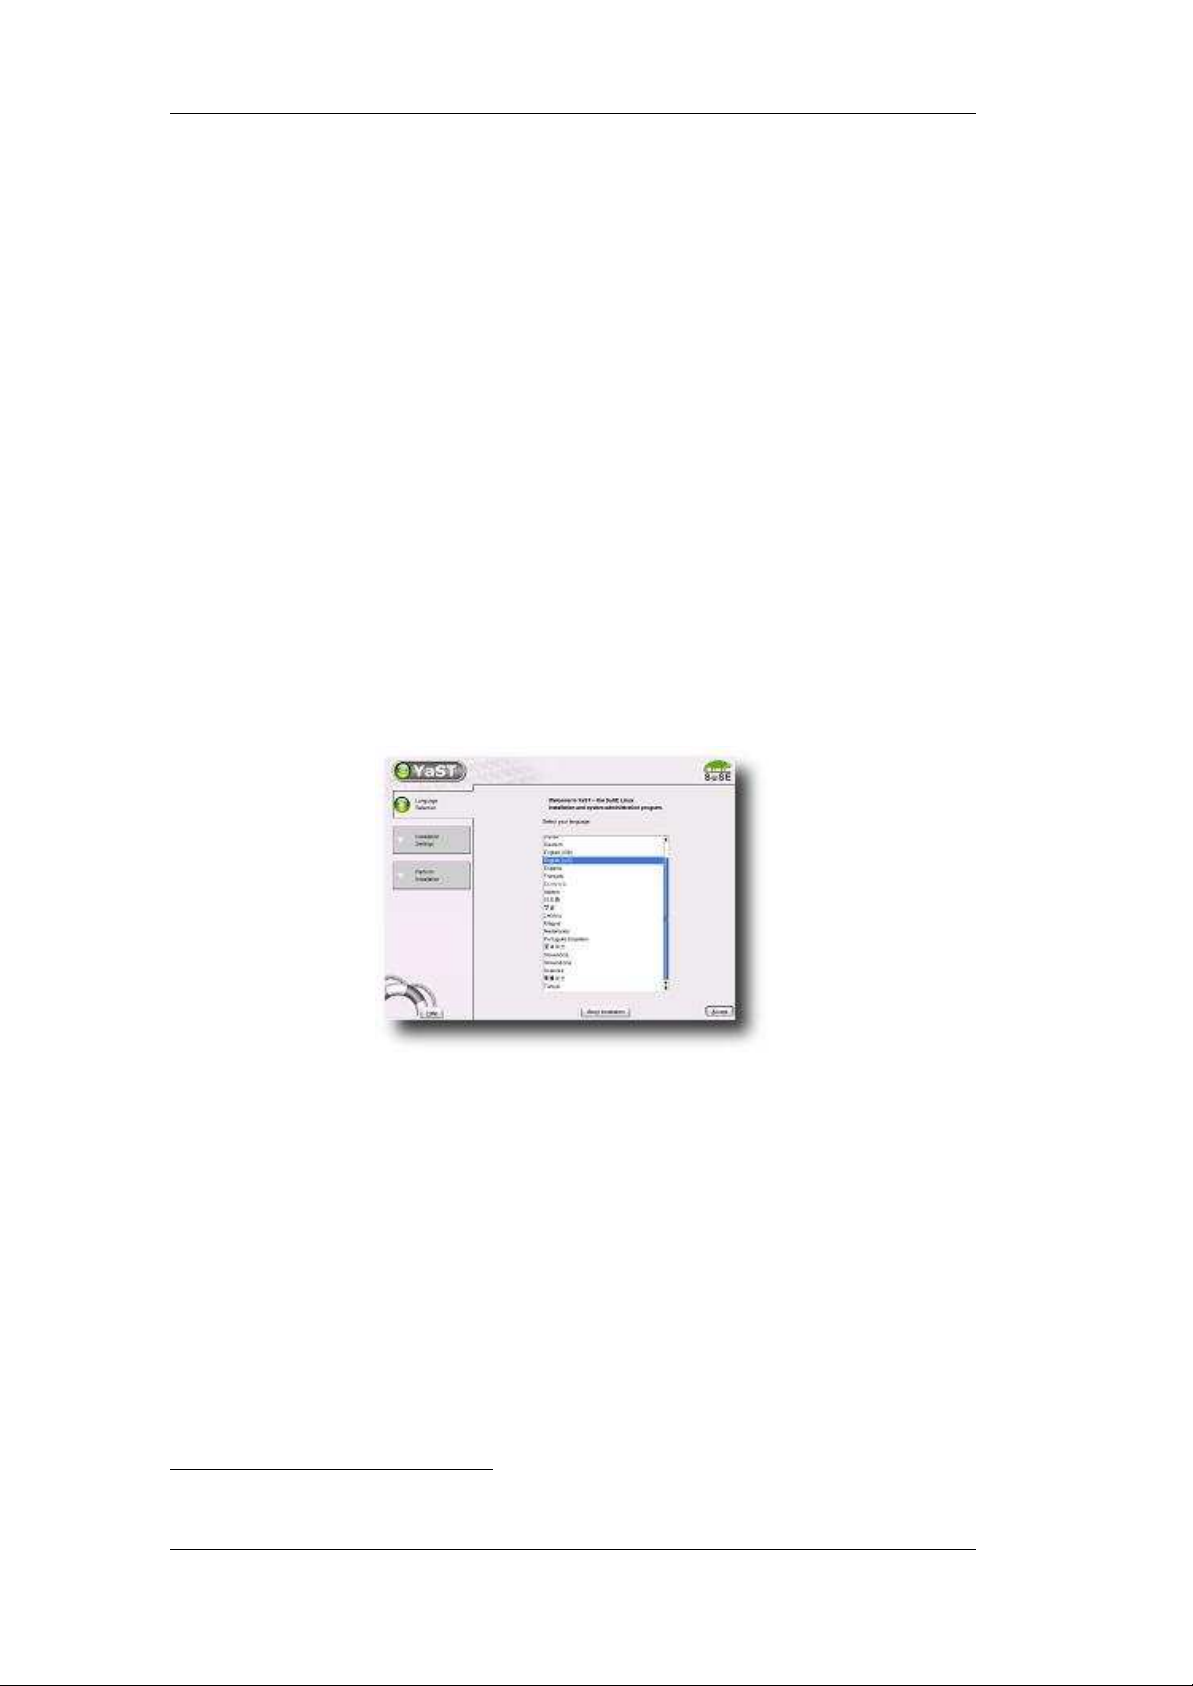
• The YaST2 installation program starts when the system is booted from
the first CD (SLRS)1.
• Read and accept the SLRS EULA (End User License Agreement).
• Select your language.
Figure 3.1: YaST2 System Assistant — Language Selection
• YaST2 prompts for the installation mode:
– New installation
– Boot installed system
– Abort installation
Select "New installation". Both other options will abort the SLRS installation. Option "Boot installed system" will try to boot an OS from the
primary hard disk drive.
1
For further information about the installation process, refer to your hardcopy SUSE LINUX
documentation or the SUSE LINUX documentation on your installation CD.
23
Page 24

3 Quick Start Guide
• Expert: Click the headline Partit io ni ng to change the YaST default set-
tings. Furthermore please note, that in some cases YaST will not delete existing partitions. Herefore select the option "Create custom partition setup".
For further information refer to the SUSE LINUX documentation.
• Click the headline Software to change the Installation Settings and select
one of the two possibilities:
– Minimum system
– Minimum graphical system (without KDE)
For example, select "Minimum graphical system (without KDE)" (recommended).
• Click "Detailed selection..." and change the following items:
– Select "SLRS POS/Retail Branch and Admin server Minimum System"
– Select "SLRS Admin server Image Building System"
– Select "YaST2 config modules" (recommended, it provides online
update services and easy-to-use configuration programs through
YaST2)
• Accept your selection.
Note: You may add additional packages or selections. For example, on the
administration server you can add the "KDE base system" selection for a
comfortable graphical user interface.
If you have selected the "Minimum system" instead of the "Minimum graphical system", as the base system, you will be asked to resolve a dependency
for the GL graphics subsystem when you add the "SLRS POS/Retail Branch
and Admin server Minimum System" selection - it is recommended to select
the "mesasoft" package here.
• Accept your Installation Settings and start the installation.
2
• After the reboot of the system, YaST2 will start again and prompt you to
set the password for root.
• Skip "Add a new user" and confirm the question about the network client
with "Yes".
• Confirm the proposal for the display resolution parameters.
• Ignore the Printers headline warning: "The print spooler is not installed
properly. ERROR: No proposal."
2
You will be prompted for the United Linux CDs during the installation.
24
Page 25

3.2 Installation of the Administration Server
• Click the headline Network interfaces when prompted and configure the
network interface3, for example, eth0. Enter the IP address, such as
192.168.2.254, and the Network Mask, in a format like 255.255.255.0.
– Configure the Host Name, for example, as1
– Set a Domain Name, such as headquarter.mycompany.mycorp.us
• The software installation is done and you are ready to login as the user
root.
• Install the United Linux Service Pack 3 CD, as described in Section 3.2.1.
Afterwards proceed with Section 3.2.2 to configure the administration
server.
Expert: Refer to Section 5.1 on page 55, which describes the key requirements
and steps for getting the administration server installed and configured on your
workstation.
3.2.1 Updating the SLRS Base Software
The actual version of the SLRS 8 is based on the SLES/UL Service Pack 3
and needs to be updated with the United Linux Service Pack 3 CD1 from the
SLRS 7-CD Set.
Future United Linux Service Packs can be used to update the installed SLRS
version on the AS. For new installations, only the latest Service Pack CD needs
to be installed.
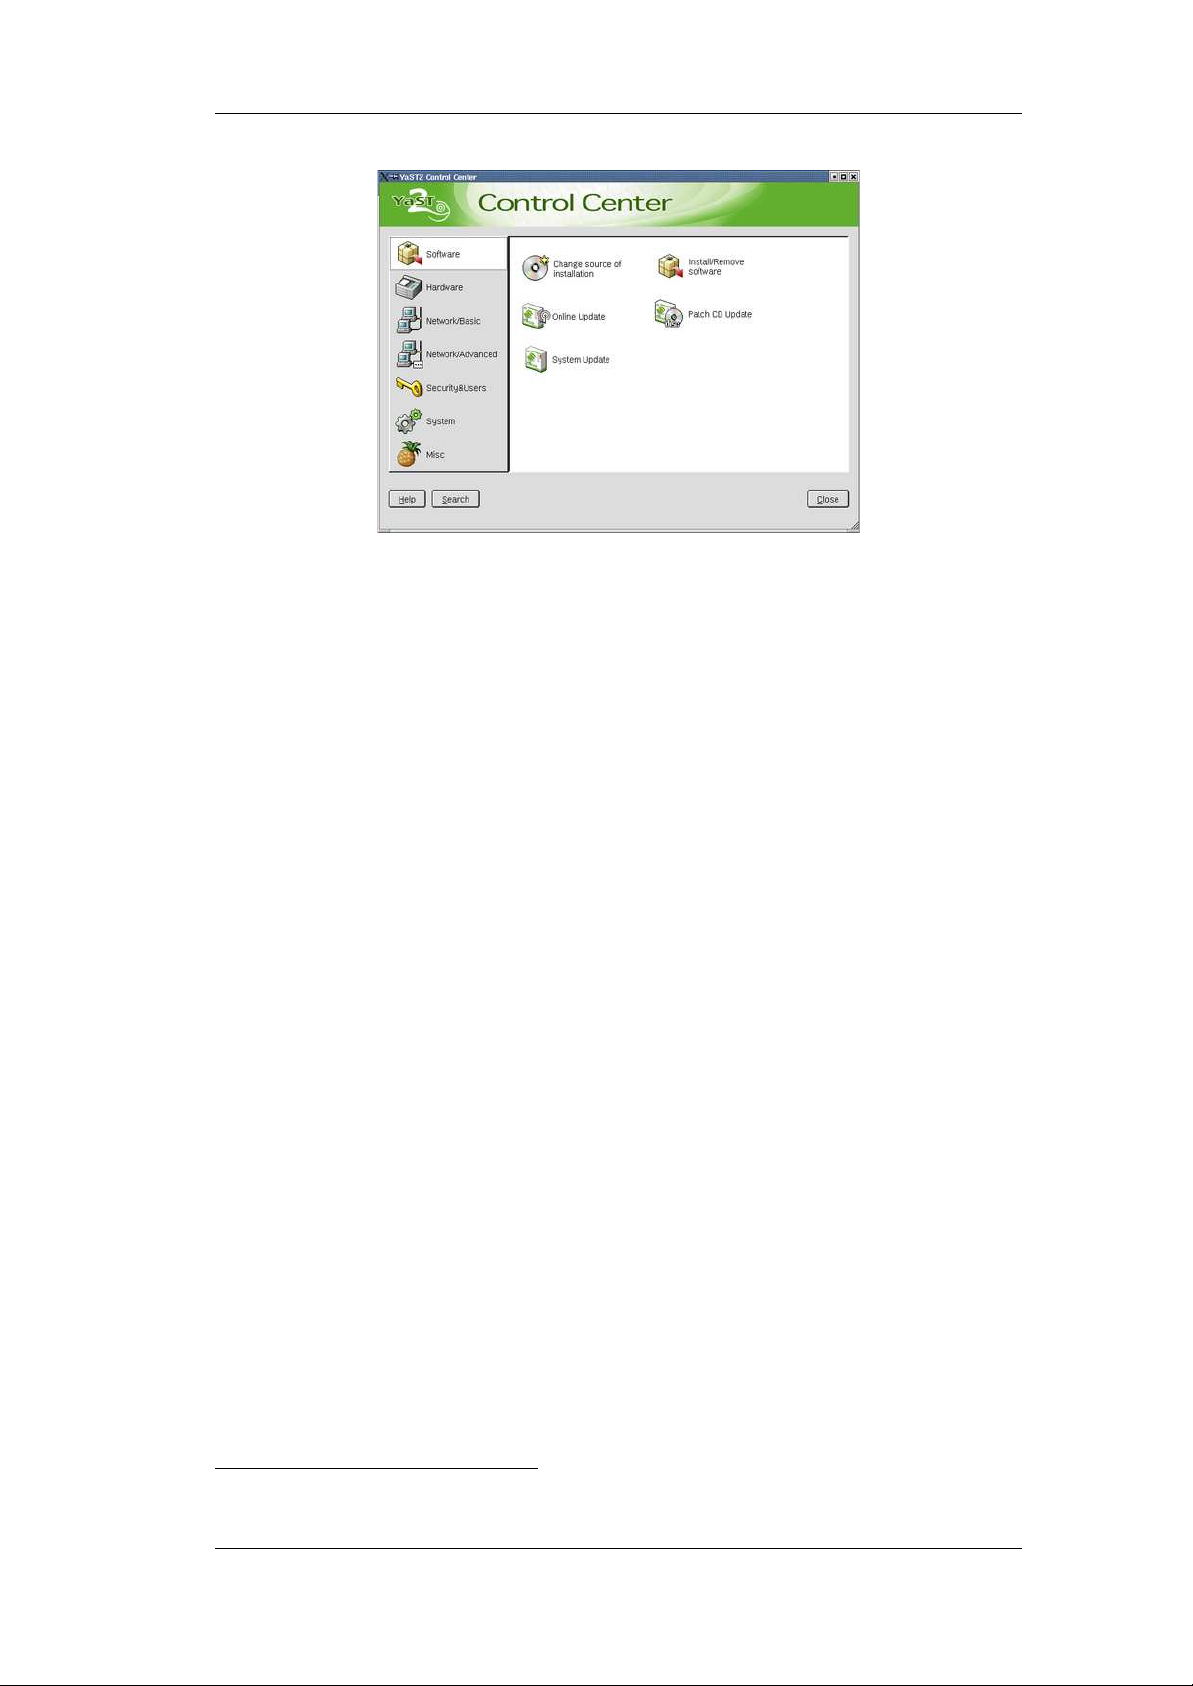
To initiate the update, start the YaST or YaST2 Control Center (see Figure 3.2),
for example, by executing the program from the command line and selecting
Software.
There are two ways of updating the SLRS software using YaST or YaST2: the
Patch CD Update or the Online Update4. For detailed information about executing the YaST Update, refer to the SUSE LINUX documentation.
Note: If you are using a non-graphical system environment, only YaST can be
used.
Furthermore the update can be done manually by mounting the Service Pack
CD and calling the install_update_rpms.sh script, as described below:
• Log in as root.
• Insert the Service Pack CD into the CD drive.
• mount /media/cdrom
3
Set the values according to your network environment.
4
You must be registered at http://www.suse.com/maintenance to access the online up-
date. For further information, refer to the SUSE LINUX MAINTENANCE PROGRAM information supplied with the SLRS.
25
Page 26
3 Quick Start Guide
Figure 3.2: YaST2 Control Center
• Execute: /media/cdrom/install_update_rpms.sh
• umount /media/cdrom
• Eject the Service Pack CD.
Note: The install scripts for updating RPMs are hard-coded to use /media/cdrom.
If your CD-ROM drive uses a different name to mount (such as /media/cdrecorder),
enter the following commands to create a link to the CD:
cd /media
ln -s cdrecorder cdrom
After installing a Service Pack CD you should reboot the administration server.
3.2.2 Configuration of the Administration Server
After installing the SLRS software, manually start the AS configuration script,
which prompts you through the configuration:
• Log in as root.
• Execute the command posInitLdap.sh5.
• Enter [company name] without spaces and without special characters,
for example, mycorp
• Enter [country abbreviation]: us
5
Refer to Section 6.1 on page 72 for further information.
6
de for Germany, us for United States, uk for United Kingdom, etc.
6
26
Page 27

3.2 Installation of the Administration Server
• Enter [ldap administrator password], such as secret
• Select (y/n) to enable or disable SSL (Secure LDAP)
7
• A summary of the LDAP directory data based on your input appears. If
all data is correct, hit the ENTER key.
• The POS LDAP base structure has now been initialized on the AS. A
summary of the configuration and the message "success" is displayed.
Expert: Refer to Section 5.1.4 on page 58 for more details or if the POS LDAP
structure has not been initialized. At this point, the base configuration of the
admininistration server is finished.
3.2.3 Install the OEM Hardware Vendor CD
The POS system manufacturer provides scripts and configuration files for
adding new branches and cash register systems to LDAP, and further add-on
software on top of the SLRS.
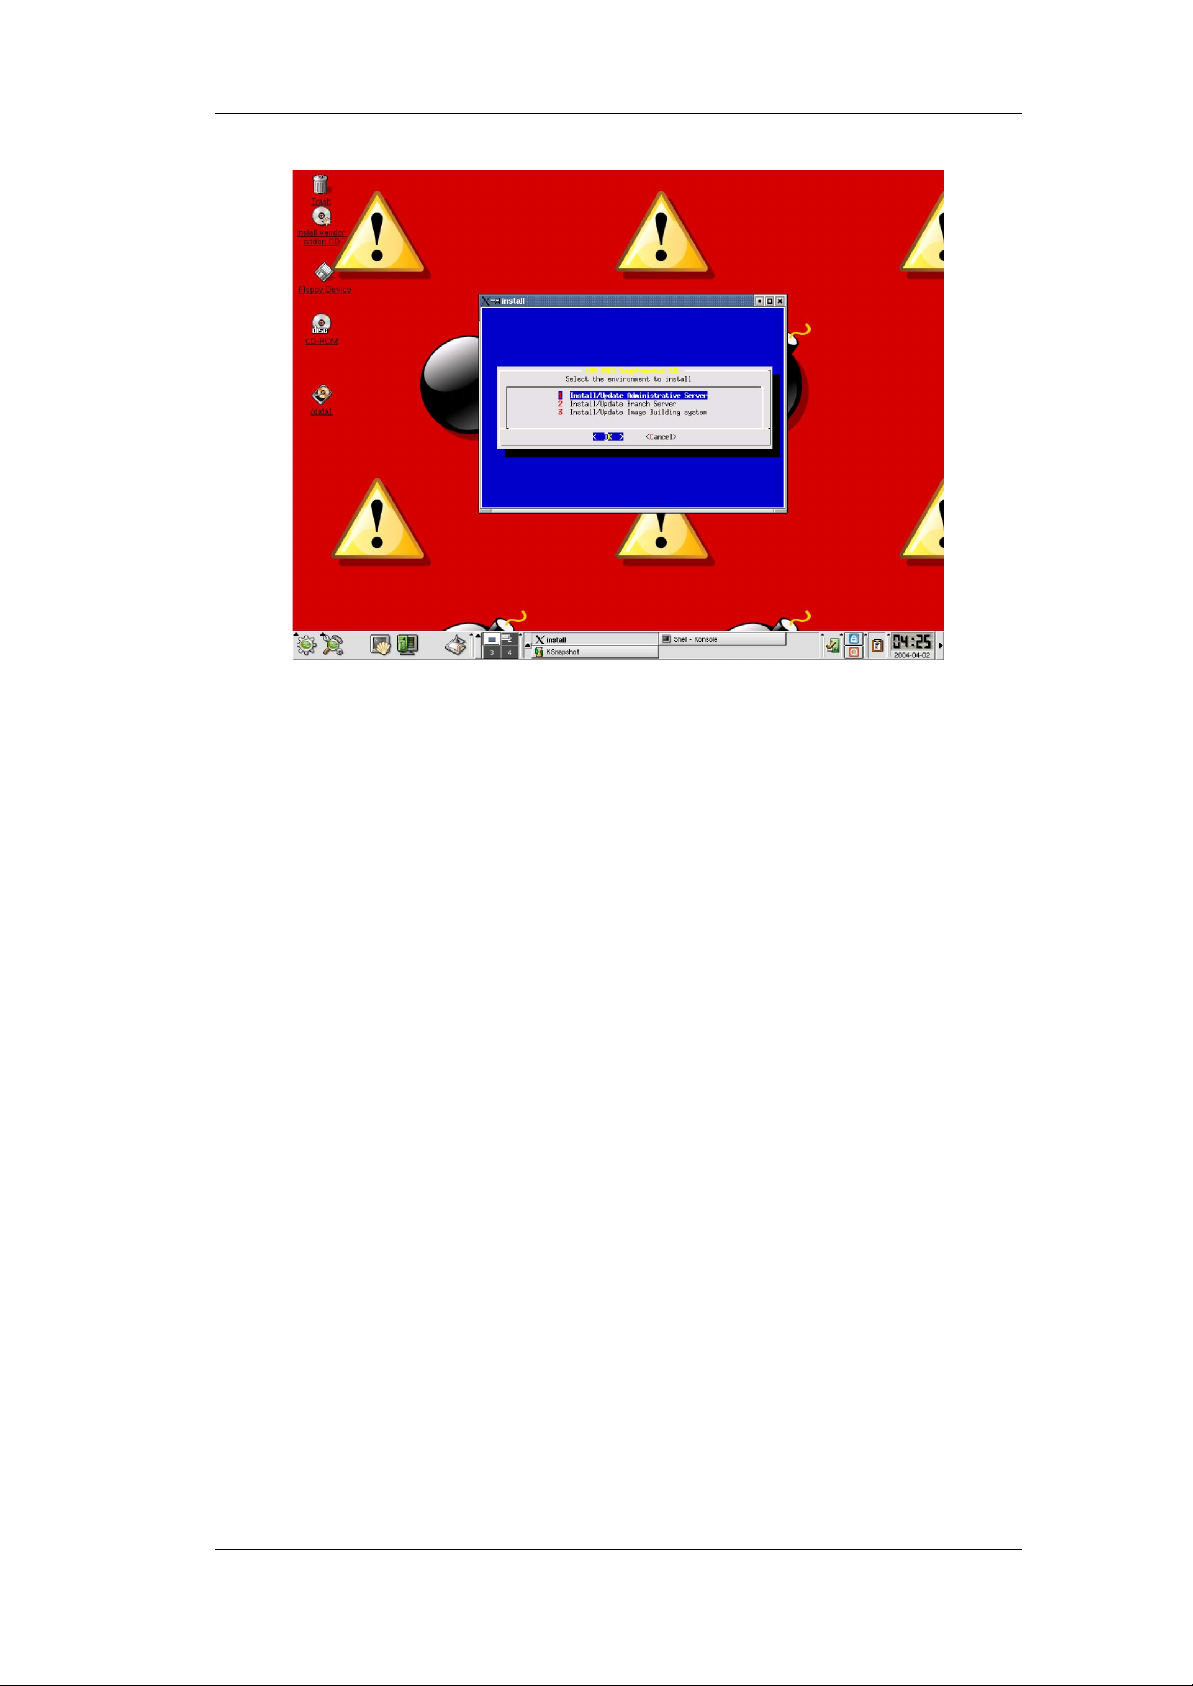
There are two ways to install the OEM8hardware vendor CD, such as the
IRES9Vendor CD. If you are using a graphical system environment, such as
KDE, execute the following steps:
• Log in as root.
• Insert the Vendor CD for SLRS into the CD drive.
• Click CD-Icon Install vendor addon CD and following menu will be dis-
played, as shown in Figure 3.3:
• Select item 1 Install/Update Administrative Server
• Select < OK > to start the installation.
• Click CD Icon Install vendor addon CD again, to install a further option.
• Select item 3 Install/Update Image Builder s ys te m
• Select < OK > to start the installation.
• Right click CD-ROM Icon and select the option Eject, to eject the Vendor
CD again.
If you are using a non-graphical system environment execute the following
steps:
7
A Certificate Authority and a server certificate are created when posInitLdap.sh is exe-
cuted, regardless of whether SSL is enabled. This allows a switch to SSL at a later time if
desired.
8
OEM: abbr. of original equipment manufacturer
9
IRES: IBM Retail Environment for SUSE LINUX
27
Page 28
3 Quick Start Guide
Figure 3.3: IRES Installation Menu
• Log in as root.
• Insert the Vendor CD for SLRS into the CD drive.
• Execute the command: mount /media/cdrom
• Start the install script: /media/cdrom/install
• Select item 1 Install/Update Administrative Server
• Select < OK > to start the installation.
• Start the install script again: /media/cdrom/install
• Select item 3 Install/Update Image Builder s ys te m
• Select < OK > to start the installation.
• umount /media/cdrom
• Eject Vendor CD.
For further information, refer to the POS system manufacturer hardcopy documentation or the documentation on the OEM vendor CD.
28
Page 29

3.2 Installation of the Administration Server
3.2.4 Adding a New Branch to LDAP
The POS system manufacturer will provide a script to add the information
about a new branch to the LDAP directory.
For information, refer to the POS system manufacturer hardcopy documentation or the documentation on the OEM vendor CD.
To proceed with your setup, execute the script of the POS system manufacturer, such as posIBM_InitLdap.
The following information is needed by the SLRS, as shown in the following
example. The values must be adapted to your configuration.
• Branch name, for example, store1.berlin.mycompany
• Company name, for example, mycorp
• Country abbreviation: us
• LDAP administrator password, for example, secret
• Branch server name, such as bs1
• IP address, like 192.168.2.1
• Network mask, for example, 255.255.255.0
Expert: Refer to Section 7 on page 79, which describes the posAdmin tool for
modifying the LDAP database on the administration server to manage the corresponding branch servers and cash registers. A PosAdmin user needs LDAP knowledge and should be familiar with the server structure described in Section 4 on
page 43.
3.2.5 Adding Cash Register Systems to LDAP
The POS system manufacturer will provide a script for adding the POS client
hardware information to the LDAP directory. For information, refer to the POS
system manufacturer hardcopy documentation or the documentation on the
OEM vendor CD.
To proceed with your setup, execute the script of the POS system manufacturer, such as posIBM_hardware.
Expert: Refer to Chapter 7 on page 79 and Chapter 4 on page 43 for informa-
tion about adding POS client systems (CR) to LDAP.
3.2.6 Managing the POS Images
The purpose of this section is to put the POS images in the central rsync directory of the AS. To do this, copy the required POS images from the directory
/opt/SLES/POS/image/ to the rsync directory /opt/SLES/POS/rsync/. SUSE
29
Page 30

3 Quick Start Guide
provides several POS images, which will be installed during the AS installation. POS images are the software that is run on the POS clients. These should
not be confused with the boot image and operating system image each POS
client needs to receive after it is powered on.
Expert: The PO S clients boot two images — a first and a second stage image.
Refer to Section 15.6.3 on page 151 for further information.
Note: The POS images that should be run on the POS clients are placed in
the rsync directory manually to give control over the POS image types and
versions distributed to the branch servers.
The following POS images are available. For further information, refer to
Section 15.2 on page 142.
– Boot Image
– Minimal Image
– Java Image
– Browser Image
– Desktop Image
Interaction
The example below uses the disknet10boot image (initrd including Linux kernel) and a java POS image for all POS client systems. The image names contain
a version number and a date for revision management. The file names should
be changed according to the expected naming convention, as shown in the
example. For further information, refer to Section 15.4 on page 143.
Note: You may have to adapt the version and date of the file names to
execute the example below. SLRS POS image versions subject to change
without notice. Please verify the names of the prebuild images, which you
have installed from the SLRS CD1. The location of the prebuild images is
/opt/SLES/POS/image.
• Copy the initial RAM Disk:
cp /opt/SLES/POS/image/initrd-disknetboot-1.1.7-2003-12-12.gz \
/opt/SLES/POS/rsync/boot/initrd.gz
• Copy the Linux kernel:
cp /opt/SLES/POS/image/initrd-disknetboot-1.1.7-2003-12-12.kernel.2.4.21-151-POS_IBM \
/opt/SLES/POS/rsync/boot/linux
• Copy the Java POS Image:
10
SLRS provides three different prebuild boot images, the netboot, disknetboot and cdboot
image. For further information refer to Chapter 15 on page 141.
30
Page 31

3.3 Installation of the Branch Server
cp /opt/SLES/POS/image/java-1.1.2-2003-12-03 \
/opt/SLES/POS/rsync/image/java-1.1.2
• Copy the Java Image MD5 check sum file:
cp /opt/SLES/POS/image/java-1.1.2-2003-12-03.md5 \
/opt/SLES/POS/rsync/image/java-1.1.2.md5
Congratulations! You have installed your Administration Server.
3.3 Installation of the Branch Server
Note: Install the administration server before proceeding with this section.
The SLRS software contains 7 CDs, 2 SLRS CD, 3 CDs for United Linux and
2 Service Pack CDs. The installation starts, booting from the first CD (SLRS
CD1). SUSE YaST2 (Yet another Setup Tool) is a powerful graphical system
assistant, which safely guides you through the installation procedure. In many
cases, a few clicks are all that is needed to install SUSE LINUX Retail Solution
on your server.
Note: SUSE recommends to use SLRS CD1 for the installation of the SLRS
software. In some cases, the installation will fail. One problem could arise,
while booting new servers with unsupported SCSI/Raid controllers. For further information refer to Section 16.1.1 on page 157.
• The YaST2 installation program starts (refer to Figure 3.1 on page 23)
after booting from the first CD (SLRS)11.
• Read and accept the SLRS EULA (End User License Agreement).
• Select your language.
• YaST2 prompts for the installation mode:
– New installation
– Boot installed system
– Abort installation
11
For further information about the installation process, refer to your hardcopy SUSE LINUX
documentation or the SUSE LINUX documentation on your installation CD.
31
Page 32

3 Quick Start Guide
Select "New installation". Both other options will abort the SLRS installation. Option "Boot installed system" will try to boot an OS from the
primary hard disk drive.
• Expert: Click the headline Partit io ni ng to change the YaST default set-
tings. Furthermore please note, that in some cases YaST will not delete existing partitions. Herefore select the option "Create custom partition setup".
For further information refer to the SUSE LINUX documentation.
• Click the headline Software to change the Installation Settings and select
one of the two possibilities:
– Minimum system
– Minimum graphical system (without KDE)
For example, select "Minimum graphical system (without KDE)" (recommended).
• Click "Detailed selection..." and change the following items:
– Select "SLRS POS/Retail Branch and Admin server Minimum System"
– Select "YaST2 config modules" (recommended, it provides online
update services and easy-to-use configuration programs through
YaST2)
• Accept your selection.
Note: If you have selected the "Minimum system" instead of the "Minimum
graphical system", as the base system, you will be asked to resolve a dependency for the GL graphics subsystem when you add the "SLRS POS/Retail
Branch and Admin server Minimum System" selection - it is recommended
to select the "mesasoft" package here.
• Accept your Installation Settings and start the installation.
12
• After rebooting the system, YaST2 starts again and you are prompted to
set the password for root.
• Skip "Add a new user" and confirm the question about the network client
with "Yes".
• Confirm the proposal for the display resolution parameters.
• Ignore the Printers headline warning: "The print spooler is not installed
properly. ERROR: No proposal."
• Click the headline Network interfaces when prompted and configure the
network interface, for example, eth0. Enter the IP address, such as
192.168.2.1, and the Network Mask, like 255.255.255.0.
12
You will be prompted for the United Linux CDs during the installation.
32
Page 33

3.3 Installation of the Branch Server
– Configure Host Name, for example, bs1
– Set Domain Name, such as store1.berlin.mycompany.mycorp.us
Note: It is very important to choose the same host name, domain
name, and IP address as defined in the LDAP database of the administration server. Otherwise, the initialization scripts will fail.
• The software installation is done and you can log in as the user root.
• Install the United Linux Service Pack 3 CD, as described in Section 3.3.1.
Afterwards proceed with Section 3.3.3 to configure the branch server.
Expert: Refer to Section 5.2 on page 61, which describes the key requirements
and steps for getting the branch server installed and configured on your workstation.
3.3.1 Updating the SLRS Base Software
The actual version of the SLRS 8 is based on the SLES/UL Service Pack 3
and needs to be updated with the United Linux Service Pack 3 CD1 from the
SLRS 7-CD Set.
Future United Linux Service Packs can be used to update the installed SLRS
version on the BS. For new installations, only the latest Service Pack CD needs
to be installed.
To initiate the update, start the YaST or YaST2 Control Center (see Figure 3.2)
on page 26, for example, by executing the program from the command line
and selecting Software.
Figure 3.4: YaST2 Online Update
There are two ways updating the SLRS software: the Patch CD Update or
33
Page 34

3 Quick Start Guide
Online Update13. For detailed information about executing the YaST Update,
refer to the SUSE LINUX documentation.
Note: If you are using a non-graphical system environment, only YaST can be
used.
Furthermore the update can be done manually by mounting the Service Pack
CD and calling the install_update_rpms.sh script, as described below:
• Log in as root.
• Insert the Service Pack CD into the CD drive.
• mount /media/cdrom
• Execute: /media/cdrom/install_update_rpms.sh
• umount /media/cdrom
• Eject the Service Pack CD.
Note: The install scripts for updating RPMs are hard-coded to use /media/cdrom.
If your CD-ROM drive uses a different name to mount (such as /media/cdrecorder),
enter the following commands to create a link to the CD:
cd /media
ln -s cdrecorder cdrom
After installing a Service Pack CD you should reboot the branch server.
3.3.2 Install the OEM Hardware Vendor CD
The POS system manufacturer provides scripts and configuration files, and
further add-on software on top of the SLRS.
There are two ways to install the OEM14hardware vendor CD, such as the
IRES15Vendor CD. If you are using a graphical system environment, such as
KDE, execute the following steps:
• Log in as root.
• Insert the Vendor CD for SLRS into the CD drive.
• Click CD-Icon Install vendor addon CD
• Select item 2 Install/Update Branch Server
• Select < OK > to start the installation.
The following messages will be displayed, as shown in Figure 3.5.
13
You must be registered at http://www.suse.com/maintenance to access the online up-
date. For further information, refer to the SUSE LINUX MAINTENANCE PROGRAM information supplied with the SLRS.
14
OEM: abbr. of original equipment manufacturer
15
IRES: IBM Retail Environment for SUSE LINUX
34
Page 35

3.3 Installation of the Branch Server
Figure 3.5: IRES - Install/Update Branch Server Option
• Right click CD-ROM Icon and select the option Eject, to eject the Vendor
CD again.
If you are using a non-graphical system environment execute the following
steps:
• Log in as root.
• Insert the Vendor CD for SLRS into the CD drive.
• Execute the command: mount /media/cdrom
• Start the install script: /media/cdrom/install
• Select item 2 Install/Update Branch Server
• Select < OK > to start the installation.
• umount /media/cdrom
• Eject Vendor CD.
For further information, refer to the POS system manufacturer hardcopy documentation or the documentation on the OEM vendor CD.
35
Page 36

3 Quick Start Guide
3.3.3 Configuration of the Branch Server
Note: Update the branch server software with United Linux Service Pack
3 CD before proceeding with this section.
Expert: This guide skips the HA service configuration. For information, refer to
Section 5.3.4 on page 66.
After the installation of the SLRS software, manually start the BS configuration
script, which prompts you through the configuration:
• Log in as root.
• Execute the command posInitBranchserver.sh16.
• Enter [company name] without spaces and without special characters,
for example, mycorp
• Enter [country abbreviation]: us
17
• Enter [IP Address of the AS]18, for example, 192.168.2.254.
• The BS is then configured. A summary of the configuration is displayed.
Expert: Refer to Section 5.2.4 on page 64 for more detailed information and
in case of failure. At this point, the base configuration of the branch server is
finished. The LDAP directory service running on the AS is accessible.
3.3.4 Managing the POS Images
The purpose of this section is to put the POS images19, located at the rsync
directory of the AS to the tftpboot directory of the BS.
Expert: The POS clients boot two images — a first and a second stage image,
which are located below the BS directories /tftpboot/boot and /tftpboot/image.
Refer to Section 15.6 on page 146 for further information.
Interaction
• Transfer the POS Images from AS to BS. To do that, execute the com-
mand possyncimages.pl.
• Verify the result of the command possyncimages.pl by checking the
contents of the following directories:
16
Refer to Section 6.2 on page 73 for further information.
17
de for Germany, us for United States, uk for United Kingdom, etc.
18
Set the value according to your AS configuration.
19
The POS image, which the POS clients attached to the LAN of the BS attempt to boot,
depends on the LDAP configuration of the AS. Refer to Section 3.2.4 — this section is the
counterpart in which the POS image and POS hardware information is placed to LDAP.
36
Page 37

3.3 Installation of the Branch Server
– ls /tftpboot/boot
– ls /tftpboot/images
According to the example in Section 3.2.6 on page 30, the disknet boot
image and a java POS image should now be available on the BS.
• Verify the LDAP settings, with the available POS images located below
the path /tftpboot/images.
Note: POS images must be activated, that POS clients are able to download them from the branch server. After the installation and configuration of the SLRS, initial entries for the browser and java POS image are
added to LDAP. These LDAP entries serve as example only!
20
For
further information how to activate POS images with PosAdmin refer to
Section 7.4 on page 95.
Expert: When later running possyncimages.pl, remember that distributing
new POS images from the AS to the branch servers is only one part of the action
needed to enable boot image version changes. The counterpart is to activate the
version changes inside the LDAP entries of the AS and to update the CR config
files that reside on the BS. Otherwise POS clients already registered in LDAP and
on the BS will not boot the new POS image version located below the /tftpboot
directory. For more details, refer to Section 7.4 on page 95 and Section 6.4 on
page 75.
3.3.5 Starting the Core Script Process
To enable the registration of cash register systems the poslease s2 ld ap script
has to be started manually. Execute the following command, which starts
posleases2ldap as a daemon process:
• /etc/init.d/po sle as es 2l da p
To enable that the core script is automatically started at boot time of the
branch server execute the following command:
• chkconfig posleases2ldap on
Expert: The POS script posleases2ldap registers new CRs in LDAP and has
to be started as a daemon on the branch server. All other POS scripts are
controlled by po sl ea se s2 ld ap . For further information, refer to section 4.5.1
on page 49.
20
The POS system manufacturer will provide a script to add the required SLRS objects to
the LDAP directory during the configuration of the administration server. For information,
refer to the POS system manufacturer documentation.
37
Page 38

3 Quick Start Guide
Congratulations! You have installed your branch server.
3.4 Test your SLRS System Environment
To complete the steps of the SLRS installation process, as described in Section
3.1 on page 22, you have to verify the installation by booting at least one POS
client attached to the previously installed branch server.
Figure 3.6 illustrates the procedure how to verify the LDAP settings of the
administration server and the tftpboot entries of the branch server up to the
state when the POS client boots the first stage image followed by the second
stage image. To verify and test your SLRS installation execute the following
steps:
• Attach a POS client to the branch server network.
• Optionally test if the POS LDAP structure is accessible on the administra-
tion server using a ldap se ar ch command or a GUI-based LDAP browser,
such as GQ. For further information refer to Section 5.1.4 on page 58.
• Optionally verify the LDAP settings for your attached POS client, the
corresponding POS image (version) and test if the configured POS image
is available on the branch server below the /tftpboot/im age s directory.
For further information how to modify and add LDAP entries for your
specific SLRS system enviroment refer to the Section 7 on page 79.
Figure 3.6 : The scCashRegister object which matches the model type
of the POS client must exist in LDAP, for example, IBMSurePOS300Series.
Furthermore the scPosImageDn object must be set to an existing POS
image, for example, the browser image.
The scPosImage object, which is associated to a Cash Register type
must exist in LDAP.
The branch server must provide the first and the second stage boot
image below the /tftpboot directory. As shown in Figure 3.6, the
browser-1.1.1 image and the corresponding MD5 check sum file (browser-
1.1.1.md5), which is configured in LDAP for a POS client from type IBMSurePOS300Series must be available for download by the CR.
The POS image must be set active in LDAP, otherwise the POS client
will not be able to download the image.21Verify the setting of the
21
SUSE decided not to set the POS images to active automatically, during the configuration
of the SLRS on the administration server.
38
Page 39

3.4 Test your SLRS System Environment
Figure 3.6: Dependences between LDAP, tftpboot directory and POS Client
39
Page 40

3 Quick Start Guide
scPosImageVersion attribute of the POS image associated to your POS
client. For further information how to activate POS images with PosAdmin
refer to Section 7.4 on page 95.
• Power on the POS client.
• Experts: Optionally watch the log messages of the branch server using the
command tail -f /var/log/messages. Check if there are tftpd entries
while your POS client is booting, for example:
.. bs1 tftpd[31434]: Serving /boot/pxelinux.0 to 192.168.2.15:2070
.. bs1 tftpd[31435]: Serving /boot/pxelinux.cfg/C0A8020F to 192.168.2.15:57217
.. bs1 tftpd[31436]: Serving /boot/pxelinux.cfg/C0A8020 to 192.168.2.15:57090
.. bs1 tftpd[31437]: Serving /boot/pxelinux.cfg/C0A802 to 192.168.2.15:56963
.. bs1 tftpd[31438]: Serving /boot/pxelinux.cfg/C0A80 to 192.168.2.15:56836
.. bs1 tftpd[31439]: Serving /boot/pxelinux.cfg/C0A8 to 192.168.2.15:56709
.. bs1 tftpd[31440]: Serving /boot/pxelinux.cfg/C0A to 192.168.2.15:56582
.. bs1 tftpd[31441]: Serving /boot/pxelinux.cfg/C0 to 192.168.2.15:56455
.. bs1 tftpd[31442]: Serving /boot/pxelinux.cfg/C to 192.168.2.15:56328
.. bs1 tftpd[31443]: Serving /boot/pxelinux.cfg/default to 192.168.2.15:56201
.. bs1 tftpd[31444]: Serving /boot/linux to 192.168.2.15:56202
.. bs1 tftpd[31445]: Serving /boot/initrd.gz to 192.168.2.15:56203
.. bs1 dhcpd: DHCPDISCOVER from 00:06:29:e3:02:e6 via eth0
.. bs1 dhcpd: DHCPOFFER on 192.168.2.15 to 00:06:29:e3:02:e6 via eth0
.. bs1 dhcpd: DHCPREQUEST for 192.168.2.15 (192.168.2.1) from 00:06:29:e3:02:e6 via eth0
.. bs1 dhcpd: DHCPACK on 192.168.2.15 to 00:06:29:e3:02:e6 via eth0
.. bs1 tftpd[31454]: Serving CR/config.00:06:29:E3:02:E6 to 192.168.2.15:32768
.. bs1 tftpd[31455]: Fetching from 192.168.2.15 to upload/hwtype.00:06:29:E3:02:E6
Figure 3.6 : As shown in the log file, the POS client perfoms a PXE boot
receiving the Linux kernel and its first stage boot image, the inird (initrd.gz).
Finally the CR control file is written on the branch server. For further information about the CR boot process refer to Section 15.6.3 on page 151.
• Watch the entries below the /tftpboot/upload directory. There you
should find the CR control file hwtype.<MAC Address>, for example as
shown in the trace above, hwtype.00:06:29:E3:02:E6. The CR control
file exists only as long as the CR configuration file is created. For further
information refer to Section 15.6 on page 146.
• Watch if your POS client is able to boot the second stage POS image.
This is the POS image as configured in LDAP for your POS client,
as shown in Figure 3.6, the browser-1.1.1 image. If everything is ok up
to this point, you will watch the POS client booting until you get the
login prompt. To verify this you can do the following:
– POS client booting successful: Watch the entries below the direc-
tory /tft pb oo t/ CR of the branch server. If the CR could be registered successfully in LDAP, the CR configuration file config.<MAC
40
Page 41

3.4 Test your SLRS System Environment
Address> and the corresponding directory will be written for this
new CR below the /tftpboot/CR directory of the branch server,
for example, the file config.00:06:29:E 3: 02 :E 6 and the directory
00:06:29:E3:02:E6.
The newly registered POS client can be found in LDAP of the administration server, for example, POS01. To verify the CR entry in LDAP
use again a ldapsearch command or a GUI-based LDAP browser.
– POS client booting fails - CR control file available: In case of failure
verify the hardware type entry of the CR control file hwtype.<MAC
Address>, below the /tftpboot/upload directory of the branch
server with the LDAP settings of the administration server.
Figure 3.6 : Check if the hardware type configured in LDAP
matches the identified hardware type of the used POS client.
Check if the corresponding POS image configured for this
hardware type is available below the /tftpboot/images directory
of the branch server.
Check if the POS image version is enabled in LDAP.
41
Page 42

3 Quick Start Guide
42
Page 43

4 Server Structure
Contents
4.1 Requirements . . . . . . . . . . . . . . . . . . . . . . . . . . 43
4.2 Architecture . . . . . . . . . . . . . . . . . . . . . . . . . . 44
4.3 LDAP Structure . . . . . . . . . . . . . . . . . . . . . . . . . 44
4.3.1 Logical Structure of the LDAP Directory . . . . . . . 44
4.4 Server Configuration and Server Services . . . . . . . . . . 47
4.4.1 DNS . . . . . . . . . . . . . . . . . . . . . . . . . . . 47
4.4.2 DHCP . . . . . . . . . . . . . . . . . . . . . . . . . . 47
4.4.3 TFTP . . . . . . . . . . . . . . . . . . . . . . . . . . . 47
4.4.4 NTP . . . . . . . . . . . . . . . . . . . . . . . . . . . 48
4.4.5 RSYNC . . . . . . . . . . . . . . . . . . . . . . . . . 48
4.5 POS Scripts . . . . . . . . . . . . . . . . . . . . . . . . . . . 48
4.5.1 Core Script Process . . . . . . . . . . . . . . . . . . . 49
4.6 Cash Register Images . . . . . . . . . . . . . . . . . . . . . 50
4.6.1 Distributing Images . . . . . . . . . . . . . . . . . . . 51
The retail project is designed to implement a complete operating system and
management structure for administering Linux-based cash registers (CR). The
CRs are implemented in a variety of hardware forms, with the main difference
being whether they are equipped with hard drives (diskless or diskful). Both
options must be supported. This section describes the required infrastructure
— server, server services, and management programs.
4.1 Requirements
The entire infrastructure is designed to be strictly centralized with the option
of complete central administration, but also with the option of delegating administrative tasks to subunits. This produces the requirement for a role-based
privilege granting system for work and system administration. The solution
is very broadly scalable, so that a small shop with five cash registers can be
managed just as well as a large chain with a thousand branches.
The availability of server services is another central topic. For chains with
several branches, the link between the branches and the central office can be
assumed to be over WAN links of varying quality. The operation must also
43
Page 44

4 Server Structure
be able to be maintained fault-free for several hours in the event of loss of
link. That means that this rigorously centralized structure must also function
decentrally and potential server failures must also be taken into account.
4.2 Architecture
There is a central administration server and a branch server in each branch or
office. All the administration data is kept in a central LDAP directory on the
administration server. This data is used to generate the necessary configuration files. In addition, the required operating system images for the CRs are
created and maintained here.
The LDAP directory is not replicated on the branch servers. The components
on the branch servers access the administration directory directly. This requires that all the functionalities for daily operation in the branches must be
able to run without any connection to the directory service, if necessary. During execution of administrative tasks, such as installation of new CRs in a
branch, steps must be taken to ensure that the WAN link to the central office
is available. The services that are needed for the operation and management
of the CRs run on the branch servers. In addition, these services are configured over the central LDAP directory. The CRs execute a network boot via
PXE by default. The branch servers provide all the services required for this.
The configuration of the CRs from the initial network boot image is not done
via directory queries, but rather via ASCII files that are loaded over TFTP.
Additionally, the branch servers provide the services DHCP and DNS.
4.3 LDAP Structure
The LDAP directory is designed to manage even the largest potential corporate structures. All the globally valid information for a chain or company, like
hardware types or OS images, is stored in the container global. The information pertaining to the branch servers is stored in the server container below
the branch entry. This data can be used to generate an automatic install file,
configure the services of a branch server, and carry out an inventory process.
The actual branches are further organized into regions. The branch containers
are used to store the information about the deployed CRs and the branch
servers. This and all other information that can be modified by the branch
server itself should be stored or referenced here to limit the need to grant
write privileges to subtrees.
4.3.1 Logical Structure of the LDAP Directory
The following text describes the LDAP structure with respect to the object
classes used. The definition of the object classes with all their attributes is
44
Page 45

Figure 4.1: LDAP Structure
4.3 LDAP Structure
listed in the Appendix.
The core scripts only search through the names of the object classes. The
common name for an entry is not used. The origin of the LDAP directory is an
objectClass: organization that is intended to depict a parent corporation,
for example.
The actual companies are depicted one level deeper in the tree as objectClass:
organizationalUnit. These units are independent organizational structures
whose POS/Retail-managed systems are completely separate. Considering the
directory structure of such a company in the example of the organizational
unit mycompany, the following standard entries are present on the next lower
level.
objectClass: scRefObjectContainer, cn=global This is where the server
and cash register hardware being used and the images are described in
the form of reference objects. These entries are then referenced from
the actual entries for the cash registers and servers in the branches
(scLocation) via distinguished names.
The following entry types are present:
• Server hardware (objectClass: scRefServer)
• Cash register hardware (objectClass: scCashRegister)
45
Page 46

4 Server Structure
• Operating system images (objectClass: scPosImage)
objectClass: scLocation, cn=headquarter corresponds in structure to the
branches described below, except here it deals with the central administration server in a central location.
objectClass: organizationalUnit, cn=berlin (Example) These organiza-
tional units are used to structure the branches and offices into regions.
They were introduced to improve organizational coherence.
The structure under a region consists primarily of instances of the objectClass:
scLocation, as in the example cn=berlin1. These correspond to the individual branches. Under the scLocation objects, find
objectClass: scServerContainer, cn=server in which the Branch Servers
are described in instances of Obje ct Cl as s: scBranchServer, for example, cn=bs1
objectClass: scWorkstation in which the CRs are described.
To make the logic of the directory structure clear, an example of the course of
an action is provided here. The data for a branch server bs1 in a branch called
berlin1 is used. The process:
1. A search is made for an object of objectClass: scLocation with cn=berlin1.
2. Below this sc Lo ca ti on, a search is made for an object of objectClass:
scServerContainer.
3. Below this scServerContainer, a search is made for an object of
objectClass: scBranchServer with cn=bs1.
4. Data specific to this server is located below this scBranchServer object,
such as objects of objectClass: scNetworkcard in which the IP addresses are indicated.
5. All the data that generally applies for this hardware type, such as the partitioning, is read from a reference object of object Cl as s: scRefServer
in which this hardware is described. These reference objects are always
organized as containers in an object of objectClass: scRefObjectContainer.
6. Now, find the reference objects that are valid for this branch server. To
do this, first read the attribute scRefServerDn in the scBranchSe rv er
object that represents this server. If a dn is included here, the target will
be used as the reference object for the branch server.
7. If the entry is empty, the search for an object of the objectClass:
scHardware moves successively higher one level at a time. If the attribute scRefServerDn is occupied in this type of object, this dn is taken
as the target; if not, the search continues upward in the directory structure. If no appropriate object with this attribute is found all the way up
to the root level, the process aborts with an error.
46
Page 47

4.4 Server Configuration and Server Services
The procedure is similar for CR hardware. Here, in addition to the referenced
hardware type (through attribute scRefPcDn to a scCashRegister object), a
reference image is pointed to via scPosImageDn to a scPosImage object.
The scRefObjectContainer container objects should, by definition, always
have cn=global and also appear only once per directory level. The initial
LDAP structure after installation includes only one scRefObjectContainer
named global under the directory ro ot. Following the above described logic,
other scRefObjectContainer objects can be added as needed. This provides
great flexibility. For example, each server can be assigned its own reference
objects and therefore its own hardware types. However, if all the servers have
the same hardware, a blanket standard can be defined for branches on the
regional or organizational level in the global container.
4.4 Server Configuration and Server Services
The services for both the administration servers and the branch servers can be
designed to be highly available. To meet this requirement, either the generic
mechanisms of the server services (DNS, DHCP, etc.) are used or a combination of heartbeat, virtual IP, and drbd is employed. An automatic installation
option is being implemented for the branch servers so new branches can be
set up at minimal expense. AutoYaST2 is used in this case and the description
files will be generated from the directory data.
The administration server runs the directory service and the RSYNC server.
The branch servers run all the services required to start the cash registers
(TFTP, DHCP, DNS) for the respective branch and an NTP server that synchronizes the system time with the administration server.
4.4.1 DNS
Every branch server runs a DNS master for that branch. The zone files are
generated on each branch server by the posldap2dns script from the data in
the LDAP directory and reloaded.
4.4.2 DHCP
A DHCP server is installed on the branch server. The dhcpd.conf file is generated by the posldap2dhcp script from the directory data for the branches.
4.4.3 TFTP
The TFTP service on the branch server is structured as described above with
boot, image, CR, and upload directories. There is a PXE default configuration
with which all the CRs first load the same initial initrd and the same kernel.
47
Page 48

4 Server Structure
TFTP Server Structure
The TFTP server directory structure is divided into the following main areas
under the tftp_root1directory:
• Image configurations
The /tftpboot/CR/ directory contains the various config.<MAC Address>
image configuration files.
• Configuration files
The /tftpboot/CR/<MAC Address>/ directory contains the various system configuration files, such as XF86config.
• Boot files
The /tftpboot/boot/ directory is where the initrd.gz, the kernel to boot,
and the PXE loader pxelinux.0 are kept.
• PXE configuration file
The /tftpboot/boot/pxelinux.cfg directory is where the PXE configuration
file is kept.
• Image files and checksums
The /tftpboot/image/ directory is where all the image files and their
checksums are kept.
• Upload area
The directory /tftpboot/upload/ is the directory into which the hwtype.<MAC
Address> files for registering new cash registers are uploaded.
4.4.4 NTP
The NTP service for the branch servers synchronizes with the administration
server NTP, which in turn must be configured to get the time from a reliable
source. The branch servers pull the images from the administration server
using the script possyncimages.
4.4.5 RSYNC
RSYNC is used to release the area with the OS images on the administration
server. This service is used to transfer the images to the branch servers.
4.5 POS Scripts
All the programs required to manage the system and to generate configuration files are implemented in Perl and as shell scripts. All the file names
1
SLRS uses the directory /tftpboot as <tftp_root> path on the branch server.
48
Page 49

4.5 POS Scripts
contain the prefix pos, so a quick overview of the available programs can
be displayed using tab completion. It is recommended to use the directory
/opt/SLES/POS/bin as the storage location for the POS scripts. All the scripts
can be controlled transparently using the posadmin metascript, as long as they
are not run by cron. The posadmin script is designed to operate in the same
way on the administration server as on the branch servers.
The basic mechanism for all actions (image transfer to a branch server, data
readout from the directory) is a pull mechanism from the branch servers that
is run directly on the branch servers. One important element is central logging
of all actions with success or failure flags on the administration server. For all
actions, the rule must be transaction security or atomic execution to avoid, for
example, inconsistent configuration files.
4.5.1 Core Script Process
When CRs are being set up in a branch or subsidiary, the posleases2ldap
script must be started as a daemon on the branch server for the respective
branch. All other scripts are controlled by this script. In this case, the process
on a branch server can be described as shown below:
1. posleases2ldap is started directly on the branch server. If the scDynamicIp
attribute is not set to TRUE in the respective scLocation, the script immediately terminates.
2. posleases2ldap is running as a daemon process and monitors the leases
file /var/lib/dhcpd/dhcpd-leases for changes. The script detects in which
scLocation (branch) it is running using the IP address of the server.
3. If posleases2ldap finds MAC addresses in the leases that are not yet
entered in the directory, it generates new entries for the scWorkstation
object class in the dn for the respective scLocation. The first items filled
out are the required attributes macAddress, ipHostNumber, and the cn
for the entry. The IP address and the CR name (cn) are automatically
generated, and the MAC address is taken from the leases file. These
entries are like a kind of skeleton.
4. A search is made through the upload directory on the TFTP server for
files of the pattern hwtype.<MAC Address> that are being uploaded by
CRs registered from the netboot system. The CR hardware type is specified in these files. For more information, see Section 15.6. If any files of
this type are found, the following process runs:
a) Using the MAC address, the respective scWorkstation entry is looked
up in the LDAP directory. With the content of the hwtype.<MAC
Address> file, the corresponding scRefPc (the reference hardware
type in the global container) is searched. In the scRefPc object
(named after the hardware type), the image type for this hardware
49
Page 50

4 Server Structure
type is specified as a reference to a scPosImage object in the attribute scPosI ma ge Dn (which points to the reference image in the
global container). The information about the reference hardware
and image are then added to the scWorkstation object as distinguished names (dn) and the attributes are named scRefPcDn and
scPosImageDn.
b) Now all information is collected to generate the configuration file
/tftpboot/CR/config.<MAC Address>. It is possible to specify hardware type or image type dependent configuration files, like XF86config
(which would be hardware type dependent). These files are generated in the /tftpboot/CR/<MAC Address> directory. For this purpose, an object of the class scConfigFileTemplate can be added
to the respective scRefPc or scPosImage object in the global container.
Then the attribute scConfigFileData of the scConfigFileTemplate
object contains the required file. Hardware or image dependent
configuration files are always looked up by the order image, hardware.
All newly generated files are initially named with the prefix TMP_.
c) The configuration files are renamed from TMP_* to their final names.
d) Finally, the /tftpboot/upload/hwtype.<MAC Address> file is deleted.
The registration of a newly detected cash register is completed.
5. posleases2ldap starts posldap2dns. The zone files for the DNS server
are regenerated from the directory data as a temporary file and renamed. The DNS service is restarted if there are any changes.
6. posleases2ldap starts posldap2dhcp. The dhcpd.conf file is regenerated
from the directory data as a temporary file and renamed. The DHCP
service is restarted if there are any changes.
7. posleases2ldap runs in a loop starting at point 2. until it is terminated
or the attribute scDynamicIp in the scLocation object for the branch is
set to FALSE.
4.6 Cash Register Images
OS images are created on the administration server, versioned, and prepared
for transmission via the RSYNC server service. The information is maintained
in the directory (LDAP). This includes the image name (scImageName), the
name of the image file (scImageFile), and the image version (scPosImageVersion).
The actual name of the image file in the tftp server are composed of scIm ag eF il e
and scPosImageVersion .
50
Page 51

4.6 Cash Register Images
4.6.1 Distributing Images
New or updated images are pulled from the individual branch servers by a
script (working title: posImageTrans.pl) using RSYNC. This procedure can
be triggered in two ways:
• The script is started locally on a branch server by an administrator.
• The script is started locally on a branch server by a cronjob.
The possyncimages.pl script initially checks via PID file to see whether an
instance is already running. After the completion of the transfer, new images are registered in the branch server object in LDAP. The image file is then
copied from the RSYNC directory into TFTP root. During this process, the
TFTP server must be stopped or otherwise prevented from transmitting this
file to clients. If a branch server has received a new image, new configuration
files are generated from the LDAP data on the branch server for the CRs of this
type. Steps should be taken to ensure that these actions are not taken during
the boot window (in the morning), but rather at night.
51
Page 52

4 Server Structure
scImageVersion
scImageSize
cn
scRefImage
scExcludeList
scImageLocation
scLocation
scDhcpRange
scDhcpFixedRange
scDefaultGw
scDynamicIp
ipNetworkNumber
ipNetmaskNumber
scRefPrinter
scDrivername
scPpd
scPrinterDeviceUri
scPartitionsTable
scInitRdScript
scRefMonitor
scRefImageDn
scHsync
scVsync
scMonitorRes
scDefaultRes
scPrinterLanguage
scDhcpOptionsRemote
scDhcpOptionsLocal
scRefPc
scCpuType
scMouse
scKeyboard
scKbLayout
scGraphicCard
scNic
scRamSize
Name MustAttributes MayAttributes OID Type Description
scHardware
scBandWidth
cn
scLanBandWidth
scWanBandWidth
scBandWidthLimitLan
scBandWidthLimitWan
cn
scService
scDnsName
scServiceName
scServiceStatus
scServer
ipHostNumber
scDnsName
ipServiceProtocol
cn
ipHostNumber
macAddress
scEnumerationMask
scWorkstationBaseName
scPrinterBaseName
1.3.6.1.4.1.7057.10.3.6.1.12 STRUCTURAL Defaults for an office
scLdapDn
scDnsDn
scExcludeListRunning
1.3.6.1.4.1.7057.10.3.6.1.9 AUXILIARY Definitions of images
scPrinterDeviceUriOptional
1.3.6.1.4.1.7057.10.3.6.1.7 AUXILIARY Hardware description for different printers
1.3.6.1.4.1.7057.10.3.6.1.6 AUXILIARY Hardware description for different monitors
scServiceEmail
scPosImageDn
scRefPcDn
scRefMonitorDn
scRefServerDn)
1.3.6.1.4.1.7057.10.3.6.1.3 STRUCTURAL Reference to standard PC hardware type and server hardware
1.3.6.1.4.1.7057.10.3.6.1.5 STRUCTURAL Hardware description for PC
1.3.6.1.4.1.7057.10.3.6.1.4 AUXILIARY Attributes for bandwidth management
1.3.6.1.4.1.7057.10.3.6.1.2 STRUCTURAL Server as service, e.g., LDAP
scPubKey
1.3.6.1.4.1.7057.10.3.6.1.1 AUXILIARY Physical server
Table 4.1: LDAP Objects
52
Page 53

4.6 Cash Register Images
Table 4.2: LDAP-Objekte
scSerialNumber
scRefPcDn
scPosImageDn
scPosImageVersion
1.3.6.1.4.1.7057.10.3.6.1.14 STRUCTURAL The entries for the real workstation
scPosRegisterBiosVersion
scStandardPrinterDn
userPassword
cn
macAddress
ipHostNumber
scStandardPrinter
scImageVersion
1.3.6.1.4.1.7057.10.3.6.1.16 AUXILIARY Inventory of hardware
scPosGroupDn)
scDiskJournal
scPcibus
scCpuInfo
1.3.6.1.4.1.7057.10.3.6.1.17 AUXILIARY The real printers in a location
scHdSize
macAddress
ipServicePort
scRefPrinterDn
scDnsName
1.3.6.1.4.1.7057.10.3.6.1.22 AUXILIARY objectClass for determining Token Ring workstation, normally used together with scWorkstation
1.3.6.1.4.1.7057.10.3.6.1.23 AUXILIARY config file for booting
macAddress
description
cn
scBootConfigFileName
scStartOption
1.3.6.1.4.1.7057.10.3.6.1.24 STRUCTURAL description of a reference server
scController
cn
scGraphicCard
scMouse
scRamSize
scCpuType
scKeyboard
1.3.6.1.4.1.7057.10.3.6.1.25 STRUCTURAL server marker
scRefServerDn
scPubKey
scKbLayout
cn
1.3.6.1.4.1.7057.10.3.6.1.26 STRUCTURAL description of a hard disk, normally a leaf entry of a scRefServer or a scBranchServer
scDevice
scHdSize
scPartitionsTable
1.3.6.1.4.1.7057.10.3.6.1.27 STRUCTURAL description of a network card, normally a subentry of a scBranchServer
macAddress
scModul
scModulOption
ipNetmaskNumber)
scDevice
ipHostNumber
1.3.6.1.4.1.7057.10.3.6.1.28 STRUCTURAL HA service of a BranchServerCluster
scDevice
cn
ipHostNumber
scDnsName
scServiceName
1.3.6.1.4.1.7057.10.3.6.1.29 STRUCTURAL Standard services, like LDAP and DNS master, outside the branch scope
scLdapDn
scDnsDn
scServiceStatus
scPrimaryService
cn
cn
1.3.6.1.4.1.7057.10.3.6.1.30 STRUCTURAL Image for pos
scConfigFile
scImageName
scPosImageVersion
scDhcpOptionsRemote
scDhcpOptionsLocal
scImageFile
scBsize
cn
1.3.6.1.4.1.7057.10.3.6.1.31 STRUCTURAL Reference Cash Register
scDiskJournal
scConfigFileParser
scCashRegisterName
scPosImageDn
cn
scMust
1.3.6.1.4.1.7057.10.3.6.1.32 STRUCTURAL Template of a config file
scConfigMd5
scConfigFileUpdateModel
scConfigFile
scBsize)
scConfigFileData
cn
1.3.6.1.4.1.7057.10.3.6.1.32 STRUCTURAL Template of a config file
scConfigMd5
scConfigFileUpdateModel
scMust
scConfigFile
scBsize)
scConfigFileLocalPath
1.3.6.1.4.1.7057.10.3.6.1.33 STRUCTURAL Ramdisk
1.3.6.1.4.1.7057.10.3.6.1.34 STRUCTURAL Image for pos
scPosImageDefaultVersion
scDevice
scImageName
scPosImageVersion
1.3.6.1.4.1.7057.10.3.6.1.35 STRUCTURAL
1.3.6.1.4.1.7057.10.3.6.1.102 STRUCTURAL SmartClient region marker
1.3.6.1.4.1.7057.10.3.6.1.103 STRUCTURAL SmartClient server container
1.3.6.1.4.1.7057.10.3.6.1.104 STRUCTURAL SmartClient reference object container
cn description
cn
cn
cn
1.3.6.1.4.1.7057.10.3.6.1.105 STRUCTURAL SmartClient user container
cn
Name MustAttributes MayAttributes OID Type Description
scWorkstation
scInventory
scPrinter
scTokenRing
scBootConfig
scRefServer
scBranchServer
scHarddisk
scNetworkcard
scHAService
scStandardServices
scPosImage
scCashRegister
scConfigFileTemplate
scConfigFileSyncTemplate
53
scRamDisk
scPosImageSync
scPosGroup
scRegion
scServerContainer
scRefObjectContainer
scUserContainer
scUserGroupContainer 1.3.6.1.4.1.7057.10.3.6.1.106 AUXILIARY SmartClient user group container
Page 54

4 Server Structure
54
Page 55

5 Setting up Administration and
Branch Servers
Contents
5.1 Installation of the Administration Server . . . . . . . . . . 55
5.1.1 Partitioning . . . . . . . . . . . . . . . . . . . . . . . 56
5.1.2 Software Selection . . . . . . . . . . . . . . . . . . . 56
5.1.3 Updating . . . . . . . . . . . . . . . . . . . . . . . . 58
5.1.4 Configuration . . . . . . . . . . . . . . . . . . . . . . 58
5.2 Installation of the Branch Server . . . . . . . . . . . . . . . 61
5.2.1 Partitioning . . . . . . . . . . . . . . . . . . . . . . . 61
5.2.2 Software Selection . . . . . . . . . . . . . . . . . . . 62
5.2.3 Updating SLES 8 . . . . . . . . . . . . . . . . . . . . 63
5.2.4 Configuration . . . . . . . . . . . . . . . . . . . . . . 64
5.3 Installation of the Highly Available Branch Servers . . . . 65
5.3.1 Hardware Requirements . . . . . . . . . . . . . . . . 65
5.3.2 Installation of the Branch Server Software . . . . . . 65
5.3.3 HA Service Configuration . . . . . . . . . . . . . . . 66
5.3.4 Installing the HA Software . . . . . . . . . . . . . . . 66
5.3.5 DRBD Configuration . . . . . . . . . . . . . . . . . . 67
5.3.6 Heartbeat Configuration . . . . . . . . . . . . . . . . 68
5.3.7 Test of the HA Setup . . . . . . . . . . . . . . . . . . 68
5.3.8 Final Setup . . . . . . . . . . . . . . . . . . . . . . . 69
5.3.9 Updating the SLRS 8 Software on HA Servers . . . . 70
5.1 Installation of the Administration Server
The following sections describe the key requirements and steps for installing
and configuring the administration server. This section is intentionally brief.
For detailed information, refer to your hardcopy SUSE Linux documentation,
or the SUSE Linux documentation on your installation CD, or the speed-start
SLRS installation procedure described in Chapter 3 on page 21.
55
Page 56

5 Setting up Administration and Branch Servers
We recommend a machine with a least a 1 GHz Pentium III, at least 30 GB of
available disk space, and at least 512 MB of RAM.
The administration server software is part of the SUSE LINUX Retail Solution
(SLRS) 8 CD set, which is based on the SUSE LINUX Enterprise Server (SLES)
8. The SLRS software contains 7 CDs, 2 SLRS CD, 3 CDs for United Linux and
2 Service Pack CDs. The installation starts, booting from the first CD (SLRS
CD1). The YaST2 installation program guides you through the installation.
5.1.1 Partitioning
If you select "Partitioning", you can modify the suggestion provided by YaST
or create a custom partition setup. Select the latter option and continue the
installation with "Custom partitioning — for experts" using the parameters
shown in Table 5.1.
The SLRS software is located below the /opt/SLES/POS partition, the partition /opt/SLES/dists will be used to hold a copy of the SLRS installation
CDs, /opt/SLES/POS/rsync is used to distribute the actual POS images to the
branch server, and the /opt/SLES/POS/space is your working partition with a
minimum size of 5GB using up the remaining space of the hard disk.
The directories marked with * will grow during the production and should be
as large as possible. All partitions should be formatted with a journaling file
system, for example reiserfs (the default selected by YaST2) or ext3, with the
exception of the swap partition where swap should be selected. For more detailed information about the partitioning, refer to the United Linux installation
manual.
Directory Size
/ 512MB+
/usr 2.5GB+
/var 2GB+ *
/tmp 1GB+
/var/log 2GB+ *
swap ∼ 2x size of RAM, >0.5GB
/opt/SLES/POS 2GB+ *
/opt/SLES/dists 5GB+ *
/opt/SLES/POS/rsync 5GB+ *
/opt/SLES/space >5GB+
Table 5.1: Directory size recommendation
5.1.2 Software Selection
Using the module "Software" of the YaST2 installation program, choose the
software packages to install on your administration server. Select the "Detailed
Selection" button, choose extended selection, then select the following:
56
Page 57

5.1 Installation of the Administration Server
• "SLRS POS/Retail Branch and Admin server Minimum System"
• "SLRS Admin server Image Building System"
and - depending on the requirements of the system - any of the following:
• KDE Desktop Environment
• LSB Runtime Environment
• Help & Support Documentation
• Graphical Base System
• YaST2 Config Modules (recommended)
• Analyzing Tools
• Authentication Server (NIS, LDAP, Kerberos)
• SLES Administration Tools
Note: If you have selected the "Minimum system" instead of the "Minimum graphical system", as the base system, you will be asked to resolve a dependency for the
GL graphics subsystem when you add the "SLRS POS/Retail Branch and Admin
server Minimum System" selection - it is recommended to select the "mesasoft"
package here.
Appendix A.2.1 lists the RPMs that are installed on the administration server
by default. After you have finished the software selection, accept your selection and start the installation and configuration of the administration server.
After the reboot of the system, YaST2 will start again and you are prompted
to set the password for root.
Skip adding a new user by leaving all input fields of the add user mask empty
and pressing continue. Confirm the question about a network (nis) client.
Also confirm the proposal for the display resolution parameters and skip the
printer detection.
IP Address 192.168.2.254
Net Mask 255.255.255.0
Host Name as1
Domain Name headquarter.mycompany.mycorp.de
Name Server [leave empty]
Table 5.2: Network Configuration of the Admin Server
Now configure the network interface, for example, eth0, depending on your
hardware configuration of the server. To build a running administration server
environment, enter the values shown in the Table 5.2 on page 57 into the
network configuration panel. The values as shown in the table serve as an
example for setting up an administration and branch server environment. Of
course, you can choose your own IP address, domain name, etc., for your
configuration.
57
Page 58

5 Setting up Administration and Branch Servers
5.1.3 Updating
The actual version of the SLRS 8 is based on the SLES/UL Service Pack 3
and needs to be updated with the United Linux Service Pack 3 CD1 from the
SLRS 7-CD Set.
To initiate the update insert the Service Pack CD into the CD drive of the AS,
mount the CD and call the install_update_rpms.sh script, as described below:
• mount /media/cdrom
• Execute: /media/cdrom/install_update_rpms.sh
• umount /media/cdrom
• Eject the Service Pack CD.
Note: The install scripts for updating RPMs are hard-coded to use /media/cdrom.
If your CD-ROM drive uses a different name to mount (such as /media/cdrecorder),
enter the following commands to create a link to the CD:
cd /media
ln -s cdrecorder cdrom
After installing the Service Pack CD you should reboot the administration
server.
5.1.4 Configuration
Now start the configuration of the administration server with posInitLdap.sh.
It prompts for the following information:
company name Enter the company name without spaces and without special
characters. For this example, mycorp as shown in Table 5.2.
abbreviation of your country Enter the abbreviation of your country: de for
Germany, us for United States, uk for United Kingdom, etc.
ldap administrator password Enter the LDAP administrator password twice
when prompted to make sure the password was entered correctly.
Now the installation script shows a summary of the LDAP directory data based
on your input. If all data is correct, continue the configuration by pressing
the ENTER key. If there is something wrong with the input data, abort the
installation by pressing CTRL+C. After ENTER is pressed, the script initializes
the basic LDAP database structure and performs some tests. Afterwards, a
summary of the configuration and the test results is shown. The successful
initialization process is finished when the message "success" is displayed.
The POS LDAP structure has been initialized on the AS and the LDAP service
is available. At this point, check if the LDAP structure is accessible using a
58
Page 59

5.1 Installation of the Administration Server
ldapsearch command or a GUI-based LDAP browser, such as GQ. For further
information about LDAP, refer to the corresponding manual pages.
The values o= and c= depend on your configuration. For example:
ldapsearch -x -h localhost -b cn=global,o=mycorp,c=de
The necessary GQ configuration to access the LDAP server is shown in the
example below:
General settings:
• LDAP host: <IP Address of the AS>
• LDAP Port: 389
• Base DN: o=mycorp,c=de
Details:
• Bind DN: cn=admin,o=mycorp,c=de
• Bind Password: <admin password>
The installation and the base configuration of the administration server is
now finished. Chapter 7 describes the posAdmin tool for modifying the LDAP
database on the administration server to manage the corresponding branch
servers and cash registers.
To create appropriate LDAP entries for the branch server installation described
in the next section, posAdmin must be used as described below1:
posAdmin.pl --user cn=admin,o=mycorp,c=de --password secret \
--base o=mycorp,c=de \
--add --organizationalUnit --ou mycompany
posAdmin.pl --user cn=admin,o=mycorp,c=de --password secret \
--base ou=mycompany,o=mycorp,c=de \
--add --organizationalUnit --ou berlin
posAdmin.pl --user cn=admin,o=mycorp,c=de --password secret \
--base ou=berlin,ou=mycompany,o=mycorp,c=de \
--add --scLocation --cn berlin1 \
--ipNetworkNumber 192.168.2.0 --ipNetmaskNumber 255.255.255.0 \
--scDhcpRange 192.168.2.220,192.168.2.240 \
--scDhcpFixedRange 192.168.2.10,192.168.2.200 \
--scDefaultGw 192.168.2.253 --scDynamicIp TRUE \
1
The POS system manufacturer will provide a Vendor CD for SLRS with scripts and con-
figuration files which will generate the branch entries in LDAP. For information, refer to
the POS system manufacturer hardcopy documentation or the documentation on the OEM
vendor CD.
59
Page 60

5 Setting up Administration and Branch Servers
--scWorkstationBasename CR --scEnumerationMask 000
posAdmin.pl --user cn=admin,o=mycorp,c=de --password secret \
--base cn=berlin1,ou=berlin,ou=mycompany,o=mycorp,c=de \
--add --scServerContainer --cn server
posAdmin.pl --user cn=admin,o=mycorp,c=de --password secret \
--base cn=server,cn=berlin1,ou=berlin,ou=mycompany,o=mycorp,c=de \
--add --scBranchServer --cn bs1
posAdmin.pl --user cn=admin,o=mycorp,c=de --password secret \
--base cn=bs1,cn=server,cn=berlin1,ou=berlin,ou=mycompany,o=mycorp,c=de \
--add --scNetworkcard --scDevice eth0 --ipHostNumber 192.168.2.1
posAdmin.pl --user cn=admin,o=mycorp,c=de --password secret \
--base cn=bs1,cn=server,cn=berlin1,ou=berlin,ou=mycompany,o=mycorp,c=de \
--add --scService --cn tftp --ipHostNumber 19 2. 16 8. 2. 1 \
--scDnsName tftp --scServiceName tftp --scServiceStatus TRUE \
--scServiceStartScript atftp
After creating the LDAP entries, the Linux kernel and initrd2used for the
network boot of the cash registers and the corresponding POS images must be
copied to the rsync directory.
Note: You may have to adapt the version and date of the file names to
execute the example below. SLRS POS image versions subject to change
without notice. Please verify the names of the prebuilt images which you
have installed from the SLRS CD1. The location of the prebuilt images is
/opt/SLES/POS/image.
cp /opt/SLES/POS/image/initrd-netboot-1.1.7-2003-11-20.gz \
/opt/SLES/POS/rsync/boot/initrd.gz
cp /opt/SLES/POS/image/initrd-netboot-1.1.7-2003-11-20.kernel.2.4.21-134 \
/opt/SLES/POS/rsync/boot/linux
cp /opt/SLES/POS/image/browser-1.1.1-2003-11-20 \
/opt/SLES/POS/rsync/image/browser-1.1.1
cp /opt/SLES/POS/image/browser-1.1.1-2003-11-20.md5 \
/opt/SLES/POS/rsync/image/browser-1.1.1.md5
cp /opt/SLES/POS/image/java-1.1.1-2003-11-20 \
/opt/SLES/POS/rsync/image/java-1.1.1
cp /opt/SLES/POS/image/java-1.1.1-2003-11-20.md5 \
/opt/SLES/POS/rsync/image/java-1.1.1.md5
2
SLRS provides three different prebuild first stage boot images, the netboot, disknetboot and
cdboot image. Keep in mind using the net boot image from the example will only operate
diskless POS clients. For further information refer to Chapter 15 on page 141.
60
Page 61

5.2 Installation of the Branch Server
5.2 Installation of the Branch Server
The following sections describe the key requirements and steps for installing
and configuring the branch server. This section is intentionally brief. For
detailed information, refer to your hardcopy SUSE Linux documentation, or
the SUSE Linux documentation on your installation CD, or the speed-start
SLRS installation procedure described in Chapter 3 on page 21.
We recommend a machine with a least a 1 GHz Pentium III, at least 30 GB of
available disk space, and at least 512 MB of RAM.
The branch server software is part of the SUSE LINUX Retail Solution (SLRS)
8 CD set, which is based on the SUSE LINUX Enterprise Server (SLES) 8.
The SLRS software contains 7 CDs, 2 SLRS CD, 3 CDs for United Linux and
2 Service Pack CDs. The installation starts, booting from the first CD (SLRS
CD1). The YaST2 installation program guides you through the installation.
5.2.1 Partitioning
If you select the module "Partitioning", you can modify the suggestion made by
YaST or create a custom partition setup. Select the latter option and continue
the installation with "Custom partitioning — for experts" using the parameters
shown in Table 5.3.
The SLRS software is located below the /opt/SLES/POS directory, the directory
/tftpboot is used to distribute the POS images to the CR clients, and the
/opt/SLES/POS/space is the working directory with a minimum size of 5GB
using up the remaining space of the hard disk.
The directories marked with * will grow during the production and should be
made as large as possible. All directories should be formatted with a journaling file system, for example reiserfs (the default selected by YaST2) or ext3,
with the exception of the swap directory where swap should be selected. For
more detailed information about the partitioning, refer to the United Linux
installation manual.
Directory Size
/ 512MB
/tftpboot 5GB+*
/usr 2.5GB+
/var 2GB+ *
/tmp 1GB+
/var/log 4GB+ *
swap ∼ 2x size of RAM
/opt/SLES/POS 2GB+
/opt/SLES/space >5GB+
Table 5.3: Directory size recommendation
Note: The required space in /tftpboot depends on the images that will be
61
Page 62

5 Setting up Administration and Branch Servers
deployed - ‘java´ and ‘browser´ images require only about 150MB per image,
whereas the ‘desktop´ image is over 700MB in size. You should have space for
2-3 generations of images in /tftpboot.
5.2.2 Software Selection
Using the module "Software" of the YaST2 installation program, choose the
software packages to install on your branch server. Select "Detailed Selection",
choose extended selection, then select the following:
• "SLRS POS/Retail Branch and Admin server Minimum System"
and - depending on the requirements of the system - any of the following:
• KDE Desktop Environment
• LSB Runtime Environment
• Help & Support Documentation
• Graphical Base System
• YaST2 Config Modules (recommended)
• Analyzing Tools
• Authentication Server (NIS, LDAP, Kerberos)
• SLES Administration Tools
Appendix A.2.2 lists the RPM packages that are installed on the branch server
by default.
Note: If you have selected the "Minimum system" instead of the "Minimum graphical system", as the base system, you will be asked to resolve a dependency for the
GL graphics subsystem when you add the "SLRS POS/Retail Branch and Admin
server Minimum System" selection - it is recommended to select the "mesasoft"
package here.
After finishing the software selection, accept your selection and start the installation and configuration of the branch server. After the reboot of the system, YaST2 restarts and prompts you to set the password for root.
Skip adding a new user by leaving all input fields of the add user mask empty
and pressing continue. Confirm the question about a network (NIS) client.
Also confirm the proposal for the di splay resolution parameters and skip the
printer detection.
Now configure the branch server’s network interface cards. For example, to
configure eth0 (the NIC for the internal POS terminal network), enter the
values shown in Table 5.4 on page 63 into the network configuration panel.
62
Page 63

5.2 Installation of the Branch Server
IP Address 10.0.0.1
Netmask 255.255.255.0
Table 5.4: Network Configuration of eth0 on the Branch Server
IP Address 192.168.2.1
Netmask 255.255.255.0
Host Name bs1
Domain Name berlin1.berlin.mycompany.mycorp.de
Name Server 127.0.0.1
Table 5.5: Network Configuration of eth1 on the Branch Server
To configure eth1 (the NIC for the external connection to the administration
server), enter the values shown in Table 5.5 on page 63.
The values as shown in Tables 5.2, 5.4, and 5.5 serve as an example setup of an
administration and branch server environment. The administration server and
branch servers communicate on the external network and the POS terminals
communicate with the branch server on the internal network. Enter your own
IP addresses, domain names, etc., for your branch server, corresponding to the
values configured in the LDAP database of the administration server.
5.2.3 Updating SLES 8
The actual version of the SLRS 8 is based on the SLES/UL Service Pack 3
and needs to be updated with the United Linux Service Pack 3 CD1 from the
SLRS 7-CD Set.
To initiate the update, insert the Service Pack CD into the CD drive of the
branch server, mount the CD and call the install_update_rpms.sh script, as
described below:
• mount /media/cdrom
• Execute: /media/cdrom/install_update_rpms.sh
• umount /media/cdrom
• Eject the Service Pack CD.
Note: The install scripts for updating RPMs are hard-coded to use /media/cdrom.
If your CD-ROM drive uses a different name to mount (such as /media/cdrecorder),
enter the following commands to create a link to the CD:
cd /media
ln -s cdrecorder cdrom
After installing the Service Pack CD you should reboot the branch server.
63
Page 64

5 Setting up Administration and Branch Servers
5.2.4 Configuration
Before starting the configuration of the branch server, check the network settings.
Note: It is very important to choose the same host name, domain name,
and IP address as defined in the LDAP database of the administration
server. Otherwise, the initialization scripts will fail.
The host name that is presented by the command hostname must resolve
to the IP address that is used for the branch network, here in our example
192.168.2.0/255.255.255.0. To ensure that the configuration settings are correct, add the following line to the /etc/hosts file:
192.168.2.1 bs1.berlin1.berlin.mycompany.mycorp.de bs1
Chapter 7 describes the posAdmin tool for modifying the LDAP database on
the AS to manage the corresponding branch servers and cash registers.
After checking the network settings, execute posInitBranchserver.sh to start
the configuration. It prompts for the following information:
company name Enter the company name without spaces and without special
characters, as in mycorp.
abbreviation of your country Enter the abbreviation of your country: de for
Germany, us for United States, uk for United Kingdom, etc.
IP Address of the Admin Server Enter the network address of the main ad-
ministration server. For this example, 192.168.2.254 as shown in Table
5.2.
ldap administrator password Enter the LDAP administrator password.
Now the installation script attempts to connect to the administration server. If
it fails, you will be prompted again for the company name, country name, and
password. Otherwise, the installation script tries to determine the IP address,
host name, and domain name as it is registered in the LDAP database.
If it fails, you will be prompted for the IP address of the branch server. A
successful installation is finalized with a summary of the main configuration
data: the server name, the IP address, and the domain name of the branch
server will be displayed.
At this point, check if the LDAP Server is accessible using a ldapsearch command or a GUI-based LDAP browser, such as GQ. The values o=, c=, and the
host name, such as as1, of your administration server depend on your configuration.
Example: ldap se ar ch -x -h as1 -b cn=global,o=mycorp,c=de
The installation and the base configuration of the branch server is now finished. You should run possyncimages.pl to get the images from the administration server to the /tftpboot directory of the branch server.
64
Page 65

5.3 Installation of the Highly Available Branch Servers
Finally the core script posleases2ldap which registers new CRs in LDAP, and
controlls all other POS scripts needs to be started.
For further information about testing your newly installed SLRS system environment refer to Section 3.4 on page 38.
5.3 Installation of the Highly Available Branch
Servers
It is possible to deploy branch servers in a high availability (HA) setup. The
necessary steps are described below. High availability in this context means an
HA cluster of two nodes in an active/passive setup. One of the nodes holds all
services. The other node is a hot-standby, which can take over all services in
the case of a failure of node1. The software used for the SLRS is a combination
of Linux Heartbeat and DRBD3for mirroring of the data.
5.3.1 Hardware Requirements
The branch server uses a network block device to replicate the data to the
standby node. No shared storage device is needed. The requirements are
additional network devices for mirroring and Linux Heartbeat. The actual
configuration of your branch server setup may differ, but here are some recommendations:
• One network card for the public network, as used for a regular branch
server.
• One network card for DRBD, most suitable is a Gigabit network card.
• One network card for the Linux HA Heartbeat.
Furthermore, you need two crosslink network cables to connect the DRBD and
the Heartbeat interfaces. A good practice is the additional use of a redundant
link for Heartbeat over a serial cable.
5.3.2 Installation of the Branch Server Software
In the first step, the two branch servers are installed as described in Section
5.2 on page 61 with one exception – the BS configuration described in Section
5.2.4. Add one partition to the suggested scheme to hold the replicated data.
The size depends on your needs. The partition accommodates all your images
plus several configuration files. A size of 2 GB or more should be sufficient.
3
DRBD is a block device which is designed to build high availability clusters. This is done
by mirroring a whole block device via a dedicated network. You could see it as a network
raid-1.
65
Page 66

5 Setting up Administration and Branch Servers
During the configuration of the network settings, configure two interfaces in
addition to the public interface. Using two networks from the private range is
suggested, for example:
node1: eth0 192.168.1.1 node2: eth0 192.168.1.2 (public network)
node1: eth1 192.168.10.1 node2: eth1 192.168.10.2 (DRBD co nn ec t)
node1: eth2 192.168.100.1 node2: eth2 192.168 .1 00 .2 (Heartbeat connect)
After the installation, make sure all HA interfaces are connected correctly to
their counterparts.
Note: In the branch server template configuration files, a setup of only two
network cards, one for the public network and the Linux Heartbeat connection
and one for DRBD, is described.
Set the host names and the domain to the values stored in the LDAP directory.
Make sure that, on both nodes, the file /etc/hosts includes the other node.
Before continuing with the HA installation of Section 5.3.4, initialize your
primary branch server as for a stand-alone server (described in Section 5.2.4
on page 64) to create the needed configuration data and settings.
5.3.3 HA Service Configuration
To simplify a highly available configuration, the configuration files for the
DHCP and DNS service are soft-linked by the configuration scripts. For this
reason, the DHCP daemon must not run in chroot(1) environments. Choose
the configuration DHCPD_RUN_CHROOTED=’no’ in the file /etc/sysconfig/dhcpd.
5.3.4 Installing the HA Software
In addition to the BS software package installation described in Section 5.2,
install the following packages from the SUSE LINUX Enterprise Server Service
Pack CD by running rpm -ihv [packagename] in the order listed:
• heartbeat-ldirectord-1.0.4-14
• heartbeat-pils-1.0.4-14
• heartbeat-1.0.4-14
• heartbeat-stonith-1.0.4-14
• drbd-0.6.6-152
• The appropriate update kernel 2.4.21-138 for your hardware.
Now perform a reboot.
66
Page 67

5.3 Installation of the Highly Available Branch Servers
5.3.5 DRBD Configuration
SUSE provides templates of the needed configuration files. Here, use the file
drbd.conf. Initially, adapt a few settings. Later, other parameters should be
changed for fine tuning.
Adapt the following settings:
disk-size to the size of your DRBD partition
And in the section on bs1 and on bs2:
bs1 and bs2 to the host names of your servers given by unam e -n
disk = to the device name of your DRBD-disk
address = to the IP address of the DRBD network on the server
Copy the customized file to /etc/drbd.conf on both servers. Make sure DRBD
is started automatically by running "chkconfig drbd on" on both branch
servers. Start DRBD on node1 with the command "rcdrbd start" and answer "yes". Now you should have a device named /dev/nb0. Create a file
system on this block device, e.g., "mke2fs -j /dev/nb0" for a journaling ext3
file system.
Now start DRBD on node2 and control the synchronization of the network
block device /dev/nb0. This can be done while you watch "cat /proc/drbd"
or the log file /var/log/messages. Finally, create the directory /drbd on both
nodes for the HA setup described in Section 5.3.6.
Testing DRBD
You are now ready to test the functionality of DRBD:
• Issue "drbdsetup /dev/nb0 primary" on node1
• Mount the device /dev/nb0 on node1 with "mount /dev/nb0 /drbd"
• Write some data to /drbd
• Unmount /dev/nb0 on node1
• Issue "drbdsetup /dev/nb0 secondary" on node1
• Issue "drbdsetup /dev/nb0 primary" on node2
• Mount /dev/nb0 on node2 with "mount /dev/nb0 /drbd"
• Check that the data is accessible through /drbd then delete the data
• Unmount /dev/nb0 on node2
67
Page 68

5 Setting up Administration and Branch Servers
• Change the primary node2 to node1 again with "drbdsetup /dev/nb0
secondary" on node2 and issue "drbdsetup /dev/nb0 primary" on node1
• Delete the test data
You have now finished the preparation of DRBD.
5.3.6 Heartbeat Configuration
Adapt the configuration file templates delivered by SUSE:
• File ha.cf: Change the entries node bs1 and node bs2 to match the
names of your servers given by "uname -n", for example, to node servername1.
• File haresources: Change the entry
"bs1 192.168.2.3 datadisk::drbd0 Filesystem::/dev/nb0::/drbd::ext3"
Here, replace bs1 with the server name of your primary node and the
IP address with your service IP (the IP will change between the nodes
during failover). The service IP is probably out of the public network
range, 192.168.1.3 in this example.
• File authkeys: No changes.
All three files must be copied to the directory /etc/ha.d/ on both nodes.
5.3.7 Test of the HA Setup
As a first test of your HA configuration, do the following:
• Make sure that DRBD is started on both nodes with node1 as the primary
and that /dev/nb0 is not mounted.
• Start Heartbeat first on node1 then on node2 with the command "rcheartbeat
start".
• After some time, the service IP on node1 should be configured and
/dev/nb0 should be mounted on /drbd.
• Issue "rcheartbeat stop" on node1. After some time, the service IP
and the mount of /dev/nb0 to /drbd should migrate to node2.
• Now issue "rcheartbeat start" on node1 again. The service IP and
the mount should migrate from node2 to node1 again.
If this test is not working as expected, first check the connection of your different network cards. Further troubleshooting is out of the scope of this document. Refer to the Heartbeat and DRBD manuals.
68
Page 69

5.3 Installation of the Highly Available Branch Servers
5.3.8 Final Setup
Now prepare the services actually used in the SUSE LINUX Retail Solution
infrastructure. Provide failover for the services dhcpd, named, and tftpd.
All data that is necessary for the services must be moved to the mirrored directory /drbd and must be linked to the locations where the daemons expect
the data. Under /drbd, a directory structure must be built to accommodate
the data, the data must be moved there, and the new locations must be linked
to the original locations in the file system. In addition, some tasks must be executed on the secondary node that were already accomplished on the primary
node by the posInitBranchserver.sh script.
SUSE LINUX does not provide any scripts to take care of the tasks mentioned
above. Make sure the following data and symbolic links are present:
• Below the path /drbd, the following directories must exist: etc, tftpboot,
var.
• /etc/opt/SLES/ POS must be linked to /drbd/et c/ op t/ SLE S/ PO S.
• /var/named must be linked to /drbd/var/name d.
• /var/lib/dhcp must be linked to /drbd/var/ li b/d hc p.
In the file /etc /h a. d/ ha re sou rc es , comment the rest of the last line with the
entries named dhcpd atftpd on both nodes. You have already edited this line
in a previous step.
Stop Heartbeat on the primary server by entering rcheartbeat stop. Wait
for the secondary server to take over. Then, on the secondary server, enter the
following commands to complete the configuration of the DNS name server
module:
/sbin/SuSEconfig --module named
rcnamed restart
On the primary server, enter rcheartbea t start to restart Heartbeat. Wait
for the server to resume its role as the primary node in the high availability
system.
In a high availability setup, the dhcpd, named, and atftpd services should only
be active on the primary server. They should not be started automatically;
Heartbeat takes care of starting and stopping them. Turn off automatic start of
the services during boot by entering the following commands on both branch
servers:
chkconfig dhcpd off
chkconfig named off
chkconfig atftpd off
Enable automatic start of Heartbeat with chkconfig heartbeat on.
69
Page 70

5 Setting up Administration and Branch Servers
Reboot both servers and check the replication of the /drbd directory from
the primary node to the secondary as described previously. Check the correct
operation of the services and the HA setup. Make sure that DNS names, like
tftp, are resolved to the virtual IP address of your HA cluster.
5.3.9 Updating the SLRS 8 Software on HA Servers
To update a high availability branch server pair to a new support pack release
of SLRS 8, do the following:
• Stop Heartbeat on the secondary branch server (for example, BS2) by
entering rcheartbeat stop.
• Upgrade the primary branch server (for example, BS1) to the latest SLES
8 support pack release, following the steps in Section 5.2.3 on page 63.
• Reboot the primary branch server (BS1).
• Upgrade the primary branch server (BS1) to the latest SLRS 8 sup-
port pack release by inserting the SLRS 8 support pack CD and running
/media/cdrom/posUpgrade.sh.
• Restart Heartbeat on BS2 with the command "rcheartbeat start".
• Stop Heartbeat on BS1 and wait for the secondary server (BS2) to be-
come the primary.
• Repeat the steps above to upgrade SLES 8, reboot the server, and up-
grade the SLRS 8 software on BS2 (the secondary branch server now
acting as the primary).
• Enter "rcheartbeat start" on BS1 to switch it back to the primary
branch server.
Note: The script for upgrading SLRS 8 is hard-coded to use /media/cdrom. If
your CD-ROM drive uses a different name to mount (such as /media/cdrecorder),
enter the following commands to create a link to the CD:
cd /media
ln -s cdrecorder cdrom
After updating the branch servers, turn off automatic start of the dhcp, named,
and atftpd services during boot by entering the following commands on both
branch servers:
chkconfig dhcpd off
chkconfig named off
chkconfig atftpd off
Enable automatic start of Heartbeat with chkconfig heartbeat on.
70
Page 71

6 Server Commands
Contents
6.1 posInitLdap.sh . . . . . . . . . . . . . . . . . . . . . . . . . 72
6.1.1 Function . . . . . . . . . . . . . . . . . . . . . . . . . 72
6.1.2 Usage . . . . . . . . . . . . . . . . . . . . . . . . . . 72
6.1.3 Files . . . . . . . . . . . . . . . . . . . . . . . . . . . 73
6.2 posInitBranchserver.sh . . . . . . . . . . . . . . . . . . . 73
6.2.1 Function . . . . . . . . . . . . . . . . . . . . . . . . . 73
6.2.2 Usage . . . . . . . . . . . . . . . . . . . . . . . . . . 74
6.2.3 Files . . . . . . . . . . . . . . . . . . . . . . . . . . . 74
6.3 possyncimages.pl . . . . . . . . . . . . . . . . . . . . . . . 74
6.3.1 Function . . . . . . . . . . . . . . . . . . . . . . . . . 74
6.3.2 Usage . . . . . . . . . . . . . . . . . . . . . . . . . . 74
6.3.3 Files . . . . . . . . . . . . . . . . . . . . . . . . . . . 74
6.4 posldap2crconfig.pl . . . . . . . . . . . . . . . . . . . . . 75
6.4.1 Function . . . . . . . . . . . . . . . . . . . . . . . . . 75
6.4.2 Usage . . . . . . . . . . . . . . . . . . . . . . . . . . 75
6.4.3 Files . . . . . . . . . . . . . . . . . . . . . . . . . . . 75
6.5 posleases2ldap.pl . . . . . . . . . . . . . . . . . . . . . . . 75
6.5.1 Function . . . . . . . . . . . . . . . . . . . . . . . . . 75
6.5.2 Usage . . . . . . . . . . . . . . . . . . . . . . . . . . 76
6.5.3 Files . . . . . . . . . . . . . . . . . . . . . . . . . . . 76
6.6 posldap2dns.pl . . . . . . . . . . . . . . . . . . . . . . . . . 76
6.6.1 Function . . . . . . . . . . . . . . . . . . . . . . . . . 76
6.6.2 Usage . . . . . . . . . . . . . . . . . . . . . . . . . . 76
6.6.3 Files . . . . . . . . . . . . . . . . . . . . . . . . . . . 76
6.7 posldap2dhcp.pl . . . . . . . . . . . . . . . . . . . . . . . . 77
6.7.1 Function . . . . . . . . . . . . . . . . . . . . . . . . . 77
6.7.2 Usage . . . . . . . . . . . . . . . . . . . . . . . . . . 77
6.7.3 Files . . . . . . . . . . . . . . . . . . . . . . . . . . . 77
6.8 posReadPassword.pl . . . . . . . . . . . . . . . . . . . . . . 77
6.8.1 Function . . . . . . . . . . . . . . . . . . . . . . . . . 78
71
Page 72

6 Server Commands
6.8.2 Usage . . . . . . . . . . . . . . . . . . . . . . . . . . 78
6.8.3 Files . . . . . . . . . . . . . . . . . . . . . . . . . . . 78
6.9 poscheckip.pl . . . . . . . . . . . . . . . . . . . . . . . . . 78
6.9.1 Function . . . . . . . . . . . . . . . . . . . . . . . . . 78
6.9.2 Usage . . . . . . . . . . . . . . . . . . . . . . . . . . 78
6.9.3 Files . . . . . . . . . . . . . . . . . . . . . . . . . . . 78
There are a number of commands for initializing and maintaining administration and branch servers. These sections describe these commands and their
usage.
6.1 posInitLdap.sh
The purpose of posInitLdap.sh is the configuration of the OpenLDAP directory server software and the initial creation of data in the LDAP directory. The
user is prompted to enter the company name, country abbreviation and the
LDAP administration password. The user can also enable or disable SSL communication. Company name and country abbreviation are used to compose
the LDAP base DN, in the form o=company,c=de.
6.1.1 Function
For creating the OpenLDAP configuration file /etc/openldap/slapd.conf, a
template configuration file is used from the directory /etc/opt/SLES/POS/
template. The necessary parts of slapd.conf, the LDAP base DN, and password are replaced from the posInitLdap.sh script with the corresponding
user entries. After generating the configuration file, the OpenLDAP service is
started.
Then the initial creation of data in LDAP is done using a template LDIF1file by
replacing the LDAP base DN. Finally, the generated LDIF file is fed into LDAP.
Now the initial LDAP directory structure is available on the administration
server.
posInitLdap.sh uses posReadPassword.pl during the password entry to hide
the typed in characters.
6.1.2 Usage
Run posInitLdap.sh on an administration server.
Caution: Running this script destroys any existing data in LDAP.
1
LDIF is a standardized file format for LDAP data.
72
Page 73

6.2 posInitBranchserver.sh
6.1.3 Files
/etc/openldap/ldap.conf
/etc/openldap/slapd.conf
/etc/opt/SLES/POS/template/slapd.conf.template
/etc/init.d/ldap
/etc/opt/SLES/POS/template/ldap.template
/etc/opt/SLES/POS/template/ldif.pos.template
6.2 posInitBranchserver.sh
The purpose of posInitBranchserver.sh is the generation of the central configuration file for all other POS scripts used on a branch server, the generation
of header files needed for automated configuration of DNS and DHCP, the
generation of configuration files for the DNS and DHCP services, adding a
multicast route for TFTP, the activation of the services DNS, DHCP, and TFTP
at boot time, and starting the services at once. Information from LDAP is used
where applicable.
6.2.1 Function
When running the posInitBranchserver.sh script, enter the company name,
country abbreviation, IP address, and the LDAP administrator password of the
administration server. The configuration file /etc/opt/SLES/P OS /b ra nc hs er ver .
conf is generated by filling in the LDAP base, LDAP administrator password,
and the IP address of the administration server. The file /etc/opt/SLES/POS/
template/branchserver.conf.template is used as template.
The posInitBranchserver.sh script uses poscheckip.pl to find its own IP
address in LDAP. It will only work correctly if the branch server data in LDAP
was created properly in advance using the posadmin tool after the installation of the administration server. For further information, refer to Chapter 7
on page 79. The poscheckip.pl script also yields the domain name for this
branch, which is used to generate proper configuration header files for the
DHCP and DNS services, which in turn are needed for po sl da p2 dn s. pl and
posldap2dhcp.pl.
The zone file header for posldap2dns.pl is generated from /etc/opt/SLES/
POS/template/dns-zonefile.head er .te mp la te and written to /var/named/
ldap_generated/dns-zonefile.he ad er. The resolver configuration (/etc /
resolv.conf) is written then posldap2dns.pl and posldap2dhcp.pl are run
and the DNS and DHCP services are started. Finally, a multicast route is set
up and the TFTP service is started. The configuration of the multicast route
is also stored in /etc/sysconfig/network/routes so it is activated at boot
time.
73
Page 74

6 Server Commands
6.2.2 Usage
Run posInitBranchserver.sh on a branch server.
6.2.3 Files
/etc/opt/SLES/POS/named/named.conf
/etc/opt/SLES/POS/template/dhcpd.conf.header.template
/etc/opt/SLES/POS/dhcpd/dhcpd.conf.header
/etc/opt/SLES/POS/template/dns-zonefile.header.template
/var/named/ldap_generated/dns-zonefile.header
/etc/opt/SLES/POS/template/resolv.conf.template
/etc/resolv.conf
/etc/sysconfig/network/routes
6.3 possyncimages.pl
The script possyncima ge s. pl must be run on a branch server for fetching or
updating the images from the administration server. It uses rsync and requires
that the rsync service is properly configured and running on the administration server. The script possyncimages.pl can be run manually, but the best
practice is to create a cron job that runs it every night to keep the images
up-to-date.
6.3.1 Function
possyncimages.pl reads the configuration file /etc/opt/SLES/POS/branchserver.
conf and uses the definitions POS_REMOTE_SYNC_COMMANDS and POS_LOCAL_
SYNC_COMMANDS from that file. POS_REMOTE_SYNC_COMMANDS contains a list of
rsync commands that fetch the data from the administration server. These
commands are executed first. On success, the commands in the directory
POS_LOCAL_SYNC_COMMANDS are executed to update the final destination of the
images.
6.3.2 Usage
Run possyncimages.pl on a branch server or set up a cron job. A crontab line
for nightly run at 1 a.m. may look like this:
0 1 * * * /usr/sbin/possyncimages.pl
6.3.3 Files
/etc/opt/SLES/POS/branchserver.conf
74
Page 75

6.4 posldap2crconfig.pl
6.4 posldap2crconfig.pl
posldap2crconfig.pl creates configuration files for CRs. Those config files
are generated by gathering data from LDAP and they contain information
needed by the CR at boot time about image, configuration files, partitioning
and disk.
6.4.1 Function
In normal operation, posldap2cr co nfi g. pl does a part of what is done by
posleases2ldap.pl: It looks for hwtype.<MAC-address> files uploaded by
CRs, looks up the CRs LDAP entry, assigns the hardware type and the default
image for this hardware type in the CRs LDAP entry and finally generates the
config files for the CRs in the subdirectory CR under the tftpboot directory. The
file uploaded by the CR is removed from the /tftpboot/upload directory after
that.
posldap2crconfig.pl can optionally be run with the parameter --dumpall.
Using the --dumpall mode, posldap2crconfig.pl regenerates the config files
for all CRs found in LDAP.
Note: When posldap2crconfig.pl generates syslog messages, these mes-
sages will be displayed in all open shell windows of the branch server, if the
default setting of the configuration file /etc/syslog.conf is used. To avoid
this behaviour edit the following line in /etc/syslog.conf and change it as
shown below:
# *.emerg *
6.4.2 Usage
posldap2crconfig.pl [--dumpall]
6.4.3 Files
/etc/opt/SLES/POS/branchserver.conf
6.5 posleases2ldap.pl
posleases2ldap.pl registers new CRs in LDAP.
6.5.1 Function
See Section 4.5.1 on page 49 for a detailed description of posleases2ldap.pl.
75
Page 76

6 Server Commands
6.5.2 Usage
In normal operation, posleases2ldap.pl is run as a daemon. It can be started
by using the init script /etc/init.d/posleases2ldap, which is also used to
start the daemon at boot time. To enable this, use chkconfig posleases2ldap
on.
If posleases2ldap.pl is started manually, it backgrounds itself immediately.
To avoid this, use the optional parameter -d. If started in this way, posleases2ldap.
pl will close when the shell is closed.
6.5.3 Files
/etc/opt/SLES/POS/branchserver.conf
/tftpboot/upload/hwtype.<MAC-address>
6.6 posldap2dns.pl
posldap2dns.pl generates DNS configuration and zone files from LDAP.
6.6.1 Function
posldap2dns.pl is called by posleases2ldap.pl at regular intervals. First, all
scLocation objects are looked up in LDAP. Each of these objects defines a subnet and for each of them a zone file is created. The header of each zone file is
taken from the file specified in the configuration file directive POS_LDAP2DNS_
ZONETEMPLATE, which is /var/named/ldap_generated/dns-zonefile.header
by default. The content of the zone file header is adapted to the installation
by posInitBranchserver.sh (see Section 6.2 on page 73). The value of the
scDhcpRange attribute in a scLocation object is translated into a $GENERATE di-
rective. For each scService or scHAService, an A record is created or, if multiple
objects of that kind point to the same IP address, a CNAME record. After
that, an A record for each CR is generated. Finally, the file /var/named/ldap_
generated/named.zones containing the definitions of all generated zones is
created. It is included from within /etc/named.conf. If zones were changed,
posldap2dns.pl returns the appropriate commands to restart the DNS service, which are executed by posleases2ldap.pl.
6.6.2 Usage
posldap2dns.pl is called by posleases2ldap.pl.
6.6.3 Files
/etc/opt/SLES/POS/branchserver.conf
76
Page 77

6.7 posldap2dhcp.pl
/var/named/ldap_generated/
/var/named/ldap_generated/dns-zonefile.header
/var/named/ldap_generated/named.zones
/etc/named.conf
6.7 posldap2dhcp.pl
posldap2dhcp.pl generates the DHCP daemon configuration file from LDAP.
6.7.1 Function
posldap2dhcp.pl is called by posleases2ldap.pl at regular intervals. First,
all scLocation objects are looked up in LDAP. Each of these objects defines a
subnet and for each of them a subnet declaration in the dhcpd.conf is generated. The header zone file is taken from the file specified in the configuration
file directive LDAP2DHCP_TEMPLATEFILE, which is /etc/opt/SLES/POS/dhcpd/
dhcpd.conf.header by default. The content of the header file is adapted to
the installation by posInitBranchserver.sh (see Section 6.2 on page 73).
The value of the scDhcpRange attribute in a scLocation object is translated into
a range statement in the subnet declaration. Also the options for tftpboot
are written into each subnet declaration. For each scCashRegister, a fixed
address declaration is generated.
The new dhcpd.conf file is first generated in a temporary directory. If it differs
from the working version, dhcpc is run with the temporary file in check mode.
If it passes the check, it is copied over the working file and the command to
restart the DHCP daemon is returned to be executed by poslea se s2 ld ap .pl .
6.7.2 Usage
posldap2dhcp.pl is called by posleases2ldap.pl.
6.7.3 Files
/etc/opt/SLES/POS/branchserver.conf
/etc/dhcpd.conf -> /etc/opt/SLES/POS/dhcpd/dhcp d. co nf
/etc/opt/SLES/POS/dhcpd/dhcpd.conf.header
6.8 posReadPassword.pl
posReadPassword.pl is a helper script for password entry that does not show
the entered password.
77
Page 78

6 Server Commands
6.8.1 Function
posReadPassword.pl is called by posInitLdap.sh and posInitBranchserver.
sh for password entry purposes.
6.8.2 Usage
From within shell scripts, use a line like
PASSWORD=‘posReadPassword.pl‘
6.8.3 Files
none
6.9 poscheckip.pl
poscheckip.pl is a helper script to look up a server’s IP address in LDAP and
output the netmask and domain name related to that entry.
6.9.1 Function
poscheckip.pl is used from within posInitBranchserver.sh to determine
the netmask and domain name related to the server IP address. The information is then used to configure the resolver (/etc/resolv.conf).
6.9.2 Usage
poscheckip.pl <ip-address>
6.9.3 Files
/etc/opt/SLES/POS/branchserver.conf
78
Page 79

7 PosAdmin
Contents
7.1 Basic Command Line Options . . . . . . . . . . . . . . . . 79
7.2 Basic Actions . . . . . . . . . . . . . . . . . . . . . . . . . . 80
7.2.1 Adding an Organizational Unit . . . . . . . . . . . . 80
7.2.2 Adding a Location (Branch) . . . . . . . . . . . . . . 82
7.2.3 Adding a Branch Server . . . . . . . . . . . . . . . . 82
7.2.4 Adding a Highly Available Branch Server Pair . . . . 85
7.2.5 Modify . . . . . . . . . . . . . . . . . . . . . . . . . . 89
7.2.6 Remove . . . . . . . . . . . . . . . . . . . . . . . . . 90
7.2.7 Query . . . . . . . . . . . . . . . . . . . . . . . . . . 90
7.2.8 Update Config . . . . . . . . . . . . . . . . . . . . . 91
7.3 Managing Hardware . . . . . . . . . . . . . . . . . . . . . . 92
7.3.1 Managing Cash Registers . . . . . . . . . . . . . . . 92
7.4 Managing Images . . . . . . . . . . . . . . . . . . . . . . . 95
PosAdmin is a tool for managing the directory service holding the data of
servers, cash registers, and network infrastructure. PosAdmin is a command
line tool to add, remove, update, and query entries in the LDAP database. The
tool consists of serveral main actions to add, delete, or modify an organizational unit or a location. The parameters depend on the main action desired.
7.1 Basic Command Line Options
Basic command line options are primarily used for authentication as a user
identified by a special password. For example:
posAdmin.pl --user cn=admin,o=mycorp,c=de --password secret
If you do not authenticate via command line options, you are prompted for
user name and password.
Another important command line option is the --base option. This option is
needed to find a base in the LDAP directory. To add a new location (branch),
specify an organization or the organizational unit as a base.
79
Page 80

7 PosAdmin
--base o=mycorp,c=de
--base ou=berlin,o=mycorp,c=de
In some cases, you can also set an abbreviation or a common name for the
base. This is only possible if the common name is a unique value in the
database.
--base hamburg
If posAdmin cannot determine the base — no or more than one base is found
— it will exit with an error message.
Another basic option is --help. This option shows a usage message with the
basic options.
7.2 Basic Actions
As mentioned above, posAdmin has four basic actions. With posAdmin, add
several objects as briefly described in Table 7.1. Each object has two types of
attributes: must and may attributes. The must attributes are the minimum
requirements for an object.
Option Explanation
--organizationalUnit a region or a city with several branches
--scLocation a branch defined as a unique network unit
--scServerContainer a structural directory for branch server in a location
--scService a service, like dns, tftp, dhcp
--scHAService a service, like dns, tftp, dhcp, which is highly available
--scBranchServer a branch server
--scNetworkcard a network interface card
Table 7.1: Add Options for PosAdmin
7.2.1 Adding an Organizational Unit
An organizational unit is a region, a city, or a subdivision. Its main purpose is
to structure the LDAP directory. They are instruments for visualizing the structure or organization of your company. Organizational units can be nested.
With posAdmin.pl, add an organizational unit with the following command:
posAdmin.pl --user cn=admin,o=mycorp,c=de \
--password secret --base o=mycorp,c=de \
--add --organizationalUnit --ou berlin
80
Page 81

7.2 Basic Actions
Attribute Type Explanation
--ou must This is the name of the organizational
unit, for example, berlin.
--userPassword may Linux password
--searchGuide
--seeAlso may This attribute specifies names of
--businessCategory may This attribute describes the kind of
--x121Address may X121 is a naming standard, for exam-
--registeredAddress may This attr ibute holds a postal address
--destinationIndicator may This attribute is used for the telegram
--preferredDeliveryMethod may Possible values are: ’any’, ’mhs’,
--telexNumber may Teletex number
--teletexTerminalIdentifier may Teletex terminal indentifier
--telephoneNumber may Business phone number
--internationliSDNNumber may International ISDN number
--facsimileTelephoneNumber may Fax number
--street may This attribute contains the physical
--postOfficeBox may PO Box
--postalCode may Business postal code
--postalAddress may Business postal address
--pyhsicalDeliveryOfficeName may This attribute type specifies a physi-
--st may This attribute contains the full name
--l may This attribute contains the name of a
--description may This attribute contains a human-
may This attribute is only for use by X.500
clients in constructing search filters.
other directory objects and is used as
a pointer to a related directory entry.
business performed by an organization.
ple for international public data network systems.
suitable for reception of telegrams
or expedited documents, where it is
necessary to have the recipient accept delivery.
service.
’physical’, ’telex’, etc.
address of the object to which the entry corresponds, such as an address
for package delivery.
cal delivery office name.
of a state or province.
locality, such as a city, county or other
geographic region.
readable description of the object.
Table 7.2: Organizational Unit Attributes for PosAdmin
81
Page 82

7 PosAdmin
This will create a directory "ou=berlin,o=mycorp,c=de". Use only uppercase
or lowercase letters or numbers. If desired, add a description by adding the
following attribute value pair to the command above:
--description ’a description of the city’
The Table 7.2 on page 81 summarizes all LDAP attributes of the object class
organizationalUnit.
7.2.2 Adding a Location (Branch)
To create a location, you need the following attributes as described in Table
7.3 on page 83:
posAdmin.pl --user cn=admin,o=mycorp,c=de \
--password secret \
--base ou=berlin,o=mycorp,c=de \
--add --scLocation --cn harbor \
--ipNetworkNumber 192.168.1.0 \
--ipNetmaskNumber 255.255.255.0 \
--scDhcpRange 192.168.1.10,192.168.1.50 \
--scDhcpFixedRange 192.168.1.10,192.168.1.50 \
--scDefaultGw 192.168.1.254 --scDynamicIp TRUE \
--scWorkstationBasename CR --scEnumarationMask 000
Note: Please note that we discovered a minor bug with the first SLRS version.
Even if the scDhcpFixedRange is set to start at 192.168.1.10 the first POS
client which will be initially registered will start with IP 192.168.1.11. We
will fix this bug for a future release of SLRS.
7.2.3 Adding a Branch Server
A branch server has a defined hardware, at least one defined IP address, and
offers network services, like TFTP, DNS, and DHCP. Before you can add a
Branch Server to a location, define a scServerContainer for a location. This is
done with the option --scServerContainer and the attribute --cn:
posAdmin.pl --user cn=admin,o=mycorp,c=de \
--password secret \
--base cn=habor,ou=berlin,o=mycorp,c=de \
--add --scServerContainer --cn server
In the new container, add a new branch server with the -s cB ra nc hS er ver
option by adding at least a common name (--cn) and, as a may attribute,
define the reference hardware with the --scRefServerDn option, a pointer
(Distinguished Name) to the global database:
82
Page 83

7.2 Basic Actions
Attribute Type Explanation
--cn must This is the common name of the location.
--ipNetworkNumber must This is the network address of the subnet of
the branch, for example, 192.168.1.0.
--ipNetmaskNumber must This is the netmask of the subnet of the
branch, for example, 255.255.255.0.
--scDhcpRange must This is the dynamic IP address range of
the DHCP server of the subnet. This is
needed to register the cash registers. It is
a comma-separated value pair, for example,
192.168.1.10, 192.168.1.50.
--scDhcpFixedRange must This is the fixed IP address range of the
DHCP server reserved for the cash registers.
It is also a comma-separated value pair. For
example: 192.168.1.51, 192.168.1.150.
--scDefaultGw must The default gateway for this location. This
will normally be a router to the corporate
wide area network.
--scDynamicIp must This flag is used to enable or disable the
dynamic IP address range of the DHCP
server. Allowed values are TRUE to enable or FALSE to disable dynamic IP address
ranges.
--scWorkstationBasename must This is the base name of the cash registers of
a branch used to create a unique name for
each cash register in combination with the
scDhcpFixedRange attribute and the scEnumerationMask.
For example, use the scWorkstationBasename CR, an scEnumerationMask of 000,
and the above-mentioned scDhcpFixedRange
to build the name of the cash registers and
their corresponding IP address. The first
newly registered cash register gets the name
CR001 and the IP address 192.168.1.51.
The next cash register is named CR002 and
gets the IP address 192.168.1.52.
--scEnumerationMask must Refer to scWorkstationBasename.
--associatedDomain may This optional entry configures the DNS do-
main and the domain part of the host names
of the cash registers to be in the stated domain. By default (if this entry is left empty),
the domain consists of the LDAP structure of
the scLocation entry DN. With this entry, a
different domain can be chosen.
Table 7.3: Location Attributes for PosAdmin
83
Page 84

7 PosAdmin
posAdmin.pl --user cn=admin,o=mycorp,c=de \
--password secret \
--base cn=server,cn=habor,ou=berlin,o=mycorp,c=de \
--add --scBranchServer --cn bs
Now add a network interface card with a static IP address from the subnet
already defined. This is a scNetworkcard object with the must attributes -scDevice and --scIpHostNumber. A description of all scNetworkcard attributes
is shown in Table 7.4.
posAdmin.pl --user cn=admin,o=mycorp,c=de \
--password secret \
--base cn=bs,cn=server,cn=habor,ou=berlin,o=mycorp,c=de \
--add --scNetworkcard --scDevice eth0 \
--ipHostNumber 192.168.1.1
Attribute Type Explanation
--scDevice must This is the name of network device of the card,
for example, eth0 or eth1.
--ipHostNumber must This is the IP address, for example,
192.168.1.1.
--macAddress may This is the MAC address of the network interface card.
--scModul may This is the name of the Linux kernel module
for the network interface card.
--scModulOption may These are the module options of the Linux kernel module for the network interface card.
--ipNetmaskNumber may If the ipHostNumber is not inside the defined
subnet of the location, add the netmask belonging to the IP address assigned to the network interface card.
Table 7.4: Network Interface Attributes for PosAdmin
The next step is to set up services running on a branch server. At least define
the required DNS, TFTP and DHCP services. You can attain this using the
scService option, which has six must attributes:
The examples below show how to add the services DNS, TFTP and DHCP;
note that the DNS service is used as the ‘canonical’ entry. A description of all
scService attributes is shown in Table 7.5 on page 86.
posAdmin.pl --user cn=admin,o=mycorp,c=de \
--password secret \
--base cn=bs,cn=server,cn=habor,ou=berlin,o=mycorp,c=de \
--add --scService --cn dns --ipHostNumber 192 .1 68 .1 .1 \
84
Page 85

7.2 Basic Actions
--scDnsName dns;C --scServiceName dns \
--scServiceStartScript named \
--scServiceStatus TRUE;
posAdmin.pl --user cn=admin,o=mycorp,c=de \
--password secret \
--base cn=bs,cn=server,cn=habor,ou=berlin,o=mycorp,c=de \
--add --scService --cn tftp --ipHostNumber 19 2. 16 8. 1. 1 \
--scDnsName tftp --scServiceName tftp \
--scServiceStartScript atftpd \
--scServiceStatus TRUE;
posAdmin.pl --user cn=admin,o=mycorp,c=de \
--password secret \
--base cn=bs,cn=server,cn=habor,ou=berlin,o=mycorp,c=de \
--add --scService --cn dhcp --ipHostNumber 19 2. 16 8. 1. 1 \
--scDnsName dhcp --scServiceName dhcp \
--scServiceStartScript dhcpd \
--scServiceStatus TRUE;
7.2.4 Adding a Highly Available Branch Server Pair
The difference between a branch server and a highly available branch server
pair is:
• two servers
• at least two network interface cards per server
• instead of scService, scHAService
Compared with section 7.2.3 on page 82 we had to add two servers in a
scServerContainer, for example, bs1 and bs2, as shown in the example below:
## bs1
posAdmin.pl --user cn=admin,o=mycorp,c=de \
--password secret \
--base cn=server,cn=habor,ou=berlin,o=mycorp,c=de \
--add --scBranchServer --cn bs1
## bs2
posAdmin.pl --user cn=admin,o=mycorp,c=de \
--password secret \
--base cn=server,cn=habor,ou=berlin,o=mycorp,c=de \
--add --scBranchServer --cn bs2
85
Page 86

7 PosAdmin
Attribute Type Explanation
--cn must This is the common name of the service.
--ipHostNumber must This is the existing IP address assigned to a
network interface card.
--scDnsName
--scServiceName must This is the name of the service. For example:
--scServiceStartScript must This is the name of the init script in /etc/init.d.
--scServiceStatus must This is the flag to enable or disable the service.
must This is the DNS Name of the service, which will
be created by the posldap2dns.pl script. For
example: dns, tftp, dhcp.
For correct ‘reverse’ resolution of service IP addresses to DNS names, exactly one of the service names for an IP address may be marked as
the canonical name. The scDnsName attribute
is marked by a semicolon, followed by the letter ‘C’ or the word ‘Canonical’. This name will
be used for the reverse lookup table for the IP
address by posldap2dns.pl. The IP addresses
belonging to a branch server have their reverse
lookup set up automatically, so only virtual or
external IP addresses need to have a ‘canonical’ address specified explicitly.
tftp, dns, dhcp.
For example, atftp for the tftp service.
Possible values are TRUE and FALSE.
Table 7.5: Service Attributes for PosAdmin
After that, each server needs two network interface cards. The example below
shows how to add the network devices:
## eth0 for bs1
posAdmin.pl --user cn=admin,o=mycorp,c=de \
--password secret \
--base cn=bs1,cn=server,cn=habor,ou=berlin,o=mycorp,c=de \
--add --scNetworkcard --scDevice eth0 --ipHostNumber 192.168.1.1
## eth1 for bs1
posAdmin.pl --user cn=admin,o=mycorp,c=de \
--password secret \
--base cn=bs1,cn=server,cn=habor,ou=berlin,o=mycorp,c=de \
--add --scNetworkcard --scDevice eth1 --ipHostNumber 192.168.0.1
## eth0 for bs2
86
Page 87

7.2 Basic Actions
posAdmin.pl --user cn=admin,o=mycorp,c=de \
--password secret \
--base cn=bs2,cn=server,cn=habor,ou=berlin,o=mycorp,c=de \
--add --scNetworkcard --scDevice eth0 --ipHostNumber 192.168.1.2
## eth1 for bs2
posAdmin.pl --user cn=admin,o=mycorp,c=de \
--password secret \
--base cn=bs2,cn=server,cn=habor,ou=berlin,o=mycorp,c=de \
--add --scNetworkcard --scDevice eth1 --ipHostNumber 192.168.0.2
Now add, the services DNS, TFTP, and DHCP as highly available services. A
description of all scHAService attributes is shown in Table 7.6 on page 88.
## DNS on bs1 as primary service
posAdmin.pl --user cn=admin,o=mycorp,c=de \
--password secret \
--base cn=bs1,cn=server,cn=habor,ou=berlin,o=mycorp,c=de \
--add --scHAService --cn dns --ipHostNumber 1 92 .1 68 .1 .3 \
--scDnsName dns --scServiceName dns \
--scServiceStartScript named \
--scServiceStatus TRUE --scPrimaryService TRUE;
## TFTP on bs1 as primary service
posAdmin.pl --user cn=admin,o=mycorp,c=de \
--password secret \
--base cn=bs1,cn=server,cn=habor,ou=berlin,o=mycorp,c=de \
--add --scHAService --cn tftp --ipHostNumber 192.168.1.4 \
--scDnsName tftp --scServiceName tftp \
--scServiceStartScript atftpd \
--scServiceStatus TRUE --scPrimaryService TRUE;
## DHCP on bs1 as primary service
posAdmin.pl --user cn=admin,o=mycorp,c=de \
--password secret \
--base cn=bs1,cn=server,cn=habor,ou=berlin,o=mycorp,c=de \
--add --scHAService --cn dhcp --ipHostNumber 192.168.1.5 \
--scDnsName dhcp --scServiceName dhcp \
--scServiceStartScript dhcpd \
--scServiceStatus TRUE --scPrimaryService TRUE;
## DNS on bs2 as backup service
87
Page 88

7 PosAdmin
posAdmin.pl --user cn=admin,o=mycorp,c=de \
--password secret \
--base cn=bs2,cn=server,cn=habor,ou=berlin,o=mycorp,c=de \
--add --scHAService --cn dns --ipHostNumber 1 92 .1 68 .1 .3 \
--scDnsName dns --scServiceName dns \
--scServiceStartScript named \
--scServiceStatus TRUE --scPrimaryService FALSE;
## TFTP on bs2 as backup service
posAdmin.pl --user cn=admin,o=mycorp,c=de \
--password secret \
--base cn=bs2,cn=server,cn=habor,ou=berlin,o=mycorp,c=de \
--add --scHAService --cn tftp --ipHostNumber 192.168.1.4 \
--scDnsName tftp --scServiceName tftp \
--scServiceStartScript atftpd \
--scServiceStatus TRUE --scPrimaryService FALSE;
## DHCP on bs2 as backup service
posAdmin.pl --user cn=admin,o=mycorp,c=de \
--password secret \
--base cn=bs2,cn=server,cn=habor,ou=berlin,o=mycorp,c=de \
--add --scHAService --cn dhcp --ipHostNumber 192.168.1.5 \
--scDnsName dhcp --scServiceName dhcp \
--scServiceStartScript dhcpd \
--scServiceStatus TRUE --scPrimaryService FALSE;
Attribute Type Explanation
--cn must This is the common name of the service.
--ipHostNumber must This is the virtual IP address of the HA Service.
--scDnsName must This is the DNS name of the service.
--scServiceName must This is the name of the service. For example:
tftp, dns, dhcp.
--scServiceStartScript must This is the name of the init script of the service.
--scServiceStatus must This is the status of the service. TRUE or FALSE
are possible values.
--scPrimaryService must This flag is used to describe if this a primary
service or not. TRUE or FALSE are the possible
values. If you define a primary server, this flag
is always TRUE. On a secondary server, this
flag is always FALSE.
88
Table 7.6: HAService Attributes for PosAdmin
Page 89

7.2 Basic Actions
7.2.5 Modify
The modify basic option enables you to modify attributes of an object, to add
a may attribute to an object, or to delete a may attribute. If an operation is
not finished successfully, get an error message.
To add or to modify attributes, specify the object, an attribute value pair, and a
DN. The main difference in command arguments between the ‘add’ operation
and the ‘modify’ and ‘remove’ operations is that with ‘add’, the base DN of the
directory object below which the new entry should be created is specified with
the ‘--base’ argument. For ‘modify’ and ‘remove’, the target object is specified
directly with the ‘--DN’ argument.
The following example adds a description to an organizationalUnit with the
dn of ou=berlin,o=mycorp,c=de and modifies the attribute value respectively:
posAdmin.pl --password secret \
--user cn=admin,o=mycorp,c=de \
--DN ou=berlin,o=mycorp,c=de \
--modify --organizationalUnit \
--description ’my description of berlin’
To remove this description, execute:
posAdmin.pl --password secret \
--user cn=admin,o=mycorp,c=de \
--DN ou=berlin,o=mycorp,c=de \
--modify --organizationalUnit --description
Option Type Explanation
--DN must Distinguished name of the object to modify.
--<object> must Object with must or may attributes which shall be
modified, for example, --scWorkstation.
--<attribute> must Attribute, for example, –scPosImageVersion.
--<value> may If a value is given the attribute is modified, otherwise the attribute entry is deleted.
Table 7.7: Modify Options for PosAdmin
A further example describes the modification of the POS image name and version of the CR POS1 with the dn of cn=POS01,cn=Lab,ou=berlin,o=mycorp,c=de,
using the attributes –scPosImageDn and –scPosImageVersion of the --scWorkstation
object class:
posAdmin.pl --password secret \
--user cn=admin,o=mycorp,c=de \
--DN cn=POS01,cn=Lab,ou=berlin,o=mycorp,c=de \
--modify --scWorkstation --scPosImageDn java \
--scPosImageVersion 1.1.3
89
Page 90

7 PosAdmin
7.2.6 Remove
To remove an object from the database, you need the basic option --remove,
the option --DN, and, as the attribute, the distinguished name of the object to
delete. If the referred object has subentries, you also need the --recursive
option.
For example, to delete a scServerContainer with all servers and all services,
use the following command:
posAdmin.pl --password secret \
--user cn=admin,o=mycorp,c=de \
--remove --recursive \
--DN cn=server,cn=habor,ou=berlin,o=mycorp,c=de
Option Type Explanation
--DN must Distinguished name of the object to delete.
--recursive may Option to delete an object with all subobjects.
Table 7.8: Remove Options for PosAdmin
7.2.7 Query
To query an object, use the basic option --query, an object option, like --scLocation
or --scBranchServer, and, if desired, an attribute value pair to search for objects with a specific value. The following examples describe all possibilities to
query.
Option Type Explanation
--base must The base option sets the base in which to search
for objects. On the administration server, the default base is the oraganization (o=mycorp,c=de). If
posAdmin is executed on a branch server, the base
defaults to the location.
--<object> must Object which shall be queried, for example,
--scLocation.
--<attribute> may Attribute to search within the specified object, for
example, –ipNetworkNumber.
--<value> may If a attribute value is given, only objects with matching values are searched.
Table 7.9: Query Options for PosAdmin
a) Listing all locations with all data in Berlin:
90
Page 91

7.2 Basic Actions
posAdmin.pl --password secret --user \
--user cn=admin,o=mycorp,c=de \
--base ou=berlin,o=mycorp,c=de \
--query --scLocation
b) Listing all locations in Berlin, but showing only the ipNetworkNumber:
posAdmin.pl --password secret \
--user cn=admin,o=mycorp,c=de \
--base ou=berlin,o=mycorp,c=de \
--query --scLocation --ipNetworkNumber
c) Listing all locations in Berlin, but showing only the ipNetworkNumber
192.168.1.0:
posAdmin.pl --password secret \
--user cn=admin,o=mycorp,c=de \
--base ou=berlin,o=mycorp,c=de \
--query --scLocation --ipNetworkNumber 192.168.1.0
7.2.8 Update Config
Use the --updateconfig basic option to indicate that configuration files have
changed for an image or cash register. --Updateconfig should be paired with
the --dnLi st option, followed by a list of distinguished names that indicate
which clients should receive the updated config files. The branch servers are
notified if the clients exist on their subnet. The following examples describe
uses of --updateconfig.
Option Type Explanation
--base must The base option sets the base in which to search
for objects. On the administration server, the default base is the oraganization (o=mycorp,c=de). If
posAdmin is executed on a branch server, the base
defaults to the location.
--dnList must A list of distinguished names delimited by colons (’:’). example,
--cn=crtype3,cn=global,o=mycorp,c=us:
cn=CR001,cn=branch,ou=berlin,o=mycorp,c=de.
Valid object types are scPosImage, scCashRegister,
scConfigFileTemplate, scConfigFileSyncTemplate
and scWorkstation
Table 7.10: Update Config Options for PosAdmin
a) Update all configuration files on clients that use the scCashRegister object
"cn=crtype3,cn=global,o=novell,c=us":
91
Page 92

7 PosAdmin
posAdmin.pl --password secret \
--user cn=admin,o=mycorp,c=de \
--base ou=berlin,o=mycorp,c=de \
--updateconfig --dnList cn=crtype3,cn=global,o= no ve ll ,c =us
b) Update all configuration files on clients that use the image object
"cn=browser,cn=global,o=novell,c=us" and the the following client
"cn=CR001,cn=branch,ou=berlin,o=mycorp,c=de":
posAdmin.pl --password secret \
--user cn=admin,o=mycorp,c=de \
--base ou=berlin,o=mycorp,c=de \
--updateconfig --dnList cn=browser,cn=global,o= no ve ll ,c =us :
cn=CR001,cn=branch,ou=berlin,o=mycorp,c=de
7.3 Managing Hardware
With posAdmin, add, remove, and modify hardware assets. These are normally hard disks, network interface cards, and configuration files. All reference hardware is registered in the global containter in the LDAP directory.
7.3.1 Managing Cash Registers
The first step to register a new Cash Register Hardware is to define a name
and the model type of the CR. The following example adds a scCashRegister
object below the global container using the attributes as described in Table
7.11.
Attribute Type Explanation
--base must The base is generally the global container, for
example, cn=global,o=mycorp,c=de.
--cn must This is the common name of the cash register.
--scCashRegisterName must The model type of the cash register.
--scPosImageDn must This is the distinguished name of the default
image of the cash register.
--scDiskJournal may This boolean field is set to true if journaling
should be enabled. Journaling is only added
on diskfull machines.
Table 7.11: CashRegister Attributes for PosAdmin
posAdmin.pl --user cn=admin,o=mycorp,c=de \
--password secret \
92
Page 93

7.3 Managing Hardware
--base cn=global,o=mycorp,c=de \
--add --scCashRegister --cn crtype3 \
--scCashRegisterName 1234567 \
--scPosImageDn cn=browser,ou=global,o=mycorp,c=de
The next step is to add hardware-dependent configuration files, such as XF86Config.
The following example adds a scConfigFileTemplate object below the Cash Reg-
ister Hardware container crtype3 using the attributes as described in Table
7.12.
posAdmin.pl --user cn=admin,o=mycorp,c=de \
--password secret \
--base cn=crtype3,cn=global,o=mycorp,c=de \
--add --scConfigFileTemplate --cn XF86Config \
--scConfigFile /etc/X11/XF86Config \
--scMust TRUE --scBsize 1024 \
--scConfigFileData /mydata/XF86Config.1234567
Attribute Type Explanation
--base must This is the base distinguished name of
the CR object, for example, cn=crtype3,
cn=global,o=mycorp,c=de.
--cn must This is the common name of the config file.
--scMust must This flag is used to enable or disable the config
file. Allowed values are TRUE to enable or FALSE
to disable the config file.
--scConfigFile must This is the target path of the config file, for example, /etc/X11/XF86Config.
--scBsize must Specifies the block size for the TFTP download.
--scConfigFileData must This is the source path of the config file, for example, /tmp/XF86Config.mydata.
Table 7.12: ConfigFileTemplate Attributes for PosAdmin
A second config file template type is supported which stores configuration files
outside of the ldap directory. Rsync is used to transfer the files to the branch
server. As such, the config files must be placed in the path: /opt/SLES/POS/rsync/config/.
The following example adds a scConfigFileSyncTemplate object below the Cash
Register Hardware container crtype3 using the additional attributes as described in Table 7.13.
posAdmin.pl --user cn=admin,o=mycorp,c=de \
--password secret \
--base cn=crtype3,cn=global,o=mycorp,c=de \
--add --scConfigFileSyncTemplate --cn XF86Config \
93
Page 94

7 PosAdmin
--scConfigFile /etc/X11/XF86Config \
--scMust TRUE --scBsize 1024 \
--scConfigFileLocalPath /opt/SLES/POS/rsync/config/XF86Config.1234567
Attribute Type Explanation
--scConfigFileLocalPath must This is the local source path
of the config file, for example,
/opt/SLES/POS/rsync/config/XF86Config.mydata.
Table 7.13: ConfigFileSyncTemplate Attributes for PosAdmin
Next, define the hard disk or the RAM1disk of the CR. To add a RAM disk,
which is a minimum requirement if no hard disk is available, you need the
following parameters as described in Table 7.14.
# defining a RAM disk
posAdmin.pl --user cn=admin,o=mycorp,c=de \
--password secret \
--base cn=crtype3,cn=global,o=mycorp,c=de \
--add --scRamDisk --cn ram --scDevice /dev/ra m1
Attribute Type Explanation
--base must This is the base distinguished name of the CR object, for
example, cn=crtype3, cn=global,o=mycorp,c=de.
--cn must The common name of the device, for example, ram.
--scDevice must This is the device of the RAM disk, for example,
/dev/ram1.
Table 7.14: RamDisk Attributes for PosAdmin
To define a hard disk, the following parameters as described in Table 7.15 are
of interest.
# defining a hard disk
posAdmin.pl --user cn=admin,o=mycorp,c=de \
--password secret \
--base cn=crtype3,cn=global,o=mycorp,c=de \
--add --scHarddisk \
--cn hda --scDevice /dev/hda \
--scHdSize 9000 \
--scPartitionsTable ’1000 82 swap swap;4000 8 3 / ext3;’
1
Note that /dev/ram0 can not be used, because this device is used for the initial RAM disk.
We recommend to use /dev/ram1. This should not be confused with the hard disk device
which uses a partition table.
94
Page 95

7.4 Managing Images
Attribute Type Explanation
--base must This is the base distinguished name of
the CR object, for example, cn=crtype3,
cn=global,o=mycorp,c=de.
--cn must The common name of the device, for example,
hda.
--scDevice must This is the device of the hard disk, for example,
/dev/hda.
--scHdSize must This is the size of the hard disk in megabytes.
--scPartitionsTable must This is a semicolon-separated (’;’) list of partition
entries. Each entry has four parameters: the size
in megabytes, the partition type ID (82 for swap,
83 for a Linux partition), the mount point, and
the file system (swap or ext3).
Table 7.15: Harddisk Attributes for PosAdmin
7.4 Managing Images
After the installation and configuration of the SLRS, initial entries for the
browser and java POS image are added to LDAP. These LDAP entries serve
as example only!
The following example adds a scPosImage object below the global container
using the attributes as described in Table 7.17 on page 97.
posAdmin.pl --user cn=admin,o=mycorp,c=de \
--password secret --base cn=global,o=mycorp,c=de \
--add --scPosImage --cn "myExtJava" \
--scImageName "myExtJava" \
--scPosImageVersion "1.1.1;active" \
--scDhcpOptionsRemote "/boot/pxelinux.0" \
--scDhcpOptionsLocal "LOCALBOOT" \
--scImageFile "myExtJava" \
--scBsize "8192" --scConfigFile "/etc/X11/XF86Config"
Each image may be available in several versions, as shown in Table 7.16,
which can be set active or passive for testing purposes. Image versions that
are ‘passive’ are never selected automatically, but only when they are configured explicitly in the scWorkstation entry for the individual cash register. For
‘active’ images, the branch server selects the highest available version automatically.
2
To activate a registered image, set its image version active. This is done with
posAdmin with the modify basic action and the multivalue option.
2
The POS system manufacturer will provide a script to add the required SLRS objects to
the LDAP directory during the configuration of the administration server. For information,
refer to the POS system manufacturer documentation.
95
Page 96

7 PosAdmin
Value Explanation
1.1.2 The Version number is set to 1.1.2, but this POS image is
disabled in LDAP and will not be used for a new CR client,
even when the scCashRegister object which correspond to the
POS client matches with the scPosImageDn attribute entry.
1.1.2;passive Same behaviour as above.
1.1.2;active This POS image with version 1.1.2 is enabled.
1.1.2;active
1.1.3;active
1.1.5;active
1.1.2;passive
1.1.3;active
1.1.5;passive
Table 7.16: Behaviour of the scPosImageVersion Attribute
All image version are enabled. The latest image version will
be used for download to the POS client.
Only image version 1.1.3 is enabled.
posAdmin.pl --user cn=admin,o=mycorp,c=de \
--password secret --modify --scPosImage \
--multival --scPosImageVersion \
’1.1.1;passive=>1.1.1;active’ \
--DN cn=browser,cn=global,o=mycorp,c=de
To activate the new image version on a branch server, use the commands
possyncimages.pl and posldap2crconfig.pl with the --dumpall option.
You can assign an image to a CR that does not default to its hardware. In
this case, the active or passive flag for the images in the global container are
ignored.
posAdmin.pl --user cn=admin,o=mycorp,c=de \
--password secret --modify --scWorkstation \
--scPosImageDn cn=browser,cn=global,o=mycorp,c=de \
--scPosImageVersion 1.1.1 \
--DN cn=CR001,ou=berlin1,ou=berlin,o=mycorp,c=de
To remove the image assigned to the workstation, run the command:
posAdmin.pl --user cn=admin,o=mycorp,c=de \
--password secret --remove --scWorkstation \
--scPosImageDn \
--scPosImageVersion \
--DN cn=CR001,ou=berlin1,ou=berlin,o=mycorp,c=de
96
Page 97

7.4 Managing Images
Attribute Type Explanation
--base must This is the base distinguished name of
the POS image object, for example,
cn=myjava,cn=global,o=mycorp,c=de.
--cn must This is the common name of the POS image, for example, myjava.
--scImageName must This is the name of the POS image, for
example, myjava.
--scPosImageVersion must This is the version number of the POS
image, followed by the flag passive
or active, for example, 1.1.2; active.
The version number and the flag are
semicolon-separted (’;’). There are several combinations possible of this attribute, which are described in Table 7.16
on page 96.
--scDhcpOptionsRemote must This is the boot option of the
POS client, the mandatory value is
/boot/pxelinux.0.
--scDhcpOptionsLocal reserved This attribute is reserved for future extension of the SLRS and is actually not
used.
--scImageFile must This is the file name of the image, which
the CR will download from the branch
server, for example, myjava.
--scBsize must Specifies the block size for the TFTP
download of the POS image, for example, 8192. Possible values are: 4096
(4KB) for image sizes <128MB, 8192
(8KB) for image sizes <256MB, 16384
(16KB) for image sizes < 512MB and
32768 (32KB) for image sizes <1GB.
Note: You have to select a TFTP block
size of 32KB for the full featured desk-
top image, because there is a limitation
of the block counter for TFTP.
scConfigFile must This specifies the path of the con-
fig file, for example, /ect/ntp.conf or
/etc/X11/XF86Config.
Table 7.17: POS Image Attributes for PosAdmin
97
Page 98

7 PosAdmin
98
Page 99

8 The imageBuilder
Contents
8.1 Overview of the POS_Image Packages . . . . . . . . . . . . 99
8.2 Operating System Images . . . . . . . . . . . . . . . . . . . 101
8.3 Installing imageBuilder . . . . . . . . . . . . . . . . . . . . 101
8.4 Copying the SLRS CDs into a Central Archive . . . . . . . 102
8.5 Configuring the imageBuilder . . . . . . . . . . . . . . . . 102
8.6 Prebuilt Standard Images . . . . . . . . . . . . . . . . . . . 103
The imageBuilder software was designed to provide an easy-to-use interface
for creating operating system images. Using the imageBuilder, the created image is automatically featured to work on Point of Sale (POS) cash register systems. To work with the imageBuilder, at least the main package POS_Image-
Builder1and one of the boot packages as well as one of the image packages
(refer to Section 8.1) must be installed.
The basic command line tool providing all features needed for handling oper-
ating system images is called:
scr [ Options ]
The name scr means setup cash register. For a detailed description refer to
Chapter 10 on page 107.
8.1 Overview of the POS_Image Packages
The software to handle the images was bundled into RPMs with the base name
POS_Image. SUSE provides the POS imageBuilder tool, several prebuild POS
images, and so-called POS image description trees for administrative purposes
which will be installed during the AS installation. POS images are the software
that is run on the POS clients. These should not be confused with the boot
1
The imageBuilder and the corresponding POS Image Packages will be installed, by selecting
"SLRS Admin server Image Building System" as software selection during the installation of
the SLRS software. For further information refer to Section 3.2 on page 23.
99
Page 100

8 The imageBuilder
image2and operating system image each POS client needs to receive after it
is powered on. For further information refer to Section 9 on page 105 and
Section 15.6.3 on page 151.
The following packages exist:
• POS_Image
This package contains the README.Packages file, which describes the
package structure of the POS project.
• POS_Image-Builder
This package provides the major programs for creating and maintaining operating system images. All functions are available with the scr
command line tool.
• POS_Image-Netboot
This package contains the netboot image description structure, which
includes all the files and directories needed to build the netboot boot
image using the imageBuilder for booting diskless cash register systems.
• POS_Image-Netboot-Binary
This is the prebuilt netboot boot image.
• POS_Image-DiskNetboot
This package contains the disknetboot image description structure, which
includes all the files and directories needed to build the disknetboot boot
image using the imageBuilder. It can boot diskful and diskless cash register systems.
• POS_Image-DiskNetboot-Binary
This is the prebuilt disknetboot boot image.
• POS_Image-Minimal
This package contains the minimal image description structure, which
includes all the files and directories needed to build the minimal image
using the imageBuilder. It can be loaded from one of the available boot
images. The minimal image supports only console-based applications.
• POS_Image-Minimal-Binary
This is the prebuilt minimal image.
• POS_Image-Java
This package contains the java image description structure, which includes all the files and directories needed to build the java image using
the imageBuilder. It can be loaded from one of the available boot images. The java image supports console-based and X11 and Java–based
applications.
2
The POS clients boot two images – a first stage image, for example, netboot-1.1.9,
disknetboot-1.1.9 or cdboot-1.1.3 and a second stage image, for example,
minimal-1.1.8, browser-1.1.2, java-1.1.2, desktop-1.1.2.
100
 Loading...