


SUSE Linux Enterprise
www.novell.com11
May27,2009 Virtualization with Xen
Server

Virtualization with Xen
All content is copyright © 2006- 2009 Novell, Inc.
Legal Notice
This manual is protected under Novell intellectual property rights. By reproducing, duplicating or
distributing this manual you explicitly agree to conform to the terms and conditions of this license
agreement.
This manual may be freely reproduced, duplicated and distributed either as such or as part of a bundled
package in electronic and/or printed format, provided however that the following conditions are fullled:
That this copyright notice and the names of authors and contributors appear clearly and distinctively
on all reproduced, duplicated and distributed copies. That this manual, specically for the printed
format, is reproduced and/or distributed for noncommercial use only. The express authorization of
Novell, Inc must be obtained prior to any other use of any manual or part thereof.
For Novell trademarks, see the Novell Trademark and Service Mark list http://www.novell
.com/company/legal/trademarks/tmlist.html. * Linux is a registered trademark of
Linus Torvalds. All other third party trademarks are the property of their respective owners. A trademark
symbol (®, ™ etc.) denotes a Novell trademark; an asterisk (*) denotes a third party trademark.
All information found in this book has been compiled with utmost attention to detail. However, this
does not guarantee complete accuracy. Neither Novell, Inc., SUSE LINUX Products GmbH, the authors,
nor the translators shall be held liable for possible errors or the consequences thereof.

Contents
About This Manual vii
1 Introduction to Xen Virtualization 1
1.1 Basic Components . . . . . . . . . . . . . . . . . . . . . . . . . 1
1.2 Understanding Virtualization Modes . . . . . . . . . . . . . . . . . 2
1.3 Xen Virtualization Architecture . . . . . . . . . . . . . . . . . . . . 3
1.4 The Virtual Machine Host . . . . . . . . . . . . . . . . . . . . . . 4
2 Setting Up a Virtual Machine Host 7
2.1 Best Practices and Suggestions . . . . . . . . . . . . . . . . . . . . 8
2.2 Managing Domain 0 Memory . . . . . . . . . . . . . . . . . . . . 9
2.3 Network Card in Fully Virtualized Guests . . . . . . . . . . . . . . . 10
2.4 Starting the Virtual Machine Host . . . . . . . . . . . . . . . . . . 12
2.5 PCI Pass-Through . . . . . . . . . . . . . . . . . . . . . . . . . 13
3 Setting Up Virtual Machines 17
3.1 Creating a Virtual Machine . . . . . . . . . . . . . . . . . . . . . 18
3.2 Installing an Operating System . . . . . . . . . . . . . . . . . . . 19
3.3 Including Add-On Products in the Installation . . . . . . . . . . . . . 24
3.4 Using the Command Line to Create Virtual Machines . . . . . . . . . . 25
3.5 Deleting Virtual Machines . . . . . . . . . . . . . . . . . . . . . 25
3.6 Using an Existing SUSE Linux Enterprise Server Virtual Machine . . . . . 25
3.7 Troubleshooting . . . . . . . . . . . . . . . . . . . . . . . . . 26
4 Managing a Virtualization Environment 29
4.1 Virtual Machine Manager . . . . . . . . . . . . . . . . . . . . . 30

4.2 Controlling the Host by Modifying xend Settings . . . . . . . . . . . . 32
4.3 Conguring a Virtual Machine by Modifying its xend Settings . . . . . . 33
4.4 The xm Command . . . . . . . . . . . . . . . . . . . . . . . . 34
4.5 Automatic Starting of Domains . . . . . . . . . . . . . . . . . . . 36
4.6 Migrating Xen VM Guest Systems . . . . . . . . . . . . . . . . . . 36
5 Virtual Networking 39
5.1 Virtual Bridges . . . . . . . . . . . . . . . . . . . . . . . . . . 40
5.2 Network Devices for Guest Systems . . . . . . . . . . . . . . . . . 40
5.3 Special Congurations . . . . . . . . . . . . . . . . . . . . . . . 42
6 Virtualization: Conguration Options and Settings 47
6.1 Updating SLE 10 VM Host Server Systems to SLE 11 . . . . . . . . . . 47
6.2 Virtual CD Readers . . . . . . . . . . . . . . . . . . . . . . . . 49
6.3 Remote Access Methods . . . . . . . . . . . . . . . . . . . . . . 53
6.4 VNC Viewer . . . . . . . . . . . . . . . . . . . . . . . . . . . 54
6.5 The Boot Loader Program . . . . . . . . . . . . . . . . . . . . . 57
6.6 Virtual Machine Initial Startup Files . . . . . . . . . . . . . . . . . 60
6.7 Sparse Image Files and Disk Space . . . . . . . . . . . . . . . . . . 62
6.8 Virtual Keyboards . . . . . . . . . . . . . . . . . . . . . . . . . 63
6.9 Mapping Physical Storage to Virtual Disks . . . . . . . . . . . . . . . 65
6.10 Virtual Disks . . . . . . . . . . . . . . . . . . . . . . . . . . . 67
6.11 Migrating Virtual Machines . . . . . . . . . . . . . . . . . . . . . 67
6.12 Passing Key Combinations to Virtual Machines . . . . . . . . . . . . . 68
6.13 xm block-list Device Numbers . . . . . . . . . . . . . . . . . . . . 69
6.14 File-Backed Virtual Disks and Loopback Devices . . . . . . . . . . . . 69
6.15 Saving Virtual Machines . . . . . . . . . . . . . . . . . . . . . . 70
6.16 Restoring Virtual Machines . . . . . . . . . . . . . . . . . . . . . 71
6.17 Virtual Machine States . . . . . . . . . . . . . . . . . . . . . . . 72
7 Xen Guest Systems 75
7.1 NetWare Virtual Machines . . . . . . . . . . . . . . . . . . . . . 75
7.2 OES Linux Virtual Machines . . . . . . . . . . . . . . . . . . . . . 75
7.3 Red Hat Linux Virtual Machines . . . . . . . . . . . . . . . . . . . 75
7.4 SUSE Linux Virtual Machines . . . . . . . . . . . . . . . . . . . . 77
7.5 Windows Virtual Machines . . . . . . . . . . . . . . . . . . . . . 84
8 Virtual Machine Drivers 85
8.1 Buying a Support Subscription . . . . . . . . . . . . . . . . . . . 86
8.2 Loading the Driver Pack . . . . . . . . . . . . . . . . . . . . . . 87
8.3 SUSE Drivers for Red Hat Enterprise Linux 4 on Xen . . . . . . . . . . 87

8.4 SUSE Drivers for Red Hat Enterprise Linux 5 on Xen . . . . . . . . . . 91
8.5 SUSE Drivers for Windows on Xen . . . . . . . . . . . . . . . . . . 95
8.6 SUSE Drivers for SUSE Linux Enterprise Server on Xen . . . . . . . . . 103
A SXP Conguration Options 105


About This Manual
This manual offers an introduction to virtualization technology of your SUSE Linux
Enterprise Server. It features an overview of the various elds of application and installation types of each of the platforms supported by SUSE Linux Enterprise Server as
well as a short description of the installation procedure.
Many chapters in this manual contain links to additional documentation resources. This
includes additional documentation that is available on the system as well as documentation available on the Internet.
For an overview of the documentation available for your product and the latest documentation updates, refer to http://www.novell.com/documentation.
Quality service is also available. Experts can answer questions about installation or
conguration, make reliable security updates available, and support development
projects.
Documentation regarding the Open Enterprise Server 2 is found at http://www
.novell.com/documentation/oes2/index.html.
1 Available Documentation
We provide HTML and PDF versions of our books in different languages. The following
manuals for users and administrators are available on this product:
Deployment Guide (↑Deployment Guide)
Shows how to install single or multiple systems and how to exploit the product
inherent capabilities for a deployment infrastructure. Choose from various approaches, ranging from a local installation or a network installation server to a mass deployment using a remote-controlled, highly-customized, and automated installation
technique.
Administration Guide (↑Administration Guide)
Covers system administration tasks like maintaining, monitoring and customizing
an initially installed system.

Security Guide (↑Security Guide)
Introduces basic concepts of system security, covering both local and network security aspects. Shows how to make use of the product inherent security software
like Novell AppArmor (which lets you specify per program which les the program
may read, write, and execute) or the auditing system that reliably collects information about any security-relevant events.
System Analysis and Tuning Guide (↑System Analysis and Tuning Guide)
An administrator's guide for problem detection, resolution and optimization. Find
how to inspect and optimize your system by means of monitoring tools and how
to efciently manage resources. Also contains an overview of common problems
and solutions and of additional help and documentation resources.
Virtualization with Xen (page 1)
Offers an introduction to virtualization technology of your product. It features an
overview of the various elds of application and installation types of each of the
platforms supported by SUSE Linux Enterprise Server as well as a short description
of the installation procedure.
Storage Administration Guide
Provides information about how to manage storage devices on a SUSE Linux Enterprise Server.
In addition to the comprehensive manuals, several quick start guides are available:
Installation Quick Start (↑Installation Quick Start)
Lists the system requirements and guides you step-by-step through the installation
of SUSE Linux Enterprise Server from DVD, or from an ISO image.
Linux Audit Quick Start
Gives a short overview how to enable and congure the auditing system and how
to execute key tasks such as setting up audit rules, generating reports, and analyzing
the log les.
Novell AppArmor Quick Start
Helps you understand the main concepts behind Novell® AppArmor.
Find HTML versions of most SUSE Linux Enterprise Server manuals in your installed
system under /usr/share/doc/manual or in the help centers of your desktop.
Find the latest documentation updates at http://www.novell.com/
viii Virtualization with Xen

documentation where you can download PDF or HTML versions of the manuals
for your product.
2 Feedback
Several feedback channels are available:
• To report bugs for a product component or to submit enhancement requests, please
use https://bugzilla.novell.com/. If you are new to Bugzilla, you
might nd the Bug Writing FAQs helpful, available from the Novell Bugzilla home
page.
• We want to hear your comments and suggestions about this manual and the other
documentation included with this product. Please use the User Comments feature
at the bottom of each page of the online documentation and enter your comments
there.
3 Documentation Conventions
The following typographical conventions are used in this manual:
•
/etc/passwd: directory names and lenames
•
placeholder: replace placeholder with the actual value
•
PATH: the environment variable PATH
•
ls, --help: commands, options, and parameters
•
user: users or groups
•
Alt, Alt + F1: a key to press or a key combination; keys are shown in uppercase as
on a keyboard
•
File, File > Save As: menu items, buttons
• ►amd64 em64t: This paragraph is only relevant for the specied architectures.
The arrows mark the beginning and the end of the text block. ◄
About This Manual ix

•
Dancing Penguins (Chapter Penguins, ↑Another Manual): This is a reference to a
chapter in another manual.
x Virtualization with Xen

Introduction to Xen Virtualization
Virtualization of operating systems is used in many different computing areas. It nds
its applications in server consolidation, energy saving efforts, or the ability to run older
software on new hardware, for example. This chapter introduces and explains the
components and technologies you need to understand to set up and manage a Xen-based
virtualization environment.
1.1 Basic Components
The basic components of a Xen-based virtualization environment are the Xen hypervisor,
the Domain0, any number of other VM Guests, and the tools, commands, and conguration les that let you manage virtualization. Collectively, the physical computer running all these components is referred to as a VM Host Server because together these
components form a platform for hosting virtual machines.
The Xen Hypervisor
The Xen hypervisor, sometimes referred to generically as a virtual machine monitor,
is an open-source software program that coordinates the low-level interaction between virtual machines and physical hardware.
The Domain0
The virtual machine host environment, also referred to as Domain0 or controlling
domain, is comprised of several components, such as:
1
Introduction to Xen Virtualization 1

• The SUSE Linux operating system, which gives the administrator a graphical
and command line environment to manage the virtual machine host components
and its virtual machines.
NOTE
The term “Domain0” refers to a special domain that provides the management environment. This may be run either in graphical or in command
line mode.
• The xend daemon (xend), which stores conguration information about each
virtual machine and controls how virtual machines are created and managed.
• A modied version of QEMU, which is an open-source software program that
emulates a full computer system, including a processor and various peripherals.
It provides the ability to host operating systems in full virtualization mode.
Xen-Based Virtual Machines
A Xen-based virtual machine, also referred to as a VM Guest or DomU consists
of the following components:
• At least one virtual disk that contains a bootable operating system. The virtual
disk can be based on a le, partition, volume, or other type of block device.
• Virtual machine conguration information, which can be modied by exporting
a text-based conguration le from xend or through Virtual Machine Manager.
Management Tools, Commands, and Conguration Files
There is a combination of GUI tools, commands, and conguration les to help
you manage and customize your virtualization environment.
1.2 Understanding Virtualization Modes
Guest operating systems are hosted on virtual machines in either full virtualization
mode or paravirtual mode. Each virtualization mode has advantages and disadvantages.
2 Virtualization with Xen

• Full virtualization mode lets virtual machines run unmodied operating systems,
such as Windows* Server 2003 and Windows XP, but requires the computer running
as the VM Host Server to support hardware-assisted virtualization technology, such
as AMD* Virtualization or Intel* Virtualization Technology.
Some guest operating systems hosted in full virtualization mode, can be congured
to run the Novell* Virtual Machine Drivers instead of drivers originating from the
operating system. Running virtual machine drivers improves performance dramatically on guest operating systems, such as Windows XP and Windows Server 2003.
For more information, see Chapter 8, Virtual Machine Drivers (page 85).
• Paravirtual mode does not require the host computer to support hardware-assisted
virtualization technology, but does require the guest operating system to be modied
for the virtualization environment. Typically, operating systems running in paravirtual mode enjoy better performance than those requiring full virtualization mode.
Operating systems currently modied to run in paravirtual mode are referred to as
paravirtualized operating systems and include SUSE Linux Enterprise Server 11
and NetWare® 6.5 SP8.
1.3 Xen Virtualization Architecture
The following graphic depicts a virtual machine host with four virtual machines. The
Xen hypervisor is shown as running directly on the physical hardware platform. Note,
that the controlling domain is also just a virtual machine, although it has several additional management tasks compared to all other virtual machines.
Introduction to Xen Virtualization 3

Figure 1.1
On the left, the virtual machine host’s Domain0 is shown running the SUSE Linux operating system. The two virtual machines shown in the middle are running paravirtualized
operating systems. The virtual machine on the right shows a fully virtual machine running an unmodied operating system, such as Windows Server 2003 or Windows XP.
Virtualization Architecture
1.4 The Virtual Machine Host
After you install the virtualization components and reboot the computer, the GRUB
boot loader menu displays a Xen menu option. Selecting the Xen menu option loads
the Xen hypervisor and starts the Domain0 running the SUSE Linux operating system.
Running on Domain0, the SUSE Linux operating system displays the installed text
console or desktop environment, such as GNOME or KDE. The terminals of VM Guest
systems are displayed in their own window inside the controlling Domain0 when opened.
4 Virtualization with Xen

Figure 1.2
Desktop Showing Virtual Machine Manager and Virtual Machines
Introduction to Xen Virtualization 5


Setting Up a Virtual Machine Host
This section documents how to set up and use SUSE Linux Enterprise 11 as a virtual
machine host.
In most cases, the hardware requirements for the Domain0 are the same as those for
the SUSE Linux Enterprise Server operating system, but additional CPU, disk, memory,
and network resources should be added to accommodate the resource demands of all
planned VM Guest systems.
TIP
Remember that VM Guest systems, just like physical machines, perform better
when they run on faster processors and have access to more system memory.
The following table lists the minimum hardware requirements for running a typical
virtualized environment. Additional requirements have to be added for the number and
type of the respective guest systems.
Table 2.1
nent
Hardware Requirements
Minimum RequirementsSystem Compo-
2
Computer with Pentium II or AMD K7 450 MHz processorComputer
512 MB of RAM for the hostMemory
Setting Up a Virtual Machine Host 7

Minimum RequirementsSystem Compo-
nent
7 GB of available disk space for the host.Free Disk Space
DVD-ROM DriveOptical Drive
20 GBHard Drive
Ethernet 100 MbpsNetwork Board
IP Address • One IP address on a subnet for the host.
• One IP address on a subnet for each VM Guest.
Xen virtualization technology is available in SUSE Linux Enterprise Server products
based on code path 10 and later. Code path 10 products include Open Enterprise Server
2 Linux, SUSE Linux Enterprise Server 10, SUSE Linux Enterprise Desktop 10, and
openSUSE 10.x.
The virtual machine host requires a number of software packages and their dependencies
to be installed. To install all necessary packages, run YaST Software Management, select
the lter Patterns and choose Xen Virtual Machine Host Server for installation. The
installation can also be performed with YaST using the module Virtualization > Install
Hypervisor and Tools.
After the Xen software is installed, restart the computer.
Updates are available through your update channel. To be sure to have the latest updates
installed, run YaST Online Update after the installation has nished.
2.1 Best Practices and Suggestions
When installing and conguring the SUSE Linux Enterprise operating system on the
host, be aware of the following best practices and suggestions:
8 Virtualization with Xen

•
If the host should always run as Xen host, run YaST System > Boot Loader and
activate the Xen boot entry as default boot section.
•
In YaST, click System > Boot Loader.
•
Change the default boot to the Xen label, then click Set as Default.
•
Click Finish.
• Close Virtual Machine Manager if you are not actively using it and restart it when
needed. Closing Virtual Machine Manager does not affect the state of virtual machines.
• For best performance, only the applications and processes required for virtualization
should be installed on the virtual machine host.
• When using both, iSCSI and OCFS2 to host Xen images, the latency required for
OCFS2 default timeouts in SP2 may not be met. To recongure this timeout, run
/etc/init.d/o2cb configure or edit O2CB_HEARTBEAT_THRESHOLD
in the system conguration.
2.2 Managing Domain 0 Memory
When the host is set up, a percentage of system memory is reserved for the hypervisor,
and all remaining memory is automatically allocated to Domain0.
A better solution is to set a minimum and maximum amount of memory for domain 0,
so the memory can be allocated appropriately to the hypervisor. An adequate maximum
amount would be 20 percent of the total system memory up to 2 GB. An appropriate
minimum amount would be 512 MB.
2.2.1 Setting a Maximum Amount of
Memory
Determine the amount of memory to set for domain 0.
1
2
At Domain0, type xm list to view the currently allocated memory.
Setting Up a Virtual Machine Host 9

Run YaST > Boot Loader.
3
Select the Xen section.
4
5
In Additional Xen Hypervisor Parameters, add dom0_mem=mem_amount
where mem_amount is the maximum amount of memory to allocate to Domain0.
Add K, M, or G, to specify the size, for example, dom0_mem=768M.
Restart the computer to apply the changes.
6
2.2.2 Setting a Minimum Amount of Memory
To set a minimum amount of memory for Domain0, edit the dom0-min-mem parameter in the /etc/xen/xend-config.sxp le and restart xend. For more informa-
tion, see Section 4.2, “Controlling the Host by Modifying xend Settings” (page 32).
2.3 Network Card in Fully Virtualized Guests
In a fully virtualized guest, the default network card is an emulated Realtek network
card. However, it also possible to use the split network driver to run the communication
between Domain0 and a VM Guest. By default, both interfaces are presented to the
VM Guest, because the drivers of some operating systems require both to be present.
When using SUSE Linux Enterprise, only the paravirtualized network cards are available
for the VM Guest by default. The following network options are available:
emulated
To use a “emulated” network interface like an emulated Realtek card, specify
(type ioemu) in the vif device section of the xend conguration. An example
conguration would look like:
(device
(vif
(bridge br0)
(uuid e2b8f872-88c7-0a4a-b965-82f7d5bdd31e)
(devid 0)
10 Virtualization with Xen

(mac 00:16:3e:54:79:a6)
(model rtl8139)
(type ioemu)
)
)
Find more details about editing the xend conguration at Section 4.3, “Conguring
a Virtual Machine by Modifying its xend Settings” (page 33).
paravirtualized
When not specifying a model or type, xend uses the paravirtualized network interface:
(device
(vif
(bridge br0)
(mac 00:16:3e:50:66:a4)
(script /etc/xen/scripts/vif-bridge)
(uuid 0a94b603-8b90-3ba8-bd1a-ac940c326514)
(backend 0)
)
)
emulated and paravirtualized
If the administrator should be offered both options, simply specify both, type and
model. The xend conguration would look like:
(device
(vif
(bridge br0)
(uuid e2b8f872-88c7-0a4a-b965-82f7d5bdd31e)
(devid 0)
(mac 00:16:3e:54:79:a6)
(model rtl8139)
(type netfront)
)
)
In this case, one of the network interfaces should be disabled on the VM Guest.
Setting Up a Virtual Machine Host 11

2.4 Starting the Virtual Machine Host
If virtualization software is correctly installed, the computer boots to display the GRUB
boot loader with a Xen option on the menu. Select this option to start the virtual machine
host.
NOTE: Xen and Kdump
In Xen, the hypervisor manages the memory resource. If you need to reserve
system memory for a recovery kernel in Domain0, this memory has to be reserved by the hypervisor. Thus, it is necessary to add the parameter
crashkernel=size@offset to the kernel line instead of using the line
with the other boot options. For more about Kdump, see also http://www
.novell.com/rc/docrepository/public/37/basedocument
.2007-09-13.2960758124/4622069_f_en.pdf.
If the Xen option is not on the GRUB menu, review the steps for installation and verify
that the GRUB boot loader has been updated. If the installation has been done without
selecting the Xen pattern, run the YaST Software Management, select the lter Patterns
and choose Xen Virtual Machine Host Server for installation.
After booting the hypervisor, the Domain0 virtual machine starts and displays its
graphical desktop environment. If you did not install a graphical desktop, the command
line environment appears.
TIP: Graphics Problems
In some rare cases it may happen that the graphics system does not work
properly. In this case, add vga=ask to the boot parameters. To activate permanent settings, use vga=mode-0x??? where ??? is calculated as 0x100 +
VESA mode from http://en.wikipedia.org/wiki/VESA_BIOS
_Extensions, e.g. vga=mode-0x361.
Before starting to install virtual guests, make sure that the system time is correct. To
do this, congure NTP (Network Time Protocol) on the controlling domain:
In YaST select Network Services > NTP Conguration.
1
12 Virtualization with Xen

Select the option to automatically start the NTP daemon during boot. Provide
2
the IP address of an existing NTP time server, then click Finish.
NOTE: Time Services on Virtual Guests
Hardware clocks commonly are not very precise. All modern operating systems
try to correct the system time compared to the hardware time by means of an
additional time source. To get the correct time on all VM Guest systems, also
activate the network time services on each respective guest or make sure that
the guest uses the system time of the host. For more about Independent
Wallclocks in SUSE Linux Enterprise Server see Section 7.4.3, “Virtual Machine
Clock Settings” (page 81).
For more information about managing virtual machines, see Chapter 4, Managing a
Virtualization Environment (page 29).
2.5 PCI Pass-Through
To take full advantage of VM Guest systems, it is sometimes necessary to assign specic PCI devices to a dedicated domain. When using fully virtualized guests, this
functionality is only available if the chipset of the system supports this feature, and if
it is activated from the BIOS.
This feature is available from both, AMD* and Intel*. For AMD machines, the feature
is called IOMMU, in Intel speak, this is VT-d. Note that Intel-VT technology is not
sufcient to use this feature for fully virtualized guests. To make sure that your computer supports this feature, ask your supplier specically to deliver a system that supports
PCI Pass-Through.
Limitations
• Some graphics drivers use highly optimized ways to access DMA. This is not always
supported, and thus using graphics cards may be difcult.
• When accessing PCI devices behind a PCIe bridge, all of the PCI devices must be
assigned to a single guest. This limitations does not apply to PCIe devices.
Setting Up a Virtual Machine Host 13

The conguration of PCI Pass-Through is twofold. First, the hypervisor must be informed at boot time that a PCI device should be available for reassigning. Second, the
PCI device must be assigned to the VM Guest.
2.5.1 Conguring the Hypervisor for PCI
Pass-Through
1
Select a device to reassign to a VM Guest. To do this run lspci and read the
device number. For example, if lspci contains the following line:
06:01.0 Ethernet controller: Digital Equipment Corporation DECchip
21142/43 (rev 41)
In this case, the PCI number is (06:01.0).
Run yast > System > Boot Loader.
2
3
Select the Xen section and press Edit.
Add the PCI number to the Optional Kernel Command Line Parameter line:
4
pciback.hide=(06:01.0)
5
When preparing for fully virtualized guests, add the parameter iommu=1 to
Additional Xen Hypervisor Parameters.
Press Ok and nish YaST.
6
Reboot the system.
7
Check if the device is in the list of assignable devices with the command
8
xm pci-list-assignable-devices
2.5.2 Assigning PCI Devices to VM Guest
Systems
There are several possibilities to dedicate a PCI device to a VM Guest:
14 Virtualization with Xen

Adding the device while installing:
During installation, add the pci line to the conguration le:
pci=['06:01.0']
Hot adding PCI devices to VM Guest systems
The command xm may be used to add or remove PCI devices on the y. To Add
the device with number 06:01.0 to a guest with name sles11 use:
xm pci-attach sles11 06:01.0
Adding the PCI device to xend
To add the device to the xend database, add the following section to the xend
database:
(device
(pci
(dev
(slot 0x01)
(domain 0x0)
(bus 0x06)
(vslt 0x0)
(func 0x0)
)
)
)
For more information about modifying the xend database, see Section 4.3, “Con-
guring a Virtual Machine by Modifying its xend Settings” (page 33).
After assigning the PCI device to the VM Guest, the guest system must care for the
conguration and device drivers for this device.
2.5.3 For More Information
PCI Pass-Through is a new technology. However there are several resources that provide
interesting information about this in the net:
• http://wiki.xensource.com/xenwiki/VTdHowTo
• http://software.intel.com/en-us/forums/virtualization-software-development/topic/56802/page/1/
Setting Up a Virtual Machine Host 15

• http://software.intel.com/en-us/articles/intel-virtualization-technology-for-directedio-vt-d-enhancing-intel-platforms-for-efcient-virtualization-of-io-devices/
• http://www.amd.com/us-en/assets/content_type/white_papers_and_tech_docs/34434.pdf
16 Virtualization with Xen

Setting Up Virtual Machines
A virtual machine is comprised of data and operating system les that dene the virtual
environment. Virtual machines are hosted and controlled by the VM Host Server. This
section provides generalized instructions for installing virtual machines.
Virtual machines have few if any requirements above those required to run the operating
system. If the operating system has not been optimized for the virtual machine host
environment, the unmodied OS can run only on hardware-assisted virtualization
computer hardware, in full virtualization mode, and requires specic device drivers to
be loaded. The hardware that is presented to the VM Guest depends on the conguration
of the Xend.
You should be aware of any licensing issues related to running a single licensed copy
of an operating system on multiple virtual machines. Consult the operating system license
agreement for more information.
NOTE: Virtual Machine Architectures
The virtual machine host runs only on x86, AMD64 and Intel 64 hardware. It
does not run on other system architectures such as Itanium, or POWER. A 64bit virtual machine host can also run a 32-bit operating system, while a 32-bit
host cannot run a 64-bit client. This holds true for both, the controlling domain
and all further guests.
3
Setting Up Virtual Machines 17

3.1 Creating a Virtual Machine
Before creating a virtual machine, you need the following:
•
Install a host server as described in Chapter 2, Setting Up a Virtual Machine Host
(page 7).
• If you want to use an automated installation le (AutoYaST, NetWare® Response
File, or RedHat Kickstart), you should create and download it to a directory on the
host machine server or make it available on the network.
• For NetWare and OES Linux virtual machines, you need a static IP address for
each virtual machine you create.
• If you are installing Open Enterprise Server (OES) 2 Linux, you need a network
installation source for OES 2 Linux software including the SUSE Linux Enterprise
Server 10 SP2 media and the OES 2 Linux add-on CD. For procedures to create
the installation sources, see Section “Setting Up the Server Holding the Installation
Sources” (Chapter 14, Remote Installation, ↑Deployment Guide).
For further prerequisites, consult the manuals of the respective operating system to install.
The Create Virtual Machine Wizard (YaST > Virtualization > Create Virtual Machines)
helps you through the steps required to create a virtual machine and install its operating
system. The information that follows is generalized for installing any operating system.
In addition to these instructions, you should consult Chapter 7, Xen Guest Systems
(page 75) for information specic to the operating system you are installing.
The actual conguration les for the Xen guests are stored at /etc/xen/vm/. The
default location for image les is /var/lib/xen/images.
Launch the Create Virtual Machine Wizard by using one of the following methods:
•
From the virtualization host server desktop, click YaST > Virtualization > Create
Virtual Machine
•
From within Virtual Machine Manager, click New.
•
At the command line, enter vm-install.
18 Virtualization with Xen

If the wizard does not appear or the vm-install command does not work, review
the process of installing and starting the virtualization host server. The virtualization
software might not be installed properly.
3.2 Installing an Operating System
You can choose to run an installation program or choose a disk or disk image that already
has an installed and bootable operating system.
Figure 3.1
If you choose to run an installation program, you are presented with a list of operating
systems. Select the one you want to install.
The Summary page shows you a summary of the virtual machine you are creating. You
can click on any of the headings to edit the information. As you edit the information in
the Summary, consult Chapter 7, Xen Guest Systems (page 75) for instructions specic
to the operating system you are installing.
Installing an Operating System
Setting Up Virtual Machines 19

Figure 3.2
Summary
Information about the following operating systems is included:
• OES NetWare Virtual Machines, see Section 7.1, “NetWare Virtual Machines”
(page 75).
• OES Linux Virtual Machines, see Section 7.2, “OES Linux Virtual Machines”
(page 75).
• SUSE Linux Virtual Machines, see Section 7.4, “SUSE Linux Virtual Machines”
(page 77).
• Windows Virtual Machines, see Section 7.5, “Windows Virtual Machines”
(page 84).
When running through the creation of a VM Guest, the following steps have to be accomplished:
20 Virtualization with Xen

Select if the VM Guest should run as full or paravirtualized guest.
1
If your computer supports hardware-assisted virtualization, you can create a virtual machine that runs in fully virtual mode. If you are installing an operating
system that is modied for virtualization, you can create a virtual machine that
runs in paravirtual mode. For more information about virtualization modes, see
Section 1.2, “Understanding Virtualization Modes” (page 2).
Each virtual machine must have a unique name. The name entered on this page
2
is used to create and name the virtual machine’s conguration le. The conguration le contains parameters that dene the virtual machine and is saved to the
/etc/xen/vm/ directory.
The Hardware page allows you to specify the amount of memory and number of
3
virtual processors for your virtual machine.
Initial Memory
The amount of memory initially allocated to the virtual machine (specied
in megabytes).
Maximum Memory
The largest amount of memory the virtual machine will ever need.
Virtual Processors
If desired, you can specify that the virtual machine has more virtual CPUs
than the number of physical CPUs. You can specify up to 32 virtual CPUs:
however, for best performance, the number of virtual processors should be
less than or equal to the number of physical processors.
Select the graphics mode to use:
4
No Graphics Support
The virtual machine operates like a server without a monitor. You can access
the operating system through operating system supported services, such as
SSH or VNC.
Paravirtualized Graphics Adapter
Requires that an appropriate graphics driver is installed in the operating
system.
A virtual machine must have at least one virtual disk. Virtual disks can be:
5
Setting Up Virtual Machines 21

File backed, which means that the virtual disk is a single image le on a
•
larger physical disk.
• A sparse image le, which means that the virtual disk is a single image le,
but the space is not preallocated.
• Congured from a block device, such as an entire disk, partition, or volume.
For more information about available physical storage, see Section 6.9,
“Mapping Physical Storage to Virtual Disks” (page 65).
For best performance, create each virtual disk from an entire disk or a partition.
For the next best performance, create an image le but do not create it as a sparse
image le. A virtual disk based on a sparse image le delivers the most diskspace exibility but slows installation and disk access speeds.
By default, a single, le-backed virtual disk is created as a sparse image le in
/var/lib/xen/images/vm_name where vm_name is the name of the
virtual machine. You can change this conguration to meet your specic requirements.
If you want to install from DVD or CD-Rom, add the drive to the list of available
6
hard disks. To learn about device names of the available optical drives, run
hwinfo --cdrom and search for the line starting with Device File:. Add
this device le to the available hard disks of the VM Guest.
Instead of the real dvd or CD-Rom drive, you can also add the ISO image of an
installation medium. For more details, see Section 6.2.1, “Virtual CD Readers
on Paravirtual Machines” (page 49).
Note, that each CD-Rom drive or ISO image can only be used by one VM Guest
at the same time. When installing many VM Guest systems, it may be better to
use a network installation source.
By default, a single virtual network card is created for the virtual machine. It has
7
a randomly generated MAC address that you can change to t your desired conguration. The virtual network card will be attached to a default bridge congured
in the host. You can also create additional virtual network cards in the Network
Adapters page of vm-install. For more details about virtual networking, see
Chapter 5, Virtual Networking (page 39).
22 Virtualization with Xen

NOTE: Using Arbitrary Bridge Names
If installing a fully virtualized guest and you are using a bridge name that
is different than the default names, explicitly specify the bridge by selecting the bridge name from the Source menu on the Virtual Network
Adapter page. Paravirtual guests by denition are aware they are running
on a virtualization platform and therefore, do not need to have the bridge
explicitly specied, thus leaving Source as Default will sufce.
The operating system can be installed from a CD/DVD device or an ISO image
8
le. In addition, if you are installing a SUSE Linux operating system, you can
install the operating system from a network installation source.
If you are installing a paravirtual machine's operating system from CD, you
should remove the virtual CD reader from the virtual machine after completing
the installation, because the virtual machine assumes that the original CD is still
in the CD reader, even if it is ejected. If it is ejected, the virtual machine cannot
access the CD (or any other newly inserted CD) and receives I/O errors.
WARNING: Changing CD-Roms
On paravirtual guests, it is currently not possible to go on with the installation of a system after changing the CD-Rom. Instead, you should use a
DVD or a network based installation. For a workaround to this problem,
see Section 6.2.1, “Virtual CD Readers on Paravirtual Machines” (page 49).
If the installation program is capable of recognizing an installation prole, response le, or script, you can automate the installation settings by specifying the
location of the prole, response le, or script you want to use. For example,
SUSE Linux uses an AutoYaST prole, NetWare uses a NetWare Response File,
and Red Hat uses a Kickstart le to move through the installation screens with
no interaction.
You can also pass instructions to the kernel at install time by entering parameters
for the Additional Arguments eld. These arguments may either be kernel options,
or options for linuxrc. More information about linuxrc can be found at
Section “Booting the Target System for Installation” (Chapter 14, Remote Instal-
lation, ↑Deployment Guide).
Setting Up Virtual Machines 23

If all the information on the Summary screen is correct, click OK to create the virtual
machine. A TightVNC screen appears and at this point you begin the installation of
your OS. From this point on, follow the regular installation instructions for installing
your OS. More information for any instructions that might be different for installing
your OS in a virtualized environment may be found in Chapter 7, Xen Guest Systems
(page 75).
TIP: TightVNC and Mouse Movement
In some situations, the mouse pointer inside TightVNC and the mouse pointer
of your X Windows System are out of sync due to different mouse acceleration
values. To still be able to use the YaST installation system, the mouse pointer
should be locked into TightVNC with the keycombination Ctrl + Alt.
3.3 Including Add-On Products in the Installation
In order to include an Add-On product in the installation process of a VM Guest, it is
necessary to provide the installation system with both, the standard installation images
and the image for the Add-On product.
First, add the system disk, the SUSE Linux Enterprise Server 11 installation image and
the physical CD-Rom or Add-On image as disks to the VM Guest. For example, you
may have:
xvda
Main system disk.
xvdb
ISO image of the installation medium.
xvdc
ISO image of the Add-On product.
24 Virtualization with Xen

During the installation, add the Add-On product to the installation by entering the device
path. Commonly, this path looks like hd:///?device=/dev/xvd<letter>. In
the special example with “xvdc” as Add-On product, this would look like:
hd:///?device=/dev/xvdc
3.4 Using the Command Line to Create Virtual Machines
From the command line, you can enter vm-install to run a text version of the Create
Virtual Machine Wizard. The text version of the wizard is helpful in environments
without a graphical user interface. This command defaults to using a graphical user
interface if available and if no options were given on the command line.
For information on scripting a virtual machine installation, see the man pages of
vm-install and vm-install-jobs.
3.5 Deleting Virtual Machines
When you use Virtual Machine Manager or the xm command to delete a virtual machine,
it no longer appears as a virtual machine, but its initial startup le and virtual disks are
not automatically deleted.
To delete all components of a virtual machine congured with a le-backed virtual
disk, you must manually delete its virtual disk image le (/var/lib/xen/images/)
and its initial startup le (/etc/xen/vm).
3.6 Using an Existing SUSE Linux Enterprise Server Virtual Machine
In SUSE Linux Enterprise Server 10 SP1 and later, the device naming is different than
the device naming of SUSE Linux Enterprise Server 10. Therefore, a SUSE Linux Enterprise Server 10 VM Guest will not be able to nd its root le system when running
on a SUSE Linux Enterprise Server 11 VM Host Server.
Setting Up Virtual Machines 25

To be able to still boot the system, you must know which device is used for the root
partition of your virtual system. For example, hdaxx will be changed to xvdaxx
where xx is the partition number.
When booting the system, append an extra root option to the kernel command line, that
tells the system about its root le system. If your VM Guest used to live on /dev/
hda2, append the string root=/dev/xvda2 to the kernel command line. This option
should enable you to boot the system, although additional lesystems still will not be
available to the system.
To make all the needed le systems available to the VM Guest, do the following:
In order to have a valid initial ramdisk that knows about the new location of the root
lesystem, run the command mkinitrd.
1
Start the VM Guest with the extra root= command line as explained above.
2
Log into the system as user root.
3
Edit the le /etc/fstab and correct all device entries.
4
Edit the virtual machine’s /boot/grub/menu.lst le. At the kernel line,
x the root= and the resume= parameters according the new naming schema.
Reboot the virtual machine.
5
3.7 Troubleshooting
In some circumstances, problems may occur during the installation of the VM Guest.
This section describes some known problems and their solutions.
During boot, the system hangs
The software I/O translation buffer allocates a large chunk of low memory early
in the bootstrap process. If the requests for memory exceed the size of the buffer
it usually results in a hung boot process. To check if this is the case, switch to
console 10 and check the output there for a message similar to
kernel: PCI-DMA: Out of SW-IOMMU space for 32768 bytes at device
000:01:02.0
26 Virtualization with Xen

In this case you need to increase the size of the swiotlb. Add “swiotlb=128” on
the Domain0 cmdline. Note that the number can be adjusted up or down to nd
the optimal size for the machine.
Setting Up Virtual Machines 27


Managing a Virtualization Environment
Graphical utilities, text-based commands, and modied conguration les are methods
you can choose from to manage your virtualization environment.Virtual Machine
Manager is a graphical utility available in YaST that can be launched from the virtual
machine Domain0.
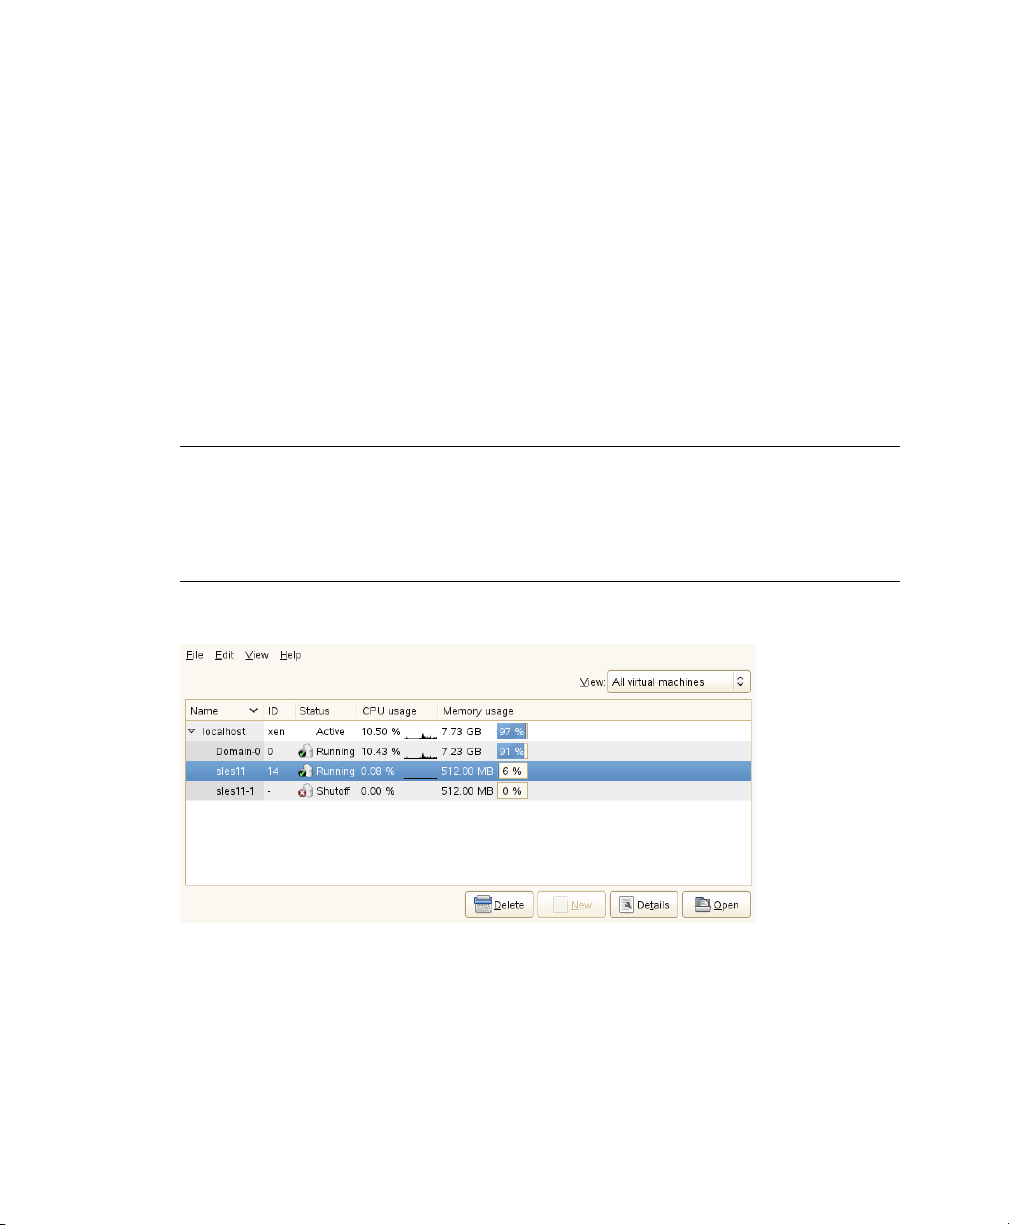
Figure 4.1
Desktop Showing Virtual Machine Manager and Virtual Machines
4
Managing a Virtualization Environment 29
From a command line interface on the virtual machine host, you can use the
vm-install and xm commands to create and manage virtual machines. You can also
edit conguration les to change the settings of the virtual machine host or a virtual
machine.
4.1 Virtual Machine Manager
The YaST Virtual Machine Manager provides a graphical user interface you can use
to create and manage virtual machines. This utility can be run either locally on the VM
Host Server or remote. The connection is then secured either with an SSL/TLS with
x509 certicate, or with a tunnel over SSH.
NOTE
Close Virtual Machine Manager if you are not actively using it and restart it
when needed. Closing Virtual Machine Manager does not affect the state of
virtual machines.
Figure 4.2
When starting the Virtual Machine Manager locally on the controlling Domain0, it is
directly connected to the Xen managing demon. All locally managed domains are displayed and can be modied.
From remote, the Virtual Machine Manager can also be started as normal user without
administrative rights. To start it, run the command virt-manager. If the local ma-
30 Virtualization with Xen
Virtual Machine Manager Main Console

chine does not manage virtual domains, the Virtual Machine Manager rst has to connect
the managing domain of a Xen VM Host Server. To do this, use the following procedure:
Make sure that Domain0 on the VM Host Server accepts incoming SSH connec-
1
tions. In doubt, run YaST > Security and Users > Firewall and make sure that
Secure Shell Server is added to the Allowed Services.
Run File > Open Connection.
2
Select Xen at the Hypervisor pull down menu.
3
Select Remote tunnel over SSH at the Connection pull down menu.
4
Enter the hostname of the controlling Domain0 into the Hostname text eld.
5
Press Connect to initiate the connection.
6
7
On request, enter the password of the root user of the controlling Domain0.
This is not necessary when using SSH keys and conguring the local user as
authorized for root access on the controlling Domain0. For more details, see
Section “SSH Authentication Mechanisms” (Chapter 14, SSH: Secure Network
Operations, ↑Security Guide).
When connected to a controlling Domain0, the Virtual Machine Manager offers several
conguration possibilities.
•
Selecting a virtual machine and clicking Open displays the virtual machine window
showing the virtual machine’s current state.
•
Clicking Run on the virtual machine window boots the virtual machine and displays
the user interface or text console running on the virtual machine.
•
Selecting a virtual machine and clicking Details lets you view performance and
congure hardware details associated with the virtual machine.
•
Clicking New in Virtual Machine Manager launches the Create Virtual Machine
Wizard, which walks you through the steps required to set up a virtual machine.
See also Section 3.1, “Creating a Virtual Machine” (page 18). This option is only
available when the xen host is selected.
Managing a Virtualization Environment 31

4.2 Controlling the Host by Modifying xend Settings
The xend is a key component of Xen virtualization. It performs management functions
and stores settings that relate to the host environment and each virtual machine. You
can customize xend to meet your specic conguration requirements.
•
To specify xend operating parameters, edit the /etc/xen/xend-config.sxp
le. The settings take effect the next time xend starts.
# -*- sh -*-
#
# Xend configuration file.
#
# This example configuration is appropriate for an installation that
# utilizes a bridged network configuration. Access to xend via http
# is disabled.
# Commented out entries show the default for that entry, unless otherwise
# specified.
#(logfile /var/log/xen/xend.log)
#(loglevel DEBUG)
# The Xen-API server configuration.
#
# This value configures the ports, interfaces, and access controls for
the
# Xen-API server. Each entry in the list starts with either unix, or a
port
•
To start the xend daemon, enter rcxend start.
•
To stop the xend daemon, enter rcxend stop.
•
To restart the xend daemon, enter rcxend restart.
•
To check the status of the xend daemon, enter rcxend status.
32 Virtualization with Xen

The parameters in the xend-config.sxp le can be customized to meet your requirements for virtualization. For a full list of all available options, read the manual
page of xend-config.sxp.
4.3 Conguring a Virtual Machine by
Modifying its xend Settings
The machine settings of each virtual guest are stored in an internal database managed
by xend. You can change a virtual machine’s settings by modifying the settings stored
in xend. This process requires you to export a virtual machine’s settings from the xend
database to a text le, edit the settings in the le to meet your conguration requirements,
import the le back into xend, and restart the virtual machine.
Some commonly used congurations can be done online with the xm command. These
include the attachment or detachment of virtual block, network or pci devices. For more
details, see the manual page of xm.
NOTE
It is no longer recommended that you edit the initial startup les stored in
/etc/xen/vm, because they are used only during the creation of a new virtual
machine.
To modify a virtual machine’s settings that is administrated with the virtual machine
manager, rst shut it down and then:
At Domain0, enter
1
xm list -l vm_name > filename
where vm_name is the name of the virtual machine you want to modify and
filename is whatever you want to name the text le.
Use a text editor to make and save any desired changes.
2
(domain
(domid 1)
Managing a Virtualization Environment 33

(bootloader /usr/bin/pygrub)
(on_crash destroy)
(uuid aa6969f3-8012-24f0-1e3a-35f150001950)
(bootloader_args -q)
(vcpus 2)
(name sles11)
(cpus (() ()))
(on_reboot restart)
(on_poweroff destroy)
(maxmem 512)
(memory 512)
(shadow_memory 0)
(features )
(on_xend_start ignore)
(on_xend_stop ignore)
(start_time 1240210933.16)
(cpu_time 35.841108115)
(online_vcpus 2)
....
3
Delete the existing conguration from xend with the command xm del
vm_name
4
Enter xm new -F filename to import the virtual machine’s new settings
into xend.
5
Enter xm start vm_name to start the virtual machine with its new settings.
You should repeat the entire process of exporting the le each time you want to
make changes to a virtual machine’s settings.
4.4 The xm Command
The xm command provides a command line interface for managing virtual machines.
It can be used to create, pause, and shut down virtual machines. It can also be used to
list the current domains, enable or pin virtual CPUs, and attach or detach block devices.
For example, the xm list command displays the status of all virtual machines.
# xm list
Name ID Mem VCPUs State Time(s)
Domain-0 0 457 2 r----- 2712.9
34 Virtualization with Xen

OES 7 512 1 -b---- 16.3
SLES10 512 1 12.9
The State information tells if a machine is running, and in which state it is. The most
common ags are r (running) and b (blocked) where blocked means it is either waiting
for IO, or just sleeping because there is nothing to do. For more details about the state
ags, see man 1 xm. The syntax of the xm command usually follows the format:
xm <subcommand> [domain-id] [OPTIONS]
where subcommand is the xm command to run, domain-id is the ID number assigned
to a domain or the name of the virtual machine, and OPTIONS indicates subcommand-
specic options.
Other useful xm commands include:
•
xm start starts a virtual machine
•
xm reboot reboots a virtual machine
•
xm destroy immediately terminates a virtual machine
•
xm block-list displays all virtual block devices attached to a virtual machine
•
All xm operations require that the Xen control daemon, xend, be running. For this
reason, you should make sure xend starts whenever the host boots.
•
Most xm commands require root privileges to allow interaction with the Xen hypervisor. Entering the xm command when you are not logged in as root returns an error.
•
Some xm commands return no information even though the action is completed.
In some instances, for example, when shutting down a virtual machine, the action
can take several seconds to complete. To verify that the action has completed, you
might need to view its status another way, such as, using the xm list command.
For a complete list of xm command parameters, enter xm help at the command line
or read the manual page of xm.
Managing a Virtualization Environment 35

4.5 Automatic Starting of Domains
If you need automatic starting of domains at bootup, or after a crash, the xend must be
congured to execute the desired behavior. There are ve different situations that need
to be handled.
After boot of the Hypervisor
Set the xend variable on_xend_start to the desired value. For more details,
see the section called “on_xend_start” (page 120). Example:
(on_xend_start start)
When shutting down xend
Xend can tell the VM Guest system to shut down. However, it does not check if
the guest was stopped when doing a system shutdown of Domain0. Thus, it is not
recommended to rely on this feature. Example:
(on_xend_stop shutdown)
When rebooting the VM Guest
Xend has control about what to do when a VM Guest does a reboot. By default, it
is restart the guest just as one would expect:
(on_reboot restart)
During poweroff of a VM Guest
When a guest is shut off, the xend by default destroys the guest without shutting
it down.
(on_poweroff destroy)
After a crash of the VM Guest
After a VM Guest crashes, the xend can restart the guest. This is also the default:
(on_crash restart)
4.6 Migrating Xen VM Guest Systems
With Xen it is possible to migrate a VM Guest system from one VM Host Server to
another with almost no service interruption. This could be used for example to move a
busy VM Guest to a VM Host Server that has stronger hardware or is not yet loaded.
Or, if a service of a VM Host Server is required, all VM Guest systems running on this
36 Virtualization with Xen

machine can be migrated to other machines in order to avoid interruption of service.
These are only two examples, many more reasons may apply to your personal situation.
Before starting, some preliminary considerations regarding the VM Host Server should
be taken:
• All VM Host Server systems should use a similar CPU. The frequency is not so
important, but they should be using the same CPU family. To get more information
about the used CPU, see cat /proc/cpuinfo.
• All resources that are used by a specic guest system must be available on all involved VM Host Server systems. This means, the network bridges must be in the
same subnet, and all used block devices must exist on both VM Host Server systems.
•
Using special features like pciback may be problematic. Do not implement these
when deploying for an environment that should migrate VM Guest systems between
different VM Host Server systems.
• For fast migrations, a fast network is mandatory. If possible, use gigabit ethernet
and fast Switches. Deploying vlan might also help avoiding collisions.
4.6.1 Conguring Xend for Migrations
To prepare a VM Host Server system for migrating, edit the conguration le /etc/
xen/xend-config.sxp. Search for the following lines:
#(xend-relocation-server no)
#(xend-relocation-port 8002)
(xend-relocation-hosts-allow '^localhost$ ^localhost\\.localdomain$')
Change the lines to match the following strings:
(xend-relocation-server yes)
(xend-relocation-port 8002)
(xend-relocation-hosts-allow '')
These changes must be done on all VM Host Server systems that should participate in
migrating guests.
Managing a Virtualization Environment 37

4.6.2 Preparing Block Devices for Migrations
The block devices needed by the VM Guest system must be available on all involved
VM Host Server systems. This is done by implementing some kind of shared storage
that serves as container for the root le system of the migrated VM Guest system.
Common possibilities include:
•
iSCSI can be setup to give access to the same block devices from different systems
at the same time. For more information about iSCSI, see http://www.novell
.com/documentation/sles11/stor_admin/data/cha_inst_system
_iscsi.html.
•
NFS is a widely used root le system that can easily be accessed from different
locations. For more information, see Chapter 25, Sharing File Systems with NFS
(↑Administration Guide).
•
DRBD can be used, if only two VM Host Server systems are involved. This gives
some extra data security, because the used data is mirrored over the network. For
more information, see http://www.novell.com/documentation/
sles11/book_sleha/data/cha_ha_drbd.html.
•
SCSI can also be used, if the available hardware permits shared access to the same
disks.
4.6.3 Migrating VM Guest Systems
The actual migration of the VM Guest system is done with the command:
xm migrate --live <domain_name> <host>
The option --live must be set to migrate a system that is currently running.
The speed of the migration depends on how fast the memory print can be saved to disk,
sent to the new VM Host Server and loaded there. This means, that small VM Guest
systems can be migrated faster than big systems with a lot of memory.
38 Virtualization with Xen

Virtual Networking
All VM Guest need some means to communicate either with other VM Guest systems
or with a local network. The network interface to the VM Guest system is made of a
split device driver, which means, that any virtual ethernet device has a corresponding
network interface in Domain0. This interface is setup to access a virtual network that
is run in Domain0. The bridged virtual network is fully integrated into the system conguration of SUSE Linux Enterprise Server and can be congured with YaST.
When installing a Xen VM Host Server, a bridged network conguration will be proposed during normal network conguration. The user can choose to change the conguration during the installation and customize it to the local needs.
If desired, Xen VM Host Server can be installed after performing a default Physical
Server installation using the Install Hypervisor and Tools module in YaST.
This module will prepare the system for hosting virtual machines, including invocation
of the default bridge networking proposal.
In case that the necessary packages for a Xen VM Host Server are installed manually
with rpm or zypper, the remaining system conguration has to be done by the admin-
istrator manually or with the help of YaST.
The network scripts that are provided by Xen are not used by default in SUSE Linux
Enterprise Server. They are only delivered for reference but disabled. The network
conguration that is used in SUSE Linux Enterprise Server is done by means of the
YaST system conguration similar to the conguration of network interfaces in SUSE
Linux Enterprise Server.
5
Virtual Networking 39

5.1 Virtual Bridges
When using SUSE Linux Enterprise Server the system congures one bridge for each
physical network device by default. For each virtual bridge, a physical ethernet device
is enslaved, and the IP address assigned to the bridge.
To add a new bridge, e.g. after installing an additional ethernet device, or to create a
bridge that is not connected to a real network, proceed as follows:
Start yast2 > Network Devices > Network Settings.
1
Click on the tab Overview and press Add.
2
Select Device Type Bridge. The parameter Conguration Name will be set to the
3
next free number. Click on Next.
Either use Dynamic Address (DHCP) as selected by default, or assign a static IP
4
address to the bridge. Using Dynamic Address is only useful, when also assigning
a Device to the bridge that is connected to some DHCP server.
If you intend to create a virtual bridge that has no connection to a real ethernet
device, use Statically assigned IP Address. In this case, it is a good idea to use
addresses from the private IP address ranges, e.g. 192.168.x.x or 10.x.x.x.
After the bridge is created, it may be used by any of the Xen VM Guest systems. A
purely virtual bridge without connection to a real network device is good to provide
fast network connections between different VM Guest systems. If you provide a DHCP
server on Domain0 that also denes routing information to the respective guest for the
bridge, the network setup of the respective VM Guest is simplied.
5.2 Network Devices for Guest Systems
The Xen hypervisor is able to provide different types of network interfaces to the VM
Guest systems. The preferred network device should be a paravirtualized network interface. This yields the highest transfer rates with the lowest requirements to the system.
Up to eight network interfaces may be provided for each VM Guest.
40 Virtualization with Xen

Systems that are not aware of paravirtualized hardware, may not have this option. To
connect systems to a network that can only run fully virtualized, several emulated network interfaces are available. The following emulations are at your disposal:
• Realtek 8139 (PCI). This is the default emulated network card.
• AMD PCnet32 (PCI)
• NE2000 (PCI)
• NE2000 (ISA)
• Intel e100 (PCI)
• Intel e1000 (PCI)
All the network interfaces are just software interfaces. Because every network interface
must have a unique MAC address, an address range has been assigned to Xensource
that can be used by these interfaces.
TIP: Virtual Network Interfaces and MAC Addresses
The default conguration of MAC addresses in virtualized environments just
creates a random MAC address that looks like 00:16:3E:xx:xx:xx. Normally the
amount of available MAC addresses should be big enough to only get unique
addresses. However if you have a very big installation, or if you want to make
sure that no problems arise from random MAC address assignment, you can
also manually assign these addresses.
For debugging or system management purposes, it may be useful to know which virtual
interface in Domain0 is connected to which ethernet device in a running guest. This
information may be read from the device naming in Domain0. All virtual devices follow
the rule vif<domain number>.<interface_number>.
As an example, if you want to know the device name for the third interface (eth2) of
the VM Guest with id 5, the device in Domain0 would be vif5.2. To obtain a list of
all available interfaces, run the command ip a.
The device naming does not contain any information to which bridge this interface is
connected. However, this information is available in Domain0 anyways. To get an
Virtual Networking 41

overview about which interface is connected to which bridge, run the command brctl
show. The output may look like the following:
# brctl show
bridge name bridge id STP enabled interfaces
br0 8000.001cc0309083 no eth0
br1 8000.000476f060cc no eth1
br2 8000.000000000000 no
In this example, there are three bridges congured: br0, br1 and br2. Currently, br0 and
br1 each have a real ethernet device added: eth0 and eth1 respectively. There is one
VM Guest running with the id 2 that has two ethernet devices available. eth0 on the
VM Guest is bridged with eth1 on the VM Host Server and eth1 on the VM Guest is
connected to eth0 on the VM Host Server. At this time, the third bridge with name br2
is not connected to any VM Guest nor real ethernet device.
vif2.1
vif2.0
5.3 Special Congurations
There are many network conguration possibilities available to Xen. Most of these are
directly congurable with YaST. These include:
•
Setting up a masqueraded network with YaST Security and Users > Firewall.
•
Creating bonded network interfaces or setup static routes with YaST Network De-
vices > Network Settings
5.3.1 Bandwidth Throtteling in Virtual
Networks
With Xen, you may limit the network transfer rate a virtual guest may use to access a
bridge. This conguration option is not available from a graphical user interface at this
time. To congure this, you will have to modify the VM Guest conguration as described
in Section 4.3, “Conguring a Virtual Machine by Modifying its xend Settings”
(page 33).
42 Virtualization with Xen

In the conguration le, rst search for the device that is connected to the virtual bridge.
The conguration looks like the following:
...
(device
(vif
(bridge br0)
(mac 00:16:3e:4f:94:a9)
(backend 0)
(uuid bf840a86-6aa9-62df-f8df-a7cf8c192c24)
(script /etc/xen/scripts/vif-bridge)
)
)
...
To add a maximum transfer rate, add a parameter rate to this conguration as in:
...
(device
(vif
(bridge br0)
(mac 00:16:3e:4f:94:a9)
(rate 100Mb/s)
(backend 0)
(uuid bf840a86-6aa9-62df-f8df-a7cf8c192c24)
(script /etc/xen/scripts/vif-bridge)
)
)
...
Note, that the rate is either Mb/s (megabit per second) or MB/s (megabyte per second).
In the above example, the maximum transfer rate of the virtual interface is 100 megabit.
By default, there is no limitation to the bandwidth of a guest to the virtual bridge.
It is even possible to ne tune the behavior in specifying the time window that is used
to dene the granularity of the credit replenishment:
...
(device
(vif
(bridge br0)
(mac 00:16:3e:4f:94:a9)
(rate 100Mb/s@20ms)
(backend 0)
(uuid bf840a86-6aa9-62df-f8df-a7cf8c192c24)
(script /etc/xen/scripts/vif-bridge)
)
)
...
Virtual Networking 43

5.3.2 Monitoring the Network Trafc
To monitor the trafc on a specic interface, the little application iftop is a nice
program that displays the current network trafc in a terminal.
When running a Xen VM Host Server, you have to dene the interface that is monitored.
The interface that Domain0 uses to get access to the physical network is the bridge de-
vice, e.g. br0. This, however, may vary on your system. To monitor all trafc to the
physical interface, as root, run a terminal and use the command:
iftop -i br0
To monitor the network trafc of a special network interface of a specic VM Guest,
just supply the correct virtual interface. For example, to monitor the rst ethernet device
of the domain with id 5, use the command:
іftop -i vif5.0
To quit iftop, press the key Q. More options and possibilities are available in the
manual page man 8 iftop.
5.3.3 Setup Bonding Devices
For some systems, it is desired to implement network connections that comply to more
than the standard data security or availability requirements of a typical ethernet device.
In these cases, several ethernet devices can be aggregated to a single bonding device.
The conguration of the bonding device is done by means of bonding module options.
The behavior is mainly affected by the mode of the bonding device. By default, this is
mode=active-backup which means that a different slave device will become active
if the active slave fails.
TIP: Bonding and Xen
Using bonding devices is only interesting for machines where you have multiple
real network cards available. In most congurations, this means that you should
use the bonding conguration only in Domain0. Only if you have multiple
network cards assigned to a VM Guest system it may also be useful to setup
the bond in a VM Guest.
44 Virtualization with Xen

To congure a bonding device, use the following procedure:
Run YaST > Network Devices > Network Settings.
1
Use Add and change the Device Type to Bond. Proceed with Next.
2
Select how to assign the IP address to the bonding device. Three methods are at
3
your disposal:
• No IP Address
• Dynamic Address (with DHCP or Zeroconf)
• Statically assigned IP Address
Use the method that is appropriate for your environment.
Select the ethernet devices that should be included into the bond by activating
4
the check box in front of the respective Bond Slave.
Edit the Bond Driver Options. The modes that are available for conguration are
5
the following:
• balance-rr
• active-backup
Virtual Networking 45

• balance-xor
• broadcast
• 802.3ad
• balance-tlb
• balance-alb
6
Make sure that the parameter miimon=100 is added to the Bond Driver Options.
Without this parameter, the data integrity is not checked regularly.
Click on Next and leave YaST with Ok to create the device.
7
All modes, and lots of more options are explained in detail in the Linux Ethernet
Bonding Driver HOWTO found at /usr/src/linux/Documentation/
networking/bonding.txt after installing the package kernel-source.
46 Virtualization with Xen

Virtualization: Conguration
Options and Settings
The documentation in this section, describes advanced management tasks and conguration options that might help technology innovators implement leading-edge virtualization solutions. It is provided as a courtesy and does not imply that all documented
options and tasks are supported by Novell, Inc.
6.1 Updating SLE 10 VM Host Server
Systems to SLE 11
The update of a Xen VM Host Server is done similar to the update of a normal SUSE
Linux Enterprise system. For details about the update, see Chapter 7, Updating SUSE
Linux Enterprise (↑Deployment Guide). However, there are some issues that you have
to resolve manually.
6.1.1 Xend Conguration
Due to changes in default settings, the Xen Management Daemon (xend) conguration
le is replaced on upgrade. Customizations are saved to /etc/xen/xend-config
.sxp.rpmsave for merging with the new conguration le. Unfortunately, there is
no automatism to solve this. For more information about editing the xend conguration,
see Section 4.2, “Controlling the Host by Modifying xend Settings” (page 32).
6
Virtualization: Conguration Options and Settings 47

6.1.2 Networking Conguration
After the upgrade, networking is not congured correctly. This is due to a change in
how networking for Xen is done between SUSE Linux Enterprise 10 and SUSE Linux
Enterprise 11. You will need to delete the existing card conguration and manually
create a new network bridge, adding that card to the bridge.
Procedure 6.1
Start YaST and select Network Devices > Network settings.
1
Use Add to create a new network bridge. Select your physical ethernet device as
2
Bridged Device.
Start the Virtual Machine Manager from YaST Virtualization menu.
3
4
Make sure that your VM Guest system are in state Shutoff.
Open the Details window and select the Hardware tab. Choose the network
5
conguration and write down the used MAC address.
Remove the network device with Remove.
6
7
Use Add to readd the network device. Use the MAC address of the previously
deleted network interface.
Repeat Step 5 (page 48) to Step 7 (page 48) for all VM Guest systems.
8
Updating the Network Conguration
6.1.3 Boot Loader Conguration
After the upgrade, Xen is no longer selected as the default boot option in the grub boot
menu. To make it default, start YaST and select System > Boot Loader. Then, select
XEN and press the button Set as Default. Finish with OK.
48 Virtualization with Xen

6.2 Virtual CD Readers
Virtual CD readers can be set up when a virtual machine is created or added to an existing virtual machine. A virtual CD reader can be based on a physical CD/DVD, or
based on an ISO image. Virtual CD readers work differently depending on whether
they are paravirtual or fully virtual.
NOTE
Only limited support for virtual machine removable media is available in the
original version of SUSE Linux Enterprise Server. Much of the following information pertains to functionality available in maintenance updates.
When installing drivers from the SUSE Linux Enterprise Server Virtual Machine
Driver Pack, proceed by adding the ISO image as a virtual CD reader. Find a
detailed description about this procedure at Section 6.2.3, “Adding Virtual CD
Readers” (page 50).
The most recent Virtual Machine Manager package is available through the
SUSE Linux Enterprise Server 11 update channel or at http://www.novell
.com/products/vmdriverpack/.
6.2.1 Virtual CD Readers on Paravirtual
Machines
A paravirtual machine can have up to 100 block devices comprised of virtual CD
readers and virtual disks. On paravirtual machines, virtual CD readers present the CD
as a virtual disk with read-only access. Unless you remove the virtual CD reader, the
virtual machine assumes that the originally-inserted CD is still in the CD reader, even
if you have ejected it. If it has been ejected, the virtual machine will not be able to access
the CD (or any other newly-inserted CD) and will receive I/O errors. Virtual CD readers
cannot be used to write data to a CD. They are congured as read-only devices.
After you have nished accessing a CD on a paravirtual machine, it is recommended
that you remove the virtual CD reader from the virtual machine.
Virtualization: Conguration Options and Settings 49

If several CDs are needed for the installation of an operating system, make all of them
available to the paravirtual machine and change the path to the data on request. If you
do not have enough CD readers, create image les from the CDs and make those
available. To create an image le, the following command may be used:
dd if=/dev/cdrom of=<path to image>/cdimage.iso
On request of the installation system, press Details and manually point to the correct
disk by changing xvdb to xvdc, xvdc to xvdd and so on.
6.2.2 Virtual CD Readers on Fully Virtual
Machines
A fully virtual machine can have up to four block devices comprised of virtual CD
readers and virtual disks. A virtual CD reader on a fully virtual machine interacts with
the inserted CD in the way you expect a physical CD reader to interact. For example,
in a Windows* XP* virtual machine, the inserted CD appears in the Devices with
Removable Storage section of My Computer.
When a CD is inserted in the physical CD reader on the host computer, all virtual machines with virtual CD readers based on the physical CD reader, such as /dev/cdrom/,
are able to read the inserted CD. Assuming the operating system has automount functionality, the CD should automatically appear in the le system. Virtual CD readers
cannot be used to write data to a CD. They are congured as read-only devices.
6.2.3 Adding Virtual CD Readers
Virtual CD readers can be based on a CD inserted into the CD reader or on an ISO
image le.
Make sure that the virtual machine is running and the operating system has
1
nished booting.
Insert the desired CD into the physical CD reader or copy the desired ISO
2
image to a location available to Domain0.
Run Virtual Machine Manager.
3
50 Virtualization with Xen

Select the virtual machine, then click Details.
4
Click Add and select Storage Device.
5
Click Normal Disk Partition if you want to specify the path to a physical CD
6
reader, such as /dev/cdrom.
Click Simple File if you are adding a virtual CD reader based on an ISO.
7
Specify the path to the ISO image le in File Location.
Select Device type Virtual Disk (read-only).
8
Click Forward and Finish to apply the changes.
9
A new block device, such as /dev/xvdb, is added to the virtual machine.
If the virtual machine is running Linux, complete the following:
10
10a
Open a terminal in the virtual machine and enter fdisk -l to verify that
the device was properly added. You can also enter ls /sys/block to
see all disks available to the virtual machine.
The CD is recognized by the virtual machine as a virtual disk with a drive
designation, for example,
/dev/xvdb
Enter the command to mount the CD or ISO image using its drive designation.
10b
For example,
mount -o ro /dev/xvdb /cd1
mounts the CD to a mount point named /cd1.
The CD or ISO image le should be available to the virtual machine at the
specied mount point.
If the virtual machine is running Windows, reboot the virtual machine.
11
Verify that the virtual CD reader appears in its My Computer section
Virtualization: Conguration Options and Settings 51

6.2.4 Adding Virtual CD Readers (Command
Line Method)
Make sure that the virtual machine is running and the operating system has n-
1
ished booting.
Insert the CD into the physical CD reader or copy the ISO image to the host.
2
In a terminal on the host, enter the appropriate command
3
• To set up an ISO image le, enter:
xm block-attach vm_id file:/mycd.iso hdc:cdrom r
where vm_id is the virtual machine ID, mycd.iso is the path to the ISO
image le, and hdc is the drive designation presented to the virtual machine.
If the virtual machine is paravirtual, replace the device designation with a
vdb x device designation, such as
xm block-attach vm_id file:/mycd.iso xvdb:cdrom r
• To set up a physical CD reader, enter:
xm block-attach vm_id phy:/dev/cdrom hdc:cdrom r
where vm_id is the virtual machine ID, /dev/cdrom is the path to the
physical CD reader, hdc is the physical drive designation to be presented
to the virtual machine, and cdrom is the name you specify for the device.
If the virtual machine is paravirtual, replace the hdc drive designation with
a vdb x drive designation, such as
xm block-attach vm_id phy:/dev/cdrom xvdb:cdrom r
If running full virtualization mode, rebooting the virtual machine is obligatory.
4
52 Virtualization with Xen

The CD or ISO image le should appear in the virtual machine’s operating system.
6.2.5 Removing Virtual CD Readers
Make sure that the virtual machine is running and the operating system has n-
1
ished booting.
If the virtual CD reader is mounted, unmount it from within the virtual machine.
2
TIP
You can enter cat /proc/partitions in the virtual machine’s terminal to view its block devices.
Run Virtual Machine Manager.
3
Select the virtual machine, then click Details.
4
Click Hardware > Disk.
5
Select the virtual CD-ROM device to remove.
6
Click Remove to remove the virtual CD-ROM device.
7
Press the hardware eject button to eject the CD.
8
6.3 Remote Access Methods
Some congurations, such as those that include rack-mounted servers, require a computer to run without a video monitor, keyboard, or mouse. This type of conguration
is often referred to as headless and requires the use of remote administration technologies.
Typical conguration scenarios and technologies include:
Virtualization: Conguration Options and Settings 53

Graphical Desktop with X Window Server
If a graphical desktop, such as GNOME or KDE, is installed on the virtual machine
host you can use a remote viewer, such as a VNC viewer. On a remote computer,
log in and manage the host environment by using graphical tools, such as Virtual
Machine Manager.
Text and Graphical Applications
If neither a graphical desktop nor the X Window Server, but the X Windows libraries
are installed on the virtual machine host, you can use the ssh -X command from
the remote computer to log in and manage the virtualization host environment. You
can then use Virtual Machine Manager and the xm command to manage virtual
machines and the vm-install command to create them.
Text Only
You can use the ssh command from a remote computer to log in to a virtual machine host and access its text-based console. You can then use the xm command
to manage virtual machines and the vm-install command to create new virtual
machines.
6.4 VNC Viewer
By default, Virtual Machine Manager uses the VNC viewer to show the display of a
virtual machine. You can also use VNC viewer from Domain0 (known as local access
or on-box access) or from a remote computer.
You can use the IP address of a VM Host Server and a VNC viewer to view the display
of this VM Guest. When a virtual machine is running, the VNC server on the host assigns
the virtual machine a port number to be used for VNC viewer connections. The assigned
port number is the lowest port number available when the virtual machine starts. The
number is only available for the virtual machine while it is running. After shutting
down, the port number might be assigned to other virtual machines.
For example, if ports 1 and 2 and 4 and 5 are assigned to the running virtual machines,
the VNC viewer assigns the lowest available port number, 3. If port number 3 is still
in use the next time the virtual machine starts, the VNC server assigns a different port
number to the virtual machine.
54 Virtualization with Xen
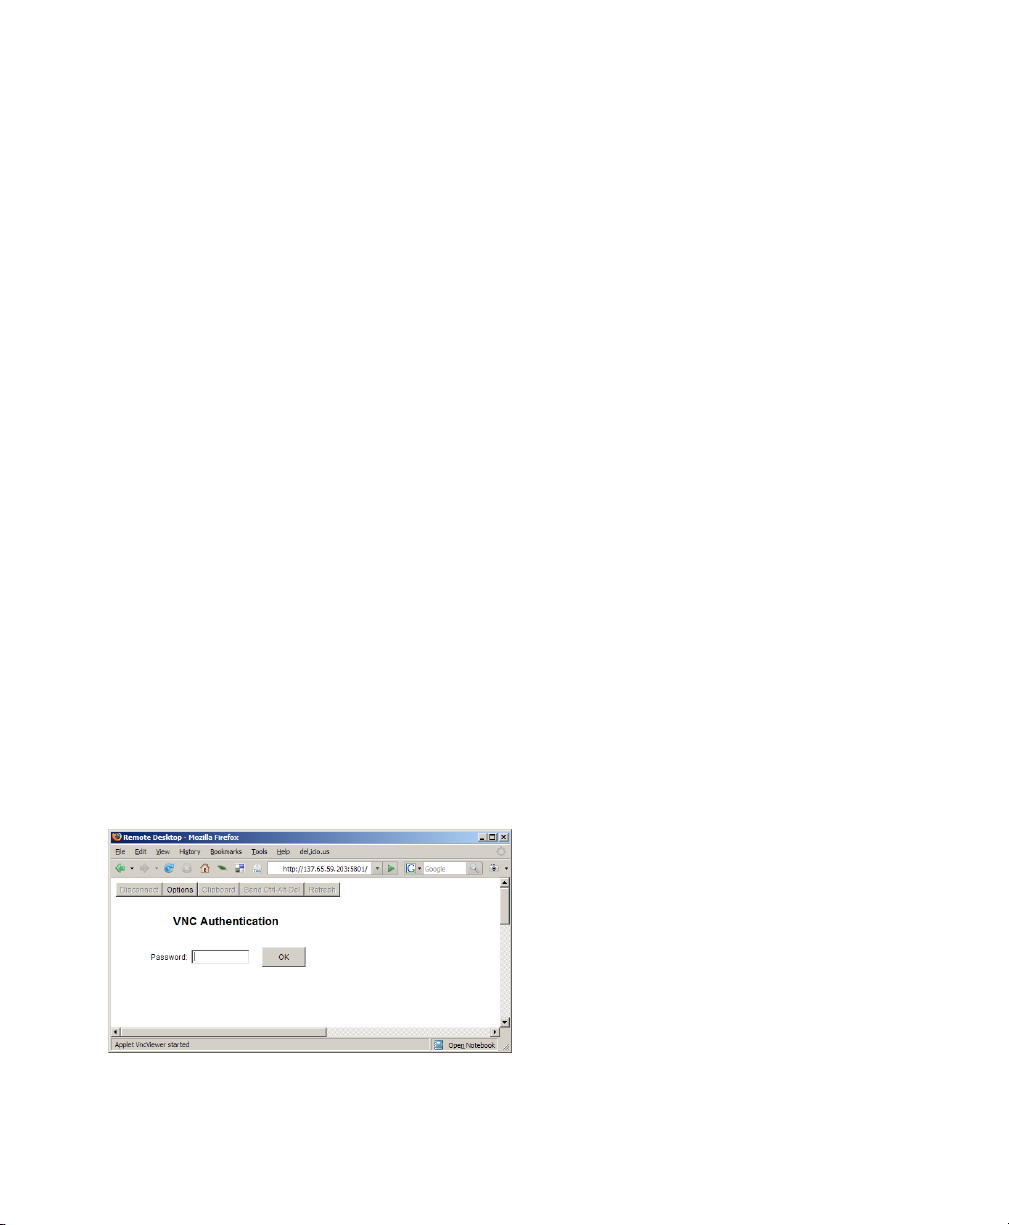
To use the VNC viewer from a remote computer, the rewall must permit access to as
many ports as VM Guest systems run from port 5900 and up. For example, if you want
to run 10 VM Guest systems, you will have to open the tcp ports 5900:5910.
In addition to this, change vnc-listen in /etc/xen/xend-config.sxp to
open the access to the VM Guest. For more information about modifying
xend-config.sxp see Section 4.2, “Controlling the Host by Modifying xend Set-
tings” (page 32).
To access the virtual machine from the local console running a VNC viewer client,
enter one of the following commands:
•
vncviewer ::590#
•
vncviewer :#
# is the VNC viewer port number assigned to the virtual machine.
When accessing the VM Guest from a machine other than Domain0, use the following
syntax:
vncviewer 192.168.3.100::590#
In this case, the IP address of Domain0 is 192.168.3.100.
If you are using the java VNC server, use 580# as the port number, where # is the
VNC viewer port number assigned to the virtual machine.
Figure 6.1
Mozilla Firefox VNC Viewer
Virtualization: Conguration Options and Settings 55

When successfully connected, the VNC viewer shows the display of the running virtual
machine.
6.4.1 Assigning VNC Viewer Port Numbers
to Virtual Machines
Although the default behavior of VNC viewer is to assign the rst available port number,
you might want to assign a specic VNC viewer port number to a specic virtual machine.
To assign a specic port number on a VM Guest, edit the xend setting of the virtual
machine and change the location to the desired value:
(device
(vfb
(type vnc)
(location localhost:5902)
)
)
For more information regarding editing the xend settings of a machine, see Section 4.1,
“Virtual Machine Manager” (page 30).
TIP
Assign higher port numbers to avoid conict with port numbers assigned by
the VNC viewer, which uses the lowest available port number.
6.4.2 Using SDL instead of a VNC Viewer
If you access a virtual machine’s display from the virtual machine host console (known
as local or on-box access), you might want to use SDL instead of VNC viewer. VNC
viewer is faster for viewing desktops over a network, but SDL is faster for viewing
desktops from the same computer.
To set the default to use SDL instead of VNC, change the virtual machine’s conguration
information to the following. For instructions, see Section 4.3, “Conguring a Virtual
Machine by Modifying its xend Settings” (page 33).
56 Virtualization with Xen
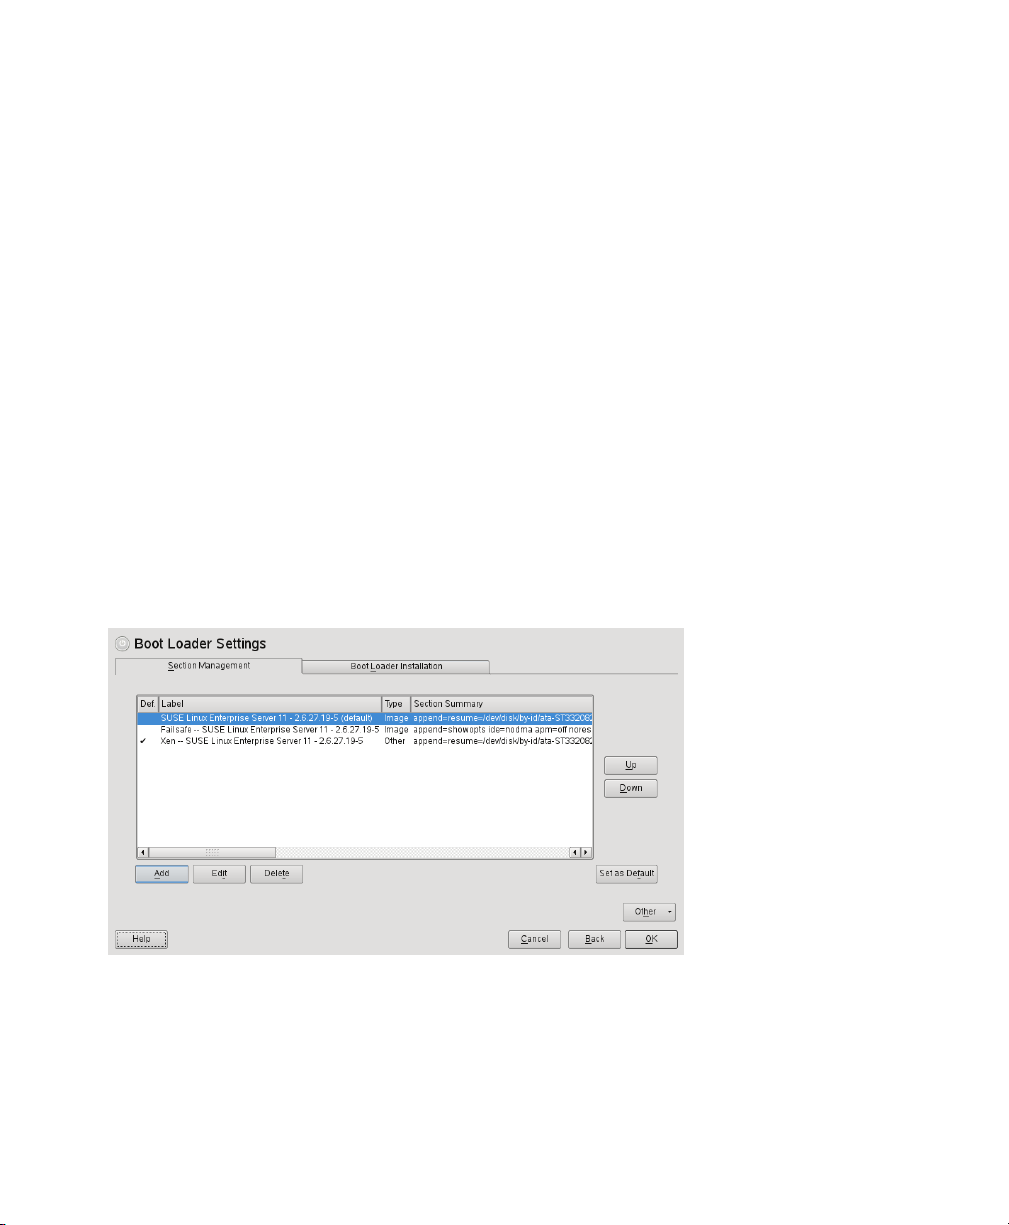
•
If it is a fully virtual machine, use vnc=0 and sdl=1.
•
If it is a paravirtual virtual machine, use vfb=["type=sdl"].
Remember that, unlike a VNC viewer window, closing an SDL window terminates the
virtual machine.
6.5 The Boot Loader Program
The boot loader controls how the virtualization software boots and runs. You can
modify the boot loader properties by using YaST, or by directly editing the boot loader
conguration le.
The YaST boot loader program is located at YaST > System > Boot Loader. The Boot
Loader Settings screen lists the sections that appear as options on the boot menu. From
this screen, you can change the boot loader so it auto-selects the virtual machine host
option when booting.
Figure 6.2
Select the Xen section, then click Edit to manage the way the boot loader and Xen
function.
Boot Loader Settings
Virtualization: Conguration Options and Settings 57
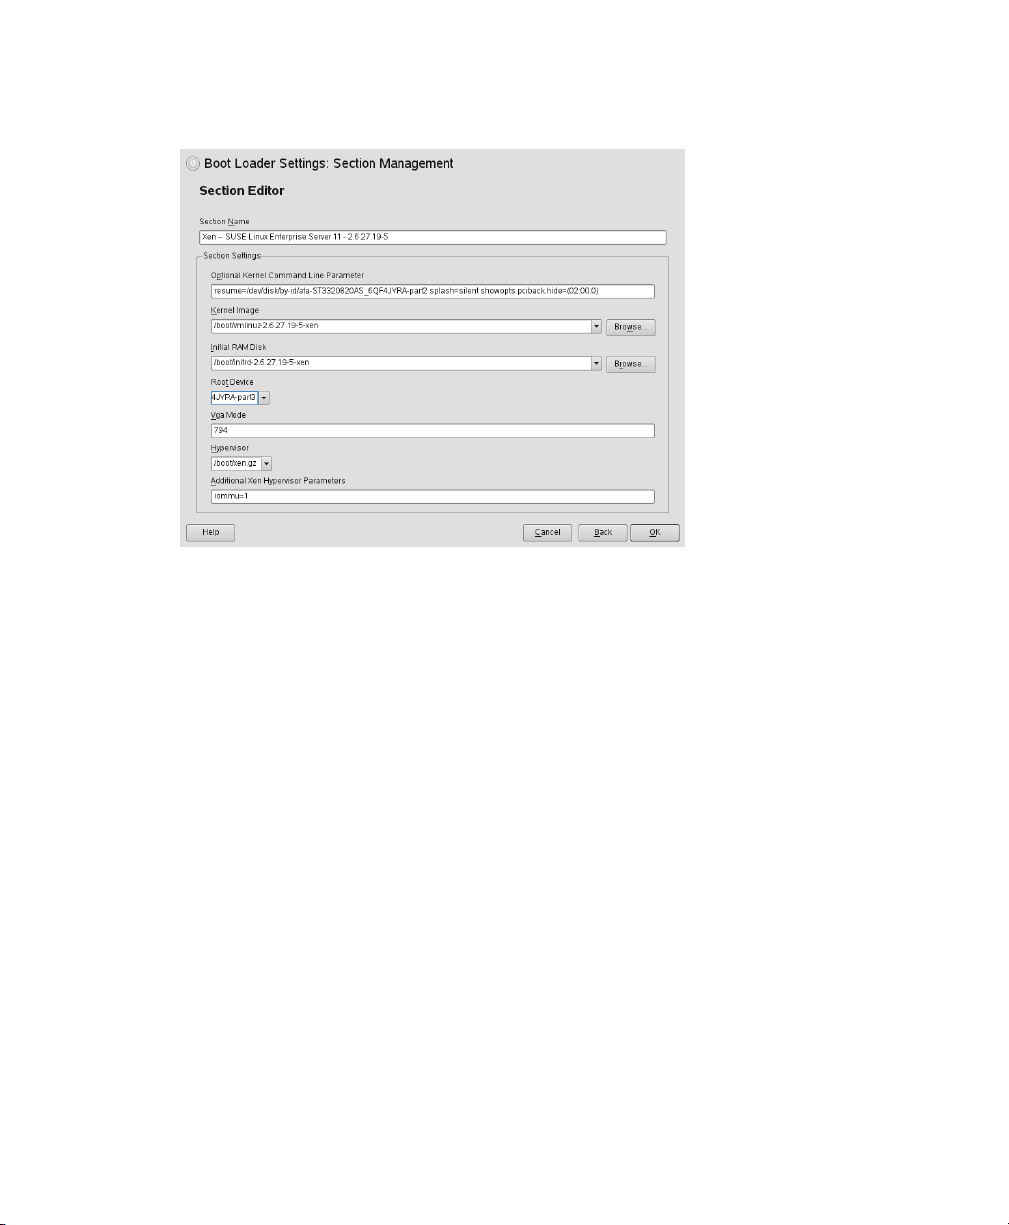
Figure 6.3
You can use the Boot Loader program to specify functionality, such as:
• Pass kernel command line parameters
• Specify the kernel image and initial RAM disk
Boot Loader Settings: Section Management
• Select a specic hypervisor
•
Pass additional parameters to the hypervisor (see /usr/share/doc/packages/
xen/pdf/user.pdf section “Xen Boot Options” after installing the package
xen-doc-pdf).
You can customize your virtualization environment by editing the /boot/grub/
menu.lst le.
If the Xen option does not appear on the GRUB boot menu, you can compare your updated GRUB boot loader le with the examples below to conrm that it was updated
correctly.
The rst example shows a typical GRUB boot loader le updated to load the kernel
that supports virtualization software. The second example shows a GRUB boot loader
le that loads the PAE-enabled virtualization kernel.
58 Virtualization with Xen

Example 6.1
title XEN
root (hd0,5)
kernel /boot/xen.gz hyper_parameters
module /boot/vmlinuz-xen kernel_parameters
module /boot/initrd-xen
Xen Section in the menu.lst File (Typical)
The title line denes sections in the boot loader le. Do not change this line, because
YaST looks for the word XEN to verify that packages are installed.
The root line species which partition holds the boot partition and /boot directory.
Replace hd0,5 with the correct partition. For example, if the drive designated as hda1
holds the /boot directory, the entry would be hd0,0.
The kernel line species the directory and lename of the hypervisor. Replace
hyper_parameters with the parameters to pass to the hypervisor. A common parameter is dom0_mem=<amount_of_memory>, which species how much memory
to allocate to Domain0. The amount of memory is specied in KB, or you can specify
the units with a K, M, or G sufx, for example 128M. If the amount is not specied,
the Domain0 takes the maximum possible memory for its operations.
For more information about hypervisor parameters, see /usr/share/doc/
packages/xen/pdf/user.pdf section “Xen Boot Options” after installing the
package xen-doc-pdf.
The rst module line species the directory and lename of the Linux kernel to load.
Replace kernel_parameters with the parameters to pass to the kernel. These
parameters are the same parameters as those that can be passed to a standard Linux
kernel on physical computer hardware.
The second module line species the directory and lename of the RAM disk used
to boot the virtual machine host.
To set the GRUB boot loader to automatically boot the Xen virtualization software,
change the default entry from 0, which means the rst title entry, to the number
that corresponds to the title XEN entry. In the example le, Xen is the second
title line, so to specify it, change the value of default from 0 to 1.
Virtualization: Conguration Options and Settings 59

6.6 Virtual Machine Initial Startup
Files
During the process of creating a new virtual machine, initial startup settings are written
to a le created at /etc/xen/vm/. During the creation process, the virtual machine
starts according to settings in this le, but the settings are then transferred and stored
in xend for ongoing operations.
IMPORTANT
Modifying the initial startup le to create or make changes to a virtual machine
is not recommended. The preferred method for changing a virtual machine’s
settings is to use Virtual Machine Manager as described in Section 4.3, “Cong-
uring a Virtual Machine by Modifying its xend Settings” (page 33) or to follow
the instructions in Section 6.5, “The Boot Loader Program” (page 57).
When a virtual machine’s settings are stored in xend, it is referred to as a
xen-managed domain or xen-managed virtual machine. Whenever the
xen-managed virtual machine starts, it takes its settings from information stored in the
xend database, not from settings in the initial startup le.
Although it is not recommended, you might need to start an existing virtual machine
based on settings in the initial startup le. If you do this, any xend settings stored for
the virtual machine are overwritten by the startup le settings. Initial startup les are
saved to /etc/xen/vm/vm_name. Values must be enclosed in single quotes, such
as localtime = '0'.
Table 6.1
disk =
60 Virtualization with Xen
Initial Startup File Entries and Descriptions
DescriptionEntry
Virtual disks for the virtual machine.
For example:

DescriptionEntry
disk = [ 'file:/var/lib/xen/images/VM1_SLES10/hda,xvda,w'
]
This entry species a virtual disk based on a le ( file:)
named hda and located at
/var/lib/xen/images/VM1_SLES10/. It presents itself
as the rst drive (xvda) and has read/write access (w).
Disks can also be based on a block device.
memory =
vcpus =
builder =
name =
vif =
localtime =
on_poweroff =
on_reboot =
on_crash =
Virtual memory in Mb.
Number of virtual CPUs.
Species paravirtual mode (Linux) or full virtualization mode
(hvm).
Name of the virtual machine.
Randomly-assigned MAC addresses and bridges assigned to
use the virtual machine’s network addresses.
Species a localtime (0) or UTC (1) time setting.
Species the action that the virtual machine performs when the
operating system is powered off.
Species the action that the virtual machine performs when the
operating system reboots.
Species the action that the virtual machine performs when the
operating system crashes.
extra =
bootloader =
Parameters passed to the kernel.
Location and lename of the domU boot loader.
Virtualization: Conguration Options and Settings 61

DescriptionEntry
bootentry =
ostype =
uuid =
Location of the kernel and initial ramdisk.
Type of operating system.
Identication number for a virtual drive.
6.7 Sparse Image Files and Disk Space
If the host’s physical disk reaches a state where it has no available space, a virtual machine using a virtual disk based on a sparse image le is unable to write to its disk.
Consequently, it reports I/O errors.
The Reiser le system, perceiving a corrupt disk environment, automatically sets the
le system to read-only. If this situation happens, you should free up available space
on the physical disk, remount the virtual machine’s le system, and set the le system
back to read-write.
To check the actual disk requirements of a sparse image le, use the command du -h
<image file>.
To increase the available space of a sparse image le, rst increase the le size and
then increase the le system.
WARNING: Backup Before Resize
Touching the sizes of partitions or sparse les always bears the risk of data
failure. Do not work without a backup.
Before you start, shutdown any guest accessing the sparse le. The actual increase of
the le size can be done with the command:
dd if=/dev/zero of=<image file> count=0 bs=1M seek=<new size in MB>
For example, to increase the le /var/lib/xen/images/sles11/disk0 to a
size of 16GB, use the command:
62 Virtualization with Xen

dd if=/dev/zero of=/var/lib/xen/images/sles11/disk0 count=0 bs=1M
seek=16000
The resizing of the le system inside the sparse le involves tools that are depending
on the actual le system. This is described in detail in the Storage Administration Guide,
found at http://www.novell.com/documentation/sles11/stor_admin/
data/bookinfo.html.
6.8 Virtual Keyboards
When a virtual machine is started, the host creates a virtual keyboard that matches the
keymap entry according to the virtual machine’s settings. If there is no keymap entry
in the virtual machine’s settings, the host uses the keymap entry specied in host’s
xend le ( xend-config.sxp). If there is no keymap entry in either the host’s
xend le or the virtual machine’s settings, the virtual machine’s keyboard defaults to
English (US).
Unless you manually specify it, a keymap entry is not specied in the host’s xend le
or for any virtual machine. Therefore, by default, all virtual machine settings use the
English (US) virtual keyboard. It is recommended that you specify a keymap setting
for xend and for each virtual machine, especially, if you want to migrate virtual machines
to different hosts
To view a virtual machine’s current keymap entry, enter the following command on
the Domain0:
xm list -l vm_name | grep keymap
You can specify a keymap entry to be used for all virtual machines and keymap entries
for specic machines.
• To specify a global keymap entry for virtual machines on the host, edit the host’s
xend-config.sxp le.
• To specify a keymap entry for a specic virtual machine, edit the virtual machine’s
settings by following instructions in Section 4.3, “Conguring a Virtual Machine
by Modifying its xend Settings” (page 33).
Virtualization: Conguration Options and Settings 63

In the device > vfb section, add the desired keymap entry to the le /etc/xen/
xend-config.sxp. For example, you can specify a German keyboard. Make sure
the virtual machine’s operating system is set to use the specied keyboard. After you
specify the host’s keymap setting, all virtual machines created by using the Create
Virtual Machine Wizard on the host add the host’s keymap entry to their virtual machine
settings.
Virtual machines created before a host’s keymap entry is specied are not automatically updated. These virtual machines start with the keyboard specied by the host, but
the keymap entry is not a permanent part of the virtual machine’s settings. For the
entry to be permanent, it must be explicitly stated in the virtual machine’s settings.
Table 6.2
Language and Keymap Settings
Keymap SettingLanguage
daDanish
deGerman
de-chSwiss-German
en-gbEnglish (UK)
en-usEnglish (US)
esSpanish
Finnish
frFrench
fr-beFrench-Belgium
fr-caFrench-Canada
64 Virtualization with Xen
fr-chFrench-Switzerland
huHungarian

Keymap SettingLanguage
isIcelandic
itItalian
jaJapanese
nlDutch
nl-beDutch-Belgium
noNorwegian
plPolish
ptPortuguese
pt-brPortuguese-Brazil
ruRussian
svSwedish
6.9 Mapping Physical Storage to Virtual Disks
To specify a mapping between physical storage and the virtual disk, you might need to
edit the virtual machine’s disk information. Follow the instructions in Section 4.3,
“Conguring a Virtual Machine by Modifying its xend Settings” (page 33), to change
the respective device entry to the desired setting.
Virtualization: Conguration Options and Settings 65

Example 6.2
(vbd
(dev xvda:disk)
(uname file:/var/lib/xen/images/sles11/disk0)
(mode w)
(type disk)
(backend 0)
)
Example: Virtual Machine Output from Xend
Table 6.3
phy:
le:
tap:aio:
tap:vmdk:
tap:qcow:
iscsi:
uname Settings
Block devices, such as a physical disk,
in domain 0
Raw disk images accessed by using
loopback
Raw disk images accessed by using
blktap. Similar to loopback but with-
out using loop devices.
VMware disk images accessed by using
blktap
Raw disk images accessed by using NBDnbd:
QEMU disk images accessed by using
blktap
iSCSI targets using connections initiated
from domain 0
ExampleDescriptionProtocol
phy:/dev/sdc
file:/path/file
tap:aio:/path/file
tap:vmdk:/path/file
ndb: ip_port
tap:qcow:/path/file
iscsi:IQN,LUN
npiv:
Fibre Channel connections initiated from
domain 0
66 Virtualization with Xen
npiv:NPIV,LUN

6.10 Virtual Disks
Virtual disks can be based on the following types of physical devices and les. Each
type includes an example statement.
• A physical disk device, such as a DVD, that is accessible as a device to the host.
phy:/dev/cdrom
• A le that contains a disk image accessible from the le system of the host. Disk
images can be encoded as raw, QEMU, or VMware.
file:/mnt/disks/sles10sp1.iso
tap:aio:/mnt/disks/sles10sp1.iso species a raw disk that might be
taken from a different virtualization platform.
tap:qcow:/mnt/disks/sles10sp1.iso.qcow
tap:vmdk:/mnt/disks/sles10sp1.iso.vmdk
• A remote storage device specied using the Internet SCSI (iSCSI) protocol.
iscsi:iqn.2001-04.com.acme@0ac47ee2-216e-452a-a341-a12624cd0225
• A remote storage device specied using a Fibre Channel (NPIV) protocol.
npiv:210400e08b80c40f
6.11 Migrating Virtual Machines
A running virtual machine can be migrated from its source virtual machine host to another virtual machine host. This functionality is referred to as live migration. For live
migration to work, the virtual machine being migrated must have access to its storage
in exactly the same location on both, source and destination host platforms.
Live migration only works when every entity involved is the same architecture. For
example, a 64-bit paravirtualized guest running on a 64-bit hypervisor can be migrated
Virtualization: Conguration Options and Settings 67

a host running a 64-bit hypervisor. If any of the pieces do not match exactly, migration
will fail.
Another requirement is, that the involved le systems are available on both machines.
The options to accomplish this task include Network Block Devices (NBD),
iSCSI, NFS, drbd and ber channel devices. Furthermore, the routing of the network
connection to the virtual network device must be correct.
The following xend options, which are located in the /etc/xen/xend-config
.sxp le, need to be set on both hosts to make live migration work.
(xend-relocation-server yes)
(xend-relocation-port 8002)
(xend-relocation-address ")
(xend-relocation-hosts-allow ")
For information on modifying xend settings, see Section 4.2, “Controlling the Host by
Modifying xend Settings” (page 32). For more details about using xm to migrate VM
Guest systems, see Section 4.6, “Migrating Xen VM Guest Systems” (page 36).
6.12 Passing Key Combinations to Virtual Machines
In a virtual machine window, some key combinations, such as Ctrl + Alt + F1, are recognized by the virtual machine host but are not passed to the virtual machine. To bypass
the virtual machine host, Virtual Machine Manager provides sticky key functionality.
Pressing Ctrl, Alt, or Shift three times makes the key sticky, then you can press the remaining keys to pass the combination to the virtual machine.
For example, to pass Ctrl + Alt + F2 to a Linux virtual machine, press Ctrl three times,
then press Alt + F2. You can also press Alt three times, then press Ctrl + F2.
The sticky key functionality is available in Virtual Machine Manager during and after
installing a virtual machine.
68 Virtualization with Xen

6.13 xm block-list Device Numbers
Virtual devices are named internally in Xen using the Linux-style major and minor
numbers. This is true even for non-Linux virtual machines. The number returned from
xm block-list is a decimal representation of the combined major and minor
numbers.
For example, if a virtual machine’s virtual disk is designated as hda, the number returned
from xm block-list is 768. hda has major number 3 and minor number 0. The
major number is stored as a high-order byte; the minor is the lower byte. A decimal
representation is (3*256)+0 = 768. Another example, sda3 has major number 8 and
minor number 3, so its decimal representation is (8*256)+3 = 2051.
Of course, it is possible to manually work backwards from a number to discover the
human-readable device name. For your reference, some common mappings are listed
in the following table.
/dev/hda 768
/dev/hdb 832
/dev/hdc 5632
/dev/hdd 5696
/dev/sda 2048
/dev/sdb 2064
/dev/sdc 2080
/dev/sdd 2096
/dev/xvda 51712
/dev/xvdb 51728
/dev/xvdc 51744
/dev/xvdd 51760
6.14 File-Backed Virtual Disks and Loopback Devices
When a virtual machine is running, each of its le-backed virtual disks consumes a
loopback device on the host. By default, the host allows up to 64 loopback devices to
be consumed.
Virtualization: Conguration Options and Settings 69

To simultaneously run more le-backed virtual disks on a host, you can increase the
number of available loopback devices by adding the following option to the host’s
/etc/modprobe.conf.local le.
options loop max_loop=x
where x is the maximum number of loopback devices to create.
Changes take effect after the module is reloaded.
TIP
Enter rmmod loop and modprobe loop to unload and reload the module.
In case rmmod does not work, unmount all existing loop devices or reboot the
computer.
6.15 Saving Virtual Machines
The save operation preserves the exact state of the virtual machine’s memory. The operation is slightly similar to hibernating a computer. The virtual machine is off, but it
can be quickly restored to its previously-saved running condition. The operation does
not make a copy of any portion of the virtual machine’s virtual disk.
When saved, the virtual machine is paused, its current memory state saved to a location
you specify, and then the virtual machine is stopped. The amount of time to save the
virtual machine depends on the amount of memory allocated. When saved, a virtual
machine’s memory is returned to the pool of memory available on the host.
The restore operation is used to return a saved virtual machine to its original running
state.
IMPORTANT
After using the save operation, do not boot, start, or run a virtual machine that
you intend to restore. If the virtual machine is at any time restarted before it
is restored, the saved memory-state le becomes invalid and should not be
used to restore.
70 Virtualization with Xen

Procedure 6.2
Make sure the virtual machine to be saved is running.
1
Select the virtual machine.
2
Click Open to view the virtual machine console or Details to view virtual machine
3
information.
Select Virtual Machine > Save from the menu.
4
Name and save the le.
5
Save a Virtual Machine’s Current State (Virtual Machine Manager)
Procedure 6.3
Make sure the virtual machine to be saved is running.
1
2
In the host environment, enter xm save ID state-file where ID is
the virtual machine ID you want to save, and state-file is the name you
specify for the memory-state le.
Save a Virtual Machine’s Current State (xm Command)
6.16 Restoring Virtual Machines
The restore operation loads a virtual machine’s previously saved memory-state le and
starts the virtual machine. The virtual machine does not boot the operating system but
resumes at the point that it was previously saved. The operation is slightly similar to
coming out of hibernation.
IMPORTANT
After using the save operation, do not boot, start, or run the virtual machine
you intend to restore. If the virtual machine is at any time restarted before it
is restored, the saved memory-state le becomes invalid and should not be
used to restore.
Virtualization: Conguration Options and Settings 71

Procedure 6.4
Make sure the virtual machine to be restored has not been started since you ran
1
the save operation.
Run Virtual Machine Manager.
2
Select the hypervisor that should restore the virtual machine. On the local machine,
3
this is localhost.
In Virtual Machine Manager, click File > Restore Saved Machine from the drop-
4
down menu.
Specify the previously-saved le.
5
Click Open.
6
The virtual machine and the guest operating system are restored to the previouslysaved state.
Restore a Virtual Machine’s Current State (Virtual Machine
Manager)
Procedure 6.5
Make sure the virtual machine to be restored has not been started since you ran
1
the save operation.
2
In the host environment, enter xm restore state-file where
state-file is the previously-saved memory-state le.
6.17 Virtual Machine States
A virtual machine’s state can be displayed in Virtual Machine Manager or by viewing
the results of the xm list command, which abbreviates the state using a single char-
acter.
•
r - running - The virtual machine is currently running and consuming allocated
resources.
72 Virtualization with Xen
Restore a Virtual Machine’s Current State (xm Command)

•
b - blocked - The virtual machine’s processor is not running and not able to run.
It is either waiting for I/O or has stopped working.
•
p - paused - The virtual machine is paused. It does not interact with the hypervisor
but still maintains its allocated resources, such as memory.
•
s - shutdown - The guest operating system is in the process of being shutdown,
rebooted, or suspended, and the virtual machine is being stopped.
•
c - crashed - The virtual machine has crashed and is not running.
•
d - dying - The virtual machine is in the process of shutting down or crashing.
Virtualization: Conguration Options and Settings 73


Xen Guest Systems
7.1 NetWare Virtual Machines
In Novell® Open Enterprise Server (OES) 2, the NetWare® operating system has been
modied to run in paravirtual mode on a Xen virtual machine.
The documentation of OES Netware virtual machines is discussed in a separate document. For more information on this topic see http://www.novell.com/
documentation/oes2/inst_oes_nw/data/b8m3eeb.html.
7.2 OES Linux Virtual Machines
The documentation of OES Linux virtual machines is discussed in a separate document.
For more information on this topic see http://www.novell.com/
documentation/oes2/inst_oes_lx/data/b9kmg9x.html.
7.3 Red Hat Linux Virtual Machines
7
On VM Host Server computers running SUSE Linux Enterprise 11, Red Hat Enterprise
Linux systems are only supported when running fully virtualized and with the latest
patch level.
To install a Red Hat virtual machine, proceed as follows:
Xen Guest Systems 75

Start YaST > Virtualization > Create Virtual machine.
1
Click Forward. Activate I need to install an operating system and click Forward.
2
Select RedHat as operating system and choose the desired version from the list.
3
Click Forward.
Click on the respective items of the installation settings to change the congura-
4
tion.
Click on Operating System Installation.
5
Select Virtual Disk and click Add.
6
Click Browse and select the path to either the physical installation DVD or to
7
the iso image of the installation DVD. Click Ok.
Click Apply.
8
The actual installation is started by clicking on Ok in the installation summary.
9
7.3.1 Installing the Virtual Machine Driver
Pack
The virtual machine driver pack can only be installed after the basic installation has
nished. To install the driver pack, proceed as follows:
Add the Driver Pack Add-On CD to the VM Host Server as described in Sec-
1
tion 8.2, “Loading the Driver Pack” (page 87).
2
Install the package vmdp-xen-<operating_system> with YaST. The iso
image of the driver pack is copied to /opt/novell/vm-driver-pack/
xen.
Add the iso image as CD drive to your VM Guestas described in Section 6.2,
3
“Virtual CD Readers” (page 49).
Mount the virtual machine driver pack CD on the Red Hat VM Guest.
4
76 Virtualization with Xen

Install the virtual machine driver pack with the command:
5
rpm -Uhv --nodeps kmod-vmdp-version
Take care to use the correct version of the virtual machine driver pack for your
system.
Reboot the VM Guest system.
6
7.4 SUSE Linux Virtual Machines
On current SUSE Linux Enterprise systems, Xen is fully integrated into the product. It
may be used as VM Host Server or VM Guest.
To change the size of the VNC display, an extra option must be supplied to the Xen
boot options.
To change the VNC resolution to 1024x768 using 8MB of memory in SLES11, simply
edit the le /boot/grub/menu.lst and add the following line to the end of the
kernel line:
xenfb.video="8,1024,768
For SLES10, the same parameter is needed. However it must be added to the extra boot
parameters of the conguration.
TIP: Mouse Synchronization in VNC
During the installation of SUSE Linux Enterprise, it may happen that the mouse
in VNC is not in sync with the mouse of your controlling X Server. To get both
in sync, it is advisable to let SaX2 create an X conguration before the installation starts.
This can be done by adding the parameter sax2=1 to the Additional Arguments
in the Create Virtual Machine wizard.
Xen Guest Systems 77

7.4.1 Updating SLE 10 Virtual Machines to
SLE 11
Typically, the guest operating system on a virtual machine can be updated using the
same procedures as if running on a physical machine. However, SLE 10 virtual machines
created on a SLE 10 host need to be updated to SLE 11 by recreating the virtual machine
from the settings stored in the virtual machine’s conguration le. For more detail, see
Section 6.1, “Updating SLE 10 VM Host Server Systems to SLE 11” (page 47).
SLE 10 virtual machines created on a SLE 10 SP1 host do not need to follow the same
procedures to be updated to SLE 11. In addition, SLE 10 did not support SLE 10 fully
virtual machines.
NOTE
In SLE 10, changing the conguration of a virtual machine by editing its conguration le (etc/xen/vm/vm_name) was acceptable. In SLE 10 SP1 and later,
editing the conguration le is no longer recommended. Instead, virtual machine
conguration changes should be made in Virtual Machine Manager and by
editing virtual machine settings stored in the xend database.
To update a SLE 10 virtual machine to SLE 10 SP1 or SLE 11, complete the following
procedure.
Make sure the host computer is running the most recent SLE updates. The
1
host computer must be running software that is more recent than the software
planned for the virtual machine update.
Shut down the virtual machine you want to update.
2
Prepare the virtual machine’s operating system environment for the update
3
by completing any prerequisite tasks. It is recommended to make a copy of
the entire virtual disk.
4
View or print the virtual machine’s conguration found with xm list -l
<vm_name>.
Use Virtual Machine Manager to create a new virtual machine.
5
78 Virtualization with Xen

Choose the selection to install an operating system.
6
Specify the same settings for the new virtual machine as the settings specied
7
in the VM’s conguration.
Make sure the following settings in Virtual Machine Manager match those in
the VM’s conguration le.
• Network MAC address
• Memory size
• Number of CPUs
Make sure to select or specify the virtual machine’s already created disk or
8
disk image, for example, /var/lib/xen/images/sles10/disk0, as
the virtual disk.
Specify the SUSE Linux Enterprise installation source as the Installation
9
Source for the virtual machine.
In the Operating System Installation section, add the following argument in
10
Additional Arguments:
root=/dev/xvda2
where /dev/xvda2 is the path and drive designation for the root partition
that contains the virtual machine’s boot les.
Click OK to create the virtual machine and start the SLE 11 installation pro-
11
gram.
A new window displaying the installation program opens on the Domain0.
If the new windows does not display, select the virtual machine in Virtual
Machine Manager, and click Open.
During the installation program, select Update from the Installation Mode
12
screen.
Xen Guest Systems 79

If you receive a message stating that an error occurred while installing GRUB,
13
click OK.
If you receive a message stating that an error occurred during boot loader in-
14
stallation, click No.
Continue the installation/update by following the instructions on the screen.
15
The installation program continues by booting the virtual machine and displaying the rest of the installation in text mode.
After the installation program is completed, the virtual machine should run
SLE 11 and be registered with xend.
Log in to the SLE 11 virtual machine.
16
If you want the SLE 11 virtual machine to run in GUI mode, complete the
17
following from its command line:
17a
Enter init 3.
17b
Enter sax2 to congure the GUI environment.
17c
Enter init 5 to restart the GUI.
If the mouse pointer stops working within the virtual machine, you might need to restart
the GUI on the virtual machine host by entering init 3 then init 5 on the host’s
command line.
After completing these instructions, the updated SLE 11 virtual machine should perform
correctly. Conguration changes should be made using Virtual Machine Manager or
by modifying xend settings.
7.4.2 Using the Add-On Products Program
The Add-On Products program is available during the SLE operating system installation
and after installation at YaST > Software > Add-On Products. It allows you to install
additional products that may reside on a separate CD, ISO image le, or installation
source.
80 Virtualization with Xen

Because paravirtual machines present removable media, such as a CD inserted in the
CD reader, as a non-removable disk device, the Add-On Product program does not
recognize inserted CD as valid add-on product media.
To use the Add-On Products program on a paravirtual machine, you must set up the
add-on product media as a network installation source or copy the ISO image le to
the virtual machine’s lesystem.
On fully virtual machines, you can use the Add-On Products program to specify addon product media as a network installation source, an ISO image le, or as a CD inserted
in the host’s CD reader.
7.4.3 Virtual Machine Clock Settings
When booting, virtual machines get their initial clock time from their host. After getting
their initial clock time, fully virtual machines manage their time independently from
the host. Paravirtual machines manage clock time according to their independent wallclock setting. If the independent wallclock is enabled, the virtual machine manages its
time independently and does not synchronize with the host. If the independent wallclock
is disabled, the virtual machine periodically synchronizes its time with the host clock.
NOTE
OES 2 NetWare virtual machines manage clock time independently after
booting. They do not synchronize with the host clock time.
If a guest operating system is congured for NTP and the virtual machine's independent
wallclock setting is disabled, it will still periodically synchronize its time with the host
time. This dual type of conguration can result in time drift between virtual machines
that need to be synchronized. To effectively use an external time source, such as NTP,
for time synchronization on a virtual machine, the virtual machine's independent wall-
clock setting must be enabled (set to 1). Otherwise, it will continue to synchronize its
time with its host.
Procedure 7.1
1
Log in to the virtual machine’s operating system as root.
In the virtual machine environment, enter
2
Viewing the Independent Wallclock Setting
Xen Guest Systems 81

cat /proc/sys/xen/independent_wallclock
•
0 means that the virtual machine is getting its time from the host and is not
using independent wallclock.
•
1 means that the virtual machine is using independent wallclock and managing its time independently from the host.
Procedure 7.2
1
Log in to the virtual machine environment as root.
2
Edit the virtual machine’s /etc/sysctl.conf le.
Add or change the following entry:
3
xen.independent_wallclock=1
Permanently Changing the Independent Wallclock Setting
Enter 1 to enable or 0 to disable the wallclock setting.
Save the le and reboot the virtual machine operating system.
4
While booting, a virtual machine gets its initial clock time from the host. Then,
if the wallclock setting is set to 1 in the sysctl.conf le, it manages its clock
time independently and does not synchronize with the host clock time.
Procedure 7.3
1
Log in to the virtual machine environment as root.
Enter the following command:
2
Temporarily Changing the Independent Wallclock Setting
echo "1" > /proc/sys/xen/independent_wallclock
Enter 1 to enable or 0 to disable the wallclock setting.
Add or change the following entry:
3
82 Virtualization with Xen

xen.independent_wallclock=1
Enter 1 to enable or 0 to disable the wallclock setting.
Although the current status of the independent wallclock changes immediately,
its clock time might not be immediately synchronized. The setting persists until
the virtual machine reboots. Then, it gets its initial clock time from the host and
uses the independent wallclock according to setting specied in the sysctl
.conf le.
7.4.4 Updating a Network Installation
Source
The installation of SUSE Linux Enterprise Server 9 is only supported from a network
installation source. To have the right device names supported in Xen, you must update
the kernel and initrd that are used to install the system. Furthermore, the updated
kernel must be available in the installation source. In the following example, the network
installation source is found at /srv/ftp. Create this directory manually, if it does
not exist already.
Get the latest kernel package for your system from the Novell Customer Center.
1
2
Create a directory for executables in your home directory: mkdir -p
$HOME/bin
3
Copy the script create_update_source.sh from http://www.suse
.de/~ug/tools/create_update_source.sh to the bin/ directory
and make it executable.
cd $HOME/bin
wget http://www.suse.de/~ug/tools/create_update_source.sh
chmod 755 create_update_source.sh
4
Install the package inst-source-utils. Then, change your working directory to your network installation source.
5
Run the command $HOME/bin/create_update_source.sh /srv/ftp.
Xen Guest Systems 83

6
Copy all updated packages to the directory /srv/ftp/updates/suse/
<arch>/.
Run the following commands to make all the new packages known to the instal-
7
lation source:
cd /srv/ftp/updates/suse;
perl /usr/bin/create_package_descr -x setup/descr/EXTRA_PROV
Create the checksums needed for the installation process with the commands:
8
cd /srv/ftp/updates/suse/setup/descr
for i in *; do echo -n "META SHA1 "; \
sha1sum $i|awk '{ORS=""; print $1}'; \
echo -n " "; basename $i; done >> /srv/ftp/updates/content
After this procedure, the packages that are copied to the updates directory are available
during the installation. However, they will only be used if they are newer than the
packages provided by the installation itself.
Note, that in order to use a new kernel during the installation, you must also create an
appropriate installation initrd as it is found in /srv/ftp/boot/.
7.5 Windows Virtual Machines
The installation of Windows virtual machines is supported by the virtual machine
manager. To install a Windows VM Guest, select the respective system from the list
provided there.
To get the best available support for Windows systems, install the driver pack. For more
information about this, see Section 8.5, “SUSE Drivers for Windows on Xen” (page 95).
84 Virtualization with Xen

Virtual Machine Drivers
SUSE® Linux Enterprise Virtual Machine Driver Pack contains disk and network device
drivers for a number of third-party operating systems in order to enable the high-performance hosting of these unmodied guest operating systems on top of SUSE Linux
Enterprise Server 11 (SLES 11). The guest operating systems supported by this driver
pack are:
• Windows Server* 2008
• Windows Vista*
• Red Hat* Enterprise Linux* 4
• Red Hat Enterprise Linux 5
• Windows Server 2003
• Windows XP*
• Windows 2000 Server
• SUSE Linux Enterprise Server 9
• SUSE Linux Enterprise Server 10
8
Virtualization allows the consolidation of Linux workloads on newer, more powerful,
energy-efcient hardware. Paravirtualized operating systems such as SUSE Linux Enterprise Server are aware of the underlying virtualization platform, and can therefore
interact efciently with it. Unmodied operating systems are unaware of the virtualiza-
Virtual Machine Drivers 85

tion platform and expect to interact directly with the hardware. Because this is not
possible when consolidating servers, the hardware must be emulated for the operating
system. Emulation can be slow, but it is especially troubling for high-throughput disk
and network subsystems. Most performance loss occurs in this area.
The device drivers in SUSE Linux Enterprise Virtual Machine Driver Pack bring many
of the performance advantages of paravirtualized operating systems to unmodied operating systems because only the paravirtualized device driver (not the rest of the operating system) is aware of the virtualization platform. For example, a paravirtualized
disk device driver appears as a normal, physical disk to the operating system. However,
the device driver interacts directly with the virtualization platform (with no emulation)
to efciently deliver disk access, allowing the disk and network subsystems to operate
at near native speeds in a virtualized environment, without requiring changes to existing
operating systems.
TIP: Best Practices
Before installing SUSE Linux Enterprise Virtual Machine Driver Pack in your
production environment, we strongly recommend that you run it in a test environment to ensure that it functions properly with your system.
8.1 Buying a Support Subscription
The customer support you receive for the SUSE Linux Enterprise Virtual Machine
Driver Pack is at the same level as your SUSE Linux Enterprise support subscription
[http://support.novell.com/linux/sles_support.html]. You can
choose the following levels of support:
• Basic
• Standard
• Priority
Descriptions of these levels of support and how to buy them are found at SUSE Linux
Enterprise Server 11 How to Buy [http://www.novell.com/products/
server/howtobuy.html].
86 Virtualization with Xen
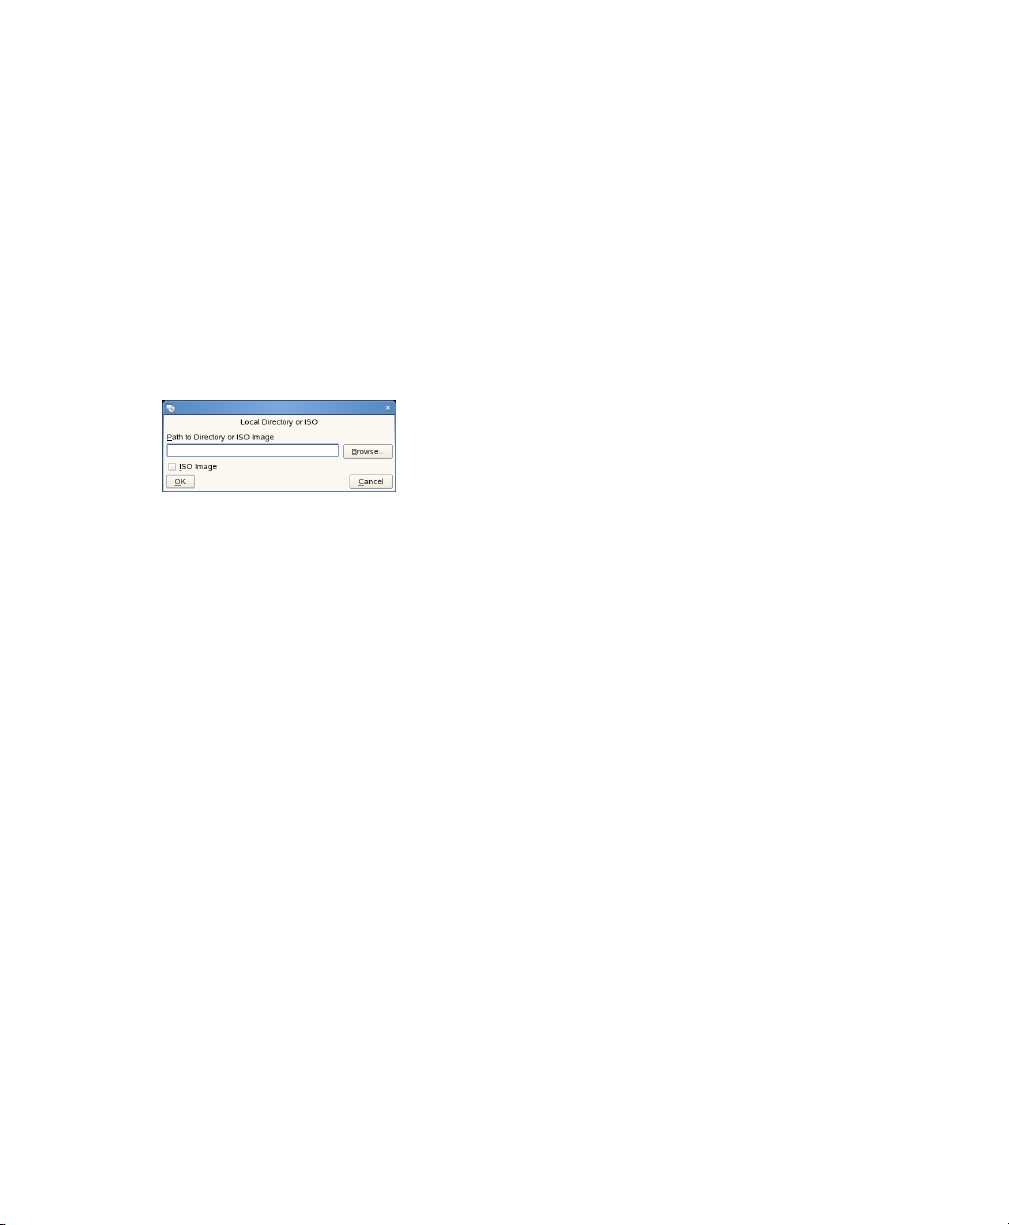
8.2 Loading the Driver Pack
Download the SLES-Virtual-Machine-Driver-Pack-10.iso le to your SLES 11
1
virtual machine host server.
Open YaST.
2
Select Software, then click Add-on Product.
3
Click Local ISO Image, then click Next.
4
Browse to the location of the driver pack ISO image you downloaded.
5
Select the driver pack ISO, then click Open. Click OK.
6
Select Patterns from the Filter drop-down list. The drivers are located under
7
Virtual Machine Driver Pack.
Select the drivers you want to install, then click Accept.
8
When asked if you want to install more packages, click No.
9
The drivers are now on your system in the /opt/novell/vm-driver-pack
directory.
8.3 SUSE Drivers for Red Hat
Enterprise Linux 4 on Xen
This section provides instructions for installing, uninstalling, and upgrading the SUSE
Drivers for Red Hat Enterprise Linux 4 on Xen.
Virtual Machine Drivers 87

8.3.1 Installing the RHEL 4 Drivers
Open a terminal.
1
2
Locate the RPM package you want to install ( opt/novell/
vm-driver-pack).
If you are installing from the binary RPM included with the driver pack, the
RPM is located on the driver pack ISO. .
(Optional) If you are installing from an RPM that you built, the RPM is located
in /usr/src/redhat/RPMS/arch, where arch is the architecture of
the virtual machine. See Section 8.3.5, “Building Your Own RPMs” (page 91)
for more information.
Set up the ISO image or CD as a virtual CD reader by following the instructions
3
in Section 6.2, “Virtual CD Readers” (page 49).
4
Enter rpm -U xxx.rpm , where xxx is the RPM lename.
5
Run mkinitrd to provide the drivers to the initial boot system.
6
Edit the /boot/grub/menu.lst le and make the following change:
For each drive specied in the virtual machine conguration le (for example,
hda and hdb), append hdx=noprobe to the kernel line for the updated
kernel, where hdx is the drive specication found in the virtual machine
conguration le.
Shut down the virtual machine.
7
8
On the virtualization host server, open a terminal and enter xm delete
vm_name to delete the virtual machine’s reference in the xenstore so it is no
longer managed.
TIP
Enter xm list to see the name of the virtual machine ( vm_name).
88 Virtualization with Xen

Open the virtual machine conguration le located on the virtualization host
9
server ( /etc/xen/vm/vm_cfgfile where vm_cfgfile is usually the
same as the name of the virtual machine).
10
Remove all parameters from the vif= line except the mac=mac_address
parameter. Make sure to leave the single quotes.
For example, change the line
vif=[ 'mac=00:16:3e:55:24:21,model=pcnet,type=ioemu', ]
to
vif=[ 'mac=00:16:3e:55:24:21', ]
11
At the terminal, enter xm new vm_cfgfile to reference the virtual machine in the xenstore so it is managed again.
Restart the virtual machine.
12
8.3.2 Uninstalling the RHEL 4 Drivers
Open a terminal.
1
2
Enter rpm -e xxx , where xxx is the name of the driver pack.
TIP
Enter rpm -qa | grep vmdp to nd out what you have installed.
3
Edit the /boot/grub/menu.lst le and remove all hdx=noprobe
entries from the kernel line.
Reboot the virtual machine.
4
Virtual Machine Drivers 89

8.3.3 Upgrading the RHEL 4 Drivers
Open a terminal.
1
2
Locate the RPM package you want to install ( opt/novell/
vm-driver-pack).
If you are installing from the binary RPM included with the driver pack, the RPM
is located on the driver pack ISO. Refer to Section 6.2, “Virtual CD Readers”
(page 49). for instructions on using the ISO image.
(Optional) If you are installing from an RPM that you built, the RPM is located
in /usr/src/redhat/RPMS/xxx, where xxx is the architecture of the vir-
tual machine. See Section 8.3.5, “Building Your Own RPMs” (page 91) for more
information.
3
Enter rpm -U xxx.rpm , where xxx is the lename of the new RPM.
8.3.4 Using the Drivers with an Upgraded
Kernel
Install the new kernel packages.
1
2
Edit the /boot/grub/menu.lst le and remove all hdx=noprobe entries
from the kernel line.
Restart the virtual machine.
3
Upgrade the driver pack (see Section 8.3.3, “Upgrading the RHEL 4 Drivers”
4
(page 90)).
5
Edit the /boot/grub/menu.lst le and make the following change:
For each drive specied in the virtual machine conguration le (for example,
hda and hdb), append hdx=noprobe to the kernel line for the updated kernel,
where hdx is the drive specication found in the virtual machine conguration
le.
90 Virtualization with Xen
 Loading...