


SUSE Linux Enterprise
www.novell.com11
March17,2009 Deployment Guide
Desktop

Deployment Guide
All content is copyright © 2006- 2009 Novell, Inc.
Legal Notice
This manual is protected under Novell intellectual property rights. By reproducing, duplicating or
distributing this manual you explicitly agree to conform to the terms and conditions of this license
agreement.
This manual may be freely reproduced, duplicated and distributed either as such or as part of a bundled
package in electronic and/or printed format, provided however that the following conditions are fullled:
That this copyright notice and the names of authors and contributors appear clearly and distinctively
on all reproduced, duplicated and distributed copies. That this manual, specically for the printed
format, is reproduced and/or distributed for noncommercial use only. The express authorization of
Novell, Inc must be obtained prior to any other use of any manual or part thereof.
For Novell trademarks, see the Novell Trademark and Service Mark list http://www.novell
.com/company/legal/trademarks/tmlist.html. * Linux is a registered trademark of
Linus Torvalds. All other third party trademarks are the property of their respective owners. A trademark
symbol (®, ™ etc.) denotes a Novell trademark; an asterisk (*) denotes a third party trademark.
All information found in this book has been compiled with utmost attention to detail. However, this
does not guarantee complete accuracy. Neither Novell, Inc., SUSE LINUX Products GmbH, the authors,
nor the translators shall be held liable for possible errors or the consequences thereof.

Contents
About This Guide vii
1 Planning for SUSE Linux Enterprise Desktop 1
1.1 Hardware Requirements . . . . . . . . . . . . . . . . . . . . . . . 2
1.2 Reasons to Use SUSE Linux Enterprise Desktop . . . . . . . . . . . . . 2
Part I Manual Deployment 5
2 Deployment Strategies 7
2.1 Deploying up to 10 Workstations . . . . . . . . . . . . . . . . . . . 7
2.2 Deploying up to 100 Workstations . . . . . . . . . . . . . . . . . . 9
2.3 Deploying More than 100 Workstations . . . . . . . . . . . . . . . 16
3 Installation with YaST 17
3.1 Choosing the Installation Method . . . . . . . . . . . . . . . . . . 17
3.2 The Installation Workow . . . . . . . . . . . . . . . . . . . . . 20
3.3 System Start-Up for Installation . . . . . . . . . . . . . . . . . . . 20
3.4 The Boot Screen . . . . . . . . . . . . . . . . . . . . . . . . . 21
3.5 Welcome . . . . . . . . . . . . . . . . . . . . . . . . . . . . 25
3.6 Installation Mode . . . . . . . . . . . . . . . . . . . . . . . . . 26
3.7 Clock and Time Zone . . . . . . . . . . . . . . . . . . . . . . . 29
3.8 Create New User . . . . . . . . . . . . . . . . . . . . . . . . . 30
3.9 Installation Settings . . . . . . . . . . . . . . . . . . . . . . . . 34
3.10 Performing the Installation . . . . . . . . . . . . . . . . . . . . . 38
3.11 Conguration of the Installed System . . . . . . . . . . . . . . . . 38
3.12 Graphical Login . . . . . . . . . . . . . . . . . . . . . . . . . . 46

4 Updating SUSE Linux Enterprise 47
4.1 Updating SUSE Linux Enterprise . . . . . . . . . . . . . . . . . . . 47
4.2 Installing Service Packs . . . . . . . . . . . . . . . . . . . . . . . 50
4.3 Software Changes from Version 10 to Version 11 . . . . . . . . . . . 50
5 Setting Up Hardware Components with YaST 51
5.1 Probing Your Hardware . . . . . . . . . . . . . . . . . . . . . . 51
5.2 Setting Up Graphics Card and Monitor . . . . . . . . . . . . . . . . 52
5.3 Setting Up Keyboard and Mouse . . . . . . . . . . . . . . . . . . 53
5.4 Setting Up Sound Cards . . . . . . . . . . . . . . . . . . . . . . 56
5.5 Setting Up a Printer . . . . . . . . . . . . . . . . . . . . . . . . 58
5.6 Setting Up a Scanner . . . . . . . . . . . . . . . . . . . . . . . 62
6 Installing or Removing Software 65
6.1 Denition of Terms . . . . . . . . . . . . . . . . . . . . . . . . 65
6.2 Using the Qt Interface . . . . . . . . . . . . . . . . . . . . . . . 66
6.3 Using the GTK+ Interface . . . . . . . . . . . . . . . . . . . . . 71
6.4 Managing Software Repositories and Services . . . . . . . . . . . . . 75
6.5 Keeping the System Up-to-date . . . . . . . . . . . . . . . . . . . 77
7 Installing Add-On Products 85
7.1 Add-Ons . . . . . . . . . . . . . . . . . . . . . . . . . . . . . 85
7.2 Binary Drivers . . . . . . . . . . . . . . . . . . . . . . . . . . 86
7.3 SUSE Software Development Kit (SDK) 10 . . . . . . . . . . . . . . . 86
8 Accessing the Internet 87
8.1 Direct Internet Connection . . . . . . . . . . . . . . . . . . . . . 87
8.2 Internet Connection Via Network . . . . . . . . . . . . . . . . . . 90
9 Managing Users with YaST 91
9.1 User and Group Administration Dialog . . . . . . . . . . . . . . . . 91
9.2 Managing User Accounts . . . . . . . . . . . . . . . . . . . . . . 93
9.3 Additional Options for User Accounts . . . . . . . . . . . . . . . . 95
9.4 Changing Default Settings for Local Users . . . . . . . . . . . . . . 103
9.5 Assigning Users to Groups . . . . . . . . . . . . . . . . . . . . . 104
9.6 Managing Groups . . . . . . . . . . . . . . . . . . . . . . . . 104
9.7 Changing the User Authentication Method . . . . . . . . . . . . . . 106

10 Changing Language and Country Settings with YaST 109
10.1 Changing the System Language . . . . . . . . . . . . . . . . . . . 109
10.2 Changing the Country and Time Settings . . . . . . . . . . . . . . 113
11 Remote Installation 117
11.1 Installation Scenarios for Remote Installation . . . . . . . . . . . . . 117
11.2 Setting Up the Server Holding the Installation Sources . . . . . . . . . 126
11.3 Preparing the Boot of the Target System . . . . . . . . . . . . . . . 136
11.4 Booting the Target System for Installation . . . . . . . . . . . . . . 146
11.5 Monitoring the Installation Process . . . . . . . . . . . . . . . . . 150
12 Advanced Disk Setup 155
12.1 Using the YaST Partitioner . . . . . . . . . . . . . . . . . . . . . 155
12.2 LVM Conguration . . . . . . . . . . . . . . . . . . . . . . . . 163
12.3 Soft RAID Conguration . . . . . . . . . . . . . . . . . . . . . 168
13 Subscription Management 173
13.1 Using Kernel Parameters to Access an SMT Server . . . . . . . . . . . 174
13.2 Conguring Clients Using AutoYaST Prole . . . . . . . . . . . . . . 175
13.3 Conguring Clients Using the clientSetup4SMT.sh Script . . . . . . . . 177
13.4 Registering Clients Against SMT Test Environment . . . . . . . . . . . 177
Part II Imaging and Creating Products 179
14 KIWI 181
14.1 Prerequisites for KIWI . . . . . . . . . . . . . . . . . . . . . . 181
14.2 Knowing KIWI’s Build Process . . . . . . . . . . . . . . . . . . . 182
14.3 Image Description . . . . . . . . . . . . . . . . . . . . . . . . 182
14.4 Creating Appliances with KIWI . . . . . . . . . . . . . . . . . . . 186
14.5 For More Information . . . . . . . . . . . . . . . . . . . . . . 188
15 Creating Add-On Products With Add-on Creator 189
15.1 Creating Images . . . . . . . . . . . . . . . . . . . . . . . . . 189
15.2 Add-On Structure . . . . . . . . . . . . . . . . . . . . . . . . 190
15.3 For More Information . . . . . . . . . . . . . . . . . . . . . . 191
16 Creating Images with YaST Product Creator 193
16.1 Prerequisites for Product Creator . . . . . . . . . . . . . . . . . . 193

16.2 Creating Images . . . . . . . . . . . . . . . . . . . . . . . . . 193
16.3 For More Information . . . . . . . . . . . . . . . . . . . . . . 195
17 Deploying Customized Preinstallations 197
17.1 Preparing the Master Machine . . . . . . . . . . . . . . . . . . . 198
17.2 Customizing the Firstboot Installation . . . . . . . . . . . . . . . . 198
17.3 Cloning the Master Installation . . . . . . . . . . . . . . . . . . . 207
17.4 Personalizing the Installation . . . . . . . . . . . . . . . . . . . . 207
Part III Automated Installations 209
18 Automated Installation 211
18.1 Simple Mass Installation . . . . . . . . . . . . . . . . . . . . . . 211
18.2 Rule-Based Autoinstallation . . . . . . . . . . . . . . . . . . . . 223
18.3 For More Information . . . . . . . . . . . . . . . . . . . . . . 228
19 Automated Deployment of Preload Images 229
19.1 Deploying system manually from rescue image . . . . . . . . . . . . 230
19.2 Automated Deployment with PXE Boot . . . . . . . . . . . . . . . 231

About This Guide
Installations of SUSE Linux Enterprise Desktop are possible in many different ways.
It is impossible to cover all combinations of boot, or installation server, automated installations or deploying images. This manual should help with selecting the appropriate
method of deployment for your installation.
Part I, “Manual Deployment” (page 5)
Most tasks that are needed during installations are described here. This includes
the manual setup of your computer as well as additional software and remote installations.
Part II, “Imaging and Creating Products” (page 179)
Mass installations often require to prepare images or products furnished with the
features that are needed in this special case. Several options are described that allow
the administrator to prepare this deployment methods.
Part III, “Automated Installations” (page 209)
To do unattended installations, either use the installation with AutoYaST or prepare
an image with kiwi or rstboot. This part describes methods to deploy these installations with a minimum of user interaction.
Many chapters in this manual contain links to additional documentation resources. This
includes additional documentation that is available on the system as well as documentation available on the Internet.
For an overview of the documentation available for your product and the latest documentation updates, refer to http://www.novell.com/documentation or to
the following section.
1 Available Documentation
We provide HTML and PDF versions of our books in different languages. The following
manuals for users and administrators are available on this product:
GNOME User Guide (↑GNOME User Guide)
Introduces the GNOME desktop of SUSE Linux Enterprise Desktop. It guides you
through using and conguring the desktop and helps you perform key tasks. It is

intended mainly for end users who want to make efcient use of GNOME desktop
as their default desktop.
Application Guide (↑Application Guide)
Learn how to use and congure key desktop applications on SUSE Linux Enterprise
Desktop. This guide introduces browsers and e-mail clients as well as ofce applications and collaboration tools. It also covers graphics and multimedia applications.
Deployment Guide (page 1)
Shows how to install single or multiple systems and how to exploit the product
inherent capabilities for a deployment infrastructure. Choose from various approaches, ranging from a local installation or a network installation server to a mass deployment using a remote-controlled, highly-customized, and automated installation
technique.
Administration Guide (↑Administration Guide)
Covers system administration tasks like maintaining, monitoring and customizing
an initially installed system.
Security Guide (↑Security Guide)
Introduces basic concepts of system security, covering both local and network security aspects. Shows how to make use of the product inherent security software
like Novell AppArmor (which lets you specify per program which les the program
may read, write, and execute) or the auditing system that reliably collects information about any security-relevant events.
Virtualization with Xen (↑Virtualization with Xen)
Offers an introduction to virtualization technology of your product. It features an
overview of the various elds of application and installation types of each of the
platforms supported by SUSE Linux Enterprise Server as well as a short description
of the installation procedure.
In addition to the comprehensive manuals, several quick start guides are available:
viii Deployment Guide

Installation Quick Start (↑Installation Quick Start)
Lists the system requirements and guides you step-by-step through the installation
of SUSE Linux Enterprise Desktop from DVD, or from an ISO image.
Linux Audit Quick Start
Gives a short overview how to enable and congure the auditing system and how
to execute key tasks such as setting up audit rules, generating reports, and analyzing
the log les.
Novell AppArmor Quick Start
Helps you understand the main concepts behind Novell® AppArmor.
Find HTML versions of most SUSE Linux Enterprise Desktop manuals in your installed
system under /usr/share/doc/manual or in the help centers of your desktop.
Find the latest documentation updates at http://www.novell.com/
documentation where you can download PDF or HTML versions of the manuals
for your product.
2 Feedback
Several feedback channels are available:
• To report bugs for a product component or to submit enhancements requests, please
use https://bugzilla.novell.com/. If you are new to Bugzilla, you
might nd the Bug Writing FAQs helpful, available from the Novell Bugzilla home
page.
• We want to hear your comments and suggestions about this manual and the other
documentation included with this product. Please use the User Comments feature
at the bottom of each page of the online documentation and enter your comments
there.
3 Documentation Conventions
The following typographical conventions are used in this manual:
•
/etc/passwd: directory names and lenames
About This Guide ix

•
placeholder: replace placeholder with the actual value
•
PATH: the environment variable PATH
•
ls, --help: commands, options, and parameters
•
user: users or groups
•
Alt, Alt + F1: a key to press or a key combination; keys are shown in uppercase as
on a keyboard
•
File, File > Save As: menu items, buttons
•
Dancing Penguins (Chapter Penguins, ↑Another Manual): This is a reference to a
chapter in another manual.
x Deployment Guide

Planning for SUSE Linux Enterprise Desktop
This chapter is addressed mainly to corporate system administrators who face the task
of having to deploy SUSE® Linux Enterprise Desktop at their site. Rolling out SUSE
Linux Enterprise Desktop to an entire site should involve careful planning and consideration of the following questions:
For which purpose will the SUSE Linux Enterprise Desktop workstations be used?
Determine the purpose for which SUSE Linux Enterprise Desktop should be used
and make sure that hardware and software able to match these requirements are
used. Consider testing your setup on a single machine before rolling it out to the
entire site.
How many workstations should be installed?
Determine the scope of your deployment of SUSE Linux Enterprise Desktop. Depending on the number of installation planned, consider different approaches to
the installation or even a mass installation using SUSE Linux Enterprises unique
AutoYaST or KIWI technology. For more information about this subject, refer to
Chapter 2, Deployment Strategies (page 7).
How do you get software updates for your deployment?
All patches provided by Novell for your product are available for download to
registered users. Register and nd the patch support database at http://www
.novell.com/linux/suse/portal/index.html.
1
Do you need help for your local deployment?
Novell provides training, support, and consulting for all topics around SUSE Linux
Enterprise Desktop. Find more information about this at http://www.novell
.com/products/desktop/.
Planning for SUSE Linux Enterprise Desktop 1

1.1 Hardware Requirements
For a standard installation of SUSE Linux Enterprise Desktop including the desktop
environment and a wealth of applications, the following conguration is recommended:
• Intel Pentium IV, 2.4 GHz or higher or any AMD64 or Intel 64 processor
• 1–2 physical CPUs
• 512 MB physical RAM or higher
• 3 GB of available disk space or more
• 1024 x 768 display resolution (or higher)
1.2 Reasons to Use SUSE Linux Enterprise Desktop
Let the following items guide you in your selection of SUSE Linux Enterprise Desktop
and while determining the purpose of the installed systems:
Wealth of Applications
SUSE Linux Enterprise Desktop's broad offer of software makes it appeal to both
professional users in a corporate environment and to home users or users in smaller
networks.
Ease of Use
SUSE Linux Enterprise Desktop comes with two enterprise-ready desktop environments, GNOME and KDE. Both enable users to comfortably adjust to a Linux
system while maintaining their efciency and productivity. To explore the desktops
in detail, refer to the KDE User Guide (↑KDE User Guide) and the GNOME User
Guide (↑GNOME User Guide).
Support for Mobile Users
With the NetworkManager technology fully integrated into SUSE Linux Enterprise
Desktop and its two desktop environments, mobile users will enjoy the freedom
of easily joining and switching wired and wireless networks.
2 Deployment Guide

Seamless Integration into Existing Networks
SUSE Linux Enterprise Desktop was designed to be a versatile network citizen. It
cooperates with various different network types:
Pure Linux Networks SUSE Linux Enterprise Desktop is a complete Linux
client and supports all the protocols used in traditional Linux and Unix* environments. It integrates well with networks consisting of other SUSE Linux or SUSE
Linux Enterprise machines. LDAP, NIS, and local authentication are supported.
Windows Networks SUSE Linux Enterprise Desktop supports Active Directory
as an authentication source. It offers you all the advantages of a secure and stable
Linux operating system plus convenient interaction with other Windows clients
and means to manipulate your Windows user data from a Linux client. Explore
this feature in detail in Chapter 5, Active Directory Support (↑Security Guide).
Windows and Novell Networks Being backed by Novell and their networking
expertise, SUSE Linux Enterprise Desktop naturally offers you support for Novell
technologies, like GroupWise, Novell Client for Linux, and iPrint, and it also offers
authentication support for Novell eDirectory services.
Application Security with Novell AppArmor
SUSE Linux Enterprise Desktop enables you to secure your applications by enforcing security proles tailor-made for your applications. To learn more about Novell
AppArmor, refer to http://www.novell.com/documentation/
apparmor/.
Planning for SUSE Linux Enterprise Desktop 3


Part I. Manual Deployment


Deployment Strategies
There are several different ways to deploy SUSE Linux Enterprise Desktop. Choose
from various approaches ranging from a local installation using physical media or a
network installation server to a mass deployment using a remote-controlled, highlycustomized, and automated installation technique. Select the method that best matches
your requirements.
TIP: Using Xen Virtualization with SLED
You may use the Xen virtualization technology to test virtual instances of SUSE
Linux Enterprise Desktop prior to rolling it out to real hardware. You could also
experiment with basic Windows*-in-SLED setups. For more information about
the virtualization technology available with SUSE Linux Enterprise Desktop, refer
to http://www.novell.com/documentation/sles10/xen_admin/
data/bookinfo.html.
2.1 Deploying up to 10 Workstations
If your deployment of SUSE Linux Enterprise Desktop only involves 1 to 10 workstations, the easiest and least complex way of deploying SUSE Linux Enterprise Desktop
is a plain manual installation as featured in Chapter 3, Installation with YaST (page 17).
Manual installation can be done in several different ways depending on your requirements:
2
Installing from the SUSE Linux Enterprise Desktop Media (page 8)
Consider this approach if you want to install a single, disconnected workstation.
Deployment Strategies 7

Installing from a Network Server Using SLP (page 8)
Consider this approach if you have a single workstation or a small number of
workstations and if a network installation server announced via SLP is available.
Installing from a Network Server (page 9)
Consider this approach if you have a single workstation or a small number of
workstations and if a network installation server is available.
Table 2.1
Tasks Requiring Manual Interaction
Details
Table 2.2
Installation Source
Installing from the SUSE Linux Enterprise Desktop Media
Installing from a Network Server Using SLP
SUSE Linux Enterprise Desktop media kitInstallation Source
• Inserting the installation media
• Booting the installation target
• Changing media
• Determining the YaST installation scope
• Conguring the system with YaST system
NoneRemotely Controlled Tasks
Installing from the SUSE Linux Enterprise Desktop
Media (page 17)
Network installation server holding the SUSE Linux
Enterprise Desktop installation media
Tasks Requiring Manual
Interaction
8 Deployment Guide
• Inserting the boot disk
• Booting installation target
• Determining the YaST installation scope
• Conguring the system with YaST

None, but this method can be combined with VNCRemotely Controlled Tasks
Details
Table 2.3
Installation Source
Tasks Requiring Manual
Interaction
Details
Installing from a Network Server
Section 3.1.1, “Installing from a Network Server Using
SLP” (page 19)
Network installation server holding the SUSE Linux
Enterprise Desktop installation media
• Inserting the boot disk
• Providing boot options
• Booting the installation target
• Determining the YaST installation scope
• Conguring the system with YaST
None, but method can be combined with VNCRemotely Controlled Tasks
Section 3.1.2, “Installing from a Network Source without SLP” (page 20)
2.2 Deploying up to 100 Workstations
With a growing numbers of workstations to install, you certainly do not want to install
and congure each one of them manually. There are many automated or semiautomated
approaches as well as several options to perform an installation with minimal to no
physical user interaction.
Before considering a fully-automated approach, take into account that the more complex
the scenario gets the longer it takes to set up. If a time limit is associated with your deployment, it might be a good idea to select a less complex approach that can be carried
out much more quickly. Automation makes sense for huge deployments and those that
need to be carried out remotely.
Deployment Strategies 9

Choose from the following options:
Simple Remote Installation via VNC—Static Network Conguration (page 11)
Consider this approach in a small to medium scenario with a static network setup.
A network, network installation server, and VNC viewer application are required.
Simple Remote Installation via VNC—Dynamic Network Conguration (page 11)
Consider this approach in a small to medium scenario with dynamic network setup
through DHCP. A network, network installation server, and VNC viewer application
are required.
Remote Installation via VNC—PXE Boot and Wake on LAN (page 12)
Consider this approach in a small to medium scenario that should be installed via
network and without physical interaction with the installation targets. A network,
a network installation server, network boot images, network bootable target hardware, and a VNC viewer application are required.
Simple Remote Installation via SSH—Static Network Conguration (page 12)
Consider this approach in a small to medium scenario with static network setup.
A network, network installation server, and SSH client application are required.
Remote Installation via SSH—Dynamic Network Conguration (page 13)
Consider this approach in a small to medium scenario with dynamic network setup
through DHCP. A network, network installation server, and SSH client application
are required.
Remote Installation via SSH—PXE Boot and Wake on LAN (page 14)
Consider this approach in a small to medium scenario that should be installed via
network and without physical interaction with the installation targets. A network,
a network installation server, network boot images, network bootable target hardware, and an SSH client application are required.
Simple Mass Installation (page 14)
Consider this approach for large deployments to identical machines. If congured
to use network booting, physical interaction with the target systems is not needed
at all. A network, a network installation server, a remote controlling application
such as a VNC viewer or an SSH client, and an AutoYaST conguration prole
are required. If using network boot, a network boot image and network bootable
hardware are required as well.
10 Deployment Guide

Rule-Based Autoinstallation (page 15)
Consider this approach for large deployments to various types of hardware. If
congured to use network booting, physical interaction with the target systems is
not needed at all. A network, a network installation server, a remote controlling
application such as a VNC viewer or an SSH client, and several AutoYaST conguration proles as well as a rule setup for AutoYaST are required. If using network
boot, a network boot image and network bootable hardware are required as well.
Table 2.4
Preparations • Setting up an installation source
Drawbacks • Each machine must be set up individually
Details
Table 2.5
Simple Remote Installation via VNC—Static Network Conguration
NetworkInstallation Source
• Booting from the installation media
Remote: VNCControl and Monitoring
small to medium scenarios with varying hardwareBest Suited For
• Physical access is needed for booting
Section 11.1.1, “Simple Remote Installation via
VNC—Static Network Conguration” (page 118)
Simple Remote Installation via VNC—Dynamic Network Conguration
NetworkInstallation Source
Preparations • Setting up the installation source
• Booting from the installation media
Remote: VNCControl and Monitoring
Deployment Strategies 11

Small to medium scenarios with varying hardwareBest Suited For
Drawbacks • Each machine must be set up individually
• Physical access is needed for booting
Details
Table 2.6
Preparations • Setting up the installation source
Best Suited For • Small to medium scenarios with varying hardware
Details
Remote Installation via VNC—PXE Boot and Wake on LAN
Section 11.1.2, “Simple Remote Installation via
VNC—Dynamic Network Conguration” (page 119)
NetworkInstallation Source
• Conguring DHCP, TFTP, PXE boot, and WOL
• Booting from the network
Remote: VNCControl and Monitoring
• Completely remote installs; cross-site deployment
Each machine must be set up manuallyDrawbacks
Section 11.1.3, “Remote Installation via VNC—PXE
Boot and Wake on LAN” (page 121)
Table 2.7
Preparations • Setting up the installation source
12 Deployment Guide
Simple Remote Installation via SSH—Static Network Conguration
NetworkInstallation Source

• Booting from the installation media
Remote: SSHControl and Monitoring
Best Suited For • Small to medium scenarios with varying hardware
• Low bandwidth connections to target
Drawbacks • Each machine must be set up individually
• Physical access is needed for booting
Details
Table 2.8
Preparations • Setting up the installation source
Best Suited For • Small to medium scenarios with varying hardware
Drawbacks • Each machine must be set up individually
Remote Installation via SSH—Dynamic Network Conguration
Section 11.1.4, “Simple Remote Installation via
SSH—Static Network Conguration” (page 122)
NetworkInstallation Source
• Booting from installation media
Remote: SSHControl and Monitoring
• Low bandwidth connections to target
• Physical access is needed for booting
Deployment Strategies 13

Details
Section 11.1.5, “Simple Remote Installation via
SSH—Dynamic Network Conguration” (page 123)
Table 2.9
Preparations • Setting up the installation source
Best Suited For • Small to medium scenarios with varying hardware
Details
Remote Installation via SSH—PXE Boot and Wake on LAN
NetworkInstallation Source
• Conguring DHCP, TFTP, PXE boot, and WOL
• Booting from the network
Remote: SSHControl and Monitoring
• Completely remote installs; cross-site deployment
• Low bandwidth connections to target
Each machine must be set up individuallyDrawbacks
Section 11.1.6, “Remote Installation via SSH—PXE
Boot and Wake on LAN” (page 125)
Table 2.10
Preparations • Gathering hardware information
14 Deployment Guide
Simple Mass Installation
Preferably networkInstallation Source
• Creating AutoYaST prole
• Setting up the installation server
• Distributing the prole

• Setting up network boot (DHCP, TFTP, PXE, WOL)
or
Booting the target from installation media
Local or remote through VNC or SSHControl and Monitoring
Best Suited For • Large scenarios
• Identical hardware
• No access to system (network boot)
Applies only to machines with identical hardwareDrawbacks
Section 18.1, “Simple Mass Installation” (page 211)Details
Table 2.11
Preparations • Gathering hardware information
Rule-Based Autoinstallation
Preferably networkInstallation Source
• Creating AutoYaST proles
• Creating AutoYaST rules
• Setting up the installation server
• Distributing the prole
• Setting up network boot (DHCP, TFTP, PXE, WOL)
or
Booting the target from installation media
Deployment Strategies 15

Local or remote through SSH or VNCControl and Monitoring
Best Suited For • Varying hardware
• Cross-site deployments
Complex rule setupDrawbacks
Section 18.2, “Rule-Based Autoinstallation” (page 223)Details
2.3 Deploying More than 100 Workstations
Most of the considerations brought up for medium installation scenarios in Section 2.1,
“Deploying up to 10 Workstations” (page 7) still hold true for large scale deployments.
However, with a growing number of installation targets, the benets of a fully automated
installation method outweigh its disadvantages.
It pays off to invest a considerable amount of time to create a sophisticated rule and
class framework in AutoYaST to match the requirements of a huge deployment site.
Not having to touch each target separately can save you a tremendous amount of time
depending on the scope of your installation project.
As an alternative, and if user settings should be done during the rst bootup, create
preload images with kiwi and rstboot. Deploying such images could even be done by
a PXE boot server specialized for this task. For more details, see Chapter 14, KIWI
(page 181), Chapter 18, Automated Installation (page 211), and Chapter 17, Deploying
Customized Preinstallations (page 197).
16 Deployment Guide

Installation with YaST
Install your SUSE® Linux Enterprise Desktop system with YaST, the central tool for
installation and conguration of your system. YaST guides you through the installation
process and the basic conguration of your system. During the installation and conguration process, YaST analyzes both your current system settings and your hardware
components and proposes installation settings based on this analysis. By default, YaST
displays an overview of all installation steps on the left hand side of the window and
provides online help texts for each step. Click Help to view the help text.
If you are a rst-time user of SUSE Linux Enterprise Desktop, you might want to follow
the default YaST proposals in most parts, but you can also adjust the settings as described
here to ne-tune your system according to your needs and wishes. Many parts of the
basic system conguration, such as user accounts or system language, can also be
modied after the installation process.
3.1 Choosing the Installation Method
After having selected the installation medium, determine a suitable installation method
and boot option that best match your needs:
Installing from the SUSE Linux Enterprise Desktop Media
Choose this option, if you want to perform a stand-alone installation and do not
want to rely on a network providing the installation data or the boot infrastructure.
The installation proceeds exactly as outlined in Section 3.2, “The Installation
Workow” (page 20).
3
Installation with YaST 17

Installing from the LiveDVD
In order to install from a LiveCD, boot the live system from DVD. In the running
system, launch the installation routine by clicking on the Install icon on the desktop.
Phase one of the installation will be carried out in a window on the desktop. It is
not possible to update or repair an existing system with a LiveDVD, you can only
perform a new installation with automatic conguration.
Installing from a Network Server
Choose this option, if you have an installation server available in your network or
want to use an external server as the source of your installation data. This setup
can be congured to use from physical media (Floppy, CD/DVD, or hard disk) for
booting or congured to boot via network using PXE/BOOTP. Refer to Sec-
tion 3.1.1, “Installing from a Network Server Using SLP” (page 19), Section 3.1.2,
“Installing from a Network Source without SLP” (page 20), or Chapter 11, Remote
Installation (page 117) for details.
SUSE Linux Enterprise Desktop supports several different boot options from which
you can choose depending on the hardware available and on the installation scenario
you prefer. Booting from the SUSE Linux Enterprise Desktop media is the most
straightforward option, but special requirements might call for special setups:
Table 3.1
DVD
Floppy
PXE or
BOOTP
18 Deployment Guide
Boot Options
DescriptionBoot Option
This is the easiest boot option. This option can be used if the system
has a local DVD-ROM drive that is supported by Linux.
The data for generating boot oppies are located on DVD 1 in the
/boot/architecture/ directory. A README with instructions
on how to create the boot oppies is available in the same directory.
Booting over the network must be supported by the system's BIOS
or rmware and a boot server must be available in the network.
This task can also be handled by another SUSE Linux Enterprise
Desktop system. Refer to Chapter 11, Remote Installation (page 117)
for more information.

DescriptionBoot Option
Hard Disk
TIP: Booting from DVD on UEFI machines
►amd64 em64t: DVD1 can be used as a boot medium for machines equipped
with UEFI (Unied Extensible Firmware Interface). Refer to your vendor's documentation for specic information. If booting fails, try to enable CSM (Compatibility Support Module) in your rmware. ◄
SUSE Linux Enterprise Desktop installation can also be booted
from the hard disk. To do this, copy the kernel (linux) and the
installation system (initrd) from the directory
/boot/architecture/ on the installation media to the hard
disk and add an appropriate entry to the existing boot loader of a
previous SUSE Linux Enterprise Desktop installation.
3.1.1 Installing from a Network Server Using
SLP
If your network setup supports OpenSLP and your network installation source has been
congured to announce itself via SLP (described in Section 11.2, “Setting Up the
Server Holding the Installation Sources” (page 126)), boot the system, press F4 in the
boot screen and select SLP from the menu.
The installation program congures the network connection with DHCP and retrieves
the location of the network installation source from the OpenSLP server. If the automatic
DHCP network conguration fails, you are prompted to enter the appropriate parameters
manually. The installation then proceeds as described below with the exception of the
network conguration step needed prior to adding additional repositories. This step is
not needed as the network is already congured and active at this point.
Installation with YaST 19

3.1.2 Installing from a Network Source
without SLP
If your network setup does not support OpenSLP for the retrieval of network installation
sources, boot the system and press F4 in the boot screen to select the desired network
protocol (NFS, HTTP, FTP, or SMB/CIFS). Provide the server's address and the path
to the installation media.
The installation program automatically congures the network connection with DHCP.
If this conguration fails, you are prompted to enter the appropriate parameters manually. The installation retrieves the installation data from the source specied. The installation then proceeds as described below with the exception of the network conguration
step needed prior to adding additional repositories. This step is not needed as the network
is already congured and active at this point.
3.2 The Installation Workow
The SUSE Linux Enterprise Desktop installation is split into three main parts: preparation, installation, conguration. During the preparation phase you congure some basic
parameters such as language, time, desktop type, users, passwords, hard disk setup and
installation scope. In the non-interactive installation phase the software is installed and
the system is prepared for the rst boot. Upon nishing the installation the machine
reboots into the newly installed system and starts the nal system conguration. You
can choose whether to do a fully automatic or a manual conguration. In this stage,
network and Internet access, as well as hardware components such as printers, are set
up.
3.3 System Start-Up for Installation
You can install SUSE Linux Enterprise Desktop from local installation sources, such
as the SUSE Linux Enterprise Desktop CDs or DVD, or from network source of an
FTP, HTTP, NFS, or SMB server. Any of these approaches requires physical access to
the system to install and user interaction during the installation. The installation procedure is basically the same regardless of the installation source. Any exceptions are
sufciently highlighted in the following workow description. For a description on
20 Deployment Guide

how to perform non-interactive, automated installations, refer to Part III, “Automated
Installations” (page 209).
3.4 The Boot Screen
The boot screen displays a number of options for the installation procedure. Boot from
Hard Disk boots the installed system and is selected default, because the CD is often
left in the drive. Select one of the other options with the arrow keys and press Enter to
boot it. The relevant options are:
Installation
The normal installation mode. All modern hardware functions are enabled. In case
the installation fails, see F5Kernel (page 23) for boot options that disable potentially problematic functions.
Repair Installed System
Boots into the graphical repair system. More information on repairing an installed
system is available in Section “Recovering a Corrupted System” (Chapter 7,
Common Problems and Their Solutions, ↑System Analysis and Tuning Guide).
Rescue System
Starts a minimal Linux system without a graphical user interface. For more information, see Section “Using the Rescue System” (Chapter 7, Common Problems
and Their Solutions, ↑System Analysis and Tuning Guide).
Firmware Test
Starts a BIOS checker that validates ACPI and other parts of your BIOS.
Memory Test
Tests your system RAM using repeated read and write cycles. Terminate the test
by rebooting. For more information, see Section “Fails to Boot” (Chapter 7, Common
Problems and Their Solutions, ↑System Analysis and Tuning Guide). This option
is not available with the CD-KDE and CD-GNOME media.
Installation with YaST 21

Figure 3.1
The Boot Screen
Use the function keys indicated in the bar at the bottom of the screen to change the
language, screen resolution, installation source or to add additional driver from your
hardware vendor:
F1Help
Get context-sensitive help for the active element of the boot screen. Use the arrow
keys to navigate, Enter to follow a link, and Esc to leave the help screen.
F2Language
Select the display language and a corresponding keyboard layout for the installation.
The default language is English (US).
F3Video Mode
Select various graphical display modes for the installation. Select Text Mode if the
graphical installation causes problems.
F4Source
Normally, the installation is performed from the inserted installation medium. Here,
select other sources, like FTP or NFS servers. If the installation is carried out in a
network with an SLP server, select an installation source available on the server
22 Deployment Guide

with this option. Find information about SLP in Chapter 21, SLP Services in the
Network (↑Administration Guide).
F5Kernel
In case you encounter problems with the regular installation, this menu offers to
disable a few potentially problematic functions. If your hardware does not support
ACPI (advanced conguration and power interface) select No ACPI to install
without ACPI support. No local APIC disables support for APIC (Advanced Programmable Interrupt Controllers) which may cause problems with some hardware.
Safe Settings boots the system with the DMA mode (for CD/DVD-ROM drives)
and power management functions disabled.
If you are not sure, try the following options rst: Installation—ACPI Disabled or
Installation—Safe Settings. Experts can also use the command line (Boot Options)
to enter or change kernel parameters.
F6Driver
Press this key to tell the system that you have an optional driver update for SUSE
Linux Enterprise Desktop. With File or URL, load drivers directly before the installation starts. If you select Yes, you are prompted to insert the update disk at the
appropriate point in the installation process.
TIP: Using IPv6 during the Installation
By default you can only assign IPv4 network addresses to your machine. To
enable IPv6 during installation, enter one of the following parameters at the
bootprompt: ipv6=1 (accept IPv4 and IPv6) or ipv6only=1 (accept IPv6
only).
After starting the installation, SUSE Linux Enterprise Desktop loads and congures a
minimal Linux system to run the installation procedure. To view the boot messages
and copyright notices during this process, press Esc. On completion of this process, the
YaST installation program starts and displays the graphical installer.
TIP: Installation without a Mouse
If the installer does not detect your mouse correctly, use Tab for navigation,
arrow keys to scroll, and Enter to conrm a selection. Various buttons or selection elds contain a letter with an underscore. Use Alt + Letter to select a button
or a selection directly instead of navigating there with Tab.
Installation with YaST 23

3.4.1 Providing Data to Access an SMT
Server
By default updates for SUSE Linux Enterprise Desktop are delivered by the Novell
Customer Center. If your network provides a so called SMT server to provide a local
update source, you need to equip the client with the server's URL. Client and server
communicate solely via HTTPS protocol, therefore you also need to enter a path to the
server's certicate if the certicate was not issued by a certicate authority. This information can either be entered at the boot prompt as described here, or during the registration process as described in Section “Local Registration Server” (page 43).
smturl
URL of the SMT server. The URL has a xed format
https://FQN/center/regsvc/ FQN has to be full qualied hostname of
the SMT server. Example:
smturl=https://smt.example.com/center/regsvc/
smtcert
Location of the SMT server's certicate. Specify one of the following locations:
URL
Remote location (http, https or ftp) from which the certicate can be downloaded. Example:
smtcert=http://smt.example.com/smt-ca.crt
Floppy
Species a location on a oppy. The oppy has to be inserted at boot time,
you will not be prompted to insert it if it is missing. The value has to start with
the string floppy followed by the path to the certicate. Example:
smtcert=floppy/smt/smt-ca.crt
local path
Absolute path to the certicate on the local machine. Example:
smtcert=/data/inst/smt/smt-ca.cert
Interactive
Use ask to open a pop-up menu during the installation where you can specify
the path to the certicate. Do not use this option with AutoYaST. Example
24 Deployment Guide

smtcert=ask
Deactivate certicate installation
Use done if either the certicate will be installed by an add-on product, or if
you are using a certicate issued by an ofcial certicate authority. Example:
smtcert=done
WARNING: Beware of typing errors
Make sure the values you enter are correct. If smturl has not been specied
correctly, the registration of the update source will fail. If a wrong value for
smtcert has been entered, you will be prompted for a local path to the certicate.
In case smtcert is not specied, it will default to http://FQN/smt.crt with
FQN being the name of the SMT server.
3.4.2 Conguring an alternative data server
for supportconfig
The data supportcong (see Chapter 2, Gathering System Information for Support
(↑Administration Guide) for more information) gathers is sent to the Novell Customer
Center by default. It is also possible to set up a local server collecting this data. If such
a server is available on your network, you need to equip the client with the server's
URL. This information has to be entered at the boot prompt.
supporturl
URL of the server. The URL has the format http://FQN/Path/ FQN has to
be full qualied hostname of the server, Path has to be replaced with the location
on the server. Example:
supporturl=http://support.example.com/supportconfig/data/
3.5 Welcome
Start the installation of SUSE Linux Enterprise Desktop by choosing your language.
Changing the language will automatically preselect a corresponding keyboard layout.
Installation with YaST 25

Override this proposal by selecting a different keyboard layout from the drop-down
menu. The language selected here is also used to assume a time zone for the system
clock. This setting—along with the selection of secondary languages to install on your
system—can be modied later in the Installation Summary, described in Section 3.9,
“Installation Settings” (page 34). For information about language settings in the installed
system, see Chapter 10, Changing Language and Country Settings with YaST (page 109).
Read the license agreement that is displayed beneath the language and keyboard selection
thoroughly. Use License Translations... to access translations. If you agree to the terms,
check I Agree to the License Terms and click Next to proceed with the installation. If
you do not agree to the license agreement, you cannot install SUSE Linux Enterprise
Desktop. Click Abort to terminate the installation.
Figure 3.2
Welcome
3.6 Installation Mode
After a system analysis where YaST probes for storage devices and tries to nd other
installed systems on your machine, the installation modes available are displayed.
New installation
Select this option to start a new installation from scratch.
26 Deployment Guide

Update
Select this option to update to a newer version. For more information about system
update, see Chapter 4, Updating SUSE Linux Enterprise (page 47).
Repair Installed System
Choose this option to repair a damaged system that is already installed. More information is available in Section “Recovering a Corrupted System” (Chapter 7,
Common Problems and Their Solutions, ↑System Analysis and Tuning Guide).
Figure 3.3
By default, the automatic conguration is used when performing a new installation. In
this mode the system automatically congures your hardware and the network, so the
installation is performed with minimal user interaction. If necessary, you can change
every conguration that is set up later in the installed system using YaST. In repair
mode the automatic conguration attempts to x errors automatically. Uncheck Use
Automatic Conguration if you prefer a manual conguration during the installation
or to start the system reparation in expert mode.
Installation Mode
This screen also offers to include add-on products during the installation. To include
such products, check Include Add-On Products from Separate Media. An add-on
product can include extensions, third-party products or additional software for your
system.
Installation with YaST 27

Click Next to proceed. If you selected to include an add-on product, proceed with Sec-
tion 3.6.1, “Add-On Products” (page 28), otherwise skip the next section and advance
to Section 3.7, “Clock and Time Zone” (page 29).
3.6.1 Add-On Products
Add-on products can be installed either from a local source (CD, DVD, or directory)
or from a network source (HTTP, FTP, NFS, CIFS,...). When installing from a network
source, you need to congure the network rst—unless you are performing a network
installation anyway. Choose Yes, Run the Network Setup and proceed as described in
Section “Network Setup” (page 28). If the add-on product is available locally, select
No, Skip the Network Setup.
Click Next and specify the product source. Source types available are CD, DVD, Hard
Disk, USB Stick or Disk, a Local Directory or a Local ISO Image, if no network was
congured. If the add-on product is available on removable media, the system automatically mounts the media and reads it's contents. If the add-on product is available on
hard disk, choose Hard Disk to install from an unmounted hard drive, or Local Direc-
tory/Local ISO Image if it is located in the le system. Add-on products may be delivered
as a repository or as a set of rpm les. In the latter case, check Plain RPM Directory.
While a network is available, you can chooses from additional remote sources such as
HTTP, SLP, FTP and others. It is also possible to specify a URL directly.
Check Download Repository Description Files to download the les describing the
repository now. If unchecked, they will be downloaded once the installation starts.
Proceed with Next and insert a CD or DVD if required. Depending on the product's
content it may be necessary to accept additional license agreements.
It is also possible to congure add-on products at any time in the installed systems.
Using add-on products in the installed system is described in Chapter 7, Installing Add-
On Products (page 85).
Network Setup
When invoking the network setup, YaST scans for available network cards. If more
than one network card is found, you have to choose the card to congure from the list.
If an ethernet network adapter is not already connected, a warning will open. Make
sure the network cable is plugged in and choose Yes, Use It. If your network is equipped
28 Deployment Guide

with a DHCP server, choose Automatic Address Setup (via DHCP). To manually set
up the network choose Static Address Setup and specify IP Address, Netmask, Default
Gateway IP, and the DNS Server IP.
Some networks require the use of a proxy server to access the Internet. Tick the check
box Use Proxy for Accessing the Internet and enter the appropriate specications. Click
Accept to perform the network setup. The installation procedure will continue with the
add-on products or repositories setup as described in Section 3.6.1, “Add-On Products”
(page 28).
3.7 Clock and Time Zone
In this dialog, select your region and time zone. Both are preselected according to the
selected installation language. To change the preselected values, either use the map or
the drop down lists for Region and Time Zone. When using the map, point the cursor
at the rough direction of your region and left-click to zoom. Now choose your country
or region by left-clicking. Right-click to return to the world map.
Figure 3.4
To set up the clock, choose whether the Hardware Clock is Set to UTC. If you run another operating system on your machine, such as Microsoft Windows*, it is likely your
Clock and Time Zone
Installation with YaST 29

system uses local time instead. If you only run Linux on your machine, set the hardware
clock to UTC and have the switch from standard time to daylight saving time performed
automatically.
If a network is already congured, you can congure time synchronization with an
NTP server. Click Change to either alter the NTP settings or to Manually set the time.
See Chapter 22, Time Synchronization with NTP (↑Administration Guide) for more information on conguring the NTP service. When nished, click Accept to continue the
installation.
3.8 Create New User
Create a local user in this step. Administrating local users is a suitable option for standalone workstations. If setting up a client on a network with centralized user authentication, click Change and proceed with the Section 3.8.1, “Expert Settings” (page 32).
After entering the rst name and last name, either accept the proposal or specify a new
Username that will be used to log in. Finally, enter a password for the user. Reenter it
for conrmation (to ensure that you did not type something else by mistake). To provide
effective security, a password should be between ve and eight characters long. The
maximum length for a password is 72 characters. However, if no special security
modules are loaded, only the rst eight characters are used to discern the password.
Passwords are case-sensitive. Special characters (7-bit ASCII) and the digits 0 to 9 are
allowed. Other special characters like umlauts or accented characters are not allowed.
Passwords you enter are checked for weakness. When entering a password that is easy
to guess, such as a dictionary word or a name, you will see a warning. It is a good security practice to use strong passwords.
IMPORTANT: Username and Password
Remember both your username and the password because they are needed
each time you log in to the system.
30 Deployment Guide

Figure 3.5
Three additional options are available:
Use this Password for the System Administrator
If checked, the same password you have entered for the user will be used for the
system administrator root. This option is suitable for stand-alone workstations
or machines in a home network that are administrated by a single user. When not
checked, you are prompted for a system administrator password in the next step of
the installation workow (see Section 3.8.2, “Password for the System Administrator
root” (page 33)).
Create New User
Receive System Mail
Checking this box sends messages created by the system services to the user. These
are usually only sent to root, the system administrator. This option is useful for
the most frequently used account, because it is highly recommended to log in as
root only in special cases.
The mails sent by system services are stored in the local mailbox /var/spool/
mail/username, where username is the login name of the selected user. To
read e-mails after installation, you can use any e-mail client, for example KMail
or Evolution.
Installation with YaST 31

Automatic Login
This option automatically logs the current user in to the system when it starts. This
is mainly useful if the computer is operated by only one user.
WARNING: Automatic Login
With the automatic login enabled, the system boots straight into your desktop
with no authentication at all. If you store sensitive data on your system, you
should not enable this option if the computer can also be accessed by others.
3.8.1 Expert Settings
Click Change in the Create User dialog to set up network authentication or, if present,
import users from a previous installation. Also change the password encryption type
in this dialog.
You can also add additional user accounts or change the user authentication method in
the installed system. For detailed information about user management, see Chapter 9,
Managing Users with YaST (page 91).
The default authentication method is Local (/etc/passwd). If a former version of SUSE
Linux Enterprise Desktop or another system using /etc/passwd is detected, you
may import local users. To do so, check Read User Data from a Previous Installation
and click Choose. In the next dialog, select the users to import and nish with OK.
Access to the following network authentication services can be congured:
LDAP
Users are administered centrally on an LDAP server for all systems in the network.
More information is available in Section “Conguring an LDAP Client with YaST”
(Chapter 4, LDAP—A Directory Service, ↑Security Guide).
NIS
Users are administered centrally on a NIS server for all systems in the network.
See Section “Conguring NIS Clients” (Chapter 3, Using NIS, ↑Security Guide)
for more information.
32 Deployment Guide

Windows Domain
SMB authentication is often used in mixed Linux and Windows networks. and
Section “Conguring a Linux Client for Active Directory” (Chapter 5, Active Di-
rectory Support, ↑Security Guide).
eDirectory LDAP
eDirectory authentication is used in Novell networks.
Along with user administration via LDAP and NIS, you can use Kerberos authentication.
To use it, select Set Up Kerberos Authentication. For more information on Kerberos,
refer to Chapter 6, Network Authentication with Kerberos (↑Security Guide).
3.8.2 Password for the System Administrator
root
If you have not chosen Use this Password for the System Administrator in the previous
step, you will be prompted to enter a Password for the System Administrator root.
Otherwise this conguration step is skipped.
root is the name of the superuser, the administrator of the system. Unlike regular
users, who may or may not have permission to do certain things on the system, root
has unlimited power to do anything: change the system conguration, install programs,
and set up new hardware. If users forget their passwords or have other problems with
the system, root can help. The root account should only be used for system administration, maintenance, and repair. Logging in as root for daily work is rather risky:
a single mistake could lead to irretrievable loss of system les.
For verication purposes, the password for root must be entered twice. Do not forget
the root password. Once entered, this password cannot be retrieved.
The root can be changed any time later in the installed system. To do so run YaST
and start Security and Users > User and Group Management.
Installation with YaST 33

WARNING: The root User
The user root has all the permissions needed to make changes to the system.
To carry out such tasks, the root password is required. You cannot carry out
any administrative tasks without this password.
3.9 Installation Settings
On the last step before the real installation takes place, you can alter installation settings
suggested by YaST and also review the settings you made so far. Basic settings can be
changed in the Overview tab, advanced options are available on the Experts tab. To
modify the suggestions, either click Change and select the category to change or click
on one of the headlines. After conguring any of the items presented in these dialogs,
you are always returned to the Installation Settings window, which is updated accordingly.
Figure 3.6
Installation Settings
34 Deployment Guide

TIP: Restoring the Default Settings
You can reset all changes to the defaults by clicking Change > Reset to Defaults.
YaST then shows the original proposal again.
3.9.1 Partitioning (Overview)
Review and—if necessary—change the partition setup proposed by the system.
Changing the partition setup either let's you partition a specic disk or, when choosing
Custom Partitioning, apply your own partitioning scheme. Modifying the partition
setup opens the Expert Partitioner described in Section 12.1, “Using the YaST Partition-
er” (page 155).
3.9.2 Booting (Expert)
YaST proposes a boot conguration for your system. Other operating systems found
on your computer, such as Microsoft Windows or other Linux installations, will automatically be detected and added to the boot loader. However, SUSE Linux Enterprise
Desktop will be booted by default. Normally, you can leave these settings unchanged.
If you need a custom setup, modify the proposal for your system. For information, see
Section “Conguring the Boot Loader with YaST” (Chapter 10, The Boot Loader
GRUB, ↑Administration Guide).
3.9.3 Software (Overview)
SUSE Linux Enterprise Desktop contains a number of software patterns for various
application purposes. Click Software to start the pattern selection and modify the installation scope according to your needs. Select your pattern from the list and see a pattern
description in the right part of the window. Each pattern contains a number of software
packages needed for specic functions (e.g. Multimedia or Ofce software). For a more
detailed selection based on software packages to install, select Details to switch to the
YaST Software Manager.
You can also install additional software packages or remove software packages from
your system at any later time with the YaST Software Manager. For more information,
refer to Chapter 6, Installing or Removing Software (page 65).
Installation with YaST 35

Figure 3.7
Software Selection and System Tasks
3.9.4 Language (Overview)
Here you can change the system Language you dened in the rst step of the installation.
It is also possible to add additional languages. To adjust the system language settings,
select Language. Select a language from the list. The primary language is used as the
system language. You can also adapt keyboard layout and time zone to the primary
language if the current settings differ. Details lets you tune language settings for the
user root, set UTF-8 support, or further specify the language (e.g. select South African
English).
Choose secondary languages to be able to switch to one of these languages at any time
without having to install additional packages. For more information, see Chapter 10,
Changing Language and Country Settings with YaST (page 109).
36 Deployment Guide

3.9.5 Add-On Products (Expert)
If you added a source for an add-on media earlier, it appears here. Add, remove, or
modify add-on products here if needed.This is the same conguration dialog as discussed
earlier in Section 3.6.1, “Add-On Products” (page 28).
3.9.6 Keyboard Layout (Expert)
To change the keyboard layout, select Keyboard Layout. By default, the layout corresponds to the language chosen for installation. Select the keyboard layout from the list.
Use the Test eld at the bottom of the dialog to check if you can enter special characters
of that layout correctly. Options to ne-tune various settings are available under Expert
Mode. Find more information about changing the keyboard layout in Section 5.3,
“Setting Up Keyboard and Mouse” (page 53). When nished, click Accept to return
to the installation summary.
3.9.7 Time Zone (Expert)
Adjust time zone and clock settings here. Provided a network is congured, you can
also set up a Network Time Protocol (NTP) client that automatically synchronizes your
computer with a time server. This is the same conguration as shown earlier in Sec-
tion 3.7, “Clock and Time Zone” (page 29).
3.9.8 Default Runlevel (Expert)
SUSE Linux Enterprise Desktop can boot to different runlevels. Normally, there should
be no need to change anything here, but if necessary set the default runlevel with this
dialog. Refer to Section “Conguring System Services (Runlevel) with YaST” (Chapter 9, Booting and Conguring a Linux System, ↑Administration Guide) for more information about runlevel conguration.
3.9.9 System (Expert)
This dialog presents all the hardware information YaST could obtain about your computer. When called, the hardware detection routine is started. Depending on your system,
Installation with YaST 37

this may take some time. Select any item in the list and click Details to see detailed
information about the selected item. Use Save to File to save a detailed list to either the
local le system or a oppy. Advanced users can also change the PCI ID setup and
Kernel Settings by choosing System Settings.
3.10 Performing the Installation
After making all installation settings, click Install in the Installation Settings window
to start the installation. Some software may require a license conrmation. If your
software selection includes such software, license conrmation dialogs are displayed.
Click Accept to install the software package. When not agreeing to the license, click I
Disagree and the software package will not be installed. In the dialog that follows,
conrm with Install again.
The installation usually takes between 15 and 30 minutes, depending on the system
performance and the selected software scope. After having prepared the hard disk and
having saved and restored the user settings, the software installation starts. During this
procedure a slide show introduces the features of SUSE Linux Enterprise Desktop.
Choose Details to switch to the installation log.
After the software installation has completed, the basic system is set up. Among others,
“Finishing the Basic Installation” includes installing the boot manager, initializing fonts
and more. Next YaST boots into the new Linux system to start the system conguration.
TIP: Existing SSH Host Keys
If you install SUSE Linux Enterprise Desktop on a machine with existing Linux
installations, the installation routine automatically imports the SSH host key
with the most recent access time from an existing installation.
3.11 Conguration of the Installed
The system is now installed, but not yet congured for use. The hardware, the network
and other services are not set up, yet. If you follow the default installation path, the
38 Deployment Guide
System

system will be automatically congured. If you have deselected the Automatic Conguration, the manual system conguration starts.
3.11.1 Automatic System Conguration
Having rebooted, the system starts the Automatic Conguration. This routine attempts
to congure your network and Internet access and sets up your hardware. The whole
process does not need any interaction. You can change the settings made by the Automatic Conguration at any time in the installed system with YaST. Continue with
Section “Novell Customer Center Conguration” (page 42).
3.11.2 Manual System Conguration
Having rebooted, the system starts the manual conguration. If the conguration fails
at one of the steps of this stage, it restarts and continues from the last successful step.
Hostname and Domain Name
The hostname is the computer's name in the network. The domain name is the name of
the network. A hostname and domain are proposed by default. If your system is part
of a network, the hostname has to be unique in this network, whereas the domain name
has to be common to all hosts on the network.
In many networks, the system receives its name over DHCP. In this case it is not necessary to modify the proposed hostname and domain name. Select Change Hostname
via DHCP instead. To be able to access your system using this hostname, even when
it is not connected to the network, select Write Hostname to /etc/hosts. If you often
change networks without restarting the desktop environment (e.g. when switching between different WLANs), do not enable this option, because the desktop system may
get confused when the hostname in /etc/hosts changes.
To change hostname settings at any time after installation, use YaST Network Devices
> Network Settings. For more information, see Section “Conguring the Network Card
with YaST” (Chapter 19, Basic Networking, ↑Administration Guide).
Installation with YaST 39

Network Conguration
If you are installing SUSE Linux Enterprise Desktop on a laptop computer, Interfaces
Controlled by NetworkManager is enabled. NetworkManager is a tool that enables au-
tomatic connection with minimal user intervention. It is ideal for WLAN and mobile
computing. If you want to use the traditional method without NetworkManager, click
Disable NetworkManager. Find detailed information about NetworkManager in Chapter 23, Using NetworkManager (↑Administration Guide). If you are installing SUSE
Linux Enterprise Desktop on any other type of machine, the traditional method without
NetworkManager is selected by default. This conguration step also lets you congure
the network devices of your system and make security settings, for example, for a
rewall or proxy.
The network can also be congured after the system installation has been completed.
If you skip it now, your system is left ofine unable to retrieve any available updates.
To congure your network connection later, select Skip Conguration and click Next.
The following network settings can be congured in this step:
General Network Settings
Enable or disable the use of NetworkManager as described above. Also change the
IPv6 support here. By default the IPv6 support is enabled. To disable it, click Dis-
able IPv6. For more information about IPv6, see Section “IPv6—The Next Generation Internet” (Chapter 19, Basic Networking, ↑Administration Guide).
Firewall
By default SuSErewall2 is enabled on all congured network interfaces. To
globally disable the rewall for this computer, click on Disable. If the rewall is
enabled, you may Open the SSH port in order to allow remote connections via secure
shell. To open the detailed rewall conguration dialog, click on Firewall. See
Section “Conguring the Firewall with YaST” (Chapter 15, Masquerading and
Firewalls, ↑Security Guide) for detailed information.
Network Interfaces
All network cards detected by YaST are listed here. If you have already set up a
network connection during the installation (as described in Section “Network Setup”
(page 28)) the card used for this connection is listed as Congured. A click on
Network Interfaces opens the Network Settings dialog, where you can change existing congurations, set up networks cards not congured yet, or add and congure
additional cards. See Section 8.2, “Internet Connection Via Network” (page 90)
40 Deployment Guide

for checklists of conguration requirements for the various connection types and
Section “Conguring the Network Card with YaST” (Chapter 19, Basic Networking,
↑Administration Guide) for conguration details.
DSL Connections, ISDN Adapters, and Modems
If your computer is equipped with an internal DSL modem, an internal ADSL Fritz
Card, an ISDN card or a modem, clicking on the respective headline opens the
conguration dialog. Refer to Chapter 8, Accessing the Internet (page 87) for further
information.
VNC Remote Administration
To enable remote administration of your machine via VNC, click VNC Remote
Administration. Choose Allow Remote Administration in the following dialog and
adjust your rewall settings accordingly.
Proxy
If you have a proxy server controlling the Internet access in your network, congure
the proxy URLs and authentication details in this dialog.
TIP: Resetting the Network Conguration to the Default Values
Reset the network settings to the original proposed values by clicking Change
> Reset to Defaults. This discards any changes made.
Test Internet Connection
After having congured a network connection, you can test it. For this purpose, YaST
establishes a connection to the SUSE Linux Enterprise Desktop server and downloads
the latest release notes. Read them at the end of the installation process. A successful
test is also a prerequisite for registering and updating online.
If you have multiple network interfaces, verify that the desired card is used to connect
to the Internet. If not, click Change Device.
To start the test, select Yes, Test Connection to the Internet and click Next. In the next
dialog, view the progress of the test and the results. Detailed information about the test
process is available via View Logs. If the test fails, click Back to return to the network
conguration to correct your entries.
Installation with YaST 41

If you do not want to test the connection at this point, select No, Skip This Test then
Next. This also skips downloading the release notes, conguring the customer center,
and updating online. These steps can be performed any time after the system has been
initially congured.
Novell Customer Center Conguration
To get technical support and product updates, you need to register and activate your
product with the Novell Customer Center. The Novell Customer Center Conguration
provides assistance for doing so. Find detailed information about Novell Customer
Center at http://www.novell.com/documentation/ncc/.
If you are ofine or want to skip this step, select Congure Later. This also skips SUSE
Linux Enterprise Desktop's online update.
In Include for Convenience, select whether to send unsolicited additional information,
such as your Hardware Prole or Optional Information when registering. This simplies
the registration process. Click on Details to get in-depth information about how the
data will be collected. In order to obtain information about which data will be sent for
your specic product, the Novell server will be connected. Upon this initial connect no
data other than the ID of your product will be send to the Novell servers.
In order to become entitled for support, make sure to check Registration Code. You
will be prompted to enter the code when proceeding with Next. Find more information
about the technical support at http://www.novell.com/products/desktop/
services_support.html.
NOTE: Data Privacy
No information is passed to anyone outside Novell. The data is used for statistical purposes and to enhancer your convenience regarding driver support and
your Web account. Find a link to the detailed privacy policy by clicking on De-
tails. View the information transmitted in the log le at /root/.suse
_register.log.
Apart from activating and registering your product, this module also adds the ofcial
update repositories to your conguration. These repositories provide xes for known
bugs or security issues which can be installed via an online update.
42 Deployment Guide

To keep your repositories valid, select Regularly Synchronize with Customer Center.
This option checks your repositories and adds newly available catalogs or removes
obsolete ones. It does not touch manually added repositories.
In addition to the update repositories, two more catalogs with ofcial drivers for ATI
and NVidia graphics cards are added. SUSE Linux Enterprise Desktop ships with open
source drivers for these cards, but the ofcial drivers, provided directly by the graphics
cards manufacturers, offer additional functionality. In order to add these repositories,
you need to import their public GnuPG keys—these keys are used to ensure the repositories is provided by the owner of the catalog. Click Trust Key and then Import to add
the catalog. Click Skip package and then Abort to prevent this specic repository from
being added to your conguration.
To keep your repositories valid, select Regularly Synchronize with Customer Center.
This option checks your repositories and adds newly available catalogs or removes
obsolete ones. It does not touch manually added repositories.
Proceed with Next. A connection with the Novell server is established. Follow the onscreen instructions to nish the registration.
Local Registration Server
If your organization provides a local registration server instead of using the Novell
Customer Center, you need to specify the server's URL. Client and server communicate
solely via HTTPS protocol, therefore you also need to enter a path to the server's certicate if the certicate was not issued by a certicate authority. Open the dialog with
Advanced > Local Registration Server
Registration Server
URL of the registration server. The URL has a xed format
https://FQN/center/regsvc/ FQN has to be full qualied hostname of
the registration server. Example:
https://smt.example.com/center/regsvc/
Server CA certicate location
Location of the registration server's certicate. Specify one of the following locations:
Installation with YaST 43

URL
Remote location (http, https or ftp) from which the certicate can be downloaded. Example:
http://smt.example.com/smt-ca.crt
Floppy
Species a location on a oppy. The oppy has to be inserted before proceeding. The value has to start with the string floppy followed by the path to the
certicate. Example:
floppy/smt/smt-ca.crt
local path
Absolute path to the certicate on the local machine. Example:
/data/inst/smt/smt-ca.cert
Interactive
Use ask to open a pop-up menu where you can specify the path to the certicate. Do not use this option with AutoYaST. Example
ask
Deactivate certicate installation
Use done if either the certicate will be installed by an add-on product, or if
you are using a certicate issued by an ofcial certicate authority. Example:
done
Online Update
If the Registration was successful, and updates are available, select whether to perform
a YaST online update. If there are any patched packages available on the servers,
download and install them now to x known bugs or security issues. For detailed instructions see Chapter 1, YaST Online Update (↑Administration Guide). Directives on
how to perform an online update in the installed system are available at Section 6.5,
“Keeping the System Up-to-date” (page 77) or Chapter 1, YaST Online Update (↑Ad-
ministration Guide). This step is skipped if no updates are available or if you haven't
registered.
44 Deployment Guide

New Local User
In addition to the user created in part one of the installation, you can create an additional
user in this dialog. To create more users, manage groups, modify defaults for new users
and set up network authentication, launch the User Management. Refer to Chapter 9,
Managing Users with YaST (page 91) for more information about user management.
To skip this step, just click Next without entering any data.
Release Notes
After completing the user authentication setup, YaST displays the release notes. Reading
them is recommended, because they contain important up-to-date information which
was not available when the manuals were printed. If you successfully tested the Internet
connection, read the most recent version of the release notes, as fetched from SUSE
Linux Enterprise Desktop's servers. Use Miscellaneous > Release Notes in YaST or
start the SUSE Help Center to view the release notes after installation.
Hardware Conguration
At the end of the installation, YaST opens a dialog for the conguration of the graphics
card and other hardware components connected to the system, such as printers or sound
cards. Click the individual components to start the hardware conguration. For the most
part, YaST detects and congures the devices automatically.
You can skip any peripheral devices and congure them later, as described in Chapter 5,
Setting Up Hardware Components with YaST (page 51). To skip the conguration,
select Skip Conguration and click Next.
However, when setting up a desktop system you should congure the graphics card
right away. Although the display settings as congured by YaST should be generally
acceptable, most users have very strong preferences as far as resolution, color depth,
and other graphics features are concerned. To change these settings, select the respective
item and set the values as desired.
TIP: Resetting Hardware Conguration to the Default Values
You can cancel any changes to the hardware conguration by clicking Change
> Reset to Defaults. YaST then shows the original proposal again.
Installation with YaST 45

Installation Completed
After a successful installation, YaST shows the Installation Completed dialog. In this
dialog, select whether to clone your newly installed system for AutoYaST. To clone
your system, select Clone This System for AutoYaST. The prole of the current system
is stored in /root/autoyast.xml.
AutoYaST is a system for installing one or more SUSE Linux Enterprise Desktop systems automatically without user intervention. AutoYaST installations are performed
using a control le with installation and conguration data. Finish the installation of
SUSE Linux Enterprise Desktop with Finish in the nal dialog.
3.12 Graphical Login
SUSE Linux Enterprise Desktop is now fully installed and congured. Unless you enabled the automatic login function or customized the default runlevel, you should see
the graphical login on your screen in which to enter a username and password to log
in to the system. On single user systems with automatic login enabled, the desktop starts
automatically.
For a short introduction to the KDE or GNOME desktop environments, refer to the
GNOME Quick Start (↑GNOME Quick Start) and the KDE Quick Start (↑KDE Quick
Start). Find detailed information about both desktop environments and about the appli-
cations to run on KDE or GNOME in the KDE User Guide (↑KDE User Guide) and
the GNOME User Guide (↑GNOME User Guide). These manuals can be accessed via
the Help function in both KDE and GNOME.
46 Deployment Guide

Updating SUSE Linux Enterprise
SUSE® Linux Enterprise provides the option of updating an existing system to the new
version without completely reinstalling it. No new installation is needed. Old data, such
as home directories and system conguration, is kept intact. During the life cycle of
the product, you can apply Service Packs to increase system security and correct software
defects. Install from a local CD or DVD drive or from a central network installation
source.
4.1 Updating SUSE Linux Enterprise
Follow the steps outlined in this section, if you want to update from SUSE Linux Enterprise Desktop 10 to SUSE Linux Enterprise Desktop 11, for example. Make sure you
update the old system to the most recent patch level rst—at the moment, that is SP2.
Software tends to “grow” from version to version. Therefore, take a look at the available
partition space with df before updating. If you suspect you are running short of disk
space, secure your data before updating and repartition your system. There is no general
rule of thumb regarding how much space each partition should have. Space requirements
depend on your particular partitioning prole and the software selected.
4
4.1.1 Preparations
Before updating, copy the old conguration les to a separate medium, such as tape
device, removable hard disk, USB stick, or ZIP drive, to secure the data. This primarily
applies to les stored in /etc as well as some of the directories and les in /var and
Updating SUSE Linux Enterprise 47

/opt. You may also want to write the user data in /home (the HOME directories) to
a backup medium. Back up this data as root. Only root has read permission for all
local les.
Before starting your update, make note of the root partition. The command df / lists
the device name of the root partition. In Example 4.1, “List with df -h” (page 48),
the root partition to write down is /dev/sda3 (mounted as /).
Example 4.1
Filesystem Size Used Avail Use% Mounted on
/dev/sda3 74G 22G 53G 29% /
tmpfs 506M 0 506M 0% /dev/shm
/dev/sda5 116G 5.8G 111G 5% /home
/dev/sda1 39G 1.6G 37G 4% /windows/C
/dev/sda2 4.6G 2.6G 2.1G 57% /windows/D
List with df -h
4.1.2 Possible Problems
If you update a default system from the previous version to this version, YaST works
out necessary changes and performs them. Depending on your customizations, some
steps or the entire update procedure may fail and you must resort to copying back your
backup data. Check the following issues before starting the system update.
Checking passwd and group in /etc
Before updating the system, make sure that /etc/passwd and /etc/group do not
contain any syntax errors. For this purpose, start the verication utilities pwck and
grpck as root and eliminate any reported errors.
PostgreSQL
Before updating PostgreSQL (postgres), dump the databases. See the manual page
of pg_dump. This is only necessary if you actually used PostgreSQL prior to your
update.
48 Deployment Guide

4.1.3 Updating with YaST
Following the preparation procedure outlined in Section 4.1.1, “Preparations” (page 47),
you can now update your system:
Optionally, prepare an installation server. For background information, see Sec-
1
tion 11.2.1, “Setting Up an Installation Server Using YaST” (page 126).
Boot the system as for the installation, described in Section 3.3, “System Start-
2
Up for Installation” (page 20). In YaST, choose a language and select Update
in the Installation Mode dialog. Do not select New Installation.
YaST determines whether there are multiple root partitions. If there is only one,
3
continue with the next step. If there are several, select the right partition and
conrm with Next (/dev/sda3 was selected in the example in Section 4.1.1,
“Preparations” (page 47)). YaST reads the old fstab on this partition to analyze
and mount the le systems listed there.
In the Installation Settings dialog, adjust the settings according to your require-
4
ments. Normally, you can leave the default settings untouched, but if you intend
to enhance your system, check the packages offered in the Software Selection
submenus or add support for additional languages.
Click Update Options to update only software that is already installed (Only
4a
Update Installed Packages) or to add new software and features to the system
according to selected patterns. It is advisable to accept the suggestion. You
can adjustment it later with YaST.
You also have the possibility to make backups (Backup) of various system
4b
components. Selecting backups slows down the update process. Use this
option if you do not have a recent system backup.
Click Accept and conrm Start Update to start the software installation process.
5
At the end of the installation read the release notes and then click Finish to restart the
computer and log in.
Updating SUSE Linux Enterprise 49

4.2 Installing Service Packs
Use Service Packs to update a SUSE Linux Enterprise installation. There are several
different ways in which you can apply a Service Pack. You can either update the existing
installation or start a whole new installation using the Service Pack media. Possible
scenarios for updating the system and setting up a central network installation source
are described here.
TIP: Installation Changes
Read the installation instructions on the Service Pack media for further changes.
4.3 Software Changes from Version 10 to Version 11
NOTE: Software Changes from SLES 10 to SLES 11
For a detailed list of software and conguration changes from SUSE Linux Enterprise Server 10 to SUSE Linux Enterprise Server 11, refer to the release notes
. View them in the installed system using the YaST release notes module.
50 Deployment Guide

Setting Up Hardware Components with YaST
YaST allows you to congure hardware items at installation time as well as in the installed system. Congure additional graphics cards and monitors, adjust mouse and
keyboard settings and congure sound hardware. If you need printer or scanner support,
use the appropriate YaST modules to congure these hardware items. Learn which
hardware components are connected to your computer by using the YaST Hardware
Information module.
5.1 Probing Your Hardware
Use YaST, if you want to know more about your hardware or if you need to nd out
details like vendor and model of a certain hardware to be able to properly congure it.
Here and in the following sections we assume that you already started YaST (for exam-
ple, by pressing Alt + F2 and entering kdesu yast2 (KDE) or gnomesu yast2
(GNOME) followed by the root password, because YaST needs system administrator
permissions to change the system les):
In YaST click Hardware > Hardware Information. Hardware probings starts
1
immediately and it will take some time until you see the hardware information
tree in a separate window.
5
In the hardware information tree recursively click on the plus icons to expand
2
the information about a specic device.
Click Close to leave the hardware information overview.
3
Setting Up Hardware Components with YaST 51
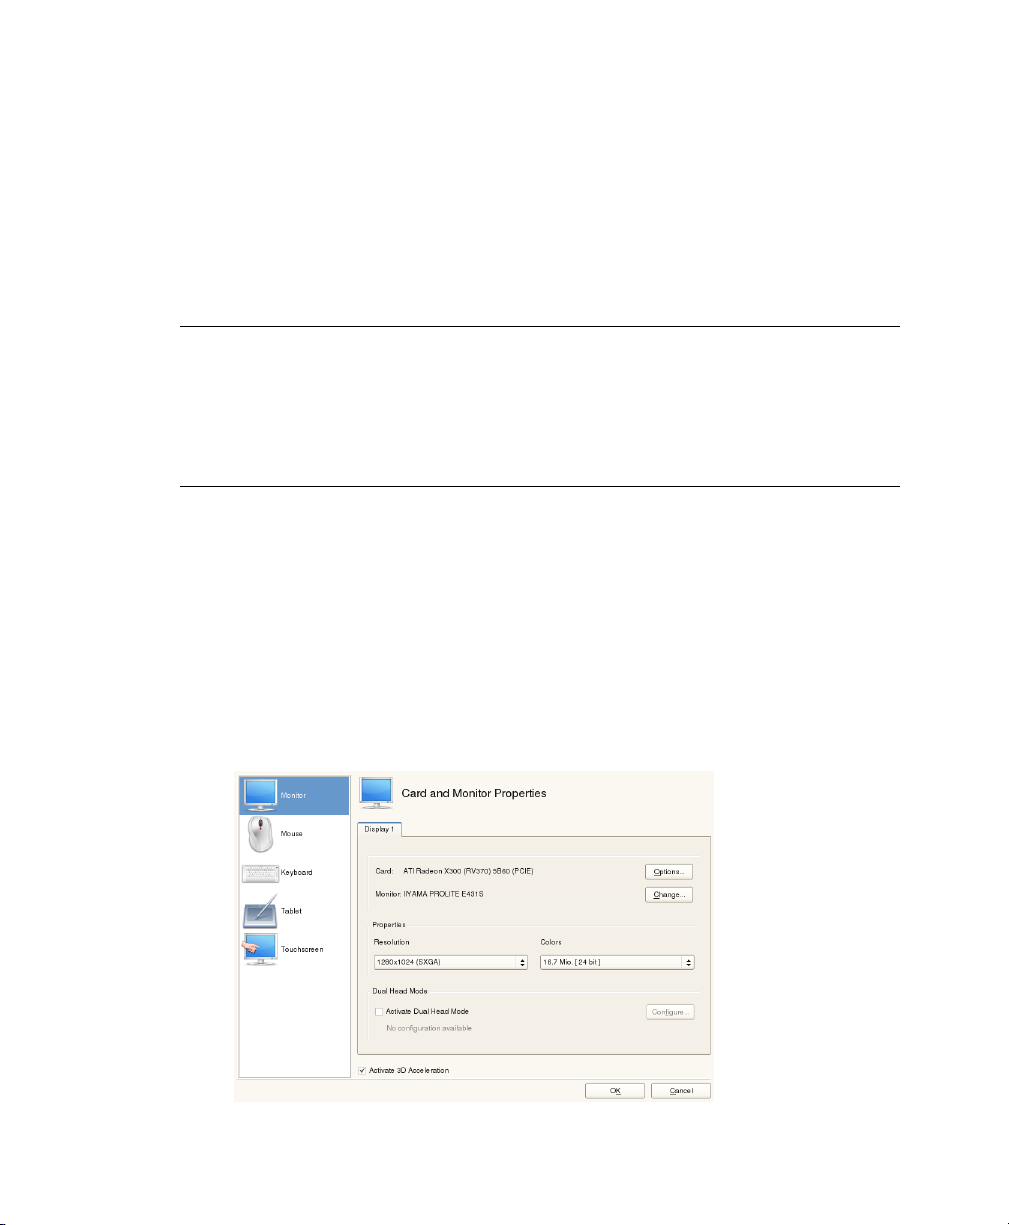
5.2 Setting Up Graphics Card and Monitor
After the installation you can change the conguration of your graphics system
(graphics card and monitor) according to your needs. Such a change can be necessary
because of accessibility issues or hardware upgrades.
WARNING: Changing Monitor Frequencies
Although there are safety mechanisms, you should still be very careful when
manually changing the allowed monitor frequencies. Incorrect values might
destroy your monitor. Always refer to the monitor's manual before changing
frequencies.
Change the resolution, if fonts are too small or if circles appear misshapen. Proceed as
follows:
In YaST, click Hardware > Graphics Card and Monitor. SaX2 checks the system
1
resources and displays a window.
Make sure the monitor is properly detected. If not, use Change to select the ap-
2
propriate model from the list.
Select an appropriate Resolution and Colors, if necessary.
3
52 Deployment Guide

Test the new conguration before it is applied to the system. Click Ok to decide
4
what to do with your conguration (Test, Save, or Cancel.)
To activate a second monitor, proceed as follows:
In YaST, click Hardware > Graphics Card and Monitor. SaX2 checks the system
1
resources and displays the Card and Monitor Properties dialog.
Make sure the monitor is properly detected. If not, use Change to select the ap-
2
propriate model from the list.
Enable Activate Dual Head Mode and click Congure for further tuning.
3
Make sure the second monitor is properly detected. If not, use Change to select
4
the appropriate model from the list.
Decide whether you want to use the second monitor in Cloned Multihead or in
5
Xinerama Multihead mode and click Ok.
Test the new conguration before it is applied to the system. Click Ok to decide
6
what to do with your conguration (Test, Save, or Cancel.)
NOTE: Restarting the X Server
Any changes you make here take effect only after you restart the X server. If
you want to restart the X server now, log out from the graphical system and
log in again.
5.3 Setting Up Keyboard and Mouse
Recongure input devices such as the keyboard or the mouse, or add more than one of
these devices using the YaST Keyboard and Mouse modules.
5.3.1 Keyboard Layout
In case you want to replace a standard 104-key keyboard with a multimedia keyboard
or use a different language or country layout, proceed as follows:
Setting Up Hardware Components with YaST 53

In YaST, click Hardware > Keyboard Layout. The SaX2 conguration tool reads
1
the system resources and displays the Keyboard Properties dialog.
Select your keyboard model from the Type list.
2
Select the country in the Layout list.
3
Depending on the country layout, you can choose a certain Variant. The selections
4
are applied immediately for testing.
As an option you can enable Additional Layouts. Check one or more boxes in
5
the list. This feature is handy if you want to switch between different languages
or scripts in the running system without the need for reconguration.
Before saving the conguration, use the Test eld at the bottom of the dialog to
6
check if special characters like umlauts and accented characters can be entered
and displayed correctly.
Click OK to leave the conguration dialog and in the following message click
7
Save to apply your changes.
54 Deployment Guide

NOTE: Conguring Console Keyboard Layout
By clicking the Save button as described in Step 7 (page 54) the setup of the
console keyboard layout takes place at the same time. If you want to change
the console keyboard layout, either call yast keyboard (the text mode interface) or check the KEYTABLE and YAST_KEYBOARD settings in /etc/
sysconfig/keyboard.
5.3.2 Mouse Model
The mouse is usually detected automatically, but you can set up your mouse model
manually if the automatic detection fails. Refer to the documentation of your mouse
for a description of the model. If you want to modify your mouse conguration, proceed
as follows:
In YaST, click Hardware > Mouse Model. The SaX2 conguration tool reads
1
the system resources and displays the Mouse Properties dialog.
Click Change and select your mouse model from the list displayed.
2
Click OK to leave the conguration dialog and apply your changes with Save.
3
In the Options part of the dialog, set various options for operating your mouse.
Activate 3-Button Emulation
If your mouse has only two buttons, a third button is emulated whenever you click
both buttons simultaneously.
Activate Mouse Wheel
Check this box to use a scroll wheel.
Invert X-Axis / Invert Y-Axis
Check these options if you want to change the direction in which the mouse
pointer moves.
Activate Left-Hand Button Mapping
Check this box to make the button mapping suitable for left-hand usage.
Setting Up Hardware Components with YaST 55

Emulate Wheel with Mouse Button
If your mouse does not have a scroll wheel but you want to use a similar functionality, you can assign an additional button for this. Select the button to use. While
pressing this button, any movement of the mouse is translated into scroll wheel
commands. This feature is especially useful with trackballs.
5.4 Setting Up Sound Cards
Most sound cards are detected automatically and congured with reasonable values.
In YaST, use Hardware > Sound if you want to add a problematic sound card that could
not be congured automatically or change the default settings. It is also possible to set
up additional sound cards or switch their sequence.
TIP: Probing for Old Sound Chips
If you know a legacy sound board is installed in your computer, let YaST probe
for old chips, if YaST cannot nd a sound board. Within the pop-up click Yes,
probe.
If YaST cannot detect your sound card automatically, proceed as follows:
Click Add to open a dialog in which to select a sound card vendor and model.
1
Refer to your sound card documentation for the information required. Find a
reference list of sound cards supported by ALSA with their corresponding sound
modules in /usr/share/doc/packages/alsa/cards.txt and at
http://www.alsa-project.org/alsa-doc/.
Make your choice and click Next.
In the Sound Card Conguration dialog, choose the conguration level in the
2
rst setup screen:
Quick automatic setup
You are not required to go through any of the further conguration steps
and no sound test is performed. The sound card is congured automatically.
Normal setup
Adjust the output volume and play a test sound.
56 Deployment Guide

Advanced setup with possibility to change options
Customize all settings manually.
Click Next to continue.
In Sound Card Volume, test your sound conguration and make adjustments to
3
the volume. You should start at about ten percent to avoid damage to your hearing
or the speakers. A test sound should be audible when you click Test. If you cannot
hear anything, increase the volume. Press Next > Finish to complete the sound
conguration.
If you want to change the conguration of a sound card, go to the Sound Conguration
dialog, select a displayed Card Model and click Edit. Use Delete to remove a sound
card altogether.
Click the Other popup menu to customize one of the following options manually:
Volume...
Use this dialog is for setting the volume.
Play Test Sound
Use this option for testting the sound system.
Start Sequencer
For playback of MIDI les, check this option.
Set as the Primary Card
Click Set as the Primary Card if you want to adjust the sequence of your sound
cards. The sound device with index 0 is the default device and thus used by the
system and the applications.
PulseAudio Conguration...
Enter this dialog if you want to disable the PulseAudio sound system because you
want to use something else system-wide.
The volume and conguration of all sound cards installed are saved when you click
Finish. The mixer settings are saved to the le /etc/asound.conf and the ALSA
conguration data is appended to the end of the les /etc/modprobe.d/sound
and /etc/sysconfig/hardware.
Setting Up Hardware Components with YaST 57

5.5 Setting Up a Printer
YaST can be used to congure a local printer that is directly connected to your machine
(normally with USB or parallel port) and to set up printing with network printers. It is
also possible to share printers over the network and to add 3rd party “drivers” (PostScript
Printer Description (PPD) les). Further information about printing (concepts, technical
details, and troubleshooting) is available in Chapter 12, Printer Operation (↑Adminis-
tration Guide).
In YaST, click Hardware > Printer to start the printer module. By default it opens in
the Printer Congurations view, displaying a list of all printers available and congured.
This is especially useful when having access to a lot of printers via the network. From
here you can also Print a Test Page on the selected printer and congure local printers.
5.5.1 Conguring Local Printers
If an uncongured local printer is detected, YaST starts automatically to congure it.
YaST can congure the printer automatically if the parallel or USB port can be set up
automatically and the connected printer can be detected. The printer model must also
be listed in the database used during the automatic hardware detection.
If the printer model is unknown or cannot be automatically detected, congure it manually. There are two possible reasons why a printer is not automatically detected:
• The printer does not identify itself correctly. This may apply to very old devices.
Try to congure your printer as described in Section “Conguring Manually”
(page 58).
• If the manual conguration does not work, communication between printer and
computer is not possible. Check the cable and the plugs to make sure that the
printer is properly connected. If this is the case, the problem may not be printerrelated, but rather a USB or parallel port–related problem.
Conguring Manually
To manually congure the printer, select Add in the Printer Congurations view. YaST
will load a list of printer drivers—this may take some time. Use the Connection Wizard
58 Deployment Guide

to specify how the printer is connected to the machine. Then choose a suitable driver
and specify a unique name for the printer queue in the Set Name eld.
A printer is never used directly, but always through a printer queue. This ensures that
simultaneous jobs can be queued and processed one after the other. Each printer queue
is assigned to a specic driver, and a printer can have multiple queues. This makes it
possible to set up a second queue on a color printer, that prints black only, for example.
Refer to Section “The Workow of the Printing System” (Chapter 12, Printer Operation,
↑Administration Guide) for more information about print queues.
For many printer models, several drivers are available. When conguring the printer,
YaST defaults to the one marked recommended as a general rule. Normally it is be
necessary to change the driver—the recommended one should produce the best results.
However, if you want a color printer to print only in black and white, it is most convenient to use a driver that does not support color printing, for example. If you experience
performance problems with a PostScript printer when printing graphics, it may help to
switch from a PostScript driver to a PCL driver (provided your printer understands
PCL).
If no driver for your printer is listed, you can try to select a generic driver with an appropriate standard language from the list. Refer to your printer's documentation to nd
out which language (the set of commands controlling the printer) your printer understands. If this does not work, refer to Section “Adding Drivers with YaST” (page 59)
for another possible solution.
The printer is now congured with the default settings and ready to use. Click Finish
Add to return to the Printer Congurations view. The newly congured printer is now
visible in the printers list.
Adding Drivers with YaST
If your printer does not appear in the Assign Drivers dialog when adding a new printer,
the PPD (PostScript Printer Description) le for your model is not available. For more
information about PPD les, refer to Section “Installing the Software” (Chapter 12,
Printer Operation, ↑Administration Guide). To manually add a PPD le from the local
le system or an FTP or HTTP server, choose Add Driver.
Get PPD les directly from your printer vendor or from the driver CD of the printer.
For details, see Section “No Suitable PPD File Available for a PostScript Printer”
(Chapter 12, Printer Operation, ↑Administration Guide). Alternatively, you can also
Setting Up Hardware Components with YaST 59

nd PPD les at http://www.linuxfoundation.org/en/OpenPrinting/,
the “OpenPrinting.org printer database”. When downloading PPD les from OpenPrinting.org, keep in mind that it always shows the latest Linux support status, which is not
necessarily met by SUSE Linux Enterprise Desktop.
Fine-tuning a Local Printer Conguration
In order to adjust the default settings for paper size, resolution, media source and others,
choose a printer from the list in the Printer Congurations view and click Congure.
In the window for modifying the respective printer queue, you can make detailed adjustments by opening All options for the Current Driver. If you have access to more
than one printer queue, you can specify whether this should be the Default Printer. You
may also alter the generic printer Description and the Location description here.
For many printer models, several drivers are available. When conguring the printer,
YaST defaults to the one marked recommended as a general rule. See the Driver
section in the dialog for all drivers available. The one that is currently chosen is marked
as Current Driver.
Normally it is not necessary to change the driver—the one chosen by YaST should
produce the best results. However, if you want a color printer to print only in black and
white, it is most convenient to use a driver that does not support color printing, for example. If you experience performance problems with a PostScript printer when printing
graphics, it may help to switch from a PostScript driver to a PCL driver (provided your
printer understands PCL).
5.5.2 Conguring Printing via the Network
with YaST
Network printers are not detected automatically. They must be congured manually
using the YaST printer module. Depending on your network setup, you can print to a
print server (CUPS, LPD, SMB, or IPX) or directly to a network printer (preferably via
TCP). Access the conguration view for network printing by choosing Printing via
Network from the left pane in the YaST printer module.
60 Deployment Guide

Using CUPS
In a Linux environment CUPS is usually used to print via the network. The simplest
setup is to only print via a single CUPS server which can directly be accessed by all
clients. Check Do All Your Printing Directly via One Remote CUPS Server and specify
the name or IP address of the server. Click Test the Server to make sure you have chosen
the correct name/IP address. Leave with OK.
If you print via more than one CUPS server, check Receive Printer Information from
remote CUPS Servers. Specify, whether you want to listen to servers in all networks
available, to servers in your local network, or to specic IP addresses. This setup needs
a running local CUPS daemon that communicates with the remote CUPS servers.
Therefore answer Yes when asked to start a local CUPS daemon.
Using Print Servers other than CUPS
If your network offers print services via print servers other than CUPS, start the Connection Wizard and choose the appropriate Connection type. Ask your network admin-
istrator for details on conguring a network printer in your environment.
5.5.3 Sharing Printers Over the Network
Printers managed by a local CUPS daemon can be shared over the network and so turn
your machine into a CUPS server. Usually you share a printer by enabling CUPS' so
called “browsing mode”. If browsing is enabled, the local printer queues are made
available on the network for listening remote CUPS daemons. It is also possible to set
up a dedicated CUPS server, that manages all printing queues and can directly be accessed by remote clients. In this case it is not necessary to enable browsing.
To share your printer, open the Share Printers view in the YaST printer module. Select
Allow Remote Access and congure your CUPS daemon to be accessible For Computers
Within the Local Network. To enable the browsing mode, also check Publish Printers
by Default Within the Local Network. Then specify the network interface(s) that should
be used by the CUPS server. If you enable more than one interface, you can also enable
or disable the browsing mode on a per interface base. Apply the settings with OK and
allow to restart the CUPS server.
Setting Up Hardware Components with YaST 61

5.6 Setting Up a Scanner
You can congure a USB or SCSI scanner at any time using YaST. The
sane-backends package contains hardware drivers and other essentials needed to
use a scanner. Scanners connected to a parallel port must be congured manually. If
you own a HP All-In-One device, see Section 5.6.1, “Conguring an HP All-In-One
Device” (page 62), instructions on how to congure a network scanner are available
at Section 5.6.3, “Scanning over the Network” (page 63).
Connect your USB or SCSI scanner to your computer and turn it on. Start YaST and
select Hardware > Scanner. YaST builds the scanner database and tries to detect your
scanner model automatically. If you scanner is detected correctly, and can be tested
with Other > Test. Leave the conguration menu with Finish.
If a USB/SCSI scanner is not properly detected, try Other > Restart Detection rst. If
that does not help, or if your scanner is connected to the parallel port, congure it
manually by clicking Add and choosing a scanner from the list. Use Other > Test to
make sure you have chosen the correct driver.
5.6.1 Conguring an HP All-In-One Device
HP All-In-One device can be congured with YaST even if they are connected to the
parallel port or are made available via network. If you own an USB HP All-In-One
device, start conguring as described at the beginning of this chapter. If it is detected
properly and the Test succeeds, it is ready to use.
If your USB device is not properly detected, or your HP All-In-One device is connected
to the parallel port or the network, run the HP Device Manager with Other > Run hp-
setup from the YaST scanner module and follow the on-screen instructions. After having
nished the HP Device Manager, the YaST scanner module automatically restarts the
auto detection. If your scanner is detected properly, leave with Finish, otherwise manually choose a scanner from the list by clicking Add.
5.6.2 Sharing a Scanner over the Network
SUSE Linux Enterprise Desktop allows to share a scanner over the network. To do so,
congure your scanner as described in Section 5.6, “Setting Up a Scanner” (page 62).
62 Deployment Guide

Once the scanner is successfully congured, choose Other > Scanning via Network in
the YaST scanner module. Enter the hostnames of the clients (separated by a comma)
that should be allowed to use the scanner under Server Settings > Permitted Clients for
saned and leave the conguration dialog with OK.
5.6.3 Scanning over the Network
To use a scanner that is shared over the network, run the YaST scanner module with
Hardware > Scanner. Open the network scanner conguration menu by Other >
Scanning via Network and enter the hostname of the machine the scanner is connected
to under Client Settings > Servers Used for the net Metadriver. Leave with OK. The
network scanner is now listed in the Scanner Conguration window and is ready to
use.
Setting Up Hardware Components with YaST 63


Installing or Removing Software
Change the software collection of your system using YaST. This YaST module is
available in three toolkit avors: Qt, GTK+, and ncurses; Qt and GTK+ avors are
described here.
In YaST's software management tool search for software components you want to add
or remove. YaST resolves all the dependencies for you. Add additional software
repositories to your setup to install packages not shipped with the installation media
and let YaST manage them. Keep your system up-to-date by managing software updates
with openSUSE Updater.
6.1 Denition of Terms
Repository
A local or remote directory containing packages plus additional information about
these packages (package meta-data).
(Repository) Alias
A short name for a repository used by various zypper commands. The alias can be
chosen by the user when adding a repository and has to be unique.
6
Product
Represents a whole product, for example SUSE Linux Enterprise Desktop.
Installing or Removing Software 65

Pattern
A pattern is an installable list of packages needed for a special purpose. Examples
are Base System, providing the openSUSE basic system, or GNOME Base
System, containing all packages needed to run the GNOME Desktop environment.
Package
A package is a compressed le in rpm format that contains the les for a particular
program.
Patch
A patch consists of one or more packages—either full packages or patchrpm or
deltarpm packages— and may also introduce dependencies to packages that are
not installed yet.
Resolvable
An generic term for product, pattern, package or patch. The most commonly used
type of resolvable is a package or a patch.
patchrpm
A patchrpm consists only of les that have been updated since it was rst released
for SUSE Linux Enterprise Desktop 11. Its download size is usually considerably
smaller than the size of a package.
deltarpm
A deltarpm consists only of the binary diff between two dened versions of a
package and therefore, has the smallest download size. Before being installed, the
rpm package has to be rebuilt on the local machine.
6.2 Using the Qt Interface
Start the YaST Qt interface on the command line with yast2 --qt.
6.2.1 Installing Software
Software is available via RPM packages. Each package contains the program itself, the
conguration les, and additional documentation. If you want to add more software to
the system, proceed as follows:
66 Deployment Guide

Click Software > Software Management to start the YaST package manager.
1
In the search eld enter the name of the software you want to install (for example,
2
xpdf, a lightweight PDF viewer) and press Enter.
The package is listed in the right frame. Select it for installation. Once done, you
3
can search for more packages and select them for installation in one go.
Click Accept.
4
When all selected packages are installed, YaST asks you whether you want to
5
install or remove additional packages. Press No to close YaST.
By specifying various search criteria, you can restrict the search to display a few or
even only one package. You can also dene special search patterns using wild cards
and regular expressions in Search Mode.
TIP: Quick Search
In addition to the Search lter, all lists of the package manager feature a quick
search. Click the respective list to gain focus (for example, the Package list)
and enter a letter to move the cursor to the rst package in the list whose
name begins with this letter.
If you do not know the name of the software you are interested in, you can browse
through the software catalog in various ways. For example, you can lter by patterns,
package groups, languages, repositories, or installation summary. Filter by patterns, if
you are looking for software for a specic task:
From the lter list in the upper left corner, select Patterns. Now you see various
1
pattern sets listed in the area below.
Installing or Removing Software 67
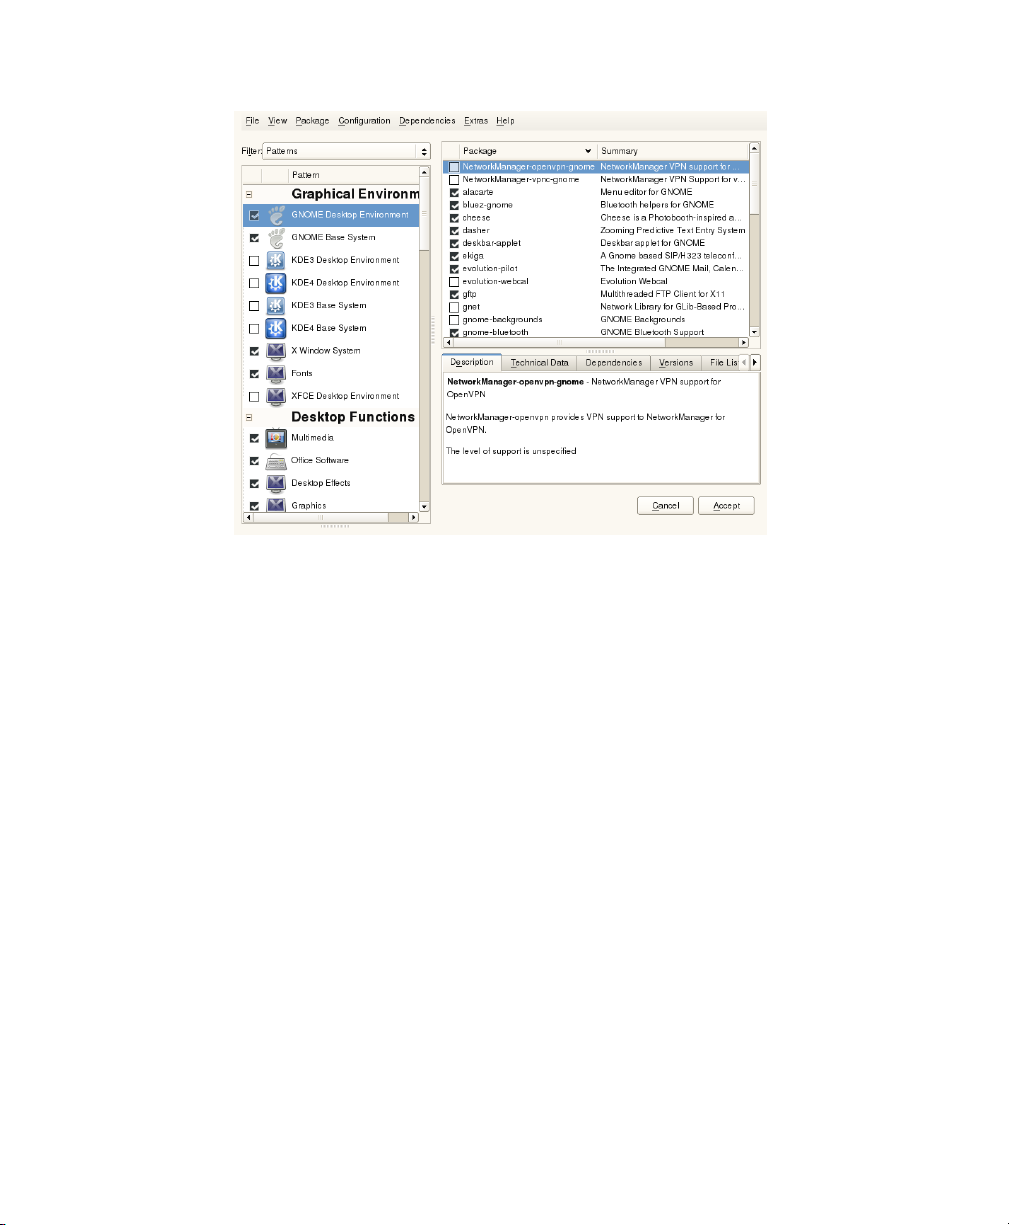
From the patterns select one or more patterns you are interested in. If you click
2
on the name of a pattern, for example on Base Development, you see the packages
it contains, in the right frame. If you activate it, the status markers at the beginning
of the line will change: all packages get marked either with the status Keep or
Install. The meaning of all the symbols and font color changes is explained in
Help > Symbols.
Click Accept.
3
Alternatively, lter by package groups. The package groups feature offers a more detailed view of the software grouped by categories. Often packages depend on other
packages; if you select a package, you might be requested to install additional packages
to resolve possible package dependencies.
Filtering by languages is similar to ltering by package groups. Using the languages
view enables you to select packages like translated program messages, documentation,
or special fonts which are needed to support a specic language.
For installing corresponding source packages, use zypper. For more information, see
Section “Installing and Removing Software with Zypper” (Chapter 5, Managing Software
with Command Line Tools, ↑Administration Guide).
68 Deployment Guide

Using the installation summary lter you see an overview of the packages you have
scheduled for installation. It is convenient for double-checking if many packages are
pending for installation.
6.2.2 Checking Software Dependencies
The software of one package might only work properly if the required package is also
installed. If packages with identical or similar functionality use the same system resource,
they should not be installed at the same time, because this would cause a package conict.
When the package manager starts, it examines the system and displays the installed
packages. When you select to install and remove packages, the package manager automatically checks the dependencies and selects any other required packages (resolution
of dependencies). If you select or deselect conicting packages, the package manager
indicates this and suggests possible solutions to this problem (resolution of conicts).
Check Dependencies and Autocheck are located under the information window. If you
click Check Dependencies, the package manager checks if the current package selection
results in any unresolved package dependencies or conicts. In the event of unresolved
dependencies, the required additional packages are selected automatically. For package
conicts, the package manager opens a dialog that shows the conict and offers various
options for solving the problem.
If you activate Autocheck, any change of a package status triggers an automatic check.
This is a useful feature, because the consistency of the package selection is monitored
permanently. However, this process consumes resources and can slow down the package
manager. For this reason, Autocheck is not activated by default. In either case, a consistency check is performed when you conrm your selection with Accept.
For example, sendmail and postfix may not be installed concurrently. Figure 6.1,
“Conict Management of the Package Manager” (page 70) shows the conict message
prompting you to take a decision. postfix is already installed. Accordingly, you can
refrain from installing sendmail, remove postfix, or take the risk and ignore the
conict.
Installing or Removing Software 69

WARNING: Handling Package Conicts
Unless you are very experienced, follow the suggestions of YaST when handling
package conicts, because otherwise the stability and functionality of your
system could be endangered by the existing conict.
Figure 6.1
Conict Management of the Package Manager
6.2.3 Packages and Software Repositories
If you want to search for packages originating from one particular software repository,
use the Repositories lter. In the default conguration, this lter shows a list of all
packages from the selected installation source. To restrict the list, use a secondary lter.
To view a list of the all installed packages from the selected repository, select the lter
Repositories then select Installation Summary from Secondary Filter list and deactivate
all check boxes except Keep.
If you are interested in the opposite and want to detect packages not belonging to any
repository, also use the Repositories lter and select Unmaintained Packages as the
Secondary Filter.
70 Deployment Guide

6.2.4 Removing Software
If you want to remove software from the system, proceed as follows:
Make use of a search strategy explained in Section 6.2.1, “Installing Software”
1
(page 66).
Depending on the search strategy, you can either select a complete set or single
2
packages one by one. For patterns, both ways are possible.
Click Accept and either watch the de-installation progress or adjust your selection,
3
if YaST complains about dependency issues.
6.3 Using the GTK+ Interface
Change the software collection of your system using YaST. In YaST's software management tool search for software components you want to add or remove. YaST resolves
all the dependencies for you. Add additional software repositories to your setup to install
packages not shipped with the installation media and let YaST manage them. Keep
your system up-to-date by managing software updates with openSUSE Updater.
Start the YaST GTK+ interface on the command line with yast2 --gtk.
6.3.1 Installing Software
Software is available via RPM packages. Each package contains the program itself, the
conguration les, and additional documentation. If you want to add more software to
the system, proceed as follows:
Click Software > Software Management to start the YaST package manager.
1
In the package search eld at the right window border enter the name of the
2
software you want to install (for example, xpdf, a leightweight PDF viewer).
YaST starts searching for the package while you enter the name. When the search
is nished, select the desired package in the main pane and click Install.
You are able to search for more packages and list them the same way.
3
Installing or Removing Software 71

When nished, click Apply to perform the installation of the listed packages.
4
If you do not know the name of the software you are interested in, you can browse
through the software catalog in various ways. For example, you can group by patterns,
package groups, languages, or repositories. Group by patterns, if you are looking for
software for a specic task:
From the grouping menu in the upper left corner, select Patterns. Now you see
1
various pattern sets listed in the area below.
From the patterns select one or more patterns you are interested in. If you click
2
the name of a pattern, for example, Base Development, you see the packages it
72 Deployment Guide

contains in the right frame. If you activate this pattern by clicking Install All, the
packages will get listed in the changes overview on the right side.
Click Apply to install all selected packages.
3
Alternatively, group by package groups. The package groups feature offers a more detailed view of the software grouped by categories. Packages often depend on other
packages; if you select a package, you might be requested to install additional packages
to resolve possible package dependencies.
Grouping by languages is similar to grouping by package groups. Using the languages
view enables you to select packages like translated program messages, documentation,
or special fonts which are needed to support a specic language.
For installing corresponding source packages, use zypper. For more information, see
Section “Installing and Removing Software with Zypper” (Chapter 5, Managing Software
with Command Line Tools, ↑Administration Guide).
6.3.2 Checking Software Dependencies
The software of one package might only work properly if the required package is also
installed. If packages with identical or similar functionality use the same system resource,
they should not be installed at the same time, because this would cause a package conict.
When the package manager starts, it examines the system and displays the installed
packages. When you select a packag to install and remove it, the package manager automatically checks the dependencies and selects any other required packages (resolution
of dependencies). If you select or deselect conicting packages, the package manager
indicates this and suggests possible solutions to this problem (resolution of conicts).
For example, sendmail and postfix should not be installed concurrently. Figure 6.2,
“Conict Management of the Package Manager” (page 74) shows a conict message
prompting you to make a decision. postfix is already installed. Accordingly, you
can decide wheter to install sendmail or remove postfix.
Installing or Removing Software 73

WARNING: Handling Package Conicts
Unless you are very experienced, follow the suggestions of YaST when handling
package conicts, because otherwise the stability and functionality of your
system could be endangered by the existing conict.
Figure 6.2
Conict Management of the Package Manager
6.3.3 Packages and Software Repositories
If you want to search for packages originating from one particular software repository,
use grouping by Repositories. This view shows a list of all packages from the selected
installation source.
To view a list of the all installed packages from the selected repository, click Installed.
From this listing select packages for removing. To accomplish the opposite action, click
Available and select packages for installation.
74 Deployment Guide

6.3.4 Removing Software
If you want to remove software from the system, proceed as follows:
Make use of a search strategy explained in Section 6.3.1, “Installing Software”
1
(page 71).
In the Packages Listing mark the packages you want to remove. To mark all of
2
them with one click, right-click in the Packages Listing pane and and choose
Select All.
Click Remove.
3
If you try to remove a package which is required by installed software, the conict
manager will complain about dependency issues and you must resolve the conicts
rst as descripted in Section 6.3.2, “Checking Software Dependencies” (page 73).
When all conicts are resolved, the package scheduled for removing is listed in
the Changes pane on the right side.
Click Apply to perform all actions listed in the Changes pane.
4
6.4 Managing Software Repositories and Services
Add additional software repositories to your system to install third-party software. By
default, the product repository such as SUSE Linux Enterprise Desktop-DVD 11 and
a matching update repository are congured once you registered your system. Depending
on the initially selected product, a separate language add-on repository with translations,
dictionaries, etc. might also be congured.
Here also manage subscriptions to so-called Services. A Service in this context is a
Repository Index Service (RIS) that can offer one or more software repositories. Such
a Service can be changed dynamically by its administrator or vendor.
Installing or Removing Software 75

WARNING: Trusting External Software Sources
Before adding external software repositories to your list of repositories, make
sure this repository can be trusted. SUSE Linux Enterprise Desktop is not responsible for any potential problems arising from software installed from thirdparty software repositories.
To ensure the integrity software repositories can be signed with the GPG Key of the
repository maintainer. You can manage these keys in YaST—for more information,
see GPG Keys (page 77). Whenever you add a new repository, YaST offers to import
its key. Verify it as any other GPG key and pay attention that it does not change. If you
detect a key change, something could be wrong with the repository and you should
better disable it as an installation source until you know the cause of the key change.
To add product repositories either click Software Repositories directly in the Software
pane of the YaST control center, or from within the Software Management, proceed as
follows:
In the Software Management start screen, select Repositories from the upper left
1
drop-down menu and then click Edit to display an overview of congured software repositories.
Click Add to select the media type holding the repository, for example, DVD or
2
USB Mass Storage with the language add-ons. Then click Next and provide additional information about the medium.
YaST asks to insert the medium.
3
Conrm with Continue. It takes some moments until YaST has downloaded and
4
parsed the metadata of the repository. Once done you can install software from
this repository as described in Section 6.2.1, “Installing Software” (page 66)
resp. Section 6.3.1, “Installing Software” (page 71).
In the Congured Software Repositories overview nd several conguration options:
Properties
By default, after adding a new repository, the repository is Enabled and the Auto-
matically Refresh is active. This means, YaST will pull in updated meta data automatically and is always aware of new versions.
76 Deployment Guide

The Priority of a repository is a value between 0 and 99, where 0 is the highest
priority. If a package is available in more than one repository the repository with
the highest priority wins. This is useful if you want to give a local repository (for
example, a DVD) a higher priority to avoid downloading packages unnecessarily
from the Internet although they have the same or a higher version number.
GPG Keys
Clicking GPG Keys, you open the GPG public keys management interface. In the
GPG Keys subdialog, you can add new keys manually, delete or edit existing keys.
Refresh
Refresh lets you update the repository meta data in various ways.
6.5 Keeping the System Up-to-date
Novell offers a continuous stream of software security patches for your product. The
updater applet informs you about the availability of patches and lets you easily install
them with just a few clicks.
6.5.1 Using the KDE Updater Applet
The updater applet resides in the system tray of your panel depicting the head of the
SUSE mascot (Geeko), which changes depending on the availability and relevance of
patches and the status of the updater. Whenever the icon changes, a tool tip displaying
the current status is shown, too. The applet is started by default. Choose Applications
> System > Desktop Applet > kupdateapplet from the main menu to manually start it.
Green Geeko Head with Green Arrows
No patches available.
Green Geeko Head with Yellow Arrows
The updater applet is busy (for example checking for updates, installing software).
Red Start with Arrow
Security patches available.
Orange Star with Arrow
Important patches are available.
Installing or Removing Software 77

Blue square with Arrow
Trivial patches are available.
Yellow Triangle with Exclamation Mark
An error occurred.
Blue Circle with Question Mark
No update repository is dened. When you click the updater applet in this state,
you are asked whether to check for updates. If you agree, the YaST Online Update
Conguration module is started.
Installing Patches
Whenever the updater icon shows the availability of patches, left-click to open the
software installation window. It lists the number of Security and Recommended
patches available. While the security patches are installed by default, you can choose
whether to install the recommended ones as well. Some patches, such as new kernel
versions, require to restart your computer. Check Do not Install Updates that Require
a Restart to skip these updates for now. Start updating your system by clicking Install.
Figure 6.3
A click on Details opens the Available Updates window which shows a detailed
list of all patches and allows you to alter the selection of packages that will be installed.
Apart from the patch name the Type (Security, Recommended or Optional), a short
Summary and the patch version number is shown. Patches are sorted alphabetically by
default—change this by clicking on a column headline (Name, Summary, Type, New
Version, Catalog, or Restart). Click Install to proceed.
78 Deployment Guide
KDE Updater Applet: Simple Update View

Figure 6.4
You will be prompted for the root password after having proceeded with Install. The
updater performs the installation of the patches. See the system tray (KDE) or the notication area (GNOME) for status messages and a progress meter.
The YaST Online Update offers advanced features to customize the patch installation.
Please refer to Chapter 1, YaST Online Update (↑Administration Guide) for more infor-
mation.
KDE Updater Applet: Detailed Update View
Installing New Software Versions
New software versions are available from software repositories provided by the openSUSE community. By default, no such repositories are precongured. To add a repository, right-click on the updater icon and choose Add/Remove Update Sources. You
need to enter the root password to start the Congured Software Repositories module.
.
WARNING: Trusting External Software Sources
Before adding external software repositories to your list of repositories make
sure this repository can be trusted. SUSE Linux Enterprise Desktop is not respon-
Installing or Removing Software 79

sible for any potential problems arising from software installed from third
party software repositories.
The updater applet does not monitor repositories for new software versions by default.
To enable this feature, open the conguration window as described in Section “Cong-
uring the Updater Applet” (page 80) and tick the check box Show Available Upgrades
When Back-End Provides Them check box. When the updater icon indicates the availability of updates, click on the icon to launch the software installation window. Click
on Details and then on the Upgrade tab to open the list with new software versions.
Either select single packages by checking the box in front of an entry, or click Select
All Packages. Install starts the installation of the selected software packages. You will
be prompted for the root password. See the system tray (KDE) or the notication area
(GNOME) for status messages and a progress meter.
Conguring the Updater Applet
By default the updater is started on login, checks for updates every 24 hours, shows
recurring notications every 60 minutes and only monitors the availability of patches.
To change this behavior, right-click the applet icon and choose Congure Applet.
Figure 6.5
80 Deployment Guide
KDE Updater Applet: Conguration

The conguration dialog also offers to change the following settings:
Back-End
Choose between different back-ends. The Package Kit Plugin is used by default.
If you prefer the ZYpp Plugin, make sure the package
kde4-kupdateapplet-zypp is installed.
Always Show Detailed View
Activate this option when you prefer the detailed patch view that lists all patches
available with short summaries rather than the simple view.
Check for Updates only When System Is Connected to Charger
Prohibits checking for updates when running on batteries in order to save power.
This option is activated by default but only affects mobile computers.
Check for Updates only When System Is under Low Load
Prohibits checking for updates when the system is under heavy load. This option
is activated by default.
Search for Drivers When New Hardware is Attached
Provided a repository offering appropriate drivers, the updater can automatically
install drivers for hardware such as USB devices.
6.5.2 Using the GNOME Updater Applet
The updater applet resides in the notication area of your panel. It's icon changes depending on the availability and relevance of patches and the status of the updater. The
applet is started by default, choose Computer > More Applications > System > Update
System.
NOTE: Icon visibility
By default, the updater applet icon is only visible in the notication area, if
patches are available.
Open box with a globe
The updater is busy (for example checking for updates, installing software).
Installing or Removing Software 81

Red Star with Exclamation Mark
Security patches available.
Orange Star with an Up Arrow
Recommended patches are available.
Yellow Star with a Down Arrow
Optional patches are available.
Yellow Triangle with Exclamation Mark
An error occurred.
Installing Patches
Whenever the updater icon shows the availability of patches, left-click the icon and
choose Update System Now. Provide the root password. The patches avaiable will be
installation in the background.
Alternatively, left-click the updater icon and choose Show Updates to open the Software
Update Viewer. In the overview it shows the number of patches available per category.
Click on Review to open a detailed view where all patches sorted by category are listed.
Security patches are displayed rst, trivial patches last. Click on a patch to see details,
such as a description, version number, repository, and—if available—a link to bugzilla,
the Novell bug tracking system.
By default all patches are marked for installation. Uncheck the checkbox in front of a
patch to prevent a patch from being installed.
82 Deployment Guide

Figure 6.6
You will be prompted for the root password after having proceeded with Apply Updates
or Update System. The updater performs the installation of the patches. After having
nished the installation, choose whether to Install More Updates or whether to Close
the Software Update Viewer.
GNOME Software Update Viewer: Detailed Update View
The YaST Online Update offers advanced features to customize the patch installation.
Please refer to Chapter 1, YaST Online Update (↑Administration Guide) for more infor-
mation.
Conguring the Updater Applet
To congure the updater applet, either right-click the updater icon in the panel and
choose Preferences, or start the confuguration dialog with Computer > Control Center
> System > Software Updates to manually start it.
Installing or Removing Software 83

Figure 6.7
The conguration dialog offers to change the following settings:
Check for Updates
Choose how often a check for updates is performed: Hourly, Daily, Weekly, or
Never.
Automatic Install
Congure whether patches are installed automatically or not (default). Automatic
installation can be chosen for either security patches only or for all patches.
GNOME Updater Applet: Conguration
Check for Major Upgrades
Choose how often a check for major updgrades is performed: Daily, Weekly, or
Never.
Display Notication Settings
Determine whether and when to show the updater applet icon in the panel with this
options.
84 Deployment Guide

Installing Add-On Products
Add-on products are system extensions. You can install a third-party add-on product
or a special system extension of SUSE Linux Enterprise, for example, the SDK add-on
or a CD with binary drivers. To install a new add-on, use Software > Add-On Products.
You can select various types of product media, like CD, FTP, USB mass storage devices
(such as USB ash drives or disks) or a local directory. You can also work directly
with local ISO les. To add an add-on as ISO le media, select Local ISO Image and
enter the Path to ISO Image. The Repository Name is arbitrary.
7.1 Add-Ons
To install a new add-on, proceed as follows:
Click Software > Add-On Products to see an overview of installed add-on prod-
1
ucts.
Select various types of product media, such as CD, FTP or a local directory, by
2
clicking Add. You can also use ISO images instead of CD or DVD media.
To add an ISO image, select Local ISO Image and clickNext.
3
7
Enter the Path to ISO Image and choose a Repository Name. Click Next.
4
After successfully adding the add-on media, the software manager window ap-
5
pears. If the add-on provides a new pattern, see the new item in the Patterns lter.
Installing Add-On Products 85

To view the list of all packages from the selected software repository, select the
lter Software Repositories and choose the repository to view.
7.2 Binary Drivers
Some hardware needs binary-only drivers to function properly. If you have such hardware, refer to the release notes for more information about availability of binary drivers
for your system. To read the release notes, open YaST and select Miscellaneous > Re-
lease Notes.
7.3 SUSE Software Development Kit (SDK) 10
SUSE Software Development Kit 10 is an add-on for SUSE Linux Enterprise 10. It is
a complete tool kit for application development. In fact, to provide a comprehensive
build system, SUSE Software Development Kit 10 includes all the open source tools
that were used to build the SUSE Linux Enterprise Server product. It provides you as
a developer, independent software vendor (ISV), or independent hardware vendor
(IHV), with all the tools needed to port applications to all the platforms supported by
SUSE Linux Enterprise Desktop and SUSE Linux Enterprise Server.
SUSE Software Development Kit also contains integrated development environments
(IDEs), debuggers, code editors, and other related tools. It supports most major programming languages, including C, C++, Java, and most scripting languages. For your convenience, SUSE Software Development Kit includes multiple Perl packages that are
not included in SUSE Linux Enterprise.
For detailed information, refer to http://developer.novell.com/ndk/
susesdk.htm. Use the YaST add-on installer and package manager to install SUSE
Software Development Kit 10.
86 Deployment Guide

Accessing the Internet
If you have chosen not to congure Internet access during the installation, you can
perform this task at any time using YaST. How to congure your computer to access
the Internet depends on your environment. If the computer you are installing is part of
a network which already is connected to the Internet, the only thing to do is to link your
machine into the network. If you are installing a machine that is directly connected to
the Internet, the hardware and the access to the Internet Service Provider (ISP) need to
be set up.
Please refer to the checklists below to make sure you have all the data ready to hand
when starting to congure the Internet access.
8.1 Direct Internet Connection
When your computer is directly connected to the Internet, you rst need to congure
the hardware that is used for this task. This can either be an internal device (such as an
ISDN card) or an external device (for example a modem). In most cases it is detected
automatically.
In a second step you need to enter data provided by your ISP, such as login credentials,
gateway, or name server, for example. You should have received a data sheet from your
ISP where all the necessary data is listed.
8
If you have successfully congured your hardware and ISP data, use the NetworkManager for managing the internet connection. See Chapter 23, Using NetworkManager
(↑Administration Guide) for details.
Accessing the Internet 87

8.1.1 Checklist DSL
There are different types of DSL devices available that use different point-to-point
protocol (PPP) methods:
• a regular ethernet card connected to the external DSL modem uses PPP over Ethernet
(PPPoE). In Austria the Point-to-Point Tunneling Protocol (PPTP) is used. With
PPTP the external modem also has a static IP address.
• an internal DSL modem uses PPP over ATM (PPPoATM)
• an internal ADSL Fritz Card uses CAPI for ADSL
The DSL conguration module already contains the data for major ISPs in some
countries. If your ISP is not listed, you will need to know how name resolving (DNS)
and IP allocation is handled (in most cases this data is received automatically when
connecting). Regardless whether you choose an ISP from the list or add a custom
provider, you need to enter at least your login and password.
For conguration details, refer to Section “DSL” (Chapter 19, Basic Networking,
↑Administration Guide).
8.1.2 Checklist ISDN
In case your internal ISDN card is not detected automatically you will need to know
the vendor and the name of the device.
NOTE: ISDN Modem or Terminal Adapter
If you are using an external ISDN modem or terminal adapter, refer to Sec-
tion 8.1.3, “Checklist Modem” (page 89) instead.
In order to congure the ISDN device you will need the following data:
• ISDN Protocol (depends on your country)
• Area code and phone number.
88 Deployment Guide

• Interface type (SyncPPP or RawIP). If unsure, select SyncPPP, because RawIP is
only used in connection with certain telephone systems.
• In case you got a static IP-address from your provider: local and remote IP-addresses
for the dial-in server and the gateway.
• The ISDN conguration module already contains the data for major ISPs in some
countries. If your ISP is not listed, you will need to know how name resolving
(DNS) and IP allocation is handled (in most cases this data is received automatically
when connecting). Regardless whether you chose an ISP from the list or added a
custom provider, you need to enter at least your login and password.
For conguration details, refer to Section “ISDN” (Chapter 19, Basic Networking,
↑Administration Guide).
8.1.3 Checklist Modem
In case your modem is not detected automatically, you need to know whether it is
connected to a serial port or to an USB port. Please note that not all USB modems and
internal modems are supported by SUSE® Linux Enterprise Desktop.
The modem conguration module already contains the data for major ISPs in some
countries. If your ISP is not listed, you will need to know its dial-in number and how
name resolving (DNS) and IP allocation is handled (in most cases this data is received
automatically when connecting). Regardless whether you chose an ISP from the list or
added a custom provider, you need to enter at least your login and password.
For conguration details, refer to Section “Modem” (Chapter 19, Basic Networking,
↑Administration Guide).
8.1.4 Checklist Cable Modem
Accessing the Internet through the TV cable requires a cable modem. Such a modem
is connected to the computer via ethernet cable. Therefore it is only necessary to congure your network card accordingly. For details, refer to Section “Cable Modem”
(Chapter 19, Basic Networking, ↑Administration Guide).
Accessing the Internet 89

8.2 Internet Connection Via Network
If your machine is part of a network which is already connected to the Internet, it is
very easy to gain Internet access—just congure your network card and connect your
machine to the existing network and you are done. This not only applies to large company networks, but to small home networks as well. Even if the machine you are installing is only connected to a router (e.g. a DSL router) it is already part of a network.
NOTE: Routing and Name Services
In the following it is assumed that the network is connected to the Internet
and provides routing and name services. In case these services are provided
by a router, make sure the router is congured correctly before setting up the
client.
8.2.1 Checklist Network
If your network provides DHCP (Dynamic Host Conguration Protocol) check the
appropriate check box when setting up the network card and you are done—all parameters needed will be provided by the DHCP server.
In case DHCP is not available, ask your network administrator for the following details:
• Hostname
• Name server
• Gateway
For conguration details, refer to Section “Conguring the Network Card with YaST”
(Chapter 19, Basic Networking, ↑Administration Guide).
90 Deployment Guide
 Loading...