


SUSE Linux Enterprise Desktop 10 GNOME User Guide
SUSE
Linux Enterprise Desktop
novdocx (ENU) 01 February 2006
10
June 19, 2006
www.novell.com
GNOME USER GUIDE

Legal Notices
Novell, Inc. makes no representations or warranties with respect to the contents or use of this documentation, and
specifically disclaims any express or implied warranties of merchantability or fitness for any particular purpose.
Further, Novell, Inc. reserves the right to revise this publication and to make changes to its content, at any time,
without obligation to notify any person or entity of such revisions or changes.
Further, Novell, Inc. makes no representations or warranties with respect to any software, and specifically disclaims
any express or implied warranties of merchantability or fitness for any particular purpose. Further, Novell, Inc.
reserves the right to make changes to any and all parts of Novell software, at any time, without any obligation to
notify any person or entity of such changes.
Any products or technical information provided under this Agreement may be subject to U.S. export controls and the
trade laws of other countries. You agree to comply with all export control regulations and to obtain any required
licenses or classification to export, re-export, or import deliverables. You agree not to export or re-export to entities
on the current U.S. export exclusion lists or to any embargoed or terrorist countries as specified in the U.S. export
laws. You agree to not use deliverables for prohibited nuclear, missile, or chemical biological weaponry end uses.
Please refer to www.novell.com/info/exports/ for more information on exporting Novell software. Novell assumes no
responsibility for your failure to obtain any necessary export approvals.
Copyright © 2004-2006 Novell, Inc. All rights reserved. Permission is granted to copy, distribute, and/or modify this
document under the terms of the GNU Free Documentation License (GFDL), Version 1.2 or any later version,
published by the Free Software Foundation with no Invariant Sections, no Front-Cover Texts, and no Back-Cover
Texts. A copy of the GFDL can be found at http://www.fsf.org/licenses/fdl.html.
novdocx (ENU) 01 February 2006
THIS DOCUMENT AND MODIFIED VERSIONS OF THIS DOCUMENT ARE PROVIDED UNDER THE
TERMS OF THE GNU FREE DOCUMENTATION LICENSE WITH THE FURTHER UNDERSTANDING THAT:
1. THE DOCUMENT IS PROVIDED ON AN “AS IS” BASIS, WITHOUT WARRANTY OF ANY KIND,
EITHER EXPRESSED OR IMPLIED, INCLUDING, WITHOUT LIMITATION, WARRANTIES THAT THE
DOCUMENT OR MODIFIED VERSION OF THE DOCUMENT IS FREE OF DEFECTS, MERCHANTABLE,
FIT FOR A PARTICULAR PURPOSE, OR NON-INFRINGING. THE ENTIRE RISK AS TO THE QUALITY,
ACCURACY, AND PERFORMANCE OF THE DOCUMENT OR MODIFIED VERSION OF THE DOCUMENT
IS WITH YOU. SHOULD ANY DOCUMENT OR MODIFIED VERSION PROVE DEFECTIVE IN ANY
RESPECT, YOU (NOT THE INITIAL WRITER, AUTHOR OR ANY CONTRIBUTOR) ASSUME THE COST OF
ANY NECESSARY SERVICING, REPAIR OR CORRECTION. THIS DISCLAIMER OF WARRANTY
CONSTITUTES AN ESSENTIAL PART OF THIS LICENSE. NO USE OF ANY DOCUMENT OR MODIFIED
VERSION OF THE DOCUMENT IS AUTHORIZED HEREUNDER EXCEPT UNDER THIS DISCLAIMER;
AND
2. UNDER NO CIRCUMSTANCES AND UNDER NO LEGAL THEORY, WHETHER IN TORT (INCLUDING
NEGLIGENCE), CONTRACT, OR OTHERWISE, SHALL THE AUTHOR, INITIAL WRITER, ANY
CONTRIBUTOR, OR ANY DISTRIBUTOR OF THE DOCUMENT OR MODIFIED VERSION OF THE
DOCUMENT, OR ANY SUPPLIER OF ANY OF SUCH PARTIES, BE LIABLE TO ANY PERSON FOR ANY
DIRECT, INDIRECT, SPECIAL, INCIDENTAL, OR CONSEQUENTIAL DAMAGES OF ANY CHARACTER
INCLUDING, WITHOUT LIMITATION, DAMAGES FOR LOSS OF GOODWILL, WORK STOPPAGE,
COMPUTER FAILURE OR MALFUNCTION, OR ANY AND ALL OTHER DAMAGES OR LOSSES ARISING
OUT OF OR RELATING TO USE OF THE DOCUMENT AND MODIFIED VERSIONS OF THE DOCUMENT,
EVEN IF SUCH PARTY SHALL HAVE BEEN INFORMED OF THE POSSIBILITY OF SUCH DAMAGES.
Novell, Inc. has intellectual property rights relating to technology embodied in the product that is described in this
document. In particular, and without limitation, these intellectual property rights may include one or more of the U.S.
patents listed at http://www.novell.com/company/legal/patents/ and one or more additional patents or pending patent
applications in the U.S. and in other countries.
Novell, Inc.

404 Wyman Street, Suite 500
Waltham, MA 02451
U.S.A.
www.novell.com
Online Documentation: To access the online documentation for this and other Novell products, and to get
updates, see www.novell.com/documentation.
novdocx (ENU) 01 February 2006

Novell Trademarks
For a list of Novell trademarks, see the Novell Trademark and Service Mark list (http://www.novell.com/company/
legal/trademarks/tmlist.html).
Third-Party Materials
All third-party trademarks are the property of their respective owners.
Parts of this manual are copyright © 2003-2004 Sun Microsystems.
novdocx (ENU) 01 February 2006

Contents
About This Guide 11
Part I GNOME Desktop 13
1 Getting Started with the GNOME Desktop 15
1.1 Starting SLED . . . . . . . . . . . . . . . . . . . . . . . . . . . . . . . . . . . . . . . . . . . . . . . . . . . . . . . . . . . . . 15
1.1.1 What Is a Session? . . . . . . . . . . . . . . . . . . . . . . . . . . . . . . . . . . . . . . . . . . . . . . . . . . 15
1.1.2 Switching Desktops . . . . . . . . . . . . . . . . . . . . . . . . . . . . . . . . . . . . . . . . . . . . . . . . . . 16
1.1.3 Locking Your Screen . . . . . . . . . . . . . . . . . . . . . . . . . . . . . . . . . . . . . . . . . . . . . . . . . 16
1.2 Logging Out . . . . . . . . . . . . . . . . . . . . . . . . . . . . . . . . . . . . . . . . . . . . . . . . . . . . . . . . . . . . . . . 16
1.3 Desktop Basics . . . . . . . . . . . . . . . . . . . . . . . . . . . . . . . . . . . . . . . . . . . . . . . . . . . . . . . . . . . . 17
1.3.1 Default Desktop Icons . . . . . . . . . . . . . . . . . . . . . . . . . . . . . . . . . . . . . . . . . . . . . . . . 17
1.3.2 Desktop Menu . . . . . . . . . . . . . . . . . . . . . . . . . . . . . . . . . . . . . . . . . . . . . . . . . . . . . . 18
1.3.3 Bottom Panel. . . . . . . . . . . . . . . . . . . . . . . . . . . . . . . . . . . . . . . . . . . . . . . . . . . . . . . 18
1.3.4 Adding Applets and Applications to the Panel. . . . . . . . . . . . . . . . . . . . . . . . . . . . . . 19
1.3.5 Main Menu. . . . . . . . . . . . . . . . . . . . . . . . . . . . . . . . . . . . . . . . . . . . . . . . . . . . . . . . . 20
1.4 Accessing Folders and Files . . . . . . . . . . . . . . . . . . . . . . . . . . . . . . . . . . . . . . . . . . . . . . . . . . 20
1.4.1 Managing Folders and Files with Nautilus File Manager. . . . . . . . . . . . . . . . . . . . . . 20
1.4.2 Accessing Floppy Disks, CDs, or DVDs . . . . . . . . . . . . . . . . . . . . . . . . . . . . . . . . . . 22
1.4.3 Finding Files on Your Computer . . . . . . . . . . . . . . . . . . . . . . . . . . . . . . . . . . . . . . . . 23
1.4.4 Accessing Files on the Network . . . . . . . . . . . . . . . . . . . . . . . . . . . . . . . . . . . . . . . . 25
1.5 Opening or Creating Documents with OpenOffice.org. . . . . . . . . . . . . . . . . . . . . . . . . . . . . . . 29
1.6 Exploring the Internet. . . . . . . . . . . . . . . . . . . . . . . . . . . . . . . . . . . . . . . . . . . . . . . . . . . . . . . . 29
1.7 E-mail and Calendering . . . . . . . . . . . . . . . . . . . . . . . . . . . . . . . . . . . . . . . . . . . . . . . . . . . . . . 29
1.8 Moving Text between Applications . . . . . . . . . . . . . . . . . . . . . . . . . . . . . . . . . . . . . . . . . . . . . 29
1.9 Other Useful Programs . . . . . . . . . . . . . . . . . . . . . . . . . . . . . . . . . . . . . . . . . . . . . . . . . . . . . . 30
1.10 Obtaining Software Updates . . . . . . . . . . . . . . . . . . . . . . . . . . . . . . . . . . . . . . . . . . . . . . . . . . 30
novdocx (ENU) 01 February 2006
2 Customizing Your Settings 31
2.1 Hardware . . . . . . . . . . . . . . . . . . . . . . . . . . . . . . . . . . . . . . . . . . . . . . . . . . . . . . . . . . . . . . . . . 32
2.1.1 Configuring Bluetooth Services . . . . . . . . . . . . . . . . . . . . . . . . . . . . . . . . . . . . . . . . . 32
2.1.2 Configuring Your Graphics Card and Monitor . . . . . . . . . . . . . . . . . . . . . . . . . . . . . . 32
2.1.3 Modifying Keyboard Preferences . . . . . . . . . . . . . . . . . . . . . . . . . . . . . . . . . . . . . . . 32
2.1.4 Configuring the Mouse . . . . . . . . . . . . . . . . . . . . . . . . . . . . . . . . . . . . . . . . . . . . . . . 36
2.1.5 Installing and Configuring Printers . . . . . . . . . . . . . . . . . . . . . . . . . . . . . . . . . . . . . . 38
2.1.6 Configuring Removable Drives and Media . . . . . . . . . . . . . . . . . . . . . . . . . . . . . . . . 39
2.1.7 Configuring a Scanner. . . . . . . . . . . . . . . . . . . . . . . . . . . . . . . . . . . . . . . . . . . . . . . . 39
2.1.8 Specifying Screen Resolution Settings . . . . . . . . . . . . . . . . . . . . . . . . . . . . . . . . . . . 40
2.2 Look and Feel . . . . . . . . . . . . . . . . . . . . . . . . . . . . . . . . . . . . . . . . . . . . . . . . . . . . . . . . . . . . . 40
2.2.1 Changing the Desktop Background. . . . . . . . . . . . . . . . . . . . . . . . . . . . . . . . . . . . . . 41
2.2.2 Configuring Fonts . . . . . . . . . . . . . . . . . . . . . . . . . . . . . . . . . . . . . . . . . . . . . . . . . . . 42
2.2.3 Configuring the Screen Saver . . . . . . . . . . . . . . . . . . . . . . . . . . . . . . . . . . . . . . . . . . 43
2.2.4 Choosing a Theme . . . . . . . . . . . . . . . . . . . . . . . . . . . . . . . . . . . . . . . . . . . . . . . . . . 44
2.2.5 Customizing Window Behavior . . . . . . . . . . . . . . . . . . . . . . . . . . . . . . . . . . . . . . . . . 46
2.3 Personal. . . . . . . . . . . . . . . . . . . . . . . . . . . . . . . . . . . . . . . . . . . . . . . . . . . . . . . . . . . . . . . . . . 47
2.3.1 Configuring Keyboard Accessibility Settings . . . . . . . . . . . . . . . . . . . . . . . . . . . . . . . 47
2.3.2 Configuring Assistive Technology Support . . . . . . . . . . . . . . . . . . . . . . . . . . . . . . . . 49
2.3.3 Changing Your Password . . . . . . . . . . . . . . . . . . . . . . . . . . . . . . . . . . . . . . . . . . . . . 50
5

2.3.4 Configuring Language Settings . . . . . . . . . . . . . . . . . . . . . . . . . . . . . . . . . . . . . . . . . 50
2.3.5 Customizing Keyboard Shortcuts. . . . . . . . . . . . . . . . . . . . . . . . . . . . . . . . . . . . . . . . 51
2.4 System . . . . . . . . . . . . . . . . . . . . . . . . . . . . . . . . . . . . . . . . . . . . . . . . . . . . . . . . . . . . . . . . . . . 51
2.4.1 Configuring Search with Beagle Settings . . . . . . . . . . . . . . . . . . . . . . . . . . . . . . . . . . 52
2.4.2 Configuring Date and Time . . . . . . . . . . . . . . . . . . . . . . . . . . . . . . . . . . . . . . . . . . . . 52
2.4.3 Configuring Network Proxies . . . . . . . . . . . . . . . . . . . . . . . . . . . . . . . . . . . . . . . . . . . 52
2.4.4 Configuring Power Management . . . . . . . . . . . . . . . . . . . . . . . . . . . . . . . . . . . . . . . . 53
2.4.5 Setting Preferred Applications . . . . . . . . . . . . . . . . . . . . . . . . . . . . . . . . . . . . . . . . . . 54
2.4.6 Setting Session Sharing Preferences . . . . . . . . . . . . . . . . . . . . . . . . . . . . . . . . . . . . 55
2.4.7 Managing Sessions . . . . . . . . . . . . . . . . . . . . . . . . . . . . . . . . . . . . . . . . . . . . . . . . . . 56
2.4.8 Setting Sound Preferences . . . . . . . . . . . . . . . . . . . . . . . . . . . . . . . . . . . . . . . . . . . . 59
2.4.9 Managing Users and Groups . . . . . . . . . . . . . . . . . . . . . . . . . . . . . . . . . . . . . . . . . . . 61
Part II Office and Collaboration 63
3 The OpenOffice.org Office Suite 65
3.1 Understanding OpenOffice.org. . . . . . . . . . . . . . . . . . . . . . . . . . . . . . . . . . . . . . . . . . . . . . . . . 65
3.1.1 What’s New in OpenOffice.org 2.0. . . . . . . . . . . . . . . . . . . . . . . . . . . . . . . . . . . . . . . 66
3.1.2 Enhancements in the Novell Edition of OpenOffice.org 2.0 . . . . . . . . . . . . . . . . . . . . 66
3.1.3 Using the Standard Edition of OpenOffice.org . . . . . . . . . . . . . . . . . . . . . . . . . . . . . . 67
3.1.4 Compatibility with Other Office Applications . . . . . . . . . . . . . . . . . . . . . . . . . . . . . . . 67
3.1.5 Starting OpenOffice.org . . . . . . . . . . . . . . . . . . . . . . . . . . . . . . . . . . . . . . . . . . . . . . . 69
3.1.6 Improving OpenOffice.org Load Time . . . . . . . . . . . . . . . . . . . . . . . . . . . . . . . . . . . . 69
3.1.7 Customizing OpenOffice.org . . . . . . . . . . . . . . . . . . . . . . . . . . . . . . . . . . . . . . . . . . . 69
3.1.8 Finding Templates . . . . . . . . . . . . . . . . . . . . . . . . . . . . . . . . . . . . . . . . . . . . . . . . . . . 72
3.2 Word Processing with Writer . . . . . . . . . . . . . . . . . . . . . . . . . . . . . . . . . . . . . . . . . . . . . . . . . . 72
3.2.1 Creating a New Document . . . . . . . . . . . . . . . . . . . . . . . . . . . . . . . . . . . . . . . . . . . . . 73
3.2.2 Sharing Documents with Other Word Processors . . . . . . . . . . . . . . . . . . . . . . . . . . . 73
3.2.3 Formatting with Styles . . . . . . . . . . . . . . . . . . . . . . . . . . . . . . . . . . . . . . . . . . . . . . . . 74
3.2.4 Using Templates to Format Documents. . . . . . . . . . . . . . . . . . . . . . . . . . . . . . . . . . . 76
3.2.5 Working with Large Documents . . . . . . . . . . . . . . . . . . . . . . . . . . . . . . . . . . . . . . . . . 76
3.2.6 Using Writer as an HTML Editor . . . . . . . . . . . . . . . . . . . . . . . . . . . . . . . . . . . . . . . . 78
3.3 Using Spreadsheets with Calc . . . . . . . . . . . . . . . . . . . . . . . . . . . . . . . . . . . . . . . . . . . . . . . . . 78
3.3.1 Using Formatting and Styles in Calc . . . . . . . . . . . . . . . . . . . . . . . . . . . . . . . . . . . . . 79
3.3.2 Using Templates in Calc . . . . . . . . . . . . . . . . . . . . . . . . . . . . . . . . . . . . . . . . . . . . . . 79
3.4 Using Presentations with Impress . . . . . . . . . . . . . . . . . . . . . . . . . . . . . . . . . . . . . . . . . . . . . . 80
3.4.1 Creating a Presentation . . . . . . . . . . . . . . . . . . . . . . . . . . . . . . . . . . . . . . . . . . . . . . . 80
3.4.2 Using Master Pages. . . . . . . . . . . . . . . . . . . . . . . . . . . . . . . . . . . . . . . . . . . . . . . . . . 80
3.5 Using Databases with Base . . . . . . . . . . . . . . . . . . . . . . . . . . . . . . . . . . . . . . . . . . . . . . . . . . . 81
3.5.1 Creating a Database Using Predefined Options . . . . . . . . . . . . . . . . . . . . . . . . . . . . 81
3.6 Creating Graphics with Draw . . . . . . . . . . . . . . . . . . . . . . . . . . . . . . . . . . . . . . . . . . . . . . . . . . 83
3.7 Creating Mathematical Formulas with Math . . . . . . . . . . . . . . . . . . . . . . . . . . . . . . . . . . . . . . . 84
3.8 Finding Help and Information About OpenOffice.org . . . . . . . . . . . . . . . . . . . . . . . . . . . . . . . . 84
novdocx (ENU) 01 February 2006
4 Evolution: E-Mail and Calendaring 85
4.1 Starting Evolution for the First Time . . . . . . . . . . . . . . . . . . . . . . . . . . . . . . . . . . . . . . . . . . . . . 85
4.1.1 Using the First-Run Assistant. . . . . . . . . . . . . . . . . . . . . . . . . . . . . . . . . . . . . . . . . . . 85
4.2 Using Evolution: An Overview . . . . . . . . . . . . . . . . . . . . . . . . . . . . . . . . . . . . . . . . . . . . . . . . . 93
4.2.1 The Menu Bar . . . . . . . . . . . . . . . . . . . . . . . . . . . . . . . . . . . . . . . . . . . . . . . . . . . . . . 94
4.2.2 The Shortcut Bar . . . . . . . . . . . . . . . . . . . . . . . . . . . . . . . . . . . . . . . . . . . . . . . . . . . . 94
4.2.3 E-Mail . . . . . . . . . . . . . . . . . . . . . . . . . . . . . . . . . . . . . . . . . . . . . . . . . . . . . . . . . . . . . 95
4.2.4 The Calendar . . . . . . . . . . . . . . . . . . . . . . . . . . . . . . . . . . . . . . . . . . . . . . . . . . . . . . . 96
4.2.5 The Contacts Tool . . . . . . . . . . . . . . . . . . . . . . . . . . . . . . . . . . . . . . . . . . . . . . . . . . . 96
6 SUSE Linux Enterprise Desktop 10 GNOME User Guide

5 GroupWise Linux Client: E-Mailing and Calendaring 99
5.1 Getting Acquainted with the Main GroupWise Window . . . . . . . . . . . . . . . . . . . . . . . . . . . . . . 99
5.1.1 Toolbar . . . . . . . . . . . . . . . . . . . . . . . . . . . . . . . . . . . . . . . . . . . . . . . . . . . . . . . . . . 100
5.1.2 Folder and Item List Header . . . . . . . . . . . . . . . . . . . . . . . . . . . . . . . . . . . . . . . . . . 100
5.1.3 Folder List . . . . . . . . . . . . . . . . . . . . . . . . . . . . . . . . . . . . . . . . . . . . . . . . . . . . . . . . 101
5.1.4 Item List. . . . . . . . . . . . . . . . . . . . . . . . . . . . . . . . . . . . . . . . . . . . . . . . . . . . . . . . . . 104
5.1.5 QuickViewer . . . . . . . . . . . . . . . . . . . . . . . . . . . . . . . . . . . . . . . . . . . . . . . . . . . . . . 104
5.2 Using Different GroupWise Modes . . . . . . . . . . . . . . . . . . . . . . . . . . . . . . . . . . . . . . . . . . . . 104
5.2.1 Online Mode . . . . . . . . . . . . . . . . . . . . . . . . . . . . . . . . . . . . . . . . . . . . . . . . . . . . . . 104
5.2.2 Caching Mode . . . . . . . . . . . . . . . . . . . . . . . . . . . . . . . . . . . . . . . . . . . . . . . . . . . . . 104
5.3 Understanding Your Mailbox . . . . . . . . . . . . . . . . . . . . . . . . . . . . . . . . . . . . . . . . . . . . . . . . . 105
5.3.1 Bolded Items in Your Mailbox . . . . . . . . . . . . . . . . . . . . . . . . . . . . . . . . . . . . . . . . . 105
5.3.2 Icons Appearing Next to Items in Your Mailbox and Calendar . . . . . . . . . . . . . . . . 105
5.4 Using the Toolbar . . . . . . . . . . . . . . . . . . . . . . . . . . . . . . . . . . . . . . . . . . . . . . . . . . . . . . . . . 107
5.5 Using Shortcut Keys . . . . . . . . . . . . . . . . . . . . . . . . . . . . . . . . . . . . . . . . . . . . . . . . . . . . . . . 107
5.6 Learning More . . . . . . . . . . . . . . . . . . . . . . . . . . . . . . . . . . . . . . . . . . . . . . . . . . . . . . . . . . . . 109
5.6.1 Online Help . . . . . . . . . . . . . . . . . . . . . . . . . . . . . . . . . . . . . . . . . . . . . . . . . . . . . . . 109
5.6.2 GroupWise 7 Documentation Web Page . . . . . . . . . . . . . . . . . . . . . . . . . . . . . . . . 109
5.6.3 GroupWise Cool Solutions Web Community. . . . . . . . . . . . . . . . . . . . . . . . . . . . . . 109
novdocx (ENU) 01 February 2006
6 Instant Messaging with Gaim 111
6.1 Supported Protocols . . . . . . . . . . . . . . . . . . . . . . . . . . . . . . . . . . . . . . . . . . . . . . . . . . . . . . . 111
6.2 Setting Up an Account . . . . . . . . . . . . . . . . . . . . . . . . . . . . . . . . . . . . . . . . . . . . . . . . . . . . . . 111
6.3 Managing Your Buddy List. . . . . . . . . . . . . . . . . . . . . . . . . . . . . . . . . . . . . . . . . . . . . . . . . . . 112
6.3.1 Displaying Buddies in the Buddy List . . . . . . . . . . . . . . . . . . . . . . . . . . . . . . . . . . . 112
6.3.2 Adding a Buddy . . . . . . . . . . . . . . . . . . . . . . . . . . . . . . . . . . . . . . . . . . . . . . . . . . . . 112
6.3.3 Removing a Buddy . . . . . . . . . . . . . . . . . . . . . . . . . . . . . . . . . . . . . . . . . . . . . . . . . 112
6.4 Chatting . . . . . . . . . . . . . . . . . . . . . . . . . . . . . . . . . . . . . . . . . . . . . . . . . . . . . . . . . . . . . . . . . 112
7 Using Voice over IP 113
7.1 Configuring Linphone. . . . . . . . . . . . . . . . . . . . . . . . . . . . . . . . . . . . . . . . . . . . . . . . . . . . . . . 113
7.1.1 Determining the Run Mode of Linphone . . . . . . . . . . . . . . . . . . . . . . . . . . . . . . . . . 113
7.1.2 Determining the Connection Type. . . . . . . . . . . . . . . . . . . . . . . . . . . . . . . . . . . . . . 113
7.1.3 Configuring the Network Parameters . . . . . . . . . . . . . . . . . . . . . . . . . . . . . . . . . . . 114
7.1.4 Configuring the Sound Device. . . . . . . . . . . . . . . . . . . . . . . . . . . . . . . . . . . . . . . . . 115
7.1.5 Configuring the SIP Options . . . . . . . . . . . . . . . . . . . . . . . . . . . . . . . . . . . . . . . . . . 115
7.1.6 Configuring the Audio Codecs. . . . . . . . . . . . . . . . . . . . . . . . . . . . . . . . . . . . . . . . . 116
7.2 Testing Linphone . . . . . . . . . . . . . . . . . . . . . . . . . . . . . . . . . . . . . . . . . . . . . . . . . . . . . . . . . . 116
7.3 Making a Call . . . . . . . . . . . . . . . . . . . . . . . . . . . . . . . . . . . . . . . . . . . . . . . . . . . . . . . . . . . . . 116
7.4 Answering a Call . . . . . . . . . . . . . . . . . . . . . . . . . . . . . . . . . . . . . . . . . . . . . . . . . . . . . . . . . . 117
7.5 Using the Address Book . . . . . . . . . . . . . . . . . . . . . . . . . . . . . . . . . . . . . . . . . . . . . . . . . . . . 117
7.6 Troubleshooting . . . . . . . . . . . . . . . . . . . . . . . . . . . . . . . . . . . . . . . . . . . . . . . . . . . . . . . . . . . 118
7.7 Glossary. . . . . . . . . . . . . . . . . . . . . . . . . . . . . . . . . . . . . . . . . . . . . . . . . . . . . . . . . . . . . . . . . 119
7.8 For More Information . . . . . . . . . . . . . . . . . . . . . . . . . . . . . . . . . . . . . . . . . . . . . . . . . . . . . . . 119
8 Managing Printers 121
8.1 Installing a Printer . . . . . . . . . . . . . . . . . . . . . . . . . . . . . . . . . . . . . . . . . . . . . . . . . . . . . . . . . 121
8.1.1 Installing a Network Printer . . . . . . . . . . . . . . . . . . . . . . . . . . . . . . . . . . . . . . . . . . . 121
8.1.2 Installing a Local Printer . . . . . . . . . . . . . . . . . . . . . . . . . . . . . . . . . . . . . . . . . . . . . 121
8.2 Modifying Printer Settings . . . . . . . . . . . . . . . . . . . . . . . . . . . . . . . . . . . . . . . . . . . . . . . . . . . 122
8.3 Canceling Print Jobs . . . . . . . . . . . . . . . . . . . . . . . . . . . . . . . . . . . . . . . . . . . . . . . . . . . . . . . 122
7

8.4 Deleting a Printer . . . . . . . . . . . . . . . . . . . . . . . . . . . . . . . . . . . . . . . . . . . . . . . . . . . . . . . . . . 122
Part III Internet 123
9 Browsing with Firefox 125
9.1 Navigating Web Sites . . . . . . . . . . . . . . . . . . . . . . . . . . . . . . . . . . . . . . . . . . . . . . . . . . . . . . . 125
9.1.1 Tabbed Browsing . . . . . . . . . . . . . . . . . . . . . . . . . . . . . . . . . . . . . . . . . . . . . . . . . . . 126
9.1.2 Using the Sidebar. . . . . . . . . . . . . . . . . . . . . . . . . . . . . . . . . . . . . . . . . . . . . . . . . . . 126
9.2 Finding Information. . . . . . . . . . . . . . . . . . . . . . . . . . . . . . . . . . . . . . . . . . . . . . . . . . . . . . . . . 126
9.2.1 Finding Information on the Web. . . . . . . . . . . . . . . . . . . . . . . . . . . . . . . . . . . . . . . . 126
9.2.2 Installing a Different Search Engine . . . . . . . . . . . . . . . . . . . . . . . . . . . . . . . . . . . . . 126
9.2.3 Searching in the Current Page. . . . . . . . . . . . . . . . . . . . . . . . . . . . . . . . . . . . . . . . . 126
9.3 Managing Bookmarks. . . . . . . . . . . . . . . . . . . . . . . . . . . . . . . . . . . . . . . . . . . . . . . . . . . . . . . 127
9.3.1 Using the Bookmark Manager . . . . . . . . . . . . . . . . . . . . . . . . . . . . . . . . . . . . . . . . . 127
9.3.2 Importing Bookmarks from Other Browsers . . . . . . . . . . . . . . . . . . . . . . . . . . . . . . . 128
9.3.3 Live Bookmarks . . . . . . . . . . . . . . . . . . . . . . . . . . . . . . . . . . . . . . . . . . . . . . . . . . . . 128
9.4 Using the Download Manager . . . . . . . . . . . . . . . . . . . . . . . . . . . . . . . . . . . . . . . . . . . . . . . . 128
9.5 Customizing Firefox . . . . . . . . . . . . . . . . . . . . . . . . . . . . . . . . . . . . . . . . . . . . . . . . . . . . . . . . 128
9.5.1 Extensions . . . . . . . . . . . . . . . . . . . . . . . . . . . . . . . . . . . . . . . . . . . . . . . . . . . . . . . . 129
9.5.2 Changing Themes . . . . . . . . . . . . . . . . . . . . . . . . . . . . . . . . . . . . . . . . . . . . . . . . . . 129
9.5.3 Adding Smart Keywords to Your Online Searches . . . . . . . . . . . . . . . . . . . . . . . . . 130
9.6 Printing from Firefox . . . . . . . . . . . . . . . . . . . . . . . . . . . . . . . . . . . . . . . . . . . . . . . . . . . . . . . . 131
9.7 For More Information . . . . . . . . . . . . . . . . . . . . . . . . . . . . . . . . . . . . . . . . . . . . . . . . . . . . . . . 131
novdocx (ENU) 01 February 2006
Part IV Multimedia 133
10 Manipulating Graphics with The GIMP 135
10.1 Graphics Formats . . . . . . . . . . . . . . . . . . . . . . . . . . . . . . . . . . . . . . . . . . . . . . . . . . . . . . . . . . 135
10.2 Starting GIMP . . . . . . . . . . . . . . . . . . . . . . . . . . . . . . . . . . . . . . . . . . . . . . . . . . . . . . . . . . . . . 135
10.2.1 Initial Configuration . . . . . . . . . . . . . . . . . . . . . . . . . . . . . . . . . . . . . . . . . . . . . . . . . 135
10.2.2 The Default Windows . . . . . . . . . . . . . . . . . . . . . . . . . . . . . . . . . . . . . . . . . . . . . . . . 135
10.3 Getting Started in GIMP . . . . . . . . . . . . . . . . . . . . . . . . . . . . . . . . . . . . . . . . . . . . . . . . . . . . . 136
10.3.1 Creating a New Image . . . . . . . . . . . . . . . . . . . . . . . . . . . . . . . . . . . . . . . . . . . . . . . 136
10.3.2 Opening an Existing Image . . . . . . . . . . . . . . . . . . . . . . . . . . . . . . . . . . . . . . . . . . . 137
10.3.3 Scanning an Image . . . . . . . . . . . . . . . . . . . . . . . . . . . . . . . . . . . . . . . . . . . . . . . . . 137
10.3.4 The Image Window . . . . . . . . . . . . . . . . . . . . . . . . . . . . . . . . . . . . . . . . . . . . . . . . . 137
10.4 Saving Images . . . . . . . . . . . . . . . . . . . . . . . . . . . . . . . . . . . . . . . . . . . . . . . . . . . . . . . . . . . . 138
10.5 Printing Images. . . . . . . . . . . . . . . . . . . . . . . . . . . . . . . . . . . . . . . . . . . . . . . . . . . . . . . . . . . . 139
10.6 For More Information . . . . . . . . . . . . . . . . . . . . . . . . . . . . . . . . . . . . . . . . . . . . . . . . . . . . . . . 139
11 Using Digital Cameras with Linux 141
11.1 Downloading Pictures from Your Camera . . . . . . . . . . . . . . . . . . . . . . . . . . . . . . . . . . . . . . . 143
11.2 Getting Information . . . . . . . . . . . . . . . . . . . . . . . . . . . . . . . . . . . . . . . . . . . . . . . . . . . . . . . . . 143
11.3 Managing Tags . . . . . . . . . . . . . . . . . . . . . . . . . . . . . . . . . . . . . . . . . . . . . . . . . . . . . . . . . . . . 144
11.4 Search and Find . . . . . . . . . . . . . . . . . . . . . . . . . . . . . . . . . . . . . . . . . . . . . . . . . . . . . . . . . . . 144
11.5 Exporting Image Collections . . . . . . . . . . . . . . . . . . . . . . . . . . . . . . . . . . . . . . . . . . . . . . . . . . 144
11.6 Basic Image Processing with f-spot . . . . . . . . . . . . . . . . . . . . . . . . . . . . . . . . . . . . . . . . . . . . 146
12 Playing and Managing Your Music with Helix Banshee 147
12.1 Managing Your Library . . . . . . . . . . . . . . . . . . . . . . . . . . . . . . . . . . . . . . . . . . . . . . . . . . . . . . 148
8 SUSE Linux Enterprise Desktop 10 GNOME User Guide

12.1.1 Playing Your Music . . . . . . . . . . . . . . . . . . . . . . . . . . . . . . . . . . . . . . . . . . . . . . . . . 148
12.1.2 Organizing Your Music . . . . . . . . . . . . . . . . . . . . . . . . . . . . . . . . . . . . . . . . . . . . . . 148
12.1.3 Importing Music . . . . . . . . . . . . . . . . . . . . . . . . . . . . . . . . . . . . . . . . . . . . . . . . . . . . 148
12.2 Using Helix Banshee with Your iPod . . . . . . . . . . . . . . . . . . . . . . . . . . . . . . . . . . . . . . . . . . . 149
12.3 Creating Audio and MP3 CDs . . . . . . . . . . . . . . . . . . . . . . . . . . . . . . . . . . . . . . . . . . . . . . . . 150
12.4 Configuring Preferences . . . . . . . . . . . . . . . . . . . . . . . . . . . . . . . . . . . . . . . . . . . . . . . . . . . . 150
13 Burning CDs and DVDs 151
Part V Appendixes 153
A Getting to Know Linux Software 155
A.1 Office . . . . . . . . . . . . . . . . . . . . . . . . . . . . . . . . . . . . . . . . . . . . . . . . . . . . . . . . . . . . . . . . . . . 155
A.2 Network . . . . . . . . . . . . . . . . . . . . . . . . . . . . . . . . . . . . . . . . . . . . . . . . . . . . . . . . . . . . . . . . . 158
A.3 Multimedia . . . . . . . . . . . . . . . . . . . . . . . . . . . . . . . . . . . . . . . . . . . . . . . . . . . . . . . . . . . . . . . 161
A.4 Graphics . . . . . . . . . . . . . . . . . . . . . . . . . . . . . . . . . . . . . . . . . . . . . . . . . . . . . . . . . . . . . . . . 165
A.5 System and File Management . . . . . . . . . . . . . . . . . . . . . . . . . . . . . . . . . . . . . . . . . . . . . . . . 167
A.6 Software Development . . . . . . . . . . . . . . . . . . . . . . . . . . . . . . . . . . . . . . . . . . . . . . . . . . . . . 170
novdocx (ENU) 01 February 2006
9

novdocx (ENU) 01 February 2006
10 SUSE Linux Enterprise Desktop 10 GNOME User Guide

About This Guide
Congratulations on choosing the SUSE® Linux* Enterprise Desktop (SLED). This manual is
designed to introduce you to the GNOME graphical desktop environment and show you how to
configure it to meet your personal needs and preferences. It also introduces you to several programs
and services, including office programs such as OpenOffice.org, Web browsers, file managers,
scanning tools, and image editing tools. It is intended for users who have some experience using a
graphical desktop environment such as Macintosh*, Windows*, or other Linux desktops.
This guide contains the following sections:
• Part I, “GNOME Desktop,” on page 13
• Part II, “Office and Collaboration,” on page 63
• Part III, “Internet,” on page 123
• Part IV, “Multimedia,” on page 133
• Part V, “Appendixes,” on page 153
novdocx (ENU) 01 February 2006
Audience
This guide is intended for SLED users using the GNOME desktop.
Feedback
We want to hear your comments and suggestions about this manual and the other documentation
included with this product. Please use the User Comments feature at the bottom of each page of the
online documentation, or go to www.novell.com/documentation/feedback.html and enter your
comments there.
Documentation Updates
For the latest version of this documentation, see the SUSE Linux Enterprise Desktop documentation
(http://www.novell.com/documentation/lg/sled/index.html) Web site.
Additional Documentation
The SUSE Linux Enterprise Desktop GNOME User Guide and documentation for each of the
components included with SUSE Linux Enterprise Desktop can be accessed using the Help Center.
To access the Novell Help Center, click Help on the top panel of the desktop and then click User's
Manual.
For documentation about the SLED KDE Desktop, see SUSE Linux Enterprise Desktop KDE User
Guide (http://www.novell.com/documentation/sled/userguide_kde/data/front.html).
For information about installing and administering SLED, see the SUSE Linux Enterprise Desktop
Deployment Guide (http://www.novell.com/documentation/nld/nld_deployment/data/front.html).
11

Documentation Conventions
In Novell documentation, a greater-than symbol (>) is used to separate actions within a step and
items in a cross-reference path.
®
A trademark symbol (
, TM, etc.) denotes a Novell trademark. An asterisk (*) denotes a third-party
trademark.
novdocx (ENU) 01 February 2006
12 SUSE Linux Enterprise Desktop 10 GNOME User Guide

I
GNOME Desktop
novdocx (ENU) 01 February 2006
I
GNOME Desktop
13

novdocx (ENU) 01 February 2006
14 SUSE Linux Enterprise Desktop 10 GNOME User Guide

1
Getting Started with the GNOME
novdocx (ENU) 01 February 2006
Desktop
This chapter assists you in becoming familiar with the conventions, layout, and common tasks of
®
SUSE
SLED, see the SUSE Linux Enterprise Desktop Quick Start (http://www.novell.com/documentation/
nld/qsnld/data/brmch9i.html).
Linux Enterprise Desktop (SLED) with the GNOME desktop. If you have not yet installed
• Section 1.1, “Starting SLED,” on page 15
• Section 1.2, “Logging Out,” on page 16
• Section 1.3, “Desktop Basics,” on page 17
• Section 1.4, “Accessing Folders and Files,” on page 20
• Section 1.5, “Opening or Creating Documents with OpenOffice.org,” on page 29
• Section 1.6, “Exploring the Internet,” on page 29
• Section 1.7, “E-mail and Calendering,” on page 29
• Section 1.8, “Moving Text between Applications,” on page 29
• Section 1.9, “Other Useful Programs,” on page 30
• Section 1.10, “Obtaining Software Updates,” on page 30
1
1.1 Starting SLED
When you start SLED, you are prompted to enter your username and password. This is the username
and password you created when you installed SLED. If you did not install SLED, check with your
system administrator for the username and password.
The login has three menu items:
• Login Prompt: Enter your username and password to log in.
• Session: Specify the desktop to run during your session. If other desktops are installed, they
appear in the list.
•Actions: Perform a system action, such as shut down the computer, reboot the computer, or
configure the Login Manager.
• Section 1.1.1, “What Is a Session?,” on page 15
• Section 1.1.2, “Switching Desktops,” on page 16
• Section 1.1.3, “Locking Your Screen,” on page 16
1.1.1 What Is a Session?
A session is the period of time from when you log in to when you log out. The login screen offers
several login options. For example, you can select the language of your session so that text that
appears in the SLED interface is presented in that language.
Getting Started with the GNOME Desktop
15

After your username and password are authenticated, the Session Manager starts. The Session
Manager lets you save certain settings for each session. It also lets you save the state of your most
recent session and return to that session the next time you log in.
The Session Manager can save and restore the following settings:
• Appearance and behavior settings, such as fonts, colors, and mouse settings.
• Applications that you were running. such as a file manager or an OpenOffice.org program.
TIP: You cannot save and restore applications that Session Manager does not manage. For
example, if you start the vi editor from the command line in a terminal window, Session
Manager cannot restore your editing session.
For information on configuring session preferences, see “Managing Sessions” on page 56.
1.1.2 Switching Desktops
If you installed both the GNOME and the KDE desktops, use the following instructions to switch
desktops.
novdocx (ENU) 01 February 2006
1 Click Computer > Logout > OK.
In KDE, click N > Logout > Logout.
2 On the SUSE Linux Enterprise Desktop login screen, click Session.
3 Select the desktop you want (GNOME or KDE), then click OK.
4 Type your username, then press Enter.
5 Type your password, then press Enter.
1.1.3 Locking Your Screen
To lock the screen, you can do either of the following:
•Click Computer > Lock Screen.
• If the Lock button is present on a panel, click it.
To add the Lock button to a panel, right-click the panel and then click Add to Panel > Actions >
Lock.
When you lock your screen, the screen saver starts. To lock your screen correctly, you must have a
screen saver enabled. To unlock the screen, move your mouse to display the locked screen dialog.
Enter your username and password, then press Enter.
For information on configuring your screen saver, see “Configuring the Screen Saver” on page 43.
1.2 Logging Out
When you are finished using the computer, click Computer > Logout. Then select one of the
following:
• Log out
Logs you out of the current session and returns you to the Login dialog.
16 SUSE Linux Enterprise Desktop 10 GNOME User Guide

• Shut down
Logs you out of the current session, then turns off the computer.
• Restart the computer
Logs you out of the current session, then restarts the computer.
• Suspend the computer
Saves the current memory contents to disk and shuts down the computer. When you restart, the
saved memory content is loaded and you can resume where you left off.
1.3 Desktop Basics
As with other common desktop products, the main components of the GNOME desktop are icons
that link to files, folders, or programs, as well as the panel at the bottom of the screen (similar to the
Task Bar in Windows). Double-click an icon to start its associated program. Right-click an icon to
access additional menus and options. You can also right-click any empty space on the desktop to
access additional menus for configuring or managing the desktop itself.
By default, the desktop features two key icons: your personal Home folder, and a trash can for
deleted items. Other icons representing devices on your computer, such as CD drives, might also be
present on the desktop. If you double-click your Home folder, the Nautilus file manager starts and
displays the contents of your home directory. For more information about using Nautilus, see
“Managing Folders and Files with Nautilus File Manager” on page 20.
novdocx (ENU) 01 February 2006
Right-clicking an icon displays a menu offering file operations, like copying, cutting, or renaming.
Selecting Properties from the menu displays a configuration dialog. The title of an icon as well as
the icon itself can be changed with Select Custom Icon. The Emblems tab lets you add graphical
descriptive symbols to the icon. The Permissions tab lets you set access permissions for the selected
files. The Notes tab lets you manage comments. The menu for the trash can additionally features the
Empty Trash option, which deletes its contents.
A link is a special type of file that points to another file or folder. When you perform an action on a
link, the action is performed on the file or folder the link points to. When you delete a link, you
delete only the link file, not the file that the link points to.
To create a link on the desktop to a folder or a file, access the object in question in File Manager by
right-clicking the object and then clicking Make Link. Drag the link from the File Manager window
and drop it onto the desktop.
• Section 1.3.1, “Default Desktop Icons,” on page 17
• Section 1.3.2, “Desktop Menu,” on page 18
• Section 1.3.3, “Bottom Panel,” on page 18
• Section 1.3.4, “Adding Applets and Applications to the Panel,” on page 19
• Section 1.3.5, “Main Menu,” on page 20
1.3.1 Default Desktop Icons
To remove an icon from the desktop, simply drag it onto the trash can. However, be careful with this
option—if you move folder or file icons to the trash can, the actual data is deleted. If the icons only
represent links to a file or to a directory, only the links are deleted.
Getting Started with the GNOME Desktop 17
NOTE: You cannot move the Home icon to the trash.
1.3.2 Desktop Menu
Right-clicking an empty spot on the desktop displays a menu with various options. Click Create
Folder to create a new folder. Create a launcher icon for an application with Create Launcher.
Provide the name of the application and the command for starting it, then select an icon to represent
it. You can also change the desktop background and align desktop icons.
1.3.3 Bottom Panel
The desktop includes a panel across the bottom of the screen. The bottom panel contains the
Computer menu (similar to the Start menu in Windows) and the icons of all applications currently
running. You can also add applications and applets to the panel for easy access. If you click the name
of a program in the taskbar, the program's window is moved to the foreground. If the program is
already in the foreground, a mouse click minimizes it. Clicking a minimized application reopens the
respective window.
novdocx (ENU) 01 February 2006
Figure 1-1 GNOME Bottom Panel
The Show Desktop icon is on the right side of the bottom panel. This icon minimizes all program
windows and displays the desktop. Or, if all windows are already minimized, it opens them up again.
If you right-click an empty spot in the panel, a menu opens, offering the options listed in the
following table:
Table 1-1 Panel Menu Options
Option Description
Add to Panel Opens a menu list of applications and applets that can be added to the
panel.
Properties Modifies the properties for this panel.
Delete This Panel Removes the panel from the desktop. All of the panel settings are lost.
Allow Panel to be Moved Locks the panel in its current position (so that it can’t be moved to another
location on the desktop, and unlocks the panel (so it can be moved).
To move the panel to another location, middle-click and hold on any vacant
space on the panel, and then drag the panel to the location you want.
New Panel Creates a new panel and adds it to the desktop.
Help Opens the Help Center.
About Panels Opens information about the panel application.
18 SUSE Linux Enterprise Desktop 10 GNOME User Guide

1.3.4 Adding Applets and Applications to the Panel
You can add applications and applets to the bottom panel for quick access. An applet is a small
program, while an application is usually a more robust stand-alone program. Adding an applet puts
useful utilities where you can easily access them.
The GNOME desktop comes with many applets. You can see a complete list by right-clicking the
bottom panel and selecting Add to Panel.
Some useful applets include the following:
Table 1-2 Some Useful Applets
Applet Description
Command Line Enter commands in a small entry field.
Dictionary Lookup Look up a word in an online dictionary.
Force Quit Terminate an application. This is especially useful if you want to
terminate an application that is no longer responding.
novdocx (ENU) 01 February 2006
Search for Files Find files, folders, and documents on the computer.
Sticky Notes Create, display, and manage sticky notes on your desktop.
Stock Ticker Display continuously updated stock quotes.
Traditional Main Menu Access programs from a menu like the one in previous versions of
GNOME. This is especially useful for people who are used to earlier
versions of GNOME.
Volume Control Increase or decrease the sound volume.
Weather Report Display current weather information for a specified city.
Workspace Switcher Access additional work areas, called workspaces, through virtual
desktops. For example, you can open applications in different
workspaces and use them on their own desktops without the clutter
from other applications.
Getting Started with the GNOME Desktop 19
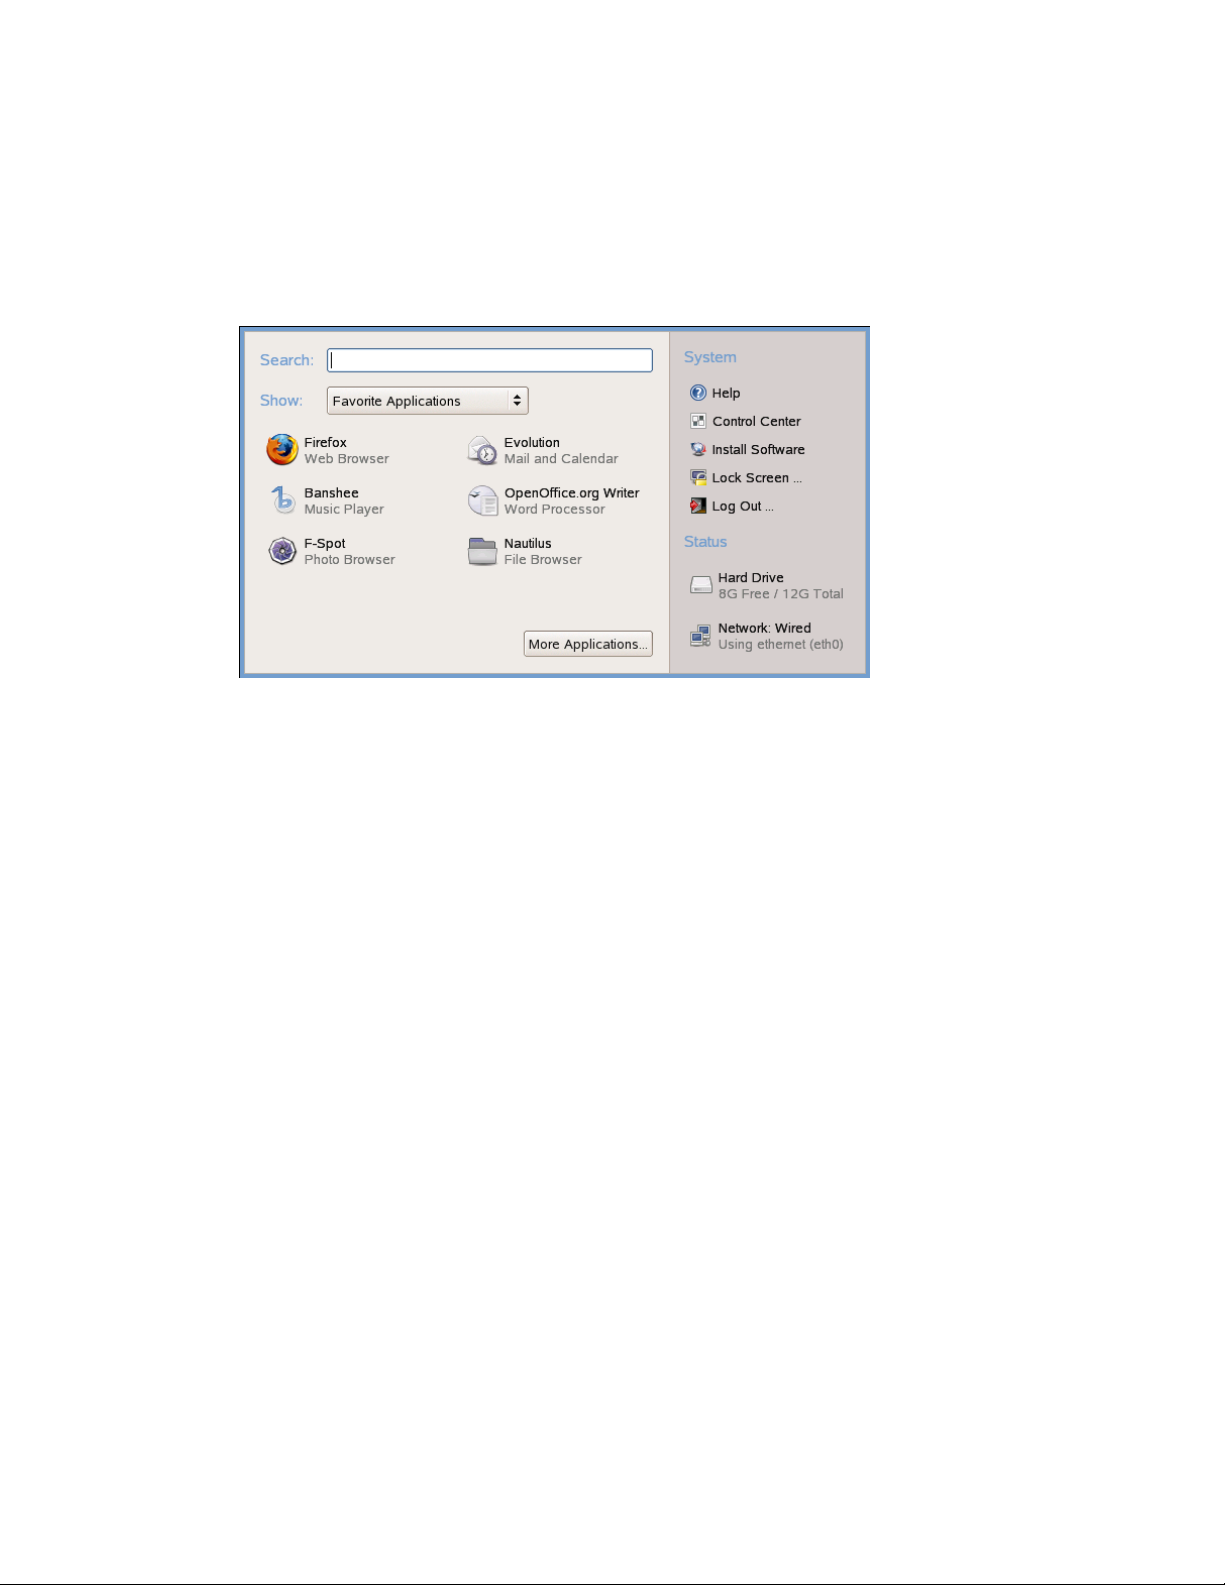
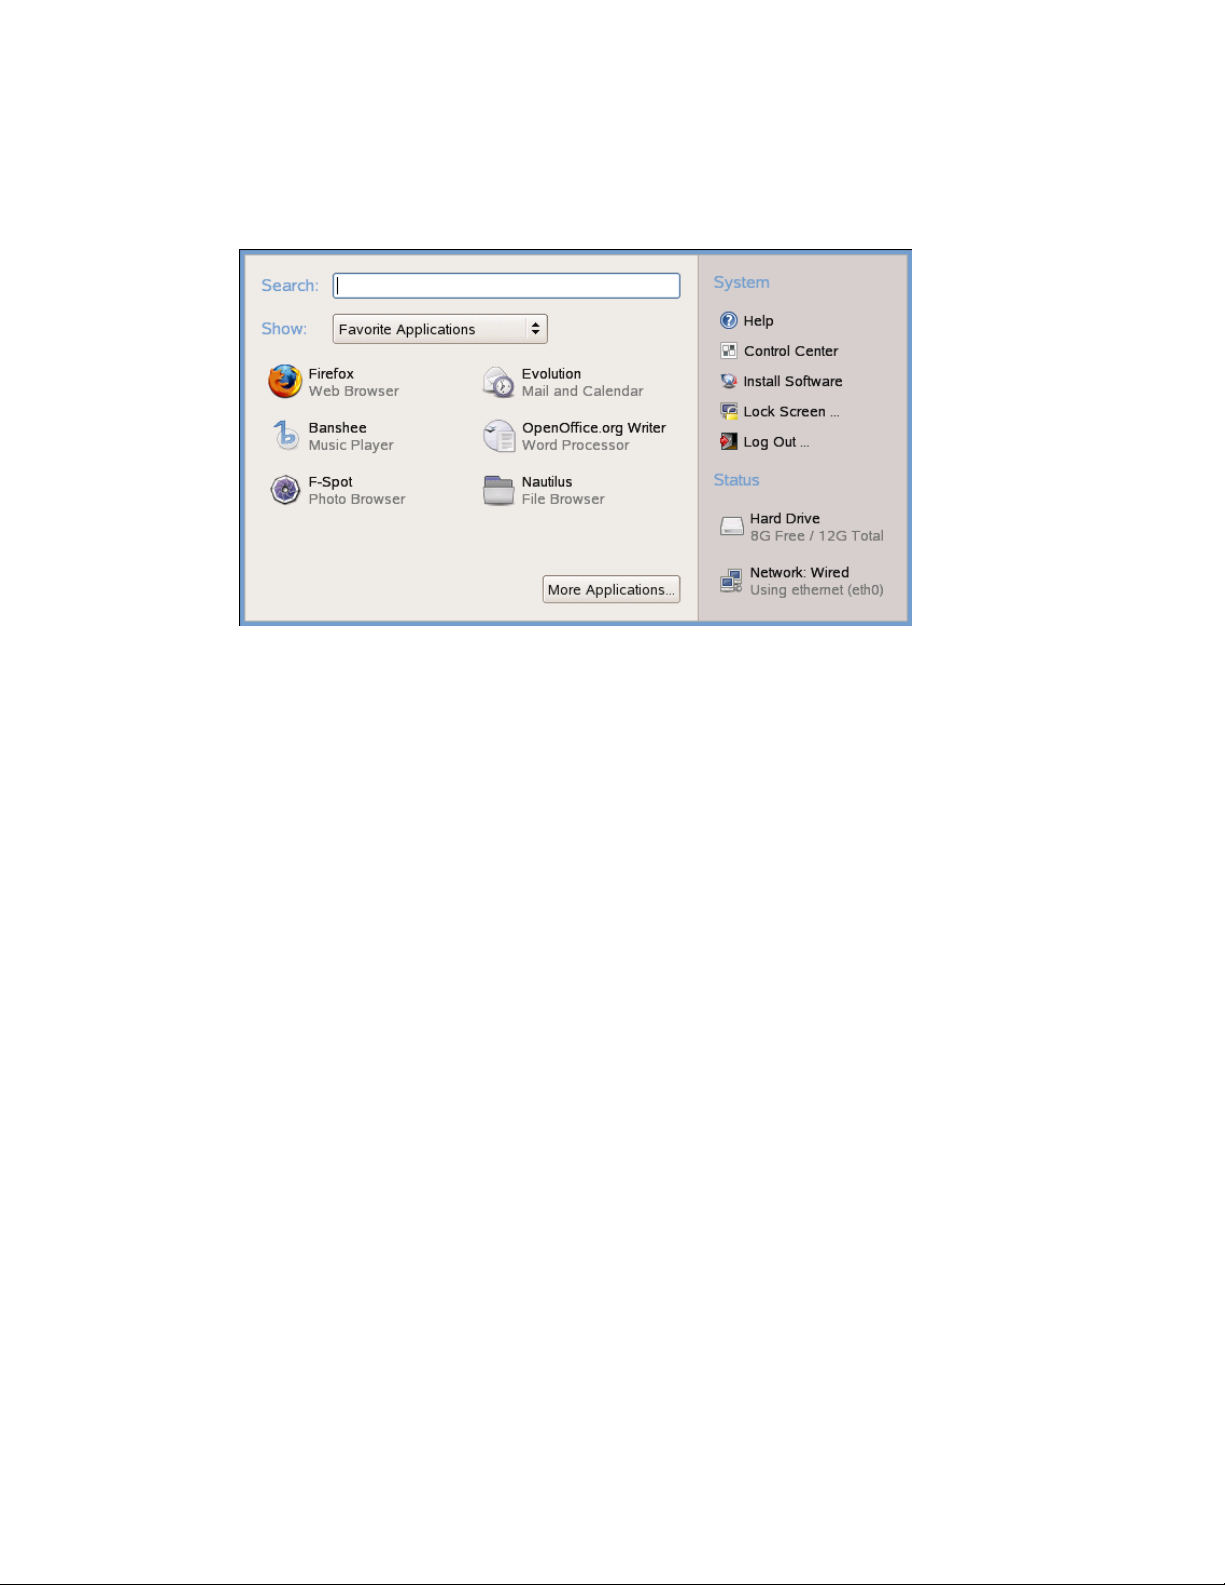
1.3.5 Main Menu
Open the main menu by clicking Computer on the far left of the bottom panel. Commonly used
applications appear in the main menu. A search field lets you quickly search for applications and
files. Access additional applications, listed in categories, by clicking More Applications.
Figure 1-2 Main Menu
novdocx (ENU) 01 February 2006
1.4 Accessing Folders and Files
SUSE Linux Enterprise Desktop enables you to access folders and files on your computer and on a
network.
• Section 1.4.1, “Managing Folders and Files with Nautilus File Manager,” on page 20
• Section 1.4.2, “Accessing Floppy Disks, CDs, or DVDs,” on page 22
• Section 1.4.3, “Finding Files on Your Computer,” on page 23
• Section 1.4.4, “Accessing Files on the Network,” on page 25
1.4.1 Managing Folders and Files with Nautilus File Manager
Use the Nautilus File Manager to create and view folders and documents, run scripts, and create
CDs of your data. In addition, Nautilus provides support for Web and file viewing.
You can open Nautilus in the following ways:
•Click Computer > Nautilus.
• Click your Home directory icon on the desktop
20 SUSE Linux Enterprise Desktop 10 GNOME User Guide
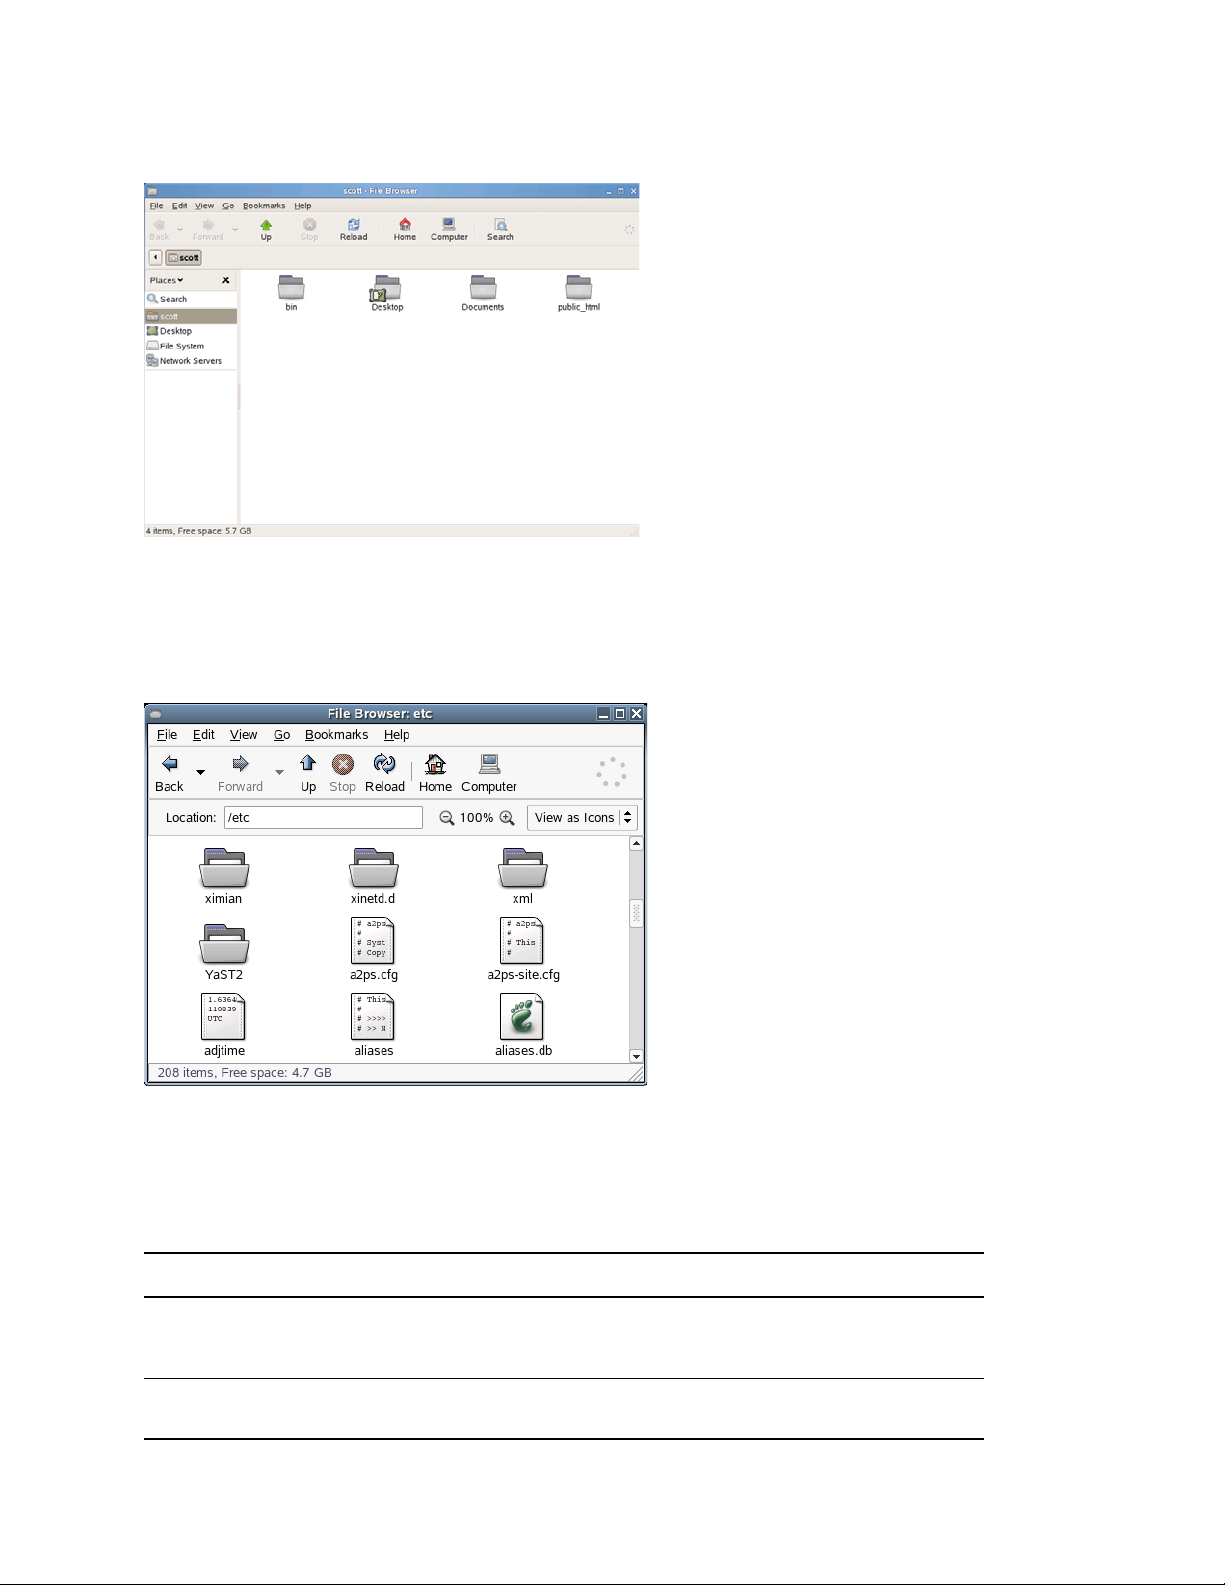
Figure 1-3 Nautilus File Manager
You can change to the browser mode by right-clicking the folder and then clicking Browse Folder.
This gives you a familiar view with a location window that shows the current path and buttons for
common functions. This applies to the current Nautilus window.
novdocx (ENU) 01 February 2006
Figure 1-4 Nautilus File Manager in Browser Mode
You can change the preferences for files and folders in Nautilus by clicking Edit > Preferences >
Behavior, then selecting from the following options:
Table 1-3 Nautilus Options
Option Description
Single Click to Activate Item Performs the default action for an item when you
click the item. If this option is selected and you point
to an item, the title of the item is underlined.
Double Click to Activate Items Performs the default action for an item when you
double-click the item.
Getting Started with the GNOME Desktop 21

Option Description
Always Open in Browser Windows Opens Nautilus in Browser mode whenever you
open it.
Run Executable Files When They Are Clicked Runs an executable file when you click the file. An
executable file is a text file than can execute (that is,
a shell script).
View Executable Files When They Are Clicked Displays the contents of an executable file when you
click the file.
Ask Each Time Displays a dialog when you click an executable file.
The dialog asks whether you want to execute the file
or display the file.
Ask Before Emptying Trash or Deleting Files Displays a confirmation message before the Trash is
emptied or before files are deleted.
Include a Delete Command That Bypasses Trash Adds a Delete menu item to the Edit menu and the
pop-up menu that is displayed when you right-click a
file, folder, or desktop object. When you select an
item and then click Delete, the item is immediately
deleted from your file system.
novdocx (ENU) 01 February 2006
Some simple shortcuts for navigating include the following:
Table 1-4 Nautilus Navigation Shortcuts
Shortcut Description
Backspace or Alt+Up-arrow Opens the parent folder.
Up or Down Selects an item.
Alt+Down, or Enter Opens an item.
Shift+Alt+Down Opens an item and closes the current folder.
Shift+Alt+Up Opens the parent folder and closes the current folder.
Shift+Ctrl+W Closes all parent folders.
Ctrl+L Opens a location by specifying a path or URL.
Alt+Home Opens your home directory.
For more information, click Help > Contents in Nautilus.
1.4.2 Accessing Floppy Disks, CDs, or DVDs
To access floppy disks, CDs, or DVDs, insert the medium into the appropriate drive. For several
types of removable media, a Nautilus window pops up automatically when the media is inserted or
attached to the computer. If Nautilus does not open, double-click the icon for that drive to view the
contents.
22 SUSE Linux Enterprise Desktop 10 GNOME User Guide
WARNING: Do not simply remove floppy disks from the drive after using them. Floppy disks,
CDs, and DVDs must always be unmounted from the system first. Close all File Manager sessions
still accessing the medium, then right-click the icon for the medium and select Eject from the menu.
Then safely remove the floppy disk or CD when the tray opens automatically.
Floppy disks can also be formatted by clicking Computer > More Applications > System > Floppy
Formatter. In the Floppy Formatter dialog, select the density of the floppy disk and the file system
settings: Linux native (ext2), the file system for Linux, or DOS (FAT) to use the floppy with
Windows systems.
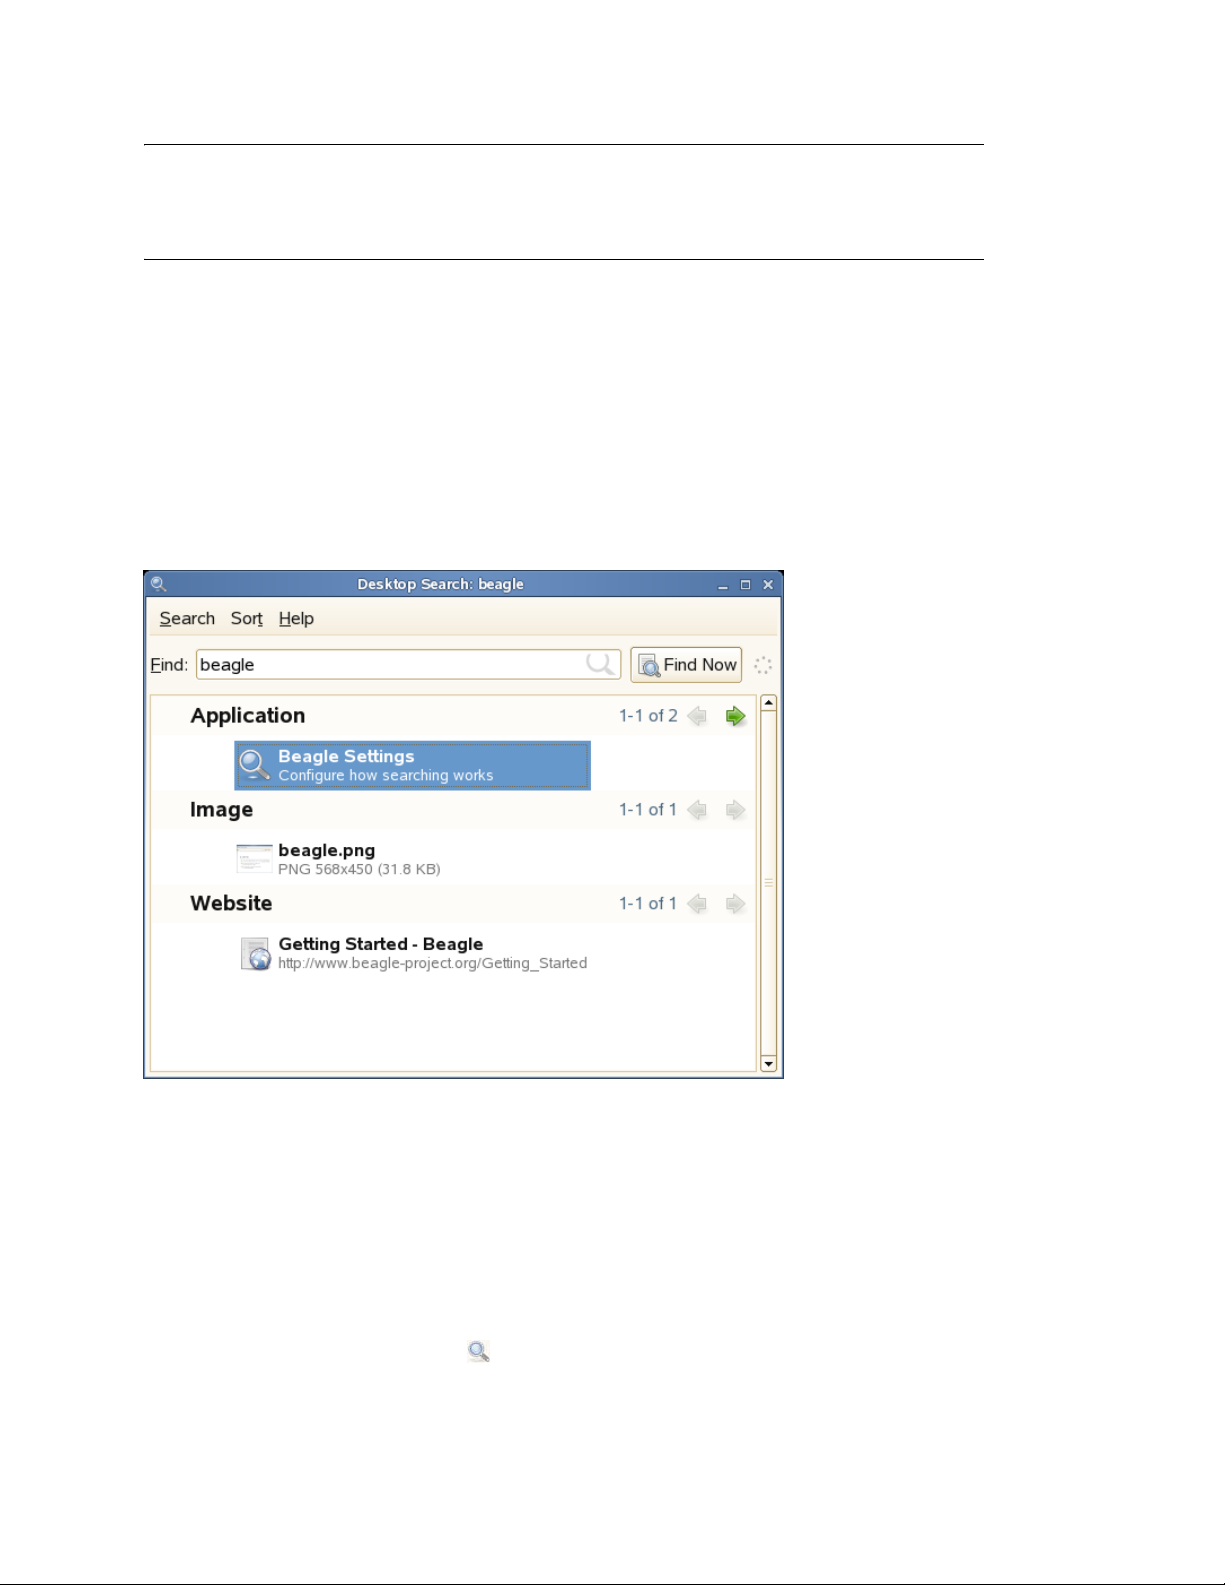
1.4.3 Finding Files on Your Computer
To locate files on your computer, click Computer, enter your search terms in the Search field, then
press Enter. The results are displayed in the Desktop Search dialog box.
Figure 1-5 Desktop Search Dialog Box
novdocx (ENU) 01 February 2006
You can use the results lists to open a file, forward it via e-mail, or display it in the file manager.
Simply right-click an item in the results list and select the option you want. The options available for
an item in the results list depend on the type of file it is. Clicking a file in the list displays a preview
of the file and information such as the title, path, and when the file was last modified or accessed.
Use the Search menu to limit your search to files in a specific location, such as your address book or
Web pages, or to display only a specific type of file in your results list. The Sort menu lets you sort
the items in your results list according to name, relevance, or the date the file was last modified.
You can also access Desktop Search by clicking Computer > More Applications > System > Beagle
Search Tool, pressing F12, or clicking on the bottom panel.
Getting Started with the GNOME Desktop 23

Search Tips
• You can use both upper and lowercase letters in search terms. Searches are not case sensitive by
default.
To perform a case sensitive search, put double quotation marks (“) around the word you want to
match exactly. For example, if you use “APPLE” in a search, apple would be ignored.
• To search for optional terms, use OR (for example, apples OR oranges).
IMPORTANT: The OR is case-sensitive when used to indicate optional search terms.
• To exclude search terms, use a minus sign (-) in front of the term you want to exclude (for
example, apples -oranges would find results containing apples but not oranges).
• To search for an exact phrase or word, put quotation marks (“) around the phrase or word.
• Common words such as “a,” “the,” and “is” are ignored.
• The base form of a search term is used when searching (for example, a search for “driving” will
match “drive,” “drives,” and “driven”).
Performing a Property Search
novdocx (ENU) 01 February 2006
By default, the Beagle search tool looks for search terms in the text of documents and in their
properties. To search for a word in a particular property, use property_keyword:query. For
example, author:john searches for files that have “john” listed in the Author property.
Table 1-5 Supported Property Keywords
Keyword Property
album Album of the media
artist Artist
author Author of the content
comment User comments
creator Creator of the content
extension or ext File extension (for example, extension:jpeg or ext:mp3). Use
extension:or ext: to search in files with no extension.
mailfrom E-mail sender name
mailfromaddr E-mail sender address
mailinglist Mailing list ID
mailto E-mail recipient name
mailtoaddr E-mail recipient address
tag FSpot and Digikam image tags
title Title
24 SUSE Linux Enterprise Desktop 10 GNOME User Guide

Property searches follow the rules mentioned in Section , “Search Tips,” on page 24. You can use
property searches as an exclusion query or OR query, and phrases can be used as query. For
example, the following line will search for all PDF or HTML documents containing the word
“apple” whose author property contains “john” and whose title does not contain the word “oranges.”
apple ext:pdf OR ext:html author:john -title:oranges
Setting Search and Indexing Preferences
Use the Search Preferences dialog box to set search and indexing preferences. To open Search
Preferences, click Computer > More Applications > System > Beagle Settings. You can also click
Search > Preferences in the Desktop Search dialog box.
On the Search tabbed page, click Start search & indexing services automatically to start the search
daemon when you log in (this is selected by default). You can also choose the keystrokes that will
display the Desktop Search window by specifying any combination of Ctrl, Alt, and a function key.
F12 is the default keystroke.
On the Indexing tabbed page, you can choose to index your home directory (selected by default), to
not index your home directory, and to add additional directories to index. Make sure you have rights
to the directories you add. You can also specify resources that you don’t want indexed (see Section ,
“Preventing Files and Directories from Being Indexed,” on page 25 for more information).
novdocx (ENU) 01 February 2006
Preventing Files and Directories from Being Indexed
Use the Search Preferences dialog box to specify resources that you don’t want indexed. These
resources can include directories, patterns, mail folders, or types of objects.
1 Click Computer > More Applications > System > Beagle Search Tool.
2 Click Search > Preferences.
3 On the Indexing tabbed page, click Add in the Privacy section.
4 Select a resource to exclude from indexing, then specify the path to the resource.
5 Click OK twice.
1.4.4 Accessing Files on the Network
This chapter helps you access network resources using the following tasks:
• “Connecting to Your Network” on page 25
• “Managing Network Connections” on page 27
• “Accessing Network Shares” on page 27
• “Sharing Directories from Your Computer” on page 28
Connecting to Your Network
There are essentially two ways that you can connect to a network: via wired and wireless
connections. To view your network connection status, click Computer. In the Status area of the main
Getting Started with the GNOME Desktop 25
menu, The Network Connections icon shows your network connection status. For example, in the
following figure, the computer is connected to a wired network using an Ethernet connection.
Figure 1-6 Network Connections Icon in the Main Menu
novdocx (ENU) 01 February 2006
Click on the icon to get information about your connection, such as IP address, gateway address, and
similar details.
Connecting to a Wired Connection
1 Make sure that an Ethernet cable is connected to your computer's network interface card.
2 Click the Network Connections icon on the main panel, then click Ethernet: eth0.
After a wired network connection is established, the Network Connections icon changes to show
your connection type.
A connection to the network is confirmed when Wired is listed next to the Network menu item. You
can also confirm connectivity by clicking the Network Connections icon. If connected, the
Connection Information window displays your IP address and other details about your connection.
Connecting to a Wireless Connection
1 Make sure that your computer contains a wireless network interface card.
2 Click the Network Connections icon on the main panel, then click Wireless: <device>.
The Network Connections icon changes to a wireless signal strength bar, and any detected wireless
networks are displayed in the Network Connections menu.
If your network name is displayed, select the network name from the Network Connections menu.
After you are connected, the Network Connections icon shows that you have a wireless connection.
If you do not see your wireless network name in the Network Connections menu:
1 Click the Network Connections icon on the main panel, then click Other.
2 In the Specify an ESSID dialog, type the wireless network name in the ESSID: field.
3 (Conditional) If the wireless network is encrypted, click Show Encryption Key to display the
Encryption Key field.
26 SUSE Linux Enterprise Desktop 10 GNOME User Guide

4 Type the encryption code, then click OK.
Your wireless network's name should now appear in the Network Connections menu.
5 Select the wireless network's name.
Upon connection, the Network Connections icon turns blue.
You can also confirm connection by clicking the Network Connections icon and viewing Connection
Information. If connected, your IP address and other details are displayed in the Connection
Information dialog.
Managing Network Connections
The Network Connection icon lets you monitor, manage, and configure your network connections.
Clicking the icon opens a window that displays which network connection is active, if you have
more than one network device in your computer.
For example, if your laptop computer is configured to use a wireless port and a port for a network
cable, you will see two network connections in the list.
If you are connected to the network via a cable and need to switch to use your wireless, simply click
the Network Connections icon and then click Wireless: eth1. SLED switches your network
connection and acquires a new IP address, if needed.
novdocx (ENU) 01 February 2006
IMPORTANT: Prior to making the change, you should save any data, because the change in
services might require that certain applications or services be restarted.
Using the menu, you can view connection informations such as the IP address being used and your
hardware address.
If you need to update or make changes to your network settings, click Computer > Control Panel >
Configure Network. This launches the Network Card Setup wizard, which steps you through the
configuration process. Using this option requires you to provide the password for root.
Accessing Network Shares
Other network devices, like workstations and servers, can be set up to share some or all of their
resources. Typically, files and folders are marked to let remote users access them. These are called
network shares. If your system is configured to access network shares, you can use Nautilus File
Manager to access them.
To access network shares, double-click Computer > Nautilus, then click Network Servers. The
window displays the network shares that you can access. Double-click the network resource that you
want to access. You might be required to authenticate to the resource by providing a username and
password.
To access NFS shares, double-click the UNIX Network icon. A list of UNIX shares available to you
is displayed.
Getting Started with the GNOME Desktop 27
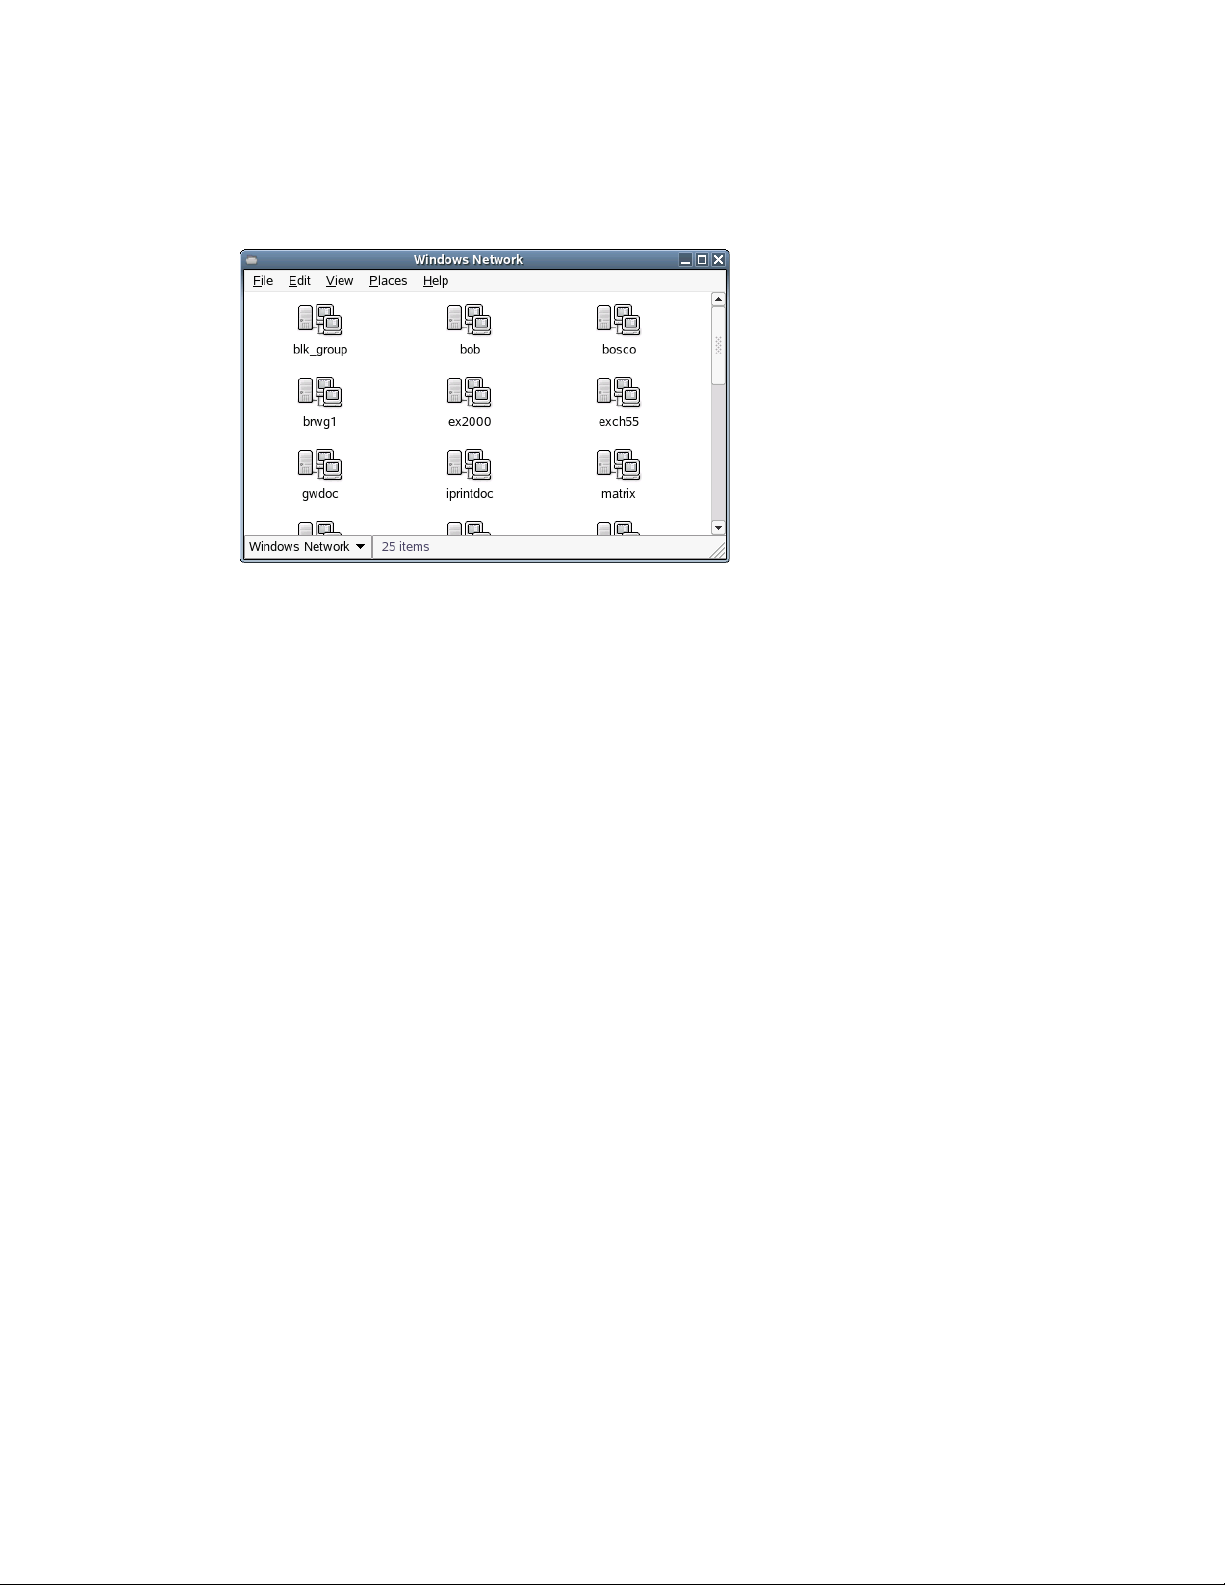
To access Windows shares, double-click the Windows Network icon. The Windows shares available
to you are displayed.
Figure 1-7 Workgroups on a Windows Network
Adding a Network Place
novdocx (ENU) 01 February 2006
1 Click Computer > Nautilus > File > Connect to Server.
2 Specify the name you want displayed for this link and its URL, then click Connect.
An icon for the network place is added to the desktop.
Sharing Directories from Your Computer
You can make directories on your computer available to other users on your network.
Enabling Sharing
Use YaST to enable sharing on your computer. In order to enable sharing, you must have root
privileges and be a member of a workgroup or domain.
1 Click Computer > More Applications > System > YaST.
2 In YaST, click Network Services > Windows Domain Membership.
3 In the Windows Domain Membership module, click Allow Users To Share Their Directories.
4 Click Finish.
Sharing a Directory
If directory sharing is enabled on your computer, use the following steps to configure a directory to
be shared.
1 Open Nautilus and browse to the directory you want to share.
2 Right-click the folder for the directory you want to share, then click Sharing Options.
3 Select the Share this folder check box, then type the name you want to use for this share.
4 If you want other users to be able to copy files to your shared directory, select the Allow other
people to write in this folder check box.
5 (Optional) Type a comment, if desired.
6 Click Create Share.
28 SUSE Linux Enterprise Desktop 10 GNOME User Guide

1.5 Opening or Creating Documents with OpenOffice.org
For creating and editing documents, SLED includes OpenOffice.org, a complete set of office tools
that can both read and save Microsoft Office file formats. OpenOffice.org has a word processor, a
spreadsheet, a data base, a drawing tool, and a presentation program. To get started, click Computer
> OpenOffice.org Writer or select an OpenOffice.org module by clicking Computer > More
Applications > Office, then select the module you want to open.
A number of sample documents and templates are included with OpenOffice.org. You can access the
templates by clicking File > New > Templates and Documents. In addition, you can use AutoPilot, a
feature which guides you through the creation of letters and other typical documents.
For a more in-depth introduction to OpenOffice.org, see Chapter 3, “The OpenOffice.org Office
Suite,” on page 65 or view the help in any OpenOffice.org program.
1.6 Exploring the Internet
SLED includes Firefox, a Mozilla* based Web browser. You can start it by clicking Computer >
Firefox.
novdocx (ENU) 01 February 2006
You can type an address into the location bar at the top or click links in a page to move to different
pages, just like in any other Web browser.
For more information, see Chapter 9, “Browsing with Firefox,” on page 125.
1.7 E-mail and Calendering
Novell Evolution seamlessly combines e-mail, a calendar, an address book, and a task list in one
easy-to-use application. With its extensive support for communications and data interchange
standards, Evolution can work with existing corporate networks and applications, including
Microsoft Exchange.
To start Evolution, click Computer > More Applications > Communicate > Evolution E-Mail or
Computer > More Applications > Office > Evolution Calendar.
The first time you start it, Evolution prompts you with a few questions as it sets up a mail account
and helps you import mail from your old mail client. Then it shows you how many new messages
you have and lists upcoming appointments and tasks, as well as the current weather and news from
news feeds. The calendar, address book, and mail tools are available in the shortcut bar on the left.
For more information, see Chapter 4, “Evolution: E-Mail and Calendaring,” on page 85 and Chapter
5, “GroupWise Linux Client: E-Mailing and Calendaring,” on page 99.
1.8 Moving Text between Applications
To copy text between applications, select the text and then move the mouse cursor to the position
where you want the text copied. Click the center button on the mouse or the scroll wheel to copy the
text.
When copying information between programs, you must keep the source program open and paste
the text before closing it. When a program closes, any content from that application that is on the
clipboard is lost.
Getting Started with the GNOME Desktop 29

1.9 Other Useful Programs
In addition to the programs already discussed, like applets you can add to a panel, SLED also
includes additional programs, organized in categories in the Application Browser. To access the
programs, open the Application Browser by clicking Computer > More Applications, then browse
through the categories to see which applications are available. Categories include the following:
Table 1-6 SLED Applications
Category Types of Programs
Audio & Video Music players, CD database, video editors, CD and DVD burners, volume
controllers, and other audio and video applications
Browse Applications for browsing the Internet and your computer’s file system
Communicate E-mail, instant messaging, video conferencing, and other communication tools
Development Web development, MONO documentation, sharing files between computers
Games Card games, arcade favorites, and puzzles
novdocx (ENU) 01 February 2006
Images Image viewers and editors, drawing programs, photo browsers, scanning
programs
Office Word processors and text editors, spreadsheets, presentation software, database
software, project management utilities, PDF reader, personal information
managers, calendars
System Search tools, system configuration tools, network tools, device managers
Tools System customization, search configuration, calculators, and other tools
Following chapters in this guide describe some of the more commonly used applications.
1.10 Obtaining Software Updates
Novell offers important updates and enhancements that help protect your computer and ensure that it
runs smoothly through ZenWorks
the software you have on your computer and to install, update, and remove programs without your
having to track dependencies and resolve conflicts. Contact your system administrator for more
information about how your company is disseminating updates.
To access the update tool, click Computer > More Applications > System > Update Software.
If updates are available, the Zen Update icon appears in the notification area of the bottom panel. In
this case, click the icon to access the update tool.
®
. The Software Update feature is designed to help you manage
30 SUSE Linux Enterprise Desktop 10 GNOME User Guide

2
Customizing Your Settings
You can change the way SUSE® Linux Enterprise Desktop (SLED) looks and behaves to suit your
own personal tastes and needs. Some of the settings you might want to change include:
• Desktop background
• Screen saver
• Keyboard and mouse configuration
• Sounds
• File associations
These settings and others can be changed in the Control Center. To access the Control Center, click
Computer > Control Center. The Control Center is divided into the following four categories:
• Section 2.1, “Hardware,” on page 32
• Section 2.2, “Look and Feel,” on page 40
novdocx (ENU) 01 February 2006
2
• Section 2.3, “Personal,” on page 47
• Section 2.4, “System,” on page 51
Figure 2-1 GNOME Control Center
Some settings require that you use the YaST Control Center. These administrator settings includes
most of the hardware, the graphical user interface, Internet access, security settings, user
administration, software installation, and system updates and information. You need the root
password to access the YaST Control Center.
For information on configuring administrator settings, see Using YaST to Configure the SUSE
Linux Enterprise Desktop (http://www.novell.com/documentation/nld/nld_deployment/data/
bsj9luh.html) in the SUSE Linux Enterprise Desktop Deployment Guide.
Customizing Your Settings
31

2.1 Hardware
Hardware settings include the following:
• Section 2.1.1, “Configuring Bluetooth Services,” on page 32
• Section 2.1.2, “Configuring Your Graphics Card and Monitor,” on page 32
• Section 2.1.3, “Modifying Keyboard Preferences,” on page 32
• Section 2.1.4, “Configuring the Mouse,” on page 36
• Section 2.1.5, “Installing and Configuring Printers,” on page 38
• Section 2.1.6, “Configuring Removable Drives and Media,” on page 39
• Section 2.1.7, “Configuring a Scanner,” on page 39
• Section 2.1.8, “Specifying Screen Resolution Settings,” on page 40
2.1.1 Configuring Bluetooth Services
Bluetooth services enable you to connect wireless devices such as mobile phones and personal data
assistants (PDAs) to your computer. Bluetooth wireless support includes automatic recognition of
Bluetooth-enabled devices via the YaST central configuration and administration tool. Click
Computer > Control Center > Hardware > Bluetooth, then set the configuration options that are
appropriate for your device.
novdocx (ENU) 01 February 2006
NOTE: Root privileges are required for configuring Bluetooth services.
2.1.2 Configuring Your Graphics Card and Monitor
Your graphics card was configured for your monitor when you installed SLED. If you ever need to
change these settings, click Computer > Control Center > Hardware > Graphics Card and Monitor,
then set the appropriate options for your monitor.
NOTE: Graphics card configuration is done in YaST2 and requires root privileges.
2.1.3 Modifying Keyboard Preferences
Use the Keyboard Preferences tool to modify the autorepeat preferences for your keyboard and to
configure typing break settings.
Click Computer > Control Center > Hardware > Keyboard.
You can set the following preferences:
• Keyboard
• Typing Break
• Layouts
• Layout Options
32 SUSE Linux Enterprise Desktop 10 GNOME User Guide

Configuring Keyboard Preferences
Use the Keyboard tabbed page to set general keyboard preferences.
Figure 2-2 Keyboard Preferences Dialog—Keyboard Page
novdocx (ENU) 01 February 2006
You can modify any of the following keyboard preferences:
Table 2-1 Keyboard Preferences
Option Description
Key Presses Repeat When Key is
Held Down
Cursor Blinks in Text Boxes and
Fields
Type to Test Settings The test area is an interactive interface that lets you see how the
Enables keyboard repeat. The action associated with a key is
performed repeatedly when you press and hold that key. For
example, if you press and hold a character key, the character is
typed repeatedly.
Use the Delay option to select the delay from the time you press a
key to the time that the action repeats.
Use the Speed option to set the speed at which the action is
repeated.
Lets the cursor blink in fields and text boxes.
Use the slider to specify the speed at which the cursor blinks.
keyboard settings affect the display as you type. Type text in the
test area to test the effect of your settings.
Click the Accessibility button to start the Keyboard accessibility preference tool.
Customizing Your Settings 33

Configuring Typing Break Preferences
Use the Typing Break tabbed page to set typing break preferences.
Figure 2-3 Keyboard Preferences Dialog—Typing Break Page
novdocx (ENU) 01 February 2006
You can modify any of the following typing break preferences:
Table 2-2 Typing Break Preferences
Option Description
Lock Screen to Enforce Typing Break Locks the screen when you are due a typing break.
Work Interval Lasts Lets you specify how long you can work before a typing break
occurs.
Break Interval Lasts Lets you specify the length of your typing breaks.
Allow Postponing of Breaks Lets you postpone typing breaks.
Click the Accessibility button to start the Keyboard accessibility preference tool.
34 SUSE Linux Enterprise Desktop 10 GNOME User Guide

Configuring Keyboard Layout Preferences
Use the Layouts tabbed page to set your keyboard layout.
Figure 2-4 Keyboard Preferences Dialog—Layouts Page
novdocx (ENU) 01 February 2006
Select your keyboard model from the drop-down list, then use the navigational buttons to add or
remove the selected layout to or from the list of available layouts.
You can select different layouts to suit different locales.
Click the Accessibility button to start the Keyboard accessibility preference tool.
Configuring Keyboard Layout Options
Use the Layout Options tabbed page to set your keyboard layout options.
Figure 2-5 Keyboard Preferences Dialog—Layout Options Page
Select an option from the list of available layout options and click Add to add the option or Remove
to remove it.
Customizing Your Settings 35

Click the Accessibility button to start the Keyboard accessibility preference tool.
2.1.4 Configuring the Mouse
Use the Mouse Preference tool to configure your mouse for right-hand use or for left-hand use. You
can also specify the speed and sensitivity of mouse movement.
Click Computer > Control Panel > Hardware > Mouse.
You can customize the settings for the Mouse Preference tool in the following areas:
• Buttons
• Cursors
• Motion
Configuring Button Preferences
Use the Buttons tabbed page to specify whether the mouse buttons are configured for left-hand use.
You can also specify the delay between clicks for a double-click.
novdocx (ENU) 01 February 2006
Figure 2-6 Mouse Preferences Dialog—Buttons Page
The following table lists the mouse button preferences you can modify.
Table 2-3 Mouse Button Preferences
Option Description
Left-handed Mouse Configures your mouse for left-hand use, swapping the functions of the left
mouse button.
Timeout Use the slider to specify the amount of time that can pass between clicks
when you double-click. If the interval between the first and second clicks
exceeds the time that is specified here, the action is not interpreted as a
double-click.
36 SUSE Linux Enterprise Desktop 10 GNOME User Guide

Configuring Cursor Preferences
Use the Cursors tabbed page to set your mouse pointer preferences.
Figure 2-7 Mouse Preferences Dialog—Cursors Page
novdocx (ENU) 01 February 2006
The following table lists the mouse pointer preferences you can modify.
Table 2-4 Mouse Pointer Preferences
Option Description
Cursor Theme Displays the available cursor themes.
Highlight the Pointer When You Press Ctrl Enables a mouse pointer animation when you press and
release Ctrl. This feature can help you locate the mouse
pointer.
Customizing Your Settings 37

Configuring Motion Preferences
Use the Motion tabbed page to set your preferences for mouse movement.
Figure 2-8 Mouse Preferences Dialog—Motion Page
novdocx (ENU) 01 February 2006
The following table lists the mouse motion preferences you can modify.
Table 2-5 Mouse Motion Preferences
Option Description
Acceleration Use the slider to specify the speed at which your mouse pointer moves on your
screen when you move your mouse.
Sensitivity Use the slider to specify how sensitive your mouse pointer is to movements of
your mouse.
Threshold Use the slider to specify the distance that you must move an item before the move
action is interpreted as a drag and drop action.
2.1.5 Installing and Configuring Printers
Use the Printers module to install and configure printers.
38 SUSE Linux Enterprise Desktop 10 GNOME User Guide

To start the Printers module, click Computer > Control Center > Hardware > Printers.
Figure 2-9 Printers Dialog
For more information about setting up printing, see Chapter 8, “Managing Printers,” on page 121.
2.1.6 Configuring Removable Drives and Media
novdocx (ENU) 01 February 2006
SLED supports a wide variety of removable drives and media, including storage devices, cameras,
scanners, and more. The configurations for many of these devices are set up automatically when
SLED is installed. To change the configuration for a drive or other removable device, click
Computer > Control Center > Hardware > Removable Drives and Media.
Some of the possible configuration settings include:
• What happens when a blank CD is inserted in the CD drive
• What happens when an audio CD is inserted in the drive
• Whether images are automatically imported from a digital camera when it is attached to the
computer
• Whether removable storage devices are mounted when they are plugged in to the computer
• Whether PDAs are automatically synced when attached to the computer
In general, you do not need to change the settings that are already configured unless you want to
change the behavior when a device is connected or if you want to connect a new device that is not
yet configured. If you attach a device for the first time and it behaves in an unexpected or undesired
way, check the Removable Drives and Media settings.
2.1.7 Configuring a Scanner
The Scanner configuration enables you to attach and configure a scanner, or to remove an alreadyattached scanner.
NOTE: Scanner configuration is done in YaST2 and requires root privileges.
To open YaST2 and configure a scanner, click Computer > Control Center > Hardware > Scanner.
Refer to the instructions on the Scanner Configuration screen for information about the available
options.
Customizing Your Settings 39

2.1.8 Specifying Screen Resolution Settings
Use this module to specify the resolution settings for your screen, including Resolution and Refresh
Rate.
Click Computer > Control Center > Hardware > Screen Resolution.
Figure 2-10 Screen Resolution Preferences Dialog
novdocx (ENU) 01 February 2006
The following table lists the screen resolution preferences you can modify.
Table 2-6 Screen Resolution Preferences
Option Description
Resolution Select the resolution (in pixels) to use for the screen.
Refresh Rate Select the refresh rate to use for the screen.
Make Default for This Computer Only Makes the screen resolution settings the default settings
only for the computer that you are logged in to.
If you cannot find a setting you want, you might need to use the Administrator Settings to
reconfigure your graphics card and monitor settings. See Configuring the Graphics Card and
Monitor (http://www.novell.com/documentation/nld/nld_deployment/data/
bsj9mwg.html#bsmqn45) in the SUSE Linux Enterprise Desktop Deployment Guide for more
information.
2.2 Look and Feel
Look and Feel settings include the following:
• Section 2.2.1, “Changing the Desktop Background,” on page 41
• Section 2.2.2, “Configuring Fonts,” on page 42
• Section 2.2.3, “Configuring the Screen Saver,” on page 43
• Section 2.2.4, “Choosing a Theme,” on page 44
• Section 2.2.5, “Customizing Window Behavior,” on page 46
40 SUSE Linux Enterprise Desktop 10 GNOME User Guide

2.2.1 Changing the Desktop Background
The desktop background is the image or color that is applied to your desktop. You can customize the
desktop background in the following ways:
• Select an image for the desktop background. The image is superimposed on the desktop
background color. The desktop background color is visible if you select a transparent image or
if the image does not cover the entire desktop.
• Select a color for the desktop background. You can select a solid color or create a gradient
effect with two colors. A gradient effect is a visual effect where one color blends gradually into
another color.
To change the desktop preferences:
1 Click Computer > Control Center > Look and Feel > Desktop Background.
2 Set the desktop preferences the way that you want them.
The following settings can be changed:
Table 2-7 Background Preferences
novdocx (ENU) 01 February 2006
Option Description
Desktop Wallpaper Displays an image of your choice on the desktop.
Style Determines what processing steps should be applied to the selected
image to adapt it optimally to the current screen resolution. To specify how
to display the image, select one of the following options from the Style
drop-down list:
•Centered: Displays the image in the middle of the desktop.
• Fill Screen: Enlarges the image to cover the desktop and maintains
the relative dimensions of the image.
•Scaled: Enlarges the image until the image meets the screen edges
and maintains the relative dimensions of the image.
•Tiled: Repeats the image over the entire screen.
Add Wallpaper Opens a dialog where you can select an image file to use as the
background picture.
Remove Removes a Desktop Wallpaper after you select it and then click Remove.
Customizing Your Settings 41

Option Description
Desktop Colors Lets you specify a color scheme using the options in the Desktop Color
drop-down list and the color selector buttons. You can specify a color
scheme using any of the following options:
• Solid Color specifies a single color for the desktop background.
To select a color, click Color. In the Pick a Color dialog, select a color
and then click OK
• Horizontal Gradient creates a gradient effect from the left screen
edge to the right screen edge.
Click Left Color to display the Pick a Color dialog, then select the
color that you want to appear at the left edge.
Click Right Color, then select the color that you want to appear at the
right edge.
• Vertical Gradient creates a gradient effect from the top screen edge
to the bottom screen edge.
Click Top C o l or to display the Pick a Color dialog, then select the
color that you want to appear at the top edge.
Click Bottom Color, then select the color that you want to appear at
the bottom edge.
novdocx (ENU) 01 February 2006
3 When you are satisfied with your choices, click Close.
Your desktop immediately changes to show the new settings.
2.2.2 Configuring Fonts
Use the Font Preferences dialog to select the fonts to use in your applications, windows, terminals,
and desktop. To open the Font Preferences dialog, click Computer > Control Center > Look and
Feel > Fonts.
Figure 2-11 Font Preferences Dialog
42 SUSE Linux Enterprise Desktop 10 GNOME User Guide

The upper part of the dialog shows the fonts selected for the application, desktop, window title, and
terminal. Click one of the buttons to open a selection dialog where you can set the font family, style,
and size.
To specify how to render fonts on your screen, select one of the following options:
• Monochrome: Renders fonts in black and white only. The edges of characters might appear
jagged in some cases because the characters are not antialiased. Antialiasing is an effect that is
applied to the edges of characters to make the characters look smoother.
• Best Shapes: Antialiases fonts where possible. Use this option for standard Cathode Ray Tube
(CRT) monitors.
• Best Contrast: Adjusts fonts to give the sharpest possible contrast and antialiases fonts so that
characters have smooth edges. This option might enhance the accessibility of the GNOME
Desktop to users with visual impairments.
• Subpixel Smoothing (LCDs): Uses techniques that exploit the shape of individual Liquid
Crystal Display (LCD) pixels to render fonts smoothly. Use this option for LCD or flat-screen
displays.
Click Details to specify further details of how to render fonts on your screen:
novdocx (ENU) 01 February 2006
• Resolution (Dots Per Inch): Use the spin box to specify the resolution to use when your
screen renders fonts.
• Smoothing: Select one of the options to specify how to antialias fonts.
• Hinting: Select one of the options to specify how to apply hinting to improves the quality of
fonts at small sizes and at low screen resolutions.
• Subpixel Order: Select one of the options to specify the subpixel color order for your fonts.
Use this option for LCD or flat-screen displays.
2.2.3 Configuring the Screen Saver
A screen saver is a program that blanks the screen or displays graphics when the computer is not
used for a specified amount of time. Originally, screen savers protected monitors from having
images burned into them. Now they are used primarily for entertainment or security.
Customizing Your Settings 43

To configure a screen saver, click Computer > Control Center > Look and Feel > Screensaver.
Figure 2-12 Screensaver Preferences Dialog
novdocx (ENU) 01 February 2006
You can select from Random (random selection of screen savers from a custom-defined list), Blank
Screen, or a selection of installed screen savers.
Select a screen saver from the list to choose it. The currently selected screen saver is displayed in the
small preview window. Specify the amount of time that the screen is to be idle before the screen
saver is activated, and whether the screen is locked when the screen saver is activated.
2.2.4 Choosing a Theme
A theme is a group of coordinated settings that specifies the visual appearance of a part of the
desktop. You can choose themes to change the appearance of the desktop. Use the Theme
Preferences tool to select from a list of preinstalled themes. The list of available themes includes
several themes for users with accessibility requirements.
To choose a theme, click Computer > Control Center > Look and Feel > Theme.
A theme contains settings that affect different parts of the desktop, as follows:
•Controls
The controls setting for a theme determines the visual appearance of windows, panels, and
applets. It also determines the visual appearance of the GNOME-compliant interface items that
appear on windows, panels, and applets, such as menus, icons, and buttons. Some of the
controls setting options that are available are designed for special accessibility needs. You can
select an option for the controls setting in the Controls tabbed page of the Theme Details tool.
•Window frame
The window frame setting for a theme determines the appearance of the frames around
windows only. You can select an option for the window frame setting in the Window Border
tabbed page of the Theme Details tool.
44 SUSE Linux Enterprise Desktop 10 GNOME User Guide

•Icon
The icon setting for a theme determines the appearance of the icons on panels and the desktop
background. You can select an option for the icon setting in the Icons tabbed page of the Theme
Details tool.
The color settings for the desktop and applications are controlled using themes. You can choose
from a variety of preinstalled themes. Selecting a style from the list overview applies it
automatically. Details opens another dialog where you can customize the style of single desktop
elements, like window content, window borders, and icons. Making changes and leaving the dialog
by clicking Close switches the theme to Custom Theme. Click Save Theme to save your modified
theme under a custom name. The Internet and other sources provide many additional themes for
GNOME as .tar.gz files. Install these with the Install theme.
Creating a Custom Theme
The themes that are listed in the Theme Preferences tool are different combinations of controls
options, window frame options, and icon options. You can create a custom theme that uses different
combinations of options.
1 Click > Computer > Control Center > Look and Feel > Theme.
novdocx (ENU) 01 February 2006
2 Select a theme from the list of themes, then click Theme Details.
3 Select the controls option that you want to use in the custom theme from the list in the Controls
tabbed page.
4 Click the Window Border tab, then select the window frame option that you want to use in the
custom theme.
5 Click the Icons tab, then select the icons option that you want to use in the custom theme.
6 Click Close > Save Theme.
A Save Theme to Disk dialog is displayed.
7 Type a name and a short description for the custom theme in the dialog, then click Save.
The custom theme now appears in your list of available themes.
Installing a New Theme
You can add a theme to the list of available themes. The new theme must be an archive file that is
tarred and zipped (a .tar.gz file).
1 Click Computer > Control Center > Look and Feel > Theme.
2 Click Install Theme.
3 Specify the location of the theme archive file in the Location field, then click OK.
You can also click Browse to browse for the file.
4 Click Install to install the new theme.
Installing a New Theme Option
You can install new controls options, window frame options, or icons options. You can find many
controls options on the Internet.
1 Click Computer > Control Center > Look and Feel > Theme.
Customizing Your Settings 45

2 Click Theme Details, then click the tab for the type of theme you want to install.
For example, to install an icons option, click the Icons tab.
3 Click Install Theme.
4 Specify the location of the theme archive file in the Location field, then click OK.
5 Click Install to install the new theme option.
Deleting a Theme Option
You can delete controls options, window frame options, or icons options.
1 Click Computer > Control Center > Look and Feel > Theme.
2 Click Theme Details, then click the tab for the type of option you want to delete.
3 Click Go To Theme Folder.
A File Manager window opens on the default option folder.
4 Use the File Manager window to delete the option.
novdocx (ENU) 01 February 2006
2.2.5 Customizing Window Behavior
Use the Window Preferences tool to customize window behavior for the desktop. You can determine
how a window reacts to contact with the mouse pointer or to double-clicks on its titlebar, and you
can define which key to hold for moving an application window.
To customize window behavior, click Computer > Control Center > Look and Feel > Windows.
Figure 2-13 Window Preferences Dialog
When several application windows populate the desktop, the active one by default is the one last
clicked. Change this behavior by activating Select Windows When the Mouse Moves over Them. If
desired, activate Raise Selected Window after an Interval and adjust the latency time with the slider.
This raises a windows a short time after the window receives focus.
Application windows can be shaded (rolled up) by double-clicking the title bar, leaving only the title
bar visible. This saves space on the desktop and is the default behavior. It is also possible to set
windows to maximize when the title bar is double-clicked.
46 SUSE Linux Enterprise Desktop 10 GNOME User Guide

Using the radio buttons, select a modifier key to press for moving a window (Ctrl, Alt, Hyper, or the
Windows logo key).
2.3 Personal
Personal settings include the following:
• Section 2.3.1, “Configuring Keyboard Accessibility Settings,” on page 47
• Section 2.3.2, “Configuring Assistive Technology Support,” on page 49
• Section 2.3.3, “Changing Your Password,” on page 50
• Section 2.3.4, “Configuring Language Settings,” on page 50
• Section 2.3.5, “Customizing Keyboard Shortcuts,” on page 51
2.3.1 Configuring Keyboard Accessibility Settings
GNOME provides keyboard settings designed to help users with motion impairments use the
GNOME desktop. Some of the available settings include:
novdocx (ENU) 01 February 2006
• How long a key is pressed and held before being recognized as valid input
• Whether the keyboard can be used as a mouse
• Whether key combinations that use Alt, Control, and Shift can be duplicated with “sticky keys”
To configure keyboard accessibility settings, click Computer > Control Center > Accessibility.
Customizing Your Settings 47

The module consists of the three tabs: Basic, Filters, and Mouse Keys. Before modifying settings,
activate Enable Keyboard Accessibility Features.
Figure 2-14 Keyboard Accessibility Preferences Dialog
novdocx (ENU) 01 February 2006
Features (Basic Tab)
The keyboard accessibility functions can be deactivated automatically after a certain time. Set an
appropriate time limit (measured in seconds) with the slider. The system can additionally provide
audible feedback when the keyboard accessibility functions are activated and deactivated.
Enable Sticky Keys (Basic Tab)
Some keyboard shortcuts require that one key (a modifier key) is kept pressed constantly (this
applies to Alt, Ctrl, and Shift) while the rest of the shortcut is typed. When sticky keys are used, the
system regards those keys as staying pressed after being pressed once. For an audible feedback
generated each time a modifier key is pressed, activate Beep when the modifier is pressed. If Disable
If Two Keys Pressed Together is selected, the keys do not “stick” anymore when two keys are
pressed simultaneously. The system then assumes that the keyboard shortcut has been completely
entered.
Enable Repeat Keys (Basic Tab)
Activate Repeat Keys to make settings with sliders for Delay and Speed. This determines how long a
key must be pressed for the automatic keyboard repeat function to be activated and at what speed the
characters are then typed.
Test the effect of the settings in the field at the bottom of the dialog. Select parameters that reflect
your normal typing habits.
48 SUSE Linux Enterprise Desktop 10 GNOME User Guide

Enable Slow Keys (Filters Tab)
To prevent accidental typing, set a minimum time limit that a key must be pressed and held before it
is recognized as valid input by the system. Also determine whether audible feedback should be
provided for keypress events, accepted keypresses, and the rejection of a keypress.
Enable Bounce Keys (Filters Tab)
To prevent double typing, set a minimum time limit for accepting two subsequent keypress events of
the same key as the input of two individual characters. If desired, activate audible feedback upon
rejection of a keypress event.
Toggle Keys (Filters Tab)
You can request audible feedback from the system when a keycap modifier key is pressed.
Mouse Keys Tab
Activates the keyboard mouse; the mouse pointer is controlled with the arrow keys of the number
pad. Use the sliders to set the maximum speed of the mouse pointer, the acceleration time until the
maximum speed is reached, and the latency between the pressing of a key and the cursor movement.
novdocx (ENU) 01 February 2006
2.3.2 Configuring Assistive Technology Support
SLED includes assistive technologies for users with special needs. These technologies include:
• Screen reader
• Screen magnifier
• On-screen keyboard
To configure assistive technology options, click Computer > Control Center > Personal > Assitive
Technology. To enable the technologies, first select Enable Assistive Technologies and then select
the technologies you want to enable every time you log in.
Figure 2-15 Assistive Technology Preferences Dialog
Customizing Your Settings 49

The gok package must be installed in order to get on-screen keyboard support, and the gnopernicus
and gnome-mag packages must be installed in order to get screenreading and magnifying
capabilities.
If these packages are not installed on your system (they are installed by default in the SLED
installation), install them with the following procedure:
1 Click System > Administrator Settings.
2 Type the root password, then click OK.
3 Click Software > Install and Remove Software.
4 Select Selection from the Filter drop-down menu, then select Accessibility from the Selection
list.
5 Select gok, gnopernicus, and gnome-mag from the Package list
6 Click Accept.
7 Insert SUSE Linux Enterprise Desktop 10 CD 2, then click OK.
8 Click Cancel > Close after the package installation is complete.
novdocx (ENU) 01 February 2006
2.3.3 Changing Your Password
For security reasons, it is a good idea to change your password from time to time. To change your
password:
1 Click Computer > Control Center > Personal > Change Password.
2 Type your old (current) password.
3 Type your new password.
4 Confirm your new password by typing it again, then click OK.
2.3.4 Configuring Language Settings
SLED can be configured to use any of many languages. The language setting determines the
language of dialogs and menus, and can also determine the keyboard and clock layout.
You can set the following language settings:
• Primary language
• Whether the keyboard language setting should depend on the primary language
• Whether the time zone should depend on the primary language
• Secondary languages
NOTE: You must have administrator (root) privileges to configure language settings.
To configure your language settings:
1 Click Computer > Control Center > Personal > Language.
2 (Conditional) If you are not logged in as root or a user with administrator privileges, enter the
root password.
50 SUSE Linux Enterprise Desktop 10 GNOME User Guide

If you do not know the root password, contact your system administrator. You cannot continue
without the root password.
3 Specify the primary language, whether you want to adapt the keyboard layout or time zone to
the primary language, and any secondary languages you need to support on the computer.
4 Click Accept.
The language configuration settings are written to several configuration files. This process can
take a few minutes. The new settings take effect immediately after they are written to the
configuration files.
2.3.5 Customizing Keyboard Shortcuts
A keyboard shortcut is a key or combination of keys that provides an alternative to standard ways of
performing an action. SLED allows you to customize the keyboard shortcuts for a number of
actions.
To open the Keyboard Shortcuts tool, click Computer > Control Center > Personal > Shortcuts.
Figure 2-16 Keyboard Shortcuts Dialog
novdocx (ENU) 01 February 2006
To change the shortcut keys for an action, select the action and then press the keys you want to
associate with the action. To disable the shortcut keys for an action, click the shortcut for the action,
then press Backspace.
2.4 System
System settings include the following:
• Section 2.4.1, “Configuring Search with Beagle Settings,” on page 52
• Section 2.4.2, “Configuring Date and Time,” on page 52
• Section 2.4.3, “Configuring Network Proxies,” on page 52
• Section 2.4.4, “Configuring Power Management,” on page 53
• Section 2.4.5, “Setting Preferred Applications,” on page 54
Customizing Your Settings 51

• Section 2.4.6, “Setting Session Sharing Preferences,” on page 55
• Section 2.4.7, “Managing Sessions,” on page 56
• Section 2.4.8, “Setting Sound Preferences,” on page 59
• Section 2.4.9, “Managing Users and Groups,” on page 61
2.4.1 Configuring Search with Beagle Settings
Beagle is the search engine used on the SLED GNOME Desktop. By default, Beagle is configured
to start automatically and index your home directory. If you want to change these settings, specify
the number of results displayed after a search or change the Beagle privacy settings, click Computer
> Control Center > System > Beagle Settings.
2.4.2 Configuring Date and Time
To change your date and time configuration, for example to change your time zone or the way the
date and time are displayed, click Computer > Control Center > System > Date and Time. This
opens the YaST Date and Time module, which requires root privileges. Enter the root password and
follow the instructions on the YaST pages.
novdocx (ENU) 01 February 2006
2.4.3 Configuring Network Proxies
The Network Proxy Configuration tool lets you configure how your system connects to the Internet.
You can configure the desktop to connect to a proxy server and specify the details of the server. A
proxy server is a server that intercepts requests to another server and fulfills the request itself, if it
can. You can specify the Domain Name Service (DNS) name or the Internet Protocol (IP) address of
the proxy server. A DNS name is a unique alphabetic identifier for a computer on a network. An IP
address is a unique numeric identifier for a computer on a network.
Click Computer > Control Center > System > Network Proxies.
Figure 2-17 Network Proxy Configuration Dialog
The following table lists the Internet connection options that you can modify.
52 SUSE Linux Enterprise Desktop 10 GNOME User Guide

Table 2-8 Internet Connection Options
Option Description
Direct Internet connection Connects directly to the Internet, without a proxy server.
Manual proxy configuration Connects to the Internet through a proxy server and lets you
configure the proxy server manually.
HTTP proxy The DNS name or IP address of the proxy server to use when
you request a HTTP service. Specify the port number of the
HTTP service on the proxy server in the Port box.
Secure HTTP proxy The DNS name or IP address of the proxy server to use when
you request a Secure HTTP service. Specify the port number
of the Secure HTTP service on the proxy server in the Port
box.
FTP proxy The DNS name or IP address of the proxy server to use when
you request an FTP service. Specify the port number of the
FTP service on the proxy server in the Port box.
Socks host The DNS name or IP address of the Socks host to use. Specify
the port number for the Socks protocol on the proxy server in
the Port spin box.
novdocx (ENU) 01 February 2006
Automatic proxy configuration Connects to the Internet through a proxy server and lets you
configure the proxy server automatically.
Autoconfiguration URL The URL that contains the information required to configure the
proxy server automatically.
2.4.4 Configuring Power Management
This module lets you manage your system’s power-saving options. It is especially useful for
extending the life of a laptop’s battery charge. However, several options also help to save electricity
when using a computer that is plugged in to an electricity source.
Click Computer > Control Center > System > Power Management.
Specifying Sleep Mode Times
Sleep mode shuts down the computer when it is unused for a specified amount of time. Whether
under battery or AC power, you can specify the amount of time that the computer remains unused
before it is put to sleep.You can also put the computer’s display to sleep without shutting down the
computer, saving the power required by the display.
Sleep mode is especially important when the computer is operating under battery power. Both the
screen and the computer draw power from the battery, so you can save a significant amount of
battery power by shutting down one or both. It is common to put the display to sleep after a shorter
period of time. (The default is five minutes.) Then, if the computer remains unused for a further
amount of time (default 20 minutes), it is also put to sleep.
To specify your computer’s sleep settings, open the Power Management module and click the Sleep
tab. Then, specify the amount of time that should pass before the display and computer are put to
sleep, for both AC power and battery power.
Customizing Your Settings 53

Setting Power Options
To set the type of sleep mode used by your computer and the action to take when the battery power
reaches the critical level, open the Power Management module and click the Options tab.
There are two available types of sleep mode:
• Standby
Standby mode turns off power-consuming computer components such as the display and the
hard drive without saving the contents of RAM. Any unsaved data is lost.
• Hibernate
Hibernate mode saves all contents of RAM to the hard disk before shutting off power to the
system. When you start the system again, the saved data is put back into RAM, restoring your
computer to the state it was in before it shut off. Hibernate requires an amount of free hard disk
space equal to the amount of RAM installed on the computer.
Choose the type of sleep mode you prefer by selecting it from the menu. If you have sufficient free
disk space, Hibernate is the better choice.
novdocx (ENU) 01 February 2006
You can also specify what your computer does when the battery reaches the critical level. The
available options are:
• Do Nothing
The computer does not shut down or automatically go into any kind of power-saving mode.
• Hibernate
The computer saves the contents of RAM to the hard disk, then shuts down. When you turn the
computer on again, the saved data is put back into RAM, restoring your computer to the state it
was in before it shut off. Hibernate requires an amount of free hard disk space equal to the
amount of RAM installed on the computer.
• Shut Down
The computer turns off without saving anything. All unsaved data is lost.
Choose the option you prefer by selecting it from the menu. If you have sufficient free disk space,
Hibernate is the better choice.
Setting Advanced Power Options
The available advanced power options allow you to display how and when the Power icon displays,
and at what point the battery is considered low or critical. Open the Power Management module,
then click the Advanced tab to set these options.
You can specify whether the power icon is always or never displayed in the System Tray, or that it is
present only when the battery is low, or when it is either charging or discharging.
You can also select the percentage of battery power remaining that is to be considered low or
critical. Slide the slider for each option until the desired percentage is specified.
2.4.5 Setting Preferred Applications
The Preferred Applications module allows you to specify which applications to use for various
common tasks:
54 SUSE Linux Enterprise Desktop 10 GNOME User Guide

To change any of these settings:
1 Click Computer > Control Center > System > Preferred Applications.
2 Click the tab for the type of application you want to set.
The following list shows the options and default settings.
• Web browser
Default: Firefox
• Mail reader
Default: Evolution
•FTP
Default: Nautilus
•News
Default: Thunderbird
•Terminal
GNOME Terminal
3 Select one of the available from the applications from the Choose menu or enter the command
used to start the application.
novdocx (ENU) 01 February 2006
4 Click Close.
The changes take effect immediately.
2.4.6 Setting Session Sharing Preferences
The Remote Desktop preference tool enables you to share a GNOME desktop session between
multiple users, and to set session-sharing preferences. To open this tool, click Computer > Control
Center > System > Remote Desktop.
The table below shows the session sharing preferences that can be set with this tool. These settings
have a direct impact on the security of your system.
Table 2-9 Session Sharing Preferences
Dialog Element Description
Allow other users to view your desktop Select this option to enable remote users to view your session.
All keyboard, pointer, and clipboard events from the remote user
are ignored.
Allow other users to control your
desktop
Users can view your desktop using
this command
Select this option to allow other users to access and control your
session from a remote location.
Click on the highlighted text to send the system address to
remote user by e-mail.
Customizing Your Settings 55

Dialog Element Description
novdocx (ENU) 01 February 2006
When a user tries to view or control
your desktop
Password Enter the password that the remote user who wants to view or
Select from the following security considerations when a user
tries to view or control your desktop:
• Ask you for confirmation
Select this option if you want remote users to ask you for
confirmation when they want to share your session. This
option enables you to be aware when other users connect
to your session. You can also decide what time is suitable
for the remote user to connect to your session.
• Require the user to enter this password
Select this option to authenticate the remote user if
authentication is used. This option provides an extra level
of security.
control your session must enter.
2.4.7 Managing Sessions
This module lets you manage your sessions. A session occurs between the time that you log in to the
desktop environment and the time that you log out. You can set session preferences and specify
which applications to start when you begin a session. You can configure sessions to save the state of
applications and then restore the state when you start another session.
You can also use this preference tool to manage multiple sessions. For example, you might have a
mobile session which starts applications you use most frequently when traveling, a demo session
that starts applications used to present a demonstration or slide show to a customer, and a work
session that uses a different set of applications when you are working in the office.
Click Computer > Control Center > System > Sessions.
This module consists of three tabbed pages:
• Session Options: Lets you manage multiple sessions and set preferences for the current
session.
• Current Session: Lets you specify startup order values and select restart styles for the sessionmanaged applications in your current session.
• Startup Programs: Lets you specify non-session-managed startup applications, which start
automatically when you start a session.
56 SUSE Linux Enterprise Desktop 10 GNOME User Guide

Setting Session Preferences
Use the Session Options tabbed page to manage multiple sessions and set preferences for the current
session.
Figure 2-18 Sessions Dialog—Session Options Page
novdocx (ENU) 01 February 2006
The following table lists the session options that you can modify.
Table 2-10 Session Preferences for Current Session
Option Description
Show Splash Screen on Login Displays a splash screen when you start a session.
Prompt on Logout Displays a confirmation dialog when you end a session.
Automatically Save Changes to Session Automatically saves the current state of your session. The
session manager saves the session-managed applications
that are open and the settings associated with the sessionmanaged applications. The next time you start a session,
the applications start automatically with the saved settings.
If you do not select this option, the Logout Confirmation
dialog displays a Save Current Setup option when you end
your session.
Sessions Lets you manage multiple sessions in the desktop, as
follows:
• To create a new session, click Add. The Add a New
Session dialog is displayed, letting you specify a
name for your session.
• To change the name of a session, select the session
and then click Edit. The Edit Session Name dialog is
displayed, letting you specify a new name for your
session.
• To delete a session, select the session and then click
Delete.
Customizing Your Settings 57

Setting Session Properties
Use the Current Session tabbed page to specify startup order values and to choose restart styles for
the session-managed applications in your current session.
Figure 2-19 Sessions Dialog—Current Session Page
novdocx (ENU) 01 February 2006
The following table lists the session properties that you can configure.
Table 2-11 Session Properties for Session-Managed Applications
Option Description
Order Specifies the order in which the session manager starts session-managed startup
applications. The session manager starts applications with lower order values first. The
default value is 50.
To set the startup order of an application, select the application in the table. Use the Order
box to specify the startup order value.
Style Determines the restart style of an application. To select a restart style for an application,
select the application in the table and then select one of the following styles:
• Normal: Starts automatically when you start a session. Use the kill command to
terminate applications with this restart style during a session.
• Restart: Restarts automatically when you close or terminate the application. Select
this style for an application if it must run continuously during your session. To
terminate an application with this restart style, select the application in the table and
then click Remove.
• Trash: Does not start when you start a session.
•Settings: Starts automatically when you start a session. Applications with this style
usually have a low startup order and store your configuration settings for GNOME
and session-managed applications.
Remove Deletes the selected application from the list. The application is removed from the session
manager and closed. Applications that you delete are not started the next time you start a
session.
Apply Applies changes made to the startup order and the restart style.
58 SUSE Linux Enterprise Desktop 10 GNOME User Guide

Configuring Startup Applications
Use the Startup Programs tabbed page to specify non-session-managed startup applications.
Figure 2-20 Sessions Dialog—Startup Programs Page
novdocx (ENU) 01 February 2006
Startup applications are applications that start automatically when you begin a session. You specify
the commands that run these applications and the commands execute automatically when you log in.
You can also start session-managed applications automatically. For more information, see “Setting
Session Preferences” on page 57.
To add a startup application, click Add. The Add Startup Program dialog is displayed. Specify the
command to start the application in the Startup Command field. If you specify more than one startup
application, use the Order box to specify the startup order of the each application.
To edit a startup application, select the startup application and then click Edit. The Edit Startup
Program dialog is displayed. Modify the command and the startup order for the startup application.
To delete a startup application, select the startup application and then click Delete.
2.4.8 Setting Sound Preferences
The Sound Preference tool lets you control when the sound server starts. You can also specify which
sounds to play when particular events occur.
Click Computer > Control Center > System > Sound.
Customizing Your Settings 59

Setting General Sound Preferences
Use the Sounds tab to specify when to launch the sound server. You can also enable sound event
functions.
Figure 2-21 Sound Preferences Dialog—General Page
novdocx (ENU) 01 February 2006
Click Enable software sound mixing (ESD) to start the sound server when you start a session. When
the sound server is active, the desktop can play sounds.
Click Play system sounds to play sounds when particular events occur in the desktop.
Finally, select the sound to play at each of the specified events.
60 SUSE Linux Enterprise Desktop 10 GNOME User Guide

Setting System Beep Preferences
Some applications play a beep sound to indicate a keyboard input error. Use the System Beep tab to
set preferences for the system beep.
Figure 2-22 Sound Preferences Dialog—System Beep Page
novdocx (ENU) 01 February 2006
2.4.9 Managing Users and Groups
Use the User Management tool to manage users and groups, including user and group names, group
membership, password and password encryption, and other options.
Click Computer > Control Center > System > User Management. The User Management tool opens
the User and Group Administration module in YaST.
Customizing Your Settings 61

NOTE: Root privileges are required to manage users and groups.
Follow the directions in YaST for information on changing settings.
novdocx (ENU) 01 February 2006
62 SUSE Linux Enterprise Desktop 10 GNOME User Guide

II
Office and Collaboration
novdocx (ENU) 01 February 2006
II
Office and Collaboration
63

novdocx (ENU) 01 February 2006
64 SUSE Linux Enterprise Desktop 10 GNOME User Guide

3
The OpenOffice.org Office Suite
OpenOffice.org is a powerful open-source office suite that provides tools for all types of office
tasks, such as writing texts, working with spreadsheets, or creating graphics and presentations. With
OpenOffice.org, you can use the same data across different computing platforms. You can also open
and edit files in other formats, including Microsoft Office, then save them back to this format, if
needed. This chapter covers information about the Novell
the key features you should be aware of when getting started with the suite.
• Section 3.1, “Understanding OpenOffice.org,” on page 65
• Section 3.2, “Word Processing with Writer,” on page 72
• Section 3.3, “Using Spreadsheets with Calc,” on page 78
• Section 3.4, “Using Presentations with Impress,” on page 80
• Section 3.5, “Using Databases with Base,” on page 81
• Section 3.6, “Creating Graphics with Draw,” on page 83
®
edition of OpenOffice.org and some of
novdocx (ENU) 01 February 2006
3
• Section 3.7, “Creating Mathematical Formulas with Math,” on page 84
• Section 3.8, “Finding Help and Information About OpenOffice.org,” on page 84
OpenOffice.org consists of several application modules (subprograms), which are designed to
interact with each other. They are listed in Table 3-1. A full description of each module is available
in the online help, described in Section 3.8, “Finding Help and Information About OpenOffice.org,”
on page 84.
Table 3-1 The OpenOffice.org Application Modules
Module Purpose
Writer Word processor application module
Calc Spreadsheet application module
Impress Presentation application module
Base Database application module
Draw Application module for drawing vector graphics
Math Application module for generating mathematical formulas
The appearance of the application varies depending on the desktop or window manager you use.
Regardless of the appearance, the basic layout and functions are the same.
3.1 Understanding OpenOffice.org
This section contains information that applies to all of the application modules in OpenOffice.org.
Module-specific information can be found in the sections relating to each module.
• Section 3.1.1, “What’s New in OpenOffice.org 2.0,” on page 66
The OpenOffice.org Office Suite
65

• Section 3.1.2, “Enhancements in the Novell Edition of OpenOffice.org 2.0,” on page 66
• Section 3.1.3, “Using the Standard Edition of OpenOffice.org,” on page 67
• Section 3.1.4, “Compatibility with Other Office Applications,” on page 67
• Section 3.1.5, “Starting OpenOffice.org,” on page 69
• Section 3.1.6, “Improving OpenOffice.org Load Time,” on page 69
• Section 3.1.7, “Customizing OpenOffice.org,” on page 69
• Section 3.1.8, “Finding Templates,” on page 72
3.1.1 What’s New in OpenOffice.org 2.0
OpenOffice.org 2.0 contains many improvements and features that were not included in earlier
versions. The biggest new feature is the Base database module. There have been many other changes
since the previous version, such as enhanced PDF export and improved word count capabilities. For
a complete list of features, fixes, and enhancements, go to the OpenOffice.org Web site (http://
www.openoffice.org/dev_docs/features/2.0/).
novdocx (ENU) 01 February 2006
3.1.2 Enhancements in the Novell Edition of OpenOffice.org 2.0
The Novell Edition of OpenOffice.org included with SLED contains enhancements that are not
available in the standard edition. These include:
Integration with SUSE Linux Enterprise Desktop
The Novell Edition of OpenOffice.org features redesigned tool bar icons for maximum consistency
with SUSE Linux Enterprise Desktop, including support for desktop appearance or theme changes.
These features provide a consistent interface across the Linux desktop, which enhances overall
usability and helps minimize enterprise training and support requirements.
Native Desktop Dialogs
The Novell Edition of OpenOffice.org uses your desktop’s native file dialogs rather than those in the
standard edition. This provides the same look and feel of other applications in your environment,
giving you a consistent, familiar experience.
Enhanced Support for Microsoft Office File Formats
OpenOffice.org supports import and export of Microsoft Office file formats, even taking advantage
of compatible fonts to match document length. Transparent document sharing makes
OpenOffice.org the best choice if you are deploying Linux desktops in a mixed Linux/Windows
environment.
E-Mail as Microsoft Office Document
The standard edition of OpenOffice.org supports e-mailing of files as PDF files from within the
OpenOffice.org application. With the Novell Edition of OpenOffice.org, you can also e-mail any
document as a Microsoft Office file. For example, you can e-mail a Writer file as a Microsoft Word
file. If that option is selected, the file is automatically converted and attached to an e-mail in your
default e-mail application.
66 SUSE Linux Enterprise Desktop 10 GNOME User Guide

Excel VBA Macro Interoperability
The Novell Edition of OpenOffice.org eases the migration of many macros from Microsoft Excel.
Although not all macros can be successfully migrated, this interoperability offers more than the
standard edition, which does not support migration of macros.
Enhanced Fonts
For the Novell Edition of OpenOffice.org, Novell licensed fonts from AGFA that use the same or
similar names as the fonts available in Microsoft Office. The fonts also look similar to those used by
Microsoft. This allows OpenOffice.org to match fonts when opening documents originally
composed in Microsoft Office, and very closely match pagination and page formatting.
Integration with Novell Evolution
The Novell Edition of OpenOffice.org is tightly integrated with Novell Evolution™, allowing users
to send documents as e-mail and to perform mail merges using the Evolution address book as a
datasource.
Improved File Access
novdocx (ENU) 01 February 2006
Files are available from any source available to the computer. Network files open and save
seamlessly.
Anti-aliased Presentation Graphics
With hardware acceleration enabled (the default), the Novell Edition of OpenOffice.org provides
higher-quality graphics in Impress slide shows.
Faster Start-up Times
The Novell Edition of OpenOffice.org includes an improved built-in quickstarter that loads
OpenOffice.org components at system startup and thus improves the application’s start-up time.
Subsequent document load times have also been improved.
3.1.3 Using the Standard Edition of OpenOffice.org
The standard edition of OpenOffice.org also works with SLED. If you install the latest version of
OpenOffice.org, all of your Novell Edition files remain compatible. However, the standard edition
does not contain the Novell enhancements.
3.1.4 Compatibility with Other Office Applications
OpenOffice.org can work with documents, spreadsheets, presentations, and databases in many other
formats, including Microsoft Office. They can be seamlessly opened like other files and saved back
to the original format. Because the Microsoft formats are proprietary and the specifications are not
available to other applications, there are occasionally formatting issues. If you have problems with
your documents, consider opening them in the original application and resaving in an open format
such as RTF for text documents or CSV for spreadsheets.
The OpenOffice.org Office Suite 67

TIP: For good information about migrating from other office suites to OpenOffice.org, refer to the
OpenOffice.org Migration Guide (http://documentation.openoffice.org/manuals/oooauthors2/
0600MG-MigrationGuide.pdf).
Converting Documents to the OpenOffice.org Format
OpenOffice.org can read, edit, and save documents in a number of formats. It is not necessary to
convert files from those formats to the OpenOffice.org format to use those files. However, if you
want to convert the files, you can do so. To convert a number of documents, such as when first
switching to OpenOffice.org, do the following:
1 Select File > Wizard > Document Converter.
2 Choose the file format from which to convert.
There are several StarOffice and Microsoft Office formats available.
3 Click Next.
4 Specify where OpenOffice.org should look for templates and documents to convert and in
which directory the converted files should be placed.
novdocx (ENU) 01 February 2006
IMPORTANT: Documents from a Windows partition are usually in a subdirectory of /
windows.
5 Make sure that all other settings are appropriate, then click Next.
6 Review the summary of the actions to perform, then start the conversion by clicking Convert.
The amount of time needed for the conversion depends on the number of files and their
complexity. For most documents, conversion does not take very long.
Sharing Files with Users of Other Office Suites
OpenOffice.org is available for a number of operating systems. This makes it an excellent tool when
a group of users frequently need to share files and do not use the same system on their computers.
When sharing documents with others, you have several options.
If the recipient needs to be able to edit the file: Save the document in the format the other user
needs. For example, to save as a Microsoft Word file, click File > Save As, then select the Microsoft
Word file type for the version of Word the other user needs.
If the recipient only needs to read the document: Export the document to a PDF file with File >
Export as PDF. PDF files can be read on any platform using a viewer like Adobe Acrobat Reader.
If you want to share a document for editing: Use one of the standard document formats. The
default formats comply with the OASIS standard XML format, making them compatible with a
number of applications. TXT and RTF formats, although limited in formatting, might be a good
option for text documents. CSV is useful for spreadsheets. OpenOffice.org might also offer your
recipient's preferred format, especially Microsoft formats.
If you want to e-mail a document as a PDF: Click File > Send > Document as PDF
Attachment.Your default e-mail program opens with the file attached.
If you want to e-mail a document to a Microsoft Word user: Click File > Send > Document as
MS-Doc Attachment. Your default e-mail program opens with the file attached.
68 SUSE Linux Enterprise Desktop 10 GNOME User Guide

3.1.5 Starting OpenOffice.org
1 Start the application in one of the following ways:
• On the menu bar, click .
This opens Writer. To open a different module, click File > New from the newly opened
Writer document, then choose the module you want to open.
• From the Computer menu, click Computer > More Applications > Office, then click the
name of the OpenOffice.org module you want to start.
• In a terminal window, enter ooffice. The OpenOffice.org window opens. Click File >
New, then choose the module you want to open.
2 Select the module you want to open.
If any OpenOffice.org application is open, you can open any of the other applications by clicking
File > New > Name of Application.
3.1.6 Improving OpenOffice.org Load Time
novdocx (ENU) 01 February 2006
To speed up the load time of OpenOffice.org by preloading the application at system startup:
1 Click Tools > Options > Memory.
2 Select Start at Startup.
The next time you restart your system, OpenOffice.org will preload. When you open an
OpenOffice.org application module, it will open faster.
3.1.7 Customizing OpenOffice.org
You can customize OpenOffice.org to best suit your needs and working style. Toolbars, menus, and
keyboard shortcuts can all be reconfigured to help you more quickly access the features you use the
most. You can also assign macros to application events if you want specific actions to occur when
those events take place. For example, if you always work with a specific spreadsheet, you can create
a macro that opens the spreadsheet and assign it to the Start Application event.
This section contains simple, generic instructions for customizing your environment. The changes
you make are effective immediately, so you can see if the changes are what you wanted and go back
and modify them if they weren’t. See the OpenOffice.org help files for detailed instructions.
Customizing Toolbars
Use the Customize dialog to modify OpenOffice.org toolbars.
1 Click the arrow icon at the end of any toolbar.
2 Click Customize Toolbar.
3 Select the toolbar you want to customize.
4 Select the check boxes next to the commands you want to appear on the toolbar, and deselect
the check boxes next to the commands you don’t want to appear.
5 Select whether to save your customized toolbar in the OpenOffice.org module you are using or
in the document.
• OpenOffice.org module
The OpenOffice.org Office Suite 69

The customized toolbar is used whenever you open that module.
• Document filename
The customized toolbar is used whenever you open that document.
6 Repeat to customize additional toolbars.
7 Click OK.
You can quickly choose the buttons that appear on a particular toolbar.
1 Click the arrow icon at the end of the toolbar you want to change.
2 Click Visible Buttons to display a list of buttons.
3 Select the buttons in the list that appears to enable (check) or disable (uncheck) them.
Customizing Menus
You can add or delete items from current menus, reorganize menus, and even create new menus.
1 Click Tools > Customize > Menu.
2 Select the menu you want to change, or click New to create a new menu.
Click Help for more information about the options in the Customize dialog.
novdocx (ENU) 01 February 2006
3 Modify, add, or delete menu items as desired.
4 Click OK.
Customizing Keyboard Shortcuts
You can reassign currently assigned keyboard shortcuts and assign new shortcuts to frequently used
functions.
1 Click Tools > Customize > Keyboard.
2 Select the keys you want to assign to a function, or select the function and assign the keys or
key combinations.
Click Help for more information about the options in the Customize dialog.
3 Modify, add, or delete keyboard shortcuts as desired.
4 Click OK.
Customizing Events
OpenOffice.org also provides ways to assign macros to events such as application startup or the
saving of a document. The assigned macro runs automatically whenever the selected event occurs.
1 Click Tools > Customize > Events.
2 Select the event you want to change.
Click Help for more information about the options in the Customize dialog box.
3 Assign or remove macros for the selected event.
4 Click OK.
70 SUSE Linux Enterprise Desktop 10 GNOME User Guide

Changing the Global Settings
Global settings can be changed in any OpenOffice.org application by clicking Tools > Options on
the menu bar. This opens the window shown in the figure below. A tree structure is used to display
categories of settings.
Figure 3-1 The Options Window
novdocx (ENU) 01 February 2006
The following table lists the settings categories along with a brief description of each category:
Table 3-2 Global Setting Categories
Settings Category Description
OpenOffice.org Various basic settings, including your user data (such as your address and
e-mail), important paths, and settings for printers and external programs.
Load/Save Includes the settings related to the opening and saving of several file
types. There is a dialog for general settings and several special dialogs to
define how external formats should be handled.
Language Settings Covers the various settings related to languages and writing aids, such as
your locale and spell checker settings. This is also the place to enable
support for Asian languages.
Internet Includes the dialogs to configure any proxies and to change settings
related to search engines.
Text Document Configures the global word processing options, such as the basic fonts
and layout that Writer should use.
HTML Document Changes the settings related to the HTML authoring features of
OpenOffice.org.
Spreadsheet Changes the settings for Calc, such as those related to sort lists and grids.
Presentation Changes the settings that should apply to all presentations. For example,
you can specify the measurement unit for the grid used to arrange
elements.
Drawing Includes the settings related to the vector drawing module, such as the
drawing scale, grid properties, and some print options.
The OpenOffice.org Office Suite 71

Settings Category Description
Formula Provides a single dialog to set special print options for formulas.
Chart Defines the default colors used for newly created charts.
Data Sources Defines how external data sources should be accessed.
IMPORTANT: All settings listed in the table are applied globally. They are used as defaults for
every new document you create.
3.1.8 Finding Templates
Templates greatly enhance the use of OpenOffice.org by simplifying formatting tasks for a variety
of different types of documents. OpenOffice.org comes with a few templates, and you can find
additional templates on the Internet. You can also create your own. Creating templates is beyond the
scope of this guide, but detailed instructions are found in the OpenOffice.org help system and in
other documents and tutorials available online.
novdocx (ENU) 01 February 2006
In addition to templates, you can find other extras and add-ins online. The following table lists a few
of the prominent places where you can find templates and other extras. (Because Web sites often
close or their content changes, the information in the following table might not be current when you
read it.)
Table 3-3 Where to Find OpenOffice.org Templates and Extras
Location What You Can Find
OpenOffice.org documentation Web site (http://
documentation.openoffice.org/
Samples_Templates/User/template_2_x/
index.html)
Worldlabel.com (http://www.worldlabel.com/Pages/
openoffice-template.htm)
Templates for Calc spreadsheets, CD cases, seed
packets, fax cover sheets, and more
Templates for many types of labels
For more information about templates, see Section 3.2.4, “Using Templates to Format Documents,”
on page 76 and Section 3.3.2, “Using Templates in Calc,” on page 79.
3.2 Word Processing with Writer
OpenOffice.org Writer is a full-featured word processor with page and text formatting capabilities.
Its interface is similar to interfaces for other major word processors, and it includes some features
that are usually found only in expensive desktop publishing applications.
This section highlights a few key features of Writer. For more information about these features and
for complete instructions for using Writer, look at the OpenOffice.org help or any of the sources
listed in Section 3.8, “Finding Help and Information About OpenOffice.org,” on page 84.
72 SUSE Linux Enterprise Desktop 10 GNOME User Guide

NOTE: Much of the information in this section can also be applied to other OpenOffice.org
modules. For example, other modules use styles similarly to how they are used in Writer.
• Section 3.2.1, “Creating a New Document,” on page 73
• Section 3.2.2, “Sharing Documents with Other Word Processors,” on page 73
• Section 3.2.3, “Formatting with Styles,” on page 74
• Section 3.2.4, “Using Templates to Format Documents,” on page 76
• Section 3.2.5, “Working with Large Documents,” on page 76
• Section 3.2.6, “Using Writer as an HTML Editor,” on page 78
3.2.1 Creating a New Document
There are two ways to create a new document:
To create a document from scratch, click File > New > Text Document.
To use a standard format and predefined elements for your own documents, try a wizard. Wizards
are small utilities that let you make some basic decisions then produce a ready-made document from
a template. For example, to create a business letter, click File > Wizards > Letter. Using the wizard's
dialogs, easily create a basic document using a standard format. A sample wizard dialog is shown in
Figure 3-2.
novdocx (ENU) 01 February 2006
Figure 3-2 An OpenOffice.org Wizard
Enter text in the document window as desired. Use the Formatting toolbar or the Format menu to
adjust the appearance of the document. Use the File menu or the relevant buttons in the toolbar to
print and save your document. With the options under Insert, add extra items to your document, such
as a table, picture, or chart.
3.2.2 Sharing Documents with Other Word Processors
You can use Writer to edit documents created in a variety of other word processors. For example,
you can import a Microsoft Word document, edit it, and save it again as a Word document. Most
The OpenOffice.org Office Suite 73

Word documents can be imported into OpenOffice.org without any problem. Formatting, fonts, and
all other aspects of the document remain intact. However, some very complex documents—such as
documents containing complicated tables, Word macros, or unusual fonts or formatting—might
require some editing after being imported. OpenOffice.org can also save in many popular word
processing formats. Likewise, documents created in OpenOffice.org and saved as Word files can be
opened in Microsoft Word without any trouble.
So, if you use OpenOffice.org in an environment where you frequently share documents with Word
users, you should have little or no trouble exchanging document files. Just open the files, edit them,
and save them as Word files.
3.2.3 Formatting with Styles
OpenOffice.org uses styles for applying consistent formatting to various elements in a document.
The following types of styles are available:
Table 3-4 About the Types of Styles
novdocx (ENU) 01 February 2006
Type of Style What it Does
Paragraph Applies standardized formatting to the various types of paragraphs in your
document. For example, apply a paragraph style to a first-level heading to
set the font and font size, spacing above and below the heading, location
of the heading, and other formatting specifications.
Character Applies standardized formatting for types of text. For example, if you want
emphasized text to appear in italics, you can create an emphasis style that
italicizes selected text when you apply the style to it.
Frame Applies standardized formatting to frames. For example, if your document
uses sidebars, you can create frames with specified graphics, borders,
location, and other formatting so that all of your sidebars have a consistent
appearance.
Page Applies standardized formatting to a specified type of page. For example, if
every page of your document contains a header and footer except for the
first page, you can use a first page style that disables headers and footers.
You can also use different page styles for left and right pages so that you
have bigger margins on the insides of pages and your page numbers
appear on an outside corner.
List Applies standardized formatting to specified list types. For example, you
can define a checklist with square check boxes and a bullet list with round
bullets, then easily apply the correct style when creating your lists.
Opening the Styles and Formatting Window
The Styles and Formatting window (called the Stylist in earlier versions of OpenOffice.org), is a
versatile formatting tool for applying styles to text, paragraphs, pages, frames, and lists. To open this
window, click Format > Styles and Formatting. OpenOffice.org comes with several predefined
styles. You can use these styles as they are, modify them, or create new styles.
TIP: By default, the Styles and Formatting window is a floating window; that is, it opens in its own
window that you can place anywhere on the screen. If you use styles extensively, you might find it
helpful to dock the window so that it always present in the same part of the Writer interface. To dock
74 SUSE Linux Enterprise Desktop 10 GNOME User Guide

the Styles and Formatting window, press Control while you double-click on a gray area in the
window. This tip applies to some other windows in OpenOffice.org as well, including the Navigator.
Applying a Style
To apply a style, select the element you want to apply the style to, and then double-click the style in
the Styles and Formatting window. For example, to apply a style to a paragraph, place the cursor
anywhere in that paragraph and double-click the desired style.
Using Styles Versus Using Formatting Buttons and Menu Options
Using styles rather than the Format menu options and buttons helps give your pages, paragraphs,
texts, and lists a more consistent look and makes it easier to change your formatting. For example, if
you emphasize text by selecting it and clicking the Bold button, then later decide you want
emphasized text to be italicized, you need to find all of your bolded text and manually change it to
italics. If you use a character style, you only need to change the style from bold to italics and all text
that has been formatted with that style automatically changes from bold to italics.
Text formatted with a menu option or button overrides any styles you have applied. If you use the
Bold button to format some text and an emphasis style to format other text, then changing the style
does not change the text that you formatted with the button, even if you later apply the style to the
text you bolded with the button. You must manually unbold the text and then apply the style.
novdocx (ENU) 01 February 2006
Likewise, if you manually format your paragraphs using Format > Paragraph, it is easy to end up
with inconsistent paragraph formatting. This is especially true if you copy and paste paragraphs
from other documents with different formatting.
Changing a Style
Styles are powerful because you can change formatting throughout a document by changing a style,
rather than applying the change separately everywhere you want to apply the new formatting.
1 In the Styles and Formatting window, right-click the style you want to change.
2 Click Modify.
3 Change the settings for the selected style.
For information about the available settings, refer to the OpenOffice.org online help.
4 Click OK.
Creating a Style
OpenOffice.org comes with a collection of styles to suit many users’ needs. However, most users
eventually need a style that does not yet exist. To create a new style:
1 Right-click in any empty space in the Styles and Formatting window.
Make sure you are in the list of styles for the type of style you want to create. For example, if
you are creating a character style, make sure you are in the character style list.
2 Click New.
3 Click OK.
4 Name your style and choose the settings you want applied with that style.
The OpenOffice.org Office Suite 75

For details about the style options available in any tab, click that tab and then click Help.
3.2.4 Using Templates to Format Documents
Most word processor users create more than one kind of document. For example, you might write
letters, memos, and reports, all of which look different and require different styles. If you create a
template for each of your document types, the styles you need for each document are always readily
available.
Creating a template requires a little bit of up-front planning. You need to determine what you want
the document to look like so you can create the styles you need in that template. You can always
change your template, but a little planning can save you a lot of time later.
NOTE: You can convert Microsoft Word templates like you would any other Word document. See
“Converting Documents to the OpenOffice.org Format” on page 68 for information.
A detailed explanation of templates is beyond the scope of this section. However, more information
is found in the help system, and detailed how-tos are found at the OpenOffice.org Documentation
page (http://documentation.openoffice.org/HOW_TO/index.html).
novdocx (ENU) 01 February 2006
Creating a Template
A template is a text document containing only the styles and content that you want to appear in
every document, such as your address information and letterhead on a letter. When a document is
created or opened with the template, the styles are automatically applied to that document.
To create a template:
1 Click File > New > Text Document.
2 Create the styles and content that you want to use in any document that uses this template.
3 Click File > Templates > Save.
4 Specify a name for the template.
5 In the Categories box, click the category you want to place the template in.
The category is the folder where the template is stored.
6 Click OK.
3.2.5 Working with Large Documents
You can use Writer to work on large documents. Large documents can be either a single file or a
collection of files assembled into a single document.
Navigating in Large Documents
The Navigator tool displays information about the contents of a document. It also lets you quickly
jump to different elements. For example, you can use the Navigator to get a quick overview of all
images included in the document.
76 SUSE Linux Enterprise Desktop 10 GNOME User Guide

To open the Navigator, click Edit > Navigator. The elements listed in the Navigator vary according
to the document loaded in Writer.
Figure 3-3 Navigator Tool in Writer
novdocx (ENU) 01 February 2006
Click an item in the Navigator to jump to that item in the document.
Creating a Single Document from Multiple Documents
If you are working with a very large document, such as a book, you might find it easier to manage
the book with a master document, rather than keeping the book in a single file. A master document
enables you to quickly apply formatting changes to a large document or to jump to each
subdocument for editing.
A master document is a Writer document that serves as a container for individual Writer files. You
can maintain chapters or other subdocuments as individual files collected in the master document.
Master documents are also useful if multiple people are working on a document. You can separate
each person’s portion of the document into subdocuments collected in a master document, allowing
multiple writers to work on their subdocuments at the same time without fear of overwriting other
people’s work.
NOTE: If you are coming to OpenOffice.org from Microsoft Word, you might be nervous about
using master documents because the master document feature in Word has a reputation for
corrupting documents. This problem does not exist in OpenOffice.org Writer, so you can safely use
master documents to manage your projects.
To create a master document:
1 Click New > Master Document.
or
Open an existing document and click File > Send > Create Master Document.
2 Insert subdocuments.
3 Click File > Save.
The OpenOffice.org help files contain more complete information about working with master
documents. Look for the topic entitled “Using Master Documents and Subdocuments.”
The OpenOffice.org Office Suite 77

TIP: The styles from all of your subdocuments are imported into the master document. To ensure
that formatting is consistent throughout your master document, you should use the same template
for each subdocument. Doing so is not mandatory; however, if subdocuments are formatted
differently, you will probably need to do some reformatting to successfully bring subdocuments into
the master document without creating inconsistencies. For example, if two documents imported into
your master document include different styles with the same name, the master document will use the
formatting specified for that style in the first document you import.
3.2.6 Using Writer as an HTML Editor
In addition to being a full-featured word processor, Writer also functions as an HTML editor. Writer
includes HTML tags that can be applied as you would any other style in a Writer document. You can
view the document as it will appear online, or you can directly edit the HTML code.
Creating an HTML Document
1 Click File > New > HTML Document.
2 Click the arrow at the bottom of the Formatting and Styles window.
3 Select HTML Styles.
4 Create your HTML document, using the styles to tag your text.
novdocx (ENU) 01 February 2006
5 Click File > Save As.
6 Select the location where you want to save your file, name the file, and select HTML Document
(.html) from the Filter list.
7 Click OK.
If you prefer to edit HTML code directly, or if you want to see the HTML code created when you
edited the HTML file as a Writer document, click View > HTML Source. In HTML Source mode,
the Formatting and Styles list is no longer available.
NOTE: The first time you switch to HTML Source mode, you are prompted to save the file as
HTML, if you have not already done so.
3.3 Using Spreadsheets with Calc
Calc is the OpenOffice.org spreadsheet application. Create a new spreadsheet with File > New >
Spreadsheet or open one with File > Open. Calc can read and save in Microsoft Excel's format, so it
is easy to exchange spreadsheets with Excel users.
NOTE: Calc can process many VBA macros in Excel documents; however, support for VBA
macros is not yet complete. When opening an Excel spreadsheet that makes heavy use of macros,
you might discover that some do not work.
In the spreadsheet cells, enter fixed data or formulas. A formula can manipulate data from other cells
to generate a value for the cell in which it is inserted. You can also create charts from cell values.
• Section 3.3.1, “Using Formatting and Styles in Calc,” on page 79
• Section 3.3.2, “Using Templates in Calc,” on page 79
78 SUSE Linux Enterprise Desktop 10 GNOME User Guide

3.3.1 Using Formatting and Styles in Calc
Calc comes with a few built-in cell and page styles to improve the appearance of your spreadsheets
and reports. Although these built-in styles are adequate for many uses, you will probably find it
useful to create styles for your own frequently used formatting preferences.
Creating a Style
1 Click Format > Styles and Formatting.
2 In the Formatting and Styles window, click either the Cell Styles or the Page Styles icon.
3 Right-click in the Formatting and Styles window, then click New.
4 Specify a name for your style and use the various tabs to set the desired formatting options.
5 Click OK.
Modifying a Style
1 Click Format > Styles and Formatting.
2 In the Formatting and Styles window, click either the Cell Styles or the Page Styles icon.
3 Right-click the name of the style you want to change, then click Modify.
novdocx (ENU) 01 February 2006
4 Change the desired formatting options.
5 Click OK.
3.3.2 Using Templates in Calc
If you use different styles for different types of spreadsheets, you can use templates to save your
styles for each spreadsheet type. Then, when you create a particular type of spreadsheet, open the
applicable template and the styles you need for that template are available in the Formatting and
Styles window.
A detailed explanation of templates is beyond the scope of this section. However, more information
is found in the help system and detailed how-tos are found at the OpenOffice.org Documentation
page (http://documentation.openoffice.org/HOW_TO/index.html).
Creating a Template
A Calc template is a spreadsheet that contains styles and content that you want to appear in every
spreadsheet created with that template, such as headings or other cell styles. When a spreadsheet is
created or opened with the template, the styles are automatically applied to that spreadsheet.
To create a template:
1 Click File > New > Spreadsheet.
2 Create the styles and content that you want to use in any spreadsheet that uses this template.
3 Click File > Templates > Save.
4 Specify a name for the template.
5 In the Categories box, click the category you want to place the template in.
The category is the folder where the template is stored.
6 Click OK.
The OpenOffice.org Office Suite 79

3.4 Using Presentations with Impress
Use OpenOffice.org Impress to create presentations for screen display or printing, such as slide
shows or transparencies. If you have used other presentation software, you can move comfortably to
Impress, which works very similarly to other presentation software.
Impress can open and save Microsoft Powerpoint presentations, which means you can exchange
presentations with Powerpoint users, as long as you save your presentations in Powerpoint format.
• Section 3.4.1, “Creating a Presentation,” on page 80
• Section 3.4.2, “Using Master Pages,” on page 80
3.4.1 Creating a Presentation
1 Click File > New > Presentation.
2 Select the option to use for creating the presentation.
There are two ways to create a presentation:
• Create an empty presentation
Opens Impress with a blank slide. Use this option to create a new presentation from
scratch, without any preformatted slides.
• Create a presentation from a template
Opens Impress with your choice of template. Use this option to create a new presentation
with a predesigned OpenOffice.org template or a template you’ve created or installed
yourself, such as your company’s presentation template. Impress uses styles and templates
the same way other OpenOffice.org modules do. See Section 3.2.4, “Using Templates to
Format Documents,” on page 76 for more information about templates.
novdocx (ENU) 01 February 2006
3.4.2 Using Master Pages
Master pages give your presentation a consistent look by defining the way each slide looks, what
fonts are used, and other graphical elements. Impress uses two types of master pages:
•Slide master
Contains elements that appear on all slides. For example, you might want your company logo
to appear in the same place on every slide. The slide master also determines the text formatting
style for the heading and outline of every slide that uses that master page, as well as any
information you want to appear in a header or footer.
• Notes master
Determines the formatting and appearance of the notes in your presentation.
Creating a Slide Master
Impress comes with a collection of preformatted master pages. Eventually, most users will want to
customize their presentations by creating their own slide masters.
1 Start Impress, then create a new empty presentation.
2 Click View > Master > Slide Master.
This opens the current slide master in Master View.
80 SUSE Linux Enterprise Desktop 10 GNOME User Guide

3 Right-click the left-hand panel, then click New Master.
4 Edit the slide master until it has the desired look.
5 Click Close Master View or Vie w > N orm a l to return to Normal View.
TIP: When you have created all of the slide masters you want to use in your presentations, you can
save them in an Impress template. Then, any time you want to create presentations that use those
slide masters, open a new presentation with your template.
Applying a Slide Master
Slide masters can be applied to selected slides or to all slides in the presentation.
1 Open your presentation, then click View > Master > Slide Master.
2 (Optional) If you want to apply the slide master to multiple slides, but not to all slides, select
the slides that you want to use that slide master.
To select multiple slides, in the Slides Pane, Control-click on the slides you want to use that
slide master.
novdocx (ENU) 01 February 2006
3 In the Task Pane, right-click the master page you want to apply.
If you do not see the Task Pane, click View > Ta s k Pan e .
4 Apply the slide master by clicking one of the following:.
• Apply to All Slides
Applies the selected slide master to all slides in the presentation.
• Apply to Selected Slides
Applies the selected slide master to the current slide, or to any slides you select before
applying the slide master. For example, if you want to apply a different slide master to the
first slide in a presentation, select that slide, then change to Master View and apply a slide
master to that slide.
3.5 Using Databases with Base
OpenOffice 2.0 introduces a new database module, Base. Use Base to design a database to store
many different kinds of information, from a simple address book or recipe file to a sophisticated
document management system.
Tables, forms, queries, and reports can be created manually or using convenient wizards. For
example, the Table Wizard contains a number of common fields for business and personal use.
Databases created in Base can be used as data sources, such as when creating form letters.
It is beyond the scope of this document to detail database design with Base. More information can
be found at the sources listed in Section 3.8, “Finding Help and Information About OpenOffice.org,”
on page 84.
3.5.1 Creating a Database Using Predefined Options
Base comes with several predefined database fields to help you create a database. The steps in this
section are specific to creating an address book using predefined fields, but it should be easy to
follow them to use the predefined fields for any of the built-in database options.
The OpenOffice.org Office Suite 81

The process for creating a database can be broken into several subprocesses:
• “Creating the Database” on page 82
• “Setting Up the Database Table” on page 82
• “Creating a Form” on page 83
• “Modifying the Form” on page 83
• “What’s Next?” on page 83
Creating the Database
First, create the database.
1 Click File > New > Database.
2 Select Create a new database, then click Next.
3 Click Yes, register the database for me to make your database information available to other
OpenOffice.org modules, select both check boxes in the bottom half of the dialog, then click
Finish.
novdocx (ENU) 01 February 2006
4 Browse to the directory where you want to save the database, specify a name for the database,
then click OK.
Setting Up the Database Table
Next, define the fields you want to use in your database table.
1 In the Table Wizard, click Personal.
The Sample tables list changes to show the predefined tables for personal use. If you had
clicked Business, the list would contain predefined business tables.
2 In the Sample tables list, click Addresses.
The available fields for the predefined address book appear in the Available fields menu.
3 In the Available fields menu, click the fields you want to use in your address book.
You can select one item at a time, or you can shift-click multiple items to select them.
4 Click the single right-arrow to move the selected items to the Selected fields menu.
To move all available fields to the Selected fields menu, click the double right-arrow.
5 Use the up-arrow and down-arrow to adjust the order of the selected fields.
The fields appear in the table and forms in the order in which they are listed.
6 Click Next.
7 Make sure each of the fields is defined correctly.
You can change the field name, type, whether the entry is required, and the maximum length of
the field (the number of characters that can be entered in that field. For this example, leave the
settings as they are.
8 Click Next.
9 Click Create a primary key, click Automatically add a primary key, click Auto value, then click
.
Next
10 Accept the default name for the table, select Create a form based on this table, then click
Finish.
82 SUSE Linux Enterprise Desktop 10 GNOME User Guide

Creating a Form
Next, create the form to use when entering data into your address book.
1 In the Form Wizard, click the double right-arrow to move all available fields to the Fields in the
form list, then click Next twice.
2 Select how you want to arrange your form, then click Next.
3 Select the option to use the form to display all data and leave all of the check boxes empty, then
click Next.
4 Apply a style and field border, then click Next.
For this example, accept the default selections.
5 Name the form, select the Modify the form option, then click Finish.
Modifying the Form
After the form has been defined, you can modify the appearance of the form to suit your preferences.
1 Close the form that opened when you finished the previous step.
2 In the main window for your database, right-click the form you want to modify (there should be
only one option), then click Edit.
3 Arrange the fields on the form by dragging them to their new locations.
For example, move the First Name field so it appears to the right of the Last Name field, and
then adjust the locations of the other fields to suit your preference.
4 When you have finished modifying the form, save it and close it.
novdocx (ENU) 01 February 2006
What’s Next?
After you have created your database tables and forms, you are ready to enter your data. You can
also design queries and reports to help sort and display the data.
Refer to OpenOffice.org online help and other sources listed in Section 3.8, “Finding Help and
Information About OpenOffice.org,” on page 84 for additional information about Base.
3.6 Creating Graphics with Draw
Use OpenOffice.org Draw to create graphics and diagrams. You can save your drawings in today’s
most common formats and import them into any application that lets you import graphics, including
the other OpenOffice.org modules. You can also create Flash versions of your drawings.
The OpenOffice.org documentation contains complete instructions on using Draw. See Section 3.8,
“Finding Help and Information About OpenOffice.org,” on page 84 for more information.
To use a Draw graphic in a document:
1 Open Draw, then create the graphic.
2 Save the graphic.
3 Copy the graphic and paste it into the document, or insert the graphic directly from the
document.
The OpenOffice.org Office Suite 83

One particularly useful feature of Draw is the ability to open it from other OpenOffice.org modules
so you can create a drawing that is automatically imported into your document.
1 From an OpenOffice.org module (for example, from Writer), click Insert > Object > OLE
Object > OpenOffice.org 2.0 Drawing > OK.
This opens Draw.
2 Create your drawing.
3 Click in your document, outside the Draw frame.
The drawing is automatically inserted into your document.
3.7 Creating Mathematical Formulas with Math
It is usually difficult to include complex mathematical formulas in your documents. The
OpenOffice.org Math equation editor lets you create formulas using operators, functions, and
formatting assistants. You can then save those formulas as objects that can be imported into other
documents. Math functions can be inserted into other OpenOffice.org documents like any other
graphic object.
novdocx (ENU) 01 February 2006
NOTE: Math is not a calculator. The functions it creates are graphical objects. Even if they are
imported into Calc, these functions cannot be evaluated.
3.8 Finding Help and Information About OpenOffice.org
OpenOffice.org contains extensive online help. In addition, a large community of users and
developers support it. As a result, it is seldom hard to find help or information about using the
OpenOffice.org. The following table shows some of the places where you can go for additional
information. (Because Web sites often close or their content changes, the information in the
following table might not be current when you read it.)
Table 3-5 Where to Get Information About OpenOffice.org
Location What You Can Find
OpenOffice.org online help menu Extensive help on performing any task in
OpenOffice.org
Official OpenOffice.org support page (http://
support.openoffice.org/index.html)
Manuals, tutorials, user and developer forums,
users@openoffice.org mailing list, FAQs, and much
more
OpenOffice.org Migration Guide (oooauthors.org/
en/authors/userguide2/migration/
OtherMSOFiles_25_June_PK.sxw)
Taming OpenOffice.org (http://www.tamingopenoffice-org.com/)
OpenOffice.org Macros (http://www.pitonyak.org/
oo.php)
84 SUSE Linux Enterprise Desktop 10 GNOME User Guide
Information about migrating to OpenOffice.org from
other office suites, including Microsoft Office
Books, news, tips and tricks
Extensive information about creating and using
macros

4
Evolution: E-Mail and Calendaring
EvolutionTM makes the tasks of storing, organizing, and retrieving your personal information easy, so
you can work and communicate more effectively with others. It’s a highly evolved groupware
program, an integral part of the Internet-connected desktop.
Evolution can help you work in a group by handling e-mail, address, and other contact information,
and one or more calendars. It can do that on one or several computers, connected directly or over a
network, for one person or for large groups.
With Evolution, you can accomplish your most common daily tasks quickly. For example, it takes
only one or two clicks to enter appointment or contact information sent to you by e-mail, or to send
e-mail to a contact or appointment. People who get lots of e-mail will appreciate advanced features
like search folders, which let you save searches as though they were ordinary e-mail folders.
This chapter introduces you to Evolution and helps you get started using it. For complete
information, refer to the Evolution documentation.
novdocx (ENU) 01 February 2006
4
• Section 4.1, “Starting Evolution for the First Time,” on page 85
• Section 4.2, “Using Evolution: An Overview,” on page 93
4.1 Starting Evolution for the First Time
Start the Evolution client by clicking Computer > Evolution Mail and Calendar, or by typing
evolution in a terminal window.
4.1.1 Using the First-Run Assistant
The first time you run Evolution, it creates a directory called .evolution in your home directory,
where it stores all of its local data. Then, it opens a First-Run Assistant to help you set up e-mail
accounts and import data from other applications.
Using the first-run assistant takes two to five minutes.
Later on, if you want to change this account, or if you want to create a new one, click Edit >
Preferences, then click Mail Accounts. Select the account you want to change, then click Edit.
Alternately, add a new account by clicking Add.
The First-Run Assistant helps you provide the information Evolution needs to get started.
• “Defining Your Identity” on page 86
• “Receiving Mail” on page 86
• “Receiving Mail Options” on page 88
• “Sending Mail” on page 91
• “Account Management” on page 92
• “Time Zone” on page 92
• “Importing Mail (Optional)” on page 92
Evolution: E-Mail and Calendaring
85

Defining Your Identity
The Identity window is the first step in the assistant.
Here, you enter some basic personal information. You can define multiple identities later by clicking
Edit > Preferences, then clicking Mail Accounts.
When the First-Run Assistant starts, the Welcome page is displayed. Click Forward to proceed to
the Identity window.
1 Type your full name in the Full Name field.
2 Type your e-mail address in the E-Mail Address field.
3 (Optional) Type a reply to address in the Reply-To field.
Use this field if you want replies to e-mails sent to a different address.
4 (Optional) Select if this account is your default account.
5 (Optional) Type your organization name in the Organization field.
This is the company where you work, or the organization you represent when you send e-mail.
6 Click Forward.
novdocx (ENU) 01 February 2006
Receiving Mail
The Receiving E-mail option lets you determine where you get your e-mail.
You need to specify the type of server you want to receive mail with. If you are unsure about the
type of server to choose, ask your system administrator or ISP.
1 Select a server type in the Server Type list.
The following a list of server types that are available:
Novell GroupWise: Select this option if you connect to Novell GroupWise®. Novell
GroupWise keeps e-mail, calendar, and contact information on the server.
Microsoft Exchange: Available only if you have installed the Connector for Microsoft*
Exchange. It allows you to connect to a Microsoft Exchange 2000 or 2003 server, which stores
e-mail, calendar, and contact information on the server.
IMAP: Keeps the e-mail on your server so you can access your e-mail from multiple systems.
IMAP4rev1: Keeps the e-mail on your server so you can access your e-mail from multiple
systems.
POP: Downloads your e-mail to your hard disk for permanent storage, freeing up space on the
e-mail server.
USENET News: Connects to the news server and downloads a list of available news digests.
Local Delivery: Choose this option if you want to move e-mail from the spool (the location
where mail waits for delivery) and store it in your home directory. You need to provide the path
to the mail spool you want to use. If you want to leave e-mail in your system’s spool files,
choose the Standard Unix Mbox Spool option instead.
86 SUSE Linux Enterprise Desktop 10 GNOME User Guide

MH Format Mail Directories: If you download your e-mail using mh or another MH-style
program, you should use this option. You need to provide the path to the mail directory you
want to use.
Maildir Format Mail Directories: If you download your e-mail using Qmail or another
maildir-style program, you should use this option. You need to provide the path to the mail
directory you want to use.
Standard Unix Mbox Spool or Directory: If you want to read and store e-mail in the mail
spool on your local system, choose this option. You need to provide the path to the mail spool
you want to use.
None: Select this if you do not plan to check e-mail with this account. If you select this, there
are no configuration options.
Remote Configuration Options
If you selected Novell GroupWise, IMAP, POP, or USENET News as your server, you need to
specify additional information.
1 Type the hostname of your e-mail server in the Hostname field.
novdocx (ENU) 01 February 2006
If you don’t know the hostname, contact your administrator.
2 Type your username for the account in the Username field.
3 Select to use a secure (SSL) connection.
If your server supports secure connections, you should enable this security option. If you are
unsure if your server supports a secure connection, contact your system administrator.
4 Select your authentication type in the Authentication list.
or
Click Check for Supported Types to have Evolution check for supported types. Some servers do
not announce the authentication mechanisms they support, so clicking this button is not a
guarantee that available mechanisms actually work.
If you are unsure what authentication type you need, contact your system administrator.
5 Select if you want Evolution to remember your password.
6 Click Forward.
7 (Conditional) If you chose Microsoft Exchange, provide your username in the Username field
and your Outlook Web Access (OWA) URL in the OWA Url field. OWA URL and user names
should be entered as in OWA. If the mail box path is different from the username, OWA path
should include mail box path also. You should see something similar to this: http://<server
name>/exchange/<mail box path>
When you have finished, continue with “Receiving Mail Options” on page 88.
Local Configuration Options
If you selected Local Delivery, MH-Format Mail Directories, Maildir-Format Mail Directories, or
Standard Unix Mbox Spool or Directory, you must specify the path to the local files in the path field.
Continue with “Receiving Mail Options” on page 88.
Evolution: E-Mail and Calendaring 87

Receiving Mail Options
After you have selected a mail delivery mechanism, you can set some preferences for its behavior.
• “Novell GroupWise Receiving Options” on page 88
• “Microsoft Exchange Receiving Options” on page 88
• “IMAP and IMAP4rev1 Receiving Options” on page 89
• “POP Receiving Options” on page 89
• “USENET News Receiving Options” on page 90
• “Local Delivery Receiving Options” on page 90
• “MH-Format Mail Directories Receiving Options” on page 90
• “Maildir-Format Mail Directories Receiving Options” on page 90
• “Standard Unix Mbox Spool or Directory Receiving Options” on page 91
Novell GroupWise Receiving Options
If you select Novell GroupWise as your receiving server type, you need to specify the following
options:
novdocx (ENU) 01 February 2006
1 Select if you want Evolution to automatically check for new mail.
If you select this option, you need to specify how often Evolution should check for new
messages.
2 Select if you want to check for new messages in all folders.
3 Select if you want to apply filters to new messages in the Inbox on the server.
4 Select if you want to check new messages for junk content.
5 Select if you want to only check for junk messages in the Inbox folder.
6 Select if you want to automatically synchronize remote mail locally.
7 Type your Post Office Agent SOAP port in the Post Office Agent SOAP Port field.
If you are unsure what your Post Office Agent SOAP port is, contact your system
administrator.
8 Click Forward.
When you have finished, continue with Sending Mail.
Microsoft Exchange Receiving Options
If you select Microsoft Exchange as your receiving server type, you need to specify the following
options.
1 Select if you want Evolution to automatically check for new mail.
If you select this option, you need to specify how often Evolution should check for new
messages.
2 Specify the Global Catalog server name in the Global Catalog Server Name field.
The Global Catalog Server contains the user information for users. If you are unsure what your
Global Catalog server name is, contact your system administrator.
3 Select if you want to limit the number of Global Address Lists (GAL).
88 SUSE Linux Enterprise Desktop 10 GNOME User Guide

The GAL contains a list of all e-mail addresses. If you select this option, you need to specify
the maximum number of responses.
4 Select if you want the password expire warning period.
If you select this option, you need to specify how often Evolution should send the password
expire message.
5 Select if you want to automatically synchronize remote mail locally.
6 Click Forward.
When you have finished, continue with Sending Mail.
IMAP and IMAP4rev1 Receiving Options
If you select IMAP or IMAP4rev1 as your receiving server type, you need to specify the following
options:
1 Select if you want Evolution to automatically check for new mail.
If you select this option, you need to specify how often Evolution should check for new
messages.
novdocx (ENU) 01 February 2006
2 Select if you want Evolution to use custom commands to connect to Evolution.
If you select this option, specify the custom command you want Evolution to use.
3 Select if you want Evolution to show only subscribed folders.
Subscribed folders are folders that you have chosen to receive mail from by subscribing to
them.
4 Select if you want Evolution to override server-supplied folder namespaces.
By choosing this option you can rename the folders that the server provides. If you select this
option, you need to specify the namespace to use.
5 Select if you want to apply filters to new messages in the Inbox.
6 Select if you want to check new messages for junk content.
7 Select if you want to check for junk messages in the Inbox folder.
8 Select if you want to automatically synchronize remote mail locally.
9 Click Forward.
When you have finished, continue with Sending Mail.
POP Receiving Options
If you select POP as your receiving server type, you need to specify the following options:
1 Select if you want Evolution to automatically check for new mail.
If you select this option, you need to specify how often Evolution should check for new
messages.
2 Select if you want to leave messages on the server.
3 Select if you want to disable support for all POP3 extensions (support for POP3).
4 Click Forward.
When you have finished, continue with Sending Mail.
Evolution: E-Mail and Calendaring 89

USENET News Receiving Options
If you select USENET News as your receiving server type, you need to specify the following
options:
1 Select if you want Evolution to automatically check for new mail.
If you select this option, you need to specify how often Evolution should check for new
messages.
2 Select if you want to show folders in short notation.
For example, comp.os.linux would appear as c.o.linux.
3 Select if you want to show relative folder names in the subscription dialog box.
If you select to show relative folder names in the subscription page, only the name of the folder
is displayed. For example the folder evolution.mail would appear as evolution.
4 Click Forward.
When you have finished, continue with Sending Mail.
Local Delivery Receiving Options
novdocx (ENU) 01 February 2006
If you select Local Delivery as your receiving server type, you need to specify the following
options:
1 Select if you want Evolution to automatically check for new mail.
If you select this option, you need to specify how often Evolution should check for new
messages.
2 Click Forward.
When you have finished, continue with Sending Mail.
MH-Format Mail Directories Receiving Options
If you select MH-Format Mail Directories as your receiving server type, you need to specify the
following options:
1 Select if you want Evolution to automatically check for new mail.
If you select this option, you need to specify how often Evolution should check for new
messages.
2 Select if you want to user the .folders summary file.
3 Click Forward.
When you have finished, continue with Sending Mail.
Maildir-Format Mail Directories Receiving Options
If you select Maildir-Format Mail Directories as your receiving server type, you need to specify the
following options:
1 Select if you want Evolution to automatically check for new mail.
If you select this option, you need to specify how often Evolution should check for new
messages.
90 SUSE Linux Enterprise Desktop 10 GNOME User Guide

2 Select if you want to apply filters to new messages in the Inbox.
3 Click Forward.
When you have finished, continue with Sending Mail.
Standard Unix Mbox Spool or Directory Receiving Options
If you select Standard Unix Mbox Spool or Directory as your receiving server type, you need to
specify the following options:
1 Select if you want Evolution to automatically check for new mail.
If you select this option, you need to specify how often Evolution should check for new
messages.
2 Select if you want to apply filters to new messages in the Inbox.
3 Select if you want to store status headers in Elm, Pine, and Mutt formats.
4 Click Forward.
When you have finished, continue with Sending Mail Sending Mail.
novdocx (ENU) 01 February 2006
Sending Mail
Now that you have entered information about how you plan to get mail, Evolution needs to know
about how you want to send it.
1 Select a server type from the Server Type list.
The following server types are available:
Sendmail: Uses the Sendmail program to send mail from your system. Sendmail is more
flexible, but is not as easy to configure, so you should select this option only if you know how
to set up a Sendmail service.
SMTP: Sends mail using an outbound mail server. This is the most common choice for sending
mail. If you choose SMTP, there are additional configuration options.
SMTP Configuration
1 Type the host address in the Host field.
If you are unsure what your host address is, contact your system administrator.
2 Select if your server requires authentication.
If you selected that your server requires authentication, you need to provide the following
information:
2a Select your authentication type in the Authentication list.
or
Click Check for Supported Types to have Evolution check for supported types. Some
servers do not announce the authentication mechanisms they support, so clicking this
button is not a guarantee that available mechanisms actually work.
2b Type your username in the Username field.
2c Select if you want Evolution to remember your password.
Evolution: E-Mail and Calendaring 91

3 Select if you use a secure connection (SSL).
4 Click Forward.
Continue with Account Management.
Account Management
Now that you have finished the e-mail configuration process you need to give the account a name.
The name can be any name you prefer. Type your account name on the Name field, then click
Forward.
Continue with Time Zone.
Time Zone
In this step, you need to select your time zone either on the map or select from the time zone dropdown list.
When you have finished, click Forward, then click Apply. Evolution opens with your new account
created.
novdocx (ENU) 01 February 2006
If you want to import e-mail from another e-mail client, continue with Importing Mail (Optional). If
not, skip to “Using Evolution: An Overview” on page 93.
Importing Mail (Optional)
If Evolution finds e-mail or address files from another application, it offers to import them.
Microsoft Outlook* and versions of Outlook Express after version 4, use proprietary formats that
Evolution cannot read or import. To import information, you might want to use the Export tool
under Windows*.
Before importing e-mail from Netscape*, make sure you have selected File > Compact All Folders.
If you don’t, Evolution will import and undelete the messages in your Trash folders.
NOTE: Evolution uses standard file types for e-mail and calendar information, so you can copy
those files from your ~/.evolution directory. The file formats used are mbox for e-mail and
iCal for calendar information.
Contacts files are stored in a database, but can be saved as a standard vCard*. To export contact data,
open your contacts tool and select the contacts you want to export (press Ctrl+A to select them all).
Click File > Save as VCard.
92 SUSE Linux Enterprise Desktop 10 GNOME User Guide

4.2 Using Evolution: An Overview
Now that the first-run configuration has finished, you’re ready to begin using Evolution. Here’s a
quick explanation of what’s happening in your main Evolution window.
Figure 4-1 Evolution Window
novdocx (ENU) 01 February 2006
Menu Bar
The menu bar gives you access to nearly all of Evolution features.
Folder List
The folder list gives you a list of the available folders for each account. To see the contents of a
folder, click the folder name and the contents are displayed in the e-mail list.
Toolbar
The toolbar gives you fast and easy access to the frequently used features in each component.
Search Tool
The search tool lets you search your e-mail, contacts, calendar, and tasks to easily find what you’re
looking for.
Message List
The message list displays a list of e-mail that you have received. To view an e-mail in the preview
pane, click the e-mail in the e-mail list.
Evolution: E-Mail and Calendaring 93

Shortcut Buttons
The shortcut bar lets you switch between folders and between Evolution tools. At the bottom of the
shortcut bar there are buttons that let you switch tools, and above that is a list of all the available
folders for the current tool. If you have the Evolution Connector for Microsoft Exchange installed,
you have an Exchange button in addition to buttons for the other tools.
Status Bar
The status bar periodically displays a message, or tells you the progress of a task. This most often
happens when you’re checking or sending e-mail. These progress queues are shown in the previous
figure. The Online/Offline indicator is here, too, in the lower left of the window.
Preview Pane
The preview pane displays the contents of the e-mail that is selected in the e-mail list.
4.2.1 The Menu Bar
The menu bar’s contents always provide all the possible actions for any given view of your data. If
you’re looking at your Inbox, most of the menu items relate to e-mail. Some content relates to other
components of Evolution and some, especially those in the File menu, relates to the application as a
whole.
novdocx (ENU) 01 February 2006
File: Anything related to a file or to the operations of the application usually falls under this menu,
such as creating things, saving them to disk, printing them, and quitting the program itself.
Edit: Holds useful tools that help you edit text and move it around. Lets you access the settings and
configuration options in the Edit menu.
View: Lets you decide how Evolution should look. Some of the features control the appearance of
Evolution as a whole, and others the way a particular kind of information appears.
Folder: Holds actions that can be performed on folders. You can find things like copy, rename,
delete, and so on.
Message: Holds actions that can be applied to a message. If there is only one target for the action,
such as replying to a message, you can normally find it in the Message menu.
Search: Lets you search for messages, or for phrases within a message. You can also see previous
searches you have made. In addition to the Search menu, there is a text entry box in the toolbar that
you can use to search for messages. You can also create a search folder from a search.
Help: Opens the Evolution Help files.
4.2.2 The Shortcut Bar
Evolution’s most important job is to give you access to your information and help you use it quickly.
One way it does that is through the shortcut bar, which is the column on the left side of the main
window. The buttons, such as Mail and Contacts, are the shortcuts. Above them is a list of folders
for the current Evolution tool.
The folder list organizes your e-mail, calendars, contact lists, and task lists in a tree, similar to a file
tree. Most people find one to four folders at the base of the tree, depending on the tool and their
94 SUSE Linux Enterprise Desktop 10 GNOME User Guide

system configuration. Each Evolution tool has at least one, called On This Computer, for local
information. For example, the folder list for the e-mail tool shows any remote e-mail storage you
have set up, plus local folders and search folders.
If you get large amounts of e-mail, you might want more folders than just your Inbox. You can
create multiple calendar, task, or contacts folders.
To create a new folder:
1 Click Folder > New.
2 Type the name of the folder in the Folder Name field.
3 Select the location of the new folder.
4 Click OK.
Folder Management
Right-click a folder or subfolder to display a menu with the following options:
Copy: Copies the folder to a different location. When you select this item, Evolution offers a choice
of locations to copy the folder to.
novdocx (ENU) 01 February 2006
Move: Moves the folder to another location.
Mark Messages As Read: Marks all the messages in the folder as read.
New Folder: Creates another folder in the same location.
Delete: Deletes the folder and all its contents.
Rename: Lets you change the name of the folder.
Disable: Disables the account.
Properties: Checks the number of total and unread messages in a folder, and, for remote folders,
lets you select whether to copy the folder to your local system for offline operation.
You can also rearrange folders and messages by dragging and dropping them.
Any time new e-mail arrives in a e-mail folder, that folder label is displayed in bold text, along with
the number of new messages in that folder.
4.2.3 E-Mail
Evolution e-mail is like other e-mail programs in several ways:
• It can send and receive e-mail in HTML or as plain text, and makes it easy to send and receive
multiple file attachments.
• It supports multiple e-mail sources, including IMAP, POP3, and local mbox or mh spools and
files created by other e-mail programs.
• It can sort and organize your e-mail in a wide variety of ways with folders, searches, and filters.
• It lets you guard your privacy with encryption.
However, Evolution has some important differences from other e-mail programs. First, it’s built to
handle very large amounts of e-mail. The junk e-mail, message filtering and searching functions
Evolution: E-Mail and Calendaring 95

were built for speed and efficiency. There’s also the search folder, an advanced organizational
feature not found in some e-mail clients. If you get a lot of e-mail, or if you keep every message you
get in case you need to refer to it later, you’ll find this feature especially useful. Here’s a quick
explanation of what’s happening in your main Evolution e-mail window.
Message List
The message list displays all the e-mails that you have. This includes all your read and unread
messages, and e-mail that is flagged to be deleted.
Preview Pane
This is where your e-mail is displayed.
If you find the preview pane too small, you can resize the pane, enlarge the whole window, or
double-click the message in the message list to have it open in a new window. To change the size of
a pane, drag the divider between the two panes.
As with folders, you can right-click messages in the message list and get a menu of possible actions,
including moving or deleting them, creating filters or search folders based on them, and marking
them as junk mail.
novdocx (ENU) 01 February 2006
Most of the e-mail-related actions you want to perform are listed in the Actions menu in the menu
bar. The most frequently used ones, like Reply and Forward, also appear as buttons in the toolbar.
Most of them are also located in the right-click menu and as keyboard shortcuts.
4.2.4 The Calendar
To begin using the calendar, click Calendar in the shortcut bar. By default, the calendar shows
today’s schedule on a ruled background. At the upper right, there’s a monthly calendar you can use
to switch days. Below that, there’s a Task list, where you can keep a list of tasks separate from your
calendar appointments.
Appointment List
The appointment list displays all your scheduled appointments.
Month Pane
The month pane is a small view of a calendar month. To display additional months, drag the column
border to the left. You can also select a range of days in the month pane to display a custom range of
days in the appointment list.
Task List
Tasks are distinct from appointments because they generally don’t have times associated with them.
You can see a larger view of your task list by clicking Tasks in the shortcut bar.
4.2.5 The Contacts Tool
The Evolution contacts tool can handle all of the functions of an address book or phone book.
However, it’s easier to update Evolution than it is to change an actual paper book, in part because
Evolution can synchronize with Palm OS* devices and use LDAP directories on a network.
96 SUSE Linux Enterprise Desktop 10 GNOME User Guide

Another advantage of the Evolution contacts tool is its integration with the rest of the application.
For example, you can right-click on an e-mail address in Evolution mail to instantly create a contact
entry.
To use the contacts tool, click Contacts in the shortcut bar. By default, the display shows all your
contacts in alphabetical order, in a minicard view. You can select other views from the View menu,
and adjust the width of the columns by clicking and dragging the gray column dividers.
The largest section of the contacts display shows a list of individual contacts. You can also search
the contacts in the same way that you search e-mail folders, using the search tool on the right side of
the toolbar.
novdocx (ENU) 01 February 2006
Evolution: E-Mail and Calendaring 97

novdocx (ENU) 01 February 2006
98 SUSE Linux Enterprise Desktop 10 GNOME User Guide

5
GroupWise Linux Client: E-Mailing
novdocx (ENU) 01 February 2006
and Calendaring
GroupWise® is a robust, dependable messaging and collaboration system that connects you to your
universal mailbox anytime and anywhere. This section gives you an introductory overview of the
GroupWise client to help you start using the GroupWise Cross-Platform client quickly and easily.
• Section 5.1, “Getting Acquainted with the Main GroupWise Window,” on page 99
• Section 5.2, “Using Different GroupWise Modes,” on page 104
• Section 5.3, “Understanding Your Mailbox,” on page 105
• Section 5.4, “Using the Toolbar,” on page 107
• Section 5.5, “Using Shortcut Keys,” on page 107
• Section 5.6, “Learning More,” on page 109
5.1 Getting Acquainted with the Main GroupWise Window
Your main work area in GroupWise is called the Main Window. From the Main Window of
GroupWise, you can read your messages, schedule appointments, view your Calendar, manage
5
GroupWise Linux Client: E-Mailing and Calendaring
99

contacts, change the mode of GroupWise you’re running in, open folders, open documents, and
much more.
Figure 5-1 Groupwise Main Window
novdocx (ENU) 01 February 2006
You can open more than one Main Window in GroupWise by clicking Window, then clicking New
Main Window. This is useful if you proxy for another user. You can look at your own Main Window
and the Main Window belonging to the person you are proxying for. You might also want to open a
certain folder in one window and look at your Calendar in another. You can open as many Main
Windows as your computer’s memory allows.
The basic components of the Main Window are explained below.
5.1.1 Toolbar
The toolbar lets you quickly accomplish common GroupWise tasks, such as opening the Address
Book, sending mail messages, and finding an item. For information about the toolbar, see Section
5.4, “Using the Toolbar,” on page 107.
5.1.2 Folder and Item List Header
The Folder and Item List header provides a drop-down list where you can select the mode of
GroupWise you want to run (Online or Caching), select to open your archived or backup mailbox,
and select a proxy mailbox.
100 SUSE Linux Enterprise Desktop 10 GNOME User Guide
 Loading...