

Page 1

SUSE Linux Enterprise
www.novell.com10 SP2
September23,2008 Subscription Management Tool Guide
Page 2

Subscription Management Tool Guide
List of Authors: Jakub Friedl
All content is copyright © Novell, Inc.
Legal Notice
This manual is protected under Novell intellectual property rights. By reproducing, duplicating or
distributing this manual you explicitly agree to conform to the terms and conditions of this license
agreement.
This manual may be freely reproduced, duplicated and distributed either as such or as part of a bundled
package in electronic and/or printed format, provided however that the following conditions are fullled:
That this copyright notice and the names of authors and contributors appear clearly and distinctively
on all reproduced, duplicated and distributed copies. That this manual, specically for the printed
format, is reproduced and/or distributed for noncommercial use only. The express authorization of
Novell, Inc must be obtained prior to any other use of any manual or part thereof.
For Novell trademarks, see the Novell Trademark and Service Mark list http://www.novell
.com/company/legal/trademarks/tmlist.html. * Linux is a registered trademark of
Linus Torvalds. All other third party trademarks are the property of their respective owners. A trademark
symbol (®, ™ etc.) denotes a Novell trademark; an asterisk (*) denotes a third party trademark.
All information found in this book has been compiled with utmost attention to detail. However, this
does not guarantee complete accuracy. Neither Novell, Inc., SUSE LINUX Products GmbH, the authors,
nor the translators shall be held liable for possible errors or the consequences thereof.
Page 3

Contents
1 SMT Installation 1
1.1 Installation During the Initial Installation Process . . . . . . . . . . . . 1
1.2 Installation On Top of an Already Installed System . . . . . . . . . . . 2
1.3 SMT Conguration Wizard . . . . . . . . . . . . . . . . . . . . . . 3
2 Conguring SMT Using YaST 5
2.1 Activating and Deactivating SMT with YaST . . . . . . . . . . . . . . . 6
2.2 Setting NU Credentials with YaST . . . . . . . . . . . . . . . . . . . 8
2.3 Setting SMT Database Password with YaST . . . . . . . . . . . . . . . 9
2.4 Setting E-mail Addresses to Receive Reports with YaST . . . . . . . . . 10
2.5 Setting the SMT Job Schedule with YaST . . . . . . . . . . . . . . . 10
3 Mirroring Installation and Update Sources Using SMT 13
3.1 Getting Mirror Credentials . . . . . . . . . . . . . . . . . . . . . 13
3.2 Managing Software Catalogs with SMT . . . . . . . . . . . . . . . . 14
3.3 The /srv/www/htdocs Structure . . . . . . . . . . . . . . . . . . . 19
3.4 Using Test Environment . . . . . . . . . . . . . . . . . . . . . . 20
4 Managing Client Machines With SMT 21
4.1 Listing Registered Clients . . . . . . . . . . . . . . . . . . . . . . 21
4.2 Deleting Registrations . . . . . . . . . . . . . . . . . . . . . . . 21
4.3 Manual Registration of Clients at Novell Customer Center . . . . . . . . 22
4.4 Scheduling Periodic Registrations of Clients at Novell Customer Center . . 22
5 SMT Reports 25
5.1 Report Schedule and Recipients . . . . . . . . . . . . . . . . . . . 25
5.2 Types of SMT Reports . . . . . . . . . . . . . . . . . . . . . . . 26
5.3 Report Output Formats and Targets . . . . . . . . . . . . . . . . . 26
Page 4

6 SMT Tools and Conguration Files 29
6.1 Important Scripts and Tools . . . . . . . . . . . . . . . . . . . . 29
6.2 SMT Conguration Files . . . . . . . . . . . . . . . . . . . . . . 37
6.3 Server Certicates . . . . . . . . . . . . . . . . . . . . . . . . . 44
7 Conguring Clients to Use SMT 49
7.1 Using Kernel Parameters to Access an SMT Server . . . . . . . . . . . 50
7.2 Conguring Clients Using AutoYaST Prole . . . . . . . . . . . . . . 51
7.3 Conguring Clients Using the clientSetup4SMT.sh Script . . . . . . . . . 52
7.4 Registering Clients Against SMT Test Environment . . . . . . . . . . . 53
Page 5

SMT Installation
SMT is distributed as an add-on product for SUSE Linux Enterprise Server 10 SP2
system. To install it, install the SUSE Linux Enterprise Server 10 SP2 base system.
You can choose to install the SMT add-on together with your base system during the
initial installation process, or you can install the SMT add-on on top of an already installed base system at any later time.
1.1 Installation During the Initial Installation Process
To install SMT add-on together with your base system during the initial installation
process, follow these steps:
Start SUSE Linux Enterprise Server 10 SP2 installation as usual. For more infor-
1
mation, see the SUSE Linux Enterprise Server documentation.
To include the SMT add-on product, check the Include Add-On Products from
2
Separate Media option in the Installation Mode dialog in the System Analysis
step and click Next.
1
In the next dialog, click Add and, if you are installing SMT from a CD medium,
3
select CD as the source type. If you are installing from a different source, such
as NFS or HTTP, choose the appropriate source type. Click Next.
SMT Installation 1
Page 6

If you are installing from CD, insert the SMT add-on product CD. If you are in-
4
stalling from a different source, provide the necessary source. Click Continue.
Conrm the SMT license agreement and click Next.
5
The SMT add-on product is displayed in the overview. Continue with the instal-
6
lation as usual. Make sure, that the SMT: Subscription Management Tool for SLE
installation pattern is selected automatically and do not remove it.
A two-step SMT Conguration Wizard is shown during the nal steps of the in-
7
stallation workow. Congure SMT as described in Section 1.3, “SMT Congu-
ration Wizard” (page 3) and continue with the SUSE Linux Enterprise Server
installation as usual.
1.2 Installation On Top of an Already Installed System
To install SMT on top of an already installed base system, follow these steps:
Start YaST and select Software > Add-On Product.
1
If you are installing SMT from a CD medium, select CD as the source type. If
2
you are installing from a different source, such as NFS or HTTP, choose the appropriate source type. Click Next.
If you are installing from CD, insert the SMT add-on product CD. If you are in-
3
stalling from a different source, provide the necessary source. Click Continue.
Conrm the SMT license agreement and click Next.
4
Click Accept to install the SMT: Subscription Management Tool for SLE pattern.
5
The SMT Conguration Wizard is launched. See Section 1.3, “SMT Conguration
6
Wizard” (page 3).
2 Subscription Management Tool Guide
Page 7

1.3 SMT Conguration Wizard
During the installation of SMT the two-step SMT Conguration Wizard is launched,
irrespective of the used installation method. Congure SMT using this wizard. However,
you will be able to change the conguration later using the YaST SMT Conguration
module.
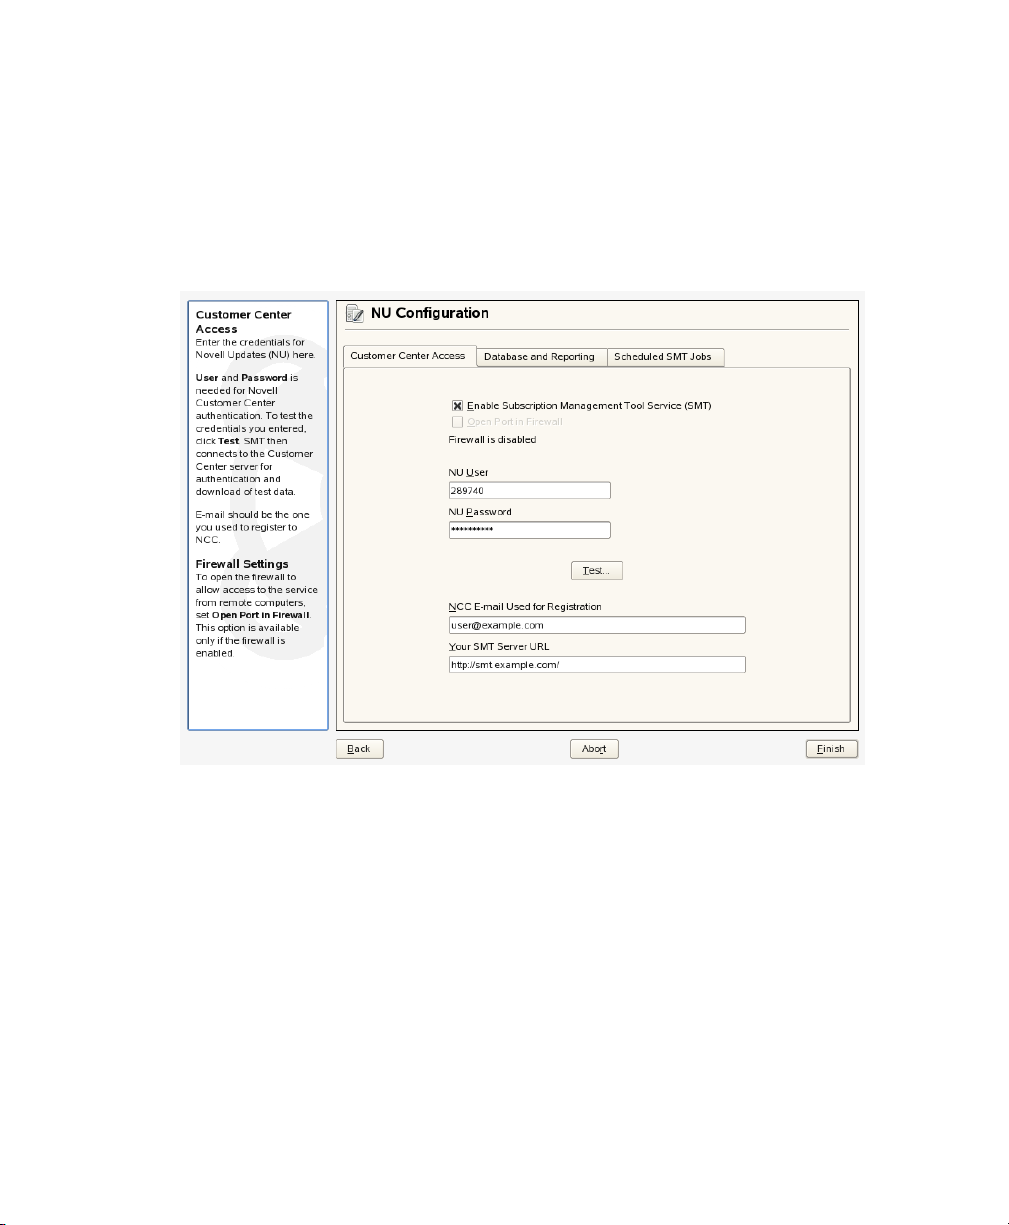
The Enable Subscription Management Tool service (SMT) option is checked by
1
default. Uncheck it only if you want to disable the installed SMT.
If the rewall is enabled, check Open Port in Firewall to allow access to the
SMT service from remote computers.
Enter your Novell Customer Center mirroring credentials in NU User and NU
Password. NU stands for Novell Update. If you do not know your Novell Customer Center credentials, refer to Section 3.1, “Getting Mirror Credentials”
(page 13). Test the entered credentials by pressing the Test button. SMT will
connect to the Customer Center server using the provided credentials and
download some testing data.
Enter the e-mail address you have used for the Novell Customer Center registration into NCC E-mail Used for Registration.
Your SMT Server URL should contain the URL of the SMT server being congured. It is lled in automatically.
Press Next to continue to the second conguration step.
For security reasons, SMT uses a special user in the database. Set the SMT
2
Database Password in the respective elds. The password should not be empty.
Enter all e-mail addresses SMT should send reports to using the Add button. You
are also able to Edit or Delete any incorrect or needless addresses.
Press Next.
If the current MySQL root password is empty—as in any freshly installed sys-
3
tem— you will be asked to enter a New MySQL Root Password.
SMT Installation 3
Page 8

Page 9

Conguring SMT Using YaST
SMT can be activated and congured using a graphical interface. A special YaST
module has been created for this purpose. The YaST SMT Conguration module can
be used to congure mirroring credentials, SMT database passwords and e-mail addresses to send SMT reports to, or to set the SMT job schedule, and activate or deactivate
the SMT service.
To congure SMT using the YaST SMT Conguration module, follow these steps:
To start YaST SMT module with text (ncurses) interface, run the yast smt
1
command as root.
To start the YaST SMT module with graphical interface, run yast2 smt as
root or open YaST Control Center and select SMT Conguration in the Network
Services section.
To activate SMT, check the Enable Subscription Management Tool Service
2
(SMT) option in the Customer Center Access tab. If you want to disable SMT,
uncheck this option. For more information about activating SMT using YaST,
see Section 2.1, “Activating and Deactivating SMT with YaST” (page 6)
In the Customer Center Access tab, set and test credentials for the NU (Novell
3
Update) service. Correct credentials are necessary to enable mirroring from NU
and determine the products that should be mirrored. Also set the e-mail address
used for the registration and the URL of your SMT server. For more information,
see Section 2.2, “Setting NU Credentials with YaST” (page 8).
2
Conguring SMT Using YaST 5
Page 10

In the Database and Reporting tab, set the password for the SMT user in the
4
MySQL database and enter the e-mail addresses where reports should be sent to.
For more information, see Section 2.3, “Setting SMT Database Password with
YaST” (page 9) and Section 2.4, “Setting E-mail Addresses to Receive Reports
with YaST” (page 10).
In the Scheduled SMT Jobs tab, set a schedule of periodic SMT jobs, such as
5
synchronization of updates, Novell Customer Center registration, or SMT report
generation. For more information, see Section 2.5, “Setting the SMT Job
Schedule with YaST” (page 10).
If satised with the conguration, click Finish. YaST adjusts the SMT congu-
6
ration and starts or restarts necessary services.
If you want to abort the conguration and cancel any changes, click Abort.
NOTE
When the YaST SMT module applies conguration changes, it checks for
the existence of the common server certicate. If the certicate does
not exist, you will be asked whether the certicate should be created
and the YaST CA Management module will be started, if you approve.
2.1 Activating and Deactivating SMT with YaST
YaST provides an easy way to activate or deactivate the SMT service. To activate SMT
service using YaST, follow these steps:
Open the Customer Center Access tab of the YaST SMT Conguration module.
1
Check the Enable Subscription Management Tool service (SMT) option.
2
NOTE
Note that if not already congured, mirroring credentials should be
congured before activating SMT. For more information about how to
6 Subscription Management Tool Guide
Page 11

set mirroring credentials using YaST, see Section 2.2, “Setting NU Creden-
tials with YaST” (page 8).
Click Finish to apply the changes and leave YaST SMT Conguration module.
3
To deactivate SMT service using YaST, follow these steps:
Open the Customer Center Access tab of the YaST SMT Conguration module.
1
Uncheck the Enable Subscription Management Tool service (SMT) option.
2
Click Finish to apply the changes and leave YaST SMT Conguration module.
3
When activating SMT, the following important operations are performed by YaST:
• The Apache conguration is changed by creating symbolic links in the /etc/
apache2/conf.d/ directory. Links to the /etc/smt.d/nu_server.conf
and /etc/smt.d/smt_mod_perl.conf les are created there.
• The Apache Web server is started or reloaded if already running.
• The MySQL server is started or reloaded if already running. If it does not exist,
smt user and necessary tables in the database are created.
• The schema of the SMT database is checked. If the database schema is obsolete,
the SMT database is upgraded to conform to the current schema.
• Cron is adjusted by creating a symbolic link in the /etc/cron.d/ directory. A
link to the /etc/smt.d/novell.com-smt le is created there.
When deactivating SMT, the following important operations are performed by YaST:
• Symbolic links created upon SMT activation in the /etc/apache2/conf.d/
and /etc/cron.d/ directories are deleted.
• The Cron, Apache Web and MySQL servers are reloaded. Neither Apache nor
MySQL are stopped, because they may be used for other purposes than the SMT
service.
Conguring SMT Using YaST 7
Page 12
2.2 Setting NU Credentials with YaST
YaST provides a comfortable interface to set and test NU credentials and the URL of
the NU service. To do so, follow these steps:
Figure 2.1
Open the Customer Center Access tab of the YaST SMT Conguration module.
1
If the credentials have been already set using YaST or the /etc/smt.conf
conguration le, they appear in the dialog. Otherwise, the NU User and NU
Password elds are blank.
Setting NU Credentials with YaST
If you do not have your credentials, visit Novell Customer Center to obtain them.
2
For more information, see Section 3.1, “Getting Mirror Credentials” (page 13).
Enter your NU username in NU User and the corresponding password in NU
3
Password.
Press Test to check the credentials. YaST will try to download a list of available
4
repositories using the provided credentials. If the test succeeded, the last line of
8 Subscription Management Tool Guide
Page 13
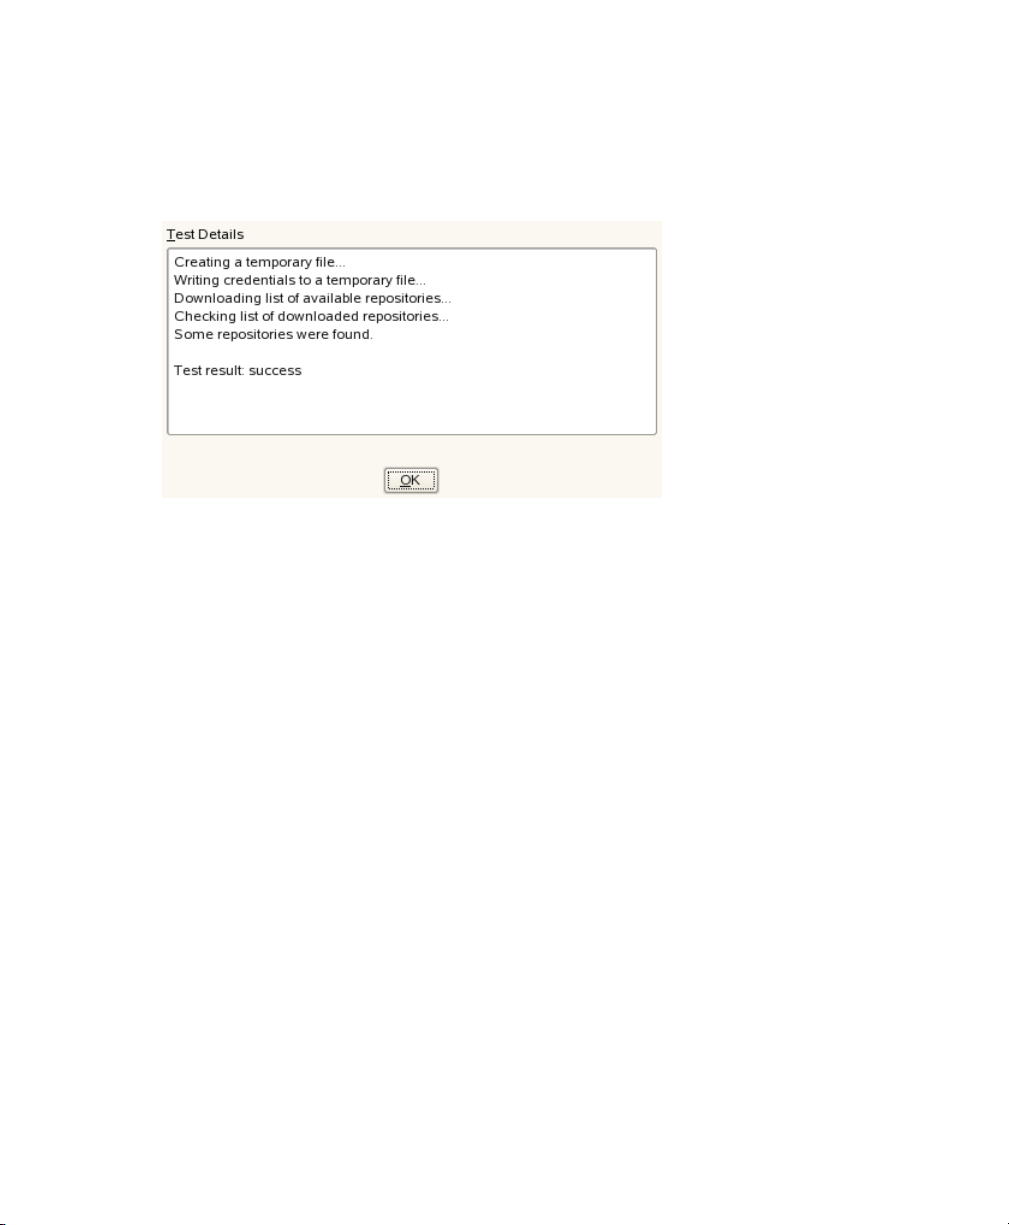
the test results will read Test result: success. If the test fails, check the
provided credentials and try again.
Figure 2.2
Enter the NCC E-mail Used for Registration. This should be the address you
5
used to register to Novell Customer Center.
Enter Your SMT Server URL if it has not been detected automatically.
Press Finish or continue with other congurations.
6
Succesful Test of NU Credentials
2.3 Setting SMT Database Password with YaST
For security reasons, SMT uses its own user in the database. YaST provides a comfortable interface for setting up or changing the SMT database password. To set or change
the SMT database password using YaST follow these steps:
Open the Database and Reporting tab of the YaST SMT module.
1
Enter the SMT Database Password for smt User. Conrm the password by
2
reentering it and press Finish or continue with other congurations.
Conguring SMT Using YaST 9
Page 14

2.4 Setting E-mail Addresses to Receive Reports with YaST
YaST SMT Conguration module provides a comfortable interface for setting up a list
of e-mail addresses SMT reports will be sent to. To edit the list of addresses to receive
the reports, follow these steps:
Open the Database and Reporting tab of the YaST SMT Conguration module.
1
The list of e-mail addresses to send reports to is shown in the table. You can Add,
2
Edit, or Delete addresses using the respective buttons.
Press Finish or continue with other congurations.
3
The comma separated list of adresses SMT reports should be sent to is written to the
reportEmail option of the /etc/smt.conf conguration le.
2.5 Setting the SMT Job Schedule with YaST
The YaST SMT Conguration module provides a comfortable interface to schedule
periodical SMT jobs. YaST uses cron to schedule congured jobs. If needed, cron
can be used directly. Three types of periodical jobs can be set:
Synchronization of Updates
Synchronizes with Novell Customer Center, updates catalogs, and downloads new
updates.
Report Generation
Generates and sends SMT reports to addresses dened in Section 2.4, “Setting E-
mail Addresses to Receive Reports with YaST” (page 10).
NCC Registration
Registers all clients to Novell Customer Center that are not already registered or
that changed their data since the last registration.
10 Subscription Management Tool Guide
Page 15
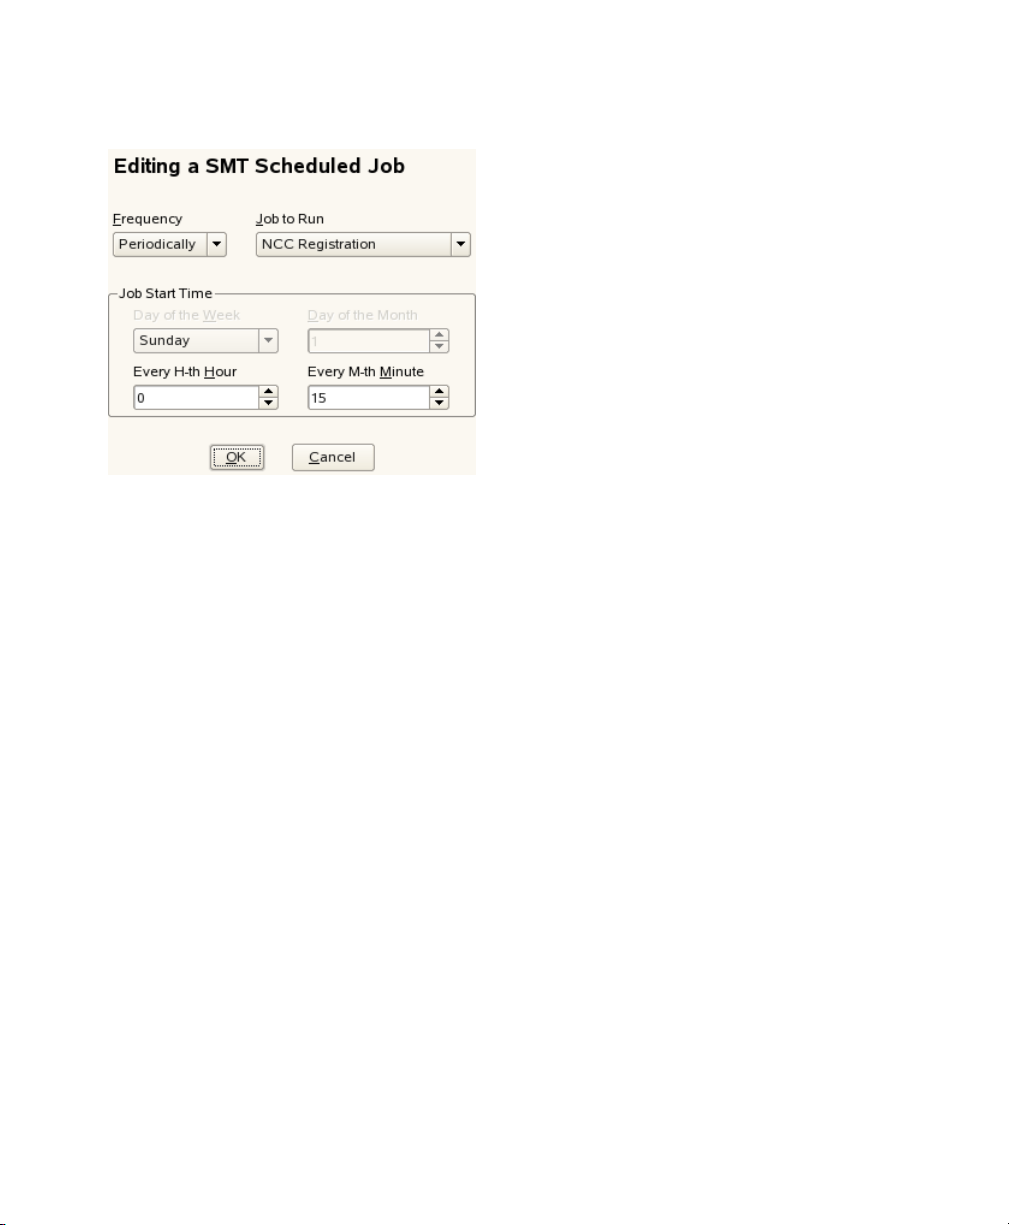
Figure 2.3
To congure the schedule of SMT jobs using YaST, follow these steps:
Open the Scheduled SMT Jobs tab of the YaST SMT Conguration module. The
1
table contains a list of all scheduled jobs, their type, frequency, date, and time
to run. You can add, delete or edit these scheduled events.
If you want to add a scheduled SMT job, press Add. The Adding New SMT
2
Scheduled Job dialog opens.
Setting SMT Job Schedule with YaST
Choose the synchronization job to schedule. You can choose between Synchronization of Updates, Report Generation, and NCC Registration.
Choose the Frequency of the new scheduled SMT job. Jobs can be performed
Daily, Weekly, Monthly, or Periodically (every n-th hour or every m-th minute).
Set the Job Start Time by entering Hour and Minute. In case of periodical frequency, enter the respective periods. For weekly and monthly schedules, select
Day of the Week or Day of the Month.
Press Add.
If you want to edit a scheduled SMT job, for example, change its frequency,
3
time, or date, select the job in the table and press Edit. Then change any parameters as if you were creating a new schedule and press OK.
Conguring SMT Using YaST 11
Page 16

If you want to cancel a scheduled job and delete it from the table, select the job
4
in the table and press Delete.
Press Finish to apply the settings and quit the YaST SMT Conguration module
5
or continue with other congurations.
12 Subscription Management Tool Guide
Page 17

Mirroring Installation and Update Sources Using SMT
SMT provides the possibility to mirror installation and update sources locally and to
bypass per-machine downloads and the bandwidth charges that go with it.
3.1 Getting Mirror Credentials
Before creating local mirrors of the repositories, you need to have proper mirror credentials. You can get these credentials from the Novell Customer Center by following these
steps:
Visit Novell Customer Center at http://www.novell.com/center and
1
log in.
Click on My Products. The list of product families is shown.
2
Expand any product family by clicking on its name. You can also expand all
3
product families by clicking on the icon showing the arrow with two converse
arrowheads (with the Expand All Product Families tooltip). Products in the expanded families are shown.
Double click on any specic product in the list to show detailed information
4
about the product.
3
In the Downloads section, click on the Mirror Credentials link.
5
Mirroring Installation and Update Sources Using SMT 13
Page 18
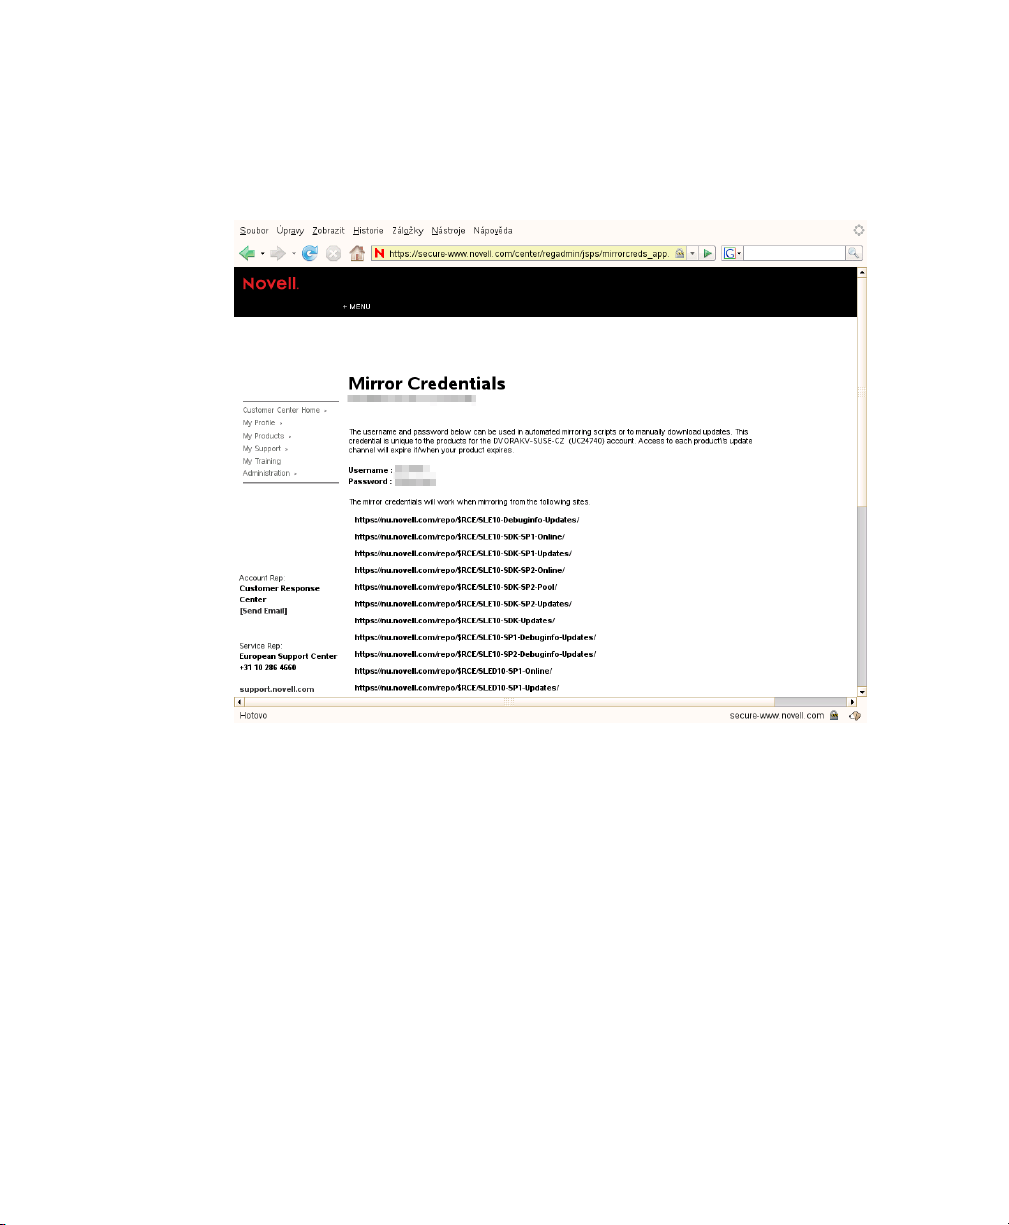
The credentials and mirror sites will be listed. These values are the same for all
6
users and subscriptions for a specic company.
Figure 3.1
NU Credentials in Novell Customer Center
The obtained credentials should be set in the YaST SMT module or manually written
in the /etc/smt.conf le. For more information about conguring NU credentials
using YaST, see Chapter 2, Conguring SMT Using YaST (page 5). For more infor-
mation about the /etc/smt.conf le, see Section 6.2.1, “/etc/smt.conf” (page 37)
3.2 Managing Software Catalogs with SMT
This section describes tools and procedures for viewing information about software
catalogs available through SMT, conguring these catalogs and setting new custom
catalogs.
14 Subscription Management Tool Guide
Page 19

3.2.1 Updating the local SMT database
The local SMT database needs to be updated periodically with the information downloaded from Novell Customer Center. These periodical updates can be congured with
YaST SMT Conguration module, as described in Section 2.5, “Setting the SMT Job
Schedule with YaST” (page 10).
To update the SMT database manually, use the smt-ncc-sync command. For more
information about the smt-ncc-sync command, see Section “smt-ncc-sync”
(page 33).
3.2.2 Enabled Catalogs and Catalogs that
Can Be Mirrored
The database installed with SMT contains information about all software catalogs
available on Novell Customer Center. However, the used mirror credentials determine
which catalogs can really be mirrored. For more information about getting and setting
mirror credentials, see Section 3.1, “Getting Mirror Credentials” (page 13).
The mirrorability of catalogs is determined by fetching https://nu.novell.com/
repo/repoindex.xml using the provided mirror credentials. Catalogs that can be
mirrored have the MIRRORABLE ag set in the catalogs table in the SMT database.
The fact that a catalog can be mirrored does not mean that it has to be mirrored. Only
catalogs with the DOMIRROR ag set in the SMT database will be mirrored. For more
information about setting which catalogs should be mirrored, see Section 3.2.4, “Select-
ing Catalogs to be Mirrored” (page 16).
3.2.3 Getting Information About Catalogs
Use the smt-catalogs command to list available software catalogs and additional
information. Using this command without any options lists all available catalogs, including catalogs that cannot be mirrored. In the rst column, the enabled catalogs
(catalogs set to be mirrored) are marked with Yes. Disabled catalogs are marked with
No. The other columns show ID, type, name, target, and description of the listed catalogs.
The last column shows whether the catalog can be mirrored.
Mirroring Installation and Update Sources Using SMT 15
Page 20

Use the -verbose option, to get additional information as the source URL of the
catalog and the path it will be mirrored to.
The catalog listing can be limited to only catalogs that can be mirrored or to enabled
catalogs. To list only catalogs that can be mirrored, use the -m or
--only-mirrorable option: smt-catalogs -m.
To list only enabled catalogs, use the -o or --only-enabled option:
smt-catalogs -o.
Example 3.1
tux:~ # smt-catalogs -o
.---------------------------------------------------------------------------------------------------------------------.
| Mirror? | ID | Type | Name | Target | Description | Can be Mirrored |
+---------+----+------+--------------------+----------------+---------------------------------------+-----------------+
| Yes | 6 | nu | SLES10-SP2-Online | sles-10-i586 | SLES10-SP2-Online for sles-10-i586 | Yes |
| Yes | 7 | nu | SLES10-SP2-Online | sles-10-ia64 | SLES10-SP2-Online for sles-10-ia64 | Yes |
| Yes | 8 | nu | SLES10-SP2-Online | sles-10-ppc | SLES10-SP2-Online for sles-10-ppc | Yes |
| Yes | 9 | nu | SLES10-SP2-Online | sles-10-s390x | SLES10-SP2-Online for sles-10-s390x | Yes |
| Yes | 10 | nu | SLES10-SP2-Online | sles-10-x86_64 | SLES10-SP2-Online for sles-10-x86_64 | Yes |
| Yes | 11 | nu | SLES10-SP2-Updates | sles-10-i586 | SLES10-SP2-Updates for sles-10-i586 | Yes |
| Yes | 12 | nu | SLES10-SP2-Updates | sles-10-ia64 | SLES10-SP2-Updates for sles-10-ia64 | Yes |
| Yes | 13 | nu | SLES10-SP2-Updates | sles-10-ppc | SLES10-SP2-Updates for sles-10-ppc | Yes |
| Yes | 14 | nu | SLES10-SP2-Updates | sles-10-s390x | SLES10-SP2-Updates for sles-10-s390x | Yes |
| Yes | 15 | nu | SLES10-SP2-Updates | sles-10-x86_64 | SLES10-SP2-Updates for sles-10-x86_64 | Yes |
'---------+----+------+--------------------+----------------+---------------------------------------+-----------------'
Listing All Enabled Catalogs
It is also possible to list only catalogs with a particular name or to show information
about a catalog with a particular name and target. To list catalogs with a particular
name, use the smt-catalogs catalog_name command. To show information
about a catalog with a particular name and target, use the smt-catalogs
catalog_name target command.
3.2.4 Selecting Catalogs to be Mirrored
Only enabled catalogs can be mirrored. In the database, the enabled catalogs have the
DOMIRROR ag set. Catalogs can be enabled or disabled using the smt-catalogs
script.
To enable one or more catalogs, follow these steps:
If you want to enable all catalogs that can be mirrored or just choose one catalog
1
from the list of all catalogs, run the smt-catalogs -e command.
You are able to limit the list of catalogs by using the respective options. To limit
the list to only catalogs that can be mirrored, use the -m option: smt-catalogs
16 Subscription Management Tool Guide
Page 21

-m -e. To limit the list to only catalogs with a particular name, use the
smt-catalogs -e catalog_name command. To list only a catalog with
a particular name and target, use the command smt-catalogs -e
catalog_name target.
If you want to enable all catalogs belonging to a certain product, use the
--enable-by-prod or -p option followed by the name of the product and,
optionally, its version, architecture, and release: smt-catalogs -p
product[, version[, architecture[, release]]] . For exam-
ple, to enable all catalogs belonging to SUSE Linux Enterprise Server 10 SP2
for PowerPC architecture, use the smt-catalogs -p
SUSE-Linux-Enterprise-Server-SP2,10,ppc command. The list
of known products can be obtained with the smt-list-products command.
If more than one catalogs is listed, choose the one you want to enable by speci-
2
fying its ID listed in the catalog table and pressing Enter. If you want to enable
all the listed catalogs, use a and press Enter.
To disable one or more catalogs, follow these steps:
If you want to disable all enabled catalogs or just choose one catalog from the
1
list of all catalogs, run the smt-catalogs -d command.
If you want to choose the catalog to be disabled from a shorter list, or if you want
to disable all catalogs from a limited group, you can use any of the available
options to limit the list of the catalogs. To limit the list to only enabled catalogs,
use the -o option: smt-catalogs -o -d. To limit the list to only catalogs
with a particular name, use the smt-catalogs -d catalog_name command. To list only a catalog with a particular name and target, use the
smt-catalogs -d catalog_name target command.
If more than one catalogs is listed, choose which one you want to disable by
2
specyng its ID listed in the catalog table shown and pressing Enter. If you want
to disable all the listed catalogs, use a and press Enter.
Mirroring Installation and Update Sources Using SMT 17
Page 22

3.2.5 Mirroring Custom Catalogs
It is possible to mirror catalogs that are not available at the Novell Customer Center
—custom catalogs— using SMT. Use the smt-setup-custom-catalogs script
for this purpose. Custom catalogs can also be deleted.
To set up a custom catalog to be available through SMT, follow these steps:
If you do not know the ID of the product the new catalogs should belong to, use
1
smt-list-products to get the ID. For the description of the
smt-list-products, see Section “smt-list-products” (page 31).
Run the smt-setup-custom-catalogs --productid product_id
2
--name catalog_name --exturl catalog_url command, where
product_id is the ID of the product the catalog belongs to, catalog_name
represents the name of the catalog and catalog_url is the URL the catalog
is available at. In case the added catalog should be available for more than one
product, specify the IDs of all products that should use the added catalog.
For example, to set My Catalog available at
http://example.com/My_Catalog to the products with the IDs 423,
424, and 425, use the following command: smt-setup-custom-catalogs
--productid 423 --productid 424 --productid 425 --name
'My_Catalog' --exturl 'http://example.com/My_Catalog'.
NOTE: Mirroring Unsigned Catalogs
In its default conguration, SUSE Linux Enterprise 10 does not allow the use
of unsigned repositories. Therefore, if you want to mirror unsigned repositories
and use them on client machines, you have to allow this explicitly by executing
the following command on the client machines:
rug set security-level checksum
To remove an already set custom catalog from the SMT database, use
smt-setup-custom-catalogs --delete ID, where ID represents the ID
of the catalog to be removed.
18 Subscription Management Tool Guide
Page 23

3.2.6 Mirroring SUSE Linux Enterprise Server
9 Repositories
For mirroring old style update repositories which were used for SUSE Linux Enterprise
Server 9 and similar products, use a special command: smt-mirror-sle9. This
script mirrors from the https://you.novell.com server.
The smt-mirror-sle9 script does not store information about sources to be mirrored
in the SMT database. It only uses the conguration from the /etc/smt.conf le.
The conguration of smt-mirror-sle9 is described in Section “smt-mirror-sle9
Sections of /etc/smt.conf” (page 41).
The smt-mirror-sle9 command uses wget to mirror sources. Therefore, you can
exclude anything you do not want to be mirrored by adding the
exclude_directories option to the /root/.wgetrc conguration le. For
more information about wget and /root/.wgetrc, see man 1 wget.
3.3 The /srv/www/htdocs Structure
The path to the directory containing the mirror is set by the MirrorTo option in the
/etc/smt.conf conguration le. For more information about /etc/smt.conf,
see Section 6.2.1, “/etc/smt.conf” (page 37). If the MirrorTo option is not set to the
Apache htdocs directory /srv/www/htdocs/, links should be created manually like
this: /srv/www/htdocs/repo/$RCE should point to /MirrorTo/repo/$RCE/,
and /srv/www/htdocs/repo/RPMMD should point to /MirrorTo/repo/
RPMMD/. Here, /MirrorTo is the path set in the MirrorTo option.
For example, if the MirrorTo is set to /space/MIRRORDATA/:
srv64:~ # l /srv/www/htdocs/repo/
insgesamt 16
drwxr-xr-x 2 root root 128 2008-01-18 14:00 ./
drwxr-xr-x 4 root root 128 2008-01-17 17:14 ../
lrwxrwxrwx 1 root root 27 2008-01-11 15:17 $RCE ->
/space/MIRRORDATA/repo/$RCE/
-rw-r--r-- 1 root root 14854 2008-01-21 12:36 repoindex.xml
lrwxrwxrwx 1 root root 26 2008-01-11 15:37 RPMMD ->
/space/MIRRORDATA/repo/RPMMD/
Mirroring Installation and Update Sources Using SMT 19
Page 24

The links can be created using the ln -s command, for example: ln -s
'/MirrorTo/repo/$RCE/' '/srv/www/htdocs/repo/$RCE'
3.4 Using Test Environment
It is possible to mirror catalogs to a test environment instead of mirroring them the
production environment. The test environment can be used with a limited number of
client machines before the tested catalogs are moved to the production environment.
The test environment can be run on the main SMT server, no special server is needed
for that.
The testing evironment uses the same structure as the production environment, but it
is located in the /srv/www/htdocs/testing/ subdirectory.
To mirror to the testing environment, set the MirrorTo option in the /etc/smt
.conf le accordingly. If your standard mirror directory is located in the default
/srv/www/htdocs/ directory, set the MirrorTo to /srv/www/htdocs/
testing. For more information about the MirrorTo option and the /etc/smt
.conf le, see Section 6.2.1, “/etc/smt.conf” (page 37).
To register a client in the testing environment, modify the /etc/suseRegister
.conf on the client machine by setting:
register = command=register&testenv=1
To move the testing environment to the production environment, manually copy or
move it to the place of the production environment using the cp -a or mv command.
20 Subscription Management Tool Guide
Page 25

Managing Client Machines With SMT
SMT provides the possibility to register client machines on Novell Customer Center.
Client machines must be congured to be able to use SMT. For information about
conguring clients to be able to use SMT, see Chapter 7, Conguring Clients to Use
SMT (page 49).
4.1 Listing Registered Clients
To list client machines registered at SMT, use the smt-list-registrations
command. The following information is listed for each client: its Unique ID, Hostname,
date and time of Last Contact with the SMT server, and the Software Product the client
uses.
4.2 Deleting Registrations
To delete a registration from SMT and Novell Customer Center, use the
smt-delete-registrations -g Client_ID command. To delete multiple
registrations, the option -g can be used several times.
4
The ID of the client machine to be deleted can be determined from the output of the
smt-list-registrations command.
Managing Client Machines With SMT 21
Page 26

4.3 Manual Registration of Clients at Novell Customer Center
The smt-register command registers clients at Novell Customer Center. All clients
that are currently not registered or whose data has changed since the last registration
are registered.
To register clients whose registration has failed, use the --reseterror option. This
option resets the NCC registration error ag and tries to submit failed registrations
again.
4.4 Scheduling Periodic Registrations of Clients at Novell Customer Center
YaST SMT Conguration module allows easy scheduling of client registrations. In the
default conguration, registrations are scheduled to repeat every 15 minutes. To change
the frequency of registrations or to create a new registration schedule, follow these
steps:
Start YaST SMT Conguration module (yast2 smt).
1
Go to the Scheduled SMT Job.
2
Select any NCC Registration job and click Edit if you want to change its schedule.
3
To create a new registration schedule, click Add and select NCC Registration as
Job to Run.
Choose the Frequency of the scheduled SMT job. Jobs can be performed Daily,
4
Weekly, Monthly, or Periodically (every n-th hour or every m-th minute).
Set the Job Start Time by entering Hour and Minute, or, in case of periodical
frequency, the respective periods. For weekly and monthly schedules, select the
Day of the Week or the Day of the Month the mirroring should occur.
22 Subscription Management Tool Guide
Page 27

NOTE: Lowest Registration Frequency
Do not set the frequency lower than 10 minutes, because the maximal
value of the rndRegister is 450 (7.5 minutes). If the frequency is
lower, it may occur that the started process is still sleeping when the next
process starts. In this case, the second request will exit.
Click either OK or Add and Finish.
5
You will nd more information about the YaST SMT Conguration module in Chap-
ter 2, Conguring SMT Using YaST (page 5). Scheduling of SMT jobs in general is
covered in Section 2.5, “Setting the SMT Job Schedule with YaST” (page 10)
YaST uses cron to schedule Novell Customer Center registrations and other SMT
jobs. If you do not want to use YaST, you can use cron directly.
To disable automatic registration, change the forwardRegistration value in the
[LOCAL] section of the /etc/smt.conf conguration le to false.
Managing Client Machines With SMT 23
Page 28

Page 29

SMT Reports
SMT provides the possibility to generate reports based on SMT and Novell Customer
Center data. Generated reports contain statistics of the registered machines and products
used and of the active, expiring, or missing subscriptions. If the number of registered
machines and products exceeds the number of available subscriptions, warnings are
given.
NOTE: Assignment of Reports
If you are using more than one SMT server in your environment, generated
reports may not represent all of the SMT servers or machines in your environment. For the complete statistics of all your registered machines, refer to the
information in the Novell Customer Center.
5.1 Report Schedule and Recipients
Generated SMT reports can be sent to a dened list of e-mail addresses periodically.
To create or edit the list of e-mail addresses to send reports to, and to set the frequency
of the reports, use the YaST SMT Conguration module. How to congure the list of
addresses to send SMT reports to is described in Section 2.4, “Setting E-mail Addresses
to Receive Reports with YaST” (page 10). Conguration of the report schedule is de-
scribed in Section 2.5, “Setting the SMT Job Schedule with YaST” (page 10).
5
The list of e-mail addresses to send reports to can also be edited manually in the
reportEmail option of the /etc/smt.conf conguration le. For more information about editing the list of addresses directly, see Section “[REPORT] Section of
SMT Reports 25
Page 30

/etc/smt.conf” (page 40). To set the frequency of reports manually, you can directly
edit the /usr/lib/SMT/bin/smt-gen-report line(s) of the crontab in /etc/
cron.d/novell.com-smt. For more information about the crontab format, see man
5 crontab.
Reports, including those created as a scheduled SMT job, are created by the
smt-report command. This command has various parameters. To edit parameters
used with scheduled commands, edit the /etc/smt.d/smt-cron.conf conguration le. For more information, see Section 6.2.2, “/etc/smt.d/smt-cron.conf” (page 43).
5.2 Types of SMT Reports
Two types of reports can be created with the smt-report command:
--local
If the --local option is used, the created report is based only on local SMT data.
--ncc
If the --ncc option is used, the created report is based on Novell Customer Center
data.
If neither --local nor --ncc is used, the type of report is determined by the
forwardRegistration in the /etc/smt.conf conguration le. If the option
is set to true, the report is based on Novell Customer Center data. If it is set to false,
the report is based on local SMT data.
If you are creating a report based on local SMT data and you do not want local data to
be synchronized with the Novell Customer Center at all, use the --nonccsync option
together with --local option.
5.3 Report Output Formats and Targets
SMT reports can be printed to the standard output, exported to one or multiple les (in
CVS format) as well as mailed to the dened list of e-mail addresses. Use the following
options for the smt-report command:
26 Subscription Management Tool Guide
Page 31

--quiet or -q
Suppress output to STDOUT and run smt-report in quiet mode.
--file or -F
Export report to one or several les. By default, the report will be written to a single
le rendered as tables. Optionally, the lename or whole path may be specied
after the parameter: --file filename. If no lename is specied, a default
lename containing a timestamp is used. However, SMT will not check if the le
or les already exist.
In CSV (Comma-Separated Value) mode the report will be written to multiple les,
therefore the specied lename will expand to [path/
]filename-reportname.extension for every report.
--csv or -c
The report will be exported to multiple les in CSV format. The rst line of each
*.csv le consists of the column names, the data starts on line two. The --csv
parameter should only be used together with the --file parameter. If the specied
lename contains .csv as extension, the report format will be CSV (as if the
--csv parameter was used).
--mail or -m
Activate mailing of the report to the addresses congured with the YaST SMT
Conguration module and written in /etc/smt.conf. The report will be rendered
as tables.
--attach or -a
Attach the report to the mails in CSV format. This option should only be used together with the --mail option.
NOTE: Disabling Sending Attachments
If you want to disable sending CSV attachments with report mails, edit the
/etc/smt.d/smt-cron.conf conguration le as follows: remove the
--attach option from the REPORT_PARAMS value. The default line reads:
REPORT_PARAMS="--mail --attach -L
/var/log/smt-report.log". To disable CSV attachments, change it to:
REPORT_PARAMS="--mail -L /var/log/smt-report.log".
SMT Reports 27
Page 32

If you have disabled CSV attachments but need them occasionally, you can
send them manually with the smt-report --mail --attach -L
/var/log/smt-report.log command.
28 Subscription Management Tool Guide
Page 33

SMT Tools and Conguration
Files
This chapter describes the most important scripts and conguration les shipped with
SMT.
6.1 Important Scripts and Tools
There are two important groups of SMT commands: The smt command with its subcommands is used for managing mirroring of updates, registration of clients, and reporting. The rcsmt script is used for starting, stopping, restarting SMT services, and for
checking their status.
6.1.1 /usr/sbin/smt Commands
The main command to manage the SMT is smt (/usr/sbin/smt). The smt command should be used together with various subcommands described in this section. If
the smt command is used alone, it prints out a list of all available subcommands. To
get help for individual subcommands, use smt subcommand --help.
The following subcommands are available:
6
• smt-catalogs
• smt-delete-registration
• smt-list-products
SMT Tools and Conguration Files 29
Page 34

• smt-list-registrations
• smt-mirror
• smt-ncc-sync
• smt-register
• smt-report
• smt-setup-custom-catalogs
• smt-mirror-sle9
There are two syntax types you can use with the smt command: either use smt followed
by a subcommand or use a single command (composed of smt, dash, and the subcommand of choice). For example, it is possible to use either smt mirror or
smt-mirror, both have the same meaning.
NOTE: Conicting Commands
Depending on your $PATH environment variable, the SMT smt command
(/usr/sbin/smt) may collide with the smt command from the star package
(/usr/bin/smt). Either use the absolute path /usr/sbin/smt, create an
alias, or set your $PATH accordingly.
Another solution is to always use the smt-subcommand syntax (connected
with a minus sign) instead of smt subcommand (separated by a space).
smt-catalogs
The smt-catalogs (or smt catalogs) script can be used for listing all available
catalogs and for enabling or disabling catalogs. The following options are available:
--enable-mirror or -e
Enable catalog mirroring.
--enable-by-prod or -p
Enable catalog mirroring by giving product data in the following format:
Product[,Version[,Architecture[,Release]]].
30 Subscription Management Tool Guide
Page 35

--disable-mirror or -d
Disable catalog mirroring.
--only-mirrorable or -m
List only catalogs that can be mirrored.
--only-enabled or -o
List only enabled catalogs.
--verbose or -v
Show detailed catalog information.
smt-delete-registration
The smt-delete-registration command deletes one or more registrations
from SMT and Novell Customer Center. It will deregister machines from the system.
The following options are available:
--guid ID or -g ID
Deletes the machine with the guid ID from the system. This option can be used
multiple times.
--debug or -d
Enables debugging mode.
smt-list-products
The smt-list-products script lists all software products in the SMT database.
The following options are available:
--used or -u
Show only used products.
--catstat or -c
Show whether all catalogs needed for a product are locally mirrored.
SMT Tools and Conguration Files 31
Page 36

smt-list-registrations
The smt-list-registrations script lists all registrations. There are no options
available for this command.
smt-mirror
The smt-mirror command performs the mirroring procedure and downloads catalogs
that are set to be mirrored.
The smt-mirror command can be run with the following options:
--clean or -c
Removes all les no longer mentioned in the metadata from the mirror. No mirroring
occurs before cleanup.
--debug or -d
Enables the debugging mode.
--deepverify
Turns on verifying of all package checksums.
--hardlink size
Searches for duplicate les with a size greater than the size specied in kilobytes.
Creates hard links for them.
--directory path
Denes the directory to work on. If you use this option, the default value congured
in the smt.conf conguration le is ignored.
--dbreplfile file
Denes the path to the *.xml le to use as database replacement. Such a le can
be created with the sync-ncc command. This option is only useful if the SMT
database is not located on the same host as the machine this script should run on.
--logfile file or --L file
Species the path to a logle.
32 Subscription Management Tool Guide
Page 37

smt-ncc-sync
The smt-ncc-sync or smt ncc-sync command gets data from the Novell Customer Center and updates the local SMT database. It can also save Novell Customer
Center data to a directory instead of the SMT database, or read Novell Customer Center
data from such a directory instead of downloading it from Novell Customer Center itself.
The smt-ncc-sync can be run with the following options:
--fromdir directory
Reads Novell Customer Center data from a directory instead of downloading it
from Novell Customer Center.
--todir directory
Writes Novell Customer Center data to the specied directory without updating
the SMT database.
--createdbreplacementfile
Creates a database replacement le for using smt-mirror without database.
--logfile file or --L file
Species the path to a log le.
--debug
Enables debugging mode.
smt-register
The smt-register or smt register command registers all currently unregistered
clients at the Novell Customer Center. It also registers all clients whose data has changed
since the last registration.
The following options are available:
--logfile file or --L file
Species the path to a log le.
--debug
Enables debugging mode.
SMT Tools and Conguration Files 33
Page 38

smt-report
The smt-report or smt report command generates a subscription report based
on local calculation or Novell Customer Center registrations.
The following options are available:
--local
Forces the creation of a report based on a local calculation without accessing
Novell Customer Center data.
--ncc
Forces the creation of a report based on Novell Customer Center data.
--nonccsync
Disables synchronizing with Novell Customer Center before creating the report.
--mail or -m
Activates mailing the report to the addresses congured with the YaST SMT
Conguration module and written in /etc/smt.conf. The report will be rendered
as tables.
--attach or -a
Appends the report to the e-mails in CSV format. This option should only be used
together with the --mail option.
--quiet or -q
Suppresses output to STDOUT and runs smt-report in quiet mode.
--csv or -c
The report will be exported to multiple les in CSV format. The rst line of each
*.csv le consists of the column names, the data starts on line two. The --csv
parameter should only be used together with the --file parameter. If the specied
lename contains .csv as extension, the report format will be CSV (as if the
--csv parameter was used).
--file or -F
Exports the report to one or several les. By default, the report will be written to
a single le rendered as tables. Optionally, the lename or whole path may be
specied after the parameter: --file filename. If no lename is specied,
34 Subscription Management Tool Guide
Page 39

a default lename containing a timestamp is used. However, SMT will not check
if the le or les already exist.
In CSV mode the report will be written to multiple les, therefore, the specied
lename will expand to [path/]filename-reportname.extension for
every report.
--logfile filename or -L filename
Species path to a logle.
--debug
Enables debugging mode.
smt-setup-custom-catalogs
The smt-setup-custom-catalogs or smt setup-custom-catalogs
script is a tool to set up custom catalogs (catalogs not present in NU) to be used with
SMT. It can be used for adding a new catalog to the SMT database or to delete a catalog
from the database. The script recognizes the following options:
--productid
ID of a product the catalog belongs to. If a catalog should belong to multiple
products, use this option multiple times to assign catalog to all relevant products.
--name
The name of the custom catalog.
--description
The description of the custom catalog.
--exturl
The URL where this catalog can be mirrored from. Only HTTP and HTTPS protocols are supported (no directory, le, or FTP).
--delete
Removes a custom catalog with a given ID from the SMT database.
To set up a new catalog, use the following command:
smt-setup-custom-catalogs --productid Product_ID
--name Catalog_Name --exturl URL
SMT Tools and Conguration Files 35
Page 40

For example:
smt-setup-custom-catalogs --productid 434
--name My_Catalog --exturl http://my.domain.top/My_Catalog
To remove an already set catalog, use the following command:
smt-setup-custom-catalogs --delete Catalog_ID
For example:
smt-setup-custom-catalogs --delete 1cf336d819e8e5904f4d4b05ee081971a0cc8afc
6.1.2 rcsmt Init Script
The rcsmt script starts, restarts, or stops SMT services. If used without any subcommands, it returns a help text. The rcsmt script can be used with the following subcommands:
rcsmt start
Starts the SMT services.
rcsmt stop
Stops the SMT services.
rcsmt status
Checks the status of the SMT services. Checks whether httpd, MySQL, and cron
are running.
rcsmt restart
Restarts the SMT services.
rcsmt try-restart
Checks whether the SMT is enabled and if so, restarts the SMT services.
SMT services can also be enabled or disabled using the YaST SMT Conguration
module.
36 Subscription Management Tool Guide
Page 41

6.2 SMT Conguration Files
The SMT has a main conguration le: /etc/smt.conf. Most of the options in this
le can be set using YaST SMT module (see Chapter 2, Conguring SMT Using YaST
(page 5)). Another important conguration le is /etc/smt.d/smt-cron.conf,
which contains parameters for commands launched as SMT scheduled jobs.
6.2.1 /etc/smt.conf
The /etc/smt.conf le has several sections. The [NU] section contains the NU
credentials and URL. The [DB] section contains the conguration of the MySQL
database SMT uses. The [LOCAL] section includes other conguration data. The
[REPORT] section contains the conguration of SMT reports. In the YOU9-* sections,
the conguration for the smt-mirror-sle9 command can be found.
WARNING
The /etc/smt.conf contains passwords in clear text and its default permissions (640, root, wwwrun) make its content easily accessible with scripts running
on the Apache server. Be careful with running other software on the SMT
Apache server. The best policy is to use this server only for SMT.
[NU] Section of /etc/smt.conf
The following options are available in the [NU] section:
NUUrl
URL of the NU service. In most cases, it should contain the
https://nu.novell.com/ URL.
NUUser
NUUser should contain the username for NU service. For information about getting
mirroring credentials, see Section 3.1, “Getting Mirror Credentials” (page 13).
This value can be set using YaST SMT Conguration module.
SMT Tools and Conguration Files 37
Page 42

NUPass
NUPass is the password for the user dened in NUUser. For information about
getting mirroring credentials, see Section 3.1, “Getting Mirror Credentials”
(page 13) This value can be set using the YaST SMT Conguration module.
[DB] Section of /etc/smt.conf
The three options dened in the [DB] section are used for conguring the database
SMT uses. Currently, only MySQL is supported by SMT.
config
The rst parameter of the DBI->connect Perl method used for connection to the
MySQL database. The value should be in the form
dbi:mysql:database=smt;host=localhost
where smt is the name of the database and localhost the hostname of the
database server.
user
The user for the database. The default value is smt.
pass
The password for the database user. The password can be set using the YaST SMT
Conguration module.
[LOCAL] Section of /etc/smt.conf
The following options are available in the [LOCAL] section:
url
The base URL of the SMT server which is used to construct URLs of the catalogs
available on the server. This value should be set by YaST automatically during installation. The format of this option should be:
https://server.domain.tld/.
The URL can be changed manually for various reasons. For example, the administrator may choose to use the http:// scheme instead of https:// for performance reasons. Another reason may be using an alias (congured using CNAME
38 Subscription Management Tool Guide
Page 43

in DNS) instead of the hostname of the server, for example
http://smt.domain.tld/ instead of http://server1.domain.tld/.
nccEmail
E-mail address used for registration at the Novell Customer Center. This value can
be set using the YaST SMT Conguration module.
MirrorTo
Determines the path to mirror to.
MirrorAll
If the MirrorAll option is set to true, the smt-ncc-sync script will set all
catalogs that can be mirrored to be mirrored (DOMIRROR ag).
MirrorSRC
If the MirrorSRC option is set to false, no source RPM packages are mirrored.
forwardRegistration
Determines whether the clients registered at SMT should be registered at Novell
Customer Center, too. If the forwardRegistration option is set to true,
client registrations will be forwarded to Novell Customer Center. If the
forwardRegistration option is set to false, no client registrations will be
sent to Novell Customer Center.
rndRegister
Species a delay in seconds before registration of clients at Novell Customer
Center. The value is a random number between 0 and 450, generated by the YaST
SMT Conguration module. The purpose of this random delay is to prevent a high
load on the Novell Customer Center server that would occur if all smt-register
cronjobs connected at the same time.
HTTPProxy
If you do not want to use global proxy settings, specify the proxy to be used for
HTTP connection here. Use the following form:
http://proxy.example.com:3128.
If the proxy settings are not congured in /etc/smt.conf, the global proxy
settings congured in /etc/syconfig/proxy are used. The global proxy
settings can be congured using the YaST Proxy module.
The HTTPProxy also applies to the smt-mirror-sle9 script.
SMT Tools and Conguration Files 39
Page 44

HTTPSProxy
If you do not want to use global proxy settings, specify the proxy to be used for
HTTPS connection here. Use the form: http://proxy.example.com:3128.
If the proxy settings are not congured in /etc/smt.conf, the global proxy
settings congured in /etc/syconfig/proxy are used. The global proxy
settings can be congured using the YaST Proxy module.
The HTTPSProxy also applies to the smt-mirror-sle9 script.
ProxyUser
If your proxy requires authentication, specify a username and password here, using
the username:password format.
If the proxy settings are not congured in /etc/smt.conf, the global proxy
settings congured in /etc/syconfig/proxy are used. The global proxy
settings can be congured using the YaST Proxy module.
Neither the ProxyUser value nor the global proxy authentication settings apply
to the smt-mirror-sle9 script. For user authentication in smt-mirror-sle9
write the following in the /root/.wgetrc le: proxy_user=username
proxy_password=password.
[REPORT] Section of /etc/smt.conf
The following options are available in the [REPORT] section:
reportEmail
A comma separated list of e-mail addresses to send SMT status reports to. This list
can be set using YaST SMT Conguration Module.
reportEmailFrom
From eld of report e-mails. If not set, the default
root@hostname.domainname will be used.
mailServer
Relay mail server. If empty, e-mails are sent directly.
mailServerPort
Port of the relay mail server set in mailServer.
40 Subscription Management Tool Guide
Page 45

mailServerUser
User name for authentication to the mail server set in mailServer.
mailServerPassword
Password for authentication to the mail server set in mailServer.
smt-mirror-sle9 Sections of /etc/smt.conf
Each product to be mirrored by the smt-mirror-sle9 command has a separate
predened YOU9-* section in the /etc/smt.conf conguration le. /etc/smt
.conf is not congured via the SMT database like the smt-mirror command, all
conguration is contained in /etc/smt.conf.
mirror_prod
A product to be mirrored, for example Novell-Linux-Desktop.
mirror_archs
Comma separated list of architectures to be mirrored, for example i386,x86_64.
Remove any architectures that do not need to be mirrored.
mirror_version
The version of the product to be mirrored, for example 9.
mirror
If you want to mirror this product, set mirror to true.
credentials
If you want to mirror this product, provide credentials in the user:password
format.
Example /etc/smt.conf
Example 6.1
[NU]
NUUrl = https://nu.novell.com/
NUUser = exampleuser
NUPass = examplepassword
[DB]
config = dbi:mysql:database=smt;host=localhost
cong/smt.conf
SMT Tools and Conguration Files 41
Page 46

user = smt
pass = examplepassword
[LOCAL]
# Default should be http://server.domain.top/
url = http://smt.example.com/
# This e-mail address is used for registration at NCC
nccEmail = exampleuser@example.com
MirrorTo = /srv/www/htdocs
MirrorAll = false
MirrorSRC = true
forwardRegistration = true
rndRegister = 91
# specify proxy settings here, if you do not want to use the global proxy
settings
#
# specify which proxy you want to use for HTTP connection
# in the form http://proxy.example.com:3128
HTTPProxy=
# specify which proxy you want to use for HTTPS connection
# in the form http://proxy.example.com:3128
HTTPSProxy=
# specify username and password if your proxy requires authentication
# in the form username:password
ProxyUser=
[REPORT]
# comma separated list of e-mail addresses where the status reports will be
sent to
reportEmail =
# from field of report mails - if empty it defaults to
"root@<hostname>.<domainname>"
reportEmailFrom =
# relay mail server - leave emtpy if mail should be sent directly
mailServer =
mailServerPort =
# mail server authentication - leave empty if not required
mailServerUser =
mailServerPassword =
[YOU9-Novell-Linux-Desktop]
mirror_prod = Novell-Linux-Desktop
mirror_archs = i386,x86_64
mirror_version = 9
mirror = false
credentials =
[YOU9-Novell-Linux-Desktop-SDK]
mirror_prod = Novell-Linux-Desktop-SDK
mirror_archs = i386,x86_64
mirror_version = 9
mirror = false
credentials =
42 Subscription Management Tool Guide
Page 47

[YOU9-Novell-Linux-POS]
mirror_prod = Novell-Linux-POS
mirror_archs = i386
mirror_version = 9
mirror = false
credentials =
[YOU9-Open-Enterprise-Server]
mirror_prod = Open-Enterprise-Server
mirror_archs = i386
mirror_version = 9
mirror = false
credentials =
[YOU9-SLES-SDK]
mirror_prod = SLES-SDK
mirror_archs = i386,ia64,ppc,s390,s390x,x86_64
mirror_version = 9
mirror = false
credentials =
[YOU9-SUSE-CORE]
mirror_prod = SUSE-CORE
mirror_archs = i386,ia64,ppc,s390,s390x,x86_64
mirror_version = 9
mirror = false
credentials =
[YOU9-SUSE-SLES]
mirror_prod = SUSE-SLES
mirror_archs = i386,ia64,ppc,s390,s390x,x86_64
mirror_version = 9
mirror = false
credentials =
6.2.2 /etc/smt.d/smt-cron.conf
The /etc/smt.d/smt-cron.conf conguration le contains options of the SMT
commands launched as SMT scheduled jobs set using YaST (see Section 2.5, “Setting
the SMT Job Schedule with YaST” (page 10)). Cron is used to launch these scheduled
jobs. The crontable is located in the /etc/cron.d/novell.com-smt le.
NCC_SYNC_PARAMS
Contains parameters of the smt ncc-sync command, if called as a part of an
SMT scheduled job via cron. The default value is "-L
/var/log/smt-ncc-sync.log".
SMT Tools and Conguration Files 43
Page 48

MIRROR_PARAMS
Contains parameters of the smt mirror command, if called as a part of an SMT
scheduled job via cron. The default value is "-L
/var/log/smt-mirror.log".
REGISTER_PARAMS
Contains parameters of the smt register command, if called as a part of an
SMT scheduled job via cron. The default value is "-r -L
/var/log/smt-register.log".
REPORT_PARAMS
Contains parameters of the smt report command, if called as a part of an SMT
scheduled job via cron. The default value is "--mail --attach -L
/var/log/smt-report.log".
6.3 Server Certicates
For communication between the SMT server and client machines, the encrypted HTTPS
protocol is used, requiring a server certicate. If the certicate is not available, or if
clients are not congured to use the certicate, the communication between server and
clients will fail.
Every client must be able to verify the server certicate by trusting the CA (certicate
authority) certicate which signed the server certicate. Therefore, the SMT server
provides a copy of the CA at /srv/www/htdocs/smt.crt. This CA can be
downloaded from every client via the URL http://FQDN/smt.crt. The copy is
created when YaST writes the SMT conguration. Whenever SMT is started with the
rcsmt init script, it checks the certicate. If a new CA certicate exists, it is copied
again. Therefore, whenever the CA certicate is changed, restart SMT using the rcsmt
restart command.
When the YaST SMT module applies conguration changes, it checks for the existence
of the common server certicate. If the certicate does not exist, YaST asks whether
the certicate should be created. If the user conrms, the YaST CA Management
module is started.
44 Subscription Management Tool Guide
Page 49

6.3.1 Certicate Expiration
The common server certicate SMT uses is valid for one year. After that time, a new
certicate is needed. Either generate a new certicate using YaST CA Management
module or import a new certicate using the YaST Common Server Certicate module.
Both options are described in the following sections.
As long as the same CA certicate is used, there is no need to update certicates at the
client machines. The generated CA certicate is valid for 10 years.
6.3.2 Creating a New Common Server
Certicate
To create a new common server certicate with YaST, proceed as follows:
Start YaST and select Security and Users > CA Management. Alternatively,
1
start the YaST CA Management module from a command line by entering
yast2 ca_mgm as root.
Select the required CA and click Enter CA.
2
Enter the password if entering a CA for the rst time. YaST displays the CA
3
key information in the Description tab.
Click the Certicates tab (see Figure 6.1, “Certicates of a CA” (page 46))
4
and select Add > Add Server Certicate.
SMT Tools and Conguration Files 45
Page 50

Figure 6.1
Enter the fully qualied domain name of the server as Common Name. Add
5
a valid e-mail address of the server administrator. Other elds, as Organization,
Organizational Unit, Locality, and State are optional. Click Next to proceed.
Certicates of a CA
IMPORTANT: Hostname in Server Certicate
The server certicate must contain the correct hostname. If the client
requests server https://some.hostname/, then some.hostname
must be part of the certicate. The hostname must either be used as
the Common Name, see Step 5 (page 46), or as the Subject Alternative
Name, see Step 7 (page 46):DNS:some.hostname and/or
IP:<ipaddress>.
Enter a Password for the private key of the certicate and reenter it in the next
6
eld to verify it.
If you want to dene a Subject Alternative Name, click Advanced Options,
7
select Subject Alternative Name from the list and click Add to enter the details
for the Subject Alternative Name.
46 Subscription Management Tool Guide
Page 51

If you want to keep the default values for the other options, like Key Length
8
and Valid Period, click Next. An overview of the certicate to be created is
shown.
Click Create to generate the certicate.
9
To export the new certicate as the common server certicate, select it in the
10
Certicates tab and select Export > Export as Common Server Certicate.
After having created a new certicate, restart SMT using the rcsmt
11
restart command. Restarting SMT ensures that the new certicate is copied
from /etc/ssl/certs/YaST-CA.pem to /srv/www/htdocs/smt
.crt, the copy SMT uses. Restarting SMT also restarts the Web server.
For detailed information about managing certication and further usage of the YaST
CA Management module and the Common Sever Certicate module, refer to the Instal-
lation and Administration.
6.3.3 Importing a Common Server
Certicate
You can import an own common server certicate from a le. The certicate to be
imported has to be in the PKCS12 format with CA chain. Common server certicates
can be imported with the YaST Common Server Certicate module.
To import an own certicate with YaST, proceed as follows:
Start YaST and select Security and Users > Common Server Certicate. Alterna-
1
tively, start the YaST Common Server Certicate module from the command
line by entering yast2 common_cert as root.
The description of the currently used common server certicate is shown in the
dialog that opens.
Click Import and select the le containing the certicate to be imported. Specify
2
the certicate password in the Password eld.
Press Next. If the certicate is successfully imported, close YaST with Finish.
3
SMT Tools and Conguration Files 47
Page 52

After having created a new certicate, restart SMT using the rcsmt restart
4
command. Restarting SMT ensures that the new certicate is copied from /etc/
ssl/certs/YaST-CA.pem to /srv/www/htdocs/smt.crt, the copy
SMT uses. Restarting SMT also restarts the Web server.
6.3.4 Synchronizing Time Between SMT
Server and Clients
There is no need for a precise synchronization of time between the SMT server and
clients. However, each server certicate has a validity period and if the client happens
to be set to a time outside of this period, the certicate validation on the client side fails.
Therefore, it is advisable to keep the time on the server and clients synchronized. You
can easily synchronize time using NTP (network time protocol). Use yast2
ntp-client to congure an NTP client. You will nd detailed information about
NTP in Installation and Administration.
48 Subscription Management Tool Guide
Page 53

Conguring Clients to Use
SMT
Any machine running SUSE Linux Enterprise SP2 or later can be congured to register
against SMT and download software updates from there instead of communicating directly with the Novell Customer Center and the NU servers.
If your network includes an SMT server to provide a local update source, you need to
equip the client with the server's URL. As client and server communicate via the HTTPS
protocol during registration, you also need to make sure the client trusts the server's
certicate. In case you set up your SMT server to use the default server certicate, the
CA certicate will be available on the SMT server at http://FQDN/smt.crt . In
this case you do not have to care about the certicate: The registration process will
automatically download the CA certicate from there, unless congured otherwise.
You have to enter a path to the server's CA certicate if the certicate was issued by
an external certicate authority.
NOTE: Registering Against *.novell.com Subdomain
If you try to register against any *.novell.com subdomain, the certicate
will not be downloaded during registration for security reasons, and certicate
handling will not be done. In such a case, use a different domain name or a
plain IP address.
7
There are several ways to provide this information and to congure the client machine
to use SMT. The rst way is to provide the needed information via kernel parameters
at boot time. The second way is to congure clients using an AutoYaST prole. There
is also a script, clientSetup4SMT.sh, which can be run on a client to make it
Conguring Clients to Use SMT 49
Page 54

register against a specied SMT server. These methods are described in the following
sections:
7.1 Using Kernel Parameters to Access
an SMT Server
Any client can be congured to use SMT by providing the following kernel parameters
during machine boot: regurl and regcert. The rst parameter is mandatory, the
latter is optional.
regurl
URL of the SMT server. The URL needs to be in the following format:
https://FQDN/center/regsvc/ with FQDN being the fully qualied
hostname of the SMT server. It must be identical to the FQDN of the server certicate used on the SMT server. Example:
regurl=https://smt.example.com/center/regsvc/
regcert
Location of the SMT server's CA certicate. Specify one of the following locations:
URL
Remote location (http, https or ftp) from which the certicate can be downloaded. Example:
regcert=http://smt.example.com/smt.crt
Floppy
Species a location on a oppy. The oppy has to be inserted at boot time—you
will not be prompted to insert it if it is missing. The value has to start with the
string floppy, followed by the path to the certicate. Example:
regcert=floppy/smt/smt-ca.crt
Local Path
Absolute path to the certicate on the local machine. Example:
regcert=/data/inst/smt/smt-ca.cert
50 Subscription Management Tool Guide
Page 55

Interactive
Use ask to open a pop-up menu during installation where you can specify the
path to the certicate. Do not use this option with AutoYaST. Example:
regcert=ask
Deactivate Certicate Installation
Use done if either the certicate will be installed by an add-on product, or if
you are using a certicate issued by an ofcial certicate authority. Example:
regcert=done
WARNING: Beware of Typing Errors
Make sure the values you enter are correct. If regurl has not been specied
correctly, the registration of the update source will fail.
If a wrong value for regcert has been entered, you will be prompted for a
local path to the certicate. In case regcert is not specied at all, it will default
to http://FQDN/smt.crt with FQDN being the name of the SMT server.
WARNING: Change of SMT Server Certicate
If the SMT server gets a new certicate from a new and untrusted CA, the
clients need to fetch the new CA certicate le. This is done automatically with
the registration process but only if a URL was used at installation time to fetch
the certicate, or if the regcert parameter was omitted and thus, the default
URL is used. If the certicate was loaded using any other method, such as
oppy or local path, the CA certicate will not be updated.
7.2 Conguring Clients Using
AutoYaST Prole
Clients can be congured to register with SMT server via AutoYaST prole. For general information about creating AutoYaST proles and preparing automatic installation,
refer to Installation and Administration. In this section, only SMT specic conguration
is described.
Conguring Clients to Use SMT 51
Page 56

To congure SMT specic data using AutoYaST, follow these steps:
As root, start YaST and select Miscellaneous > Autoinstallation to start the
1
graphical AutoYaST front-end.
From a command line, you can start the graphical AutoYaST front-end with the
yast2 autoyast command.
Open an existing prole using File > Open, create a prole based on the current
2
system's conguration using Tools > Create Reference Prole, or just work with
an empty prole.
Select Software > Novell Customer Center Conguration. An overview of the
3
current conguration is shown.
Click Congure.
4
Set the URL of the SMT Server and, optionally, the location of the SMT Certi-
5
cate. The possible values are the same as for the kernel parameters regurl and
regcert (see Section 7.1, “Using Kernel Parameters to Access an SMT Server”
(page 50)). The only exception is, that the ask value for regcert does not
work in AutoYaST, because it requires user interaction. If using it, the registration
process will be skipped.
Perform all other conguration needed for the systems to be deployed.
6
Select File > Save As and enter a lename for the prole, such as autoinst
7
.xml.
7.3 Conguring Clients Using the
clientSetup4SMT.sh Script
The /usr/share/doc/packages/smt/clientSetup4SMT.sh script is
provided with SMT. This script allows to congure a client machine to use a SMT
server or to recongure it to use a different SMT server.
To congure a client machine to use SMT with the clientSetup4SMT.sh script,
follow these steps:
52 Subscription Management Tool Guide
Page 57

Copy the /usr/share/doc/packages/smt/clientSetup4SMT.sh
1
script at your SMT server to the client machine.
As root, execute the script on the client machine. The script can be executed
2
in two ways. In the rst case, the script name is followed by the registration URL:
./clientSetup4SMT.sh registration_URL, for example,
./clientSetup4SMT.sh
https://smt.example.com/center/regsvc. In the second case, the
script name is followed by the --host option followed by hostname of the SMT
server: ./clientSetup4SMT.sh --host server_hostname, for example, ./clientSetup4SMT.sh --host smt.example.com.
The script downloads the server's CA certicate. Accept it by pressing y.
3
The script performs all necessary modications on the client. However, the reg-
4
istration itself is not performed by the script.
Perform a registration by executing suse_register or running yast2
5
inst_suse_register module on the client.
The clientSetup4SMT.sh script works with SUSE Linux Enterprise 10 SP1 and
SP2 systems.
7.4 Registering Clients Against SMT Test Environment
To congure a client to register against the test environment instead the production
environment, modify /etc/suseRegister.conf on the client machine by setting:
register = command=register&testenv=1
For more information about using SMT with a test environment, see Section 3.4, “Using
Test Environment” (page 20).
Conguring Clients to Use SMT 53
Page 58

 Loading...