

Page 1

SUSE Linux Enterprise
www.novell.com11
February18,2010 High Availability Guide
High Availability
Extension
Page 2

High Availability Guide
Copyright © 2006- 2010 Novell, Inc.
Permission is granted to copy, distribute and/or modify this document under the terms of the GNU
Free Documentation License, Version 1.2 or (at your option) version 1.3; with the Invariant Section
being this copyright notice and license. A copy of the license version 1.2 is included in the section
entitled “GNU Free Documentation License”.
SUSE®, openSUSE®,the openSUSE® logo, Novell®, the Novell® logo, the N® logo, are registered
trademarks of Novell, Inc. in the United States and other countries. Linux* is a registered trademark
of Linus Torvalds. All other third party trademarks are the property of their respective owners. A
trademark symbol (® , ™, etc.) denotes a Novell trademark; an asterisk (*) denotes a third-party
trademark.
All information found in this book has been compiled with utmost attention to detail. However, this
does not guarantee complete accuracy.Neither Novell, Inc., SUSE LINUX Products GmbH, the authors,
nor the translators shall be held liable for possible errors or the consequences thereof.
Page 3

Contents
About This Guide vii
Part I Installation and Setup 1
1 Conceptual Overview 3
1.1 Product Features . . . . . . . . . . . . . . . . . . . . . . . . . . 3
1.2 Product Benets . . . . . . . . . . . . . . . . . . . . . . . . . . 5
1.3 Cluster Congurations . . . . . . . . . . . . . . . . . . . . . . . 8
1.4 Architecture . . . . . . . . . . . . . . . . . . . . . . . . . . . 11
1.5 What's New? . . . . . . . . . . . . . . . . . . . . . . . . . . . 14
2 Getting Started 19
2.1 Hardware Requirements . . . . . . . . . . . . . . . . . . . . . . 19
2.2 Software Requirements . . . . . . . . . . . . . . . . . . . . . . 20
2.3 Shared Disk System Requirements . . . . . . . . . . . . . . . . . . 20
2.4 Preparations . . . . . . . . . . . . . . . . . . . . . . . . . . . 21
2.5 Overview: Installing and Setting Up a Cluster . . . . . . . . . . . . . 21
3 Installation and Basic Setup with YaST 23
3.1 Installing the High Availability Extension . . . . . . . . . . . . . . . 23
3.2 Initial Cluster Setup . . . . . . . . . . . . . . . . . . . . . . . . 24
3.3 Bringing the Cluster Online . . . . . . . . . . . . . . . . . . . . . 27
Page 4

Part II Conguration and Administration 29
4 Conguring Cluster Resources with the GUI 31
4.1 Linux HA Management Client . . . . . . . . . . . . . . . . . . . . 32
4.2 Creating Cluster Resources . . . . . . . . . . . . . . . . . . . . . 33
4.3 Creating STONITH Resources . . . . . . . . . . . . . . . . . . . . 37
4.4 Conguring Resource Constraints . . . . . . . . . . . . . . . . . . 38
4.5 Specifying Resource Failover Nodes . . . . . . . . . . . . . . . . . 43
4.6 Specifying Resource Failback Nodes (Resource Stickiness) . . . . . . . . 45
4.7 Conguring Resource Monitoring . . . . . . . . . . . . . . . . . . 46
4.8 Starting a New Cluster Resource . . . . . . . . . . . . . . . . . . . 48
4.9 Removing a Cluster Resource . . . . . . . . . . . . . . . . . . . . 49
4.10 Conguring a Cluster Resource Group . . . . . . . . . . . . . . . . 49
4.11 Conguring a Clone Resource . . . . . . . . . . . . . . . . . . . . 54
4.12 Migrating a Cluster Resource . . . . . . . . . . . . . . . . . . . . 55
4.13 For More Information . . . . . . . . . . . . . . . . . . . . . . . 57
5 Conguring Cluster Resources From Command Line 59
5.1 Command Line Tools . . . . . . . . . . . . . . . . . . . . . . . 59
5.2 Debugging Your Conguration Changes . . . . . . . . . . . . . . . 60
5.3 Creating Cluster Resources . . . . . . . . . . . . . . . . . . . . . 60
5.4 Creating a STONITH Resource . . . . . . . . . . . . . . . . . . . . 65
5.5 Conguring Resource Constraints . . . . . . . . . . . . . . . . . . 66
5.6 Specifying Resource Failover Nodes . . . . . . . . . . . . . . . . . 68
5.7 Specifying Resource Failback Nodes (Resource Stickiness) . . . . . . . . 69
5.8 Conguring Resource Monitoring . . . . . . . . . . . . . . . . . . 69
5.9 Starting a New Cluster Resource . . . . . . . . . . . . . . . . . . . 69
5.10 Removing a Cluster Resource . . . . . . . . . . . . . . . . . . . . 70
5.11 Conguring a Cluster Resource Group . . . . . . . . . . . . . . . . 70
5.12 Conguring a Clone Resource . . . . . . . . . . . . . . . . . . . . 71
5.13 Migrating a Cluster Resource . . . . . . . . . . . . . . . . . . . . 72
5.14 Testing with Shadow Conguration . . . . . . . . . . . . . . . . . 73
5.15 For More Information . . . . . . . . . . . . . . . . . . . . . . . 74
6 Setting Up a Simple Testing Resource 75
6.1 Conguring a Resource with the GUI . . . . . . . . . . . . . . . . . 75
6.2 Manual Conguration of a Resource . . . . . . . . . . . . . . . . . 77
7 Adding or Modifying Resource Agents 79
7.1 STONITH Agents . . . . . . . . . . . . . . . . . . . . . . . . . 79
7.2 Writing OCF Resource Agents . . . . . . . . . . . . . . . . . . . . 80
Page 5

8 Fencing and STONITH 81
8.1 Classes of Fencing . . . . . . . . . . . . . . . . . . . . . . . . . 81
8.2 Node Level Fencing . . . . . . . . . . . . . . . . . . . . . . . . 82
8.3 STONITH Conguration . . . . . . . . . . . . . . . . . . . . . . 84
8.4 Monitoring Fencing Devices . . . . . . . . . . . . . . . . . . . . 88
8.5 Special Fencing Devices . . . . . . . . . . . . . . . . . . . . . . 89
8.6 For More Information . . . . . . . . . . . . . . . . . . . . . . . 90
9 Load Balancing with Linux Virtual Server 91
9.1 Conceptual Overview . . . . . . . . . . . . . . . . . . . . . . . 91
9.2 High Availability . . . . . . . . . . . . . . . . . . . . . . . . . 93
9.3 For More Information . . . . . . . . . . . . . . . . . . . . . . . 94
10 Network Device Bonding 95
11 Updating Your Cluster to SUSE Linux Enterprise 11 99
11.1 Preparation and Backup . . . . . . . . . . . . . . . . . . . . . . 100
11.2 Update/Installation . . . . . . . . . . . . . . . . . . . . . . . . 101
11.3 Data Conversion . . . . . . . . . . . . . . . . . . . . . . . . . 101
11.4 For More Information . . . . . . . . . . . . . . . . . . . . . . 103
Part III Storage and Data Replication 105
12 Oracle Cluster File System 2 107
12.1 Features and Benets . . . . . . . . . . . . . . . . . . . . . . . 107
12.2 Management Utilities and Commands . . . . . . . . . . . . . . . . 108
12.3 OCFS2 Packages . . . . . . . . . . . . . . . . . . . . . . . . . 109
12.4 Creating an OCFS2 Volume . . . . . . . . . . . . . . . . . . . . 110
12.5 Mounting an OCFS2 Volume . . . . . . . . . . . . . . . . . . . . 113
12.6 Additional Information . . . . . . . . . . . . . . . . . . . . . . 115
13 Cluster LVM 117
13.1 Conguration of cLVM . . . . . . . . . . . . . . . . . . . . . . 117
13.2 Conguring Eligible LVM2 Devices Explicitly . . . . . . . . . . . . . 119
13.3 For More Information . . . . . . . . . . . . . . . . . . . . . . 120
14 Distributed Replicated Block Device (DRBD) 121
14.1 Installing DRBD Services . . . . . . . . . . . . . . . . . . . . . . 122
Page 6

14.2 Conguring the DRBD Service . . . . . . . . . . . . . . . . . . . 122
14.3 Testing the DRBD Service . . . . . . . . . . . . . . . . . . . . . 124
14.4 Troubleshooting DRBD . . . . . . . . . . . . . . . . . . . . . . 126
14.5 Additional Information . . . . . . . . . . . . . . . . . . . . . . 128
Part IV Troubleshooting and Reference 131
15 Troubleshooting 133
15.1 Installation Problems . . . . . . . . . . . . . . . . . . . . . . . 133
15.2 “Debugging” a HA Cluster . . . . . . . . . . . . . . . . . . . . . 134
15.3 FAQs . . . . . . . . . . . . . . . . . . . . . . . . . . . . . . 136
15.4 Fore More Information . . . . . . . . . . . . . . . . . . . . . . 137
16 Cluster Management Tools 139
17 Cluster Resources 193
17.1 Supported Resource Agent Classes . . . . . . . . . . . . . . . . . 193
17.2 OCF Return Codes . . . . . . . . . . . . . . . . . . . . . . . . 194
17.3 Resource Options . . . . . . . . . . . . . . . . . . . . . . . . 197
17.4 Resource Operations . . . . . . . . . . . . . . . . . . . . . . . 198
17.5 Instance Attributes . . . . . . . . . . . . . . . . . . . . . . . . 199
18 HA OCF Agents 201
Part V Appendix 275
A GNU Licenses 277
A.1 GNU General Public License . . . . . . . . . . . . . . . . . . . . 277
A.2 GNU Free Documentation License . . . . . . . . . . . . . . . . . 280
Terminology 285
Page 7

About This Guide
SUSE® Linux Enterprise High Availability Extension is an integrated suite of open
source clustering technologies that enables you to implement highly available physical
and virtual Linux clusters. For quick and efcient conguration and administration,
the High Availability Extension includes both a graphical user interface (GUI) and a
command line interface (CLI).
This guide is intended for administrators who need to set up, congure, and maintain
High Availability (HA) clusters. Both approaches (GUI and CLI) are covered in detail
to help the administrators choose the appropriate tool that matches their needs for performing the key tasks.
The guide is divided into the following parts:
Installation and Setup
Before starting to install and congure your cluster, make yourself familiar with
cluster fundamentals and architecture, get an overview of the key features and
benets, as well as modications since the last release. Learn which hardware and
software requirements must be met and what preparations to take before executing
the next steps. Perform the installation and basic setup of your HA cluster using
YaST.
Conguration and Administration
Add, congure and manage resources, using either the GUI or the crm command
line interface. Learn how to make use of load balancing and fencing. In case you
consider writing your own resource agents or modifying existing ones, get some
background information on how to create different types of resource agents.
Storage and Data Replication
SUSE Linux Enterprise High Availability Extension ships with a cluster-aware le
system (Oracle Cluster File System, OCFS2) and volume manager (clustered
Logical Volume Manager, cLVM). For replication of your data, the High Availability Extension also delivers DRBD (Distributed Replicated Block Device) which
you can use to mirror the data of a high availabilitly service from the active node
of a cluster to its standby node.
Page 8

Troubleshooting and Reference
Managing your own cluster requires you to perform a certain amount of troubleshooting. Learn about the most common problems and how to x them. Find a comprehensive reference of the command line tools the High Availability Extension offers
for administering your own cluster. Also, nd a list of the most important facts and
gures about cluster resources and resource agents.
Many chapters in this manual contain links to additional documentation resources.
These include additional documentation that is available on the system as well as documentation available on the Internet.
For an overview of the documentation available for your product and the latest documentation updates, refer to http://www.novell.com/documentation.
1 Feedback
Several feedback channels are available:
• To report bugs for a product component or to submit enhancement requests, please
use https://bugzilla.novell.com/. If you are new to Bugzilla, you
might nd the Bug Writing FAQs helpful, available from the Novell Bugzilla home
page.
• We want to hear your comments and suggestions about this manual and the other
documentation included with this product. Please use the User Comments feature
at the bottom of each page of the online documentation and enter your comments
there.
2 Documentation Conventions
The following typographical conventions are used in this manual:
•
/etc/passwd: directory names and lenames
•
placeholder: replace placeholder with the actual value
•
PATH: the environment variable PATH
viii High Availability Guide
Page 9

•
ls, --help: commands, options, and parameters
•
user: users or groups
•
Alt, Alt + F1: a key to press or a key combination; keys are shown in uppercase as
on a keyboard
•
File, File > Save As: menu items, buttons
• This paragraph is only relevant for the specied architectures. The arrows mark
the beginning and the end of the text block.
This paragraph is only relevant for the specied architectures. The arrows mark
the beginning and the end of the text block.
•
Dancing Penguins (Chapter Penguins, ↑Another Manual): This is a reference to a
chapter in another manual.
About This Guide ix
Page 10

Page 11

Part I. Installation and Setup
Page 12

Page 13

Conceptual Overview
SUSE® Linux Enterprise High Availability Extension is an integrated suite of open
source clustering technologies that enables you to implement highly available physical
and virtual Linux clusters, and to eliminate single points of failure. It ensures the high
availability and manageability of critical network resources including data, applications,
and services. Thus, it helps you maintain business continuity, protect data integrity,
and reduce unplanned downtime for your mission-critical Linux workloads.
It ships with essential monitoring, messaging, and cluster resource management functionality (supporting failover, failback, and migration (load balancing) of individually
managed cluster resources). The High Availability Extension is available as add-on to
SUSE Linux Enterprise Server 11.
1.1 Product Features
SUSE® Linux Enterprise High Availability Extension helps you ensure and manage
the availability of your network resources. The following list highlights some of the
key features:
Support for a Wide Range of Clustering Scenarios
Including active/active and active/passive (N+1, N+M, N to 1, N to M) scenarios,
as well as hybrid physical and virtual clusters (allowing virtual servers to be clustered with physical servers to improve services availability and resource utilization).
1
Conceptual Overview 3
Page 14

Multi-node active cluster, containing up to 16 Linux servers. Any server in the
cluster can restart resources (applications, services, IP addresses, and le systems)
from a failed server in the cluster.
Flexible Solution
The High Availability Extension ships with OpenAIS messaging and membership
layer and Pacemaker Cluster Resource Manager. Using Pacemaker, administrators
can continually monitor the health and status of their resources, manage dependencies, and automatically stop and start services based on highly congurable rules
and policies. The High Availability Extension allows you to tailor a cluster to the
specic applications and hardware infrastructure that t your organization. Timedependent conguration enables services to automatically migrate back to repaired
nodes at specied times.
Storage and Data Replication
With the High Availability Extension you can dynamically assign and reassign
server storage as needed. It supports Fibre Channel or iSCSI storage area networks
(SANs). Shared disk systems are also supported, but they are not a requirement.
SUSE Linux Enterprise High Availability Extension also comes with a clusteraware le system (Oracle Cluster File System, OCFS2) and volume manager
(clustered Logical Volume Manager, cLVM). For replication of your data, the High
Availability Extension also delivers DRBD (Distributed Replicated Block Device)
which you can use to mirror the data of a high availably service from the active
node of a cluster to its standby node.
Support for Virtualized Environments
SUSE Linux Enterprise High Availability Extension supports the mixed clustering
of both physical and virtual Linux servers. SUSE Linux Enterprise Server 11 ships
with Xen, an open source virtualization hypervisor. The cluster resource manager
in the High Availability Extension is able to recognize, monitor and manage services
running within virtual servers created with Xen, as well as services running in
physical servers. Guest systems can be managed as services by the cluster.
Resource Agents
SUSE Linux Enterprise High Availability Extension includes a huge number of
resource agents to manage resources such as Apache, IPv4, IPv6 and many more.
It also ships with resource agents for popular third party applications such as IBM
WebSphere Application Server. For a list of Open Cluster Framework (OCF) resource agents included with your product, refer to Chapter 18, HA OCF Agents
(page 201).
4 High Availability Guide
Page 15

User-friendly Administration
For easy conguration and administration, the High Availability Extension ships
with both a graphical user interface (like YaST and the Linux HA Management
Client) and a powerful unied command line interface. Both approaches provide
a single point of administration for effectively monitoring and administrating your
cluster. Learn how to do so in the following chapters.
1.2 Product Benets
The High Availability Extension allows you to congure up to 16 Linux servers into
a high-availability cluster (HA cluster), where resources can be dynamically switched
or moved to any server in the cluster. Resources can be congured to automatically
migrate in the event of a server failure, or they can be moved manually to troubleshoot
hardware or balance the workload.
The High Availability Extension provides high availability from commodity components.
Lower costs are obtained through the consolidation of applications and operations onto
a cluster. The High Availability Extension also allows you to centrally manage the
complete cluster and to adjust resources to meet changing workload requirements (thus,
manually “load balance” the cluster). Allowing clusters of more than two nodes also
provides savings by allowing several nodes to share a “hot spare”.
An equally important benet is the potential reduction of unplanned service outages as
well as planned outages for software and hardware maintenance and upgrades.
Reasons that you would want to implement a cluster include:
• Increased availability
• Improved performance
• Low cost of operation
• Scalability
• Disaster recovery
• Data protection
• Server consolidation
Conceptual Overview 5
Page 16

• Storage consolidation
Shared disk fault tolerance can be obtained by implementing RAID on the shared disk
subsystem.
The following scenario illustrates some of the benets the High Availability Extension
can provide.
Example Cluster Scenario
Suppose you have congured a three-server cluster, with a Web server installed on
each of the three servers in the cluster. Each of the servers in the cluster hosts two Web
sites. All the data, graphics, and Web page content for each Web site are stored on a
shared disk subsystem connected to each of the servers in the cluster. The following
gure depicts how this setup might look.
Figure 1.1
During normal cluster operation, each server is in constant communication with the
other servers in the cluster and performs periodic polling of all registered resources to
detect failure.
Suppose Web Server 1 experiences hardware or software problems and the users depending on Web Server 1 for Internet access, e-mail, and information lose their connections. The following gure shows how resources are moved when Web Server 1 fails.
Three-Server Cluster
6 High Availability Guide
Page 17
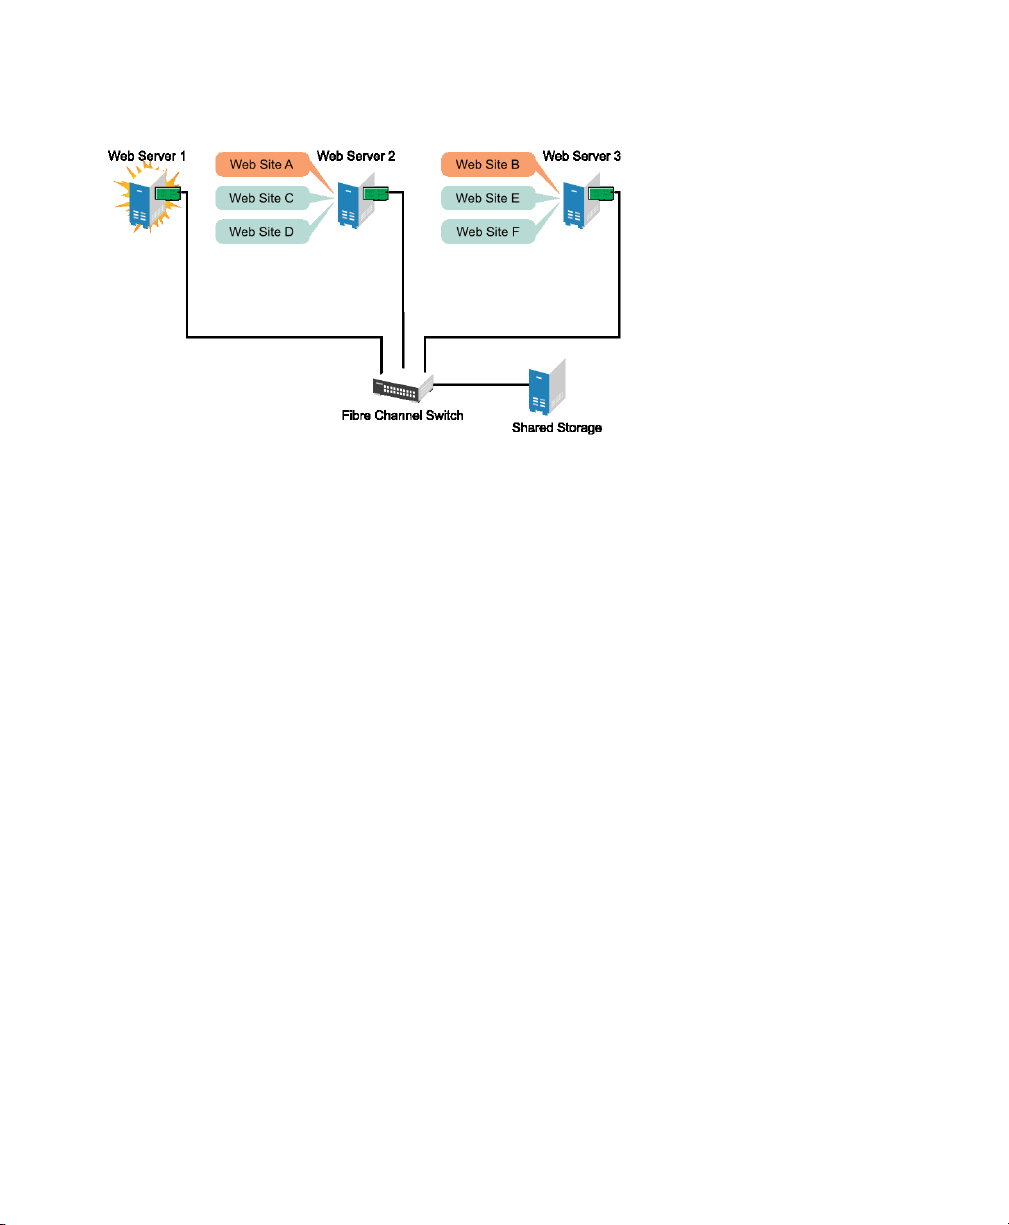
Figure 1.2
Web Site A moves to Web Server 2 and Web Site B moves to Web Server 3. IP addresses
and certicates also move to Web Server 2 and Web Server 3.
When you congured the cluster, you decided where the Web sites hosted on each Web
server would go should a failure occur. In the previous example, you congured Web
Site A to move to Web Server 2 and Web Site B to move to Web Server 3. This way,
the workload once handled by Web Server 1 continues to be available and is evenly
distributed between any surviving cluster members.
Three-Server Cluster after One Server Fails
When Web Server 1 failed, the High Availability Extension software
• Detected a failure and veried with STONITH that Web Server 1 was really dead
• Remounted the shared data directories that were formerly mounted on Web server
1 on Web Server 2 and Web Server 3.
• Restarted applications that were running on Web Server 1 on Web Server 2 and
Web Server 3
• Transferred IP addresses to Web Server 2 and Web Server 3
In this example, the failover process happened quickly and users regained access to
Web site information within seconds, and in most cases, without needing to log in again.
Now suppose the problems with Web Server 1 are resolved, and Web Server 1 is returned
to a normal operating state. Web Site A and Web Site B can either automatically fail
Conceptual Overview 7
Page 18

back (move back) to Web Server 1, or they can stay where they are. This is dependent
on how you congured the resources for them. Migrating the services back to Web
Server 1 will incur some down-time, so the High Availability Extension also allows
you to defer the migration until a period when it will cause little or no service interruption. There are advantages and disadvantages to both alternatives.
The High Availability Extension also provides resource migration capabilities. You
can move applications, Web sites, etc. to other servers in your cluster as required for
system management.
For example, you could have manually moved Web Site A or Web Site B from Web
Server 1 to either of the other servers in the cluster. You might want to do this to upgrade
or perform scheduled maintenance on Web Server 1, or just to increase performance
or accessibility of the Web sites.
1.3 Cluster Congurations
Cluster congurations with the High Availability Extension might or might not include
a shared disk subsystem. The shared disk subsystem can be connected via high-speed
Fibre Channel cards, cables, and switches, or it can be congured to use iSCSI. If a
server fails, another designated server in the cluster automatically mounts the shared
disk directories that were previously mounted on the failed server. This gives network
users continuous access to the directories on the shared disk subsystem.
IMPORTANT: Shared Disk Subsystem with cLVM
When using a shared disk subsystem with cLVM, that subsystem must be connected to all servers in the cluster from which it needs to be accessed.
Typical resources might include data, applications, and services. The following gure
shows how a typical Fibre Channel cluster conguration might look.
8 High Availability Guide
Page 19
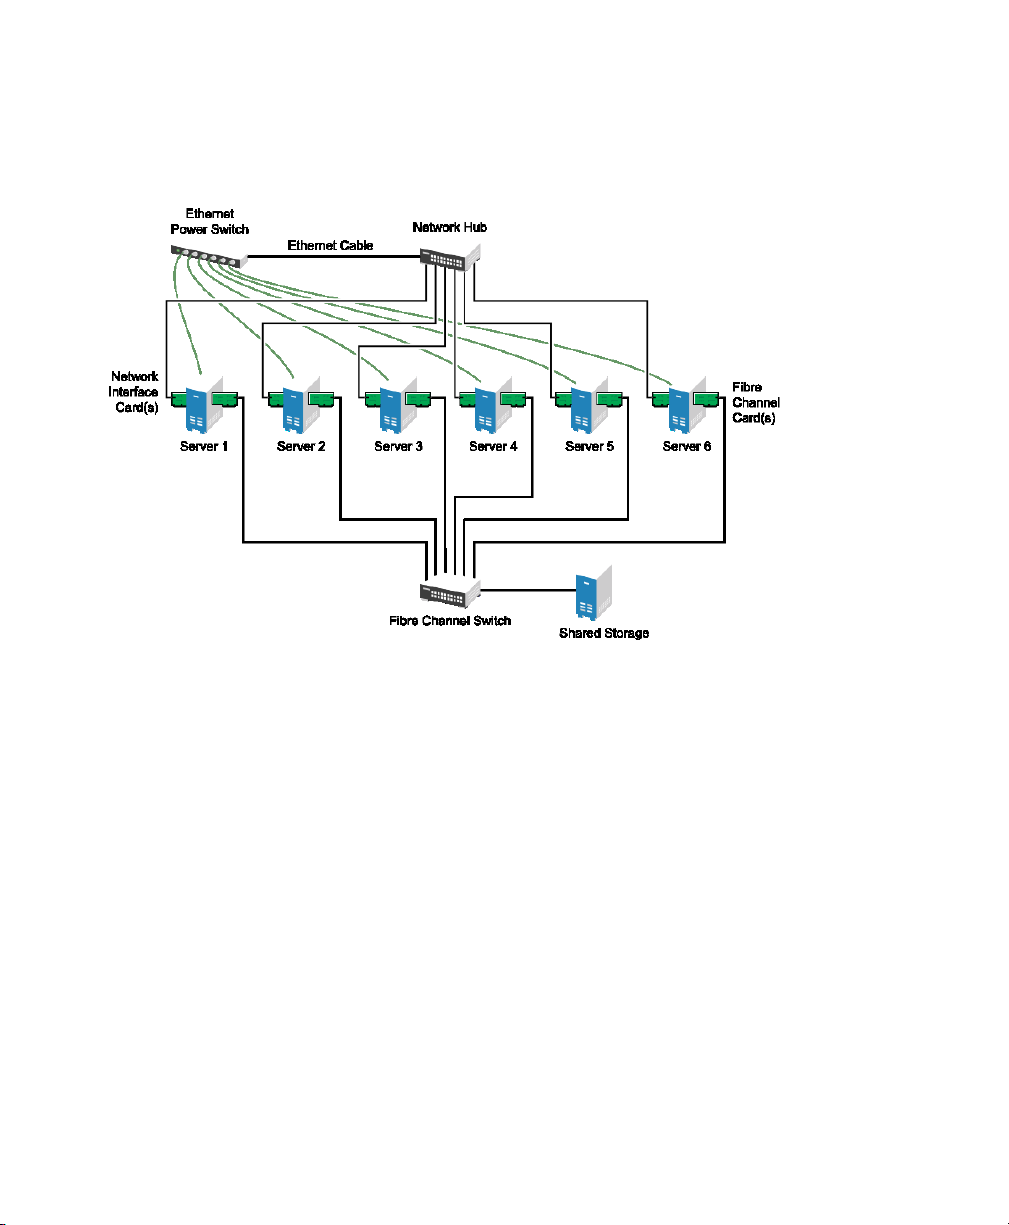
Figure 1.3
Typical Fibre Channel Cluster Conguration
Although Fibre Channel provides the best performance, you can also congure your
cluster to use iSCSI. iSCSI is an alternative to Fibre Channel that can be used to create
a low-cost Storage Area Network (SAN). The following gure shows how a typical
iSCSI cluster conguration might look.
Conceptual Overview 9
Page 20
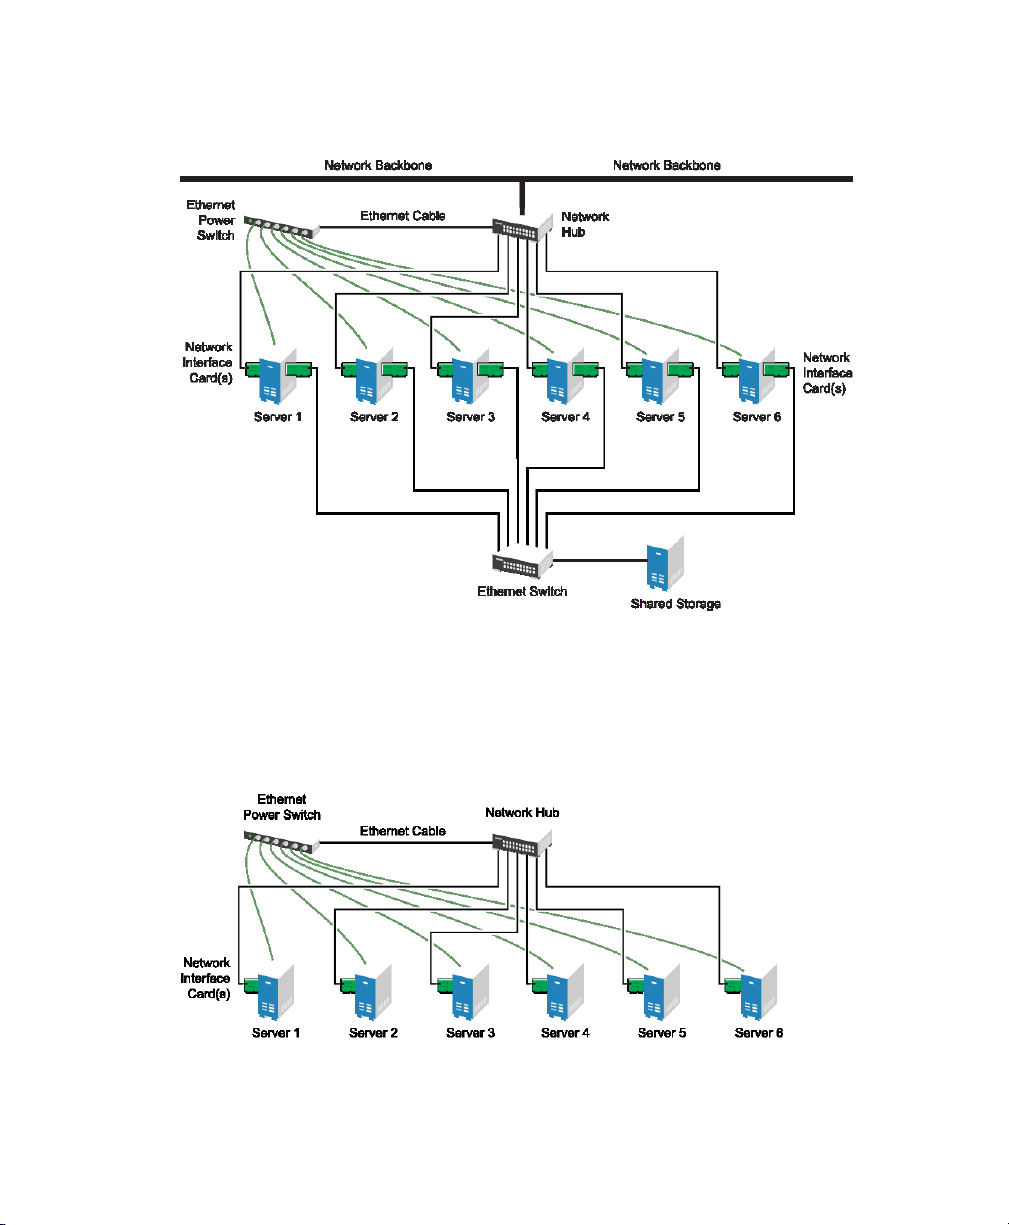
Figure 1.4
Although most clusters include a shared disk subsystem, it is also possible to create a
cluster without a share disk subsystem. The following gure shows how a cluster
without a shared disk subsystem might look.
Typical iSCSI Cluster Conguration
Figure 1.5
10 High Availability Guide
Typical Cluster Conguration Without Shared Storage
Page 21
1.4 Architecture
This section provides a brief overview of the High Availability Extension architecture.
It identies and provides information on the architectural components, and describes
how those components interoperate.
1.4.1 Architecture Layers
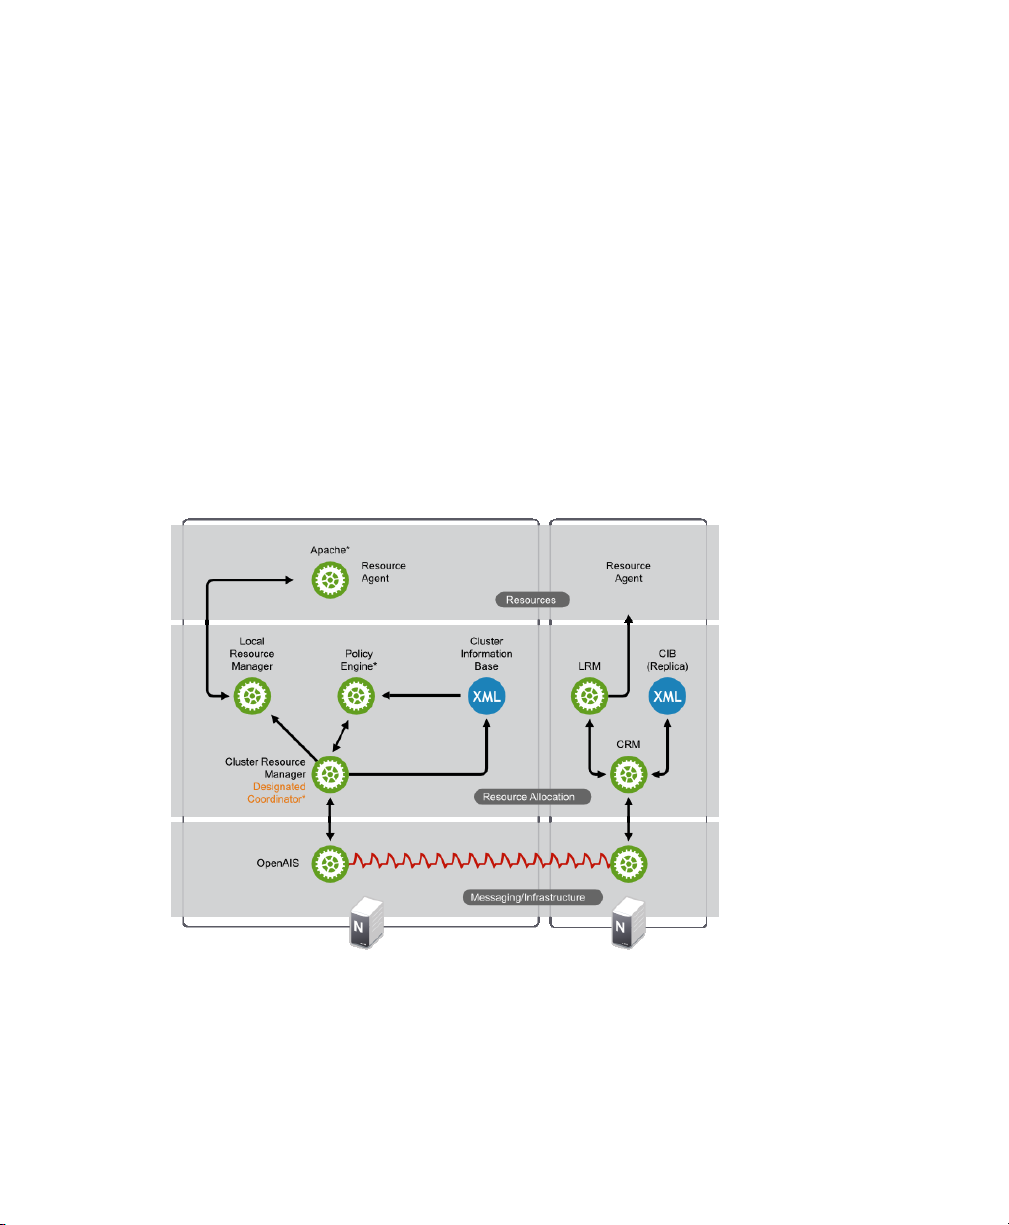
The High Availability Extension has a layered architecture. Figure 1.6, “Architecture”
(page 11) illustrates the different layers and their associated components.
Figure 1.6
Architecture
Conceptual Overview 11
Page 22

Messaging and Infrastructure Layer
The primary or rst layer is the messaging/infrastructure layer, also known as the
OpenAIS layer. This layer contains components that send out the messages containing
“I'm alive” signals, as well as other information. The program of the High Availability
Extension resides in the messaging/infrastructure layer.
Resource Allocation Layer
The next layer is the resource allocation layer. This layer is the most complex, and
consists of the following components:
Cluster Resource Manager (CRM)
Every action taken in the resource allocation layer passes through the Cluster Resource Manager. If other components of the resource allocation layer (or components
which are in a higher layer) need to communicate, they do so through the local
CRM.
On every node, the CRM maintains the Cluster Information Base (CIB) (page 12),
containing denitions of all cluster options, nodes, resources their relationship and
current status. One CRM in the cluster is elected as the Designated Coordinator
(DC), meaning that it has the master CIB. All other CIBs in the cluster are a replicas
of the master CIB. Normal read and write operations on the CIB are serialized
through the master CIB. The DC is the only entity in the cluster that can decide
that a cluster-wide change needs to be performed, such as fencing a node or moving
resources around.
Cluster Information Base (CIB)
The Cluster Information Base is an in-memory XML representation of the entire
cluster conguration and current status. It contains denitions of all cluster options,
nodes, resources, constraints and the relationship to each other. The CIB also synchronizes updates to all cluster nodes. There is one master CIB in the cluster,
maintained by the DC. All other nodes contain a CIB replica.
Policy Engine (PE)
Whenever the Designated Coordinator needs to make a cluster-wide change (react
to a new CIB), the Policy Engine calculates the next state of the cluster based on
the current state and conguration. The PE also produces a transition graph con-
12 High Availability Guide
Page 23

taining a list of (resource) actions and dependencies to achieve the next cluster
state. The PE runs on every node to speed up DC failover.
Local Resource Manager (LRM)
The LRM calls the local Resource Agents (see Section “Resource Layer” (page 13))
on behalf of the CRM. It can thus perform start / stop / monitor operations and report
the result to the CRM. It also hides the difference between the supported script
standards for Resource Agents (OCF, LSB, Heartbeat Version 1). The LRM is the
authoritative source for all resource-related information on its local node.
Resource Layer
The highest layer is the Resource Layer. The Resource Layer includes one or more
Resource Agents (RA). Resource Agents are programs (usually shell scripts) that have
been written to start, stop, and monitor a certain kind of service (a resource). Resource
Agents are called only by the LRM. Third parties can include their own agents in a
dened location in the le system and thus provide out-of-the-box cluster integration
for their own software.
1.4.2 Process Flow
SUSE Linux Enterprise High Availability Extension uses Pacemaker as CRM. The
CRM is implemented as daemon (crmd) that has an instance on each cluster node.
Pacemaker centralizes all cluster decision-making by electing one of the crmd instances
to act as a master. Should the elected crmd process (or the node it is on) fail, a new one
is established.
A CIB, reecting the cluster’s conguration and current state of all resources in the
cluster is kept on each node. The contents of the CIB are automatically kept in sync
across the entire cluster.
Many actions performed in the cluster will cause a cluster-wide change. These actions
can include things like adding or removing a cluster resource or changing resource
constraints. It is important to understand what happens in the cluster when you perform
such an action.
For example, suppose you want to add a cluster IP address resource. To do this, you
can use one of the command line tools or the GUI to modify the CIB. It is not required
to perform the actions on the DC, you can use either tool on any node in the cluster and
Conceptual Overview 13
Page 24

they will be relayed to the DC. The DC will then replicate the CIB change to all cluster
nodes.
Based on the information in the CIB, the PE then computes the ideal state of the cluster
and how it should be achieved and feeds a list of instructions to the DC. The DC sends
commands via the messaging/infrastructure layer which are received by the crmd peers
on other nodes. Each crmd uses it LRM (implemented as lrmd) to perform resource
modications. The lrmd is non-cluster aware and interacts directly with resource agents
(scripts).
The peer nodes all report the results of their operations back to the DC. Once the DC
concludes that all necessary operations are successfully performed in the cluster, the
cluster will go back to the idle state and wait for further events. If any operation was
not carried out as planned, the PE is invoked again with the new information recorded
in the CIB.
In some cases, it may be necessary to power off nodes in order to protect shared data
or complete resource recovery. For this Pacemaker comes with a fencing subsystem,
stonithd. STONITH is an acronym for “Shoot The Other Node In The Head” and is
usually implemented with a remote power switch. In Pacemaker, STONITH devices
are modeled as resources (and congured in the CIB) to enable them to be easily
monitored for failure. However, stonithd takes care of understanding the STONITH
topology such that its clients simply request a node be fenced and it does the rest.
1.5 What's New?
With SUSE Linux Enterprise Server 11, the cluster stack has changed from Heartbeat
to OpenAIS. OpenAIS implements an industry standard API, the Application Interface
Specication (AIS), published by the Service Availability Forum. The cluster resource
manager from SUSE Linux Enterprise Server 10 has been retained but has been significantly enhanced, ported to OpenAIS and is now known as Pacemaker.
For more details what changed in the High Availability components from SUSE®
Linux Enterprise Server 10 SP2 to SUSE Linux Enterprise High Availability Extension
11, refer to the following sections.
14 High Availability Guide
Page 25

1.5.1 New Features and Functions Added
Migration Threshold and Failure Timeouts
The High Availability Extension now comes with the concept of a migration
threshold and failure timeout. You can dene a number of failures for resources,
after which they will migrate to a new node. By default, the node will no longer
be allowed to run the failed resource until the administrator manually resets the
resource’s failcount. However it is also possible to expire them by setting the re-
source’s failure-timeout option.
Resource and Operation Defaults
You can now set global defaults for resource options and operations.
Support for Ofine Conguration Changes
Often it is desirable to preview the effects of a series of changes before updating
the conguration atomically. You can now create a “shadow” copy of the
conguration that can be edited with the command line interface, before committing
it and thus changing the active cluster conguration atomically.
Reusing Rules, Options and Sets of Operations
Rules, instance_attributes, meta_attributes and sets of operations can be dened
once and referenced in multiple places.
Using XPath Expressions for Certain Operations in the CIB
The CIB now accepts XPath-based create, modify, delete operations. For
more information, refer to the cibadmin help text.
Multi-dimensional Collocation and Ordering Constraints
For creating a set of collocated resources, previously you could either dene a resource group (which could not always accurately express the design) or you could
dene each relationship as an individual constraint—causing a constraint explosion
as the number of resources and combinations grew. Now you can also use an alter-
nate form of collocation constraints by dening resource_sets.
Connection to the CIB From Non-cluster Machines
Provided Pacemaker is installed on a machine, it is possible to connect to the
cluster even if the machine itself is not a part of it.
Conceptual Overview 15
Page 26

Triggering Recurring Actions at Known Times
By default, recurring actions are scheduled relative to when the resource started,
but this is not always desirable. To specify a date/time that the operation should
be relative to, set the operation’s interval-origin. The cluster uses this point to calculate the correct start-delay such that the operation will occur at origin + (interval
* N).
1.5.2 Changed Features and Functions
Naming Conventions for Resource and Custer Options
All resource and cluster options now use dashes (-) instead of underscores (_). For
example, the master_max meta option has been renamed to master-max.
Renaming of master_slave Resource
The master_slave resource has been renamed to master. Master resources
are a special type of clone that can operate in one of two modes.
Container Tag for Attributes
The attributes container tag has been removed.
Operation Field for Prerequisites
The pre-req operation eld has been renamed requires.
Interval for Operations
All operations must have an interval. For start/stop actions the interval must be set
to 0 (zero).
Attributes for Collocation and Ordering Constraints
The attributes of collocation and ordering constraints were renamed for clarity.
Cluster Options for Migration Due to Failure
The resource-failure-stickiness cluster option has been replaced by
the migration-threshold cluster option. See also Migration Threshold and
Failure Timeouts (page 15).
Arguments for Command Line Tools
The arguments for command-line tools have been made consistent. See also Naming
Conventions for Resource and Custer Options (page 16).
16 High Availability Guide
Page 27

Validating and Parsing XML
The cluster conguration is written in XML. Instead of a Document Type Denition
(DTD), now a more powerful RELAX NG schema is used to dene the pattern for
the structure and content. libxml2 is used as parser.
id Fields
id elds are now XML IDs which have the following limitations:
• IDs cannot contain colons.
• IDs cannot begin with a number.
• IDs must be globally unique (not just unique for that tag).
References to Other Objects
Some elds (such as those in constraints that refer to resources) are IDREFs. This
means that they must reference existing resources or objects in order for the
conguration to be valid. Removing an object which is referenced elsewhere will
therefor fail.
1.5.3 Removed Features and Functions
Setting Resource Meta Options
It is no longer possible to set resource meta-options as top-level attributes. Use
meta attributes instead.
Setting Global Defaults
Resource and operation defaults are no longer read from crm_cong.
Conceptual Overview 17
Page 28

Page 29

Getting Started
In the following, learn about the system requirements and which preparations
to take before installing the High Availability Extension. Find a short overview of the
basic steps to install and set up a cluster.
2.1 Hardware Requirements
The following list species hardware requirements for a cluster based on SUSE® Linux
Enterprise High Availability Extension. These requirements represent the minimum
hardware conguration. Additional hardware might be necessary, depending on how
you intend to use your cluster.
• 1 to 16 Linux servers with software as specied in Section 2.2, “Software Requirements” (page 20). The servers do not require identical hardware (memory, disk
space, etc.).
• At least two TCP/IP communication media. Cluster nodes use multicast for communication so the network equipment must support multicasting. The communication
media should support a data rate of 100 Mbit/s or higher. Preferably, the Ethernet
channels should be bonded.
2
• Optional: A shared disk subsystem connected to all servers in the cluster from
where it needs to be accessed.
• A STONITH mechanism. STONITH is an acronym for “Shoot the other node in
the head”. A STONITH device is a power switch which the cluster uses to reset
Getting Started 19
Page 30

nodes that are thought to be dead or behaving in a strange manner. Resetting nonheartbeating nodes is the only reliable way to ensure that no data corruption is
performed by nodes that hang and only appear to be dead.
For more information, refer to Chapter 8, Fencing and STONITH (page 81).
2.2 Software Requirements
Ensure that the following software requirements are met:
• SUSE® Linux Enterprise Server 11 with all available online updates installed on
all nodes that will be part of the cluster.
• SUSE Linux Enterprise High Availability Extension 11 including all available online
updates installed on all nodes that will be part of the cluster.
2.3 Shared Disk System Requirements
A shared disk system (Storage Area Network, or SAN) is recommended for your cluster
if you want data to be highly available. If a shared disk subsystem is used, ensure the
following:
• The shared disk system is properly set up and functional according to the manufacturer’s instructions.
• The disks contained in the shared disk system should be congured to use mirroring
or RAID to add fault tolerance to the shared disk system. Hardware-based RAID
is recommended. Host-based software RAID is not supported for all congurations.
• If you are using iSCSI for shared disk system access, ensure that you have properly
congured iSCSI initiators and targets.
• When using DRBD to implement a mirroring RAID system that distributes data
across two machines, make sure to only access the replicated device. Use the same
(bonded) NICs that the rest of the cluster uses to leverage the redundancy provided
there.
20 High Availability Guide
Page 31

2.4 Preparations
Prior to installation, execute the following preparatory steps:
• Congure hostname resolution and use static host information by by editing the
/etc/hosts le on each server in the cluster. For more information, refer to
SUSE Linux Enterprise Server Administration Guide, chapter Basic Networking ,
section Conguring Hostname and DNS , available at http://www.novell
.com/documentation.
It is essential that members of the cluster are able to nd each other by name. If
the names are not available, internal cluster communication will fail.
• Congure time synchronization by making cluster nodes synchronize to a time
server outside the cluster . For more information, refer to SUSE Linux Enterprise
Server Administration Guide, chapter Time Synchronization with NTP , available
at http://www.novell.com/documentation.
The cluster nodes will use the time server as their time synchronization source.
2.5 Overview: Installing and Setting Up a Cluster
After the preparations are done, the following steps are necessary to install and set up
a cluster with SUSE® Linux Enterprise High Availability Extension:
1. Installing SUSE® Linux Enterprise Server 11 and SUSE® Linux Enterprise High
Availability Extension 11 as add-on on top of SUSE Linux Enterprise Server. For
detailed information, see Section 3.1, “Installing the High Availability Extension”
(page 23).
2. Conguring OpenAIS. For detailed information, see Section 3.2, “Initial Cluster
Setup” (page 24).
3. Starting OpenAIS and monitoring the cluster status. For detailed information, see
Section 3.3, “Bringing the Cluster Online” (page 27).
Getting Started 21
Page 32

4. Adding and conguring cluster resources, either with a graphical user interface
(GUI) or from command line. For detailed information, see Chapter 4, Conguring
Cluster Resources with the GUI (page 31) or Chapter 5, Conguring Cluster Resources From Command Line (page 59).
To protect your data from possible corruption by means of fencing and STONITH,
make sure to congure STONITH devices as resources. For detailed information,
see Chapter 8, Fencing and STONITH (page 81).
You might also need to create le systems on a shared disk (Storage Area Network,
SAN) if they do not already exist and, if necessary, congure those le systems as
cluster resources.
Both cluster-aware (OCFS 2) and non-cluster-aware le systems can be congured
with the High Availability Extension. If needed, you can also make use of data
replication with DRBD. For detailed information, see Part III, “Storage and Data
Replication” (page 105).
22 High Availability Guide
Page 33

Installation and Basic Setup with YaST
There are several ways to install the software needed for High Availability clusters:
either from a command line, using zypper, or with YaST which provides a graphical
user interface. After installing the software on all nodes that will be part of your cluster,
the next step is to initially congure the cluster so that the nodes can communicate with
each other. This can either be done manually (by editing a conguration le) or with
the YaST cluster module.
NOTE: Installing the Software Packages
The software packages needed for High Availability clusters are not automatically copied to the cluster nodes. Install SUSE® Linux Enterprise Server 11 and
SUSE® Linux Enterprise High Availability Extension 11 on all nodes that will be
part of your cluster.
3.1 Installing the High Availability Extension
The packages needed for conguring and managing a cluster with the High Availability
Extension are included in the High Availability installation pattern. This patterns
is only available after SUSE® Linux Enterprise High Availability Extension has been
installed as add-on. For information on how to install add-on products, refer to the
SUSE Linux Enterprise 11 Deployment Guide, chapter Installing Add-On Products .
3
Installation and Basic Setup with YaST 23
Page 34

Start YaST and select Software > Software Management to open the YaST
1
package manager.
From the Filter list, select Patterns and activate the High Availability pattern in
2
the pattern list.
Click Accept to start the installation of the packages.
3
3.2 Initial Cluster Setup
After having installed the HA packages, you can congure the initial cluster setup with
YaST. This includes the communication channels between the nodes, security aspects
(like using encrypted communication) and starting OpenAIS as service.
For the communication channels, you need to dene a bind network address
(bindnetaddr), a multicast address (mcastaddr) and a multicast port
(mcastport). The bindnetaddr is the network address to bind to. To ease sharing
conguration les across the cluster, OpenAIS uses network interface netmask to mask
only the address bits that are used for routing the network. The mcastaddr can be a
IPv4 or IPv6 multicast address. The mcastport is the UDP port specied for
mcastaddr.
The nodes in the cluster will know each other from using the same multicast address
and the same port number. For different clusters, use a different multicast address.
Procedure 3.1
1
Start YaST and select Miscellaneous > Cluster or run yast2 cluster on a
command line to start the initial cluster conguration dialog.
In the Communication Channel category, congure the channels used for com-
2
munication between the cluster nodes. This information is written to the /etc/
ais/openais.conf conguration le.
24 High Availability Guide
Conguring the Cluster
Page 35

Dene the Bind Network Address, the Multicast Address and the Multicast Port
to use for all cluster nodes.
Specify a unique Node ID for every cluster node. It is recommended to start at
3
1.
In the Security category, dene the authentication settings for the cluster. If Enable
4
Security Authentication is activated, HMAC/SHA1 authentication is used for
communication between the cluster nodes.
This authentication method requires a shared secret, which is used to protect and
authenticate messages. The authentication key (password) you specify will be
used on all nodes in the cluster. For a newly created cluster, click Generate Auth
Key File to create an authentication key that is written to /etc/ais/authkey.
Installation and Basic Setup with YaST 25
Page 36

In the Service category, choose whether you want to start OpenAIS on this cluster
5
server each time it is booted.
If you select Off, you must start OpenAIS manually each time this cluster server
is booted. To start OpenAIS manually, use the rcopenais start command.
To start OpenAIS immediately, click Start OpenAIS Now.
If all options are set according to your wishes, click Finish. YaST then automat-
6
ically also adjusts the rewall settings and opens the UDP port used for multicast.
26 High Availability Guide
Page 37

After the initial conguration is done, you need to transfer the conguration to
7
the other nodes in the cluster. The easiest way to do so is to copy the /etc/
ais/openais.conf le to the other nodes in the cluster. As each node needs
to have a unique node ID, make sure to adjust the node ID accordingly after
copying the le.
8
If you want to use encrypted communication, also copy the /etc/ais/
authkey to the other nodes in the cluster.
3.3 Bringing the Cluster Online
After the basic conguration, you can bring the stack online and check the status.
Run the following command on each of the cluster nodes to start OpenAIS:
1
rcopenais start
On one of the nodes, check the cluster status with the following command:
2
crm_mon
If all nodes are online, the output should be similar to the following:
============
Last updated: Thu Feb 5 18:30:33 2009
Current DC: d42 (d42)
Version: 1.0.1-node: b7ffe2729e3003ac8ff740bebc003cf237dfa854
3 Nodes configured.
0 Resources configured.
============
Node: d230 (d230): online
Node: d42 (d42): online
Node: e246 (e246): online
After the basic conguration is done and the nodes are online, you can now start to
congure cluster resources, either with the crm command line tool or with a graphical
user interface. For more information, refer to Chapter 4, Conguring Cluster Resources
with the GUI (page 31) or Chapter 5, Conguring Cluster Resources From Command
Line (page 59).
Installation and Basic Setup with YaST 27
Page 38

Page 39

Part II. Conguration and
Administration
Page 40

Page 41

Conguring Cluster Resources
with the GUI
The main purpose of an HA cluster is to manage user services. Typical examples of
user services are an Apache web server or a database. From the user's point of view,
the services do something specic when ordered to do so. To the cluster, however, they
are just resources which may be started or stopped—the nature of the service is irrelevant
to the cluster.
As a cluster administrator, you need to create cluster resources for every resource or
application you run on servers in your cluster. Cluster resources can include Web sites,
e-mail servers, databases, le systems, virtual machines, and any other server-based
applications or services you want to make available to users at all times.
To create cluster resources, either use the graphical user interface (the Linux HA
Management Client) or the crm command line utility. For the command line approach,
refer to Chapter 5, Conguring Cluster Resources From Command Line (page 59).
This chapter introduces the Linux HA Management Client and then covers several
topics you need when conguring a cluster: creating resources, conguring constraints,
specifying failover nodes and failback nodes, conguring resource monitoring, starting
or removing resources, conguring resource groups or clone resources, and migrating
resources manually.
The graphical user interface for conguring cluster resources is included in the
pacemaker-pygui package.
4
Conguring Cluster Resources with the GUI 31
Page 42

4.1 Linux HA Management Client
When starting the Linux HA Management Client you need to connect to a cluster.
NOTE: Password for the hacluster User
The installation creates a linux user named hacluster. Prior to using the
Linux HA Management Client, you must set the password for the hacluster
user. To do this, become root, enter passwd hacluster at the command
line and enter a password for the hacluster user.
Do this on every node you will connect to with the Linux HA Management
Client.
To start the Linux HA Management Client, enter crm_gui at the command line. To
connect to the cluster, select Connection > Login. By default, the Server eld shows
the localhost's IP address and hacluster as User Name. Enter the user's password
to continue.
Figure 4.1
If you are running the Linux HA Management Client remotely, enter the IP address of
a cluster node as Server. As User Name, you can also use any other user belonging to
the haclient group to connect ot the cluster.
32 High Availability Guide
Connecting to the Cluster
Page 43

After being connected, the main window opens:
Figure 4.2
The Linux HA Management Client lets you add and modify resources, constraints,
congurations etc. It also provides functionalities for managing cluster components
like starting, stopping or migrating resources, cleaning up resources, or setting nodes
to standby. Additionally, you can easily view, edit, import and export the XML
structures of the CIB by selecting any of the Conguration subitems and selecting Show
> XML Mode.
Linux HA Management Client - Main Window
In the following, nd some examples how to create and manage cluster resources with
the Linux HA Management Client.
4.2 Creating Cluster Resources
You can create the following types of resources:
Primitive
A primitive resource, the most basic type of a resource.
Conguring Cluster Resources with the GUI 33
Page 44

Group
Groups contain a set of resources that need to be located together, start sequentially
and stop in the reverse order. For more information, refer to Section 4.10, “Conguring a Cluster Resource Group” (page 49).
Clone
Clones are resources that can be active on multiple hosts. Any resource can be
cloned, provided the respective resource agent supports it. For more information,
refer to Section 4.11, “Conguring a Clone Resource” (page 54).
Master
Masters are a special type of a clone resources, masters can have multiple modes.
Masters must contain exactly one group or one regular resource.
Procedure 4.1
Start the Linux HA Management Client and log in to the cluster as described in
1
Section 4.1, “Linux HA Management Client” (page 32).
In the left pane, select Resources and click Add > Primitive.
2
In the next dialog, set the following parameters for the resource:
3
3a
Enter a unique ID for the resource.
From the Class list, select the resource agent class you want to use for that
3b
resource: heartbeat, lsb, ocf or stonith. For more information, see Section 17.1, “Supported Resource Agent Classes” (page 193).
If you selected ocf as class, specify also the Provider of your OCF resource
3c
agent. The OCF specication allows multiple vendors to supply the same
resource agent.
From the Type list, select the resource agent you want to use (for example,
3d
IPaddr or Filesystem). A short description for this resource agent is displayed
below.
The selection you get in the Type list depends on the Class (and for OCF
resources also on the Provider) you have chosen.
Adding Primitive Resources
Below Options, set the Initial state of resource.
3e
34 High Availability Guide
Page 45

Activate Add monitor operation if you want the cluster to monitor if the re-
3f
source is still healthy.
Click Forward. The next window shows a summary of the parameters that you
4
have already dened for that resource. All required Instance Attributes for that
resource are listed. You need to edit them in order to set them to appropriate
values. You may also need to add more attributes, depending on your deployment
and settings. For details how to do so, refer to Procedure 4.2, “Adding or Modifying Meta and Instance Attributes” (page 36).
If all parameters are set according to your wishes, click Apply to nish the con-
5
guration of that resource. The conguration dialog is closed and the main window
shows the newly added resource.
You can add or modify the following parameters for primitive resources at any time:
Meta Attributes
Meta attributes are options you can add for a resource. They tell the CRM how to
treat a specic resource. For an overview of the available meta attributes, their
values and defaults, refer to Section 17.3, “Resource Options” (page 197).
Conguring Cluster Resources with the GUI 35
Page 46

Instance Attributes
Instance attributes are parameters for certain resource classes that determine how
they behave and which instance of a service they control. For more information,
refer to Section 17.5, “Instance Attributes” (page 199).
Operations
The monitor operations added for a resource. These instruct the cluster to make
sure that the resource is still healthy. Monitor operations can be added for all
classes of resource agents. You can also set particular parameters, such as Timeout
for start or stop operations. For more information, refer to Section 4.7, “Con-
guring Resource Monitoring” (page 46).
Procedure 4.2
In the Linux HA Management Client main window, click Resources in the left
1
pane to see the resources already congured for the cluster.
In the right pane, select the resource to modify and click Edit (or double-click
2
the resource). The next window shows the basic resource parameters and the
Meta Attributes, Instance Attributes or Operations already dened for that resource.
Adding or Modifying Meta and Instance Attributes
36 High Availability Guide
Page 47

To add a new meta attribute or instance attribute, select the respective tab and
3
click Add.
Select the Name of the attribute you want to add. A short Description is displayed.
4
If needed, specify an attribute Value. Otherwise the default value of that attribute
5
will be used.
Click OK to conrm your changes. The newly added or modied attribute appears
6
on the tab.
If all parameters are set according to your wishes, click OK to nish the congu-
7
ration of that resource. The conguration dialog is closed and the main window
shows the modied resource.
TIP: XML Source Code
The Linux HA Management Client allows you to view the XML that is generated
from the parameters that you have dened for a specic resource or for all
the resources. Select Show > XML Mode in the top right corner of the resource
conguration dialog or in the Resources view of the main window.
The editor displaying the XML code allows you to Import or Export the XML
elements or to manually edit the XML code.
4.3 Creating STONITH Resources
To congure fencing, you need to congure one or more STONITH resources.
Procedure 4.3
Start the Linux HA Management Client and log in to the cluster as described in
1
Section 4.1, “Linux HA Management Client” (page 32).
In the left pane, select Resources and click Add > Primitive.
2
In the next dialog, set the following parameters for the resource:
3
3a
Enter a unique ID for the resource.
Adding a STONITH Resource
Conguring Cluster Resources with the GUI 37
Page 48

From the Class list, select the resource agent class stonith.
3b
From the Type list, select the STONITH plug-in for controlling your
3c
STONITH device. A short description for this plug-in is displayed below.
Below Options, set the Initial state of resource.
3d
Activate Add monitor operation if you want the cluster to monitor the fencing
3e
device. For more information, refer to Section 8.4, “Monitoring Fencing
Devices” (page 88).
Click Forward. The next window shows a summary of the parameters that you
4
have already dened for that resource. All required Instance Attributes for the
selected STONITH plug-in are listed. You need to edit them in order to set them
to appropriate values. You may also need to add more attributes or monitor operations, depending on your deployment and settings. For details how to do so,
refer to Procedure 4.2, “Adding or Modifying Meta and Instance Attributes”
(page 36) and Section 4.7, “Conguring Resource Monitoring” (page 46).
If all parameters are set according to your wishes, click Apply to nish the con-
5
guration of that resource. The conguration dialog is closed and the main window
shows the newly added resource.
To complete your fencing conguration add constraints, or use clones or both. For more
details, refer to Chapter 8, Fencing and STONITH (page 81).
4.4 Conguring Resource Constraints
Having all the resources congured is only part of the job. Even if the cluster knows
all needed resources, it might still not be able to handle them correctly. Resource constraints let you specify which cluster nodes resources can run on, what order resources
will load, and what other resources a specic resource is dependent on.
There are three different kinds of constraints available:
Resource Location
Locational constraints that dene on which nodes a resource may be run, may not
be run or is preferred to be run.
38 High Availability Guide
Page 49

Resource Collocation
Collocational constraints that tell the cluster which resources may or may not run
together on a node.
Resource Order
Ordering constraints to dene the sequence of actions.
When dening constraints, you also need to deal with scores. Scores of all kinds are
integral to how the cluster works. Practically everything from migrating a resource to
deciding which resource to stop in a degraded cluster is achieved by manipulating scores
in some way. Scores are calculated on a per-resource basis and any node with a negative
score for a resource cannot run that resource. After calculating the scores for a resource,
the cluster then chooses the node with the highest score. INFINITY is currently dened
as 1,000,000. Additions or subtractions with it follows the following 3 basic rules:
• Any value + INFINITY = INFINITY
• Any value - INFINITY = -INFINITY
• INFINITY - INFINITY = -INFINITY
When dening resource constraints, you also specify a score for each constraint. The
score indicates the value you are assigning to this resource constraint. Constraints with
higher scores are applied before those with lower scores. By creating additional location
constraints with different scores for a given resource, you can specify an order for the
nodes that a resource will fail over to.
Procedure 4.4
Start the Linux HA Management Client and log in to the cluster as described
1
in Section 4.1, “Linux HA Management Client” (page 32).
In the Linux HA Management Client main window, click Constraints in the
2
left pane to see the constraints already congured for the cluster.
In the left pane, select Constraints and click Add.
3
Select Resource Location and click OK.
4
Enter a unique ID for the constraint. When modifying existing constraints,
5
the ID is already dened and is displayed in the conguration dialog.
Adding or Modifying Locational Constraints
Conguring Cluster Resources with the GUI 39
Page 50

Select the Resource for which to dene the constraint. The list shows the IDs
6
of all resources that have been congured for the cluster.
Set the Score for the constraint. Positive values indicate the resource can run
7
on the Node you specify below. Negative values indicate the resource can not
run on this node. Values of +/- INFINITY change “can” to must.
Select the Node for the constraint.
8
If you leave the Node and the Score eld empty, you can also add rules by
9
clicking Add > Rule. To add a lifetime, just click Add > Lifetime.
If all parameters are set according to your wishes, click OK to nish the con-
10
guration of the constraint. The conguration dialog is closed and the main
window shows the newly added or modied constraint.
Procedure 4.5
Start the Linux HA Management Client and log in to the cluster as described
1
in Section 4.1, “Linux HA Management Client” (page 32).
In the Linux HA Management Client main window, click Constraints in the
2
left pane to see the constraints already congured for the cluster.
In the left pane, select Constraints and click Add.
3
Select Resource Collocation and click OK.
4
40 High Availability Guide
Adding or Modifying Collocational Constraints
Page 51

Enter a unique ID for the constraint. When modifying existing constraints,
5
the ID is already dened and is displayed in the conguration dialog.
Select the Resource which is the collocation source. The list shows the IDs
6
of all resources that have been congured for the cluster.
If the constraint cannot be satised, the cluster may decide not to allow the
resource to run at all.
If you leave both the Resource and the With Resource eld empty, you can
7
also add a resource set by clicking Add > Resource Set. To add a lifetime, just
click Add > Lifetime.
In With Resource, dene the collocation target. The cluster will decide where
8
to put this resource rst and then decide where to put the resource in the Resource eld.
Dene a Score to determine the location relationship between both resources.
9
Positive values indicate the resources should run on the same node. Negative
values indicate the resources should not run on the same node. Values of +/-
INFINITY change should to must. The score will be combined with other
factors to decide where to put the node.
If needed, specify further parameters, like Resource Role.
10
Depending on the parameters and options you choose, a short Description
explains the effect of the collocational constraint you are conguring.
If all parameters are set according to your wishes, click OK to nish the con-
11
guration of the constraint. The conguration dialog is closed and the main
window shows the newly added or modied constraint.
Procedure 4.6
Start the Linux HA Management Client and log in to the cluster as described in
1
Section 4.1, “Linux HA Management Client” (page 32).
In the Linux HA Management Client main window, click Constraints in the left
2
pane to see the constraints already congured for the cluster.
In the left pane, select Constraints and click Add.
3
Adding or Modifying Ordering Constraints
Conguring Cluster Resources with the GUI 41
Page 52

Select Resource Order and click OK.
4
Enter a unique ID for the constraint. When modifying existing constraints, the
5
ID is already dened and is displayed in the conguration dialog.
With First, dene the resource that must be started before the Then resource is
6
allowed to.
With Then dene the resource that will start after the First resource.
7
If needed, dene further parameters, for example Score (if greater than zero, the
8
constraint is mandatory; otherwise it is only a suggestion) or Symmetrical (if
true, stop the resources in the reverse order).
Depending on the parameters and options you choose, a short Description explains
the effect of the ordering constraint you are conguring.
If all parameters are set according to your wishes, click OK to nish the congu-
9
ration of the constraint. The conguration dialog is closed and the main window
shows the newly added or modied constraint.
You can access and modify all constraints that you have congured in the Constraints
view of the Linux HA Management Client.
Figure 4.3
42 High Availability Guide
Linux HA Management Client - Constraints
Page 53

For more information on conguring constraints and detailed background information
about the basic concepts of ordering and collocation, refer to the following documents
available at http://clusterlabs.org/wiki/Documentation:
•
Conguration 1.0 Explained , chapter Resource Constraints
•
Collocation Explained
•
Ordering Explained
4.5 Specifying Resource Failover Nodes
A resource will be automatically restarted if it fails. If that cannot be achieved on the
current node, or it fails N times on the current node, it will try to fail over to another
node. You can dene a number of failures for resources (a migration-threshold),
after which they will migrate to a new node. If you have more than two nodes in your
cluster, the node a particular resource fails over to is chosen by the High Availability
software.
If you want to choose which node a resource will fail over to, you must do the following:
Congure a location constraint for that resource as described in Procedure 4.4,
1
“Adding or Modifying Locational Constraints” (page 39).
2
Add the migration-threshold meta attribute to that resource as described
in Procedure 4.2, “Adding or Modifying Meta and Instance Attributes” (page 36)
and enter a Value for the migration-threshold. The value should be positive and
less that INFINITY.
If you want to automatically expire the failcount for a resource, add the
3
failure-timeout meta attribute to that resource as described in Procedure 4.2, “Adding or Modifying Meta and Instance Attributes” (page 36) and
enter a Value for the failure-timeout.
If you want to specify additional failover nodes with preferences for a resource,
4
create additional location constraints.
Conguring Cluster Resources with the GUI 43
Page 54

For example, let us assume you have congured a location constraint for resource r1
to preferably run on node1. If it fails there, migration-threshold is checked
and compared to the failcount. If failcount >= migration-threshold then the resource is
migrated to the node with the next best preference.
By default, once the threshold has been reached, the node will no longer be allowed to
run the failed resource until the administrator manually resets the resource’s failcount
(after xing the failure cause).
However, it is possible to expire the failcounts by setting the resource’s failure-timeout
option. So a setting of migration-threshold=2 and failure-timeout=60s
would cause the resource to migrate to a new node after two failures and potentially
allow it to move back (depending on the stickiness and constraint scores) after one
minute.
There are two exceptions to the migration threshold concept, occurring when a resource
either fails to start or fails to stop: Start failures set the failcount to INFINITY and thus
always cause an immediate migration. Stop failures cause fencing (when
stonith-enabled is set to true which is the default). In case there is no STONITH
resource dened (or stonith-enabled is set to false), the resource will not mi-
grate at all.
To clean up the failcount for a resource with the Linux HA Management Client, select
Management in the left pane, select the respective resource in the right pane and click
Cleanup Resource in the toolbar. This executes the commands crm_resource -C
and crm_failcount -D for the specied resource on the specied node. For more
information, see also crm_resource(8) (page 166) and crm_failcount(8) (page 157).
44 High Availability Guide
Page 55

4.6 Specifying Resource Failback Nodes (Resource Stickiness)
A resource might fail back to its original node when that node is back online and in the
cluster. If you want to prevent a resource from failing back to the node it was running
on prior to failover, or if you want to specify a different node for the resource to fail
back to, you must change its resource stickiness value. You can either specify resource
stickiness when you are creating a resource, or afterwards.
Consider the following when specifying a resource stickiness value:
Value is 0:
This is the default. The resource will be placed optimally in the system. This may
mean that it is moved when a “better” or less loaded node becomes available. This
option is almost equivalent to automatic failback, except that the resource may be
moved to a node that is not the one it was previously active on.
Value is greater than 0:
The resource will prefer to remain in its current location, but may be moved if a
more suitable node is available. Higher values indicate a stronger preference for a
resource to stay where it is.
Value is less than 0:
The resource prefers to move away from its current location. Higher absolute values
indicate a stronger preference for a resource to be moved.
Value is INFINITY:
The resource will always remain in its current location unless forced off because
the node is no longer eligible to run the resource (node shutdown, node standby,
reaching the migration-threshold, or conguration change). This option
is almost equivalent to completely disabling automatic failback .
Value is -INFINITY:
The resource will always move away from its current location.
Conguring Cluster Resources with the GUI 45
Page 56

Procedure 4.7
1
Add the resource-stickiness meta attribute to the resource as described
in Procedure 4.2, “Adding or Modifying Meta and Instance Attributes” (page 36).
2
As Value for the resource-stickiness, specify a value between -INFINITY and
INFINITY.
Specifying Resource Stickiness
4.7 Conguring Resource Monitoring
Although the High Availability Extension can detect a node failure, it also has the
ability to detect when an individual resource on a node has failed. If you want to ensure
that a resource is running, you must congure resource monitoring for it. Resource
monitoring consists of specifying a timeout and/or start delay value, and an interval.
The interval tells the CRM how often it should check the resource status.
Procedure 4.8
Start the Linux HA Management Client and log in to the cluster as described
1
in Section 4.1, “Linux HA Management Client” (page 32).
In the Linux HA Management Client main window, click Resources in the
2
left pane to see the resources already congured for the cluster.
In the right pane, select the resource to modify and click Edit. The next window
3
shows the basic resource parameters and the meta attributes, instance attributes
and operations already dened for that resource.
46 High Availability Guide
Adding or Modifying Monitor Operations
Page 57

To add a new monitor operation, select the respective tab and click Add.
4
To modify an existing operation, select the respective entry and click Edit.
Enter a unique ID for the monitor operation. When modifying existing monitor
5
operations, the ID is already dened and is displayed in the conguration dialog.
6
In Name, select the action to perform, for example monitor, start, or
stop.
In the Interval eld, enter a value in seconds.
7
In the Timeout eld, enter a value in seconds. After the specied timeout pe-
8
riod, the operation will be treated as failed. The PE will decide what to do
or execute what you specied in the On Fail eld of the monitor operation.
If needed, set optional parameters, like On Fail (what do if this action ever
9
fails?) or Requires (what conditions need to be satised before this action
occurs?).
If all parameters are set according to your wishes, click OK to nish the con-
10
guration of that resource. The conguration dialog is closed and the main
window shows the modied resource.
Conguring Cluster Resources with the GUI 47
Page 58

If you do not congure resource monitoring, resource failures after a successful start
will not be communicated, and the cluster will always show the resource as healthy.
If the resource monitor detects a failure, the following takes place:
• Log le messages are generated, according to the conguration specied in the
logging section of /etc/ais/openais.conf (by default, written to syslog,
usually /var/log/messages).
•
The failure is reected in the Linux HA Management Client, the crm_mon tools,
and in the CIB status section. To view them in the Linux HA Management Client,
click Management in the left pane, then in the right pane, select the resource whose
details you want to see.
• The cluster initiates noticeable recovery actions which may include stopping the
resource to repair the failed state and restarting the resource locally or on another
node. The resource also may not be restarted at all, depending on the conguration
and state of the cluster.
4.8 Starting a New Cluster Resource
NOTE: Starting Resources
When conguring a resource with the High Availability Extension, the same
resource should not be started or stopped manually (outside of the cluster).
The High Availability Extension software is responsible for all service start or
stop actions.
If a resource's initial state was set to stopped when being created (target-role
meta attribute has the value stopped), it does not start automatically after being cre-
ated. To start a new cluster resource with the Linux HA Management Client, select
Management in the left pane. In the right pane, right click the resource and select Start
(or start it from the toolbar).
48 High Availability Guide
Page 59

4.9 Removing a Cluster Resource
To remove a cluster resource with the Linux HA Management Client, switch to the
Resources view in the left pane, then select the respective resource and click Remove.
NOTE: Removing Referenced Resources
Cluster resources cannot be removed if their ID is referenced by any constraint.
If you cannot delete a resource, check where the resource ID is referenced and
remove the resource from the constraint rst.
4.10 Conguring a Cluster Resource
Group
Some cluster resources are dependent on other components or resources, and require
that each component or resource starts in a specic order and runs together on the same
server. To simplify this conguration we support the concept of groups.
Groups have the following properties:
Starting and Stopping Resources
Resources are started in the order they appear in and stopped in the reverse order
which they appear in.
Dependency
If a resource in the group cannot run anywhere, then none of the resources located
after that resource in the group is allowed to run.
Group Contents
Groups may only contain a collection of primitive cluster resources. To refer to
the child of a group resource, use the child’s ID instead of the group’s.
Constraints
Although it is possible to reference the group’s children in constraints, it is usually
preferable to use the group’s name instead.
Conguring Cluster Resources with the GUI 49
Page 60

Stickiness
Stickiness is additive in groups. Every active member of the group will contribute
its stickiness value to the group’s total. So if the default resource-stickiness
is 100 and a group has seven members (ve of which are active), then the group
as a whole will prefer its current location with a score of 500.
Resource Monitoring
To enable resource monitoring for a group, you must congure monitoring separately for each resource in the group that you want monitored.
NOTE: Empty Groups
Groups must contain at least one resource, otherwise the conguration is not
valid.
Procedure 4.9
Start the Linux HA Management Client and log in to the cluster as described in
1
Section 4.1, “Linux HA Management Client” (page 32).
In the left pane, select Resources and click Add > Group.
2
3
Enter a unique ID for the group.
Below Options, set the Initial state of resource and click Forward.
4
In the next step, you can add primitives as sub-resources for the group. These
5
are created similar as described in Procedure 4.1, “Adding Primitive Resources”
(page 34).
If all parameters are set according to your wishes, click Apply to nish the con-
6
guration of the primitive.
In the next window, you can continue adding sub-resources for the group by
7
choosing Primitive again and clicking OK.
When you do not want to add more primitives to the group, click Cancel instead.
The next window shows a summary of the parameters that you have already dened for that group. The Meta Attributes and Primitives of the group are listed.
Adding a Resource Group
50 High Availability Guide
Page 61

The position of the resources in the Primitive tab represents the order in which
the resources are started in the cluster.
As the order of resources in a group is important, use the Up and Down buttons
8
to sort the Primitives in the group.
If all parameters are set according to your wishes, click OK to nish the congu-
9
ration of that group. The conguration dialog is closed and the main window
shows the newly created or modied group.
Figure 4.4
Example 4.1
An example of a resource group would be a Web server that requires an IP address and
a le system. In this case, each component is a separate cluster resource that is combined
into a cluster resource group. The resource group would then run on a server or servers,
and in case of a software or hardware malfunction, fail over to another server in the
cluster the same as an individual cluster resource.
Linux HA Management Client - Groups
Resource Group for a Web Server
Conguring Cluster Resources with the GUI 51
Page 62

Figure 4.5
In Procedure 4.9, “Adding a Resource Group” (page 50), you learned how to create a
resource group. Let us assume you already have created a resource group as explained
above. Procedure 4.10, “Adding Resources to an Existing Group” (page 52) shows you
how to modify the group to match Example 4.1, “Resource Group for a Web Server”
(page 51).
Group Resource
Procedure 4.10
Start the Linux HA Management Client and log in to the cluster as described in
1
Section 4.1, “Linux HA Management Client” (page 32).
In the left pane, switch to the Resources view and in the right pane, select the
2
group to modify and click Edit. The next window shows the basic group parameters and the meta attributes and primitives already dened for that resource.
Click the Primitives tab and click Add.
3
In the next dialog, set the following parameters to add an IP address as sub-re-
4
source of the group:
4a
Enter a unique ID (for example, my_ipaddress).
From the Class list, select ocf as resource agent class.
4b
52 High Availability Guide
Adding Resources to an Existing Group
Page 63

As Provider of your OCF resource agent, select heartbeat.
4c
From the Type list, select IPaddr as resource agent.
4d
Click Forward.
4e
In the Instance Attribute tab, select the IP entry and click Edit (or double-
4f
click the IP entry).
4g
As Value, enter the desired IP address, for example, 192.168.1.1.
Click OK and Apply. The group conguration dialog shows the newly added
4h
primitive.
Add the next sub-resources (le system and Web server) by clicking Add again.
5
Set the respective parameters for each of the sub-resources similar to steps Step
6
4a (page 52) to Step 4h (page 53), until you have congured all sub-resources
for the group.
As we congured the sub-resources already in the order in that they need to be
started in the cluster, the order on the Primitives tab is already correct.
Conguring Cluster Resources with the GUI 53
Page 64

In case you need to change the resource order for a group, use the Up and Down
7
buttons to sort the resources on the Primitive tab.
To remove a resource from the group, select the resource on the Primitives tab
8
and click Remove.
Click OK to nish the conguration of that group. The conguration dialog is
9
closed and the main window shows the modied group.
4.11 Conguring a Clone Resource
You may want certain resources to run simultaneously on multiple nodes in your cluster.
To do this you must congure a resource as a clone. Examples of resources that might
be congured as clones include STONITH and cluster le systems like OCFS2. You
can clone any resource provided it is supported by the resource’s Resource Agent. Clone
resources may even be congured differently depending on which nodes they are
hosted.
There are three types of resource clones:
Anonymous Clones
These are the simplest type of clones. They behave identically anywhere they are
running. Because of this, there can only be one instance of an anonymous clone
active per machine.
Globally Unique Clones
These resources are distinct entities. An instance of the clone running on one node
is not equivalent to another instance on another node; nor would any two instances
on the same node be equivalent.
Stateful Clones
Active instances of these resources are divided into two states, active and passive.
These are also sometimes referred to as primary and secondary, or master and slave.
Stateful clones can be either anonymous or globally unique.
54 High Availability Guide
Page 65

Procedure 4.11
Start the Linux HA Management Client and log in to the cluster as described in
1
Section 4.1, “Linux HA Management Client” (page 32).
In the left pane, select Resources and click Add > Clone.
2
3
Enter a unique ID for the clone.
Below Options, set the Initial state of resource.
4
Activate the respective options you want to set for your clone and click Forward.
5
In the next step, you can either add a Primitive or a Group as sub-resources for
6
the clone. These are created similar as described in Procedure 4.1, “Adding
Primitive Resources” (page 34) or Procedure 4.9, “Adding a Resource Group”
(page 50).
If all parameters in the clone conguration dialog are set according to your
7
wishes, click Apply to nish the conguration of the clone.
Adding or Modifying Clones
4.12 Migrating a Cluster Resource
As mentioned in Section 4.5, “Specifying Resource Failover Nodes” (page 43), the
cluster will fail over (migrate) resources automatically in case of software or hardware
failures—according to certain parameters you can dene (for example, migration
threshold or resource stickiness). Apart from that, you can also manually migrate a resource to another node in the cluster resources manually.
Procedure 4.12
Start the Linux HA Management Client and log in to the cluster as described in
1
Section 4.1, “Linux HA Management Client” (page 32).
Switch to the Management view in the left pane, then right-click the respective
2
resource in the right pane and select Migrate Resource.
Manually Migrating Resources
Conguring Cluster Resources with the GUI 55
Page 66

In the new window, select the node to which to move the resource to in To Node.
3
This creates a location constraint with an INFINITY score for the destination
node.
If you want to migrate the resource only temporarily, activate Duration and enter
4
the time frame for which the resource should migrate to the new node. After the
expiration of the duration, the resource can move back to its original location or
it may stay where it is (depending on resource stickiness).
In cases where the resource cannot be migrated (if the resource's stickiness and
5
constraint scores total more than INFINITY on the current node), activate the
Force option. This forces the resource to move by creating a rule for the current
location and a score of -INFINITY.
NOTE
This prevents the resource from running on this node until the constraint
is removed with Clear Migrate Constraints or the duration expires.
Click OK to conrm the migration.
6
56 High Availability Guide
Page 67

To allow the resource to move back again, switch to the Management, right-click the
resource view and select Clear Migrate Constraints. This uses the crm_resource -U
command. The resource can move back to its original location or it may stay where it
is (depending on resource stickiness). For more information, refer to crm_resource(8)
(page 166) or Conguration 1.0 Explained , section Resource Migration , available from
http://clusterlabs.org/wiki/Documentation.
4.13 For More Information
http://clusterlabs.org/
Home page of Pacemaker, the cluster resource manager shipped with the High
Availability Extension.
http://linux-ha.org
Home page of the The High Availability Linux Project.
http://clusterlabs.org/wiki/Documentation
CRM Command Line Interface : Introduction to the crm command line tool.
http://clusterlabs.org/wiki/Documentation
Conguration 1.0 Explained : Explains the concepts used to congure Pacemaker.
Contains comprehensive and very detailed information for reference.
Conguring Cluster Resources with the GUI 57
Page 68

Page 69

Conguring Cluster Resources
From Command Line
Like in Chapter 4 (page 31), a cluster resource must be created for every resource or
application you run on the servers in your cluster. Cluster resources can include Web
sites, e-mail servers, databases, le systems, virtual machines, and any other serverbased applications or services that you want to make available to users at all times.
You can either use the graphical HA Management Client utility, or the crm command
line utility to create resources. This chapter introduces the several crm utilities.
5.1 Command Line Tools
After the installation there are several tools used to administer a cluster. Usually you
need the crm command only. This command has several subcommands. Run crm
help to get an overview of all available commands. It has a thorough help system with
embedded examples.
The crm tool has management abilities (the subcommands resources and node),
and are used for conguration (cib, configure). Management subcommands take
effect immediately, but conguration needs a nal commit.
5
Conguring Cluster Resources From Command Line 59
Page 70

5.2 Debugging Your Conguration
Changes
Before loading the changes back into the cluster, it is recommended to view your changes
with ptest. The ptest can show a diagram of actions which would be induced by
the changes to be committed. You need the graphiz package to display the diagrams.
The following example is a transcript, adding a monitor operation:
# crm
crm(live)# configure
crm(live)configure# show fence-node2
primitive fence-node2 stonith:apcsmart \
crm(live)configure# monitor fence-node2 120m:60s
crm(live)configure# show changed
primitive fence-node2 stonith:apcsmart \
crm(live)configure# ptest
crm(live)configure# commit
params hostlist="node2"
params hostlist="node2" \
op monitor interval="120m" timeout="60s"
5.3 Creating Cluster Resources
There are three types of RAs (Resource Agents) available with the cluster. First, there
are legacy Heartbeat 1 scripts. High availability can make use of LSB initialization
scripts. Finally, the cluster has its own set of OCF (Open Cluster Framework) agents.
This documentation concentrates on LSB scripts and OCF agents.
To create a cluster resource use the crm tool. To add a new resource to the cluster, the
general procedure is as follows:
1
Open a shell and become root.
2
Run crm to open the internal shell of crm. The prompt changes to crm(live)#.
Congure a primitive IP address:
3
crm(live)# configure
crm(live)configure# primitive myIP ocf:heartbeat:IPaddr \
params ip=127.0.0.99 op monitor interval=60s
60 High Availability Guide
Page 71

The previous command congures a “primitive” with the name myIP. You need
the class (here ocf), provider (heartbeat), and type (IPaddr). Furthermore
this primitive expects some parameters like the IP address. You have to change
the address to your setup.
Display and review the changes you have made:
4
crm(live)configure# show
To see the XML structure, use the following:
crm(live)configure# show xml
Commit your changes to take effect:
5
crm(live)configure# commit
5.3.1 LSB Initialization Scripts
All LSB scripts are commonly found in the directory /etc/init.d. They must have
several actions implemented, which are at least start, stop, restart, reload,
force-reload, and status as explained in http://www.linux-foundation
.org/spec/refspecs/LSB_1.3.0/gLSB/gLSB/iniscrptact.html.
The conguration of those services is not standardized. If you intend to use an LSB
script with High Availability, make sure that you understand how the relevant script is
congured. Often you can nd some documentation to this in the documentation of the
relevant package in /usr/share/doc/packages/PACKAGENAME.
NOTE: Do Not Touch Services Used by High Availability
When used by High Availability, the service should not be touched by other
means. This means that it should not be started or stopped on boot, reboot,
or manually. However, if you want to check if the service is congured properly,
start it manually, but make sure that it is stopped again before High Availability
takes over.
Before using an LSB resource, make sure that the conguration of this resource is
present and identical on all cluster nodes. The conguration is not managed by High
Availability. You must do this yourself.
Conguring Cluster Resources From Command Line 61
Page 72

5.3.2 OCF Resource Agents
All OCF agents are located in /usr/lib/ocf/resource.d/heartbeat/. These
are small programs that have a functionality similar to that of LSB scripts. However,
the conguration is always done with environment variables. All OCF Resource Agents
are required to have at least the actions start, stop, status, monitor, and
meta-data. The meta-data action retrieves information about how to congure
the agent. For example, if you want to know more about the IPaddr agent, use the
command:
OCF_ROOT=/usr/lib/ocf /usr/lib/ocf/resource.d/heartbeat/IPaddr meta-data
The output is lengthy information in a simple XML format. You can validate the output
with the ra-api-1.dtd DTD. Basically this XML format has three sections—rst
several common descriptions, second all the available parameters, and last the available
actions for this agent.
This output is meant to be machine-readable, not necessarily human-readable. For this
reason, the crm tool contains the ra command to get different information about re-
source agents:
# crm
crm(live)# ra
crm(live)ra#
The command classes gives you a list of all classes and providers:
crm(live)ra# classes
stonith
lsb
ocf / lvm2 ocfs2 heartbeat pacemaker
heartbeat
To get an overview about all available resource agents for a class (and provider) use
list:
crm(live)ra# list ocf
AudibleAlarm ClusterMon Delay Dummy
Filesystem ICP IPaddr IPaddr2
IPsrcaddr IPv6addr LVM LinuxSCSI
MailTo ManageRAID ManageVE Pure-FTPd
Raid1 Route SAPDatabase SAPInstance
SendArp ServeRAID SphinxSearchDaemon Squid
...
62 High Availability Guide
Page 73

More information about a resource agent can be viewed with meta:
crm(live)ra# meta Filesystem ocf heartbeat
Filesystem resource agent (ocf:heartbeat:Filesystem)
Resource script for Filesystem. It manages a Filesystem on a shared storage
medium.
Parameters (* denotes required, [] the default):
...
You can leave the viewer by pressing Q. Find a conguration example at Chapter 6,
Setting Up a Simple Testing Resource (page 75).
5.3.3 Example Conguration for an NFS
Server
To set up the NFS server, three resources are needed: a le system resource, a drbd
resource, and a group of an NFS server and an IP address. The following subsection
shows you how to do it.
Setting Up a File System Resource
The filesystem resource is congured as an OCF primitive resource. It has the task
of mounting and unmounting a device to a directory on start and stop requests. In this
case, the device is /dev/drbd0 and the directory to use as mount point is /srv/
failover. The le system used is xfs.
Use the following commands in the crm shell to congure a lesystem resource:
crm(live)# configure
crm(live)configure# primitive filesystem_resource \
ocf:heartbeat:Filesystem \
params device=/dev/drbd0 directory=/srv/failover fstype=xfs
Conguring drbd
Before starting with the drbd High Availability conguration, set up a drbd device
manually. Basically this is conguring drbd in /etc/drbd.conf and letting it syn-
chronize. The exact procedure for conguring drbd is described in the Storage Admin-
Conguring Cluster Resources From Command Line 63
Page 74

istration Guide. For now, assume that you congured a resource r0 that may be accessed
at the device /dev/drbd0 on both of your cluster nodes.
The drbd resource is an OCF master slave resource. This can be found in the description
of the metadata of the drbd RA. However, more important is that there are the actions
promote and demote in the actions section of the metadata. These are mandatory
for master slave resources and commonly not available to other resources.
For High Availability, master slave resources may have multiple masters on different
nodes. It is even possible to have a master and slave on the same node. Therefore,
congure this resource in a way that there is exactly one master and one slave, each
running on different nodes. Do this with the meta attributes of the master resource.
Master slave resources are special kinds of clone resources in High Availability. Every
master and every slave counts as a clone.
Use the following commands in the crm shell to congure a master slave resource:
crm(live)# configure
crm(live)configure# primitive drbd_r0 ocf:heartbeat:drbd params
crm(live)configure# ms drbd_resource drbd_r0 \
meta clone_max=2 clone_node_max=1 master_max=1 master_node_max=1 notify=true
crm(live)configure# commit
NFS Server and IP Address
To make the NFS server always available at the same IP address, use an additional IP
address as well as the ones the machines use for their normal operation. This IP address
is then assigned to the active NFS server in addition to the system's IP address.
The NFS server and the IP address of the NFS server should always be active on the
same machine. In this case, the start sequence is not very important. They may even be
started at the same time. These are the typical requirements for a group resource.
Before starting the High Availability RA conguration, congure the NFS server with
YaST. Do not let the system start the NFS server. Just set up the conguration le. If
you want to do that manually, see the manual page exports(5) (man 5 exports).
The conguration le is /etc/exports. The NFS server is congured as an LSB
resource.
Congure the IP address completely with the High Availability RA conguration. No
additional modication is necessary in the system. The IP address RA is an OCF RA.
64 High Availability Guide
Page 75

crm(live)# configure
crm(live)configure# primitive nfs_resource lsb:nfsserver
crm(live)configure# primitive ip_resource ocf:heartbeat:IPaddr \
params ip=10.10.0.1
crm(live)configure# group nfs_group nfs_resource ip_resource
crm(live)configure# commit
crm(live)configure# end
crm(live)# quit
5.4 Creating a STONITH Resource
From the crm perspective, a STONITH device is just another resource. To create a
STONITH resource, proceed as follows:
1
Run the crm command as system administrator. The prompt changes to
crm(live).
Get a list of all STONITH types with the following command:
2
crm(live)# ra list stonith
apcmaster apcsmart baytech
cyclades drac3 external/drac5
external/hmchttp external/ibmrsa external/ibmrsa-telnet
external/ipmi external/kdumpcheck external/rackpdu
external/riloe external/sbd external/ssh
external/vmware external/xen0 external/xen0-ha
ibmhmc ipmilan meatware
null nw_rpc100s rcd_serial
rps10 ssh suicide
Choose a STONITH type from the above list and view the list of possible options.
3
Use the following command (press Q to close the viewer):
crm(live)# ra meta external/ipmi stonith
IPMI STONITH external device (stonith:external/ipmi)
IPMI-based host reset
Parameters (* denotes required, [] the default):
...
4
Create the STONITH resource with the class stonith, the type you have chosen
in Step 3, and the respective parameters if needed, for example:
crm(live)# configure
crm(live)configure# primitive my-stonith stonith:external/ipmi \
Conguring Cluster Resources From Command Line 65
Page 76

meta target-role=Stopped \
operations my_stonith-operations \
op monitor start-delay=15 timeout=15 hostlist='' \
pduip='' community=''
5.5 Conguring Resource Constraints
Having all the resources congured is only one part of the job. Even if the cluster knows
all needed resources, it might still not be able to handle them correctly. For example,
it would not make sense to try to mount the le system on the slave node of drbd (in
fact, this would fail with drbd). To inform the cluster about these things, dene constraints.
In High Availability, there are three different kinds of constraints available:
• Locational constraints that dene on which nodes a resource may be run (in the
crm shell with the command location).
• Collocational constraints that tell the cluster which resources may or may not run
together on a node (colocation).
•
Ordering constraints to dene the sequence of actions (order).
5.5.1 Locational Constraints
This type of constraint may be added multiple times for each resource. All
rsc_location constraints are evaluated for a given resource. A simple example
that increases the probability to run a resource with the ID fs1-loc on the node with
the name earth to 100 would be the following:
crm(live)configure# location fs1-loc fs1 100: earth
5.5.2 Collocational Constraints
The colocation command is used to dene what resources should run on the same
or on different hosts. Usually it is very common to use the following sequence:
66 High Availability Guide
Page 77

crm(live)configure# order rsc1 rsc2
crm(live)configure# colocation rsc2 rsc1
It is only possible to set a score of either +INFINITY or -INFINITY, dening resources
that must always or must never run on the same node. For example, to run the two re-
sources with the IDs filesystem_resource and nfs_group always on the same
host, use the following constraint:
crm(live)configure# colocation nfs_on_filesystem inf: nfs_group
filesystem_resource
For a master slave conguration, it is necessary to know if the current node is a master
in addition to running the resource locally. This can be checked with an additional
to_role or from_role attribute.
5.5.3 Ordering Constraints
Sometimes it is necessary to provide an order in which services must start. For example,
you cannot mount a le system before the device is available to a system. Ordering
constraints can be used to start or stop a service right before or after a different resource
meets a special condition, such as being started, stopped, or promoted to master. Use
the following commands in the crm shell to congure an an ordering constraint:
crm(live)configure# order nfs_after_filesystem mandatory: group_nfs
filesystem_resource
5.5.4 Constraints for the Example
Conguration
The example used for this chapter would not work as expected without additional constraints. It is essential that all resources run on the same machine as the master of the
drbd resource. Another thing that is critical is that the drbd resource must be master
before any other resource starts. Trying to mount the drbd device when drbd is not
master simply fails. The constraints that must be fullled look like the following:
• The le system must always be on the same node as the master of the drbd resource.
crm(live)configure# colocation filesystem_on_master inf: \
filesystem_resource drbd_resource:Master
Conguring Cluster Resources From Command Line 67
Page 78

• The NFS server as well as the IP address must be on the same node as the le system.
crm(live)configure# colocation nfs_with_fs inf: \
nfs_group filesystem_resource
• The NFS server as well as the IP address start after the le system is mounted:
crm(live)configure# order nfs_second mandatory: \
filesystem_resource nfs_group
• The le system must be mounted on a node after the drbd resource is promoted to
master on this node.
crm(live)configure# order drbd_first inf: \
drbd_resource:promote filesystem_resource
5.6 Specifying Resource Failover Nodes
To determine a resource failover, use the meta attribute migration-threshold. For example:
crm(live)configure# location r1-node1 r1 100: node1
Normally r1 prefers to run on node1. If it fails there, migration-threshold is checked
and compared to the failcount. If failcount >= migration-threshold then it is migrated
to the node with the next best preference.
Start failures set the failcount to INFINITY depends on the
start-failure-is-fatal option. Stop failures cause fencing. If there's no
STONITH dened, then the resource will not migrate at all.
68 High Availability Guide
Page 79

5.7 Specifying Resource Failback Nodes (Resource Stickiness)
A rsc may failback after it has been migrated due to the number of failures only when
the administrator resets the failcount or the failures have been expired (see failuretimeout meta attribute).
crm resource failcount RSC delete NODE
5.8 Conguring Resource Monitoring
To monitor a resource, there are two possibilities: either dene monitor operation with
the op keyword or use the monitor command. The following example congures an
Apache resource and monitors it for every 30 minutes with the op keyword:
crm(live)configure# primitive apache apache \
params ... \
op monitor interval=60s timeout=30s
The same can be done with:
crm(live)configure# primitive apache apache \
params ...
crm(live)configure# monitor apache 60s:30s
5.9 Starting a New Cluster Resource
To start a new cluster resource you need the respective identier. Proceed as follows:
1
Run the crm command as system administrator. The prompt changes to
crm(live).
2
Search for the respective resource with the command status.
Start the resource with:
3
crm(live)# resource start ID
Conguring Cluster Resources From Command Line 69
Page 80

5.10 Removing a Cluster Resource
To remove a cluster resource you need the relevant identier. Proceed as follows:
1
Run the crm command as system administrator. The prompt changes to
crm(live).
Run the following command to get a list of your resources:
2
crm(live)# resource status
For example, the output can look like this (whereas myIP is the relevant identier
of your resource):
myIP (ocf::IPaddr:heartbeat) ...
3
Delete the resource with the relevant identier (which implies a commit too):
crm(live)# configure delete YOUR_ID
Commit the changes:
4
crm(live)# configure commit
5.11 Conguring a Cluster Resource
Group
One of the most common elements of a cluster is a set of resources that needs to be located together. Start sequentially and stop in the reverse order. To simplify this conguration we support the concept of groups. The following example creates two primitives
(an IP address and an email resource):
1
Run the crm command as system administrator. The prompt changes to
crm(live).
Congure the primitives:
2
crm(live)# configure
crm(live)configure# primitive Public-IP ocf:IPaddr:heartbeat \
70 High Availability Guide
Page 81

params ip=1.2.3.4
crm(live)configure# primitive Email lsb:exim
Group the primitives with their relevant identiers in the correct order:
3
crm(live)configure# group shortcut Public-IP Email
5.12 Conguring a Clone Resource
Clones were initially conceived as a convenient way to start N instances of an IP resource
and have them distributed throughout the cluster for load balancing. They have turned
out to quite useful for a number of other purposes, including integrating with DLM,
the fencing subsystem and OCFS2. You can clone any resource, provided the resource
agent supports it.
These types of cloned resources exist:
Anonymous Resources
Anonymous clones are the simplest type. These resources behave completely
identically wherever they are running. Because of this, there can only be one copy
of an anonymous clone active per machine.
Multi-State Resources
Multi-state resources are a specialization of clones. They allow the instances to be
in on of two operating modes. These modes are called “master” and “slave” but
can mean whatever you wish them to mean. The only limitation is that when an
instance is started, it must come up in a slave state.
5.12.1 Creating Anonymous Clone Resources
To create an anonymouse clone resource, rst create a primitive resource and then refer
to it with the clone command. Do the following:
1
Run the crm command as system administrator. The prompt changes to
crm(live).
Congure the primitive, for example:
2
Conguring Cluster Resources From Command Line 71
Page 82

crm(live)# configure
crm(live)configure# primitive Apache lsb:apache
Clone the primitive:
3
crm(live)configure# clone apache-clone Apache \
meta globally-unique=false
5.12.2 Creating Stateful/Multi-State Clone
Resources
To create an stateful clone resource, rst create a primitive resource and then the masterslave resource.
1
Run the crm command as system administrator. The prompt changes to
crm(live).
Congure the primitive. Change the intervals if needed:
2
crm(live)# configure
crm(live)configure# primitive myRSC ocf:myCorp:myAppl \
operations foo \
op monitor interval=60 \
op monitor interval=61 role=Master
Create the master slave resource:
3
crm(live)configure# clone apache-clone Apache \
meta globally-unique=false
5.13 Migrating a Cluster Resource
Although resources are congured to automatically fail over (or migrate) to other nodes
of the cluster in the event of a hardware or software failure, you can also manually migrate a resource to another node in the cluster using either the Linux HA Management
Client or the command line.
1
Run the crm command as system administrator. The prompt changes to
crm(live).
72 High Availability Guide
Page 83

2
To migrate a resource named ipaddress1 to a cluster node named node2,
enter:
crm(live)# resource
crm(live)resource# migrate ipaddress1 node2
5.14 Testing with Shadow
Conguration
NOTE: For Experienced Administrators Only
Although the concept is easy, it is nevertheless recommended to use shadow
conguration only when you really need them, and if you are experienced with
High Availability.
A shadow conguration is used to test different conguration scenarios. If you have
created several shadow congurations, you can test them one by one to see the effects
of your changes.
The usual process looks like this:
1.
User starts the crm tool.
2.
You switch to the configure subcommand:
crm(live)# configure
crm(live)configure#
3. Now you can make your changes. However, when you gure out that they are risky
or you want to apply them later, you can save them into a new shadow conguration:
crm(live)configure# cib new myNewConfig
INFO: myNewConfig shadow CIB created
crm(myNewConfig)configure# commit
4. After you have created the shadow conguration, you can make your changes.
5. To switch back to the live cluster conguration, use this command:
Conguring Cluster Resources From Command Line 73
Page 84

crm(myNewConfig)configure# cib use
crm(live)configure#
5.15 For More Information
http://linux-ha.org
Homepage of High Availability Linux
http://www.clusterlabs.org/mediawiki/images/8/8d/Crm_cli
.pdf
Gives you an introduction to the CRM CLI tool
http://www.clusterlabs.org/mediawiki/images/f/fb/
Configuration_Explained.pdf
Explains the Pacemaker conguration
74 High Availability Guide
Page 85

Setting Up a Simple Testing Resource
After your cluster is installed and set up as described in Chapter 3, Installation and
Basic Setup with YaST (page 23) and you have learned how to congure resources either
with the GUI or from command line, this chapter provides a basic example for the
conguration of a simple resource: an IP address. It demonstrates both approaches to
do so, using either the Linux HA Management Client or the crm command line tool.
For the following example, we assume that your cluster consists of at least two nodes.
6.1 Conguring a Resource with the
GUI
Creating a sample cluster resource and migrating it to another server can help you test
to ensure your cluster is functioning properly. A simple resource to congure and migrate
is an IP address.
Procedure 6.1
Start the Linux HA Management Client and log in to the cluster as described in
1
Section 4.1, “Linux HA Management Client” (page 32).
Creating an IP Address Cluster Resource
6
In the left pane, switch to the Resources view and in the right pane, select the
2
group to modify and click Edit. The next window shows the basic group parameters and the meta attributes and primitives already dened for that resource.
Setting Up a Simple Testing Resource 75
Page 86

Click the Primitives tab and click Add.
3
In the next dialog, set the following parameters to add an IP address as sub-re-
4
source of the group:
4a
Enter a unique ID. For example, myIP.
From the Class list, select ocf as resource agent class.
4b
As Provider of your OCF resource agent, select heartbeat.
4c
From the Type list, select IPaddr as resource agent.
4d
Click Forward.
4e
In the Instance Attribute tab, select the IP entry and click Edit (or double-
4f
click the IP entry).
4g
As Value, enter the desired IP address, for example, 10.10.0.1 and click
OK.
4h
Add a new instance attribute and specify nic as Name and eth0 as Value,
then click OK.
The name and value are dependent on your hardware conguration and what
you chose for the media conguration during the installation of the High
Availability Extension software.
Once all parameters are set according to your wishes, click OK to nish the
5
conguration of that resource. The conguration dialog is closed and the main
window shows the modied resource.
To start the resource with the Linux HA Management Client, select Management in
the left pane. In the right pane, right-click the resource and select Start (or start it from
the toolbar).
To migrate the IP address resource to another node (saturn) proceed as follows:
76 High Availability Guide
Page 87

Procedure 6.2
Switch to the Management view in the left pane, then right-click the IP address
1
resource in the right pane and select Migrate Resource.
2
In the new window, select saturn from the To Node drop-down list to move
the selected resource to the node saturn.
If you want to migrate the resource only temporarily, activate Duration and enter
3
the time frame for which the resource should migrate to the new node.
Click OK to conrm the migration.
4
Migrating Resources to Another Node
6.2 Manual Conguration of a
Resource
Resources are any type of service that a computer provides. Resources are known to
High Availability when they may be controlled by RAs (Resource Agents), which are
LSB scripts, OCF scripts, or legacy Heartbeat 1 resources. All resources can be cong-
ured with the crm command or as XML in the CIB (Cluster Information Base) in the
resources section. For an overview of available resources, look at Chapter 18, HA
OCF Agents (page 201).
To add an IP address 10.10.0.1 as a resource to the current conguration, use the
crm command:
Procedure 6.3
1
Run the crm command as system administrator. The prompt changes to
crm(live).
2
Switch to the configure subcommand:
crm(live)# configure
Create an IP address resource:
3
crm(live)configure# resource
primitive myIP ocf:heartbeat:IPaddr params ip=10.10.0.1
Creating an IP Address Cluster Resource
Setting Up a Simple Testing Resource 77
Page 88

NOTE
When conguring a resource with High Availability, the same resource should
not be initialized by init. High availability is be responsible for all service start
or stop actions.
If the conguration was successful, a new resource appears in crm_mon that is started
on a random node of your cluster.
To migrate a resource to another node, do the following:
Procedure 6.4
1
Start a shell and become the user root.
2
Migrate your resource myip to node saturn:
crm resource migrate myIP saturn
Migrating Resources to Another Node
78 High Availability Guide
Page 89

Adding or Modifying Resource Agents
All tasks that need to be managed by a cluster must be available as a resource. There
are two major groups here to consider: resource agents and STONITH agents. For both
categories, you can add your own agents, extending the abilities of the cluster to your
own needs.
7.1 STONITH Agents
A cluster sometimes detects that one of the nodes is behaving strangely and needs to
remove it. This is called fencing and is commonly done with a STONITH resource. All
STONITH resources reside in /usr/lib/stonith/plugins on each node.
WARNING: SSH and STONITH Are Not Supported
It is impossible to know how SSH might react to other system problems. For
this reason, SSH and STONITH agent are not supported for production environments.
To get a list of all currently available STONITH devices (from the software side), use
the command stonith -L.
7
As of yet there is no documentation about writing STONITH agents. If you want to
write new STONITH agents, consult the examples available in the source of the
heartbeat-common package.
Adding or Modifying Resource Agents 79
Page 90

7.2 Writing OCF Resource Agents
All OCF RAs are available in /usr/lib/ocf/resource.d/, see Section 17.1,
“Supported Resource Agent Classes” (page 193) for more information. To avoid naming
contradictions, create a new subdirectory for each new resource agent. For example, if
you have a resource group kitchen with the resource coffee_machine, add this
resource to the directory /usr/lib/ocf/resource.d/kitchen/. To access
this RA, execute the command crm:
configure
primitive coffee_1 ocf:coffee_machine:kitchen ...
When implementing your own OCF RA, provide several actions for the agent. More
details about writing OCF resource agents can be found at http://www.linux-ha
.org/OCFResourceAgent. Find special information about several concepts of
High Availability 2 at Chapter 1, Conceptual Overview (page 3).
80 High Availability Guide
Page 91

Fencing and STONITH
Fencing is a very important concept in computer clusters for HA (High Availability).
A cluster sometimes detects that one of the nodes is behaving strangely and needs to
remove it. This is called fencing and is commonly done with a STONITH resource.
Fencing may be dened as a method to bring an HA cluster to a known state.
Every resource in a cluster has a state attached. For example: “resource r1 is started on
node1”. In an HA cluster, such a state implies that “resource r1 is stopped on all nodes
but node1”, because an HA cluster must make sure that every resource may be started
on at most one node. Every node must report every change that happens to a resource.
The cluster state is thus a collection of resource states and node states.
If, for whatever reason, a state of some node or resource cannot be established with
certainty, fencing comes in. Even when the cluster is not aware of what is happening
on a given node, fencing can ensure that the node does not run any important resources.
8.1 Classes of Fencing
There are two classes of fencing: resource level and node level fencing. The latter is
the primary subject of this chapter.
8
Resource Level Fencing
Using resource level fencing the cluster can ensuresure that a node cannot access
one or more resources. One typical example is a SAN, where a fencing operation
changes rules on a SAN switch to deny access from the node.
Fencing and STONITH 81
Page 92

The resource level fencing may be achieved using normal resources on which the
resource you want to protect depends. Such a resource would simply refuse to start
on this node and therefore resources which depend on will not run on the same
node.
Node Level Fencing
Node level fencing ensures that a node does not run any resources at all. This is
usually done in a very simple, yet abrupt way: the node is reset using a power
switch. This is necessary when the node becomes unresponsive.
8.2 Node Level Fencing
In SUSE® Linux Enterprise High Availability Extension, the fencing implementation
is STONITH (Shoot The Other Node in the Head). It provides the node level fencing.
The High Availability Extension includes the stonith command line tool, an extensible interface for remotely powering down a node in the cluster. For an overview of
the available options, run stonith --help or refer to the man page of stonith
for more information.
8.2.1 STONITH Devices
To use node level fencing, you rst need to have a fencing device. To get a list of
STONITH devices which are supported by the High Availability Extension, run the
following command as root on any of the nodes:
stonith -L
STONITH devices may be classied into the following categories:
Power Distribution Units (PDU)
Power Distribution Units are an essential element in managing power capacity and
functionality for critical network, server and data center equipment. They can provide remote load monitoring of connected equipment and individual outlet power
control for remote power recycling.
Uninterruptible Power Supplies (UPS)
A stable power supply provides emergency power to connected equipment by
supplying power from a separate source in the event of utility power failure.
82 High Availability Guide
Page 93

Blade Power Control Devices
If you are running a cluster on a set of blades, then the power control device in the
blade enclosure is the only candidate for fencing. Of course, this device must be
capable of managing single blade computers.
Lights-out Devices
Lights-out devices (IBM RSA, HP iLO, Dell DRAC) are becoming increasingly
popular, and in the future they may even become standard on off-the-shelf computers. However, they are inferior to UPS devices, because they share a power supply
with their host (a cluster node). If a node stays without power, the device supposed
to control it would be just as useless. In that case, the CRM would continue its attempts to fence the node indenitely, as all other resource operations would wait
for the fencing/STONITH operation to complete.
Testing Devices
Testing devices are used exclusively for testing purposes. They are usually more
gentle on the hardware. Once the cluster goes into production, they must be replaced
with real fencing devices.
The choice of the STONITH device depends mainly on your budget and the kind of
hardware you use.
8.2.2 STONITH Implementation
The STONITH implementation of SUSE® Linux Enterprise High Availability Extension
consists of two components:
stonithd
stonithd is a daemon which can be accessed by local processes or over the network.
It accepts the commands which correspond to fencing operations: reset, power-off,
and power-on. It can also check the status of the fencing device.
The stonithd daemon runs on every node in the CRM HA cluster. The stonithd instance running on the DC node receives a fencing request from the CRM. It is up
to this and other stonithd programs to carry out the desired fencing operation.
STONITH Plug-ins
For every supported fencing device there is a STONITH plug-in which is capable
of controlling said device. A STONITH plug-in is the interface to the fencing device.
Fencing and STONITH 83
Page 94

All STONITH plug-ins reside in /usr/lib/stonith/plugins on each node.
All STONITH plug-ins look the same to stonithd, but are quite different on the
other side reecting the nature of the fencing device.
Some plug-ins support more than one device. A typical example is ipmilan (or
external/ipmi) which implements the IPMI protocol and can control any device
which supports this protocol.
8.3 STONITH Conguration
To set up fencing, you need to congure one or more STONITH resources—the stonithd
daemon requires no conguration. All conguration is stored in the CIB. A STONITH
resource is a resource of class stonith (see Section 17.1, “Supported Resource Agent
Classes” (page 193)). STONITH resources are a representation of STONITH plug-ins
in the CIB. Apart from the fencing operations, the STONITH resources can be started,
stopped and monitored, just like any other resource. Starting or stopping STONITH
resources means enabling and disabling STONITH in this case. Starting and stopping
are thus only administrative operations, and do not translate to any operation on the
fencing device itself. However, monitoring does translate to device status.
STONITH resources can be congured just like any other resource. For more information
about conguring resources, see Section 4.3, “Creating STONITH Resources” (page 37)
or Section 5.4, “Creating a STONITH Resource” (page 65).
The list of parameters (attributes) depends on the respective STONITH type. To view
a list of parameters for a specic device, use the stonith command:
stonith -t stonith-device-type -n
For example, to view the parameters for the ibmhmc device type, enter the following:
stonith -t ibmhmc -n
To get a short help text for the device, use the -h option:
stonith -t stonith-device-type -h
84 High Availability Guide
Page 95

8.3.1 Example STONITH Resource
Congurations
In the following, nd some example congurations written in the syntax of the crm
command line tool. To apply them, put the sample in a text le (for example, sample
.txt) and run:
crm < sample.txt
For more information about conguring resources with the crm command line tool,
refer to Chapter 5, Conguring Cluster Resources From Command Line (page 59).
WARNING: Testing Congurations
Some of the examples below are for demonstration and testing purposes only.
Do not use any of the Testing Configuration examples in real-life cluster
scenarios.
Example 8.1
configure
primitive st-null stonith:null \
params hostlist="node1 node2"
clone fencing st-null
commit
Example 8.2
Testing Conguration
Testing Conguration
An alternative conguration:
configure
primitive st-node1 stonith:null \
params hostlist="node1"
primitive st-node2 stonith:null \
params hostlist="node2"
location l-st-node1 st-node1 -inf: node1
location l-st-node2 st-node2 -inf: node2
commit
This conguration example is perfectly alright as far as the cluster software is concerned.
The only difference to a real world conguration is that no fencing operation takes
place.
Fencing and STONITH 85
Page 96

Example 8.3
Testing Conguration
A more realistic example (but still only for testing) is the following external/ssh conguration:
configure
primitive st-ssh stonith:external/ssh \
params hostlist="node1 node2"
clone fencing st-ssh
commit
This one can also reset nodes. The conguration is remarkably similar to the rst one
which features the null STONITH device. In this example, clones are used. They are a
CRM/Pacemaker feature. A clone is basically a shortcut: instead of dening n identical,
yet differently-named resources, a single cloned resource sufces. By far the most
common use of clones is with STONITH resources, as long as the STONITH device
is accessible from all nodes.
Example 8.4
Conguration of an IBM RSA Lights-out Device
The real device conguration is not much different, though some devices may require
more attributes. An IBM RSA lights-out device might be congured like this:
configure
primitive st-ibmrsa-1 stonith:external/ibmrsa-telnet \
params nodename=node1 ipaddr=192.168.0.101 \
userid=USERID passwd=PASSW0RD
primitive st-ibmrsa-2 stonith:external/ibmrsa-telnet \
params nodename=node2 ipaddr=192.168.0.102 \
userid=USERID passwd=PASSW0RD
location l-st-node1 st-ibmrsa-1 -inf: node1
location l-st-node2 st-ibmrsa-2 -inf: node2
commit
In this example, location constraints are used because of the following reason: There
is always a certain probability that the STONITH operation is going to fail. Therefore,
a STONITH operation (on the node which is the executioner, as well) is not reliable.
If the node is reset, then it cannot send the notication about the fencing operation
outcome. The only way to do that is to assume that the operation is going to succeed
and send the notication beforehand. But problems could arise if the operation fails.
Therefore, stonithd refuses to kill its host.
86 High Availability Guide
Page 97

Example 8.5
Conguration of an UPS Fencing Device
The conguration of a UPS type of fencing device is similar to the examples above.
The details are left (as an exercise) to the reader. All UPS devices employ the same
mechanics for fencing, but how the device itself is accessed varies. Old UPS devices
used to have just a serial port, in most cases connected at 1200baud using a special serial cable. Many new ones still have a serial port, but often they also utilize a USB or
ethernet interface. The kind of connection you can use is dependent on what the plugin supports.
For example, compare the apcmaster with the apcsmart device by using the
stonith -t stonith-device-type -n command:
stonith -t apcmaster -h
returns the following information:
STONITH Device: apcmaster - APC MasterSwitch (via telnet)
NOTE: The APC MasterSwitch accepts only one (telnet)
connection/session a time. When one session is active,
subsequent attempts to connect to the MasterSwitch will fail.
For more information see http://www.apc.com/
List of valid parameter names for apcmaster STONITH device:
ipaddr
login
password
With
stonith -t apcsmart -h
you get the following output:
STONITH Device: apcsmart - APC Smart UPS
(via serial port - NOT USB!).
Works with higher-end APC UPSes, like
Back-UPS Pro, Smart-UPS, Matrix-UPS, etc.
(Smart-UPS may have to be >= Smart-UPS 700?).
See http://www.networkupstools.org/protocols/apcsmart.html
for protocol compatibility details.
For more information see http://www.apc.com/
List of valid parameter names for apcsmart STONITH device:
ttydev
hostlist
The rst plug-in supports APC UPS with a network port and telnet protocol. The second
plug-in uses the APC SMART protocol over the serial line, which is supported by many
different APC UPS product lines.
Fencing and STONITH 87
Page 98

8.3.2 Constraints Versus Clones
In Section 8.3.1, “Example STONITH Resource Congurations” (page 85) you learned
that there are several ways to congure a STONITH resource: using constraints clones
or both. The choice of which construct to use for conguration depends on several
factors (nature of the fencing device, number of hosts managed by the device, number
of cluster nodes, or personal preference).
In short: if clones are safe to use with your conguration and if they reduce the conguration, then use cloned STONITH resources.
8.4 Monitoring Fencing Devices
Just like any other resource, the STONITH class agents also support the monitoring
operation which is used for checking status.
NOTE: Monitoring STONITH Resources
Monitoring STONITH resources is strongly recommended. Monitor them regularly, yet sparingly.
Fencing devices are an indispensable part of an HA cluster, but the less you need to
utilize them, the better. Power management equipment is known to be rather fragile on
the communication side. Some devices give up if there is too much broadcast trafc.
Some cannot handle more than ten or so connections per minute. Some get confused
if two clients try to connect at the same time. Most cannot handle more than one session
at a time.
Checking the fencing devices once every couple of hours should be enough in most
cases. The probability that within those few hours there will be a need for a fencing
operation and that the power switch would fail is usually low.
For detailed information on how to congure monitor operations, refer to Procedure 4.2,
“Adding or Modifying Meta and Instance Attributes” (page 36) for the GUI approach
or to Section 5.8, “Conguring Resource Monitoring” (page 69) for the command line
approach.
88 High Availability Guide
Page 99

8.5 Special Fencing Devices
Apart from plug-ins which handle real devices, some STONITH plug-ins require additional explanation.
external/kdumpcheck
Sometimes, it is important to get a kernel core dump. This plug-in can be used to
check if a dump is in progress. If that is the case, it will return true, as if the node
has been fenced (it cannot run any resources at that time). kdumpcheck is typically used in concert with another (actual) fencing device. See /usr/share/
doc/packages/heartbeat/stonith/README_kdumpcheck.txt for
more details.
external/sbd
This is a self-fencing device. It reacts to a so-called “poison pill” which can be inserted into a shared disk. On shared-storage connection loss, it also makes the node
cease to operate. See http://www.linux-ha.org/SBD_Fencing for more
details.
meatware
meatware requires help from a human to operate. Whenever invoked, meatware
logs a CRIT severity message which shows up on the node's console. The operator
then conrms that the node is down and issue a meatclient(8) command.
This tells meatware that it can inform the cluster that it may consider the node
dead. See /usr/share/doc/packages/heartbeat/stonith/README
.meatware for more information.
null
This is an imaginary device used in various testing scenarios. It always behaves as
if and claims that it has shot a node, but never does anything. Do not use it unless
you know what you are doing.
suicide
This is a software-only device, which can reboot a node it is running on, using the
reboot command. This requires action by the node's operating system and can
fail under certain circumstances. Therefore avoid using this device whenever possible. However, it is safe to use on one-node clusters.
Fencing and STONITH 89
Page 100

suicide and null are the only exceptions to the “do not shoot my host” rule.
8.6 For More Information
/usr/share/doc/packages/heartbeat/stonith/
In your installed system, this directory holds README les for many STONITH
plug-ins and devices.
http://linux-ha.org/STONITH
Information about STONITH on the home page of the The High Availability Linux
Project.
http://linux-ha.org/fencing
Information about fencing on the home page of the The High Availability Linux
Project.
http://linux-ha.org/ConfiguringStonithPlugins
Information about STONITH plug-ins on the home page of the The High Availability Linux Project.
http://linux-ha.org/CIB/Idioms
Information about STONITH on the home page of the The High Availability Linux
Project.
http://clusterlabs.org/wiki/Documentation, Conguration 1.0 Ex-
plained
Explains the concepts used to congure Pacemaker. Contains comprehensive and
very detailed information for reference.
http://techthoughts.typepad.com/managing_computers/2007/
10/split-brain-quo.html
Article explaining the concepts of split brain, quorum and fencing in HA clusters.
90 High Availability Guide
 Loading...