

Page 1

Novell®
www.novell.com
AUTHORIZED DOCUMENTATION
Novell Cluster ServicesTM 1.8.7 For Linux Administration Guide
Open Enterprise Server
novdocx (en) 7 January 2010
2 SP2
March 15, 2010
OES 2 SP2: Novell Cluster Services 1.8.7 for Linux Administration Guide
Page 2

Legal Notices
Novell, Inc., makes no representations or warranties with respect to the contents or use of this documentation, and
specifically disclaims any express or implied warranties of merchantability or fitness for any particular purpose.
Further, Novell, Inc., reserves the right to revise this publication and to make changes to its content, at any time,
without obligation to notify any person or entity of such revisions or changes.
Further, Novell, Inc., makes no representations or warranties with respect to any software, and specifically disclaims
any express or implied warranties of merchantability or fitness for any particular purpose. Further, Novell, Inc.,
reserves the right to make changes to any and all parts of Novell software, at any time, without any obligation to
notify any person or entity of such changes.
Any products or technical information provided under this Agreement may be subject to U.S. export controls and the
trade laws of other countries. You agree to comply with all export control regulations and to obtain any required
licenses or classification to export, re-export or import deliverables. You agree not to export or re-export to entities on
the current U.S. export exclusion lists or to any embargoed or terrorist countries as specified in the U.S. export laws.
You agree to not use deliverables for prohibited nuclear, missile, or chemical biological weaponry end uses. See the
Novell International Trade Services Web page (http://www.novell.com/info/exports/) for more information on
exporting Novell software. Novell assumes no responsibility for your failure to obtain any necessary export
approvals.
novdocx (en) 7 January 2010
Copyright © 2007–2010 Novell, Inc. All rights reserved. No part of this publication may be reproduced,
photocopied, stored on a retrieval system, or transmitted without the express written consent of the publisher.
Novell, Inc.
404 Wyman Street, Suite 500
Waltham, MA 02451
U.S.A.
www.novell.com
Online Documentation: To access the latest online documentation for this and other Novell products, see
the Novell Documentation Web page (http://www.novell.com/documentation).
Page 3

Novell Trademarks
For Novell trademarks, see the Novell Trademark and Service Mark list (http://www.novell.com/company/legal/
trademarks/tmlist.html).
Third-Party Materials
All third-party trademarks are the property of their respective owners.
novdocx (en) 7 January 2010
Page 4

novdocx (en) 7 January 2010
4 OES 2 SP2: Novell Cluster Services 1.8.7 for Linux Administration Guide
Page 5

Contents
About This Guide 13
1 Overview of Novell Cluster Services 15
1.1 Why Should I Use Clusters? . . . . . . . . . . . . . . . . . . . . . . . . . . . . . . . . . . . . . . . . . . . . . . . . . . 15
1.2 Benefits of Novell Cluster Services . . . . . . . . . . . . . . . . . . . . . . . . . . . . . . . . . . . . . . . . . . . . . 15
1.3 Product Features . . . . . . . . . . . . . . . . . . . . . . . . . . . . . . . . . . . . . . . . . . . . . . . . . . . . . . . . . . . 16
1.4 Clustering for High-Availability . . . . . . . . . . . . . . . . . . . . . . . . . . . . . . . . . . . . . . . . . . . . . . . . . 16
1.5 Shared Disk Scenarios. . . . . . . . . . . . . . . . . . . . . . . . . . . . . . . . . . . . . . . . . . . . . . . . . . . . . . . 18
1.5.1 Using Fibre Channel Storage Systems . . . . . . . . . . . . . . . . . . . . . . . . . . . . . . . . . . . 19
1.5.2 Using iSCSI Storage Systems . . . . . . . . . . . . . . . . . . . . . . . . . . . . . . . . . . . . . . . . . . 20
1.5.3 Using Shared SCSI Storage Systems . . . . . . . . . . . . . . . . . . . . . . . . . . . . . . . . . . . . 21
2What’s New 23
novdocx (en) 7 January 2010
2.1 What’s New (January 2010). . . . . . . . . . . . . . . . . . . . . . . . . . . . . . . . . . . . . . . . . . . . . . . . . . . 23
2.2 What’s New (OES 2 SP2) . . . . . . . . . . . . . . . . . . . . . . . . . . . . . . . . . . . . . . . . . . . . . . . . . . . . 23
2.2.1 Improved Error Reporting . . . . . . . . . . . . . . . . . . . . . . . . . . . . . . . . . . . . . . . . . . . . . 23
2.2.2 Improved Time Calculations . . . . . . . . . . . . . . . . . . . . . . . . . . . . . . . . . . . . . . . . . . . 23
2.2.3 Specifying the Size of the SBD Partition . . . . . . . . . . . . . . . . . . . . . . . . . . . . . . . . . . 24
2.2.4 Customizing Translation Syntax . . . . . . . . . . . . . . . . . . . . . . . . . . . . . . . . . . . . . . . . 24
2.2.5 Migration Tool Support for Cluster Configurations . . . . . . . . . . . . . . . . . . . . . . . . . . . 24
2.2.6 New iFolder Resource Template . . . . . . . . . . . . . . . . . . . . . . . . . . . . . . . . . . . . . . . . 24
2.2.7 Removed MPK Calls from the Code . . . . . . . . . . . . . . . . . . . . . . . . . . . . . . . . . . . . . 24
2.2.8 Cluster Restart Is No Longer Required in a Rolling Cluster Upgrade . . . . . . . . . . . . 24
2.3 What’s New (OES 2 SP1) . . . . . . . . . . . . . . . . . . . . . . . . . . . . . . . . . . . . . . . . . . . . . . . . . . . . 25
2.3.1 Schema Extension. . . . . . . . . . . . . . . . . . . . . . . . . . . . . . . . . . . . . . . . . . . . . . . . . . . 25
2.3.2 Installation by Container Administrator . . . . . . . . . . . . . . . . . . . . . . . . . . . . . . . . . . . 25
2.3.3 Behavior Change for Adding a Node . . . . . . . . . . . . . . . . . . . . . . . . . . . . . . . . . . . . . 25
2.3.4 Attribute NCS: GIPC Config Is No Longer Maintained . . . . . . . . . . . . . . . . . . . . . . . 26
2.3.5 Support for Novell AFP for Linux . . . . . . . . . . . . . . . . . . . . . . . . . . . . . . . . . . . . . . . . 26
2.3.6 Support for Novell CIFS for Linux . . . . . . . . . . . . . . . . . . . . . . . . . . . . . . . . . . . . . . . 26
2.3.7 Support for Domain Services for Windows . . . . . . . . . . . . . . . . . . . . . . . . . . . . . . . . 26
2.4 What’s New (OES 2) . . . . . . . . . . . . . . . . . . . . . . . . . . . . . . . . . . . . . . . . . . . . . . . . . . . . . . . . 26
3 Installing and Configuring Novell Cluster Services on OES 2 Linux 27
3.1 System Requirements for Novell Cluster Services. . . . . . . . . . . . . . . . . . . . . . . . . . . . . . . . . . 27
3.1.1 Hardware Requirements . . . . . . . . . . . . . . . . . . . . . . . . . . . . . . . . . . . . . . . . . . . . . . 27
3.1.2 Software Requirements . . . . . . . . . . . . . . . . . . . . . . . . . . . . . . . . . . . . . . . . . . . . . . . 28
3.1.3 Configuration Requirements . . . . . . . . . . . . . . . . . . . . . . . . . . . . . . . . . . . . . . . . . . . 34
3.1.4 Shared Disk System Requirements. . . . . . . . . . . . . . . . . . . . . . . . . . . . . . . . . . . . . . 36
3.1.5 SAN Rules for LUN Masking . . . . . . . . . . . . . . . . . . . . . . . . . . . . . . . . . . . . . . . . . . . 38
3.1.6 Using Device Mapper Multipath with Novell Cluster Services . . . . . . . . . . . . . . . . . . 38
3.2 Novell Cluster Services Licensing . . . . . . . . . . . . . . . . . . . . . . . . . . . . . . . . . . . . . . . . . . . . . . 39
3.3 Extending the eDirectory Schema to Add Cluster Objects. . . . . . . . . . . . . . . . . . . . . . . . . . . . 40
3.3.1 Prerequisites for Extending the Schema . . . . . . . . . . . . . . . . . . . . . . . . . . . . . . . . . . 40
3.3.2 Extending the Schema. . . . . . . . . . . . . . . . . . . . . . . . . . . . . . . . . . . . . . . . . . . . . . . . 41
3.4 Assigning Install Rights for Container Administrators . . . . . . . . . . . . . . . . . . . . . . . . . . . . . . . 41
3.5 Installing Novell Cluster Services . . . . . . . . . . . . . . . . . . . . . . . . . . . . . . . . . . . . . . . . . . . . . . . 42
Contents 5
Page 6

3.5.1 Installing Novell Cluster Services during a OES 2 Linux Installation . . . . . . . . . . . . . 42
3.5.2 Installing Novell Cluster Services on an Existing OES 2 Linux Server . . . . . . . . . . . 44
3.6 Configuring Novell Cluster Services. . . . . . . . . . . . . . . . . . . . . . . . . . . . . . . . . . . . . . . . . . . . . 46
3.6.1 Opening the Novell Open Enterprise Server Configuration Page . . . . . . . . . . . . . . . 46
3.6.2 Using Different LDAP Credentials for the Cluster Configuration . . . . . . . . . . . . . . . . 47
3.6.3 Enabling the Novell Cluster Services Configuration Page in YaST . . . . . . . . . . . . . . 48
3.6.4 Configuring a New Cluster. . . . . . . . . . . . . . . . . . . . . . . . . . . . . . . . . . . . . . . . . . . . . 48
3.6.5 Adding a Node to an Existing Cluster . . . . . . . . . . . . . . . . . . . . . . . . . . . . . . . . . . . . 50
3.7 Configuring Additional Administrators . . . . . . . . . . . . . . . . . . . . . . . . . . . . . . . . . . . . . . . . . . . 52
3.8 What’s Next . . . . . . . . . . . . . . . . . . . . . . . . . . . . . . . . . . . . . . . . . . . . . . . . . . . . . . . . . . . . . . . 52
4 Upgrading OES 2 Linux Clusters 53
4.1 Requirements for Upgrading Clusters . . . . . . . . . . . . . . . . . . . . . . . . . . . . . . . . . . . . . . . . . . . 53
4.2 Upgrading OES 2 Clusters (Rolling Cluster Upgrade) . . . . . . . . . . . . . . . . . . . . . . . . . . . . . . . 53
4.3 Upgrade Issues for OES 2 SP2 . . . . . . . . . . . . . . . . . . . . . . . . . . . . . . . . . . . . . . . . . . . . . . . . 54
4.3.1 Updating the iFolder Resource Template . . . . . . . . . . . . . . . . . . . . . . . . . . . . . . . . . 54
5 Upgrading OES 1 Linux Clusters to OES 2 Linux 55
5.1 Requirements and Guidelines for Upgrading Clusters from OES 1 Linux and OES 2 Linux . . 55
5.2 Upgrading Existing OES 1 Linux Cluster Nodes to OES 2 (Rolling Cluster Upgrade) . . . . . . . 56
5.3 Adding New OES 2 Linux Cluster Nodes to Your OES 1 Linux Cluster. . . . . . . . . . . . . . . . . . 57
5.4 Modifying Cluster Resource Scripts for Mixed OES 1 Linux and OES 2 Linux Clusters . . . . . 57
5.5 Finalizing the Cluster Upgrade. . . . . . . . . . . . . . . . . . . . . . . . . . . . . . . . . . . . . . . . . . . . . . . . . 57
novdocx (en) 7 January 2010
6 Converting NetWare 6.5 Clusters to OES 2 Linux 59
6.1 Guidelines for Converting Clusters from NetWare to OES 2 Linux . . . . . . . . . . . . . . . . . . . . . 59
6.1.1 Supported Mixed-Node Clusters . . . . . . . . . . . . . . . . . . . . . . . . . . . . . . . . . . . . . . . . 60
6.1.2 SBD Devices Must Be Marked as Shareable for Clustering . . . . . . . . . . . . . . . . . . . 60
6.1.3 Syntax Translation Issues for Load and Unload Scripts . . . . . . . . . . . . . . . . . . . . . . 60
6.1.4 Case Sensitivity Issues . . . . . . . . . . . . . . . . . . . . . . . . . . . . . . . . . . . . . . . . . . . . . . . 61
6.1.5 Adding New NetWare Nodes to a Mixed-Node Cluster . . . . . . . . . . . . . . . . . . . . . . . 61
6.1.6 Converting Multiple NetWare Cluster Nodes to OES 2 Linux . . . . . . . . . . . . . . . . . . 61
6.1.7 Converting Nodes that Contain the eDirectory Master Replica . . . . . . . . . . . . . . . . . 62
6.1.8 Failing Over Cluster Resources on Mixed-Node Clusters . . . . . . . . . . . . . . . . . . . . . 62
6.1.9 Managing File Systems in Mixed-Node Clusters . . . . . . . . . . . . . . . . . . . . . . . . . . . . 62
6.1.10 Using Novell iManager in Mixed-Node Clusters . . . . . . . . . . . . . . . . . . . . . . . . . . . . 62
6.1.11 Using Novell Remote Manager Is Not Supported in Mixed-Node Clusters . . . . . . . . 63
6.1.12 Using ConsoleOne Is Not Supported for Mixed-Node Clusters . . . . . . . . . . . . . . . . . 63
6.1.13 Using the Monitor Function in Mixed-Node Clusters Is Not Supported . . . . . . . . . . . 63
6.2 Guidelines for Converting NSS Pool Resources from NetWare to Linux. . . . . . . . . . . . . . . . . 63
6.2.1 NSS Pool Cluster Migration . . . . . . . . . . . . . . . . . . . . . . . . . . . . . . . . . . . . . . . . . . . . 63
6.2.2 NSS File System Migration to NCP Volumes or Linux POSIX File Systems. . . . . . . 64
6.2.3 Estimated Time Taken to Build the Trustee File on Linux . . . . . . . . . . . . . . . . . . . . . 64
6.3 Guidelines for Converting Service Cluster Resources from NetWare to Linux . . . . . . . . . . . . 64
6.3.1 Overview of All NetWare 6.5 SP8 Services . . . . . . . . . . . . . . . . . . . . . . . . . . . . . . . . 65
6.3.2 Apache Web Server. . . . . . . . . . . . . . . . . . . . . . . . . . . . . . . . . . . . . . . . . . . . . . . . . . 67
6.3.3 Apple Filing Protocol (AFP) . . . . . . . . . . . . . . . . . . . . . . . . . . . . . . . . . . . . . . . . . . . . 67
6.3.4 Archive and Version Services . . . . . . . . . . . . . . . . . . . . . . . . . . . . . . . . . . . . . . . . . . 67
6.3.5 CIFS. . . . . . . . . . . . . . . . . . . . . . . . . . . . . . . . . . . . . . . . . . . . . . . . . . . . . . . . . . . . . . 68
6.3.6 DFS VLDB . . . . . . . . . . . . . . . . . . . . . . . . . . . . . . . . . . . . . . . . . . . . . . . . . . . . . . . . . 68
6.3.7 DHCP Server . . . . . . . . . . . . . . . . . . . . . . . . . . . . . . . . . . . . . . . . . . . . . . . . . . . . . . . 69
6.3.8 DNS Server . . . . . . . . . . . . . . . . . . . . . . . . . . . . . . . . . . . . . . . . . . . . . . . . . . . . . . . . 71
6.3.9 eDirectory Server Certificates . . . . . . . . . . . . . . . . . . . . . . . . . . . . . . . . . . . . . . . . . . 72
6 OES 2 SP2: Novell Cluster Services 1.8.7 for Linux Administration Guide
Page 7

6.3.10 iPrint. . . . . . . . . . . . . . . . . . . . . . . . . . . . . . . . . . . . . . . . . . . . . . . . . . . . . . . . . . . . . . 74
6.3.11 QuickFinder Server . . . . . . . . . . . . . . . . . . . . . . . . . . . . . . . . . . . . . . . . . . . . . . . . . . 75
6.4 Converting NetWare Cluster Nodes to OES 2 Linux (Rolling Cluster Conversion) . . . . . . . . . 78
6.5 Adding New OES 2 Linux Nodes to Your NetWare Cluster . . . . . . . . . . . . . . . . . . . . . . . . . . . 81
6.6 Translation of Cluster Resource Scripts for Mixed NetWare and Linux Clusters . . . . . . . . . . . 82
6.6.1 Comparing Script Commands for NetWare and Linux. . . . . . . . . . . . . . . . . . . . . . . . 82
6.6.2 Comparing Master IP Address Scripts. . . . . . . . . . . . . . . . . . . . . . . . . . . . . . . . . . . . 83
6.6.3 Comparing NSS Pool Resource Scripts . . . . . . . . . . . . . . . . . . . . . . . . . . . . . . . . . . 84
6.6.4 Comparing File Access Protocol Resource Script Commands . . . . . . . . . . . . . . . . . 85
6.7 Customizing the Translation Syntax for Converting Load and Unload Scripts. . . . . . . . . . . . . 87
6.8 Finalizing the Cluster Conversion . . . . . . . . . . . . . . . . . . . . . . . . . . . . . . . . . . . . . . . . . . . . . . 88
7 Configuring Cluster Policies and Priorities 91
7.1 Understanding Cluster Settings . . . . . . . . . . . . . . . . . . . . . . . . . . . . . . . . . . . . . . . . . . . . . . . . 91
7.1.1 Cluster Policies . . . . . . . . . . . . . . . . . . . . . . . . . . . . . . . . . . . . . . . . . . . . . . . . . . . . . 91
7.1.2 Cluster Protocols Properties . . . . . . . . . . . . . . . . . . . . . . . . . . . . . . . . . . . . . . . . . . . 92
7.2 Configuring Quorum Membership and Timeout Properties . . . . . . . . . . . . . . . . . . . . . . . . . . . 92
7.2.1 Quorum Triggers (Number of Nodes) . . . . . . . . . . . . . . . . . . . . . . . . . . . . . . . . . . . . 93
7.2.2 Quorum Triggers (Timeout) . . . . . . . . . . . . . . . . . . . . . . . . . . . . . . . . . . . . . . . . . . . . 93
7.3 Configuring Cluster Protocol Properties. . . . . . . . . . . . . . . . . . . . . . . . . . . . . . . . . . . . . . . . . . 93
7.3.1 Heartbeat . . . . . . . . . . . . . . . . . . . . . . . . . . . . . . . . . . . . . . . . . . . . . . . . . . . . . . . . . . 94
7.3.2 Tolerance. . . . . . . . . . . . . . . . . . . . . . . . . . . . . . . . . . . . . . . . . . . . . . . . . . . . . . . . . . 94
7.3.3 Master Watchdog. . . . . . . . . . . . . . . . . . . . . . . . . . . . . . . . . . . . . . . . . . . . . . . . . . . . 94
7.3.4 Slave Watchdog. . . . . . . . . . . . . . . . . . . . . . . . . . . . . . . . . . . . . . . . . . . . . . . . . . . . . 94
7.3.5 Maximum Retransmits . . . . . . . . . . . . . . . . . . . . . . . . . . . . . . . . . . . . . . . . . . . . . . . . 94
7.4 Configuring Cluster Event E-Mail Notification . . . . . . . . . . . . . . . . . . . . . . . . . . . . . . . . . . . . . 95
7.5 Viewing the Cluster Node Properties . . . . . . . . . . . . . . . . . . . . . . . . . . . . . . . . . . . . . . . . . . . . 95
7.6 Modifying the Cluster IP Address and Port Properties . . . . . . . . . . . . . . . . . . . . . . . . . . . . . . . 96
7.7 What’s Next . . . . . . . . . . . . . . . . . . . . . . . . . . . . . . . . . . . . . . . . . . . . . . . . . . . . . . . . . . . . . . . 96
novdocx (en) 7 January 2010
8 Managing Clusters 97
8.1 Starting and Stopping Novell Cluster Services . . . . . . . . . . . . . . . . . . . . . . . . . . . . . . . . . . . . 97
8.1.1 Starting Novell Cluster Services . . . . . . . . . . . . . . . . . . . . . . . . . . . . . . . . . . . . . . . . 98
8.1.2 Stopping Novell Cluster Services . . . . . . . . . . . . . . . . . . . . . . . . . . . . . . . . . . . . . . . 98
8.1.3 Enabling and Disabling the Automatic Start of Novell Cluster Services . . . . . . . . . . 98
8.2 Monitoring Cluster and Resource States . . . . . . . . . . . . . . . . . . . . . . . . . . . . . . . . . . . . . . . . . 99
8.3 Generating a Cluster Configuration Report . . . . . . . . . . . . . . . . . . . . . . . . . . . . . . . . . . . . . . 101
8.4 Cluster Migrating Resources to Different Nodes . . . . . . . . . . . . . . . . . . . . . . . . . . . . . . . . . . 101
8.5 Onlining and Offlining (Loading and Unloading) Cluster Resources from a Cluster Node. . . 102
8.6 Removing (Leaving) a Node from the Cluster . . . . . . . . . . . . . . . . . . . . . . . . . . . . . . . . . . . . 103
8.7 Joining a Node to the Cluster. . . . . . . . . . . . . . . . . . . . . . . . . . . . . . . . . . . . . . . . . . . . . . . . . 103
8.8 Configuring the EVMS Remote Request Timeout . . . . . . . . . . . . . . . . . . . . . . . . . . . . . . . . . 103
8.9 Shutting Down Linux Cluster Servers When Servicing Shared Storage . . . . . . . . . . . . . . . . 104
8.10 Enabling or Disabling Cluster Maintenance Mode . . . . . . . . . . . . . . . . . . . . . . . . . . . . . . . . . 104
8.11 Preventing a Cluster Node Reboot after a Node Shutdown. . . . . . . . . . . . . . . . . . . . . . . . . . 104
8.12 Renaming a Pool for a Pool Cluster Resource . . . . . . . . . . . . . . . . . . . . . . . . . . . . . . . . . . . 105
8.13 Moving a Cluster, or Changing IP Addresses, LDAP Server, or Administrator Credentials for a
Cluster . . . . . . . . . . . . . . . . . . . . . . . . . . . . . . . . . . . . . . . . . . . . . . . . . . . . . . . . . . . . . . . . . . 105
8.13.1 Changing the Administrator Credentials or LDAP Server IP Addresses for a
Cluster . . . . . . . . . . . . . . . . . . . . . . . . . . . . . . . . . . . . . . . . . . . . . . . . . . . . . . . . . . . 105
8.13.2 Moving a Cluster or Changing IP Addresses of Cluster Nodes and Resources . . . 107
8.14 Adding a Node That Was Previously in the Cluster . . . . . . . . . . . . . . . . . . . . . . . . . . . . . . . . 109
Contents 7
Page 8

8.15 Deleting a Cluster Node from a Cluster, or Reconfiguring a Cluster Node . . . . . . . . . . . . . . 109
8.16 Creating or Deleting Cluster SBD Partitions. . . . . . . . . . . . . . . . . . . . . . . . . . . . . . . . . . . . . . 110
8.16.1 Prerequisites for Creating an SBD Partition . . . . . . . . . . . . . . . . . . . . . . . . . . . . . . 111
8.16.2 Before Creating an Cluster SBD Partition . . . . . . . . . . . . . . . . . . . . . . . . . . . . . . . . 111
8.16.3 Creating a Non-Mirrored Cluster SBD Partition . . . . . . . . . . . . . . . . . . . . . . . . . . . . 111
8.16.4 Creating a Mirrored Cluster SBD Partition. . . . . . . . . . . . . . . . . . . . . . . . . . . . . . . . 112
8.16.5 Deleting a Non-Mirrored Cluster SBD Partition . . . . . . . . . . . . . . . . . . . . . . . . . . . . 113
8.16.6 Deleting a Mirrored Cluster SBD Partition . . . . . . . . . . . . . . . . . . . . . . . . . . . . . . . . 114
8.16.7 Removing a Segment from a Mirrored Cluster SBD Partition . . . . . . . . . . . . . . . . . 114
8.17 Customizing Cluster Services Management . . . . . . . . . . . . . . . . . . . . . . . . . . . . . . . . . . . . . 115
9 Configuring and Managing Cluster Resources 117
9.1 Planning Cluster Maintenance . . . . . . . . . . . . . . . . . . . . . . . . . . . . . . . . . . . . . . . . . . . . . . . . 117
9.2 Creating Cluster Resource Templates . . . . . . . . . . . . . . . . . . . . . . . . . . . . . . . . . . . . . . . . . . 117
9.2.1 Default Resource Templates . . . . . . . . . . . . . . . . . . . . . . . . . . . . . . . . . . . . . . . . . . 118
9.2.2 Creating a Resource Template . . . . . . . . . . . . . . . . . . . . . . . . . . . . . . . . . . . . . . . . 119
9.3 Creating Cluster Resources . . . . . . . . . . . . . . . . . . . . . . . . . . . . . . . . . . . . . . . . . . . . . . . . . . 120
9.4 Configuring a Load Script for a Cluster Resource . . . . . . . . . . . . . . . . . . . . . . . . . . . . . . . . . 121
9.5 Configuring an Unload Script for a Cluster Resource . . . . . . . . . . . . . . . . . . . . . . . . . . . . . . 122
9.6 Enabling Monitoring and Configuring the Monitor Script . . . . . . . . . . . . . . . . . . . . . . . . . . . . 123
9.6.1 Configuring Resource Monitoring . . . . . . . . . . . . . . . . . . . . . . . . . . . . . . . . . . . . . . 123
9.6.2 Example Monitoring Scripts . . . . . . . . . . . . . . . . . . . . . . . . . . . . . . . . . . . . . . . . . . . 124
9.6.3 Monitoring Services Critical to Clustering . . . . . . . . . . . . . . . . . . . . . . . . . . . . . . . . 125
9.7 Setting Start, Failover, and Failback Modes for Cluster Resources. . . . . . . . . . . . . . . . . . . . 125
9.7.1 Understanding Cluster Resource Modes . . . . . . . . . . . . . . . . . . . . . . . . . . . . . . . . . 125
9.7.2 Viewing or Modifying the Start, Failover, and Failback Modes for a Resource . . . . 126
9.8 Assigning Nodes to a Resource. . . . . . . . . . . . . . . . . . . . . . . . . . . . . . . . . . . . . . . . . . . . . . . 127
9.9 Configuring Resource Priorities for Load Order . . . . . . . . . . . . . . . . . . . . . . . . . . . . . . . . . . . 127
9.10 Changing the IP Address of a Cluster Resource . . . . . . . . . . . . . . . . . . . . . . . . . . . . . . . . . . 128
9.11 Deleting Cluster Resources . . . . . . . . . . . . . . . . . . . . . . . . . . . . . . . . . . . . . . . . . . . . . . . . . . 128
9.11.1 Deleting a Cluster Resource on a Master Node . . . . . . . . . . . . . . . . . . . . . . . . . . . 128
9.11.2 Deleting a Cluster Resource on a Non-Master Node . . . . . . . . . . . . . . . . . . . . . . . 129
9.12 Additional Information for Creating Cluster Resources . . . . . . . . . . . . . . . . . . . . . . . . . . . . . 130
9.12.1 Creating Storage Cluster Resources . . . . . . . . . . . . . . . . . . . . . . . . . . . . . . . . . . . . 130
9.12.2 Creating Service Cluster Resources . . . . . . . . . . . . . . . . . . . . . . . . . . . . . . . . . . . . 130
9.12.3 Creating Virtual Machine Cluster Resources. . . . . . . . . . . . . . . . . . . . . . . . . . . . . . 131
novdocx (en) 7 January 2010
10 Configuring Cluster Resources for Shared NSS Pools and Volumes 133
10.1 Planning for Shared NSS Pools and Volumes . . . . . . . . . . . . . . . . . . . . . . . . . . . . . . . . . . . . 133
10.1.1 Shared Storage . . . . . . . . . . . . . . . . . . . . . . . . . . . . . . . . . . . . . . . . . . . . . . . . . . . . 134
10.1.2 Novell Cluster Services . . . . . . . . . . . . . . . . . . . . . . . . . . . . . . . . . . . . . . . . . . . . . . 134
10.1.3 Novell Storage Services . . . . . . . . . . . . . . . . . . . . . . . . . . . . . . . . . . . . . . . . . . . . . 134
10.1.4 IP Address . . . . . . . . . . . . . . . . . . . . . . . . . . . . . . . . . . . . . . . . . . . . . . . . . . . . . . . . 135
10.1.5 NCP Server for Linux. . . . . . . . . . . . . . . . . . . . . . . . . . . . . . . . . . . . . . . . . . . . . . . . 135
10.1.6 Novell CIFS for Linux. . . . . . . . . . . . . . . . . . . . . . . . . . . . . . . . . . . . . . . . . . . . . . . . 135
10.1.7 Novell AFP for Linux . . . . . . . . . . . . . . . . . . . . . . . . . . . . . . . . . . . . . . . . . . . . . . . . 136
10.2 Considerations for Working with Shared NSS Pools and Volumes in the Cluster . . . . . . . . . 136
10.3 Creating NSS Shared Disk Partitions and Pools . . . . . . . . . . . . . . . . . . . . . . . . . . . . . . . . . . 137
10.3.1 Initializing Shared Devices. . . . . . . . . . . . . . . . . . . . . . . . . . . . . . . . . . . . . . . . . . . . 137
10.3.2 Enabling Sharing on a Device . . . . . . . . . . . . . . . . . . . . . . . . . . . . . . . . . . . . . . . . . 137
10.3.3 Creating Shared NSS Pools . . . . . . . . . . . . . . . . . . . . . . . . . . . . . . . . . . . . . . . . . . 138
10.4 Creating NSS Volumes on a Shared Pool . . . . . . . . . . . . . . . . . . . . . . . . . . . . . . . . . . . . . . . 142
10.4.1 Using iManager to Create NSS Volumes . . . . . . . . . . . . . . . . . . . . . . . . . . . . . . . . 142
10.4.2 Using NSSMU to Create NSS Volumes . . . . . . . . . . . . . . . . . . . . . . . . . . . . . . . . . 143
8 OES 2 SP2: Novell Cluster Services 1.8.7 for Linux Administration Guide
Page 9

10.5 Cluster-Enabling an Existing NSS Pool and Its Volumes. . . . . . . . . . . . . . . . . . . . . . . . . . . . 144
10.6 Adding Advertising Protocols . . . . . . . . . . . . . . . . . . . . . . . . . . . . . . . . . . . . . . . . . . . . . . . . . 147
10.7 Configuring a Load Script for the Shared NSS Pool . . . . . . . . . . . . . . . . . . . . . . . . . . . . . . . 149
10.8 Configuring an Unload Script for the Shared NSS Pool . . . . . . . . . . . . . . . . . . . . . . . . . . . . . 150
10.9 Configuring a Monitor Script for the Shared NSS Pool . . . . . . . . . . . . . . . . . . . . . . . . . . . . . 150
10.10 Mirroring and Cluster-Enabling Shared NSS Pools and Volumes . . . . . . . . . . . . . . . . . . . . . 150
10.10.1 Understanding NSS Mirroring . . . . . . . . . . . . . . . . . . . . . . . . . . . . . . . . . . . . . . . . . 151
10.10.2 Requirements for NSS Mirroring . . . . . . . . . . . . . . . . . . . . . . . . . . . . . . . . . . . . . . . 152
10.10.3 Creating and Mirroring NSS Pools on Shared Storage . . . . . . . . . . . . . . . . . . . . . . 152
10.10.4 Verifying the NSS Mirror Status in the Cluster. . . . . . . . . . . . . . . . . . . . . . . . . . . . . 154
10.11 Deleting NSS Pool Cluster Resources. . . . . . . . . . . . . . . . . . . . . . . . . . . . . . . . . . . . . . . . . . 154
10.12 Changing the Volume ID . . . . . . . . . . . . . . . . . . . . . . . . . . . . . . . . . . . . . . . . . . . . . . . . . . . . 155
10.13 What’s Next . . . . . . . . . . . . . . . . . . . . . . . . . . . . . . . . . . . . . . . . . . . . . . . . . . . . . . . . . . . . . . 155
11 Configuring Cluster Resources for Shared Linux POSIX Volumes 157
11.1 Requirements for Shared Linux POSIX Volumes . . . . . . . . . . . . . . . . . . . . . . . . . . . . . . . . . 157
11.2 Creating Linux POSIX Volumes on Shared Disks . . . . . . . . . . . . . . . . . . . . . . . . . . . . . . . . . 158
11.2.1 Removing Existing Formatting and Segment Managers . . . . . . . . . . . . . . . . . . . . . 158
11.2.2 Creating a Cluster Segment Manager Container. . . . . . . . . . . . . . . . . . . . . . . . . . . 159
11.2.3 Adding a Non-CSM Segment Manager Container. . . . . . . . . . . . . . . . . . . . . . . . . . 160
11.2.4 Creating an EVMS Volume . . . . . . . . . . . . . . . . . . . . . . . . . . . . . . . . . . . . . . . . . . . 161
11.2.5 Making a File System on the EVMS Volume . . . . . . . . . . . . . . . . . . . . . . . . . . . . . . 161
11.3 Cluster-Enabling a Linux POSIX Volume on a Shared Disk . . . . . . . . . . . . . . . . . . . . . . . . . 162
11.3.1 Logging in to iManager . . . . . . . . . . . . . . . . . . . . . . . . . . . . . . . . . . . . . . . . . . . . . . 163
11.3.2 Creating a Cluster Resource for a Linux POSIX Volume . . . . . . . . . . . . . . . . . . . . 163
11.3.3 Configuring a Load Script for a Linux POSIX Volume Cluster Resource. . . . . . . . . 164
11.3.4 Configuring an Unload Script for a Linux POSIX Volume Cluster Resource . . . . . . 165
11.3.5 Enabling Monitoring and Configuring a Monitor Script for a Linux POSIX Volume Cluster
Resource . . . . . . . . . . . . . . . . . . . . . . . . . . . . . . . . . . . . . . . . . . . . . . . . . . . . . . . . . 166
11.3.6 Configuring Policies for a Linux POSIX Volume Cluster Resource . . . . . . . . . . . . . 167
11.4 Creating a Virtual Server Name for the Cluster Resource . . . . . . . . . . . . . . . . . . . . . . . . . . . 169
11.4.1 Using ncs_ncpserv.py to Create an NCS:NCP Server Object. . . . . . . . . . . . . . . . . 169
11.4.2 Using iManager to Create an NCS:NCP Server Object. . . . . . . . . . . . . . . . . . . . . . 171
11.5 Sample Scripts for a Linux POSIX Volume Cluster Resource . . . . . . . . . . . . . . . . . . . . . . . . 172
11.5.1 Sample Load Script for the Linux POSIX Volume Cluster Resource. . . . . . . . . . . . 174
11.5.2 Sample Unload Script for the Linux POSIX Volume Cluster Resource . . . . . . . . . . 175
11.5.3 Sample Monitor Script for a Linux POSIX Volume Cluster Resource . . . . . . . . . . . 176
11.6 Expanding EVMS Volumes on Shared Disks. . . . . . . . . . . . . . . . . . . . . . . . . . . . . . . . . . . . . 176
11.6.1 Expanding a Volume to a Separate Disk . . . . . . . . . . . . . . . . . . . . . . . . . . . . . . . . . 176
11.6.2 Moving a Volume to a Larger Disk. . . . . . . . . . . . . . . . . . . . . . . . . . . . . . . . . . . . . . 177
11.7 Deleting Shared Storage . . . . . . . . . . . . . . . . . . . . . . . . . . . . . . . . . . . . . . . . . . . . . . . . . . . . 178
11.8 Known Issues for Working with Cluster Resources for Linux POSIX Volumes . . . . . . . . . . . 178
11.8.1 Dismount Volumes before Onlining a Comatose Resource . . . . . . . . . . . . . . . . . . 178
11.8.2 Cluster Services Must Be Running When Using EVMS . . . . . . . . . . . . . . . . . . . . . 178
11.8.3 Close EVMS Utilities When They Are Not In Use . . . . . . . . . . . . . . . . . . . . . . . . . . 178
11.8.4 Do Not Migrate Resources When EVMS Tools Are Running . . . . . . . . . . . . . . . . . 179
11.9 What’s Next . . . . . . . . . . . . . . . . . . . . . . . . . . . . . . . . . . . . . . . . . . . . . . . . . . . . . . . . . . . . . . 179
novdocx (en) 7 January 2010
12 Configuring Novell Cluster Services in a Xen Virtualization Environment 181
12.1 Prerequisites for Xen Host Server Environments. . . . . . . . . . . . . . . . . . . . . . . . . . . . . . . . . . 181
12.2 Virtual Machines as Cluster Resources . . . . . . . . . . . . . . . . . . . . . . . . . . . . . . . . . . . . . . . . . 182
12.2.1 Creating a Xen Virtual Machine Cluster Resource . . . . . . . . . . . . . . . . . . . . . . . . . 183
12.2.2 Configuring Virtual Machine Load, Unload, and Monitor Scripts . . . . . . . . . . . . . . . 184
Contents 9
Page 10

12.2.3 Setting Up Live Migration. . . . . . . . . . . . . . . . . . . . . . . . . . . . . . . . . . . . . . . . . . . . . 189
12.3 Virtual Machines as Cluster Nodes . . . . . . . . . . . . . . . . . . . . . . . . . . . . . . . . . . . . . . . . . . . . 190
12.4 Virtual Cluster Nodes in Separate Clusters . . . . . . . . . . . . . . . . . . . . . . . . . . . . . . . . . . . . . . 191
12.5 Mixed Physical and Virtual Node Clusters . . . . . . . . . . . . . . . . . . . . . . . . . . . . . . . . . . . . . . . 191
12.6 Additional Information . . . . . . . . . . . . . . . . . . . . . . . . . . . . . . . . . . . . . . . . . . . . . . . . . . . . . . 193
13 Troubleshooting Novell Cluster Services 195
13.1 File Location Information . . . . . . . . . . . . . . . . . . . . . . . . . . . . . . . . . . . . . . . . . . . . . . . . . . . . 195
13.2 Diagnosing Cluster Problems. . . . . . . . . . . . . . . . . . . . . . . . . . . . . . . . . . . . . . . . . . . . . . . . . 196
13.3 Cluster Search Times Out (Bad XML Error). . . . . . . . . . . . . . . . . . . . . . . . . . . . . . . . . . . . . . 197
13.4 A Device Name Is Required to Create a Cluster Partition . . . . . . . . . . . . . . . . . . . . . . . . . . . 197
13.5 Cluster Resource Goes Comatose Immediately After Migration or Failover . . . . . . . . . . . . . 197
13.6 smdr.novell Is Not Registered with SLP for a New Cluster Resource . . . . . . . . . . . . . . . . . . 197
13.7 Cluster View Displays the Wrong Cluster Node Name . . . . . . . . . . . . . . . . . . . . . . . . . . . . . 198
13.8 NSS Takes Up to 10 Minutes to Load When the Server Is Rebooted (Linux) . . . . . . . . . . . . 198
13.9 Could Not Delete This Resource Data_Server (Error 499) . . . . . . . . . . . . . . . . . . . . . . . . . . 198
13.10 Problem Authenticating to Remote Servers during Cluster Configuration . . . . . . . . . . . . . . . 199
13.11 Problem Connecting to an iSCSI Target . . . . . . . . . . . . . . . . . . . . . . . . . . . . . . . . . . . . . . . . 199
13.12 Problem Deleting a Cluster Resource or Clustered Pool . . . . . . . . . . . . . . . . . . . . . . . . . . . 199
13.13 Version Issues . . . . . . . . . . . . . . . . . . . . . . . . . . . . . . . . . . . . . . . . . . . . . . . . . . . . . . . . . . . . 199
13.14 Can’t Find the Prevent Cascading Failover Option . . . . . . . . . . . . . . . . . . . . . . . . . . . . . . . . 199
13.15 Is there a way to uninstall Novell Cluster Services from a server? . . . . . . . . . . . . . . . . . . . . 200
13.16 Cluster Resource Is Stuck in "NDS Sync" or "eDirectory Sync" State . . . . . . . . . . . . . . . . . . 200
novdocx (en) 7 January 2010
14 Security Considerations 201
14.1 Cluster Administration Rights . . . . . . . . . . . . . . . . . . . . . . . . . . . . . . . . . . . . . . . . . . . . . . . . . 201
14.2 Ports . . . . . . . . . . . . . . . . . . . . . . . . . . . . . . . . . . . . . . . . . . . . . . . . . . . . . . . . . . . . . . . . . . . . 201
14.3 E-Mail Alerts . . . . . . . . . . . . . . . . . . . . . . . . . . . . . . . . . . . . . . . . . . . . . . . . . . . . . . . . . . . . . . 201
14.4 Log Files. . . . . . . . . . . . . . . . . . . . . . . . . . . . . . . . . . . . . . . . . . . . . . . . . . . . . . . . . . . . . . . . . 202
A Console Commands for Novell Cluster Services 203
A.1 Cluster Management Commands . . . . . . . . . . . . . . . . . . . . . . . . . . . . . . . . . . . . . . . . . . . . . 203
A.2 Business Continuity Clustering Commands . . . . . . . . . . . . . . . . . . . . . . . . . . . . . . . . . . . . . . 206
A.3 extend_schema Command . . . . . . . . . . . . . . . . . . . . . . . . . . . . . . . . . . . . . . . . . . . . . . . . . . 206
A.4 SBD Utility . . . . . . . . . . . . . . . . . . . . . . . . . . . . . . . . . . . . . . . . . . . . . . . . . . . . . . . . . . . . . . . 207
B Files for Novell Cluster Services 209
C Comparing Novell Cluster Services for Linux and NetWare 213
D Comparing Clustering Support for OES 2 Services on Linux and NetWare 219
E Documentation Updates 225
E.1 March 15, 2010 . . . . . . . . . . . . . . . . . . . . . . . . . . . . . . . . . . . . . . . . . . . . . . . . . . . . . . . . . . . 225
E.1.1 Configuring and Managing Cluster Resources . . . . . . . . . . . . . . . . . . . . . . . . . . . . 226
E.1.2 Configuring Cluster Resources for Shared Linux POSIX Volumes . . . . . . . . . . . . . 226
E.1.3 Configuring Novell Cluster Services in a Xen Virtualization Environment . . . . . . . . 227
E.1.4 Troubleshooting Novell Cluster Services. . . . . . . . . . . . . . . . . . . . . . . . . . . . . . . . . 227
10 OES 2 SP2: Novell Cluster Services 1.8.7 for Linux Administration Guide
Page 11

E.2 February 19, 2010 . . . . . . . . . . . . . . . . . . . . . . . . . . . . . . . . . . . . . . . . . . . . . . . . . . . . . . . . . 227
E.2.1 Installing and Configuring Novell Cluster Services on OES 2 Linux . . . . . . . . . . . . 227
E.2.2 Managing Clusters . . . . . . . . . . . . . . . . . . . . . . . . . . . . . . . . . . . . . . . . . . . . . . . . . . 227
E.3 February 10, 2010 . . . . . . . . . . . . . . . . . . . . . . . . . . . . . . . . . . . . . . . . . . . . . . . . . . . . . . . . . 228
E.3.1 Configuring Cluster Resources for Linux POSIX Volumes . . . . . . . . . . . . . . . . . . . 228
E.4 January 29, 2010 . . . . . . . . . . . . . . . . . . . . . . . . . . . . . . . . . . . . . . . . . . . . . . . . . . . . . . . . . . 228
E.4.1 Converting NetWare 6.5 Clusters to OES 2 Linux. . . . . . . . . . . . . . . . . . . . . . . . . . 228
E.4.2 Installing and Configuring Novell Cluster Services on OES 2 Linux . . . . . . . . . . . . 229
E.4.3 Managing Clusters . . . . . . . . . . . . . . . . . . . . . . . . . . . . . . . . . . . . . . . . . . . . . . . . . . 229
E.4.4 Troubleshooting Novell Cluster Services. . . . . . . . . . . . . . . . . . . . . . . . . . . . . . . . . 229
E.4.5 What’s New . . . . . . . . . . . . . . . . . . . . . . . . . . . . . . . . . . . . . . . . . . . . . . . . . . . . . . . 229
E.5 January 20, 2010 . . . . . . . . . . . . . . . . . . . . . . . . . . . . . . . . . . . . . . . . . . . . . . . . . . . . . . . . . . 230
E.5.1 Converting NetWare 6.5 Clusters to OES 2 Linux. . . . . . . . . . . . . . . . . . . . . . . . . . 230
E.5.2 What’s New . . . . . . . . . . . . . . . . . . . . . . . . . . . . . . . . . . . . . . . . . . . . . . . . . . . . . . . 230
E.6 January 4, 2010 . . . . . . . . . . . . . . . . . . . . . . . . . . . . . . . . . . . . . . . . . . . . . . . . . . . . . . . . . . . 230
E.6.1 Configuring Cluster Resources for Shared NSS Pools and Volumes . . . . . . . . . . . 230
E.6.2 Converting NetWare 6.5 Clusters to OES 2 Linux. . . . . . . . . . . . . . . . . . . . . . . . . . 231
E.7 December 15, 2009 . . . . . . . . . . . . . . . . . . . . . . . . . . . . . . . . . . . . . . . . . . . . . . . . . . . . . . . . 231
E.7.1 Installing and Configuring Novell Cluster Services on OES 2 Linux . . . . . . . . . . . . 231
E.8 December 10, 2009 . . . . . . . . . . . . . . . . . . . . . . . . . . . . . . . . . . . . . . . . . . . . . . . . . . . . . . . . 231
E.8.1 Converting NetWare 6.5 Clusters to OES 2 Linux. . . . . . . . . . . . . . . . . . . . . . . . . . 232
E.8.2 Installing and Configuring Novell Cluster Services on OES 2 Linux . . . . . . . . . . . . 232
E.8.3 Managing Clusters . . . . . . . . . . . . . . . . . . . . . . . . . . . . . . . . . . . . . . . . . . . . . . . . . . 232
E.8.4 Troubleshooting Novell Cluster Services. . . . . . . . . . . . . . . . . . . . . . . . . . . . . . . . . 232
E.9 November 2009 (OES 2 SP2) . . . . . . . . . . . . . . . . . . . . . . . . . . . . . . . . . . . . . . . . . . . . . . . . 232
E.9.1 Configuring Novell Cluster Services in a Xen Host Environment. . . . . . . . . . . . . . . 233
E.9.2 Converting NetWare 6.5 Clusters to OES 2 Linux. . . . . . . . . . . . . . . . . . . . . . . . . . 233
E.9.3 Console Commands for Novell Cluster Services. . . . . . . . . . . . . . . . . . . . . . . . . . . 233
E.9.4 Installing Novell Cluster Services on OES 2 Linux . . . . . . . . . . . . . . . . . . . . . . . . . 234
E.9.5 Managing Clusters . . . . . . . . . . . . . . . . . . . . . . . . . . . . . . . . . . . . . . . . . . . . . . . . . . 234
E.9.6 Troubleshooting Novell Cluster Services. . . . . . . . . . . . . . . . . . . . . . . . . . . . . . . . . 234
E.9.7 Upgrading OES 2 Linux Clusters. . . . . . . . . . . . . . . . . . . . . . . . . . . . . . . . . . . . . . . 234
E.9.8 What’s New . . . . . . . . . . . . . . . . . . . . . . . . . . . . . . . . . . . . . . . . . . . . . . . . . . . . . . . 235
E.10 July 30, 2009 . . . . . . . . . . . . . . . . . . . . . . . . . . . . . . . . . . . . . . . . . . . . . . . . . . . . . . . . . . . . . 235
E.10.1 Configuring Cluster Resources for Shared NSS Pools and Volumes . . . . . . . . . . . 235
E.10.2 Console Commands for Novell Cluster Services. . . . . . . . . . . . . . . . . . . . . . . . . . . 235
E.10.3 Converting NetWare 6.5 Clusters to OES 2 Linux. . . . . . . . . . . . . . . . . . . . . . . . . . 236
E.10.4 Installing Novell Cluster Services on OES 2 Linux . . . . . . . . . . . . . . . . . . . . . . . . . 236
E.10.5 Managing Clusters. . . . . . . . . . . . . . . . . . . . . . . . . . . . . . . . . . . . . . . . . . . . . . . . . . 236
E.10.6 Security Considerations. . . . . . . . . . . . . . . . . . . . . . . . . . . . . . . . . . . . . . . . . . . . . . 236
E.10.7 Troubleshooting Novell Cluster Services . . . . . . . . . . . . . . . . . . . . . . . . . . . . . . . . . 237
E.10.8 What’s New . . . . . . . . . . . . . . . . . . . . . . . . . . . . . . . . . . . . . . . . . . . . . . . . . . . . . . . 237
E.11 June 22, 2009 . . . . . . . . . . . . . . . . . . . . . . . . . . . . . . . . . . . . . . . . . . . . . . . . . . . . . . . . . . . . 237
E.11.1 Converting NetWare 6.5 Clusters to OES 2 Linux. . . . . . . . . . . . . . . . . . . . . . . . . . 237
E.11.2 Managing Clusters. . . . . . . . . . . . . . . . . . . . . . . . . . . . . . . . . . . . . . . . . . . . . . . . . . 237
E.12 June 5, 2009 . . . . . . . . . . . . . . . . . . . . . . . . . . . . . . . . . . . . . . . . . . . . . . . . . . . . . . . . . . . . . 238
E.12.1 Configuring Cluster Policies and Priorities. . . . . . . . . . . . . . . . . . . . . . . . . . . . . . . . 238
E.12.2 Configuring Cluster Resources for Shared NSS Pools and Volumes . . . . . . . . . . . 238
E.12.3 Console Commands for Novell Cluster Services. . . . . . . . . . . . . . . . . . . . . . . . . . . 238
E.12.4 Converting NetWare 6.5 Clusters to OES 2 Linux. . . . . . . . . . . . . . . . . . . . . . . . . . 239
E.12.5 Installing Novell Cluster Services on OES 2 Linux . . . . . . . . . . . . . . . . . . . . . . . . . 239
E.12.6 Managing Clusters. . . . . . . . . . . . . . . . . . . . . . . . . . . . . . . . . . . . . . . . . . . . . . . . . . 239
E.13 May 6, 2009 . . . . . . . . . . . . . . . . . . . . . . . . . . . . . . . . . . . . . . . . . . . . . . . . . . . . . . . . . . . . . . 240
E.13.1 Configuring Cluster Resources for Shared NSS Pools and Volumes . . . . . . . . . . . 240
E.13.2 Configuring and Managing Cluster Resources . . . . . . . . . . . . . . . . . . . . . . . . . . . . 240
E.13.3 Converting NetWare 6.5 Clusters to OES 2 SP1 Linux. . . . . . . . . . . . . . . . . . . . . . 241
E.13.4 Installing Novell Cluster Services on OES 2 Linux . . . . . . . . . . . . . . . . . . . . . . . . . 241
novdocx (en) 7 January 2010
Contents 11
Page 12

E.13.5 Troubleshooting Novell Cluster Services . . . . . . . . . . . . . . . . . . . . . . . . . . . . . . . . . 241
E.13.6 Upgrading OES 2 Linux Servers . . . . . . . . . . . . . . . . . . . . . . . . . . . . . . . . . . . . . . . 242
E.14 March 3, 2009 . . . . . . . . . . . . . . . . . . . . . . . . . . . . . . . . . . . . . . . . . . . . . . . . . . . . . . . . . . . . 242
E.14.1 Configuring and Managing Cluster Resources . . . . . . . . . . . . . . . . . . . . . . . . . . . . 242
E.14.2 Configuring Cluster Resources for Shared NSS Pools and Volumes . . . . . . . . . . . 242
E.14.3 Converting NetWare 6.5 Clusters to OES 2 Linux. . . . . . . . . . . . . . . . . . . . . . . . . . 243
E.14.4 Managing Clusters. . . . . . . . . . . . . . . . . . . . . . . . . . . . . . . . . . . . . . . . . . . . . . . . . . 243
E.14.5 What’s Next . . . . . . . . . . . . . . . . . . . . . . . . . . . . . . . . . . . . . . . . . . . . . . . . . . . . . . . 243
E.15 February 13, 2009 . . . . . . . . . . . . . . . . . . . . . . . . . . . . . . . . . . . . . . . . . . . . . . . . . . . . . . . . . 243
E.15.1 Converting NetWare 6.5 Clusters to OES 2 Linux. . . . . . . . . . . . . . . . . . . . . . . . . . 244
E.16 February 3, 2009 . . . . . . . . . . . . . . . . . . . . . . . . . . . . . . . . . . . . . . . . . . . . . . . . . . . . . . . . . . 244
E.16.1 Configuring and Managing Cluster Resources . . . . . . . . . . . . . . . . . . . . . . . . . . . . 244
E.16.2 Configuring Cluster Resources for Shared NSS Pools and Volumes . . . . . . . . . . . 244
E.16.3 Converting NetWare 6.5 Clusters to OES 2 Linux. . . . . . . . . . . . . . . . . . . . . . . . . . 245
E.16.4 Installing Novell Cluster Services on OES 2 Linux . . . . . . . . . . . . . . . . . . . . . . . . . 245
E.17 January 13, 2009 . . . . . . . . . . . . . . . . . . . . . . . . . . . . . . . . . . . . . . . . . . . . . . . . . . . . . . . . . . 245
E.18 December 2008 (OES 2 SP1) . . . . . . . . . . . . . . . . . . . . . . . . . . . . . . . . . . . . . . . . . . . . . . . . 245
E.18.1 Comparison of Clustering OES 2 Services for Linux and NetWare . . . . . . . . . . . . . 246
E.18.2 Comparison of Novell Cluster Services for Linux and NetWare . . . . . . . . . . . . . . . 246
E.18.3 Configuring and Managing Cluster Resources . . . . . . . . . . . . . . . . . . . . . . . . . . . . 246
E.18.4 Configuring Cluster Resources for Shared Linux POSIX Volumes . . . . . . . . . . . . . 246
E.18.5 Configuring Cluster Resources for Shared NSS Pools and Volumes . . . . . . . . . . . 246
E.18.6 Configuring Novell Cluster Services in a Virtualization Environment . . . . . . . . . . . . 247
E.18.7 Console Commands for Novell Cluster Services. . . . . . . . . . . . . . . . . . . . . . . . . . . 247
E.18.8 Converting NetWare 6.5 Cluster to OES 2 Linux. . . . . . . . . . . . . . . . . . . . . . . . . . . 248
E.18.9 Installing Novell Cluster Services on OES 2 Linux . . . . . . . . . . . . . . . . . . . . . . . . . 248
E.18.10 Managing Clusters . . . . . . . . . . . . . . . . . . . . . . . . . . . . . . . . . . . . . . . . . . . . . . . . . . 249
E.18.11 Overview of Novell Cluster Services . . . . . . . . . . . . . . . . . . . . . . . . . . . . . . . . . . . . 249
E.18.12 Troubleshooting Novell Cluster Services. . . . . . . . . . . . . . . . . . . . . . . . . . . . . . . . . 249
E.18.13 Upgrading OES 2 Clusters . . . . . . . . . . . . . . . . . . . . . . . . . . . . . . . . . . . . . . . . . . . 249
E.18.14 What’s New . . . . . . . . . . . . . . . . . . . . . . . . . . . . . . . . . . . . . . . . . . . . . . . . . . . . . . . 250
E.19 June 4, 2008 . . . . . . . . . . . . . . . . . . . . . . . . . . . . . . . . . . . . . . . . . . . . . . . . . . . . . . . . . . . . . 250
E.19.1 Configuring Cluster Resources for Shared NSS Pools and Volumes . . . . . . . . . . . 250
E.19.2 Configuring Cluster Resources for Shared Linux POSIX Volumes . . . . . . . . . . . . . 251
E.19.3 Installation and Setup . . . . . . . . . . . . . . . . . . . . . . . . . . . . . . . . . . . . . . . . . . . . . . . 251
E.19.4 Managing Novell Cluster Services. . . . . . . . . . . . . . . . . . . . . . . . . . . . . . . . . . . . . . 252
E.20 May 2, 2008 . . . . . . . . . . . . . . . . . . . . . . . . . . . . . . . . . . . . . . . . . . . . . . . . . . . . . . . . . . . . . . 253
E.20.1 Installation and Setup . . . . . . . . . . . . . . . . . . . . . . . . . . . . . . . . . . . . . . . . . . . . . . . 253
E.20.2 Managing Novell Cluster Services. . . . . . . . . . . . . . . . . . . . . . . . . . . . . . . . . . . . . . 253
novdocx (en) 7 January 2010
12 OES 2 SP2: Novell Cluster Services 1.8.7 for Linux Administration Guide
Page 13

About This Guide
This guide describes how to install, upgrade, configure, and manage Novell® Cluster ServicesTM. It
is intended for cluster administrators and is divided into the following sections:
Chapter 1, “Overview of Novell Cluster Services,” on page 15
Chapter 2, “What’s New,” on page 23
Chapter 3, “Installing and Configuring Novell Cluster Services on OES 2 Linux,” on page 27
Chapter 4, “Upgrading OES 2 Linux Clusters,” on page 53
Chapter 5, “Upgrading OES 1 Linux Clusters to OES 2 Linux,” on page 55
Chapter 6, “Converting NetWare 6.5 Clusters to OES 2 Linux,” on page 59
Chapter 7, “Configuring Cluster Policies and Priorities,” on page 91
Chapter 8, “Managing Clusters,” on page 97
Chapter 9, “Configuring and Managing Cluster Resources,” on page 117
Chapter 10, “Configuring Cluster Resources for Shared NSS Pools and Volumes,” on page 133
novdocx (en) 7 January 2010
Chapter 11, “Configuring Cluster Resources for Shared Linux POSIX Volumes,” on page 157
Chapter 12, “Configuring Novell Cluster Services in a Xen Virtualization Environment,” on
page 181
Chapter 13, “Troubleshooting Novell Cluster Services,” on page 195
Appendix A, “Console Commands for Novell Cluster Services,” on page 203
Appendix B, “Files for Novell Cluster Services,” on page 209
Appendix C, “Comparing Novell Cluster Services for Linux and NetWare,” on page 213
Appendix D, “Comparing Clustering Support for OES 2 Services on Linux and NetWare,” on
page 219
Audience
This guide is intended for intended for anyone involved in installing, configuring, and managing
Novell Cluster Services.
Feedback
We want to hear your comments and suggestions about this manual and the other documentation
included with this product. Please use the User Comments feature at the bottom of each page of the
online documentation, or go to www.novell.com/documentation/feedback.html and enter your
comments there.
Documentation Updates
The latest version of this Novell Cluster Services for Linux Administration Guide is available on the
OES 2 documentation Web site (http://www.novell.com/documentation/oes2/cluster-services.html).
About This Guide 13
Page 14

Additional Documentation
For information about creating cluster resources for various Linux services on your OES 2 Linux
server, refer to the clustering sections in the individual guides. See the “Clustering Linux Services”
list on the Clustering (High Availability) Documentation Web site (http://www.novell.com/
documentation/oes2/cluster-services.html#clust-config-resources).
®
For information about Novell Cluster Services 1.8.5 for NetWare
, see the “Clustering NetWare
Services” list on the NetWare 6.5 SP8 Clustering (High Availability) Documentation Web site (http:/
/www.novell.com/documentation/nw65/cluster-services.html#clust-config-resources).
Documentation Conventions
In Novell documentation, a greater-than symbol (>) is used to separate actions within a step and
items in a cross-reference path.
®
A trademark symbol (
, TM, etc.) denotes a Novell trademark. An asterisk (*) denotes a third-party
trademark.
novdocx (en) 7 January 2010
14 OES 2 SP2: Novell Cluster Services 1.8.7 for Linux Administration Guide
Page 15

1
Overview of Novell Cluster
novdocx (en) 7 January 2010
Services
Novell® Cluster ServicesTM is a server clustering system that ensures high availability and
manageability of critical network resources including data, applications, and services. It is a multinode clustering product for Linux* that is enabled for Novell eDirectory
failback, and migration (load balancing) of individually managed cluster resources.
Section 1.1, “Why Should I Use Clusters?,” on page 15
Section 1.2, “Benefits of Novell Cluster Services,” on page 15
Section 1.3, “Product Features,” on page 16
Section 1.4, “Clustering for High-Availability,” on page 16
Section 1.5, “Shared Disk Scenarios,” on page 18
1.1 Why Should I Use Clusters?
A server cluster is a group of redundantly configured servers that work together to provide highly
available access for clients to important applications, services, and data while reducing unscheduled
outages. The applications, services, and data are configured as cluster resources that can be failed
over or cluster migrated between servers in the cluster. For example, when a failure occurs on one
node of the cluster, the clustering software gracefully relocates its resources and current sessions to
another server in the cluster. Clients connect to the cluster instead of an individual server, so users
are not aware of which server is actively providing the service or data. In most cases, users are able
to continue their sessions without interruption.
TM
and supports failover,
1
Each server in the cluster runs the same operating system and applications that are needed to provide
the application, service, or data resources to clients. Shared devices are connected to and mounted
on only one server at a time. Clustering software monitors the health of each of the member servers
by listening for its heartbeat, a simple message that lets the others know it is alive.
The cluster’s virtual server provides a single point for accessing, configuring, and managing the
cluster servers and resources. The virtual identity is bound to the cluster’s master node and remains
with the master node regardless of which member server acts the master node. The master server
also keeps information about each of the member servers and the resources they are running. If the
master server fails, the control duties are passed to another server in the cluster.
1.2 Benefits of Novell Cluster Services
Novell Cluster Services provides high availability from commodity components. You can configure
up to 32 OES 2 Linux servers in a high-availability cluster, where resources can be dynamically
relocated to any server in the cluster. Resources can be configured to automatically fail over to one
or multiple different preferred servers in the event of a server failure. In addition, costs are lowered
through the consolidation of applications and operations onto a cluster.
Novell Cluster Services allows you to manage a cluster from a single point of control and to adjust
resources to meet changing workload requirements (thus, manually “load balance” the cluster).
Resources can also be cluster migrated manually to allow you to troubleshoot hardware. For
Overview of Novell Cluster Services
15
Page 16

example, you can move applications, Web sites, and so on to other servers in your cluster without
waiting for a server to fail. This helps you to reduce unplanned service outages and planned outages
for software and hardware maintenance and upgrades.
Novell Cluster Services clusters provide the following benefits over standalone servers:
Increased availability of applications, services, and data
Improved performance
Lower cost of operation
Scalability
Disaster recovery
Data protection
Server consolidation
Storage consolidation
1.3 Product Features
novdocx (en) 7 January 2010
Novell Cluster Services includes several important features to help you ensure and manage the
availability of your network resources:
Support for shared SCSI, iSCSI, or Fibre Channel storage subsystems. Shared disk fault
tolerance can be obtained by implementing RAID on the shared disk subsystem.
Multi-node all-active cluster (up to 32 nodes). Any server in the cluster can restart resources
(applications, services, IP addresses, and file systems) from a failed server in the cluster.
A single point of administration through the browser-based Novell iManager cluster
configuration and monitoring GUI. iManager also lets you remotely manage your cluster.
The ability to tailor a cluster to the specific applications and hardware infrastructure that fit
your organization.
Dynamic assignment and reassignment of server storage as needed.
The ability to use e-mail to automatically notify administrators of cluster events and cluster
state changes.
1.4 Clustering for High-Availability
A Novell Cluster Services for Linux cluster consists of the following components:
2 to 32 OES 2 Linux servers, each containing at least one local disk device.
Novell Cluster Services software running on each Linux server in the cluster.
A shared disk subsystem connected to all servers in the cluster (optional, but recommended for
most configurations).
Equipment to connect servers to the shared disk subsystem, such as one of the following:
High-speed Fibre Channel cards, cables, and switches for a Fibre Channel SAN
Ethernet cards, cables, and switches for an iSCSI SAN
SCSI cards and cables for external SCSI storage arrays
16 OES 2 SP2: Novell Cluster Services 1.8.7 for Linux Administration Guide
Page 17
The benefits that Novell Cluster Services provides can be better understood through the following
Fibre Channel Switch
Web Server 1 Web Server 2 Web Server 3
Shared Disk
System
Web Site E
Web Site F
Web Site C
Web Site D
Web Site A
Web Site B
Fibre Channel Switch
Web Server 1 Web Server 2 Web Server 3
Shared Disk
System
Web Site B
Web Site E
Web Site F
Web Site A
Web Site C
Web Site D
scenario.
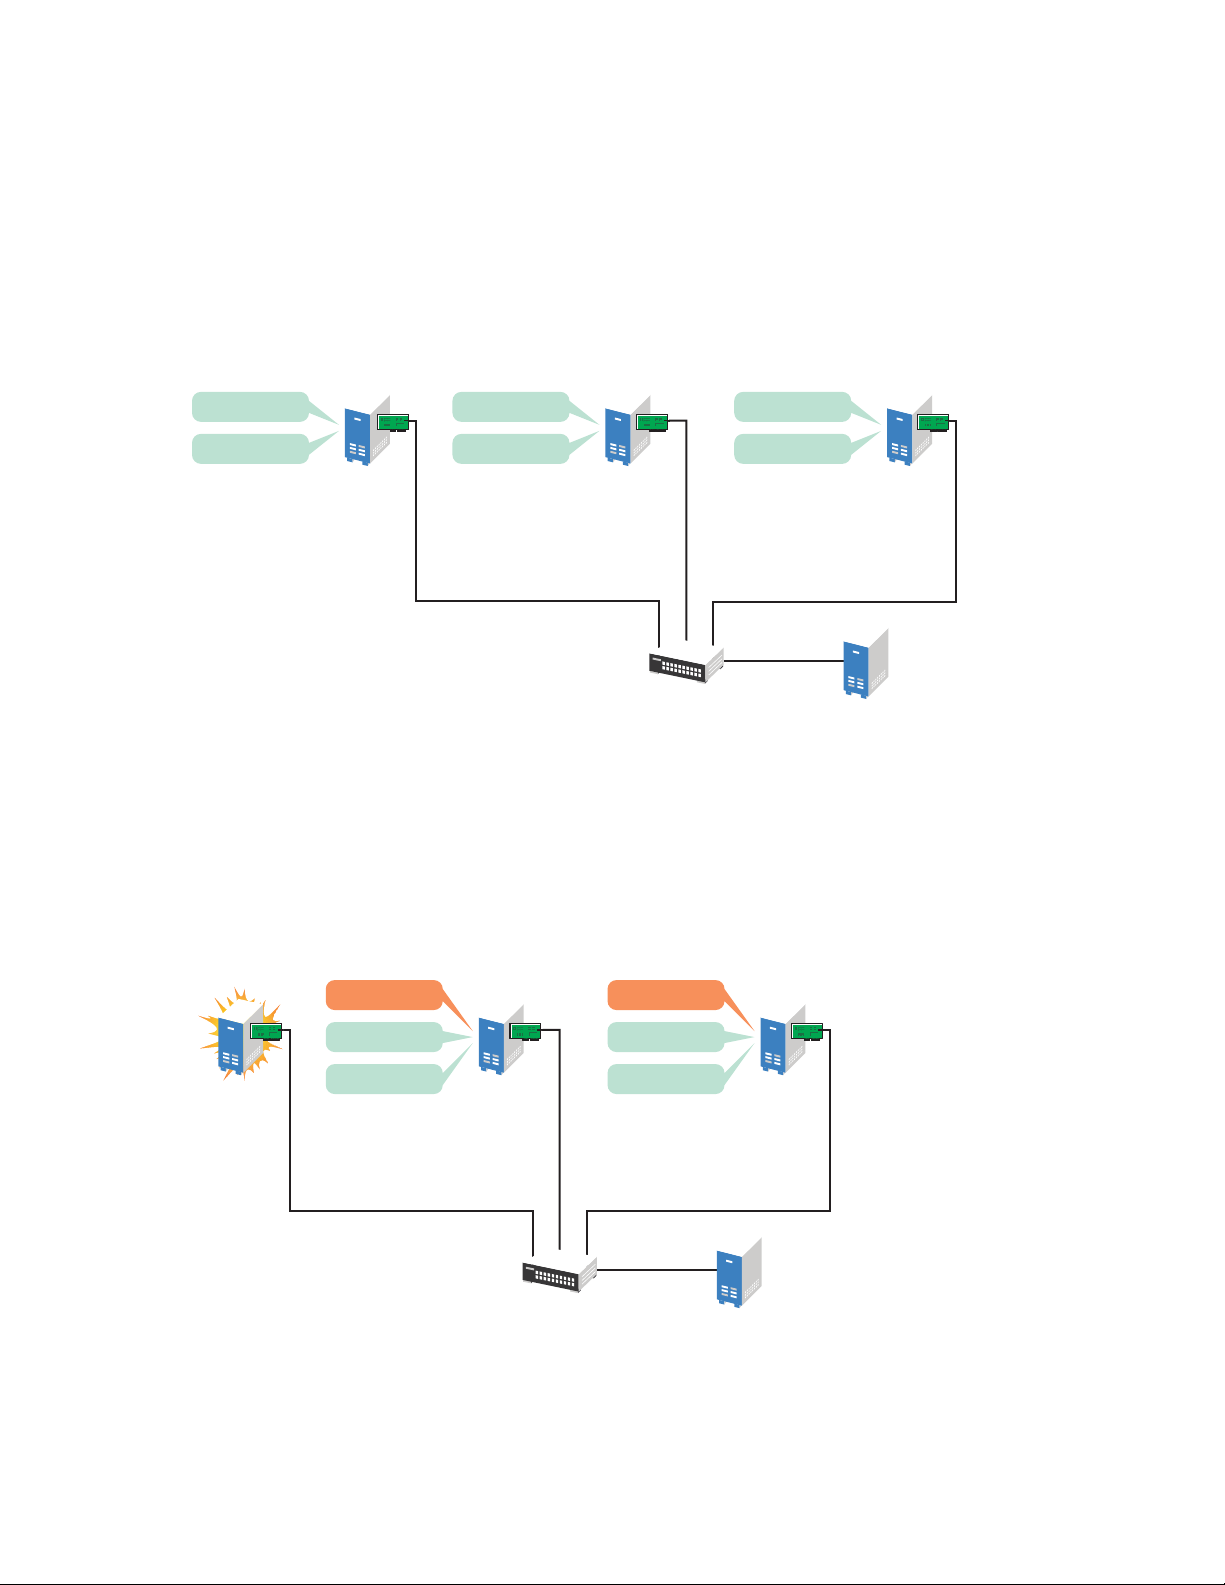
Suppose you have configured a three-server cluster, with a Web server installed on each of the three
servers in the cluster. Each of the servers in the cluster hosts two Web sites. All the data, graphics,
and Web page content for each Web site is stored on a shared disk system connected to each of the
servers in the cluster. Figure 1-1 depicts how this setup might look.
Figure 1-1 Three-Server Cluster
novdocx (en) 7 January 2010
During normal cluster operation, each server is in constant communication with the other servers in
the cluster and performs periodic polling of all registered resources to detect failure.
Suppose Web Server 1 experiences hardware or software problems and the users who depend on
Web Server 1 for Internet access, e-mail, and information lose their connections. Figure 1-2 shows
how resources are moved when Web Server 1 fails.
Figure 1-2 Three-Server Cluster after One Server Fails
Web Site A moves to Web Server 2 and Web Site B moves to Web Server 3. IP addresses and
certificates also move to Web Server 2 and Web Server 3.
Overview of Novell Cluster Services 17
Page 18

When you configured the cluster, you decided where the Web sites hosted on each Web server would
go if a failure occurred. You configured Web Site A to move to Web Server 2 and Web Site B to
move to Web Server 3. This way, the workload once handled by Web Server 1 is evenly distributed.
When Web Server 1 failed, Novell Cluster Services software did the following:
Detected a failure.
Remounted the shared data directories (that were formerly mounted on Web server 1) on Web
Server 2 and Web Server 3 as specified.
Restarted applications (that were running on Web Server 1) on Web Server 2 and Web Server 3
as specified.
Transferred IP addresses to Web Server 2 and Web Server 3 as specified.
In this example, the failover process happened quickly and users regained access to Web site
information within seconds, and in most cases, without logging in again.
Now suppose the problems with Web Server 1 are resolved, and Web Server 1 is returned to a
normal operating state. Web Site A and Web Site B will automatically fail back, or be moved back to
Web Server 1, and Web Server operation will return to the way it was before Web Server 1 failed.
novdocx (en) 7 January 2010
Novell Cluster Services also provides resource migration capabilities. You can move applications,
Web sites, etc. to other servers in your cluster without waiting for a server to fail.
For example, you could have manually moved Web Site A or Web Site B from Web Server 1 to
either of the other servers in the cluster. You might want to do this to upgrade or perform scheduled
maintenance on Web Server 1, or just to increase performance or accessibility of the Web sites.
1.5 Shared Disk Scenarios
Typical cluster configurations normally include a shared disk subsystem connected to all servers in
the cluster. The shared disk subsystem can be connected via high-speed Fibre Channel cards, cables,
and switches, or it can be configured to use shared SCSI or iSCSI. If a server fails, another
designated server in the cluster automatically mounts the shared disk directories previously mounted
on the failed server. This gives network users continuous access to the directories on the shared disk
subsystem.
Section 1.5.1, “Using Fibre Channel Storage Systems,” on page 19
Section 1.5.2, “Using iSCSI Storage Systems,” on page 20
Section 1.5.3, “Using Shared SCSI Storage Systems,” on page 21
18 OES 2 SP2: Novell Cluster Services 1.8.7 for Linux Administration Guide
Page 19
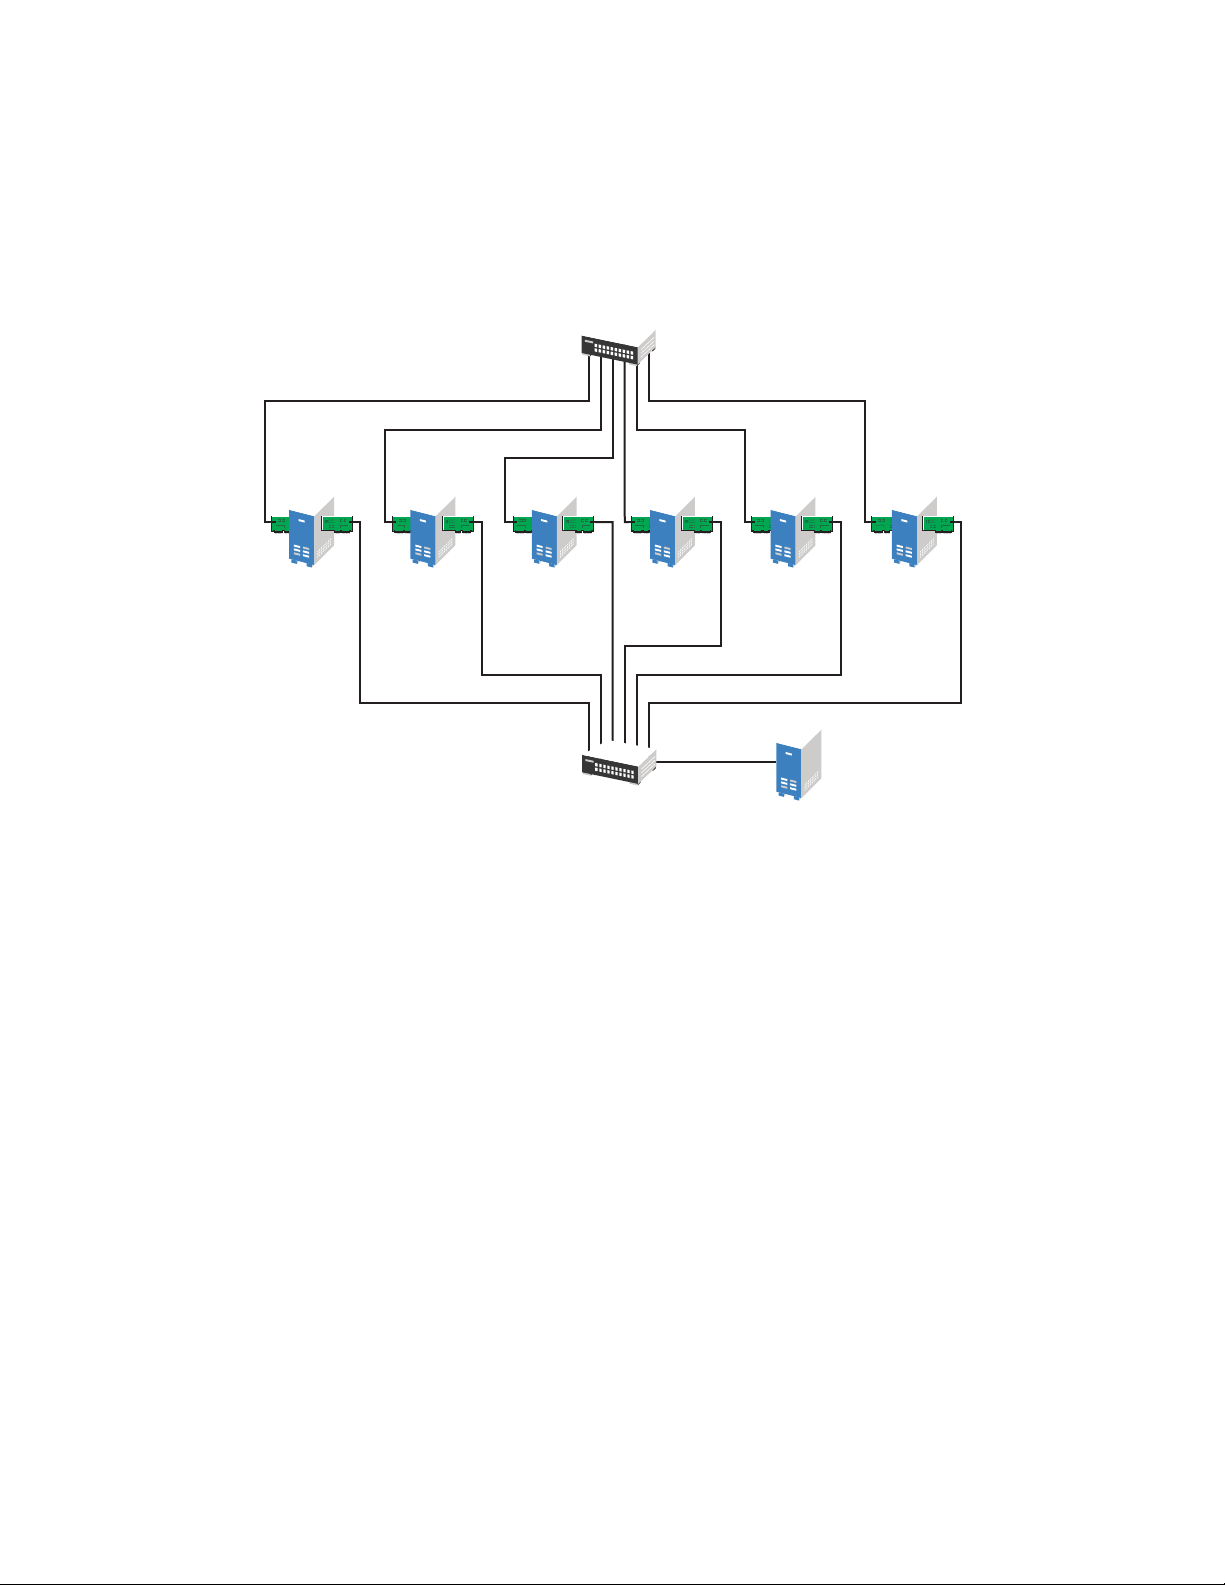
1.5.1 Using Fibre Channel Storage Systems
Network
Interface
Card(s)
Fibre Channel Switch
Network Hub
Fibre
Channel
Card(s)
Server 1 Server 2 Server 3 Server 4 Server 5 Server 6
Shared Disk
System
Fibre Channel provides the best performance for your storage area network (SAN). Figure 1-3
shows how a typical Fibre Channel cluster configuration might look.
Figure 1-3 Typical Fibre Channel Cluster Configuration
novdocx (en) 7 January 2010
Overview of Novell Cluster Services 19
Page 20
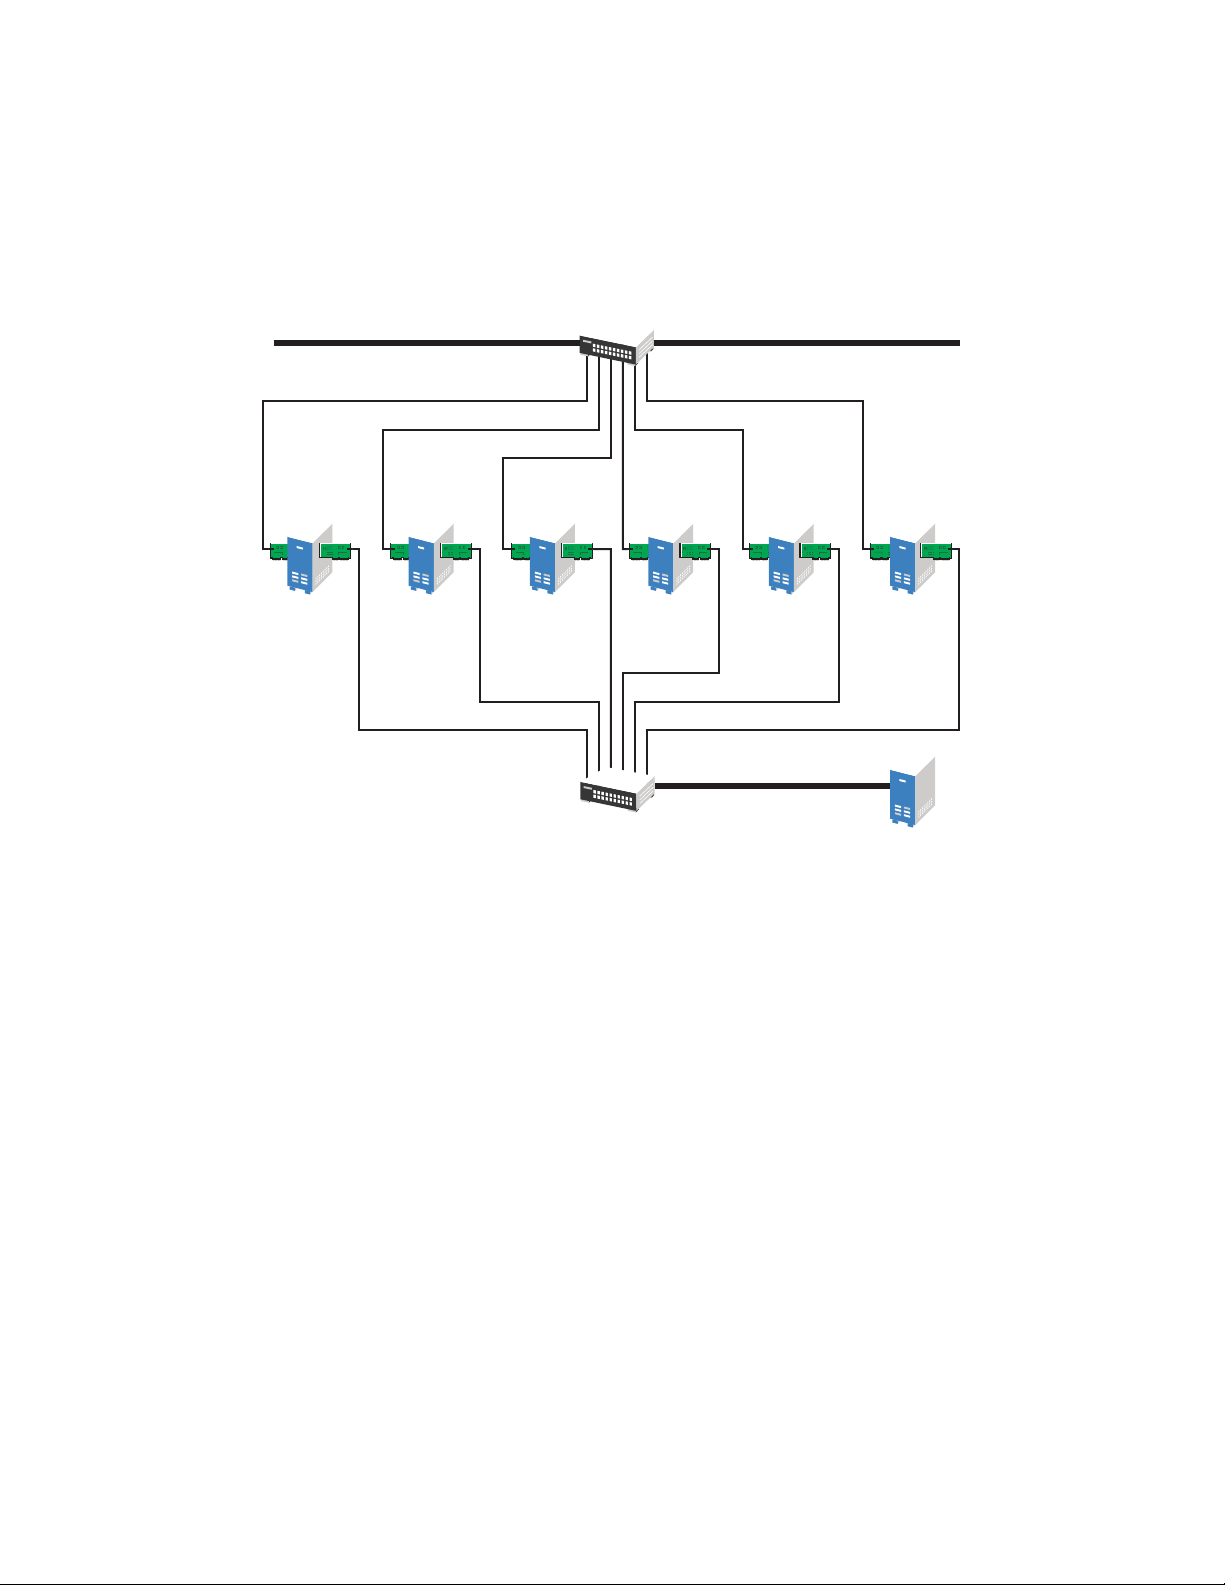
1.5.2 Using iSCSI Storage Systems
Ethernet
Card(s)
Ethernet Switch
Ethernet Switch
Ethernet
Card(s)
Server 1 Server 2 Server 3 Server 4 Server 5 Server 6
Storage
System
Network Backbone
iSCSI
Initiator
iSCSI
Initiator
iSCSI
Initiator
iSCSI
Initiator
iSCSI
Initiator
iSCSI
Initiator
Network Backbone
Ethernet
iSCSI is an alternative to Fibre Channel that can be used to create a lower-cost SAN with Ethernet
equipment. Figure 1-4 shows how a typical iSCSI cluster configuration might look.
Figure 1-4 Typical iSCSI Cluster Configuration
novdocx (en) 7 January 2010
20 OES 2 SP2: Novell Cluster Services 1.8.7 for Linux Administration Guide
Page 21
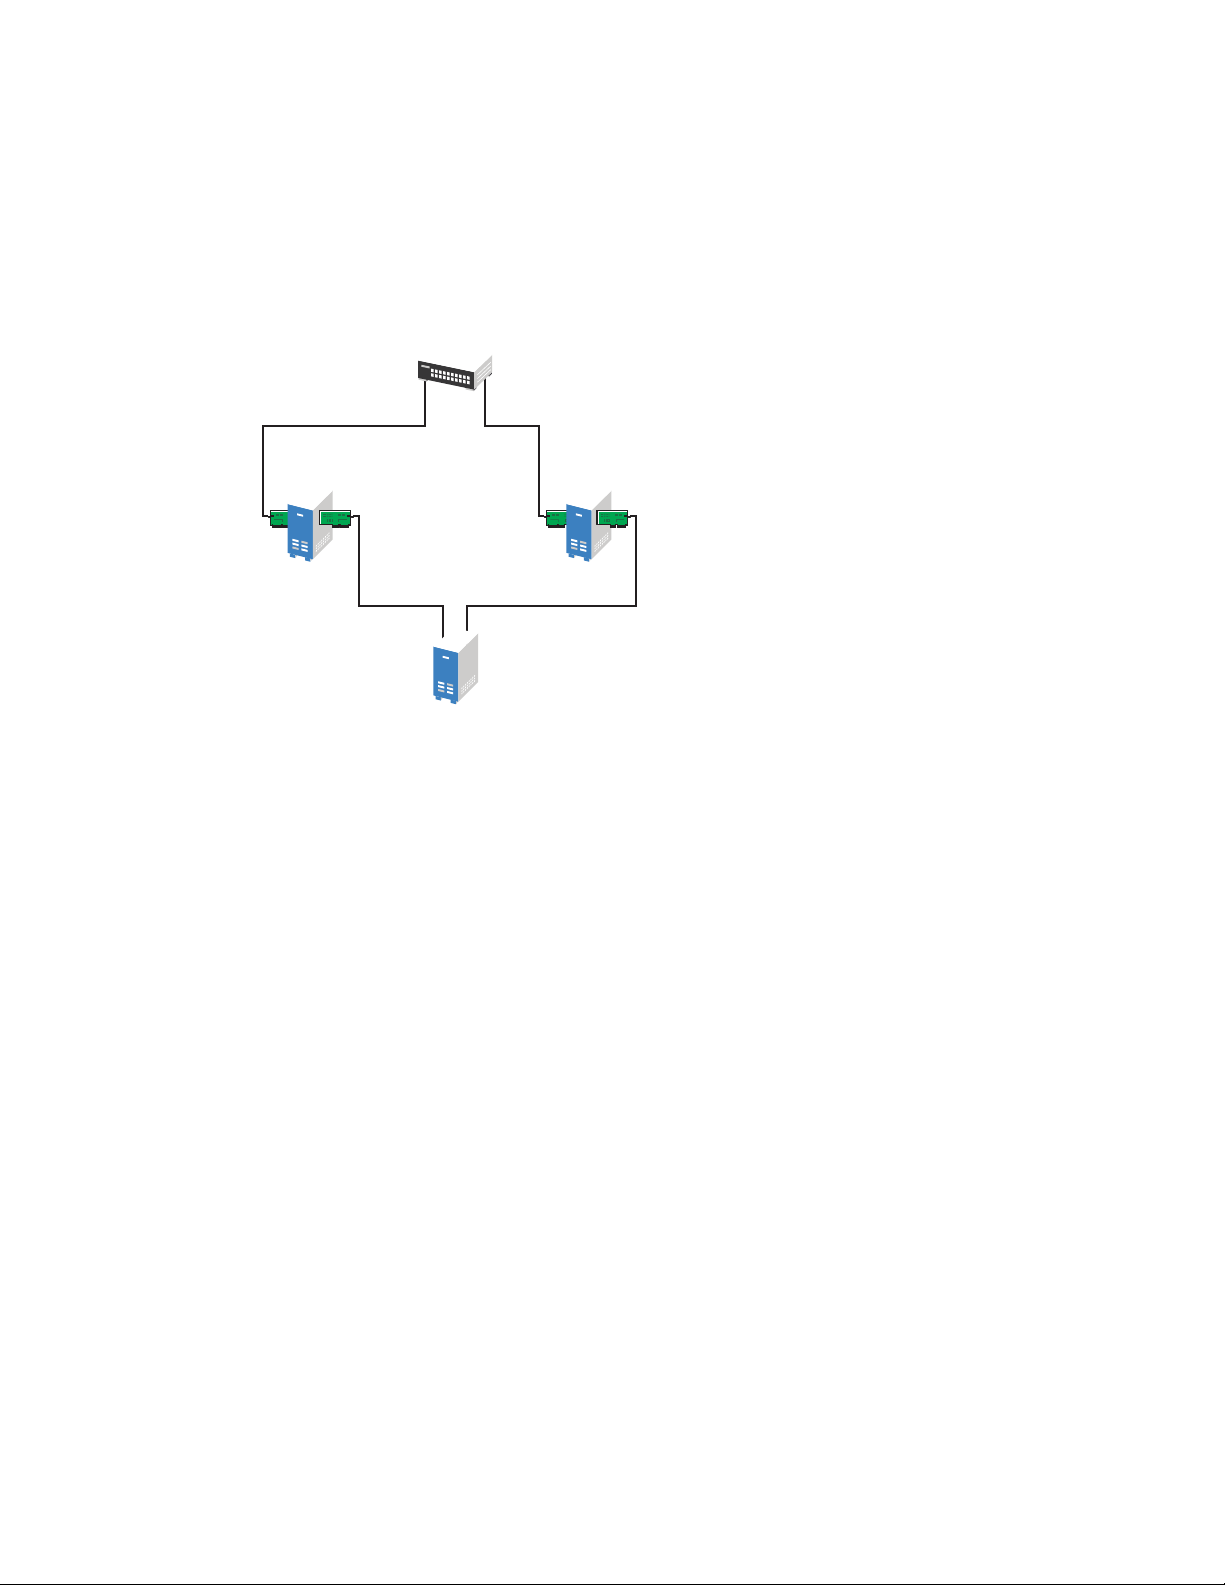
1.5.3 Using Shared SCSI Storage Systems
Network
Interface
Card
Network
Interface
Card
Network Hub
SCSI
Adapter
SCSI
Adapter
Server 1 Server 2
Shared Disk
System
You can configure your cluster to use shared SCSI storage systems. This configuration is also a
lower-cost alternative to using Fibre Channel storage systems. Figure 1-5 shows how a typical
shared SCSI cluster configuration might look.
Figure 1-5 Typical Shared SCSI Cluster Configuration
novdocx (en) 7 January 2010
Overview of Novell Cluster Services 21
Page 22

novdocx (en) 7 January 2010
22 OES 2 SP2: Novell Cluster Services 1.8.7 for Linux Administration Guide
Page 23

2
What’s New
This section describes changes and enhancements that were made to Novell® Cluster ServicesTM for
Linux since the initial release of Novell Open Enterprise Server (OES) 2 Linux.
Section 2.1, “What’s New (January 2010),” on page 23
Section 2.2, “What’s New (OES 2 SP2),” on page 23
Section 2.3, “What’s New (OES 2 SP1),” on page 25
Section 2.4, “What’s New (OES 2),” on page 26
2.1 What’s New (January 2010)
The January 2010 patch for OES 2 SP1 Linux contains bug fixes for Novell Cluster Services and
Novell Business Continuity Clustering 1.2 for OES 2 SP1 Linux.
The January 2010 patch for OES 2 SP2 Linux contains bug fixes for Novell Cluster Services and
adds support for Novell Business Continuity Clustering 1.2.1 for OES 2 SP2 Linux.
novdocx (en) 7 January 2010
2
2.2 What’s New (OES 2 SP2)
In addition to bug fixes, the following changes and enhancements were made for Novell Cluster
Services for Linux in OES 2 SP2.
Section 2.2.1, “Improved Error Reporting,” on page 23
Section 2.2.2, “Improved Time Calculations,” on page 23
Section 2.2.3, “Specifying the Size of the SBD Partition,” on page 24
Section 2.2.4, “Customizing Translation Syntax,” on page 24
Section 2.2.5, “Migration Tool Support for Cluster Configurations,” on page 24
Section 2.2.6, “New iFolder Resource Template,” on page 24
Section 2.2.7, “Removed MPK Calls from the Code,” on page 24
Section 2.2.8, “Cluster Restart Is No Longer Required in a Rolling Cluster Upgrade,” on
page 24
2.2.1 Improved Error Reporting
This release provides improved error reporting for file protocol errors.
2.2.2 Improved Time Calculations
This release improves the way time is calculated so that the inter-packet gap between two heartbeat
packets is reduced.
This means that you will observe an increase in the instances of packets incrementing the 0x (less
than one second) counter, and a decrease in the instances of packets incrementing the 1x (between
one second and two seconds) counter.
What’s New
23
Page 24

For example:
cluster stats display
Report taken: startTime= Thu Jul 23 13:16:33 2009,
endTime= Mon Jul 27 08:44:36 2009
node=5, name=Cluster_06, heartbeat=1, tolerance=8
0x=645550, 1x=6, 2x=1, 3x=2, 5x=2
2.2.3 Specifying the Size of the SBD Partition
When you configure the SBD partition during the cluster configuration of a new cluster (as
described in “Configuring a New Cluster” on page 48), you can now specify the size of the partition.
2.2.4 Customizing Translation Syntax
Beginning in OES 2 SP2, Novell Cluster Services allows you to customize the translation syntax
that is used for load and unload scripts in mixed-platform situations by defining new syntax
translations in the
create. The
processes them in addition to the normal translations in the Cluster Translation Library. For
information, see Section 6.7, “Customizing the Translation Syntax for Converting Load and Unload
Scripts,” on page 87.
/var/opt/novell/ncs/customized_translation_syntax
clstrlib.py
script reads the additional translation syntax from the syntax file, and
file that you
novdocx (en) 7 January 2010
2.2.5 Migration Tool Support for Cluster Configurations
Support was added for migrating services and data in cluster configurations by using the OES 2 SP2
Migration Tool. For instructions on using the Migration Tool to migrate services and data, see the
OES 2 SP2: Migration Tool Administration Guide.
2.2.6 New iFolder Resource Template
The Novell iFolder 3.x resource template has been modified for OES 2 SP2. For information about
using the new template, see Section 4.3.1, “Updating the iFolder Resource Template,” on page 54.
2.2.7 Removed MPK Calls from the Code
MPK calls were removed from the Novell Cluster Services code. The MPK calls were replaced with
POSIX and Linux functions. These changes were made in support of the MPK calls being removed
from the Novell Storage Services
enhancements for the NSS file system.
TM
(NSS) file system software to achieve performance
2.2.8 Cluster Restart Is No Longer Required in a Rolling Cluster Upgrade
In the OES 2 SP1 release, a cluster restart was required at the end of a rolling cluster upgrade in
order to properly update the names of the nodes, as described in Section 2.3.3, “Behavior Change for
Adding a Node,” on page 25. This issue was resolved in OES 2 SP2. The rolling cluster upgrade
process no long requires a cluster restart.
24 OES 2 SP2: Novell Cluster Services 1.8.7 for Linux Administration Guide
Page 25

2.3 What’s New (OES 2 SP1)
In addition to bug fixes, the following changes and enhancements were made for Novell Cluster
Services for Linux in OES 2 SP1.
Section 2.3.1, “Schema Extension,” on page 25
Section 2.3.2, “Installation by Container Administrator,” on page 25
Section 2.3.3, “Behavior Change for Adding a Node,” on page 25
Section 2.3.4, “Attribute NCS: GIPC Config Is No Longer Maintained,” on page 26
Section 2.3.5, “Support for Novell AFP for Linux,” on page 26
Section 2.3.6, “Support for Novell CIFS for Linux,” on page 26
Section 2.3.7, “Support for Domain Services for Windows,” on page 26
2.3.1 Schema Extension
The administrator of a Novell eDirectoryTM tree can now extend the schema for cluster objects
before clusters are installed in the tree. This allows container administrators to install Novell Cluster
Services without needing tree-level administrator rights. See Section 3.3, “Extending the eDirectory
Schema to Add Cluster Objects,” on page 40.
novdocx (en) 7 January 2010
2.3.2 Installation by Container Administrator
Container administrators can install Novell Cluster Services without needing tree-level
administrator rights. Make sure you have the rights needed for the install. See Section 3.4,
“Assigning Install Rights for Container Administrators,” on page 41.
2.3.3 Behavior Change for Adding a Node
In this release, a behavior change was made to address a deadlock defect. After adding a new node
to the cluster, the new node cannot be displayed in the Clusters plug-in to iManager until the
configd.py -init
IMPORTANT: A Novell Cluster Services patch is available in the patch channel and on the Novell
Downloads Web site (http://www.novell.com/downloads) that allows you to add a new node
seamlessly again on a Linux server. For cluster conversions, a cluster restart is still necessary after
all NetWare nodes have been removed from the cluster.
Run one of the following commands in order to make
correctly. It is okay to run
/opt/novell/ncs/bin/ncs-configd.py -init
or
script is run, or until the cluster is restarted.
cluster view
ncs-configd.py
on an active cluster.
display the new node’s name
ncs-
rcnovell-ncs restart
If you are converting a cluster from NetWare to Linux, you must restart the cluster instead so that
clstrlib.ko is reloaded.
What’s New 25
Page 26

novdocx (en) 7 January 2010
For example, if you install a server named
oes2_sales_cluster
node is generically displayed as
Cluster OES2_SALES_CLUSTER
This node SALES_02 [ epoch 4 master node SALES_02 ]
Cluster nodes [ SALES_01, SALES_02, Node_03 ]
After running the cluster configuration daemon or restarting Novell Cluster Services, the new node’s
name is properly displayed as
Cluster OES2_SALES_CLUSTER
This node SALES_02 [ epoch 4 master node SALES_02 ]
Cluster nodes [ SALES_01, SALES_02, SALES_03 ]
with two existing member nodes named
Node_03
SALES_03
sales_03
when you enter the
, and the node is visible in iManager.
in an existing cluster named
sales_01
cluster view
and
sales_02
command:
, the new
2.3.4 Attribute NCS: GIPC Config Is No Longer Maintained
Beginning in OES 2 SP1 Linux, the attribute NCS:GIPC Config in the Cluster object is no longer
maintained. This applies to Linux clusters and mixed NetWare and Linux clusters.
2.3.5 Support for Novell AFP for Linux
This release supports Novell AFP (Apple* Filing Protocol) for Linux in combination with Novell
Storage Services
TM
(NSS) volumes on OES 2 SP1 Linux. See “Novell AFP for Linux” on page 32.
2.3.6 Support for Novell CIFS for Linux
This release supports Novell CIFS for Linux in combination with NSS volumes on OES 2 SP1
Linux. See “Novell CIFS for Linux” on page 32.
2.3.7 Support for Domain Services for Windows
This release supports using clusters in Domain Services for Windows contexts for OES 2 SP1
Linux. See “Novell Domain Services for Windows” on page 32.
2.4 What’s New (OES 2)
The following changes and enhancements were added to Novell Cluster Services for Linux in OES
2.
Resource Monitoring: See Section 9.6, “Enabling Monitoring and Configuring the Monitor
Script,” on page 123.
Support for Xen* Virtualization: See Chapter 12, “Configuring Novell Cluster Services in a
Xen Virtualization Environment,” on page 181.
26 OES 2 SP2: Novell Cluster Services 1.8.7 for Linux Administration Guide
Page 27

3
Installing and Configuring Novell
novdocx (en) 7 January 2010
Cluster Services on OES 2 Linux
Novell® Cluster ServicesTM can be installed during the Novell Open Enterprise Server (OES) 2
Linux installation or afterwards on an existing OES 2 Linux server.
For information about upgrading a cluster server from OES 1 SP2 Linux to OES 2 Linux, see
Chapter 5, “Upgrading OES 1 Linux Clusters to OES 2 Linux,” on page 55.
®
For information about converting a cluster server from NetWare
see Chapter 6, “Converting NetWare 6.5 Clusters to OES 2 Linux,” on page 59.
Section 3.1, “System Requirements for Novell Cluster Services,” on page 27
Section 3.2, “Novell Cluster Services Licensing,” on page 39
Section 3.3, “Extending the eDirectory Schema to Add Cluster Objects,” on page 40
Section 3.4, “Assigning Install Rights for Container Administrators,” on page 41
Section 3.5, “Installing Novell Cluster Services,” on page 42
Section 3.6, “Configuring Novell Cluster Services,” on page 46
Section 3.7, “Configuring Additional Administrators,” on page 52
Section 3.8, “What’s Next,” on page 52
6.5 SP7 or later to OES 2 Linux,
3
3.1 System Requirements for Novell Cluster Services
Section 3.1.1, “Hardware Requirements,” on page 27
Section 3.1.2, “Software Requirements,” on page 28
Section 3.1.3, “Configuration Requirements,” on page 34
Section 3.1.4, “Shared Disk System Requirements,” on page 36
Section 3.1.5, “SAN Rules for LUN Masking,” on page 38
Section 3.1.6, “Using Device Mapper Multipath with Novell Cluster Services,” on page 38
3.1.1 Hardware Requirements
The following hardware requirements for installing Novell Cluster Services represent the minimum
hardware configuration. Additional hardware might be necessary depending on how you intend to
use Novell Cluster Services.
A minimum of two Linux servers, and not more than 32 servers in a cluster
At least 512 MB of memory on each server in the cluster
One non-shared device on each server to be used for the operating system
At least one network card per server in the same IP subnet
Installing and Configuring Novell Cluster Services on OES 2 Linux
27
Page 28

In addition, each server must meet the requirements for Novell Open Enterprise Server 2 Linux. For
information, see “Meeting All Server Software and Hardware Requirements” in the OES 2 SP2:
Installation Guide.
NOTE: Although identical hardware for each cluster server is not required, having servers with the
same or similar processors and memory can reduce differences in performance between cluster
nodes and make it easier to manage your cluster. There are fewer variables to consider when
designing your cluster and failover rules if each cluster node has the same processor and amount of
memory.
If you have a Fibre Channel SAN, the host bus adapters (HBAs) for each cluster node should be
identical.
3.1.2 Software Requirements
Ensure that your system meets the following software requirements for installing and managing
Novell Cluster Services:
“Novell Open Enterprise Server 2 Linux” on page 28
novdocx (en) 7 January 2010
“Novell eDirectory 8.8” on page 29
“Novell iManager 2.7.3” on page 29
“EVMS” on page 30
“Linux POSIX File Systems” on page 30
“NSS File System on Linux” on page 31
“Dynamic Storage Technology Shadow Volume Pairs” on page 31
“NCP Server for Linux” on page 31
“Novell AFP for Linux” on page 32
“Novell CIFS for Linux” on page 32
“Novell Domain Services for Windows” on page 32
“OpenWBEM” on page 32
“SLP” on page 33
“Xen Virtualization Environments” on page 33
Novell Open Enterprise Server 2 Linux
Novell Cluster Services 1.8.5 (or later) for Linux supports Novell Open Enterprise Server 2 Linux or
later. OES 2 Linux must be installed and running on each cluster server in the cluster. Novell Cluster
Services is a component of the OES 2 services for OES 2 Linux.
You cannot mix two versions of OES 2 Linux in a single cluster except to support a rolling cluster
upgrade. For OES 2 Linux cluster upgrade information, see Chapter 4, “Upgrading OES 2 Linux
Clusters,” on page 53.
You cannot mix OES 2 Linux and OES 1 Linux in a single cluster except to support a rolling cluster
upgrade. For OES 1 Linux to OES 2 Linux upgrades, see Chapter 5, “Upgrading OES 1 Linux
Clusters to OES 2 Linux,” on page 55.
28 OES 2 SP2: Novell Cluster Services 1.8.7 for Linux Administration Guide
Page 29

You cannot mix OES 2 Linux and NetWare 6.5 SP7 (or later) in a single cluster except to support a
rolling cluster conversion. For cluster conversion information, see Chapter 6, “Converting NetWare
6.5 Clusters to OES 2 Linux,” on page 59.
Novell eDirectory 8.8
TM
Novell eDirectory
8.8 or later is required for managing the Cluster object and Cluster Node
objects for Novell Cluster Services. eDirectory must be installed somewhere in the same tree as the
cluster. eDirectory can be installed on any node in the cluster, on a separate server, or in a separate
cluster. You can install an eDirectory master replica or replica in the cluster, but it is not required to
do so for Novell Cluster Services.
For eDirectory configuration requirements, see “eDirectory Configuration” on page 34.
Novell iManager 2.7.3
Novell iManager 2.7.3 or later is required for configuring and managing clusters for OES 2 SP2.
iManager must be installed on at least one server in your tree.
NOTE: A February 3, 2009 update to the Clusters plug-in for OES 2 SP1 Linux is available that can
be used to manage the Novell Business Continuity Clustering (BCC) 1.2 for OES 2 SP1 Linux. You
can download the update from the Novell Downloads Web site (http://download.novell.com/). For
information about BCC 1.2, see BCC 1.2: Administration Guide for OES 2 SP1 Linux (http://
www.novell.com/documentation/bcc/bcc12_admin_lx/data/bookinfo.html)
novdocx (en) 7 January 2010
The OES 2 SP2 Linux release contains a Clusters plug-in that is required when using Novell
Business Continuity Clustering 1.2.1 for OES 2 SP2 Linux. For information about BCC 1.2.1, see
BCC 1.2.1: Administration Guide for OES 2 SP2 Linux (http://www.novell.com/documentation/bcc/
bcc121_admin_lx/data/bookinfo.html).
To use the Clusters role in iManager, the following storage-related plug-ins must be installed:
Clusters (
Common code for storage-related plug-ins (
The
storagemgmt.npm
ncsmgmt.npm
contains code in common with other storage-related plug-ins for OES 2
)
storagemgmt.npm
)
SP1:
Product Plug-In NPM File
Novell Archive and Version Services Archive Versioning
Novell Apple* Filing Protocol (AFP) for OES 2
SP1 Linux and NetWare
Novell CIFS for OES 2 SP1 Linux and NetWare File Protocols > CIFS
Novell Distributed File Services Distributed File Services
Novell Storage Services
TM
File Protocols > AFP
Storage
arkmgmt.npm
afpmgmt.npm
cifsmgmt.npm
dfsmgmt.npm
nssmgmt.npm
These additional plug-ins are needed when working with the NSS file system. Make sure that you
include the common
storagemgmt.npm
plug-in module when installing any of these storage-related
plug-ins.
Installing and Configuring Novell Cluster Services on OES 2 Linux 29
Page 30

IMPORTANT: If you use more than one of these plug-ins, you should install, update, or remove
them all at the same time to make sure the common code works for all plug-ins.
Make sure to uninstall the old version of the plug-ins before you attempt to install the new versions
of the plug-in files.
These iManager plug-ins support iManager 2.7.2 and later on all operating systems supported by
iManager and iManager Workstation.
The latest Novell storage-related plug-ins can be downloaded as a single zipped download file from
the Novell Downloads Web site (http://download.novell.com). For information about installing
plug-ins in iManager, see “Downloading and Installing Plug-in Modules” in the Novell iManager
2.7.3 Administration Guide.
To update storage-related plug-ins:
1 In iManager, uninstall the currently installed storage-related plug-ins.
2 Copy the new .npm files into the iManager plug-ins location, manually overwriting the older
version of the plug-in in the packages folder with the newer version of the plug-in.
novdocx (en) 7 January 2010
3 In iManager, install all of the storage-related plug-ins, or install the plug-ins you need, plus the
common code.
For information about working with storage-related plug-ins for iManager, see “Understanding
Storage-Related Plug-Ins” in the OES 2 SP2: NSS File System Administration Guide.
For browser configuration requirements, see “Web Browser” on page 36.
EVMS
EVMS (Enterprise Volume Management System) 2.5.5-24.54.5 or later is automatically installed on
the server when you install Novell Cluster Services. It provides the Cluster Segment Manager
(CSM) for shared cluster resources.
®
Updates to EVMS are received through the update channel for SUSE
Linux Enterprise Server 10
SP 2 or later. Make sure that you install the latest patches for EVMS before you create any cluster
resources for this server.
WARNING: EVMS administration utilities (
evms, evmsgui
, and
evmsn
) should not be running
when they are not being used. EVMS utilities lock the EVMS engine, which prevents other EVMSrelated actions from being performed. This affects both NSS and Linux POSIX* volume actions.
NSS and Linux POSIX volume cluster resources should not be migrated while any of the EVMS
administration utilities are running.
Linux POSIX File Systems
Novell Cluster Services supports creating shared cluster resources on Linux POSIX file systems,
such as Ext3, XFS, and ReiserFS. Linux POSIX file systems are automatically installed as part of
the OES 2 Linux installation.
30 OES 2 SP2: Novell Cluster Services 1.8.7 for Linux Administration Guide
Page 31

NSS File System on Linux
Novell Cluster Services supports creating shared cluster resources by using Novell Storage Services
file system on Linux. NSS is not a required component for Novell Cluster Services on Linux unless
you want to create and cluster-enable NSS pools and volumes. You can also use NSS for the SBD
partition. The Novell Storage Services option is not automatically selected when you select Novell
Cluster Services option during the install.
NSS on Linux supports the following advertising protocols in concurrent use for a given clusterenabled NSS pool:
novdocx (en) 7 January 2010
NetWare Core Protocol
TM
(NCP), which is selected by default and is mandatory for NSS. For
information, see “NCP Server for Linux” on page 31.
Novell Apple Filing Protocol (AFP), which is available for NSS only in OES 2 SP1 Linux and
later. For information, see “Novell AFP for Linux” on page 32.
Novell CIFS, which is available for NSS only in OES 2 SP1 Linux and later. For information,
see “Novell CIFS for Linux” on page 32.
Dynamic Storage Technology Shadow Volume Pairs
Novell Cluster Services supports clustering for Novell Dynamic Storage Technology (DST) shadow
volume pairs on OES 2 Linux. DST is installed automatically when you install NCP Server for
Linux. The NCP Server and Dynamic Storage Technology option is not automatically selected when
you select Novell Cluster Services option during the install.
For information about creating and cluster-enabling Dynamic Storage Technology volumes on
Linux, see “Configuring DST Shadow Volumes with Novell Cluster Services for Linux” in the OES
2 SP2: Dynamic Storage Technology Administration Guide.
NCP Server for Linux
NCP Server for Linux is required to be installed and running before you can cluster-enable NCP
volumes on Linux POSIX file systems, NSS volumes, or Dynamic Storage Technology shadow
volume pairs. This applies to physical servers and Xen-based virtual machine (VM) guest servers
(DomU). NCP Server is required in order to create virtual cluster server objects for cluster resources
for these volume types. The NCP Server and Dynamic Storage Technology option is not
automatically selected when you select Novell Cluster Services option during the install.
NCP Server for Linux is required to be installed and running for NSS volumes, even if users access
the volume only with other protocols such as Novell AFP for Linux, Novell CIFS for Linux, or
Samba.
NCP Server for Linux is not required when you are cluster-enabling only Linux POSIX volumes
where you plan to use only native Linux protocols for user access, such as Samba.
NCP Server for Linux is not required when running Novell Cluster Services on a Xen-based VM
host server (Dom0) for the purpose of cluster-enabling the configuration files for Xen-based VMs.
Users do not access these VM files.
For information about installing and configuring NCP Server for Linux, see the OES 2 SP2: NCP
Server for Linux Administration Guide.
Installing and Configuring Novell Cluster Services on OES 2 Linux 31
Page 32

For information about creating and cluster-enabling NCP volumes on Linux POSIX file systems, see
“Configuring NCP Volumes with Novell Cluster Services” in the OES 2 SP2: NCP Server for Linux
Administration Guide.
Novell AFP for Linux
Novell Cluster Services supports using Novell AFP for Linux as an advertising protocol for clusterenabled NSS pools and volumes on OES 2 SP1 Linux and later. Novell AFP is not required to be
installed when you install Novell Cluster Services, but it must be installed and running when you
create and cluster-enable the shared NSS pool in order for the AFP option to be available as an
advertising protocol for the cluster resource.
For information about installing and configuring the Novell AFP service, see the OES 2 SP2:
Novell AFP For Linux Administration Guide.
Novell CIFS for Linux
Novell Cluster Services supports using Novell CIFS for Linux as an advertising protocol for clusterenabled NSS pools and volumes on OES 2 SP1 Linux and later. Novell CIFS is not required to be
installed when you install Novell Cluster Services, but it must be installed and running when you
cluster-enable the shared NSS pool in order for the CIFS Virtual Server Name and CIFS option to be
available as an advertising protocol for the cluster resource.
novdocx (en) 7 January 2010
For information about installing and configuring the Novell CIFS service, see the OES 2 SP2:
Novell CIFS for Linux Administration Guide.
Novell Domain Services for Windows
Novell Cluster Services supports using clusters in Domain Services for Windows* (DSfW) contexts
for OES 2 SP1 Linux and later. If Domain Services for Windows is installed in the eDirectory tree,
the nodes in a given cluster can be in the same or different DSfW subdomains. Port 1636 is used for
DSfW communications. This port must be opened in the firewall.
For information using Domain Services for Windows, see the OES 2 SP2: Domain Services for
Windows Administration Guide.
OpenWBEM
OpenWBEM must be configured to start with
chkconfig
, and be running when you manage the
cluster with Novell iManager. For information on setup and configuration, see the OES 2 SP2:
OpenWBEM Services Administration Guide.
Port 5989 is the default setting for secure HTTP (HTTPS) communications. If you are using a
firewall, the port must be opened for CIMOM communications.
For OES 2 and later, the Clusters plug-in (and all other storage-related plug-ins) for iManager
require CIMOM connections for tasks that transmit sensitive information (such as a username and
password) between iManager and the
_admin
volume on the OES 2 Linux that server you are
managing. Typically, CIMOM is running, so this should be the normal condition when using the
server. CIMOM connections use Secure HTTP (HTTPS) for transferring data, and this ensures that
sensitive data is not exposed.
32 OES 2 SP2: Novell Cluster Services 1.8.7 for Linux Administration Guide
Page 33

If CIMOM is not currently running when you click OK or Finish for the task that sends the sensitive
information, you get an error message explaining that the connection is not secure and that CIMOM
must be running before you can perform the task.
IMPORTANT: If you receive file protocol errors, it might be because WBEM is not running.
To check the status of WBEM:
root
1 As
rcowcimomd status
in a console shell, enter
To start WBEM:
1 As
root
in a console shell, enter
rcowcimomd start
SLP
SLP (Service Location Protocol) is a required component for Novell Cluster Services on Linux
when you are using NCP to access file systems on cluster resources. NCP requires SLP for the
ncpcon bind
and
ncpcon unbind
commands in the cluster load and unload scripts. For example,
NCP is needed for NSS volumes and for NCP volumes on Linux POSIX file systems.
novdocx (en) 7 January 2010
SLP is not automatically installed when you select Novell Cluster Services. SLP is installed as part
of the Novell eDirectory configuration during the OES 2 Linux install. You can enable and
configure SLP on the eDirectory Configuration - NTP & SLP page. For information, see
“Specifying SLP Configuration Options” in the OES 2 SP2: Installation Guide.
slpd
When the SLP daemon (
that contains the
ncpcon bind
) is not installed and running on a cluster node, any cluster resource
command goes comatose when it is migrated or failed over to the
node because the bind cannot be executed without SLP.
For more information, see “Implementing the Service Location Protocol” (http://www.novell.com/
documentation/edir88/edir88/data/ba5lb4b.html) in the Novell eDirectory 8.8 Administration Guide.
Xen Virtualization Environments
Xen virtualization software is included with SUSE Linux Enterprise Server. Novell Cluster Services
supports using Xen virtual machine (VM) guest servers as nodes in a cluster. You can install Novell
Cluster Services on the guest server just as you would a physical server. All templates except the
Xen and XenLive templates can be used on a VM guest server. For examples, see Chapter 12,
“Configuring Novell Cluster Services in a Xen Virtualization Environment,” on page 181.
Novell Cluster Services is supported to run on a Xen host server where it can be used to cluster the
virtual machine configuration files on Linux POSIX file systems. Only the Xen and XenLive
templates are supported for use in the XEN host environment. For information about setting up Xen
and XenLive cluster resources, see Section 12.2, “Virtual Machines as Cluster Resources,” on
page 182.
Installing and Configuring Novell Cluster Services on OES 2 Linux 33
Page 34

3.1.3 Configuration Requirements
Ensure that configuration requirements are met for these components:
“IP Addresses” on page 34
“eDirectory Configuration” on page 34
“Cluster Services Installation Administrator” on page 34
“Cluster Services Management Administrator” on page 35
“Web Browser” on page 36
IP Addresses
All IP addresses used by the master cluster IP address, its cluster servers, and its cluster
resources must be on the same IP subnet.They do not need to be contiguous addresses.
Each server in the cluster must be configured with a unique static IP address.
You need additional unique static IP addresses for the cluster and for each cluster resource and
cluster-enabled pool.
novdocx (en) 7 January 2010
eDirectory Configuration
All servers in the cluster must be in the same Novell eDirectory tree.
If the servers in the cluster are in separate eDirectory containers, the user who administers the
cluster must have rights to the cluster server containers and to the containers where any clusterenabled pool objects are stored. You can do this by adding trustee assignments for the cluster
administrator to a parent container of the containers where the cluster server objects reside. See
“eDirectory Rights” (http://www.novell.com/documentation/edir88/edir88/data/fbachifb.html)
in the eDirectory 8.8 Administration Guide for more information.
If you are creating a new cluster, the eDirectory context where the new Cluster object will
reside must be an existing context. Specifying a new context during the Novell Cluster Services
install configuration does not create a new context.
Multiple clusters can co-exist in the same eDirectory container.
Cluster Services Installation Administrator
A tree administrator user with credentials to do so can extend the eDirectory schema before a
cluster is installed anywhere in a tree. Extending the schema separately allows a container
administrator (or non-administrator user) to install a cluster in a container in that same tree
without needing full administrator rights for the tree. For instructions, see Section 3.3,
“Extending the eDirectory Schema to Add Cluster Objects,” on page 40.
IMPORTANT: It is not necessary to extend the schema separately if the installer of the first
cluster server in the tree has the eDirectory rights necessary to extend the schema.
After the schema has been extended, the container administrator (or non-administrator user)
needs the following eDirectory rights to install Novell Cluster Services:
Attribute Modify rights on the NCP Server object of each node in the cluster.
To set the Attribute Modify rights for the user on the nodes’ NCP Server objects:
1. In iManager, select Rights > Modify Trustees.
34 OES 2 SP2: Novell Cluster Services 1.8.7 for Linux Administration Guide
Page 35

2. Select the NCP server object for the node, then click Add Trustee.
3. For Entry Rights, set the Browse right.
4. For All Attributes Rights, set the Compare, Read, and Write rights.
5. Click Apply to save and apply your changes.
6. Repeat Step 1 to Step 5 for the NCP Server object of each server that you plan to add
to the cluster.
Object Create rights on the container where the NCP Server objects are.
To set the Object Create rights for the user on the container where the NCP Server objects
are:
1. In iManager, select Rights > Modify Trustees.
2. Select the Container object, then click Add Trustee.
3. For Entry Rights, set the Browse, Create, and Rename rights.
4. For All Attributes Rights, set the Compare, Read, and Write rights.
5. Click Apply to save and apply your changes.
Object Create rights where the cluster container will be.
novdocx (en) 7 January 2010
This step is needed if the container for the Cluster object is different than the container for
the NCP Server objects.
To set the Object Create rights for the user on the container where the Cluster objects will
be:
1. In iManager, select Rights > Modify Trustees.
2. Select the Container object, then click Add Trustee.
3. For Entry Rights, set the Browse, Create, and Rename rights.
4. For All Attributes Rights, set the Compare, Read, and Write rights.
5. Click Apply to save and apply your changes.
NOTE: If the eDirectory administrator username or password contains special characters (such as $,
#, and so on), some interfaces in iManager and YaST might not handle the special characters. If you
encounter problems, try escaping each special character by preceding it with a backslash (\) when
you enter credentials.
Cluster Services Management Administrator
The administrator credentials entered during the install are automatically configured to allow that
user to manage the cluster. You can modify this default administrator username or password after the
install by following the procedure in Section 8.13, “Moving a Cluster, or Changing IP Addresses,
LDAP Server, or Administrator Credentials for a Cluster,” on page 105.
After the install, you can add other users (such as the tree administrator) as administrator equivalent
accounts for the cluster by configuring the following for the user account:
Give the user the Supervisor right to the Server object of each of the servers in the cluster.
Linux-enable the user account with Linux User Management.
Make the user a member of a LUM-enabled administrator group that is associated with the
servers in the cluster.
Installing and Configuring Novell Cluster Services on OES 2 Linux 35
Page 36

Web Browser
The browser that will be used to manage Novell Cluster Services must be set to a supported
language. For information about supported languages, see the Novell iManager documentation
(http://www.novell.com/documentation/imanager27/).
The Cluster plug-in for iManager might not operate properly if the highest priority Language setting
for your Web browser is set to a language other than one of the supported languages. To avoid
problems, in your Web browser, click Too ls > Options > Languages, and then set the first language
preference in the list to a supported language.
Supported language codes are Unicode (UTF-8) compliant. To avoid display problems, make sure
the Character Encoding setting for the browser is set to Unicode (UTF-8) or ISO 8859-1 (Western,
Western European, West European). In a Mozilla browser, click View > Character Encoding, then
select the supported character encoding setting. In an Internet Explorer browser, click View >
Encoding, then select the supported character encoding setting.
For a information about supported browsers, see “Using a Supported Web Browser” in the Novell
iManager 2.7.3 Administration Guide.
novdocx (en) 7 January 2010
3.1.4 Shared Disk System Requirements
A shared disk subsystem is required for each cluster in order to make data highly available. Make
sure your shared storage devices meet the following requirements:
“Shared Devices” on page 36
“SBD Partitions” on page 37
“Shared iSCSI Devices” on page 37
“Shared RAID Devices” on page 37
Shared Devices
Novell Cluster Services supports the following shared disks:
Fibre Channel LUN (logical unit number) devices in a storage array
iSCSI LUN devices
SCSI disks (shared external drive arrays)
Before installing Novell Cluster Services, the shared disk system must be properly set up and
functional according to the manufacturer's instructions.
Prior to installation, verify that all the drives in your shared disk system are recognized by Linux by
viewing a list of the devices on each server that you intend to add to your cluster. If any of the drives
in the shared disk system do not show up in the list, consult the OES 2 documentation or the shared
disk system documentation for troubleshooting information.
Devices where you plan to create shared file systems (such as NSS pools and Linux POSIX file
systems) must be unpartitioned devices that can be managed by EVMS. NSS automatically
partitions the device and lays down a Cluster Segment Manager on the partition when you use NSS
tools to create a pool. You use the EVMS GUI to partition and create shared Linux POSIX file
systems.
36 OES 2 SP2: Novell Cluster Services 1.8.7 for Linux Administration Guide
Page 37

If this is a new cluster, the shared disk system must be connected to the first server so that the cluster
partition can be created during the Novell Cluster Services install.
SBD Partitions
The shared disk system must have at least 20 MB of free disk space available for creating a special
cluster partition for the split-brain detector (SBD).
IMPORTANT: The cluster SBD partition is not required unless you have shared storage in the
cluster.
The Novell Cluster Services installation automatically allocates one cylinder on one drive of the
shared disk system for the special cluster partition. Depending on the location of the cylinder, the
actual amount of space used by the cluster partition might be less than 20 MB.
If you want to mirror the SBD partition for greater fault tolerance, you need at least 20 MB of free
disk space on a second shared disk where you want to create the mirror.
Before installing Novell Cluster Services or creating a new SBD partition, you must initialize the
partition, and mark its device as shareable for clustering. If you plan to mirror the SBD, you must
also initialize the partition you want to use as the mirrored SBD, and mark its device as shareable for
clustering. This allows the installation software to recognize available partitions and present them
for use during the install. You can initialize the device by using NSSMU or the Storage plug-in to
iManager. Beginning in OES 2 SP2, the NSS utility called
ncsinit
is also available for initializing
a device and setting it to a shared state.
novdocx (en) 7 January 2010
For information about how SBD partitions work and how to create one after installing the first node,
see Section 8.16.3, “Creating a Non-Mirrored Cluster SBD Partition,” on page 111.
Shared iSCSI Devices
If you are using iSCSI for shared disk system access, ensure that you have configured iSCSI
initiators and targets (LUNs) prior to installing Novell Cluster Services.
Shared RAID Devices
We recommend that you use hardware RAID in the shared disk subsystem to add fault tolerance to
the shared disk system.
Consider the following when using software RAIDs:
NSS software RAID is supported for shared disks.
Linux software RAID can be used in shared disk configurations that do not require the RAID to
be concurrently active on multiple nodes. Linux software RAID cannot be used underneath
clustered file systems (such as OCFS2, GFS, and CXFS) because it does not support concurrent
activation.
WARNING: Activating Linux software RAID devices concurrently on multiple nodes can
result in data corruption or inconsistencies.
Installing and Configuring Novell Cluster Services on OES 2 Linux 37
Page 38

3.1.5 SAN Rules for LUN Masking
When you create a Novell Cluster Services system that uses shared storage space, it is important to
remember that all of the servers that you grant access to the shared device, whether in the cluster or
not, have access to all of the volumes on the shared storage space unless you specifically prevent
such access. Novell Cluster Services arbitrates access to shared volumes for all cluster nodes, but
cannot protect shared volumes from being corrupted by non-cluster servers.
LUN masking is the ability to exclusively assign each LUN to one or more host connections. With it
you can assign appropriately sized pieces of storage from a common storage pool to various servers.
See your storage system vendor documentation for more information on configuring LUN masking.
Software included with your storage system can be used to mask LUNs or to provide zoning
configuration of the SAN fabric to prevent shared volumes from being corrupted by non-cluster
servers.
IMPORTANT: We recommend that you implement LUN masking in your cluster for data
protection. LUN masking is provided by your storage system vendor.
novdocx (en) 7 January 2010
3.1.6 Using Device Mapper Multipath with Novell Cluster Services
When you use Device Mapper Multipath (DM-MP) with Novell Cluster Services, make sure to set
the path failover settings so that the paths fail when path I/O errors occur.
The default setting in DM-MP is to queue I/O if one or more HBA paths is lost. Novell Cluster
Services does not migrate resources from a node set to the Queue mode because of data corruption
issues that can be caused by double mounts if the HBA path is recovered before a reboot.
IMPORTANT: The HBAs must be set to Failed mode so that Novell Cluster Services can auto
failover storage resources if a disk paths go down.
Change the setting in the
Cluster Services works correctly with DM-MP. Also consider changes as needed for the retry
settings in the HBA BIOS.
“Settings for the modprobe.conf.local File” on page 38
“Settings for the multipath.conf File” on page 39
“Settings for a QLogic HBA BIOS” on page 39
Settings for the modprobe.conf.local File
modprobe.conf.local
and
multipath.conf
files so that Novell
Use the following setting in the
options qla2xxx qlport_down_retry=1
There was a change in the latest kernel and qla-driver that influences the time-out. Without the latest
patch, an extra five seconds is automatically added to the port_down_retry variable to determine the
time-out value for option 1 (dev_loss_tmo=port_down_retry_count+5), and option 1 is the best
choice. In the patch, the extra 5 seconds are no longer added to the port_down_retry variable to
determine the time-out value for option 1 (dev_loss_tmo=port_down_retry_count). If you have
installed the latest qla-driver, option 2 is the best choice.
38 OES 2 SP2: Novell Cluster Services 1.8.7 for Linux Administration Guide
/etc/modprobe.conf.local
file:
Page 39

For OES 2 SP2 and later, or if you have installed the latest kernel and qla-driver, use the following
setting in the
options qla2xxx qlport_down_retry=2
/etc/modprobe.conf.local
file:
Settings for the multipath.conf File
novdocx (en) 7 January 2010
Use the following settings for the device settings in the
failback "immediate"
no_path_retry fail
The value
fail
is the same as a setting value of 0.
/etc/multipath.conf
file:
For example:
defaults
{
polling_interval 1
# no_path_retry 0
user_friendly_names yes
features 0
}
devices {
device {
vendor "DGC"
product ".*"
product_blacklist "LUNZ"
path_grouping_policy "group_by_prio"
path_checker "emc_clariion"
features "0"
hardware_handler "1 emc"
prio "emc"
failback "immediate"
no_path_retry fail #Set MP for failed I/O mode, any other non-zero
values sets the HBAs for Blocked I/O mode
}
}
Settings for a QLogic HBA BIOS
For the QLogic HBA BIOS, the defaults for the Port Down Retry and Link Down Retry values are
45 seconds, so it will take about 50 seconds after a fault occurs before I/O resumes on the remaining
HBAs. Change these settings from 45 seconds to 5 seconds in the HBA BIOS. For example:
Port Down Retry=5
Link Down Retry=5
3.2 Novell Cluster Services Licensing
Novell Cluster Services supports up to 32 nodes in a single cluster. Novell Open Enterprise Server 2
customers receive a Novell Cluster Services entitlement that covers an unlimited number of twonode clusters. Customers who want to add nodes to any cluster can purchase a paper license for
them for an additional fee. For information, see the Novell Cluster Services for Open Enterprise
Server How-to-Buy Web site (http://www.novell.com/products/openenterpriseserver/ncs/
howtobuy.html).
Installing and Configuring Novell Cluster Services on OES 2 Linux 39
Page 40

3.3 Extending the eDirectory Schema to Add Cluster Objects
When you install Novell Cluster Services in a tree, the eDirectory schema for the tree is extended to
include the following types of objects:
Cluster objects (containers)
Cluster Node objects
Cluster Resource objects
Cluster Template objects
Volume Resource objects
In OES 2 SP1 Linux and later, a tree administrator user with credentials to do so can extend the
eDirectory schema before a cluster is installed anywhere in a tree. This allows container
administrators (or non-administrator users) to install a cluster in a container in that same tree without
needing full administrator rights for the tree. After the schema has been extended, you must assign
some eDirectory rights to the container administrators (or non-administrator users) who will install
Novell Cluster Services clusters.
novdocx (en) 7 January 2010
If the schema is not extended separately, the installer of the first cluster server in the tree must be an
administrator with credentials to extend the eDirectory schema. The schema is automatically
extended during the install. Subsequent cluster servers can be installed by container administrators
(or non-administrator users) with sufficient rights to install Novell Cluster Services. For install
rights information, see “Cluster Services Installation Administrator” on page 34 and Section 3.4,
“Assigning Install Rights for Container Administrators,” on page 41.
Section 3.3.1, “Prerequisites for Extending the Schema,” on page 40
Section 3.3.2, “Extending the Schema,” on page 41
3.3.1 Prerequisites for Extending the Schema
This procedure assumes that no clusters currently exist in the tree, and the schema needs to be
extended for cluster objects.
You need the Administrator credentials for extending the eDirectory schema.
You need the following information about the tree where you want to install Novell Cluster Services
clusters:
Table 3-1 Tree Information Needed for the Schema Expansion
Parameter Description Example
port_num The port number you assigned for eDirectory
communications in the tree where you plan to
install clusters. The default port is 636.
admin_username The typeful fully distinguished username of the
administrator who has the eDirectory rights
needed to extend the schema.
40 OES 2 SP2: Novell Cluster Services 1.8.7 for Linux Administration Guide
636
cn=admin,o=example
Page 41

Parameter Description Example
novdocx (en) 7 January 2010
admin_password The password of the administrator user.
server_ip_address The IP address of the eDirectory server that
contains the schema files.
pas5W0rd
10.10.10.1
3.3.2 Extending the Schema
You need to extend the schema only one time in the tree where you will be installing clusters.
IMPORTANT: It is not necessary to extend the schema separately from the Novell Cluster Services
installation if the installer of the first cluster server in the tree has the eDirectory rights necessary to
change the schema, because the schema can be automatically extended during the install.
To extend the schema separately from the first cluster installation in the tree, the tree administrator
user modifies the schema files as follows:
root
1 On an OES 2 SP1 Linux (or later) server, open a terminal console, then log in as the
to the tree.
2 In a text editor, create a text file, specify the configuration information for the Novell Cluster
Services cluster in it, then save the file.
The following lines are an example of the content of the file with sample values. The directives
are self-explanatory.
user
IMPORTANT: Make sure to change the values inside the quotation marks to the actual
settings for your cluster.
CONFIG_NCS_LDAP_IP="10.1.1.102"
CONFIG_NCS_LDAP_PORT="636"
CONFIG_NCS_ADMIN_DN="cn=admin.o=context"
CONFIG_NCS_ADMIN_PASSWORD="password"
3 As the
4 As the
5 Delete the configuration file (
root
user, enter the following command at a terminal console prompt:
mkdir -p /var/opt/novell/install
root
user, enter the following command at a terminal console prompt:
/opt/novell/ncs/install/ncs_install.py -e -f configuration_filename
Replace
configuration_filename
configuration_filename
with the actual name of the file you created.
) that you created.
6 Continue with Section 3.4, “Assigning Install Rights for Container Administrators,” on
page 41.
3.4 Assigning Install Rights for Container Administrators
After the eDirectory schema has been extended in the tree where you want to create clusters, the
container administrator (or non-administrator user) needs the following rights to install Novell
Cluster Services:
Attribute Modify rights on the NCP Server object of each node in the cluster.
Installing and Configuring Novell Cluster Services on OES 2 Linux 41
Page 42

Object Create rights on the container where the NCP Server objects are.
Object Create rights where the cluster container will be.
For information about assigning eDirectory rights, see “eDirectory Rights” (http://www.novell.com/
documentation/edir88/edir88/data/fbachifb.html) in the eDirectory 8.8 Administration Guide.
After assigning rights for these users, they can specify their credentials when they install Novell
Cluster Services clusters in their containers. You can also specify a different administrator user with
these rights to configure Novell Cluster Services as described in Section 3.6.2, “Using Different
LDAP Credentials for the Cluster Configuration,” on page 47.
3.5 Installing Novell Cluster Services
Novell Cluster Services for Linux is included on the add-on media for OES 2 Linux (or later). It is
necessary to install OES 2 Linux on every server that you want to add to a cluster.
You can install up to 32 nodes in each cluster. For information, see Section 3.2, “Novell Cluster
Services Licensing,” on page 39.
Installing Novell Cluster Services does the following:
novdocx (en) 7 January 2010
If the eDirectory schema has not already been extended for cluster objects, the schema is
extended.
Installs Novell Cluster Services software on the server.
You can create a new cluster or add a server to an existing cluster during the OES 2 Linux
installation, or afterwards by using the Open Enterprise Server > OES Install and Configuration
tool in YaST. For information, see Section 3.6, “Configuring Novell Cluster Services,” on page 46.
You can install Novell Cluster Services when you install OES 2 Linux, or afterwards on an existing
OES 2 Linux server.
IMPORTANT: Before you begin, make sure your system meets the requirements and caveats in
Section 3.1, “System Requirements for Novell Cluster Services,” on page 27.
If the eDirectory schema has not been extended in the tree where you want to create the cluster as
explained in Section 3.3, “Extending the eDirectory Schema to Add Cluster Objects,” on page 40,
the administrator user who installs Novell Cluster Services must have the rights necessary to extend
the schema.
Section 3.5.1, “Installing Novell Cluster Services during a OES 2 Linux Installation,” on
page 42
Section 3.5.2, “Installing Novell Cluster Services on an Existing OES 2 Linux Server,” on
page 44
3.5.1 Installing Novell Cluster Services during a OES 2 Linux Installation
This section describes only those steps in the install that are directly related to installing Novell
Cluster Services. For detailed instructions on installing OES 2 Linux, see the OES 2 SP2:
Installation Guide.
42 OES 2 SP2: Novell Cluster Services 1.8.7 for Linux Administration Guide
Page 43

IMPORTANT: If you want Novell Cluster Services to use a local eDirectory database on this
server, we recommend that you install and configure eDirectory before installing Novell Cluster
Services.
Repeat the following procedure for each server that you want to add to the cluster:
1 If you have a shared disk system and the server where you are installing Novell Cluster
Services is the second node in a cluster, verify that a cluster partition for the cluster’s Split
Brain Detector exists on the first cluster node before you begin the install on the second node.
A one-node cluster that has shared disk storage can be configured without an SBD, but the
SBD must be created before you add another node.
IMPORTANT: The cluster SBD partition is not required unless you have shared storage.
For information, see:
Section 8.16.3, “Creating a Non-Mirrored Cluster SBD Partition,” on page 111
Section 8.16.4, “Creating a Mirrored Cluster SBD Partition,” on page 112
2 Start the YaST install for SUSE Linux Enterprise Server 10 and continue to the Installation
Mode page.
3 Select New Installation, select Include Add-On Products from Separate Media, click Next, then
continue through the OES 2 add-on part of the install until you get to the Installation Settings
page.
4 On the Installation Settings page, click Software to open the Software Selection and System
Tasks page.
novdocx (en) 7 January 2010
5 Under OES Services, select Novell Cluster Services and any other OES components that you
want to install, then click Accept.
When you select Novell Cluster Services, the following basic services for managing OES 2 are
automatically selected:
Novell Backup / Storage Management
Installing and Configuring Novell Cluster Services on OES 2 Linux 43
Page 44

Novell Linux User Management
Novell Remote Manager
The following OES services are not automatically selected, but are required for managing and
configuring Novell Cluster Services:
Novell iManager must be installed on at least one server in your data center.
Novell eDirectory must already be installed on at least one server in the tree where you are
installing the cluster. You can install a replica on the cluster server.
Select Novell Storage Services and NCP Server and Dynamic Storage Technology options if
you want to cluster-enable NSS pools and volumes. This combination is also required to use
cluster-enabled NSS volumes in DST shadow volume pairs.
Select NCP Server and Dynamic Storage Technology if you want to cluster-enable NCP
volumes on Linux POSIX file systems.
Select other protocols and services according to your planned setup. For information, see
Section 3.1.2, “Software Requirements,” on page 28.
IMPORTANT: If you deselect a pattern after selecting it, you are instructing the installation
program to not install that pattern and all of its dependent patterns. Rather than deselecting a
pattern, click Cancel to cancel your software selections, then click the Software heading again
to choose your selections again.
Selecting only the patterns that you want to install ensures that the patterns and their dependent
patterns and packages are installed.
If you click Accept, then return to software pattern selection page, the selections that you made
become your base selections and must be deselected if you want to remove them from the
installation proposal.
novdocx (en) 7 January 2010
6 Continue through the installation process until you reach the Novell Open Enterprise Server
Configuration page, then do one of the following:
Configure Novell Cluster Services now: If eDirectory is already installed and running in
your environment and you want to configure clustering for the server now, continue with
Section 3.6.3, “Enabling the Novell Cluster Services Configuration Page in YaST,” on
page 48.
Configure Novell Cluster Services later: Continue with the rest of the OES installation,
but do not configure clustering. You can configure clustering later by using YaST > O pen
Enterprise Server > OES Install and Configuration to access the Novell Open Enterprise
Server Configuration page. For information, see Section 3.6, “Configuring Novell Cluster
Services,” on page 46.
3.5.2 Installing Novell Cluster Services on an Existing OES 2 Linux Server
If you did not install Novell Cluster Services during the OES 2 Linux installation, you can install it
later by using YaST > Open Enterprise Server > OES Install and Configuration.
IMPORTANT: If you want Novell Cluster Services to use a local eDirectory database on the
existing server, we recommend that you install and configure eDirectory before installing Novell
Cluster Services.
44 OES 2 SP2: Novell Cluster Services 1.8.7 for Linux Administration Guide
Page 45

Repeat the following procedure for each server that you want to add to the cluster:
1 If you have a shared disk system and the server where you are installing Novell Cluster
Services is the second node in a cluster, verify that a cluster partition for the cluster’s Split
Brain Detector exists on the first cluster node before you begin the install on the second node.
A one-node cluster that has shared disk storage can be configured without an SBD, but the
SBD must be created before you add another node.
IMPORTANT: The cluster SBD partition is not required unless you have shared storage.
For information, see:
Section 8.16.3, “Creating a Non-Mirrored Cluster SBD Partition,” on page 111
Section 8.16.4, “Creating a Mirrored Cluster SBD Partition,” on page 112
root
2 Log in to the server as the
user.
3 In YaST, select Open Enterprise Server > OES Install and Configuration.
novdocx (en) 7 January 2010
4 On the Software Selection page under OES Services, click Novell Cluster Services and any
other compatible OES components that you want to install.
Services that you have already installed are indicated by a blue check mark in the status check
box next to the service.
For information about the options, see Step 5 in Section 3.5.1, “Installing Novell Cluster
Services during a OES 2 Linux Installation,” on page 42.
5 Click Accept to begin the install, then click Continue to accept changed packages.
Installing and Configuring Novell Cluster Services on OES 2 Linux 45
Page 46

6 Continue through the installation process until you reach the Novell Open Enterprise Server
Configuration page.
7 On the Novell Open Enterprise Server Configuration page, do one of the following:
Configure Novell Cluster Services now: If eDirectory is already installed and running in
your environment and you want to configure clustering for the server now, continue with
Section 3.6.3, “Enabling the Novell Cluster Services Configuration Page in YaST,” on
page 48.
Configure Novell Cluster Services later: Continue with the rest of the Novell Cluster
Services installation, but do not configure clustering. You can configure clustering later by
using YaST > Open Enterprise Server > OES Install and Configuration to access the
Novell Open Enterprise Server Configuration page. For information, see Section 3.6,
“Configuring Novell Cluster Services,” on page 46.
3.6 Configuring Novell Cluster Services
You can create a new cluster or add a server to an existing cluster during the OES 2 Linux
installation, or afterwards by using the Open Enterprise Server > OES Install and Configuration
tool in YaST.
novdocx (en) 7 January 2010
IMPORTANT: If Novell Cluster Services is already configured on the server, see Section 8.13,
“Moving a Cluster, or Changing IP Addresses, LDAP Server, or Administrator Credentials for a
Cluster,” on page 105 for information about modifying an existing cluster configuration.
If you are creating a new cluster, the Novell Cluster Services configuration does the following:
Creates a new Cluster object and a Cluster Node object in eDirectory.
Creates a special cluster partition for the Split Brain Detector (SBD) if you have a shared disk
system.
If you are adding a server to an existing cluster, the Novell Cluster Services configuration does the
following:
Creates a new Cluster Node object in eDirectory.
Section 3.6.1, “Opening the Novell Open Enterprise Server Configuration Page,” on page 46
Section 3.6.2, “Using Different LDAP Credentials for the Cluster Configuration,” on page 47
Section 3.6.3, “Enabling the Novell Cluster Services Configuration Page in YaST,” on page 48
Section 3.6.4, “Configuring a New Cluster,” on page 48
Section 3.6.5, “Adding a Node to an Existing Cluster,” on page 50
3.6.1 Opening the Novell Open Enterprise Server Configuration Page
1 Log in to the server as the
46 OES 2 SP2: Novell Cluster Services 1.8.7 for Linux Administration Guide
root
user.
Page 47

2 In YaST, select Open Enterprise Server > OES Install and Configuration.
3 On the Software Selection page under OES Services, verify that the Novell Cluster Services
option is already installed as indicated by a blue check mark, then click Accept.
It is okay to install other OES components at this time, but this setup focuses only on
configuring Novell Cluster Services.
novdocx (en) 7 January 2010
4 Click Accept to proceed to the Novell Open Enterprise Server Configuration page.
5 Do one of the following:
Same Administrator: To use the same administrator credentials that were used to install
Novell Cluster Services, continue with Section 3.6.3, “Enabling the Novell Cluster
Services Configuration Page in YaST,” on page 48.
Different Administrator: To use different administrator credentials than those used to
install Novell Cluster Services, continue with Section 3.6.2, “Using Different LDAP
Credentials for the Cluster Configuration,” on page 47.
3.6.2 Using Different LDAP Credentials for the Cluster Configuration
You can use different user credentials to configure Novell Cluster Services than were used during
the installation of OES Services on the server by reconfiguring the settings for the LDAP
Configuration of Open Enterprise Services option.
Installing and Configuring Novell Cluster Services on OES 2 Linux 47
Page 48

For information about what rights are needed, see Section 3.4, “Assigning Install Rights for
Container Administrators,” on page 41.
1 On the Novell Open Enterprise Server Configuration page under LDAP Configuration of Open
Enterprise Services, click the disabled link to enable re-configuration.
The sentence changes to Reconfiguration is enabled.
2 Click the LDAP Configuration of Open Enterprise Services link to open the LDAP
Configuration page.
3 Specify the following values:
Admin name and context: The username and context (in LDAP form) of the container
administrator user (or non-administrator user) who has the eDirectory rights needed to
install Novell Cluster Services.
Admin password: The password of the container administrator (or non-administrator
user).
4 Click Next.
The install returns to the Novell Open Enterprise Server Configuration page.
5 Continue with Section 3.6.3, “Enabling the Novell Cluster Services Configuration Page in
YaST,” on page 48.
novdocx (en) 7 January 2010
3.6.3 Enabling the Novell Cluster Services Configuration Page in YaST
1 On the Novell Open Enterprise Server Configuration page under Novell Cluster Services, click
the disabled link to enable configuration.
The sentence changes to Configure is enabled.
2 Click the Novell Cluster Services link to open the Novell Cluster Services Configuration page.
3 If you are prompted for credentials, specify the password of the specified Administrator user,
then click OK.
If you did not specify a different administrator user in Section 3.6.2, “Using Different LDAP
Credentials for the Cluster Configuration,” on page 47, this is the Administrator user whose
credentials you specified for eDirectory when the OES Services were installed on the server.
4 On the Novell Cluster Services Configuration page, continue with one of the following:
Section 3.6.4, “Configuring a New Cluster,” on page 48
Section 3.6.5, “Adding a Node to an Existing Cluster,” on page 50
3.6.4 Configuring a New Cluster
Perform the following configuration for the first node that you configure for a cluster:
1 Go to the Novell Cluster Services Configuration page, then select New Cluster.
2 Specify the following settings for the new cluster, then click Next.
Fully Distinguished name (FDN) of the Cluster
IMPORTANT: Use the comma format illustrated in the example. Do not use dots.
48 OES 2 SP2: Novell Cluster Services 1.8.7 for Linux Administration Guide
Page 49

This is the name you will give the new cluster and the eDirectory context where the new
Cluster object will reside.
You must specify an existing context. Specifying a new context does not create a new context.
Cluster names must be unique. You cannot create two clusters with the same name in the same
eDirectory tree.
Cluster IP Address
The cluster IP address is separate from the server IP address, is required to be on the same IP
subnet as the other servers in the same cluster, and is required for certain external network
management programs to get cluster status alerts. The cluster IP address provides a single point
for cluster access, configuration, and management. A Master IP Address resource that makes
this possible is created automatically during the Cluster Services installation.
The cluster IP address is bound to the master node and remains with the master node regardless
of which server is the master node.
SBD (Split Brain Detector) Partition
If you have a shared disk system attached to your cluster servers, Novell Cluster Services
creates a small cluster partition for the Split Brain Detector (SBD) on that shared disk system.
You can create the SBD partition as part of the first cluster node setup, or any time before you
attempt to install the second node in the cluster by using one of the following procedures:
novdocx (en) 7 January 2010
Section 8.16.3, “Creating a Non-Mirrored Cluster SBD Partition,” on page 111
Section 8.16.4, “Creating a Mirrored Cluster SBD Partition,” on page 112
IMPORTANT: For each SBD partition, you must have at least 20 MB of free space on a
device that has been initialized and marked as shareable for clustering.
If your cluster Do this
Has no shared devices Accept the default setting of None.
The SBD is not needed.
Has shared devices, but a device that you want
to use for the SBD partition has not yet been
initialized and marked as shareable for
clustering, or you want to set up the SBD later.
Has shared devices, and you want to create a
single SBD partition. The partition you want to
use has been initialized and marked as
shareable for clustering.
Accept the default setting of None.
To create an SBD partition after the install, see
Section 8.16.3, “Creating a Non-Mirrored Cluster
SBD Partition,” on page 111.
To create a mirrored SBD partitions after the
install, see Section 8.16.4, “Creating a Mirrored
Cluster SBD Partition,” on page 112.
Select the device where the SBD partition will be
created and specify the size to use.
For example, the device might be something
similar to
sdc
.
Has shared devices, and you want to create a
mirrored SBD partition for greater fault tolerance.
The partitions you want to use have each been
initialized and marked as shareable for
clustering.
Installing and Configuring Novell Cluster Services on OES 2 Linux 49
Select the device where the SBD partition will be
created, specify the size to use, and select the
device where you want to create the mirrored
partition.
Page 50

3 Select the IP address that Novell Cluster Services will use for this node.
Some servers have multiple IP addresses. This step lets you choose which IP address Novell
Cluster Services uses.
4 If this is an existing server, choose whether to start Novell Cluster Services software on this
node after configuring it, then click Next.
This option applies only to installing Novell Cluster Services on an existing server, because it
starts automatically when the server reboots during the OES installation.
5 If you are configuring during the install, continue through the rest of the OES installation and
setup process.
6 After the configuration is completed, start Novell Cluster Services using one of these methods:
Setup Condition Instructions
New install Novell Cluster Services starts automatically
when the server reboots during the OES
installation.
Automatically start specified in Step 4 Novell Cluster Services should be running after
the configuration completes.
novdocx (en) 7 January 2010
Do not automatically start specified in Step 4 Start Novell Cluster Services manually by using
one of these methods:
Reboot the cluster server.
At a terminal console prompt, go to the
etc/init.d
following as the
./novell-ncs start
directory, then enter the
root
user:
At a terminal console prompt, enter the
following as the
rcnovell-ncs start
root
user:
7 Use the Software Updater (or other update methods) to install any patches from the OES 2
Linux patch channel and any EVMS patches from the SUSE Linux Enterprise Server 10 SP3
patch channel.
8 Continue with Section 3.7, “Configuring Additional Administrators,” on page 52.
3.6.5 Adding a Node to an Existing Cluster
Perform the following configuration for each node that you add to an existing cluster:
1 If you have a shared disk system attached to your cluster servers, an SBD partition is required
and must be created before you configure the second node in the cluster.
If you have not previously configured the SBD partition for the cluster, create an SBD partition
for the cluster by using one of the following procedures:
/
Section 8.16.3, “Creating a Non-Mirrored Cluster SBD Partition,” on page 111
Section 8.16.4, “Creating a Mirrored Cluster SBD Partition,” on page 112
50 OES 2 SP2: Novell Cluster Services 1.8.7 for Linux Administration Guide
Page 51

IMPORTANT: An SBD partition requires least 20 MB of free space on a device that has been
previously initialized and marked as shareable for clustering.
2 Go to the Novell Cluster Services Configuration page, then click Existing Cluster.
3 Specify the fully distinguished name (FDN) of the cluster, then click Next.
IMPORTANT: Use the comma format illustrated in the example. Do not use dots.
This is the name and eDirectory context of the cluster where you want to add this server.
4 Select the IP address that Novell Cluster Services will use for this node.
Some servers have multiple IP addresses. This step lets you choose which IP address Novell
Cluster Services uses.
5 If this is an existing server, choose whether to start Novell Cluster Services software on this
node after configuring it, then click Next.
This option applies only to installing Novell Cluster Services on an existing server, because it
starts automatically when the server reboots during the OES installation.
6 If you are configuring during the install, continue through the rest of the OES installation and
setup process.
novdocx (en) 7 January 2010
7 After the configuration is completed, start Novell Cluster Services using one of these methods:
Setup Condition Instructions
New install Novell Cluster Services starts automatically
when the server reboots during the OES
installation.
Automatically start specified in Step 4 Novell Cluster Services should be running after
the configuration completes.
Do not automatically start specified in Step 4 Start Novell Cluster Services manually by using
one of these methods:
Reboot the cluster server.
At a terminal console prompt, go to the
etc/init.d
following as the
./novell-ncs start
directory, then enter the
root
user:
/
At a terminal console prompt, enter the
following as the
rcnovell-ncs start
root
user:
8 Use the Software Updater (or other update methods) to install any patches from the OES 2
Linux patch channel and any EVMS patches from the SUSE Linux Enterprise Server 10 SP3
patch channel.
9 Update the cluster configuration on the other nodes by doing one of the following as the
root
user on the master node in the cluster:
Run the cluster configuration daemon by entering the following:
cluster exec "/opt/novell/ncs/bin/ncs-configd.py -init"
Installing and Configuring Novell Cluster Services on OES 2 Linux 51
Page 52

Restart Novell Cluster Services by entering:
rcnovell-ncs restart
This step is necessary to make
allows the node to be displayed in iManager. For information, see Section 2.3, “What’s New
(OES 2 SP1),” on page 25.
10 Continue with Section 3.7, “Configuring Additional Administrators,” on page 52.
cluster view
display the new node’s name correctly, and
3.7 Configuring Additional Administrators
The Administrator user who you specify during Novell Cluster Services install process is
automatically configured as the administrator for the cluster with the following setup:
The user is a trustee and has the Supervisor right to the Server object of each server node in the
cluster.
The user is enabled for Linux with Linux User Management. This gives the user a Linux UID
in addition to the users eDirectory GUID.
The user is a member of a LUM-enabled administrator group associated with the servers in the
cluster.
novdocx (en) 7 January 2010
IMPORTANT: To allow other administrators (such as the tree administrator) to manage the cluster,
the users’ usernames must be similarly configured.
You can modify the default administrator username or password after the install by following the
procedure in Section 8.13, “Moving a Cluster, or Changing IP Addresses, LDAP Server, or
Administrator Credentials for a Cluster,” on page 105.
3.8 What’s Next
After installing Novell Cluster Services on OES 2 Linux servers (physical servers or virtual guest
servers), you can configure and manage the cluster and cluster resources. For information, see the
following:
Chapter 7, “Configuring Cluster Policies and Priorities,” on page 91
Chapter 8, “Managing Clusters,” on page 97.
Chapter 9, “Configuring and Managing Cluster Resources,” on page 117
Chapter 10, “Configuring Cluster Resources for Shared NSS Pools and Volumes,” on page 133
Chapter 11, “Configuring Cluster Resources for Shared Linux POSIX Volumes,” on page 157
If you install Novell Cluster Services at the host level of an OES 2 Linux (Xen) server, you can
create cluster resources for the virtual machines. For information, see Section 12.2, “Virtual
Machines as Cluster Resources,” on page 182.
52 OES 2 SP2: Novell Cluster Services 1.8.7 for Linux Administration Guide
Page 53

4
Upgrading OES 2 Linux Clusters
You can upgrade a Novell® Open Enterprise (OES) 2 Linux (or later) cluster to OES 2 SP2 Linux.
This section describes the upgrade process and how to manage the temporarily mixed cluster during
the upgrade.
Section 4.1, “Requirements for Upgrading Clusters,” on page 53
Section 4.2, “Upgrading OES 2 Clusters (Rolling Cluster Upgrade),” on page 53
Section 4.3, “Upgrade Issues for OES 2 SP2,” on page 54
4.1 Requirements for Upgrading Clusters
Make sure your environment meets the requirements for installing Novell Cluster Services that are
described in Section 3.1, “System Requirements for Novell Cluster Services,” on page 27.
novdocx (en) 7 January 2010
4
4.2 Upgrading OES 2 Clusters (Rolling Cluster Upgrade)
Performing a rolling cluster upgrade on your OES 2 Linux cluster lets you keep your cluster up and
running. Your users can continue to access cluster resources while the upgrade is being performed.
During a rolling cluster upgrade, one server is upgraded to OES 2 SP2 Linux while the other servers
in the cluster continue running older versions of OES 2 Linux. Then, if desired, another server can
be upgraded, and then another, until all servers in the cluster have been upgraded.
You can also add OES 2 SP2 Linux servers to the existing OES 2 Linux (or later) cluster, and
remove the old ervers from the cluster.
You should complete the upgrade as soon as possible. Don’t leave the cluster in a mixed version
state for an extended period.
Make sure that any services that are available only in OES 2 SP1 or later (such as Novell CIFS or
Novell AFP) are set up with preferred nodes for failover that are running OES 2 SP1 or later.
Consider the following issues when working with a mixed-release OES 2 cluster:
OES 2 SP1 features that are not available for the OES 2 Linux:
Novell AFP for Linux
Novell CIFS for Linux
64-bit eDirectory 8.8.4 support
Domain Services for Windows support
NSS
NSS
NSS
The NSS default namespace on OES 2 SP1 Linux was changed to Long. This is not a problem
for existing pools, but you should be aware of the difference when creating pools on OES 2
nodes versus OES 2 SP1 (or later) nodes.
/(No)atime
/PoxixPermissionMask
/UnplugAlways
option
option
option
Upgrading OES 2 Linux Clusters
53
Page 54

To perform a rolling cluster upgrade of OES 2 Linux and Novell Cluster Services:
1 Bring down the OES 2 Linux cluster server you want to upgrade.
Any cluster resources that were running on the server should fail over to another server in the
cluster.
You can also manually migrate the resources to another server in the cluster prior to bringing
down the server. This prevents the resources from failing back to the node after you have
completed the upgrade.
2 Upgrade the server by using the Update option on the OES 2 Linux installation.
See “Upgrading to OES 2 SP2” in the OES 2 SP2: Installation Guide.
3 If necessary, manually cluster migrate the resources that were previously loaded on this server
server back to the upgraded server.
The resources can automatically fail back if both of the following apply:
The failback mode for the resources was set to Auto.
This Linux server is the preferred node for the resources.
4 Repeat Step 2 through Step 5 for each OES 2 Linux cluster server until your entire cluster has
been upgraded.
novdocx (en) 7 January 2010
4.3 Upgrade Issues for OES 2 SP2
This section contains known issues for upgrading clusters from OES 2 Linux or OES 2 SP1 Linux to
OES 2 SP2.
Section 4.3.1, “Updating the iFolder Resource Template,” on page 54
4.3.1 Updating the iFolder Resource Template
In OES 2 SP2 Linux, the Novell Cluster Services resource template for Novell iFolder 3.x has
changed. The revised template is
must run a script on cluster nodes after upgrading to SP2 in order to update the new resource
template information in Novell Cluster Services and eDirectory.
After upgrading the cluster nodes from OES 2 Linux or OES 2 SP1 Linux to OES 2 SP2 Linux:
1 For each node in the cluster, open a terminal console as the
/opt/novell/ncs/bin/ncstempl.py -U
/opt/novell/ncs/templates/iFolder_template.xml
root
user, then enter:
. You
54 OES 2 SP2: Novell Cluster Services 1.8.7 for Linux Administration Guide
Page 55

5
Upgrading OES 1 Linux Clusters
novdocx (en) 7 January 2010
to OES 2 Linux
This section provides information to help you upgrade a Novell® Open Enterprise (OES) 1 Linux
cluster to OES 2 Linux, and how to manage the temporarily mixed cluster during the upgrade.
For information about managing an OES 1 Linux cluster, see the OES: Novell Cluster Services 1.8.2
Administration Guide for Linux (http://www.novell.com/documentation/oes/cluster_admin_lx/data/
h4hgu4hs.html).
Section 5.1, “Requirements and Guidelines for Upgrading Clusters from OES 1 Linux and OES
2 Linux,” on page 55
Section 5.2, “Upgrading Existing OES 1 Linux Cluster Nodes to OES 2 (Rolling Cluster
Upgrade),” on page 56
Section 5.3, “Adding New OES 2 Linux Cluster Nodes to Your OES 1 Linux Cluster,” on
page 57
Section 5.4, “Modifying Cluster Resource Scripts for Mixed OES 1 Linux and OES 2 Linux
Clusters,” on page 57
Section 5.5, “Finalizing the Cluster Upgrade,” on page 57
5.1 Requirements and Guidelines for Upgrading
5
Clusters from OES 1 Linux and OES 2 Linux
In addition to the Section 3.1, “System Requirements for Novell Cluster Services,” on page 27,
consider the following rules and recommendations for mixed OES 1 Linux and OES 2 Linux
clusters:
Mixed OES 1 Linux and OES 2 Linux clusters should be considered a temporary configuration
that exists only during an upgrade.
Adding an OES 1 Linux cluster node to a mixed-node OES 1 Linux and OES 2 Linux cluster is
not supported
If you have configured resource monitoring for a resource running on an OES 2 Linux cluster
node, resource monitoring does not function if the resource fails over or is migrated to an OES
1 Linux cluster node.
The use of EVMS is recommended for upgrading file system resources.
You should ensure that all resource policies are configured to the settings that existed before the
upgrade.
No storage management functions should be executed while a cluster is in a mixed-cluster
mode. Do not attempt to create, delete, expand, or modify the properties for partitions, pools, or
volumes for any shared resources in the cluster.
Upgrading OES 1 Linux Clusters to OES 2 Linux
55
Page 56

5.2 Upgrading Existing OES 1 Linux Cluster Nodes to OES 2 (Rolling Cluster Upgrade)
Performing a rolling cluster upgrade from OES 1 Linux to OES 2 Linux lets you keep your cluster
up and running and lets your users continue to access cluster resources while the upgrade is being
performed.
During a rolling cluster upgrade, one server is upgraded to OES 2 Linux while the other servers in
the cluster continue running OES 1 Linux. Then, if desired, another server can be upgraded, and
then another, until all servers in the cluster have been upgraded to OES 2 Linux. You should
complete the upgrade as soon as possible. Don’t leave the cluster in a mixed version state for an
extended period.
To perform a rolling cluster upgrade from OES 1 Linux to OES 2 Linux:
1 Make a note of the OES components that are installed on the server you are upgrading.
You will probably want to install the same components on the node as you perform the
upgrade.
novdocx (en) 7 January 2010
NOTE: NSS, eDirectory, and NCP Server are not required components for Novell Cluster
Services on OES 2, but are required components for Novell Cluster Services on OES 1 Linux.
Ensure that you install these components on OES 2 Linux servers when you upgrade your OES
1 Linux cluster servers.
2 Bring down the OES 1 Linux cluster server you want to upgrade to OES 2.
Any cluster resources that were running on the server should fail over to another server in the
cluster.
You can also manually migrate the resources to another server in the cluster prior to bringing
down the server. This prevents the resources from failing back to the node after you have
completed the upgrade.
3 Upgrade the server by using the Update option on the OES 2 Linux installation, making sure to
install the components that are currently installed on the server that you noted in Step 1.
See “Upgrading to OES 2 SP2” in the OES 2 SP2: Installation Guide.
4 Repeat Step 1 through Step 3 for each OES 1 Linux cluster server until your entire cluster has
been upgraded to OES 2.
5 (Conditional) If necessary, manually migrate the resources that were on the former OES 1
server to this Linux server.
The resources will automatically fail back if both of the following apply:
The failback mode for the resources was set to Auto.
This Linux server is the preferred node for the resources.
6 After the last OES 1 cluster node has been upgraded to OES 2, finalize the upgrade by
following the instructions in Section 5.5, “Finalizing the Cluster Upgrade,” on page 57.
See also Section 5.1, “Requirements and Guidelines for Upgrading Clusters from OES 1 Linux
and OES 2 Linux,” on page 55 for more information on mixed OES 1 and OES 2 clusters and
the rules that apply to them.
56 OES 2 SP2: Novell Cluster Services 1.8.7 for Linux Administration Guide
Page 57

5.3 Adding New OES 2 Linux Cluster Nodes to Your OES 1 Linux Cluster
The process for adding a new OES 2 Linux cluster node to an existing OES 1 Linux cluster is the
same as for adding an OES 1 cluster node to an OES 1 Linux cluster and adding a new OES 2 cluster
node to an existing OES 2 cluster. See Section 3.5, “Installing Novell Cluster Services,” on page 42.
However, you should be aware of the rules that apply to mixed OES 1 and OES 2 clusters. See
Section 5.1, “Requirements and Guidelines for Upgrading Clusters from OES 1 Linux and OES 2
Linux,” on page 55.
5.4 Modifying Cluster Resource Scripts for Mixed OES 1 Linux and OES 2 Linux Clusters
OES 1 Linux and OES 2 Linux cluster resource load and unload scripts perform similar actions, but
some template scripts differ in the functions used to perform those actions. OES 2 cluster template
scripts have been upgraded and some of them now conform to the Open Cluster Framework (OCF).
novdocx (en) 7 January 2010
Cluster resources created on an OES 1 Linux cluster server can run in a mixed version cluster on
either OES 1 or OES 2 Linux cluster servers.
Cluster resources created on an OES 2 Linux cluster server that is part of an OES 1 and OES 2 Linux
mixed cluster can also run either OES 1 and OES 2 cluster servers.
After completing the cluster upgrade to OES 2 you must finalize the cluster upgrade. See Finalizing
the Cluster Upgrade below for more information. Any new cluster resources that are created using
resource templates included with OES 2 Linux use upgraded templates after finalizing the cluster
upgrade. New resources created after finalizing the upgrade cannot run on OES 1 Linux cluster
nodes, so you should finalize the cluster upgrade only after all nodes have been upgraded to OES 2
Linux.
After you have finalized the cluster upgrade you, might want to change the scripts for existing
cluster resources that were created by using templates so that they use the scripts in the upgraded
templates. This is especially true if you want to use the new resource monitoring feature. There are
three ways to do this:
Copy and paste the scripts from the upgraded resource templates to existing resource scripts
and then customize the scripts for the resource.
Offline an existing resource and then create a new resource with a different name to replace the
existing resource, using the upgraded templates.
Offline and then delete an existing resource, then create a new resource with the same name to
replace the existing resource, using the upgraded templates.
5.5 Finalizing the Cluster Upgrade
If you have upgraded all nodes in an OES 1 Linux cluster to OES 2 Linux, you must finalize the
upgrade process by issuing the
cluster convert commit
The
and adds monitor scripts.
cluster convert commit
command upgrades load and unload scripts for cluster templates
command on one Linux cluster node.
Upgrading OES 1 Linux Clusters to OES 2 Linux 57
Page 58

novdocx (en) 7 January 2010
58 OES 2 SP2: Novell Cluster Services 1.8.7 for Linux Administration Guide
Page 59

6
Converting NetWare 6.5 Clusters
novdocx (en) 7 January 2010
to OES 2 Linux
You can use a rolling cluster conversion to convert a Novell® Cluster ServicesTM cluster from
NetWare
how to prepare for and perform the conversion, and how to manage the temporarily mixed cluster
during the conversion.
®
6.5 SP8 to Novell Open Enterprise Server (OES) 2 SP1 Linux. This section describes
Section 6.1, “Guidelines for Converting Clusters from NetWare to OES 2 Linux,” on page 59
Section 6.2, “Guidelines for Converting NSS Pool Resources from NetWare to Linux,” on
page 63
Section 6.3, “Guidelines for Converting Service Cluster Resources from NetWare to Linux,” on
page 64
Section 6.4, “Converting NetWare Cluster Nodes to OES 2 Linux (Rolling Cluster
Conversion),” on page 78
Section 6.5, “Adding New OES 2 Linux Nodes to Your NetWare Cluster,” on page 81
Section 6.6, “Translation of Cluster Resource Scripts for Mixed NetWare and Linux Clusters,”
on page 82
Section 6.7, “Customizing the Translation Syntax for Converting Load and Unload Scripts,” on
page 87
Section 6.8, “Finalizing the Cluster Conversion,” on page 88
6
For information about managing a NetWare cluster, see the “Clustering NetWare Services” list on
the NetWare 6.5 SP8 Clustering (High Availability) Documentation Web site (http://
www.novell.com/documentation/nw65/cluster-services.html#clust-config-resources).
6.1 Guidelines for Converting Clusters from NetWare to OES 2 Linux
In addition to Section 3.1, “System Requirements for Novell Cluster Services,” on page 27, consider
the requirements and guidelines described in the following sections when converting clusters from
NetWare to OES 2 Linux:
Section 6.1.1, “Supported Mixed-Node Clusters,” on page 60
Section 6.1.2, “SBD Devices Must Be Marked as Shareable for Clustering,” on page 60
Section 6.1.3, “Syntax Translation Issues for Load and Unload Scripts,” on page 60
Section 6.1.4, “Case Sensitivity Issues,” on page 61
Section 6.1.5, “Adding New NetWare Nodes to a Mixed-Node Cluster,” on page 61
Section 6.1.6, “Converting Multiple NetWare Cluster Nodes to OES 2 Linux,” on page 61
Section 6.1.7, “Converting Nodes that Contain the eDirectory Master Replica,” on page 62
Section 6.1.8, “Failing Over Cluster Resources on Mixed-Node Clusters,” on page 62
Section 6.1.9, “Managing File Systems in Mixed-Node Clusters,” on page 62
Converting NetWare 6.5 Clusters to OES 2 Linux
59
Page 60

Section 6.1.10, “Using Novell iManager in Mixed-Node Clusters,” on page 62
Section 6.1.11, “Using Novell Remote Manager Is Not Supported in Mixed-Node Clusters,” on
page 63
Section 6.1.12, “Using ConsoleOne Is Not Supported for Mixed-Node Clusters,” on page 63
Section 6.1.13, “Using the Monitor Function in Mixed-Node Clusters Is Not Supported,” on
page 63
6.1.1 Supported Mixed-Node Clusters
Mixed NetWare and OES 2 Linux nodes in the same cluster are supported as a temporary
configuration while you are migrating a cluster from NetWare to Linux.
All NetWare servers must be either version 6.5 or 6.0 in order to exist in a mixed NetWare and OES
2 Linux cluster.
Mixed NetWare 6.5 and OES 2 Linux clusters are supported so that you can convert a NetWare
6.5 cluster to OES 2 Linux.
Mixed NetWare 6.0 and OES 2 Linux clusters are also supported so that you can convert a
NetWare 6.0 cluster to OES 2 Linux.
Mixed clusters consisting of NetWare 6.0 servers, NetWare 6.5 servers, and OES 2 Linux
servers are not supported.
novdocx (en) 7 January 2010
Before converting NetWare 6.5 clusters or NetWare 6.0 clusters to OES 2 Linux, you must apply all
of the latest service packs and patches for that version. For information, see “Upgrading NetWare
Clusters” in the NW6.5 SP8: Novell Cluster Services 1.8.5 Administration Guide.
If you have a NetWare 5.1 cluster, you must upgrade all nodes to a NetWare 6.5 cluster (with the
latest service packs and patches) before adding new Linux cluster nodes to the cluster. For
information, see “Upgrading NetWare Clusters” in the NW6.5 SP8: Novell Cluster Services 1.8.5
Administration Guide.
6.1.2 SBD Devices Must Be Marked as Shareable for Clustering
Novell Cluster Services for Linux requires that the devices used for the SBD partition be explicitly
marked as Shareable for Clustering. When converting a NetWare cluster, make sure that the SBD
device, or both devices for a mirrored SBD, are marked as Shareable for Clustering before you add
the first Linux node to the cluster.
6.1.3 Syntax Translation Issues for Load and Unload Scripts
When cluster migrating resources in a mixed-platform cluster from a NetWare cluster node to a OES
2 Linux cluster node, each cluster resource’s Load script and Unload script needs to be translated inmemory while the cluster contains mixed-platform nodes, and when the cluster is finally converted
from NetWare to Linux. Executing a script that is valid for the NetWare platform is not necessarily
recognized on the OES 2 Linux platform. This translation is done by the Cluster Translation Library
/opt/novell/ncs/bin/clstrlib.py
script (
unload scripts are not part of the normal translation library, the cluster resource can end up in a
comatose state.
). If the commands in cluster resource’s load or
60 OES 2 SP2: Novell Cluster Services 1.8.7 for Linux Administration Guide
Page 61

Beginning in OES 2 SP2, Novell Cluster Services allows you to customize the translation syntax
that is used for load and unload scripts in mixed-platform situations by defining them in the
opt/novell/ncs/customized_translation_syntax
script reads the additional translation syntax from the syntax file. For information, see Section 6.7,
“Customizing the Translation Syntax for Converting Load and Unload Scripts,” on page 87.
file that you create. The
clstrlib.py
/var/
6.1.4 Case Sensitivity Issues
When adding a Linux node to the existing NetWare cluster, there are two areas where case
sensitivity might be an issue:
Node name: After you install the Linux node into the NetWare cluster, the Linux node is
unable to join the cluster. To resolve this problem, edit the
file to modify the hostname of the node from lowercase (
characters (CLUSNODE1), reboot the server, then run the
This allows the cluster node to start and join the cluster.
NOTE: This case sensitivity issue has been resolved for OES 2 SP2 and later.
/etc/opt/novell/ncs/nodename
clusnode1
rcnovell-ncs start
) to all uppercase
command.
novdocx (en) 7 January 2010
Cluster object name: The Cluster object name (such as
cn=Clustername,ou=context,o=org
Clustername.sbd
(
sbdutil -f
object name and SBD name during the Linux cluster install do not match the case used in
eDirectory, the cluster install fails to detect the SBD partition.
) matches the case of the object name in eDirectoryTM. Running the
command displays the SBD name. If the case used when you enter the Cluster
) is also present on the SBD partition. The SBD name
6.1.5 Adding New NetWare Nodes to a Mixed-Node Cluster
You cannot add additional NetWare nodes to your cluster after adding a new Linux node or changing
an existing NetWare cluster node to a Linux cluster node. If you want to add NetWare cluster nodes
after converting part of your cluster to Linux, you must first remove the Linux nodes from the
cluster.
6.1.6 Converting Multiple NetWare Cluster Nodes to OES 2 Linux
If you attempt to concurrently convert multiple NetWare cluster servers to OES 2 Linux, we strongly
recommend that you use the old NetWare node IP addresses for your Linux cluster servers. You
should record the NetWare node IP addresses before converting them to Linux.
If you must assign new node IP addresses, we recommend that you only convert one node at a time.
Another option if new cluster node IP addresses are required and new server hardware is being used
is to shut down the NetWare nodes that are to be removed and then add the new Linux cluster nodes.
After adding the new Linux cluster nodes, you can remove the NetWare cluster node-related objects
as described in Step 5 of Section 6.4, “Converting NetWare Cluster Nodes to OES 2 Linux (Rolling
Cluster Conversion),” on page 78.
IMPORTANT: Failure to follow these recommendations might result in NetWare server abends
and Linux server restarts.
Converting NetWare 6.5 Clusters to OES 2 Linux 61
Page 62

6.1.7 Converting Nodes that Contain the eDirectory Master Replica
When converting NetWare cluster servers to Linux, do not convert the server that has the master
eDirectory replica first. If the server with the eDirectory master replica is a cluster node, convert it at
the end of the rolling cluster conversion.
6.1.8 Failing Over Cluster Resources on Mixed-Node Clusters
Cluster resources that were created on NetWare cluster nodes and migrated or failed over to Linux
cluster nodes can be migrated or failed back to NetWare cluster nodes.
Cluster resources that were originally created on Linux cluster nodes cannot be migrated or failed
over to NetWare cluster nodes.
If you cluster migrate an NSS pool from a NetWare cluster server to a Linux cluster server, it could
take several minutes for volume trustee assignments to synchronize after the migration. Users might
have limited access to the migrated volumes until after the synchronization process is complete.
novdocx (en) 7 January 2010
6.1.9 Managing File Systems in Mixed-Node Clusters
In a mixed cluster of NetWare and OES 1 or 2 Linux nodes, Linux POSIX file systems as cluster
resources cannot be created until the entire cluster had been successfully converted to OES 2 Linux.
Linux POSIX file systems as cluster resources cannot be migrated or failed over to NetWare cluster
nodes.
Only NSS pool cluster resources that are created on a NetWare cluster node can be failed over
between Linux and NetWare nodes of a mixed-node cluster.
NetWare-to-Linux (and vice versa) failover of NSS pool cluster resources requires that the Linux
node be configured for NSS and that the version of NSS supports the NSS media format and features
that are currently being used by the NSS pool cluster resource on NetWare.
No storage management functions should be executed while a cluster is in a mixed-cluster mode. Do
not attempt to create, delete, expand, or modify the properties for partitions, pools, or volumes for
any shared resources in the cluster.
WARNING: Attempting to reconfigure shared storage in a mixed cluster can cause data loss.
If you need to configure (or reconfigure) existing shared NSS pools and volumes in a mixed-node
cluster, you must temporarily bring down either all Linux cluster nodes or all NetWare cluster nodes
prior to making changes.
6.1.10 Using Novell iManager in Mixed-Node Clusters
Use Novell iManager 2.7.2 or later for all cluster administration in the mixed-node cluster. Using the
Clusters plug-in to iManager is required to manage the cluster after the first OES 2 Linux node is
added to the cluster.
The display of node IDs from the NetWare master node might be incomplete if you use other tools
like ConsoleOne
/admin/Novell/Cluster/NodeConfig.xml
62 OES 2 SP2: Novell Cluster Services 1.8.7 for Linux Administration Guide
®
and Novell Remote Manager in a mixed-node cluster. However, you can use
on any cluster node to get the node IDs.
cat
Page 63

6.1.11 Using Novell Remote Manager Is Not Supported in Mixed-Node Clusters
Do not use Novell Remote Manager when managing mixed-node clusters. Novell Remote Manager
is not supported for cluster management on OES 2 Linux.
Because different time formats are used in the NCS Event log for NetWare and Linux, Novell
Remote Manager might have difficulty displaying the time of logged events. To avoid this problem
in a mixed-node cluster, use iManager to access the NCS Event log.
To reduce any confusion you might have when using Novell Remote Manager, you can unload
module
in Novell Remote Manager.
pcluster.nlm
and delete its references in
ldncs
and
uldncs
. This removes the Cluster tab
6.1.12 Using ConsoleOne Is Not Supported for Mixed-Node Clusters
Do not use ConsoleOne when managing mixed-node clusters. ConsoleOne is not supported for
cluster management on OES 2 Linux.
novdocx (en) 7 January 2010
6.1.13 Using the Monitor Function in Mixed-Node Clusters Is Not Supported
In mixed-node clusters, the Monitor function in Novell Cluster Services for Linux is not available.
You cannot enable the Monitor function or modify the Monitor script for cluster resources on the
Linux nodes until the conversion is finalized and all nodes in the cluster are running OES 2 Linux.
6.2 Guidelines for Converting NSS Pool Resources from NetWare to Linux
Section 6.2.1, “NSS Pool Cluster Migration,” on page 63
Section 6.2.2, “NSS File System Migration to NCP Volumes or Linux POSIX File Systems,”
on page 64
Section 6.2.3, “Estimated Time Taken to Build the Trustee File on Linux,” on page 64
6.2.1 NSS Pool Cluster Migration
In the mixed-node cluster, NSS pool cluster resources created on NetWare can be failed over or
cluster migrated to nodes that are running OES 2 Linux where NSS is installed and running. Some
NSS features are not available or work differently on Linux. For information, see “Cross-Platform
Issues for NSS” in the OES 2 SP2: NSS File System Administration Guide.
Pool snapshots use different technologies on NetWare and Linux. Make sure to delete pool
snapshots for all clustered pools before you begin the cluster conversion.
Converting NetWare 6.5 Clusters to OES 2 Linux 63
Page 64

6.2.2 NSS File System Migration to NCP Volumes or Linux POSIX File Systems
To move data from NSS file systems on NetWare to NCP volumes or to Linux POSIX file systems
on Linux, you must use the OES 2 SP1 Migration tool. For information, see “Migrating File System
from NetWare, OES 1 or OES 2 to OES 2 SP2 Linux” in the OES 2 SP2: Migration Tool
Administration Guide.
6.2.3 Estimated Time Taken to Build the Trustee File on Linux
novdocx (en) 7 January 2010
When you migrate NSS volumes from NetWare to Linux, a
the volume.
Testing found that this process takes about one minute per 50,000 storage objects.Testing was done
on the following configuration for the target server:
HP DL380 G5
2 Quadcore Intel* Xeon* CPU E5345 @ 2.33 GHz
12 GB RAM
1 Gigabit NIC
2 HBAs with 4 paths to the EMC DMX Symmetrix Storage with 4 gigabits per second (Gbps)
bandwidth
trustee.xml
file is built at the root of
6.3 Guidelines for Converting Service Cluster Resources from NetWare to Linux
Converting cluster resources for OES 2 services from NetWare to Linux might require more than a
simple cluster migration from a NetWare node to a Linux node. For example, the service might
require that you use migration tools to convert the service to Linux. Some services require postconversion configuration to finalize the conversion. A few services on NetWare are not available on
OES 2 Linux, so you must use the standard Linux service instead.
Section 6.3.1, “Overview of All NetWare 6.5 SP8 Services,” on page 65
Section 6.3.2, “Apache Web Server,” on page 67
Section 6.3.3, “Apple Filing Protocol (AFP),” on page 67
Section 6.3.4, “Archive and Version Services,” on page 67
Section 6.3.5, “CIFS,” on page 68
Section 6.3.6, “DFS VLDB,” on page 68
Section 6.3.7, “DHCP Server,” on page 69
Section 6.3.8, “DNS Server,” on page 71
Section 6.3.9, “eDirectory Server Certificates,” on page 72
Section 6.3.10, “iPrint,” on page 74
Section 6.3.11, “QuickFinder Server,” on page 75
64 OES 2 SP2: Novell Cluster Services 1.8.7 for Linux Administration Guide
Page 65

6.3.1 Overview of All NetWare 6.5 SP8 Services
See Tabl e 6-1 for information about converting cluster resources for NetWare 6.5 SP8 services:
Table 6-1 Guidelines for Converting Service Cluster Resources from NetWare to Linux
novdocx (en) 7 January 2010
Service on NetWare 6.5
SP8
Cluster Migrate the
Resource
Apache Web Server Requires special
handling
Apple Filing Protocol
(AFP)
Archive and Version
Requires special
handling
No On Linux, you must configure a new cluster resource
Services
CIFS
(Windows File
Requires special
handling
Services)
DFS VLDB
(Distributed File
Requires special
handling
Services volume
location database)
Converting the Service to OES 2 Linux
See Section 6.3.2, “Apache Web Server,” on page 67.
See Section 6.3.3, “Apple Filing Protocol (AFP),” on
page 67.
on a shared Linux POSIX file system. On NetWare,
Archive and Versioning Services uses a MySQL
database. On Linux, it uses a PostgreSQL database.
The load script commands are also different.
See Section 6.3.4, “Archive and Version Services,” on
page 67.
See Section 6.3.5, “CIFS,” on page 68.
See Section 6.3.6, “DFS VLDB,” on page 68.
DHCP Server Requires special
See Section 6.3.7, “DHCP Server,” on page 69.
handling
DNS Server Requires special
See Section 6.3.8, “DNS Server,” on page 71.
handling
eDirectory Not clustered See Section 6.1.7, “Converting Nodes that Contain
the eDirectory Master Replica,” on page 62.
eDirectory Certificate
Server
Requires special
handling
The Certificate Authority (CA) service is not clusterenabled for NetWare or OES 2 Linux. There are no
cluster-specific tasks for the CA itself.
The Server Certificate service issues Server
Certificate objects that might need to reside on each
node in a cluster, depending on the service that is
clustered. NetWare and Linux generate certificates
differently, so the NetWare server’s certificate is not
reused for the OES 2 Linux server. See Section 6.3.9,
“eDirectory Server Certificates,” on page 72.
TM
exteNd
Application
Server and MySQL
Not applicable The exteNd Application Server was discontinued as
an install option for NetWare 6.5 SP3.
See MySQL.
Converting NetWare 6.5 Clusters to OES 2 Linux 65
Page 66

novdocx (en) 7 January 2010
Service on NetWare 6.5
SP8
Cluster Migrate the
Resource
Converting the Service to OES 2 Linux
FTP Not applicable Use the standard FTP service for Linux.
®
iFolder Requires special
handling
Novell iFolder
You must upgrade to Novell iFolder 3.x.
2.1x is not available on OES 2 Linux.
After you add a Novell iFolder 3.x server to the
NetWare cluster and before you finalize the cluster
conversion, use iFolder migration procedures to
migrate the iFolder 2.1x server configuration and user
data from the source NetWare node to the target
Linux node. For information, see “Migrating iFolder
Services” in the Novell iFolder 3.8 Administration
Guide.
iPrint Requires special
See Section 6.3.10, “iPrint,” on page 74.
handling
MySQL* Not applicable Use the MySQL 5.0.x software on OES2 Linux that is
offered under the GPL.
Configure the OES service to use MySQL 5.0.x on
OES 2 Linux before setting up clustering for the
related MySQL database.
For Linux, use a procedure similar to the one on
NetWare to set up a new cluster resource. Use the
Linux commands for MySQL in the load and unload
scripts. Use a Linux path on a shared Linux POSIX file
system for the MySQL database. As a general
reference, see “Configuring MySQL on Novell
Clustering Services” in the.NW 6.5 SP8: Novell
MySQL Administration Guide
NetStorage Yes Clustering the NetStorage service is supported for
OES 2 SP1 Linux and later.
For information, see “Configuring NetStorage with
Novell Cluster Services” in the OES 2 SP2:
NetStorage for Linux Administration Guide.
NFS Not applicable Use standard NFS service for Linux.
QuickFinder
Synchronization
Feature)
TM
(Server
No You must create a new cluster resource. QuickFinder
5.0.x is supported only on OES 2 Linux. NetWare
uses QuickFinder 4.2.0. QuickFinder does not support
any automated procedure or scripts for a rolling
upgrade from Netware to Linux.
For information, see “Configuring QuickFinder Server
for Novell Cluster Services” in the NW 6.5 SP8 Novell
QuickFinder Server 5.0 Administration Guide.
Tomcat Not applicable Use the standard Tomcat service for Linux.
66 OES 2 SP2: Novell Cluster Services 1.8.7 for Linux Administration Guide
Page 67

6.3.2 Apache Web Server
1 On NetWare, offline the NSS pool cluster resource, then modify its load and unload scripts to
remove the Apache start and stop commands.
2 On NetWare, online the cluster resource, then cluster migrate it to a Linux node.
3 After the cluster conversion is finished, use the standard Apache Web Server for Linux to set up
the Apache service on the OES 2 Linux servers.
4 Use a procedure similar to the one on NetWare to set up the Apache configuration file, and
copy it to every Linux node in the cluster. Point the service to the virtual IP address of the NSS
pool cluster resource that contains the Web content.
5 On Linux, offline the cluster resource, then modify its load and unload scripts to add the
Apache service start and stop commands for Linux.
6 Online the cluster resource.
6.3.3 Apple Filing Protocol (AFP)
Novell AFP for Linux is available beginning in OES 2 SP1 Linux. After you set up Novell AFP on
the Linux node and before you finalize the NetWare-to-Linux conversion, use the AFP migration
tool to convert the configuration. For information, see “Migrating AFP from NetWare to OES 2 SP2
Linux ” in the OES 2 SP2: Migration Tool Administration Guide.
novdocx (en) 7 January 2010
The commands in the scripts are also different. After the migration, modify the load and unload
scripts on the Linux server. For information, see Section 6.6.4, “Comparing File Access Protocol
Resource Script Commands,” on page 85.
AFP on Linux supports NCP cross-protocol file locking, which allows NCP, AFP, and CIFS users to
access files on an NSS volume concurrently without data corruption by locking the files across
protocols. On Linux, the cross-protocol file locking parameter for NCP Server is disabled by default.
It must be enabled on each node in the cluster if you plan to give both NCP users and AFP users
access to NSS volume in the cluster. See “Configuring Cross-Protocol File Locks for NCP Server”
in the OES 2 SP2: NCP Server for Linux Administration Guide.
6.3.4 Archive and Version Services
Mixed-node cluster configurations are not supported by Novell Archive and Version Services.
Before you begin the conversion, make sure that Archive and Version Services is not running on the
NetWare servers in the cluster.
1 Install Archive and Version Services on an OES 2 Linux node in the cluster.
2 Install Archive and Version Services on a a second OES 2 Linux node in the cluster.
3 Using the database migration tools, migrate the data in the MySQL database on NetWare to the
PostgreSQL database on of the Linux nodes.
4 Cluster migrate the shared NSS pool resource that contains the volumes that were being
archived from the NetWare server to a Linux node.
5 Remove the NetWare nodes from the cluster and finish the cluster conversion process.
6 On the Linux node where the primary NSS pool resources are active, use the Clusters plug-in
in iManager to create an Archive Versioning cluster resource.
Converting NetWare 6.5 Clusters to OES 2 Linux 67
Page 68

Other preparatory tasks are involved in the setup. Follow the procedure as described in
“Configuring Archive and Version Service for Novell Cluster Services” in the OES 2 SP2:
Novell Archive and Version Services 2.1 for Linux Administration Guide.
7 Copy the database files from the single-server location (
) to the shared Linux POSIX volume that you created when you set up Archive and
data
/var/opt/novell/arkmanager/
Version Services for clustering in Step 6.
cp -a
Use the
command at a terminal console prompt to copy all files and retain the
permissions.
8 Change the ownership of the new database location on the shared volume by entering the
following at a terminal console prompt:
chown -R arkuser:arkuser_prggrp /shared/datapath
9 Edit the
/etc/opt/novell/arkmanager/conf/arkdatadir.conf
file to change the
database location to new shared path.
10 Edit the
/opt/novell/arkmanger/bin/pg_restart.sh
file to change the line that starts the
PostgreSQL database to the following:
su arkuser -c "postmaster -D /shared/datapath -h 127.0.0.1 -p 5432 -i"
11 Start Archive and Version Services by entering
rcnovell-ark start
You should see Archive and Version Services and the PostgreSQL database starting.
novdocx (en) 7 January 2010
6.3.5 CIFS
Novell CIFS for Linux is available beginning in OES 2 SP1 Linux.
After you set up Novell CIFS on the Linux node and before you finalize the NetWare-to-Linux
conversion, use the CIFS migration tool to convert the configuration. For information, see
“Migrating CIFS from NetWare to OES 2 SP2 Linux” in the OES 2 SP2: Migration Tool
Administration Guide.
The commands in the scripts are also different. After the migration, modify the load and unload
scripts on the Linux server. For information, see Section 6.6.4, “Comparing File Access Protocol
Resource Script Commands,” on page 85.
CIFS on OES 2 SP1 Linux does not support NCP cross-protocol file locking.
Beginning in OES 2 SP2 Linux, CIFS supports NCP cross-protocol file locking, which allows NCP,
AFP, and CIFS users to access files on an NSS volume concurrently without data corruption by
locking the files across protocols. On Linux, the cross-protocol file locking parameter for NCP
Server is disabled by default. It must be enabled on each node in the cluster if you plan to give both
NCP users and CIFS users access to an NSS volume in the cluster. See “Configuring Cross-Protocol
File Locks for NCP Server” in the OES 2 SP2: NCP Server for Linux Administration Guide.
6.3.6 DFS VLDB
The Novell Distributed File Services volume location database (VLDB)
on both NetWare and Linux. The shared NSS volume that contains the
migrated to the Linux server.
.dat
file format is the same
.dat
file can be cluster
68 OES 2 SP2: Novell Cluster Services 1.8.7 for Linux Administration Guide
Page 69

Use one of these two methods for migrating the VLDB from NetWare to Linux:
“Cluster Migrating the Shared NSS Volume for the VLDB” on page 69
“Adding a Linux Server as a Replica Site” on page 69
Cluster Migrating the Shared NSS Volume for the VLDB
Use this method if you want to use the same shared disk where the VLDB is currently stored.
1 Install Novell Storage Services and any dependent services on the Linux node, then add it to the
mixed cluster that you are converting.
2 Cluster migrate the DFS cluster resource from NetWare to Linux.
3 On the Linux node where the VLDB is active, offline the DFS cluster resource.
4 Remove the NetWare clusters from the cluster by using the
cluster leave
command, then
finish the cluster conversion.
This automatically updates the basic cluster commands in the cluster resource scripts.
5 Using the Clusters plug-in in iManager, modify the load script of the DFS cluster resource to
change the
vldb /dir=vldbpath
vldb
command to the Linux format. For example, change it from
to
vldb -dir /vldbpath
6 Online the cluster resource.
7 Run a VLDB repair to ensure that the database is correct.
novdocx (en) 7 January 2010
Adding a Linux Server as a Replica Site
Use this method if you want to use a different shared disk for the VLDB on Linux. You can do this
by adding a DFS replica site on Linux.
1 Install OES 2 Linux on the server that you want to add to the cluster. Make sure Novell Storage
Services and any dependent services are installed.
2 Create a shared NSS pool and volume on the OES 2 Linux server, or create a shared Linux
POSIX volume.
3 In iManager, add the Linux server as the second VLDB replica site for the DFS management
context, and point to the shared NSS volume as the VLDB location.
4 Allow the VLDB data to synchronize between the NetWare replica and the Linux replica.
5 In iManager, remove the NetWare instance of the replica site.
6 Add the Linux server to the mixed-node NetWare cluster.
7 Continue with the cluster conversion as described in Section 6.4, “Converting NetWare Cluster
Nodes to OES 2 Linux (Rolling Cluster Conversion),” on page 78.
6.3.7 DHCP Server
The Novell DHCP Server for Linux is a standards compliant implementation that is based on the
bind protocol. DHCP uses a different schema on Linux to store the configuration in eDirectory.
Converting NetWare 6.5 Clusters to OES 2 Linux 69
Page 70

Novell DHCP Server for Linux supports using a shared Linux POSIX file system or a shared NSS
file system for the cluster resource. For information, see “Configuring DHCP with Novell Cluster
Services for the NSS File System” and “Configuring DHCP with Novell Cluster Services for the
Linux File System” in the OES 2 SP2: Novell DNS/DHCP Administration Guide for Linux.
After you set up Novell DHCP Server on the Linux server, you can use the DHCP Migration utility
to convert the configuration from NetWare to Linux. You cannot directly reuse the data. Use one of
the following scenarios to migrate your DNS server data, then perform the post-migration tasks to
set up clustering.
For information about prerequisites, see “Migrating DHCP from NetWare to OES 2 SP2 Linux” in
the OES 2 SP2: Migration Tool Administration Guide.
“NetWare and Linux Clusters Are in the Same Tree” on page 70
“NetWare and Linux Clusters Are in Different Trees” on page 70
“Post-Migration Tasks” on page 71
NetWare and Linux Clusters Are in the Same Tree
In this scenario, both the NetWare server and the OES 2 SP1 Linux server are in the same eDirectory
tree. The NetWare source server must be running NetWare 5.1 or later versions. The Linux target
server must be running OES 2 SP1 Linux on either 32-bit or 64-bit hardware.
novdocx (en) 7 January 2010
Run the DHCP migration tool from one of the Linux nodes. Perform the Tree Level Migration with
the same Source server (tree to which NetWare clustered nodes are attached) and Target server (tree
to which the Linux clustered nodes are attached). This ensures that the entire NetWare DHCP
configuration data is available for Linux DHCP. For information see “NetWare and Linux Clusters
Attached to the Same Tree” in the OES 2 SP2: Migration Tool Administration Guide.
IMPORTANT: Before starting the DHCP server on the Linux cluster, stop the DHCP server on the
Netware cluster.
NetWare and Linux Clusters Are in Different Trees
In this scenario, the NetWare server and the OES 2 SP1 Linux server are on different eDirectory
trees. The NetWare source server must be running NetWare 5.1 or later versions. The Linux target
server must be running OES 2 SP1 Linux on either 32-bit or 64-bit hardware.
Run the DHCP migration tool from one of the Linux nodes. Perform the Tree Level Migration with
a different Source server (tree to which NetWare clustered nodes are attached) and Target server
(tree to which the Linux clustered nodes are attached). This ensures that the entire NetWare DHCP
configuration data is available for Linux DHCP. For information, see “NetWare and Linux Clusters
Attached to Different Trees” in the OES 2 SP2: Migration Tool Administration Guide.
IMPORTANT: Before starting the DHCP server on the Linux cluster, stop the DHCP server on the
Netware cluster.
70 OES 2 SP2: Novell Cluster Services 1.8.7 for Linux Administration Guide
Page 71

Post-Migration Tasks
1 On the Linux node where you ran the migration, configure the DHCP service for clustering by
using one of the following methods described in OES 2 SP2: Novell DNS/DHCP
Administration Guide for Linux:
“Configuring DHCP with Novell Cluster Services for the NSS File System”
“Configuring DHCP with Novell Cluster Services for the Linux File System”
2 Online the DHCP service cluster resource.
3 On the Linux node where you ran the migration:
3a Open the
/mountpath/etc/dhcpd.conf
file in a text editor.
Replace /mountpath with the Linux path to the directory in the shared volume where
DHCP-specific directories are created.
3b In the
/mountpath/etc/dhcpd.conf
file, change the value for the ldap-dhcp-server-cn
parameter to the cn needed for the migrated server, then save your changes.
novdocx (en) 7 January 2010
3c Copy the
mountpath/var/lib/dhcp/db/
migrated_server.leases
file from
/var/lib.dhcp/bd
directory, then rename it here to
directory to the
dhcpd.leases
/
.
4 Stop the DHCP server on the NetWare cluster.
5 Start the DHCP server on the Linux cluster.
6.3.8 DNS Server
You can migrate the data from the Novell DNS Server on NetWare to a Novell DNS Server on Linux
after you have installed and set up DNS services on an OES 2 SP1 Linux node in the cluster. You
cannot directly reuse the data. Use one of the following scenarios to migrate your DNS server data,
then perform the post-migration tasks.
For information about prerequisites, see “Migrating DNS from NetWare to OES 2 SP2 Linux” in the
OES 2 SP2: Migration Tool Administration Guide.
“NetWare and Linux Clusters Are in the Same Tree” on page 71
“NetWare and Linux Clusters Are in Different Trees” on page 72
“Post-Migration Tasks” on page 72
NetWare and Linux Clusters Are in the Same Tree
In this scenario, both the NetWare server and the OES 2 SP1 Linux server are in the same eDirectory
tree. The NetWare source server must be running NetWare 5.1 or later versions. The Linux target
server must be running OES 2 SP1 Linux on either 32-bit or 64-bit hardware. Use iManager to move
the DNS server from a NetWare NCP server to an OES 2 SP1 Linux NCP server.
Run the DNS migration tool from one of the Linux nodes.Perform the Tree Level migration with the
same Source server (tree to which NetWare clustered nodes are attached) and Target server (tree to
which the Linux clustered nodes are attached). This ensures that the entire NetWare DNS
configuration data is available for Linux DNS. For information see “Using iManager to Migrate
Servers within the Same eDirectory Tree” in the OES 2 SP2: Migration Tool Administration Guide.
IMPORTANT: Before starting the DNS server on the Linux cluster, stop the DNS server on the
Netware cluster.
Converting NetWare 6.5 Clusters to OES 2 Linux 71
Page 72

NetWare and Linux Clusters Are in Different Trees
In this scenario, the NetWare server and the OES 2 SP1 Linux server are on different eDirectory
trees. The NetWare source server must be running NetWare 5.1 or later versions. The Linux target
server must be running OES 2 SP1 Linux on either 32-bit or 64-bit hardware.
Run the DNS migration tool from one of the Linux nodes.Perform the Tree Level Migration with a
different Source server (tree to which NetWare clustered nodes are attached) and Target server (tree
to which the Linux clustered nodes are attached). This ensures that the entire NetWare DNS
configuration data is available for Linux DNS. For information see “Using iManager to Migrate
Servers across eDirectory Trees” in the OES 2 SP2: Migration Tool Administration Guide.
IMPORTANT: Before starting the DNS server on the Linux cluster, stop the DNS server on the
Netware cluster.
Post-Migration Tasks
See “Post-Migration Procedure” in the OES 2 SP2: Migration Tool Administration Guide.
novdocx (en) 7 January 2010
6.3.9 eDirectory Server Certificates
Novell Certificate ServerTM provides two categories of services: Certificate Authority (CA) and
Server Certificates. The Certificate Authority services include the Enterprise CA and CRL
(Certificate Revocation List). Only one server can host the CA, and normally that same server hosts
the CRLs if they are enabled (although if you move the CA to a different server, the CRLs usually
stay on the old server). The CA and CRL services are not cluster-enabled in either NetWare or OES
2 Linux, and therefore, there are no cluster-specific tasks for them.
Novell Certificate Server provides a Server Certificates service for NetWare and Linux. The service
is not clustered. However, clustered applications that use the server certificates must be able to use
the same server certificates on whichever cluster node they happen to be running. Use the
instructions in the following sections to set up Server Certificate objects in a clustered environment
to ensure that your cryptography-enabled applications that use Server Certificate objects always
have access to them.
The eDirectory Server Certificate objects are created differently in OES 2 Linux and cannot be
directly reused from the NetWare server. The differences and alternatives for setting up certificates
on Linux are described in the following sections:
“Server Certificate Changes in OES 2 Linux” on page 72
“Using Internal Certificates in a Cluster” on page 73
“Using External Certificates in a Cluster” on page 73
Server Certificate Changes in OES 2 Linux
When you install NetWare or OES 2 Linux in an eDirectory environment, the Server Certificate
service can create certificates for eDirectory services to use. In addition, custom certificates can be
created after the install by using iManager or command line commands.
72 OES 2 SP2: Novell Cluster Services 1.8.7 for Linux Administration Guide
Page 73

For NetWare, all applications are integrated with eDirectory. This allows applications to
automatically use the server certificates created by Novell Certificate Server directly from
eDirectory. In a NetWare cluster, you might have copied the Server Certificate objects to all nodes in
the cluster using backup and restore functions as described in “Server Certificate Objects and
Clustering” in the Novell Certificate Server 3.3.2 Administration Guide.
For OES 2 Linux, many applications (such as Apache and Tomcat) are not integrated with
eDirectory and therefore, cannot automatically use the certificates created by Novell Certificate
Server directly from eDirectory. By default, these services use self-signed certificates, which are not
in compliance with the X.509 requirements as specified in RFC 2459 and RFC 3280.
To address the difference, Novell Certificate Server offers an install option for OES 2 Linux called
Use eDirectory Certificates that automatically exports the default eDirectory certificate SSL
Certificate DNS and its key pair to the local file system in the following files:
/etc/ssl/servercerts/servercert.pem
/etc/ssl/servercerts/serverkey.pem
Using Internal Certificates in a Cluster
novdocx (en) 7 January 2010
Recent versions of Novell Certificate Server create default certificates that allow you to specify an
alternative IP address or DNS address by adding it in the Subject Alternative Name extension. This
requires that your DNS service be configured to reflect the cluster IP/DNS address as the default (or
first) address. If the DNS service is set up correctly, the cluster applications can use the default
certificates without needing any administration.
IMPORTANT: If the DNS service is not set up correctly, then you must use the process described
for external certificates in “Using External Certificates in a Cluster” on page 73.
For OES 2 Linux clusters using the internal certificate method, make sure the DNS service is
configured to use the cluster IP/DNS address. During the OES 2 Linux install, select the Use
eDirectory Certificates option so that Novell Certificate Server automatically creates the SSL
Certificate DNS certificate with the correct IP/DNS address. By selecting the Use eDirectory
Certificates option during the install and using the cluster IP/DNS address, clustered applications
should be able to access the certficates without needing further configuration for the Server
Certificate object.
Using External Certificates in a Cluster
External (third-party) certificates create a Server Certificate object that includes the cluster's IP and/
or DNS address. Create a backup of this certificate. For each server in the cluster, create a Server
Certificate object with the same name by importing the previously created backup certificate and
key pair to a location on that server. This allows all of the servers in the cluster to use and share the
same certificate and key pair. After all cluster nodes have the certificate, configure the cluster
applications to use the server certificate.
IMPORTANT: This cluster task can also be used for sharing internal certificates on the cluster
nodes. In early versions of Novell Certificate Server, this was the only option available.
For information about exporting and using eDirectory Server Certificates for External Services, see
“Using eDirectory Certificates with External Applications” in the Novell Certificate Server 3.3.2
Administration Guide.
Converting NetWare 6.5 Clusters to OES 2 Linux 73
Page 74

For OES 2 Linux clusters using the external certificate method, the solution is more complicated
than for internal certificates. You must create the certificate for each server in the cluster just as you
did for NetWare. You must also create a configuration on the SAS:Service object for each server so
that the common certificate is automatically exported to the file system where the non-eDirectory
enabled applications can use it.
6.3.10 iPrint
After adding the OES 2 Linux node to the NetWare cluster, you must use the following procedure to
set up clustering for iPrint on Linux, then migrate the iPrint information from a NetWare shared NSS
pool resource to a newly created Linux shared NSS pool resource on the Linux node.
1 On a Linux node, create a new shared NSS pool and volume.
2 Log in as the
opt/novell/iprint/bin
./iprint_nss_relocate -a admin_fdn -p password -n nss_volume_path -l
cluster
Replace admin_fdn with the comma-delimited fully distinguished name of the iPrint
administrator user (such as
password of the iPrint administrator user. Replace nss_volume_path with the Linux path (such
/media/nss/NSSVOL1
as
configuration data.
3 Review the messages displayed on the screen to confirm the data migration from the local
Linux path to the shared NSS path is completed.
root
user to the Linux node where the shared pool resource is active, go to the
directory, then run the
cn=admin,o=mycompany
iprint_nss_relocate
script by entering
). Replace password with the actual
) to the shared NSS volume where you want to relocate the iPrint
/
novdocx (en) 7 January 2010
For example, enter
./iprint_nss_relocate -a cn=admin,o=mycompany -p pass -n /media/nss/
NSSVOL1 -l cluster
For information, see “Executing the Script” in the OES 2 SP2: iPrint for Linux Administration
Guide.
4 For each Linux node in the cluster where iPrint is installed, set up clustering for iPrint.
4a In iManager, select Clusters > Cluster Manager, then cluster migrate the shared NSS pool
resource from the active Linux node to another Linux node.
4b Log in to the Linux node as the
user, then run the
iprint_nss_relocate
script as
root
described in Step 2, using the same values.
5 In iManager, click Clusters > Cluster Manager, then select the Linux node where the shared
NSS pool is currently active.
6 Select the Linux shared NSS pool, then go to the Preferred Nodes tab and move all of the
remaining NetWare nodes from the Assigned Nodes to Unassigned Nodes column to prevent an
inadvertent failback of the resource to a NetWare server.
7 In iManager, select iPrint, then create a Driver Store (iPrint > Create Driver Store) and a Print
Manager (iPrint > Create Print Manager) on the Linux node with the IP or DNS name of the
shared NSS pool resource.
IMPORTANT: Do not modify the load and unload scripts for the Linux shared NSS pool
resource at this time.
8 Use the Migration tool to migrate data from the NetWare shared NSS pool to the Linux shared
NSS pool.
74 OES 2 SP2: Novell Cluster Services 1.8.7 for Linux Administration Guide
Page 75

For information about using the Migration tool for iPrint migration, see “Migrating iPrint from
NetWare to OES 2 Linux” in the OES 2 SP2: Migration Tool Administration Guide.
8a Start the migration tool from the target server, then authenticate by using the IP address or
DNS name of the NetWare shared NSS pool resource.
8b For the target server, authenticate by using the IP address or DNS name of the Linux
shared NSS pool resource.
8c Configure the Migration tool for migrating iPrint information, then proceed with the
migration as described in “Migrating iPrint from NetWare to OES 2 Linux”.
9 Edit the load and unload scripts for the Linux shared NSS pool resource. For information, see
“Prerequisites” in the OES 2 SP2: iPrint for Linux Administration Guide.
6.3.11 QuickFinder Server
In a Novell Cluster Services cluster, you must install QuickFinder on each node in the cluster. This
registers QuickFinder Server with each of the Web servers and application servers running on each
server. On OES 2 Linux, QuickFinder is installed by default in the
/var/lib/qfsearch
We recommend that you use the default path. After the installation, you must set up one or more
virtual search servers to enable QuickFinder Server to work in a cluster.
directory.
novdocx (en) 7 January 2010
When the Linux setup is completed, you are ready to manually migrate settings from the NetWare
cluster to the Linux cluster. Set up QuickFinder on the OES 2 Linux cluster nodes, then manually
migrate QuickFinder data from a NetWare node to an OES 2 Linux node.
For information about using the QuickFinder Server Manager and other procedures for QuickFinder,
see the OES 2: Novell QuickFinder Server 5.0 Administration Guide.
“Prerequisites” on page 75
“Setting Up QuickFinder Server on Linux Cluster Nodes” on page 75
“Migrating QuickFinder Data from NetWare to Linux” on page 76
“Post-Migration Considerations” on page 77
“Searching the Cluster Volume” on page 77
Prerequisites
Before you begin:
1 On one Linux node, create a Linux POSIX cluster resource where all of the indexes and virtual
search server settings are to be stored.
For information, see Chapter 11, “Configuring Cluster Resources for Shared Linux POSIX
Volumes,” on page 157.
Setting Up QuickFinder Server on Linux Cluster Nodes
On each OES 2 Linux node, do the following to set up QuickFinder for Linux:
1 Cluster migrate the Linux POSIX cluster resource to the OES 2 Linux node where you want to
install QuickFinder
2 Install QuickFinder on the active cluster node.
3 Create a virtual search server to enable QuickFinder Server to work in a cluster.
Converting NetWare 6.5 Clusters to OES 2 Linux 75
Page 76

Give each virtual search server the same name and location. After the first server is set up, any
settings that you create on the shared volume are automatically displayed.
3a On the active cluster node, open the QuickFinder Server Manager.
3b Click Global Settings, then click Add New Virtual Server.
3c In Name, specify the DNS name of the cluster.
3d In Location, specify the Linux path on the Linux POSIX cluster resource where all of the
indexes and virtual search server settings will be located.
3e Click Add.
4 Repeat Step 1 to Step 3 for each of the nodes in the cluster.
Migrating QuickFinder Data from NetWare to Linux
Use the following steps to migrate QuickFinder Server data from a NetWare server to a
corresponding Linux server. You must repeat the tasks for each NetWare server in the cluster. It
assumes a one-to-one server replacement in the cluster.
WARNING: Migrating indexes and virtual search server settings from a QuickFinder Server
running on NetWare to QuickFinder Server running on OES 2 Linux replaces the existing settings
on the Linux server. If you want to merge your NetWare settings with the existing Linux settings,
you must manually re-create the NetWare settings by using the QuickFinder Server Manager.
novdocx (en) 7 January 2010
1 Open a Web browser, the access the QuickFinder Server Manager on the NetWare server.
http://servername/qfsearch/admin
2 Click Global Settings in the top toolbar.
3 Write down the paths for each virtual search server displayed in the Location column.
4 On the OES 2 Linux server where the shared volume is active, mount the NetWare server by
using the
5 Make a backup of the
ncpmount
command.
/var/lib/qfsearch/SiteList.properties
file.
Make sure that you don't have a file with this name as a backup on the NetWare server.
6 Copy all
NetWare server to
7 Copy
8 Copy
Templates
9 If any of the paths listed in Step 3 are not under
.properties
sys:/qfsearch/Sites
sys:/qfsearch/Templates
and
Cron.jobs
/var/lib/qfsearch
and all of its subdirectories to
.
files from the root directory
on the Linux server.
/var/lib/qfsearch/Sites
and all of its subdirectories to
sys:/qfsearch
sys:/qfsearch
on the
.
/var/lib/qfsearch/
(for example, if you installed
a virtual search server somewhere other than the default location), you must also copy those
paths to Linux.
For example, if you have the path
Linux server. You could copy it to
qfsearch/Sites/PartnerSite
sys:/SearchSites/PartnerSite,
/var/opt/SearchSites/PartnerSite
you must copy it to the
.
or
/var/lib/
10 Edit all NetWare paths in
/var/lib/qfsearch/SiteList.properties
Linux paths.
For example, change
76 OES 2 SP2: Novell Cluster Services 1.8.7 for Linux Administration Guide
sys:/qfsearch
to
/var/lib/qfsearch.
to reflect the new
Page 77

novdocx (en) 7 January 2010
Or, as in the example in Step 9, change
SearchSites/PartnerSite
.
sys:/SearchSites/PartnerSite
to
/var/opt/
Some paths might have one or two backslashes (\) that must be replaced with one forward slash
(/). For example,
.
docs
sys:\\qfsearch\\docs
needs to be changed to
/var/lib/qfsearch/
11 Update all NetWare paths in the properties and configuration files copied in the steps above to
the Linux paths, and update any DNS names.
The following files must be updated:
AdminServlet.properties
Cron.jobs
Sites/Highlighter.properties
Sites/Print.properties
Sites/Search.properties
For each of the virtual search servers, modify the following:
qfind.cfg
Any of the above
.properties
files, if they exist.
IMPORTANT: Linux filenames are case sensitive.
The names of most properties files are mixed case, so make sure the files copied from NetWare
are the correct case. You can compare them to the
.properties.sample
files on Linux.
You might also need to update paths in templates. If you have problems such as a template not
being found or some properties not being set properly, check the case of the filename.
If you modified any “file” index paths to index directories on the Linux server, that index must
be regenerated.
12 After all the files have been modified, run the following commands to set the access rights and
the owner and groups so that the QuickFinder engine has rights to access the files.
As the
root
user, enter
chown -R root:www /var/lib/qfsearch
chmod -R 770 /var/lib/qfsearch
13 Repeat Step 1 to Step 12 for each NetWare and Linux pair of nodes.
Post-Migration Considerations
QuickFinder Server 5.0 indexes are not compatible with previous versions of QuickFinder Server.
The indexes must be regenerated, and you cannot synchronize QuickFinder Server 5.0 indexes with
indexes from a previous version of QuickFinder Server (and vice-versa).
Searching the Cluster Volume
To perform a search on the shared volume after the NetWare migration is complete:
1 Open a Web browser, then enter
http://DNS_CLUSTER/qfsearch/search
QuickFinder Server sees the DNS and sends the request to the appropriate virtual search server.
Converting NetWare 6.5 Clusters to OES 2 Linux 77
Page 78

6.4 Converting NetWare Cluster Nodes to OES 2 Linux (Rolling Cluster Conversion)
Performing a rolling cluster conversion from NetWare 6.5 to OES 2 Linux lets you keep your cluster
up and running and lets your users continue to access cluster resources while the conversion is being
performed.
During a rolling cluster conversion, one server is converted to Linux while the other servers in the
cluster continue running NetWare 6.5. Then, if desired, another server can be converted to OES 2
Linux, and then another, until all servers in the cluster have been converted to Linux. You can also
leave the cluster as a mixed NetWare and Linux cluster.
The process for converting NetWare 6.0 cluster nodes to OES 2 Linux cluster nodes is the same as
for converting NetWare 6.5 cluster nodes to OES 2 Linux cluster nodes.
IMPORTANT: Before you begin, make sure you system meets the following requirements and
caveats:
Section 3.1, “System Requirements for Novell Cluster Services,” on page 27
Section 6.1, “Guidelines for Converting Clusters from NetWare to OES 2 Linux,” on page 59
novdocx (en) 7 January 2010
If you are converting from NetWare on physical servers to OES 2 Linux on virtual servers (guest
operating systems running on Xen virtual machines), you can use the same methods and processes
as those used on a physical server. No additional changes or special configuration is required. For
information, see Section 12.5, “Mixed Physical and Virtual Node Clusters,” on page 191.
To perform a rolling cluster conversion from NetWare 6.5 to OES 2 Linux:
1 Before you add the first Linux node to the NetWare cluster, if the NetWare cluster uses an SBD,
make sure that the device (or devices) being used by the SBD are marked as Shareable for
Clustering.
You can use NSSMU or iManager to mark the SBD devices as shareable. It is not necessary to
bring the cluster down when changing the device attribute to Shareable for Clustering.
Using NSSMU:
1a Log in to the master node of the NetWare cluster as the administrator user.
1b Enter
1c In the NSSMU main menu, select Devices.
1d In the Devices list, highlight the device that contains the SBD partition, then press F5 to
1e Press F6 to mark the device as Shareable for Clustering.
1f If the SBD partition is mirrored, repeat Step 1d and Step 1e to also mark the mirror device
1g Press Esc to exit NSSMU.
nssmu
at the server console prompt.
select it.
as Shareable for Clustering.
2 Make a note of the services that are installed on the server you are converting.
You might want to install the same components on the Linux node if they are available.
3 On the NetWare server that you want to convert to Linux, remove eDirectory.
78 OES 2 SP2: Novell Cluster Services 1.8.7 for Linux Administration Guide
Page 79

You can do this by running NWConfig, then selecting Product Options > Directory Options
<install NDS> > Remove Directory Services from this server.
4 Bring down the NetWare server you want to convert to Linux.
Any cluster resources that were running on the server should fail over to another server in the
cluster.
You can also manually cluster migrate the resources to another server in the cluster prior to
bringing down the server. This prevents the resources from failing back to the node after you
have completed the upgrade.
5 In eDirectory, remove (delete) the Cluster Node object, the Server object, and all corresponding
objects relating to the downed NetWare server.
Depending on your configuration, there could be 10 or more objects that relate to the downed
NetWare server.
6 Run DSRepair from another server in the eDirectory tree to fix any directory problems.
If DSRepair finds errors or problems, run it multiple times until no errors are returned.
7 Install OES 2 Linux on the server, but do not install the Novell Cluster Services option in OES
Services at this time.
You can use the same server name and IP address that were used on the NetWare server. This is
suggested, but not required.
novdocx (en) 7 January 2010
See the OES 2 SP2: Installation Guide for more information.
8 Set up and verify SAN connectivity for the Linux node.
Consult your SAN vendor documentation for SAN setup and connectivity instructions.
9 Install Novell Cluster Services and add the node to your existing NetWare 6.5 cluster.
9a Log in to the OES 2 Linux server as the
root
user.
9b In YaST, select Open Enterprise Server > OES Install and Configuration.
9c On the Software Selection page under OES Services, click Novell Cluster Services.
Services that you have already installed are indicated by a blue check mark in the status
check box next to the service.
For information about other install options, see Step 5 in Section 3.5.1, “Installing Novell
Cluster Services during a OES 2 Linux Installation,” on page 42.
9d Click Accept to begin the install, then click Continue to accept changed packages.
9e Continue through the installation process until you reach the Novell Open Enterprise
Server Configuration page.
9f Reconfigure LDAP Configuration of Open Enterprise Services to specify the credentials
for the container administrator user (or non-administrator user) who has the eDirectory
rights needed to install Novell Cluster Services.
For information about what rights are needed, see Section 3.4, “Assigning Install Rights
for Container Administrators,” on page 41.
9f1 On the Novell Open Enterprise Server Configuration page under LDAP
Configuration of Open Enterprise Services, click the disabled link to enable re-
configuration.
The sentence changes to Reconfiguration is enabled.
9f2 Click the LDAP Configuration of Open Enterprise Services link to open the LDAP
Configuration page.
Converting NetWare 6.5 Clusters to OES 2 Linux 79
Page 80

9f3 Specify the following values:
Admin name and context: The username and context (in LDAP form) of the
container administrator user (or non-administrator user) who has the eDirectory
rights needed to install Novell Cluster Services.
Admin password: The password of the container administrator (or non-
administrator user).
9f4 Click Next.
The install returns to the Novell Open Enterprise Server Configuration page.
9g On the Novell Open Enterprise Server Configuration page under Novell Cluster Services,
click the disabled link to enable configuration.
The sentence changes to Configuration is enabled.
9h Click the Novell Cluster Services link to open the Novell Cluster Services Configuration
page.
9i Click Existing Cluster, specify the fully distinguished name (FDN) of the cluster, then
click Next.
IMPORTANT: Use the comma format illustrated in the example. Do not use dots.
novdocx (en) 7 January 2010
This is the name and eDirectory context of the cluster that you are adding this server to.
9j Select the IP address that Novell Cluster Services will use for this node.
Some servers have multiple IP addresses. This step lets you choose which IP address
Novell Cluster Services uses.
9k Deselect Start Services Now.
9l Click Next, then continue through the rest of the OES installation.
9m After the install is complete, use the Software Updater (or other update methods) to install
any patches from the OES 2 Linux patch channel and any EVMS patches from the SUSE
Linux Enterprise Server 10 SP2 patch channel.
10 If you have a shared disk system on the cluster, enter
sbdutil -f
at the Linux terminal
console to verify that the node can see the cluster (SBD) partition on the SAN.
sbdutil -f
also tells you the device on the SAN where the SBD partition is located.
11 Reboot the server.
12 (Optional) Manually migrate the resources that were on the old server nodes to this Linux
server.
Some cluster resources for services on NetWare cannot be used on Linux. For information, see
Section 6.3, “Guidelines for Converting Service Cluster Resources from NetWare to Linux,” on
page 64.
The resources can automatically fail back if all of the following apply:
The failback mode for the resources was set to Auto.
®
You used the same node number for this Linux server that was used for the former
NetWare server.
This only applies if this Linux server is the next server added to the cluster.
This Linux server is the preferred node for the resources.
80 OES 2 SP2: Novell Cluster Services 1.8.7 for Linux Administration Guide
Page 81

6.5 Adding New OES 2 Linux Nodes to Your NetWare Cluster
You can add new OES 2 Linux cluster nodes to your existing NetWare 6.5 cluster without bringing
down the cluster.
1 Before you add the first Linux node to the NetWare cluster, if the NetWare cluster uses an SBD,
make sure that the device (or devices) being used by the SBD are marked as Shareable for
Clustering.
You can use NSSMU or iManager to mark the SBD devices as shareable. It is not necessary to
bring the cluster down when changing the device attribute to Shareable for Clustering.
Using NSSMU:
1a Log in to the master node of the NetWare cluster as the administrator user.
1b Enter
1c In the NSSMU main menu, select Devices.
1d In the Devices list, highlight the device that contains the SBD partition, then press F5 to
nssmu
select it.
at the server console prompt.
novdocx (en) 7 January 2010
1e Press F6 to mark the device as Shareable for Clustering.
1f If the SBD partition is mirrored, repeat Step 1d and Step 1e to also mark the mirror device
as Shareable for Clustering.
1g Press Esc to exit NSSMU.
2 Install OES 2 Linux on the new node, but do not install the Novell Cluster Services option from
OES Services at this time.
See the “OES 2 SP2: Installation Guide” for more information.
3 Set up and verify SAN connectivity for the new OES 2 Linux node.
Consult your SAN vendor documentation for SAN setup and connectivity instructions.
4 Install Cluster Services and add the new node to your existing NetWare 6.5 cluster.
See Section 3.5.2, “Installing Novell Cluster Services on an Existing OES 2 Linux Server,” on
page 44 for more information.
5 If you have a shared disk system on the cluster, enter
console to verify that the node can see the cluster (SBD) partition on the SAN.
sbdutil -f
6 Start cluster software by going to the
start
You must be logged in as root to run
7 Add and assign cluster resources to the new Linux cluster node.
For information, see Section 9.8, “Assigning Nodes to a Resource,” on page 127.
will also tell you the device on the SAN where the SBD partition is located.
/etc/init.d
.
novell-ncs start
sbdutil -f
directory and running
.
at the Linux terminal
novell-ncs
Converting NetWare 6.5 Clusters to OES 2 Linux 81
Page 82

6.6 Translation of Cluster Resource Scripts for Mixed NetWare and Linux Clusters
Novell Cluster Services includes specialized functionality to help NetWare and Linux servers
coexist in the same cluster. This functionality is also beneficial as you migrate NetWare cluster
servers to Linux. The translation between NetWare and Linux versions of the load and unload scripts
is performed by the Cluster Translation Library script (
automates the conversion of the Master IP Address resource and cluster-enabled NSS pool resource
load and unload scripts from NetWare to Linux.
The NetWare load and unload scripts are read from eDirectory, converted, and written into Linux
load and unload script files. Those Linux load and unload script files are then searched for NetWarespecific command strings, and the command strings are then either deleted or replaced with Linuxspecific command strings. Separate Linux-specific commands are also added, and the order of
certain lines in the scripts is also changed to function with Linux.
This section compares NetWare commands in cluster scripts to their corresponding Linux
commands that are used in Cluster Translation Library. If the commands in cluster resource’s load or
unload scripts are not part of the translation library, the cluster resource can end up in a comatose
state.
/opt/novell/ncs/bin/clstrlib.py
). It
novdocx (en) 7 January 2010
IMPORTANT: Beginning in OES 2 SP2, Novell Cluster Services allows you to customize the
translation syntax that us used for load and unload scripts in mixed-platform situations by defining
new syntax translations to be used in addition to the normal translations. For information, see
Section 6.7, “Customizing the Translation Syntax for Converting Load and Unload Scripts,” on
page 87.
Unlike NetWare cluster load and unload scripts that are stored in eDirectory, the Linux cluster load
and unload scripts are stored in files on Linux cluster servers. The cluster resource name is used in
the load and unload script filenames. The path to the files is
IMPORTANT: Use the Properties > Scripts page in the Clusters plug-in in iManager whenever
you make manual changes to the load and unload scripts. The changes are automatically saved to the
files.
The normal translations performed by the Cluster Translation Library are described in the following
sections:
Section 6.6.1, “Comparing Script Commands for NetWare and Linux,” on page 82
Section 6.6.2, “Comparing Master IP Address Scripts,” on page 83
Section 6.6.3, “Comparing NSS Pool Resource Scripts,” on page 84
Section 6.6.4, “Comparing File Access Protocol Resource Script Commands,” on page 85
/var/opt/novell/ncs/
.
6.6.1 Comparing Script Commands for NetWare and Linux
Table 6 - 2 identifies some of the NetWare cluster load and unload script commands that are searched
for and the Linux commands that they are replaced with (unless the commands are deleted).
82 OES 2 SP2: Novell Cluster Services 1.8.7 for Linux Administration Guide
Page 83

Table 6-2 Cluster Script Command Comparison
Action NetWare Cluster Command Linux Cluster Command
novdocx (en) 7 January 2010
Replace
Replace
Replace
Replace
Delete
Delete
Replace
Replace
Replace
Replace
Replace
IGNORE_ERROR add secondary
ipaddress
IGNORE_ERROR del secondary
ipaddress
ignore_error
add_secondary_ipaddress
ignore_error
del_secondary_ipaddress
del secondary ipaddress ignore_error
del_secondary_ipaddress
add secondary ipaddress exit_on_error
add_secondary_ipaddress
IGNORE_ERROR NUDP
IGNORE_ERROR HTTP
(deletes the entire line)
(deletes the entire line)
nss /poolactivate= nss /poolact=
nss /pooldeactivate= nss /pooldeact=
mount volume_name VOLID=number exit_on_error ncpcon mount
volume_name=number
NUDP ADD clusterservername
ipaddress
exit_on_error ncpcon bind
--ncpservername=ncpservername
--ipaddress=ipaddress
NUDP DEL clusterservername
ipaddress
ignore_error ncpcon unbind
--ncpservername=ncpservername
--ipaddress=ipaddress
Delete
Delete
CLUSTER CVSBIND
CIFS
(deletes the entire line)
(deletes the entire line)
6.6.2 Comparing Master IP Address Scripts
“Master IP Address Resource Load Script” on page 83
“Master IP Address Resource Unload Script” on page 84
Master IP Address Resource Load Script
This section provides examples of the master IP address resource load scripts on NetWare and
Linux.
NetWare
IGNORE_ERROR set allow ip address duplicates = on
IGNORE_ERROR CLUSTER CVSBIND ADD BCCP_Cluster 10.1.1.175
IGNORE_ERROR NUDP ADD BCCP_Cluster 10.1.1.175
IGNORE_ERROR add secondary ipaddress 10.1.1.175
IGNORE_ERROR HTTPBIND 10.1.1.175 /KEYFILE:"SSL CertificateIP"
IGNORE_ERROR set allow ip address duplicates = off
Converting NetWare 6.5 Clusters to OES 2 Linux 83
Page 84

Linux
#!/bin/bash
. /opt/novell/ncs/lib/ncsfuncs
ignore_error add_secondary_ipaddress 10.1.1.175 -np
exit 0
Master IP Address Resource Unload Script
This section provides examples of the master IP address resource unload scripts on NetWare and
Linux.
NetWare
IGNORE_ERROR HTTPUNBIND 10.1.1.175
IGNORE_ERROR del secondary ipaddress 10.1.1.175
IGNORE_ERROR NUDP DEL BCCP_Cluster 10.1.1.175
IGNORE_ERROR CLUSTER CVSBIND DEL BCCP_Cluster 10.1.1.175
novdocx (en) 7 January 2010
Linux
#!/bin/bash
. /opt/novell/ncs/lib/ncsfuncs
ignore_error del_secondary_ipaddress 10.1.1.175
exit 0
6.6.3 Comparing NSS Pool Resource Scripts
“NSS Pool Resource Load Script” on page 84
“NSS Pool Resource Unload Script” on page 85
NSS Pool Resource Load Script
This section provides examples of the NSS pool resource load scripts on NetWare and Linux.
NetWare
nss /poolactivate=HOMES_POOL
mount HOMES VOLID=254
CLUSTER CVSBIND ADD BCC_CLUSTER_HOMES_SERVER 10.1.1.180
NUDP ADD BCC_CLUSTER_HOMES_SERVER 10.1.1.180
add secondary ipaddress 10.1.1.180
CIFS ADD .CN=BCC_CLUSTER_HOMES_SERVER.OU=servers.O=lab.T=TEST_TREE.
84 OES 2 SP2: Novell Cluster Services 1.8.7 for Linux Administration Guide
Page 85

Linux
#!/bin/bash
. /opt/novell/ncs/lib/ncsfuncs
exit_on_error nss /poolact=HOMES_POOL
exit_on_error ncpcon mount HOMES=254
exit_on_error add_secondary_ipaddress 10.1.1.180
exit_on_error ncpcon bind --ncpservername=BCC_CLUSTER_HOMES_SERVER
--ipaddress=10.1.1.180
exit 0
NSS Pool Resource Unload Script
This section provides examples of the NSS pool resource unload scripts on NetWare and Linux.
NetWare
del secondary ipaddress 10.1.1.180
CLUSTER CVSBIND DEL BCC_CLUSTER_HOMES_SERVER 10.1.1.180
NUDP DEL BCC_CLUSTER_HOMES_SERVER 10.1.1.180
nss /pooldeactivate=HOMES_POOL /overridetype=question
CIFS DEL .CN=BCC_CLUSTER_HOMES_SERVER.OU=servers.O=lab.T=TEST_TREE.
novdocx (en) 7 January 2010
Linux
#!/bin/bash
. /opt/novell/ncs/lib/ncsfuncs
ignore_error ncpcon unbind --ncpservername=BCC_CLUSTER_HOMES_SERVER
--ipaddress=10.1.1.180
ignore_error del_secondary_ipaddress 10.1.1.180
ignore_error nss /pooldeact=HOMES_POOL
exit 0
6.6.4 Comparing File Access Protocol Resource Script Commands
“File Access Protocol Resource Load Scripts” on page 85
“File Access Protocol Resource Unload Scripts” on page 86
File Access Protocol Resource Load Scripts
This section provides examples of the file access protocol commands for load scripts on NetWare
and Linux.
NetWare
Protocol Script Command for Load Scripts
TM
NCP
Novell AFP
NUDP ADD NCS1_P1_SERVER 10.10.10.194
AFPBIND ADD NCS1_P1_SERVER 10.10.10.204
Converting NetWare 6.5 Clusters to OES 2 Linux 85
Page 86

Protocol Script Command for Load Scripts
novdocx (en) 7 January 2010
Novell CIFS
CIFS ADD .CN=NCS1_P1_SERVER.O=novell.T=CLUSTER.
Linux
Protocol Script Command for Load Scripts
NCP
# mount the NCP volume
exit_on_error ncpcon mount $NCP_VOLUME=VOL_ID,PATH=$MOUNT_POINT
exit_on_error ncpcon bind --ncpservername=NCS1_P1_SERVER
--ipaddress=10.10.10.194
Novell AFP
Novell CIFS
exit_on_error cluster_afp.sh add NCS1_P1_SERVER 10.10.10.204
exit_on_error novcifs --add
--vserver=.CN=NCS1_P1_SERVER.O=novell.T=TREE-188. --ipaddr=$CIFS_IP
File Access Protocol Resource Unload Scripts
This section provides examples of the Novell AFP commands for unload scripts on NetWare and
Linux.
NetWare
Protocol Script Command for Unload Scripts
NCP
Novell AFP
Novell CIFS
NUDP DEL NCS1_P1_SERVER 10.10.10.194
AFPBIND DEL NCS1_P1_SERVER 10.10.10.204
CIFS DEL .CN=NCS1_P1_SERVER.O=novell.T=CLUSTER.
Linux
Protocol Script Command for Unload Scripts
NCP
Novell AFP
Novell CIFS
ignore_error ncpcon unbind --ncpservername=NCS1_P1_SERVER
--ipaddress=10.10.10.194
# dismount the NCP volume
ignore_error ncpcon dismount $NCP_VOLUME
ignore_error cluster_afp.sh del NCS1_P1_SERVER 10.10.10.204
ignore_error novcifs --remove
--vserver=.CN=NCS1_P1_SERVER.O=novell.T=TREE-188.
--ip-addr=$CIFS_IP
ignore_error nss /pooldeact=OESPOOL /overridetype=question
86 OES 2 SP2: Novell Cluster Services 1.8.7 for Linux Administration Guide
Page 87

6.7 Customizing the Translation Syntax for Converting Load and Unload Scripts
The syntax for load and unload scripts differs for NetWare and Linux platforms. A script that is valid
for the NetWare platform is not necessarily recognized on the OES 2 Linux platform. In a mixedplatform cluster, a cluster resource’s load script and unload script must be translated to use the
proper syntax when running on the NetWare or Linux nodes. Translation occurs in-memory while
the cluster contains mixed-platform nodes, and during the final cluster conversion of the cluster
from NetWare to Linux.
The translation between NetWare and Linux versions of the load and unload scripts is performed by
the Cluster Translation Library script (
/opt/novell/ncs/bin/clstrlib.py
translations in the library are described in Section 6.6, “Translation of Cluster Resource Scripts for
Mixed NetWare and Linux Clusters,” on page 82. If the commands in cluster resource’s load or
unload scripts are not part of the translation library, the cluster resource can end up in a comatose
state.
Beginning in OES 2 SP2, Novell Cluster Services allows you to customize the translation syntax
that is used for load and unload scripts in mixed-platform situations by defining new syntax
translations in the
create. The
/var/opt/novell/ncs/customized_translation_syntax
clstrlib.py
script reads the additional translation syntax from the syntax file, and
processes them in addition to the normal translations in the Cluster Translation Library.
). The normal
file that you
novdocx (en) 7 January 2010
The customized translation supports using Python regular expressions to search for strings (
(\d+)
digits (
), and other data types. The search is case insensitive.
(\S+)
NOTE: Refer to information about Python regular expressions to learn how to create searches for
other data types.
In a text editor, create the
customized_translation_syntax
syntax that you need, then copy the file to the
/var/opt/novell/ncs/ directory
file with the additional translation
on each Linux
node in the mixed-platform cluster.
The syntax file should contain a four-line command for each type of translation you want to add:
<R|D>
search_string
[replacement_data]
[preceding_data]
You can have any number of the four-line commands in the file. Use the following guidelines for
creating the syntax translation commands:
Line Description
<R|D>
search_string
Specify whether to replace (R) all matches or to delete (D) all matches of
the data type you are looking for in the load or unload script.
Specify the search string that is used to locate a line in the scripts.
),
[replacement_data]
Specify the replacement data used to replace a line matched by the
search performed.
Leave this line empty if there is no replacement.
Converting NetWare 6.5 Clusters to OES 2 Linux 87
Page 88

Line Description
novdocx (en) 7 January 2010
[preceding_data]
Specify a line to be inserted before the first line that is matched by the
search performed.
Leave this line empty if there is no line to be inserted before the first
matching line.
The following four lines are sample code for a search command in the
customized_translation_syntax file. The fourth line is intentionally left empty.
R
^\s*bind\s+IP\s+(\S+)\s(\S+)\s+address=(\d+\.\d+\.\d+\.\d+)
ignore_error bind IP \1 \2 address=\3\nexit_on_error ip addr add \3/32 dev \1
You can use the c
luster convert preview
command to verify that the
customized_translation_syntax file is working as intended for a particular resource.
root
1 On the master node, open a terminal console as the
cluster convert preview resource_name
user, then enter
6.8 Finalizing the Cluster Conversion
If you have converted all nodes in a former NetWare cluster to OES 2 Linux, you must finalize the
conversion process by issuing the
cluster convert
command moves cluster resource load and unload scripts from the files where
cluster convert
they were stored on Linux cluster nodes into eDirectory. This enables a Linux cluster that has been
converted from NetWare to utilize eDirectory like the former NetWare cluster.
command on one Linux cluster node. The
WARNING: After you finalize the cluster conversion, rollback to NetWare is not supported.
To finalize the cluster conversion:
1 Run
cluster convert preview resource_name
at the terminal console of one Linux
cluster node.
Replace resource_name with the name of a resource that you want to preview.
The preview switch lets you view the resource load and unload script changes that will be made
when the conversion is finalized. You can preview all cluster resources.
2 Run
cluster convert commit
at the terminal console of one Linux cluster node to finalize
the conversion.
The
cluster convert commit
command generates or regenerates the cluster resource
templates that are included with Novell Cluster Services for Linux. In addition to generating
Linux cluster resource templates, this command deletes all NetWare cluster resource templates
that have the same name as Linux cluster resource templates.
The cluster resource templates are automatically created when you create a new Linux cluster,
but are not created when you convert an existing NetWare cluster to Linux.
88 OES 2 SP2: Novell Cluster Services 1.8.7 for Linux Administration Guide
Page 89

3 Update the cluster configuration on all nodes by running the cluster configuration daemon.
root
Enter the following command as the
/opt/novell/ncs/bin/ncs-configd.py -init
user on every node in the cluster:
This removes the NetWare nodes from the list of nodes in the cluster so they are not displayed
in iManager.
novdocx (en) 7 January 2010
Converting NetWare 6.5 Clusters to OES 2 Linux 89
Page 90

novdocx (en) 7 January 2010
90 OES 2 SP2: Novell Cluster Services 1.8.7 for Linux Administration Guide
Page 91

7
Configuring Cluster Policies and
novdocx (en) 7 January 2010
Priorities
After installing Novell® Cluster ServicesTM on one or more nodes in a cluster, you can configure the
settings for the cluster to meet your needs and help you manage the cluster effectively. This
additional configuration might consist of changing the values on some of the properties for the
Cluster object.
Section 7.1, “Understanding Cluster Settings,” on page 91
Section 7.2, “Configuring Quorum Membership and Timeout Properties,” on page 92
Section 7.3, “Configuring Cluster Protocol Properties,” on page 93
Section 7.4, “Configuring Cluster Event E-Mail Notification,” on page 95
Section 7.5, “Viewing the Cluster Node Properties,” on page 95
Section 7.6, “Modifying the Cluster IP Address and Port Properties,” on page 96
Section 7.7, “What’s Next,” on page 96
7.1 Understanding Cluster Settings
IMPORTANT: You must perform all Cluster Services configuration operations on the master node
in the cluster. In iManager, select the Cluster object, not the Cluster Node objects.
7
Section 7.1.1, “Cluster Policies,” on page 91
Section 7.1.2, “Cluster Protocols Properties,” on page 92
7.1.1 Cluster Policies
Table 7 - 1 describes the configurable cluster policies. You can manage cluster policies in iManager
by going to the Clusters > Cluster Options > Policies page. For instructions, see Section 7.2,
“Configuring Quorum Membership and Timeout Properties,” on page 92.
Table 7-1 Cluster Policies
Property Description
Cluster IP address Specifies the IP address for the cluster.
You specify the IP address when you install Novell Cluster Services on the
first node of the cluster. Rarely, you might need to modify this value.
Port Specifies the port used for cluster communication.
The default cluster port number is 7023, and is automatically assigned when
the cluster is created. You might need to modify this value if there is a port
conflict.
Configuring Cluster Policies and Priorities
91
Page 92

Property Description
Quorum membership Specifies number of nodes that must be up and running in the cluster in order
for cluster resources to begin loading.
Specify a value between 1 and the number of nodes.
Quorum timeout Specifies the maximum amount of time in seconds to wait for the specified
quorum to be met before cluster resources begin loading on whatever
number of nodes are actually up and running.
E-mail notification Enables or disables e-mail notification for the cluster. If it is enabled, you can
specify up to eight administrator e-mail addresses for cluster events
notification.
7.1.2 Cluster Protocols Properties
Table 7 - 2 describes the configurable cluster protocols properties that govern inter-node
communication transmission and tolerances. You can manage cluster protocols policies in iManager
by going to the Clusters > Cluster Options > Protocols page. For instructions, see Section 7.3,
“Configuring Cluster Protocol Properties,” on page 93.
novdocx (en) 7 January 2010
Table 7-2 Cluster Policies
Property Description
Heartbeat Specifies the interval of time in seconds between signals sent by each of the
non-master nodes in the cluster to the master node to indicate that it is alive.
Tolerance Specifies the maximum amount of time in seconds that a master node waits
to get an alive signal from a non-master node before considering that node to
have failed and removing it from the cluster. The default is 8 seconds.
Master watchdog Specifies the interval of time in seconds between alive signals sent from the
master node to non-master nodes to indicate that it is alive.
Slave watchdog Specifies the maximum amount of time in seconds that the non-master
nodes wait to get an alive signal from the master node before considering
that the master node has failed, assigning another node to become the
master node, and removing the old master node from the cluster.
Maximum retransmits This value is set by default and should not be changed.
7.2 Configuring Quorum Membership and Timeout Properties
The quorum membership and timeout properties govern when cluster resources begin loading on
cluster startup, failback, or failover.
1 In iManager, select Clusters, then select Cluster Options.
2 Specify the cluster name, or browse and select the Cluster object.
3 Click the Properties button under the cluster name.
4 Click the Policies tab.
92 OES 2 SP2: Novell Cluster Services 1.8.7 for Linux Administration Guide
Page 93

5 Under Quorum Triggers, specify the number of nodes that are required to form a quorum for
the specified cluster.
For information, see Section 7.2.1, “Quorum Triggers (Number of Nodes),” on page 93.
6 Under Quorum Triggers, specify the amount of time in seconds to wait for the quorum to form
before beginning to load the cluster resources without a quorum being formed.
For information, see Section 7.2.2, “Quorum Triggers (Timeout),” on page 93.
7 Click Apply or OK to save your changes.
7.2.1 Quorum Triggers (Number of Nodes)
The number of nodes required to form a cluster quorum is the number of nodes that must be running
in the cluster before resources start to load. When you first bring up servers in your cluster, Novell
Cluster Services reads the number specified in this field and waits until that number of servers is up
and running in the cluster before it starts loading resources.
Set this value to a number greater than 1 so that all resources don't automatically load on the first
server that is brought up in the cluster. For example, if you set the Number of Nodes value to 4, there
must be four servers up in the cluster before any resource loads and starts.
novdocx (en) 7 January 2010
7.2.2 Quorum Triggers (Timeout)
Timeout specifies the amount of time to wait for the number of servers defined in the Number of
Nodes field to be up and running. If the timeout period elapses before the quorum membership
reaches its specified number, resources automatically start loading on the servers that are currently
up and running in the cluster. For example, if you specify a Number of Nodes value of 4 and a
timeout value equal to 30 seconds, and after 30 seconds only two servers are up and running in the
cluster, resources begin to load on the two servers that are up and running in the cluster.
7.3 Configuring Cluster Protocol Properties
You can use the Cluster Protocol property pages to view or edit the transmit frequency and tolerance
settings for all nodes in the cluster, including the master node. The master node is generally the first
node brought online in the cluster, but if that node fails, any of the other nodes in the cluster can
become the master.
IMPORTANT: If you change any protocol properties, you should restart all servers in the cluster to
ensure that the changes take effect.
1 In iManager, select Clusters, then select Cluster Options.
2 Specify the cluster name, or browse and select the Cluster object.
3 Click the Properties button under the cluster name.
4 Click the Protocols tab.
The Protocols page also lets you view the script used to configure the cluster protocol settings,
but not to change it. Changes made to the protocols setting automatically update the scripts.
5 Specify values for the cluster protocols properties.
For information, see the following:
Heartbeat
Configuring Cluster Policies and Priorities 93
Page 94

Tol eran ce
Master Watchdog
Slave Watchdog
Maximum Retransmits
6 Click Apply or OK to save changes.
7 Restart all nodes in the cluster to make the changes take effect.
7.3.1 Heartbeat
Heartbeat specifies the amount of time between transmits for all nodes in the cluster except the
master. For example, if you set this value to 1, non-master nodes in the cluster send a signal that they
are alive to the master node every second.
7.3.2 Tolerance
Tolerance specifies the amount of time the master node gives all other nodes in the cluster to signal
that they are alive. For example, setting this value to 4 means that if the master node does not receive
an “I'm alive” signal from a node in the cluster within four seconds, that node is removed from the
cluster.
novdocx (en) 7 January 2010
7.3.3 Master Watchdog
Master Watchdog specifies the amount of time between transmits for the master node in the cluster.
For example, if you set this value to 1, the master node in the cluster transmits an “I'm alive” signal
to all the other nodes in the cluster every second.
If you are using multipath I/O to manage multiple paths between the server and the shared drive,
make sure that you allow sufficient time in the watchdog setting for a path failover to avoid
unnecessary cluster resource failovers between nodes. Test the failover time of the MPIO solution
you are using, then adjust the watchdog setting upward accordingly.
7.3.4 Slave Watchdog
Slave Watchdog specifies the amount of time the master node has to signal that it is alive. For
example, setting this value to 5 means that if the non-master nodes in the cluster do not receive an
“I'm alive” signal from the master within five seconds, the master node is removed from the cluster
and one of the other nodes becomes the master node.
If you are using multipath I/O to manage multiple paths between the server and the shared drive,
make sure that you allow sufficient time in the watchdog setting for a path failover to avoid
unnecessary cluster resource failovers between nodes. Test the failover time of the MPIO solution
you are using, then adjust the watchdog setting upward accordingly.
7.3.5 Maximum Retransmits
This value is set by default, and should not be changed.
94 OES 2 SP2: Novell Cluster Services 1.8.7 for Linux Administration Guide
Page 95

7.4 Configuring Cluster Event E-Mail Notification
Novell Cluster Services can automatically send out e-mail messages for certain cluster events like
cluster and resource state changes or nodes joining or leaving the cluster.
IMPORTANT: Novell Cluster Services uses Postfix to send e-mail alerts. If you have a cluster
resource that uses SMTP, that resource might not work in the cluster unless you change the Postfix
configuration.
®
For example, GroupWise
same port, which it does by default. In this case, Postfix must be configured to use a different port.
You can do this by editing the
inet_interfaces, mydestination
uses SMTP and will not function as a cluster resource if Postfix uses the
/etc/postfix/main.cf
, and
mynetworks_style
file and changing the values for the
lines.
novdocx (en) 7 January 2010
You also need to change the listen port for the
See the Postfix Web site (http://www.postfix.org) for more information on configuring Postfix.
You can enable or disable e-mail notification for the cluster and specify up to eight administrator email addresses for cluster notification.
1 In iManager, select Clusters, then select Cluster Options.
2 Specify the cluster name, or browse and select the Cluster object.
3 Click the Properties button under the cluster name.
4 Click the Policies tab.
5 Select or deselect the Enable Cluster Notification Events check box to enable or disable e-mail
notification.
6 If you enable e-mail notification, add up to eight e-mail addresses in the field provided.
You can click the buttons next to the field to add, delete, or edit e-mail addresses. Repeat this
process for each e-mail address you want on the notification list.
7 If you enable e-mail notification, specify the type of cluster events you want administrators to
receive messages for.
Only Critical Events: To only receive notification of critical events like a node failure or
a resource going comatose, click the Receive Only Critical Events radio button.
All Events: To receive notification of all cluster state changes including critical events,
resource state changes, and nodes joining and leaving the cluster, click the Ver bo s e
Messages radio button.
smtpd
process in the
/etc/postfix/master.cf
file.
8 If you enable e-mail notification, specify whether you want to receive notification of all cluster
state changes in XML format by selecting the XML Messages option.
XML format messages can be interpreted and formatted with a parser that lets you customize
the message information for your specific needs.
9 Click Apply or OK to save changes.
7.5 Viewing the Cluster Node Properties
You can view the cluster node number and IP address of the selected node as well as the
distinguished name of the Linux Server object.
1 In iManager, select Clusters, then select Cluster Options.
Configuring Cluster Policies and Priorities 95
Page 96

2 Specify the cluster name, or browse and select the Cluster object.
3 Select the check box next to the cluster node whose properties you want to view, then click the
Details link.
4 View the desired information, then click OK.
7.6 Modifying the Cluster IP Address and Port Properties
The cluster IP address is assigned when you install Novell Cluster Services. The cluster IP address
normally does not need to be changed, but it can be if needed.
The default cluster port number is 7023, and is automatically assigned when the cluster is created.
The cluster port number does not need to be changed unless a conflict is created by another resource
using the same port number. If there is a port number conflict, change the Port number to any other
value that doesn't cause a conflict.
1 In the left column of the main iManager page, locate Clusters, then click the Cluster Options
link.
novdocx (en) 7 January 2010
2 Specify the cluster name, or browse and select the Cluster object.
3 Click the Properties button under the cluster name.
4 Click the Policies tab.
5 Specify the new value for the IP address or port.
6 Click Apply or OK to save your changes.
7.7 What’s Next
After installing and configuring the cluster, you should configure cluster resources for it. For
information, see the following:
Chapter 9, “Configuring and Managing Cluster Resources,” on page 117
Chapter 10, “Configuring Cluster Resources for Shared NSS Pools and Volumes,” on page 133
Chapter 11, “Configuring Cluster Resources for Shared Linux POSIX Volumes,” on page 157
For information about managing the cluster, see Chapter 8, “Managing Clusters,” on page 97.
96 OES 2 SP2: Novell Cluster Services 1.8.7 for Linux Administration Guide
Page 97

8
Managing Clusters
After you have installed, set up, and configured Novell® Cluster ServicesTM for your specific needs
and configured cluster resources, use the information in this section to help you effectively manage
your cluster. This section provides instructions for migrating resources, identifying cluster and
resource states, and customizing cluster management.
IMPORTANT: For information about using console commands to manage a cluster, see
Appendix A, “Console Commands for Novell Cluster Services,” on page 203.
Section 8.1, “Starting and Stopping Novell Cluster Services,” on page 97
Section 8.2, “Monitoring Cluster and Resource States,” on page 99
Section 8.3, “Generating a Cluster Configuration Report,” on page 101
Section 8.4, “Cluster Migrating Resources to Different Nodes,” on page 101
Section 8.5, “Onlining and Offlining (Loading and Unloading) Cluster Resources from a
Cluster Node,” on page 102
Section 8.6, “Removing (Leaving) a Node from the Cluster,” on page 103
novdocx (en) 7 January 2010
8
Section 8.7, “Joining a Node to the Cluster,” on page 103
Section 8.8, “Configuring the EVMS Remote Request Timeout,” on page 103
Section 8.9, “Shutting Down Linux Cluster Servers When Servicing Shared Storage,” on
page 104
Section 8.10, “Enabling or Disabling Cluster Maintenance Mode,” on page 104
Section 8.11, “Preventing a Cluster Node Reboot after a Node Shutdown,” on page 104
Section 8.12, “Renaming a Pool for a Pool Cluster Resource,” on page 105
Section 8.13, “Moving a Cluster, or Changing IP Addresses, LDAP Server, or Administrator
Credentials for a Cluster,” on page 105
Section 8.14, “Adding a Node That Was Previously in the Cluster,” on page 109
Section 8.15, “Deleting a Cluster Node from a Cluster, or Reconfiguring a Cluster Node,” on
page 109
Section 8.16, “Creating or Deleting Cluster SBD Partitions,” on page 110
Section 8.17, “Customizing Cluster Services Management,” on page 115
8.1 Starting and Stopping Novell Cluster Services
Novell Cluster Services automatically starts after it is installed. Novell Cluster Services also
automatically starts when you reboot your Novell Open Enterprise Server (OES) 2 Linux server.
IMPORTANT: If you are using iSCSI for shared disk system access, ensure that you have
configured iSCSI initiators and targets to start prior to starting Novell Cluster Services. You can do
this by entering the following at the Linux terminal console:
Managing Clusters
97
Page 98

chkconfig open-iscsi on
8.1.1 Starting Novell Cluster Services
If you stop Novell Cluster Services, you can restart it by doing the following:
novdocx (en) 7 January 2010
1 Open a terminal console, then log in as the
root
user.
2 Use one of the following methods to start Novell Cluster Services:
At the terminal console prompt, go to the
./novell-ncs start
At the terminal console prompt, enter
rcnovell-ncs start
/etc/init.d
directory and enter
8.1.2 Stopping Novell Cluster Services
1 Open a terminal console, then log in as the
2 Use one of the following methods to start Novell Cluster Services:
Go to the
./novell-ncs stop
At the terminal prompt, enter
rcnovell-ncs stop
/etc/init.d
directory and enter
root
user.
8.1.3 Enabling and Disabling the Automatic Start of Novell Cluster Services
Novell Cluster Services automatically starts by default after it is installed and on server reboot.
To cause Novell Cluster Services to not start automatically after a server reboot:
1 Open a terminal console, then log in as the
root
user.
2 Enter the following at a Linux terminal console:
chkconfig novell-ncs off
3 Reboot the server.
4 After rebooting, you must manually start Novell Cluster Services by entering
rcnovell-ncs start
To cause Novell Cluster Services to resume starting automatically after a server reboot:
1 Open a terminal console, then log in as the
root
user.
2 Enter the following at a Linux terminal console:
chkconfig novell-ncs on
3 Reboot the server.
98 OES 2 SP2: Novell Cluster Services 1.8.7 for Linux Administration Guide
Page 99

8.2 Monitoring Cluster and Resource States
The Cluster Manager link in iManager gives you important information about the status of servers
and resources in your cluster.
1 In iManager, click Cluster, then click Cluster Manager.
2 Type the name of the desired cluster, or browse to locate and select the Cluster object.
A list of resources and resource states displays.
The master server in the cluster is identified by a yellow diamond in the middle of the server icon
( ). The master server is initially the first server in the cluster, but another server can become the
master if the first server fails.
Cluster servers and resources display the following icons for the different operating states:
Table 8-1 Cluster Operating States
State Icon Description
novdocx (en) 7 January 2010
Normal A green ball indicates that the server or resource is online or running.
Stopped A red ball with a horizontal white line indicates that the node is stopped.
Offline A white ball with a horizontal red line indicates that the node is offline.
Critical A white ball with a red X indicates that the node has failed or is comatose.
Warning A white ball with a yellow diamond indicates that an alert condition has
occurred, and the resource needs administrator attention.
When a resource is red, it is waiting for administrator intervention. When a resource is gray with no
break in the icon, either that server is not currently a member of the cluster or its state is unknown.
When a resource is blank or has no colored icon, it is unassigned, offline, changing state, or in the
process of loading or unloading.
The Epoch number indicates the number of times the cluster state has changed. The cluster state
changes every time a server joins or leaves the cluster.
Table 8-2 identifies the different resource states and gives descriptions and possible actions for each
state.
Managing Clusters 99
Page 100

Table 8-2 Cluster Resource States
Resource State Description Possible Actions
novdocx (en) 7 January 2010
Alert Either the Start, Failover, or
Failback mode for the resource
has been set to Manual. The
resource is waiting to start, fail
over, or fail back on the
specified server.
Comatose The resource is not running
properly and requires
administrator intervention.
Loading The resource is in the process
of loading on a server.
NDS_Sync The properties of the resource
have changed and the
changes are still being
synchronized in Novell
TM
eDirectory
.
Click the Alert status indicator. Depending on the
resource state, you are prompted to start, fail over, or
fail back the resource.
If you attempt to offline a resource that is in the Start
Alert state, nothing happens. You must clear the Start
Alert before you can offline the resource.
If you attempt to online a resource that is in the Start
Alert state, you get the following warning:
This operation cannot be completed. It
is only available when the resource is
in an offline state.
When the resource is in state Start Alert, you must
clear the alert before you can offline the resource.
After the resource is offline, you can online the
resource.
Click the Comatose status indicator and bring the
resource offline. After resource problems have been
resolved, the resource can be brought back online
(returned to the running state).
None.
None.
Offline Offline status indicates the
resource is shut down or is in a
dormant or inactive state.
Click the Offline status indicator and, if desired, click
the Online button to load the resource on the best
node possible, given the current state of the cluster
and the resource's preferred nodes list.
Quorum Wait The resource is waiting for the
None.
quorum to be established so it
can begin loading.
Running The resource is in a normal
running state.
Click the Running status indicator and choose to
either migrate the resource to a different server in
your cluster or unload (bring offline) the resource.
Unassigned There isn't an assigned node
available that the resource can
be loaded on.
Click the Unassigned status indicator and, if desired,
offline the resource. Offlining the resource prevents it
from running on any of its preferred nodes if any of
them join the cluster.
Unloading The resource is in the process
None.
of unloading from the server it
was running on.
100 OES 2 SP2: Novell Cluster Services 1.8.7 for Linux Administration Guide
 Loading...