

Page 1

Novell®
www.novell.com
GroupWise 8 Linux/Mac Client User Guide
novdocx (en) 24 March 2009
AUTHORIZED DOCUMENTATION
GroupWise
8
August 31, 2009
®
GroupWise 8 Linux/Mac Client User Guide
Page 2

Legal Notices
Novell, Inc. makes no representations or warranties with respect to the contents or use of this documentation, and
specifically disclaims any express or implied warranties of merchantability or fitness for any particular purpose.
Further, Novell, Inc. reserves the right to revise this publication and to make changes to its content, at any time,
without obligation to notify any person or entity of such revisions or changes.
Further, Novell, Inc. makes no representations or warranties with respect to any software, and specifically disclaims
any express or implied warranties of merchantability or fitness for any particular purpose. Further, Novell, Inc.
reserves the right to make changes to any and all parts of Novell software, at any time, without any obligation to
notify any person or entity of such changes.
Any products or technical information provided under this Agreement may be subject to U.S. export controls and the
trade laws of other countries. You agree to comply with all export control regulations and to obtain any required
licenses or classification to export, re-export, or import deliverables. You agree not to export or re-export to entities
on the current U.S. export exclusion lists or to any embargoed or terrorist countries as specified in the U.S. export
laws. You agree to not use deliverables for prohibited nuclear, missile, or chemical biological weaponry end uses.
Please refer to www.novell.com/info/exports/ for more information on exporting Novell software. Novell assumes no
responsibility for your failure to obtain any necessary export approvals.
Copyright © 2004-2009 Novell, Inc. All rights reserved. No part of this publication may be reproduced, photocopied,
stored on a retrieval system, or transmitted without the express written consent of the publisher.
novdocx (en) 24 March 2009
Novell, Inc. has intellectual property rights relating to technology embodied in the product that is described in this
document. In particular, and without limitation, these intellectual property rights may include one or more of the U.S.
patents listed at http://www.novell.com/company/legal/patents/ and one or more additional patents or pending patent
applications in the U.S. and in other countries.
Novell, Inc.
404 Wyman Street, Suite 500
Waltham, MA 02451
U.S.A.
www.novell.com
Online Documentation: To access the online documentation for this and other Novell products, and to get
updates, see www.novell.com/documentation.
Page 3

Novell Trademarks
For Novell trademarks, see the Novell Trademark and Service Mark list (http://www.novell.com/company/legal/
trademarks/tmlist.html).
Third-Party Materials
All third-party trademarks are the property of their respective owners.
novdocx (en) 24 March 2009
Page 4

novdocx (en) 24 March 2009
4 GroupWise 8 Linux/Mac Client User Guide
Page 5

Contents
About This Guide 13
1 Getting Started 15
1.1 Installing the GroupWise Linux/Mac Client . . . . . . . . . . . . . . . . . . . . . . . . . . . . . . . . . . . . . . . 15
1.1.1 Installing the GroupWise Client on Linux . . . . . . . . . . . . . . . . . . . . . . . . . . . . . . . . . . 15
1.1.2 Installing the GroupWise Client on a Mac . . . . . . . . . . . . . . . . . . . . . . . . . . . . . . . . . 16
1.2 Starting GroupWise . . . . . . . . . . . . . . . . . . . . . . . . . . . . . . . . . . . . . . . . . . . . . . . . . . . . . . . . . 16
1.3 Assigning a Password to Your Mailbox . . . . . . . . . . . . . . . . . . . . . . . . . . . . . . . . . . . . . . . . . . 16
1.4 Getting to Know the GroupWise Interface . . . . . . . . . . . . . . . . . . . . . . . . . . . . . . . . . . . . . . . . 17
1.4.1 Understanding the Main GroupWise Window . . . . . . . . . . . . . . . . . . . . . . . . . . . . . . 17
1.4.2 Understanding the Main Menu. . . . . . . . . . . . . . . . . . . . . . . . . . . . . . . . . . . . . . . . . . 18
1.4.3 Understanding the Nav Bar . . . . . . . . . . . . . . . . . . . . . . . . . . . . . . . . . . . . . . . . . . . . 19
1.4.4 Understanding the Main Toolbar . . . . . . . . . . . . . . . . . . . . . . . . . . . . . . . . . . . . . . . . 19
1.4.5 Understanding Item Lists . . . . . . . . . . . . . . . . . . . . . . . . . . . . . . . . . . . . . . . . . . . . . . 20
1.5 Exploring the Folder List . . . . . . . . . . . . . . . . . . . . . . . . . . . . . . . . . . . . . . . . . . . . . . . . . . . . . 21
1.5.1 Home Folder . . . . . . . . . . . . . . . . . . . . . . . . . . . . . . . . . . . . . . . . . . . . . . . . . . . . . . . 22
1.5.2 Mailbox Folder . . . . . . . . . . . . . . . . . . . . . . . . . . . . . . . . . . . . . . . . . . . . . . . . . . . . . . 22
1.5.3 Sent Items Folder . . . . . . . . . . . . . . . . . . . . . . . . . . . . . . . . . . . . . . . . . . . . . . . . . . . 22
1.5.4 Calendar Folder . . . . . . . . . . . . . . . . . . . . . . . . . . . . . . . . . . . . . . . . . . . . . . . . . . . . . 22
1.5.5 Frequent Contacts Folder . . . . . . . . . . . . . . . . . . . . . . . . . . . . . . . . . . . . . . . . . . . . . 22
1.5.6 Tasklist Folder . . . . . . . . . . . . . . . . . . . . . . . . . . . . . . . . . . . . . . . . . . . . . . . . . . . . . . 23
1.5.7 Documents Folder . . . . . . . . . . . . . . . . . . . . . . . . . . . . . . . . . . . . . . . . . . . . . . . . . . . 23
1.5.8 Cabinet Folder . . . . . . . . . . . . . . . . . . . . . . . . . . . . . . . . . . . . . . . . . . . . . . . . . . . . . . 23
1.5.9 Work in Progress Folder . . . . . . . . . . . . . . . . . . . . . . . . . . . . . . . . . . . . . . . . . . . . . . 23
1.5.10 Junk Mail Folder . . . . . . . . . . . . . . . . . . . . . . . . . . . . . . . . . . . . . . . . . . . . . . . . . . . . 23
1.5.11 Trash Folder . . . . . . . . . . . . . . . . . . . . . . . . . . . . . . . . . . . . . . . . . . . . . . . . . . . . . . . 23
1.5.12 Shared Folders . . . . . . . . . . . . . . . . . . . . . . . . . . . . . . . . . . . . . . . . . . . . . . . . . . . . . 24
1.5.13 IMAP4 Account Folder. . . . . . . . . . . . . . . . . . . . . . . . . . . . . . . . . . . . . . . . . . . . . . . . 24
1.5.14 NNTP Newsgroup Account Folder. . . . . . . . . . . . . . . . . . . . . . . . . . . . . . . . . . . . . . . 24
1.5.15 RSS Feeds Folder . . . . . . . . . . . . . . . . . . . . . . . . . . . . . . . . . . . . . . . . . . . . . . . . . . . 24
1.6 Displaying the QuickViewer for Folder Items . . . . . . . . . . . . . . . . . . . . . . . . . . . . . . . . . . . . . . 25
1.6.1 Turning the QuickViewer On and Off . . . . . . . . . . . . . . . . . . . . . . . . . . . . . . . . . . . . . 25
1.6.2 Positioning the QuickViewer . . . . . . . . . . . . . . . . . . . . . . . . . . . . . . . . . . . . . . . . . . . 25
1.6.3 Using the QuickViewer . . . . . . . . . . . . . . . . . . . . . . . . . . . . . . . . . . . . . . . . . . . . . . . 26
1.7 Using Panels in the Home Folder . . . . . . . . . . . . . . . . . . . . . . . . . . . . . . . . . . . . . . . . . . . . . . 26
1.8 Understanding GroupWise Item Types . . . . . . . . . . . . . . . . . . . . . . . . . . . . . . . . . . . . . . . . . . 27
1.8.1 Mail . . . . . . . . . . . . . . . . . . . . . . . . . . . . . . . . . . . . . . . . . . . . . . . . . . . . . . . . . . . . . . 27
1.8.2 Appointment. . . . . . . . . . . . . . . . . . . . . . . . . . . . . . . . . . . . . . . . . . . . . . . . . . . . . . . . 27
1.8.3 Task . . . . . . . . . . . . . . . . . . . . . . . . . . . . . . . . . . . . . . . . . . . . . . . . . . . . . . . . . . . . . . 27
1.8.4 Reminder Note. . . . . . . . . . . . . . . . . . . . . . . . . . . . . . . . . . . . . . . . . . . . . . . . . . . . . . 27
1.8.5 Phone Message. . . . . . . . . . . . . . . . . . . . . . . . . . . . . . . . . . . . . . . . . . . . . . . . . . . . . 28
1.9 Identifying the Icons Appearing Next to Items . . . . . . . . . . . . . . . . . . . . . . . . . . . . . . . . . . . . . 28
1.10 Learning More . . . . . . . . . . . . . . . . . . . . . . . . . . . . . . . . . . . . . . . . . . . . . . . . . . . . . . . . . . . . . 29
1.10.1 Online Help . . . . . . . . . . . . . . . . . . . . . . . . . . . . . . . . . . . . . . . . . . . . . . . . . . . . . . . . 29
1.10.2 GroupWise 8 Documentation Web Page. . . . . . . . . . . . . . . . . . . . . . . . . . . . . . . . . . 30
1.10.3 GroupWise Cool Solutions Web Community . . . . . . . . . . . . . . . . . . . . . . . . . . . . . . . 30
novdocx (en) 24 March 2009
2 Getting Organized 31
2.1 Customizing the GroupWise Interface . . . . . . . . . . . . . . . . . . . . . . . . . . . . . . . . . . . . . . . . . . . 31
Contents 5
Page 6

2.1.1 Selecting a GroupWise Scheme . . . . . . . . . . . . . . . . . . . . . . . . . . . . . . . . . . . . . . . . 31
2.1.2 Customizing GroupWise Appearance Settings . . . . . . . . . . . . . . . . . . . . . . . . . . . . . 32
2.1.3 Customizing the Main Toolbar . . . . . . . . . . . . . . . . . . . . . . . . . . . . . . . . . . . . . . . . . . 33
2.1.4 Setting Your Default Start Folder. . . . . . . . . . . . . . . . . . . . . . . . . . . . . . . . . . . . . . . . 34
2.1.5 Setting the Default Read/Compose View . . . . . . . . . . . . . . . . . . . . . . . . . . . . . . . . . 35
2.1.6 Automatically Reading the Next Item in Your Mailbox. . . . . . . . . . . . . . . . . . . . . . . . 35
2.1.7 Changing the GroupWise Interface Font . . . . . . . . . . . . . . . . . . . . . . . . . . . . . . . . . . 35
2.1.8 Changing the GroupWise Interface Language . . . . . . . . . . . . . . . . . . . . . . . . . . . . . 36
2.2 Using Categories to Organize Items . . . . . . . . . . . . . . . . . . . . . . . . . . . . . . . . . . . . . . . . . . . . 36
2.2.1 Understanding Categories . . . . . . . . . . . . . . . . . . . . . . . . . . . . . . . . . . . . . . . . . . . . . 36
2.2.2 Assigning Categories to Items . . . . . . . . . . . . . . . . . . . . . . . . . . . . . . . . . . . . . . . . . . 36
2.2.3 Working with Categories . . . . . . . . . . . . . . . . . . . . . . . . . . . . . . . . . . . . . . . . . . . . . . 38
2.3 Using Folders to Organize Your Mailbox . . . . . . . . . . . . . . . . . . . . . . . . . . . . . . . . . . . . . . . . . 40
2.3.1 Understanding Folders . . . . . . . . . . . . . . . . . . . . . . . . . . . . . . . . . . . . . . . . . . . . . . . 40
2.3.2 Displaying the Folder List . . . . . . . . . . . . . . . . . . . . . . . . . . . . . . . . . . . . . . . . . . . . . 41
2.3.3 Working with Folders . . . . . . . . . . . . . . . . . . . . . . . . . . . . . . . . . . . . . . . . . . . . . . . . . 41
2.3.4 Managing Item Lists in Folders . . . . . . . . . . . . . . . . . . . . . . . . . . . . . . . . . . . . . . . . . 42
2.3.5 Customizing Folder Display Settings . . . . . . . . . . . . . . . . . . . . . . . . . . . . . . . . . . . . . 45
2.3.6 Using Shared Folders . . . . . . . . . . . . . . . . . . . . . . . . . . . . . . . . . . . . . . . . . . . . . . . . 48
2.3.7 Using Find Results Folders . . . . . . . . . . . . . . . . . . . . . . . . . . . . . . . . . . . . . . . . . . . . 51
2.4 Using Panels to Organize Your Home Folder . . . . . . . . . . . . . . . . . . . . . . . . . . . . . . . . . . . . . 52
2.4.1 Understanding Panels . . . . . . . . . . . . . . . . . . . . . . . . . . . . . . . . . . . . . . . . . . . . . . . . 52
2.4.2 Resizing a Panel . . . . . . . . . . . . . . . . . . . . . . . . . . . . . . . . . . . . . . . . . . . . . . . . . . . . 53
2.4.3 Moving a Panel . . . . . . . . . . . . . . . . . . . . . . . . . . . . . . . . . . . . . . . . . . . . . . . . . . . . . 53
2.4.4 Customizing a Panel . . . . . . . . . . . . . . . . . . . . . . . . . . . . . . . . . . . . . . . . . . . . . . . . . 53
2.4.5 Creating a New Panel . . . . . . . . . . . . . . . . . . . . . . . . . . . . . . . . . . . . . . . . . . . . . . . . 54
2.4.6 Removing a Panel from the View . . . . . . . . . . . . . . . . . . . . . . . . . . . . . . . . . . . . . . . 54
2.5 Customizing Other GroupWise Functionality . . . . . . . . . . . . . . . . . . . . . . . . . . . . . . . . . . . . . . 55
2.5.1 Changing GroupWise Modes. . . . . . . . . . . . . . . . . . . . . . . . . . . . . . . . . . . . . . . . . . . 55
2.5.2 Changing Your Display Name . . . . . . . . . . . . . . . . . . . . . . . . . . . . . . . . . . . . . . . . . . 56
2.5.3 Setting the Key Used to Delete Items . . . . . . . . . . . . . . . . . . . . . . . . . . . . . . . . . . . . 56
2.5.4 Setting the Interval for Refreshing GroupWise . . . . . . . . . . . . . . . . . . . . . . . . . . . . . 56
2.5.5 Using a Web Proxy . . . . . . . . . . . . . . . . . . . . . . . . . . . . . . . . . . . . . . . . . . . . . . . . . . 57
2.5.6 Customizing Date and Time Formats . . . . . . . . . . . . . . . . . . . . . . . . . . . . . . . . . . . . 57
novdocx (en) 24 March 2009
3E-Mail 63
3.1 Sending E-Mail. . . . . . . . . . . . . . . . . . . . . . . . . . . . . . . . . . . . . . . . . . . . . . . . . . . . . . . . . . . . . 63
3.1.1 Selecting the Default Compose View and Font . . . . . . . . . . . . . . . . . . . . . . . . . . . . . 63
3.1.2 Composing E-Mail . . . . . . . . . . . . . . . . . . . . . . . . . . . . . . . . . . . . . . . . . . . . . . . . . . . 64
3.1.3 Formatting E-Mail . . . . . . . . . . . . . . . . . . . . . . . . . . . . . . . . . . . . . . . . . . . . . . . . . . . 64
3.1.4 Spell-Checking Messages . . . . . . . . . . . . . . . . . . . . . . . . . . . . . . . . . . . . . . . . . . . . . 66
3.1.5 Attaching Files . . . . . . . . . . . . . . . . . . . . . . . . . . . . . . . . . . . . . . . . . . . . . . . . . . . . . . 69
3.1.6 Adding a Signature or vCard . . . . . . . . . . . . . . . . . . . . . . . . . . . . . . . . . . . . . . . . . . . 70
3.1.7 Saving Unfinished E-Mail. . . . . . . . . . . . . . . . . . . . . . . . . . . . . . . . . . . . . . . . . . . . . . 71
3.1.8 Selecting Send Options . . . . . . . . . . . . . . . . . . . . . . . . . . . . . . . . . . . . . . . . . . . . . . . 72
3.1.9 Posting a Discussion Note. . . . . . . . . . . . . . . . . . . . . . . . . . . . . . . . . . . . . . . . . . . . . 75
3.1.10 Sending a Phone Message . . . . . . . . . . . . . . . . . . . . . . . . . . . . . . . . . . . . . . . . . . . . 75
3.2 Managing Sent E-Mail . . . . . . . . . . . . . . . . . . . . . . . . . . . . . . . . . . . . . . . . . . . . . . . . . . . . . . . 76
3.2.1 Working with Sent Items . . . . . . . . . . . . . . . . . . . . . . . . . . . . . . . . . . . . . . . . . . . . . . 76
3.2.2 Retracting Sent E-Mail. . . . . . . . . . . . . . . . . . . . . . . . . . . . . . . . . . . . . . . . . . . . . . . . 78
3.2.3 Resending E-Mail . . . . . . . . . . . . . . . . . . . . . . . . . . . . . . . . . . . . . . . . . . . . . . . . . . . 78
3.2.4 Confirming Delivery of E-Mail You Send . . . . . . . . . . . . . . . . . . . . . . . . . . . . . . . . . . 78
3.2.5 Tracking the Status of Send E-Mail . . . . . . . . . . . . . . . . . . . . . . . . . . . . . . . . . . . . . . 80
3.3 Receiving E-Mail . . . . . . . . . . . . . . . . . . . . . . . . . . . . . . . . . . . . . . . . . . . . . . . . . . . . . . . . . . . 81
3.3.1 Reading Received E-Mail . . . . . . . . . . . . . . . . . . . . . . . . . . . . . . . . . . . . . . . . . . . . . 81
3.3.2 Reading Attachments . . . . . . . . . . . . . . . . . . . . . . . . . . . . . . . . . . . . . . . . . . . . . . . . 84
6 GroupWise 8 Linux/Mac Client User Guide
Page 7

3.3.3 Replying to E-Mail . . . . . . . . . . . . . . . . . . . . . . . . . . . . . . . . . . . . . . . . . . . . . . . . . . . 85
3.3.4 Forwarding E-Mail . . . . . . . . . . . . . . . . . . . . . . . . . . . . . . . . . . . . . . . . . . . . . . . . . . . 86
3.4 Managing Received E-Mail . . . . . . . . . . . . . . . . . . . . . . . . . . . . . . . . . . . . . . . . . . . . . . . . . . . 87
3.4.1 Personalizing E-Mail . . . . . . . . . . . . . . . . . . . . . . . . . . . . . . . . . . . . . . . . . . . . . . . . . 87
3.4.2 Changing an E-Mail to Another Item Type. . . . . . . . . . . . . . . . . . . . . . . . . . . . . . . . . 88
3.4.3 Saving Received E-Mail to Disk. . . . . . . . . . . . . . . . . . . . . . . . . . . . . . . . . . . . . . . . . 89
3.4.4 Deleting E-Mail . . . . . . . . . . . . . . . . . . . . . . . . . . . . . . . . . . . . . . . . . . . . . . . . . . . . . 90
3.4.5 Archiving and Backing Up E-Mail . . . . . . . . . . . . . . . . . . . . . . . . . . . . . . . . . . . . . . . 90
3.5 Printing E-Mail . . . . . . . . . . . . . . . . . . . . . . . . . . . . . . . . . . . . . . . . . . . . . . . . . . . . . . . . . . . . . 90
3.5.1 Selecting a Printer . . . . . . . . . . . . . . . . . . . . . . . . . . . . . . . . . . . . . . . . . . . . . . . . . . . 91
3.5.2 Printing E-Mail . . . . . . . . . . . . . . . . . . . . . . . . . . . . . . . . . . . . . . . . . . . . . . . . . . . . . . 91
3.5.3 Printing E-Mail with Attachments . . . . . . . . . . . . . . . . . . . . . . . . . . . . . . . . . . . . . . . . 91
3.5.4 Specifying Default E-Mail Header Information to Print . . . . . . . . . . . . . . . . . . . . . . . 92
3.5.5 Changing the Printed Font on Plain Text Items. . . . . . . . . . . . . . . . . . . . . . . . . . . . . 92
3.6 Handling Unwanted E-Mail (Spam) . . . . . . . . . . . . . . . . . . . . . . . . . . . . . . . . . . . . . . . . . . . . . 92
3.6.1 Understanding Junk Mail Handling . . . . . . . . . . . . . . . . . . . . . . . . . . . . . . . . . . . . . . 93
3.6.2 Blocking or Junking All E-Mail From a Particular User . . . . . . . . . . . . . . . . . . . . . . . 93
3.6.3 Blocking or Junking E-Mail From a Particular Internet Domain . . . . . . . . . . . . . . . . . 95
3.6.4 Junking E-Mail From Users Not In a Personal Address Book . . . . . . . . . . . . . . . . . . 95
3.6.5 Preventing E-Mail From a User or Internet Domain From Being Junked or Blocked. 96
3.6.6 Modifying Junk Mail Handling Lists and Settings. . . . . . . . . . . . . . . . . . . . . . . . . . . . 97
3.6.7 Automatically Deleting Items From the Junk Mail Folder. . . . . . . . . . . . . . . . . . . . . . 98
3.6.8 Manually Deleting Items From the Junk Mail Folder . . . . . . . . . . . . . . . . . . . . . . . . . 98
novdocx (en) 24 March 2009
4 Calendar 99
4.1 Understanding the Calendar . . . . . . . . . . . . . . . . . . . . . . . . . . . . . . . . . . . . . . . . . . . . . . . . . . 99
4.2 Managing Your Calendar . . . . . . . . . . . . . . . . . . . . . . . . . . . . . . . . . . . . . . . . . . . . . . . . . . . . . 99
4.2.1 Viewing Your Calendar . . . . . . . . . . . . . . . . . . . . . . . . . . . . . . . . . . . . . . . . . . . . . . 100
4.2.2 Reading a Calendar Entry . . . . . . . . . . . . . . . . . . . . . . . . . . . . . . . . . . . . . . . . . . . . 104
4.2.3 Creating a Personal Calendar . . . . . . . . . . . . . . . . . . . . . . . . . . . . . . . . . . . . . . . . . 104
4.2.4 Customizing a Calendar . . . . . . . . . . . . . . . . . . . . . . . . . . . . . . . . . . . . . . . . . . . . . 104
4.2.5 Exporting a Calendar . . . . . . . . . . . . . . . . . . . . . . . . . . . . . . . . . . . . . . . . . . . . . . . . 107
4.2.6 Importing a Calendar . . . . . . . . . . . . . . . . . . . . . . . . . . . . . . . . . . . . . . . . . . . . . . . . 107
4.3 Sending Calendar Items. . . . . . . . . . . . . . . . . . . . . . . . . . . . . . . . . . . . . . . . . . . . . . . . . . . . . 107
4.3.1 Understanding Calendar Items . . . . . . . . . . . . . . . . . . . . . . . . . . . . . . . . . . . . . . . . 107
4.3.2 Scheduling Appointments . . . . . . . . . . . . . . . . . . . . . . . . . . . . . . . . . . . . . . . . . . . . 108
4.3.3 Sending Reminder Notes. . . . . . . . . . . . . . . . . . . . . . . . . . . . . . . . . . . . . . . . . . . . . 112
4.3.4 Scheduling Recurring Items. . . . . . . . . . . . . . . . . . . . . . . . . . . . . . . . . . . . . . . . . . . 113
4.4 Receiving Calendar Items . . . . . . . . . . . . . . . . . . . . . . . . . . . . . . . . . . . . . . . . . . . . . . . . . . . 114
4.4.1 Accepting or Declining Calendar Items . . . . . . . . . . . . . . . . . . . . . . . . . . . . . . . . . . 114
4.4.2 Delegating Calendar Items . . . . . . . . . . . . . . . . . . . . . . . . . . . . . . . . . . . . . . . . . . . 115
4.4.3 Saving Calendar Items . . . . . . . . . . . . . . . . . . . . . . . . . . . . . . . . . . . . . . . . . . . . . . 116
4.5 Setting Calendar Alarms . . . . . . . . . . . . . . . . . . . . . . . . . . . . . . . . . . . . . . . . . . . . . . . . . . . . 116
4.5.1 Setting the Default Alarm. . . . . . . . . . . . . . . . . . . . . . . . . . . . . . . . . . . . . . . . . . . . . 116
4.5.2 Setting an Alarm on a Calendar Item. . . . . . . . . . . . . . . . . . . . . . . . . . . . . . . . . . . . 116
4.6 Sharing a Personal Calendar . . . . . . . . . . . . . . . . . . . . . . . . . . . . . . . . . . . . . . . . . . . . . . . . . 117
4.6.1 Sharing an Existing Calendar with Other Users . . . . . . . . . . . . . . . . . . . . . . . . . . . 117
4.6.2 Posting a Calendar Entry to a Shared Calendar . . . . . . . . . . . . . . . . . . . . . . . . . . . 118
4.7 Printing a Calendar . . . . . . . . . . . . . . . . . . . . . . . . . . . . . . . . . . . . . . . . . . . . . . . . . . . . . . . . 118
4.7.1 Printing Your Main Calendar . . . . . . . . . . . . . . . . . . . . . . . . . . . . . . . . . . . . . . . . . . 118
4.7.2 Printing a Specific Calendar . . . . . . . . . . . . . . . . . . . . . . . . . . . . . . . . . . . . . . . . . . 119
4.8 Junking Calendar Items from Unknown Senders. . . . . . . . . . . . . . . . . . . . . . . . . . . . . . . . . . 119
5 Tasks and the Tasklist 121
5.1 Understanding Tasks . . . . . . . . . . . . . . . . . . . . . . . . . . . . . . . . . . . . . . . . . . . . . . . . . . . . . . . 121
Contents 7
Page 8

5.2 Understanding the Tasklist Folder . . . . . . . . . . . . . . . . . . . . . . . . . . . . . . . . . . . . . . . . . . . . . 121
5.3 Using Tasks . . . . . . . . . . . . . . . . . . . . . . . . . . . . . . . . . . . . . . . . . . . . . . . . . . . . . . . . . . . . . . 122
5.3.1 Assigning a Task . . . . . . . . . . . . . . . . . . . . . . . . . . . . . . . . . . . . . . . . . . . . . . . . . . . 123
5.3.2 Tracking Task Completion . . . . . . . . . . . . . . . . . . . . . . . . . . . . . . . . . . . . . . . . . . . . 125
5.4 Using the Tasklist Folder . . . . . . . . . . . . . . . . . . . . . . . . . . . . . . . . . . . . . . . . . . . . . . . . . . . . 125
5.4.1 Adding an Item to the Tasklist Folder . . . . . . . . . . . . . . . . . . . . . . . . . . . . . . . . . . . 125
5.4.2 Creating a Tasklist in a Folder Other Than the Tasklist Folder . . . . . . . . . . . . . . . . 128
5.4.3 Organizing the Tasklist Folder . . . . . . . . . . . . . . . . . . . . . . . . . . . . . . . . . . . . . . . . . 129
5.4.4 Assigning a Due Date to a Tasklist Item . . . . . . . . . . . . . . . . . . . . . . . . . . . . . . . . . 130
5.4.5 Tracking Status in the Tasklist Folder . . . . . . . . . . . . . . . . . . . . . . . . . . . . . . . . . . . 131
6 Contacts and Address Books 133
6.1 Understanding Address Books. . . . . . . . . . . . . . . . . . . . . . . . . . . . . . . . . . . . . . . . . . . . . . . . 133
6.1.1 GroupWise Address Book . . . . . . . . . . . . . . . . . . . . . . . . . . . . . . . . . . . . . . . . . . . . 133
6.1.2 Frequent Contacts Address Book . . . . . . . . . . . . . . . . . . . . . . . . . . . . . . . . . . . . . . 133
6.1.3 Personal Address Books . . . . . . . . . . . . . . . . . . . . . . . . . . . . . . . . . . . . . . . . . . . . . 134
6.2 Understanding Contacts Folders . . . . . . . . . . . . . . . . . . . . . . . . . . . . . . . . . . . . . . . . . . . . . . 134
6.3 Addressing Items . . . . . . . . . . . . . . . . . . . . . . . . . . . . . . . . . . . . . . . . . . . . . . . . . . . . . . . . . . 134
6.3.1 Using Name Completion . . . . . . . . . . . . . . . . . . . . . . . . . . . . . . . . . . . . . . . . . . . . . 135
6.3.2 Using the Address Selector . . . . . . . . . . . . . . . . . . . . . . . . . . . . . . . . . . . . . . . . . . . 135
6.3.3 Using the Frequent Contacts Address Book . . . . . . . . . . . . . . . . . . . . . . . . . . . . . . 136
6.3.4 Sending Mail from a Contacts Folder . . . . . . . . . . . . . . . . . . . . . . . . . . . . . . . . . . . 137
6.3.5 Sending Mail from the Address Book . . . . . . . . . . . . . . . . . . . . . . . . . . . . . . . . . . . 137
6.3.6 Sending Mail to an Entire Address Book . . . . . . . . . . . . . . . . . . . . . . . . . . . . . . . . . 137
6.4 Using Contacts Folders . . . . . . . . . . . . . . . . . . . . . . . . . . . . . . . . . . . . . . . . . . . . . . . . . . . . . 137
6.4.1 Creating a Contacts Folder . . . . . . . . . . . . . . . . . . . . . . . . . . . . . . . . . . . . . . . . . . . 137
6.4.2 Managing Contacts . . . . . . . . . . . . . . . . . . . . . . . . . . . . . . . . . . . . . . . . . . . . . . . . . 138
6.4.3 Managing Groups . . . . . . . . . . . . . . . . . . . . . . . . . . . . . . . . . . . . . . . . . . . . . . . . . . 140
6.4.4 Managing Resources. . . . . . . . . . . . . . . . . . . . . . . . . . . . . . . . . . . . . . . . . . . . . . . . 144
6.4.5 Managing Organizations . . . . . . . . . . . . . . . . . . . . . . . . . . . . . . . . . . . . . . . . . . . . . 147
6.5 Working with Address Books . . . . . . . . . . . . . . . . . . . . . . . . . . . . . . . . . . . . . . . . . . . . . . . . . 148
6.5.1 Opening an Address Book. . . . . . . . . . . . . . . . . . . . . . . . . . . . . . . . . . . . . . . . . . . . 148
6.5.2 Creating a Personal Address Book . . . . . . . . . . . . . . . . . . . . . . . . . . . . . . . . . . . . . 149
6.5.3 Editing a Personal or Frequent Contacts Address Book . . . . . . . . . . . . . . . . . . . . . 149
6.5.4 Renaming a Personal Address Book. . . . . . . . . . . . . . . . . . . . . . . . . . . . . . . . . . . . 150
6.5.5 Deleting a Personal Address Book . . . . . . . . . . . . . . . . . . . . . . . . . . . . . . . . . . . . . 150
6.5.6 Sharing an Address Book with Another User . . . . . . . . . . . . . . . . . . . . . . . . . . . . . 151
6.5.7 Accepting a Shared Address Book . . . . . . . . . . . . . . . . . . . . . . . . . . . . . . . . . . . . . 151
6.5.8 Viewing Contacts, Groups, Organizations, or Resources in the Address Book. . . . 152
6.5.9 Searching for Address Book Entries . . . . . . . . . . . . . . . . . . . . . . . . . . . . . . . . . . . . 152
6.5.10 Choosing the Display Format of Names . . . . . . . . . . . . . . . . . . . . . . . . . . . . . . . . . 152
6.5.11 Sorting an Address Book . . . . . . . . . . . . . . . . . . . . . . . . . . . . . . . . . . . . . . . . . . . . . 153
6.5.12 Importing/Exporting an Address Book . . . . . . . . . . . . . . . . . . . . . . . . . . . . . . . . . . . 153
6.6 Printing Address Lists . . . . . . . . . . . . . . . . . . . . . . . . . . . . . . . . . . . . . . . . . . . . . . . . . . . . . . 153
novdocx (en) 24 March 2009
7 Finding Items 155
7.1 Quickly Finding Items in a Folder. . . . . . . . . . . . . . . . . . . . . . . . . . . . . . . . . . . . . . . . . . . . . . 155
7.1.1 Finding Items . . . . . . . . . . . . . . . . . . . . . . . . . . . . . . . . . . . . . . . . . . . . . . . . . . . . . . 155
7.1.2 Finding Contacts . . . . . . . . . . . . . . . . . . . . . . . . . . . . . . . . . . . . . . . . . . . . . . . . . . . 156
7.1.3 Clearing a Find . . . . . . . . . . . . . . . . . . . . . . . . . . . . . . . . . . . . . . . . . . . . . . . . . . . . 156
7.1.4 Creating and Saving a Find . . . . . . . . . . . . . . . . . . . . . . . . . . . . . . . . . . . . . . . . . . . 156
7.1.5 Using a Saved Find . . . . . . . . . . . . . . . . . . . . . . . . . . . . . . . . . . . . . . . . . . . . . . . . . 157
7.1.6 Deleting a Saved Find . . . . . . . . . . . . . . . . . . . . . . . . . . . . . . . . . . . . . . . . . . . . . . . 157
7.2 Finding Items Anywhere in Your Mailbox . . . . . . . . . . . . . . . . . . . . . . . . . . . . . . . . . . . . . . . . 157
7.2.1 Using a Global Find . . . . . . . . . . . . . . . . . . . . . . . . . . . . . . . . . . . . . . . . . . . . . . . . . 157
8 GroupWise 8 Linux/Mac Client User Guide
Page 9

7.2.2 Narrowing a Global Find . . . . . . . . . . . . . . . . . . . . . . . . . . . . . . . . . . . . . . . . . . . . . 158
7.2.3 Creating and Saving a Global Find . . . . . . . . . . . . . . . . . . . . . . . . . . . . . . . . . . . . . 158
7.2.4 Using a Saved Global Find . . . . . . . . . . . . . . . . . . . . . . . . . . . . . . . . . . . . . . . . . . . 158
7.2.5 Deleting a Saved Global Find . . . . . . . . . . . . . . . . . . . . . . . . . . . . . . . . . . . . . . . . . 159
7.3 Using Advanced Find . . . . . . . . . . . . . . . . . . . . . . . . . . . . . . . . . . . . . . . . . . . . . . . . . . . . . . . 159
7.3.1 Composing an Advanced Find. . . . . . . . . . . . . . . . . . . . . . . . . . . . . . . . . . . . . . . . . 159
7.3.2 Selecting Fields in Advanced Finds and Rules . . . . . . . . . . . . . . . . . . . . . . . . . . . . 160
7.3.3 Using Operators in Advanced Finds and Rules . . . . . . . . . . . . . . . . . . . . . . . . . . . . 164
7.3.4 Using Wildcard Characters and Switches in Advanced Finds and Rules . . . . . . . . 165
7.4 Finding Text in Items . . . . . . . . . . . . . . . . . . . . . . . . . . . . . . . . . . . . . . . . . . . . . . . . . . . . . . . 166
7.5 Comparing the GroupWise Find Methods . . . . . . . . . . . . . . . . . . . . . . . . . . . . . . . . . . . . . . . 166
7.5.1 Comparing Search Results . . . . . . . . . . . . . . . . . . . . . . . . . . . . . . . . . . . . . . . . . . . 166
7.5.2 Comparing Find Functionality . . . . . . . . . . . . . . . . . . . . . . . . . . . . . . . . . . . . . . . . . 167
7.5.3 Comparing GroupWise Versions . . . . . . . . . . . . . . . . . . . . . . . . . . . . . . . . . . . . . . . 168
8Notify 169
8.1 Understanding Notify . . . . . . . . . . . . . . . . . . . . . . . . . . . . . . . . . . . . . . . . . . . . . . . . . . . . . . . 169
8.2 Using Notify . . . . . . . . . . . . . . . . . . . . . . . . . . . . . . . . . . . . . . . . . . . . . . . . . . . . . . . . . . . . . . 169
8.3 Customizing Notify . . . . . . . . . . . . . . . . . . . . . . . . . . . . . . . . . . . . . . . . . . . . . . . . . . . . . . . . . 170
8.3.1 Setting How Long to Display the Notification . . . . . . . . . . . . . . . . . . . . . . . . . . . . . . 170
8.3.2 Setting Notification for New Items . . . . . . . . . . . . . . . . . . . . . . . . . . . . . . . . . . . . . . 170
8.3.3 Setting Which Folders to Check for New Items . . . . . . . . . . . . . . . . . . . . . . . . . . . . 171
8.3.4 Setting How Often to Check for New Items . . . . . . . . . . . . . . . . . . . . . . . . . . . . . . . 171
8.3.5 Setting How to Be Notified for Calendar Alarms . . . . . . . . . . . . . . . . . . . . . . . . . . . 171
8.3.6 Setting How to Be Notified about Outgoing Message Status . . . . . . . . . . . . . . . . . 171
8.3.7 Setting How to Be Notified about Return Status Messages . . . . . . . . . . . . . . . . . . 172
8.4 Being Notified of Someone Else’s Messages . . . . . . . . . . . . . . . . . . . . . . . . . . . . . . . . . . . . 172
8.5 Starting Notify without the GroupWise Main Window . . . . . . . . . . . . . . . . . . . . . . . . . . . . . . . 173
8.6 Turning Off Notification . . . . . . . . . . . . . . . . . . . . . . . . . . . . . . . . . . . . . . . . . . . . . . . . . . . . . 174
novdocx (en) 24 March 2009
9Rules 175
9.1 Understanding Rules . . . . . . . . . . . . . . . . . . . . . . . . . . . . . . . . . . . . . . . . . . . . . . . . . . . . . . . 175
9.2 Actions a Rule Can Perform. . . . . . . . . . . . . . . . . . . . . . . . . . . . . . . . . . . . . . . . . . . . . . . . . . 175
9.3 Events That Trigger a Rule . . . . . . . . . . . . . . . . . . . . . . . . . . . . . . . . . . . . . . . . . . . . . . . . . . 177
9.4 Creating a Rule . . . . . . . . . . . . . . . . . . . . . . . . . . . . . . . . . . . . . . . . . . . . . . . . . . . . . . . . . . . 177
9.4.1 Creating a Basic Rule . . . . . . . . . . . . . . . . . . . . . . . . . . . . . . . . . . . . . . . . . . . . . . . 177
9.4.2 Creating a Vacation Rule or Auto Reply . . . . . . . . . . . . . . . . . . . . . . . . . . . . . . . . . 178
9.4.3 Creating a Rule to Forward Mail to Another Account . . . . . . . . . . . . . . . . . . . . . . . 179
9.4.4 Copying a Rule to Make a New Rule. . . . . . . . . . . . . . . . . . . . . . . . . . . . . . . . . . . . 179
9.4.5 Limiting Items Affected by a Rule . . . . . . . . . . . . . . . . . . . . . . . . . . . . . . . . . . . . . . 179
9.5 Editing a Rule. . . . . . . . . . . . . . . . . . . . . . . . . . . . . . . . . . . . . . . . . . . . . . . . . . . . . . . . . . . . . 180
9.6 Enabling or Disabling a Rule . . . . . . . . . . . . . . . . . . . . . . . . . . . . . . . . . . . . . . . . . . . . . . . . . 180
9.7 Running a Rule Manually . . . . . . . . . . . . . . . . . . . . . . . . . . . . . . . . . . . . . . . . . . . . . . . . . . . . 181
9.8 Deleting a Rule. . . . . . . . . . . . . . . . . . . . . . . . . . . . . . . . . . . . . . . . . . . . . . . . . . . . . . . . . . . . 181
10 Mailbox/Calendar Access for Proxy Users 183
10.1 Granting Proxy Rights as a Mailbox Owner . . . . . . . . . . . . . . . . . . . . . . . . . . . . . . . . . . . . . . 183
10.2 Protecting Private Items as a Mailbox Owner . . . . . . . . . . . . . . . . . . . . . . . . . . . . . . . . . . . . 184
10.3 Becoming a Proxy User in Another User’s Mailbox . . . . . . . . . . . . . . . . . . . . . . . . . . . . . . . . 184
Contents 9
Page 10

11 Caching Mode 187
11.1 Understanding Caching Features . . . . . . . . . . . . . . . . . . . . . . . . . . . . . . . . . . . . . . . . . . . . . 187
11.2 Setting Up Your Caching Mailbox . . . . . . . . . . . . . . . . . . . . . . . . . . . . . . . . . . . . . . . . . . . . . 187
11.3 Changing to Caching Mode . . . . . . . . . . . . . . . . . . . . . . . . . . . . . . . . . . . . . . . . . . . . . . . . . . 188
11.4 Setting Caching Properties . . . . . . . . . . . . . . . . . . . . . . . . . . . . . . . . . . . . . . . . . . . . . . . . . . 188
11.5 Working in Caching Mode . . . . . . . . . . . . . . . . . . . . . . . . . . . . . . . . . . . . . . . . . . . . . . . . . . . 188
11.6 Changing the Download Interval Time for Your Caching Mailbox . . . . . . . . . . . . . . . . . . . . . 189
11.7 Synchronizing Your Caching Mailbox with Your Online Mailbox . . . . . . . . . . . . . . . . . . . . . . 189
11.8 Displaying Connection Status . . . . . . . . . . . . . . . . . . . . . . . . . . . . . . . . . . . . . . . . . . . . . . . . 189
12 POP3 and IMAP4 Accounts 191
12.1 Understanding POP3 and IMAP4 Accounts. . . . . . . . . . . . . . . . . . . . . . . . . . . . . . . . . . . . . . 191
12.1.1 Understanding POP3 Accounts . . . . . . . . . . . . . . . . . . . . . . . . . . . . . . . . . . . . . . . . 191
12.1.2 Understanding IMAP4 Accounts . . . . . . . . . . . . . . . . . . . . . . . . . . . . . . . . . . . . . . . 191
12.2 Adding POP3 and IMAP4 Accounts to GroupWise . . . . . . . . . . . . . . . . . . . . . . . . . . . . . . . . 192
12.3 Configuring POP3 and IMAP4 Accounts . . . . . . . . . . . . . . . . . . . . . . . . . . . . . . . . . . . . . . . . 193
12.4 Using POP3 and IMAP4 Accounts. . . . . . . . . . . . . . . . . . . . . . . . . . . . . . . . . . . . . . . . . . . . . 193
12.4.1 Using POP3 and IMAP4 Accounts in Online Mode . . . . . . . . . . . . . . . . . . . . . . . . . 193
12.4.2 Using POP3 and IMAP4 Accounts in Caching Mode . . . . . . . . . . . . . . . . . . . . . . . 193
12.4.3 Changing the Length of Time for POP3 and IMAP4 Server Timeouts . . . . . . . . . . 194
12.4.4 Using SSL to Connect to a POP3 or IMAP4 Server . . . . . . . . . . . . . . . . . . . . . . . . 194
12.4.5 Downloading Items from POP3 and IMAP4 Accounts . . . . . . . . . . . . . . . . . . . . . . . 194
12.4.6 Deleting an Item from a POP3 or IMAP4 Account. . . . . . . . . . . . . . . . . . . . . . . . . . 195
12.5 POP3-Specific Features. . . . . . . . . . . . . . . . . . . . . . . . . . . . . . . . . . . . . . . . . . . . . . . . . . . . . 195
12.5.1 Storing Your Items on a POP3 Mail Server . . . . . . . . . . . . . . . . . . . . . . . . . . . . . . . 195
12.5.2 Deleting Items from a POP3 Mail Server. . . . . . . . . . . . . . . . . . . . . . . . . . . . . . . . . 195
12.6 IMAP4-Specific Features . . . . . . . . . . . . . . . . . . . . . . . . . . . . . . . . . . . . . . . . . . . . . . . . . . . . 196
12.6.1 Subscribing and Unsubscribing to IMAP4 Folders . . . . . . . . . . . . . . . . . . . . . . . . . 196
12.6.2 Alphabetizing the Folders in an IMAP4 Account . . . . . . . . . . . . . . . . . . . . . . . . . . . 196
12.6.3 Downloading Only the Header (Subject) for IMAP4 Accounts. . . . . . . . . . . . . . . . . 196
12.6.4 Downloading Voice Mail Attachments through an IMAP4 Account . . . . . . . . . . . . . 197
12.6.5 Deleting Items from an IMAP4 Mail Server . . . . . . . . . . . . . . . . . . . . . . . . . . . . . . . 197
novdocx (en) 24 March 2009
13 Newsgroups 199
13.1 Setting Up Newsgroups . . . . . . . . . . . . . . . . . . . . . . . . . . . . . . . . . . . . . . . . . . . . . . . . . . . . . 199
13.1.1 Adding a News Account. . . . . . . . . . . . . . . . . . . . . . . . . . . . . . . . . . . . . . . . . . . . . . 199
13.1.2 Subscribing to a Newsgroup . . . . . . . . . . . . . . . . . . . . . . . . . . . . . . . . . . . . . . . . . . 200
13.2 Working with Newsgroup Messages . . . . . . . . . . . . . . . . . . . . . . . . . . . . . . . . . . . . . . . . . . . 200
13.2.1 Reading Newsgroup Messages. . . . . . . . . . . . . . . . . . . . . . . . . . . . . . . . . . . . . . . . 200
13.2.2 Posting a New Discussion to a Newsgroup . . . . . . . . . . . . . . . . . . . . . . . . . . . . . . . 201
13.2.3 Replying to a Message in a Newsgroup . . . . . . . . . . . . . . . . . . . . . . . . . . . . . . . . . 201
13.2.4 Adding a Signature to All Newsgroup Items You Send . . . . . . . . . . . . . . . . . . . . . . 201
13.2.5 Changing the Display Name for Newsgroup Postings . . . . . . . . . . . . . . . . . . . . . . . 202
13.2.6 Deleting a Newsgroup Message . . . . . . . . . . . . . . . . . . . . . . . . . . . . . . . . . . . . . . . 202
13.3 Working with Newsgroups . . . . . . . . . . . . . . . . . . . . . . . . . . . . . . . . . . . . . . . . . . . . . . . . . . . 202
13.3.1 Collapsing or Expanding All Threads in a Newsgroup. . . . . . . . . . . . . . . . . . . . . . . 202
13.3.2 Performing a Search on a Newsgroup Server . . . . . . . . . . . . . . . . . . . . . . . . . . . . . 202
13.3.3 Specifying Download Settings for Individual Newsgroups . . . . . . . . . . . . . . . . . . . . 203
13.3.4 Updating the Local Newsgroup Folder . . . . . . . . . . . . . . . . . . . . . . . . . . . . . . . . . . 203
13.3.5 Deleting a News Account. . . . . . . . . . . . . . . . . . . . . . . . . . . . . . . . . . . . . . . . . . . . . 203
10 GroupWise 8 Linux/Mac Client User Guide
Page 11

14 RSS Feeds 205
14.1 Reading RSS Feeds . . . . . . . . . . . . . . . . . . . . . . . . . . . . . . . . . . . . . . . . . . . . . . . . . . . . . . . 205
14.2 Deleting an Individual RSS Entry . . . . . . . . . . . . . . . . . . . . . . . . . . . . . . . . . . . . . . . . . . . . . . 205
14.3 Deleting a Subscribed RSS Feed . . . . . . . . . . . . . . . . . . . . . . . . . . . . . . . . . . . . . . . . . . . . . 205
15 Document Management 207
16 GroupWise Maintenance 209
16.1 Managing Non-Standard Login Requirements . . . . . . . . . . . . . . . . . . . . . . . . . . . . . . . . . . . . 209
16.1.1 Logging In to Your Mailbox from Another User’s Workstation . . . . . . . . . . . . . . . . . 209
16.1.2 Logging In to Your Mailbox from a Shared Workstation . . . . . . . . . . . . . . . . . . . . . 209
16.2 Managing Mailbox Passwords . . . . . . . . . . . . . . . . . . . . . . . . . . . . . . . . . . . . . . . . . . . . . . . . 211
16.2.1 Changing Your GroupWise Password . . . . . . . . . . . . . . . . . . . . . . . . . . . . . . . . . . . 211
16.2.2 Removing Your GroupWise Password . . . . . . . . . . . . . . . . . . . . . . . . . . . . . . . . . . 211
16.2.3 Using LDAP Authentication instead of GroupWise Passwords . . . . . . . . . . . . . . . . 211
16.2.4 Using Mailbox Passwords in Caching Mode . . . . . . . . . . . . . . . . . . . . . . . . . . . . . . 212
16.2.5 Using Mailbox Passwords with Proxies . . . . . . . . . . . . . . . . . . . . . . . . . . . . . . . . . . 212
16.3 Archiving E-Mail . . . . . . . . . . . . . . . . . . . . . . . . . . . . . . . . . . . . . . . . . . . . . . . . . . . . . . . . . . . 212
16.3.1 Understanding Your Archive . . . . . . . . . . . . . . . . . . . . . . . . . . . . . . . . . . . . . . . . . . 212
16.3.2 Specifying Where Archives Are Stored . . . . . . . . . . . . . . . . . . . . . . . . . . . . . . . . . . 213
16.3.3 Moving an Item to the Archive . . . . . . . . . . . . . . . . . . . . . . . . . . . . . . . . . . . . . . . . . 213
16.3.4 Archiving Items Automatically . . . . . . . . . . . . . . . . . . . . . . . . . . . . . . . . . . . . . . . . . 213
16.3.5 Viewing Archived Items . . . . . . . . . . . . . . . . . . . . . . . . . . . . . . . . . . . . . . . . . . . . . . 214
16.3.6 Unarchiving Items . . . . . . . . . . . . . . . . . . . . . . . . . . . . . . . . . . . . . . . . . . . . . . . . . . 214
16.4 Backing Up E-Mail . . . . . . . . . . . . . . . . . . . . . . . . . . . . . . . . . . . . . . . . . . . . . . . . . . . . . . . . . 215
16.4.1 Backing Up Your Mailbox . . . . . . . . . . . . . . . . . . . . . . . . . . . . . . . . . . . . . . . . . . . . 215
16.4.2 Restoring Items from Backup . . . . . . . . . . . . . . . . . . . . . . . . . . . . . . . . . . . . . . . . . 216
16.5 Repairing Your Mailbox . . . . . . . . . . . . . . . . . . . . . . . . . . . . . . . . . . . . . . . . . . . . . . . . . . . . . 216
16.6 Managing Trash . . . . . . . . . . . . . . . . . . . . . . . . . . . . . . . . . . . . . . . . . . . . . . . . . . . . . . . . . . . 216
16.6.1 Displaying Items in Your Trash . . . . . . . . . . . . . . . . . . . . . . . . . . . . . . . . . . . . . . . . 217
16.6.2 Undeleting an Item in Your Trash . . . . . . . . . . . . . . . . . . . . . . . . . . . . . . . . . . . . . . 217
16.6.3 Saving an Item From Your Trash. . . . . . . . . . . . . . . . . . . . . . . . . . . . . . . . . . . . . . . 217
16.6.4 Emptying the Trash . . . . . . . . . . . . . . . . . . . . . . . . . . . . . . . . . . . . . . . . . . . . . . . . . 217
novdocx (en) 24 March 2009
A What’s New in GroupWise 8 219
A.1 Improved Interface . . . . . . . . . . . . . . . . . . . . . . . . . . . . . . . . . . . . . . . . . . . . . . . . . . . . . . . . . 219
A.1.1 Nav Bar . . . . . . . . . . . . . . . . . . . . . . . . . . . . . . . . . . . . . . . . . . . . . . . . . . . . . . . . . . 219
A.1.2 Customizable Toolbar . . . . . . . . . . . . . . . . . . . . . . . . . . . . . . . . . . . . . . . . . . . . . . . 219
A.1.3 Panels . . . . . . . . . . . . . . . . . . . . . . . . . . . . . . . . . . . . . . . . . . . . . . . . . . . . . . . . . . . 219
A.1.4 Customizable Date and Time Formats . . . . . . . . . . . . . . . . . . . . . . . . . . . . . . . . . . 220
A.1.5 Categories . . . . . . . . . . . . . . . . . . . . . . . . . . . . . . . . . . . . . . . . . . . . . . . . . . . . . . . . 220
A.1.6 The Linux Client Can Use the GTK Look and Feel (v8.0.1) . . . . . . . . . . . . . . . . . . 220
A.1.7 New Folder Types . . . . . . . . . . . . . . . . . . . . . . . . . . . . . . . . . . . . . . . . . . . . . . . . . . 220
A.1.8 Vacation Rule (v8.0.1) . . . . . . . . . . . . . . . . . . . . . . . . . . . . . . . . . . . . . . . . . . . . . . . 220
A.2 Notify . . . . . . . . . . . . . . . . . . . . . . . . . . . . . . . . . . . . . . . . . . . . . . . . . . . . . . . . . . . . . . . . . . . 220
A.3 Search Improvements . . . . . . . . . . . . . . . . . . . . . . . . . . . . . . . . . . . . . . . . . . . . . . . . . . . . . . 221
A.4 E-Mail Improvements . . . . . . . . . . . . . . . . . . . . . . . . . . . . . . . . . . . . . . . . . . . . . . . . . . . . . . . 221
A.5 Calendar Improvements . . . . . . . . . . . . . . . . . . . . . . . . . . . . . . . . . . . . . . . . . . . . . . . . . . . . . 221
A.6 Tasklists . . . . . . . . . . . . . . . . . . . . . . . . . . . . . . . . . . . . . . . . . . . . . . . . . . . . . . . . . . . . . . . . . 222
A.6.1 Subtask Management (v8.0.1) . . . . . . . . . . . . . . . . . . . . . . . . . . . . . . . . . . . . . . . . . 222
Contents 11
Page 12

B GroupWise Frequently Asked Questions 223
C Startup Options 225
C.1 GroupWise Startup Options . . . . . . . . . . . . . . . . . . . . . . . . . . . . . . . . . . . . . . . . . . . . . . . . . . 225
C.2 Using GroupWise Startup Options on Linux . . . . . . . . . . . . . . . . . . . . . . . . . . . . . . . . . . . . . 227
C.3 Using GroupWise Startup Options on a Macintosh . . . . . . . . . . . . . . . . . . . . . . . . . . . . . . . . 227
D Shortcut Keys 229
D.1 Linux Shortcut Keys . . . . . . . . . . . . . . . . . . . . . . . . . . . . . . . . . . . . . . . . . . . . . . . . . . . . . . . . 229
D.2 Mac Shortcut Keys . . . . . . . . . . . . . . . . . . . . . . . . . . . . . . . . . . . . . . . . . . . . . . . . . . . . . . . . . 231
E Documentation Updates 235
E.1 August 31, 2009 (GroupWise 8 SP 1) . . . . . . . . . . . . . . . . . . . . . . . . . . . . . . . . . . . . . . . . . . 235
novdocx (en) 24 March 2009
12 GroupWise 8 Linux/Mac Client User Guide
Page 13

About This Guide
This Novell® GroupWise® Linux/Mac Client User Guide explains how to use GroupWise on a
Linux* or Macintosh* computer. The guide is divided into the following sections:
Chapter 1, “Getting Started,” on page 15
Chapter 2, “Getting Organized,” on page 31
Chapter 3, “E-Mail,” on page 63
Chapter 4, “Calendar,” on page 99
Chapter 5, “Tasks and the Tasklist,” on page 121
Chapter 6, “Contacts and Address Books,” on page 133
Chapter 7, “Finding Items,” on page 155
Chapter 8, “Notify,” on page 169
Chapter 9, “Rules,” on page 175
Chapter 10, “Mailbox/Calendar Access for Proxy Users,” on page 183
novdocx (en) 13 May 2009
Chapter 11, “Caching Mode,” on page 187
Chapter 12, “POP3 and IMAP4 Accounts,” on page 191
Chapter 13, “Newsgroups,” on page 199
Chapter 14, “RSS Feeds,” on page 205
Chapter 15, “Document Management,” on page 207
Chapter 16, “GroupWise Maintenance,” on page 209
Appendix A, “What’s New in GroupWise 8,” on page 219
Appendix B, “GroupWise Frequently Asked Questions,” on page 223
Appendix C, “Startup Options,” on page 225
Appendix D, “Shortcut Keys,” on page 229
Appendix E, “Documentation Updates,” on page 235
Audience
This guide is intended for GroupWise users.
Feedback
We want to hear your comments and suggestions about this manual and the other documentation
included with this product. Please use the User Comments feature at the bottom of each page of the
online documentation, or go to www.novell.com/documentation/feedback.html and enter your
comments there.
Documentation Updates
For the most recent version of the GroupWise Client for Linux and Macintosh User Guide, visit the
Novell GroupWise 8 documentation Web site (http://www.novell.com/documentation/gw8).
About This Guide 13
Page 14

Additional Documentation
For additional GroupWise documentation, see the following guides at the Novell GroupWise 8
documentation Web site (http://www.novell.com/documentation/gw8):
Installation Guide
Administration Guide
Multi-System Administration Guide
Interoperability Guide
Troubleshooting Guides
GroupWise Windows Client User Guide
GroupWise WebAccess Client User Guide
GroupWise Client Frequently Asked Questions (FAQ)
Documentation Conventions
In Novell documentation, a greater-than symbol (>) is used to separate actions within a step and
items in a cross-reference path.
A trademark symbol (
®
, TM, etc.) denotes a Novell trademark. An asterisk (*) denotes a third-party
trademark.
novdocx (en) 13 May 2009
When a single pathname can be written with a backslash for some platforms or a forward slash for
other platforms, the pathname is presented with a backslash. Users of platforms that require a
forward slash, such as Linux or UNIX*, should use forward slashes as required by your software.
14 GroupWise 8 Linux/Mac Client User Guide
Page 15

1
Getting Started
GroupWise® is a robust, dependable messaging and collaboration system that connects you to your
universal mailbox anytime and anywhere. This section gives you an overview of the GroupWise
client to help you start using GroupWise quickly and easily.
Section 1.1, “Installing the GroupWise Linux/Mac Client,” on page 15
Section 1.2, “Starting GroupWise,” on page 16
Section 1.3, “Assigning a Password to Your Mailbox,” on page 16
Section 1.4, “Getting to Know the GroupWise Interface,” on page 17
Section 1.5, “Exploring the Folder List,” on page 21
Section 1.6, “Displaying the QuickViewer for Folder Items,” on page 25
Section 1.7, “Using Panels in the Home Folder,” on page 26
Section 1.8, “Understanding GroupWise Item Types,” on page 27
Section 1.9, “Identifying the Icons Appearing Next to Items,” on page 28
novdocx (en) 13 May 2009
1
Section 1.10, “Learning More,” on page 29
1.1 Installing the GroupWise Linux/Mac Client
To begin using GroupWise, you or your system administrator must install GroupWise on your Linux
or Mac computer.
Section 1.1.1, “Installing the GroupWise Client on Linux,” on page 15
Section 1.1.2, “Installing the GroupWise Client on a Mac,” on page 16
1.1.1 Installing the GroupWise Client on Linux
1 Insert the GroupWise 8 DVD into the DVD drive of your Linux workstation.
There might be a pause as Linux reads the DVD.
2 If you are prompted to allow auto-run, click Yes .
3 Specify the
There might be a pause before the GroupWise Installation program starts.
If it doesn’t start:
3a Double-click the CDROM icon on your desktop.
3b Double-click the
4 Select the language in which you want to run the Installation program and install the client
software, then click OK.
5 Click Install Products > Install GroupWise Client.
Run.
root
password, then click OK.
linux
folder, double-click the GroupWise
install
script, then click
6 When the installation is complete, click OK, then close the Installation program.
Getting Started
15
Page 16

For your convenience, a GroupWise icon is automatically created on your desktop.
7 Skip to Section 1.2, “Starting GroupWise,” on page 16
1.1.2 Installing the GroupWise Client on a Mac
1 Insert the GroupWise 8 DVD into the DVD drive of your Mac workstation.
2 Double-click the CDROM icon that appears on your desktop.
novdocx (en) 13 May 2009
3 Double-click the
4 Drag the GroupWise package from the DVD to the
software on your Mac.
5 Drag the GroupWise package from the
GroupWise icon there for convenient access.
6 Continue with Starting GroupWise.
mac
folder, then double-click the GroupWise
Applications
.dmg
file.
Applications
folder to the dock to create a
folder to install the
1.2 Starting GroupWise
When you start GroupWise, you might be prompted to type information such as your password, the
TCP/IP address of your post office agent, and so forth. This Startup dialog box changes, depending
on the information GroupWise needs to be able to open your Mailbox, and the GroupWise mode that
you log in to.
Your system administrator might restrict the GroupWise modes you can log in to.
On your own workstation:
1 Start GroupWise by double-clicking to display the GroupWise Main Window.
If you have not specified a password for your Mailbox and GroupWise needs no additional
information, you bypass the Startup dialog box and GroupWise opens.
2 If you are prompted for a password, type the password in the Password field.
3 If you are prompted for additional information, click the mode of GroupWise you are logging
in to and type additional information as necessary, such as the TCP/IP address and port of the
Post Office Agent.
If you do not know the required information, contact your system administrator.
4 Click OK.
For instructions to start GroupWise under specialized circumstances, see Section 16.1, “Managing
Non-Standard Login Requirements,” on page 209.
1.3 Assigning a Password to Your Mailbox
Your GroupWise administrator might have set an initial password for you. If not, you can assign a
password to your Mailbox. GroupWise passwords are case sensitive (for example, Wednesday is not
the same as WEDNESDAY). If you forget your password, you cannot access any of your items.
Your GroupWise administrator can reset your password if you forget it.
1 Linux: Click Tool s > Options.
Mac: Click GroupWise > Preferences.
16 GroupWise 8 Linux/Mac Client User Guide
Page 17

2 Click Security > Password.
3 In the Old password field, type the old password.
4 In the New password field, type the new password.
5 In the Confirm new password field, retype the new password, then click OK.
For more information about mailbox passwords, see Section 16.2, “Managing Mailbox Passwords,”
on page 211.
1.4 Getting to Know the GroupWise Interface
Section 1.4.1, “Understanding the Main GroupWise Window,” on page 17
Section 1.4.2, “Understanding the Main Menu,” on page 18
Section 1.4.3, “Understanding the Nav Bar,” on page 19
Section 1.4.4, “Understanding the Main Toolbar,” on page 19
Section 1.4.5, “Understanding Item Lists,” on page 20
novdocx (en) 13 May 2009
1.4.1 Understanding the Main GroupWise Window
Your main work area in GroupWise is called the Main Window. From the Main Window of
GroupWise, you can read your messages, schedule appointments, view your Calendar, manage
contacts, change the mode of GroupWise you’re running in, open folders, open documents, and
much more.
Getting Started 17
Page 18
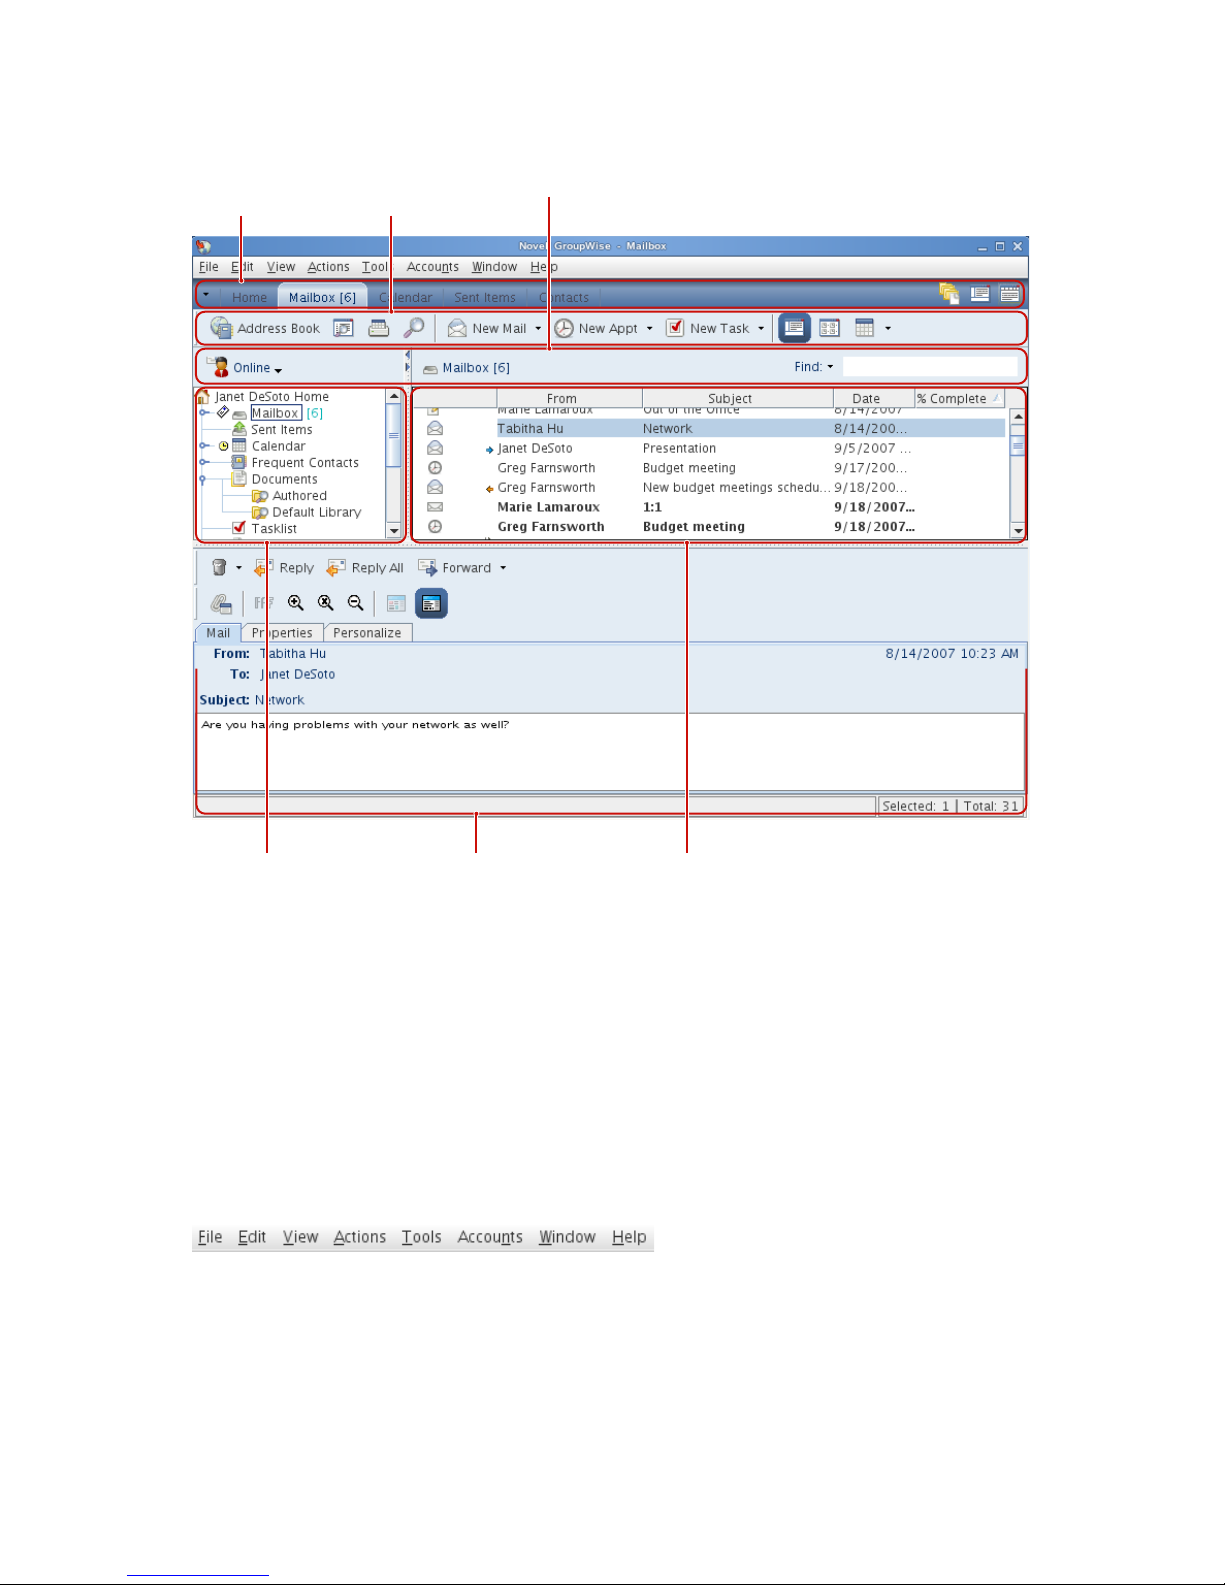
Figure 1-1 The GroupWise Main Window
Folder and Item
List HeaderToolbarNav Bar
Folder List Quick Viewer Item List
novdocx (en) 13 May 2009
You can open more than one Main Window by clicking Window, then clicking New Main Window.
You can open as many Main Windows as your computer’s memory allows.
This is useful if you proxy for another user. You can look at your own Main Window and the Main
Window belonging to the person you are proxying for. For more information about accessing other
users’ mailboxes, see Chapter 10, “Mailbox/Calendar Access for Proxy Users,” on page 183.
1.4.2 Understanding the Main Menu
The Main Menu provides access to all GroupWise client features that can be used in the Main
Window.
Figure 1-2 The GroupWise Main Menu.
The most frequently used GroupWise features are conveniently available on item drop-down menus,
toolbars, and so on.
18 GroupWise 8 Linux/Mac Client User Guide
Page 19

Turning the Main Menu On and Off
To turn the Main Menu off:
1 Linux: Click Tool s > Options.
Mac: Click GroupWise > Preferences.
2 Click Environment > Appearance.
3 Deselect Display Main Menu.
With the Main Menu turned off, you can still access all its functionality by clicking the drop-down
arrow on the left end of the Nav Bar.
To turn the Main Menu on:
1 Click the drop-down arrow on the left end of the Nav Bar, then click Display Main Menu.
GroupWise requires that either the Main Menu or the Nav Bar be displayed at all times.
1.4.3 Understanding the Nav Bar
novdocx (en) 13 May 2009
The Nav Bar is located at the top of the GroupWise window. It is designed for quick access to the
folders you use the most.
Figure 1-3 The GroupWise Nav Bar
By default the Nav Bar contains the Home, Mailbox, Calendar, Sent Items, and Contacts folders.
However, the Nav Bar is customizable, so you can add the folders you use the most.
Turning the Nav Bar On and Off
1 Linux: Click Tool s > Options.
Mac: Click GroupWise > Preferences.
2 Click Environment > Appearance.
3 Select or deselect Display Nav Bar.
Customizing the Nav Bar
1 Linux: Right-click the Nav Bar.
Mac: Control+click the Nav Bar.
2 Click Customize Nav Bar.
3 Select the folders you want to display on the Nav Bar.
4 Select a color scheme for the Nav Bar.
5 Click OK.
1.4.4 Understanding the Main Toolbar
The Main Toolbar provides single-click access to the most common GroupWise features, such as
sending a message or appointment, performing a search, and so on.
Getting Started 19
Page 20
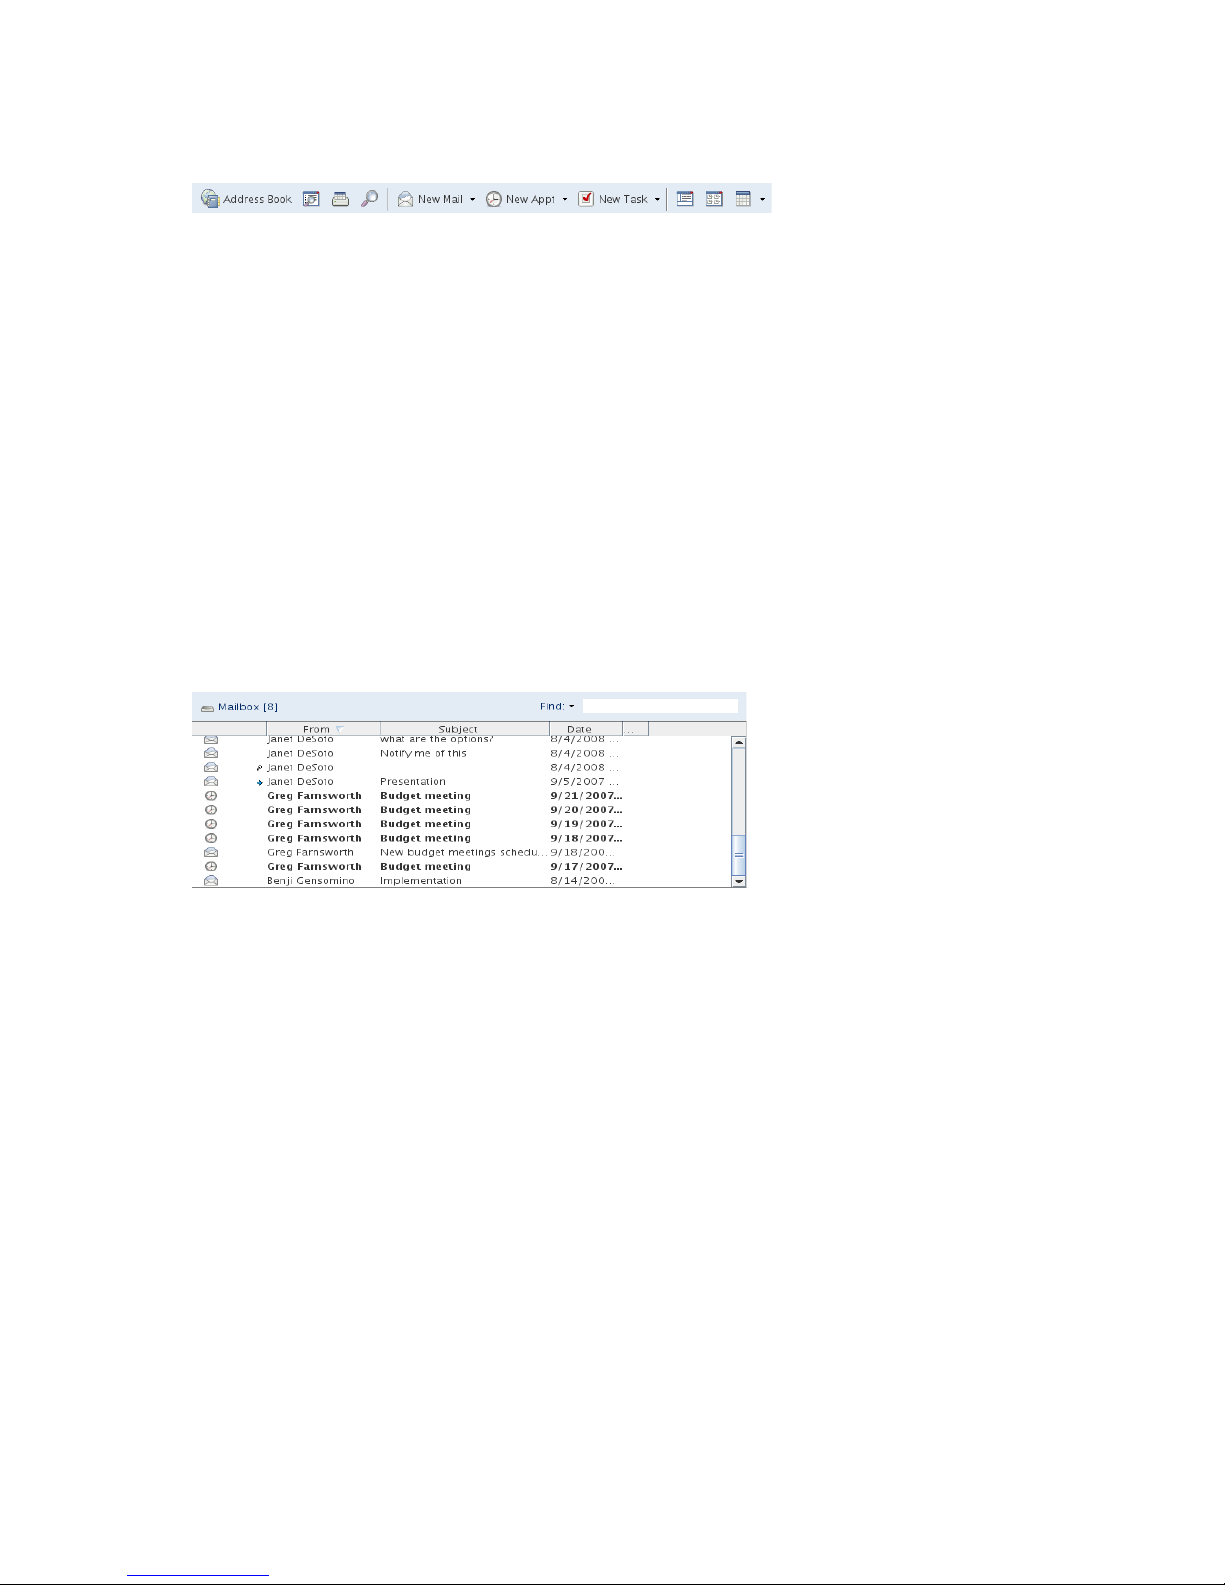
Figure 1-4 The GroupWise Main Toolbar
Turning the Main Toolbar On and Off
1 Click View > Toolbar.
2 Select or deselect Main Toolbar.
When a toobar is displayed, a check mark is displayed next to the toolbar name in the Main
Menu.
For more information, see Section 2.1.3, “Customizing the Main Toolbar,” on page 33.
1.4.5 Understanding Item Lists
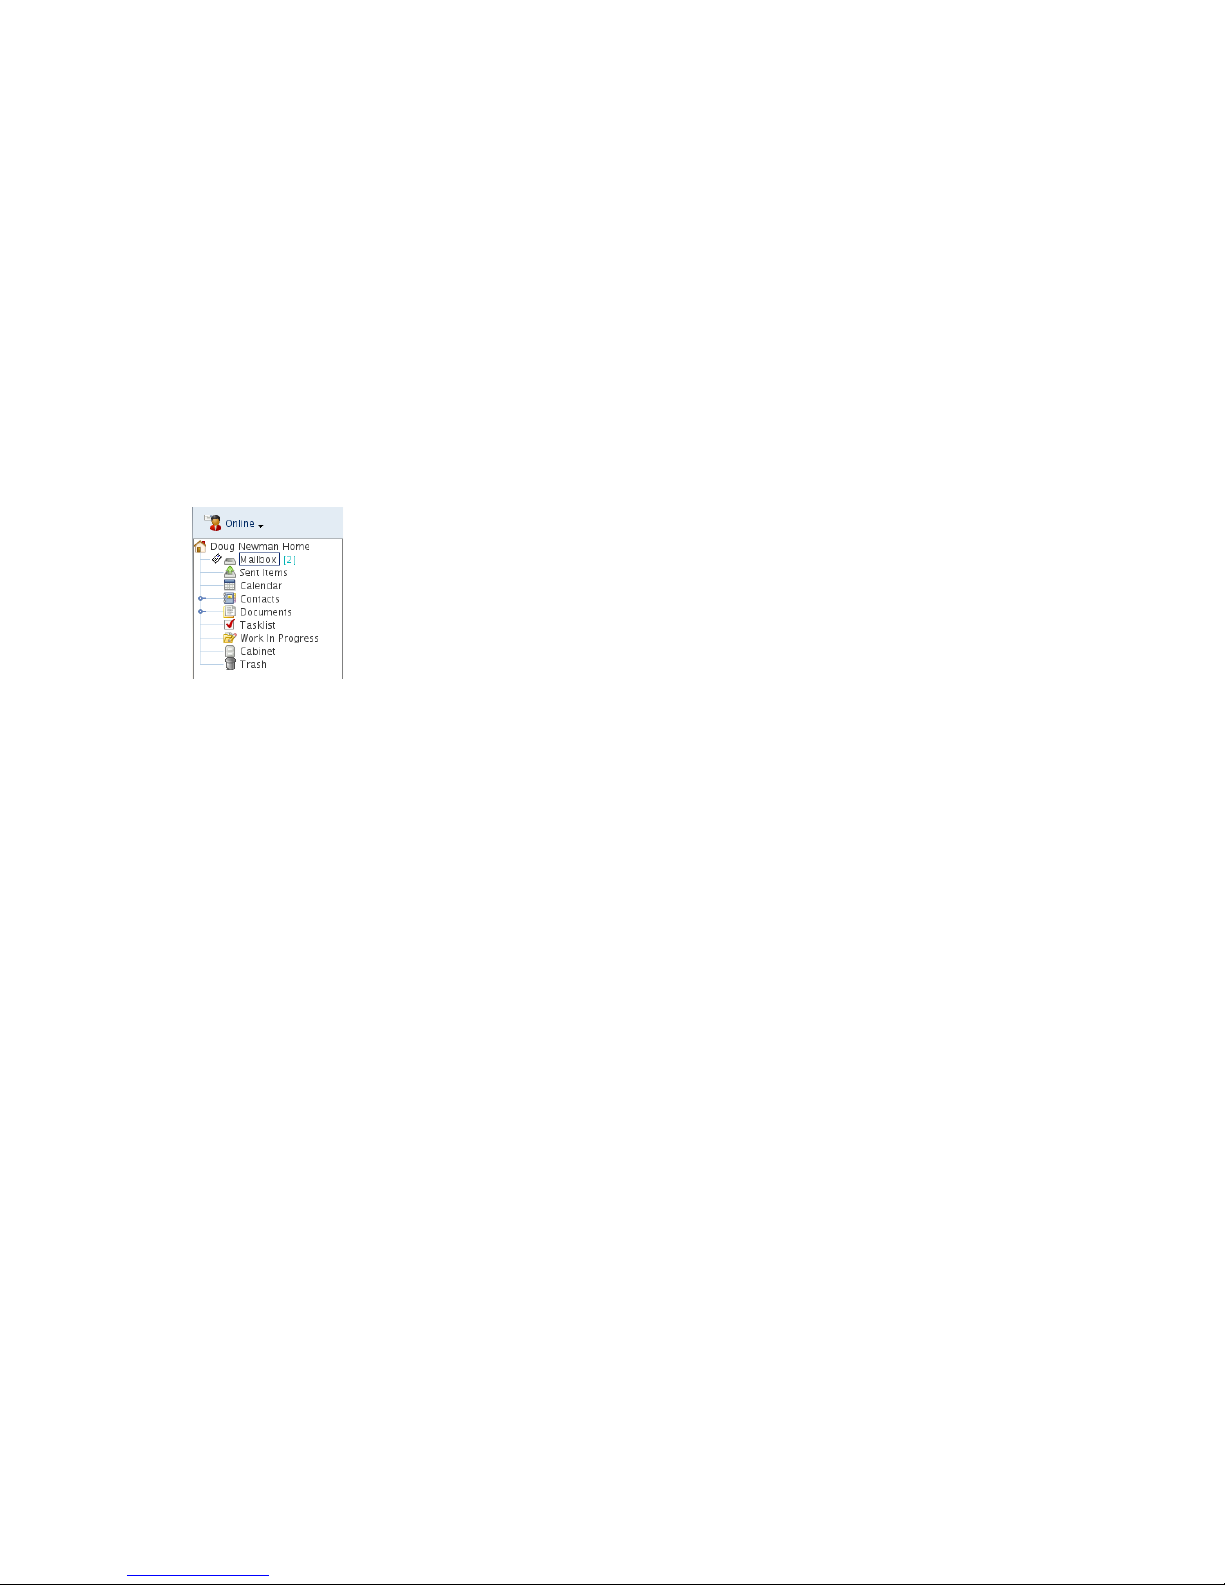
The most common way to display information is in an Item List. For example, the Item List for your
Mailbox is the list of messages you have received. The Item List header displays the name of the
folder whose contents are being listed. It also provides the Find field for quickly finding items in the
folder.
novdocx (en) 13 May 2009
Figure 1-5 Mailbox Item list
To select one item in the Item List:
1 Click the item.
To select several items throughout the Item List:
1 Linux: Ctrl+click each item.
Mac: Command+click each item.
To select a range of items:
1 Shift+click the first and last item in the range.
Item lists are organized into columns, which help you display the items in the order most useful for
you. You can drag a column to a new position in the column header.You can resize a column by
dragging the edge of the column heading. You can sort by columns and add new columns. For
complete instructions on customizing Item Lists, see Section 2.3.4, “Managing Item Lists in
Folders,” on page 42 and Section 2.3.5, “Customizing Folder Display Settings,” on page 45.
20 GroupWise 8 Linux/Mac Client User Guide
Page 21
The right-click or Control+click menus provide different options, depending on which column you
click in. In the item type icon column, you can select a category for the item. In the first text column
(for example, Name), you can select an item action (Reply, Forward, and so on). In the other text
columns (for example, Subject, Date, and so on), you can select a display setting (for example, Show
Group Labels, View Discussion Threads, and so on).
1.5 Exploring the Folder List
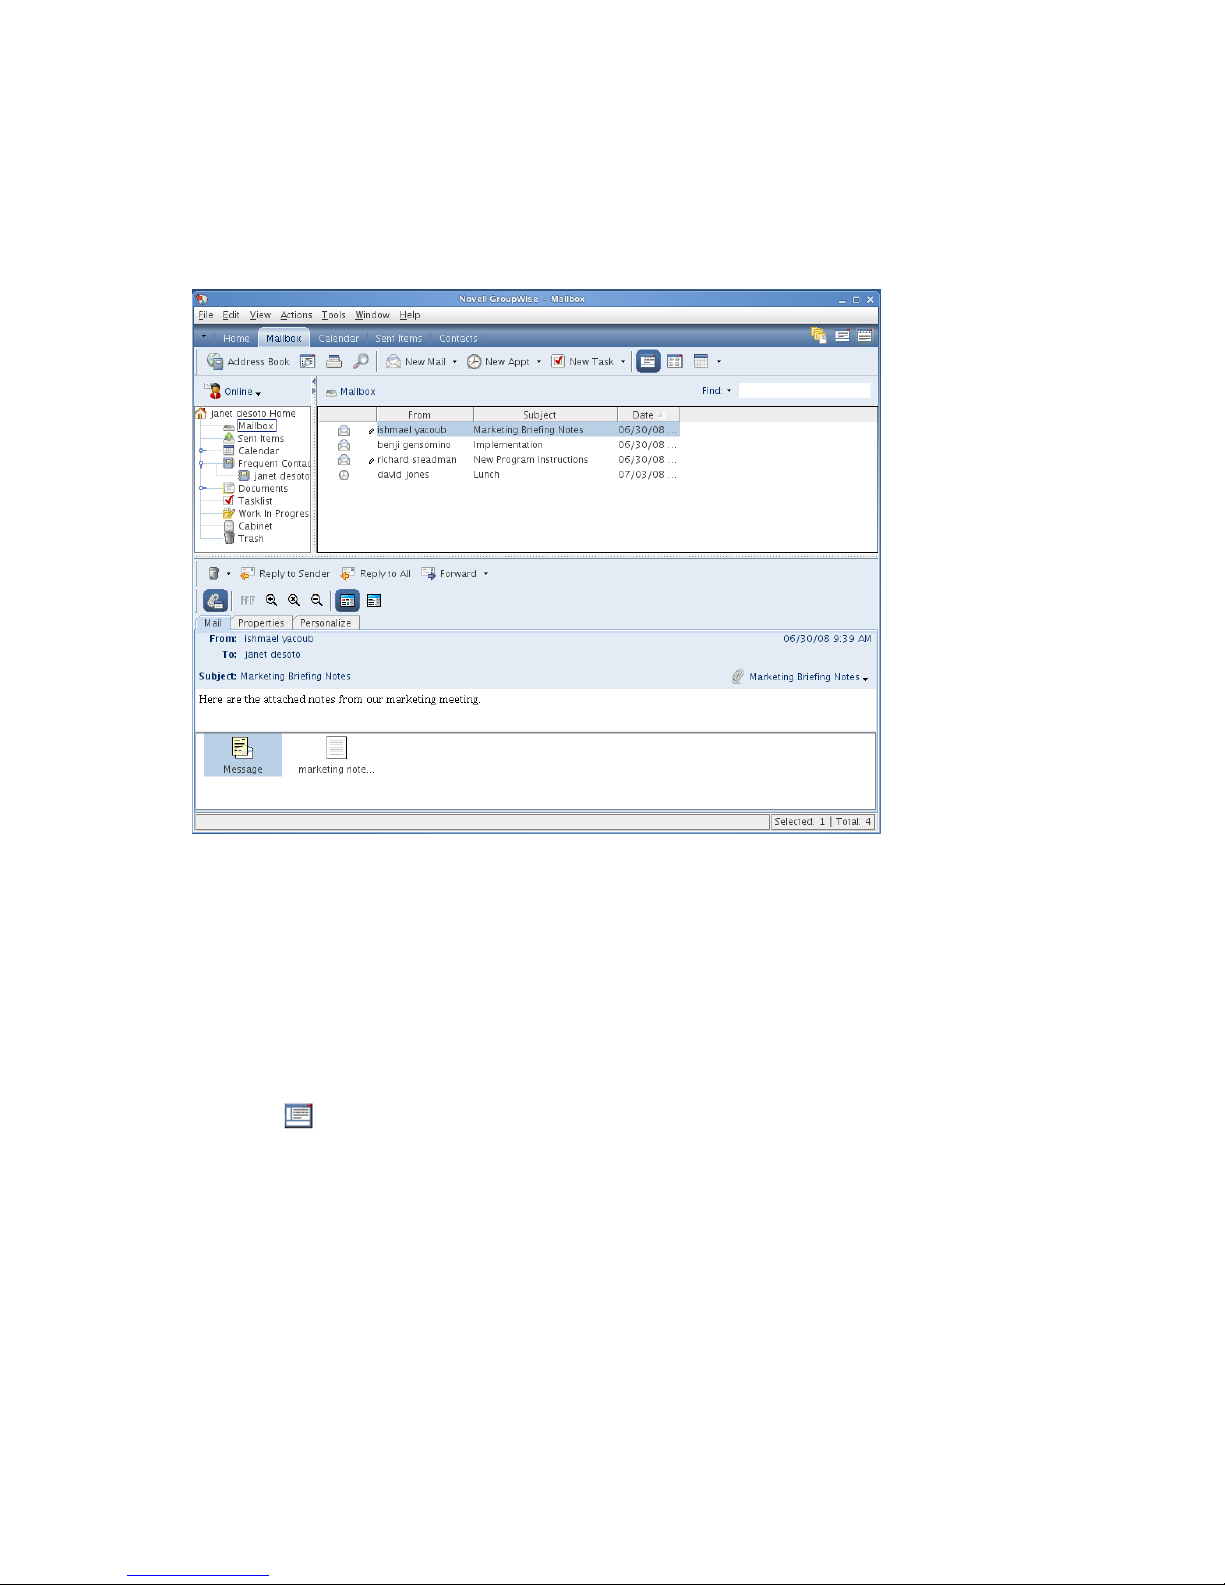
The Folder List at the left of the Main Window lets you organize your GroupWise items by creating
folders to store your items in. Next to any folder (except for shared folders), the number of unread
items is shown in square brackets. Next to the Sent Items folder, the number in square brackets
shows how many items are pending to be sent from Caching mode.
Figure 1-6 The GroupWise Folder List
novdocx (en) 13 May 2009
The Folder List header includes the Mode Selector for changing between Online mode and Caching
mode. Some folders are available by default. Additional folders are created as you use additional
GroupWise features.
Section 1.5.1, “Home Folder,” on page 22
Section 1.5.2, “Mailbox Folder,” on page 22
Section 1.5.3, “Sent Items Folder,” on page 22
Section 1.5.4, “Calendar Folder,” on page 22
Section 1.5.5, “Frequent Contacts Folder,” on page 22
Section 1.5.6, “Tasklist Folder,” on page 23
Section 1.5.7, “Documents Folder,” on page 23
Section 1.5.8, “Cabinet Folder,” on page 23
Section 1.5.9, “Work in Progress Folder,” on page 23
Section 1.5.10, “Junk Mail Folder,” on page 23
Section 1.5.11, “Trash Folder,” on page 23
Section 1.5.12, “Shared Folders,” on page 24
Section 1.5.13, “IMAP4 Account Folder,” on page 24
Section 1.5.14, “NNTP Newsgroup Account Folder,” on page 24
Section 1.5.15, “RSS Feeds Folder,” on page 24
For more information about the Folder List, see Section 2.3, “Using Folders to Organize Your
Mailbox,” on page 40.
Getting Started 21
Page 22

1.5.1 Home Folder
Your Home folder (indicated by your name) represents your GroupWise database. All folders in
your Main Window are subfolders of your Home folder. The Home folder can be organized into
panels to display your most important folders. For more information, see Section 2.4, “Using Panels
to Organize Your Home Folder,” on page 52.
1.5.2 Mailbox Folder
The Mailbox displays all the items you have received, with the exception of scheduled items
(appointments, tasks, and reminder notes) you have accepted or declined. By default, scheduled
items and tasks are moved to the Calendar when you accept them.
Your received items are stored in your GroupWise Mailbox. You can quickly change what is
displayed by clicking a setting on the Find drop-down list. See Section 7.1, “Quickly Finding Items
in a Folder,” on page 155 for more information.
You can organize your messages by moving them into folders within your Cabinet, and you can
create new folders as necessary. For more information, see Section 2.3, “Using Folders to Organize
Your Mailbox,” on page 40.
novdocx (en) 13 May 2009
You can also organize your messages by assigning categories to them. Each category displays as a
different color in your Mailbox. You can find items based on categories. For more information, see
“Using Categories to Organize Items” on page 36.
1.5.3 Sent Items Folder
The Sent Items folder displays all the items you have sent. By checking the properties of your
sent items, you can determine their status (Delivered, Opened, and so on).
For more information, see Section 3.2.1, “Working with Sent Items,” on page 76.
1.5.4 Calendar Folder
The Calendar folder shows scheduled items (appointments, tasks, and reminder notes) that you
have accepted. There are several calendar view options. The Calendar folder contains any personal
Calendars that you have created. You can use the Folder List to choose which calendars to display.
The selected calendars are displayed in the calendar view.
For more information about your Calendar, see Section 4.1, “Understanding the Calendar,” on
page 99
1.5.5 Frequent Contacts Folder
The Frequent Contacts folder , by default, represents the Frequent Contacts address book. Any
modification you make in the Frequent Contacts folder is also made in the Frequent Contacts
address book.
From this folder, you can view, create, and modify contacts, resources, organizations and groups.
For more information, see Section 6.4, “Using Contacts Folders,” on page 137.
If other users proxy into your mailbox, they never see your Frequent Contacts folder.
22 GroupWise 8 Linux/Mac Client User Guide
Page 23

1.5.6 Tasklist Folder
Use the Tasklist folder to create a task list. You can move any items (mail messages, phone
messages, reminder notes, tasks, or appointments) to this folder and arrange them in the order you
want. Each item has a check box so that you can check off items as you complete them.
For more information, see Chapter 5, “Tasks and the Tasklist,” on page 121.
1.5.7 Documents Folder
Your document references are organized in the Documents folder so you can easily locate them.
The Documents folder includes an Authored folder for documents you have written and a Default
Library folder for documents you have access to in your default library. The Documents folder can
contain only documents.
For more information, see Chapter 15, “Document Management,” on page 207.
1.5.8 Cabinet Folder
novdocx (en) 13 May 2009
The Cabinet contains all of your personal folders. See the following topics for information about
rearranging your Cabinet folder:
“Reorganizing Your Folders” on page 41
“Alphabetizing the Folder List” on page 41
1.5.9 Work in Progress Folder
The Work In Progress folder is a folder where you can save messages you have started but want
to finish later. For more information, see “Saving an Unfinished E-Mail” on page 72.
1.5.10 Junk Mail Folder
All e-mail items from addresses and Internet domains that are junked through Junk Mail Handling
are placed in the Junk Mail folder . This folder is not created in the Folder List unless a Junk Mail
option is enabled.
While Junk Mail options are enabled, this folder cannot be deleted. However, the folder can be
renamed or moved to a different location in the Folder List. If all Junk Mail options are disabled, the
folder can be deleted. The folder can also be deleted if the Junk Mail Handling feature is disabled by
the system administrator.
For more information about Junk Mail Handling, see “Handling Unwanted E-Mail (Spam)” on
page 92.
1.5.11 Trash Folder
All deleted mail and phone messages, appointments, tasks, documents, and reminder notes are
stored in the Trash folder . Items in the Trash can be viewed, opened, or returned to your Mailbox
before the Trash is emptied. (Emptying the Trash removes items in the Trash from the system.)
Getting Started 23
Page 24

You can empty your entire Trash, or empty only selected items. Items in the Trash are automatically
emptied according to the number of days entered in the Cleanup tab in Environment Options, or you
can empty the Trash manually. The system administrator can specify that your Trash is emptied
automatically on a regular basis.
For more information, see Section 16.6, “Managing Trash,” on page 216.
1.5.12 Shared Folders
A shared folder is like any other folder in your Cabinet, except other people have access to it.
You can create shared folders or share existing personal folders in your Cabinet. You choose whom
to share the folder with, and what rights to grant each user. Users can post messages to the shared
folder, drag existing items into the folder, and create discussion threads. You can’t share system
folders, which include the Cabinet, Trash, and Work In Progress folders.
If you place a document in a shared folder, people with rights to the shared folder don’t
automatically have rights to edit the document. Before they can edit the document, you must give
them Edit rights on the Sharing tab.
For more information, see “Using Shared Folders” on page 48.
novdocx (en) 13 May 2009
1.5.13 IMAP4 Account Folder
If you add a folder for an IMAP4 account, a icon displays in your Folder List. (POP3 accounts do
not use a separate folder.)
For more information, see Chapter 12, “POP3 and IMAP4 Accounts,” on page 191.
1.5.14 NNTP Newsgroup Account Folder
If you subscribe to an NNTP newsgroup account, an NNTP folder is created. It displays the NNTP
folder icon in your Folder List.
For more information, see Chapter 13, “Newsgroups,” on page 199.
1.5.15 RSS Feeds Folder
When you subscribe to RSS feeds in the Windows* client, the GroupWise Feeds folder is created in
your Mailbox. It displays the RSS folder icon in the Folder List. A list of subscribed feeds is
displayed under the GroupWise Feeds folder.
NOTE: In this release, only the GroupWise Windows client allows you to subscribe to RSS feeds.
However, if you use the Windows client to subscribe to feeds, you can read the feeds in the
GroupWise Linux/Mac Client, after the Windows client has downloaded the feeds.
For additional information on RSS feeds, see Chapter 14, “RSS Feeds,” on page 205.
24 GroupWise 8 Linux/Mac Client User Guide
Page 25
1.6 Displaying the QuickViewer for Folder Items
Use the QuickViewer to scan the contents of your items in a folder. The QuickViewer saves time
because you don’t need to open each item; you simply click an item or press the Down-arrow to read
your items.
novdocx (en) 13 May 2009
Section 1.6.1, “Turning the QuickViewer On and Off,” on page 25
Section 1.6.2, “Positioning the QuickViewer,” on page 25
Section 1.6.3, “Using the QuickViewer,” on page 26
1.6.1 Turning the QuickViewer On and Off
1 Click View, then select QuickViewer.
or
Click on the toolbar.
1.6.2 Positioning the QuickViewer
1 Click Tools > Options.
2 Click Environment > Appearance.
3 Select whether you want the QuickViewer displayed at the bottom or at the right of the folder
Getting Started 25
Page 26
1.6.3 Using the QuickViewer
1 Size the QuickViewer by dragging a corner of the window or by dragging the horizontal
dividing line up or down.
If you size and close the QuickViewer, it is the same size when you open it again. Size it by
dragging a corner of the window, not by clicking the maximize button.
2 In the Mailbox, click an item that you want to read.
or
In the Calendar, click an appointment that you want to see details for.
To view an attachment, click the drop-down list on the QuickViewer header, then click the
attachment.
Linux: Right-click in the QuickViewer to choose other options.
Mac: Control+click in the QuickViewer to choose other options.
3 To change how information displays in the header:
Linux: Right-click the header and choose the options you want to set.
Mac: Control+click the header and choose the options you want to set.
4 To lengthen the Folder List so that it extends to the bottom of the QuickViewer when displayed
below the Item List (rather than to the right), click View > Quick View > Long Folder List.
5 To close the QuickViewer, click on the toolbar.
novdocx (en) 13 May 2009
When you read an item in the QuickViewer, the icon changes to the opened status. For example, the
closed envelope representing a mail message changes to an opened envelope.
For more information about QuickViewer display options, see Section 2.1.2, “Customizing
GroupWise Appearance Settings,” on page 32.
1.7 Using Panels in the Home Folder
The Home folder is a personalized view of your most important information. The Home folder
uses panels to display information in sections.
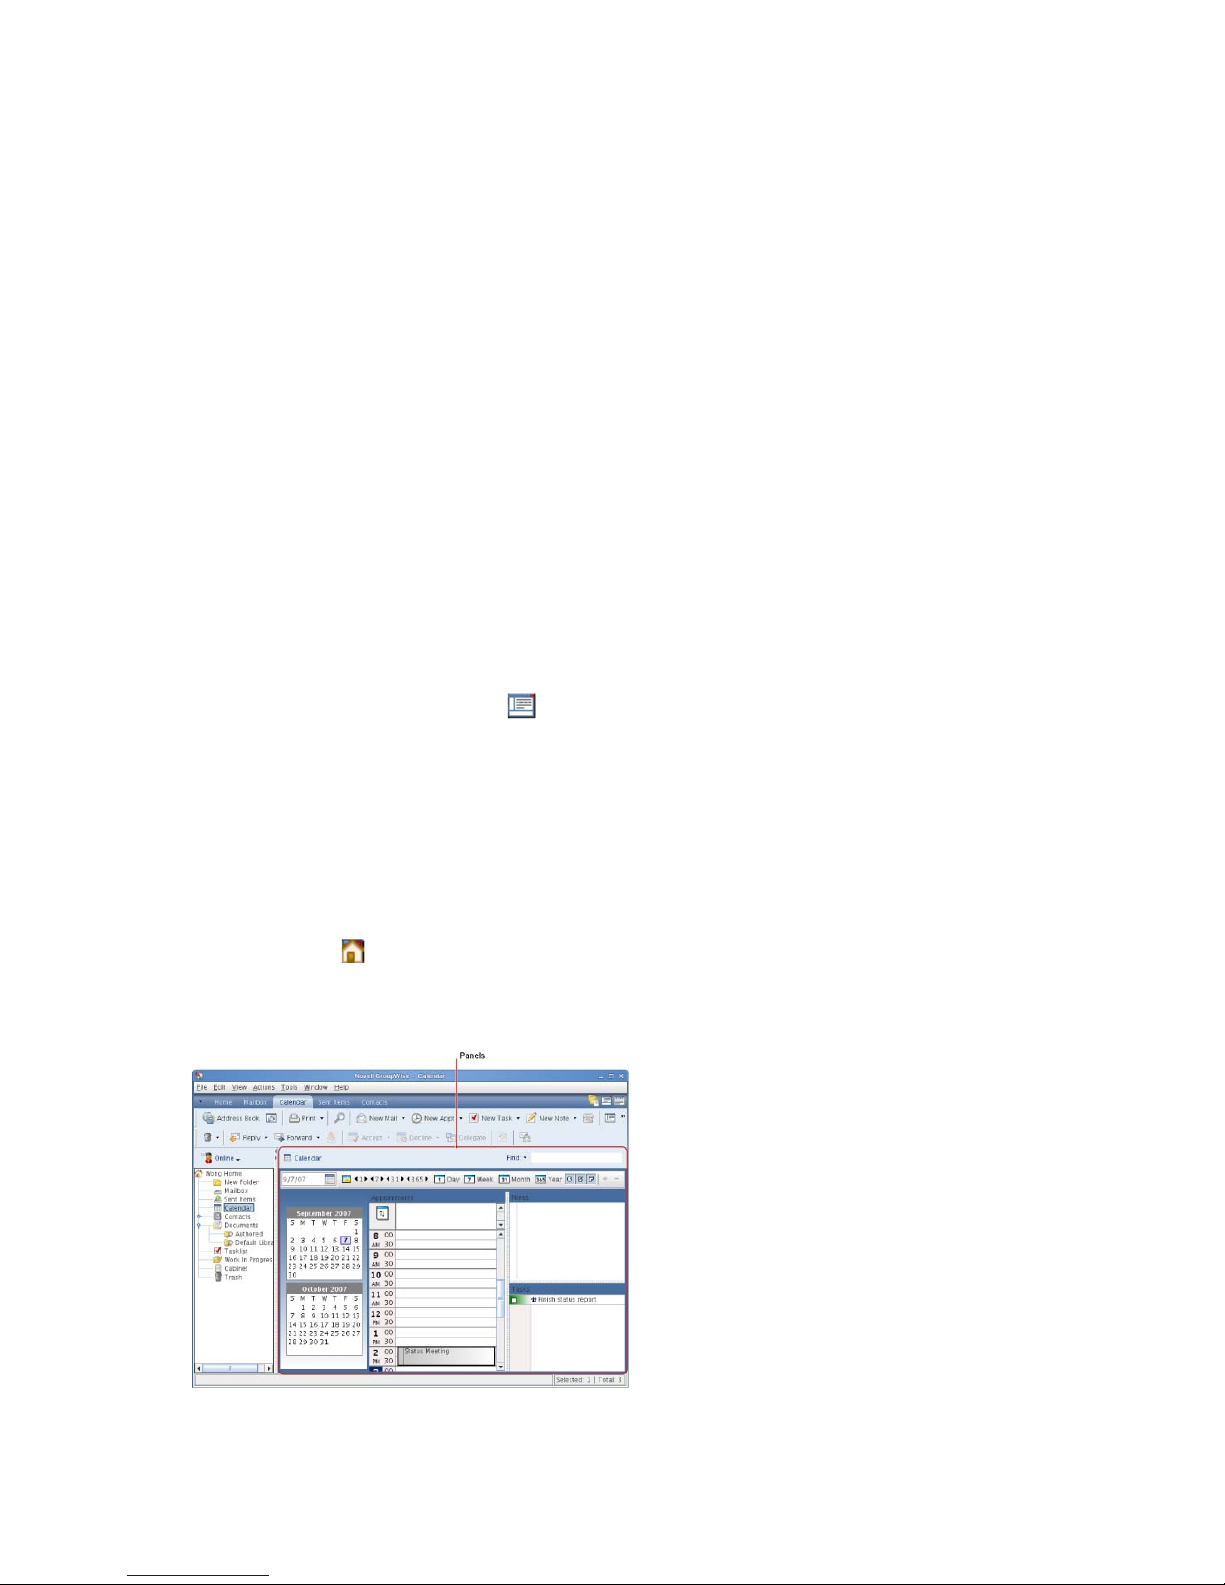
Figure 1-7 The Default GroupWise Home Folder
26 GroupWise 8 Linux/Mac Client User Guide
Page 27

The default Home folder displays your calendar for the day, your Tasklist items, and your unread
messages.
The Home folder is fully customizable. You can create additional panels that display the information
you need. For information on how to customize your Home folder, see Section 2.4, “Using Panels to
Organize Your Home Folder,” on page 52.
1.8 Understanding GroupWise Item Types
Every day you communicate in a variety of ways. To accommodate these needs, GroupWise delivers
your items using a variety of item types.
Section 1.8.1, “Mail,” on page 27
Section 1.8.2, “Appointment,” on page 27
Section 1.8.3, “Task,” on page 27
Section 1.8.4, “Reminder Note,” on page 27
Section 1.8.5, “Phone Message,” on page 28
novdocx (en) 13 May 2009
1.8.1 Mail
A mail message is for basic correspondence, such as a memorandum or letter. See Section 3.1,
“Sending E-Mail,” on page 63 and Section 3.3, “Receiving E-Mail,” on page 81.
1.8.2 Appointment
An appointment lets you invite people to and schedule resources for meetings or events. You can
schedule the date, time, and location for the meeting. You can use posted appointments to schedule
personal events such as a doctor’s appointment, a reminder to make a phone call at a certain time,
and so forth. Appointments display on the Calendar. See Section 4.3.2, “Scheduling Appointments,”
on page 108.
1.8.3 Task
A task lets you place a to-do item on your own or on another person’s Calendar after it has been
accepted. You can schedule a due date for the task and include a priority. Uncompleted tasks are
carried forward to the next day. See Section 5.3.1, “Assigning a Task,” on page 123.
TIP: You can also create a Tasklist that is not associated with your Calendar. In this type of Tasklist,
any item type (mail, appointment, task, reminder note, phone message) can be used.
For more information, see Chapter 5, “Tasks and the Tasklist,” on page 121.
1.8.4 Reminder Note
A reminder note is posted on a specific date on your own or another person’s Calendar. You can use
reminder notes to remind yourself or others of deadlines, holidays, days off, and so forth. Posted
reminder notes are useful as reminders for birthdays, vacations, paydays, and so forth. See
Section 4.3.3, “Sending Reminder Notes,” on page 112.
Getting Started 27
Page 28
1.8.5 Phone Message
A phone message helps you inform someone of a phone call or visitor. You can include such
information as caller, phone number, company, urgency of the call, and so forth. You cannot answer
your phone from a phone message. See “Sending a Phone Message” on page 75.
1.9 Identifying the Icons Appearing Next to Items
The icons that appear next to items in your Mailbox, Sent Items folder, and the Calendar show
information about the items.
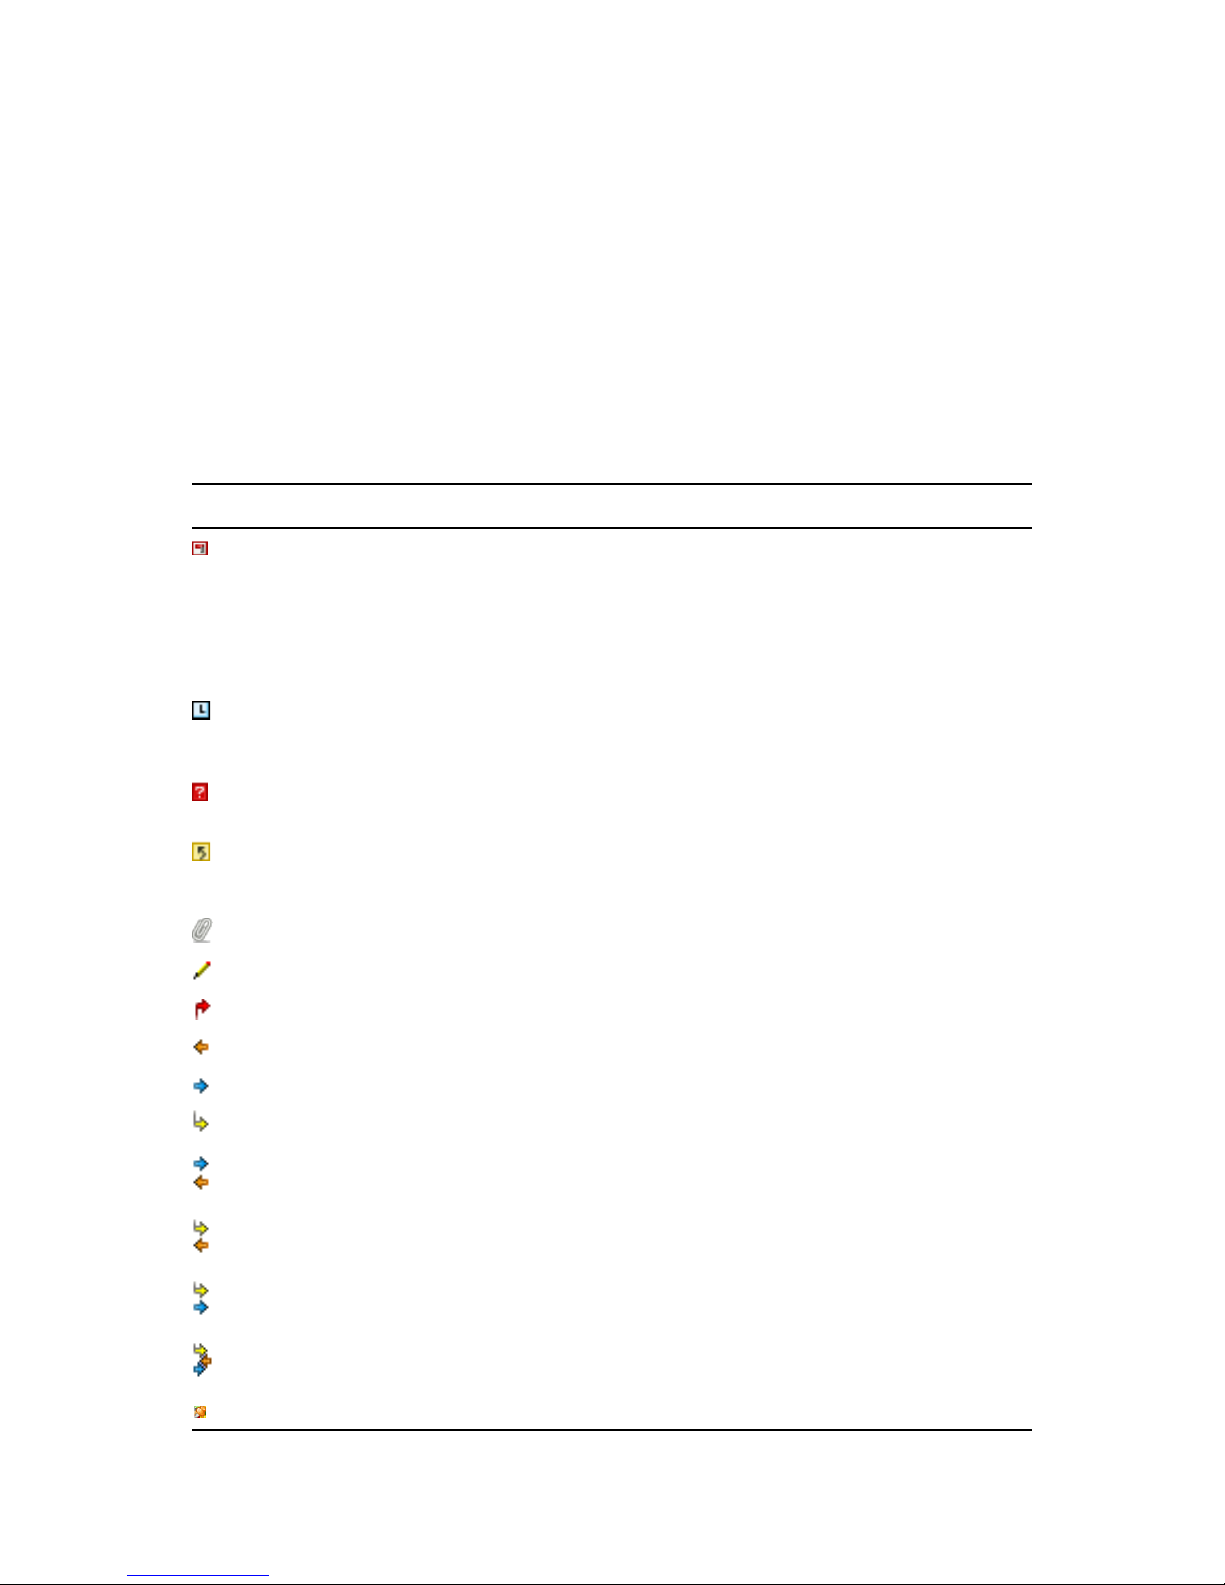
Table 1-1 Icon Descriptions
Icon Description
In Caching mode, indicates that the item has been queued, but the queue has not been
uploaded. After the item has been uploaded, it indicates that status information has not been
received about the item being delivered to the destination post office or transferred to the
Internet.
novdocx (en) 13 May 2009
Next to the Sent Items folder, the icon indicates that there is at least one item that has been
queued but the queue has not been uploaded.
A sent item that has been opened by at least one person. The icon displays until all
recipients have 1) opened the mail, phone message, or reminder note; 2) accepted the
appointment; or 3) completed the task.
Next to an item you have sent, the icon indicates that the item couldn’t be delivered to the
destination post office or it failed to transfer to the Internet.
Next to an appointment or task, the icon indicates that at least one person has declined/
deleted the item. Next to a mail message, phone message, or reminder note, the icon
indicates that at least one person has deleted the item without opening it.
One or more attachments are included with the item.
Draft item.
An item you have sent.
An item you have replied to.
An item you have forwarded.
An item you have delegated.
An item you have replied to and forwarded
An item you have replied to and delegated.
An item you have forwarded and delegated.
An item you have replied to, forwarded, and delegated
A posted item.
28 GroupWise 8 Linux/Mac Client User Guide
Page 29
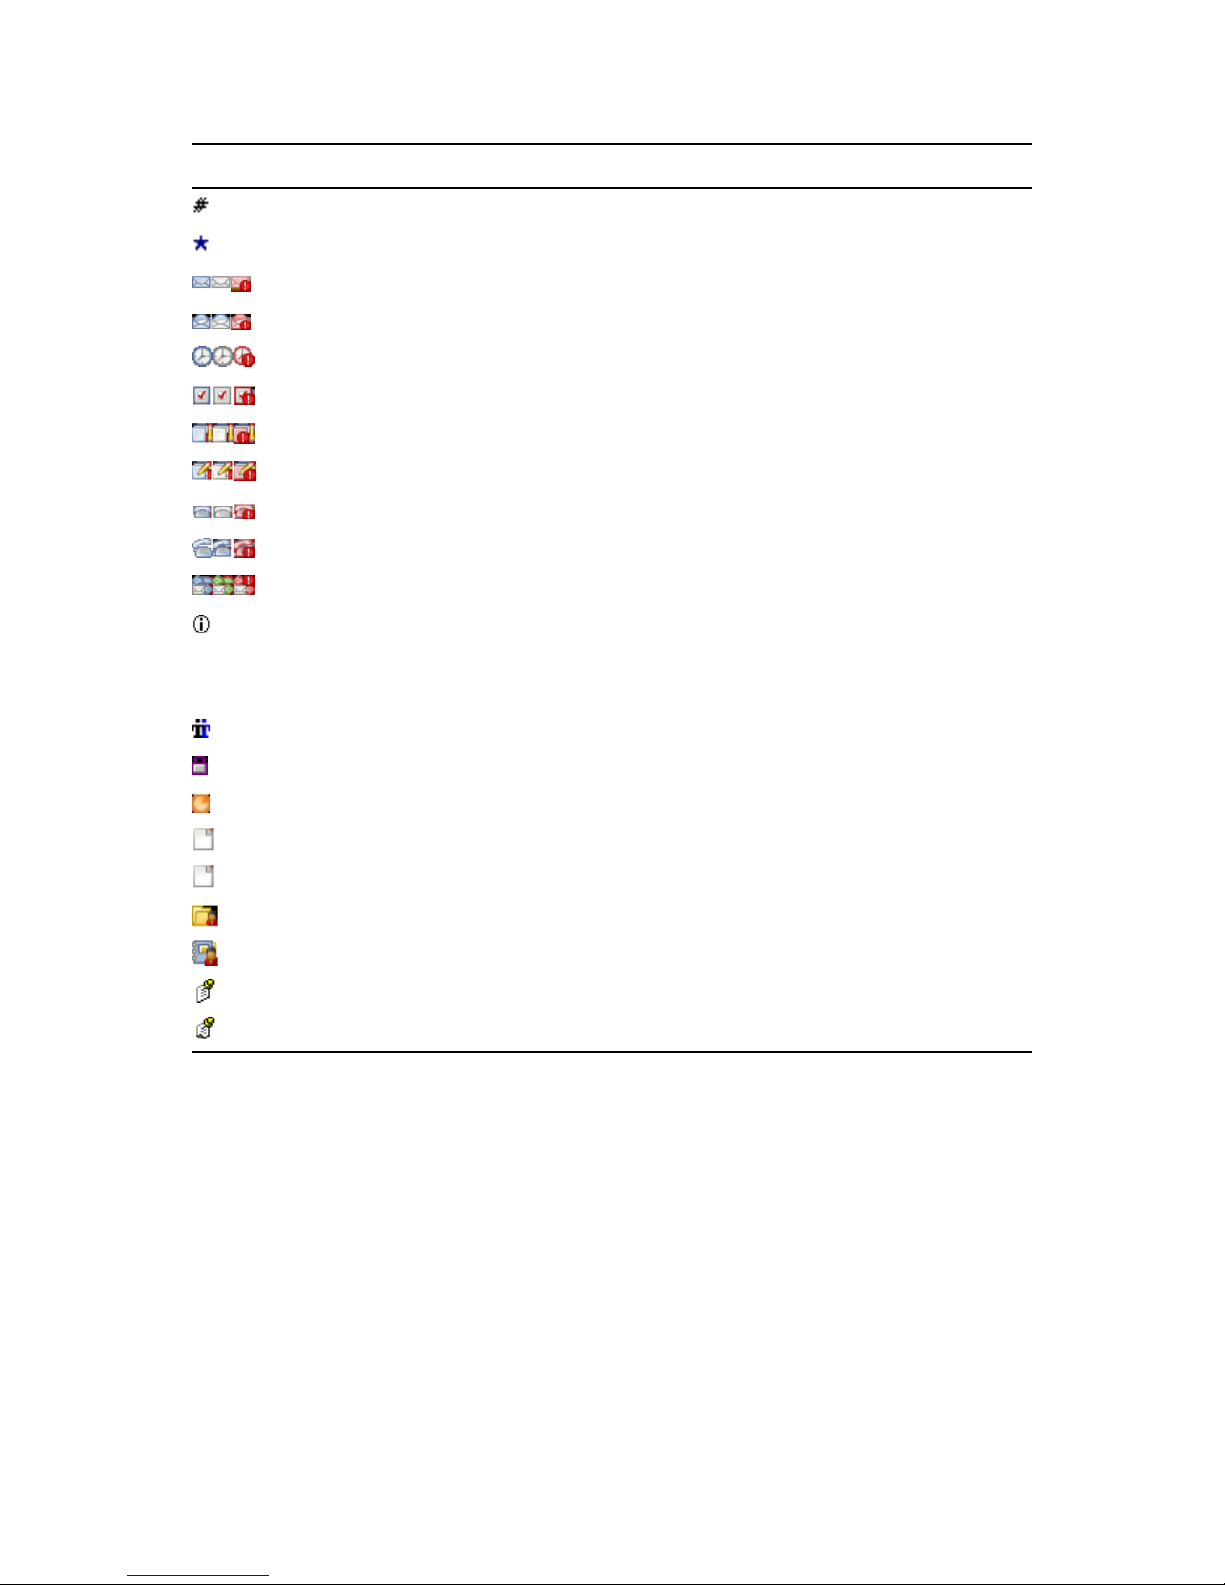
Icon Description
Specific version of a document.
Official version of a document.
Unopened mail message with a low, standard, or high priority.
Opened mail message with a low, standard, or high priority.
Unopened and opened appointment with a low, standard, or high priority.
Unopened and opened task with a low, standard, or high priority.
Unopened reminder note with a low, standard, or high priority.
Opened reminder note with a low, standard, or high priority.
Unopened phone message with a low, standard, or high priority.
Opened phone message with a low, standard, or high priority.
A reply is requested for this low, standard, or high priority item.
novdocx (en) 13 May 2009
In a Busy Search, the icon indicates that you can click a scheduled time next to the
username or resource to display more information about the appointment. However, the user
or resource owner must give you appointment Read rights in the Access List before this icon
appears.
A group appointment, reminder note, or task.
A private Calendar item.
A Calendar item that was declined but not deleted.
Unopened document reference.
Opened document reference.
Shared folder notification.
Shared address book notification.
Unopened posted item (shared folder).
Opened posted item (shared folder).
1.10 Learning More
You can learn more about GroupWise from the following resources:
Section 1.10.1, “Online Help,” on page 29
Section 1.10.2, “GroupWise 8 Documentation Web Page,” on page 30
Section 1.10.3, “GroupWise Cool Solutions Web Community,” on page 30
1.10.1 Online Help
Complete user documentation is available in Help. In the Main Window, click Help > Help Topics,
then use the Contents tab, Index tab, or Search tab to locate the help topics you want.
Getting Started 29
Page 30

1.10.2 GroupWise 8 Documentation Web Page
For a complete set of GroupWise user and GroupWise administration documentation, go to the
GroupWise 8 Documentation Web site (http://www.novell.com/documentation/gw8).
The User Guide is also available in the GroupWise client by clicking Help > User’s Guide.
1.10.3 GroupWise Cool Solutions Web Community
At the Cool Solutions Web site (http://www.novell.com/communities/coolsolutions/gwmag), you’ll
find tips, tricks, feature articles, and answers to frequent questions.
The link is also available in the GroupWise client by clicking Help > Cool Solutions Web
Community.
novdocx (en) 13 May 2009
30 GroupWise 8 Linux/Mac Client User Guide
Page 31

2
Getting Organized
In Getting Started, you learned the basics of the GroupWise® environment. Now, in “Getting
Organized”, you learn how to transform the basic GroupWise environment into an efficient,
customized collaboration environment that suits your personal work style.
Section 2.1, “Customizing the GroupWise Interface,” on page 31
Section 2.2, “Using Categories to Organize Items,” on page 36
Section 2.3, “Using Folders to Organize Your Mailbox,” on page 40
Section 2.4, “Using Panels to Organize Your Home Folder,” on page 52
Section 2.5, “Customizing Other GroupWise Functionality,” on page 55
2.1 Customizing the GroupWise Interface
You can select to customize the look and feel of GroupWise in many different ways.
novdocx (en) 13 May 2009
2
Section 2.1.1, “Selecting a GroupWise Scheme,” on page 31
Section 2.1.2, “Customizing GroupWise Appearance Settings,” on page 32
Section 2.1.3, “Customizing the Main Toolbar,” on page 33
Section 2.1.4, “Setting Your Default Start Folder,” on page 34
Section 2.1.5, “Setting the Default Read/Compose View,” on page 35
Section 2.1.6, “Automatically Reading the Next Item in Your Mailbox,” on page 35
Section 2.1.7, “Changing the GroupWise Interface Font,” on page 35
Section 2.1.8, “Changing the GroupWise Interface Language,” on page 36
2.1.1 Selecting a GroupWise Scheme
You can select from four schemes:
Default: The Default scheme has a new color scheme and displays the Nav Bar, Full Folder
List, the Main Menu, and two columns with panels.
GroupWise 6.5: The GroupWise 6.5 scheme has the Folder List, Main Toolbar, and Item List,
displaying in the old colors.
Simplified: The Simplified scheme has a new color scheme and has the Nav Bar, Simple
Folder List, and two columns with panels.
Custom: The Custom scheme allows you to set the appearance settings however you like. If
you edit one of the predefined schemes, those settings become your Custom scheme.
To select a scheme:
1 Linux: Click Tool s > Options.
Mac: Click GroupWise > Preferences.
2 Click Environment > Appearance.
Getting Organized
31
Page 32
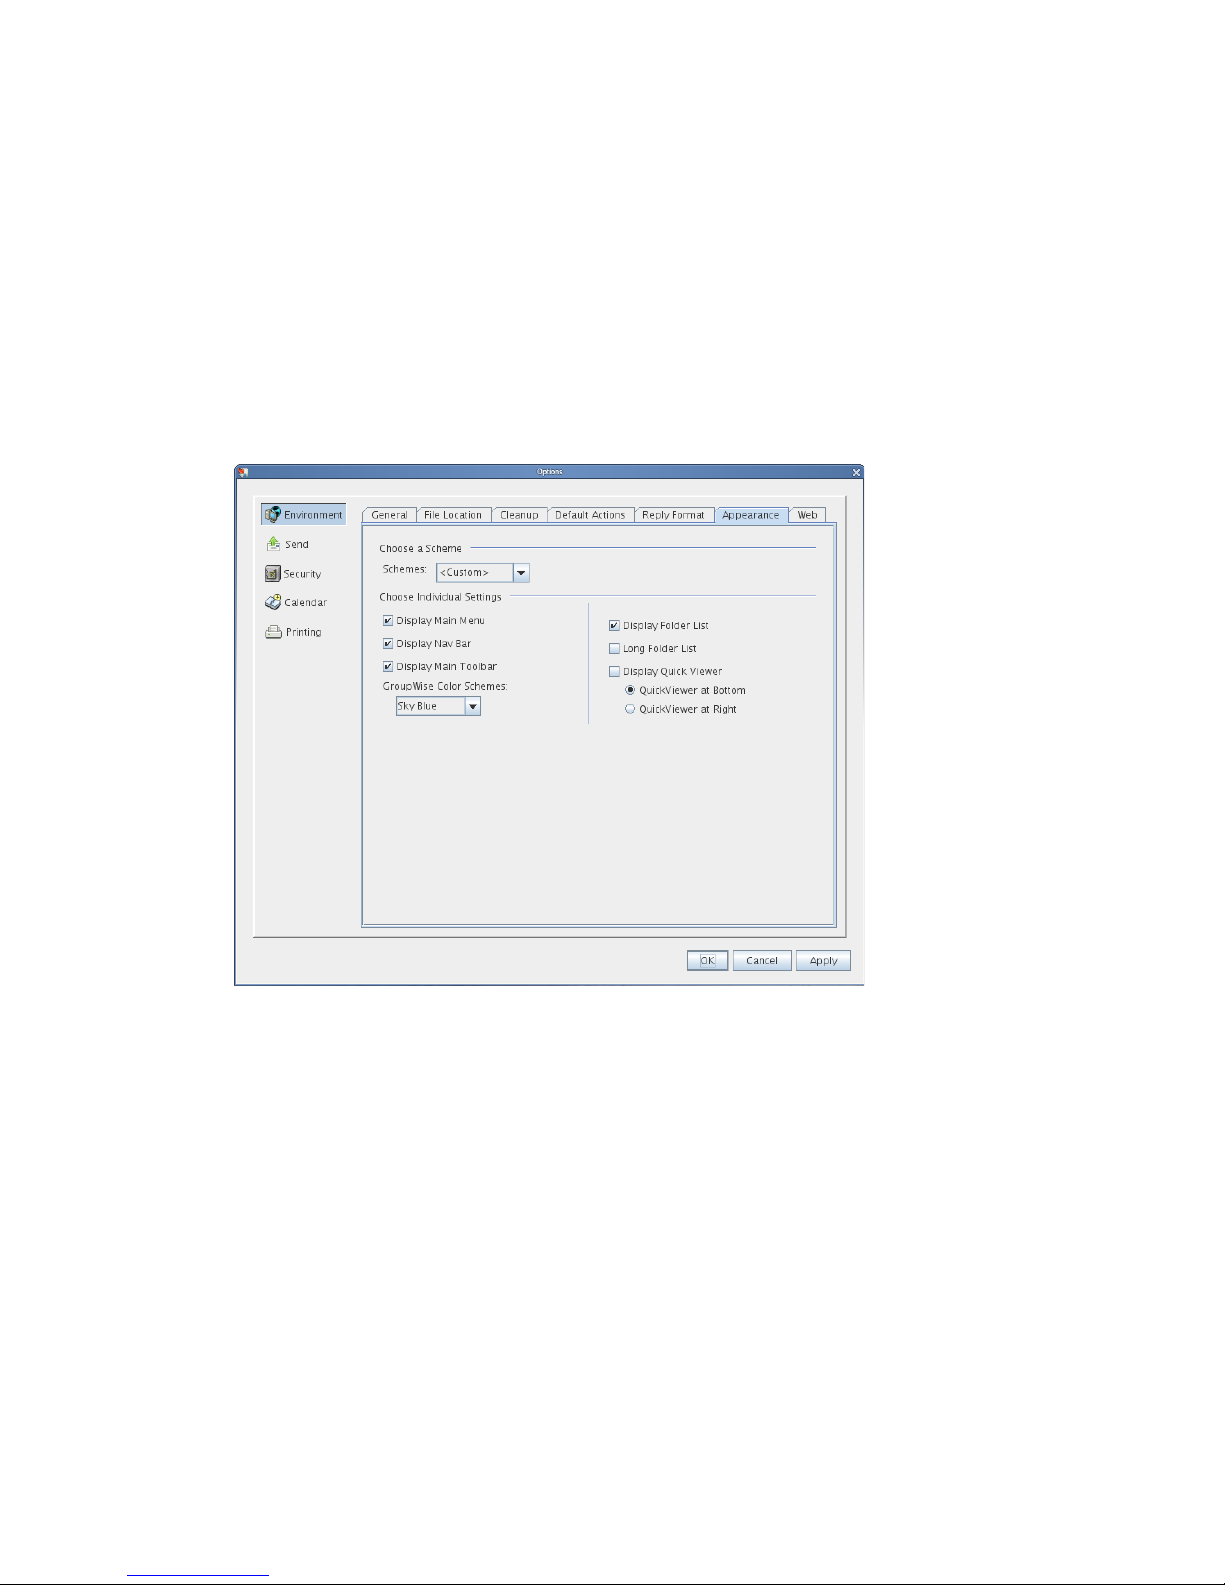
3 Select a scheme from the Schemes drop-down list.
4 Click OK, then click Close.
2.1.2 Customizing GroupWise Appearance Settings
1 Linux: Click Tool s > Options.
Mac: Click GroupWise > Preferences.
2 Click Environment > Appearance.
3 Select Custom.
4 Select the appearance settings you want for GroupWise.
novdocx (en) 13 May 2009
Schemes: See Section 2.1.1, “Selecting a GroupWise Scheme,” on page 31.
Display Main Menu: Displays the Main Menu above the Nav Bar.
Display Nav Bar: Displays the Nav Bar for quick access to your most used folders.
Display Main Toolbar Displays the Main Toolbar for quick access to your most common
functions.
GroupWise Color Schemes: Overrides any operating system color schemes for the selected
GroupWise color scheme.
Use GTK Look and Feel: Use the look and feel of the Linux desktop.
Display Folder List: Displays the Folder List on the left side of the window.
Long Folder List: If the QuickViewer is displayed, select this option to extend the Folder List
to the bottom of the QuickViewer when it is displayed below the Item List rather than to the
right.
Display QuickViewer: Select this option to display the QuickViewer, or leave it deselected to
prevent the QuickViewer from displaying.
32 GroupWise 8 Linux/Mac Client User Guide
Page 33
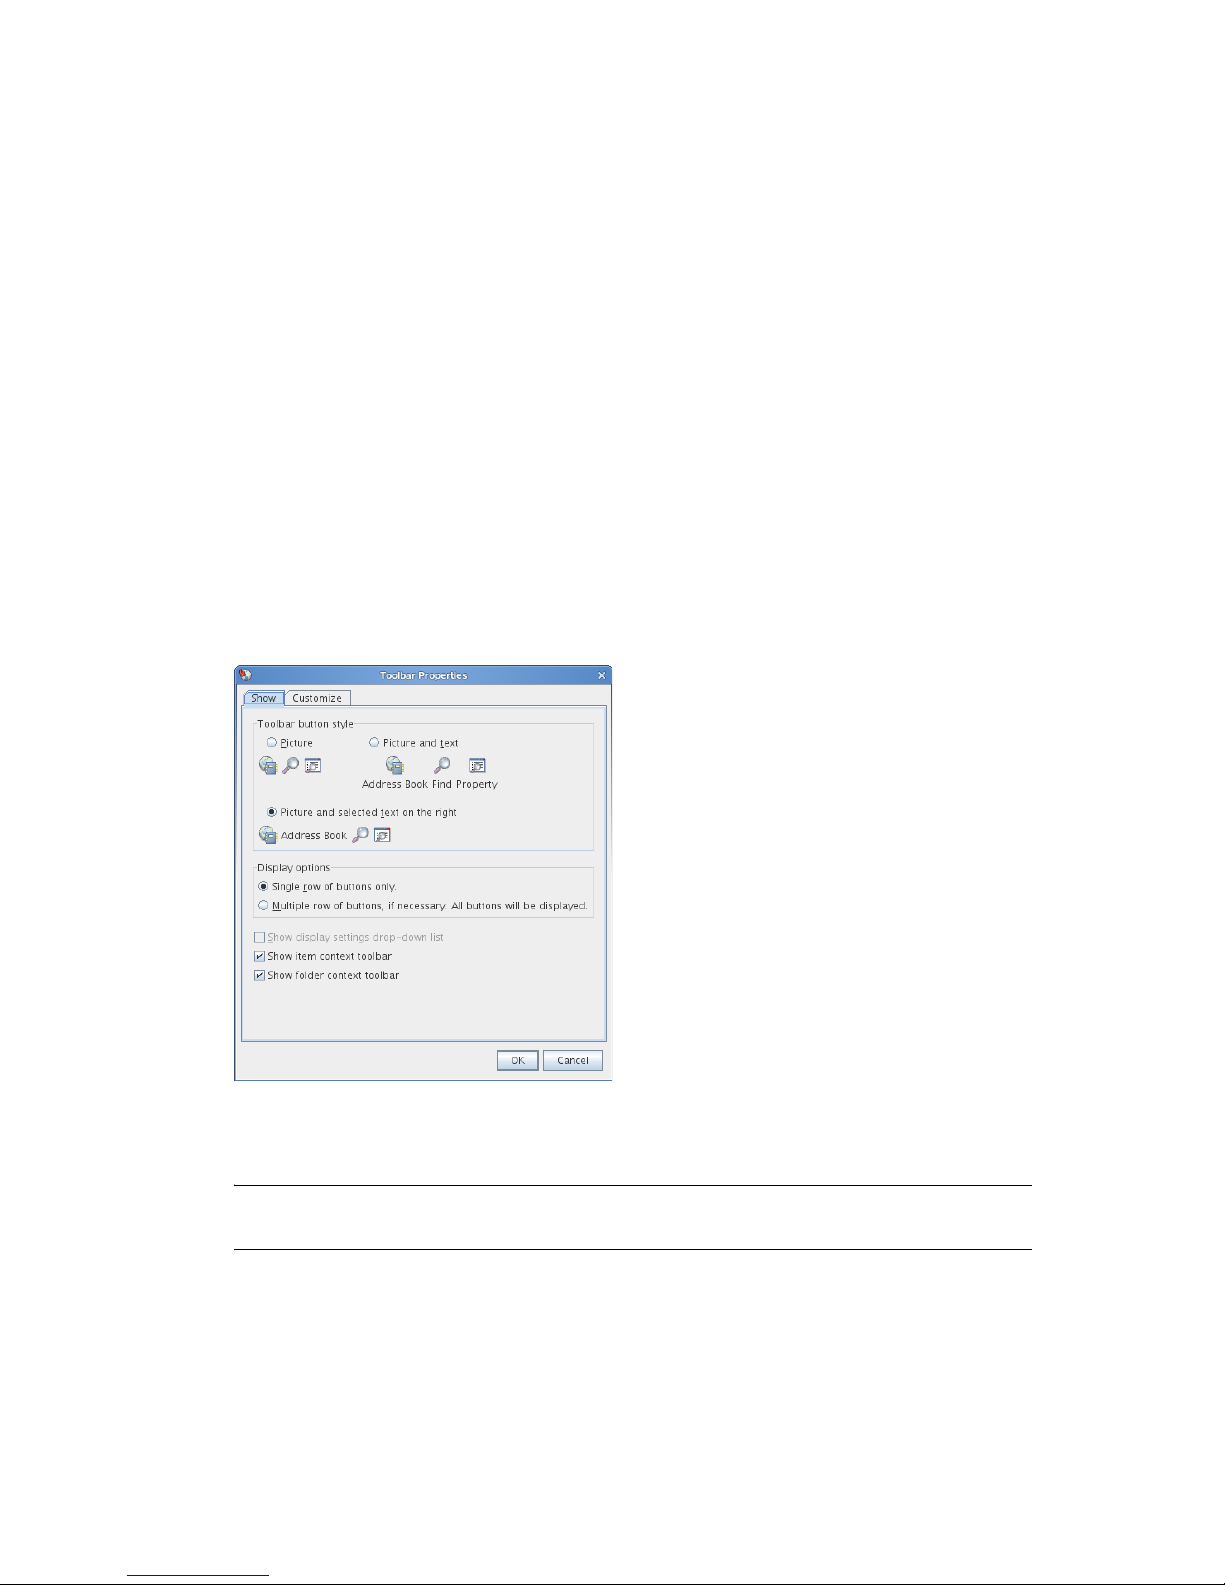
You can also customize individual folders for QuickViewer display. Right-click a folder, then
click Properties > Display. Select or deselect Remember QuickViewer visibility and Show
QuickViewer as needed.
QuickViewer at Bottom: If Display QuickViewer is selected, this option displays the
QuickViewer at the bottom of the window.
QuickViewer at Right If Display QuickViewer is selected, this option displays the
QuickViewer at the right of the window.
5 Click OK.
2.1.3 Customizing the Main Toolbar
You can customize the Main Toolbar by adding and deleting buttons, choosing button order, and
placing separators between buttons.
1 Linux: Right-click the Main Toolbar.
Mac: Control+click the Main Toolbar.
2 Click Customize Toolbar.
3 Click the Show tab.
novdocx (en) 13 May 2009
4 Select whether you want the toolbar to display text with the button pictures.
5 Select if you want a single row of buttons, or multiple rows of buttons if necessary.
NOTE: The Show display settings drop-down list option is dimmed because it is not currently
available in the Linux/Mac client.
In addition to the Main Toolbar, item views also have customizable toolbars.
6 To show the buttons that are most useful for an open item, select Show item context toolbar.
The Tasklist folder and the Trash folder also have customizable toolbars.
7 To show the buttons that are most useful for the Tasklist or Trash folder, select Show folder
context toolbar.
Getting Organized 33
Page 34
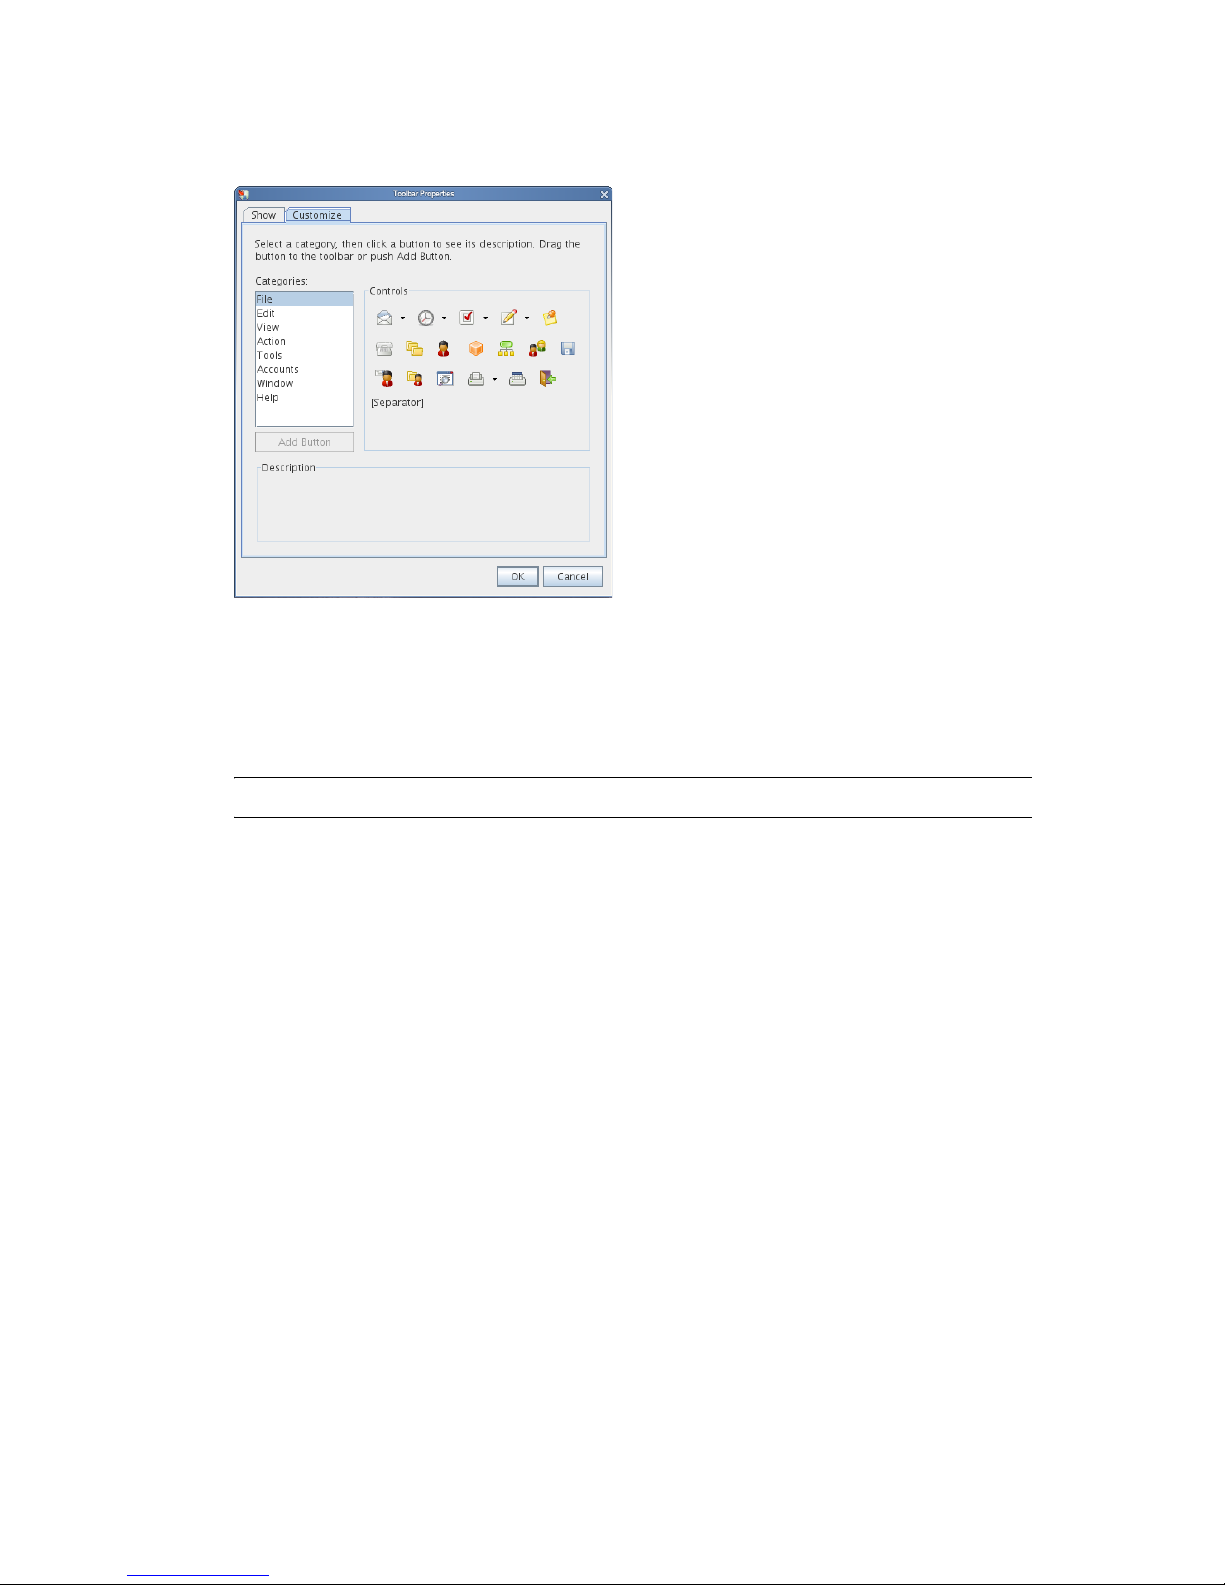
8 Click the Customize tab.
novdocx (en) 13 May 2009
9 To add a button, click a category from the Categories list box, click a button in the Controls
box, then click Add Button.
The categories correspond to menu titles in the Main Window. The buttons in the Controls box
correspond to features found under the menu title. For example, the buttons for the File
category are actions under the File menu (opening views, printing, saving, and so on).
TIP: You must keep the Customize tab open as you perform the following steps.
10 To remove a button, drag it off the toolbar.
11 To change the order of a button on a toolbar, drag it to where you want it to display.
12 To add or remove space between buttons, drag one button away from or toward the other
button.
13 Click OK.
2.1.4 Setting Your Default Start Folder
By default, GroupWise displays your Mailbox folder. After you set up your Home folder, you might
prefer to start in your Home folder instead.
To change the view for all items:
1 Linux: Click Tool s > Options.
Mac: Click GroupWise > Preferences.
2 Click Environment > Default Actions.
3 Select if you want to start GroupWise in the Mailbox folder or Home folder.
4 Click OK.
34 GroupWise 8 Linux/Mac Client User Guide
Page 35

2.1.5 Setting the Default Read/Compose View
Be default, GroupWise uses HTML as the default Read View and Compose View. You might prefer
to use the Plain Text view instead.
1 Linux: Click Tool s > Options.
Mac: Click GroupWise > Preferences.
2 Click Environment > General.
3 Make selections in the Default Compose View & Font and Default Read View & Font group
boxes.
HTML-only messages are displayed in HTML, even though you have selected Plain Text for
the default read view.
4 Select a default font style.
5 Select a default font size.
6 Click OK.
To change the view in one item:
novdocx (en) 13 May 2009
1 Open an item.
2 Click View, then click Plain Text or HTML.
2.1.6 Automatically Reading the Next Item in Your Mailbox
You can configure GroupWise to automatically open the next item in your mailbox after you accept,
decline, or delete the item you are reading. By default, this option is disabled.
1 Linux: Click Tool s > Options.
Mac: Click GroupWise > Preferences.
2 Click Environment > General.
3 Select Read next after accept, decline or delete, then click OK.
2.1.7 Changing the GroupWise Interface Font
You can change the font for the GroupWise interface. This is helpful, for example, if you are
visually impaired and need a larger or easier-to-read interface font, or if you just find another font
more attractive than the default.
NOTE: You must restart GroupWise after changing the interface font for your changes to take
effect.
1 Linux: Click Tool s > Options.
Mac: Click GroupWise > Preferences.
2 Click Environment > General.
3 Select a font and font size in the Interface Font drop-down lists, then click OK.
4 Restart GroupWise.
To return to the default font, select the blank font and font size at the top of the lists.
Getting Organized 35
Page 36

2.1.8 Changing the GroupWise Interface Language
If you have the multilanguage version of GroupWise, you can select the interface language.
1 Linux: Click Tool s > Options.
Mac: Click GroupWise > Preferences.
2 Click Environment > General.
3 Select a language in the Interface Language drop-down list, then click OK.
TIP: To change the Spell Checker language, see “Selecting the Spell Checker Language” on
page 69.
2.2 Using Categories to Organize Items
Categories provide you with a way to organize your items. You can assign a category to any item,
including contacts. You create and add categories and can give each category an identifying color.
The colors display in the Item List and in the Calendar.
novdocx (en) 13 May 2009
Section 2.2.1, “Understanding Categories,” on page 36
Section 2.2.2, “Assigning Categories to Items,” on page 36
Section 2.2.3, “Working with Categories,” on page 38
2.2.1 Understanding Categories
When you assign a category to an item, the item is displayed in the color of the category. Categories
help you to quickly organize items in groups.
The following figures illustrate how categories display in the message list and in the calendar.
You can assign more than one category to an item, and specify which category is the primary one.
The color of the primary category is used to identify the item.
Four default categories (Follow-Up, Low Priority, Personal, and Urgent) are available for you to
immediately assign to items. You can modify and delete them if you choose, as well as continue to
create new categories.
If you assign one of the default categories (Follow-Up, Low Priority, Personal, and Urgent) to an
item you are sending, the item arrives in the recipient’s Mailbox with that category assigned. If you
assign a category that you created to an item you are sending, the item arrives in the recipient’s
Mailbox with no category assigned.
2.2.2 Assigning Categories to Items
“Assigning a Category Quickly” on page 37
“Assigning Any Category to Any Item Type” on page 37
“Assigning a Category Using Item Properties” on page 37
“Assigning Multiple Categories” on page 38
“Removing a Category from an Item” on page 38
36 GroupWise 8 Linux/Mac Client User Guide
Page 37

Assigning a Category Quickly
In any Item List:
1 Click the item icon.
2 Click a category in the drop-down list.
The 10 most recently used categories are listed. (If you have not yet used categories, they are
displayed alphabetically.)
Assigning Any Category to Any Item Type
To assign a category to a message, appointment, task, note, or contact:
1 Linux: Right-click the item.
Mac: Control+click the item.
2 Click Categories.
3 Click a category in the drop-down list.
or
If the category you want isn’t listed, click More to display the Edit Categories dialog box, select
the category, then click OK.
novdocx (en) 13 May 2009
To assign a category to an address book entry:
1 Open a personal address book.
2 Locate the user you want.
3 Linux: Right-click the user.
Mac: Control+click the user.
4 Click Details, then click Categories.
5 Click a category in the drop-down list.
or
If the category you want isn’t listed, click More to display the Edit Categories dialog box, select
the category, then click OK.
Assigning a Category Using Item Properties
1 Open an existing item, click the Personalize tab, then click Edit Categories.
or
Open a new item to compose, click the Send Options tab, then click Edit Categories.
Getting Organized 37
Page 38
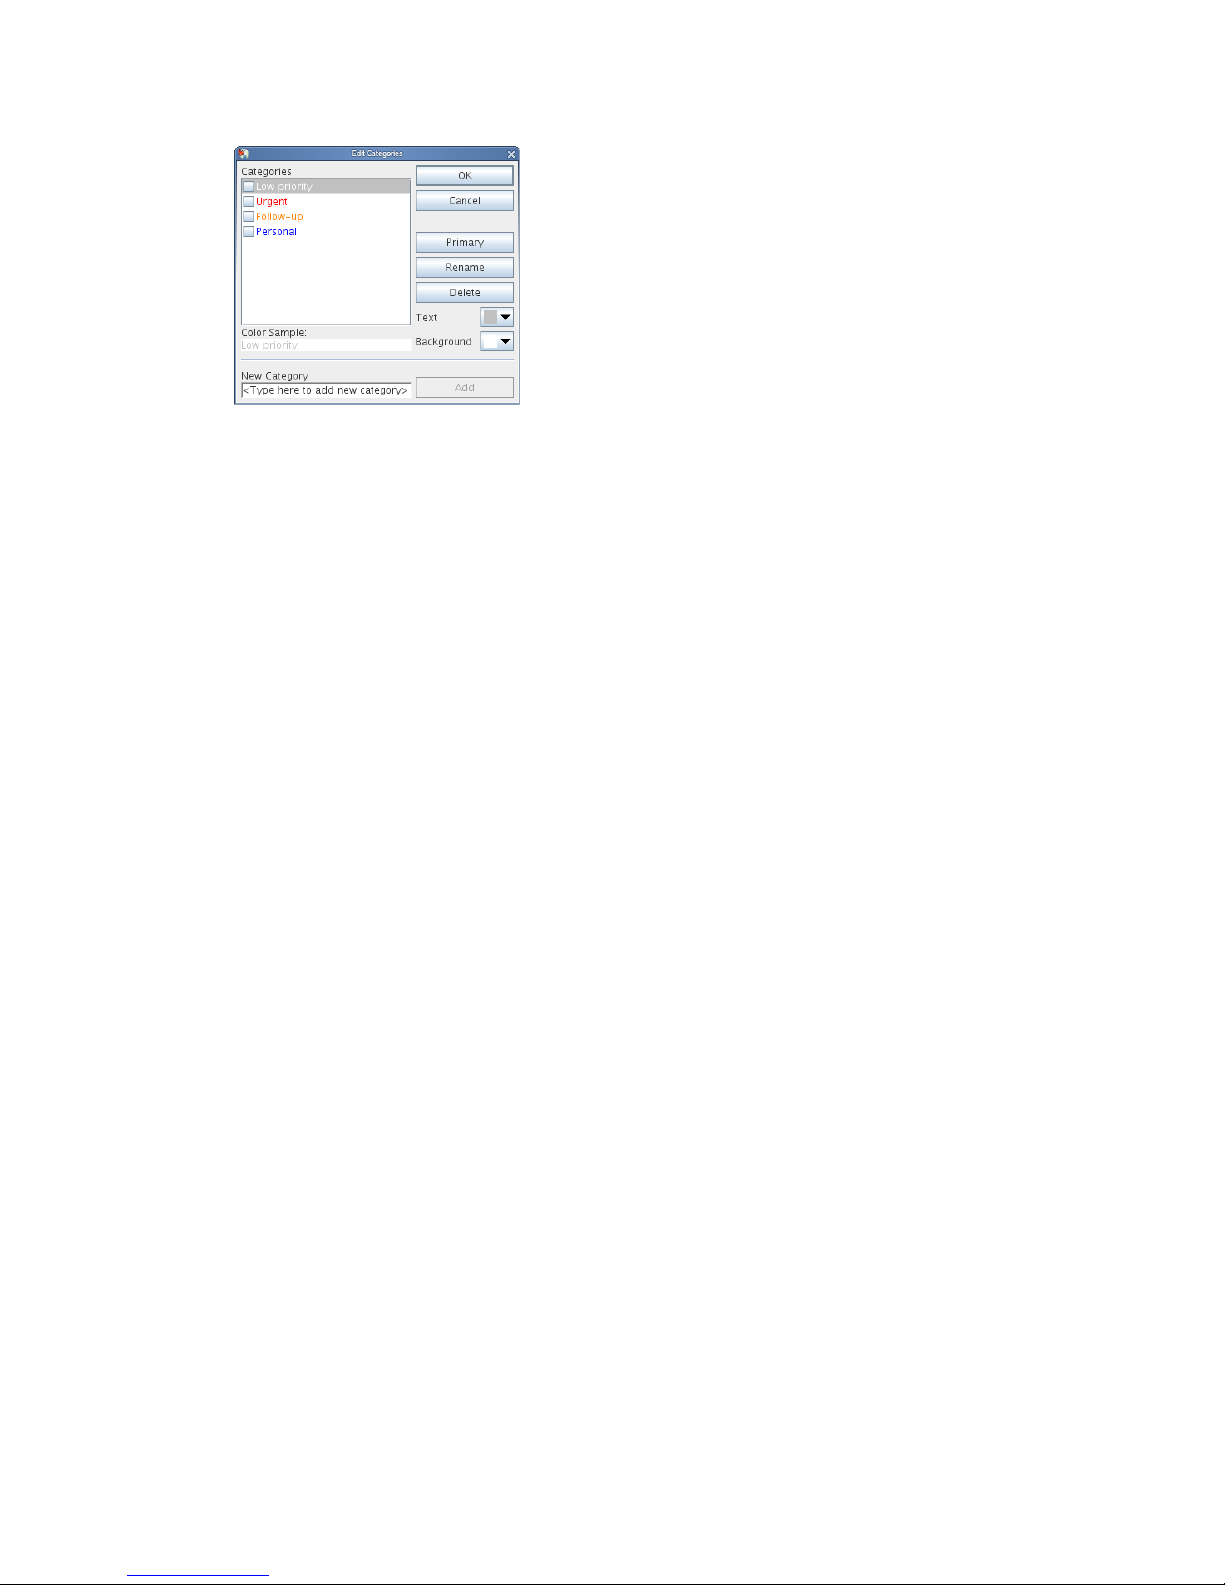
If you assign one of the default categories (Follow-Up, Low Priority, Personal, and Urgent) to
an item you are sending, the item arrives in the recipient’s Mailbox with that category assigned.
If you assign a category that you created to an item you are sending, the item arrives in the
recipient’s Mailbox with no category assigned.
2 In the Edit Categories dialog box, select a category, then click OK.
Assigning Multiple Categories
novdocx (en) 13 May 2009
1 Linux: Right-click the item.
Mac: Control+click the item.
2 Click Categories > More to display the Edit Categories dialog box.
3 Select the desired categories.
When you assign multiple categories to an item, the color of the primary category is the color
that shows in the Item List. When you sort the Item List by category, items are sorted by the
primary category. By default, the first category you assign is the primary category.
4 To set the primary category for this item, select a category, then click Primary.
5 Click OK.
Removing a Category from an Item
1 Linux: Right-click the item.
Mac: Control+click the item.
2 Click Categories > More. to display the Edit Categories dialog box
3 Deselect the category to remove, then click OK.
The category is removed from the item.
2.2.3 Working with Categories
“Adding a New Category” on page 39
“Renaming a Category” on page 39
“Finding Items by Category in a Folder” on page 39
“Finding Items by Category throughout Your Mailbox” on page 39
“Sorting Items by Category” on page 40
“Deleting a Category” on page 40
38 GroupWise 8 Linux/Mac Client User Guide
Page 39
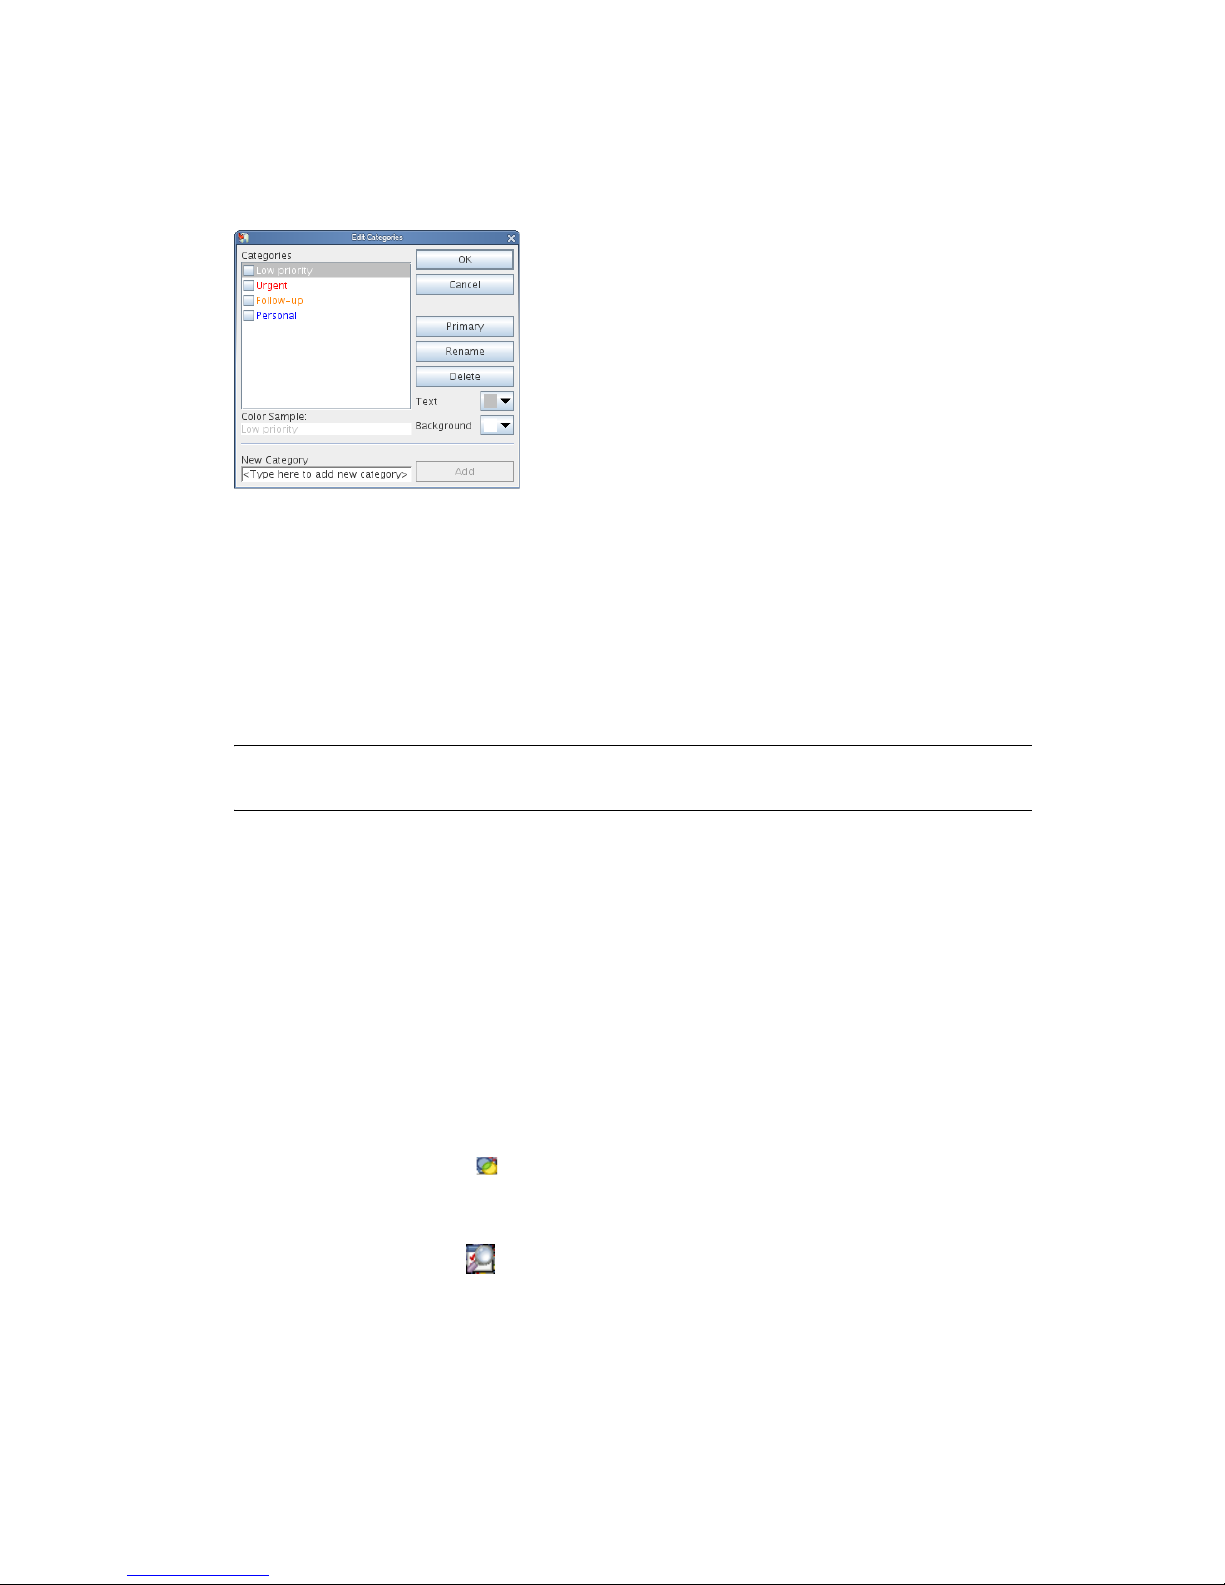
Adding a New Category
1 Click Actions > Categories > More to display the Edit Categories dialog box.
2 Type the category name in the New Category field at the bottom of the Edit Categories dialog
box.
3 Click Add.
The Add button becomes active when you begin typing a category name.
4 To assign a color to a category, select the category name in the list, then select the text and
background colors.
5 Click OK to save the new category.
novdocx (en) 13 May 2009
TIP: You can also select an item before creating the new category, then immediately assign the
new category to the selected item.
Renaming a Category
1 Display the Edit Categories dialog box.
2 Select the category name, then click Rename.
3 Type the new name, then click OK.
The category is renamed in the list, and for all the items to which it was assigned.
Finding Items by Category in a Folder
1 In the upper right corner of any folder, click Find > Categories, then click the category name.
All items that have been assigned this category are displayed.
2 To clear this selection, click .
Finding Items by Category throughout Your Mailbox
1 On the Main Toolbar, click .
2 Select search criteria as needed.
3 Click Advanced Find.
4 Select Category in the drop-down list, select a category name, then click OK to set the
Advanced Find options.
Getting Organized 39
Page 40

5 Click OK.
All items of the selected category that meet the other selected search criteria are listed.
Sorting Items by Category
1 Add a Category column to the folder Item List, as described in “Adding a Column” on page 44.
2 Click the Category column to sort the Item List by category.
Deleting a Category
1 Display the Edit Categories dialog box.
2 Select the category name, then click Delete.
3 Click Ye s, then click OK.
The category is removed from the list, and from all the items to which it was assigned.
2.3 Using Folders to Organize Your Mailbox
novdocx (en) 13 May 2009
Use folders to store and organize your items. For example, you can group all items related to a
particular task or subject together.
Section 2.3.1, “Understanding Folders,” on page 40
Section 2.3.2, “Displaying the Folder List,” on page 41
Section 2.3.3, “Working with Folders,” on page 41
Section 2.3.4, “Managing Item Lists in Folders,” on page 42
Section 2.3.5, “Customizing Folder Display Settings,” on page 45
Section 2.3.6, “Using Shared Folders,” on page 48
Section 2.3.7, “Using Find Results Folders,” on page 51
2.3.1 Understanding Folders
All folders are subfolders of your Home folder. Click + and - to expand and collapse folders. For
information about the individual folders you might have in your Folder List, see the Section 1.5,
“Exploring the Folder List,” on page 21.
Next to any folder (except for shared folders), the number of unread items is shown in square
brackets. Next to the Sent Items folder, the number in square brackets shows how many items are
pending to be sent from Caching mode.
You can organize items in your folders by moving or linking them. When you move an item into a
folder, it is taken from one location and placed in another. When you link an item to a folder, the
item still exists in its original folder and it also appears in the new folder. When you change a linked
item, it is also changed in the other folders. If an item is linked to multiple folders and you delete the
original item, the copies in your other folders remain.
You can define a different set of properties for each folder in your Mailbox. For example, you can
sort the items in one folder by date, and sort the items in another folder by company.
40 GroupWise 8 Linux/Mac Client User Guide
Page 41
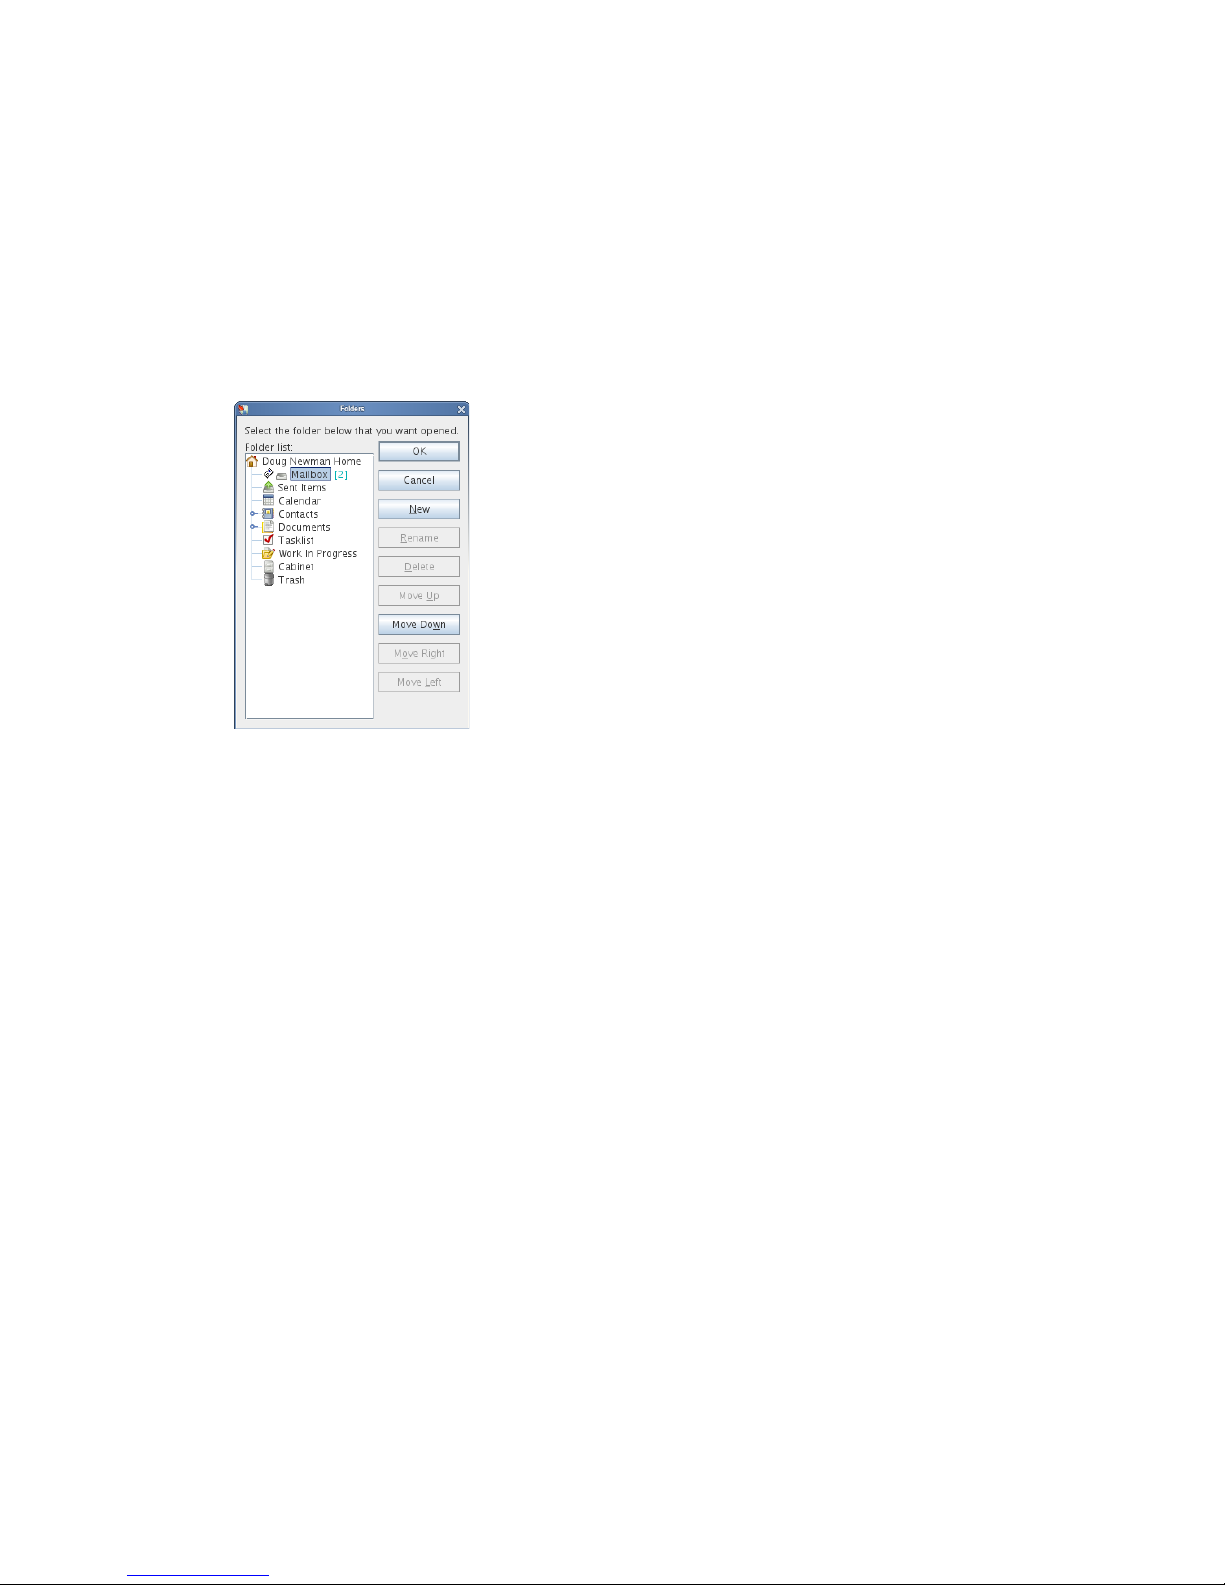
2.3.2 Displaying the Folder List
“Reorganizing Your Folders” on page 41
“Alphabetizing the Folder List” on page 41
“Closing the Folder List” on page 41
Reorganizing Your Folders
1 Click Edit > Folders.
novdocx (en) 13 May 2009
Use the options in the Folders dialog box to create, delete, rename, and move folders.
Alphabetizing the Folder List
1 Linux: Right-click the Home folder or any other folder.
Mac: Control+click the Home folder or any other folder.
2 Click Sort Subfolders.
Closing the Folder List
You can also close your Folder List to leave more room for other views, such as the Calendar, in the
Main Window. This is convenient when you access your folders through the Nav Bar. To hide or
show the Folder List, click View > Folder List.
If you are not displaying your Folder List and you drag and drop an item to where the folder location
is, the Folder List pops out so you can drag and drop the item to the Folder List.
2.3.3 Working with Folders
“Creating a Personal Folder” on page 42
“Moving a Folder” on page 42
“Renaming a Folder” on page 42
“Deleting a Folder” on page 42
Getting Organized 41
Page 42

Creating a Personal Folder
1 In the Folder List, click File > New > Folder.
2 Make sure Personal folder is selected, then click Next.
3 Type the name and description for the new folder.
4 Click Up, Down, Right, or Left to position the folder where you want it in the Folder List, then
click Next.
5 Specify the display settings for the folder, as described in Section 2.3.5, “Customizing Folder
Display Settings,” on page 45, then click Finish.
Moving a Folder
1 Drag and drop the folder to the desired location in your folder structure.
See also “Reorganizing Your Folders” on page 41.
Renaming a Folder
1 Linux: Right-click the folder.
Mac: Control+click the folder.
2 Click Rename.
novdocx (en) 13 May 2009
3 Type a new name for the folder, then press Enter.
You cannot rename the Calendar, Documents, Mailbox, Sent Items, Tasklist, Contacts, Cabinet,
Work In Progress, or Trash folders.
Deleting a Folder
1 Linux: Right-click the folder you want to delete.
Mac: Control+click the folder you want to delete.
2 Click Delete.
3 Select Items only or Folder(s) and items, then click OK.
You cannot delete the Calendar, Documents, Mailbox, Sent Items, Tasklist, Contacts, Cabinet, Work
In Progress, or Trash folders. You can delete the Junk Mail folder only if Junk Mail Handling has
been disabled.
2.3.4 Managing Item Lists in Folders
“Enabling Group Labels” on page 43
“Enabling Message Previews” on page 43
“Using Columns” on page 43
“Moving or Linking an Item to Another Folder” on page 44
“Changing the Item Read Options” on page 45
42 GroupWise 8 Linux/Mac Client User Guide
Page 43

Enabling Group Labels
You can sort the messages in a folder into groups by using Group Labels. Group Labels group the
messages according to the column that is being sorted. For example, the message list default sort is
by the date, so the Group Label default is also by date. Messages are sorted by the day they are
received. You can set a Group Label for each folder.
1 Linux: Right-click the folder.
Mac: Control+click the folder.
2 Click Properties.
3 Click the Display tab.
4 Select Show Group Labels.
5 Click OK.
To collapse or expand Group Labels, click the + or - sign next to the label.
Enabling Message Previews
You can display a message preview of the messages in the message list which shows up to 2 lines of
the message. When you select to display a message preview, the first few lines are displayed under
the message in the message list.
novdocx (en) 13 May 2009
1 Linux: Right-click the folder.
Mac: Control+click the folder.
2 Click Properties.
3 Click the Display tab.
4 Select Message Preview.
5 Click OK.
Using Columns
The Item List in a folder is divided into columns. Each column displays information about the items
in the list. For example, different columns display the subject of items, the date they were sent, and
so forth. You can customize the column display for each folder.
“Moving a Column” on page 43
“Resizing a Column” on page 43
“Adding a Column” on page 44
“Sorting by a Column” on page 44
“Removing a Column” on page 44
Moving a Column
Drag a column to a new position in the column header.
Resizing a Column
Drag the edge of the column heading to make the column wider or narrower.
Getting Organized 43
Page 44

Adding a Column
1 Linux: Right-click the column header.
Mac: Control+click the column header.
2 Click a column to add.
or
Click More Columns.
2a In the Available columns list, select one or more columns, then click Add.
2b Use Up and Down to position the new columns relative to the existing columns.
2c Click OK.
Sorting by a Column
1 Linux: Right-click the folder containing the items you want to sort.
Mac: Control+click the folder containing the items you want to sort.
2 Click Properties > Display.
3 Select the item type you want to sort in the Setting Name drop-down list.
4 Click the item property you want to sort by in the Sort by drop-down list.
novdocx (en) 13 May 2009
5 In the Sort order drop-down, click Ascending to sort from A to Z.
or
Click Descending to sort from Z to A.
6 Click OK.
Removing a Column
Drag the column heading off the column header bar.
Moving or Linking an Item to Another Folder
1 Drag an item from the Item List to the folder you want.
Linux:
Press Alt while you drag the item to remove it from all folders it was previously linked to and
place it in only that folder.
Press Ctrl while you drag the item to link it to that folder.
Mac:
Press Command while you drag the item to remove it from all folders it was previously linked
to and place it in only that folder.
Press Option while you drag the item to link it to that folder.
or
Use menu options to perform the same task:
1a Select an item, then click Edit > Move/Link to Folders
44 GroupWise 8 Linux/Mac Client User Guide
Page 45

1b Select the folders you want to move or link the item to, then click Move or Link.
1c Select Delete old links to remove the item from all folders it was previously linked to and
place it in the selected folder.
If you delete the original item, the copies in your other folders remain.
Changing the Item Read Options
You can select to have the folder display either the first unread item or to the last item read.
However, if the folder contains a large number of items, it could take a while for the contents of the
folder to display.
To select the default read option for the folder:
1 Linux: Right-click the folder to modify.
Mac: Control+click the folder to modify.
2 Click Properties.
3 On the General tab, select Select newest unread item when folder is opened.
If you deselect Select newest unread item when folder is opened, the folder displays the last
item read.
4 Click OK.
novdocx (en) 13 May 2009
2.3.5 Customizing Folder Display Settings
Display settings determine how GroupWise displays the information in a particular folder. For
example, the Home folder has a default display setting that includes the Folder List and panels.
These settings are saved in the GroupWise database so they follow you from machine to machine.
You can select from a list of default preconfigured display settings or customize your own display
settings.
“Understanding Basic Folder Display Settings” on page 45
“Changing or Deleting Folder Display Settings” on page 48
Understanding Basic Folder Display Settings
You can view the items in any folder different ways, depending on how you want the information
organized.
1 Linux: Right-click the folder to modify.
Mac: Control+click the folder to modify.
2 Click Properties.
3 Click the Display tab.
4 Select the display setting from the View By drop-down list.
You can select from the following settings:
Calendar
Tasklist
Discussion Thread
Getting Organized 45
Page 46
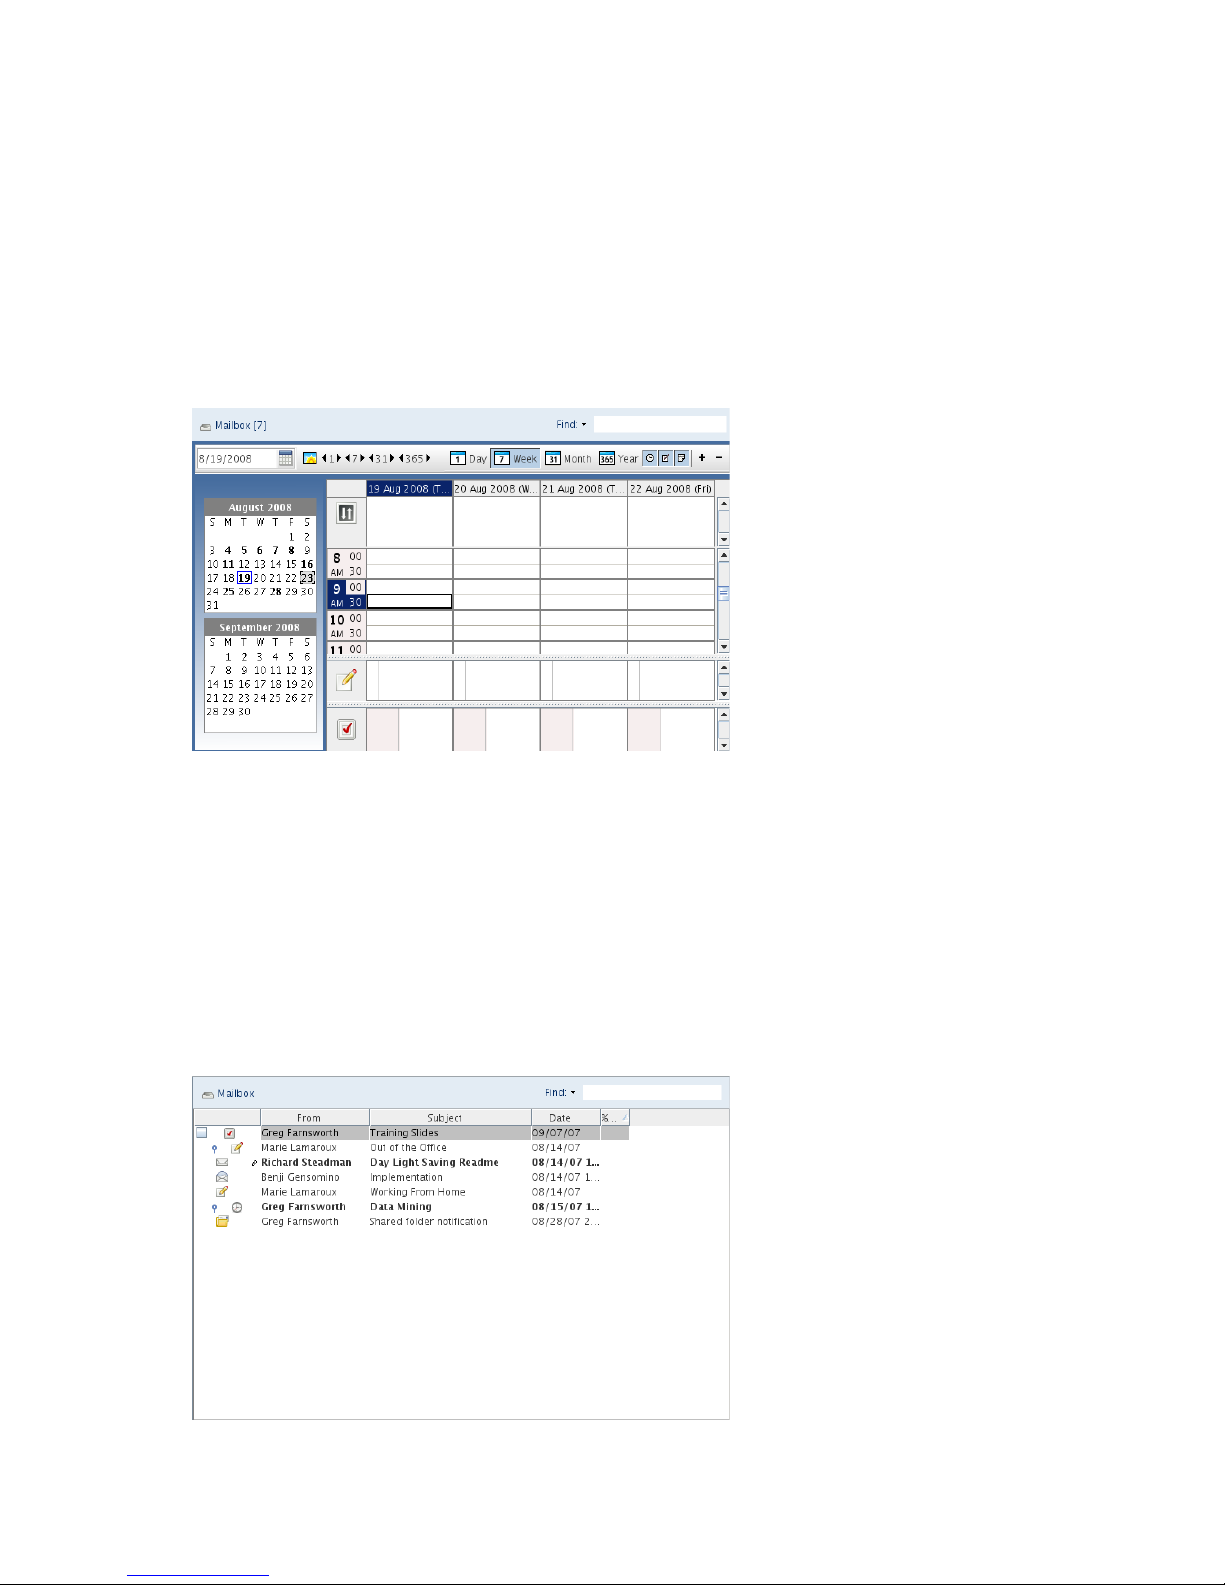
Details
Panels
5 Click OK.
Calendar
The As Calendar view displays all scheduled items that are saved in a particular folder. This is
useful if you organize all your appointments and other items for a specific project in one folder.
Figure 2-1 Calendar View
novdocx (en) 13 May 2009
Ta sk li s t
The As Tasklist view displays a Tasklist area at the top of your Item List where you can create a
Tasklist from items in your Item List. Each item that is dragged to the Tasklist area displays with a
check box so that you can mark it completed. You can assign due dates, priorities, and more to
Tasklist items. Any items you move to the Tasklist area also display in the Tasklist folder in the
Folder List.
For more information about creating a Tasklist, see Section 5.4, “Using the Tasklist Folder,” on
page 125.
Figure 2-2 Tasklist View
46 GroupWise 8 Linux/Mac Client User Guide
Page 47
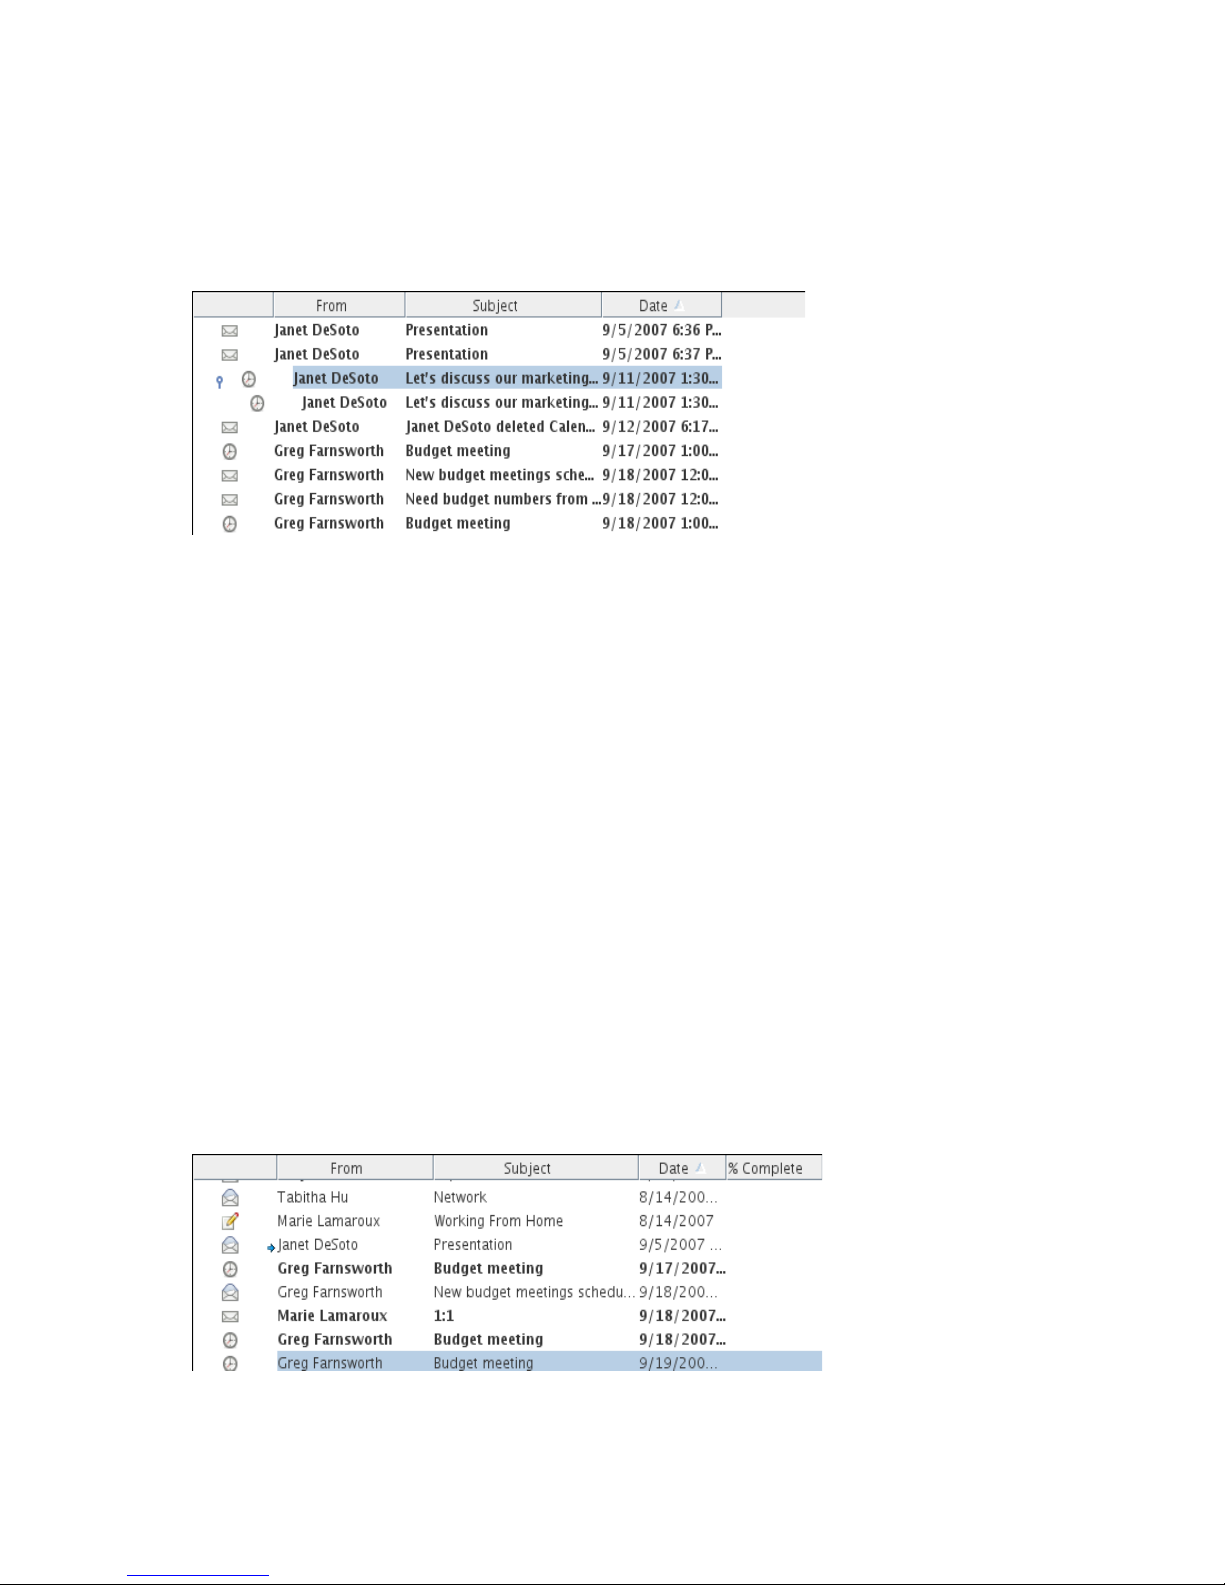
Discussion Thread
Discussion Threads shows the e-mail discussion of an original item and all its replies grouped in
hierarchical order. By default, only items that are received are displayed in a discussion thread.
Figure 2-3 Discussion Threads View
By default, only items that are in the folder are displayed in a discussion thread. You can add other
types of items to the folder to be viewed in the discussion thread. For example, sent items can be
added to the folder to complete the discussion thread.
novdocx (en) 13 May 2009
To display sent items in a discussion thread:
1 Linux: Right-click the folder that is displaying discussion threads.
Mac: Control+click the folder that is displaying discussion threads.
2 Click Properties.
3 Click the Display tab, then click More Display Settings.
4 Select Sent under Choose item source.
5 Click OK twice, then specify a name for the display setting.
6 Click OK.
Details
Details displays a list of your items and information about them organized in columns, including
Subject, Date, CC, Priority, Document Type, Due Date, Size, Version#, and many other item
properties. Details is the default view for most folders. For information about adding or rearranging
columns, see “Using Columns” on page 43.
Figure 2-4 Details View
Getting Organized 47
Page 48
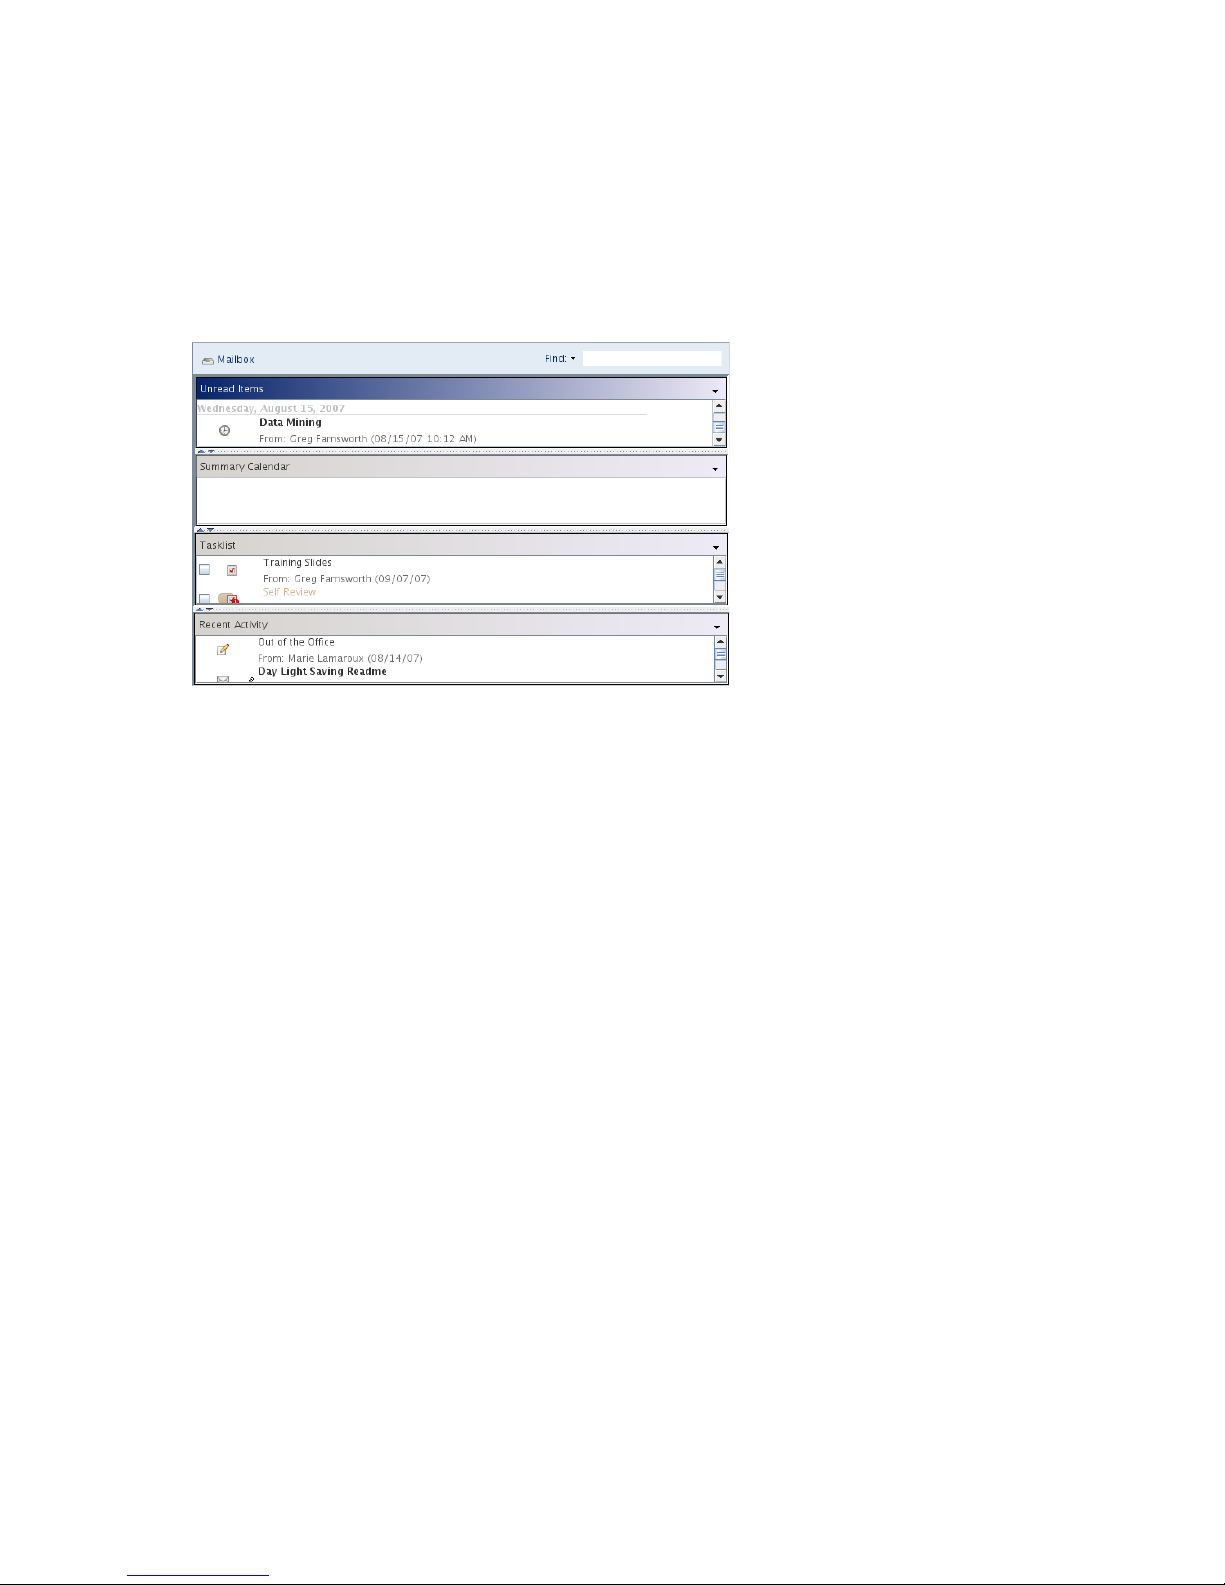
Panels
A panel displays a customized view of information in GroupWise. For example, the default Home
folder includes an Unread Messages panel, which displays a list of items you have not read. The
Tasklist panel is another default panel on the Home folder. The Tasklist panel displays items that are
in your Tasklist folder.
Figure 2-5 Panels
novdocx (en) 13 May 2009
Changing or Deleting Folder Display Settings
You can control the name that appears in the Display drop-down list, the source of the items in the
folder, the column display, and the order in which items sort in the folder. The display settings are
set at the folder level. If you want to use the same display settings for multiple folders, save the
display settings, then use that display setting for the other folders.
1 Linux: Right-click any folder.
Mac: Control+click any folder.
2 Click Properties.
3 Click the Display tab.
4 Click the display setting you want to modify in the Setting name drop-down list.
5 Make any changes to the display settings in the dialog box.
6 Click Save As, change the display settings name as required, then click OK.
The new display settings name is added to the Setting name drop-down list for selection on
other folders.
7 To delete a folder display setting, click the display setting, then click Delete.
8 Click OK.
2.3.6 Using Shared Folders
“Understanding Shared Folders” on page 49
“Sharing an Existing Folder with Other Users” on page 49
“Creating and Sharing a New Folder” on page 49
48 GroupWise 8 Linux/Mac Client User Guide
Page 49

“Accepting Shared Folders” on page 50
“Posting an Item to a Shared Folder” on page 50
“Viewing Discussion Threads in a Shared Folder” on page 50
“Deleting a Shared Folder” on page 51
Understanding Shared Folders
A shared folder is like any other folder in your Cabinet, except other people have access to it and it
appears in their Cabinets. You can create shared folders or share existing personal folders in your
Cabinet. You choose whom to share the folder with, and what rights to grant each user. Then, users
can post messages to the shared folder, drag existing items into the folder, and create discussion
threads. You can’t share system folders, which include the Calendar, Documents, Mailbox, Sent
Items, Tasklist, Contacts, Cabinet, Work In Progress, Junk Mail Handling, and Trash folders.
If you place a document in a shared folder, people with rights to the shared folder don’t
automatically have rights to edit the document. Before they can edit the document, you must give
them Edit rights on the Document Sharing tab.
You can share personal folders with other users. Recipients of the shared folder receive a
notification explaining that you have shared the folder with them. They can then accept the folder or
decline the folder.
novdocx (en) 13 May 2009
Sharing an Existing Folder with Other Users
1 Linux: Right-click the folder you want to share.
Mac: Control+click the folder you want to share.
2 Click Sharing.
3 Click Shared with.
4 In the Name field, start typing the name of a user, or click the Address Book button to select the
user from the Address Selector dialog box.
5 When the user’s name appears in the field, click Add User to move the user into the Share list.
6 Click the user’s name in the Share list.
7 Select the access options you want for the user.
8 Repeat Step 4 through Step 7 for each user you want to share the folder with.
9 Click OK.
If you want the folder to have a specific function, you can create a new display setting. For example,
if the folder is for shared discussions, you should create a setting that views items by reply thread
and contains both sent and received items. For more information on customizing the display of a
shared folder, see Section 2.3.5, “Customizing Folder Display Settings,” on page 45.
Creating and Sharing a New Folder
1 Click File > New > Folder and put the folder where you want it in the Folder List.
2 Name the folder.
3 Linux: Right-click the new folder.
Mac: Control+click the new folder.
Getting Organized 49
Page 50

4 Click Sharing.
5 Select Shared folder, then click Next.
6 Specify the display settings for the folder, then click Next.
7 In the Name field, start typing the name of the user.
8 When the user’s name appears in the field, click Add User to move the user into the Share List.
9 Click the user’s name in the Share List.
10 Select the access options you want for the user.
11 Repeat Step 7 through Step 10 for each user you want to share the folder with.
12 When you’re done, click Finish.
For more information about shared folders, see “Using Shared Folders” on page 48. For more
information about display settings, see Section 2.3.5, “Customizing Folder Display Settings,” on
page 45.
Accepting Shared Folders
1 Click the Shared Folder notification in your Mailbox.
A screen appears, showing you the name of the folder you have been granted rights to and the
type of rights you have been given.
2 Click Next.
3 The name of the folder is filled in by default. Make any desired changes to the name.
novdocx (en) 13 May 2009
4 Select the folder’s location.
5 Click Finish.
Posting an Item to a Shared Folder
1 Click the shared folder in your Folder List to open it.
2 Click File > New > Discussion/Note.
If you want to post a different type of item, such as a task, click Edit > Change To, then click an
item type.
3 Type a subject.
4 Type your message.
5 Click Attach to attach files.
6 Click Post on the toolbar.
To reply to an existing item in a shared folder, open the item, click Reply, select a reply option, then
click OK. See “Replying to an Item in a Shared Folder” on page 86 for more information.
Viewing Discussion Threads in a Shared Folder
1 Linux: Right-click a shared folder.
Mac: Control+click a shared folder.
2 Click Properties > Display.
3 Select Discussion Thread from the Setting Name drop-down list.
50 GroupWise 8 Linux/Mac Client User Guide
Page 51

4 Click OK.
5 To expand or collapse a discussion thread, click the - and + next to the original discussion item.
6 To scroll through different discussions, press Ctrl+Left-arrow or Ctrl+Right-arrow.
Deleting a Shared Folder
To delete a folder that is shared with you:
1 Linux: Right-click the folder.
Mac: Control+click the folder.
2 Click Delete.
3 Click Ye s.
Deleting a folder that is shared with you just deletes the folder from your GroupWise Mailbox. All
other users are unaffected. However, if you are the one who shared the folder with others, then
deleting that folder removes it from all other users as well.
2.3.7 Using Find Results Folders
novdocx (en) 13 May 2009
“Understanding Find Results Folders” on page 51
“Creating a Find Results Folder” on page 51
Understanding Find Results Folders
A Find Results folder is a folder that displays the results of a query. When the folder is opened,
GroupWise examines the search criteria defined for the folder, searches for everything specified,
then displays everything it finds in the Item List. You can act on items in a Find Results folder the
same way you act on items in any folder, such as opening, forwarding, printing, copying, moving, or
deleting them. The original item remains stored in the folder where the search found it and is also
acted on. This means that if you move or delete an item from a Find Results folder, the item is
deleted from the Item List, and from the original location.
You can see the folder where each item originated if you open a Find Results folder and look at the
columns of information displayed in the Item List. The Folder column lists where each item is
actually stored.
You can create your own Find Results folders and define the search criteria you want, such as all
items from a particular address or all items with a certain word in the Subject field.
Creating a Find Results Folder
1 Start a search by clicking on .
2 Specify the search criteria, find by example criteria, or information for items you want to find,
then click OK.
A Find Results Window displays.
3 Click File > Save As Folder.
4 Type a name and a description for your folder.
5 Click Up, Down, Right, or Left to position the folder where you want it in the Folder List, then
click Next.
Getting Organized 51
Page 52
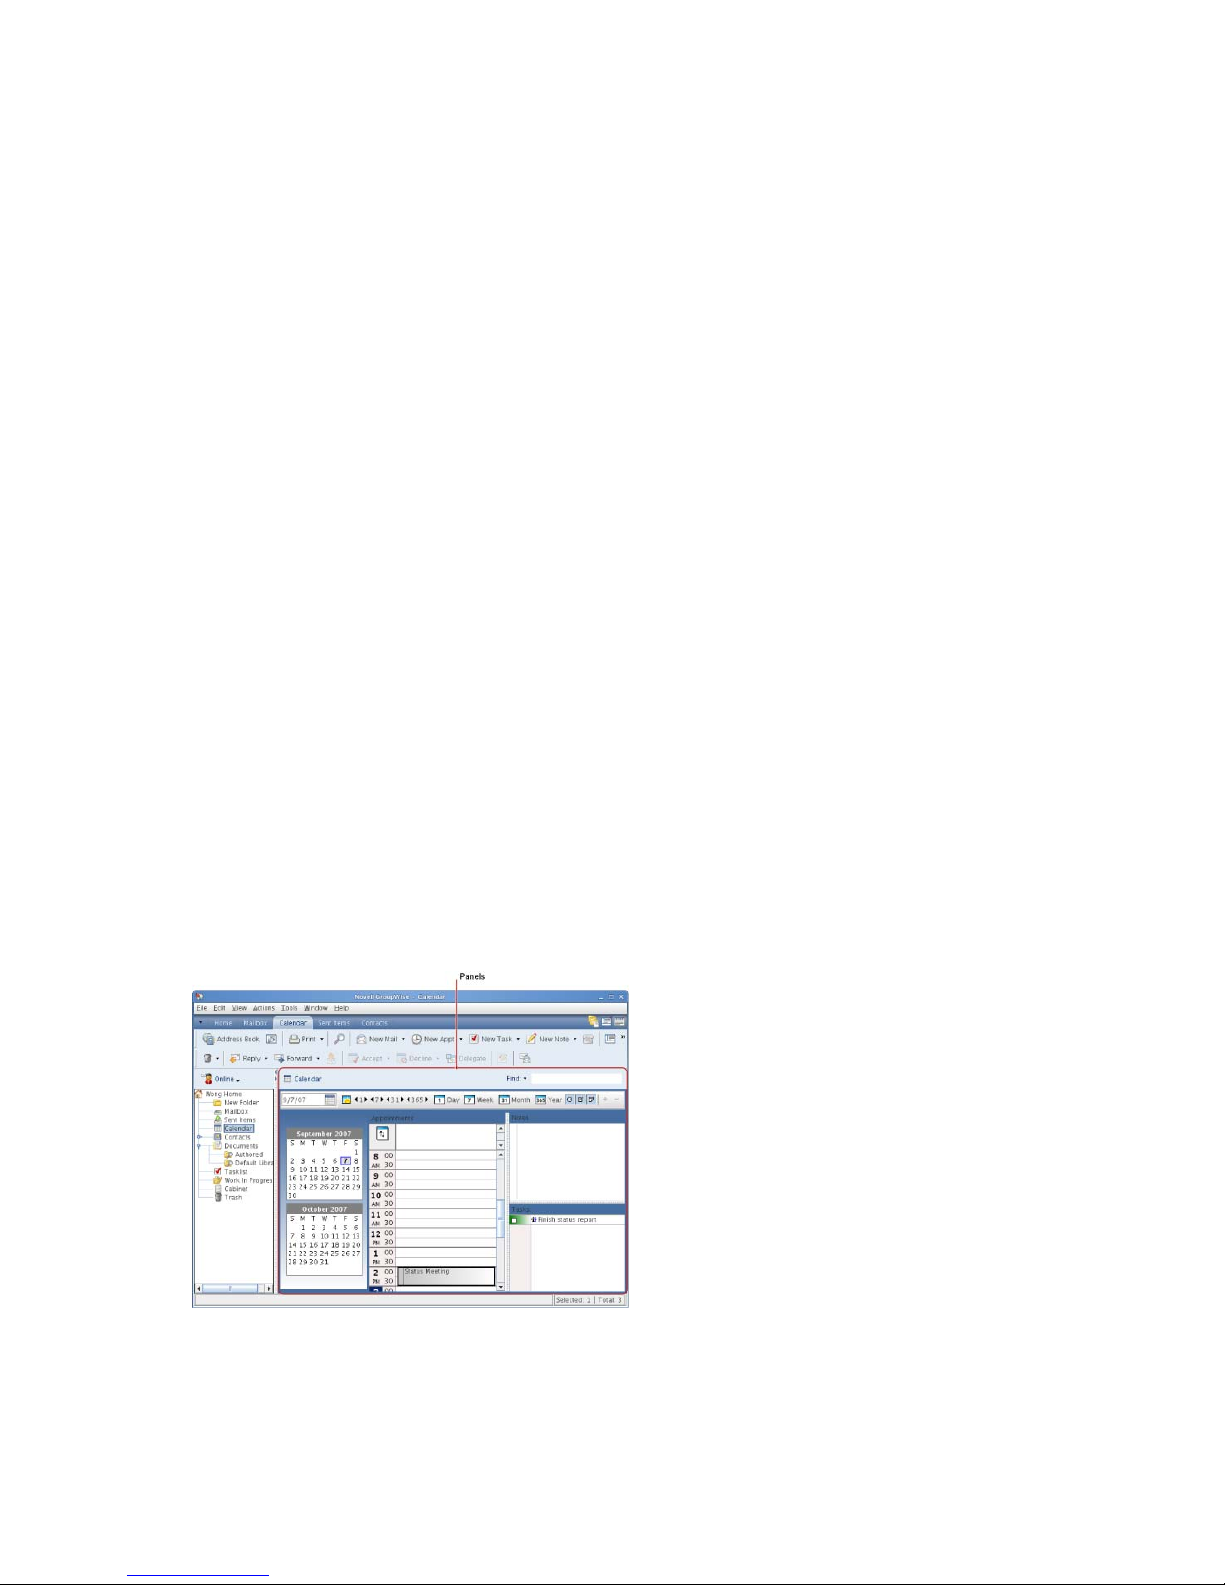
6 If you don’t want the folder to update its results each time you open it, deselect Find new
matching items each time the folder is opened.
7 Click Finish.
2.4 Using Panels to Organize Your Home Folder
Panels enable you to display multiple areas in a single, customized view. You can display any folder
in a panel. You can also display an address book or a Web page in a panel.
Section 2.4.1, “Understanding Panels,” on page 52
Section 2.4.2, “Resizing a Panel,” on page 53
Section 2.4.3, “Moving a Panel,” on page 53
Section 2.4.4, “Customizing a Panel,” on page 53
Section 2.4.5, “Creating a New Panel,” on page 54
Section 2.4.6, “Removing a Panel from the View,” on page 54
You are most likely to use panels to customize your Home folder, but any folder can be formatted
with panels.
novdocx (en) 13 May 2009
2.4.1 Understanding Panels
A panel is a customized view of information in GroupWise. For example, the default Home folder
has an Unread Messages panel that displays a list of items you have not read. The Tasklist panel is
another default panel in the Home folder. The Tasklist panel displays items that are in your Tasklist
folder.
A panel can be created to display a multitude of information, from unread items to a summary
calendar. A predefined list of panels has been created, but you can also create your own custom
panels.
Figure 2-6 The GroupWise Panels
52 GroupWise 8 Linux/Mac Client User Guide
Page 53
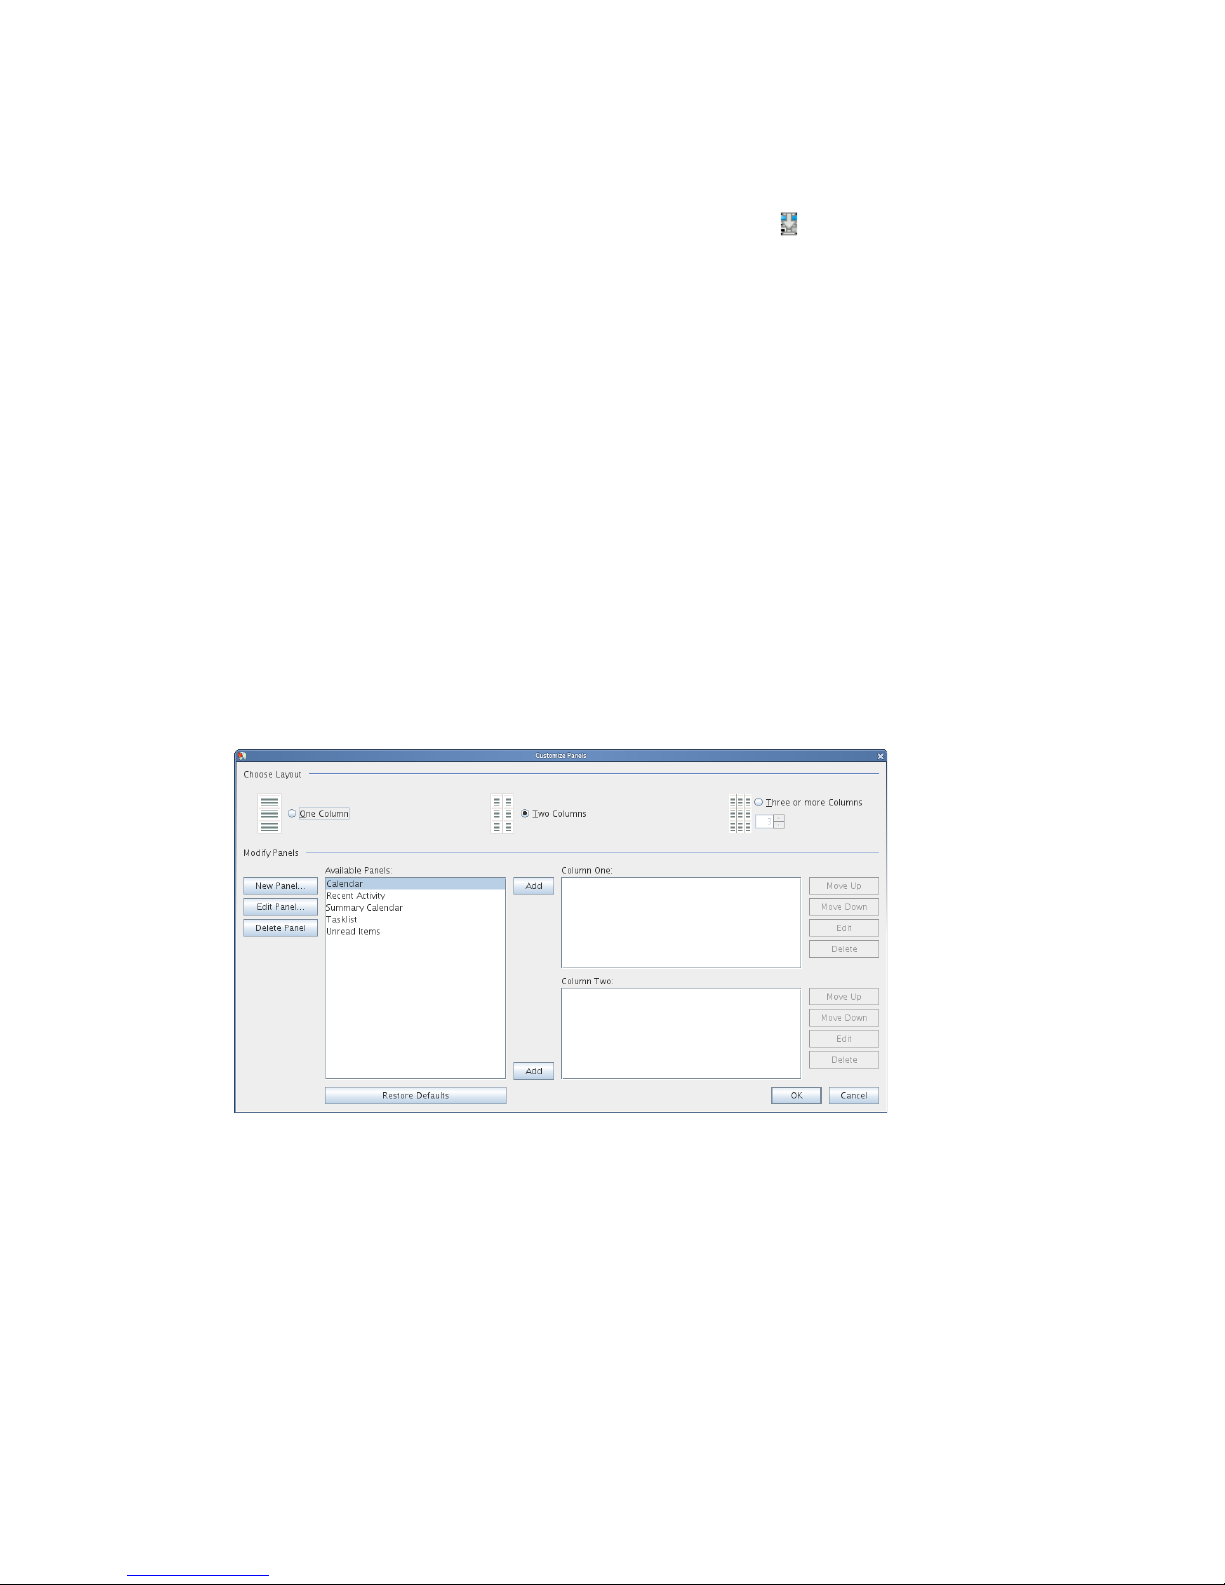
2.4.2 Resizing a Panel
You might want to resize the height of a panel to display more or less information. To change the
height of a panel, move your mouse cursor to the top of the line until displays, then drag the
mouse cursor up or down to resize the panel.
2.4.3 Moving a Panel
1 Place your cursor in the title bar of a panel, then drag and drop the panel to its new location.
2 Resize surrounding panels to accommodate the panel in its new location.
See also Customizing a Panel.
2.4.4 Customizing a Panel
1 Linux: Right-click the folder that you want to modify the panels for.
Mac: Control+click the folder that you want to modify the panels for.
2 Click Properties.
novdocx (en) 13 May 2009
3 Click the Display tab.
4 Select Panels from the Vie w B y drop-down list.
5 Click Customize Panels.
6 Select whether you want to view the panels in one, two, three, or more columns.
If you select Three or more columns, select the number of columns in the column field.
7 Select from the list of available panels, or create your own panels by clicking New Panel.
8 Click Add next to the column you want the column to display in.
9 (Optional) Click Move Up or Move Down to position the column where you want it to display.
10 Click OK.
11 Click OK.
Getting Organized 53
Page 54
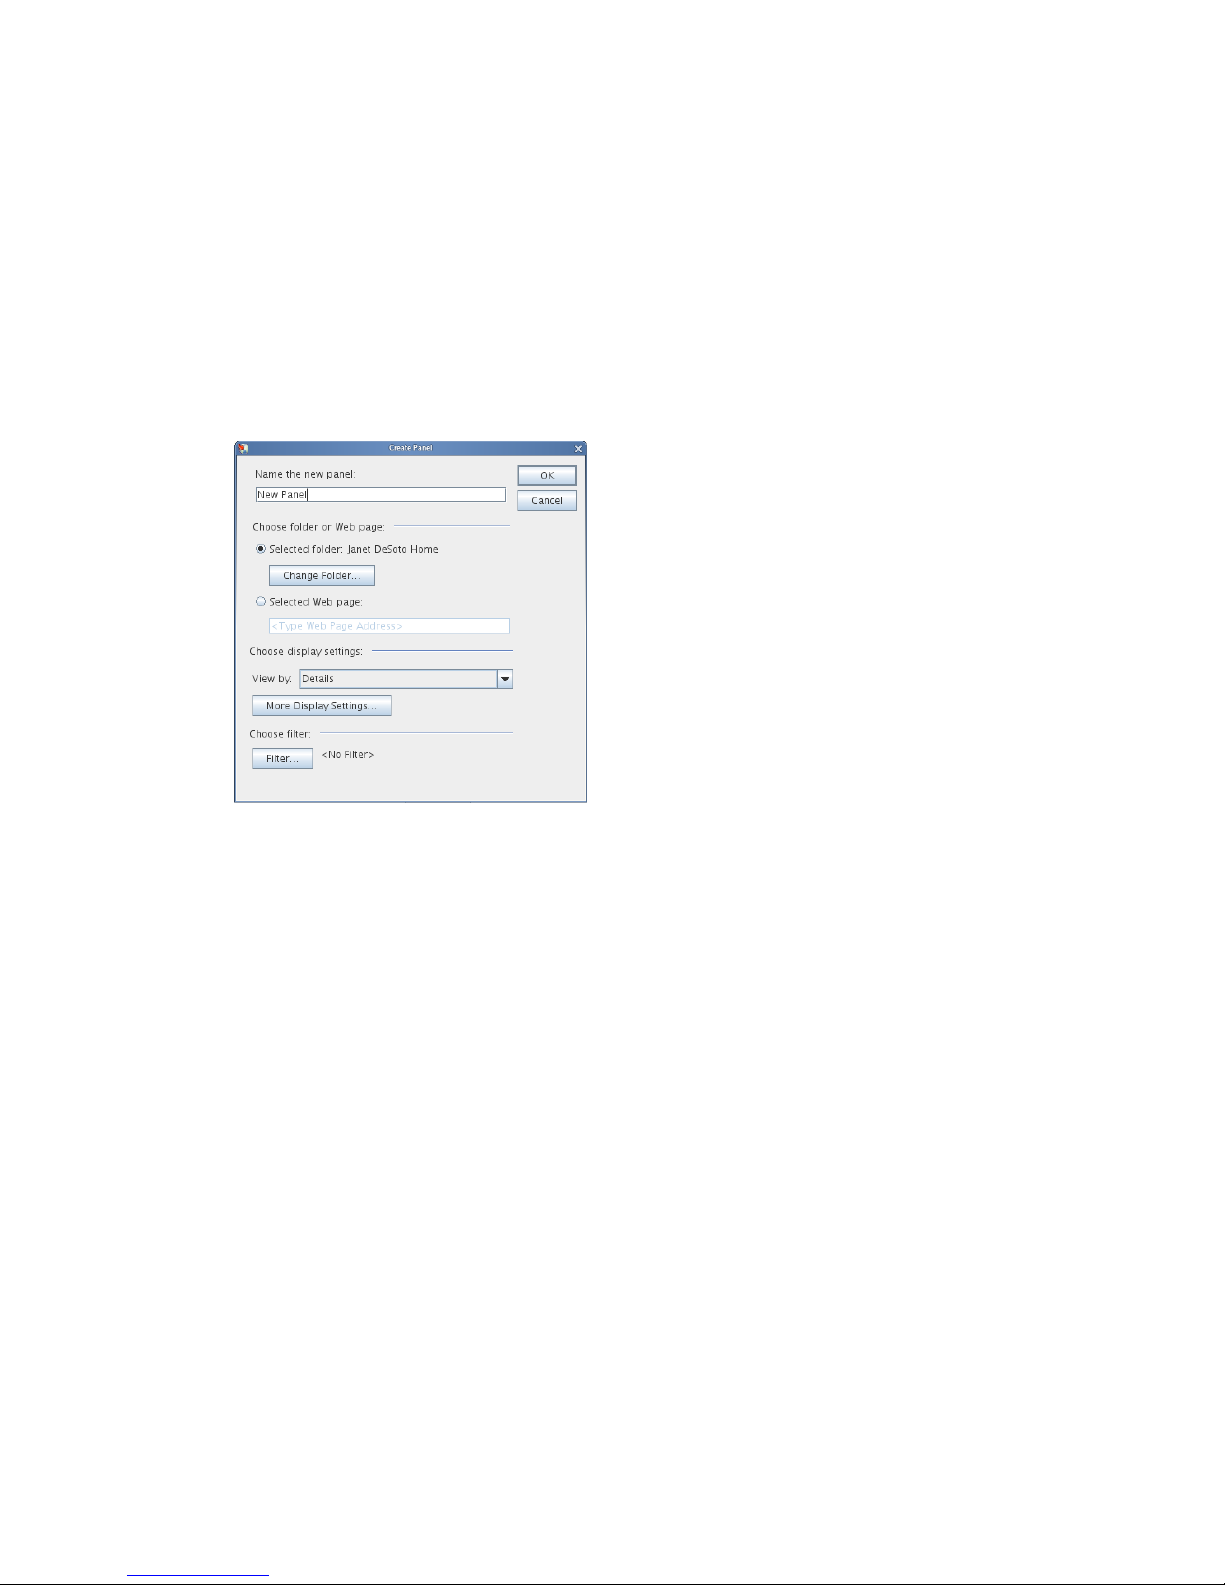
2.4.5 Creating a New Panel
1 Linux: Right-click the folder that you want to modify the panels for.
Mac: Control+click the folder that you want to modify the panels for.
2 Click Properties.
3 Click the Display tab.
4 Select Panels from the Vie w B y drop-down list.
5 Click Customize Panels.
6 Click New Panel.
novdocx (en) 13 May 2009
7 Type the panel name in the Name the new panel field.
8 Select whether you want the panel to display a folder or a Web page.
If you want to display a folder, click Change Folder to select the folder to display the contents
of.
or
If you want to display a Web page, type the URL of the Web page in the Selected web page
field.
9 Select a display setting from the View By drop-down list in the Choose display settings section.
Calendar: Displays the panel as a graphical calendar.
Tasklist: Displays the panel as a Tasklist.
Discussion Thread: Groups the items in the panel according to threads.
Details: Displays the details for items in the panel.
(Optional) Click More Display Settings for additional display settings.
10 (Optional) Click Filter to add a filter to the panel.
11 Click OK, then click Add to display the panel.
2.4.6 Removing a Panel from the View
1 Click the panel drop-down arrow, then click Close.
54 GroupWise 8 Linux/Mac Client User Guide
Page 55

2.5 Customizing Other GroupWise Functionality
Section 2.5.1, “Changing GroupWise Modes,” on page 55
Section 2.5.2, “Changing Your Display Name,” on page 56
Section 2.5.3, “Setting the Key Used to Delete Items,” on page 56
Section 2.5.4, “Setting the Interval for Refreshing GroupWise,” on page 56
Section 2.5.5, “Using a Web Proxy,” on page 57
Section 2.5.6, “Customizing Date and Time Formats,” on page 57
2.5.1 Changing GroupWise Modes
GroupWise provides two different ways to run the GroupWise client:
“Online Mode” on page 55
“Caching Mode” on page 55
“Changing Modes” on page 56
novdocx (en) 13 May 2009
You might be able to run GroupWise in either mode, or your system administrator might require that
you use only a certain mode.
Most GroupWise features are available in both GroupWise modes, with some exceptions, as listed in
Section 11.5, “Working in Caching Mode,” on page 188.
Online Mode
When you use Online mode, you are connected to your post office on the network. Your mailbox
displays the messages and information stored in your network mailbox (also called your Online
Mailbox). Online mode is connected to your network mailbox continuously. In Online mode, if your
Post Office Agent shuts down or you lose your network connection, you temporarily lose your
connection to your mailbox.
You should use this mode if you do not have a lot of network traffic, or if you use several different
workstations and do not want to download a local mailbox to each one.
Caching Mode
Caching mode stores a copy of your network mailbox, including your messages and other
information, on your local drive. This allows you to use GroupWise whether or not your network or
Post Office Agent is available. Because you are not connected to the network all the time, this mode
cuts down on network traffic and has the best performance. A connection is automatically made to
retrieve and send new messages. All updates are performed in the background so your work is not
interrupted.
You should use this mode if you have enough disk space on your local drive to store your mailbox.
For more information about setting up Caching mode, see Chapter 11, “Caching Mode,” on
page 187.
Getting Organized 55
Page 56

Changing Modes
GroupWise starts in Online mode by default. After you have set up a Caching Mailbox, it is easy to
change between modes as needed.
1 Click the Mode Selector in the upper left corner of the Main Window.
2 Select the desired mode.
GroupWise must restart in order to changes modes.
2.5.2 Changing Your Display Name
You can change the name that is displayed in items that you send from GroupWise. You can only
change your display name if the Account menu is displayed. The Account menu is displayed if you
are in Caching mode or if your administrator allows POP and IMAP or NNTP on your GroupWise
system.
1 Click Accounts > Account Options.
2 Click the Mail tab, then click General Options.
3 Type your display name in the Display Name field.
novdocx (en) 13 May 2009
4 Click OK, then click Close.
2.5.3 Setting the Key Used to Delete Items
You can specify the key used to delete items.
1 Linux: Click Tools > Options.
Mac: Click GroupWise > Preferences.
2 Click Environment > General.
3 In the Item deletion method list, select the method you want to use.
Linux:
Delete Key: Use the Delete key to delete items (default).
Backspace Key: Use the Backspace key to delete items.
Mac:
Del Key: Use the Del key (Forward Delete) to delete items (default).
Delete Key: Use the Delete key to delete items.
2.5.4 Setting the Interval for Refreshing GroupWise
When you refresh GroupWise, GroupWise checks for new e-mail and refreshes the screen to show
new or changed information. By default, GroupWise refreshes every minute. However, you can
change the refresh interval.
1 Linux: Click Tool s > Options.
Mac: Click GroupWise > Preferences.
56 GroupWise 8 Linux/Mac Client User Guide
Page 57

2 Click Environment > General.
3 Under Refresh Interval, specify the number of minutes and seconds you want before a refresh,
then click OK.
2.5.5 Using a Web Proxy
GroupWise uses the Firefox* browser to display HTML messages. Your GroupWise administrator
might have set up a Web proxy between the Internet and your GroupWise system. If so, you must
obtain the URL or server information from your GroupWise administrator.
1 Linux: Click Tool s > Options.
Mac: Click GroupWise > Preferences.
2 Click Environment > Web.
3 Select Use Proxy.
4 (Conditional) To automatically configure the proxy, select Automatic proxy configuration and
enter the proxy’s URL.
5 (Conditional) To manually configure the proxy, select Manual proxy configuration, specify the
server address and port number, specify any proxy bypass addresses, then click Add.
novdocx (en) 13 May 2009
6 Click OK.
2.5.6 Customizing Date and Time Formats
GroupWise offers several date and time formats that determine the way dates and times display
throughout the application. For example, you might prefer dates to appear with the day first,
followed by the month, and then the year, such as 24 August, 2008.
The time and date formats in GroupWise are highly customizable. You can specify the order of
elements, the type of separators between elements, whether dates are spelled out or represented by
numbers, and several other options.
“Setting Default Date and Time Formats” on page 57
“Setting the General GroupWise Format” on page 60
“Setting Specific GroupWise Formats” on page 60
Setting Default Date and Time Formats
There are three configurable date and time settings.
1 Linux: Click Tool s > Options.
Mac: Click GroupWise > Preferences.
2 Click Calendar > Date/Time.
3 Set each format as needed:
“Time Format” on page 58
“Short Date Format” on page 58
“Long Date Format” on page 59
Getting Organized 57
Page 58

Time Format
You can set the time format to display the hour, minutes, and second in whatever order and format
you prefer, with whatever separators you like. The following table shows the symbols available for
formatting the time.
Table 2-1 Time Format Symbols
Symbol Meaning Presentation Example
h Hour in am/pm (1-12) Number 12
H Hour in day (0-23) Number 0
m Minute in hour Number 30
s Second in minute Number 55
E Day in week Text Tue
a am/pm marker Text PM
novdocx (en) 13 May 2009
‘ Escape for text Delimiter (none)
‘ Single quote Literal ‘
The following table shows some common time formats.
Table 2-2 Example Time Formats
Example Result
h:mm 12:08
h:mm:ss 12:08:52
H:mm 17:23
H:mm.ss 17:23.16
h:mm a 2:45 PM
E h:mm a Tue, 2:45 PM
Short Date Format
Use the Short date setting to specify how the date appears in its short format (typically, with
numbers representing the day, month, and year) with whatever separators you like. The following
table shows the symbols available for formatting the short date.
Table 2-3 Short Date Format Symbols
Symbol Meaning Presentation Example
y Year Number 2008
58 GroupWise 8 Linux/Mac Client User Guide
Page 59

Symbol Meaning Presentation Example
M Month in year Number or Text 08, Aug, or August
d Day in month Number 12
h Hour in am/pm (1-12) Number 8
H Hour in day (0-23) Number 16
m Minute in hour Number 30
s Second in minute Number 52
E Day in week Text Tue
w Week in year Number 27
a am/pm marker Text PM
‘ Escape for text Delimiter (none)
‘ Single quote Literal ‘
novdocx (en) 13 May 2009
The following table shows some common short date formats.
Table 2-4 Example Short Date Formats
Example Result
dd.M.yyyy 24.7.2008
dd.MM.yy 24.07.08
M/dd/yyyy 7/24/2008
M-dd-yy 7-24-08
Long Date Format
Use the Long date setting to specify how the date appears in its long format (typically, with numbers
representing the day and year, and the month spelled out) with whatever separators you like. The
following table shows the symbols available for formatting the long date.
Table 2-5 Long Date Format Symbols
Symbol Meaning Presentation Example
y Year Number 2008
M Month in year Number or Text 08, Aug, or August
d Day in month Number 12
h Hour in am/pm (1-12) Number 8
H Hour in day (0-23) Number 16
m Minute in hour Number 30
Getting Organized 59
Page 60

Symbol Meaning Presentation Example
s Second in minute Number 52
E Day in week Text Tue
w Week in year Number 27
a am/pm marker Text PM
‘ Escape for text Delimiter (none)
‘ Single quote Literal ‘
The following table shows some common long date formats.
Table 2-6 Example Long Date Formats
Example Result
dd.MMMM, yyyy 24.August, 2008
novdocx (en) 13 May 2009
dd.MM.yy 24.08.08
EEEE dd MMM, yyyy Sunday 24 Aug, 2008
EEEE, MMMM dd, yyyy Sunday, August 24, 2008
E, MMM d, yy Sun, Aug 24, 08
MMM dd, yyyy Aug 24, 2008
M-dd-yy 8-24-08
Setting the General GroupWise Format
Use the General GroupWise format setting to determine whether the long date or short date is used
throughout GroupWise.
1 Linux: Click Tool s > Options.
Mac: Click GroupWise > Preferences.
2 Click Calendar > Date/Time.
3 Under General GroupWise format, select either Long date or Short date, then click OK.
Setting Specific GroupWise Formats
Use the Specific GroupWise formats settings to specify the date and time formats used in the Main
Window, properties, and file info areas throughout GroupWise.
1 Linux: Click Tool s > Options.
Mac: Click GroupWise > Preferences.
2 Click Calendar > Date/Time.
60 GroupWise 8 Linux/Mac Client User Guide
Page 61

3 Under Specific GroupWise formats, select the formats you prefer for each of the settings, then
click OK.
You can select either Long Date, Short Date, Time, or one of the available combinations of date
and time formats.
novdocx (en) 13 May 2009
Getting Organized 61
Page 62

novdocx (en) 13 May 2009
62 GroupWise 8 Linux/Mac Client User Guide
Page 63

3
E-Mail
An e-mail item is basically a text message sent to a recipient. In GroupWise®, an e-mail item can be
a message, appointment, task, reminder note, or a phone message note. You can write them in plain
text or HTML, and you can add attachments to them. All incoming items are delivered to your
Mailbox folder.
Section 3.1, “Sending E-Mail,” on page 63
Section 3.2, “Managing Sent E-Mail,” on page 76
Section 3.3, “Receiving E-Mail,” on page 81
Section 3.4, “Managing Received E-Mail,” on page 87
Section 3.5, “Printing E-Mail,” on page 90
Section 3.6, “Handling Unwanted E-Mail (Spam),” on page 92
novdocx (en) 13 May 2009
3
3.1 Sending E-Mail
When you send an e-mail message from GroupWise, you can send the message either as text or
HTML. Additionally, you can choose to attach a file, add a signature or vCard* to the message, and
spell check the message before it is sent.
The address book and name completion help you to quickly and easily find the contacts you need
when sending an e-mail message.
Section 3.1.1, “Selecting the Default Compose View and Font,” on page 63
Section 3.1.2, “Composing E-Mail,” on page 64
Section 3.1.3, “Formatting E-Mail,” on page 64
Section 3.1.4, “Spell-Checking Messages,” on page 66
Section 3.1.5, “Attaching Files,” on page 69
Section 3.1.6, “Adding a Signature or vCard,” on page 70
Section 3.1.7, “Saving Unfinished E-Mail,” on page 71
Section 3.1.8, “Selecting Send Options,” on page 72
Section 3.1.9, “Posting a Discussion Note,” on page 75
Section 3.1.10, “Sending a Phone Message,” on page 75
3.1.1 Selecting the Default Compose View and Font
By default, GroupWise provides the HTML Compose view for composing items. The HTML view
offers a broad selection of fonts, point sizes, and colors; text formatting options that include
paragraph styles, indentation, bulleted lists, numbered lists, hyperlinked text, and horizontal lines;
and image options for embedded images and background images.
If you prefer a simpler editing environment, you can use the Plain Text Compose view.
1 Linux: Click Tool s > Options.
E-Mail
63
Page 64

Mac: Click GroupWise > Preferences.
2 Click Environment > General.
3 Under Default Compose View & Font, select Plain Text or HTML.
4 (Optional) Select the default font and font size to use.
5 Click OK.
TIP: In a new item you are composing, you can change your Compose view for that one item by
clicking Vie w > P lain Text or View > HTML.
3.1.2 Composing E-Mail
1 Click New Mail on the toolbar.
You can select a different mail view by clicking the down-arrow next to New Mail.
2 In the To field, type a username, then press Enter. Repeat for additional users.
or
novdocx (en) 13 May 2009
To select usernames from a list, click Address on the toolbar, double-click each user, then click
OK.
3 If necessary, type usernames in the CC and BC fields.
CC (Carbon Copy): Carbon copy recipients (CC) receive a copy of an item. CC recipients are
users who would benefit from the information in an item, but are not affected by or directly
responsible for it. All recipients can see that a carbon copy was sent. They can also see the
names of the CC recipients.
BC (Blind Copy): Blind copy recipients (BC) receive a copy of an item. Other recipients
receive no information about blind copies. Only the sender and the blind copy recipient know
that a blind copy was sent. If a recipient replies and chooses Reply to All, the blind copy
recipient does not receive the reply.
4 To change the From name (to another account or proxy), click From, then click a name.
5 Type a subject.
6 Type a message.
You can specify many options, such as making this message a high priority, requesting a reply
from the recipients, and more, by clicking the Send Options tab.
When you use the Categories option, only the four default categories carry over to the recipient.
7 Include any attachments by clicking Attach a File on the toolbar.
8 Click Send on the toolbar.
3.1.3 Formatting E-Mail
The formatting options you have when composing a message depend on the Compose View you
have selected. The options described in this section apply to the message you are composing. To set
defaults for all e-mails,
“Formatting HTML E-Mail” on page 65
64 GroupWise 8 Linux/Mac Client User Guide
Page 65

“Formatting Plain Text E-Mail” on page 66
“Changing the Font in Plain Text View” on page 66
Formatting HTML E-Mail
The HTML functions help to add additional formatting to your e-mails. By using the HTML tools,
more powerful and creative e-mails can be made. Standard text features like font, underline, and
italics are all available. Added to the toolbar are features like alignment and indentation and even
more powerful features like adding pictures and tables.
“Adding Horizontal Line” on page 65
“Adding a Hyperlink to a Web Page” on page 65
“Adding E-Mail Addresses” on page 65
If the recipient of the item is using the HTML Read view, he or she sees the e-mail as you formatted
it.The recipient cannot change the font of an HTML-formatted item. If he or she is using the Plain
Text Read view, HTML formatting is lost. However, the recipient can click View > HTML to display
the message the way you formatted it.
novdocx (en) 13 May 2009
Adding Horizontal Line
1 In an e-mail you are composing, select a location in the e-mail where you would like the line to
appear.
2 Click the Insert a Horizontal Line or Link icon on the right end of the HTML toolbar to display
the drop-down list, then click Insert horizontal line.
3 A line appears in the e-mail.
Adding a Hyperlink to a Web Page
Hyperlinks are often referred to as a link. They connect a specific word or phrase to a specific Web
site. Using the Hyperlink function, a person clicks on the hyperlink and they are brought directly to
a specified Web page.
1 Open a new e-mail message.
2 Click the Insert a Horizontal Line or Link icon on the right end of the HTML toolbar to display
the drop-down list, then click Insert hyperlink to web page.
3 Specify the text that you want to appear as a hyperlink in your message.
4 Specify the URL you want to link to.
5 Click OK.
The link now appears in blue and is underlined, indicating it as a link.
Adding E-Mail Addresses
1 Open a new e-mail message.
2 Click the Insert a Horizontal Line or Link icon on the right end of the HTML toolbar to display
the drop-down list, then click Insert hyperlink to e-mail.
3 Specify the text that you want to appear as a hyperlink in your message.
E-Mail 65
Page 66

4 Specify the e-mail address you want to open a new message for.
5 Click OK.
The e-mail address appears in blue and be underlined indicating it as a link.
Formatting Plain Text E-Mail
The formatting options are easily accessible from the Plain Text toolbar.
You can change the font, size, and color. You can use bold, italics, and underline. However, in the
Plain Text Compose view, you cannot indent text, or insert hyperlinks and horizontal lines.
Changing the Font in Plain Text View
1 In an open item you are composing, click Vie w > Plain Text.
2 Click the Message field.
3 Click Edit > Font, then click Font again.
4 Select a font and a font style.
novdocx (en) 13 May 2009
5 Select a size.
6 Select any other options you want to change, then click OK.
You can also bold, italicize, or underline portions of text using toolbar buttons.
3.1.4 Spell-Checking Messages
There are two ways to spell-check the items you send. Both features check for misspelled words,
duplicate words, and irregular capitalization in items you are creating.
“Using Quick Speller” on page 66
“Using Spell Checker” on page 67
Using Quick Speller
Quick Speller checks the spelling as you type, and underlines the words that are spelled wrong.
When Quick Speller finds a misspelled word, you can replace it with a word Quick Speller suggests
or skip the word whenever it appears in that message. You can also add the word to a user word list.
“Enabling Quick Speller by Default” on page 66
“Spell-Checking with Quick Speller” on page 67
“Disabling Quick Speller as You Compose an E-Mail” on page 67
Enabling Quick Speller by Default
1 Linux: Click Tool s > Options.
Mac: Click GroupWise > Preferences.
2 Click Environment > General.
66 GroupWise 8 Linux/Mac Client User Guide
Page 67

3 Select Check spelling as you type, then click OK.
Deselect this option to disable Quick Speller.
Spell-Checking with Quick Speller
In the Subject or Message field:
1 Linux: Right-click the misspelled word.
Mac: Control+click the misspelled word.
2 Click the correctly spelled word.
or
Click Learn Word to skip the word.
or
Click Ignore Word to add the word to your dictionary.
Disabling Quick Speller as You Compose an E-Mail
In the Subject or Message field:
novdocx (en) 13 May 2009
1 Linux: Right-click the misspelled word.
Mac: Control+click the misspelled word.
2 Deselect Check spelling as you type.
To re-enable Quick Speller:
1 Linux: Right-click in the Subject or Message field.
Mac: Control+click in the Subject or Message field.
2 Select Check spelling as you type.
Using Spell Checker
You run Spell Checker separately from the process of composing an e-mail, either manually or by
selecting to have it run when you click Send. When Spell Checker finds a misspelled word, you can
replace it with a word Spell Checker suggests, edit the word manually, or skip the word. You use
Environment Options to set up Spell Checker to automatically spell check your messages before you
send them.
“Spell-Checking an Item with Spell Checker” on page 67
“Spell-Checking Items Automatically with Spell Checker” on page 68
“Configuring Spell Checker” on page 69
“Selecting the Spell Checker Language” on page 69
Spell-Checking an Item with Spell Checker
1 Click the Subject field or the Message field.
or
Select the text to spell-check.
2 Click Too ls > Spell Checker.
E-Mail 67
Page 68
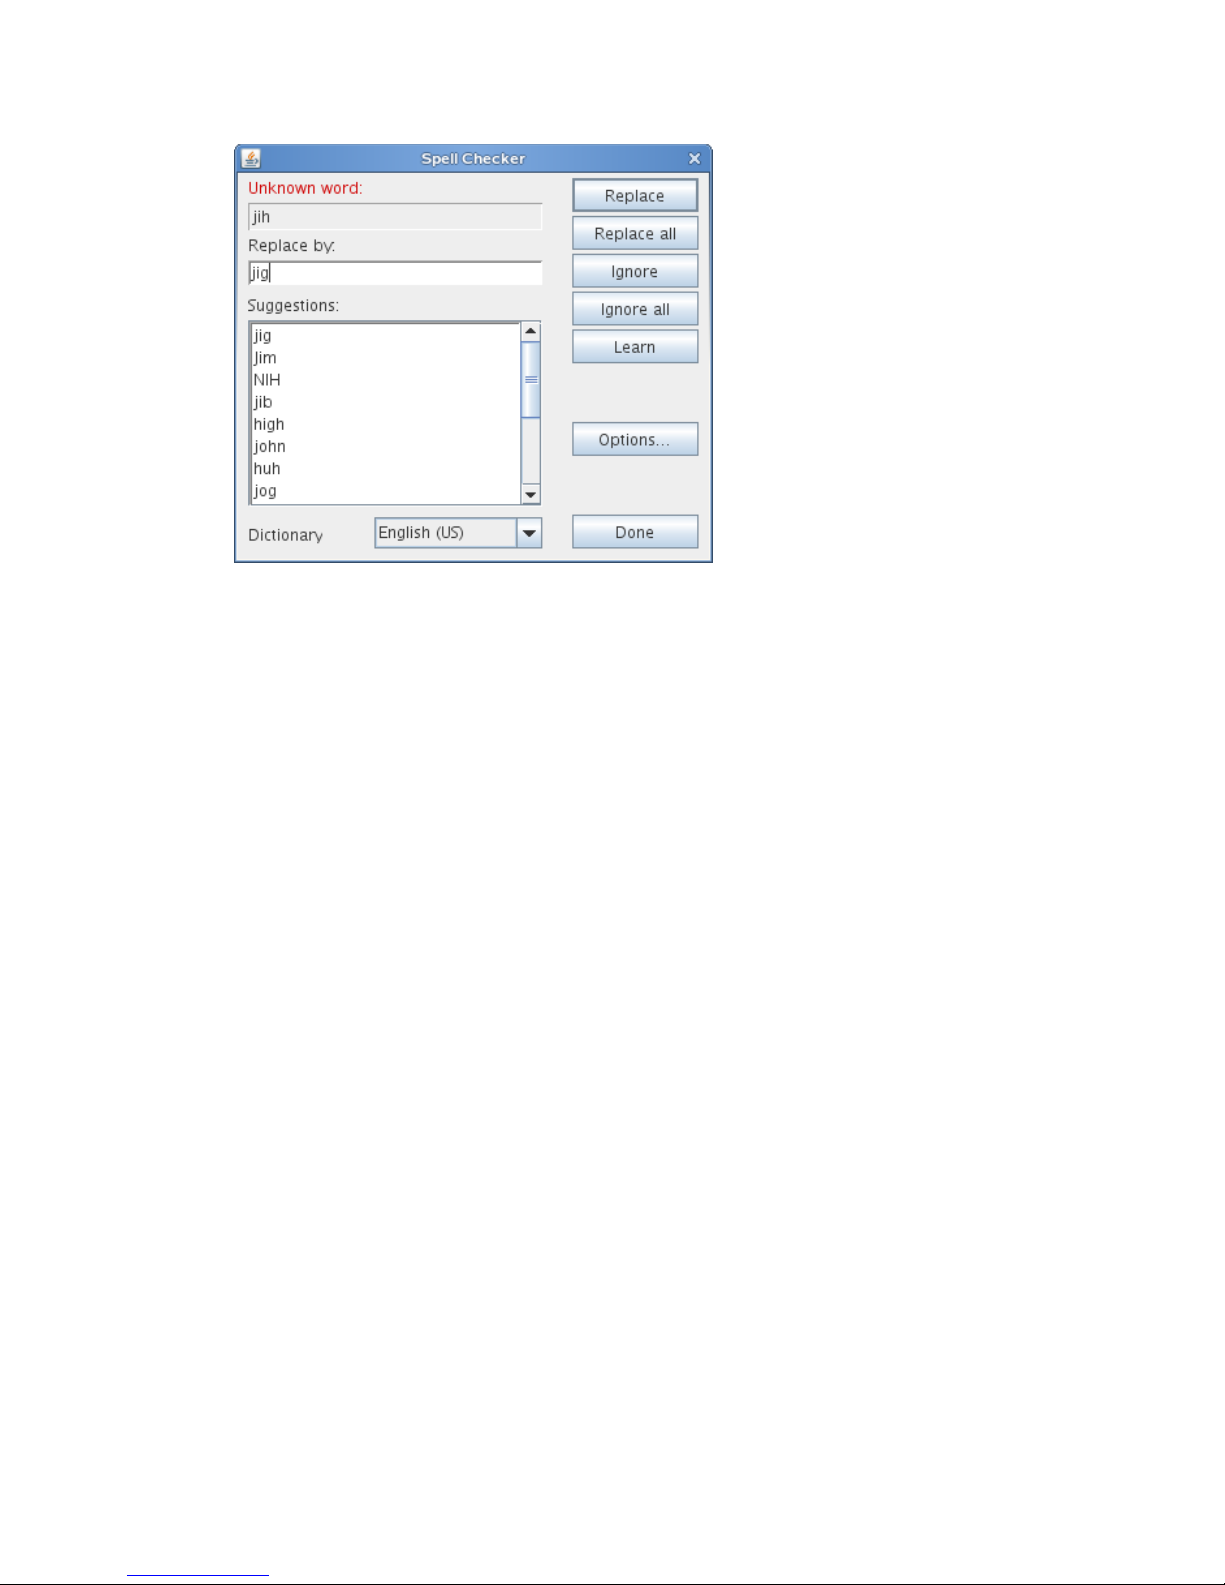
3 To specify a dictionary, select a dictionary in the Dictionary drop-down list.
4 When Spell Checker stops on a word, click any of the available options, or edit the word
manually.
You can choose from the following options:
Replace: Replaces a misspelled word with a word Spell Checker suggests. To replace a
misspelled word, double-click the word, or click the word and click Replace. To make your
own corrections, edit the word in the Replace With box, then click Replace.
Replace All: Replaces all instances of the same misspelled word with a word Spell Checker
suggests. To replace the misspelled word, double-click the word, or click the word and then
click Replace All. To make your own corrections, edit the word in the Replace With box, then
click Replace All.
novdocx (en) 13 May 2009
Ignore: Ignores the word one time. Spell Checker stops the next time it encounters the word.
Ignore All: Ignores every occurrence of the word throughout the document. Spell Checker
ignores the word until the next time you spell-check.
Learn: Adds the word to the current user word list, which stores supplemental words so that
Spell Checker can recognize the word in future spell-checks.
5 Click Done when spell-checking is complete.
Spell-Checking Items Automatically with Spell Checker
You can spell-check items automatically every time you click Send.
1 Linux: Click Tool s > Options.
Mac: Click GroupWise > Preferences.
2 Click Environment > General.
3 Select Check spelling before send, then click OK.
68 GroupWise 8 Linux/Mac Client User Guide
Page 69

Configuring Spell Checker
You can modify the types of words the Spell Checker considers misspelled.
1 Click the Subject field or the Message field.
or
Select the text to spell-check.
2 Click Too ls > Spell Checker.
3 Click Options.
The following options are available:
Ignore Case: Ignores the case of words.
Ignore Mixed-Case Words: Ignores words with capital letters that do not begin a word, such
as “THe”.
Ignore Words with Digits: Ignores words containing both letters and numbers, such as “2nd”.
Ignore Duplicate Words: Ignores duplicate words, such as “the the”.
Ignore URL-Like Words: Ignores words that look like URLs.
novdocx (en) 13 May 2009
Check Punctuation: Checks the punctuation of sentences for mistakes.
Enable Auto-Replace: Auto-replaces words that are commonly misspelled.
Enable Compound Words: Checks the spelling of compound words.
Enable General Prefixes: Checks the spelling of prefixes.
Enable Common File Extensions: Checks the spelling of common file extensions.
Suggestions: Use this setting to specify if you want to favor speed over quality, normal, or
favor quality over speed. All these settings effect the length of the suggestion list.
Selecting the Spell Checker Language
1 Click the Subject field or the Message field.
or
Select the text to spell-check.
2 Click Too ls > Spell Checker.
3 In the Dictionary field, select the language for Spell Checker to use, then click Done.
3.1.5 Attaching Files
Use Attach File to send one or more files to other users. You can attach files that exist on your hard
disk, diskette, or network drive to an item you are sending. The recipients can open the attached file,
save it, view it, or print it. If you change the attached file after you have sent it, the recipients do not
see the changes.
If you attach a file that is password-protected, the recipient cannot open or view the attachment
without entering the password.
1 Open a new item.
2 Fill in the To , Subject, and Message fields.
3 Click File > Attach File and select the file or files you want to send.
E-Mail 69
Page 70

4 Linux: Click OK.
Mac: Click Open.
5 Click Send on the toolbar.
You can also attach a file or an item by dragging the file or item into the Attachment Window.
To remove an attachment before you send the item:
1 Linux: Right-click the attachment.
Mac: Control+click the attachment.
2 Click Delete.
If you delete an attached file, it is not erased from disk or network drive; it is simply removed
from the attachment list.
Moving or deleting a file on a disk or network drive does not affect a file you have attached to an
item and sent.
Showing Hidden Linux Files
novdocx (en) 13 May 2009
In the Linux client, you can show hidden files when viewing the file system from GroupWise, such
as when you are attaching a file or saving an attached file. By default, this option is disabled.
1 Click Too ls > Options.
2 Click Environment > General.
3 Select Show hidden files, then click OK.
3.1.6 Adding a Signature or vCard
Use Signatures to insert a signature or tag-line at the end of items you send. For example, you can
have GroupWise automatically list your name, phone number, and e-mail address at the bottom of
every item you send. If you have a number of different accounts, including POP3, IMAP4, and
NNTP newsgroup accounts, you can create a different signature for each account.
You can also have GroupWise automatically add a vCard, or virtual business card, to the end of
messages.
“Creating a Signature” on page 70
“Setting Up a vCard” on page 71
“Adding the Signature or vCard to an E-Mail” on page 71
“Understanding Global Signatures” on page 71
Creating a Signature
1 Linux: Click Tool s > Options.
Mac: Click GroupWise > Preferences.
2 Click Send > Signature.
3 Select Signature.
4 Type the text that you want placed at the end of your sent items.
70 GroupWise 8 Linux/Mac Client User Guide
Page 71

5 Select whether you want to automatically add the signature or be prompted to add a signature
for each item you send.
6 Click OK.
Setting Up a vCard
vCards are electronic business cards formatted according to standards set by the Internet Mail
Consortium. A vCard file has a
.vcf
extension, and you can add the file to your outgoing e-mail
items. Third-party companies create software you can use to create vCards that include text,
graphics, and sound. When you use GroupWise to generate your vCard, it uses the information from
the fields in your Address Book listing.
1 Linux: Click Tool s > Options.
Mac: Click GroupWise > Preferences.
2 Click Send > Signature.
3 Select Electronic business card (vCard).
4 Select a custom vCard
.vcf
file provided by a third-party company.
or
novdocx (en) 13 May 2009
Leave the field empty to compose a vCard based on your personal information in the
GroupWise Address Book.
5 Select whether you want to be prompted to add a vCard for each item you send.
6 Click OK.
Adding the Signature or vCard to an E-Mail
If you selected Prompt before adding, you’re prompted for a signature or vCard each time you send
an e-mail. If you selected Automatically add, your default signature is automatically added to all emails. If you set up a vCard, your vCard is added automatically to all e-mails as well. You can have
both a signature and a vCard at the same time.
Understanding Global Signatures
In addition to personal signatures, your system administrator can create a global signature for
everyone to use on external Internet messages. If the system administrator requires the global
signature, it is automatically appended to all items that are sent. If a global signature is available but
not required, it is appended to your signature if you already use a personal signature. If you don’t
have a personal signature, the global signature is added only if required. When you resend an item,
the global signature is not automatically added to the message.
3.1.7 Saving Unfinished E-Mail
“Understanding Auto-Save” on page 71
“Saving an Unfinished E-Mail” on page 72
Understanding Auto-Save
When you compose a new message in GroupWise, items are automatically saved for you. This
prevents the loss of any messages you are authoring if GroupWise unexpectedly shuts down. When
GroupWise restarts, you have the option to recover these messages and finish composing them.
E-Mail 71
Page 72

When composing a new message in GroupWise, by default the message is automatically saved to
disk every thirty seconds. The message is saved as a MIME file to:
/home/desktop_user/.novell/groupwise/groupwise_user/GWItemSave.eml
The filename increments if you are composing multiple messages simultaneously. When you save
the message to your Work in Progress folder or close the item, the auto-saved message is deleted.
novdocx (en) 13 May 2009
When GroupWise starts, if there are auto-saved messages in the
groupwise/groupwise_user
directory, a window is displayed, providing the following options to
/home/desktop_user/.novell/
deal with auto-saved messages:
Retrieve all saved messages into GroupWise: Recovers the auto-saved messages in GroupWise so
that you can finish composing the messages.
Delete all saved messages: Deletes the auto-saved messages from disk. The information in them is
permanently lost.
Ask again next time GroupWise is started: Retains the saved messages on disk but does not
recover them in GroupWise. The next time that GroupWise is started, the same window reappears.
Enabling or Disabling Auto-Save
By default, Auto-Save is enabled.
1 Linux: Click Tool s > Options.
Mac: Click GroupWise > Preferences.
2 Click Environment > General.
3 Select Disable auto-save to disable Auto-Save.
or
Deselect Disable auto-save to enable Auto-Save.
4 Click OK.
Saving an Unfinished E-Mail
1 In an open item click File > Save Draft.
2 Click the folder you want to save the item to, then click OK.
The draft message is placed in the folder you chose in Step 2. The default folder for unfinished
messages is the Work In Progress folder.
3.1.8 Selecting Send Options
“Changing the Priority of E-Mail You Send” on page 73
“Concealing the Subject of E-Mail You Send” on page 73
“Delaying Delivery of an Item” on page 73
“Setting an Expiration Date for E-Mail You Send” on page 74
“Setting the Security Setting (Classification) for E-Mail You Send” on page 74
“Changing the MIME Encoding for E-Mail You Send” on page 75
72 GroupWise 8 Linux/Mac Client User Guide
Page 73

Changing the Priority of E-Mail You Send
1 To change the priority of one item.
Open an item view, then click Send Options > General.
or
To change the priority of all items you send:
Linux: Click Tool s > Options > Send > Send Options.
Mac: Click GroupWise > Preferences > Send > Send Options.
2 Select High Priority, Standard Priority, or Low Priority.
The small icon next to an item in the Mailbox is red when the priority is high, white when the
priority is standard, and gray when the priority is low.
3 Return to the item you are composing.
or
Click OK, then click Close to save the setting for all items.
Concealing the Subject of E-Mail You Send
novdocx (en) 13 May 2009
You can hide the subject of an e-mail you send so the recipient does not see it until the e-mail is
opened.
1 To conceal the subject of one item:
Open an item view, then click Send Options > Security.
or
To conceal the subject of all items you send:
Linux: Click Tool s > Options > Send > Security.
Mac: Click GroupWise > Preferences > Send > Security.
2 Select Conceal Subject.
3 Return to the item you are composing.
or
Click OK, then click Close to save the setting for all items.
Delaying Delivery of an Item
1 To delay the delivery of one item:
Open an item view, then click Send Options > General.
or
To delay delivery of all items you send:
Linux: Click Tool s > Options > Send > Send Options.
Mac: Click GroupWise > Preferences > Send > Send Options.
2 Select Delay delivery.
3 In the text box, specify how many days later you want the item delivered.
or
E-Mail 73
Page 74

Select a date and time under Until.
4 Return to the item you are composing.
or
Click OK, then click Close to save the setting for all items.
Setting an Expiration Date for E-Mail You Send
If you set an expiration date for e-mail you send to other GroupWise users, the message is
automatically deleted from the recipient’s GroupWise Mailbox when the message expires.
1 To set an expiration date for one item:
Open an item view, then click Send Options > General.
or
To set an expiration date for all items you send:
Linux: Click Tools > Options > Send > Send Options.
Mac: Click GroupWise > Preferences > Send > Send Options.
2 Select Expiration Date.
3 Specify how long you want the message to remain in the recipient's Mailbox.
novdocx (en) 13 May 2009
4 Return to the item you are composing.
or
Click OK, then click Close to save the setting for all items.
Setting the Security Setting (Classification) for E-Mail You Send
A classification is a security setting that lets the recipient know if the item is confidential, top secret,
and so forth. This information appears at the top of the item. A classification does not provide any
encryption or additional security. It is meant to alert the recipient to the relative sensitivity of the
item.
1 To set the security for one item:
Open an item view, then click Send Options > General.
or
To set the security for all items you send:
Linux: Click Tools > Options > Send > Send Options.
Mac: Click GroupWise > Preferences > Send > Send Options.
2 Select a security setting from the Classification drop-down list.
Normal
Proprietary
Confidential
Secret
Top secret
For your eyes only
74 GroupWise 8 Linux/Mac Client User Guide
Page 75

3 Return to the item you are composing.
or
Click OK, then click Close to save the setting for all items.
Changing the MIME Encoding for E-Mail You Send
Many languages require different character encodings to display certain characters properly. In
GroupWise you can change the encoding for items that you send. Many times this is necessary for
the recipient to view the item correctly.
1 To change the MIME encoding for one item:
Open an item view, then click Send Options > General.
or
To change the MIME encoding for all items you send:
Linux: Click Tools > Options > Send > Send Options.
Mac: Click GroupWise > Preferences > Send > Send Options.
2 Select your MIME encoding from the MIME Encoding drop-down list.
3 Return to the item you are composing.
novdocx (en) 13 May 2009
or
Click OK, then click Close to save the setting for all items.
3.1.9 Posting a Discussion Note
A discussion note is a message that is posted to your mailbox only. Discussion notes are a way of
creating personal notes for yourself.
1 Click File > New > Discussion/Note.
2 Type a subject.
3 Type a message.
You can specify many options, such as making this message a high priority, requesting a reply
from the recipients, and more, by clicking the Send Options tab.
4 Include any attachments by clicking Attach a File on the toolbar.
5 Click Post on the toolbar.
3.1.10 Sending a Phone Message
A phone message is a note you can send to notify other GroupWise users of calls they received while
they were out of the office or unavailable. Phone messages are stored in the recipient’s Mailbox. You
cannot answer your phone from a phone message.
You can change the phone messages you receive into tasks, reminder notes, or other posted item
views. This way, you can leave a record of the conversation on the date it was held (reminder note)
or create a to-do item to complete at a later date (task).
1 Click File > New > New Phone.
You can place a New Phone Message button on the toolbar.
E-Mail 75
Page 76

2 In the To field, type a username, then press Enter. Repeat for additional users. If necessary, type
usernames in the CC and BC fields.
or
To select usernames from a list, click Address on the toolbar, double-click each user, then click
OK.
3 Type the name, company, and phone number of the caller.
4 Select the check boxes that apply to this phone message.
5 Type the message in the Message field.
6 To change the From name (to another account or proxy), click From, then click a name.
7 Click Send on the toolbar.
3.2 Managing Sent E-Mail
Section 3.2.1, “Working with Sent Items,” on page 76
Section 3.2.2, “Retracting Sent E-Mail,” on page 78
Section 3.2.3, “Resending E-Mail,” on page 78
novdocx (en) 13 May 2009
Section 3.2.4, “Confirming Delivery of E-Mail You Send,” on page 78
Section 3.2.5, “Tracking the Status of Send E-Mail,” on page 80
3.2.1 Working with Sent Items
You can track status information about an item in the Sent Items folder. Usually, this is turned on by
default to track delivered and opened information. If you choose not to create sent items, GroupWise
cannot track any information for sent items.
“Listing Sent Items” on page 76
“Displaying Sent Item Properties” on page 77
“Configuring Sent Item Information to Track” on page 77
Listing Sent Items
You might want to display items you previously sent. For example, you can read a sent item, resend
it with or without corrections, and in some cases, retract it (if it has not already been opened by the
recipient).
1 Click the Sent Items folder in the Folder List.
The icons next to an item give you helpful status information. See “Identifying the Icons Appearing
Next to Items” on page 28.
All sent items reside in this folder unless they are moved to a folder other than the Mailbox or
Calendar. If a sent item is moved to another folder, it no longer displays in the Sent Items folder. To
display sent items that have been moved to other folders, open those folders.
If you are sending messages to non-GroupWise systems, remember that those systems must have
status tracking capability in order to return the status of your outgoing message to your GroupWise
system.
76 GroupWise 8 Linux/Mac Client User Guide
Page 77

Displaying Sent Item Properties
Properties lets you check the status of any item you send. For example, you can see when an item
was delivered and when the recipient opened or deleted the item. If a recipient accepted or declined
an appointment and included a comment, you’ll see the comment in the Properties window. You also
see if a recipient marked a task Completed.
The Properties window also shows information about items you receive. You can see who else
received the item (except for blind copy recipients), the size and creation date of attached files, and
more.
In your Sent Items folder:
1 Linux: Right-click an item.
Mac: Control+click an item.
2 Click Properties.
3 Scroll to the status information near the bottom of the Properties page.
If you are sending messages to non-GroupWise systems, remember that those systems must have
status tracking capability in order to return the status of your outgoing message to your GroupWise
system.
novdocx (en) 13 May 2009
Configuring Sent Item Information to Track
You can configure information to track
1 To change the sent information to track for an item:
Open a new item, click Send Options > Status Tracking.
or
To change the sent information to track for all items you send:
Linux: Click Tool s > Options > Send > Status Tracking.
Mac: Click GroupWise > Preferences > Status Tracking.
IMPORTANT: The Create a sent item to track information option is selected by default. It is
highly recommended that you do not deselect it. If this option is not selected, no sent item is
created when you send an item; therefore, you do not have a copy of the items you send unless
you save them yourself.
2 Select the information to track:
Delivered: Tracks when an item you have sent was delivered to a user’s mailbox.
Delivered and opened: Tracks when an item you have sent was delivered and when it was
opened by the recipient.
All information: Tracks when an item you have sent was delivered, opened, deleted and
emptied.
3 (Optional) Decide if you want to Auto-delete sent item enabled. This removes sent items from
your mailbox after all the recipients have deleted the items and emptied them from their Trash.
E-Mail 77
Page 78

4 Return to the item you are composing.
or
Select the information to track for each item type, click OK, then click Close to save the setting
for all items.
3.2.2 Retracting Sent E-Mail
Use Delete to retract a sent item from the recipient’s Mailbox. You can retract a mail or phone
message from those GroupWise recipients who haven’t yet opened the item. You can retract an
appointment, reminder note, or task at any time.
1 Click the Sent Items folder in the Folder List.
2 Linux: Right-click the item you want to retract.
Mac: Control+click the item you want to retract.
3 Click Delete.
4 Select the appropriate option.
5 (Optional) If you have selected to retract this item from other recipients’ mailboxes, type a
comment to the recipients, explaining why the item was retracted.
novdocx (en) 13 May 2009
6 Click OK.
To see which recipients have opened your message, see Section 3.2.1, “Working with Sent Items,”
on page 76. E-mail cannot be retracted if it has already been opened.
Items that have been sent out across the Internet to other e-mail systems cannot be retracted.
3.2.3 Resending E-Mail
Use Resend to send an item a second time, perhaps with corrections.
1 Click the Sent Items folder in the Folder List.
2 Linux: Right-click the item you want to resend.
Mac: Right-click the item you want to resend.
3 Click Resend.
4 If the item was an Auto-Date item, click This Instance or All Instances.
5 Make any changes to the item, if necessary, then click Send on the toolbar.
6 Click Ye s to retract the original item.
or
Click No to leave the original item.
To see which recipients have opened your message, see Section 3.2.1, “Working with Sent Items,”
on page 76. E-mail cannot be retracted if it has already been opened.
3.2.4 Confirming Delivery of E-Mail You Send
GroupWise provides several ways to confirm that your item was delivered.
“Receiving Notification About Items You Send” on page 79
78 GroupWise 8 Linux/Mac Client User Guide
Page 79

“Requesting a Reply for Items You Send” on page 79
“Notifying Recipients About Items You Send” on page 80
If you are sending messages to non-GroupWise systems, remember that those systems must have
status tracking capability in order to return the status of your outgoing message to your GroupWise
system.
Receiving Notification About Items You Send
You can receive notification when the recipient opens or deletes a message, declines an
appointment, or completes a task.
1 To get a return receipt for one item:
Open an item view, click Send Options > Status Tracking.
or
To always get a return receipt for items you send:
Linux: Click Tool s > Options > Send > Status Tracking.
Mac: Click GroupWise > Preferences > Status Tracking.
2 Select an item type.
3 In the Return Notification section, specify the type of return receipt you want.
novdocx (en) 13 May 2009
You are automatically subscribed to Notify in Options. If you have deselected to receive alarms
and notifications, you cannot receive notifications with Notify. For more information, see
Section 8.2, “Using Notify,” on page 169.
If you are sending an item to an Internet address, you can click Enable delivery confirmation. If
the receiver’s Internet e-mail system enables status tracking, you can receive status about the
item you send.
4 Return to the item you are composing.
or
Click OK, then click Close to save the setting for all items.
Requesting a Reply for Items You Send
You can inform the recipient of an item that you need a reply. GroupWise adds a sentence to the item
stating that a reply is requested and changes the icon in the recipient’s Mailbox to a double arrow.
1 To request a reply for one item:
Open an item view, then click Send Options > General.
or
To request a reply for all items you send:
Linux: Click Tools > Options > Send > Send Options.
Mac: Click GroupWise > Preferences > Send > Send Options.
2 Click Reply requested, then specify when you want to receive the reply.
The recipient sees next to the message. If you select When Convenient, “Reply Requested:
When convenient” appears at the top of the message. If you select Within x Days, “Reply
Requested: By xx/xx/xx” appears at the top of the message.
E-Mail 79
Page 80

3 Return to the item you are composing.
or
Click OK, then click Close to save the setting for all items.
Notifying Recipients About Items You Send
1 To notify the recipients of one item:
Open an item view, then click Send Options > General.
or
To notify the recipients of all items you send:
Linux: Click Tool s > Options > Send > Send Options.
Mac: Click GroupWise > Preferences > Send > Send Options.
2 Click Notify Recipients.
Users are automatically subscribed to Notify in Options. If they have deselected to receive
alarms and notifications, they cannot be notified of messages you send.
3 Return to the item you are composing.
novdocx (en) 13 May 2009
or
Click OK, then click Close to save the setting for all items.
3.2.5 Tracking the Status of Send E-Mail
You can configure a single item to help you track its status. For example, for information about
tracking the status of an e-mail, see “Notifying Recipients About Items You Send” on page 80.
You can also set up GroupWise to track the status of all items you send.
1 Linux: Click Tool s > Options.
Mac: Click GroupWise > Preferences.
2 Click Send > Status Tracking.
3 From the Settings drop-down list, select the type of item you want to configure.
You can track the status of:
E-Mail Messages
Appointments
Task s
Reminder notes
4 Select Create a sent item to track information.
IMPORTANT: The Create a sent item to track information option is selected by default. It is
highly recommended that you do not deselect it. If this option is not selected, no sent item is
created when you send an item; therefore, you do not have a copy of the items you send unless
you save them yourself.
5 Make sure that the type of status information you want to track is selected.
80 GroupWise 8 Linux/Mac Client User Guide
Page 81

The options are:
Delivered
Delivered and opened
All information (default, recommended)
6 (Optional) Leave Auto delete sent item deselected.
If you select this option, you lose your copy of the item you sent.
7 In the Return notification group box, specify the type of return receipt you want.
8 (Conditional) If you are sending an item to an Internet address, select Enable delivery
confirmation, then select Send notification to my mailbox (if desired).
If the receiver’s Internet e-mail system enables status tracking, you can receive status about the
item you send.
9 Click OK.
3.3 Receiving E-Mail
GroupWise stores all the mail messages, appointments, and other items you receive in your
Mailbox.
novdocx (en) 13 May 2009
Section 3.3.1, “Reading Received E-Mail,” on page 81
Section 3.3.2, “Reading Attachments,” on page 84
Section 3.3.3, “Replying to E-Mail,” on page 85
Section 3.3.4, “Forwarding E-Mail,” on page 86
From your Mailbox, you can read items, reply to items, and forward items you receive. You can
organize items by assigning them to categories or by creating a Tasklist. You can delegate tasks and
appointments to other users. You can handle unwanted Internet e-mail with Junk Mail Handling.
You can even change an item, such as a mail message, to another type of item, such as an
appointment.
3.3.1 Reading Received E-Mail
You can read items you receive in your Mailbox or Calendar. Your Mailbox displays a list of all of
the items you have received from other users. Posted appointments, tasks, and reminder notes appear
in your Calendar, not in your Mailbox.
You can open and read all types of new items in your Mailbox. However, you might want to read
tasks and reminder notes in your Calendar so you can view new messages while looking at your
schedule.
Phone and mail messages stay in your Mailbox until you delete them. Appointments, reminder
notes, and tasks stay in your Mailbox until you accept, decline, or delete them. When you accept an
appointment, reminder note, or task, it is moved to your Calendar.
All Mailbox items are marked with an icon.The icons change depending on whether or not the item
has been opened. See “Identifying the Icons Appearing Next to Items” on page 28 for more
information.
E-Mail 81
Page 82

In addition, all unopened items in your Mailbox are bolded to help you easily identify which items
and documents you have not yet read. This is especially useful for collapsed discussion threads
because it saves you the time of expanding each thread to check if there are newly posted items.
“Selecting the Default Read View and Font” on page 82
“Reading Items” on page 83
“Changing the Font of Received Items” on page 83
“Marking an Item Read Later” on page 83
“Marking an Item Read” on page 83
Selecting the Default Read View and Font
By default, GroupWise uses the HTML Read view to display items for reading. This Read view
enables both HTML-formatted and plain text e-mail to display correctly.
When you read an item in GroupWise, you can select how you want the message to display. You can
select whether the message is displayed in text or HTML. If the message is a text message, you can
also select the default font and font size.
novdocx (en) 13 May 2009
1 Linux: Click Tool s > Options.
Mac: Click GroupWise > Preferences.
2 Click Environment > General.
3 Under Default Read View & Font, select Plain Text or HTML.
4 If you select Plain Text:
4a Select the font and the font size in the appropriate fields.
By default, incoming HTML messages are displayed in HTML, even when you select
Plain Text. This makes reading messages easier when you receive both plain text and
HTML messages.
4b (Optional) Select Force view if you want to force all messages to be displayed in text only.
This prevents all HTML formatting and embedded images from being displayed.
5 Click OK.
6 If you selected HTML:
For security reasons, images are not displayed in HTML messages by default. You can
customize the functionality of this warning.
6a Click Environment > Default Actions.
6b In the HTML external images section, select if you want to Always show warning, Never
show warning, or Check Frequent Contacts.
If you select Check Frequent Contacts, images display from senders in your Frequent
Contacts address book, but the warning displays for everyone else.
6c Click OK.
7 Click Close.
82 GroupWise 8 Linux/Mac Client User Guide
Page 83

Reading Items
1 Double-click the message in the Message list to view the message in a new window.
or
Select the message to view the message in the QuickViewer.
For security reasons, images are not displayed by default in HTML messages. To view blocked
images, click GroupWise has prevented images on this page from displaying. Click here to display
the images at the top of the Message view to display the images.
TIP: In an open item, you can change your Read view for just that one item by clicking Vie w >
Plain Text or View > HTM L .
Changing the Font of Received Items
This information applies to reading an item in an item view or in the QuickViewer. This font change
is only in effect while you read the item. If you close the item and re-open it, the font returns to the
default font.
novdocx (en) 13 May 2009
1 In the open item, click Edit > Font, then select the font, font style, and font size.
2 Click OK to apply the changes.
NOTE: You cannot change the font of an HTML message in the QuickViewer. The font is encoded
into the HTML.
Marking an Item Read Later
If you open an item to read it, and then decide you want to read the item later, you can mark the item
read later. Marking the item read later changes the item to bold and changes the item’s icon to
unopened so you know you still need to read the item.
1 In the Mailbox, click the item in the Item List.
2 Click Actions > Read Later.
If you have opened an item, marking it read later does not change the status of the item in Properties.
For example, if you have opened an item, then marked the item read later, the sender of the item still
sees the item status as Opened in the Properties window.
Marking an Item Read
1 In the Mailbox, click the item in the Item List.
2 Click Actions > Mark Read.
Marking an item Read changes the status of the item in Properties. For example, if you have not
opened an item, but you marked the item read, the sender of the item sees the item status as Opened
in the Properties window.
E-Mail 83
Page 84

3.3.2 Reading Attachments
GroupWise has the ability to send and receive attachments with items. When you receive an
attachment with an item, the list of attachments is displayed in the Attachment Window or to the
right of the subject.
“Viewing Attached Files” on page 84
“Opening Attached Files” on page 84
“Viewing an Attached vCard” on page 85
NOTE: The Linux/Mac client cannot display attached OLE objects.
Viewing Attached Files
When you click an attached file, the attachment is displayed in the message pane of the
QuickViewer. This is usually faster than opening the attachment; however, the attachment might not
be formatted properly. If the attachment type is not supported, you receive an error.
1 Open the item containing the attachment.
2 Click the attachment.
novdocx (en) 13 May 2009
If you receive a message indicating that
external application
, then you must open the file. For information on opening an attachment,
The attachment can only be viewed with an
see Opening Attached Files.
Opening Attached Files
When you open an attached file, as opposed to viewing it, GroupWise lets the operating system
determine the correct application to open the file in. If the operating system cannot open the file,
then GroupWise cannot open the file.
1 Open the item containing the attachment.
2 Double-click the attachment in the Attachment Window.
or
Linux: Right-click the attachment, then click Open Attachment.
Mac: Control+click the attachment, then click Open Attachment.
By default, GroupWise warns you if an attachment is larger than 1000 KB (1 MB).
To eliminate the warning message:
1 Linux: Click Tool s > Options.
Mac: Click GroupWise > Preferences.
2 Click Environment > Default Actions.
3 Deselect Warn if larger than.
You can also adjust the attachment size for when the warning message is displayed.
4 Click OK.
84 GroupWise 8 Linux/Mac Client User Guide
Page 85

Viewing an Attached vCard
vCards are electronic business cards formatted according to standards set by the Internet Mail
Consortium.
To view a vCard that has been attached to an item:
1 Linux: Right-click the vCard attachment.
Mac: Control+click the vCard attachment.
2 Click View Attachment.
3.3.3 Replying to E-Mail
Use Reply to respond to an item. You can reply to everyone who received the original item or to the
sender only, without creating and addressing a new message. You can also include a copy of the
original message in your reply. Your reply includes Re: preceding the original subject text. You can
modify the subject text if you want.
“Replying to an E-Mail” on page 85
“Setting Up an Automated Reply” on page 85
“Setting the Default Reply Format” on page 85
novdocx (en) 13 May 2009
“Replying to an Item in a Shared Folder” on page 86
Replying to an E-Mail
1 Open the item you want to reply to.
2 Click Reply on the toolbar to send the e-mail just to the sender.
or
Click Reply All on the toolbar to send the e-mail to the sender and all recipients.
3 Type your message, then click Send on the toolbar.
If the original item includes BC or CC recipients and you select to reply to all, your reply is sent to
the CC recipients but not to the BC recipients.
Setting Up an Automated Reply
If you are going on vacation or are out of the office for some other reason, you can create a rule to
reply to messages you receive while you are away. For setup instructions, see Section 9.4.2,
“Creating a Vacation Rule or Auto Reply,” on page 178.
Setting the Default Reply Format
1 Linux: Click Tool s > Options
Mac: Click GroupWise > Preferences.
2 Click Environment > Reply Format.
3 If you use the Plain Text Compose view, select from the following format options:
GroupWise classic: Provides separator characters, original sender, date, and time.
E-Mail 85
Page 86

Include headers: Allows the selection of the separator character; provides original sender,
recipient, date, time, and subject.
Internet standard: Allows the selection of the separator character; allows you to choose to
include original sender, e-mail address, date, time, and message identifier.
Separator: (Conditional) This option is only available if Internet standard is selected as the
reply format.
Tex t co l o r : Allows you to select a reply color, regardless of the reply format selected above.
Type my reply: Select Top or Bottom if you selected Include headers or Internet standard
above.
4 If you use the HTML Compose view, select from the following format options:
GroupWise classic: Provides separator characters, original sender, date, and time.
HTML enhanced: Allows the selection of the separator character; allows you to choose to
include original sender, e-mail address, date, time, and message identifier. Select Include
headers to provide the original sender, recipient, date, time, and subject instead.
Include headers: (Conditional) If you select HTML enhanced, select Include headers if you
want to include headers in the HTML reply format.
Type my reply: Select Top or Bottom if you selected HTML enhanced above.
5 Click OK.
novdocx (en) 13 May 2009
Replying to an Item in a Shared Folder
1 Open or select an item in the shared folder.
2 Linux: Click Reply on the toolbar, select Reply options, then click OK.
You can reply to the original discussion topic, rather than to the item you are reading. Or, you
can reply to any item you are reading, whether it’s an original discussion topic or someone
else’s reply. In both cases, these replies are posted in the shared folder and not sent to
individuals.
If you reply privately to the individual who wrote the item, your reply is not posted to the
shared folder.
Mac: Click Reply or Reply All.
The original message is automatically included when you reply.
3 Type your reply, then click Post on the toolbar.
3.3.4 Forwarding E-Mail
Use Forward to send items you receive to other users. When you forward an item, the mail message
includes your name and any additional comments you have made.
“Forwarding an E-Mail” on page 87
“Forwarding Multiple E-Mails” on page 87
If you want to forward some or all messages to another e-mail account automatically, see
Section 9.4.3, “Creating a Rule to Forward Mail to Another Account,” on page 179.
86 GroupWise 8 Linux/Mac Client User Guide
Page 87

Forwarding an E-Mail
1 Open the item you want to forward.
2 Click the Forward drop-down list on the toolbar.
3 Click Forward.
or
Click Forward as Attachment.
The forwarding method you select becomes the default functionality for the Forward button
thereafter.
4 Add the names of the users to whom you want to forward the item.
5 (Optional) Type a message.
6 Click Send on the toolbar.
If you can’t accept an appointment, task, or reminder note, you can delegate the item instead of
forwarding it. Delegating places a Delegated status in the item’s Properties window, letting the
sender know you have transferred responsibility for the item to another person.
novdocx (en) 13 May 2009
Forwarding Multiple E-Mails
1 Linux: Ctrl+click the items you want to forward in your Mailbox.
Mac: Command+click the items you want to forward in your Mailbox.
2 Click Actions > Forward as Attachment.
3 Add the names of the users to whom you want to forward the item.
4 Type a message (optional).
5 Click Send on the toolbar.
3.4 Managing Received E-Mail
Section 3.4.1, “Personalizing E-Mail,” on page 87
Section 3.4.2, “Changing an E-Mail to Another Item Type,” on page 88
Section 3.4.3, “Saving Received E-Mail to Disk,” on page 89
Section 3.4.4, “Deleting E-Mail,” on page 90
Section 3.4.5, “Archiving and Backing Up E-Mail,” on page 90
3.4.1 Personalizing E-Mail
When you receive an e-mail message, you can click the Personalize tab to add personal information
to the e-mail. You can change the subject, add a note, and select a category.
“Changing the Subject of an E-Mail You Receive” on page 88
“Adding a Note to an E-Mail You Receive” on page 88
“Assigning a Category to an E-Mail You Receive” on page 88
E-Mail 87
Page 88

Changing the Subject of an E-Mail You Receive
If you personalize a subject, the new subject displays in your Mailbox and Calendar and in the
Mailbox and Calendar of anyone who proxies for you. If you change the subject of an item in a
shared folder, other users of the shared folder still see the original subject.
1 Open an item from your Mailbox or Calendar.
2 Click the Personalize tab.
3 Type a new subject in the My Subject field.
To see the original subject, open the item and look in the Subject field in the item header.
When you perform a Find with a specific word in the Subject field, the Find results show items
whose original subject or personalized subject contains this word. When you create an Advanced
Find, use the Subject field to search for the original subject, and use the My Subject field to search
for the personalized subject.
When you create a rule that looks for a specific word in the Subject field, the rule only looks at the
original subject.
novdocx (en) 13 May 2009
Adding a Note to an E-Mail You Receive
When you add a note to an e-mail you receive, the note is visible to you and anyone who proxies for
you. You can only view the note only by using the Personalize tab for the e-mail.
1 Open an item from your Mailbox or Calendar.
2 Click the Personalize tab.
3 In the My Notes field, type your note. The note is automatically saved when you leave the
Personalize tab.
Assigning a Category to an E-Mail You Receive
See “Using Categories to Organize Items” on page 36.
3.4.2 Changing an E-Mail to Another Item Type
You can use Change To to convert an item in your Mailbox to another type of item. For example,
you can change a mail message in your Mailbox to an appointment in your Calendar. The new
appointment contains all the information from the mail message (such as To, CC, and BC lists,
subject, and message text) that is applicable in the appointment.
When you change a mail or phone message to another type of item (such as an appointment or task),
the original item is removed from your Mailbox and the new item is added in the appropriate
location, such as the Calendar.
When you change an item, GroupWise displays the default item view selected in Environment
Options.
1 In your Mailbox, click the item you want to change.
2 Click Edit > Change To, then click an item type.
or
88 GroupWise 8 Linux/Mac Client User Guide
Page 89
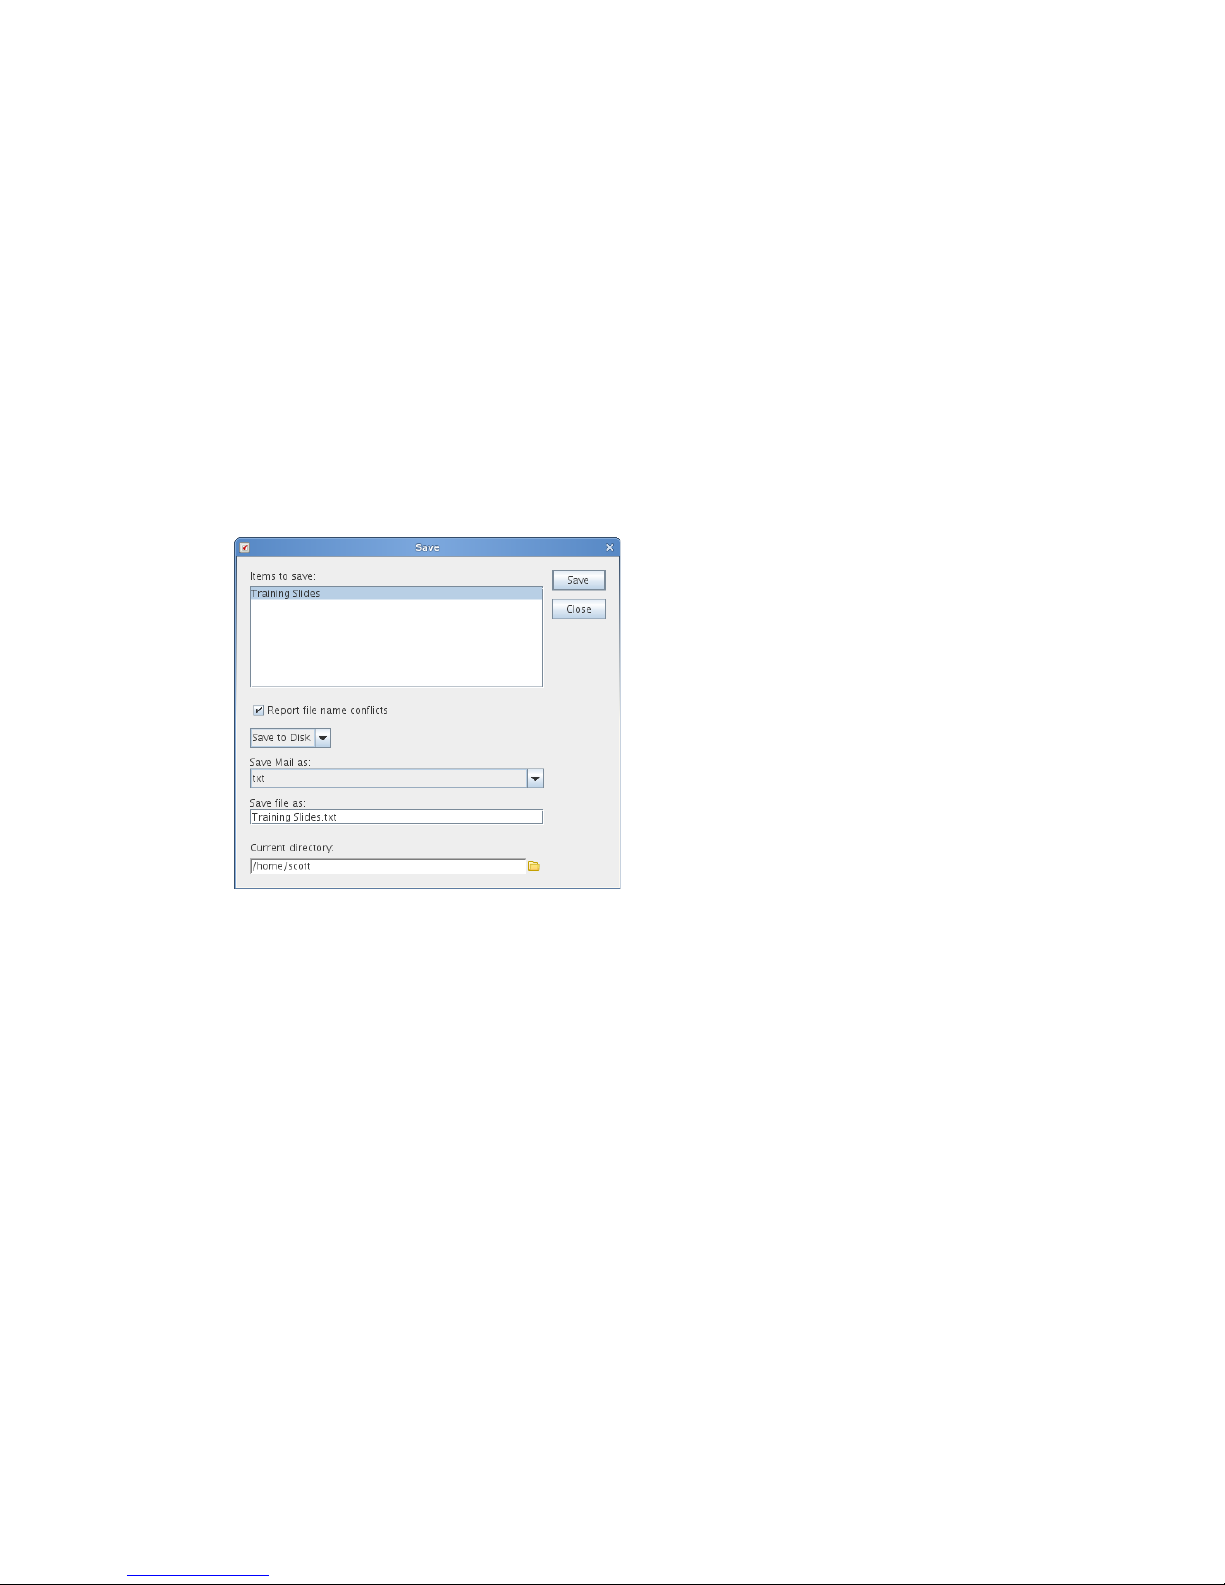
Click Edit > Change To, click More, then click an item type. You can choose posted or group
items.
Posted items are sent directly to your Calendar. Group items are sent to the Mailboxes of
individuals and groups the message is sent to.
3 Type any necessary information.
4 Click Send or Post on the toolbar.
When you change a mail or phone message to another type of item (such as an appointment or task),
the original item is removed from your Mailbox and the new item is added in the appropriate
location, such as the Calendar.
3.4.3 Saving Received E-Mail to Disk
1 In your Mailbox or Calendar, click the item you want to save, then click File > Save As.
novdocx (en) 13 May 2009
2 Select the item and any attachments you want to save.
3 Select the file format (txt, pdf, rtf, eml) to save the file in.
4 Type a filename for the item in the Save file as field.
5 To save the item in a different directory than is shown in the Current directory field, click
Browse, then select the new directory.
6 Select Report file name conflicts to be prompted before replacing a file with the same name.
7 Click Save, then click Close.
Saved items remain in your Mailbox and Calendar as well as being copied to the location you
specify. Items saved to disk are saved in the selected format so that they can also be opened in other
programs. Attachments are saved in their original format.
You can also drag and drop an item from within GroupWise to the location where you want to save
the file. For example, you could drag and drop a message into a project folder on your Windows
desktop.
E-Mail 89
Page 90

3.4.4 Deleting E-Mail
Use Delete to remove selected items from your Mailbox. You can also use Delete to retract items
you have sent. You can retract mail and phone messages if the recipients have not read them or if
they have not been sent to the Internet. You can retract appointments, reminder notes, and tasks at
any time.
“Deleting an Item from Your Mailbox” on page 90
“Deleting and Emptying Items from Your Mailbox” on page 90
“Confirming Deletion of Items” on page 90
Deleting an Item from Your Mailbox
1 In the Main Window, select one or more items, then press the Delete key.
For information about customizing this functionality, see Section 2.5.3, “Setting the Key Used
to Delete Items,” on page 56.
2 In the Sent Items folder, select the mailboxes (your mailbox, recipients’ mailboxes, or all
mailboxes) where you want the item deleted. You cannot delete an item from a recipient’s
mailbox if he or she has already opened the item.
3 Click OK.
novdocx (en) 13 May 2009
Deleting and Emptying Items from Your Mailbox
1 In the Main Window, select one or more items, then click Edit > Delete and Empty.
Deleted items are not moved to your Trash if you select this option; they are unrecoverable.
Confirming Deletion of Items
Use Item Deletion Confirmation to have GroupWise prompt you for confirmation each time you
delete an item.
1 Linux: Click Tool s > Options.
Mac: Click GroupWise > Preferences.
2 Click Environment > General.
3 Select the Item deletion confirmation check box, then click OK or Apply.
3.4.5 Archiving and Backing Up E-Mail
E-mail can accumulate rapidly. See Chapter 16, “GroupWise Maintenance,” on page 209 for long-
term management strategies.
3.5 Printing E-Mail
From GroupWise, you can print any item and its attachments.
When you print an item, the From, To, Date, Subject, CC, and attachment names are displayed at the
top of the page.
Section 3.5.1, “Selecting a Printer,” on page 91
90 GroupWise 8 Linux/Mac Client User Guide
Page 91

Section 3.5.2, “Printing E-Mail,” on page 91
Section 3.5.3, “Printing E-Mail with Attachments,” on page 91
Section 3.5.4, “Specifying Default E-Mail Header Information to Print,” on page 92
Section 3.5.5, “Changing the Printed Font on Plain Text Items,” on page 92
3.5.1 Selecting a Printer
GroupWise defaults to the same printer that you have set as your default on your desktop.
Linux:
For example, to select your default printer on the GNOME* desktop:
1 Click Computer > Control Center.
2 Click Hardware > Printers.
3 Right-click a printer, the click Make Default.
Mac:
novdocx (en) 13 May 2009
1 In System Preferences, click Printer & Fax.
2 Control+click a printer, then click Set default printer.
When you print an item, you can select a different printer as needed.
3.5.2 Printing E-Mail
1 In an open folder, select the message, then click File > Print.
or
In an open item, click Print.
In the Select item to be printed field, the message is selected by default.
2 In the Select available print form field, select the select the form you want if more than one is
available.
3 Linux: In the Name field, select a printer other than the default, as needed.
4 On the Contents tab, select whether you want to include the page number, the sender, the
recipient, the date and the subject line.
You can select some options as defaults for all printed items, as described in Section 3.5.4,
“Specifying Default E-Mail Header Information to Print,” on page 92.
5 Click Preview if you want to see how the printed item will look.
6 Click Print.
7 Mac: Select the desired standard Mac print options as needed, including selecting a printer
other than the default, then click Print.
3.5.3 Printing E-Mail with Attachments
1 In an open folder, right-click the message, then click Print.
or
E-Mail 91
Page 92

In an open item, click Print.
In the Select Item to be printed field, the message is selected by default.
You can deselect the message if you do not want to print it along with the attachments.
2 Select one or more attachments.
Attachments are printed as they would appear if viewed in the GroupWise document viewer
(JadeLiquid*). If this rendering is not sufficient, drag and drop the attachment into the
application in which it was originally created and print it from there.
3 Select print options as needed.
4 Click Print.
3.5.4 Specifying Default E-Mail Header Information to Print
When you print an item, the From, To , Date, Subject, CC, and attachment names are displayed in the
header at the top of the page. You can change the information that prints.
1 Linux: Click Tools > Options.
Mac: Click GroupWise > Preferences.
2 Click Printing.
novdocx (en) 13 May 2009
3 Click General, then select or deselect these options as desired.
4 Click Message, then select or deselect options as desired.
5 Click OK.
3.5.5 Changing the Printed Font on Plain Text Items
1 Linux: Click Tools > Options.
Mac: Click GroupWise > Preferences.
2 Click Printing.
3 In the Plain text printing font box, click the button to select a font.
4 Select a font, font style, and font size.
5 Click OK.
3.6 Handling Unwanted E-Mail (Spam)
Use Junk Mail Handling to decide what to do with unwanted Internet e-mail, also known as spam,
that is sent to your GroupWise e-mail address.
Section 3.6.1, “Understanding Junk Mail Handling,” on page 93
Section 3.6.2, “Blocking or Junking All E-Mail From a Particular User,” on page 93
Section 3.6.3, “Blocking or Junking E-Mail From a Particular Internet Domain,” on page 95
Section 3.6.4, “Junking E-Mail From Users Not In a Personal Address Book,” on page 95
Section 3.6.5, “Preventing E-Mail From a User or Internet Domain From Being Junked or
Blocked,” on page 96
Section 3.6.6, “Modifying Junk Mail Handling Lists and Settings,” on page 97
92 GroupWise 8 Linux/Mac Client User Guide
Page 93

Section 3.6.7, “Automatically Deleting Items From the Junk Mail Folder,” on page 98
Section 3.6.8, “Manually Deleting Items From the Junk Mail Folder,” on page 98
3.6.1 Understanding Junk Mail Handling
Blocking or junking e-mail applies to items that you receive from the Internet. Internet e-mail
includes all e-mail where the sender’s address is in the form of [email protected],
[email protected], and so forth.
Junk Mail Handling does not apply to internal e-mail. Internal e-mail is e-mail where the sender is
part of your GroupWise system and the From field shows only the name of the sender, not an
Internet address as explained above. If you want to block or junk internal e-mail, you can use Rules.
(For more information, see Section 9.4, “Creating a Rule,” on page 177.)
You have three options for blocking or junking Internet e-mail:
Block list: You can add individual e-mail addresses or entire Internet domains to a Block List.
Items from these addresses or Internet domains are blocked and never arrive in your Mailbox.
An Internet domain is the part of the e-mail address that comes after the @. For example, in the
address [email protected], the Internet domain is example.com.
novdocx (en) 13 May 2009
However, e-mail from contacts in your Frequent Contact address book and your corporate
address book is not blocked.
Addresses and domains: You can add individual e-mail addresses or entire Internet domains
to a Junk List. Items from these addresses or Internet domains are delivered to the Junk Mail
folder in your Mailbox. You can specify that the items in this folder be automatically deleted
after a certain number of days.
Personal address book: You can specify that any e-mail items from users whose addresses are
not in your personal address books (including your Frequent Contacts address book and any
personal address books you have created) are sent to the Junk Mail folder. This is sometimes
called “white listing.”
For information about the Junk Mail folder, see “Junk Mail Folder” on page 23.
In addition to the Block List and Junk List, there is a Trust List. Use this list to add e-mail addresses
or Internet domains that you do not want blocked or junked, no matter what is specified in the other
two lists. For example, you might have example.com in your Block List, but you have one friend
whose address is [email protected]. You can add this friend’s e-mail address to the Trust List.
See “Preventing E-Mail From a User or Internet Domain From Being Junked or Blocked” on
page 96.
If you specify Junk Mail Handling options in Caching mode, make sure to synchronize with your
Online Mailbox in order to see the same options when you log in to GroupWise on another
computer.
Your system administrator can turn off Junk Mail Handling so that it is not available.
3.6.2 Blocking or Junking All E-Mail From a Particular User
1 Linux: Right-click an item with an Internet address.
Mac: Control+click an item with an Internet address.
E-Mail 93
Page 94
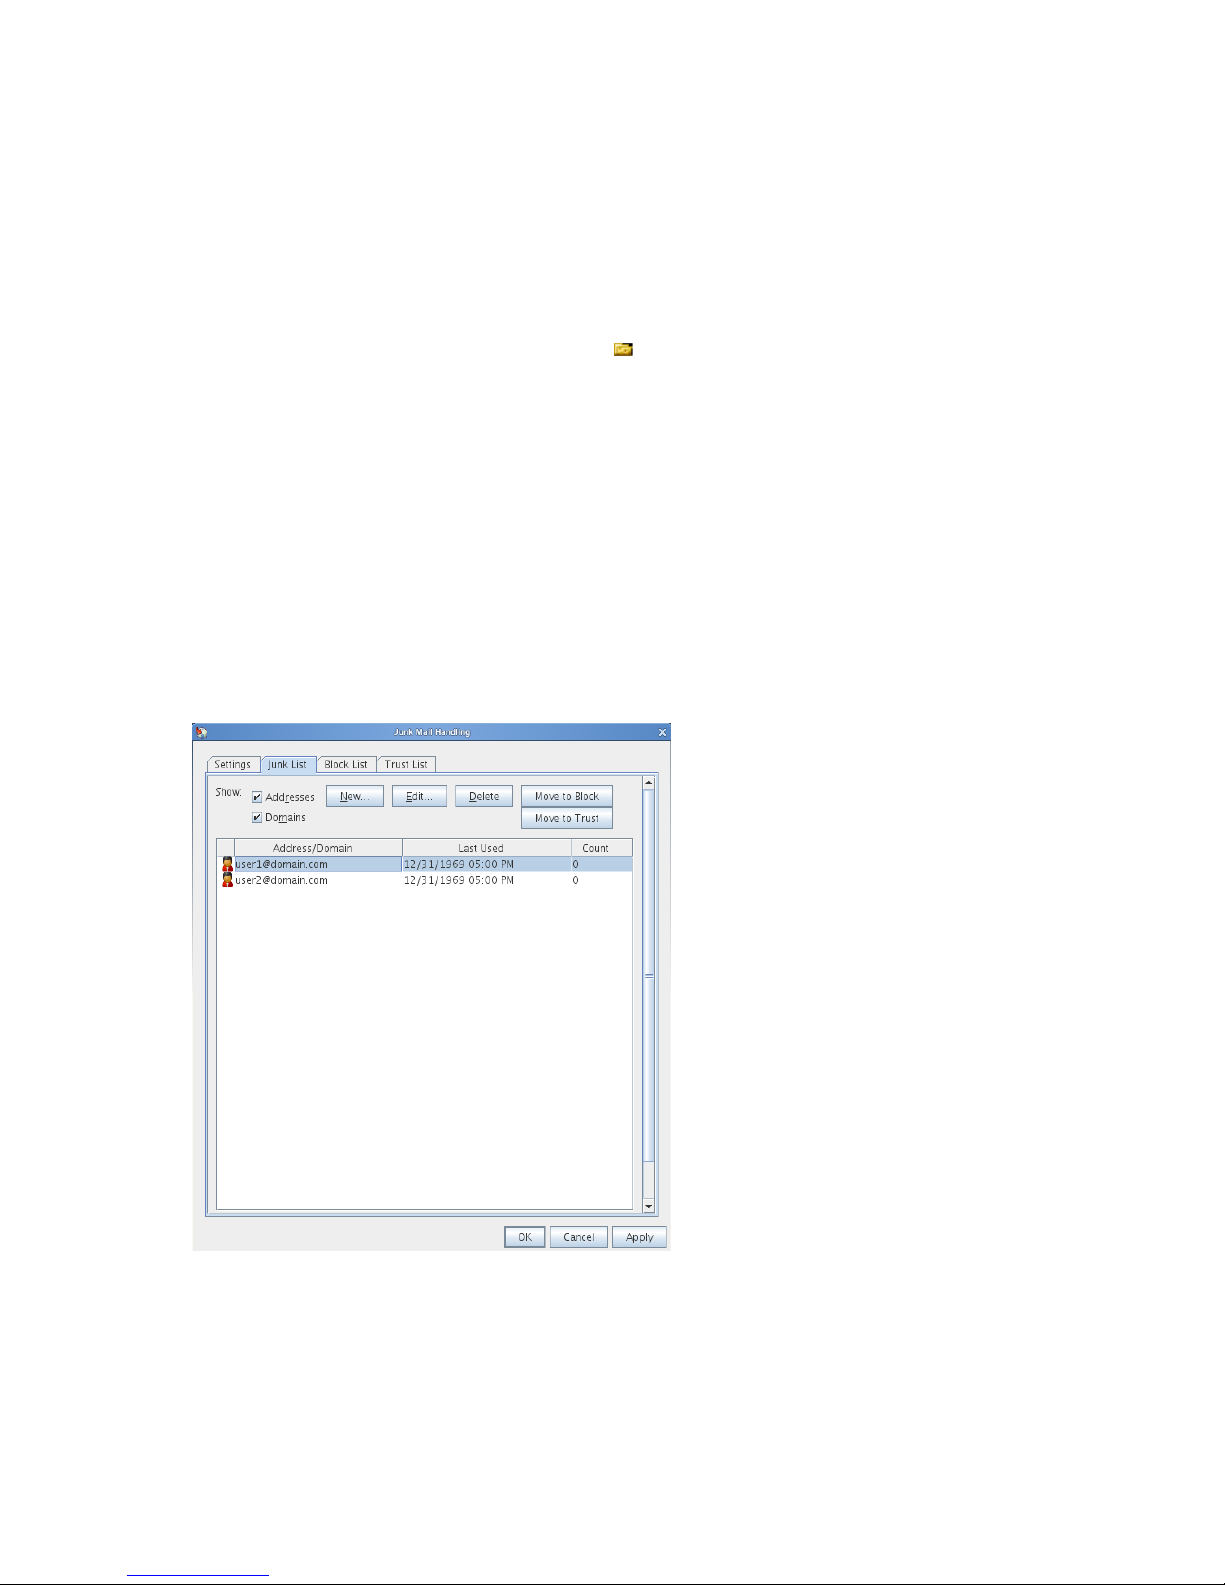
2 Click Junk Mail.
3 Click Junk Sender.
or
Click Block Sender.
4 Select Junk e-mail from this address or Block e-mail from this address.
If you select Junk, the address is added to the Junk List. All future e-mail items from this e-mail
address are delivered to the Junk Mail folder .
You can specify that the items in this folder be automatically deleted after a certain number of
days. This folder is not created in the Folder List unless a Junk Mail option is enabled or an
address or Internet domain is added to the Junk List (which enables the Junk List option).
If you select Block, the address is added to the Block List. All future e-mail items from this email address are not delivered to your Mailbox.
Your Junk List and Block List can each include up to 1000 entries. If more than 1000 entries
are added, the least-used entries are discarded.
5 If the Junk List or Block List is not enabled, select Enable junk list or Enable block list.
novdocx (en) 13 May 2009
At any time, you can click To ols > Junk Mail Handling, click Junk List or Block List, then click New
to add an e-mail address to the Junk List or Block List.
Figure 3-1 Junk Mail Handling Dialog Box Showing the Junk List Tab
94 GroupWise 8 Linux/Mac Client User Guide
Page 95

3.6.3 Blocking or Junking E-Mail From a Particular Internet
Domain
An Internet domain is the part of the e-mail address that comes after the @. For example, in the
address [email protected], the Internet domain is example.com.
1 Linux: Right-click an item.
Mac: Control+click an item.
2 Click Junk Mail.
3 Click Junk Sender.
or
Click Block Sender.
4 Select Junk any e-mail from this internet domain or Block any e-mail from this internet domain.
If you select Junk, the Internet domain is added to the Junk List. All future e-mail items from
this Internet domain are delivered to the Junk Mail folder .
You can specify that the items in this folder be automatically deleted after a certain number of
days. This folder is not created in the Folder List unless a Junk Mail option is enabled or an
address or Internet domain is added to the Junk List (which enables the Junk List option).
If you select Block, the Internet domain is added to the Block List. All future e-mail items from
this Internet domain are not delivered to your Mailbox.
Your Junk List and Block List can each include up to 1000 entries. If more than 1000 entries
are added, the least-used entries are discarded.
novdocx (en) 13 May 2009
5 If the Junk List or Block List is not enabled, select Enable junk list or Enable block list.
At any time, you can click To ols > Junk Mail Handling, click Junk List or Block List, then click New
to add an Internet domain to the Junk List or Block List.
3.6.4 Junking E-Mail From Users Not In a Personal Address
Book
1 Click Too ls > Junk Mail Handling.
2 Select Enable junk mail using personal address books.
E-Mail 95
Page 96
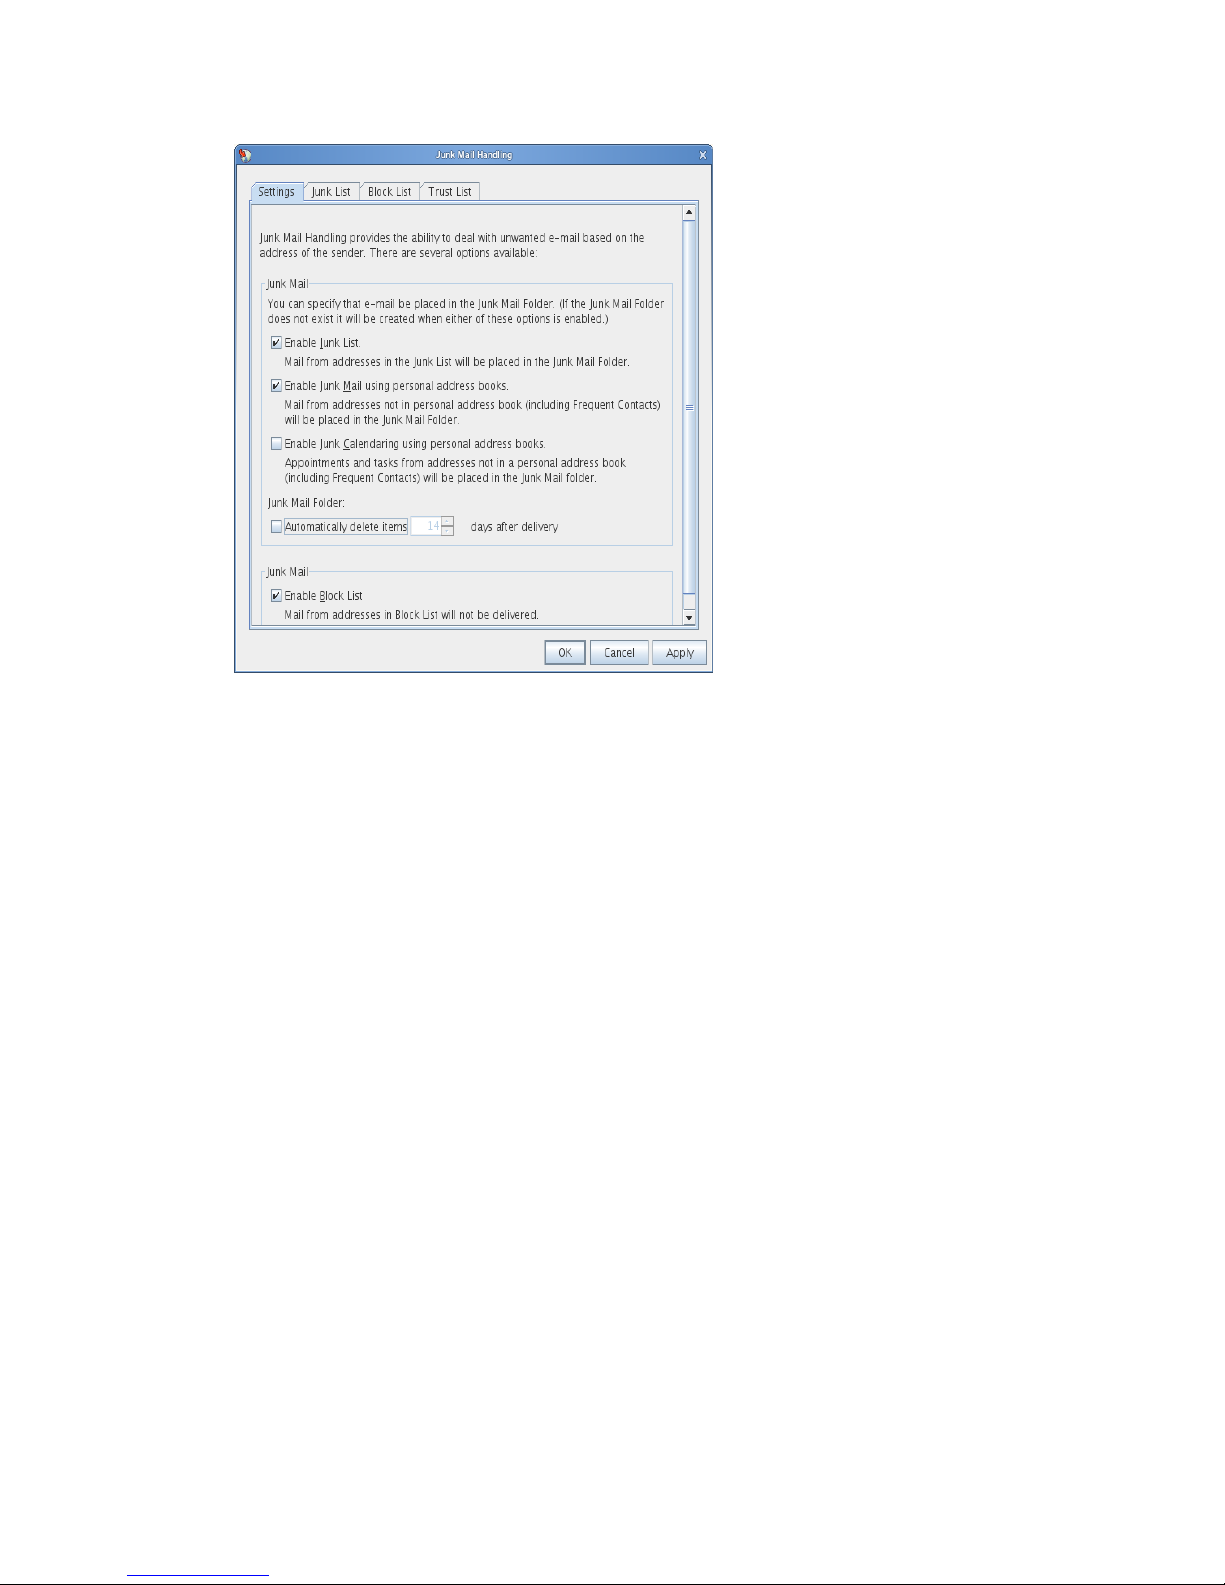
novdocx (en) 13 May 2009
3 Click OK.
All future e-mail from addresses not in your Frequent Contacts address book and other personal
address books is delivered to the Junk Mail folder. You can specify that the items in this folder are
deleted after a specified number of days.
3.6.5 Preventing E-Mail From a User or Internet Domain From
Being Junked or Blocked
1 Click Too ls > Junk Mail Handling.
2 Click the Trust List tab.
96 GroupWise 8 Linux/Mac Client User Guide
Page 97
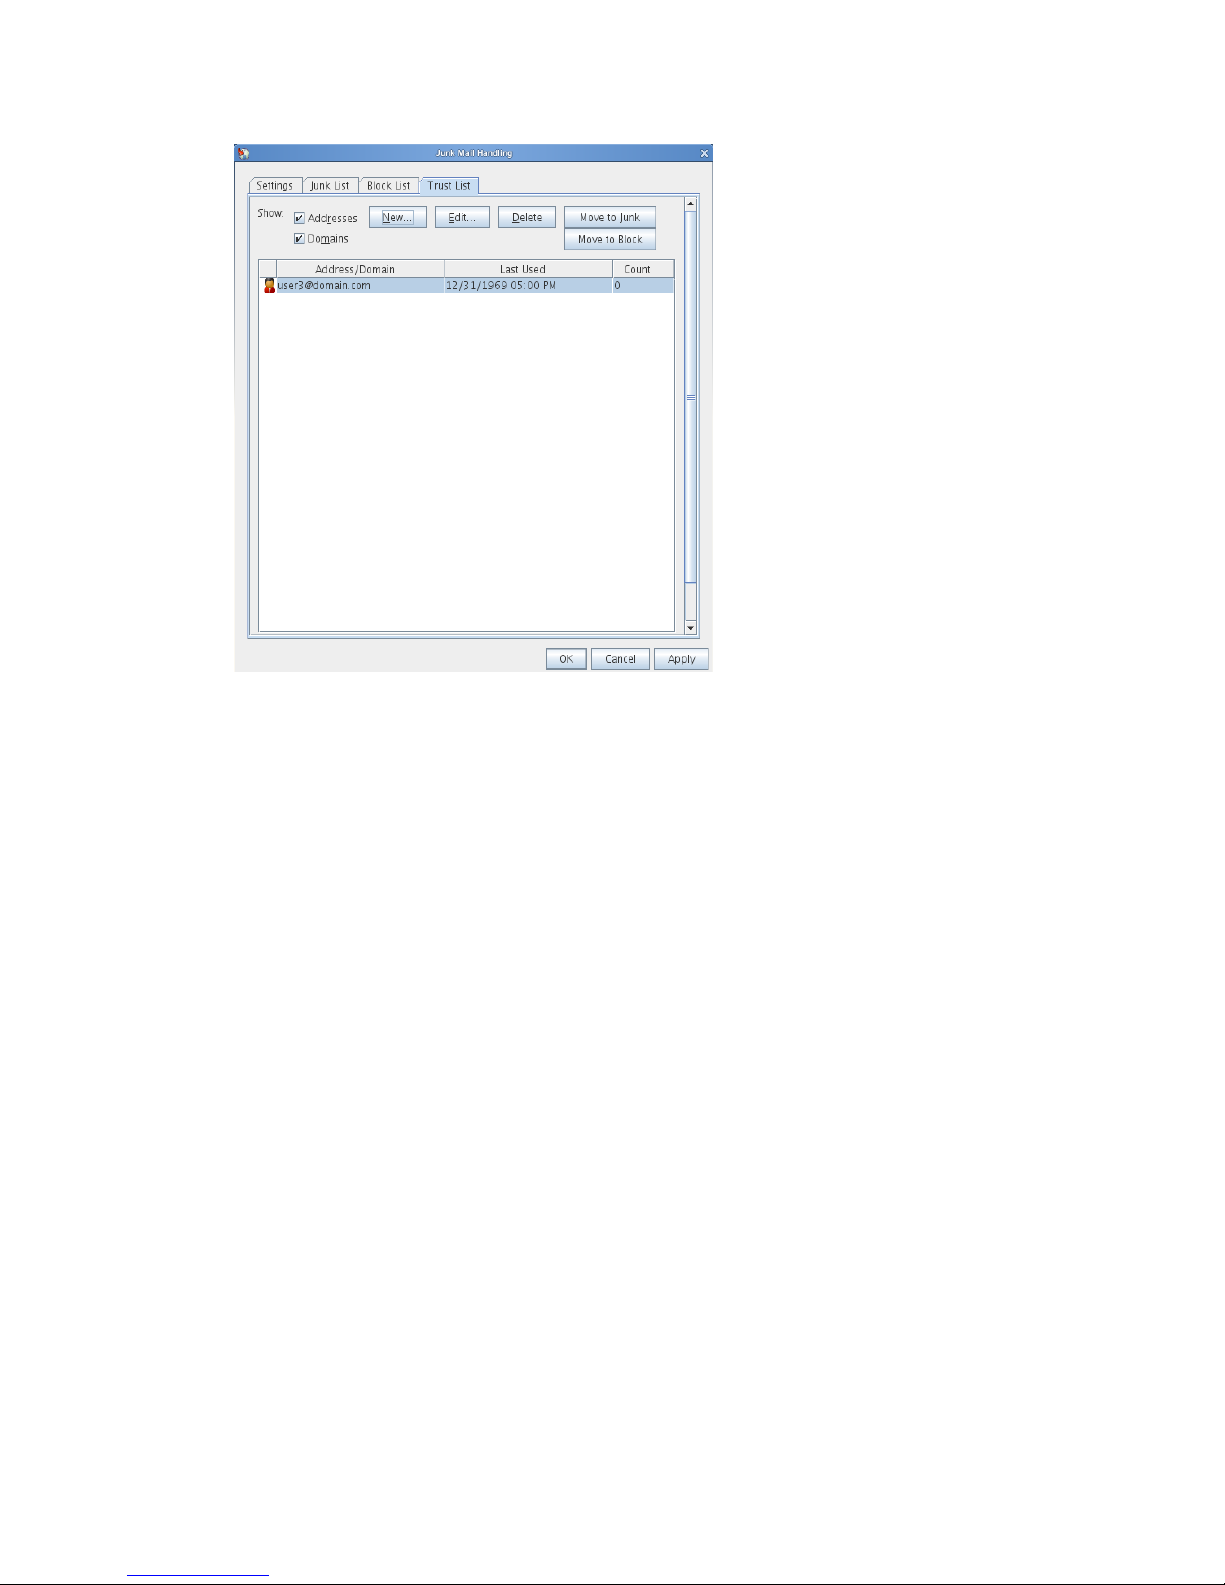
novdocx (en) 13 May 2009
3 Click New, type an e-mail address or Internet domain, then click OK.
An address or Internet domain can be in uppercase, lowercase, or mixed case. For example,
[email protected] and [email protected] are both the same.
You cannot use wildcard characters such as * or ? in an Internet domain name. However, an
Internet domain, for example idomain.com, affects all e-mail from example.com and any
subdomains that prefix this Internet domain, for example, offers.example.com or
members.example.com. A domain of abcexample.com is not affected.
4 Click OK.
All future items from this e-mail address or Internet domain are not blocked or delivered to the Junk
Mail folder, no matter what is specified in the Block List and Junk List.
3.6.6 Modifying Junk Mail Handling Lists and Settings
1 Click Too ls > Junk Mail Handling.
2 On the Settings tab, modify any settings.
3 Click the tab of the list you want to modify.
4 To add an e-mail address or Internet domain to a list, click New, type the e-mail address or
Internet domain, then click OK.
An address or Internet domain can be in uppercase, lowercase, or mixed case. For example,
[email protected] and [email protected] are both the same.
You cannot use wildcard characters such as * or ? in an Internet domain name. However, an
Internet domain, for example idomain.com, affects all e-mail from example.com and any
subdomains that prefix this Internet domain, for example, offers.example.com or
members.example.com. A domain of abcexample.com is not affected.
E-Mail 97
Page 98

5 To change an e-mail address or Internet domain, click the address or Internet domain, click
Edit, make changes, then click OK.
6 To remove an e-mail address or Internet domain from a list, click the address or Internet
domain, then click Remove.
7 Click OK.
3.6.7 Automatically Deleting Items From the Junk Mail Folder
1 Click Too ls > Junk Mail Handling.
2 Click Automatically delete items __ days after delivery (move to Trash).
Specify how long you want items retained in the Junk Mail folder.
3 Click OK.
3.6.8 Manually Deleting Items From the Junk Mail Folder
1 Linux: Right-click the Junk Mail folder.
Mac: Control+click the Junk Mail folder.
novdocx (en) 13 May 2009
2 Click Empty Junk Mail Folder.
3 Click Ye s.
98 GroupWise 8 Linux/Mac Client User Guide
Page 99

4
Calendar
You can view your schedule in a variety of views or formats, including day, week, month, year, task
list, and project planner. For example, the Month view lets you view a month schedule, and the
Summary Calendar panel lets you see a text summary of your calendar.
Section 4.1, “Understanding the Calendar,” on page 99
Section 4.2, “Managing Your Calendar,” on page 99
Section 4.3, “Sending Calendar Items,” on page 107
Section 4.4, “Receiving Calendar Items,” on page 114
Section 4.5, “Setting Calendar Alarms,” on page 116
Section 4.6, “Sharing a Personal Calendar,” on page 117
Section 4.7, “Printing a Calendar,” on page 118
Section 4.8, “Junking Calendar Items from Unknown Senders,” on page 119
novdocx (en) 13 May 2009
4
4.1 Understanding the Calendar
You can use Graphic Display to show appointment duration in blocks to visualize time use in your
schedule or you can use Text Display to better comprehend the sequence of your appointments.
Time intervals in the Appointments List can be adjusted from ten minutes to two hours, depending
on how detailed you want the list to be. You can also define your work schedule to display only your
office hours on your Calendar. And by using Show Appointment As, you can display levels of
availability for appointments in Busy Search and in your Calendar.
You can have multiple calendars that display in your calendar view. You can create a unique color
for each calendar, making it quickly identifiable in the calendar view. You can share each calendar or
all calendars with other users.
If you set automatic archiving, items that have been archived are no longer displayed on your
calendar. To make them appear on your calendar, unarchive the item from your archive calendar. For
more information on how to unarchive an item, see Section 16.3.6, “Unarchiving Items,” on
page 214.
Use the Find drop-down list in the Calendar header to find scheduled items according to category or
other find criteria.
Many types of calendar views and printouts are available to let you choose the one that displays the
information you need.
4.2 Managing Your Calendar
Section 4.2.1, “Viewing Your Calendar,” on page 100
Section 4.2.2, “Reading a Calendar Entry,” on page 104
Section 4.2.3, “Creating a Personal Calendar,” on page 104
Section 4.2.4, “Customizing a Calendar,” on page 104
Calendar
99
Page 100

Section 4.2.5, “Exporting a Calendar,” on page 107
Section 4.2.6, “Importing a Calendar,” on page 107
4.2.1 Viewing Your Calendar
There are several different ways to view your GroupWise® calendar, from a day view to a month
view. Likewise, you can view your calendar and a proxies calendar at the same time.
All unaccepted items in your Calendar are italicized to help you easily identify which items you
have not yet accepted.
Fonts cannot be changed or modified in the calendar view. However the text inside the appointment
may be modified to other fonts, styles, and sizes.
“Customizing Your Calendar Folder” on page 100
“Selecting Calendars to Display” on page 101
“Viewing a Different Date in the Calendar” on page 101
“Viewing All Day Events in the Calendar” on page 101
“Navigating in the Calendar” on page 101
novdocx (en) 13 May 2009
“Displaying Two Time Zones in the Calendar” on page 102
“Working with Time and Date Differences” on page 102
“Understanding the Calendar Item Icons” on page 103
“Understanding Calendar Shading” on page 103
“Viewing Any Folder As a Calendar” on page 103
“Opening a New Calendar View” on page 104
Customizing Your Calendar Folder
The Calendar has several view options. The view that is displayed when you exit your Calendar
displays when you open the Calendar folder again.
1 Linux: Right-click the Calendar folder.
Mac: Command+click the Calendar folder.
2 Click Properties.
3 On the Display tab, select or deselect display options as needed.
Show Month Picker: Displays or hides the monthly calendars on the left of your main
Calendar view. You can click a date on a monthly calendar to go to that date in your main
calendar view.
Show Calendar Toolbar: Displays or hides the Calendar toolbar that provides navigation
buttons for viewing different dates.
On Week View Show: Select the number of days to include in your Week view.
4 Click OK.
100 GroupWise 8 Linux/Mac Client User Guide
 Loading...