


Multi-System Administration Guide
Novell®
novdocx (en) 11 July 2008
AUTHORIZED DOCUMENTATION
GroupWise
8
November 17, 2008
®
www.novell.com
GroupWise 8 Multi-System Administration Guide

Legal Notices
Novell, Inc. makes no representations or warranties with respect to the contents or use of this documentation, and
specifically disclaims any express or implied warranties of merchantability or fitness for any particular purpose.
Further, Novell, Inc. reserves the right to revise this publication and to make changes to its content, at any time,
without obligation to notify any person or entity of such revisions or changes.
Further, Novell, Inc. makes no representations or warranties with respect to any software, and specifically disclaims
any express or implied warranties of merchantability or fitness for any particular purpose. Further, Novell, Inc.
reserves the right to make changes to any and all parts of Novell software, at any time, without any obligation to
notify any person or entity of such changes.
Any products or technical information provided under this Agreement may be subject to U.S. export controls and the
trade laws of other countries. You agree to comply with all export control regulations and to obtain any required
licenses or classification to export, re-export, or import deliverables. You agree not to export or re-export to entities
on the current U.S. export exclusion lists or to any embargoed or terrorist countries as specified in the U.S. export
laws. You agree to not use deliverables for prohibited nuclear, missile, or chemical biological weaponry end uses. See
the Novell International Trade Services Web page (http://www.novell.com/info/exports/) for more information on
exporting Novell software. Novell assumes no responsibility for your failure to obtain any necessary export
approvals.
novdocx (en) 11 July 2008
Copyright © 2003-2008 Novell, Inc. All rights reserved. No part of this publication may be reproduced, photocopied,
stored on a retrieval system, or transmitted without the express written consent of the publisher.
Novell, Inc. has intellectual property rights relating to technology embodied in the product that is described in this
document. In particular, and without limitation, these intellectual property rights may include one or more of the U.S.
patents listed on the Novell Legal Patents Web page (http://www.novell.com/company/legal/patents/) and one or
more additional patents or pending patent applications in the U.S. and in other countries.
Novell, Inc.
404 Wyman Street, Suite 500
Waltham, MA 02451
U.S.A.
www.novell.com
Online Documentation: To access the online documentation for this and other Novell products, and to get
updates, see the Novell Documentation Web site (http://www.novell.com/documentation).

Novell Trademarks
For Novell trademarks, see the Novell Trademark and Service Mark list (http://www.novell.com/company/legal/
trademarks/tmlist.html).
Third-Party Materials
All third-party trademarks are the property of their respective owners.
novdocx (en) 11 July 2008

novdocx (en) 11 July 2008

Contents
About This Guide 9
Part I Connecting to Other GroupWise Systems 11
1 Understanding Connection Options 13
1.1 Connection Methods Supported by the Various GroupWise Versions. . . . . . . . . . . . . . . . . . . 13
1.2 External System Links . . . . . . . . . . . . . . . . . . . . . . . . . . . . . . . . . . . . . . . . . . . . . . . . . . . . . . . 14
1.3 Dynamic Internet Links. . . . . . . . . . . . . . . . . . . . . . . . . . . . . . . . . . . . . . . . . . . . . . . . . . . . . . . 14
1.4 Direct Links . . . . . . . . . . . . . . . . . . . . . . . . . . . . . . . . . . . . . . . . . . . . . . . . . . . . . . . . . . . . . . . 14
1.5 Gateway Links . . . . . . . . . . . . . . . . . . . . . . . . . . . . . . . . . . . . . . . . . . . . . . . . . . . . . . . . . . . . . 15
2 Using External System Links 17
novdocx (en) 11 July 2008
3 Using Dynamic Internet Links 19
3.1 MTA Version Requirements . . . . . . . . . . . . . . . . . . . . . . . . . . . . . . . . . . . . . . . . . . . . . . . . . . . 19
3.2 Installing the GroupWise Internet Agent . . . . . . . . . . . . . . . . . . . . . . . . . . . . . . . . . . . . . . . . . 19
3.3 Setting Up Internet-Style Addressing . . . . . . . . . . . . . . . . . . . . . . . . . . . . . . . . . . . . . . . . . . . . 20
3.4 Adding MTA Resource Records to DNS . . . . . . . . . . . . . . . . . . . . . . . . . . . . . . . . . . . . . . . . . 20
3.4.1 Creating the Address ("A") Record . . . . . . . . . . . . . . . . . . . . . . . . . . . . . . . . . . . . . . 20
3.4.2 Creating the Service ("SRV") or Text ("TXT") Record . . . . . . . . . . . . . . . . . . . . . . . . 21
3.5 Configuring the MTA’s Server for DNS Lookups . . . . . . . . . . . . . . . . . . . . . . . . . . . . . . . . . . . 22
3.5.1 Configuring a NetWare 6.5 Server for DNS Lookups . . . . . . . . . . . . . . . . . . . . . . . . 22
3.5.2 Configuring Windows Server 2003/2008 for DNS Lookups . . . . . . . . . . . . . . . . . . . . 23
3.6 Enabling MTAs to Perform DNS Lookups . . . . . . . . . . . . . . . . . . . . . . . . . . . . . . . . . . . . . . . . 23
3.6.1 Enabling DNS Lookups for All MTAs . . . . . . . . . . . . . . . . . . . . . . . . . . . . . . . . . . . . . 23
3.6.2 Enabling/Disabling DNS Lookups for Individual MTAs . . . . . . . . . . . . . . . . . . . . . . . 24
3.7 Understanding Dynamic Internet Links . . . . . . . . . . . . . . . . . . . . . . . . . . . . . . . . . . . . . . . . . . 25
3.7.1 Stage 1: GroupWise Client in the Sending System . . . . . . . . . . . . . . . . . . . . . . . . . . 25
3.7.2 Stage 2: GroupWise Client in the Sending System . . . . . . . . . . . . . . . . . . . . . . . . . . 25
3.7.3 Stage 3: GroupWise MTA in the Sending System. . . . . . . . . . . . . . . . . . . . . . . . . . . 26
3.7.4 Stage 4: GroupWise MTA in the Sending System. . . . . . . . . . . . . . . . . . . . . . . . . . . 26
3.7.5 Stage 5: GroupWise MTA in the Sending System. . . . . . . . . . . . . . . . . . . . . . . . . . . 26
3.7.6 Stage 6: GroupWise MTA in the Sending System. . . . . . . . . . . . . . . . . . . . . . . . . . . 26
3.7.7 Stage 7: GroupWise Internet Agent in the Sending System . . . . . . . . . . . . . . . . . . . 26
3.7.8 Stage 8: GroupWise Internet Agent in the Sending System . . . . . . . . . . . . . . . . . . . 27
3.7.9 Stage 9: GroupWise MTA in the Sending System. . . . . . . . . . . . . . . . . . . . . . . . . . . 27
3.7.10 Stage 10: GroupWise MTA in the Sending System . . . . . . . . . . . . . . . . . . . . . . . . . . 27
3.7.11 Stage 11: GroupWise MTA in the Receiving System . . . . . . . . . . . . . . . . . . . . . . . . 27
3.7.12 Stage 12: Both GroupWise MTAs . . . . . . . . . . . . . . . . . . . . . . . . . . . . . . . . . . . . . . . 27
4 Using Direct Links 29
4.1 Overview . . . . . . . . . . . . . . . . . . . . . . . . . . . . . . . . . . . . . . . . . . . . . . . . . . . . . . . . . . . . . . . . . 29
4.2 Creating an External Domain . . . . . . . . . . . . . . . . . . . . . . . . . . . . . . . . . . . . . . . . . . . . . . . . . . 30
4.3 Linking to the External Domain . . . . . . . . . . . . . . . . . . . . . . . . . . . . . . . . . . . . . . . . . . . . . . . . 31
4.4 Checking the Link Status of the External Domain . . . . . . . . . . . . . . . . . . . . . . . . . . . . . . . . . . 32
4.5 Sending Messages Between Systems. . . . . . . . . . . . . . . . . . . . . . . . . . . . . . . . . . . . . . . . . . . 33
Contents 5

4.6 Exchanging Information Between Systems . . . . . . . . . . . . . . . . . . . . . . . . . . . . . . . . . . . . . . . 33
4.7 Message Flow Between External Domains . . . . . . . . . . . . . . . . . . . . . . . . . . . . . . . . . . . . . . . 33
5 Using Gateway Links 35
5.1 Connecting Systems Through the Internet. . . . . . . . . . . . . . . . . . . . . . . . . . . . . . . . . . . . . . . . 35
5.2 Connecting Systems Through an Asynchronous Phone Line . . . . . . . . . . . . . . . . . . . . . . . . . 36
5.3 Connecting Systems Through an X.25 Line. . . . . . . . . . . . . . . . . . . . . . . . . . . . . . . . . . . . . . . 36
5.4 Connecting GroupWise Systems Through Other E-Mail Systems . . . . . . . . . . . . . . . . . . . . . . 36
6 Synchronizing External GroupWise Systems 39
Part II Connecting to Non-GroupWise Messaging Systems 43
7 GroupWise Internet Agent 45
8 GroupWise Gateways 47
novdocx (en) 11 July 2008
Part III Merging GroupWise Systems 49
9 Why Merge GroupWise Systems? 51
10 Planning the Merge 53
10.1 Understanding the Merge Process. . . . . . . . . . . . . . . . . . . . . . . . . . . . . . . . . . . . . . . . . . . . . . 53
10.2 Planning Administrator Rights . . . . . . . . . . . . . . . . . . . . . . . . . . . . . . . . . . . . . . . . . . . . . . . . . 55
10.3 Determining Which GroupWise Objects Are No Longer In Use . . . . . . . . . . . . . . . . . . . . . . . . 55
10.4 Planning the Location of the Domain Database Backup Directories . . . . . . . . . . . . . . . . . . . . 56
10.5 Planning GroupWise System Connections . . . . . . . . . . . . . . . . . . . . . . . . . . . . . . . . . . . . . . . 56
10.5.1 External Domains . . . . . . . . . . . . . . . . . . . . . . . . . . . . . . . . . . . . . . . . . . . . . . . . . . . 57
10.5.2 Linking the Domains . . . . . . . . . . . . . . . . . . . . . . . . . . . . . . . . . . . . . . . . . . . . . . . . . 58
10.5.3 Releasing the Secondary Domains in Site #2 . . . . . . . . . . . . . . . . . . . . . . . . . . . . . . 59
10.6 Planning to Merge Additional GroupWise Systems . . . . . . . . . . . . . . . . . . . . . . . . . . . . . . . . . 60
10.6.1 Merging in One Session . . . . . . . . . . . . . . . . . . . . . . . . . . . . . . . . . . . . . . . . . . . . . . 60
10.6.2 Merging at Different Times . . . . . . . . . . . . . . . . . . . . . . . . . . . . . . . . . . . . . . . . . . . . 61
10.7 Merge Planning Worksheet . . . . . . . . . . . . . . . . . . . . . . . . . . . . . . . . . . . . . . . . . . . . . . . . . . . 61
11 Preparing for the Merge 67
11.1 Setting Up Administrator Rights . . . . . . . . . . . . . . . . . . . . . . . . . . . . . . . . . . . . . . . . . . . . . . . . 67
11.2 Deleting Unused GroupWise Objects . . . . . . . . . . . . . . . . . . . . . . . . . . . . . . . . . . . . . . . . . . . 67
11.3 Verifying That UNC Paths Are Correct. . . . . . . . . . . . . . . . . . . . . . . . . . . . . . . . . . . . . . . . . . . 67
11.4 Resolving Pending Operations. . . . . . . . . . . . . . . . . . . . . . . . . . . . . . . . . . . . . . . . . . . . . . . . . 68
12 Merging the GroupWise Systems 69
12.1 Creating External Domains for Both Systems . . . . . . . . . . . . . . . . . . . . . . . . . . . . . . . . . . . . . 69
12.1.1 Creating Site #1 External Domains in Site #2 . . . . . . . . . . . . . . . . . . . . . . . . . . . . . . 70
12.1.2 Creating Site #2 External Domains in Site #1 . . . . . . . . . . . . . . . . . . . . . . . . . . . . . . 70
12.2 Configuring Links Between Site #2 Domains and Site #1 Secondary Domains. . . . . . . . . . . . 71
12.3 Checking Links to External Domains for Both Systems . . . . . . . . . . . . . . . . . . . . . . . . . . . . . . 71
6 GroupWise 8 Multi-System Administration Guide

12.3.1 Checking Links to Site #1 External Domains in Site #2. . . . . . . . . . . . . . . . . . . . . . . 72
12.3.2 Checking Links to Site #2 External Domains in Site #1. . . . . . . . . . . . . . . . . . . . . . . 72
12.4 Creating Temporary Holding Directories . . . . . . . . . . . . . . . . . . . . . . . . . . . . . . . . . . . . . . . . . 72
12.5 Releasing Site #2 Secondary Domains . . . . . . . . . . . . . . . . . . . . . . . . . . . . . . . . . . . . . . . . . . 73
12.6 Sending Site #2 Databases to the Site #1 Administrator . . . . . . . . . . . . . . . . . . . . . . . . . . . . . 74
12.7 Receiving Site #2 Databases at Site #1 . . . . . . . . . . . . . . . . . . . . . . . . . . . . . . . . . . . . . . . . . . 74
12.8 Merging a Site #2 Domain into Site #1. . . . . . . . . . . . . . . . . . . . . . . . . . . . . . . . . . . . . . . . . . . 74
12.9 Merging the Next GroupWise System . . . . . . . . . . . . . . . . . . . . . . . . . . . . . . . . . . . . . . . . . . . 75
12.10 Sending the Merged Site #2 Databases to Site #2 . . . . . . . . . . . . . . . . . . . . . . . . . . . . . . . . . 75
12.11 Restarting the GroupWise Agents . . . . . . . . . . . . . . . . . . . . . . . . . . . . . . . . . . . . . . . . . . . . . . 75
12.12 Testing the Merged System . . . . . . . . . . . . . . . . . . . . . . . . . . . . . . . . . . . . . . . . . . . . . . . . . . . 76
novdocx (en) 11 July 2008
Contents 7

novdocx (en) 11 July 2008
8 GroupWise 8 Multi-System Administration Guide

About This Guide
This Novell® GroupWise® 8 Multi-System Administration Guide helps you connect your GroupWise
system to other GroupWise systems or non-GroupWise messaging systems, and helps you merge
your GroupWise system with another GroupWise system to create one system. The guide is divided
into the following sections:
“Connecting to Other GroupWise Systems” on page 11
“Connecting to Non-GroupWise Messaging Systems” on page 43
“Merging GroupWise Systems” on page 49
Audience
This guide is intended for network administrators who install and administer GroupWise.
Feedback
novdocx (en) 11 July 2008
We want to hear your comments and suggestions about this manual and the other documentation
included with this product. Please use the User Comment feature at the bottom of each page of the
online documentation, or go to www.novell.com/documentation/feedback.html and enter your
comments there.
Documentation Updates
For the most recent version of the GroupWise 8 Multi-System Administration Guide, visit the Novell
GroupWise 8 Documentation Web site (http://www.novell.com/documentation/gw8).
Additional Documentation
For additional GroupWise documentation, see the following guides at the Novell GroupWise 8
documentation Web site (http://www.novell.com/documentation/gw8):
Installation Guide
Administration Guide
Interoperability Guide
Troubleshooting Guides
GroupWise Client User Guides
GroupWise Client Frequently Asked Questions (FAQ)
Documentation Conventions
In Novell documentation, a greater-than symbol (>) is used to separate actions within a step and
items in a cross-reference path.
A trademark symbol (
trademark.
®
, TM, etc.) denotes a Novell trademark. An asterisk (*) denotes a third-party
About This Guide 9

When a single pathname can be written with a backslash for some platforms or a forward slash for
other platforms, the pathname is presented with a backslash. Users of platforms that require a
forward slash, such as Linux*, should use forward slashes as required by your software.
When a startup switch can be written with a forward slash for some platforms or a double hyphen for
other platforms, the startup switch is presented with a forward slash. Users of platforms that require
a double hyphen, such as Linux, should use double hyphens as required by your software.
novdocx (en) 11 July 2008
10 GroupWise 8 Multi-System Administration Guide

I
Connecting to Other GroupWise
Systems
Chapter 1, “Understanding Connection Options,” on page 13
Chapter 2, “Using External System Links,” on page 17
Chapter 3, “Using Dynamic Internet Links,” on page 19
Chapter 4, “Using Direct Links,” on page 29
Chapter 5, “Using Gateway Links,” on page 35
Chapter 6, “Synchronizing External GroupWise Systems,” on page 39
novdocx (en) 11 July 2008
Connecting to Other GroupWise SystemsI11

novdocx (en) 11 July 2008
12 GroupWise 8 Multi-System Administration Guide

1
Understanding Connection
novdocx (en) 11 July 2008
Options
When connecting your GroupWise® 8 system with another GroupWise 5.x, 6.x, or 7, or 8 system,
you can choose from several connection methods. To help you choose the best method for your
system, the following sections provide brief summaries:
Section 1.1, “Connection Methods Supported by the Various GroupWise Versions,” on page 13
Section 1.2, “External System Links,” on page 14
Section 1.3, “Dynamic Internet Links,” on page 14
Section 1.4, “Direct Links,” on page 14
Section 1.5, “Gateway Links,” on page 15
Depending on the versions of the two GroupWise systems you are trying to connect, some of the
methods might not be available. For information about methods available for the two systems you
are connecting, see Section 1.1, “Connection Methods Supported by the Various GroupWise
Versions,” on page 13.
1.1 Connection Methods Supported by the Various GroupWise Versions
1
The following chart lists the GroupWise 5.x, 6.x, 7, and 8 versions and the methods that can be used
when connecting systems that are these versions:
KEY
D = Direct Link
G = Gateway Link
I = Dynamic Internet Link
E = External System Link
5.2 5.5 5.5 EP 6.x 78
5.2 D G D G D G D G D G D G
5.5 D G D G I D G I D G I D G I D G I
5.5 EP D G D G I D G I D G I D G I D G I
6.x D G D G I D G I D G I D G I D G I
7 D G D G I D G I D G I D G I D G I
8 D G D G I D G I D G I D G I D G I E
To use the chart, locate your system’s version in the first column, then read across the row until you
reach the version of the system you are connecting to. The methods listed are the methods supported
when connecting the two systems.
Understanding Connection Options
13

IMPORTANT: A GroupWise system’s version is determined by the version of the Message
Transfer Agent (MTA) running in the system. If your system includes multiple versions of the MTA,
determine which MTA will be used when connecting to the other system and use that MTA’s version
when reading the table.
1.2 External System Links
Before GroupWise 8, if you wanted users in your GroupWise system to be able to exchange
messages conveniently with users in another GroupWise system, you needed to set up external
domains, external post offices, and external users, or use dynamic Internet links, as described in later
sections.
Starting with GroupWise 8, you can set up an Internet domain in GroupWise to represent the other
GroupWise system. As a result, messages are routed to the other GroupWise system based on links
set up in the Link Configuration Tool, rather than through the Internet Agent.
For information about connecting GroupWise systems via external system links, see Chapter 2,
“Using External System Links,” on page 17.
novdocx (en) 11 July 2008
1.3 Dynamic Internet Links
The dynamic Internet link capability of the GroupWise Message Transfer Agent (MTA) enables it to
use Domain Name Service (DNS) to associate the domain name in an Internet-style address (for
example, jsmith@novell.com) to an MTA assigned to receive messages for that domain name. After
the address has been resolved, the sending MTA uses the GroupWise Message Transfer Protocol
(GWMTP) to connect with and transfer messages to the destination MTA.
Because messages are transferred directly from one MTA to another, no GroupWise client
functionality is lost. Users can perform Busy Searches, retract sent messages, and see the status of
their outgoing messages, just as if the recipient were in the same GroupWise system. In addition,
users are able to use well-known Internet-style address syntax (for example, jsmith@novell.com).
Administratively, using dynamic Internet links enables you to avoid defining users from other
GroupWise systems in your GroupWise system. As long as the sender knows the recipient’s
Internet-style address, and the recipient’s domain name is registered in DNS and associated with an
MTA, the message is properly routed to the recipient.
For information about connecting GroupWise systems via dynamic Internet links, see Chapter 3,
“Using Dynamic Internet Links,” on page 19.
1.4 Direct Links
The direct link capability of the MTA enables it to use a mapped or UNC path to access a domain
directory in another GroupWise system or to use TCP/IP to connect to the domain’s MTA. This is
the same functionality that enables two domains in the same GroupWise system to be connected.
Because messages are transferred directly from one MTA to another, no GroupWise client
functionality is lost.
14 GroupWise 8 Multi-System Administration Guide

Administratively, you can use the External System Synchronization feature to exchange information
between the two systems and enable users to select addresses from the Address Book, or you can
choose to not exchange information and require users to enter a fully-qualified address
(userID.post_office.domain or user@host).
For information about connecting GroupWise systems via direct links, see Chapter 4, “Using Direct
Links,” on page 29.
1.5 Gateway Links
If you can’t establish a direct link (mapped path, UNC path, or TCP/IP connection) between
domains in two systems, you can use a GroupWise gateway to link the two systems. Depending on
the gateway used, some GroupWise functionality might not be available when sending messages
between systems.
For information about connecting GroupWise systems via gateways, see Chapter 5, “Using Gateway
Links,” on page 35.
novdocx (en) 11 July 2008
Understanding Connection Options 15

novdocx (en) 11 July 2008
16 GroupWise 8 Multi-System Administration Guide
2
Using External System Links
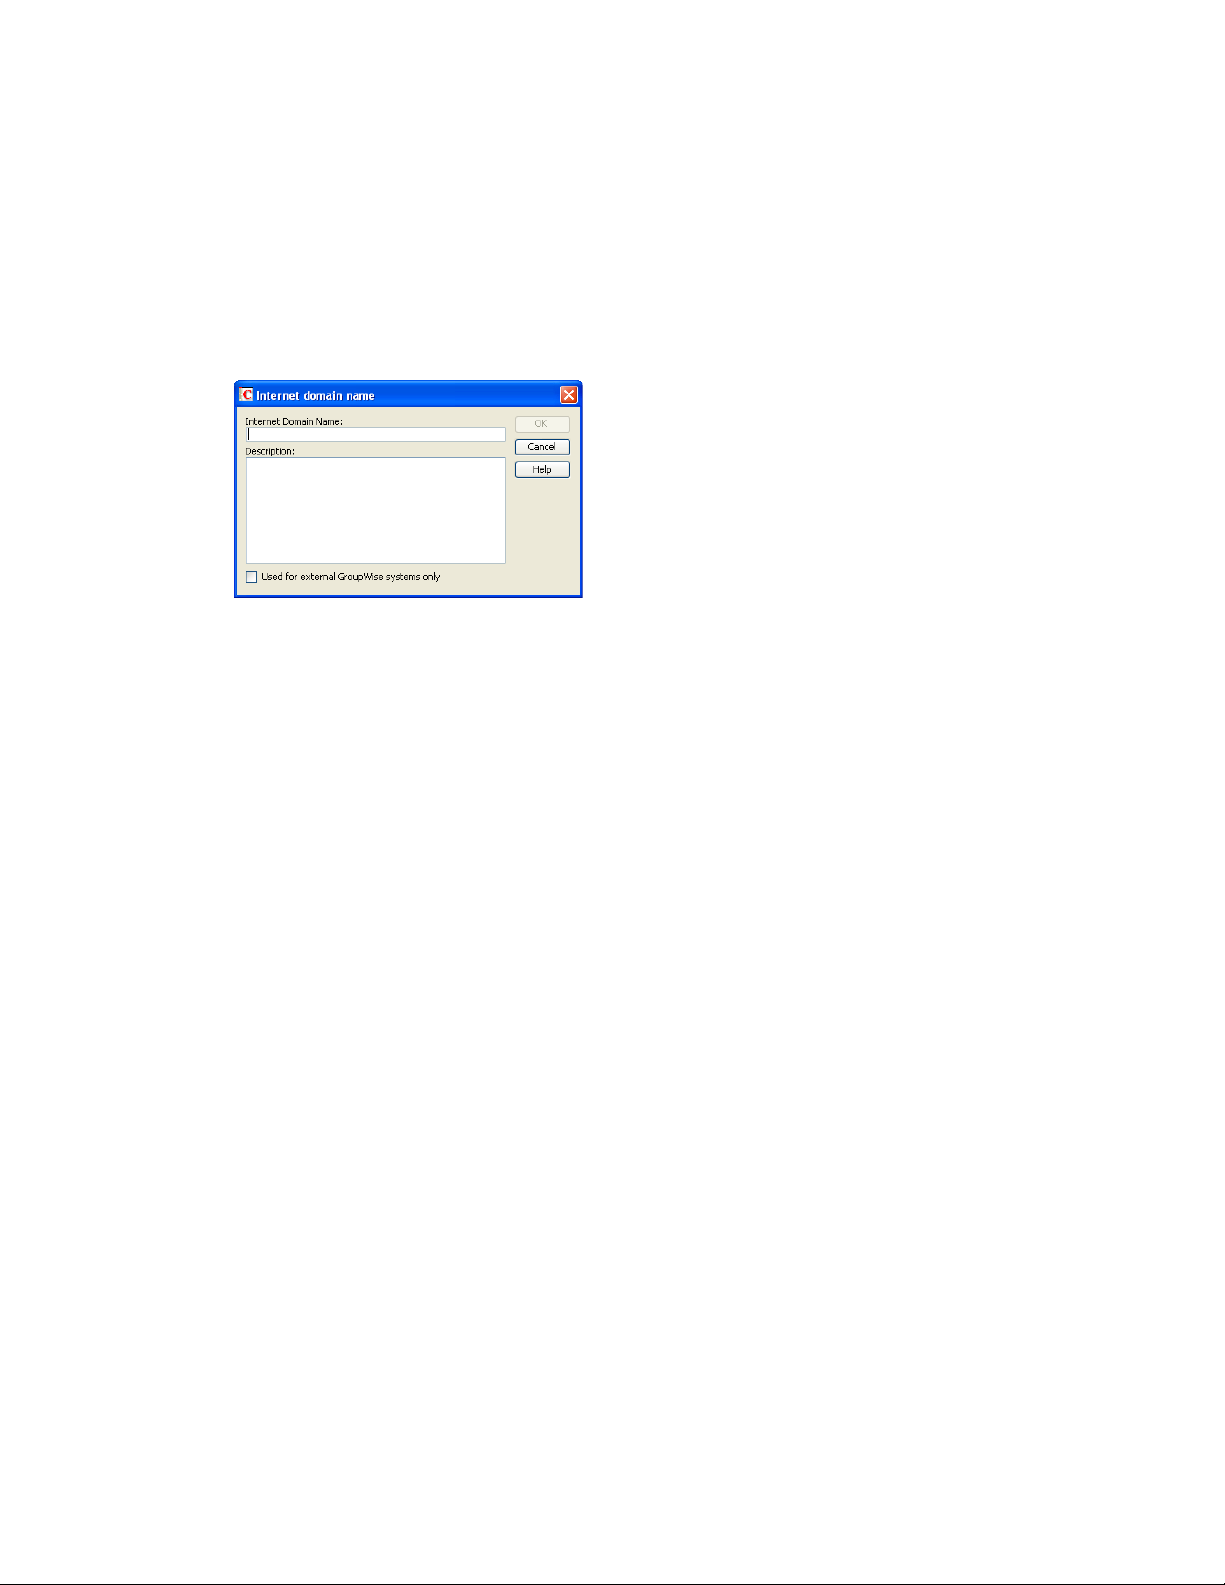
To set up an Internet domain that represents an external GroupWise® system:
1 In ConsoleOne®, click Tools > GroupWise System Operations > Internet Addressing.
2 On the Internet Domains tab, click Create.
novdocx (en) 11 July 2008
2
3 Specify the Internet domain name for the external GroupWise system, then provide a
description if desired.
4 Select Used for External GroupWise Systems Only, then click OK.
Users in both systems are listed in the GroupWise Address Books for both systems, so that users can
conveniently address items to users in either system.
Using External System Links
17

novdocx (en) 11 July 2008
18 GroupWise 8 Multi-System Administration Guide

3
Using Dynamic Internet Links
You can connect two GroupWise® systems through dynamic Internet links. Dynamic Internet links
enable a GroupWise Message Transfer Agent (MTA) to use Domain Name Service (DNS) and
GroupWise Message Transfer Protocol (GWMTP) to send messages from one system to anther. For
an overview of dynamic Internet links, see Chapter 1, “Understanding Connection Options,” on
page 13.
To use dynamic Internet links, complete the tasks in the following sections:
Section 3.1, “MTA Version Requirements,” on page 19
Section 3.2, “Installing the GroupWise Internet Agent,” on page 19
Section 3.3, “Setting Up Internet-Style Addressing,” on page 20
Section 3.4, “Adding MTA Resource Records to DNS,” on page 20
Section 3.5, “Configuring the MTA’s Server for DNS Lookups,” on page 22
Section 3.6, “Enabling MTAs to Perform DNS Lookups,” on page 23
Section 3.7, “Understanding Dynamic Internet Links,” on page 25
novdocx (en) 11 July 2008
3
For a general explanation of how dynamic Internet links work, see Section 3.7, “Understanding
Dynamic Internet Links,” on page 25.
3.1 MTA Version Requirements
To use dynamic Internet links to connect your GroupWise system with another GroupWise system,
both GroupWise systems must have at least one domain that is running one of the following versions
of the GroupWise MTA:
GroupWise 5.5
GroupWise 5.5 Enhancement Pack
GroupWise 6.x
GroupWise 7
GroupWise 8
Versions of the MTA prior to version 5.5 do not support dynamic Internet links.
3.2 Installing the GroupWise Internet Agent
Before configuring your GroupWise system to use dynamic Internet links, you need to make sure
that the GroupWise Internet Agent has been installed. Dynamic Internet links require your
GroupWise system to use Internet-style addressing, which is only available if you’ve installed the
Internet Agent and created one or more Internet domains for your GroupWise system.
Using Dynamic Internet Links
19

novdocx (en) 11 July 2008
The only requirement is that the Internet Agent be installed so that an Internet Agent object is
created in Novell
correctly or running. However, if there are GroupWise systems that you need to connect to but
cannot do so through dynamic Internet links, you can use the Internet Agent to connect to those
systems while using dynamic Internet links to connect to supported GroupWise systems.
For information about installing the Internet Agent, see “Installing the GroupWise Internet Agent”
in the GroupWise 8 Installation Guide.
®
eDirectoryTM. The Internet Agent does not actually need to be configured
3.3 Setting Up Internet-Style Addressing
Dynamic Internet links require your GroupWise system to be configured to use Internet-style
addressing (user@hostname) rather than standard GroupWise addressing
(userID.post_office.domain). If you have not enabled Internet-style addressing and defined at least
one Internet domain for your GroupWise system, see “Configuring Internet Addressing” in the
GroupWise 8 Administration Guide.
The Internet domains you establish when setting up Internet-style addressing (for example,
novell.com, groupwise.novell.com, and support.novell.com) are the key to enabling dynamic
Internet links. Each MTA that will receive messages must be defined in DNS and associated with the
Internet domain (or domains) that it will receive messages for. This allows MTAs in other
GroupWise systems to route messages that contain your Internet domain names to the appropriate
MTAs in your system.
3.4 Adding MTA Resource Records to DNS
In order for your GroupWise system to receive messages from another GroupWise system via a
dynamic Internet link, you need to create a DNS resource record for at least one of your MTAs. The
resource record enables the MTA’s address, along with the Internet domain names associated with it,
to be broadcast throughout the Internet.
You need to create the following resource records in DNS:
An address ("A") record that maps the MTA server’s host name to its IP address.
A service ("SRV") record or a text ("TXT") record that maps the Internet domain name to the
host name or IP address assigned to the MTA’s server.
You can use your tool of choice to modify DNS. The following sections explain the information
required and provide sample records.
Section 3.4.1, “Creating the Address ("A") Record,” on page 20
Section 3.4.2, “Creating the Service ("SRV") or Text ("TXT") Record,” on page 21
3.4.1 Creating the Address ("A") Record
You can create an "A" record to map your MTA server’s fully-qualified host name to its IP address.
Doing so enables you to use the server’s fully-qualified host name in the service ("SRV") or text
("TXT") record rather than the IP address. The "A" record is required if you plan to use a "SRV"
record.
The following text shows sample "A" records.
20 GroupWise 8 Multi-System Administration Guide

;
; Address ("A") records
;
localhost IN A 172.0.0.1
corp.serv.novl IN A 172.16.5.18
gwdev.serv.novl IN A 172.16.5.19
gwsup.serv.novl IN A 172.16.5.20
Host Name (column 1): Use the host name assigned to the MTA’s server. In the above example,
corp, gwdev, and gwsupport are the host names assigned to three MTA servers.
Class (column 2): Use IN to represent the Internet.
Type (column 3): Use A to specify an address record.
IP Address (column 4): Use the IP address assigned to the MTA’s server.
3.4.2 Creating the Service ("SRV") or Text ("TXT") Record
You can use either service records or text records to map your Internet domain names to MTAs. The
following text shows sample "SRV" and "TXT" records:
novdocx (en) 11 July 2008
;
; Service ("SRV") records
;
gwmtp.tcp.novell.com 172800 IN SRV 1 0 7100 corp.serv.novl
gwmtp.tcp.groupwise IN SRV 1 1 7100 corp.serv.novl
gwmtp.tcp.groupwise IN SRV 1 2 7100 gwdev.serv.novl
gwmtp.tcp.support 172800 IN SRV 1 0 7100 gwsup.serv.novl
gwmtp.tcp.support 172800 IN SRV 2 0 7100 corp.serv.novl
;
; Text ("TXT") records
;
gwmtp.tcp.novell.com 172800 IN TXT "1 0 7100 corp.serv.novl"
gwmtp.tcp.groupwise IN TXT "1 1 7100 corp.serv.novl"
gwmtp.tcp.groupwise IN TXT "1 2 7100 gwdev.serv.novl"
gwmtp.tcp.support 172800 IN TXT "1 0 7100 gwsup.serv.novl"
gwmtp.tcp.support 172800 IN TXT "2 0 7100 corp.serv.novl"
Service.Protocol.Name (column 1): The service must be specified as gwmtp. The protocol must
be specified as tcp. The name corresponds to the Internet domain name you want associated with
the MTA. In the above sample, novell.com, groupwise.novell.com, and support.novell.com are the
Internet domain names defined in GroupWise.
Time to Live (column 2): TTL (time to live) is the amount of time the record is cached in memory
so it doesn’t need to be looked up again. TTL is specified in seconds. In the above sample, 172800
represents 2 days. If you don’t specify a TTL, the record is not cached.
Class (column 3): Enter IN to represent the Internet.
Type (column 4): Enter SRV to specify a service record. Enter TXT to specify a text record.
Using Dynamic Internet Links 21

Priority (column 5): If an Internet domain name is associated with two different MTAs, the host
with the lowest value is always contacted first. For example, a host with priority 1 is contacted
before a host with priority 2. If two records with the same Internet domain name have the same
priority, the weight number is used. In the above example, the two groupwise.novell.com records
have the same priority, so the weight would be used.
Weight (column 6): The weight number specifies how to allocate connections among hosts with
equal priorities. In the groupwise.novell.com record above, the corp.serv.novl host and the
gwdev.serv.novl host have equal priorities, but the corp.serv.novl host has a weight of 1
and the gwdev.serv.novl host has a weight of 2. This means that 1 out of 3 times the
corp.serv.novl host would be contacted first, and 2 out of 3 times, the gwdev.serv.novl
host would be contacted first.
Port (column 7): The port number specifies the TCP port on which the MTA listens for incoming
messages. The default port number for the MTA is 7100.
Host (column 8): The host specifies the fully-qualified host name or IP address of the MTA’s server.
For a service record, you must specify the host name. For a text record, you can specify either the
server’s host name or IP address. If you use a host name, it must be mapped to an IP address through
an DNS "A" record. In the above example, corp.serv.novl, gwdev.serv.novl, and
gwsup.serv.novl are all host names that are mapped to IP addresses through "A" records in
DNS.
novdocx (en) 11 July 2008
3.5 Configuring the MTA’s Server for DNS Lookups
In order for an MTA in your GroupWise system to use dynamic Internet links to send messages, you
must make sure the MTA’s server is properly configured for DNS lookups. Basic configuration
information is provided below. Consult your DNS documentation for more detailed information
about configuring a server for DNS lookups.
Section 3.5.1, “Configuring a NetWare 6.5 Server for DNS Lookups,” on page 22
Section 3.5.2, “Configuring Windows Server 2003/2008 for DNS Lookups,” on page 23
3.5.1 Configuring a NetWare 6.5 Server for DNS Lookups
On a NetWare® server, you need to have a resolv.cfg file in the sys:\etc directory that
defines the DNS name server for that NetWare server. The resolv.cfg file would look similar to
the following, based on a novell.com domain:
domain novell.com
nameserver 172.16.5.18
Consult your NetWare documentation for more detailed information about configuring a NetWare
server for DNS lookups.
22 GroupWise 8 Multi-System Administration Guide
3.5.2 Configuring Windows Server 2003/2008 for DNS Lookups
On the Windows* Server 2003/2008:
1 Click the Start menu > Control Panel > Network Connections > Local Area Connection.
2 In the Local Area Connection dialog box, click Properties to display the Local Area
Connection Properties dialog box.
3 In the list on the General tab, select Internet Protocol (TCP/IP), then click Properties to
display the Internet Protocol (TCP/IP) Properties dialog box.
4 Click Advanced to display the Advanced TCP/IP Settings dialog box.
5 Click the DNS tab, then make sure the IP address of at least one DNS name server is listed in
the DNS Server Addresses list, then click OK.
Consult your DNS documentation for more detailed information about configuring a Windows
workstation or server for DNS lookups.
3.6 Enabling MTAs to Perform DNS Lookups
novdocx (en) 11 July 2008
After you have performed the necessary configuration to enable an MTA’s server to allow DNS
lookups (see Section 3.5, “Configuring the MTA’s Server for DNS Lookups,” on page 22), you must
configure the MTA to perform DNS lookups.
By default, your GroupWise system is configured not to allow MTAs to perform DNS lookups. You
can retain the system default of no DNS lookups, then enable DNS lookups for individual MTAs. Or
you can enable DNS lookups for all MTAs in your GroupWise system, then selectively disable DNS
lookups for individual MTAs.
Section 3.6.1, “Enabling DNS Lookups for All MTAs,” on page 23
Section 3.6.2, “Enabling/Disabling DNS Lookups for Individual MTAs,” on page 24
3.6.1 Enabling DNS Lookups for All MTAs
To configure your GroupWise system so all MTAs perform DNS lookups (provided their servers are
enabled for DNS lookups):
®
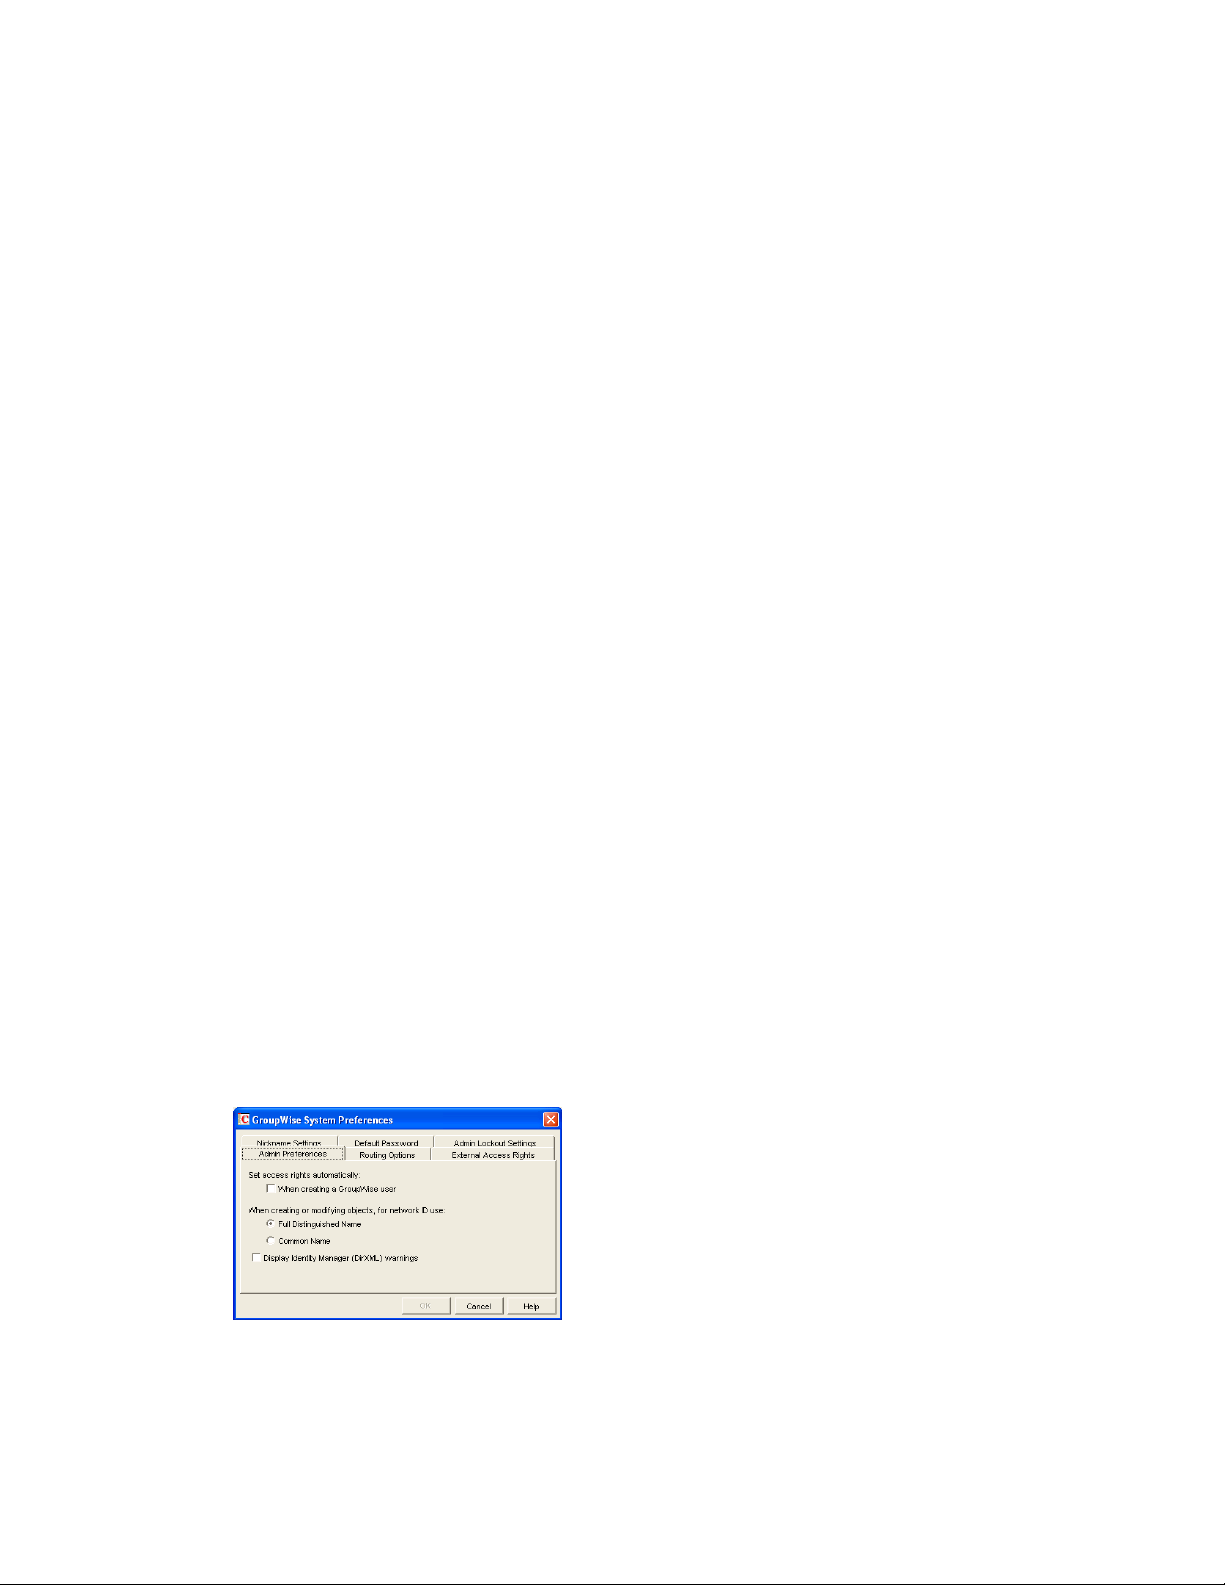
1 In ConsoleOne
to display the GroupWise System Preferences dialog box.
, click the Tools menu > GroupWise System Operations > System Preferences
2 Click the Routing Options tab.
Using Dynamic Internet Links 23
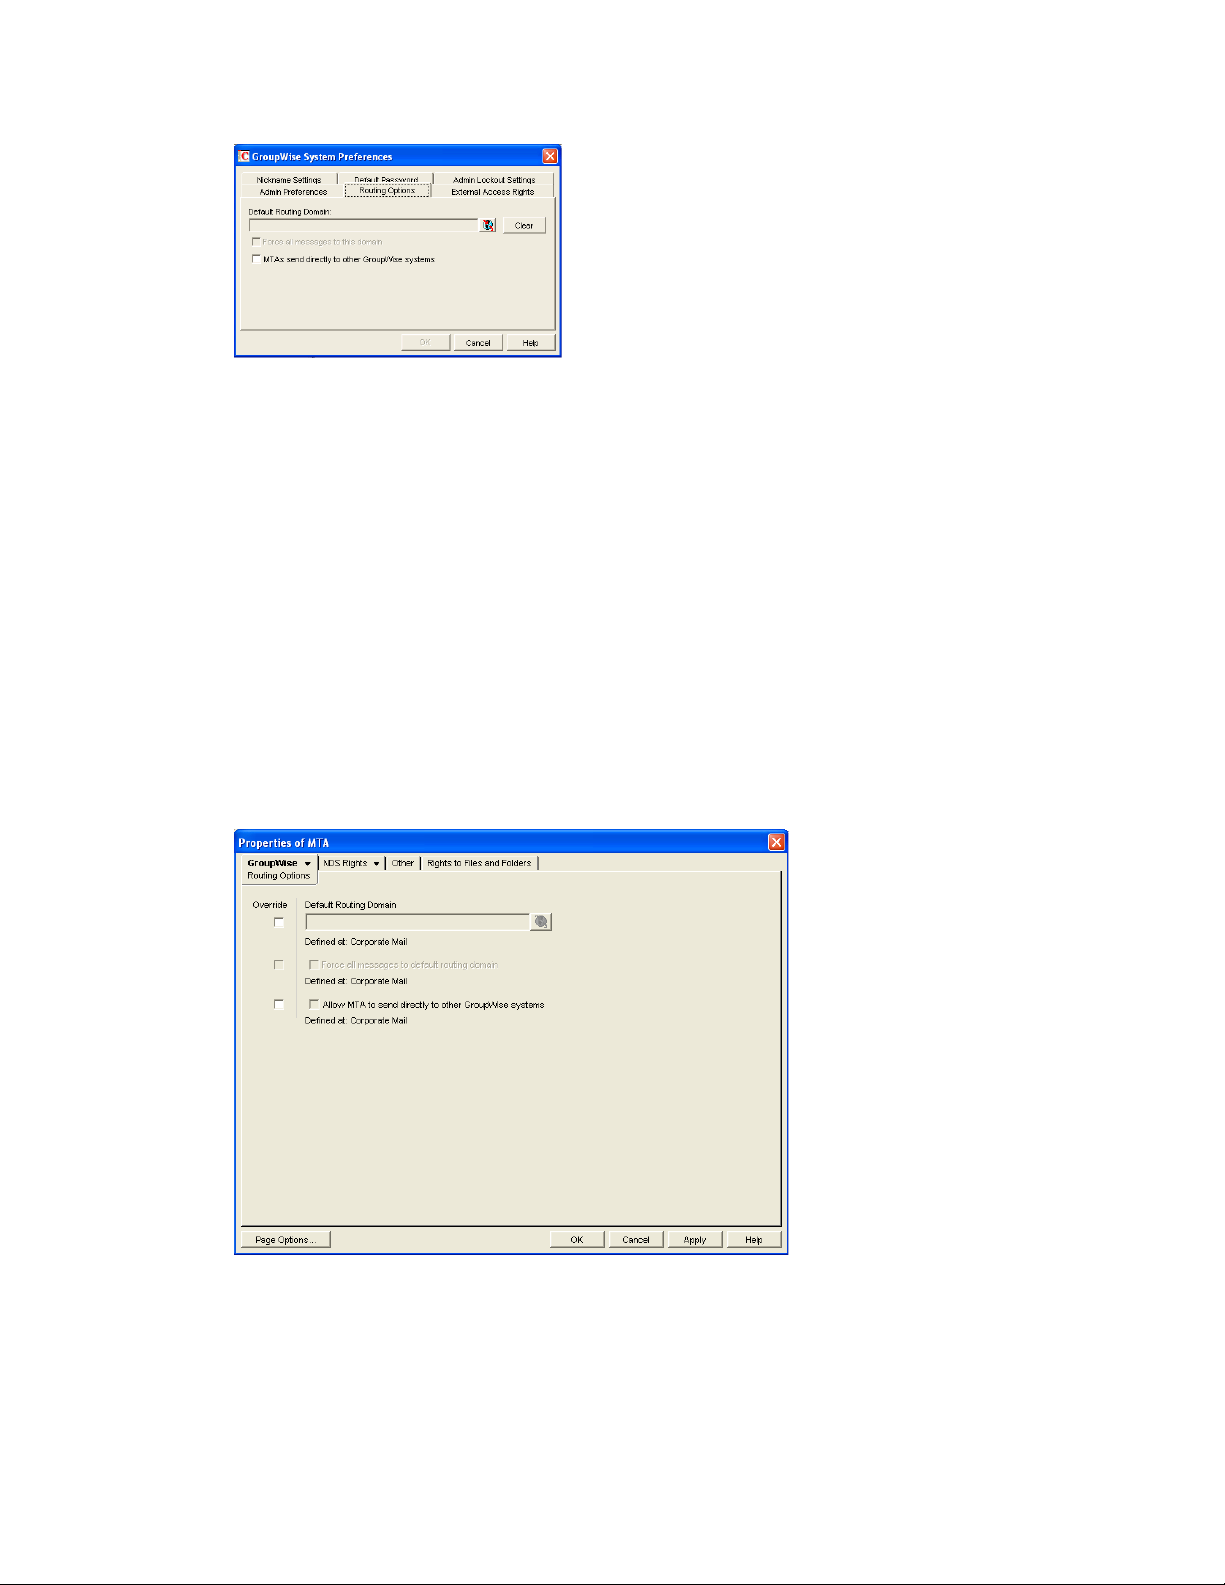
3 Enable the Allow MTAs to Send Directly to Other GroupWise Systems option
If the option is dimmed, you have not defined an Internet domain yet. See “Configuring
Internet Addressing” in “Internet Agent” in the GroupWise 8 Administration Guide.
4 Click OK.
3.6.2 Enabling/Disabling DNS Lookups for Individual MTAs
If you’ve used the GroupWise System Preferences to enable all MTAs to perform DNS lookups in
order to send messages directly to other GroupWise systems (see “Enabling DNS Lookups for All
MTAs” on page 23), you can disable DNS lookups for individual MTAs.
novdocx (en) 11 July 2008
If you haven’t used the GroupWise System Preferences to enable all MTAs to perform DNS
lookups, you can enable DNS lookups for individual MTAs.
1 In ConsoleOne, right-click the MTA object, then click Properties.
2 Click GroupWise > Routing Options to display the Routing Options page.
3 Select the Override box to the left of the Allow MTA to Send Directly to Other GroupWise
Systems option.
4 Select or deselect Allow MTA to Send Directly to Other GroupWise Systems as needed for this
MTA.
5 Click OK.
24 GroupWise 8 Multi-System Administration Guide
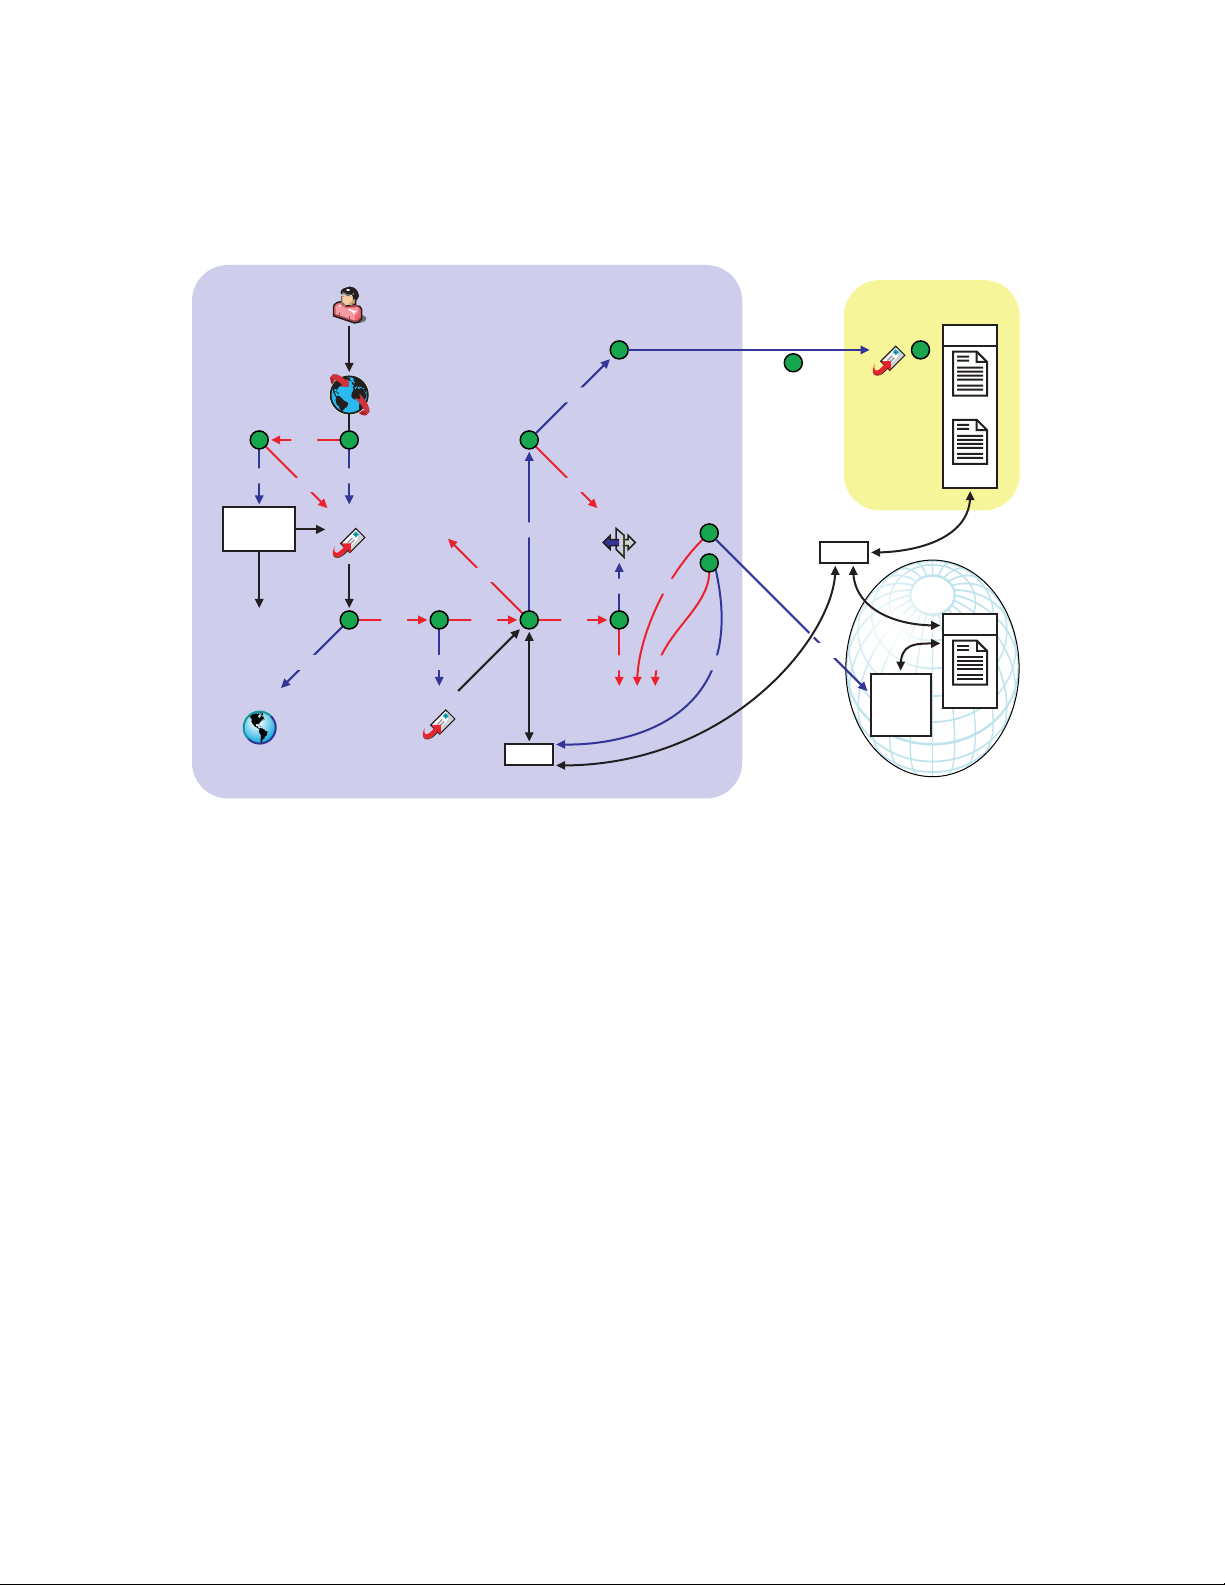
3.7 Understanding Dynamic Internet Links
The following diagram illustrates the basic process of establishing a dynamic Internet link between
GroupWise systems.
ctp.com
10
yes
no
2
1
9
GWMTP
12
MTA
DNS
11
SRV
novdocx (en) 11 July 2008
no
yes
yes
MTA
3
Undeliverable
no
4
yes
MTA
no
no
yes
5
DNS
no
GWIA
yes
no
6
no
Undeliverable
no
no
8
7
yes
SMTP
yes
DNS
SMTP
Mail
Server
TXT
DNS
MX
yes
Domain
Look up
Undeliverable
Domain
3.7.1 Stage 1: GroupWise Client in the Sending System
The GroupWise client parses the address by breaking it down into parts and attempting to map it to
the userID.post_office.domain syntax. When the parsing is complete, the client looks in its own
system address book and asks: “Does the parsed address match any listed in the system address
book?”
The address can be typed by the user or obtained from the system address book.
If Yes: The GroupWise client sends this “internal” message to the MTA to be queued for
delivery.
If No: The GroupWise client attempts to resolve the address further. Go to Stage 2.
3.7.2 Stage 2: GroupWise Client in the Sending System
The GroupWise client checks the Internet domain addressing element listed after an @ sign in the
address syntax and asks: “Is this Internet domain defined in my GroupWise system (that is, is it
internal)?” If there is no Internet domain element at this point, the message is undeliverable.
If Yes: The client looks at the address to determine if all parts are present. If they are present, it
attempts to find a domain element in the address and resolve the address for local delivery. If a
domain element cannot be found, the message is undeliverable.
If No: The client recognizes the Internet domain as external to its system and queues the
message to the MTA. Go to Stage 3.
Using Dynamic Internet Links 25

3.7.3 Stage 3: GroupWise MTA in the Sending System
The GroupWise MTA asks: “Does the Internet domain in this address match any Internet domain
defined in the local GroupWise system?”
If Yes: The GroupWise MTA recognizes that the Internet domain is internal and routes it to the
internal domain.
If No: The GroupWise MTA cannot find a matching Internet domain in its system. The
GroupWise MTA attempts to find a resource to help it route the message. Go to Stage 4.
3.7.4 Stage 4: GroupWise MTA in the Sending System
The GroupWise MTA checks its system and asks: “Has a route been defined to an alternate MTA
configured for Internet domain service?”
If Yes: All messages with an external Internet domain are routed to a designated MTA. Go to
Stage 5.
If No: The local MTA handles messages with an external Internet domain in the address. Go to
Stage 5.
novdocx (en) 11 July 2008
3.7.5 Stage 5: GroupWise MTA in the Sending System
The GroupWise MTA asks: “Is this system set up to support DNS lookups?”
If Yes: The GroupWise MTA checks DNS. Go to Stage 9.
If No: The GroupWise MTA attempts to find another way to connect to the Internet domain. Go
to Stage 6.
3.7.6 Stage 6: GroupWise MTA in the Sending System
The MTA checks the system for capability to establish SMTP links and asks: “Does this system
have a designated GroupWise Internet Agent?”
If Yes: Go to Stage 7.
If No: The message is undeliverable.
3.7.7 Stage 7: GroupWise Internet Agent in the Sending System
The MTA passes the message to the designated Internet Agent in this GroupWise system. The
Internet Agent checks DNS and asks: “Does DNS have a mail exchange record (MX) for this other
system that I can use to establish an SMTP link?”
If Yes: The Internet Agent does a DNS lookup for an MX record. Go to Stage 8.
If No: The message is undeliverable.
26 GroupWise 8 Multi-System Administration Guide

3.7.8 Stage 8: GroupWise Internet Agent in the Sending System
The designated Internet Agent establishes an SMTP link with the Internet domain in the address,
converts the GroupWise message to SMTP format, and sends the message to the other messaging
system through the SMTP Internet connection. No further information about the message is returned
to the sender unless the addressee (or the addressee’s mail server) replies.
3.7.9 Stage 9: GroupWise MTA in the Sending System
The MTA performs a DNS lookup at the DNS name server by asking: “Does DNS have an SRV or
TXT resource record associated with this Internet domain name?”
If Yes: DNS returns either a SRV or TXT resource record and returns it to the MTA. Go to
Stage 10.
If No: The GroupWise MTA does not find any resource record. Go to Stage 7.
3.7.10 Stage 10: GroupWise MTA in the Sending System
novdocx (en) 11 July 2008
The MTA reads the name-to-TCP/IP address mappings listed in the resource record for the other
GroupWise system’s MTAs, chooses a domain to connect to based on a priority system established
in the resource record, and initiates a GroupWise Message Transport Protocol (GWMTP)
connection procedure with an MTA in the other system (sending to its port and address). Go to Stage
11.
3.7.11 Stage 11: GroupWise MTA in the Receiving System
The receiving MTA recognizes the sender’s attempt to connect, then completes the GWMTP
connection with the sending MTA. Go to Stage 12.
3.7.12 Stage 12: Both GroupWise MTAs
The message is sent unaltered over the GWMTP connection between the two GroupWise MTAs.
Using Dynamic Internet Links 27

novdocx (en) 11 July 2008
28 GroupWise 8 Multi-System Administration Guide

4
Using Direct Links
When you connect two domains in different GroupWise® systems through direct links (mapped
drive, UNC path, or TCP/IP connection), both systems remain external to each other, meaning that
they must be administered separately. However, you can exchange information (domains, post
office, users, resources, and distribution lists) so that the two systems look like one system to your
GroupWise users.
The following sections provide information to help you connect two systems via direct links:
Section 4.1, “Overview,” on page 29
Section 4.2, “Creating an External Domain,” on page 30
Section 4.3, “Linking to the External Domain,” on page 31
Section 4.4, “Checking the Link Status of the External Domain,” on page 32
Section 4.5, “Sending Messages Between Systems,” on page 33
Section 4.6, “Exchanging Information Between Systems,” on page 33
Section 4.7, “Message Flow Between External Domains,” on page 33
novdocx (en) 11 July 2008
4
4.1 Overview
For the purpose of the following discussion, GroupWise System 1 and GroupWise System 2
represent two separate GroupWise systems.
A direct link requires an MTA in GroupWise System 1 to have access via a mapped drive or UNC
path to a domain directory in GroupWise System 2, or to have a TCP/IP connection to a domain’s
MTA in GroupWise System 2. Likewise, an MTA in GroupWise System 2 must have the same type
of access to GroupWise System 1.
To create a direct link between GroupWise System 1 and GroupWise System 2, you would do the
following:
In GroupWise System 1, define one domain from GroupWise System 2 as an external domain
and then configure a direct link from a domain in GroupWise System 1 to the external domain.
This allows GroupWise System 1 to deliver messages to GroupWise System 2.
In GroupWise System 2, define one domain from GroupWise System 1 as an external domain
and then configure a direct link from a domain in GroupWise System 2 to the external domain.
This allows GroupWise System 2 to deliver messages to GroupWise System 1.
After you’ve connected the two systems, users can send messages to the other system by
entering the recipients’ full addresses (userID.post_office.domain or user@host). If desired,
you can simplify addressing by exchanging information between systems, which causes user
information to be displayed in the Address Book. The easiest way to exchange information is to
enable the External System Synchronization feature in both systems. When enabled, this
synchronization constantly updates the Address Books in both systems so that local users can
more easily address messages to and access information about the users in the external system.
If you don’t want to enable the External System Synchronization feature, you can manually
Using Direct Links
29

exchange information. For information about External System Synchronization, see “External
System Synchronization” in “GroupWise System Operations” in “System” in the GroupWise 8
Administration Guide.
4.2 Creating an External Domain
The first step in connecting two GroupWise systems via a direct link is to create an external domain
in each GroupWise system. The external domain represents a domain in the other GroupWise
system and provides the medium through which you define the link to the other system.
®
1 In ConsoleOne
Domain to display the Create External GroupWise Domain dialog box.
, right-click GroupWise System (in the left-pane), click New > External
novdocx (en) 11 July 2008
2 Fill in the following fields:
Domain Name: Enter the name of the domain as it is defined in the external GroupWise
system.
Domain Database Location (Optional): This is an optional field. If you select the location of
the domain database (wpdomain.db) you are connecting to, GroupWise automatically
establishes a direct link to the domain, using a UNC path as the link protocol.
Time Zone: Select the time zone where the domain is physically located.
Ve rs io n : Select the domain’s GroupWise version. The domain’s version is determined by its
MTA version. The options are 4.x, 5.x, 6, 6.5, 7, 7.0.1, and 8.
Link to Domain: Select the domain in your system that you want to link to the external
domain. By default, all messages sent to the external GroupWise system are routed to this
domain. Your domain’s MTA then routes the messages to the external domain.
3 Click OK to create the external domain.
The external domain is added to your GroupWise system and is visible in the GroupWise View.
In the following example, Dublin is the external domain.
30 GroupWise 8 Multi-System Administration Guide

4 Repeat Step 1 through Step 3 to define an external domain in the second GroupWise system. If
you do not have administrative rights to that system, you need to coordinate with that
GroupWise system’s administrator.
5 Continue with the next section, Linking to the External Domain.
4.3 Linking to the External Domain
novdocx (en) 11 July 2008
After you define a domain from the other GroupWise system as an external domain in your system,
you need to make sure that your system’s domains have the appropriate links to the external domain.
One domain in your system needs to have a direct link (mapped drive, UNC path, or TCP/IP) to the
external domain. By default, this is the domain you entered in the Link to Domain field when
creating the external domain (see Section 4.2, “Creating an External Domain,” on page 30).
All other domains in your system then have indirect links (through the direct link domain) to the
external domain. These links are configured automatically when the external domain was created.
To make sure your links are set up correctly:
1 In ConsoleOne, right-click the domain that has the direct link to the external domain, then click
GroupWise Utilities > Link Configuration to display the Link Configuration tool.
2 In the Outbound Links list, double-click the external domain to display the Edit Domain Link
dialog box.
Using Direct Links 31
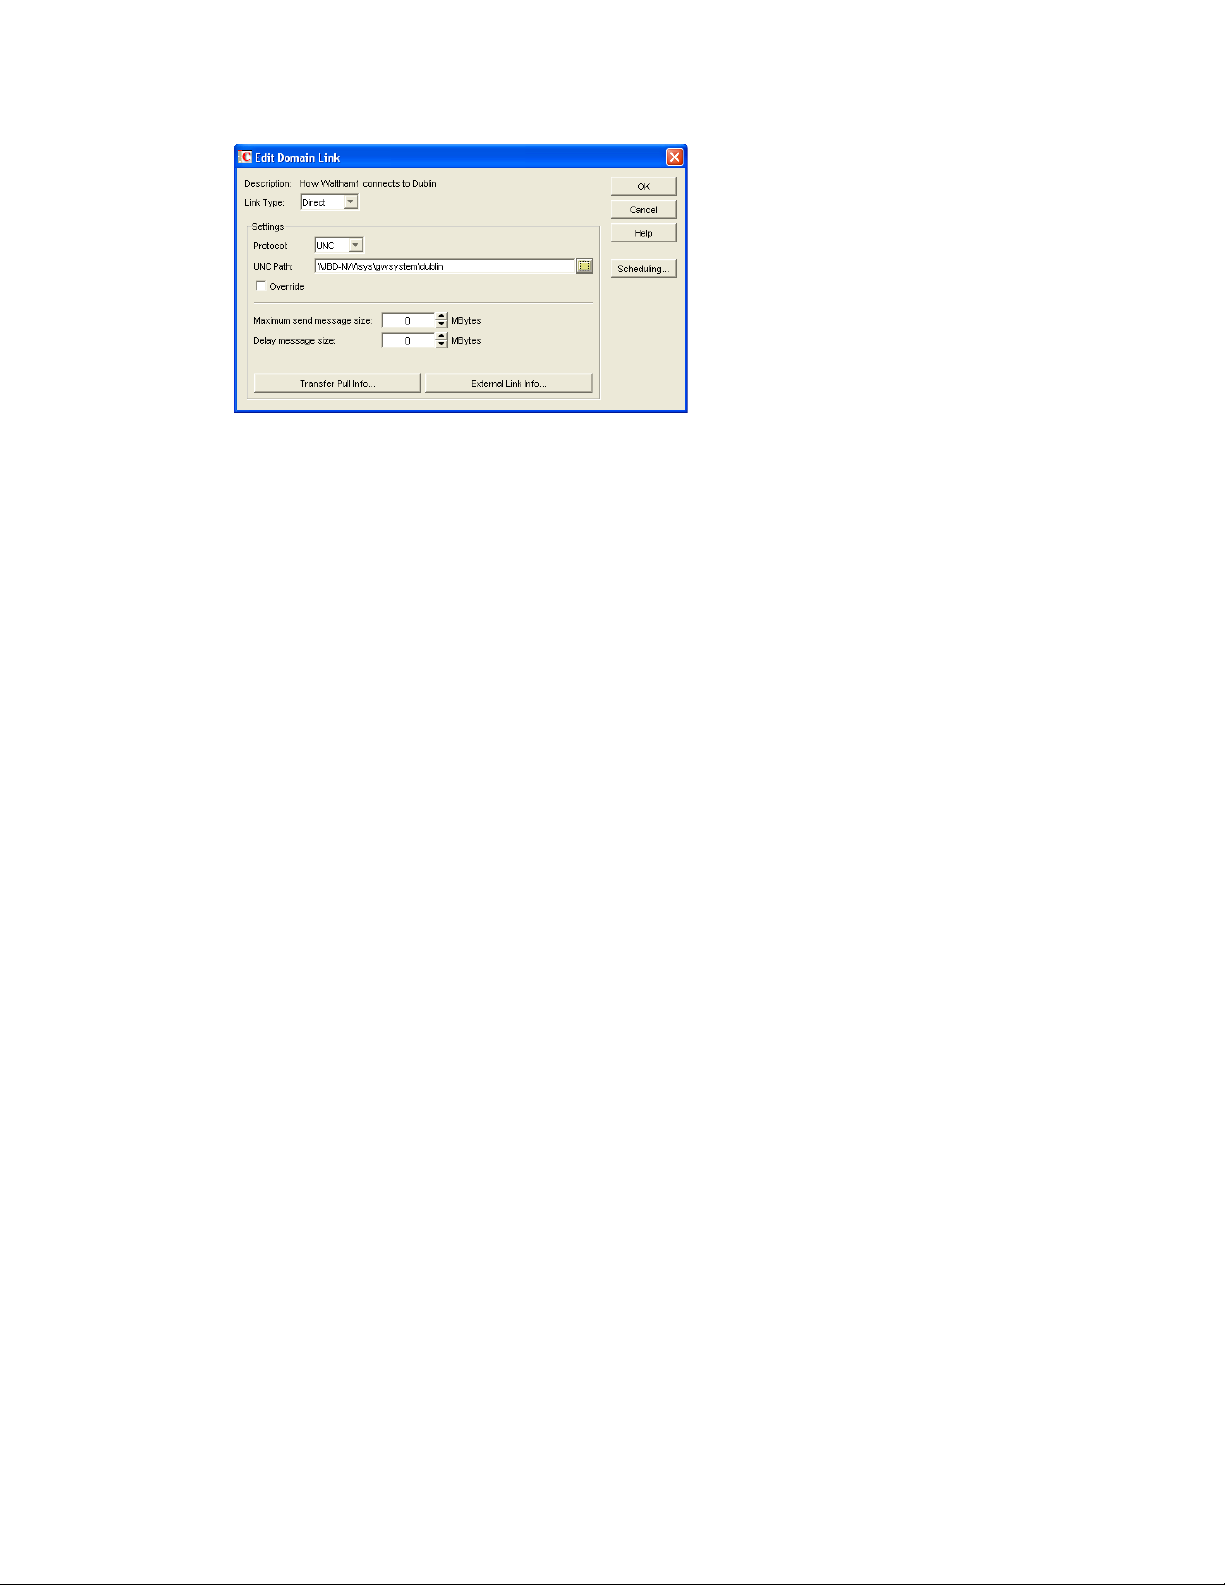
3 Check the link configuration to make sure that the link type is Direct.
4 Select the link protocol (UNC, Mapped, or TCP/IP), then fill in the information required for the
selected protocol.
For more information about link types and protocols, see “Managing the Links between
Domains and Post Offices” in “Domains” in the GroupWise 8 Administration Guide.
5 Click OK to save your changes.
The external domain is displayed in the Direct column of the Outbound Links list to show that
the current domain is using a direct link to the external domain.
By default, the rest of the domains in your system should have an indirect link to the external
domain. To verify this for a domain:
novdocx (en) 11 July 2008
6 In the list of domains on the Link Configuration utility’s toolbar, select the domain whose link
you want to check, then verify that the external domain is displayed in the Indirect column of
the Outbound Links list.
7 After verifying your domain links, repeat Step 1 through Step 6 in the second GroupWise
system to establish the links to the first GroupWise system. If you do not have administrative
rights to that system, you need to coordinate with that GroupWise system’s administrator.
8 Continue with Checking the Link Status of the External Domain.
4.4 Checking the Link Status of the External Domain
The GroupWise MTA has monitoring capabilities that let you determine whether the domains in
your system are properly linked to the external domain. When you look at the MTA’s operation
screen, you should see the external domain added to the domain count in the Status box.
If the link to the external domain is closed, the MTA should be logging and displaying the reasons
under its Configuration Status function. The most common reason that a direct link is closed is that
the MTA cannot attach to the server or volume. There can be various reasons for a failure to attach.
Make sure the server where the closed domain is located is not down. If you are using a mapped
drive or UNC path for the direct link protocol, the NetWare
and /password switches to connect to the other system. If you are using the Windows MTA, verify
the UNC path or drive mapping to the closed domain.
®
MTA startup file must have valid /user
If you are using a TCP/IP connection as the direct link protocol, the MTAs on both systems must be
properly configured with the IP addresses and port numbers for the defined TCP/IP links.
32 GroupWise 8 Multi-System Administration Guide

For more information about link protocols, see “Managing the Links between Domains and Post
Offices” in “Domains” in the GroupWise 8 Administration Guide.
4.5 Sending Messages Between Systems
After you establish links between a domain in your GroupWise system and a domain in an external
GroupWise system, the MTA in your system and an MTA in the other system can route messages to
the respective external systems as long as the message is addressed with a fully-qualified
GroupWise address:
userID.post_office.domain or user@host
To simplify addressing for your GroupWise users, you can exchange information between the two
systems. This enables users in your GroupWise system to use the Address Book when selecting
recipients from the other system. For information, continue with Exchanging Information Between
Systems.
4.6 Exchanging Information Between Systems
novdocx (en) 11 July 2008
Exchanging information between two GroupWise systems enables users in either system to use the
Address Book when addressing messages to users in the other system. To exchange information,
you can choose from the following methods:
External System Synchronization: You can use the External System Synchronization feature to
automatically exchange domain, post office, user, resource, and distribution list information
between the two systems. After the initial exchange of information, any information that changes in
one system is automatically propagated to the other system in order to synchronize the information
in that system. This is the recommended method for exchanging information between two systems.
For information about setting up synchronization between two external systems, see “External
System Synchronization” in “GroupWise System Operations” in “System” in the GroupWise 8
Administration Guide.
Manual Creation of Information: You can manually create the other systems’ objects (domains,
post offices, users, resources, and distribution lists) as external objects in your GroupWise system.
When doing so, the names of your external objects need to exactly match the names of the objects as
defined in their system. Domains in your system link to the external domains indirectly through the
first external domain you created (this is the external domain that one of your system’s domains has
a direct link to). The advantage to this method is that you can choose which of the other system’s
domains, post offices, users, resources, and distribution lists you want included in your system. The
disadvantage is that there is a great amount of administrative overhead involved in creating all the
objects and, after the objects are created, no automatic synchronization takes place so updates must
be made manually.
4.7 Message Flow Between External Domains
Because a link to an external domain is really just a way of defining a link between a domain on
your local GroupWise system and a domain on another GroupWise system, the flow of messages is
identical to the flow of messages between any two GroupWise domains. For more information about
message flows between domains, choose the type of link that you want to know more about in
“Message Delivery to a Different Domain” in the GroupWise 8 Troubleshooting 3: Message Flow
and Directory Structure.
Using Direct Links 33

novdocx (en) 11 July 2008
34 GroupWise 8 Multi-System Administration Guide

5
Using Gateway Links
novdocx (en) 11 July 2008
5
When you can’t use dynamic Internet links (see Chapter 3, “Using Dynamic Internet Links,” on
page 19) or direct links (see Chapter 4, “Using Direct Links,” on page 29) to connect GroupWise
systems that are located on different networks, you can use GroupWise gateways to connect the
systems. An MTA in the sending GroupWise system transfers outgoing messages to the gateway,
which passes the messages to a gateway in the receiving system. The receiving gateway transfers the
messages to an MTA, which then routes the messages to the appropriate post offices for delivery.
The following sections present summaries of the gateway options for connecting GroupWise
systems on different networks.
Section 5.1, “Connecting Systems Through the Internet,” on page 35
Section 5.2, “Connecting Systems Through an Asynchronous Phone Line,” on page 36
Section 5.3, “Connecting Systems Through an X.25 Line,” on page 36
Section 5.4, “Connecting GroupWise Systems Through Other E-Mail Systems,” on page 36
GroupWise 4.1 gateways work with GroupWise 4.1, 5.x, 6.x., 7, and 8. GroupWise 5.x gateways
work with GroupWise 5.x, 6.x, 7, and 8. For the most current GroupWise gateway product
information, contact your local Novell
®
office (http://www.novell.com/index/wwoffices.html).
®
5.1 Connecting Systems Through the Internet
The Internet now links thousands of networks and workstations throughout the world. GroupWise
messages can pass over the Internet from one GroupWise system to another. Currently, there are two
GroupWise products that let you connect GroupWise systems (and other systems) through the
Internet: the GroupWise Internet Agent, and the GroupWise SMTP/MIME Gateway.
GroupWise Internet Agent
The GroupWise Internet Agent is used with the following GroupWise versions:
GroupWise 5.2
GroupWise 5.5
GroupWise 5.5 Enhancement Pack
GroupWise 6.x
GroupWise 7
GroupWise 8
You can use the Internet Agent to connect your GroupWise system to the Internet and to connect to
other GroupWise systems through the Internet.
For instructions about installing the Internet Agent in a GroupWise 8 system, see “Installing the
GroupWise Internet Agent” in the GroupWise 8 Installation Guide.
For instructions about connecting GroupWise systems using the Internet Agent, see “Connecting
GroupWise Systems and Domains Using the Internet Agent” in “Internet Agent” in the GroupWise 8
Administration Guide.
Using Gateway Links
35

GroupWise SMTP/MIME Gateway
The GroupWise SMTP/MIME gateway is used with the following GroupWise versions:
GroupWise 4.1
GroupWise 5.0
GroupWise 5.1
For information about obtaining the SMTP/MIME gateway for use with the GroupWise versions,
contact your local Novell office (http://www.novell.com/index/wwoffices.html).
5.2 Connecting Systems Through an Asynchronous Phone Line
Another common way to connect GroupWise systems on different networks is across phone lines,
either through dedicated lines or by using modems for more occasional access. The GroupWise
Async Gateway provides this capability. For more information, see the GroupWise Async Gateway
Guide at the GroupWise Gateways Documentation Web site (http://www.novell.com/
documentation/gwgateways).
novdocx (en) 11 July 2008
5.3 Connecting Systems Through an X.25 Line
X.25 lines can also be used to connect GroupWise systems on different networks. The GroupWise
X.25 gateway provides this capability. For more information, see the GroupWise X.25 Gateway
Guide at the GroupWise Gateways Documentation Web site (http://www.novell.com/
documentation/gwgateways).
5.4 Connecting GroupWise Systems Through Other E-Mail Systems
Several GroupWise gateways allow GroupWise messages to pass through other e-mail systems with
no loss of GroupWise functionality. This setup is termed “passthrough” or “tunneled” messaging.
GroupWise messages are encapsulated into the format of the other e-mail system and sent to the
GroupWise system on the other end. No GroupWise functionality is lost. This is a convenience
when the other e-mail system is already configured to connect sites where GroupWise is also in use.
The gateways that can be used for passthrough messaging include:
GroupWise 5.x/6.x Internet Agent
GroupWise 4.1/5.0/5.1 SMTP/MIME Gateway
GroupWise Gateway for Microsoft* Mail
GroupWise Gateway for Lotus* Notes*
GroupWise Gateway for Lotus cc:Mail*
GroupWise Gateway for OfficeVision/VM*
GroupWise X.400 Gateway
GroupWise SNADS Gateway
36 GroupWise 8 Multi-System Administration Guide

For information about these gateways, see the GroupWise Gateway Documentation Web site (http:/
/www.novell.com/documentation/gwgateways).
novdocx (en) 11 July 2008
Using Gateway Links 37

novdocx (en) 11 July 2008
38 GroupWise 8 Multi-System Administration Guide

6
Synchronizing External
novdocx (en) 11 July 2008
GroupWise Systems
The External System Synchronization feature lets you automatically synchronize information
between your system and an external GroupWise
information about connecting GroupWise systems, see “Connecting to Other GroupWise Systems”
on page 11). This simplifies message addressing by enabling your users to select the other system’s
users from the Address Book. Otherwise, your users are required to enter the recipient’s full address
(userID.post_office.domain or user@host).
IMPORTANT: The External System Synchronization feature exists in GroupWise 5.x, 6.x, 7, and 8.
Therefore, you can use it to synchronize information between 5.x, 6.x, 7, and 8 systems. You cannot
use it to synchronize information with GroupWise 4.x or 3.x systems.
External System Synchronization lets you control what information (domains, post offices, users,
resources, and distribution lists) you send to the external system and what information you want to
accept from the external system. Any user, resource, and distribution list information you receive
from the external GroupWise system is displayed in the system Address Book.
External synchronization must be set up in both GroupWise systems before it can work properly.
To set up synchronization so that all future Address Book changes are propagated to external
GroupWise systems:
®
1 In ConsoleOne
Synchronization to display the External System Synchronization dialog box.
, click Tools > GroupWise System Operations > External System
®
system connected to your system (for
6
2 Click Add to display the Add External GroupWise System dialog box.
Synchronizing External GroupWise Systems
39
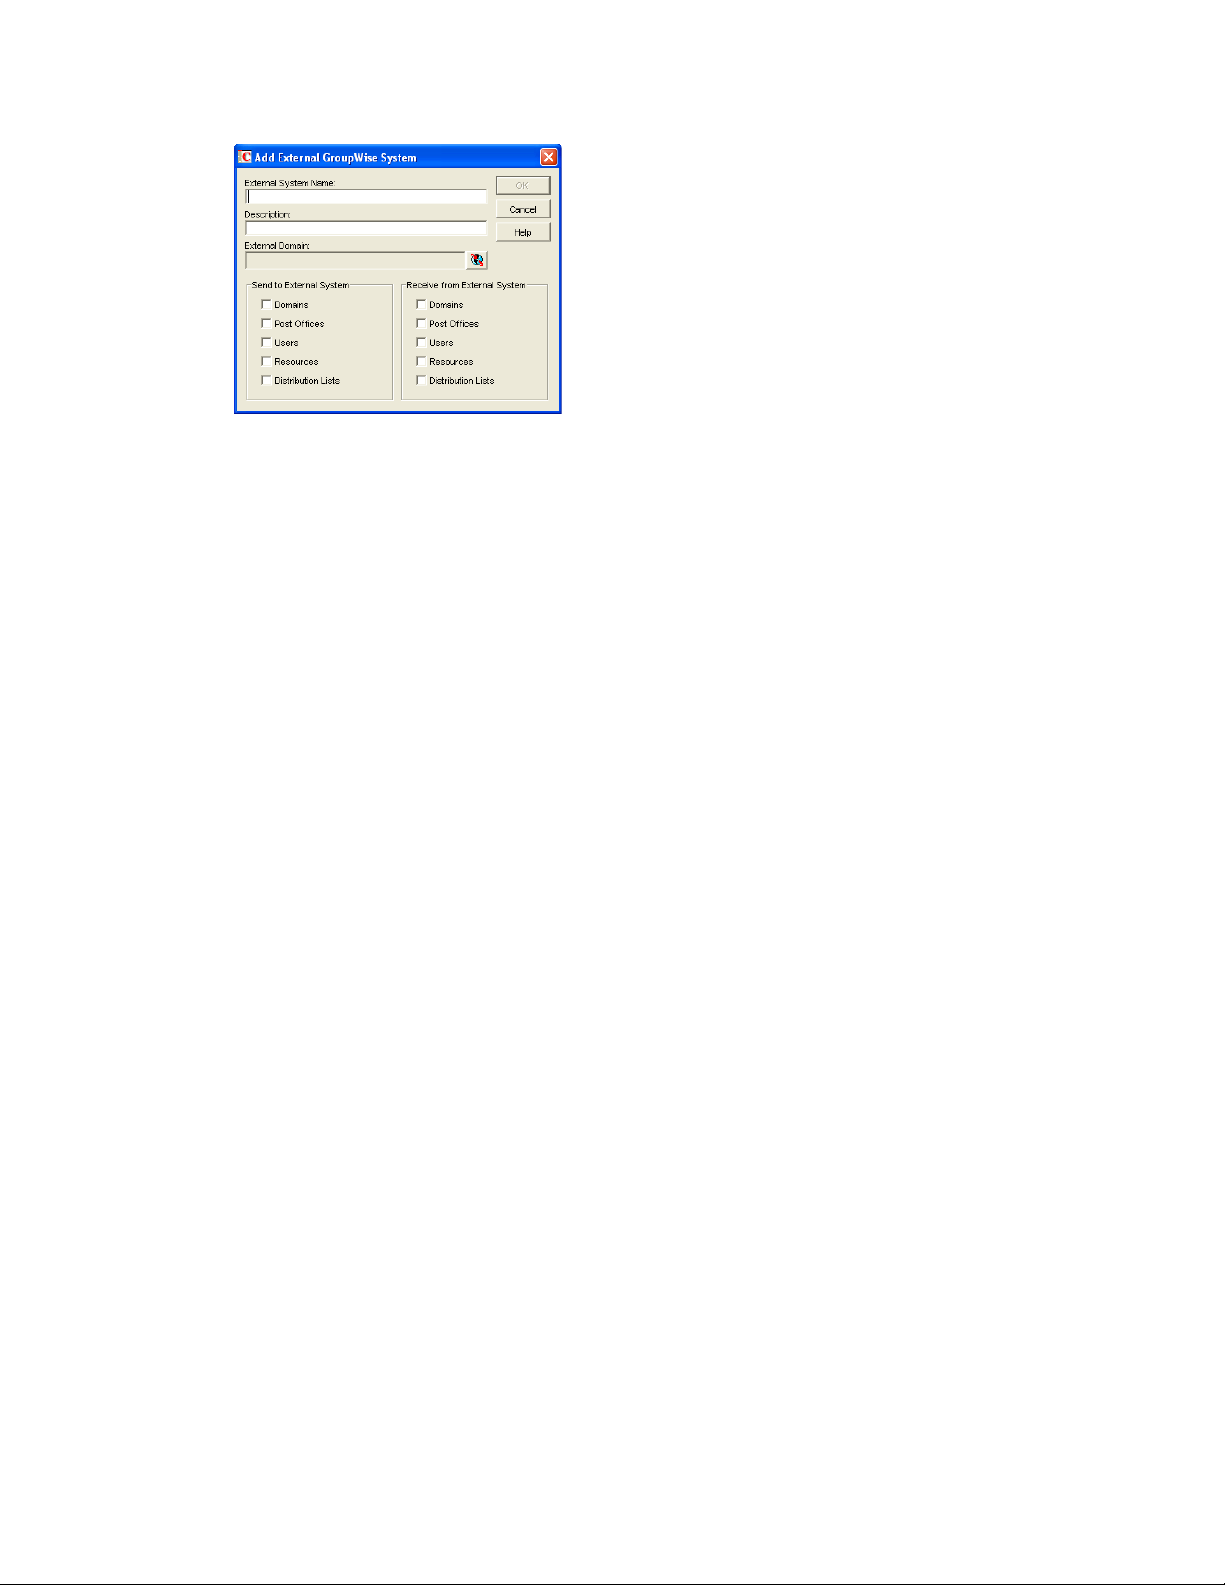
3 Fill in the following fields:
External System Name: Specify the name of the external GroupWise system. The name needs
to match the actual name of that GroupWise system.
Description: If desired, enter a description for the external system. This is an optional field.
External Domain: Click the External Domain (globe) icon to display a list of the external
domains defined in your GroupWise system. Select the external domain that belongs to the
external GroupWise system with which you are synchronizing information.
Send to External System: Select the information (Domains, Post Offices, Users, Resources,
and Distribution Lists) you want sent to the external GroupWise system during
synchronization. Only the information that your system owns is sent. For example, if you’ve
connected to another GroupWise system and its information is contained in your GroupWise
system as external domains, post offices, users, resources, and distribution lists, that
information is not sent.
A user, resource, or distribution list from your system is added to the external GroupWise
system only if its domain and post office exist in the external system (as an external domain
and post office in that system). Because of this, you should make sure that the Domains and
Post Offices options are selected as well as the desired Users, Resources, and Distribution Lists
options. After the initial synchronization takes place, the domains and post offices exist in the
external system. You can then choose not to send domain and post office information.
However, if you add domains or post offices or change the information for your existing
domains and post offices, that information is not sent to the external system until you select
Domains and Post Offices again.
novdocx (en) 11 July 2008
Receive from External System: Select the information (Domains, Post Offices, Users,
Resources, and Distribution Lists) you are willing to receive from the external GroupWise
system. As with sending information, a user, resource, or distribution list is added to your
system only if its domain and post office exist as an external domain and post office in your
system. Therefore, you should make sure to select the Domains and Post Offices options for at
least the initial synchronization.
4 Click OK to add the external GroupWise system to the list of external systems you are
synchronizing information with.
40 GroupWise 8 Multi-System Administration Guide

5 Click Close to save your changes.
After External System Synchronization is configured in both GroupWise systems, the two systems
exchange information. After the initial synchronization, any time domain, post office, user, resource,
or distribution list information in one system changes, the new information is sent to the other
system (provided that information is flagged to be sent).
novdocx (en) 11 July 2008
Synchronizing External GroupWise Systems 41

novdocx (en) 11 July 2008
42 GroupWise 8 Multi-System Administration Guide

II
Connecting to Non-GroupWise
novdocx (en) 11 July 2008
Messaging Systems
Chapter 7, “GroupWise Internet Agent,” on page 45
Chapter 8, “GroupWise Gateways,” on page 47
II
Connecting to Non-GroupWise Messaging Systems
43

novdocx (en) 11 July 2008
44 GroupWise 8 Multi-System Administration Guide

7
GroupWise Internet Agent
The preferred way to connect to non-GroupWise messaging systems is through the Internet.
GroupWise® provides connectivity to the Internet through the GroupWise Internet Agent. The
Internet Agent uses standard Internet protocols and formats. This means that messages can be sent to
or received from any Internet-connected e-mail system that can handle MIME or RFC-822
formatted messages sent using the SMTP protocol.
The Internet Agent also supports POP3 and IMAP4, which means that POP3/IMAP4 clients can be
used to access GroupWise mailboxes. In addition, the Internet Agent supports LDAP, which means
that it can act as an LDAP server by providing LDAP queries of the GroupWise directory.
For information about installing the Internet Agent, see “Installing the GroupWise Internet Agent”
in the GroupWise 8 Installation Guide.
For information about configuring and administering the Internet Agent, see “Internet Agent” in the
GroupWise 8 Administration Guide.
novdocx (en) 11 July 2008
7
GroupWise Internet Agent
45

novdocx (en) 11 July 2008
46 GroupWise 8 Multi-System Administration Guide

8
GroupWise Gateways
GroupWise® provides gateways to enable you to connect directly to a variety of messaging systems,
message transport protocols, and communication standards. For example, GroupWise provides
gateways for the Microsoft Exchange and Lotus Notes messaging systems as well as the X.400
message transport protocol.
For up-to-date information about currently available GroupWise gateways, see the GroupWise
Gateways Web site (http://www.novell.com/products/groupwise/gateways/details.html).
For GroupWise gateway documentation, see the GroupWise Gateway Documentation Web site
(http://www.novell.com/documentation/gwgateways).
novdocx (en) 11 July 2008
8
GroupWise Gateways
47

novdocx (en) 11 July 2008
48 GroupWise 8 Multi-System Administration Guide

III
Merging GroupWise Systems
Chapter 9, “Why Merge GroupWise Systems?,” on page 51
Chapter 10, “Planning the Merge,” on page 53
Chapter 11, “Preparing for the Merge,” on page 67
Chapter 12, “Merging the GroupWise Systems,” on page 69
novdocx (en) 11 July 2008
III
Merging GroupWise Systems
49

novdocx (en) 11 July 2008
50 GroupWise 8 Multi-System Administration Guide

9
Why Merge GroupWise Systems?
novdocx (en) 11 July 2008
9
If you are consolidating organizations or combining departments, you might want to merge two or
more GroupWise
GroupWise Systems” on page 11).
WARNING: When merging systems, do not merge a domain from one system into another system
if the merged domain is a newer version than the primary domain of its new system. For example, do
not merge a GroupWise 8 domain into a GroupWise system whose primary domain is version 7. The
primary domain in a GroupWise system must always be at or above the version level of all
secondary domains in the system.
You can achieve the same GroupWise functionality for your users by merging systems or by
connecting them. Therefore, the question of whether to merge GroupWise systems is mostly a
matter of administration:
If you want your entire GroupWise system configured so it can be administered by one
administrator from any location without needing to change system connections and manage
external objects, you should merge your systems.
If you want your entire GroupWise system configured so it can be administered by any
administrator from any location, and changing system connections and managing external
objects are not issues, you do not need to merge the systems.
If you want independent administrators for each GroupWise system, whether the systems are
connected or not, you should not merge the systems.
®
5.x 6.x, 7, or 8 systems rather than connect them (see “Connecting to Other
If you want to merge a GroupWise 5.x, 6.x, 7, or 8 system into your GroupWise 8 system, continue
with Chapter 10, “Planning the Merge,” on page 53.
If you do not want to merge the systems, but they are not connected and you would like to have them
connected, see “Connecting to Other GroupWise Systems” on page 11.
Why Merge GroupWise Systems?
51

novdocx (en) 11 July 2008
52 GroupWise 8 Multi-System Administration Guide
10
Planning the Merge
novdocx (en) 11 July 2008
10
Section 10.7, “Merge Planning Worksheet,” on page 61 lists all the information you need as you
merge a GroupWise
Section 10.1, “Understanding the Merge Process,” on page 53
Section 10.2, “Planning Administrator Rights,” on page 55
Section 10.3, “Determining Which GroupWise Objects Are No Longer In Use,” on page 55
Section 10.4, “Planning the Location of the Domain Database Backup Directories,” on page 56
Section 10.5, “Planning GroupWise System Connections,” on page 56
Section 10.6, “Planning to Merge Additional GroupWise Systems,” on page 60
Section 10.7, “Merge Planning Worksheet,” on page 61
When you have completed the following planning tasks and filled out the worksheet, you are ready
to continue with Chapter 11, “Preparing for the Merge,” on page 67.
®
5.x, 6.x, 7, or 8 system into your GroupWise 8 system.
10.1 Understanding the Merge Process
A merge is performed between the primary domains of two GroupWise systems. Merging one
system (the primary domain and all of its subordinate objects) with another consolidates the two
systems, resulting in only one primary domain and one or more new secondary domains and their
subordinate objects.
To avoid confusion, we will hereafter refer to the system whose primary domain you’ll retain as Site
#1 and the other system as Site #2.
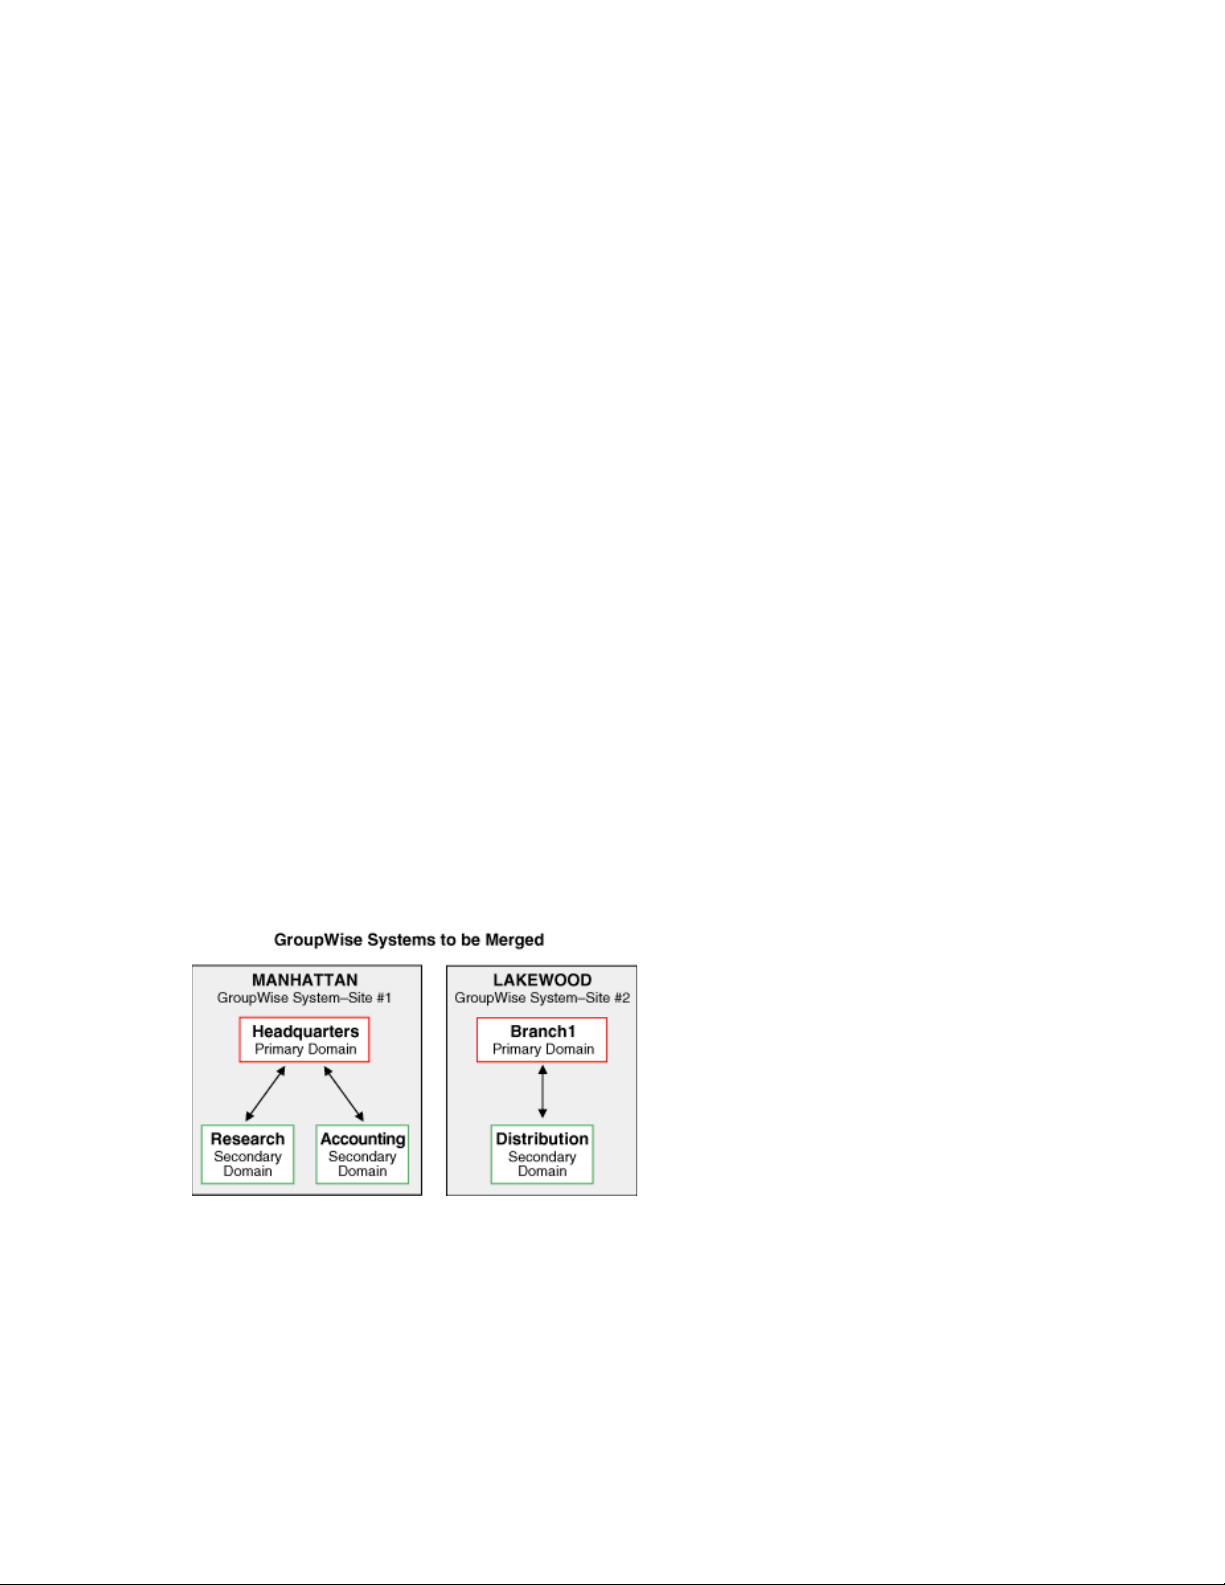
Figure 10-1 GroupWise Systems to be Merged
In the above illustration, we have two GroupWise systems that are not connected. We have
designated the Manhattan GroupWise system as Site #1 and the Lakewood GroupWise system as
Site #2. The Lakewood system will be merged into the Manhattan system.
Planning the Merge
53

If you have three or more systems to be merged, you must merge the systems one after the other. We
will not use references to a Site #3, a Site #4, and so on. Instead, after the first and second systems
have been merged, the third system will become Site #2 as you go through the merge planning,
preparation, and step sections again. Therefore, each system will take its turn at being Site #2 while
the first system being merged to will continue to be Site #1.
The merge process permanently affects a database. Before merging, you create backups of all
wpdomain.db files for the primary and secondary domains that will be affected by the merge.
This allows you to recover from any mistakes. For more information, see Section 10.4, “Planning
the Location of the Domain Database Backup Directories,” on page 56.
During the merge, you must shut down any GroupWise Message Transfer Agents (MTAs) that can
write to the domain databases. Even though you shut down the MTAs during the merge, users can
continue to use GroupWise because the Post Office Agents (POAs) do not need to be shut down.
The following GroupWise agent functions are not available until the MTAs are running again:
Transferring e-mail messages between post offices
Logging statistics
Updating domain database files
Replicating database information
Synchronizing GroupWise with Novell
®
eDirectory
TM
novdocx (en) 11 July 2008
Repairing domain databases
Print a copy of the Merge Planning Worksheet.
WORKSHEET
Under Item 23: GroupWise MTAs for Sites #1 and #2, list the GroupWise MTAs for both sites that you
need to shut down during the merge.
The items in the worksheet are listed in the order you enter them when running the GroupWise merge
utility. This planning section does not follow the same order as the worksheet, but all worksheet items are
covered.
If Site #2 has a primary domain and some secondary domains, you first release all of the secondary
domains in Site #2 to become primary domains in their own GroupWise systems. Then you merge
each Site #2 primary domain one at a time with the primary domain of Site #1. In other words, you
run the merge process once for each domain in Site #2. For more information, see Section 12.5,
“Releasing Site #2 Secondary Domains,” on page 73.
One link (of any type) must exist between a domain in Site #1 and the domain being merged in Site
#2. The merge utility automatically creates indirect links between the Site #1 secondary domains
and the Site #2 domain being merged. You have the option to accept these indirect links and
configure them later (if necessary), or you can create direct links between all domains in Site #1 and
the domain being merged from Site #2 before beginning the merge. All links must be completed and
correct before you run the MTAs after merging the systems. For more information, see “Linking the
Domains” on page 58.
54 GroupWise 8 Multi-System Administration Guide

WORKSHEET
Under Item 16: Site #1 Name, enter the name of the GroupWise system to designate as Site #1.
Under Item 7: Site #2 Name, enter the name of the GroupWise system to designate as Site #2. If you are
merging three or more GroupWise systems, you will select a different system as Site #2 each time you
reuse this planning section and rerun the merge process.
Under Item 14: Site #1 Primary Domain, enter the exact name of your Site #1 primary domain. Under
Item 5: Site #2 Primary Domain, enter the exact name of your Site #2 primary domain.
Under Item 18: Site #1 Secondary Domains, enter the exact names of your Site #1 secondary domains.
Under Item 10: Site #2 Secondary Domains, enter the exact names of your Site #2 secondary domains.
Under Item 17: Site #1 Time Zone, enter the time zone for Site #1.
Under Item 9: Site #2 Time Zone, enter the time zone for Site #2.
10.2 Planning Administrator Rights
novdocx (en) 11 July 2008
To perform the merge process, the Site #1 administrator must have exclusive access to the Site #2
databases. This access can be to either the Site #2 domain databases if the two GroupWise systems
are connected, or to copies of the Site #2 domain databases if the systems are not connected.
Exclusive access is created when the GroupWise MTAs are shut down and the administrator has
admin-equivalent rights to the two systems.
See “GroupWise Administrator Rights” in “Security Administration” in the GroupWise 8
Administration Guide for information on setting up administrator rights.
WORKSHEET
If the administrator performing the merge has the necessary rights, under Item 2: Does Administrator
Performing the Merge Have Admin-Equivalent Rights to Both Systems?, select Yes or No. If the
administrator does not currently have the required rights, make sure that the required rights are obtained
before starting the merge.
10.3 Determining Which GroupWise Objects Are No Longer In Use
You can save merging time and end up with a less cluttered GroupWise system if you determine
which GroupWise objects in Site #2 are no longer used and remove them. You can also use this
opportunity to delete any eDirectory user objects that are no longer used.
WORKSHEET
Under Item 3: GroupWise Objects to Delete, list each eDirectory user, GroupWise user account,
resource, and distribution list that you want to delete.
Planning the Merge 55

10.4 Planning the Location of the Domain Database Backup Directories
Because the domain database is critical to the performance of GroupWise, you should always create
a backup copy of the domain databases you will be manipulating. This ensures that an original
version of each database is available should you make a mistake, or if any problems should arise
during the merge process. You can always return to the former configurations while you correct any
problems encountered.
WORKSHEET
Under Item 15: Paths to Site #1 wpdomain.dbs, enter paths to the Site #1 wpdomain.db files.
Under Item 6: Paths to Site #2 wpdomain.dbs, enter paths to the Site #2 wpdomain.db files.
Under Item 24: Paths to Site #1 Backup Directories, enter the path to the backup directory you will create
to hold the backup copy of the Site #1 domain database.
Under Item 25: Paths to Site #2 Backup Directories, enter the path to each backup directory you will
create to hold the backup copy of a Site #2 domain database. Every domain database has the same
name, so plan to either temporarily rename the database copies or to create separate directories for
them.
novdocx (en) 11 July 2008
10.5 Planning GroupWise System Connections
The merge cannot occur unless Site #1 is able to make a direct connection to the Site #2 domain
being merged. You should have direct system connections established between Site #1 and Site #2
so that you can open the databases. If you are able to connect to Site #2 and have appropriate rights,
you can create external domains, release secondary domains, and merge domains in the GroupWise
Vie w.
If you cannot open the domain databases to be merged (you do not have the necessary rights and/or
the systems cannot be connected), you need to use copies of each Site #2 domain database for
making the direct connections.
So that the database copies will accurately mirror the live databases, you and the other GroupWise
administrator involved with the merge should avoid making any administrative changes in
GroupWise after you have made the copies of the Site #2 databases. GroupWise clients can function
in the two systems while you run the merge against the copy.
If you are the Site #1 administrator, you create directories for the Site #2 database copies (both the
original Site #2 primary domain and the newly-released Site #2 domain databases). During the
merge process, you target each of these directories to merge that domain to the Site #1 system. When
the merge process is completed, you copy the merged database copies over the live databases.
If you want to merge systems that are connected through a GroupWise gateway, you should treat the
systems as if they are not connected. This is because the merge requires use of external domains.
56 GroupWise 8 Multi-System Administration Guide
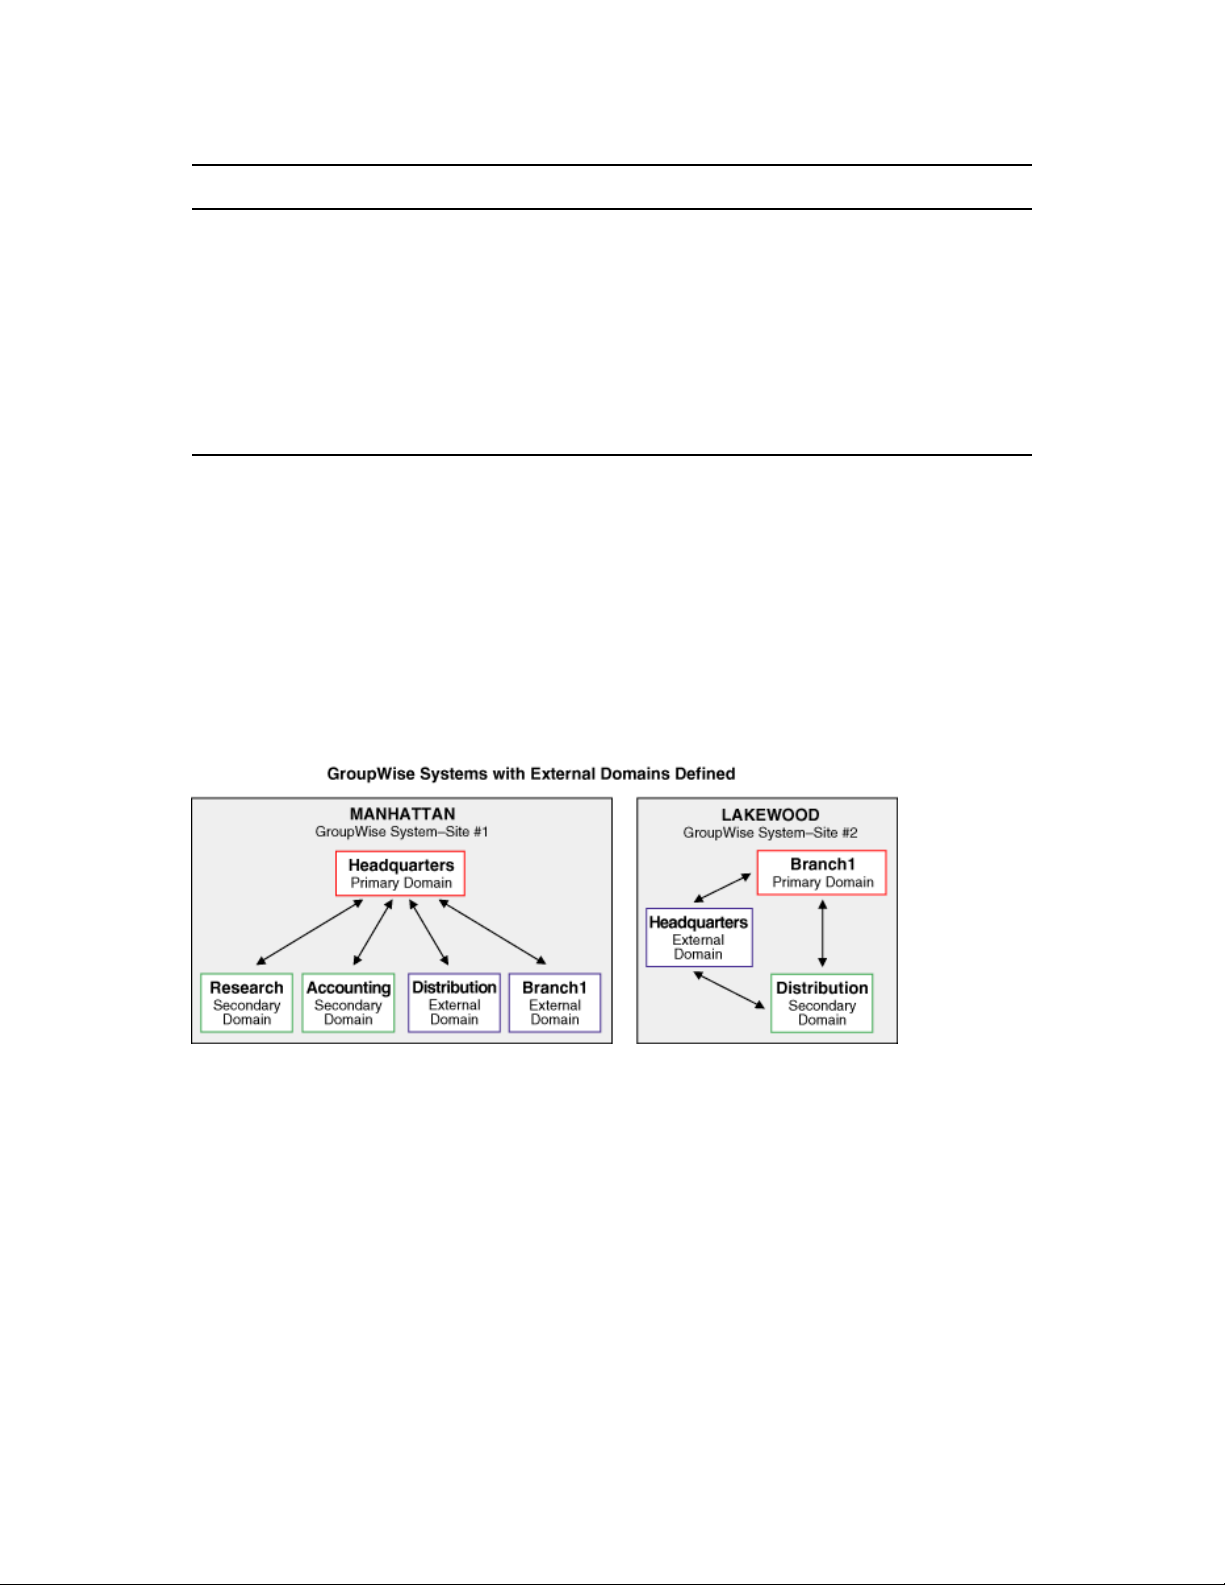
WORKSHEET
If the GroupWise systems you are merging are already connected, select Yes under Item 4: Systems
Connected?; otherwise, select No.
If you selected No for worksheet item 4 and the systems cannot be connected, enter the path to each
temporary directory you must create to hold the copies of the Site #2 wpdomain.db files under Item 21:
Paths to Site #2 Temporary Holding Directories.
If you selected No for worksheet item 4 and the temporary directories you create for the Site #2 domain
copies are on another tree, select Yes under Item 22: Temporary Directories for Site #2 on Another
Tree?; otherwise, select No. If you select Yes, you will need to be logged in to the other tree during the
merge.
10.5.1 External Domains
If the GroupWise systems you are merging are not already connected through external domains, you
need to create external domains to connect the systems. An external domain, which you must create
manually, provides a reference in your GroupWise system from which you can add a link to another
GroupWise system.
novdocx (en) 11 July 2008
You need external domains in each system with names that are identical to the domain names of the
site with which the merge is planned. You also need a link between the two systems.
Figure 10-2 GroupWise Systems with External Domains Defined
In the above illustration, we have created external domains in each system to represent where we
need direct connections for performing the merge.
You must have rights to Site #2 (that is, you must be able to authenticate to its servers) so that you
can establish a system connection using the GroupWise View. If you are able to connect to Site #2,
you can create external domains in that system. For more information, see Section 10.2, “Planning
Administrator Rights,” on page 55.
Creating a Site #2 external domain in Site #1 does not add an object to your eDirectory tree;
however, you can see the external domain object in the GroupWise View. A reference to the external
domain is added to your own system’s databases so that it can use the defined link to route messages
to users represented in the external domain.
Planning the Merge 57

WORKSHEET
Under Item 13: Site #1 External Domain Names, enter the exact name of each Site #1 domain you want
to create as an external domain in Site #2. Refer to worksheet items 14 and 18 for the Site #1 domain
names.
Under Item 19: Descriptions for Site #1 External Domains, enter descriptions for the Site #1 external
domains.
Under Item 8: Site #2 External Domain Names, enter the exact name of each Site #2 domain you must
create as an external domain in Site #1. Refer to worksheet items 5 and 10 for the Site #2 domain
names.
Under Item 11: Descriptions for Site #2 External Domains, enter descriptions for the Site #2 external
domains.
10.5.2 Linking the Domains
It is important that the inbound links for the external domains you create in Site #2 and Site #1 are
established and correct for both systems. These links are used to transfer messages, including
administrative messages, from one GroupWise system to another.
novdocx (en) 11 July 2008
Each domain object in eDirectory includes a link configuration attribute that is used to control
access to link information. If you have appropriate eDirectory rights, you can view the domain links
®
with the Link Configuration tool available in ConsoleOne
.
You can create links (of any type) between the domain being merged from Site #2 and the secondary
domains in Site #1 before running the merge. However, this is not necessary to perform the merge.
Instead, you can allow the merge utility to automatically create the indirect links between the
secondary domains of Site #1 and the domain being merged from Site #2, and you can later optimize
your system by reconfiguring the indirect links created by the merge utility.
WORKSHEET
If you want the merge utility to automatically create indirect links between the Site #2 domain being
merged and the secondary domains in Site #1, select Yes under Item 12: Allow Indirect Links to Site #1
Secondary Domains?; otherwise, select No so that you can configure the links before performing the
merge.
If you selected Yes for worksheet item 12, edit your domains list under Item 13: Site #1 External Domain
Names to indicate which Site #1 domain will be linked to the Site #2 domain being merged.
See “Managing the Links between Domains and Post Offices” in “Domains” in the GroupWise 8
Administration Guide for information on setting up direct links between domains.
58 GroupWise 8 Multi-System Administration Guide

WORKSHEET
Under Item 20: Link Configuration Fields, enter the information needed for the following link configuration
fields for each direct link you will create:
Description: Indicate which domains are being directly linked.
Link Type: Select Direct as the type of link between the domains.
Settings - Protocol: Select UNC as the protocol for communication between the domains.
Settings - Path or UNC Path: Enter the UNC path to the domain being merged.
10.5.3 Releasing the Secondary Domains in Site #2
You will release GroupWise secondary domain databases in Site #2 before you merge them into Site
#1. A released domain database is one that you disassociate from a primary domain. In effect, each
released domain (which shows as an external domain for Site #1) is its own, independent system.
Figure 10-3 GroupWise Systems with Site #2 Secondary Domain Released
novdocx (en) 11 July 2008
In the above illustration, the secondary domain in the Lakewood system has been released to
become its own primary domain. Each primary domain in the Lakewood system maintains a direct
connection with the Headquarters domain in Site #1 through the Headquarters external domain
created earlier for the Lakewood system.
Releasing a secondary domain requires the system to use drive mappings or UNC paths to locate the
domains to be released. If you have established a system connection to Site #2 through your
network, you can release a Site #2 secondary domain in the GroupWise View. When you release a
secondary domain, it becomes an external Site #2 domain and is considered a primary-level domain
in its own single-domain system. The released (that is, external) domain can then be merged into
Site #1 to become a secondary domain there.
If the systems are not connected (worksheet item 4), the Site #2 GroupWise administrator must have
network access to the temporary holding directories where you copied the wpdomain.db files for
the Site #2 primary and secondary domains. You need to establish a system connection to the
temporary directory where you copied the Site #2 primary domain database before you can release a
Site #2 secondary domain.
Planning the Merge 59

10.6 Planning to Merge Additional GroupWise Systems
If you have three or more systems to be merged, you must merge the systems one after the other. We
will not use references to Site #3, Site #4, and so on. Instead, after the first and second systems have
been merged, the third system will become Site #2 as you go through the merge planning,
preparation, and step sections again. Therefore, each system will take its turn at being Site #2 while
the first system being merged to will continue to be Site #1.
WORKSHEET
If you are merging three or more GroupWise systems, select Yes and continue in this section under Item
1: Merging Three or More GroupWise Systems?; otherwise, select No and you are finished with your
planning.
If you have three or more GroupWise systems to be merged, you can merge them in one session or at
different times. In either case, you will be merging them one after the other with each additional
system taking a turn at being Site #2. You need a separate worksheet for each additional system
being merged.
novdocx (en) 11 July 2008
Whether you merge the systems in one session or at different times, you can probably copy
information specific to Site #1 to each additional worksheet, because most of that information
should not be changed by a merge.
The merge process can be very lengthy when three or more systems are merged, especially if each
system being merged has a number of secondary domains. For example, when you merge several
systems, you select one as Site #1. This first system retains its primary domain, while the primary
and secondary domains of the other systems all become secondary domains in Site #1. Also, all
secondary domains in the other systems each need to be released before they can be merged.
Because the merge process itself involves moving only one domain at a time, you could be running
the release and merge programs many times—once for each primary and secondary domain in the
second system, then the third system, and so on.
10.6.1 Merging in One Session
If you plan to merge all of your GroupWise systems in one session, you should fill out all of the
worksheets before running the merge utility. Therefore, as you fill out the worksheets for each
system, keep in mind the changes in structure for Site #1 that will occur after each system is merged
with it.
Print another copy of the Merge Planning Worksheet for each additional GroupWise system to be
merged.
60 GroupWise 8 Multi-System Administration Guide

WORKSHEET
Do the following on each additional worksheet:
Under Item 16: Site #1 Name, enter the name of the GroupWise system to designate as Site #1.
Under Item 7: Site #2 Name, enter the name of the GroupWise system to designate as Site #2. If you are
merging three or more GroupWise systems, you will select a different system as Site #2 each time you
reuse this planning section and rerun the merge process.
Under Item 23: GroupWise MTAs for Sites #1 and #2, list the GroupWise MTAs that you need to shut
down during the merge. Because you should be including all domains in the previously combined
systems, your list should be longer for each subsequent worksheet.
10.6.2 Merging at Different Times
You might not want to merge several systems in one session. The amount of time required depends
on how many secondary domains exist in each additional system. This is because you must release
and merge each secondary domain one at a time.
novdocx (en) 11 July 2008
If you plan to merge your GroupWise systems at different times, you can fill in each additional
worksheet when you are ready to plan the merge for its system using this section.
10.7 Merge Planning Worksheet
The GroupWise Merge Domain Advisor helps you merge GroupWise systems. You need to prepare
for the merge by planning the location and structure of your domain databases.
Table 10-1 Merge Planning Worksheet
Item Example Explanation
1) Merging Three or
More GroupWise
Systems?
Yes
No
2) Does Administrator
Performing the Merge
Have Admin-Equivalent
Rights to Both Systems?
Yes
No
No If you will be merging three or more
GroupWise systems, whether in one
session or at different times, select Yes;
otherwise, select No.
For more information, see Section 10.1,
“Understanding the Merge Process,” on
page 53.
Yes If the administrator does not have the
necessary rights to perform the merge,
select No; otherwise, select Yes . The
merge utility depends on the rights of the
person logged in for access to the
applicable databases.
For more information, see Section 10.2,
“Planning Administrator Rights,” on
page 55.
Planning the Merge 61

Item Example Explanation
novdocx (en) 11 July 2008
3) GroupWise Objects to
Delete:
4) Systems Connected?
Yes
No
5) Site #2 Primary
Domain:
6) Paths to Site #2
wpdomain.db Files:
None List any eDirectory user objects,
GroupWise user accounts, resources, or
distribution lists that are no longer in use.
Enter “none” if you have nothing to delete.
For more information, see Section 10.3,
“Determining Which GroupWise Objects
Are No Longer In Use,” on page 55.
No If the GroupWise systems you are merging
are not connected, select No; otherwise,
select Yes .
For more information, see Section 10.5,
“Planning GroupWise System
Connections,” on page 56.
Branch1 List the name of the primary domain for
Site #2.
For more information, see Section 10.1,
“Understanding the Merge Process,” on
page 53.
\\gw\sys\branch1
\\gw\sys\distrib
To merge a domain from Site #2, you must
supply the path to the wpdomain.db file
for the domain being merged. If there are
multiple domains in Site #2, list the paths
for each wpdomain.db file.
For more information, see Section 10.4,
“Planning the Location of the Domain
Database Backup Directories,” on page 56.
7) Site #2 Name: Lakewood Identify the GroupWise system you want to
merge into Site #1. The primary domain of
this system will become a secondary
domain in Site #1. Each secondary domain
in Site #2 will be released so it can be
merged as a primary domain.
For more information, see Section 10.1,
“Understanding the Merge Process,” on
page 53.
62 GroupWise 8 Multi-System Administration Guide

Item Example Explanation
novdocx (en) 11 July 2008
8) Site #2 External
Domain Names:
9) Site #2 Time Zone: Central Enter the local time zone for Site #2.
Headquarters There must be at least one direct link
between a domain in Site #1 and each
domain being merged from Site #2. Specify
the exact name of the external domains
you will create in Site #2. Each external
domain you create in Site #2 must
correspond to a domain of the same name
in Site #1.
If you selected Yes for worksheet item 12,
you only need to create one external
domain in Site #2 because indirect links are
automatically created between the other
domains in Site #1 and the domain being
merged from Site #2.
If you selected No for worksheet item 12,
you need to create direct links from all
primary and secondary domains in Site #1
to Site #2, and from all primary and
secondary domains in Site #2 to Site #1.
For more information, see “External
Domains” on page 57.
For more information, see Section 10.1,
“Understanding the Merge Process,” on
page 53.
10) Site #2 Secondary
Domains:
11) Descriptions for Site
#2 External Domains:
12) Allow Indirect Links
to Site #1 Secondary
Domains?
Yes
No
Distribution List the names of all secondary domains in
Site #2. One at a time, each secondary
domain in Site #2 will be released to
become an independent primary domain
on its own to be merged into Site #1.
For more information, see Section 10.1,
“Understanding the Merge Process,” on
page 53.
Headquarters - primary Enter an informative description for each
Site #2 external domain.
For more information, see “External
Domains” on page 57.
Yes Sel ec t Yes and the merge utility
automatically creates indirect links between
the secondary domains in Site #1 and the
domain being merged from Site #2. You
can configure links later, if necessary.
Select No if you want to configure all of
your links before performing the merge.
For more information, see “Linking the
Domains” on page 58.
Planning the Merge 63

Item Example Explanation
novdocx (en) 11 July 2008
13) Site #1 External
Domain Names:
14) Site #1 Primary
Domain:
15) Paths to Site #1
Files: wpdomain.db
Branch1
Distribution
Headquarters List the name of the primary domain for
\\gw\sys\headq If you selected Yes for worksheet item 12,
You must have an external domain in Site
#1 for each primary and secondary domain
in Site #2. Specify the exact name of each
external domain you will create in Site #1
that corresponds to a domain of the same
name in Site #2.
For more information, see “External
Domains” on page 57.
Site #1. For more information, see
Section 10.1, “Understanding the Merge
Process,” on page 53.
you will make a direct link only to the
primary domain of Site #1. List the path to
its wpdomain.db file.
If you selected No for worksheet item 12,
you will need to make direct links to all Site
#1 secondary domains. List each of the
paths to their wpdomain.db files.
For more information, see Section 10.4,
“Planning the Location of the Domain
Database Backup Directories,” on page 56.
16) Site #1 Name: Manhattan Identify the GroupWise system you want to
be Site #1. This system will retain its
primary domain status.
For more information, see Section 10.1,
“Understanding the Merge Process,” on
page 53.
17) Site #1 Time Zone: Eastern Enter the local time zone for Site #1.
For more information, see Section 10.1,
“Understanding the Merge Process,” on
page 53.
18) Site #1 Secondary
Domains:
None If you selected No for worksheet item 12,
you will be creating direct links between the
secondary domains in Site #1 and the
domains being merged from Site #2. List
the Site #1 secondary domains.
If you selected Yes for worksheet item 12,
enter “none” because indirect links are
automatically made by the merge utility to
secondary domains in Site #1.
For more information, see Section 10.1,
“Understanding the Merge Process,” on
page 53.
64 GroupWise 8 Multi-System Administration Guide

Item Example Explanation
novdocx (en) 11 July 2008
19) Descriptions for Site
#1 External Domains:
20) Link Configuration
Fields:
Description:
Link Type:
Settings - Protocol:
Settings: Path or
UNC Path:
21) Paths to Site #2
Temporary Holding
Directories:
Branch1 - primary
Distribution - secondary
Headquarters
Direct
UNC
\\gw\sys\headq
(This example is only for a
Headquarters link. You will
need to list this information
for each link.)
\\gw\sys\hold\branch1
\\gw\sys\hold\distrib
Enter an informative description for each
Site #1 external domain.
For more information, see “External
Domains” on page 57.
Fill in the fields once for each link being set
up.
For more information, see “Linking the
Domains” on page 58.
If the systems you are merging cannot be
connected, and you are the administrator
for Site #1, specify the paths for each
temporary holding directory you will create
to hold the domain databases of Site #2.
Name the directories so that you can keep
track of which domain the database file
belongs to.
For more information, see Section 10.5,
“Planning GroupWise System
Connections,” on page 56.
22) Are Temporary
Holding Directories for
Site #2 on Another Tree?
Yes
No
23) GroupWise MTAs for
Sites #1 and #2:
No If your temporary holding directories are
located on a tree different than the one Site
#1 is on, select Yes ; otherwise, select No.
If you select Yes , you will need to be
logged in to the other tree during the
merge.
For more information, see Section 10.5,
“Planning GroupWise System
Connections,” on page 56.
MTA.Headquarters.Manhattan
MTA.Research.Manhattan
MTA.Accounting.Manhattan
MTA.Branch1.Lakewood
MTA.Distribution.Lakewood
The MTAs must be shut down during the
merge to prevent changes from being
made to the domain databases. The POAs
can be left running so that users can use
GroupWise during the merge. Enter the
applicable MTAs for both systems.
For more information, see Section 10.1,
“Understanding the Merge Process,” on
page 53.
Planning the Merge 65

Item Example Explanation
novdocx (en) 11 July 2008
24) Paths to Site #1
Backup Directories:
25) Paths to Site #2
Backup Directories:
\\gw\sys\bak\research
\\gw\sys\bak\headq
\\gw\sys\bak\account
\\gw\sys\bak\distrib
\\gw\sys\bak\branch1
To protect against losing information in
case of error, you need a backup of each
Site #1 domain database. You should place
each wpdomain.db file in a separate
backup directory. Enter the paths for each
directory.
For more information, see Section 10.4,
“Planning the Location of the Domain
Database Backup Directories,” on page 56.
To protect against losing information in
case of error, you need a backup of each
Site #2 domain database. You should place
each wpdomain.db file in a separate
backup directory. Enter the paths for each
directory.
For more information, see Section 10.4,
“Planning the Location of the Domain
Database Backup Directories,” on page 56.
66 GroupWise 8 Multi-System Administration Guide

11
Preparing for the Merge
Before you merge two GroupWise® systems, you need to prepare the GroupWise systems.
Section 10.7, “Merge Planning Worksheet,” on page 61 contains information you need to prepare
for the merge.
Do the following tasks to prepare the GroupWise domains for merging.
Section 11.1, “Setting Up Administrator Rights,” on page 67
Section 11.2, “Deleting Unused GroupWise Objects,” on page 67
Section 11.3, “Verifying That UNC Paths Are Correct,” on page 67
Section 11.4, “Resolving Pending Operations,” on page 68
11.1 Setting Up Administrator Rights
Make sure the administrator performing the move is an admin-equivalent in Novell® eDirectoryTM
(worksheet item 2).
novdocx (en) 11 July 2008
11
Make sure the administrator also has access to the GroupWise systems being merged.
See “GroupWise Administrator Rights” in “Security Administration” the GroupWise 8
Administration Guide for information on setting up administrator rights.
11.2 Deleting Unused GroupWise Objects
Use ConsoleOne® and the GroupWise View to delete any eDirectory User objects, GroupWise user
accounts, and GroupWise distributions lists that are no longer in use (worksheet item 3).
11.3 Verifying That UNC Paths Are Correct
Merging GroupWise systems requires the use of correct UNC paths. The merge brings over all UNC
paths defined for Site #2.
Even if you have already defined UNC paths, verify that they are accurate. See the following
worksheet items for the paths you will be using:
Item 6: Paths to Site #2 wpdomain.db Files
Item 15: Paths to Site #1 wpdomain.db Files
Item 21: Paths to Site #2 Temporary Holding Directories
Item 24: Paths to Site #1 Backup Directories
Item 25: Paths to Site #2 Backup Directories
Preparing for the Merge
67

11.4 Resolving Pending Operations
When you release secondary domains in Site #2, you are asked to resolve any pending operations.
You can speed up the release operations by doing this now.
1 In ConsoleOne, make sure you are connected to the GroupWise system for Site #2, then click
Tools > GroupWise System Operations > Pending Operations.
2 Note any pending operations and resolve them.
novdocx (en) 11 July 2008
68 GroupWise 8 Multi-System Administration Guide

12
Merging the GroupWise Systems
The information in this section helps you to merge Site #2 into Site #1. The Merge Planning
Work she et contains all the information the merge process prompts you for. (If you have several
worksheets because you are merging three or more systems, you will only use one worksheet each
time you follow the steps in this section.) Some tasks apply only to systems that cannot be directly
connected. If you selected Ye s for worksheet item 1, be sure you are using the worksheet for the
GroupWise
Do the following tasks to merge Site #2 into Site #1.
Section 12.1, “Creating External Domains for Both Systems,” on page 69
Section 12.2, “Configuring Links Between Site #2 Domains and Site #1 Secondary Domains,”
Section 12.3, “Checking Links to External Domains for Both Systems,” on page 71
Section 12.4, “Creating Temporary Holding Directories,” on page 72
Section 12.5, “Releasing Site #2 Secondary Domains,” on page 73
®
system being merged.
on page 71
novdocx (en) 11 July 2008
12
Section 12.6, “Sending Site #2 Databases to the Site #1 Administrator,” on page 74
Section 12.7, “Receiving Site #2 Databases at Site #1,” on page 74
Section 12.8, “Merging a Site #2 Domain into Site #1,” on page 74
Section 12.9, “Merging the Next GroupWise System,” on page 75
Section 12.10, “Sending the Merged Site #2 Databases to Site #2,” on page 75
Section 12.11, “Restarting the GroupWise Agents,” on page 75
Section 12.12, “Testing the Merged System,” on page 76
12.1 Creating External Domains for Both
Systems
This section applies only if the systems you are merging are not already connected through external
domains (worksheet item 4).
Both the Site #1 and Site #2 administrators must create an external domain to represent the domain
structure in the corresponding system. In other words, if you are the Site #1 administrator, you will
create Site #2 external domains in your system to represent the domains in Site #2. If you are the
Site #2 administrator, you will create Site #1 external domains in your system to represent the
domains in Site #1.
Refer to the appropriate section for instructions:
Section 12.1.1, “Creating Site #1 External Domains in Site #2,” on page 70
Section 12.1.2, “Creating Site #2 External Domains in Site #1,” on page 70
Merging the GroupWise Systems
69
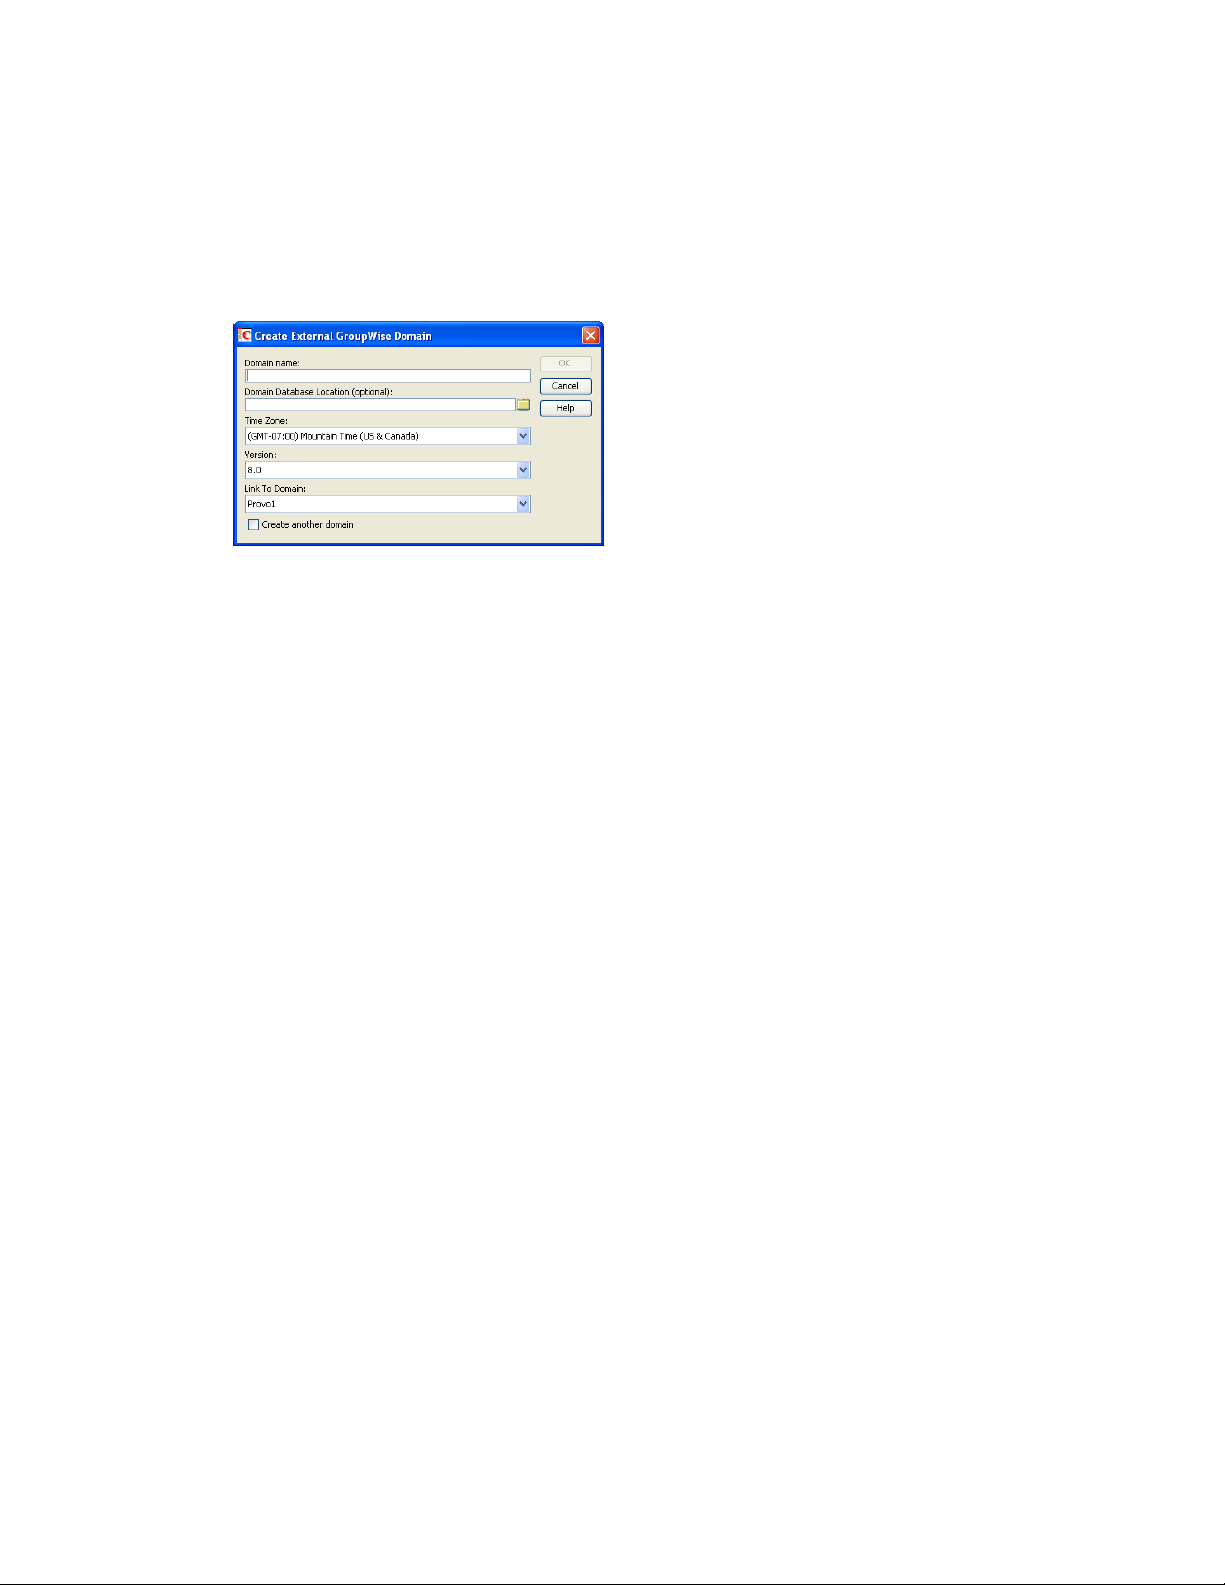
12.1.1 Creating Site #1 External Domains in Site #2
1 In ConsoleOne®, make sure you are connected to the Site #2 GroupWise system (worksheet
item 7).
2 Right-click GroupWise System in the GroupWise View, then click New > External Domain to
display the Create External GroupWise Domain dialog box.
3 Fill in the fields:
novdocx (en) 11 July 2008
Domain Name: Enter the name of the Site #1 domain you are connecting to (worksheet item
8). This creates the external domain on Site #2. Names are not case sensitive.
Domain Database Location: Select the path to the Site #1 domain database (wpdomain.db)
you will link to. ConsoleOne interprets a mapped location as a UNC path (worksheet item 6).
Time Zone: Select the time zone where the Site #1 domain is physically located (worksheet
item 9).
Ve rs io n : Select the database version for the Site #1 domain. The version is determined by the
domain’s MTA version.
Link to Domain: Select the domain in Site #2 you want the external domain to link to.
ConsoleOne creates a direct link to this domain (worksheet item 5 and worksheet item 10).
4 Click Create to create the external domain and add it to the GroupWise View.
5 Repeat Step 2 through Step 4 for every Site #1 external domain you need to create (worksheet
item 12 and worksheet item 13).
12.1.2 Creating Site #2 External Domains in Site #1
You must also create a Site #2 external domain in Site #1.
1 In ConsoleOne, make sure you are connected to the Site #1 GroupWise system (worksheet item
14 and worksheet item 15).
2 Right-click GroupWise System in the GroupWise View, then click New > External Domain to
display the Create External GroupWise Domain dialog box.
70 GroupWise 8 Multi-System Administration Guide
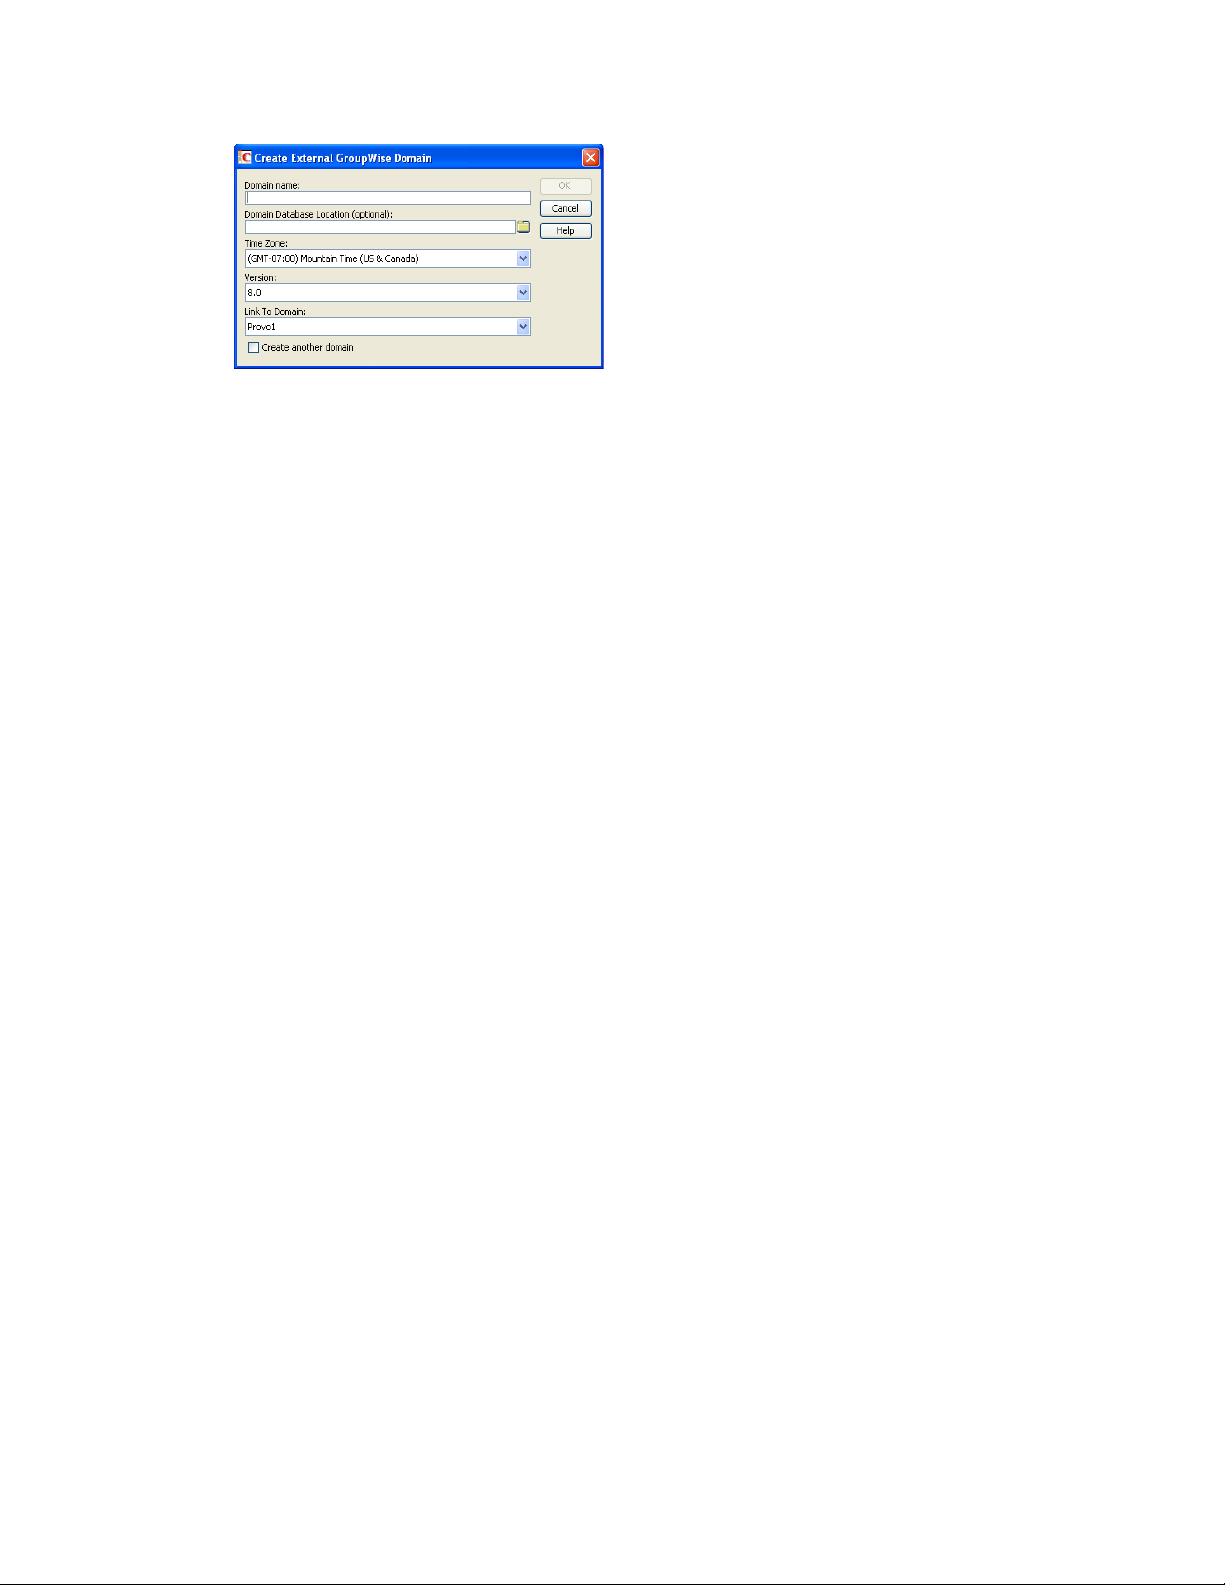
3 Fill in the fields:
Domain Name: Enter the name of the Site #2 domain you are connecting to (worksheet item 5
and worksheet item 10). Names are not case sensitive.
Domain Database Location: Select the path to the Site #2 domain database (wpdomain.db)
you are connecting to. ConsoleOne interprets a mapped location as a UNC path (worksheet
item 15).
Time Zone: Select the time zone where the external domain is physically located (worksheet
item 17).
Ve rs io n : Select the database version for the Site #2 domain. The version is determined by the
domain’s MTA version.
novdocx (en) 11 July 2008
Link to Domain: Select the domain in your system you want the external domain linked to.
The MTA for the Site #1 domain you specify will route messages to and from the external
domain (worksheet item 14 and worksheet item 18).
4 Click Create to create the external domain and add it to the GroupWise View.
5 Repeat Step 2 through Step 4 for every Site #2 external domain you need to create (worksheet
item 5 and worksheet item 10).
12.2 Configuring Links Between Site #2 Domains
and Site #1 Secondary Domains
If you selected No under worksheet item 12, configure the links between each Site #2 domain and all
of the secondary domains in Site #1 (worksheet item 13).
See “Managing the Links between Domains and Post Offices” in “Domains” in the GroupWise 8
Administration Guide for information on setting up direct links between domains.
12.3 Checking Links to External Domains for
Both Systems
The merge cannot be performed if there are broken or missing links. Therefore, you should check
the links in Site #1 and check the links in Site #2.
Refer to the appropriate section for instructions:
“Checking Links to Site #1 External Domains in Site #2” on page 72
“Checking Links to Site #2 External Domains in Site #1” on page 72
Merging the GroupWise Systems 71

12.3.1 Checking Links to Site #1 External Domains in Site #2
You use the Link Configuration tool to verify that each Site #1 primary domain or a Site #1
secondary domain has an inbound link from the Site #2 external domain.
1 In ConsoleOne, make sure you are connected to the Site #2 GroupWise system.
2 Click Tools > GroupWise Utilities > Link Configuration to launch the Link Configuration tool.
3 In the domain list, select the external domain (worksheet item 13) whose inbound links you
want to check.
4 Check the Inbound Links window (displayed by default for an external domain) to make sure
that a direct link icon labeled with a Site #2 secondary or primary domain name is displayed
there (worksheet item 8).
An inbound link to the Site #1 external domain from a Site #2 domain is required for the merge
to proceed.
5 If the link is incorrectly configured, double-click the Site #2 domain name to display the Edit
Domain Link dialog box.
6 Edit the fields as necessary (worksheet item 20), then click OK to save your changes.
novdocx (en) 11 July 2008
12.3.2 Checking Links to Site #2 External Domains in Site #1
You use the Link Configuration tool to verify that each Site #2 external domain has an inbound link
from either the Site #1 primary domain or a Site #1 secondary domain.
1 In ConsoleOne, make sure you are connected to the Site #2 GroupWise system.
2 Click Tools > GroupWise Utilities > Link Configuration to launch the Link Configuration tool.
3 In the domain list, select the external domain (worksheet item 8) whose inbound links you want
to check.
4 Check the Inbound Links window (displayed by default for an external domain) to make sure
that a direct link icon labeled with a Site #1 secondary or primary domain name is displayed
there (worksheet item 14 and worksheet item 18).
5 If the link is incorrectly configured, double-click the Site #1 domain name to display the Edit
Domain Link dialog box.
6 Edit the fields as necessary (worksheet item 20), then click OK to save the changes.
12.4 Creating Temporary Holding Directories
This section applies only if the systems you are merging cannot be directly connected and you must
use temporary database copies (worksheet item 4).
You need to create temporary holding directories where you can place copies of the Site #2
wpdomain.db files for the primary and secondary domains (worksheet item 8).
1 For Site #2, create separate directories for the primary domain and each secondary domain.
You create these directories in Site #2 to accommodate releasing the secondary domains. Each
wpdomain.db file must have its own temporary directory (worksheet item 21). Name the
temporary directory so that you can keep track of which domain the database belongs to. One
suggested strategy is to create a temporary directory and then create subdirectories in it that
match the names of the primary and secondary domains.
72 GroupWise 8 Multi-System Administration Guide

2 Make a copy of each wpdomain.db file in its appropriate holding directory.
3 Make a copy of the gwdom.dc file from the domain subdirectory of your software
distribution directory in each holding directory.
12.5 Releasing Site #2 Secondary Domains
1 In ConsoleOne, make sure you are connected to Site #2’s primary domain (worksheet item 5).
2 In the GroupWise View, right-click the secondary domain you want to release (worksheet item
8), click GroupWise Utilities > System Maintenance to display the GroupWise System
Maintenance dialog box.
3 Select Release Secondary, then click Run to launch the Release Domain Advisor.
4 In the Release Domain dialog box, click Next.
5 If the Rights Warning dialog box is displayed, make sure you have sufficient rights (see
Section 11.1, “Setting Up Administrator Rights,” on page 67), then click Next.
6 Take care of any pending operations, then click Next.
7 In the Path to Domain dialog box, select the domain directory (if it is not already displayed),
then click Next.
8 In the System Name dialog box, specify a name for the new GroupWise system that will be
created for the released domain, then click Next.
9 In the Update eDirectory Objects dialog box, select Yes if you have access to the eDirectory
tree in which the domain is located, then click Next.
or
TM
novdocx (en) 11 July 2008
If you don’t have access to the domain’s eDirectory tree, select No, then click Next. After you
release the domain, you will need to send the released domain’s database to someone who has
access to the domain’s eDirectory tree. He or she can then use the Graft GroupWise Objects
utility to update the domain’s objects in the eDirectory tree (see “Graft GroupWise Objects” in
“GroupWise Utilities” in “System” in the GroupWise 8 Administration Guide).
10 If you have not already done so, shut down the primary domain’s MTA and the MTA that
services the domain you are releasing, then click Next.
11 In the Ready to Release dialog box, click Release to start the release process.
When the process is finished, the Domain Successfully Released dialog box is displayed.
12 Click Done to return to the GroupWise System Maintenance dialog box, then click Close.
The secondary domain has now been released to become its own GroupWise system. It is
displayed as an external domain in Site #2.
13 Restart the MTAs in case you need to take care of any pending operations for the next domain
you release.
14 Repeat Step 2 through Step 13 for every Site #2 secondary domain you want to release
(worksheet item 5 and worksheet item 10).
When you have released all of the Site #2 secondary domains, you are ready to proceed with
merging the domains into Site #1. For more information, see Section 12.8, “Merging a Site #2
Domain into Site #1,” on page 74.
Merging the GroupWise Systems 73

However, if the systems you are merging cannot be directly connected, you must first do the tasks
under Section 12.6, “Sending Site #2 Databases to the Site #1 Administrator,” on page 74 and
Section 12.7, “Receiving Site #2 Databases at Site #1,” on page 74.
12.6 Sending Site #2 Databases to the Site #1
Administrator
This section applies only if the systems you are merging cannot be directly connected and you must
use temporary database copies (worksheet item 4).
Because your systems cannot be directly connected, you must send the Site #2 databases (including
released secondary domains) to Site #1.
1 Create temporary holding directories on portable media, such as a disk, removable drive, or
tape, to match the names of the temporary holding directories you created in Site #2 (worksheet
item 21).
2 If you are not the administrator for Site #1, make a record of the directory name for each
database, indicating whether that database is a primary or secondary domain (worksheet item
6).
3 Copy the databases and gwdom.dc files into their temporary holding directories.
4 Send the portable media to the Site #1 administrator.
novdocx (en) 11 July 2008
12.7 Receiving Site #2 Databases at Site #1
This section applies only if the systems you are merging cannot be directly connected and you must
use temporary database copies (worksheet item 4).
1 If you created temporary holding directories to accommodate the Site #2 system databases,
copy the files from the media to your server (worksheet item 21).
You will use these directories as the location for the merge of the Site #2 domains to Site #1.
2 Keep the portable media from Site #2 as an archival copy.
3 When you have copied all of the databases and gwdom.dc files to temporary directories,
proceed with merging the domains into Site #1. For more information, see Section 12.8,
“Merging a Site #2 Domain into Site #1,” on page 74.
12.8 Merging a Site #2 Domain into Site #1
1 In ConsoleOne, make sure you are connected to Site #1.
2 In the GroupWise View, right-click the Site #2 external domain that you want to merge into Site
#1, then click System Maintenance (worksheet item 5 and worksheet item 10).
3 Verify that Merge External Domain is selected, then click Run to start the Merge Domain
Advisor.
4 In the Merge Domain into System dialog box, click Next.
5 If the Rights Warning dialog box is displayed, make sure you have sufficient rights (see
Section 11.1, “Setting Up Administrator Rights,” on page 67), then click Next.
6 In the Path to Domain dialog box, specify the path to the directory containing the domain’s
database (worksheet item 21), then click Next.
74 GroupWise 8 Multi-System Administration Guide

7 In the Merge External Systems dialog box, click Yes to indicate that you want the Site #2
domain to include information about its defined external systems, then click Next.
This refers to systems, not domains. These are created for external synchronization.
This information includes the definition and links for Site #1.
8 In the Update eDirectory Objects dialog box, select Yes if you have access to the eDirectory
tree in which the domain is located, then click Next.
or
If you don’t have access to the domain’s eDirectory tree, select No, then click Next. After you
merge the domain, you need to send the merged domain’s database to someone who has access
to the domain’s eDirectory tree. He or she can then use the Graft GroupWise Objects utility to
update the domain’s objects in the eDirectory tree (see “Graft GroupWise Objects” in
“GroupWise Utilities” in “System” in the GroupWise 8 Administration Guide).
9 If you have not already done so, shut down the primary domain’s MTA and the MTA that
services the domain you are merging, then click Next.
10 In the Ready to Merge Domain dialog box, click Merge to begin the merging process.
When the process has completed, the Domain Successfully Merged dialog box is displayed.
11 Click Done to exit the Merge GroupWise Domains Advisor.
The merged Site #2 domain now appears as a secondary domain in Site #1.
novdocx (en) 11 July 2008
12 Repeat Step 2 through Step 11 to merge any other external domains (that is, the secondary
domains that you have released from Site #2) (worksheet item 5 and worksheet item 10).
12.9 Merging the Next GroupWise System
If you selected Yes for worksheet item 1, use the worksheet you completed for the next GroupWise
system to be merged and begin with Section 12.1, “Creating External Domains for Both Systems,”
on page 69.
12.10 Sending the Merged Site #2 Databases to
Site #2
This section applies only if the systems you are merging cannot be directly connected and you must
use temporary database copies (worksheet item 4).
The merged Site #2 domains must be sent to Site #2 so that the post office databases can be rebuilt
(worksheet item 5 and worksheet item 10).
1 From Site #1, copy the merged Site #2 databases to the Site #2 domain directory.
12.11 Restarting the GroupWise Agents
Restart any MTAs and POAs that you shut down to complete the merge processes.
Merging the GroupWise Systems 75

12.12 Testing the Merged System
You should test your merged Site #1 system to make sure it is operating correctly.
1 Search the Address Book for users who were in the old Site #2 to see if they are now being
displayed for the newly-merged Site #1. Also search the Address Book for users who were in
Site #1 before the merge to see if they are still being displayed.
2 Send a test message from the primary domain to the new secondary domains (merged from Site
#2) to ensure that message routing is working correctly.
After you are satisfied with the operation of the merged system, you can merge the next system by
starting with Chapter 10, “Planning the Merge,” on page 53. If you have already completed the
planning worksheet for the next system to be merged, continue from Section 12.1, “Creating
External Domains for Both Systems,” on page 69.
novdocx (en) 11 July 2008
76 GroupWise 8 Multi-System Administration Guide
 Loading...