

Page 1

Interoperability Guide
Novell®
novdocx (en) 22 June 2009
AUTHORIZED DOCUMENTATION
GroupWise
8
August 31, 2009
®
www.novell.com
GroupWise 8 Interoperability Guide
Page 2

Legal Notices
Novell, Inc. makes no representations or warranties with respect to the contents or use of this documentation, and
specifically disclaims any express or implied warranties of merchantability or fitness for any particular purpose.
Further, Novell, Inc. reserves the right to revise this publication and to make changes to its content, at any time,
without obligation to notify any person or entity of such revisions or changes.
Further, Novell, Inc. makes no representations or warranties with respect to any software, and specifically disclaims
any express or implied warranties of merchantability or fitness for any particular purpose. Further, Novell, Inc.
reserves the right to make changes to any and all parts of Novell software, at any time, without any obligation to
notify any person or entity of such changes.
Any products or technical information provided under this Agreement may be subject to U.S. export controls and the
trade laws of other countries. You agree to comply with all export control regulations and to obtain any required
licenses or classification to export, re-export, or import deliverables. You agree not to export or re-export to entities
on the current U.S. export exclusion lists or to any embargoed or terrorist countries as specified in the U.S. export
laws. You agree to not use deliverables for prohibited nuclear, missile, or chemical biological weaponry end uses. See
the Novell International Trade Services Web page (http://www.novell.com/info/exports/) for more information on
exporting Novell software. Novell assumes no responsibility for your failure to obtain any necessary export
approvals.
novdocx (en) 22 June 2009
Copyright © 2003-2009 Novell, Inc. All rights reserved. No part of this publication may be reproduced, photocopied,
stored on a retrieval system, or transmitted without the express written consent of the publisher.
Novell, Inc. has intellectual property rights relating to technology embodied in the product that is described in this
document. In particular, and without limitation, these intellectual property rights may include one or more of the U.S.
patents listed on the Novell Legal Patents Web page (http://www.novell.com/company/legal/patents/) and one or
more additional patents or pending patent applications in the U.S. and in other countries.
Novell, Inc.
404 Wyman Street, Suite 500
Waltham, MA 02451
U.S.A.
www.novell.com
Online Documentation: To access the online documentation for this and other Novell products, and to get
updates, see the Novell Documentation Web site (http://www.novell.com/documentation).
Page 3

Novell Trademarks
For Novell trademarks, see the Novell Trademark and Service Mark list (http://www.novell.com/company/legal/
trademarks/tmlist.html).
Third-Party Materials
All third-party trademarks are the property of their respective owners.
novdocx (en) 22 June 2009
Page 4

novdocx (en) 22 June 2009
4 GroupWise 8 Interoperability Guide
Page 5

Contents
About This Guide 15
Part I Novell Cluster Services on NetWare 17
1 Introduction to GroupWise 8 and Novell Cluster Services on NetWare 19
2 Planning GroupWise in a NetWare Cluster 21
2.1 Meeting Software Version Requirements. . . . . . . . . . . . . . . . . . . . . . . . . . . . . . . . . . . . . . . . . 22
2.2 Installing Novell Cluster Services . . . . . . . . . . . . . . . . . . . . . . . . . . . . . . . . . . . . . . . . . . . . . . . 22
2.3 Planning a New Clustered Domain . . . . . . . . . . . . . . . . . . . . . . . . . . . . . . . . . . . . . . . . . . . . . 23
2.4 Planning a New Clustered Post Office . . . . . . . . . . . . . . . . . . . . . . . . . . . . . . . . . . . . . . . . . . . 24
2.5 Planning a New Library for a Clustered Post Office. . . . . . . . . . . . . . . . . . . . . . . . . . . . . . . . . 25
2.6 Deciding Whether to Cluster-Enable the Shared Volumes Used by GroupWise . . . . . . . . . . . 25
2.7 Ensuring Successful Name Resolution for GroupWise Volumes . . . . . . . . . . . . . . . . . . . . . . . 27
2.8 Deciding How to Install and Configure the Agents in a Cluster . . . . . . . . . . . . . . . . . . . . . . . . 28
2.8.1 Planning Secondary IP Addresses and Cluster-Unique Port Numbers for Agents in the
Cluster . . . . . . . . . . . . . . . . . . . . . . . . . . . . . . . . . . . . . . . . . . . . . . . . . . . . . . . . . . . . 29
2.8.2 Determining Appropriate Failover Paths for the Agents . . . . . . . . . . . . . . . . . . . . . . 31
2.8.3 Deciding Where to Install the Agent Software . . . . . . . . . . . . . . . . . . . . . . . . . . . . . . 31
2.8.4 Deciding Whether to Run the Agents in Protected Memory . . . . . . . . . . . . . . . . . . . 34
2.8.5 Planning the NetWare Agent Installation . . . . . . . . . . . . . . . . . . . . . . . . . . . . . . . . . . 34
2.9 GroupWise Clustering Worksheets . . . . . . . . . . . . . . . . . . . . . . . . . . . . . . . . . . . . . . . . . . . . . 35
2.9.1 System Clustering Worksheet . . . . . . . . . . . . . . . . . . . . . . . . . . . . . . . . . . . . . . . . . . 35
2.9.2 IP Address Worksheet . . . . . . . . . . . . . . . . . . . . . . . . . . . . . . . . . . . . . . . . . . . . . . . . 37
2.9.3 Agent Clustering Worksheet . . . . . . . . . . . . . . . . . . . . . . . . . . . . . . . . . . . . . . . . . . . 39
novdocx (en) 22 June 2009
3 Setting Up a Domain and Post Office in a NetWare Cluster 41
3.1 Preparing the Cluster for GroupWise . . . . . . . . . . . . . . . . . . . . . . . . . . . . . . . . . . . . . . . . . . . . 41
3.1.1 Ensuring Required Software Versions . . . . . . . . . . . . . . . . . . . . . . . . . . . . . . . . . . . . 41
3.1.2 Cluster-Enabling Shared Volumes for Use with GroupWise . . . . . . . . . . . . . . . . . . . 41
3.1.3 Configuring Short Name Resolution . . . . . . . . . . . . . . . . . . . . . . . . . . . . . . . . . . . . . 42
3.2 Setting Up a New GroupWise System in a Cluster . . . . . . . . . . . . . . . . . . . . . . . . . . . . . . . . . 44
3.3 Creating a New Secondary Domain in a Cluster . . . . . . . . . . . . . . . . . . . . . . . . . . . . . . . . . . . 45
3.4 Creating a New Post Office in a Cluster. . . . . . . . . . . . . . . . . . . . . . . . . . . . . . . . . . . . . . . . . . 46
3.5 Installing and Configuring the MTA and the POA in a Cluster . . . . . . . . . . . . . . . . . . . . . . . . . 48
3.5.1 Installing the Agent Software in a Cluster . . . . . . . . . . . . . . . . . . . . . . . . . . . . . . . . . 48
3.5.2 Editing Clustered Agent Startup Files . . . . . . . . . . . . . . . . . . . . . . . . . . . . . . . . . . . . 49
3.5.3 Configuring the GroupWise Volume Resource to Load and Unload the Agents . . . . 50
3.5.4 Setting Up New Instances of the Agents without Installing the Agent Software . . . . 54
3.6 Testing Your Clustered GroupWise System. . . . . . . . . . . . . . . . . . . . . . . . . . . . . . . . . . . . . . . 56
3.7 Managing Your Clustered GroupWise System. . . . . . . . . . . . . . . . . . . . . . . . . . . . . . . . . . . . . 57
3.7.1 Updating GroupWise Objects with Cluster-Specific Descriptions . . . . . . . . . . . . . . . 57
3.7.2 Using Novell Remote Manager on NetWare 6.5 . . . . . . . . . . . . . . . . . . . . . . . . . . . . 58
3.7.3 Knowing What to Expect in MTA and POA Failover Situations . . . . . . . . . . . . . . . . . 61
3.8 What’s Next . . . . . . . . . . . . . . . . . . . . . . . . . . . . . . . . . . . . . . . . . . . . . . . . . . . . . . . . . . . . . . . 61
3.9 Clustering Quick Checklists . . . . . . . . . . . . . . . . . . . . . . . . . . . . . . . . . . . . . . . . . . . . . . . . . . . 62
3.9.1 GroupWise System Quick Checklist . . . . . . . . . . . . . . . . . . . . . . . . . . . . . . . . . . . . . 62
Contents 5
Page 6

3.9.2 Domain Quick Checklist. . . . . . . . . . . . . . . . . . . . . . . . . . . . . . . . . . . . . . . . . . . . . . . 63
3.9.3 Post Office Quick Checklist . . . . . . . . . . . . . . . . . . . . . . . . . . . . . . . . . . . . . . . . . . . . 64
4 Implementing the Internet Agent in a NetWare Cluster 67
4.1 Planning the Internet Agent in a Cluster . . . . . . . . . . . . . . . . . . . . . . . . . . . . . . . . . . . . . . . . . 67
4.1.1 Planning a Domain for the Internet Agent . . . . . . . . . . . . . . . . . . . . . . . . . . . . . . . . . 68
4.1.2 Deciding Whether to Cluster-Enable the Internet Agent Volume. . . . . . . . . . . . . . . . 68
4.1.3 Determining an Appropriate Failover Path for the Internet Agent Volume. . . . . . . . . 68
4.1.4 Planning a Secondary IP Address and Cluster-Unique Port Numbers for the Internet
Agent and Its MTA . . . . . . . . . . . . . . . . . . . . . . . . . . . . . . . . . . . . . . . . . . . . . . . . . . . 69
4.1.5 Preparing Your Firewall for the Internet Agent . . . . . . . . . . . . . . . . . . . . . . . . . . . . . 69
4.1.6 Deciding Where to Install the Internet Agent and Its MTA. . . . . . . . . . . . . . . . . . . . . 70
4.1.7 Deciding Whether to Run the Internet Agent and Its MTA in Protected Memory. . . . 70
4.1.8 Planning the MTA Installation . . . . . . . . . . . . . . . . . . . . . . . . . . . . . . . . . . . . . . . . . . 71
4.1.9 Planning the Internet Agent Installation . . . . . . . . . . . . . . . . . . . . . . . . . . . . . . . . . . . 71
4.2 Setting Up the Internet Agent in a Cluster . . . . . . . . . . . . . . . . . . . . . . . . . . . . . . . . . . . . . . . . 71
4.2.1 Cluster-Enabling a Shared Volume for Use with the Internet Agent . . . . . . . . . . . . . 71
4.2.2 Creating a Domain for the Internet Agent . . . . . . . . . . . . . . . . . . . . . . . . . . . . . . . . . 72
4.2.3 Installing the MTA for the Internet Agent Domain . . . . . . . . . . . . . . . . . . . . . . . . . . . 72
4.2.4 Installing and Configuring the Internet Agent in a Cluster . . . . . . . . . . . . . . . . . . . . . 72
4.2.5 Testing the Clustered Internet Agent . . . . . . . . . . . . . . . . . . . . . . . . . . . . . . . . . . . . . 79
4.3 Managing the Internet Agent in a Cluster. . . . . . . . . . . . . . . . . . . . . . . . . . . . . . . . . . . . . . . . . 80
4.3.1 Updating GroupWise Objects with Cluster-Specific Descriptions . . . . . . . . . . . . . . . 81
4.3.2 Knowing What to Expect in an Internet Agent Failover Situation . . . . . . . . . . . . . . . 82
4.4 Internet Agent Clustering Worksheet . . . . . . . . . . . . . . . . . . . . . . . . . . . . . . . . . . . . . . . . . . . . 82
4.5 Internet Agent Quick Checklist. . . . . . . . . . . . . . . . . . . . . . . . . . . . . . . . . . . . . . . . . . . . . . . . . 83
novdocx (en) 22 June 2009
5 Implementing WebAccess in a NetWare Cluster 85
5.1 Understanding the WebAccess Components . . . . . . . . . . . . . . . . . . . . . . . . . . . . . . . . . . . . . 85
5.2 Planning WebAccess in a Cluster . . . . . . . . . . . . . . . . . . . . . . . . . . . . . . . . . . . . . . . . . . . . . . 85
5.2.1 Planning a New Domain for the WebAccess Agent. . . . . . . . . . . . . . . . . . . . . . . . . . 86
5.2.2 Deciding Whether to Cluster-Enable the WebAccess Agent Volume . . . . . . . . . . . . 86
5.2.3 Determining an Appropriate Failover Path for the WebAccess Agent Volume . . . . . 87
5.2.4 Planning a Secondary IP Address and Cluster-Unique Port Numbers for the
WebAccess Agent and Its MTA . . . . . . . . . . . . . . . . . . . . . . . . . . . . . . . . . . . . . . . . . 87
5.2.5 Deciding Where to Install the WebAccess Agent and Its MTA . . . . . . . . . . . . . . . . . 87
5.2.6 Deciding Whether to Run the WebAccess Agent and Its MTA in Protected Memory 88
5.2.7 Planning the MTA Installation . . . . . . . . . . . . . . . . . . . . . . . . . . . . . . . . . . . . . . . . . . 88
5.2.8 Planning the WebAccess Installation. . . . . . . . . . . . . . . . . . . . . . . . . . . . . . . . . . . . . 88
5.3 Setting Up WebAccess in a Cluster . . . . . . . . . . . . . . . . . . . . . . . . . . . . . . . . . . . . . . . . . . . . . 89
5.3.1 Cluster-Enabling a Shared Volume for Use with the WebAccess Agent . . . . . . . . . . 89
5.3.2 Creating a Domain for the WebAccess Agent . . . . . . . . . . . . . . . . . . . . . . . . . . . . . . 90
5.3.3 Installing the MTA for the WebAccess Agent Domain . . . . . . . . . . . . . . . . . . . . . . . . 90
5.3.4 Installing and Configuring the WebAccess Agent in a Cluster. . . . . . . . . . . . . . . . . . 90
5.3.5 Testing Your Clustered WebAccess Installation . . . . . . . . . . . . . . . . . . . . . . . . . . . . 96
5.4 Managing WebAccess in a Cluster . . . . . . . . . . . . . . . . . . . . . . . . . . . . . . . . . . . . . . . . . . . . . 97
5.4.1 Updating GroupWise Objects with Cluster-Specific Descriptions . . . . . . . . . . . . . . . 97
5.4.2 Knowing What to Expect in WebAccess Failover Situations . . . . . . . . . . . . . . . . . . . 98
5.4.3 Updating the WebAccess Agent Configuration File (commgr.cfg). . . . . . . . . . . . . . . 98
5.5 WebAccess Clustering Worksheet . . . . . . . . . . . . . . . . . . . . . . . . . . . . . . . . . . . . . . . . . . . . . . 99
5.6 WebAccess Quick Checklist . . . . . . . . . . . . . . . . . . . . . . . . . . . . . . . . . . . . . . . . . . . . . . . . . 100
6 GroupWise 8 Interoperability Guide
Page 7

6 Implementing GroupWise Gateways in a NetWare Cluster 103
7 Monitoring a GroupWise System in a NetWare Cluster 105
8 Backing Up a GroupWise System in a NetWare Cluster 107
9 Updating a GroupWise System in a NetWare Cluster 109
10 Moving an Existing GroupWise 8 System into a NetWare Cluster 111
11 Implementing Messenger in a NetWare Cluster 113
11.1 Planning Your Messenger System in a Cluster . . . . . . . . . . . . . . . . . . . . . . . . . . . . . . . . . . . 113
11.1.1 Understanding Your Cluster . . . . . . . . . . . . . . . . . . . . . . . . . . . . . . . . . . . . . . . . . . 113
11.1.2 Planning Messenger Administration . . . . . . . . . . . . . . . . . . . . . . . . . . . . . . . . . . . . 113
11.1.3 Deciding Where to Install the Messenger Agent Software . . . . . . . . . . . . . . . . . . . 114
11.1.4 Planning the Messenger Agent Installation . . . . . . . . . . . . . . . . . . . . . . . . . . . . . . . 116
11.2 Setting Up Your Messenger System in a Cluster . . . . . . . . . . . . . . . . . . . . . . . . . . . . . . . . . . 116
11.2.1 Installing to Each Node in the Cluster . . . . . . . . . . . . . . . . . . . . . . . . . . . . . . . . . . . 117
11.2.2 Installing to a Messenger Volume . . . . . . . . . . . . . . . . . . . . . . . . . . . . . . . . . . . . . . 117
11.3 Messenger Clustering Worksheet . . . . . . . . . . . . . . . . . . . . . . . . . . . . . . . . . . . . . . . . . . . . . 121
novdocx (en) 22 June 2009
Part II Novell Cluster Services on Linux 123
12 Introduction to GroupWise 8 and Novell Cluster Services on Linux 125
13 Planning GroupWise in a Linux Cluster 127
13.1 Installing Novell Cluster Services on Linux . . . . . . . . . . . . . . . . . . . . . . . . . . . . . . . . . . . . . . 128
13.2 Planning a Clustered Software Distribution Directory . . . . . . . . . . . . . . . . . . . . . . . . . . . . . . 129
13.3 Planning a New Clustered Domain . . . . . . . . . . . . . . . . . . . . . . . . . . . . . . . . . . . . . . . . . . . . 130
13.4 Planning a New Clustered Post Office . . . . . . . . . . . . . . . . . . . . . . . . . . . . . . . . . . . . . . . . . . 131
13.5 Planning a New Library for a Clustered Post Office . . . . . . . . . . . . . . . . . . . . . . . . . . . . . . . . 131
13.6 Deciding How to Install and Configure the Linux Agents in a Cluster . . . . . . . . . . . . . . . . . . 132
13.6.1 Recording Secondary IP Addresses for the Agents . . . . . . . . . . . . . . . . . . . . . . . . 132
13.6.2 Determining Appropriate Failover Lists for the Agents . . . . . . . . . . . . . . . . . . . . . . 132
13.6.3 Determining Cluster Resource Information for the Linux Agents. . . . . . . . . . . . . . . 133
13.6.4 Planning the Linux Agent Installation. . . . . . . . . . . . . . . . . . . . . . . . . . . . . . . . . . . . 133
13.7 GroupWise Clustering Worksheets . . . . . . . . . . . . . . . . . . . . . . . . . . . . . . . . . . . . . . . . . . . . 133
13.7.1 System Clustering Worksheet . . . . . . . . . . . . . . . . . . . . . . . . . . . . . . . . . . . . . . . . . 134
13.7.2 Agent Clustering Worksheet . . . . . . . . . . . . . . . . . . . . . . . . . . . . . . . . . . . . . . . . . . 135
14 Setting Up a Domain and a Post Office in a Linux Cluster 137
14.1 Setting Up a New GroupWise System in a Linux Cluster. . . . . . . . . . . . . . . . . . . . . . . . . . . . 137
14.2 Creating a New Secondary Domain in a Linux Cluster . . . . . . . . . . . . . . . . . . . . . . . . . . . . . 138
14.3 Creating a New Post Office in a Linux Cluster . . . . . . . . . . . . . . . . . . . . . . . . . . . . . . . . . . . . 139
14.4 Installing and Configuring the MTA and the POA in a Cluster . . . . . . . . . . . . . . . . . . . . . . . . 140
14.4.1 Installing and Setting Up the Agents in Your Cluster . . . . . . . . . . . . . . . . . . . . . . . . 140
14.4.2 Changing Agent Paths to Locations on GroupWise Partitions . . . . . . . . . . . . . . . . 144
14.4.3 Configuring GroupWise Cluster Resources to Load and Unload the Agents . . . . . 146
14.4.4 Setting Up New Instances of the Agents without Installing the Agent Software . . . 152
Contents 7
Page 8

14.5 Testing Your Clustered GroupWise System. . . . . . . . . . . . . . . . . . . . . . . . . . . . . . . . . . . . . . 154
14.6 Managing Your Clustered GroupWise System. . . . . . . . . . . . . . . . . . . . . . . . . . . . . . . . . . . . 155
14.6.1 Updating GroupWise Objects with Cluster-Specific Descriptions . . . . . . . . . . . . . . 155
14.6.2 Knowing What to Expect in MTA and POA Failover Situations . . . . . . . . . . . . . . . . 157
14.7 What’s Next . . . . . . . . . . . . . . . . . . . . . . . . . . . . . . . . . . . . . . . . . . . . . . . . . . . . . . . . . . . . . . 157
14.8 Clustering Quick Checklists . . . . . . . . . . . . . . . . . . . . . . . . . . . . . . . . . . . . . . . . . . . . . . . . . . 158
14.8.1 GroupWise System Quick Checklist . . . . . . . . . . . . . . . . . . . . . . . . . . . . . . . . . . . . 158
14.8.2 Domain Quick Checklist. . . . . . . . . . . . . . . . . . . . . . . . . . . . . . . . . . . . . . . . . . . . . . 158
14.8.3 Post Office Quick Checklist . . . . . . . . . . . . . . . . . . . . . . . . . . . . . . . . . . . . . . . . . . . 159
15 Implementing the Internet Agent in a Linux Cluster 161
15.1 Planning the Internet Agent in a Linux Cluster . . . . . . . . . . . . . . . . . . . . . . . . . . . . . . . . . . . . 161
15.1.1 Planning a Domain for the Internet Agent . . . . . . . . . . . . . . . . . . . . . . . . . . . . . . . . 162
15.1.2 Selecting the Internet Agent Partition and Secondary IP Address . . . . . . . . . . . . . 162
15.1.3 Determining an Appropriate Failover List for the Internet Agent . . . . . . . . . . . . . . . 163
15.1.4 Determining Cluster Resource Information for the Internet Agent . . . . . . . . . . . . . . 163
15.1.5 Preparing DNS for the Clustered Internet Agent . . . . . . . . . . . . . . . . . . . . . . . . . . . 163
15.1.6 Preparing Your Firewall for the Clustered Internet Agent . . . . . . . . . . . . . . . . . . . . 163
15.1.7 Planning the MTA Installation . . . . . . . . . . . . . . . . . . . . . . . . . . . . . . . . . . . . . . . . . 164
15.1.8 Planning the Internet Agent Installation . . . . . . . . . . . . . . . . . . . . . . . . . . . . . . . . . . 164
15.2 Setting Up the Internet Agent in a Linux Cluster . . . . . . . . . . . . . . . . . . . . . . . . . . . . . . . . . . 165
15.2.1 Creating a Domain for the Internet Agent . . . . . . . . . . . . . . . . . . . . . . . . . . . . . . . . 165
15.2.2 Installing the MTA for the Internet Agent Domain . . . . . . . . . . . . . . . . . . . . . . . . . . 165
15.2.3 Installing and Configuring the Internet Agent in a Cluster . . . . . . . . . . . . . . . . . . . . 165
15.3 Testing the Internet Agent in a Linux Cluster . . . . . . . . . . . . . . . . . . . . . . . . . . . . . . . . . . . . . 175
15.4 Managing the Internet Agent in a Linux Cluster . . . . . . . . . . . . . . . . . . . . . . . . . . . . . . . . . . . 177
15.4.1 Updating GroupWise Objects with Cluster-Specific Descriptions . . . . . . . . . . . . . . 177
15.4.2 Knowing What to Expect in an Internet Agent Failover Situation . . . . . . . . . . . . . . 178
15.5 Internet Agent Clustering Worksheet . . . . . . . . . . . . . . . . . . . . . . . . . . . . . . . . . . . . . . . . . . . 178
15.6 Internet Agent Quick Checklist. . . . . . . . . . . . . . . . . . . . . . . . . . . . . . . . . . . . . . . . . . . . . . . . 179
novdocx (en) 22 June 2009
16 Implementing WebAccess in a Linux Cluster 181
16.1 Understanding the WebAccess Components . . . . . . . . . . . . . . . . . . . . . . . . . . . . . . . . . . . . 181
16.2 Planning the WebAccess Agent in a Linux Cluster . . . . . . . . . . . . . . . . . . . . . . . . . . . . . . . . 181
16.2.1 Planning a Domain for the WebAccess Agent . . . . . . . . . . . . . . . . . . . . . . . . . . . . . 182
16.2.2 Selecting the WebAccess Agent Partition and Secondary IP Address . . . . . . . . . . 183
16.2.3 Determining an Appropriate Failover List for the WebAccess Agent . . . . . . . . . . . . 183
16.2.4 Determining Cluster Resource Information for the WebAccess Agent . . . . . . . . . . 183
16.2.5 Planning the MTA Installation . . . . . . . . . . . . . . . . . . . . . . . . . . . . . . . . . . . . . . . . . 184
16.2.6 Planning the WebAccess Agent Installation . . . . . . . . . . . . . . . . . . . . . . . . . . . . . . 184
16.2.7 Planning the WebAccess Application Installation . . . . . . . . . . . . . . . . . . . . . . . . . . 184
16.3 Setting Up the WebAccess Agent in a Linux Cluster . . . . . . . . . . . . . . . . . . . . . . . . . . . . . . . 184
16.3.1 Creating a Domain for the WebAccess Agent . . . . . . . . . . . . . . . . . . . . . . . . . . . . . 185
16.3.2 Installing the MTA for the WebAccess Agent Domain . . . . . . . . . . . . . . . . . . . . . . . 185
16.3.3 Installing and Configuring the WebAccess Agent in a Cluster. . . . . . . . . . . . . . . . . 185
16.3.4 Installing and Configuring the WebAccess Application in a Cluster . . . . . . . . . . . . 194
16.4 Testing the WebAccess Agent in a Linux Cluster . . . . . . . . . . . . . . . . . . . . . . . . . . . . . . . . . 195
16.5 Managing the WebAccess Agent in a Linux Cluster . . . . . . . . . . . . . . . . . . . . . . . . . . . . . . . 196
16.5.1 Updating GroupWise Objects with Cluster-Specific Descriptions . . . . . . . . . . . . . . 196
16.5.2 Knowing What to Expect in a WebAccess Agent Failover Situation . . . . . . . . . . . . 197
16.6 WebAccess Agent Clustering Worksheet . . . . . . . . . . . . . . . . . . . . . . . . . . . . . . . . . . . . . . . 197
16.7 WebAccess Agent Quick Checklist . . . . . . . . . . . . . . . . . . . . . . . . . . . . . . . . . . . . . . . . . . . . 198
8 GroupWise 8 Interoperability Guide
Page 9

17 Implementing GroupWise Monitor in a Linux Cluster 201
17.1 Understanding the Monitor Components . . . . . . . . . . . . . . . . . . . . . . . . . . . . . . . . . . . . . . . . 201
17.2 Planning GroupWise Monitor in a Linux Cluster. . . . . . . . . . . . . . . . . . . . . . . . . . . . . . . . . . . 202
17.2.1 Selecting a Domain for Access during Monitor Agent Installation . . . . . . . . . . . . . . 202
17.2.2 Selecting an MTA for the Monitor Agent to Access after Installation. . . . . . . . . . . . 202
17.2.3 Selecting the Monitor Agent Partition and Secondary IP Address. . . . . . . . . . . . . . 203
17.2.4 Determining an Appropriate Failover List for the Monitor Agent . . . . . . . . . . . . . . . 203
17.2.5 Determining Cluster Resource Information for the Monitor Agent . . . . . . . . . . . . . . 203
17.2.6 Planning the Monitor Agent Installation . . . . . . . . . . . . . . . . . . . . . . . . . . . . . . . . . . 204
17.3 Setting Up GroupWise Monitor in a Linux Cluster . . . . . . . . . . . . . . . . . . . . . . . . . . . . . . . . . 204
17.3.1 Installing and Configuring the Monitor Agent on Each Node in Your Cluster . . . . . 204
17.3.2 Configuring the Monitor Agent Cluster Resource to Load and Unload the Monitor
Agent . . . . . . . . . . . . . . . . . . . . . . . . . . . . . . . . . . . . . . . . . . . . . . . . . . . . . . . . . . . . 207
17.4 Testing the Monitor Agent in a Linux Cluster . . . . . . . . . . . . . . . . . . . . . . . . . . . . . . . . . . . . . 211
17.5 Managing the Monitor Agent in a Linux Cluster . . . . . . . . . . . . . . . . . . . . . . . . . . . . . . . . . . . 212
17.6 Monitor Agent Clustering Worksheet . . . . . . . . . . . . . . . . . . . . . . . . . . . . . . . . . . . . . . . . . . . 212
17.7 Monitor Agent Quick Checklist . . . . . . . . . . . . . . . . . . . . . . . . . . . . . . . . . . . . . . . . . . . . . . . . 213
18 Backing Up a GroupWise System in a Linux Cluster 215
novdocx (en) 22 June 2009
19 Updating a GroupWise System in a Linux Cluster 217
20 Moving an Existing Linux GroupWise 8 System into a Linux Cluster 219
21 Moving a Clustered GroupWise 8 System from NetWare to Linux 221
22 Implementing Messenger in a Linux Cluster 223
22.1 Planning Your Messenger System in a Linux Cluster . . . . . . . . . . . . . . . . . . . . . . . . . . . . . . 223
22.1.1 Understanding Your Cluster . . . . . . . . . . . . . . . . . . . . . . . . . . . . . . . . . . . . . . . . . . 223
22.1.2 Selecting the Messenger Partition and Secondary IP Address . . . . . . . . . . . . . . . . 224
22.1.3 Determining an Appropriate Failover List for the Messenger Agents . . . . . . . . . . . 224
22.1.4 Determining Cluster Resource Information for the Messenger Agents . . . . . . . . . . 224
22.1.5 Planning the Messenger Agent Installation . . . . . . . . . . . . . . . . . . . . . . . . . . . . . . . 225
22.2 Setting Up Your Messenger System in a Linux Cluster . . . . . . . . . . . . . . . . . . . . . . . . . . . . . 225
22.2.1 Creating Your Messenger System and Installing the Messenger Agents . . . . . . . . 225
22.2.2 Changing Messenger Paths to Locations on the Messenger Partition . . . . . . . . . . 227
22.2.3 Configuring the Messenger Cluster Resource to Load and Unload the Messenger
Agents . . . . . . . . . . . . . . . . . . . . . . . . . . . . . . . . . . . . . . . . . . . . . . . . . . . . . . . . . . . 229
22.3 Testing Your Clustered Messenger System. . . . . . . . . . . . . . . . . . . . . . . . . . . . . . . . . . . . . . 233
22.4 Managing Your Clustered Messenger System. . . . . . . . . . . . . . . . . . . . . . . . . . . . . . . . . . . . 234
22.5 Messenger Clustering Worksheet . . . . . . . . . . . . . . . . . . . . . . . . . . . . . . . . . . . . . . . . . . . . . 234
22.6 Messenger Clustering Quick Checklist. . . . . . . . . . . . . . . . . . . . . . . . . . . . . . . . . . . . . . . . . . 235
Part III Novell Teaming and Conferencing 237
23 Using GroupWise with Novell Teaming 239
23.1 Understanding How Novell Teaming Interacts with eDirectory and GroupWise . . . . . . . . . . 239
23.2 Using eDirectory as the Teaming LDAP Directory . . . . . . . . . . . . . . . . . . . . . . . . . . . . . . . . . 239
23.3 Using GroupWise as the Teaming E-Mail System . . . . . . . . . . . . . . . . . . . . . . . . . . . . . . . . . 239
23.4 Enabling GroupWise/Teaming Integration for GroupWise Windows Client Users . . . . . . . . . 240
Contents 9
Page 10

23.5 Accessing Teaming from the GroupWise Client. . . . . . . . . . . . . . . . . . . . . . . . . . . . . . . . . . . 242
23.5.1 Accessing Teaming through the Novell Teaming Folder . . . . . . . . . . . . . . . . . . . . . 242
23.5.2 Accessing Teaming from a GroupWise Web Panel. . . . . . . . . . . . . . . . . . . . . . . . . 242
24 Using GroupWise with Conferencing 243
24.1 Configuring GroupWise as the Conferencing E-Mail System. . . . . . . . . . . . . . . . . . . . . . . . . 243
24.1.1 Preparing for GroupWise Integration with Conferencing . . . . . . . . . . . . . . . . . . . . . 243
24.1.2 Integrating GroupWise with Novell Conferencing . . . . . . . . . . . . . . . . . . . . . . . . . . 243
24.1.3 Testing GroupWise as the Novell Conferencing E-Mail System . . . . . . . . . . . . . . . 244
25 Streamlining Authentication to Teaming or Conferencing 245
25.1 Using iChain for Authenticating to Teaming or Conferencing . . . . . . . . . . . . . . . . . . . . . . . . 245
25.1.1 Meeting iChain Requirements . . . . . . . . . . . . . . . . . . . . . . . . . . . . . . . . . . . . . . . . . 245
25.1.2 Setting Up an iChain Web Server Accelerator for Teaming or Conferencing . . . . . 245
25.1.3 Adding the New Web Server Accelerator to the iChain Server Object in
ConsoleOne. . . . . . . . . . . . . . . . . . . . . . . . . . . . . . . . . . . . . . . . . . . . . . . . . . . . . . . 246
25.1.4 Using iChain for Authentication . . . . . . . . . . . . . . . . . . . . . . . . . . . . . . . . . . . . . . . . 247
25.2 Using Novell Access Manager for Authenticating to Teaming or Conferencing. . . . . . . . . . . 247
novdocx (en) 22 June 2009
Part IV Novell ZENworks 249
26 Using ZENworks Desktop Management to Distribute the GroupWise Windows
Client 251
26.1 Creating a GroupWise Client Application Object . . . . . . . . . . . . . . . . . . . . . . . . . . . . . . . . . . 251
26.2 Using GroupWise 8 Tuner . . . . . . . . . . . . . . . . . . . . . . . . . . . . . . . . . . . . . . . . . . . . . . . . . . . 255
26.3 Configuring ZENworks to Use a Transform File. . . . . . . . . . . . . . . . . . . . . . . . . . . . . . . . . . . 257
27 Using ZENworks Linux Management to Distribute the GroupWise Linux/Mac
Client 259
28 ZENworks Application Virtualization for GroupWise and Messenger 261
Part V Other Novell Products 263
29 GroupWise DirXML Driver for Novell Identity Manager 265
29.1 Identity Manager Warnings in ConsoleOne . . . . . . . . . . . . . . . . . . . . . . . . . . . . . . . . . . . . . . 265
29.1.1 Recovering a Deleted GroupWise Account . . . . . . . . . . . . . . . . . . . . . . . . . . . . . . . 265
29.1.2 Grafting Users . . . . . . . . . . . . . . . . . . . . . . . . . . . . . . . . . . . . . . . . . . . . . . . . . . . . . 266
29.1.3 Converting an External Entity to a User. . . . . . . . . . . . . . . . . . . . . . . . . . . . . . . . . . 266
29.1.4 Converting a User to an External Entity. . . . . . . . . . . . . . . . . . . . . . . . . . . . . . . . . . 266
29.1.5 Associating a GroupWise Object with an eDirectory Object . . . . . . . . . . . . . . . . . . 266
29.1.6 Disassociating a GroupWise Object’s Attributes from an eDirectory Object . . . . . . 266
29.1.7 Resolving an Invalid Association . . . . . . . . . . . . . . . . . . . . . . . . . . . . . . . . . . . . . . . 267
29.1.8 Disabling the DirXML Warnings. . . . . . . . . . . . . . . . . . . . . . . . . . . . . . . . . . . . . . . . 267
29.1.9 Enabling the DirXML Warnings . . . . . . . . . . . . . . . . . . . . . . . . . . . . . . . . . . . . . . . . 267
10 GroupWise 8 Interoperability Guide
Page 11

30 GroupWise Customization Tools 269
31 Novell exteNd 271
Part VI Microsoft Clustering Services on Windows 273
32 Introduction to GroupWise 8 and Microsoft Clusters 275
33 Planning GroupWise in a Microsoft Cluster 277
33.1 Setting Up Your Microsoft Cluster . . . . . . . . . . . . . . . . . . . . . . . . . . . . . . . . . . . . . . . . . . . . . 278
33.2 Planning a New Clustered Domain . . . . . . . . . . . . . . . . . . . . . . . . . . . . . . . . . . . . . . . . . . . . 278
33.3 Planning a New Clustered Post Office . . . . . . . . . . . . . . . . . . . . . . . . . . . . . . . . . . . . . . . . . . 279
33.4 Planning a New Library for a Clustered Post Office . . . . . . . . . . . . . . . . . . . . . . . . . . . . . . . . 280
33.5 Planning GroupWise Resource Groups . . . . . . . . . . . . . . . . . . . . . . . . . . . . . . . . . . . . . . . . . 280
33.6 Planning Shared Administrative Resources . . . . . . . . . . . . . . . . . . . . . . . . . . . . . . . . . . . . . . 281
33.7 Ensuring Successful Name Resolution for GroupWise Resource Groups. . . . . . . . . . . . . . . 281
33.8 Deciding How to Install and Configure the Agents in a Cluster . . . . . . . . . . . . . . . . . . . . . . . 283
33.8.1 Planning Cluster-Unique Port Numbers for Agents in the Cluster . . . . . . . . . . . . . . 283
33.8.2 Deciding Where to Install the Agent Software . . . . . . . . . . . . . . . . . . . . . . . . . . . . . 285
33.8.3 Planning the Agent Services . . . . . . . . . . . . . . . . . . . . . . . . . . . . . . . . . . . . . . . . . . 287
33.8.4 Planning the Windows Agent Installation. . . . . . . . . . . . . . . . . . . . . . . . . . . . . . . . . 287
33.9 GroupWise Clustering Worksheets . . . . . . . . . . . . . . . . . . . . . . . . . . . . . . . . . . . . . . . . . . . . 288
33.9.1 System Clustering Worksheet . . . . . . . . . . . . . . . . . . . . . . . . . . . . . . . . . . . . . . . . . 288
33.9.2 Network Address Worksheet . . . . . . . . . . . . . . . . . . . . . . . . . . . . . . . . . . . . . . . . . . 290
33.9.3 Agent Clustering Worksheet . . . . . . . . . . . . . . . . . . . . . . . . . . . . . . . . . . . . . . . . . . 291
novdocx (en) 22 June 2009
34 Setting Up a Domain and Post Office in a Microsoft Cluster 293
34.1 Preparing the Cluster for GroupWise . . . . . . . . . . . . . . . . . . . . . . . . . . . . . . . . . . . . . . . . . . . 293
34.1.1 Creating GroupWise Resource Groups . . . . . . . . . . . . . . . . . . . . . . . . . . . . . . . . . . 293
34.1.2 Creating Agent Service Resources . . . . . . . . . . . . . . . . . . . . . . . . . . . . . . . . . . . . . 293
34.1.3 Configuring Short Name Resolution . . . . . . . . . . . . . . . . . . . . . . . . . . . . . . . . . . . . 294
34.2 Setting Up a New GroupWise System in a Cluster . . . . . . . . . . . . . . . . . . . . . . . . . . . . . . . . 295
34.3 Creating a New Secondary Domain in a Cluster . . . . . . . . . . . . . . . . . . . . . . . . . . . . . . . . . . 296
34.4 Creating a New Post Office in a Cluster. . . . . . . . . . . . . . . . . . . . . . . . . . . . . . . . . . . . . . . . . 297
34.5 Installing and Configuring the MTA and the POA in a Cluster . . . . . . . . . . . . . . . . . . . . . . . . 298
34.5.1 Installing the Agent Software in a Cluster . . . . . . . . . . . . . . . . . . . . . . . . . . . . . . . . 299
34.5.2 Editing Clustered Agent Startup Files . . . . . . . . . . . . . . . . . . . . . . . . . . . . . . . . . . . 300
34.5.3 Setting Up New Instances of the Agents without Installing the Agent Software . . . 300
34.6 Testing Your Clustered GroupWise System. . . . . . . . . . . . . . . . . . . . . . . . . . . . . . . . . . . . . . 301
34.7 Managing Your Clustered GroupWise System. . . . . . . . . . . . . . . . . . . . . . . . . . . . . . . . . . . . 301
34.7.1 Updating GroupWise Objects with Cluster-Specific Descriptions . . . . . . . . . . . . . . 301
34.7.2 Knowing What to Expect in MTA and POA Failover Situations . . . . . . . . . . . . . . . . 302
34.8 What’s Next . . . . . . . . . . . . . . . . . . . . . . . . . . . . . . . . . . . . . . . . . . . . . . . . . . . . . . . . . . . . . . 303
35 Implementing the Internet Agent in a Microsoft Cluster 305
35.1 Planning the Internet Agent in a Cluster . . . . . . . . . . . . . . . . . . . . . . . . . . . . . . . . . . . . . . . . 305
35.1.1 Planning a Domain for the Internet Agent . . . . . . . . . . . . . . . . . . . . . . . . . . . . . . . . 305
35.1.2 Planning the Internet Agent Resource Group . . . . . . . . . . . . . . . . . . . . . . . . . . . . . 306
35.1.3 Planning Cluster-Unique Port Numbers for the Internet Agent and Its MTA . . . . . . 306
35.1.4 Preparing Your Firewall for the Internet Agent . . . . . . . . . . . . . . . . . . . . . . . . . . . . 307
Contents 11
Page 12

35.1.5 Deciding Where to Install the Internet Agent and Its MTA . . . . . . . . . . . . . . . . . . . . 307
35.1.6 Planning the MTA Installation . . . . . . . . . . . . . . . . . . . . . . . . . . . . . . . . . . . . . . . . . 308
35.1.7 Planning the Internet Agent Installation . . . . . . . . . . . . . . . . . . . . . . . . . . . . . . . . . . 308
35.2 Setting Up the Internet Agent in a Cluster . . . . . . . . . . . . . . . . . . . . . . . . . . . . . . . . . . . . . . . 308
35.2.1 Setting Up the Internet Agent Resource Group . . . . . . . . . . . . . . . . . . . . . . . . . . . . 309
35.2.2 Creating a Domain for the Internet Agent . . . . . . . . . . . . . . . . . . . . . . . . . . . . . . . . 309
35.2.3 Installing the MTA for the Internet Agent Domain . . . . . . . . . . . . . . . . . . . . . . . . . . 309
35.2.4 Installing and Configuring the Internet Agent in a Cluster . . . . . . . . . . . . . . . . . . . . 309
35.2.5 Testing the Clustered Internet Agent . . . . . . . . . . . . . . . . . . . . . . . . . . . . . . . . . . . . 312
35.3 Managing the Internet Agent in a Cluster. . . . . . . . . . . . . . . . . . . . . . . . . . . . . . . . . . . . . . . . 312
35.3.1 Updating GroupWise Objects with Cluster-Specific Descriptions . . . . . . . . . . . . . . 312
35.3.2 Knowing What to Expect in an Internet Agent Failover Situation . . . . . . . . . . . . . . 313
35.4 Internet Agent Clustering Worksheet . . . . . . . . . . . . . . . . . . . . . . . . . . . . . . . . . . . . . . . . . . . 314
36 Implementing WebAccess in a Microsoft Cluster 315
36.1 Understanding the WebAccess Components . . . . . . . . . . . . . . . . . . . . . . . . . . . . . . . . . . . . 315
36.2 Planning WebAccess in a Cluster . . . . . . . . . . . . . . . . . . . . . . . . . . . . . . . . . . . . . . . . . . . . . 315
36.2.1 Setting Up Your Web Server in the Microsoft Cluster . . . . . . . . . . . . . . . . . . . . . . . 316
36.2.2 Planning a New Domain for the WebAccess Agent. . . . . . . . . . . . . . . . . . . . . . . . . 316
36.2.3 Planning the WebAccess Resource Group . . . . . . . . . . . . . . . . . . . . . . . . . . . . . . . 317
36.2.4 Planning Cluster-Unique Port Numbers for the WebAccess Agent and Its MTA. . . 317
36.2.5 Deciding Where to Install the WebAccess Agent and Its MTA . . . . . . . . . . . . . . . . 318
36.2.6 Planning the MTA Installation . . . . . . . . . . . . . . . . . . . . . . . . . . . . . . . . . . . . . . . . . 318
36.2.7 Planning the WebAccess Installation. . . . . . . . . . . . . . . . . . . . . . . . . . . . . . . . . . . . 318
36.3 Setting Up WebAccess in a Cluster . . . . . . . . . . . . . . . . . . . . . . . . . . . . . . . . . . . . . . . . . . . . 319
36.3.1 Setting Up the WebAccess Resource Group. . . . . . . . . . . . . . . . . . . . . . . . . . . . . . 319
36.3.2 Creating a Domain for the WebAccess Agent . . . . . . . . . . . . . . . . . . . . . . . . . . . . . 320
36.3.3 Installing the MTA for the WebAccess Agent Domain . . . . . . . . . . . . . . . . . . . . . . . 320
36.3.4 Installing the WebAccess Agent in a Cluster . . . . . . . . . . . . . . . . . . . . . . . . . . . . . . 320
36.3.5 Installing and Configuring the WebAccess Application in a Cluster . . . . . . . . . . . . 321
36.3.6 Testing Your Clustered WebAccess Installation . . . . . . . . . . . . . . . . . . . . . . . . . . . 322
36.4 Managing WebAccess in a Cluster . . . . . . . . . . . . . . . . . . . . . . . . . . . . . . . . . . . . . . . . . . . . 322
36.4.1 Updating GroupWise Objects with Cluster-Specific Descriptions . . . . . . . . . . . . . . 323
36.4.2 Knowing What to Expect in WebAccess Failover Situations . . . . . . . . . . . . . . . . . . 324
36.4.3 Updating the WebAccess Agent Configuration File (commgr.cfg). . . . . . . . . . . . . . 324
36.5 WebAccess Clustering Worksheet . . . . . . . . . . . . . . . . . . . . . . . . . . . . . . . . . . . . . . . . . . . . . 325
novdocx (en) 22 June 2009
37 Implementing GroupWise Gateways in a Microsoft Cluster 327
38 Monitoring a GroupWise System in a Microsoft Cluster 329
39 Backing Up a GroupWise System in a Microsoft Cluster 331
40 Moving an Existing GroupWise 8 System into a Microsoft Cluster 333
41 Implementing Messenger in a Microsoft Cluster 335
41.1 Planning Your Messenger System in a Cluster . . . . . . . . . . . . . . . . . . . . . . . . . . . . . . . . . . . 335
41.1.1 Understanding Your Cluster . . . . . . . . . . . . . . . . . . . . . . . . . . . . . . . . . . . . . . . . . . 335
41.1.2 Planning Messenger Administration . . . . . . . . . . . . . . . . . . . . . . . . . . . . . . . . . . . . 335
41.1.3 Deciding Where to Install the Messenger Agent Software . . . . . . . . . . . . . . . . . . . 336
41.1.4 Planning the Messenger Agent Installation . . . . . . . . . . . . . . . . . . . . . . . . . . . . . . . 337
41.2 Setting Up Your Messenger System in a Cluster . . . . . . . . . . . . . . . . . . . . . . . . . . . . . . . . . . 338
12 GroupWise 8 Interoperability Guide
Page 13

41.2.1 Installing the Messenger Agents to Each Node in the Cluster. . . . . . . . . . . . . . . . . 338
41.2.2 Installing the Messenger Agents to a Shared Disk . . . . . . . . . . . . . . . . . . . . . . . . . 338
41.3 Messenger Clustering Worksheet . . . . . . . . . . . . . . . . . . . . . . . . . . . . . . . . . . . . . . . . . . . . . 339
Part VII Non-GroupWise Clients 341
42 Outlook Express 343
43 Microsoft Outlook 345
44 Evolution 347
44.1 GroupWise Features Available in Evolution . . . . . . . . . . . . . . . . . . . . . . . . . . . . . . . . . . . . . . 347
44.2 Configuring Evolution . . . . . . . . . . . . . . . . . . . . . . . . . . . . . . . . . . . . . . . . . . . . . . . . . . . . . . . 348
Part VIII Mobile Devices 351
45 GroupWise Mobile Server, Powered by Intellisync 353
novdocx (en) 22 June 2009
46 BlackBerry Enterprise Server 355
Part IX Documentation Updates 357
A August 31, 2009 (GroupWise 8 SP1) 359
Contents 13
Page 14

novdocx (en) 22 June 2009
14 GroupWise 8 Interoperability Guide
Page 15

About This Guide
This Novell® GroupWise® 8 Interoperability Guide helps you use GroupWise in the context of
other software products. The guide provides assistance with Novell products and third-party
products:
Novell Products “Novell Cluster Services on NetWare” on page 17
“Novell Cluster Services on Linux” on page 123
“Novell Teaming and Conferencing” on page 237
“Novell ZENworks” on page 249
“Other Novell Products” on page 263
novdocx (en) 22 June 2009
Third-Party Products
For information about additional GroupWise-related software from GroupWise partners, see the
Novell Partner Product Guide (http://www.novell.com/partnerguide).
For troubleshooting assistance, see:
GroupWise 8 Troubleshooting 1: Error Messages
GroupWise 8 Troubleshooting 2: Solutions to Common Problems
GroupWise 8 Troubleshooting 3: Message Flow and Directory Structure
Novell Support and Knowledgebase (http://www.novell.com/support)
To search the GroupWise documentation from the Novell Support Web site, click Advanced
Search, select Documentation in the Search In drop-down list, select GroupWise in the
Products drop-down list, type the search string, then click Search.
GroupWise 8 Support Forums (http://forums.novell.com/novell-product-support-forums/
groupwise)
GroupWise Support Community (http://www.novell.com/support/products/groupwise)
GroupWise Cool Solutions (http://www.novell.com/coolsolutions/gwmag/index.html)
“Microsoft Clustering Services on Windows” on page 273
“Non-GroupWise Clients” on page 341
“Mobile Devices” on page 351
Audience
This guide is intended for network administrators who install and administer GroupWise.
Feedback
We want to hear your comments and suggestions about this manual and the other documentation
included with this product. Please use the User Comment feature at the bottom of each page of the
online documentation, or go to www.novell.com/documentation/feedback.html and enter your
comments there.
About This Guide 15
Page 16

Documentation Updates
For the most recent version of the GroupWise 8 Interoperability Guide, visit the Novell GroupWise
8 documentation Web site (http://www.novell.com/documentation/gw8).
Additional Documentation
For additional GroupWise documentation, see the following guides at the Novell GroupWise 8
documentation Web site (http://www.novell.com/documentation/gw8):
Installation Guide
Administration Guide
Multi-System Administration Guide
Troubleshooting Guides
GroupWise Client User Guides
GroupWise Client Frequently Asked Questions (FAQ)
Documentation Conventions
novdocx (en) 22 June 2009
In Novell documentation, a greater-than symbol (>) is used to separate actions within a step and
items within a cross-reference path.
A trademark symbol (TM, ®, etc.) denotes a Novell trademark. An asterisk denotes a third-party
trademark.
When a single pathname can be written with a backslash for some platforms or a forward slash for
other platforms, the pathname is presented with a backslash. Users of platforms that require a
forward slash, such as Linux*, should use forward slashes as required by your software.
When a startup switch can be written with a forward slash for some platforms or a double hyphen for
other platforms, the startup switch is presented with a forward slash. Users of platforms that require
a double hyphen, such as Linux, should use double hyphens as required by your software.
16 GroupWise 8 Interoperability Guide
Page 17

I
Novell Cluster Services on
NetWare
Chapter 1, “Introduction to GroupWise 8 and Novell Cluster Services on NetWare,” on
page 19
Chapter 2, “Planning GroupWise in a NetWare Cluster,” on page 21
Chapter 3, “Setting Up a Domain and Post Office in a NetWare Cluster,” on page 41
Chapter 4, “Implementing the Internet Agent in a NetWare Cluster,” on page 67
Chapter 5, “Implementing WebAccess in a NetWare Cluster,” on page 85
Chapter 6, “Implementing GroupWise Gateways in a NetWare Cluster,” on page 103
Chapter 7, “Monitoring a GroupWise System in a NetWare Cluster,” on page 105
Chapter 8, “Backing Up a GroupWise System in a NetWare Cluster,” on page 107
Chapter 9, “Updating a GroupWise System in a NetWare Cluster,” on page 109
novdocx (en) 22 June 2009
Chapter 10, “Moving an Existing GroupWise 8 System into a NetWare Cluster,” on page 111
Chapter 11, “Implementing Messenger in a NetWare Cluster,” on page 113
Novell Cluster Services on NetWareI17
Page 18

novdocx (en) 22 June 2009
18 GroupWise 8 Interoperability Guide
Page 19

1
Introduction to GroupWise 8 and
novdocx (en) 22 June 2009
Novell Cluster Services on
NetWare
Before implementing GroupWise® 8 with Novell® Cluster ServicesTM, make sure you have a solid
understanding of Novell Cluster Services by reviewing the following information resources:
AppNote: An Introduction to Novell Cluster Services (http://developer.novell.com/research/
appnotes/1999/may/01/a990501_.pdf)
Novell Open Enterprise Server (OES) Product Documentation: OES Novell Cluster
Services 1.8 Administration Guide for NetWare (http://www.novell.com/documentation/oes/
cluster_admin/data/h4hgu4hs.html#bktitle)
NetWare 6.5 Product Documentation: Novell Cluster Services (http://www.novell.com/
documentation/ncs65)
When you review the information resources recommended above, you discover that clustering
employs very specialized terminology. The following brief glossary provides basic definitions of
clustering terms and relates them to your GroupWise system:
®
cluster: A grouping of from 2 to 32 NetWare
that data storage locations and applications can transfer from one server to another without
interrupting their availability to users.
servers configured using Novell Cluster Services so
1
node: A clustered server; in other words, a single NetWare server that is part of a cluster.
resource: An IP address, volume, application, service, and so on, that can function successfully
anywhere in the cluster. The volumes where domains and post offices reside are a specific type of
cluster resources termed “volume resources.” In this section, the terms “cluster resource” and
“volume resource” are used instead of “resource” to avoid confusion with GroupWise resources
(such as conference rooms and projectors).
failover: The process of moving cluster resources from a failed node to a functional node so that
availability to users is uninterrupted. For example, if the node where the POA is running goes down,
the POA and its post office fail over to a secondary node so that users can continue to use
GroupWise. When setting up cluster resources, you need to consider what components need to fail
over together in order to continue functioning.
fan-out-failover: The configuration where cluster resources from a failed node fail over to different
nodes in order to distribute the load from the failed node across multiple nodes. For example, if a
node runs a cluster resource consisting of a domain and its MTA, another cluster resource consisting
of a post office and its POA, and a third cluster resource for WebAccess, each cluster resource can
be configured to fail over separately to different secondary nodes.
failback: The process of returning cluster resources to their preferred node after the situation
causing the failover has been resolved. For example, if a POA and its post office fail over to a
secondary node, that cluster resource can be configured to fail back to its preferred node when the
problem is resolved.
Introduction to GroupWise 8 and Novell Cluster Services on NetWare
19
Page 20

migration: The process of manually moving a cluster resource from its preferred node to a
secondary node for the purpose of performing maintenance on the preferred node, temporarily
lightening the load on the preferred node, and so on.
shared disk system: The hardware housing the physical disk volumes that are shared among the
cluster nodes.
shared volume: A volume in a shared disk system that can be accessed from any cluster node that
needs the data stored on it.
novdocx (en) 22 June 2009
cluster-enabled shared volume: A shared volume for which a Volume Resource object has been
TM
created in Novell eDirectory
. The properties of the Volume Resource object provide load and
unload scripts for programs installed on the volume, failover/failback/migration policies for the
volume, and the failover path for the volume. Cluster-enabling is highly recommended for
GroupWise.
GroupWise volume: As used in this section, a cluster-enabled shared volume that is used for
GroupWise, such as for storing a domain, post office, software distribution directory, and so on. This
section also uses the terms Internet Agent volume, WebAccess Agent volume, Messenger volume,
and gateway volume in a similar manner.
storage area network (SAN): The cluster nodes together with their shared disk system and shared
volumes.
virtual server: A logical server, rather than a physical server, to which cluster-enabled shared
volumes are tied.
active/active mode: The configuration of a clustered application where the application runs
simultaneously on multiple nodes in the cluster. Active/active mode is recommended when the
GroupWise MTA, POA, Internet Agent, and WebAccess Agent run in protected memory because
protected memory isolates them from each other, even if they are running on the same node.
active/passive mode: The configuration of a clustered application where the application runs on
only one node at a time in the cluster. The GroupWise MTA, POA, Internet Agent, and WebAccess
Agent must run in active/passive mode if they are not running in protected memory because only
one instance of each agent/database combination can be running at the same time in the cluster.
20 GroupWise 8 Interoperability Guide
Page 21

2
Planning GroupWise in a NetWare
novdocx (en) 22 June 2009
Cluster
The majority of this part of the GroupWise 8 Interoperability Guide (Chapter 2, “Planning
GroupWise in a NetWare Cluster,” on page 21 through Chapter 8, “Backing Up a GroupWise
System in a NetWare Cluster,” on page 107) is designed for those who are creating a new
GroupWise
Services
a newly installed cluster, see Chapter 10, “Moving an Existing GroupWise 8 System into a NetWare
Cluster,” on page 111.
When you implement a new GroupWise system or a new domain or post office in a clustering
environment, overall GroupWise system design does not need to change substantially. For a review,
see “Installing a Basic GroupWise System” in the GroupWise 8 Installation Guide. However, the
configuration of individual components of your GroupWise system will be significantly different.
This section helps you plan the following GroupWise components in a cluster:
A new GroupWise system consisting of the primary domain and the initial post office
A new secondary domain
A new post office
The GroupWise agents (MTA and POA)
®
system, or at least new domains and post offices, in the context of Novell® Cluster
TM
. If you already have an existing GroupWise 8 system and need to configure it to work in
2
During the planning process, component configuration alternatives are explained. For example, you
might want the domain and post office together on the same shared volume or on different shared
volumes. You might want to install the agents to standard
created
might or might not need to run the agents in protected memory.
The “System Clustering Worksheet” on page 35 lists all the information you need as you set up
GroupWise in a clustering environment. You should print the worksheet and fill it out as you
complete the tasks listed below:
After you have completed the tasks and filled out “System Clustering Worksheet” on page 35, you
are ready to continue with Chapter 3, “Setting Up a Domain and Post Office in a NetWare Cluster,”
on page 41.
vol:\system
Section 2.1, “Meeting Software Version Requirements,” on page 22
Section 2.2, “Installing Novell Cluster Services,” on page 22
Section 2.3, “Planning a New Clustered Domain,” on page 23
Section 2.4, “Planning a New Clustered Post Office,” on page 24
Section 2.5, “Planning a New Library for a Clustered Post Office,” on page 25
Section 2.6, “Deciding Whether to Cluster-Enable the Shared Volumes Used by GroupWise,”
on page 25
Section 2.7, “Ensuring Successful Name Resolution for GroupWise Volumes,” on page 27
Section 2.8, “Deciding How to Install and Configure the Agents in a Cluster,” on page 28
Section 2.9, “GroupWise Clustering Worksheets,” on page 35
directories on shared volumes where domains and post offices reside. You
sys:\system
directories or to manually
Planning GroupWise in a NetWare Cluster
21
Page 22

2.1 Meeting Software Version Requirements
GroupWise 8 can be clustered on a system that meets the following requirements:
GroupWise 8
A supported version of NetWare
OES NetWare
NetWare 6.5
®
with the latest Support Pack
IMPORTANT: Novell Cluster Services does not support mixed NetWare versions within a cluster.
SYSTEM CLUSTERING WORKSHEET
Under Item 1: Software Version Updates for Cluster, mark any updates required for nodes in the
cluster to ensure that all nodes in the cluster are running the same version of NetWare.
2.2 Installing Novell Cluster Services
novdocx (en) 22 June 2009
Install Novell Cluster Services by following the instructions provided in the documentation for your
version of NetWare, as listed in Chapter 1, “Introduction to GroupWise 8 and Novell Cluster
Services on NetWare,” on page 19.
The installation process includes:
Meeting hardware and software requirements
Setting up a shared disk system
Creating a new NetWare Cluster object to represent the cluster in Novell eDirectory
Adding nodes to the cluster
Installing the Novell Cluster Services software on all nodes in the cluster
Mounting the shared volumes where you will set up GroupWise domains and post offices and
TM
install the GroupWise agents
As you install Novell Cluster Services, record key information about the cluster on the System
Clustering Worksheet:
SYSTEM CLUSTERING WORKSHEET
Under Item 2: eDirectory Tree for Cluster, record the name of the eDirectory tree where the new
NetWare Cluster object has been created.
Under Item 3: Cluster Name, record the name of the NetWare Cluster object that you created for your
GroupWise system.
Under Item 4: Cluster Context, record the full context of the NetWare Cluster object.
Under Item 5: Nodes in Cluster, list the nodes that you have added to the cluster.
The number of nodes and shared volumes that are available in the cluster strongly influences where
you place GroupWise domains and post offices. You have several alternatives:
Your whole GroupWise system can run in a single cluster.
22 GroupWise 8 Interoperability Guide
Page 23

Parts of your GroupWise system can run in one cluster while other parts of it run in one or more
other clusters.
Parts of your GroupWise system can run in a cluster while other parts run outside of the cluster,
on non-clustered servers.
If you do not have the system resources to run all of your GroupWise system in a clustering
environment, you must decide which parts have the most urgent need for the high availability
provided by clustering. Here are some suggestions:
Post offices and their POAs must be available in order for users to access their GroupWise
mailboxes. Therefore, post offices and their POAs are excellent candidates for the high
availability provided by clustering.
In a like manner, WebAccess provides user access to GroupWise mailboxes across the Internet
through users’ Web browsers. It is another good candidate for clustering.
Domains and their MTAs are less noticeable to users when they are unavailable (unless users in
different post offices happen to be actively engaged in an e-mail discussion when the MTA
goes down). On the other hand, domains and their MTAs are critical to GroupWise
administrators, although administrators might be more tolerant of a down server than end users
are. Critical domains in your system would be the primary domain and, if you have one, a hub
or routing domain. These domains should be in the cluster, even if other domains are not.
The Internet Agent might or might not require high availability in your GroupWise system,
depending on the importance of immediate messaging across the Internet and the use of POP3
or IMAP4 clients by GroupWise users.
novdocx (en) 22 June 2009
There is no right or wrong way to implement GroupWise in a clustering environment. It all depends
on the specific needs of your particular GroupWise system and its users.
2.3 Planning a New Clustered Domain
The considerations involved in planning a new domain in a clustering environment are essentially
the same as for any other environment.
Primary Domain: If you are setting up a new GroupWise system in a clustering environment,
you will be creating the primary domain as you complete the tasks in this section. In
preparation, review “Planning a Basic GroupWise System”, then print and fill out the “Basic
GroupWise System Summary Sheet” in “Installing a Basic GroupWise System” in the
GroupWise 8 Installation Guide. This covers planning the primary domain and an initial post
office in the primary domain.
Secondary Domain: If your GroupWise system already exists, you will be creating a new
secondary domain. In preparation, review “Planning a New Domain”, then print and fill out the
“Domain Worksheet” in “Domains” in the GroupWise 8 Administration Guide.
Planning GroupWise in a NetWare Cluster 23
Page 24

Regardless of the type of domain you are creating, keep in mind the following cluster-specific
details as you fill out the worksheet you need:
When you specify the location for the domain directory (and for a new GroupWise system, the
post office directory) on the worksheet, include the shared volume where you want the
directory to reside.
Do not concern yourself with the GroupWise agent information on the worksheet. You will
plan the agent installation later. If you are filling out the Basic GroupWise System Worksheet,
stop with Post Office Settings. If you are filling out the Domain Worksheet, stop with Domain
Administrator.
When you have completed the worksheet, transfer the key information from the Basic GroupWise
System Worksheet or the Domain Worksheet to the System Clustering Worksheet.
SYSTEM CLUSTERING WORKSHEET
Under Item 10: Domain Name, transfer the domain name and database directory to the System
Clustering Worksheet.
Under Item 7: Shared Volume for Domain, transfer the domain location to the System Clustering
Worksheet. You will fill out the rest of the information under item 7 later.
novdocx (en) 22 June 2009
IMPORTANT: Do not create the new domain until you are instructed to do so in Chapter 3,
“Setting Up a Domain and Post Office in a NetWare Cluster,” on page 41.
2.4 Planning a New Clustered Post Office
The considerations involved in planning a new post office in a clustering environment are
essentially the same as for any other environment. The initial post office in a new GroupWise
system is planned on the Basic GroupWise System Worksheet. To plan additional new post offices,
review “Planning a New Post Office ”, then print and fill out the “Post Office Worksheet” in “Post
Offices” in the GroupWise 8 Administration Guide. When you specify the locations for the post
office directories, include the shared volumes where you want the post office directories to reside.
When you have completed the worksheet, transfer key information from the Basic GroupWise
System Worksheet or the Post Office Worksheet to the System Clustering Worksheet.
SYSTEM CLUSTERING WORKSHEET
Under Item 11: Post Office Name, transfer the post office name and database location to the System
Clustering Worksheet.
If you will create the post office on a different shared volume from where the domain is located, under
Item 8: Shared Volume for Post Office, transfer the post office location to the System Clustering
Worksheet. You will fill out the rest of the information under item 8 later.
IMPORTANT: Do not create the new post office until you are instructed to do so in Chapter 3,
“Setting Up a Domain and Post Office in a NetWare Cluster,” on page 41.
24 GroupWise 8 Interoperability Guide
Page 25

2.5 Planning a New Library for a Clustered Post Office
The considerations involved in planning a new library in a clustering environment are essentially the
same as for any other environment. You can plan a library for a clustered post office by following
the standard instructions provided in “Creating and Managing Libraries” in the GroupWise 8
Administration Guide and filling out the “Basic Library Worksheet” or the “Full-Service Library
Worksh ee t”. Then provide the library information on the System Clustering Worksheet.
SYSTEM CLUSTERING WORKSHEET
Under Item 14: Library Location, mark where you want to create the library’s document storage area.
If the document storage area will be located outside the post office directory structure, specify a user
name and password that the POA can use to access the volume where the document storage area
will reside.
IMPORTANT: Do not create the new library until you are instructed to do so in Chapter 3, “Setting
Up a Domain and Post Office in a NetWare Cluster,” on page 41.
novdocx (en) 22 June 2009
2.6 Deciding Whether to Cluster-Enable the Shared Volumes Used by GroupWise
Cluster-enabling the shared volumes where domains and post offices reside greatly simplifies
GroupWise administration. If you are creating a new GroupWise system, you might also want to
cluster-enable shared volumes for the GroupWise administration snap-ins to ConsoleOne
the GroupWise software distribution directory so that these locations are always available within the
cluster. To review the concept of cluster-enabled shared volumes, see the applicable section of
clustering documentation for your version of NetWare, as listed in Chapter 1, “Introduction to
GroupWise 8 and Novell Cluster Services on NetWare,” on page 19.
The advantages of cluster-enabling GroupWise volumes include:
Drive mappings always occur through the virtual server associated with the cluster-enabled
volume, rather than through a physical server. This guarantees that you can always map a drive
to the domain or post office database no matter which node it is currently located on.
The GroupWise snap-ins to ConsoleOne always work no matter which node is running
ConsoleOne.
Cluster-enabling the domain volume and installing the GroupWise agents to this volume
guarantees that the GroupWise snap-ins to ConsoleOne can always find the configuration files
that they need to access.
When you rebuild a domain database or a post office database, you do not need to determine
which node the database is currently located on.
Help desk personnel do not need to be trained to determine where GroupWise is running before
they connect to a domain to create a new GroupWise user.
®
and for
When you cluster-enable a volume, additional eDirectory objects are created:
Planning GroupWise in a NetWare Cluster 25
Page 26

Table 2-1 eDirectory Objects Used in a Cluster
novdocx (en) 22 June 2009
eDirectory
Object
Object Name and Description
clustername_volumename (default object name)
A new Volume object represents the cluster-enabled volume. It is created by renaming
the original Volume object that was tied to a physical server and associating it with a
virtual server instead.
For example, if your cluster name is GWCLUSTER and your original volume name is
gwvol1, the new Volume object representing the cluster-enabled volume is named
gwcluster_gwvol1.
clustername_volumename_SERVER (default object name)
A new Server object represents the virtual server to which the new cluster-enabled
volume is tied.
Continuing with the above example, the new Server object representing the virtual server
is named GWCLUSTER_GWVOL1_SERVER.
volumename_SERVER.clustername (default object name)
A new Volume Resource object stores property information for the cluster-enabled
volume, such as start, failover, and failback mode information and load/unload scripts.
These modes and scripts enable the cluster-enabled volume to function much like an
independent server; hence, the SERVER portion of its name. The Volume Resource
object is created in the Cluster container object.
Continuing with the above example, the new Volume Resource object is named
GWVOL1_SERVER.GWCLUSTER.
IMPORTANT: Notice that the default object names include the underscore (_) character. Some
DNS name servers cannot resolve object names that include underscore characters. If you have met
the system requirements described in Section 2.1, “Meeting Software Version Requirements,” on
page 22, you can rename these objects as needed when you cluster enable the volume.
Cluster-enabling the shared volumes used by GroupWise is highly recommended. Throughout the
rest of this document, the term “GroupWise volume” means “a cluster-enabled shared volume used
by GroupWise.”
SYSTEM CLUSTERING WORKSHEET
Under Item 6: Shared Volumes for GroupWise Administration, list any shared volumes you want to
use for GroupWise administration purposes. For example, you might have a shared pub: volume with
a public directory where you install the GroupWise snap-ins to ConsoleOne instead of installing them
on multiple administrator workstations. You might have a shared apps: volume where you create the
GroupWise software distribution directory. Mark whether or not you want to cluster-enable the
GroupWise administration volumes.
Under Item 7: Shared Volume for Domain, specify the name of the shared volume where you will
create the domain. Mark whether or not you want to cluster-enable the domain volume. Also mark
whether you will place the post office on the same volume with the domain.
If you want the post office on a different volume from where the domain is located, under Item 8:
Shared Volume for Post Office, specify the name of the shared volume where you will create the post
office. Mark whether or not you want to cluster-enable the post office volume.
26 GroupWise 8 Interoperability Guide
Page 27
IMPORTANT: Because cluster-enabling the volumes where domains and post offices reside is so
strongly recommended, this documentation does not include the steps for setting up domains and
post offices on non-cluster-enabled volumes. If you decide not to cluster-enable GroupWise
volumes, you should adjust the steps presented in this documentation for your system’s specialized
needs. Novell Cluster Services does provide a GroupWise Mail Server template for use when
creating GroupWise Cluster Resource objects instead of cluster-enabled Volume Resource objects.
2.7 Ensuring Successful Name Resolution for GroupWise Volumes
Because you are using cluster-enabled volumes for GroupWise domains and post offices, you must
ensure that short name resolution is always successful. For example, in ConsoleOne, if you rightclick a Domain object in the GroupWise View and then click Connect, ConsoleOne must be able to
resolve the domain database location, as provided in the UNC Path field, to the network address of
the current, physical location of that domain within your cluster. It is through short name resolution
that all GroupWise cluster resources (such as domain and post office volumes) are accessed and
managed in ConsoleOne.
novdocx (en) 22 June 2009
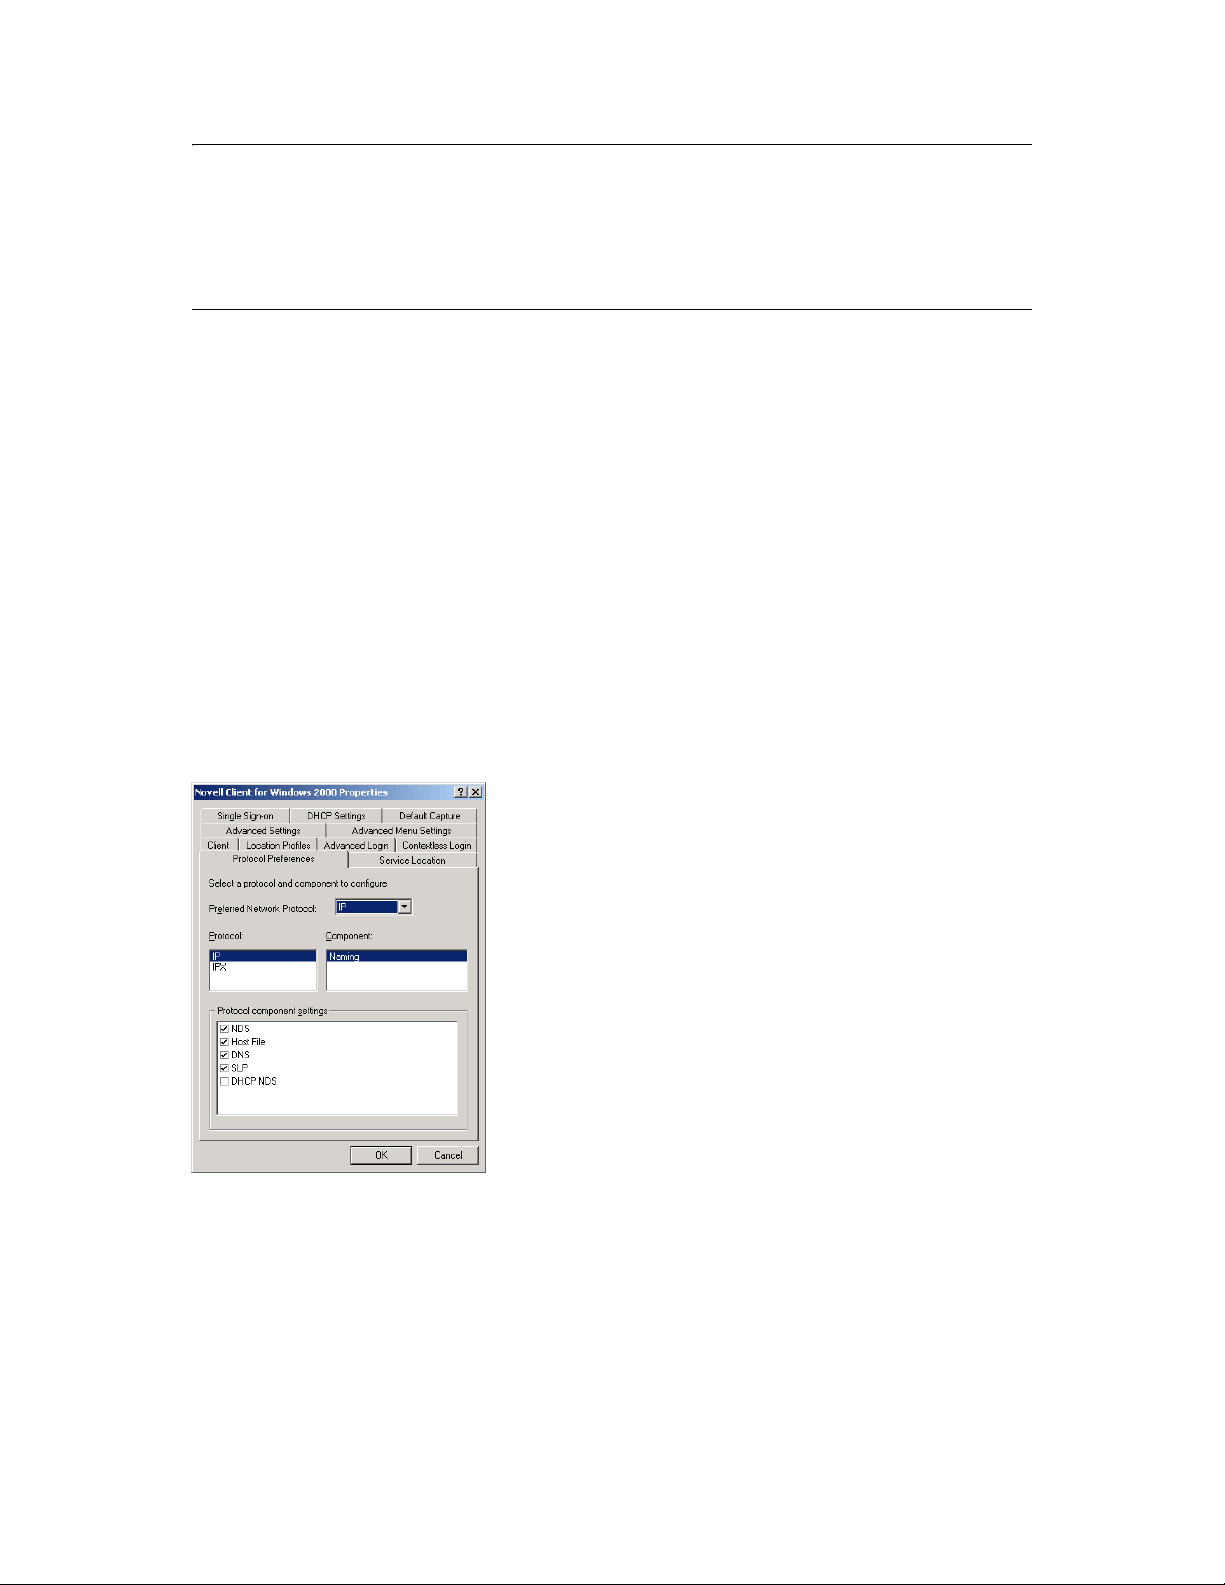
A client program (such as ConsoleOne) that runs on a Windows* workstation, can be configured to
use several different short name resolution methods. To see which methods are in use at a particular
workstation, view the protocol preferences for the Novell Client
workstation:
Figure 2-1 Novell Client Preferences Property Page
TM
that is installed on the Windows
Short name resolution methods that pertain to clustering your GroupWise system are discussed
below:
Planning GroupWise in a NetWare Cluster 27
Page 28

Table 2-2 Short Name Resolution Methods
Short Name
Resolution
Method
eDirectory You can use eDirectory to resolve short names into specific network addresses.
Hosts File Windows uses the following files when performing short name resolution at the
Description
However, when using eDirectory for short name resolution, you must remember to
consider current context in the name resolution process. eDirectory short name resolution
works only if your current context is the same as the context of the eDirectory object you
need to access.
workstation:
Windows XP\Vista:
\winnt\system32\drivers\etc\hosts
Using these files at the Windows workstation is not a preferred method for TCP/IP name
resolution (except perhaps for the administrator’s workstation).
However, whenever you cluster-enable a volume, you should add its virtual server to the
sys:\etc\hosts
file of all nodes in the cluster.
novdocx (en) 22 June 2009
DNS Perhaps the most common short name resolution option is Domain Name Service (DNS).
As with the
For short name resolution to work using DNS, the client workstation must either belong to
the same DNS zone (such as provo.novell.com) as the cluster resource, or the cluster
resource zone must be configured in the client’s DNS suffix search path under TCP/IP
settings for the workstation.
The underscore (_) character is part of default cluster-related object names. Because it is
not supported by the DNS RFC, some DNS name servers cannot resolve default clusterrelated object names.
SLP NetWare 6.5 uses Service Location Protocol (SLP) to advertise service information
across TCP/IP-based networks, which provides short name resolution of TCP/IP-based
cluster resources within the network. On NetWare 6.5, Novell Cluster Services
propagates virtual server information into SLP by default.
hosts
file, it is good practice to place all of your virtual servers into DNS.
Specific setup instructions for each of these short name resolution methods will be provided in
Chapter 3, “Setting Up a Domain and Post Office in a NetWare Cluster,” on page 41.
2.8 Deciding How to Install and Configure the Agents in a Cluster
There are several cluster-specific issues to consider as you plan to install the NetWare MTA and
POA in your clustered GroupWise system:
Section 2.8.1, “Planning Secondary IP Addresses and Cluster-Unique Port Numbers for Agents
in the Cluster,” on page 29
Section 2.8.2, “Determining Appropriate Failover Paths for the Agents,” on page 31
Section 2.8.3, “Deciding Where to Install the Agent Software,” on page 31
28 GroupWise 8 Interoperability Guide
Page 29

Section 2.8.4, “Deciding Whether to Run the Agents in Protected Memory,” on page 34
Section 2.8.5, “Planning the NetWare Agent Installation,” on page 34
2.8.1 Planning Secondary IP Addresses and Cluster-Unique Port Numbers for Agents in the Cluster
The GroupWise agents listen on all IP addresses, both primary and secondary, that are bound to the
server on their specified port numbers. This means that any time there is a possibility of two of the
same type of agent loading on the same node, it is important that each agent use a cluster-unique port
number, even though each agent is using a unique secondary IP address. The best way for you to
avoid port conflicts is to plan your cluster so that each agent in the cluster runs on a cluster-unique
port. Print out a copy of the “IP Address Worksheet” on page 37 to help you plan secondary IP
addresses and cluster-unique port numbers for all GroupWise agents.
The following filled-out version of the IP Address Worksheet illustrates one way this can be done:
Domain Information
novdocx (en) 22 June 2009
Domain
Provo1 172.16.5.81 7100 7180
MTA
IP Address
MTA
MTP Port
MTA
HTTP Port
Post Office Information
Post Office
Development (same as MTA) 1677 7101 7181
Manufacturing 172.16.5.82 1678 7102 7182
POA
IP Address
POA
C/S Port
POA
MTP Port
POA
HTTP Port
Internet Agent Information
Internet Agent
GWIA Domain
MTA
Internet Agent
(GWIA)
GWIA
IP Address
172.16.5.83 7110 7677 7183 N/A
(same as MTA) N/A N/A N/A 9850
MTA
MTP Port
MTA Live
Remote Port
MTA
HTTP
Port
GWIA
HTTP Port
Planning GroupWise in a NetWare Cluster 29
Page 30

WebAccess Information
novdocx (en) 22 June 2009
WebAccess Agent
WebAccess
Domain MTA
WebAccess Agent
(GWINTER)
WebAccess
IP Address
172.16.5.84 7120 7184 N/A N/A
(same as MTA) N/A N/A 7205 7205
MTA
MTP Port
MTA
HTTP Port
WebAccess
Agent Port
WebAccess
HTTP Port
(same as agent)
This example places the Development post office on the same node and on the same GroupWise
volume with the Provo1 domain; therefore, the Provo1 MTA and the Development POA can use the
same secondary IP address. The Manufacturing post office is placed on a different node on a
different GroupWise volume, so that the Manufacturing post office has a different secondary IP
address.
The example also illustrates that the MTA, the POA, and the Internet Agent use different port
numbers for agent ports and HTTP ports. In contrast, the WebAccess Agent uses the same port
number for the agent port and the HTTP port.
The example uses default port numbers where possible. For example, the default MTA message
transfer port is 7100 and the default POA client/server port is 1677. Incrementing port numbers are
used in the example when multiple components have the same type of ports. For example, port
numbers 1677 and 1678 are both POA client/server ports and port numbers 7180 through 7184 are
all HTTP ports. Incrementing from the default port numbers generates unique, though related, port
numbers.
If you are going to set up a GroupWise name server to help GroupWise clients locate their post
offices, make sure that the default POA port number of 1677 is used somewhere in the cluster. For
more information, see “Simplifying Client/Server Access with a GroupWise Name Server” in “Post
Office Agent” in the GroupWise 8 Administration Guide.
IP ADDRESS WORKSHEET
Fill out the “IP Address Worksheet” on page 37 to help you plan secondary IP addresses and cluster-
unique port numbers for all GroupWise agents in the cluster. (MTA, POA, Internet Agent, WebAccess
Agent).
After you have filled out the IP Address Worksheet, transfer the secondary IP addresses and clusterunique port numbers from the IP Address Worksheet to the System Clustering Worksheet and the
Agent Clustering Worksheet so that they are available in the sequence in which you will need them
as you set up GroupWise in a cluster.
30 GroupWise 8 Interoperability Guide
Page 31

SYSTEM CLUSTERING WORKSHEET
If you are setting up a new GroupWise system, under Item 6: Shared Volumes for GroupWise
Administration, specify secondary IP addresses for your GroupWise administration volumes.
Under Item 7: Shared Volume for Domain, use the domain MTA secondary IP address from the IP
Address Worksheet as the domain volume IP address.
If you are planning the post office on a different volume from the domain, under Item 8: Shared
Volume for Post Office, use the post office POA secondary IP address from the IP Address
Worksheet as the post office volume IP address.
AGENT CLUSTERING WORKSHEET
Under Item 4: MTA Network Information, transfer the secondary IP address and cluster-unique port
numbers for the MTA from the IP Address Worksheet to the Agent Clustering Worksheet.
Under Item 7: POA Network Information, transfer the secondary IP address and cluster-unique port
numbers for the POA from the IP Address Worksheet to the Agent Clustering Worksheet.
novdocx (en) 22 June 2009
2.8.2 Determining Appropriate Failover Paths for the Agents
By default, a GroupWise volume is configured to have all nodes in the cluster in its failover path,
organized in ascending alphanumeric order. Only one node at a time can have a particular
GroupWise volume mounted and active. If a GroupWise volume’s preferred node fails, the volume
fails over to the next node in the failover path. You will want to customize the failover path for each
GroupWise volume based on the fan-out-failover principle.
When a node fails, its volumes should not all fail over together to the same secondary node. Instead,
the volumes should be distributed across multiple nodes in the cluster. This prevents any one node
from shouldering the entire processing load typically carried by another node. In addition, some
volumes should never have the potential of being mounted on the same node during a failover
situation. For example, a post office and POA that service a large number of very active GroupWise
client users should never fail over to a node where another very large post office and heavily loaded
POA reside. If they did, users on both post offices would notice a decrease in responsiveness of the
GroupWise client.
AGENT CLUSTERING WORKSHEET
Under Item 3: Domain Failover Path, list the nodes that you want to have in the domain volume
failover path. The MTA might need to run on any node that the domain volume fails over to.
If you are planning the post office on a different GroupWise volume from where the domain is located,
under Item 6: Post Office Failover Path, list the nodes that you want to have in the post office volume
failover path. The POA might need to run on any node that the post office volume fails over to.
2.8.3 Deciding Where to Install the Agent Software
When you install the NetWare MTA and POA in a clustering environment, you can choose between
two different installation locations:
Planning GroupWise in a NetWare Cluster 31
Page 32

Table 2-3 Agent Software Installation Locations
Location Description
novdocx (en) 22 June 2009
sys:\system
on each node
in the cluster
This is the default location provided by the Agent Installation program. Because
the agents must be installed on each node where they might need to run during
a failover situation, you need to do one of the following if you select this
alternative:
Run the Agent Installation program multiple times in order to install the
agent software and to create the agent startup files on each node that is
on a GroupWise volume failover path.
Run the Agent Installation program, then copy the agent software and
startup files to each node that is on a GroupWise volume failover path.
system
on each GroupWise
volume
directory
If you create a
software and startup files fail over and back with the domains and post offices
that the agents service.
Unless you have a very small GroupWise system with all domains and post
offices on a single GroupWise volume, you still need to install the agent
software multiple times, once to each GroupWise volume.
vol:\system
directory on a GroupWise volume, the agent
A simple way to look at the agent location alternatives would be that if you have fewer nodes on
failover paths than you have GroupWise volumes for domains and post offices, then it would be
most efficient to install the agent software to the nodes. Conversely, if you have fewer GroupWise
volumes than you have nodes on failover paths, then it would be most efficient to install the agent
software to the GroupWise volumes. However, there are issues to consider that extend beyond
efficiency during installation.
The following sections can help you choose which installation location would be best for your
clustered GroupWise system:
“Advantages of a vol:\system Directory on Each GroupWise Volume” on page 32
“Disadvantages of a vol:\system Directory on Each GroupWise Volume” on page 33
“Recommendation” on page 33
Advantages of a vol:\system Directory on Each GroupWise Volume
Using a
vol:\system
directory on each GroupWise volume has several advantages:
If you change information in the agent startup files, you only need to change it in one place, not
on every node on any GroupWise volume failover path.
Having the agent startup files on the same GroupWise volume as the domain or post office
makes them easy to find.
32 GroupWise 8 Interoperability Guide
Page 33

When you update the agent software, you only need to update it in one place for a particular
domain or post office, not on every node on a GroupWise volume failover path. This prevents
the potential problem of having a domain or post office fail over to a location where a different
version of the agent software is installed.
If you ever need to add or replace a physical server in the cluster, you only need to install
NetWare and Novell Cluster Services to the new server, then add that node to the appropriate
failover paths. No extra GroupWise configuration is necessary because there are no
sys:\system
dependencies for the GroupWise agents.
novdocx (en) 22 June 2009
If you want to back up the GroupWise software, you do not have to include the
sys:\system
directory in the backup.
Disadvantages of a vol:\system Directory on Each GroupWise Volume
Installing the agents on a GroupWise volume does have some disadvantages:
GroupWise administrators who are used to the GroupWise agents being installed in
sys:\system
might be confused by not finding them there in the clustered GroupWise system.
You must remember where you installed the GroupWise agents when you update the agent
software. Accidently installing a GroupWise Support Pack to the default location of
sys:\system
vol:\system
the
would not have the desired results if the original agent software was installed to
directory on a GroupWise volume.
Recommendation
Whichever method you choose, be consistent throughout the entire cluster. Either put all the
GroupWise agents on the GroupWise volumes with the domains and post offices they service, or put
them all in
no agent files in
sys:\system
sys:\system
Even if you choose to install the agents to multiple
directories. If you put them on GroupWise volumes, make sure there are
directories to confuse the issue at a later time.
sys:\system
directories, you can still store the
agent startup files on the GroupWise volumes. The significant advantage of this approach is that you
only have one startup file to modify per agent.
AGENT CLUSTERING WORKSHEET
Under Item 1: Agent Installation Location, mark whether you will install the agent software to a
vol:\system
necessary, specify where the agent startup files will be stored.
Under Item 2: Domain Name, transfer the domain name and location from the System Clustering
Worksheet to the Agent Clustering Worksheet.
Under Item 5: Post Office Name, transfer the post office name and location from the System
Clustering Worksheet to the Agent Clustering Worksheet.
directory on a GroupWise volume or to
sys:\system
on each node in the cluster. If
Planning GroupWise in a NetWare Cluster 33
Page 34

2.8.4 Deciding Whether to Run the Agents in Protected Memory
On a NetWare server, using protected memory allows you to create isolated memory spaces where
TM
NLM
contributes to the high availability of the cluster. Using protected memory has the following
advantages:
If you have any possibility of the same type of GroupWise agent loading multiple times on any node
in the cluster, you must use protected memory so that you can unload agents individually. Check
your failover paths (Agent Clustering Worksheet items 3 and 6) for failover combinations where
multiple instances of the same type of agent might need to run on the same node.
programs can run without affecting other NLM programs running on the same node. This
When using protected memory, the node can restart a specific memory space if any NLM
program within that memory space abends. This allows for recovery without failing the entire
node, which enhances both up time and database integrity.
Using protected memory gives you the ability to unload a single instance of an agent, rather
than all instances.
If you use protected memory, you can run the agents in active/active mode, rather than active/
passive mode.
novdocx (en) 22 June 2009
Protected memory does result in higher memory utilization (about 5% to 10%) and a slight
performance penalty. Make sure your nodes have sufficient memory to handle the number of
memory spaces that might reside on them. Keep in mind that if you load the MTA and the POA in
different memory spaces, the agent engine (
gwenn5.nlm
) will load twice on the node. Remember to
provide memory for any GroupWise volumes that could fail over to a node, in addition to that
node’s regular processing load.
IMPORTANT: For optimum stability, we strongly recommend that you run the agents in protected
memory, with one agent per memory space.
AGENT CLUSTERING WORKSHEET
Under Item 8: Load Agents in Protected Memory?, mark whether or not you need to run the
GroupWise agents in protected memory.
If you will use protected memory, provide one or two unique protected memory space names. If you
will create the domain and post office on the same GroupWise volume, the MTA and POA can use the
same memory space, although this is not recommended. If you will create the domain and post office
on different GroupWise volumes, the MTA and POA must use different memory spaces.
2.8.5 Planning the NetWare Agent Installation
Aside from the cluster-specific issues discussed in the preceding sections, the considerations
involved in planning to install the GroupWise NetWare agents are the same in a clustering
environment as for any other environment. Review “Planning the GroupWise Agents”, then print
and fill out the “GroupWise Agent Installation Summary Sheet” in “Installing GroupWise Agents”
in the GroupWise 8 Installation Guide for each location where you will install the NetWare MTA
and/or POA.
Fill out the NetWare Agent Worksheet, taking into account the following cluster-specific issues:
34 GroupWise 8 Interoperability Guide
Page 35

GROUPWISE AGENT INSTALLATION WORKSHEET
Under Agents and Locations, mark POA Local to Post Office and MTA Local to Domain. In a
clustering environment, a domain or post office and its agent must reside on the same GroupWise
volume in order to fail over together.
Under Installation Path, take into account your decision based on “Deciding Where to Install the Agent
Software” on page 31.
Under Installation Options for your agent platform, mark Yes for Configure the GroupWise Agents for
Clustering. This will cause the Agent Installation program to customize the agent startup files for
clustering.
Under Domain Information and Post Office Information, refer to the Domain and Post Office
Worksheets you filled out in Section 2.3, “Planning a New Clustered Domain,” on page 23 and
Section 2.4, “Planning a New Clustered Post Office,” on page 24, and to the IP Address Worksheet
you completed during “Planning Secondary IP Addresses and Cluster-Unique Port Numbers for
Agents in the Cluster” on page 29.
Under Launch GroupWise Agents Now, mark No.
novdocx (en) 22 June 2009
IMPORTANT: Do not install the NetWare agent software until you are instructed to do so in
Chapter 3, “Setting Up a Domain and Post Office in a NetWare Cluster,” on page 41.
Skip to Chapter 3, “Setting Up a Domain and Post Office in a NetWare Cluster,” on page 41.
2.9 GroupWise Clustering Worksheets
Section 2.9.1, “System Clustering Worksheet,” on page 35
Section 2.9.2, “IP Address Worksheet,” on page 37
Section 2.9.3, “Agent Clustering Worksheet,” on page 39
2.9.1 System Clustering Worksheet
Item Explanation
1) Software Version Updates
for Cluster:
2) eDirectory Tree for Cluster: Record the eDirectory tree where you created the new Novell
List any servers that need to be updated so that all nodes in
the cluster are running the same version of NetWare.
For more information, see Section 2.1, “Meeting Software
Version Requirements,” on page 22.
Cluster object when you installed Novell Cluster Services.
For more information, see Section 2.2, “Installing Novell
Cluster Services,” on page 22
Planning GroupWise in a NetWare Cluster 35
Page 36

Item Explanation
novdocx (en) 22 June 2009
3) Cluster Name:
Cluster IP Address:
4) Cluster Context: Record the full context where you created the new NetWare
5) Nodes in Cluster List the nodes that are part of the cluster that you set up for
6) Shared Volumes for GroupWise
Administration:
Cluster Enabled?
Yes (highly recommended)
Cluster volume IP addresses
No
GroupWise Administration Snap-ins to
ConsoleOne
Record the name of the new NetWare Cluster object that you
created for your GroupWise system. Also record the virtual IP
address of the cluster that will remain constant regardless of
which node is currently active.
For more information, see Section 2.2, “Installing Novell
Cluster Services,” on page 22.
Cluster object.
For more information, see Section 2.2, “Installing Novell
Cluster Services,” on page 22.
your GroupWise system.
For more information, see Section 2.2, “Installing Novell
Cluster Services,” on page 22.
Specify the names (cluster_volume) of the shared volumes
where the GroupWise administration snap-ins to ConsoleOne
and the GroupWise software distribution directory will reside.
For cluster-enabling, specify the IP addresses of the virtual
servers (volume_SERVER.cluster) to which the clusterenabled volumes are tied.
For more information, see Section 2.6, “Deciding Whether to
Cluster-Enable the Shared Volumes Used by GroupWise,” on
page 25.
public directory
Other
GroupWise Software Distribution
Directory
\grpwise\software
directory
Other
7) Shared Volume for Domain:
Cluster Enabled?
Yes (highly recommended)
Cluster volume IP address
No
Post Office on Same Volume as
Domain?
Yes
No
Specify the name (cluster_volume) of the shared volume
where the GroupWise domain will reside.
For cluster-enabling, specify the IP address of the virtual
server (volume_SERVER.cluster) to which the cluster-enabled
volume is tied.
For more information, see Section 2.4, “Planning a New
Clustered Post Office,” on page 24 and Section 2.6, “Deciding
Whether to Cluster-Enable the Shared Volumes Used by
GroupWise,” on page 25.
36 GroupWise 8 Interoperability Guide
Page 37

Item Explanation
novdocx (en) 22 June 2009
8) Shared Volume for Post Office:
Cluster Enabled?
Yes (highly recommended)
Cluster volume IP address
No
9) IP Address Resolution Methods:
eDirectory
hosts file
DNS
SLP (highly recommended)
10) Domain Name:
Domain Database Location:
11) Post Office Name:
Post Office Database Location:
Specify the name (cluster_volume) of the shared volume
where the GroupWise post office will reside.
For cluster-enabling, specify the IP address of the virtual
server (volume_SERVER.cluster) to which the cluster-enabled
volume is tied.
For more information, see Section 2.4, “Planning a New
Clustered Post Office,” on page 24 and Section 2.6, “Deciding
Whether to Cluster-Enable the Shared Volumes Used by
GroupWise,” on page 25.
Mark the short name address resolution methods you want to
implement to ensure that the UNC paths stored in ConsoleOne
can be successfully resolved into physical network addresses.
For more information, see Section 2.7, “Ensuring Successful
Name Resolution for GroupWise Volumes,” on page 27
Specify a unique name for the domain. Specify the directory on
the GroupWise volume where you want to create the new
domain.
For more information, see Section 2.3, “Planning a New
Clustered Domain,” on page 23.
Specify a unique name for the post office. Specify the directory
on the GroupWise volume where you want to create the post
office.
For more information, see Section 2.4, “Planning a New
Clustered Post Office,” on page 24.
12) Document Storage Area Location:
At the post office
Outside the post office
Separate post office
Document Storage Area Access
If you need a library for a clustered post office, mark where you
want to create its document storage area and provide a
directory if necessary.
For more information, see Section 2.5, “Planning a New
Library for a Clustered Post Office,” on page 25.
POA /user startup switch setting
POA /password startup switch
setting
2.9.2 IP Address Worksheet
“Domain Information” on page 38
“Post Office Information” on page 38
“Internet Agent Information” on page 38
“WebAccess Information” on page 38
Planning GroupWise in a NetWare Cluster 37
Page 38

Domain Information
novdocx (en) 22 June 2009
Domain
MTA
IP Address
Post Office Information
Post Office
POA
IP Address
Internet Agent Information
Internet Agent
GWIA Domain
MTA
GWIA
IP Address
MTA
MTP Port
POA
C/S Port
MTA
MTP Port
MTA
HTTP Port
POA
MTP Port
MTA
Live Remote
Port
POA
HTTP Port
MTA
HTTP Port
GWIA
HTTP Port
N/A
Internet Agent
(same) N/A N/A N/A
(GWIA)
WebAccess Information
WebAccess
Agent
WebAccess
Domain MTA
WebAccess
Agent
(GWINTER)
WebAccess
IP Address
(same) N/A N/A
MTA
MTP Port
MTA
HTTP Port
WebAccess
Agent Port
WebAccess
HTTP Port
N/A N/A
38 GroupWise 8 Interoperability Guide
Page 39

2.9.3 Agent Clustering Worksheet
Item Explanation
novdocx (en) 22 June 2009
1) agent installation location:
vol:\system
volume
sys:\system
Consolidate multiple startup files on
GroupWise volume?
2) Domain Name:
Domain Location:
3) Domain Failover Path: List other nodes in the cluster where the GroupWise
4) MTA Network Information:
on the GroupWise
on each node
Mark the location where you will install the agent
software.
If necessary, specify the location where you will
consolidate multiple agent startup files on a GroupWise
volume.
For more information, see “Deciding Where to Install the
Agent Software” on page 31.
Transfer this information from the System Clustering
Worksheet (item 10).
domain and its MTA could fail over.
For more information, see “Determining Appropriate
Failover Paths for the Agents” on page 31.
Gather the MTA network address information from the
“IP Address Worksheet” on page 37.
MTA IP address
MTA message transfer port
MTA HTTP port
5) Post Office Name:
Post Office Location:
For more information, see “Planning Secondary IP
Addresses and Cluster-Unique Port Numbers for Agents
in the Cluster” on page 29.
Transfer this information from the System Clustering
Worksheet (item 11).
6) Post Office Failover Path: List other nodes in the cluster where the GroupWise post
office and its POA could fail over.
For more information, see “Determining Appropriate
Failover Paths for the Agents” on page 31.
7) POA Network Information:
Gather the POA network address information from the
“IP Address Worksheet” on page 37.
POA IP address
POA client/server port
POA message transfer port
For more information, see “Planning Secondary IP
Addresses and Cluster-Unique Port Numbers for Agents
in the Cluster” on page 29.
POA HTTP port
8) Load Agents in Protected Memory?
No
Yes
MTA protected address space
POA protected address space
POA /user startup switch setting
POA /password startup switch setting
Mark whether you need to run the agents in protected
memory. If so, specify a unique address space for each
agent. For the POA, specify a user name and password
if required by your version of NetWare.
For more information, see “Deciding Whether to Run the
Agents in Protected Memory” on page 34.
Planning GroupWise in a NetWare Cluster 39
Page 40

novdocx (en) 22 June 2009
40 GroupWise 8 Interoperability Guide
Page 41

3
Setting Up a Domain and Post
novdocx (en) 22 June 2009
Office in a NetWare Cluster
You should have already reviewed “Planning GroupWise in a NetWare Cluster” on page 21 and
filled out the “System Clustering Worksheet” on page 35, the “IP Address Worksheet” on page 37,
and the “Agent Clustering Worksheet” on page 39. You are now ready to complete the following
tasks to set up GroupWise
Section 3.1, “Preparing the Cluster for GroupWise,” on page 41
Section 3.2, “Setting Up a New GroupWise System in a Cluster,” on page 44
Section 3.3, “Creating a New Secondary Domain in a Cluster,” on page 45
Section 3.4, “Creating a New Post Office in a Cluster,” on page 46
Section 3.5, “Installing and Configuring the MTA and the POA in a Cluster,” on page 48
Section 3.6, “Testing Your Clustered GroupWise System,” on page 56
Section 3.7, “Managing Your Clustered GroupWise System,” on page 57
Section 3.8, “What’s Next,” on page 61
Section 3.9, “Clustering Quick Checklists,” on page 62
3.1 Preparing the Cluster for GroupWise
®
in a clustering environment:
3
After you have installed Novell® Cluster ServicesTM, as described in Novell Cluster Services
Overview and Installation, complete the following tasks to prepare the cluster for your GroupWise
system:
Section 3.1.1, “Ensuring Required Software Versions,” on page 41
Section 3.1.2, “Cluster-Enabling Shared Volumes for Use with GroupWise,” on page 41
Section 3.1.3, “Configuring Short Name Resolution,” on page 42
3.1.1 Ensuring Required Software Versions
Double-check each node in the cluster to make sure it meets the requirements described in
Section 2.1, “Meeting Software Version Requirements,” on page 22.
3.1.2 Cluster-Enabling Shared Volumes for Use with GroupWise
To cluster-enable a shared volume for use with GroupWise:
1 Select a System Clustering Worksheet item (6, 7, or 8) where you marked Yes under Cluster
Enabled?.
2 Complete the steps in the cluster-enabling section of the cluster documentation for your version
of NetWare
on NetWare,” on page 19.
®
, as listed in Chapter 1, “Introduction to GroupWise 8 and Novell Cluster Services
Setting Up a Domain and Post Office in a NetWare Cluster
41
Page 42

The System Clustering Worksheet provides the volume to cluster-enable for use the
GroupWise, the cluster-enabled volume IP address, and the failover path for the GroupWise
volume.
For a review of the new Novell eDirectoryTM objects that are created when you cluster-enable a
shared volume, see Section 2.6, “Deciding Whether to Cluster-Enable the Shared Volumes
Used by GroupWise,” on page 25.
®
If you have installed the latest version of ConsoleOne
and the Novell Cluster Services snapin, you can rename the cluster-related objects in case your DNS name server cannot resolve
object names that include the underscore (_) character.
3 Repeat Step 1 and Step 2 above for the other shared volumes on your System Clustering
Worksheet that need to be cluster-enabled.
4 Continue with Configuring Short Name Resolution.
3.1.3 Configuring Short Name Resolution
To ensure that GroupWise volumes are always locatable, configure the short name resolution
methods that you want to rely on for GroupWise (System Clustering Worksheet item 9):
novdocx (en) 22 June 2009
“eDirectory” on page 42
“Hosts Files” on page 43
“DNS” on page 43
“SLP” on page 44
After configuring your selected short name resolution methods, continue with the task you need to
perform:
“eDirectory” on page 42
“Hosts Files” on page 43
“DNS” on page 43
“SLP” on page 44
eDirectory
Most commonly, you will use eDirectory to resolve the UNC path of a volume into its network
address. For example, on the workstation where you run ConsoleOne, you need to map a drive to the
location of a domain directory so that ConsoleOne can access the domain database. You could use a
map
command as shown in the example below:
Syntax:
map drive: = .cluster_volume.context
Example:
map m: = .GWCLUSTER_GWVOL1.GWServers
When specifying the
map
commands, use System Clustering Worksheet item 3 for cluster. Use
System Clustering Worksheet item 7 or 8 for each volume where a domain or post office resides.
Use System Clustering Worksheet item 4 for context.
42 GroupWise 8 Interoperability Guide
Page 43

Hosts Files
Because each GroupWise volume where you plan to create a domain or post office has been
associated with a virtual server, you should add lines for the new virtual servers to one or more of
the following files as needed:
NetWare:
sys:\etc\hosts
(on all nodes in the cluster; recommended)
Windows XP/Vista:
\winnt\system32\drivers\etc\hosts
(on the administrator’s workstation only; optional)
The lines you add to a hosts file could look similar to the following example:
Syntax:
IP_address cluster_volume_SERVER.context cluster_volume_SERVER
Remember that cluster_volume_SERVER represents the name of the virtual server created when
you cluster-enabled the volume.
novdocx (en) 22 June 2009
Example:
172.16.5.81 gwcluster_gwvol1_SERVER.gwcluster.com
gwcluster_gwvol1_SERVER
When specifying the lines in the hosts files, use System Clustering Worksheet item 7 or 8 for each
IP_address and volume where a domain or post office resides. Use System Clustering Worksheet
item 3 for cluster. Use System Clustering Worksheet item 4 for context.
DNS
Because each GroupWise volume where you plan to create a domain or post office has been
associated with a virtual server, you should add all your new virtual servers to DNS. Then you could
map
use a
command as shown in the example below (all on one line, of course):
Syntax:
map drive: = \\volume_SERVER.cluster.com\volume
Remember that volume_SERVER represents the name of the Volume Resource object created when
you cluster-enabled the volume. A cluster-enabled volume can function like a server, as these
commands illustrate.
Example:
map m: = \\gwvol1_SERVER.gwcluster.com\gwvol1
Or, if the ConsoleOne workstation is in the same DNS domain as the GroupWise volume:
Syntax:
map drive: = \\volume_SERVER\volume
Example
map m: = \\gwvol1_SERVER\gwvol1
Setting Up a Domain and Post Office in a NetWare Cluster 43
Page 44

novdocx (en) 22 June 2009
When specifying the
each volume where a domain or post office resides. Use System Clustering Worksheet item 3 for
cluster.
SLP
On NetWare 6.5, Novell Cluster Services automatically propagates virtual server information into
SLP and provides the most reliable name resolution.
map
commands you will need, use System Clustering Worksheet item 7 or 8 for
3.2 Setting Up a New GroupWise System in a Cluster
The GroupWise Installation Advisor walks you through setting up the primary domain and an initial
post office in the primary domain. You might be creating your primary domain and initial post office
on the same GroupWise volume or on two different volumes. After you have created the primary
domain and initial post office and installed the GroupWise agents, you can create additional
secondary domains and post offices as needed.
To set up the primary domain and initial post office for a new GroupWise system in a clustering
environment:
1 If necessary, map a drive to each GroupWise administration volume (System Clustering
Worksh e e t item 6).
2 Map a drive to the GroupWise volume for the domain (System Clustering Worksheet item 7)
and, if needed, to the GroupWise volume for the post office (System Clustering Worksheet
item 8), where the primary domain and the initial post office for your new GroupWise system
will be created.
The GroupWise volume name will be cluster_volume. For assistance with mapping a drive to a
cluster-enabled volume, see “Configuring Short Name Resolution” on page 42.
3 Manually create the domain directory (System Clustering Worksheet item 10) and the post
office directory (System Clustering Worksheet item 12).
This step is not required, but in a clustered environment, the following step is easier if the
domain directory already exists.
4 Run the GroupWise Installation Advisor to set up your initial GroupWise system, following the
steps provided in “NetWare and Windows: Setting Up a Basic GroupWise System” in
“Installing a Basic GroupWise System” in the GroupWise 8 Installation Guide. Keep in mind
the following cluster-specific details:
When you specify the ConsoleOne directory and the software distribution directory, be
sure to browse to each location through the GroupWise volume accessed in Step 1 above.
When you specify the domain directory and post office directory, be sure to browse
through the GroupWise volume accessed in Step 2 to select the directory created in Step 3
above.
For the post office link type, select TCP/IP Link.
When providing the MTA and POA network address information, use the Agent
Clustering Worksheet that you filled out in Section 2.8, “Deciding How to Install and
Configure the Agents in a Cluster,” on page 28. The information you provide is used to
configure the MTA and POA objects in the domain and post office even though you have
not yet installed the agent software.
44 GroupWise 8 Interoperability Guide
Page 45

Do not create users in the post office at this time.
In the Summary dialog box, the domain directory and post office directory that you
browsed to should display as UNC paths using the virtual server name with the
GroupWise volume.
novdocx (en) 22 June 2009
5 When you have finished creating the primary domain and the initial post office, continue with
installing the GroupWise Agents, starting with Step 4 on page 49 in Section 3.5, “Installing and
Configuring the MTA and the POA in a Cluster,” on page 48.
3.3 Creating a New Secondary Domain in a Cluster
After you have set up the primary domain and initial post office, as described in Section 3.2,
“Setting Up a New GroupWise System in a Cluster,” on page 44, you can create additional
secondary domains as needed.
To create a new secondary domain in a clustering environment:
1 Map a drive to the GroupWise volume for the domain (System Clustering Worksheet item 7)
where the new secondary domain will be created.
The GroupWise volume name will be cluster_volume. For assistance with mapping a drive to a
cluster-enabled volume, see “Configuring Short Name Resolution” on page 42.
2 Manually create the domain directory (System Clustering Worksheet item 10).
This step is not required, but in a clustered environment, Step 5 is easier if the domain directory
already exists.
3 If you selected
Agent Clustering Worksheet item 1), create the
volume accessed in Step 1.
vol:\system
on GroupWise volume as the agent installation location (under
vol:\system
directory on the GroupWise
or
If you selected
first.
4 In ConsoleOne, connect to the primary domain in your GroupWise system, as described in
“Connecting to a Domain” in “Domains” in the GroupWise 8 Administration Guide.
sys:\system
on each node, decide which node you will install the agents to
Setting Up a Domain and Post Office in a NetWare Cluster 45
Page 46

5 Create the new domain, following the steps provided in “Creating the New Domain” in
“Domains” in the GroupWise 8 Administration Guide. Keep in mind the following cluster-
specific details:
Use the Domain Worksheet you filled out in Section 2.3, “Planning a New Clustered
Domain,” on page 23 to fill in the fields in the Create GroupWise Domain dialog box.
In the Domain Database Location field, be sure to browse through the drive you mapped
in Step 1 to the domain directory you created in Step 2 above.
In the Link to Domain field, link the new domain to the primary domain of your
GroupWise system.
The Configure Link option is selected by default. Select TCP/IP Link to the Other
Domain. Refer to the Agent Clustering Worksheet that you filled out in “Planning
Secondary IP Addresses and Cluster-Unique Port Numbers for Agents in the Cluster” on
page 29 for the secondary IP address and cluster-unique port numbers that you need to
specify in order to configure the link.
6 Use the Link Configuration tool to change the links from the new domain to all other domains
in the cluster to direct TCP/IP links, following the steps provided in “Changing the Link
Protocol between Domains to TCP/IP” in “Message Transfer Agent” in the GroupWise 8
Administration Guide.
novdocx (en) 22 June 2009
Although a complete mesh link configuration is the most efficient, it might not be feasible in all
situations. Set up as many direct TCP/IP links as possible for best MTA performance in the
cluster.
7 Make sure you are still connected to the primary domain.
8 Rebuild the domain database for the new domain, following the steps provided in “Rebuilding
Domain or Post Office Databases” in “Databases” in the GroupWise 8 Administration Guide.
Be sure to browse to the database location (under System Clustering Worksheet item 10)
through the virtual server that was created when you cluster-enabled the GroupWise volume.
The database rebuild is necessary in order to transfer the MTA configuration information and
the domain link information into the secondary domain database, because the MTA for the new
domain is not yet running.
9 Continue with Creating a New Post Office in a Cluster.
3.4 Creating a New Post Office in a Cluster
You can create a new post office on the same GroupWise volume where its domain resides or on a
separate GroupWise volume. If the post office and its domain are on the same GroupWise volume,
they fail over together. If they are on separate GroupWise volumes, they fail over separately.
To create a new post office in a clustering environment:
1 If you marked Yes for Post Office on Same Volume as Domain? (under System Clustering
Worksh e e t item 7), map a drive to the GroupWise volume for the domain (System Clustering
Worksh e e t item 7).
or
Map a drive to the GroupWise volume for the post office (System Clustering Worksheet item
8).
The GroupWise volume name will be cluster_volume. For assistance with mapping a drive to a
cluster-enabled volume, see “Configuring Short Name Resolution” on page 42.
46 GroupWise 8 Interoperability Guide
Page 47

2 Manually create the post office directory (System Clustering Worksheet item 12).
This step is not required, but in a clustered environment, Step 4 is easier if the post office
directory already exists.
3 In ConsoleOne, connect to the GroupWise domain where you want to create the new post
office, as described in “Connecting to a Domain” in “Domains” in the GroupWise 8
Administration Guide.
4 Create the new post office, following the steps provided in “Creating the New Post Office” in
“Post Offices” in the GroupWise 8 Administration Guide. Keep in mind the following cluster-
specific details:
Use the Post Office Worksheet you filled out in Section 2.4, “Planning a New Clustered
Post Office,” on page 24 to fill in the fields in the Create GroupWise Post Office dialog
box.
In the Post Office Database Location field, be sure to browse through the drive you
mapped in Step 1 to the post office directory you created in Step 2 above.
If you want to create a library at the post office (System Clustering Worksheet item 14),
select Create Library.
This option creates the document storage area for the library under the post office
directory and is not recommended for large libraries.
novdocx (en) 22 June 2009
The Configure Link option is selected by default. Select TCP/IP Link from Domain to New
Post Office. Refer to the Agent Clustering Worksheet that you filled in during “Planning
Secondary IP Addresses and Cluster-Unique Port Numbers for Agents in the Cluster” on
page 29 for the secondary IP address and cluster-unique port numbers that you need to
specify in order to configure the link.
5 Right-click the new Post Office object, then click Properties.
6 Click GroupWise > Post Office Settings; in the Access Mode field, select Client/Server Only.
7 Right-click the new POA object, then click Properties.
On the POA Agent Settings and Scheduled Events pages, you might want to specify unique
times for the following POA activities to prevent multiple POAs from performing the same
activities on the same node at the same time during a failover situation:
Start User Upkeep
Generate Address Book for Remote
Enable QuickFinder Indexing
Mailbox/Library Maintenance Event
For more information about these repetitive POA activities, see “Performing Nightly User
Upkeep”, “Regulating Indexing”, and “Scheduling Database Maintenance” in “Post Office
Agent” in the GroupWise 8 Administration Guide.
8 Make sure you are still connected to the domain that owns the new post office.
9 Rebuild the post office database for the new post office, following the steps provided in
“Rebuilding Domain or Post Office Databases” in “Databases” in the GroupWise 8
Administration Guide. Be sure to browse to the database location (under System Clustering
Worksh e e t item 11 ) through the virtual server that was created when you cluster-enabled the
GroupWise volume.
Setting Up a Domain and Post Office in a NetWare Cluster 47
Page 48

The database rebuild is necessary in order to transfer the POA configuration information and
the post office link information into the post office database, because the POA for the new post
office is not yet running.
10 If you want to create a library with its document storage area outside the post office directory,
(System Clustering Worksheet item 14), follow the steps in “Setting Up a Basic Library” or
“Setting Up a Full-Service Library” in “Libraries and Documents” in the GroupWise 8
Administration Guide, after you have completely finished setting up the clustered post office.
11 Continue with Installing and Configuring the MTA and the POA in a Cluster.
3.5 Installing and Configuring the MTA and the POA in a Cluster
After you have created a new domain and/or post office, you are ready to install and configure the
GroupWise agents. Complete all the tasks below if you are setting up a new GroupWise system or if
you have created a new GroupWise volume where you want to install the agent software:
Section 3.5.1, “Installing the Agent Software in a Cluster,” on page 48
Section 3.5.2, “Editing Clustered Agent Startup Files,” on page 49
Section 3.5.3, “Configuring the GroupWise Volume Resource to Load and Unload the
Agents,” on page 50
Section 3.5.4, “Setting Up New Instances of the Agents without Installing the Agent Software,”
on page 54
novdocx (en) 22 June 2009
Under some circumstances, the agent software has already been installed and you simply need to
create a new startup file specific to the new domain or post office. For example:
You have created a new domain and/or post office on a GroupWise volume where the agent
software is already installed in the
In your GroupWise system, the agent software is already installed to multiple
directories.
In these circumstances, follow the instructions in “Setting Up New Instances of the Agents without
Installing the Agent Software” on page 54 instead of completing the tasks above.
vol:\system
directory of the GroupWise volume.
sys:\system
3.5.1 Installing the Agent Software in a Cluster
To install the MTA and the POA:
1 Map a drive to the GroupWise volume for the domain (Agent Clustering Worksheet item 2) or
the post office (Agent Clustering Worksheet item 5).
The GroupWise volume name will be cluster_volume. For assistance with mapping a drive to a
cluster-enabled volume, see “Configuring Short Name Resolution” on page 42.
2 If you selected
Agent Clustering Worksheet item 1), create the
volume accessed in Step 1.
or
If you selected
first.
vol:\system
sys:\system
on GroupWise volume as the agent installation location (under
vol:\system
on each node, decide which node you will install the agents to
directory on the GroupWise
48 GroupWise 8 Interoperability Guide
Page 49

3 Start the Agent Installation program, following the steps provided in “Installing the NetWare
Agent Software” in “Installing GroupWise Agents” in the GroupWise 8 Installation Guide.
4 Install the NetWare agents, keeping in mind the following cluster-specific details:
Use the NetWare Agent Clustering Worksheet that you filled out in “Planning the
NetWare Agent Installation” on page 34 to fill in the fields during the agent installation
process.
In the Installation Path dialog box, be sure to browse through the drive you mapped in
Step 1 to the location you chose in Step 2 above. Also select Configure GroupWise Agents
for Clustering.
In the Domains / Post Offices dialog box, click Add for each domain and post office that
the agents will service. In the Path to Database field, be sure to browse through the drive
you mapped in Step 1 above to the domain directory or the post office directory. In the
HTTP Port field, specify the cluster-unique HTTP port planned for each agent (under
Agent Clustering Worksheet items 4 and 7).
In the Installation Complete dialog box, do not select Launch GroupWise Agents Now.
You will configure the agents to launch in protected mode later.
5 If you need to install the agents to
sys:\system
on multiple nodes in the cluster:
5a Repeat Step 4, mapping new drives as needed.
novdocx (en) 22 June 2009
5b If you marked Yes for Consolidate Multiple Startup Files on GroupWise Volume? (under
Agent Clustering Worksheet item 1), copy one complete set of agent startup files and the
grpwise.ncf
grpwise.ncf
The
grpwise.ncf
file to the planned location, then delete all agent startup files, as well as the
file, from the
file includes a
sys:\system
load
command for each instance of each agent. You
directories to avoid future confusion.
will use this information later when you create the load and unload scripts for the volume
resources.
6 Continue with Editing Clustered Agent Startup Files.
3.5.2 Editing Clustered Agent Startup Files
By default, the Agent Installation program creates agent startup files in the agent installation
.mta
directory. Each MTA startup file is named after the domain it services, with a
.poa
POA startup file is named after the post office it services, with a
extension.
Because you selected Configure GroupWise Agents for Clustering during installation, the Agent
Installation program set the MTA /home startup switch and the POA /home startup switch using the
format:
volume:\directory
so that the startup files are valid no matter which node the agents are currently running on.
The Agent Installation program also adds a /cluster startup switch to POA startup files to ensure that
GroupWise clients detect the clustering environment and try more persistently to reconnect in a
failover, failback, or migration situation.
extension. Each
One additional manual modification of POA startup files is required for robust functionality in a
clustering environment. Uncomment the /ip startup switch and provide the secondary IP address of
the GroupWise volume where the post office is located (Agent Clustering Worksheet item 7). This
Setting Up a Domain and Post Office in a NetWare Cluster 49
Page 50

information is available to the POA in its eDirectory object properties. However, in some failover
situations, reconnection to the MTA is improved when the information is immediately available to
the POA in its startup file.
If you are running the POA in protected memory and your version of NetWare requires it, add the /
user and /password startup switches (under Agent Clustering Worksheet item 8) in order to provide
a user name and password that the POA can use to access its post office volume.
If the POA needs to access a remote document storage area, add the /user and /password startup
switches (under System Clustering Worksheet item 12) in order to provide a user name and
password that the POA can use to access the volume where the document storage area resides. As an
alternative to startup switches, you can assign the POA object all rights except Supervisor and
Access control, as long as the remote document storage area is located in the same tree with the post
office.
If you have connection problems between the MTA and the POA, you can use the /user and /
password startup switches in the MTA startup file as well.
3.5.3 Configuring the GroupWise Volume Resource to Load and Unload the Agents
novdocx (en) 22 June 2009
The properties of the Volume Resource object define how the GroupWise volume functions within
TM
the cluster, how NLM
programs are loaded and unloaded, and how failover and failback situations
are handled. At this point, you might have one volume resource with a domain and post office on it,
or you might have two volume resources, one for the domain and one for the post office. Complete
the following tasks for each volume resource:
“Modifying the Volume Resource Load Script for the Agents” on page 50
“Modifying the Volume Resource Unload Script for the Agents” on page 52
“Setting the Failover Path and Policies for the Agents” on page 53
Modifying the Volume Resource Load Script for the Agents
The volume resource load script executes whenever the GroupWise volume comes online.
To set up the load script:
1 In ConsoleOne, browse to and select the Cluster object.
If necessary, click View > Conso le View to display its contents.
2 Right-click the Volume Resource object (volume_SERVER), then click Properties > Load to
display the default volume resource load script for the GroupWise volume.
3 Make the following changes to the default load script:
Remove the
trustmig
command. It is not necessary to migrate trustees for a GroupWise
volume. Removing this line helps the load script to execute faster.
If you selected
vol:\system
(Agent Clustering Worksheet item 1), add a
vol:\system
search add volume:\system
50 GroupWise 8 Interoperability Guide
directory to the server search path.
on GroupWise volume as the agent installation location
search add
command to add the new
Page 51

novdocx (en) 22 June 2009
If you selected
sys:\system
on each node as the installation location (Agent Clustering
Worksheet item 1) but you are storing the agent startup files on the GroupWise volume,
add that location to the server search path.
If you marked No under Load Agents in Protected Memory? (Agent Clustering Worksheet
item 8), add the following abend recovery options:
set auto restart after abend = 2
set auto restart after abend delay time = 0
set auto restart down timeout = 60
set developer option = off
These settings provide the best possible handling of GroupWise databases in the event that
an abend should occur within the cluster when the agents are not running in protected
memory.
Transfer the agent
load
commands from the
grpwise.ncf
file into the load script. Use
Ctrl+C to copy and Ctrl+V to paste text into the load script page. Then delete or rename
grpwise.ncf
the
load volume:\system\agent.nlm @startup_file
If you marked Yes under Load Agents in Protected Memory? (Agent Clustering
Worksheet item 8), add the address space parameter to the agent
specify the protected address space for each agent. Add a
file to avoid future confusion.
load
commands to
protection restart
command for each address space name.
load address space=addr_space_name
volume:\system\agent.nlm @startup_file
protection restart name
The result would look similar to the following example:
NOTE: The
set
commands are needed in the load script only when the agents are not running
in protected memory. The address space parameters are needed in the
when the agents are running in protected memory.
4 Click Apply to save the load script.
Setting Up a Domain and Post Office in a NetWare Cluster 51
load
commands only
Page 52

5 If necessary, click OK to confirm that you must offline and then online the volume resource in
order for the changes to take effect.
6 Continue with Modifying the Volume Resource Unload Script for the Agents.
Modifying the Volume Resource Unload Script for the Agents
The volume resource unload script executes whenever the GroupWise volume goes offline.
Programs should be unloaded in the reverse order of how they were loaded. This ensures that
supporting programs are not unloaded before programs that rely on them in order to function
properly.
To set up the unload script:
1 In ConsoleOne, in the properties pages for the Volume Resource object (volume_SERVER),
click Unload to display the default volume resource unload script.
2 Make the following changes to the default unload script:
If you marked Yes under Load Agents in Protected Memory? (Agent Clustering
Worksheet item 8), add an
Add an
unload kill address space
unload address space
command to ensure that the address space is
command for each address space.
completely cleaned up.
unload address space=addr_space_name
unload kill address space=addr_space_name
If you marked No under Load Agents in Protected Memory? (Agent Clustering Worksheet
item 8), create an
unload
command parallel to each
load
command that you placed in the
load script.
unload agent.nlm
Remove the
trustmig
command just like you did in the load script.
The result would look similar to the following example:
novdocx (en) 22 June 2009
3 Click Apply to save the unload script.
4 If necessary, click OK to confirm that you must offline and then online the volume resource in
order for the changes to take effect.
5 Continue with Setting the Failover Path and Policies for the Agents.
52 GroupWise 8 Interoperability Guide
Page 53

Setting the Failover Path and Policies for the Agents
To modify the failover path and policies for a GroupWise volume resource:
1 In ConsoleOne, in the properties pages for the Volume Resource object (volume_SERVER),
click Nodes to display the default failover path for the GroupWise volume resource.
novdocx (en) 22 June 2009
2 Arrange the nodes in the cluster into the desired failover path for the domain or post office
volume (under Agent Clustering Worksheet items 3 or 6).
3 Click Apply to save the failover path.
4 Click Policies to display the default start, failover, and failback policies.
The default policy settings are often appropriate. By default, a volume resource:
Fails over automatically if the node it is running on fails
Starts automatically on the next node in its failover path
Continues running at its failover location, even after its most preferred node is again
available
If you are considering changing these defaults, see the section about failover and failback
modes in the cluster documentation for your version of NetWare, as listed in Chapter 1,
“Introduction to GroupWise 8 and Novell Cluster Services on NetWare,” on page 19.
5 Click OK when you are finished editing the GroupWise volume resource properties.
6 Skip to Section 3.6, “Testing Your Clustered GroupWise System,” on page 56.
Setting Up a Domain and Post Office in a NetWare Cluster 53
Page 54

3.5.4 Setting Up New Instances of the Agents without Installing the Agent Software
There are two steps to setting up new instances of the agents without installing the agent software:
“Creating New Startup Files” on page 54
“Modifying Existing Load and Unload Scripts” on page 54
Creating New Startup Files
novdocx (en) 22 June 2009
Each MTA startup file is named after the domain it services, with a
startup file is named after the post office it services, with a
software is located in the
vol:\system
directory of a GroupWise volume, the startup files are there
as well. If the existing agent software is located in multiple
.poa
sys:\system
.mta
extension. Each POA
extension. If the existing agent
directories, the startup
files might be located there as well, or they might be in a directory on a GroupWise volume.
To create a new startup file without installing the agent software:
1 Make a copy of an existing startup file and name it after the domain or post office that will be
serviced by the agent.
2 Edit the setting of the /home startup switch to point to the location of the new domain directory
or post office directory. Be careful to maintain the syntax of the original line.
3 Scroll down through the startup file looking for other active (not commented out) startup
switches, then modify them as needed for the new agent.
For example, you might find that the /httpport switch is active and needs to be changed to a
cluster-unique port number for the new agent.
4 Save the new startup file.
5 Continue with Modifying Existing Load and Unload Scripts.
Modifying Existing Load and Unload Scripts
load
The agent startup file names are part of the
commands found in GroupWise volume resource
load scrips.
If you created the new domain and/or post office on a new GroupWise volume, skip back to
“Configuring the GroupWise Volume Resource to Load and Unload the Agents” on page 50 for
instructions to create new load and unload scripts.
If you created the new domain and/or post office on an existing GroupWise volume, most of the
configuration of the volume resource has already been done. You just need to add new
unload
commands to the existing scripts. Continue with the steps below:
To modify existing load and unload scripts:
1 In ConsoleOne, browse to and select the Cluster object.
If necessary, click View > Conso le View to display its contents.
2 Right-click the Volume Resource object (volume_SERVER), then click Properties > Load to
display the volume resource load script for the GroupWise volume.
54 GroupWise 8 Interoperability Guide
load
and
Page 55

novdocx (en) 22 June 2009
3 Following the pattern of the existing
load
commands, add
load
commands for the new
instances of the agents you are setting up. Use Ctrl+C to copy and Ctrl+V to paste lines in the
load script page.
The results would be similar to the following example:
4 Click Apply to save the modified load script.
5 Click Unload
6 Add corresponding
unload
commands for the new instances of the agents.
7 Click Apply to save the modified unload script.
You might want to review other properties of the Volume Resource object, such as the failover
path on the Nodes page and the failover/failback/migration procedures on the Policies page, in
light of the fact that an additional domain and/or post office now resides on the GroupWise
volume.
8 Change other Volu m e Re s o urce properties as needed.
Setting Up a Domain and Post Office in a NetWare Cluster 55
Page 56

9 Click OK to save the modified properties.
10 In the Cluster State View, take the GroupWise volume offline and then bring it online again to
test the new startup files and the modified load and unload scripts. If you need assistance with
these tasks, see Section 3.6, “Testing Your Clustered GroupWise System,” on page 56.
3.6 Testing Your Clustered GroupWise System
After you have configured the GroupWise volume resources, you can test the load and unload
scripts by bringing the GroupWise volume online and taking it offline again.
1 In ConsoleOne, select the Cluster object, then click View > Cluster State.
novdocx (en) 22 June 2009
The new GroupWise volume resource shows Offline in the State column.
2 Click the new GroupWise volume resource, then click Online.
The State column for the volume resource now displays Running.
3 Observe the server console where the MTA and/or POA are loading to see that they start and
run correctly.
If you are using protected memory, you can use the
console prompt to list all the address spaces on the node and what NLM programs are running
in each one.
4 Click the new GroupWise volume resource, then click Offline.
The State column for the volume resource returns to Offline.
protection
command at the server
5 Observe the server console where the MTA and/or POA are unloading to see that they shut
down correctly.
56 GroupWise 8 Interoperability Guide
Page 57

novdocx (en) 22 June 2009
If you are using protected memory, you can use the
that the address spaces used by the GroupWise agents are no longer present.
6 Repeat Step 2 whenever you are ready to bring the new GroupWise volume resource online
permanently.
On NetWare 6.5, these actions can also be performed from your Web browser. See “Using
Novell Remote Manager on NetWare 6.5” on page 58.
7 Continue with Managing Your Clustered GroupWise System.
protection
command again to make sure
3.7 Managing Your Clustered GroupWise System
After you have set up a basic clustered GroupWise system, you should consider some long-term
management issues.
Section 3.7.1, “Updating GroupWise Objects with Cluster-Specific Descriptions,” on page 57
Section 3.7.2, “Using Novell Remote Manager on NetWare 6.5,” on page 58
Section 3.7.3, “Knowing What to Expect in MTA and POA Failover Situations,” on page 61
3.7.1 Updating GroupWise Objects with Cluster-Specific Descriptions
After setting up your clustered GroupWise system, while the cluster-specific information is fresh in
your mind, you should record that cluster-specific information as part of the GroupWise objects in
ConsoleOne so that you can easily refer to it later. Be sure to keep the information recorded in the
GroupWise objects up to date if the configuration of your system changes.
“Recording Cluster-Specific Information for a Domain and Its MTA” on page 57
“Recording Cluster-Specific Information for a Post Office and Its POA” on page 58
“Recording Cluster-Specific Information for a Software Distribution Directory” on page 58
Recording Cluster-Specific Information for a Domain and Its MTA
To permanently record important cluster-specific information for the domain:
1 In ConsoleOne, browse to and right-click the Domain object, then click Properties.
2 In the Description field of the domain Identification page, provide a cluster-specific description
of the domain, including the secondary IP address of its cluster-enabled volume and the clusterunique port numbers used by its MTA.
3 Click OK to save the domain description.
4 Select the Domain object to display its contents.
5 Right-click the MTA object, then click Properties.
6 In the Description field of the MTA Identification page, record the secondary IP address of the
cluster-enabled domain volume and the cluster-unique port numbers used by the MTA.
This information appears on the MTA console, no matter which node in the cluster it is
currently running on.
7 Click OK to save the MTA description.
8 Continue with Recording Cluster-Specific Information for a Post Office and Its POA.
Setting Up a Domain and Post Office in a NetWare Cluster 57
Page 58

Recording Cluster-Specific Information for a Post Office and Its POA
To permanently record important cluster-specific information for a post office:
1 In ConsoleOne, browse to and right-click the Post Office object, then click Properties.
2 In the Description field of the post office Identification page, provide a cluster-specific
description of the post office, including the secondary IP address of its cluster-enabled volume
and the cluster-unique port numbers used by its POA.
3 Click OK to save the post office description.
4 Select the Post Office object to display its contents.
5 Right-click the POA object, then click Properties.
6 In the Description field of the POA Identification page, record the secondary IP address of the
cluster-enabled post office volume and the cluster-unique port numbers used by the POA.
This information appears on the POA console, no matter which node in the cluster it is
currently running on.
7 Click OK to save the POA description.
8 If necessary, continue with “Recording Cluster-Specific Information for a Software
Distribution Directory” on page 58.
or
novdocx (en) 22 June 2009
Skip to “Knowing What to Expect in MTA and POA Failover Situations” on page 61.
Recording Cluster-Specific Information for a Software Distribution Directory
To permanently record important cluster-specific information about a software distribution directory
located on a cluster-enabled volume:
1 In ConsoleOne, click Tools > System Operations > Software Directory Management.
2 Select the software distribution directory, then click Edit.
3 In the description field, record the secondary IP address of the cluster-enabled volume where
the software distribution directory resides.
4 Click OK, then click Close to save the software distribution directory description.
5 Skip to “Knowing What to Expect in MTA and POA Failover Situations” on page 61.
3.7.2 Using Novell Remote Manager on NetWare 6.5
On NetWare 6.5, you can use Novell Remote Manager to manage many aspects of your GroupWise
cluster from your Web browser. For instructions on setting up and accessing this useful network
administration utility, see the NetWare 6.5 Novell Remote Manager Administration Guide at the
Novell Documentation Web site (http://www.novell.com/documentation). Cluster management
features are automatically added to Novell Remote Manager when you install Novell Cluster
Services.
After you have accessed Novell Remote Manager, you might find that many GroupWise cluster
management tasks are easier to perform with Novell Remote Manager than with ConsoleOne. The
following sections help you configure and manage the cluster using Novell Remote Manager:
“Configuring Your GroupWise Cluster” on page 59
“Managing Your GroupWise Cluster” on page 60
58 GroupWise 8 Interoperability Guide
Page 59

Configuring Your GroupWise Cluster
On the main Novell Remote Manager page:
1 In the left frame, scroll down to the Clustering section, then click Cluster Config.
novdocx (en) 22 June 2009
The Cluster Configuration page displays the cluster name, the nodes in the cluster, and the
resources in the cluster. It also enables you to create new GroupWise Volume Resource objects
(termed Cluster Volumes in the Novell Remote Manager interface).
2 Click the cluster name to display the Cluster object properties:
Click a linked item to edit the Cluster object properties. Click your browser’s Back button to
return to the Cluster Configuration page.
3 On the Cluster Configuration page, click a server to display the Server object properties:
Setting Up a Domain and Post Office in a NetWare Cluster 59
Page 60

Click a linked item to edit the Server object properties. Click Back or Delete to perform the
specified action.
4 On the Cluster Configuration page, click a GroupWise volume to display the Volume Resource
object properties:
Click a linked item to edit Volume Resource object properties. Click Back or Delete to perform
the specified action.
5 On the Cluster Configuration page, click New Cluster Volume to create a new GroupWise
Volume Resource object, then follow the instructions to provide the information needed to
create the new Cluster Volume object.
novdocx (en) 22 June 2009
Managing Your GroupWise Cluster
On the main Novell Remote Manager page:
1 In the left frame, scroll down to the Clustering section, then click Cluster Management.
The Cluster Status page displays the nodes and volume resources in the cluster. The master
node in the cluster is marked with a yellow ball. Status information is listed for each volume
resource. You can set the refresh rate for the status information at the top of the Cluster Status
page.
2 Select a page refresh rate, then click Begin Refresh so that the page automatically refreshes at
the selected rate.
3 Click a cluster resource to bring it online, take it offline, or migrate it to another node.
60 GroupWise 8 Interoperability Guide
Page 61

To take the currently running volume resource offline, click Offline. To migrate the volume
resource, select a node from the drop-down list, then click Migrate.
4 On the Cluster Resource page, click Event Log to view a list of cluster events.
The event log can help you resolve problems with cluster functioning.
3.7.3 Knowing What to Expect in MTA and POA Failover Situations
In a failover situation, the agents might need to perform some database repair as they start on the
new node. The time required depends on the size of the databases involved.
Typically, the POA returns to full functionality faster than the MTA. This benefits GroupWise client
users, who can reconnect to their mailboxes very quickly and probably do not notice if messages to
users in other post offices are not delivered immediately. The only time a user would need to restart
the GroupWise client would be if he or she was actually in the process of sending a message when
the POA went down. Notify can continue running even if the connection to the POA becomes
unavailable and then it reconnects automatically when the POA is again available.
novdocx (en) 22 June 2009
The MTA typically takes some time reestablishing the links to its post offices, other domains, and
gateways, but this situation usually resolves itself in a few minutes without administrator
intervention. If it does not, you can manually restart the MTA to speed up the process.
In comparison to failover, migration typically takes longer because the agents methodically
terminate their threads and close their databases as part of their normal shutdown procedure.
However, as a result, no database repair is required when the agents start up again in their new
location.
Continue with What’s Next.
3.8 What’s Next
Now that you have at least one GroupWise domain and post office up and running in a clustering
environment, you are ready to proceed with the rest of your GroupWise system setup by:
Adding users to post offices. See “Users” in the GroupWise 8 Administration Guide.
Setting up the GroupWise client software and helping users to get started using it. See “Client”
in the GroupWise 8 Administration Guide. Also see the GroupWise 8 Windows Client User
Guide.
Connecting your clustered GroupWise system to the Internet. See Chapter 4, “Implementing
the Internet Agent in a NetWare Cluster,” on page 67.
Providing access to users’ GroupWise mailboxes from their Web browsers. See Chapter 5,
“Implementing WebAccess in a NetWare Cluster,” on page 85.
Setting Up a Domain and Post Office in a NetWare Cluster 61
Page 62

Connecting your clustered GroupWise system to other e-mail systems through GroupWise
gateways. See Chapter 6, “Implementing GroupWise Gateways in a NetWare Cluster,” on
page 103.
Monitoring the status of your clustered GroupWise system from your Web browser. See
Chapter 7, “Monitoring a GroupWise System in a NetWare Cluster,” on page 105.
Backing up your clustered GroupWise system. See Chapter 8, “Backing Up a GroupWise
System in a NetWare Cluster,” on page 107.
3.9 Clustering Quick Checklists
Section 3.9.1, “GroupWise System Quick Checklist,” on page 62
Section 3.9.2, “Domain Quick Checklist,” on page 63
Section 3.9.3, “Post Office Quick Checklist,” on page 64
3.9.1 GroupWise System Quick Checklist
Plan your new clustered GroupWise system.
novdocx (en) 22 June 2009
See Chapter 2, “Planning GroupWise in a NetWare Cluster,” on page 21.
Cluster-enable the volumes where GroupWise domains and post offices will reside.
See Section 3.1.2, “Cluster-Enabling Shared Volumes for Use with GroupWise,” on page 41.
Make sure that short name resolution works throughout your network.
See Section 3.1.3, “Configuring Short Name Resolution,” on page 42.
Create the primary domain and initial post office in your new clustered GroupWise system.
See Section 3.2, “Setting Up a New GroupWise System in a Cluster,” on page 44.
Set up the agents for the primary domain and the initial post office.
See Section 3.5, “Installing and Configuring the MTA and the POA in a Cluster,” on page 48.
Modify the volume resource load script(s):
Remove the
Add the
If you will not run the agents in protected memory, add the
commands and the
Add the agent
If you will run the agents in protected memory, add the
load
command(s) and add a corresponding
trustmig
search add
set developer option = off
load
command(s)
command
command (optional)
set auto restart
command
address space
protection restart
parameter to the
command for each
address space
See “Modifying the Volume Resource Load Script for the Agents” on page 50.
Modify the volume resource unload script(s):
Add the agent or address space
Remove the
trustmig
See “Modifying the Volume Resource Unload Script for the Agents” on page 52.
Set up the volume failover path(s) and policies.
62 GroupWise 8 Interoperability Guide
command
unload
command(s)
Page 63

See “Setting the Failover Path and Policies for the Agents” on page 53.
Test your new clustered GroupWise system.
See Section 3.6, “Testing Your Clustered GroupWise System,” on page 56.
Record cluster-specific information in the properties pages of the GroupWise objects that the
information pertains to.
See Section 3.7, “Managing Your Clustered GroupWise System,” on page 57.
3.9.2 Domain Quick Checklist
Plan your new clustered domain.
See Section 2.3, “Planning a New Clustered Domain,” on page 23.
Cluster-enable the volume where the domain will reside.
See Section 3.1.2, “Cluster-Enabling Shared Volumes for Use with GroupWise,” on page 41.
Make sure that short name resolution for the new domain volume works throughout your
network.
See Section 3.1.3, “Configuring Short Name Resolution,” on page 42.
Create the new domain.
novdocx (en) 22 June 2009
See Section 3.3, “Creating a New Secondary Domain in a Cluster,” on page 45.
Set up the MTA for the new domain.
See Section 3.5, “Installing and Configuring the MTA and the POA in a Cluster,” on page 48.
Modify the domain volume resource load script:
Remove the
Add the
If you will not run the MTA in protected memory, add the
and the
Add the MTA
If you will run the MTA in protected memory, add the
MTA
trustmig
search add
set developer option = off
load
load
command and add a corresponding
command
command (optional)
command
command
address space
protection restart
set auto restart
parameter to the
command for the
commands
address space
See “Modifying the Volume Resource Load Script for the Agents” on page 50.
Modify the domain volume resource unload script:
Add the MTA or address space
Remove the
trustmig
command
unload
command
See “Modifying the Volume Resource Unload Script for the Agents” on page 52.
Set up the domain volume failover path and policies.
See “Setting the Failover Path and Policies for the Agents” on page 53.
Test your new clustered domain.
See Section 3.6, “Testing Your Clustered GroupWise System,” on page 56.
Setting Up a Domain and Post Office in a NetWare Cluster 63
Page 64

Record cluster-specific information in the properties pages of the GroupWise objects that the
information pertains to.
See Section 3.7, “Managing Your Clustered GroupWise System,” on page 57.
3.9.3 Post Office Quick Checklist
Plan your new clustered post office.
See Section 2.4, “Planning a New Clustered Post Office,” on page 24.
Cluster-enable the volume where the post office will reside.
See Section 3.1.2, “Cluster-Enabling Shared Volumes for Use with GroupWise,” on page 41.
Make sure that short name resolution for the new post office volume works throughout your
network.
See Section 3.1.3, “Configuring Short Name Resolution,” on page 42.
Create the new post office.
See Section 3.4, “Creating a New Post Office in a Cluster,” on page 46.
Set up the POA for the new post office.
See Section 3.5, “Installing and Configuring the MTA and the POA in a Cluster,” on page 48.
novdocx (en) 22 June 2009
Add the /ip startup switch to the POA startup file in order to provide the secondary IP address
of the post office volume. If you are running the POA in protected memory, add the /user and /
password startup switches so the POA can access the volume.
See “Editing Clustered Agent Startup Files” on page 49.
Modify the post office volume resource load script:
Remove the
Add the
If you will not run the POA in protected memory, add the
and the
Add the POA
If you will run the POA in protected memory, add the
POA
trustmig
search add
set developer option = off
load
load
command and add a corresponding
command
command (optional)
command
command
address space
protection restart
set auto restart
parameter to the
command for the
commands
address space
See “Modifying the Volume Resource Load Script for the Agents” on page 50.
Modify the post office volume resource unload script:
Add the POA or address space
Remove the
trustmig
command
unload
command
See “Modifying the Volume Resource Unload Script for the Agents” on page 52.
Set up the post office volume failover path and policies.
See “Setting the Failover Path and Policies for the Agents” on page 53.
Test your new clustered post office.
See Section 3.6, “Testing Your Clustered GroupWise System,” on page 56.
64 GroupWise 8 Interoperability Guide
Page 65

Record cluster-specific information in the properties pages of the GroupWise objects that the
information pertains to.
See Section 3.7, “Managing Your Clustered GroupWise System,” on page 57.
novdocx (en) 22 June 2009
Setting Up a Domain and Post Office in a NetWare Cluster 65
Page 66

novdocx (en) 22 June 2009
66 GroupWise 8 Interoperability Guide
Page 67

4
Implementing the Internet Agent in
novdocx (en) 22 June 2009
a NetWare Cluster
You should already have set up at least a basic GroupWise® system, as described in Chapter 2,
“Planning GroupWise in a NetWare Cluster,” on page 21 and Chapter 3, “Setting Up a Domain and
Post Office in a NetWare Cluster,” on page 41. As part of this process, the “System Clustering
Worksheet” on page 35 and the “IP Address Worksheet” on page 37 were filled out. If you do not
have access to the filled-out worksheets, print the worksheets now and fill in the clustering and
network address information as it currently exists on your system. You need this information as you
implement the Internet Agent in a cluster.
Section 4.1, “Planning the Internet Agent in a Cluster,” on page 67
Section 4.2, “Setting Up the Internet Agent in a Cluster,” on page 71
Section 4.3, “Managing the Internet Agent in a Cluster,” on page 80
Section 4.4, “Internet Agent Clustering Worksheet,” on page 82
Section 4.5, “Internet Agent Quick Checklist,” on page 83
4.1 Planning the Internet Agent in a Cluster
A main system configuration difference between a GroupWise system in a clustering environment
and a GroupWise system in a regular environment is that you need to create a separate domain to
house each GroupWise gateway, including the Internet Agent.
4
The Section 4.4, “Internet Agent Clustering Worksheet,” on page 82 lists all the information you
need as you set up the Internet Agent in a clustering environment. You should print the worksheet
and fill it out as you complete the tasks listed below:
Section 4.1.1, “Planning a Domain for the Internet Agent,” on page 68
Section 4.1.2, “Deciding Whether to Cluster-Enable the Internet Agent Volume,” on page 68
Section 4.1.3, “Determining an Appropriate Failover Path for the Internet Agent Volume,” on
page 68
Section 4.1.4, “Planning a Secondary IP Address and Cluster-Unique Port Numbers for the
Internet Agent and Its MTA,” on page 69
Section 4.1.5, “Preparing Your Firewall for the Internet Agent,” on page 69
Section 4.1.6, “Deciding Where to Install the Internet Agent and Its MTA,” on page 70
Section 4.1.7, “Deciding Whether to Run the Internet Agent and Its MTA in Protected
Memory,” on page 70
Section 4.1.8, “Planning the MTA Installation,” on page 71
Section 4.1.9, “Planning the Internet Agent Installation,” on page 71
Implementing the Internet Agent in a NetWare Cluster
67
Page 68

4.1.1 Planning a Domain for the Internet Agent
The considerations involved in planning a domain for the Internet Agent are much the same as
planning any other domain. In preparation, review “Planning a New Domain”, then print and fill out
the “Domain Worksheet” in “Domains” in the GroupWise 8 Administration Guide.
Keep in mind the following cluster-specific details:
When you specify the location for the domain directory on the Domain Worksheet, include the
shared volume where you want the domain directory to reside.
Do not concern yourself with the GroupWise agent information on the Domain Worksheet.
You can stop with item 10. You will plan the MTA installation later.
When you have completed the Domain Worksheet, transfer the key information from the Domain
Worksheet to the Internet Agent Clustering Worksheet.
INTERNET AGENT CLUSTERING WORKSHEET
Under Item 1: Shared Volume for Internet Agent, transfer the domain location to the Internet Agent
Clustering Worksheet.
novdocx (en) 22 June 2009
Under Item 2: Internet Agent Domain Name, transfer the domain name and database directory to the
Internet Agent Clustering Worksheet.
4.1.2 Deciding Whether to Cluster-Enable the Internet Agent Volume
You should plan to cluster-enable the shared volume where the Internet Agent domain will reside.
For a review of the benefits of cluster-enabling volumes, see Section 2.6, “Deciding Whether to
Cluster-Enable the Shared Volumes Used by GroupWise,” on page 25, which describes the issues in
the context of planning MTA and POA installations.
INTERNET AGENT CLUSTERING WORKSHEET
Under Item 1: Shared Volume for Internet Agent, mark Yes under Cluster Enabled?.
Cluster-enabling relies on successful short name resolution throughout your system. Review
Section 2.7, “Ensuring Successful Name Resolution for GroupWise Volumes,” on page 27, which
describes the issues in the context of planning MTA and POA installations.
4.1.3 Determining an Appropriate Failover Path for the Internet Agent Volume
As with the MTA and the POA, you need to decide which nodes in the cluster would be appropriate
locations for the Internet Agent volume to fail over to. For a review of failover paths, see
“Determining Appropriate Failover Paths for the Agents” on page 31, which describes the issues in
the context of planning MTA and POA installations.
68 GroupWise 8 Interoperability Guide
Page 69

INTERNET AGENT CLUSTERING WORKSHEET
Under Item 3: Internet Agent Failover Path, list the nodes that you want to have in the Internet Agent
volume failover path.
4.1.4 Planning a Secondary IP Address and Cluster-Unique Port Numbers for the Internet Agent and Its MTA
As with the MTA and the POA, the Internet Agent needs a secondary IP address and cluster-unique
port numbers. As part of planning to install the MTA and POA, you should already have determined
the secondary IP address and cluster-unique port numbers for the Internet Agent and its MTA as you
filled out the “IP Address Worksheet” on page 37. If you do not have a filled-out copy of this
worksheet for your system, print it now and fill in current system information.
INTERNET AGENT CLUSTERING WORKSHEET
Under Item 5: MTA Network Information, transfer the MTA secondary IP address and cluster-unique
port numbers from the Internet Agent section of the IP Address Worksheet to the Internet Agent
Clustering Worksheet.
novdocx (en) 22 June 2009
Under Item 1: Shared Volume for Internet Agent, copy the MTA secondary IP address under Cluster
Volume IP Address as well, because they are the same.
Under Item 7: Internet Agent Network Information, transfer the Internet Agent secondary IP address
(the same as for its MTA) and the cluster-unique Internet Agent port number from the Internet Agent
section of the IP Address Worksheet to the Internet Agent Clustering Worksheet.
4.1.5 Preparing Your Firewall for the Internet Agent
The Internet Agent receives incoming messages on the secondary IP address of the Internet Agent
domain volume. Your firewall configuration must be modified to allow inbound TCP/IP traffic from
the Internet to the Internet Agent secondary IP address on the following standard ports:
Table 4-1 Standard Ports
Protocol Standard Port
IMAP4 143
LDAP 389
POP3 110
SMTP 25
By default, the Internet Agent sends outgoing messages on the primary IP address of the server
where it is running. If you decide to use this default configuration, your firewall must be configured
to allow outbound TCP/IP traffic from all nodes in the Internet Agent volume failover path.
Implementing the Internet Agent in a NetWare Cluster 69
Page 70

If the Internet Agent has a large number of nodes on its failover path, you could configure the
Internet Agent to send outgoing messages to a relay host, which would then send them out through
the firewall using its own IP address rather than the address of the particular node where the Internet
Agent was running. This reduces the amount of modification to your firewall required to set up the
Internet Agent. However, if the relay host goes down, outgoing messages are delayed.
As another alternative, you can configure the Internet Agent to use its secondary IP address for
sending as well as receiving messages. Setup instructions for this configuration are provided in
“Forcing Use of the Internet Agent Secondary IP Address” on page 79, which you can complete
after installing the Internet Agent.
In preparation for installing the Internet Agent, configure your firewall as needed to handle the
Internet Agent’s use of primary and secondary IP addresses when sending and receiving messages.
4.1.6 Deciding Where to Install the Internet Agent and Its MTA
As with the MTA and the POA, you can choose to install the Internet Agent and its MTA to the
sys:\system
For a discussion of these alternatives, see “Deciding Where to Install the Agent Software” on
page 31, which describes the issues in the context of planning MTA and POA installations. If you
only have one Internet Agent for your GroupWise system with several servers in its failover path, it
is an easy choice: Install it once to a
directory of each node or to a
vol:\system
vol:\system
directory on the Internet Agent volume.
directory on the Internet Agent volume.
novdocx (en) 22 June 2009
INTERNET AGENT CLUSTERING WORKSHEET
Under Item 4: MTA Installation Location and Item 6: Internet Agent Installation Location, mark
whether you will install the Internet Agent and its MTA to a
Agent volume or to
startup file and the Internet Agent configuration file will be stored.
sys:\system
on each node in the cluster. If necessary, specify where the MTA
vol:\system
directory on the Internet
4.1.7 Deciding Whether to Run the Internet Agent and Its MTA in Protected Memory
As with the MTA and the POA, you can choose whether to run the Internet Agent in protected
memory. For a review of the benefits of protected memory, see “Deciding Whether to Run the
Agents in Protected Memory” on page 34, which describes the issues in the context of planning
MTA and POA installations.
You might think that protected memory is not necessary if you have only one Internet Agent for
your GroupWise system because it could never fail over to a node where another Internet Agent was
running. However, because the Internet Agent in a cluster is installed into its own domain with its
own MTA, this MTA could fail over to a node where another MTA was already running. Therefore,
it is safest to load the MTA into protected memory. Loading the Internet Agent into protected
memory is also recommended. Load each agent into its own memory space and mark each memory
space as restartable.
INTERNET AGENT CLUSTERING WORKSHEET
Under Item 8: Load Internet Agent and Its MTA in Protected Memory?, mark whether you need to run
the Internet Agent and its MTA in protected memory. If you do, provide a protected memory address
space name for each agent.
70 GroupWise 8 Interoperability Guide
Page 71

4.1.8 Planning the MTA Installation
Follow the instructions in “Planning the NetWare Agent Installation” on page 34, then return to this
point. After you follow the instructions, you have a filled-out NetWare Agent Worksheet to use
when you install the MTA.
IMPORTANT: Do not install the NetWare MTA until you are instructed to do so in Section 4.2,
“Setting Up the Internet Agent in a Cluster,” on page 71.
4.1.9 Planning the Internet Agent Installation
Aside from the cluster-specific issues discussed in the preceding sections, the considerations
involved in planning to install the Internet Agent are the same in a clustering environment as for any
other environment. Review the installation instructions in “NetWare and Windows: Installing the
Internet Agent Software” in “Installing the GroupWise Internet Agent” in the GroupWise 8
Installation Guide. You might want to print this section and write down the types of planning
information you have provided on worksheets in other sections. You will need this information as
you install the Internet Agent in your cluster.
novdocx (en) 22 June 2009
IMPORTANT: Do not install the Internet Agent software until you are instructed to do so in
Section 4.2, “Setting Up the Internet Agent in a Cluster,” on page 71.
4.2 Setting Up the Internet Agent in a Cluster
You should already have reviewed Section 4.1, “Planning the Internet Agent in a Cluster,” on
page 67 and filled out the Section 4.4, “Internet Agent Clustering Worksheet,” on page 82. You are
now ready to complete the following tasks to set up the Internet Agent in a clustering environment:
Section 4.2.1, “Cluster-Enabling a Shared Volume for Use with the Internet Agent,” on page 71
Section 4.2.2, “Creating a Domain for the Internet Agent,” on page 72
Section 4.2.3, “Installing the MTA for the Internet Agent Domain,” on page 72
Section 4.2.4, “Installing and Configuring the Internet Agent in a Cluster,” on page 72
Section 4.2.5, “Testing the Clustered Internet Agent,” on page 79
4.2.1 Cluster-Enabling a Shared Volume for Use with the Internet Agent
To cluster-enable the Internet Agent shared volume:
1 Complete the cluster-enabling steps in the applicable section of the cluster documentation for
your version of NetWare, as listed in Chapter 1, “Introduction to GroupWise 8 and Novell
Cluster Services on NetWare,” on page 19.
The Internet Agent Clustering Worksheet provides the volume to cluster-enable, the clusterenabled volume IP address, and the failover path for the Internet Agent volume.
®
For a review of the new Novell
a shared volume, see Section 2.6, “Deciding Whether to Cluster-Enable the Shared Volumes
Used by GroupWise,” on page 25.
eDirectoryTM objects that are created when you cluster-enable
Implementing the Internet Agent in a NetWare Cluster 71
Page 72

If you have installed the latest version of ConsoleOne® and the Novell Cluster Services snapin, you can rename the cluster-related objects in case your DNS name server cannot resolve
object names that include the underscore (_) character.
2 To ensure successful short name resolution, add entries for the Internet Agent virtual server to
support your preferred methods of short name resolution, as described in “Configuring Short
Name Resolution” on page 42.
3 To ensure that the Internet Agent has incoming and outgoing access to the Internet, make sure
your firewall is properly configured, as described in “Preparing Your Firewall for the Internet
Agent” on page 69.
4 Continue with Creating a Domain for the Internet Agent.
4.2.2 Creating a Domain for the Internet Agent
The Internet Agent domain will be a secondary domain. To create it, follow the instructions in
Section 3.3, “Creating a New Secondary Domain in a Cluster,” on page 45, taking your information
from the Internet Agent Clustering Worksheet, rather than the System Clustering Worksheet, then
return to this point.
novdocx (en) 22 June 2009
Do not create any post offices in the Internet Agent domain.
Continue with Installing the MTA for the Internet Agent Domain.
4.2.3 Installing the MTA for the Internet Agent Domain
The MTA for the Internet Agent domain can be installed just like any other MTA in your clustered
GroupWise system. Follow the instructions in “Installing the Agent Software in a Cluster” on
page 48, then return to this point.
You do not need to edit the MTA startup file. You do not need to modify the Volume Resource
properties until after you have installed the Internet Agent.
Continue with Installing and Configuring the Internet Agent in a Cluster.
4.2.4 Installing and Configuring the Internet Agent in a Cluster
After you have created a domain for the Internet Agent and installed the MTA for that domain, you
are ready to install and configure the Internet Agent.
“Installing the Internet Agent Software in a Cluster” on page 72
“Configuring the Internet Agent Volume Resource to Load and Unload the Internet Agent and
Its MTA” on page 73
“Enabling Internet Addressing for Your Clustered GroupWise System” on page 78
“Verifying Internet Agent Object Properties” on page 78
Installing the Internet Agent Software in a Cluster
1 Map a drive to the Internet Agent volume (Internet Agent Clustering Worksheet item 1).
The Internet Agent volume name will be cluster_volume. For assistance with mapping a drive
to a cluster-enabled volume, see “Configuring Short Name Resolution” on page 42.
72 GroupWise 8 Interoperability Guide
Page 73

novdocx (en) 22 June 2009
2 If you selected
location (Internet Agent Clustering Worksheet item 6), create the
vol:\system
on Internet Agent Volume as the Internet Agent installation
vol:\system
directory on
the Internet Agent volume accessed in Step 1.
or
If you selected
sys:\system
Agent to first, then map a drive to
3 Start the Internet Agent Installation program and install the NetWare
on Each Node, decide which node you will install the Internet
sys:\system
on that node.
®
Internet Agent,
following the steps provided in “NetWare and Windows: Installing the Internet Agent
Software” in “Installing the GroupWise Internet Agent” in the GroupWise 8 Installation Guide.
Keep in mind the following cluster-specific details:
Use the notes you made during “Planning the Internet Agent Installation” on page 71 to
fill in the fields during the Internet Agent installation process.
In the Installation Path dialog box, be sure to browse through the drive you mapped to the
location you chose in Step 2 above. Deselect Update AUTOEXEC File and select
Configure GroupWise Agents for Clustering.
In the GroupWise Domain dialog box, be sure to browse through the drive you mapped in
Step 1 to the domain directory (Internet Agent Clustering Worksheet item 2).
The Internet Agent Installation program creates the
load
command for the Internet Agent. You need this information later when you create
gwia.ncf
file, which includes the
the load script for the Volume Resource object.
4 If you need to install the Internet Agent to
sys:\system
to each node in the cluster:
4a Repeat Step 3, mapping new drives as needed.
4b If you marked Yes for Consolidate Multiple Configuration Files on Internet Agent
Volume? (under Internet Agent Clustering Worksheet item 6), copy the
the planned location, then delete it from the
sys:\system
directories to avoid future
gwia.cfg
file to
confusion.
5 Make sure you have completed all the tasks described in “Installing the GroupWise Internet
Agent” in the GroupWise 8 Installation Guide.
The Internet Agent starts automatically immediately after Installation.
6 Stop each Internet Agent you have installed before configuring it for clustering.
7 Continue with Configuring the Internet Agent Volume Resource to Load and Unload the
Internet Agent and Its MTA.
Configuring the Internet Agent Volume Resource to Load and Unload the Internet
Agent and Its MTA
The properties of the Volume Resource object define how the Internet Agent volume functions
TM
within the cluster, how NLM
programs are loaded and unloaded, and how failover and failback
situations are handled. Complete the following tasks for the Internet Agent volume:
“Modifying the Volume Resource Load Script for the Internet Agent” on page 73
“Modifying the Volume Resource Unload Script for the Internet Agent” on page 75
“Setting the Failover Path and Policies for the Internet Agent” on page 76
Modifying the Volume Resource Load Script for the Internet Agent
The volume resource load script executes whenever the Internet Agent volume comes online.
Implementing the Internet Agent in a NetWare Cluster 73
Page 74

To set up the load script:
1 In ConsoleOne, browse to and select the Cluster object.
If necessary, click View > Conso le View to display its contents.
2 Right-click the Volume Resource object (volume_SERVER), then click Properties > Load to
display the default volume resource load script for the Internet Agent volume.
The next step assumes that this is the first time you have edited this load script. If other
GroupWise agents are already running from this volume, some of the modifications have
already been made.
3 Make the following changes to the default load script:
Remove the
trustmig
command. It is not necessary to migrate trustees for the Internet
Agent volume. Removing this line helps the load script to execute faster.
If you selected
(Internet Agent Clustering Worksheet items 4 and 6), add a
the new
search add volume:\system
If you selected
vol:\system
vol:\system
sys:\system
on Internet Agent volume as the installation location
search add
directory to the server search path.
on each node as the installation location (Internet Agent
command to add
Clustering Worksheet items 4 and 6) but you are storing the MTA startup file and the
Internet Agent configuration file on the Internet Agent volume, add that location to the
server search path.
novdocx (en) 22 June 2009
If you marked No under Load Internet Agent and Its MTA in Protected Memory? (Internet
Agent Clustering Worksheet item 8), add the following abend recovery options:
set auto restart after abend = 2
set auto restart after abend delay time = 0
set auto restart down timeout = 60
set developer option = off
These settings provide the best possible handling of GroupWise databases in the event that
an abend should occur within the cluster.
Transfer the MTA
vol:\system
into the load script page. Then delete or rename the
load
command from the
grpwise.ncf
file located in the
directory into the load script. Use Ctrl+C and Ctrl+V to copy and paste text
grpwise.ncf
file to avoid future
confusion.
load volume:\system\gwmta.nlm @domain.mta
Transfer the Internet Agent
vol:\system
directory into the load script. Use Ctrl+C and Ctrl+V to copy and paste text
into the load script page. Then delete or rename the
load
command from the
gwia.ncf
gwia.ncf
file located in the
file to avoid future
confusion.
load volume:\system\gwia.nlm @gwia.cfg
If you marked Yes under Load Internet Agent and Its MTA in Protected Memory?
(Internet Agent Clustering Worksheet item 8), add the
load
commands to specify the protected address space where the Internet Agent and its
MTA will run. Add a
load address space=addr_space_name
volume:\system\gwmta.nlm @domain.mta
load address space=addr_space_name
volume:\system\gwia.nlm @gwia.cfg
protection restart addr_space_name
protection restart
command for the address space name.
address space
parameter to the
74 GroupWise 8 Interoperability Guide
Page 75

The result would look similar to the following example:
novdocx (en) 22 June 2009
NOTE: The
set
commands are needed in the load script only when the MTA and the Internet
Agent are not running in protected memory. The address space parameters are needed in the
load
commands only when the MTA and the Internet Agent are running in protected memory.
4 Click Apply to save the load script.
5 If necessary, click OK to confirm that you must offline and then online the volume resource in
order for the changes to take effect.
6 Continue with Modifying the Volume Resource Unload Script for the Internet Agent.
Modifying the Volume Resource Unload Script for the Internet Agent
The volume resource unload script executes whenever the Internet Agent volume goes offline.
Programs should be unloaded in the reverse order of how they were loaded. This ensures that
supporting programs are not unloaded before programs that rely on them in order to function
properly.
To set up the unload script:
1 In ConsoleOne, in the properties pages for the Volume Resource object (volume_SERVER),
click Unload to display the default volume resource unload script.
The next step assumes that this is the first time you have edited this unload script. If other
GroupWise agents are already running from this volume, some of the modifications have
already been made.
2 Make the following changes to the default unload script:
If you marked Yes under Load Internet Agent and Its MTA in Protected Memory?
(Internet Agent Clustering Worksheet item 8), add an
and an
unload kill address space
command to ensure that the address space is
unload address space
command
completely cleaned up.
unload address space=addr_space_name
unload kill address space=addr_space_name
Implementing the Internet Agent in a NetWare Cluster 75
Page 76

If your system seems to be trying to kill the address space before the Internet Agent and its
MTA have been completely unloaded, resulting in the agents hanging in the unloading
state, set a delay of several seconds before issuing the
unload kill address space
command to allow the Internet Agent and its MTA adequate time to unload completely.
The length of the delay varies from system to system; ten seconds is a good starting place.
unload address space=addr_space_name
delay 10
unload kill address space=addr_space_name
If you marked No under Load Internet Agent and Its MTA in Protected Memory? (Internet
Agent Clustering Worksheet items 8), create an
unload
command parallel to each
load
command that you placed in the load script.
unload gwia.nlm
unload gwmta.nlm
Remove the
trustmig
command just like you did in the load script.
The result would look similar to the following example:
novdocx (en) 22 June 2009
3 Click Apply to save the unload script.
4 If necessary, click OK to confirm that you must offline and then online the volume resource in
order for the changes to take effect.
5 Continue with Setting the Failover Path and Policies for the Internet Agent.
Setting the Failover Path and Policies for the Internet Agent
To modify the failover path and policies for the Internet Agent volume resource:
1 In ConsoleOne, in the properties pages for the Volume Resource object (volume_SERVER),
click Nodes to display the default failover path for the Internet Agent volume resource.
76 GroupWise 8 Interoperability Guide
Page 77

2 Arrange the nodes in the cluster into the desired failover path for the Internet Agent volume
(Internet Agent Clustering Worksheet item 3).
3 Click Apply to save the failover path.
4 Click Policies to display the default start, failover, and failback policies.
novdocx (en) 22 June 2009
The default policy settings are often appropriate. By default, a volume resource:
Fails over automatically if the node it is running on fails
Starts automatically on the next node in its failover path
Continues running at its failover location, even after its most preferred node is again
available
If you are considering changing these defaults, see the applicable section about failover and
failback modes in the cluster documentation for your version of NetWare, as listed in
Chapter 1, “Introduction to GroupWise 8 and Novell Cluster Services on NetWare,” on
page 19.
5 Click OK when you are finished editing the Internet Agent volume resource properties.
6 Continue with Enabling Internet Addressing for Your Clustered GroupWise System.
Implementing the Internet Agent in a NetWare Cluster 77
Page 78

Enabling Internet Addressing for Your Clustered GroupWise System
Setting up Internet addressing for a clustered Internet Agent is no different from setting it up for an
Internet Agent in a any other environment. Follow the instructions in “Enabling Internet
Addressing” in “System” in the GroupWise 8 Administration Guide, then return to this point.
Verifying Internet Agent Object Properties
During installation of the Internet Agent, the Internet Agent object should have been configured
correctly. However, it can be helpful to verify certain cluster-specific information in order to
familiarize yourself with the configuration of a clustered Internet Agent.
“Accessing Internet Agent Object Properties” on page 78
“Verifying the Reference to the Volume Resource” on page 78
“Verifying the Reference to the Virtual Server” on page 78
“Verifying Post Office Links” on page 79
“Forcing Use of the Internet Agent Secondary IP Address” on page 79
Accessing Internet Agent Object Properties
novdocx (en) 22 June 2009
1 In ConsoleOne, browse to and select the Internet Agent domain in order to display its contents.
2 Right-click the Internet Agent object, then click Properties.
3 Continue with Verifying the Reference to the Volume Resource.
Verifying the Reference to the Volume Resource
In the Internet Agent object properties pages:
1 Click SMTP/MIME > Settings.
2 Verify the contents of the Hostname/DNS "A Record" Name field.
It displays the hostname as currently configured in DNS. It should match the Volume Resource
object name (volume_SERVER) of the Internet Agent volume, not the name of a physical
server in the cluster.
3 Make changes if necessary.
4 Continue with Verifying the Reference to the Virtual Server.
Verifying the Reference to the Virtual Server
In the Internet Agent object properties pages:
1 Click Server Directories.
2 Verify that the displayed directories match the virtual server name (cluster_volume_SERVER)
associated with the Volume Resource object, not the name of a physical server in the cluster.
3 Make changes if necessary.
4 Continue with Verifying Post Office Links.
78 GroupWise 8 Interoperability Guide
Page 79

Verifying Post Office Links
In the Internet Agent object properties pages:
1 Click Post Office Links.
2 Verify that the Access Mode column displays C/S (for client/server mode) for all post offices
serviced by the Internet Agent.
3 Verify that the Links column displays the secondary IP addresses of the GroupWise volumes
where post offices reside, not the IP addresses of any physical servers in the cluster.
4 Make changes if necessary.
5 Continue with Forcing Use of the Internet Agent Secondary IP Address.
Forcing Use of the Internet Agent Secondary IP Address
If you want the Internet Agent to send outgoing messages on its secondary IP address, rather than
using the default of its primary IP address:
1 Click GroupWise > Network Address.
2 In the TCP/IP Address field, provide the secondary IP address (under Internet Agent Clustering
Worksh e e t item 1) for the Internet Agent to use for sending outgoing messages.
3 Click SMTP/MIME, then click Settings.
4 Select Bind to TCP/IP Address at Connection Time.
novdocx (en) 22 June 2009
5 Click OK.
6 Continue with Testing the Clustered Internet Agent.
4.2.5 Testing the Clustered Internet Agent
After you have configured the Internet Agent volume resource, you can test the load and unload
scripts by bringing the Internet Agent volume online and taking it offline again.
1 In ConsoleOne, select the Cluster object, then click View > Cluster State.
The new Internet Agent volume resource shows Offline in the State column.
2 Click the new Internet Agent volume resource, then click Online.
Implementing the Internet Agent in a NetWare Cluster 79
Page 80

The State column for the volume resource now displays Running.
3 Observe the server console where the Internet Agent and its MTA are loading to see that they
start and run correctly.
If you are using protected memory, you can use the
console prompt to list all the address spaces on the node and what NLM programs are running
in each one.
4 Click the new Internet Agent volume resource, then click Offline.
protection
command at the server
novdocx (en) 22 June 2009
The State column for the volume resource returns to Offline.
5 Observe the server console where the Internet Agent and its MTA are unloading to see that they
shut down correctly.
If you are using protected memory, you can use the
that the address space used by the Internet Agent and its MTA is no longer present.
6 Repeat Step 2 whenever you are ready to bring the new Internet Agent volume resource online
permanently.
On NetWare 6.5, these actions can also be performed from your Web browser. See “Using
Novell Remote Manager on NetWare 6.5” on page 58.
7 Continue with Managing the Internet Agent in a Cluster.
protection
command again to make sure
4.3 Managing the Internet Agent in a Cluster
After you have installed the Internet Agent in a cluster, you should consider some long-term
management issues.
Section 4.3.1, “Updating GroupWise Objects with Cluster-Specific Descriptions,” on page 81
Section 4.3.2, “Knowing What to Expect in an Internet Agent Failover Situation,” on page 82
80 GroupWise 8 Interoperability Guide
Page 81

4.3.1 Updating GroupWise Objects with Cluster-Specific Descriptions
After installing the Internet Agent in your clustered GroupWise system, while the cluster-specific
information is fresh in your mind, you should record that cluster-specific information as part of the
GroupWise objects in ConsoleOne so that you can easily refer to it later. Be sure to update the
information recorded in the GroupWise objects if the configuration of your system changes.
“Recording Cluster-Specific Information about the Internet Agent Domain and Its MTA” on
page 81
“Recording Cluster-Specific Information about the Internet Agent” on page 81
Recording Cluster-Specific Information about the Internet Agent Domain and Its
MTA
To permanently record important cluster-specific information for the Internet Agent domain:
1 In ConsoleOne, browse to and right-click the Domain object, then click Properties.
2 In the Description field of the Internet Agent domain Identification page, provide a cluster-
specific description of the Internet Agent domain, including the secondary IP address of its
cluster-enabled volume and the cluster-unique port numbers used by its MTA.
3 Click OK to save the Internet Agent domain description.
novdocx (en) 22 June 2009
4 Select the Internet Agent Domain object to display its contents.
5 Right-click the MTA object, then click Properties.
6 In the Description field of the MTA Identification page, record the secondary IP address of the
cluster-enabled Internet Agent domain volume and the cluster-unique port numbers used by the
MTA.
This information appears on the MTA console, no matter which node in the cluster it is
currently running on.
7 Click OK to save the MTA description.
8 Continue with Recording Cluster-Specific Information about the Internet Agent.
Recording Cluster-Specific Information about the Internet Agent
With the contents of the Internet Agent domain still displayed:
1 Right-click the Internet Agent object, then click Properties.
2 Click GroupWise, then click Identification.
3 In the Description field, record the secondary IP address of the cluster-enabled Internet Agent
domain volume and the cluster-unique port numbers used by the Internet Agent.
This information appears on the Internet Agent console, no matter which node in the cluster it
is currently running on.
4 Click OK to save the Internet Agent information.
5 Continue with Knowing What to Expect in an Internet Agent Failover Situation.
Implementing the Internet Agent in a NetWare Cluster 81
Page 82

4.3.2 Knowing What to Expect in an Internet Agent Failover Situation
The failover behavior of the MTA for the Internet Agent domain is the same as for an MTA in a
regular domain. See “Knowing What to Expect in MTA and POA Failover Situations” on page 61.
Failover of the Internet Agent itself is more complex. The various clients (POP3, IMAP4, and
LDAP) receive an error message that the node is not available. Most of the clients do not attempt to
reconnect automatically, so the user must exit the client and restart it to reestablish the connection
after the failover process is complete. Fortunately, the Internet Agent restarts quickly in its failover
location so users can reconnect quickly.
As with the MTA and the POA, migration of the Internet Agent takes longer than failover. In fact,
the Internet Agent can seem especially slow to shut down properly as it finishes its normal
processing and stops its threads. For a busy Internet Agent, you might need to wait several minutes
for it to shut down properly.
4.4 Internet Agent Clustering Worksheet
novdocx (en) 22 June 2009
Item Explanation
1) Shared Volume for Internet
Agent:
Cluster Enabled?
Yes (highly recommended)
Cluster volume IP address
No
2) Internet Agent
Domain Name:
Domain Database Location:
3) Internet Agent
Failover Path:
4) MTA Installation Location:
vol:\system
Agent volume
sys:\system
node
Consolidate multiple MTA
startup files on Internet
Agent volume?
on Internet
on each
Specify the name (cluster_volume) of the shared volume where the
Internet Agent domain will be created.
For cluster-enabling, specify the IP addresses of the virtual server
(volume_SERVER.cluster) to which the cluster-enabled volume is
tied.
For more information, see “Deciding Whether to Cluster-Enable the
Internet Agent Volume” on page 68.
Specify a unique name for the Internet Agent domain. Specify the
directory on the Internet Agent volume where you want to create the
new domain.
For more information, see “Planning a Domain for the Internet Agent”
on page 68.
List other nodes in the cluster where the Internet Agent and its MTA
could fail over.
For more information, see “Determining an Appropriate Failover Path
for the Internet Agent Volume” on page 68.
Mark the location where you will install the MTA software. If
necessary, specify the location where you will consolidate multiple
MTA startup files on an Internet Agent volume.
For more information, see “Deciding Where to Install the Internet
Agent and Its MTA” on page 70.
82 GroupWise 8 Interoperability Guide
Page 83

Item Explanation
novdocx (en) 22 June 2009
5) MTA Network Information:
MTA IP address
MTA message transfer port
MTA live remote port
MTA HTTP port
6) Internet Agent
Installation Location:
vol:\system
Internet Agent volume
sys:\system
node
Consolidate multiple
Internet Agent configuration
files on Internet Agent
volume?
7) Internet Agent
Network Information:
on the
on each
Internet Agent IP address
Internet Agent HTTP port
Gather the MTA network address information from the Internet Agent
section of the “IP Address Worksheet” on page 37.
For more information, see “Planning a Secondary IP Address and
Cluster-Unique Port Numbers for the Internet Agent and Its MTA” on
page 69.
Mark the location where you will install the Internet Agent software.
If necessary, specify the location where you will consolidate multiple
Internet Agent configuration files (
volume.
For more information, see “Deciding Where to Install the Internet
Agent and Its MTA” on page 70.
Gather the Internet Agent network address information from the
Internet Agent section of the “IP Address Worksheet” on page 37.
For more information, see “Planning a Secondary IP Address and
Cluster-Unique Port Numbers for the Internet Agent and Its MTA” on
page 69.
gwia.cfg
) on an Internet Agent
8) Load Internet Agent and Its
MTA
in Protected Memory?
No
Yes
Protected address space names:
Mark whether you need to run the Internet Agent and its MTA in
protected memory. If so, specify a unique address space for each
agent.
For more information, see “Deciding Whether to Run the Internet
Agent and Its MTA in Protected Memory” on page 70.
MTA:
Internet Agent:
4.5 Internet Agent Quick Checklist
Plan the new clustered Internet Agent, including the new domain required to house the Internet
Agent in a clustering environment.
See Section 4.1, “Planning the Internet Agent in a Cluster,” on page 67.
Make sure your firewall is configured to accommodate the Internet Agent.
See Section 4.1.5, “Preparing Your Firewall for the Internet Agent,” on page 69.
Cluster-enable the volume where the Internet Agent domain will reside.
See Section 5.3.1, “Cluster-Enabling a Shared Volume for Use with the WebAccess Agent,” on
page 89.
Create the new Internet Agent domain.
See Section 4.2.2, “Creating a Domain for the Internet Agent,” on page 72.
Implementing the Internet Agent in a NetWare Cluster 83
Page 84

Set up the MTA for the new Internet Agent domain.
See Section 4.2.3, “Installing the MTA for the Internet Agent Domain,” on page 72.
Install the Internet Agent.
See “Installing the Internet Agent Software in a Cluster” on page 72.
Modify the Internet Agent volume resource load script:
Remove the
trustmig
command
novdocx (en) 22 June 2009
Add the
If you will not run the MTA and the Internet Agent in protected memory, add the
auto restart
Add the
delay
If you will run the MTA and the Internet Agent in protected memory, add the address
space parameter to the
search add
commands and the
load
commands for the MTA and the Internet Agent, separating them with a
command
command (optional)
set developer option = off
load
commands and add a
command
protection restart
command for
the address space
See “Modifying the Volume Resource Load Script for the Internet Agent” on page 73.
Modify the Internet Agent volume resource unload script:
Add the MTA and Internet Agent or address space
Remove the
trustmig
command
unload
command(s)
See “Modifying the Volume Resource Unload Script for the Internet Agent” on page 75.
Set up the Internet Agent volume failover path and policies.
See “Setting the Failover Path and Policies for the Internet Agent” on page 76.
Enable Internet Addressing for the clustered Internet Agent.
See “Enabling Internet Addressing for Your Clustered GroupWise System” on page 78.
Double-check the cluster-specific Internet Agent object properties.
See “Verifying Internet Agent Object Properties” on page 78.
Test the clustered Internet Agent.
See Section 4.2.5, “Testing the Clustered Internet Agent,” on page 79.
set
Record cluster-specific information in the properties pages of the GroupWise objects
associated with the Internet Agent.
See Section 4.3.1, “Updating GroupWise Objects with Cluster-Specific Descriptions,” on
page 81.
84 GroupWise 8 Interoperability Guide
Page 85

5
Implementing WebAccess in a
novdocx (en) 22 June 2009
NetWare Cluster
You should already have set up at least a basic GroupWise® system, as described in Chapter 2,
“Planning GroupWise in a NetWare Cluster,” on page 21 and Chapter 3, “Setting Up a Domain and
Post Office in a NetWare Cluster,” on page 41. As part of this process, the “System Clustering
Worksheet” on page 35 and the “IP Address Worksheet” on page 37 were filled out. If you do not
have access to the filled-out worksheets, print the worksheets now and fill in the clustering and
network address information as it currently exists on your system. You need this information as you
implement WebAccess in a cluster.
Section 5.1, “Understanding the WebAccess Components,” on page 85
Section 5.2, “Planning WebAccess in a Cluster,” on page 85
Section 5.3, “Setting Up WebAccess in a Cluster,” on page 89
Section 5.4, “Managing WebAccess in a Cluster,” on page 97
Section 5.5, “WebAccess Clustering Worksheet,” on page 99
Section 5.6, “WebAccess Quick Checklist,” on page 100
5.1 Understanding the WebAccess Components
If you are not familiar with GroupWise WebAccess, review “GroupWise WebAccess Overview” in
“Installing GroupWise WebAccess” in the GroupWise 8 Installation Guide.
5
As you plan WebAccess in a clustering environment, you must keep in mind that WebAccess
consists of two components:
WebAccess Agent (
domain in the cluster
WebAccess Application (a Java* servlet) that will be added to your Web server. You can install
the WebAccess Application on a clustered Web server or a non-clustered Web server. How to
set up and manage a clustered Web server is beyond the scope of the GroupWise
documentation. If you have not clustered your Web server, you can install the WebAccess
Application on a server that is outside of the cluster where the WebAccess Agent is installed.
gwinter.nlm
) that will be associated with a GroupWise WebAccess
5.2 Planning WebAccess in a Cluster
A main system configuration difference between a GroupWise system in a clustering environment
and a GroupWise system in a regular environment is that you need to create a separate domain to
house each GroupWise gateway, including the WebAccess Agent.
Section 5.5, “WebAccess Clustering Worksheet,” on page 99 lists all the information you need as
you set up the WebAccess Agent in a clustering environment. You should print the worksheet and
fill it out as you complete the tasks listed below:
Section 5.2.1, “Planning a New Domain for the WebAccess Agent,” on page 86
Implementing WebAccess in a NetWare Cluster
85
Page 86

Section 5.2.2, “Deciding Whether to Cluster-Enable the WebAccess Agent Volume,” on
page 86
Section 5.2.3, “Determining an Appropriate Failover Path for the WebAccess Agent Volume,”
on page 87
Section 5.2.4, “Planning a Secondary IP Address and Cluster-Unique Port Numbers for the
WebAccess Agent and Its MTA,” on page 87
Section 5.2.5, “Deciding Where to Install the WebAccess Agent and Its MTA,” on page 87
Section 5.2.6, “Deciding Whether to Run the WebAccess Agent and Its MTA in Protected
Memory,” on page 88
Section 5.2.7, “Planning the MTA Installation,” on page 88
Section 5.2.8, “Planning the WebAccess Installation,” on page 88
5.2.1 Planning a New Domain for the WebAccess Agent
The considerations involved in planning a domain for the WebAccess Agent are much the same as
planning any other domain. In preparation, review “Planning a New Domain”, then print and fill out
the “Domain Worksheet” in “Domains” in the GroupWise 8 Administration Guide.
novdocx (en) 22 June 2009
Keep in mind the following cluster-specific details:
When you specify the location for the domain directory on the Domain Worksheet, include the
shared volume where you want the domain directory to reside.
Do not concern yourself with the GroupWise agent information on the Domain Worksheet.
You can stop with item 10. You will plan the MTA installation later.
When you have completed the Domain Worksheet, transfer the key information from the Domain
Worksheet to the WebAccess Clustering Worksheet.
WEBACCESS CLUSTERING WORKSHEET
Under Item 1: Shared Volume for WebAccess Agent, transfer the domain location from the Domain
Worksheet to the WebAccess Clustering Worksheet.
Under Item 2: WebAccess Agent Domain Name, transfer the domain name and database directory
from the Domain Worksheet to the WebAccess Clustering Worksheet.
5.2.2 Deciding Whether to Cluster-Enable the WebAccess Agent Volume
You should plan to cluster-enable the shared volume where the WebAccess Agent domain will
reside. For a review of the benefits of cluster-enabling volumes, see Section 2.6, “Deciding Whether
to Cluster-Enable the Shared Volumes Used by GroupWise,” on page 25, which describes the issues
in the context of planning MTA and POA installations.
WEBACCESS CLUSTERING WORKSHEET
Under Item 1: Shared Volume for WebAccess Agent, mark Yes under Cluster Enabled?.
86 GroupWise 8 Interoperability Guide
Page 87

Cluster-enabling relies on successful short name resolution throughout your system. Review
Section 2.7, “Ensuring Successful Name Resolution for GroupWise Volumes,” on page 27, which
describes the issues in the context of planning MTA and POA installations.
5.2.3 Determining an Appropriate Failover Path for the WebAccess Agent Volume
As with the MTA and the POA, you need to decide which nodes in the cluster are appropriate
locations where the WebAccess Agent volume could fail over. For a review of failover paths, see
“Determining Appropriate Failover Paths for the Agents” on page 31, which describes the issues in
the context of planning MTA and POA installations.
WEBACCESS CLUSTERING WORKSHEET
Under Item 4: WebAccess Agent Failover Path, list the nodes that you want to have in the
WebAccess Agent volume failover path.
5.2.4 Planning a Secondary IP Address and Cluster-Unique
novdocx (en) 22 June 2009
Port Numbers for the WebAccess Agent and Its MTA
As with the MTA and the POA, the WebAccess Agent needs a secondary IP address and clusterunique port numbers. As part of planning to install the MTA and POA, you should already have
determined the secondary IP address and cluster-unique port numbers for the WebAccess Agent and
its MTA as you filled out the “IP Address Worksheet” on page 37. If you do not have a filled-out
copy of this worksheet for your system, print it now and fill in current system information.
WEBACCESS CLUSTERING WORKSHEET
Under Item 6: MTA Network Information, transfer the MTA secondary IP address and cluster-unique
port numbers from the WebAccess section the IP Address Worksheet to the WebAccess Clustering
Worksheet.
Under Item 1: Shared Volume for WebAccess Agent, copy the MTA secondary IP address under
Cluster Volume IP Address as well, because they are the same.
Under Item 8: WebAccess Agent Network Information, transfer the WebAccess Agent secondary IP
address (the same as for its MTA) and the cluster-unique WebAccess Agent port number from the
WebAccess section of the IP Address Worksheet to the WebAccess Clustering Worksheet.
5.2.5 Deciding Where to Install the WebAccess Agent and Its MTA
As with the MTA and the POA, you can choose to install the WebAccess Agent and its MTA to the
sys:\system
directory of each node or to a
vol:\system
directory on the WebAccess Agent
volume. For a discussion of these alternatives, see “Deciding Where to Install the Agent Software”
on page 31, which describes the issues in the context of planning MTA and POA installations. If you
only have one WebAccess Agent for your GroupWise system with several nodes in its failover path,
it is an easy choice.
Implementing WebAccess in a NetWare Cluster 87
Page 88

WEBACCESS CLUSTERING WORKSHEET
Under Item 5: MTA Installation Location and Item 7: WebAccess Agent Installation Location, mark
whether you will install the WebAccess Agent and its MTA to
cluster or to a
startup file will be stored.
vol:\system
directory on the WebAccess Agent volume. Also specify where the MTA
sys:\system
on each node in the
5.2.6 Deciding Whether to Run the WebAccess Agent and Its MTA in Protected Memory
As with the MTA and the POA, you can choose whether to run the WebAccess Agent in protected
memory. For a review of the benefits of protected memory, see “Deciding Whether to Run the
Agents in Protected Memory” on page 34, which describes the issues in the context of planning
MTA and POA installations.
You might think that protected memory is not necessary if you have only one WebAccess Agent for
your GroupWise system because it could never fail over to a node where another WebAccess Agent
was running. However, because the WebAccess Agent in a cluster is installed into its own domain
with its own MTA, this MTA could fail over to a node where another MTA was already running.
Therefore, it is safest to load the WebAccess Agent and its MTA into protected memory. Load each
agent into its own memory space and mark each memory space as restartable.
novdocx (en) 22 June 2009
WEBACCESS CLUSTERING WORKSHEET
Under Item 8: Load WebAccess Agent and Its MTA in Protected Memory?, mark whether you need to
run the WebAccess Agent and its MTA in protected memory. If you do, provide a protected memory
address space name for each agent.
5.2.7 Planning the MTA Installation
Follow the instructions in “Planning the NetWare Agent Installation” on page 34, then return to this
point. After you follow the instructions, you will have a filled-out NetWare Agent Worksheet to use
when you install the MTA.
IMPORTANT: Do not install the NetWare MTA until you are instructed to do so in Section 5.3,
“Setting Up WebAccess in a Cluster,” on page 89.
5.2.8 Planning the WebAccess Installation
Aside from the cluster-specific issues discussed in the preceding sections, the considerations
involved in planning to install WebAccess are the same in a clustering environment as for any other
environment. Review “Planning GroupWise WebAccess”, then print and fill out the “GroupWise
WebAccess Installation Summary Sheets” in “Installing GroupWise WebAccess” in the GroupWise
8 Installation Guide. When you set up WebAccess in a cluster, you install the WebAccess Agent and
the WebAccess Application in two separate steps:
“Planning the WebAccess Agent Installation” on page 89
“Planning the WebAccess Application Installation” on page 89
88 GroupWise 8 Interoperability Guide
Page 89

IMPORTANT: Do not install the WebAccess software until you are instructed to do so in
Section 5.3, “Setting Up WebAccess in a Cluster,” on page 89.
Planning the WebAccess Agent Installation
For the WebAccess Agent, fill out items 2 through 12 on the GroupWise WebAccess Installation
Worksheet, taking into account the following cluster-specific issues:
WEBACCESS INSTALLATION WORKSHEET
Under Server Information: Installation Path, take into account your decision recorded on the
WebAccess Clustering Worksheet (Item 7: WebAccess Agent Installation Location).
Under Server Address, transfer the IP address and port number from the WebAccess Clustering
Worksheet (Item 8: WebAccess Agent Network Information) filled out in “Planning a Secondary IP
Address and Cluster-Unique Port Numbers for the WebAccess Agent and Its MTA” on page 87.
Under Server Address: Configure the WebAccess Agent for Clustering, mark Yes. This causes the
WebAccess Installation program to customize the WebAccess files for clustering.
novdocx (en) 22 June 2009
Under Gateway Directory: Domain Directory Path, transfer the domain directory from the Domain
Worksheet you filled out in “Planning a New Domain for the WebAccess Agent” on page 86.
Planning the WebAccess Application Installation
The WebAccess Application can be installed on a clustered or non-clustered Web server. How to set
up and manage a clustered Web server is beyond the scope of the GroupWise documentation. For
WebAccess Application planning information, see “Determining the WebAccess and WebPublisher
Applications’ Configuration” in “Installing GroupWise WebAccess” in the GroupWise 8
Installation Guide.
5.3 Setting Up WebAccess in a Cluster
You should already have reviewed Section 5.2, “Planning WebAccess in a Cluster,” on page 85 and
filled out the Section 5.5, “WebAccess Clustering Worksheet,” on page 99. You are now ready to
complete the following tasks to set up the WebAccess Agent in a clustering environment:
Section 5.3.1, “Cluster-Enabling a Shared Volume for Use with the WebAccess Agent,” on
page 89
Section 5.3.2, “Creating a Domain for the WebAccess Agent,” on page 90
Section 5.3.3, “Installing the MTA for the WebAccess Agent Domain,” on page 90
Section 5.3.4, “Installing and Configuring the WebAccess Agent in a Cluster,” on page 90
Section 5.3.5, “Testing Your Clustered WebAccess Installation,” on page 96
5.3.1 Cluster-Enabling a Shared Volume for Use with the WebAccess Agent
1 Complete the cluster-enabling steps in the applicable section of cluster documentation for your
version of NetWare, as listed in Chapter 1, “Introduction to GroupWise 8 and Novell Cluster
Services on NetWare,” on page 19.
Implementing WebAccess in a NetWare Cluster 89
Page 90

The WebAccess Clustering Worksheet provides the volume to cluster-enable, the clusterenabled volume IP address, and the failover path for the WebAccess volume.
For a review of the new Novell eDirectory
shared volume, see Section 2.6, “Deciding Whether to Cluster-Enable the Shared Volumes
Used by GroupWise,” on page 25.
If you have installed the latest version of ConsoleOne® and the Novell Cluster Services snapin, you can rename the cluster-related objects in case your DNS name server cannot resolve
object names that include the underscore (_) character.
2 To ensure successful short name resolution, add entries for the WebAccess Agent virtual server
to support your preferred methods of short name resolution, as described in “Configuring Short
Name Resolution” on page 42.
3 Continue with Creating a Domain for the WebAccess Agent.
TM
objects that are created when you cluster-enable a
5.3.2 Creating a Domain for the WebAccess Agent
The WebAccess Agent domain will be a secondary domain. To create it, follow the instructions in
Section 3.3, “Creating a New Secondary Domain in a Cluster,” on page 45, taking your information
from the WebAccess Clustering Worksheet, rather than the System Clustering Worksheet, then
return to this point.
novdocx (en) 22 June 2009
Do not create any post offices in the WebAccess Agent domain.
Continue with Installing the MTA for the WebAccess Agent Domain.
5.3.3 Installing the MTA for the WebAccess Agent Domain
The MTA for the WebAccess Agent domain can be installed just like any other MTA in your
clustered GroupWise system. Follow the instructions in “Installing the Agent Software in a Cluster”
on page 48, then return to this point.
You do not need to edit the MTA startup file. You do not need to modify the Volume Resource
properties until after you have installed the WebAccess Agent.
Continue with Installing and Configuring the WebAccess Agent in a Cluster.
5.3.4 Installing and Configuring the WebAccess Agent in a Cluster
After you have created a domain for the WebAccess Agent and installed the MTA for that domain,
you are ready to install and configure the WebAccess Agent.
“Installing the WebAccess Agent Software in a Cluster” on page 91
“Configuring the WebAccess Agent Volume Resource to Load and Unload the WebAccess
Agent and Its MTA” on page 92
90 GroupWise 8 Interoperability Guide
Page 91

Installing the WebAccess Agent Software in a Cluster
The WebAccess Agent is the component of your WebAccess installation that accesses post offices
and libraries to retrieve information for WebAccess client users.
1 Map a drive to the WebAccess Agent volume (WebAccess Clustering Worksheet item 1)
where the WebAccess domain is located.
The WebAccess Agent volume name will be cluster_volume. For assistance with mapping a
drive to a cluster-enabled volume, see “Configuring Short Name Resolution” on page 42.
2 If you selected
vol:\system
installation location (WebAccess Clustering Worksheet item 7), create the
on WebAccess Agent volume as the WebAccess Agent
vol:\system
directory on the WebAccess Agent volume accessed in Step 1.
or
novdocx (en) 22 June 2009
if you selected
sys:\system
agent to first, then map a drive to its
on each node, decide which node you will install the WebAccess
sys:\system
directory.
3 Start the WebAccess Installation program and install the NetWare WebAccess Agent,
following Step 1 through Step 5 provided in “Installing the WebAccess Agent” in “Installing
GroupWise WebAccess” in the GroupWise 8 Installation Guide. Keep in mind the following
cluster-specific details:
In the Components dialog box, select only GroupWise WebAccess Agent.
Do not install the WebAccess Application at this time.
Use items 2 through 12 on the GroupWise WebAccess Installation Worksheet that you
filled out in “Planning the WebAccess Installation” on page 88 to fill in the fields during
the WebAccess Agent installation process.
In the Network Address dialog box, select Configure GroupWise Agents for Clustering.
In the Installation Path dialog box, be sure to browse through the drive you mapped to the
location you chose in Step 2 above.
In the Gateway Directory dialog box, be sure to browse to the domain directory through
the drive you mapped in Step 1 above.
In the Start Applications dialog box, deselect Start the GroupWise WebAccess Agent.
The WebAccess Installation program creates the
load
and
which include the
unload
commands for the WebAccess Agent. You use this
strtweb.ncf
and
stopweb.ncf
information later when you create the load and unload scripts for the WebAccess Volume
Resource object.
files,
4 If you need to install the WebAccess Agent to
sys:\system
on multiple nodes in the cluster,
repeat Step 4, mapping new drives as needed.
5 Make sure you have completed all the WebAccess Agent tasks described in “NetWare and
Windows: Setting Up GroupWise WebAccess” in “Installing GroupWise WebAccess” in the
GroupWise 8 Installation Guide, but do not start the WebAccess Agent at this time.
6 Continue with Configuring the WebAccess Agent Volume Resource to Load and Unload the
WebAccess Agent and Its MTA.
Implementing WebAccess in a NetWare Cluster 91
Page 92

Configuring the WebAccess Agent Volume Resource to Load and Unload the
WebAccess Agent and Its MTA
novdocx (en) 22 June 2009
The properties of the Volume Resource object define how the WebAccess Agent volume functions
TM
within the cluster, how NLM
programs are loaded and unloaded, and how failover and failback
situations are handled. Complete the following tasks for the WebAccess Agent volume:
“Modifying the Volume Resource Load Script for the WebAccess Agent” on page 92
“Modifying the Volume Resource Unload Script for the WebAccess Agent” on page 94
“Setting the Failover Path and Policies for the WebAccess Agent” on page 95
“Installing and Configuring the WebAccess Application in a Cluster” on page 96
Modifying the Volume Resource Load Script for the WebAccess Agent
The volume resource load script executes whenever the WebAccess Agent volume comes online.
To set up the load script:
1 In ConsoleOne
®
, browse to and select the Cluster object.
If necessary, click View > Conso le View to display its contents.
2 Right-click the Volume Resource object (volume_SERVER), then click Properties > Load to
display the default volume resource load script for the WebAccess Agent volume.
The next step assumes that this is the first time you have edited the load script. If other
GroupWise agents are already running from this volume, some of the modifications have
already been made.
3 Make the following changes to the default load script:
Remove the
trustmig
command. It is not necessary to migrate trustees for the
WebAccess Agent volume. Removing this line helps the load script to execute faster.
If you selected
(WebAccess Clustering Worksheet items 5 and 7), add a
the new
search add volume:\system
If you selected
vol:\system
vol:\system
sys:\system
on WebAccess Agent volume as the installation location
search add
command to add
directory to the server search path.
on each node as the installation location (WebAccess
Clustering Worksheet items 5 and 7) but you are storing the MTA startup file on the
WebAccess Agent volume, add that location to the server search path.
If you marked No under Load WebAccess Agent and Its MTA in Protected Memory?
(WebAccess Clustering Worksheet item 9), add the following abend recovery options:
set auto restart after abend = 2
set auto restart after abend delay time = 0
set auto restart down timeout = 60
set developer option = off
These settings provide the best possible handling of GroupWise databases in the event that
an abend should occur within the cluster.
Transfer the MTA
vol:\system
into the load script page. Then delete or rename the
load
command from the
grpwise.ncf
file located in the
directory into the load script. Use Ctrl+C and Ctrl+V to copy and paste text
grpwise.ncf
file to avoid future
confusion.
load volume:\system\gwmta.nlm @domain.mta
92 GroupWise 8 Interoperability Guide
Page 93

Add a delay so that the MTA is fully loaded before the WebAccess Agent starts to load:
load delay
delay 10
The length of the delay varies from system to system; ten seconds is a good starting place.
novdocx (en) 22 June 2009
Transfer the WebAccess Agent
vol:\system
directory into the load script. Use Ctrl+C and Ctrl+V to copy and paste text
load
command from the
strtweb.ncf
file located in the
into the load script page.
load volume:\system\gwinter.nlm
/ph=volume:\domain\wpgate\webac80a
/user=username /PASSWORD=password
If you marked Yes under Load WebAccess Agent and Its MTA in Protected Memory?
(WebAccess Clustering Worksheet item 9), add the
load
commands to specify the protected address space where the WebAccess Agent and
its MTA will run. Add a
load address space=addr_space_name
volume:\system\gwmta.nlm @domain.mta
load address space=addr_space_name
volume:\system\gwinter.nlm
/ph=volume:\domain\wpgate\webac80a
/user=username /password=password
protection restart addr_space_name
protection restart
address space
command for the address space name.
parameter to the
The result would look similar to the following example:
NOTE: The
running in protected memory. The address space parameters are needed in the
set
commands are needed only when the MTA and the WebAccess Agent are not
load
commands
only when the MTA and the WebAccess Agent are running in protected memory.
4 Click Apply to save the load script.
5 If necessary, click OK to confirm that you must offline and then online the volume resource in
order for the changes to take effect.
6 Continue with Modifying the Volume Resource Unload Script for the WebAccess Agent.
Implementing WebAccess in a NetWare Cluster 93
Page 94

Modifying the Volume Resource Unload Script for the WebAccess Agent
The volume resource unload script executes whenever the WebAccess Agent volume goes offline.
Programs should be unloaded in the reverse order of how they were loaded. This ensures that
supporting programs are not unloaded before programs that rely on them in order to function
properly.
To set up the unload script:
1 In ConsoleOne, in the properties pages for the Volume Resource object (volume_SERVER),
click Unload to display the default volume resource unload script.
The next step assumes that this is the first time you have edited the unload script. If other
GroupWise agents are already running from this volume, some of the modifications have
already been made.
2 Make the following changes to the default unload script:
If you marked Yes under Load WebAccess Agent and Its MTA in Protected Memory?
(WebAccess Clustering Worksheet item 9), add an
and an
unload kill address space
command to ensure that the address space is
unload address space
command
completely cleaned up.
unload address space=addr_space_name
unload kill address space=addr_space_name
If your system seems to be trying to kill the address space before the WebAccess Agent
and its MTA have been completely unloaded, resulting in the agents hanging in the
unloading state, set a delay of several seconds before issuing the
command to allow the WebAccess Agent and its MTA adequate time to unload
space
unload kill address
completely. The length of the delay varies from system to system; ten seconds is a good
starting place.
unload address space=addr_space_name
delay 10
unload kill address space=addr_space_name
If you marked No under Load WebAccess Agent and Its MTA in Protected Memory?
(WebAccess Clustering Worksheet items 9), create an
load
command that you placed in the load script.
unload gwinter.nlm
unload gwmta.nlm
Remove the
trustmig
command just like you did in the load script.
unload
command parallel to each
novdocx (en) 22 June 2009
The result would look similar to the following example:
94 GroupWise 8 Interoperability Guide
Page 95

3 Click Apply to save the unload script.
4 If necessary, click OK to confirm that you must offline and then online the volume resource in
order for the changes to take effect.
5 Continue with Setting the Failover Path and Policies for the WebAccess Agent.
novdocx (en) 22 June 2009
Setting the Failover Path and Policies for the WebAccess Agent
To modify the failover path and policies for the WebAccess Agent volume resource:
1 In ConsoleOne, in the properties pages for the Volume Resource object (volume_SERVER),
click Nodes to display the default failover path for the WebAccess Agent volume resource.
2 Arrange the nodes in the cluster into the desired failover path for the WebAccess Agent volume
(WebAccess Clustering Worksheet item 4).
3 Click Apply to save the failover path.
4 Click Policies to display the default start, failover, and failback policies.
Implementing WebAccess in a NetWare Cluster 95
Page 96

The default policy settings are often appropriate. By default, a volume resource:
Fails over automatically if the node it is running on fails
Starts automatically on the next node in its failover path
Continues running at its failover location, even after its most preferred node is again
available
If you are considering changing these defaults, see the section about failover and failback mode
modes in the clustering documentation for your version of NetWare, as listed in Chapter 1,
“Introduction to GroupWise 8 and Novell Cluster Services on NetWare,” on page 19.
5 Click OK when you are finished editing the WebAccess Agent volume resource properties.
6 Continue with “Installing and Configuring the WebAccess Agent in a Cluster” on page 90.
novdocx (en) 22 June 2009
Installing and Configuring the WebAccess Application in a Cluster
If you have clustered your Web server, you must install the WebAccess Application on each node
where the Web server is installed, as described in “Installing the WebAccess Application and
WebPublisher Application” in “Installing GroupWise WebAccess” in the GroupWise 8 Installation
Guide.
5.3.5 Testing Your Clustered WebAccess Installation
Remember that the WebAccess Agent volume resource and the WebAccess Application on your
Web server are separate and could fail over to different nodes at different times.
To thoroughly test your WebAccess installation:
1 Make sure the initial combination of WebAccess Agent volume resource and the WebAccess
Application installed on your Web server is functioning properly.
2 Migrate the WebAccess Agent volume resource to each node on its failover path, making sure
it functions with your Web server.
3 If your Web server is clustered, migrate the Web server cluster resource to a different node,
migrate the WebAccess Agent volume resource to each node in the Web server cluster resource
failover path, then make sure each combination works.
4 Repeat Step 3 for each Web server cluster resource.
96 GroupWise 8 Interoperability Guide
Page 97

5.4 Managing WebAccess in a Cluster
After you have installed WebAccess in a cluster, you should consider some long-term management
issues.
Section 5.4.1, “Updating GroupWise Objects with Cluster-Specific Descriptions,” on page 97
Section 5.4.2, “Knowing What to Expect in WebAccess Failover Situations,” on page 98
Section 5.4.3, “Updating the WebAccess Agent Configuration File (commgr.cfg),” on page 98
5.4.1 Updating GroupWise Objects with Cluster-Specific Descriptions
After installing WebAccess in your clustered GroupWise system, while the cluster-specific
information is fresh in your mind, you should record that cluster-specific information as part of the
GroupWise objects in ConsoleOne so that you can easily refer to it later. Be sure to update the
information recorded in the GroupWise objects if the configuration of your system changes.
“Recording Cluster-Specific Information about the WebAccess Agent Domain and Its MTA”
on page 97
novdocx (en) 22 June 2009
“Recording Cluster-Specific Information about the WebAccess Agent” on page 98
Recording Cluster-Specific Information about the WebAccess Agent Domain and Its
MTA
To permanently record important cluster-specific information for the WebAccess Agent domain:
1 In ConsoleOne, browse to and right-click the Domain object, then click Properties.
2 In the Description field of the WebAccess Agent domain Identification page, provide a cluster-
specific description of the WebAccess Agent domain, including the secondary IP address of its
cluster-enabled volume and the cluster-unique port numbers used by its MTA.
You might also want to include cluster-specific information about the WebAccess Application,
such as the secondary IP address of the Web server cluster resource where the WebAccess
Application is installed.
3 Click OK to save the WebAccess Agent domain description.
4 Select the WebAccess Agent Domain object to display its contents.
5 Right-click the MTA object, then click Properties.
6 In the Description field of the MTA Identification page, record the secondary IP address of the
cluster-enabled WebAccess Agent domain volume and the cluster-unique port numbers used by
the MTA.
This information appears on the MTA console, no matter which node in the cluster it is
currently running on.
7 Click OK to save the MTA description.
8 Continue with Recording Cluster-Specific Information about the Internet Agent.
Implementing WebAccess in a NetWare Cluster 97
Page 98

Recording Cluster-Specific Information about the WebAccess Agent
With the contents of the WebAccess Agent domain still displayed:
1 Right-click the WEBAC80A object, then click Properties.
2 Click GroupWise, then click Identification.
3 In the Description field, record the secondary IP address of the cluster-enabled WebAccess
Agent domain volume and the cluster-unique port numbers used by the WebAccess Agent.
This information appears on the WebAccess Agent console, no matter which node in the cluster
it is currently running on.
4 Click OK to save the WebAccess Agent information.
5 Continue with Knowing What to Expect in MTA and POA Failover Situations.
5.4.2 Knowing What to Expect in WebAccess Failover Situations
The failover behavior of the MTA for the WebAccess Agent domain is the same as for an MTA in a
regular domain. See “Knowing What to Expect in MTA and POA Failover Situations” on page 61.
novdocx (en) 22 June 2009
The WebAccess Application caches users’ credentials on the node where it is running. Therefore, if
that node fails, or if the WebAccess Application migrates to a different node, the cached credentials
are lost. Consequently, the user needs to restart the WebAccess client in order to re-authenticate and
re-establish the credentials.
If the WebAccess Agent fails over or migrates, the user receives an error message that the
WebAccess Agent is no longer available. However, after the WebAccess Agent starts in its new
location, the WebAccess Application passes the cached user credentials to the WebAccess Agent
and the user reconnects automatically without having to re-authenticate.
As with the MTA and the POA, migration of the WebAccess Agent takes longer than failover.
However, the WebAccess Agent restarts quickly so that users are able to reconnect quickly.
5.4.3 Updating the WebAccess Agent Configuration File (commgr.cfg)
As part of installing WebAccess, the WebAccess Agent configuration file (
in the following subdirectory:
domain\wpgate\webac80a
It is also automatically copied to the following Web server subdirectory:
sys:\novell\webaccess
commgr.cfg
) is created
If you change WebAccess agent configuration information (for example, if you change its ip
address), the information is changed in the following file:
domain\wpgate\webac80a\commgr.cfg
because the domain is on a cluster-enabled volume, and it is changed in the following file:
sys:\novell\webaccess\commgr.cfg
98 GroupWise 8 Interoperability Guide
Page 99

on the node where the WebAccess Application is currently running. However, the other nodes on the
WebAccess Application failover path are not currently available for update. therefore, you must
manually copy the updated
commgr.cfg
file to the
sys:\novell\webaccess
subdirectory on each
node in the WebAccess Application failover path.
5.5 WebAccess Clustering Worksheet
Item Explanation
novdocx (en) 22 June 2009
1) Shared Volume for
WebAccess Agent:
Cluster Enabled?
Yes (highly recommended)
Cluster volume IP address
No
2) WebAccess Agent
Domain Name:
Domain Database Location:
3) WebAccess Agent
Failover Path:
4) MTA Installation Location:
vol:\system
WebAccess Agent volume
sys:\system
node
Consolidate multiple MTA
startup files on WebAccess
Agent volume?
on
on each
Specify the name (cluster_volume) of the shared volume where the
WebAccess Agent domain will be created.
For cluster-enabling, specify the IP addresses of the virtual server
(volume_.cluster) to which the cluster-enabled volume is tied.
For more information, see “Deciding Whether to Cluster-Enable the
WebAccess Agent Volume” on page 86.
Specify a unique name for the WebAccess Agent domain. Specify the
directory on the WebAccess Agent volume where you want to create
the new domain.
For more information, see “Planning a New Domain for the
WebAccess Agent” on page 86.
List other nodes in the cluster where the WebAccess Agent and its
MTA could fail over.
For more information, see “Determining an Appropriate Failover Path
for the WebAccess Agent Volume” on page 87.
Mark the location where you will install the MTA software.
If necessary, specify the location where you will consolidate multiple
MTA startup files on a WebAccess Agent volume.
For more information, see “Deciding Where to Install the WebAccess
Agent and Its MTA” on page 87.
5) MTA Network Information:
MTA IP address
MTA message transfer port
MTA live remote port
MTA HTTP port
6) WebAccess Agent
Installation Location:
vol:\system
WebAccess Agent volume
sys:\system
node
on the
on each
Gather the MTA network address information from the WebAccess
section of the “IP Address Worksheet” on page 37.
For more information, see “Planning a Secondary IP Address and
Cluster-Unique Port Numbers for the WebAccess Agent and Its MTA”
on page 87.
Mark the location where you will install the WebAccess Agent
software.
For more information, see “Deciding Where to Install the WebAccess
Agent and Its MTA” on page 87.
Implementing WebAccess in a NetWare Cluster 99
Page 100

Item Explanation
novdocx (en) 22 June 2009
7) WebAccess Agent
Network Information:
WebAccess Agent IP
address
WebAccess Agent HTTP
port
8) Load WebAccess Agent and
Its MTA in Protected Memory?
Gather the WebAccess Agent network address information from the
WebAccess section of the “IP Address Worksheet” on page 37.
For more information, see “Planning a Secondary IP Address and
Cluster-Unique Port Numbers for the WebAccess Agent and Its MTA”
on page 87.
Mark whether you need to run the WebAccess Agent and its MTA in
protected memory. If so, specify a unique address space for each
agent.
No
Yes
Protected address space names:
For more information, see “Deciding Whether to Run the WebAccess
Agent and Its MTA in Protected Memory” on page 88.
MTA:
WebAccess:
5.6 WebAccess Quick Checklist
Plan the new clustered WebAccess installation, including the new domain required to house the
WebAccess Agent in a clustering environment.
See Section 5.2, “Planning WebAccess in a Cluster,” on page 85.
Cluster-enable the volume where the WebAccess Agent domain will reside.
See Section 5.3.1, “Cluster-Enabling a Shared Volume for Use with the WebAccess Agent,” on
page 89.
Create the new WebAccess Agent domain.
See Section 5.3.2, “Creating a Domain for the WebAccess Agent,” on page 90.
Set up the MTA for the new WebAccess Agent domain.
See Section 5.3.3, “Installing the MTA for the WebAccess Agent Domain,” on page 90.
Install the WebAccess Agent.
See Section 5.3.4, “Installing and Configuring the WebAccess Agent in a Cluster,” on page 90.
Modify the WebAccess Agent volume resource load script:
Remove the
Add the
trustmig
search add
If you will not run the MTA and the WebAccess Agent in protected memory, add the
auto restart
Add the
delay
command
commands and the
load
commands for the MTA and the WebAccess Agent, separating them with a
If you will run the MTA and the WebAccess Agent in protected memory, add the
parameter to the
space
the address space
See “Modifying the Volume Resource Load Script for the WebAccess Agent” on page 92.
100 GroupWise 8 Interoperability Guide
command
command (optional)
set developer option = off
load
commands and add a
command
protection restart
set
address
command for
 Loading...