


I
System
Chapter 1, “GroupWise System Administration,” on page 39
Chapter 2, “ConsoleOne Administration Tool,” on page 41
Chapter 3, “GroupWise View,” on page 47
Chapter 4, “GroupWise System Operations,” on page 55
Chapter 5, “GroupWise Utilities,” on page 79
Chapter 6, “GroupWise Address Book,” on page 91
Chapter 7, “Multilingual GroupWise Systems,” on page 111
novdocx (en) 22 June 2009
SystemI37

novdocx (en) 22 June 2009
38 GroupWise 8 Administration Guide

1
GroupWise System Administration
As a GroupWise® system administrator, it is your responsibility to keep your GroupWise system
running smoothly for your GroupWise users. This GroupWise 8 Administration Guide provides a
wealth of information to help you accomplish this task. This System section provides an overview of
the GroupWise administration tool, ConsoleOne
tasks that affect your GroupWise system as a whole and provides links to more specialized
instructions.
The following sections of the Administration Guide detail the eDirectory
GroupWise information is stored. Instructions are provided for creating and managing all
GroupWise object types.
“Domains” on page 117
“Post Offices” on page 161
“Users” on page 211
“Resources” on page 259
®
, and its capabilities. It summarizes administrative
TM
objects where
novdocx (en) 22 June 2009
1
“Distribution Lists, Groups, and Organizational Roles” on page 275
The following sections of the Administration Guide detail the GroupWise software components that
make your GroupWise system run. Instructions are provided for configuring, monitoring, and
optimizing each software component.
“Post Office Agent” on page 473
“Message Transfer Agent” on page 617
“Internet Agent” on page 715
“WebAccess” on page 875
“Monitor” on page 1001
“Calendar Publishing Host” on page 983
The following additional sections of the Administration Guide provide supporting details and
background information:
“Libraries and Documents” on page 305
“Databases” on page 387
“Client” on page 1073
“Security Administration” on page 1149
“Security Policies” on page 1203
GroupWise System Administration
39

novdocx (en) 22 June 2009
40 GroupWise 8 Administration Guide

2
ConsoleOne Administration Tool
GroupWise® is administered using ConsoleOne®, a Java*-based tool for managing your network
and its resources. When you create your GroupWise system, GroupWise snap-ins are added to your
ConsoleOne installation and GroupWise objects are created in Novell
manage your GroupWise system, you use ConsoleOne to create additional GroupWise objects,
modify GroupWise object properties, and so on.
IMPORTANT: Because the GroupWise snap-ins to ConsoleOne are required in order to work with
GroupWise objects, you cannot use other network management tools, such as Novell iManager, to
administer your GroupWise system. Also, you should not use older network management tools, such
as NetWare
includes legacy gateways that require such tools to administer the corresponding Gateway objects
and their properties.
Because GroupWise is a cross-platform product, you might have components of your GroupWise
system located on NetWare servers, Linux servers, and Windows* servers. You can run ConsoleOne
on Windows or Linux to manage GroupWise domains and post offices located on any of these
platforms.
®
Administrator, to administer your GroupWise system, unless your GroupWise system
®
eDirectoryTM. As you
novdocx (en) 22 June 2009
2
Section 2.1, “ConsoleOne on Windows,” on page 41
Section 2.2, “ConsoleOne on Linux,” on page 42
Section 2.3, “ConsoleOne in a Multiple-Platform Environment,” on page 43
NOTE: For a GroupWise system on NetWare, you cannot run ConsoleOne to administer
GroupWise at the NetWare server console. The GroupWise Administrator snap-ins to ConsoleOne
do not run in that environment.
2.1 ConsoleOne on Windows
You can run ConsoleOne on Windows on any Windows machine that meets the requirements listed
in “GroupWise Administration Requirements” in the GroupWise 8 Installation Guide.
Section 2.1.1, “Installing ConsoleOne on Windows,” on page 41
Section 2.1.2, “Configuring Your Windows Machine for ConsoleOne,” on page 42
Section 2.1.3, “Starting ConsoleOne on Windows,” on page 42
2.1.1 Installing ConsoleOne on Windows
When you create your initial GroupWise system using the GroupWise Installation program
(
install.exe
ConsoleOne installation on that machine. If necessary, you can install ConsoleOne itself to the
machine where you are running the GroupWise Installation program. You are also given the
opportunity to copy the GroupWise snap-ins to ConsoleOne into a GroupWise software distribution
directory for later use.
) on Windows, the GroupWise snap-ins to ConsoleOne are installed to the
ConsoleOne Administration Tool
41

After you have set up your GroupWise system, you can use the GroupWise Installation program to
install ConsoleOne and the GroupWise snap-ins from the GroupWise 8 DVD or downloaded
GroupWise 8 image, or you can run
distribution directory to additional locations as needed.
admin\install.exe
to install the snap-ins from the software
2.1.2 Configuring Your Windows Machine for ConsoleOne
To ensure GroupWise database integrity across the network:
1 Right-click the Novell Client icon on the tool bar at the bottom of your screen, then click
Novell Client Properties.
2 Click Advanced Settings.
3 Set File Caching to Off.
4 Set File Commit to On.
5 Click OK to save the new Novell Client settings, then reboot the Windows machine to put the
new settings into effect.
novdocx (en) 22 June 2009
2.1.3 Starting ConsoleOne on Windows
When you install ConsoleOne, a ConsoleOne icon is automatically created on your Windows
desktop for starting ConsoleOne.
Before you start ConsoleOne, turn off file caching in the Novell Client to protect database integrity.
1 Right-click the red N in the notification area, then click Novell Client Properties.
2 Click Advanced Settings, select File Caching, then select Off.
3 Click OK to save your change.
2.2 ConsoleOne on Linux
You can run ConsoleOne on Linux on any Linux machine that meets the requirements listed in
“GroupWise Administration Requirements” in the GroupWise 8 Installation Guide.
Section 2.2.1, “Installing ConsoleOne on Linux,” on page 42
Section 2.2.2, “Starting ConsoleOne on Linux,” on page 43
2.2.1 Installing ConsoleOne on Linux
When you create your initial GroupWise system using the GroupWise Installation program
(
install
Novell Open Enterprise Server Linux, you can install ConsoleOne from YaST using Software >
Install and Remove Software. Linux ConsoleOne is also available on the Novell Downloads page
(http://download.novell.com).
) on Linux, ConsoleOne should already be installed before you begin. If you are running
After ConsoleOne is installed, the GroupWise Installation program on Linux installs the GroupWise
snap-ins to ConsoleOne to the ConsoleOne installation on that machine. You are also given the
opportunity to copy the GroupWise Administration RPM into a GroupWise software distribution
directory for later use.
42 GroupWise 8 Administration Guide

After you have set up your GroupWise system, you can use the GroupWise Installation program to
the GroupWise snap-ins from the GroupWise 8 DVD or downloaded GroupWise 8 image, or you can
admin
install the GroupWise Administration RPM from the
directory to install the snap-ins to additional locations as needed.
ConsoleOne and the GroupWise Administrator snap-ins should be installed on each Linux server
where a domain is located. For some administration tasks, ConsoleOne on the primary domain
server needs to have secondary domain servers mounted. Depending on how you organize your
GroupWise administration, you might also want to mount the primary domain server to each
secondary domain server. Administrative messages can flow from one secondary domain to another
through the primary domain.
subdirectory of the software distribution
2.2.2 Starting ConsoleOne on Linux
novdocx (en) 22 June 2009
1 In a terminal window, become root by entering
sux
The
2 Enter the following command:
/usr/ConsoleOne/bin/ConsoleOne
command enables the X Window System*, which is required for running ConsoleOne.
su -
and the
root
password.
2.3 ConsoleOne in a Multiple-Platform Environment
If your GroupWise system includes multiple platforms, you can administer Linux domains from
Windows ConsoleOne or administer NetWare or Windows domains from Linux ConsoleOne.
This section helps you set up the cross-platform connections that enable ConsoleOne to successfully
access GroupWise databases on any platform.
Section 2.3.1, “Using Windows ConsoleOne to Access Domains and Post Offices on Linux,”
on page 43
Section 2.3.2, “Using Linux ConsoleOne to Access Domains and Post Offices on NetWare or
Windows,” on page 44
2.3.1 Using Windows ConsoleOne to Access Domains and Post Offices on Linux
In order for you to be able to use ConsoleOne on Windows to administer GroupWise domains, post
offices, and agents that are located on Linux, the Linux servers where the domains, post offices, and
agents are located must be accessible from Windows.
“Making a Linux Server Visible from Windows” on page 43
“Accessing a Domain or Post Office on Linux from Windows ConsoleOne” on page 44
Making a Linux Server Visible from Windows
To make a Linux server visible from Windows, you need to configure it so that you can map a drive
to it as if it were a Windows server.
ConsoleOne Administration Tool 43

Table 2-1 Creating a Connection from Windows to Linux
Operating System Connection Method
novdocx (en) 22 June 2009
Open Enterprise
Server (OES)
Linux
SUSE Linux
Enterprise Server
(SLES)
Use the NetWare Core ProtocolTM (NCPTM) Server to create an NCP volume on the
Linux server that will be visible from Windows just as a NetWare volume would be.
On the Linux server, become
ncpcon create volume volume_name directory
ncpcon set cross_protocol_locks=1
From a Windows workstation or server where the Novell client is installed, you can
now use the Novell Map Network Drive feature to map a drive to the volume on your
Linux server, and Windows-type file locking is respected by Linux.
For more information about NCP Server, see the NCP Server Administration Guide
for Linux (http://www.novell.com/documentation/oes/ncp_lx/data/
h9izvdye.html#h9izvdye).
Use Samba to create a Windows share on the Linux server that will be visible from
Windows just as a directory on another Windows server would be. For instructions
on setting up a Samba share, see the SUSE Linux Enterprise Server Administration
and Installation Guide (http://www.novell.com/documentation/sles10/pdfdoc/
sles_admin/sles_admin.pdf).
From a Windows workstation or server, you can now use the Windows Map
Network Drive feature to map a drive to the directory on your Linux server.
root
, then enter the following commands:
Accessing a Domain or Post Office on Linux from Windows ConsoleOne
After you have made the Linux server visible from Windows:
1 Map a drive to the domain directory on the Linux server.
2 In Windows ConsoleOne, click Tools > GroupWise System Operations > Select Domain.
3 Browse to and select the domain directory, then click OK.
You can now use Windows ConsoleOne to administer all GroupWise objects that belong to the
domain that is located on Linux.
2.3.2 Using Linux ConsoleOne to Access Domains and Post Offices on NetWare or Windows
In order for you to be able to use ConsoleOne on Linux to administer GroupWise domains, post
offices, and agents that are located on NetWare or Windows, the NetWare or Windows servers where
the domains, post offices, and agents are located must be accessible from Linux.
“Making a NetWare or Windows Server Visible from Linux” on page 44
“Accessing a Domain or Post Office on NetWare or Windows from Linux ConsoleOne” on
page 45
Making a NetWare or Windows Server Visible from Linux
To make a NetWare or Windows server visible from Linux, you mount the directory you need to
access as a Linux file system.
44 GroupWise 8 Administration Guide

Table 2-2 Creating a Connection from Linux to NetWare or Windows
novdocx (en) 22 June 2009
Operating
System
NetWare:
Connection Method
mount -t ncpfs NetWare_server_full_DNS_name_or_IP_address
/Linux_mount_location/mount_point_directory
-o user=fully_qualified_username
-o ipserver=NetWare_server_full_DNS_name
A NetWare server full DNS name should have the format of mail2.provo.corporate.com. A
fully qualified username should have the format of Admin.Users.Corporate. A typical Linux
mount location would be /mnt.
You can also use Novell Remote Manager (NRM) to create the NCP mount.
Windows:
mount -t smbfs //Windows_server_name_or_IP_address/sharename
/Linux_mount_location/mount_point_directory
-o username=Windows_username
To use this command, the WINS protocol must be functioning properly on your network. The
specified Windows user must have sufficient rights to access the post office directory.
Accessing a Domain or Post Office on NetWare or Windows from Linux ConsoleOne
After you have made the NetWare or Windows server visible from Linux:
1 Mount the domain directory to the Linux server.
2 In Linux ConsoleOne, authenticate to the eDirectory
TM
tree where the Domain object is located.
3 Click Tools > GroupWise System Operations > Select Domain.
4 Browse to and select the domain directory, then click OK.
You can now use Linux ConsoleOne to administer all GroupWise objects that belong to the domain
that is located on NetWare or Windows.
ConsoleOne Administration Tool 45

novdocx (en) 22 June 2009
46 GroupWise 8 Administration Guide
3
GroupWise View
When administering GroupWise® in ConsoleOne®, you can use the standard Novell® eDirectoryTM
View or you can use the GroupWise View. The following sections discuss the GroupWise View and
how to use it:
Section 3.1, “eDirectory View vs. GroupWise View,” on page 47
Section 3.2, “GroupWise Object Icons,” on page 48
Section 3.3, “Customizing the GroupWise View,” on page 50
Section 3.4, “Searching in the GroupWise View,” on page 52
Section 3.5, “Performing Administrative Tasks from the GroupWise View,” on page 52
NOTE: The ConsoleOne illustrations used in the guide show ConsoleOne on Windows.
ConsoleOne on Linux appears different but provides substantially the same functionality.
novdocx (en) 22 June 2009
3
3.1 eDirectory View vs. GroupWise View
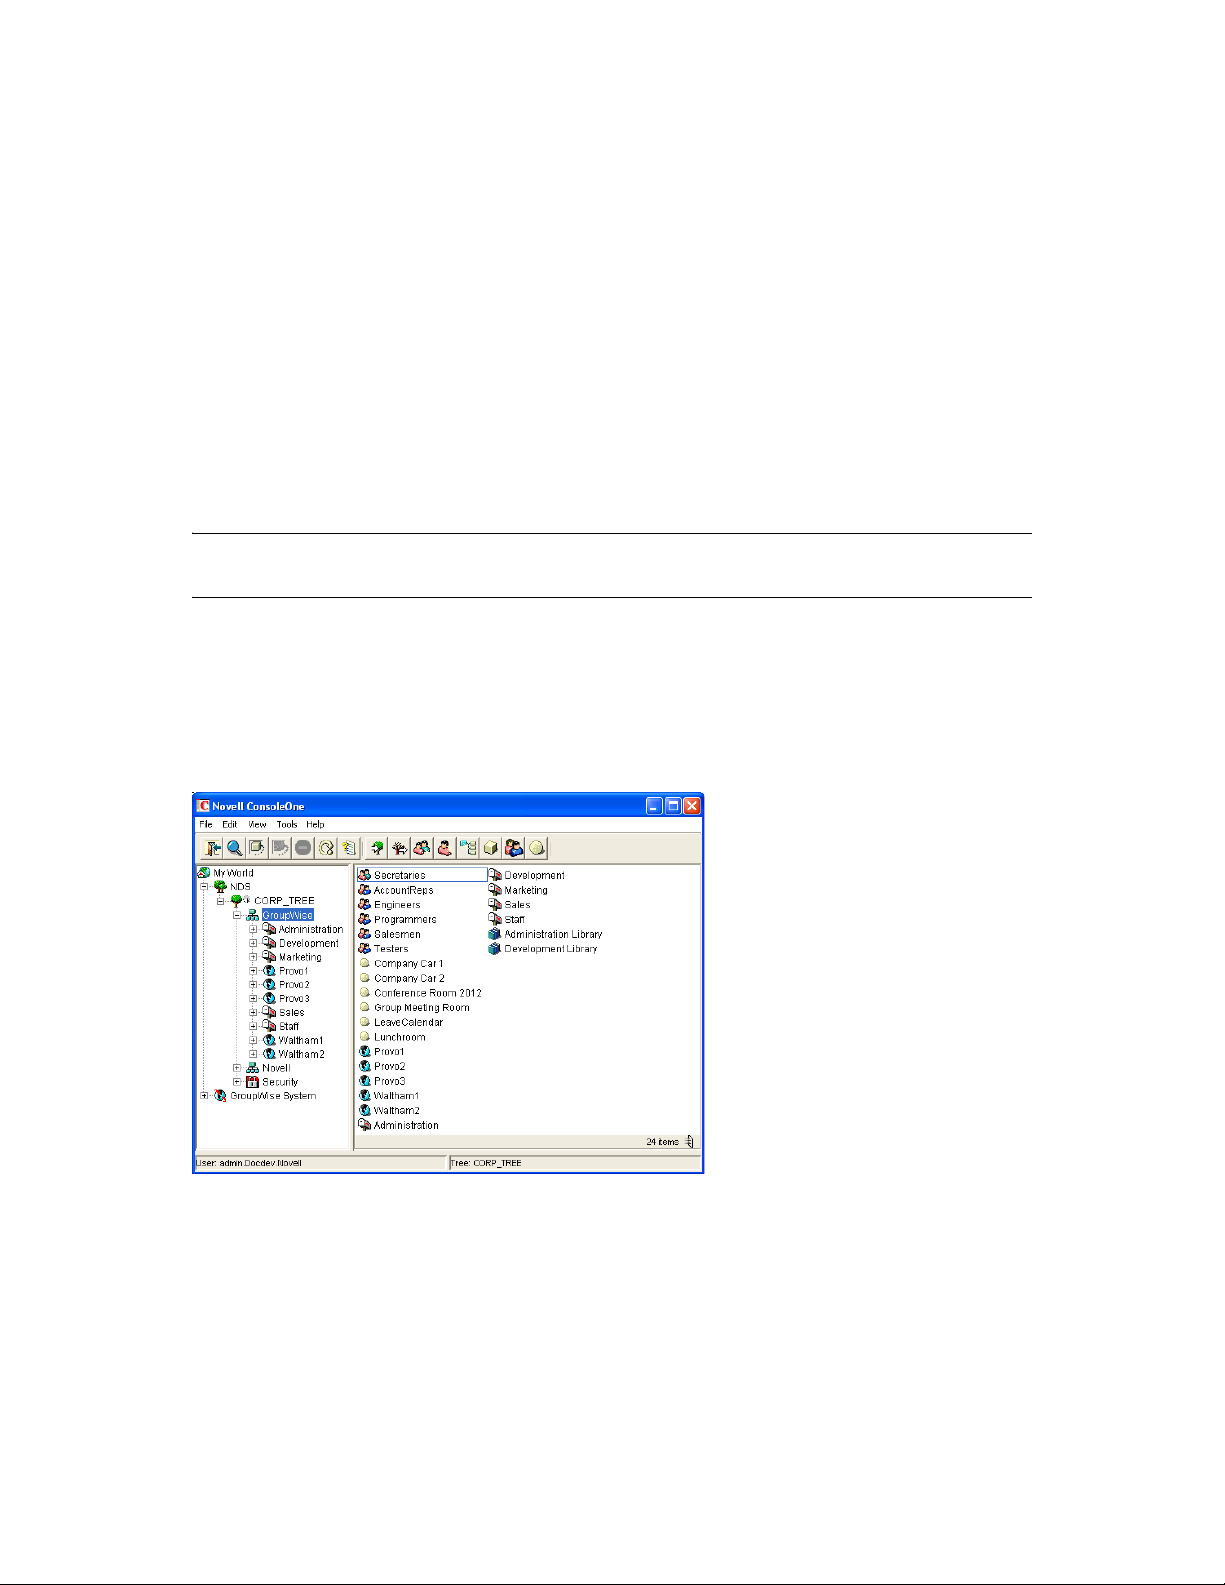
The eDirectory View displays the GroupWise objects in their contexts in the eDirectory tree, as
shown in the following example.
Figure 3-1 eDirectory View
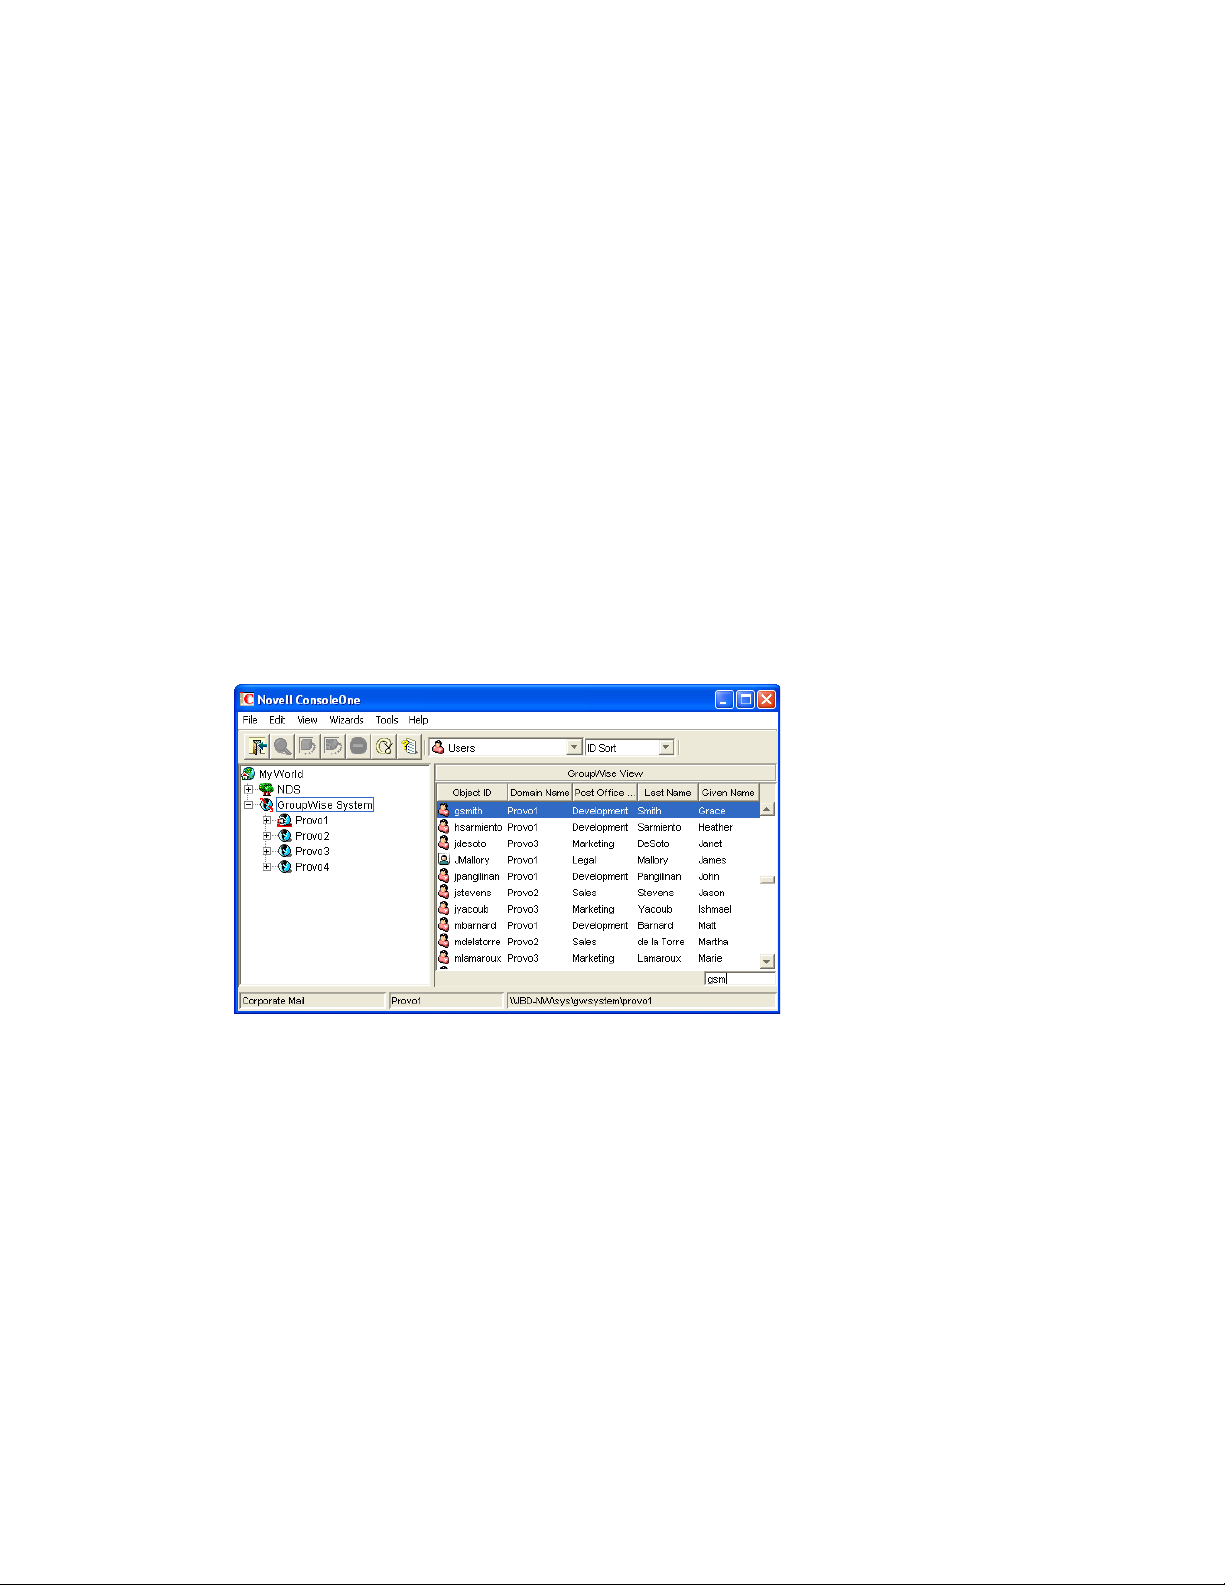
The GroupWise View filters out all non-GroupWise objects and shows how the GroupWise objects
relate to each other in the GroupWise system, as shown in the following example.
GroupWise View
47
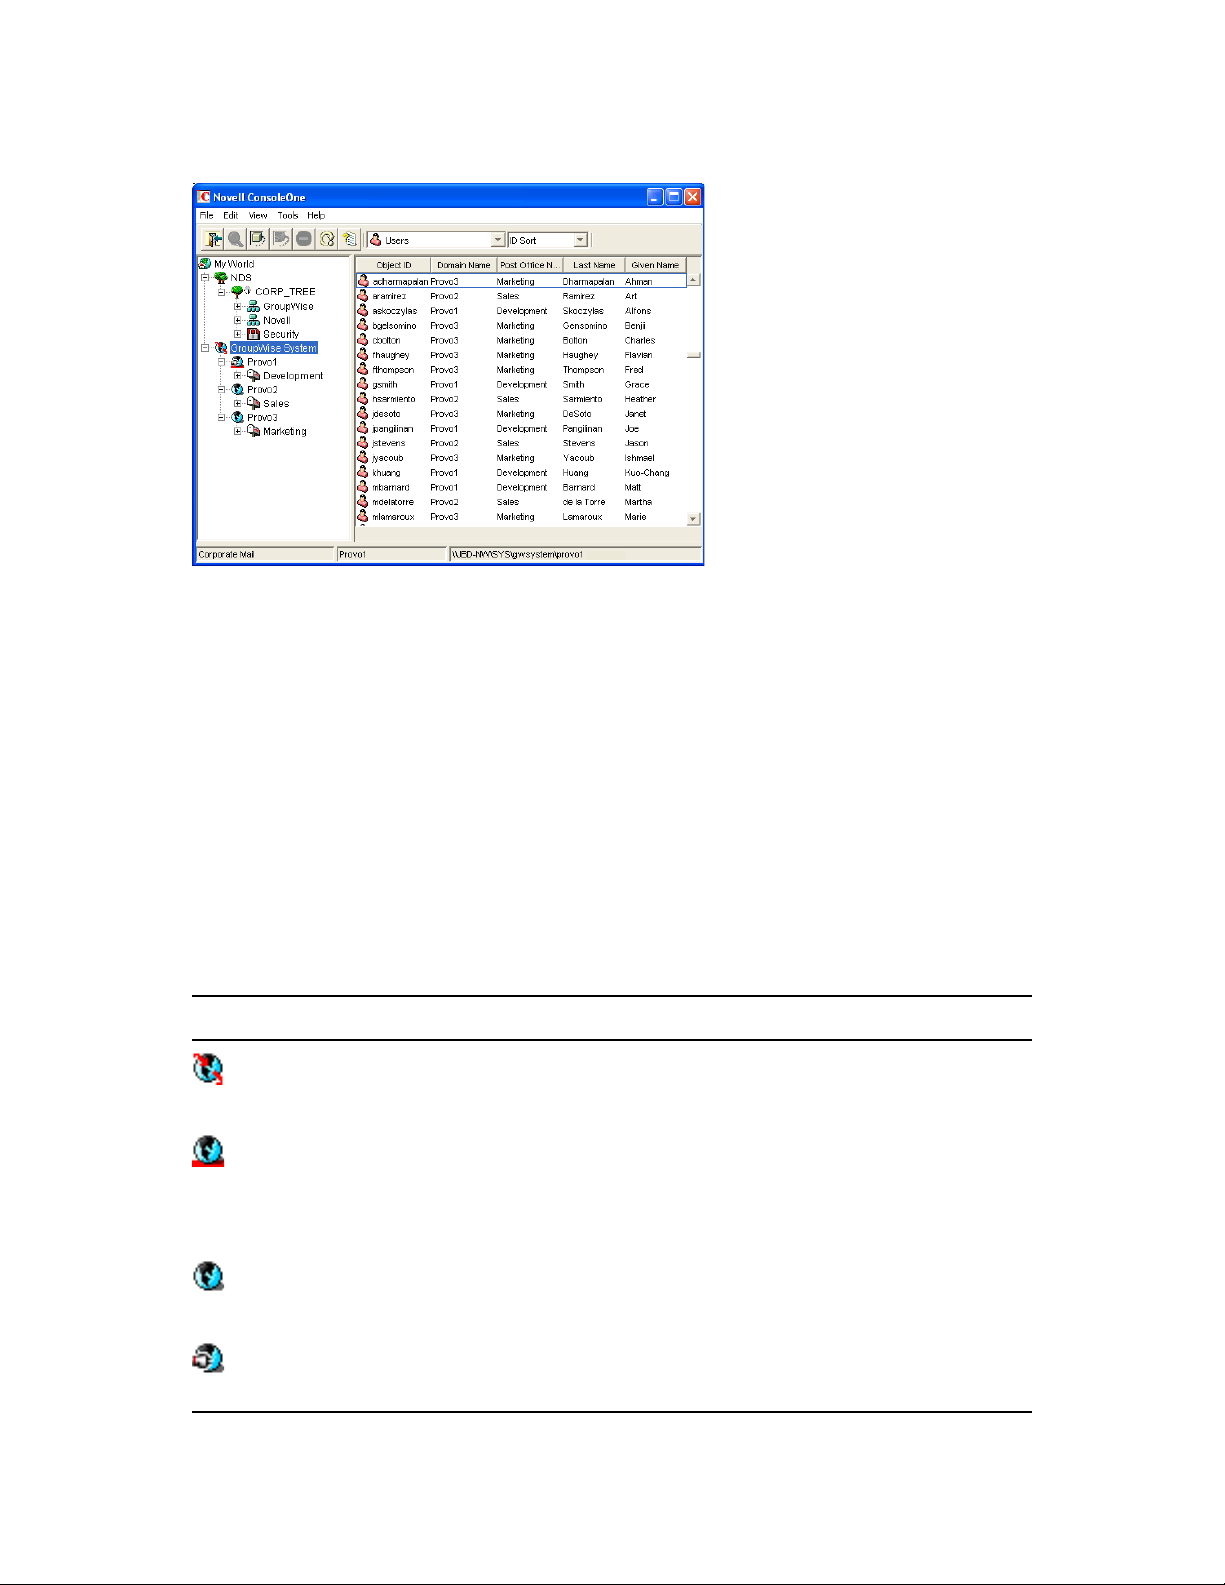
Figure 3-2 GroupWise View
In the left pane, all Domain objects are displayed under the GroupWise system, and all Post Office
objects are subordinate to the domains where they reside. You can select the GroupWise system, a
domain, or a post office in the left pane and then use the drop-down list of GroupWise objects on the
toolbar to display associated objects (Users, Resources, Message Transfer Agents, and so on) in the
right pane. In the above example, the GroupWise System is selected in the left pane and the
GroupWise Object list is set to Users, so the right pane is displaying all users in the entire
GroupWise system.
novdocx (en) 22 June 2009
3.2 GroupWise Object Icons
The following table lists all the GroupWise objects that are displayed in the eDirectory View or
GroupWise View in ConsoleOne.
Table 3-1 Object Icons
Icon GroupWise Object Additional Information
GroupWise System Represents the GroupWise system you are currently
connected to. The GroupWise system’s name is displayed in
the lower left corner of the ConsoleOne window.
Primary Domain Represents the system’s primary domain. To ensure
consistency, all replication of GroupWise information to the
GroupWise domain and post office databases takes place
through the primary domain. For additional information, see
Part II, “Domains,” on page 117.
Secondary Domain Represents any additional domains, other than the primary,
created in the GroupWise system. For additional information,
see Part II, “Domains,” on page 117.
Current Domain Represents the domain to which ConsoleOne is currently
connected. For information about changing the current domain,
see Section 9.1, “Connecting to a Domain,” on page 135.
48 GroupWise 8 Administration Guide
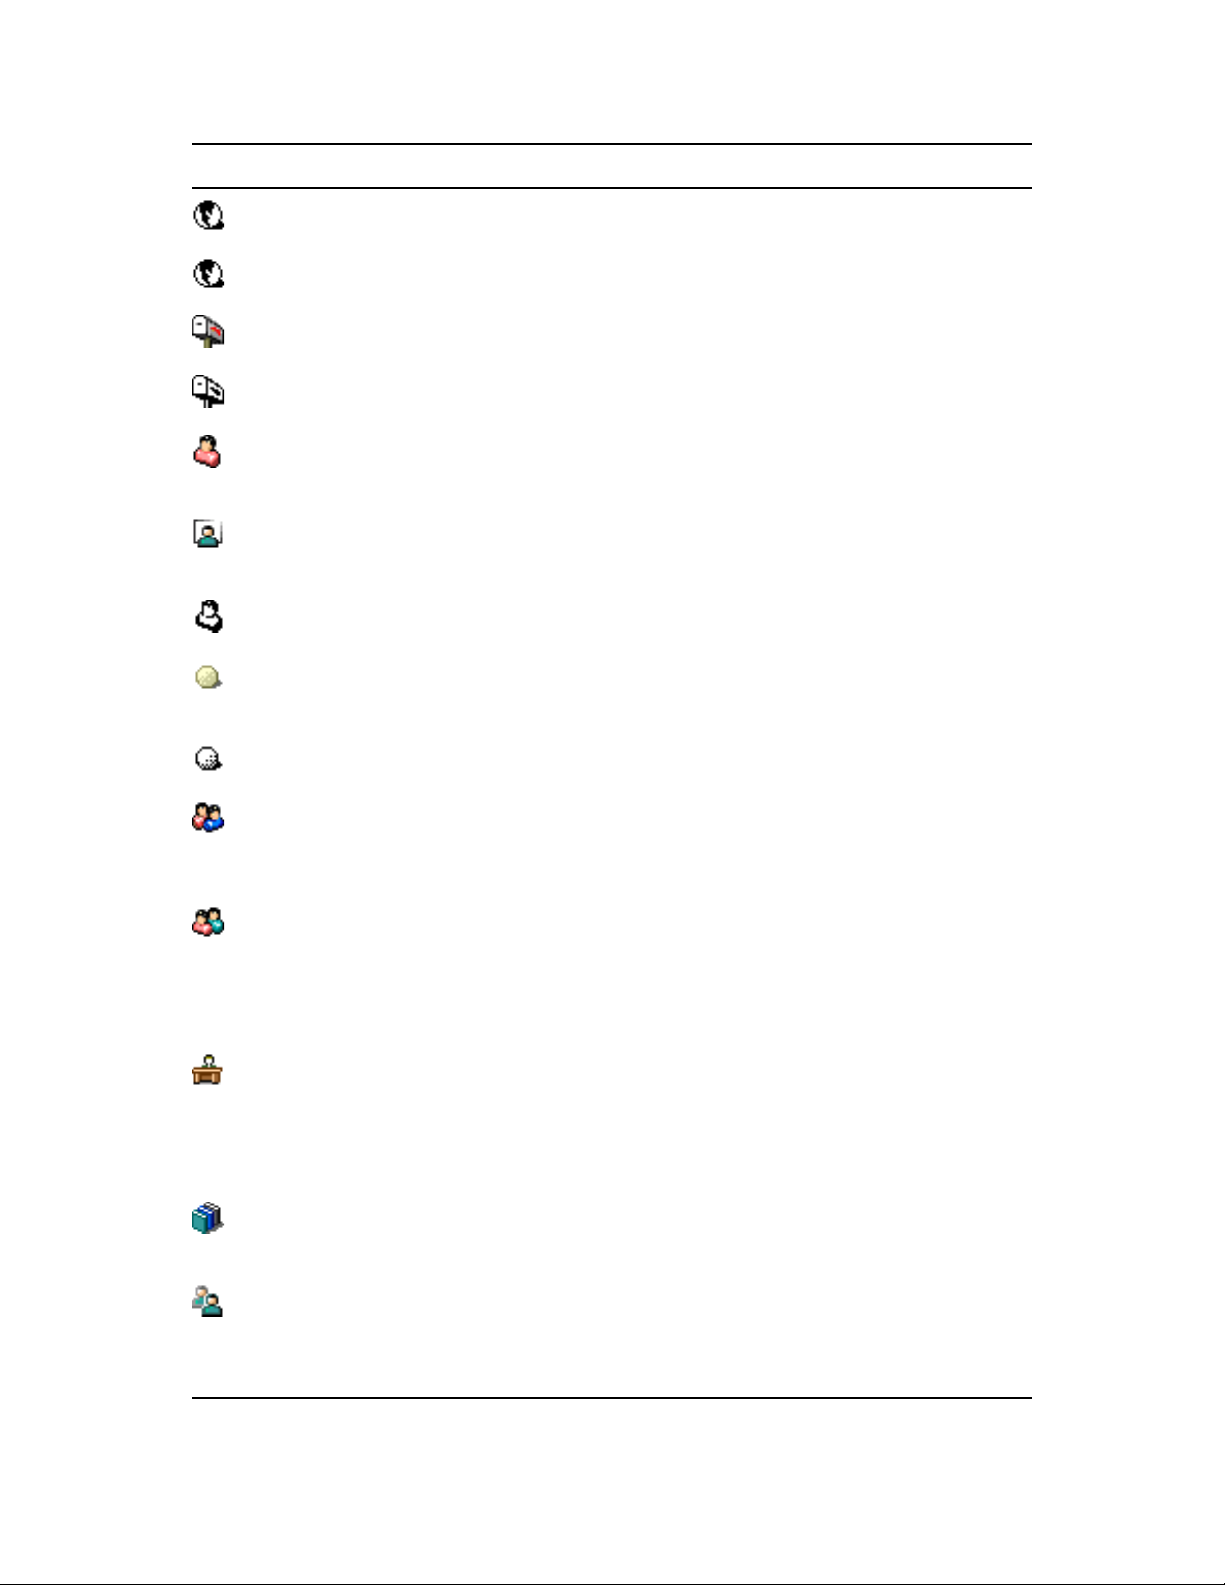
Icon GroupWise Object Additional Information
External Domain Represents a domain from another GroupWise system.
Non-GroupWise Domain Represents all or part of a non-GroupWise system.
Post Office Represents a collection of user accounts (mailboxes). For
additional information, see Part III, “Post Offices,” on page 161.
External Post Office Represents a post office in an external GroupWise system or a
non-GroupWise system.
User Represents an eDirectory user who has been given a
GroupWise account in a post office. For additional information,
see Part IV, “Users,” on page 211.
External Entity Represents a user not listed in eDirectory who has been given
a GroupWise account in a post office. For additional
information, see Part IV, “Users,” on page 211.
External User Represents a user in an external GroupWise system or a non-
GroupWise system.
novdocx (en) 22 June 2009
Resource Represents a conference room or some other resource that
can be scheduled by users. For additional information, see
Part V, “Resources,” on page 259.
External Resource Represents a resource that belongs to an external GroupWise
system or a non-GroupWise system.
Distribution List Represents a group of users or resources that can all be
addressed by using the distribution list’s name. For additional
information, see Part VI, “Distribution Lists, Groups, and
Organizational Roles,” on page 275.
Group Represents an eDirectory group. eDirectory groups, like
distribution lists, can be addressed by using the group’s name.
Any members of the group who have GroupWise accounts
receive the message. For additional information, see Part VI,
“Distribution Lists, Groups, and Organizational Roles,” on
page 275.
Organizational Role Represents an eDirectory organizational role. eDirectory
organizational roles, like distribution lists, can be addressed by
using the organizational role’s name. Any members of the role
who have GroupWise accounts receive the message. For
additional information, see Part VI, “Distribution Lists, Groups,
and Organizational Roles,” on page 275.
Library Represents a collection of documents. For additional
information, see Chapter 21, “Document Management
Services Overview,” on page 307.
Nickname Represents an additional address associated with a user,
resource, or distribution list. For additional information, see
Part IV, “Users,” on page 211, Part V, “Resources,” on
page 259, or Part VI, “Distribution Lists, Groups, and
Organizational Roles,” on page 275.
GroupWise View 49
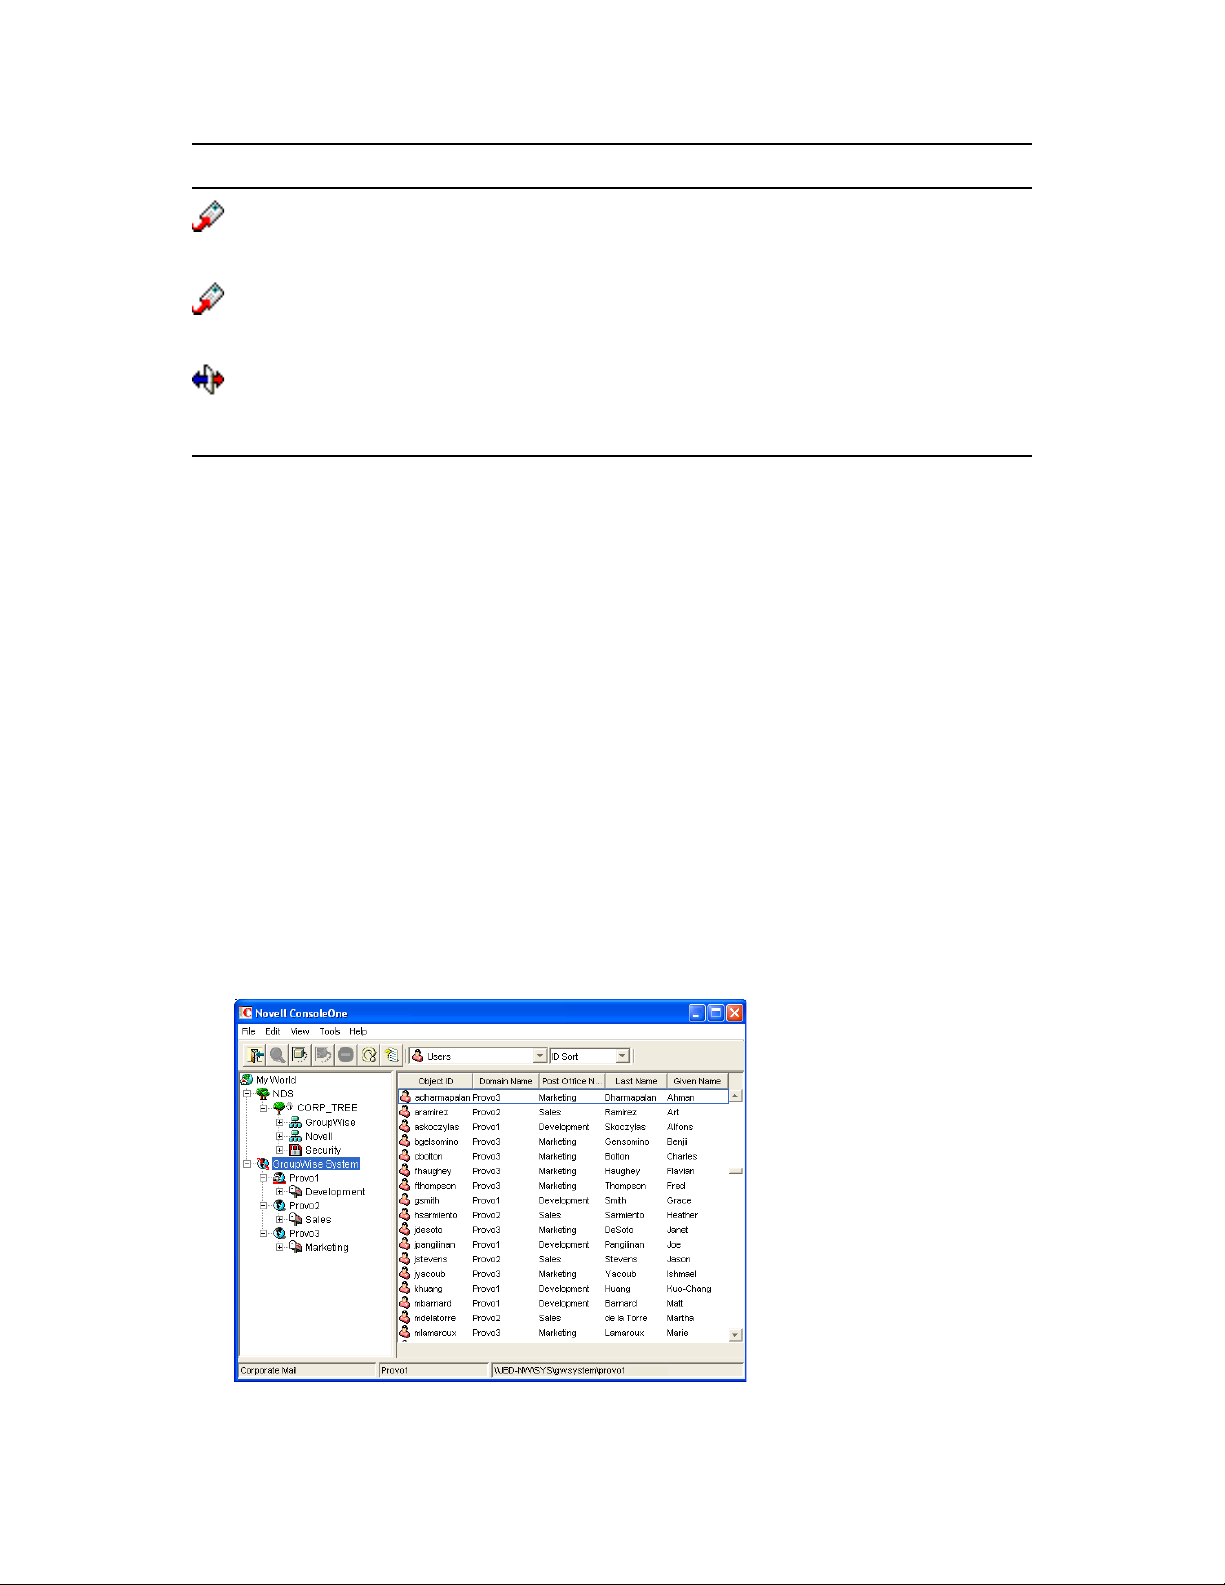
Icon GroupWise Object Additional Information
Message Transfer Agent Represents a Message Transfer Agent (MTA) associated with a
domain. For additional information, see Part X, “Message
Transfer Agent,” on page 617.
Post Office Agent Represents a Post Office Agent (POA) associated with a post
office. For additional information, see Part IX, “Post Office
Agent,” on page 473.
Gateway Represents a method of linking to another e-mail system or
transport. For additional information, see the GroupWise
gateway guides (http://www.novell.com/documentation/
gwgateways).
3.3 Customizing the GroupWise View
You can change the column display, order, and width to customize the GroupWise View.
Changes are preserved from one ConsoleOne session to the next. In addition, your last view is
persistent from session to session. For example, if you last used the Distribution Lists view, the next
time you start ConsoleOne and open the GroupWise View, the Distribution Lists view is displayed.
If the last-used view is not applicable (for example, you had the Gateways view open and when the
new ConsoleOne session starts you select a Post Office object), the GroupWise View defaults to the
Users view.
novdocx (en) 22 June 2009
Section 3.3.1, “Changing the Column Display and Order,” on page 50
Section 3.3.2, “Changing the Column Widths,” on page 51
3.3.1 Changing the Column Display and Order
For each view (Users, Distribution Lists, Gateways, Post Offices, and so forth), you can determine
which columns are displayed and the order in which they are displayed.
1 Select GroupWise System in the left (tree) pane, then select the view (for example, Users).
50 GroupWise 8 Administration Guide
2 If you are changing the Users view, use the drop-down list to select how you want to sort users
(ID Sort, User Name Sort, First Name Sort, or Last Name Sort).
The Users view allows you to sort by ID, user name, first name, or last name. Each of these is
treated as a separate Users view for which you can determine the column display and order.
The views for different objects offer different sort options.
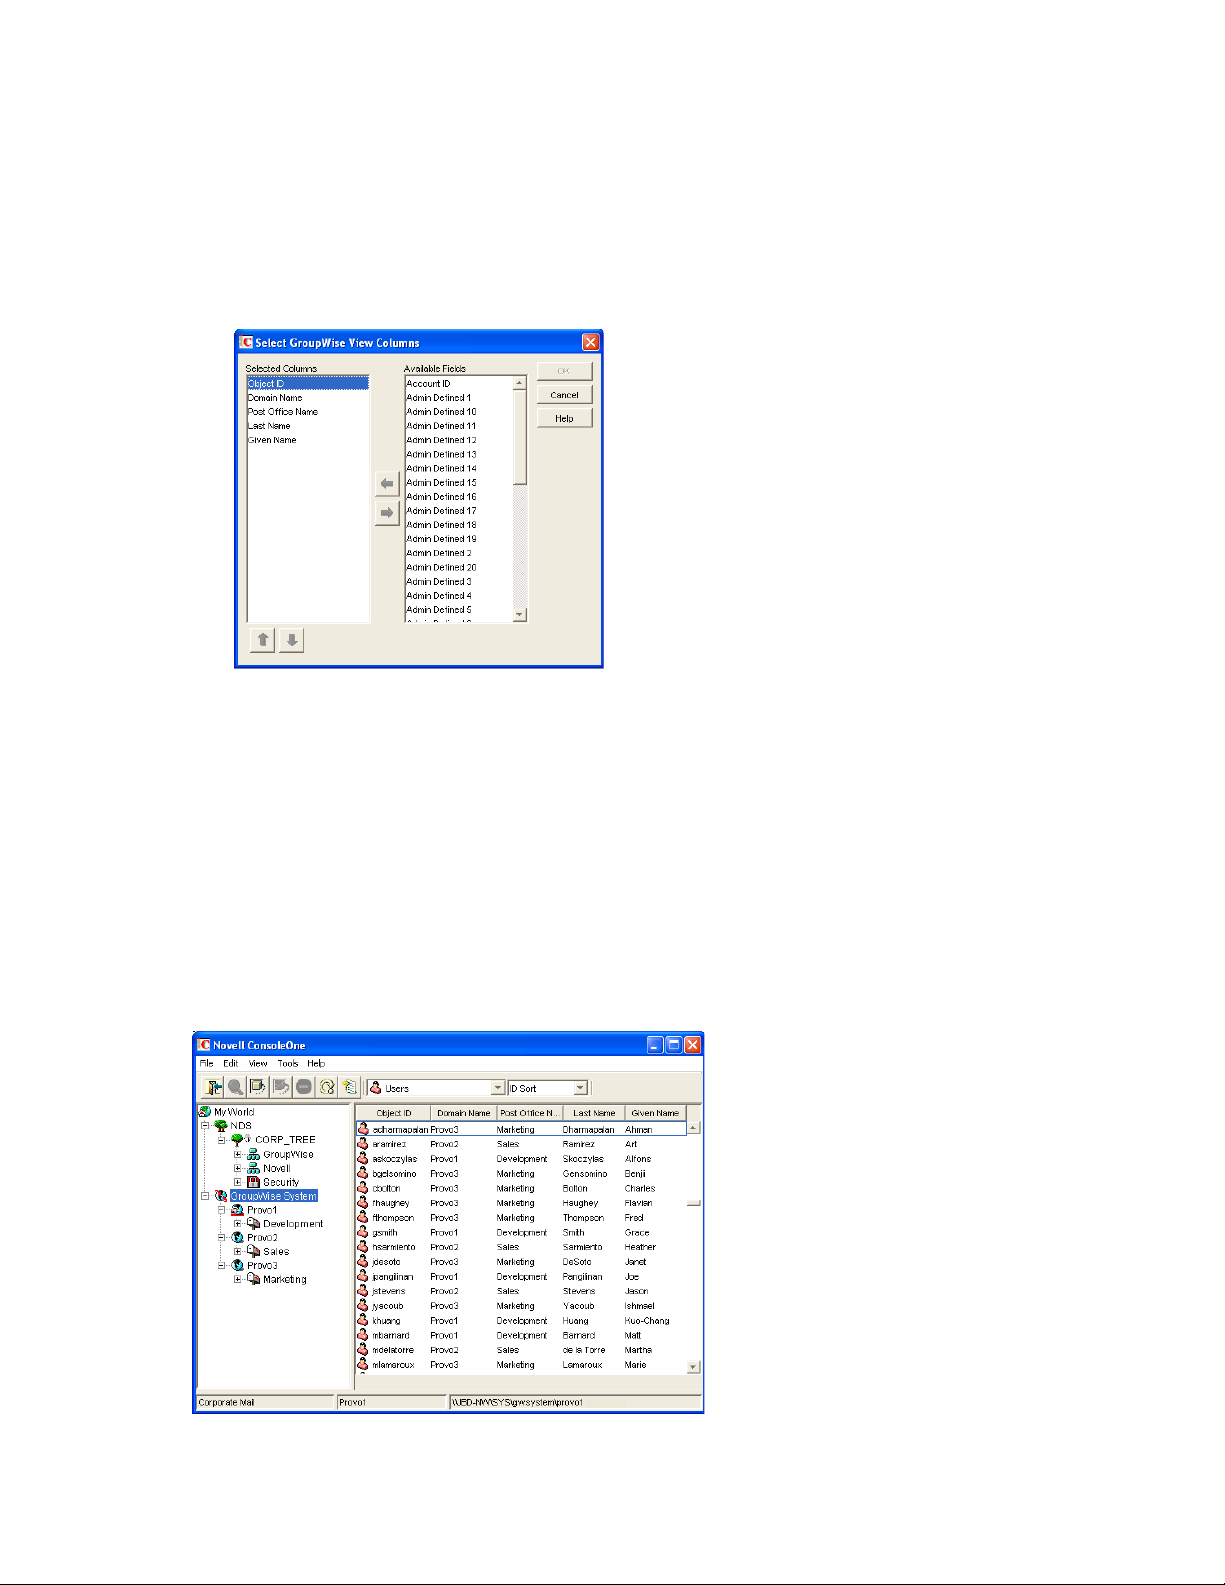
3 Click View > Edit Columns to display the Select GroupWise View Columns dialog box.
novdocx (en) 22 June 2009
4 To add a column, select the column in the Available Fields list, then click the left-arrow to add
it to the Selected Columns list.
5 To determine the display order, select a column in the Selected Columns list, then click the up-
arrow and down-arrow to move it to the desired position.
6 To remove a column, select the column in the Selected Columns list, then click the right-arrow
to add it to the Available Fields list.
7 When you are finished, click OK to save your changes.
3.3.2 Changing the Column Widths
You can change column widths in a view by dragging the right or left edge of the column label.
GroupWise View 51
3.4 Searching in the GroupWise View
You can search for a specific entry in a view. The search is performed on the first column. For
example, if the Resources view is displayed, you can search for a specific resource based on its
object ID. If the Users view (with Last Name Sort selected) is displayed, you can search for a
specific user based on the user’s last name.
With the Users view, if you have First Name Sort or Last Name Sort selected, you can search for a
complete user name (both first and last name) by using a comma as a delimiter between the names.
A space after the comma is optional.
For example, if the Users view displays first names in the first column and last names in the second
column, you can type John,Smith to go directly to that user name. If the columns were reversed, you
could use Smith,John.
To perform a search:
1 Change to the view you want to search.
2 Select the first entry in the view.
3 Type the text to search for.
As you type text, a text box appears in the lower right corner of the GroupWise View.
novdocx (en) 22 June 2009
3.5 Performing Administrative Tasks from the GroupWise View
You can perform many GroupWise administrative tasks from the GroupWise View as well as from
the eDirectory View. For example, you can:
Create new objects.
Modify the properties of an object.
Move, rename, or delete an object from the GroupWise system.
Use the GroupWise utilities, system operations, and diagnostic options on the Tools menu.
52 GroupWise 8 Administration Guide

In addition, external objects must be created and managed in the GroupWise View because they are,
by definition, external to eDirectory and have no eDirectory context. For example, if you install the
GroupWise Internet Agent and want to simplify addressing for your users by adding the Internet as a
non-GroupWise domain, you must perform the task in the GroupWise View.
novdocx (en) 22 June 2009
GroupWise View 53

novdocx (en) 22 June 2009
54 GroupWise 8 Administration Guide

4
GroupWise System Operations
The GroupWise® system operations in ConsoleOne® allow you to perform various tasks to maintain
and optimize your GroupWise system. The following sections provide information about the system
operations included on the To ol s menu (Too ls > GroupWise System Operations):
Section 4.1, “Select Domain,” on page 55
Section 4.2, “System Preferences,” on page 57
Section 4.3, “eDirectory User Synchronization,” on page 64
Section 4.4, “Admin-Defined Fields,” on page 64
Section 4.5, “Pending Operations,” on page 65
Section 4.6, “Addressing Rules,” on page 66
Section 4.7, “Time Zones,” on page 66
Section 4.8, “External System Synchronization,” on page 69
Section 4.9, “Software Directory Management,” on page 69
novdocx (en) 22 June 2009
4
Section 4.10, “Restore Area Management,” on page 74
Section 4.11, “Internet Addressing,” on page 74
Section 4.12, “Trusted Applications,” on page 74
Section 4.13, “LDAP Servers,” on page 78
Section 4.14, “Global Signatures,” on page 78
NOTE: If the majority of the items on the GroupWise System Operations menu are dimmed, you are
connected to a secondary domain in a GroupWise system where Restrict System Operations to
Primary Domain has been selected under System Preferences. For more information, see
Section 4.2, “System Preferences,” on page 57.
4.1 Select Domain
By default, ConsoleOne must be connected to a GroupWise domain in order for you to administer
your GroupWise system. Being connected to a GroupWise domain ensures that information is
replicated not only in Novell
databases.
You can be connected to any domain in the GroupWise system. As shown in the following example,
the domain to which you are connected is indicated by a plug on the domain’s icon. In addition, the
connected domain is listed at the bottom of the ConsoleOne window.
®
eDirectoryTM but also in the GroupWise domain and post office
GroupWise System Operations
55
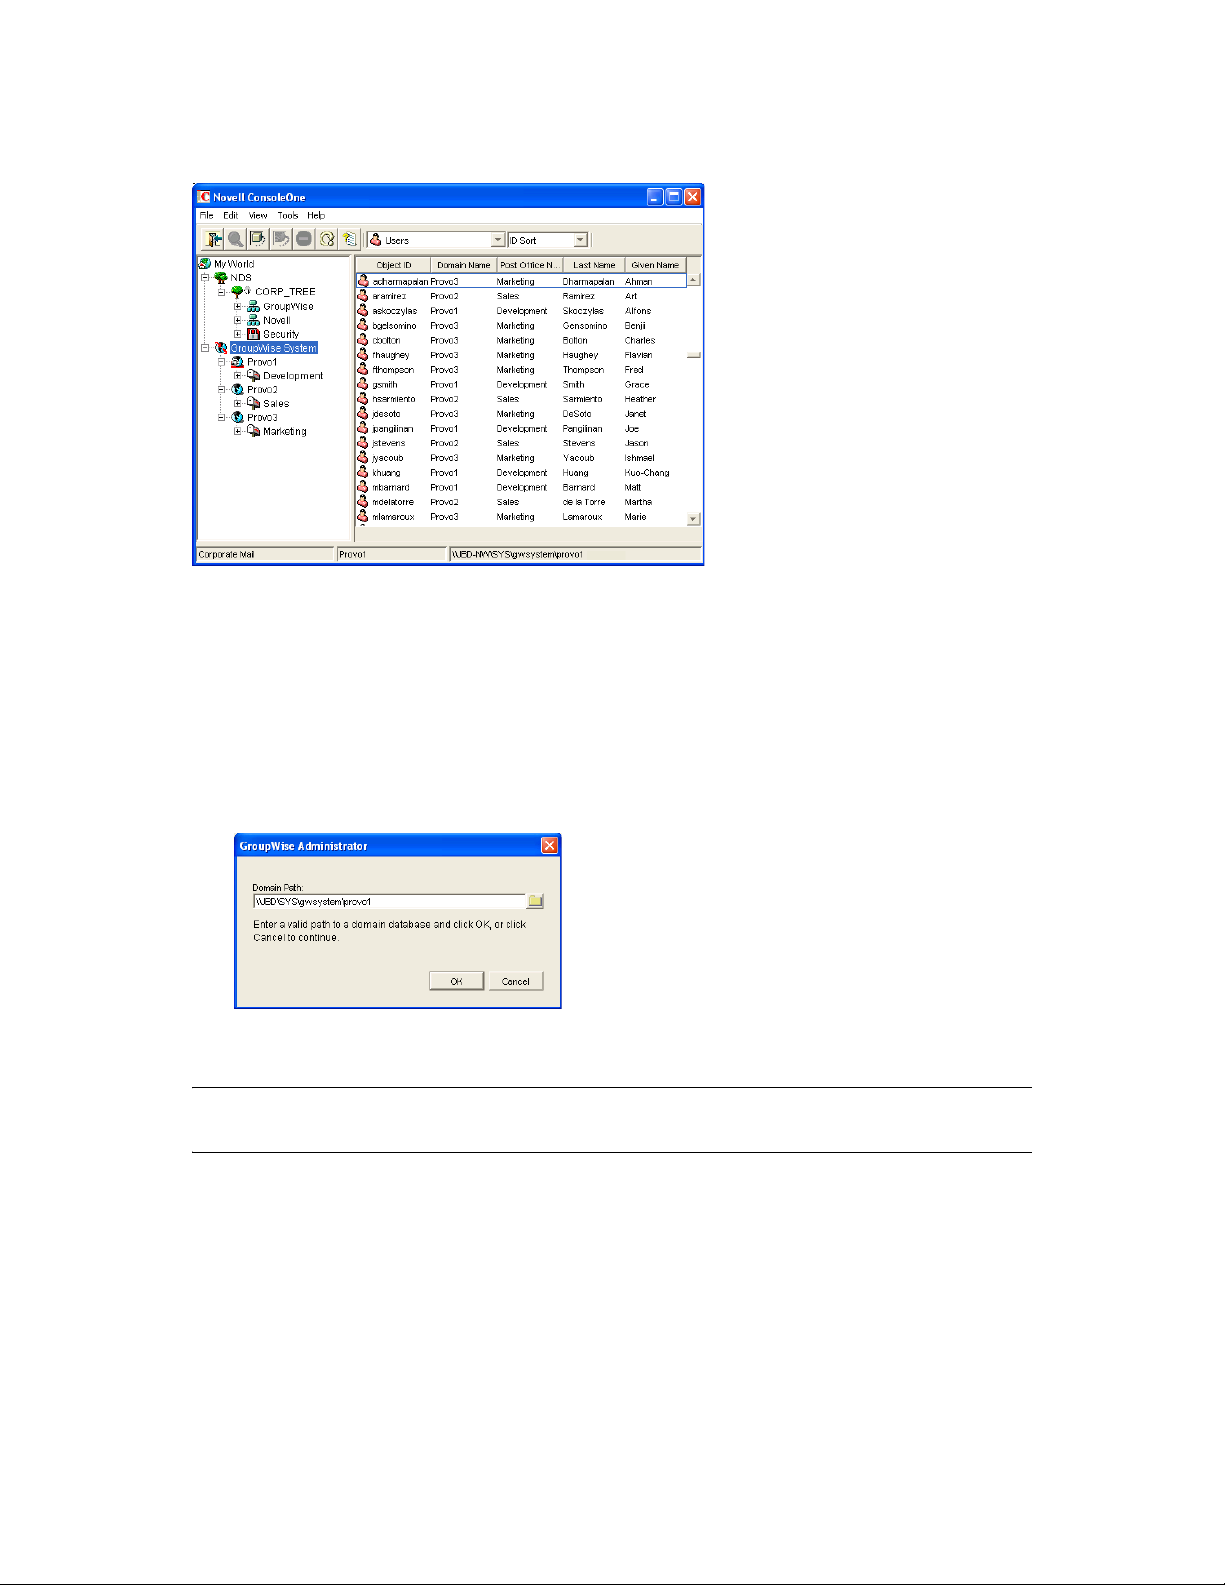
Figure 4-1 ConsoleOne Window Showing the Domain You Are Connected To
Some administrative tasks require you to be connected to a specific domain but others do not. In
general, operations that create new GroupWise container objects or delete GroupWise container
objects require you to be connected to the domain where the object resides. Operations that add or
delete leaf object or modify the properties of an existing object do not require you to be connected to
the object’s domain.
novdocx (en) 22 June 2009
To change the domain to which you are connected:
1 In ConsoleOne, click Too ls > GroupWise System Operations > Select Domain.
2 Browse to and select the domain directory, then click OK to connect to the domain.
NOTE: You can also connect to a domain by right-clicking the domain in the GroupWise View and
clicking Connect.
Being connected to a domain means that ConsoleOne has write access to the domain database
wpdomain.db
(
). How the write access is achieved depends on the platform where you are running
ConsoleOne and the platform where the domain is located.
56 GroupWise 8 Administration Guide

Table 4-1 Domain Connection Options
novdocx (en) 22 June 2009
ConsoleOne
Platform
Windows
ConsoleOne
Linux
ConsoleOne
The database location is stored internally in UNC path format (
Domain Platform Connection Options
NetWare server Mapped drive
Linux server Samba mount where the path to the domain on the Linux server is
prefixed by the Linux server hostname from the point of view of
ConsoleOne
Windows server Local drive
Mapped drive
NetWare server File system mount where the mount point directory matches the
NetWare server hostname and volume name
Linux server Local directory
Mounted file system where the mount point directory matches the
domain directory on the mounted file system
Windows server Mounted file system where the mount point directory matches the
Windows server hostname and share
\\server\volume\directory
is displayed on the Domain object Identification page in ConsoleOne based on the platform of
ConsoleOne and the database location.
) but
Table 4-2 Database Locations
ConsoleOne
Platform
Windows
ConsoleOne
Linux
ConsoleOne
Domain Platform Database Location
NetWare server
Linux server
Windows server
NetWare server
Linux server
Windows server
\\NetWare_server\volume\domain_directory
\\Linux_server\domain_directory
\\Windows_server\share\domain_directory
/mnt/NetWare_server/volume/domain_directory
/domain_directory
/mnt/Windows_server/share/domain_directory
When you click Connect, ConsoleOne uses the domain’s UNC path to automatically connect you to
the correct domain if possible; otherwise, you must manually browse to and select the domain
database in order to connect to the domain.
4.2 System Preferences
You can use the GroupWise system preferences to configure the defaults for various GroupWise
system settings.
GroupWise System Operations 57
To change the system preferences:
1 In ConsoleOne, click Too ls > GroupWise System Operations > System Preferences.
The GroupWise System Preferences dialog box contains the following tabs:
Admin Preferences: Controls how rights are assigned and what network ID format is used
when creating new GroupWise users. By default, rights are assigned automatically and the
fully distinguished name format is used.
Routing Options: Controls default message routing for your GroupWise system. By
default, no routing domain is assigned.
External Access Rights: Controls the access that users on external GroupWise systems
have to your GroupWise users’ information. By default, Busy Search and status tracking
information is not returned to users on external GroupWise systems.
Nickname Settings: Controls what happens when you move a user from one post office to
another. By default, nicknames representing old addresses are not automatically created
when users are moved.
Default Password: Assigns a default password for new GroupWise user accounts. By
default, you must manually assign a password for each GroupWise account you create.
novdocx (en) 22 June 2009
Admin Lockout Settings: Controls access to the GroupWise administration functions in
ConsoleOne. By default, there are no restrictions.
Archive Service Settings: Sets the default archive service for your GroupWise system.
Archive services are third-party applications that can function as GroupWise trusted
applications (for example, Messaging Architects M+Archive Email Archiving Software
(http://www.messagingarchitects.com/products/m-archive-email-archiving.html)).
When you install an archive service to a server, an instance of the archive service
is added to the list of archive service trusted applicationsthat displays in ConsoleOne.
Linux Settings (Linux ConsoleOne Only): Establishes the mount directory where
ConsoleOne can find mounted file systems where domains and post offices are located.
2 Change the system preferences as needed.
3 Click OK to save the changes.
4.2.1 Admin Preferences
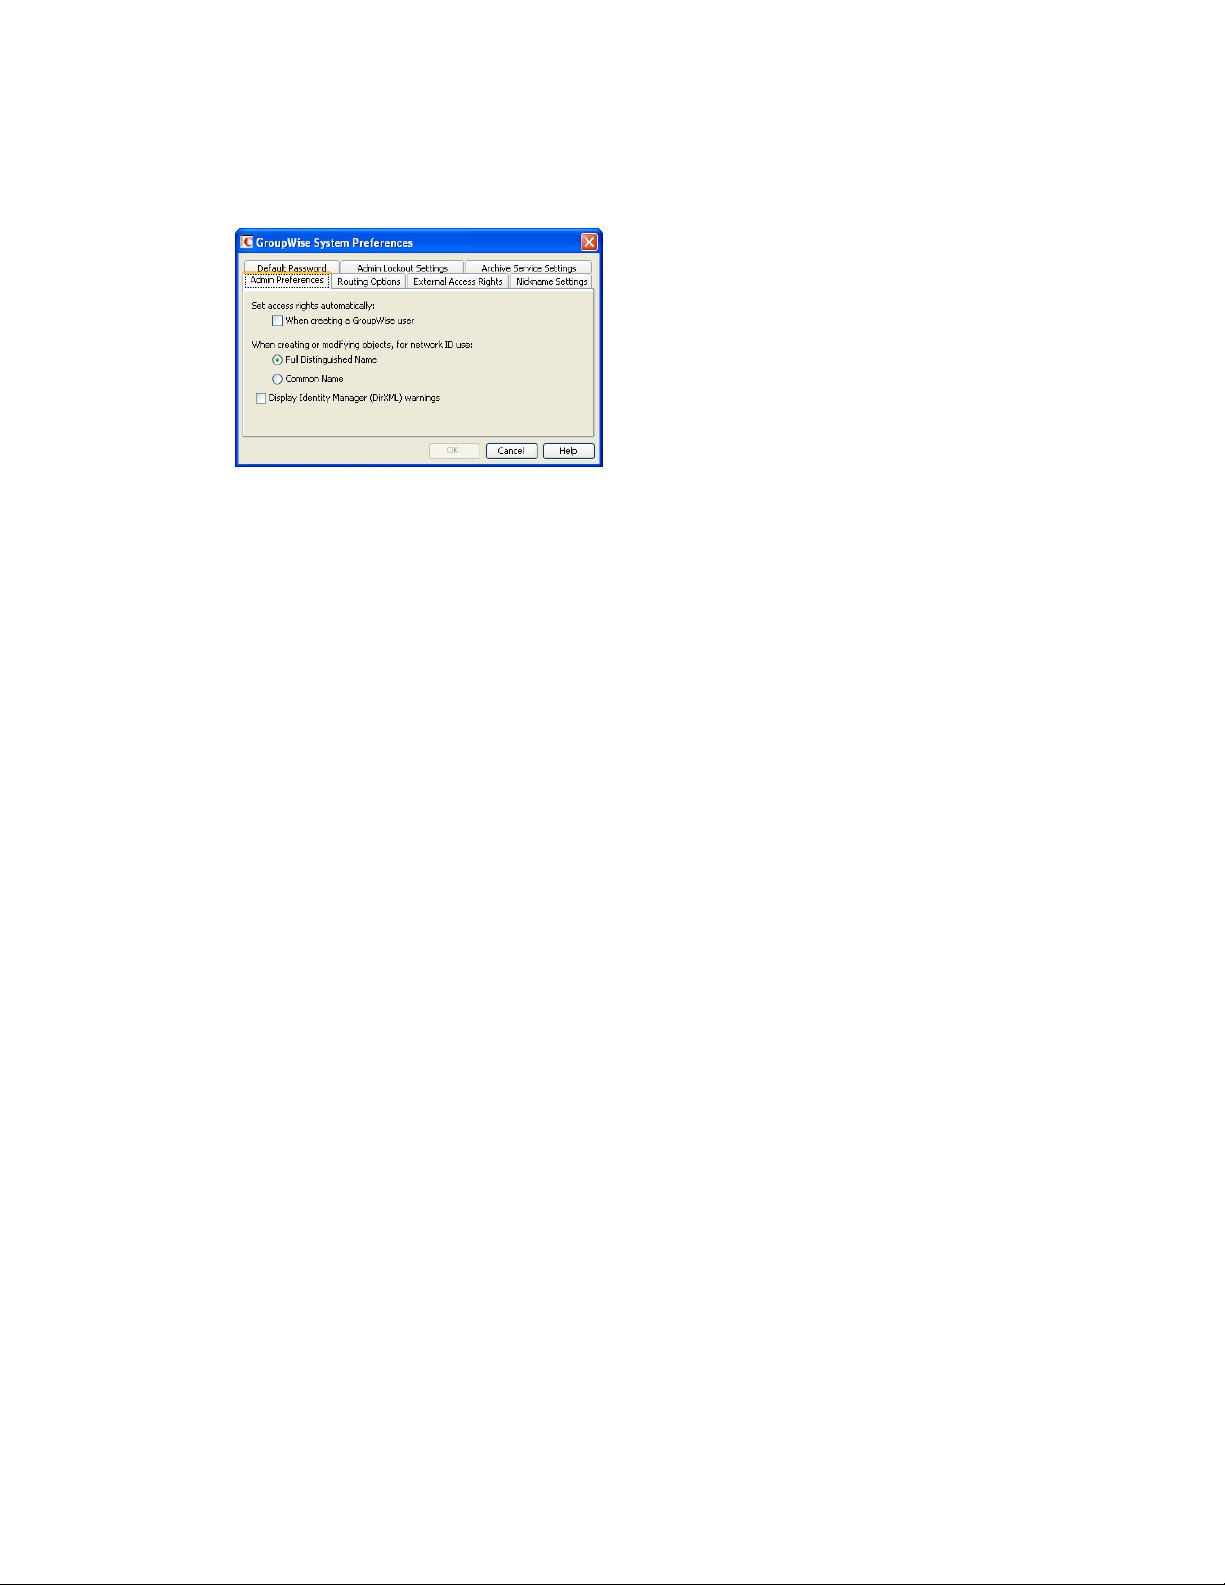
1 In the GroupWise System Preferences dialog box, click the Admin Preferences tab to modify
any of the following options:
58 GroupWise 8 Administration Guide
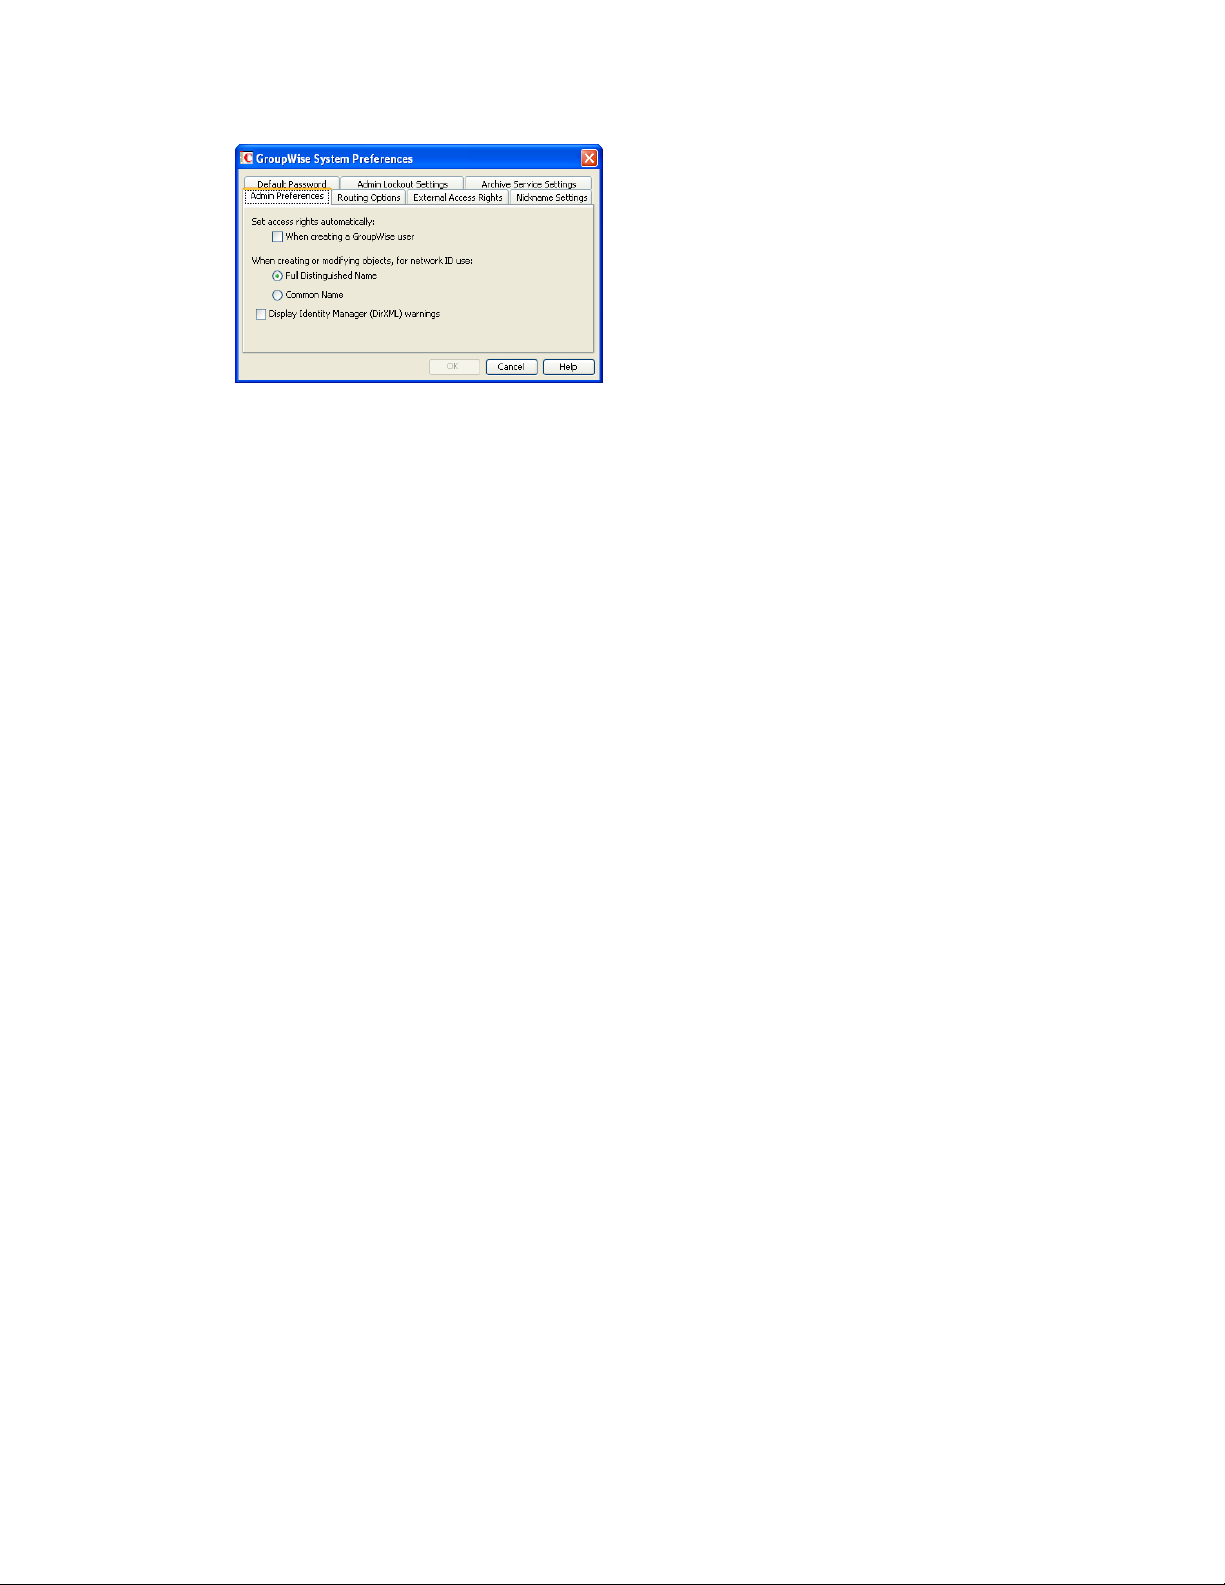
Set Access Rights Automatically: Users require specific eDirectory and file system rights in
order to use GroupWise (see Chapter 81, “GroupWise User Rights,” on page 1193). Select this
option to automatically grant these rights when creating a GroupWise account for users.
Appropriate eDirectory object rights enable the GroupWise client to log in to the user’s post
office without prompting the user for the post office location (IP address, UNC path, or mapped
drive.)
Appropriate file system rights enable the GroupWise client to directly access the post office
directory rather than use client/server access.
novdocx (en) 22 June 2009
When Creating or Modifying Objects, For Network ID Use: Select Full Distinguished
®
Name (for example, paul.engineering.ny) when users’ mailboxes reside on a NetWare
4.1x or
later server and users have an eDirectory connection to the server where the post office resides.
Select Common Name (for example, paul) under the following circumstances:
The users’ mailboxes reside on a NetWare 3.1 server.
The users’ mailboxes reside on a NetWare 4.1x server but users have a bindery emulation
connection to the server where the post office resides.
Users’ GroupWise IDs are different from their NetWare IDs.
Display Identity Manager (DirXML) Warnings: The Identity Manager Driver for
GroupWise provides data integration between GroupWise users and groups in eDirectory. For
example, you can have an e-mail account automatically created as soon as an employee is
hired. The same driver can also disable an e-mail account when a user is no longer active.
If you are using the Identity Manager Driver for GroupWise, some GroupWise operations that
you perform in ConsoleOne require you to take preliminary actions with the driver. For
example, if you recover a deleted account, you need to stop the driver before recovering the
account and restart it after the operation is complete.
This option enables you to receive a warning message whenever you perform a GroupWise
operation in ConsoleOne that is affected by the Identity Manager driver. The warning message
includes instructions about the actions you need to take with the driver before continuing with
the GroupWise operation. If you are using the Identity Manager Driver for GroupWise, we
strongly recommend that you enable this option. If you are not using the driver, you can disable
the option to avoid receiving unnecessary messages.
For more information, see “GroupWise DirXML Driver for Novell Identity Manager” in the
GroupWise 8 Interoperability Guide.
2 Click OK to save the changes.
GroupWise System Operations 59
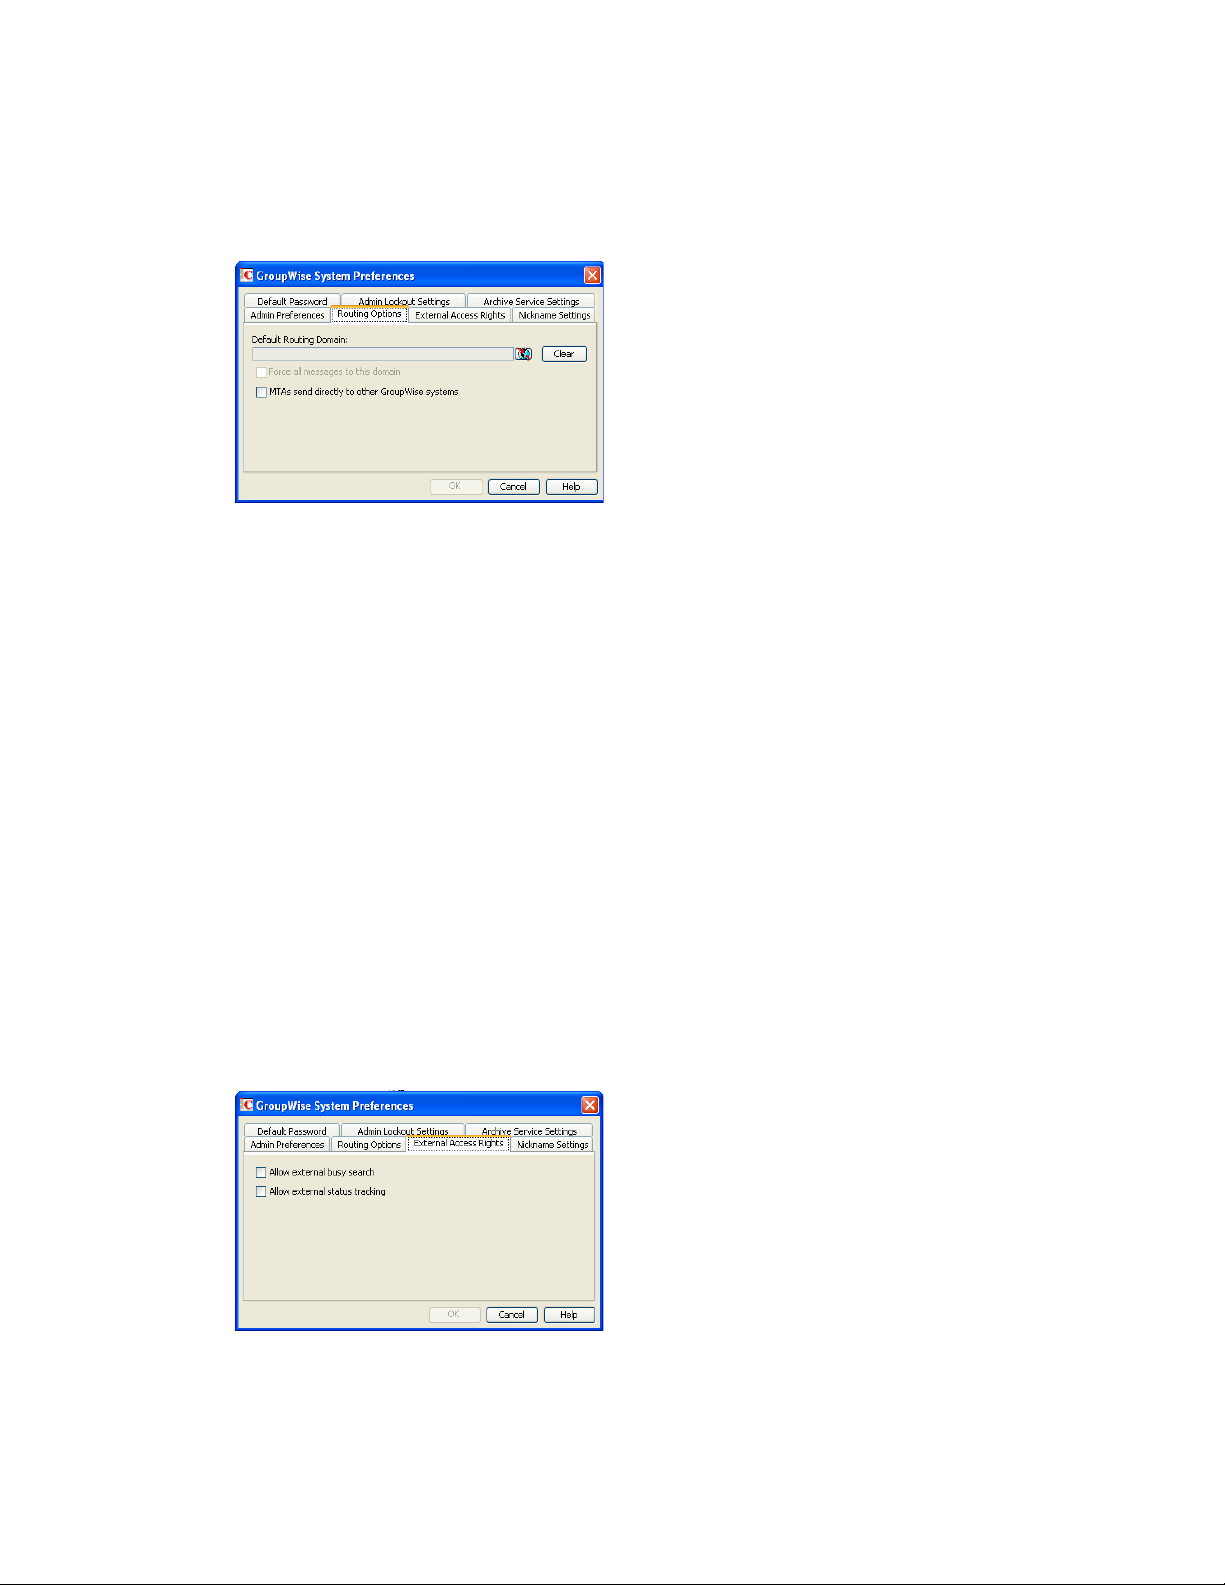
4.2.2 Routing Options
1 In the GroupWise System Preferences dialog box, click the Routing Options tab to modify any
of the following options:
Default Routing Domain: If a domain’s MTA cannot resolve a message’s address, the
message is routed to this default domain’s MTA. The default domain’s MTA can then be
configured to handle the undeliverable messages. This might involve routing the message to
another GroupWise domain or to an Internet address (by performing a DNS lookup). Browse to
and select the GroupWise domain you want to use as the default routing domain.
Force All Messages to this Domain: This option applies only if you select a default routing
domain. Select this option to force all messages to be routed through the default routing domain
regardless of the links you have configured for your GroupWise system’s domains.
MTAs Send Directly to Other GroupWise Systems: Select this option if you want all MTAs
in your GroupWise system to perform DNS lookups and route messages out across the Internet.
If you deselect this option, you can designate individual MTAs to perform DNS lookups and
route messages to the Internet. For more information, see “Using Dynamic Internet Links” in
“Connecting to Other GroupWise Systems” in the GroupWise 8 Multi-System Administration
Guide.
2 Click OK to save the changes.
novdocx (en) 22 June 2009
4.2.3 External Access Rights
1 In the GroupWise System Preferences dialog box, click the External Access Rights tab to
modify any of the following options:
Allow External Busy Search: Select this option to enable users in other GroupWise systems
to perform Busy Searches on your GroupWise users’ Calendars.
60 GroupWise 8 Administration Guide

Allow External Status Tracking: Select this option to enable users in other GroupWise
systems to receive message status information (such as whether a message has been delivered,
opened, and so on) when messages arrive in your GroupWise system.
2 Click OK to save the changes.
4.2.4 Nickname Settings
1 In the GroupWise System Preferences dialog box, click the Nickname Settings tab to modify
any of the following options:
novdocx (en) 22 June 2009
Auto-Create on User Move: A nickname is an alternative address that can be associated with
a user. Whenever you move a user, GroupWise can automatically create a nickname with the
user’s old name and old post office. This enables messages sent to the old name to be
automatically forwarded to the user’s new address. Select whether or not you want GroupWise
to never create nicknames, always create nicknames, or prompt you during the move process.:
Expire After: This option applies only if you selected Always or Prompt. If you want the
nickname to be automatically removed after a period of time, specify the time period (in days).
Valid values range from 1 to 365 days. A setting of 0 indicates that the nickname will not be
automatically removed after the specified time period.
2 Click OK to save the changes.
4.2.5 Default Password
1 In the GroupWise System Preferences dialog box, click the Default Password tab to modify
any of the following options:
GroupWise System Operations 61

Default Password for New Users: Specify the default password you want assigned to new
GroupWise user accounts.
2 Click OK to save the changes.
4.2.6 Admin Lockout Settings
1 In the GroupWise System Preferences dialog box, click the Admin Lockout Settings tab to
modify any of the following options:
novdocx (en) 22 June 2009
Restrict System Operations to Primary Domain: Enable this option to allow an
administrator to perform system operations (Too ls > GroupWise System Operations) only when
he or she is connected to the primary domain. All operations except Select Domain, Pending
Operations, Software Directory Management, and Restore Area Management are unavailable
when connected to a secondary domain.
Lock Out Older GroupWise Administration Snap-Ins: Enable this option to prevent
administrators from using older GroupWise ConsoleOne snap-ins for accessing GroupWise
objects in eDirectory. You can override these system lockout settings for individual domains
(Domain object > GroupWise > Admin Lockout Settings).
There are four GroupWise snap-ins to ConsoleOne, one for general administration, one for
Internet Agent administration, and two for WebAccess administration. The ability to lock out
older GroupWise snap-ins starts with GroupWise 6.5.
In the Minimum Snap-In Release Version (x.x.x) field, specify the version number of the oldest
GroupWise snap-ins that can be used to administer your GroupWise system.
In the Minimum Snap-in Release Date field, select the date of the oldest GroupWise snap-ins
that can be used to administer your GroupWise system.
You can specify the minimum version, the minimum date, or both. If you specify both
minimums, any administrator using snap-ins that are older than both minimums cannot use the
GroupWise snap-ins. However, such an administrator can still run ConsoleOne for other
purposes but must update the GroupWise snap-ins before GroupWise administration features
are available again.
NOTE: Default admin lockout settings can be overridden on individual domains as needed.
2 Click OK to save the changes.
62 GroupWise 8 Administration Guide

4.2.7 Archive Service Settings
1 In the GroupWise System Preferences dialog box, click the Archive Service Settings tab to
select the system default archive service for your GroupWise system.
Archive Service Trusted Applications: Lists the instances of your third-party archive service.
Select the archive service instance that you want to use as the default for your GroupWise
system. You can override the system default on individual post offices.
novdocx (en) 22 June 2009
2 Click OK to save your selection.
Overriding the System Default Archive Service
1 Browse to and right-click the Post Office object where you want to override the default, then
click Properties
2 Click GroupWise > Post Office Settings.
3 In the Default Archive Service Trusted Application field, select Override.
4 Select the archive service for that post office, then click OK.
4.2.8 Linux Settings (Linux ConsoleOne Only)
1 In the GroupWise System Preferences dialog box, on Linux, click the Linux Settings tab to
specify the mount directory.
Mount Directory: Specify the mount directory where ConsoleOne can find mounted file
systems where domains and post offices are located.
GroupWise databases can be located on Linux servers, NetWare servers, or Windows servers.
In the Linux mount directory, you create directories that have the same names as the servers
that are mounted to those mount points. You do this for each server where a domain or post
GroupWise System Operations 63

office is located that you want to access from ConsoleOne. The following table illustrates the
correspondence between UNC paths and mount point directories for GroupWise database
locations on Linux, NetWare, and Windows, assuming the typical mount point directory of /
mnt:
novdocx (en) 22 June 2009
Platform GroupWise Domain UNC Path
Linux
NetWare
Windows
\\Linux_server\GW_partition\domain_directory/mnt/Linux_server/
\\NetWare_server\GW_volume\domain_directory /mnt/
\\Windows_server\GW_share\domain_directory /mnt/
Corresponding Linux
Mount Point
GW_partition
NetWare_server/
GW_volume
Windows_server/
GW_share
GroupWise administrators can have different mount points depending on the workstation or
server where they are running ConsoleOne. The mount directory information is stored in a
user-specific preferences file (
.consoleone/SnapinPrefs.ser
in each GroupWise
administrator’s home directory).
2 Click OK to save the changes.
4.3 eDirectory User Synchronization
For user information to be displayed in the GroupWise Address Book, it must be stored not only in
eDirectory but also in the GroupWise domain and post office databases. If you add or modify user
information using an installation of ConsoleOne with the GroupWise Administrator snap-in, the
GroupWise Administrator snap-in adds the user information to the GroupWise databases. However,
if you add or modify user information using a ConsoleOne installation that is not running the
GroupWise Administrator snap-in, the user information is not changed in the GroupWise databases.
This is also true if you add or modify user information using Novell iManager or older
administration tools such as NetWare Administrator.
To ensure that the user information stored in the GroupWise databases is always synchronized with
the user information in eDirectory, you can set up eDirectory user synchronization. For detailed
information see Section 41.4.1, “Using eDirectory User Synchronization,” on page 653.
4.4 Admin-Defined Fields
eDirectory includes user information that is not associated to GroupWise user fields. By default,
such eDirectory fields are not displayed in the GroupWise Address Book. However, you can use the
Admin-Defined Fields feature to map eDirectory user fields to GroupWise fields so that they can be
displayed in the GroupWise Address Book.
1 Click Tools > System Operations > Admin-Defined Fields.
64 GroupWise 8 Administration Guide

eDirectory fields that you associate with GroupWise fields here are available for use in all
domains throughout your GroupWise system. You can also customize the GroupWise Address
Book for individual domains, as described in Section 6.1.1, “Adding eDirectory Fields to the
Address Book,” on page 92
2 Select the first available admin-defined field, then click Edit.
3 Select the eDirectory property that you want to associated with the admin-defined field, then
click OK.
novdocx (en) 22 June 2009
4 To remove an admin-defined field, select the field, then click Clear.
You are prompted for whether to remove the corresponding values from user records. This
might be a time-consuming process.
5 Click Ye s to clean up all obsolete references to deleted admin-defined fields in all user records.
or
Click No to perform the cleanup later.
At any time, you can click Cleanup to remove obsolete references to deleted admin-defined
fields from all user records. It is a good practice to run Cleanup periodically to ensure that the
admin-defined fields in ConsoleOne match the admin-defined fields that appear in user records.
4.5 Pending Operations
Pending operations are the results of administrative operations, such as adding GroupWise objects
and modifying GroupWise object properties, that have not yet been permanently written to the
appropriate GroupWise databases. While operations are pending, GroupWise data is not in a
consistent state.
For example, you can maintain any domain’s objects you have administrative rights over. However,
because a secondary domain owns its own objects, any operation you perform from the primary
domain on a secondary domain’s objects must be validated by the secondary domain. While the
operation is being validated, the Pending Operations dialog box displays object details and the
pending operation.
While the operation is pending, the object is marked Unsafe in the primary domain database. The
Operation field in the dialog box displays the pending operation. An unsafe object can have other
operations performed on it, such as being added to a distribution list; however, the object record is
not distributed to other domains and post offices in the system until it is marked Safe.
GroupWise System Operations 65

All pending operations require confirmation that the operation was either successfully performed or
could not be performed. If the operation was successful, the pending operation is removed from the
list, the record is marked in the database as Safe, and the record is distributed to all other domains
and post offices in your system. If the operation could not be performed, the pending operation
remains in the list where you can monitor and manage it.
1 In ConsoleOne, connect to the domain whose pending operations you want to view, as
described in Section 4.1, “Select Domain,” on page 55.
2 Make sure the agents are running for the domain and/or post office where you are checking for
pending operations
3 Click Too ls > GroupWise System Operations > Pending Operations.
While an operation is being validated, the Pending Operations dialog box displays the object
and the operation waiting completion and confirmation.
4 For more detailed information, select the pending operation, then click View.
5 If conditions on the network have changed so that a pending operation might now succeed,
select the pending operation, then click Retry.
6 If you want to cancel a pending operating that has not yet taken place, select the pending
operation, then click Undo.
novdocx (en) 22 June 2009
4.6 Addressing Rules
You can use the Addressing Rules feature to configure GroupWise so that users can enter shortened
forms of e-mail addresses. For more information, see Section 6.9, “Facilitating Addressing through
GroupWise Gateways,” on page 108.
4.7 Time Zones
When you create a domain or post office, you select the time zone in which it is located. This
ensures that GroupWise users in other time zones receive Calendar events and tracking information
adjusted for local time.
The time zone list includes predefined definitions for each time zone. Most time zones include
multiple definitions to account for different locations within the time zone. Each time zone
definition allows you to specify the Daylight Saving Time dates and bias (1 hour, 30 minutes, etc.).
You can modify existing time zone definitions, add new definitions, or delete definitions.
Section 4.7.1, “Modifying a Time Zone Definition,” on page 66
Section 4.7.2, “Adding a Time Zone Definition,” on page 68
Section 4.7.3, “Deleting a Time Zone Definition,” on page 69
4.7.1 Modifying a Time Zone Definition
1 In ConsoleOne, click Too ls > GroupWise System Operations > Time Zo nes.
66 GroupWise 8 Administration Guide

2 Select the time zone to modify, then click Edit to display the Edit Time Zone dialog box.
novdocx (en) 22 June 2009
3 Modify any of the following fields:
Time Zone Name: Provide a name for the time zone definition (for example, some of the
major cities in the time zone). We suggest you include a reference (+ or -) to GMT, for example
(GMT-07:00). The time zone list is sorted by the GMT offset.
Offset from GMT: Specify the hours and minutes that the time zone is offset from Greenwich
Mean Time. The offset from GMT keeps your different locations synchronized. For example, if
a conference call is scheduled for 4:00 p.m. June 1 in Salt Lake City, the call would appear on a
schedule in Adelaide at 8:30 a.m. June 2. If you are in the western hemisphere (west of the
Greenwich Meridian and east of the International Date Line) be sure the hour offset is negative
(-). If you are in the eastern hemisphere (east of the Greenwich meridian and west of the
International Date Line) be sure the hour offset is positive.
Abbreviation: Specify an abbreviation for the time zone. For example, the abbreviation for
Atlantic Standard Time could be AST; the abbreviation for Atlantic Daylight Time could be
ADT.
Observe Daylight Saving Time: If the time zone observes daylight saving time, click the
Observe Daylight Saving Time box, then fill out the remaining fields.
Start Day: Select the week, day, month, and hour daylight saving time starts.
Last Day: Select the week, day, month, and hour daylight saving time ends.
Bias: Enter the number of hours and minutes that the clock changes at the daylight saving time
start day, such as 1 hour or 1 hour 30 minutes.
Example:
Start day: Second Sunday of March at 2:00 am.
GroupWise System Operations 67

Last day: First Sunday of November at 2:00 am.
Bias: 1 hour 0 minutes
4 Click OK to save the changes.
4.7.2 Adding a Time Zone Definition
1 In ConsoleOne, click Too ls > GroupWise System Operations > Time Zo nes.
novdocx (en) 22 June 2009
2 Click Add to display the Add Time Zone dialog box.
3 Fill in the following fields:
Time Zone Name: Provide a name for the time zone definition (for example, some of the
major cities in the time zone). We suggest you include a reference (+ or -) to GMT, for example
(GMT-07:00). The time zone list is sorted by the GMT offset.
Offset from GMT: Specify the hours and minutes that the time zone is offset from Greenwich
Mean Time. The offset from GMT keeps your different locations synchronized. For example, if
a conference call is scheduled for 4:00 p.m. June 1 in Salt Lake City, the call would appear on a
schedule in Adelaide at 8:30 a.m. June 2. If you are in the western hemisphere (west of the
Greenwich Meridian and east of the International Date Line) be sure the hour offset is negative
(-). If you are in the eastern hemisphere (east of the Greenwich meridian and west of the
International Date Line) be sure the hour offset is positive.
Abbreviation: Specify an abbreviation for the time zone. For example, the abbreviation for
Atlantic Standard Time could be AST; the abbreviation for Atlantic Daylight Time could be
ADT.
68 GroupWise 8 Administration Guide

Observe Daylight Saving Time: If the time zone observes daylight saving time, click the
Observe Daylight Saving Time box, then fill out the remaining fields:
Start Day: Select the day and time that daylight saving time starts.
Last Day: Select the day and time that daylight saving time ends.
Bias: Select the number of hours and minutes that the clock changes at the daylight saving
time start day, such as1 hour or 1 hour 30 minutes.
4 Click OK to add the definition to the time zone list.
4.7.3 Deleting a Time Zone Definition
When you delete a time zone from the list, you can no longer select it for a domain or post office.
1 In ConsoleOne, click Too ls > GroupWise System Operations > Time Zo nes.
novdocx (en) 22 June 2009
2 Select the time zone to remove from the list, click Delete, then click Yes to confirm the deletion.
4.8 External System Synchronization
The External System Synchronization feature lets you automatically synchronize information
between your system and an external GroupWise system connected to your system. For information
about connecting GroupWise systems and keeping information synchronized between them, see
“Connecting to Other GroupWise Systems” in the GroupWise 8 Multi-System Administration Guide.
4.9 Software Directory Management
The Software Directory Management feature lets you manage GroupWise software distribution
directories. A software distribution directory is simply an image of the GroupWise DVD or
downloaded GroupWise 8 image located on a network server. Diagrams of the contents of software
distribution directories are provided in “Directory Structure Diagrams” in GroupWise 8
Troubleshooting 3: Message Flow and Directory Structure:
“NetWare/Windows Software Distribution Directory”
“Linux Software Distribution Directory”
GroupWise System Operations 69

From this network location, you can distribute the GroupWise client software to users or install
additional GroupWise software such as the Message Transfer Agent, Post Office Agent, Internet
Agent, WebAccess, and Monitor.
When you install GroupWise, one software distribution directory is created automatically. Using
Software Directory Management, you can create additional software distribution directories, update
existing software distribution directories, or delete existing software distribution directories. A
single software distribution directory can service multiple post offices and can contain software for
multiple platforms.
Section 4.9.1, “Creating a Software Distribution Directory,” on page 70
Section 4.9.2, “Updating a Software Distribution Directory,” on page 72
Section 4.9.3, “Deleting a Software Distribution Directory,” on page 73
4.9.1 Creating a Software Distribution Directory
1 Make sure the directory you want to use as the software distribution directory exists.
All distribution subdirectories (admin, agents, client, and so forth) will be created under this
directory.
2 Click Too ls > GroupWise System Operations > Software Directory Management to display the
Software Distribution Directory Management dialog box.
novdocx (en) 22 June 2009
The Software Distribution Directories list includes all software distribution directories defined
in your GroupWise system.
3 Click Create to display the Create Software Distribution Directory dialog box.
70 GroupWise 8 Administration Guide

4 Fill in the following fields:
Name: Specify a name to identify the software distribution directory within your GroupWise
system. For example, whenever you create a post office, you associate it with a software
distribution directory. The software distribution directory’s name, not its location, appears in
the list of directories from which you can select. The name can include any characters; there are
no restrictions.
novdocx (en) 22 June 2009
Description: Specify an optional description for the software distribution directory. You might
want to use this description to indicate the software version or to give other pertinent
information.
Location: Specify the location where you want to create the software distribution directory. If
you specify a path to a directory that does not exist, ConsoleOne creates the directory for you.
NetWare
and
Windows:
Linux: In the Linux Path field, specify the location where you want to create a software
Macintosh: The AppleTalk Path field is used only if you are still running the GroupWise 5.2
In the UNC Path field, specify the location where you want to create a software
distribution directory based on the GroupWise 8 DVD or downloaded GroupWise 8
image. The Windows client checks this location for software updates.
distribution directory based on the GroupWise 8 DVD or downloaded GroupWise 8
image. The Linux/Mac client checks this location for software updates for both the
Linux and Macintosh versions of the Linux/Mac client.
Macintosh client.
You can fill in more than one field in order to distribute software for multiple platforms from a
single software distribution directory.
Copy Software From: Select this option to copy GroupWise software to the new directory,
then choose from the following source locations:
Software Distribution Directory: If you want to copy software from an existing
software distribution directory, select this option, then select the software distribution
directory. All directories are copied.
GroupWise System Operations 71

Path: If you want to copy software from a location that is not defined as a software
distribution directory in your GroupWise system (such as the GroupWise 8 DVD or
downloaded GroupWise 8 image), select this option, then browse for and select the correct
path.
5 Click OK to create the software distribution directory and add it to the list.
novdocx (en) 22 June 2009
6 Click Close to exit the dialog box.
Each time it starts, the POA checks to make sure it can access all of the software distribution
directories in the list. If it encounters a problem accessing any software distribution directory, the
POA notifies you of the problem through the POA agent console and the POA log file. This helps
ensure that each software distribution directory is always available.
4.9.2 Updating a Software Distribution Directory
1 Click Too ls > GroupWise System Operations > Software Directory Management to display the
Software Distribution Directory Management dialog box.
The Software Distribution Directories list includes all software distribution directories defined
in your GroupWise system.
2 Select the software distribution directory to update, then click Update to display the Update
Software Distribution Directory dialog box.
72 GroupWise 8 Administration Guide

3 Fill in the following fields:
Update by Copying From: Select this option, then choose from the following source
locations:
Software Distribution Directory: If you want to copy software from an existing software
distribution directory, select this option, then select the software distribution directory. All
files and subdirectories are copied.
Path: If you want to copy software from a location, that is not defined as a software
distribution directory in your GroupWise system (such as the GroupWise 8 DVD or
downloaded GroupWise 8 image), select this option, then browse for and select the correct
path.
Force Auto-Update Check by GroupWise Components: This option causes the GroupWise
Post Office Agent (in client/server access mode) or the GroupWise client (in direct access
mode) to check the software distribution directory for a new version of the GroupWise client; if
a new version is found, the next time a user starts the GroupWise client, he or she is prompted
to update the client software.
The Force Auto-Update Check by GroupWise Components option is automatically selected
when you select the Update by Copying From option. If you don’t select the Update by
Copying From option, you can still select this option and then click OK. This forces an auto-
update check of the client software version, but the software distribution directory’s files are
not updated.
novdocx (en) 22 June 2009
To determine the current client software version in ConsoleOne, click Too ls > GroupWise
Diagnostics > Record Enumerations to display a list of records types in the domain database.
From the drop-down list, select Areas by ID, select a software distribution directory, then click
Info to list detailed information about the software distribution directory. Check the Software
Version field to determine the GroupWise client software version.
4 Click OK to update the directory’s software.
4.9.3 Deleting a Software Distribution Directory
When you delete a software distribution directory, the directory is removed from the file system and
no longer appears in the list of software distribution directories. You cannot delete a software
distribution directory if any post offices are still configured to access it.
To delete a software distribution directory:
1 Click Too ls > GroupWise System Operations > Software Directory Management to display the
Software Distribution Directory Management dialog box.
GroupWise System Operations 73

The Software Distribution Directories list includes all software distribution directories defined
in your GroupWise system.
2 Select the directory to delete, click Delete, then click Yes to confirm the deletion.
novdocx (en) 22 June 2009
4.10 Restore Area Management
A restore area is a location you designate to hold a backup copy of a post office so that you or
GroupWise users can access it to retrieve mailbox items that are unavailable in your live GroupWise
system. The Restore Area Management feature lets you manage your GroupWise system’s restore
areas.
Detailed information for using restore areas is provided in Section 32.5, “Restoring Deleted Mailbox
Items,” on page 429. Information about backing up post offices is provided in Section 31.2,
“Backing Up a Post Office,” on page 423.
4.11 Internet Addressing
By default, GroupWise uses a proprietary address format consisting of a user’s ID, post office, and
domain (userID.post_office.domain). After you install the GroupWise Internet Agent, you can
configure your GroupWise system to handle one or more formats of Internet e-mail addresses. For
setup instructions, see Chapter 45, “Configuring Internet Addressing,” on page 717
4.12 Trusted Applications
Trusted applications are third-party programs that can log into Post Office Agents (POAs) and
Internet Agents in order to access GroupWise mailboxes without needing personal user passwords.
Trusted applications might perform such services as message retention or synchronization with
mobile devices. The Trusted Application feature allows you to edit and delete trusted applications
that are available in your GroupWise system.
For information about creating and installing trusted applications, search for GroupWise Trusted
Application API at the Novell Developer Kit Web site (http://developer.novell.com/wiki/index.php/
Category:Novell_Developer_Kit). For security guidelines for managing trusted applications, see
Section 85.6, “Protecting Trusted Applications,” on page 1209
Section 4.12.1, “Creating a Key for a Trusted Application,” on page 75
74 GroupWise 8 Administration Guide

Section 4.12.2, “Editing a Trusted Application,” on page 76
Section 4.12.3, “Deleting a Trusted Application,” on page 78
4.12.1 Creating a Key for a Trusted Application
A trusted application key allows a third-party program to authenticate to the POA or the Internet
Agent and obtain GroupWise information that would otherwise be available only by logging in to
GroupWise mailboxes.
Before GroupWise 8 Support Pack 1, trusted application keys needed to be created by the third-party
program developer, using the GroupWise Trusted Application API (http://developer.novell.com/
wiki/index.php/GroupWise_Trusted_Application_API) at the Novell Developer Kit Web site (http://
developer.novell.com/wiki/index.php/Category:Novell_Developer_Kit).
Starting with GroupWise 8 Support Pack 1, you can create a trusted application key in ConsoleOne
for use with both Linux and Windows trusted applications.
1 Click Too ls > GroupWise System Operations > Trusted Applications to display the Configure
Trusted Applications dialog box.
novdocx (en) 22 June 2009
2 Click Create.
3 Fill in the following fields as needed for your trusted application:
Name: Specify the name of the trusted application as you want it to be listed in ConsoleOne.
Description: Specify a description for the trusted application.
TCP/IP Address: If you want to restrict the location from which the trusted application can
run, specify the IP address of the server from which the application can run. To do so, click the
Edit (pencil) button, then specify the IP address or DNS hostname of the trusted application’s
server.
GroupWise System Operations 75

If you want to allow the trusted application to be run from any server, do not specify an IP
address or DNS hostname.
Requires SSL: Select this option to require a secure (SSL) connection between the trusted
application and POAs and Internet Agents.
Provides Message Retention Service: Select this option if the purpose of the trusted
application is to retain GroupWise user messages by copying them from GroupWise mailboxes
into another storage medium.
Turning on this option defines the trusted application as a Message Retention Service
application. However, in order for GroupWise mailboxes to support message retention, you
must also turn on the Enable Message Retention Service option in GroupWise Client Options
(To ol s > GroupWise Utilities > Client Options > Environment > Retention). You can enable
individual mailboxes, all mailboxes in a post office, or all mailboxes in a domain by selecting
the appropriate object (User, Post Office, or Domain) before selecting Client Options. For more
information, see Chapter 69, “Setting Defaults for the GroupWise Client Options,” on
page 1085.
For information about the complete process required to use a trusted application for message
retention, see Chapter 33, “Retaining User Messages,” on page 435.
Allow Access to Archive Service: Select this option if your trusted application interacts with
an archive service, as described in Section 4.2.7, “Archive Service Settings,” on page 63.
Specify the IP address or DNS hostname of the server where the archive service is running.
Select Archive Service Requires SSL if you want to use a secure connection between the
message retention service and the archive service.
Location for Key File: Browse to and select the directory where you want to create the trusted
application key file.
novdocx (en) 22 June 2009
Name of Key File: Specify the name of the trusted application key file to create. The thirdparty program must be designed to successfully access the trusted application key file where
you create it.
4 Click OK to save the trusted application configuration information.
For information about how the POA handles trusted application processing of message files, see
Section 36.3.6, “Configuring Trusted Application Support,” on page 520.
4.12.2 Editing a Trusted Application
You can edit a trusted application’s description, IP address, port, and SSL settings.
1 Click Too ls > GroupWise System Operations > Trusted Applications to display the Configure
Trusted Applications dialog box.
2 In the Trusted Applications list, select the application you want to edit, then click Edit.
76 GroupWise 8 Administration Guide

3 Modify the following fields as needed for your trusted application:
Name: This field displays the trusted application’s name. You cannot change the name.
Description: Specify a description for the trusted application.
TCP/IP Address: If you want to restrict the location from which the trusted application can
run, specify the IP address of the server from which the application can run. To do so, click the
Edit (pencil) button, then specify the IP address or DNS hostname of the trusted application’s
server.
If you want to allow the trusted application to be run from any server, do not specify an IP
address or DNS hostname.
Requires SSL: Select this option to require a secure (SSL) connection between the trusted
application and POAs and Internet Agents.
novdocx (en) 22 June 2009
Provides Message Retention Service: Select this option if the purpose of the trusted
application is to retain GroupWise user messages by copying them from GroupWise mailboxes
into another storage medium.
Turning on this option defines the trusted application as a Message Retention Service
application. However, in order for GroupWise mailboxes to support message retention, you
must also turn on the Enable Message Retention Service option in GroupWise Client Options
(To ol s > GroupWise Utilities > Client Options > Environment > Retention). You can enable
individual mailboxes, all mailboxes in a post office, or all mailboxes in a domain by selecting
the appropriate object (User, Post Office, or Domain) before selecting Client Options. For more
information, see Chapter 69, “Setting Defaults for the GroupWise Client Options,” on
page 1085.
For information about the complete process required to use a trusted application for message
retention, see Chapter 33, “Retaining User Messages,” on page 435.
Allow Access to Archive Service: Select this option if you have also installed an archive
service, as described in Section 4.2.7, “Archive Service Settings,” on page 63. Specify the IP
address or DNS hostname of the server where the archive service is running. Select Archive
Service Requires SSL if you want to use a secure connection between the message retention
service and the archive service.
4 Click OK to save the trusted application configuration information.
For information about how the POA handles trusted application processing of message files, see
Section 36.3.6, “Configuring Trusted Application Support,” on page 520.
GroupWise System Operations 77

4.12.3 Deleting a Trusted Application
1 Click Too ls > GroupWise System Operations > Trusted Applications to display the Configure
Trusted Applications dialog box.
2 In the Trusted Applications list, select the application you want to delete, click Delete, then
click Yes to confirm the deletion.
4.13 LDAP Servers
novdocx (en) 22 June 2009
The LDAP Servers feature lets you define the LDAP servers you want to use for LDAP
authentication to GroupWise mailboxes.
For information about defining LDAP servers, see “Providing LDAP Server Configuration
Information” on page 514.
For information about using LDAP for user authentication to GroupWise mailboxes, see “Providing
LDAP Authentication for GroupWise Users” on page 514.
4.14 Global Signatures
You can build a list of globally available signatures that can be automatically appended to messages
sent by GroupWise client users. The global signature is appended to messages after any personal
signatures that users create for themselves. For setup instructions, see Section 14.3, “Adding a
Global Signature to Users’ Messages,” on page 229.
78 GroupWise 8 Administration Guide

5
GroupWise Utilities
The GroupWise® utilities in ConsoleOne® are used to perform various maintenance and
configuration tasks for your GroupWise system. The following sections provide information about
the system utilities included on the To ol s menu (To ol s > GroupWise System Utilities):
Section 5.1, “Mailbox/Library Maintenance,” on page 79
Section 5.2, “System Maintenance,” on page 80
Section 5.3, “Backup/Restore Mailbox,” on page 80
Section 5.4, “Recover Deleted Account,” on page 80
Section 5.5, “Client Options,” on page 80
Section 5.6, “Expired Records,” on page 80
Section 5.7, “Email Address Lookup,” on page 81
Section 5.8, “Synchronize,” on page 81
Section 5.9, “User Move Status,” on page 81
novdocx (en) 22 June 2009
5
Section 5.10, “Link Configuration,” on page 81
Section 5.11, “Document Properties Maintenance,” on page 82
Section 5.12, “Import/Export,” on page 82
Section 5.13, “New System,” on page 82
Section 5.14, “Check eDirectory Schema,” on page 82
Section 5.15, “Gateway Alias Migration,” on page 83
Section 5.16, “GW / eDirectory Association,” on page 83
Section 5.17, “Standalone GroupWise Utilities,” on page 88
In addition to the system utilities included on the Tools menu in ConsoleOne, GroupWise includes
the following standalone utilities:
Section 5.17.1, “GroupWise Check Utility (GWCheck),” on page 88
Section 5.17.2, “GroupWise Target Service Agent for File Systems (TSAFSGW),” on page 88
Section 5.17.3, “GroupWise Backup Time Stamp Utility (GWTMSTMP),” on page 88
Section 5.17.4, “GroupWise Database Copy Utility (DBCOPY),” on page 89
Section 5.17.5, “GroupWise Generate CSR Utility (GWCSRGEN),” on page 89
5.1 Mailbox/Library Maintenance
You can use the Mailbox/Library Maintenance utility to check the integrity of and repair user/
resource, message, and library databases, and to free disk space in post offices.
For detailed information and instructions, see Chapter 27, “Maintaining User/Resource and Message
Databases,” on page 401, Chapter 28, “Maintaining Library Databases and Documents,” on
page 407, and Chapter 30, “Managing Database Disk Space,” on page 415.
GroupWise Utilities
79

5.2 System Maintenance
You can use the System Maintenance utility to check the integrity of and repair domain and post
office databases.
For detailed information and instructions, see Chapter 26, “Maintaining Domain and Post Office
Databases,” on page 393.
5.3 Backup/Restore Mailbox
You can use the Backup/Restore Mailbox utility to restore an individual user’s Mailbox items from a
backup copy of the post office database.
For detailed information and instructions, see Chapter 32, “Restoring GroupWise Databases from
Backup,” on page 427.
5.4 Recover Deleted Account
If you have a reliable backup procedure in place, you can use the Recover Deleted Account utility to
restore recently deleted user and resource accounts from the backup version of the GroupWise
primary domain database. After the account has been re-created, you can then restore the
corresponding mailbox and its contents to complete the process. Membership in distribution lists
and ownership of resources must be manually re-established.
novdocx (en) 22 June 2009
For complete instructions, see Section 32.6, “Recovering Deleted GroupWise Accounts,” on
page 432.
5.5 Client Options
You can use the Client Options utility to set the default options (preferences) for the GroupWise
client. You can set options at the domain, post office, or user level. Options set at the domain level
apply to all users in the domain, and options set at the post office level apply to all users in the post
office. If you don’t want users to change options, you can lock the options.
NOTE: The GroupWise Linux/Mac client does not yet support all of the client options that can be
set in ConsoleOne.
For detailed information and instructions, see Chapter 69, “Setting Defaults for the GroupWise
Client Options,” on page 1085.
5.6 Expired Records
You can use the Expired Records utility to view and manage the GroupWise user accounts that have
an expiration date assigned to them.
For detailed information and instructions, see Chapter 14.10, “Removing GroupWise Accounts,” on
page 253.
80 GroupWise 8 Administration Guide

5.7 Email Address Lookup
You can use the Email Address Lookup utility to search for the GroupWise object (User, Resource,
Distribution List) that an e-mail address is associated with. You can then view the object’s
information. For more information, see Section 14.7.1, “Ensuring Unique E-Mail Addresses,” on
page 247.
5.8 Synchronize
GroupWise automatically replicates information (domain, post office, user, resource, and so forth) to
all domain and post office databases throughout your GroupWise system. This ensures that the
information in each database is synchronized.
Situations might occur, however, that result in information not being replicated to all domain and
post office databases. If you think that some information has not been replicated correctly, you can
cause the information to be replicated again so that it becomes synchronized throughout your entire
GroupWise system. For example, if you notice that a user’s information is incorrect in the Address
Book, you can synchronize that user’s eDirectory
replicated to all domain and post office databases again.
TM
User object so that his or her information is
novdocx (en) 22 June 2009
For detailed information and instructions, see Chapter 29, “Synchronizing Database Information,”
on page 411.
5.9 User Move Status
You can use the User Move Status utility to track progress as you move users from one post office to
another. Using the User Move Status utility, you can:
List users that are currently being moved and filter the list by domain, post office, and object.
View the current status of the move for each object and see any errors that have occurred.
Immediately retry a move where some of the information on the user inventory list failed to
arrive at the destination post office. By default, the POA retries automatically every 12 hours
for seven days to move all the information included on the user inventory list.
Stop the POA from continuing its automatic retries.
Restart (from the beginning) a move that has stopped before successful completion.
Refresh the list to display current move status and clear completed moves from the list.
For more information, see Section 14.4.7, “Monitoring User Move Status,” on page 238.
5.10 Link Configuration
GroupWise domains and post offices must be properly linked in order for messages to flow
throughout your GroupWise system. You can use the Link Configuration utility to ensure that your
domains and post offices are properly linked and to optimize the links if necessary. For detailed
information and instructions, see Chapter 10, “Managing the Links between Domains and Post
Offices,” on page 145.
GroupWise Utilities 81

5.11 Document Properties Maintenance
Each document stored in the GroupWise Document Management Services (DMS) has properties
associated with it. These properties identify the document, determine its disposition (archive, delete,
keep), set its level of security, and provide information for locating it in searches. Certain document
properties are standard in GroupWise. You can also customize DMS for your organization by
defining additional properties. For detailed information and instructions, see Section 23.2.1,
“Customizing Document Properties,” on page 354.
NOTE: On Linux, Document properties maintenance is not available in ConsoleOne.
5.12 Import/Export
novdocx (en) 22 June 2009
The GroupWise Import utility reads an ASCII-delimited text file created by the GroupWise Export
utility or by a third-party export, and creates Novell
attributes from the file. The Import utility supports most eDirectory classes (including extensions)
and GroupWise classes. You can specify the delimiters, eDirectory contexts, and file field positions
to use during import. For instructions, see Section 13.2.4, “Creating GroupWise Accounts by
Importing Users,” on page 219.
NOTE: On Linux, the Import/Export utility is not available for use in ConsoleOne.
®
eDirectory and GroupWise objects with
5.13 New System
You can use the New System utility to create a new GroupWise system.
The process for creating a new GroupWise system is similar to the process of creating your initial
GroupWise system (see “Installing a Basic GroupWise System” in the GroupWise 8 Installation
Guide), except that you don’t install the software from the GroupWise 8 DVD or downloaded
GroupWise 8 image. Instead, during creation of the new system, you are asked to specify an existing
software distribution directory to use in the new system. If you don’t want to share software
distribution directories between systems, you should create a new distribution directory. For
information about creating software distribution directories, see Section 4.9, “Software Directory
Management,” on page 69.
5.14 Check eDirectory Schema
GroupWise systems include GroupWise-specific objects that are not available in eDirectory until the
eDirectory schema for the tree has been extended for these objects. Schema extension takes place
automatically when you create a GroupWise system using the GroupWise Setup Advisor. You can
check an eDirectory tree to determine whether its schema has been extended for GroupWise.
1 In ConsoleOne, select a tree to check.
2 Click Too ls > GroupWise Utilities > Check eDirectory Schema.
If the eDirectory tree has not yet been extended for GroupWise, the eDirectory Schema
Extension dialog box lists the changes that are required for GroupWise.
3 Click Yes to extend the schema for GroupWise so that you can create GroupWise objects in the
selected tree.
82 GroupWise 8 Administration Guide

or
Click No if you decide you do not want to be able to create GroupWise objects in the selected
tree.
If the schema of the tree has already been extended for GroupWise objects, a message notifies you
of this and you can immediately create new GroupWise objects in the selected tree.
5.15 Gateway Alias Migration
If you have been using SMTP gateway aliases to handle e-mail addresses that do not fit the default
format expected by the Internet Agent or to customize users’ Internet addresses, the Gateway Alias
Migration utility can convert the usernames in those gateway aliases into preferred e-mail IDs. The
Preferred E-Mail ID feature was first introduced in GroupWise 6.5 and is the suggested method for
overriding the current e-mail address format, as described in Section 14.7.2, “Changing a User’s
Internet Addressing Settings,” on page 247. The Gateway Alias Migration utility can also update
users’ preferred Internet domain names based on their existing gateway aliases.
For usage instructions, see Section 45.3, “Transitioning from SMTP Gateway Aliases to Internet
Addressing,” on page 727.
novdocx (en) 22 June 2009
5.16 GW / eDirectory Association
The GW / eDirectory Association menu includes the following options:
Section 5.16.1, “Graft GroupWise Objects,” on page 83
Section 5.16.2, “Invalid Associations,” on page 84
Section 5.16.3, “Associate Objects,” on page 85
Section 5.16.4, “Disassociate GroupWise Attributes,” on page 87
Section 5.16.5, “Convert External Entity to User,” on page 87
Section 5.16.6, “Convert User to External Entity,” on page 87
5.16.1 Graft GroupWise Objects
You can use the Graft GroupWise Objects utility to create GroupWise objects in the eDirectory tree
from the information in your GroupWise domain database. The utility creates Domain, Post Office,
and Gateway objects as well as User, Resource, and Distribution List objects. When grafting
GroupWise user information from the GroupWise database into eDirectory, you can match the
GroupWise user information to an existing User object, or you can create a new GroupWise External
Entity object and convert it into an eDirectory User object, as described in Section 5.16.5, “Convert
External Entity to User,” on page 87.
Grafting GroupWise objects from the GroupWise database into eDirectory can be useful in the
following situations:
The GroupWise database includes information that is not included in eDirectory.
You want to move GroupWise information (domains, post offices, gateways, users, or
resources) from one eDirectory tree to another.
GroupWise Utilities 83

To graft GroupWise objects:
1 In ConsoleOne, select a container in the eDirectory view.
2 Click Too ls > GroupWise Utilities > GW / eDirectory Associations > Graft GroupWise Object
to display the Graft GroupWise Objects dialog box.
novdocx (en) 22 June 2009
3 Follow the on-screen prompts. If you need information about a dialog box, click the Help
button.
5.16.2 Invalid Associations
Normally, a GroupWise object in eDirectory points to corresponding information in the GroupWise
domain database. In turn, the information in the GroupWise domain database points back to its
corresponding object in eDirectory.
Occasionally, a situation might arise where information in the GroupWise domain database no
longer points to the same eDirectory object that points to it. This results in an invalid association
between the information in the two directories.
You can use the Invalid Associations utility to correct invalid associations between information in
the GroupWise domain database and eDirectory.
To check for invalid associations:
1 In the eDirectory View in ConsoleOne, select the container whose objects you want to check
for invalid associations (for example, an Organization, Organizational Unit, Domain, or Post
Office).
2 Click Too ls > GroupWise Utilities > GW / eDirectory Associations > Invalid Associations to
display the Invalid Associations dialog box.
84 GroupWise 8 Administration Guide

novdocx (en) 22 June 2009
The dialog box lists each invalid association for the objects in the selected container. The
dialog box fields are described below:
Object in Question (Column I): This field lists the eDirectory object that has an invalid
association to a GroupWise object. The eDirectory object points to the GroupWise object
listed in Column II, but the GroupWise object, according to the GroupWise domain
database, does not point back to the eDirectory object.
GroupWise Object (Column II): This field lists the GroupWise object to which the
eDirectory object listed in Column I is associated.
Linked to Object (Column III): This field lists the eDirectory object to which the
GroupWise object listed in Column II has a valid association.
3 To remove the invalid association by disassociating the eDirectory object in Column I with the
GroupWise object in Column II, select the association, then click Disassociate.
4 To remove the invalid association by deleting the eDirectory object listed in Column I, select
the association, then click Delete.
5.16.3 Associate Objects
You can use the Associate Objects utility to associate GroupWise information with an eDirectory
object.
For example, if you delete a user’s eDirectory account but not his or her GroupWise account, the
user’s GroupWise information is retained as a GroupWise External User object in the GroupWise
database and can be viewed in the GroupWise View. You can then associate the GroupWise External
User object with another eDirectory User object. In essence, you are moving the GroupWise
information from one eDirectory User object to another.
GroupWise Utilities 85

In some circumstances, it is possible for the link between an eDirectory User object and its
GroupWise information to be lost. If this occurs, the GroupWise information, which still exists in
the GroupWise database, appears as a GroupWise External User object in the GroupWise View. You
can use the Associate Objects utility to reassociate the GroupWise information with the eDirectory
User object.
The Associate Objects utility can be used to associate the following objects:
GroupWise User or External User objects with eDirectory User objects
GroupWise External Entity objects with eDirectory External Entity objects
Associating GroupWise User or External User Objects with eDirectory User Objects
1 In the GroupWise View in ConsoleOne, select the GroupWise User or External User object you
want.
or
In the eDirectory View, select the eDirectory User object you want.
2 Click Too ls > GroupWise Utilities > GW / eDirectory Associations > Associate Objects.
3 If you selected a GroupWise User or External User object in Step 1, select the eDirectory User
object you want to associate with it.
novdocx (en) 22 June 2009
or
If you selected an eDirectory User object in Step 1, select the GroupWise User object you want
to associate with it.
4 Click OK to create the association.
If the eDirectory User object is already associated with another GroupWise object, you receive
a warning message indicating this. If you continue, the eDirectory User object is associated
with the selected GroupWise object and its association with the other GroupWise object is
removed.
If the GroupWise User or External User object is already associated with another eDirectory
User object, you receive a warning message indicating this. If you continue, the GroupWise
User object is associated with the selected eDirectory object and its association with the other
eDirectory object is removed.
Associating GroupWise External Entity Objects with eDirectory External Entity
Objects
1 In the GroupWise View in ConsoleOne, select the GroupWise External Entity object you want.
or
In the eDirectory View, select the eDirectory External Entity object you want.
2 Click Too ls > GroupWise Utilities > GW / eDirectory Associations > Associate Objects.
3 If you selected a GroupWise External Entity object in Step 1, select the eDirectory External
Entity object you want to associate with it.
or
If you selected an eDirectory External Entity object in Step 1, select the GroupWise External
Entity object you want to associate with it.
4 Click OK to create the association.
86 GroupWise 8 Administration Guide

If the eDirectory External Entity object is already associated with another GroupWise object,
you receive a warning message indicating this. If you continue, the eDirectory External Entity
object is associated with the selected GroupWise object and its association with the other
GroupWise object is removed.
If the GroupWise External Entity object is already associated with another eDirectory External
Entity object, you receive a warning message indicating this. If you continue, the GroupWise
External Entity object is associated with the selected eDirectory object and its association with
the other eDirectory object is removed.
5.16.4 Disassociate GroupWise Attributes
You can use the Disassociate GroupWise Attributes utility to disassociate GroupWise information
from an eDirectory User object. This results in two separate eDirectory objects:
The User object, which no longer includes any GroupWise information.
A GroupWise External User object, which represents the user’s record in the GroupWise
database and is displayed only in the GroupWise View. The External User object allows the
user to continue to have access to GroupWise and also enables you to graft the user record to
another eDirectory User object. For more information, see Section 5.16.1, “Graft GroupWise
Objects,” on page 83.
novdocx (en) 22 June 2009
To disassociate the GroupWise attributes from an eDirectory User object:
1 In ConsoleOne, select the User object whose GroupWise attributes you want to remove.
2 Click Too ls > GroupWise Utilities > GW / eDirectory Associations > Disassociate GroupWise
Attributes.
5.16.5 Convert External Entity to User
You can use the Convert External Entity to User utility to convert a GroupWise External Entity
object to an eDirectory User object.
1 In ConsoleOne, select the GroupWise External Entity object that you want to convert to an
eDirectory User object.
2 Click Too ls > GroupWise Utilities > GW / eDirectory Associations > Convert External Entity to
User.
3 Click Yes to confirm that you want the conversion performed.
5.16.6 Convert User to External Entity
You can use the Convert User to External Entity utility to convert a User object to a GroupWise
External Entity object.
1 In ConsoleOne, select the User object that you want to convert to an GroupWise External
Entity object.
2 Click Too ls > GroupWise Utilities > GW / eDirectory Associations > Convert User to External
Entity.
3 Click Ye s to confirm that you want the conversion performed.
GroupWise Utilities 87

5.17 Standalone GroupWise Utilities
Although ConsoleOne provides the primary administrative tool for managing your GroupWise
system, additional standalone utilities are provide to meet specialized needs. These utilities perform
tasks that might need to be performed in environments where ConsoleOne is not available.
Section 5.17.1, “GroupWise Check Utility (GWCheck),” on page 88
Section 5.17.2, “GroupWise Target Service Agent for File Systems (TSAFSGW),” on page 88
Section 5.17.3, “GroupWise Backup Time Stamp Utility (GWTMSTMP),” on page 88
Section 5.17.4, “GroupWise Database Copy Utility (DBCOPY),” on page 89
Section 5.17.5, “GroupWise Generate CSR Utility (GWCSRGEN),” on page 89
5.17.1 GroupWise Check Utility (GWCheck)
GroupWise Check is a standalone version of the ConsoleOne Mailbox/Library Maintenance utility.
Like the Mailbox/Library Maintenance utility, GroupWise Check checks and repairs GroupWise
user, message, library, and resource databases. However, in addition to checking post office, user,
and library databases, it also checks users’ remote, caching, and archive databases.
novdocx (en) 22 June 2009
For information about using GroupWise Check, see Section 34.1, “GroupWise Check,” on
page 439.
5.17.2 GroupWise Target Service Agent for File Systems (TSAFSGW)
The GroupWise Target Service Agent for File Systems (TSAFSGW) works with software backup
programs to provide reliable backups of a running GroupWise system on NetWare 6.5/OES and
Linux
For information about using TSAFSGW, see Section 34.2, “GroupWise Target Service Agent,” on
page 451.
5.17.3 GroupWise Backup Time Stamp Utility (GWTMSTMP)
The GroupWise Backup Time Stamp utility (GWTMSTMP) can be used to place a time stamp on a
GroupWise user database to indicate the last time the database was backed up. If a user deletes an
item from his or her mailbox and purges it from the Trash, the item is only deleted from the user’s
database if the time stamp shows that the item would have already been backed up. Otherwise, the
item remains in the user’s database until the database is backed up, at which time it is deleted from
the working database.
For information about using the GroupWise Backup Time Stamp utility, see Section 34.3,
“GroupWise Time Stamp Utility,” on page 461.
88 GroupWise 8 Administration Guide

5.17.4 GroupWise Database Copy Utility (DBCOPY)
The GroupWise Database Copy utility (DBCOPY) copies files from a live GroupWise system to a
static location for backup. During the copy process, DBCOPY prevents the files from being
modified, using the same locking mechanism used by other GroupWise programs that access
databases. This ensures that the backed-up versions are consistent with the originals even when large
databases take a substantial amount of time to copy.
For information about using the GroupWise Database Copy utility, see Section 34.4, “GroupWise
Database Copy Utility,” on page 468.
5.17.5 GroupWise Generate CSR Utility (GWCSRGEN)
To provide secure communication through an SSL (Secure Socket Layer) connection, the
GroupWise Agents (MTA, POA, and Internet Agent) require access to a server certificate and
private key.
You can use the GroupWise Generate CSR utility (GWCSRGEN) to generate a Certificate Signing
Request (CSR) file and a Private Key file.
novdocx (en) 22 June 2009
The CSR file, which is Base64 encoded, contains the information required for a Certificate
Authority (CA) to issue you a server certificate. This server certificate, when paired with the private
key generated by the GroupWise Generate CSR utility, enables GroupWise agents to use SSL
connections.
For information about SSL and certificates, see Section 75.2, “Server Certificates and SSL
Encryption,” on page 1161.
GroupWise Utilities 89

novdocx (en) 22 June 2009
90 GroupWise 8 Administration Guide

6
GroupWise Address Book
The GroupWise® Address Book plays a central role in a GroupWise user’s experience with
addressing messages. The default configuration of the GroupWise Address Book is often sufficient
for a typical GroupWise system, but a variety of customization options are available to enable the
GroupWise Address Book to meet user needs.
Section 6.1, “Customizing Address Book Fields,” on page 91
Section 6.2, “Controlling Object Visibility,” on page 96
Section 6.3, “Updating Address Book Information,” on page 97
Section 6.4, “Controlling Users’ Frequent Contacts Address Books,” on page 98
Section 6.5, “Controlling Address Book Synchronization for Remote Client Users,” on page 99
Section 6.6, “Publishing E-Mail Addresses to eDirectory.,” on page 100
Section 6.7, “Enabling Wildcard Addressing,” on page 100
Section 6.8, “Adding External Users to the GroupWise Address Book,” on page 103
novdocx (en) 22 June 2009
6
Section 6.9, “Facilitating Addressing through GroupWise Gateways,” on page 108
NOTE: In addition to the administrator-controlled changes you can make to the Address Book,
GroupWise users can make individual changes such as creating personal address books, sharing
personal address books, and accessing LDAP address books. For information about the Address
Book functionality available to users, see:
“Contacts and Address Books” in the GroupWise 8 Windows Client User Guide
“Contacts and Address Books” in the GroupWise 8 Linux/Mac Client User Guide
“Contacts and Address Books” in the GroupWise 8 WebAccess Client User Guide
6.1 Customizing Address Book Fields
The GroupWise clients displays specific fields in the GroupWise Address Book by default:
Table 6-1 Default Address Book Fields in the GroupWise Clients
Windows Client Linux/Mac Client WebAccess Client
Name Name Name
E-Mail Address E-Mail Address E-Mail Address
Title Department
Office Phone Number Office Phone Number
Fax Number
User ID
Last Name
GroupWise Address Book
91

Windows Client Linux/Mac Client WebAccess Client
First Name
NOTE: Address Book fields in the WebAccess client are set permanently and cannot be changed by
you or by client users.
Windows and Linux/Mac client users can add more columns to their own Address Book. In the
client, users right-click the Address Book column header, then select a column from the drop-down
list or click More Columns to display a longer list of possible columns.
In ConsoleOne
®
, you can add columns to the list that is displayed in the GroupWise clients when
users click More Columns. This is configured at the domain level.
Section 6.1.1, “Adding eDirectory Fields to the Address Book,” on page 92
Section 6.1.2, “Adding LDAP Fields to the Address Book,” on page 93
Section 6.1.3, “Changing the Default Sort Order,” on page 95
Section 6.1.4, “Changing the Default Field Order,” on page 95
novdocx (en) 22 June 2009
Section 6.1.5, “Removing Fields from the Address Book,” on page 96
Section 6.1.6, “Preventing the User Description Field from Displaying in the Address Book,”
on page 96
6.1.1 Adding eDirectory Fields to the Address Book
Adding an eDirectory field makes the field available in the GroupWise Address Book. However,
individual users can determine which available fields they want to display when they view the
GroupWise Address Book in the GroupWise client.
®
1 In ConsoleOne
click Properties.
2 Click GroupWise > Address Book to display the Address Book page.
, right-click the Domain object whose Address Book you want to modify, then
92 GroupWise 8 Administration Guide

The Address Book Fields list shows all fields that are available for selection in the Address
Book in the GroupWise client.
The Available Fields list shows additional predefined GroupWise user fields that can be added
to the Address Book. Novell® eDirectoryTM also includes user information that is not associated
to GroupWise user fields. You can use the Map Additional Fields button to map eDirectory user
fields to GroupWise fields so that they can be displayed in the GroupWise Address Book.
3 To add a field that is not displayed in the Available Fields list, click Map Additional Fields,
select an unmapped Admin-defined field, click Edit, select the eDirectory property to map to
the Admin-defined field, then click OK twice to add it to the Available Fields list.
NOTE: To add fields independent of a specific domain’s Address Book, use To ol s >
GroupWise System Operations > Admin-Defined Fields to display the Administrator-Defined
Fields dialog box. The fields defined in this dialog box are available for selection and display in
the Address Book belonging to any domain. For more information, see Section 4.4, “Admin-
Defined Fields,” on page 64.
4 In the Available Fields list, select the field you want to make available in the Address Book,
then click the left-arrow to move it to the Address Book Fields list.
The field is added to the bottom of the list. The Address Book displays the fields in the order
they are listed.
novdocx (en) 22 June 2009
5 If necessary, select the field, then use the up-arrow and down-arrow to move the field to the
appropriate location in the list.
6 If the field is an Administrator-defined field and you want to change how the field is labeled in
the Address Book, select the field, click Edit Label, specify a new label in the Address Book
Label field, then click OK.
Administrator-defined fields are marked with an asterisk (*). You can only edit an
Administrator-defined field that is in the Address Book Fields list.
7 When you are finished, click OK in the Address Book page to save your changes.
6.1.2 Adding LDAP Fields to the Address Book
A number of LDAP fields available in ConsoleOne are not listed on the Address Book property page
of the Domain object. These LDAP fields can also be added to the GroupWise Address Book by
making them visible in eDirectory.
1 In ConsoleOne, right-click your Tree object, then click Properties.
GroupWise Address Book 93

2 Select Public, click Assigned Rights, then click Add Property.
novdocx (en) 22 June 2009
In the Add Property dialog box, all capitalized property names sort ahead of all uncapitalized
property names.
3 Select Show All Properties, scroll down to locate the property you want to add to the
GroupWise Address Book, select the property (for example, Title), then click OK.
94 GroupWise 8 Administration Guide

4 With the new property highlighted, select Inheritable, then click OK twice to save the new
property settings.
When you return to the Address Book property page of the Domain object, you can select the new
property to display in the GroupWise Address Book, as described in Section 6.1.1, “Adding
eDirectory Fields to the Address Book,” on page 92.
novdocx (en) 22 June 2009
6.1.3 Changing the Default Sort Order
NOTE: The Sort Address Book By field on the Address Book page of the Domain object is obsolete
and no longer affects Address Book sorting in the GroupWise clients.
The sort order determines whether addresses in the Address Book are sorted by first name or last
name. The sort order you establish becomes the default for the Address Book and remains in effect
until individual users change it.
The preset default sort order for the Address Book is First Name/Last Name. You can change the
default sort order to Last Name/First Name.
On the Address Book page of the Domain object:
1 In the Sort Address Book By list, select the sort order you want to be the default.
2 Click OK to save your changes.
6.1.4 Changing the Default Field Order
The field order determines the order in which the GroupWise fields are displayed in the Address
Book. The field order you establish becomes the default for the Address Book and remains in effect
until individual users change the order.
On the Address Book page of the Domain object:
1 In the Address Book Fields list, select a field whose position you want to change, then use the
up-arrow and down-arrow to move the field to its new position.
2 Repeat Step 1 until you have established the field order you want.
3 Click OK to save your changes.
GroupWise Address Book 95

6.1.5 Removing Fields from the Address Book
If there are fields in the Address Book that are not used or that you don’t want displayed to users,
you can remove them.
On the Address Book page of the Domain object:
1 In the Address Book Fields list, select the field you want to remove, then click the right-arrow
to move the field to the Available Fields list.
The fields in the Available Fields list are not displayed in the Address Book.
2 Repeat Step 1 to remove additional fields you don’t want to use.
3 Click OK to save your changes.
6.1.6 Preventing the User Description Field from Displaying in the Address Book
The GroupWise Address Book provides detailed user information as well as e-mail addresses. A
user’s detailed information includes a comments field that displays the information stored in the
User object Description field (User object > General > Identification). If you have included
information in the Description field that you don’t want displayed in the GroupWise Address Book,
you can prevent the field’s contents from being displayed.
novdocx (en) 22 June 2009
TIP: To view a user’s detailed information, including the comments field, in the Address Book,
select the user’s address, then click Vie w > Details.
On the Address Book page of the Domain object:
1 Enable the Do Not Display User Comments option.
2 Click OK to save your changes.
6.2 Controlling Object Visibility
An object’s visibility determines which post office databases the object’s information is distributed
to. A post office’s users can only see an object’s information in the Address Book if the object’s
information has been distributed to its post office.
Visibility applies to the following objects: user, external user, external entity, resource, external
resource, distribution list, eDirectory group, eDirectory organizational role, and nickname.
IMPORTANT: Unlike the other objects listed above, nicknames that have been distributed to a post
office do not actually appear in the post office’s Address Book. Users must type the nickname’s
address in the message rather than select it from the Address Book.
You can choose from the following visibility levels:
System: The object is visible in every post office Address Book throughout the system; if
external system synchronization is turned on, it is also available for distribution to other
GroupWise systems. This is the default for users, external users, resources, external resources,
external entities, and nicknames.
96 GroupWise 8 Administration Guide

Domain: The object is visible only in the Address Book of the post offices located in the
object’s domain.
Post Office: The object is visible only in the Address Book of the object’s post office. This is
the default for distribution lists, groups, and organizational roles.
None: The object is not visible in the Address Book of any post offices.
For information about setting visibility for various GroupWise objects, see:
Section 14.7.3, “Changing a User’s Visibility in the Address Book,” on page 249
Section 16.6.2, “Changing a Resource’s Visibility in the Address Book,” on page 270
Section 18.8.2, “Changing a Distribution List’s Visibility in the Address Book,” on page 288
Section 19.3, “Changing a Group’s Visibility in the Address Book,” on page 295
Section 20.3, “Changing an Organizational Role’s Visibility in the Address Book,” on page 301
6.3 Updating Address Book Information
Each post office database includes all the information displayed in the GroupWise Address Book
that is stored in the domain. By keeping the information in the post office, the post office’s users
have quick access to it. Whenever changes are made in eDirectory that affect Address Book
information, the information is replicated to each domain database and each post office database.
novdocx (en) 22 June 2009
If information in a post office’s Address Book is out-of-date or missing, you can synchronize the
missing information with eDirectory or rebuild the post office database to obtain updated
information from the domain.
Section 6.3.1, “Synchronizing Information,” on page 97
Section 6.3.2, “Rebuilding the Post Office Database,” on page 97
6.3.1 Synchronizing Information
The information for each object (user, resource, distribution list, and so forth) in the GroupWise
Address Book is contained in eDirectory. When an object’s information is incorrect in a post office’s
Address Book, you can synchronize the object’s information in the Address Book with the
information stored in eDirectory. This causes the correct information to be replicated to each domain
and post office database in the GroupWise system. For instructions, see Chapter 29, “Synchronizing
Database Information,” on page 411.
6.3.2 Rebuilding the Post Office Database
If the post office Address Book is missing a lot of information, or if you are having other difficulties
with information in the Address Book, you might want to rebuild the post office database. This
causes all information to be replicated to the post office database from the domain database. For
instructions, see Section 26.3, “Rebuilding Domain or Post Office Databases,” on page 397.
GroupWise Address Book 97

6.4 Controlling Users’ Frequent Contacts Address Books
By default, e-mail addresses of those to whom users send messages are automatically added to their
Frequent Contacts address books. Users can also choose to automatically save e-mail addresses of
those from whom they receive messages. You can restrict the types of addresses that users can
collect in their Frequent Contacts address books.
1 In ConsoleOne, select a Domain, Post Office, or User object.
2 Click Too ls > GroupWise Utilities > Client Options
3 Click Environment > Address Book.
novdocx (en) 22 June 2009
4 With Enable Auto-Saving selected, adjust the auto-save options as needed.
Save Addresses of Items That Are Received: Select this option to allow users to
automatically add external and internal e-mail address from items that they receive to their
Frequent Contacts address books. If desired, you can restrict users to collecting e-mail
addresses only if the user’s name or e-mail address appears in the To field, as opposed to the
CC or BC fields.
Save Addresses of Items That Are Sent: Select this option to allow users to automatically
add external and internal e-mail address from items that they send to their Frequent Contacts
address books.
or
Deselect Enable Auto-Saving to change the default so that e-mail addresses are not collected
unless users enable that functionality.
5 To prevent users from changing your Frequent Contacts address book settings, click the Lock
button.
6 Click OK to save the Frequent Contacts address book settings.
98 GroupWise 8 Administration Guide

6.5 Controlling Address Book Synchronization for Remote Client Users
Before GroupWise 7, Remote client users received updated GroupWise Address Books based on the
Refresh Address Books and Rules Every nn Days setting under Accounts > Mail > Properties >
Advanced. The entire Address Book was downloaded to the Remote client according to the specified
schedule. The downloadable version of the Address Book was created by the POA according to the
schedule described in Section 36.4.3, “Performing Nightly User Upkeep,” on page 526
Starting in GroupWise 7, the POA automatically updates the post office database with changes to the
Address Book as they occur. As a result, whenever a Remote client connects to the GroupWise
system, it automatically downloads any updates to the Address Book that have occurred since the
last time it connected. This means that Remote client users always have an up-to-date Address Book
to work with.
novdocx (en) 22 June 2009
Because the Address Book updates are stored as records in the post office database (
this feature causes the post office database to grow in size as time passes. Therefore, in ConsoleOne,
you can specify the maximum number of days you want to store the incremental update records. The
longer the incremental update records are stored, the larger the post office database becomes, which
can impact available disk space and backup time.
1 Browse to and right-click a Post Office object, then click Properties.
2 Click GroupWise > Post Office Settings.
wphost.db
),
3 In the Max Age for Address Book Updates field, specify the number of days you want to retain
Address Book update records.
The default is 15 days. The maximum number of days is 90.
4 Click OK to save the setting.
GroupWise Address Book 99

Remote client users should not deselect Refresh Address Books and Rules Every nn Days because
rules are still downloaded according to this schedule. Even if users do not want to download their
rules, they still should not deselect this option because it would turn off the Address Book delta
sync. They can, however, set the option to a greater number of days to cause the download of the full
Address Book to occur less frequently.
6.6 Publishing E-Mail Addresses to eDirectory.
The GroupWise databases and eDirectory both contain information about users’ e-mail address
formats. When you change settings for users’ GroupWise e-mail addresses, you can publish the
changes to eDirectory so that user e-mail address information matches in both places.
1 In ConsoleOne, click Tools > GroupWise System Operations > Internet Addressing.
2 Click Publish to eDirectory.
novdocx (en) 22 June 2009
By default, users’ preferred e-mail addresses are published to eDirectory only in the format
established in the Preferred Address Format field on the Addressing Formats tab. This
publishes one e-mail address per user in the format established for your GroupWise system.
3 Select additional options to publish additional e-mail addresses, as needed.
4 Click OK to save the address publishing settings.
6.7 Enabling Wildcard Addressing
By default, users address messages by selecting users and distribution lists from the Address Book.
If you enable wildcard addressing, users can send items to all users in a post office, domain,
GroupWise system, or connected GroupWise system by using asterisks (*) as wildcards in e-mail
addresses.
You can limit wildcard addressing to a specific level (system, domain, or post office) or allow
unlimited wildcard addressing. The default is to limit the wildcard addressing to post office only,
meaning that a user can use wild card addressing to send to all users on his or her post office only.
You can change the default for individual users, post offices, or domains.
100 GroupWise 8 Administration Guide

When using wildcard addressing, the sender only sees whether the item was delivered to a domain,
post office, or system (by viewing the item’s properties). The properties do not show the individual
usernames or additional statuses. Recipients can reply to the sender only. Reply to All is unavailable.
Section 6.7.1, “Setting Wildcard Addressing Levels,” on page 101
Section 6.7.2, “Wildcard Addressing Syntax,” on page 102
NOTE: Wildcard addressing cannot be used for assigning shared folders or shared address books,
granting proxy rights, performing busy searches, or sending routing slips.
6.7.1 Setting Wildcard Addressing Levels
By default, wildcard addressing is enabled at the post office level for all users in your GroupWise
system. You can change the level (post office, domain, or system) or disable wildcard addressing.
Wildcard addressing levels can be applied to a single user, to all users in a post office, or to all users
in a domain.
To set wildcard addressing defaults:
novdocx (en) 22 June 2009
1 In ConsoleOne, select a Domain, Post Office, or User object.
2 Click Too ls > GroupWise Utilities > Client Options to display the GroupWise Client Options
dialog box.
3 Click Send to display the Send Options dialog box.
GroupWise Address Book 101

novdocx (en) 22 June 2009
4 In the Wildcard Addressing list, select from the following options:
Not Allowed: Select this option to disable wildcard addressing.
Limited to Post Office (Default): Select this option to limit wildcard addressing to the
user’s post office. The user can use wildcard addressing to send items to users in his or her
post office only.
Limited to Domain: Select this option to limit wildcard addressing to the user’s domain.
The user can use wildcard addressing to send items to users in his or her domain only.
Limited to System: Select this option to limit wildcard addressing to the user’s
GroupWise system. The user can use wildcard addressing to send items to all users in his
or her system only. This excludes external users (users from other systems) who have been
added to your GroupWise address book.
Unlimited: Select this option to allow unlimited use of wildcard addressing. The user can
use wildcard addressing to send to all users (including external users and non-visible
users) defined in the GroupWise address book.
5 Click OK to save the changes.
6.7.2 Wildcard Addressing Syntax
The following table shows the syntax that must be used when using wildcard addressing to send
items.
Table 6-2 Wildcard Addressing
Wildcard Addressing Setting To send an item to... Type in the To field...
Limited to Post Office
102 GroupWise 8 Administration Guide
All users in your post office *

Wildcard Addressing Setting To send an item to... Type in the To field...
Limited to Domain All users in your post office *
All users in your domain *.*
novdocx (en) 22 June 2009
All users in another post office in your
domain
Limited to System All users in your post office *
All users in your domain *.*
All users in another post office in your
domain
All users in a post office in another
domain
All users in another domain *.domain
All users in your GroupWise system *.*.*
Unlimited All users in your post office *
All users in your domain *.*
All users in a different post office in your
domain
All users in a post office in another
domain. You can also use this for external
post offices and external domains.
All users in a another domain. You can
also use this for external domains.
*.post_office
*.post_office
*.post_office.domain
*.post_office
*.post_office.domain
*.domain
All users in the GroupWise address book
(all users in the same system, all external
users, and all non-visible users)
*.*.*
6.8 Adding External Users to the GroupWise Address Book
The GroupWise Address Book lists all users that belong to your GroupWise system. When users
receive incoming messages, the senders are added to users’ Frequent Contacts Address Books to
facilitate replying to users who are not included in the GroupWise Address Book. If necessary, you
can configure GroupWise so that external (non-GroupWise) users appear in the GroupWise Address
Book and are therefore available to all GroupWise users.
The following sections help you add non-GroupWise users to the GroupWise Address Book:
Section 6.8.1, “Creating a Non-GroupWise Domain to Represent the Internet,” on page 104
Section 6.8.2, “Linking to the Non-GroupWise Domain,” on page 104
Section 6.8.3, “Creating a Non-GroupWise Post Office to Represent an Internet Host,” on
page 106
Section 6.8.4, “Creating External Users,” on page 107
GroupWise Address Book 103

6.8.1 Creating a Non-GroupWise Domain to Represent the Internet
1 In ConsoleOne®, right-click GroupWise System (in the left pane), then click New > Non-
GroupWise Domain.
2 Fill in the fields:
Domain Name: Specify a name that has not been used for another domain in your system (for
example, Internet).
Time Zone: This should match the time zone for the Internet Agent. If it does not, select the
correct time zone.
novdocx (en) 22 June 2009
Link to Domain: Select a domain where the Internet Agent is running.
3 Click OK to create the non-GroupWise domain.
The non-GroupWise domain appears under GroupWise System in the left pane.
4 Continue with Linking to the Non-GroupWise Domain.
6.8.2 Linking to the Non-GroupWise Domain
After you have created the non-GroupWise domain, you must modify the link between the domain
where the Internet Agent is running and the non-GroupWise domain. This enables the GroupWise
system to route all Internet messages to the MTA of the Internet Agent domain. The MTA can then
route the messages to the Internet Agent, which sends them to the Internet.
To modify the link to the non-GroupWise domain:
1 In ConsoleOne, click Too ls > GroupWise Utilities > Link Configuration to display the Link
Configuration tool.
By default, the Link Configuration tool displays the links for the domain that you are currently
connected to.
104 GroupWise 8 Administration Guide

2 If the Internet Agent domain is not the currently displayed domain, select it from the list of
domains on the toolbar.
The non-GroupWise domain should be displayed in the Direct column. In the graphic displayed
under step 1, Internet is the non-GroupWise domain.
3 Double-click the non-GroupWise domain to display the Edit Domain Link dialog box.
NOTE: If you are prompted that the mapped path is empty, click Ye s to dismiss the prompt and
display the Edit Domain Link dialog box.
novdocx (en) 22 June 2009
4 In the Link Type field, select Gateway.
After you select Gateway, the dialog boxes changes to display the settings required for a
gateway link.
5 Fill in the following fields:
Gateway Link: Select the Internet Agent.
Gateway Access String: If you want to specify the conversion format (RFC-822 or MIME) for
messages sent to the domain, include one of the following parameters: -rfc822 or -mime. If you
do not use either of these parameters, the Internet Agent converts messages to the format
specified in its startup file. The default is for MIME conversion (as specified by the Internet
Agent’s /mime startup switch).
Return Link: Leave this field as is. It does not apply to the Internet Agent.
GroupWise Address Book 105

Maximum Send Message Size: If you want to limit the size of messages that the MTA for the
Internet Agent domain passes to the Internet Agent, specify the maximum size. This is applied
to all messages. If you want to limit the size of messages sent by specific users or groups of
users, you can also use the Access Control feature. For details, see Section 47.1, “Controlling
User Access to the Internet,” on page 763.
Delay Message Size: If you want the MTA to delay routing of large messages to the Internet
Agent, specify the message size. Any messages that exceed the message size are assigned a
lower priority by the MTA and are processed after the higher priority messages.
6 Click OK to save the changes.
The non-GroupWise domain is moved from the Direct column to the Gateway column. For a
description of the link symbols in front of the domain names, see the Help in the Link
Configuration tool.
novdocx (en) 22 June 2009
7 Click the File menu, click Exit, then click Yes to exit the Link Configuration tool and save your
changes.
8 Continue with Creating a Non-GroupWise Post Office to Represent an Internet Host.
6.8.3 Creating a Non-GroupWise Post Office to Represent an Internet Host
When creating a post office to represent an Internet host, the post office name cannot be identical to
the hostname because the period that separates the hostname components (for example, novell.com)
is not a valid character for post office names. GroupWise reserves the period for its addressing
syntax of user_ID.post_office.domain. Therefore, you should choose a name that is closely related
to the hostname.
To create a non-GroupWise post office:
1 In ConsoleOne, right-click the non-GroupWise domain that represents the Internet, then click
New > External Post Office.
106 GroupWise 8 Administration Guide

2 Fill in the following fields:
Post Office Name: Specify a name to associate the post office with the Internet host. Do not
use the fully-qualified hostname.
Time Zone: Select the time zone in which the Internet host is located.
3 Click OK to create the post office.
The non-GroupWise post office is added under the non-GroupWise domain.
4 Right-click the new non-GroupWise post office, then click Properties.
5 Click GroupWise > Internet Addressing.
novdocx (en) 22 June 2009
6 If you want to override the GroupWise system allowed address formats, select Override beside
Allowed Address Formats, then select the allowed address formats for this Internet host.
7 Beside Internet Domain Name, select Override, then specify the actual name of the Internet
host that the external post office represents.
8 Click OK to save your changes.
9 Continue with Creating External Users.
6.8.4 Creating External Users
By creating external users, you add them to the GroupWise Address Book for easy selection by
GroupWise users when addressing messages.
To add an Internet user to a post office:
1 In ConsoleOne, right-click the post office that represents the user’s Internet host, then click
New > External User.
GroupWise Address Book 107

2 In the User Name field, specify the exact user portion of the user’s Internet address. If the
address is jsmith@novell.com, the portion you would specify is jsmith.
3 Click OK to create the external user.
4 Provide personal information about the external user:
4a Right-click the new External User object.
4b Fill in the desired fields on the Identification page.
Because the user is displayed in the GroupWise Address Book, you might want to define
the user’s first name and last name. This is especially important if the allowed address
formats for the Internet host include first name and last name information.
4c Click OK to save the user’s personal information.
If you have only a few users on some Internet hosts, you can create a single external post office for
these users, then define their Internet domain names on the Identification pages of the External User
objects instead of on the External Post Office object.
6.9 Facilitating Addressing through GroupWise
novdocx (en) 22 June 2009
Gateways
Current GroupWise Gateways, such as the GroupWise Gateway 2.0 for Microsoft* Exchange and
the GroupWise Gateway 3.0 for Lotus Notes*, provide convenient addressing features for users on
both sides of the gateway. Earlier GroupWise gateways made use of addressing rules to simplify
addressing through the gateway. Setting up addressing rules is not necessary for current GroupWise
gateways.
Addressing rules let you search for text in an address and replace it with other text. Addressing rules
are created at the system level and enabled by domain. Gateway-specific instructions are available
on the GroupWise Gateways documentation page (http://www.novell.com/documentation/
gwgateways). The following sections provide some general instructions for setting up addressing
rules:
Section 6.9.1, “Creating an Addressing Rule,” on page 108
Section 6.9.2, “Enabling an Addressing Rule,” on page 110
6.9.1 Creating an Addressing Rule
1 In ConsoleOne, click Too ls > GroupWise System Operations > Addressing Rules.
108 GroupWise 8 Administration Guide

2 Click New to display the New Addressing Rule dialog box.
3 Fill in the following fields:
Description: Specify a short description for the rule. The description is what appears when the
rule is listed in the Addressing Rules dialog box.
Name: Specify the name you want to use for the rule.
novdocx (en) 22 June 2009
Search String: Specify the text string that determines which addresses the rule is applied to.
You can use an asterisk as a wildcard to represent one or more characters. For example, if you
want the rule to apply to all addresses with JSmith as the userID, specify jsmith.*.* (the first
asterisk represents the post office and the second represents the domain).
Replace With: Specify the replacement text. You can use variables (%1, %2, and so forth) to
reference the wildcard text used in the search string. For example, if you use two wildcards in
the search string, you could use two variables (%1 and %2) to insert the matched wildcard text
into the replacement string. %1 (replace string 1) replaces the first wildcard in the search string,
%2 replaces the second wildcard, and so on. The replacement variables must be placed in the
string according to the order required for the explicit address, not according to their numerical
order (for example, %2 could come before %1).
Using the jsmith.*.* example, assume that you want to replace jsmith with jjones. You would
specify jjones.%1.%2. The resulting addressing would include the same post office and domain
but a different userID.
4 If desired, you can test the rule on an address. To do so, specify an address in the Test Address
dialog box (the address does not have to be real) > click Te st to see the results.
5 Click OK to add the rule to the list.
The rule is automatically enabled, which means that it is available for use. To apply it to a
domain, however, you need to enable it in the domain. For instructions, see Section 6.9.2,
“Enabling an Addressing Rule,” on page 110.
6 If necessary, select the rule, then use the up-arrow and down-arrow to move the rule to the
position in which you want it executed.
Addressing rules are executed in the order they are listed. When an addressing rule is applied to
an address, no further addressing rules are applied.
7 When you are finished creating rules, click OK to close the Define Addressing Rules dialog
box.
GroupWise Address Book 109

6.9.2 Enabling an Addressing Rule
After you create an addressing rule, you need to enable it in the domains where you want it applied.
1 In ConsoleOne, right-click the Domain object, then click Properties.
novdocx (en) 22 June 2009
2 Click GroupWise > Addressing Rules.
The list displays all addressing rules that have been made available in the system. However, an
addressing rule does not apply to the domain until you enable it.
3 Click the check box in front of an addressing rule to enable it.
4 When you are finished enabling rules, click OK to save your changes.
110 GroupWise 8 Administration Guide

7
Multilingual GroupWise Systems
GroupWise® is a multilingual e-mail product that meets the needs of users around the world. The
following sections provide guidance if your GroupWise system includes users that speak a variety of
languages:
Section 7.1, “Client Languages,” on page 111
Section 7.2, “Administration and Agent Languages,” on page 112
Section 7.3, “International Character Considerations,” on page 113
Section 7.4, “MIME Encoding,” on page 113
Section 7.5, “Multi-Language Workstations,” on page 115
See also Chapter 71, “Supporting the GroupWise Client in Multiple Languages,” on page 1141.
7.1 Client Languages
novdocx (en) 22 June 2009
7
You can run the GroupWise client in the following languages:
Language Code Language Code
Arabic AR Hungarian HU
Chinese - Simplified CS Italian IT
Chinese - Traditional CT Japanese JA
Czech CZ Korean KO
Danish DA Norwegian NO
Dutch NL Polish PL
English EN Portuguese PT
Finnish FI Russian RU
French FR Spanish ES
German DE Swedish SV
Hebrew HE
Language codes are used to identify language-specific files and directories. They are also used as the
values of the client language (/l) startup option.
Users can select the languages they want when they install the GroupWise client. If users have
access to the GroupWise client media, they can choose from all languages. If users are installing
from a software distribution directory, they can choose from the languages you installed in the
software distribution directory, as described in “GroupWise Languages” in “Installing a Basic
GroupWise System” in the GroupWise 8 Installation Guide. The maximum disk space required to
store all the GroupWise software components for one language in the software distribution directory
is approximately 500 MB. Each additional client language adds about 20 MB.
Multilingual GroupWise Systems
111

Users should have at least 200 MB available on their workstations to install the GroupWise client
software in one language. Users need an additional 20 MB of disk space for each additional
language they install.
By default, the GroupWise client starts in the language of the operating system, if it is available. If
the operating system language is not available, the next default language is English. When starting
the GroupWise client, you can use the /l startup switch to override the English default and select an
interface language from those that have been installed.
The online help available in the GroupWise clients is provided in all languages into which the client
software is translated. The GroupWise client user guides available from the GroupWise clients and
on the GroupWise Documentation Web site are translated only into the administration languages. If
you try to access a user guide from a client that is running in a language into which the user guide
has not been translated, you can select any of the available languages.
By default, the GroupWise clients use UTF-8 for MIME encoding. This accommodates the character
sets used by all supported languages.
7.2 Administration and Agent Languages
novdocx (en) 22 June 2009
You can run the GroupWise Installation program, administer your GroupWise system in
®
ConsoleOne
Language Code
English EN
French FR
German DE
Portuguese PT
Spanish ES
, and run the GroupWise agents in the following languages:
Language codes are used to identify language-specific files and directories. They are also used as the
values of the GroupWise agent /language startup switches.
When you select a language for a domain, it determines the sorting order for items in the GroupWise
Address Book. This language becomes the default for post offices that belong to the domain. You
can override the domain language at the post office level if necessary.
For example, if you set the domain and post office language to English, the Address Book items are
sorted according to English sort order rules. This is true even if some users in the post office are
running non-English GroupWise clients such as German or Japanese. Their client interface and Help
files are in German or Japanese, but the sort order is according to English standards.
By default, the agents start in the language selected for the domain. If that language has not been
installed, the agents start in the language used by the operating system. If that language has not been
installed, the agents start in English. You can also use the /language agent startup switch to select the
language for the agent to start in.
112 GroupWise 8 Administration Guide

The POA also includes language-specific files in all client languages so that information returned
from the POA to the GroupWise client, such as message status and undeliverable messages, is
displayed in the language of the GroupWise client rather than the language in which the POA
interface is being displayed.
7.3 International Character Considerations
GroupWise client users have complete flexibility in the characters they use in composing messages.
Accented characters used by various European languages and double-byte characters used by
various Asian and Middle Eastern languages are all acceptable in the GroupWise client and can even
be combined in the same message text.
As an administrator, the only limitation you need to be aware of is that double-byte Asian and
Middle Eastern characters should not be used in directory names and filenames within your
GroupWise system. This limitation is based on operating system capabilities. You should also not
use double-byte characters in passwords. You are free to use double-byte characters in GroupWise
usernames, domain names, post offices names, and so on.
7.4 MIME Encoding
novdocx (en) 22 June 2009
MIME (Multipurpose Internet Mail Extensions) encoding must be used when messages are sent
across the Internet, so that characters display correctly for users on computers that are configured for
different languages. In ConsoleOne, you can set the default MIME encoding (for example, UTF-8,
Windows Default, ISO Default, and so on) that is used by the GroupWise clients.
1 In ConsoleOne, browse to and select the domain, post office, or user where you want to change
the maximum mailbox size.
2 Click Tools > GroupWise Utilities.
3 Click Client Options > Send.
Multilingual GroupWise Systems 113

novdocx (en) 22 June 2009
4 In the MIME Encoding box on the Send Options tab, select the desired default MIME encoding,
then click OK to save the setting.
GroupWise users can override the default MIME encoding in the GroupWise clients, as described
in:
“Changing the MIME Encoding for E-Mail You Send” in “E-Mail” in the GroupWise 8
Windows Client User Guide
“Changing the MIME Encoding for E-Mail You Send” in “E-Mail” in the GroupWise 8 Linux/
Mac Client User Guide
“Changing the MIME Encoding of a Message” in “E-Mail” in the GroupWise 8 WebAccess
Client User Guide
The Windows client and the Linux/Mac client support 24 character sets for MIME encoding. The
WebAccess client and ConsoleOne support 16 character sets, marked with asterisks in the table
below.
Table 7-1 Supported Character Sets with Their Associated Languages or Alphabets
Languages/Alphabets Character Sets
Windows Default*
ISO Default*
Arabic Windows 1256*
Arabic ISO 8859-6
Baltic Windows 1257*
Baltic ISO 8859-4
114 GroupWise 8 Administration Guide
UTF-8*

Languages/Alphabets Character Sets
Central European Windows 1250*
Central European ISO 8859-2
Chinese Simplified GB2312*
Chinese Traditional Big 5
Cyrillic KOI8-R*
Cyrillic ISO 8859-5
Hebrew Windows 1255*
Hebrew ISO 8859-8
Japanese ISO 2022-JP*
Japanese Shift-JIS
Korean EUC-KR*
novdocx (en) 22 June 2009
Thai Windows 874*
Turkish Windows 1254*
Turkish ISO 8859-9
Western European Windows 1252
Western European ISO 8859-1
Western European ISO 8859-15
The Internet Agent also has options for controlling MIME encoding when messages are set to and
from the Internet, as described in:
ConsoleOne settings:Section 46.1.4, “Determining Format Options for Messages,” on
page 738
Startup switches: Section 52.6.4, “Message Formatting and Encoding,” on page 850
7.5 Multi-Language Workstations
If GroupWise users receive messages in multiple languages, their workstations need to be
configured to handle the character sets used by these languages.
On Windows Vista*:
1 From the Control Panel, double-click Regional and Language Options, then click Keyboards
and Languages.
2 Under Display Languages, click Install/Uninstall Languages.
3 Follow the on-screen instructions to install the required language files.
On Windows XP:
1 From the Control Panel, double-click Regional and Language Options, then click Languages.
Multilingual GroupWise Systems 115

2 If you receive messages in Arabic, Hebrew, or other complex languages, select Install Files for
Complex Script and Right-to-Left Languages.
3 If you receive messages in Chinese, Japanese, or other similar languages, select Install Files for
East Asian Languages.
4 Click OK to install the required language files.
On Linux and Macintosh workstations, if users see the correct characters at the operating system and
desktop levels, they see the correct characters in GroupWise as well.
novdocx (en) 22 June 2009
116 GroupWise 8 Administration Guide
 Loading...