

Page 1

III
Post Offices
Chapter 11, “Creating a New Post Office,” on page 155
Chapter 12, “Managing Post Offices,” on page 175
novdocx (en) 11 December 2007
III
Post Offices
153
Page 2

novdocx (en) 11 December 2007
154 GroupWise 7 Administration Guide
Page 3
11
Creating a New Post Office
As your GroupWise® system grows, you typically need to add new post offices.
Section 11.1, “Understanding the Purpose of Post Offices,” on page 155
Section 11.2, “Planning a New Post Office,” on page 156
Section 11.3, “Setting Up the New Post Office,” on page 167
Section 11.4, “What’s Next,” on page 171
Section 11.5, “Post Office Worksheet,” on page 171
IMPORTANT: If you are creating a new post office in a clustered GroupWise system, see the
GroupWise 7 Interoperability Guide before you create the post office:
11.1 Understanding the Purpose of Post Offices
novdocx (en) 11 December 2007
11
The post office serves as an administrative unit for a group of users and is used for addressing
messages. Each GroupWise user has an address that consists of a user ID, the user’s post office
name, the GroupWise domain name, and, optionally, an Internet domain name.
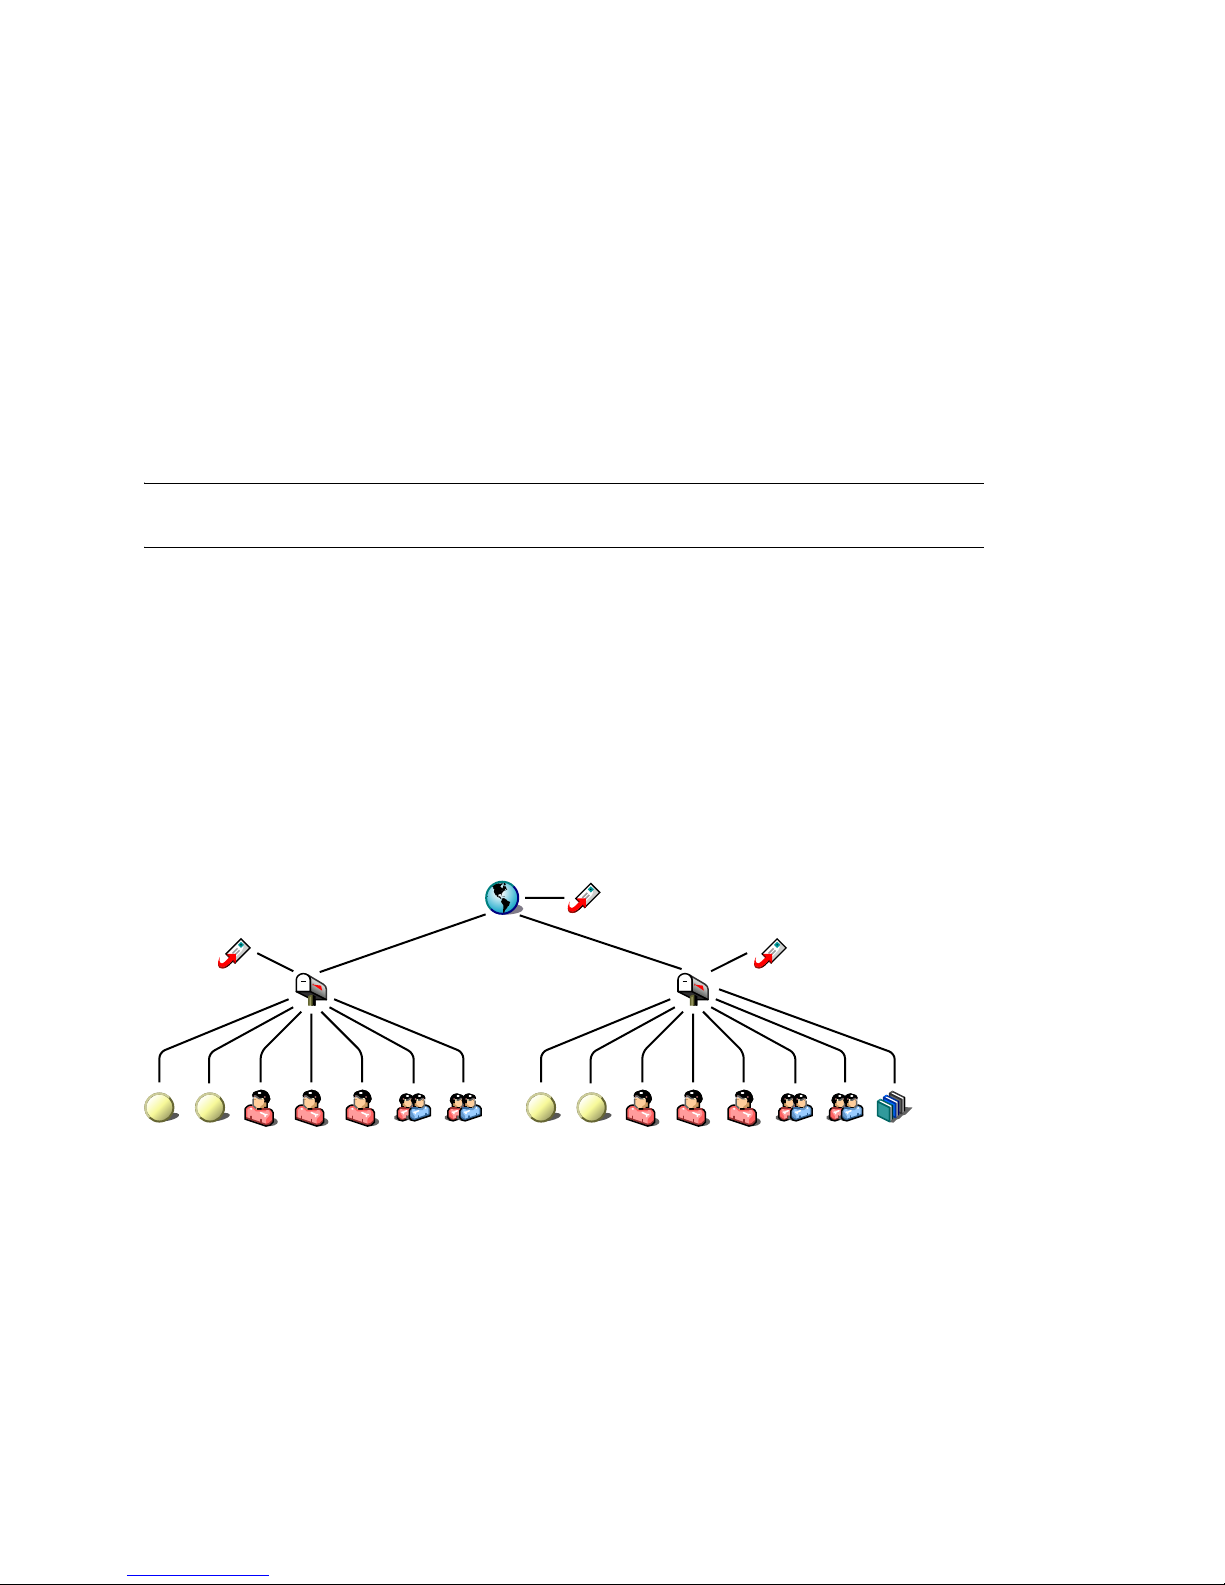
The following diagram illustrates the logical organization of a GroupWise domain with multiple
post offices. The two post offices belong to the domain. All of the objects under each post office
belong to that post office.
Figure 11-1 GroupWise Domain with Multiple Post Offices
Post
Office
Agent
GroupWise
Resources
GroupWise
Users
Post Office
GroupWise
Distribution
Domain
GroupWise
Resources
Lists
Message
Transfer
Agent
Post Office
GroupWise
Users
Post
Office
Agent
GroupWise
Distribution
Lists
GroupWise
Library
As illustrated above, each post office must have at least one Post Office Agent (POA) running for it.
The POA delivers messages to users’ mailboxes and performs a variety of post office and mailbox
maintenance activities.
When you add a new post office, you must link it to a domain. The link defines how messages travel
between the post office and its domain. Links are discussed in detail in Chapter 10, “Managing the
Links between Domains and Post Offices,” on page 137.
Creating a New Post Office
155
Page 4

Physically, a post office consists of a set of directories that house all the information stored in the
post office. To view the structure of the post office directory, see “Post Office Directory” in
GroupWise 7 Troubleshooting 3: Message Flow and Directory Structure. The post office directory
contains user mailboxes and messages, as well as other vital information. For an overview, see
Section 35.3, “Information Stored in the Post Office,” on page 464.
11.2 Planning a New Post Office
This section provides the information you need in order to decide when, where, and how to create a
new post office. The “Post Office Worksheet” on page 171 lists all the information you need as you
set up your post office. You should print the worksheet and fill it out as you complete the tasks listed
below.
Section 11.2.1, “Determining When to Add a Post Office,” on page 156
Section 11.2.2, “Selecting the Domain That the Post Office Will Belong To,” on page 157
Section 11.2.3, “Determining the Context for the Post Office Object,” on page 158
Section 11.2.4, “Choosing the Post Office Name,” on page 160
Section 11.2.5, “Deciding Where to Create the Post Office Directory,” on page 160
novdocx (en) 11 December 2007
Section 11.2.6, “Deciding Where to Install the Agent Software,” on page 161
Section 11.2.7, “Deciding How to Link the New Post Office,” on page 164
Section 11.2.8, “Selecting the Post Office Language,” on page 165
Section 11.2.9, “Selecting the Post Office Time Zone,” on page 165
Section 11.2.10, “Selecting a Software Distribution Directory,” on page 165
Section 11.2.11, “Selecting a Post Office Security Level,” on page 166
Section 11.2.12, “Deciding if You Want to Create a Library for the New Post Office,” on
page 166
After you have completed the tasks and filled out the “Post Office Worksheet” on page 171, you are
ready to continue with Section 11.3, “Setting Up the New Post Office,” on page 167.
11.2.1 Determining When to Add a Post Office
After you have your basic GroupWise system up and running, you might need to expand it. How do
you know when you should add a post office? The answer to this depends on your company
organization, the number of users on your network, and the physical limitations of your network
servers.
“Physical Organization” on page 156
“Logical Organization” on page 157
“Number of Users” on page 157
“Demand on the POA” on page 157
Physical Organization
If your network spans several sites, you might want to create post offices (if not domains) at each
physical location. This reduces the demands on long distance network links.
156 GroupWise 7 Administration Guide
Page 5

Logical Organization
Processing messages within a post office is faster and typically generates less network traffic than
messages traveling between different post offices. As you expand GroupWise, you might find it
useful to add post offices in order to group users who frequently send mail to each other.
Grouping users into post offices, based upon company organization or job function, makes
administrative tasks, such as creating distribution lists, limiting Address Book visibility, and
distributing shared folders, easier. For example, some employees might work in corporate functions
like accounting and human resources. Other employees might be involved in sales and marketing
and frequently attend meetings together, requiring frequent busy searches. Some areas, for example
the production floor, might not need a workstation or user account for each individual.
Number of Users
Although a GroupWise post office can support more than 10,000 users, you should consider adding
a post office when an existing post office has more than about 1000 to 2500 users and you expect it
to keep growing. There are several reasons for this:
It minimizes the impact if you have a problem with a server.
It keeps the time required to perform post office and mailbox maintenance activities including
backups from becoming excessive.
novdocx (en) 11 December 2007
It allows room to grow while maintaining best performance.
Therefore, a good post office size is about 1000 to 2500 users and include all of the resources (such
as equipment, company cars, and conference rooms) and distribution lists they might need.
Demand on the POA
The POA is a very flexible component of your GroupWise system. Many aspects of its functioning
are configurable, to meet the particular needs of the post office it services, no matter what the size.
In addition, you can choose to run multiple POAs for the same post office, in order to specialize its
functioning, as described in:
Section 38.1.3, “Configuring a Dedicated Client/Server POA,” on page 550
Section 38.2.2, “Configuring a Dedicated Message File Processing POA,” on page 553
Section 38.3.2, “Configuring a Dedicated Indexing POA,” on page 556
Section 38.4.2, “Configuring a Dedicated Database Maintenance POA,” on page 560
As a result, the choice is up to you whether you prefer a single, large post office, perhaps with
multiple POAs, or multiple smaller post offices, each with its own POA.
11.2.2 Selecting the Domain That the Post Office Will Belong To
A post office is associated with a specific domain, even though it might reside in a different
organizational unit in the Novell
office will belong to it. If you want to create a new domain as well as a new post office, see
Chapter 8, “Creating a New Domain,” on page 111.
®
eDirectoryTM tree. If you have just one domain, the new post
In a multiple post office system, the domain organizes post offices into a logical grouping for
addressing and routing purposes. Each user in the domain has a GroupWise address that consists of
Creating a New Post Office 157
Page 6

the user’s GroupWise ID, the post office name, the GroupWise domain name, and optionally, an
Internet domain name.
Domains function as the main administration units for the GroupWise system. Post office
information is stored in the domain database, as well as in the post office database. Changes are
distributed to each post office database from the domain.
WORKSHEET
Under Item 3: GroupWise Domain, specify the GroupWise domain that the new post office will belong to.
The items in the worksheet are listed in the order you enter them when setting up your post office.
This planning section does not follow the same order as the worksheet, but all worksheet items are
covered.
11.2.3 Determining the Context for the Post Office Object
The eDirectory context of the Post Office object determines how you administer the post office. The
post office can be created in any Organization or Organizational Unit container in any context as
long as it is in the same tree as the domain. The following diagrams provide some examples of how
post offices can be placed in the eDirectory tree:
novdocx (en) 11 December 2007
“GroupWise Objects Reflect Physical Locations” on page 158
“GroupWise Objects Reflect Company Organization” on page 159
“GroupWise Objects Are Grouped with Servers” on page 159
“GroupWise Objects Are Located in a Separate GroupWise Container” on page 159
WORKSHEET
Under Item 1: eDirectory Container, specify the name of the eDirectory container where you want to
create the new post office.
GroupWise Objects Reflect Physical Locations
The GroupWise system below focuses on the physical layout of the company. Because most mail
traffic is generated by users in the same location, the mail traffic across the WAN is minimized. An
organizational unit was created for each site. A domain and post office were created under each
organizational unit, corresponding to the city. The sites can be administered centrally or at each site.
Administrator rights can be assigned at the domain level.
Figure 11-2 A GroupWise System Following the Physical Layout of the Company
158 GroupWise 7 Administration Guide
Page 7

GroupWise Objects Reflect Company Organization
The following GroupWise system focuses on departmental organization, as does the eDirectory tree.
GroupWise domains and post offices parallel eDirectory organizational units, placing the domains
and post offices within the organizational units containing the users that belong to them.
Figure 11-3 A GroupWise System Following the Departmental Organization of the Company
GroupWise Objects Are Grouped with Servers
Because domains and post offices have directory structures on network servers, you can also choose
to place the Domain and Post Office objects in the same context as the servers where the directories
reside, as shown in the following example.
novdocx (en) 11 December 2007
Figure 11-4 A GroupWise System with the Domains and Post Offices Grouped with the Servers
GroupWise Objects Are Located in a Separate GroupWise Container
Domains and post offices can also be created in their own organizational unit. Administratively, this
approach makes it easier to restrict a GroupWise administrator’s object and property rights to
GroupWise objects only.
Creating a New Post Office 159
Page 8

Figure 11-5 GroupWise Objects Located in Their Own Organizational Unit
11.2.4 Choosing the Post Office Name
The post office must be given a unique name. The name is used for addressing and routing purposes
within GroupWise, and might appear in the GroupWise Address Book.
The post office name can reflect a location, organization, department, and so on. For example, you
might want the domain name to be the location (for example, Provo) while the post office name is
one of the company’s departments (for example, Research). Name the new post office carefully.
After it is created, the name cannot be changed.
novdocx (en) 11 December 2007
The post office name should consist of a single string. Use underscores (_) rather than spaces as
separators between words to facilitate addressing across the Internet. Do not use any of the
following invalid characters in the post office name:
ASCII characters 0-13 Comma ,
Asterisk * Double quote "
At sign @ Extended ASCII characters that are graphical or typographical
symbols; accented characters in the extended range can be used
Braces { } Parentheses ( )
Colon : Period .
WORKSHEET
Under Item 2: Post Office Name, specify the post office name.
Under Item 9: Post Office Description, provide a description for the post office to help you identify its
function in the system.
11.2.5 Deciding Where to Create the Post Office Directory
Logically, the Post Office object resides in eDirectory and is administered through ConsoleOne®.
Physically, the post office has a directory structure for databases, message queues, and other files.
The post office directory structure can be created on any of the supported platforms listed in
“GroupWise Administration Requirements” in the GroupWise 7 Installation Guide. It can also be
located on any platform that a POA running on a supported platform could access successfully. The
160 GroupWise 7 Administration Guide
Page 9

server where you create the post office directory structure can be in the same tree as the Post Office
object or in another tree.
Databases and directories in the post office are updated as messages are sent. Because the POA
typically makes these updates, we recommend that you place the post office directory on a server
that can be easily accessed by the POA and, depending on configuration, the MTA. Users typically
need a TCP/IP connection to the POA in order to access their mailboxes.
When you are planning the post office directory location and which users will belong to the post
office, consider the following:
Post Office Directory Space Requirements: You need a minimum of 50 MB for each user.
Because the message store can require considerable disk space, we recommend you allow each
user at least 200 MB of storage space. You should also take into consideration the size of
attachments, and your archive and delete policies. If message attachments are large and you are
not planning to require users to archive or delete old messages, allow more storage. If you are
creating libraries you need even more storage, depending on the size and number of documents.
For details about managing post office disk space, see Section 12.3, “Managing Disk Space
Usage in the Post Office,” on page 182.
Network Access by the POA: The POA must have direct network access (mapped drive or
file system mount) to the post office directory so that it can write to user databases (userxxx.db)
and message databases (msgnnn.db). This issue is discussed in detail in Section 11.2.6,
“Deciding Where to Install the Agent Software,” on page 161.
Security from User Access: Users typically access their mailboxes through a TCP/IP
connection to the POA. Therefore, users do not need access to the post office directory. You
should create it in a location you can easily secure; otherwise, you could have files
inadvertently moved or deleted.
novdocx (en) 11 December 2007
Choose an empty directory for the new post office. If you want, the directory can reflect the name of
the post office, for example research for the Research post office. Use the following platformspecific conventions:
NetWare: Use a maximum of 8 characters
Linux: Use only lowercase characters
Windows: No limitations.
Choose the name and path carefully. After the post office directory is created, it is difficult to rename
it. If the directory you specify does not exist, it is created when you create the post office. Do not
create the post office directory under another domain or post office directory.
WORKSHEET
Under Item 4: Post Office Database Location, specify the full path for the post office directory.
Under Item 10: Network Type, record the network type in use at that location.
11.2.6 Deciding Where to Install the Agent Software
You must run a new instance of the POA for each new post office. To review the functions of the
POA for the post office, see Section 35.5, “Role of the Post Office Agent,” on page 469. For
Creating a New Post Office 161
Page 10

complete POA installation instructions and system requirements, see “Installing GroupWise
Agents” in the GroupWise 7 Installation Guide.
When planning the installation of the POA, you need to consider how the new post office links to its
domain. For an overview of link configuration, see Chapter 10, “Managing the Links between
Domains and Post Offices,” on page 137.
The POA requires direct network access (mapped drive or file system mount) to the post office
directory so that it can write to user databases (userxxx.db) and message databases (msgnnn.db).
Consider the following alternatives when selecting a location for the POA:
“POA Access to the New Post Office: Local vs. Remote” on page 162
“MTA Access to the New Post Office: Mapped and UNC Links vs. TCP/IP Links” on page 163
“Cross-Platform Issues” on page 164
WORKSHEET
Under Item 12: Agent Location, indicate whether you plan to run the POA on the same server where the
post office directory is located (recommended), or on a different server.
novdocx (en) 11 December 2007
Under Item 13: Agent Platform, specify the platform where the POA will run (NetWare, Linux, or
Windows).
POA Access to the New Post Office: Local vs. Remote
Running the POA locally on the same server where the post office resides simplifies network
connections (no login is required), reduces network traffic, and protects database integrity. In the
following diagram, the agent software is installed on the same server where the domain and post
office reside.
Figure 11-6 Agent Software on the Same Server with the Domain and Post Office
POA
MTA
Acct-Dom
Acct-PO1
POA
MTA
Dev-Dom
Dev-PO1
Running the POA on a remote server allows you to place the heaviest processing load on your
highest performing server. In the following diagram, the agent software is installed on a different
server from where the domains and post offices reside.
Figure 11-7 Agent Software on a Different Server than the Domain and Post Office
Windows NetWare
MTA
POA
When you run the POA on a different server from where its directory structure and databases are
located, you need to provide adequate access.
162 GroupWise 7 Administration Guide
Dev-Dom
Dev-PO1
Page 11

NetWare: If the NetWare® POA needs direct network access to another NetWare server where the
post office is located, you must add the /dn switch or the /user and /password switches to
the POA startup file to provide authentication information. Username and password
information can also be provided in the Remote File Server Settings box of the Post Office
Settings page in ConsoleOne.
Linux: If the Linux POA needs direct network access to another Linux server, you must mount the
file system where the post office is located before you start the Linux POA.
Windows: If the Windows POA needs direct network access to another Windows server where the
post office is located, you must map a drive to the other server before you start the
Windows POA.
MTA Access to the New Post Office: Mapped and UNC Links vs. TCP/IP Links
If a domain includes multiple post offices, the new post office will probably reside on different
server from where the domain is located. If you plan to use mapped or UNC links between the
domain and the new post office, the MTA requires the same access to the post office directory as it
requires to the domain directory.
novdocx (en) 11 December 2007
Figure 11-8 MTA Access Using Mapped or UNC Links
MTA MTA
Acct-Dom
Acct-PO1
POA
NetWare: If the NetWare MTA needs direct network access to a new post office on another NetWare
server, you must add the /dn switch or the /user and /password switches to the MTA
startup file to provide authentication information.
Linux: N/A. The Linux MTA requires TCP/IP links to the POA.
Windows: If the Windows MTA needs direct network access to a new post office on another Windows
server, you must map a drive to the post office directory before you start the MTA.
POA
Dev-Dom
Dev-PO1
To avoid these direct network access requirements between the MTA and a new post office, you can
use TCP/IP links between the domain and the new post office.
Figure 11-9 MTA Access Using TCP/IP Links
MTA MTA
Acct-Dom
Acct-PO1
POA
POA
Dev-Dom
Dev-PO1
When using TCP/IP links, the MTA does not write message files into message queues in the post
office directory structure. Instead, the MTA communicates the information to the POA by way of
TCP/IP and then the POA uses its direct network access to write the information.
Creating a New Post Office 163
Page 12

Cross-Platform Issues
In most cases, it is most efficient if you match the POA platform with the network operating system
where the post office resides. For example, if you create a new post office on a NetWare server, use
the NetWare POA.
If you decide not to run the POA on the same platform as the post office, the POA must still have
direct network access to the post office directory so that it can write to user databases
(userxxx.db) and message databases (msgnnn.db). For example, you can set up the new post
office on a NetWare server and run the Windows POA on a Windows server to service it.
Figure 11-10 A Domain on a NetWare Server and the MTA on a Windows Server
Windows NetWare
MTA
Dev-Dom
Dev-PO1
POA
novdocx (en) 11 December 2007
However, the NetWare POA cannot service a post office located on a Windows server because
Windows does not support the required cross-platform connection.
If you are using mapped or UNC links to the new post office, the MTA must also have direct
network access to the post office directory so that it can write message files into the post office
message queues. You can, for example, run the agents on a Windows server while domains and post
offices are located on NetWare servers.
Figure 11-11 Agents on a Windows Server and Domains and Post Offices on a NetWare Server
NetWare Windows NetWare
MTA MTA
Acct-Dom
Acct-PO1
POA
POA
Dev-Dom
Dev-PO1
Again, the opposite combination of NetWare agents servicing domains and post offices on Windows
servers is not an option because Windows does not support the required cross-platform connection.
To avoid these cross-platform access issues, use TCP/IP links between a domain and its post offices.
For more detailed information, see Section 40.7, “Cross-Platform Issues between Domains and Post
Offices,” on page 609.
11.2.7 Deciding How to Link the New Post Office
When you create a new post office, you have the opportunity to choose the type of link to use
between the new post office and its domain. Based on issues discussed in the preceding section, you
might decide to set up a TCP/IP link between the new post office and its domain.
164 GroupWise 7 Administration Guide
Page 13

WORKSHEET
Under Item 14: Link to Domain, indicate the type of link you plan to set up between the new post office
and its domain.
11.2.8 Selecting the Post Office Language
The post office language determines the sort order for items in the GroupWise Address Book.
The post office defaults to the same language as its domain unless you specify otherwise. For
example, if you set the domain and post office language to English-US, the Address Book items are
sorted according to English-US sort order rules. This is true even if some users in the post office are
running non-English GroupWise clients such as German or Japanese. Their client interface and Help
files are in German or Japanese, but the Address Book sort order is according to English-US
standards. Time, date, and number formats for the non-English clients defaults to the workstation
language.
WORKSHEET
novdocx (en) 11 December 2007
Under Item 5: Post Office Language, specify the post office language.
11.2.9 Selecting the Post Office Time Zone
When a message is sent from a user in one time zone to a user in another time zone, GroupWise
adjusts the message’s time so that it is correct for the recipient’s time zone. For example, if a user in
New York (GMT -05:00, Eastern Time) schedules a user in Los Angeles (GMT -08:00, Pacific
Time) for a conference call at 4:00 p.m. Eastern Time, the appointment is scheduled in the Los
Angeles user’s calendar at 1:00 p.m. Pacific Time.
The domain time zone becomes the default time zone for each post office in the domain.
WORKSHEET
Under Item 6: Time Zone, specify the time zone for the new post office.
11.2.10 Selecting a Software Distribution Directory
A software distribution directory was created when your GroupWise system was initially set up. The
software distribution directory contains files that users need in order to set up the GroupWise
Windows or Cross-Platform client on their workstations. Additional software distribution directories
might have been created since that time to accommodate users in various locations.
You can select the most convenient software distribution directory for the new post office.
WORKSHEET
Under Item 7: Software Distribution Directory, specify the name of the software distribution directory from
which users in the new post office will install the GroupWise client software on their Windows, Linux, or
Macintosh workstations.
Creating a New Post Office 165
Page 14

11.2.11 Selecting a Post Office Security Level
Post office security settings affect two types of GroupWise users:
Users who do not set passwords on their mailboxes
Users who use LDAP passwords instead of GroupWise passwords to access their mailboxes
After a user sets a GroupWise password on his or her mailbox, the post office security level no
longer applies. The user is always prompted for the password unless the administrator has set certain
client options in ConsoleOne to prevent the password prompt, as described in Section 70.1.3,
“Managing GroupWise Passwords,” on page 1112.
In the absence of GroupWise passwords on user mailboxes, the post office security level takes
effect. By default, a new post office is created with low security. In a low security post office,
mailboxes are completely unprotected. Without a GroupWise password, any user’s mailbox could be
accessed by another user who knows how to use the @u-userID startup switch.
By increasing the post office security level to high, you provide protection to GroupWise mailboxes
through other types of authentication. In a high security post office, you can choose between
eDirectory authentication and LDAP authentication:
novdocx (en) 11 December 2007
eDirectory Authentication: If you use eDirectory authentication for a post office, users must
be logged in to eDirectory in order to access their GroupWise mailboxes.
LDAP Authentication: If you use LDAP authentication for a post office, users must
successfully authenticate to an LDAP server in order to access their GroupWise mailboxes.
WORKSHEET
Under Item 11: Post Office Security Level, mark the security level for the post office. If you choose high
security, indicate the type of authentication you plan to use.
11.2.12 Deciding if You Want to Create a Library for the New
Post Office
If you anticipate that users on this post office will require document management services, you can
create a library at the same time you create the post office. The library is created with all of the
default library options including Store Documents at Post Office. Using a document storage area is
preferable to storing documents at the post office because a document storage area can be moved.
You should appropriately configure the library immediately after it is created, before users begin to
store documents there. See Part VII, “Libraries and Documents,” on page 291.
WORKSHEET
Under Item 8: Create Library, indicate whether or not you want to immediately create a library for the new
post office. You can always add a library to the post office at a later time.
166 GroupWise 7 Administration Guide
Page 15

11.3 Setting Up the New Post Office
You should have already reviewed Section 11.2, “Planning a New Post Office,” on page 156 and
filled out Section 11.5, “Post Office Worksheet,” on page 171. Complete the following tasks to
create a new post office.
Section 11.3.1, “Creating the New Post Office,” on page 167
Section 11.3.2, “Configuring the POA for the New Post Office,” on page 170
Section 11.3.3, “Installing and Starting the New POA,” on page 170
Section 11.3.4, “Setting Up User Access to the New Post Office,” on page 171
11.3.1 Creating the New Post Office
1 Make sure you are logged in to the tree where you want to create the post office.
This must be the same tree as the domain that the post office belongs to (worksheet item 3).
2 In ConsoleOne, browse to and right-click the eDirectory container where you want to create the
post office (worksheet item 1), then click New > Object.
novdocx (en) 11 December 2007
3 Double-click GroupWise Post Office, then fill in the fields in the Create GroupWise Post Office
dialog box (worksheet items 2 through 8).
4 Make sure the Configure Links and Define Additional Properties options are selected, then
click OK to display the Link Configuration Wizard.
Creating a New Post Office 167
Page 16

5 Follow the on-screen instructions to define how the post office links to its domain. When you
finish defining the link, ConsoleOne creates the Post Office object and displays the post office
Identification page.
novdocx (en) 11 December 2007
6 Fill in the Description field (worksheet item 9).
7 Click GroupWise > Post Office Settings to display the Post Office Settings page.
168 GroupWise 7 Administration Guide
Page 17

8 Provide the network type for the post office location (worksheet item 10).
9 Select the software distribution directory for the post office (worksheet item 7).
novdocx (en) 11 December 2007
10 If the POA will run on a different server from where the post office directory, a library, or a
document storage area is located, provide a username and password that enables the POA to
access the remote location (worksheet item 12).
11 Click GroupWise > Security to display the Security page.
12 Provide the post office security level and authentication type for the post office (worksheet item
11). For additional LDAP instructions, see Section 36.3.4, “Providing LDAP Authentication
for GroupWise Users,” on page 501.
13 Click OK to save the post office information.
Creating a New Post Office 169
Page 18

11.3.2 Configuring the POA for the New Post Office
Although there are many POA settings, the default settings are sufficient to get your post office
operational. However, there are a few important settings that you can conveniently modify before
you install the agent software.
1 In ConsoleOne, double-click the new Post Office object.
2 Right-click the POA object, then click Properties to display the POA Identification page.
novdocx (en) 11 December 2007
3 Provide a description for the POA.
The description displays on the POA agent console as the POA runs.
4 Select the platform where the POA will run (worksheet item 12).
5 If you have created the post office in a clustered environment, follow the instructions in the
appropriate section of the GroupWise 7 Interoperability Guide.
6 For more POA configuration options, see Section 12.10, “Changing POA Configuration to
Meet Post Office Needs,” on page 199.
7 Click OK to save the POA configuration information.
11.3.3 Installing and Starting the New POA
To install the POA for the new post office to the location recorded under worksheet item 11, follow
the instructions in “Installing GroupWise Agents” in the GroupWise 7 Installation Guide.
170 GroupWise 7 Administration Guide
Page 19

11.3.4 Setting Up User Access to the New Post Office
The post office access mode determines how GroupWise client users access their mailboxes. By
default, the GroupWise Windows and Cross-Platform clients use client/server access to the post
office. Client/server access provides the following benefits:
Client/server access provides the greatest level of security. Users do not need rights to the post
office directory because the GroupWise client does not write directly to databases in the post
office. All database updates are performed by the POA.
Client/server access eliminates the need for separate network logins and passwords. This
avoids problems with login restrictions, changing passwords, and insufficient network rights.
Client/server access allows the GroupWise client to maintain multiple simultaneous
connections to the post office.
With client/server access mode, proxy rights can be granted to any user visible in the Address
Book.
Historical Note: In GroupWise 5.x, the GroupWise client allowed the user to enter a path to the post
office directory to facilitate direct access mode. The GroupWise 6.x and later clients no longer offer
the user that option. However, you can force the GroupWise 6.x and later client to use direct access
mode by starting it with the /ps switch and providing the path to the post office directory.
novdocx (en) 11 December 2007
Continue with Section 11.4, “What’s Next,” on page 171.
11.4 What’s Next
After you have created the new post office and started its POA, you are ready to expand the post
office by:
Adding users to the post office. See “Users” on page 201.
Defining groups of users (distribution lists) that GroupWise users can select when addressing
messages. See “Distribution Lists, Groups, and Organizational Roles” on page 261.
Defining resources (for example, conference rooms or company cars) that users can schedule.
See “Resources” on page 247.
Defining libraries and setting up Document Management Services. See “Libraries and
Documents” on page 291.
Setting up the GroupWise Windows or Cross-Platform client software so that GroupWise users
can run the client from Windows, Linux, or Macintosh workstations. See “Client” on
page 1033.
Configuring the POA for optimal performance. See “Post Office Agent” on page 461.
11.5 Post Office Worksheet
Use this worksheet as you complete the tasks in Section 11.2, “Planning a New Post Office,” on
page 156.
Creating a New Post Office 171
Page 20

Item Explanation
1) eDirectory Container Specify the name of the eDirectory container where you plan to create the
new post office.
For more information, see Section 11.2.3, “Determining the Context for the
Post Office Object,” on page 158.
2) Post Office Name Specify a name for the new post office. Choose the name carefully. After
the post office is created, it cannot be renamed.
For more information, see Section 11.2.4, “Choosing the Post Office
Name,” on page 160.
3) GroupWise Domain Specify the domain this post office will belong to.
For more information, see Section 11.2.2, “Selecting the Domain That the
Post Office Will Belong To,” on page 157.
novdocx (en) 11 December 2007
4) Post Office Database
Location
5) Post Office Language Specify the post office language if it is different from the domain language.
6) Post Office Time Zone Specify the time zone for the post office if it is different from the domain
7) Software Distribution
Directory:
8) Create Library:
Specify the path for the post office directory. Choose the post office
directory carefully. After it is created, it is difficult to rename.
For more information, see Section 11.2.5, “Deciding Where to Create the
Post Office Directory,” on page 160.
For more information, see Section 11.2.8, “Selecting the Post Office
Language,” on page 165.
time zone.
For more information, see See Section 11.2.9, “Selecting the Post Office
Time Zone,” on page 165.
Specify the name of the software distribution directory for the new post
office.
For more information, see Section 11.2.10, “Selecting a Software
Distribution Directory,” on page 165.
Mark whether or not you want to create a library for the new post office at
the same time you create the new post office.
Yes
No
9) Post Office Description Provide a description for the new post office to help you identify its function
For more information, see Section 11.2.12, “Deciding if You Want to Create
a Library for the New Post Office,” on page 166.
in the system.
10) Network Type Specify the network type in use on the server where the new post office will
172 GroupWise 7 Administration Guide
be located.
For more information, see Section 11.2.5, “Deciding Where to Create the
Post Office Directory,” on page 160.
Page 21

Item Explanation
novdocx (en) 11 December 2007
11) Post Office Security
Level:
Low
High
eDirectory
authentication
LDAP authentication
12) Agent Location
POA on the same
server as the post
office (local)
POA on a different
server from the post
office (remote)
Username
Password
13) Agent Platform
NetWare POA
Linux POA
Windows POA
Mark the security level for the post offices. For high security, mark the type
of authentication you plan to use.
For more information, see Section 11.2.11, “Selecting a Post Office
Security Level,” on page 166.
Mark the location of the POA relative to the post office.
If the POA will run on a different server from where the post office, a library,
or a document storage area is located, provide a username and password
to enable the POA to access the remote location.
For more information, see Section 11.2.6, “Deciding Where to Install the
Agent Software,” on page 161.
Specify the platform where you plan to run the POA.
For more information, see Section 11.2.6, “Deciding Where to Install the
Agent Software,” on page 161.
14) Link to Domain
TCP/IP
Mapped
UNC
Mark how you plan to link the new post office to its domain.
For more information, see Section 11.2.7, “Deciding How to Link the New
Post Office,” on page 164.
Creating a New Post Office 173
Page 22

novdocx (en) 11 December 2007
174 GroupWise 7 Administration Guide
Page 23

12
Managing Post Offices
As your GroupWise® system grows and evolves, you might need to perform the following
maintenance activities on post offices:
Section 12.1, “Connecting to the Domain That Owns a Post Office,” on page 175
Section 12.2, “Editing Post Office Properties,” on page 176
Section 12.3, “Managing Disk Space Usage in the Post Office,” on page 182
Section 12.4, “Auditing Mailbox License Usage in the Post Office,” on page 191
Section 12.5, “Tracking and Restricting Client Access to the Post Office,” on page 193
Section 12.6, “Refreshing the Client View Files in the Post Office,” on page 195
Section 12.7, “Disabling a Post Office,” on page 195
Section 12.8, “Moving a Post Office,” on page 196
Section 12.9, “Deleting a Post Office,” on page 197
Section 12.10, “Changing POA Configuration to Meet Post Office Needs,” on page 199
novdocx (en) 11 December 2007
12
See also Section 26, “Maintaining Domain and Post Office Databases,” on page 377 and Section 31,
“Backing Up GroupWise Databases,” on page 407. Proper database maintenance and backups allow
recovery from accidental deletions, as described in Section 32.5, “Restoring Deleted Mailbox
Items,” on page 413 and Section 32.6, “Recovering Deleted GroupWise Accounts,” on page 416.
12.1 Connecting to the Domain That Owns a
Post Office
Whenever you change post office information, it is most efficient to connect directly to the domain
that the post office belongs to before you begin making modifications. Performing administrative
tasks in a post office while not connected to the post office’s domain increases the amount of
administrative message traffic sent between domains.
To change your domain connection:
®
1 In ConsoleOne
Select Domain, browse to and select the domain directory, then click OK.
or
In the GroupWise View, right-click the Domain object, then click Connect.
The GroupWise view identifies the domain that you are connected to by adding a plug symbol
to the domain icon.
in the Console View, click Too ls > GroupWise System Operations. Click
Managing Post Offices
175
Page 24

The domain marked with the red underscore is the primary domain.
For a discussion of cross-platform connection issues, see Section 4.1, “Select Domain,” on
page 51.
12.2 Editing Post Office Properties
After creating a post office, you can change some post office properties. Other post office properties
cannot be changed.
1 In ConsoleOne, browse to and right-click the Post Office object, then click Properties to
display the post office Identification page.
novdocx (en) 11 December 2007
2 Change editable fields as needed.
For information about individual fields, see Section 11.3, “Setting Up the New Post Office,” on
page 167 or use online help when editing the post office.
3 Click GroupWise > Post Office Settings to display the Post Office Settings page.
176 GroupWise 7 Administration Guide
Page 25

These post office settings are discussed in the following sections:
Section 11.2.10, “Selecting a Software Distribution Directory,” on page 165
novdocx (en) 11 December 2007
Section 11.3.4, “Setting Up User Access to the New Post Office,” on page 171
4 Click GroupWise > Client Access Settings to display the Client Access Settings page.
The client access settings are discussed in the following sections:
Section 12.5, “Tracking and Restricting Client Access to the Post Office,” on page 193
Section 12.7, “Disabling a Post Office,” on page 195
Section 36.3.5, “Enabling Intruder Detection,” on page 506
5 Click GroupWise > Membership to display the Membership page.
Managing Post Offices 177
Page 26

All users in the post office are listed, no matter where their Novell® eDirectoryTM objects are
located in the tree. Here you can add, delete, and move users in the post office. See “Users” on
page 201.
6 Click GroupWise > Resources to display the Resources page.
novdocx (en) 11 December 2007
All resources in the post office are listed, no matter where their eDirectory objects are located
in the tree. This is a convenient place to delete resources from the post office. See “Resources”
on page 247
7 Click GroupWise > Distribution Lists to display the Distribution Lists page.
178 GroupWise 7 Administration Guide
Page 27

All distribution lists in the post office are listed, no matter where their eDirectory objects are
located in the tree. This is a convenient place to delete distribution lists from the post office.
See “Distribution Lists, Groups, and Organizational Roles” on page 261.
8 Click GroupWise > Libraries to display the Libraries page.
novdocx (en) 11 December 2007
All libraries belonging to the post office are listed, no matter where their eDirectory objects are
located in the tree. This is a convenient place to delete libraries. See “Libraries and
Documents” on page 291.
9 Click GroupWise > Aliases to display the Aliases page.
Managing Post Offices 179
Page 28

You need to set up aliases for a post office only if you are using GroupWise gateways. For a list
of gateways, see the GroupWise Gateways Documentation Web site (http://www.novell.com/
documentation/gwgateways).
10 Click GroupWise > Internet Addressing to display the Internet Addressing page.
novdocx (en) 11 December 2007
Here you provide information used to determine the Internet addressing settings for the post
office. See Section 45, “Configuring Internet Addressing,” on page 703 for more information.
11 Click GroupWise > Security to display the Security page.
180 GroupWise 7 Administration Guide
Page 29

For instructions on setting the security level for the post office, see Section 11.2.11, “Selecting
a Post Office Security Level,” on page 166.
novdocx (en) 11 December 2007
12 Click GroupWise > Default WebAccess to display the Default WebAccess page.
Use this page to designate the default WebAccess gateway for the post office. See
“WebAccess” on page 853 for more information.
13 Click OK to save changes to the post office properties.
Managing Post Offices 181
Page 30

12.3 Managing Disk Space Usage in the Post
Office
Many users are prone to save every message and attachment they ever receive. You can moderate
this behavior by implementing disk space management:
Section 12.3.1, “Preparing to Implement Disk Space Management,” on page 182
Section 12.3.2, “Setting Mailbox Size Limits,” on page 183
Section 12.3.3, “Enforcing Mailbox Size Limits,” on page 185
Section 12.3.4, “Restricting the Size of Messages That Users Can Send,” on page 185
Section 12.3.5, “Preventing the Post Office from Running Out of Disk Space,” on page 187
Section 12.3.6, “An Alternative to Disk Space Management in the Post Office,” on page 190
Section 12.3.7, “Forcing Caching Mode,” on page 190
NOTE: The Cross-Platform client does not currently respect the mailbox size limits established in
ConsoleOne.
novdocx (en) 11 December 2007
12.3.1 Preparing to Implement Disk Space Management
If you are implementing disk space management in an existing GroupWise system, you must begin
by setting the initial size information on all users’ mailboxes. If you are implementing disk space
management in a new GroupWise system, skip to Section 12.3.2, “Setting Mailbox Size Limits,” on
page 183.
To establish current mailbox size:
1 In ConsoleOne, browse to and select a Post Office object.
2 Click Too ls > GroupWise Utilities > Mailbox/Library Maintenance.
3 In the GroupWise Objects field, select Post Offices.
182 GroupWise 7 Administration Guide
Page 31

4 In the Action field, select Analyze/Fix Databases.
5 As options to the action, select Contents, Fix Problems, and Reset User Disk Space Totals.
Make sure all other options are deselected.
6 On the Databases tab, select User. Make sure all other types of databases are deselected.
7 Click Run, then click OK to acknowledge that the Mailbox/Library Maintenance task has been
sent to the POA.
After the POA has performed the task, current mailbox size information becomes available on
each user’s mailbox. The information is updated regularly as the user receives and deletes
messages.
8 To generate a report of current mailbox information, follow the instructions in Section 30.1,
“Gathering Mailbox Statistics,” on page 399.
9 Repeat Step 1 through Step 8 for each post office where you want to implement disk space
management.
10 Continue with Section 12.3.2, “Setting Mailbox Size Limits,” on page 183.
12.3.2 Setting Mailbox Size Limits
novdocx (en) 11 December 2007
After initial size information is recorded on each user’s mailbox, you can establish a limit on the
amount of disk space each user’s mailbox is allowed to occupy. You can set a single limit for an
entire domain. You can set different limits for each post office. You can even set individual user
limits if necessary.
If you are implementing disk space management in an existing GroupWise system where users are
accustomed to unlimited disk space, you should warn them about the coming change. After you
establish the mailbox size limits as described in this section, users whose mailboxes exceed the
established limit cannot send messages until the size of their mailboxes is reduced. Users might
want to manually delete and archive items in advance in order to avoid this interruption in their use
of GroupWise.
To establish mailbox size limits:
1 In ConsoleOne, browse to and select a Domain, Post Office, or User object.
2 Click Too ls > GroupWise Utilities > Client Options.
3 Click Send > Disk Space Management.
Managing Post Offices 183
Page 32

novdocx (en) 11 December 2007
4 Select User Limits.
5 Specify the maximum number of megabytes allowed for each user’s mailbox.
Unless disk space is extremely limited, 200 MB is a comfortable mailbox size to enforce. The
maximum size limit that you can set for mailboxes is 4 GB. However, GroupWise databases
themselves have no inherent maximum size limit.
6 Specify as a percentage the point where you want to warn users that their mailboxes are getting
full.
After a user receives a warning message, he or she cannot send additional messages until
mailbox cleanup has been performed and the mailbox size is brought below the warning
percentage.
7 Optionally, specify in kilobytes the largest message that users can send.
By restricting message size, you can influence how fast users’ mailboxes fill up. However, if
users have valid reasons for sending messages that exceed this limit, the limit can become a
hindrance to users getting their work done.
8 Click OK > Close to save the disk space management settings.
9 If you are adding disk space management to an existing GroupWise system where users’
mailboxes are already over the desired size limit, continue with Section 12.3.3, “Enforcing
Mailbox Size Limits,” on page 185.
or
If you are implementing disk space management in a new system where users have not yet
begun to use their mailboxes, see “Using Mailbox Storage Size Information” in “Managing
Your Mailbox” in the GroupWise 7 Windows Client User Guide to see how setting a mailbox
size limit affects users’ activities in the GroupWise client.
184 GroupWise 7 Administration Guide
Page 33

12.3.3 Enforcing Mailbox Size Limits
If existing GroupWise users are having difficulty fitting their mailboxes into the established mailbox
size limits, you can assist them by reducing their mailboxes for them. Users should be warned before
this action is taken.
1 In ConsoleOne, select a Post Office object.
2 Click Too ls > GroupWise Utilities > Mailbox/Library Maintenance.
novdocx (en) 11 December 2007
3 In the Action field, select Expire/Reduce.
4 Set the Expire and Reduce options as desired, making sure that Reduce Mailbox to Limited Size
is selected.
5 Click Run, then click OK to acknowledge that the Mailbox/Library Maintenance task has been
sent to the POA.
After the POA has performed the task, users mailboxes fit within the mailbox size limit you
have established.
6 Repeat Step 1 through Step 5 for each post office where you want to reduce user mailboxes to
the established mailbox size limit.
See “Using Mailbox Storage Size Information” in “Managing Your Mailbox” in the GroupWise 7
Windows Client User Guide to see how setting a mailbox size limit affects user activities in the
GroupWise client.
12.3.4 Restricting the Size of Messages That Users Can Send
By restricting message size, you can influence how fast user mailboxes fill up. However, if users
have valid reasons for sending messages that exceed this limit, the limit can become a hindrance to
users getting their work done.
For HTML-formatted messages, the MIME portion of the message counts in the message size.
MIME files can be large. If a user cannot send an HTML-formatted message, he or she could use
Managing Post Offices 185
Page 34

plain text instead, in order to decrease the size of the message so that it falls within the message size
restriction.
There are four levels at which you can restrict message size:
“Within the Post Office” on page 186
“Between Post Offices” on page 187
“Between Domains” on page 187
“Between Your GroupWise System and the Internet” on page 187
NOTE: Although the Cross-Platform client does not enforce the message size limits established in
ConsoleOne using To ol s > GroupWise Utilities > Client Options > Send > Disk Space Management,
messages originating from the Cross-Platform client can be restricted by the POA and MTA as they
pass between post offices and domains.
Within the Post Office
You can use Client Options to restrict the size of messages that users can send within their local post
office.
novdocx (en) 11 December 2007
1 In ConsoleOne, browse to and select a Domain, Post Office, or User object.
2 Click Too ls > GroupWise Utilities > Client Options.
3 Click Send > Disk Space Management.
186 GroupWise 7 Administration Guide
Page 35

novdocx (en) 11 December 2007
4 Select User Limits.
5 Specify in kilobytes the largest message that users can send.
6 Click OK, then click Close to save the maximum message size setting.
Between Post Offices
You can configure the POA to restrict the size of messages that it allows to pass outside the local
post office. See Section 36.2.8, “Restricting Message Size between Post Offices,” on page 495 for
setup instructions.
Between Domains
You can configure the MTA to restrict the size of messages that it allows to pass outside the local
domain. See Section 41.2.1, “Restricting Message Size between Domains,” on page 628 for setup
instructions.
Between Your GroupWise System and the Internet
You can configure the Internet Agent to restrict the size of messages that it allows to pass to and
from your GroupWise system by setting the size limits in a customized class of service. See
Section 47.1, “Controlling User Access to the Internet,” on page 747 for setup instructions.
12.3.5 Preventing the Post Office from Running Out of Disk
Space
In spite of the best disk space management plans, it is still possible that some unforeseen situation
could result in a post office running out of disk space. To prevent this occurrence, you can configure
Managing Post Offices 187
Page 36

the POA to stop processing messages, so that disk space usage in the post office cannot increase
until the disk space problem is resolved.
1 In ConsoleOne, double-click a Post Office object, right-click its POA object, then click
Properties.
2 Click GroupWise > Agent Settings, then adjust the settings in the Disk Check Interval and Disk
Check Delay fields as described in Section 36.4.2, “Scheduling Disk Space Management,” on
page 510.
3 Click GroupWise > Scheduled Events.
novdocx (en) 11 December 2007
4 Click Create to create a new scheduled event to handle an unacceptably low disk space
condition.
5 Type a unique name for the new scheduled event, then select Disk Check as the event type.
6 In the Trigger Actions At field, specify the amount of free post office disk space at which to
take preventive measures.
188 GroupWise 7 Administration Guide
Page 37

7 Click Create to define your own disk check actions, then give the new action a unique name.
novdocx (en) 11 December 2007
8 Configure the actions for the POA to take in order to relieve the low disk space condition.
Use the Results or Notification tab if you want to receive notification about the POA’s response
to the low disk space condition.
9 Click OK to return to the Create Scheduled Event dialog box.
For additional instructions, see Section 36.4.2, “Scheduling Disk Space Management,” on
page 510.
10 Select the new set of actions.
11 In the Stop Mail Processing At field, specify the amount of free post office disk space at which
you want the POA to stop processing messages.
12 Click OK to create the new disk space management event and return to the Scheduled Events
page.
Managing Post Offices 189
Page 38

13 Select the new disk space management event.
14 Click OK to close the Scheduled Events page.
novdocx (en) 11 December 2007
ConsoleOne then notifies the POA to restart so the new disk space management event can be
put into effect.
12.3.6 An Alternative to Disk Space Management in the Post
Office
If you want to place more responsibility for disk space management onto GroupWise client users,
you can require that they run the client in Caching mode, where all messages can be stored on user
workstations, or other personal locations, rather than in the post office. For an overview of Caching
mode, see:
“Using Caching Mode” in the GroupWise 7 Windows Client User Guide
“Using Caching Mode” in the GroupWise 7 Cross-Platform Client User Guide
IMPORTANT: Do not force Caching mode for a post office that supports Outlook* clients along
with GroupWise clients.
12.3.7 Forcing Caching Mode
You can force Caching mode for an entire domain. You can force Caching mode for specific post
offices. You can even force Caching mode for an individual user if necessary.
When you initially force caching mode, users’ Caching mailboxes are identical with their Online
mailboxes. However, as you employ disk space management processes in the post office and reduce
the size of users’ Online mailboxes, more and more of the users’ mailbox items exist only in their
190 GroupWise 7 Administration Guide
Page 39

Caching mailboxes. Make sure that users understand their responsibilities to back up their Caching
mailboxes, as described in:
“Backing Up Your Mailbox” in “Managing Your Mailbox” in the GroupWise 7 Windows Client
User Guide
“Backing Up Your Mailbox” in “Managing Your Mailbox” in the GroupWise 7 Cross-Platform
Client User Guide
To force Caching mode:
1 In ConsoleOne, browse to and select a Domain, Post Office, or User object.
2 Click Too ls > GroupWise Utilities > Client Options.
novdocx (en) 11 December 2007
3 Click Environment > Client Access.
4 In the Client Login Mode box, select Force Use of Caching Mode.
5 Click OK, then click Close to save the Caching mode setting.
If you are helping existing users, who might have sizeable mailboxes, to start using Caching mode
exclusively, you can configure the POA to respond efficiently when multiple users need to
download their entire mailboxes for the first time. See Section 36.2.7, “Supporting Forced Mailbox
Caching,” on page 494 for setup instructions.
12.4 Auditing Mailbox License Usage in the Post
Office
You can run an audit report in a post office to see 1) which mailboxes require full client licenses and
which mailboxes require limited client licenses, and 2) which mailboxes are active (have been
accessed at least one time), which ones have never been active, and which ones have been inactive
for a specified period of time.
A mailbox requires a full client license (and is marked as a full client license mailbox) if it has been
accessed by any of the following:
The GroupWise Windows client (grpwise.exe)
GroupWise Notify (notify.exe) or GroupWise Address Book (addrbook.exe)
The GroupWise Cross-Platform client (groupwise)
Microsoft Outlook with the GroupWise 7 Connector installed
Managing Post Offices 191
Page 40

The Microsoft Outlook Plug-In for GroupWise 5.5
A third-party plug-in to the GroupWise client API
A mobile device with mailbox synchronization capabilities provided by GroupWise Mobile
Server (GMS) or Research in Motion* (RIM*) BlackBerry* Enterprise Server* (BES).
A mailbox requires a limited client license only (and is marked as a limited client license mailbox) if
access to it has been limited to the following:
The GroupWise WebAccess client
A GroupWise Windows or WebAccess client via the Proxy feature
Any GroupWise client via the Busy Search feature
A POP, IMAP, or SOAP client
A mobile device using WebAccess browser access to the mailbox
A mobile device with mailbox synchronization capabilities provided by NotifyCorp*
NotifyLink* and other third-party products that use IMAP access to the mailbox
To generate an audit report for the post office:
novdocx (en) 11 December 2007
1 In ConsoleOne, browse to and select the Post Office object.
2 Click Too ls > GroupWise Utilities > Mailbox/Library Maintenance.
3 In the Action field, select Audit Report.
192 GroupWise 7 Administration Guide
Page 41

novdocx (en) 11 December 2007
4 In the Show Accounts without Activity for nn Days field, select the number of days you want to
use for the inactivity report.
Using the default setting (60 days) causes the Mailbox/Library Maintenance program to
indicate the mailboxes that have not had any activity within the last 60 days.
5 If you want write the report to a log file, click the Logging tab, then specify a name for the log
file.
6 If you want to send the results as an e-mail message to the domain’s GroupWise administrator
or to another individual, click the Results tab, then select the appropriate options.
7 Click Run, then click OK to acknowledge that the Mailbox/Library Maintenance task has been
sent to the POA.
After the POA has performed the task, the audit report is generated in the format (log file or email message) you specified.
Audit reports are stored as part of the information available on Post Office and Domain objects in
ConsoleOne. Right-click a Domain or Post Office object, then click To ol s > GroupWise Diagnostics
> Information. The information stored on the Domain object is cumulative for all post office in the
domain for which audit reports have been run.
Audit reports can also be scheduled to run on a regular basis by properly configuring the POA to
perform a Mailbox/Library Maintenance event. See Section 36.4.1, “Scheduling Database
Maintenance,” on page 507.
12.5 Tracking and Restricting Client Access to
the Post Office
By default, the post office allows multiple versions of the GroupWise Windows and Cross-Platform
clients to access it. Using the Web console available for the post office’s POA, you can see the
version number of each GroupWise client that logs in to the post office in client/server access mode
(TCP/IP to the POA). This information is displayed on the POA Web console’s C/S Users page. For
more information, see Section 37.2, “Using the POA Web Console,” on page 530.
Managing Post Offices 193
Page 42

IMPORTANT: Because the POA provides the version tracking and enforces the client lockout, this
functionality applies only to GroupWise clients that are accessing the post office in client/server
mode (not direct access mode).
To help you better monitor and track which versions of the GroupWise client are being used to
access the post office, you can specify a preferred GroupWise client version for the post office. Any
version that does not match the preferred version is highlighted on the POA Web console’s C/S
Users page. Older versions are shown in red, and newer versions are shown in blue.
In addition, to restrict which versions of the GroupWise client can access the post office, you can
choose to lock out any GroupWise clients that are older than the preferred version. If you want to
lock out all GroupWise clients (for example, to rebuild the post office database), see Section 12.7,
“Disabling a Post Office,” on page 195.
To specify a preferred GroupWise client version for the post office and to enable the POA to lock
out specific GroupWise client versions:
1 In ConsoleOne, right-click the Post Office object, then click Properties.
2 Click GroupWise > Client Access Settings to display the Client Access Settings page.
novdocx (en) 11 December 2007
3 Fill in the following fields:
Minimum Client Release Version: Specify the version to use as the post office’s preferred
GroupWise client version. Any version that does not match the preferred version is highlighted
on the POA Web console’s C/S Users page. Older versions are shown in red, and newer
versions are shown in blue. The version number syntax should match what is displayed in the
GroupWise client’s About GroupWise dialog box. Only version 5.5 Enhancement Pack SP1
and newer are supported.
Minimum Client Release Date: This field is available only if you specify a release version.
You can use this field to associate an expected release date with the release version. The C/S
Users page highlights any dates that do not match the one entered here.
Lock Out Older GroupWise Clients: Select this option for either or both of the above options
to lock out any GroupWise clients (client/server mode only) that are older than the version and/
194 GroupWise 7 Administration Guide
Page 43

or date specified in the Release Version and Release Date fields. For example, if you entered
6.0.0 in the Release Version field and April 6, 2001 12:00 AM in the Release Date field and
selected this option for both, any GroupWise client that is older than version 6.0 or is dated
before April 6, 2001 12:00 AM is not allowed access to the post office.
4 Click OK to save the changes.
12.6 Refreshing the Client View Files in the Post
Office
The GroupWise Windows client software includes view files that control the appearance of the
client interface. When you copy the client software to a software distribution directory, the view
files are included. A copy of the view files is also stored in each post office.
When you use AutoUpdate to force Windows client software updates, the AutoUpdate process
makes one attempt to update the view files in the post office based on the latest client software in the
software distribution directory. If that attempt fails, the problem is recorded in the POA log file and
you can then manually update the view files in the post office.
1 In ConsoleOne, select the post office whose view files you want to update, then click Too ls >
GroupWise Utilities > System Maintenance.
novdocx (en) 11 December 2007
2 Select Refresh Views, click Run, click Yes , then click OK.
The POA then retrieves the latest view files from the software distribution directory associated
with the selected post office.
IMPORTANT: If you have created custom view files with the same names as standard view
files, they will be overwritten when the post office view files are refreshed from the software
distribution directory. If you have such customized view files, you must back them up and t hen
restore them so that your customizations are not lost because of the refresh.
12.7 Disabling a Post Office
Disabling a post office restricts users from starting the GroupWise Windows or Cross-Platform
client and accessing the post office. However, users who are already running the GroupWise client
Managing Post Offices 195
Page 44

can continue to access the post office; after they exit, they cannot access the post office again until
the post office is enabled.
A post office must be disabled if you are rebuilding the post office database (wphost.db). You might
also want to disable a post office when you are doing a complete GroupWise system backup. That
ensures that all data is consistent at the time of the backup.
1 In ConsoleOne, browse to and right-click the Post Office object, then click Properties.
2 Click GroupWise > Client Access Settings to display the Client Access Settings page.
novdocx (en) 11 December 2007
3 Select Disable Logins, then click OK to disable the post office.
4 To re-enable logins, deselect Disable Logins so that it is blank.
12.8 Moving a Post Office
You cannot move a Post Office object in ConsoleOne because it is a container object. Only leaf
objects can be moved. If you need to change the context, graft the GroupWise post office to its
corresponding eDirectory object in the new container location. See Section 5.16, “GW / eDirectory
Association,” on page 77 for more information on grafting objects.
You can, however, move the post office directory, the post office database (wphost.db), and the
other databases that reside in the post office by copying the post office directory structure and all its
contents to the new location.
IMPORTANT: Follow these instructions if you want to move a post office on a NetWare or
Windows server to another directory on the same server or to a different NetWare or Windows
server. If you want to move a post office located on a NetWare or Windows server onto a Linux
server, see “Manually Migrating a Post Office and Its POA to Linux” in “Update” in the GroupWise
7 Installation Guide.
To move a post office directory structure and all its contents:
196 GroupWise 7 Administration Guide
Page 45

1 Make sure all users are out of the post office, then disable logins to the post office. See
Section 12.7, “Disabling a Post Office,” on page 195.
2 Back up the post office. See Chapter 31, “Backing Up GroupWise Databases,” on page 407.
3 In ConsoleOne, display the Identification page of the post office to move.
4 In the UNC Path field, change the UNC path to the location where you want to move the post
office, then click OK to save the new location.
The location change is then propagated up to the domain.
5 Stop the POA for the post office.
6 Use xcopy with the /s and /e options to move the post office directory and its contents. These
options re-create the same directory structure even if directories are empty.
Example:
xcopy post_office_directory /s /e destination
7 Give rights to objects that need to access the post office database.
For example, if the new location is on a different server, the NetWare
administrators who run ConsoleOne need adequate rights to the new location, as described in
Chapter 75, “GroupWise Administrator Rights,” on page 1135.
8 Edit the POA startup file by changing the setting of the /home switch, then restart the POA. See
Section 36.1.6, “Adjusting the POA for a New Post Office Location,” on page 484.
9 When you are sure the post office is functioning properly, delete the original post office
directories.
®
POA and GroupWise
novdocx (en) 11 December 2007
If you need to move the POA along with its post office, see Section 36.1.5, “Moving the POA to a
Different Server,” on page 484.
12.9 Deleting a Post Office
You cannot delete a post office until you have deleted or moved all objects that belong to it. Keep
the POA running until after you have deleted the post office, so that it can process the object deletion
requests.
1 In ConsoleOne, right-click the Post Office object to delete, then click Properties.
Managing Post Offices 197
Page 46

novdocx (en) 11 December 2007
2 Click GroupWise > Resources, then delete any resources that still belong to the post office. See
Section 16.5, “Deleting a Resource,” on page 256.
You must delete resources before users, because users who own resources cannot be deleted
without assigning a new owner in the same post office.
3 Click GroupWise > Membership, then delete or move any users that still belong to the post
office. See Section 14.10, “Removing GroupWise Accounts,” on page 241 and Section 14.4,
“Moving GroupWise Accounts,” on page 222.
4 Click GroupWise > Distribution Lists, then delete any distribution lists that still belong to the
post office. See Section 18.7, “Deleting a Distribution List,” on page 272.
5 Click GroupWise > Libraries, then delete any libraries that still belong to the post office. See
Section 22.6.7, “Deleting a Library,” on page 330.
6 Click OK to perform the deletions.
It is easy to perform such deletions in the GroupWise View. Select the Post Office object in the
GroupWise View, then use the drop-down list of objects to display objects of each type that still
belong to the post office. Delete any residual objects in the Console View.
7 In ConsoleOne, browse to and right-click the Domain object that owns the post office to delete,
then click Properties.
8 Click GroupWise > Post Offices, select the post office to delete, then click Delete.
9 Stop the POA for the post office, as described in the following sections in the GroupWise 7
Installation Guide:
“Stopping the NetWare GroupWise Agents”
“Stopping the Linux GroupWise Agents”
“Stopping the Windows GroupWise Agents”
10 Uninstall the POA software if applicable, as described in the following sections in the
GroupWise 7 Installation Guide:
“Uninstalling the NetWare GroupWise Agents”
“Uninstalling the Linux GroupWise Agents”
198 GroupWise 7 Administration Guide
Page 47

“Uninstalling the Windows GroupWise Agents”
12.10 Changing POA Configuration to Meet Post
Office Needs
Because the POA delivers messages to mailboxes, responds in real time to client/server users, and
maintains all databases located in the post office, its functioning affects the post office and all users
who belong to the post office. Proper POA configuration is essential for a smoothly running
GroupWise system. Complete details about the POA are provided in Part IX, “Post Office Agent,”
on page 461. As you create and manage post offices, you should keep in mind the following aspects
of POA configuration:
Section 36.3.3, “Securing the Post Office with SSL Connections to the POA,” on page 498
Section 36.3.4, “Providing LDAP Authentication for GroupWise Users,” on page 501
Section 36.3.5, “Enabling Intruder Detection,” on page 506
Section 36.2.3, “Supporting IMAP Clients,” on page 490
Section 36.2.4, “Supporting SOAP Clients,” on page 491
Section 36.2.5, “Supporting CAP Clients,” on page 492
Section 38.1, “Optimizing Client/Server Processing,” on page 547
novdocx (en) 11 December 2007
Section 36.4.1, “Scheduling Database Maintenance,” on page 507
Section 36.4.3, “Performing Nightly User Upkeep,” on page 513
Section 36.2.8, “Restricting Message Size between Post Offices,” on page 495
Managing Post Offices 199
 Loading...