

Page 1

II
Domains
Chapter 8, “Creating a New Domain,” on page 111
Chapter 9, “Managing Domains,” on page 127
Chapter 10, “Managing the Links between Domains and Post Offices,” on page 137
novdocx (en) 11 December 2007
II
Domains
109
Page 2

novdocx (en) 11 December 2007
110 GroupWise 7 Administration Guide
Page 3

8
Creating a New Domain
As your GroupWise® system grows, you might need to add new domains.
Section 8.1, “Understanding the Purpose of Domains,” on page 111
Section 8.2, “Planning a New Domain,” on page 112
Section 8.3, “Setting Up the New Domain,” on page 122
Section 8.4, “What’s Next,” on page 124
Section 8.5, “Domain Worksheet,” on page 125
IMPORTANT: If you are creating a new domain in a clustered GroupWise system, see the
GroupWise 7 Interoperability Guide before you create the domain:
8.1 Understanding the Purpose of Domains
novdocx (en) 11 December 2007
8
The domain functions as the main administrative unit for your GroupWise system. Each GroupWise
system has one primary domain, which was created when you first installed GroupWise. All other
domains that you add are secondary domains.
The domain serves as a logical grouping of one or more post offices and is used for addressing and
routing messages. Each GroupWise user has a GroupWise address that consists of a user ID, the
user’s post office name, the GroupWise domain name, and, optionally, an Internet domain name.
The following diagram illustrates the logical organization of a GroupWise system with multiple
domains and post offices. All of the objects under the domain belong to that domain. All of the
objects under a post office belong to that post office.
Figure 8-1 Logical Organization of a GroupWise System with Multiple Domains and Post Offices
GroupWise
System
Post
Office
Agent
Primary
Domain
Post
Office
Post
Office
Message
Transfer
Agent
Office
Agent
Post
Post
Office
Agent
Secondary
Domain
Post
Office
Message
Transfer
Agent
Post
Office
Post
Office
Agent
GroupWise Users
GroupWise Users
Messages are moved from user to user through your GroupWise system by the GroupWise agents.
As illustrated above, each domain must have a Message Transfer Agent (MTA) running for it. The
MTA transfers messages between domains and between post offices in the same domain. Each post
GroupWise Users
GroupWise Users
Creating a New Domain
111
Page 4

office must have at least one Post Office Agent (POA) running for it. The POA delivers messages to
users’ mailboxes and performs a variety of post office and mailbox maintenance activities.
When you add a new domain to your GroupWise system, links define how messages are routed from
one domain to another. When you add the first secondary domain, the links between the primary and
secondary domains are very simple. As the number of domains grows, the links among them can
become quite complex. Links are discussed in detail in Chapter 10, “Managing the Links between
Domains and Post Offices,” on page 137.
Physically, a domain consists of a set of directories that house all the information stored in the
domain. To view the structure of a domain directory, see “Domain Directory” in GroupWise 7
Troubleshooting 3: Message Flow and Directory Structure. The domain directory does not contain
mailboxes or messages, but it does contain other vital information. For an overview, see
Section 40.3, “Information Stored in the Domain,” on page 606. Domain directories can be located
®
on NetWare
, Linux, and Windows servers.
8.2 Planning a New Domain
After you have your basic GroupWise system up and running, you might need to expand it by
adding one or more domains. The GroupWise architecture lets you create a simple, single domain
system, or a complex system that links dozens of domains across a campus, a city, or around the
world.
novdocx (en) 11 December 2007
This section provides the information you need in order to decide when, where, and how to set up a
new domain. The “Domain Worksheet” on page 125 lists all the information you need. You should
print the worksheet and fill it out as you complete the tasks listed below.
Section 8.2.1, “Determining When to Add a New Domain,” on page 112
Section 8.2.2, “Deciding Who Will Administer the New Domain,” on page 113
Section 8.2.3, “Planning Post Offices in the New Domain,” on page 114
Section 8.2.4, “Determining the Context for the Domain Object,” on page 114
Section 8.2.5, “Choosing the Domain Name,” on page 116
Section 8.2.6, “Deciding Where to Create the Domain Directory,” on page 117
Section 8.2.7, “Deciding Where to Install the Agent Software,” on page 118
Section 8.2.8, “Deciding How to Link the New Domain,” on page 121
Section 8.2.9, “Selecting the Domain Language,” on page 121
Section 8.2.10, “Selecting the Domain Time Zone,” on page 121
After you have completed the tasks and filled out the “Domain Worksheet” on page 125, you are
ready to continue with Section 8.3, “Setting Up the New Domain,” on page 122.
8.2.1 Determining When to Add a New Domain
How do you know when you should add a domain? The answer to this depends on your
administration policies and on physical and logical network organization.
112 GroupWise 7 Administration Guide
Page 5

Although a single domain can contain as many post offices and users as you want to add, there are
some conditions that indicate the need for a new domain:
Administrative Convenience: To spread out the administrative workload, you can create one
or more new domains with their own administrators. Each new domain can be managed by a
different administrator as long as each administrator has sufficient rights to connect to it and
write to the domain database.
Remote Sites: If communication between servers is slow, or if you have remote sites, you can
add a new domain to minimize mail traffic between the servers. For example, if you have
locations in three separate cities, you might have an organization that represents each location.
You could then create a domain in each organization. You could administer all of the domains
from one location or you could assign a different administrator for each one.
Demand on the MTA: Each domain has its own MTA that routes messages between post
offices within its domain. If your current domain has many post offices that are placing a heavy
workload on the MTA, you might want to create another domain to handle additional post
offices.
Multiple eDirectory Trees: All of the objects that are logically subordinate to a GroupWise
domain must be in the same Novell
®
eDirectoryTM tree as the domain. If you have users in other
eDirectory trees that need GroupWise accounts, you must create secondary domains and post
offices in each tree.
novdocx (en) 11 December 2007
8.2.2 Deciding Who Will Administer the New Domain
Any user who is an Admin equivalent can administer GroupWise. We recommend that whoever
creates the new domain should be an Admin equivalent so that he or she has the necessary rights to
create objects and directories. You can then assign a different user as a domain administrator and
limit rights to other objects if necessary. For more information, see Chapter 75, “GroupWise
Administrator Rights,” on page 1135.
Depending upon the size, complexity, and layout of your eDirectory tree, you might choose a
centralized administration model with one person administering both eDirectory and GroupWise, or
you might choose a distributed administration model with the administration workload shared by
two or more individuals. With a distributed administration model, each administrator obtains rights
to the GroupWise objects and directory structures over which he or she has jurisdiction. If you want
to restrict access to some network operations or to certain domains, you can limit access rights to
domains the user should not administer.
The user assigned as the administrator must be able to create or modify objects in the domain and
will receive an e-mail message whenever an agent encounters a problem. You can designate
yourself, one or more other users, or a distribution list as an administrator.
WORKSHEET
Under Item 10: Domain Administrator, enter the ID of the user or distribution list that will administer this
domain.
The items in the worksheet are listed in the order you will enter them when setting up your domain.
This planning section does not follow the same order as the worksheet, but all worksheet items are
covered.
Creating a New Domain 113
Page 6

8.2.3 Planning Post Offices in the New Domain
Before adding the new domain, you should plan the post offices that you want to belong to the
domain. You should consider the following issues when planning post offices.
Physical Organization: If your network spans several sites, you might want to create post
offices (if not domains) at each physical location. This reduces the demands on long-distance
network links.
Logical Organization: Grouping users who frequently send messages to each other is faster
and generates less network traffic than if messages travel between different post offices and
domains.
Number of Users: A typical post office can serve from 1000 to 2500 users, depending on its
configuration. Larger post offices are possible, but grouping similar users might be preferable.
Demand on the POA: Each post office has at least one POA that delivers messages to user
mailboxes and performs other post office maintenance tasks. It is possible to run multiple
POAs, located on different servers, for the same post office, or you might prefer to create
multiple post offices.
For more details, see Section 11.2, “Planning a New Post Office,” on page 156.
novdocx (en) 11 December 2007
8.2.4 Determining the Context for the Domain Object
When deciding where to place the new Domain object in the eDirectory tree, you should consider
how you can most easily administer GroupWise and how the domain and its associated post offices
fit into the logical organization of your eDirectory tree.
Domains and their associated objects, including Post Offices, Users, Resources, and Distribution
Lists, must be located in the same eDirectory tree. If you have multiple trees, you must create a
separate domain in each tree. The domains can all belong to the same GroupWise system, even
though they are located in different trees.
You can place the domain in any Organization or Organizational Unit container in any context in an
eDirectory tree. The following sections provide some examples of how domains can be placed in the
eDirectory tree:
“GroupWise Objects Reflect Physical Locations” on page 115
“GroupWise Objects Reflect Company Organization” on page 115
“GroupWise Objects Are Grouped with Servers” on page 115
“GroupWise Objects Are Located in a Separate GroupWise Container” on page 116
WORKSHEET
Under Item 1: Tree Name, specify the name of the eDirectory tree where you plan to create the new
domain.
Under Item 2: eDirectory Container, specify the name of the eDirectory container where you plan to
create the new domain.
114 GroupWise 7 Administration Guide
Page 7

GroupWise Objects Reflect Physical Locations
The GroupWise system below focuses on the physical layout of the company. Because most mail
traffic is probably generated by users in the same location, the mail traffic across the WAN is
minimized. An organizational unit is created for each site. A domain is created under each
organizational unit, corresponding to the city. The sites can be administered centrally or at each site.
Administrator rights can be assigned at the domain level.
Figure 8-2 A GroupWise System Following the Company’s Physical Organization
GroupWise Objects Reflect Company Organization
The following GroupWise system focuses on departmental organization, as does the eDirectory tree.
GroupWise domains and post offices parallel eDirectory organizational units, placing the domains
and post offices within the organizational units containing the users that belong to them.
novdocx (en) 11 December 2007
Figure 8-3 A GroupWise System Following the Company’s Departmental Organization
GroupWise Objects Are Grouped with Servers
Because domains and post offices have directory structures on network servers, you could also
choose to place the Domain and Post Office objects in the same context as the servers where the
directories reside, as shown in the following example.
Creating a New Domain 115
Page 8
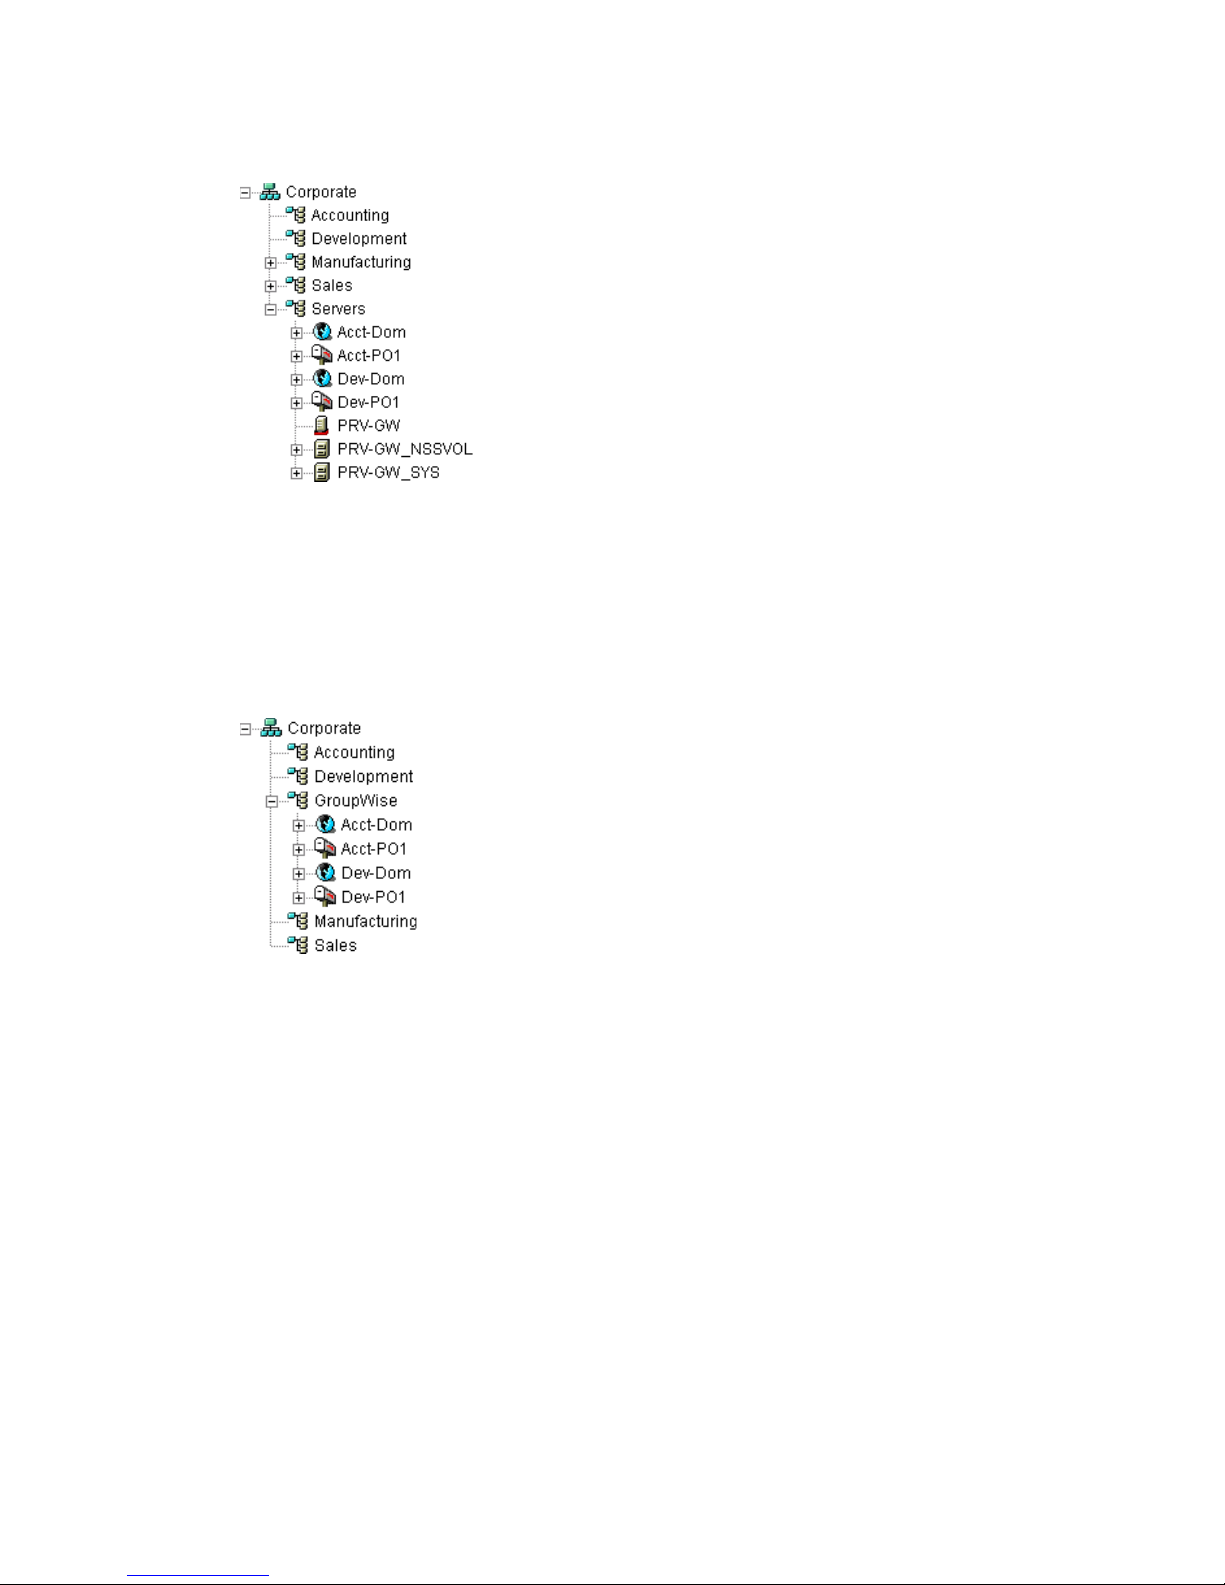
Figure 8-4 A GroupWise System with the Domains And Post Offices Grouped with the Servers
GroupWise Objects Are Located in a Separate GroupWise Container
Domains and post offices can also be created in their own organizational unit. Administratively, this
approach makes it easier to restrict a GroupWise administrator’s object and property rights to
GroupWise objects only. For information about GroupWise Administrator rights, see Section 8.2.2,
“Deciding Who Will Administer the New Domain,” on page 113.
novdocx (en) 11 December 2007
Figure 8-5 Groupwise Objects Located in Their Own Organizational Unit
8.2.5 Choosing the Domain Name
The domain requires a unique name. The name is used as the Domain object’s name in eDirectory. It
is also used for addressing and routing purposes within GroupWise, and might appear in the
GroupWise Address Book.
The domain name can reflect a location, company name or branch name, or some other element that
makes sense for your organization. For example, you might want the domain name to be the location
(for example, Provo) while the post office name is one of the company’s departments (for example,
Research). Name the new domain carefully. After it is created, the name cannot be changed.
The domain name should consist of a single string. Use underscores (_) rather than spaces as
separators between words to facilitate addressing across the Internet. Do not use any of the
following invalid characters in the domain name:
ASCII characters 0-13 Comma ,
Asterisk * Double quote “
116 GroupWise 7 Administration Guide
Page 9

At sign @ Extended ASCII characters that are graphical or typographical
symbols; accented characters in the extended range can be used
Braces { } Parentheses ( )
Colon : Period .
WORKSHEET
Under Item 3: Domain Name, specify the domain name.
Under Item 8: Domain Description, provide a description for the new domain.
8.2.6 Deciding Where to Create the Domain Directory
Logically, the Domain object resides in eDirectory and is administered through ConsoleOne®.
Physically, the domain has a directory structure for databases, message queues, and other files. The
domain directory structure can be created on any of the supported platforms listed in “GroupWise
Administration Requirements” in the GroupWise 7 Installation Guide. It can also be located on any
platform that an MTA running on a supported platform can access successfully. The server where
you create the domain directory structure can be in the same tree as the Domain object or in another
tree.
novdocx (en) 11 December 2007
Many different configurations are possible. When deciding where to create the domain directory,
you should consider the following.
Domain Directory Space Requirements: The domain directory requires less than 10 MB of
free disk space. However, this requirement could increase as your system grows.
Network Access by the MTA: If the MTA is not installed on the same server with the domain
directory, the MTA must have direct network access to the domain directory so that it can write
to the domain database (wpdomain.db) and, depending on link configuration, to the post office
directories so that it can write to the POA input queues. This issue is discussed in detail in
Section 8.2.7, “Deciding Where to Install the Agent Software,” on page 118.
Security from User Access: Users never need access to the domain directory so you should
create it in a location you can easily secure; otherwise, you could have files inadvertently
moved or deleted.
Choose an empty directory for the new domain. If you want, the directory can reflect the name of the
domain, for example, res_dev for the Research and Development domain. Use the following
platform-specific conventions:
NetWare: Use a maximum of 8 characters
Linux: Use only lowercase characters
Windows: No limitations.
Choose the name and path carefully. After the domain directory is created, it is difficult to rename it.
If the directory you specify does not exist, it is created when you create the domain. Do not create
the domain directory under another domain or post office directory.
Creating a New Domain 117
Page 10

WORKSHEET
Under Item 4: Domain Database Location, enter the full path for the domain directory.
Under Item 9: Network Type, enter the type of network in use at that location.
8.2.7 Deciding Where to Install the Agent Software
You must run a new instance of the MTA for each new domain. To review the functions of the MTA
for the domain, see Section 40.4, “Role of the Message Transfer Agent,” on page 608. For complete
installation instructions and system requirements, see “Installing GroupWise Agents” in the
GroupWise 7 Installation Guide.
When planning the installation of the MTA, you need to consider how the new domain links to
existing domains and how the new domain will link to its post offices. For an overview of link
configuration, see Chapter 10, “Managing the Links between Domains and Post Offices,” on
page 137.
The MTA requires direct network access to the domain directory so that it can write to the domain
database (wpdomain.db) and, depending on the link configuration, to each post office directory so
that it can write to the POA input queues. Consider the following alternatives when selecting a
location for the MTA relative to the domain and its post offices:
novdocx (en) 11 December 2007
“MTA Access to the New Domain: Local vs. Remote” on page 118
“MTA Access to New Post Offices: Mapped and UNC Links vs. TCP/IP Links” on page 119
“Cross-Platform Access Issues” on page 120
WORKSHEET
Under Item 11: Agent Location, indicate whether you plan to run the MTA on the same server where the
domain directory is located (recommended), or on a different server.
Under Item 12: Agent Platform, enter the platform of the server where the MTA will run (NetWare, Linux,
or Windows).
MTA Access to the New Domain: Local vs. Remote
Running the MTA locally on the same server where the domain and post offices reside simplifies
network connections (no login is required), reduces network traffic, and protects database integrity.
In the following diagram, the agent software is installed on the same server where the domain and
post office reside.
Figure 8-6 Agent Software on the Same Server with the Domain and Post Office
POA
MTA
Acct-Dom
Acct-PO1
POA
MTA
Dev-Dom
Dev-PO1
118 GroupWise 7 Administration Guide
Page 11
Running the MTA on a remote server allows you to place the heaviest processing load on your
highest performing server. In the following diagram, the agent software is installed on a different
server from where the domains and post offices reside.
Figure 8-7 Agent Software on a Different Server than the Domain and Post Office
MTA MTA
Acct-Dom
Acct-PO1
POA
POA
Dev-Dom
Dev-PO1
When you run the MTA on a different server from where its directory structures and databases are
located, you need to provide adequate access.
NetWare: If the NetWare MTA needs direct network access to another NetWare server, you must
add the /dn switch or the /user and /password switches to the MTA startup file to provide
authentication information.
Linux: If the Linux MTA needs direct network access to another Linux server, you must mount the
file system where the domain is located before you start the Linux MTA.
novdocx (en) 11 December 2007
Windows: If the Windows MTA needs direct network access to another Windows server, you must
map a drive to the other server before you start the Windows MTA.
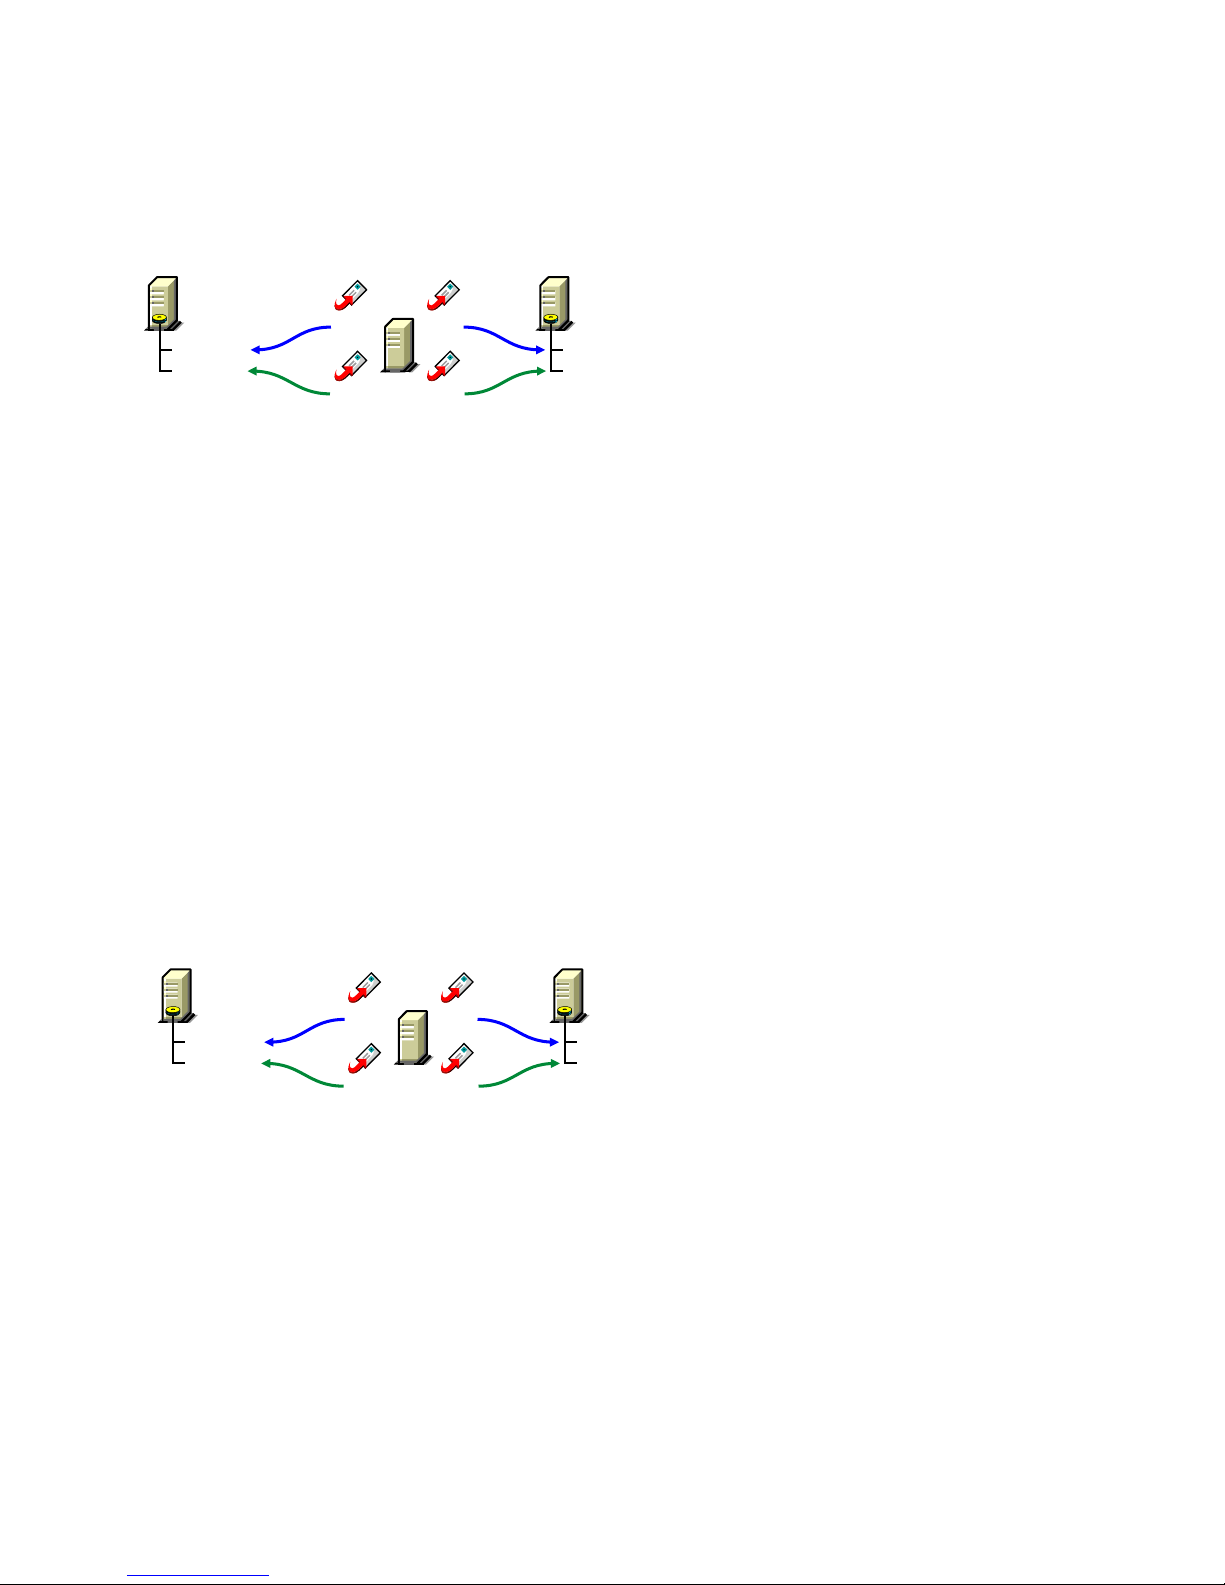
MTA Access to New Post Offices: Mapped and UNC Links vs. TCP/IP Links
If the new domain will include multiple post offices, the post offices will probably reside on
different servers from where the domain is located. If you plan to use mapped or UNC links between
the domain and its post offices, the MTA requires the same access to the post office directories as it
requires to the domain directory.
Figure 8-8 MTA Access Using Mapped or UNC Links
NetWare Windows NetWare
MTA MTA
Acct-Dom
Acct-PO1
POA
NetWare: If the NetWare MTA needs access to a post office on another NetWare server, you must
add the /dn switch or the /user and /password switches to the MTA startup file to provide
authentication information.
POA
Dev-Dom
Dev-PO1
Linux: N/A. The Linux MTA requires TCP/IP links to the POA.
Windows: If the Windows MTA needs access to a post office on another Windows server, you must
map a drive to the other server before you start the Windows MTA.
To avoid these direct network access requirements between the MTA and its post offices, you can
use TCP/IP links between the domain and its post offices.
Creating a New Domain 119
Page 12
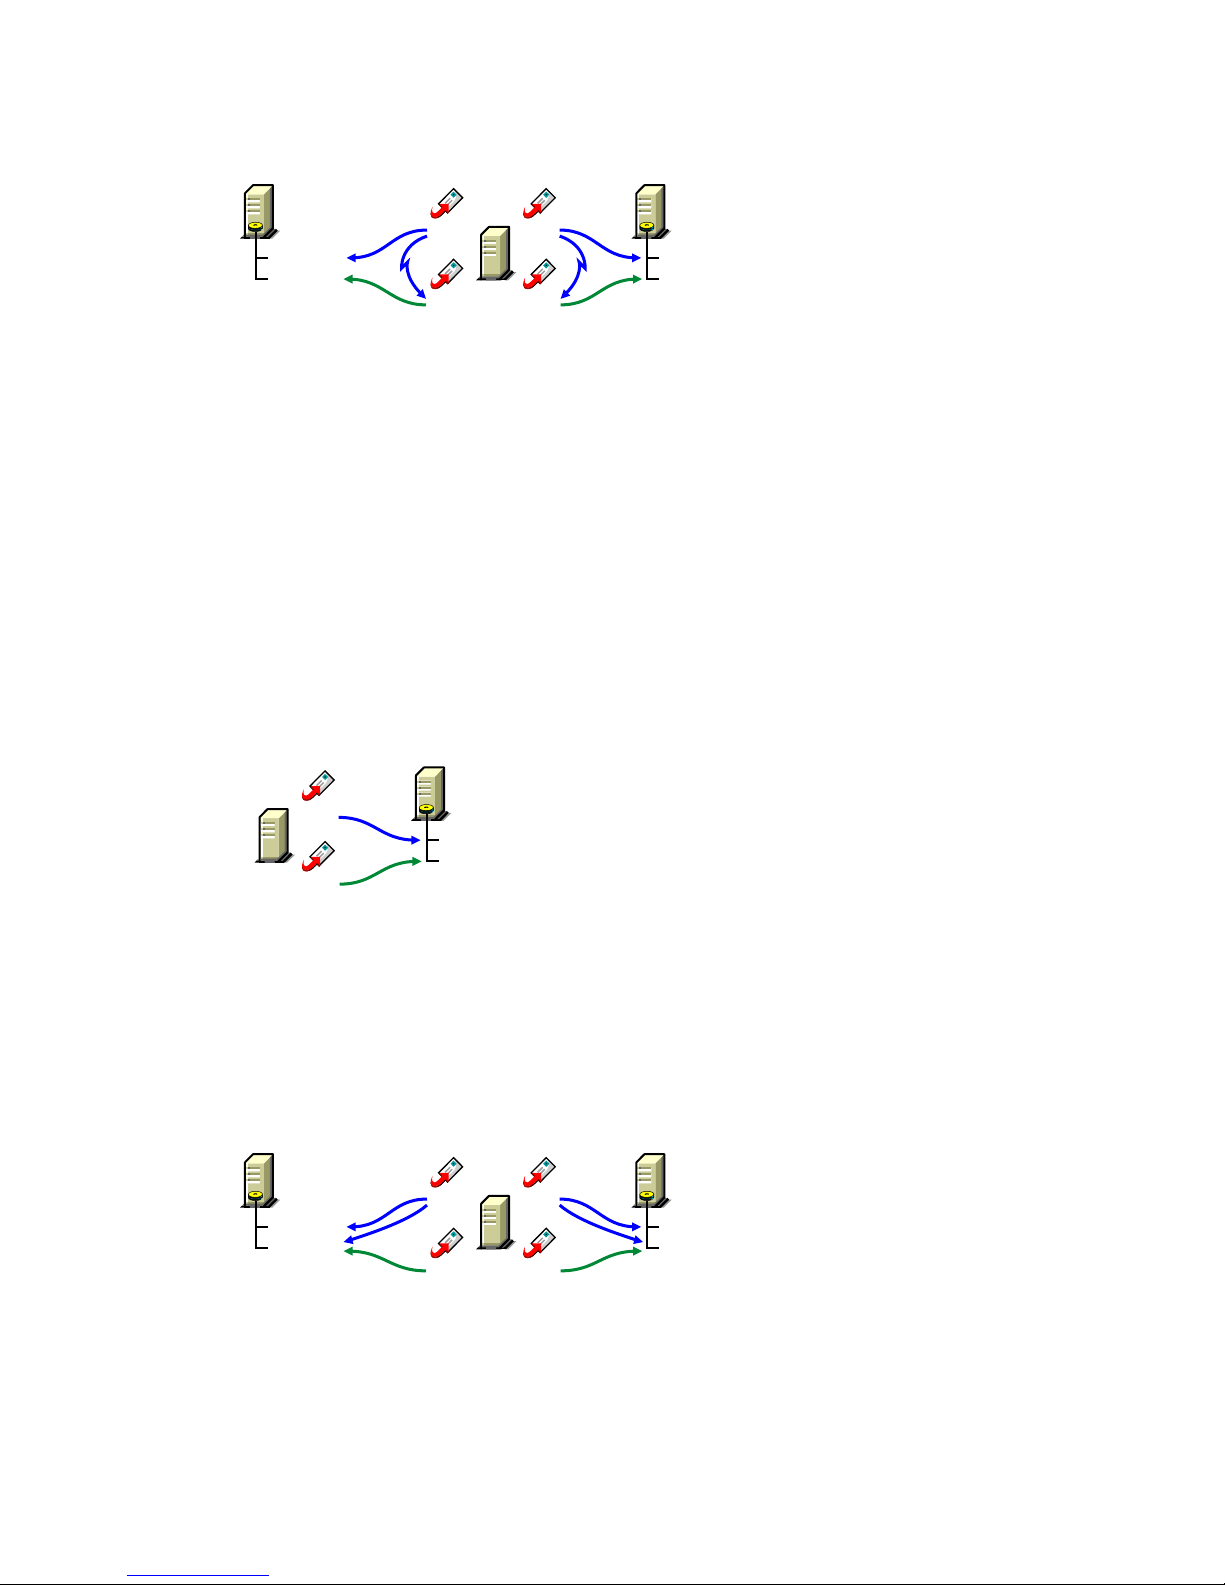
Figure 8-9 MTA Access Using TCP/IP Links
MTA MTA
Acct-Dom
Acct-PO1
POA
POA
Dev-Dom
Dev-PO1
When using TCP/IP links, the MTA does not write message files into message queues in the post
office directory structure. Instead, the MTA communicates the information to the POA by way of
TCP/IP and then the POA uses its direct network access to write the information.
Cross-Platform Access Issues
In most cases, it is most efficient if you match the MTA platform with the network operating system
where the domain resides. For example, if you create a new domain on a NetWare server, use the
NetWare MTA.
If you decide not to run the MTA on the same platform as the domain, the MTA must still have
direct network access to the domain directory so that it can write to the domain database
(wpdomain.db). For example, you could set up the new domain on a NetWare server and run the
Windows MTA on a Windows server to service it.
novdocx (en) 11 December 2007
Figure 8-10 A Domain on a NetWare Server and the MTA on a Windows Server
Windows NetWare
MTA
Dev-Dom
Dev-PO1
POA
However, the NetWare MTA could not service a domain located on a Windows server because
Windows does not support the required cross-platform connection.
If you are using mapped or UNC links to post offices, the MTA must also have direct network access
to the post office directories so that it can write messages files into the post office message queues.
You could, for example, run the agents on an Windows server while domains and post offices were
located on NetWare servers.
Figure 8-11 Agents on a Windows Server and Domains and Post Offices on a NetWare Server
MTA MTA
Acct-Dom
Acct-PO1
POA
POA
Dev-Dom
Dev-PO1
Again, the opposite combination of NetWare agents servicing domains and post offices on Windows
servers is not an option because Windows does not support the required cross-platform connection.
To avoid these cross-platform access issues, use TCP/IP links between a domain and its post offices.
120 GroupWise 7 Administration Guide
Page 13

For more detailed information, see Section 40.7, “Cross-Platform Issues between Domains and Post
Offices,” on page 609.
8.2.8 Deciding How to Link the New Domain
Domain links tell the MTAs how to route messages between domains. Properly configured links
optimize message flow throughout your GroupWise system. For a review of link types, see
Section 10.1.1, “Domain-to-Domain Links,” on page 137.
When you create the new domain, you link it to one existing domain. By default, this link is a direct
link using TCP/IP as the link protocol, which means the new domain’s MTA communicates with the
existing domain’s MTA through TCP/IP. If desired, you can configure the direct link to use a UNC
path as the link protocol, which means the new domain’s MTA transfers information to and from the
existing domain by accessing the existing domain’s directory.
WORKSHEET
Under Item 7: Link to Domain, specify the existing domain that you want to link the new domain to, then
specify the link protocol (TCP/IP or UNC path).
novdocx (en) 11 December 2007
After you create the new domain, you can configure links to additional domains as needed. See
Section 10.2, “Using the Link Configuration Tool,” on page 143.
8.2.9 Selecting the Domain Language
The domain language determines the default sort order for items in the GroupWise Address Book
for users in post offices that belong to the domain. For more information, see Section 11.2.8,
“Selecting the Post Office Language,” on page 165.
WORKSHEET
Under Item 5: Domain Language, specify the domain language.
8.2.10 Selecting the Domain Time Zone
When a message is sent from a user in one time zone to a user in another time zone, GroupWise
adjusts the message’s time so that it is correct for the recipient’s time zone. For example, if a user in
New York (GMT -05:00, Eastern Time) schedules a user in Los Angeles (GMT -08:00, Pacific
Time) for a conference call at 4:00 p.m. Eastern Time, the appointment is scheduled in the Los
Angeles user’s calendar at 1:00 p.m. Pacific Time.
The domain time zone becomes the default time zone for each post office in the domain.
WORKSHEET
Under Item 6: Domain Time Zone, enter the time zone.
Creating a New Domain 121
Page 14

8.3 Setting Up the New Domain
You should have already reviewed Section 8.2, “Planning a New Domain,” on page 112 and filled
out Section 8.5, “Domain Worksheet,” on page 125. Complete the following tasks to create the new
domain.
Section 8.3.1, “Creating the New Domain,” on page 122
Section 8.3.2, “Configuring the MTA for the New Domain,” on page 123
Section 8.3.3, “Installing and Starting the New MTA,” on page 124
8.3.1 Creating the New Domain
1 Make sure you are logged in to the tree where you want to create the domain (worksheet item
1).
2 Click Too ls > GroupWise Utilities > Check eDirectory Schema to make sure that the tree’s
schema has been extended to accommodate GroupWise objects.
®
3 In ConsoleOne
the domain (worksheet item 2), then click New > Object.
, browse to and right-click the eDirectory container where you want to create
novdocx (en) 11 December 2007
4 Double-click GroupWise Domain, then fill in the fields in the Create GroupWise Domain
dialog box (worksheet items 3 through 7).
5 Make sure the Configure Links and Define Additional Properties options are selected, then
click OK to display the Link Configuration Wizard.
122 GroupWise 7 Administration Guide
Page 15

6 Follow the on-screen instructions to define how the new domain links to the existing domain
(listed in the Link to Domain field). When you’ve finished defining the link, ConsoleOne
creates the Domain object and displays the domain Identification page.
novdocx (en) 11 December 2007
7 Fill in the fields that have not been filled in for you (worksheet items 8 through 10).
8 Click OK to save the domain information.
8.3.2 Configuring the MTA for the New Domain
Although there are many MTA settings, the default settings are sufficient to get your domain
operational. However, there are a few important settings that you can conveniently modify before
you install the agent software.
1 In ConsoleOne, double-click the new Domain object.
2 Right-click the MTA object, then click Properties to display the MTA Identification page.
Creating a New Domain 123
Page 16

3 Specify a description for the MTA.
This description displays on the MTA agent console as the MTA runs.
4 Select the platform where the MTA will run (worksheet item 12).
novdocx (en) 11 December 2007
5 If you have multiple domains in your system and want to use TCP/IP to link to the other
domains (worksheet item 7), follow the instructions in Section , “Using TCP/IP Links between
Domains,” on page 618.
6 If you have created the domain in a clustered environment, follow the instructions in the
appropriate section of the GroupWise 7 Interoperability Guide.
7 To ensure that user information in the new domain stays synchronized with user information in
eDirectory, follow the instructions in Section 41.4.1, “Using eDirectory User
Synchronization,” on page 638.
8 For more MTA configuration options, see Section 9.6, “Changing MTA Configuration to Meet
Domain Needs,” on page 135.
9 Click OK to save the MTA configuration information.
8.3.3 Installing and Starting the New MTA
To install the MTA for the new domain to the location recorded under worksheet item 11, follow the
instructions in “Installing GroupWise Agents” in the GroupWise 7 Installation Guide.
Continue with What’s Next.
8.4 What’s Next
After you have added the new domain and started its MTA, you are ready to continue to expand and
enhance your GroupWise system by:
Configuring the Address Book for the new domain. See “GroupWise Address Book” on
page 85
Adding post offices to the new domain. See “Post Offices” on page 153.
124 GroupWise 7 Administration Guide
Page 17

Configuring the MTA for optimal performance. See “Message Transfer Agent” on page 603.
Setting up GroupWise Monitor to monitor the GroupWise agents. See “Monitor” on page 963.
Connecting domains and GroupWise systems across the Internet using the GroupWise Internet
Agent. See “Internet Agent” on page 701.
Connecting domains and GroupWise systems using gateways. For a list of gateways, see the
GroupWise Gateways Documentation Web site (http://www.novell.com/documentation/
gwgateways).
8.5 Domain Worksheet
Use this worksheet as you complete the tasks described in Section 8.2, “Planning a New Domain,”
on page 112.
Item Explanation
1) Tree Name: Specify the name of the eDirectory tree where you want to create the
secondary domain.
novdocx (en) 11 December 2007
For more information, see Section 8.2.4, “Determining the Context for the
Domain Object,” on page 114.
2) eDirectory Container: Specify the name of the eDirectory container where you want to create the
new domain.
For more information, see Section 8.2.4, “Determining the Context for the
Domain Object,” on page 114.
3) Domain Name: Specify a name for the new domain. Choose the name carefully. After the
domain is created, it cannot be renamed.
For more information, see Section 8.2.5, “Choosing the Domain Name,” on
page 116.
4) Domain Database
Location:
5) Domain Language: Specify a default language for the domain.
6) Domain Time Zone: Specify the time zone where the domain is located.
Specify the path for the domain directory. Choose the domain directory
carefully. After it is created, it is difficult to rename.
For more information, see Section 8.2.6, “Deciding Where to Create the
Domain Directory,” on page 117.
For more information, see Section 8.2.9, “Selecting the Domain Language,”
on page 121.
For more information, see Section 8.2.10, “Selecting the Domain Time
Zone,” on page 121.
7) Link to Domain:
Link Protocol:
UNC path
TCP/IP
Address:
Port:
Specify the existing domain that you want to link the new domain to, then
specify the link protocol. If you select TCP/IP, enter the IP address or
hostname of the server where the MTA will run and the port number that the
MTA will listen on.
For more information, see Section 8.2.8, “Deciding How to Link the New
Domain,” on page 121.
Creating a New Domain 125
Page 18

Item Explanation
8) Domain Description: Enter a description for the domain to help you identify its function in the
system.
9) Network Type: Specify the network type in use on the server where this domain will be
located.
For more information, see Section 8.2.6, “Deciding Where to Create the
Domain Directory,” on page 117.
10) Domain Administrator: Enter the ID of the user or distribution list that will administer this domain.
For more information, see Section 8.2.2, “Deciding Who Will Administer the
New Domain,” on page 113.
novdocx (en) 11 December 2007
11) Agent Location:
MTA on the same
server as the domain
(local)
MTA on a different
server from the
domain (remote)
12) Agent Platform:
NetWare MTA
Linux MTA
Windows MTA
Mark the location of the MTA relative to the domain.
For more information, see Section 8.2.7, “Deciding Where to Install the
Agent Software,” on page 118.
Specify the platform on which you plan to run the MTA.
For more information, see Section 8.2.7, “Deciding Where to Install the
Agent Software,” on page 118.
126 GroupWise 7 Administration Guide
Page 19

9
Managing Domains
As your GroupWise® system grows and evolves, you might need to perform the following
maintenance activities on domains:
Section 9.1, “Connecting to a Domain,” on page 127
Section 9.2, “Editing Domain Properties,” on page 127
Section 9.3, “Converting a Secondary Domain to a Primary Domain,” on page 131
Section 9.4, “Moving a Domain,” on page 132
Section 9.5, “Deleting a Domain,” on page 133
Section 9.6, “Changing MTA Configuration to Meet Domain Needs,” on page 135
See also Chapter 26, “Maintaining Domain and Post Office Databases,” on page 377.
9.1 Connecting to a Domain
novdocx (en) 11 December 2007
9
Whenever you change domain information, it is most efficient to connect directly to the domain
before you begin making modifications.
To change your domain connection:
®
1 In ConsoleOne
Domain, browse to and select the domain directory, then click OK.
or
In the GroupWise View, right-click the Domain object, then click Connect.
The GroupWise view identifies the domain to which you are connected by adding a plug
symbol to the domain icon.
The domain marked with the red underscore is the primary domain.
For cross-platform considerations, see Section 4.1, “Select Domain,” on page 51.
in the Console View, click Too ls > GroupWise System Operations, click Select
9.2 Editing Domain Properties
After creating a domain, you can change some domain properties. Other domain properties cannot
be changed.
1 In ConsoleOne, browse to and right-click a Domain object, then click Properties to display the
domain Identification page.
Managing Domains
127
Page 20

2 Change editable fields as needed. For information about individual fields, see Section 8.2,
“Planning a New Domain,” on page 112 or use online help when editing the domain
information.
novdocx (en) 11 December 2007
3 Click GroupWise > Post Offices to display the Post Offices page.
®
All post offices in the domain are listed, no matter where their Novell
eDirectoryTM objects are
placed in the tree. This is a convenient place to delete post offices from the domain.
4 Click GroupWise > Address Book to display the Address Book page.
128 GroupWise 7 Administration Guide
Page 21

5 Use this page to configure the Address Book to control how it appears to GroupWise client
users in all post offices in the domain. See Section 6.1, “Customizing Address Book Fields,” on
page 85 for more information.
6 Click GroupWise > Addressing Rules to display the Addressing Rules page.
novdocx (en) 11 December 2007
This page lists all addressing rules that have been set up for the domain. See Section 6.8,
“Facilitating Addressing through GroupWise Gateways,” on page 100 for more information.
7 Click GroupWise > Internet Addressing to display the Internet Addressing page.
Managing Domains 129
Page 22

Use this page to override any Internet addressing settings established at the system level. See
Section 45, “Configuring Internet Addressing,” on page 703 for more information.
8 Click GroupWise > Default WebAccess to display the Default WebAccess page.
novdocx (en) 11 December 2007
Use this page to designate the default WebAccess Agent (gateway) for the domain. See
Part XII, “WebAccess,” on page 853 for more information.
9 Click GroupWise > Admin Lockout Settings.
130 GroupWise 7 Administration Guide
Page 23

Use this page to control the version of the GroupWise Administrator snap-ins to ConsoleOne
that is allowed to access GroupWise databases. See Section 4.2.6, “Admin Lockout Settings,”
on page 57 for more information.
novdocx (en) 11 December 2007
10 Click OK to save the new domain settings.
9.3 Converting a Secondary Domain to a Primary
Domain
You can change which domain is primary if it becomes more convenient to administer the primary
domain from a different location. You can, however, have only one primary domain at a time. When
you convert a secondary domain to primary, the old primary domain becomes a secondary domain.
To convert a secondary domain to primary:
1 In ConsoleOne, connect to the primary domain, as described in Section 9.1, “Connecting to a
Domain,” on page 127.
2 Make sure there are no pending operations for the primary domain, as described in Section 4.5,
“Pending Operations,” on page 60.
3 Browse to and select the secondary domain you want to convert.
4 Click Too ls > GroupWise Utilities > System Maintenance.
Managing Domains 131
Page 24

5 Click Convert Secondary to Primary.
6 Specify the path to the secondary domain database, then click OK.
The GroupWise View in ConsoleOne displays the primary domain with a red underscore.
novdocx (en) 11 December 2007
9.4 Moving a Domain
You cannot use ConsoleOne to move a Domain object to a different location in the eDirectory tree
because it is a container object. Only leaf objects can be moved. If you need to change the context,
graft the GroupWise domain to its corresponding eDirectory object in the new container location.
See Section 5.16, “GW / eDirectory Association,” on page 77 for more information about grafting
objects.
You can, however, move the domain directory and the domain database (wpdomain.db) by copying
the domain directory structure and all its contents to the new location.
IMPORTANT: Follow these instructions if you want to move a domain on a NetWare® or
Windows server to another directory on the same server or to a different NetWare or Windows
server. If you want to move a domain located on a NetWare or Windows server onto a Linux server,
see “Manually Migrating a Domain and Its MTA to Linux” in “Update” in the GroupWise 7
Installation Guide.
1 Back up the domain, as described in Chapter 31, “Backing Up GroupWise Databases,” on
page 407.
2 In ConsoleOne, browse to and right-click the domain to move, then click Properties to display
the domain Identification page.
132 GroupWise 7 Administration Guide
Page 25

3 In the UNC Path field, change the UNC path to the location where you want to move the
domain, then click OK to save the new location.
The location change is propagated throughout your GroupWise system.
4 Stop the MTA and any gateways running for the domain.
5 Use xcopy with the /s and /e options to copy the domain directory and database to the new
location. These options re-create the same directory structure even if directories are empty.
Example:
xcopy domain_directory /s /e destination
6 Give rights to all objects that need to access the domain database.
For example, if the new location is on a different server, the NetWare MTA and GroupWise
administrators who run ConsoleOne need adequate rights to the new location, as described in
Chapter 75, “GroupWise Administrator Rights,” on page 1135.
7 Edit the MTA and gateway startup files to reflect the changes, then restart the MTA and
gateways.
See Section 41.1.7, “Adjusting the MTA for a New Location of a Domain or Post Office,” on
page 626.
8 When you are sure the domain is functioning properly in its new location, delete the original
domain directory and its contents.
novdocx (en) 11 December 2007
If you need to move the MTA along with its domain, see Section 41.1.6, “Moving the MTA to a
Different Server,” on page 626.
9.5 Deleting a Domain
You can delete a domain only when it no longer owns subordinate GroupWise objects. For example,
you cannot delete the primary domain of your GroupWise system if it still owns secondary domains.
You cannot delete a secondary domain if it still owns post offices. However, MTA and Gateway
objects are automatically deleted along with the Domain object. Keep the MTA running until after
you have deleted the domain, so that it can process the object deletion requests.
1 In ConsoleOne, connect to the primary domain of your GroupWise system, as described in
Section 9.1, “Connecting to a Domain,” on page 127.
2 Browse to and right-click the Domain object you want to delete, then click Properties to
display the domain Identification page.
Managing Domains 133
Page 26

3 Verify that the current directory path displayed on the domain Identification page is correct.
4 Click Post Offices, then move or delete any post offices that belong to this domain. See
Section 12.8, “Moving a Post Office,” on page 196 and Section 12.9, “Deleting a Post Office,”
on page 197.
novdocx (en) 11 December 2007
5 Right-click the Domain object, then click Delete to delete the Domain object from eDirectory.
6 When prompted, click Yes to delete the corresponding domain directory structure.
7 Stop the MTA for the domain, as described in the following sections in the GroupWise 7
Installation Guide:
“Stopping the NetWare GroupWise Agents”
“Stopping the Linux GroupWise Agents”
“Stopping the Windows GroupWise Agents”
134 GroupWise 7 Administration Guide
Page 27

8 Uninstall the MTA software if applicable, as described in the following sections in the
GroupWise 7 Installation Guide:
“Uninstalling the NetWare GroupWise Agents”
“Uninstalling the Linux GroupWise Agents”
“Uninstalling the Windows GroupWise Agents”
9.6 Changing MTA Configuration to Meet Domain
Needs
Because the MTA transfers messages between domains and between post offices in the same
domain, it affects the domain itself, local users in post offices belonging to the domain, and users
who exchanges messages with local users in the domain. Proper MTA configuration is essential for
a smoothly running GroupWise system. Complete details about the MTA are provided in “Message
Transfer Agent” on page 603. As you create and manage domains, you should keep in mind the
following aspects of MTA configuration:
“Securing the Domain with SSL Connections to the MTA” on page 629
“Restricting Message Size between Domains” on page 628
“Scheduling Direct Domain Links” on page 633
novdocx (en) 11 December 2007
“Optimizing TCP/IP Links” on page 675
Managing Domains 135
Page 28

novdocx (en) 11 December 2007
136 GroupWise 7 Administration Guide
Page 29

10
Managing the Links between
novdocx (en) 11 December 2007
Domains and Post Offices
When you create a new secondary domain in your GroupWise® system or a new post office in a
domain, you configure one direct link to connect the new domain or post office to a domain in your
GroupWise system. For simple configurations, this initial link might be adequate. For more complex
configurations, you must modify link types and protocols to achieve optimum message flow
throughout your GroupWise system.
The following topics help you manage links between domains and post offices:
Section 10.1, “Understanding Link Configuration,” on page 137
Section 10.2, “Using the Link Configuration Tool,” on page 143
Section 10.3, “Interpreting Link Symbols,” on page 150
Section 10.4, “Modifying Links,” on page 151
10.1 Understanding Link Configuration
In GroupWise, a link is defined as the information required to route messages between domains,
post offices, and gateways in a GroupWise system. Initial links are created when domains, post
offices, and gateways are created. The following topics help you understand link configuration:
10
Section 10.1.1, “Domain-to-Domain Links,” on page 137
Section 10.1.2, “Domain-to-Post Office Links,” on page 140
Section 10.1.3, “Link Protocols for Direct Links,” on page 141
10.1.1 Domain-to-Domain Links
The primary role of the MTA is to route messages from one domain to another. Domain links tell the
MTA how to route messages between domains. Domain links are stored in the domain database
(wpdomain.db). There are three types of links between source and destination domains:
“Direct Links” on page 137
“Indirect Links” on page 138
“Gateway Links” on page 140
As an alternative to configuring individual links between individual domains throughout your
GroupWise system, you can establish a system of one or more routing domains. See Section 41.3.1,
“Using Routing Domains,” on page 631.
Direct Links
In a direct link between domains, the source domain’s MTA communicates directly with the
destination domain’s MTA. If it is using a TCP/IP link, the source domain MTA communicates
messages to the destination domain MTA by way of TCP/IP, which does not require disk access by
the source MTA in the destination domain. If it is using a mapped or UNC link, the source domain
Managing the Links between Domains and Post Offices
137
Page 30

MTA writes message files into the destination domain MTA input queue, which does require disk
access by the source MTA in the destination domain. For additional details about the configuration
options for direct links, see Section 10.1.3, “Link Protocols for Direct Links,” on page 141.
Figure 10-1 Direct Link between Domain A and Domain B
novdocx (en) 11 December 2007
Domain A
UNC Path
Mapped Drive
TCP/IP
Domain B
Direct links can be used between all domains. This is a very efficient configuration but might not be
practical in a large system.
Figure 10-2 Direct Links to All Domains
Domain 1
Domain 5
Domain 4
Domain 2
Domain 3
Indirect Links
In an indirect link between domains, the source domain’s MTA routes messages through one or
more intermediate MTAs in other domains to reach the destination domain’s MTA. In other words,
an indirect link is a series of two or more direct links. In large systems, direct links between each
pair of domains might be impractical, so indirect links can be common. A variety of indirect link
configurations are possible, including:
“Simple Indirect Links” on page 138
“Star Configuration” on page 139
“Two-Way Ring Configuration” on page 139
“Combination Configuration” on page 140
Properly configured links optimize message flow throughout your GroupWise system.
Simple Indirect Links
In simplest form, an indirect link can be used to pass messages between two domains that are not
directly linked.
138 GroupWise 7 Administration Guide
Page 31

Figure 10-3 Indirectly Linking Two Domains by Going through a Third Domain
Domain A
novdocx (en) 11 December 2007
UNC Path
Mapped Drive
TCP/IP
Domain B
Indirect
UNC Path
Mapped Drive
TCP/IP
Link
Domain C
Star Configuration
In a star configuration, one central domain is linked directly to all other domains in the system. All
other domains are indirectly linked to each other through the central domain.
Figure 10-4 Indirect Links through a Central Domain
Domain 2
Domain 6
Domain 1
Domain 3
Domain 5
Domain 4
If you have more than ten domains, you might want to designate the central domain as a routing
domain. The sole function of a routing domain is to transfer messages between other domains; it has
no post offices of its own. See Section 41.3.1, “Using Routing Domains,” on page 631.
The major drawback of the star configuration is that the central domain is a single point of failure.
Two-Way Ring Configuration
In a two-way ring configuration, each domain is directly linked to the next and previous domains in
the ring and indirectly linked to all other domains in the system.
Managing the Links between Domains and Post Offices 139
Page 32

Figure 10-5 Ring Configuration with Direct Links to Neighboring Domain and Indirect Links to All Other Domains
Domain 1
novdocx (en) 11 December 2007
Domain 5
Domain 4
Domain 2
Domain 3
An advantage of the two-way ring configuration is that it has no single point of failure. A
disadvantage is that, depending on the size of the system, a message might go through several
domains before arriving at its destination. A two-way ring works well in a system with five domains
or less because transferring a message never requires more than two hops.
Combination Configuration
These three basic link configurations can be combined in any way to meet the needs of your
GroupWise system.
Gateway Links
In a gateway link between domains, the sending domain’s MTA must route the message through a
gateway to reach its destination. Gateways can be used to:
Link domains within your GroupWise system. See “Using Gateway Links between Domains”
on page 622.
Link your GroupWise system to another GroupWise system through an external domain. See
“Using Direct Links” in “Connecting to GroupWise 5.x, 6.x, and 7.x Systems” in the
GroupWise 7 Multi-System Administration Guide
Link your GroupWise system to a different e-mail system through a non-GroupWise domain.
See “Connecting to Non-GroupWise Messaging Systems” in the GroupWise 7 Multi-System
Administration Guide.
For more information, see the GroupWise Gateways Documentation Web site (http://
www.novell.com/documentation/gwgateways).
You cannot locate a post office across a gateway link from its domain. This precludes locating a post
office across a modem connection.
10.1.2 Domain-to-Post Office Links
Between a domain and its post offices, all links must be direct links. There are no alternative link
types between a domain and its post offices.
140 GroupWise 7 Administration Guide
Page 33

10.1.3 Link Protocols for Direct Links
The link protocol of a direct link between domains determines how the MTAs for the domains
communicate with each other across the link. When you create a new domain, you must link it to an
existing domain. This creates the initial domain-to-domain link.
Between a domain and a post office, the link protocol determines how the MTA transfers messages
to the post office. Messages do not flow directly from one post office to another within a domain.
Instead, they are routed through the domain. When you create a new post office, you must specify
which domain it belongs to. This creates the initial domain-to-post office link.
There are three link protocols for direct links between domains and between a domain and its post
offices:
“TCP/IP Links” on page 141
“Mapped Links” on page 141
“UNC Links” on page 142
NOTE: On Linux, TCP/IP links are required.
novdocx (en) 11 December 2007
TCP/IP Links
“Domain-to-Domain TCP/IP Links” on page 141
“Domain-to-Post Office TCP/IP Links” on page 141
Domain-to-Domain TCP/IP Links
In a TCP/IP link between domains, the source MTA and the destination MTA communicate by way
of TCP/IP rather than by writing message files into queue directories. The source MTA establishes a
TCP/IP link with the destination MTA and transmits whatever messages need to go to that domain.
The destination MTA receives the messages and routes them on to local post offices or to other
domains as needed. During the process, message files are created in the gwinprog directory for
backup purposes and are deleted when the TCP/IP communication process is completed.
Domain-to-Post Office TCP/IP Links
In a TCP/IP link between a domain and a post office, you must configure both the POA and the
MTA for TCP/IP. The source MTA establishes a TCP/IP link with the destination POA and transmits
whatever messages need to go to that post office. The destination POA receives the messages and
delivers them into mailboxes in the post office. During this process, message files are created in the
POA input queue for backup purposes and are deleted when delivery is completed.
Mapped Links
“Domain-to-Domain Mapped Links” on page 141
“Domain-to-Post Office Mapped Links” on page 142
Domain-to-Domain Mapped Links
In a mapped link between domains, the location of the destination domain is specified in the
following format:
Managing the Links between Domains and Post Offices 141
Page 34

drive:\domain_directory
The source MTA writes message files into its output queue at the location:
drive:\domain_directory\wpcsin
as input for the destination domain’s MTA. Because drive mappings are changeable, you can move
the domain directory structure, map its new location to the original drive letter, and the domain-todomain link is still intact.
Domain-to-Post Office Mapped Links
In a mapped link between a domain and a post office, the location of the post office is specified in
the following format:
drive:\post_office_directory
The MTA writes message files into its output queue at the location:
drive:\post_office_directory\wpcsout
as input for the post office’s POA. Because drive mappings are changeable, you can move the post
office directory structure, map its new location to the original drive letter, and the domain-to-post
office link is still intact.
novdocx (en) 11 December 2007
UNC Links
“Domain-to-Domain UNC Links” on page 142
“Domain-to-Post Office UNC Links” on page 142
Domain-to-Domain UNC Links
In a UNC link between domains, the location of the destination domain is specified in the following
format:
\\server\volume\domain_directory
The source MTA writes message files into its output queue at the location:
\\server\volume\domain_directory\wpcsin
as input for the destination domain’s MTA. Because UNC paths represent absolute locations on your
network, if you move the domain to a new location, you need to edit the link to match.
Domain-to-Post Office UNC Links
In a UNC link between a domain and a post office, the location of the post office is specified in the
following format:
\\server\volume\post_office_directory
The MTA writes message files into its output queue at the location:
\\server\volume\post_office_directory\wpcsout
as input for the post office’s POA. Because UNC paths represent absolute locations in your network,
if you move the post office to a new location, you need to edit the link to match.
142 GroupWise 7 Administration Guide
Page 35

10.2 Using the Link Configuration Tool
The Link Configuration tool helps you manage the links between the domains and post offices in
your GroupWise system. The following topics help you perform basic link management tasks:
Section 10.2.1, “Starting the Link Configuration Tool,” on page 143
Section 10.2.2, “Editing a Domain Link,” on page 144
Section 10.2.3, “Editing Multiple Domain Links,” on page 145
Section 10.2.4, “Editing a Post Office Link,” on page 146
Section 10.2.5, “Viewing the Path of an Indirect Link between Domains,” on page 147
Section 10.2.6, “Viewing the Indirect Links Passing through a Domain,” on page 148
Section 10.2.7, “Viewing the Gateway Links Passing through a Gateway,” on page 149
Section 10.2.8, “Saving and Synchronizing Link Configuration Information,” on page 150
10.2.1 Starting the Link Configuration Tool
The Link Configuration tool is provided to help you change from default links to whatever link
configuration best suits your GroupWise system.
®
1 In ConsoleOne
2 Click Too ls > GroupWise Utilities > Link Configuration to display the Link Configuration Tool
window.
, select the Domain object whose links you want to modify.
novdocx (en) 11 December 2007
The most frequently used features of the Link Configuration tool are available on the toolbar:
Button
Menu
Equivalent Function
File > Open Open a different domain database (wpdomain.db) to modify
File > Save Save the current link configuration information to the domain
links in a different domain
database
Managing the Links between Domains and Post Offices 143
Page 36

novdocx (en) 11 December 2007
Button
Menu
Equivalent Function
Edit > Undo Undo your changes to the link configuration (since the last
save)
Help > Help Display online Help for the Link Configuration tool
Search > Find Search for a specified domain
Double-click object Display details of the selected object
View > Domain Links View domain links for the selected domain
View > Post Office Links View post office links for the selected domain
3 Continue with a specific link management task:
Section 10.2.2, “Editing a Domain Link,” on page 144
Section 10.2.3, “Editing Multiple Domain Links,” on page 145
Section 10.2.4, “Editing a Post Office Link,” on page 146
Section 10.2.5, “Viewing the Path of an Indirect Link between Domains,” on page 147
Section 10.2.6, “Viewing the Indirect Links Passing through a Domain,” on page 148
Section 10.2.7, “Viewing the Gateway Links Passing through a Gateway,” on page 149
10.2.2 Editing a Domain Link
After starting the Link Configuration tool:
1 From the drop-down list, select the domain whose links you want to edit.
2 Click Vie w > Domain Links to display domain links.
Outbound and inbound links for the selected domain are listed.
3 Double-click a domain in the Outbound Links list to edit the link to that domain from the
selected domain.
or
144 GroupWise 7 Administration Guide
Page 37

Double-click a domain in the Inbound Links list to edit the link from that domain to the selected
domain.
TIP: You can also open the Edit Domain Link dialog box by dragging a domain from one link
type to another.
4 Select the link type.
novdocx (en) 11 December 2007
“Direct Links” on page 137
“Indirect Links” on page 138
“Gateway Links” on page 140
5 For a direct link, select the link protocol.
“Mapped Links” on page 141
“UNC Links” on page 142
“TCP/IP Links” on page 141
6 Provide the location of the domain in the format appropriate to the selected protocol.
7 Click OK.
8 Repeat Step 1 through Step 7 for whatever links you need to modify.
As a time-saving measure, you can make a new domain’s links the same as an existing
domain’s links. Click Edit > Default Links, then click the domain whose links you want to use
as a pattern for the new domain. Select Outbound and/or Inbound as needed, then click OK.
To look at the same link information from different points of view, you can start the Link
Configuration tool multiple times to open multiple Link Configuration Tool windows.
9 To exit the Link Configuration Tool and save your changes, click File > Exit > Yes .
10.2.3 Editing Multiple Domain Links
When your GroupWise system includes indirect links, it is not unusual for several domains to link to
the same domain. As a time-saving measure, you can create links from multiple domains to the same
domain in one operation.
After starting the Link Configuration tool:
1 Click Edit > Multiple Link Edits.
Managing the Links between Domains and Post Offices 145
Page 38

2 In the Domains to Be Linked column, select the source domains whose outgoing links you want
to modify.
novdocx (en) 11 December 2007
3 In the Indirect Link Through column, select the intermediate domain through which you want
the indirect links to pass.
4 In the Link To column, select one or more destination domains.
5 Click OK.
6 Fill in the fields in the Edit Domain Link dialog box for each direct link between a source
domain and the intermediate domain, as described in Section 10.2.2, “Editing a Domain Link,”
on page 144, then click OK.
The Edit Domain Link dialog box continues to appear until you have defined all the direct links
between the source domains and the intermediate domain.
IMPORTANT: After defining links from the source domains to the intermediate domain, make sure
the links from the intermediate domain to other domains are set up the way you want them.
10.2.4 Editing a Post Office Link
After starting the Link Configuration tool:
146 GroupWise 7 Administration Guide
Page 39

1 From the drop-down list, select the domain whose post office link you want to edit.
2 Click Vie w > Post Office Links to display post office links.
3 Double-click a post office to edit the link from the domain to the post office.
novdocx (en) 11 December 2007
4 Select the link protocol for the direct link.
“Mapped Links” on page 141
“UNC Links” on page 142
“TCP/IP Links” on page 141
5 Provide the location of the post office in the format appropriate to the selected protocol.
6 For a TCP/IP link, provide the message transfer port number where you want the POA to listen
for incoming messages from the MTA.
The default message transfer port for the POA is 7101.
7 Click OK.
8 To exit the Link Configuration tool and save your changes, click File > Exit > Ye s.
10.2.5 Viewing the Path of an Indirect Link between Domains
The more hops between two indirectly linked domains, the longer it takes a message to travel
between them. To make sure the number of hops between two indirectly linked domains is as small
as possible, you can list the route a message would take from one domain to the other in
ConsoleOne.
After starting the Link Configuration tool:
1 Select a domain from the drop-down list.
2 Select a domain in the Indirect links list.
3 Click Vie w > Link Path to see a list of the hops between the two domains.
Managing the Links between Domains and Post Offices 147
Page 40

You can also use GroupWise Monitor to trace the path a message would take between two domains.
See Section 61.3.1, “Link Trace Report,” on page 1002.
10.2.6 Viewing the Indirect Links Passing through a Domain
novdocx (en) 11 December 2007
If a domain serves as a hop in an indirect link, making changes to that domain could affect all
indirect links passing through that domain. You can list all the indirect links that pass through a
domain in ConsoleOne.
After starting the Link Configuration tool:
1 Click View > Link Hop to list all domains in your system.
2 Double-click a domain to list the indirect links passing through it.
148 GroupWise 7 Administration Guide
Page 41

3 If you need to reroute a link, right-click the link, then click Edit to open the Edit Domain Link
dialog box and make changes as needed.
You can also use GroupWise Monitor to check the links passing through a selected domain. See
Section 61.3.2, “Link Configuration Report,” on page 1003. However, you cannot change link
information using Monitor.
novdocx (en) 11 December 2007
10.2.7 Viewing the Gateway Links Passing through a Gateway
Before making changes to a gateway, you can list all the links that pass through the gateway.
After starting the Link Configuration tool:
1 Click Vie w > Gateway Hop to list all gateways in your system.
2 Double-click a gateway to list the domains linked through that gateway.
Managing the Links between Domains and Post Offices 149
Page 42

3 If you need to reroute a link, right-click the link, then click Edit to open the Edit Domain Link
dialog box and make changes as needed.
10.2.8 Saving and Synchronizing Link Configuration
Information
Whenever you modify link configuration information, a cautionary symbol (see Section 10.3.2,
“Link Status Symbols,” on page 150) appears next to the modified link until you save the current
link configuration by clicking Edit > Save. If you are making extensive changes to link
configuration information, you should save regularly. When you save, the information is written out
to the domain database (wpdomain.db) for the domain to which you are currently connected. You
can change to a different domain database without exiting the Link Configuration tool by clicking
File > Open.
The MTA routinely synchronizes the information in the domain databases throughout your
GroupWise system. If you are making extensive changes to link configuration information, you can
synchronize the information immediately by clicking Edit > Synchronize.
novdocx (en) 11 December 2007
10.3 Interpreting Link Symbols
As you modify links, you see symbols that represent the various link types. Along with the link type
symbols, you sometimes see link status symbols.
Section 10.3.1, “Link Type Symbols,” on page 150
Section 10.3.2, “Link Status Symbols,” on page 150
10.3.1 Link Type Symbols
Table 10-1 Symbols for Link Types
Link Type
Symbol
Meaning
Direct link
Indirect link
Gateway link
TCP/IP link to domain
TCP/IP link to post office
Undefined link
10.3.2 Link Status Symbols
Link Status
Symbol
150 GroupWise 7 Administration Guide
Meaning
Link modification not yet saved
Page 43

novdocx (en) 11 December 2007
Link Status
Symbol
Meaning
Link modification not yet synchronized
Insufficient rights to modify link
Rights not yet checked
10.4 Modifying Links
In “Post Office Agent” on page 461 and “Message Transfer Agent” on page 603, detailed
instructions for changing link types are provided as outlined below:
Changing the Link Protocol between the Post Office and the Domain
“Using TCP/IP Links between the Post Office and the Domain” on page 481
“Using Mapped or UNC Links between the Post Office and the Domain” on page 483
Changing the Link Protocol between Domains
“Using TCP/IP Links between Domains” on page 618
“Using Mapped or UNC Links between Domains” on page 621
“Using Gateway Links between Domains” on page 622
Customizing Link Configuration
“Using Routing Domains” on page 631
“Scheduling Direct Domain Links” on page 633
“Using a Transfer Pull Configuration” on page 636
Managing the Links between Domains and Post Offices 151
 Loading...