


VII
Libraries and Documents
Chapter 21, “Document Management Services Overview,” on page 293
Chapter 22, “Creating and Managing Libraries,” on page 299
Chapter 23, “Creating and Managing Documents,” on page 335
Chapter 24, “Integrations,” on page 363
novdocx (en) 11 December 2007
VII
Libraries and Documents
291

novdocx (en) 11 December 2007
292 GroupWise 7 Administration Guide

21
A
Document Management Services
novdocx (en) 11 December 2007
Overview
GroupWise® Document Management Services (DMS) lets users create documents with integrated
applications, save them, then easily locate a specific document later without knowing the
application, a specific document name, or the document’s physical location. Users can create, share,
locate, edit, view, and check out documents that are created under the management of GroupWise
DMS.
A GroupWise DMS system consists of the following components:
Section 21.1, “Libraries,” on page 293
Section 21.2, “Document Storage Areas,” on page 295
Section 21.3, “Documents,” on page 295
Section 21.4, “Integrations,” on page 298
21.1 Libraries
A library is a set of documents and a database that allows the documents to be managed as a unit. A
library must belong to a specific post office but can be accessed by users in other post offices. The
GroupWise client enables users to store and manage their documents in the library. The GroupWise
Post Office Agent (POA) transfers documents between the GroupWise client and the library.
21
Figure 21-1 Relationship between the Library and the Clients, Applications, and Users Who Use It
Post Office Library
POA
GroupWise
Client
Integrated
pplication
GroupWise
Client
Integrated
Application
User UserUser
GroupWise
Client
Integrated
Application
In ConsoleOne®, a library can be viewed where it resides in the Novell® eDirectoryTM tree.
Document Management Services Overview
293

Figure 21-2 ConsoleOne View Showing its Location in the eDirectory Tree
A library can also be viewed in relationship to the post office that owns it.
Figure 21-3 ConsoleOne View Showing the Library in Relationship to Its Post Office
novdocx (en) 11 December 2007
In the GroupWise Windows client, users can view a list of all the libraries to which they have access
by clicking Tool s > Options > Documents.
Figure 21-4 GroupWise Documents Setup Dialog Box
294 GroupWise 7 Administration Guide

NOTE: This feature is not available in the Cross-Platform client.
Physically, a library consists of a set of directories and databases stored in the gwdms subdirectory
of the post office, as illustrated in “Post Office Directory” in GroupWise 7 Troubleshooting 3:
Message Flow and Directory Structure.
For complete information on libraries, see Chapter 22, “Creating and Managing Libraries,” on
page 299.
21.2 Document Storage Areas
Documents can be stored at the post office, as illustrated in “Post Office Directory” in GroupWise 7
Troubleshooting 3: Message Flow and Directory Structure. This is the simplest configuration, but it
is not recommended for libraries where substantial growth is anticipated because documents stored
at the post office cannot easily be moved to a different location where additional storage space is
available.
Preferably, documents should be stored outside the post office, in document storage areas.
Document storage areas are physical locations, such as drive volumes, optical devices, hard drives
on other servers, and so on. Document storage areas can be located anywhere that the POA can
access them locally or using direct network access (mapped drive or mounted file system).
novdocx (en) 11 December 2007
A document storage area has the same internal directory structure that is used to store documents at
the post office. The only difference is that a document storage area can be located anywhere in your
system. Therefore, a document storage area can be moved easily, so it is easy to expand your
document storage capacity if you store documents in a document storage area rather than at the post
office.
For complete information on document storage areas, see Section 22.6.2, “Managing Document
Storage Areas,” on page 321.
21.3 Documents
Documents created using GroupWise DMS are not stored as individual files. Instead, documents are
stored in database structures called binary large objects (BLOBs). A document and all of its versions
are stored in the separate BLOB files. BLOBs are compressed (50% or more) to conserve storage
space. BLOBs are encrypted to provide security.
Because documents are stored in a database structure, information can be associated with each
document that is not part of the document itself, such as:
Section 21.3.1, “Document Properties,” on page 295
Section 21.3.2, “Document Types,” on page 296
For complete information on documents, see Chapter 23, “Creating and Managing Documents,” on
page 335.
21.3.1 Document Properties
Document properties are attributes that determine what users see on the document property sheets
when they create DMS documents. In the GroupWise Windows client, the default document
properties for a new document appear like this:
Document Management Services Overview 295

Figure 21-5 GroupWise Client New Document Dialog Box
NOTE: In the Cross-Platform client, you cannot create new documents in GroupWise.
novdocx (en) 11 December 2007
In ConsoleOne, the default document properties for a library are defined like this:
Figure 21-6 ConsoleOne Document Properties Maintenance Window
The default document properties are often adequate, but for some libraries, additional customized
document properties can be very useful. For example, the legal department might want Client and
Matter fields to be required for most documents created by anyone in that department.
NOTE: Document properties cannot be set in ConsoleOne on Linux. However, you can use
ConsoleOne on Windows to set document properties for libraries that are located on Linux.
21.3.2 Document Types
The Document Type property defines how a document is disposed of when its “life” in the system
has expired. It is a required field. Users select a document type each time they create a new
document.
296 GroupWise 7 Administration Guide

Figure 21-7 Lookup Dialog Box
A number of default document types are provided, as shown above. If needed, you can set up
additional document types. For example, you could set up Pleading for the legal department,
Spreadsheet for accounting, Correspondence for administration, RFP for marketing, White Paper for
R&D, and so on.
The document type establishes the following document characteristics:
novdocx (en) 11 December 2007
“Maximum Versions” on page 297
“Expiration Actions” on page 298
“Document Life” on page 298
The following table lists some of the default document types and their default characteristics:
Table 21-1 Document Types
Document Type Maximum Versions Expiration Action Document Life
Agenda 100 Archive 99 days
Document 100 Archive 365 days
Memo 1 Delete 99 days
Minutes 100 Archive 99 days
Misc 10 Archive 30 days
Proposal 100 Archive 99 days
Report 100 Archive 99 days
Template 100 Archive 365 days
Maximum Versions
Users can create new versions of their documents when they revise them. Version numbers are
automatically incremented.
Any version of a document can be designated as the official version by the user. The official version,
which is not necessarily the most recently edited version, is the one located in searches. GroupWise
users have the right to designate an official version if they have Edit rights to the document.
Document Management Services Overview 297

Each document type property has a maximum number of versions (up to 50,000 per document).
Most types have a default of 99 versions. A maximum of 0 (zero) versions means that documents of
that type cannot have versions.
Document Life
Document life is the number of days that must pass between the time when a document is last
accessed and when it is ready for archival or deletion. A document life value of 0 (zero) indicates
that the document will never be available for archival or deletion.
Expiration Actions
When a document’s life expires, its associated expiration action takes place:
Archive: The document is archived when it reaches its document life date. This is useful for
important documents because archived documents can be unarchived.
Delete: The document is automatically deleted when its document life date is reached. This is useful
for documents that are temporary in nature.
novdocx (en) 11 December 2007
Retain: The document is not deleted or archived, and remains in the system indefinitely. This option
is practical for documents that have a recurring use, such as template documents.
21.4 Integrations
Integrations serve as the “glue” between document-producing applications and your GroupWise
DMS system. Integrations provide code specifically designed to allow function calls, such as Open
or Save, to be redirected to the GroupWise Windows client. This allows GroupWise dialog boxes to
be displayed instead of the application’s normal dialog boxes for the integrated functions.
Integrations also allow GroupWise to pull documents from a library and deliver them to applications
for modification. Then, integrations enable GroupWise to return modified documents to the library
so that other users can access them.
NOTE: The Cross-Platform client does not include integrations, which is why you cannot create
and edit documents from the Cross-Platform client.
For complete information on the integrations available for the Windows client, see Chapter 24,
“Integrations,” on page 363.
298 GroupWise 7 Administration Guide

22
Creating and Managing Libraries
When you first set up a new GroupWise® system, a basic library is automatically created for the first
post office. A basic library is adequate when:
Document management is not a primary activity of your GroupWise users.
The library will store documents created and used by members of the post office that owns the
library, or, if you do not need one basic library per post office, by all users within a domain.
All documents will be stored at the post office or in a single document storage area external to
the post office that owns the library.
If your anticipated document management needs are more demanding than those listed above, you
can set up one or more full-service libraries, where you can implement the full range of document
management capabilities offered by GroupWise Document Management Services (DMS).
NOTE: The Linux version of ConsoleOne® allows you to create libraries, but it does not allow you
to set document properties as described in Section 23.2, “Organizing Documents,” on page 338. As
you plan for libraries on Linux, keep in mind that the Cross-Platform client has only basic document
management capabilities when compared with the Windows client, as described in “Working with
Documents” in the GroupWise 7 Cross-Platform Client User Guide.
novdocx (en) 11 December 2007
22
To use one or more libraries as part of your GroupWise system, perform the following tasks as
needed:
Section 22.1, “Planning a Basic Library,” on page 299
Section 22.2, “Setting Up a Basic Library,” on page 302
Section 22.3, “Planning Full-Service Libraries,” on page 303
Section 22.4, “Setting Up a Full-Service Library,” on page 315
Section 22.5, “Viewing a New Library in Your GroupWise System,” on page 318
Section 22.6, “Managing Libraries,” on page 319
Section 22.7, “Library Worksheets,” on page 331
IMPORTANT: If you are creating a new library in a clustered GroupWise system, see the
GroupWise 7 Interoperability Guide before you create the library.
22.1 Planning a Basic Library
An initial basic library was created along with the first post office when you set up your GroupWise
system. That initial basic library is available for immediate use. However, you might want to change
the location where documents are stored, as described in Section 22.1.4, “Deciding Where to Store
Documents,” on page 301. You can also create additional basic libraries as needed.
Creating and Managing Libraries
299

This section provides the information you need in order to set up a new basic library. Section 22.7.1,
“Basic Library Worksheet,” on page 331 lists all the information you need as you set up a basic
library. You should print the worksheet and fill it out as you complete the tasks listed below:
Section 22.1.1, “Selecting the Post Office That the Library Will Belong To,” on page 300
Section 22.1.2, “Determining the Context for the Library Object,” on page 300
Section 22.1.3, “Choosing the Library Name,” on page 300
Section 22.1.4, “Deciding Where to Store Documents,” on page 301
After you have completed the tasks and filled out the worksheet, you are ready to continue with
Section 22.2, “Setting Up a Basic Library,” on page 302.
22.1.1 Selecting the Post Office That the Library Will Belong To
If you are creating a basic library for each post office in your GroupWise system, print a copy of
Section 22.7.1, “Basic Library Worksheet,” on page 331 for each post office.
If users in several post offices will store documents in the same basic library, you must decide which
post office should own the library. A library can never be reassigned to a different post office, so you
should choose the owning post office carefully. You should consider which users will use the library
most frequently and where you might want to create additional libraries in the future.
novdocx (en) 11 December 2007
BASIC LIBRARY WORKSHEET
Under Item 3: Post Office, specify the name of the post office that will own the new basic library.
22.1.2 Determining the Context for the Library Object
Generally, you should create the Library object in the same context as its post office. You cannot
move a Library object after you have created it.
BASIC LIBRARY WORKSHEET
Under Item 1: eDirectory Container, specify the container for the Library object.
22.1.3 Choosing the Library Name
When you create the Library object, you must give the library a name. This is the name that is
displayed in ConsoleOne.
After you have specified the library’s name and created the Library object, the name cannot be
changed. Therefore, if you have or will have other libraries, you should pick a name that uniquely
identifies the library. For example, use the name to identify the post office it is assigned to.
Do not use any of the following characters in the library’s name:
ASCII characters 0-13 Comma ,
Asterisk * Double quote "
300 GroupWise 7 Administration Guide

At sign @ Extended ASCII characters that are graphical or typographical
symbols; accented characters in the extended range can be used
Braces { } Parentheses ( )
Colon : Period .
By default, the library name that users see in the GroupWise client is the same as the Library object
name. However, you can change the display name if you want it to be different from the Library
object name.
BASIC LIBRARY WORKSHEET
Under Item 2: Library Name, specify the Library object name.
Under Item 7: Library Description, provide a brief description of the planned use for the library.
Under Item 8: Display Name, specify the library name you want users to see in the GroupWise client, if it
is different from the Library object name.
novdocx (en) 11 December 2007
22.1.4 Deciding Where to Store Documents
You can store documents at the post office in the post_office\gwdms\library\docs
subdirectory of the post office. You can later add document storage areas outside the post office if
DMS usage grows. However, the documents stored at the post office can never be moved.
A document storage area has the same internal directory structure that is used to store documents at
the post office, but it can be located anywhere in your system. Document storage areas can be
moved easily, so it is easy to expand your document storage capacity when you store documents in
document storage areas rather than at the post office.
You might want to set up a document storage area on the same server where the POA runs so as not
to increase network traffic. The POA can index and serve documents to users most efficiently if the
document storage area is located locally.
BASIC LIBRARY WORKSHEET
Under Item 4: Store Documents at the Post Office?, mark Yes or No. (No is recommended for permanent
document storage).
To define a document storage area, you must know its direct access path. For example, a UNC path
specifies the absolute location of the document storage directory.
Syntax:
\\NetWare_server\volume\storage_directory
\\Windows_server\sharename\storage_directory
Example:
\\nw65\gwdocs\docs
\\winxp\c$\docs
NOTE: On Linux, ConsoleOne interprets a UNC path so that the first item in the UNC path is the
Linux server hostname, followed by a Linux path to the document storage area.
Creating and Managing Libraries 301

BASIC LIBRARY WORKSHEET
If you entered No for Item 4, specify the direct access path under Item 6: Document Storage Area Path.
Under Item 5: Document Storage Area Description, enter a useful description of the document storage
area. (This description is displayed only in ConsoleOne.)
If you need to add a document storage area to the initial library that was created with the first post
office in your GroupWise system, use the Storage Areas properties page of the Library object in
ConsoleOne to provide the direct access path, as described in “Adding a Document Storage Area”
on page 321.
22.2 Setting Up a Basic Library
You should already have reviewed Section 22.1, “Planning a Basic Library,” on page 299 and filled
out Section 22.7.1, “Basic Library Worksheet,” on page 331. Complete the following tasks to set up
a new basic library:
Section 22.2.1, “Creating the Basic Library,” on page 302
Section 22.5, “Viewing a New Library in Your GroupWise System,” on page 318
novdocx (en) 11 December 2007
22.2.1 Creating the Basic Library
To create a new library:
1 Make sure the POA is running for the post office that will own the new basic library.
®
2 In ConsoleOne, browse to and right-click the Novell
to create the library (worksheet item 1), then click New > Object.
3 Double-click GroupWise Library, then fill in the fields in the Create GroupWise Library dialog
box (worksheet items 2 through 6).
eDirectoryTM container where you want
302 GroupWise 7 Administration Guide

4 Click Define Additional Properties, then click OK to create the Library object and display the
library Identification page.
novdocx (en) 11 December 2007
5 Fill in the Description field (worksheet item 7).
6 If necessary, edit the Display Name field (worksheet item 8).
7 Click OK to save the library information.
8 Test the new library. See Section 22.5, “Viewing a New Library in Your GroupWise System,”
on page 318.
Although there are many configuration options for libraries and documents, as described in
Section 22.3, “Planning Full-Service Libraries,” on page 303, no additional setup is required for a
basic library. GroupWise client users can begin to store documents in the new library at once.
22.3 Planning Full-Service Libraries
If your document management requirements go beyond basic libraries, you can create one or more
full-service libraries. You might or might not need to make use of all document management
features in order to meet your DMS users’ needs.
Creating and Managing Libraries 303

This section covers everything you should consider when you set up full-service libraries. The “Full-
Service Library Worksheet” on page 332 lists all the information you need as you set up a full-
service library. You should print a copy of the worksheet for each library you plan to create. Fill out
the worksheet for each library as you complete the tasks listed below.
Section 22.3.1, “Deciding Which Libraries to Create,” on page 304
Section 22.3.2, “Selecting the Post Offices To Own Libraries,” on page 308
Section 22.3.3, “Determining the Contexts for Library Objects,” on page 308
Section 22.3.4, “Choosing Library Names,” on page 308
Section 22.3.5, “Deciding Where to Store Documents,” on page 309
Section 22.3.6, “Setting Document Version Options,” on page 311
Section 22.3.7, “Figuring Maximum Archive Directory Size,” on page 312
Section 22.3.8, “Designating Initial Librarians,” on page 312
Section 22.3.9, “Restricting Initial Public Library Rights,” on page 313
Section 22.3.10, “Determining Your Indexing Needs,” on page 314
Section 22.3.11, “Determining If You Need to Set Up Integrations for DMS Users,” on
page 314
novdocx (en) 11 December 2007
After you have completed the above tasks and filled out the worksheets, you are ready to continue
with Section 22.4, “Setting Up a Full-Service Library,” on page 315.
22.3.1 Deciding Which Libraries to Create
When designing a system of libraries for your GroupWise system, you should review the following
considerations:
“Library Access for DMS Users” on page 304
“Centralized vs. Decentralized Library Configurations” on page 304
“Library Specialization” on page 307
Library Access for DMS Users
Client/server access is the preferred access mode for GroupWise client users. It is the best access
mode for DMS users because it enables them to access libraries outside their own post offices.
For information about access modes, see Section 35.4, “Post Office Access Mode,” on page 468.
Centralized vs. Decentralized Library Configurations
Reorganizing existing libraries is not a simple process. Therefore, you should determine whether
you want a centralized or decentralized library configuration before you start creating libraries.
“Centralized Libraries” on page 305
“Decentralized Libraries” on page 306
“Comparative Scenarios” on page 307
304 GroupWise 7 Administration Guide

Centralized Libraries
Centralized libraries are located in a post office that is dedicated to libraries (no users). Centralized
libraries are serviced by the POA in the dedicated DMS post office, as shown in the following
illustration:
Figure 22-1 Centralized Libraries
DMS
Accounting Library
Post Office
Manufacturing Library
novdocx (en) 11 December 2007
Accounting
Post Office
POA
GroupWise
Clients
Development Library
Development
Post Office
POA
GroupWise
Clients
POA
Sales Library
Manufacturing
Post Office
POA
GroupWise
Clients
Sales
Post Office
POA
GroupWise
Clients
Integrated
Applications
Accounting
Users
Integrated
Applications
Development
Users
Integrated
Applications
Manufacturing
Users
Integrated
Applications
Sales
Users
In the illustration, notice that all libraries belong to the DMS post office, which has no users. All
GroupWise client users are using client/server access mode, which is required because there are no
libraries in their local post offices. Each user has access to all four libraries through TCP/IP links to
the DMS POA.
The following table lists some advantages and disadvantages of centralized libraries:
Creating and Managing Libraries 305

Table 22-1 Centralized Libraries
Advantages Disadvantages
novdocx (en) 11 December 2007
Administration can be consolidated, allowing
one administrator to specialize in document
management.
Backup can be easier with hardware
dedicated to one DMS post office, such as
optical drives, RAID, fast backup units, and so
on.
If a post office server other than the one
dedicated to libraries goes down, DMS access
is unaffected for users in the remaining post
You must create and maintain a post office
that is dedicated to libraries only (no users).
This configuration guarantees that all
document searching and accessing is back
and forth between users’ post offices and the
libraries’ post office, possibly degrading
network performance.
If the post office server dedicated to libraries
goes down, DMS is unusable for the whole
GroupWise system.
offices.
Decentralized Libraries
Decentralized libraries are located along with users in different post offices. Decentralized libraries
are serviced by their own local POAs as shown in the following illustration:
Figure 22-2 Decentralized Libraries
Accounting
Library
Accounting
Post Office
Development
Library
POA
Development
Post Office
POA
Manufacturing
Library
Manufacturing
Post Office
POA
Sales
Post Office
Sales
Library
POA
GroupWise
Clients
Integrated
Applications
Accounting
Users
In the illustration, notice that each post office has its own library. Users can see each others’ libraries
as well as their own because of client/server access mode.
The following table lists some advantages and disadvantages of decentralized libraries
306 GroupWise 7 Administration Guide
GroupWise
Clients
Integrated
Applications
Development
Users
GroupWise
Clients
Integrated
Applications
Manufacturing
Users
GroupWise
Clients
Integrated
Applications
Sales
Users

Table 22-2 Decentralized Libraries
Advantages Disadvantages
novdocx (en) 11 December 2007
Network traffic is minimized because most
document accessing are in users’ local post
offices.
You do not need to maintain an extra DMS
post office dedicated to libraries only.
Users in a post office where a library resides
can use direct access mode if necessary.
Libraries and their documents are scattered
over different servers, adding to your
administrative workload (such as doing
backups).
Comparative Scenarios
The following scenarios further illustrate the differences between centralized and decentralized
libraries:
Assume that you assigned your first library to the same post office your users have membership
in. By initially assigning a library to the same post office as your users, you establish a
decentralized configuration for future libraries. You now want a centralized library
configuration. However, because you cannot reassign the library to another post office, you
must do one of the following:
Create one or more new libraries under a DMS post office, export all of the documents
from the first library and import them to the new libraries, delete the first library, and then
ensure that users can locate their documents.
Create one or more new libraries under a DMS post office and have your librarian use
mass document operations to move the documents from the first library to the other
libraries, delete the first library, and then ensure that users can locate their documents.
Assume that you assigned your first library to a DMS post office that is used only for libraries.
Now you can use either the centralized or decentralized library configuration for your
additional libraries. The DMS post office can be used for all future libraries to create a
centralized configuration, or you could assign future libraries to other post offices and leave
that first one where it is, giving you a decentralized configuration. Setting up your first library
on a post office server dedicated to only libraries allows you to use either configuration option.
However, this method initially requires additional hardware and administration.
Library Specialization
You can create libraries for such user specialties as administration, accounting, development, human
resources, legal, marketing, manufacturing, payroll, R&D, sales, shipping, and so on. You can also
specialize libraries by such functions as general (for all users), administration (including legal and
payroll), engineering and documentation development (R&D), marketing and sales, manufacturing
and shipping, and so on.
You can also use specialization to provide security for sensitive libraries. You do this by setting up
access restrictions for the libraries. The default is for all DMS users to have access to all libraries in
the GroupWise system. For more information about restricting library access, see Section 22.6.3,
“Managing Library Access,” on page 324.
Restricting library access can also improve users’ search time. When users install the GroupWise
client on their workstations, they are either automatically assigned a default library (if there is one
on their post office), or they are asked to select one from the libraries they have access to. By
Creating and Managing Libraries 307

default, DMS searches are performed only on the user’s default library. To search other libraries
(“global” search), users can select other libraries using the Look In list in the Find dialog box. If you
limit users’ access to libraries (perhaps by department), their global searches would also be faster.
Another reason for creating specialized libraries could be for different library configuration needs.
For example, each library could have specialized document types and document properties that
would not be needed in other libraries. For a review of document types and properties, see
Section 21.3, “Documents,” on page 295. For more detailed information, see “Customizing the
Default Document Type Property” on page 339 and Section 23.2.1, “Customizing Document
Properties,” on page 338.
Specialization can also facilitate library management activities, such as controlling library
accessibility for individual users or groups of users, or managing different uses of document types,
document properties, or field label naming schemes.
22.3.2 Selecting the Post Offices To Own Libraries
As a result of deciding whether you want to use a centralized or decentralized configuration for your
libraries and whether or not you need specialized libraries, you should have a good idea of what post
offices you want to create libraries in.
novdocx (en) 11 December 2007
If you are using a centralized configuration, create the DMS post office by following the instructions
in Chapter 11, “Creating a New Post Office,” on page 155, then return to this point.
FULL-SERVICE LIBRARY WORKSHEET
Under Item 3: Post Office, specify the name of the post office that will own the new library.
22.3.3 Determining the Contexts for Library Objects
You can create a Library object in any container in the eDirectory tree. For example, you could
create the Library object in the same container as its Post Office object. Or you could create it in a
special container just for Library objects:
The containers in which you place the Library objects have no bearing on whether your libraries are
centralized or decentralized. Library objects can be located anywhere in the tree, no matter which
post offices the libraries belong to.
FULL-SERVICE LIBRARY WORKSHEET
Under Item 1: eDirectory Container, specify the name of the eDirectory container where you want to
create the new library.
22.3.4 Choosing Library Names
A library’s name must be unique within the post office; it also must be unique within its container.
You should devise a naming scheme that helps to identify all libraries in the GroupWise system. It
can be useful to include within the library name an indication of which post office it belongs to.
After you have specified the library’s name and created the Library object, the name cannot be
changed.
308 GroupWise 7 Administration Guide

Do not use any of the following characters in the library’s name:
ASCII characters 0-13 Comma ,
Asterisk * Double quote "
At sign @ Extended ASCII characters that are graphical or typographical symbols;
accented characters in the extended range can be used
Braces { } Parentheses ( )
Colon : Period .
By default, the library name that users see in the GroupWise client is the same as the Library object
name. However, you can change the display name if you want it to be different from the Library
object name.
FULL-SERVICE LIBRARY WORKSHEET
Under Item 2: Library Name, specify the Library object name.
novdocx (en) 11 December 2007
Under Item 7: Library Description, provide a brief description of the planned use for the library.
Under Item 10: Display Name, specify the library name you want users to see in the GroupWise client, if
it is different from the Library object name.
22.3.5 Deciding Where to Store Documents
When deciding where to store documents, you should review the following considerations:
“Document Storage Location” on page 309
“Disk Space Requirements” on page 309
“Direct Access Paths to Document Storage Areas” on page 310
Document Storage Location
Documents belonging to full-service libraries should not be stored at the post office. Instead, they
should be stored in document storage areas. For a review, see Section 21.2, “Document Storage
Areas,” on page 295.
A library can have more than one document storage area. The only requirement is that the POA that
services the library must have direct network access (mapped drive or mounted file system) to each
storage area.
You can set up one document storage area for each library as you create the Library object.
Additional document storage areas can be set up using the Storage Areas properties page of the
Library object, as described in “Adding a Document Storage Area” on page 321.
Disk Space Requirements
You need to know the disk space requirements for your libraries in order to choose appropriate
locations for document storage areas.
Creating and Managing Libraries 309

If you have chosen a centralized library configuration, your document storage areas are all serviced
by the POA of the DMS post office. Therefore, you can calculate the disk space requirements for
your GroupWise system as a whole. If you have chosen a decentralized configuration, document
storage areas are located throughout your GroupWise system. Therefore, disk space requirements
must be calculated separately for each library.
If your current document storage statistics are an accurate indicator for a given library or for your
system, use them for calculating your disk space requirements. Otherwise, use the following formula
for determining DMS storage needs:
Formula:
Number of Users
x Average Number of Documents per User
x Average Document Size
x Average Number of Versions per Document
-------------------------------------------
Disk Space Required for Library
Example:
250 Users
x 200 Documents per User
x 50 KB per Document
x 10 Versions per Document
-----------------------
25 GB of Disk Space
novdocx (en) 11 December 2007
Users might create a new version of a document any time they revise it. Because all versions of a
document are saved in BLOB storage with the original document, disk space can be used up
quickly! If you know how many versions per document your users average, use that value in the
formula; otherwise, allow for an average of at least ten versions per document.
If your Average Document Size value for the formula is based on non-GroupWise documents, they
will be compressed by about 50% after they have been imported into GroupWise and stored in
BLOBs.
You should research your current or expected document usage before deciding where to store
documents.
FULL-SERVICE LIBRARY WORKSHEET
Under Item 7: Document Usage Estimate, enter the requested values and calculate the resulting disk
space requirements.
If your values are calculated for the system (rather than per library), enter this information on only one of
the worksheets.
Direct Access Paths to Document Storage Areas
To define a document storage area, you need to know its direct access path. For example, a UNC
path specifies the absolute location of the document storage directory.
Syntax:
\\NetWare_server\volume\storage_directory
\\Windows_server\sharename\storage_directory
310 GroupWise 7 Administration Guide

Example:
\\nw65\gwdocs\docs
\\winxp\c$\docs
NOTE: On Linux, ConsoleOne interprets a UNC path so that the first item in the UNC path is the
Linux server hostname, followed by a Linux path to the document storage area.
You might want to set up a document storage area on the same server where the POA runs so as not
to increase network traffic. The POA can index and serve documents to users most efficiently if the
document storage area is located locally.
FULL-SERVICE LIBRARY WORKSHEET
Under Item 6: Document Storage Area Path, specify the direct access path.
Under Item 5: Document Storage Area Description, provide a useful description of the document storage
area. (This description is displayed only in ConsoleOne.)
22.3.6 Setting Document Version Options
novdocx (en) 11 December 2007
When you create a new library, you can establish how document versions are handled. For an
overview of document versioning, see “Maximum Versions” on page 297.
“Official Version” on page 311
“Start Version Number” on page 311
Restricting the maximum number of versions should be done after the library has been created, as
described in Section 22.6.1, “Editing Library Properties,” on page 320.
Official Version
By default, any user can establish the official version of a document. However, you can remove that
right from one or more users if needed.
FULL-SERVICE LIBRARY WORKSHEET
Under Item 11: Restrict Public Access Rights, cross out Designate Official Version if you want to
eliminate that right for all users.
You can later grant the Designate Official Version to specific users or distribution lists, as described in
Section 22.6.3, “Managing Library Access,” on page 324.
Start Version Number
You must set the start number for each library to either 0 (zero) or 1. The default is 1. This number
identifies the original document.
Version numbers are automatically increased from the number you select. If you select 0, the first
version of a document will be 000. If you select 1, the first version will be 001.
Creating and Managing Libraries 311

FULL-SERVICE LIBRARY WORKSHEET
Under Item 8: Start Version Number, select 0 or 1.
22.3.7 Figuring Maximum Archive Directory Size
Documents created with GroupWise DMS can be archived, depending on their Document Type
properties. A document’s type determines its disposition, such as archiving or deleting. For more
information, see “Customizing the Default Document Type Property” on page 339.
When you archive documents, their BLOB files are moved into archive directories. Each library in a
document storage area has its own set of archive directories that are automatically created as needed.
They are named arxxxxxx (where xxxxxx is an incremental integer with leading zeros). A document
storage area has the same archive directory structure as the gwdms subdirectory in the post office, as
illustrated in “Post Office Directory” in GroupWise 7 Troubleshooting 3: Message Flow and
Directory Structure.
When a document is archived, GroupWise determines if the document’s BLOB file can fit in the
current archive directory. If it cannot fit, another archive directory is created and the BLOB is
archived there.
novdocx (en) 11 December 2007
An archive set consists of all documents in one archive directory. The Maximum Archive Size
property on the Library object establishes in bytes each archive directory’s size limit. You should set
this to mirror the capacity of your archival medium (such as a CD). It should not be more than your
archival medium’s capacity.
It is usually better to keep archive sets small in comparison to the size of the backup medium. This
lets you back up archive directories often enough to keep your hard disk space from being used up
too quickly between backups. For example, if your backup medium has 1 GB capacity, you could
limit your archive sets to a maximum archive size of 200 MB.
If your archival system only lets you back up in one pass (in other words, you cannot perform
consecutive backups to the medium), the Maximum Archive Size should match the archival
medium’s capacity.
Some archival mediums require extra space for recording file storage data, such as an index of the
files stored to tape. Ten percent is usually sufficient. For example, a tape system with 100 MB
capacity means you should set your Maximum Archive Size to 90 MB.
Consult your archival medium documentation for information on setting up an effective backup
strategy. Include in your strategy such concepts as multiple archive sets per backup medium, or
allowing extra space for the medium’s file storage data.
ADDITIONAL LIBRARIES WORKSHEET
Under Item 9: Maximum Archive Size, enter a number (in bytes, with no abbreviations or commas).
22.3.8 Designating Initial Librarians
A librarian has full rights to the properties of every document in the library, and can therefore
perform management tasks on all library documents. You can assign yourself as a librarian. You can
also delegate these tasks by assigning responsible users in each library as librarians. Any GroupWise
312 GroupWise 7 Administration Guide

user who normally has access to the library can be a librarian. You can also have multiple librarians
for each library.
When you first create a new library, you might want to simply designate yourself as the librarian and
assign other users later. For more detailed information, see Section 22.6.4, “Adding and Training
Librarians,” on page 326.
ADDITIONAL LIBRARIES WORKSHEET
Under Item 12: Librarians, list any users that you want to function as librarians for the new library.
22.3.9 Restricting Initial Public Library Rights
The rights to documents in a library apply to the library as a whole; therefore, they are referred to as
public rights. By default, all public rights are granted to all users in a new library.
You can restrict which GroupWise library features individual users or distribution lists should have
by removing the public rights and then restoring them for selected users or distribution lists.
The following table summarizes the public library rights:
novdocx (en) 11 December 2007
Table 22-3 Public Library Rights
Public Right Description
Add Allows users to add new documents to the library.
Change Allows users to make changes to existing documents in the library.
Delete Allows users to delete documents, regardless of who else created them or has
rights to the documents. However, to be able to delete a document, users must also
have rights to locate and modify the document (View and Change rights), in addition
to the Delete right.
View By itself, this right allows searching, viewing, or copying documents, but does not
permit editing them. Copies can be edited, because a copy is saved as a separate
document. Therefore, editing a copy does not affect the original document or any of
its versions.
Designate Official
Ver sion
Allows any version of a document to be designated as the official version. The
official version, which is not necessarily the most recently-edited version, is the one
located in searches.
The official version is usually determined by the creator or author of the document.
However, the official version can be designated by the last user to edit the
document (if the user has this right). A user also needs the Change right to the
document to be able to designate an official version. However, you might still want
to deselect this as an initial public right.
Creating and Managing Libraries 313

Public Right Description
Reset In-Use Flag The In-Use flag protects against data loss by preventing multiple users from
concurrently opening the same document. The purpose of the Reset In-Use Flag
right is to allow a user or librarian to reset a document’s status when the document
is in use by someone else or when it is erroneously flagged as in use.
Because you can manually reset the In-Use flag to change a document’s status,
even if the document is currently open, you should use prudence in allowing users
the public right to change the In-Use flag. You might want to deselect this as a public
right.
FULL-SERVICE LIBRARY WORKSHEET
Under Item 11: Restrict Public Access Rights, cross out any public rights you want to eliminate for all
users.
You can later grant the rights to specified users or groups, as described in Section 22.6.3, “Managing
Library Access,” on page 324.
novdocx (en) 11 December 2007
Rights to individual documents in a library can be modified at any time by the user listed as the
creator or author of the document. Just because users might have public rights in a library does not
mean that they have the equivalent rights to every document in the library. For additional
information on rights, see “Sharing Documents” in “Creating and Working with Documents” in the
GroupWise 7 Windows Client User Guide.
22.3.10 Determining Your Indexing Needs
The POA performs many tasks in the post offices, as described in Section 35.5, “Role of the Post
Office Agent,” on page 469. Indexing documents is just one of its many functions.
If necessary, you can configure an extra POA on another server to handle indexing. Separating POA
functions can optimize the processing load for the respective POAs, particularly if your GroupWise
system will regularly search and index a large number of documents.
If you feel you might need dedicated indexing for DMS documents, see Section 23.3, “Indexing
Documents,” on page 351 for in-depth information on different configurations. Then determine
whether you need dedicated indexing.
FULL-SERVICE LIBRARY WORKSHEET
Under Item 11: Dedicated POA for Indexing, mark whether or not you plan to set up a separate indexing
POA.
22.3.11 Determining If You Need to Set Up Integrations for DMS Users
For an overview of integrations, see Section 21.4, “Integrations,” on page 298. To determine if you
should set up integrations for a given application, see Chapter 24, “Integrations,” on page 363.
314 GroupWise 7 Administration Guide

NOTE: This item does not apply if all of your users use the Cross-Platform client, where
integrations are not available.
ADDITIONAL LIBRARIES WORKSHEET
Under Item 14: Set Up Integrations, mark whether or not you need to manually set up integrated
applications for your DMS users.
22.4 Setting Up a Full-Service Library
You should have already reviewed Section 22.3, “Planning Full-Service Libraries,” on page 303 and
filled out Section 22.7.2, “Full-Service Library Worksheet,” on page 332 for each new library.
Before starting to create new libraries, be sure your system meets the following prerequisites:
Make sure the eDirectory contexts exist where you will create new Library objects.
Make sure the post offices exist that will own the new libraries. If you are using a centralized
configuration, make sure you have created the DMS post office that will own all the libraries by
following the instructions in Chapter 11, “Creating a New Post Office,” on page 155.
Make sure the POA is running for each post office that will own a new library.
Make sure you have access to the physical locations where you will set up document storage
areas.
novdocx (en) 11 December 2007
After the prerequisites are met, you are ready set up one or more full-service libraries.
Section 22.4.1, “Creating the Full-Service Library,” on page 315
Section 22.5, “Viewing a New Library in Your GroupWise System,” on page 318
Section 22.4.2, “What’s Next,” on page 317
22.4.1 Creating the Full-Service Library
1 Make sure you are logged in to the eDirectory tree where you want to create the library.
This must be the same tree as the post office the library will belong to (worksheet item 3).
2 In ConsoleOne, browse to and right-click the eDirectory container where you want to create the
library (worksheet item 1), then click New > Object.
3 Double-click GroupWise Library, then fill in the fields in the New Library dialog box
(worksheet items 2 through 6).
Creating and Managing Libraries 315

4 Click Define Additional Properties, then click OK to create the new Library object and display
the library Identification page.
novdocx (en) 11 December 2007
5 Fill in the fields (worksheet items 7 through 10).
6 Click GroupWise > Rights to display the Rights page.
316 GroupWise 7 Administration Guide

7 In the Public Rights box, deselect any rights you want to remove from all library users
(worksheet item 11).
novdocx (en) 11 December 2007
8 If you want to set up one or more librarians, click Add, browse to and select one or more users
or distribution lists (worksheet item 12), then click OK. Select the users and distribution lists,
then select Manage (Librarian) to give them rights to the properties of all documents in the
library.
9 Click OK to save the library information.
10 Test the library. See Section 22.5, “Viewing a New Library in Your GroupWise System,” on
page 318.
22.4.2 What’s Next
After you have created the new library, you can expand its capabilities as needed:
Import and manage documents. See Chapter 23, “Creating and Managing Documents,” on
page 335
Set up integrated applications for DMS users (worksheet item 14). See Chapter 24,
“Integrations,” on page 363
Grant library rights to specific users or distribution lists. See Section 22.6.3, “Managing
Library Access,” on page 324.
Assign librarians. See Section 22.6.4, “Adding and Training Librarians,” on page 326.
Set up multiple document storage areas. See “Adding a Document Storage Area” on page 321.
Set up a dedicated indexing POA (worksheet item 13). See Section 23.3, “Indexing
Documents,” on page 351
Creating and Managing Libraries 317

22.5 Viewing a New Library in Your GroupWise System
After you create a new library, you can see it in ConsoleOne and GroupWise client users can see it in
the GroupWise client.
Section 22.5.1, “Seeing the New Library in ConsoleOne,” on page 318
Section 22.5.2, “Seeing the New Library in the GroupWise Windows Client,” on page 319
22.5.1 Seeing the New Library in ConsoleOne
In the Console View in ConsoleOne, you can see the new Library object in the context of its
eDirectory container object.
Figure 22-3 Console View Showing the New Library Object
novdocx (en) 11 December 2007
In the GroupWise View, you can see the relationship between the new library and the post office it
belongs to.
To locate the library in the GroupWise view:
1 Expand the GroupWise System object.
2 Expand the Domain object where the owning post office resides.
3 Select the owning post office.
4 In the drop-down list of objects, select Libraries.
318 GroupWise 7 Administration Guide

22.5.2 Seeing the New Library in the GroupWise Windows Client
GroupWise Windows client users can see that a new library has been created. They can set it as their
default library if desired.
novdocx (en) 11 December 2007
In the GroupWise client:
1 Click Too ls > Options > Documents.
The Library Configuration tab should include the new library.
2 Select the new library, click Set as Default, then click OK to use the new library as the default
location for storing documents and searching for documents.
22.6 Managing Libraries
As your GroupWise DMS system grows and evolves, you might need to perform the following
activities:
Section 22.6.1, “Editing Library Properties,” on page 320
Section 22.6.2, “Managing Document Storage Areas,” on page 321
Section 22.6.3, “Managing Library Access,” on page 324
Section 22.6.4, “Adding and Training Librarians,” on page 326
Creating and Managing Libraries 319

Section 22.6.5, “Maintaining Library Databases,” on page 330
Section 22.6.6, “Moving a Library,” on page 330
Section 22.6.7, “Deleting a Library,” on page 330
22.6.1 Editing Library Properties
After creating a library, you can change some library properties. Other library properties cannot be
changed.
1 In ConsoleOne, browse to and right-click the Library object, then click Properties to display
the library Identification page.
novdocx (en) 11 December 2007
2 Change editable fields as needed. For information about individual fields, click Help.
3 Click GroupWise > Storage Areas to display the Storage Areas page.
320 GroupWise 7 Administration Guide

All document storage areas associated with the library are listed, no matter where they are
located. On this page, you can add, move, and delete document storage areas. See
Section 22.6.2, “Managing Document Storage Areas,” on page 321.
4 Click GroupWise > Rights to display the library Rights page.
novdocx (en) 11 December 2007
Public library rights granted to all users are selected in the Public Rights box. The Individual
and Distribution List Rights box shows any additional rights that have been granted to specific
users. See Section 22.6.3, “Managing Library Access,” on page 324 and Section 22.6.4,
“Adding and Training Librarians,” on page 326.
5 Click OK to save changes to the library properties.
22.6.2 Managing Document Storage Areas
For a review, see Section 21.2, “Document Storage Areas,” on page 295 and Section 22.1.4,
“Deciding Where to Store Documents,” on page 301.
Typically, the initial document storage area for a library is set up when the library is created.
Thereafter, you can create additional document storage areas as the library grows. You can move a
document storage area to a location where more storage is available. You can delete a document
storage area if it is no longer used.
“Adding a Document Storage Area” on page 321
“Moving a Document Storage Area” on page 323
“Deleting a Document Storage Area” on page 323
Adding a Document Storage Area
To help you plan where to create the new document storage area, see Section 22.1.4, “Deciding
Where to Store Documents,” on page 301.
To create a new document storage area for a library:
1 In ConsoleOne, browse to and right-click the Library object, then click Properties.
Creating and Managing Libraries 321

2 Click GroupWise > Storage Areas to display the Storage Areas page.
novdocx (en) 11 December 2007
Existing document storage areas are listed.
3 Click Add to create a new document storage area.
4 Provide a description for the document storage area.
5 Specify the UNC path to the directory where you want to create the document storage area.
If the directory does not exist, it will be created as the document storage area is set up.
As an alternative, you can specify an AppleTalk zone to store documents on an Apple*
computer, or you can specify a UNIX path to store documents on a UNIX server. On Linux,
you can specify a Linux path. The POA that will service the library must have direct access to
the location you specify.
6 Click OK to create the new document storage area and add it to the list of storage areas for the
library.
If you have multiple document storage areas selected in the Storage Areas list, new and
modified documents could be added to any one of them.
7 If you want to stop storing documents in the previous document storage area, deselect it in the
Storage Areas list.
8 Click OK to save the document storage area information.
322 GroupWise 7 Administration Guide

Moving a Document Storage Area
You might choose to move a document storage area if it is close to exceeding the available disk
space at its current location and you do not want to create an additional document storage area.
1 Stop the POA that services the library.
2 Copy the document storage area directory and all of its contents to the desired location.
3 Make sure that the POA has access to the new location so that it can read and write documents
in the document storage area.
4 In ConsoleOne, browse to and right-click the Library object, then click Properties.
5 Click GroupWise > Storage Areas to display the Storage Areas page.
novdocx (en) 11 December 2007
Existing document storage areas are listed.
6 Select a document storage area, then click Edit.
7 Provide the new location for the document storage area, then click OK twice to save the new
document storage information.
8 Restart the POA.
Deleting a Document Storage Area
When you delete a document storage area, any documents in the document storage area are moved
to other valid document storage areas for the library. If you want to move documents to a specific
location before deleting the document storage area, see Section 23.1.3, “Managing Groups of
Documents,” on page 337.
To delete a document storage area:
1 In ConsoleOne, browse to and right-click the Library object that owns the document storage
area, then click Properties.
2 Click GroupWise > Storage Areas to display the Storage Areas page.
Creating and Managing Libraries 323

3 Select a document storage area, then click Delete.
4 Click OK to close the Storage Areas page
novdocx (en) 11 December 2007
If the above steps are not successful in deleting a document storage area, perhaps because one or
more documents were in use during the deletion process, you can use the Analyze/Fix Library action
of Mailbox/Library Maintenance, with the Remove Deleted Storage Areas and Move Documents
First options selected, to finish cleaning up the deleted document storage area. For more
information, see Chapter 28, “Maintaining Library Databases and Documents,” on page 391.
22.6.3 Managing Library Access
Access to libraries is controlled by the rights users have to the Library object. By default, when a
new library is created, all of the following rights are granted:
Table 22-4 Public Library Rights
Public Right Description
Add Allows users to add new documents to the library.
Change Allows users to make changes to existing documents in the library.
Delete Allows users to delete documents, regardless of who created them or has rights to
the documents. However, to be able to delete a document, users must also have
rights to locate and modify the document (View and Change rights), in addition to
the Delete right.
View By itself, this right allows searching, viewing, or copying documents, but does not
permit editing them. Copies can be edited, because a copy is saved as a separate
document. Therefore, editing a copy does not affect the original document or any of
its versions.
324 GroupWise 7 Administration Guide

Public Right Description
novdocx (en) 11 December 2007
Designate Official
Ver sion
Reset In-Use Flag The In-Use flag protects against data loss by preventing multiple users from
Allows any version of a document to be designated as the official version. The
official version, which is not necessarily the most recently edited version, is the one
located in searches.
The official version is usually determined by the creator or author of the document.
However, the official version can be designated by the last user to edit the
document (if the user has this right). A user also needs the Change right to the
document to be able to designate an official version.
concurrently opening the same document. The purpose of the Reset In-Use Flag
right is to allow a user or librarian to reset a document’s status when the document
is in use by someone else or when it is erroneously flagged as in use.
In the GroupWise client the document properties Status field displays the current InUse flag setting for a document. The Status field is automatically set to In Use when
a document is opened and reset to Available when a document is closed. There can
also be other values, such as Checked Out. A document cannot be checked out
when its status is In Use.
There are a variety of reasons for which you might want to restrict certain library rights, including:
Your libraries are specialized by department and you want to restrict access to sensitive
libraries, such as a payroll library.
Your libraries are distributed across multiple post offices and you want to restrict the scope of
user searches to only the libraries they should use, thereby speeding up searches.
Your libraries are distributed across multiple servers and you want to minimize network traffic.
You have some users who should have more rights than other users to certain libraries.
To restrict public rights while granting individual rights:
1 In ConsoleOne, browse to and right-click the Library object, then click Properties.
2 Click GroupWise > Rights to display the Rights page.
3 In the Public Rights box, deselect the rights that you want to remove from all users.
4 Click Add, then browse to and select the users who need to have rights to the library.
If the number is large, you might find it easier to create a distribution list for users who need
rights. Then you can select one distribution list rather than multiple users. See Chapter 18,
“Creating and Managing Distribution Lists,” on page 265
5 In the Individual or Distribution List Rights box, select the users or distribution lists to grant
rights to.
6 Below the list, select the rights that you want to grant.
Creating and Managing Libraries 325

In the first example, only one user is granted the Reset In-Use Flag right.
novdocx (en) 11 December 2007
In the second example, only members of the Engineers group are granted any rights to the
Development Library.
7 Click OK to save the updated library rights information.
22.6.4 Adding and Training Librarians
When you first create a library, you might for convenience assign yourself as the initial librarian. As
library activity increases you can add librarians, and if desired, remove yourself as a librarian.
“Understanding the Role of the Librarian” on page 327
“Setting Up a Librarian GroupWise Account (Optional)” on page 329
“Assigning Librarians” on page 329
326 GroupWise 7 Administration Guide

Understanding the Role of the Librarian
Keep in mind the following when assigning librarians:
“Librarian Identity” on page 327
“Librarian Functions” on page 327
“Librarian Rights” on page 328
Librarian Identity
Any GroupWise user with access to a library can be a librarian for the library. You can have multiple
librarians for a single library. You can also assign a single user as a librarian for multiple libraries.
Because being a librarian entails additional functions and rights in the library, you should choose
responsible users as librarians.
Librarian Functions
A librarian can perform the following actions:
Check out a document without a copy.
novdocx (en) 11 December 2007
Modify the properties of any document in the library.
Copy documents to another library.
Delete both documents and properties.
Reassign document creators and authors to handle orphaned documents
Reset a document’s status (change the In-Use flag).
View all activity log records of any document in the library.
Restore document BLOBs from backup.
Perform mass operations, such as moving, deleting, archiving, and changing properties.
Perform searches (but not full-text searches) on documents that are not available for searching
by regular users.
Use GroupWise third-party APIs to generate reports on all library documents.
All operations available to a normal user are also available to a librarian, as long as the security
requirement discussed under “Librarian Rights” on page 328 is not compromised. The intention is
that librarians can modify their own documents and document properties.
All actions taken by a librarian are written to a document’s activity log.
Unless the librarian’s own GroupWise user ID is in the Author or Security fields, a librarian cannot
perform the following functions:
Open a document
View a document
Save a document
Check out a document with a copy
To help new librarians get started, you should explain these librarian functions to them. You can also
refer new librarians to the “librarian users” topic in the GroupWise client help.
Creating and Managing Libraries 327

Librarian Rights
In addition to the six public rights, libraries also have a Manage right. When you grant the Manage
right to a GroupWise user, you designate that user as a librarian. The Manage right gives the
librarian full access to the properties of every document in the library. However, the Manage right
does not grant the librarian direct access to the content of any document.
Because a librarian has full access to document properties, the librarian could add his or her own
personal GroupWise user ID to the Author or Security field of a document, thus gaining access to
the document’s content. However, a high-priority e-mail notification would automatically be sent to
the original person listed in the Author field informing him or her of the action by the librarian.
Therefore, document privacy is maintained.
The following table lists the various librarian functions, and whether an e-mail notification is sent if
the function is performed.
Table 22-5 Librarian Functions
Librarian Function Notification?
novdocx (en) 11 December 2007
Modify the Author or Security fields High-priority e-mail to the author
Copy a document High-priority e-mail to the author
Delete a document High-priority e-mail to the author
Replace a document with a copy from backup High-priority e-mail to the author
Perform a mass document operation (copy, move, delete, or archive
documents; modify document properties)
Reset a document’s status (In-Use flag) None
Check out a document without a copy None
View the activity log of any document None
Generate reports on any documents (using GroupWise third-party
APIs)
Mass operation e-mails
None
Mass operation notifications do not specify what action was taken by the librarian; they only specify
that an action was taken.
The following table lists the document property fields that the librarian has rights to modify, and
whether an e-mail notification is sent if the field is modified.
Property Field Notification?
Subject No
Author Yes
Security (sharing list) Yes
Document Type No
Version Description No
328 GroupWise 7 Administration Guide

Property Field Notification?
Custom Fields No
File Extension No
Official Version No
Current Version No
If you remove the Manage right from a user, you must manually deselect any rights that the user
gained from being made a librarian that the user did not previously have.
Setting Up a Librarian GroupWise Account (Optional)
The Manage right is always in effect for those users who have been assigned as librarians. However,
there might be times librarians want to act on their own accord without the possibility of seeing or
modifying documents that belong to other users.
To allow users assigned as librarians to act as normal GroupWise users, you could create a single
librarian account for a library and have users who need to perform librarian tasks log in using the
librarian GroupWise account and password instead of their own.
novdocx (en) 11 December 2007
If users assigned as librarians log in under a librarian GroupWise account, they do not have access to
any documents they would normally have access to under their own accounts, except by altering the
Author or Security fields.
Assigning Librarians
To add librarians to a library:
1 In ConsoleOne, browse to and right-click the Library object, then click Properties.
2 Click GroupWise > Rights to display the Rights page.
3 Click Add, browse to and select the users that you want to assign as librarians, then click OK to
return to the Rights page.
Creating and Managing Libraries 329

4 In the Individual or Distribution List Rights box, select the librarian users, select Manage
(Librarian), then click OK to save the library rights changes.
22.6.5 Maintaining Library Databases
The Mailbox/Library Maintenance feature of ConsoleOne offers database maintenance features to
keep your library and document databases in good condition. See Chapter 28, “Maintaining Library
Databases and Documents,” on page 391. It also helps you manage the disk space occupied by
library and document databases and document storage areas. See Section 30.4, “Reducing the Size
of Libraries and Document Storage Areas,” on page 404.
When document creators or authors are removed from your GroupWise system, orphaned
documents might be left behind. See Section 23.4.3, “Handling Orphaned Documents,” on
page 362.
To supplement your library maintenance procedures, you should back up your libraries and
documents regularly. See Section 31.3, “Backing Up a Library and Its Documents,” on page 408.
22.6.6 Moving a Library
novdocx (en) 11 December 2007
You cannot move a Library object from one location to another in the eDirectory tree. To accomplish
the equivalent, you would need to create a new library in the desired location, use a mass move
operation in the GroupWise client to move the library’s documents from the old library into the new
library, and then delete the old library.
As an alternative to moving the library, you can move just its document storage areas. See “Moving
a Document Storage Area” on page 323.
22.6.7 Deleting a Library
You should not delete a library until you make sure that all documents still in the library are no
longer needed.
1 In ConsoleOne, browse to and right-click the Post Office object that owns the library to delete,
then click Properties.
2 Click GroupWise > Libraries to display the Libraries page.
330 GroupWise 7 Administration Guide

3 Select the library to delete, then click Delete.
All document storages areas and documents are deleted along with the library.
4 Click OK to close the Libraries page and complete the deletion of the library.
novdocx (en) 11 December 2007
22.7 Library Worksheets
Section 22.7.1, “Basic Library Worksheet,” on page 331
Section 22.7.2, “Full-Service Library Worksheet,” on page 332
22.7.1 Basic Library Worksheet
For instructions on how to use this worksheet, see Section 22.1, “Planning a Basic Library,” on
page 299.
Item Explanation
1) eDirectory Container: Specify the eDirectory container where you will create the Library object. This
could be the same container as the post office that the library is assigned to.
The Library object cannot later be moved to a different location.
For more information, see Section 22.1.2, “Determining the Context for the
Library Object,” on page 300.
2) Library Name: Specify a name for the new library. Choose the name carefully. After the
library is created, it cannot be renamed.
For more information, see Section 22.1.3, “Choosing the Library Name,” on
page 300.
3) Post Office: Indicate which post office the library will belong to. A library cannot later be
assigned to a different post office.
For more information, see Section 22.1.1, “Selecting the Post Office That the
Library Will Belong To,” on page 300.
Creating and Managing Libraries 331

Item Explanation
novdocx (en) 11 December 2007
4) Store Documents at
the Post Office?
No
Yes
5) Document Storage
Area Description:
6) Document Storage
Area Path:
7) Library Description: Provide a description for the library to help you identify its function in the
8) Display Name: Specify the library name you want users to see in the GroupWise client, if it is
Mark No unless you are absolutely certain you will never need to move the
documents stored at the post office
For more information, see Section 22.1.4, “Deciding Where to Store
Documents,” on page 301.
Provide a brief description for the document storage area, including such
information as to which post office it belongs, its current capacity in
megabytes, and the types of documents that might be stored in it.
For more information, see Section 22.1.4, “Deciding Where to Store
Documents,” on page 301.
If you are not storing documents at the post office, specify the document
storage area for the library.
For more information, see Section 22.1.4, “Deciding Where to Store
Documents,” on page 301.
system.
For more information, see Section 22.1.3, “Choosing the Library Name,” on
page 300.
different from the Library object name.
For more information, see Section 22.1.3, “Choosing the Library Name,” on
page 300.
22.7.2 Full-Service Library Worksheet
For instructions on how to use this worksheet, see Section 22.3, “Planning Full-Service Libraries,”
on page 303.
Item Explanation
1) eDirectory Container: Specify the name of the eDirectory container where you will
create the Library object. This could be the same container as for
the post office that owns the library. The LIbrary object cannot
later be moved to a different context.
For more information, see Section 22.3.3, “Determining the
Contexts for Library Objects,” on page 308.
2) Library Name: Specify a name for the new library. Choose the name carefully.
After the library is created, it cannot be renamed.
For more information, see Section 22.3.4, “Choosing Library
Names,” on page 308.
332 GroupWise 7 Administration Guide

Item Explanation
3) Post Office: Specify the post office that the library will belong to. A library
cannot later be assigned to a different library.
If you will using a centralized library configuration and you have
not yet created the DMS post office, follow the instructions in
Chapter 11, “Creating a New Post Office,” on page 155 before
you begin creating libraries.
For more information, see Section 22.3.1, “Deciding Which
Libraries to Create,” on page 304.
novdocx (en) 11 December 2007
4) Document Usage Estimate:
a) Number of DMS users:
b) Average number of
documents per user:
c) Average document
size (bytes):
d) Average number of
versions per document:
e) Total:
(multiply a times b times
c times d)
5) Document Storage Area
Description:
6) Document Storage Area Path: Specify the UNC path to the location where you want to create
7) Library Description: Provide a brief description for the new library, including what post
Calculate how much disk space the new library will need in order
to help you select a location where you will store documents.
For more information, see Section 22.3.5, “Deciding Where to
Store Documents,” on page 309.
Provide a brief description for the document storage area,
including such information as which library it belongs to, its
current capacity in megabytes, and the types of documents
stored in it.
For more information, see Section 22.3.5, “Deciding Where to
Store Documents,” on page 309.
the initial document storage area for the post office.
For more information, see Section 22.3.5, “Deciding Where to
Store Documents,” on page 309.
office it belongs to, what types of documents will be stored in it,
and so on.
For more information, see Section 22.3.1, “Deciding Which
Libraries to Create,” on page 304.
8) Start Version Number:
0
1
9) Maximum Archive Size: Specify the maximum number of bytes to allow per archive
Select 0 or 1.
For more information, see Section 22.3.6, “Setting Document
Version Options,” on page 311.
directory. Use a size that conforms with your backup strategy
and backup medium requirements.
For more information, see Section 22.3.7, “Figuring Maximum
Archive Directory Size,” on page 312.
Creating and Managing Libraries 333

Item Explanation
10) Display Name: Specify the library name you want users to see in the GroupWise
client, if it is different from the Library object name.
For more information, see Section 22.3.4, “Choosing Library
Names,” on page 308.
novdocx (en) 11 December 2007
11) Restrict Public Library Rights:
Cross out any public library rights you do not want all users to
have.
Add
Change
Delete
For more information, see Section 22.3.1, “Deciding Which
Libraries to Create,” on page 304 or Section 22.3.6, “Setting
Document Version Options,” on page 311.
View
Designate Official Version
Reset In-Use Flag
12) Librarians: List any users you want to have full rights to all documents in the
library.
For more information, see Section 22.3.8, “Designating Initial
Librarians,” on page 312.
13) Dedicated POA for Indexing
Mark whether or not you want to configure and run a separate
POA dedicated to indexing documents.
Yes
No
14) Set Up Integrations
Yes
No
For more information, see Section 22.3.10, “Determining Your
Indexing Needs,” on page 314.
Mark whether or not you need to manually set up integrations.
For more information, see Chapter 24, “Integrations,” on
page 363.
334 GroupWise 7 Administration Guide

23
Creating and Managing
novdocx (en) 11 December 2007
Documents
GroupWise® Document Management Services (DMS) lets Windows client users create documents
with integrated applications, save them, then easily locate a specific document later without
knowing the application, a specific document name, or the document’s physical location. Windows
client users can create, share, locate, edit, view, and check out documents that are created under the
management of GroupWise DMS.
Section 23.1, “Adding Documents to Libraries,” on page 335
Section 23.2, “Organizing Documents,” on page 338
Section 23.3, “Indexing Documents,” on page 351
Section 23.4, “Managing Documents,” on page 360
NOTE: Cross-Platform client users have only basic DMS capabilities, as described in “Work ing
with Documents” in the GroupWise 7 Cross-Platform Client User Guide.
23.1 Adding Documents to Libraries
After you set up one or more libraries, users can add new documents to any library to which they
have rights. They can also import existing documents into the GroupWise DMS system.
23
Section 23.1.1, “Creating New Documents in the GroupWise Windows Client,” on page 335
Section 23.1.2, “Importing Existing Documents into the GroupWise DMS System,” on
page 336
Section 23.1.3, “Managing Groups of Documents,” on page 337
23.1.1 Creating New Documents in the GroupWise Windows Client
1 Click File > New > Document.
2 Select the program you want to use to create the document, select the library where you want to
store the document, then click OK.
Creating and Managing Documents
335

3 In the New Document dialog box, type a brief description of the document.
4 To set document properties, click Properties.
novdocx (en) 11 December 2007
5 Set the document properties as needed, then click OK.
The selected program starts so you can create a new document.
For more detailed information about creating documents in the GroupWise client, see “Creating
Documents” in “Creating and Working with Documents” in the GroupWise 7 Windows Client User
Guide. You can also look up “documents” in the GroupWise client help.
23.1.2 Importing Existing Documents into the GroupWise DMS
System
Some users might have existing documents that they want to manage by adding them to a
GroupWise library.
To import documents using the GroupWise Windows client:
1 Click File > Import Documents.
336 GroupWise 7 Administration Guide

2 Click Add Individual Documents, browse to and select the documents to add, then click OK.
or
Click Add Entire Directory, browse to and select a directory containing documents to import,
then click OK.
For additional instructions about creating documents in the GroupWise client, see “Importing
Documents into a GroupWise Library” in “Creating and Working with Documents” in the
GroupWise 7 Windows Client User Guide. You can also look up “import documents” in the
GroupWise client help.
novdocx (en) 11 December 2007
23.1.3 Managing Groups of Documents
As users add documents and your GroupWise DMS system grows, your librarians might need to
assist users in managing large groups of documents. If you have not yet assigned librarians to your
GroupWise libraries, see Section 22.6.4, “Adding and Training Librarians,” on page 326.
To manage large groups of documents in the GroupWise Windows client:
1 Click Too ls > Mass Document Operations.
Creating and Managing Documents 337

2 Select the operation to perform on the group of documents:
Change properties
Move
Delete
Change sharing
Copy
3 Select the method for identifying the group of documents to perform the operation on:
Use Find/Advanced Find to select documents
Use Find by Example to select documents
Use currently selected documents
Use documents listed in a file.
For additional instructions about creating documents in the GroupWise client, see “Managing
Groups of Documents” in “Creating and Working with Documents” in the GroupWise 7 Windows
Client User Guide. You can also look up “mass document operations” in the GroupWise client help.
novdocx (en) 11 December 2007
23.2 Organizing Documents
Because documents are stored in a database structure, information can be associated with each
document that is not part of the document itself. This additional information is stored as document
properties.
Section 23.2.1, “Customizing Document Properties,” on page 338
Section 23.2.2, “Defining Related Document Properties,” on page 347
NOTE: Document properties cannot be set in ConsoleOne® on Linux. However, you can use
ConsoleOne on Windows to set document properties for libraries that are located on Linux.
23.2.1 Customizing Document Properties
For a summary of document properties, see Section 21.3.1, “Document Properties,” on page 295. To
review, the following document properties are provided by default:
Author
Creator
Current Version Number
Date Created
Document Number
Document Type
Official Version Number
Subject
The default document property types cannot be deleted. Except for the Document Type property,
they cannot be modified. However, you can add custom document types as needed.
“Customizing the Default Document Type Property” on page 339
“Planning Custom Document Properties” on page 340
338 GroupWise 7 Administration Guide

“Adding Custom Document Properties” on page 343
“Planning Custom Lookup Tables for Custom Document Properties” on page 344
“Adding Custom Lookup Tables” on page 346
Customizing the Default Document Type Property
The Document Type property is the only default document property that you can modify. For a
review of document types, see Section 21.3.2, “Document Types,” on page 296. You must have at
least one document type, because it is a required document property field.
To modify the Document Type property for all libraries in a post office:
1 In ConsoleOne on Windows, browse to and select the post office that has libraries where you
want to modify the Document Type property.
2 Click Too ls > GroupWise Utilities > Document Properties Maintenance.
novdocx (en) 11 December 2007
If you expand Libraries and select each library, you see that each library has the Document
Type property. It is required.
3 Expand Lookup Tables, then select Document Type.
Creating and Managing Documents 339

The lookup table defines the list of choices offered to users when they select a document type,
no matter which library in the post office they are creating the document in.
4 To add a new document type, click Edit > Add. In the Va l ue field, type the new document type,
click Add, then click Close.
5 To edit an existing document type, click Edit > Edit. Change the settings as needed, click
Update, then click Close.
novdocx (en) 11 December 2007
For more details about the fields associated with the Document Type property, see
Section 21.3.2, “Document Types,” on page 296.
6 To delete a document type, select the document type, click Edit, then click Delete.
Planning Custom Document Properties
When you need to add custom document properties, print the “Custom Document Properties
Worksheet” on page 342. One copy of the worksheet accommodates three new document properties.
The following table describes the fields and values associated with custom document properties:
Table 23-1 Document Properties
Document Property
Field
Property Field: The document property field is the label that GroupWise client users see in the
Read-Only? Yes: The document property field displays information, but it is not accessible to
Field Values
document Properties dialog box.
When you create a new document property, you can provide a description as
well. However, the description displays only in ConsoleOne, not in the GroupWise
client.
users.
340 GroupWise 7 Administration Guide
No: Users can type in the document property field.

novdocx (en) 11 December 2007
Document Property
Field
Required? Ye s: The user must supply a value for the document property.
Hidden? Yes: The document property field is not displayed in the GroupWise client
Lookup Table: A lookup table is required for a custom document property only when you want to
Related Property: A related property is required for a custom document property only when you
Data Type: Binary: An Object API reads and writes this information
Field Values
No: The user can leave the document property field blank.
interface.
No: The document property field is displayed in the GroupWise client interface.
offer the user a list of choices, rather than having the user type in the setting. The
lookup table guarantees that the user provides a valid setting. For more
information, see “Planning Custom Lookup Tables for Custom Document
Properties” on page 344.
create a lookup table that references a related lookup table. For more information,
see Section 23.2.2, “Defining Related Document Properties,” on page 347.
Date: Displayed in the Windows format selected by the user
Number: Numerical only
String: Alphanumeric
Maximum Length: For the String data type, you can specify the maximum number of characters
allowed in the string. The longest possible string is 65535 alphanumeric
characters.
Case: For the String data type, you can control how the user’s input is handled:
Upper: Forces entries to display in uppercase
Lower: Forces entries to display in lowercase
Mixed: Allows alphabetical characters to be displayed as typed
Minimum Value: For the Number data type, you can specify a minimum acceptable value.
Maximum Value: For the Number data type, you can specify a maximum acceptable value.
Parent: If the new document property is related to an existing document property in a
parent-child relationship, you must specify the parent document property. For
more information, see Section 23.2.2, “Defining Related Document Properties,”
on page 347.
Use copies of the “Custom Document Properties Worksheet” on page 342 to plan the custom
document properties you want to add to libraries.
If you need to create one or more lookup tables for your custom document properties, follow the
instructions in “Planning Custom Lookup Tables for Custom Document Properties” on page 344 and
“Adding Custom Lookup Tables” on page 346. Lookup tables used by new document properties
should exist before you create custom document properties.
Then continue with “Adding Custom Document Properties” on page 343.
Creating and Managing Documents 341

Custom Document Properties Worksheet
For instructions on how to use this worksheet, see “Planning Custom Document Properties” on
page 340.
novdocx (en) 11 December 2007
Item
1) Post Office:
2) Libraries:
3) Property Label:
4) Description:
5) Read-Only?
Yes
No
6) Required?
Yes
No
Custom Document
Property
Custom Document
Property
Custom Document
Property
7) Hidden?
Yes
No
8) Lookup Table:
9) Data Type:
Binary
Date
Number
String
10) Maximum Length:
11) Case:
Mixed
Upper
Lower
12) Minimum Value:
13) Maximum Value:
342 GroupWise 7 Administration Guide

novdocx (en) 11 December 2007
Item
14) Parent:
Custom Document
Property
Custom Document
Property
Custom Document
Property
Adding Custom Document Properties
After you have determined what new document properties will meet the needs of your DMS system,
as described in “Planning Custom Document Properties” on page 340, and if necessary you have
created lookup tables for your new document properties, as described in “Planning Custom Lookup
Tables for Custom Document Properties” on page 344 and “Adding Custom Lookup Tables” on
page 346, you are ready to add new custom document properties.
To add new custom document properties:
1 In ConsoleOne on Windows, browse to and select the Post Office object that owns the library
for which you are creating custom document properties (worksheet item 1).
2 Click Too ls > GroupWise Utilities > Document Properties Maintenance.
3 Expand Libraries, then select the library for which you are creating custom document
properties (worksheet item 2).
4 Click Edit > Add to display the Document Property Definition dialog box.
Creating and Managing Documents 343

Fields vary according to data type.
5 Fill in the fields (worksheet items 3 through 14).
6 Click OK to create the new custom document property.
In the Document Properties Maintenance window, the new document property is listed in
alphabetical order. In the GroupWise client, custom document properties are listed after default
document properties, in the order in which they are added to the library.
7 Repeat Step 4 through Step 6 for each new custom document property.
novdocx (en) 11 December 2007
When users next create documents in the library, the new custom document properties will be
available to them.
Planning Custom Lookup Tables for Custom Document Properties
A lookup table is required for a custom document property only when you want to offer the user a
list of choices, rather than having the user type in the setting. The lookup table guarantees that the
user provides a valid setting.
Lookup tables are defined for the post office, so that multiple libraries in the post office can
reference the same lookup tables.
When you need to provide lookup tables for custom document properties, print the “Custom Lookup
Tables Worksheet” on page 345. One copy of the worksheet accommodates three new lookup tables.
The following table describes the fields and values associated with lookup tables:
344 GroupWise 7 Administration Guide

Table 23-2 Lookup Table Values
Look Up Table Field Field Values
Lookup Table Name: The lookup table name identifies the lookup table when you are assigning it to a
property field.
If the lookup table pertains to only one document property, you can name the
lookup table the same as the document property. For example, the default
property Document Type uses a lookup table named Document Type.
However, lookup tables can be used by multiple document properties. For
example, you could have a lookup table named Project used by document
properties named Primary Project and Secondary Project.
When you create a new lookup table, you can provide a description as well. If the
lookup table name does not match a document property, you could indicate what
document properties use the lookup table.
Related Table: A related table is required for a lookup table only when you want to define related
properties. For more information, see Section 23.2.2, “Defining Related
Document Properties,” on page 347.
novdocx (en) 11 December 2007
Data Type: Binary: An Object API reads and writes this information
Date: Displayed in the Windows format selected by the user
Number: Numerical only
String: Alphanumeric
Maximum Length: For the String data type, you can specify the maximum number of characters
allowed in the string. The longest possible string is 65535 alphanumeric
characters.
Case: For the String data type, you can control how the user’s input is handled:
Upper: Forces entries to display in uppercase
Lower: Forces entries to display in lowercase
Mixed: Allows alphabetical characters to be displayed as typed
Minimum Value: For the Number data type, you can specify a minimum acceptable value.
Maximum Value: For the Number data type, you can specify a maximum acceptable value.
Lookup Table Entries: The lookup table entries are the settings that users will choose from when they
set the custom document property.
Use copies of the “Custom Lookup Tables Worksheet” on page 345 to plan the lookup tables you
need in order to provide values for new custom document properties. If you need to use related
properties, follow the instructions in Section 23.2.2, “Defining Related Document Properties,” on
page 347. Then continue with “Adding Custom Lookup Tables” on page 346.
Custom Lookup Tables Worksheet
For instructions on how to use this worksheet, see “Planning Custom Lookup Tables for Custom
Document Properties” on page 344.
Creating and Managing Documents 345

novdocx (en) 11 December 2007
Item
1) Post Office:
2) Property Label:
3) Lookup Table Name:
4) Description:
5) Related Table:
6) Data Type:
Binary
Date
Number
String
7) Maximum Length:
Custom
Lookup Table
Custom
Lookup Table
Custom
Lookup Table
8) Case:
Mixed
Upper
Lower
9) Minimum Value:
10) Maximum Value:
11) Lookup Table Entries:
Adding Custom Lookup Tables
After you have determined what new lookup tables and lookup table entries you need to
accommodate your new custom document properties, as described in “Planning Custom Lookup
Tables for Custom Document Properties” on page 344, you are ready to add new lookup tables.
1 In ConsoleOne on Windows, browse to and select the Post Office object that owns the libraries
for which you are creating lookup tables (worksheet item 1).
2 Click Too ls > GroupWise Utilities > Document Properties Maintenance.
346 GroupWise 7 Administration Guide

3 Select Lookup Tables, then click Edit > Add to display the Lookup Table Definition dialog box.
novdocx (en) 11 December 2007
Fields vary depending on data type.
4 Fill in the fields (worksheet items 3 through 10).
5 Click OK to create the new lookup table.
6 Select the new lookup table, then click Edit > Add to display the Lookup Entry dialog box.
7 In the Va l u e field, type one of the document property settings you want to offer to users
(worksheet item 11), then click Add.
8 Repeat Step 7 for all the lookup table entries listed on your worksheet for this lookup table,
then click Close.
9 Click OK to create the custom lookup table.
23.2.2 Defining Related Document Properties
When document properties are related, your choice for the first property determines the settings you
are offered for the second property. The user’s selection in the first field determines what choices
were offered in the second field.
Creating and Managing Documents 347

Related document properties are set up by creating related lookup tables. Complete the following
tasks to set up related document properties:
“Planning Related Document Properties” on page 348
“Creating Related Lookup Tables” on page 350
“Setting Up Related Document Properties” on page 351
Planning Related Document Properties
Related document properties use a parent-child relationship. A parent property can have multiple
child properties, but a child property can belong to only one parent. The relationship can include
only two levels. A parent property cannot function as a child and a child property cannot function as
a parent. The default document properties cannot participate as related properties.
In the Development Library example above, the Product document property would be the parent
property and the Component document property would be the child property. If the Development
®
Library belonged to Novell
, products would include GroupWise, NetWare®, ZENworks®, and so
on. When users selected GroupWise as the product, listed components could include the GroupWise
client, the agents, GroupWise system administration, and so on. Or you could let users type in
whatever components they wanted.
novdocx (en) 11 December 2007
When you need to set up related document properties, print the “Related Document Properties
Worksheet” on page 349. One copy of the worksheet accommodates one pair of related property
fields, one parent lookup table, and one child lookup table (optional).
The following table describes the document properties and lookup tables that are required in order to
set up related document properties:
Table 23-3 Document Properties and Lookup Tables
Properties and Tables Description
Parent Document Property The parent document property is the user’s first selection. In the
Development Library example above, the parent document property is
Product.
Child Document Property The child document property is the user’s second selection, based on the
first selection. In the Development Library example above, the child
document property is Component.
Parent Lookup Table The entries in the parent lookup table provide the choices offered to the
user in the parent document property field. In the Development Library
example above, the user could select from GroupWise, NetWare, and
ZENworks in the Product field.
Child Lookup Table The entries in the child lookup table provide the choices offered to the user
after a choice from the parent lookup table has been selected. In the
Development Library example above, if the user selected GroupWise in
the Product field, the child lookup table would provide choices such as
Agents, Client, and Admin in the Component field.
348 GroupWise 7 Administration Guide
The child lookup table is not required if you want to allow the user to type in
anything they want in the child document property field.

Use copies of the “Related Document Properties Worksheet” on page 349 to plan the related
document properties you want to use. One copy of the worksheet accommodates one pair of related
properties. Continuing with the Development Library example, a filled-in worksheet might look like
this:
Table 23-4 Sample Document Properties Worksheet
Item Setting Item Setting
novdocx (en) 11 December 2007
1) Parent
Document Property
2) Parent
Lookup Table
3) Parent
Lookup Entries
Property Name:
Product
Table Name:
Product
(required) 6) Child
Parent Entry:
GroupWise
Parent Entry:
NetWare
Parent Entry:
ZENworks
4) Child
Document Property
5) Child
Lookup Table
Lookup Entries
Property Name:
Component
Table Name:
Component
(optional)
Child Entries:
Admin
Agents
Client
Child Entries:
Client
eDirectory
Servers
Child Entries:
Desktops
Servers
When you have finished planning related properties and their associated lookup tables, you should
print and fill in a worksheet for each for each new related property, as described in “Planning
Custom Document Properties” on page 340, and for each new lookup table, as described in
“Planning Custom Lookup Tables for Custom Document Properties” on page 344.
Then you are ready to continue with “Creating Related Lookup Tables” on page 350.
Related Document Properties Worksheet
For instructions on how to use this worksheet, see “Planning Related Document Properties” on
page 348.
Item Setting Item Setting
1) Parent
Document Property
2) Parent
Lookup Table
3) Parent
Lookup Entries
Name: 4) Child
Document Property
Name: 5) Child
Lookup Table
(required) 6) Child
Lookup Entries
Name:
Name:
(optional)
Creating and Managing Documents 349

Item Setting Item Setting
Entry: Entries:
Entry: Entries:
Entry: Entries:
Creating Related Lookup Tables
novdocx (en) 11 December 2007
If you are supplying the choices for both related fields, you need both a parent lookup table and a
child lookup table. If you are going to have users type information into the child property field, then
you only need to create the parent lookup table. You should create lookup tables before creating the
document properties that use them.
“Creating the Parent Lookup Table” on page 350
“Creating the Child Lookup Table (Optional)” on page 350
Creating the Parent Lookup Table
1 Create a new lookup table, as described in Step 1 through Step 5 in “Adding Custom Lookup
Tables” on page 346. Use worksheet item 2 in the Table Name field. Leave the Related Table
field set to (none).
2 Add entries to the new lookup table, as described in Step 6 through Step 8 in “Adding Custom
Lookup Tables” on page 346. Use the entries listed under worksheet item 3 in the Value field.
3 Continue with “Creating the Child Lookup Table (Optional)” on page 350.
or
If you are going to have users type information into the child property field, rather than
selecting from a predefined list, skip to “Setting Up Related Document Properties” on page 351
Creating the Child Lookup Table (Optional)
1 Create a new lookup table, as described in Step 1 through Step 5 in “Adding Custom Lookup
Tables” on page 346. Use worksheet item 5 in the Table Name field. Use worksheet item 2 in
the Related Table field to link the child table to the parent table.
2 Select the new lookup table, click Edit, then click Add to display the Lookup Entry dialog box.
350 GroupWise 7 Administration Guide

3 Select a Parent value.
4 In the Va l u e field, type one of the child lookup table entries for the selected parent value
(worksheet item 6), then click Add.
5 Repeat Step 4 for each entry listed under worksheet item 6.
6 Repeat Step 3 through Step 5 for each parent value listed under worksheet item 3.
7 Continue with “Setting Up Related Document Properties” on page 351.
Setting Up Related Document Properties
After you have created related lookup tables, you are ready to set up the related document properties
that use them. A few document property fields are required settings in the context of related
properties:
novdocx (en) 11 December 2007
Read-Only must be set to No.
Hidden must be set to No.
Required must be set the same on the child property as it is on the parent property.
To set up related document properties:
1 Create the parent document property as described in “Adding Custom Document Properties”
on page 343. Use worksheet item 1 in the Property Label field. Use worksheet item 2 in the
Lookup Table field. Leave the Related Property field set to (none).
2 Create the child document property using the same procedure. Use worksheet item 4 in the
Property Label field. Use worksheet item 5 in the Lookup Table field. The Related Property
field should automatically display as worksheet item 1, showing that the child property is
related to the parent property.
23.3 Indexing Documents
Documents stored in GroupWise libraries need to be indexed so users can locate documents using
the Find feature in the GroupWise Windows client. Your organization might need dedicated
indexing to minimize performance degradation and network congestion. You might also need
dedicated indexing so users can have prompt access to newly created documents.
Section 23.3.1, “Understanding DMS Indexing,” on page 352
Section 23.3.2, “Determining Your Indexing Needs,” on page 358
Section 23.3.3, “Implementing Indexing,” on page 360
Creating and Managing Documents 351

23.3.1 Understanding DMS Indexing
Before determining if you will need dedicated indexing, you should have a basic understanding of
how indexing works in GroupWise.
“Index Storage” on page 352
“Index Content” on page 352
“Indexing Performed by the POA” on page 352
“Indexing Cycle” on page 353
“Bandwidth Considerations” on page 353
“Indexer Configurations” on page 353
Index Storage
novdocx (en) 11 December 2007
When documents are indexed, the information is stored in QuickFinder
TM
indexes, which are located
in a library’s index subdirectory. A library’s QuickFinder index is partitioned into ten *.idx files.
Additionally, temporary *.inc (incremental) files are created that contain each day’s new index
information. The *.inc files are combined once per day into the *.idx files (usually at midnight).
In a system with multiple libraries, each library has its own set of QuickFinder index files.
Depending on how many libraries belong to a post office, and how many post offices with libraries
are in your GroupWise system, there can be many sets of QuickFinder index files.
Index Content
Indexing can include a document’s full text (depending on its document type), and always includes
the document’s property sheet information (subject, author, version descriptions, and so on). Both
newly edited and newly created documents are indexed, which means indexing volume is
determined by how many existing documents are edited as well as how many new documents are
created.
Newly-created documents must be indexed before users can search for them. In setting up your
indexing strategy, you must know how quickly users will need access to newly-created documents.
The standard search is limited to the QuickFinder indexes in the user’s default library. But users can
choose to search for documents in other libraries to which they have access.
Indexing Performed by the POA
Indexing is among the many functions of the Post Office Agent (POA). To learn more about POA
functions, see Section 35.5, “Role of the Post Office Agent,” on page 469.
You can configure the POA for a post office to meet basic indexing needs. See Section 38.3.1,
“Regulating Indexing,” on page 555.
To support greater indexing needs, you can set up an additional POA that is dedicated to indexing.
See Section 38.3.2, “Configuring a Dedicated Indexing POA,” on page 556.
Not all libraries need dedicated POAs for indexing documents because indexing needs vary widely:
In a small GroupWise system that has only one post office and one library, indexing can easily
be done by the one POA.
352 GroupWise 7 Administration Guide

In a post office with heavy DMS usage, one or more additional POAs can be dedicated to
indexing the documents.
In a large system that has a DMS post office housing all libraries in the GroupWise system,
indexing can be done by the DMS post office’s POAs.
A library can have more than one POA dedicated to indexing its documents. Because the library’s
QuickFinder index is partitioned into ten separate *.idx files, an organization that is extremely
document-intensive can boost indexing performance by using up to ten POAs dedicated to indexing.
These POAs do not conflict with each other in performing indexing because the *.idx and *.inc
files are locked during the indexing process.
You can temporarily use multiple indexing POAs for importing documents to speed up importing
time.
Indexing Cycle
The frequency of indexing is determined by the POA QuickFinder Interval setting. The default is
once every 24 hours at 8:00 p.m. This might be often enough in an organization where document
usage is minimal, or where searching for newly-created documents is not mission-critical.
novdocx (en) 11 December 2007
You can specify the QuickFinder Interval setting in one-hour increments. For example, a setting of 1
would allow users to find documents created as recently as an hour ago. Whether you should use a
dedicated indexer at this frequency would depend on the volume (per hour) of documents that get
queued for indexing.
You can set the QuickFinder Interval to 0 (zero) for continuous indexing. This is recommended for
organizations where document usage is intensive, or where users routinely need to find documents
that have just been created. If document usage is intensive in your organization, you might need a
separate indexer server dedicated to continuous indexing because the post office server’s
performance could become unacceptably slow if continuous indexing is performed on it.
Bandwidth Considerations
A primary factor in network speed is bandwidth. This is the amount of data that can be passed
through the network per second. If a network’s bandwidth is not sufficient for handling heavy traffic,
intensive document indexing can degrade network performance.
A number of elements affect network bandwidth, including cable types, transmission protocols, and
hardware. Ethernet networks are susceptible to wide fluctuations in transmission speed during
periods of heavy traffic. WANs can benefit from reduced network traffic.
If you locate a post office in close proximity to its users, you have less traffic through routers,
bridges, and other network hardware. Running GroupWise in client/server access mode also reduces
network traffic.
GroupWise users can add heavy messaging traffic to your existing network. DMS usage adds
document indexing traffic as well. These factors can create much more network bandwidth usage
than you have previously experienced.
Indexer Configurations
Following are five basic examples of how dedicated indexers can be configured. The examples do
not cover all possibilities. You can combine elements from these configurations to customize
indexing for your organization.
Creating and Managing Documents 353

In all configuration examples, the post office can contain multiple libraries, although the Single
Server with One POA configuration is best suited to only one library. In the other configuration
examples, one or more POAs can be set up for indexing documents for all libraries in the post office.
“Single Server with One POA” on page 354
“Single Server with Multiple POAs” on page 355
“Dedicated Indexer Server” on page 355
“Dedicated Indexer Server on an Isolated Network Segment” on page 356
“Dedicated DMS Post Office” on page 357
Single Server with One POA
One POA runs on the post office server and performs all POA functions for the post office and its
libraries. This basic configuration is best suited for a small system, or a decentralized library
configuration with small post offices that each have a library. For more information, see
“Centralized vs. Decentralized Library Configurations” on page 304.
Figure 23-1 Single Machine with One POA
novdocx (en) 11 December 2007
Post Office
Library
Message
Database
GroupWise Client
Workstation
Advantages Disadvantages
GroupWise Client
User
Database
Workstation
Library
Database
POA
GroupWise Client
Workstation
Document
Database
GroupWise Client
Workstation
Default configuration; no additional
setup is required.
Troubleshooting is limited to a single
server.
354 GroupWise 7 Administration Guide
All operations are performed on one server, which
can cause performance degradation if your
organization does enough DMS operations.
If you increase QuickFinder intervals to lessen the
load on the POA, you lengthen the time users must
wait to search for new files, or find modified
information through new searching keywords.

Single Server with Multiple POAs
It is possible to run more than one POA for the same post office on the same server.
Figure 23-2 Single Machine with Multiple POAs
Post Office
Library
novdocx (en) 11 December 2007
Message
Database
GroupWise Client
Workstation
Table 23-5 Advantages and Disadvantages of a Single Server with Multiple POAs
Advantages Disadvantages
User
Database
POA
GroupWise Client
Workstation
Library
Database
Document
Database
POA
Network Segment
GroupWise Client
Workstation
Production
GroupWise Client
Workstation
None. Many processes running on one server can slow it down.
A single point of failure can cause the server to shut
down when a problem is encountered.
There are no advantages to running multiple POAs on the same server. If you need more than one
POA, run it on a separate server, as described in “Dedicated Indexer Server” on page 355
Dedicated Indexer Server
You can have the post office on one server and a POA dedicated to indexing DMS documents on
another server. This configuration is useful for systems of any size with heavy DMS usage.
Creating and Managing Documents 355
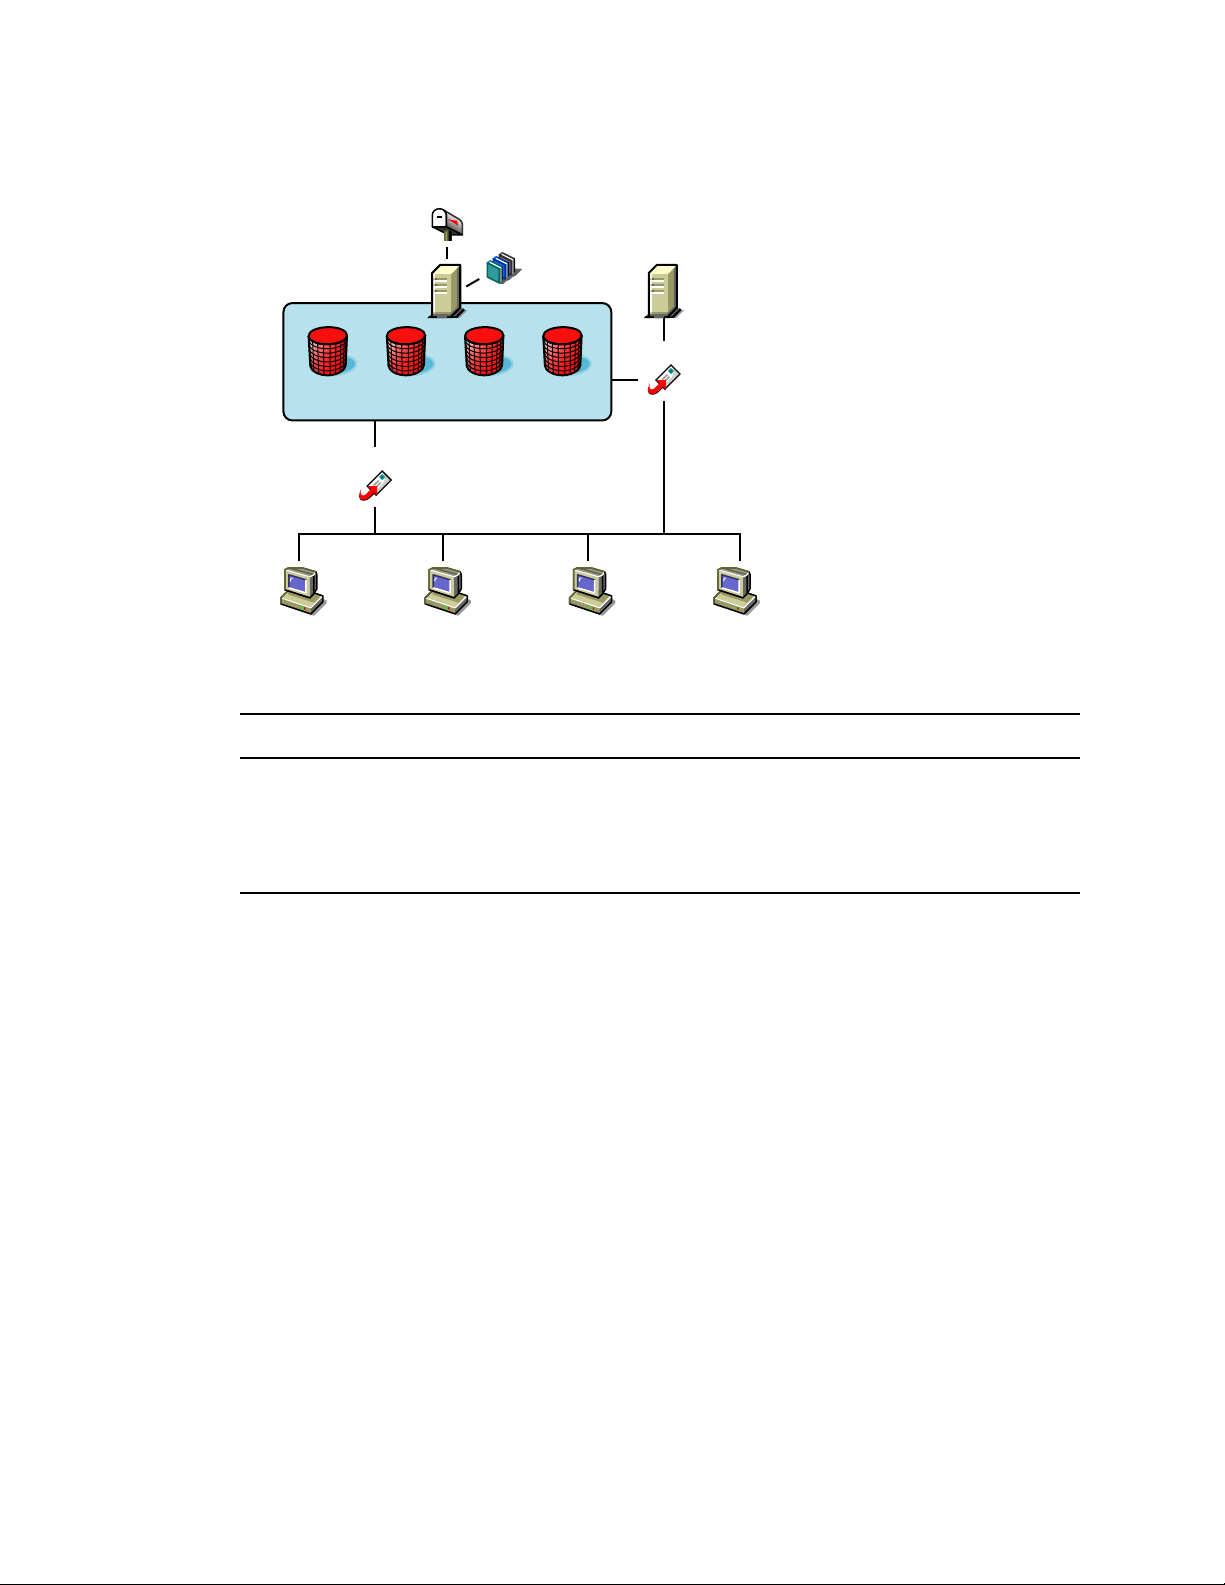
Figure 23-3 Dedicated Indexing Machine
Post Office
Library
novdocx (en) 11 December 2007
POA 2
Message
Database
GroupWise Client
Workstation
Advantages Disadvantages
A dedicated server for quicker DMS indexing.
This is useful for organizations that are
document-intensive.
User
Database
POA 1
GroupWise Client
Workstation
Library
Database
Network Segment
Document
Database
Production
GroupWise Client
Workstation
GroupWise Client
Workstation
Network traffic can increase significantly
during periods of intense indexing.
Multiple server hardware is required.
The messaging post office is not hampered by
DMS indexing.
Dedicated Indexer Server on an Isolated Network Segment
You can have the post office on one server and a POA dedicated to indexing documents on another
server that is on an isolated network segment. This configuration minimizes bandwidth congestion
for the production network segment.
356 GroupWise 7 Administration Guide

Figure 23-4 Post Office on One Machine and the Dedicated Indexing POA on Another Machine
Post Office
Library
Isolated
Message
Database
User
Database
Database
POA 1
Library
Document
Database
Production
Network Segment
Network
Segment
POA 2
novdocx (en) 11 December 2007
GroupWise Client
Workstation
Table 23-6 Advantages and Disadvantages of a Dedicated Indexer Server on an Isolated Network Segment
Advantages Disadvantages
Dedicated server for quicker DMS indexing.
This is useful for organizations that are
document-intensive.
The messaging post office is not hampered
by DMS indexing.
The large amount of information that is
GroupWise Client
Workstation
GroupWise Client
Workstation
GroupWise Client
Workstation
Multiple server hardware is required.
A dedicated network segment is required
(including second network interface card that is
directly linked to the indexer server).
For multiple indexing servers, a dedicated hub
might be needed.
passed between the post office server and
the indexing server does not congest the
bandwidth of the production network
segment.
Dedicated DMS Post Office
You can have one post office that is dedicated to messaging and another to DMS. This configuration
is useful for post offices that have heavy DMS usage. For a review of this configuration, see
“Centralized Libraries” on page 305.
Creating and Managing Documents 357

Figure 23-5 Dedicated DMS Post Office
novdocx (en) 11 December 2007
User
Post Office
User
Database
GroupWise Client
Workstation
Table 23-7 Advantages and Disadvantages of a Dedicated DMS Post Office
Message
Database
POA 1
GroupWise Client
Workstation
Production
Network Segment
GroupWise Client
Workstation
Post Office
Library
Database
POA 2
DMS
LibraryLibrary
Document
Database
GroupWise Client
Workstation
Advantages Disadvantages
A dedicated POA for quicker DMS indexing.
This is useful for organizations that are
document-intensive.
The messaging post office is not hampered
by DMS traffic and indexing.
Logical separation of messaging and DMS
databases. Processes such as backing up
databases are easier.
This configuration is ideal for creating a
centralized library configuration.
High-end hardware is required for DMS server.
An additional post office and POA to be
maintained.
Client/server is required for searching and
accessing documents.
Remote access is required for users who
cannot use client/server mode. This ensures
that the slower store-and-forward process is
used for remote searching and accessing of
documents.
23.3.2 Determining Your Indexing Needs
The following table presents some indexing considerations and suggests an indexing configuration
based on how the considerations pertain to your indexing needs:
Consideration
Does the post office own
multiple libraries?
Single Server
with One POA
Dedicated Indexer
Server
No Yes or No Yes or No Yes
Dedicated Indexer
Server on an Isolated
Network Segment
Dedicated DMS
Post Office
358 GroupWise 7 Administration Guide

novdocx (en) 11 December 2007
Consideration
What is the expected
indexing volume (per
hour)?
Is hardware available for
a dedicated indexer
server?
Could bandwidth
congestion be a
problem?
Single Server
with One POA
Light Light or Moderate Moderate or Heavy Heavy
No Yes Ye s Yes
No Maybe Maybe or Yes Yes
Dedicated Indexer
Server
Dedicated Indexer
Server on an Isolated
Network Segment
Dedicated DMS
Post Office
Use the “Indexing Worksheet” on page 359 to estimate the indexing needs of the libraries in your
GroupWise system. Each worksheet accommodates three libraries.
Identify each library (worksheet items 1 and 2). Estimate the impact of each consideration in each
library (worksheet items 3 through 6). Then compare your estimates for each library to the values in
the table above to determine the indexing configuration for each library (worksheet item 7).
Indexing Worksheet
For instructions on how to use this worksheet, see Section 23.3.2, “Determining Your Indexing
Needs,” on page 358.
1) Library:
2) Library’s Post Office:
3) Multiple Libraries per Post Office?
Yes
No
4) Expected Indexing Volume (per hour):
Light
Moderate
Heavy
5) Additional Server Available?
Yes
No
6) Bandwidth Congestion Possible?
Yes
Maybe
No
Library Library Library
Creating and Managing Documents 359

Library Library Library
7) Indexer Configuration:
Single server with one POA
Dedicated indexer server
Dedicated indexer server
on an insolated network
segment
Dedicated DMS post office
23.3.3 Implementing Indexing
For libraries where a single POA running on the post office server can provide adequate indexing
support for the post office’s libraries, follow the instructions in Section 38.3.1, “Regulating
Indexing,” on page 555 to implement indexing.
For libraries where additional POAs running on separate servers are required to support the indexing
needs of the post office’s libraries, follow the instructions in Section 38.3.2, “Configuring a
Dedicated Indexing POA,” on page 556 to implement indexing.
novdocx (en) 11 December 2007
23.4 Managing Documents
As more and more documents are added to your GroupWise libraries, you must manage the disk
space occupied by libraries and respond to various changes in your GroupWise system.
Section 23.4.1, “Archiving and Deleting Documents,” on page 360
Section 23.4.2, “Backing Up and Restoring Archived Documents,” on page 360
Section 23.4.3, “Handling Orphaned Documents,” on page 362
See also Section 22.6.2, “Managing Document Storage Areas,” on page 321.
23.4.1 Archiving and Deleting Documents
The Document Type property determines what happens to documents whose document life in your
GroupWise system has expired. For a review of the document types and document life, see
Section 21.3.2, “Document Types,” on page 296.
You can use the Mailbox/Library Maintenance feature in ConsoleOne to archive and delete
documents on demand, as described in Section 30.4, “Reducing the Size of Libraries and Document
Storage Areas,” on page 404.
You can also configure the POA to archive and delete documents on a regular schedule, as described
in Section 36.4.2, “Scheduling Disk Space Management,” on page 510.
23.4.2 Backing Up and Restoring Archived Documents
When documents are archived, they are physically moved to a directory in the post office, where
disk space can be limited. You should move archived documents to your backup medium regularly.
“Moving Archived Documents to Backup” on page 361
360 GroupWise 7 Administration Guide

“Restoring Archived Documents” on page 361
Moving Archived Documents to Backup
When documents are archived, they are placed in automatically created archive directories. Each
library has a set of archive directories. For example, gwdms (GroupWise Document Management
Services) is one of the post office’s directories. The library directories exist under it, named
lib0001-ff. Under each library directory is an archive directory, under which are the
sequentially-numbered archival directories, named arnnnnnn (where nnnnnn is an integer with
leading zeros). Each arnnnnnn directory is an archive set. To view the gwdms directory, see “Post
Office Directory” in GroupWise 7 Troubleshooting 3: Message Flow and Directory Structure.
To move archived documents to backup:
1 Make sure you have a backup medium (such as tape or CD) operating with your system.
2 Make sure you have already archived documents that have reached their expiration dates.
Documents that have not been archived cannot be removed to a backup medium.
3 Start the software for your backup medium.
4 When the backup software asks for the location of your archive files, give the full path.
Example:
j:\post_office\gwdms\lib0\archive\ar000001
novdocx (en) 11 December 2007
If users need the backed-up documents in the future, see “Restoring Archived Documents” on
page 361.
Restoring Archived Documents
When a user tries to access a document that has been archived, one of two things happens:
If the document is in the post office archive set, and has not yet been physically moved from the
archive location, the document opens normally. The user does not realize it was archived. The
document is unarchived from the archive set at that time; that is, it is moved back to the library
document directory from which it was archived. It is also given a new archive date according to
the document type.
The user sees a message indicating the document cannot be opened. In this case, the archive set
containing the document has been physically moved to a backup medium. Therefore, the
document cannot be automatically unarchived. In this case, the user might contact you, asking
you to locate or recover the document. You can restore either the document’s BLOB or the
archive set that contains the BLOB. After the document is restored to its archive directory, the
user will be able to open the document normally.
To restore archived documents from a backup medium:
1 Obtain the Document Number for the document the user was trying to access.
2 In the GroupWise Windows client, click Tools > Find.
3 Specify the Document Number, then click OK.
4 Right-click the document in the Find Results listing, then click Properties > Version.
5 Note the archive directory in the path listed in the Current Location field.
The subdirectory listed after the ..\archive directory is the archive set containing the
document, for example, \ar000001.
Creating and Managing Documents 361

6 If you have the ability to recover individual files from your backup medium, also note the
BLOB filename listed in the Current Filename field.
7 Determine where you backed up the archive set, then copy either the archive set or the
individual BLOB file to the archive directory specified in the Current Location field that you
noted earlier.
8 You can now notify the user that the requested document is available.
9 When you are sure the user has opened the document (causing it to be unarchived), you should
delete any files remaining in that archive directory because you have already backed them up.
23.4.3 Handling Orphaned Documents
If you remove public rights for a library, some documents might become inaccessible. For example,
if a user who has been denied access to the library is the only user who had access to certain
documents, those documents become orphaned. No other user can access or search for those
orphaned documents. This is because document security is controlled by the user listed in the
Author and Creator fields in the document’s properties. In other words, if the author or creator no
longer has access to a document, neither does anyone else.
novdocx (en) 11 December 2007
However, orphaned documents can be reassigned to another author so that someone can access them
again. This can be done in one of two ways:
In ConsoleOne, the Analyze/Fix Library action in Mailbox/Library Maintenance can reassign
orphaned documents to a specified user. Then, the new user has access to all orphaned
documents in that library. For more information, see Section 28.2, “Analyzing and Fixing
Library and Document Information,” on page 392.
A librarian has the ability to alter the Author field of documents. Therefore, a librarian can
replace the previous user’s GroupWise ID with his or her own ID. In doing so, the librarian
becomes the new author of the document. This can also be done as a mass operation for
multiple documents with varying user IDs in the Author field. For more information, see
Section 22.6.4, “Adding and Training Librarians,” on page 326.
362 GroupWise 7 Administration Guide

24
Integrations
Document-producing applications can be integrated with GroupWise® Document Management
Services (DMS) to allow GroupWise management control over files produced by the integrated
applications. Integrations provide code specifically designed to allow function calls, such as Open or
Save, to be redirected to the GroupWise Windows client. This allows GroupWise dialog boxes to be
displayed instead of the application’s normal dialog boxes for the integrated functions.
NOTE: The Cross-Platform client does not include integrations, which is why you cannot create
and edit documents from the Cross-Platform client.
GroupWise DMS includes standard integrations for the following applications:
Corel* Presentations* 7.x through 10.x
Corel Quattro Pro* 7.x and 8.x
Corel WordPerfect 6.1 through 10.x
novdocx (en) 11 December 2007
24
Lotus* Word Pro* 96 and 97
Microsoft Binder 97
Microsoft Excel 95, 97, 2000, and 2002
Microsoft PowerPoint* 97, 2000, and 2002
Microsoft Word 95, 97, 2000, and 2002
Other applications can be integrated manually using the gwappint.inf file.
Section 24.1, “Setting Up Integrations during Windows Client Installation,” on page 363
Section 24.2, “Setting Up Integrations Using the gwappint.inf File,” on page 364
Section 24.3, “Controlling Integrations in the GroupWise Windows Client,” on page 369
24.1 Setting Up Integrations during Windows Client Installation
The GroupWise Windows client Setup program can offer users the opportunity to integrate their
document-producing applications during client installation.
Integrations
363

Figure 24-1 Software Integrations Wizard
This dialog box lists the applications that can be integrated with GroupWise that are currently
installed on users’ workstations. Therefore, it is important to make sure that the applications to
integrate are installed before the GroupWise client is installed. However, it does not matter whether
GroupWise and the applications are installed to run from the network or from the users’
workstations. The integrations work with any combination of installation choices.
novdocx (en) 11 December 2007
After selecting applications to integrate during GroupWise client integration, users can manage their
integrations in the GroupWise client, as described in “Integrating GroupWise with Your
Applications” in “Creating and Working with Documents” in the GroupWise 7 Windows Client User
Guide.
If users need to install and integrate applications after installing the GroupWise client, they can
install the new applications, then reinstall the GroupWise client so that they can select the new
applications during GroupWise client installation. If reinstalling the GroupWise client is not an
option, you might need to assist them in setting up additional integrations, as described in
Section 24.2, “Setting Up Integrations Using the gwappint.inf File,” on page 364.
24.2 Setting Up Integrations Using the gwappint.inf File
The gwappint.inf file controls how document-producing applications are integrated with the
GroupWise Windows client. During client installation, the gwappint.inf file is installed in the
Windows system32 subdirectory. It is a text file that can be viewed and modified in a text editor
such as Notepad. You might want to print the gwappint.inf file from a user workstation to help
you understand how integrations have been set up for your users during GroupWise client
installation.
Section 24.2.1, “Understanding the Three Levels of Integration,” on page 365
Section 24.2.2, “Understanding the gwappint.inf File,” on page 365
Section 24.2.3, “Editing the gwappint.inf File,” on page 368
364 GroupWise 7 Administration Guide

24.2.1 Understanding the Three Levels of Integration
The gwappint.inf file provides for three different levels of integration, to meet the needs of different
types of document-producing applications:
“ODMA Integration” on page 365
“Point-to-Point Integration” on page 365
“No Integration” on page 365
ODMA Integration
The Open Document Management API (ODMA) is an industry standard for applications and
document management programs to use in achieving seamless integration. ODMA is platformindependent. GroupWise DMS is 32-bit ODMA-compliant, and can automatically integrate with all
32-bit ODMA-compliant applications. Applications that are not 32-bit ODMA-compliant must have
integrations created for them to be used with GroupWise DMS.
The 16-bit ODMA integration standards are not 100% compatible with the 32-bit ODMA
integration in Windows 95/98/2000. Therefore, 16-bit applications that are ODMA-compliant must
still have integrations created for them to be used with the GroupWise DMS.
novdocx (en) 11 December 2007
Point-to-Point Integration
®
This integration involves applications that are not 32-bit ODMA-compliant. Novell
macros for various applications, such as Microsoft Word, which allow them to be integrated with
GroupWise. This provides the same functionality as for 32-bit ODMA-integrated applications.
These applications can be selected for integration when the GroupWise client is installed.
Integration macros are written in the macro language of the application being integrated with
GroupWise. Macro calls are made to GroupWise dialog boxes to replace access of the application’s
own dialog boxes (for example, Open and Save).
No Integration
Non-integrated applications rely on Windows 95/98/2000 associations. When a reference icon is
selected in GroupWise, the file’s extension is examined to determine which application to use. The
application is launched and the file is opened.
Functions performed in a non-integrated application are not managed by GroupWise. So, if the file
is renamed or saved to a different location, the file is not part of a GroupWise library. When the file
is opened later, a message is displayed reminding the user that the file is not under management of
GroupWise. However, if you simply edit the file and re-save it without changing the name or
location, GroupWise continues to provide management of the file.
has written
24.2.2 Understanding the gwappint.inf File
The gwappint.inf file includes the following sections and lines:
[executable_name] sections
- Integration= line
- DualExe= line
- AppName= line
Integrations 365

- AppKey= line
[ODMA Application Extensions] section
[Integration State] section
[Non-Integrated Defaults] section
- WaitInterval= line
- ShowMessage= line
[executable_name] Sections
The gwappint.inf file contains one [executable_name] section for each integrated application. It
supplies the name of the executable for the program being integrated.
Integration= Line
Each [executable_name] section must have an Integration= line, where digits identify the type of
integration employed for the executable:
Integration = 0 (No Integration)
Integration = 1 (Point-to-Point Integration)
Integration = 2 (ODMA Integration)
novdocx (en) 11 December 2007
DualExe= Line
Some programs, such as Lotus Word Pro, use a small startup executable that, in turn, calls the main
program. Use the DualExe= line to specify the name of the main executable. You can specify the full
path to the main executable, or you can specify the path relative to the startup executable.
AppName= Line
The AppName= line assigns the application an arbitrary name for use in the [ODMA Application
Extensions] and [Integration State] sections.
AppKey= Line
The AppKey= line is used only with point-to-point integrations (Integration=1). It specifies a value
used by GroupWise to pass information to and from the integrated application. The value must be
unique among the point-to-point integrations defined in the gwappint.inf file.
Examples Based on Standard Integrations
The table below shows how the standard integrations are implemented in the gwappint.inf file:
366 GroupWise 7 Administration Guide

Table 24-1 Integration Examples
novdocx (en) 11 December 2007
Application Executable
Corel
prwin.exe 3 If it is already installed on the workstation, GroupWise installation
Presentations
Corel
qpw.exe 6.1 If it is already installed on the workstation, the GroupWise client
Quattro Pro
Corel
wpwin.exe 6.1 If it is already installed on the workstation, the GroupWise client
WordPerfect
Versi
Comments
on
changes the Integrations= line to 0 and the application is
available for selection as a non-integrated application.
7 For ODMA integration, change the DualExe= line to
system\prwin70.exe and the Integrations= line to 2.
8, 9, 10For ODMA integration, change the Integrations= line to 2.
installation changes the Integrations= line to 0 and the
application is available for selection as a non-integrated
application.
7 For ODMA integration, change the Integrations= line to 2
installation changes the Integrations= line to 0 and the
application is available for selection as a non-integrated
application.
7 For ODMA integration, change the DualExe= line to
system\wpwin7.exe and the Integrations= line to 2.
8, 9, 10For ODMA integration, no DualExe= line is needed. Change the
Integrations= line to 2.
Lotus
Word Pro
Microsoft
Binder
Microsoft
Excel
Microsoft
PowerPoint
Microsoft
Word
wordpro.exe 96 This application is 32-bit ODMA-compliant. Therefore, if it is
installed before GroupWise, it is available for selection as an
ODMA-integrated application.
97 For ODMA integration, change the DualExe= line to
system\wordpro.exe and the Integrations= line to 2.
binder.exe 97 This application is 32-bit ODMA-compliant. Therefore, if it is
installed before GroupWise, it is available for selection as an
ODMA-integrated application.
excel.exe 95,
The Integrations= line is set to 1 for both versions.
97,
2000,
2002
powerpnt.exe 97,
This application is 32-bit ODMA-compliant. Therefore, if it is
2000,
installed before GroupWise, it is available for selection as an
2002
ODMA-integrated application.
winword.exe 95 If it is already installed on the workstation, GroupWise installation
changes the Integrations= line to 1 and the application is
available for selection for point-to-point integration.
97,
For ODMA integration, change the Integrations= line to 2.
2000,
2002
Integrations 367

[ODMA Application Extensions] Section
The [ODMA Application Extensions] section lists the file extensions GroupWise associates with
particular document-producing applications. Examples include:
Table 24-2 Applications and Their Extensions
Application File Extension
Corel WordPerfect .wpd
Microsoft Excel .xls
Microsoft PowerPoint .ppt
Microsoft Word .doc
[Integration State] Section
The [Integration State] section records whether the user has turned integrations on or off for
integrated applications.
novdocx (en) 11 December 2007
[Non-Integrated Defaults] Section
The [Non-Integrated Defaults] section provides two configuration settings that apply to all nonintegrated applications:
WaitInterval= line
ShowMessage= line
WaitInterval= Line
The WaitInterval= line specifies a number of milliseconds for the GroupWise client to wait before it
attempts to communicate with a non-integrated process. The wait interval allows the application to
start completely before GroupWise contacts it. The default wait interval is 1000 milliseconds (one
second).
The default setting supplied in the [Non-Integrated Defaults] section can be overridden for specific
applications by including a WaitInterval= line in the application’s [executable_name] section.
ShowMessage= Line
The ShowMessage= line indicates whether or not to display a message to the GroupWise client user
if GroupWise cannot contact a non-integrated application. Use ShowMessage=1 to display the
message or ShowMessage=0 to suppress the message.
The default setting supplied in the [Non-Integrated Defaults] section can be overridden for specific
applications by including a ShowMessage= line in the application’s [executable_name] section.
24.2.3 Editing the gwappint.inf File
The gwappint.inf file is a text file that can be modified using any text editor (Notepad, for example).
By editing the gwappint.inf file, you can add integrations for applications for which Novell has not
provided integrations.
368 GroupWise 7 Administration Guide

24.3 Controlling Integrations in the GroupWise Windows Client
For the convenience of GroupWise Windows client users, some settings in the gwappint.inf file can
be modified from the client.
In the GroupWise client:
1 Click Tools > Options > Documents > Integrations.
novdocx (en) 11 December 2007
The Integrations tab of the Documents Setup dialog box lets users turn integrations on and off
for the listed registered applications.
If the application that users want to integrate is does not appear in the registered applications
list, users must first make sure the application is installed on their workstations. Then they can
either reinstall the GroupWise client or modify the gwappint.inf file as described in
Section 24.2, “Setting Up Integrations Using the gwappint.inf File,” on page 364.
The users’ selections on the Integrations tab are recorded in the [Integration State] section of
the gwappint.inf file.
2 Select an application to configure integration for, then click Advanced.
The Non-Integrated tab enables users to set values for the ShowMessage= and WaitInterval=
lines in the gwappint.inf file.
3 Click Executable.
Integrations 369

The Executable tab enables users to set the DualExe= line in the gwappint.inf file.
4 Click OK twice to save the updated integration information.
If users check the contents of the gwappint.inf file in the Windows system32 subdirectory, they
see their integration configuration changes reflected there.
novdocx (en) 11 December 2007
370 GroupWise 7 Administration Guide
 Loading...