

Page 1

IV
Users
Chapter 13, “Creating GroupWise Accounts,” on page 203
Chapter 14, “Managing GroupWise Accounts and Users,” on page 217
novdocx (en) 11 December 2007
IV
Users
201
Page 2

novdocx (en) 11 December 2007
202 GroupWise 7 Administration Guide
Page 3
13
Creating GroupWise Accounts
For users to be able to use GroupWise®, you must give them GroupWise accounts. A GroupWise
account defines the user in the GroupWise system by providing the user with a GroupWise user ID
and GroupWise mailbox.
®
You can give GroupWise accounts to Novell
eDirectory. You can also give GroupWise accounts to users who do not have eDirectory accounts.
Refer to the following sections for details:
Section 13.1, “Establishing a Default Password for All New GroupWise Accounts,” on
page 203
Section 13.2, “Creating GroupWise Accounts for eDirectory Users,” on page 204
Section 13.3, “Creating GroupWise Accounts for Non-eDirectory Users,” on page 214
Section 13.4, “Educating Your New Users,” on page 215
eDirectoryTM users during or after their creation in
novdocx (en) 11 December 2007
13
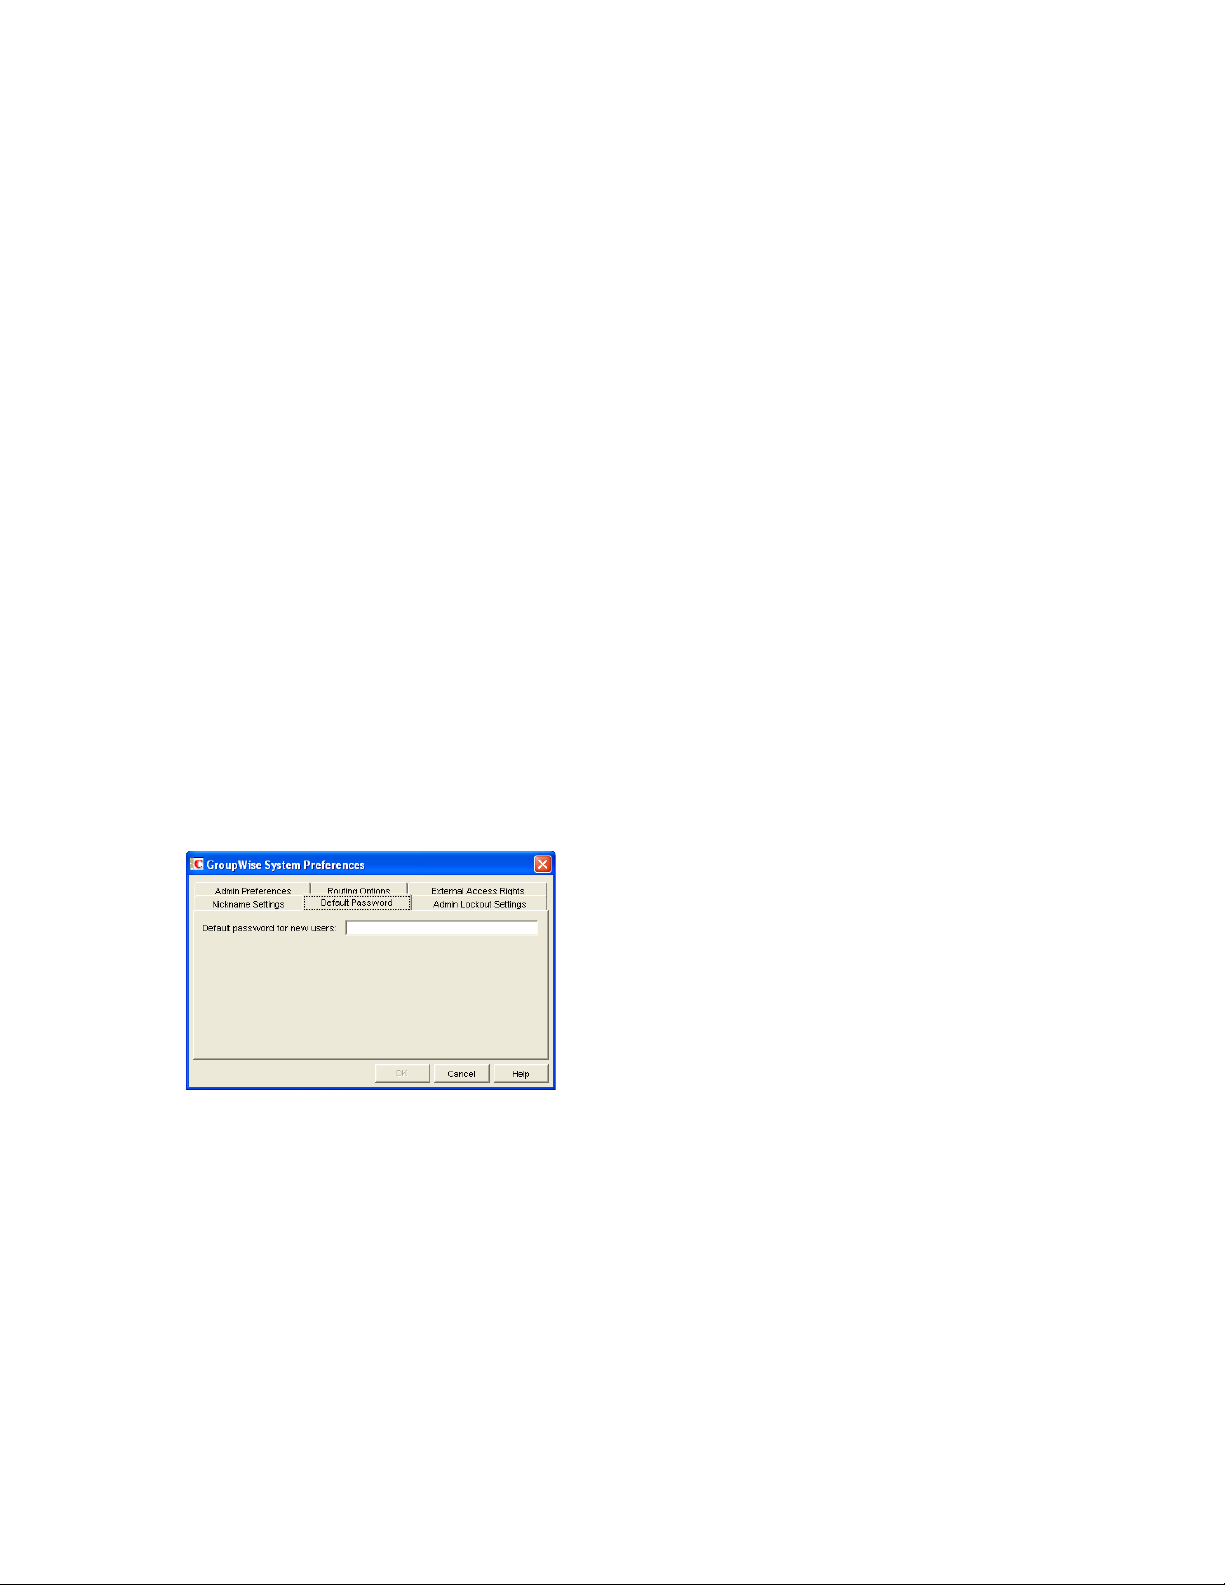
13.1 Establishing a Default Password for All New GroupWise Accounts
To save time and energy when you are creating new GroupWise accounts, you can establish a
default password to use for all new accounts.
®
1 In ConsoleOne
Password.
2 Type the password you want to use as the default, then click OK.
3 Explain to users how to set their own passwords in the GroupWise client, as described in:
“Assigning Passwords to Your Mailbox” in the GroupWise 7 Windows Client User Guide
“Assigning Passwords to Your Mailbox” in the GroupWise 7 Cross-Platform Client User
Guide
“Changing Your GroupWise Password” in the GroupWise 7 WebAccess Client User Guide
, click To ol s > GroupWise System Operations > System Preferences > Default
Creating GroupWise Accounts
203
Page 4

13.2 Creating GroupWise Accounts for eDirectory Users
Depending on your needs, you can choose from the following methods to create GroupWise
accounts for eDirectory users:
Creating a Single GroupWise Account: You can create a GroupWise account for a single
eDirectory user by editing the GroupWise information on his or her User object. This method
lets you create the GroupWise account on any post office, select the GroupWise user ID, and
configure optional GroupWise information. It provides the most flexibility in creating a user’s
GroupWise account.
Creating Multiple GroupWise Accounts: You can create GroupWise accounts for multiple
eDirectory users by editing the membership information on a Post Office object. This method
allows you to quickly add multiple users to the same post office at one time. However, you
cannot select the user’s GroupWise user ID; instead, the user’s eDirectory username is
automatically used as his or her GroupWise user ID. In addition, to configure other optional
GroupWise information for a user, you need to modify each User object.
Using a Template to Create GroupWise Accounts: You can create a template to apply to new
eDirectory User objects you create. The template can be configured to automatically assign the
user to a post office.
novdocx (en) 11 December 2007
Creating GroupWise Accounts by Importing Users: You can import information from ASCII-
delimited text files.
13.2.1 Creating a Single GroupWise Account
To create a GroupWise account for an eDirectory user:
1 In ConsoleOne, right-click the User object, then click Properties.
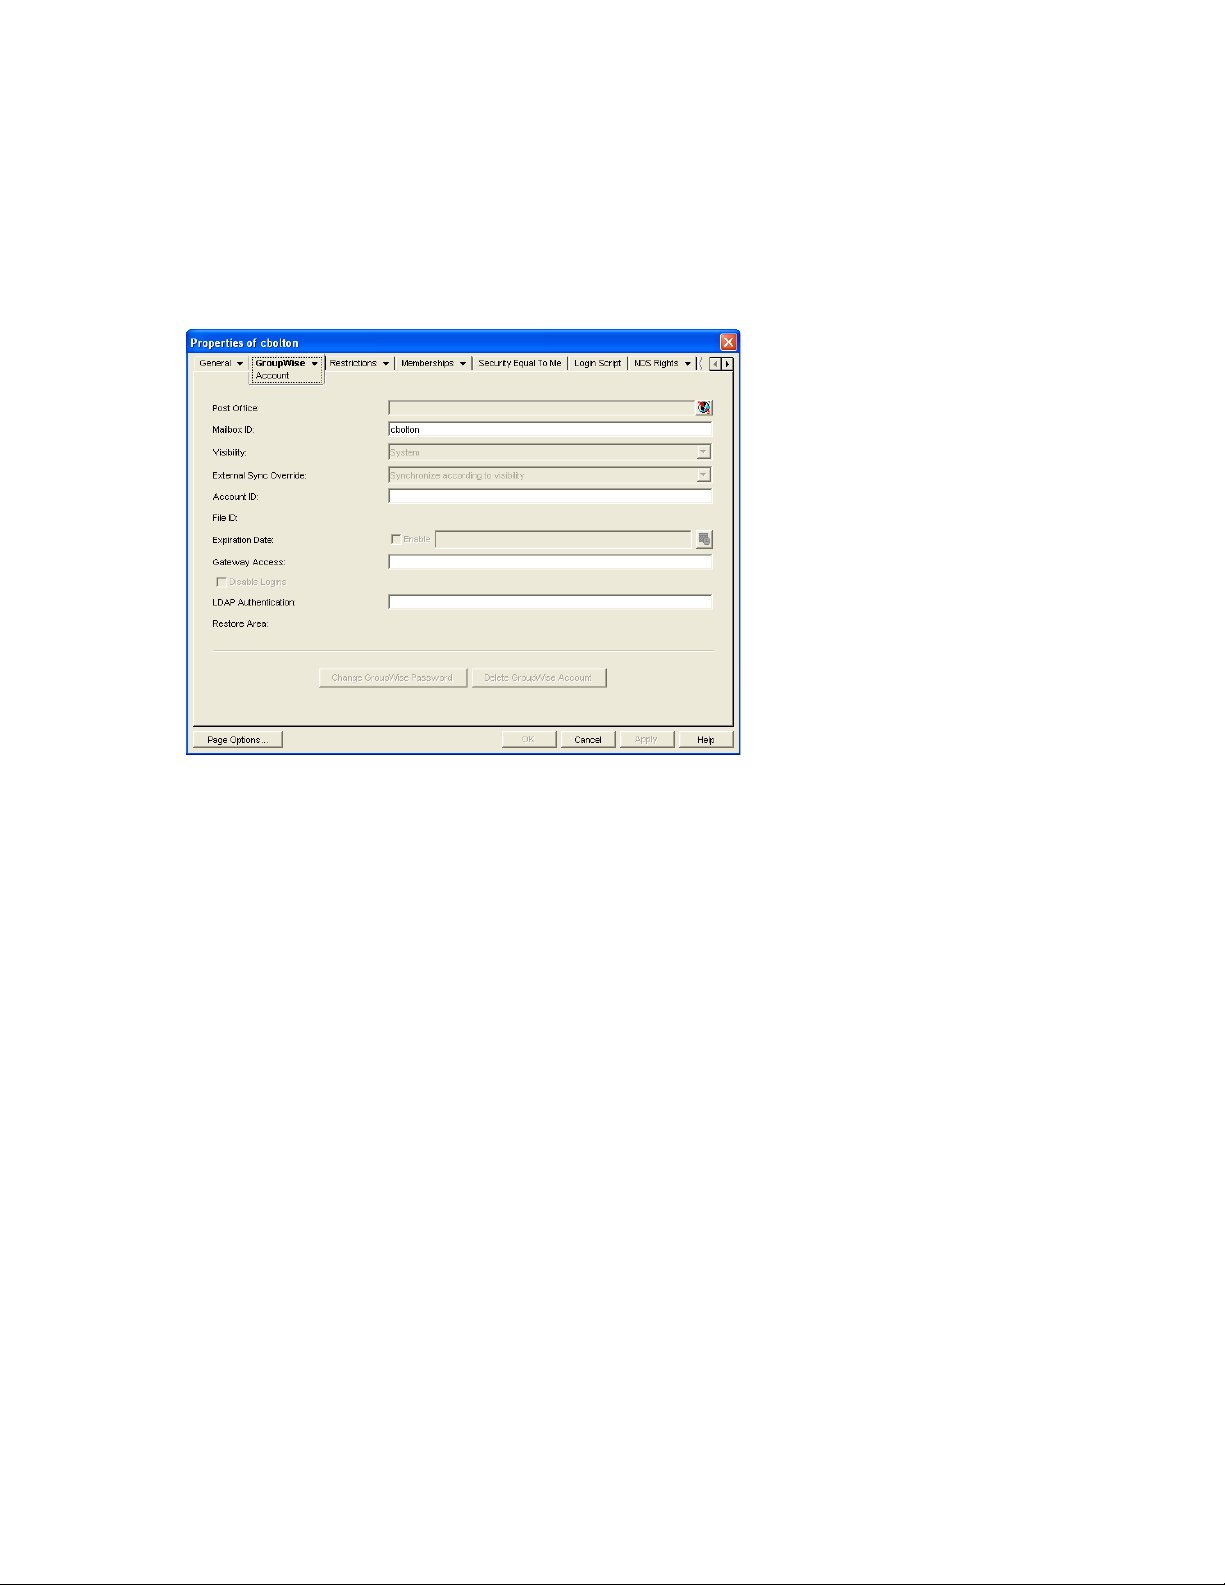
2 Click GroupWise > Account to display the Account page.
3 Fill in the following fields:
204 GroupWise 7 Administration Guide
Page 5

Post Office: Select the post office where you want the user’s mailbox created.
Mailbox ID: The mailbox ID (also referred to as the GroupWise user ID or username) defaults
to the eDirectory username. You can change it if necessary.
Do not use any of the following invalid characters in the mailbox ID:
ASCII characters 0-13 Comma ,
Asterisk * Double quote “
At sign @ Extended ASCII characters that are graphical or typographical
symbols; accented characters in the extended range can be used
Braces { } Parentheses ( )
Colon : Period .
4 Click Apply to create the account.
You must create the account by clicking Apply (or OK) before you can modify any of the other
fields, including the GroupWise password.
5 If desired, modify any of the following optional fields:
Visibility: Select the level at which you want the user to be visible in the Address Book.
System enables the user to be visible to all users in your GroupWise system. Domain enables
the user to be visible to all users in the same domain as the user. Post Office enables the user to
be visible to all users on the same post office as the user. Setting the visibility level to None
means that no users can see the user in the Address Book. However, even if the user is not
displayed in the Address Book, other users can send messages to the user by typing the user’s
ID (mailbox ID) in a message’s To field.
novdocx (en) 11 December 2007
External Sync Override: This option applies only if your GroupWise system links to and
synchronizes with an external system, as described in “Connecting to GroupWise 5.x, 6.x, and
7.x Systems” in the GroupWise 7 Multi-System Administration Guide.
Select the Synchronize According to Visibility setting if you want the user information to be
provided to the other system only if the user’s visibility is set to System.
Select the Synchronize Regardless of Visibility setting if you always want the user information
provided to the other system regardless of the user’s visibility level.
Select the Don’t Synchronize Regardless of Visibility setting if you never want the user
information provided to the other system.
Account ID: This option applies only if you have a GroupWise gateway that supports
accounting. For more information about gateway accounting, see your GroupWise gateway
documentation (http://www.novell.com/documentation/gwgateways).
File ID: This three-letter ID is randomly generated and is non-editable. It is used for various
internal purposes within the GroupWise system, including ensuring that files associated with
the user have unique names.
Expiration Date: If you want the user’s GroupWise account to no longer work after a certain
date, specify the expiration date. This date applies to the user’s GroupWise account only; it is
independent of the eDirectory account expiration date (User object > Restrictions > Login
Restrictions). For more information, see Section 14.10.2, “Expiring a GroupWise Account,” on
page 243.
Creating GroupWise Accounts 205
Page 6

Gateway Access: This option applies only if you have GroupWise gateways that support
access restrictions. For more information, see your GroupWise gateway documentation (http://
www.novell.com/documentation/gwgateways).
Disable Logins: Select this option to prevent the user from accessing his or her GroupWise
mailbox. For more information, see Section 14.9, “Disabling and Enabling GroupWise
Accounts,” on page 240.
LDAP Authentication: This option applies only if you are using LDAP to authenticate users
to GroupWise, as described in Section 36.3.4, “Providing LDAP Authentication for GroupWise
Users,” on page 501, and if the LDAP server is not a Novell LDAP server. If this is the case,
specify the user’s LDAP authentication ID.
Restore Area: This field applies only if you are using the GroupWise backup and restore
features. If so, this field indicates the location where the user’s mailbox is being backed up. For
details, see Chapter 32, “Restoring GroupWise Databases from Backup,” on page 411.
Change GroupWise Password: Click this option to assign a password to the user’s
GroupWise account or change the current password. The user is prompted for this password
each time he or she logs in to GroupWise.
To be able to skip this option by setting a default password, see Section 13.1, “Establishing a
Default Password for All New GroupWise Accounts,” on page 203.
novdocx (en) 11 December 2007
Delete GroupWise Account: Click this option to delete the user’s GroupWise account. This
includes the user’s mailbox and all items in the mailbox. The user’s eDirectory account is not
affected. For more information, see Section 14.10, “Removing GroupWise Accounts,” on
page 241
6 Click Apply to save the changes.
7 Click GroupWise > General > Identification to display the user’s current eDirectory
information.
This information appears in the GroupWise Address Book, as described in Chapter 6,
“GroupWise Address Book,” on page 85. If you keep private information in the Description
field of the User object, you can prevent this information from appearing the GroupWise
Address Book. See Section 6.1.5, “Preventing the User Description Field from Displaying in
the Address Book,” on page 89.
8 Make sure that the user’s eDirectory information is current, then click OK.
13.2.2 Creating Multiple GroupWise Accounts
If you have multiple eDirectory users who will have GroupWise accounts on the same post office,
you can use the Post Office object’s Membership page to quickly add the users and create their
accounts. Each user’s GroupWise user ID will be the same as his or her eDirectory username.
To create GroupWise accounts for multiple eDirectory users:
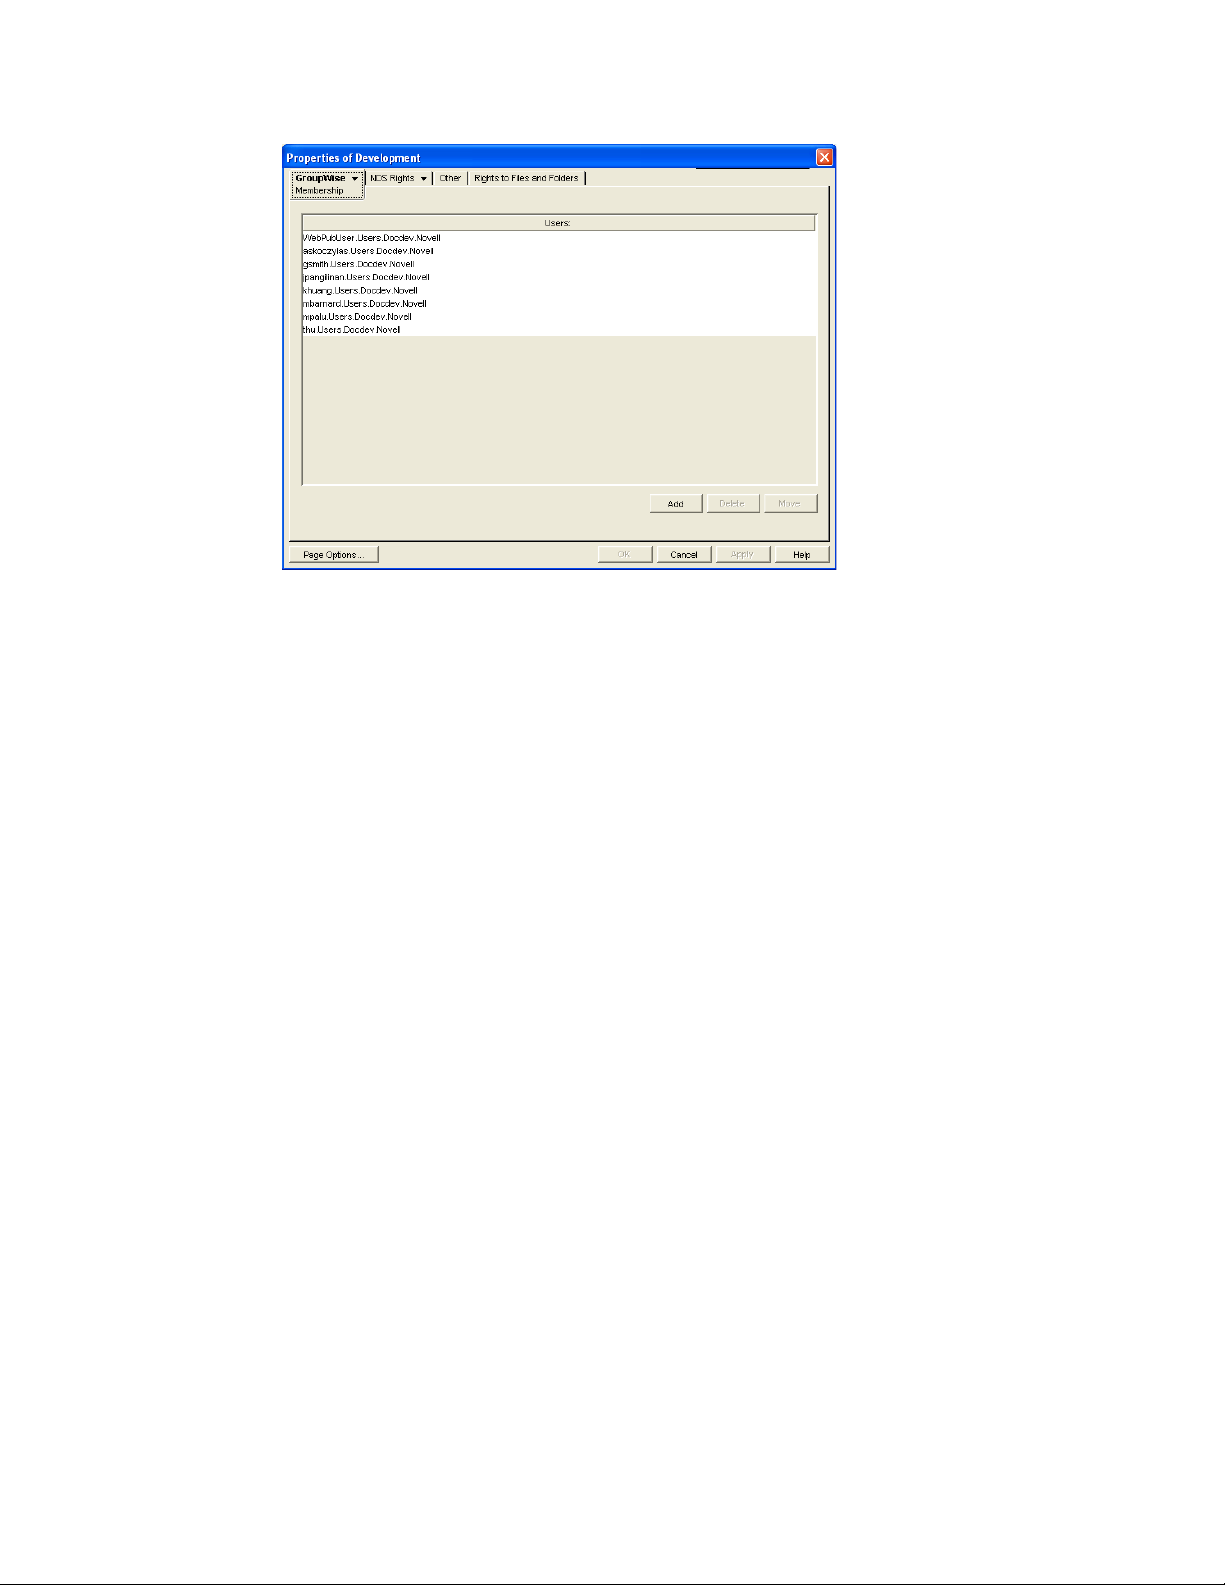
1 In ConsoleOne, right-click the Post Office object, then click Properties.
2 Click GroupWise > Membership to display the Membership page.
206 GroupWise 7 Administration Guide
Page 7

3 Click Add, select the eDirectory user you want to add to the post office, then click OK to add
the user to the post office’s membership list.
By default, the user’s eDirectory username is used as the GroupWise ID.
A GroupWise user ID cannot contain any of the following invalid characters:
novdocx (en) 11 December 2007
ASCII characters 0-13 Comma ,
Asterisk * Double quote “
At sign @ Extended ASCII characters that are graphical or typographical
symbols; accented characters in the extended range can be used
Braces { } Parentheses ( )
Colon : Period .
4 Repeat Step 3 to create additional GroupWise accounts in the post office.
Creating GroupWise Accounts 207
Page 8
5 When finished, click OK to save the changes.
novdocx (en) 11 December 2007
13.2.3 Using a Template to Create GroupWise Accounts
If you frequently create new users, you might want to create Template objects with the necessary
GroupWise properties. This makes creating a new eDirectory user with GroupWise access a onestep process. However, you cannot use a Template object to give GroupWise properties to existing
eDirectory users.
The steps to create a template with GroupWise properties include assigning the post office and
setting up directory rights. Because a user can have membership in only one post office, a different
template should be created for each existing post office. Further, for each post office, a template can
be created for different categories of users, such as secretarial, accounting, administrative, human
resources, development, sales, and manufacturing.
After one template has been created with eDirectory properties and post office directory rights, you
can use it to quickly create templates for subsequent post offices.
“Creating a Template” on page 208
“Creating a User Account from a Template” on page 209
Creating a Template
1 In ConsoleOne, right-click the Organizational Unit object where you want to create the
Template object, then click New > Object to display the New Object dialog box.
Templates should be placed in the same organizational unit where they will be used because the
browser first lists any templates in the current context. The template also inherits rights from
the container the template is created in, further simplifying its setup.
2 In the Class list, select Template, then click OK to display the New Template dialog box.
3 Specify a name that describes the purpose for which the template will be used.
4 If you want to base the template on another Template or User object, select Use Template or
User, then browse to and select the desired Template or User object.
208 GroupWise 7 Administration Guide
Page 9

5 Select Define Additional Properties.
6 Click Create to display the properties pages for the Template object.
7 Click GroupWise > Information.
8 Fill in the following fields:
Post Office: Select the post office the user will be assigned to.
Visibility: Select the level at which the user will be visible in the Address Book. System
enables the user to be visible to all users in your GroupWise system. Domain enables the user
to be visible to all users in the same domain as the user. Post Office enables the user to be
visible to all users on the same post office as the user. Setting the visibility level to None means
that no users can see the user in the Address Book. However, even if the user is not displayed in
the Address Book, other users can send messages to the user by typing the user’s ID (mailbox
ID) in a message’s To field.
Account ID: This field supports accounting for GroupWise gateways. For more information
about gateway accounting, see your gateway documentation.
Expiration Date: Use this to set a date when the user’s account will expire. The user cannot
access the account after that date. For more information, see Section 14.10.2, “Expiring a
GroupWise Account,” on page 243.
Gateway Access: This is used to grant or restrict access to some GroupWise gateways. See
your GroupWise gateway documentation (http://www.novell.com/documentation/gwgateways)
to determine if this field applies.
9 Modify information on any of the other tabs to configure the template, then click OK to save
the template changes.
novdocx (en) 11 December 2007
Creating a User Account from a Template
1 In ConsoleOne, right-click the container where you want to create a new eDirectory user, then
click New > User.
2 Specify a Name, Surname, and Unique ID (all three are required).
3 Select Use Template, then browse to and select the template you want applied to this user.
4 Modify any of the other options you want.
5 Click OK to create the user’s eDirectory and GroupWise accounts.
13.2.4 Creating GroupWise Accounts by Importing Users
You can use the GroupWise Import utility to quickly create multiple GroupWise users. The Import
utility reads an ASCII-delimited text file created by the GroupWise Export utility or by a third-party
export, and creates Novell eDirectory and GroupWise objects with attributes from the file. The
Import utility supports most eDirectory classes (including extensions) and GroupWise classes. You
can specify the delimiters, eDirectory contexts, and file field positions to use during import.
IMPORTANT: The Import/Export utility is not included on the GroupWise CDs. You can
download the Import/Export utility from TID 2960897 in the Novell Support Knowledgebase (http:/
/www.novell.com/support/supportcentral). To install the Import/Export utility, follow the
Creating GroupWise Accounts 209
Page 10
instructions provided with the download. After you have installed the Import/Export utility, the
Import and Export menu items appear under Too ls > GroupWise Utilities in ConsoleOne.
“Using the Import Utility” on page 210
“Using the Export Utility” on page 212
NOTE: The Import/Export utility is not available for use on Linux.
Using the Import Utility
In order to import objects into GroupWise, the following conditions must be met:
You must create an ASCII-delimited text file by using the GroupWise Export utility or another
export utility.
The destination context for each eDirectory object must already exist. The GroupWise Import
utility supports creating organizational units. If a large portion of a tree needs to be
reconstructed to support the objects, you can import organizational units before importing the
objects.
novdocx (en) 11 December 2007
To import objects into GroupWise:
1 In ConsoleOne, select the eDirectory tree to which the objects will be imported, then click
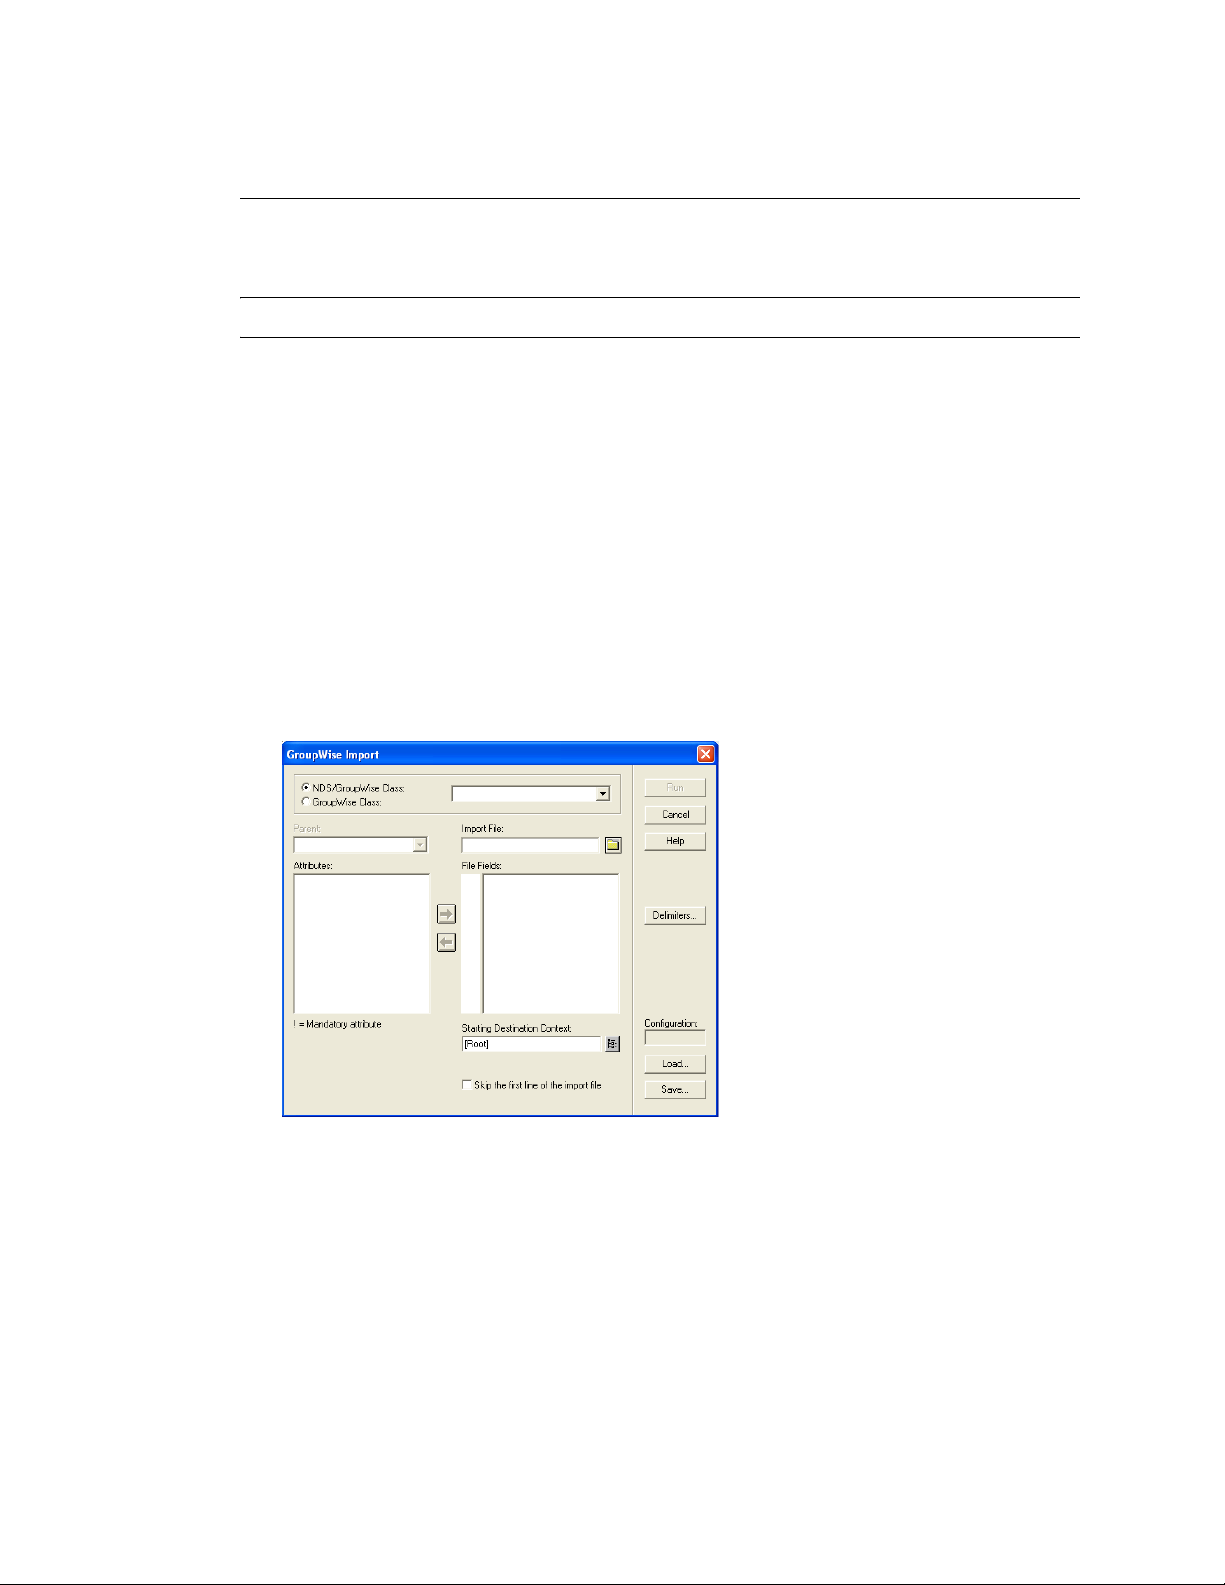
To ol s > GroupWise Utilities > Import to display the GroupWise Import dialog box.
2 If you have previously defined and saved a configuration file, click Load to fill in the fields
from the configuration files, then click Run to perform the import.
or
Fill in the fields in the Import Dialog box.
NDS/GroupWise Class: Select this option to import objects belonging to an eDirectory class
or to a GroupWise-related eDirectory class. Choose the class from the list.
GroupWise Class: Select this option to import objects belonging to a GroupWise class not
represented in eDirectory. Choose external user, external domain, external post office,
Document-Version, or Lookup Entry from the list
210 GroupWise 7 Administration Guide
Page 11

Parent: If you are importing objects that belong to a GroupWise-related eDirectory class or a
GroupWise-only class, the parent attribute is required unless:
The class is the eDirectory User class, in which case the object can be optionally
associated with GroupWise by specifying a value here.
The value is in the import file and is explicitly imported by your positioning the NGW:
Post Office attribute in the File Fields list box, explained below. In this case, if the value
obtained from the file is blank, the Post Office field value, if any, is used.
Import File: Specify the full path and file name of the ASCII text file.
Attributes / File Fields: This list displays the attributes of the selected class. Move the
attributes to correspond to the fields in the ASCII text file to the File Fields list.
Some attributes are marked with an exclamation point (!), indicating that a value for that
attribute must exist for a successful import. The import also requires a value for either the
object name or distinguished name.
Starting Destination Context: Specify the destination eDirectory context for the objects to be
imported. If DN or Context from Root is selected as an import field, the value in this field is
ignored because both DN and Context from Root specify the destination context.
An imported object’s position in the tree can be constructed in a flexible manner using the
Context from Root, Context from Starting, DN, and Object Name class attribute fields and the
Starting Destination Context field. The following combinations are valid:
novdocx (en) 11 December 2007
DN Each object’s name and context are found in this field value.
Object Name +
Starting Destination
Context
Object Name +
Context from Starting +
Starting Destination
Context
Object Name +
Context from Root
Each object name in the Object Name field is added to the context
specified in Starting Destination Context.
Each object name in the Object Name field is added to the context
obtained by concatenating the value in the Context from Starting field
and the value specified in Starting Destination Context.
Each object name in the Object Name field is added to the context read
from the Context from Root field.
Skip the First Line of the Import File: This directs the import to skip the first line if it
contains the attribute names.
Delimiters: Accept the defaults shown or change the delimiters to match those used by the
export file. For more information, see “Delimiters” on page 212.
3 For convenience, save the configuration for later use. See “Loading or Saving a Configuration
File” on page 211.
4 Click Run to perform the import.
An import.log file is created in the same directory as the import file and contains a list of the
imported objects.
Loading or Saving a Configuration File
An import or export configuration can be saved and loaded, saving you the trouble of manually
filling in the fields for multiple imports or exports. A configuration saved from an export can be
Creating GroupWise Accounts 211
Page 12

loaded for an import, helping ensure that the file field positions, for example, correspond for both
the import and export.
Delimiters
Delimiters are used in ASCII text files to separate items that represent fields and records in imported
or exported data.
Default delimiters are associated with each delimiter type. A delimiter can be set to None, but if so,
and the export encounters a condition requiring a delimiter, the export reports an error.
Between Fields: This delimiter is placed between each field.
Around Each Field: Use this delimiter to indicate the beginning and end of each field.
After Each Record: This delimiter is placed at the end of each record.
Between Values (Multi-Value Fields): Use this delimiter to separate the values in a multi-
valued field. For example, an attribute such as Group Membership can have one or more
values. Each Group Membership value is delimited by the multi-value field delimiter.
Between Elements (Multi-Element Values): Use this delimiter to separate the elements of a
multi-element value. For example, an attribute having the syntax of SYN_OBJECT_ACL has
three elements: the protected attribute name, the subject name, and the privileges.
novdocx (en) 11 December 2007
Before Literal Characters: When you import an ASCII file created by a third-party export
program, precede each literal character that is also a delimiter with the Before Literal
Characters delimiter. If you use the Around Each Field delimiter, you do not need to precede
literal characters within the field with the Before Literal Character delimiter.
Using the Export Utility
The GroupWise Export utility reads eDirectory and GroupWise object information from GroupWise
databases and creates an ASCII-delimited text file containing the object attributes. The Export utility
supports most eDirectory classes (including extensions) and GroupWise classes. You can specify the
delimiters, eDirectory contexts, and file field positions during export.
IMPORTANT: The Export utility is not included on the GroupWise CDs. You can download the
Import/Export utility from TID 2960897 in the Novell Support Knowledgebase (http://
www.novell.com/support/supportcentral). To install the Import/Export utility, follow the instructions
provided with the download. The Import/Export utility is not available for use on Linux.
To export objects from GroupWise:
1 In ConsoleOne, select the eDirectory tree that contains the GroupWise objects you want to
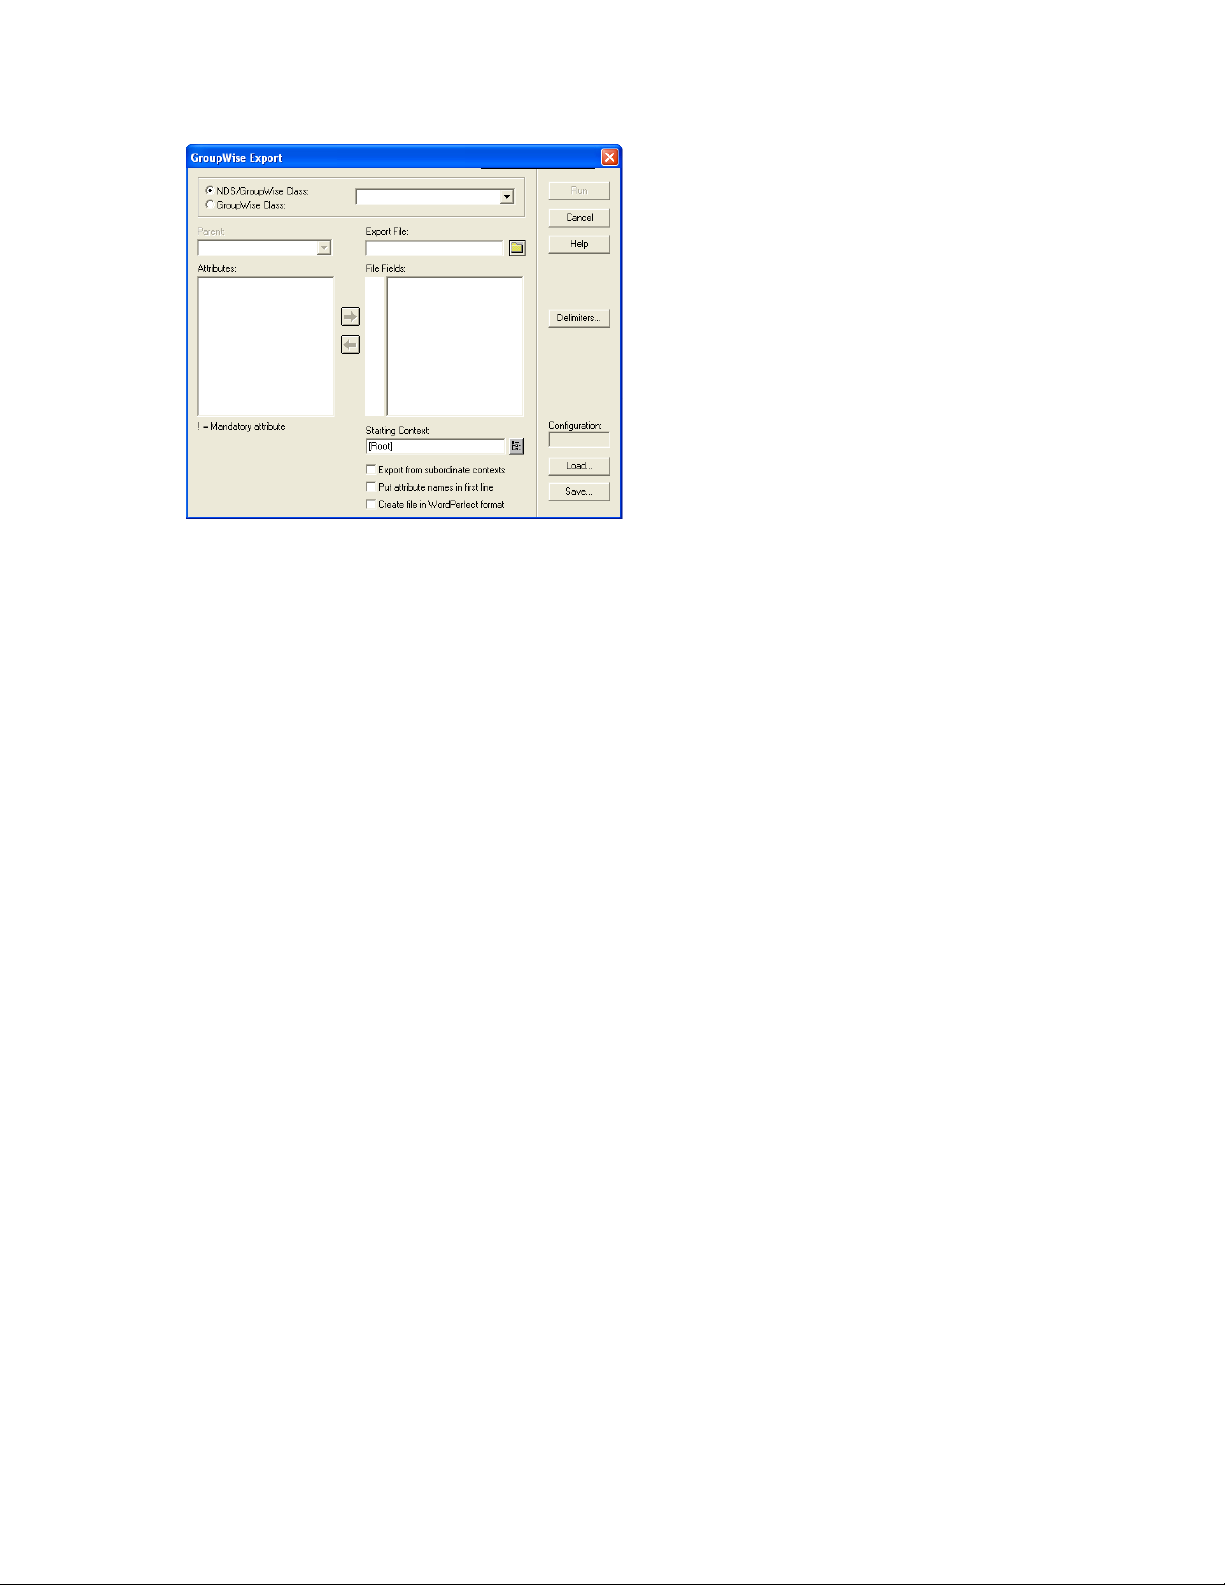
export, click Too ls > GroupWise Utilities > Export to display the GroupWise Export dialog box.
212 GroupWise 7 Administration Guide
Page 13
2 If you have previously defined and saved a configuration, click Load to fill in the fields from
the configuration file, then click Run to perform the export.
or
novdocx (en) 11 December 2007
Fill in the fields in the Export dialog box.
NDS/GroupWise Class: Select this option to export objects belonging to an eDirectory class
or to a GroupWise-related eDirectory class. Choose the class from the list.
GroupWise Class: Select this option to export objects belonging to a GroupWise class not
represented in eDirectory. Choose external user, external domain, external post office,
Document-Version, or Lookup Entry from the list.
Parent: If you are exporting objects that belong to a GroupWise-related eDirectory class or a
GroupWise-only class, and that class has a parent attribute, post office, or domain, this field
allows you to export objects having only the parent attribute value you specify. The object
selection process is still subject to the values in Starting Context, explained below, and the
Export from Subordinate Contexts check box.
Export File: Specify the full path and file name of the ASCII text file.
Attributes / File Fields: This list displays the attributes of the selected class. Move the
attributes to correspond to the fields in the ASCII text file to the File Fields list.
Some attributes are marked with an exclamation point (!), indicating that a value for that
attribute must exist.
Starting Context: Specify the eDirectory context from which to begin the export. If the Export
from Subordinate Contexts list box is selected, objects belonging to contexts subordinate to the
context specified here is also exported.
Export from Subordinate Contexts: Select this option to cause objects in subordinate
contexts to be exported. If this box is left deselected, only those objects in the immediate
Starting Context context are exported.
Put Attribute Names in First Line: Select this option to direct the export to put the attribute
names as a comment in the first line of the export file.
Create the File in WordPerfect Office Notebook Format: If you use this option, you might
also want to select Put Attribute Names in First Line to permit WordPerfect* to display the
attribute names for each merge field.
Creating GroupWise Accounts 213
Page 14
Delimiters: Accept the defaults shown or change the delimiters. For more information, see
“Delimiters” on page 212.
3 Click Run to perform the export.
13.3 Creating GroupWise Accounts for NoneDirectory Users
If you have users who do not have eDirectory accounts, you can still assign them GroupWise
accounts by defining them as GroupWise external entities in eDirectory. Defining a user as a
GroupWise external entity provides the user with access to GroupWise only; it does not enable the
user to log in to eDirectory. External entities have eDirectory objects, but they are not considered
eDirectory users for licensing purposes.
To create a GroupWise account for a non-eDirectory user:
1 In ConsoleOne, right-click the eDirectory container where you want to create the user’s
GroupWise External Entity object, then click New > Object to display the New Object dialog
box.
novdocx (en) 11 December 2007
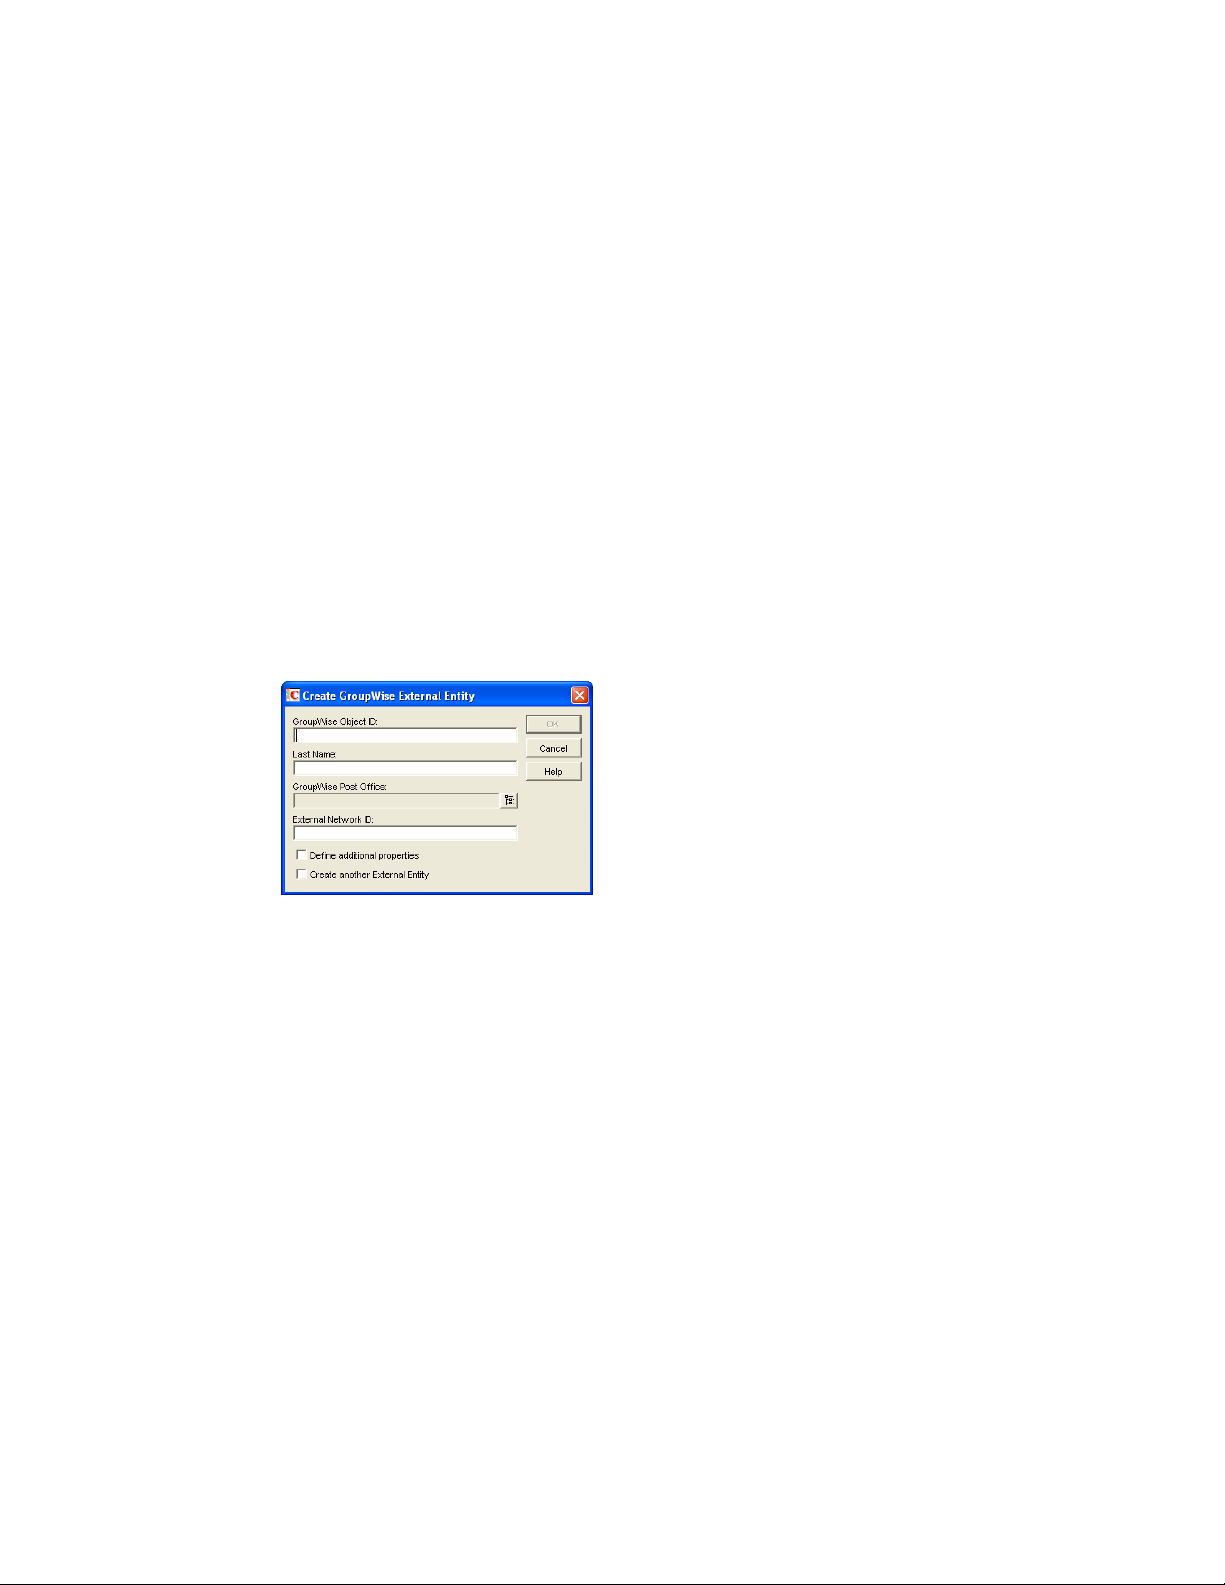
2 Select GroupWise External Entity, then click OK to display the Create GroupWise External
Entity dialog box.
3 Fill in the following fields:
GroupWise Object ID: Specify the user’s GroupWise ID. The user’s ID along with the user’s
post office and domain, provide the user with a unique name within the GroupWise system
(userID.po.domain).
Do not use any of the following invalid characters in the GroupWise object ID:
ASCII characters 0-13 Comma ,
Asterisk * Double quote “
At sign @ Extended ASCII characters that are graphical or typographical
symbols; accented characters in the extended range can be used
Braces { } Parentheses ( )
Colon : Period .
Last Name: Specify the user’s last name.
GroupWise Post Office: Select the post office where you want the user’s mailbox.
External Network ID: Specify the user’s network ID for the network that he or she logs in to.
214 GroupWise 7 Administration Guide
Page 15

4 Select Define Additional Properties, then click OK to display the GroupWise Identification
page.
novdocx (en) 11 December 2007
5 If desired, fill in any of the fields on the Identification page.
This information appears in the GroupWise Address Book, as described in Section 6.1,
“Customizing Address Book Fields,” on page 85. If you want to keep private information in the
Description field, you can prevent this information from appearing the GroupWise Address
Book. See Section 6.1.5, “Preventing the User Description Field from Displaying in the
Address Book,” on page 89.
6 If you want the external entity user to be able to access his or her GroupWise mailbox using
LDAP authentication, as described in Section 36.3.4, “Providing LDAP Authentication for
GroupWise Users,” on page 501, click GroupWise > Account, then provide the fully
distinguished name of the user’s External Entity object in LDAP format (for example,
cn=user_id,ou=orgunit,o=organization).
7 Click OK to save the information.
The user is given a GroupWise mailbox in the post office you selected and can access his or her
mailbox through the GroupWise client.
Because the external entity does not have an associated eDirectory User object, external entity users
must access their mailboxes using GroupWise passwords. They cannot use eDirectory
authentication or LDAP authentication to obtain mailbox access. For more information, see
Section 70.1, “Mailbox Passwords,” on page 1111.
13.4 Educating Your New Users
After users can log in to their GroupWise accounts, all of the GroupWise client’s features are at their
fingertips, but some new users do not know how to get started. You can give your users the
following suggestions to encourage them to explore their GroupWise client:
Click Help > Help Topics > Contents > How Do I to learn to perform common GroupWise
tasks
Click Help > What’s New to learn about the latest new GroupWise features
Creating GroupWise Accounts 215
Page 16

Click Help > User Guide to view the GroupWise 7 Windows Client User Guide in HTML
format
Refer to the GroupWise 7 Client Frequently Asked Questions (FAQ) as needed
For convenience in printing, the GroupWise 7 Windows Client User Guide is available in PDF
format at the GroupWise 7 Documentation Web site (http://www.novell.com/documentation/gw7).
novdocx (en) 11 December 2007
216 GroupWise 7 Administration Guide
Page 17

14
Managing GroupWise Accounts
novdocx (en) 11 December 2007
and Users
As your GroupWise® system grows, you will need to add users and manage their GroupWise
accounts.
Section 14.1, “Adding a User to a Distribution List,” on page 217
Section 14.2, “Allowing Users to Modify Distribution Lists,” on page 218
Section 14.3, “Adding a Global Signature to Users’ Messages,” on page 219
Section 14.4, “Moving GroupWise Accounts,” on page 222
Section 14.5, “Renaming Users and Their GroupWise Accounts,” on page 231
Section 14.6, “Managing Mailbox Passwords,” on page 231
Section 14.7, “Managing E-Mail Addresses,” on page 235
Section 14.8, “Checking GroupWise Account Usage,” on page 240
Section 14.9, “Disabling and Enabling GroupWise Accounts,” on page 240
Section 14.10, “Removing GroupWise Accounts,” on page 241
See also Section 26, “Maintaining Domain and Post Office Databases,” on page 377, Chapter 27,
“Maintaining User/Resource and Message Databases,” on page 385, and Section 31, “Backing Up
GroupWise Databases,” on page 407. Proper database maintenance and backups allow recovery
from accidental deletions, as described in Section 32.5, “Restoring Deleted Mailbox Items,” on
page 413 and Section 32.6, “Recovering Deleted GroupWise Accounts,” on page 416.
14
14.1 Adding a User to a Distribution List
GroupWise distribution lists are sets of users and resources that can be addressed as a single entity.
When a GroupWise user addresses an item (message, appointment, task, or note) to a distribution
list, each user or resource that is a member receives a copy of the item.
To add a user to a distribution list:
®
1 In ConsoleOne
2 Click GroupWise > Distribution Lists to display the Distribution Lists page.
, right-click the User object, then click Properties.
Managing GroupWise Accounts and Users
217
Page 18

3 Click Add, select the distribution list that you want to add the user to, then click OK.
novdocx (en) 11 December 2007
By default, the user is added as a primary recipient (To: recipient).
4 If you want to change the resource’s recipient type, select the distribution list, click
Participation, then click To, CC, or BC.
5 Click OK to save your changes.
14.2 Allowing Users to Modify Distribution Lists
Because distribution lists are created in ConsoleOne, users by default cannot modify them.
However, in ConsoleOne, you can grant rights to selected users to modify specific distribution lists.
For setup instructions, see Section 18.6, “Enabling Users to Modify a Distribution List,” on
page 270.
218 GroupWise 7 Administration Guide
Page 19

14.3 Adding a Global Signature to Users’ Messages
You can build a list of globally available signatures to be automatically appended to messages sent
by GroupWise client users. Global signatures are created in HTML format. For users who prefer the
Plain Text compose view in the GroupWise client, a plain text version of the signature is appended
instead of the HTML version. When this occurs, HTML formatting and embedded images are lost,
but you can customize the plain text version as needed to compensate for the loss of HTML
formatting.
For Windows client users, the global signature is appended by the client to messages after any
personal signatures that users create for themselves. It is appended after the user clicks Send. If S/
MIME encryption is enabled, the global signature is encrypted along with the rest of the message.
Windows client users can choose whether global signatures are appended only for recipients outside
the local GroupWise system or for all recipients, local as well as external. For Windows client users,
you can assign a global signature based on users, resources, post offices, and domains.
For all client users, the Internet Agent can append global signatures to the end of messages for
recipients outside the local GroupWise system. However, the Internet Agent does not append global
signatures to S/MIME-encoded messages, nor does it duplicate global signatures already appended
by the Windows client. You can assign a default global signature for all users in your system and
then override that default by editing the properties of each Internet Agent object
novdocx (en) 11 December 2007
Section 14.3.1, “Creating Global Signatures,” on page 219
Section 14.3.2, “Selecting a Default Global Signature for All Outgoing Messages,” on
page 220
Section 14.3.3, “Assigning Global Signatures to Internet Agents,” on page 221
Section 14.3.4, “Assigning Global Signatures to Windows Client Users,” on page 221
Section 14.3.5, “Excluding Global Signatures,” on page 222
For information about users’ personal signatures, see:
“Adding a Signature or vCard to Items You Send” in “Working with Items in Your Mailbox” in
the GroupWise 7 Windows Client User Guide
“Adding a Signature or vCard to Items You Send” in “Working with Items in Your Mailbox” in
the GroupWise 7 Cross-Platform Client User Guide
“Adding A Signature to Items You Send” in “Working with Items in Your Mailbox” in the
GroupWise 7 WebAccess Client User Guide
14.3.1 Creating Global Signatures
1 Click Too ls > GroupWise System Operations > Global Signatures.
Managing GroupWise Accounts and Users 219
Page 20

2 Click Create to create a new global signature.
novdocx (en) 11 December 2007
3 Specify a descriptive name for the signature.
4 Compose the signature using the using the basic HTML editing tools provided, then click OK
to add the new signature to the list in the Global Signatures dialog box.
5 If you want to check or edit the text version of the signature that was automatically generated:
5a Select the new signature, then click Edit.
5b Modify the text version of the signature as needed, then click OK.
6 Click OK in the Global Signatures list dialog box to save the list.
7 Continue with Assigning Global Signatures to Windows Client Users.
14.3.2 Selecting a Default Global Signature for All Outgoing Messages
If you want the Internet Agent to append a global signature to all outgoing messages:
1 Click Too ls > GroupWise System Operations > Global Signatures.
2 Click Settings.
220 GroupWise 7 Administration Guide
Page 21

3 In the drop-down list, select the default global signature, then click OK.
14.3.3 Assigning Global Signatures to Internet Agents
If your organization needs more than one global signature on outgoing messages, you can assign
different global signatures to Internet Agents as needed.
1 Browse to and right-click an Internet Agent object, then click Properties.
2 Click SMTP/MIME > Message Formatting.
novdocx (en) 11 December 2007
3 Under Default Global Signature to Insert in Outbound Messages, select Override, then select
the global signature that you want this Internet Agent to append to messages.
4 Click OK to save the setting.
14.3.4 Assigning Global Signatures to Windows Client Users
For Windows client users, you can assign different global signatures to different sets of users.
1 Browse to and select the domain, post office, or users to which you want to assign a global
signature.
2 Click Too ls > GroupWise Utilities > Client Options.
3 Double-click Send, then click Global Signature.
Managing GroupWise Accounts and Users 221
Page 22

novdocx (en) 11 December 2007
4 In the Global Signature drop-down list, select the global signature that you want to use.
By default, the selected signature is applied only to messages that are being sent outside your
GroupWise system.
5 Select Apply Signature to All Messages if you want to also use global signatures internally.
6 Click OK to save the settings.
14.3.5 Excluding Global Signatures
You might have a domain, post office, or set of users where you do not want the global signature to
be added to messages. You can suppress global signatures at the domain, post office, or user level.
1 Browse to and select the domain, post office, or users for which you want to suppress a global
signature.
2 Click Too ls > GroupWise Utilities > Client Options.
3 Double-click Send, then click Global Signature.
4 In the Global Signature drop-down list, select <None>, then click OK.
14.4 Moving GroupWise Accounts
Expansion or consolidation of your GroupWise system can make it necessary for you to move
GroupWise accounts from one post office to another.
When you move a GroupWise account, the user’s mailbox is physically moved from one post office
directory to another. The user’s Novell
information, remains in the same eDirectory container.
The following sections provide information you should know before performing a move and
instructions to help you perform the move.
Section 14.4.1, “Live Move vs. File Transfer Move,” on page 223
222 GroupWise 7 Administration Guide
®
eDirectoryTM object, including the GroupWise account
Page 23

Section 14.4.2, “Moves Between GroupWise 6.x or Later Post Offices,” on page 223
Section 14.4.3, “Moves Between GroupWise 6.x or Later and GroupWise 5.x Post Offices,” on
page 223
Section 14.4.4, “Preparing for a User Move,” on page 224
Section 14.4.5, “Moving a GroupWise Account to Another Post Office in the Same eDirectory
Tree,” on page 225
Section 14.4.6, “Moving a GroupWise Account to Another Post Office in a Different
eDirectory Tree,” on page 226
Section 14.4.7, “Monitoring User Move Status,” on page 228
14.4.1 Live Move vs. File Transfer Move
GroupWise 6.x and later support two types of moves: a live move and a file transfer move.
A live move uses a TCP/IP connection between Post Office Agents (POAs) to move a user from one
post office to another. In general, a live move is significantly faster (approximately 5 to 10 times)
than a file transfer move. However, it does require that both POAs are version 6.x or later and that
TCP/IP is functioning efficiently between the two POAs. A file transfer move uses the transfer of
message files (using POAs and MTAs) rather than a TCP/IP connection between POAs. A file
transfer move is required if you are moving a user to a post office that is not using a GroupWise 6.x
or later POA or if you are moving a user across a WAN link where TCP/IP might not be efficient.
novdocx (en) 11 December 2007
By default, when you initiate a move from a GroupWise 6.x or later post office, the post office’s
POA attempts to establish a live move session with the destination post office’s POA. If it cannot, a
file transfer move is used instead.
If desired, you can disable the live move capability on a GroupWise 6.x or later post office (Post
Office object > GroupWise > Identification). Any moves to or from the post office would be done by
file transfer.
14.4.2 Moves Between GroupWise 6.x or Later Post Offices
When you move a user’s account from one GroupWise 6.x or later post office to another, all items
are moved correctly and all associations (proxy rights, shared folder access, and so forth) are
resolved so that the move is transparent to the user. Occasionally, some client options the user has
set (GroupWise client > Too ls > Options) might be lost and must be re-created for the new mailbox.
14.4.3 Moves Between GroupWise 6.x or Later and GroupWise
5.x Post Offices
Moves that include a GroupWise 5.x post office are performed at the level supported by the 5.x post
office. This means that users might experience the following:
Rules need to be re-created.
Folders do not appear in the same order as in the original mailbox.
The Address Book contains more than one of the same type of address book (for example,
Frequent Contacts).
Folders and personal address books shared with others are no longer shared. They must be
shared again.
Managing GroupWise Accounts and Users 223
Page 24

Shared folders and personal address books received from others are no longer available. They
must be shared again.
Proxy rights to other mailboxes are lost. The rights must be reestablished.
Folders’ sort order and column settings are lost. They must be reset.
Query folders no longer work. The query must be performed again.
Replies (from other users) to items sent by the moved user before the user moved are
undeliverable.
Messages sent to the moved user from Remote client users are undeliverable until the Remote
client users download the Address Book again.
14.4.4 Preparing for a User Move
Consider the following before moving a user’s GroupWise account:
Make sure the POAs for the user’s current post office and destination post office are running.
See Chapter 37, “Monitoring the POA,” on page 515.
Configure both POAs for verbose logging, in case troubleshooting is required during the user
move process. See Section 37.3, “Using POA Log Files,” on page 538.
novdocx (en) 11 December 2007
If you are performing the user move during off hours, optimize both POAs for the user move
process. On the Agent Settings property page of the POA object in ConsoleOne, set Max
Thread Usage for Priming and Moves to 80%. Set TCP Handler Threads to 40. If you must
move multiple users during regular work hours, you can set up additional POA instances
customized for the user move process, as described in Section 38.2.2, “Configuring a
Dedicated Message File Processing POA,” on page 553. This would prevent the user move
process from impacting users’ regular activities in their mailboxes.
Make sure the Message Transfer Agent (MTA) for the user’s current domain and destination
domain (if different) are running. See Chapter 42, “Monitoring the MTA,” on page 645.
Make sure that all links between POAs and MTAs are all open. See Section 10.2, “Using the
Link Configuration Tool,” on page 143, Section 61.3.1, “Link Trace Report,” on page 1002,
and Section 61.3.2, “Link Configuration Report,” on page 1003
Make sure that all domain databases along the route for the user move are valid. See
Section 26.1, “Validating Domain or Post Office Databases,” on page 377.
Make sure that the mailbox to move is valid. See Section 27.1, “Analyzing and Fixing User and
Message Databases,” on page 385. Select the Structure, Index, and Contents options in
GroupWise Check (GWCheck) or in Mailbox/Library Maintenance in ConsoleOne.
Enable automatic creation of nicknames for moved users, so that replies and forwarded
messages can be delivered successfully after the user has been moved. See Section 4.2.4,
“Nickname Settings,” on page 57.
A user who owns a resource cannot be moved. If the user owns a resource, reassign ownership
of the resource to another user who is on the same post office as the resource. You can do this
beforehand, as described in Section 16.1, “Changing a Resource’s Owner,” on page 253, or
when initiating the user move.
(Optional) To reduce the number of mailbox items that must be moved, consider asking the
user to clean up his or her mailbox by deleting or archiving items.
(Optional) Have the user exit the GroupWise client and GroupWise Notify before you initiate
the move. When the move is initiated, the user’s POA first creates an inventory list of all
224 GroupWise 7 Administration Guide
Page 25

information in the user’s mailbox. This inventory list is sent to the new post office’s POA so
that it can verify when all items have been received. If the user has not exited when the move
begins, the user is automatically logged out so that the inventory list can be built. However,
after the move has been initiated, the user can log in to his or her new mailbox even if the move
is not complete.
14.4.5 Moving a GroupWise Account to Another Post Office in the Same eDirectory Tree
The following steps apply only if the user’s current post office and destination post office are located
in the same eDirectory tree. If not, see Section 14.4.6, “Moving a GroupWise Account to Another
Post Office in a Different eDirectory Tree,” on page 226.
To move a user’s GroupWise account to a different post office in the same eDirectory tree:
1 In ConsoleOne, connect to the domain that owns the destination post office where you are
moving the user.
2 In the GroupWise View, right-click the User object or GroupWise External Entity, then click
Move to display the GroupWise Move dialog box.
If you want to move multiple users from the same post office to another post office, select all
the User objects, right-click the selected objects, then click Move.
novdocx (en) 11 December 2007
3 Select the post office to which you want to move the user’s account, then click OK.
If the user owns a resource, the following dialog box appears.
4 Select a new owner for the resource, then click OK.
5 Keep track of the user move process using the User Move utility. See Section 14.4.7,
“Monitoring User Move Status,” on page 228
Resolving Addressing Issues Caused By Moving an Account
The user’s new address information is immediately replicated to each post office throughout your
system so that the GroupWise Address Book contains the user’s updated address. Any user who
selects the moved user from the GroupWise Address Book can successfully send messages to the
user.
However, some users might have the user’s old address (GroupWise user ID) in their Frequent
Contacts Address Book. In this case, if the sender types the moved user’s name in the To field rather
than selecting it from the Address Book, GroupWise uses the old address stored in the Frequent
Managing GroupWise Accounts and Users 225
Page 26

Contacts Address Book instead of the new address in the GroupWise Address Book. This results in
the message being undeliverable. The POA automatically resolves this issue when it performs its
nightly user upkeep (see Section 36.4.3, “Performing Nightly User Upkeep,” on page 513). During
the nightly user upkeep process, the POA ensures that all addresses in a user’s Frequent Contacts
Address Book are valid addresses in the GroupWise Address Book.
If you want to ensure that messages sent to the user’s old address are delivered even before the POA
cleans up the Frequent Contacts Address Book, you can create a nickname using the old GroupWise
user ID. For information about creating a nickname, see Section 14.7.4, “Creating a Nickname for a
User,” on page 239. To have a nickname created automatically when the user is moved, see
Section 4.2, “System Preferences,” on page 53.
14.4.6 Moving a GroupWise Account to Another Post Office in a Different eDirectory Tree
A GroupWise system can span multiple eDirectory trees, provided that all components for a single
domain (post offices, users, resources, and so forth) are all in the same eDirectory tree. For example,
a user cannot be located in one tree and his or her post office in another.
novdocx (en) 11 December 2007
If necessary, you can move a user’s account from a post office in one eDirectory tree to a post office
in another eDirectory tree as long as the post offices are in the same GroupWise system. This
requires the user to have a User object (or GroupWise External Entity object) in the eDirectory tree
to which his or her GroupWise account is being moved.
To move a user’s GroupWise account to a post office in a different eDirectory tree:
1 Make sure the user has a User object or GroupWise External Entity object in the eDirectory tree
to which his or her GroupWise account is being moved.
2 In ConsoleOne, right-click the User object or GroupWise External Entity object (in the
GroupWise View) > click Move to display the GroupWise Move dialog box.
If you want to move multiple users from the same post office to another post office, select all
the User objects, right-click the selected objects > click Move.
3 Select the post office to which you want to move the user’s account, then click OK.
If the user owns a resource, the following dialog box appears.
4 Select a new owner for the resource, then click OK.
226 GroupWise 7 Administration Guide
Page 27
5 Keep track of the user move process by using the User Move utility to determine when the user
has been successfully moved. See Section 14.4.7, “Monitoring User Move Status,” on
page 228.
6 In the destination eDirectory tree, right-click the User object or GroupWise External Entity
object where the GroupWise account will be assigned. This is the object referred to in Step 1.
7 Click GroupWise > Account to display the Account page.
novdocx (en) 11 December 2007
8 In the Post Office field, select the post office that the user’s GroupWise account was moved to.
9 In the Mailbox ID field, make sure that the mailbox ID is the same as the user’s mailbox ID
(GroupWise user ID) on his or her original post office.
10 Click OK.
A dialog box appears asking if you want to match the GroupWise account to this eDirectory
user.
11 Click Ye s.
Resolving Addressing Issues Caused By Moving an Account
The user’s new address information is immediately replicated to each post office throughout your
system so that the GroupWise Address Book contains the user’s updated address. Any user who
selects the moved user from the GroupWise Address Book can successfully send messages to the
user.
However, some users might have the moved user’s old address (GroupWise user ID) in their
Frequent Contacts Address Book. In this case, if the sender types the moved user’s name in the To
field instead of selecting it from the Address Book, GroupWise uses the old address stored in the
Frequent Contacts Address Book instead of the new address in the GroupWise Address Book. This
results in the message being undeliverable. The POA automatically resolves this issue when it
performs its nightly user upkeep (see Section 36.4.3, “Performing Nightly User Upkeep,” on
page 513). During the nightly user upkeep process, the POA ensures that all addresses in a user’s
Frequent Contacts Address Book are valid addresses in the GroupWise Address Book.
Managing GroupWise Accounts and Users 227
Page 28

If you want to ensure that messages sent to the user’s old address are delivered even before the POA
cleans up the Frequent Contacts Address Book, you can create a nickname using the old GroupWise
user ID. For information about creating a nickname, see Section 14.7.4, “Creating a Nickname for a
User,” on page 239. To have a nickname created automatically when the user is moved, see
Section 4.2, “System Preferences,” on page 53.
14.4.7 Monitoring User Move Status
The User Move Status utility helps you track progress as you move users and resources from one
post office to another. It displays the user moves associated with the object you selected before
displaying the User Move Status dialog box. For example, if you selected a Domain object, all user
moves for the selected domain are displayed, but not user moves for other domains.
While a GroupWise user account is being moved, the POA in the source post office and the POA in
the destination post office communicate back and forth. You can track the move process progresses
through various steps and statuses:
1 In ConsoleOne, select a Post Office or Domain object.
All moves occurring within the selected location will be listed.
2 Click Too ls > GroupWise Utilities > User Move Status.
novdocx (en) 11 December 2007
At the beginning of the move process, most buttons are dim, because it would not be safe for
you to perform those actions at that point in the move process. When those actions are safe, the
buttons become active.
228 GroupWise 7 Administration Guide
Page 29

3 To restrict the number of users and resources in the list, type distinguishing information in any
of the Filter fields, then press Enter to filter the list.
4 During the move, click Refresh to update the status information.
IMPORTANT: The list does not refresh automatically.
During the move, you might observe some of the following statuses:
Destination post office updated: The destination POA has updated the destination post
office database with the user’s account information. At this point, the user account exists
in the new location and appears in the Address Book with the new location information.
Source post office updated: The source POA has updated the user in the source post
office database to show the new destination post office. At this point, the user can no
longer access the mailbox at the old location.
Moving mailbox information: The POAs have finished exchanging administrative
information and are ready to move items from the old mailbox to the new mailbox.
Sending mailbox inventory list: The source POA sends the destination POA a list of all
the mailbox items that it should expect to receive.
novdocx (en) 11 December 2007
Send item request: The destination POA starts requesting items from the source POA
and the source POA responds to the requests
Retry mailbox item retrieval: The destination POA was unable to retrieve an item and is
retrying. The POA continues to retry every 12 hours for 7 days, then considers the move
complete. To complete the move without waiting, click Force Complete. Typically, items
that cannot be moved were not accessible to the user in the first place, so nothing is missed
in the destination mailbox.
Completed retrieving items: The destination POA has received all of the items on its
mailbox inventory list.
Move completed: After all of the user’s mailbox items have arrived in the destination
post office, the user’s original account in the source post office is deleted and the user
move is finished.
The User Move Status utility cannot gather status information for destination post offices that
are running POAs older than GroupWise 6.5. Status information for users moving to older post
offices displays as Unavailable.
5 If something disrupts the user move process, select the problem user or resource, then click
Retry/Restart.
Managing GroupWise Accounts and Users 229
Page 30

6 Select the option appropriate to the problem you are having, then click OK.
Retry the Last Step of the Mailbox Move: Select this option to retry whatever step the user
move process has stopped on. This is equivalent to performing one of the POA’s automatic
retries manually and immediately. Ideally, the step completes successfully on the retry and
processing continues normally.
Skip Retry on the Current Mailbox Item: Select this option to skip a particular mailbox item
that cannot be successfully moved. The need for this action can usually be avoided by running
Mailbox/Library Maintenance on the mailbox before moving the user account. Ideally, the user
move processing should continue normally after skipping the problem item.
Stop Deferred Retries: Select this option to stop the POA from retrying to send items that
have not been successfully received. This completes the user move process even though some
individual items have not been moved successfully.
Restart the Entire Mailbox Move: Select this option if something major disrupts the user
move process and you want to start over from the beginning. Because nothing is deleted from
the source mailbox until everything has been received in the destination mailbox, you can
safely restart a move at any time for any reason.
novdocx (en) 11 December 2007
After you have moved a user in ConsoleOne, you can display detailed information about items
belonging to that account that have not yet been moved to the destination post office, perhaps
because problems were encountered when trying to move them. This information can help
determine the importance of moving residual items that are still pending after all other items
have been successfully moved.
7 Assess the importance of items that are still pending.
7a Select an account for which the move has not completed, then click Pending Items.
You can determine the record type (item, folder, Address Book contact, and so on), the
item type (mail, appointment, task, and so on), how old the item is, the sender of the item,
and the Subject line of the item. Not all columns in the Pending Items dialog box apply to
all record types and item types, so some columns might be empty.
7b Click Request to request pending items.
Pending items are retrieved in groups of 25.
7c Click Ye s to request the first group of pending items, then click OK.
You might need to wait for a while before the pending item lists displays because the
request goes out through the destination domain to the source domain to the source post
office, where the source POA sends the requested information back to the destination
domain. Do not click Request again before the list appears or you receive the same list
twice.
When the pending items appear, you can select an item, then click Info to display detailed
information about the item. You can also click Refresh to reread the domain database to
determine if additional items have been moved.
230 GroupWise 7 Administration Guide
Page 31

7d If you and the user whose mailbox is being moved decide that the pending items are
expendable, click Force Complete to finish the move process.
14.5 Renaming Users and Their GroupWise Accounts
When you rename a user, the user’s GroupWise user ID (mailbox ID) changes but the user remains
in the same post office. All of the user’s associations remain unchanged. For example, the user
retains ownership of any resources and documents while other users who had proxy rights to the
user’s mailbox retain proxy right.
1 Make sure the user has exited the GroupWise client and GroupWise Notify.
2 Make sure the domain’s MTA and post office’s POA are running.
3 In the GroupWise View, right-click the User object, then click Rename to display the
GroupWise Rename dialog box.
novdocx (en) 11 December 2007
4 Specify the GroupWise user ID.
5 Click OK to rename the user.
Resolving Addressing Issues Caused By Renaming a User
The user’s new information is immediately replicated to each post office throughout your system so
that the GroupWise Address Book contains the user’s updated address. Any user who selects the
renamed user from the GroupWise Address Book can successfully send messages to the renamed
user.
However, some users might have the user’s old address (GroupWise user ID) in their Frequent
Contacts Address Books. In this case, if the sender types the renamed user’s name in the To field
instead of selecting it from the Address Book, GroupWise uses the old address stored in the
Frequent Contacts Address Book instead of the new address in the GroupWise Address Book. This
results in the message being undeliverable. The POA automatically resolves this issue when it
performs its nightly user upkeep (see Section 36.4.3, “Performing Nightly User Upkeep,” on
page 513). During the nightly user upkeep process, the POA ensures that all addresses in a user’s
Frequent Contacts Address Book are valid addresses in the GroupWise Address Book.
If you want to ensure that messages sent to the user’s old address are delivered even before the POA
cleans up the Frequent Contacts Address Book, you can create a nickname using the old GroupWise
user ID. For information about creating a nickname, see Section 14.7.4, “Creating a Nickname for a
User,” on page 239.
14.6 Managing Mailbox Passwords
The following sections provide information to help you manage GroupWise mailbox passwords:
Section 14.6.1, “Creating or Changing a Mailbox Password,” on page 232
Managing GroupWise Accounts and Users 231
Page 32

Section 14.6.2, “Removing a Mailbox Password,” on page 233
Section 14.6.3, “Bypassing the GroupWise Password,” on page 233
For background information about GroupWise passwords, see Chapter 70, “GroupWise Passwords,”
on page 1111.
14.6.1 Creating or Changing a Mailbox Password
As administrator, you can use ConsoleOne to create a user’s mailbox password or change a user’s
existing password. If a user can log in to GroupWise, he or she can also change the mailbox
password through the Security Options dialog box (GroupWise Windows or Cross-Platform client >
To ol s > Options > Security) or on the Passwords page (GroupWise WebAccess client > Options >
Password.
To create or change a user’s mailbox password:
1 In ConsoleOne, right-click the User object (or GroupWise External Entity object), then click
Properties.
2 Click GroupWise > Account to display the Account page.
novdocx (en) 11 December 2007
3 Click Change GroupWise Password to display the Security Options dialog box.
4 Enter and reenter a new password.
5 Click OK.
232 GroupWise 7 Administration Guide
Page 33

14.6.2 Removing a Mailbox Password
If you want to remove a user’s mailbox password but not assign a new password, you can clear the
password.
1 In ConsoleOne, right-click the User object (or GroupWise External Entity object), then click
Properties.
2 Click GroupWise > Account to display the Account page.
novdocx (en) 11 December 2007
3 Click Change GroupWise Password to display the Security Options dialog box.
4 Select the Clear User’s Password option.
5 Click OK.
NOTE: A mailbox with no password cannot be accessed using the WebAccess client.
14.6.3 Bypassing the GroupWise Password
By default, if a user must enter a password when logging in to GroupWise, he or she is prompted for
the password.
The GroupWise client includes several options that users can choose from to enable them to log in
without providing a password. These options, located on the Security Options dialog box
(GroupWise client > Too ls > Options > Security), are described in the following table.
Managing GroupWise Accounts and Users 233
Page 34

Table 14-1 Options for Bypassing a Password
GroupWise Client Option Description
Remember My Password This option is available only when running an earlier GroupWise
client on Windows 95/98. The GroupWise 7.x Windows client is
not supported on Windows 95/98.
The GroupWise password is stored in the Windows password list.
When GroupWise starts, it pulls the password from the list.
novdocx (en) 11 December 2007
No Password Required with
eDirectory
Use Single Sign-On This option is available only when using Novell Single Sign-on 2.0
Use Collaboration Single Sign-On
(CASA)
This option is available only when logged in to Novell eDirectory.
When GroupWise starts, it automatically logs in to the GroupWise
account associated with the user who is logged in to eDirectory at
the workstation. No GroupWise password is required.
and SecureLogin 3.0 and later products.
When GroupWise starts, it uses the GroupWise password stored
by Novell Single Sign-on or SecureLogin.
This option is available only when using Novell Common
Authentication Services Adapter (CASA) 1.0 and later.
When GroupWise starts, it uses the GroupWise password stored
by Novell CASA.
As shown in the table, these options appear only if certain conditions are met, such as the user
running on a Windows 95/98 workstation or having Novell Single Sign-on or SecureLogin installed.
If you don’t want the option available to users even if the condition is met, you can disable the
option. Doing so removes it from the GroupWise client’s Password dialog box.
To disable one or more of the password options:
1 In ConsoleOne, click a Domain object if you want to disable password options for all users in
the domain.
or
Click a Post Office object if you want to disable password options for all users in the post
office.
or
Click a User object or GroupWise External Entity object if you want to disable password
options for the individual user.
2 With the appropriate GroupWise object selected, click Too ls > GroupWise Utilities > Client
Options to display the GroupWise Client Options dialog box.
234 GroupWise 7 Administration Guide
Page 35

3 Click Security to display the Security Options dialog box.
novdocx (en) 11 December 2007
4 On the Password tab, deselect Allow Password Caching if you don’t want Windows 95/98
users to be able to use the GroupWise client’s Remember My Password option.
5 Deselect Allow eDirectory Authentication Instead of Password if you don’t want eDirectory
users to be able to use the GroupWise client’s No Password Required with eDirectory option.
6 Deselect Allow Novell Single Sign-on if you don’t want Single Sign-on or SecureLogin users to
be able to use the GroupWise client’s Use Novell Single Sign-on option.
7 Deselect Use Collaboration Single Sign-On (CASA) if you don’t want users of Novell
collaboration products (GroupWise, Messenger, iFolder, and iPrint) to be able to use the same
password for all collaboration products.
8 Click OK to save your changes.
For more information about addressing formats, see Chapter 45, “Configuring Internet Addressing,”
on page 703.
14.7 Managing E-Mail Addresses
To ensure that user addresses meet your needs, GroupWise enables you to determine the format and
visibility of addresses, as well as create additional names for users. The following sections provide
details:
Section 14.7.1, “Ensuring Unique E-Mail Addresses,” on page 236
Section 14.7.2, “Changing a User’s Internet Addressing Settings,” on page 236
Section 14.7.3, “Changing a User’s Visibility in the Address Book,” on page 238
Section 14.7.4, “Creating a Nickname for a User,” on page 239
Managing GroupWise Accounts and Users 235
Page 36

14.7.1 Ensuring Unique E-Mail Addresses
Starting with GroupWise 7, you can use the same e-mail ID for more than one user in your
GroupWise system, provided each user is in a different Internet domain. Rather than requiring that
each e-mail ID be unique in your GroupWise system, each combination of e-mail ID and Internet
domain must be unique. This provides more flexibility for handling the situation where two people
have the same name.
When adding or changing users’ e-mail addresses you can check to make sure that the e-mail
address you want to use for a particular user is not already in use.
1 In ConsoleOne, click Tool s > GroupWise Utilities > Email Address Lookup to display the Email
Address Lookup dialog box.
novdocx (en) 11 December 2007
2 In the Email Address field, specify the e-mail address. You can specify the user ID only (for
example, jsmith) or the entire address (for example, jsmith@novell.com).
3 Click Search.
All objects whose e-mail address match the one you specified are displayed.
4 If desired, select an object, then click Info to see details about the object.
14.7.2 Changing a User’s Internet Addressing Settings
By default, a user inherits his or her Internet address settings (preferred Internet address format,
allowed address formats, and Internet domain name) from the user’s post office, domain, or
GroupWise system. For more information, see Chapter 45, “Configuring Internet Addressing,” on
page 703.
If necessary, you can override these settings for individual users.
1 In ConsoleOne, right-click the User object (or GroupWise External Entity object), then click
Properties.
2 Click GroupWise > Internet Addressing to display the Internet Addressing page.
236 GroupWise 7 Administration Guide
Page 37

3 To override one of the settings, select the Override box, then change the setting.
Preferred Address Format: The preferred address format determines how the user’s address
is displayed in the GroupWise Address Book and in sent messages.
novdocx (en) 11 December 2007
Preferred E-Mail ID: At the user and resource level, the preferred address format can be
completely overridden by explicitly defining the user portion of the address format
(user@Internet domain name). The user portion can include any RFC-compliant characters (no
spaces, commas, and so forth). The user portion must be unique within its Internet domain.
This means that a user can be used multiple times in your GroupWise system, if it is used only
once in each Internet domain.
If you have two users with the same name in the same Internet domain, you can further modify
the user portion. For example, if you’ve selected First Name.Last Name@Internet domain
name as your system’s preferred address format and you have two John Petersons in the same
Internet domain, you would have two users with the same address
(John.Peterson@novell.com). You could use this field to differentiate them by including their
middle initials in their addresses (John.S.Peterson@novell.com and
John.A.Peterson@novell.com).
Allowed Address Formats: The allowed address formats determine which address formats
can be used to send messages to the user. For example, using John Peterson as the user,
Research as the post office, and novell.com as the Internet domain, if you select all five
formats, John Peterson would receive messages sent using any of the following addresses:
jpeterson.research@novell.com
jpeterson@novell.com
john.peterson@novell.com
peterson.john@novell.com
jpeterson@novell.com
Internet Domain Name: The Internet domain name, along with the preferred address format,
is used when constructing the e-mail address that is displayed in the GroupWise Address Book
and in the To field of sent messages.
Only the Internet domain names that have been defined are displayed in the list. Internet
domain names must be defined at the system level (Tools > GroupWise System Operations >
Managing GroupWise Accounts and Users 237
Page 38

Internet Addressing). For more information, see Section 45, “Configuring Internet
Addressing,” on page 703.
If you override the Internet domain name, the For Incoming Mail, Recipients are Known
Exclusively by This Internet Domain Name option becomes available. Enable this option if you
only want the user to be able to receive messages addressed with this Internet domain name. If
you don’t enable this option, the user receives messages addressed using any of the Internet
domain names assigned to your GroupWise system.
4 Click OK to save your changes.
14.7.3 Changing a User’s Visibility in the Address Book
A user’s visibility level determines the extent to which the user’s address is visible throughout your
GroupWise system. You can make the user visible in the Address Book throughout your entire
GroupWise system, you can limit visibility to the user’s domain or post office only, or you can make
it so that no users can see the user in the Address Book.
Making a user visible in the Address Book simply makes it easier to address items to the user.
Regardless of a user’s visibility, other users can send items to the user if they know the user’s
GroupWise user ID.
novdocx (en) 11 December 2007
1 In ConsoleOne, right-click the User object (or GroupWise External Entity object), then click
Properties.
2 Click GroupWise > Account to display the Account page.
3 In the Visibility field, select the desired visibility level.
System (Default): All users in your GroupWise system can see the user’s information in the
Address Book.
Domain: Only users in the same domain as the user can see the user’s information in the
Address Book.
Post Office: Only users in the same post office as the user can see the user’s information in the
Address Book.
238 GroupWise 7 Administration Guide
Page 39

None: No users can see the user’s information in the Address Book. Users need to know the
user’s GroupWise user ID to send items to him or her.
4 Click OK to save your changes.
14.7.4 Creating a Nickname for a User
Each user has a specific GroupWise address consisting of the user’s ID, post office, and domain
(user_ID.post_office.domain). You can assign one or more nicknames to a user to give the user an
alternate address. Each part of the address (user_ID, post_office, and domain) can be different than
the user’s actual address.
For example, you might want to create a nickname for a user you have just moved (see Section 14.4,
“Moving GroupWise Accounts,” on page 222) or renamed (see Section 14.5, “Renaming Users and
Their GroupWise Accounts,” on page 231). The nickname, which would be the user’s old address,
would ensure that any use of the old address would result in the new address being used instead.
Nicknames are not displayed in the Address Book, which means users need to know the nickname to
use it.
novdocx (en) 11 December 2007
To manually create a nickname for a user:
1 In ConsoleOne, right-click the User object or GroupWise External Entity object, then click
Properties.
2 Click GroupWise > Nicknames to display the Nicknames page.
3 Click Add to display the Create Nickname dialog box.
Managing GroupWise Accounts and Users 239
Page 40

4 Fill in the following fields:
Domain.PO: Select the post office where you want to assign the nickname. This can be any
post office in your GroupWise system; it does not have to be the user’s post office.
Object ID: Specify the name to use as the user_ID portion of the nickname. The nickname
must be unique.
Visibility: This field does not apply to nicknames. Nicknames are not displayed in the Address
Book. To use a nickname, a message sender must specify the nickname’s address.
novdocx (en) 11 December 2007
Given Name: Specify the user’s given (first) name.
Last Name: Specify the user’s last name.
Expiration Date: If you want the nickname to be removed by the Expire Records feature after
a certain date, as described in Section 14.10.3, “Managing Expired or Expiring GroupWise
Accounts,” on page 244, select Enable, then select the desired date.
5 Click OK to add the nickname to the list.
6 Click OK to save the changes to the User object or GroupWise External Entity object.
To have nicknames created automatically whenever you move a user, see Section 4.2, “System
Preferences,” on page 53.
14.8 Checking GroupWise Account Usage
You can identify GroupWise accounts that have been inactive for a specified period of time. See
Section 12.4, “Auditing Mailbox License Usage in the Post Office,” on page 191.
You can measure message traffic from individual GroupWise mailboxes. See Section 61.3.5, “User
Traffic Report,” on page 1009.
14.9 Disabling and Enabling GroupWise Accounts
You can disable a GroupWise account so that the user cannot access his or her mailbox until you
enable the account again. This might be necessary if you need to perform database maintenance on
the user’s mailbox or when a user leaves the company and no longer needs access to the mailbox.
1 In ConsoleOne, right-click the User object (or GroupWise External Entity object), then click
Properties.
2 Click GroupWise > Account to display the Account page.
240 GroupWise 7 Administration Guide
Page 41

3 Select Disable Logins, then click OK.
4 To enable the user’s account when access is again permitted, deselect Disable Logins, then
click OK.
novdocx (en) 11 December 2007
While a user’s account is disabled, other users to whom proxy rights have been granted can still
access the mailbox. This is convenient for reviewing the contents of the mailbox of a departed
employee and pulling out those messages that are of use to the incoming employee.
14.10 Removing GroupWise Accounts
You can remove a user’s GroupWise account by deleting or expiring it. Deleting an account removes
the entire account (address, mailbox, items, and so forth) from the GroupWise system. Expiring an
account deactivates the account so that it cannot be accessed, but does not remove it from the
system. The following sections provide information to help you delete or expire GroupWise
accounts
Section 14.10.1, “Deleting a GroupWise Account,” on page 241
Section 14.10.2, “Expiring a GroupWise Account,” on page 243
Section 14.10.3, “Managing Expired or Expiring GroupWise Accounts,” on page 244
If you delete a GroupWise account by accident, or need to retrieve a deleted account for some other
reason, see Section 32.6, “Recovering Deleted GroupWise Accounts,” on page 416.
NOTE: When you remove a GroupWise account, any personal databases, such as an archive, a
Caching mailbox, or a Remote mailbox, that are associated with the account are unaffected by the
account deletion. Such databases are not located where ConsoleOne could delete them, so they must
be deleted manually.
14.10.1 Deleting a GroupWise Account
When you delete a user’s GroupWise account, the user’s mailbox is deleted and the user is removed
from the GroupWise system. If the user owns library documents, see “Ensuring that a User’s Library
Managing GroupWise Accounts and Users 241
Page 42

Documents Remain Accessible” on page 243 before deleting the user. Otherwise, refer to one of the
following sections:
“Deleting an eDirectory User’s GroupWise Account” on page 242
“Deleting a Non-eDirectory User’s GroupWise Account” on page 242
Deleting an eDirectory User’s GroupWise Account
1 Make sure the user has exited the GroupWise client and GroupWise Notify.
2 Make sure the POA for the user’s post office is running.
If the POA is not running, the user mailbox is not deleted until the next time the POA runs.
3 In ConsoleOne, right-click the User object, then click Delete.
or
Select multiple User objects, right-click the selected object, then click Delete.
4 Click Ye s to display the Delete Options dialog box.
novdocx (en) 11 December 2007
5 In the GroupWise Account box, select Delete.
6 In the eDirectory Account box, deselect Delete.
7 Click OK to delete the eDirectory user’s GroupWise account.
or
If you selected multiple User objects, click OK to All to apply the same deletion options to all
accounts. If you click OK rather than OK to All, you can select deletion options for each
account individually as it is deleted.
8 If a user was a resource owner, the following dialog box appears. Select a new user to be the
resource’s owner, then click OK.
Deleting a Non-eDirectory User’s GroupWise Account
Non-eDirectory users are given GroupWise accounts by adding the users to eDirectory as
GroupWise external entities (see Section 13.3, “Creating GroupWise Accounts for Non-eDirectory
Users,” on page 214). You remove a non-eDirectory user’s GroupWise account by deleting the
user’s GroupWise External Entity object from eDirectory.
242 GroupWise 7 Administration Guide
Page 43

NOTE: Remember that external entities do have eDirectory objects, but they are not considered
eDirectory users for licensing purposes.
As with eDirectory users, when you remove a non-eDirectory user’s GroupWise account, the user’s
mailbox is deleted and the user is removed from the GroupWise system.
To delete a non-eDirectory user’s GroupWise account:
1 Make sure the user has exited the GroupWise client and GroupWise Notify.
2 Make sure the POA for the user’s post office is running.
If the POA is not running, the user’s mailbox will not be deleted until the next time the POA
runs.
3 In ConsoleOne, right-click the user’s GroupWise External Entity object, then click Delete.
4 Click Yes to confirm the deletion.
Ensuring that a User’s Library Documents Remain Accessible
When you delete a user’s GroupWise account, GroupWise does not delete any library documents to
which the user has Author or Creator status. These documents remain in the library as “orphaned”
documents, meaning that no one can access the documents.
novdocx (en) 11 December 2007
If you or other users need access to the documents, you have the following choices:
Rather than deleting the user, change the user’s GroupWise mailbox password so that he or she
can’t log in. Other users can continue accessing the documents, and you can log in as the user
to manage the documents. For information about changing a user’s password, see
Section 14.6.1, “Creating or Changing a Mailbox Password,” on page 232.
Rather than deleting the user or changing the user’s password, disable the user’s ability to log
in. This is done on the user’s GroupWise Account page (User object > GroupWise > Accounts
> Disable Logins).
Delete the user, then reassign the orphaned documents to another user. For information, see
Section 28.2, “Analyzing and Fixing Library and Document Information,” on page 392.
14.10.2 Expiring a GroupWise Account
Rather than delete a user’s GroupWise account, you can expire the account. The account, including
the user’s mailbox and all items, remains in GroupWise but cannot be accessed by the user. If
necessary, the user’s account can be reactivated at a later date, as described in Section 14.10.3,
“Managing Expired or Expiring GroupWise Accounts,” on page 244. This option is useful for
providing GroupWise accounts to temporary or contract employees who come and go.
You can set a user’s GroupWise account to expire immediately or at a future date and time.
1 Make sure the user has exited the GroupWise client and GroupWise Notify.
2 In ConsoleOne, right-click the User object or GroupWise External Entity object with the
account you want to expire, then click Properties.
3 Click GroupWise > Account to display the Account page.
Managing GroupWise Accounts and Users 243
Page 44

4 In the Expiration Date field, select the Enable check box to turn on the option.
5 If you want the account to expire immediately, leave the date and time set to the current date
and time.
or
If you want the account to expire at a later date, select the desired date and time.
novdocx (en) 11 December 2007
6 Click OK.
NOTE: To immediately expire an account assigned to an eDirectory user, you can also right-click
the User object, click Delete, select the Expire GroupWise Account option, then click OK. This
method is not available for non-eDirectory (GroupWise External Entity object) users.
14.10.3 Managing Expired or Expiring GroupWise Accounts
Expired GroupWise accounts remain expired until you reactivate them or delete them. Refer to the
following sections for information to help you manage expired accounts:
“Identifying Expired or Expiring Accounts” on page 244
“Changing an Account’s Expiration Date” on page 245
“Reactivating an Expired Account” on page 246
Identifying Expired or Expiring Accounts
Rather than search through all your User or GroupWise External Entity objects in eDirectory to
identify which ones have expired or expiring accounts, you can use the Expired Records option to
quickly list expired accounts for your entire system, a single domain, or a single post office.
Depending on the date you choose, you can see expired accounts only or both expired and expiring
accounts.
1 In the GroupWise View, select the post office, domain, or GroupWise system that contains the
accounts you want to view.
244 GroupWise 7 Administration Guide
Page 45
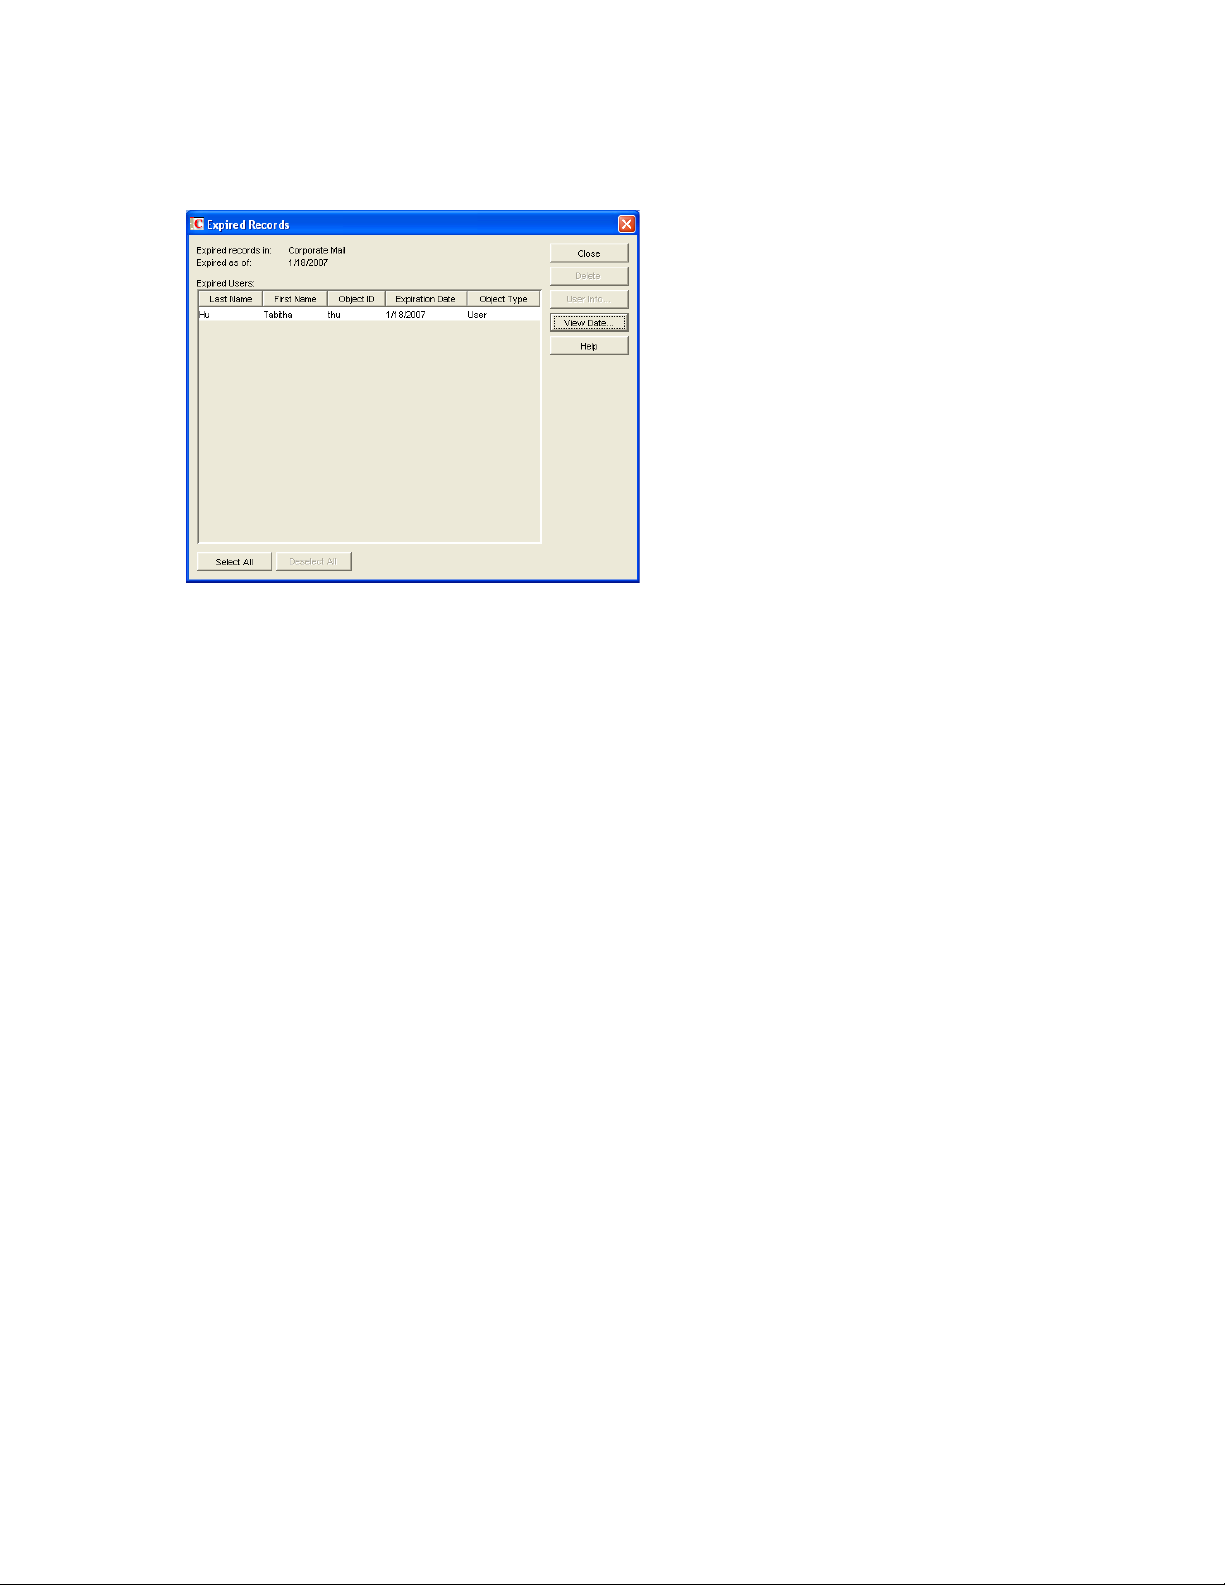
2 Click Too ls > GroupWise Utilities > Expired Records to display the Expired Records dialog
box.
novdocx (en) 11 December 2007
The Expired As Of field defaults to the current date. Only accounts that have expired as of this
date are displayed in the list. To see accounts that will expire in the future, you need to change
the date in the Expired As Of field.
3 To change the date in the Expired As Of field, click Vie w D a t e, specify the desired date, then
click OK.
For example, in the dialog box shown above, the current date is 1/18/2007 (January 1, 2007).
To see what accounts will expire by June 30, 2007, you would change the Expired As Of date to
6/30/2007.
4 When finished viewing expired or expiring accounts, click OK to close the Expired Accounts
dialog box.
Changing an Account’s Expiration Date
1 In ConsoleOne, right-click the User object or GroupWise External Entity object, then click
Properties.
2 Click GroupWise > Account to display the Account page.
Managing GroupWise Accounts and Users 245
Page 46

3 In the Expiration Date field, change the time and date.
4 Click OK.
novdocx (en) 11 December 2007
Reactivating an Expired Account
1 In ConsoleOne, right-click the User object or GroupWise External Entity object with the
expired GroupWise account, then click Properties.
2 Click GroupWise > Account to display the Account page.
3 In the Expiration Date field, deselect the Enable check box to turn off the option.
4 Click OK.
246 GroupWise 7 Administration Guide
 Loading...