


XV
Security Administration
Chapter 70, “GroupWise Passwords,” on page 1111
Chapter 71, “Encryption and Certificates,” on page 1117
Chapter 72, “LDAP Directories,” on page 1127
Chapter 73, “Message Security,” on page 1131
Chapter 74, “Address Book Security,” on page 1133
Chapter 75, “GroupWise Administrator Rights,” on page 1135
Chapter 76, “GroupWise Agent Rights,” on page 1147
Chapter 77, “GroupWise User Rights,” on page 1149
Chapter 78, “Spam Protection,” on page 1155
Chapter 79, “Virus Protection,” on page 1157
See also Part XVI, “Security Policies,” on page 1159.
novdocx (en) 11 December 2007
XV
Security Administration
1109

novdocx (en) 11 December 2007
1110 GroupWise 7 Administration Guide

70
GroupWise Passwords
novdocx (en) 11 December 2007
70
Access to GroupWise® mailboxes is protected by post office security settings or GroupWise
passwords. Agent passwords grant access to remote servers and to Novell
protect access to GroupWise agent status information.
Section 70.1, “Mailbox Passwords,” on page 1111
Section 70.2, “Agent Passwords,” on page 1115
See also Part XVI, “Security Policies,” on page 1159.
®
eDirectoryTM, and
70.1 Mailbox Passwords
When you are setting up a new GroupWise system, you need to determine what kind of password
protection you want to have on users’ GroupWise mailboxes before users start running GroupWise.
In ConsoleOne
GroupWise and you can set defaults under Client Options to enforce your choices. You and
GroupWise client users should keep in mind that GroupWise passwords are case sensitive.
Section 70.1.1, “Using Post Office Security Instead of GroupWise Passwords,” on page 1111
Section 70.1.2, “Requiring GroupWise Passwords,” on page 1112
Section 70.1.3, “Managing GroupWise Passwords,” on page 1112
Section 70.1.4, “Using LDAP Passwords Instead of GroupWise Passwords,” on page 1114
Section 70.1.5, “Bypassing Mailbox Passwords to Respond to Corporate Mandates,” on
page 1114
®
, you can choose where password information is obtained when users log in to
70.1.1 Using Post Office Security Instead of GroupWise Passwords
When you create a new post office, you must select a security level for it.
If you select Low Security for the post office, users are not required to set passwords on their
GroupWise mailboxes. However, passwordless mailboxes are completely unprotected from other
users who know how to use the @u-user_ID startup switch.
If you select High Security for the post office, users are still not required to set passwords on their
GroupWise mailboxes, but they are required to be successfully logged in to a network before they
can access their own passwordless mailboxes. Users cannot access other users’ passwordless
mailboxes.
After you select High Security, you can further enhance post office security by requiring specific
types of authentication before users can access their passwordless GroupWise mailboxes. You can
require eDirectory authentication so that users must be logged into eDirectory before they can
access their passwordless GroupWise mailboxes.
In spite of these passwordless solutions to GroupWise mailbox security, users are always free to set
their own GroupWise passwords on their mailboxes. When they do, the post office security settings
no longer apply (except for LDAP authentication as discussed below) and users are regularly faced
GroupWise Passwords
1111

with both logins unless some additional password options are selected for them, as described in the
following sections.
70.1.2 Requiring GroupWise Passwords
Users are required to set passwords on their GroupWise mailboxes if they want to access their
GroupWise mailboxes in any of the following ways:
Using Caching mode or Remote mode in the GroupWise Windows client
Using Caching mode in the GroupWise Cross-Platform client
Using their Web browsers and the GroupWise WebAccess client
Using an IMAP e-mail client
Accessing a GroupWise mailbox as an external entity rather than as an eDirectory user
70.1.3 Managing GroupWise Passwords
When GroupWise passwords are in use in addition to network passwords, there are a variety of
things you can do to make GroupWise password management easier for your and to make the
additional GroupWise password essentially transparent for your GroupWise users.
novdocx (en) 11 December 2007
“Establishing a Default GroupWise Password for New Accounts” on page 1112
“Accepting eDirectory Authentication Instead of GroupWise Passwords” on page 1112
“Using Novell SecureLogin to Handle GroupWise Passwords” on page 1113
“Allowing Windows to Cache GroupWise Passwords” on page 1113
“Using Intruder Detection” on page 1113
“Resetting GroupWise Passwords” on page 1113
“Synchronizing GroupWise Passwords and LDAP Passwords” on page 1114
NOTE: A GroupWise password can contain as many as 64 characters and can contain any typeable
characters.
Establishing a Default GroupWise Password for New Accounts
If you want to require users to have GroupWise passwords on their mailboxes, you can establish the
initial passwords when you create the GroupWise accounts. In ConsoleOne, you can establish a
default mailbox password to use automatically on all new GroupWise accounts, as described in
Section 13.1, “Establishing a Default Password for All New GroupWise Accounts,” on page 203. Or
you can set the password on each new GroupWise account as you create it.
Keep in mind that some situations require users to have passwords on their GroupWise mailboxes,
as listed in Section 70.1.2, “Requiring GroupWise Passwords,” on page 1112.
Accepting eDirectory Authentication Instead of GroupWise Passwords
When you create users in eDirectory, you typically assign them network passwords and users must
provide those passwords when they log in to the network. If you want to make GroupWise mailbox
access easy for client users, you can select Allow eDirectory Authentication Instead of Password
(ConsoleOne > Tools > GroupWise Utilities > Client Options > Password). This allows GroupWise
1112 GroupWise 7 Administration Guide

users to select No Password Required with eDirectory (Windows client > Tools > Security >
Password).
NOTE: This option is not available in the Cross-Platform client or the WebAccess client.
As long as users who select this option are logged into eDirectory as part of their network login, they
are not prompted by GroupWise for a password when they access their GroupWise mailboxes. If
they are not logged in to eDirectory, they must provide their GroupWise passwords in order to
access their GroupWise mailboxes.
Using Novell SecureLogin to Handle GroupWise Passwords
If users have Novell SecureLogin installed on their workstations, you can select Enable Single SignOn (ConsoleOne > Tools > GroupWise Utilities > Client Options > Security > Password). This
allows GroupWise users to select Use Single Sign-On (Windows client > Tools > Security >
Password). Users need to provide their GroupWise mailbox password only once and thereafter
SecureLogin provides it for them as long as they are logged in to eDirectory.
NOTE: This option is not available in the Cross-Platform client or the WebAccess client.
novdocx (en) 11 December 2007
Allowing Windows to Cache GroupWise Passwords
If you want to allow password information to be stored on Windows workstations, you can select
Allow Password Caching (ConsoleOne > Tools > GroupWise Utilities > Client Options > Security
> Password). This allows GroupWise users to select Remember My Password (Windows client >
Tools > Security > Password). Users need to provide their GroupWise mailbox passwords only once
and thereafter Windows provides them automatically.
NOTE: This option is not available in the Cross-Platform client or the WebAccess client.
Using Intruder Detection
Intruder detection identifies system break-in attempts in the form of repeated unsuccessful logins. If
someone cannot provide a valid username and password combination within a reasonable time, then
that person probably does not belong in your GroupWise system.
Intruder detection for the GroupWise Windows client and Cross-Platform client is performed by the
POA and is configurable. You can set the number of failed login attempts before lockout, the length
of the lockout, and so on. If a user is locked out, you can re-enable his or her account in ConsoleOne.
See Section 36.3.5, “Enabling Intruder Detection,” on page 506.
Intruder detection for the GroupWise WebAccess client is built in and is not configurable. After five
failed login attempts, the user is locked out for 10 minutes. If a user is locked out, the user must wait
for the lockout period to end (unless you want to restart the WebAccess Agent).
Resetting GroupWise Passwords
In ConsoleOne, you can remove a user’s password from his or her mailbox if the password has been
forgotten and needs to be reset (User object > Tools > GroupWise Utilities > Client Options >
Security > Password). If necessary, you can remove the passwords from all mailboxes in a post
office (Post Office object > Tools > Mailbox/Library Maintenance > Reset Client Options) This
resets all or users’ client options settings, not just the passwords.
GroupWise Passwords 1113

It is easy for GroupWise users to reset their own passwords (Windows or Cross-Platform client >
Tools > Options > Security > Password). However, if this method is used when users are in Caching
or Remote mode, this changes the password on the local Caching or Remote mailboxes, but does not
change the password on the Online mailboxes. To change the Online mailbox password while in
Caching or Remote mode, users must use a method they might not be familiar with (Windows client
> Accounts > Account Options > Novell GroupWise Account > Properties > Advanced > Online
Mailbox Password).
It is also easy for WebAccess users to reset their own passwords (WebAccess client > Options >
Password). However, you might not want users to be able to reset their GroupWise passwords from
Web browsers. In ConsoleOne, you can prevent WebAccess client users from resetting their
GroupWise passwords (ConsoleOne > GroupWiseWebAccess object > Application > Settings).
Windows and Cross-Platform client users cannot be prevented from changing their GroupWise
passwords.
Synchronizing GroupWise Passwords and LDAP Passwords
There is no automatic procedure for synchronizing GroupWise passwords and eDirectory
passwords. However, if you use LDAP authentication, synchronization becomes a moot point
because GroupWise users are authenticated through an LDAP directory (such as eDirectory) rather
than by using GroupWise passwords. See Section 70.1.4, “Using LDAP Passwords Instead of
GroupWise Passwords,” on page 1114.
novdocx (en) 11 December 2007
70.1.4 Using LDAP Passwords Instead of GroupWise Passwords
Instead of using GroupWise passwords, users’ password information can be validated using an
LDAP directory. In order for users to use their LDAP passwords to access their GroupWise
mailboxes, you must define one or more LDAP servers in your GroupWise system and configure the
POA for each post office to perform LDAP authentication, as described in Section 36.3.4,
“Providing LDAP Authentication for GroupWise Users,” on page 501.
When LDAP authentication is enabled, you can control whether users can use the GroupWise client
to change their LDAP passwords (ConsoleOne> Post Office object > GroupWise > Security). If you
allow them to, GroupWise users can change their passwords through the Security Options dialog
box (Windows and Cross-Platform client > Tools > Options > Security) or on the Passwords page
(GroupWise WebAccess client > Options > Password). If you do not allow them to change their
LDAP passwords in the GroupWise client, users must use a different application in order to change
their LDAP passwords.
You and users can use some of the same methods to bypass LDAP passwords as you can use for
bypassing GroupWise passwords. See “Accepting eDirectory Authentication Instead of GroupWise
Passwords” on page 1112 and “Allowing Windows to Cache GroupWise Passwords” on page 1113.
For more information about LDAP passwords, see Section 72.3, “Authenticating to GroupWise with
Passwords Stored in an LDAP Directory,” on page 1127.
70.1.5 Bypassing Mailbox Passwords to Respond to Corporate Mandates
Sometimes it is necessary to access user mailboxes to meet corporate mandates such as virus
scanning, content filtering, or e-mail auditing that might be required during litigation. These types of
1114 GroupWise 7 Administration Guide

mailbox access are obtain using trusted applications, third-party programs that can log into Post
Office Agents (POAs) in order to access GroupWise mailboxes. For more information about using
trusted application to bypass mailbox passwords, see Section 4.12, “Trusted Applications,” on
page 69
70.2 Agent Passwords
Agent passwords facilitate access to remote servers where domains, post office, and document
storage areas are located and access to eDirectory for synchronization of user information between
GroupWise and eDirectory. They also protect GroupWise Monitor and the agent Web consoles from
unauthorized access.
Section 70.2.1, “Facilitating Access to Remote Servers,” on page 1115
Section 70.2.2, “Facilitating Access to eDirectory,” on page 1116
Section 70.2.3, “Protecting the Agent Web Consoles,” on page 1116
Section 70.2.4, “Protecting the GroupWise Monitor Web Console,” on page 1116
70.2.1 Facilitating Access to Remote Servers
novdocx (en) 11 December 2007
If the NetWare® POA runs on a server other than where the post office database and directory
structure are located, it needs to log in to that remote server using an existing username and
password. There are several ways to provide this information:
Fill in the Remote User Name and Remote Password fields on the Post Office Settings page of
the Post Office object in ConsoleOne
Add the /dn startup switch to the POA startup file to provide the fully distinguished name of the
NetWare POA object
Add the /user and /password startup switches to the POA startup file to provide a username and
password
The Windows POA also needs username and password information if it needs to access a document
storage area on a server other than the one where the post office database and directory structure are
located. The three methods listed above can be used for this situation as well. The Windows POA
does not need username and password information in order to access the post office directory
because it should already have a drive mapped to that location.
If the NetWare MTA, Internet Agent, or WebAccess Agent runs on a server other than where the
domain database and directory structure are located, it needs to log in to that remote server using an
existing username and password. All three of these agents support the /user and /password switches
for this purpose. The MTA also supports the /dn switch parallel to the POA. You cannot currently
use ConsoleOne to specify username and password information for these agents.
Providing passwords in clear text in a startup file might seem like a security risk. However, the
servers where the agents run should be kept physically secure. If an unauthorized person did gain
physical access, they would not be doing so for the purpose of obtaining these particular passwords.
And the passwords are encrypted as they pass over the wire between servers, so the security risk is
minimal.
GroupWise Passwords 1115

70.2.2 Facilitating Access to eDirectory
If you have enabled eDirectory user synchronization, the MTA must be able to log in to eDirectory
in order to obtain the updated user information. An eDirectory-enabled MTA should be installed on
a server where a local eDirectory replica is located.
If the eDirectory-enabled NetWare MTA is running on a different server from where the domain is
located, you must add the /user and /password switches, or the /dn switch, to the MTA startup file so
that the MTA can authenticate to eDirectory. The /dn switch is preferable, so that username and
password information is not exposed in the MTA startup file. If the NetWare MTA is running on the
same server where the domain is located, the MTA can look up the distinguished name in the
domain database.
For the eDirectory-enabled Windows MTA, you must add the /user and /password switches to the
MTA startup file in order to specify the network user account that the MTA should use to
authenticate to eDirectory.
For more information, see Section 41.4.1, “Using eDirectory User Synchronization,” on page 638.
70.2.3 Protecting the Agent Web Consoles
novdocx (en) 11 December 2007
When you install the POA and the MTA, they are automatically configured with an agent Web
console and no password protection is provided. When you install the Internet Agent and the
WebAccess Agent, you can choose whether to enable the agent Web console during installation. If
you do, you can provide password protection at that time.
If you do not want agent Web console status information available to anyone who knows the agent
network address and port number, you should set passwords on your agent Web console, as
described in the following sections:
Section 37.2, “Using the POA Web Console,” on page 530
Section 42.2, “Using the MTA Web Console,” on page 657
Section 49.2, “Using the Internet Agent Web Console,” on page 787
Section 56.1.2, “Using the WebAccess Agent Web Console,” on page 929
If you plan to access the agent Web consoles from GroupWise Monitor, it is most convenient if you
use the same password on all agent Web consoles. That way, you can provide the agent Web console
password once in GroupWise Monitor, rather than having to provide various passwords as you view
the Web consoles for various agents. For information about providing the agent Web console
password in GroupWise Monitor, see Section 59.4, “Configuring Polling of Monitored Agents,” on
page 978.
70.2.4 Protecting the GroupWise Monitor Web Console
Along with the agent Web consoles, you can also provide password protection for the Monitor Web
console itself, from which all the agent Web consoles can be accessed. For instructions, see
Section 59.8, “Configuring Authentication and Intruder Lockout for the Monitor Web Console,” on
page 985.
1116 GroupWise 7 Administration Guide

71
Encryption and Certificates
Although GroupWise® native encryption is employed throughout your GroupWise system,
additional security measures should be utilized to secure your GroupWise data.
Section 71.1, “Personal Digital Certificates, Digital Signatures, and S/MIME Encryption,” on
page 1117
Section 71.2, “Server Certificates and SSL Encryption,” on page 1119
Section 71.3, “Trusted Root Certificates and LDAP Authentication,” on page 1123
See also Part XVI, “Security Policies,” on page 1159.
71.1 Personal Digital Certificates, Digital Signatures, and S/MIME Encryption
novdocx (en) 11 December 2007
71
If desired, you can implement S/MIME encryption for GroupWise client users by installing various
security providers on users’ workstations, including:
Entrust* 4.0 or later (http://www.entrust.com)
Microsoft Base Cryptographic Provider 1.0 or later (included with Internet Explorer 4.0 or
later)
Microsoft Enhanced Cryptographic Provider 1.0 or later (http://www.microsoft.com/windows/
ie/downloads/recommended/128bit/default.asp)
Microsoft Strong Cryptographic Provider (http://www.siliconprairiesc.com/spsckb/EncryptAll/
strong_cryptographic_provider.htm)
Gemplus GemSAFE Card CSP 1.0 or later (http://www.gemplus.com)
Schlumberger Cryptographic Provider (http://www.slb.com)
For additional providers, consult the Novell Partner Product Guide (http://www.novell.com/
partnerguide).
These products enable users to digitally sign and/or encrypt their messages using S/MIME
encryption. When a sender digitally signs a message, the recipient is able to verify that the item was
not modified en route and that it originated from the sender specified. When a sender encrypts a
message, the sender ensures that the intended recipient is the only one who can read it. Digitally
signed and/or encrypted messages are protected as they travel across the Internet, whereas native
GroupWise encryption is removed as messages leave your GroupWise system.
After users have installed the S/MIME security providers on their workstations, you can configure
default functionality for it in ConsoleOne
GroupWise Utilities > Client Options > Send > Security). You can specify a URL from which you
want users to obtain their S/MIME certificates. You can require the use of digital signatures and/or
encryption, rather than letting users decide when to use them. You can even select the encryption
algorithm and encryption key size if necessary. For more information, see Section 65.2.2,
“Modifying Send Options,” on page 1062.
®
(Domain, Post Office, or User object > Too l s >
Encryption and Certificates
1117

After you have configured S/MIME functionality in ConsoleOne, GroupWise users must select the
security provider (Windows client > Tools > Options > Security > Send Options) and then obtain a
personal digital certificate. Unless you installed Entrust, users can request certificates (Windows
client > Tools > Options > Certificates > Get Certificate). If you provided a URL, users are taken to
the Certificate Authority of your choice. Otherwise, certificates for use with GroupWise can be
obtained from various certificate providers, including:
Novell, Inc. (if you have installed Novell
®
Certificate ServerTM 2 or later (http://
www.novell.com/products/certserver))
VeriSign*, Inc. (http://www.verisign.com)
Thawte* Certification (http://www.thawte.com)
GlobalSign* (http://www.globalsign.com)
NOTE: Some certificate provides charge a fee for certificates and some do not.
After users have selected the appropriate security provider and obtained a personal digital
certificate, they can protect their messages with S/MIME encryption by digitally signing them
(Windows client > Actions > Sign Digitally) and/or encrypting them (Windows client > Actions >
Encrypt). Buttons are added to the GroupWise toolbar for convenient use on individual messages, or
users can configure GroupWise to always use digital signatures and/or encryption (Windows client
> Tools > Options > Security > Send Options). The messages they send with digital signatures and/
or encryption can be read by recipients using any other S/MIME-enabled e-mail products.
novdocx (en) 11 December 2007
GroupWise Windows client users are responsible for managing their personal digital certificates.
Users can have multiple personal digital certificates. In the GroupWise client, users can view their
own certificates, view the certificates they have received from their contacts, access recipient
certificates from LDAP directories (see Section 72.4, “Accessing S/MIME Certificates in an LDAP
Directory,” on page 1128 for details), change the trust level on certificates, import and export
certificates, and so on.
The certificates are stored in the local certificate store on the user’s workstation. They are not stored
in GroupWise. Therefore, if a user moves to a different workstation, he or she must import the
personal digital certificate into the certificate store on the new workstation, even though the same
GroupWise account is being accessed.
If your system includes smart card readers on users’ workstations, certificates can be retrieved from
this source as well, so that after composing a message, users can sign them by inserting their smart
cards into their card readers. The GroupWise client picks up the digital signature and adds it to the
message.
The GroupWise Windows client verifies the user certificate to ensure that it has not been revoked. It
also verifies the Certificate Authority. If a certificate has expired, the GroupWise user receives a
warning message.
For complete details about using S/MIME encryption in the GroupWise Windows client, see
“Sending S/MIME Secure Message” in the GroupWise 7 Windows Client User Guide.
NOTE: S/MIME encryption is not available in the Cross-Platform client or the WebAccess client.
Any messages that are not digitally signed or encrypted are still protected by native GroupWise
encryption as long as they are within your GroupWise system.
1118 GroupWise 7 Administration Guide

71.2 Server Certificates and SSL Encryption
You should strengthen native GroupWise encryption with Secure Sockets Layer (SSL)
communication between servers where GroupWise agents are installed. If you have not already set
up SSL on your system, you must complete the following tasks:
Section 71.2.1, “Generating a Certificate Signing Request,” on page 1119
Section 71.2.2, “Using a GWCSRGEN Configuration File,” on page 1120
Section 71.2.3, “Submitting the Certificate Signing Request to a Certificate Authority,” on
page 1121
Section 71.2.4, “Creating Your Own Certificate,” on page 1121
Section 71.2.5, “Installing the Certificate on the Server,” on page 1123
Section 71.2.6, “Configuring the Agents to Use SSL,” on page 1123
If you have already set up SSL on your system and are using it with other applications besides
GroupWise, skip to Section 71.2.6, “Configuring the Agents to Use SSL,” on page 1123.
novdocx (en) 11 December 2007
71.2.1 Generating a Certificate Signing Request
Before the GroupWise agents can use SSL, you must create a Certificate Signing Request (CSR) and
obtain a public certificate file. The CSR includes the hostname of the server where the agents run.
Therefore, you must create a CSR for every server where you want the GroupWise agents to use
SSL. However, all GroupWise agents running on the same server can all use the same resulting
certificate, so you do not need separate CSRs for different agents. The CSR also includes your
choice of name and password for the private key file that must be used with each certificate. This
information is needed when configuring the agents to use SSL.
One way to create a CSR is to use the GWCSRGEN utility. This utility takes the information you
provide and creates a .csr file from which a public certificate file can be generated.
1 Start the GroupWise Generate CSR utility.
Linux: The utility (gwcsrgen) is installed to the /opt/novell/groupwise/agents/bin
directory. You must be logged in as root to start the utility.
Windows: The utility (gwcsrgen.exe) is located in the \admin\utility\gwcsrgen
directory either on the GroupWise 7 Administrator for NetWare/Windows CD or in the
GroupWise software distribution directory.
Encryption and Certificates 1119

2 Fill in the fields in the Private Key box. The private key information is used to create both the
Private Key file and the Certificate Signing Request file.
Key Filename: Specify a name for the Private Key file (for example, server1.key). If you don’t
want the file stored in the same directory as the GWCSRGEN utility, specify a full path with
the filename (for example, c:\server1.key or /opt/novell/groupwise/certs/
server1.key).
Key Password: Specify the password for the private key. The password can be up to 256
characters (single-byte environments).
Verify Password: Specify the password again.
3 Fill in the fields in the Certificate Signing Request box.
CSR Filename: Specify a name for the Certificate Signing Request file (for example,
server1.csr). If you don’t want the file stored in the same directory as the GWCSRGEN
utility, specify a full path with the filename (for example, c:\server1.csr or /opt/
novell/groupwise/certs/server1.csr).
4 Fill in the fields in the Required Information box. This information is used to create the
Certificate Signing Request file. You must fill in all fields to generate a valid CSR file.
Country: Specify the two-letter abbreviation for your country (for example, US).
State/Province: Specify the name of your state or province (for example, Utah). Use the full
name. Do not abbreviate it.
City: Specify the name of your city (for example, Provo).
Organization: Specify the name of your organization (for example, Novell, Inc.).
novdocx (en) 11 December 2007
Division: Specify your organization’s division that this certificate is being issued to (for
example, Novell Product Development).
Hostname of Server: Specify the DNS hostname of the server where the server certificate will
be used (for example, dev.provo.novell.com).
5 Click Create to generate the CSR file and Private Key file.
The CSR and Private Key files are created with the names and in the locations you specified in
the Key Filename and CSR Filename fields.
71.2.2 Using a GWCSRGEN Configuration File
For convenience if you need to generate multiple certificates, you can record the information for the
above fields in a configuration file so that the information is automatically provided whenever you
run the Generate CSR utility. The configuration file must have the following format:
[Private Key]
Location =
Extension = key
[CSR]
Location =
Extension = csr
[Required Information]
Country =
State =
City =
Organization =
1120 GroupWise 7 Administration Guide

Division =
Hostname =
If you do not want to provide a default for a certain field, insert a comment character (#) in front of
that line. Name the file gwcsrgen.cnf. Save the file in the same directory where the utility is
installed:
Linux: /opt/novell/groupwise/agents/bin
Windows: \grpwise\software\admin\utility\gwcsrgen
71.2.3 Submitting the Certificate Signing Request to a Certificate Authority
To obtain a server certificate, you can submit the Certificate Signing Request
(server_name.csr file) to a Certificate Authority. If you have not previously used a Certificate
Authority, you can use the keywords “Certificate Authority” to search the Web for Certificate
Authority companies. The Certificate Authority must be able to provide the certificate in Base64/
PEM or PFX format.
novdocx (en) 11 December 2007
The process of submitting the CSR varies from company to company. Most provide online
submission of the request. Please follow their instructions for submitting the request.
71.2.4 Creating Your Own Certificate
The Novell Certificate Server, which runs on a NetWare® server with Novell eDirectoryTM, enables
you to establish your own Certificate Authority and issue server certificates for yourself. For
complete information, see the Novell Certificate Server Web site (http://www.novell.com/products/
certserver).
To quickly create your own public certificate in ConsoleOne:
1 Click Help > About Snap-ins to see if the Certificate Server snap-in to ConsoleOne is installed.
If it is not installed, you can obtain it from Novell Product Downloads (http://
download.novell.com). If you are using eDirectory on Linux, the Certificate Server snap-in is
installed by default.
NOTE: You can create a server certificate in Novell iManager, as well as in ConsoleOne, using
steps similar to those provided below.
2 Browse to and select the container where your Server object is located.
3 Click Tools > Issue Certificate.
Encryption and Certificates 1121
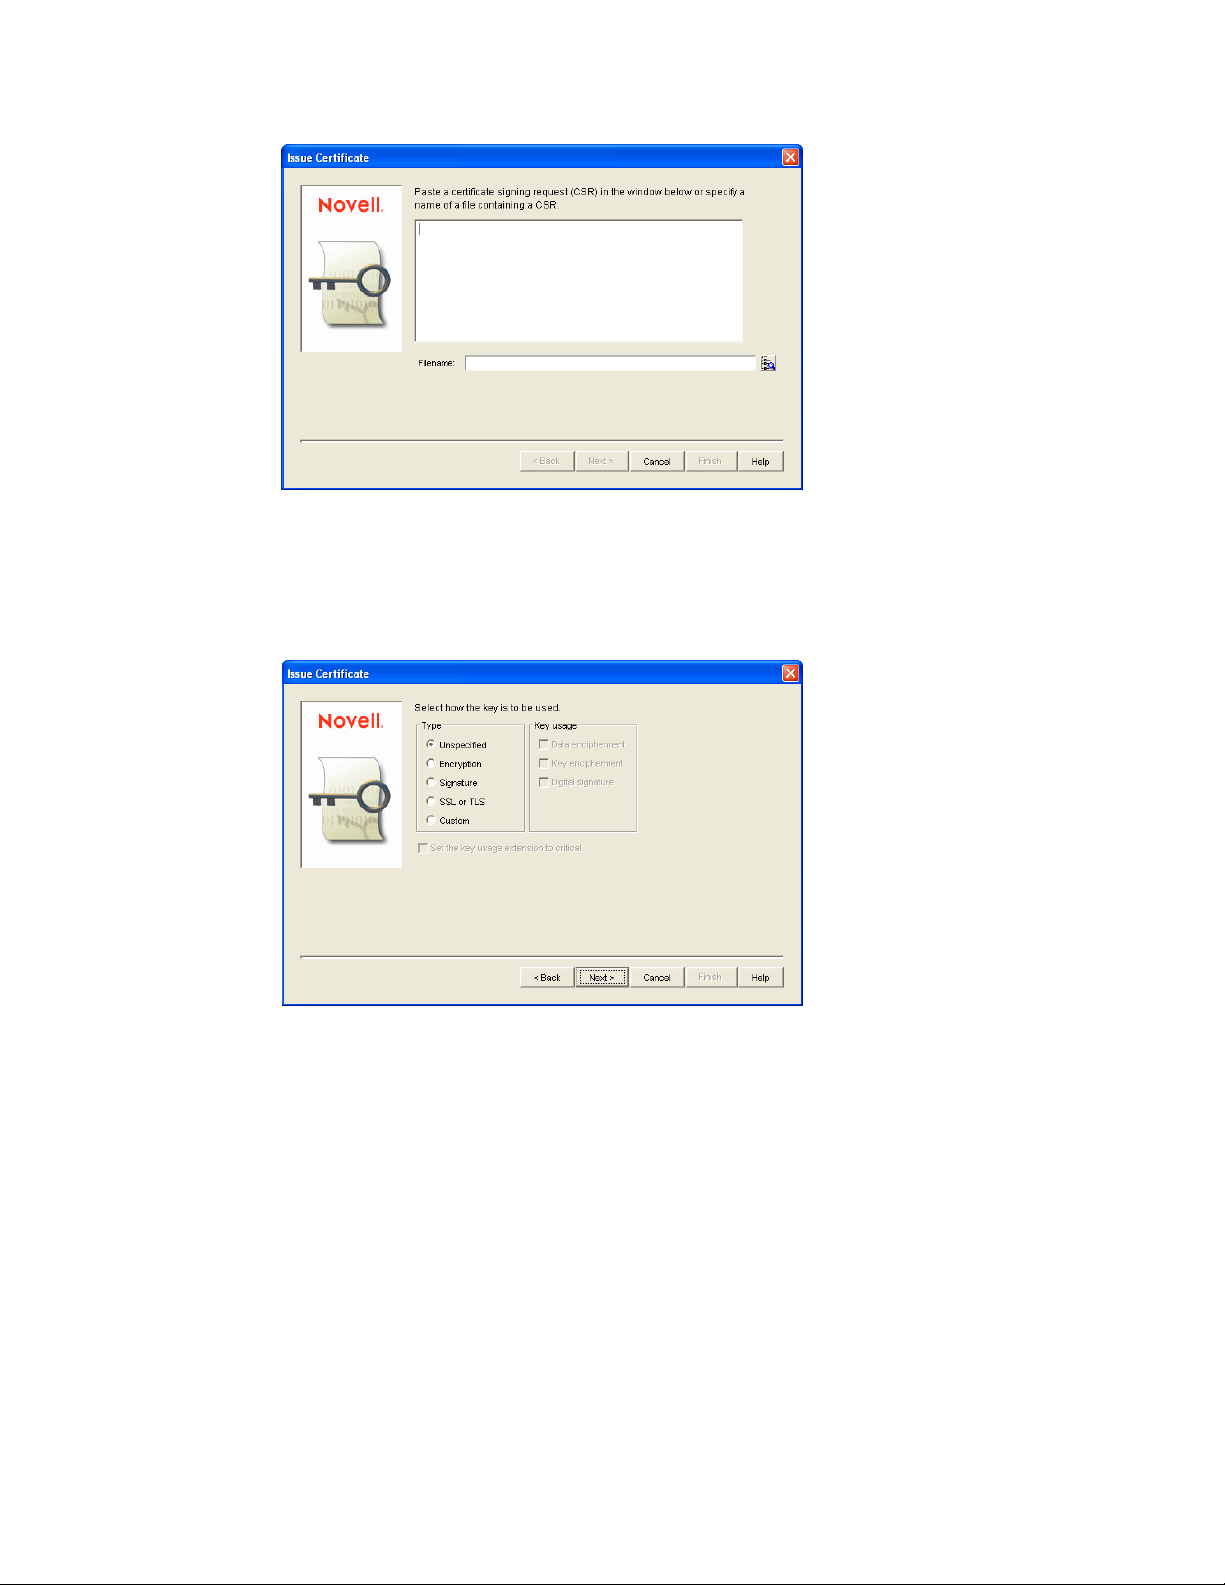
4 Browse to and select the CSR file created by GWCSRGEN in Section 71.2.1, “Generating a
Certificate Signing Request,” on page 1119, then click Next.
By default, your own organizational certificate authority signs the request.
5 Click Next.
novdocx (en) 11 December 2007
6 In the Type box, select Custom.
7 In the Key Usage box, select all three usage options.
8 Click Next.
9 In the Validity Period field, select the length of time you want the certificate to be valid.
You might want to change the setting to a longer period of time to best meet the needs of your
organization.
10 Click Next, view the summary information, then click Finish.
1122 GroupWise 7 Administration Guide

11 Select File in Base64 Format.
12 Specify the path and filename for the certificate.
Limit the filename to 8 characters. You can retain the .b64 extension or use the more general
.crt extension.
13 Click Save.
71.2.5 Installing the Certificate on the Server
novdocx (en) 11 December 2007
After processing your CSRs, the Certificate Authority sends you a public certificate
(server_name.b64) file for each CSR. You might need to extract the private key from the public
certificate. The private key file might have an extension such as .pem or .pfx. The extension is
unimportant as long as the file format is correct.
If you used the Issue Certificate feature in ConsoleOne, as described in Section 71.2.4, “Creating
Your Own Certificate,” on page 1121, it generated the public certificate file (server_name.b64)
and private key file (server_name.key).
Copy the files to any convenient location on each server. The location must be accessible to the
GroupWise agents that run on the server.
71.2.6 Configuring the Agents to Use SSL
To configure the agents to use SSL you must first enable them for SSL and then provide certificate
and key file information. For detailed instructions, see the following sections:
“Securing the Post Office with SSL Connections to the POA” on page 498
“Securing the Domain with SSL Connections to the MTA” on page 629
Securing Internet Agent Connections with SSL
Securing WebAccess Agent Connections with SSL
71.3 Trusted Root Certificates and LDAP Authentication
LDAP authentication, as described in Section 36.3.4, “Providing LDAP Authentication for
GroupWise Users,” on page 501, relies on the presence of a trusted root certificate (often named
rootcert.der) located on your LDAP server. A trusted root certificate is automatically created
Encryption and Certificates 1123

for a server when you install eDirectory on that server. However, circumstances might arise where
you need to create one manually. You can do this in ConsoleOne.
1 Make sure that Novell International Cryptography Infrastructure (NICI) is installed on the
workstation where you run ConsoleOne.
If necessary, you can download NICI from the Novell Product Downloads site (http://
download.novell.com).
2 In ConsoleOne, click Help > About Snapins and verify that the following snap-ins are installed:
Novell LDAP
Novell Certificate Server
Novell Modular Authentication Services (NMAS)
You can download these snap-ins from the Novell Product Downloads site (http://
download.novell.com). After these snap-ins are installed, you can generate a trusted root
certificate for the LDAP server.
3 In ConsoleOne, check current SSL/TLS configuration of the LDAP server:
3a Browse to and right-click the LDAP Server object in your eDirectory tree (typically
named LDAP Server - server_name), then click Properties.
3b Click SSL/TLS Configuration.
novdocx (en) 11 December 2007
3c Note the name of the server certificate (typically SSL CertificateDNS).
3d Make sure that Disable SSL Port is not selected.
4 Export a trusted root certificate:
4a Browse to and right-click the SSL Certificate object identified in Step 3c, then click
Properties.
4b Click Certificates.
1124 GroupWise 7 Administration Guide

5 Click Va l id a t e , then click OK.
novdocx (en) 11 December 2007
6 Click Export.
7 When asked if you want to export the private key with the certificate, select No, then click
Next.
8 In the Output Format box, select File in Binary DER Format.
9 In the Filename field, specify the full path and filename for the trusted root certificate.
IMPORTANT: For use with GroupWise, the name of the trusted root certificate file can
consist of 8 characters plus the .der extension. It cannot be a long filename. The most
convenient location for the trusted root certificate for use with GroupWise is in the directory
where the POA software is installed.
10 Click Next, then click Finish.
You are now ready to configure the POA for LDAP authentication, as described in Section 36.3.4,
“Providing LDAP Authentication for GroupWise Users,” on page 501.
Encryption and Certificates 1125

novdocx (en) 11 December 2007
1126 GroupWise 7 Administration Guide

72
LDAP Directories
novdocx (en) 11 December 2007
72
LDAP (Lightweight Directory Access Protocol) is a standard Internet protocol for accessing
commonly used network directories. If you are new to GroupWise
useful to review TID 2955731: GroupWise and LDAP in the Novell Support Knowledgebase. (http:/
/www.novell.com/support/supportcentral) This TID provides an overview of LDAP and explains the
two address-book-related ways that GroupWise makes use of LDAP. This section briefly
summarizes the address book usages of LDAP and explains how LDAP can also be used to store
security information such as passwords and certificates for use with GroupWise.
Section 72.1, “Accessing Public LDAP Directories from GroupWise,” on page 1127
Section 72.2, “Offering the GroupWise Address Book as an LDAP Directory,” on page 1127
Section 72.3, “Authenticating to GroupWise with Passwords Stored in an LDAP Directory,” on
page 1127
Section 72.4, “Accessing S/MIME Certificates in an LDAP Directory,” on page 1128
See also Part XVI, “Security Policies,” on page 1159.
®
or LDAP, you might find it
72.1 Accessing Public LDAP Directories from GroupWise
The GroupWise client uses LDAP to provide access to directory services such as Bigfoot* and
Switchboard*. This enables GroupWise users to select e-mail addresses from these popular
directory services and add them to their personal GroupWise address books. See “Using LDAP in
the Address Book” in “Using the Address Book” in the GroupWise 7 Windows Client User Guide.
72.2 Offering the GroupWise Address Book as an LDAP Directory
The GroupWise Internet Agent uses LDAP to make the GroupWise address book available to any
LDAP-enabled client. This enables users of other e-mail clients to define GroupWise address books
as LDAP directories from which they can select e-mail addresses. See Section 46.2, “Configuring
LDAP Services,” on page 737. See also Chapter 74, “Address Book Security,” on page 1133.
72.3 Authenticating to GroupWise with Passwords Stored in an LDAP Directory
Enabling LDAP authentication for the POA is independent of these LDAP address book features.
You need to enable LDAP authentication when you want the POA to authenticate the user’s
password in an LDAP directory rather than looking for a password in the user’s GroupWise account
information. The POA can make use of the following LDAP capabilities:
Section 72.3.1, “Access Method,” on page 1128
Section 72.3.2, “LDAP Username,” on page 1128
LDAP Directories
1127

When you understand these LDAP capabilities, you are ready to set up LDAP authentication for
your GroupWise users. See Section 36.3.4, “Providing LDAP Authentication for GroupWise
Users,” on page 501.
72.3.1 Access Method
On a server-by-server basis (ConsoleOne > GroupWise System Operations > LDAP Servers), you
can specify whether you want each LDAP server to respond to authentication requests using a bind
or a compare.
Bind: With a bind, the POA essentially logs in to the LDAP server. When responding to a bind
request, most LDAP servers enforce password policies such as grace logins and intruder
lockout, if such policies have been implemented by the LDAP directory.
Compare: With a compare, the POA provides the user password to the LDAP server. When
responding to a compare request, the LDAP server compares the password provided by the
POA with the user’s password in the LDAP directory, and returns the results of the comparison.
Using a compare connection can provide faster access because there is typically less overhead
involved because password policies are not being enforced.
novdocx (en) 11 December 2007
Regardless of whether the POA is submitting bind requests or compare requests to authenticate
GroupWise users, the POA can stay connected to the LDAP server as long as authentication requests
continue to occur before the connection times out. This provides quick response as users are
accessing their mailboxes.
72.3.2 LDAP Username
On a post office-by-post office basis (ConsoleOne > Post Office object > GroupWise > Security),
you can decide what username you want the POA to use when accessing the LDAP server.
LDAP Username Login: If you want the POA to access the LDAP server with specific rights
to the LDAP directory, you can provide a username for the POA to use when logging in. The
rights of the user determine what information in the LDAP directory will be available during
the authentication process.
Public or Anonymous Login: If you do not provide a specific LDAP username as part of the
post office LDAP configuration information, then the POA accesses the LDAP directory with a
public or anonymous connection. Only public information is available when using such a login.
72.4 Accessing S/MIME Certificates in an LDAP Directory
Just as the POA can access user password information in an LDAP directory, the GroupWise
Windows client can access recipients’ digital certificates in an LDAP directory. See “Searching for
Recipient Encryption Certificates Using LDAP” in “Sending S/MIME Secure Message” in the
GroupWise 7 Windows Client User Guide.
When a certificate is stored on an LDAP server, the GroupWise Windows client searches the LDAP
server every time the certificate is used. Certificates from LDAP servers are not downloaded into the
local certificate store on the user’s workstation. To facilitate this process, the user must select a
default LDAP directory in the LDAP address book (Windows client > LDAP Address Book >
Directories > Set as Default) and enable searching (Windows client > Tools > Options Security >
Send > Advanced Options > Search for Recipient Encryption Certificates in the Default LDAP
1128 GroupWise 7 Administration Guide

Directory). An advantage to this is that recipients’ certificates are available no matter what
workstation the GroupWise user sends the message from.
NOTE: This feature is not available in the Cross-Platform client or the WebAccess client.
novdocx (en) 11 December 2007
LDAP Directories 1129

novdocx (en) 11 December 2007
1130 GroupWise 7 Administration Guide

73
Message Security
The GroupWise® client accommodates users’ preferences for security and privacy when sending
messages. Users can:
Sign a message with standardized text (Windows client > Tools > Options > Environment >
Signature and Cross-Platform client > Tools > Options > Send > Signature).
Sign a message with an electronic business card (vCard) (Windows client > Tools > Options >
Environment > Signature and Cross-Platform client > Tools > Options > Send > Signature).
Digitally sign and/or encrypt a message. See Section 71.1, “Personal Digital Certificates,
Digital Signatures, and S/MIME Encryption,” on page 1117.
Give a message a security classification (Windows client > Mail To > Send Options > General
> Classification > Proprietary, Confidential, Secret, Top Secret, or For Your Eyes Only and
Cross-Platform client > Mail To > Send Options > Classification).
Conceal the subject of an e-mail message (Windows client > Mail To > Send Options >
Security > Conceal Subject).
Mark messages and appointments private so that proxy users cannot see them. (Windows client
> Actions > Mark Private).
novdocx (en) 11 December 2007
73
Attach a password-protected document to a message and have the recipient prompted by the
application to supply the password before the recipient can open the document
Require a password in order to mark a Routing Slip completed (Windows client > Too ls >
Options > Send > Security > Require Password to Complete Routed Item). This can prevent a
user who is proxied to the mailbox from marking the item completed, or if multiple users proxy
to the mailbox, it can be used to ensure that only the user for whom the item was intended can
complete it.
In addition, if the users in your GroupWise system exchange messages with users in other
GroupWise systems, you can set preferences to control what types of information pass between the
two systems. For example, you can prevent external GroupWise users from performing busy
searches or obtaining message delivery status. See Section 4.2, “System Preferences,” on page 53.
See also Part XVI, “Security Policies,” on page 1159.
Message Security
1131

novdocx (en) 11 December 2007
1132 GroupWise 7 Administration Guide

74
Address Book Security
One of the purposes of the Address Book is to make user information available to all GroupWise®
users. However, there might be types of information that you do not want to display.
Section 74.1, “eDirectory Information Displayed in the Address Book,” on page 1133
Section 74.2, “Suppressing the Contents of the User Description Field,” on page 1133
Section 74.3, “Controlling GroupWise Object Visibility in the Address Book,” on page 1133
Section 74.4, “Controlling GroupWise Object Visibility between GroupWise Systems,” on
page 1134
See also Part XVI, “Security Policies,” on page 1159.
74.1 eDirectory Information Displayed in the Address Book
novdocx (en) 11 December 2007
74
The Address Book displays information stored in Novell® eDirectoryTM for users, resources, and
distribution lists in your GroupWise system. By default, the following information is displayed:
Name
Office phone number
Department
Fax number
User ID
You can configure the Address Book to display more or less information to meet the needs of your
users. See Section 6.1, “Customizing Address Book Fields,” on page 85.
By default, all users, resources, and distribution lists that you create in eDirectory are displayed in
the Address Book and are available to all GroupWise users.
74.2 Suppressing the Contents of the User Description Field
By default, when you display details about a user in the Address Book, the information in the
Description field of the User object in eDirectory is displayed. If you keep confidential information
in the Description field of the User object, you can prevent this information from appearing the
GroupWise Address Book. See Section 6.1.5, “Preventing the User Description Field from
Displaying in the Address Book,” on page 89.
74.3 Controlling GroupWise Object Visibility in the Address Book
You might need to create users, resources, or distribution lists that are not available to all GroupWise
users. You can accomplish this by restricting the set of users that can see such objects in the Address
Book. You can make such objects visible only to the members of a domain, only to the members of
Address Book Security
1133

a post office, or to no one at all. An object does not need to be visible to be addressable. For
instructions, see Section 6.2, “Controlling Object Visibility,” on page 89.
74.4 Controlling GroupWise Object Visibility between GroupWise Systems
If you synchronize your GroupWise system with other GroupWise systems to simplify addressing
for users of both systems, you can control what information from your Address Book you want to be
available in the Address Books of other GroupWise systems. For instructions, see “Exchanging
Information Between Systems” in “Connecting to GroupWise 5.x, 6.x, and 7.x Systems” in the
GroupWise 7 Multi-System Administration Guide.
novdocx (en) 11 December 2007
1134 GroupWise 7 Administration Guide

75
GroupWise Administrator Rights
To administer GroupWise®, a user needs the appropriate file system rights and Novell® eDirectoryTM
rights. The following sections provide information to help you configure GroupWise administrator
rights to meet the needs of your environment:
Section 75.1, “Setting Up a GroupWise Administrator as an Admin Equivalent,” on page 1135
Section 75.2, “Assigning Rights Based on Administration Responsibilities,” on page 1135
Section 75.3, “eDirectory Object and Properties Rights,” on page 1143
Section 75.4, “Granting or Removing Object and Property Rights,” on page 1146
See also Part XVI, “Security Policies,” on page 1159.
75.1 Setting Up a GroupWise Administrator as an Admin Equivalent
novdocx (en) 11 December 2007
75
The easiest way to ensure that a GroupWise administrator has all necessary eDirectory rights and
NetWare file system rights is to make the administrator an Admin equivalent. Unless you have
implemented multiple administrators who have different roles and access rights (for example, a
server administrator, a printer administrator, and a GroupWise administrator), we suggest you make
your GroupWise administrator an Admin equivalent.
®
1 In ConsoleOne
2 Click the Memberships tab, then click Security Equal To to display the Security Equal To page.
3 Click Add to display the Select Objects dialog box.
4 Browse for and select the Admin object, then click OK.
The Admin object should now be displayed in the Security Equal To list.
5 Click OK.
, right-click the GroupWise administrator’s User object, then click Properties.
75.2 Assigning Rights Based on Administration Responsibilities
Making a GroupWise administrator an Admin equivalent gives the GroupWise administrator all
eDirectory rights required to administer GroupWise. It will also give him or her full file system
rights to NetWare servers. To increase security or to support a distributed administration model, you
can restrict GroupWise administrators’ file system and eDirectory rights to only those required to
administer GroupWise and assign rights to your GroupWise administrators based on their
administration responsibilities. For example,
If you have only one GroupWise administrator (a centralized GroupWise administration
model), you can give the administrator rights only to the eDirectory objects and file systems
that are used for GroupWise.
If you have multiple administrators who are each responsible for a domain (a distributed
GroupWise administration model), you can restrict their rights to only those eDirectory objects
and file systems associated with their GroupWise domain.
GroupWise Administrator Rights
1135

If you have one administrator whom you want to control all links between domains, you can
assign rights to the eDirectory objects and file systems associated with domains links.
The following two sections, Section 75.2.1, “File System Rights,” on page 1136 and Section 75.2.2,
“eDirectory Rights,” on page 1136, provide general information about the file system rights and
eDirectory object and property rights needed to perform GroupWise administration tasks.
The final section, Section 75.2.3, “Common Types of GroupWise Administrators,” on page 1140,
lists some common types of GroupWise administrators (for example, Domain administrator and
Post Office administrator) and the specific file system and eDirectory rights they need.
75.2.1 File System Rights
A GroupWise administrator must have an account (or security equivalence) that provides the
following rights to the directories listed below:
Table 75-1 GroupWise Administrator Rights
Directory NetWare Rights Windows Permissions
novdocx (en) 11 December 2007
sys:\public (for ConsoleOne and GroupWise
Administrator snap-ins)
Any GroupWise system directory the administrator is
responsible for. This includes:
domain directories
post office directories
software distribution directories
library storage area directories
Any directory in which the GroupWise agents are
installed.
For NetWare, the default directory is sys:\system.
For Windows, the default directory is c:\grpwise
(for the MTA, POA, and Internet Agent) and
c:\webacc (for the WebAccess Agent).
Read
File
Scan
Read
Write
Create
Erase
Modify
File Scan
Access Control
Read
Write
Create
Erase
Modify
File Scan
Access Control
Not applicable
Full Control
Full Control
75.2.2 eDirectory Rights
The eDirectory object and property rights an administrator requires depend on the administrative
tasks he or she needs to perform. In GroupWise administration, there are five basic tasks an
administrator can perform:
Create and delete objects (for example, domains, post offices, gateways, agents, libraries,
resources, external entities, and distribution lists).
Modify object properties (for example, moving a GroupWise user from one post office to
another or deleting a GroupWise user from a distribution list).
1136 GroupWise 7 Administration Guide

Modify link information (for example, defining whether Domain 1 links directly to Domain 3
or indirectly to Domain 3 through Domain 2).
Perform system operations (for example, managing software distribution directories, creating
administrator-defined fields, and setting up eDirectory user synchronization).
Perform maintenance operations (for example, rebuilding domain and post office databases,
analyzing and fixing user and message databases, and changing a user’s client options).
Creating and Deleting Objects
The following rules apply to creating or deleting a GroupWise object (for example, domain, post
office, gateway, agent, library, resource, external entity, or distribution list):
To create a GroupWise object, the administrator must have Create object rights in the container
where he or she is creating the object. To delete a GroupWise object, the administrator must
have Delete object rights to the GroupWise object’s container.
If creating or deleting the object requires modification of a second object’s properties, the
administrator must have Read and Write rights to the second object’s NGW: GroupWise ID
property and all other affected properties. For example, when you create a distribution list, the
list is assigned to a post office. Therefore, the administrator needs Read and Write rights to the
post office object’s NGW: GroupWise ID property and NGW: Distribution List Member
property.
novdocx (en) 11 December 2007
For information about giving a user rights to an object or an objects’s properties or restricting a
user’s rights to an object or an object’s properties, see Section 75.4, “Granting or Removing Object
and Property Rights,” on page 1146.
Modifying Object Properties
Each eDirectory object has certain properties that hold information about the object. For example, a
User object includes Full Name, Given Name, Last Name, Network Address, and Title properties.
The following rules apply to modifying an object’s properties:
Each object has an NGW: GroupWise ID property. The administrator must always have Read
and Write rights to the NGW: GroupWise ID property for the object being modified. Without
rights to the NGW: GroupWise ID property, no modifications can be made to any of the
object’s GroupWise properties.
The administrator must have Read and Write rights to the property being modified. For
example, to change a user’s visibility within the GroupWise system, the administrator requires
Read and Write rights to the user object’s NGW: GroupWise ID property and NGW: Visibility
property.
If the modification affects a second object’s properties, the administrator must have Read and
Write rights to the second object’s affected properties. For example, when you move a user
from one post office to another, the move affects properties for 1) the User object, 2) the Post
Office object from which you are moving the user (the source post office) and 3) the Post
Office object to which you are moving the user (the target post office). Therefore, the
administrator must have 1) Read and Write rights for the User object’s NGW: GroupWise ID
property and NGW: Post Office property, 2) Read and Write rights for the source post office
object’s NGW: GroupWise ID property and Members property, and 3) Read and Write rights
for the target post office object’s NGW: GroupWise ID property and Members property.
GroupWise Administrator Rights 1137

Modifications to an object can fail for the following reasons:
The administrator does not have the appropriate rights to the object’s properties. For example,
to restrict an administrator from moving a user from one post office to another, you could 1) not
give the administrator Read and Write rights to the source or target post office object’s NGW:
Members property or 2) not give the administrator Read and Write rights to the user object’s
NGW: Post Office property.
The administrator, in addition to modifying properties he or she has rights to, attempts to
modify a property he or she does not have rights to modify. For example, if an administrator
has rights to modify a user’s mailbox ID and visibility but does not have rights to modify the
mailbox expiration date, any modifications made to the mailbox ID and visibility fail if the
administrator tries to modify the mailbox expiration date at the same time.
In general, a GroupWise administrator should have Read and Write rights to all GroupWise
properties for the objects he or she needs to administer. This ensures that the administrator can
modify all GroupWise information for the objects. In addition, an administrator should also have
Read and Write rights to other eDirectory properties used by GroupWise. For example, Full Name is
an eDirectory User object property used by GroupWise. For a list of GroupWise objects, GroupWise
object properties, associated eDirectory object properties, see Section 75.3, “eDirectory Object and
Properties Rights,” on page 1143.
novdocx (en) 11 December 2007
For information about giving a user rights to modify an object’s properties or restricting a user’s
rights to modify an object’s properties, see Section 75.4, “Granting or Removing Object and
Property Rights,” on page 1146.
Modifying Link Information
By default, when an administrator creates a domain or post office, the links to other domains or post
offices are automatically created. Because there are many different ways you can configure your
domain and post office links, you can use the Link Configuration utility to modify how domains and
post offices are linked together. You can also use object and property rights to determine which
administrators have the ability to modify link information. The following rules apply to modifying
link information:
To modify the links for post offices within a domain, the administrator must have Read and
Write rights to the NGW: GroupWise ID property for the Domain object and the Post Office
objects. In addition, the administrator must have Write rights to the NGW: Link Configuration
property for the Domain object.
To modify the links between domains, the administrator must have Read and Write rights to the
NGW: GroupWise ID property for each Domain object, and Write rights to the NGW: Link
Configuration property for each Domain object.
Because correct domain and post office links are essential to the proper functioning of your
GroupWise system, you might want to assign link configuration tasks to a single administrator and
restrict other administrators’ abilities to modify link information. Or, if you have a multiple-domain
system with multiple administrators, you could have one administrator responsible for all domain
links and the other administrators responsible for the post office links for their domains. For
information about giving a user rights to an object’s properties (or restricting a user’s rights to an
object’s properties), see Section 75.4, “Granting or Removing Object and Property Rights,” on
page 1146.
1138 GroupWise 7 Administration Guide

Performing System Operations
The system operations that a GroupWise administrator can perform in ConsoleOne are listed on the
Tools > GroupWise System Operations menu.
Figure 75-1 GroupWise System Operations Submenu on the Tools Menu
novdocx (en) 11 December 2007
The Select Domain, Pending Operations, and Restore Area Management operations are always
available to GroupWise administrators. To perform any of the other system operations, an
administrator must have Read and Write rights to the NGW: GroupWise ID property for the primary
Domain object. In GroupWise systems that span multiple eDirectory trees, the administrator’s
current tree must be the tree in which the primary Domain object is located.
You can restrict the ability to perform system operations (other than Select Domain, Pending
Operations, and Restore Area Management) to only those GroupWise administrators who connect to
the primary domain database. To do so, you use the Restrict System Operations to Primary Domain
option (Tools > GroupWise System Operations > System Preferences > Admin Lockout).
Administrators connected to secondary domain databases see the GroupWise System Operations
menu with only the Select Domain, Pending Operations, and Restore Area Management options
available.
Figure 75-2 GroupWise System Operations Submenu on the Tools Menu
For information about giving a user rights to an object’s properties or restricting a user’s rights to an
object’s properties, see Section 75.4, “Granting or Removing Object and Property Rights,” on
page 1146.
GroupWise Administrator Rights 1139

Performing Maintenance Operations
To perform maintenance operations such as validating, recovering, or rebuilding domain databases;
fixing user, resource, or post office databases; or changing a user’s client options, an administrator
must have Read and Write rights to the NGW: GroupWise ID property for the object being modified.
For example, to rebuild a domain database, an administrator requires Read and Write rights to the
NGW: GroupWise ID property for the Domain object. Or, to change a user’s client options, an
administrator requires Read and Write rights to the NGW: GroupWise ID property for the User
object.
For information about giving a user rights to an object’s properties or restricting a user’s rights to an
object’s properties, see Section 75.4, “Granting or Removing Object and Property Rights,” on
page 1146.
75.2.3 Common Types of GroupWise Administrators
The following sections provide information about assigning directory, object, and property rights to
some common types of GroupWise administrators:
“Domain Administrator” on page 1140
“Post Office Administrator” on page 1141
“Link Configuration Administrator” on page 1142
novdocx (en) 11 December 2007
Domain Administrator
A Domain administrator is a GroupWise administrator who has all file system and eDirectory rights
needed to create and maintain a single GroupWise domain.
File System Rights
A Domain administrator requires the file system rights listed in the following table.
Directory NetWare Rights Windows Permissions
sys:\public (for ConsoleOne and GroupWise
Administrator snap-ins)
Any GroupWise system directory the administrator is
responsible for. This includes:
domain directories
post office directories
software distribution directories
library storage area directories
If the domain is not yet created, it is necessary to give
the administrator rights to the directories where it will
be created.
Read
File
Scan
Read
Write
Create
Erase
Modify
File Scan
Access Control
Not applicable
Full Control
1140 GroupWise 7 Administration Guide

Directory NetWare Rights Windows Permissions
novdocx (en) 11 December 2007
The GroupWise agent directories.
For NetWare, the default directory is sys:\system.
For Windows, the default directory is c:\grpwise.
Read
Write
Create
Erase
Modify
File Scan
Access Control
Full Control
eDirectory Rights
A Domain administrator requires Read and Write rights to properties for the objects listed below.
Domain object: Only the domain the administrator is responsible for unless he or she will also
configure domain links. If so, the administrator also needs rights to the NGW: GroupWise ID
and NGW: Link Configuration properties for the other Domain objects.
Post Office objects: All post offices in the domain.
Gateway objects: All gateways in the domain.
User objects: All users in the domain.
Resource objects: All resources in the domain.
Distribution List objects: All distribution lists in the domain.
Library objects: All libraries in the domain.
Agent objects: All MTAs and POAs in the domain.
External Entity objects: All resources in the domain.
In most cases, the administrator does not need rights to all of the object properties. After reviewing
the list of objects, if you want to restrict an administrator’s rights to only the required properties, see
Section 75.3, “eDirectory Object and Properties Rights,” on page 1143.
In addition, the administrator must have Create and Delete rights in any container in which one of
the objects listed above will be created or deleted.
For a listing of the explicit object properties to which the administrator requires rights, see
Section 75.3, “eDirectory Object and Properties Rights,” on page 1143.
Post Office Administrator
A Post Office administrator is a GroupWise administrator who has all file system and eDirectory
rights needed to create and maintain a single GroupWise post office.
File System Rights
A Post Office administrator requires the file system rights listed in the following table.
Directory NetWare Rights Windows Permissions
sys:\public (for ConsoleOne and
GroupWise Administrator snap-ins)
Read
File Scan
Not applicable
GroupWise Administrator Rights 1141

Directory NetWare Rights Windows Permissions
novdocx (en) 11 December 2007
The domain directory Read
Write
Create
Erase
Modify
File Scan
Access Control
The following directories:
post office directory
library storage area directories for libraries
assigned to the post office
The directory for the Post Office Agent.
For NetWare, the default directory is
sys:\system.
For Windows, the default directory is c:\grpwise.
Read
Write
Create
Erase
Modify
File Scan
Access Control
Read
Write
Create
Erase
Modify
File Scan
Access Control
Full Control
Full Control
Full Control
eDirectory Rights
A Post Office administrator requires Read and Write rights to properties for the objects listed below.
In most cases, the administrator does not need rights to all of the object properties. After reviewing
the list of objects, if you want to restrict an administrator’s rights to only the required properties, see
Section 75.3, “eDirectory Object and Properties Rights,” on page 1143.
Post Office object: Only the post office that the administrator is responsible for.
User objects: All users with accounts on the post office.
Resource objects: All resources assigned to the post office.
Distribution List objects: All distribution lists assigned to the post office.
Library objects: All libraries assigned to the post office.
Agent objects: Only the post office’s POA.
External Entity objects: All external entities with accounts on the post office.
In addition, the administrator must have Create and Delete rights in any container in which one of
the objects listed above will be created or deleted.
Link Configuration Administrator
A Link Configuration administrator has all file system and eDirectory rights needed to create and
maintain the links between GroupWise domains.
File System Rights
A Link Configuration administrator requires the file system rights listed in the following table.
1142 GroupWise 7 Administration Guide

Table 75-2 File System Rights
Directory NetWare Rights Windows Permissions
novdocx (en) 11 December 2007
sys:\public (for ConsoleOne and
GroupWise Administrator snap-ins)
Domain directory Read
Read
File Scan
Write
Create
Erase
Modify
File Scan
Not applicable
Full Control
eDirectory Rights
A Post Office administrator requires Read and Write rights to the properties for the objects listed
below.
Table 75-3 Read and Write Rights
Object Property
Domain (all domains) NGW: GroupWise ID
NGW: Link Configuration
75.3 eDirectory Object and Properties Rights
The table below lists the GroupWise objects and their properties.
Some properties are specific only to GroupWise. GroupWise-specific properties begin with NGW or
ngw. Other properties are common eDirectory properties used by GroupWise objects. Common
eDirectory properties do not begin with NGW or ngw.
Table 75-4 GroupWise Objects and Their Properties
Object Property
Domain NGW: File ID
NGW: GroupWise ID
NGW: Language
NGW: Link Configuration
NGW: Location
NGW: Network Type
NGW: Time Zone ID
NGW: Type
NGW: Version
ngwDefaultWebAccess
CN
Description
Member
GroupWise Administrator Rights 1143

Object Property
Post Office NDA: Port
NGW: Access Mode
NGW: Distribution List Member
NGW: Domain
NGW: File ID
NGW: GroupWise ID
NGW: Language
NGW: Library Member
NGW: Location
NGW: Network Type
NGW: Resource Member
NGW: Time Zone ID
NGW: Version
ngwDefaultWebAccess
ngwLDAPServerAddress
CN
Description
Member
Gateway NGW: Domain
NGW: File ID
NGW: GroupWise ID
NGW: Language
NGW: Location
NGW: Platform
NGW: Time Zone ID
NGW: Type
ngwProviderComm
ndaReferenceList
ndaServiceList
ndaXISSettings
CN
Description
novdocx (en) 11 December 2007
User NGW: Account
1144 GroupWise 7 Administration Guide
NGW: File ID
NGW: Gateway Access
NGW: GroupWise ID
NGW: Mailbox Expiration Date
NGW: Object ID
NGW: Post Office
NGW: Visibility
ngwNLSInfo
Department
Description
EMail Address
Fax Number
Given Name
Internet EMail Address
Last Name
Telephone
Title

Object Property
Resource NGW: File ID
NGW: GroupWise ID
NGW: Owner
NGW: Post Office
NGW: Type
NGW: Visibility
CN
Description
Distribution List NGW: Blind Copy Member
NGW: Carbon Copy Member
NGW: GroupWise ID
NGW: Post Office
NGW: Visibility
CN
Description
Member
Library NGW: Archive Max Size
NGW: Document Area Size
NGW: File ID
NGW: GroupWise ID
NGW: Library Display Name
NGW: Post Office
NGW: Starting Version Number
CN
Description
Member
novdocx (en) 11 December 2007
Agent NGW: File ID
NGW: GroupWise ID
NGW: Platform
NGW: Type
ngwProxyServerAddress
ndaServiceList
ndaXISSettings
CN
Description
Network Address
External Entity NGW: Account ID
NGW: External Net ID
NGW: File ID
NGW: GroupWise ID
NGW: Mailbox Expiration Time
NGW: Object ID
NGW: Post Office
NGW: Visibility
Department
Description
EMail Address
Fax Number
Given Name
Internet EMail Address
Last Name
Telephone
Title
GroupWise Administrator Rights 1145

75.4 Granting or Removing Object and Property Rights
You can use trustee assignments to grant or restrict rights to an object and its properties. The
following steps provide one way to grant or remove a user’s rights to an object or its properties. For
additional methods, see your eDirectory documentation.
1 Right-click the object in the eDirectory tree, then click Trustees of this Object.
2 Click Add Trustee to display the Select Object dialog box.
3 Browse for and select the User object, then click OK to display the Rights Assigned to Selected
Objects dialog box.
4 Set the object and property rights you want. If necessary, add additional properties. Click Help
for additional information.
5 Click OK when finished.
novdocx (en) 11 December 2007
1146 GroupWise 7 Administration Guide

76
GroupWise Agent Rights
When you create domains and post offices, ConsoleOne® creates the directory structures and Agent
objects with all the required rights to enable the agents to function properly, regardless of link type
between locations and including requirements for Novell
manual adjustment of agent rights is necessary in GroupWise
You can check the POA’s rights to the post office directory by starting it using the /rights switch in
the POA startup file.
See also Part XVI, “Security Policies,” on page 1159.
®
eDirectoryTM user synchronization. No
®
7.
novdocx (en) 11 December 2007
76
GroupWise Agent Rights
1147

novdocx (en) 11 December 2007
1148 GroupWise 7 Administration Guide

77
GroupWise User Rights
GroupWise® users require specific Novell® eDirectoryTM rights and, in some cases, specific file
system rights in order for the GroupWise client to function properly. The following sections provide
information about the required rights and how to supply them.
Section 77.1, “eDirectory Rights,” on page 1149
Section 77.2, “File System Rights,” on page 1151
See also Part XVI, “Security Policies,” on page 1159.
77.1 eDirectory Rights
By default, ConsoleOne® is configured to automatically provide a GroupWise user’s required
eDirectory rights when you add the user to a post office. You can, however, configure GroupWise
Administrator to not assign rights automatically, in which case you would need to manually assign
eDirectory rights.
novdocx (en) 11 December 2007
77
The following sections provide information about how to configure ConsoleOne to automatically set
GroupWise users’ eDirectory rights and how to manually set these rights:
Section 77.1.1, “Configuring ConsoleOne to Automatically Set eDirectory Rights When
Creating User Accounts,” on page 1149
Section 77.1.2, “Manually Granting eDirectory Rights,” on page 1150
77.1.1 Configuring ConsoleOne to Automatically Set eDirectory Rights When Creating User Accounts
By default, the GroupWise Administrator snap-in for ConsoleOne is configured to automatically set
the eDirectory rights required by a GroupWise user. This is done when you create the user’s
GroupWise account.
For GroupWise Administrator to be able to set these rights, you must have sufficient administrative
rights to eDirectory. If you don’t have sufficient rights to manually set the user’s access rights,
GroupWise Administrator does not have sufficient rights to set them automatically. In general, we
recommend that you be an Admin equivalent. For more information, see Chapter 75, “GroupWise
Administrator Rights,” on page 1135.
If you choose not to grant eDirectory rights automatically, you should manually set the rights to
ensure that users have appropriate access. For instructions, see Section 77.1.2, “Manually Granting
eDirectory Rights,” on page 1150.
To configure whether or not GroupWise Administrator automatically assigns rights to users when
you create GroupWise accounts:
1 In ConsoleOne, click Tools > GroupWise System Operations > System Preferences to display
the GroupWise System Preferences dialog box.
GroupWise User Rights
1149

2 To have GroupWise Administrator automatically set access rights, select the Set Access Rights
Automatically When Creating a GroupWise User option.
or
To turn off this option, deselect the Set Access Rights Automatically When Creating a
GroupWise User option.
3 Click OK to save your changes.
77.1.2 Manually Granting eDirectory Rights
novdocx (en) 11 December 2007
At startup, the GroupWise client must know the following:
The post office where the user has an account.
Whether to connect to the user’s post office in direct access mode or client/server access mode.
The user can supply this information in the GroupWise Startup dialog box that appears or use the /
ph-path_to_post_office, /ipa-IP_address, /ipp-TCP_port, and /@u-user_ID startup options.
If you do not want users to be required to supply this information, you can give users rights to the
eDirectory objects shown below. When a user has rights to the objects, the GroupWise client can
read the object’s information in eDirectory to determine the user’s post office and access mode. This
requires users to be logged in to eDirectory.
Table 77-1 eDirectory Object Rights
Object and Properties Rights
User object
NGW:Post Office
Post Office object
NGW:Location
NGW:Access Mode
Browse
Read
Browse
Read
Read
POA object
NGW:Type
Network Address
1150 GroupWise 7 Administration Guide
Browse
Read
Read

GroupWise Name Server (ngwnameserver)
The following information applies to users running the GroupWise client in client/server access
mode.
If you do not want to provide eDirectory rights to GroupWise users as explained above, or if you
have GroupWise users who don’t log in to eDirectory, you can set up a GroupWise name server. A
GroupWise name server enables users to access their post office without knowing the IP address and
port number of the POA.
The GroupWise name server is a DNS host entry for one of the POAs in your GroupWise system. At
startup, the GroupWise client automatically looks for the GroupWise name server. When a user
reaches the POA designated as the GroupWise name server, the POA redirects the user to the IP
address and port number of the POA that services the user’s post office.
The primary GroupWise name server must be named ngwnameserver. You can set up one backup
GroupWise name server and name it ngwnameserver2. Both POAs must use the default TCP port of
1677.
To set up a GroupWise name server:
novdocx (en) 11 December 2007
1 Use your tool of choice for modifying DNS.
2 Create an entry for the IP address of the POA you want to designate as the primary GroupWise
name server, then give it the hostname ngwnameserver.
3 Create an entry for the IP address of the POA you want to designate as the backup GroupWise
name server, then give it the hostname ngwnameserver2.
77.2 File System Rights
Listed below are the locations you need to consider when assigning file system rights to GroupWise
users:
Domain Directory: Users do not require file system access to the domain directory.
Post Office Directory: The recommended post office access mode for the GroupWise client is
client/server (TCP/IP), which means that the user does not require file system access to the post
office. Therefore, ConsoleOne does not assign any file system rights when you add a user to a
post office.
If you want to use direct access mode (mapped drive or UNC path), you need to manually
assign users the required file system rights to their post office directories. For instructions, see
Section 77.2.1, “Granting File System Rights to the Post Office Directory,” on page 1152.
GroupWise Software Distribution Directory: If you want users to have file system rights to
a GroupWise software distribution directory to install or run the GroupWise client, you need to
manually assign rights. For instructions, see Section 77.2.2, “Granting File System Rights to
the Software Distribution Directory,” on page 1153.
Mailbox Backup Directory: For users to restore their mailbox from a network backup
directory, they need the appropriate file system rights to the directory. For more information,
see Section 77.2.3, “Granting File System Rights to the Mailbox Backup Directory,” on
page 1154.
GroupWise User Rights 1151

77.2.1 Granting File System Rights to the Post Office Directory
The following information applies only to users who are running the GroupWise client in direct
access mode. Users who are running in client/server access mode do not require rights to the post
office directories.
To increase security in your post office directories, you should restrict rights as shown in the
following table.
Table 77-2 Post Office Directory Rights
Directories NetWare Rights Windows Permissions
post office RWC--F Change
agents ------ No Access
nlm ------ No Access
language ------ No Access
novdocx (en) 11 December 2007
nt ------ No Access
language ------ No Access
gwdms RW---F Change
libx RW---F Change
index RW---F Change
archive RW---F Change
arxx RW---F Change
docs RWCEMF Full Control
fdx RWCEMF Full Control
offiles R----F Change
fdx RWCEMF Full Control
ofmsg RWCEMF Full Control
ofuser RWCEMF Full Control
index RW---F Change
ofviews ------ No Access
win R----F Read
ofwork R----F Read
ofdirect RWCEMF Full Control
wpcsin RWCEMF Full Control
0-7 -WC-M- Change
problem -WC-M- Change
1152 GroupWise 7 Administration Guide

Directories NetWare Rights Windows Permissions
wpcsout ------ No Access
ads ------ No Access
0-7 ------ No Access
chk RWCEMF Full Control
0-3 -WC-M- Change
defer -WC-M- Change
ofs RWC-MF Full Control
0-7 RWC-MF Full Control
problem -WC-M- Change
77.2.2 Granting File System Rights to the Software Distribution Directory
novdocx (en) 11 December 2007
The software distribution directory contains the GroupWise client for Windows. To set up and run
the GroupWise client, users require the directory rights listed in the table below.
Table 77-3 Software Distribution Directory Rights
Directories NetWare Rights Windows Permissions
software distribution directory R----F Read
admin ------ No Access
agents ------ No Access
client R----F Read
ofviews R----F Read
win32 R----F Read
internet ------ No Access
domain ------ No Access
po ------ No Access
IMPORTANT: Users require rights only to the client directory and subdirectories. The other
directories (admin, agents, domain, internet, and po) are administration directories that
users should not have access to.
GroupWise User Rights 1153

77.2.3 Granting File System Rights to the Mailbox Backup Directory
If you back up a user’s network mailbox, or a user backs up his or her local mailbox, to a network
location, the user requires Read and Write file system rights to the backup directory in order to
restore his or her mailbox.
novdocx (en) 11 December 2007
1154 GroupWise 7 Administration Guide

78
Spam Protection
Unwanted Internet e-mail messages (spam) can be a distracting nuisance to GroupWise® client
users. Your first line of defense against spam is the Internet Agent. Your second line of defense is the
Junk Mail Handling feature of the GroupWise Windows client.
Section 78.1, “Configuring the Internet Agent for Spam Protection,” on page 1155
Section 78.2, “Configuring the GroupWise Client for Spam Protection,” on page 1155
See also Part XVI, “Security Policies,” on page 1159.
78.1 Configuring the Internet Agent for Spam Protection
In ConsoleOne®, you can configure the Internet Agent to reject messages in certain situations:
novdocx (en) 11 December 2007
78
Messages are received from known open relay hosts or spam hosts (Internet Agent object >
Access Control > Blacklists).
Messages are received from any hosts that you specifically do not want to receive messages
from (Internet Agent object > Access Control > Default Class of Service > Edit > Allow
Incoming Messages, Prevent Incoming Messages, and Exceptions).
Messages are received through an anti-spam service that uses an “X” header field to identify
potential spam (Internet Agent object > SMTP/MIME > Settings > Junk Mail).
Thirty messages are received within 10 seconds from the same sending host (Internet Agent
object > SMTP/MIME Settings > Security Settings). The number of message and the time
interval can be modified to identify whatever you consider to be a potential mailbomb.
Messages are received from SMTP hosts that are not using the AUTH LOGIN host
authentication method (/forceinboundauth startup switch).
The sender’s identify cannot be verified (Internet Agent object > SMTP/MIME Settings >
Security Settings).
For detailed setup instructions on these anti-spam security measures, see Section 47.2, “Blocking
Unwanted E-Mail from the Internet,” on page 757.
Messages that are identified as spam by the Internet Agent are not accepted into your GroupWise
system.
78.2 Configuring the GroupWise Client for Spam Protection
The Junk Mail Handling feature (Windows and Cross-Platform client > Tools > Junk Mail
Handling) provides users with the following options for dealing with unwanted messages that have
not been stopped by the Internet Agent:
Individual e-mail addresses or entire Internet domains can be placed on the user’s Block List.
Messages from blocked addresses never arrive in the user’s mailbox.
Spam Protection
1155

Individual e-mail addresses or entire Internet Domains can be placed on the user’s Junk List.
Messages from these addresses are automatically delivered to the Junk Mail folder in the user’s
mailbox. The user can configure automatic deletion of items in the Junk Mail folder and can
also create rules to act on items placed in the Junk Mail folder.
Messages from users whose addresses are not in the user’s personal address books can be
automatically delivered to the Junk Mail folder.
The Junk Mail Handling feature in the GroupWise Windows client and Cross-Platform client is
enabled by default, although you can control its functionality in ConsoleOne (Domain, Post Office,
or User object > Tools > GroupWise Utilities > Client Options > Environment > Junk Mail).
For detailed usage instructions for the Junk Mail Handling feature in the GroupWise client, see:
“Handling Unwanted Mail” in “Working with Items in Your Mailbox” in the GroupWise 7
Windows Client User Guide
“Handling Unwanted Mail” in “Working with Items in Your Mailbox” in the GroupWise 7
Cross-Platform Client User Guide
NOTE: The Junk Mail Handling feature is not available in the WebAccess client.
novdocx (en) 11 December 2007
1156 GroupWise 7 Administration Guide

79
Virus Protection
Virus protection for your GroupWise® system is provided by third-party products, including:
GWAVA* by Beginfinite*
RAV* AntiVirus* by GeCAD Software*
IronMail* by CipherTrust*
GWGuardian* by The Messaging Architects*
novdocx (en) 11 December 2007
79
For information about these and other security products for use with your GroupWise system, see
the Novell
Enterprise Server Partner Support site (http://www.novell.com/products/openenterpriseserver/
partners).
See also Part XVI, “Security Policies,” on page 1159.
®
Partner Product Guide (http://www.novell.com/partnerguide/) and the Novell Open
Virus Protection
1157
 Loading...