

Page 1

XII
WebAccess
Chapter 53, “Scaling Your WebAccess Installation,” on page 855
Chapter 54, “Configuring WebAccess Components,” on page 869
Chapter 55, “Managing User Access,” on page 915
Chapter 56, “Monitoring WebAccess Operations,” on page 925
Chapter 57, “Using WebAccess Startup Switches,” on page 945
novdocx (en) 11 December 2007
XII
WebAccess
853
Page 2

novdocx (en) 11 December 2007
854 GroupWise 7 Administration Guide
Page 3
53
Scaling Your WebAccess
novdocx (en) 11 December 2007
Installation
If your GroupWise® system is relatively small (one domain and a few post offices) and all post
offices reside in the same location, a basic installation of GroupWise WebAccess might very well
meet your needs. However, if your GroupWise system is large, spans multiple locations, or requires
failover support, you might need to scale your GroupWise WebAccess installation to better meet the
reliability, performance, and availability needs of your users.
The following sections provide information about the various configurations you can implement and
instructions to help you create the configuration you choose:
Section 53.1, “WebAccess Configurations,” on page 855
Section 53.2, “Installing Additional WebAccess Components,” on page 858
Section 53.3, “Configuring Redirection and Failover Support,” on page 860
For information about creating a basic GroupWise WebAccess installation, see “Installing
GroupWise WebAccess” in the GroupWise 7 Installation Guide.
53.1 WebAccess Configurations
A basic installation of GroupWise WebAccess requires the WebAccess Agent and the WebAccess
Application, as shown in the following diagram. The WebPublisher Application is also required if
you plan to use GroupWise WebPublisher.
53
Figure 53-1 A Basic Installation of GroupWise WebAccess
Web Server with
WebAccess and
WebPublisher Applications
Depending on your needs, it might be necessary for you to add additional WebAccess Agents or to
have multiple Web servers running the WebAccess Application and WebPublisher Application.
Section 53.1.1, “Multiple WebAccess Agents,” on page 855
Section 53.1.2, “Multiple WebAccess and WebPublisher Applications,” on page 856
WebAccess
Agent
Post Office
Post Office
Domain
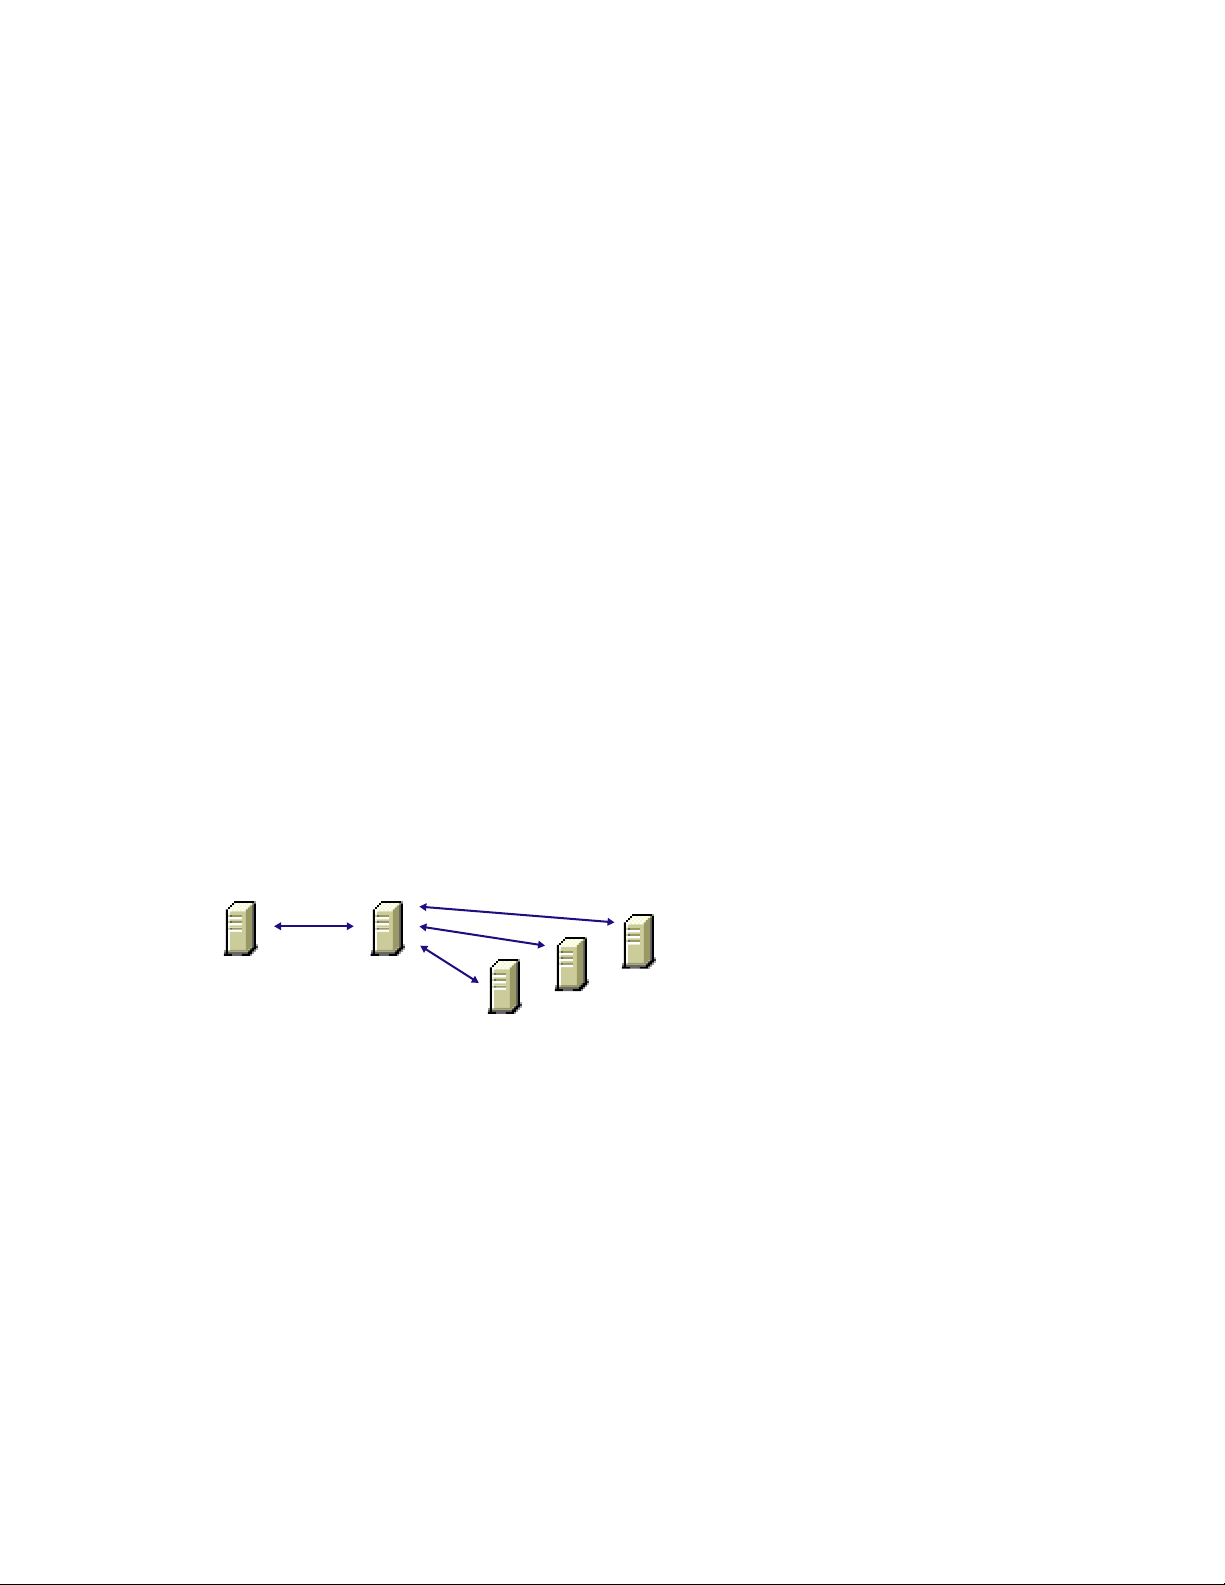
53.1.1 Multiple WebAccess Agents
GroupWise WebAccess is designed to allow one installation of the WebAccess Application and
WebPublisher Application to support multiple WebAccess Agents, as shown in the following
diagram.
Scaling Your WebAccess Installation
855
Page 4
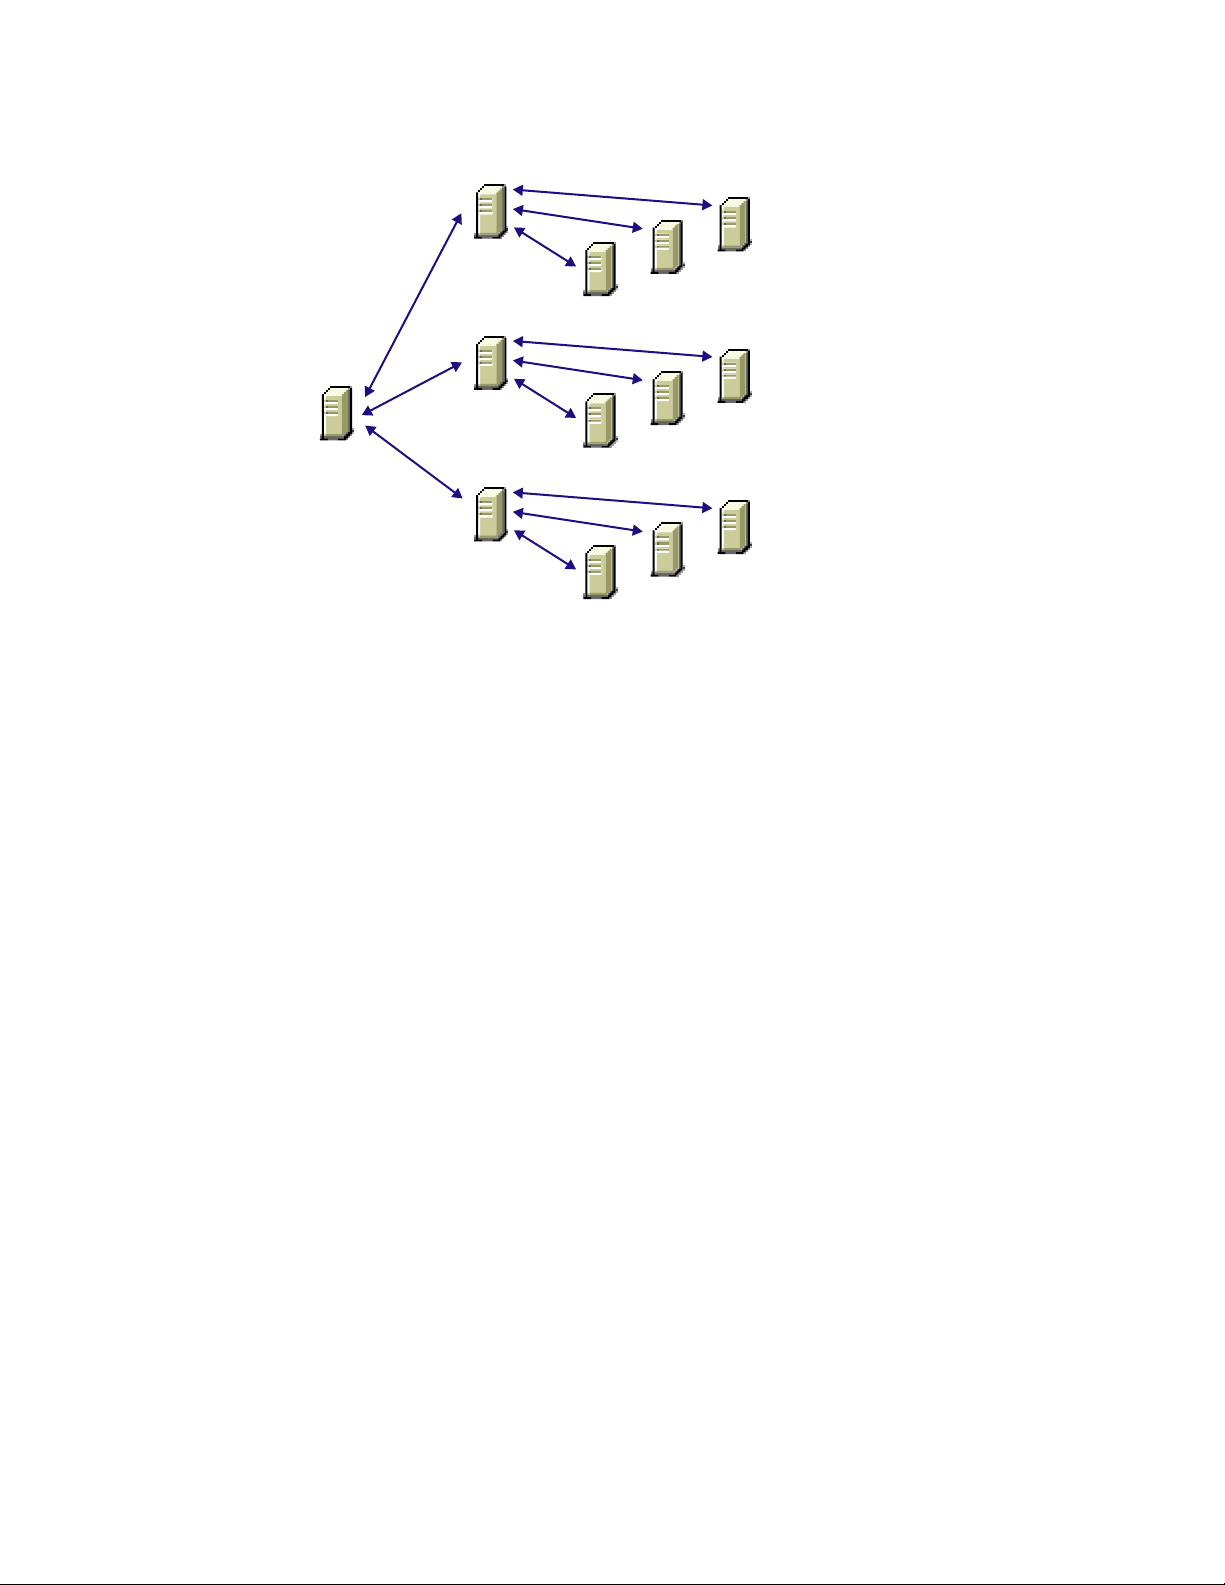
Figure 53-2 Multiple WebAccess Agents
novdocx (en) 11 December 2007
Web Server with
WebAccess and
WebPublisher Applications
WebAccess
Agent
WebAccess
Agent
WebAccess
Agent
Post Office
Domain
Post Office
Domain
Post Office
Domain
Post Office
Post Office
Post Office
There are various reasons why you might want to add additional WebAccess Agents, including:
Improving reliability: One WebAccess Agent might provide sufficient access and
performance, but you want to protect against downtime that would occur if the WebAccess
Agent became unavailable because of server failure or some other reason. Installing more than
one WebAccess Agent enables you to set up failover support to make your system more
reliable.
Improving performance: The WebAccess Agent is designed to be close to the GroupWise
databases. It requires direct access to a domain database and either direct access to post office
databases or TCP/IP access to the Post Office Agents. For best performance, you should ensure
that the WebAccess Agent is on the same local area network as the domain and post offices it
needs access to. For example, in most cases you would not want a WebAccess Agent in Los
Angeles accessing a post office in London.
Improving availability: The WebAccess Agent has 12 threads assigned to process user
requests, which means that it can process only 12 requests at one time regardless of the number
of users logged in. If necessary, you can increase the number of threads allocated to the
WebAccess Agent, but each thread requires additional server memory. If you reach a point
where WebAccess is unavailable to users because thread utilization is at a peak and all server
memory is being used, you might need to have several WebAccess Agents, installed on
different network servers, servicing your post offices. For information about changing the
number of allocated threads, see Section 54.1, “Configuring the WebAccess Agent,” on
page 870.
53.1.2 Multiple WebAccess and WebPublisher Applications
As with the WebAccess Agent, you can also install the WebAccess Application and WebPublisher
Application to multiple Web servers, as shown in the following diagram.
856 GroupWise 7 Administration Guide
Page 5
Figure 53-3 The WebAccess Application and WebPublisher Application Installed to Multiple Web Servers
pp
Web Server with
WebAccess and
WebPublisher Applications
novdocx (en) 11 December 2007
Web Server with
WebAccess and
WebPublisher A
lications
WebAccess
Agent
Post Office
Domain
Post Office
Some reasons for wanting to use this type of configuration include:
Enabling WebAccess users on an intranet to access GroupWise through an internal Web server
and WebAccess users on the Internet to access GroupWise through an exposed Web server.
Increasing Web server performance by balancing the workload among several Web servers,
especially if you are using the Web server for other purposes in addition to GroupWise
WebAccess.
Hosting WebAccess (the WebAccess Application) on one Web server for your GroupWise
users and WebPublisher (the WebPublisher Application) on another Web server for public
Internet use.
If necessary, you can use multiple WebAccess Agents in this configuration, as shown below.
Figure 53-4 The WebAccess Application on One Web Server, and the WebPublisher Application on Another
Web Server with
WebAccess and
WebPublisher Applications
Web Server with
WebAccess and
WebPublisher Applications
WebAccess
Agent
WebAccess
Agent
WebAccess
Agent
Post Office
Post Office
Domain
Post Office
Post Office
Domain
Post Office
Post Office
Domain
Scaling Your WebAccess Installation 857
Page 6

53.2 Installing Additional WebAccess Components
The following sections assume that you have installed at least one WebAccess Agent and one
WebAccess Application (or WebPublisher Application) and now need to install additional agents or
applications.
Section 53.2.1, “Installing Additional Components on NetWare or Windows,” on page 858
Section 53.2.2, “Installing Additional Components on Linux,” on page 859
53.2.1 Installing Additional Components on NetWare or Windows
“Installing a NetWare or Windows WebAccess Agent” on page 858
“Installing a NetWare or Windows WebAccess or WebPublisher Application” on page 858
For more information, see “NetWare and Windows: Setting Up GroupWise WebAccess” in the
GroupWise 7 Installation Guide.
novdocx (en) 11 December 2007
Installing a NetWare or Windows WebAccess Agent
1 Insert the GroupWise 7 Administrator for NetWare/Windows CD into the CD drive to start the
Installation program, click Install Products, click GroupWise WebAccess, then click Install
GroupWise WebAccess. If the Installation program does not start automatically, run
setup.exe from the root of the CD.
or
If you’ve already copied the GroupWise WebAccess software to a software distribution
directory, run setup.exe from the internet\webacces directory.
2 Click Ye s to accept the license agreement and display the Select Components dialog box.
3 Deselect all components except the GroupWise WebAccess Agent, then click Next.
4 Follow the prompts to create the WebAccess Agent’s gateway directory, install the WebAccess
Agent software, and create the WebAccess Agent’s object in Novell
If you are installing to a domain where another WebAccess Agent already exists, you must use
a different directory and object name than the one used for the existing WebAccess Agent.
5 When installation is complete, you need to configure your system so that the WebAccess and
WebPublisher Applications know about the WebAccess Agent and can direct the appropriate
user requests to it. For information, see Section 53.3, “Configuring Redirection and Failover
Support,” on page 860.
Installing a NetWare or Windows WebAccess or WebPublisher Application
®
eDirectoryTM.
To install a WebAccess Application or a WebPublisher Application to a Web server:
1 Insert the GroupWise 7 Administrator for NetWare/Windows CD into the CD drive to start the
installation program, click Install Products, click Groupwise WebAccess, then click Install
GroupWise WebAccess. If the installation program does not start automatically, run
setup.exe from the root of the CD.
858 GroupWise 7 Administration Guide
Page 7

or
If you’ve already copied the Groupwise WebAccess software to a software distribution
directory, run setup.exe from the internet/webacces directory.
2 Click Yes to accept the license agreement and display the Select Components dialog box.
3 Deselect all components except the GroupWise WebAccess application and/or the Groupwise
WebPublisher Application, then click Next.
The WebAccess Application and WebPublisher Application must be associated with a
WebAccess Agent. For information on configuring a WebAccess or WebPublisher Application
to connect to other WebAccess Agents, see Section 53.3, “Configuring Redirection and
Failover Support,” on page 860.
4 Specify the path for the WebAccess Agent’s gateway directory.
5 Follow the prompts to install the files to the Web server. Restart the Web server.
53.2.2 Installing Additional Components on Linux
“Installing a Linux WebAccess Agent” on page 859
“Installing a Linux WebAccess and WebPublisher Application” on page 860
novdocx (en) 11 December 2007
For more information, see “Linux: Setting Up GroupWise WebAccess” in the GroupWise 7
Installation Guide.
Installing a Linux WebAccess Agent
1 Make sure that LDAP is running on your eDirectory server and that it is configured to accept
login from the WebAccess Agent Installation program.
2 In a terminal window, become root by entering sux and the root password.
The sux command enables the X Window System, which is required for running the GUI
GroupWise Installation program, Installation Advisor, and the Setup Advisor. If you do not
want to use the X Window System, you can install GroupWise components individually, as
described in “Installing the GroupWise Agents Using the Text-Based Installation Program” in
“Installing GroupWise Agents” in the GroupWise 7 Installation Guide.
3 Change to the root of the GroupWise 7 Administrator for Linux CD.
4 Enter ./install.
5 Select the language in which you want to run the Installation program and install the
WebAccess software, then click Next.
6 In the Installation program, click Install Products > GroupWise WebAccess > Install
WebAccess Agent.
7 When the installation is complete, click OK.
8 Click Configure WebAccess Agent.
9 Follow the prompts to configure the Linux WebAccess Agent.
10 When installation and configuration is complete, you need to configure your GroupWise
system so that the WebAccess and WebPublisher Applications know about this instance of the
WebAccess Agent and can direct the appropriate user requests to it. For instructions, see
Section 53.3, “Configuring Redirection and Failover Support,” on page 860.
Scaling Your WebAccess Installation 859
Page 8

Installing a Linux WebAccess and WebPublisher Application
To install a WebAccess Application and a WebPublisher Application to a Web server:
1 After installing and configuring the WebAccess Agent, if you want to use an existing Apache
and Tomcat installations, click Install GroupWise WebAccess Application.
or
Click Install GroupWise WebAccess Application with Apache and Tomcat.
This installs a version of Apache and Tomcat specifically for use with GroupWise. Apache files
are installed under /var/opt/novell/http and /etc/opt/novell/http. Tomcat
files are installed under /var/opt/novell/tomcat4 and /etc/opt/novell/
tomcat4.
In addition, a self-signed certificate is generated, enabling users to use WebAccess and
WebPublisher using an SSL connection.
NOTE: The option to install Apache and Tomcat along with the WebAccess Application is not
available if you are installing to Novell Open Enterprise Server Linux because Apache and
Tomcat are already installed and configured correctly in that environment.
novdocx (en) 11 December 2007
2 When the installation is complete, click OK.
3 Click Configure WebAccess Application.
4 Follow the prompts to configure the Linux WebAccess Application.
5 When the installation and configuration is complete, start or restart the Web server.
53.3 Configuring Redirection and Failover Support
Redirection enables the WebAccess Application to direct user requests to specific WebAccess
Agents. For example, you might want WebAccess Agent 1 to process all requests from users on Post
Office 1 and WebAccess Agent 2 to process all requests from users on Post Office 2.
Failover support enables the WebAccess Application to contact a second WebAccess Agent if the
first WebAccess Agent is unavailable. For example, if the WebAccess Application receives a user
request that should be processed by WebAccess Agent 1 but it is unavailable, the WebAccess
Application can route the user request to WebAccess Agent 2 instead.
The following sections provide information to help you successfully configure redirection and
failover support:
Section 53.3.1, “How the WebAccess Application Knows Which WebAccess Agents to Use,”
on page 861
Section 53.3.2, “Synchronizing the Encryption Key,” on page 863
Section 53.3.3, “Specifying a WebAccess Agent in the WebAccess URL,” on page 864
Section 53.3.4, “Assigning a Default WebAccess Agent to a Post Office,” on page 865
Section 53.3.5, “Assigning a Default WebAccess Agent to a Domain,” on page 866
Section 53.3.6, “Adding WebAccess Agents to the GroupWise Service Provider’s List,” on
page 867
860 GroupWise 7 Administration Guide
Page 9

53.3.1 How the WebAccess Application Knows Which WebAccess Agents to Use
To redirect user requests or to fail over to a second WebAccess Agent, the WebAccess Application
needs to know which WebAccess Agents you want it to use. This might be all of the WebAccess
Agents in your system, or only specific WebAccess Agents.
Each time a user logs in, the WebAccess Application compiles a list, referred to as a redirection/
failover list, of the WebAccess Agents defined in the locations listed below.
The WebAccess URL. The standard URL does not contain a WebAccess Agent, but you can
modify the URL to point to a specific agent.
The user’s Post Office object. You can assign a default WebAccess Agent to the post office to
handle requests from the post office’s users.
The user’s Domain object. You can assign a default WebAccess Agent to the domain to
handle requests from the domain’s users.
The GroupWiseProvider object. This is the service provider used by the WebAccess
Application to connect to WebAccess Agents.
novdocx (en) 11 December 2007
The commgr.cfg file. This file located in the WebAccess Application’s home directory, which
varies by platform.
NetWare
and
Windows:
Linux: /opt/novell/groupwise/webaccess/users
novell\webaccess\users on the Web server
By default, only the GroupWise Provider object and the commgr.cfg file include a WebAccess
Agent definition, as shown in the following table:
Table 53-1 WebAccess Agent Default Locations
Location WebAccess Agent
WebAccess URL No agent defined
Post office No agent defined
Domain No agent defined
GroupWise service provider Agent 1
Commgr.cfg Agent 1
If no other WebAccess Agents are defined (as is the case by default), the WebAccess Application
directs all user requests to the WebAccess Agent (Agent 1) listed in the commgr.cfg file. This file
is located in the WebAccess Application’s home directory on the Web server. The commgr.cfg
file contains the IP address and encryption key for the WebAccess Agent that was associated with
the WebAccess Application during the application’s installation.
If Agent 1 is not available, the user receives an error message and cannot log in.
Scaling Your WebAccess Installation 861
Page 10

Redirection/Failover List: Example 1
Assume that the WebAccess Agents are defined as follows:
Location WebAccess Agent
WebAccess URL No agent defined
Post office Agent 1
Domain Agent 4
GroupWise service provider Agent 2
Agent 3
Commgr.cfg Agent 4
Using this information, the WebAccess Application would create the following redirection/failover
list:
List Entry Taken From
novdocx (en) 11 December 2007
Agent 1 Post office
Agent 4 Domain
Agent 2 GroupWise service provider
Agent 3 GroupWise service provider
Because there is no WebAccess Agent defined in the WebAccess URL, the WebAccess Application
redirects the user’s request to the default WebAccess Agent (Agent 1) assigned to the user’s post
office. If Agent 1 is unavailable, the WebAccess Application fails over to the domain’s default
WebAccess Agent (Agent 4). If Agent 4 is unavailable, the WebAccess Application fails over to
Agent 2 and then Agent 3, both of which are defined in the GroupWise service provider’s list.
Redirection/Failover List: Example 2
Assume that the WebAccess Agents are defined as follows:
Location WebAccess Agent
WebAccess URL No agent defined
Post office No agent defined
Domain No agent defined
GroupWise service provider Agent 1
Commgr.cfg Agent 2
Using this information, the WebAccess Application would create the following redirection/failover
list:
862 GroupWise 7 Administration Guide
Agent 2
Agent 3
Page 11
List Entry Taken From
Agent 1 GroupWise service provider
Agent 2 GroupWise service provider
Agent 3 GroupWise service provider
Because there is no WebAccess Agent defined in the WebAccess URL, user’s post office, or user’s
domain, the WebAccess Application redirects the user’s request to the first WebAccess Agent
(Agent 1) in the GroupWise service provider’s list. If Agent 1 is unavailable, the WebAccess
Application fails over to Agent 2 and then Agent 3.
53.3.2 Synchronizing the Encryption Key
Every WebAccess Agent has an encryption key. In order to communicate with a WebAccess Agent,
the WebAccess Application must know the agent’s encryption key. The encryption key is randomly
generated when the WebAccess Agent object is created in eDirectory, which means that every
WebAccess Agent has a unique encryption key.
novdocx (en) 11 December 2007
If a WebAccess Application communicates with more than one WebAccess Agent, all the
WebAccess Agents must use the same encryption key.
To modify a WebAccess Agents encryption key:
®
1 In ConsoleOne
, right-click the WebAccess Agent object, then click Properties.
2 Click WebAccess to display the WebAccess Settings page.
3 Make the encryption key the same as the key for any other WebAccess Agents with which the
WebAccess Application communicates.
4 Click OK to save the changes.
Scaling Your WebAccess Installation 863
Page 12

53.3.3 Specifying a WebAccess Agent in the WebAccess URL
To have the WebAccess Application connect to a WebAccess Agent other than the one specified in
the commgr.cfg file, you can add the WebAccess Agent’s IP address and port number to the URL
that calls the WebAccess Application. For example, the default WebAccess Application URL is:
http://web_server_ip_address/gw/webacc
This URL causes the WebAccess Application to use the IP address and port number that is listed in
the commgr.cfg file. To redirect the WebAccess Application to another WebAccess Agent, you
would use the following URLs:
http://web_server_ip_address/gw/webacc
?GWAP.ip=agent_ip_address&GWAP.port=port_number
For example:
http://172.16.5.18/gw/webacc
?GWAP.ip=172.16.6.10&GWAP.port=7204
In this example, the WebAccess Application redirects its requests to the WebAccess Agent at IP
address 172.16.6.10 and port number 7204. If the WebAccess Agent is using the same port number
that is listed in the commgr.cfg file, you do not need to include the GWAP.port parameter. Or, if
the WebAccess Agent is using the same IP address that is listed in the commgr.cfg file, you do
not need to include the GWAP.ip parameter.
novdocx (en) 11 December 2007
If you want, you can use the WebAccess Agent’s DNS hostname in the URL rather than its IP
address.
You can also specify the user interface language by adding the &User.lang option. This allows you
to bypass the initial WebAccess language page. For example:
http://172.16.5.18/gw/webpub
?GWAP.ip=172.16.6.10&GWAP.port=7204&User.lang=en
You can use the language codes listed below with the &User.lang parameter in the WebAccess URL.
Table 53-2 Language Codes
Language Code Language Code
Arabic ar Hebrew iw
Brazilian Portuguese pt Hungarian hu
Chinese Simplified cs Italian it
Chinese Traditional ct Japanese jp
Czechoslovakian cz Korean kr
Danish da Norwegian no
Dutch nl Polish pl
English us Russian ru
Finnish su Spanish es
French fr Swedish sv
864 GroupWise 7 Administration Guide
Page 13

Language Code Language Code
German de
You can add the URL to any Web page. For example, if you are using the Web Services page as your
initial WebAccess page, you could add the URL to that page. You should add one URL for each
WebAccess Agent.
For example, suppose you had offices in three different locations and installed a WebAccess Agent
at each location to service the post offices at those locations. To enable the WebAccess Application
to redirect requests to the WebAccess Agent at the appropriate location, you could modify the Web
Services page to display a list of the locations. The modified page would include the following
HTML code (if WebAccess is running on NetWare or Windows):
<UL>
<LI><A HREF="http://172.16.5.18/gw/
webacc?GWAP.ip=172.16.6.10&GWAP.port=7204>San Francisco
</A></LI>
novdocx (en) 11 December 2007
<LI><A HREF="http://172.16.5.18/gw/webacc?GWAP.ip=172.16.6.12>New York
</A></LI>
<LI><A HREF="http://172.16.5.18/gw/
webacc?GWAP.ip=172.16.6.33&GWAP.port=7203>London
</A></LI>
</UL>
The displayed HTML page would contain the following list of locations:
San Francisco
New York
London
When a user selects a location, the WebAccess Application routes all requests to the WebAccess
Agent at the selected location.
53.3.4 Assigning a Default WebAccess Agent to a Post Office
The WebAccess Application uses the post office’s default WebAccess Agent if no WebAccess Agent
has been specified in the WebAccess URL (see Section 53.3.3, “Specifying a WebAccess Agent in
the WebAccess URL,” on page 864) or if that WebAccess Agent is unavailable. This applies only if
you have multiple WebAccess Agents installed in your GroupWise system. If you have only one
WebAccess Agent, it services all post offices.
To assign a default WebAccess Agent to a post office:
1 In ConsoleOne, right-click the Post Office object, then click Properties.
2 Click GroupWise > Default WebAccess to display the Default WebAccess page.
Scaling Your WebAccess Installation 865
Page 14
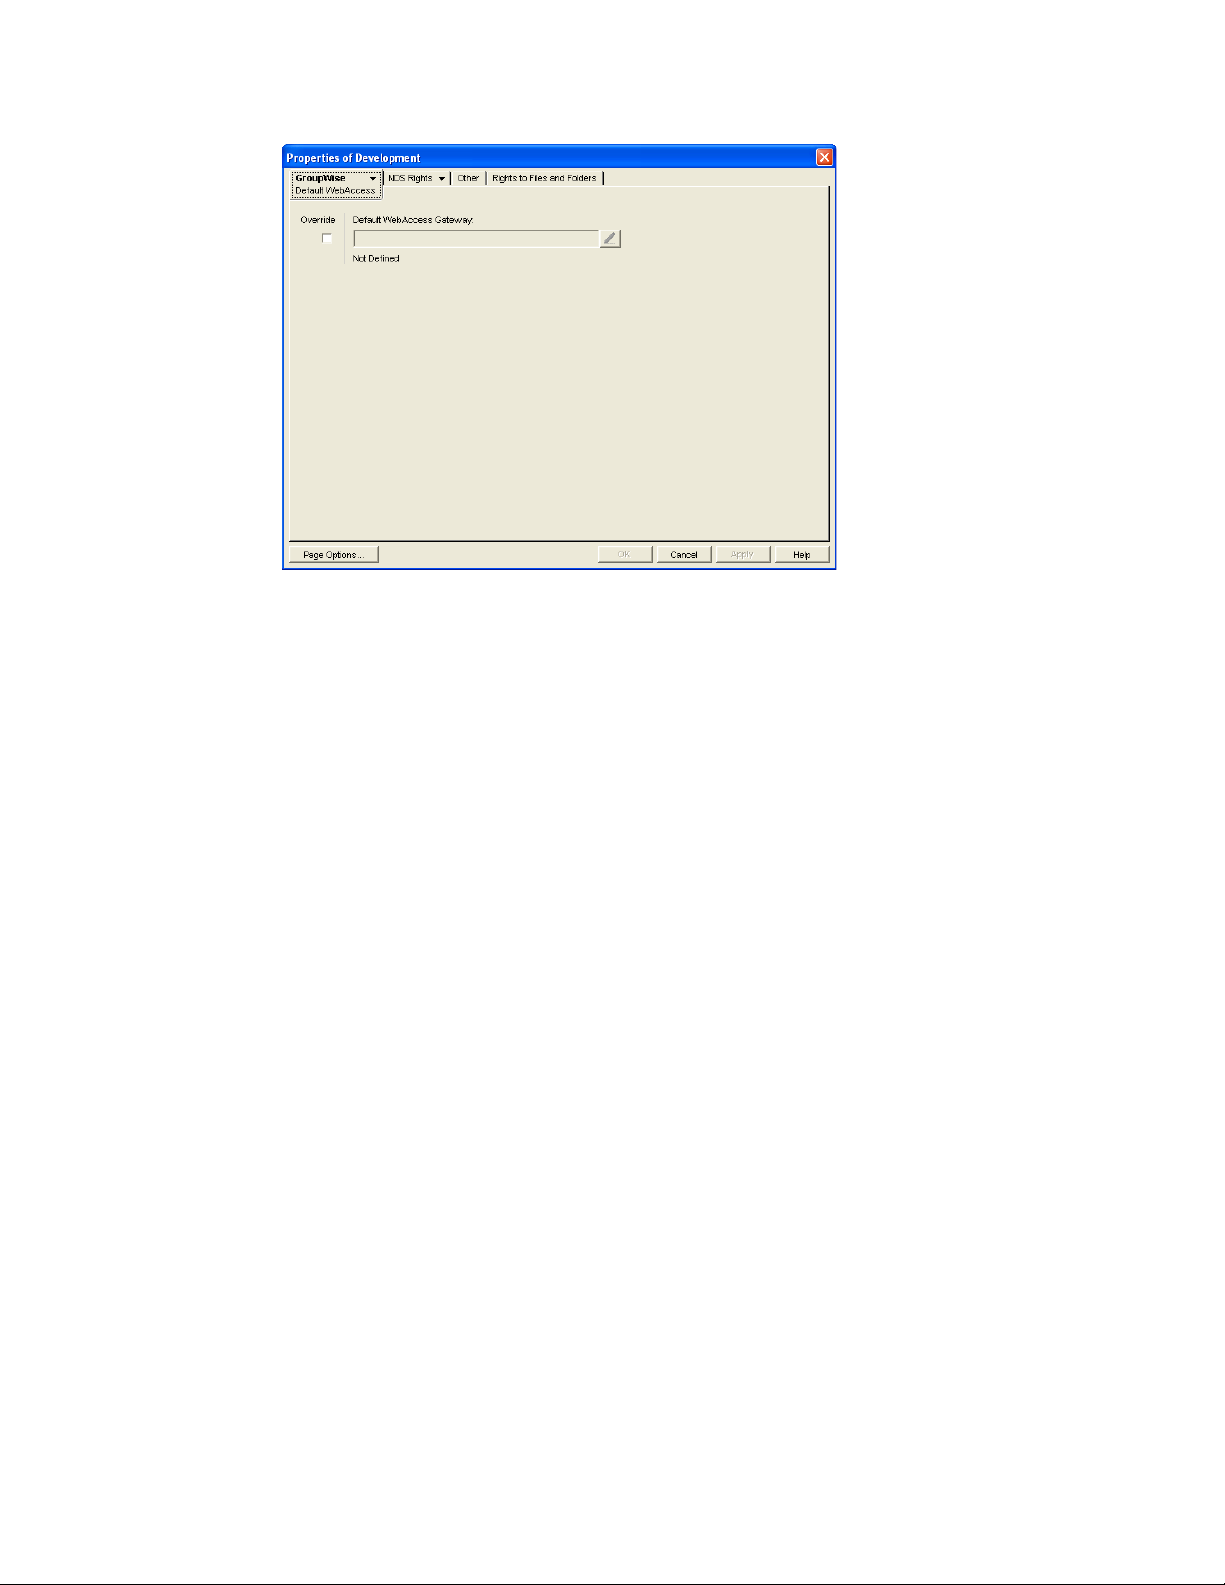
3 Select the Override box to turn on the option.
4 In the Default WebAccess Gateway box, browse for and select the WebAccess Agent that you
want to assign as the default agent.
When you have multiple WebAccess Agents and a user logs in to GroupWise WebAccess, the
GroupWise Application running on the Web server checks to see if a default WebAccess Agent
has been assigned to the user’s post office. If so, the WebAccess Application connects to the
assigned WebAccess Agent. If not, it connects to the default WebAccess Agent assigned to the
post office’s domain, as described in Section 53.3.5, “Assigning a Default WebAccess Agent to
a Domain,” on page 866 or to one of the WebAccess Agents in its service provider list, as
described in Section 53.3.6, “Adding WebAccess Agents to the GroupWise Service Provider’s
List,” on page 867. If possible, select a WebAccess Agent that has good access to the post
office to ensure the best performance.
5 Click OK to save the changes.
novdocx (en) 11 December 2007
53.3.5 Assigning a Default WebAccess Agent to a Domain
The WebAccess Application uses the domain’s default WebAccess Agent if 1) no WebAccess Agent
has been specified in the WebAccess URL (see Section 53.3.3, “Specifying a WebAccess Agent in
the WebAccess URL,” on page 864), 2) no default WebAccess Agent has been defined for the user’s
post office, or 3) neither of those WebAccess Agents are available. This applies only if you have
multiple WebAccess Agents installed in your GroupWise system. If you have only one WebAccess
Agent, it services users in all domains.
To assign a default WebAccess Agent to a domain:
1 In ConsoleOne, right-click the Domain object, then click Properties.
2 Click GroupWise > Default WebAccess to display the Default WebAccess page.
866 GroupWise 7 Administration Guide
Page 15

3 Select the Override box to turn on the option.
4 In the Default WebAccess Gateway box, browse for and select the WebAccess Agent that you
want to assign as the default agent.
When you have multiple WebAccess Agents and a user logs in to GroupWise WebAccess, the
GroupWise Application running on the Web server checks to see if a default WebAccess Agent
has been assigned to the user’s post office, as described in Section 53.3.4, “Assigning a Default
WebAccess Agent to a Post Office,” on page 865. If so, the WebAccess Application connects to
the assigned WebAccess Agent. If not, it connects to the default WebAccess Agent assigned to
the post office’s domain or to one of the WebAccess Agents in its service provider list, as
described in Section 53.3.6, “Adding WebAccess Agents to the GroupWise Service Provider’s
List,” on page 867. If possible, you should select a WebAccess Agent that has good access to
the domain’s post offices to ensure the best performance. Each post office uses the domain’s
default WebAccess Agent unless you override the default at the post office level.
5 Click OK to save the changes.
novdocx (en) 11 December 2007
53.3.6 Adding WebAccess Agents to the GroupWise Service Provider’s List
1 In ConsoleOne, right-click the GroupWise service provider object (GroupWiseProvider), then
click Properties.
2 Click Provider to display the Environment page.
Scaling Your WebAccess Installation 867
Page 16
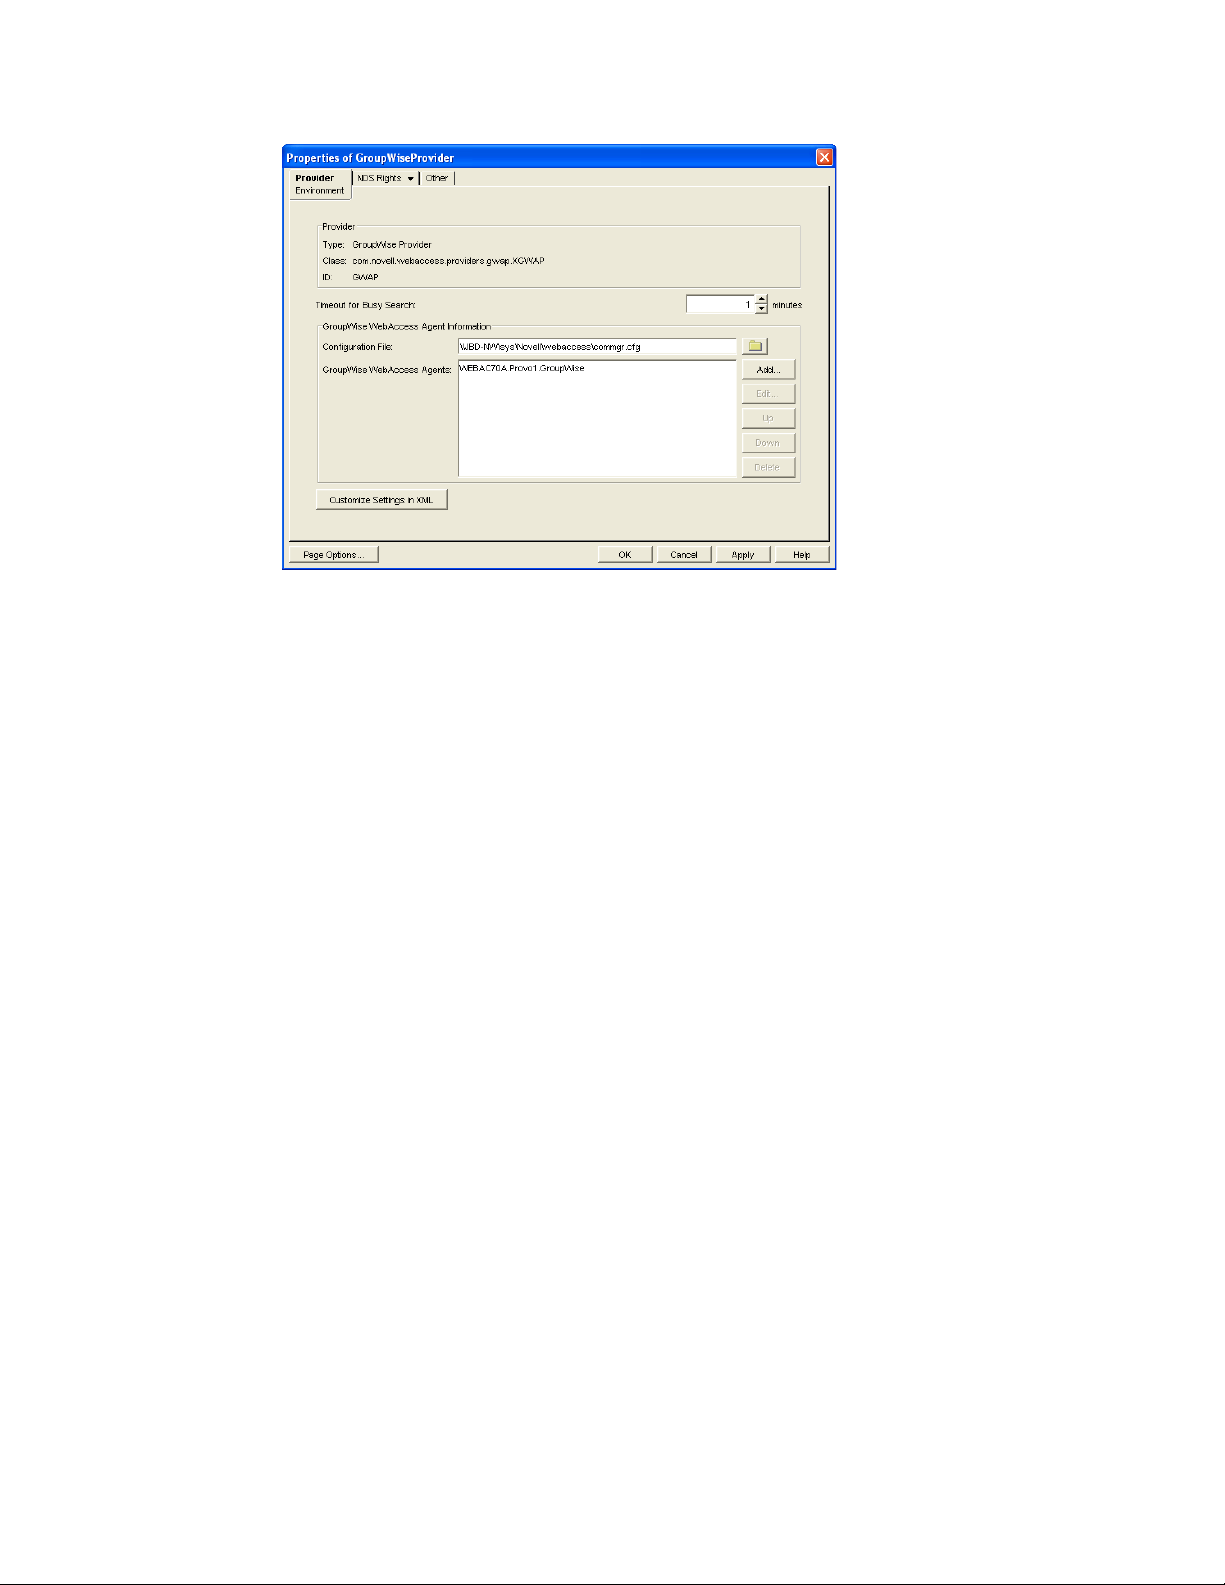
The GroupWise WebAccess Agents list displays the WebAccess Agents the GroupWise service
provider can communicate with when attempting to complete a request. By default, the list
includes the WebAccess Agent that is defined in the commgr.cfg file (listed in the
Configuration File field). If the first WebAccess Agent is unavailable, the GroupWise service
provider attempts to use the second, third, fourth, and so on until it is successful.
novdocx (en) 11 December 2007
3 Click Add, select the WebAccess Agent you want to add to the list, then click OK.
4 Repeat Step 3 for each WebAccess Agent you want to add to the list, then click OK to save the
changes.
868 GroupWise 7 Administration Guide
Page 17
54
Configuring WebAccess
novdocx (en) 11 December 2007
Components
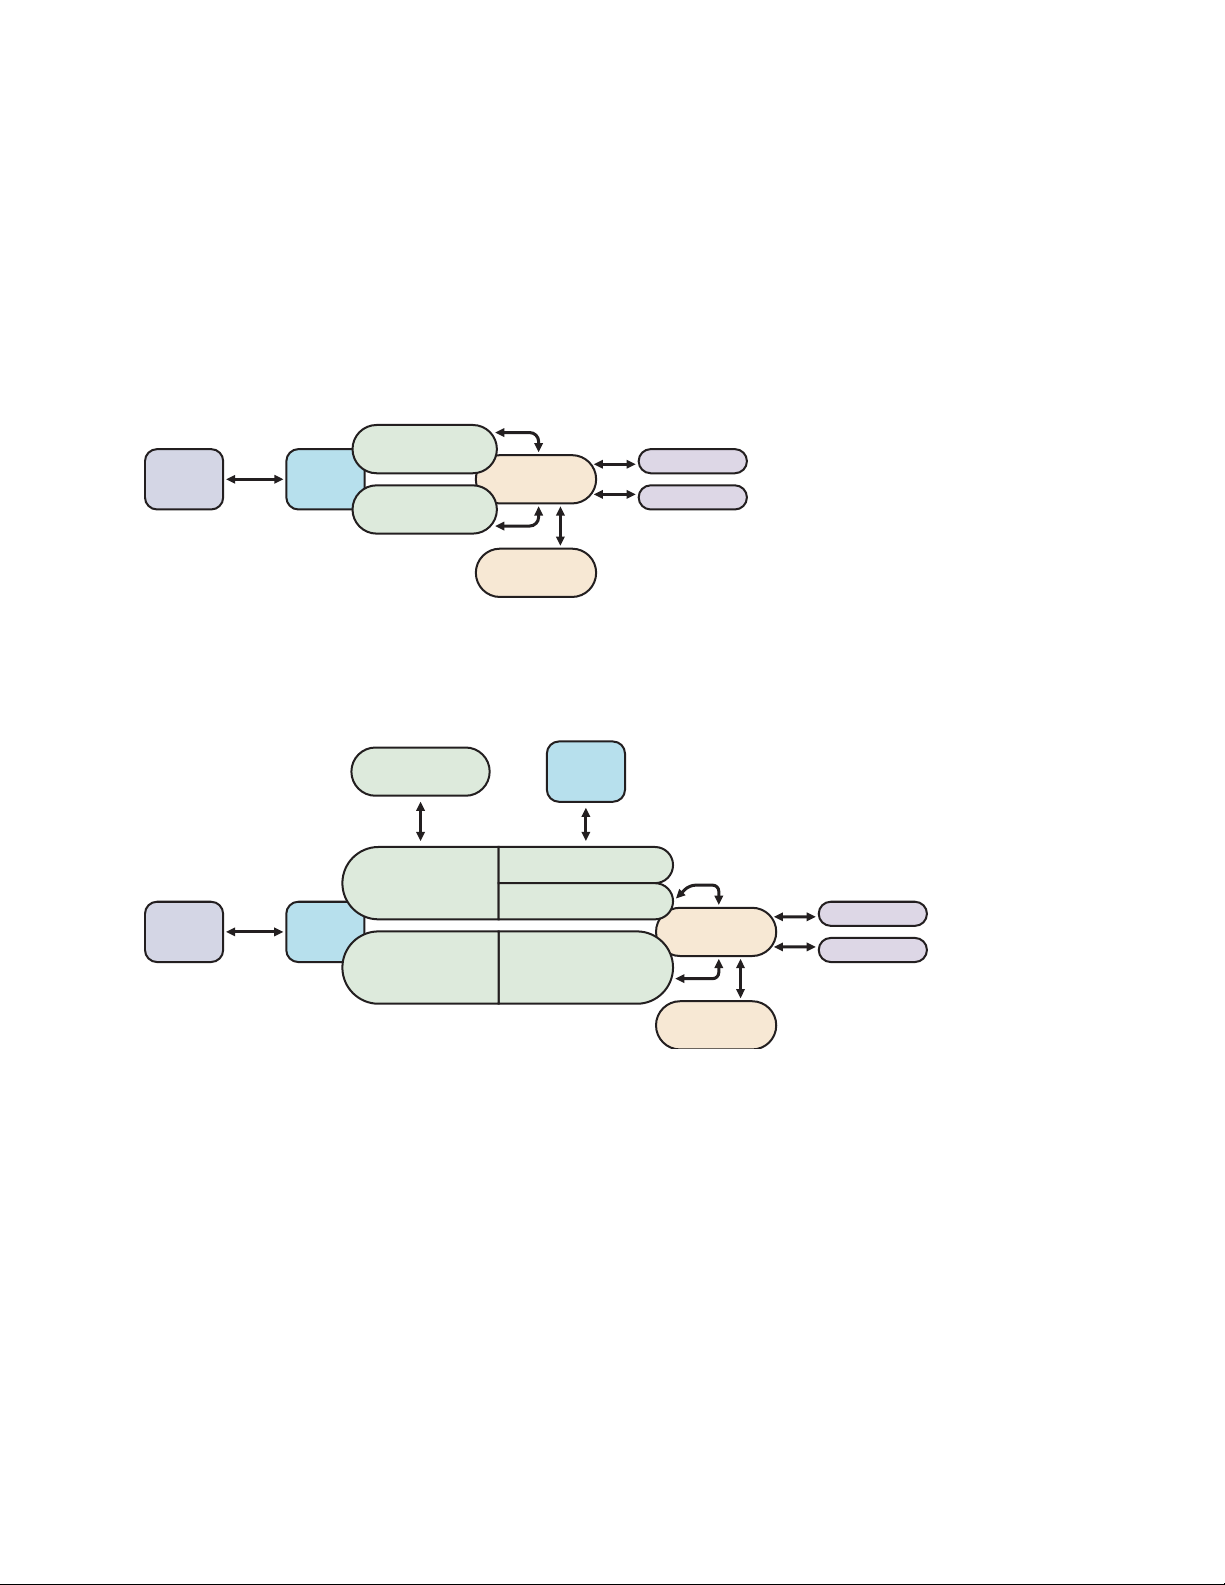
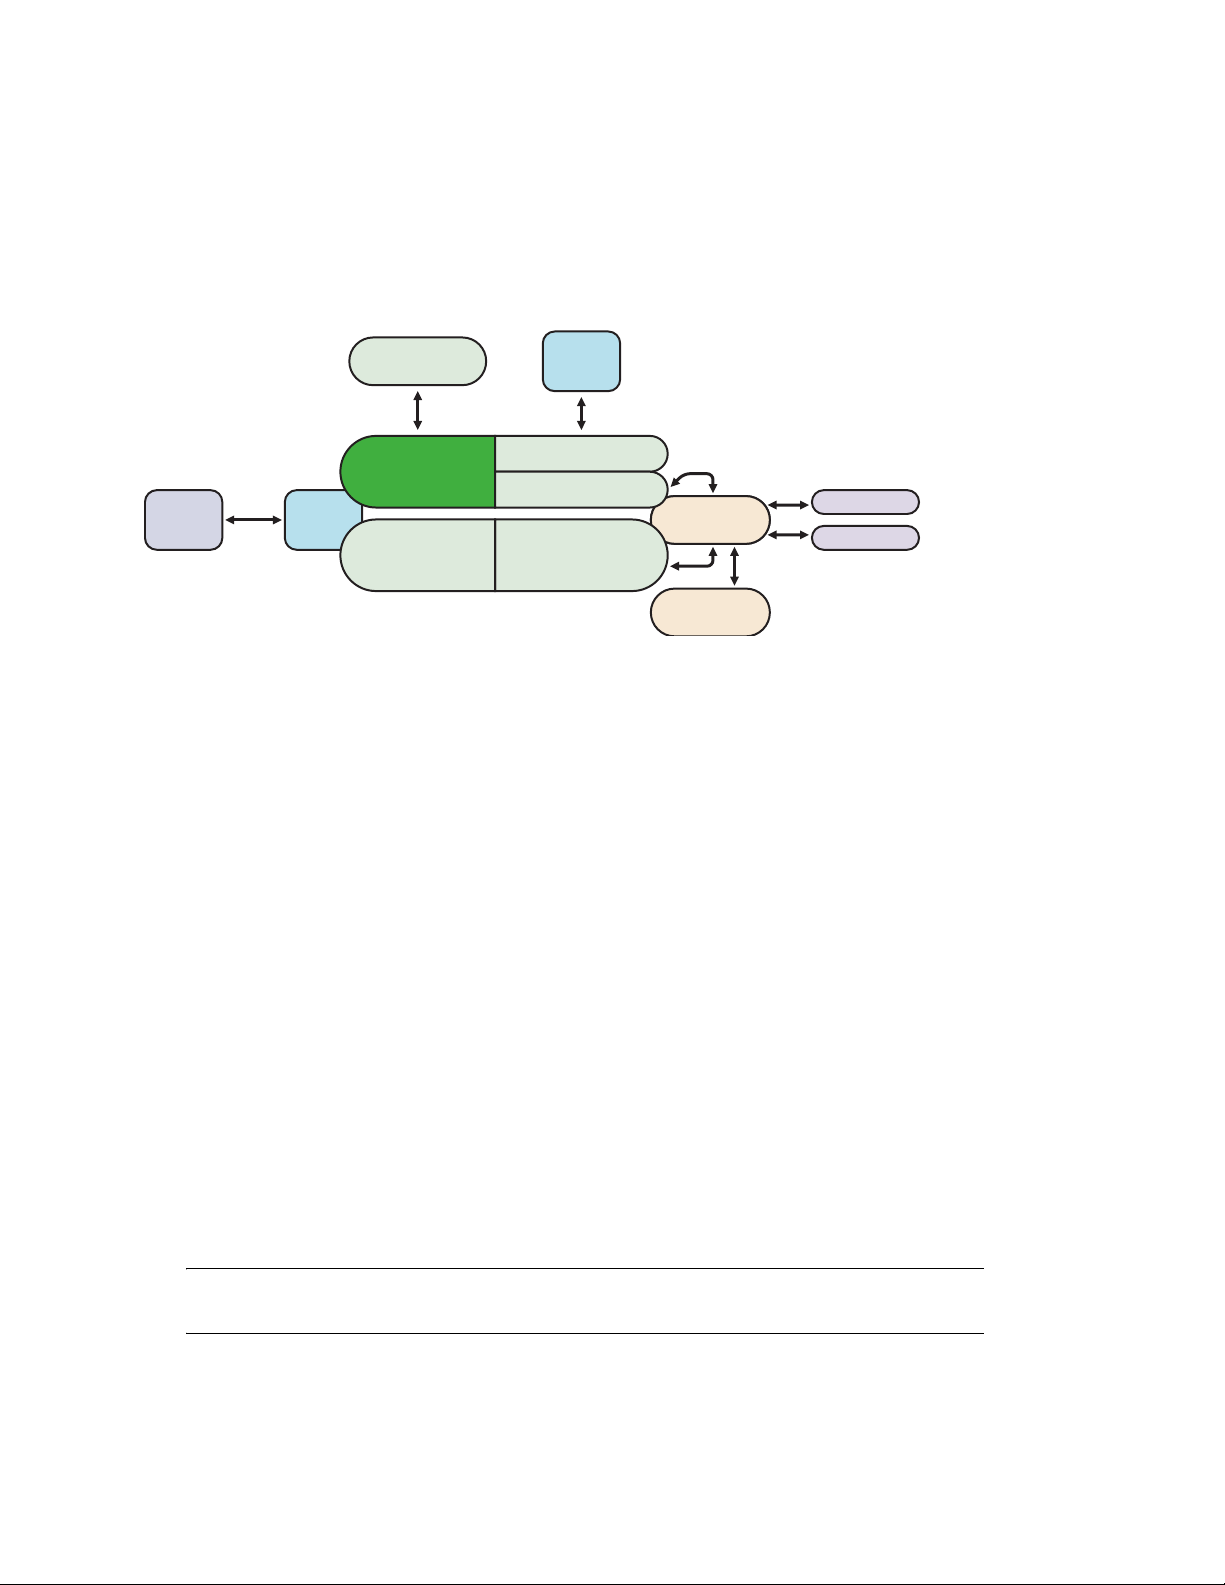
GroupWise® WebAccess consists of a number of components. The GroupWise 7 Installation Guide
presented a simple overview of those components:
Figure 54-1 WebAccess Components: Simplified
WebAccess
Web
Browser
Web
Server
Application
WebPublisher
Application
WebAccess
Agent
Viewer
Agent
This section of the GroupWise 7 Administration Guide provides additional details about those and
additional components:
Figure 54-2 WebAccess Components: Complete
Speller
Application
LDAP
Server
Post Office
Library
54
LDAP Provider
GroupWise Provider
Document
Service Provider
WebAccess
Agent
Viewer
Agent
Post Office
Library
Web
Browser
WebAccess
Application
Web
Server
WebPublisher
Application
Each component can be configured to meet the specific needs of your GroupWise system:
Section 54.1, “Configuring the WebAccess Agent,” on page 870
Section 54.2, “Configuring the WebAccess Application,” on page 879
Section 54.3, “Configuring the Novell Speller Application,” on page 892
Section 54.4, “Configuring the WebPublisher Application,” on page 894
Section 54.5, “Configuring the GroupWise Service Provider,” on page 903
Section 54.6, “Configuring the LDAP Service Provider,” on page 905
Section 54.7, “Configuring the GroupWise Document Service Provider,” on page 907
Section 54.8, “Configuring the Document Viewer Agent,” on page 909
Section 54.9, “Enabling Web Server Data Compression,” on page 913
Configuring WebAccess Components
869
Page 18
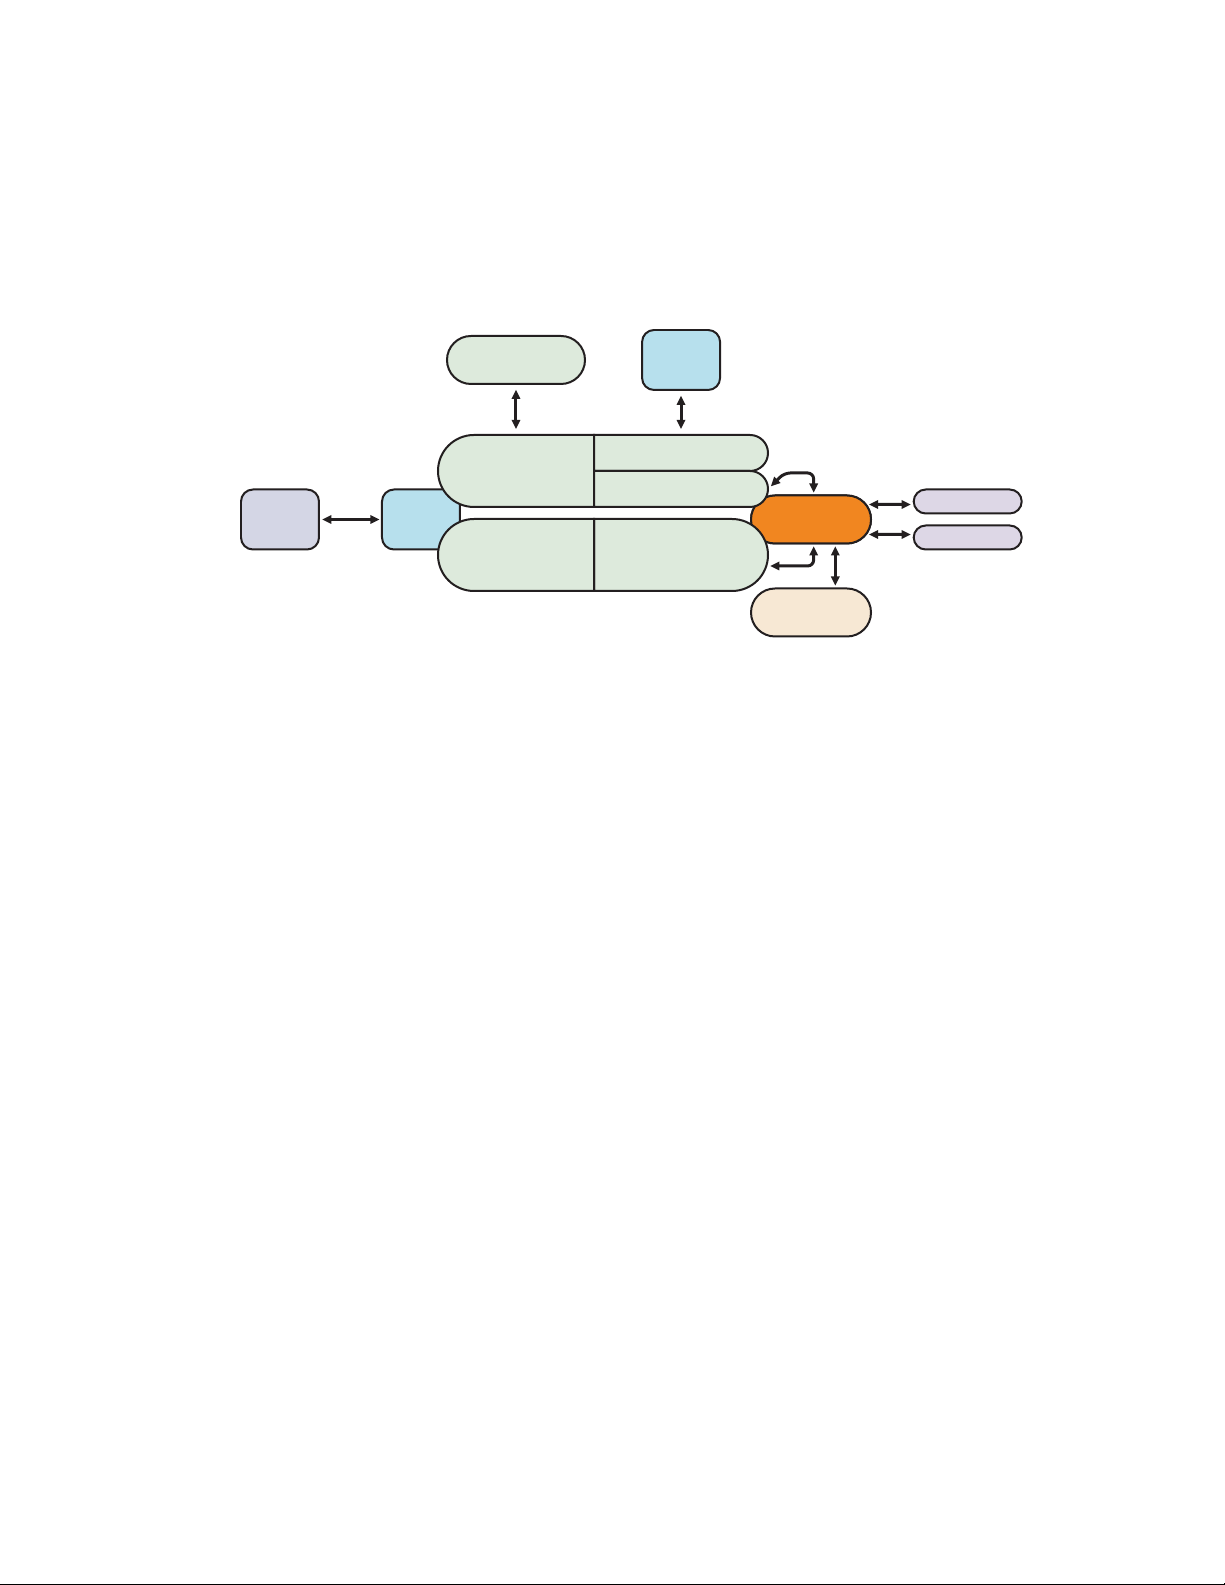
54.1 Configuring the WebAccess Agent
The WebAccess Agent receives user requests from the WebAccess Application and WebPublisher
Application, accesses post offices and libraries to process the requests, and then passes information
back to the applications.
Figure 54-3 WebAccess Agent
novdocx (en) 11 December 2007
LDAP
Server
LDAP Provider
GroupWise Provider
Document
Service Provider
WebAccess
Agent
Viewer
Agent
Post Office
Library
Web
Browser
Speller
Application
WebAccess
Application
Web
Server
WebPublisher
Application
During installation, the GroupWise® WebAccess Agent is set up with a default configuration.
However, you can use the information in the following sections to optimize the WebAccess Agent
for your environment:
Section 54.1.1, “Modifying WebAccess Settings,” on page 870
Section 54.1.2, “Modifying WebPublisher Settings,” on page 871
Section 54.1.3, “Managing Access to Post Offices,” on page 873
Section 54.1.4, “Securing WebAccess Agent Connections with SSL,” on page 875
Section 54.1.5, “Changing the WebAccess Agent’s Network Address or Port Numbers,” on
page 877
Section 54.1.6, “Binding the WebAccess Agent to a Specific IP Address,” on page 878
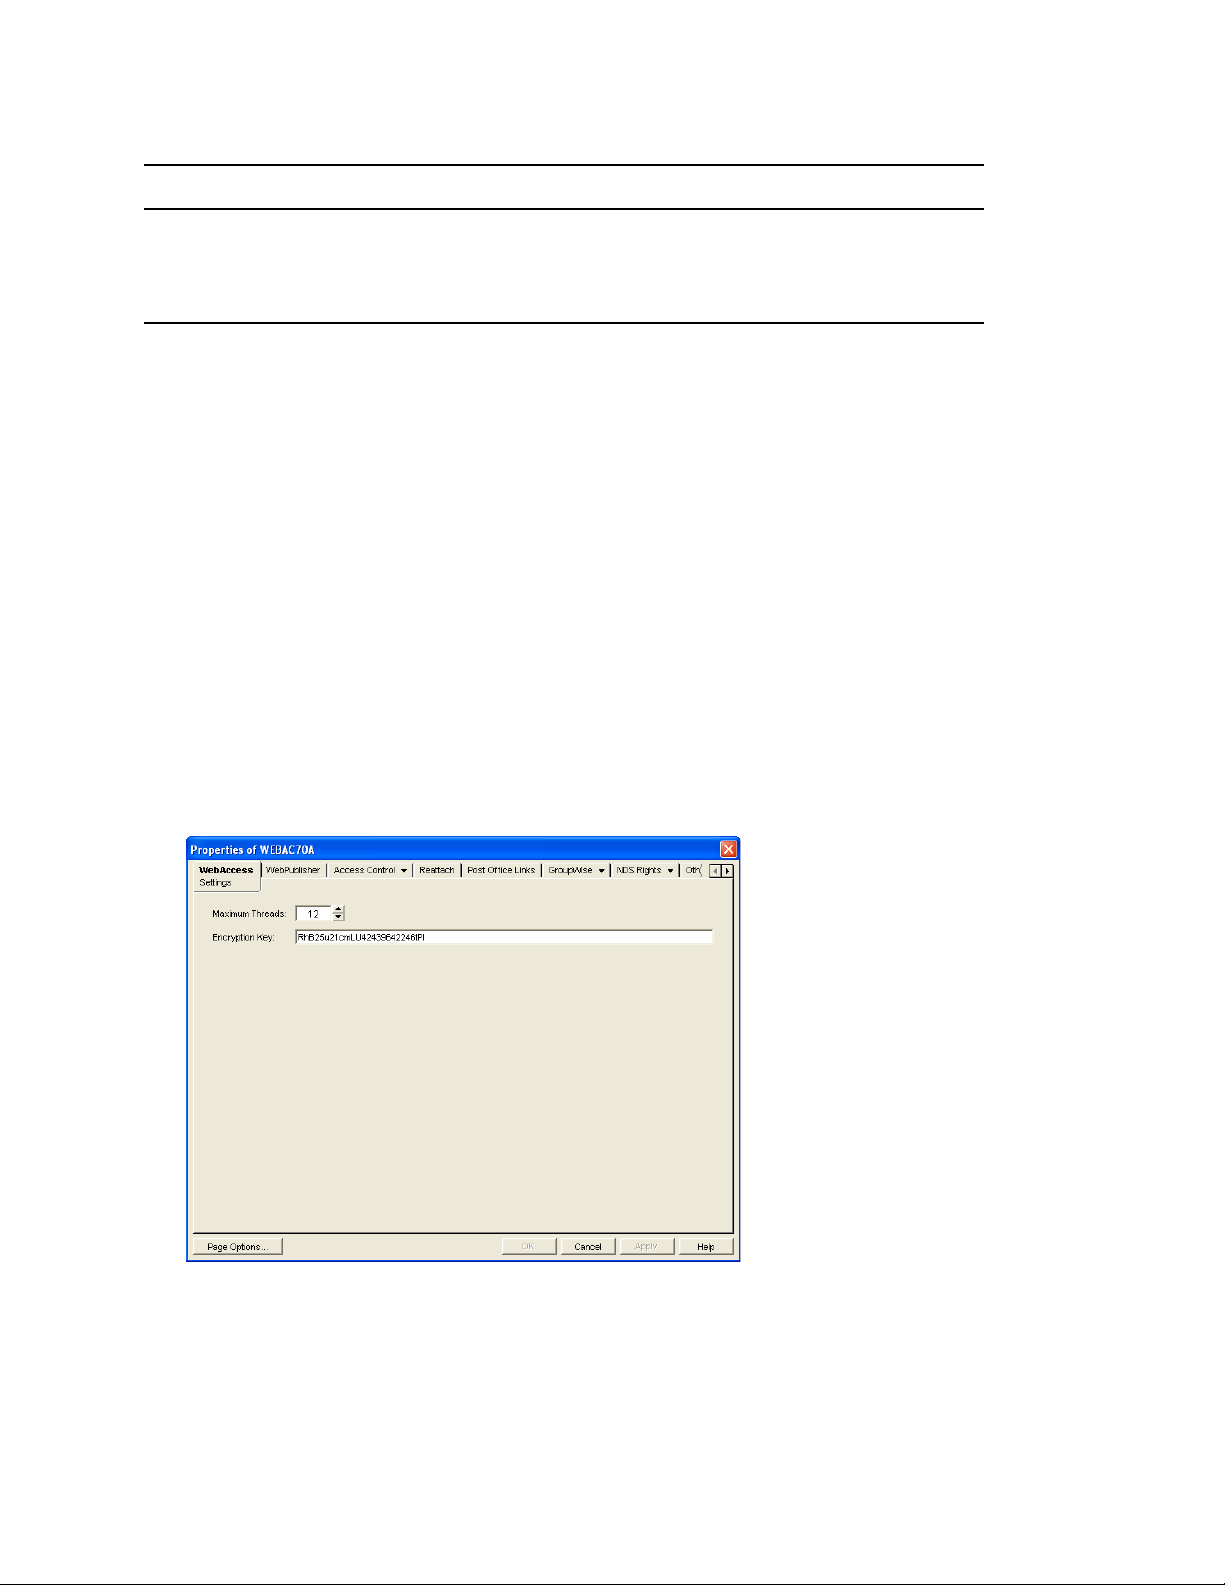
54.1.1 Modifying WebAccess Settings
Using ConsoleOne®, you can configure the following GroupWise WebAccess settings for the
WebAccess Agent:
The maximum number of threads the agent uses to process WebAccess messages
The key used to encrypt information sent between the agent and the WebAccess Application
To modify the configuration information:
1 In ConsoleOne, right-click the WebAccess Agent object, then click Properties.
2 Click WebAccess > Settings to display the WebAccess Settings page.
870 GroupWise 7 Administration Guide
Page 19

3 Modify any of the following fields:
Maximum Threads: This is the maximum number of threads the agent uses at one time to
process requests. The default (12) enables the agent to process 12 requests at one time, which is
usually sufficient. If the agent regularly receives more requests than it has threads, you might
want to increase the maximum number of threads. Increasing the threads increases the amount
of server memory used by the agent.
To determine the maximum number of threads that have been in use at one time (for example, 8
®
of the 12 threads), you can view the WebAccess Agent server console on NetWare
or you can
view the status information displayed through the WebAccess Agent Web console on any
platform. See Section 56.1, “Monitoring the WebAccess Agent,” on page 925.
Encryption Key: The encryption key is used to encrypt and decrypt the information sent
between the WebAccess Agent and the WebAccess Application. If you do not want to use the
default encryption key, you can type your own key. The encryption key must be identical to the
encryption keys of any other WebAccess Agents that the WebAccess Application
communicates with. For more information, see Section 53.3, “Configuring Redirection and
Failover Support,” on page 860.
4 Click OK to save the changes.
novdocx (en) 11 December 2007
54.1.2 Modifying WebPublisher Settings
Using ConsoleOne, you can configure the following WebPublisher settings for the WebAccess
Agent:
The GroupWise account used by the WebAccess Agent to retrieve documents for WebPublisher
users
The GroupWise libraries where the WebAccess Agent looks for documents that have been
shared with GroupWise WebPublisher users
Whether the WebPublisher user has General User Access to documents
To modify the configuration information:
1 In ConsoleOne, right-click the WebAccess Agent object, then click Properties.
Configuring WebAccess Components 871
Page 20
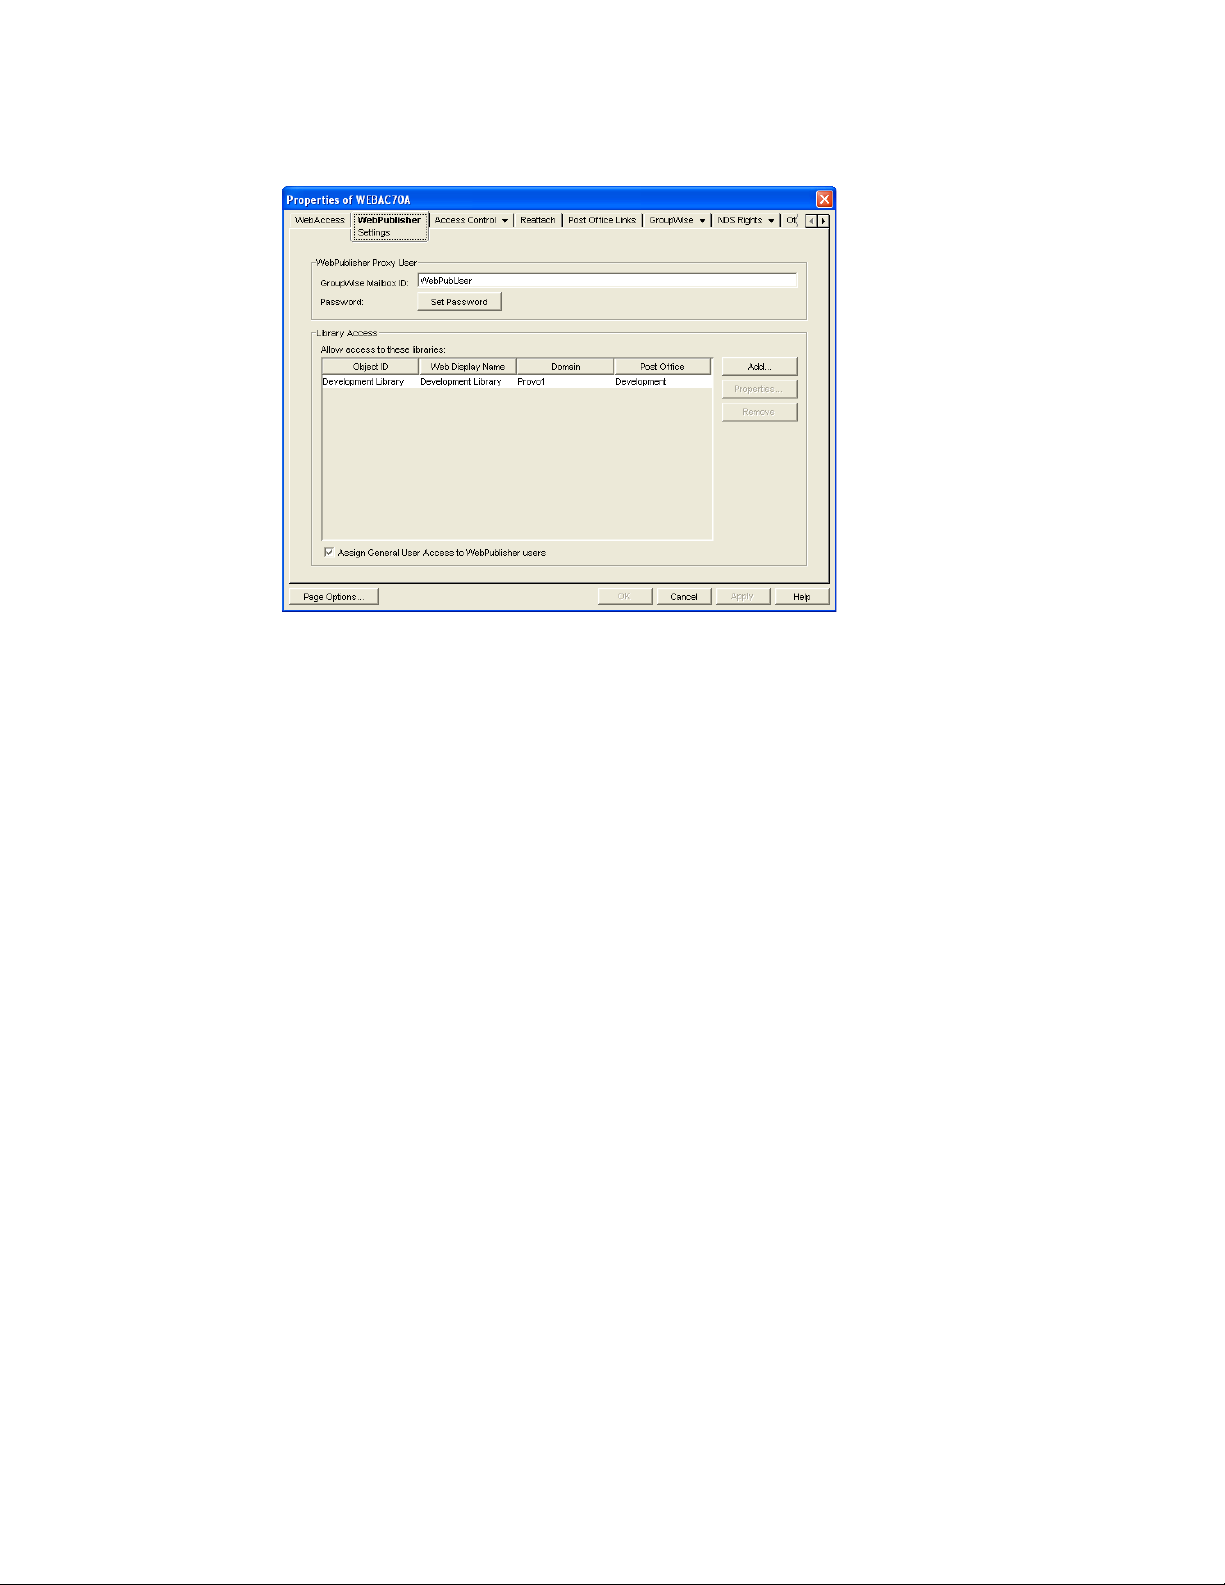
2 Click WebPublisher > Settings to display the WebPublisher Settings page.
novdocx (en) 11 December 2007
3 Modify any of the following fields:
GroupWise Mailbox ID: The WebPublisher proxy user serves two purposes: 1) GroupWise
users make documents available to GroupWise WebPublisher users by sharing the documents
with the WebPublisher proxy user and 2) the WebAccess Agent logs in to GroupWise through
the WebPublisher proxy user. This enables the WebAccess Agent to search for and retrieve
documents that have been shared with the WebPublisher proxy user. Specify the ID for the
GroupWise mailbox you want to use.
Password: Click Set Password to specify the mailbox password.
Allow Access to These Libraries: This list displays the libraries that the WebAccess Agent
has access to. If a library is not in the list, WebPublisher users cannot see the library’s
documents. If a library is listed, WebPublisher users can view any of the library’s documents
that have been shared (by the document owner) with the WebPublisher proxy user.
To add a library to the list, click Add, then browse for and select the library.
To change the display name or description for the library, select the library, then click
®
Properties. By default, the library’s Novell
eDirectoryTM object name is used for the display
name.
To remove a library from the list, select the library, then click Remove.
Assign General User Access to WebPublisher Users: When sharing documents with
GroupWise users, a document’s owner can assign individual access rights and general access
rights (through the General User Access option). The General User Access rights determine the
access for all GroupWise users who do not receive individual access rights. For example, if a
document’s owner sets the General User Access to View, all GroupWise users with access to
that library can view the document.
This option lets you determine whether or not you, as the GroupWise system administrator,
want to give General User Access rights to WebPublisher users. For example, with this option
enabled, WebPublisher users can view any documents that have General User Access set to
Vie w.
4 Click OK to save the changes.
872 GroupWise 7 Administration Guide
Page 21
IMPORTANT: When you first set up WebPublisher, library documents are not visible to
WebPublisher users until they have been indexed by the POA. You can wait until documents
are indexed as part of the POA’s next indexing cycle or you can start the indexing process
manually.
5 If WebPublisher documents have not yet been indexed, run QuickFinder indexing, as described
in “Updating QuickFinder Indexes” on page 527.
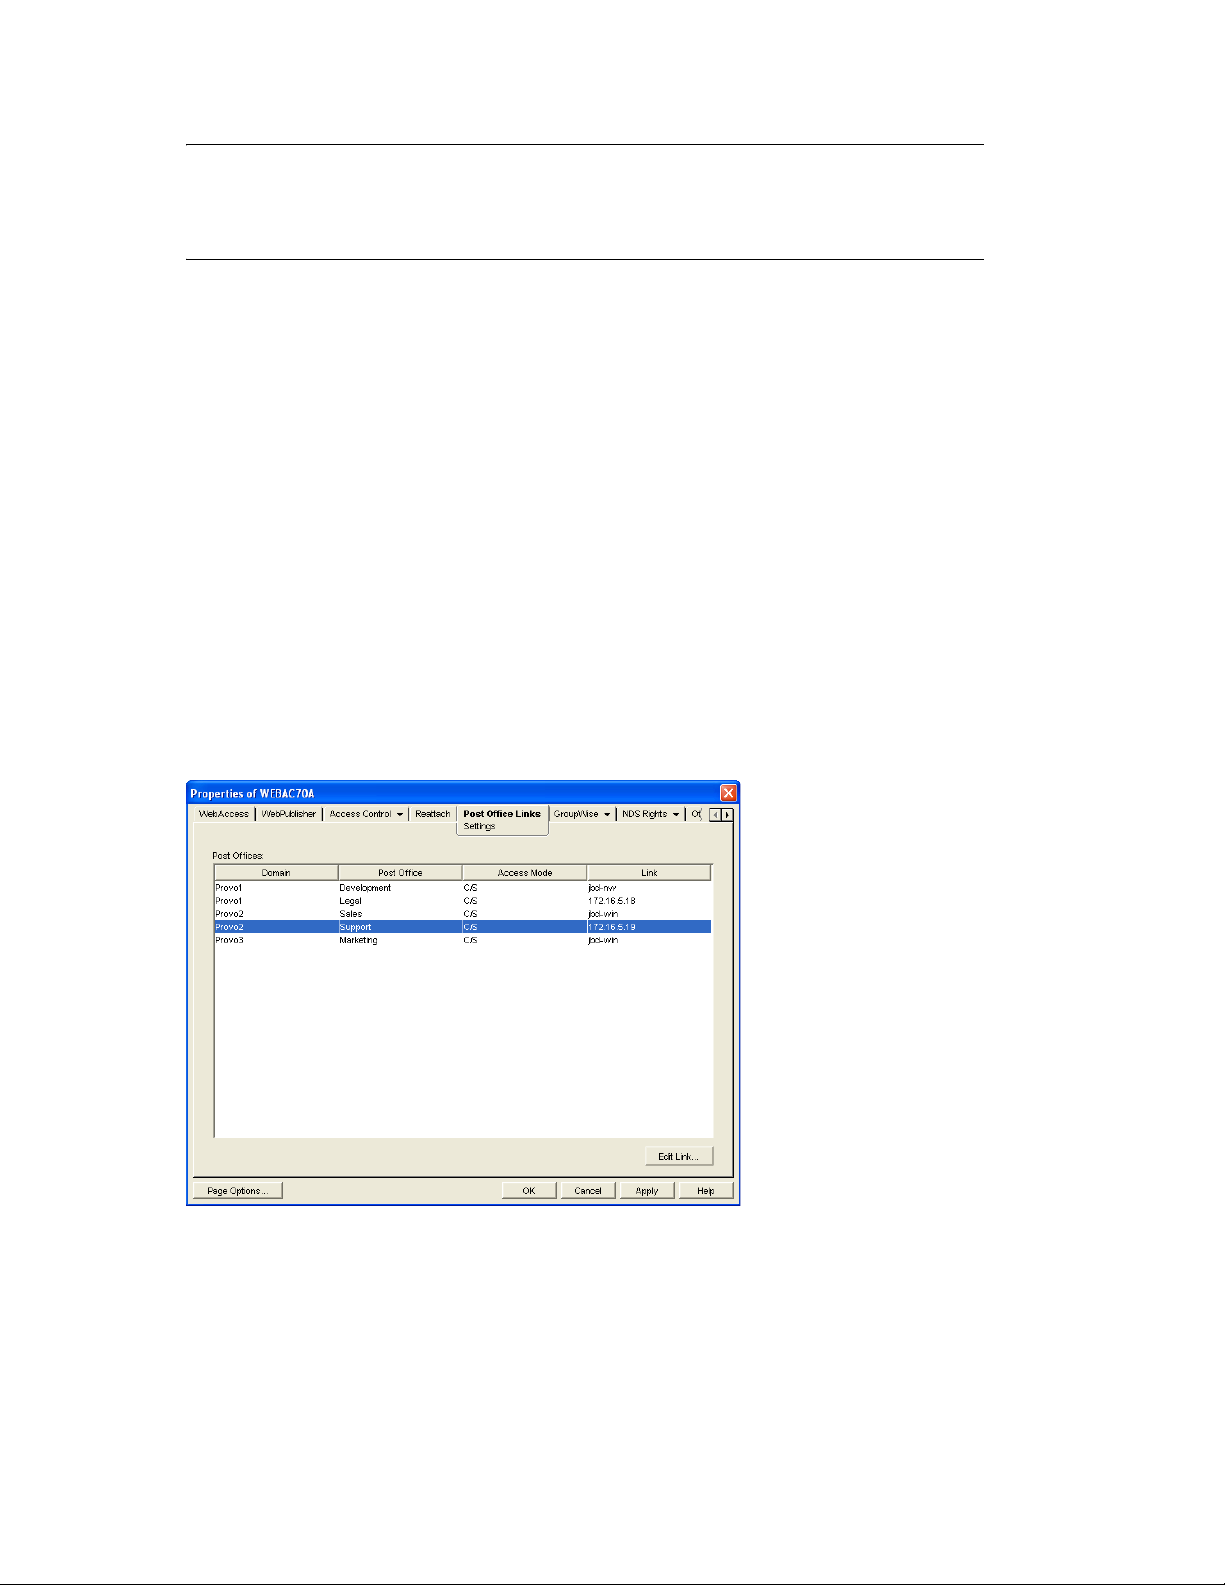
54.1.3 Managing Access to Post Offices
The WebAccess Agent requires access to all post offices where WebAccess users’ mailboxes or
GroupWise libraries reside. The agent can access a post office using client/server mode, direct
mode, or both. By default, it uses whichever mode is defined on the Post Office object’s Post Office
Settings page of the Post Office object.
“Modifying Links to Post Offices” on page 873 explains how to set the access mode to client/
server, direct, or both.
“Automating Reattachment to NetWare Servers” on page 874 explains how to configure the
agent to automatically reconnect to post offices on NetWare servers.
novdocx (en) 11 December 2007
Modifying Links to Post Offices
1 In ConsoleOne, right-click the WebAccess Agent object, then click Properties.
2 Click Post Office Links > Settings.
3 In the Post Offices list, select the post office whose link information you want to change, then
click Edit Link to display the Edit Post Office Link dialog box.
Configuring WebAccess Components 873
Page 22
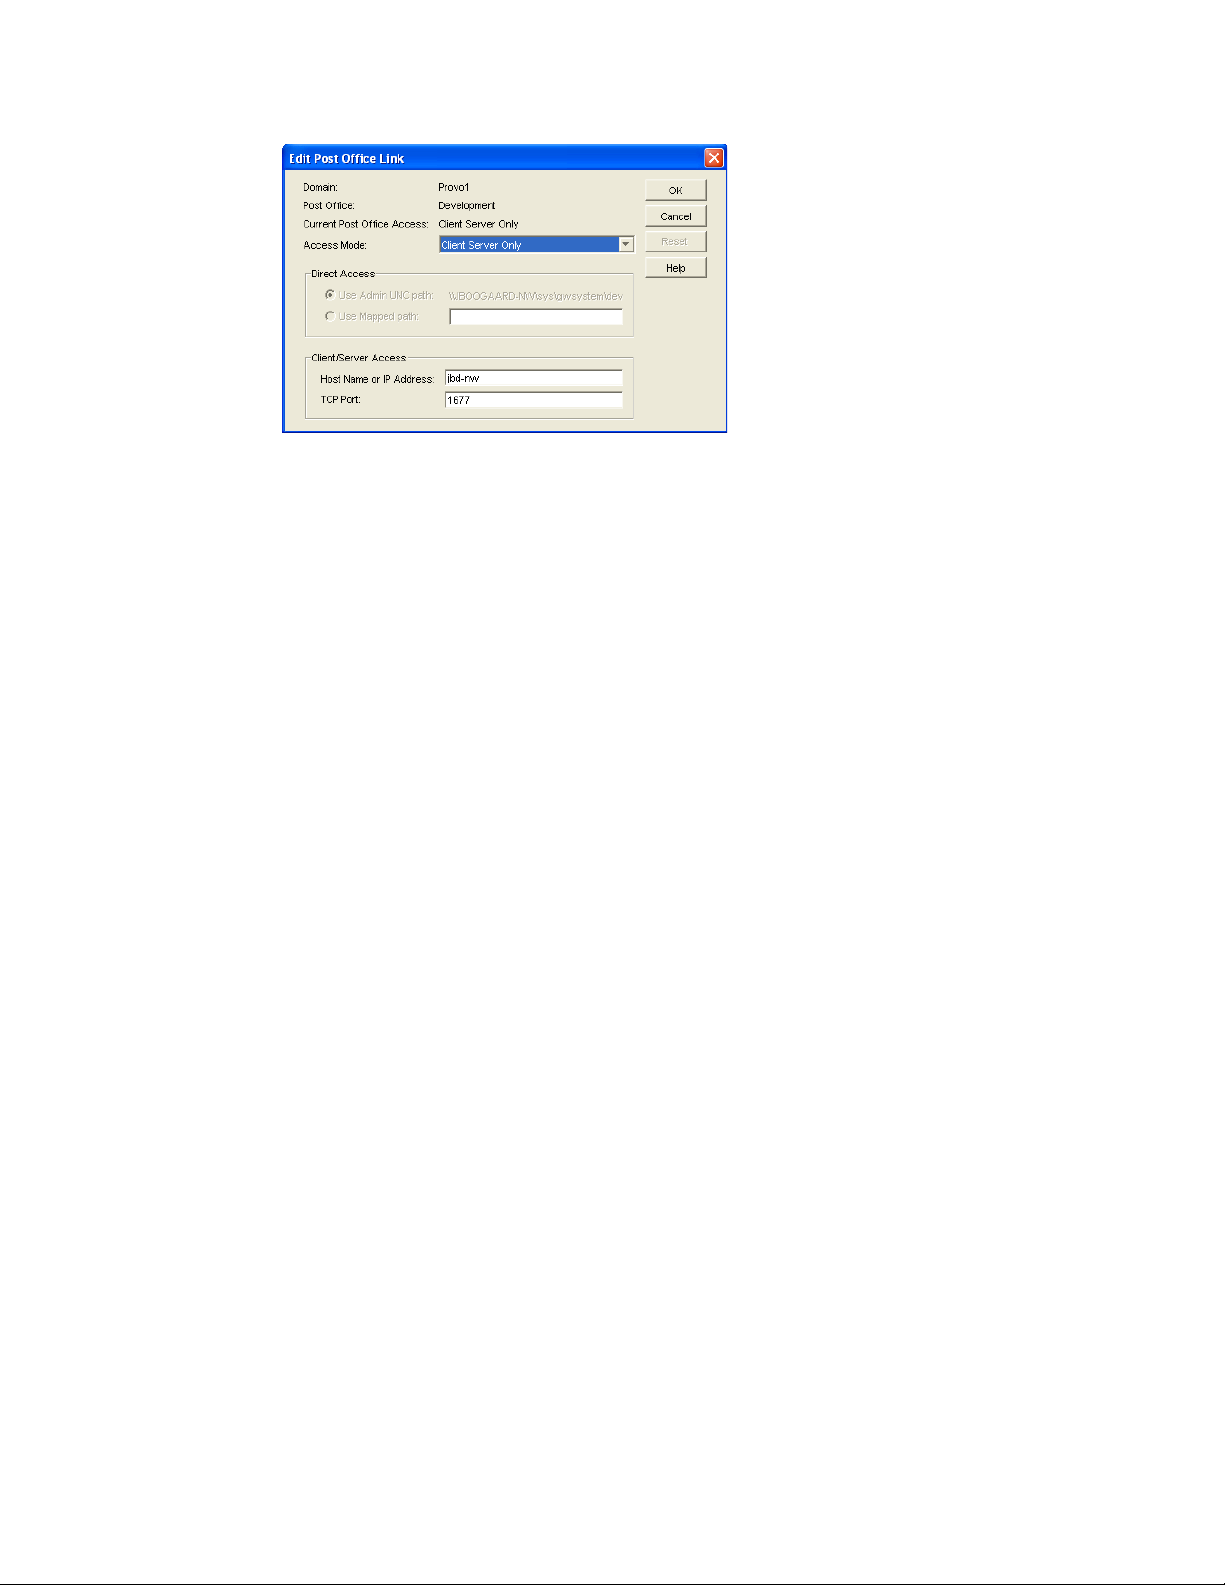
4 Define the following properties:
Access Mode: The access mode determines whether the WebAccess Agent uses client/server
access, direct access, or both client/server and direct access to connect to the post office. With
client/server and direct, the WebAccess Agent first tries client/server access; if client/server
access fails, it then tries direct access. You can also choose to use the same access mode
currently defined for the post office (on the Post Office object’s Post Office Settings page). The
current access mode is displayed in the Current Post Office Access field.
Direct Access: When connecting to the post office in direct mode, the WebAccess Agent can
use the post office’s UNC path (as defined on the Post Office object’s Identification page) or a
mapped path that you specify.
Client/Server Access: When connecting to the post office in client/server mode, the
WebAccess Agent must know the hostname (or IP address) and port number of the Post Office
Agent running against the post office.
5 Click OK.
6 Repeat Step 3 through Step 5 for each post office whose link you want to change.
novdocx (en) 11 December 2007
Automating Reattachment to NetWare Servers
You can specify the reattach information for the Windows WebAccess Agent in ConsoleOne.
Whenever the Windows WebAccess Agent loses its connection to a post office that is on a NetWare
server, it reads the reattach information from the domain database and attempts to reattach to the
NetWare server.
The NetWare WebAccess Agent does not use this information. To reattach to NetWare servers where
users’ post offices reside, the NetWare WebAccess Agent uses the user ID and password specified
during installation. This user ID and password are specified in the strtweb.ncf file
To specify the reattachment information for the NetWare WebAccess Agent:
1 In ConsoleOne, right-click the WebAccess Agent object, then click Properties.
2 Click Reattach > Settings.
874 GroupWise 7 Administration Guide
Page 23
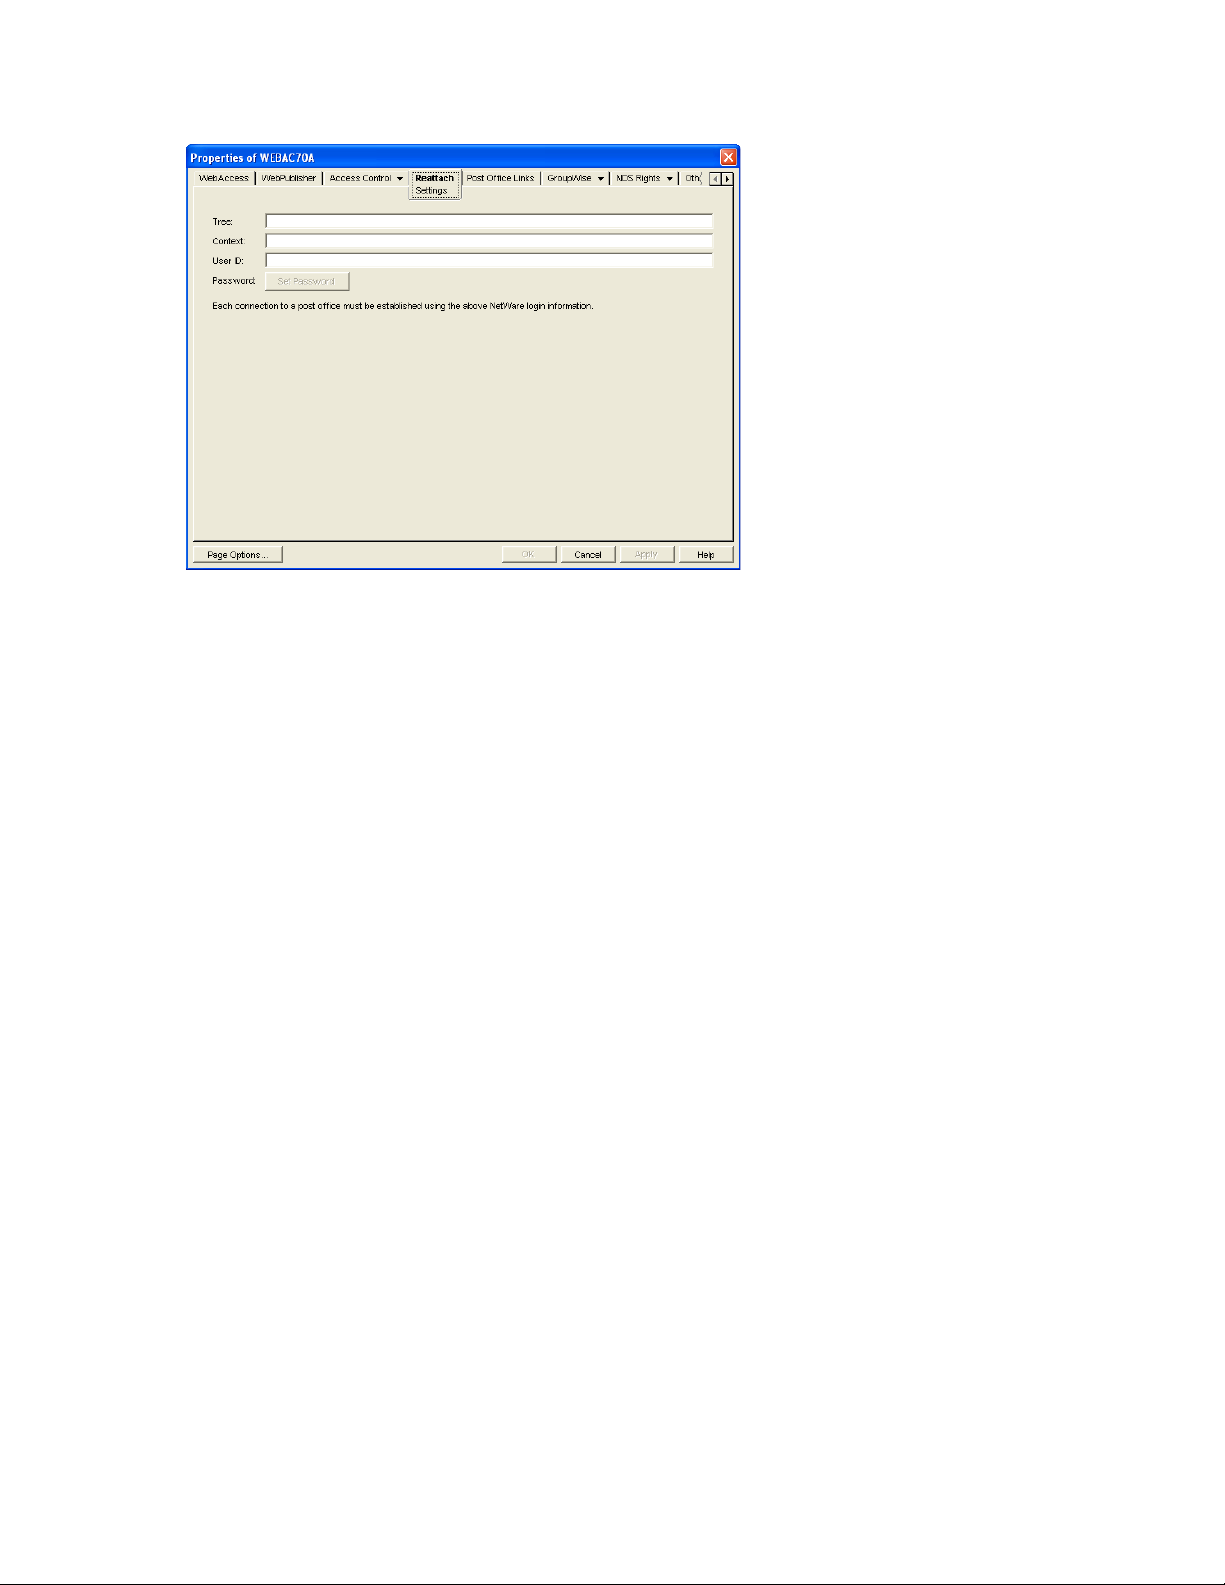
3 Define the following properties:
Tre e: Specify the eDirectory tree that the WebAccess Agent logs in to. If the WebAccess Agent
does not use an eDirectory user account, leave this field blank.
Context: Specify the eDirectory context of the WebAccess Agent’s user account. If the
WebAccess Agent does not use an eDirectory user account, leave this field blank.
novdocx (en) 11 December 2007
User ID: Specify the name of the user account.
Password: Specify the password for the user account.
4 Click OK.
54.1.4 Securing WebAccess Agent Connections with SSL
The GroupWise WebAccess Agent can use the SSL (Secure Socket Layer) protocol to enable secure
connections to Post Office Agents (POAs) and the WebAccess Agent Web console. For it to do so,
you must ensure that the WebAccess Agent has access to a server certificate file and that you
specified the connection types that you want secured through SSL. The following sections provide
instructions:
“Defining the Certificate File” on page 875
“Enabling SSL” on page 876
Defining the Certificate File
To use SSL, the WebAccess Agent requires access to a server certificate file and key file. The
WebAccess Agent can use any Base64/PEM or PFX formatted certificate file located on its server. If
the WebAccess Agent’s server does not have a server certificate file, you can use the GroupWise
Generate CSR utility to help you obtain one. For information, see Section 5.17.6, “GroupWise
Generate CSR Utility (GWCSRGEN),” on page 83.
To define the certificate file and key file for the WebAccess Agent to use:
1 In ConsoleOne, right-click the WebAccess Agent object, then click Properties.
Configuring WebAccess Components 875
Page 24
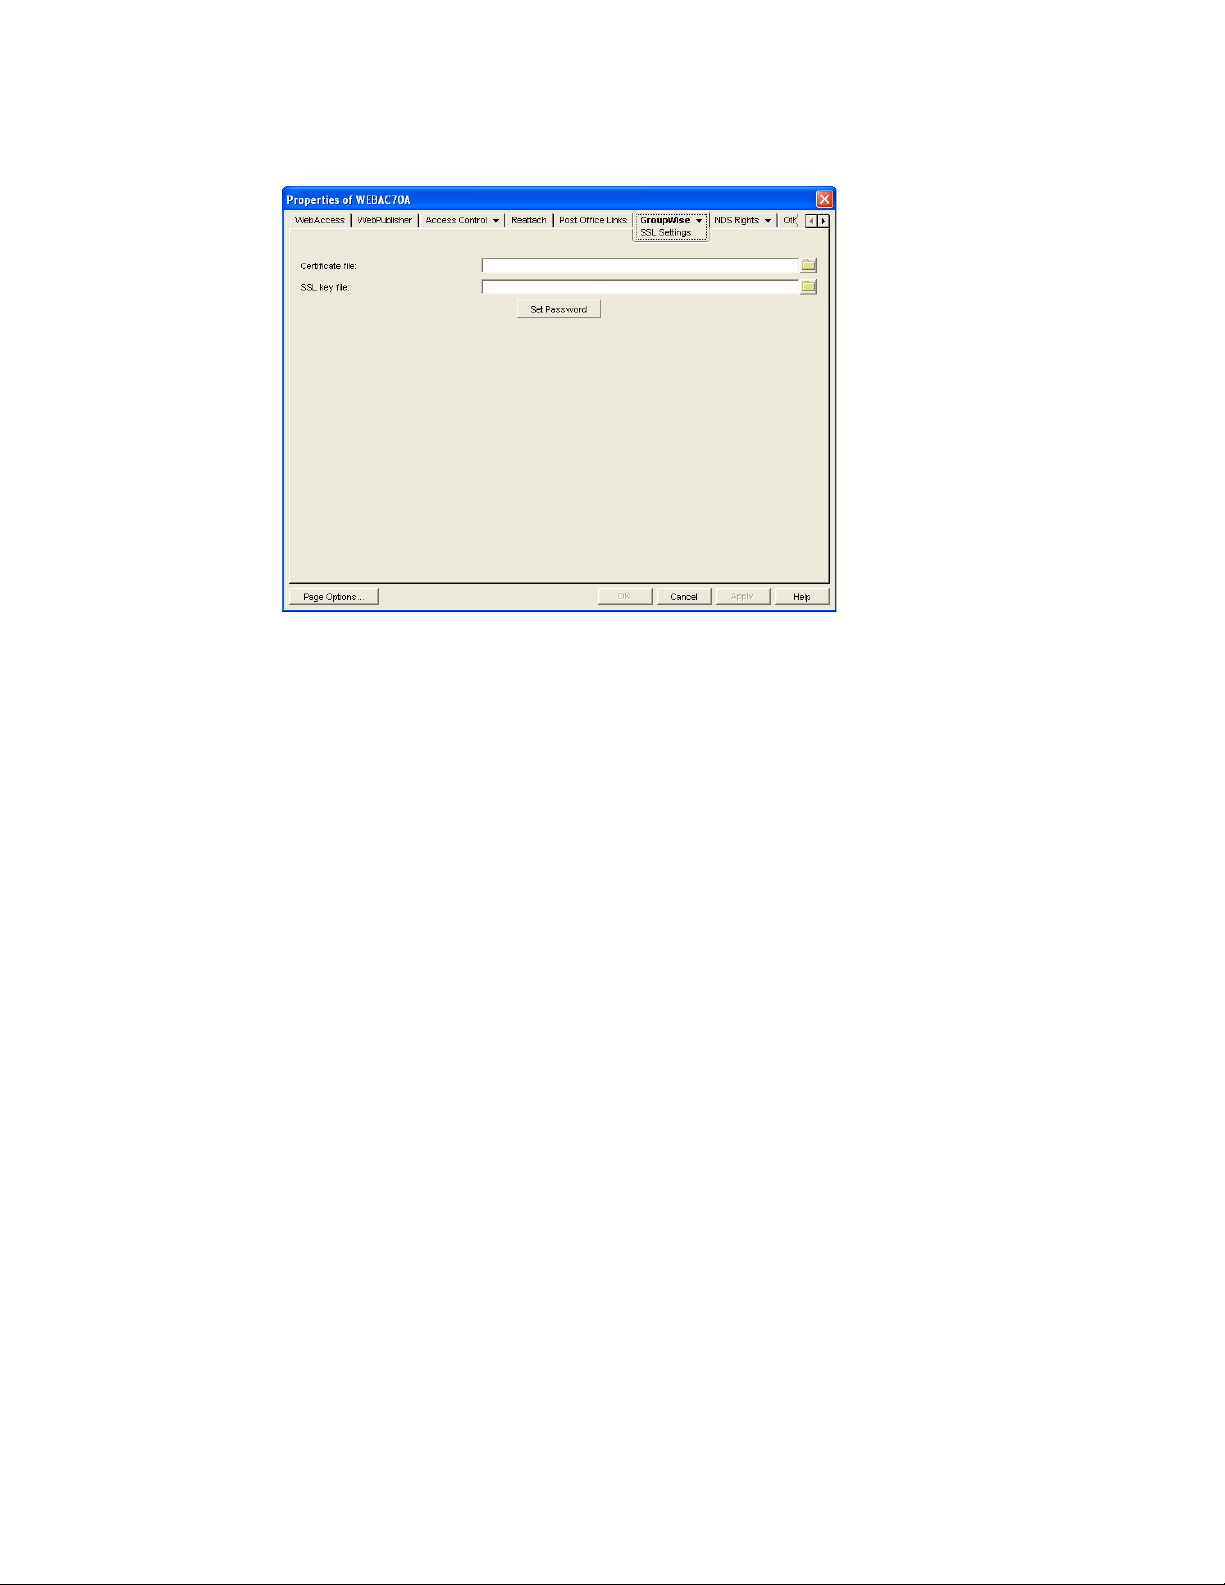
2 Click GroupWise > SSL Settings to display the SSL Settings page.
novdocx (en) 11 December 2007
3 Fill in the Certificate File, SSL Key File, and Set Password fields:
Certificate File: Select the server certificate file for the WebAccess Agent to use. The
certificate file must be in Base64/PEM or PFX format. If you type the filename rather than
using the Browse button to select it, use the full path if the file is not in the same directory as the
WebAccess Agent program.
SSL Key File: Select the key file associated with the certificate. If the private key is included
in the certificate file rather than in a separate key file, leave this field blank. If you type the
filename rather than using the Browse button to select it, use the full path if the file is not in the
same directory as the WebAccess Agent program.
Set Password: Click Set Password to specify the password for the key. If the key does not
require a password, do not use this option.
4 If you want to define which connections will use SSL, click Apply to save your changes, then
continue with the next section, Enabling SSL.
or
Click OK to save your changes.
Enabling SSL
After you’ve defined the WebAccess Agent’s certificate and key file (see “Defining the Certificate
File” on page 875), you can configure which connections you want to use SSL.
1 In ConsoleOne, if the WebAccess Agent object’s property pages are not already displayed,
right-click the WebAccess Agent object, then click Properties.
2 Click GroupWise > Network Address to display the Network Address page.
876 GroupWise 7 Administration Guide
Page 25
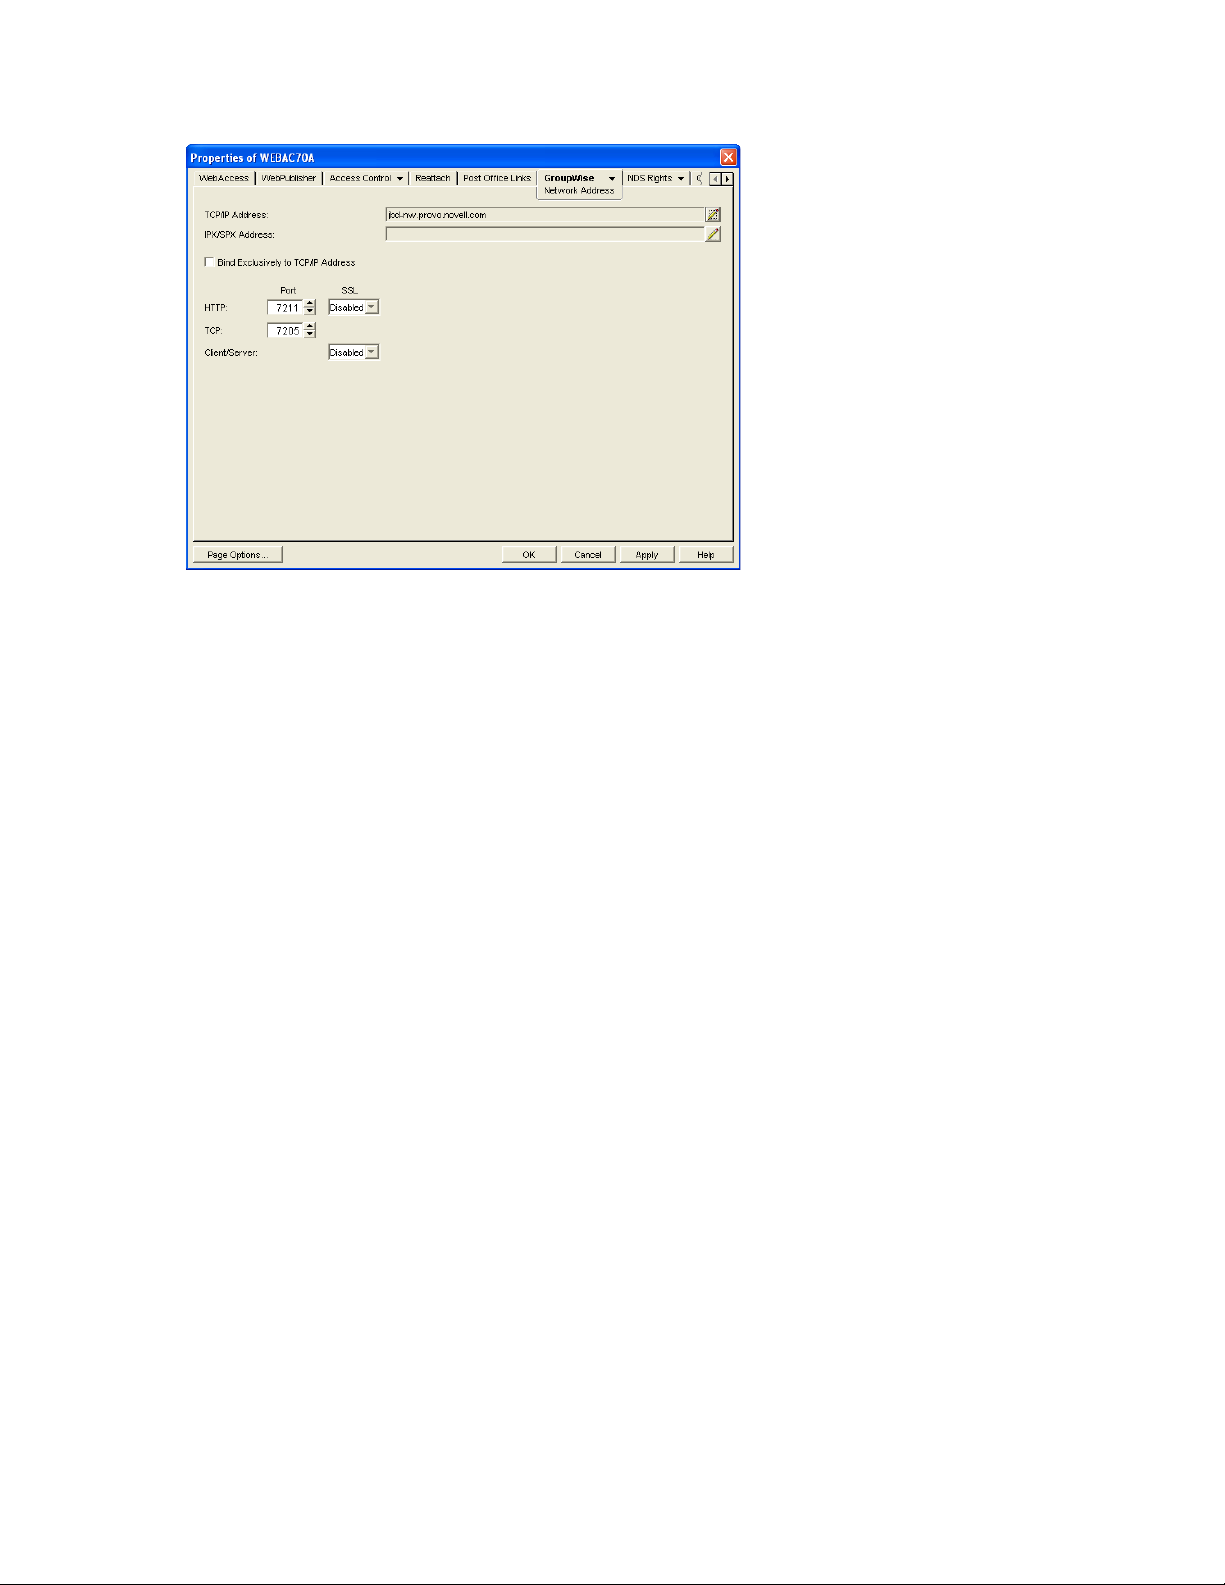
3 Configure the SSL settings for the following connections:
HTTP: Select Enabled to enable the WebAccess Agent to use a secure connection when
passing information to the WebAccess Agent Web console. The Web browser must also be
enabled to use SSL; if it is not, a non-secure connection is used.
Client/Server: Select from the following options to configure the WebAccess Agent’s use of
secure connections to POAs:
Disabled: The WebAccess Agent does not support SSL connections. All connections are
non-SSL.
novdocx (en) 11 December 2007
Enabled: The POA determines whether an SSL connection or non-SSL connection is used.
54.1.5 Changing the WebAccess Agent’s Network Address or Port Numbers
If you change the network address (IP address or DNS hostname) of the WebAccess Agent’s server
or move the WebAccess Agent to a new server, you need to change the network address in
ConsoleOne. You can also change the port numbers used by the WebAccess Agent.
1 In ConsoleOne, right-click the WebAccess Agent object, then click Properties.
2 Click GroupWise > Network Address to display the Network Address page.
Configuring WebAccess Components 877
Page 26
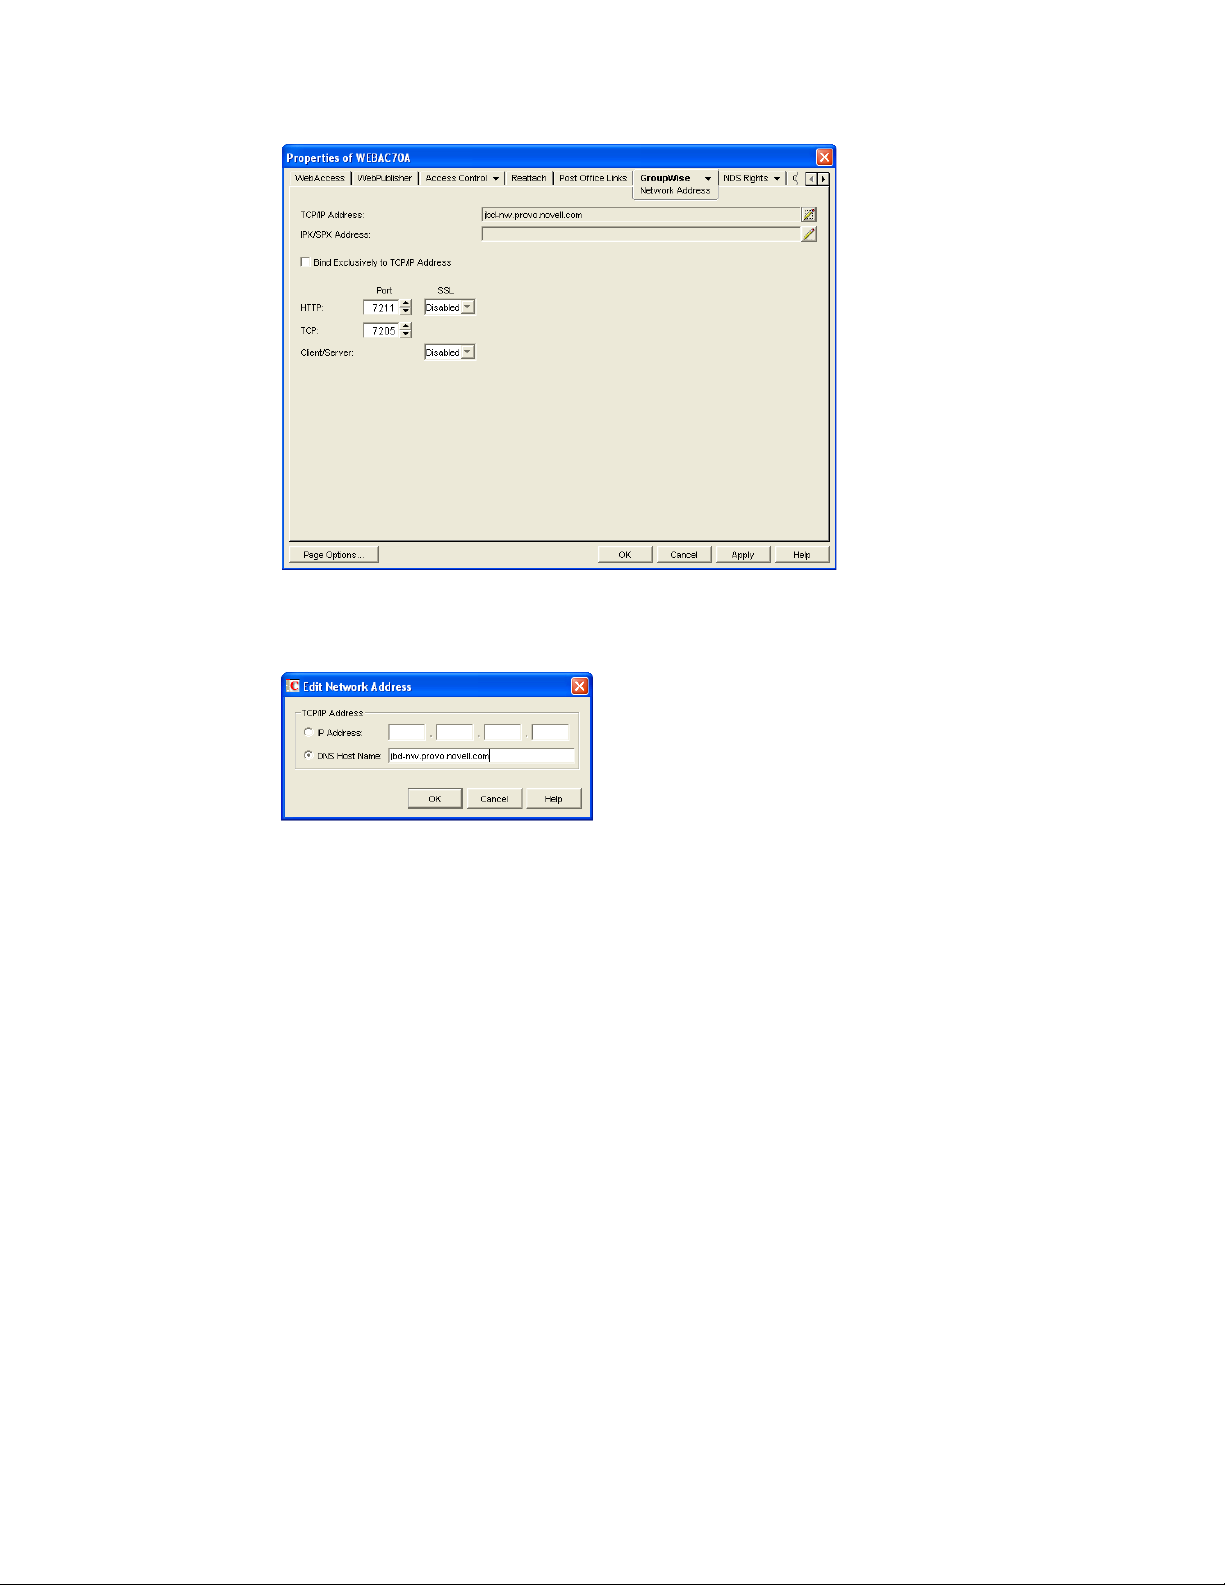
3 To change the WebAccess Agent’s IP address, click the Edit button next to the TCP/IP Address
field to display the Edit Network Address dialog box.
novdocx (en) 11 December 2007
4 Change the IP address or DNS hostname as necessary, then click OK to return to the Network
Address page.
5 To change the port numbers used by the WebAccess Agent, type the new port number in the
appropriate field.
HTTP Port: This is the port used to listen for requests from its Web console. The default port
number is 7211.
TCP Port: This is the port used to listen for requests from the WebAccess Application and
WebPublisher Application. The default port is 7205.
6 Click OK to save the changes.
54.1.6 Binding the WebAccess Agent to a Specific IP Address
You can now cause the WebAccess Agent to bind to a specified IP address when the server where it
runs uses multiple IP addresses. The specified IP address is associated with all ports used by the
agent. Without an exclusive bind, the WebAccess Agent binds to all IP addresses available on the
server. Use the /ip startup switch in the WebAccess Agent startup file (webac70.waa) to specify
the IP address that you want the WebAccess Agent to bind to.
878 GroupWise 7 Administration Guide
Page 27
54.2 Configuring the WebAccess Application
The WebAccess Application, which resides on the Web server, provides the WebAccess user
interface. As users perform actions in the WebAccess client, the WebAccess Application passes
information between the Web browser and the WebAccess Agent.
Figure 54-4 WebAccess Application
novdocx (en) 11 December 2007
LDAP
Server
LDAP Provider
GroupWise Provider
Document
Service Provider
WebAccess
Agent
Viewer
Agent
Post Office
Library
Web
Browser
Speller
Application
WebAccess
Application
Web
Server
WebPublisher
Application
During installation, the WebAccess Application is set up with a default configuration. However, you
can use the information in the following sections to optimize the WebAccess Application
configuration:
Section 54.2.1, “Modifying the WebAccess Application Environment Settings,” on page 879
Section 54.2.2, “Adding or Removing Service Providers,” on page 881
Section 54.2.3, “Modifying WebAccess Application Template Settings,” on page 882
Section 54.2.4, “Securing WebAccess Application Sessions,” on page 888
Section 54.2.5, “Controlling Availability of WebAccess Features,” on page 890
54.2.1 Modifying the WebAccess Application Environment Settings
Using ConsoleOne, you can modify the WebAccess Application’s environment settings. The
environment settings determine such things as the location where ConsoleOne stores the WebAccess
Application’s configuration file and how long the WebAccess Application maintains an open session
with an inactive user.
To modify the environment settings:
1 In ConsoleOne, right-click the WebAccess Application object (GroupWiseWebAccess), then
click Properties.
NOTE: The WebAccess Application object is not available in the GroupWise View. To locate
the WebAccess Application object, you must use the Console View.
2 Click Applications > Environment to display the Environment page.
Configuring WebAccess Components 879
Page 28
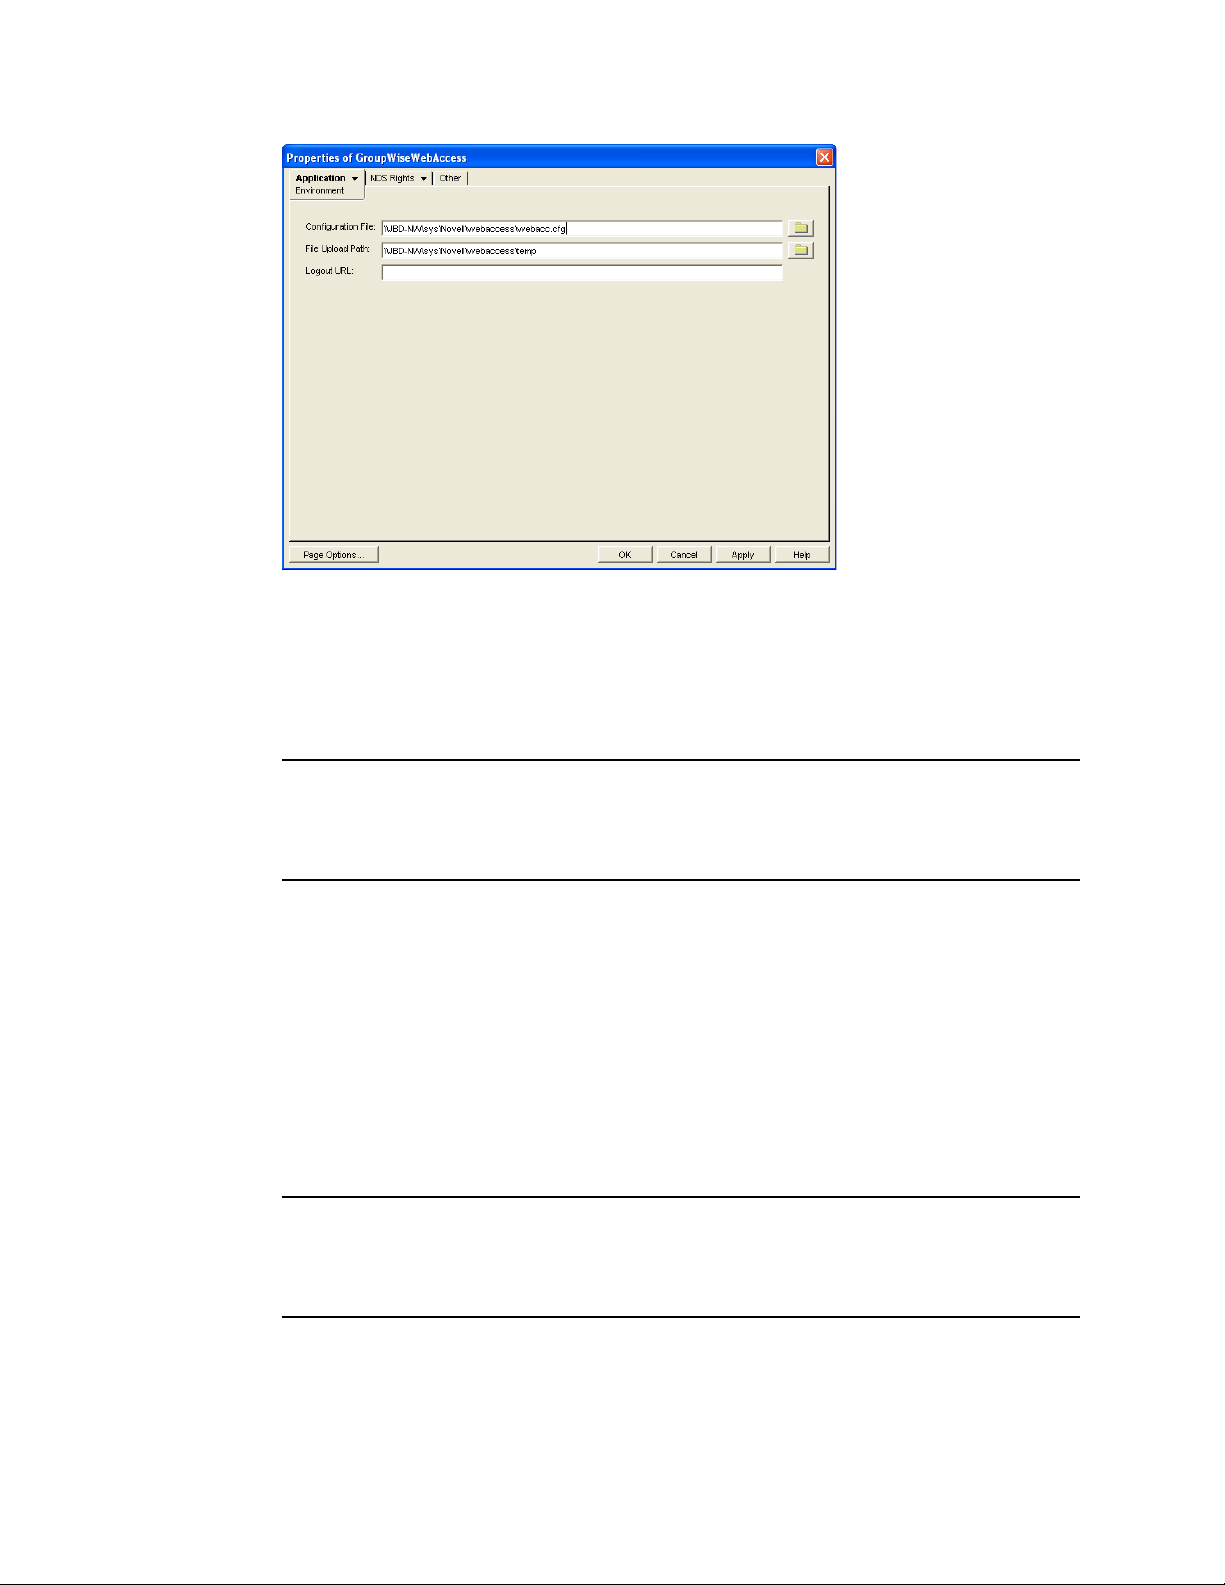
3 Modify any of the following fields:
Configuration File: The WebAccess Application does not have access to Novell eDirectory or
the GroupWise domain database. Therefore, ConsoleOne writes the application’s configuration
information to the file specified in this field. By default, this is the webacc.cfg file located
in the WebAccess Application’s home directory, which varies by platform.
novdocx (en) 11 December 2007
NetWare
and
Windows:
Linux: /opt/novell/groupwise/webaccess/users
novell\webaccess\users on the Web server
In general, you should avoid changing the location of the file. If you do, you need to make sure
to modify the webacc.cfg path in the Java servlet engine’s property file or (for example,
web.xml for Tomcat). If you do not, the WebAccess Application continues to look for its
configuration information in the old location.
File Upload Path: When a user attaches a file to an item, the file is uploaded to the directory
displayed in this field. By uploading the file before the item is sent, less time is required to send
the item when the user clicks the Send button. After the user sends the item (or cancels it), the
WebAccess Application deletes the file from the directory.
Specify the upload directory you want to use. The default path is to the temp directory, located
in the WebAccess Application’s home directory, which varies by platform.
NetWare
and
Windows:
Linux: /opt/novell/groupwise/webaccess/users
novell\webaccess\users on the Web server
Logout URL: By default, users who log out of GroupWise WebAccess are returned to the
login page. If desired, you can enter the URL for a different page.
880 GroupWise 7 Administration Guide
Page 29

The logout URL can be defined in this location and two additional locations. These locations
are listed below, in the order that the WebAccess Application checks them.
Trusted server logout URL (configured on the Security page)
Template-specific logout URL (configured on the Templates page)
General logout URL (configured on the Environment page)
For example, you define a general logout URL (WebAccess Application object > Environment)
and a Standard HTML template logout URL (WebAccess Application object > Tem pl at es ). You
are not using trusted servers, so you do not set any trusted server logout URLs. When a
Standard HTML template user logs out of WebAccess, the Standard HTML template logout
URL is used. However, when a Basic HTML template user logs out, the general logout URL is
used.
If none of these locations include a logout URL, the WebAccess Application defaults to the
standard login page.
4 Click OK to save the changes.
54.2.2 Adding or Removing Service Providers
novdocx (en) 11 December 2007
The WebAccess Application receives requests from users and then passes the requests to the
appropriate service provider. The service provider fills the requests and returns the required
information to the WebAccess Application. The WebAccess Application merges the information
into the appropriate template and displays it to the user.
To function properly, the WebAccess Application must know which service providers are available.
WebAccess includes three service providers:
GroupWise service provider (GroupWiseProvider object): Communicates with the
WebAccess Agent to fill GroupWise requests.
Document service provider (GroupWiseDocumentProvider object): Communicates with
the WebAccess Agent to fill WebPublisher requests.
LDAP service provider (LDAPProvider object): Communicates with LDAP servers to fill
LDAP requests, such as LDAP directory searches initiated through the GroupWise Address
Book.
The service providers are installed and configured at the same time as the WebAccess Application.
You can disable a service by removing the corresponding provider.
If you create new service providers to expose additional services through GroupWise WebAccess,
you must define those service providers so that the WebAccess Application knows about them.
To define service providers:
1 In ConsoleOne, right-click the WebAccess Application object, then click Properties.
2 Click Application > Services to display the Services page.
The Provider List displays all service providers that the WebAccess Application is configured
to use.
Configuring WebAccess Components 881
Page 30
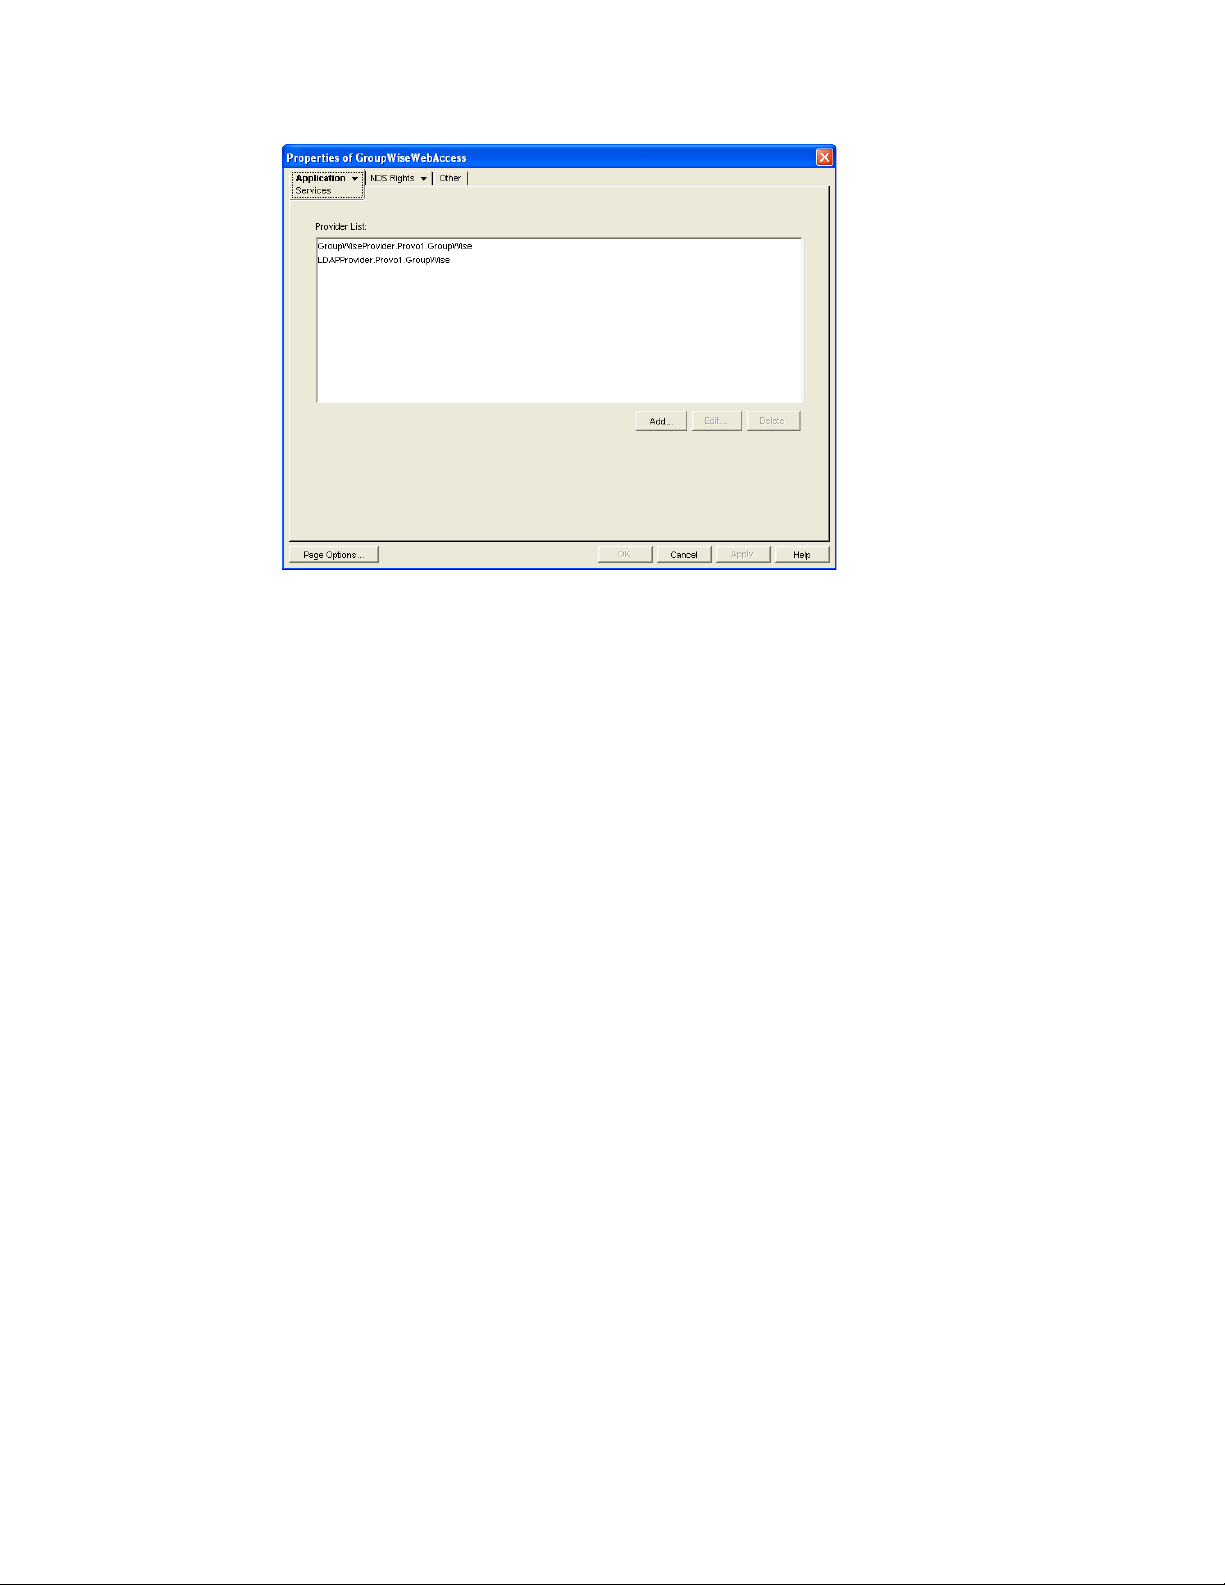
3 Choose from the following options:
Add: To add a service provider to the list, click Add, browse for and select the service
provider’s object, then click OK.
Edit: To edit a service provider’s information, select the provider in the list, then click Edit. For
information about the modifications you can make, see Section 54.5, “Configuring the
GroupWise Service Provider,” on page 903 and Section 54.6, “Configuring the LDAP Service
Provider,” on page 905.
Delete: To remove a service provider from the list, select the provider, then click Delete.
novdocx (en) 11 December 2007
4 Click OK to save the changes.
54.2.3 Modifying WebAccess Application Template Settings
When the WebAccess Application receives information from a service provider, it merges the
information into the appropriate WebAccess template before displaying the information to the user.
Using ConsoleOne, you can modify the WebAccess Application’s template settings. The template
settings determine such things as the location of the templates, the maximum amount of server
memory to use for caching the templates, and the default template language.
1 In ConsoleOne, right-click the WebAccess Application object, then click Properties.
2 Click Application > Templates to display the Templates page.
882 GroupWise 7 Administration Guide
Page 31

3 Modify any of the following fields:
Template Path: Select the location of the template base directory. The template base directory
contains the subdirectories (simple, frames, hdml, and wml) for each of the templates
provided with GroupWise WebAccess. If you create your own templates, you need to place the
templates in a new subdirectory in the template base directory. The default template path varies
by platform.
novdocx (en) 11 December 2007
NetWare
and
Windows:
Linux: /var/opt/novell/tomcat/webapps/gw/WEB-INF/classes/com/novell/
tomcat_dir\webapps\ROOT\webinf\classes\com\novell\webaccess\templates.
webaccess/templates.
Java Package: Specify the Java package that contains the template resources used by the
WebAccess Application. The default package is com.novell.webaccess.templates.
Images URL: Specify the URL for the GroupWise WebAccess image files. These images are
merged into the templates along with the GroupWise information. This URL must be relative to
the Web server’s document root directory. The default relative URL varies by platform.
NetWare
and
Windows:
Linux: /gw/com/novell/webaccess/images
/com/novell/webaccess/images
Applets URL: In some instances (Address Book and Month Calendar, for example), applets
can be used instead of the standard templates. Specify the URL for the GroupWise WebAccess
applets (Address Book, Month Calendar, and so forth). This URL must be relative to the Web
server’s document root directory. The default relative URL varies by platform.
Configuring WebAccess Components 883
Page 32

novdocx (en) 11 December 2007
NetWare
and
Windows:
Linux: /gw/com/novell/webaccess/applets
/com/novell/webaccess/applets
Help URL: Specify the URL for the GroupWise WebAccess Help files. This URL must be
relative to the Web server’s document root directory. The default relative URL varies by
platform.
NetWare
and
Windows:
Linux: /gw/com/novell/webaccess/help
/com/novell/webaccess/help
Enable Template Caching: To speed up access to the template files, the WebAccess
Application can cache the files to the server’s memory. Select this option to turn on template
caching.
Cache Size: Select the maximum amount of memory, in kilobytes, that you want to use when
caching the templates. The default cache size, 2500 KB, is sufficient to cache all templates
shipped with GroupWise WebAccess. If you modify or add templates, you can turn on Verbose
logging (WebAccess Application object > Application > Log Settings) to view the size of the
template files. Using this information, you can then change the cache size appropriately.
Default Language: If you have more than one language installed, select the language to use
when displaying the initial GroupWise WebAccess page. If users want the GroupWise
WebAccess interface (templates) displayed in a different language, they can change it on the
initial page.
Define User Interfaces: GroupWise WebAccess supports Web browsers on many different
devices (for example, computers and wireless telephones). Each device supports specific
content types such as HTML, HDML, and WML. When returning information to a device’s
Web browser, the WebAccess Application must merge the information into a set of templates to
create an interface that supports the content type required by the Web browser.
GroupWise WebAccess ships with five predefined user interfaces (Standard HTML, Basic
HTML, Handheld Device Markup Language, Wireless Markup Language, and Web Clipping).
These interfaces support Web browsers that require HTML, HDML, and WML content types.
Click the User Interface button to view, add, modify, or delete user interfaces. For more
information, see Defining WebAccess User Interfaces below.
4 Click OK to save the changes.
Defining WebAccess User Interfaces
1 From the WebAccess Application object’s Templates page, click Define User Interfaces to
display the Define User Interfaces dialog box.
884 GroupWise 7 Administration Guide
Page 33

The dialog box includes three tabs:
User Interfaces: The User Interfaces tab lets you add, modify, and remove user interfaces, as
well as determine whether or not GroupWise data added to an interface should be cached on
proxy servers. Each interface consists of template files that support a specific content type. For
example, the predefined Standard HTML interface uses frame-based HTML templates, located
in the frames directory, that support the text/html content type.
novdocx (en) 11 December 2007
Browser User Agents: The Browser User Agents tab lets you associate a user interface with a
Web browser. The association is based on the browser’s User Agent information (signature,
platform, version, and so forth). For example, if a browser’s User Agent information includes
"Windows CE" (one of the predefined entries), the WebAccess Application uses the Basic
HTML interface (no-frames interface).
Browser Accept Types: The Browser Accept Types tab lets you associate a user interface with
a Web browser. The association is based on the content type the browser accepts. For example,
if a browser accepts text/html (one of the predefined entries), the WebAccess Application uses
the Standard HTML interface (frames-based interface).
2 To add, remove, or modify user interfaces, click the User Interfaces tab.
The User Interface list displays all available user interfaces. The list includes the following
information:
User Interface: This column displays the name assigned to the user interface (for example,
Standard HTML or Wireless Markup Language).
Configuring WebAccess Components 885
Page 34

Template: This column displays the directory in which the template files are located. Only the
directory name is shown. You can append this directory name to the template path shown on
the Templates page to see the full template directory path.
Content Type: This column displays the content type required by the templates (for example,
text/html, text/x-hdml, or text/vnd.wap.wml).
Logout URL: By default, when a user logs out, he or she is returned to the standard login page.
When adding or editing the user interface, you can use the logout URL to define a different
page. If you do so, this column displays the URL. This URL overrides the logout URL
specified on the WebAccess Application object’s Environment page (see Section 54.2.1,
“Modifying the WebAccess Application Environment Settings,” on page 879). It is overridden
by the logout URL specified for a trusted server on the WebAccess Application object’s
Security page (see Section 54.2.4, “Securing WebAccess Application Sessions,” on page 888).
Choose from the following options to manage the user interfaces:
Add: Click Add to add a user interface to the list.
Edit: Select a user interface in the list, then click Edit to edit the interface’s name, template
directory, content type, or proxy caching setting.
Default: Select a user interface in the list, then click Default to make that interface the default
interface. The WebAccess Application uses the default interface only if it can’t determine the
appropriate interface based on the browser’s User Agent (WebAccess Application object >
Browser User Agent) or the browser’s accepted content types (WebAccess Application object >
Browser Accept Types).
novdocx (en) 11 December 2007
Delete: Select a user interface in the list, then click Delete to remove the interface. This only
removes the entry from the list. It does not delete the template files from the template directory.
3 To associate a user interface with a Web browser based on the browser’s User Agent
information, click Browser User Agents.
The Browser User Agents tab lets you associate a user interface with a Web browser. The
association is based on the browser’s User Agent information (signature, platform, version, and
so forth). For example, if a browser’s User Agent information includes Windows CE (one of
the predefined entries), the WebAccess Application uses the Basic HTML interface (no-frames
interface).
If a browser’s User Agent information matches more than one entry in the list, the application
uses the first entry. If the browser’s User Agent information does not match any entries in the
list, the WebAccess Application tries to select an interface based on the content types the
886 GroupWise 7 Administration Guide
Page 35

browser accepts (WebAccess Application object > Browser Accept Types). If no match is made
based on the Accept Types information, the WebAccess Application uses the default user
interface listed on the User Interfaces tab.
Choose from the following options to manage the associations:
Add: Click Add to add an entry to the list.
Edit: Select an entry from the list, then click Edit to edit the entry’s information.
Up: Select an entry from the list, then click Up to move it up in the list. If two entries match the
information in a browser’s User Agent header, the WebAccess Application uses the interface
associated with the first entry listed.
Down: Select an entry from the list, then click Down to move it down in the list.
Delete: Select an entry from the list, then click Delete to remove the entry.
4 To associate a user interface with a Web browser based on the content type that the browser
accepts, click Browser Accept Types.
novdocx (en) 11 December 2007
The Browser Accept Types tab lets you associate a user interface with a Web browser. The
association is based on the content type the browser accepts. For example, if a browser accepts
text/html (one of the predefined entries), the WebAccess Application uses the Standard HTML
interface (frames-based interface).
Many browsers accept more than one content type (for example, both text/html and text/plain).
If the list contains more than one acceptable content type, the WebAccess Application uses the
browser’s preferred content type, which is the type that is listed first in the browser’s Accept
Type header.
If no interface can be determined based on the entries in the list, the WebAccess Application
uses the default user interface listed on the User Interfaces tab.
Choose from the following options to manage the associations:
Add: Click Add to add an entry to the list.
Edit: Select an entry from the list, then click Edit to edit the entry’s information.
Delete: Select an entry from the list, then click Delete to remove the entry.
5 Click OK to save your changes and return to the WebAccess Application object’s Templates
page.
Configuring WebAccess Components 887
Page 36

54.2.4 Securing WebAccess Application Sessions
The WebAccess Application includes several settings to help you ensure that user information is
secure. You can:
Specify a period of time after which inactive sessions are closed. The default is 20 minutes.
Secure sessions through the use of client IP binding or browser session cookies.
Disable information caching by proxy servers and Web browsers.
Enable GroupWise authentication through a trusted server.
To modify the security settings:
1 In ConsoleOne, right-click the WebAccess Application object, then click Properties.
2 Click Application > Security to display the Security page.
novdocx (en) 11 December 2007
3 Modify any of the following fields:
Timeout for Inactive Sessions: When a user logs in, the WebAccess Application opens a
session with the user. This option lets you specify a period of time after which the WebAccess
Application closes a session that has become inactive. A session becomes inactive when the
user does not perform any actions, such as opening a message, that generate calls to the
WebAccess Application. Having a timeout period not only provides security for user e-mail but
also ensures that GroupWise WebAccess runs efficiently.
Select how long the WebAccess Application should wait before ending an inactive session. If
the user attempts to perform an action after the session has timed out, he or she is prompted to
log in again.
Path for Inactive Sessions: Browse for and select the folder where you want the WebAccess
Application to save information about inactive sessions. This allows the WebAccess
Application to return the user to the exact state he or she was in when the session timed out.
Inactive sessions are automatically deleted after a period of time.
The default path is to the users directory, located in the WebAccess Application’s home
directory, which varies by platform.
888 GroupWise 7 Administration Guide
Page 37

novdocx (en) 11 December 2007
NetWare
and
Windows:
Linux: /opt/novell/groupwise/webaccess/users
novell\webaccess\users on the Web server
Use Client IP in Securing Sessions: Select this option if you want the WebAccess Application
to bind the client IP address to the session. For that session, the WebAccess Application accepts
requests from the bound IP address only. If you are using a proxy server that masks the client IP
address, you should use the Use Cookies option instead.
User Interface/Use Cookies/Disable Caching: You can increase security by using session
cookies and disabling caching of WebAccess information. Session cookies and caching are
configurable on a per-user interface (template basis). For example, you could use session
cookies and disable caching for the Standard HTML interface and not use session cookies or
disable caching for the Wireless Markup Language interface.
Use Cookies: Select this option if you want the WebAccess Application to use a session
cookie to secure the user’s session. The session cookie, which is created when the user
opens the session, ties the session to the browser and ensures that the WebAccess
Application accepts session requests from that browser only. The session cookie is held in
memory and exists only as long as the user is logged in.
By default, session cookies are enabled for all interfaces, with the exception of the Web
Clippings interface, which does not support session cookies.
Disable Caching: This option affects both Web browser caching and proxy server
caching. Because the WebAccess Application sends sensitive mailbox information (such
as message text and passwords) to users, caching of files by Web browsers and proxy
servers can pose an information security risk.
If you select the Disable Caching option, the WebAccess Application includes a disable
caching request in the header of each file that it sends. By default, Web browsers honor
this request and does not cache files that include the request. Proxy servers, on the other
hand, might or might not honor the request, depending on how they are configured. If the
proxy server honors the request, the file is not cached; if it does not honor the request, the
file is cached, regardless of this setting.
Single Sign-On: The WebAccess Application supports authentication to GroupWise using
Base64 authentication header credentials generated by a trusted server (for example, a Novell
®
iChain
Authentication Server). The authentication header generated by the trusted server must
contain the username and password required to log the user into GroupWise. For this to occur,
one of the following conditions must be met:
The regular GroupWise username and password must match the credentials passed from
the trusted server.
or
The LDAP authentication credentials used by each POA (if LDAP has been enabled) must
match the credentials passed from the trusted server (Post Office object > GroupWise >
Security).
If the credentials passed from the trusted server match the credentials being used by the
GroupWise system, then the GroupWise WebAccess login page is bypassed and the user has
immediate access to the requested mailbox.
Configuring WebAccess Components 889
Page 38

To specify a trusted server whose authentication header credentials are accepted by the
WebAccess Application, click Add to display the Add Trusted Server Information dialog box,
then provide the server’s IP address or DNS hostname. For more information about the fields in
the Add Trusted Server Information dialog box, click the dialog box’s Help button.
54.2.5 Controlling Availability of WebAccess Features
By default, WebAccess users can:
Spell check messages
Search LDAP directories
Change their GroupWise mailbox passwords
Use Document Management Services
Open attachments in native format
Open documents in native format
View attachments in HTML format
View documents in HTML format
novdocx (en) 11 December 2007
All users who log in through a single Web server have the same feature access. You cannot configure
individual user settings. However, if you have multiple Web servers, you can establish different
settings for the Web servers by completing the following steps for each server’s WebAccess
Application.
To configure the WebAccess Application’s user settings:
1 In ConsoleOne, right-click the WebAccess Application object, then click Properties.
2 Click Application > Settings to display the Settings page.
3 Configure the following settings:
890 GroupWise 7 Administration Guide
Page 39

Spell Check Items: Enable this option if you want users to be able to use the Novell Speller to
spell check an item’s text before sending the item. Disable this option to remove all Spell
Check features from the user interface.
Search LDAP Directories: Enable this option if you have an LDAP server and you want users
to be able to search any LDAP address books you have defined. Disable this option to remove
all LDAP features from the user interface.
Change Passwords Enable this option if you want users to be able to change their Mailbox
passwords. Disable this option to remove all Password features from the user interface.
Access Document Management: Enable this option if you want users to be able to use the
Document Management features. Disable this option to remove all Document Management
features from the user interface.
Open Attachments in Native Format: By default, the Save As option enables users to save
message attachments to their local drives and then open them in their native applications. You
can turn on this option to enable the Open option. The Open option enables users to open
message attachments directly in their native applications without first saving the files to the
local drive.
This option requires that 1) each user’s Web browser knows the correct application or plug-in
to associate with the attachment, according to its file extension or MIME type, and 2) the
application or plug-in is available to the user. Otherwise, the user are prompted to save the file
to disk or specify the application to open it.
This option and the View Attachments in HTML Format option can both be enabled at the
same time. Doing so gives users both the Open option and the View option, which means they
have the choice of opening an attachment in its native application or viewing it as HTML.
Open Documents in Native Format: By default, the Save As option enables user to save
library documents to their local drives and then open them in their native applications. You can
turn on this option to enable the Open option. The Open option enables users to open
documents directly in their native applications without first saving the files to the local drive.
novdocx (en) 11 December 2007
This option requires that 1) each user’s Web browser knows the correct application or plug-in
to associate with the document, according to its file extension or MIME type, and 2) the
application or plug-in is available to the user. Otherwise, the user is prompted to save the file to
disk or specify the application to open it.
This option and the View Documents in Native Format option can both be enabled at the same
time. Doing so gives users both the Open option and the View option, which means they have
the choice of opening a document in its native application or viewing it as HTML.
Include Only Files With These Extensions: If you want only certain file types to be
have the Open option, enter the file types in the Include Only Files With These Extensions
field. Include only the extension and separate each extension with a comma (for example,
doc, xls, ppt). The Open option is not available for any file types not entered in this field.
This setting applies when opening either library documents or attachments.
View Attachments in HTML Format: Enable this option if you want users to be able to view
any type of attachments in HTML format. Disable this option to require users to save an
attachment to a local drive and view it in its native application. WebAccess uses Stellent*
Outside In* HTML Export to convert files to HTML format.
For a list of the supported file format conversions, download the following document from the
Stellent Web site:
Outside In Supported Platforms and File Formats (http://www.stellent.com/stellent3/groups/
mkt/documents/nativepage/outside_in_supported_platforms.pdf)
Configuring WebAccess Components 891
Page 40

This option and the Open Attachments in Native Format option can both be enabled at the same
time. Doing so gives users both the View option and the Open option, which means they have
the choice of viewing an attachment as HTML or opening it in its native application.
View Documents in HTML Format: Enable this option if you want users to be able to view
library documents in HTML format. Disable this option to require users to save a document to
a local drive and view it in its native application. WebAccess uses Stellent Outside In HTML
Export to convert files to HTML format.
For a list of the supported file format conversions, download the following document from the
Stellent Web site:
Outside In Supported Platforms and File Formats (http://www.stellent.com/stellent3/groups/
mkt/documents/nativepage/outside_in_supported_platforms.pdf)
This option and the Open Documents in Native Format option can both be enabled at the same
time. Doing so gives users both the View option and the Open option, which means they have
the choice of viewing a document as HTML or opening it in its native application.
Exclude Files With These Extensions: If you want to exclude certain file types from
having the View option, specify the file types in the Exclude Files With These Extensions
field. Include only the extension and separate each extension with a comma (for example,
doc, xls, ppt). The Vi ew option is available for any file types not entered in this field. This
setting applies when viewing either library documents or attachments.
Maximum Document View Size: Specify the maximum size file that can be viewed in
HTML format. If a file exceeds the maximum size, it must be opened in native format (if
allowed) rather than viewed in HTML format. The default maximum size is 1024 KB.
This setting applies when viewing either library documents or attachments.
4 Click OK.
novdocx (en) 11 December 2007
54.3 Configuring the Novell Speller Application
The Novell Speller Application enables users to spell check their messages. The Speller Application
is installed automatically with the WebAccess Application.
Figure 54-5 Speller Application
Speller
Application
WebAccess
Application
Web
Browser
Web
Server
WebPublisher
Application
During installation, the Speller Application is set up with a default configuration. However, you can
optimize the Speller Application configuration:
LDAP
Server
LDAP Provider
GroupWise Provider
Document
Service Provider
WebAccess
Agent
Viewer
Agent
Post Office
Library
892 GroupWise 7 Administration Guide
Page 41

Using ConsoleOne, you can modify the Speller Application’s environment settings. The
environment settings determine such things as the location where ConsoleOne stores the Speller
Application’s configuration file.
To modify the environment settings:
1 In ConsoleOne, right-click the Speller Application object (NovellSpeller), then click
Properties.
NOTE: The Speller Application object is not available in the GroupWise View. To locate the
Speller Application object, you must use the Console View.
2 Click Application > Environment to display the Environment page.
novdocx (en) 11 December 2007
3 Modify any of the following fields:
Configuration File: The Speller Application does not have access to Novell eDirectory or the
GroupWise domain database. Therefore, ConsoleOne writes the application’s configuration
information to the file specified in this field. By default, this is the spellchk.cfg file
located in the WebAccess Application’s home directory, which varies by platform.
NetWare
and
Windows:
Linux: /opt/novell/groupwise/webaccess/users
novell\webaccess\users on the Web server
In general, you should avoid changing the location of the file. If you do change the location of
the file, you need to make sure to modify the spellchk.cfg path in the Java servlet engine’s
properties file. If you do not, the Speller Application continues to look for its configuration
information in the old location.
Dictionary Path: Displays the path to the dictionary files used by the Speller Application. The
default installation directory varies by platform.
Configuring WebAccess Components 893
Page 42

novdocx (en) 11 December 2007
NetWare
and
Windows:
Linux: /var/opt/novell/tomcat/webapps/gw/WEB-INF/classes/com/novell/
tomcat_dir\webapps\ROOT\webinf\classes\com\novell\collexion\morphology\data
collexion/morphology/data
Maximum Suggestions: Select the maximum number of suggestions the Speller Application
returns for misspelled words. The default is 10.
Customize Settings in XML: Click this button to launch the XML editor. You can use the
editor to add, modify, or delete settings.
4 Click OK to save the changes.
54.4 Configuring the WebPublisher Application
The WebPublisher Application, which resides on the Web server, provides the WebPublisher user
interface. As users perform actions in the WebPublisher client, the WebPublisher Application passes
information between the Web browser and the WebAccess Agent.
Figure 54-6 WebPublisher Application
Speller
Application
LDAP
Server
LDAP Provider
GroupWise Provider
Document
Service Provider
WebAccess
Agent
Viewer
Agent
Post Office
Library
Web
Browser
WebAccess
Application
Web
Server
WebPublisher
Application
During installation, the WebPublisher Application is set up with a default configuration. However,
you can use the information in the following sections to optimize the WebPublisher Application
configuration:
Section 54.4.1, “Modifying the WebPublisher Application Environment Settings,” on page 895
Section 54.4.2, “Adding or Removing Service Providers,” on page 896
Section 54.4.3, “Modifying WebPublisher Application Template Settings,” on page 897
Section 54.4.4, “Controlling Availability of WebPublisher Features,” on page 901
894 GroupWise 7 Administration Guide
Page 43

54.4.1 Modifying the WebPublisher Application Environment Settings
Using ConsoleOne, you can modify the WebPublisher Application’s environment settings. The
environment settings determine such things as the location where ConsoleOne stores the
WebPublisher Application’s configuration file.
To modify the environment settings:
1 In ConsoleOne, right-click the WebPublisher Application object (GroupWiseWebPublisher), >
click Properties.
NOTE: The WebPublisher Application object is not available in the GroupWise View. To
locate the WebPublisher Application object, you must use the Console View.
2 Click Application > Environment to display the Environment page.
novdocx (en) 11 December 2007
3 Modify any of the following fields:
Configuration File: The WebPublisher Application does not have access to Novell eDirectory
or the GroupWise domain database. Therefore, ConsoleOne writes the application’s
configuration information to the file specified in this field. By default, this is the
webpub.cfg file located in the WebPublisher Application’s home directory, which varies by
platform.
NetWare
and
Windows:
Linux: /opt/novell/groupwise/webpublisher
novell\webpublisher on the Web server
In general, you should avoid changing the location of the file. If you do change the location of
the file, you need to make sure to modify the webpub.cfg path in the Java servlet engine’s
properties file. If you do not, the WebPublisher Application continues to look for its
configuration information in the old location.
Configuring WebAccess Components 895
Page 44

4 Click OK to save the changes.
54.4.2 Adding or Removing Service Providers
The WebPublisher Application receives requests from users and then passes the requests to the
appropriate service provider. The service provider fills the requests and returns the required
information to the WebPublisher Application. The WebPublisher Application merges the
information into the appropriate template and displays it to the user.
To function properly, the WebPublisher Application must know which service providers are
available. By default, WebPublisher includes one service provider, the GroupWise Document
service provider (GroupWiseDocumentProvider). The GroupWise Document service provider
communicates with the WebAccess Agent to fill WebPublisher requests.
The GroupWise Document service provider is installed and configured at the same time as the
WebPublisher Application. You can disable the GroupWise Document service by removing the
GroupWise Document service provider. If you create new service providers to expose additional
services through GroupWise WebPublisher, you must define those service providers so that the
WebPublisher Application knows about them.
novdocx (en) 11 December 2007
To define service providers:
1 In ConsoleOne, right-click the WebPublisher Application object, then click Properties.
2 Click Application > Services to display the Services page.
The Provider List displays all service providers that the WebPublisher Application is
configured to use.
3 Choose from the following options:
Add: To add a service provider to the list, click Add, browse for and select the service
provider’s object, then click OK.
Edit: To edit a service provider’s information, select the provider in the list, then click Edit. For
information about the modifications you can make, see Chapter 54.7, “Configuring the
GroupWise Document Service Provider,” on page 907.
896 GroupWise 7 Administration Guide
Page 45

Delete: To remove a service provider from the list, select the provider, then click Delete.
4 Click OK to save the changes.
54.4.3 Modifying WebPublisher Application Template Settings
When the WebPublisher Application receives information from a service provider, it merges the
information into the appropriate WebPublisher template before displaying the information to the
user. Using ConsoleOne, you can modify the WebPublisher Application’s template settings. The
template settings determine such things as the location of the templates, the maximum amount of
server memory to use for caching the templates, and the default template language.
1 In ConsoleOne, right-click the WebPublisher Application object, then click Properties.
2 Click Application > Templates to display the Templates page.
novdocx (en) 11 December 2007
3 Modify any of the following fields:
Template Path: Select the location of the template base directory. The template base directory
contains the subdirectories for each of the templates provided with GroupWise WebAccess.
Currently, only one template is provided for WebPublisher. This is an HTML template that uses
frames; the template files are stored in the FRAMES subdirectory. If you create your own
templates, you need to place the templates in a new subdirectory in the template base directory.
The default installation directory varies by platform.
NetWare
and
Windows:
Linux: /var/opt/tomcat/webapps/gw/WEB-INF/classes/com/novell/
tomcat_dir\webapps\ROOT\webinf\classes\com\novell\webpublisher\templates
webpublisher/templates
Java Package: Specify the Java package that contains the template resources used by the
WebPublisher Application. The default package is com.novell.webpublisher.templates.
Configuring WebAccess Components 897
Page 46

Images URL: Specify the URL for the GroupWise WebPublisher image files. These images
are merged into the templates along with the GroupWise document information. This URL
must be relative to the Web server’s document root directory. The default relative URL varies
by platform.
novdocx (en) 11 December 2007
NetWare
and
Windows:
Linux: /gw/com/novell/webpublisher/images
/com/novell/webpublisher/images
Applets URL: GroupWise WebPublisher does not include any applets. If you create
GroupWise WebPublisher applets, you need to specify the URL for the applets. To mirror the
storage location of the GroupWise WebAccess applets, you can store the applets in a
com\novell\webpublisher\applets directory under the Web server’s document root directory.
The applets URL is then relative to the Web server’s document root directory, which varies by
platform.
NetWare
and
Windows:
Linux: /gw/com/novell/webpublisher/applets
/com/novell/webpublisher/applets
Help URL: Specify the URL for the GroupWise WebPublisher Help files. This URL must be
relative to the Web server’s document root directory. The default relative URL varies by
platform.
NetWare
and
Windows:
/com/novell/webpublisher/help
Linux: /gw/com/novell/webpublisher/help
Enable Template Caching: To speed up access to the template files, the WebPublisher
Application can cache the files to the server’s memory. Select this option to turn on template
caching.
Cache Size: Select the maximum amount of memory, in kilobytes, you want to use when
caching the templates. The default cache size, 1024 KB, is sufficient to cache all templates
shipped with GroupWise WebPublisher. If you modify or add templates, you can turn on
Verbose logging (WebPublisher Application object > Application > Log Settings to view the
size of the template files. Using this information, you can then change the cache size
appropriately.
Default Language: Select the language to use when displaying the initial GroupWise
WebPublisher page. If users want the GroupWise WebPublisher interface (templates) displayed
in a different language, they can change it on the initial page.
4 Click OK to save the changes.
898 GroupWise 7 Administration Guide
Page 47

Defining WebPublisher User Interfaces
1 From the WebPublisher Application object’s Templates page, click Define User Interfaces to
display the Define User Interfaces dialog box.
The dialog box includes three tabs:
novdocx (en) 11 December 2007
User Interfaces: The User Interfaces tab lets you add, modify, and remove user interfaces, as
well as determine whether or not GroupWise data added to an interface should be cached on
proxy servers. Each interface consists of template files that support a specific content type. For
example, the predefined Standard HTML interface uses frame-based HTML templates, located
in the frames directory, that support the text/html content type.
Browser User Agents: The Browser User Agents tab lets you associate a user interface with a
Web browser. The association is based on the browser’s User Agent information (signature,
platform, version, and so forth).
Browser Accept Types: The Browser Accept Types tab lets you associate a user interface with
a Web browser. The association is based on the content type the browser accepts.
2 To add, remove, or modify user interfaces, click the User Interfaces tab.
The User Interface list displays all available user interfaces. The list includes the following
information:
User Interface: This column displays the name assigned to the user interface (for example,
Standard HTML).
Configuring WebAccess Components 899
Page 48

Template: This column displays the directory in which the template files are located. Only the
directory name is shown. You can append this directory name to the template path shown on
the Templates page to see the full template directory path.
Content Type: This column displays the content type required by the templates (for example,
text/html, text/x-hdml, or text/vnd.wap.wml).
Logout URL: By default, when a user logs out, he or she is returned to the standard login page.
When adding or editing the user interface, you can use the logout URL to define a different
page. If you do so, this column displays the URL. This URL overrides the logout URL
specified on the WebPublisher Application object’s Environment page (see Section 54.3,
“Configuring the Novell Speller Application,” on page 892).
Choose from the following options to manage the user interfaces:
Add: Click Add to add a user interface to the list.
Edit: Select a user interface in the list, then click Edit to edit the interface’s name, template
directory, content type, or proxy caching setting.
Default: Select a user interface in the list, then click Default to make that interface the default
interface. The WebPublisher Application uses the default interface only if it can’t determine the
appropriate interface based on the browser’s User Agent (WebAccess Application object >
Browser User Agent) or the browser’s accepted content types (WebAccess Application object >
Browser Accept Types).
Delete: Select a user interface in the list, then click Delete to remove the interface. This only
removes the entry from the list. It does not delete the template files from the template directory.
novdocx (en) 11 December 2007
3 To associate a user interface with a Web browser based on the browser’s User Agent
information, click the Browser User Agents tab.
The Browser User Agents tab lets you associate a user interface with a Web browser. The
association is based on the browser’s User Agent information (signature, platform, version, and
so forth). For example, if a browser’s User Agent information includes Windows CE and
you’ve created a specialized Windows CE user interface (templates), you could associate the
User Agent and user interface so that Windows CE users see your specialized Windows CE
user interface.
If a browser’s User Agent information matches more than one entry in the list, the application
uses the first entry. If the browser’s User Agent information does not match any entries in the
list, the WebPublisher Application tries to select an interface based on the content types the
browser accepts (WebAccess Application object > Browser Accept Types). If no match is made
900 GroupWise 7 Administration Guide
Page 49

based on the Accept Types information, the WebPublisher Application uses the default user
interface listed on the User Interfaces tab.
Choose from the following options to manage the associations:
Add: Click Add to add an entry to the list.
Edit: Select an entry from the list, then click Edit to edit the entry’s information.
Up: Select an entry from the list, then click Up to move it up in the list. If two entries match the
information in a browser’s User Agent header, the WebPublisher Application uses the interface
associated with the first entry listed.
Down: Select an entry from the list, then click Down to move it down in the list.
Delete: Select an entry from the list, then click Delete to remove the entry.
4 To associate a user interface with a Web browser based on the content type that the browser
accepts, click the Browser Accept Types tab.
novdocx (en) 11 December 2007
The Browser Accept Types tab lets you associate a user interface with a Web browser. The
association is based on the content type the browser accepts.
Many browsers accept more than one content type (for example, both text/html and text/plain).
If the list contains more than one acceptable content type, the WebPublisher Application uses
the browser’s preferred content type, which is the type that is listed first in the browser’s
Accept Type header.
If no interface can be determined based on the entries in the list, the WebPublisher Application
uses the default user interface listed on the User Interfaces tab.
Choose from the following options to manage the associations:
Add: Click Add to add an entry to the list.
Edit: Select an entry from the list, then click Edit to edit the entry’s information.
Delete: Select an entry from the list, then click Delete to remove the entry.
5 Click OK to save your changes and return to the WebPublisher Application object’s Templates
page.
54.4.4 Controlling Availability of WebPublisher Features
WebPublisher users can:
View documents in HTML format.
Configuring WebAccess Components 901
Page 50

Open documents in native format.
All users who access WebPublisher through a single Web server have the same feature access. You
cannot configure individual user settings. However, if you have multiple Web servers, you can
establish different settings for the Web servers by completing the following steps for each server’s
WebPublisher Application.
To configure the WebPublisher Application’s user settings:
1 In ConsoleOne, right-click the WebAccess Application object, then click Properties.
2 Click Application > Settings to display the Settings page.
novdocx (en) 11 December 2007
3 Configure the following settings:
Open Documents in Native Format: By default, the Save As option enables user to save
library documents to their local drives and then open them in their native applications. You can
turn on this option to enable the Open option. The Open option enables users to open
documents directly in their native applications without first saving the files to the local drive.
This option requires that 1) each user’s Web browser knows the correct application or plug-in
to associate with the document, according to its file extension or MIME type, and 2) the
application or plug-in is available to the user. Otherwise, the user is prompted to save the file to
disk or specify the application to open it.
This option and the View Documents in Native Format option can both be enabled at the same
time. Doing so gives users both the Open option and the View option, which means they have
the choice of opening a document in its native application or viewing it as HTML.
Include Only Files With These Extensions: If you want only certain file types to be
have the Open option, specify the file types in the Include Only Files With These
Extensions field. Include only the extension and separate each extension with a comma
(for example, doc, xls, ppt). The Open option is not available for any file types not entered
in this field.
View Documents in HTML Format: Enable this option if you want users to be able to view
library documents in HTML format. Disable this option to require users to save a document to
902 GroupWise 7 Administration Guide
Page 51

a local drive and view it in its native application. WebAccess uses Stellent Outside In HTML
Export to convert files to HTML format.
For a list of the supported file format conversions, download the following document from the
Stellent Web site:
Outside In Supported Platforms and File Formats (http://www.stellent.com/stellent3/groups/
mkt/documents/nativepage/outside_in_supported_platforms.pdf)
This option and the Open Documents in Native Format option can both be enabled at the same
time. Doing so gives users both the View option and the Open option, which means they have
the choice of viewing a document as HTML or opening it in its native application.
Exclude Files With These Extensions: If you want to exclude certain file types from
having the View option, enter the file types in the Exclude Files With These Extensions
field. Include only the extension and separate each extension with a comma (for example,
doc, xls, ppt). The View option is available for any file types not entered in this field.
Maximum Document View Size: Specify the maximum size file that can be viewed in
HTML format. If a file exceeds the maximum size, it must be opened in native format (if
allowed) rather than viewed in HTML format. The default maximum size is 1024 KB.
4 Click OK.
novdocx (en) 11 December 2007
54.5 Configuring the GroupWise Service Provider
The GroupWise service provider receives GroupWise requests from the WebAccess Application and
communicates with the WebAccess Agent to fill the requests.
Figure 54-7 GroupWise Service Provider
Speller
Application
WebAccess
Application
Web
Browser
Web
Server
WebPublisher
Application
The GroupWise service provider is installed and configured when you install the WebAccess
Application to a Web server. The WebAccess installation program creates a Novell eDirectory object
for the GroupWise service provider in the same context as the WebAccess Application. The object is
named GroupWiseProvider. Using ConsoleOne, you can modify the GroupWiseProvider object to:
LDAP
Server
LDAP Provider
GroupWise Provider
Document
Service Provider
WebAccess
Agent
Viewer
Agent
Post Office
Library
Change how long the service provider waits for the WebAccess Agent to return information for
a Busy Search. Users can perform Busy Searches when scheduling appointments to ensure that
the appointment’s recipients are available at the scheduled time. The default timeout interval is
1 minute.
Configuring WebAccess Components 903
Page 52

Define the WebAccess Agents that the service provider contacts to fill GroupWise requests. If
your GroupWise system includes more than one WebAccess Agent, you can use this feature to
provide failover support.
To modify the GroupWise service provider’s configuration:
1 In ConsoleOne, right-click the GroupWise service provider object (GroupWiseProvider), then
click Properties.
NOTE: The GroupWise service provider object is not available in the GroupWise View. To
locate the GroupWise service provider object, you must use the Console View.
2 Click Provider > Environment to display the Environment page.
novdocx (en) 11 December 2007
3 Choose from the following options:
Timeout for Busy Search: Select how long you want the GroupWise service provider to wait
for the WebAccess Agent to return information when a user performs a Busy Search.
Configuration File: The WebAccess Agent’s configuration file (commgr.cfg) contains the
agent’s IP address and the encryption key required by the GroupWise service provider to
communicate with the WebAccess Agent. By default, the commgr.cfg file is stored in the
WebAccess Application’s home directory, which varies by platform.
NetWare
and
Windows:
Linux: /opt/novell/groupwise/webaccess/users
novell\webaccess\users on the Web server
In general, you should not need to change this setting. However, if you have multiple
WebAccess Agents in your GroupWise system and you are optimizing WebAccess to provide
greater scalability and availability, you might need to change the setting. For information, see
Section 53.3, “Configuring Redirection and Failover Support,” on page 860.
904 GroupWise 7 Administration Guide
Page 53

GroupWise WebAccess Agents: This list displays the WebAccess Agents the GroupWise
service provider can communicate with when attempting to complete a request. If the first one
listed is unavailable, the GroupWise service provider attempts to use the second, third, fourth,
and so on until it is successful. This provides failover support and ensures greater availability
for your WebAccess users. For more information about optimizing availability, see
Section 53.3, “Configuring Redirection and Failover Support,” on page 860.
The list must include at least one WebAccess Agent.
Choose from the following options to manage the WebAccess Agents:
Add: Click Add to browse for and select the WebAccess Agent object, then click OK to
add it to the list.
Edit: Select a WebAccess Agent in the list, then click Edit to edit the WebAccess Agent’s
object properties.
Up: Select a WebAccess Agent from the list, then click Up to move it up in the list.
Down: Select a WebAccess Agent from the list, then click Down to move it down in the
list.
Delete: Select a WebAccess Agent in the list, then click Delete to remove it from the list.
Customize Settings in XML: Click this button to launch the XML editor. You can use the
editor to add, modify, or delete GroupWise service provider settings.
novdocx (en) 11 December 2007
4 Click OK to save the changes.
54.6 Configuring the LDAP Service Provider
The LDAP service provider is installed and configured when you install the WebAccess Application
to a Web server. The LDAP service provider receives LDAP directory requests from the WebAccess
Application and communicates with LDAP services to fill the requests.
Figure 54-8 LDAP Service Provider
LDAP
Server
LDAP Provider
GroupWise Provider
Document
Service Provider
WebAccess
Agent
Viewer
Agent
Post Office
Library
Web
Browser
Speller
Application
WebAccess
Application
Web
Server
WebPublisher
Application
The GroupWise WebAccess installation program creates a Novell eDirectory object for the LDAP
service provider in the same context as the WebAccess Application. The object is named
®
LDAPProvider. Using ConsoleOne
, you can modify the LDAPProvider object to define the LDAP
services that the service provider can contact.
To modify the LDAP service provider’s configuration:
Configuring WebAccess Components 905
Page 54

1 In ConsoleOne, right-click the LDAP service provider object (LDAPProvider), then click
Properties.
NOTE: The LDAP service provider object is not available in the GroupWise View. To locate
the LDAP service provider object, you must use the Console View.
2 Click Provider > Environment to display the Environment page.
novdocx (en) 11 December 2007
3 Choose from the following options:
Configuration File: The LDAP service provider’s configuration file (ldap.cfg) contains
the information for the LDAP services defined in the LDAP servers list. Because the LDAP
service provider cannot access eDirectory or the GroupWise databases for this information,
ConsoleOne writes the information to the ldap.cfg file.
By default, the ldap.cfg file is stored in the WebAccess Application’s home directory,
which varies by platform.
NetWare
and
Windows:
Linux: /opt/novell/groupwise/webaccess/users
novell\webaccess\users on the Web server
You should avoid changing the location of the file. If you do change the location of the file, you
need to make sure to modify the ldap.cfg path in the Java servlet engine’s properties file. If
you do not, the LDAP service provider continues to look for its configuration information in
the old location.
LDAP Servers: This list displays the LDAP services the LDAP service provider can
communicate with. The GroupWise WebAccess Address Book lists all LDAP services shown
in the list.
906 GroupWise 7 Administration Guide
Page 55

Choose from the following options to manage LDAP servers:
Add: Click Add to display the Add LDAP Server dialog box, fill in the required
information, then click OK to add the LDAP service to the list. For information about each
of the LDAP server information fields, click Help in the Add LDAP Server dialog box.
Edit: Select an LDAP service in the list, then click Edit to edit the LDAP service’s
information.
Delete: Select an LDAP service in the list, then click Delete to remove the LDAP service
from the list.
Customize Settings in XML: Click this button to launch the XML editor. You can use the
editor to add, modify, or delete LDAP service provider settings.
4 Click OK to save the changes.
54.7 Configuring the GroupWise Document Service Provider
The GroupWise Document service provider is installed and configured when you install the
WebPublisher Application to a Web server. The GroupWise Document service provider receives
GroupWise document requests from the WebPublisher Application and communicates with the
WebAccess Agent to fill the requests.
novdocx (en) 11 December 2007
Figure 54-9 Document Service Provider
LDAP
Server
LDAP Provider
GroupWise Provider
Document
Service Provider
WebAccess
Agent
Viewer
Agent
Post Office
Library
Web
Browser
Speller
Application
WebAccess
Application
Web
Server
WebPublisher
Application
The WebAccess installation program creates a Novell eDirectory object for the GroupWise
Document service provider in the same context as the WebPublisher Application. The object is
named GroupWiseDocumentProvider. Using ConsoleOne, you can modify the
GroupWiseDocumentProvider object to define the WebAccess Agents that the service provider
contacts to fill GroupWise document requests. If your GroupWise system includes more than one
WebAccess Agent, you can use this feature to provide failover support.
To modify the GroupWise Document service provider’s configuration:
1 In ConsoleOne, right-click the GroupWise Document service provider object
(GroupWiseDocumentProvider), then click Properties.
Configuring WebAccess Components 907
Page 56

NOTE: The GroupWise Document service provider object is not available in the GroupWise
View. To locate the GroupWise Document service provider object, you must use the Console
Vie w.
2 Click Provider > Environment to display the Environment page.
novdocx (en) 11 December 2007
3 Choose from the following options:
Configuration File: The WebAccess Agent’s configuration file (commgr.cfg) contains the
agent’s IP address and the encryption key required by the GroupWise Document service
provider to communicate with the WebAccess Agent. By default, the commgr.cfg file is
stored in the WebPublisher Application’s home directory, which varies by platform.
NetWare
and
Windows:
Linux: /opt/novell/groupwise/webpublisher
novell\webpublisher on the Web server
In general, you should not need to change this setting. However, if you have multiple
WebAccess Agents in your GroupWise system and you are optimizing WebPublisher to
provide greater scalability and availability, you might need to change the setting. For
information, see Section 53.3, “Configuring Redirection and Failover Support,” on page 860.
GroupWise WebAccess Agents: This list displays the WebAccess Agents the GroupWise
Document service provider can communicate with when attempting to complete a request. If
the first one listed is unavailable, the GroupWise Document service provider attempts to use
the second, third, fourth, and so on until it is successful. This provides failover support and
ensures greater availability for your WebPublisher users. For more information about
optimizing availability, see Section 53.3, “Configuring Redirection and Failover Support,” on
page 860.
The list must include at least one WebAccess Agent.
908 GroupWise 7 Administration Guide
Page 57

Choose from the following options to manage the WebAccess Agents:
Add: Click Add to browse for and select the WebAccess Agent object, then click OK to
add it to the list.
Edit: Select a WebAccess Agent in the list, then click Edit to edit the WebAccess Agent’s
object properties.
Up: Select a WebAccess Agent from the list, then click Up to move it up in the list.
Down: Select a WebAccess Agent from the list, then click Down to move it down in the
list.
Delete: Select a WebAccess Agent in the list, then click Delete to remove it from the list.
Customize Settings in XML: Click this button to launch the XML editor. You can use the
editor to add, modify, or delete GroupWise Document service provider settings.
4 Click OK to save the changes.
54.8 Configuring the Document Viewer Agent
The documents that users attach to e-mail messages are as varied as the combinations of document
formats, tools, and users throughout the world. In order to display documents in your Web browser,
WebAccess must convert them to HTML. Because some documents contain unexpected data,
WebAccess cannot convert them. In earlier versions of GroupWise, the WebAccess Agent
sometimes shut down when it could not convert a document. This occurrence then interrupted the
activities of all WebAccess users.
novdocx (en) 11 December 2007
The Document Viewer Agent isolates the document conversion task from the WebAccess Agent.
The Viewer Agent can simultaneously convert multiple documents into HTML format. If it
encounters a problem converting a document, the problem does not affect conversion of other
documents, nor does it affect the functioning of the WebAccess Agent. Therefore, WebAccess users
do not experience interruptions because of documents that fail to convert into HTML.
Figure 54-10 Viewer Agent
LDAP
Server
LDAP Provider
GroupWise Provider
Document
Service Provider
WebAccess
Agent
Viewer
Agent
Post Office
Library
Web
Browser
Speller
Application
WebAccess
Application
Web
Server
WebPublisher
Application
The Viewer Agent is automatically installed along with the WebAccess Agent, and the WebAccess
Agent manages the Viewer Agent, starting and stopping it as needed. The default configuration of
the Viewer Agent is sufficient to provide basic document conversion functionality. The Viewer
Agent is configured by editing its startup file (gwdva.dva). The default location for the startup
files varies by platform.
Configuring WebAccess Components 909
Page 58

NetWare: sys:\system
Linux: /opt/novell/groupwise/agents/share
Windows: c:\webacc
In the Viewer Agent startup file, you can configure the following aspects of Viewer Agent
functioning:
Section 54.8.1, “Viewer Agent Web Console,” on page 910
Section 54.8.2, “Document Conversion,” on page 910
Section 54.8.3, “Document Quarantine,” on page 911
Section 54.8.4, “Document Cache,” on page 911
Section 54.8.5, “Agent Performance,” on page 912
Section 54.8.6, “Agent Log Files,” on page 912
Section 54.8.7, “Client/Server Configuration,” on page 912
novdocx (en) 11 December 2007
54.8.1 Viewer Agent Web Console
As with the other GroupWise agents, you can view configuration and status information about the
Viewer Agent in your Web browser. To enable the Viewer Agent Web console, enable the /http
startup switch in the Viewer Agent startup file. The default port number is 7439. By default, anyone
who knows the server IP address and port number can access the Viewer Agent Web console, but
you can configure the Viewer Agent to prompt for a username and password if desired.
The following switches configure the Viewer Agent Web console.
/http
/httpport
/httpuser
/httppw
After enabling the /http switch and restarting the WebAccess Agent, use the following URL to
display the Viewer Agent Web console:
http://server_address:7439
For more information, see Section 56.3, “Monitoring the Document Viewer Agent,” on page 935
54.8.2 Document Conversion
The Viewer Agent creates a working directory named gwdva.dir under the directory where the
Viewer Agent program is installed. Under this directory, it uses the temp subdirectory for temporary
files created during file conversion. By default, if the Viewer Agent cannot determine the language
of a file it is trying to convert, it uses the ISO language code en for English.
The following switches configure the document conversion functionality of the Viewer Agent:
/temp
910 GroupWise 7 Administration Guide
Page 59

/lang
After editing the Viewer Agent startup file, stop and restart the WebAccess Agent to put the new
settings into effect.
54.8.3 Document Quarantine
You can configure the Viewer Agent to quarantine documents that cannot be converted to HTML so
that they can be examined manually if necessary. To enable the file quarantine feature, uncomment
the /hold startup switch in the Viewer Agent startup file. Documents that fail HTML conversion are
then placed in the hold subdirectory of the Viewer Agent working directory (gwdva.dir).
You can configure the Viewer Agent to notify an administrator whenever a document is placed in
quarantine. You can also control the maximum amount of disk space that the document quarantine is
allowed to occupy.
The following switches configure the document quarantine functionality of the Viewer Agent:
/hold
/maxhold
/email
novdocx (en) 11 December 2007
/domain
/relay
After editing the Viewer Agent startup file, stop and restart the WebAccess Agent to put the new
settings into effect.
54.8.4 Document Cache
You can configure the Viewer Agent to cache documents that have already been converted to
HTML. This speeds up document display when the same document is viewed multiple times and by
multiple users. To enable document caching, enable the /cache startup switch in the Viewer Agent
startup file. This creates a cache subdirectory under the Viewer Agent working directory
(gwdva.dir). Under the cache subdirectory, converted GroupWise library documents are stored in
a library cache subdirectory (000) and converted document attachments are stored in a transient
cache subdirectory (tran). If the Viewer Agent encounters a problem converting a document, it
adds the document to its list of problem documents in the problem directory, so that it does not
repeatedly try to convert the same problem documents.
You can control the maximum amount of disk space that the document cache is allowed to occupy.
You can also control the maximum amount of time documents remain cached.
The following switches configure the document cache functionality of the Viewer Agent:
/cache
/maxcache
/maxtrancache
/maxtrantime
/maxprobtime
Configuring WebAccess Components 911
Page 60

After editing the Viewer Agent startup file, stop and restart the WebAccess Agent to put the new
settings into effect.
54.8.5 Agent Performance
By default, the Viewer starts 5 worker threads and adds additional threads as needed until reaching
15 threads. If users experience unacceptable delays when trying to view documents, you can
increase the number of worker threads so that documents can be processed more quickly.
By default, the Viewer Agent has limits on the amount of time it can spend converting a single
document and on how large a converted document can become. If the documents that users receive
exceed these limits, you can increase them.
On NetWare, you can run each worker thread in its own namespace so that a failure of one worker
thread does not affect other worker threads.
The following switches configure the performance of the Viewer Agent:
/minworkers
/maxworkers
/maxtime
novdocx (en) 11 December 2007
/maxsize
/addrspacename
After editing the Viewer Agent startup file, stop and restart the WebAccess Agent to put the new
settings into effect.
54.8.6 Agent Log Files
As with the other GroupWise agents, the Viewer Agent creates log files that include error messages
and other information about Viewer Agent functioning. Log files can provide a wealth of
information for resolving problems with the Viewer Agent.
The following switches configure the logging performed by the Viewer Agent:
/log
/loglevel
/logdays
/logmax
After editing the Viewer Agent startup file, stop and restart the WebAccess Agent to put the new
settings into effect.
54.8.7 Client/Server Configuration
The Viewer Agent communicates with the WebAccess Agent by way of TCP/IP. By default, the
Viewer Agent uses the first IP address it finds on the server and listens on port 7440. Worker threads
are assigned port numbers ascending above the main port number. For example, the 5 default worker
threads would be assigned ports 7441 through 7445.
912 GroupWise 7 Administration Guide
Page 61

The following switches configure TCP/IP for the Viewer Agent:
/ip
/port
After editing the Viewer Agent startup file, stop and restart the WebAccess Agent to put the new
settings into effect.
54.9 Enabling Web Server Data Compression
By enabling data compression on your Web server, you can increase performance for all WebAccess
users. However, because this is a change to the configuration of your Web server, it affects all
programs that interact with the Web server. A side effect of enabling data compression might be a
decline in Web server scalability.
Section 54.9.1, “Apache 2 on NetWare 6.5,” on page 913
Section 54.9.2, “Apache 2 on Open Enterprise Server (OES) Linux,” on page 914
Section 54.9.3, “Apache 2 on SUSE Linux Enterprise Server 9,” on page 914
Section 54.9.4, “Microsoft Internet Information Server (IIS) on Windows 2003,” on page 914
novdocx (en) 11 December 2007
54.9.1 Apache 2 on NetWare 6.5
1 Download Apache 2.0/2.2 for NetWare (http://mirrors.combose.com/apache/httpd/binaries/
netware/) from the Apache Software Foundation (http://www.apache.org/).
2 Extract deflate.nlm from the distribution and copy it to the sys:\apache2\modules
directory.
3 Change to the sys:\apache2\conf directory and open the httpd.conf file in a text
editor.
4 Locate the LoadModule entries in the file.
5 Add the following entry:
LoadModule deflate_module modules/deflate.nlm
<IfModule mod_deflate.c>
AddOutputFilterByType DEFLATE text/html text/plain text/xml
DeflateFilterNote Input instream
DeflateFilterNote Output outstream
DeflateFilterNote Ratio ratio
LogFormat '%{ratio}n%%\t%{outstream}n\t%{instream}n\t"%r"'
deflate
CustomLog "|sys:/apache2/bin/rotlogs.nlm sys:/apache2/logs/
deflate_log 5M" deflate
</IfModule>
NOTE: Lines that appear wrapped in the above example should be entered in the
httpd.conf file as single lines without line wrapping.
6 Save the httpd.conf file and exit the text editor.
7 Restart Apache.
Configuring WebAccess Components 913
Page 62

54.9.2 Apache 2 on Open Enterprise Server (OES) Linux
1 As root, change to the /etc/opt/novell/httpd/conf directory and open the
httpd.conf file.
2 Locate the LoadModule entries in the file.
3 Add the following entry:
LoadModule deflate_module modules/mod_deflate.so
<IfModule mod_deflate.c>
AddOutputFilterByType DEFLATE text/html text/plain text/xml
DeflateFilterNote Input instream
DeflateFilterNote Output outstream
DeflateFilterNote Ratio ratio
LogFormat '%{ratio}n%%\t%{outstream}n\t%{instream}n\t"%r"'
deflate
CustomLog logs/deflate_log deflate
</IfModule>
NOTE: Lines that appear wrapped in the above example should be entered in the
httpd.conf file as single lines without line wrapping.
novdocx (en) 11 December 2007
4 Save the httpd.conf file and exit the text editor.
5 Restart Apache.
For more information about data compression on Apache, see Apache Module mod_deflate (http://
httpd.apache.org/docs/2.0/mod/mod_deflate.html) on the Apache Software Foundation (http://
www.apache.org/) Web site.
54.9.3 Apache 2 on SUSE Linux Enterprise Server 9
The steps for Apache 2 on SUSE Linux Enterprise Server 9 are essentially the same as those for
Novell Open Enterprise Server, as described in Section 54.9.2, “Apache 2 on Open Enterprise
Server (OES) Linux,” on page 914, except that you need to know the location of the httpd.conf
file in your Apache installation.
54.9.4 Microsoft Internet Information Server (IIS) on Windows 2003
1 Open IIS Manager.
2 Right-click Web S i te s, then click Properties.
3 Select Compress Application Files and Compress Static Files.
4 Click OK to save the compression settings.
5 Restart IIS.
For more information about data compression on IIS, see Using HTTP Compression for Faster
Downloads (http://www.microsoft.com/technet/prodtechnol/WindowsServer2003/Library/IIS/
25d2170b-09c0-45fd-8da4-898cf9a7d568.mspx) on Microsoft TechNet (http://
technet.microsoft.com/default.aspx).
914 GroupWise 7 Administration Guide
Page 63

55
Managing User Access
You can manage various aspects of user experience with the WebAccess client.
Section 55.1, “Controlling User Access to Mailboxes,” on page 915
Section 55.2, “Setting the Timeout Interval for Inactive Sessions,” on page 920
Section 55.3, “Configuring User Access to WebAccess Features,” on page 921
Section 55.4, “Customizing the WebAccess Interface,” on page 924
55.1 Controlling User Access to Mailboxes
You control which users have access to their mailboxes by creating classes of service and assigning
users membership in a class. For example, if you don’t want users on a particular post office to have
access to their mailboxes through WebAccess, you can create a class of service that prevents access
and then assign the entire post office membership in that class.
novdocx (en) 11 December 2007
55
The following sections provide information to help you create and manage classes of service:
Section 55.1.1, “Class Membership,” on page 915
Section 55.1.2, “Creating a Class of Service,” on page 916
Section 55.1.3, “Adding Users to a Class of Service,” on page 918
Section 55.1.4, “Maintaining the Access Database,” on page 918
55.1.1 Class Membership
When you create a class of service, you assign membership in the class at a domain level, post office
level, distribution list (group) level, or individual user level, which means that a user could be
assigned membership in multiple classes. For example, a user might be a member in one class
because his or her domain is a member; at the same time, the user is a member in another class
because his or her post office is a member of that class. Because each user can have only one class of
service, membership conflicts are resolved hierarchically, as shown below:
Membership assigned to a
user through a...
domain default class of service
post office
Overrides membership assigned to the user through the...
default class of service
domain
distribution list
user
default class of service
domain
post office
default class of service
domain
post office
Managing User Access
915
Page 64

If a user’s membership in two classes of service is based upon the same level of membership (for
example, both through individual user membership), the class that applies is the one that allows the
most privileges. For example, if the user belongs to one class of service that allows access to
WebAccess and another class that prevents access, the class that allows access applies to the user.
55.1.2 Creating a Class of Service
1 In ConsoleOne®, right-click the WebAccess Agent object, then click Properties.
2 Click Access Control > Settings to display the Access Control Settings page.
novdocx (en) 11 December 2007
3 Click Create to display the Create New Class of Service dialog box.
4 Type a name for the class, then click OK to display the Edit Class of Service dialog box.
5 Select one of the following options:
916 GroupWise 7 Administration Guide
Page 65

Inherit Access: Select this option if you want members of this class of service to inherit their
access from the default class of service or another class of service that they have membership
in.
Allow Access: Select this option to enable members of the class to use WebAccess.
If you select Allow Access, you must also set a timeout interval. The timeout interval
determines how long the WebAccess Agent keeps open a dedicated connection to the post
office on behalf of the user. If the agent does not receive a user request within the specified
interval, it closes the user’s connection to the post office in order to free up its resources and the
Post Office Agent’s resources for other uses.
When the WebAccess Agent closes a user’s connection to the post office, the user is not logged
out of WebAccess. The user can continue to use WebAccess. As soon as the agent receives a
request from the user, it opens the user’s connection again. In general, you should leave the
timeout interval set to the default 20 minutes.
You can also have users automatically logged out of WebAccess after a specified period of
activity. WebAccess logout is handled by the WebAccess Application running on the Web
server, not by the WebAccess Agent. For information, see Section 55.2, “Setting the Timeout
Interval for Inactive Sessions,” on page 920.
Prevent Access: Select this option to prevent members of the class from using WebAccess.
novdocx (en) 11 December 2007
6 Click OK to display the Select GroupWise Object dialog box.
7 Select Domains, Post Offices, Distribution Lists, or Users to display the list you want.
8 In the list, select the domain, post office, distribution list, or user you want, then click Add to
add the object as a member in the class. You can Ctrl+click or Shift+click to select multiple
users.
9 To add additional domains, post offices, distribution lists or users as members of the class of
service, select the class of server, then click Add to display the Select GroupWise Object dialog
box.
10 Click OK (on the Settings page) when finished adding members.
Managing User Access 917
Page 66

55.1.3 Adding Users to a Class of Service
The following steps help you add users to an existing class of service. For information about adding
new classes of service, see Section 55.1.2, “Creating a Class of Service,” on page 916.
1 In ConsoleOne, right-click the WebAccess Agent object, then click Properties.
2 Click Access Control > Settings to display the Access Control Settings page.
novdocx (en) 11 December 2007
3 In the Class of Service list, select the class you want to add members to, then click Add to
display the Select GroupWise Object dialog box.
4 Select Domains, Post Offices, Distribution Lists, or Users to display the list you want.
5 In the list, select the domain, post office, distribution list, or user you want, then click Add to
add the object as a member in the class.
6 Repeat Step 3 through Step 5 for each object you want to add.
55.1.4 Maintaining the Access Database
The Access database stores the information for the classes of service you have set up to control user
access to GroupWise
for physical inconsistencies with the database records and indexes. If inconsistencies are found, you
can recover the database.
The Access database, gwac.db, is located in the domain\wpgate\webac70a directory.
This section includes the following information:
“Validating the Access Database” on page 919
“Recovering the Access Database” on page 919
®
WebAccess. When problems occur, you can validate the database to check
918 GroupWise 7 Administration Guide
Page 67

Validating the Access Database
Validating the Access database checks for physical inconsistencies with the database’s records and
indexes.
1 In ConsoleOne, right-click the WebAccess Agent object, then click Properties.
2 Click Access Control > Database Management to display the Database Management page.
novdocx (en) 11 December 2007
3 Click Val id at e No w.
4 After the database has been validated, click OK.
If inconsistencies are found, see “Recovering the Access Database” on page 919.
Recovering the Access Database
When you recover the Access database, a new database is created and all salvageable records are
copied to the new database. Because some records might not be salvageable, after the recovery you
should check the classes of services you have defined to see if any information was lost.
1 In ConsoleOne, right-click the WebAccess Agent object, then click Properties.
2 Click Access Control > Database Management to display the Database Management page.
Managing User Access 919
Page 68

3 Click Recover Now.
novdocx (en) 11 December 2007
4 After the database has been recovered, click OK.
55.2 Setting the Timeout Interval for Inactive Sessions
By default, users are logged out of GroupWise WebAccess after 20 minutes if they have not
performed any actions that generate requests. Actions such as opening or sending a message
generate requests. Other actions, such as scrolling through the Item List, composing a mail message
without sending it, and reading Help topics, do not generate requests.
The timeout interval provides security for WebAccess users who forget to log out. It also helps the
performance of the Web server by freeing the resources dedicated to that user’s connection.
The WebAccess Application on the Web server controls the timeout. At the time the user is logged
out, the WebAccess Application saves the user’s current session to a directory on the Web server,
where it is stored for 24 hours. If the logged-out user attempts to continue the session, he or she is
prompted to log in again, after which the WebAccess Application renews the session. For example,
suppose a user is composing a message when the timeout interval expires and then attempts to send
the message. The user is prompted to log in again, after which the message is sent. No information is
lost.
IMPORTANT: This timeout interval is different than the one you can establish when creating a
class of service (see Section 55.1.2, “Creating a Class of Service,” on page 916). That timeout
interval determines how long the WebAccess Agent keeps open a session with an inactive user, and
this timeout interval determines how long the WebAccess Application maintains an inactive session.
In general, if the WebAccess Agent session times out, users do not notice; the next time they make a
request, the WebAccess Agent opens a new session. However, if the WebAccess Application session
times out, users are prompted to log in again.
To modify the timeout interval:
920 GroupWise 7 Administration Guide
Page 69

1 In ConsoleOne, right-click the WebAccess Application object, click Properties, then click
Application > Security to display the Security page.
novdocx (en) 11 December 2007
2 In the Timeout for Inactive Sessions box, select the number of minutes for the timeout interval.
3 In the Path for Inactive Sessions box, select the path for the directory where you want inactive
sessions stored.
4 Click OK.
The timeout interval applies to all users who log in through the Web server where the WebAccess
Application is running. You cannot set individual user timeout intervals. However, if you have
multiple Web servers, you can set different timeout intervals for the Web servers by completing the
above steps for each server’s WebAccess Application.
55.3 Configuring User Access to WebAccess Features
By default, WebAccess users can:
Spell check messages
Search LDAP directories
Change their GroupWise mailbox passwords
Use Document Management Services
Open attachments in native format
Open documents in native format
View attachments in HTML format
View documents in HTML format
Access to these features is controlled by the WebAccess Application on the Web server. All users
who log in through the Web server have the same feature access. You cannot configure individual
Managing User Access 921
Page 70

user settings. However, if you have multiple Web servers, you can establish different settings for the
Web servers by completing the following steps for each server’s WebAccess Application.
To configure the WebAccess feature settings:
1 In ConsoleOne, right-click the WebAccess Application object, then click Properties.
2 Click Application > Settings to display the Application Settings page.
novdocx (en) 11 December 2007
3 Configure the following settings:
Spell Check Items: Enable this option if you want users to be able to use the Novell
®
Speller
to spell check an item’s text before sending the item. Disable this option to remove all Spell
Check features from the user interface.
Search LDAP Directories: Enable this option if you have an LDAP server and you want users
to be able to search any LDAP address books you have defined. Disable this option to remove
all LDAP features from the user interface.
Change Passwords: Enable this option if you want users to be able to change their Mailbox
passwords. Disable this option to remove all Password features from the user interface.
Access Document Management: Enable this option if you want users to be able to use the
Document Management features. Disable this option to remove all Document Management
features from the user interface (for example, the Documents tab in the WebAccess client).
Open Attachments in Native Format: By default, the Save As option enables users to save
message attachments to their local drives and then open them in their native applications. You
can turn on this option to enable the Open option. The Open option enables users to open
message attachments directly in their native applications without first saving the files to the
local drive.
This option requires that 1) each user’s Web browser knows the correct application or plug-in
to associate with the attachment, according to its file extension or MIME type, and 2) the
application or plug-in is available to the user. Otherwise, the user is prompted to save the file to
disk or specify the application to open it.
922 GroupWise 7 Administration Guide
Page 71

This option and the View Attachments in HTML Format option can both be enabled at the same
time. Doing so gives users both the Open option and the View option, which means they have
the choice of opening an attachment in its native application or viewing it as HTML.
Open Documents in Native Format: By default, the Save As option enables user to save
library documents to their local drives and then open them in their native applications. You can
turn on this option to enable the Open option. The Open option enables users to open
documents directly in their native applications without first saving the files to the local drive.
This option requires that 1) each user’s Web browser knows the correct application or plug-in
to associate with the document, according to its file extension or MIME type, and 2) the
application or plug-in is available to the user. Otherwise, the user is prompted to save the file to
disk or specify the application to open it.
This option and the View Documents in Native Format option can both be enabled at the same
time. Doing so gives users both the Open option and the View option, which means they have
the choice of opening a document in its native application or viewing it as HTML.
If you want only certain file types to be have the Open option, enter the file types in the Include
Only Files With These Extensions field. Include only the extension and separate each extension
with a comma (for example, doc, xls, ppt). The Open option is not available for any file types
not entered in this field.
novdocx (en) 11 December 2007
View Attachments in HTML Format: Enable this option if you want users to be able to view
any type of attachments in HTML format. Disable this option to require users to save an
attachment to a local drive and view it in its native application. WebAccess uses Stellent
Outside In HTML Export to convert files to HTML format.
For a list of the supported file format conversions, download the following document from the
Stellent Web site:
Outside In Supported Platforms and File Formats (http://www.stellent.com/stellent3/groups/
mkt/documents/nativepage/outside_in_supported_platforms.pdf)
This option and the Open Attachments in Native Format option can both be enabled at the same
time. Doing so gives users both the View option and the Open option, which means they have
the choice of viewing an attachment as HTML or opening it in its native application.
View Documents in HTML Format: Enable this option if you want users to be able to view
library documents in HTML format. Disable this option to require users to save a document to
a local drive and view it in its native application. WebAccess uses Stellent Outside In HTML
Export to convert files to HTML format.
For a list of the supported file format conversions, download the following document from the
Stellent Web site:
Outside In Supported Platforms and File Formats (http://www.stellent.com/stellent3/groups/
mkt/documents/nativepage/outside_in_supported_platforms.pdf)
This option and the Open Documents in Native Format option can both be enabled at the same
time. Doing so gives users both the View option and the Open option, which means they have
the choice of viewing a document as HTML or opening it in its native application.
If you want to exclude certain file types from having the View option, enter the file types in the
Exclude Files With These Extensions field. Include only the extension and separate each
extension with a comma (for example, doc, xls, ppt). The View option is available for any file
types not entered in this field.
4 Click OK.
Managing User Access 923
Page 72

55.4 Customizing the WebAccess Interface
GroupWise WebAccess enables you to change the default Novell logo and colors used in the
WebAccess interface. For example, you can add your company logo to the main WebAccess
window and change the colors to match your company colors.
You use the customization.properties file to change the logo and colors.
1 Open the customization.properties file with a text editor.
The file is located in the following platform-specific directory:
novdocx (en) 11 December 2007
NetWare
and
Windows:
Linux: tomcat_dir/webapps/gw/WEB-INF/classes/com/novell/webaccess/
tomcat_dir\webapps\gw\WEBINF\classes\com\novell\webaccess\
templates
templates
2 If you want to change the logo image:
2a Locate the CUSTOMIZABLE IMAGE FOR GROUPWISE WEBACCESS section at the
beginning of the file.
2b To turn on customization for the logo image, set the WebAccess.Customize.Image.enable
property to TRUE:
WebAccess.Customize.Image.enable=true
2c Modify the image properties as desired. The customization.properties file contains
descriptions of each property.
3 If you want to change the WebAccess colors:
3a Locate the CUSTOMIZABLE COLORS SCHEME FOR GROUPWISE WEBACCESS
section in the file.
3b To turn on customization of the colors, set the WebAccess.Customize.Color.enable setting
to TRUE:
WebAccess.Customize.Color.enable=true
3c Modify the color properties as desired. The customization.properties file contains
descriptions of each property.
4 Save the customization.properties file.
5 Restart the Web server.
6 In a Web browser, clear the browser cache, then log in to GroupWise WebAccess.
924 GroupWise 7 Administration Guide
Page 73

56
Monitoring WebAccess
novdocx (en) 11 December 2007
Operations
The WebAccess Agent can be monitored at the server where it runs and also in your Web browser.
The WebAccess Application and the Document Viewer Agent can be monitored in your Web
browser. You can also use log files to monitor any WebAccess component.
Section 56.1, “Monitoring the WebAccess Agent,” on page 925
Section 56.2, “Monitoring the WebAccess Application,” on page 934
Section 56.3, “Monitoring the Document Viewer Agent,” on page 935
Section 56.4, “Using WebAccess Log Files,” on page 937
56.1 Monitoring the WebAccess Agent
The following sections explain the various methods you can use to monitor the GroupWise®
WebAccess Agent to ensure that it is operating properly.
Section 56.1.1, “Using the WebAccess Agent Server Console,” on page 925
Section 56.1.2, “Using the WebAccess Agent Web Console,” on page 929
Section 56.1.3, “Using Novell Remote Manager,” on page 932
Section 56.1.4, “Using an SNMP Management Console,” on page 932
56
Section 56.1.5, “Assigning Operators to Receive Warning and Error Messages,” on page 932
Section 56.1.6, “Using WebAccess Agent Error Message Documentation,” on page 933
Section 56.1.7, “Employing WebAccess Agent Troubleshooting Techniques,” on page 934
56.1.1 Using the WebAccess Agent Server Console
“NetWare: Using the WebAccess Agent Server Console” on page 925
“Linux: Using the WebAccess Agent Server Console” on page 927
“Windows: Using the WebAccess Agent Server Console” on page 928
NetWare: Using the WebAccess Agent Server Console
The NetWare
view the agent’s log information, and change the log settings while at the server.
®
WebAccess Agent console, shown below, lets you monitor the operation of the agent,
Monitoring WebAccess Operations
925
Page 74

Figure 56-1 WebAccess Agent Console
novdocx (en) 11 December 2007
The console and its options are described below.
Up Time
The Up Time field displays how long it has been since the WebAccess Agent was started.
Threads
The default of 12 threads enables the WebAccess Agent to service 12 user requests at one time. The
Busy field displays the number of threads that are currently servicing user requests. The Tot al field
displays the total number of threads available to service requests (by default, 12). The Peak field
displays the most threads used at one time to service requests. If all threads are busy much of the
time, you can increase the number of threads available for use. See Section 54.1.1, “Modifying
WebAccess Settings,” on page 870.
Users In
The Users In field displays the number of users who currently are logged in. During startup, if you
have enabled WebPublisher, the WebAccess Agent logs in one time for each available thread; these
logins are reflected in the Users In fields. The Tot al field displays the total number of users who
have logged in during the current up time. The Peak field displays the most users who have been
logged in at one time.
By default, a maximum of 250 users can be logged in at one time. You can use the /maxusers startup
switch to change the default. See Section 57, “Using WebAccess Startup Switches,” on page 945.
Requests
The Total field displays the total number of requests the WebAccess Agent has processed during its
current up time. The Errors field lists the number of requests that could not be processed because of
errors.
926 GroupWise 7 Administration Guide
Page 75

Logging Box
The Logging box displays the logged information. The current log level determines the amount of
information that is displayed (see Section , “F10 = Options,” on page 927). For each line, the first
item is the number of the thread that processed the user’s request, the second item is the time of the
request, and the third item is the information associated with the request.
F7 = Exit
Press F7 to shut down the WebAccess Agent.
F9 = Browse Logfile
Press F9 to view the log file. If disk logging is turned on, the current log file is displayed. If disk
logging is turned off, a list of old log files is displayed (if any exist). You can then choose which log
file you want to view.
F10 = Options
Press F10, then select View Log F i les or Logging Options. Using the logging options, you can
specify the logging level, turn disk logging on or off, specify the number of days to keep old log
files, and specify the maximum amount of disk space to use for log files.
novdocx (en) 11 December 2007
Any changes you make to the logging options apply only to the current session. When you restart
®
the WebAccess Agent, the logging level is reset to the level specified in ConsoleOne
or in the
startup file (strtweb.ncf).
Log Level: Off turns logging off; Normal displays initial statistics, user logins, warnings, and errors;
Ve r bo s e displays Normal logging plus user requests; and Diagnostic displays Ver b os e logging plus
thread information. The default is Normal logging. Use Diagnostic only if you are troubleshooting a
problem with WebAccess.
File Logging: Turns disk logging on or off. When disk logging is turned on, the WebAccess Agent
creates a new log file each day and each time it is restarted. The log file is named mmddweb.nnn,
where mm is the month, dd is the day, and nnn is a sequenced number (001 for the first log file of the
day, 002 for the second, and so forth). The default location for the log files is the
domain\wpgate\webac70a\xxx.prc directory.
The verbose and diagnostic logging levels do not degrade WebAccess Agent performance, but log
files saved to disk consume more disk space when verbose or diagnostic logging is in use.
Max Log File Age: Specifies the number of days you want the WebAccess Agent to retain old log
files. The WebAccess Agent retains the log file for the specified number of days unless the
maximum disk space for the log files is exceeded. The default age is 7 days.
Max Log Disk Space: Specifies the maximum amount of disk space you want to use for log files. If
the disk space limit is exceeded, the WebAccess Agent deletes log files, beginning with the oldest
file, until the limit is no longer exceeded. The default disk space is 65536 KB.
Linux: Using the WebAccess Agent Server Console
By default, the Linux Agent runs as a daemon with no user interface. To display information on the
server where the WebAccess Agent runs, you must start the WebAccess Agent with the --show
startup switch. The console is displayed in a terminal window.
Monitoring WebAccess Operations 927
Page 76

Figure 56-2 Linux WebAccess Agent Server Console
novdocx (en) 11 December 2007
Windows: Using the WebAccess Agent Server Console
The Windows WebAccess Agent server console lets you monitor the operation of the agent. The
server console, shown below, is displayed in a DOS window.
Figure 56-3 Windows WebAccess Agent Server Console
The console and its options are described below.
Logging Window
The current logging level determines the amount of information that is displayed. You can specify
the logging level through ConsoleOne, through startup switches, or by using the F2 function key.
See “Modifying WebAccess Agent Log Settings in ConsoleOne” on page 939, “Modifying
WebAccess Agent Log Settings through Startup Switches” on page 940, and “F2” on page 929.
The verbose and diagnostic logging levels do not degrade WebAccess Agent performance, but log
files saved to disk consume more disk space when verbose or diagnostic logging is in use.
For each line, the first item is the number of the thread that processed the user’s request, the second
item is the time of the request, and the third item is the information associated with the request.
928 GroupWise 7 Administration Guide
Page 77

F1 or F7
Shuts down and exits the agent.
F2
Cycles the logging level among Normal, Ve r b os e , and Diagnostic. Normal displays initial statistics,
user logins, warnings, and errors; Ver b os e displays Normal logging plus user requests; and
Diagnostic displays Ve r b o se logging plus thread information. The default is Normal logging. Use
Ve r bo s e only if you are troubleshooting a problem with WebAccess.
The verbose and diagnostic logging levels do not degrade WebAccess Agent performance, but log
files saved to disk consume more disk space when verbose or diagnostic logging is in use.
Any changes you make to the logging level using F2 apply only to the current session. When you
restart the WebAccess Agent, the logging level is reset to the level specified in ConsoleOne or in the
startup file (strtweb.bat).
56.1.2 Using the WebAccess Agent Web Console
novdocx (en) 11 December 2007
You can use a Web browser interface, referred to as the Web console, to monitor the WebAccess
Agent.
Figure 56-4 WebAccess Agent Web Console
Through the Web console you can view the following information:
Status: Displays how long the WebAccess Agent has been up; the number of client/server
users who have logged in, the number of threads dedicated to handling requests, and the
number of successful and failed requests; and the amount of memory on the server and the
percent of processor utilization.
Configuration: Displays the gateway home directory being used by the WebAccess Agent, the
current log settings, the performance settings (processing threads and maximum users), and the
client/server settings (IP address, TCP port, and so forth).
Environment: Displays server information such as name, operating system date, memory,
processor utilization, and loaded modules.
Log Files: Lets you view the contents of the WebAccess Agent’s log files and the current log
settings.
For detailed information about each field on the Status, Configuration, Environment, or Log Files
page, select the page, then click Help.
Monitoring WebAccess Operations 929
Page 78

You cannot use the Web console to change any of the WebAccess Agent’s settings. Changes must be
made through ConsoleOne, the WebAccess Agent console, or the startup file.
Refer to the following sections for information about enabling and using the Web console:
“Enabling the WebAccess Agent Web Console” on page 930
“Viewing the WebAccess Agent Web Console” on page 931
Enabling the WebAccess Agent Web Console
The default HTTP port for the WebAccess Agent Web console is established during WebAccess
Agent installation. You can change the port number and increase security after installation in
ConsoleOne.
1 In ConsoleOne, right-click the WebAccess Agent object, then click Properties.
2 Click GroupWise > Network Address to display the Network Address page.
novdocx (en) 11 December 2007
3 In the HTTP Port field, specify a port number. We recommend that you use port 7211 if it is not
already in use on the WebAccess Agent’s server.
Assigning a port number enables the Web console; assigning 0 as the port number disables the
Web console.
Any user who knows the WebAccess Agent’s IP address (or hostname) and the HTTP port
number can use the Web console. If you want to restrict Web console access, you can assign a
username and password. To do so:
4 Click the GroupWise tab, then click Optional Gateway Settings to display the Optional
Gateway Settings page.
930 GroupWise 7 Administration Guide
Page 79

5 In the HTTP User Name field, enter an arbitrary username (for example, webcon).
6 Click Set Password to assign a password (for example, monitor).
novdocx (en) 11 December 2007
7 Click OK to save your changes.
Viewing the WebAccess Agent Web Console
1 In a Web browser, enter the following:
http://IP_address:agent_port
or
https://IP_address:agent_port
where IP_address is the IP address of the server where the WebAccess Agent is running, and
agent_port is the port number assigned to the agent. If you used the default port during
installation, the port number is 7211.
2 If prompted, enter the Web console username and password.
3 Select Status, Configuration, Environment, or Log Files to view the desired information.
For detailed information about each field on the Status, Configuration, Environment, or Log
Files page, select the page, then click Help.
Monitoring WebAccess Operations 931
Page 80

56.1.3 Using Novell Remote Manager
If the WebAccess Agent is running on NetWare 6.5 or on Novell Open Enterprise Server (OES), you
can use the IP Address Management feature in Novell Remote Manager (Manage Server > IP
Address Management) to view the IP address and port configuration for the WebAccess Agent. This
is also true for other GroupWise agents (MTA, POA, and Internet Agent) running on NetWare 6.5/
OES servers.
IMPORTANT: If the WebAccess Agent is running on NetWare in protected mode, it does not
display in Novell Remote Manager.
You access Novell Remote Manager by entering the following URL in a Web browser:
http://server_address:8008
For example:
http://172.16.5.18:8008
For more information about using Novell Remote Manager, see the NetWare 6.5 documentation
(http://www.novell.com/documentation/nw65) and the Novell Open Enterprise Server
Documentation Web site (http://www.novell.com/documentation/oes).
novdocx (en) 11 December 2007
56.1.4 Using an SNMP Management Console
The WebAccess Agent can be monitored through an SNMP management console, such as the one
provide with Novell
Before you can monitor the WebAccess Agent through an SNMP management console, you must
compile the WebAccess Agent’s MIB (Management Information Base) file. The Internet Agent’s
MIB file, named gwweb.mib, is located in the agents\snmp directory on the GroupWise 7
Administrator CD or in the GroupWise software distribution directory.
The MIB file contains all the Trap, Set, and Get variables used for communication between the
WebAccess Agent and management console. The Trap variables provide warnings that point to
current and potential problems. The Set variables allow you to configure portions of the application
while it is still running. The Get variables display the current status of different processes of the
application.
To compile the MIB file:
1 Copy the WebAccess Agent MIB (gwweb.mib) to the SNMP management console’s MIB
directory.
2 Compile the MIB file.
3 Create a profile that uses the WebAccess Agent MIB, then select that profile.
®
ZENworks® Server Management.
56.1.5 Assigning Operators to Receive Warning and Error Messages
You can select GroupWise users to receive warning and error messages issued by the WebAccess
Agent. Whenever the agent issues a warning or error, these users, called operators, receive a
message in their mailboxes. You can specify one or more operators.
To assign an operator:
932 GroupWise 7 Administration Guide
Page 81

1 In ConsoleOne, right-click the WebAccess Agent object, then click Properties.
2 Click GroupWise > Gateway Administrators to display the Gateway Administrators page.
novdocx (en) 11 December 2007
3 Click Add, select a user, then click OK to add the user to the Gateway Administrators list.
4 Make sure Operator is selected as the Administrator Role.
5 If desired, add additional operators.
6 Click OK.
56.1.6 Using WebAccess Agent Error Message Documentation
WebAccess Agent error messages are documented with the source and explanation of the error,
possible causes of the error, and actions to take to resolve the error. See “WebAccess Agent Error
Messages” in GroupWise 7 Troubleshooting 1: Error Messages.
Monitoring WebAccess Operations 933
Page 82

56.1.7 Employing WebAccess Agent Troubleshooting Techniques
If you are having a problem with the WebAccess Agent but not receiving a specific error message,
or if the suggested actions for the specific error did not resolve the problem, you can review more
general troubleshooting strategies for dealing with WebAccess Agent problems. See “Strategies for
Agent Problems” in GroupWise 7 Troubleshooting 2: Solutions to Common Problems.
56.2 Monitoring the WebAccess Application
The WebAccess Application includes a Web console, similar to the WebAccess Agent’s Web
console, that you can use to monitor it. The Web console lets you see information about logged in
users, such as their IP address, their GroupWise and Web browser versions, and the WebAccess
Agent providing mailbox access. In addition, you can view the WebAccess Application’s log files
and configuration files, and view Java information such as the version and classpath settings.
The following sections provide information to help you use the Web console:
Section 56.2.1, “Enabling the WebAccess Application Web Console,” on page 934
novdocx (en) 11 December 2007
Section 56.2.2, “Using the WebAccess Application Web Console,” on page 935
56.2.1 Enabling the WebAccess Application Web Console
1 Edit the webacc.cfg file, located in the WebAccess Application’s home directory, which
varies by platform.
NetWare
and
Windows:
Linux: /opt/novell/groupwise/webaccess/users
2 Locate the following lines in the file:
Admin.WebConsole.enable=false
Admin.WebConsole.username=admin
Admin.WebConsole.password=admin
3 Enable the Web console by changing the FALSE entry to TRUE:
Admin.WebConsole.enable=true
4 If desired, change the default username and password. A username and password is required.
5 Save the file.
6 Restart Tomcat.
novell\webaccess\users on the Web server
NetWare: java -exit
tomcat4
Linux: /etc/init.d/novell-tomcat restart
Windows: Restart the Tomcat service
934 GroupWise 7 Administration Guide
Page 83

56.2.2 Using the WebAccess Application Web Console
1 In a Web browser, enter the following URL:
http://server_address/gw/webacc?action=Admin.Open
where server_address is the Web server’s IP address or DNS hostname.
2 When prompted, enter the username and password.
The Web console is displayed.
novdocx (en) 11 December 2007
56.3 Monitoring the Document Viewer Agent
Like the WebAccess Agent, the Document Viewer Agent has a server console and a Web console
Section 56.3.1, “Using the Document Viewer Agent Server Console,” on page 935
Section 56.3.2, “Using the Document Viewer Agent Web Console,” on page 935
56.3.1 Using the Document Viewer Agent Server Console
The Document Viewer Agent server console functions just like the WebAccess Agent server
console. For more information, see Section 56.1.1, “Using the WebAccess Agent Server Console,”
on page 925.
56.3.2 Using the Document Viewer Agent Web Console
Like the WebAccess Agent, the Document Viewer Agent also has a Web console.
“Enabling the Document Viewer Agent Web Console” on page 935
“Viewing the Document Viewer Agent Web Console” on page 936
Enabling the Document Viewer Agent Web Console
Because the Document Viewer Agent is currently configured using switches in its startup file, you
must activate the switches that pertain to its Web console.
1 Use an ASCII text editor to edit the Document Viewer Agent startup file (gwdva.dva).
The default location of the startup file depends on the platform where the Document Viewer
Agent is running:
NetWare: sys:\system
Monitoring WebAccess Operations 935
Page 84

Linux: /opt/novell/groupwise/agents/share
Windows: c:\webacc
2 Scroll down to the HTTP monitoring section.
3 Remove the comment character (;) from the /http startup switch to enable HTTP for the
Document Viewer Agent.
4 If the default HTTP port of 7439 is already in use on the server, remove the comment marker
from the /httpport switch and provide a unique port number.
5 If you want to secure the Document Viewer Agent Web console by requiring a username and
password to access it, remove the comment characters from the /httpuser and /httppw switches,
then provide a username and password.
6 Save the gwdva.dva file, then exit the text editor.
7 Restart the WebAccess Agent to put the new settings into effect.
Each time you update the WebAccess software, the existing gwdva.dva file is backed up as
gwdva.nnn. Therefore, after updating the WebAccess software, you need to rename the modified
gwdva.nnn file back to gwdva.dva or repeat the editing changes in the updated gwdva.dva
file.
novdocx (en) 11 December 2007
Viewing the Document Viewer Agent Web Console
1 In a Web browser, enter the following URL:
http://server_address:port_number
where server_address is the Web server’s IP address or DNS hostname and port_number is
7439 or whatever port number you have specified in the Viewer Agent startup file.
2 If you provided a username and password in the startup file, enter the username and password
when prompted.
The Web console is displayed.
936 GroupWise 7 Administration Guide
Page 85

Through the Web console you can view the following information:
Status: Displays how long the Document Viewer Agent has been up, the number of worker
threads it has started, the current server utilization, and statistics about the files the worker
threads have processed.
Configuration: Displays the current settings of all the options that you can set in the Viewer
Agent startup file (gwdva.dva). For more information, see Section 54.8, “Configuring the
Document Viewer Agent,” on page 909.
Environment: Displays server information such as name, operating system date, memory,
processor utilization, and loaded modules.
Log Files: Lets you view the contents of the Viewer Agent’s log files and the current log
settings. For more information, see Section 56.4.3, “Controlling Document Viewer Agent
Logging,” on page 943.
Problem Files: Indicates whether a list of problem files is being generated, and if so, what files
have failed the conversion process. For more information, see Section 54.8.4, “Document
Cache,” on page 911.
Quarantine Files: Indicates whether the document quarantine is enabled, and if so, what files
have been quarantined. For more information, see Section 54.8.3, “Document Quarantine,” on
page 911
novdocx (en) 11 December 2007
For detailed information about each field on the Status, Configuration, Environment, Log Files,
Problem Files, or Quarantine Files page, select the page, then click Help.
You cannot use the Web console to change any of the Viewer Agent’s settings. Changes must be
made through the Viewer Agent startup file.
56.4 Using WebAccess Log Files
Error messages and other information about WebAccess functioning are written to log files as well
as displaying on the WebAccess server console. Log files can provide a wealth of information for
resolving problems with WebAccess functioning or message flow. This section covers the following
subjects to help you get the most from WebAccess log files:
Section 56.4.1, “Controlling WebAccess Agent Logging,” on page 937
Section 56.4.2, “Controlling WebAccess Application Logging,” on page 941
Section 56.4.3, “Controlling Document Viewer Agent Logging,” on page 943
Section 56.4.4, “Viewing WebAccess Log Files,” on page 943
Section 56.4.5, “Interpreting WebAccess Log File Information,” on page 944
56.4.1 Controlling WebAccess Agent Logging
The WebAccess Agent provides logging options to help you monitor the operation of the agent. The
WebAccess Agent logs information to the console and to a log file on disk (by default, disk logging
is turned off). You can control the following logging features:
The type of information to log.
Whether disk logging is on or off.
How long to retain log files.
Monitoring WebAccess Operations 937
Page 86

The maximum amount of disk space to use for log files.
Where to store log files.
You can control logging through ConsoleOne, WebAccess Agent startup switches, and the
WebAccess Agent console. The following table shows which logging options you can control from
each location.
Table 56-1 Logging Options
novdocx (en) 11 December 2007
ConsoleOne
Logging Level
Disk Logging Yes Yes Yes No No
Maximum Log File Age Yes Yes Yes No No
Maximum Disk Space Yes Yes Yes No No
Log File Location Yes Yes No No Yes
Yes Yes Yes No Yes
Startup
Switches
NetWare
Console
Linux
Console
Windows
Console
The log settings in ConsoleOne are used as the default settings. Startup switches override the
ConsoleOne log settings, and agent console settings override startup switches and ConsoleOne
settings for the current agent session.
Whether or not logging is turned on by default varies by platform:
NetWare
and
Windows:
Linux: Off by default
On by default
When logging is turned on, the WebAccess Agent creates a new log file each day and each time it is
started. The log file is named mmddweb.nnn, where mm is the month, dd is the day, and nnn is a
sequenced number (001 for the first log file of the day, 002 for the second, and so forth).
Where WebAccess Agent log files are located by default varies by platform:
NetWare
and
Windows:
Linux:
domain\wpgate\webac70a\000.prc
/var/log/novell/groupwise/domain_name.gateway_name/000.prc
For information about modifying log settings, see the following sections:
“Modifying WebAccess Agent Log Settings in ConsoleOne” on page 939
“Modifying WebAccess Agent Log Settings through Startup Switches” on page 940
“Modifying WebAccess Agent Log Settings through the WebAccess Agent Server Console” on
page 940
938 GroupWise 7 Administration Guide
Page 87

Modifying WebAccess Agent Log Settings in ConsoleOne
To modify log settings in ConsoleOne:
1 In ConsoleOne, right-click the WebAccess Agent object, then click Properties.
2 Click GroupWise > Log Settings to display the Log Settings page.
novdocx (en) 11 December 2007
3 Modify any of the following properties:
Log File Path: By default, this field is empty. If you have turned on disk logging by using the /
logdiskon startup switch (see Section , “Modifying WebAccess Agent Log Settings through
Startup Switches,” on page 940), the log files are saved to the default directory or to the
directory specified by the /log startup switch. If you want to specify a different location, enter
the directory path or browse to and select the directory.
If you have not used the /logdiskon startup switch to turn on logging, specifying a log file path
activates disk logging (after you restart the WebAccess Agent).
Logging Level: There are four logging levels: Off, Normal, Ver b os e , and Diagnostic. Off turns
logging off; Normal displays initial statistics, user logins, warnings, and errors; Ve rb os e
displays normal logging plus user requests; and Diagnostic displays Ve r b os e logging plus
thread information. The default is Normal logging. Use Diagnostic only if you are
troubleshooting a problem with WebAccess.
The verbose and diagnostic logging levels do not degrade WebAccess Agent performance, but
log files saved to disk consume more disk space when verbose or diagnostic logging is in use.
Max Log File Age: Specify the number of days you want the WebAccess Agent to retain old
log files. The WebAccess Agent retains the log file for the specified number of days unless the
maximum disk space for the log files is exceeded. The default age is 7 days.
Max Log Disk Space: Specify the maximum amount of disk space you want to use for log
files. If the disk space limit is exceeded, the WebAccess Agent deletes log files, beginning with
the oldest file, until the limit is no longer exceeded. The default disk space is 65536 KB.
4 Click OK to save the log settings.
Monitoring WebAccess Operations 939
Page 88

Modifying WebAccess Agent Log Settings through Startup Switches
Startup switches override any log settings you specified through ConsoleOne. See “Modifying
WebAccess Agent Log Settings in ConsoleOne” on page 939.
For information about startup switches that can be used to modify log settings, see Section 57,
“Using WebAccess Startup Switches,” on page 945.
Modifying WebAccess Agent Log Settings through the WebAccess Agent Server
Console
“Modifying Log Settings through the NetWare Agent Server Console” on page 940
“Modifying Log Settings through the Windows WebAccess Agent Server Console” on
page 940
“Modifying Log Settings through the Linux WebAccess Agent Server Console” on page 940
Modifying Log Settings through the NetWare Agent Server Console
You can use the NetWare WebAccess Agent server console to modify the following log settings:
novdocx (en) 11 December 2007
Changes you make to log settings at the console apply only to the current session. When you restart
the WebAccess Agent, the log settings are reset to the settings specified in ConsoleOne or the startup
switches. See “Modifying WebAccess Agent Log Settings in ConsoleOne” on page 939 and
“Modifying WebAccess Agent Log Settings through Startup Switches” on page 940.
To modify the log settings:
1 At the NetWare WebAccess Agent’s server console, press F10, select Logging Options, then set
the log settings as needed:
2 Press Esc to save the information.
Modifying Log Settings through the Windows WebAccess Agent Server Console
You can use the Windows WebAccess Agent’s console to modify the logging level. All other log
settings must be modified through ConsoleOne or startup switches. See “Modifying WebAccess
Agent Log Settings in ConsoleOne” on page 939 and “Modifying WebAccess Agent Log Settings
through Startup Switches” on page 940.
Changes you make to the log level at the console apply only to the current session. When you restart
the WebAccess Agent, the log level is reset to the level specified in ConsoleOne or the startup
switches.
To modify the logging level:
1 In the NetWare WebAccess Agent’s console (the DOS window), press F2 to cycle the log level
between Normal, Verbose, and Diagnostic. Each level is described below:
Modifying Log Settings through the Linux WebAccess Agent Server Console
On Linux, the WebAccess Agent server console does not include functionality to change log
settings. These settings must be modified through ConsoleOne, as described in “Modifying
WebAccess Agent Log Settings in ConsoleOne” on page 939 or in the startup file, as described in
“Modifying WebAccess Agent Log Settings through Startup Switches” on page 940.
940 GroupWise 7 Administration Guide
Page 89

56.4.2 Controlling WebAccess Application Logging
The following WebAccess applications (Web server servlets) create log files that are configured by
editing the Log Settings property page of their objects in ConsoleOne:
WebAccess Application (GroupWiseWebAccess object)
WebPublisher Application (GroupWiseWebPublisher object)
Novell Speller Application (NovellSpeller object
The WebAccess applications log information to log files on disk. You can control the following
logging features:
Where to store log files
The amount of information to log
How long to retain log files (not applicable to the Speller Application)
The maximum amount of disk space to use for log files (not applicable to the Speller
Application)
The language you want the log files written in
The format you want time information written in (not applicable to the Speller Application)
novdocx (en) 11 December 2007
When logging is turned on, the WebAccess applications create a new log file each day and each time
it is restarted (as part of the Web server startup).
WebAccess Application: mmddwas.nnn
WebPublisher Application: mmddwps.nnn
Speller Application: spellchk.log
In the log filenames, mm is the month, dd is the year, and nnn is a sequenced log file number (001
for the first log file of the day, 002 for the second, and so forth). WebAccess application log files are
stored in platform-specific directories that are not the same as where the WebAccess Agent log files
are stored.
NetWare
and
Windows:
Linux: /opt/novell/groupwise/webaccess/logs
novell\webaccess\logs on the Web server
To modify the application log settings:
1 In ConsoleOne, browse to and select the Domain object where the application object is located.
2 Right-click the application object (GroupWiseWebAccess, GroupWiseWebPublisher, or
NovellSpeller), then click Properties.
3 Click Application > Log Settings to display the Log Settings page.
Monitoring WebAccess Operations 941
Page 90

The Log Settings pages for the WebAccess Application and the WebPublisher Application are
the same. The Log Settings page for the Speller Application does not include some of the fields
shown above.
novdocx (en) 11 December 2007
4 Modify any of the following properties:
Log File Path: Specify the path to the directory where you want to store the log files.
Maximum Log File Age: Specify the number of days you want to retain the log files. The
WebAccess application retains the log file for the specified number of days unless the
maximum disk space for the log files is exceeded. The default age is 7 days. (Not applicable to
the Speller Application.)
Maximum Log Disk Space: Specify the maximum amount of disk space you want to use for
application log files. If the disk space limit is exceeded, the WebAccess application deletes log
files, beginning with the oldest file, until the limit is no longer exceeded. The default disk space
is 65536 KB. (Not applicable to the Speller Application.)
Logging Level: There are four logging levels: None, Normal, Ve r b os e , and Diagnostic. None
turns logging off; Normal displays warnings and errors; Ve r b o se displays Normal logging plus
information messages and user requests; and Diagnostic displays all possible information. The
default is Normal logging. Use Diagnostic only if you are troubleshooting a problem with
WebAccess. The verbose and diagnostic logging levels do not degrade application
performance, but log files saved to disk consume more disk space when verbose or diagnostic
logging is in use.
Log Language: Select the language in which you want information written to the log files. The
list contains many languages, some of which the WebAccess application might not support. If
you select an unsupported language, the information is written in English.
Log Time Format: Choose from the following formats to use when the WebAccess
application records dates and times in the log files: HH:mm:ss:SS, MM/dd: H:mm:ss.SS,
or dd/MM: H:mm:ss.SS. H and HH represent hours, mm represents minutes, ss and SS
represent seconds, MM represents months, and dd represents days. (Not applicable to the
Speller Application.)
5 Click OK to save the log settings.
942 GroupWise 7 Administration Guide
Page 91

56.4.3 Controlling Document Viewer Agent Logging
The Document Viewer Agent also creates log files. Logging is enabled by default. The default
location where log files are created varies by platform:
NetWare: sys:\system\gwdva.dir\log
Linux: /var/log/novell/groupwise/gwdva
Windows: c:\webacc\gwdva.dir\log
Because the Document Viewer Agent is currently configured using switches in its startup file, you
must activate the switches in order to change how logging is performed.
1 Use an ASCII text editor to edit the Document Viewer Agent startup file (gwdva.dva).
The default location of the startup file depends on the platform where the Document Viewer
Agent is running:
NetWare: sys:\system
novdocx (en) 11 December 2007
Linux: /opt/novell/groupwise/agents/share
Windows: c:\webacc
2 Scroll down to the log switches section.
3 Remove the comment character (;) from the /loglevel startup switch, then set the log level as
needed.
4 If you want to change the location where the Document Viewer Agent stores log files, remove
the comment marker from the /log switch, then provide a the full path to the desired location.
5 If you want to change the length of time log files are stored from its default of 7 days, remove
the comment characters from the /logdays switch, then specify the number of days to store log
files.
6 If you want to change the maximum size for log files, remove the comment characters from the
/logmax switch, then specify the maximum size in kilobytes for each log file.
7 Save the gwdva.dva file, then exit the text editor.
8 Restart the WebAccess Agent to put the new settings into effect.
56.4.4 Viewing WebAccess Log Files
You can view the log file for the current WebAccess Agent session, or you can view archived log
files. The current WebAccess Agent log file is viewable through the NetWare WebAccess Agent
console, as described in “NetWare: Using the WebAccess Agent Server Console” on page 925 (but it
is not available at the server console on Linux or Windows), or in the WebAccess Agent Web
console for all platforms, as described in Section 56.1.2, “Using the WebAccess Agent Web
Console,” on page 929. Archived WebAccess Agent log files are viewable through the Web consoles
or an ASCII text editor.
The WebAccess Application log files can be viewed through the WebAccess Application Web
console, as described in Section 56.2.2, “Using the WebAccess Application Web Console,” on
page 935. The other application log files can be viewed through ASCII text editors.
Monitoring WebAccess Operations 943
Page 92

The Document Viewer Agent log files can be viewed through the Document Viewer Web console, as
described in “Viewing the Document Viewer Agent Web Console” on page 936.
56.4.5 Interpreting WebAccess Log File Information
On startup, the WebAccess records the WebAccess settings currently in effect. Thereafter, it logs
events that take place, including errors. To look up error messages that appear in WebAccess log
files, see “WebAccess Agent Error Messages” in GroupWise 7 Troubleshooting 1: Error Messages.
novdocx (en) 11 December 2007
944 GroupWise 7 Administration Guide
Page 93

57
Using WebAccess Startup
novdocx (en) 11 December 2007
Switches
Section 57.1, “WebAccess Agent Startup Switches,” on page 945
Section 57.2, “Document Viewer Agent Startup Switches,” on page 953
57.1 WebAccess Agent Startup Switches
You can use the switches listed below when starting the GroupWise® WebAccess Agent. The
switches override any configuration settings you specified through ConsoleOne
During installation of the WebAccess Agent, the Installation program creates a default startup file,
agent_name.waa, where agent_name is the name assigned to the WebAccess Agent (for
example, webac70a.waa). The location of the startup file varies by platform.
NetWare: sys:system\gwinter @webac70a.waa
Linux: /opt/novell/groupwise/agents/share/webac70a.waa
Windows: c:\webacc\webac70a.waa
®
.
57
The startup file is referenced from platform-specific files that are used to start the WebAccess
Agent. You can also add startup switches to these platform-specific files.
NetWare: sys:\system\strtweb.ncf
Linux: /etc/init.d/grpwise-wa
Windows: c:\webacc\strtweb.bat
The table below summarizes WebAccess Agent startup switches for all platforms and how they
correspond to configuration settings in ConsoleOne.
Switch starts with: a b c d e f g h i j k l m n o p q r s t u v w x y z
NetWare WebAccess
Agent
@filename @filename @filename N/A
/cluster N/A N/A N/A
/help --help /help N/A
/home --home /home N/A
/http --http /http N/A
Linux WebAccess
Agent
Windows WebAccess
Agent
ConsoleOne Settings
Using WebAccess Startup Switches
945
Page 94

novdocx (en) 11 December 2007
NetWare WebAccess
Agent
/httppassword --httppassword /httppassword GroupWise > Optional Gateway
/httpport --httpport /httpport GroupWise > Network Address >
/httpuser --httpuser /httpuser GroupWise > Optional Gateway
/ip --ip /ip GroupWise > Network Address
/log --log /log GroupWise > Log Files > Log File
/logdays --logdays /logdays GroupWise > Log Files > Max Log
/logdiskon --logdiskon /logdiskon N/A
/loglevel --loglevel /loglevel GroupWise > Log Settings > Logging
/logmax --logmax /logmax GroupWise > Log Settings > Max
/maxusers --maxusers /maxusers N/A
Linux WebAccess
Agent
Windows WebAccess
Agent
ConsoleOne Settings
Settings > HTTP Password
HTTP Port
Settings > HTTP User Name
Path
File Age
Level
Log Disk Space
/password N/A N/A N/A
/port --port /port GroupWise > Network Address
N/A --show N/A N/A
/threads --threads /threads WebAccess > Settings > Maximum
Threads
/user N/A N/A N/A
/work --work /work
57.1.1 @filename
Specifies a startup file to use. You can add any of the WebAccess Agent startup switches to the
startup file and then reference the file when starting the WebAccess Agent. For example:
NetWare: load sys:system\gwinter @webac70a.waa
Linux: /opt/novell/groupwise/agents/bin/gwinter @webac70a.waa
Windows: c:\webacc\gwinter.exe @webac70a.waa
During installation of the WebAccess Agent, the Installation program creates a default startup file,
agent_name.waa, where agent_name is the name assigned to the WebAccess Agent object (for
example, webac70a.waa). The default startup file is created in the following platform-specific
locations:
946 GroupWise 7 Administration Guide
Page 95

NetWare: sys:\system
Linux: /opt/novell/groupwise/agents/share
Windows: c:\webacc
The startup file is referenced from the batch files or scripts so that you do not need to specify the
startup file when you start the WebAccess Agent.
NetWare: strtweb.ncf
Linux: grpwise-wa
Windows: strtweb.bat
novdocx (en) 11 December 2007
NetWare WebAccess Agent
Syntax: @[vol:][\dir\]file
@\\svr\vol\dir\file
Example: load gwinter @webac70a.waa
load gwinter @sys:\agt\webac70a.waa
load gwinter @\\s2\sys\agt\webac70a.
waa
Linux WebAccess
Agent
@[/dir/]file @[drive:][\dir\]file
./gwinter
@webac70a.waa
Windows WebAccess Agent
@\\svr\sharename\dir\file
gwinter.exe @webac70a.waa
gwinter.exe @d:\agt\webac70
a.waa
gwinter.exe @\\s2\c\agt\weba
c70a.waa
57.1.2 /cluster
Enables the WebAccess Agent to run in a clustered environment (using Novell® Cluster ServicesTM).
See “Implementing WebAccess in a NetWare Cluster” in “Novell Cluster Services on NetWare” in
the GroupWise 7 Interoperability Guide.
®
If you are running the NetWare
Cluster Services, the WebAccess Agent can detect the cluster automatically.
NetWare WebAccess Agent Linux WebAccess Agent Windows WebAccess Agent
Syntax: /cluster N/A N/A
WebAccess Agent on the latest version of NetWare 6.x and Novell
57.1.3 /help
Displays a listing and description of the startup switches. When this switch is used, the WebAccess
Agent does not start.
NetWare WebAccess Agent Linux WebAccess Agent Windows WebAccess Agent
Syntax: /help or /? --help /help or /?
Example: load gwinter /help ./gwinter --help gwinter.exe /help
Using WebAccess Startup Switches 947
Page 96

57.1.4 /home (Required)
Specifies the path to the WebAccess Agent’s gateway directory under the domain directory. If you
use the default WebAccess Agent gateway directory name, the path is
x:\domain\wpgate\webac70a. This switch is required.
NetWare WebAccess Agent Linux WebAccess Agent Windows WebAccess Agent
novdocx (en) 11 December 2007
Syntax: /home-[svr\][vol:]\dir
/home-\\svr\vol\dir
Example: /home-\provo1
/home-mail:\provo1
/home-server2\mail:\provo1
/home-\\server2\mail\provo1
--home /dir /home-[drive:]\dir
/home-\\svr\sharename\dir
--home /gwsystem/provo1 /home-\provo1
/home-m:\provo1
/home-\\server2\c\provo1
57.1.5 /http
If the WebAccess Agent’s Web console is disabled in ConsoleOne, this switch enables the Web
console. See “Enabling the WebAccess Agent Web Console” on page 930.
NetWare WebAccess Linux WebAccess Windows WebAccess
Syntax: /http --http /http
See also /httppassword, /httpport, and /httpuser.
57.1.6 /httppassword
Specifies the password that must be entered when logging in to the WebAccess Agent’s Web
console. See “Enabling the WebAccess Agent Web Console” on page 930.
NetWare WebAccess Agent Linux WebAccess Agent Windows WebAccess Agent
Syntax: /httppassword-
unique_password
Exampl
e:
/httppassword-AgentWatch --httppassword AgentWatch /httppassword-AgentWatch
See also /http, /httpport, and /httpuser.
57.1.7 /httpport
Sets the HTTP port number used for the WebAccess Agent to communicate with your Web browser.
The default is 7211; the setting must be unique. See “Using the WebAccess Agent Web Console” on
page 929.
NetWare WebAccess Agent Linux WebAccess Agent Windows WebAccess Agent
Syntax: /httpport-port_number --httpport port_number /httpport-port_number
948 GroupWise 7 Administration Guide
--httppassword
unique_password
/httppassword-
unique_password
Page 97

NetWare WebAccess Agent Linux WebAccess Agent Windows WebAccess Agent
Example: /httpport-7212 --httpport 7213 /httpport-7214
See also /http, /httppassword, and /httpuser.
57.1.8 /httpuser
Specifies the username that must be entered when logging in to the WebAccess Agent’s Web
console. See “Enabling the WebAccess Agent Web Console” on page 930.
NetWare WebAccess Agent Linux WebAccess Agent Windows WebAccess Agent
Syntax: /httpuser-unique_name --httprefresh unique_name /httprefresh-unique_name
Example: /httpuser-GWWebCon --httpuser GWWebCon /httpuser-GWWebCon
See also /http, /httpport, and /httppassword.
novdocx (en) 11 December 2007
57.1.9 /ip
Specifies the IP address of the WebAccess Agent’s server.
NetWare WebAccess Agent Linux WebAccess Agent Windows WebAccess Agent
Syntax: /ip-IP_address
/ip-”full_DNS_name”
Example: /ip-172.16.5.18
/ip-
”webacsvr.provo.novell.com
”
--ip IP_address
--ip ”full_DNS_name”
--ip 172.16.5.18
--ip
”webacsvr.provo.novell.co
m”
/ip-IP_address
/ip-”full_DNS_name”
/ip-172.16.5.18
/ip-
”webacsvr.provo.novell.co
m”
57.1.10 /log
Specifies the path to the log file directory. The default location varies by platform.
NetWare: domain\wpgate\webac70a\000.prc
Linux:
Windows: domain\wpgate\webac70a\000.prc
/var/log/novell/groupwise/domain.gateway/000.prc
For more information about the WebAccess Agent’s logging, see Section 56.4.1, “Controlling
WebAccess Agent Logging,” on page 937.
NetWare WebAccess Agent Linux WebAccess Agent Windows WebAccess Agent
Syntax: /log-[svr\][vol:]\dir
/log-\\svr\vol\dir
--log /dir /log-[drive:]\dir
/log-\\svr\sharename\dir
Using WebAccess Startup Switches 949
Page 98

NetWare WebAccess Agent Linux WebAccess Agent Windows WebAccess Agent
novdocx (en) 11 December 2007
Example: /log-\agt\log
/log-\\server2\mail:\agt\log
/log-\\server2\mail\agt\log
--log /gwsystem/logs /log-\agt\log
/log-m:\agt\log
/log-\\server2\c\mail\agt\log
Log files are named mmdd.nnn, where mm is the month, dd is the day, and nnn is a sequenced
number starting with 001. For example, the first log file used on March 28 is named 0328.001,
and the second log file used is named 0328.002.
See also /logdays, /logdiskon, /loglevel, and /logmax
57.1.11 /logdays
Specifies the maximum number of days to keep log files. This setting works in combination with the
/logmax setting. Log files are deleted when the maximum number of days or disk space size is
reached, whichever comes first. The default is 7 days.
For more information about the WebAccess Agent’s logging, see Section 56.4.1, “Controlling
WebAccess Agent Logging,” on page 937.
NetWare WebAccess Agent Linux WebAccess Agent Windows WebAccess Agent
Syntax: /logdays-days --logdays days /logdays-days
Example: /logdays-5 --logdays 10 /logdays-14
See also /log, /logdiskon, /loglevel, and /logmax
57.1.12 /logdiskon
Turns disk logging on. By default, the log file is not written to disk on NetWare and Windows. On
Linux, the log file is written to disk by default.
For more information about the WebAccess Agent’s logging, see Section 56.4.1, “Controlling
WebAccess Agent Logging,” on page 937.
NetWare WebAccess
Agent
Syntax: /logdiskon --logdiskon /logdiskon
Linux WebAccess Agent Windows WebAccess Agent
See also /log, /logdays, /loglevel, and /logmax
57.1.13 /loglevel
Specifies the level of information to write to the screen and to disk. There are three levels: Normal,
Ve r bo s e , and Diagnostic. The default level is Normal. You can use Ve rb o se to receive more
information. You should use Diagnostic only if you are having problems with the WebAccess
Agent. The verbose and diagnostic logging levels do not degrade Internet Agent performance, but
log files saved to disk consume more disk space when verbose or diagnostic logging is in use.
950 GroupWise 7 Administration Guide
Page 99

For more information about the logging levels, see Section 56.4.1, “Controlling WebAccess Agent
Logging,” on page 937.
novdocx (en) 11 December 2007
NetWare WebAccess
Agent
Syntax: /loglevel-level --loglevel level /loglevel-level
Example: /loglevel-verbose --loglevel verbose /loglevel-verbose
Linux WebAccess Agent Windows WebAccess Agent
See also /log, /logdays, /logdiskon, and /logmax
57.1.14 /logmax
Specifies the maximum disk space to use for logging. This setting works in combination with the /
logdays setting. Log files are deleted when the maximum disk space or number of days is reached,
whichever comes first. The default is 65536 KB.
For more information about the WebAccess Agent’s logging, see Section 56.4.1, “Controlling
WebAccess Agent Logging,” on page 937.
NetWare WebAccess Agent Linux WebAccess Agent Windows WebAccess Agent
Syntax: /logmax-kilobytes --logmax kilobytes /logmax-kilobytes
Example: /logmax-32000 --logmax 130000 /logmax-16000
See also /log, /logdays, /logdiskon, and /loglevel
57.1.15 /maxusers
Specifies the maximum number of users that the WebAccess Agent allows to log in at one time. The
default is 250.
NetWare WebAccess Agent Linux WebAccess Agent Windows WebAccess Agent
Syntax: /maxusers-number_of_users --maxusers number_of_users /maxusers-number_of_users
Example: /maxusers-300 --maxusers 400 /maxusers-500
57.1.16 /password
Used by the NetWare WebAccess Agent only. Specifies the Novell eDirectoryTM password to use to
access the network servers where the GroupWise domain directory and post office directories reside.
NetWare WebAccess Agent Linux WebAccess Agent Windows WebAccess Agent
Syntax: /password-NetWare_password N/A N/A
Example: /password-GWise N/A N/A
See also /user.
Using WebAccess Startup Switches 951
Page 100

57.1.17 /port-number
Specifies the port number the WebAccess Agent listens to. The default is 7205. See Section 54.1.5,
“Changing the WebAccess Agent’s Network Address or Port Numbers,” on page 877.
NetWare WebAccess Agent Linux WebAccess Agent Windows WebAccess Agent
Syntax: /port-port_number --port port_number /port-port_number
Example: /port-1678 --port 1679 /port-1680
See also /ip.
57.1.18 --show
Used by the Linux WebAccess Agent only. Running the WebAccess Agent with this option disabled
(the default) causes the WebAccess Agent to run as a daemon without a user interface. Enabling this
option causes the logging UI to appear in a terminal window.
novdocx (en) 11 December 2007
NetWare WebAccess Agent Linux WebAccess Agent Windows WebAccess Agent
Syntax: N/A --show N/A
57.1.19 /threads-number
Specifies the number of threads the WebAccess Agent uses to process user requests. The default is
12, which means the WebAccess Agent can process 12 user requests at one time. For more
information, see Section 54.1, “Configuring the WebAccess Agent,” on page 870.
NetWare WebAccess Agent Linux WebAccess Agent Windows WebAccess Agent
Syntax: /threads-number --threads number /threads-number
Example: /threads-15 --threads 20 /threads-30
57.1.20 /user
Used by the NetWare WebAccess Agent only. Specifies the eDirectory username to use to access the
network servers where the GroupWise domain directory and post office directories reside. Must be
used with /password.
NetWare WebAccess Agent Linux WebAccess Agent Windows WebAccess Agent
Syntax: /user-NetWare_user_ID N/A N/A
Example: /user-GWAgents N/A N/A
See also /password.
952 GroupWise 7 Administration Guide
 Loading...