


XI
Internet Agent
Chapter 45, “Configuring Internet Addressing,” on page 703
Chapter 46, “Configuring Internet Services,” on page 717
Chapter 47, “Managing Internet Access,” on page 747
Chapter 48, “Configuring the Internet Agent,” on page 769
Chapter 49, “Monitoring the Internet Agent,” on page 775
Chapter 50, “Optimizing the Internet Agent,” on page 799
Chapter 51, “Connecting GroupWise Systems and Domains Using the Internet Agent,” on
page 805
Chapter 52, “Using Internet Agent Startup Switches,” on page 813
novdocx (en) 11 December 2007
XI
Internet Agent
701

novdocx (en) 11 December 2007
702 GroupWise 7 Administration Guide

45
Configuring Internet Addressing
By default, GroupWise® uses a proprietary address format consisting of a user’s ID, post office, and
domain (userID.post_office.domain). However, when you install the GroupWise Internet Agent,
GroupWise also supports native Internet-style addressing consisting of a username and Internet
domain name (for example, userID@Internet_domain_name).
Internet-style addressing is the preferred addressing format if you are connected to the Internet,
because with Internet-style addressing, users have the same address within the GroupWise system as
they do outside the GroupWise system. For example, if John Smith’s address at Novell
jsmith@novell.com, this address can be used by users within the GroupWise system and users
external to the system.
To set up Internet addressing, you do the following:
Define Internet domain names for your GroupWise system. You can have one or more domain
names (for example, novell.com, gw.novell.com, and support.novell.com).
Set up the default Internet address format for use when displaying user addresses in the
GroupWise Address Book and sent messages. There are six formats that can be assigned at the
system, domain, post office, or user level. In addition, there is a free-form format that can be
used at the user level.
Designate the address formats that can be used to address messages to your GroupWise users.
There are five possible formats to choose from. You can allow all five formats, or only one.
Specify the default Internet Agent to be used when sending messages from your GroupWise
system to the Internet. This becomes your system’s default Internet Agent for outbound
messages sent from all domains; however, if you have multiple Internet Agents, you can
override this setting by assigning Internet Agents at the domain level.
®
is
novdocx (en) 11 December 2007
45
The following sections help you plan and set up Internet addressing:
Section 45.1, “Planning Internet Addressing,” on page 703
Section 45.2, “Setting Up Internet Addressing,” on page 708
Section 45.3, “Transitioning from SMTP Gateway Aliases to Internet Addressing,” on
page 713
45.1 Planning Internet Addressing
The following sections help you prepare to set up Internet-style addressing for your GroupWise
system:
Section 45.1.1, “Internet Agent Requirement,” on page 704
Section 45.1.2, “Internet Agents Used for Outbound Messages,” on page 704
Section 45.1.3, “Internet Domain Names,” on page 704
Section 45.1.4, “Preferred Address Format,” on page 704
Section 45.1.5, “Allowed Address Formats,” on page 707
Section 45.1.6, “Override Options,” on page 707
Configuring Internet Addressing
703

45.1.1 Internet Agent Requirement
Internet addressing requires you to have the GroupWise Internet Agent installed in your GroupWise
system. The Internet Agent connects your GroupWise system to the Internet. To install the Internet
Agent, see “Installing the GroupWise Internet Agent” in the GroupWise 7 Installation Guide.
45.1.2 Internet Agents Used for Outbound Messages
Each domain in your GroupWise system must be assigned an Internet Agent for outbound messages.
A domain’s assigned Internet Agent handles all outbound messages sent by the domain’s users.
If your GroupWise system includes only one Internet Agent, that Internet Agent must be assigned to
all domains and is used for all outbound messages.
If your GroupWise system includes multiple Internet Agents, you must decide which Internet Agent
you want to be responsible for outbound messages for each domain. You must select one Internet
Agent as your system’s default Internet Agent, but you can override the default at each domain.
45.1.3 Internet Domain Names
novdocx (en) 11 December 2007
You must associate at least one Internet domain (novell.com, gw.novell.com, support.novell.com, or
so forth) with your GroupWise system. These Internet domains need to exist in the domain name
service (DNS).
After you have associated Internet domains with your GroupWise system, all users in your system
can be addressed using any of the domains (for example, jsmith@novell.com,
jsmith@gw.novell.com, and jsmith@support.novell.com). The addresses can be used both internally
and externally.
Preferred Internet Domain Name
You must assign each GroupWise user a preferred Internet domain. GroupWise uses the preferred
Internet domain name when constructing the e-mail address that are displayed in the GroupWise
Address Book and in the To field of sent messages.
To make this process easier, GroupWise lets you assign a preferred Internet domain to be used as the
default for your GroupWise system (for example, novell.com). The system’s preferred Internet
domain is applied to all users in your GroupWise system. However, you can override the system’s
preferred Internet domain at the domain, post office, or user level, meaning that different users
within your GroupWise system can be assigned different preferred Internet domains. For example,
users in one domain can be assigned gw.novell.com as their preferred Internet domain while users in
another domain are assigned support.novell.com.
45.1.4 Preferred Address Format
You must choose a preferred address format for your GroupWise users. GroupWise uses the
preferred address format, along with the preferred Internet domain, to construct the e-mail addresses
that are published in the GroupWise Address Book and in the To field of sent messages.
GroupWise supports the following address formats:
userID.post_office.domain@internet_domain_name
704 GroupWise 7 Administration Guide

userID.post_office@internet_domain_name
userID@internet_domain_name
firstname.lastname@internet_domain_name
lastname.firstname@internet_domain_name
firstinital lastname@internet_domain_name
As with the preferred Internet domain, you must assign a preferred address format to be used as the
default for your GroupWise system. The system’s preferred address format is applied to all users in
your GroupWise system. However, you can override the system’s preferred address format at the
domain, post office, and user/resource level.
The following sections explain some of the advantages and disadvantages of each address format:
“userID.post_office.domain@internet_domain_name” on page 705
“userID.post_office@internet_domain_name” on page 705
“userID@internet_domain_name” on page 705
“firstname.lastname@internet_domain_name” on page 706
“lastname.firstname@internet_domain_name” on page 706
“firstinitial lastname@internet_domain_name” on page 706
novdocx (en) 11 December 2007
userID.post_office.domain@internet_domain_name
Advantages
Reliable format. GroupWise guarantees that each address is unique.
Identical usernames can be used in different post offices.
Disadvantages
Addresses tend to be long and hard to remember.
Addresses might change over time as users are moved from one post office to another.
userID.post_office@internet_domain_name
Advantages
Guarantees uniqueness if all your post offices have unique names.
Identical usernames can be placed in different post offices.
Disadvantages
Addresses tend to be long and hard to remember.
Addresses might change over time as users are moved from one post office to another.
userID@internet_domain_name
Advantages
Addresses are short and easy to remember.
Configuring Internet Addressing 705

Backwards-compatible with previous versions of GroupWise. (Users won’t need to update their
business cards.)
Addresses do not change as users are moved.
Disadvantages
novdocx (en) 11 December 2007
When you first enable this address format, you might have duplicate user IDs in your
GroupWise system. However, in the future, ConsoleOne
®
prevents you from creating duplicate
user IDs within the same Internet domain name. The same user ID can be used in different
Internet domains without problem.
firstname.lastname@internet_domain_name
Advantages
Addresses are intuitive and easy to remember.
Addresses do not change as users are moved.
Disadvantages
When you first enable this address format, you might have duplicate first and last names in
your GroupWise system. However, in the future, ConsoleOne prevents you from creating users
with the same first and last names within the same Internet domain name. The same first name
and last name combination can be used in different Internet domains without problem.
The probability of conflicts increases if any user’s first and last names match any GroupWise
domain or post office name, if any two users have the same first and last names, or if any two
users have the opposite first and last names (such as James Dean and Dean James).
lastname.firstname@internet_domain_name
Advantages
Addresses are intuitive and easy to remember.
Addresses do not change as users are moved.
Disadvantages
When you first enable this address format, you might have duplicate first and last names in
your GroupWise system. However, in the future, ConsoleOne prevents you from creating users
with the same first and last names within the same Internet domain name. The same last name
and first name combination can be used in different Internet domains without a problem.
The probability of conflicts increases if any user’s first and last names match any GroupWise
domain or post office name, if any two users have the same first and last names, or if any two
users have the opposite first and last names (such as James Dean and Dean James).
firstinitial lastname@internet_domain_name
Advantages
Addresses are intuitive and easy to remember.
706 GroupWise 7 Administration Guide

Addresses do not change as users are moved.
Disadvantages
When you first enable this address format, you might have duplicate first initial and last names
in your GroupWise system. However, in the future, ConsoleOne prevents you from creating
users with the same first initials and last names within the same Internet domain name. The
same first initial and last name combination can be used in different Internet domains without
problem
The probability of conflicts increases when using first initials instead of complete first names.
45.1.5 Allowed Address Formats
The preferred Internet domain and preferred address format apply to user addresses as displayed in
the GroupWise Address Book or in the address displayed on sent messages.
The allowed address formats, on the other hand, determine which address formats are accepted by
the Internet Agent. There are five possible allowed formats:
novdocx (en) 11 December 2007
userID.post_office@internet_domain_name
userID@internet_domain_name
firstname.lastname@internet_domain_name
lastname.firstname@internet_domain_name
firstinital lastname@internet_domain_name
If you select all five formats, the Internet Agent accepts messages addressed to users in any of the
formats. For example, John Peterson would receive messages sent using any of the following
addresses:
jpeterson.research@novell.com
jpeterson@novell.com
john.peterson@novell.com
peterson.john@novell.com
jpeterson@novell.com
You must designate the allowed address formats to be used as the default formats for your
GroupWise system. The system’s allowed address formats are applied to all users in your
GroupWise system. However, you can override the system’s allowed address formats at the domain,
post office, and user/resource level.
For example, assume you have two John Petersons with userIDs of jpeterson and japeterson. The
userID.post_office and userID address formats do not cause message delivery problems, but the
firstname.lastname, lastname.firstname, and firstinitial lastname address formats do. To overcome
this problem, you could disallow the three problem formats for these users at the user level.
45.1.6 Override Options
In spite of the best planning, some e-mail addresses do not fit the rules and are not processed
correctly. You can handle such addresses by overriding the regular address processing, as described
in Section 45.2.3, “Overriding Internet Addressing Defaults,” on page 710.
Configuring Internet Addressing 707
45.2 Setting Up Internet Addressing
The following sections help you to set up Internet addressing:
Section 45.2.1, “Installing the Internet Agent,” on page 708
Section 45.2.2, “Enabling Internet Addressing,” on page 708
Section 45.2.3, “Overriding Internet Addressing Defaults,” on page 710
45.2.1 Installing the Internet Agent
Before you can set up Internet addressing, you must install the GroupWise Internet Agent. If you
have not already installed the agent, see “Installing the GroupWise Internet Agent” in the
GroupWise 7 Installation Guide.
45.2.2 Enabling Internet Addressing
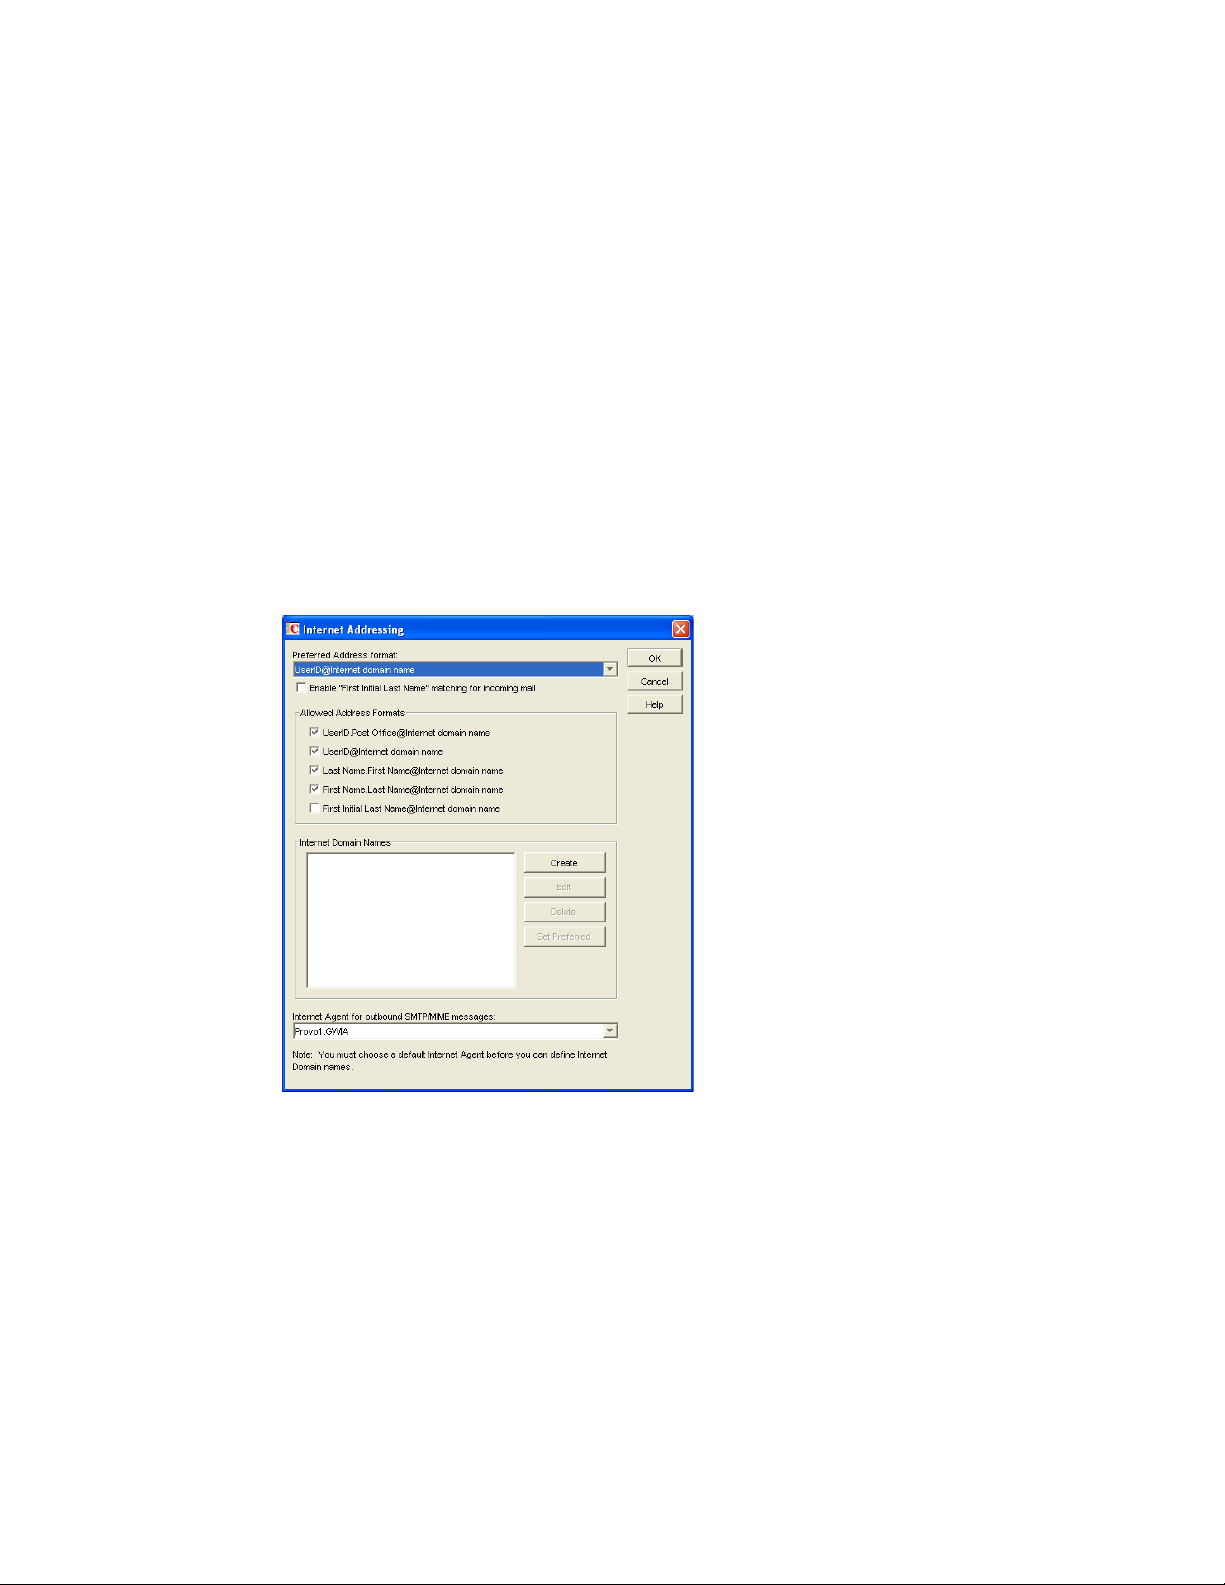
1 In ConsoleOne, click Tools > GroupWise System Operations > Internet Addressing.
novdocx (en) 11 December 2007
2 In the Internet Agent for Outbound SMTP/MIME Messages list, select the Internet Agent to use
as the default Internet Agent for your system.
By default, each domain uses this Internet Agent for outbound messages sent by users in the
domain. If you have multiple Internet Agents in your GroupWise system, you can override the
default setting at the domain level. For more information, see “Domain Overrides” on
page 710.
3 To define an Internet domain, click Create to display the Internet Domain Name dialog box.
708 GroupWise 7 Administration Guide
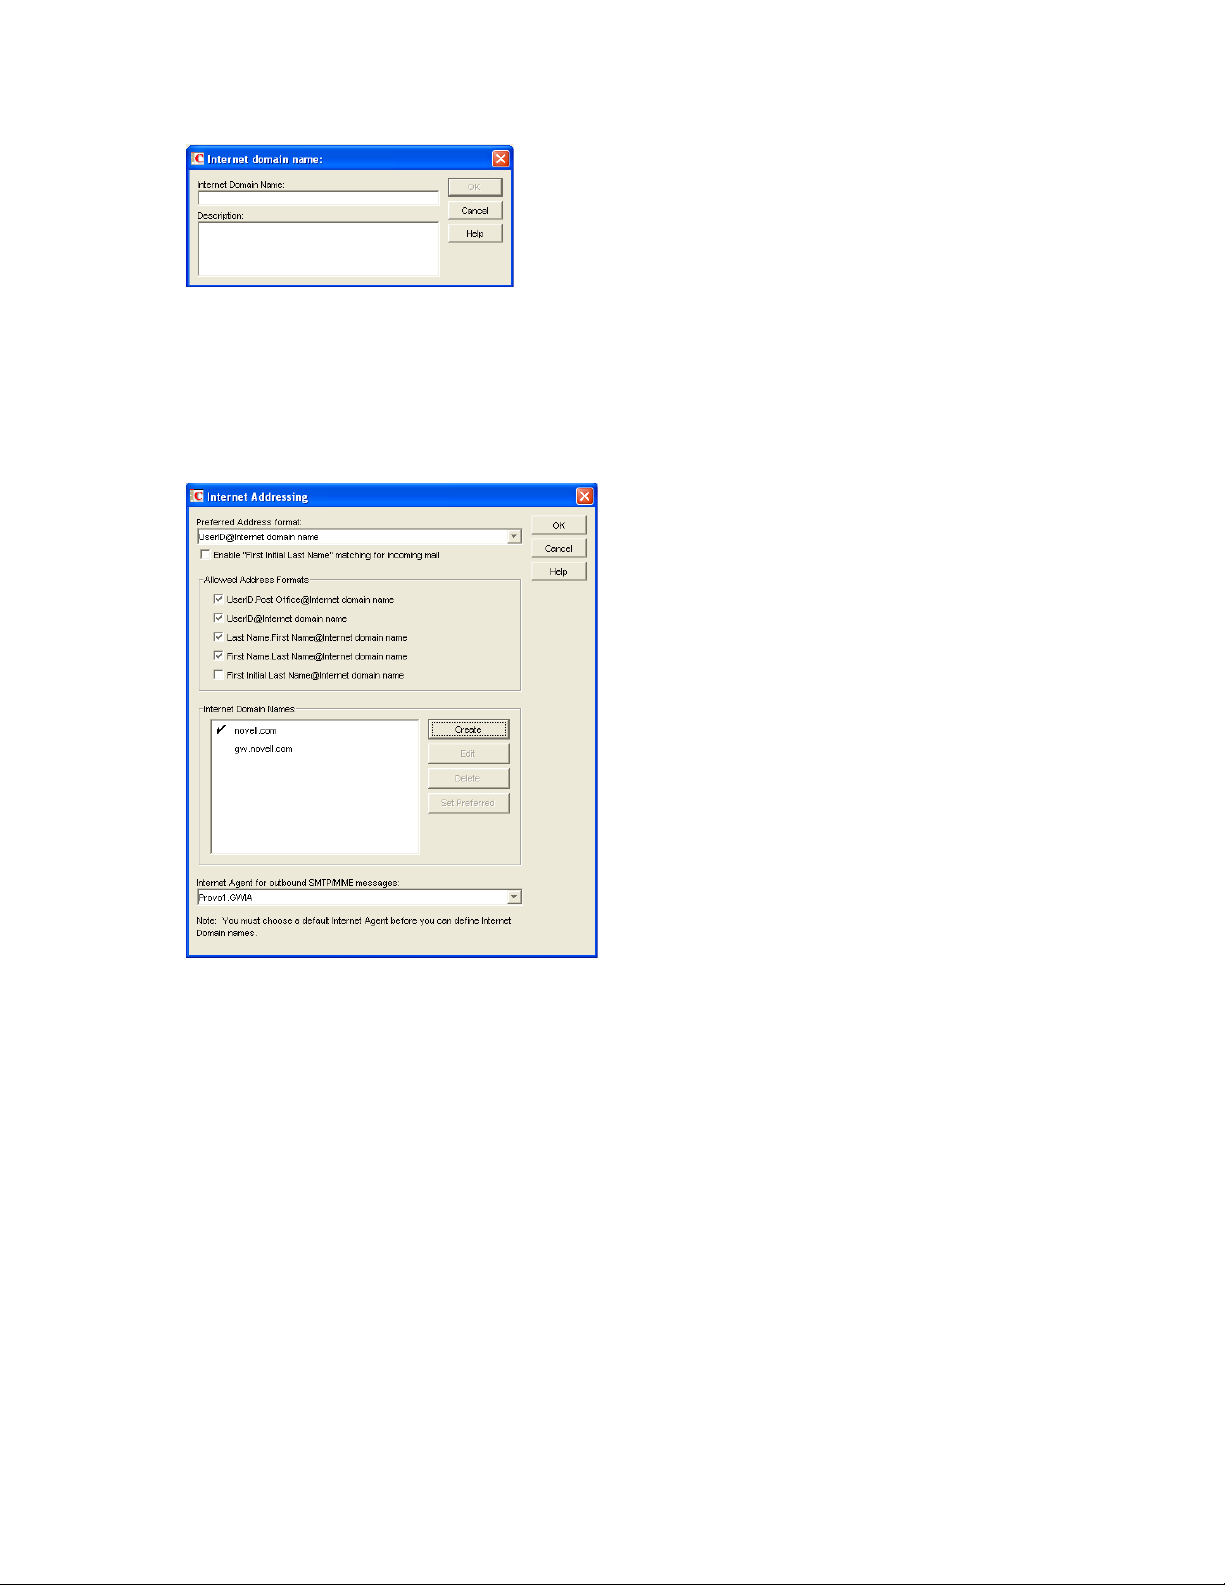
4 Specify the Internet domain you want to define in your GroupWise system, then click OK to
add it to the list of Internet domains.
5 Repeat Step 3 and Step 4 for each Internet domain you want to define.
When you finish, all Internet domains you want to define should be listed in the Internet
Domain Names box.
novdocx (en) 11 December 2007
The preferred Internet domain is indicated by a check mark. This is the Internet domain name
that is used when GroupWise constructs a user’s preferred e-mail address. A preferred e-mail
address is the address that is published in the GroupWise Address Book and in the To field of
sent messages. You can override the preferred Internet domain name at the domain, post office,
and user/resource levels. For more information, see Section 45.2.3, “Overriding Internet
Addressing Defaults,” on page 710.
6 If the Internet domain you want to be the default preferred domain for your GroupWise system
is not already selected, select the desired Internet domain, then click Set Preferred Name.
7 In the Preferred Address Format list, select your system’s default Internet address format.
This is the format that is used when displaying addresses in the GroupWise Address Book and
in a message’s From field if it is not overridden at a lower level. For a list of the available
addressing formats and their respective advantages and disadvantages, see Section 45.1.4,
“Preferred Address Format,” on page 704.
You can override the preferred address format at the domain, post office, and user/resource
levels. For more information, see Section 45.2.3, “Overriding Internet Addressing Defaults,”
on page 710.
Configuring Internet Addressing 709

8 If desired, turn on the Enable "First Initial Last Name" Matching for Incoming Mail option.
This option allows the Internet Agent to resolve addresses for incoming messages by
performing first initial last name lookups on the username portion of the address. When doing
so, the Internet Agent uses the first letter of the username as the first initial and the remainder
of the username as the last name. It then resolves the address to any GroupWise users whose
Last Name field (in their eDirectory User object properties) contains the last name and whose
Given Name field starts with the first initial.
For example, if the recipient’s address is jpeterson@novell.com, the first initial would be J and
the last name would be Peterson. The address would resolve to the user whose Last Name field
is Peterson and Given Name field starts with J. If more than one user’s given name starts with J
(for example, John and Janice), the message is undeliverable.
This option is useful if you want to be able to use the UserID@Internet_domain_name format
but your userIDs do not really reflect your users’ actual names (for example, John Peterson’s
user ID is 46789 so his address is 46789@novell.com). In this case, you could publish users’
addresses as the first initial last name (for example, jpeterson@novell.com) and enable this
option so that the Internet Agent resolves the addresses to the appropriate users.
9 In the Allowed Address Formats list, select the address formats that you want to be supported
for incoming messages. GroupWise delivers a message to the recipient if any of the allowed
formats have been used in the address.
You can override the allowed address formats at the domain, post office, and user/resource
levels. For more information, see Section 45.2.3, “Overriding Internet Addressing Defaults,”
on page 710.
10 Click OK to save your changes.
If you changed the preferred address format, you are prompted to update the Internet e-mail
address (User object > General > Identification > E-Mail Address) for all affected users. The
Internet e-mail address is the address returned in response to LDAP queries to eDirectory
is recommended that you allow this update; however, performing it for the entire GroupWise
system might take a while.
TM
novdocx (en) 11 December 2007
. It
At this point, Internet addressing is enabled.
45.2.3 Overriding Internet Addressing Defaults
All domains, post offices, and users/resources in your GroupWise system inherit the defaults
(Internet Agent for outbound messages, preferred Internet domain name, preferred address format,
and allowed address formats) you established when enabling Internet addressing for your system.
However, if desired, you can override these defaults for individual domains, post offices, or users/
resources.
“Domain Overrides” on page 710
“Post Office Overrides” on page 711
“User/Resource Overrides” on page 712
Domain Overrides
At the domain level, you can override all Internet addressing defaults assigned to your GroupWise
system.
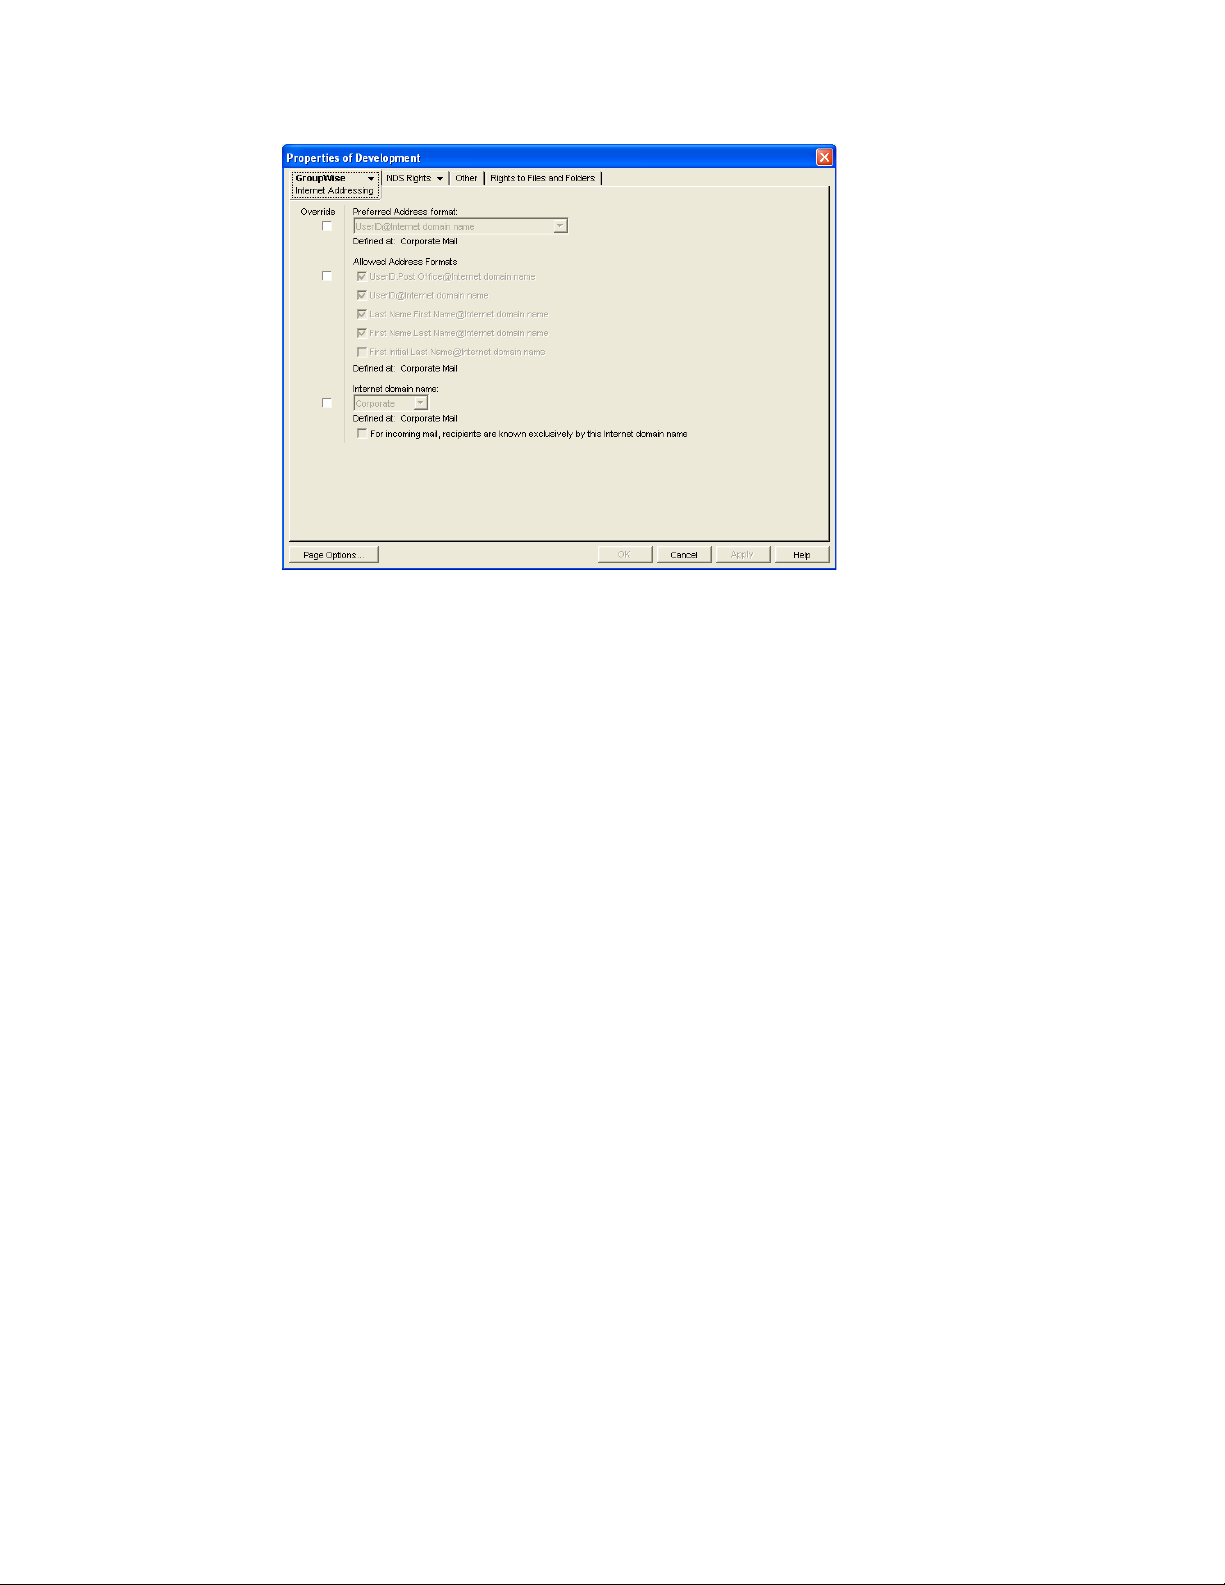
1 In ConsoleOne, right-click a Domain object, then click Properties.
710 GroupWise 7 Administration Guide

2 Click GroupWise > Internet Addressing.
novdocx (en) 11 December 2007
3 To override one of the options, select the Override box, then select the option you prefer for
this domain.
4 Click OK to save the changes.
If you changed the preferred address format, you are prompted to update the Internet e-mail
address (User object > General > Identification > E-Mail Address) for all affected users. The
Internet e-mail address is the address returned in response to LDAP queries to eDirectory. We
recommend that you allow this update; however, performing it for an entire GroupWise domain
might take a while.
Post Office Overrides
At the post office level, you can override the preferred Internet domain name, preferred address
format, and allowed address formats the post office has inherited from its domain. You cannot
override the Internet Agent that is assigned to handle outbound messages.
1 In ConsoleOne, right-click a Post Office object, then click Properties.
2 Click GroupWise > Internet Addressing.
Configuring Internet Addressing 711
3 To override one of the options, select the Override box, then select the option you prefer for
this post office.
If you need additional information about any of the fields, click Help.
novdocx (en) 11 December 2007
4 Click OK to save the changes.
If you changed the preferred address format, you are prompted to update the Internet e-mail
address (User object > General > Identification > E-Mail Address) for all affected users. The
Internet e-mail address is the address returned in response to LDAP queries to eDirectory. We
recommend that you allow this update; however, performing it for an entire GroupWise post
office might take a while.
User/Resource Overrides
At the user and resource level, you can override the preferred Internet domain, preferred address
format, and allowed address formats that the user/resource has inherited from its post office. You
cannot override the Internet Agent that is assigned to handle outbound messages.
1 In ConsoleOne, right-click a User or Resource object, then click Properties.
2 Click GroupWise > Internet Addressing.
712 GroupWise 7 Administration Guide

3 To override one of the options, select the Override box, then select the option you prefer for
this user or resource.
novdocx (en) 11 December 2007
At the user and resource level, the preferred address format can be completely overridden by
explicitly defining the user portion of the address format (user@Internet domain name). The
user portion can include any RFC-compliant characters (no spaces, commas, and so forth).
For example, if you’ve selected First Name.Last Name@Internet domain name as your
system’s preferred address format and you have two John Petersons, each on a different post
office in your system, you would end up two users having the same address
(John.Peterson@novell.com). You could use this field to differentiate them by including their
middle initials in their address (John.S.Peterson@novell.com and
John.A.Peterson@novell.com).
You can use the same e-mail ID for more than one user in your GroupWise system, if each user
is in a different Internet domain. Rather than requiring that each e-mail ID be unique in your
GroupWise system, each combination of e-mail ID and Internet domain must be unique. This
provides more flexibility for handling the situation where two people have the same name.
If you need additional information about any of the fields, click Help.
4 Click OK to save the changes.
If you changed the preferred address format for a user, you are prompted to update the user’s
Internet e-mail address (General > Identification > E-Mail Address). The Internet e-mail
address is the address returned in response to LDAP queries to eDirectory. We recommend that
you allow this update.
45.3 Transitioning from SMTP Gateway Aliases to Internet Addressing
For those who have been using SMTP gateway aliases to handle e-mail addresses that do not fit the
default format expected by the Internet Agent or to customize users’ Internet addresses, the Gateway
Alias Migration utility can convert the usernames in those gateway aliases into preferred e-mail IDs.
The Preferred E-Mail ID feature was first introduced in GroupWise 6.5 and is the suggested method
for overriding the current e-mail address format, as described in Section 14.7.2, “Changing a User’s
Configuring Internet Addressing 713

Internet Addressing Settings,” on page 236. The Gateway Alias Migration utility can also update
users’ preferred Internet domain names based on their existing gateway aliases.
Section 45.3.1, “Planning to Migrate Gateway Aliases,” on page 714
Section 45.3.2, “Preparing to Migrate Gateway Aliases,” on page 714
Section 45.3.3, “Performing the Gateway Alias Migration,” on page 714
Section 45.3.4, “Verifying the Gateway Alias Migration,” on page 716
45.3.1 Planning to Migrate Gateway Aliases
You can migrate SMTP gateway aliases by individual user, by post office, by domain, or for your
entire GroupWise system. Migrating at the post office level is recommended, although you can test
the process by migrating individual users. Assess the gateway aliases in your GroupWise system and
decide how you want to organize the migration process.
The Gateway Alias Migration utility runs most efficiently if you are connected to the domain that
owns the users whose aliases you are migrating. This reduces network traffic between domains
during the migration process.
novdocx (en) 11 December 2007
The Gateway Alias Migration utility requires that you connect to a GroupWise 7 domain, although
you can select users from 6.x and 5.x domains for migration. If you still have 4.x domains, you can
migrate aliases by connecting to the GroupWise System object before connecting to a domain.
Determine the domains you need to connect to as you perform the migration.
45.3.2 Preparing to Migrate Gateway Aliases
Before starting the SMTP gateway alias migration process:
Validate each domain database (wpdomain.db) that you will connect to in order to clean up
any orphaned aliases that might exist. See Section 26.1, “Validating Domain or Post Office
Databases,” on page 377.
Create a current backup of each domain database before performing the migration. See
Section 31.1, “Backing Up a Domain,” on page 407
45.3.3 Performing the Gateway Alias Migration
To run the Gateway Alias Migration utility in ConsoleOne:
1 If you want to migrate all gateway aliases in your GroupWise system, connect to the primary
domain in the GroupWise View.
or
If you want to migrate the gateway aliases in a particular domain or post office, connect to the
domain where the aliases are located.
2 Browse to and select the object representing the set of gateway aliases that you want to migrate
(GroupWise system, domain, post office, or user).
3 Click Tools > GroupWise Utilities > Gateway Alias Migration.
4 In the SMTP Gateway Alias Type drop-down list, select the type of alias you want to migrate.
714 GroupWise 7 Administration Guide
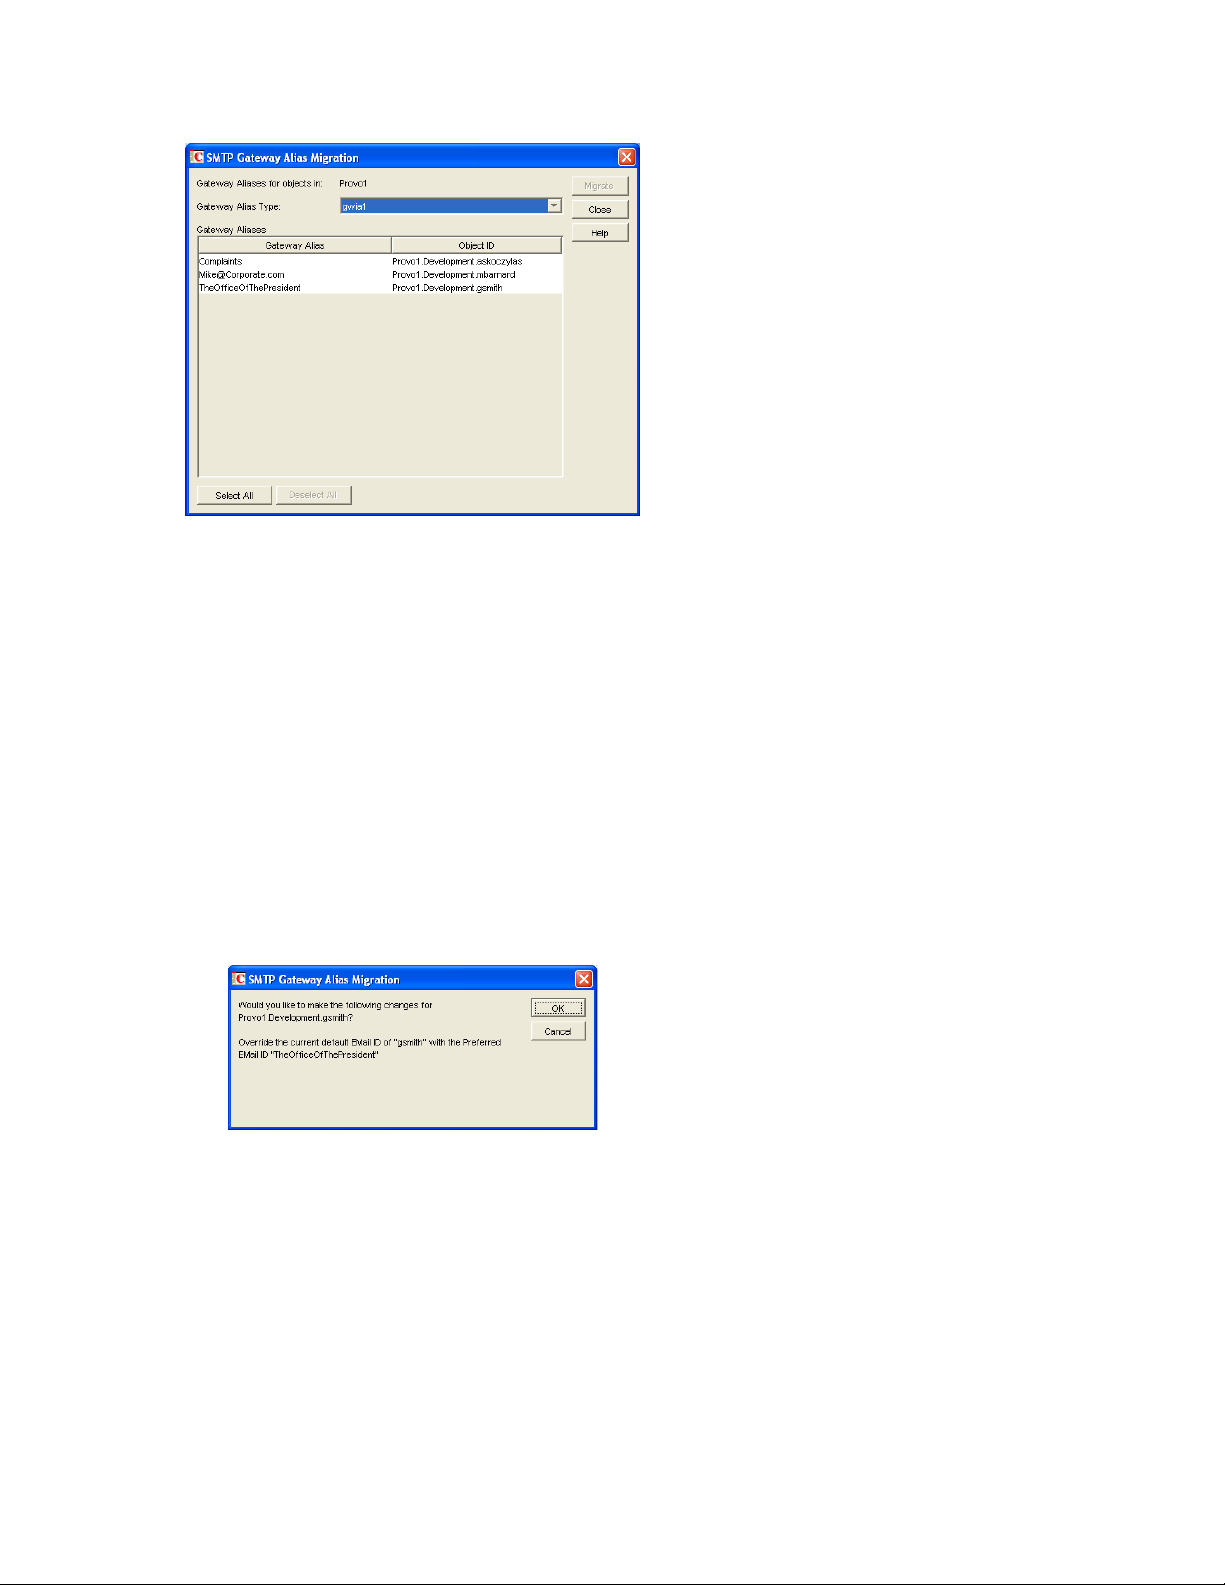
The list of available gateway alias types is generated from the Gateway Alias Type fields on the
Identification property pages of the Internet Agent objects in your GroupWise system.
The resulting alias list provides the SMTP gateway aliases for all users associated with the
object selected in Step 2. If the list is extremely long, you can click Stop and just work with a
subset of the alias list.
The list does not include any aliases that have a pending operation on them.
5 Select one or more gateway aliases to migrate.
novdocx (en) 11 December 2007
or
Click Select All.
6 Click Migrate to start the migration process.
You are prompted for how to handle each gateway alias.
If the alias is just a username, you can select whether or not you want to use that username
as the user's preferred e-mail ID.
If you do, the username is transferred into the Preferred E-Mail ID field on the Internet
Addressing property page of the User object.
If the alias also includes an Internet domain name, you can select whether or not you want
to use that Internet domain name with the user's preferred e-mail ID.
Configuring Internet Addressing 715
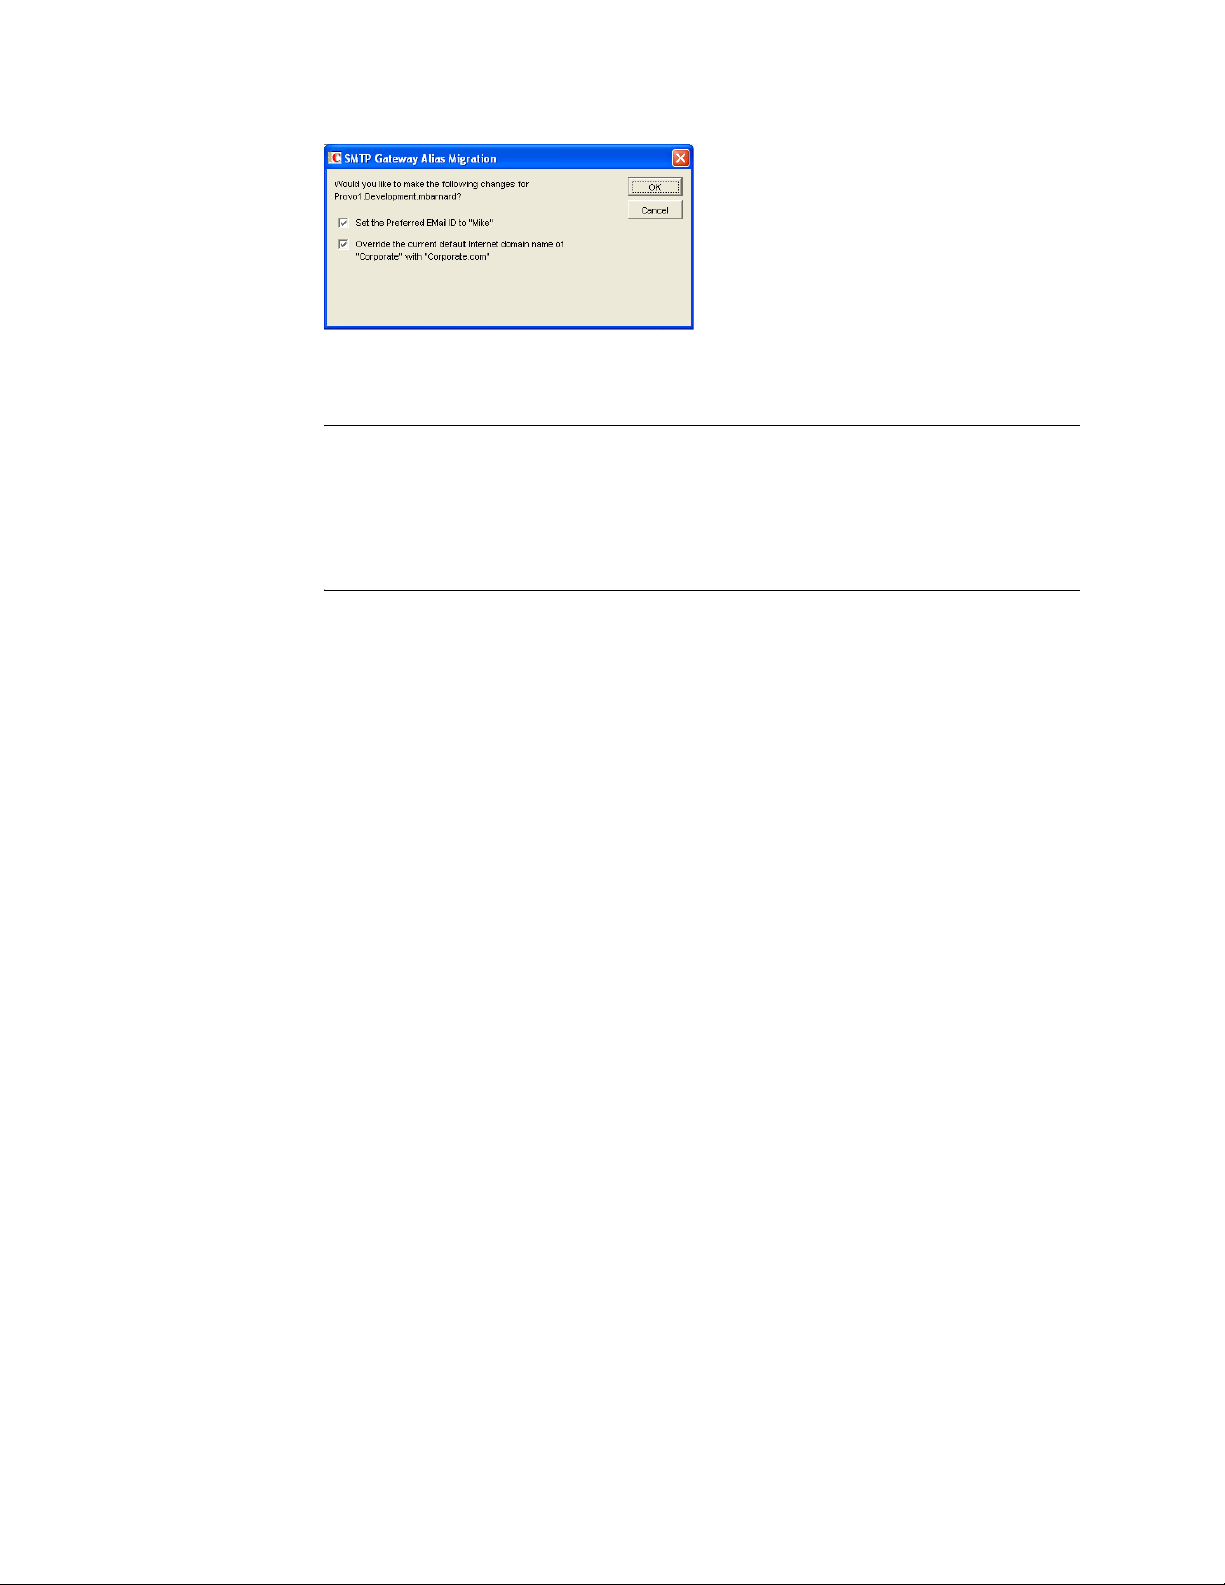
If you do, the domain name is transferred into the Internet Domain Name field on the
Internet Addressing property page of the User object.
NOTE: For an internal user, if the Internet domain name is not defined in your
GroupWise system under Tools > GroupWise System Operations > Internet Addressing,
then the Internet domain name is not transferred into the Internet Domain Name field on
the Internet Addressing property page of the User object. However, for external users,
undefined Internet domain names are transferred into the Internet Domain Name field on
the Internet Addressing property page of the External User or External Entity object.
By default, both usernames and domain names are selected for migration.
7 For each gateway alias, deselect the check boxes for any actions that you do not want the Alias
Migration utility to perform, then click OK.
For convenience when migrating multiple aliases, you can click OK to All to apply your current
selections to all aliases.
novdocx (en) 11 December 2007
8 When the migration is complete, select a different gateway alias type to migrate.
or
Click Close.
45.3.4 Verifying the Gateway Alias Migration
To see what the Gateway Alias Migration utility has accomplished:
1 Browse to and right-click a User object that used to have a gateway alias, then click Properties.
2 Click GroupWise > Gateway Aliases.
The alias list should be empty.
3 On the same User object, click GroupWise > Internet Addressing.
The Preferred EMail ID field should be filled in with the information from the old gateway
alias.
716 GroupWise 7 Administration Guide

46
Configuring Internet Services
For detailed instructions about installing and starting the Internet Agent for the first time, see
“Installing the GroupWise Internet Agent” in the GroupWise 7 Installation Guide.
novdocx (en) 11 December 2007
46
The Internet Agent offers several useful services that you can configure to meet the needs of your
GroupWise
Section 46.1, “Configuring SMTP/MIME Services,” on page 717
Section 46.2, “Configuring LDAP Services,” on page 737
Section 46.3, “Configuring POP3/IMAP4 Services,” on page 739
Section 46.4, “Configuring Paging Services,” on page 744
®
system.
46.1 Configuring SMTP/MIME Services
SMTP and MIME are standard protocols that the GroupWise Internet Agent uses to send and receive
e-mail messages over the Internet. SMTP, or Simple Mail Transfer Protocol, is the message
transmission protocol. MIME, or Multipurpose Internet Mail Extension, is the message format
protocol. Choose from the following topics for information about how to enable SMTP/MIME
services and configure various SMTP/MIME settings:
Section 46.1.1, “Configuring Basic SMTP/MIME Settings,” on page 717
Section 46.1.2, “Using Extended SMTP (ESMTP) Options,” on page 720
Section 46.1.3, “Configuring How the Internet Agent Handles E-Mail Addresses,” on page 721
Section 46.1.4, “Determining Format Options for Messages,” on page 723
Section 46.1.5, “Configuring the SMTP Timeout Settings,” on page 725
Section 46.1.6, “Determining What to Do with Undeliverable Messages,” on page 726
Section 46.1.7, “Configuring SMTP Dial-Up Services,” on page 727
Section 46.1.8, “Enabling SMTP Relaying,” on page 731
Section 46.1.9, “Using a Route Configuration File,” on page 732
Section 46.1.10, “Customizing Delivery Status Notifications,” on page 733
Section 46.1.11, “Managing MIME Messages,” on page 734
46.1.1 Configuring Basic SMTP/MIME Settings
Basic SMTP/MIME settings configure the following aspects of Internet Agent functioning:
Number of send and receive threads that the Internet Agent starts and how often the send
threads poll for outgoing messages
Hostname of the server where the Internet Agent is running and of a relay host if your system
includes one
IP address to bind to at connection time if the server has multiple IP addresses
Whether to use 7-bit or 8-bit encoding for outgoing messages
Configuring Internet Services
717
How to handle messages that cannot be sent immediately and must be deferred
Whether to display GroupWise version information when establishing an SMTP connection
To set the Internet Agent basic SMTP/MIME settings:
1 In ConsoleOne®, right-click the Internet Agent object, then click Properties.
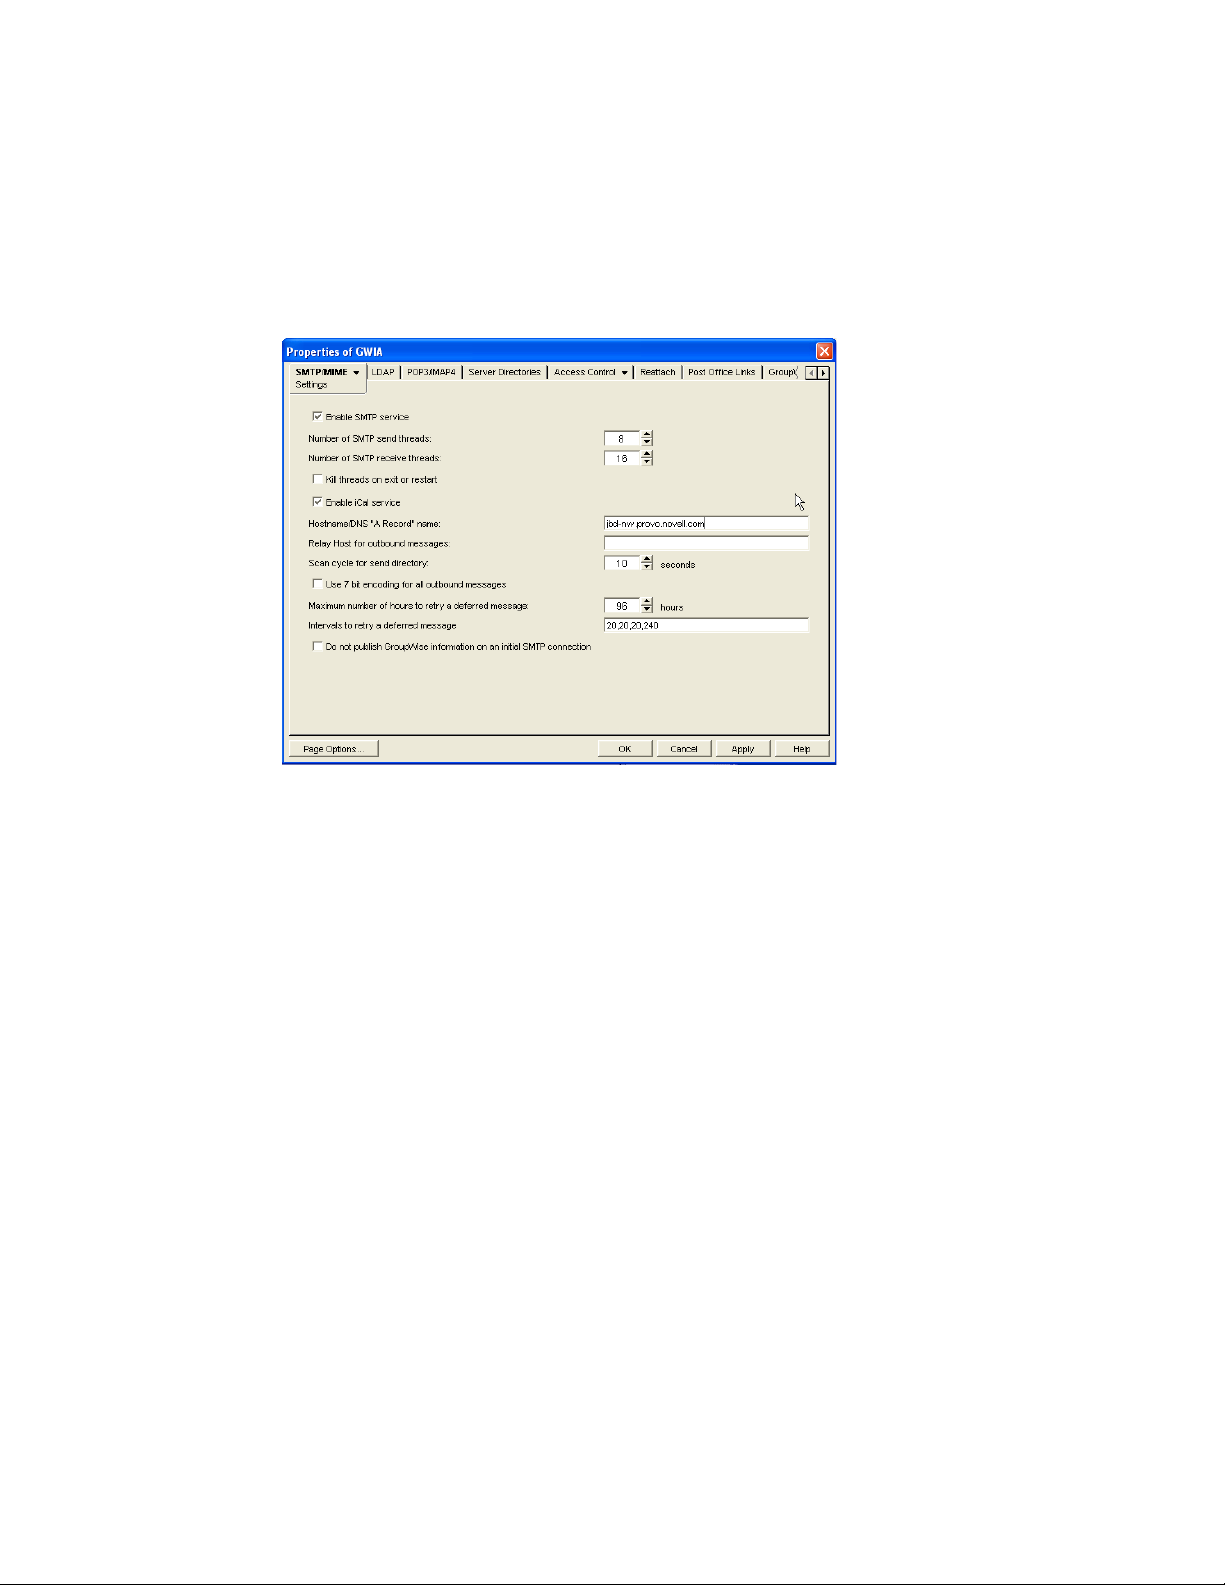
2 If the SMTP/MIME Settings page is not the default page, click SMTP/MIME > Settings.
novdocx (en) 11 December 2007
3 Fill in the fields:
Enable SMTP Service: SMTP service is on by default. This setting allows SMTP Internet
messaging. This setting corresponds with the Internet Agent’s /smtp switch.
Number of SMTP Send Threads: The SMTP send threads setting lets you specify the
number of threads that process SMTP send requests. Each thread is equivalent to one
connection. The default is 8 threads. This setting corresponds with the Internet Agent’s /sd
switch.
Number of SMTP Receive Threads: The SMTP receive threads setting lets you specify the
number of threads that process SMTP receive requests. Each thread is equivalent to one
connection. The default is 16 threads. This setting corresponds with the Internet Agent’s /rd
switch.
Kill Threads on Exit or Restart: Select this option to cause the Internet Agent to stop
immediately, without allowing its send/receive threads to perform their normal shutdown
procedures. The normal termination of all send/receive threads can take several minutes,
especially if a large message is being processed. By terminating immediately, a needed restart
can occur immediately as well. This setting corresponds with the Internet Agent’s /killthreads
switch.
Enable iCal Service: Select this option if you want the Internet Agent to convert outbound
GroupWise Calendar items into MIME text/calendar iCal objects and to convert incoming
MIME text/calendar messages into GroupWise Calendar items. Enabling the iCal service
provides the functionality described in “Accepting or Declining Internet Items” in “Scheduling
Group and Posted Items” in the GroupWise 7 Windows Client User Guide. This setting
corresponds with the Internet Agent's /imip switch.
718 GroupWise 7 Administration Guide

Hostname/DNS "A Record" Name: The Hostname/DNS “A Record” name setting lets you
identify the hostname of the server where the Internet Agent resides, or in other words the A
Record in your DNS table that associates a hostname with the server’s IP address (for example,
gwia.novell.com). This setting corresponds with the Internet Agent’s /hn switch.
If you leave this field blank, the Internet Agent uses the hostname obtained by querying the
hosts file from the server.
Relay Host for Outbound Messages: The Relay host setting can be used if you want to use
one or more relay hosts to route all outbound Internet e-mail. Specify the IP address or DNS
hostname of the relay hosts. Use a space between relay hosts in a list. Relay hosts can be part of
your network or can reside at the Internet service provider’s site. This setting corresponds with
the Internet Agent’s /mh switch.
If you want to use a relay host, but you want some outbound messages sent directly to the
destination host rather than to the relay host, you can use a route configuration file
(route.cfg). Whenever a message is addressed to a user at a host that is included in the
route.cfg file, the Internet Agent sends the message directly to the host rather than to the
relay host. For information about creating a route.cfg file, see Section 46.1.9, “Using a
Route Configuration File,” on page 732.
Scan Cycle for Send Directory: The Scan cycle setting specifies how often the Internet Agent
polls for outgoing messages. The default is 10 seconds. This setting corresponds with the
Internet Agent’s /p switch.
Use 7 Bit Encoding for All Outbound Messages: By default, the Internet Agent uses 8-bit
MIME encoding for any outbound messages that are HTML-formatted or that contain 8-bit
characters. If, after connecting with the receiving SMTP host, the Internet Agent discovers that
the receiving SMTP host cannot handle 8-bit MIME encoded messages, the Internet Agent
converts the messages to 7-bit encoding.
With this option selected, the Internet Agent automatically uses 7-bit encoding and does not
attempt to use 8-bit MIME encoding. You should use this option if you are using a relay host
that does not support 8-bit MIME encoding. This setting corresponds with the Internet Agent’s
/force7bitout switch.
Maximum Number of Hours to Retry a Deferred Message: Specify the number of hours
after which the Internet Agent stops trying to send deferred messages. The default is 96 hours,
or four days. A deferred message is any message that can’t be sent because of a temporary
problem (host down, MX record not found, and so forth). This setting corresponds with the
Internet Agent’s /maxdeferhours switch.
Intervals to Retry a Deferred Message: Specify in a comma-delimited list the number of
minutes after which the Internet Agent retries sending deferred messages. The default is 20, 20,
20, 240. The Internet Agent interprets this list as follows: It retries 20 minutes after the initial
send, 20 minutes after the first retry, 20 minutes after the second retry, and 240 minutes (4
hours) after the third retry. Thereafter, it retries every 240 minutes until the number of hours
specified in the Maximum Number of Hours to Retry a Deferred Message field is reached. You
can provide additional retry intervals as needed. It is the last retry interval that repeats until the
maximum number of hours is reached. This setting corresponds with the Internet Agent’s /
msgdeferinterval switch.
Do Not Publish GroupWise Information on an Initial SMTP Connection: Select this
option to suppress the GroupWise version and copyright date information that the Internet
Agent typically responds with when contacted by another SMTP host or a telnet session. This
setting corresponds with the Internet Agent’s /nosmtpversion switch.
novdocx (en) 11 December 2007
4 Click OK to save the changes.
Configuring Internet Services 719
46.1.2 Using Extended SMTP (ESMTP) Options
The Internet Agent supports several Extended SMTP (ESMTP) settings. These are settings that
might or might not be supported by another SMTP system.
The following ESMTP extensions are supported:
SIZE: For more information, see RFC 1870 (http://www.ietf.org/rfc/rfc1870.txt).
AUTH: For more information, see RFC 2554 (http://www.ietf.org/rfc/rfc2554.txt).
DSN: For more information, see RFC 3464 (http://www.ietf.org/rfc/rfc3464.txt) and RFC 3461
(http://www.ietf.org/rfc/rfc3461.txt).
8BITMIME: For more information, see RFC 1652 (http://www.ietf.org/rfc/rfc1652.txt).
STARTTLS: For more information, see RFC 3207 (http://www.ietf.org/rfc/rfc3207.txt).
To configure ESMTP settings:
1 In ConsoleOne, right-click the Internet Agent object, then click Properties.
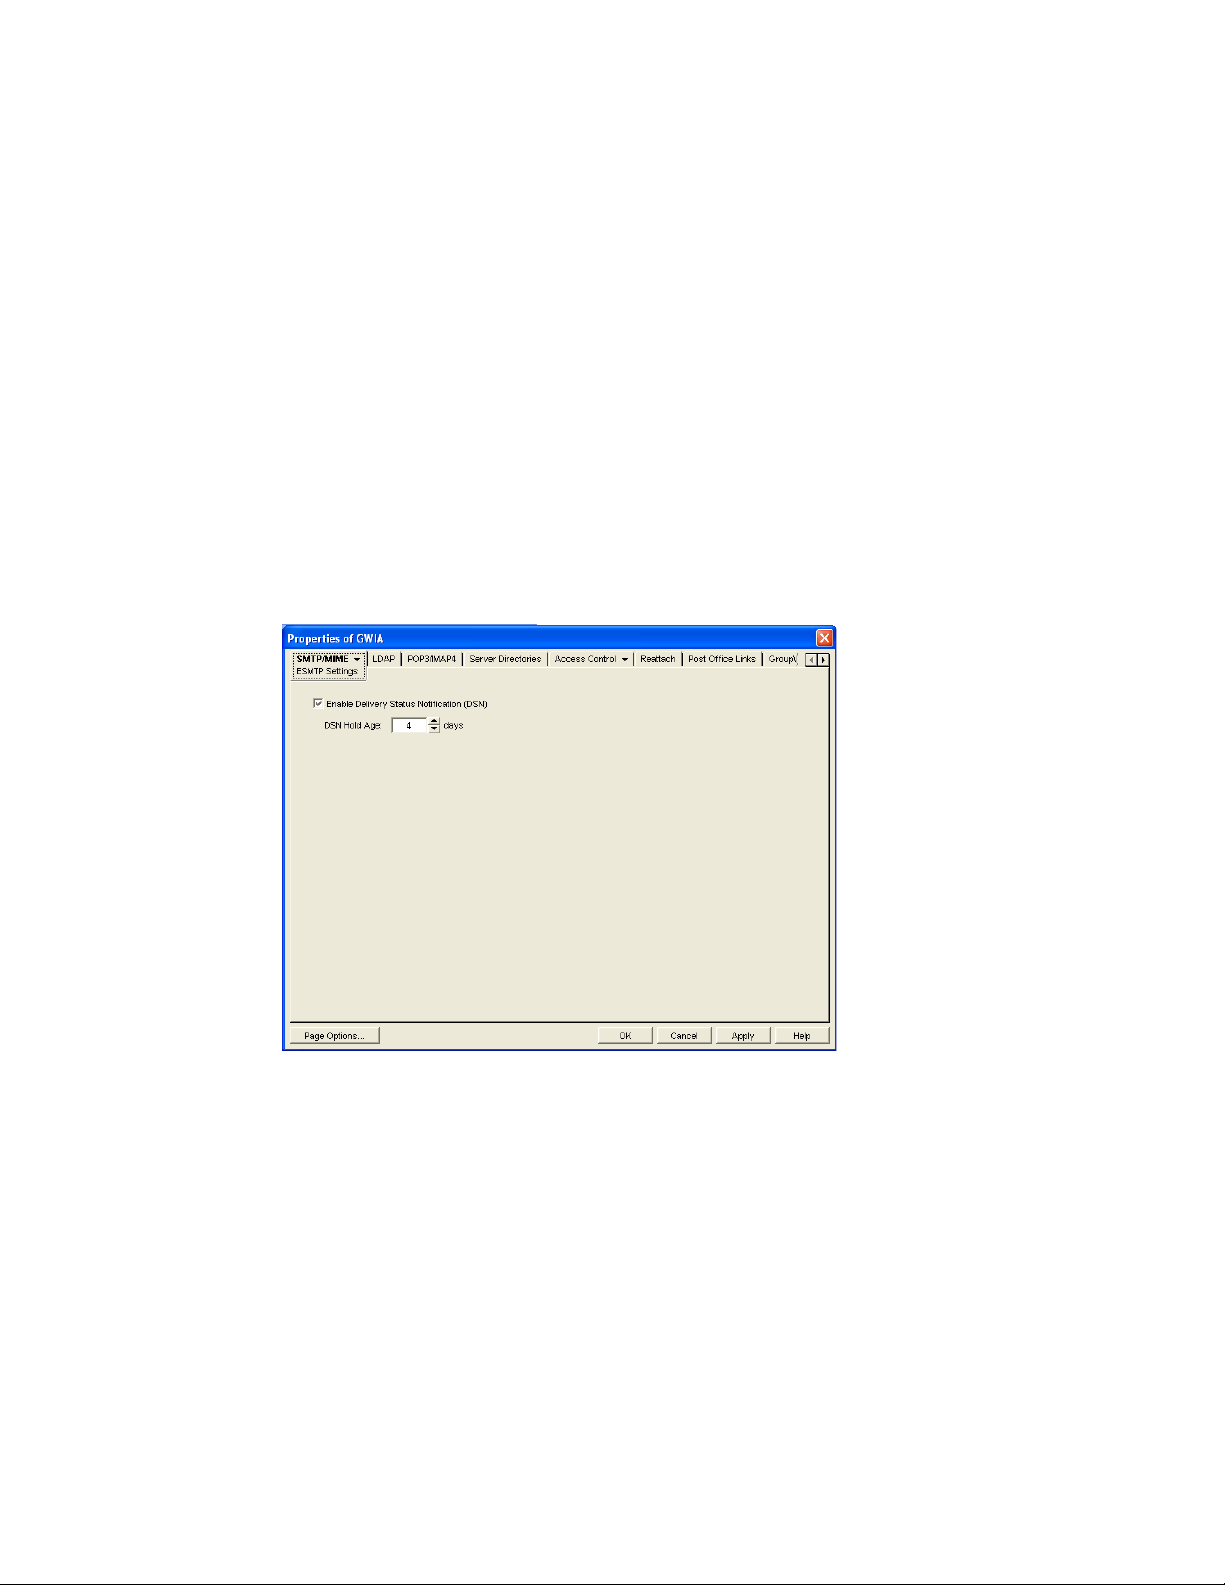
2 Click SMTP/MIME > ESMTP Settings.
novdocx (en) 11 December 2007
3 Fill in the fields:
Enable Delivery Status Notification: Turn on this option to allow the Internet Agent to
request status notifications for outgoing messages and to supply status notifications for
incoming messages. This requires the external e-mail system to also support Delivery Status
Notification. Currently, notification consists of two delivery statuses: successful or
unsuccessful.
If you enable the Delivery Status Notification option, you need to select the number of days that
you want the Internet Agent to retain information about the external sender so that status
updates can be delivered to him or her. For example, the default hold age causes the sender
information to be retained for 4 days. If the Internet Agent does not receive delivery status
notification from the GroupWise recipient’s Post Office Agent (POA) within that time period, it
deletes the sender information and the sender does not receive any delivery status notification.
4 Click OK to save the changes.
720 GroupWise 7 Administration Guide
46.1.3 Configuring How the Internet Agent Handles E-Mail Addresses
The Internet Agent can handle e-mail addresses in a variety of ways:
Internet addressing vs. GroupWise proprietary addressing
Group membership expansion on inbound messages
Distribution membership expansion on outbound messages
Using non-GroupWise domains
Using sender’s address format
Using domain and post office information
To set the Internet Agent address handling options:
1 In ConsoleOne, right-click the Internet Agent object, then click Properties.
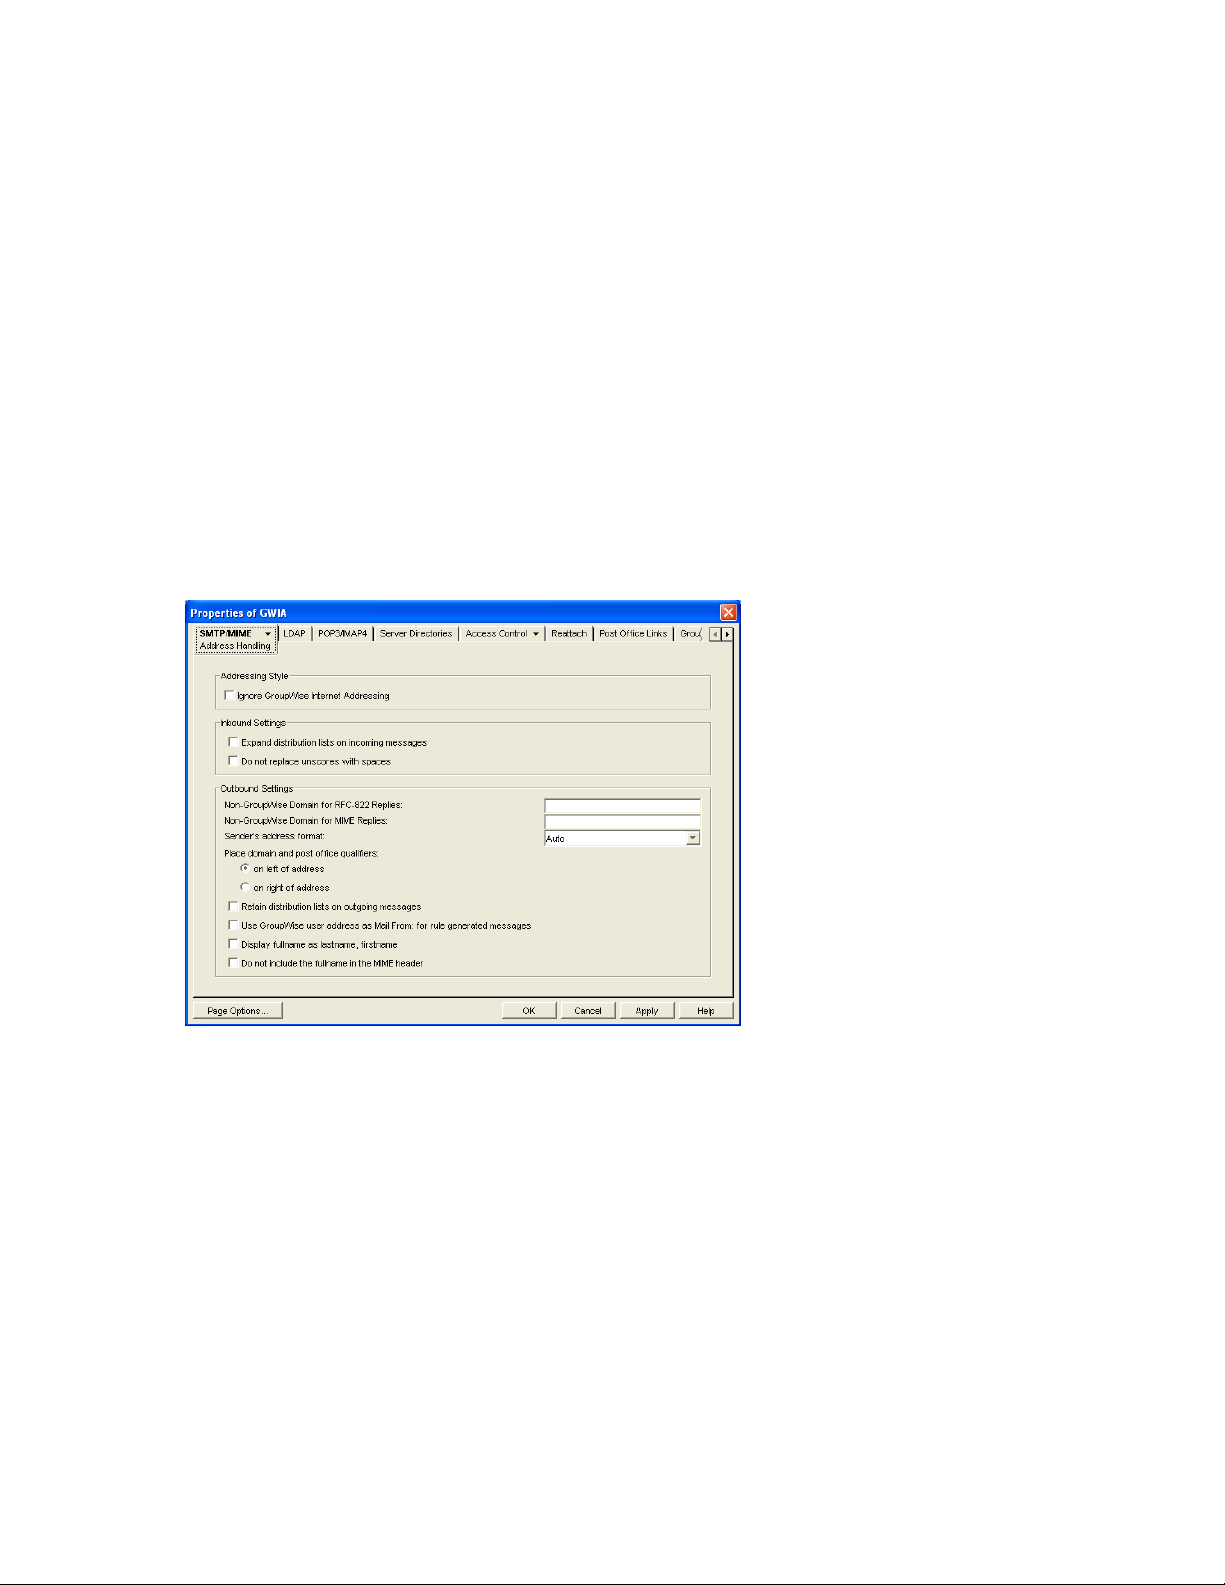
2 Click SMTP/MIME > Address Handling.
novdocx (en) 11 December 2007
3 Fill in the fields:
Ignore GroupWise Internet Addressing: GroupWise supports both Internet-style addressing
(user@host) and GroupWise proprietary addressing (user_ID.post_office.domain). By default,
the Internet Agent uses Internet-style addressing.
If you do not want the Internet Agent to use standard Internet-style addressing (user@host),
turn on the Ignore GroupWise Internet Addressing option. With this option turned on, messages
use the mail domain name in the Foreign ID field (Internet Agent object > GroupWise >
Identification) for the domain portion of a user’s Internet address. If you included multiple mail
domain names in the Foreign ID field or the frgnames.cfg file, as described in “Listing
Foreign Domain Names” on page 723, the first mail domain name listed is the one used in
addresses.
The Internet Agent supports user and post office aliases in either mode. This setting
corresponds with the Internet Agent’s /dia switch.
Configuring Internet Services 721

Expand Groups on Incoming Messages: Turn on this option to have incoming Internet
messages addressed to public groups sent to all members of the groups. This setting
corresponds with the Internet Agent’s /group switch.
Non-GroupWise Domain for RFC-822 Replies: This setting can be used only if 1) you
created a non-GroupWise domain to represent all or part of the Internet, as described in
Section 6.7, “Adding External Users to the GroupWise Address Book,” on page 95, and 2) you
defined the non-GroupWise domain’s outgoing conversion format as RFC-822 when you
linked the Internet Agent to the domain.
Specify the name of the non-GroupWise domain associated with the RFC-822 conversion
format. When a GroupWise user replies to a message that was originally received by the
Internet Agent in RFC-822 format, the reply is sent to the specified non-GroupWise domain
and converted to RFC-822 format so that it is in the same format as the original message.
This setting corresponds with the Internet Agent’s /fd822 switch.
Non-GroupWise Domain for MIME Replies: This setting can be used only if 1) you created
a non-GroupWise domain that represents all or part of the Internet, as described in Section 6.7,
“Adding External Users to the GroupWise Address Book,” on page 95, and 2) you defined the
non-GroupWise domain’s outgoing conversion format as MIME when you linked the Internet
Agent to the domain.
novdocx (en) 11 December 2007
Specify the name of the non-GroupWise domain associated with the MIME conversion format.
When a GroupWise user replies to a message that was originally received by the Internet Agent
in MIME format, the reply is sent to the specified non-GroupWise domain and converted to
MIME format so that it is in the same format as the original message.
This setting corresponds with the Internet Agent’s /fdmime switch.
Sender’s Address Format: This setting applies only if you have not enabled GroupWise
Internet addressing (in other words, you selected the Ignore GroupWise Internet Addressing
option). If GroupWise Internet addressing is enabled, the Internet Agent ignores this setting and
uses the preferred address format established for outbound messages (Tools > GroupWise
System Operations > Internet Addressing).
The Sender’s Address Format setting lets you specify which GroupWise address components
(domain.post_office.user_ID) are included as the user portion of the address on outbound
messages. You can choose from the following options:
Domain, Post Office, User, and Hostname: Uses the domain.post_office.user_ID@host
syntax.
Post Office, User, and Hostname: Uses the post_office.user_ID@host syntax.
User and Hostname: Uses the user_ID@host syntax.
Auto (default): Uses the GroupWise addressing components required to make the address
unique within the user’s GroupWise system. If a user ID is unique in a GroupWise system,
the outbound address uses only the user ID. If the post office or domain.post office
components are required to make the address unique, these components are also included
in the outbound address.
The Sender’s Address Format setting corresponds with the Internet Agent’s /aql switch.
Place Domain and Post Office Qualifiers: If the sender’s address format must include the
domain and/or post office portions to be unique, you can use this option to determine where the
domain and post office portions are located within the address.
On Left of Address (default): Leaves the domain and post office portions on the left side
of the @ sign (for example, domain.post_office.user_ID@host.
722 GroupWise 7 Administration Guide

On Right of Address: Moves the domain and post office portions to the right side of the
@ sign, making the domain and post office part of the host portion of the address (for
example, user_ID@post_office.domain.host. If you choose this option, you must ensure
that your DNS server can resolve each post_office.domain.host portion of the address.
This setting corresponds with the Internet Agent’s /aqor switch.
Retain Distribution Lists on Outgoing Messages: Select this option if you do not want
the Internet Agent to expand distribution lists on messages going to external Internet
users. Expansion of distribution lists can result in large SMTP headers on outgoing
messages. This setting corresponds with the Internet Agent’s /keepsendgroups switch.
Use GroupWise User Address as Mail From: for Rule Generated Messages: Select
this option if you want the Internet Agent to use the real user in the Mail From field
instead of having auto-forwards come from Postmaster and auto-replies come from
Mailer-Daemon. This setting corresponds with the Internet Agent’s /realmailfrom switch.
4 Click OK to save the changes.
Listing Foreign Domain Names
The Foreign ID field (Internet Agent object > GroupWise > Identification) identifies the Internet
domain names for which the Internet Agent accepts messages. The field should always include your
mail domain name (for example, novell.com). You can include additional domain names by
separating them with a space, as in the following example:
novell.com gw.novell.com gwia.novell.com
novdocx (en) 11 December 2007
When you list multiple Internet domain names, the Internet Agent accepts messages for a
GroupWise user if any of the Internet domain names are used (for example, jsmith@novell.com,
jsmith@gw.novell.com, or jsmith@gwia.novell.com).
The field limit is 255 characters. If you need to exceed that limit, you can create a frgnames.cfg
text file in the domain\wpgate\gwia directory. Include each Internet domain name, separated
by a space, just like you would in the Foreign ID field.
46.1.4 Determining Format Options for Messages
You can control aspects of how the Internet Agent formats incoming and outgoing messages:
Number of Internet Agent threads for converting messages into the specified format
The view in which incoming messages are displayed to GroupWise users
Text encoding method (Basic RFC-822 or MIME)
Text wrapping
Message prioritization based on x-priority fields
To set the Internet Agent format options:
1 In ConsoleOne, right-click the Internet Agent object, then click Properties.
2 Click SMTP/MIME > Message Formatting.
Configuring Internet Services 723
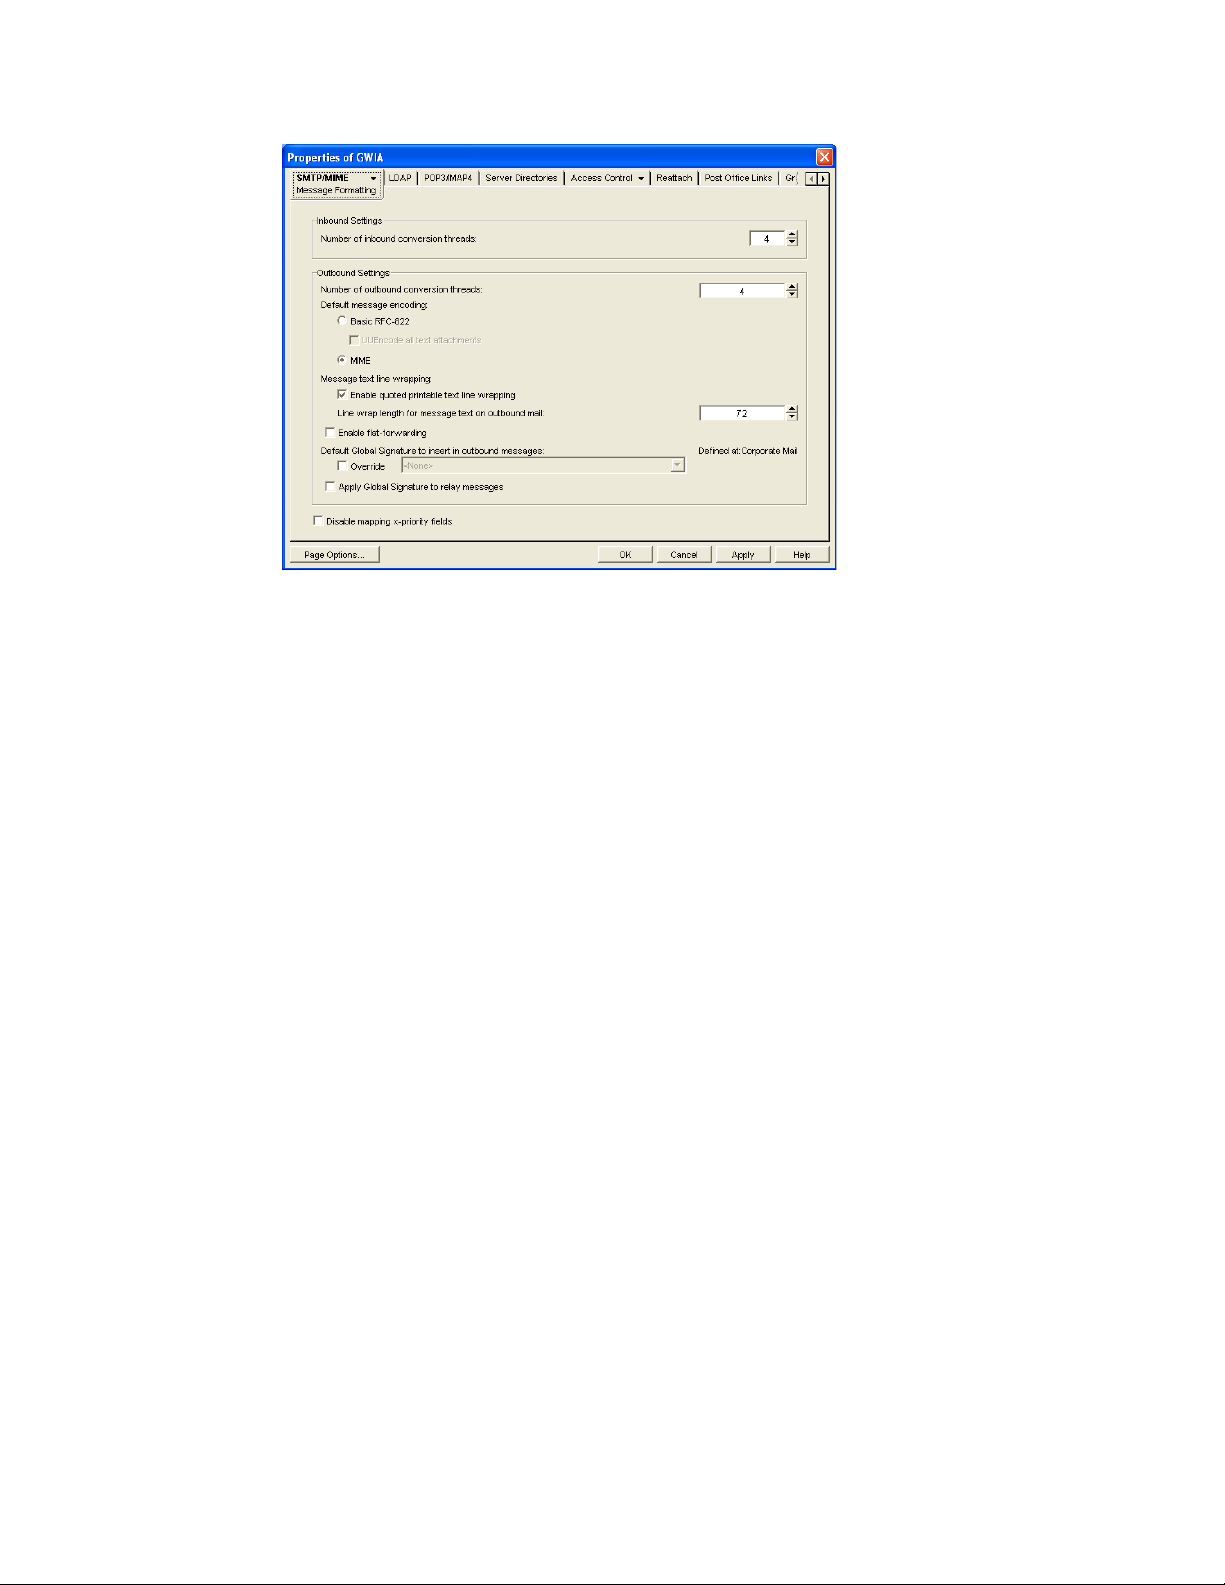
3 Fill in the fields:
Number of Inbound Conversion Threads: The inbound conversion threads setting lets you
specify the number of threads that convert inbound messages from MIME or RFC-822 format
to the GroupWise message format. The default setting is 4. This setting corresponds with the
Internet Agent’s /rt switch.
Number of Outbound Conversion Threads: The outbound conversion threads setting lets
you specify the number of threads that convert outbound messages from the GroupWise
message format to MIME or RFC-822 format. The default setting is 4. This setting corresponds
with the Internet Agent’s /st switch.
novdocx (en) 11 December 2007
Default Message Encoding: The default message encoding setting lets you select the
encoding method for your outbound Internet messages. You can select either Basic RFC-822
formatting or MIME formatting. MIME is the default message format. This setting corresponds
with the Internet Agent’s /mime switch.
If you select the Basic RFC-822 option, you can decide whether or not to have the Internet
Agent UUEncode all ASCII text attachments to RFC-822 formatted messages. By default, this
option is turned off, which means ASCII text attachments are included as part of the message
body. This setting corresponds with the Internet Agent’s /uueaa switch.
Message Text Line Wrapping: The Quoted Printable text line wrapping setting lets you
select the Quoted Printable MIME standard for line wrapping, which provides “soft returns”.
By default this setting is turned on. If you turn the setting off, MIME messages go out as plain
text and wrap text with “hard returns” according to the number of characters specified in the
line wrap length setting. This setting corresponds with the Internet Agent’s /nqpmt switch.
The Line Wrap Length for Message Text on Outbound Mail setting lets you specify the line
length for outgoing messages. This is useful if the recipient’s e-mail system requires a certain
line length. The default line length is 72 characters. This setting corresponds with the Internet
Agent’s /wrap switch.
Enable Flat Forwarding: Select this option to automatically strip out the empty message that
is created when a message is forwarded without adding text, and retain the original sender of
the message, rather than showing the user who forwarded it. This facilitates users forwarding
messages from GroupWise to other e-mail accounts. Messages arrive in the other accounts
724 GroupWise 7 Administration Guide
showing the original senders, not the users who forwarded the messages from GroupWise. This
setting corresponds with the Internet Agent’s /flatfwd switch.
Default Global Signature to Insert in Outbound Messages: Displays the default global
signature for your GroupWise system as described in Section 14.3.2, “Selecting a Default
Global Signature for All Outgoing Messages,” on page 220. If you want this Internet Agent to
append a different global signature, select Override, then select the desired signature.
Apply Global Signature to Relay Messages: Select this option to append the global signature
to messages that are relayed through your GroupWise system (for example, messages from
POP and IMAP clients) in addition to messages that originate within your GroupWise system.
This setting corresponds with the Internet Agent’s /relayaddsignature switch.
Disable Mapping X-Priority Fields: Select this option to disable the function of mapping an
x-priority MIME field to a GroupWise priority for the message. By default, the Internet Agent
maps x-priority 1 and 2 messages as high priority, x-priority 3 messages as normal priority, and
x-priority 4 and 5 as low priority in GroupWise. This setting corresponds with the Internet
Agent’s /nomappriority switch.
4 Click OK to save the changes.
novdocx (en) 11 December 2007
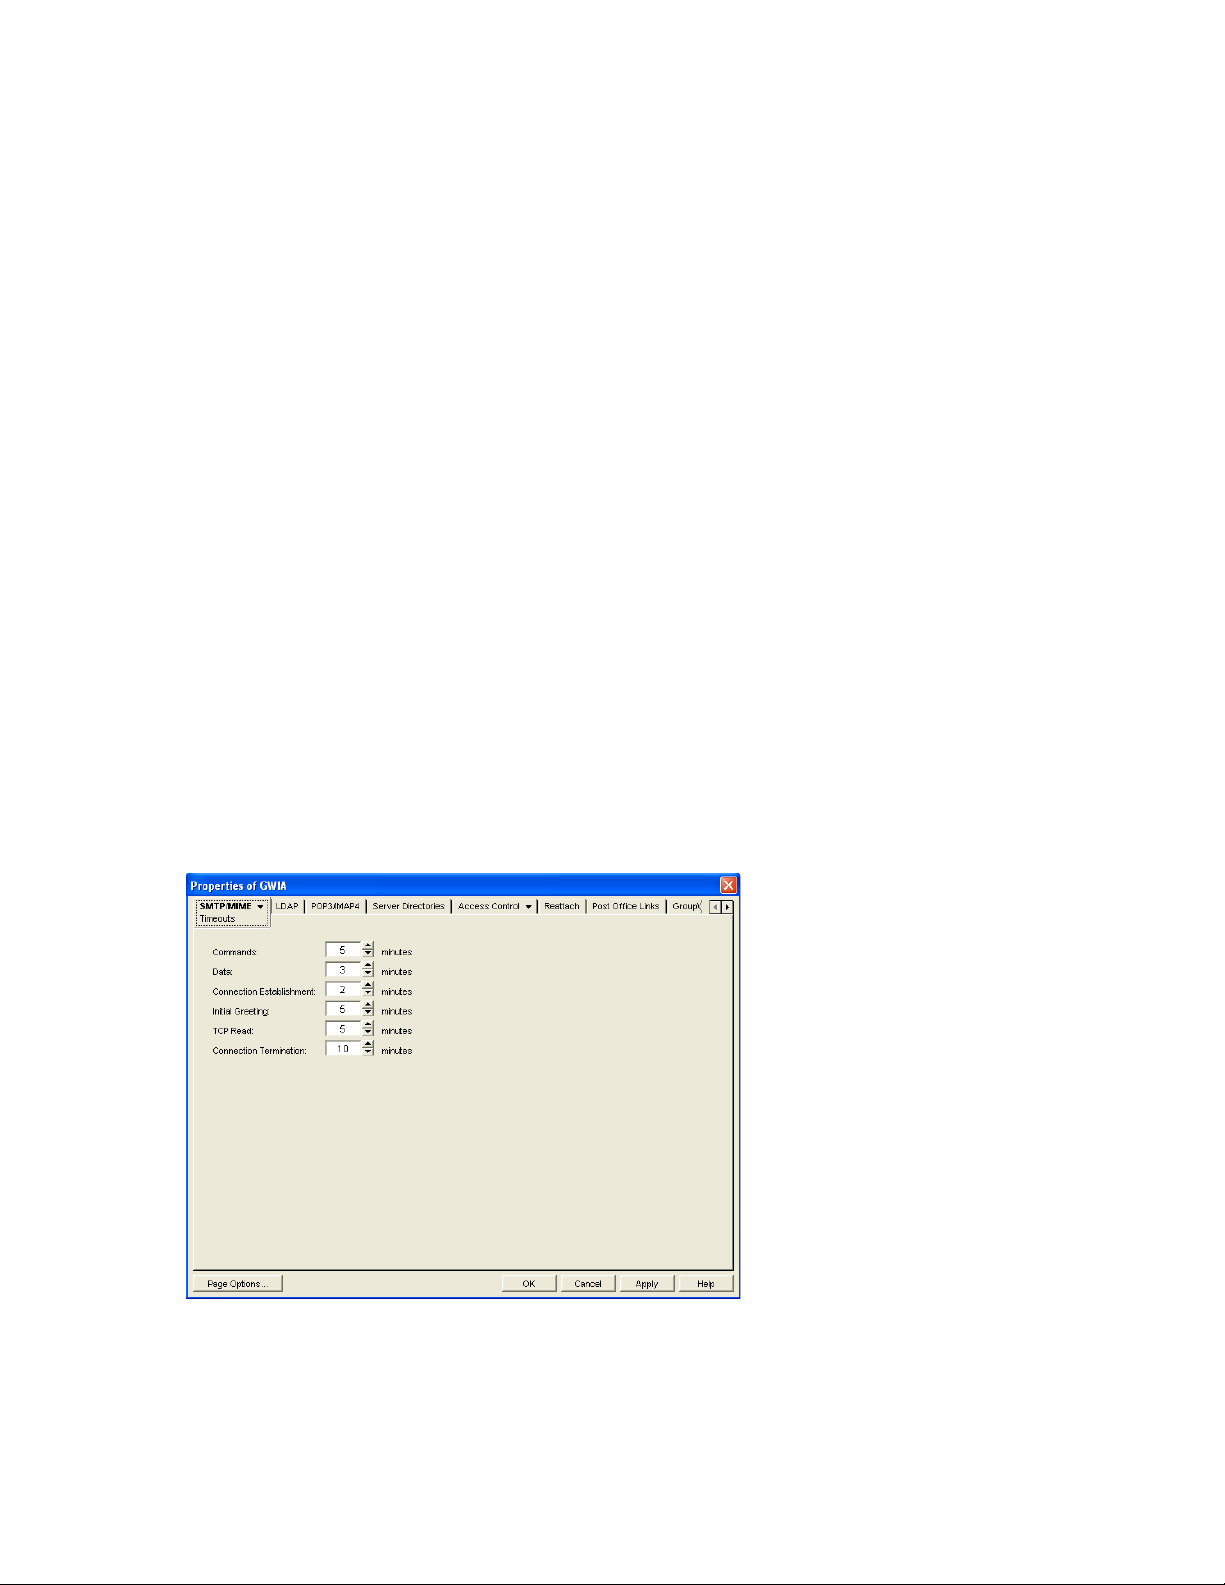
46.1.5 Configuring the SMTP Timeout Settings
The SMTP Timeout settings specify how long the Internet Agent’s SMTP service waits to receive
data that it can process. After the allocated time expires, the Internet Agent might give a TCP read/
write error.
To configure the SMTP timeout settings:
1 In ConsoleOne, right-click the Internet Agent object, then click Properties.
2 Click SMTP/MIME > Timeouts.
3 Fill in the fields:
Commands: The Commands setting lets you specify how long the Internet Agent waits for an
SMTP command. The default is 5 minutes. This setting corresponds with the Internet Agent’s /
tc switch.
Configuring Internet Services 725
Data: The Data setting lets you specify how long the Internet Agent waits for data from the
receiving host. The default is 3 minutes. This setting corresponds with the Internet Agent’s /td
switch.
Connection Establishment: The Connection Establishment setting lets you specify how long
the Internet Agent waits for the receiving host to establish a connection. The default is 2
minutes. This setting corresponds with the Internet Agent’s /te switch.
Initial Greeting: The Initial Greeting setting lets you specify how long the Internet Agent
waits for the initial greeting from the receiving host. The default is 5 minutes. This setting
corresponds with the Internet Agent’s /tg switch.
TCP Read: The TCP Read setting lets you specify how long the Internet Agent waits for a
TCP read. The default is 5 minutes. This setting corresponds with the Internet Agent’s /tr
switch.
Connection Termination: The Connection Termination setting lets you specify how long the
Internet Agent waits for the receiving host to terminate the connection. The default is 10
minutes. This setting corresponds with the Internet Agent’s /tt switch.
4 Click OK to save the changes.
novdocx (en) 11 December 2007
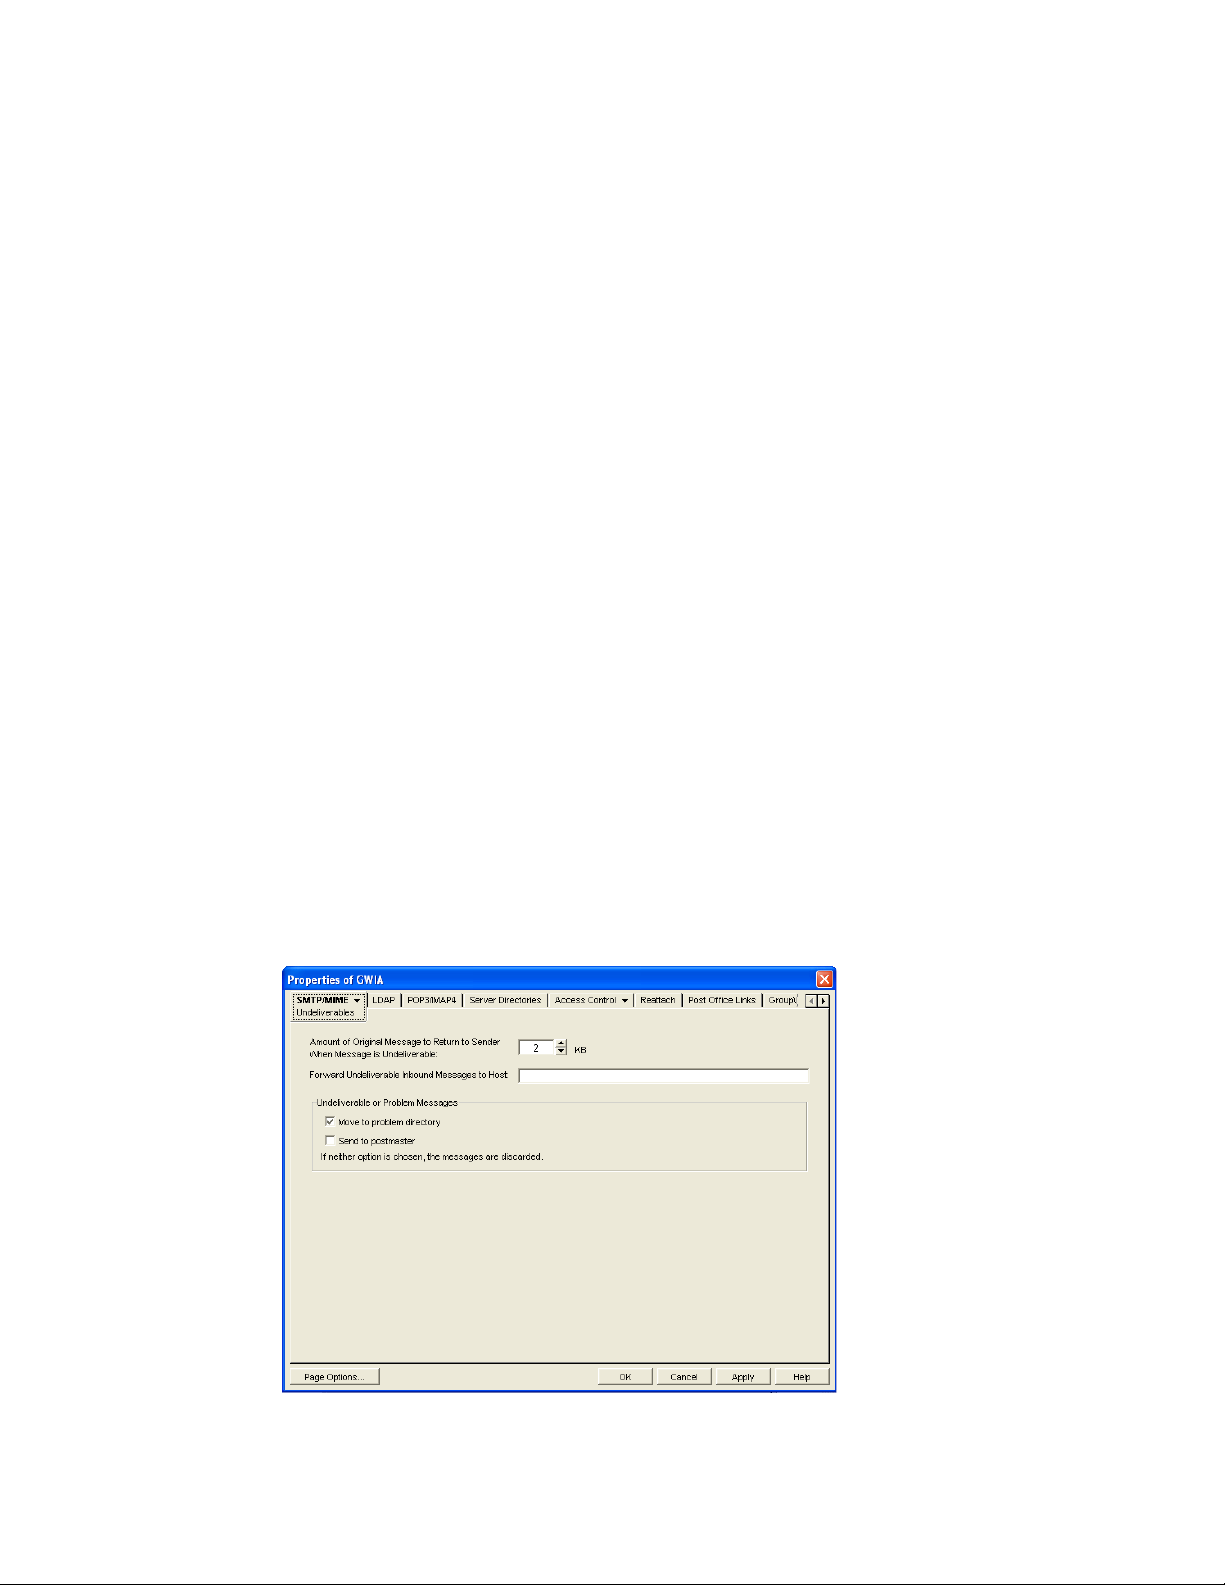
46.1.6 Determining What to Do with Undeliverable Messages
You can configure how the Internet Agent handles messages that it cannot deliver:
How much of the message to return to the sender
Another host to forward the message to (where it might be deliverable)
Whether to move the message to the GroupWise problem directory or send it to the GroupWise
administrator
To set the Internet Agent undeliverable message options:
1 In ConsoleOne, right-click the Internet Agent object, then click Properties.
2 Click SMTP/MIME > Undeliverables.
726 GroupWise 7 Administration Guide

3 Fill in the fields:
Amount of Original Message to Return to Sender When Message is Undeliverable: This
setting lets you specify how much of the original message is sent back to the sender when a
message is deemed undeliverable. By default, only 2 KB of the original message is sent back.
This setting corresponds with the Internet Agent’s /mudas switch.
Forward Undeliverable Inbound Messages to Host: This setting lets you specify a host to
which undeliverable messages are forwarded. This might be useful if you use UNIX sendmail
aliases.
When an IP address is specified rather than a DNS hostname, the IP address must be
surrounded by square brackets [ ]. For example, [172.16.5.18].
This setting corresponds with the Internet Agent’s /fut switch.
Undeliverable or Problem Messages: This setting lets you specify what you want the Internet
Agent to do with problem messages. A problem message is an inbound or outbound message
that the Internet Agent cannot convert properly. By default, problem messages are discarded. If
you want to save problem messages, specify whether to move the messages to the problem
directory (gwprob), send them to the postmaster, or do both. This setting corresponds with the
Internet Agent’s /badmsg switch.
novdocx (en) 11 December 2007
IMPORTANT: Despite the field name (Undeliverable or Problem Messages), this setting does
not apply to undeliverable messages.
4 Click OK to save the changes.
46.1.7 Configuring SMTP Dial-Up Services
SMTP dial-up services can be used when you don’t require a permanent connection to the Internet
and want to periodically check for mail messages queued for processing. Perform the following
tasks in order to use SMTP dial-up services:
“Setting up Internet Dial-Up Software” on page 728
“Enabling Dial-Up Services” on page 728
“Creating a Dial-Up Schedule” on page 729
Setting up Internet Dial-Up Software
The Internet Agent requires routing software to make the dial-up connection to the Internet. The
Internet Agent cannot make this connection itself; it simply creates packets to hand off to the routing
software.
For information about configuring the Internet Agent’s dial-up feature with routing software, see
TID 10007366 in the Novell Support Knowledgebase (http://www.novell.com/support/
supportcentral).
Enabling Dial-Up Services
After you have the appropriate routing software in place, you can enable and configure the Internet
Agent’s dial-up services.
1 In ConsoleOne, right-click the Internet Agent object, then click Properties.
2 Click SMTP/MIME > Dial-Up Settings.
Configuring Internet Services 727
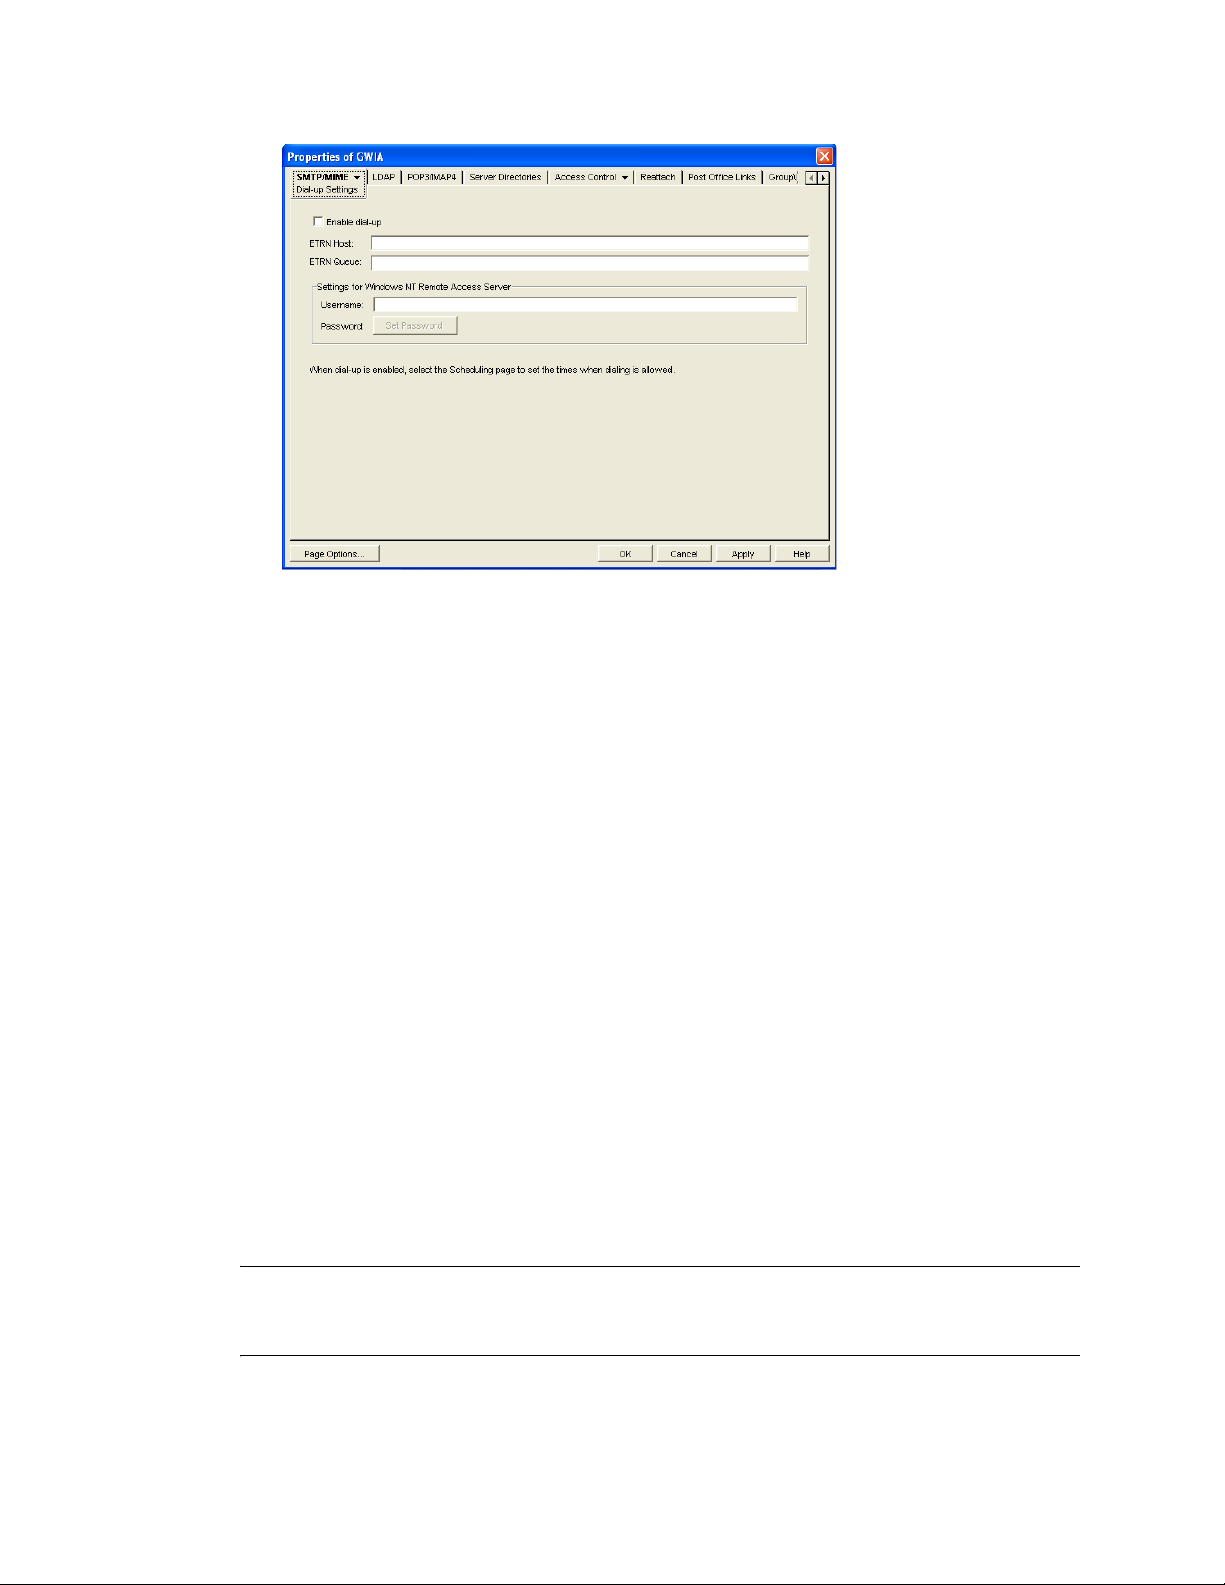
3 Fill in the fields:
Enable Dial-Up: Turn on this option to allow the Internet Agent to support SMTP dial-up
service. This option is off by default. This setting corresponds with the Internet Agent’s /
usedialup switch.
ETRN Host: Specify the IP address, or DNS hostname, of the mail server (where your mail
account resides) at your Internet Service Provider. You should obtain this address from your
Internet Service Provider. This setting corresponds with the Internet Agent’s /etrnhost switch.
ETRN Queue: Specify your e-mail domain as provided by your Internet Service Provider (for
example, novell.com). This setting corresponds with the Internet Agent’s /etrnqueue switch.
novdocx (en) 11 December 2007
Username: The Username setting applies only if you are using a Windows Remote Access
Server (RAS) and the Internet Agent is not running on the same server as the RAS.
Specify the RAS Security username. This setting corresponds with the Internet Agent’s /
dialuser switch.
Password: The Password setting applies only if you are using a Windows Remote Access
Server (RAS) and the Internet Agent is not running on the same server as the RAS.
Specify the RAS Security user’s password. This setting corresponds with the Internet Agent’s /
dialpass switch.
4 Click OK to save the changes.
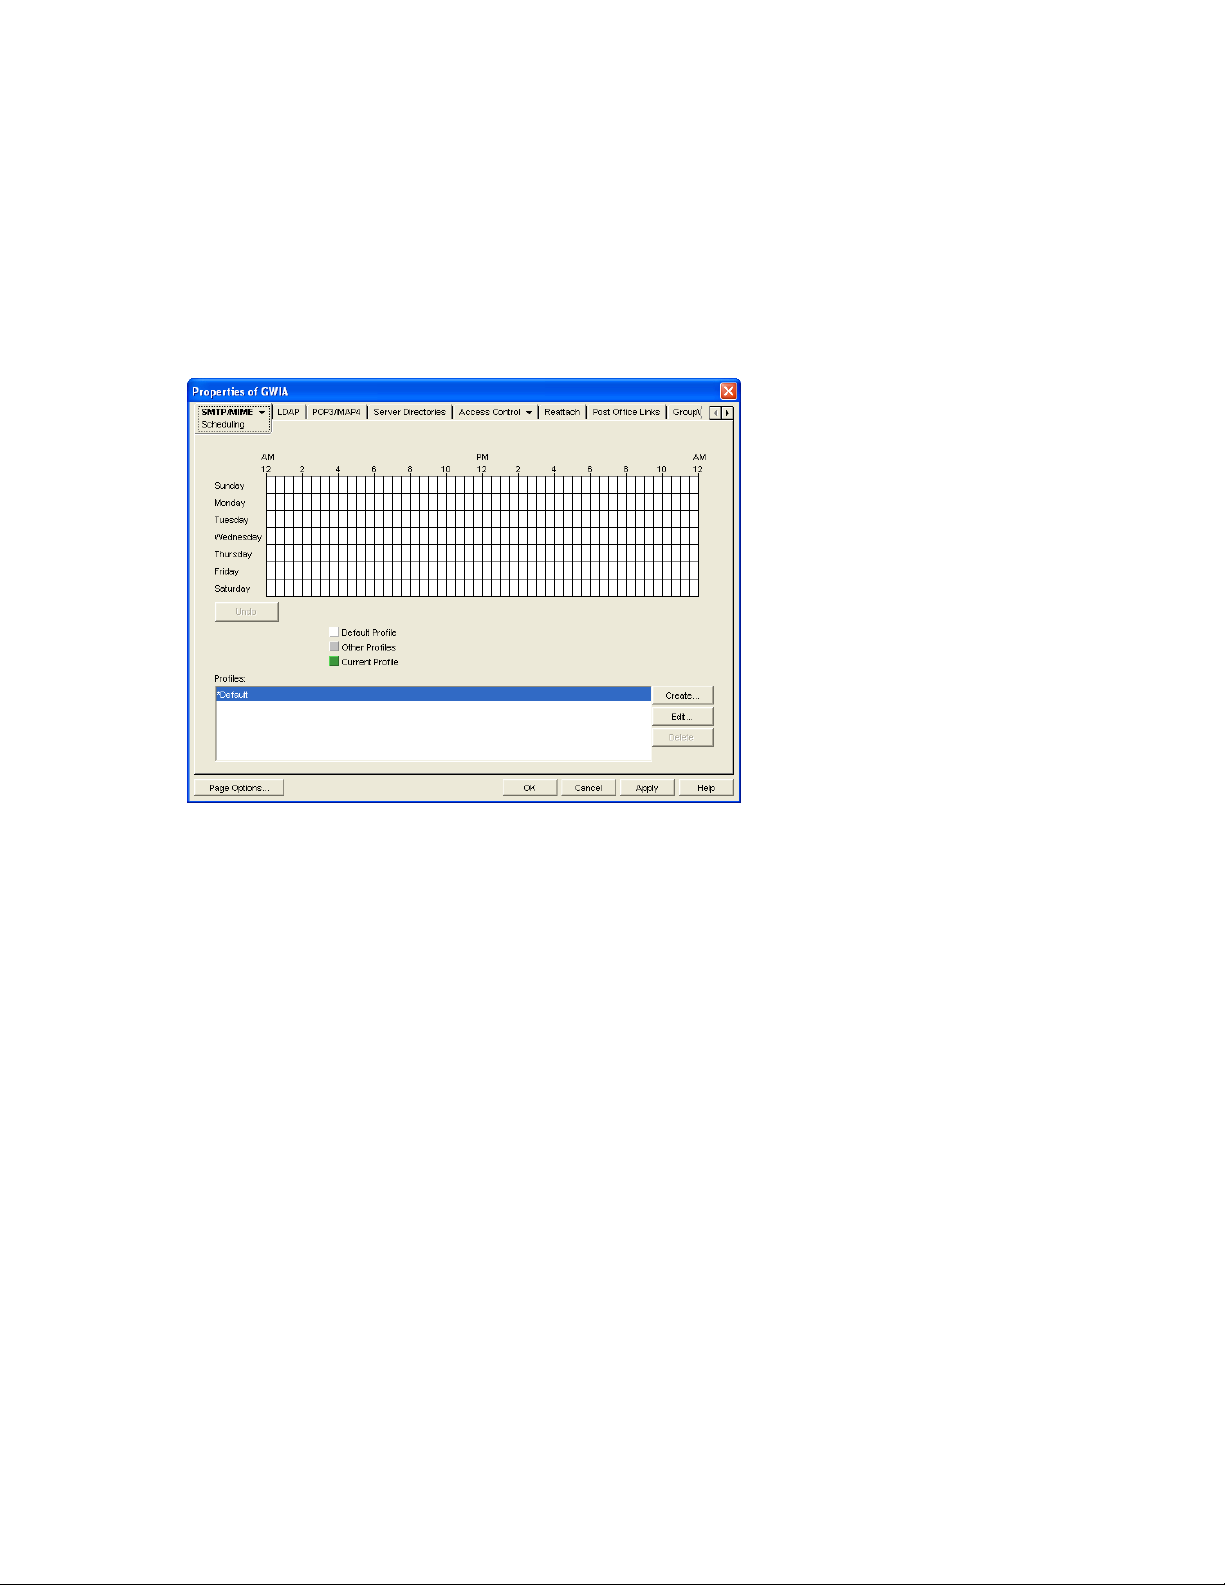
Creating a Dial-Up Schedule
After you enable the Internet Agent to use a dial-up connection, you need to schedule the times
when the Internet Agent initiates a connection.
NOTE: When the Internet Agent initiates a connection, it simply passes TCP/IP packets to the
routing service that makes the Internet connection. The routing software, not the Internet Agent, is
responsible for the actual dial-up or timeout.
The Internet Agent uses profiles to enable you to assign different dial-up criteria to different times.
For example, the default profile instructs the Internet Agent to initiate a dial-up connection
728 GroupWise 7 Administration Guide
whenever an outgoing message is placed in its send queue. However, during the night, you might
want the Internet Agent to initiate a connection only after 30 outgoing messages have been queued.
In this case, you could create a profile that requires 30 messages to be queued and then apply the
profile between the hours of 11 p.m. and 7 a.m. each day.
To create a dial-up schedule:
1 In ConsoleOne, right-click the Internet Agent object, then click Properties.
2 Click SMTP/MIME > Scheduling.
novdocx (en) 11 December 2007
3 Continue with the desired task:
“Applying a Profile” on page 730
“Creating a Profile” on page 730
“Editing a Profile” on page 730
“Deleting a Profile” on page 731
Applying a Profile
1 Select the profile in the Profiles list.
2 Click the desired hour.
or
Drag to select multiple hours.
3 Click Apply to save the changes or click OK to save the changes and close the page.
Creating a Profile
1 Click Create to display the Create Profile dialog box.
2 Fill in the fields:
Name: Specify a unique name for the profile. It must be different than any other name in the
Profile list.
Description: If desired, specify a description for the profile.
Configuring Internet Services 729

Queue Thresholds: The queue thresholds determine the criteria for the Internet Agent to
initiate a dial-up connection to send messages. The settings do not apply to receiving messages
(see Dial Parameters below).
You can base the criteria on the number of messages in the send queue, the total size of the
messages in the send queue, or the number of minutes to wait between connections. If
necessary, you can use a combination of the three criteria.
For example, if you set Messages to 20, Kilobytes to 100, and Minutes to 60, the Internet Agent
instructs the routing service to initiate a dial-up connection when 20 messages have
accumulated in the queue, when the total size of the messages in the queue reaches 100 K, or
when 60 minutes have passed since the last connection.
Dial Parameters: The dial parameters serve two purposes: 1) the Internet Agent passes the
Redial Interval and Idle Time Before Hangup parameters to the routing service to use when
initiating a connection to send outbound messages, and 2) the Internet Agent uses the Polling
Interval parameter to determine how often the routing service should initiate a connection to
check for inbound messages. The Polling Interval parameter is required.
Specify the interval between redials (default is 30 seconds), the amount of time to wait before
hanging up when there are no messages to process (default is 60 seconds), and the interval
between polling for inbound messages (default is 0 minutes).
novdocx (en) 11 December 2007
3 Click OK to add the profile to the Profiles list.
4 To apply the profile to a block of time, see “Applying a Profile” on page 730.
Editing a Profile
1 Select the profile you want to edit, then click Edit to display the Edit Profile dialog box.
2 Modify the desired fields. For information about each of the fields, click the Help button in the
Edit Profile dialog box or see “Creating a Profile” on page 730.
3 Click Apply to save the changes or click OK to save the changes and close the page.
Deleting a Profile
1 Select the profile you want to remove from the list, then click Delete.
2 Click Apply to save the changes or click OK to save the changes and close the page.
46.1.8 Enabling SMTP Relaying
You can enable the Internet Agent to function as a relay host for Internet messages. The Internet
Agent can relay messages received from all Internet hosts, or you can select specific hosts for which
you allow it to relay.
1 In ConsoleOne, right-click the Internet Agent object, then click Properties.
2 Click Access Control > SMTP Relay Settings.
730 GroupWise 7 Administration Guide

3 Under SMTP Relay Defaults, select whether you want to allow or prevent message relaying.
If you prevent message relaying, you can define exceptions that allow message relaying for
specific Internet hosts. This can also be done if you allow message relaying. We suggest that
you select the option that enables you to define the fewest exceptions.
4 To prevent relaying of messages larger than a specific size (regardless of the SMTP Relay
Defaults setting), enable the Prevent Messages Larger Than option and specify the size
limitation.
5 To define an exception, click Create to display the New Internet Address dialog box.
novdocx (en) 11 December 2007
6 Fill in the following fields:
From: Specify the Internet address that must be in the message’s From field for the exception
to be applied.
To : Specify the Internet address that must be in the message’s To field for the exception to be
applied. This is also the address that the message is relayed to (in the case of an Allow
exception).
In both the From and To fields, you can use either an IP address or a DNS hostname, as shown
in the following examples:
novell.com
10.1.1.10
You can enter a specific address, as shown above, or you can use wildcards and IP address
ranges to specify multiple addresses, as follows:
*.novell.com
10.1.1.*
10.1.1.10-15
7 Click OK to add the exception to the list.
Configuring Internet Services 731

8 When finished defining exceptions, click OK to save your changes.
46.1.9 Using a Route Configuration File
The Internet Agent supports the use of a route configuration file (route.cfg) to specify
destination SMTP hosts. This can be useful in situations such as the following:
You are using a relay host for outbound messages. However, you want some outbound
messages sent directly to the destination host rather than the relay host. Whenever a message is
addressed to a user at a host that is included in the route.cfg file, the Internet Agent sends
the message directly to the destination host rather than the relay host.
You need to send messages to SMTP hosts that are unknown to the public Domain Name
Servers. The route.cfg file acts much like a hosts file to enable the Internet Agent to
resolve addresses not listed in DNS.
The Internet Agent uses external DNS servers but the server it is running on has an internal IP
address. This prevents the Internet Agent from querying external DNS servers for its own
internal domain names and receiving Host Down errors from the external DNS servers.
You want to route messages through an SMTP host that checks for viruses (or performs some
other task) before routing them to the destination host.
novdocx (en) 11 December 2007
To set up a route.cfg file:
1 Create the route.cfg file as a text file in the domain\wpgate\gwia directory.
2 Add an entry for each SMTP host you want to send to directly. The entry format is:
hostname address
where address is either an alternative hostname or an IP address. For example:
novell.com gwia.novell.com
unixbox [172.16.5.18]
Make sure to include a hard return after the last entry. In addition, if you use an IP address, it
must be included in square brackets, as shown in the second example.
3 Save the route.cfg file.
46.1.10 Customizing Delivery Status Notifications
The Internet Agent returns status messages for all outbound messages. For example, if a GroupWise
user sends a message that the Internet Agent cannot deliver, the Internet Agent returns an
undeliverable message to the GroupWise user.
By default, the Internet Agent uses internal status messages. However, you can override the internal
status messages by using a status.xml file that includes the status messages you want to use.
1 Open the appropriate statusxx.xml file, located in the domain\wpgate\gwia
directory.
The domain\wpgate\gwia directory includes a statusxx.xml file for each language
included on your GroupWise 7 Administrator CD (for example, statusus.xml,
statusde.xml, and statusfr.xml).
2 Make the modifications you want.
732 GroupWise 7 Administration Guide

The following sample code shows the elements and default text of the Undeliverable Message
status:
<STATUS_MESSAGE type="undeliverableMessage" xml:lang="en-US">
<SUBJECT>Message status - undeliverable</SUBJECT>
<MESSAGE_BODY>
<TEXT>\r\nThe attached file had the following undeliverable
recipient(s):\r\n</TEXT>
<RECIPIENT_LIST format="\t%s\r\n"
<SESSION_TRANSCRIPT>
<TEXT>\r\nTranscript of session follows:\r\n<TEXT>
</SESSION_TRANSCRIPT>
<ATTACH_ORIGINAL_MSG></ATTACH_ORIGINAL_MSG>
</MESSAGE_BODY>
</STATUS_MESSAGE>
You can modify text in the <SUBJECT> tag or in the <TEXT> tags.
You can add additional <TEXT> tags in the <MESSAGE_BODY>.
You can remove tags to keep an element from being displayed. For example, you could remove
the <ATTACH_ORIGINAL_MSG></ATTACH_ORIGINAL_MSG> tags to keep the original
message from displaying.
You can use the following format characters and variables:
novdocx (en) 11 December 2007
\t: tab
\r: carriage return
\n: line feed
%s: recipient name variable
3 Save the file, renaming it from statusxx.xml to status.xml.
4 Restart the Internet Agent.
The Internet Agent now uses the status messages defined in the status.xml file rather than its
internal status messages.
46.1.11 Managing MIME Messages
Multipurpose Internet Mail Extensions, or MIME, provides a means to interchange text in languages
with different character sets. Multimedia e-mail can be sent between different computer systems that
use the SMTP protocol. MIME allows you to send and receive e-mail messages containing:
Images
Sounds
UNIX Tar Files
PostScript*
FTP-able File Pointers
Non-ASCII Character Sets
Enriched Text
Nearly any other file
Configuring Internet Services 733

Because MIME handles such a variety of file types, you might need to customize aspects of MIME
for your users.
“Customizing MIME Preamble Text” on page 734
“Customizing MIME Content-Type Mappings” on page 735
Customizing MIME Preamble Text
An ASCII file called preamble.txt is installed in the Internet Agent gateway directory
(domain\wpgate\gwia). This file, which is included with any MIME multipart message, is
displayed when the message recipient lacks a MIME-compliant mail reader.
The content of the preamble.txt file is a warning, in English, that the file is being sent in MIME
format. If the recipient cannot read the message, he or she needs to either use a MIME-compliant
mail reader or reply to the sender and request the message not be sent in MIME format.
We recommend that you use the preamble.txt file so that those who read MIME messages
coming from your GroupWise system and who lack MIME-compliant mail readers can understand
why they cannot read the message and can take corrective action.
novdocx (en) 11 December 2007
If you choose to modify the preamble.txt file, be aware of the following considerations:
The maximum file size is 1024 bytes (1 KB)
This file is read by the Internet Agent when the Internet Agent starts, so if you change the file,
you must restart the Internet Agent.
The Internet Agent’s gateway directory also contains a preamble.all file. The
preamble.all file includes the text of preamble.txt translated into several languages. If
you anticipate that your users will be sending mail to non-English speaking users, you might want to
copy the appropriate language sections from the preamble.all file to the preamble.txt file.
The 1024-byte limit on the size of the preamble.txt file still applies, so make sure that the file
does not exceed 1024 bytes.
Customizing MIME Content-Type Mappings
By default, the GroupWise client determines the MIME content-type and encoding for message
attachments. If, for some reason, the GroupWise client cannot determine the appropriate MIME
content-type and encoding for an attachment, the Internet Agent must determine the content-type
and encoding.
The Internet Agent uses a mimetype.cfg file to map attachments to the appropriate MIME
content types. Based on an attachment’s content type, the Internet Agent encodes the attachment
using quoted-printable, Base64, or BinHex. Generally, quoted-printable is used for text-based files,
Base64 for application files, and BinHex for Macintosh files.
The mimetype.cfg file includes mappings for many standard files. If necessary, you can modify
the file to include additional mappings. If an attachment is sent which does not have a mapping in
the file, the Internet Agent chooses quoted-printable, BinHex or Base64 encoding.
The mimetype.cfg file is also used for RFC-822 attachments, but UUencode or BinHex
encoding is used regardless of the mapped content type.
734 GroupWise 7 Administration Guide

The mimetype.cfg file is located in the domain\wpgate\gwia directory. The following
section provide information you need to know to modify the file:
“Mapping Format” on page 735
“File Organization” on page 736
Mapping Format
Each mapping entry in the file uses the following format:
content-type .ext|dtk-code|mac-ttttcccc [/parms] ["comment"]
Element Description
content-type The MIME content type to which the file type is being mapped (for
example, text/plain). You can omit the content-type only if you use the /
parms element to explicitly define the encoding scheme for the file
type.
.ext|dtk-code|mac-ttttcccc The .ext element, dtk-code element, and mac-ttttcccc element are
mutually exclusive. Each entry contains only one of the elements.
novdocx (en) 11 December 2007
.ext: The file type extension being mapped to the content type
(for example, .txt).
dtk-code: The detect code being mapped to the content type (for
example, dtk-1126). GroupWise assigns a detect code to each
attachment type.
mac-ttttcccc: The Macintosh file type and creator application
being mapped to the content type (for example, mac-textmswd).
The first four characters (tttt) are used for the file type. The last
four characters (cccc) are used for the creator application. You
can use ???? for the creator portion (mac-text????) to indicate a
certain file type created by any application. You can use ???? in
both portions (mac-????????) to match any file type created by
any application.
/parms Optional parameters that can be used to override the default encoding
assigned to the MIME content type. Possible parameters are:
/alternate
/parallel
/base64
/quoted-printable
/quoted-printable-safe
/uuencode
/plain
/binhex
/nofixeol
/force-ext
/noconvert
/apple-single
/apple-double
Configuring Internet Services 735

Element Description
"comment" Optional content description
File Organization
The mimetype.cfg file contains the following four sections:
[Parameter-Override]
[Mac-Mappings]
[Detect-Mappings]
[Extension-Mappings]
[Parameter-Override]
The [Parameter-override] section take priority over other sections. You can use this section to force
the encoding scheme for certain file types. This section also contains defaults for sending various
kinds of multipart messages. This is how the Internet Agent knows to put attachments into MIME
Alternate/Parallel multiparts.
novdocx (en) 11 December 2007
[Mac-Mappings]
The [Mac-mappings] section defines mappings for Macintosh file attachments. The following is a
sample entry:
application/msword mac-wdbnmswd "Word for Macintosh"
Macintosh files have a type and creator associated with them. The first four characters are used for
the type and the last four characters are used for the creator application.
In the above example, the type is wdbn and the creator application is mswd. When a user attaches a
Macintosh file to a message, the Internet Agent uses the appropriate entry in the [Map-mappings]
section to map the file to a MIME content type and then encode the file according to the assigned
encoding scheme. Unless otherwise specified by the /parms element, BinHex 4.0 is used for the
encoding. The following example shows how you can use the /parms element to change the
encoding from the default (BinHex) to Base64:
application/msword mac-wdbnmswd /base64 "Word for Macintosh"
If necessary, you can use ???? for the creator portion (mac-text????) to indicate a certain file type
created by any application. Or, you can use ???? in both portions (mac-????????) to match any file
type created by any application. For example:
application/octet-stream mac-???????? /base64 "Mac Files"
This causes all Macintosh files to be encoded using Base64 rather than BinHex.
[Detect-Mappings]
GroupWise attempts to assign each attachment a detect code based on the attachment’s file type. The
[Detect-mappings] section defines the mappings based on these detect codes. The following is a
sample entry:
application/msword dtk-1000 "Microsoft Word 4"
736 GroupWise 7 Administration Guide

The Internet Agent uses the detect code to map to a MIME content type and then encode the file
according to the assigned encoding scheme. If there is no mapping specified or if the file type cannot
be determined, one of the other mapping methods, such as Extension-Mappings, are used. The
detect codes associated with attachments are GroupWise internal codes and cannot be changed.
[Extension-Mappings]
If a mapping could not be made based on the entries in the [Mac-mappings] and [Detect-mappings]
section, the Internet Agent uses the [Extension-mappings] section. The [Extension-mappings]
section defines mappings based on the attachment’s file extension. The following is a sample entry:
application/pdf .pdf
46.2 Configuring LDAP Services
The Internet Agent supports the Lightweight Directory Access Protocol (LDAP) standard. With
LDAP enabled, the GroupWise Internet Agent functions as an LDAP server, allowing LDAP queries
for GroupWise user information contained in the GroupWise Address Book. You can also configure
which GroupWise fields (Given Name, Last Name, Phone, and E-Mail) are visible to an LDAP
query.
novdocx (en) 11 December 2007
Section 46.2.1, “Enabling LDAP Services,” on page 737
Section 46.2.2, “Configuring Public Access,” on page 738
IMPORTANT: For users to perform LDAP searches for GroupWise user information, they need to
define the GroupWise Address Book as an LDAP directory in their e-mail client. When doing so,
they use the Internet Agent’s DNS hostname or IP address for the LDAP server address
46.2.1 Enabling LDAP Services
To enable and configure LDAP services for mail client access:
1 In ConsoleOne, right-click the Internet Agent object, then click Properties.
2 Click LDAP > Settings to display the LDAP Settings page.
Configuring Internet Services 737

3 Fill in the fields:
novdocx (en) 11 December 2007
Enable LDAP Service: Turn on this option to allow LDAP queries. LDAP service is on by
default. This setting corresponds to the Internet Agent’s /ldap switch.
Number of LDAP Threads: The LDAP Threads setting lets you specify the maximum
number of threads that process LDAP queries. The default is 10 threads. This setting
corresponds with the Internet Agent’s /ldapthrd switch.
LDAP Context: Use this option to limit the directory context in which the LDAP server
searches. For example, if you want to limit LDAP searches to the Novell organization container
located under the United States country container, enter O=Novell,C=US. This setting
corresponds with the Internet Agent’s /ldapcntxt switch.
If you enter an LDAP context, you must make sure that users, when defining the directory in
their e-mail client, enter the same context (using the identical text you did) in the Search Base
or Search Root field.
You can leave the settings empty in both locations.
LDAP Referral URL: Use this option to define a secondary LDAP server to which you can
refer an LDAP query if the query fails to find a user or address in your GroupWise system. For
this option to work, the requesting Web browser must be able to track referral URLs. This
setting corresponds with the Internet Agent’s /ldaprefurl switch.
4 Continue with the next section, Configuring Public Access.
46.2.2 Configuring Public Access
After you’ve enabled LDAP services, you can configure which GroupWise fields are visible to
LDAP searches and also set search restrictions. By default, no fields are visible.
1 If the Internet Agent object’s property page is not open, right-click the Internet Agent object,
then click Properties.
2 Click Access Control > LDAP Public Settings.
738 GroupWise 7 Administration Guide

3 Fill in the fields:
LDAP Defaults: Select one of the following defaults for public access: Allow Access or
Prevent Access. If you select Allow Access, the GroupWise fields (in the Visible Fields lists)
default to Visible for an LDAP search. If you select Prevent Access, the GroupWise fields
default to Not Visible.
Visible Fields: You can override the default visibility for a GroupWise field (Given Name, Last
Name, Phone, and E-Mail) by selecting the field and then clicking the appropriate visibility
button (Visib le or Not Visible). For example, if you’ve selected Allow Access as the LDAP
default, but you don’t want users’ telephone numbers to be visible, you can mark the Phone
field as Not Visible.
Number of Entries to Return: Select the maximum number of entries to return. The default is
100.
How Many Seconds to Search: Select the maximum amount of time (in seconds) you want
the Internet Agent to spend searching. The default is 120 seconds.
novdocx (en) 11 December 2007
Idle Minutes before Timeout: Specify the number of minutes to allow the search to continue
without finding a matching address entry. The default is 5 minutes.
4 Click OK to save the changes.
46.3 Configuring POP3/IMAP4 Services
The Post Office Protocol 3 (POP3) and the Internet Message Access Protocol 4 (IMAP4) are
standard messaging protocols for the Internet. The GroupWise Internet Agent can function as a
POP3 or an IMAP server, allowing access to the GroupWise domain database and message store.
With POP3 or IMAP server functionality enabled, GroupWise users can download their messages
from GroupWise to any POP3/IMAP4-compliant Internet e-mail client. To send messages, POP3/
IMAP4 clients can identify the Internet Agent as their SMTP server.
Complete the instructions in the following sections to set up POP3/IMAP4 service:
Section 46.3.1, “Enabling POP3/IMAP4 Services,” on page 740
Section 46.3.2, “Configuring Post Office Links,” on page 741
Configuring Internet Services 739

Section 46.3.3, “Giving POP3 or IMAP4 Access Rights to Users,” on page 743
Section 46.3.4, “Setting Up an E-Mail Client for POP3/IMAP4 Services,” on page 743
NOTE: Internal IMAP clients can connect directly to the POA, rather than connecting through the
Internet Agent, as described in Section 36.2.3, “Supporting IMAP Clients,” on page 490. Direct
connection provides faster access for internal IMAP clients.
46.3.1 Enabling POP3/IMAP4 Services
By default, POP3 service and IMAP4 service are enabled. To verify that the services are enabled and
configured appropriately:
1 In ConsoleOne, right-click the Internet Agent object, then click Properties.
2 Click POP3/IMAP4 > Settings to display the POP3/IMAP4 Settings page.
novdocx (en) 11 December 2007
3 Fill in the fields:
Enable POP3 Service: POP3 service is on by default. This setting allows POP3 downloads
from a GroupWise mailbox. It corresponds with the Internet Agent’s /pop3 switch.
Number of Threads for POP3 Connections: The POP3 threads setting lets you specify the
number of connections for POP3 download requests. The default is 10 threads. This setting
corresponds with the Internet Agent’s /pt switch.
Number of Threads for POP3 SSL Connections: Specify the maximum number of threads
you want the Internet Agent to use for secure POP3 connections. This setting corresponds with
the Internet Agent’s /sslpt switch.
Enable Intruder Detection: Select this option to instruct the Internet Agent to log POP3 email clients in through the POA so that the POA’s intruder detection can take effect, if it has
been configured in ConsoleOne (POA object > Client Access Settings > Intruder Detection).
This setting corresponds with the Internet Agent’s /popintruderdetect switch.
740 GroupWise 7 Administration Guide

Enable IMAP4 Service: IMAP4 service is on by default. This setting allows IMAP4
downloads and management of GroupWise messages. It corresponds with the Internet Agent’s /
imap4 switch.
Number of Threads for IMAP4 Connections: The IMAP4 threads setting lets you specify
the number of connections for IMAP4 requests. The default is 10 threads. This setting
corresponds with the Internet Agent’s /it switch.
Number of Threads for IMAP4 SSL Connections: Specify the maximum number of threads
you want the Internet Agent to use for secure IMAP4 connections. This setting corresponds
with the Internet Agent’s /sslit switch.
Maximum Number of Items to Read: Specify in thousands the maximum number of items
that you want the Internet Agent to download at one time. By default, the Internet Agent
downloads 10,000 items at a time. For example, specify 15 to download 15,000 items at a time.
This setting corresponds with the Internet Agent’s /imapreadlimit switch.
4 Click OK to save the changes.
The Post Office Agent (POA) can also be configured to support IMAP connections. You could offer
IMAP services internally through the POA to provide faster response time for internal users, as
described in Section 36.2.3, “Supporting IMAP Clients,” on page 490. However, IMAP is primarily
available on the POA to support several third-party applications that communicate with the POA
using IMAP, while the IMAP services provided by the Internet Agent provide the standard IMAP
access used by users across the Internet.
novdocx (en) 11 December 2007
46.3.2 Configuring Post Office Links
To function as a POP3/IMAP4 server, the Internet Agent requires access to each post office that
contains mailboxes that will be accessed by a POP3/IMAP4 client. The Internet Agent can connect
directly to the post office directory through a UNC path or mapped drive, or it can use a TCP/IP
connection to the Post Office Agent (POA). By default, the Internet Agent uses the access mode that
has been defined for the post office (Post Office object > GroupWise > Post Office Settings). If
necessary, you can change the way the Internet Agent links to a post office.
To change a post office link:
1 In ConsoleOne, right-click the Internet Agent object, then click Properties.
2 Click Post Office Links > Settings.
The Post Office list displays all post offices in your GroupWise system and how the Internet
Agent connects to them
Configuring Internet Services 741

3 In the Post Offices list, select the post office whose link information you want to change, then
click Edit Link to display the Edit Post Office Link dialog box.
novdocx (en) 11 December 2007
4 Define the following properties:
Access Mode: The access mode determines whether the Internet Agent uses client/server
access, direct access, or both client/server and direct access to connect to the post office. With
client/server and direct, the Internet Agent first tries client/server access; if client/server access
fails, it then tries direct access. You can also choose to use the same access mode currently
defined for the post office (on the Post Office object’s Post Office Settings). The current access
mode is displayed in the Current Post Office Access field.
Direct Access: When connecting to the post office in direct mode, the Internet Agent can use
the post office’s UNC path (as defined on the Post Office object’s Identification) or a mapped
path that you enter.
Client/Server Access: When connecting to the post office in client/server mode, the Internet
Agent must know the hostname (or IP address) and port number of the Post Office Agent
running against the post office.
5 Click OK.
6 Repeat Step 3 through Step 5 for each post office whose link you want to change.
742 GroupWise 7 Administration Guide

46.3.3 Giving POP3 or IMAP4 Access Rights to Users
Access to POP3/IMAP4 services is determined by the class of service in which they are a member.
By default, all users are members of the default class of service, which gives them POP3 and IMAP4
access.
If you changed the default class of service to exclude POP3 or IMAP4 access rights, or if you
defined additional classes of services that do not provide POP3 or IMAP4 access rights, you might
want to evaluate your currently defined classes of service to ensure that they provide the appropriate
POP3 or IMAP4 access. For details, see Section 47.1, “Controlling User Access to the Internet,” on
page 747.
46.3.4 Setting Up an E-Mail Client for POP3/IMAP4 Services
With the Internet Agent set up as a POP3 and/or IMAP4 server, you can configure users’ e-mail
clients to download messages from GroupWise mailboxes.
Most e-mail clients are configured differently. However, all Internet clients need to know the
following information:
novdocx (en) 11 December 2007
POP3/IMAP4 Server: The DNS hostname or IP address of the Internet Agent.
Login Name: The user’s GroupWise user ID. For POP3 clients, there are several user ID login
options you can use to control how the Internet Agent handles the user’s messages. For
example, you can limit how many messages are downloaded each session. For more
information, see “User ID Login Options” on page 743.
Password: The user’s existing GroupWise mailbox password. POP3/IMAP4 services requires
users to have passwords assigned to their mailboxes.
User ID Login Options
With POP3 clients, users can add the options listed in the table below to the login name (GroupWise
user ID) to control management of their mailbox messages. If used, these options override the POP3
settings assigned through the user’s class of service (see Section 47.1.2, “Creating a Class of
Service,” on page 748).
Login options are appended to the user ID name with a colon character (:) between the user ID name
and the switches:
Syntax: user_ID:switch
Example: User1:v=1
You can combine options by stringing them together after the user ID and the colon without any
spaces between the options:
Syntax: user_ID:switch1switch2
Example: User1:v=1sdl=10
The syntax for the user ID options is not case sensitive. Login options are not required. If you do not
want to include any login options, just enter the user ID name in the text box, or following the USER
command if you are using a Telnet application as your POP3 client.
Configuring Internet Services 743

Table 46-1 User ID Login Options
Option Explanation Example
novdocx (en) 11 December 2007
v=number between 1-31 The v option defines the POP3 client’s view number. If
multiple POP3 clients access the same GroupWise
mailbox, each client must use a different view number in
order to see a fresh mailbox.
For example, if two POP3 clients access a mailbox and the
first client downloads the unread messages, the second
client cannot download the messages unless it is using a
different view number than the first client.
If this option is not used, the default value is 1.
d The d option deletes the messages from the GroupWise
mailbox after they have been downloaded to the POP3
client.
p The p option purges the messages from the GroupWise
mailbox after they have been downloaded to the POP3
client.
t=1-1000 The t option defines the download period, starting with the
current day. For example, if you specify 14, then only
messages that are 14 days old or newer are downloaded.
If this option is not used, the default value is 30 days.
n The n option downloads messages in RFC-822 format
rather than the default MIME format.
m The m option downloads messages in MIME format. This
is the default.
User_ID:v=1
User_ID:d
User_ID:p
User_ID:t=14
User_ID:N
User_ID:M
s The s option presets the file size when the STAT command
is executed. If the user mailbox contains a lot of messages
or large messages, it can take a long time to calculate the
file size. With this option, the STAT command always
reports an artificial file size of 1, which can save time.
l=1-1000 The l option limits the number of messages to download for
each POP3 session. For example, if you want to limit the
number of messages to 10, you enter l=10. If this option is
not used, the default value is 100 messages.
User_ID:S
User_ID:L=10
46.4 Configuring Paging Services
The GroupWise Internet Agent includes the ability to send a GroupWise message to a pager through
an Internet paging service provider. The Internet Agent’s paging service includes the following
features:
Smart forwarding: If a message has been replied to or forwarded before being sent to a pager,
the Internet Agent identifies the original message and sends only it.
Easy to read originator information: The Internet Agent sends the original From, Subject,
and Message information to the pager, rather than cryptic Header information.
744 GroupWise 7 Administration Guide

User block control: By using the /l=length and /b=number switches on the message’s To line,
the sender can control the block length and number of blocks to send to the pager. By default,
the Internet Agent sends 255 bytes per block (/l=255 /b=1).
To set up and use paging services, complete the tasks in the following sections:
Section 46.4.1, “Setting Up Paging,” on page 745
Section 46.4.2, “Using Paging,” on page 746
46.4.1 Setting Up Paging
To set up the Internet Agent’s paging service, you need to create a non-GroupWise domain to
represent the paging service and then use your Internet Agent to link your system to the nonGroupWise domain. The non-GroupWise domain enables GroupWise to correctly identify pager
messages and route messages to the Internet Agent, which can then send the messages to the
Internet.
“Creating a Non-GroupWise Domain” on page 745
“Linking the Internet Agent to the Non-GroupWise Domain” on page 745
novdocx (en) 11 December 2007
Creating a Non-GroupWise Domain
1 In ConsoleOne, right-click the GroupWise System object, click New, then click Non-
GroupWise Domain to display the Create Non-GroupWise Domain dialog box.
2 Fill in the following information:
Domain Name: Provide the domain with a name such as Page. Users need to know the name
when addressing pager messages.
Time Zone: Select the time zone in which the Internet Agent is located.
Link to Domain: Select the domain in which the Internet Agent is located.
3 Click OK to create the domain.
Linking the Internet Agent to the Non-GroupWise Domain
1 In ConsoleOne, click Tools > GroupWise Utilities > Link Configuration to display the
GroupWise Link Configuration tool.
2 In the drop-down list, select the domain that owns the Internet Agent that you are using for this
paging service.
3 In the Outbound Links box, right-click the non-GroupWise domain, then click Edit.
4 Click Yes to accept the domain path as the mapped path and display the Edit Domain Link
dialog box.
Configuring Internet Services 745

5 In the Link Type field, select Gateway.
6 In the Gateway Link field, select the Internet Agent.
7 In the Gateway Access String field, type -page.
8 Click OK to save the information.
9 Click File > Exit > Yes to save your changes and exit the Link Configuration tool.
10 Restart the Internet Agent.
46.4.2 Using Paging
To use paging, GroupWise users must address messages to the non-GroupWise domain, specifying
the PIN number of the pager and the hostname of the paging service in the following format:
domain:pin@paging_service_provider
For example,
page:123456789@skytel.com
page:123456789@epage.arch.com
novdocx (en) 11 December 2007
By using the /l=length and /b=number switches on the message’s To line, the sender can control the
block length and number of blocks to send to the pager. For example,
page:123456789@epage.arch.com/l=128/b=4
By default, the Internet Agent sends 255 bytes per block (/l=255 /b=1).
746 GroupWise 7 Administration Guide

47
Managing Internet Access
novdocx (en) 11 December 2007
47
After you have configured the Internet services that you want the Internet Agent to provide in your
GroupWise
GroupWise system and the Internet.
Section 47.1, “Controlling User Access to the Internet,” on page 747
Section 47.2, “Blocking Unwanted E-Mail from the Internet,” on page 757
Section 47.3, “Tracking Internet Traffic with Accounting Data,” on page 764
®
system, you need to take control of the information that flows in and out between your
47.1 Controlling User Access to the Internet
You can use the GroupWise Internet Agent’s Access Control feature to configure a user’s ability to
send and receive SMTP/MIME messages to and from Internet recipients and to access his or her
mailbox from POP3 or IMAP4 e-mail clients. In addition to enabling or disabling a user’s access to
features, you can configure specific settings for the features. For example, for outgoing SMTP/
MIME messages, you can limit the size of the messages or the sites to which they can be sent.
Access Control can be implemented at a user, distribution list, post office, or domain level.
Choose from the following information to learn how to set up and use Access Control.
Section 47.1.1, “Classes of Service,” on page 747
Section 47.1.2, “Creating a Class of Service,” on page 748
Section 47.1.3, “Testing Access Control Settings,” on page 753
Section 47.1.4, “Maintaining the Access Control Database,” on page 755
47.1.1 Classes of Service
A class of service is a specifically defined configuration of Internet Agent privileges. A class of
service controls the following types of access activities:
Whether or not SMTP/MIME messages are allowed to transfer to and from the Internet
Whether or not SMTP/MIME messages are allowed to transfer to and from specific domains on
the Internet
The maximum size of SMTP/MIME messages that can transfer to and from the Internet
Whether or not SMTP/MIME messages generated by GroupWise rules are allowed to transfer
to the Internet
Whether or not IMAP4 clients are allowed to access the GroupWise system
Whether or not POP3 clients are allowed to access the GroupWise system, and if allowed, how
messages to and from POP3 clients are managed by the GroupWise system
The default class of service, which all users belong to, allows incoming and outgoing SMTP/MIME
messages, and allows POP3 and IMAP4 access. You can control user access, at an individual,
distribution list, post office, or domain level, by creating different classes of service and adding the
Managing Internet Access
747

appropriate members to the classes. For example, you could create a class of service that limits the
size of SMTP/MIME messages for a selected individual, distribution list, post office, or domain.
Because you can assign membership at the user, distribution list, post office, and domain level, it is
possible that a single user can be a member of multiple classes of service. This conflict is resolved
hierarchically, as shown in the following table.
Table 47-1 Conflict Resolution for Classes of Service
novdocx (en) 11 December 2007
Membership assigned to a
user through a...
domain default class of service
post office
distribution list
user
Overrides membership assigned to the user through the...
default class of service
domain
default class of service
domain
post office
default class of service
domain
post office
If a user’s membership in two classes of service is based upon the same level of membership (for
example, both through individual user membership), the class that applies is the one that allows the
most privileges.
IMPORTANT: The Internet Agent uses the message size limit set for the default class of service as
the maximum incoming message size for your GroupWise system. Therefore, you should set the
message size for the default class of service to accommodate the largest message that you want to
allow into your GroupWise system. As needed, you can then create other classes of service with
smaller message size limits to restrict the size of incoming messages for selected users, distribution
lists, post offices, or domains. Methods for restricting message size within your GroupWise system
are described in Section 12.3.4, “Restricting the Size of Messages That Users Can Send,” on
page 185.
Attachments on incoming SMTP messages are included in the mime.822 file, in addition to being
attached to the message. Therefore, attachments contribute twice to the size of the overall message.
Take this into account when determining the maximum incoming message size for your GroupWise
system.
47.1.2 Creating a Class of Service
1 In ConsoleOne®, right-click the Internet Agent object, then click Properties.
2 Click Access Control > Settings to display the Access Control Settings page.
748 GroupWise 7 Administration Guide

3 Click Create to display the Create New Class of Service dialog box.
novdocx (en) 11 December 2007
4 Type a name for the class, then click OK to display the Edit Class of Service dialog box.
5 On the SMTP Incoming tab, choose from the following options:
Inherit Access: Select this option if you want members of this class of service to inherit their
SMTP Incoming access from a class of service assigned at a higher level. For example, a post
Managing Internet Access 749

office inherits the domain’s access. If the domain is not a member of a class of service, the post
office inherits the default class of service.
Allow Incoming Messages: Select this option to allow members of the class of service to
receive e-mail messages through the Internet Agent. You can use the Exceptions option to
prevent messages from specific Internet sites.
Prevent Incoming Messages: Select this option to prevent e-mail messages coming from the
Internet. You can use the Exceptions option to allow messages from specific Internet sites.
Prevent Messages Larger Than: This option is available only if you chose Allow Incoming
Messages or Prevent Incoming Messages. In the case of Prevent Incoming Messages, this
option only applies to messages received from Internet sites listed in the Allow Messages From
list.
If you want to set a size limit on incoming messages, select the limit.
Internet messages that exceed the limit are not delivered. The sender receives an e-mail
message indicating that the message is undeliverable and including the following explanation:
Message exceeds maximum allowed size
Exceptions: This option is available only if you chose Allow Incoming Messages or Prevent
Incoming Messages.
Prevent Messages From: If you chose to allow incoming messages but you want to prevent
messages from specific Internet sites (IP addresses or DNS hostnames), add the sites to the
Prevent Messages From list.
Allow Messages From: Conversely, if you chose to prevent incoming messages but you want
to allow messages from specific Internet sites (IP addresses or DNS hostnames), add the sites
to the Allow Messages From list.
If you want to allow messages where the username is blank, add Blank-Sender-User-ID to the
Allow Messages From list.
6 Click SMTP Outgoing, then choose from the following options:
Inherit Access: Select this option if you want members of this class of service to inherit their
SMTP Outgoing access from a class of service assigned at a higher level. For example, a post
office inherits the domain’s access. If the domain is not a member of a class of service, the post
office inherits the default class of service.
novdocx (en) 11 December 2007
Allow Outgoing Messages: Select this option to allow members of the class of service to send
e-mail messages over the Internet. You can use the Exceptions option to prevent messages from
being sent to specific Internet sites.
Prevent Outgoing Messages: Select this option to prevent members of the class of service
from sending e-mail messages over the Internet. You can use the Exceptions option to allow
messages to be sent to specific Internet sites.
Prevent Messages Larger Than: This option is available only if you chose Allow Outgoing
Messages or Prevent Outgoing Messages.
If you want to set a size limit on outgoing messages, specify the limit.
Allow Rule-Generated Messages: This option is available only if you chose Allow Outgoing
Messages or
Prevent Outgoing Messages.
Turn on this option to allow the Internet Agent to send messages that were generated by a
GroupWise rule.
In addition, you can use the /blockrulegenmsg startup switch in the Internet Agent startup file
(gwia.cfg) to allow some types of rule-generated messages while blocking others.
750 GroupWise 7 Administration Guide

Exceptions: This option is available only if you chose Allow Outgoing Messages or Prevent
Outgoing Messages.
If you chose to allow outgoing messages but you want to prevent messages from being sent to
specific Internet sites (IP addresses or DNS hostnames), add the sites to the Prevent Messages
To list.
Conversely, if you chose to prevent outgoing messages but you want to allow messages to be
sent to specific Internet sites (IP addresses or DNS hostnames), add the sites to the Allow
Messages To list.
7 Click IMAP4, then choose from the following options:
Inherit Access: Select this option if you want members of this class of service to inherit their
IMAP4 access from a class of service assigned at a higher level. For example, a post office
inherits the domain’s access. If the domain is not a member of a class of service, the post office
inherits the default class of service.
Allow Access: Select this option to allow members of the class to send and receive messages
with an IMAP4 client.
Prevent Access: Select this option to prevent members of the class from sending and receiving
messages with an IMAP4 client.
8 Click POP3, then choose from the following options:
novdocx (en) 11 December 2007
Inherit Access: Select this option if you want members of this class of service to inherit their
POP3 access from a class of service assigned at a higher level. For example, a post office
inherits the domain’s access. If the domain is not a member of a class of service, the post office
inherits the default class of service.
Allow Access: Select this option to allow members of the class to download their GroupWise
messages to a POP3 client.
Prevent Access: Select this option to prevent downloading GroupWise messages to a POP3
client.
Delete Messages from GroupWise Mailbox after Download: This option applies only if you
selected Allow Access.
If you turn on this option, messages downloaded from a GroupWise Mailbox to a POP3 client
are moved to the Trash folder in the GroupWise Mailbox.
POP3 client users can enable this option by using the userID:d login option when initiating
their POP session. For more information, see “User ID Login Options” on page 743.
Purge Messages from GroupWise Mailbox after Download: This option applies only if you
selected Allow Access.
If you turn on this option, messages downloaded from a GroupWise Mailbox are moved to the
Mailbox’s Trash folder and then emptied, completely removing the messages from the
Mailbox.
POP3 client users can enable this option by using the userID:p login option when initiating
their POP session. For more information, see “User ID Login Options” on page 743.
Convert Messages to MIME Format When Downloading: This option applies only if you
selected Allow Access.
If you turn on this option, messages downloaded to a POP3 client are converted to the MIME
format.
POP3 client users can enable this option by using the userID:m login option when initiating
their POP session. They can disable it by using the userID:n login option; this converts
Managing Internet Access 751

messages to RFC-822 format. For more information, see “User ID Login Options” on
page 743.
High Performance on File Size Calculations: This option applies only if you selected Allow
Access.
POP3 clients calculate the size of each message file before downloading it. Turn on this option
if you want to assign a size of 1 KB to each message file. This eliminates the time associated
with calculating a file’s actual size.
POP3 client users can enable this option by using the userID:s login option when initiating
their POP session. For more information, see “User ID Login Options” on page 743.
Number of Days Prior to Today to Get Messages From: This option applies only if you
selected Allow Access.
Select the number of days to go back to look for GroupWise Mailbox messages to download to
the POP3 client. The default is 30 days.
POP3 client users can override this option by using the userID:t=x login option when initiating
their POP session. For more information, see “User ID Login Options” on page 743.
Maximum Number of Messages to Download: This option applies only if you selected
Allow Access.
Select the maximum number of messages a user can download at one time from a GroupWise
Mailbox to a POP3 client. The default is 100 messages.
POP3 client users can override this option by using the userID:l=x login option when initiating
their POP session. For more information, see “User ID Login Options” on page 743.
novdocx (en) 11 December 2007
9 Click OK to display the Select GroupWise Object dialog box.
10 Select Domains, Post Offices, Distribution Lists, or Users to display the list you want.
11 In the list, select the domain, post office, distribution list, or user you want, then click Add to
add the object as a member in the class. You can Control+click or Shift+click to select multiple
users.
752 GroupWise 7 Administration Guide

12 To add additional domains, post offices, distribution lists or users as members of the class of
service, select the class of server, then click Add to display the Select GroupWise Object dialog
box.
13 Click OK (on the Settings page) when finished adding members.
novdocx (en) 11 December 2007
47.1.3 Testing Access Control Settings
If you created multiple classes of service, you might not know exactly which settings are being
applied to a specific object (domain, post office, distribution list, or user) and which class of service
the setting is coming from. To discover an object’s settings, you can test the object’s access.
1 In ConsoleOne, right-click the Internet Agent object, then click Properties.
2 Click Access Control > Settings to display the Access Control Settings page.
Managing Internet Access 753

3 Click Te st to display the Select GroupWise Object dialog box.
You use this dialog box to select the object (domain, post office, distribution list, or user) whose
access you want to test.
4 Select Domains, Post Offices, Distribution Lists, or Users to display the list you want. For
example, if you want to see what access an individual user has, select Users.
novdocx (en) 11 December 2007
5 In the list, select the object you want to view, then click View Access.
The tabbed pages show the access control settings for SMTP Incoming, SMTP Outgoing,
IMAP4, and POP3 as they are applied to that user, distribution list, post office, or domain.
6 To view the source for a specific setting, select the setting in the Setting box
The Setting Source fields display the class of service being applied to the object. It also displays
the Member ID through which the class is being applied.
754 GroupWise 7 Administration Guide

7 When finished, click OK.
47.1.4 Maintaining the Access Control Database
novdocx (en) 11 December 2007
The Access Control database stores the information for the various classes of service you have
created. If any problems occur with a class of service, you can validate the database to check for
errors with the records and indexes contained in the database. If errors are found, you can recover
the database.
The Access database, gwac.db, is located in the domain\wpgate\gwia directory.
“Validating the Database” on page 755
“Recovering the Database” on page 756
Validating the Database
1 In ConsoleOne, right-click the Internet Agent object, then click Properties.
2 Click Access Control > Database Management to display the Database Management page.
Managing Internet Access 755

3 Click Va l i d a t e N ow .
4 After the database has been validated, click OK.
5 If errors were found, see Recovering the Database below.
novdocx (en) 11 December 2007
Recovering the Database
If you encountered errors when validating the database, you must recover the database. During the
recovery process a new database is created and all intact records are copied to the new database.
Some records might not be intact, so you should check the classes of services to see if any
information was lost.
1 In ConsoleOne, right-click the Internet Agent object, then click Properties.
2 Click Access Control > Database Management to display the Database Management page.
756 GroupWise 7 Administration Guide

3 Click Recover Now.
4 Click OK.
5 Check your class of service list to make sure that it is complete.
47.2 Blocking Unwanted E-Mail from the Internet
The GroupWise Internet Agent includes the following features to help you protect your GroupWise
system and users from unwanted e-mail:
Section 47.2.1, “Real-Time Blacklists,” on page 757
Section 47.2.2, “Access Control Lists,” on page 759
Section 47.2.3, “Blocked.txt File,” on page 759
Section 47.2.4, “Mailbomb (Spam) Protection,” on page 760
Section 47.2.5, “Customized Spam Identification,” on page 761
Section 47.2.6, “SMTP Host Authentication,” on page 762
Section 47.2.7, “Unidentified Host Rejection,” on page 763
novdocx (en) 11 December 2007
47.2.1 Real-Time Blacklists
Many organizations, such as Mail Abuse Prevention System (MAPS*) and SpamCop*, provide lists
of IP addresses that are known to be open relay hosts or spam hosts. If you want to use free blacklist
services such as these, or if you subscribe to fee-based services, you can define the blacklist
addresses for these services. The Internet Agent then uses the defined services to ensure that no
messages are received from blacklisted hosts. The following sections provide information to help
you define blacklist addresses and, if necessary, override a host address included in a blacklist.
“Defining a Blacklist Address” on page 757
“Overriding a Blacklist” on page 759
Defining a Blacklist Address
1 In ConsoleOne, right-click the Internet Agent object, then click Properties.
2 Click Access Control > Blacklists to display the Blacklists page.
Managing Internet Access 757

The Blacklist Addresses list displays the addresses of all blacklists that the Internet Agent
checks when it receives a message from another SMTP host. The Internet Agent checks the
first blacklist and continues checking lists until the sending SMTP host’s IP address is found or
all lists have been checked. If the sending SMTP host’s IP address is included on any of the
blacklists, the message is rejected. If you have the Internet Agent’s logging level set to Verbose,
the log file includes information about the rejected message and the referring blacklist.
novdocx (en) 11 December 2007
This list corresponds with the Internet Agent’s /rbl switch.
3 Click Add to display the New Blacklist Address dialog box.
The following list provides the names, Web sites, and blacklist addresses for two services that
are free at the time of this release:
Service Site Address
Mail Abuse Prevention
System (MAPS)
SpamCop www.spamcop.net bl.spamcop.net
www.mail-abuse.org blackholes.mail-abuse.org
4 Type the blacklist address in the Address box, then click OK to add the address to the Blacklist
Addresses list.
5 If you have multiple blacklists in the Blacklist Addresses list, use the up-arrow and down-arrow
to position the blacklists in the order you want them checked. The Internet Agent checks the
blacklists in the order they are listed, from top to bottom.
6 Click OK to save your changes.
758 GroupWise 7 Administration Guide

Overriding a Blacklist
In some cases, a blacklist might contain a host from which you still want to receive messages. For
example, goodhost.com has been accidentally added to a blacklist but you still want to receive
messages from that host.
You can use the SMTP Incoming Exceptions list on a class of service to override a blacklist. For
information about editing or creating a class of service, see Section 47.1.2, “Creating a Class of
Service,” on page 748.
47.2.2 Access Control Lists
If you want to block specific hosts yourself rather than use a blacklist (in other words, create your
own blacklist), you can configure a class of service that prevents messages from those hosts. You do
this on the Internet Agent object’s Access Control Settings page by editing the desired class of
service to add the hosts to the Prevent Messages From exception list on the SMTP Incoming tab. For
example, if you wanted to block all messages from badhost.com, you could edit the default class of
service to add badhost.com to the list of prevented hosts.
You can also create a list of hosts that you always want to allow messages from, so you can create
your own white list.
novdocx (en) 11 December 2007
For information about editing or creating a class of service, see Section 47.1.2, “Creating a Class of
Service,” on page 748.
47.2.3 Blocked.txt File
ConsoleOne creates a blocked.txt file that includes all the hosts that have been added to the
Prevent Messages From exceptions list for the default class of service (see Section 47.1,
“Controlling User Access to the Internet,” on page 747).
You can manually edit the blocked.txt file to add or remove hosts. To maintain consistency for
your system, you can also copy the list to other Internet Agent installations.
To manually edit the blocked.txt file:
1 Open the blocked.txt file in a text editor.
2 Add the host addresses.
The entry format is:
address1
address2
address3
where address is either a hostname or an IP address. You can block on any octet. For example:
IP Address Blocks
*.*.*.34 Any IP address ending with 34
172.16.*.34 Any IP address starting with 172.16 and ending with 34
172.16.10-34.* Any IP address starting with 172.16 and any octet from 10 to 34
You can block on any segment of the hostname. For example:
Managing Internet Access 759

Hostname Blocks
provo*.novell.com provo.novell.com
provo1.novell.com
provo2.novell.com
*.novell.com gw.novell.com (but not novell.com itself)
There is no limit to the number of IP addresses and hostnames that you can block in the
blocked.txt file
3 Save the file as blocked.txt.
47.2.4 Mailbomb (Spam) Protection
Multiple unsolicited messages (sometimes called a mailbomb or spam) from the Internet can
potentially harm your GroupWise messaging environment. You can use the settings on the SMTP
Security page to help protect your GroupWise system from malicious or accidental attacks.
novdocx (en) 11 December 2007
To configure the SMTP security settings:
1 In ConsoleOne, right-click the Internet Agent object, then click Properties.
2 Click SMTP/MIME > Security Settings.
3 Fill in the fields:
Reject Mail if Sender’s Identity Cannot be Verified: This setting lets you prevent messages
if the sender’s host is not authentic.
When this setting is turned on, the Internet Agent refuses messages from a smart host if a DNS
reverse lookup shows that a PTR record does not exist for the IP address of the sender’s host.
When this setting is turned off, the Internet Agent accepts messages from any host, but display
a warning if the initiating host is not authentic.
This setting corresponds with the Internet Agent’s /rejbs switch.
760 GroupWise 7 Administration Guide

Enable Mailbomb Protection: Mailbomb protection is turned off by default. You can turn it
on by selecting this option.
Mailbomb Threshold: When you enable Mailbomb protection, default values are defined in
the threshold settings. The default settings are 30 messages received within 10 seconds. You
can change the settings to establish an acceptable security level.
Any group of messages that exceeds the specified threshold settings is entirely discarded. If
you want to prevent future mailbombs from the mailbomb sender, identify the sender’s IP
address (by looking at the Internet Agent’s console) and then modify the appropriate class of
service to prevent mail being received from that IP address (Access Control > Settings). For
more information, see Section 47.1.2, “Creating a Class of Service,” on page 748.
The time setting corresponds with the Internet Agent’s /mbtime switch. The message count
setting corresponds with the /mbcount switch.
4 Click OK to save the changes.
You can protect your system against mailbombs (spam). With mailbomb protection enabled, if the
Internet Agent receives a certain number of messages (the default is 30) from the same host or IP
address within a specific time interval (the default is 10 seconds), it discards the messages.
novdocx (en) 11 December 2007
47.2.5 Customized Spam Identification
Before GroupWise 7, you could use the /xspam startup switch to flag messages for handling by the
client Junk Mail Handling feature if they contained an x-spam-flag:yes in the MIME header. Starting
in GroupWise 7, you can configure as many strings as needed to identify junk mail and you can use
ConsoleOne to specify the strings.
1 In ConsoleOne, right-click the Internet Agent, then click Properties.
2 Click SMTP/MIME > Junk Mail.
3 Select Flag Any Messages, then specify the strings in the text box.
Anti-spam services use different indicators to mark potential spam. One might use a string of
asterisks; the more asterisks, the greater the likelihood that the message is spam. Another might
Managing Internet Access 761

use a numerical value; the higher the number, the greater the likelihood that the message is
spam. The following samples are taken from MIME headers of messages:
X-Spam-Results: *****
X-Spam-Status: score=9
Based on these samples, examples are provided below of lines that you could add to the list to
handle the X-Spam tags found in the MIME headers of messages coming into your system.
Example:
X-Spam-Results: *****
This line marks as spam any message whose MIME header contained an X-Spam-Results tag
with five or more asterisks. Messages with X-Spam-Results tags with fewer than five asterisks
are not marked as spam.
Example:
X-Spam-Status: Yes
This line marks as spam any message whose MIME header contained the X-Spam-Status tag
set to Yes, regardless of the score.
Example:
X-Spam-Status: score=9
X-Spam-Status: score=10
novdocx (en) 11 December 2007
These lines marks as spam any message whose MIME header has the X-Spam-Status tag set to
Yes and had a score of 9 or 10. X-Spam-Status tags with scores less than 9 are not marked as
spam.
You can add as many lines as necessary to the list to handle whatever message tagging your
anti-spam service uses.
4 Click OK to save your list of strings.
The list is saved in the xspam.cfg file in the domain\wpgate\gwia directory. As described
above, each line of the xspam.cfg file identifies an “X” header field that your anti-spam service is
writing to the MIME header, along with the values that flag the message as spam. The Internet
Agent examines the MIME header for any field listed in the xspam.cfg file. When a match
occurs, the message is marked for handling by the GroupWise client Junk Mail Handling feature.
47.2.6 SMTP Host Authentication
The Internet Agent supports SMTP host authentication for both outbound and inbound message
traffic.
“Outbound Authentication” on page 762
“Inbound Authentication” on page 763
Outbound Authentication
For outbound authentication to other SMTP hosts, the Internet Agent requires that the remote SMTP
hosts support the AUTH LOGIN authentication method. To set up outbound authentication:
1 Include the remote SMTP host’s domain name an authentication credentials in the
gwauth.cfg file, located in the domain\wpgate\gwia directory. The format is:
domain_name authuser authpassword
For example:
762 GroupWise 7 Administration Guide

smtp.novell.com remotehost novell
2 If you have multiple SMTP hosts that require authentication before they accept messages from
your system, create an entry for each host. Make sure to include a hard return after the last
entry.
3 If you want to allow the Internet Agent to send messages only to SMTP hosts listed in the
gwauth.cfg file, use the following startup switch:
/forceoutboundauth
With the /forceoutboundauth switch enabled, if a message is sent to an SMTP host not listed in
the gwauth.cfg file, the sender receives an Undeliverable message.
Inbound Authentication
For inbound authentication from other SMTP hosts, you can use the /forceinboundauth startup
switch to ensure that the Internet Agent accepts messages only from SMTP hosts that use the AUTH
LOGIN authentication method to provide a valid GroupWise user ID and password. The remote
SMTP hosts can use any valid GroupWise user ID and password. However, for security reasons, we
recommend that you create a dedicated GroupWise user account for remote SMTP host
authentication.
novdocx (en) 11 December 2007
47.2.7 Unidentified Host Rejection
You can have the Internet Agent reject messages from unidentified sources. The Internet Agent
refuses messages from a host if a DNS reverse lookup shows that a “PTR” record does not exist for
the IP address of the sender’s host.
If you choose not to have the Internet Agent reject messages from unidentified hosts, it accepts
messages from any host, but it displays a warning if the sender’s host is not authentic.
To configure the Internet Agent to reject messages from unidentified hosts:
1 In ConsoleOne, right-click the Internet Agent object, then click Properties.
2 Click SMTP/MIME > Security Settings to display the Security Settings page.
Managing Internet Access 763

3 Turn on the Reject Mail if Sender’s Identity Cannot Be Verified option.
This setting corresponds with the Internet Agent’s /rejbs switch.
4 Click OK to save your changes.
47.3 Tracking Internet Traffic with Accounting Data
The Internet Agent can supply accounting information for all messages, including information such
as the message’s source, priority, size, and destination.
The accounting file is an ASCII-delimited text file that records the source, priority, message type,
destination, and other information about each message sent through the gateway. The file, which is
updated daily at midnight (and each time the Internet Agent restarts), is called acct and is located
in the xxx.prc directory. If no accountant is specified for the gateway in ConsoleOne, the file is
deleted and re-created each day. Follow the steps below to set up accounting.
Section 47.3.1, “Selecting an Accountant,” on page 764
Section 47.3.2, “Enabling Accounting,” on page 765
novdocx (en) 11 December 2007
Section 47.3.3, “Understanding the Accounting File,” on page 766
47.3.1 Selecting an Accountant
You can select one or more GroupWise users to be accountants. Every day at midnight, each
accountant receives an accounting file (acct) that contains information about the messages the
gateway sent that day.
1 In ConsoleOne, right-click the Internet Agent object, then click Properties.
2 Click GroupWise > Gateway Administrators to display the Gateway Administrators page.
3 Click Add, browse for and select the user you want to add, then click OK to add the user to the
list of administrators.
764 GroupWise 7 Administration Guide

4 Select the user in the list of administrators, then click Accountant.
novdocx (en) 11 December 2007
5 Click OK to save the changes.
47.3.2 Enabling Accounting
1 In ConsoleOne, right-click the Internet Agent object, then click Properties.
2 Click GroupWise > Optional Gateway Settings to display the Optional Gateway Settings page.
3 Set Accounting to Yes .
4 Set Correlation Enabled to Yes .
5 Click OK.
Managing Internet Access 765

47.3.3 Understanding the Accounting File
The following is an Accounting file entry for a single event. Each field in the entry is described
below.
O,11/25/2007,21:58:39,3DE29CD2.14E:7:6953,
Mail,2,Provo,Research,jsmith,48909,Meeting
Agenda,Provo,GWIA,sde23a9f.001,MIME,hjones@novell.com,1,2,11388,0
Table 47-2 Accounting File Entry Fields
Field Example Description
novdocx (en) 11 December 2007
Inbound/Outbound
O Displays I for inbound messages and O for
outbound messages
Date 11/25/2007 The date the message was processed.
Time 21:58:39 The time the message was processed.
GroupWise message ID 3DE29CD2.14E:7:6953 The unique GroupWise ID assigned to the
message.
GroupWise message type Mail Mail message, appointment, task, note, or
phone message for outbound messages.
Unknown for inbound messages.
GroupWise message
priority
2 High priority = 1
Normal priority = 2
Low priority = 3
GroupWise user’s domain Provo The domain in which the GroupWise user
resides.
GroupWise user’s post
office
GroupWise user’s ID jsmith The GroupWise user’s ID. For outbound
Research The post office where the GroupWise user’s
mailbox resides.
messages, the GroupWise user is the message
sender. For inbound messages, the GroupWise
user is the message recipient.
GroupWise user’s account
ID
Message subject Meeting Agenda The message’s Subject line. Only the first 32
Gateway domain Provo The domain where the Internet Agent resides.
Gateway name GWIA The Internet Agent’s name.
Foreign message ID sde23a9f.001 A unique ID for outbound messages. The
Foreign message type MIME The message type (MIME, etc.)
766 GroupWise 7 Administration Guide
48909 The GroupWise user’s account ID. The account
ID is assigned on the user’s GroupWise Account
page (User object > GroupWise > Account).
characters are displayed.
identifier before the period (sde23a9f) uniquely
identifies a message. The identifier after the
period (001) is incremented by one for each
message sent.

Field Example Description
Foreign user’s address hjones@novell.com The foreign user’s e-mail address. For inbound
messages, the foreign user is the message
sender. For outbound messages, the foreign
user is the message recipient.
Recipient count 1 The number of recipients.
Attachment count 2 The number of attached files. The total count
includes the message.
Message size 11388 The total size, in bytes, of the message and its
attachments.
Other 0 Not used.
You can use the Monitor Agent to generate a report based on the contents of this file. For more
information, see Section 61.3.10, “Gateway Accounting Report,” on page 1011.
novdocx (en) 11 December 2007
Managing Internet Access 767

novdocx (en) 11 December 2007
768 GroupWise 7 Administration Guide

48
Configuring the Internet Agent
As your GroupWise® system grows and evolves, you might need to modify Internet Agent
configuration to meet the changing needs of your system. The following topics help you configure
the Internet Agent:
Section 48.1, “Changing the Link Protocol between the Internet Agent and the Message
Transfer Agent,” on page 769
Section 48.2, “Configuring an Alternate Internet Agent for a Domain,” on page 770
Section 48.3, “Binding the Internet Agent to a Specific IP Address,” on page 771
Section 48.4, “Securing Internet Agent Connections with SSL,” on page 772
48.1 Changing the Link Protocol between the Internet Agent and the Message Transfer Agent
novdocx (en) 11 December 2007
48
Before GroupWise 7, the Internet Agent and the MTA communicated by transferring message files
through message queue directories, as shown in the following diagrams in GroupWise 7
Troubleshooting 3: Message Flow and Directory Structure:
“Mapped/UNC Link: Outbound Transfer to the Internet Successful”
“Mapped/UNC Link: Inbound Transfer from the Internet Successful”
Starting in GroupWise 7, you can configure the Internet Agent so that it uses TCP/IP to
communicate with the MTA, instead of message files, as shown in the following diagrams:
“TCP/IP Link: Outbound Transfer to the Internet Successful”
“TCP/IP Link: Inbound Transfer from the Internet Successful”
During installation of the Internet Agent, you had the opportunity to choose between a direct link
(message files) and a TCP/IP link. If you did not choose the TCP/IP link during installation, you can
configure the Internet Agent to use TCP/IP at any time.
If you want to enable TCP/IP communication between the Internet Agent and the MTA, use 7102 or
another available port number. If you do not want to enable TCP/IP communication, use 0 (zero) as
the port number.
®
1 In ConsoleOne
2 Click GroupWise > Network Address.
, right-click the Internet Agent, then click Properties.
Configuring the Internet Agent
769

3 In the TCP/IP Address field, click Edit, specify the IP address of the server where the Internet
Agent is running, then click OK to return to the Network Address page.
novdocx (en) 11 December 2007
4 In the Message Transfer Port field, specify a unique port number; for example, 7102.
5 Click OK to save the new link configuration for the Internet Agent.
ConsoleOne then notifies the Internet Agent and MTA to restart using the new link protocol.
48.2 Configuring an Alternate Internet Agent for a Domain
By configuring the Internet Agent to communicate with the MTA by way of TCP/IP, you can
configure an alternate Internet Agent for a domain, so that if the domain’s primary Internet Agent
goes down, the MTA can fail over to another Internet Agent in your GroupWise system until the
primary Internet Agent is up and running again. This feature is especially useful in large GroupWise
systems with multiple Internet Agents that handle a lot of Internet messages.
1 Make sure that you have configured the Internet Agents for TCP/IP, as described in Changing
the Link Protocol between the Internet Agent and the Message Transfer Agent.
2 In ConsoleOne, right-click the Domain object, then click Properties.
3 Click GroupWise > Internet Addressing.
770 GroupWise 7 Administration Guide

4 In the Alternate Internet Agent for Outbound SMTP/MIME Messages field, select an Internet
Agent as an alternate for this domain.
novdocx (en) 11 December 2007
5 Click OK to save your changes.
The MTA always tries to transfer outbound Internet messages to the primary Internet Agent first, so
after an outage the primary Internet Agent automatically resumes its normal processing for the
domain.
48.3 Binding the Internet Agent to a Specific IP Address
You can now cause the Internet Agent to bind to a specified IP address when the server where it runs
uses multiple IP addresses. The specified IP address is associated with all ports used by the agent.
Without an exclusive bind, the Internet Agent binds to all IP addresses available on the server.
1 In ConsoleOne, browse to and right-click the Internet Agent object, then click Properties.
2 Click GroupWise > Network Address to display the Network Address page.
Configuring the Internet Agent 771

3 Select Bind Exclusively to TCP/IP Address, then click OK to save your change.
novdocx (en) 11 December 2007
Corresponding Startup Switches
You can also use the /ip startup switch in the Internet Agent startup file to establish an exclusive bind
to the specified IP address.
48.4 Securing Internet Agent Connections with SSL
The Internet Agent can use the SSL (Secure Socket Layer) protocol to enable secure connections to
other SMTP hosts, POP/IMAP clients, and the Internet Agent Web console. For the Internet Agent
to do so, you must ensure that it has access to a server certificate file and that you’ve configured the
connection types (SMTP, POP, IMAP, HTTP) you want secured through SSL. The following
sections provide instructions:
Section 48.4.1, “Defining the Certificate File,” on page 772
Section 48.4.2, “Defining Which Connections Use SSL,” on page 773
48.4.1 Defining the Certificate File
To use SSL, the Internet Agent requires access to a server certificate file and key file. The Internet
Agent can use any Base64/PEM or PFX formatted certificate file located on its server. If the Internet
Agent’s server does not have a server certificate file, you can use the GroupWise Generate CSR
utility to help you obtain one. For information, see Section 5.17.6, “GroupWise Generate CSR
Utility (GWCSRGEN),” on page 83.
To define the certificate file and key file that the Internet Agent will use:
1 In ConsoleOne, right-click the Internet Agent object, then click Properties.
2 Click GroupWise > SSL Settings to display the SSL Settings page.
772 GroupWise 7 Administration Guide

3 Fill in the Certificate File, SSL Key File, and Set Password fields:
Certificate File: Specify the server certificate file that the Internet Agent will use. The
certificate file must be in Base64/PEM or PFX format. If you type the filename rather than
using the Browse button to select it, use the full path if the file is not in the same directory as the
Internet Agent program. This setting corresponds to the Internet Agent’s /certfile switch.
novdocx (en) 11 December 2007
SSL Key File: Specify the key file associated with the certificate. If the private key is included
in the certificate file rather than in a separate key file, leave this field blank. If you type the
filename rather than using the Browse button to select it, use the full path if the file is not in the
same directory as the Internet Agent program. This setting corresponds to the Internet Agent’s /
keyfile switch.
Set Password: Click Set Password to specify the password for the key. If the key does not
require a password, do not use this option. This setting corresponds to the /keypasswd switch.
4 If you want to define which connections (HTTP, SMTP, POP3, or IMAP4) use SSL, click
Apply to save your changes, then continue with the next section, Section 48.4.2, “Defining
Which Connections Use SSL,” on page 773.
or
Click OK to save your changes.
48.4.2 Defining Which Connections Use SSL
After you define the Internet Agent’s certificate and key file (see Section 48.4.1, “Defining the
Certificate File,” on page 772), you can configure which connections you want to use SSL. You can
enable SSL connections to other SMTP hosts and the Internet Agent Web console, which means that
an SSL connection is used if the other SMTP host or the Web browser (running the Web console)
supports SSL. You can also enable or require SSL connections to POP3 and IMAP4 clients. If SSL
is enabled, an SSL connection is used if the client supports SSL; if SSL is required, only SSL
connections are accepted.
To configure connections to use SSL:
Configuring the Internet Agent 773

1 In ConsoleOne, if the Internet Agent object’s property pages are not already displayed, right-
click the Internet Agent object, then click Properties.
2 Click GroupWise > Network Address to display the Network Address page.
novdocx (en) 11 December 2007
3 Configure the SSL settings for the following connections:
HTTP: Select Enabled to enable the Internet Agent to use a secure connection when passing
information to the Internet Agent Web console. The Web browser must also be enabled to use
SSL; if it is not, a non-secure connection is used.
SMTP: Select Enabled to enable the Internet Agent to use a secure connection to other SMTP
hosts. The SMTP host must also be enabled to use SSL or TLS (Transport Layer Security); if it
is not, a non-secure connection is used.
POP: Select from the following options to configure the Internet Agent’s use of secure
connections to POP clients:
Disabled: The Internet Agent does not support SSL connections. All connections are non-
SSL through port 110.
Enabled: The POP client determines whether an SSL connection or non-SSL connection
is used. The Internet Agent listens for SSL connections on port 995 and non-SSL
connections on port 110.
Required: The Internet Agent forces SSL connections on port 995 and port 110. Non-SSL
connections are denied.
IMAP: Select from the following options to configure the Internet Agent’s use of secure
connections to IMAP clients:
Disabled: The Internet Agent does not support SSL connections. All connections are non-
SSL through port 143.
Enabled: The IMAP client determines whether an SSL connection or non-SSL
connection is used. The Internet Agent listens for SSL connections on port 993 and nonSSL connections on port 143.
Required: The Internet Agent forces SSL connections on port 993 and port 143. Non-
SSL connections are denied.
774 GroupWise 7 Administration Guide

49
Monitoring the Internet Agent
You can monitor the operation of the GroupWise® Internet Agent by using several different
diagnostic tools. Each provides important and helpful information about the status of the Internet
Agent and how it is currently functioning. Choose from the titles listed below to learn more about
how to monitor the operations of the Internet Agent.
Section 49.1, “Using the Internet Agent Server Console,” on page 775
Section 49.2, “Using the Internet Agent Web Console,” on page 787
Section 49.3, “Using Novell Remote Manager,” on page 789
Section 49.4, “Using an SNMP Management Console,” on page 789
Section 49.5, “Assigning Operators to Receive Warning and Error Messages,” on page 790
Section 49.6, “Using Internet Agent Log Files,” on page 791
Section 49.7, “Using Internet Agent Error Message Documentation,” on page 796
Section 49.8, “Employing Internet Agent Troubleshooting Techniques,” on page 796
novdocx (en) 11 December 2007
49
Section 49.9, “Stopping the Internet Agent,” on page 796
49.1 Using the Internet Agent Server Console
The Internet Agent console provides information, status, and message statistics about the Internet
Agent to help you assess its current functioning.
Figure 49-1 Internet Agent Console
®
NetWare The Internet Agent console always displays on the NetWare
Linux: You must use the --show startup switch in order to display the Linux Internet Agent server
console.
server console.
Monitoring the Internet Agent
775

Windows: If the Internet Agent is running as a Windows service under the Local System User, it is
displayed on the desktop only if the Allow Service to Interact with Desktop option was
selected during installation or has been configured on the Internet Agent service’s General
property page.
Refer to the following sections for information about the specific sections and functionality included
in the console:
Section 49.1.1, “Description,” on page 776
Section 49.1.2, “Status,” on page 776
Section 49.1.3, “Statistics,” on page 777
Section 49.1.4, “Logging,” on page 784
Section 49.1.5, “Menu Functions,” on page 785
49.1.1 Description
The description section of the console identifies the Internet Agent and displays how long its has
been running.
novdocx (en) 11 December 2007
Figure 49-2 Internet Agent Server Console
Domain.Gateway: Displays the domain and Internet Agent names.
Up Time: Displays the total length of time the Internet Agent has been running. If the Internet
Agent terminates unexpectedly (such as in a power outage), the Up Time display does not reset to 0
(zero). It shows the total time elapsed since the Internet Agent was last loaded after a proper
termination.
Description: Displays any descriptive information provided on the Internet Agent object’s
Identification page (Internet Agent object > GroupWise > Identification).
49.1.2 Status
The Status section of the console provides a quick look at the Internet Agent’s current message
processing activity, network connectivity, and information logging level.
776 GroupWise 7 Administration Guide

Figure 49-3 Internet Agent Server Console
Processing: Displays a rotating bar if the Internet Agent is running. If there is no bar, or if the bar is
stationary for more than one minute, the Internet Agent is not running.
novdocx (en) 11 December 2007
GroupWise: Displays whether the Internet Agent’s network connection is OPEN or CLOSED. This
network connection is the Internet Agent’s only link to GroupWise. The status indicates whether or
not the Internet Agent can write to the wpcsin directory and access the wpcsout directory. The
Internet Agent does a scan each cycle to see if these directories exist. If the status is CLOSED, the
Internet Agent attempts to reattach to the network.
It is normal for this field to display the word CLOSED for a minute or so after you start the Internet
Agent. However, if the connection remains CLOSED, look for the wpcsin and wpcsout
directories. If they are not created yet, start the Message Transfer Agent (MTA).
Other Link: This field does not apply to the Internet Agent. It always says OPEN.
Program: Displays the processing cycle. You can use the Gateway Time Settings page (Internet
Agent object > GroupWise > Gateway Time Settings) to adjust the processing cycle.
Log Level: Displays the logging level the Internet Agent is currently using. The logging level
determines how much data is displayed on the message portion of this screen and written to the log
file. You can use the console menu options to override the default setting for the current session. For
information, see Section 49.1.4, “Logging,” on page 784
49.1.3 Statistics
The Statistics section of the console can display five different sets of information:
“Message Statistics” on page 778
“SMTP Service Statistics” on page 778
“POP Service Statistics” on page 780
“IMAP Service Statistics” on page 782
“LDAP Service Statistics” on page 783
Monitoring the Internet Agent 777

Message Statistics
The Message Statistics section of the console, shown below, is the default statistics section displayed
by the Internet Agent console.
Figure 49-4 Internet Agent Server Console
novdocx (en) 11 December 2007
Message Statistics shows the number of inbound and outbound messages processed by the Internet
Agent. The Out and In columns display the cumulative message totals and the 10 Minutes column
display snap shot totals for the last ten minutes. You change the time interval of the 10 Minutes
column in ConsoleOne. For instructions, see Section 50.2.3, “Increasing Polling Time,” on
page 801.
Normal: Displays the number of inbound and outbound messages processed by the Internet Agent.
Status: Displays the number of inbound and outbound status messages processed by the Internet
Agent. The amount of status message traffic depends on the Outbound Status level (Internet Agent
object > GroupWise > Optional Gateway Settings). If the Outbound Status level is set to Full, more
status messages are generated. If the Outbound Status level is set to Undelivered, fewer status
messages are generated.
Passthrough: Displays the number of inbound and outbound passthrough messages the Internet
Agent has processed.
Convert Errors: Outbound messages are converted from GroupWise format to MIME or RFC-822
format. Inbound messages are converted to GroupWise format. This field displays the number of
inbound and outbound messages that the Internet Agent could not convert.
Communication: Displays the number of communication errors encountered by the Internet Agent.
Tot al By t es : Displays the total number of bytes of inbound and outbound messages processed by
the Internet Agent.
SMTP Service Statistics
The SMTP Service Statistics section, shown below, includes only the information for messages
processed by the Internet Agent’s SMTP daemon.
NetWare: Press F10-Options, then F9-Stats to switch to the SMTP Service Statistics.
778 GroupWise 7 Administration Guide

novdocx (en) 11 December 2007
Linux and
Windows:
Figure 49-5 SMTP Service Statistics Section of the Internet Agent Server Console
Click Statistics > SMTP Service.
Messages Sent: Displays the total number of SMTP messages sent by the Internet Agent during its
current up time.
Send Threads: The first number displays the number of threads currently being used to send SMTP
messages. The second number displays the number of threads still available to the Internet Agent for
sending SMTP messages. This is the total number of assigned send threads (by default, 8) minus the
currently used threads. You can change the total number of assigned SMTP send threads in
ConsoleOne (Internet Agent object > SMTP/MIME > Settings). For more information, see
Section 46.1.1, “Configuring Basic SMTP/MIME Settings,” on page 717.
Messages Received: Displays the total number of SMTP messages received by the Internet Agent
during its current up time.
Receive Threads: The first number is the number of threads currently being used to receive SMTP
messages. The second number is the number of threads still available to the Internet Agent for
receiving SMTP messages. This is the total number of assigned receive threads (by default, 16)
minus the currently used threads. You can change the total number of assigned SMTP receive
threads in ConsoleOne (Internet Agent object > SMTP/MIME > Settings). For more information, see
Section 46.1.1, “Configuring Basic SMTP/MIME Settings,” on page 717.
MX Lookup Errors: To resolve hostnames to IP addresses, the Internet Agent performs MX record
lookups in DNS. This field displays the number of MX record lookups that failed.
Unknown Hosts: Displays the number of SMTP hosts that the Internet Agent could not establish a
connection with because the hostname could not be resolved to an IP address.
TCP/IP Read Errors: Displays the number of TCP read errors encountered by the Internet Agent.
A TCP read error occurs if the Internet Agent connects successfully to another SMTP host but is
unable to process a TCP read command during the message transfer.
TCP/IP Write Errors: Displays the number of TCP write errors encountered by the Internet Agent.
A TCP write error occurs if the Internet Agent connects successfully to another SMTP host but is
unable to process a TCP write command during the message transfer.
Monitoring the Internet Agent 779

Hosts Down: Displays the number of SMTP hosts that the Internet Agent could not establish a
connection with in order to send or receive messages. The Internet Agent was able to resolve the
hostname to an IP address, but the connection could not be established.
Connections Denied: Displays the number of connections denied by the Internet Agent. A
connection is denied if the host is blocked through:
A Class of Service (Internet Agent object > Access Control > Settings). For more information,
see Chapter 47.1, “Controlling User Access to the Internet,” on page 747.
A blacklist (Internet Agent object > Access Control > Blacklists). For more information, see
Chapter 47.2, “Blocking Unwanted E-Mail from the Internet,” on page 757.
The Reject Mail if Sender’s Identity Cannot Be Verified setting (Internet Agent object > SMTP/
MIME > Security Settings), if it is enabled and the sender’s identity cannot be verified. For
more information, see Section 47.2.4, “Mailbomb (Spam) Protection,” on page 760.
Message Size Denied: Displays the number of SMTP messages that the Internet Agent did not send
or receive because they exceeded the maximum message size. You can change the maximum
message size in ConsoleOne (Internet Agent object > Access Control > Settings > edit class of
service > SMTP Incoming tab or SMTP Outgoing tab). For more information, see Section 47.1,
“Controlling User Access to the Internet,” on page 747.
novdocx (en) 11 December 2007
Relaying Denied: Displays the number of relay messages denied by the Internet Agent. A relay
message is denied for the following reasons:
The Internet Agent is not enabled as a relay host (Internet Agent object > Access Control >
SMTP Relay Settings). For more information, see Section 46.1.8, “Enabling SMTP Relaying,”
on page 731.
The relay message could not be authenticated.
POP Service Statistics
The POP Service Statistics section, shown below, provides information about the POP activity
handled by the Internet Agent.
NetWare: Press F10-Options, then F9-Stats to switch to the POP Service Statistics.
Linux and
Windows:
Click Statistics > POP Service.
780 GroupWise 7 Administration Guide

Figure 49-6 POP Service Statistics Section of the Internet Agent Server Console
Total Sessions: Displays the total number of POP3 sessions processed by the Internet Agent during
its current up time.
novdocx (en) 11 December 2007
Active Sessions: Displays the number of currently active POP3 sessions.
Idle Sessions: Displays the number of threads still available to the Internet Agent for POP3
sessions. This is the total number of assigned POP3 threads (by default, 10) minus the active
sessions. You can change the total number of assigned POP3 threads in ConsoleOne (Internet Agent
object > POP3/IMAP4 > Settings). For more information, see Section 46.3, “Configuring POP3/
IMAP4 Services,” on page 739.
Messages Sent: Displays the total number of GroupWise mailbox messages retrieved through POP3
sessions.
Normal Threads: Displays the number of POP threads that are busy and the number that are
available.
Secure Threads: Displays the number of POP SSL threads that are busy and the number that are
available.
Unknown Users: Displays the number of user logins that failed because the user does not exist in
the GroupWise system.
Authentication Errors: Displays the number of GroupWise user logins that failed because the user
supplied an incorrect password.
Retrieve Errors: Displays the number of errors generated because the Internet Agent could not
transfer messages to the POP3 client.
Conversion Errors: Displays the number of errors generated because the Internet Agent could not
convert retrieved GroupWise messages to MIME format.
TCP/IP Read Errors: Displays the number of TCP read errors encountered by the Internet Agent.
A TCP read error occurs if the Internet Agent successfully opens a POP3 session but is unable to
process a TCP read command during the session.
Monitoring the Internet Agent 781

TCP/IP Write Errors: Displays the number of TCP write errors encountered by the Internet Agent.
A TCP write error occurs if the Internet Agent successfully opens a POP3 session but is unable to
process a TCP write command during the session.
Denied Access Count: Displays the number of POP3 sessions that were denied because the user
does not have POP3 access. POP3 access is controlled through the user’s Class of Service
assignment (Internet Agent object > Access Control > Settings). For more information, see
Section 47.1, “Controlling User Access to the Internet,” on page 747.
Store Login Errors: Displays the number of GroupWise user logins that failed because the users’
GroupWise mailboxes were unavailable (for example, the post office is down or the Internet Agent
link to the post office is down).
IMAP Service Statistics
The IMAP Service Statistics section, shown below, provides information about the IMAP activity
handled by the Internet Agent.
NetWare: Press F10-Options, then F9-Stats to switch to the IMAP Service Statistics.
novdocx (en) 11 December 2007
Linux and
Windows:
Figure 49-7 IMAP Service Statistics Section of the Internet Agent Server Console
Click Statistics > IMAP Service.
Total Sessions: Displays the total number of IMAP4 sessions processed by the Internet Agent
during its current up time.
Active Sessions: Displays the number of currently active IMAP4 sessions.
Sessions Available: Displays the number of threads still available to the Internet Agent for IMAP4
sessions. This is the total number of assigned IMAP4 threads (by default, 10) minus the active
sessions. You can change the total number of assigned IMAP4 threads in ConsoleOne (Internet
Agent object > POP3/IMAP4 > Settings). For more information, see Section 46.3, “Configuring
POP3/IMAP4 Services,” on page 739.
Messages Sent: Displays the total number of GroupWise mailbox messages retrieved through
IMAP4 sessions.
782 GroupWise 7 Administration Guide

Normal Threads: Displays the number of IMAP threads that are busy and the number that are
available.
Secure Threads: Displays the number of IMAP SSL threads that are busy and the number that are
available.
Unknown Users: Displays the number of user logins that failed because the user does not exist in
the GroupWise system.
Authentication Errors: Displays the number of GroupWise user logins that failed because the user
supplied an incorrect password.
Retrieve Errors: Displays the number of errors generated because the Internet Agent could not
transfer messages to the IMAP4 client.
Conversion Errors: Displays the number of errors generated because the Internet Agent could not
convert retrieved GroupWise messages to MIME format.
TCP/IP Read Errors: Displays the number of TCP read errors encountered by the Internet Agent.
A TCP read error occurs if the Internet Agent successfully opens a IMAP4 session but is unable to
process a TCP read command during the session.
novdocx (en) 11 December 2007
TCP/IP Write Errors: Displays the number of TCP write errors encountered by the Internet Agent.
A TCP write error occurs if the Internet Agent successfully opens an IMAP4 session but is unable to
process a TCP write command during the session.
Denied Access Count: Displays the number of IMAP4 sessions that were denied because the user
does not have IMAP4 access. IMAP4 access is controlled through the user’s Class of Service
assignment (Internet Agent object > Access Control > Settings). For more information, see
Section 47.1, “Controlling User Access to the Internet,” on page 747.
Store Login Errors: Displays the number of GroupWise user logins that failed because the users’
GroupWise mailboxes were unavailable (for example, the post office is down or the Internet Agent
link to the post office is down).
LDAP Service Statistics
The LDAP Service Statistics section, shown below, provides information about the LDAP activity
handled by the Internet Agent.
NetWare: Press F10-Options, then F9-Stats to switch to the LDAP Service Statistics.
Linux: Click Statistics > LDAP Service.
Monitoring the Internet Agent 783

Figure 49-8 LDAP Service Statistics Section of the Internet Agent Server Console
Public Sessions: Displays the total number of LDAP sessions handled by the Internet Agent.
Authenticated Sessions: This field is not used.
novdocx (en) 11 December 2007
Sessions Active: Displays the total number of LDAP sessions currently being processed by the
Internet Agent.
Sessions Available: Displays the number of threads still available to the Internet Agent for LDAP
sessions. This is the total number of assigned LDAP threads (by default, 10) minus the active
sessions. You can change the total number of assigned LDAP threads in ConsoleOne (Internet Agent
object > LDAP > Settings). For more information, see Section 46.2, “Configuring LDAP Services,”
on page 737.
Search Requests: Displays the total number of LDAP queries against the GroupWise Address
Book.
Entries Returned: Displays the total number of Address Book entries returned for the search
requests. For example, a single search request might return 25 entries.
49.1.4 Logging
The Logging section of the console, shown below, displays Internet Agent activity. The number and
detail of these messages depend on the logging level you select. See Chapter 49.6, “Using Internet
Agent Log Files,” on page 791 for more information.
784 GroupWise 7 Administration Guide

Figure 49-9 Internet Agent Server Console
49.1.5 Menu Functions
novdocx (en) 11 December 2007
The following sections explain the menu options available in the Internet Agent console:
“NetWare Internet Agent Console” on page 785
“Linux and Windows Internet Agent Console” on page 786
NetWare Internet Agent Console
The menu functions on the NetWare Internet Agent console provide you with the following options.
F6-Restart: Select this option to restart the Internet Agent. The Internet Agent rereads all of its
configuration files (gwia.cfg, blocked.txt, gwauth.cfg, route.cfg, and so forth).
F7-Exit: Select this option to terminate the Internet Agent and return to the system prompt.
F8-Info: Select this option to display the Internet Agent configuration information in the Logging
section of the console and in the log file.
F9-Browse Log File: Select this option to browse the log file. The following browse options are
displayed:
F1-Cancel Browse: Select this option to exit browse mode and to return to the console.
Up-arrow, Down-arrow: Press the Up-arrow and Down-arrow keys to scroll one line at a
time.
PgUp, PgDn: Press the PageUp and PageDown keys to scroll one screen at a time.
Ctrl+PgUp: Press Ctrl+PageUp to move to the top of the log file.
Ctrl+PgDn: Press Ctrl+PageUp to move to the bottom of the log file.
F-10 Options: Select this option to display the options menu. The following options are displayed:
F1-Exit Options: Select this option to return to the main Internet Agent console screen.
F2-Log Level: Select this option to toggle between log levels. This option overrides the default
log level set in the Log Settings page (Internet Agent object > GroupWise > Log Settings) or
the /loglevel switch in the startup file for the current session.
Monitoring the Internet Agent 785

F6-Colors: Select this option to scroll through the several color options. This option is useful if
the Internet Agent station has a monochrome monitor. You can also use this option to help you
quickly identify an Internet Agent if more than one is running.
F8-Zero Stats: Select this option to reset the values in the Statistics section of the screen.
F9-Stats: Select this option to scroll through the SMTP service statistics, POP service
statistics, IMAP service statistics, LDAP service statistics, and message transfer status.
Linux and Windows Internet Agent Console
The menu functions on the Linux and Windows Internet Agent console provide you with the
following options.
File > Restart (F6): Select this option to restart the Internet Agent. The Internet Agent rereads all
of its configuration files (gwia.cfg, blocked.txt, gwauth.cfg, route.cfg and so forth).
File > Exit (F7): Select this option to terminate the Internet Agent and return to the system prompt.
Configuration > Agent Settings (F5): Select this option to display the Internet Agent configuration
information.
novdocx (en) 11 December 2007
Configuration > Message Transfer Status: Select this option to display the status of the TCP/IP
link between the Internet Agent and the MTA for the domain.
Configuration > Edit Startup File: Select this option to open the gwia.cfg file in the default
text editor.
Log > Cycle Log: Select this option to close the current log file and start a new one.
Log > View Log: Select this option to view the log files.
Log > Log Settings: Select this option to set the logging level, turn on or off disk logging, and
configure the maximum log file size and disk space. These changes apply only to the current
session.
Statistics > Message: Select this option to display the Message statistics. For information about the
Message statistics, see “Message Statistics” on page 778.
Statistics > SMTP Service: Select this option to display the SMTP Service statistics. For
information about the SMTP Service statistics, see “SMTP Service Statistics” on page 778.
Statistics > POP Service: Select this option to display the POP Service statistics. For information
about the POP Service statistics, see “POP Service Statistics” on page 780.
Statistics > IMAP Service: Select this option to display the IMAP Service statistics. For
information about the IMAP Service statistics, see “IMAP Service Statistics” on page 782.
Statistics > LDAP Service: Select this option to display the LDAP Service statistics. For
information about the LDAP Service statistics, see “LDAP Service Statistics” on page 783.
Statistics > Zero Statistics (F8): Select this option to reset the Message, SMTP, POP, IMAP, and
LDAP statistics.
786 GroupWise 7 Administration Guide

49.2 Using the Internet Agent Web Console
You can use a Web browser interface, referred to as the Web console, to monitor the Internet Agent.
You cannot use the Internet Agent Web console to change any of the Internet Agent’s settings.
Changes must be made through ConsoleOne, the server console, or the startup file.
Section 49.2.1, “Setting Up the Internet Agent Web Console,” on page 787
Section 49.2.2, “Monitoring the Internet Agent at the Web Console,” on page 788
49.2.1 Setting Up the Internet Agent Web Console
The default HTTP port for the Internet Agent Web console is established during Internet Agent
installation. You can change the port number and increase security after installation in ConsoleOne.
1 In ConsoleOne, right-click the WebAccess Agent object, then click Properties.
2 Click GroupWise > Network Address to display the Network Address page.
novdocx (en) 11 December 2007
3 Make a note of the TCP/IP address and the HTTP port number. You need this information to
access the Internet Agent Web console.
4 If you want to use an SSL connection for the Internet Agent Web console, which provides
optimum security, select Enabled in the HTTP SSL drop-down list.
For additional instructions about using SSL connections, see Section 71.2, “Server Certificates
and SSL Encryption,” on page 1119.
5 Click Apply to save your changes on the Network Address page.
If you want to limit access to the Internet Agent Web console, you can provide a username and
password.
6 Click GroupWise > Optional Gateway Settings to display the Optional Gateway Settings page.
Monitoring the Internet Agent 787

7 In the HTTP User Name field, enter an arbitrary username (for example, gwia).
8 Click Set Password to assign a password (for example, monitor).
novdocx (en) 11 December 2007
9 Click OK to save your changes.
ConsoleOne then notifies the Internet Agent to restart to put the new settings into effect.
49.2.2 Monitoring the Internet Agent at the Web Console
1 In a Web browser, enter the following:
http://IP_address:agent_port (non-secure server)
or
https://IP_address:agent_port (secure server)
where IP_address is the IP address or hostname of the server where the Internet Agent is
running, and HTTP_port is the port number assigned to the agent. If you used the default port
during installation, the port number is 9850.
2 If prompted, enter the Web console username and password.
The Internet Agent Web console is displayed.
788 GroupWise 7 Administration Guide

The Web console has five pages (Status, Configuration, Environment, and Log Files, and MTP
Status). You can click Help on any page for information about the page.
novdocx (en) 11 December 2007
49.3 Using Novell Remote Manager
If the Internet Agent is running on NetWare 6.5 or on Novell Open Enterprise Server (OES), you can
use the IP Address Management feature in Novell Remote Manager (Manage Server > IP Address
Management) to view the IP address and port configuration for the Internet Agent. This is also true
for other GroupWise agents (MTA, POA, and WebAccess Agent) running on NetWare 6.5/OES
servers.
IMPORTANT: If the Internet Agent is running in protected mode on NetWare, it does not display
in Novell Remote Manager.
You access Novell Remote Manager by entering the following URL in a Web browser:
http://server_address:8008
For example:
http://172.16.5.18:8008
For more information about using Novell Remote Manager, see the NetWare 6.5 Documentation
Web site (http://www.novell.com/documentation/nw65) and the Novell Open Enterprise Server
Documentation Web site (http://www.novell.com/documentation/oes).
49.4 Using an SNMP Management Console
The Internet Agent can be monitored through an SNMP management console, such as the one
provide with Novell
®
ZENworks® Server Management.
Before you can monitor the Internet Agent through an SNMP management console, you must
compile the Internet Agent’s MIB (Management Information Base) file. The Internet Agent’s MIB
file, named gwia.mib, is located in the agents\snmp directory on the GroupWise 7
Administrator CD or in the GroupWise software distribution directory.
The MIB file contains all the Trap, Set, and Get variables used for communication between the
Internet Agent and management console. The Trap variables provide warnings that point to current
Monitoring the Internet Agent 789

and potential problems. The Set variables allow you to configure portions of the application while it
is still running. The Get variables display the current status of different processes of the application.
To compile the MIB file:
1 Copy the Internet Agent MIB (gwia.mib) to the SNMP management console’s MIB
directory.
2 Compile the MIB file.
3 Create a profile that uses the Internet Agent MIB, then select that profile.
49.5 Assigning Operators to Receive Warning and Error Messages
You can select GroupWise users to receive warning and error messages issued by the Internet Agent.
Whenever the agent issues a warning or error, these users, called operators, receive a message in
their mailboxes. You can specify one or more operators.
An operator can also shut down the Internet Agent by sending a mail message addressed as follows:
gwia:shutdown
novdocx (en) 11 December 2007
where gwia is your Internet Agent’s name.
To assign an operator:
1 In ConsoleOne, right-click the Internet Agent object, then click Properties.
2 Click GroupWise > Gateway Administrators to display the Gateway Administrators page.
3 Click Add, select a user, then click OK to add the user to the Gateway Administrators list.
790 GroupWise 7 Administration Guide

4 Make sure Operator is selected as the Administrator Role.
5 If desired, add additional operators.
novdocx (en) 11 December 2007
6 Click OK.
49.6 Using Internet Agent Log Files
You can use the Internet Agent logging options to help you monitor its operation. By default, the
Internet Agent logs information to its server console, Web console, and to a log file on disk. You can
control the following logging features:
The type of information to log.
Disabling disk logging (Windows Internet Agent only).
How long to retain log files.
The maximum amount of disk space to use for log files.
Where to store log files.
You can control logging through ConsoleOne, Internet Agent startup switches, and the Internet
Agent console. The following table shows which logging options you can control from each
location.
Table 49-1 Logging Options
ConsoleOne
Startup
Switches
NetWare
Console
Linux
Console
Windows
Console
Logging Level
Disk Logging No No No Yes Yes
Maximum Log File Age Yes Yes No Yes Yes
Maximum Disk Space Ye s Yes No Yes Yes
Yes Yes Yes Yes Yes
Monitoring the Internet Agent 791

novdocx (en) 11 December 2007
ConsoleOne
Log File Location Yes Yes No No No
Startup
Switches
NetWare
Console
Linux
Console
Windows
Console
The log settings in ConsoleOne are used as the default settings. Startup switches override the
ConsoleOne log settings, and console settings override startup switches.
Section 49.6.1, “Modifying Log Settings in ConsoleOne,” on page 792
Section 49.6.2, “Modifying Log Settings through Startup Switches,” on page 793
Section 49.6.3, “Modifying Log Settings through the Internet Agent Server Console,” on
page 793
Section 49.6.4, “Viewing Log Files,” on page 795
49.6.1 Modifying Log Settings in ConsoleOne
Through ConsoleOne, you can configure the following log settings:
Log file location
Logging level (applies to both console logging and disk logging)
Maximum age for log files
Maximum disk spaced used for log files
The ConsoleOne settings are the default settings. The Internet Agent uses these settings unless you
override them with startup switches in the gwia.cfg startup file or at the server console.
To configure the default log settings in ConsoleOne:
1 Right-click the Internet Agent object, then click Properties.
2 Click GroupWise > Log Settings to display the Log Settings page.
3 Modify any of the following properties:
792 GroupWise 7 Administration Guide

Log File Path: The Internet Agent creates a new log file each day and each time it is started.
The log file is named mmddgwia.nnn, where mm is the month, dd is the day, and nnn is a
sequenced number (001 for the first log file of the day, 002 for the second, and so forth). The
default location of the log files depends on the platform where the Internet Agent is running.
NetWare: domain\wpgate\gwia\000.prc
novdocx (en) 11 December 2007
Linux:
Windows: c:\grpwise\gwia
If you want to specify a different location, enter the directory path or browse to and select the
directory.
Logging Level: There are four logging levels:
Off: Disables the logging function.
Normal: Displays warnings and error messages. This is the preferred logging level.
Ve rb os e: Displays information about traffic, including non-delivery reports, in addition to
warnings and error messages. Information includes the filename, path, message ID, and
size of the message being processed; the IP address of any inbound SMTP connections;
the Internet Agent-specific MSG number; and SMTP connection messages such as
“Connect to novell.com” and “Accepted connection from 172.16.5.18 novell.com”.
Diagnostic: Displays detailed function calls made by the Internet Agent. This level is not
useful for most troubleshooting. Verbose is better for standard troubleshooting.
The verbose and diagnostic logging levels do not degrade Internet Agent performance, but log
files saved to disk consume more disk space when verbose or diagnostic logging is in use.
Max Log File Age: Specify the number of days you want the Internet Agent to retain old log
files. The Internet Agent retains the log file for the specified number of days unless the
maximum disk space for the log files is exceeded. The default age is 7 days.
Max Log Disk Space: Specify the maximum amount of disk space you want to use for log
files. If the disk space limit is exceeded, the Internet Agent deletes log files, beginning with the
oldest file, until the limit is no longer exceeded. The default disk space is 65536 KB.
4 Click OK to save the log settings.
/var/log/novell/groupwise/domain_name.gwia
49.6.2 Modifying Log Settings through Startup Switches
You can use startup switches to override any log settings you configured in ConsoleOne. as
described in Section 49.6.1, “Modifying Log Settings in ConsoleOne,” on page 792. Edit the
gwia.cfg file to change switch settings, as described in Section 52.1.2, “Modifying the gwia.cfg
File,” on page 814.
For information about the startup switches that can be used to modify log settings, see
Section 52.12, “Log File Switches,” on page 851.
49.6.3 Modifying Log Settings through the Internet Agent Server Console
“NetWare Internet Agent Server Console” on page 794
“Linux or Windows Internet Agent Server Console” on page 794
Monitoring the Internet Agent 793

NetWare Internet Agent Server Console
You can use the NetWare Internet Agent console to set the logging level for the current session.
Changes you make to logging level at the console apply only to the current session. When you
restart the Internet Agent, the logging level is reset to the settings specified in ConsoleOne or the
startup switches. See Section 49.6.1, “Modifying Log Settings in ConsoleOne,” on page 792 and
Section 49.6.2, “Modifying Log Settings through Startup Switches,” on page 793.
To modify the logging level:
1 At the NetWare Internet Agent’s console, press F10-Options, then press F2-Log Level
repeatedly to toggle among the available log levels:
Off: Disables the logging function.
Normal: Displays warnings and error messages. This is the preferred logging level.
Ve rb os e: Displays information about traffic, including non-delivery reports, in addition to
warnings and error messages. Information includes the filename, path, message ID, and
size of the message being processed; the IP address of any inbound SMTP connections;
the Internet Agent-specific MSG number; and SMTP connection messages such as
“Connect to novell.com” and “Accepted connection from 172.16.5.18 novell.com”.
novdocx (en) 11 December 2007
Diag: Displays detailed function calls made by the Internet Agent. This level is not useful
for most troubleshooting. Verbose is better for standard troubleshooting.
2 Press F1-Exit Options to return to the main console screen.
Linux or Windows Internet Agent Server Console
You can use the Windows Internet Agent console to override the following log settings for the
current sessions:
Disk logging on/off
Log file location
Logging level (applies to both console logging and disk logging)
Maximum age for log files
Maximum disk spaced used for log files
Changes you make to the log settings at the console apply only to the current session. When you
restart the Internet Agent, the log level is reset to the level specified in ConsoleOne or the startup
switches. See Section 49.6.1, “Modifying Log Settings in ConsoleOne,” on page 792 and
Section 49.6.2, “Modifying Log Settings through Startup Switches,” on page 793.
To modify the log settings:
1 In the Windows Internet Agent console, click Log > Log Settings to display the Log Settings
dialog box.
794 GroupWise 7 Administration Guide

2 Change the desired settings:
Log Level: Select Normal to display warnings and error messages; this is the preferred
logging level. Select Verbose to display information about traffic, including non-delivery
reports, in addition to warnings and error messages. Information includes the filename,
path, message ID, and size of the message being processed; the IP address of any inbound
SMTP connections; the Internet Agent-specific MSG number; and SMTP connection
messages such as “Connect to novell.com” and “Accepted connection from 172.16.5.18
novell.com”.
novdocx (en) 11 December 2007
Disk Logging: Select On or Off to enable or disable logging of information to log files.
Maximum Log File Age: Specify the number of days you want the Internet Agent to
retain old log files. The Internet Agent retains the log file for the specified number of days
unless the maximum disk space for the log files is exceeded. The default age is 7 days.
Maximum Log Disk Space: Specify the maximum amount of disk space you want to use
for log files. If the disk space limit is exceeded, the Internet Agent deletes log files,
beginning with the oldest file, until the limit is no longer exceeded. The default disk space
is 65536 KB.
49.6.4 Viewing Log Files
You can view the log file for the current session, or you can view archived log files. The current log
file is viewable through the Internet Agent console, as described in Section 49.1, “Using the Internet
Agent Server Console,” on page 775, or in the Internet Agent Web console, as described in
Section 49.2, “Using the Internet Agent Web Console,” on page 787. Archived files are viewable
through the consoles or an ASCII text editor.
Current Log File
The current log file is displayed in the Logging window of the Internet Agent console, with only the
most current operations visible. The log file is complete, and includes the gateway startup and
configuration information and ongoing operations logged by time, including the shutdown
operation. You can browse the file from top to bottom or perform a search for any text string you
want. You can also view the current log file from the Internet Agent Web console.
Archived Log Files
The Internet Agent creates a new log file every day at midnight or every time it restarts. Older log
files are not deleted for at least one day unless you have not allowed sufficient disk space for them to
be archived.
Monitoring the Internet Agent 795

Log files are named according to the date they were created. If the Internet Agent was restarted
during the day, the file extension indicates which session is logged (for example 0518log.003
indicates the third session logged for May 18).
Archived log files are saved in ASCII. You can use any text editor to open a file or to print it. You
can also view the log files from the Internet Agent console or the Internet Agent Web console.
49.7 Using Internet Agent Error Message Documentation
Internet Agent error messages are documented with the source and explanation of the error, possible
causes of the error, and actions to take to resolve the error. See “Internet Agent Error Messages” in
GroupWise 7 Troubleshooting 1: Error Messages.
49.8 Employing Internet Agent Troubleshooting Techniques
If you are having a problem with the Internet Agent but not receiving a specific error message, or if
the suggested actions for the specific error did not resolve the problem, you can review more general
troubleshooting strategies for dealing with Internet Agent problems. See “Strategies for Agent
Problems” in GroupWise 7 Troubleshooting 2: Solutions to Common Problems.
novdocx (en) 11 December 2007
49.9 Stopping the Internet Agent
The following sections describe the various methods you can use to shut down the Internet Agent:
Section 49.9.1, “Using the Internet Agent Console,” on page 796
Section 49.9.2, “Using a Command at the Command Line,” on page 796
Section 49.9.3, “Using a Mail Message,” on page 797
Section 49.9.4, “Using a Shutdown File,” on page 797
49.9.1 Using the Internet Agent Console
To stop the Internet Agent while at the server console:
NetWare: Press F7-Exit, then select Yes.
Linux and
Windows:
49.9.2 Using a Command at the Command Line
To stop the Internet Agent at the command line:
Click File > Exit.
NetWare: unload gwia
Linux: /etc/init.d/grpwise stop
Windows: N/A
796 GroupWise 7 Administration Guide

49.9.3 Using a Mail Message
The Internet Agent can be stopped by sending a shutdown message to the Internet Agent. In order to
shut down the program with a message, the user sending the message must be defined as an operator
for the Internet Agent. This prevents unauthorized users from shutting down the Internet Agent. For
information about defining a user as an operator, see Section 49.5, “Assigning Operators to Receive
Warning and Error Messages,” on page 790.
The message to shut down the Internet Agent must be addressed to the Internet Agent, not a nonGroupWise domain. The syntax for the To line is:
gwia:shutdown
where gwia is the name of the Internet Agent object.
49.9.4 Using a Shutdown File
The Internet Agent can also be stopped by placing a file named shutdown in the
domain\wpgate\gwia\000.prc directory. When the Internet Agent sees this file, it deletes
the file and shuts down.
novdocx (en) 11 December 2007
Monitoring the Internet Agent 797

novdocx (en) 11 December 2007
798 GroupWise 7 Administration Guide

50
Optimizing the Internet Agent
novdocx (en) 11 December 2007
50
The following sections provide information about some of the methods you can use to optimize the
speed and reliability of the GroupWise
Section 50.1, “Relocating the Internet Agent’s Processing Directories,” on page 799
Section 50.2, “Increasing Internet Agent Speed,” on page 801
Section 50.3, “Automating Reattachment to NetWare Servers,” on page 802
®
Internet Agent:
50.1 Relocating the Internet Agent’s Processing Directories
The Internet Agent uses several directories to process message files. For best performance, these
directories should be located on the same server where the Internet Agent is running.
NetWare: If you installed the Internet Agent on a different server from where the domain is located,
you should move the Internet Agent’s processing directories to the server where the
Internet Agent is running.
Linux: If you installed the Internet Agent on a different server from where the domain is located,
you should move the Internet Agent’s processing directories to the server where the
Internet Agent is running.
Windows: The Internet Agent Installation program creates the Internet Agent’s processing directories
on the Windows server when it installs the Windows Internet Agent, so you typically don’t
need to move them.
To define the location of the Internet Agent’s directories:
®
1 In ConsoleOne
2 Click Server Directories > Settings to display the server directories Settings page.
, right-click the Internet Agent object, then click Properties.
Optimizing the Internet Agent
799

3 Fill in the fields:
Conversion Directory: Select the directory where the Internet Agent stores temporary files for
message conversion. The default conversion directory depends on the Internet Agent platform.
NetWare: domain\wpgate\gwia000.prc\gwwork
Linux: domain/wpgate/gwia/000.prc/gwwork
Windows: c:\grpwise\gwia
If you type a path to a Windows drive (rather than using the Browse button to select the
directory), you must use UNC path syntax.
This setting corresponds with the Internet Agent’s /work switch.
SMTP Queues Directory: Select the directory where the Internet Agent stores messages being
routed to and from the Internet. The default directory depends on the Internet Agent platform.
NetWare: domain\wpgate\gwia
Linux: domain/\wpgate/gwia
novdocx (en) 11 December 2007
Windows: c:\grpwise\gwia
Four subdirectories are created under the SMTP queues directory: defer, send, receive, and
result.
This setting corresponds with the Internet Agent’s /dhome switch.
4 Click the Advanced button.
5 Fill in the field:
SMTP Service Queues Directory: If you want, specify a secondary SMTP queues directory
for outbound messages. This secondary directory can be helpful for troubleshooting by
providing a way to trap messages before they are routed to the Internet. You can also use the
secondary directory to run third-party utilities such as a virus scanner on Internet-bound
messages.
The Internet Agent places all outbound messages in this secondary directory. The messages
must then be moved manually (or by another application) to the primary SMTP queues’ send
directory (see Step 3) before the Internet Agent routes them to the Internet.
This setting corresponds with the /smtphome switch.
If you type a directory path rather than using the Browse button to select a directory, make sure
you use UNC path syntax.
6 Click OK to close the dialog box.
800 GroupWise 7 Administration Guide
 Loading...