

Page 1

Installation Guide
Novell®
novdocx (en) 22 June 2009
AUTHORIZED DOCUMENTATION
GroupWise
7
March 14, 2008
®
www.novell.com
GroupWise 7 Installation Guide
Page 2

Legal Notices
Novell, Inc. makes no representations or warranties with respect to the contents or use of this documentation, and
specifically disclaims any express or implied warranties of merchantability or fitness for any particular purpose.
Further, Novell, Inc. reserves the right to revise this publication and to make changes to its content, at any time,
without obligation to notify any person or entity of such revisions or changes.
Further, Novell, Inc. makes no representations or warranties with respect to any software, and specifically disclaims
any express or implied warranties of merchantability or fitness for any particular purpose. Further, Novell, Inc.
reserves the right to make changes to any and all parts of Novell software, at any time, without any obligation to
notify any person or entity of such changes.
Any products or technical information provided under this Agreement may be subject to U.S. export controls and the
trade laws of other countries. You agree to comply with all export control regulations and to obtain any required
licenses or classification to export, re-export, or import deliverables. You agree not to export or re-export to entities
on the current U.S. export exclusion lists or to any embargoed or terrorist countries as specified in the U.S. export
laws. You agree to not use deliverables for prohibited nuclear, missile, or chemical biological weaponry end uses. See
the Novell International Trade Services Web page (http://www.novell.com/info/exports/) for more information on
exporting Novell software. Novell assumes no responsibility for your failure to obtain any necessary export
approvals.
novdocx (en) 22 June 2009
Copyright © 1993-2008 Novell, Inc. All rights reserved. No part of this publication may be reproduced, photocopied,
stored on a retrieval system, or transmitted without the express written consent of the publisher.
Novell, Inc. has intellectual property rights relating to technology embodied in the product that is described in this
document. In particular, and without limitation, these intellectual property rights may include one or more of the U.S.
patents listed on the Novell Legal Patents Web page (http://www.novell.com/company/legal/patents/) and one or
more additional patents or pending patent applications in the U.S. and in other countries.
Novell, Inc.
404 Wyman Street, Suite 500
Waltham, MA 02451
U.S.A.
www.novell.com
Online Documentation: To access the online documentation for this and other Novell products, and to get updates,
see the Novell Documentation Web site (http://www.novell.com/documentation).
Page 3

Novell Trademarks
For Novell trademarks, see the Novell Trademark and Service Mark list (http://www.novell.com/company/legal/
trademarks/tmlist.html).
Third-Party Materials
All third-party trademarks are the property of their respective owners.
novdocx (en) 22 June 2009
Page 4

novdocx (en) 22 June 2009
4 GroupWise 7 Installation Guide
Page 5

Contents
About This Guide 13
Part I Installation 15
1 What Is GroupWise? 17
1.1 What GroupWise Provides. . . . . . . . . . . . . . . . . . . . . . . . . . . . . . . . . . . . . . . . . . . . . . . . . . . . 17
1.1.1 Essential Communication and Collaboration Services . . . . . . . . . . . . . . . . . . . . . . . 17
1.1.2 Available Anytime . . . . . . . . . . . . . . . . . . . . . . . . . . . . . . . . . . . . . . . . . . . . . . . . . . . 18
1.1.3 Accessible Anywhere. . . . . . . . . . . . . . . . . . . . . . . . . . . . . . . . . . . . . . . . . . . . . . . . . 18
1.1.4 Always Secure . . . . . . . . . . . . . . . . . . . . . . . . . . . . . . . . . . . . . . . . . . . . . . . . . . . . . . 18
1.2 What You Need to Do . . . . . . . . . . . . . . . . . . . . . . . . . . . . . . . . . . . . . . . . . . . . . . . . . . . . . . . 19
2 GroupWise System Requirements 21
novdocx (en) 22 June 2009
2.1 GroupWise Administration Requirements . . . . . . . . . . . . . . . . . . . . . . . . . . . . . . . . . . . . . . . . 21
2.2 GroupWise Client Requirements . . . . . . . . . . . . . . . . . . . . . . . . . . . . . . . . . . . . . . . . . . . . . . . 22
2.2.1 Windows Client . . . . . . . . . . . . . . . . . . . . . . . . . . . . . . . . . . . . . . . . . . . . . . . . . . . . . 22
2.2.2 Cross-Platform Client on Linux . . . . . . . . . . . . . . . . . . . . . . . . . . . . . . . . . . . . . . . . . 23
2.2.3 Cross-Platform Client on Macintosh . . . . . . . . . . . . . . . . . . . . . . . . . . . . . . . . . . . . . 23
2.2.4 WebAccess Client . . . . . . . . . . . . . . . . . . . . . . . . . . . . . . . . . . . . . . . . . . . . . . . . . . . 23
2.3 Supported Environments . . . . . . . . . . . . . . . . . . . . . . . . . . . . . . . . . . . . . . . . . . . . . . . . . . . . . 23
2.3.1 IPV6 Support . . . . . . . . . . . . . . . . . . . . . . . . . . . . . . . . . . . . . . . . . . . . . . . . . . . . . . . 24
2.3.2 Clustering Support . . . . . . . . . . . . . . . . . . . . . . . . . . . . . . . . . . . . . . . . . . . . . . . . . . . 24
2.3.3 Virtual Machine Support . . . . . . . . . . . . . . . . . . . . . . . . . . . . . . . . . . . . . . . . . . . . . . 24
2.3.4 Citrix Support . . . . . . . . . . . . . . . . . . . . . . . . . . . . . . . . . . . . . . . . . . . . . . . . . . . . . . . 24
2.3.5 Linux File System Support. . . . . . . . . . . . . . . . . . . . . . . . . . . . . . . . . . . . . . . . . . . . . 24
3 Installing a Basic GroupWise System 25
3.1 Basic System Overview . . . . . . . . . . . . . . . . . . . . . . . . . . . . . . . . . . . . . . . . . . . . . . . . . . . . . . 25
3.2 Planning Your Basic GroupWise System. . . . . . . . . . . . . . . . . . . . . . . . . . . . . . . . . . . . . . . . . 26
3.2.1 Determining Installation Locations . . . . . . . . . . . . . . . . . . . . . . . . . . . . . . . . . . . . . . . 26
3.2.2 Planning Your Domain. . . . . . . . . . . . . . . . . . . . . . . . . . . . . . . . . . . . . . . . . . . . . . . . 30
3.2.3 Planning Your Post Office . . . . . . . . . . . . . . . . . . . . . . . . . . . . . . . . . . . . . . . . . . . . . 35
3.2.4 Planning Your GroupWise Agents . . . . . . . . . . . . . . . . . . . . . . . . . . . . . . . . . . . . . . . 38
3.2.5 Sample GroupWise Configurations . . . . . . . . . . . . . . . . . . . . . . . . . . . . . . . . . . . . . . 43
3.3 Setting Up a Basic GroupWise System . . . . . . . . . . . . . . . . . . . . . . . . . . . . . . . . . . . . . . . . . . 45
3.3.1 NetWare and Windows: Setting Up a Basic GroupWise System. . . . . . . . . . . . . . . . 46
3.3.2 Linux: Setting Up a Basic GroupWise System. . . . . . . . . . . . . . . . . . . . . . . . . . . . . . 60
3.4 What’s Next . . . . . . . . . . . . . . . . . . . . . . . . . . . . . . . . . . . . . . . . . . . . . . . . . . . . . . . . . . . . . . . 72
3.5 Basic GroupWise System Worksheet . . . . . . . . . . . . . . . . . . . . . . . . . . . . . . . . . . . . . . . . . . . 73
4 Installing the GroupWise Internet Agent 79
4.1 GroupWise Internet Agent Overview . . . . . . . . . . . . . . . . . . . . . . . . . . . . . . . . . . . . . . . . . . . . 79
4.2 Internet Agent System Requirements . . . . . . . . . . . . . . . . . . . . . . . . . . . . . . . . . . . . . . . . . . . 83
4.2.1 Network Server Requirements. . . . . . . . . . . . . . . . . . . . . . . . . . . . . . . . . . . . . . . . . . 83
4.2.2 GroupWise System Requirements . . . . . . . . . . . . . . . . . . . . . . . . . . . . . . . . . . . . . . 84
4.2.3 Internet Connectivity Requirements. . . . . . . . . . . . . . . . . . . . . . . . . . . . . . . . . . . . . . 84
Contents 5
Page 6

4.3 Planning the GroupWise Internet Agent. . . . . . . . . . . . . . . . . . . . . . . . . . . . . . . . . . . . . . . . . . 84
4.3.1 Selecting the Internet Agent Platform . . . . . . . . . . . . . . . . . . . . . . . . . . . . . . . . . . . . 85
4.3.2 Gathering Server Information . . . . . . . . . . . . . . . . . . . . . . . . . . . . . . . . . . . . . . . . . . 85
4.3.3 Selecting the Internet Agent Installation Directory . . . . . . . . . . . . . . . . . . . . . . . . . . . 86
4.3.4 Gathering Domain and Gateway Information . . . . . . . . . . . . . . . . . . . . . . . . . . . . . . 86
4.3.5 Selecting the Gateway Object Name. . . . . . . . . . . . . . . . . . . . . . . . . . . . . . . . . . . . . 87
4.3.6 Specifying the Internet Mail Domain Name for Your GroupWise System . . . . . . . . . 87
4.3.7 Handling Outbound Mail . . . . . . . . . . . . . . . . . . . . . . . . . . . . . . . . . . . . . . . . . . . . . . 87
4.3.8 Enabling the Internet Agent Web Console. . . . . . . . . . . . . . . . . . . . . . . . . . . . . . . . . 88
4.3.9 NetWare Installation Options: Automatic Startup and Clustering . . . . . . . . . . . . . . . 88
4.3.10 Linux Installation Options: LDAP Information and Clustering . . . . . . . . . . . . . . . . . . 89
4.3.11 Windows Installation Options: Service vs. Application and SNMP Traps . . . . . . . . . 90
4.4 Setting Up the Internet Agent. . . . . . . . . . . . . . . . . . . . . . . . . . . . . . . . . . . . . . . . . . . . . . . . . . 91
4.4.1 Installing the Internet Agent . . . . . . . . . . . . . . . . . . . . . . . . . . . . . . . . . . . . . . . . . . . . 92
4.4.2 Assigning a Postmaster . . . . . . . . . . . . . . . . . . . . . . . . . . . . . . . . . . . . . . . . . . . . . . . 96
4.4.3 Starting the Internet Agent. . . . . . . . . . . . . . . . . . . . . . . . . . . . . . . . . . . . . . . . . . . . . 97
4.4.4 Testing the Internet Agent . . . . . . . . . . . . . . . . . . . . . . . . . . . . . . . . . . . . . . . . . . . . . 99
4.5 What’s Next . . . . . . . . . . . . . . . . . . . . . . . . . . . . . . . . . . . . . . . . . . . . . . . . . . . . . . . . . . . . . . 100
4.6 GroupWise Internet Agent Installation Worksheet . . . . . . . . . . . . . . . . . . . . . . . . . . . . . . . . . 100
5 Installing GroupWise WebAccess 103
novdocx (en) 22 June 2009
5.1 GroupWise WebAccess Overview . . . . . . . . . . . . . . . . . . . . . . . . . . . . . . . . . . . . . . . . . . . . . 103
5.1.1 GroupWise WebAccess Introduction . . . . . . . . . . . . . . . . . . . . . . . . . . . . . . . . . . . . 103
5.1.2 GroupWise WebAccess Components . . . . . . . . . . . . . . . . . . . . . . . . . . . . . . . . . . . 104
5.1.3 One WebAccess Server vs. Two. . . . . . . . . . . . . . . . . . . . . . . . . . . . . . . . . . . . . . . 105
5.1.4 WebAccess Security Requirements . . . . . . . . . . . . . . . . . . . . . . . . . . . . . . . . . . . . 105
5.1.5 GroupWise Document Viewer Agent . . . . . . . . . . . . . . . . . . . . . . . . . . . . . . . . . . . . 107
5.2 WebAccess System Requirements . . . . . . . . . . . . . . . . . . . . . . . . . . . . . . . . . . . . . . . . . . . . 107
5.3 Planning GroupWise WebAccess . . . . . . . . . . . . . . . . . . . . . . . . . . . . . . . . . . . . . . . . . . . . . 108
5.3.1 Deciding Where to Install the GroupWise WebAccess Components. . . . . . . . . . . . 109
5.3.2 Determining the WebAccess Agent’s Configuration . . . . . . . . . . . . . . . . . . . . . . . . 109
5.3.3 Determining the WebAccess and WebPublisher Applications’ Configuration . . . . . 115
5.4 Setting Up GroupWise WebAccess . . . . . . . . . . . . . . . . . . . . . . . . . . . . . . . . . . . . . . . . . . . . 116
5.4.1 NetWare and Windows: Setting Up GroupWise WebAccess . . . . . . . . . . . . . . . . . 116
5.4.2 Linux: Setting Up GroupWise WebAccess . . . . . . . . . . . . . . . . . . . . . . . . . . . . . . . 123
5.4.3 Testing GroupWise WebAccess and WebPublisher . . . . . . . . . . . . . . . . . . . . . . . . 129
5.5 What’s Next . . . . . . . . . . . . . . . . . . . . . . . . . . . . . . . . . . . . . . . . . . . . . . . . . . . . . . . . . . . . . . 131
5.6 GroupWise WebAccess Installation Worksheet. . . . . . . . . . . . . . . . . . . . . . . . . . . . . . . . . . . 131
5.6.1 WebAccess Agent and WebAccess/WebPublisher Applications. . . . . . . . . . . . . . . 132
5.6.2 WebAccess Agent . . . . . . . . . . . . . . . . . . . . . . . . . . . . . . . . . . . . . . . . . . . . . . . . . . 132
5.6.3 WebAccess/WebPublisher Applications . . . . . . . . . . . . . . . . . . . . . . . . . . . . . . . . . 135
6 Installing GroupWise Monitor 137
6.1 GroupWise Monitor Overview . . . . . . . . . . . . . . . . . . . . . . . . . . . . . . . . . . . . . . . . . . . . . . . . 137
6.1.1 One Monitor Server vs. Two . . . . . . . . . . . . . . . . . . . . . . . . . . . . . . . . . . . . . . . . . . 138
6.1.2 Monitor Security Requirements . . . . . . . . . . . . . . . . . . . . . . . . . . . . . . . . . . . . . . . . 138
6.2 Monitor System Requirements. . . . . . . . . . . . . . . . . . . . . . . . . . . . . . . . . . . . . . . . . . . . . . . . 140
6.3 Planning GroupWise Monitor . . . . . . . . . . . . . . . . . . . . . . . . . . . . . . . . . . . . . . . . . . . . . . . . . 141
6.3.1 Deciding Where to Install the GroupWise Monitor Components . . . . . . . . . . . . . . . 141
6.3.2 Determining the Monitor Agent’s Configuration . . . . . . . . . . . . . . . . . . . . . . . . . . . . 142
6.3.3 Determining the Monitor Application’s Configuration. . . . . . . . . . . . . . . . . . . . . . . . 144
6.4 Setting Up GroupWise Monitor . . . . . . . . . . . . . . . . . . . . . . . . . . . . . . . . . . . . . . . . . . . . . . . 145
6.4.1 Windows: Setting Up GroupWise Monitor . . . . . . . . . . . . . . . . . . . . . . . . . . . . . . . . 146
6.4.2 Linux: Setting Up GroupWise Monitor . . . . . . . . . . . . . . . . . . . . . . . . . . . . . . . . . . . 147
6 GroupWise 7 Installation Guide
Page 7

6.4.3 Completing Optional Post-Installation Tasks . . . . . . . . . . . . . . . . . . . . . . . . . . . . . . 152
6.5 Using GroupWise Monitor . . . . . . . . . . . . . . . . . . . . . . . . . . . . . . . . . . . . . . . . . . . . . . . . . . . 153
6.5.1 Monitor Agent Server Console on a Windows Server . . . . . . . . . . . . . . . . . . . . . . . 153
6.5.2 Monitor Web Consoles in Your Web Browser . . . . . . . . . . . . . . . . . . . . . . . . . . . . . 154
6.6 GroupWise Monitor Installation Worksheet . . . . . . . . . . . . . . . . . . . . . . . . . . . . . . . . . . . . . . 155
7 Installing GroupWise Agents 159
7.1 GroupWise Agent Overview. . . . . . . . . . . . . . . . . . . . . . . . . . . . . . . . . . . . . . . . . . . . . . . . . . 159
7.1.1 Local Access to Databases . . . . . . . . . . . . . . . . . . . . . . . . . . . . . . . . . . . . . . . . . . . 160
7.1.2 Remote Access to Databases . . . . . . . . . . . . . . . . . . . . . . . . . . . . . . . . . . . . . . . . . 160
7.1.3 Links between the MTA and the POA . . . . . . . . . . . . . . . . . . . . . . . . . . . . . . . . . . . 160
7.2 Agent System Requirements . . . . . . . . . . . . . . . . . . . . . . . . . . . . . . . . . . . . . . . . . . . . . . . . . 161
7.3 Planning the GroupWise Agents . . . . . . . . . . . . . . . . . . . . . . . . . . . . . . . . . . . . . . . . . . . . . . 162
7.3.1 Selecting the Agent Platform . . . . . . . . . . . . . . . . . . . . . . . . . . . . . . . . . . . . . . . . . . 162
7.3.2 Selecting the Agent Location . . . . . . . . . . . . . . . . . . . . . . . . . . . . . . . . . . . . . . . . . . 163
7.3.3 Selecting the Agent Installation Directory . . . . . . . . . . . . . . . . . . . . . . . . . . . . . . . . 163
7.3.4 Gathering Domain and Post Office Information . . . . . . . . . . . . . . . . . . . . . . . . . . . . 164
7.3.5 Deciding Which Languages to Install. . . . . . . . . . . . . . . . . . . . . . . . . . . . . . . . . . . . 164
7.3.6 NetWare Installation Options: Automatic Startup and Clustering . . . . . . . . . . . . . . 164
7.3.7 Linux Installation Option: Clustering . . . . . . . . . . . . . . . . . . . . . . . . . . . . . . . . . . . . 165
7.3.8 Windows Installation Options: Service vs. Application and SNMP Traps . . . . . . . . 166
7.4 Setting Up the GroupWise Agents . . . . . . . . . . . . . . . . . . . . . . . . . . . . . . . . . . . . . . . . . . . . . 167
7.4.1 Configuring New Agent Objects in eDirectory . . . . . . . . . . . . . . . . . . . . . . . . . . . . . 168
7.4.2 NetWare: Setting Up the GroupWise Agents. . . . . . . . . . . . . . . . . . . . . . . . . . . . . . 168
7.4.3 Linux: Setting Up the GroupWise Agents . . . . . . . . . . . . . . . . . . . . . . . . . . . . . . . . 175
7.4.4 Windows: Setting Up the GroupWise Agents . . . . . . . . . . . . . . . . . . . . . . . . . . . . . 192
7.5 What’s Next . . . . . . . . . . . . . . . . . . . . . . . . . . . . . . . . . . . . . . . . . . . . . . . . . . . . . . . . . . . . . . 198
7.6 GroupWise Agent Installation Worksheet . . . . . . . . . . . . . . . . . . . . . . . . . . . . . . . . . . . . . . . 198
novdocx (en) 22 June 2009
8 Installing the GroupWise Windows and Cross-Platform Clients 201
8.1 GroupWise Client Overview . . . . . . . . . . . . . . . . . . . . . . . . . . . . . . . . . . . . . . . . . . . . . . . . . . 201
8.2 GroupWise Client Workstation Requirements . . . . . . . . . . . . . . . . . . . . . . . . . . . . . . . . . . . . 201
8.2.1 GroupWise Windows Client . . . . . . . . . . . . . . . . . . . . . . . . . . . . . . . . . . . . . . . . . . . 201
8.2.2 GroupWise Cross-Platform Client on Linux . . . . . . . . . . . . . . . . . . . . . . . . . . . . . . . 202
8.2.3 GroupWise Cross-Platform Client on Macintosh . . . . . . . . . . . . . . . . . . . . . . . . . . . 202
8.3 Planning Your GroupWise Client Installation . . . . . . . . . . . . . . . . . . . . . . . . . . . . . . . . . . . . . 202
8.3.1 Assigning GroupWise Accounts to Users . . . . . . . . . . . . . . . . . . . . . . . . . . . . . . . . 202
8.3.2 System-Wide Rollouts . . . . . . . . . . . . . . . . . . . . . . . . . . . . . . . . . . . . . . . . . . . . . . . 203
8.4 Setting Up the GroupWise Client . . . . . . . . . . . . . . . . . . . . . . . . . . . . . . . . . . . . . . . . . . . . . . 204
8.4.1 Setting Up the GroupWise Windows Client . . . . . . . . . . . . . . . . . . . . . . . . . . . . . . . 204
8.4.2 Setting Up the GroupWise Cross-Platform Client on Linux . . . . . . . . . . . . . . . . . . . 206
8.4.3 Setting Up the GroupWise Cross-Platform Client on Macintosh . . . . . . . . . . . . . . . 207
8.5 What’s Next . . . . . . . . . . . . . . . . . . . . . . . . . . . . . . . . . . . . . . . . . . . . . . . . . . . . . . . . . . . . . . 207
Contents 7
Page 8

9 Installing the GroupWise Connector for Microsoft Outlook 209
10 Installing the GroupWise Mobile Server 211
11 Installing GroupWise Messenger 213
Part II Update 215
12 What’s New in GroupWise 7 217
12.1 GroupWise Administration . . . . . . . . . . . . . . . . . . . . . . . . . . . . . . . . . . . . . . . . . . . . . . . . . . . 217
12.1.1 Distribution List Administration (v7.0) . . . . . . . . . . . . . . . . . . . . . . . . . . . . . . . . . . . 218
12.1.2 Global Signatures (v7.0 / v7.0.1) . . . . . . . . . . . . . . . . . . . . . . . . . . . . . . . . . . . . . . . 218
12.1.3 User Move Pending Items (v7.0) . . . . . . . . . . . . . . . . . . . . . . . . . . . . . . . . . . . . . . . 218
12.1.4 Address Book Delta Sync (v7.0) . . . . . . . . . . . . . . . . . . . . . . . . . . . . . . . . . . . . . . . 219
12.1.5 Client Options Enhancements (v7.0) . . . . . . . . . . . . . . . . . . . . . . . . . . . . . . . . . . . . 219
12.1.6 More Flexibility with Preferred E-Mail IDs (v7.0) . . . . . . . . . . . . . . . . . . . . . . . . . . . 220
12.1.7 Gateway Alias Migration (v7.0.1). . . . . . . . . . . . . . . . . . . . . . . . . . . . . . . . . . . . . . . 220
12.1.8 Refresh Views (v7.0) . . . . . . . . . . . . . . . . . . . . . . . . . . . . . . . . . . . . . . . . . . . . . . . . 221
12.1.9 Improved Backup Capabilities with Novell Cluster Services on NetWare (v7.0.1) . 221
12.1.10 Simplified Installation Procedure for Novell Cluster Services on Linux (v7.0.1) . . . 221
12.1.11 PolyServe Matrix Server Support (v7.0.1) . . . . . . . . . . . . . . . . . . . . . . . . . . . . . . . . 222
12.2 GroupWise Agents . . . . . . . . . . . . . . . . . . . . . . . . . . . . . . . . . . . . . . . . . . . . . . . . . . . . . . . . . 222
12.2.1 Windows 2003 Server Support (v7.0) . . . . . . . . . . . . . . . . . . . . . . . . . . . . . . . . . . . 222
12.2.2 IPV6 Support (v7.0) . . . . . . . . . . . . . . . . . . . . . . . . . . . . . . . . . . . . . . . . . . . . . . . . . 222
12.2.3 GroupWise High Availability Service (v7.0) . . . . . . . . . . . . . . . . . . . . . . . . . . . . . . . 222
12.2.4 Agents Run as Non-root User (v7.0 / v7.0.1). . . . . . . . . . . . . . . . . . . . . . . . . . . . . . 223
12.2.5 SOAP Support (v7.0) . . . . . . . . . . . . . . . . . . . . . . . . . . . . . . . . . . . . . . . . . . . . . . . . 223
12.2.6 Agent Exclusive Bind (v7.0). . . . . . . . . . . . . . . . . . . . . . . . . . . . . . . . . . . . . . . . . . . 223
12.2.7 Disable Administration Task Processing for the POA (v7.0) . . . . . . . . . . . . . . . . . . 224
12.2.8 POA Creates Additional Message Databases (v7.0) . . . . . . . . . . . . . . . . . . . . . . . . 224
12.2.9 Fix for POA Problem with Deferred Messages (v7.0) . . . . . . . . . . . . . . . . . . . . . . . 224
12.3 GroupWise Windows Client . . . . . . . . . . . . . . . . . . . . . . . . . . . . . . . . . . . . . . . . . . . . . . . . . . 224
12.3.1 Appearance Schemes (v7.0) . . . . . . . . . . . . . . . . . . . . . . . . . . . . . . . . . . . . . . . . . . 225
12.3.2 Individual Appearance Settings (v7.0) . . . . . . . . . . . . . . . . . . . . . . . . . . . . . . . . . . . 225
12.3.3 Color Schemes (v7.0) . . . . . . . . . . . . . . . . . . . . . . . . . . . . . . . . . . . . . . . . . . . . . . . 225
12.3.4 Header Controls (v7.0) . . . . . . . . . . . . . . . . . . . . . . . . . . . . . . . . . . . . . . . . . . . . . . 225
12.3.5 Quick Filter (v7.0) . . . . . . . . . . . . . . . . . . . . . . . . . . . . . . . . . . . . . . . . . . . . . . . . . . 226
12.3.6 Messenger Presence (v7.0). . . . . . . . . . . . . . . . . . . . . . . . . . . . . . . . . . . . . . . . . . . 226
12.3.7 Home View (v7.0) . . . . . . . . . . . . . . . . . . . . . . . . . . . . . . . . . . . . . . . . . . . . . . . . . . 226
12.3.8 New Customized Navigation Bar (v7.0) . . . . . . . . . . . . . . . . . . . . . . . . . . . . . . . . . . 226
12.3.9 Unicode Support (v7.0) . . . . . . . . . . . . . . . . . . . . . . . . . . . . . . . . . . . . . . . . . . . . . . 226
12.3.10 Spell Check as You Type (v7.0) . . . . . . . . . . . . . . . . . . . . . . . . . . . . . . . . . . . . . . . 226
12.3.11 HTML Signatures (v7.0). . . . . . . . . . . . . . . . . . . . . . . . . . . . . . . . . . . . . . . . . . . . . . 226
12.3.12 Global Signatures (v7.0) . . . . . . . . . . . . . . . . . . . . . . . . . . . . . . . . . . . . . . . . . . . . . 227
12.3.13 Inline Quotation for Replies (v7.0) . . . . . . . . . . . . . . . . . . . . . . . . . . . . . . . . . . . . . . 227
12.3.14 Prevent Images from Displaying for HTML Messages (v7.0) . . . . . . . . . . . . . . . . . 227
12.3.15 Search Attachments (v7.0) . . . . . . . . . . . . . . . . . . . . . . . . . . . . . . . . . . . . . . . . . . . 227
12.3.16 Multiple Calendars (v7.0). . . . . . . . . . . . . . . . . . . . . . . . . . . . . . . . . . . . . . . . . . . . . 227
12.3.17 Print Calendar in Full Color (v7.0) . . . . . . . . . . . . . . . . . . . . . . . . . . . . . . . . . . . . . . 227
12.3.18 All Day Events (v7.0) . . . . . . . . . . . . . . . . . . . . . . . . . . . . . . . . . . . . . . . . . . . . . . . . 228
12.3.19 Edit Corporate Distribution Lists (v7.0) . . . . . . . . . . . . . . . . . . . . . . . . . . . . . . . . . . 228
12.3.20 Default Compose and Read Views (v7.0) . . . . . . . . . . . . . . . . . . . . . . . . . . . . . . . . 228
12.3.21 Interactive Tutorial (v7.0.1) . . . . . . . . . . . . . . . . . . . . . . . . . . . . . . . . . . . . . . . . . . . 228
12.3.22 Check Mailbox Size (v7.0.1) . . . . . . . . . . . . . . . . . . . . . . . . . . . . . . . . . . . . . . . . . . 228
12.3.23 Quickly Adding Contacts to Your Personal Address Book (v7.0.1) . . . . . . . . . . . . . 228
novdocx (en) 22 June 2009
8 GroupWise 7 Installation Guide
Page 9

12.3.24 Changing the Background for Calendar Parts (v7.0.1) . . . . . . . . . . . . . . . . . . . . . . 228
12.3.25 Printing Attachment Names (v7.0.1) . . . . . . . . . . . . . . . . . . . . . . . . . . . . . . . . . . . . 228
12.3.26 Accepting and Declining Internet Items (v7.0.1) . . . . . . . . . . . . . . . . . . . . . . . . . . . 228
12.4 GroupWise Cross-Platform Client . . . . . . . . . . . . . . . . . . . . . . . . . . . . . . . . . . . . . . . . . . . . . 229
12.4.1 All Day Events (v7.0) . . . . . . . . . . . . . . . . . . . . . . . . . . . . . . . . . . . . . . . . . . . . . . . . 229
12.4.2 Show Hidden Files (v7.0). . . . . . . . . . . . . . . . . . . . . . . . . . . . . . . . . . . . . . . . . . . . . 229
12.4.3 Cleanup (v7.0) . . . . . . . . . . . . . . . . . . . . . . . . . . . . . . . . . . . . . . . . . . . . . . . . . . . . . 229
12.4.4 Reply Text Format (v7.0) . . . . . . . . . . . . . . . . . . . . . . . . . . . . . . . . . . . . . . . . . . . . . 230
12.4.5 Default Compose and Read View Fonts (v7.0) . . . . . . . . . . . . . . . . . . . . . . . . . . . . 230
12.4.6 GroupWise Check (GWCheck) (v7.0) . . . . . . . . . . . . . . . . . . . . . . . . . . . . . . . . . . . 230
12.4.7 User Interface Startup Switch (v7.0) . . . . . . . . . . . . . . . . . . . . . . . . . . . . . . . . . . . . 230
12.4.8 Rules (v7.0) . . . . . . . . . . . . . . . . . . . . . . . . . . . . . . . . . . . . . . . . . . . . . . . . . . . . . . . 230
12.4.9 Spell Checker (v7.0) . . . . . . . . . . . . . . . . . . . . . . . . . . . . . . . . . . . . . . . . . . . . . . . . 230
12.4.10 Spell Checking As You Type (v7.0) . . . . . . . . . . . . . . . . . . . . . . . . . . . . . . . . . . . . . 230
12.4.11 Filters (v7.0). . . . . . . . . . . . . . . . . . . . . . . . . . . . . . . . . . . . . . . . . . . . . . . . . . . . . . . 231
12.4.12 Junk Mail Handling (v7.0) . . . . . . . . . . . . . . . . . . . . . . . . . . . . . . . . . . . . . . . . . . . . 231
12.4.13 Backup and Restore (v7.0) . . . . . . . . . . . . . . . . . . . . . . . . . . . . . . . . . . . . . . . . . . . 232
12.4.14 Improved HTML Rendering (v7.0.1) . . . . . . . . . . . . . . . . . . . . . . . . . . . . . . . . . . . . 232
12.4.15 Improved Calendar Performance (v7.0.1) . . . . . . . . . . . . . . . . . . . . . . . . . . . . . . . . 232
12.4.16 Additional Folder Views (v7.0.1) . . . . . . . . . . . . . . . . . . . . . . . . . . . . . . . . . . . . . . . 232
12.4.17 Toolbar Display/Hide Options (v7.0.1) . . . . . . . . . . . . . . . . . . . . . . . . . . . . . . . . . . . 232
12.5 GroupWise Internet Agent . . . . . . . . . . . . . . . . . . . . . . . . . . . . . . . . . . . . . . . . . . . . . . . . . . . 232
12.5.1 Windows 2003 Server Support (v7.0) . . . . . . . . . . . . . . . . . . . . . . . . . . . . . . . . . . . 233
12.5.2 IPV6 Support (v7.0) . . . . . . . . . . . . . . . . . . . . . . . . . . . . . . . . . . . . . . . . . . . . . . . . . 233
12.5.3 Internet Agent High Availability (v7.0) . . . . . . . . . . . . . . . . . . . . . . . . . . . . . . . . . . . 233
12.5.4 Internet Agent Runs as Non-root User (v7.0) . . . . . . . . . . . . . . . . . . . . . . . . . . . . . 233
12.5.5 Internet Agent Exclusive Bind (v7.0) . . . . . . . . . . . . . . . . . . . . . . . . . . . . . . . . . . . . 233
12.5.6 TCP/IP Links between the Internet Agent and the MTA (v7.0) . . . . . . . . . . . . . . . . 234
12.5.7 Alternate Internet Agents (v7.0). . . . . . . . . . . . . . . . . . . . . . . . . . . . . . . . . . . . . . . . 234
12.5.8 Multiple Relay Hosts (v7.0) . . . . . . . . . . . . . . . . . . . . . . . . . . . . . . . . . . . . . . . . . . . 234
12.5.9 Improved Spam Identification (v7.0) . . . . . . . . . . . . . . . . . . . . . . . . . . . . . . . . . . . . 234
12.5.10 External Global Signatures for all Clients (v7.0.1) . . . . . . . . . . . . . . . . . . . . . . . . . . 234
12.5.11 iCal Support (v7.0.1) . . . . . . . . . . . . . . . . . . . . . . . . . . . . . . . . . . . . . . . . . . . . . . . . 235
12.5.12 More Internet Agent Settings Available on the Internet Agent Object in ConsoleOne
(v7.0) . . . . . . . . . . . . . . . . . . . . . . . . . . . . . . . . . . . . . . . . . . . . . . . . . . . . . . . . . . . . 235
12.5.13 New /nosmtpversion Startup Switch (v7.0) . . . . . . . . . . . . . . . . . . . . . . . . . . . . . . . 235
12.5.14 New Message Defer Interval Setting (v7.0) . . . . . . . . . . . . . . . . . . . . . . . . . . . . . . . 236
12.5.15 Consolidated Configuration Information (v7.0.1) . . . . . . . . . . . . . . . . . . . . . . . . . . . 236
12.5.16 External Internet Message Threading (v7.0) . . . . . . . . . . . . . . . . . . . . . . . . . . . . . . 236
12.6 GroupWise WebAccess . . . . . . . . . . . . . . . . . . . . . . . . . . . . . . . . . . . . . . . . . . . . . . . . . . . . . 236
12.6.1 Windows 2003 Server Support (v7.0) . . . . . . . . . . . . . . . . . . . . . . . . . . . . . . . . . . . 237
12.6.2 WebAccess Agent High Availability (v7.0.1) . . . . . . . . . . . . . . . . . . . . . . . . . . . . . . 237
12.6.3 WebAccess Agent Exclusive Bind (v7.0). . . . . . . . . . . . . . . . . . . . . . . . . . . . . . . . . 237
12.6.4 Simplified WebAccess Agent Startup (v7.0.1). . . . . . . . . . . . . . . . . . . . . . . . . . . . . 237
12.6.5 New Novell Web Services Page (v7.0) . . . . . . . . . . . . . . . . . . . . . . . . . . . . . . . . . . 237
12.6.6 Document Viewer Agent (v7.0) . . . . . . . . . . . . . . . . . . . . . . . . . . . . . . . . . . . . . . . . 237
12.6.7 New Document Viewer Agent Startup Switch (v7.0.1) . . . . . . . . . . . . . . . . . . . . . . 238
12.6.8 New WebAccess Client URL on NetWare and Windows (v7.0) . . . . . . . . . . . . . . . 238
12.6.9 New WebAccess Client Features (v7.0 / v7.0.1) . . . . . . . . . . . . . . . . . . . . . . . . . . . 238
12.6.10 Improved Performance for Low-Bandwidth WebAccess Client Users (v7.0.1) . . . . 239
12.6.11 Improved Performance for All WebAccess Client Users . . . . . . . . . . . . . . . . . . . . . 239
12.7 GroupWise Monitor . . . . . . . . . . . . . . . . . . . . . . . . . . . . . . . . . . . . . . . . . . . . . . . . . . . . . . . . 239
12.7.1 Windows 2003 Server Support (v7.0) . . . . . . . . . . . . . . . . . . . . . . . . . . . . . . . . . . . 240
12.7.2 IPV6 Support (v7.0) . . . . . . . . . . . . . . . . . . . . . . . . . . . . . . . . . . . . . . . . . . . . . . . . . 240
12.7.3 Monitor Agent Web Console Emphasized (v7.0) . . . . . . . . . . . . . . . . . . . . . . . . . . . 240
12.7.4 Agent GroupWise Available at Monitor Agent Web Console (v7.0.1) . . . . . . . . . . . 240
12.7.5 Gateway Accounting Report (v7.0) . . . . . . . . . . . . . . . . . . . . . . . . . . . . . . . . . . . . . 240
12.7.6 Trends Report (v7.0) . . . . . . . . . . . . . . . . . . . . . . . . . . . . . . . . . . . . . . . . . . . . . . . . 240
novdocx (en) 22 June 2009
Contents 9
Page 10

12.7.7 Downtime Report (v7.0). . . . . . . . . . . . . . . . . . . . . . . . . . . . . . . . . . . . . . . . . . . . . . 241
12.7.8 Image Map (v7.0). . . . . . . . . . . . . . . . . . . . . . . . . . . . . . . . . . . . . . . . . . . . . . . . . . . 241
13 Understanding the Update Process 243
13.1 Understanding eDirectory Schema Extensions . . . . . . . . . . . . . . . . . . . . . . . . . . . . . . . . . . . 243
13.2 Understanding GroupWise Software Updates . . . . . . . . . . . . . . . . . . . . . . . . . . . . . . . . . . . . 243
13.2.1 Software Distribution Directory . . . . . . . . . . . . . . . . . . . . . . . . . . . . . . . . . . . . . . . . 244
13.2.2 ConsoleOne. . . . . . . . . . . . . . . . . . . . . . . . . . . . . . . . . . . . . . . . . . . . . . . . . . . . . . . 244
13.3 Understanding Domain and Post Office Database Updates . . . . . . . . . . . . . . . . . . . . . . . . . 244
13.4 Understanding GroupWise Client Updates . . . . . . . . . . . . . . . . . . . . . . . . . . . . . . . . . . . . . . 245
13.5 Understanding Internet Agent Updates . . . . . . . . . . . . . . . . . . . . . . . . . . . . . . . . . . . . . . . . . 246
13.6 Understanding WebAccess Updates . . . . . . . . . . . . . . . . . . . . . . . . . . . . . . . . . . . . . . . . . . . 246
13.6.1 WebAccess Agent . . . . . . . . . . . . . . . . . . . . . . . . . . . . . . . . . . . . . . . . . . . . . . . . . . 246
13.6.2 WebAccess Application on the Web Server . . . . . . . . . . . . . . . . . . . . . . . . . . . . . . 247
13.7 Understanding Monitor Updates . . . . . . . . . . . . . . . . . . . . . . . . . . . . . . . . . . . . . . . . . . . . . . 247
13.8 Understanding GroupWise Gateway Compatibility . . . . . . . . . . . . . . . . . . . . . . . . . . . . . . . . 247
14 Preparing Your GroupWise System for Update 249
novdocx (en) 22 June 2009
15 Updating Your GroupWise 6.x System to Version 7 251
15.1 Installing the GroupWise 7 Software . . . . . . . . . . . . . . . . . . . . . . . . . . . . . . . . . . . . . . . . . . . 251
15.2 Updating the Primary Domain . . . . . . . . . . . . . . . . . . . . . . . . . . . . . . . . . . . . . . . . . . . . . . . . 254
15.3 Updating Post Offices . . . . . . . . . . . . . . . . . . . . . . . . . . . . . . . . . . . . . . . . . . . . . . . . . . . . . . 255
15.3.1 Installing and Starting the POA . . . . . . . . . . . . . . . . . . . . . . . . . . . . . . . . . . . . . . . . 255
15.3.2 Copying the GroupWise Views to the Post Office Directory . . . . . . . . . . . . . . . . . . 256
15.4 Updating Users’ GroupWise Clients. . . . . . . . . . . . . . . . . . . . . . . . . . . . . . . . . . . . . . . . . . . . 257
15.5 Updating Secondary Domains . . . . . . . . . . . . . . . . . . . . . . . . . . . . . . . . . . . . . . . . . . . . . . . . 259
15.6 Updating the GroupWise Internet Agent . . . . . . . . . . . . . . . . . . . . . . . . . . . . . . . . . . . . . . . . 259
15.7 Updating GroupWise WebAccess . . . . . . . . . . . . . . . . . . . . . . . . . . . . . . . . . . . . . . . . . . . . . 259
15.8 Updating GroupWise Monitor . . . . . . . . . . . . . . . . . . . . . . . . . . . . . . . . . . . . . . . . . . . . . . . . . 260
16 Updating Your GroupWise 5.x System to Version 7 261
17 Updating an Evaluation GroupWise System to a Fully Licensed System 263
Part III Migration 265
18 Transitioning Windows Users to Linux or Macintosh 267
19 Transitioning GroupWise Administration to Linux 269
19.1 Using Windows ConsoleOne to Access Domains and Post Offices on Linux . . . . . . . . . . . . 269
19.1.1 Making a Linux Server Visible from Windows . . . . . . . . . . . . . . . . . . . . . . . . . . . . . 269
19.1.2 Accessing a Domain or Post Office on Linux from Windows ConsoleOne . . . . . . . 270
19.2 Using Linux ConsoleOne to Access Domains and Post Offices on NetWare or Windows . . 270
19.2.1 Making a NetWare or Windows Server Visible from Linux . . . . . . . . . . . . . . . . . . . 271
19.2.2 Accessing a Domain or Post Office on NetWare or Windows from Linux
ConsoleOne. . . . . . . . . . . . . . . . . . . . . . . . . . . . . . . . . . . . . . . . . . . . . . . . . . . . . . . 271
19.3 Migrating eDirectory to Linux . . . . . . . . . . . . . . . . . . . . . . . . . . . . . . . . . . . . . . . . . . . . . . . . . 271
10 GroupWise 7 Installation Guide
Page 11

20 Manually Migrating a Post Office and Its POA to Linux 273
20.1 Preparing for the Post Office Migration . . . . . . . . . . . . . . . . . . . . . . . . . . . . . . . . . . . . . . . . . 273
20.2 Performing the Post Office Migration . . . . . . . . . . . . . . . . . . . . . . . . . . . . . . . . . . . . . . . . . . . 274
20.3 Reconfiguring the Post Office in ConsoleOne . . . . . . . . . . . . . . . . . . . . . . . . . . . . . . . . . . . . 277
20.4 Finalizing the Post Office Migration . . . . . . . . . . . . . . . . . . . . . . . . . . . . . . . . . . . . . . . . . . . . 278
21 Manually Migrating a Domain and Its MTA
to Linux 281
21.1 Preparing for the Domain Migration . . . . . . . . . . . . . . . . . . . . . . . . . . . . . . . . . . . . . . . . . . . . 281
21.2 Performing the Domain Migration . . . . . . . . . . . . . . . . . . . . . . . . . . . . . . . . . . . . . . . . . . . . . 282
21.3 Reconfiguring the Domain in ConsoleOne. . . . . . . . . . . . . . . . . . . . . . . . . . . . . . . . . . . . . . . 283
21.4 Finalizing the Domain Migration . . . . . . . . . . . . . . . . . . . . . . . . . . . . . . . . . . . . . . . . . . . . . . . 284
22 Manually Migrating the Internet Agent to Linux 287
23 Manually Migrating WebAccess to Linux 291
23.1 Manually Migrating the WebAccess Agent to Linux . . . . . . . . . . . . . . . . . . . . . . . . . . . . . . . . 291
23.2 Manually Migrating the WebAccess and WebPublisher Applications to Linux . . . . . . . . . . . . 293
novdocx (en) 22 June 2009
24 Manually Migrating Monitor to Linux 297
24.1 Manually Migrating the Monitor Agent to Linux . . . . . . . . . . . . . . . . . . . . . . . . . . . . . . . . . . . 297
24.2 Manually Migrating the Monitor Application to Linux . . . . . . . . . . . . . . . . . . . . . . . . . . . . . . . 298
Part IV Appendixes 301
A GroupWise Version Compatibility 303
A.1 GroupWise 7 on NetWare and Windows . . . . . . . . . . . . . . . . . . . . . . . . . . . . . . . . . . . . . . . . 303
A.1.1 Compatibility with GroupWise 6.x on NetWare and Windows . . . . . . . . . . . . . . . . . 303
A.1.2 Compatibility with GroupWise 5.x on NetWare and Windows . . . . . . . . . . . . . . . . . 305
A.2 GroupWise 7 on Linux . . . . . . . . . . . . . . . . . . . . . . . . . . . . . . . . . . . . . . . . . . . . . . . . . . . . . . 307
A.2.1 Compatibility with GroupWise 7 on NetWare and Windows . . . . . . . . . . . . . . . . . . 307
A.2.2 Compatibility with GroupWise 6.x on NetWare or Windows . . . . . . . . . . . . . . . . . . 309
B Third-Party Materials 313
B.1 Apache . . . . . . . . . . . . . . . . . . . . . . . . . . . . . . . . . . . . . . . . . . . . . . . . . . . . . . . . . . . . . . . . . . 313
B.2 BLT. . . . . . . . . . . . . . . . . . . . . . . . . . . . . . . . . . . . . . . . . . . . . . . . . . . . . . . . . . . . . . . . . . . . . 314
B.3 GD Graphics Library . . . . . . . . . . . . . . . . . . . . . . . . . . . . . . . . . . . . . . . . . . . . . . . . . . . . . . . 314
B.4 getopt.h . . . . . . . . . . . . . . . . . . . . . . . . . . . . . . . . . . . . . . . . . . . . . . . . . . . . . . . . . . . . . . . . . 315
B.5 JRE . . . . . . . . . . . . . . . . . . . . . . . . . . . . . . . . . . . . . . . . . . . . . . . . . . . . . . . . . . . . . . . . . . . . 316
B.6 NET-SNMP Open Source Package . . . . . . . . . . . . . . . . . . . . . . . . . . . . . . . . . . . . . . . . . . . . 316
B.6.1 ---- Part 1: CMU/UCD copyright notice: (BSD like) ----- . . . . . . . . . . . . . . . . . . . . . . 316
B.6.2 ---- Part 2: Networks Associates Technology, Inc copyright notice (BSD) ----- . . . . 316
B.6.3 ---- Part 3: Cambridge Broadband Ltd. copyright notice (BSD) ----- . . . . . . . . . . . . 317
B.6.4 ---- Part 4: Sun Microsystems, Inc. copyright notice (BSD) ----- . . . . . . . . . . . . . . . 318
B.7 ODMA 2.0 . . . . . . . . . . . . . . . . . . . . . . . . . . . . . . . . . . . . . . . . . . . . . . . . . . . . . . . . . . . . . . . 318
B.8 OpenLDAP . . . . . . . . . . . . . . . . . . . . . . . . . . . . . . . . . . . . . . . . . . . . . . . . . . . . . . . . . . . . . . . 319
B.9 OpenSSL . . . . . . . . . . . . . . . . . . . . . . . . . . . . . . . . . . . . . . . . . . . . . . . . . . . . . . . . . . . . . . . . 320
Contents 11
Page 12

B.10 Python 2.2 . . . . . . . . . . . . . . . . . . . . . . . . . . . . . . . . . . . . . . . . . . . . . . . . . . . . . . . . . . . . . . . 322
C Documentation Updates 323
C.1 March 14, 2008 (GroupWise 7 SP3) . . . . . . . . . . . . . . . . . . . . . . . . . . . . . . . . . . . . . . . . . . . 323
C.2 October 5, 2007 . . . . . . . . . . . . . . . . . . . . . . . . . . . . . . . . . . . . . . . . . . . . . . . . . . . . . . . . . . . 324
C.3 April 16, 2007 (GroupWise 7 SP2). . . . . . . . . . . . . . . . . . . . . . . . . . . . . . . . . . . . . . . . . . . . . 324
C.4 September 29, 2006. . . . . . . . . . . . . . . . . . . . . . . . . . . . . . . . . . . . . . . . . . . . . . . . . . . . . . . . 325
C.5 August 15, 2006 . . . . . . . . . . . . . . . . . . . . . . . . . . . . . . . . . . . . . . . . . . . . . . . . . . . . . . . . . . . 325
C.6 June 15, 2006 (GroupWise 7 SP 1) . . . . . . . . . . . . . . . . . . . . . . . . . . . . . . . . . . . . . . . . . . . . 326
C.7 November 30, 2005 . . . . . . . . . . . . . . . . . . . . . . . . . . . . . . . . . . . . . . . . . . . . . . . . . . . . . . . . 327
novdocx (en) 22 June 2009
12 GroupWise 7 Installation Guide
Page 13

About This Guide
This Novell® GroupWise® 7 Installation Guide helps you install a new GroupWise system or update
an existing GroupWise 5.x/6.x system. The guide is divided into the following sections:
“Installation” on page 15
“Update” on page 215
“Migration” on page 265
“Appendixes” on page 301
Appendix A, “GroupWise Version Compatibility,” on page 303
Appendix B, “Third-Party Materials,” on page 313
Appendix C, “Documentation Updates,” on page 323
Audience
novdocx (en) 22 June 2009
This guide is intended for network administrators who install and administer GroupWise.
Feedback
We want to hear your comments and suggestions about this manual and the other documentation
included with this product. Please use the User Comment feature at the bottom of each page of the
online documentation, or go to www.novell.com/documentation/feedback.html and enter your
comments there.
Documentation Updates
For the most recent version of the GroupWise 7 Installation Guide, visit the Novell GroupWise 7
Documentation Web site (http://www.novell.com/documentation/gw7).
Additional Documentation
For additional GroupWise documentation, see the following guides at the Novell GroupWise 7
Documentation Web site (http://www.novell.com/documentation/gw7):
Administration Guide
Multi-System Administration Guide
Interoperability Guide
Troubleshooting Guides
GroupWise Client User Guides
GroupWise Client Frequently Asked Questions (FAQ)
Documentation Conventions
In Novell documentation, a greater-than symbol (>) is used to separate actions within a step and
items in a cross-reference path.
About This Guide 13
Page 14

A trademark symbol (®, TM, etc.) denotes a Novell trademark. An asterisk (*) denotes a third-party
trademark.
When a single pathname can be written with a backslash for some platforms or a forward slash for
other platforms, the pathname is presented with a backslash. Users of platforms that require a
forward slash, such as Linux*, should use forward slashes as required by your software.
When a startup switch can be written with a forward slash for some platforms or a double hyphen for
other platforms, the startup switch is presented with a forward slash. Users of platforms that require
a double hyphen, such as Linux, should use double hyphens as required by your software.
novdocx (en) 22 June 2009
14 GroupWise 7 Installation Guide
Page 15

I
Installation
Chapter 1, “What Is GroupWise?,” on page 17
Chapter 2, “GroupWise System Requirements,” on page 21
Chapter 3, “Installing a Basic GroupWise System,” on page 25
Chapter 4, “Installing the GroupWise Internet Agent,” on page 79
Chapter 5, “Installing GroupWise WebAccess,” on page 103
Chapter 6, “Installing GroupWise Monitor,” on page 137
Chapter 7, “Installing GroupWise Agents,” on page 159
Chapter 8, “Installing the GroupWise Windows and Cross-Platform Clients,” on page 201
Chapter 9, “Installing the GroupWise Connector for Microsoft Outlook,” on page 209
Chapter 10, “Installing the GroupWise Mobile Server,” on page 211
Chapter 11, “Installing GroupWise Messenger,” on page 213
novdocx (en) 22 June 2009
InstallationI15
Page 16

novdocx (en) 22 June 2009
16 GroupWise 7 Installation Guide
Page 17

1
What Is GroupWise?
Novell® GroupWise® is an enterprise collaboration system that provides secure e-mail, calendaring,
scheduling, and instant messaging. GroupWise also includes task management, contact
management, document management, and other productivity tools. GroupWise can be used on your
desktop on Linux, Windows*, or Macintosh*; in a Web browser anywhere you have an Internet
connection; and even on mobile devices. Your GroupWise system can be set up on NetWare
Linux, Windows, or any combination of these operating systems.
The following sections include more details about what GroupWise provides and what you need to
do to set up GroupWise to best meet your needs.
Section 1.1, “What GroupWise Provides,” on page 17
Section 1.2, “What You Need to Do,” on page 19
®
,
1.1 What GroupWise Provides
novdocx (en) 22 June 2009
1
GroupWise provides communication and collaboration services that are secure, highly available,
and easily accessible, as explained in the following sections:
Section 1.1.1, “Essential Communication and Collaboration Services,” on page 17
Section 1.1.2, “Available Anytime,” on page 18
Section 1.1.3, “Accessible Anywhere,” on page 18
Section 1.1.4, “Always Secure,” on page 18
1.1.1 Essential Communication and Collaboration Services
GroupWise provides a variety of tools to enable users to work together and work smarter.
Messaging: Send and receive mail messages, phone messages, and reminder notes. A mail
message is for general correspondence. A phone message is designed for those who take phone
messages for others. A reminder note includes a start date and, when accepted by the recipient,
is posted to the recipient’s Calendar.
Instant Messaging: Communicate in real time with other GroupWise users through
GroupWise Messenger. GroupWise Messenger lets you know when other users are online,
busy, or away from their desks. It also allows you to save conversations.
Scheduling: Schedule both appointments and tasks. When you schedule an appointment, you
can search other users’ Calendars to find free times for the appointment. When you schedule a
task, you can assign a priority and due date to the task. If the recipient accepts an appointment
or task, it is automatically added to his or her Calendar.
Calendaring: View and manage your appointments, tasks, and reminder notes in a Calendar
view. You can create multiple calendars
Task Management: Accept or decline the tasks you are sent, and track accepted tasks through
to completion. You can also turn any message into a task by adding it to your Checklist folder.
What Is GroupWise?
17
Page 18

Contact Management: Manage information for your contacts, groups, resources, and
organizations, including being able to view, update, delete, and add information to the contacts
in your address book. In addition, you can view a history of messages sent to and received from
individual contacts.
Document Management: Store documents in GroupWise libraries. In a library, documents are
compressed to save disk space and encrypted to maintain security. With document
management, you can check in, check out, share, and version documents.
1.1.2 Available Anytime
GroupWise ensures that your essential communication tools are always available:
Caching: The GroupWise Windows and Cross-Platform clients include a Caching mode that
allows you to cache GroupWise information to your local drive and continue to work even
when you aren’t logged into your network mailbox.
LDAP Pooling: If you are using LDAP authentication for GroupWise mailbox authentication,
LDAP pooling ensures that there is always an LDAP server through which authentication can
be performed.
novdocx (en) 22 June 2009
Clustering: To ensure that GroupWise data is always available and GroupWise components
are always running, you can install GroupWise in a cluster on NetWare, Linux, or Windows.
1.1.3 Accessible Anywhere
GroupWise lets you communicate and collaborate with other people using the device that is most
convenient:
Personal Computers: To access your mailbox, you can run the GroupWise Windows client on
any workstation that uses Windows 2000 or higher. On Linux and Macintosh workstations, you
can run the GroupWise Cross-Platform client.
Web Browsers and Mobile Devices: With GroupWise WebAccess installed, you can also
access your mailbox through a Web browser, a cellular phone, or a PDA (personal digital
assistant) such as Pocket PC*. The GroupWise WebAccess client formats information to best
accommodate the type of device on which it is being displayed. In addition, mailbox content
can be synchronized to your mobile device by using GroupWise Mobile Server or BlackBerry*
Enterprise Server
Other E-Mail Clients: GroupWise enables you to access your mailbox with any POP3,
IMAP4, and SOAP e-mail clients.
1.1.4 Always Secure
GroupWise provides extensive security measures to protect your information.
Encryption: To protect your information as it is stored in the various GroupWise databases
and moved across the network, GroupWise encrypts the information. Each piece of information
is encrypted differently through the use of randomly-generated encryption keys.
Open Security Standards: To further ensure that your information is secure while moving
across your internal network or across the Internet, GroupWise supports open security
standards such as Secure Socket Layer (SSL), Secure Multipurpose Internet Mail Extension (S/
MIME), Public Key Infrastructure (PKI), and Transport Layer Security (TSL).
18 GroupWise 7 Installation Guide
Page 19

Spam Protection: To protect you from seeing unwanted messages, the GroupWise Windows
client includes a Junk Mail Handling feature that lets you control unwanted Internet e-mail
messages. In addition, you can configure the Internet Agent (the GroupWise component
responsible for sending and receiving Internet e-mail messages) to reject messages from known
open relay hosts and spam hosts. GroupWise also works with partner products that provide
additional anti-spam solutions.
Virus Protection: GroupWise works with partner products to provide solutions that detect and
eliminate viruses.
For information about additional security solutions available for GroupWise through GroupWise
partners, see the Novell Partner Product Guide (http://www.novell.com/partnerguide).
1.2 What You Need to Do
GroupWise includes multiple components that you need to install to realize the full benefits of
GroupWise. However, some components might not be necessary, depending on your needs. The
following table outlines the components, what they provide, and where to find instructions for
installing them.
novdocx (en) 22 June 2009
Table 1-1 Components of Your GroupWise System
Component What it does Go to
Administration, Agents,
and Client (Windows or
Cross-Platform)
Internet Agent Provides Internet e-mail
WebAccess Provides access to mailboxes
Monitor Provides administrative monitoring
Messenger Provides instant messaging. GroupWise Messenger Installation
Necessary for a basic GroupWise
system. These components are
required and must be installed
before any other components.
communication, POP3/IMAP4 client
access, and paging services.
through a Web browser or mobile
device.
of the GroupWise agents.
Chapter 3, “Installing a Basic
GroupWise System,” on page 25
Chapter 4, “Installing the GroupWise
Internet Agent,” on page 79
Chapter 5, “Installing GroupWise
WebAccess,” on page 103
Chapter 6, “Installing GroupWise
Monitor,” on page 137
Guide (http://www.novell.com/
documentation/nm2)
In addition to the sections referenced in the above table, this Installation Guide includes the
following sections:
Chapter 7, “Installing GroupWise Agents,” on page 159
Chapter 8, “Installing the GroupWise Windows and Cross-Platform Clients,” on page 201
Chapter 9, “Installing the GroupWise Connector for Microsoft Outlook,” on page 209
Chapter 10, “Installing the GroupWise Mobile Server,” on page 211
Chapter 11, “Installing GroupWise Messenger,” on page 213
What Is GroupWise? 19
Page 20

The information in these sections is provided as a reference for installing additional components
after you’ve created your basic GroupWise system.
novdocx (en) 22 June 2009
20 GroupWise 7 Installation Guide
Page 21

2
GroupWise System Requirements
You, as a GroupWise® administrator, must ensure that your system meets GroupWise system
requirements, so that your GroupWise system can be set up successfully. After your GroupWise
system is set up, you must ensure that users’ workstations meet GroupWise client requirements, so
that users can run the GroupWise clients successfully.
Section 2.1, “GroupWise Administration Requirements,” on page 21
Section 2.2, “GroupWise Client Requirements,” on page 22
Section 2.3, “Supported Environments,” on page 23
2.1 GroupWise Administration Requirements
32-bit/x86 processor or 64-bit/x86 processor
Any of the following server operating systems for the GroupWise agents (Post Office Agent,
Message Transfer Agent, Internet Agent, WebAccess Agent, Monitor Agent):
Novell
NetWare 5.1, NetWare 6, or NetWare 6.5, plus the latest Support Pack for your version of
SUSE
Windows Server 2000, Windows Server 2003, or Windows Server 2003 R2, plus the latest
®
Open Enterprise Server 1 or Open Enterprise Server 2 (NetWare® or Linux
version), plus the latest Support Pack
NetWare
Domains and post offices can be located on NetWare 3.12 and NetWare 4.2 servers,
although the agents cannot run there. The Monitor Agent is not available for NetWare.
®
Linux Enterprise Server 9 or SUSE Linux Enterprise Server 10, plus the latest
Support Pack
The X Window System* is required by the GUI GroupWise Installation program,
Installation Advisor, and Setup Advisor that step you through the process of creating a
new GroupWise system. A text-based Installation program is also available.
The X Window System and Open Motif* are required by the GUI GroupWise agent server
consoles. By default, the agents run as daemons without user interfaces.
Service Pack for your version of Windows
novdocx (en) 22 June 2009
2
Adequate server memory as required by the operating system
eDirectory
ConsoleOne
On Linux, ConsoleOne requires Java* Virtual Machine (JVM*) 1.4.2, plus the X Window
System, version X11R6 or later. If necessary, you can download ConsoleOne for Linux from
the Novell Product Downloads site (http://download.novell.com).
Windows 2000/XP/2003/2003 R2 and the Novell Client
machine where you run ConsoleOne or the GroupWise Installation program
If necessary, you can download the Novell Client from the Novell Product Downloads site
(http://download.novell.com).
TM
8.7 or later, plus the latest Support Pack
®
1.3.6 or later
TM
on any administrator Windows
GroupWise System Requirements
21
Page 22

Adequate server disk space:
Software distribution directory: 500 MB for all GroupWise components in one language
Domain directory: 100-200 MB for the domain database; plus 1 GB or more for message
queues when links are down
Post office directory: 5 MB per user (minimum); 100 MB or more per user
(recommended); plus 100-300 MB for the post office database; plus 500 MB or more for
message queues when links are down
MTA/POA installation: approximately 25 MB (varies by platform)
Internet Agent installation: approximately 37 MB (varies by platform)
WebAccess installation: approximately 215 MB (111 MB shared with Monitor; varies by
platform)
Monitor installation: approximately 140 MB (111 MB shared with WebAccess; varies by
platform)
Internet connectivity for the Internet Agent
Internet domain name for your company
Internet Service Provider (ISP) or in-house DNS address resolution
Any of the following Web servers for WebAccess and Monitor:
NetWare 6: Netscape Enterprise Server* for NetWare, Apache 1.3 plus Tomcat 3.3 plus
the Jakarta Connector
NetWare 6.5: Apache 2 plus Tomcat 4 plus the Jakarta Connector
Linux: Apache 2.2 plus Tomcat 5 plus the ModProxy Module
novdocx (en) 22 June 2009
Windows Server 2000/2003/2003 R2: Microsoft Internet Information Server (IIS) 5 or
later plus Tomcat 5.5 plus the Jakarta Connector
UNIX*: Apache 2 plus a compatible servlet engine and connector
Any of the following Web browsers for the agent Web consoles:
Linux: Mozilla* Firefox*
Windows: Microsoft Internet Explorer 6.0 or later; Mozilla Firefox
Macintosh: The latest version of Safari* for your Mac OS (10.3 or 10.4); Mozilla Firefox
UNIX: Mozilla Firefox
2.2 GroupWise Client Requirements
Section 2.2.1, “Windows Client,” on page 22
Section 2.2.2, “Cross-Platform Client on Linux,” on page 23
Section 2.2.3, “Cross-Platform Client on Macintosh,” on page 23
Section 2.2.4, “WebAccess Client,” on page 23
2.2.1 Windows Client
Any of the following desktop operating systems for the GroupWise Windows client:
Windows 2000 on a 200 MHz or higher workstation with at least 128 MB of RAM
22 GroupWise 7 Installation Guide
Page 23

Windows XP Professional on a 300 MHz or higher workstation with at least 128 MB of
RAM
Windows 2003 on a 350 MHz or higher workstation with at least 256 MB of RAM
Windows 2003 R2 on a 350 MHz or higher workstation with at least 256 MB of RAM
Windows Vista* on a 1 GHz or higher workstation with at least 1 GB of RAM
200 MB of free disk space on each user’s workstation to install the Windows client
2.2.2 Cross-Platform Client on Linux
Any of the following desktop operating systems:
Novell Linux Desktop, plus the KDE desktop or the GNOME* desktop
SUSE Linux Enterprise Desktop 10, plus the KDE desktop or the GNOME desktop
Red Hat* Desktop 4 or Red Hat Enterprise Linux WS 4, plus the GNOME desktop
Java Virtual Machine (JVM) 1.5 or later
200 MB of free disk space on each user’s workstation to install the Cross-Platform client
novdocx (en) 22 June 2009
2.2.3 Cross-Platform Client on Macintosh
Any of the following desktop operating systems:
Mac OS 10.3 (Panther) or Mac OS 10.4 (Tiger)
Mac OS X for Intel
Java Virtual Machine (JVM) 1.4.2 or later
75 MB of free disk space on each user’s workstation to install the Cross-Platform client
2.2.4 WebAccess Client
Any of the following Web browsers:
Linux: Mozilla Firefox
Windows: Microsoft Internet Explorer 6.0 or later; Mozilla Firefox
Macintosh: The latest version of Safari for your Mac OS (10.3 or 10.4); Mozilla Firefox
UNIX: Mozilla Firefox
Any of the following mobile devices:
Any mobile device that supports the Wireless Access Protocol (WAP) and has a
microbrowser that uses Handheld Device Markup Language (HDML) 3.0 or later, or
Wireless Markup Language (WML) 1.1 or later
Pocket PC with Windows 2000/2002/2003
2.3 Supported Environments
Section 2.3.1, “IPV6 Support,” on page 24
Section 2.3.2, “Clustering Support,” on page 24
Section 2.3.3, “Virtual Machine Support,” on page 24
GroupWise System Requirements 23
Page 24

Section 2.3.4, “Citrix Support,” on page 24
Section 2.3.5, “Linux File System Support,” on page 24
2.3.1 IPV6 Support
The POA, the MTA, the Internet Agent, and the Monitor Agent support the IPV6 protocol when it is
available on the server. If it is available, the agent detects it and supports IPV6 by default, along with
IPV4. The WebAccess Agent and its accompanying Viewer Agent do not support IPV6.
As you configure your GroupWise system and specify the network address of an IPV6 server, you
must specify its DNS hostname. IP Address fields in ConsoleOne do not accommodate IPV6
address format.
IPV6 support is available on Linux and Windows. IPV6 support is not currently available on
NetWare.
2.3.2 Clustering Support
You can set up your GroupWise system in any of the following clustering environments, as
described in the GroupWise 7 Interoperability Guide (http://www.novell.com/documentation/gw7):
novdocx (en) 22 June 2009
“Novell Cluster Services on NetWare”
“Novell Cluster Services on Linux”
“Microsoft Clustering Services on Windows”
If you are using one of these clustering environments, follow the installation instructions in the
GroupWise 7 Interoperability Guide, rather than the installation instructions in this guide.
2.3.3 Virtual Machine Support
You can install components of your GroupWise system in virtual environments where a software
program enables one physical server to function as if it were two or more physical servers. The
following virtualization software is supported:
VMware* GSX Server*, an enterprise-class virtual infrastructure for x86-based servers
VMware ESX Server*, a data center-class virtual infrastructure for mission-critical
environments
For more information, see the VMWare Web site (http://www.vmware.com).
2.3.4 Citrix Support
Any version of the GroupWise client runs successfully on any version of Citrix.
2.3.5 Linux File System Support
For best GroupWise performance on Linux, the Reiser file system is recommended. If you are
running OES Linux and need the feature-rich environment of the NSS file system, GroupWise is
also supported there.
24 GroupWise 7 Installation Guide
Page 25
3
Installing a Basic GroupWise
novdocx (en) 22 June 2009
System
Every Novell® GroupWise® system, whether it services five users or 50,000 users, starts as a basic
GroupWise system. The following sections present the background information and installation
instructions you need to successfully implement your basic GroupWise system.
Section 3.1, “Basic System Overview,” on page 25
Section 3.2, “Planning Your Basic GroupWise System,” on page 26
Section 3.3, “Setting Up a Basic GroupWise System,” on page 45
Section 3.4, “What’s Next,” on page 72
Section 3.5, “Basic GroupWise System Worksheet,” on page 73
IMPORTANT: If you plan to install GroupWise in a clustered server environment, see the
GroupWise 7 Interoperability Guide (http://www.novell.com/documentation/gw7) before starting to
set up your GroupWise system.
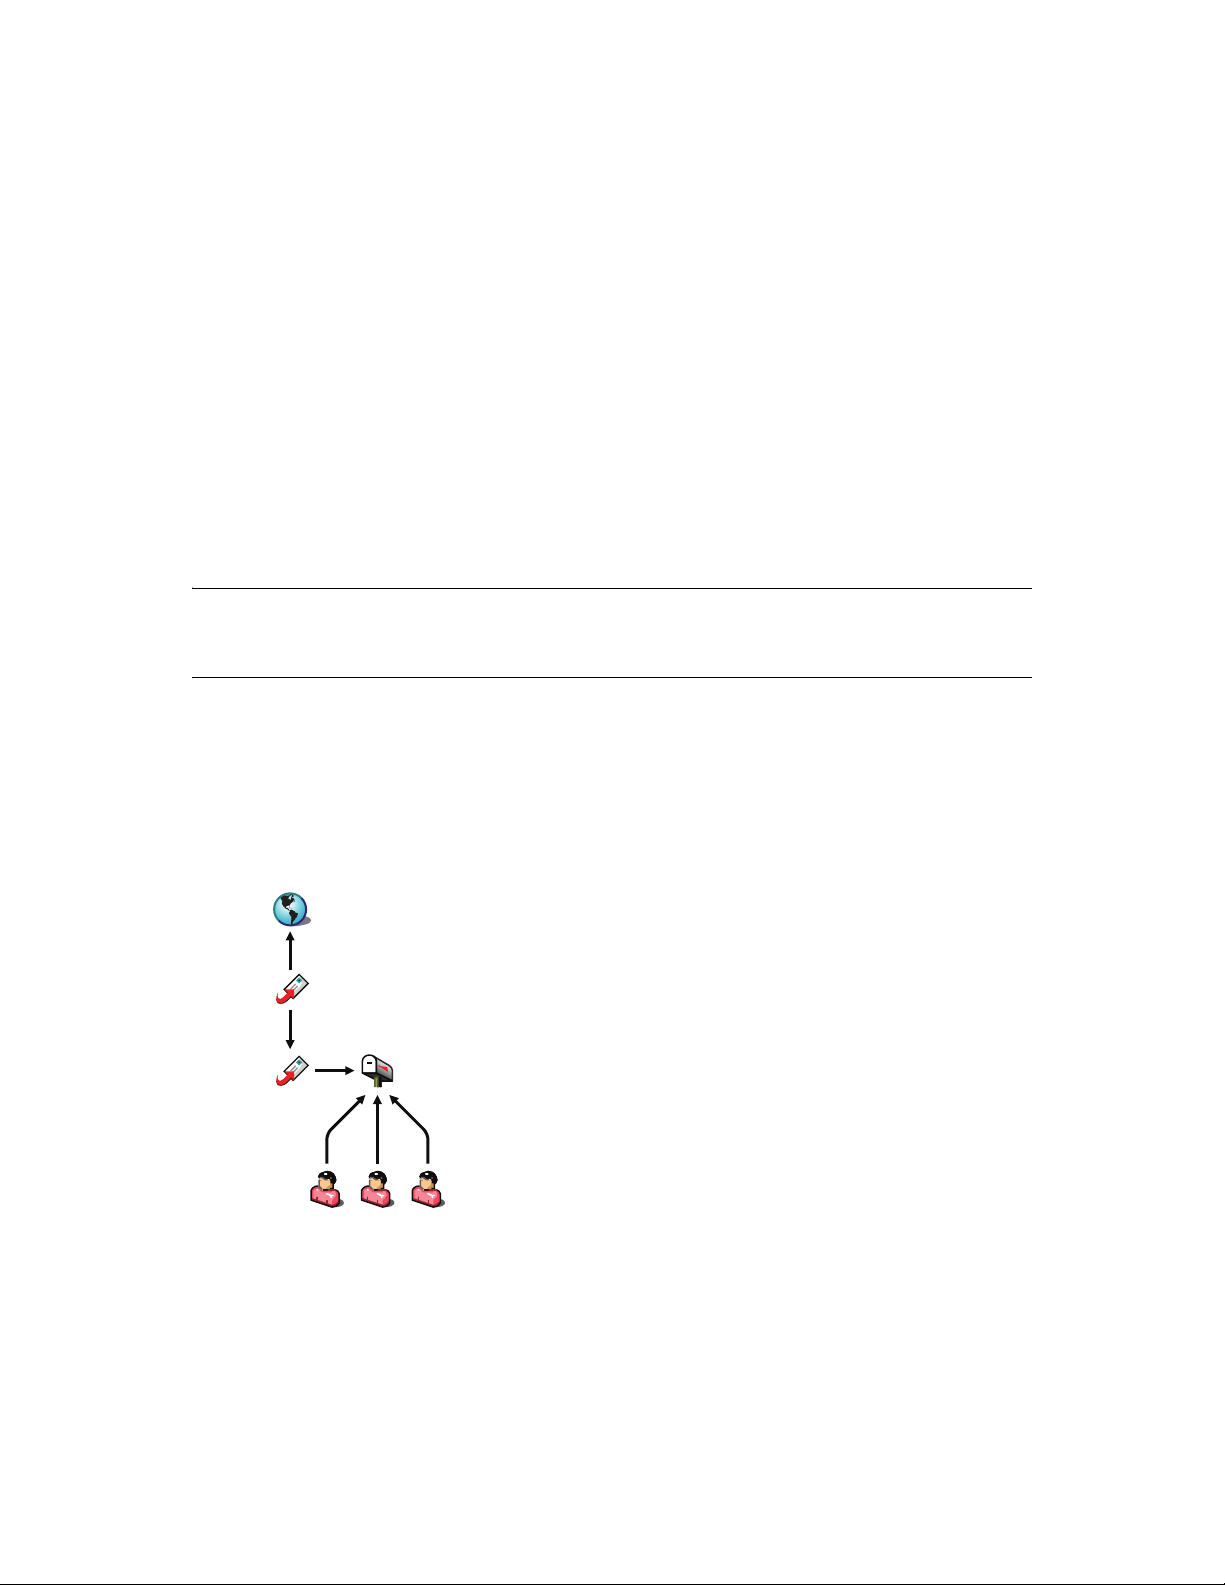
3.1 Basic System Overview
A basic GroupWise system consists of a single domain with one post office, a document library, and
one or more users, as shown below.
3
Figure 3-1 Basic GroupWise System
Domain
Message
Transfer
Agent
Post Office
Agent
Each GroupWise user has a mailbox in the post office; users run the GroupWise client (Windows,
Cross-Platform, or WebAccess) to access their mailboxes and to send and receive mail.
The GroupWise Post Office Agent (POA) delivers messages between users’ mailboxes in a post
office, and the GroupWise Message Transfer Agent (MTA) routes messages between post offices (if
there is more than one post office in the domain) and between domains (if there is more than one
domain in the system).
Post Office
with Library
GroupWise
Client
Installing a Basic GroupWise System
25
Page 26

After you finish setting up your basic GroupWise system, you can review Section 3.4, “What’s
Next,” on page 72 to learn how you can expand your system.
3.2 Planning Your Basic GroupWise System
The GroupWise Installation program includes an Installation Advisor to help you install the
GroupWise files to the appropriate locations and a Setup Advisor to help you create and configure
your GroupWise system. Both Advisors provide information to guide you through the process.
If you are comfortable with your knowledge of GroupWise, you can skip this planning section and
continue with Section 3.3, “Setting Up a Basic GroupWise System,” on page 45. Otherwise, you
should review the following sections while filling out Section 3.5, “Basic GroupWise System
Worksheet,” on page 73. The worksheet lists all the information you are prompted for as you run the
Advisors.
Section 3.2.1, “Determining Installation Locations,” on page 26
Section 3.2.2, “Planning Your Domain,” on page 30
Section 3.2.3, “Planning Your Post Office,” on page 35
Section 3.2.4, “Planning Your GroupWise Agents,” on page 38
Section 3.2.5, “Sample GroupWise Configurations,” on page 43
novdocx (en) 22 June 2009
To help with the above tasks, you can also review the GroupWise Wiki (http://wiki.novell.com/
index.php/GroupWise), which includes a Best Practices section.
IMPORTANT: If you plan to install GroupWise in a clustered server environment, refer to the
GroupWise 7 Interoperability Guide (http://www.novell.com/documentation/gw7) as you plan your
GroupWise system.
3.2.1 Determining Installation Locations
The Installation Advisor prompts you for information about the Novell eDirectoryTM tree where you
plan to create GroupWise objects and the network server locations where you plan to create
GroupWise directories and install files. The following sections prepare you to supply the required
information.
“Novell eDirectory” on page 26
“ConsoleOne” on page 27
“GroupWise Software Distribution Directory” on page 28
“GroupWise Languages” on page 29
Novell eDirectory
GroupWise is administered through eDirectory, the directory service provided by Novell. All
components, such as domains, post offices, libraries, and agents, as well as all users’ GroupWise
accounts, are configured through objects in eDirectory. You need to make sure that you have
eDirectory installed in your environment. eDirectory can be installed on NetWare, Linux, or
Windows.
26 GroupWise 7 Installation Guide
Page 27

GroupWise 7 includes the Novell eDirectory CD to assist those who do not already have eDirectory
installed and want to install it on Linux. Follow the instructions in the Novell eDirectory Installation
Guide (http://www.novell.com/documentation/edir87) to install eDirectory, along with its latest
®
Support Pack, and ConsoleOne
before proceeding to install your basic GroupWise system.
Extending the eDirectory Tree’s Schema
The Setup Advisor must extend the schema of the eDirectory tree where you plan to create your
GroupWise system. Because all objects for a single GroupWise domain must reside in the same
eDirectory tree, installing a basic system (one domain) requires you to extend one tree only.
BASIC GROUPWISE SYSTEM WORKSHEET
Under Item 5: Tree Name, specify the eDirectory tree where you plan to create the GroupWise objects.
Making Sure Users Exist in eDirectory
You must make sure all users who will use GroupWise exist in eDirectory. GroupWise accounts can
only be assigned to eDirectory User objects and GroupWise External Entity objects.
novdocx (en) 22 June 2009
GroupWise external entities represent non-eDirectory users and are added to eDirectory for the sole
purpose of assigning GroupWise accounts to these users. GroupWise external entities require
GroupWise licenses but not eDirectory licenses. You can add GroupWise external entities only after
you have installed GroupWise. Instructions for adding GroupWise external entities are provided in
Section 8.3.1, “Assigning GroupWise Accounts to Users,” on page 202.
ConsoleOne
GroupWise administration is performed through ConsoleOne, using the version listed in
Section 2.1, “GroupWise Administration Requirements,” on page 21. When you install GroupWise,
the GroupWise Administrator snap-in files are copied into an existing ConsoleOne installation. The
GroupWise Administrator snap-in files extend the functionality of ConsoleOne to let you administer
GroupWise. ConsoleOne considerations differ by platform:
NetWare and
Windows:
For a GroupWise system on NetWare or Windows, you need to decide which
ConsoleOne location you want use to administer GroupWise. This can be a
ConsoleOne location on a network server, or it can be on a local workstation. If you plan
to use ConsoleOne on a local workstation, you need to perform the GroupWise
installation from that workstation. For your convenience, ConsoleOne is included on the
GroupWise 7 Administrator for NetWare/Windows CD. The Installation program lets you
install ConsoleOne if necessary. You can also use the Installation program at a later
time to install ConsoleOne and the GroupWise Administrator snap-in files to additional
locations.
IMPORTANT: For a GroupWise system on NetWare, you cannot run ConsoleOne to
administer GroupWise at the NetWare server console. The GroupWise Administrator
snap-ins to ConsoleOne do not run in that environment.
Linux: For a GroupWise system on Linux, ConsoleOne must already be installed before you
set up your GroupWise system. GroupWise 7 includes eDirectory for Solaris*, Linux,
and AIX*, from which you can install ConsoleOne. ConsoleOne is installed to
ConsoleOne
plan to create your basic GroupWise system.
. Make sure that ConsoleOne is installed on the Linux server where you
/usr/
Installing a Basic GroupWise System 27
Page 28

BASIC GROUPWISE SYSTEM WORKSHEET
Under Item 2: ConsoleOne Path, specify the path for the ConsoleOne location you want to use to
administer GroupWise.
GroupWise Software Distribution Directory
During installation, you are prompted to create a GroupWise software distribution directory on a
network server and then copy selected GroupWise software components to the directory.
You should consider the following when deciding where to create the software distribution
directory:
“User Access to the Directory” on page 28
“Disk Space Required for the Software” on page 28
User Access to the Directory
User access considerations depend on which GroupWise client users are running:
novdocx (en) 22 June 2009
Windows
Client:
CrossPlatform
Client:
WebAccess
Client:
Users can install the GroupWise Windows client through a TCP/IP or mapped connection
to the software distribution directory. If you want users to install via a mapped connection,
you should create the software distribution directory on a server where you can provide
appropriate user access.
When users install the GroupWise Windows client, they can choose to copy it to a local
drive or they can run it from the software distribution directory. If you want users to be able
to run the GroupWise client from the software distribution directory, they must have a
permanent drive mapping to the directory.
Users can install the GroupWise Cross-Platform client from the GroupWise 7 Client for
Linux and Macintosh CD or from the software distribution directory, which requires user
access to the file system where the software distribution directory is located. However,
Cross-Platform client users cannot run the client from the software distribution directory.
They must install it locally.
The GroupWise WebAccess client does not require that users install any GroupWise
software on their workstations.
Disk Space Required for the Software
The disk space required for the directory depends on which software components you copy to the
directory. The maximum disk space required to store all the GroupWise software components for
one language is approximately 500 MB. For a breakdown by component, see Chapter 2,
“GroupWise System Requirements,” on page 21.
We recommend that you copy at least the GroupWise client files to the directory. This enables users
to install the GroupWise client from the distribution directory. Otherwise, you need to mount the
GroupWise 7 Client for Windows CD or GroupWise 7 Client for Linux and Macintosh CD as a
network volume or file system, or distribute the CD to individual users, unless you use one of the
software distribution methods described in “Distributing the GroupWise Client” in “Client” in the
GroupWise 7 Administration Guide (http://www.novell.com/documentation/gw7).
28 GroupWise 7 Installation Guide
Page 29

All GroupWise software other than the client is used for administrative purposes only; if disk space
is an issue and you don’t mind accessing the GroupWise 7 Administrator CD for your platform when
you need to install one of the software components, you might want to leave the administrative
software on the CD.
NOTE: On Linux, you might want to install the GroupWise Administration component to your
software distribution directory. It includes the RPMs for GroupWise Check (GWCheck) and the
GroupWise Database Copy utility (DBCopy). These RPMs are not installed by the GroupWise
Installation program. For more information about these utilities, see “Standalone Database
Maintenance Programs” in “Databases” in the GroupWise 7 Administration Guide (http://
www.novell.com/documentation/gw7).
BASIC GROUPWISE SYSTEM WORKSHEET
Under Item 3: Software Distribution Directory, specify the path for the software distribution directory.
Under Item 4: Select Software, select the software components you want copied to the software
distribution directory.
novdocx (en) 22 June 2009
The Installation Advisor lets you create one software distribution directory. After you’ve set up your
basic GroupWise system, you can create additional software distribution directories if needed.
For example, if not all users can access a single software distribution directory to run the GroupWise
Windows client Setup program, you can create an additional software distribution directory on a
server they can access. For information about creating additional software distribution directories,
see “Software Directory Management” in “System” in the GroupWise 7 Administration Guide
(http://www.novell.com/documentation/gw7).
GroupWise Languages
The GroupWise 7 CDs contain multiple languages.
NetWare
and
Windows:
Linux: All languages are always automatically installed. You can run any GroupWise program in
Decide which languages you want to install. Your choice affects the programs listed below.
any available language at any time.
The language selection affects the following GroupWise components:
GroupWise Administrator snap-ins for ConsoleOne
GroupWise agents
GroupWise client (Windows, Cross-Platform, and WebAccess)
For example, if you install English-US and German, you can run GroupWise Administrator and the
agents in either language. By default, GroupWise Administrator runs in the language in which you
are running ConsoleOne. Your users then have the choice of using either the English-US client or
the German client.
Installing a Basic GroupWise System 29
Page 30

BASIC GROUPWISE SYSTEM WORKSHEET
Under Item 1: Select Languages, specify the languages you want to install for a GroupWise system. The
GroupWise Administrator languages are copied to the ConsoleOne location. The GroupWise agent and
client languages are copied to the software distribution directory.
For more information, see “Multilingual GroupWise Systems” in “System” in the GroupWise 7
Administration Guide (http://www.novell.com/documentation/gw7).
3.2.2 Planning Your Domain
The domain functions as the main administration unit for the GroupWise system. When you
configure GroupWise information in eDirectory, it is also stored in the GroupWise domain database.
From the domain database, the GroupWise agents distribute the information to each post office
database. Users then get the information, such as user addresses, from the post office database.
In a multiple-post-office system, the domain also organizes post offices into a logical grouping for
addressing and routing purposes, and enables you to scale your GroupWise system to meet your
current and future needs.
novdocx (en) 22 June 2009
As you create your basic GroupWise system, the Setup Advisor prompts you for information about
the domain. The following sections prepare you to supply the required information.
“System and Domain Names” on page 30
“Domain Directory” on page 31
“Domain Context” on page 32
“Domain Language” on page 35
“Domain Time Zone” on page 35
System and Domain Names
The domain requires a unique name. The name is used as the Domain object’s name in eDirectory. It
is also used for addressing and routing purposes within GroupWise, and can appear in the
GroupWise Address Book. The domain name can reflect a location, company name or branch name,
or some other element that makes sense for your organization. For example, you might want the
domain name to be the location (such as Provo) while the post office name is one of the company’s
departments (such as Research).
A domain names should consist of a single string. Use underscores (_) rather than spaces as
separators between words to facilitate addressing across the Internet. Do not use any of the
characters listed below in system and domain names:
ASCII characters 0-13 Comma ,
Asterisk * Double quote "
At sign @ Extended ASCII characters that are graphical or typographical symbols;
Braces { } Parentheses ( )
Colon : Period .
30 GroupWise 7 Installation Guide
accented characters in the extended range can be used
Page 31

Name your domain carefully. After it is created, the name cannot be changed.
You must also provide a name for your GroupWise system. The system name is used when
connecting to other GroupWise systems; for this reason, it must be different than any other
GroupWise system with which you might want to connect. The system name can be your company
name (for example, Novell), GroupWise, or anything else that fits the naming scheme you want to
use. The system name is displayed only in ConsoleOne so any characters can be used. You cannot
change the name after your system is created.
BASIC GROUPWISE SYSTEM WORKSHEET
Under Item 6: System Name, specify the system name.
Under Item 7: Domain Name, specify the domain name.
Domain Directory
The domain requires a directory structure in which to store database files and temporary files that
are created during message routing. As you choose a location for the domain directory, consider the
following:
novdocx (en) 22 June 2009
Security: GroupWise users never need access to the domain directory, so you should create it
in a location that you can easily secure.
Server Platform and Version: The domain directory can be located on any of the supported
platforms listed in Section 2.1, “GroupWise Administration Requirements,” on page 21. It can
also be located on any platform that an MTA running on a supported platform could access
successfully.
For example, NetWare 4.2 is not a supported platform for GroupWise 7, but you could put a
domain directory on a NetWare 4.2 server because an MTA running on a supported NetWare
version would be able to access it there.
MTA Access: The MTA requires direct access to the domain directory so that it can write to
the domain database. Therefore, you might want to consider the server type (NetWare, Linux,
or Windows) and location (local or remote) of the MTA before deciding on a domain directory.
For information about the MTA, see Section 3.2.4, “Planning Your GroupWise Agents,” on
page 38. For examples of possible domain directory locations and MTA configurations, see
“Sample GroupWise Configurations” on page 43.
IMPORTANT: On Linux, the MTA must be installed on the same server where its directory
structure is located. A file system mount between Linux servers does not provide the necessary
file locking mechanisms for the GroupWise Linux MTA to write to the domain database on a
remote Linux server.
Disk Space Requirements: The domain directory requires a minimum of 100-200 MB of disk
space for the domain database. In addition, you should plan for an additional 1 GB or more of
free disk space for the temporary storage of messages when links are down.
Directory Name: You should specify an empty directory for the domain. If you want, the
directory can reflect the domain name you chose. Use the following platform-specific
conventions:
NetWare: Use a maximum of 8 characters
Installing a Basic GroupWise System 31
Page 32

Linux: Use only lowercase characters
Windows: No limitations.
Choose the name and path carefully. After the directory is created, it is difficult to rename. If the
directory you specify does not exist, it is created during installation.
BASIC GROUPWISE SYSTEM WORKSHEET
Under Item 8: Domain Directory, specify the full path for the domain directory.
Domain Context
You can create the Domain object in any Organization or Organizational Unit container in any
context in your eDirectory tree. The only requirement is that it be in the same tree as the other
objects associated with the domain (Post Office object, User objects, and so forth).
The following sections provide examples of where you might place your Domain object. Because it
is helpful to discuss the Domain object’s context in relationship to the Post Office object’s context,
the examples also include context information for the Post Office object.
novdocx (en) 22 June 2009
“Objects in the Same Container as Users’ Organizational Units” on page 32
“Objects Mirror eDirectory Organization” on page 32
“Objects Mirror Network Server Organization” on page 33
“Objects in a Dedicated Container” on page 33
“The GroupWise View in ConsoleOne” on page 34
Objects in the Same Container as Users’ Organizational Units
In the following example, the Domain object (Provo) and Post Office object (Research) reside in the
same container (Provo) as the organizational units (Accounting, Manufacturing, R&D, and Sales)
that contain the users. This allows you to associate the domain with a single organization and
associate one post office with all users within the organization.
Figure 3-2 eDirectory Tree with the GroupWise Objects and Users’ Organizational Units in the Same Organization
Container
Objects Mirror eDirectory Organization
The following example is similar to the previous example, except that a separate post office is
created for each organizational unit that contains users. The Domain object (Provo) resides in the
organization (Provo) and the Post Office objects reside in the same organizational units
(Accounting, Manufacturing, R&D, and Sales) as the users.
32 GroupWise 7 Installation Guide
Page 33

Figure 3-3 eDirectory Tree with the GroupWise Objects Mirroring the eDirectory Structure
As in the previous example, this organizational structure allows you to quickly associate users with
their post offices. In addition, if you have thousands of users split between the different
organizational units, this method allows you to create multiple post offices with a smaller number of
users on each post office.
Objects Mirror Network Server Organization
novdocx (en) 22 June 2009
Because the domain and post office have directory structures on network servers, you could also
choose to place the Domain and Post Office objects in the same context as the servers where the
directories will reside, as shown in the following example.
Figure 3-4 eDirectory Tree with the GroupWise Objects Located in the Same Containers as the Network Servers
Where Their Directories Reside
Objects in a Dedicated Container
If, rather than mirroring your eDirectory or server organization, you prefer to keep all your
GroupWise objects together, you could create a container, such as GroupWise, and place all
GroupWise objects in that container, as shown below.
Administratively, this type of organizational structure makes it easier to restrict a GroupWise
administrator’s object and property rights to GroupWise objects only.
Installing a Basic GroupWise System 33
Page 34

Figure 3-5 eDirectory Tree with the GroupWise Objects in a Dedicated Organizational Unit Container
For information about GroupWise administrator rights, see “GroupWise Administrator Rights” in
“Security Administration” in the GroupWise 7 Administration Guide (http://www.novell.com/
documentation/gw7).
BASIC GROUPWISE SYSTEM WORKSHEET
Under Item 9: Domain Context, specify the context where you want to create the Domain object. If the
context does not already exist in your eDirectory tree, create the context now.
novdocx (en) 22 June 2009
The GroupWise View in ConsoleOne
ConsoleOne includes a GroupWise View, displayed under the GroupWise System container.
The GroupWise View filters out all non-GroupWise objects and shows how GroupWise objects
relate to each other. For example, in the left pane, notice the Post Office object (Development) is
subordinate to the Domain object (Provo1). You can select an object in the left pane and display its
associated objects (User, Resource, and so forth) in the right pane.
Figure 3-6 GroupWise View in ConsoleOne
The GroupWise View is particularly useful if your GroupWise objects are placed in different
contexts in the eDirectory tree. Rather than searching for GroupWise objects throughout the tree,
you can administer the objects from the GroupWise View.
34 GroupWise 7 Installation Guide
Page 35

Some GroupWise administrative functions can only be done while in the GroupWise View. This
includes such tasks as defining users from other GroupWise systems so that they appear in your
system’s Address Book.
Domain Language
The domain language determines the sort order for items in the GroupWise Address Book.
BASIC GROUPWISE SYSTEM WORKSHEET
Under Item 10: Domain Language, specify the language for the domain. The domain language becomes
the default language for the domain’s post offices.
For more information, see “Multilingual GroupWise Systems” in “System” in the GroupWise 7
Administration Guide (http://www.novell.com/documentation/gw7).
Domain Time Zone
When a message is sent from a user in one time zone to a user in another time zone, GroupWise
adjusts the message’s time so that it is correct for the recipient’s time zone. For example, if a user in
New York (GMT -05:00, Eastern Time) schedules a user in Los Angeles (GMT -08:00, Pacific
Time) for a conference call at 4:00 p.m. Eastern Time, the appointment is scheduled in the Los
Angeles user’s calendar at 1:00 p.m. Pacific Time.
novdocx (en) 22 June 2009
BASIC GROUPWISE SYSTEM WORKSHEET
Under Item 11: Domain Time Zone, specify the time zone for the domain. The domain time zone
becomes the default time zone for the domain’s post offices.
3.2.3 Planning Your Post Office
The post office contains users’ mailboxes. Like a domain, a post office requires a name, has a
directory structure and an eDirectory object, and can be configured to support different languages
and time zones. The following sections prepare you to supply the Setup Advisor with the required
information.
“Post Office Name” on page 35
“Post Office Directory” on page 36
“Post Office Context” on page 37
“Post Office Language” on page 37
“Post Office Time Zone” on page 38
“Post Office Users” on page 38
Post Office Name
The post office, like the domain, requires a unique name. The name is used as the Post Office
object’s name in eDirectory. It is also used for addressing and routing purposes within GroupWise,
and can appear in the GroupWise Address Book. The post office name can reflect any element that
Installing a Basic GroupWise System 35
Page 36

makes sense for your organization. For example, you might want the domain name to be the location
(such as Provo) while the post office name is one of the company’s departments (such as Research).
Name your post office carefully. After it is created, the name cannot be changed.
Post office names must be a single string. The same characters that are invalid in domain names are
also invalid in post office names (see “System and Domain Names” on page 30).
BASIC GROUPWISE SYSTEM WORKSHEET
Under Item 12: Post Office Name, specify the name you’ve selected.
Post Office Directory
The post office requires a directory structure in which to store database files and temporary files that
are created during message routing. As you choose a location for the post office directory, consider
the following:
Security: The GroupWise Windows and Cross-Platform clients access the post office through
a client/server (TCP/IP) connection to the Post Office Agent (POA). The WebAccess client
uses an HTTP connection. Therefore, GroupWise users never need access to the post office
directory, so you should create the directory in a location that you can easily secure.
Server Platform and Version: The post office directory can be located on any of the
supported platforms listed in Section 2.1, “GroupWise Administration Requirements,” on
page 21. It can also be located on any platform that a POA running on a supported platform
could access successfully.
novdocx (en) 22 June 2009
For example, NetWare 4.2 is not a supported platform for GroupWise 7, but you could put a
post office directory on a NetWare 4.2 server because a POA running on a supported NetWare
version would be able to access it there.
POA Access: The POA requires direct access to the post office directory so that it can write to
the post office database. Therefore, you might want to consider the server type (NetWare,
Linux, or Windows) and location (local or remote) of the POA before deciding on a post office
directory. For information about the POA, see Section 3.2.4, “Planning Your GroupWise
Agents,” on page 38. For examples of possible post office directory locations and POA
configurations, see Section 3.2.5, “Sample GroupWise Configurations,” on page 43.
IMPORTANT: On Linux, the POA must be installed on the same server where its directory
structure is located. A file system mount between Linux servers does not provide the necessary
file locking mechanisms for the GroupWise Linux POA to write to the post office database on
a remote Linux server.
Disk Space Requirements: The post office directory holds users’ messages and attachments,
so you should plan a minimum of 5 MB per user. 100 MB or more per user is recommended.
Although actual messages are relatively small, message attachments (documents, spreadsheets,
images, and so forth) can greatly increase the amount of disk space used.
Using ConsoleOne, you can restrict the amount of disk space users are allowed for their
mailboxes. When you know the number of users and the amount of disk space allocated to each
user, you can more accurately determine the amount of disk space required for the post office.
36 GroupWise 7 Installation Guide
Page 37

You can reduce the amount of disk space required for the post office by forcing users to run the
GroupWise Windows and Cross-Platform clients in Caching mode rather than Online mode. In
Online mode, messages are stored only in the post office. In Caching mode, messages are also
stored on users’ local drives, so you can reduce the size of users’ Online mailboxes independent
of what users want to store in personal locations.
In addition to user messages and attachments, the post office directory also contains a
document library. If you want to use GroupWise document management, you should take into
account the disk space you want to provide for storing documents.
Plan for 100-300 MB for the post office database, which holds the GroupWise Address Book
and updates to it for download by Remote client users. Also plan 500 MB or more for the
temporary storage of messages when links are down.
Directory Names: You should specify an empty directory for the post office. If you want, the
directory can reflect the post office name you chose. Use the following platform-specific
conventions:
NetWare: Use a maximum of 8 characters
Linux: Use only lowercase characters
novdocx (en) 22 June 2009
Windows: No limitations.
Choose the name and path carefully. After the directory is created, it is difficult to rename. If the
directory you specify does not exist, it is created during installation.
BASIC GROUPWISE SYSTEM WORKSHEET
Under Item 13: Post Office Directory, specify the full path for the post office directory.
Post Office Context
Like the Domain object, you can create the Post Office object in any Organization or Organizational
Unit container in any context in your eDirectory tree. The only requirement is that it be in the same
tree as the Domain object and other objects associated with the domain (User objects and so on). For
configuration examples, see “Domain Context” on page 32.
BASIC GROUPWISE SYSTEM WORKSHEET
Under Item 14: Post Office Context, specify the context where you want to create the Post Office object.
If the context does not already exist in your eDirectory tree, create the context now.
Post Office Language
The post office language determines the sort order for items in the GroupWise Address Book.
The post office assumes the same language as its domain unless you specify otherwise. For example,
if you set the domain and post office language to English-US, the Address Book items are sorted
according to English-US sort order rules. This is true even if some users in the post office are
running non-English-US GroupWise clients such as German or Japanese. Their client interface and
Help files are in German or Japanese, but the sort order is according to English-US standards. Time,
date, and number formats for the non-English clients default to the workstation language.
Installing a Basic GroupWise System 37
Page 38

BASIC GROUPWISE SYSTEM WORKSHEET
Under Item 15: Post Office Language, specify the language for the post office.
For more information, see “Multilingual GroupWise Systems” in “System” in the GroupWise 7
Administration Guide (http://www.novell.com/documentation/gw7).
Post Office Time Zone
When a message is sent from a user in one time zone to a user in another time zone, GroupWise
adjusts the message’s time so that it is correct for the recipient’s time zone. For example, if a user in
New York (GMT -05:00, Eastern Time) schedules a user in Los Angeles (GMT -08:00, Pacific
Time) for a conference call at 4:00 p.m. Eastern Time, the appointment is scheduled in the Los
Angeles user’s calendar at 1:00 p.m. Pacific Time.
The post office assumes the same time zone as its domain unless you specify otherwise.
BASIC GROUPWISE SYSTEM WORKSHEET
novdocx (en) 22 June 2009
Under Item 16: Post Office Time Zone, specify the time zone where the post office is located.
Post Office Users
You need to assign a GroupWise account to each eDirectory user who should have a mailbox in the
post office. You can do this while creating your system, or you can do it afterwards. However, we
recommend that you at least add yourself as a GroupWise user so you can test the system.
BASIC GROUPWISE SYSTEM WORKSHEET
If desired, specify the context for each user under Item 20: Post Office Users.
The Setup Advisor lets you select users from the eDirectory tree to add to the post office. You do not
need to list all of the users at this time.
If you are adding non-eDirectory users as GroupWise external entities, you must wait to add them to
the post office until after you have finished the installation. Instructions for adding GroupWise
external entities are provided in Section 8.3.1, “Assigning GroupWise Accounts to Users,” on
page 202.
3.2.4 Planning Your GroupWise Agents
The Message Transfer Agent (MTA) and Post Office Agent (POA) route messages through the
GroupWise system. The MTA handles all message traffic between the domain and post office, while
the POA handles all message traffic within the post office.
MTA: GroupWise requires one MTA per domain, which means that you need to install and run one
MTA for your basic GroupWise system.
In addition to routing user messages between post offices and between domains, the MTA routes
administration messages from the domain to the post office. For example, when a user is given a
GroupWise account in eDirectory, the user is added to the GroupWise domain database. At the same
38 GroupWise 7 Installation Guide
Page 39

time, the MTA routes an administration message from the domain to the post office so that the POA
can add the user to the post office database. After the user is added to the post office database, the
post office’s users can see the newly added user’s information in the GroupWise Address Book
POA: GroupWise requires one POA per post office, which means that you need to install and run
one POA for your basic GroupWise system.
The POA routes messages within the post office, updates the post office database when it receives
administration messages from the MTA, and performs other maintenance tasks in the post office.
The following sections prepare you to supply the information required when installing the MTA and
POA:
“Agent Platform” on page 39
“Agent Location” on page 39
“MTA Link to the Post Office” on page 41
“Web Console” on page 41
“Agent Language” on page 42
“Windows Installation Option: Application vs. Service” on page 42
novdocx (en) 22 June 2009
Agent Platform
The MTA and POA are available as NetWare NLM
TM
programs, Linux executables, and Windows
executables.
In general, GroupWise is most efficient if you match the agent platform with the network operating
system where the post office and domain are located. For example, if a domain and post office are
located on a NetWare server, then you would install the NetWare agents for them. However, this is
not required. For configuration examples, see Section 3.2.5, “Sample GroupWise Configurations,”
on page 43.
BASIC GROUPWISE SYSTEM WORKSHEET
Under Item 21: Agent Platform, specify the type of agents (NetWare, Linux, or Windows) you want to
use.
Agent Location
The MTA requires direct access to the domain directory so that it can write to the domain database.
The POA requires direct access to the post office directory so that it can write to the post office
database.
In general, we recommend that you install an agent on the same server as its directory. For example,
you would install the MTA on the same server as the domain directory and the POA on the same
server as the post office directory. This ensures that the agent always has access to its directory.
Installing a Basic GroupWise System 39
Page 40

Figure 3-7 Direct Access between Agents and Directories
novdocx (en) 22 June 2009
Message
Transfer Agent
Domain
Post Office
Agent
Post Office
However, if necessary, you can install the agent on a different server from its directory. This requires
the agent to have a direct link (mapped drive, UNC path, or file system mount) to its directory in
order to function. The following diagram illustrates the direct links:
Figure 3-8 MTA with UNC or Mapped Path to Domain and Post Office Directories; POA with UNC or Mapped
Path to the Post Office Directory
Message
Transfer Agent
Mapped Drive
Post Office
Agent
Mapped Drive
UNC PathUNC Path
Domain
Post Office
For the purpose of simplifying the setup of your basic system, you are required to install both the
MTA and the POA to the same server. If, at a later time, you decide that you want to run one of the
agents on a different server, see Chapter 7, “Installing GroupWise Agents,” on page 159.
Consider these platform-specific guidelines:
NetWare: When installing the NetWare agents, we recommend you use the
on the NetWare server. This simplifies the use of startup files and ensures that the agent
NLM programs are in the server’s search path. If you use a different directory, you must add
that directory to the server’s search path.
Linux: The Linux agents are automatically installed to
/opt/novell/groupwise/agents
Linux, do not move the agent software to a different location.
Windows: The default installation directory is
c:\grpwise
. However, you can install the agents to any
directory you want.
BASIC GROUPWISE SYSTEM WORKSHEET
Under Item 22: Installation Path, specify the installation path for the agents.
sys:\system
directory
. On
40 GroupWise 7 Installation Guide
Page 41

MTA Link to the Post Office
To route user and administration messages to the post office, the MTA requires a TCP/IP connection
with the post office’s POA, or alternatively, direct access or a direct link (mapped drive, UNC path,
or file system mount) to the post office directory. The following diagram illustrates the alternatives:
Figure 3-9 MTA Link Alternatives
novdocx (en) 22 June 2009
Message
Transfer Agent
Post Office
Agent
Message
Transfer Agent
Post Office
Agent
TCP IP
Mapped
UNC
Domain
Post Office
Domain
Post Office
In general, a TCP/IP connection between the MTA and the POA is preferable.
BASIC GROUPWISE SYSTEM WORKSHEET
Under Item 17: Post Office Link, select whether the MTA will connect to the post office through a TCP/IP
link to the POA or a direct link to the post office directory.
Under Item 18: POA Network Address, specify the IP address or DNS hostname of the POA’s server.
The GroupWise Windows and Cross-Platform clients, which access the POA through TCP/IP, need to
know the address. If the MTA will have a TCP/IP connection to the POA, it will also use this address.
If you plan to have the MTA use a TCP/IP connection to the POA, under Item 19: MTA Network Address,
specify the IP address or DNS hostname of the MTA’s server.
Web Console
The MTA and POA provide server consoles to let you monitor and configure the agents while at the
agents’ servers.
NetWare: The MTA and POA consoles are always displayed.
Linux: The MTA and POA consoles are displayed only if you start the agents with the --show
switch on the command line.
Windows: The MTA and POA consoles are displayed if you run the agents as applications but are not
displayed if you run the agents as services.
When the MTA and POA consoles are not available, you can monitor and configure the agents
through a Web browser. This feature, referred to as the agent Web console, lets you access the
agents’ statistics and diagnostic information from any location where you are connected to the
Internet and have access to a Web browser, either at a workstation or on a mobile device.
Installing a Basic GroupWise System 41
Page 42

By default, the MTA Web console is enabled on port 7180 and the POA Web console is enabled on
port 7181. In your browser, you access the agent Web consoles using the following URLs:
http://mta_network_address:port
http://poa_network_address:port
where mta_network_address and poa_network_address are the agents’ IP addresses or host names
and port is the agent’s HTTP port number.
BASIC GROUPWISE SYSTEM WORKSHEET
Under Item 18: POA Network Address, specify the POA’s HTTP port. The default port, 7181, should be
used unless there is a port conflict.
Under Item 19: MTA Network Address, specify the MTA’s HTTP port. The default port, 7180, should be
used unless there is a port conflict.
Agent Language
If you have users with various language preferences, you can install the GroupWise agents in
multiple languages. The language determines the agents’ interface language only. It does not affect
messages processed by the agents.
novdocx (en) 22 June 2009
By default, the agents start in the language selected for the domain. If that language has not been
installed, the agents start in the language used by the operating system. If that language has not been
installed, the agents start in English-US.
NOTE: On Linux, all available languages are included in the same RPM, so all languages are
always installed.
BASIC GROUPWISE SYSTEM WORKSHEET
Under Item 24: Language, list the languages you want to install for the agents.
For more information, see “Multilingual GroupWise Systems” in “System” in the GroupWise 7
Administration Guide (http://www.novell.com/documentation/gw7).
Windows Installation Option: Application vs. Service
You can run the Windows MTA and POA as normal applications or as services. When you run the
agents as Windows services, they must run under a specific user account. The user account you use
depends on where the domain and post office directories are located:
When the domain and post office directories are located on the same server where you are
installing the agents, the agents can run under the local system account. You can also display
the agent server console when the agent software, directories, and databases are local.
When the domain and post office directories are located on a remote server, you must specify a
user with rights to access the domain and post office directories.
Windows If the Windows agents need to log in to another Windows server, provide a Windows
username and password.
42 GroupWise 7 Installation Guide
Page 43

NetWare: If the Windows agents need to log in to a NetWare server, provide an existing
j
eDirectory username and password, or create a new account for the agents, as
described in “Creating a NetWare Account for Agent Access (Optional)” on page 170.
Linux: Configuring the Windows agents to log in to a Linux server is not recommended.
As with all Windows services, you can start the agents manually or have them start automatically
each time the Windows server restarts.
BASIC GROUPWISE SYSTEM WORKSHEET
Under Item 23: Windows Installation Options, select Install as Windows Services if you want to run the
agents as Windows services.
If you want to run the agents as Windows services, under Item 25: Windows Services Information, record
the account the agents will run under, and if necessary, the password for the account. Also select
whether you want the service to start automatically or manually.
3.2.5 Sample GroupWise Configurations
novdocx (en) 22 June 2009
Many different configurations are possible for your GroupWise system. The following diagrams
illustrate some of the ways a basic GroupWise system (one domain and one post office) can be set
up.
“NetWare 6.x Server” on page 43
“Linux Server” on page 44
“Windows 2003 Server” on page 44
“Open Enterprise Server and Windows 2003 Server” on page 44
NetWare 6.x Server
The following diagram shows a basic GroupWise system set up on a single NetWare 6.x server.
Figure 3-10 GroupWise System Installed on a Single NetWare 6 Server
NetWare 6.x
User running the
GroupWise Windows
client from the software
distribution directory.
TCP/IP
Administrator
:=nw65\mail:
z:=nw65\sys:
c:\novell\consoleone
j:\provo
j:\research
j:\software
z:\system
ConsoleOne
Domain (Provo)
Post Office (Research)
Software Distribution Directory
NetWare MTA
NetWare POA
x:\software
TCP/IP
User running the
GroupWise Windows or
Cross-Platform client
from a local drive.
Installing a Basic GroupWise System 43
Page 44

Linux Server
The following diagram shows all GroupWise components on a Linux server.
Figure 3-11 GroupWise System Installed on a Single Linux Server
Linux
novdocx (en) 22 June 2009
Administrator
/usr/ConsoleOne/bin
/gwsystem/provo
/gwsystem/research
/opt/novell/groupwise/software
/opt/novell/groupwise/agents/bin
ConsoleOne
Domain (Provo)
Post Office (Research)
Software Distribution Directory
Linux MTA
Linux POA
TCP/IP
User running the GroupWise
Cross-Platform client
from a local drive.
Windows 2003 Server
The following diagram shows all GroupWise components on a Windows 2003 server.
Figure 3-12 GroupWise System Installed on a Single Windows 2003 Server
Windows 2003
User running the
GroupWise Windows
client from the software
distribution directory.
TCP/IP
Administrator
j:=w2k3\mail:
k:=w2k3\c:
c:\novell\consoleone
k:\provo
j:\research
j:\software
k:\grpwise
ConsoleOne
Domain (Provo)
Post Office (Research)
Software Distribution Directory
Windows MTA
Windows POA
x:\software
Open Enterprise Server and Windows 2003 Server
The following diagram shows the domain, post office, and software distribution directory on a
server running the NetWare version of Novell Open Enterprise Server (OES). The MTA and POA,
located on a Windows 2003 server, use a UNC path to access the domain directory and post office
directory on the OES NetWare server.
44 GroupWise 7 Installation Guide
TCP/IP
User running the
GroupWise Windows or
Cross-Platform client
from a local drive.
Page 45

Figure 3-13 GroupWise System Installed on an OES NetWare Server and Windows 2000 Server
j
Open Enterprise Sever
NetWare
Administrator
:=nwoes\mail:
z:=nwoes\sys:
c:\novell\consoleone
j:\software
j:\research
j:\provo
ConsoleOne
Software Distribution Directory
Post Office (Research)
Domain (Provo)
x:\software
novdocx (en) 22 June 2009
User running
the GroupWise
Windows client
from the software
distribution
directory.
Windows 2003
\\w2k3\mail
User running the
GroupWise Windows
or Cross-Platform client
from a local drive.
TCP/IP
Windows MTA
Windows POA
TCP/IP
The following diagram shows the domain and MTA on a NetWare 6 server. The post office,
software distribution directory, and POA are on a Windows 2000 server. The MTA communicates
with the POA through TCP/IP.
Figure 3-14 GroupWise System Installed on a NetWare 6 Server and Windows 2000 Server
NetWare 6
Administrator
j:=nw6\mail:
z:=nw6\sys:
k:=w2k\mail:
c:\novell\consoleone
j:\provo
z:\system
Windows 2000
k:\grpwise
k:\research
k:\software
ConsoleOne
Domain (Provo)
NetWare MTA
TCP/IP
Windows POA
Post Office (Research)
Software Distribution Directory
TCP/IP
User running the
GroupWise Windows or
Cross-Platform client
from a local drive.
TCP/IP
x:\software
User running the
GroupWise Windows
client from the software
distribution directory.
NOTE: The above configuration has the MTA on one server and the POA on another. Because the
basic GroupWise system setup requires you to install the MTA and POA on the same server, you
would need to do additional setup to create a similar configuration.
3.3 Setting Up a Basic GroupWise System
Follow the setup instructions for the platform where you are creating your basic GroupWise system:
Section 3.3.1, “NetWare and Windows: Setting Up a Basic GroupWise System,” on page 46
Section 3.3.2, “Linux: Setting Up a Basic GroupWise System,” on page 60
Installing a Basic GroupWise System 45
Page 46

3.3.1 NetWare and Windows: Setting Up a Basic GroupWise System
You should have already reviewed Section 3.2, “Planning Your Basic GroupWise System,” on
page 26 and filled out the worksheet.
The following sections step you through the GroupWise Installation program, Installation Advisor
and, Setup Advisor. The Installation Advisor installs the GroupWise software. It then launches the
Setup Advisor to create your domain and post office, set up the GroupWise agents, and set up the
GroupWise Windows client (if desired) on your local machine.
“Starting the GroupWise Installation Program on Windows” on page 46
“Installing the GroupWise Software” on page 48
“Providing System Information” on page 49
“Creating Your Basic GroupWise System” on page 52
“Installing and Starting the GroupWise Agents” on page 53
“Setting Up and Running the GroupWise Windows Client on Your Local Machine” on page 58
“Installing the GroupWise Administrator Snap-Ins to Additional Windows Machines” on
page 60
novdocx (en) 22 June 2009
IMPORTANT: If you plan to install GroupWise in a clustered server environment, see the
GroupWise 7 Interoperability Guide (http://www.novell.com/documentation/gw7) before starting to
set up your GroupWise system.
Starting the GroupWise Installation Program on Windows
To start the GroupWise Installation program:
1 At a Windows machine that meets the administrator machine requirements listed in
Section 2.1, “GroupWise Administration Requirements,” on page 21, log in as an Admin
equivalent to the eDirectory tree in which you are installing GroupWise.
2 Insert the GroupWise 7 Administrator for NetWare/Windows CD into the CD drive to start the
GroupWise Installation program.
46 GroupWise 7 Installation Guide
Page 47

novdocx (en) 22 June 2009
If the Installation program does not start automatically, run
setup.exe
from the root of the
CD.
3 Click Create or Update a GroupWise System, then click Yes to accept the license agreement
and display the Welcome to GroupWise Install page.
4 Click Next until you reach the Administration Options page.
Installing a Basic GroupWise System 47
Page 48

5 Make sure that Create a New System or Update an Existing System is selected, then click Next.
6 Continue with Installing the GroupWise Software.
novdocx (en) 22 June 2009
Installing the GroupWise Software
1 Follow the prompts to provide the following information from your Basic GroupWise System
Works he et .
Item 1: Select Languages
Item 2: ConsoleOne Path
Item 3: Software Distribution Directory
Item 4: Select Software
When you have provided this information, the Installation Advisor is ready to install the
GroupWise administrative software.
2 Click Install.
The Installation Advisor installs GroupWise software to the ConsoleOne location and software
distribution directory.
3 Follow the prompts until you reach the Determine Next Step page.
48 GroupWise 7 Installation Guide
Page 49

4 Select Creating a New GroupWise System, then click Next to display the Run ConsoleOne
page.
novdocx (en) 22 June 2009
5 Continue with Providing System Information.
Providing System Information
The Installation Advisor launches ConsoleOne with the GroupWise Setup Advisor active.
1 On the Run ConsoleOne page, click Run to start ConsoleOne and the GroupWise Setup
Advisor.
The Setup Advisor provides an overview of the information it needs to collect in order to create
your basic GroupWise system.
Installing a Basic GroupWise System 49
Page 50

2 Follow the prompts to provide the GroupWise system and domain information from your Basic
GroupWise System Worksheet.
Item 3: Software Distribution Directory
Item 5: Tree Name
Item 6: System Name
Item 7: Domain Name
Item 8: Domain Directory
Item 9 Domain Context
Item 10: Domain Language
Item 11: Domain Time Zone
3 Follow the prompts to provide the GroupWise post office information from your Basic
GroupWise System Worksheet.
novdocx (en) 22 June 2009
Item 12: Post Office Name
Item 13: Post Office Directory
Item 14: Post Office Context
Item 15: Post Office Language
Item 16: Post Office Time Zone
4 Follow the prompts to provide information about how to link the domain and the post office
from your Basic GroupWise System Worksheet.
Item 17: Post Office Link
Item 18: POA Network Address
Item 19: MTA Network Address (for a TCP/IP link)
When you have provided the system, domain, post office, and link information for your
GroupWise system, you are ready to create users. However, adding users at this point is
optional. After the Setup Advisor has finished, you can add users to the post office at any time
by using ConsoleOne.
50 GroupWise 7 Installation Guide
Page 51

5 Add any users that you listed on your Basic GroupWise System Worksheet, then click Next.
The Setup Advisor summarizes your overall progress.
novdocx (en) 22 June 2009
6 Click Next to display a summary of the system, domain, post office, and link information you
entered.
Installing a Basic GroupWise System 51
Page 52

7 Continue with the Creating Your Basic GroupWise System.
Creating Your Basic GroupWise System
novdocx (en) 22 June 2009
After you have verified that the information you entered is correct, you are ready for the Setup
Advisor to create your GroupWise system.
1 On the Summary page, click Next.
The Setup Advisor creates the GroupWise system using the information you provided.
2 When your system has been created, click Next to display the GroupWise Setup Progress:
Install Agent Software page.
3 Continue with Installing and Starting the GroupWise Agents.
52 GroupWise 7 Installation Guide
Page 53

Installing and Starting the GroupWise Agents
At this point, the Setup Advisor has created GroupWise objects in eDirectory and directory
structures on servers for your GroupWise system. You now need to install and start the MTA and
POA on your NetWare or Windows server.
1 On the GroupWise Setup Progress page, click Next to have the Setup Advisor launch the Agent
Installation program and display the Select Platform page.
novdocx (en) 22 June 2009
2 If you are installing the NetWare agents (worksheet item 21), continue with NetWare:
Installing and Starting the GroupWise Agents.
or
If you are installing the Windows agents (worksheet item 21), skip to “Windows: Installing and
Starting the GroupWise Agents” on page 55.
NetWare: Installing and Starting the GroupWise Agents
1 Follow the prompts to provide NetWare Agent information from your Basic GroupWise
System Worksheet.
Item 22: Installation Path
Item 24: Language
2 Review the information displayed on the Summary page, then click Install to install the
NetWare agents.
The Installation Complete page appears when the software has been installed.
Installing a Basic GroupWise System 53
Page 54

3 Select from the following options:
Update AUTOEXEC File: Select this option to reference the
server’s
autoexec.ncf
file so that the GroupWise agents are automatically loaded whenever
grpwise.ncf
file from the
the server is started.
Launch GroupWise Agents Now: Select this option to have the Installation program start the
GroupWise agents for you immediately. You should only do this if the MTA and POA are on
the same server as the domain and post office directories. If you want the agents to run in
protected mode, select Launch in Protected Mode.
4 Click Finish to return to the Setup Advisor. The GroupWise Setup Progress page is again
displayed.
novdocx (en) 22 June 2009
5 If you selected Launch GroupWise Agents Now, skip to Step 8.
or
To configure the agents to access the remote server where their domain and post office
directories have been created, continue with Step 6.
6 Use a text editor to modify the agents’ startup files.
The load command in the
their startup files. The startup files include configuration information the agents need to
function properly. When the MTA is not on the same server as the domain directory, you need
54 GroupWise 7 Installation Guide
grpwise.ncf
file includes a startup switch that points the agents to
Page 55

to edit the MTA startup file to include the MTA’s eDirectory distinguished name. When the
POA is not on the same server as the post office directory, you need to edit the POA startup file
to include the POA’s eDirectory distinguished name.
The startup files are located in the agent installation directory you specified in Step 1. The
MTA startup file is named
(for example,
provo.mta
domain.mta
). The POA startup file is named
post_office is the first 8 letters of the post office name (for example,
, where domain is the first 8 letters of the domain name
post_office.poa
research.poa
, where
).
The /dn-distinguished_object_name startup switch is located in Section 1 of the startup file.
Delete the semicolon (;) at the beginning of the line and replace the distinguished_object_name
variable with the distinguished name of the MTA or POA. For example, if the MTA is for a
domain named Provo that is located in a container named Novell, you would enter:
/dn-mta.provo.novell
7 At the NetWare server console, enter
grpwise.ncf
to start the agents.
If the agents do not start successfully, see “Starting the NetWare GroupWise Agents” on
page 173.
8 Now that you have the NetWare agents installed and running, skip to “Setting Up and Running
the GroupWise Windows Client on Your Local Machine” on page 58.
novdocx (en) 22 June 2009
Windows: Installing and Starting the GroupWise Agents
To install the Windows agents, you must run the Agent Installation program at the Windows server
where you are installing the agents.
1 If you are already running the Agent Installation program at the Windows server where you are
installing the agents, skip to Step 6.
or
Click Exit to close the Agent Installation program that was launched automatically by the Setup
Advisor, go to the Windows server where you want to install the agents, then continue with
Step 2 below.
2 Make sure you are logged in as an Admin equivalent and have network access to the software
distribution directory (or the GroupWise 7 Administrator for NetWare/Windows CD), domain
directory, and post office directory.
3 Start the Agent Installation program (
install.exe
in the
agents
subdirectory), then click Yes
to accept the license agreement and display the Overview page.
Installing a Basic GroupWise System 55
Page 56

4 Click Next to continue.
5 Select Install, then click Next to display the Select Platform page.
6 Select Windows, then click Next.
novdocx (en) 22 June 2009
7 Follow the prompts to provide Windows Agent information from your Basic GroupWise
System Worksheet in the order listed.
Item 22: Installation Path
Item 23: Windows Installation Options
Item 24: Language
Item 7: Domain Name and Item 8: Domain Directory (if prompted)
Item 12: Post Office Name and Item 13: Post Office Directory (if prompted)
Item 25: Windows Service Information (if applicable)
8 If you are not running the Agent Installation program on the same server as the GroupWise
Setup Advisor, the Domains/Post Offices page is displayed.
The MTA and POA must know the location of the domain and post office directories. Continue
with Step 9.
or
56 GroupWise 7 Installation Guide
Page 57

If you are running the Agent Installation program on the same server as the GroupWise Setup
Advisor, the Setup Advisor passes the domain and post office information to the Agent
Installation program so you are not prompted for it again. Skip to Step 13.
9 To specify the location of your domain, click Add, select Domain, specify the domain name,
provide the path to the domain directory, then click OK.
The location you specify for the domain directory is stored in the MTA startup file. When you
start the MTA, it reads the startup file to find the location of the domain directory. The MTA
then reads the domain database (
wpdomain.db
) in the
domain
directory for all configuration
information it needs to run.
The MTA startup file is located in the agent installation directory you specified in Step 7. The
startup file is named
example,
provo.mta
domain.mta
).
, where domain is the first 8 letters of the domain name (for
10 To specify the location of your post office, click Add, select Post Office, specify the post office
name, provide the path to the post office directory, then click OK.
The location you specify for the post office directory is stored in the POA startup file. When
you start the POA, it reads the startup file to find the location of the post office directory. The
POA then reads the post office database (
wphost.db
) in the post office directory for all
configuration information it needs to run.
novdocx (en) 22 June 2009
The POA startup file is located in the agent installation directory you specified in Step 7. The
startup file is named
post_office.poa
office name (for example,
research.poa
, where post_office is the first 8 letters of the post
).
11 Click Next to continue.
12 If you are installing the agents as Window services, the Windows Service Information page is
displayed. Fill in the service information (worksheet item 25), then click Next to display the
Summary page.
or
If you are not installing the agents as services, the Summary page is displayed.
13 Click Install to install the agents.
The Installation Complete page appears when the files have been installed.
Installing a Basic GroupWise System 57
Page 58

14 Select from the following options:
Update the AUTOEXEC File: This option does not apply to the Windows agents, so it is
dimmed.
Launch GroupWise Agents Now: This option applies only if you installed the agents as
Windows applications, rather than services. Select this option to start the GroupWise agents as
applications.
If the agents do not start successfully as applications, or if you need to start them as services,
see “Starting the Windows GroupWise Agents” on page 194.
15 Click Finish, then if necessary, return to the workstation where the Setup Advisor is running.
The Set Up Client Software page is displayed.
novdocx (en) 22 June 2009
16 Now that you have the Windows agents installed and running, continue with Setting Up and
Running the GroupWise Windows Client on Your Local Machine.
Setting Up and Running the GroupWise Windows Client on Your Local Machine
1 In the Setup Advisor, click Next to launch the GroupWise Windows client Setup program, then
follow the prompts.
58 GroupWise 7 Installation Guide
Page 59

2 When setup is finished, double-click the GroupWise shortcut on your desktop to start the
GroupWise Windows client.
Because the GroupWise client can get the location of your post office from eDirectory, and
because you do not yet have a password on your mailbox, the GroupWise client starts without
prompting you for post office and password information.
novdocx (en) 22 June 2009
If the GroupWise client cannot get the location of your post office from eDirectory or cannot
access the post office, the GroupWise Startup page appears. You should make sure that you are
logged in through your own eDirectory user account and not through an Admin account, and
that your current eDirectory tree is the tree in which the post office is located. By default, the
GroupWise client logs in to GroupWise as the user who is logged in at the workstation. If you
are not logged in as yourself, you might receive a “user not found” error; specify your
GroupWise user ID in the User ID field, then click OK to log in.
3 Get started with the GroupWise client by completing the following tasks:
Setting A Mailbox Password: After you are logged in and using GroupWise, one of the
first things you should do is set a password on your mailbox so that other users cannot
access it. For information about setting a password, see Help in the GroupWise client.
Sending Messages and Scheduling Appointments: You can send messages to or
schedule appointments with any users you have added to the post office. To test your
system, you might want to send a message to yourself. As soon as users set up the
GroupWise clients on their workstations, as described in Section 8.4.1, “Setting Up the
GroupWise Windows Client,” on page 204, they will also be able to send messages and
schedule appointments.
Using Document Management Services (Optional): GroupWise Document
Management Services (DMS) lets you store documents in GroupWise libraries. Library
documents can be shared with other users, versioned, and searched for within the library.
The Setup Advisor created a library under the post office directory. For information about
using Document Management Services, see Help in the GroupWise client.
4 Continue with Installing the GroupWise Administrator Snap-Ins to Additional Windows
Machines.
or
If you have installed all the administrative software you need, skip to Section 3.4, “What’s
Next,” on page 72.
Installing a Basic GroupWise System 59
Page 60

Installing the GroupWise Administrator Snap-Ins to Additional Windows Machines
As part of creating your basic GroupWise system, the GroupWise Administrator snap-ins to
ConsoleOne were installed in one location (worksheet item 2). If ConsoleOne is installed in multiple
locations and if you want to be able to administer GroupWise from those locations, you need to
install the GroupWise snap-ins to each ConsoleOne installation.
1 Go to the Windows machine where you want to install the GroupWise snap-ins to ConsoleOne.
2 Make sure you are logged in as an Admin equivalent and have network access to a software
distribution directory (or GroupWise 7 Administrator for NetWare/Windows CD) and the
domain directory.
3 Start the GroupWise Administration Installation program (
install.exe
in the
\admin
subdirectory)
4 Accept the License Agreement, then follow the prompts to provide the necessary information.
5 In the Administration Options dialog box, deselect Create a New System or Update an Existing
System. Also deselect Copy Files to a Software Distribution Directory. Then continue to install
just the GroupWise Administrator snap-ins to ConsoleOne.
novdocx (en) 22 June 2009
6 Repeat Step 1 through Step 5 for each location where you want to install the GroupWise snap-
ins.
7 Skip to Section 3.4, “What’s Next,” on page 72.
3.3.2 Linux: Setting Up a Basic GroupWise System
You should have already reviewed Section 3.2, “Planning Your Basic GroupWise System,” on
page 26 and filled out the worksheet.
The following sections step you through the GroupWise Installation program, Installation Advisor,
and Setup Advisor on Linux. The Installation Advisor installs the GroupWise software on your
Linux server. It then launches the Setup Advisor in ConsoleOne to create your domain and post
office and set up the GroupWise agents.
“Starting the GroupWise Installation Program on Linux” on page 61
“Installing the GroupWise Software” on page 62
“Selecting a Linux Mount Directory” on page 63
60 GroupWise 7 Installation Guide
Page 61

“Using ConsoleOne to Create Your Basic GroupWise System” on page 64
“Installing and Starting the Linux GroupWise Agents” on page 67
“Setting Up and Running the GroupWise Cross-Platform Client on Your Local Machine” on
page 70
“Installing the GroupWise Administrator Snap-Ins to Additional Linux Machines” on page 71
IMPORTANT: If you plan to install GroupWise in a clustered server environment, see the
GroupWise 7 Interoperability Guide (http://www.novell.com/documentation/gw7) before starting to
set up your GroupWise system.
If you are new to Linux, you might want to review “Useful Linux Commands for Administering a
GroupWise System” in GroupWise 7 Troubleshooting 2: Solutions to Common Problems (http://
www.novell.com/documentation/gw7) before beginning to set up your GroupWise system on Linux.
Starting the GroupWise Installation Program on Linux
1 Make sure that ConsoleOne is installed on your Linux server.
novdocx (en) 22 June 2009
ConsoleOne is installed in
/usr/ConsoleOne/bin
. If ConsoleOne and eDirectory have not yet
been installed on your system, see “Novell eDirectory” on page 26.
2 In a terminal window, become
sux
The
command enables the X Window System, which is required for running the GUI
root
by entering
sux
and the
root
password.
GroupWise Installation program, Installation Advisor, and the Setup Advisor. If you are not
using the X Window System, you can install GroupWise components individually, as described
in “Installing the GroupWise Agents Using the Text-Based Installation Program” on page 177.
3 Change to the root of the GroupWise 7 Administrator for Linux CD.
4 Start the GroupWise Installation program:
./install
5 Select the language in which you want to run the GroupWise Installation program, then click
OK.
NOTE: On Linux, all available languages are included in the same RPM, so all languages are
always installed.
Installing a Basic GroupWise System 61
Page 62

6 Continue with Installing the GroupWise Software.
novdocx (en) 22 June 2009
Installing the GroupWise Software
1 Click Create or Update a GroupWise System to start the Installation Advisor.
The list on the left details the steps the Installation Advisor performs for you.
2 Follow the prompts to provide the following information from your Basic GroupWise System
Works he et .
Item 3: Software Distribution Directory
Item 4: Select Software
The Installation Advisor automatically installs the GroupWise Administrator snap-ins to
ConsoleOne under
software components into your software distribution directory.
3 When the copying is complete, click Next.
62 GroupWise 7 Installation Guide
/usr/ConsoleOne
. Then, the Installation Advisor copies the selected
Page 63

4 Select Creating a New GroupWise System, then click Next.
You use the New System utility in ConsoleOne to create your basic GroupWise system.
5 Click Run to start ConsoleOne.
6 Continue with Selecting a Linux Mount Directory
novdocx (en) 22 June 2009
Selecting a Linux Mount Directory
The first time you start ConsoleOne with the GroupWise Administrator snap-ins installed, you are
prompted to specify a Linux mount directory under which you create mount points. Typically, Linux
servers and workstations use
/mnt
for this purpose. In the future as your system grows, this
information helps ConsoleOne resolve the UNC paths of GroupWise database locations into Linux
paths. Although the mount directory information is not used when you are creating your basic
GroupWise system, it is gathered at this time for later reference.
GroupWise databases can be located on Linux servers, NetWare servers, or Windows servers. In the
Linux mount directory, you will eventually create mount points that have the same names as the
servers that are mounted to those mount points. You will need to do this for each server where a
domain or post office is located that you want to access from ConsoleOne. The following table
illustrates the correspondence between UNC paths and mount points for GroupWise database
locations on Linux, NetWare, and Windows, assuming the typical mount directory of /mnt:
Table 3-1 Correspondence between UNC Paths and Mount Points
Platform GroupWise Domain UNC Path Corresponding Linux Mount Point
Linux \\linux_server\gw_partition\domain_directory /mnt/linux_server/gw_partition
NetWare \\netware_server\gw_volume\domain_directory /mnt/netware_server/gw_volume
Windows \\windows_server\gw_share\domain_directory /mnt/windows_server/gw_share
Installing a Basic GroupWise System 63
Page 64

IMPORTANT: Although NetWare and Windows are not case-sensitive operating systems, the case
of characters in pathnames becomes significant when the directory structure is mounted to a Linux
machine.
1 In the Linux Mount Directory dialog box, browse to and select the Linux mount directory, then
click OK.
/mnt
The typical Linux mount directory is
.
In the future, you and other GroupWise administrators might have different mount points
depending on the workstation or server where ConsoleOne runs. To change the mount directory
later in ConsoleOne, click Tools > GroupWise System Operations > System Preferences >
Linux Settings. The mount directory information is stored in a user-specific preferences file
.consoleone/SnapinPrefs.ser
(
in each GroupWise administrator’s home directory).
2 Continue with Using ConsoleOne to Create Your Basic GroupWise System.
novdocx (en) 22 June 2009
Using ConsoleOne to Create Your Basic GroupWise System
ConsoleOne automatically attempts to authenticate to an eDirectory tree when it starts.
1 Fill in the following fields, then click Login to start ConsoleOne:
If the Login dialog box does not appear automatically, select the NDS
®
object, then click File
> Authenticate.
Login Name: Provide a Novell eDirectory username that has rights to create eDirectory
objects.
Password: Provide the password for the username.
Tree: Type or select the eDirectory tree where you want to create GroupWise objects.
If the eDirectory tree is located on a Windows server, you might need to specify the IP address
of the server instead of the tree name.
64 GroupWise 7 Installation Guide
Page 65

Context: Provide the full context of the User object associated with the username you
provided.
2 Under the NDS object, select the tree where you want to create the GroupWise system, then
click Tools > GroupWise Utilities > New System.
novdocx (en) 22 June 2009
3 Follow the prompts to provide the GroupWise system and domain information from your Basic
GroupWise System Worksheet.
Item 3: Software Distribution Directory
Item 5: Tree Name
Item 6: System Name
Item 7: Domain Name
Item 8: Domain Directory
Item 9 Domain Context
Item 10: Domain Language
Item 11: Domain Time Zone
4 Follow the prompts to provide the GroupWise post office information from your Basic
GroupWise System Worksheet.
Item 12: Post Office Name
Item 13: Post Office Directory
Item 14: Post Office Context
Item 15: Post Office Language
Item 16: Post Office Time Zone
5 Follow the prompts to provide information about how to link the domain and the post office
from your Basic GroupWise System Worksheet.
Item 17: Post Office Link
Item 18: POA Network Address
Item 19: MTA Network Address
When you have provided the system, domain, post office, and link information for your
GroupWise system, you are ready to create users. However, adding users at this point is
optional. After the Setup Advisor has finished, you can add users to the post office at any time
by using ConsoleOne.
Installing a Basic GroupWise System 65
Page 66

6 Add any users that you listed on your Basic GroupWise System Worksheet, then click Next.
The Setup Advisor summarizes your overall progress.
novdocx (en) 22 June 2009
7 Click Next to display a summary of the system, domain, post office, and link information you
entered.
66 GroupWise 7 Installation Guide
Page 67

After you have verified that the information you entered is correct, you are ready for the Setup
Advisor to create your GroupWise system.
8 Click Next to create your GroupWise system.
The Setup Advisor summarizes your overall progress.
novdocx (en) 22 June 2009
9 Click Next to install the MTA and POA software.
10 Continue with Installing and Starting the Linux GroupWise Agents.
Installing and Starting the Linux GroupWise Agents
At this point, the Setup Advisor has created eDirectory objects and network server directories
associated with your GroupWise system. You now need to install and start the MTA and POA on
your Linux server.
“Installing the Linux Agents” on page 67
“Starting the Linux Agents with a User Interface” on page 68
Installing the Linux Agents
The Setup Advisor starts the Agent Configuration program for you.
Installing a Basic GroupWise System 67
Page 68

Figure 3-15 Introduction Page
1 Review the Introduction, then click Next.
2 Accept the License Agreement, then click Next.
On the Configuration Complete page, Launch GroupWise Agents on System Startup is selected
by default.
novdocx (en) 22 June 2009
IMPORTANT: If you want to configure the agents for high availability, as described in
“Enabling the High Availability Service for the Linux GroupWise Agents” on page 185, they
must be configured to start automatically on system startup.
3 If you do not want the agents to start automatically when the server restarts, deselect Launch
GroupWise Agents on System Startup.
4 Click Exit to complete the configuration.
5 Continue with Starting the Linux Agents with a User Interface.
Starting the Linux Agents with a User Interface
1 In a terminal window, become
sux
The
command enables the X Window System, which is required for running GUI
root
by entering
sux
and the
root
password.
GroupWise agent server consoles.
2 Change to the GroupWise agent bin directory.
cd /opt/novell/groupwise/agents/bin
3 Use one of the following commands to start the MTA:
Syntax:
./gwmta --show --home domain_directory &
./gwmta --show @domain.mta
Example:
./gwmta --show --home /gwsystem/domlnx &
./gwmta --show @provo.mta
The --show startup switch starts the MTA with a server console interface similar to that
provided for the NetWare and Windows MTAs. This user interface requires that the X Window
System and Open Motif be running on the Linux server.
The --home startup switch specifies the domain directory and is required to start the MTA.
68 GroupWise 7 Installation Guide
Page 69

The @domain.mta startup switch specifies the MTA startup files, which contains the --home
startup switch.
The ampersand (&) causes the MTA to run in the background, so that the terminal window you
started it in is again available for use.
novdocx (en) 22 June 2009
The status messages displayed on the MTA server console are also written to the MTA log file
mmddmta.nnn
(
) in the
/var/log/novell/groupwise/domain.mta
directory. The log file
name includes the month and day when it was created, along with an incrementing extension to
accommodate multiple log files on the same day.
In ConsoleOne, you can see that the domain database has been updated by the MTA because
the Version field on the Identification page of the Domain object shows 7 when the database
update is complete.
4 Wait until the domain has been updated before you start the POA.
5 Use the following command to start the POA:
Syntax:
./gwpoa --show --home post_office_directory &
./gwpoa --show @post_office.poa
Example:
./gwpoa --show --home /gwsystem/polnx &
./gwpoa --show --home /gwsystem/polnx &
Installing a Basic GroupWise System 69
Page 70

The status messages displayed on the POA server console are also written to the POA log file
mmddpoa.nnn
(
) in the
/var/log/novell/groupwise/post_office.poa
directory. The log
file name includes the month and day when it was created, along with an incrementing
extension to accommodate multiple log files on the same day.
novdocx (en) 22 June 2009
In ConsoleOne, you can see that the post office database has been updated by the POA because
the Version field on the Identification page of the Post Office object shows 7 when the database
update is complete.
After the post office database has been updated, you can install the GroupWise Cross-Platform
client and connect to the post office.
6 If you want to finish setting up your basic GroupWise system, continue with Setting Up and
Running the GroupWise Cross-Platform Client on Your Local Machine.
or
If you want to learn more about managing the GroupWise agents on Linux, skip to the
following sections in Chapter 7, “Installing GroupWise Agents,” on page 159:
“Starting the Linux GroupWise Agents as Daemons” on page 180
“Monitoring the Linux GroupWise Agents from Your Web Browser” on page 181
“Starting the Linux GroupWise Agents on System Startup” on page 182
“Running the Linux GroupWise Agents as a Non-root User” on page 182
“Enabling the High Availability Service for the Linux GroupWise Agents” on page 185
“Stopping the Linux GroupWise Agents” on page 189
Setting Up and Running the GroupWise Cross-Platform Client on Your Local
Machine
The Create or Update a GroupWise System option in the GroupWise Installation program does not
include installation of the GroupWise Cross-Platform client. Therefore, you have to install it
separately.
1 On the GroupWise Installation program main page, click Install Products > Install GroupWise
Client.
70 GroupWise 7 Installation Guide
Page 71

2 When the Cross-Platform client files have been copied, click OK.
To start the Cross-Platform client, click its icon on your desktop.
3 Specify your GroupWise user ID, password, and the required information about the server
where the POA is running (worksheet item 18), then click OK.
4 Get started with the GroupWise Cross-Platform client by completing the following tasks:
Setting A Mailbox Password: After you are logged in and using GroupWise, one of the
first things you should do is set a password on your mailbox so that other users cannot
access it. For information about setting a password, see Help in the GroupWise client.
Sending Messages and Scheduling Appointments: You can send messages to or
schedule appointments with any users that you have added to the post office. To test your
system, you might want to send a message to yourself. As soon as users set up the
GroupWise clients on their workstations, as described in Section 8.4, “Setting Up the
GroupWise Client,” on page 204, they will also be able to send messages and schedule
appointments.
5 Continue with Installing the GroupWise Administrator Snap-Ins to Additional Linux
Machines.
novdocx (en) 22 June 2009
or
If you have installed all the administrative software you need, skip to Section 3.4, “What’s
Next,” on page 72.
Installing the GroupWise Administrator Snap-Ins to Additional Linux Machines
As part of creating your basic GroupWise system, the GroupWise Administrator snap-ins to
ConsoleOne were installed under
/usr/ConsoleOne
of the server where you ran the GroupWise
Installation program. If ConsoleOne is installed in multiple locations and if you want to be able to
administer GroupWise from those locations, you need to install the GroupWise snap-ins to each
ConsoleOne installation.
1 Go to the Linux machine where you want to install the GroupWise snap-ins to ConsoleOne.
root
2 Make sure you are logged in as
and have network access to the software distribution
directory (or GroupWise 7 Administrator for Linux CD) and the domain directory.
3 Start the GroupWise Installation program (install at the root of the software distribution
directory or the CD), then click Install Products > GroupWise Administration > Install
Administration.
4 When the installation is complete, click OK, then click Configure GroupWise Administration.
5 Accept the License Agreement, then follow the prompts to provide the necessary information.
Installing a Basic GroupWise System 71
Page 72

6 Repeat Step 1 through Step 5 for each location where you want to install the GroupWise snap-
ins.
7 Continue with What’s Next.
3.4 What’s Next
After you have set up your basic GroupWise system, you can expand the system by:
Setting up access to the Internet through the GroupWise Internet Agent. See Chapter 4,
“Installing the GroupWise Internet Agent,” on page 79.
Setting up GroupWise WebAccess so that users can access their mailboxes through a Web
browser on a computer or mobile device such as a telephone. See Chapter 5, “Installing
GroupWise WebAccess,” on page 103.
Setting up GroupWise Monitor to monitor your GroupWise agents. See Chapter 6, “Installing
GroupWise Monitor,” on page 137.
Installing the MTA or POA on a different server than the one you installed to during the basic
system setup. See Chapter 7, “Installing GroupWise Agents,” on page 159.
Setting up users to run the GroupWise client on their workstations. See Chapter 8, “Installing
the GroupWise Windows and Cross-Platform Clients,” on page 201.
Setting up Microsoft Outlook users to access GroupWise mailboxes. See Chapter 9, “Installing
the GroupWise Connector for Microsoft Outlook,” on page 209.
novdocx (en) 22 June 2009
Setting up synchronization between users’ GroupWise mailboxes and their mobile devices. See
Chapter 10, “Installing the GroupWise Mobile Server,” on page 211.
Setting up users with instant messaging capabilities. See Chapter 11, “Installing GroupWise
Messenger,” on page 213.
After your GroupWise system is fully installed, you can refer to sections of the GroupWise 7
Administration Guide (http://www.novell.com/documentation/gw7) as you maintain your
GroupWise system by:
Adding more users to the post office. See “Users”.
Defining resources that users can schedule. See “Resources”.
Defining groups of users that GroupWise users can select when addressing messages. See
“Distribution Lists, Groups, and Organizational Roles”.
Changing the GroupWise client from Online mode to Caching mode so that users’ messages
are stored on a local drive as well as in the post office. See “Client”.
Setting up GroupWise Remote so that Windows client users can access their mailboxes from a
computer that is not directly connected to your network. See “Client”.
Controlling the functionality of users’ GroupWise client software. See “Client”.
Configuring your current post office’s library or setting up additional libraries. See “Libraries
and Documents”.
Adding additional post offices to the domain. See “Post Offices”.
Adding additional domains to the system. See “Domains”.
72 GroupWise 7 Installation Guide
Page 73

Configuring the Post Office Agent (POA) and Message Transfer Agent (MTA) to support
secure connections (SSL). See “Post Office Agent” and “Message Transfer Agent”.
Connecting to other GroupWise 5.x, 6.x, or 7.x systems. See the GroupWise 7 Multi-System
Administration Guide (http://www.novell.com/documentation/gw7).
3.5 Basic GroupWise System Worksheet
The GroupWise Installation Advisor helps you install the GroupWise software. It then launches the
GroupWise Setup Advisor, which helps you set up your first domain and post office. The Advisors
prompt you for the information in this worksheet. You should print the worksheet and carefully fill
in the information for your system.
Item Explanation
1) Select Languages: Specify the languages to install for the GroupWise
Administrator snap-ins to ConsoleOne, the GroupWise
agents, and the GroupWise clients.
See “GroupWise Languages” on page 29.
novdocx (en) 22 June 2009
2) ConsoleOne Path:
Windows default:
c:\novell\consoleone\1.2
Linux default:
/usr/ConsoleOne
3) Software Distribution Directory:
NetWare default:
\\server\vol\grpwise\software
Linux default:
/opt/novell/groupwise/software
Windows default:
c:\grpwise\software
4) Select Software:
GroupWise Administration
GroupWise agents
Internet Agent
WebAccess
GroupWise client
Monitor
Specify the path to a ConsoleOne location, either on the local
workstation or on a network server. The GroupWise
Installation Advisor installs the GroupWise Administrator
snap-in files in the specified location.
Your existing ConsoleOne installation must meet the version
requirements listed in Section 2.1, “GroupWise Administration
Requirements,” on page 21
See “ConsoleOne” on page 27.
Specify the directory path for the software distribution
directory. If the directory does not exist, it is created.
The path should be from the perspective of the machine you
plan to use to install GroupWise.
See “GroupWise Software Distribution Directory” on page 28.
Select the software you want copied to the software
distribution directory.
See “GroupWise Software Distribution Directory” on page 28.
Installing a Basic GroupWise System 73
Page 74

Item Explanation
5) Tree Name: Specify the name of the eDirectory tree where your domain
and post office will be created. Because GroupWise
introduces new objects into the tree, the eDirectory schema
must be extended.
See “Novell eDirectory” on page 26.
6) System Name: Specify a one-word name. Names can reflect companies,
locations, and so forth.
See “System and Domain Names” on page 30.
7) Domain Name: Specify a one-word name. Names can reflect locations,
organizations, and so forth.
See “System and Domain Names” on page 30.
8) Domain Directory: Specify the path for the domain directory. If the directory does
not exist, it is created. On NetWare, do not use a directory
name that exceeds 8 characters. On Linux, use lowercase
letters.
novdocx (en) 22 June 2009
The path should be from the perspective of the machine you
plan to use to install GroupWise.
See “Domain Directory” on page 31.
9) Domain Context: Specify the eDirectory context where you want to create the
Domain object. Make sure the context exists before you start
installing GroupWise.
See “Domain Context” on page 32.
10) Domain Language: Specify a language for the domain. The language determines
the sort order for items in the GroupWise Address Book.
See “Domain Language” on page 35.
11) Domain Time Zone: Specify the time zone where the domain is located. The time
zone information is used to ensure that times for messages
sent between time zones are adjusted properly.
See “Domain Time Zone” on page 35.
12) Post Office Name: Specify a one-word name. Names can reflect locations,
organizations, and so forth.
74 GroupWise 7 Installation Guide
See “Post Office Name” on page 35.
Page 75

Item Explanation
13) Post Office Directory: Specify the path for the post office directory. If the directory
does not exist, it is created.
The path should be from the perspective of the machine you
plan to use to install GroupWise.
See “Post Office Directory” on page 36.
14) Post Office Context: Specify the eDirectory context where you want to create the
Post Office object. Make sure the context exists before you
start installing GroupWise.
See “Post Office Context” on page 37.
15) Post Office Language: The post office language defaults to the domain language.
Specify a different language if you do not want the post office
to use the default domain language.
See “Post Office Language” on page 37.
novdocx (en) 22 June 2009
16) Post Office Time Zone: The post office time zone defaults to the domain time zone.
Specify a different time zone if the post office is not in the
same time zone as the domain.
See “Post Office Time Zone” on page 38.
17) Post Office Link:
TCP/IP link
Direct link
Select whether you want the MTA to link to the post office
through a TCP/IP connection to the POA or a direct
connection to the post office directory.
See “MTA Link to the Post Office” on page 41.
If you mark Direct Link, skip to worksheet item 20.
Installing a Basic GroupWise System 75
Page 76

Item Explanation
novdocx (en) 22 June 2009
18) POA Network Address:
IP address or DNS hostname:
Client/Server port:
(default = 1677)
Message transfer port:
(default = 7101)
HTTP port:
(default = 7181)
19) MTA Network Address:
IP address or
DNS hostname:
Message transfer port:
(default = 7100)
HTTP port:
(default = 7180)
This item applies only if you selected TCP/IP as the post office
link type (worksheet item 17).
Specify the IP address or DNS hostname of the POA’s server.
By default, the POA listens for the GroupWise client on Client/
Server port 1677. If this port is already being used, specify a
different C/S port number (for example, 1678).
If the MTA and POA are communicating using TCP/IP, the
POA listens for the MTA on Message Transfer port 7101 by
default. If this port is already being used, specify a different
MT port number (for example, 7111).
By default, the POA uses HTTP port 7181 for its Web
console. The Web console enables you to view POA
information through a Web browser. If this port is already
being used, specify a different HTTP port number (for
example, 7183).
See “MTA Link to the Post Office” on page 41.
This item applies only if you selected TCP/IP as the post office
link type (worksheet item 17).
Specify the IP address or DNS hostname of the server
running the Message Transfer Agent.
By default, the MTA listens for the POA on Message Transfer
port 7100. If this port is already being used, specify a different
MT port number (for example, 7103).
By default, the MTA uses HTTP port 7180 for its Web
console. The Web console enables you to view MTA
information through a Web browser. If this port is already
being used, specify a different HTTP port number (for
example, 7182).
See “MTA Link to the Post Office” on page 41.
20) Post Office Users: Specify the users who will have mailboxes in the post office.
The Setup Advisor lets you browse the eDirectory tree to
select the users you want.
Adding users at this point is optional. After the Setup Advisor
has finished, you can add users to the post office at any time
by using ConsoleOne.
See “Post Office Users” on page 38.
21) Agent Platform:
Specify the platform (NetWare, Linux, or Windows) where you
want to run the GroupWise agents.
NetWare
Linux
See “Agent Platform” on page 39.
Windows
76 GroupWise 7 Installation Guide
Page 77

Item Explanation
novdocx (en) 22 June 2009
22) Installation Path:
NetWare default:
\\server1\sys\system
Linux default:
/opt/novell/groupwise/agents
Windows default:
c:\grpwise
23) Windows Installation Options:
Install GroupWise agent software:
Yes | N o
Install and configure SNMP for
GroupWise Agents:
Yes | N o
Install as Windows services:
Yes | N o
Specify the path to the directory where you want to install the
agents.
We recommend that you install the NetWare agents to the
sys:\system directory to simplify the use of startup files and
ensure that dependent NLM programs load properly.
The Linux agents are automatically installed into /opt/novell/
groupwise/agents.
You can install the Windows agents to any directory on the
Windows server. Because the installation is done from the
Windows server, the default is c:\grpwise.
See “Agent Location” on page 39.
This item applies only if you are installing the Windows
agents.
Specify the installation options you want to use.
The Install GroupWise Agent Software option needs to be
selected to install the files.
The Install and Configure SNMP for GroupWise Agents option
requires the SNMP service to already be enabled on the
Windows server. If SNMP is not enabled, this option is dim in
the Installation Advisor.
The Install as Windows Services option configures the agents
as Windows services.
See “Windows Installation Option: Application vs. Service” on
page 42.
24) Language: Specify the language in which you want to be able to run the
agents.
See “Agent Language” on page 42.
25) Windows Service Information:
This item applies only if you are installing the Windows agents
as Windows services.
Use local system account
Use a user account
Startup:
Automatic | Manual
Select whether you want the services to use the local system
account or another user account. If the domain and post office
directories are on the same Windows server as the agents,
you can use the local system account. If the domain and post
office directories are on a different server, specify a different
user account that exists in eDirectory and has rights to the
domain and post office directories.
Select whether you want to manually start the services or
have them start automatically when the server starts.
See “Windows Installation Option: Application vs. Service” on
page 42.
Installing a Basic GroupWise System 77
Page 78

novdocx (en) 22 June 2009
78 GroupWise 7 Installation Guide
Page 79

4
Installing the GroupWise Internet
novdocx (en) 22 June 2009
Agent
The Novell® GroupWise® Internet Agent enables you to send and receive messages over the
Internet. The following sections provide information to help you successfully install the Internet
Agent in your existing GroupWise system.
Section 4.1, “GroupWise Internet Agent Overview,” on page 79
Section 4.2, “Internet Agent System Requirements,” on page 83
Section 4.3, “Planning the GroupWise Internet Agent,” on page 84
Section 4.4, “Setting Up the Internet Agent,” on page 91
Section 4.5, “What’s Next,” on page 100
Section 4.6, “GroupWise Internet Agent Installation Worksheet,” on page 100
After you’ve installed the Internet Agent, there are additional tasks you can perform to optimize and
maintain your GroupWise system. These tasks are discussed under Section 4.5, “What’s Next,” on
page 100.
IMPORTANT: If you plan to install the Internet Agent in a clustered server environment, see the
GroupWise 7 Interoperability Guide (http://www.novell.com/documentation/gw7) before you install
the Internet Agent.
4
4.1 GroupWise Internet Agent Overview
The Internet Agent allows communication between GroupWise users and users of other messaging
systems who send e-mail across the Internet. The Internet Agent picks up inbound e-mail messages
from the Internet, converts them from RFC-822 or MIME format to the GroupWise message format,
and then passes the converted messages to the GroupWise Message Transfer Agent (MTA).
For outgoing messages to the Internet, the GroupWise MTA passes the messages to the Internet
Agent, which then converts the messages to Internet messaging format, and then sends them to the
designated Internet addresses.
Installing the GroupWise Internet Agent
79
Page 80

Figure 4-1 GroupWise Internet Agent Connecting a GroupWise System to the Internet
novdocx (en) 22 June 2009
GWIA
Domain
Internet
Domain
Domain
PO
PO
PO
Domain
PO
PO
PO
PO
Choose from the following list of topics to learn more about the capabilities of the GroupWise
Internet Agent.
“SMTP/MIME Service” on page 81
“POP3 Service” on page 81
“IMAP4 Service” on page 82
“LDAP Services” on page 82
“iCal and iMip Services” on page 82
“Secure Connections via SSL” on page 82
“Access Control” on page 82
“Multiple Threading” on page 82
“SNMP-Compliant” on page 82
“SMP Support (NetWare Only)” on page 83
80 GroupWise 7 Installation Guide
Page 81

SMTP/MIME Service
The SMTP/MIME service in the Internet Agent allows you to send and receive e-mail with standard
encoding on attachments, international character sets, and multipart messages. Multimedia e-mail
with images, sound, and video can also be exchanged. The service also includes these additional
features:
SMTP Dial-Up Service: The Internet Agent includes SMTP dial-up functionality. This can be
useful when your system does not meet the requirements of a dedicated Internet connection, or
when you prefer not to have a permanent Internet connection. With the SMTP dial-up feature,
you can establish a schedule to periodically check the message store without maintaining a
permanent link.
Flexible Addressing: The Internet Agent offers full GroupWise addressing support, including
system groups, nicknames, and individual users.
The Internet Agent also takes advantage of GroupWise Internet addressing, which allows
inbound messages addressed in a variety of formats to be delivered to GW users. These formats
include:
UserID@Internet_domain_name
UserID.PostOffice@Internet_domain_name
Last_Name.First_Name@Internet_domain_name
First_Name.Last_Name@Internet_domain_name
First_Initial_Last_Name@Internet_domain_name
Internet Users in the Address Book: Internet users can be added to the GroupWise Address
Book so users won’t have to remember long Internet addresses.
Real-Time Blacklists: Many organizations, such as Mail Abuse Prevention System (MAPS*),
Open Relay DataBase (ORDB), and SpamCop*, provide lists of IP addresses that are known to
be open relay hosts or spam hosts. You can use the real-time blacklists provided by these sites
to protect your users from offensive spam.
novdocx (en) 22 June 2009
Spam Protection: Anti-spam services use different indicators to mark potential spam. One
might use a string of asterisks; the more asterisks, the greater the likelihood that the message is
spam. Another might use a numerical value; the higher the number, the greater the likelihood
that the message is spam. You can configure the Internet Agent to recognize as spam whatever
indicators your anti-spam service uses and flag such messages for processing by the client Junk
Mail Handling feature.
Accounting: The accounting feature provides inbound and outbound tracking of messages
passing through Internet Agent. This lets administrators track how the Internet Agent is being
used. GroupWise Monitor includes a Gateway Accounting report that organizes information
gathered in Internet Agent accounting files into a format that is visually easy to read.
DNS Name Resolution: The Internet Agent can access a DNS server directly to resolve host
names to IP addresses, or it can rely on a relay host to perform the name resolution.
Connect to Other GroupWise Systems Through the Internet: Using passthrough
addressing, you can connect to other GroupWise systems anywhere on the Internet and have
access to all of the GroupWise features. The Internet simply becomes a mail transport medium
for GroupWise.
POP3 Service
The POP3 service in the Internet Agent allows you to download messages from your GroupWise
post office to a POP3 client application such as a Web browser’s e-mail program or a Telnet
application. The Internet Agent acts as the POP3 server, providing a TCP connection between the
Installing the GroupWise Internet Agent 81
Page 82

user’s GroupWise post office and a POP3 client. Accessing the GroupWise post office via the
Internet Agent’s POP3 server capability, users can retrieve their e-mail messages and manage them
through user ID login options.
IMAP4 Service
The GroupWise Internet Agent supports the Internet Messaging Access Protocol 4 (IMAP4). As an
IMAP4 server, the Internet Agent allows IMAP4-compliant e-mail clients to read and manipulate
GroupWise messages.
LDAP Services
The Internet Agent supports the Lightweight Directory Access Protocol (LDAP) directory standard
with LDAP server capability that allows access for directory searches of GroupWise post offices.
Using LDAP Public Access, Internet mail clients can do lookups on GroupWise users and address
information.
iCal and iMip Services
The Internet Agent supports iCalendar (iCal), the Internet Calendaring and Scheduling core object
specification (RFC 2445), and iMIP, the iCalendar Message-based Interoperability Protocol (RFC
2447). When a GroupWise user sends an appointment to an external Internet user, the Internet agent
converts the appointment into an iMIP message that can be read and accepted or declined in
compatible e-mail systems such as Microsoft Exchange and Lotus Notes. GroupWise users can also
receive and accept or decline appointments from users of these e-mail systems. Accept/decline
notifications are also exchanged between systems.
novdocx (en) 22 June 2009
Secure Connections via SSL
The Internet Agent supports the use of SSL for its connections to SMTP hosts, POP3 clients, IMAP4
clients, and Internet Agent Web console.
Access Control
The Internet Agent program includes security capabilities called Access Control that allow
administrators to control user access to all services (SMTP/MIME, LDAP, POP3, and IMAP4).
Access Control can help you reduce costs and provide added security.
With the SMTP/MIME service, Access Control can be used to block messages being sent to or
received from specific host or IP addresses.
Multiple Threading
Multiple threading allows more than one send or receive process to be running concurrently. You
can configure the number of threads to enhance the speed and performance of the Internet Agent.
The number of thread switches are set separately for the SMTP/MIME service, POP3 service,
IMAP4 service, and LDAP service.
SNMP-Compliant
The Internet Agent can be managed by any SNMP-compliant network manager, such as the alarm
®
management features of Novell ZENworks
Server Management.
82 GroupWise 7 Installation Guide
Page 83

SMP Support (NetWare Only)
The NetWare Internet Agent supports Symmetric Multi-Processing (SMP), letting it take advantage
of a server with multiple processors.
4.2 Internet Agent System Requirements
The following sections define the Internet Agent’s requirements:
Section 4.2.1, “Network Server Requirements,” on page 83
Section 4.2.2, “GroupWise System Requirements,” on page 84
Section 4.2.3, “Internet Connectivity Requirements,” on page 84
4.2.1 Network Server Requirements
The network server where you install the Internet Agent must meet the following requirements:
32-bit/x86 processor or 64-bit/x86 processor
Any of the following server operating systems for the GroupWise agents (Post Office Agent,
Message Transfer Agent, Internet Agent, WebAccess Agent, Monitor Agent):
novdocx (en) 22 June 2009
Novell Open Enterprise Server 1 or Open Enterprise Server 2 (NetWare or Linux version),
plus the latest Support Pack
NetWare 5.1, NetWare 6.0, or NetWare 6.5, plus the latest Support Pack for your version
of NetWare
Domains and post offices can be located on NetWare 3.12 and NetWare 4.2 servers,
although the agents cannot run there. The Monitor Agent is not available for NetWare.
SUSE
®
Linux Enterprise Server 9 or SUSE Linux Enterprise Server 10, plus the latest
Support Pack
The X Window System is required by the GUI Installation Advisor and Setup Advisor that
step you through the process of creating a new GroupWise system. A text-based
Installation program is also available.
The X Window System and Open Motif are required by the GUI GroupWise agent server
consoles. By default, the agents run as daemons without user interfaces.
Windows Server 2000 or Windows Server 2003, plus the latest Service Pack for your
version of Windows
Adequate server memory as required by the operating system
Adequate server disk space:
17 MB for the Internet Agent program files.
200 MB minimum for message file processing. The actual amount will be determined by
the number and size of message files being processed at one time by the Internet Agent.
Adequate RAM
12 MB. This is the amount of memory the Internet Agent needs to operate. It does not
include memory for the operating system or for TCP/IP connectivity. This amount can
increase depending on message size and complexity.
Installing the GroupWise Internet Agent 83
Page 84

4.2.2 GroupWise System Requirements
The GroupWise system in which you install the Internet Agent must meet the following
requirements:
The domain’s version must be equal to or later than the Internet Agent’s version. The domain’s
version is determined by the Message Transfer Agent (MTA) version running for it.
The versions of any post offices that the Internet Agent will access on behalf of POP3 or
IMAP4 clients must be equal to or later than the Internet Agent’s version. A post office’s
version is determined by the Post Office Agent (POA) version running against it.
4.2.3 Internet Connectivity Requirements
Before you install the Internet Agent, you need to ensure that your network is configured for Internet
connectivity.
Internet Connection: You can connect to the Internet using a direct connection over a leased
line or a standard switched telephone line.
Internet Domain Name: You must have an Internet domain name. The domain name must be
defined by an MX RR (mail exchanger resource record) in DNS.
DNS Server Access or Relay Host Access: If you want the Internet Agent to send messages
directly to other SMTP hosts, it requires access to a DNS server for address resolution.
Otherwise, it requires access to a relay host that can perform the address resolution and
message routing. Make sure the server where you plan to install the Internet Agent is
configured to access a DNS server or can access your relay host. For specific details, refer to
your server documentation.
IP Address: The Internet Agent’s server requires a static IP address and a fully qualified
hostname.
novdocx (en) 22 June 2009
4.3 Planning the GroupWise Internet Agent
Use Section 4.6, “GroupWise Internet Agent Installation Worksheet,” on page 100 to record your
decisions about how to install the Internet Agent as you review the following considerations:
Section 4.3.1, “Selecting the Internet Agent Platform,” on page 85
Section 4.3.2, “Gathering Server Information,” on page 85
Section 4.3.3, “Selecting the Internet Agent Installation Directory,” on page 86
Section 4.3.4, “Gathering Domain and Gateway Information,” on page 86
Section 4.3.5, “Selecting the Gateway Object Name,” on page 87
Section 4.3.6, “Specifying the Internet Mail Domain Name for Your GroupWise System,” on
page 87
Section 4.3.7, “Handling Outbound Mail,” on page 87
Section 4.3.8, “Enabling the Internet Agent Web Console,” on page 88
Section 4.3.9, “NetWare Installation Options: Automatic Startup and Clustering,” on page 88
84 GroupWise 7 Installation Guide
Page 85

Section 4.3.10, “Linux Installation Options: LDAP Information and Clustering,” on page 89
Section 4.3.11, “Windows Installation Options: Service vs. Application and SNMP Traps,” on
page 90
To help with the above tasks, you can also review the GroupWise Wiki (http://wiki.novell.com/
index.php/GroupWise), which includes a Best Practices section.
IMPORTANT: If you plan to install the Internet Agent in a clustered server environment, refer to
the GroupWise 7 Interoperability Guide (http://www.novell.com/documentation/gw7) as you plan
your Internet Agent installation.
4.3.1 Selecting the Internet Agent Platform
The Internet Agent is available as a NetWare NLMTM program, a Linux executable, and a Windows
executable.
GROUPWISE INTERNET AGENT INSTALLATION WORKSHEET
novdocx (en) 22 June 2009
Under Item 1: Software Platform, mark whether you plan to install the Internet Agent on NetWare, Linux,
or Windows. Review Section 4.2, “Internet Agent System Requirements,” on page 83 to ensure that the
specific server you have selected meets the listed requirements.
4.3.2 Gathering Server Information
Prior to GroupWise 7, the Internet Agent and the MTA communicated by transferring message files
through message queue directories, as shown in diagrams in GroupWise 7 Troubleshooting 3:
Message Flow and Directory Structure (http://www.novell.com/documentation/gw7):
“Mapped/UNC Link: Outbound Transfer to the Internet Successful”
“Mapped/UNC Link: Inbound Transfer from the Internet Successful”
Starting in GroupWise 7, you can configure the Internet Agent so that it uses TCP/IP to
communicate with the MTA, instead of message files, as shown in these additional diagrams:
“TCP/IP Link: Outbound Transfer to the Internet Successful”
“TCP/IP Link: Inbound Transfer from the Internet Successful”
The Internet Agent Installation program needs to know the network address of the server where the
Internet Agent will run. For best performance, install the Internet Agent on the same server with the
domain it belongs to. In this configuration, in a GroupWise system with a single Internet Agent,
UNC links between the Internet Agent and the MTA are sufficient. Therefore, the Internet Agent
Installation program displays a default port number of 0 (zero), indicating that TCP/IP will not be
used.
In a larger GroupWise system with multiple Internet Agents, you can configure the Internet Agent to
communicate with the MTA by way of TCP/IP. This configuration enables you to designate an
alternate Internet Agent for the domain. With this configuration, if the domain’s primary Internet
Agent goes down, the MTA can fail over to another Internet Agent in your GroupWise system until
the primary Internet Agent is up and running again. This feature is especially useful in larger
GroupWise systems where multiple Internet Agents handle a large number of Internet messages.
Installing the GroupWise Internet Agent 85
Page 86

If you want to enable TCP/IP communication between the Internet Agent and the MTA, use a port
number of 7102 or any other available port number. If you do not want to enable TCP/IP
communication, use 0 (zero) as the port number.
GROUPWISE INTERNET AGENT INSTALLATION WORKSHEET
Under Item 3: Server Information, list the IP address and DNS hostname of the server where you plan to
install the Internet Agent. Also, specify the port number for TCP/IP communication if you want to enable
it.
4.3.3 Selecting the Internet Agent Installation Directory
You should install the Internet Agent on the same server where the domain directory is located. The
Internet Agent installation directory depends on the platform where you are installing it.
Consider these platform-specific guidelines:
novdocx (en) 22 June 2009
NetWare: When installing the NetWare Internet Agent, we recommend you use the
directory on the NetWare server. This simplifies access to the Internet Agent configuration
file and ensures that the NLM program is in the server’s search path. If you use a different
directory, you must add that directory to the server’s search path.
Linux: The Linux Internet Agent is automatically installed to
agents
Windows: The default installation directory is
Internet Agent to any directory you want.
GROUPWISE INTERNET AGENT INSTALLATION WORKSHEET
Under Item 2: Installation Options, record the directory where you want to install the Internet Agent
software.
.
c:\grpwise\gwia
/opt/novell/groupwise/
. However, you can install the
sys:\system
4.3.4 Gathering Domain and Gateway Information
The Internet Agent requires a GroupWise gateway directory in which to store configuration
information and work files. The gateway directory must be located under a GroupWise domain
gwia
directory. The default directory name is
specific conventions:
. If you change the name, use the following platform-
NetWare: Use a maximum of 8 characters
Linux: Use only lowercase characters
Windows: No limitations.
After you specify the domain directory location and a gateway directory name, the Internet Agent
Installation program creates the gateway directory under the
example,
provo\wpgate\gwia
86 GroupWise 7 Installation Guide
domain\wpgate
directory (for
).
Page 87

GROUPWISE INTERNET AGENT INSTALLATION WORKSHEET
Under Item 6: GroupWise Domain, specify the domain name and the full path to the domain directory
where you want to create the gateway directory, then give the gateway directory a name.
TM
If you are installing the Linux Internet Agent, record the eDirectory
example,
cn=provo3,ou=groupwise,o=corporate
).
context of the Domain object (for
4.3.5 Selecting the Gateway Object Name
The Internet Agent also requires a GroupWise Gateway object in Novell eDirectory. By default, it is
named the same as the gateway directory and is referred to as the Internet Agent object. This object
stores the Internet Agent’s information and enables configuration of the agent through
ConsoleOne
The Internet Agent’s object is created below the Domain object. If you have multiple domains, the
Installation Advisor uses the Domain object associated with the domain directory where you are
creating the Internet Agent’s gateway directory.
®
.
novdocx (en) 22 June 2009
GROUPWISE INTERNET AGENT INSTALLATION WORKSHEET
Under Item 6: GroupWise Internet Agent Name, specify the name you want to give the Internet Agent’s
object. The default name is the same as the gateway directory name you chose under Item 5.
4.3.6 Specifying the Internet Mail Domain Name for Your GroupWise System
When e-mail users across the Internet address messages to GroupWise users, the address includes
the Internet mail domain for your GroupWise system (for example, novell.com). Typically, the
Internet mail domain name for your GroupWise system is the name of your company, with its
accompanying domain type (.com, .edu, and so on).
GROUPWISE INTERNET AGENT INSTALLATION WORKSHEET
Under Item 8: Internet Mail Domain Name, specify the name you want your GroupWise system to be
known by across the Internet.
4.3.7 Handling Outbound Mail
If the Internet Agent is connected to the Internet and is able to perform DNS name resolution, it can
send messages from GroupWise users directly across the Internet to Internet users. However, you
might prefer to keep the Internet Agent behind your firewall. To accomplish this, you can configure
the Internet Agent to route all outbound messages to a relay host.
GROUPWISE INTERNET AGENT INSTALLATION WORKSHEET
Under Item 5: Relay Host, mark how you want to handle outbound mail. If you plan to use a relay host,
specify the IP address of the relay host.
Installing the GroupWise Internet Agent 87
Page 88

4.3.8 Enabling the Internet Agent Web Console
The Internet Agent server console enables you to monitor the Internet Agent from the server where
it is running. If you want, you can enable the Internet Agent Web console. The Web console lets you
view the Internet Agent’s statistical and diagnostic information through a Web browser, which is
useful if want to see the Internet Agent’s activity without physically visiting the agent’s server.
You access the Web console by entering the Internet Agent’s network address and HTTP port
number in a Web browser (for example,
http://172.16.5.18:7211
change the Internet Agent’s default HTTP port number (9850).
If you want to restrict access to the Web console, you can assign a username and password. This can
be any username and password you want. By default, the username and password are passed through
an unsecure connection between the Web browser and the Internet Agent. Therefore, we
recommend that you do not use an existing eDirectory username and password unless you secure
this connection using SSL. For information about securing the Internet Agent’s connections, see
“Internet Agent” in the GroupWise 7 Administration Guide (http://www.novell.com/documentation/
gw7).
). If necessary, you can
novdocx (en) 22 June 2009
GROUPWISE INTERNET AGENT INSTALLATION WORKSHEET
Under Item 4: Web Console Information, select Yes if you want to enable the Internet Agent Web
console. If you want to restrict access to the Web console, enter a username and password.
4.3.9 NetWare Installation Options: Automatic Startup and Clustering
When you install the NetWare Internet Agent, the following options specific to NetWare are
available in the Internet Agent Installation program:
“Automatic Startup” on page 88
“Novell Cluster Services” on page 88
Automatic Startup
You can have the Internet Agent Installation program add a reference to the
NetWare server’s
autoexec.ncf
file so that the Internet Agent is automatically loaded whenever
the server is started.
GROUPWISE INTERNET AGENT INSTALLATION WORKSHEET
Under Item 2: Installation Options, mark whether or not you want to configure the NetWare server to start
the Internet Agent automatically.
gwia.ncf
file in the
Novell Cluster Services
Novell Cluster Services
manageability of critical network resources including volumes (where GroupWise domains reside)
and applications (such as the Internet Agent). Novell Cluster Services supports failover, failback,
and migration of individually managed cluster resources.
88 GroupWise 7 Installation Guide
TM
is a server clustering system that ensures high availability and
Page 89

The NetWare Internet Agent can be configured to take advantage of the fault-tolerant environment
provided by Novell Cluster Services if the following requirements are met:
The domain where the Internet Agent is installed has already been created on a shared NSS
volume in the cluster.
The NetWare Internet Agent is being installed to a server that is part of the same cluster.
When the Internet Agent is configured for clustering, its startup file is configured with shared
volume names rather than specific server names.
GROUPWISE INTERNET AGENT INSTALLATION WORKSHEET
Under Item 2: Installation Options, mark whether or not you want to configure the NetWare Internet
Agent for clustering. If you do, follow the installation instructions in “Implementing the Internet Agent in a
NetWare Cluster” or “Implementing the Internet Agent in a Linux Cluster” in the GroupWise 7
Interoperability Guide (http://www.novell.com/documentation/gw7), rather than the installation
instructions in this guide.
4.3.10 Linux Installation Options: LDAP Information and Clustering
novdocx (en) 22 June 2009
When you install the Linux Internet Agent, the following Linux-specific options are available in the
Internet Agent Installation program:
“LDAP Information” on page 89
“Clustering Alternatives on Linux” on page 90
LDAP Information
The Linux Internet Agent Installation program needs to access eDirectory through LDAP.
eDirectory access is required in order to create the Internet Agent object. To obtain access, the
Installation program needs the IP address and port number of an LDAP server, along with an
eDirectory username and password to log in with. The user must have sufficient rights to create
GroupWise objects in eDirectory. Because the Linux Installation program uses LDAP to access
eDirectory, you must provide the username in LDAP format. For example:
cn=admin,ou=users,o=corporate
If you want to secure the connection to eDirectory with SSL, you can specify a certificate file. For
background information about SSL, see “Encryption and Certificates” in “Security Administration”
in the GroupWise 7 Administration Guide (http://www.novell.com/documentation/gw7).
IMPORTANT: If you do not want to use SSL, the LDAP server must be configured to accept clear
text passwords. This is configured on the server’s LDAP Group object in ConsoleOne by
deselecting Require TLS for Simple Binds with Password. The LDAP snap-in to ConsoleOne is
required in order to change the setting.
GROUPWISE INTERNET AGENT INSTALLATION WORKSHEET
Under Item 9: LDAP Authentication, specify the IP address and port number of an LDAP server, a
username in LDAP format, the password for the username, and if necessary, the full path to your SSL
certificate file.
Installing the GroupWise Internet Agent 89
Page 90

Clustering Alternatives on Linux
On Linux, you can install the Internet Agent in three different clustering environments, as described
in the GroupWise 7 Interoperability Guide (http://www.novell.com/documentation/gw7):
“Novell Cluster Services on Linux”
“Heartbeat on Linux”
If you are using Novell Cluster Services, the Linux GroupWise Installation program provides a
Configure GroupWise for Clustering option that simplifies the process of installing the Linux
Internet Agent on multiple nodes in the cluster.
GROUPWISE INTERNET AGENT INSTALLATION WORKSHEET
Under Item 2: Installation Options, mark whether or not you want to configure the Linux Internet Agent for
clustering using Novell Cluster Services. If you do, follow the installation instructions provided in
“Implementing the Internet Agent in a Linux Cluster” in Novell Cluster Services on Linux in the
GroupWise 7 Interoperability Guide (http://www.novell.com/documentation/gw7), rather than the
installation instructions provided in this guide.
novdocx (en) 22 June 2009
If you are installing the Linux Internet Agent on PolyServe Matrix Server, the Linux GroupWise
Installation program does not assist you with the setup. See the GroupWise 7 Interoperability Guide
(http://www.novell.com/documentation/gw7) for installation instructions.
4.3.11 Windows Installation Options: Service vs. Application and SNMP Traps
When you install the Windows Internet Agent, you have choices about how the Internet Agent
interacts with the Windows operating system.
“Service vs. Application” on page 90
“SNMP Traps” on page 91
Service vs. Application
When you run the Windows Internet Agent as a service, it can start automatically and run without a
user interface, just like any Windows service.
GROUPWISE INTERNET AGENT INSTALLATION WORKSHEET
Under Item 2: Installation Options, mark Install as Windows Service if you want to run the Internet Agent
as a service.
When you run the Windows Internet Agent as a service, it must run under a specific Windows user
account.
When the Internet Agent domain is located on the same server where you are installing the Internet
Agent, the Internet Agent can run under the local system account. Installing the Internet Agent on
the same server with its domain is recommended.
If the Internet Agent domain is located on a remote server, you must specify a user with rights to
access the domain directory.
90 GroupWise 7 Installation Guide
Page 91

Windows If the Windows Internet Agent needs to log in to another Windows server, provide a
Windows username and password.
NetWare: If the Windows Internet Agent needs to log in to a NetWare server, provide an existing
eDirectory username and password, or create a new account for the agents, as described
in “Creating a NetWare Account for Agent Access (Optional)” on page 170.
Linux: Configuring the Windows Internet Agent to log in to a Linux server is not recommended.
GROUPWISE INTERNET AGENT INSTALLATION WORKSHEET
Under Item 10: Windows Service Information, record the account the Internet Agent will run under, and if
necessary, the password for the account.
As with all Windows services, the Windows Internet Agent can be started automatically or manually
as a service each time the Windows server restarts.
GROUPWISE INTERNET AGENT INSTALLATION WORKSHEET
novdocx (en) 22 June 2009
Under Item 10: Windows Service Information, mark how you want the Windows Internet Agent to start
each time the server is restarted.
SNMP Traps
If you want to use an SNMP manager program, such as the Management and Monitoring Services
component of Novell ZENworks Server Management, to monitor the Windows Internet Agent, you
must install some SNMP components along with the Internet Agent software.
GROUPWISE INTERNET AGENT INSTALLATION WORKSHEET
Under Item 2: Installation Options, mark Install and Configure SNMP for GroupWise Agents if you want
to use an SNMP manager program.
If this option is dimmed during installation, the SNMP service has not been enabled on the Windows
server where you are installing the agents. If you want to monitor the agents from an SNMP management
program, the SNMP service must be enabled so you can select this option.
NOTE: The NetWare and Linux Internet Agents rely on operating system components for SNMP
functionality and do not require this installation option.
4.4 Setting Up the Internet Agent
Complete the following tasks to set up the Internet Agent:
Section 4.4.1, “Installing the Internet Agent,” on page 92
Section 4.4.2, “Assigning a Postmaster,” on page 96
Section 4.4.3, “Starting the Internet Agent,” on page 97
Section 4.4.4, “Testing the Internet Agent,” on page 99
Installing the GroupWise Internet Agent 91
Page 92

4.4.1 Installing the Internet Agent
As you install the Internet Agent, you are prompted to supply configuration information. Use
Section 4.6, “GroupWise Internet Agent Installation Worksheet,” on page 100 to understand the
prompts and to record your installation and configuration information.
“NetWare and Windows: Installing the Internet Agent Software” on page 92
“Linux: Installing the Internet Agent Software” on page 94
IMPORTANT: If you plan install the Internet Agent in a clustered server environment, see the
GroupWise 7 Interoperability Guide (http://www.novell.com/documentation/gw7) before you install
the Internet Agent.
NetWare and Windows: Installing the Internet Agent Software
The Internet Agent Installation program does the following:
Installs the Internet Agent software files to the server where the Internet Agent will run and to
the domain directory.
Tests the server you are installing to for correct Internet configuration.
Creates the Internet Agent object in eDirectory.
novdocx (en) 22 June 2009
Configures the Internet Agent startup file (
gwia.cfg
).
To install the Internet Agent:
1 Select an appropriate location to run the Internet Agent Installation program.
NetWare: If you are installing the NetWare Internet Agent, you can run the Installation
program from any Windows machine that meets the administrator machine
requirements listed in Section 2.1, “GroupWise Administration Requirements,” on
page 21.
Windows: If you are installing the Windows Internet Agent, you must run the Installation
program at the Windows server were you want to install the Internet Agent. It must
also meet the administrator machine requirements listed in Section 2.1,
“GroupWise Administration Requirements,” on page 21.
2 Make sure that no other GroupWise agents are running on the server where you want to install
the Internet Agent.
3 Make sure that you have access to the directory where you want to install the Internet Agent
and to the domain directory.
4 Log in to eDirectory with Admin-equivalent rights to the eDirectory tree where you want the
Installation program to create the Internet Agent object.
5 Insert the GroupWise 7 Administrator for NetWare/Windows CD into the CD drive to start the
GroupWise Installation program, then click Install Products > Install GroupWise Internet
Agent. If the Installation program does not start automatically, run
setup.exe
from the root of
the CD.
or
If you have already copied the Internet Agent software to a software distribution directory, run
internet\gwia\install.exe
92 GroupWise 7 Installation Guide
to start the Agent Installation program.
Page 93

6 Follow the prompts, using the following information from the GroupWise Internet Agent
Installation Worksheet.
Item 1: Software Platform
Item 2: Installation Options
Item 3: Server Information
Item 4: Web Console Information
Item 5: Relay Host
Item 6: GroupWise Domain
Item 7: GroupWise Internet Agent Name
Item 8: Internet Mail Domain Name
Item 10: Windows Service Information (Windows only)
novdocx (en) 22 June 2009
7 When the installation is complete, select from the following options:
Options not applicable to the platform where you are installing or to the configuration you
selected are dimmed.
Launch Internet Agent Now: This option starts the Internet Agent immediately.
Launch in Protected Mode: This option starts the NetWare Internet Agent in its own
protected address space.
Installing the GroupWise Internet Agent 93
Page 94

View Internet Agent Configuration Test Results: During the installation process, the
Internet Agent Installation program examined the server where it was installing the Internet
Agent to see if the server was properly configured to connect to the Internet. This option
displays the results of the test and can help you resolve any problems the Installation program
discovered with the Internet connectivity of the server.
Save Task List to a File: This option saves the task lists in the Topic box to a file so you can
complete them later. Typically, the task of assigning a postmaster is listed. You may see other
tasks listed as well.
8 Click Finish, then continue with Section 4.4.2, “Assigning a Postmaster,” on page 96.
Linux: Installing the Internet Agent Software
As you install the Internet Agent, you are prompted to supply configuration information. Use
Section 4.6, “GroupWise Internet Agent Installation Worksheet,” on page 100 to understand the
prompts and to record your installation and configuration information.
“Installing the Internet Agent” on page 94
“Configuring the Internet Agent” on page 95
novdocx (en) 22 June 2009
IMPORTANT: If you plan to install the Internet Agent in a clustered server environment, see the
GroupWise 7 Interoperability Guide (http://www.novell.com/documentation/gw7) before you install
the Internet Agent.
Installing the Internet Agent
1 Make sure that LDAP is running on your eDirectory server and that it is configured to accept
login from the Internet Agent Installation program (worksheet item 8).
The Internet Agent Installation program requires eDirectory access in order to create the
Internet Agent object in eDirectory. The Installation program uses LDAP to gain the required
access.
2 In a terminal window, become
The
sux
command enables the X Window System, which is required for running the GUI
by entering
sux
and the
root
password.
root
GroupWise Installation program. If you are not using the X Window System, you can install
GroupWise components individually, as described in “Installing the GroupWise Agents Using
the Text-Based Installation Program” on page 177.
3 Change to the root of GroupWise 7 Administrator for Linux CD.
4 Start the GroupWise Installation program.
./install
5 Select the language in which you want to run the GroupWise Installation program, then click
OK.
NOTE: On Linux, all available languages are included in the same RPM, so all languages are
always installed.
94 GroupWise 7 Installation Guide
Page 95

6 Click Install Products > GroupWise Internet Agent > Install Internet Agent
7 When the installation is complete, click OK.
novdocx (en) 22 June 2009
The Internet Agent software is installed to
/opt/novell/groupwise/agents
8 Continue with Configuring the Internet Agent.
Configuring the Internet Agent
1 After the Internet Agent files have been installed, click Configure Internet Agent.
The Internet Agent installation and configuration steps are separate so that you can install
updated agent software without repeating the agent configuration steps.
.
2 Follow the prompts, using the following information from the GroupWise Internet Agent
Installation Worksheet in the order listed.
Item 3: Server Information
Item 5: Relay Host
Item 8: Internet Mail Domain Name
Item 6: GroupWise Domain
Installing the GroupWise Internet Agent 95
Page 96

Item 9 LDAP Authentication
Item 7: GroupWise Internet Agent Name
On the Configuration Complete page, Launch Internet Agent on System Startup is selected by
default.
IMPORTANT: If you want to configure the Internet Agent for high availability, as described
in “Enabling the High Availability Service for the Linux GroupWise Agents” on page 185, it
must be configured to start automatically on system startup.
3 If you do not want the Internet Agent to start automatically when the server restarts, deselect
Launch Internet Agent on System Startup.
4 Click Exit to complete the configuration.
5 Continue with Assigning a Postmaster.
4.4.2 Assigning a Postmaster
The Internet requires each site to assign at least one user to be a Postmaster. The Postmaster is
assigned to be the recipient of messages addressed to postmaster@host.
novdocx (en) 22 June 2009
1 In ConsoleOne, right-click the Internet Agent object, the click Properties.
2 Click GroupWise > Gateway Administrators.
3 On the Gateway Administrators page, click Add, select a GroupWise user to be the Postmaster,
then click OK.
4 Select the user from the list, then click Postmaster.
5 Click OK to save the information.
6 Continue with Starting the Internet Agent.
The Internet Agent can also be configured to send problem messages to the Postmaster. For
instructions, see “Determining What to Do with Undeliverable Messages” in “Internet Agent” in the
GroupWise 7 Administration Guide (http://www.novell.com/documentation/gw7).
96 GroupWise 7 Installation Guide
Page 97

4.4.3 Starting the Internet Agent
After you’ve installed the Internet Agent and configured a Postmaster, you can start the Internet
Agent.
“NetWare: Starting the Internet Agent” on page 97
“Linux: Starting the Internet Agent” on page 97
“Windows: Starting the Internet Agent” on page 99
NetWare: Starting the Internet Agent
novdocx (en) 22 June 2009
During installation, the Internet Agent Installation program copied the
sys:\system
directory (unless you specified a different directory). You use this file when you load
gwia.ncf
startup file to the
the Internet Agent.
If you chose to have the Internet Agent Installation program add the
autoexec.ncf
, the Internet Agent loads whenever you start the server.
gwia.ncf
command to your
To manually start the Internet Agent:
1 At the NetWare server console, enter
gwia
to run the
gwia.ncf
file.
If the Internet Agent does not start successfully, see “Starting the NetWare GroupWise Agents”
on page 173.
After you have started the Internet Agent, verify that the program is running. You can monitor
the program from the operation screen. Press F10-Options, then press F9-Stats. If you see an
error message in the Statistics window, the program has not loaded properly.
2 If you enabled the Internet Agent Web console, you can use the following URL to view the
Web console:
http://internet_agent_network_address:http_port
For example:
http://172.16.5.18:9850
For more information, see “Using the Internet Agent Web Console” in “Internet Agent” in the
GroupWise 7 Administration Guide (http://www.novell.com/documentation/gw7).
3 Skip to with Section 4.4.4, “Testing the Internet Agent,” on page 99.
Linux: Starting the Internet Agent
To start the Linux Internet Agent with a user interface:
1 If Sendmail, Postfix, or any other SMTP daemon is enabled on your Linux server, disable it
before starting the Internet Agent.
For example, use the following commands to stop and disable Postfix:
/etc/init.d/postfix stop
chkconfig postfix off
As an alternative, you could configure the Internet Agent to bind exclusively to the server IP
address, as described in “Binding the Internet Agent to a Specific IP Address”, so that the
Internet Agent does not conflict with the default Postfix IP address of 127.0.0.1 (the loopback
address).
Installing the GroupWise Internet Agent 97
Page 98

2 If you want to use the Internet Agent for POP3 and IMAP4 mail, make sure no POP3 or
IMAP4 daemons are running on your Linux server.
3 Make sure that the MTA for the domain is running.
4 In a terminal window, become
sux
The
command enables the X Window System, which is required for running the GUI
root
by entering
sux
and the
root
password.
Internet Agent server console.
novdocx (en) 22 June 2009
5 Change to the
/opt/novell/groupwise/agents/bin
directory.
6 Enter the following command to start the Internet Agent:
./gwia --show @gwia.cfg &
The --show switch starts the Internet Agent with a server console interface similar to that
provided for the NetWare and Window Internet Agent. This user interface requires that the X
Window System and Open Motif be running on the Linux server.
The @ startup switch points to the Internet Agent startup file and is required to start the Internet
Agent.
The ampersand (&) causes the Internet Agent to run in the background, so that the terminal
window you started it in is again available for use.
The status messages displayed on the Internet Agent server console are also written to the
Internet Agent log file (
directory. The log file name includes the month and day when it was created, along with an
incrementing extension to accommodate multiple log files on the same day.
After the Internet Agent starts successfully, refer to the following sections in Chapter 7,
“Installing GroupWise Agents,” on page 159 for additional information about managing the
Internet Agent on Linux:
“Starting the Linux GroupWise Agents as Daemons” on page 180
“Monitoring the Linux GroupWise Agents from Your Web Browser” on page 181
“Starting the Linux GroupWise Agents on System Startup” on page 182
“Running the Linux GroupWise Agents as a Non-root User” on page 182
98 GroupWise 7 Installation Guide
mmddlog.nnn
) in the
/var/log/novell/groupwise/domain.gwia
Page 99

“Enabling the High Availability Service for the Linux GroupWise Agents” on page 185
“Stopping the Linux GroupWise Agents” on page 189
“Uninstalling the Linux GroupWise Agents” on page 191
7 Skip to Section 4.4.4, “Testing the Internet Agent,” on page 99
Windows: Starting the Internet Agent
1 If the domain directory is not on the Internet Agent server, map a drive to the domain directory
as a user that has rights to access the domain directory.
2 If the Internet Agent is installed as a Windows application, click Start > Programs >
GroupWise Internet Agent > GroupWise Internet Agent.
novdocx (en) 22 June 2009
or
If the Internet Agent is installed as a Windows service, click the Start menu > Settings >
Control Panel > Administrative Tools > Services. Right-click the GWIA service, then click
Start.
If the Internet Agent does not start successfully, see “Starting the Windows GroupWise
Agents” on page 194.
3 If you enabled the Internet Agent Web console, use the following URL to log into the Web
console:
http://internet_agent_network_address:http_port
For example:
http://172.16.5.18:9850
For more information, see “Using the Internet Agent Web Console” in “Internet Agent” in the
GroupWise 7 Administration Guide (http://www.novell.com/documentation/gw7).
4 Continue with Testing the Internet Agent.
4.4.4 Testing the Internet Agent
After you’ve started the Internet Agent, you should send a message to ensure that the system is
working properly.
To send a message:
1 Open a new mail message in your GroupWise client.
Installing the GroupWise Internet Agent 99
Page 100

2 In the To field, enter your Internet address using the following syntax:
internet_agent:"user@host"
where internet_agent is the Internet Agent’s name. For example:
gwia:"rcollins@novell.com"
3 Send the message, then check your mailbox to verify that you receive it.
4 Continue with What’s Next.
4.5 What’s Next
The “Internet Agent” section of the GroupWise 7 Administration Guide (http://www.novell.com/
documentation/gw7) provides information to help you further configure and maintain the Internet
Agent, including how to:
Configure addressing options. By default, your GroupWise system is set up to use the standard
GroupWise address format (user_id.post_office.domain). This requires your users to enter
Internet addresses in the following format: internet_agent:"user@host". You can configure
your GroupWise system to use Internet-style address format (user@host) rather than the
standard GroupWise address format. See “Configuring Internet Addressing” and “Configuring
How the Internet Agent Handles E-Mail Addresses”.
Optimize configuration settings for the SMTP/MIME, IMAP, POP, and LDAP services. See
“Configuring Internet Services”.
novdocx (en) 22 June 2009
Use SSL to secure connections between the Internet Agent and other SMTP hosts, POP/IMAP
clients, and the Internet Agent Web console. See “Securing Internet Agent Connections with
SSL”
Control users’ access to SMTP/MIME (inbound and outbound), IMAP, and POP services. See
“Controlling User Access to the Internet”
Protect users from spam. See “Blocking Unwanted E-Mail from the Internet”
Control logging for the Internet Agent. See “Using Internet Agent Log Files”
4.6 GroupWise Internet Agent Installation Worksheet
The following table lists the information you are prompted to provide as you complete the Internet
Agent installation
Item Explanation
1) Software Platform
NetWare
Linux
Windows
Select the type of server where you will install the Internet Agent.
For more information, see Section 4.3.1, “Selecting the Internet Agent
Platform,” on page 85.
100 GroupWise 7 Installation Guide
 Loading...