

Page 1

GroupWise 7 Gateway for Microsoft Exchange Installation and Administration Guide
Novell
GroupWise® Gateway for
Microsoft* Exchange
novdocx (en) 6 April 2007
7
May 8, 2007
www.novell.com
INSTALLATION AND
ADMINISTRATION GUIDE
Page 2

Legal Notices
Novell, Inc. makes no representations or warranties with respect to the contents or use of this documentation, and
specifically disclaims any express or implied warranties of merchantability or fitness for any particular purpose.
Further, Novell, Inc. reserves the right to revise this publication and to make changes to its content, at any time,
without obligation to notify any person or entity of such revisions or changes.
Further, Novell, Inc. makes no representations or warranties with respect to any software, and specifically disclaims
any express or implied warranties of merchantability or fitness for any particular purpose. Further, Novell, Inc.
reserves the right to make changes to any and all parts of Novell software, at any time, without any obligation to
notify any person or entity of such changes.
Any products or technical information provided under this Agreement may be subject to U.S. export controls and the
trade laws of other countries. You agree to comply with all export control regulations and to obtain any required
licenses or classification to export, re-export, or import deliverables. You agree not to export or re-export to entities
on the current U.S. export exclusion lists or to any embargoed or terrorist countries as specified in the U.S. export
laws. You agree to not use deliverables for prohibited nuclear, missile, or chemical biological weaponry end uses. See
the Novell International Trade Services Web page (http://www.novell.com/info/exports/) for more information on
exporting Novell software. Novell assumes no responsibility for your failure to obtain any necessary export
approvals.
novdocx (en) 6 April 2007
Copyright © 2004-2007 Novell, Inc. All rights reserved. No part of this publication may be reproduced, photocopied,
stored on a retrieval system, or transmitted without the express written consent of the publisher.
Novell, Inc. has intellectual property rights relating to technology embodied in the product that is described in this
document. In particular, and without limitation, these intellectual property rights may include one or more of the U.S.
patents listed on the Novell Legal Patents Web page (http://www.novell.com/company/legal/patents/) and one or
more additional patents or pending patent applications in the U.S. and in other countries.
Novell, Inc.
404 Wyman Street, Suite 500
Waltham, MA 02451
U.S.A.
www.novell.com
Online Documentation: To access the online documentation for this and other Novell products, and to get
updates, see the Novell Documentation Web site (http://www.novell.com/documentation).
Page 3

Novell Trademarks
For Novell trademarks, see the Novell Trademark and Service Mark list (http://www.novell.com/company/legal/
trademarks/tmlist.html).
Third-Party Materials
All third-party trademarks are the property of their respective owners.
novdocx (en) 6 April 2007
Page 4

novdocx (en) 6 April 2007
Page 5

Contents
About This Guide 9
1 What Is the GroupWise Gateway for Microsoft Exchange? 11
1.1 What’s New in This Release . . . . . . . . . . . . . . . . . . . . . . . . . . . . . . . . . . . . . . . . . . . . . . . . . . 11
2 Exchange Gateway System Requirements 13
3 Planning the Exchange Gateway Installation 15
3.1 Gathering GroupWise System Information . . . . . . . . . . . . . . . . . . . . . . . . . . . . . . . . . . . . . . . 15
3.2 Deciding Where to Install the Exchange Gateway. . . . . . . . . . . . . . . . . . . . . . . . . . . . . . . . . . 15
3.3 Choosing a Gateway Name. . . . . . . . . . . . . . . . . . . . . . . . . . . . . . . . . . . . . . . . . . . . . . . . . . . 16
3.4 Deciding between Windows Application and Windows Service. . . . . . . . . . . . . . . . . . . . . . . . 16
3.5 Deciding How to Monitor the Exchange Gateway . . . . . . . . . . . . . . . . . . . . . . . . . . . . . . . . . . 17
3.5.1 Using the Exchange Gateway Web Console . . . . . . . . . . . . . . . . . . . . . . . . . . . . . . 17
3.5.2 Using an SNMP Monitoring Program . . . . . . . . . . . . . . . . . . . . . . . . . . . . . . . . . . . . 17
3.6 Gathering Exchange System Information . . . . . . . . . . . . . . . . . . . . . . . . . . . . . . . . . . . . . . . . 18
3.7 Determining Connections between Systems . . . . . . . . . . . . . . . . . . . . . . . . . . . . . . . . . . . . . . 19
3.8 Selecting User Address Type and Format. . . . . . . . . . . . . . . . . . . . . . . . . . . . . . . . . . . . . . . . 19
3.9 Determining Where to Install the Exchange Gateway Administrator Snap-In to ConsoleOne. 20
3.10 Exchange Gateway Installation Worksheet . . . . . . . . . . . . . . . . . . . . . . . . . . . . . . . . . . . . . . . 21
novdocx (en) 6 April 2007
4 Installing the Exchange Gateway 25
4.1 Meeting Installation Prerequisites . . . . . . . . . . . . . . . . . . . . . . . . . . . . . . . . . . . . . . . . . . . . . . 25
4.2 Adding the Exchange Library Directory to the Path Variable. . . . . . . . . . . . . . . . . . . . . . . . . . 26
4.3 Installing the Exchange Gateway Software . . . . . . . . . . . . . . . . . . . . . . . . . . . . . . . . . . . . . . . 26
4.4 Installing the Exchange Gateway Addressing Components . . . . . . . . . . . . . . . . . . . . . . . . . . 27
4.5 Installing the Exchange Gateway Administrator Snap-In to ConsoleOne . . . . . . . . . . . . . . . . 29
5 Configuring the Exchange Side of the Exchange Gateway 31
5.1 Configuring Exchange 5.5 . . . . . . . . . . . . . . . . . . . . . . . . . . . . . . . . . . . . . . . . . . . . . . . . . . . . 31
5.1.1 Customizing Addressing for Exchange 5.5 . . . . . . . . . . . . . . . . . . . . . . . . . . . . . . . . 33
5.2 Configuring Exchange 2000/2003 . . . . . . . . . . . . . . . . . . . . . . . . . . . . . . . . . . . . . . . . . . . . . . 34
5.2.1 Performing Basic Configuration for Exchange 2000/2003 . . . . . . . . . . . . . . . . . . . . 35
5.2.2 Setting Up Bidirectional Busy Search for Exchange 2000/2003 . . . . . . . . . . . . . . . . 39
5.2.3 Customizing Addressing for Exchange 2000/2003 . . . . . . . . . . . . . . . . . . . . . . . . . . 49
6 Configuring the GroupWise Side of the Exchange Gateway 51
6.1 Providing Foreign System Configuration Information . . . . . . . . . . . . . . . . . . . . . . . . . . . . . . . 51
6.2 Providing Gateway Information . . . . . . . . . . . . . . . . . . . . . . . . . . . . . . . . . . . . . . . . . . . . . . . . 53
7 Running the Exchange Gateway 55
7.1 Starting the Exchange Gateway . . . . . . . . . . . . . . . . . . . . . . . . . . . . . . . . . . . . . . . . . . . . . . . 55
Contents 5
Page 6

7.1.1 Starting the Exchange Gateway As a Windows Application . . . . . . . . . . . . . . . . . . . 55
7.1.2 Starting the Exchange Gateway As a Windows Service . . . . . . . . . . . . . . . . . . . . . . 56
7.2 Acquainting E-Mail Users with the Exchange Gateway . . . . . . . . . . . . . . . . . . . . . . . . . . . . . . 57
7.2.1 Addressing Messages . . . . . . . . . . . . . . . . . . . . . . . . . . . . . . . . . . . . . . . . . . . . . . . . 57
7.2.2 Understanding What GroupWise Send Options Are Available through the Gateway 57
7.3 Stopping the Exchange Gateway . . . . . . . . . . . . . . . . . . . . . . . . . . . . . . . . . . . . . . . . . . . . . . . 58
7.3.1 Stopping the Exchange Gateway If It Is Running As an Application . . . . . . . . . . . . . 58
7.3.2 Stopping the Exchange Gateway If It Is Running As a Service . . . . . . . . . . . . . . . . . 58
7.4 Uninstalling the Exchange Gateway . . . . . . . . . . . . . . . . . . . . . . . . . . . . . . . . . . . . . . . . . . . . . 58
7.4.1 Uninstalling the Exchange Gateway As an Application . . . . . . . . . . . . . . . . . . . . . . . 59
7.4.2 Uninstalling the Exchange Gateway As a Service . . . . . . . . . . . . . . . . . . . . . . . . . . . 59
8 Configuring the Exchange Gateway 61
8.1 Enabling Directory Synchronization and Exchange of Address Books . . . . . . . . . . . . . . . . . . 61
8.2 Configuring Addressing Instead of Using Directory Synchronization and Exchange . . . . . . . . 64
8.2.1 Adding Individual Exchange Users to the GroupWise Address Book . . . . . . . . . . . . 64
8.2.2 Adding Individual Exchange Users to Personal Address Books . . . . . . . . . . . . . . . . 66
8.2.3 Adding Individual GroupWise Users to the Exchange Address Book . . . . . . . . . . . . 67
8.2.4 Using Explicit Addressing. . . . . . . . . . . . . . . . . . . . . . . . . . . . . . . . . . . . . . . . . . . . . . 71
8.2.5 Setting Up an Addressing Rule to Facilitate Busy Searches . . . . . . . . . . . . . . . . . . . 71
8.3 Changing the Link Protocol between the Exchange Gateway and the MTA . . . . . . . . . . . . . . 72
8.4 Controlling Gateway Access. . . . . . . . . . . . . . . . . . . . . . . . . . . . . . . . . . . . . . . . . . . . . . . . . . . 73
8.4.1 Using the Access.cfg File in the Gateway Directory . . . . . . . . . . . . . . . . . . . . . . . . . 74
8.4.2 Using the Gateway Access Field on Individual User Objects . . . . . . . . . . . . . . . . . . 79
8.5 Setting Up Accounting . . . . . . . . . . . . . . . . . . . . . . . . . . . . . . . . . . . . . . . . . . . . . . . . . . . . . . . 81
8.5.1 Enabling Accounting . . . . . . . . . . . . . . . . . . . . . . . . . . . . . . . . . . . . . . . . . . . . . . . . . 81
8.5.2 Defining an Accountant . . . . . . . . . . . . . . . . . . . . . . . . . . . . . . . . . . . . . . . . . . . . . . . 82
8.5.3 Understanding the Accounting File . . . . . . . . . . . . . . . . . . . . . . . . . . . . . . . . . . . . . . 82
8.6 Establishing Gateway Administrators . . . . . . . . . . . . . . . . . . . . . . . . . . . . . . . . . . . . . . . . . . . . 84
8.7 Enabling Message Status for Sent Items . . . . . . . . . . . . . . . . . . . . . . . . . . . . . . . . . . . . . . . . . 85
8.8 Binding the Exchange Gateway to a Specific IP Address . . . . . . . . . . . . . . . . . . . . . . . . . . . . 86
novdocx (en) 6 April 2007
9 Monitoring the Exchange Gateway 89
9.1 Using the Exchange Gateway Server Console . . . . . . . . . . . . . . . . . . . . . . . . . . . . . . . . . . . . 89
9.1.1 Information Box . . . . . . . . . . . . . . . . . . . . . . . . . . . . . . . . . . . . . . . . . . . . . . . . . . . . . 90
9.1.2 Status Box . . . . . . . . . . . . . . . . . . . . . . . . . . . . . . . . . . . . . . . . . . . . . . . . . . . . . . . . . 90
9.1.3 Statistics Box . . . . . . . . . . . . . . . . . . . . . . . . . . . . . . . . . . . . . . . . . . . . . . . . . . . . . . . 90
9.1.4 Log Message Box . . . . . . . . . . . . . . . . . . . . . . . . . . . . . . . . . . . . . . . . . . . . . . . . . . . 91
9.1.5 Menu Summary . . . . . . . . . . . . . . . . . . . . . . . . . . . . . . . . . . . . . . . . . . . . . . . . . . . . . 91
9.2 Using the Exchange Gateway Web Console . . . . . . . . . . . . . . . . . . . . . . . . . . . . . . . . . . . . . . 92
9.2.1 Setting Up the Exchange Gateway Web Console . . . . . . . . . . . . . . . . . . . . . . . . . . . 92
9.2.2 Accessing the Exchange Gateway Web Console . . . . . . . . . . . . . . . . . . . . . . . . . . . 93
9.2.3 Monitoring the Exchange Gateway from the Web Console . . . . . . . . . . . . . . . . . . . . 94
9.3 Using Exchange Gateway Log Files. . . . . . . . . . . . . . . . . . . . . . . . . . . . . . . . . . . . . . . . . . . . . 97
9.4 Using SNMP Monitoring Programs. . . . . . . . . . . . . . . . . . . . . . . . . . . . . . . . . . . . . . . . . . . . . . 99
9.4.1 Copying and Compiling the Exchange Gateway MIB File . . . . . . . . . . . . . . . . . . . . 100
9.4.2 Configuring the Exchange Gateway for SNMP Monitoring . . . . . . . . . . . . . . . . . . . 100
9.5 Notifying the Exchange Gateway Administrator about Bad Messages . . . . . . . . . . . . . . . . . 102
9.6 Understanding Exchange Gateway Error Messages . . . . . . . . . . . . . . . . . . . . . . . . . . . . . . . 102
10 Optimizing the Exchange Gateway 103
10.1 Adjusting the Gateway’s Send/Receive Cycle . . . . . . . . . . . . . . . . . . . . . . . . . . . . . . . . . . . . 103
6 GroupWise 7 Gateway for Microsoft Exchange Installation and Administration Guide
Page 7

10.2 Adjusting the Number of Sender and Receiver Threads . . . . . . . . . . . . . . . . . . . . . . . . . . . . 105
10.3 Automating Network Reattachment . . . . . . . . . . . . . . . . . . . . . . . . . . . . . . . . . . . . . . . . . . . . 105
10.4 Reducing Network Traffic . . . . . . . . . . . . . . . . . . . . . . . . . . . . . . . . . . . . . . . . . . . . . . . . . . . 106
11 Using Exchange Gateway Startup Switches 107
11.1 /addressrule . . . . . . . . . . . . . . . . . . . . . . . . . . . . . . . . . . . . . . . . . . . . . . . . . . . . . . . . . . . . . . 108
11.2 /allowdom. . . . . . . . . . . . . . . . . . . . . . . . . . . . . . . . . . . . . . . . . . . . . . . . . . . . . . . . . . . . . . . . 108
11.3 /badmsg . . . . . . . . . . . . . . . . . . . . . . . . . . . . . . . . . . . . . . . . . . . . . . . . . . . . . . . . . . . . . . . . . 109
11.4 /blockdom . . . . . . . . . . . . . . . . . . . . . . . . . . . . . . . . . . . . . . . . . . . . . . . . . . . . . . . . . . . . . . . 109
11.5 /corr . . . . . . . . . . . . . . . . . . . . . . . . . . . . . . . . . . . . . . . . . . . . . . . . . . . . . . . . . . . . . . . . . . . . 110
11.6 /custom . . . . . . . . . . . . . . . . . . . . . . . . . . . . . . . . . . . . . . . . . . . . . . . . . . . . . . . . . . . . . . . . . 110
11.7 /displaynamelastfirst . . . . . . . . . . . . . . . . . . . . . . . . . . . . . . . . . . . . . . . . . . . . . . . . . . . . . . . 110
11.8 /group. . . . . . . . . . . . . . . . . . . . . . . . . . . . . . . . . . . . . . . . . . . . . . . . . . . . . . . . . . . . . . . . . . . 110
11.9 /help . . . . . . . . . . . . . . . . . . . . . . . . . . . . . . . . . . . . . . . . . . . . . . . . . . . . . . . . . . . . . . . . . . . . 111
11.10 /home. . . . . . . . . . . . . . . . . . . . . . . . . . . . . . . . . . . . . . . . . . . . . . . . . . . . . . . . . . . . . . . . . . . 111
11.11 /httppassword . . . . . . . . . . . . . . . . . . . . . . . . . . . . . . . . . . . . . . . . . . . . . . . . . . . . . . . . . . . . 111
11.12 /httpport . . . . . . . . . . . . . . . . . . . . . . . . . . . . . . . . . . . . . . . . . . . . . . . . . . . . . . . . . . . . . . . . . 111
11.13 /httprefresh. . . . . . . . . . . . . . . . . . . . . . . . . . . . . . . . . . . . . . . . . . . . . . . . . . . . . . . . . . . . . . . 112
11.14 /httpuser. . . . . . . . . . . . . . . . . . . . . . . . . . . . . . . . . . . . . . . . . . . . . . . . . . . . . . . . . . . . . . . . . 112
11.15 /importsubcontainers . . . . . . . . . . . . . . . . . . . . . . . . . . . . . . . . . . . . . . . . . . . . . . . . . . . . . . . 112
11.16 /ip . . . . . . . . . . . . . . . . . . . . . . . . . . . . . . . . . . . . . . . . . . . . . . . . . . . . . . . . . . . . . . . . . . . . . . 112
11.17 /log . . . . . . . . . . . . . . . . . . . . . . . . . . . . . . . . . . . . . . . . . . . . . . . . . . . . . . . . . . . . . . . . . . . . . 113
11.18 /logdays . . . . . . . . . . . . . . . . . . . . . . . . . . . . . . . . . . . . . . . . . . . . . . . . . . . . . . . . . . . . . . . . . 113
11.19 /loglevel . . . . . . . . . . . . . . . . . . . . . . . . . . . . . . . . . . . . . . . . . . . . . . . . . . . . . . . . . . . . . . . . . 113
11.20 /logmax . . . . . . . . . . . . . . . . . . . . . . . . . . . . . . . . . . . . . . . . . . . . . . . . . . . . . . . . . . . . . . . . . 114
11.21 /nohtml . . . . . . . . . . . . . . . . . . . . . . . . . . . . . . . . . . . . . . . . . . . . . . . . . . . . . . . . . . . . . . . . . . 114
11.22 /noreadreceipt . . . . . . . . . . . . . . . . . . . . . . . . . . . . . . . . . . . . . . . . . . . . . . . . . . . . . . . . . . . . 114
11.23 /recv . . . . . . . . . . . . . . . . . . . . . . . . . . . . . . . . . . . . . . . . . . . . . . . . . . . . . . . . . . . . . . . . . . . . 114
11.24 /rt . . . . . . . . . . . . . . . . . . . . . . . . . . . . . . . . . . . . . . . . . . . . . . . . . . . . . . . . . . . . . . . . . . . . . . 115
11.25 /send . . . . . . . . . . . . . . . . . . . . . . . . . . . . . . . . . . . . . . . . . . . . . . . . . . . . . . . . . . . . . . . . . . . 115
11.26 /single . . . . . . . . . . . . . . . . . . . . . . . . . . . . . . . . . . . . . . . . . . . . . . . . . . . . . . . . . . . . . . . . . . 115
11.27 /st . . . . . . . . . . . . . . . . . . . . . . . . . . . . . . . . . . . . . . . . . . . . . . . . . . . . . . . . . . . . . . . . . . . . . . 115
11.28 /useimportcontainer . . . . . . . . . . . . . . . . . . . . . . . . . . . . . . . . . . . . . . . . . . . . . . . . . . . . . . . . 116
11.29 /work . . . . . . . . . . . . . . . . . . . . . . . . . . . . . . . . . . . . . . . . . . . . . . . . . . . . . . . . . . . . . . . . . . . 116
novdocx (en) 6 April 2007
A Error and Informational Messages 117
A.1 Error Messages . . . . . . . . . . . . . . . . . . . . . . . . . . . . . . . . . . . . . . . . . . . . . . . . . . . . . . . . . . . 117
A.2 Informational Messages. . . . . . . . . . . . . . . . . . . . . . . . . . . . . . . . . . . . . . . . . . . . . . . . . . . . . 132
B Exchange Gateway Directory Structure 135
B.1 Exchange Server Directory Structure . . . . . . . . . . . . . . . . . . . . . . . . . . . . . . . . . . . . . . . . . . 135
B.1.1 exchsvr directory . . . . . . . . . . . . . . . . . . . . . . . . . . . . . . . . . . . . . . . . . . . . . . . . . . . 135
B.1.2 bin directory . . . . . . . . . . . . . . . . . . . . . . . . . . . . . . . . . . . . . . . . . . . . . . . . . . . . . . . 135
B.1.3 address directory . . . . . . . . . . . . . . . . . . . . . . . . . . . . . . . . . . . . . . . . . . . . . . . . . . . 135
B.2 Exchange Gateway Directory Structure under the Domain . . . . . . . . . . . . . . . . . . . . . . . . . . 136
B.2.1 domain\wpgate\exchange directory. . . . . . . . . . . . . . . . . . . . . . . . . . . . . . . . . . . . . 137
C Documentation Updates 143
C.1 May 8, 2007 (Support Pack 2). . . . . . . . . . . . . . . . . . . . . . . . . . . . . . . . . . . . . . . . . . . . . . . . 143
Contents 7
Page 8

C.2 January 24, 2007 (Support Pack 1) . . . . . . . . . . . . . . . . . . . . . . . . . . . . . . . . . . . . . . . . . . . . 143
novdocx (en) 6 April 2007
8 GroupWise 7 Gateway for Microsoft Exchange Installation and Administration Guide
Page 9

About This Guide
This Novell® GroupWise® 7 Gateway for Microsoft Exchange Installation and Administration
Guide explains how to install, configure, and run the GroupWise 7 Gateway for Microsoft
Exchange. The guide is divided into the following sections:
Chapter 1, “What Is the GroupWise Gateway for Microsoft Exchange?,” on page 11
Chapter 2, “Exchange Gateway System Requirements,” on page 13
Chapter 4, “Installing the Exchange Gateway,” on page 25
Chapter 5, “Configuring the Exchange Side of the Exchange Gateway,” on page 31
Chapter 6, “Configuring the GroupWise Side of the Exchange Gateway,” on page 51
Chapter 7, “Running the Exchange Gateway,” on page 55
Chapter 8, “Configuring the Exchange Gateway,” on page 61
Chapter 9, “Monitoring the Exchange Gateway,” on page 89
Chapter 10, “Optimizing the Exchange Gateway,” on page 103
novdocx (en) 6 April 2007
Chapter 11, “Using Exchange Gateway Startup Switches,” on page 107
Appendix A, “Error and Informational Messages,” on page 117
Appendix B, “Exchange Gateway Directory Structure,” on page 135
Appendix C, “Documentation Updates,” on page 143
Audience
This guide is intended for network administrators who install and administer the GroupWise
Exchange Gateway.
Feedback
We want to hear your comments and suggestions about this manual and the other documentation
included with this product. Please use the User Comment feature at the bottom of each page of the
online documentation, or go to www.novell.com/documentation/feedback.html and enter your
comments there.
Documentation Updates
For the most recent version of the GroupWise 7 Gateway for Microsoft Exchange Installation and
Administration Guide, visit the Novell GroupWise 7 Gateway Documentation Web site (http://
www.novell.com/documentation/gwgateways).
Additional Documentation
For additional GroupWise 7 documentation, see the following guides at the Novell GroupWise 7
documentation Web site (http://www.novell.com/documentation/gw7):
Installation Guide
Administration Guide
About This Guide
9
Page 10

Multi-System Administration Guide
Interoperability Guide
Troubleshooting Guides
GroupWise Client User Guides
For additional GroupWise 6.5 documentation, see the following guides at the Novell GroupWise 6.5
documentation Web site (http://www.novell.com/documentation/gw65):
Installation Guide
Administration Guide
Multi-System Administration Guide
Interoperability Guide
Troubleshooting Guides
GroupWise Client User Guides
For the most recent version of the GroupWise 7 Gateway for Microsoft Exchange Installation and
Administration Guide, visit the GroupWise Gateway Documentation Web site (http://
www.novell.com/documentation/gwgateways).
novdocx (en) 6 April 2007
Documentation Conventions
In Novell documentation, a greater-than symbol (>) is used to separate actions within a step and
items in a cross-reference path.
®
A trademark symbol (
, TM, etc.) denotes a Novell trademark. An asterisk (*) denotes a third-party
trademark.
10 GroupWise 7 Gateway for Microsoft Exchange Installation and Administration Guide
Page 11
1
What Is the GroupWise Gateway
novdocx (en) 6 April 2007
for Microsoft Exchange?
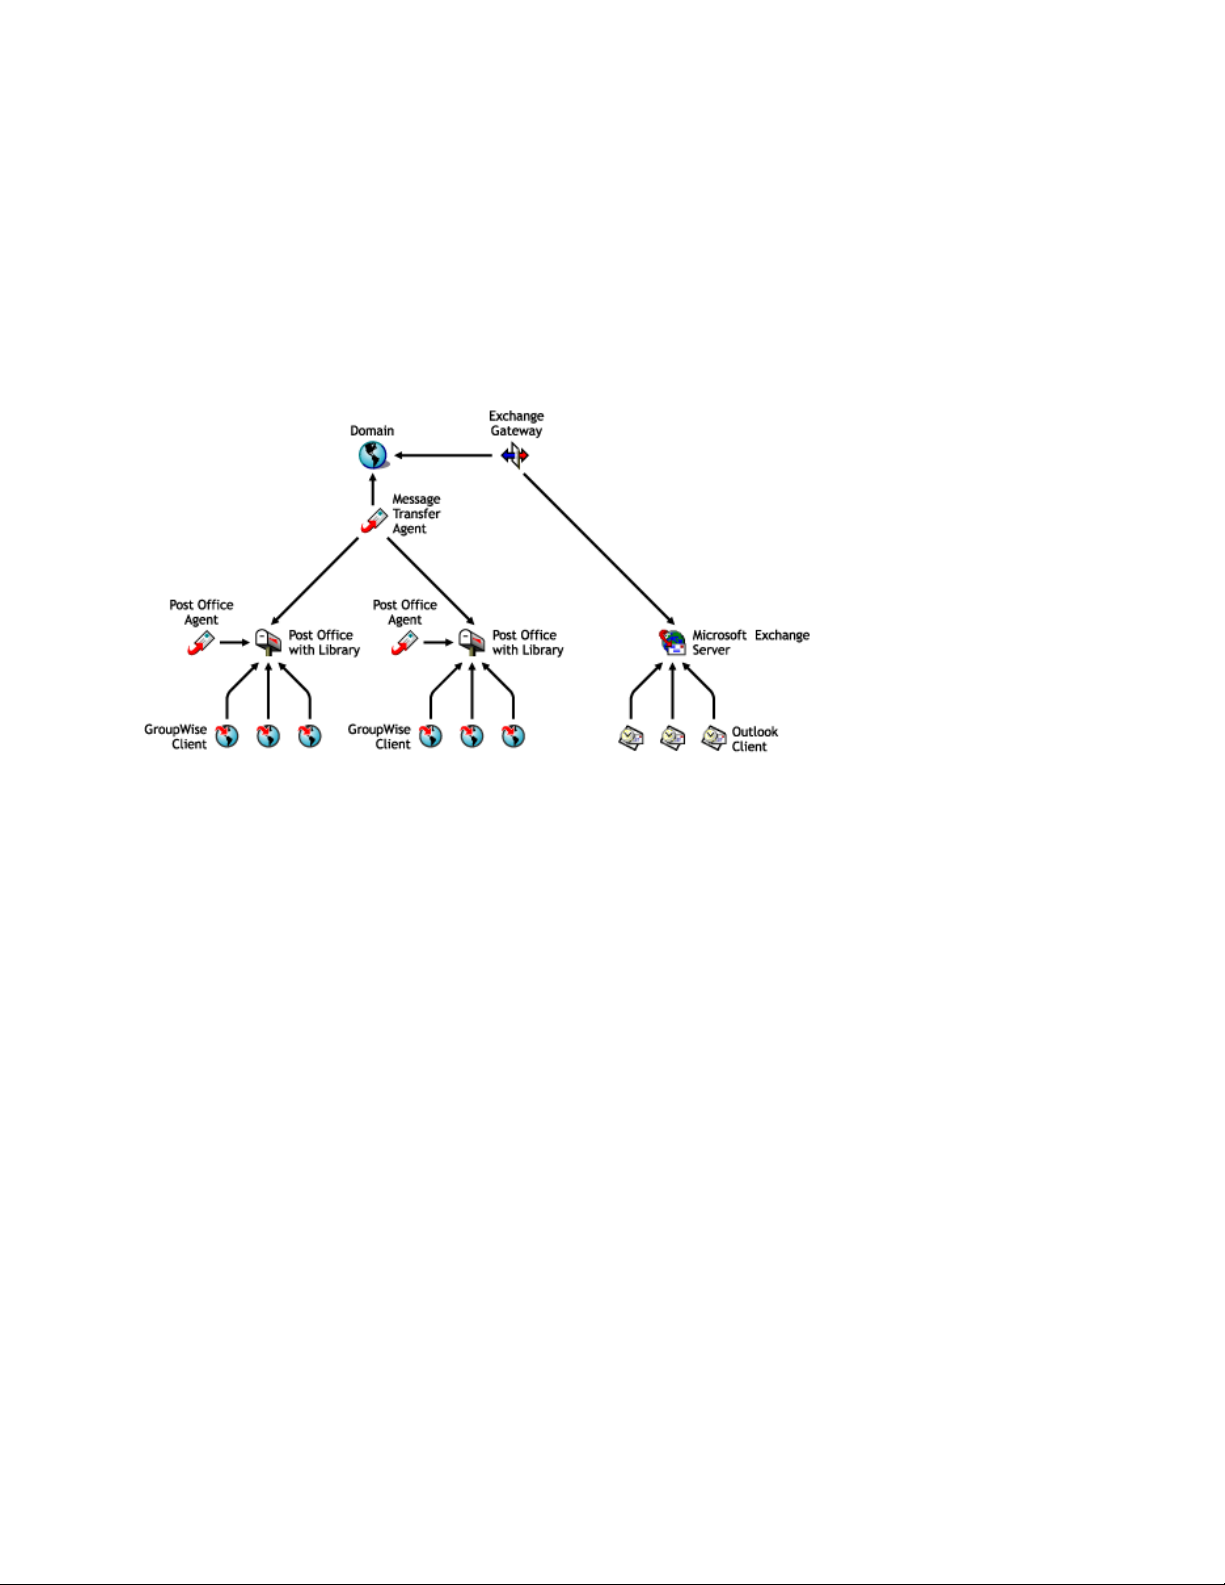
The GroupWise® 7 Gateway for Microsoft Exchange connects a GroupWise system and an
Exchange system by creating a link between a GroupWise domain and an Exchange server, as
shown in the following diagram.
The GroupWise 7 version of the Exchange Gateway provides the following capabilities:
1
Message exchange between users of GroupWise 5.x, 6.x, and 7.x and users of Exchange 5.5,
2000, and 2003.
Directory exchange, so that GroupWise users can be imported into the Exchange Address Book
and Exchange users can be imported into the GroupWise Address Book. This enables users to
select recipients from either system in their respective, familiar Address Books.
Directory synchronization, so that when users are added or removed, or user information is
modified, the changes are automatically replicated between the GroupWise and Exchange
systems. This keeps the GroupWise and Exchange Address Books up-to-date for all users.
1.1 What’s New in This Release
The following enhancements have been added since the previous major release of the Exchange
Gateway:
The Exchange Gateway has been updated to match GroupWise 6.x and 7.x functionality in
several areas, including the ConsoleOne
Microsoft Exchange 2000 and 2003 are supported in addition to Exchange 5.5.x.
The Exchange Gateway can run as a Windows* service as well as an application.
You can configure TCP/IP links between the Exchange Gateway and the MTA
Busy Search works for both GroupWise users and Exchange users with Exchange 2000/2003
Internet-style addressing is supported.
®
snap-ins.
What Is the GroupWise Gateway for Microsoft Exchange?
11
Page 12

SNMP is supported, so that the Exchange Gateway can be monitored from SNMP management
and monitoring programs.
A Web console is provided, so that the Exchange Gateway can be monitored from any location
where you have access to a Web browser and the Internet.
novdocx (en) 6 April 2007
12 GroupWise 7 Gateway for Microsoft Exchange Installation and Administration Guide
Page 13

2
Exchange Gateway System
novdocx (en) 6 April 2007
Requirements
The Windows* server on which you run the GroupWise® 7 Gateway for Microsoft Exchange must
meet the following system requirements.
Hardware/Software
Computer Pentium* Pentium II or better
Windows NT* Server (for use with Microsoft
Exchange 5.5)
Windows Server 2000 (for use with
Microsoft Exchange 5.5)
Windows Server 2000 with Active Directory
and the NNTP Service (for use with
Microsoft Exchange 2000)
Windows Server 2003 with Active Directory
and the NNTP Service (for use with
Microsoft Exchange 2003)
®
Novell
ConsoleOne
Client™ Any version Latest version
®
Minimum
Requirements
Updated with
Service Pack 6
Updated with
Service Pack 2
Updated with
Service Pack 2
Updated with
Service Pack 1
1.3.6 Latest version
Recommended Requirements
Updated with Service Pack 6 or later
Updated with Service Pack 3 or later
Updated with Service Pack 3 or later
Updated with Service Pack 1 or later
2
Available Disk Space 80 MB 80 MB or more
Available Memory 32 MB 64 MB or more
Exchange Server 5.5 5.5 updated with Service Pack 1 or
later; 2000/2003
GroupWise client 6.5 6.5 or later
The GroupWise 7 Gateway for Microsoft Exchange can connect your Exchange system to
GroupWise 6.5 and GroupWise 7.x systems.
Exchange Gateway System Requirements
13
Page 14

novdocx (en) 6 April 2007
14 GroupWise 7 Gateway for Microsoft Exchange Installation and Administration Guide
Page 15

3
Planning the Exchange Gateway
novdocx (en) 6 April 2007
Installation
Before installing the Exchange Gateway, you should complete the planning tasks listed below. The
planning tasks provide concepts and information you need as you install and set up the Exchange
Gateway. You can use the Section 3.10, “Exchange Gateway Installation Worksheet,” on page 21 to
record your installation and setup information.
Section 3.1, “Gathering GroupWise System Information,” on page 15
Section 3.2, “Deciding Where to Install the Exchange Gateway,” on page 15
Section 3.3, “Choosing a Gateway Name,” on page 16
Section 3.4, “Deciding between Windows Application and Windows Service,” on page 16
Section 3.5, “Deciding How to Monitor the Exchange Gateway,” on page 17
Section 3.6, “Gathering Exchange System Information,” on page 18
Section 3.7, “Determining Connections between Systems,” on page 19
Section 3.8, “Selecting User Address Type and Format,” on page 19
Section 3.9, “Determining Where to Install the Exchange Gateway Administrator Snap-In to
ConsoleOne,” on page 20
Section 3.10, “Exchange Gateway Installation Worksheet,” on page 21
3
3.1 Gathering GroupWise System Information
The Exchange Gateway needs to access the GroupWise domain where you want to link the gateway
into your GroupWise system. You might want to create a new domain specifically for the Exchange
Gateway. This keeps Exchange Gateway activity separate from domains where post offices are
located. If you create a new domain, you might want to create it on the Exchange server to minimize
network traffic.
EXCHANGE GATEWAY INSTALLATION WORKSHEET
Under Item 4: eDirectory Information, list the Novell® eDirectory™ tree and context where the Domain
object is located.
Under Item 5: GroupWise Domain Information, list the domain name and domain directory. If you want
to use a separate domain for the Exchange Gateway, create the new domain now.
3.2 Deciding Where to Install the Exchange Gateway
You can install the Exchange Gateway on the same server with the domain that the gateway belongs
to, if that domain is located on Windows. You can also install the Exchange Gateway on a separate
server, regardless of where the domain is located. The server where you install the Exchange
Gateway must be an Exchange server.
Planning the Exchange Gateway Installation
15
Page 16

If you install the Exchange Gateway on a different server from where the domain is located, you
must provide a username and password for the gateway to use when logging in to the server where
the domain is located. The gateway requires Read, Write, Create, Erase, Modify, and File Scan
rights in the domain directory.
EXCHANGE GATEWAY INSTALLATION WORKSHEET
Under Item 1: Exchange Gateway Location, mark whether you want to install the Exchange Gateway
on the same server where the domain is located or on a remote server. For a remote server location,
specify a username and password to provide login and access rights.
Under Item 3: Domain Server Type, mark whether the domain that owns the Exchange Gateway
resides on a NetWare® or a Windows server.
The owning domain cannot reside on a Linux server, but the Exchange Gateway can still service
domains that reside on Linux servers by way of TCP/IP links.
3.3 Choosing a Gateway Name
When you install the Exchange Gateway, a Gateway object is created in the domain where you
install the gateway. The default gateway name is exchange.
novdocx (en) 6 April 2007
EXCHANGE GATEWAY INSTALLATION WORKSHEET
Under Item 6: Gateway Details, specify the name you want to use for the Exchange Gateway object in
the GroupWise system.
When you install the Exchange Gateway, a subdirectory for the gateway software and queues is
created under the domain directory. By default, the directory name is the same as the object name. If
you use the default object name of Exchange, the gateway subdirectory is
domain\wpgate\exchange.
3.4 Deciding between Windows Application and Windows Service
You can install the Exchange Gateway as a Windows application or a Windows service.
When you install the Exchange Gateway as an application, it can be manually started by a user or it
can be added to a user’s Startup folder so that it starts automatically when the user logs in to the
Windows server. When running as an application, the Exchange Gateway displays a console on the
Windows server where you can monitor and control the gateway.
When you install the Exchange Gateway as a service, it can be configured to start automatically
when the server starts and must run under a specific Windows user account that has rights to run
services. By default, when running as a service, the Exchange Gateway does not display a user
interface on the Windows server. However, it can still be monitored from its Web console, as
described in Section 9.2, “Using the Exchange Gateway Web Console,” on page 92.
16 GroupWise 7 Gateway for Microsoft Exchange Installation and Administration Guide
Page 17

EXCHANGE GATEWAY INSTALLATION WORKSHEET
Under Item 8: Gateway Installation Method, mark whether you want to install and run the Exchange
Gateway as an application or service. If you want to install it as a service, provide a username and
password of the Windows account that you want to own the service.
If the user account does not yet exist, create the user account now and give the account rights to run
services.
If you want to run the Exchange Gateway as a service and if the domain it belongs to is on a
NetWare server (worksheet item 3), you must create an eDirectory account with a username and
password that match the Windows user account. The eDirectory user must have Read, Write,
Compare, Edit, Modify, and File Scan rights to the domain\wpgate\exchange directory.
3.5 Deciding How to Monitor the Exchange Gateway
If you install the Exchange Gateway as an application, the Exchange Gateway server console is
displayed on the Windows server where the Exchange Gateway is running, which allows you to
monitor the Exchange Gateway from that location. If you install the Exchange Gateway as a service,
the Exchange Gateway server console is not displayed, so you must plan to monitor it some other
way.
novdocx (en) 6 April 2007
Section 3.5.1, “Using the Exchange Gateway Web Console,” on page 17
Section 3.5.2, “Using an SNMP Monitoring Program,” on page 17
3.5.1 Using the Exchange Gateway Web Console
The Exchange Gateway Web console enables you to monitor and control the Exchange Gateway
from any location where you have access to a Web browser and the Internet. This provides
substantially more flexible access than the Exchange Gateway server console or an SNMP
monitoring program.
EXCHANGE GATEWAY INSTALLATION WORKSHEET
Under Item 7: Monitoring Options, mark Exchange Gateway Web console. After installing the
Exchange Gateway, follow the instructions in Section 9.2, “Using the Exchange Gateway Web
Console,” on page 92 to set up the Exchange Gateway Web console.
3.5.2 Using an SNMP Monitoring Program
If desired, you can monitor the Exchange Gateway from Novell ZENworks® for Servers or any
other SNMP management and monitoring program. When properly configured, the Exchange
Gateway sends SNMP traps to network management consoles for display along with other SNMP
monitored programs.
EXCHANGE GATEWAY INSTALLATION WORKSHEET
Under Item 9: Enable SNMP?, mark whether you want to configure the Exchange Gateway for SNMP.
Planning the Exchange Gateway Installation 17
Page 18

You must enable SNMP during gateway installation. You cannot add this functionality after
installation. In order for the option to be offered during installation, the Windows server where you
install the gateway must have the SNMP service installed.
The SNMP service is usually not included during the initial Windows operating system installation.
To add or configure the SNMP service on the server where you plan to install and run the Exchange
Gateway, you must be logged in as a member of the Administrator group.
To add the SNMP service to a Windows NT server:
1 From the Control Panel, double-click Network.
2 Click Services, click Add, then select SNMP Service.
3 Follow the on-screen prompts. You need your original Windows NT media.
You are given the opportunity to configure the SNMP service. The only required information
for the Exchange Gateway is the Trap Destination and Community Name fields.
4 After the installation is complete, reboot the Windows NT server.
For more information about configuring the SNMP service, see your Windows NT
documentation.
novdocx (en) 6 April 2007
To add the SNMP service to a Windows 2000/2003 server:
1 From the Control Panel, double-click Add/Remove Programs.
2 Click Add/Remove Windows Components.
3 Select Management and Monitoring Tools.
4 Click Details, then select Simple Network Management Protocol.
5 After the installation is complete, reboot the Windows server.
For more information about configuring the SNMP service, see your Windows documentation.
3.6 Gathering Exchange System Information
If you are using Exchange 5.5, you must know the name of the Exchange 5.5 site where you want to
create the Exchange mailbox through which messages will flow to and from the GroupWise system.
If you are using Exchange 2000/2003, you must know the name of the Exchange server, along with
the name of the mailbox store where you want to create the Exchange mailbox and the name of the
storage group where the mailbox store is located. You must also know the administrative group and
routing group that the server belongs to.
In either case, you must have a list of all servers in your Exchange system. The Exchange Gateway
needs to be installed on only one Exchange server, but the addressing components must be installed
on all Exchange servers. The addressing components generate GroupWise-type addresses for
Exchange users.
EXCHANGE GATEWAY INSTALLATION WORKSHEET
Under Item 2: Exchange Server Information, list the Exchange system information required for your
version of Exchange.
18 GroupWise 7 Gateway for Microsoft Exchange Installation and Administration Guide
Page 19

3.7 Determining Connections between Systems
To facilitate addressing of messages between systems, you must set up a representation of the
Exchange system in your GroupWise system and a connector to your GroupWise system in your
Exchange system.
In GroupWise, non-GroupWise systems are represented by non-GroupWise domains. When you
first start the Exchange Gateway, the non-GroupWise domain for the Exchange system is created
automatically. By default, it is named after the Exchange organization. Under the non-GroupWise
domain for the Exchange system, an external post office is automatically created for the Exchange
site or administrative group on the Exchange server. By default, it is given the same name as the
Exchange site or administrative group. If necessary, you can specify different names for the nonGroupWise domain and external post office.
EXCHANGE GATEWAY INSTALLATION WORKSHEET
Under Item 12: Non-GroupWise Domain, mark whether you want to use the default name (the
Exchange organization) or specify a name for the non-GroupWise domain.
Under Item 13: External Post Office, mark whether you want to use the default name (the Exchange
site or administrative group) or specify a name for the external post office.
novdocx (en) 6 April 2007
In Exchange, non-Exchange systems link to the Exchange system through connectors. On the
Exchange side, you might want to call the Exchange Gateway GroupwiseConnector, because it
connects the Exchange system to GroupWise.
EXCHANGE GATEWAY INSTALLATION WORKSHEET
Under Item 6: Gateway Details, specify the name you want to use in Exchange to represent the link to
the GroupWise system.
3.8 Selecting User Address Type and Format
By default, every Exchange user will have a GroupWise-type address with the following format:
GWise:domain.post_office.user_ID
GWise is the default Exchange address type created for the GroupWise system. You can change it if
needed.
EXCHANGE GATEWAY INSTALLATION WORKSHEET
Under Item 11: GroupWise Address Type in Exchange System, mark whether you want to use the
default address type (GWise) or specify the address type name you want to use.
Exchange user addresses are generated automatically when you start the Exchange Gateway, using
the format shown above. As described earlier, the Installation program maps the name of the
Exchange organization to the GroupWise domain portion of the address, the name of the Exchange
site or administrative group on the server to the post office portion of the address, and the Exchange
user mailbox name to the GroupWise user ID portion of the address.
Planning the Exchange Gateway Installation 19
Page 20

The recommendation is to use Exchange mailbox names as GroupWise user IDs. However, if this is
not possible for some reason, the following variables can be used to specify the information you
want to appear in the GroupWise user IDs:
Variable Description
%m Mailbox name (default)
%s Surname
%g Given name
%d Display name
%r char1 char2 Replace char1 with char2
%% Per cent sign character
Preferably, the GroupWise user IDs should include the Exchange mailbox names along with
whatever other information you want to provide. For example, “%m_%d” would create GroupWise
user IDs that consist of the Exchange mailbox names and users’ display names.
novdocx (en) 6 April 2007
EXCHANGE GATEWAY INSTALLATION WORKSHEET
Under Item 14: Exchange User Address Format, mark whether you want to use the default GroupWise
user ID format (Exchange mailbox name) or specify the format you want to use.
3.9 Determining Where to Install the Exchange Gateway Administrator Snap-In to ConsoleOne
Exchange Gateway administration is performed through ConsoleOne®, version 1.3.6 or later. When
you install the Exchange Gateway, the Gateway Administrator snap-in files can be copied to a
ConsoleOne location that you specify. The Gateway Administrator snap-in files extend the
functionality of ConsoleOne to let you administer the Exchange Gateway.
You must install the Gateway Administrator snap-in files to an installation of ConsoleOne on an
Exchange server where the GroupWise Administrator snap-ins have already been installed. The
Gateway Administrator snap-in cannot be installed to a workstation nor can it be used without the
GroupWise Administrator snap-ins. When you install the Gateway Administrator snap-in, you need
to know whether you are installing it along with the GroupWise 6.5 or GroupWise 7.x Administrator
snap-ins.
EXCHANGE GATEWAY INSTALLATION WORKSHEET
Under Item 9: Install Gateway Administrator Snap-In to ConsoleOne, specify the path for the
ConsoleOne location you want to use to administer the Exchange Gateway and the version of the
GroupWise Administrator snap-ins that are already in use.
You can install the Gateway Administrator snap-in files to additional Exchange servers after you
have installed the gateway, as described in Section 4.5, “Installing the Exchange Gateway
Administrator Snap-In to ConsoleOne,” on page 29.
20 GroupWise 7 Gateway for Microsoft Exchange Installation and Administration Guide
Page 21

3.10 Exchange Gateway Installation Worksheet
Item Explanation
novdocx (en) 6 April 2007
1) Exchange Gateway Location:
Domain server
Remote server
Username
Password
2) Exchange Server Information:
Exchange 5.5 Server:
Site
Exchange 2000/2003 Server:
Administrative Group
Routing Group
Exchange Server
Storage Group
Mailbox Store
Servers in Your Exchange System:
Mark whether you want to install the Exchange Gateway on the
same server with the GroupWise domain it belongs to, or on a
remote server.
For access to a remote server, provide a username and password
to facilitate logging in with the required rights.
See Section 3.2, “Deciding Where to Install the Exchange
Gateway,” on page 15.
Provide the required information for your version of the Exchange
server, along with a list of all servers in your Exchange system.
See “Gathering Exchange System Information” on page 18.
3) Domain Server Type:
NetWare
Windows
4) eDirectory Information:
Tree
Domain Object Context
5) GroupWise Domain Information:
Domain Name
Domain Directory
6) Gateway Details:
Gateway Object Name on
Exchange Server
Gateway Object Name in
GroupWise System
Gateway Directory
Mark the platform of the server where the gateway’s domain is
located.
See “Gathering GroupWise System Information” on page 15.
Specify the eDirectory tree and context where the Domain object is
located. The Exchange Gateway object will be created in the
Domain object.
See “Gathering GroupWise System Information” on page 15
Specify the domain name and directory. The Exchange Gateway
will be installed in a subdirectory under the domain.
See “Gathering GroupWise System Information” on page 15
Specify the name of the Exchange Gateway object in the Exchange
system and in the GroupWise system, as well as the subdirectory in
the domain where the Exchange Gateway software will be installed.
The default is Exchange.
See “Choosing a Gateway Name” on page 16
Planning the Exchange Gateway Installation 21
Page 22

Item Explanation
novdocx (en) 6 April 2007
7) Monitoring Options:
Exchange Gateway Web
console
SNMP monitoring program
8) Gateway Installation Method:
Application
Service
User
Password
9) Install Gateway Administrator
Snap-In to ConsoleOne?
Yes
ConsoleOne path
GroupWise Administrator
snap-in version: 6.5 / 7.x
No
10) Enable SNMP?
Yes
No
Mark how you want to monitor the Exchange Gateway.
See “Deciding How to Monitor the Exchange Gateway” on page 17.
Mark whether you want to install the Exchange Gateway as a
Windows application or a Windows service.
If you want to install it as a service, provide a username and
password of the Windows account that will own the service.
See “Deciding between Windows Application and Windows
Service” on page 16.
Mark whether you want to install the Exchange Gateway
Administrator snap-in to ConsoleOne at the same time when you
install the Exchange Gateway. If you do, record the path where
ConsoleOne and the GroupWise Administrator snap-ins to
ConsoleOne are currently installed and the version of the
GroupWise Administrator snap-ins.
See “Determining Where to Install the Exchange Gateway
Administrator Snap-In to ConsoleOne” on page 20.
Mark whether you want to enable SNMP.
See “Deciding How to Monitor the Exchange Gateway” on page 17.
11) GroupWise Address Type in
Exchange System:
GWise (default)
Custom
12) Non-GroupWise Domain:
Exchange organization
(default)
Custom
13) External Post Office:
Exchange site or
administrative group (default)
Custom
Mark whether you want to use the default address type of GWise or
a custom address type. If you do not want to use GWise, specify
the address type you want to use for addressing messages to
GroupWise users.
See Section 3.8, “Selecting User Address Type and Format,” on
page 19
Mark whether you want to use the name of the Exchange
organization as the name of the non-GroupWise domain that
represents the Exchange system in GroupWise. If you do not want
to use the default, specify the name for the non-GroupWise
domain.
See “Determining Connections between Systems” on page 19.
Mark whether you want to use the name of the Exchange site or
administrative group as the name of the external post office that
represents the collection of Exchange users on the server where
you are installing the Exchange Gateway. If you do not want to use
the default, specify the name for the external post office.
See “Determining Connections between Systems” on page 19.
22 GroupWise 7 Gateway for Microsoft Exchange Installation and Administration Guide
Page 23

Item Explanation
novdocx (en) 6 April 2007
14) Exchange User Address
Format
Exchange mailbox name
(default)
Custom
Mark whether you want to use the Exchange mailbox name as the
GroupWise user ID for each Exchange user.
See Section 3.8, “Selecting User Address Type and Format,” on
page 19.
Planning the Exchange Gateway Installation 23
Page 24

novdocx (en) 6 April 2007
24 GroupWise 7 Gateway for Microsoft Exchange Installation and Administration Guide
Page 25

4
Installing the Exchange Gateway
Before you install the GroupWise® 7 Gateway for Microsoft Exchange, both the GroupWise system
and the Exchange system should be running smoothly. Then complete the following tasks to connect
the two systems through the Exchange Gateway:
Section 4.1, “Meeting Installation Prerequisites,” on page 25
Section 4.2, “Adding the Exchange Library Directory to the Path Variable,” on page 26
Section 4.3, “Installing the Exchange Gateway Software,” on page 26
Section 4.4, “Installing the Exchange Gateway Addressing Components,” on page 27
Section 4.5, “Installing the Exchange Gateway Administrator Snap-In to ConsoleOne,” on
page 29
4.1 Meeting Installation Prerequisites
novdocx (en) 6 April 2007
4
After you have gathered the information that the Exchange Gateway Installation program requires
and have planned the information you need to configure the Exchange Gateway after installation,
make sure that the Windows server where you plan to install the Exchange Gateway meets the
system requirements listed in Chapter 2, “Exchange Gateway System Requirements,” on page 13.
1 Make sure that the Novell Client™ is installed.
The Installation program creates a Gateway object in eDirectory. The Novell Client is required
to access eDirectory. If necessary, you can download the Novell Client from the Novell Product
Downloads site (http://download.novell.com).
2 Make sure that ConsoleOne is installed, along with the GroupWise Administrator snap-ins.
ConsoleOne and the GroupWise Administrator snap-ins are available on your GroupWise
Administrator CD.
3 Log in to the server where the domain directory resides and map a drive to the domain directory
(worksheet item 5).
The Installation program creates domain subdirectories and copies Exchange Gateway files to
the subdirectories under the domain. This requires full file system rights to the domain
directory.
IMPORTANT: The owning domain cannot reside on a Linux server, but the Exchange
Gateway can still service domains that reside on Linux servers by way of TCP/IP links.
4 Log in to eDirectory with Admin-equivalent rights to the eDirectory tree where the Domain
object resides (worksheet item 4).
The Installation program creates a Gateway object under the Domain object.
5 Continue with Adding the Exchange Library Directory to the Path Variable.
Installing the Exchange Gateway
25
Page 26
4.2 Adding the Exchange Library Directory to the Path Variable
The Exchange Gateway Installation program needs to be able to locate the Exchange software
library directory. The Installation program adds the default location (c:\program
files\exchsrvr\bin) to the end of the path variable. If you have installed Exchange in
another location, you must manually add the Exchange software library directory to the path
variable on the server where the Exchange Gateway runs.
1 Right-click My Computer, then click Properties.
2 Click Advanced > Environment Variables.
3 In the User Variables for Administrator list, add the Exchange software library directory to the
end of the path variable value.
If one of the directory names in the path includes a space, use one of the following formats for
your software library directory:
"c:\program files\exchsrvr\bin"
c:\progra~1\exchsrvr\bin
4 Click Set, then click OK.
novdocx (en) 6 April 2007
5 Continue with Installing the Exchange Gateway Software.
4.3 Installing the Exchange Gateway Software
1 Download the GroupWise Gateway for Microsoft* Exchange from the Novell Product
Downloads site (http://download.novell.com) into an empty directory on the server where you
want to install it (worksheet item 1).
The server where you install the Exchange Gateway must be an Exchange server.
2 Run setupexch701.exe to extract the Exchange Gateway files into the directory.
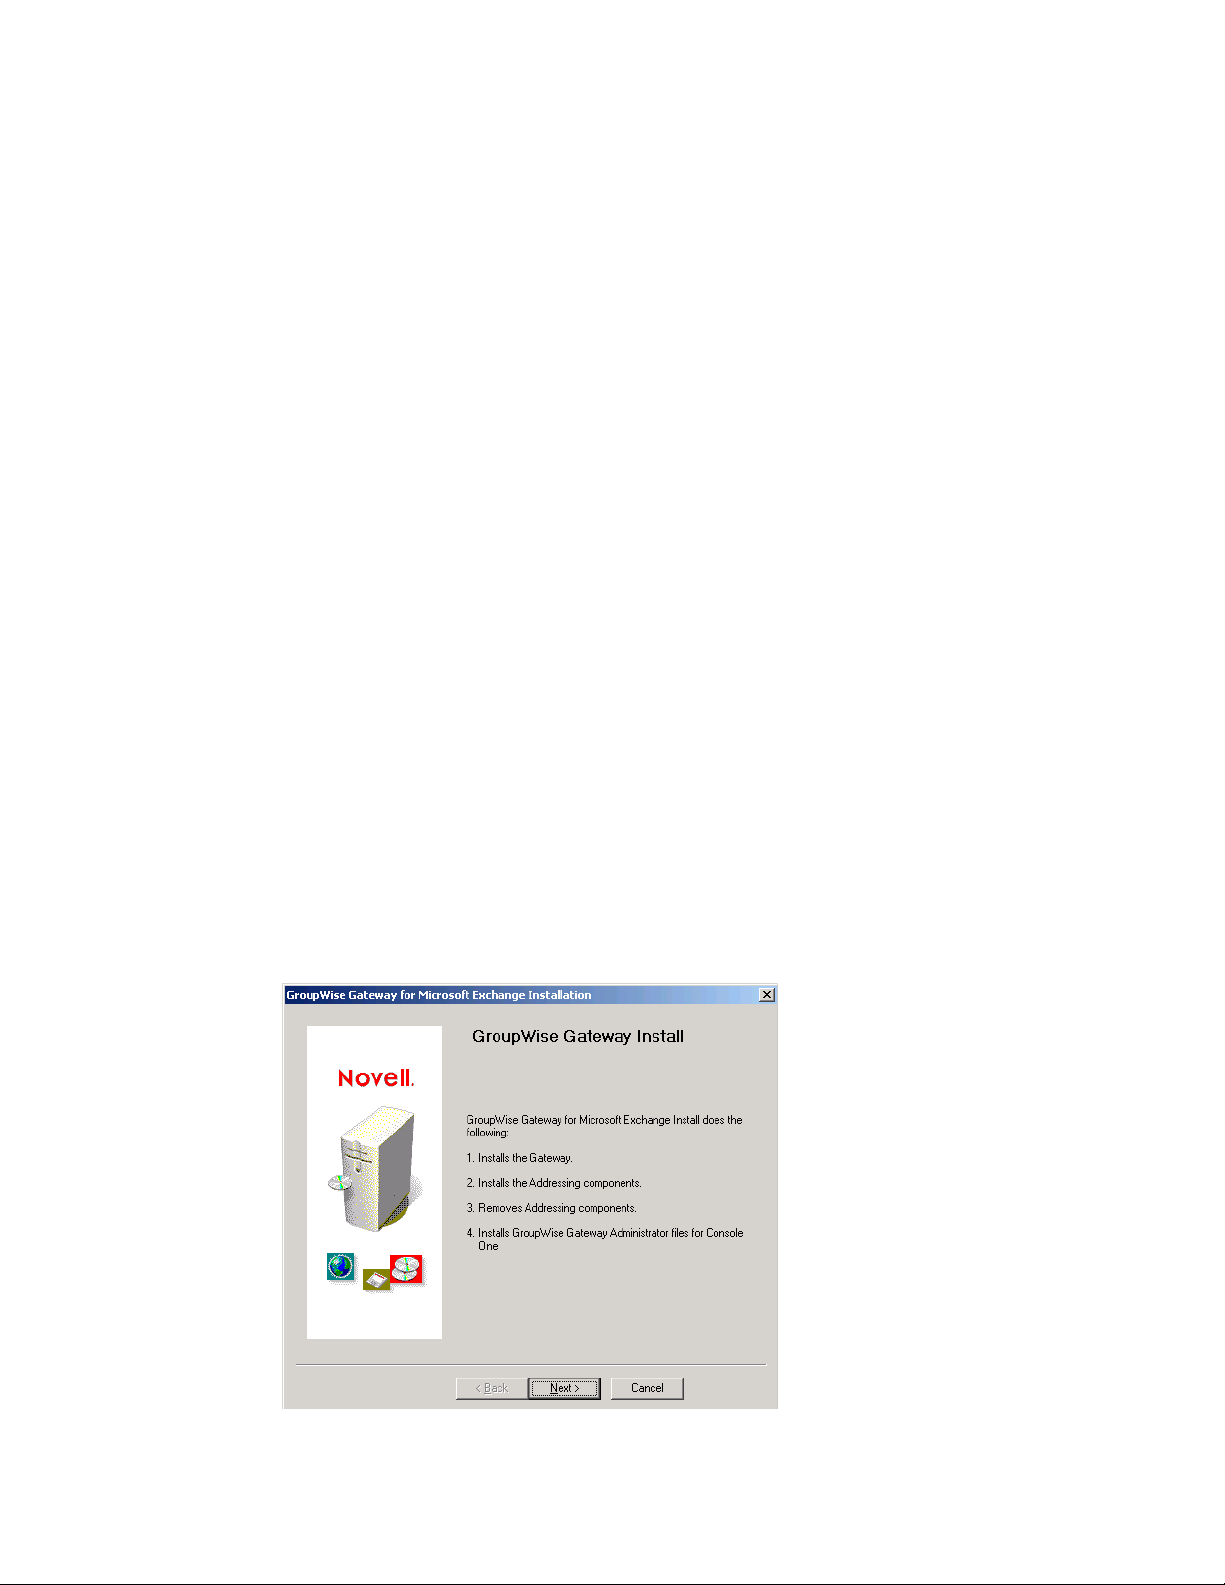
3 Run install.exe to start the Exchange Gateway Installation program on the Exchange
server.
26 GroupWise 7 Gateway for Microsoft Exchange Installation and Administration Guide
Page 27
If the Installation program does not start automatically, run install.exe in the directory
where you extracted the Exchange Gateway files.
4 Click Next to view the license agreement, then click Accept to accept the license agreement.
novdocx (en) 6 April 2007
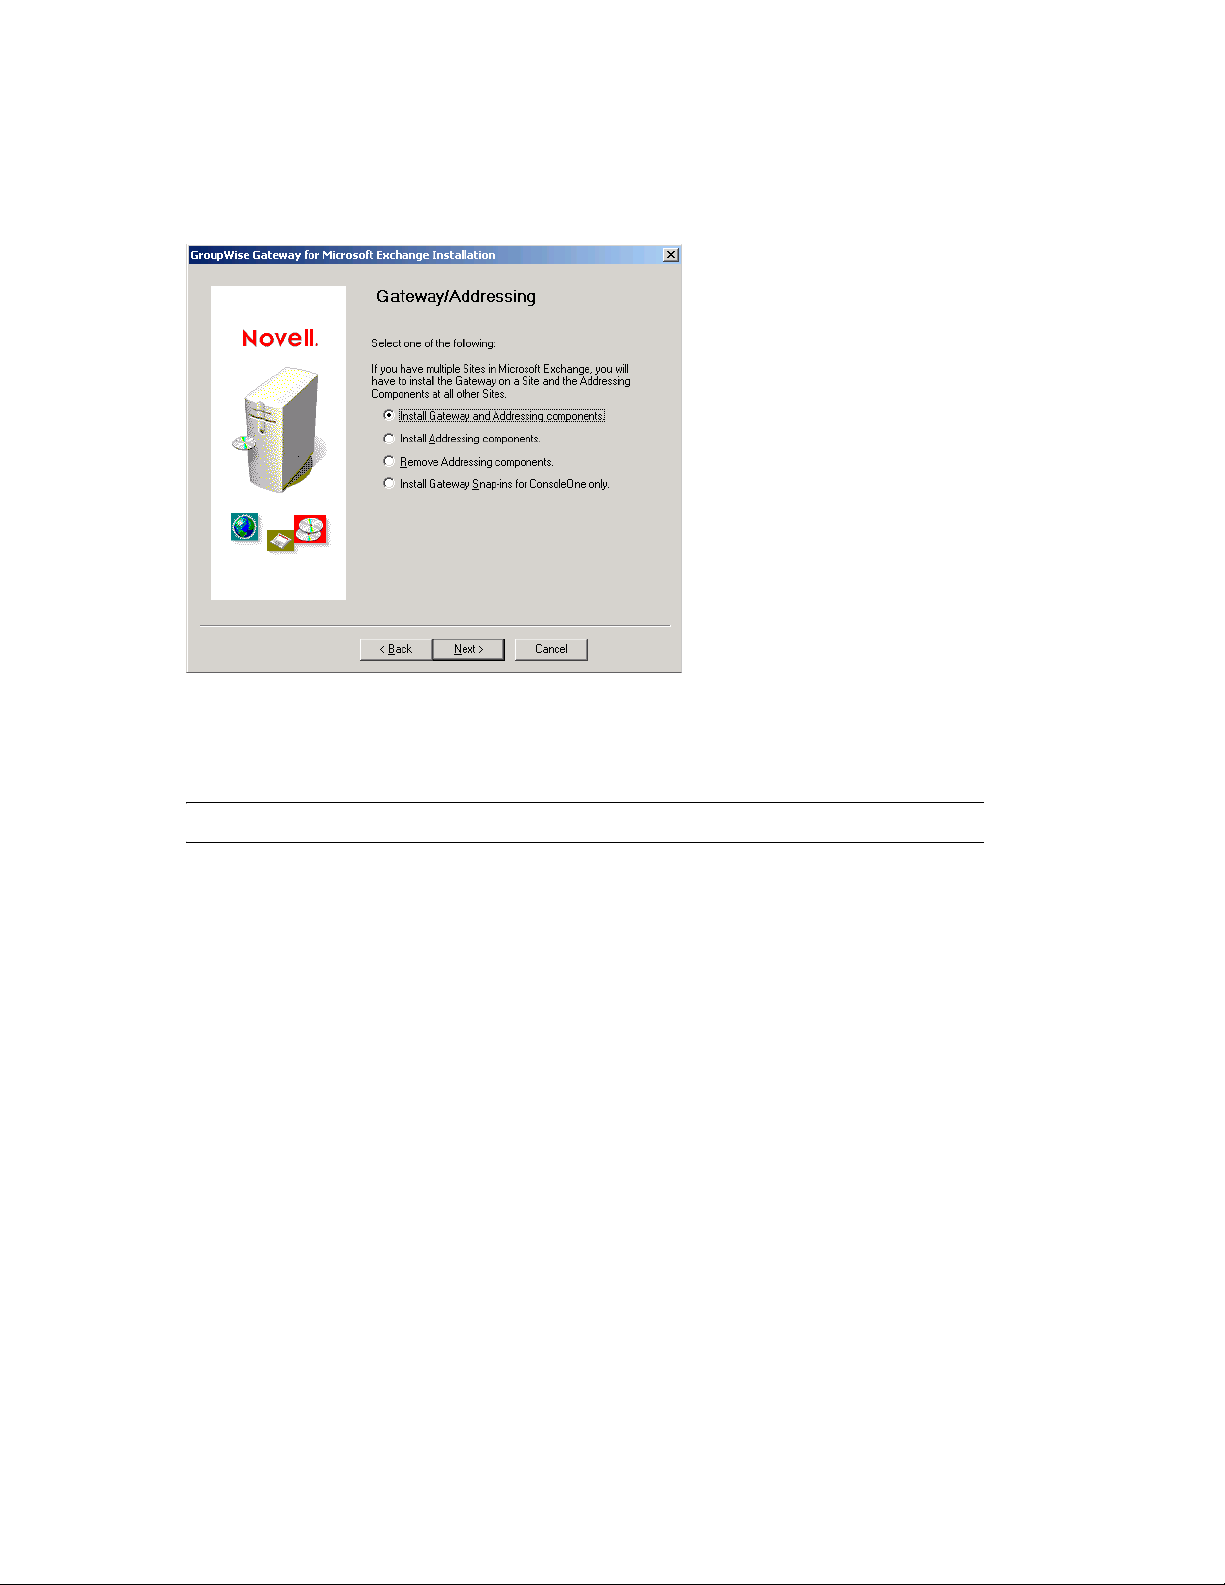
5 Select Install Gateway and Addressing Components, then click Next.
6 Follow the prompts, using the information from items 2 through 9 on the Section 3.10,
“Exchange Gateway Installation Worksheet,” on page 21 to install the Exchange Gateway
IMPORTANT: Do not start the Exchange Gateway after installation.
7 If your Exchange system consists of more than one server, continue with Section 4.4,
“Installing the Exchange Gateway Addressing Components,” on page 27.
8 Continue with Configuring the Exchange Side of the Exchange Gateway.
4.4 Installing the Exchange Gateway Addressing Components
When you installed the Exchange Gateway, the Installation program automatically generated
GroupWise-type addresses for all Exchange users on that server. If your Exchange system consists
of multiple servers, you must install the Exchange Gateway addressing components on each server.
1 Plan the addressing format you want to use for users on the new server, as described in
“Determining Connections between Systems” on page 19 and Section 3.8, “Selecting User
Address Type and Format,” on page 19.
2 If you are going to use customized address format, stop the Exchange Gateway.
Installing the Exchange Gateway 27
Page 28

3 At each Exchange server, run setupexch700.exe to start the Installation program.
novdocx (en) 6 April 2007
If the Installation program does not start it automatically, run install.exe in the directory
where you extracted the Exchange Gateway files.
4 Click Next to view the license agreement, then click Accept to accept the license agreement.
5 Select Install Addressing Components.
6 Click Next to continue with the installation.
The Installation program installs the gwproxy.dll file on each Exchange server.
7 Follow the instructions in “Configuring the Exchange Side of the Exchange Gateway” on
page 31 to prepare the Exchange server to connect to the original Exchange server where the
gateway is installed.
8 Skip to Chapter 7, “Running the Exchange Gateway,” on page 55.
28 GroupWise 7 Gateway for Microsoft Exchange Installation and Administration Guide
Page 29
4.5 Installing the Exchange Gateway Administrator Snap-In to ConsoleOne
After you have installed the Exchange Gateway, you can install the Exchange Gateway
Administrator snap-in to Console One to additional Exchange servers as needed. The Gateway
Administrator snap-in cannot be installed on a workstation.
1 Make sure that no one is running ConsoleOne from the Exchange server where you want to
install the Gateway Administrator snap-in.
2 At the Exchange server where you want to install the Gateway Administrator snap-in to
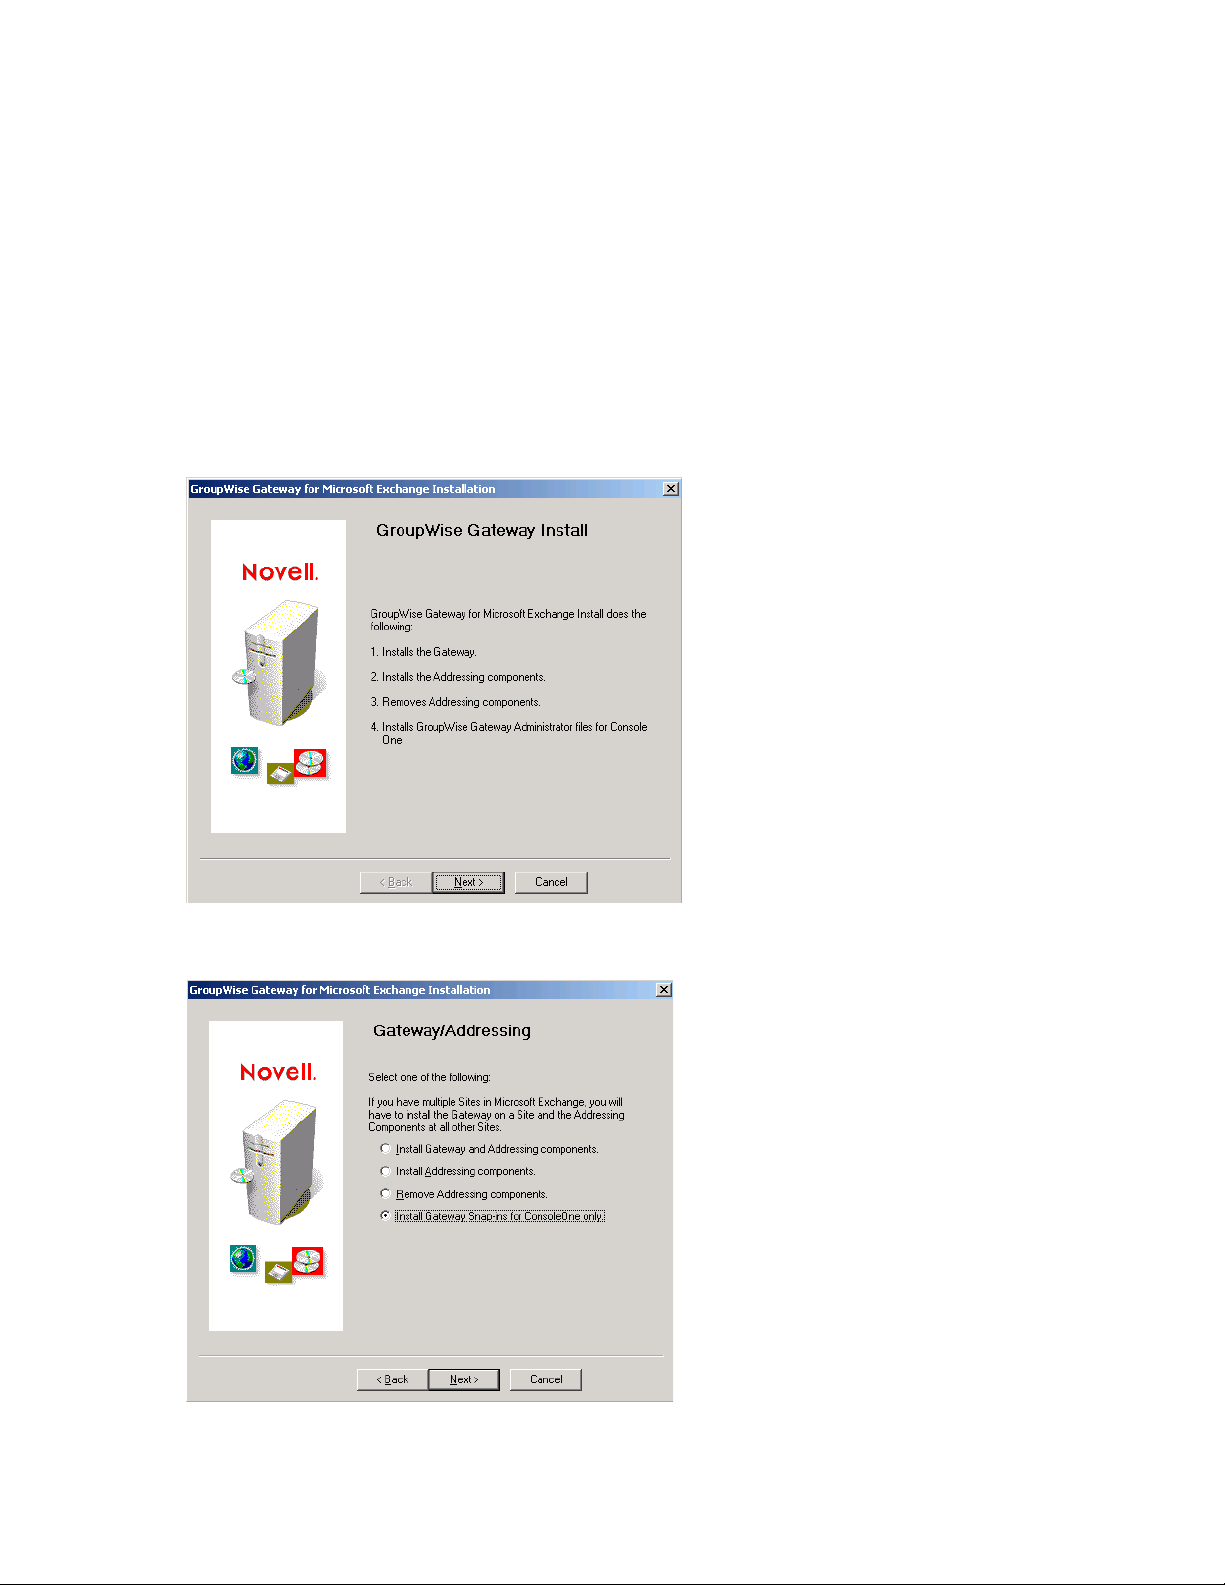
ConsoleOne, run install.exe in the directory where you extracted the Exchange Gateway
files to start the Exchange Gateway Installation program.
novdocx (en) 6 April 2007
3 Click Next to view the license agreement, then click Accept to accept the license agreement.
Installing the Exchange Gateway 29
Page 30

4 Select Install Gateway Administrator Snap-Ins for ConsoleOne Only.
5 Click Next to continue with the installation.
novdocx (en) 6 April 2007
30 GroupWise 7 Gateway for Microsoft Exchange Installation and Administration Guide
Page 31

5
Configuring the Exchange Side of
novdocx (en) 6 April 2007
the Exchange Gateway
After you install the Exchange Gateway software but before you start the Exchange Gateway for the
first time, you must prepare your Exchange system to link to your GroupWise
Section 5.1, “Configuring Exchange 5.5,” on page 31
Section 5.2, “Configuring Exchange 2000/2003,” on page 34
5.1 Configuring Exchange 5.5
1 Start Exchange Administrator.
®
system:
5
2 Expand the Exchange site, expand the Configuration container, then select the Connections
container.
Configuring the Exchange Side of the Exchange Gateway
31
Page 32

3 Double-click the Exchange Gateway object (worksheet item 6), then click Export Containers.
novdocx (en) 6 April 2007
4 Select the Recipient containers that contain users whose Address Book information you want to
export into the GroupWise system, then click Add.
5 In the Trust Level field, select a trust level number that is larger than the trust level numbers of
the users you want to export.
IMPORTANT: Directory synchronization and exchange cannot occur if the trust level of one
or more gateway users is less than that of the Gateway object.
6 Click OK to save the Exchange user export information.
When GroupWise users are imported into the Exchange system, they are, by default, placed in
a container named GroupWise at the root of Active Directory. You can use the /
useimportcontainer gateway startup switch to place the users into the import container
specified under Administrative Groups > First Administrative Group > Routing Group > First
Routing Group > Connectors > Exchange Gateway Connector.
7 Make sure that the Exchange services are running.
7a On the Control Panel, double-click Services.
7b Scroll down to check the status of the following services:
Microsoft Exchange Directory
Microsoft Exchange Event Service
Microsoft Exchange Information Store
Microsoft Exchange Message Transfer Agent
Microsoft Exchange System Attendant
7c If any of the Microsoft Exchange services are not running, start them now.
8 If you want to customize the name of the non-GroupWise domain that represents the Exchange
system, the external post office that represents the Exchange site, or the format of GroupWisetype usernames for Exchange users, continue with Section 5.1.1, “Customizing Addressing for
Exchange 5.5,” on page 33.
or
32 GroupWise 7 Gateway for Microsoft Exchange Installation and Administration Guide
Page 33

Skip to Chapter 6, “Configuring the GroupWise Side of the Exchange Gateway,” on page 51
5.1.1 Customizing Addressing for Exchange 5.5
1 In Exchange Administrator, expand the Site container, then select the Configuration container.
novdocx (en) 6 April 2007
2 Double-click the Site Addressing object, then click the Site Addressing tab.
If no GroupWise-specific address type appears in the list, then the addressing components have
not been installed on the server. See Section 4.4, “Installing the Exchange Gateway Addressing
Components,” on page 27.
Configuring the Exchange Side of the Exchange Gateway 33
Page 34

3 Select GWISE (or your custom address type for GroupWise), then click Edit.
4 To change the name of the non-GroupWise domain that you want to represent your Exchange
system, replace the Exchange organization with the domain name you want to use (worksheet
item 12).
5 To change the name of the external post office, replace the Exchange site with the post office
name you want to use (worksheet item 13).
6 To change the format of the GroupWise usernames that will be generated for Exchange users,
specify the desired address format (worksheet item 14).
7 Click OK to save the addressing information.
8 Back on the Site Addressing tab, click OK.
novdocx (en) 6 April 2007
9 Skip to Chapter 6, “Configuring the GroupWise Side of the Exchange Gateway,” on page 51.
5.2 Configuring Exchange 2000/2003
Section 5.2.1, “Performing Basic Configuration for Exchange 2000/2003,” on page 35
Section 5.2.2, “Setting Up Bidirectional Busy Search for Exchange 2000/2003,” on page 39
Section 5.2.3, “Customizing Addressing for Exchange 2000/2003,” on page 49
NOTE: The Exchange System Manager interface is different in Windows 2000 and Windows 2003,
but the same steps can be performed in both Windows versions.
34 GroupWise 7 Gateway for Microsoft Exchange Installation and Administration Guide
Page 35

5.2.1 Performing Basic Configuration for Exchange 2000/2003
1 Start Exchange System Manager.
novdocx (en) 6 April 2007
TIP: If you do not see the Administrative Groups object, right-click the Organization object,
then click Properties. Select Display Administrative Groups and Display Routing Groups, then
click OK.
2 Expand Administrative Groups, then expand First Administrative Group (or whatever your
system’s administrative group is).
3 Expand Routing Groups, then expand First Routing Group (or whatever your system’s routing
group is).
Configuring the Exchange Side of the Exchange Gateway 35
Page 36

4 Expand Connectors, right-click the Gateway object, then click Properties.
novdocx (en) 6 April 2007
5 Click Modify, specify the administrator username and password, then click OK.
6 Click Export Containers.
7 Click Add, select the container that contains Exchange users whose addresses and information
you want to export to the GroupWise system (for example, the Users container), then click OK
to add the export container to the list.
IMPORTANT: Directory synchronization and exchange cannot occur if you have not added
any user containers to the Export Containers property page.
When GroupWise users are imported into the Exchange system, they are, by default, placed in
a container named GroupWise at the root of Active Directory. You can use the /
36 GroupWise 7 Gateway for Microsoft Exchange Installation and Administration Guide
Page 37

useimportcontainer gateway startup switch to place the users into the import container
specified under Administrative Groups > First Administrative Group > Routing Group > First
Routing Group > Connectors > Exchange Gateway Connector.
8 Click OK again to return to the main Exchange System Manager window.
novdocx (en) 6 April 2007
9 Expand Servers, then expand the Server object for your server.
10 Expand First Storage Group (or whatever your system’s storage group is).
Configuring the Exchange Side of the Exchange Gateway 37
Page 38

11 Right-click Mailbox Store, click Properties, then click Security.
novdocx (en) 6 April 2007
12 Add the user to log in to the Exchange services and the Windows server (if the user has not
been added already).
13 Scroll to the bottom of the Permissions list, grant the user Send As and Receive As permissions,
then click OK.
Make sure that the permissions are explicitly granted, not inherited through a parent security
object. If necessary, click Advanced to verify the permissions.
14 Make sure that the Exchange services are running.
14a On the Control Panel, double-click Services.
14b Scroll down to check the status of the following services:
Microsoft Exchange Event
Microsoft Exchange IMAP4
Microsoft Exchange Information Store
Microsoft Exchange Management
Microsoft Exchange MTA Stacks
Microsoft Exchange POP3
Microsoft Exchange Routing Engine
Microsoft Exchange Site Replication Service
Microsoft Exchange System Attendant
14c If any of the Microsoft Exchange services are not running, start them now.
Make sure that the Startup Type field for each service is set to Automatic so that you do not
need to start them manually in the future.
15 If you want to set up bidirectional Busy Search between the GroupWise and Exchange systems,
continue with Setting Up Bidirectional Busy Search for Exchange 2000/2003.
or
38 GroupWise 7 Gateway for Microsoft Exchange Installation and Administration Guide
Page 39

If you want to customize the name of the non-GroupWise domain that represents the Exchange
system, the external post office that represents the Exchange administrative group, or the
format of GroupWise-type usernames for Exchange users, skip to Section 5.2.3, “Customizing
Addressing for Exchange 2000/2003,” on page 49.
or
Skip to Chapter 6, “Configuring the GroupWise Side of the Exchange Gateway,” on page 51
5.2.2 Setting Up Bidirectional Busy Search for Exchange 2000/ 2003
After performing basic configuration of the Exchange Gateway, you can configure it so that both
GroupWise users and Exchange users can perform Busy Searches on each other.
“Setting Up the Microsoft Calendar Connector on Exchange 2000” on page 39
“Setting Up the Microsoft Calendar Connector on Exchange 2003” on page 42
“Checking GroupWise-Related Windows Services” on page 46
“Resynchronizing Users” on page 47
“Testing the Bidirectional Busy Search” on page 48
novdocx (en) 6 April 2007
NOTE: Bidirectional busy search is not available for Exchange 5.5.
Setting Up the Microsoft Calendar Connector on Exchange 2000
“Installing the Calendar Connector on Exchange 2000” on page 39
“Configuring the Calendar Connector on Exchange 2000” on page 40
Installing the Calendar Connector on Exchange 2000
For background information about the Exchange 2000 Calendar Connector, see the Microsoft article
Exchange 2000 Service Pack 1 Calendar Connector (http://support.microsoft.com/kb/278009/).
1 Insert the Microsoft Exchange 2000 Service Pack 1 or later CD into the CD drive on the
Exchange server.
2 Browse to the \english\exch2000\ent_spn\calcon\i386 directory on the CD,
then run setup.exe.
3 When the Setup program appears, click Next.
4 Select Full installation including required Schema updates, then click Next.
5 When the installation is complete, click OK.
6 Continue with Configuring the Calendar Connector on Exchange 2000.
Configuring the Exchange Side of the Exchange Gateway 39
Page 40

Configuring the Calendar Connector on Exchange 2000
1 In Exchange System Manager, expand Administrative Groups > First Administrative Group >
Routing Groups > First Routing Group > Connectors.
novdocx (en) 6 April 2007
2 Right-click the Calendar Connector, then click Properties.
3 Under Connector used to import users into Active Directory, click Modify.
40 GroupWise 7 Gateway for Microsoft Exchange Installation and Administration Guide
Page 41

4 In the Name field, specify the name of the GroupWise Gateway for Microsoft Exchange
connector, then click OK to display the Calendar Connector Properties dialog box.
novdocx (en) 6 April 2007
5 Set Maximum age in minutes to 0.
The 0-second setting causes a free/busy request to come through the gateway for every refresh.
If you change to a larger number, Exchange caches free/busy requests for the specified number
of minutes.
6 Set Maximum number of seconds to wait to 60.
The 60-second setting prevents the gateway from quitting too soon as it waits for responses.
You can customize these settings as needed for your Exchange system.
7 Click Apply to save your settings.
8 Click Calendar Connections.
9 If there is not a Novell
®
GroupWise type already listed, click New, select Novell GroupWise,
then click OK to display the GroupWise Calendar Connection dialog box.
10 In the GroupWise API Gateway field, specify domain.exchange_gateway, then click OK.
This provides the name of the Domain object and the name of the Exchange Gateway object.
Configuring the Exchange Side of the Exchange Gateway 41
Page 42

11 Click Schedule.
novdocx (en) 6 April 2007
12 Select Always, then click OK.
13 Skip to “Checking GroupWise-Related Windows Services” on page 46.
Setting Up the Microsoft Calendar Connector on Exchange 2003
“Installing the Calendar Connector on Exchange 2003” on page 42
“Deactivating the Microsoft Connector for Novell GroupWise” on page 44
“Configuring the Calendar Connector on Exchange 2003” on page 45
Installing the Calendar Connector on Exchange 2003
1 Insert the Microsoft Exchange 2003 CD into the CD drive on the Exchange server.
2 If the CD autoruns, ignore the installation page that appears.
3 Browse to the \setup\i386 directory on the CD, then run setup.exe.
42 GroupWise 7 Gateway for Microsoft Exchange Installation and Administration Guide
Page 43

4 When the Installation Wizard appears, click Next.
novdocx (en) 6 April 2007
5 Click the check mark in the Action column for Microsoft Exchange, then select Change from
the drop-down list.
6 Click the check mark in the Action column for Microsoft Exchange Messaging and
Collaboration Services, then select Change from the drop-down list.
7 Click in the Action column for Microsoft Exchange Connector for Novell GroupWise, then
select Install.
8 Click in the Action column for Microsoft Exchange Calendar Connector, then select Install.
9 Continue with Deactivating the Microsoft Connector for Novell GroupWise.
Configuring the Exchange Side of the Exchange Gateway 43
Page 44

Deactivating the Microsoft Connector for Novell GroupWise
The Exchange Gateway does not use the Connector for Novell GroupWise provided by Microsoft.
1 In Exchange System Manager, expand Administrative Groups > First Administrative Group >
Routing Groups > First Routing Group > Connectors.
novdocx (en) 6 April 2007
2 Right-click Connector for Novell GroupWise, then click Properties.
3 In the API Gateway Path field, type some text in order to activate the other properties.
It does not matter what you type in the field because the Exchange Gateway does not use the
Connector for Novell GroupWise provided by Microsoft.
4 Click Address Space.
5 Select the GWISE address space, then click Modify.
6 In the Address field, change the address space to NotUsed, then click OK.
44 GroupWise 7 Gateway for Microsoft Exchange Installation and Administration Guide
Page 45

The bidirectional configuration for Busy Search does not use the GWISE address space that is
set up when you install the Exchange Gateway.
7 Continue with Configuring the Calendar Connector on Exchange 2003.
Configuring the Calendar Connector on Exchange 2003
1 In the Connectors list, right-click Calendar Connector, then click Properties.
2 Under Connector used to import users into Active Directory, click Modify.
novdocx (en) 6 April 2007
3 In the Enter the object name to select field, specify the name of the GroupWise Gateway for
Microsoft Exchange connector.
4 Click Names to verify that you typed it correctly, then click OK to display the Calendar
Connector Properties dialog box.
5 Set Maximum age in minutes to 0.
The 0-second setting causes a free/busy request to come through the gateway for every refresh.
If you change to a larger number, Exchange caches free/busy requests for the specified number
of minutes.
6 Set Maximum number of seconds to wait to 60.
The 60-second setting prevents the gateway from quitting too soon as it waits for responses.
Configuring the Exchange Side of the Exchange Gateway 45
Page 46

You can customize these settings as needed for your Exchange system.
7 Click Apply to save your settings.
8 Click Calendar Connections.
9 If there is not a Novell GroupWise type already listed, click New, select Novell GroupWise,
then click OK to display the GroupWise Calendar Connection dialog box.
10 In the GroupWise API Gateway field, specify domain.exchange_gateway, then click OK.
This provides the name of the Domain object and the name of the Exchange Gateway object.
11 Click Schedule.
novdocx (en) 6 April 2007
12 Select Always, then click OK.
13 Continue with Checking GroupWise-Related Windows Services.
Checking GroupWise-Related Windows Services
1 On the Windows desktop of the Exchange server, open the Control Panel.
2 Double-click Administrator Tools, then double-click Services.
3 Right-click Microsoft Exchange Connector for Novell GroupWise, then click Properties.
4 If Startup Type is set to Automatic, change it to Manual.
The Microsoft Exchange Connector for Novell GroupWise is no longer needed and should not
be started when the Windows server restarts.
46 GroupWise 7 Gateway for Microsoft Exchange Installation and Administration Guide
Page 47

5 If the Microsoft Exchange Connector for Novell GroupWise is currently running, click Stop.
6 Click OK to save the new settings for the Microsoft Exchange Connector for Novell
GroupWise.
7 In the list of services, make sure that the Microsoft Exchange Calendar Connector is running. If
it is not:
7a Right-click Microsoft Exchange Calendar Connector, then click Properties.
7b In the Startup Type field, select Automatic.
7c Click Start, then click OK.
8 In the list of services, make sure that the Microsoft Exchange Router for Novell GroupWise is
running. If it is not:
8a Right-click Microsoft Exchange Router for Novell GroupWise, then click Properties.
8b In the Startup Type field, select Automatic.
8c Click Start, then click OK.
9 Click File > Exit to close the Services window.
10 If this is a new installation of the Exchange Gateway, skip to “Testing the Bidirectional Busy
Search” on page 48.
or
If this is an update installation of the Exchange Gateway, continue with Resynchronizing
Users.
novdocx (en) 6 April 2007
Resynchronizing Users
If you are updating your Exchange Gateway with Support Pack 1, you need to resynchronize users.
In order to ensure that the Address Books of both systems are synchronized and contain valid
addresses, you delete the existing user information so that it is refreshed automatically with the new
configuration that you have just set up.
1 Delete the GroupWise users that currently display in the Exchange Address Book.
1a Start Active Directory Users and Computers.
1b Expand the Exchange server object.
1c Click the GroupWise folder.
1d Delete all the users from the folder.
2 Delete the Exchange users that currently display in the GroupWise Address Book.
2a In the GroupWise View in ConsoleOne
®
, select Users in the drop-down list at the top of
the window.
2b Expand the External Domain object that contains the representation of your Exchange
system.
2c Select an External Post Office object that represents an Exchange site or administrative
group of your Exchange system to display the users in that post office.
2d Delete all the users, then delete the External Post Office object.
2e Repeat Step 2c and Step 2d for each External Post Office object.
2f Delete the External Domain object.
3 Make sure that directory synchronization is enabled.
Configuring the Exchange Side of the Exchange Gateway 47
Page 48

3a Browse to and right-click the Exchange Gateway object, then click Properties.
3b Click GroupWise > Optional Gateway Settings.
3c Make sure that Directory Sync/Exchange is set to Both.
4 Start the Exchange Gateway, as described in Section 7.1, “Starting the Exchange Gateway,” on
page 55.
A fresh user synchronization automatically takes places between the two systems and
bidirectional Busy Search is now available.
5 Continue with Testing the Bidirectional Busy Search.
Testing the Bidirectional Busy Search
1 Start Outlook.
2 Create a new meeting request for a GroupWise user.
3 Click Attendee Availability in the new meeting request.
You should see the schedule of the GroupWise user.
4 Select a time, then send the meeting request to the GroupWise user.
novdocx (en) 6 April 2007
5 In the GroupWise client of the user to whom you send the meeting request, accept the meeting
request, then create an appointment for an Outlook user.
6 Click Busy Search in the new appointment.
You should see the schedule of the Outlook user.
7 Select a time, then send the appointment to the Outlook user.
If you can perform these tasks, then bidirectional busy search is set up correctly.
8 If you want to customize the name of the non-GroupWise domain that represents the Exchange
system, the external post office that represents the Exchange administrative group, or the
format of GroupWise-type usernames for Exchange users, continue with Customizing
Addressing for Exchange 2000/2003.
or
Skip to Chapter 6, “Configuring the GroupWise Side of the Exchange Gateway,” on page 51.
48 GroupWise 7 Gateway for Microsoft Exchange Installation and Administration Guide
Page 49

5.2.3 Customizing Addressing for Exchange 2000/2003
1 In Exchange System Manager, expand the Recipients container, then select the Recipient
Policies container.
novdocx (en) 6 April 2007
2 Right-click the Default Policy object, click Properties, then click the E-Mail Addresses
(Policy) tab.
If no GroupWise-specific address type appears in the list, then the addressing components have
not been installed on the server. See Section 4.4, “Installing the Exchange Gateway Addressing
Components,” on page 27.
Configuring the Exchange Side of the Exchange Gateway 49
Page 50

3 Select GWISE (or your custom address type for GroupWise), then click Edit.
novdocx (en) 6 April 2007
In the Address field, the three parts of a GroupWise address (domain, post office, and
username) are separated by periods. The displayed default is
Exchange_organization.Exchange_administrative_group.address_format_variable.
4 To change the name of the non-GroupWise domain that you want to represent your Exchange
system, replace the Exchange organization with the domain name you want to use worksheet
item 12).
5 To change the name of the external post office, replace the Exchange administrative group with
the post office name you want to use (worksheet item 13).
6 To change the format of the GroupWise usernames that will be generated for Exchange users,
replace %m with the desired address format (worksheet item 14).
7 Click OK.
8 Back on the Default Policy properties dialog box, click OK again to save the address format,
then click Yes to update all corresponding recipient e-mail addresses to the specified format.
9 Continue with Chapter 6, “Configuring the GroupWise Side of the Exchange Gateway,” on
page 51
50 GroupWise 7 Gateway for Microsoft Exchange Installation and Administration Guide
Page 51

6
Configuring the GroupWise Side
novdocx (en) 6 April 2007
of the Exchange Gateway
After you have configured the Exchange side of the gateway, you must configure the GroupWise®
side of the gateway by configuring the Exchange Gateway object in ConsoleOne
Section 6.1, “Providing Foreign System Configuration Information,” on page 51
Section 6.2, “Providing Gateway Information,” on page 53
6.1 Providing Foreign System Configuration Information
1 In ConsoleOne, connect to the domain where you installed the Exchange Gateway (worksheet
item 4), then select the Domain object.
2 Right-click the Exchange Gateway object, then click Properties.
®
.
6
3 On the Foreign System Configuration page, click Default to populate the fields.
NOTE: If the Foreign System Configuration page is not available, then the Exchange Gateway
snap-in is not installed in ConsoleOne.
Configuring the GroupWise Side of the Exchange Gateway
51
Page 52

novdocx (en) 6 April 2007
The defaults are typically acceptable, but you can change the information if needed.
Address: Specify the name of the Exchange address type (worksheet item 11) that you want
the gateway to create in the Exchange system. The default is GWise.
Administrator: Specify the name and e-mail address of the administrator of the Exchange
system.
Converters: The locations of the conversion DLLs is provided automatically.
IMPORTANT: We highly recommend that you do not change the default information.
4 Click Apply to save the foreign system configuration information.
5 Continue with Section 6.2, “Providing Gateway Information,” on page 53.
52 GroupWise 7 Gateway for Microsoft Exchange Installation and Administration Guide
Page 53

6.2 Providing Gateway Information
1 On the Exchange Gateway object, click GroupWise > Identification.
novdocx (en) 6 April 2007
2 Fill in the following fields on the Identification page:
Description: This field is optional. If desired, provide any descriptive information about the
gateway.
Subdirectory: Displays the name of the Exchange Gateway root directory specified during
installation. The default is exchange.
Time Zone: Displays the time zone of the domain where the gateway is installed.
Database Version: Select 6.5 or 7.x, depending on the version of your GroupWise system.
Platform: Displays Windows as the default platform.
Gateway Type: Defaults to Exchange.
Gateway Alias Type: Specify Exchange.
3 Click OK to save the gateway information.
You have now provided sufficient configuration information to start the Exchange Gateway.
4 Continue with “Running the Exchange Gateway” on page 55.
Configuring the GroupWise Side of the Exchange Gateway 53
Page 54

novdocx (en) 6 April 2007
54 GroupWise 7 Gateway for Microsoft Exchange Installation and Administration Guide
Page 55

7
Running the Exchange Gateway
After you have installed the Exchange Gateway software and configured both sides of the gateway,
you are ready to start the gateway.
Section 7.1, “Starting the Exchange Gateway,” on page 55
Section 7.2, “Acquainting E-Mail Users with the Exchange Gateway,” on page 57
Section 7.3, “Stopping the Exchange Gateway,” on page 58
Section 7.4, “Uninstalling the Exchange Gateway,” on page 58
After the Exchange Gateway has started successfully, continue with Chapter 8, “Configuring the
Exchange Gateway,” on page 61
7.1 Starting the Exchange Gateway
Before you start the Exchange Gateway, make sure that it has network access to the following
locations:
The GroupWise
The gateway requires Read, Write, Create, Erase, Modify, and File Scan rights.
®
domain directory and subdirectories where you installed the gateway files.
novdocx (en) 6 April 2007
7
The Exchange server. You should have already provided access when you configured the
Exchange side of the gateway, as described in Chapter 5, “Configuring the Exchange Side of
the Exchange Gateway,” on page 31.
Follow the instructions for the installation method you chose for the Exchange Gateway (worksheet
item 7):
“Starting the Exchange Gateway As a Windows Application” on page 55
“Starting the Exchange Gateway As a Windows Service” on page 56
IMPORTANT: After you start the gateway, stop and then start the MTAs in the GroupWise system.
This establishes the links to the non-GroupWise domain that represents the Exchange system.
7.1.1 Starting the Exchange Gateway As a Windows Application
1 At the Windows server where you installed the Exchange Gateway, click Start > Programs.
Running the Exchange Gateway
55
Page 56

2 Click GroupWise Exchange Gateway > Exchange > GroupWise Exchange Gateway.
novdocx (en) 6 April 2007
When running as an application, the Exchange Gateway server console appears on the server
while it is running. For instructions on interpreting the information displayed on the Exchange
Gateway server console, and for information about other monitoring alternatives, see
Chapter 9, “Monitoring the Exchange Gateway,” on page 89.
3 Stop and then start the MTAs in the GroupWise system.
This establishes the links to the non-GroupWise domain that represents the Exchange system.
4 After the Exchange Gateway has started successfully and the links between systems have been
established, skip to Chapter 8, “Configuring the Exchange Gateway,” on page 61.
7.1.2 Starting the Exchange Gateway As a Windows Service
1 At the Windows server where you installed the Exchange Gateway, click Start > Settings >
Control Panel.
2 Double-click Services.
In the alphabetical list of services, the name of the Exchange Gateway service starts with the
name of the domain where the gateway is installed, followed by the name of the gateway itself,
followed by Service. For example, if the domain is named Connector and the gateway is named
Exchange, then the name of the service is ConnectorExchangeService.
3 Select the gateway service, then click Start.
When running as a service, the Exchange Gateway does not have a console on the server where
it is running. However, you can monitor it in other ways, as described in Chapter 9,
“Monitoring the Exchange Gateway,” on page 89.
4 Stop and then start the MTAs in the GroupWise system.
This establishes the links to the non-GroupWise domain that represents the Exchange system.
5 After the Exchange Gateway has started successfully and the links between systems have been
established, skip to Chapter 8, “Configuring the Exchange Gateway,” on page 61.
56 GroupWise 7 Gateway for Microsoft Exchange Installation and Administration Guide
Page 57

7.2 Acquainting E-Mail Users with the Exchange Gateway
After you have started the Exchange Gateway, GroupWise users and Exchange users need only the
following information in order to start using the gateway immediately:
Section 7.2.1, “Addressing Messages,” on page 57
Section 7.2.2, “Understanding What GroupWise Send Options Are Available through the
Gateway,” on page 57
7.2.1 Addressing Messages
If you plan to set up directory synchronization and exchange, as described in Section 8.1, “Enabling
Directory Synchronization and Exchange of Address Books,” on page 61, GroupWise users can
select Exchange users from the GroupWise Address Book, and Exchange users can select
GroupWise users from the Exchange Address Book.
If you do not plan to set up directory synchronization and exchange, you must explain to GroupWise
users how to add Exchange users to their personal address books, as described in “Adding Individual
Exchange Users to Personal Address Books” on page 66. You must also explain to both GroupWise
users and Exchange users how to manually type addresses in the To field of messages.
novdocx (en) 6 April 2007
GroupWise to
Exchange
Exchange to
GroupWise
Syntax
gateway_name:exchange_organization.exchange_site.recipient’s_mailboxt_name
Examples
Exchange:XYZCorp.Provo.SJones
Syntax
address_type:domain.post_office.user_ID
Examples
GWise:Corporate.Marketing.LTanaka
7.2.2 Understanding What GroupWise Send Options Are Available through the Gateway
GroupWise users can use some, but not all, GroupWise send options through the Exchange
Gateway. The following GroupWise send options are supported:
Priority (high, normal, low)
Classification (normal, proprietary, confidential, secret, top secret, for your eyes only)
Reply Requested (when convenient or within x days)
Delay Delivery (deliver item after x days)
Notify Recipients (if enabled as described in Section 8.7, “Enabling Message Status for Sent
Items,” on page 85)
Running the Exchange Gateway 57
Page 58

The following GroupWise send options are not supported:
Expiration Date (after x days)
Auto-Delete (when the last recipient has deleted the message)
Conceal Subject
Require Password to Complete Routed Item
Sign Digitally
Encrypt for Recipients
7.3 Stopping the Exchange Gateway
Occasionally, it might be necessary to stop the gateway to perform maintenance on the Windows
server or for some other purpose. When you stop the gateway, any messages being sent from
GroupWise users are queued in one of the
domain\wpgate\exchange\wpcsout\ngaxxxx\0-7 directories. Messages sent from
Exchange users are moved to the gateway’s mail store. The messages waiting in each system are
processed as soon as the gateway is started again.
novdocx (en) 6 April 2007
Follow the instructions for the installation option you chose for the Exchange Gateway:
Section 7.3.1, “Stopping the Exchange Gateway If It Is Running As an Application,” on
page 58
Section 7.3.2, “Stopping the Exchange Gateway If It Is Running As a Service,” on page 58
7.3.1 Stopping the Exchange Gateway If It Is Running As an Application
1 At the Exchange Gateway server console, click File > Exit.
or
Press F7.
2 Click Ye s to stop the gateway.
7.3.2 Stopping the Exchange Gateway If It Is Running As a Service
1 At the Exchange Gateway server console, click Start > Settings > Control Panel.
2 Double-click Services.
3 Select the Exchange Gateway service, then click Stop.
Recall that the Exchange Gateway Service is named after the domain and gateway.
7.4 Uninstalling the Exchange Gateway
If you need to remove the Exchange Gateway from the server where you installed it, follow the
instructions for the installation option you chose when installing the Exchange Gateway:
Section 7.4.1, “Uninstalling the Exchange Gateway As an Application,” on page 59
58 GroupWise 7 Gateway for Microsoft Exchange Installation and Administration Guide
Page 59

Section 7.4.2, “Uninstalling the Exchange Gateway As a Service,” on page 59
7.4.1 Uninstalling the Exchange Gateway As an Application
1 At the Windows server where you installed the Exchange Gateway, click Start > Programs >
GroupWise Exchange Gateway > Exchange > Uninstall.
2 If a message informs you that some files could not be deleted, delete the
domain\wpgate\exchange directory.
3 In ConsoleOne
®
, delete the Exchange Gateway object from the domain.
7.4.2 Uninstalling the Exchange Gateway As a Service
1 At the Windows server where you installed the Exchange Gateway, click Start > Settings >
Control Panel.
2 Double-click Add/Remove Programs, select domain.gateway (Exchange Gateway), then click
OK.
3 If a message informs you that some files could not be deleted, delete the
domain\wpgate\exchange directory.
4 In ConsoleOne, delete the Exchange Gateway object from the domain.
novdocx (en) 6 April 2007
Running the Exchange Gateway 59
Page 60

novdocx (en) 6 April 2007
60 GroupWise 7 Gateway for Microsoft Exchange Installation and Administration Guide
Page 61

8
Configuring the Exchange
novdocx (en) 6 April 2007
Gateway
After the Exchange Gateway is up and running between the GroupWise® system and the Exchange
system, there are a variety of ways to refine its configuration to meet the specific needs of your email users.
Section 8.1, “Enabling Directory Synchronization and Exchange of Address Books,” on
page 61
Section 8.2, “Configuring Addressing Instead of Using Directory Synchronization and
Exchange,” on page 64
Section 8.3, “Changing the Link Protocol between the Exchange Gateway and the MTA,” on
page 72
Section 8.4, “Controlling Gateway Access,” on page 73
Section 8.5, “Setting Up Accounting,” on page 81
Section 8.6, “Establishing Gateway Administrators,” on page 84
Section 8.7, “Enabling Message Status for Sent Items,” on page 85
Section 8.8, “Binding the Exchange Gateway to a Specific IP Address,” on page 86
8.1 Enabling Directory Synchronization and
8
Exchange of Address Books
Directory synchronization and exchange enable the Exchange Gateway to automatically exchange
Address Book information between the GroupWise system and the Exchange system.
Directory Exchange: Causes the gateway to perform a nightly exchange of the Exchange
public Address Book and GroupWise Address Book.
Directory Synchronization: Causes the gateway to update each Address Book as changes in
Address Book information occur. If directory synchronization is not enabled, the Address
Books are not updated until the nightly directory exchange occurs.
IMPORTANT: To ensure proper replication of names and addresses in both systems, use both
directory synchronization and exchange.
1 Make sure that the Exchange system is set up to support directory synchronization and
exchange, as described in Chapter 5, “Configuring the Exchange Side of the Exchange
Gateway,” on page 31. You might want to double-check the trust level established for the
gateway.
2 If you have domains in your GroupWise system that contain users that you do not want to
appear in the Exchange version of the GroupWise Address Book, use the /blockdom switch in
the startup files (gwexch.cfg) to list the GroupWise domains that should not be included in
the directory synchronization and exchange process.
Configuring the Exchange Gateway
61
Page 62

3 In ConsoleOne®, browse to and select the domain where you installed the Exchange Gateway,
right-click the Exchange Gateway object, then click Properties to display the gateway
Identification page.
4 Click GroupWise > Optional Gateway Settings to display the Optional Gateway Settings page.
novdocx (en) 6 April 2007
5 In the Directory Sync/Exchange field, select Both, then click OK.
ConsoleOne passes the directory synchronization and exchange information to the Exchange
Gateway so that it can start transferring user information. The larger the Address Books are, the
longer the process takes.
6 If you want the names of GroupWise users to display as Lastname, Firstname in the Exchange
Address Book, add the /displaynamelastfirst gateway startup switch to the gwexch.cfg file.
7 If you edited the gwexch.cfg file, stop and then start the Exchange Gateway so that it reads
the updated startup file.
When you first started the Exchange Gateway, a non-GroupWise domain representing the Exchange
system was created automatically. It was named after the Exchange organization. Under the nonGroupWise domain, an external post office was created for each Exchange site or server and given
the same name as the corresponding Exchange site or server. However, no user information was
transferred at that time.
Now that you have enabled directory synchronization and exchange, Exchange users are added to
these external post offices as external GroupWise users.
You can see the results of directory synchronization and exchange in the following locations:
Exchange users appear in ConsoleOne because External User objects are created in the
External Post Office object that represents the Exchange site or administrative group.
Exchange users appear in the GroupWise Address Book because they have External User
objects in the GroupWise system.
62 GroupWise 7 Gateway for Microsoft Exchange Installation and Administration Guide
Page 63

GroupWise users appear in the Exchange Address Book because the Exchange Gateway
creates recipient addresses based on the GroupWise address type, as described in Section 3.8,
“Selecting User Address Type and Format,” on page 19.
When you first turn on directory synchronization and exchange, e-mail addresses from the Exchange
system come into the GroupWise Address Book in the format
username.administrative_group.exchange_organization. You can configure the non-GroupWise
domain that represents the Exchange system to format e-mail addresses in a more familiar manner.
1 In ConsoleOne, browse to and right-click the Non-GroupWise Domain object that represents
your Exchange system, then click Properties.
2 Click GroupWise > Internet Addressing.
novdocx (en) 6 April 2007
3 Select Override next to the Internet Domain Name field, then specify the Internet domain name
for your Exchange system (such as example.com).
4 Select Override next to the Preferred Address Format field, then select the address format that
your users are accustomed to.
After the specified Internet domain name and address format have replicated throughout the
GroupWise system, users’ e-mail addresses display as desired in the GroupWise Address Book.
Related Startup Switches You can use the /allowdom and /blockdom startup switches in the
Exchange Gateway startup file (gwexch.cfg) to control which GroupWise domains have their
users displayed in the Exchange Address Book.
Exchange Gateway Web Console You can see whether directory synchronization and exchange
are enabled on the Configuration page. You can turn directory synchronization and exchange on and
off for the current gateway session on the Optional Gateway Settings page.
8.2 Configuring Addressing Instead of Using Directory Synchronization and Exchange
When you take advantage of directory synchronization and exchange, as described in Section 8.1,
“Enabling Directory Synchronization and Exchange of Address Books,” on page 61, GroupWise
Configuring the Exchange Gateway 63
Page 64

users and Exchange users can select each other out of their familiar Address Books. Addressing is
not an issue under these circumstances.
If you do not want to enable directory synchronization and exchange, you must use other addressing
alternatives:
Section 8.2.1, “Adding Individual Exchange Users to the GroupWise Address Book,” on
page 64
Section 8.2.2, “Adding Individual Exchange Users to Personal Address Books,” on page 66
Section 8.2.3, “Adding Individual GroupWise Users to the Exchange Address Book,” on
page 67
Section 8.2.4, “Using Explicit Addressing,” on page 71
Section 8.2.5, “Setting Up an Addressing Rule to Facilitate Busy Searches,” on page 71
8.2.1 Adding Individual Exchange Users to the GroupWise Address Book
If there are some specific Exchange users who you want to appear in the GroupWise Address Book,
you can add those individual users without enabling directory synchronization and exchange. You
add Exchange users to the GroupWise Address Book by defining them as external users and then
specifying the explicit addresses required to route messages to them in the Exchange system.
novdocx (en) 6 April 2007
1 In ConsoleOne, select GroupWise System, select the non-GroupWise domain that represents the
Exchange system, then select the external post office that represents the Exchange site or
administrative group where the Exchange user is located.
2 Right-click the GroupWise Post Office object that represents the Exchange site or
administrative group, then click New > External User.
3 Type a username, then click OK.
64 GroupWise 7 Gateway for Microsoft Exchange Installation and Administration Guide
Page 65

4 Right-click the new External User object, then click Properties.
novdocx (en) 6 April 2007
5 Fill in fields as needed to provide information about Exchange the user that you want to appear
in the GroupWise Address Book.
6 Click Apply to save the user information.
7 Click GroupWise > Gateway Aliases to display the Gateway Aliases page.
You use the Gateway Aliases page to define the explicit address required to route messages to
the user in the Exchange system.
Configuring the Exchange Gateway 65
Page 66

8 Click Add to display the Create Alias dialog box.
9 Fill in the following fields:
Gateway Alias Type: From the list, select the Exchange Gateway.
The gateway alias type was defined during configuration of the gateway. If there is no gateway
alias type listed for the gateway, you can define one now. See Section 6.2, “Providing Gateway
Information,” on page 53.
Gateway Alias: Specify the user’s address as defined in Exchange.
For an example, see “Addressing Messages” on page 57.
10 Click OK to save the gateway alias and return to the Gateway Alias page.
novdocx (en) 6 April 2007
The gateway alias is now listed in the Gateway Alias list.
11 Click OK to save the list.
ConsoleOne passes the alias information to the Exchange Gateway so that the Exchange user is
added to the GroupWise Address Book.
12 Repeat Step 2 through Step 11 for each Exchange user you want to add to the GroupWise
Address Book.
8.2.2 Adding Individual Exchange Users to Personal Address Books
GroupWise users can also add Exchange users to their personal address books if the Exchange users
are not already defined in the GroupWise Address Book.
1 In the GroupWise Windows client, click Tools > Address Book to open the Address Book.
2 Select a personal address book.
66 GroupWise 7 Gateway for Microsoft Exchange Installation and Administration Guide
Page 67

3 Click New > Contact > OK.
novdocx (en) 6 April 2007
4 Fill in the following fields:
First: Specify the user’s first name.
Last: Specify the user’s last name.
E-mail Address: Specify the explicit address required to route a message to the Exchange
user. For syntax and examples, see “Addressing Messages” on page 57.
5 Click OK to save the new contact in the personal address book.
8.2.3 Adding Individual GroupWise Users to the Exchange Address Book
If there are some specific GroupWise users who you want to appear in the Exchange Address Book,
you can add those individual users without enabling directory synchronization and exchange. You
add GroupWise users to the Exchange Address Book by defining them as custom recipients and then
specifying the explicit addresses required to route messages to them in the GroupWise system. You
can also configure the Exchange Gateway to perform directory synchronization and exchange for
them.
“Adding GroupWise Users in Exchange 5.5” on page 68
“Adding GroupWise Users in Exchange 2000/2003” on page 69
“Including Custom Users in Directory Synchronization” on page 71
Configuring the Exchange Gateway 67
Page 68

Adding GroupWise Users in Exchange 5.5
1 Start Exchange Administrator.
novdocx (en) 6 April 2007
2 Expand the Recipients container.
3 Select an existing container.
or
Create a new container for GroupWise recipients.
3a Click File > New Other > Recipients Container.
3b Specify a name for the new container; for example, GroupWise Recipients.
3c Specify a directory for the new container.
3d Click OK.
4 Select the container in which you want to create a custom recipient to represent a GroupWise
user, then click File > New Custom Recipient.
68 GroupWise 7 Gateway for Microsoft Exchange Installation and Administration Guide
Page 69

5 Select GWISE Address, then click OK.
6 In the Display Name field, specify the full name of the GroupWise user.
7 In the Address field, specify the GroupWise user’s address in the following format:
domain.post_office.user_ID
where domain is the name of the GroupWise domain, post_office is the name of the GroupWise
post office, and user_ID is the user’s GroupWise ID.
8 Click OK.
9 In the Properties dialog box, specify whatever information you want to be available about the
GroupWise user, then click OK.
The GroupWise user can now be selected from the Exchange Address Book.
novdocx (en) 6 April 2007
Adding GroupWise Users in Exchange 2000/2003
1 On the Windows desktop, click Programs > Microsoft Exchange > Active Directory Users and
Computers.
Configuring the Exchange Gateway 69
Page 70

2 Expand the Users container, select the container in which you want to create a Contact, then
click Action > New > Contact.
3 Specify the information about the GroupWise user that you want to be available in the
Exchange Address Book, then click Next.
novdocx (en) 6 April 2007
4 In the E-mail Address field, click Modify.
70 GroupWise 7 Gateway for Microsoft Exchange Installation and Administration Guide
Page 71

5 Select Novell GroupWise Address, then click OK.
6 In the Address field, specify the GroupWise user’s address in the following format:
domain.post_office.user_ID
where domain is the name of the GroupWise domain, post_office is the name of the GroupWise
post office, and user_ID is the user’s GroupWise ID.
7 Click OK, click Next, then click Finish.
novdocx (en) 6 April 2007
The GroupWise user can now be selected from the Exchange Address Book.
Including Custom Users in Directory Synchronization
If you want to be able to change user information associated with custom recipients in Exchange and
have the information for the corresponding GroupWise user updated to match, you must enable
directory synchronization for custom recipients. In the Exchange Gateway startup file
(gwexch.cfg), use the /custom startup switch to enable directory synchronization for custom
recipients. For more information about directory synchronization, see Section 8.1, “Enabling
Directory Synchronization and Exchange of Address Books,” on page 61.
8.2.4 Using Explicit Addressing
If you do not enable directory synchronization and exchange, and if users are not represented in the
other e-mail system’s Address Book, then users on both sides of the gateway must use explicit
addressing. See “Addressing Messages” on page 57.
8.2.5 Setting Up an Addressing Rule to Facilitate Busy Searches
When performing a busy search, the Exchange server uses LDAP to identify the users being
searched, rather than the typical recipient information used when delivering messages. If users’ email addresses do not match their mailbox names, messages are delivered successfully but busy
searches fail.
You can use the /addressrule startup switch in the gwexch.cfg file to define the format you want
the gateway to use when it sends a busy search request to the Exchange system. With the /
addressrule startup switch, you can use the following tags to specify the address format you want:
<domain>
<username>
Configuring the Exchange Gateway 71
Page 72

<firstname>
<lastname>
<firstinitial>
<lastinitial>
Each tag is replaced with the corresponding user-specific information. Additional text can be added
to the address format as well.
Examples:
/addressrule-<firstname>_<lastname>@<domain>
/addressrule-<firstname>.<lastname>@<domain>
/addressrule-<username>@exchange.<domain>
These address rules would result in the following addresses for a user named Sophie Jones at
Corporate.com:
Sophie_Jones@Corporate.com
Sophie.Jones@Corporate.com
SJones@exchange.Corporate.com
novdocx (en) 6 April 2007
8.3 Changing the Link Protocol between the Exchange Gateway and the MTA
Before the GroupWise 7 Gateway for Microsoft Exchange, the Exchange Gateway and the MTA
communicated by transferring message files through message queue directories using a mapped/
UNC link. Starting with the GroupWise 7 version of the gateway, you can configure the gateway so
that it uses a TCP/IP link to communicate with the MTA, instead of transferring message files
through queue directories. During installation, the Exchange Gateway is configured for a mapped/
UNC link. You can reconfigure it to use a TCP/IP link in ConsoleOne®.
1 In ConsoleOne, right-click the Exchange Gateway object, then click Properties.
72 GroupWise 7 Gateway for Microsoft Exchange Installation and Administration Guide
Page 73

2 Click GroupWise > Network Address.
novdocx (en) 6 April 2007
3 In the TCP/IP Address field, click Edit, specify the IP address or DNS hostname of the server
where the Exchange Gateway is running (which is not necessarily the server where the
Exchange Gateway software is installed), then click OK to return to the Network Address page.
4 In the Message Transfer Port field, specify a unique port number; for example, 7103.
5 Click OK to save the new link configuration for the Exchange Gateway.
ConsoleOne then notifies the Exchange Gateway and the MTA to restart using the new link
protocol.
8.4 Controlling Gateway Access
The Exchange Gateway lets you control access through the gateway. For example, you can:
Control which GroupWise users can send messages and to which Exchange users
Control which GroupWise users can receive messages and from which Exchange users
Control the maximum size for messages sent through the gateway
Control whether or not rule-generated GroupWise messages are sent through the gateway
The standard way to control access for all GroupWise and Exchange users on the GroupWise side of
the gateway is with the access.cfg file in the domain\wpgate\exchange directory. In
addition, you can control individual user access using the Gateway Access field of individual User
objects in ConsoleOne.
Section 8.4.1, “Using the Access.cfg File in the Gateway Directory,” on page 74
Section 8.4.2, “Using the Gateway Access Field on Individual User Objects,” on page 79
On the Exchange side of the gateway, access control is provided on the Permissions page of the Site
Addressing object. See your Exchange documentation for more information.
Configuring the Exchange Gateway 73
Page 74

8.4.1 Using the Access.cfg File in the Gateway Directory
The access.cfg file is an ASCII text file that can be edited with a standard text editor. It is
located in the gateway root directory (for example, domain\wpgate\exchange). The
access.cfg file enables you to implement the following specific types of access control:
Provide specific access control based on GroupWise domains and post offices
Provide specific access control based on access groups that you define
Limit the size of incoming and outgoing messages to and from your GroupWise system for
specific domains, post offices, or access groups
Prevent messages from specific addresses from entering your GroupWise system for specific
domains, post offices, or access groups
Allow messages from specified addresses to enter your GroupWise system, while preventing
all others for specific domains, post offices, or access groups
Prevent rule-generated messages from going out of your GroupWise system for specific
domains, post offices, or access groups
The initial access.cfg file includes descriptions and examples of the section headers and
keywords that you can use in the file. However, all lines are initially commented out and access
control is off by default. Print the initial access.cfg file in the domain\wpgate\exchange
directory. Reviewing the file can help you understand how it works.
novdocx (en) 6 April 2007
Add the following line at the top of the file to turn on access control:
Access Control=On
After access control has been turned on, you can create sections in the access.cfg file for
various groups of users. Section headers are enclosed in square brackets ([header]). Within each
section, you use keywords to define the access control settings for the group to which the section
applies. The following section headers and keywords are available:
Section Headers Keywords
[Default:In|Out]
[groupwise_domain:In|Out]
[groupwise_domain.post_office:In|Out]
[AccessGroup:group_name]
AllAccess
NoAccess
Block
Allow
MaxSize
AllowRuleGenerated
Section headers, keywords, and settings are not case sensitive. The In and Out directions are from
the point of view of the GroupWise system. Semicolons (;), slashes (/), and pound signs (#) can be
used to comment out lines of text. In the examples provided in the access.cfg file, the string
gwaddresstext represents the address of an Exchange user. For example, you could replace
gwaddresstext with Novell.Sales.Glen if that is the appropriate address format, as explained in
Section 3.8, “Selecting User Address Type and Format,” on page 19.
Exchange Gateway Web Console You can turn access control on and off for the current gateway
session on the Access Control page. You can also adjust the maximum message size.
74 GroupWise 7 Gateway for Microsoft Exchange Installation and Administration Guide
Page 75

Section Headers
Section headers establish groups of users to which access control settings are applied.
“[Default:In|Out]” on page 75
“[groupwise_domain:In|Out]” on page 75
“[groupwise_domain.post_office:In|Out]” on page 75
“[AccessGroup:group_name]” on page 76
[Default:In|Out]
This section lists the access control settings for users who are not covered by access control settings
for a particular GroupWise domain, post office, or access group.
Syntax:
[Default:In]
[Default:Out]
Examples:
novdocx (en) 6 April 2007
[Default:In]
MaxSize=100000
[Default:Out]
AllowRuleGenerated=No
This example limits incoming messages to 100 KB but does not limit the size of outgoing messages.
It prevents rule-generated GroupWise messages from transferring through the gateway to the
Exchange system. These access control settings would apply to any users who did not fall under a
more specific section header.
[groupwise_domain:In|Out]
This section lists the access control settings for users in a particular GroupWise domain.
Syntax:
[groupwise_domain:In]
[groupwise_domain:Out]
Examples:
[Corporate:In]
MaxSize=100000000
[Corporate:Out]
AllowRuleGenerated=Yes
This example limits incoming messages to 1 MB but does not limit outgoing messages. It allows
GroupWise users to send rule-generated messages.
[groupwise_domain.post_office:In|Out]
This section lists the access control settings for users in a particular GroupWise post office.
Configuring the Exchange Gateway 75
Page 76

Syntax:
[groupwise_domain.post_office:In]
[groupwise_domain.post_office:Out]
Examples:
[Corporate.Temps:In]
Allow NetTech
MaxSize=10000
[Corporate.Temps:Out]
Allow NetTech
MaxSize=10000
AllowRuleGenerated=No
This example allows users in the Temps post office to exchange messages with users in the
Exchange NetTech system only. It restricts incoming and outgoing messages to 10 KB. It prevents
rule-generated messages.
novdocx (en) 6 April 2007
[AccessGroup:group_name]
This section lists the access control settings for individual GroupWise users who are assigned to the
access group in ConsoleOne, as described in “Using the Gateway Access Field on Individual User
Objects” on page 79. Access groups do not have direction parameters. If you want to control access
in both directions, you must create separate access groups.
Syntax:[
[AccessGroup:group_name]
Examples:
[AccessGroup:SysAdminsIn]
MaxSize=5000000[
[AccessGroup:SysAdminsOut]
AllowRuleGenerated=Yes
This example allows users in the SysAdminsIn and SysAdminsOut access groups to receive
messages up to 5 MB in size and to send rule-generated messages.
Keywords
Keywords define the access control settings for the users included under each section header.
“AllAccess” on page 77
“NoAccess” on page 77
“Block” on page 77
“Allow” on page 78
“MaxSize” on page 78
“AllowRuleGenerated” on page 79
76 GroupWise 7 Gateway for Microsoft Exchange Installation and Administration Guide
Page 77

AllAccess
This keyword provides unrestricted access to the Exchange Gateway for those GroupWise users
specified by the section header. Users can send messages to or receive messages from Exchange
users, depending on the direction specified by the header.
Examples:
[Corporate.Executives:In]
AllAccess[
[Corporate.Executives:Out]
AllAccess
This example allows all GroupWise users in the Executives post office to exchange messages with
all Exchange users with no access control restrictions.
NoAccess
This keyword restricts access to the Exchange Gateway for those GroupWise users specified by the
section header. Users cannot send or receive messages through the gateway, depending on the
direction specified in the header.
novdocx (en) 6 April 2007
Examples:
[Corporate.Temps:In]
NoAccess
[Corporate.Temps:Out]
NoAccess
This example prevents all GroupWise users in the Temps post office from exchanging messages
with Exchange users.
Block
This keyword restricts access to the Exchange Gateway from the perspective of Exchange users.
This keyword differs from NoAccess because a specific Exchange address must be provided. If
GroupWise users try to send mail to a Exchange address that has been blocked, they receive a
message from the gateway stating that the message is undeliverable.
Syntax:
Block exchange_server
Block username@exchange_server
Block CN=full_name/O=organization@exchange_server
Examples:
[Corporate.Temps:In]
Block XYZCorp
[Corporate.Temps:Out]
Block XYZCorp
[Corporate.Executives:In]
Block SJones@XYZCorp
Configuring the Exchange Gateway 77
Page 78

Block CN=Sophie Jones/O=Sales@XYZCorp
The first example prevents GroupWise users in the Temps post office from exchanging messages
with users in the Exchange XYZCorp system. The second example prevents GroupWise users in the
Executives post office from receiving messages from a specific Exchange user. Providing the
username in both formats is required to totally block a user.
Allow
This keyword allows messages to pass through the Exchange Gateway only if the message’s
recipient matches the Exchange address specified on the Allow line. Any messages addressed to
other Exchange addresses are blocked.
Syntax:
Allow exchange_server
Allow username@exchange_server
Allow CN=full_name/O=organization@exchange_server
Examples:
novdocx (en) 6 April 2007
[Corporate.Temps:In]
Allow NetTech
[Corporate.Temps:Out]
Allow NetTech
[Default:In]
Allow SJones@XYZCorp
Allow CN=Sophie Jones/O=Sales@XYZCorp
The first example allows GroupWise users in the Temps post office to exchange messages with the
NetTech Exchange system but no others. The second example allows all users to receive messages
from a specified user.
MaxSize
This keyword determines the maximum size of messages that the Exchange Gateway can transfer
between systems. Maxsize is specified in bytes (1000 = 1000 bytes or 1 KB), with a range from 0 to
2147483647.
Unless you have a reason to limit the message size (for example, you are charged for the amount of
data transferred by the gateway), you might not want to limit the message size. When attachments
are encoded as they pass through the gateway, they generally become larger.
Syntax:
Maxsize=number_of_bytes
Examples:
[Corporate.Temps:In]
MaxSize=1000000
[Corporate.Temps:Out]
MaxSize=5000000
78 GroupWise 7 Gateway for Microsoft Exchange Installation and Administration Guide
Page 79

This example prevents GroupWise users in the Temps post office from receiving messages larger
than 1 MB and from sending messages larger than 5 MB.
AllowRuleGenerated
This keyword determines whether or not rule-generated messages are allowed through the Exchange
Gateway. It applies only to outbound messages from GroupWise to Exchange.
You could use this keyword to control rule-generated messages such as “On Vacation” from entering
the Exchange system. Unlike NoAccess and Block, the gateway does not generate a status message
stating that the mail message was undeliverable. Instead, the message remains pending in the
sender’s mailbox.
Syntax:
AllowRuleGenerated=Yes | No
Examples:
[Default:Out]
AllowRuleGenerated=No
novdocx (en) 6 April 2007
This example prevents all rule-generated messages from transferring from the GroupWise system to
the Exchange system.
8.4.2 Using the Gateway Access Field on Individual User Objects
You can use the Gateway Access field on the GroupWise Account page of each User object in
ConsoleOne to control individual user access. This can be useful if you only have a few users whose
access you want to control. If you have many users whose access you want to control, you should
use the access.cfg file, as described in “Using the Access.cfg File in the Gateway Directory” on
page 74.
1 If desired, create an access control group in the access.cfg file.
2 In ConsoleOne, browse to and right-click the user whose access you want to control, then click
Properties.
Configuring the Exchange Gateway 79
Page 80

3 Click GroupWise > Account to display the Account page.
novdocx (en) 6 April 2007
4 Fill in the Gateway Access field.
If you created an access control group in the access.cfg file in Step 1, specify the name of
the access control group that you want this user to be associated with.
If you have not created an access control group, you can put access control information unique
to this user in the Gateway Access field.
Syntax:
gateway.direction:keyword,keyword,...,keyword;gateway.direction:keyword,...,keyword
The following keywords are valid in the Gateway Access field:
AllAccess
NoAccess
MaxSize
AllowRuleGenerated
IMPORTANT: The Block and Allow keywords cannot be used in the Gateway Access field.
They can only be used in the access.cfg file.
Example:
Exchange.Out:MaxSize=500000,AllowRuleGenerated=No;Exchange.In:Maxsize=50000
In this example, the gateway name is Exchange, the maximum message size is 500 KB, and
rule-generated messages are prevented from leaving the GroupWise system. The gateway
direction designations and their keywords are separated by a semicolon (;).
5 Click OK to save the access control information for the selected user.
ConsoleOne passes the access control information to the Exchange Gateway so that the access
control settings are in force immediately.
80 GroupWise 7 Gateway for Microsoft Exchange Installation and Administration Guide
Page 81

8.5 Setting Up Accounting
Every day at midnight, the Exchange Gateway creates an accounting file (acct) in the
domain\wpgate\exchange\000.prc directory. The acct file is an ASCII-delimited text file
that records the source, priority, message type, destination, and size of each item passing through the
gateway.
Section 8.5.1, “Enabling Accounting,” on page 81
Section 8.5.2, “Defining an Accountant,” on page 82
Section 8.5.3, “Understanding the Accounting File,” on page 82
8.5.1 Enabling Accounting
1 In ConsoleOne, browse to and right-click the Exchange Gateway object, then click Properties.
2 Click GroupWise > Optional Gateway Settings to display the Optional Gateway Settings page.
novdocx (en) 6 April 2007
3 Make sure Accounting is set to Yes.
4 Click Apply to save your changes.
5 Continue with “Defining an Accountant” on page 82.
Exchange Gateway Web Console You can turn accounting on and off for the current gateway
session on the Optional Gateway Settings page.
Configuring the Exchange Gateway 81
Page 82

8.5.2 Defining an Accountant
1 On the Exchange Gateway object, click GroupWise > Gateway Administrators to display the
Gateway Administrators page.
novdocx (en) 6 April 2007
The Gateway Administrators page lets you select a GroupWise user to be the Accountant for
the Exchange Gateway. Each night at midnight, the gateway mails the accounting file (acct)
to the Accountant.
2 Click Add to open the Select GroupWise Object dialog box, then select a user to function as the
Accountant for the Exchange Gateway.
You can also select multiple users and/or distribution lists in the Select GroupWise Object
dialog box.
3 Click OK to return to the Gateway Administrators page.
4 In the Administrators list, select the user or distribution list that you want to function as the
Accountant.
In the Administrators list, you can also select multiple users and distribution lists as needed.
5 In the Administrator Role box, select Accountant.
6 Click OK to save the changes.
ConsoleOne passes the accounting information to the Exchange Gateway so that the
Accountant can begin receiving daily accounting files.
7 Continue with “Understanding the Accounting File” on page 82.
8.5.3 Understanding the Accounting File
The accounting file (acct) is an ASCII-delimited text file that records the source, priority, message
type, destination, and other information about each message sent through the gateway. The file,
82 GroupWise 7 Gateway for Microsoft Exchange Installation and Administration Guide
Page 83

which is updated daily at midnight, is located in the domain\wpgate\exchange\000.prc
directory. If no Accountant is defined to receive the file, the file is deleted each day.
A sample line from an accounting file is shown below:
O,05/18/05, 20:42:55,,
Mail,3,Corporate,Temps,LTanaka,,Reminder,Connector,Exchange,,
Mail,SJones@Provo,1,0,2593
Each item sent through the gateway is recorded on a separate line, with the fields separated by
commas. Two or more commas in a row indicate that a field has no data. The following table
describes the fields in the order in which they are found in the accounting file.
Field Description Example
In/Out Status Indicates if the message is outbound (O) or inbound (I) O
Message Date The date when the message was sent 5/18/06
Message Time The time when the message was sent 20:42:55
novdocx (en) 6 April 2007
GroupWIse Message ID A set of numbers that uniquely identifies the message
in the GroupWise system
GroupWise Message
Type
GroupWise Message
Priority
GroupWise User Domain The GroupWise domain where the sender’s or
GroupWise User Post
Office
GroupWise User ID The user ID of the sender or recipient LTanaka
GroupWise Account ID The recipient’s or sender’s account ID as specified on
Message Subject The subject line of the message Reminder
Gateway Domain The GroupWise domain where the gateway is installed Connector
Gateway Name The name of the gateway as defined in GroupWise Exchange
Foreign Message ID The message ID supplied by Exchange
Foreign Message Type The type of message sent from Exchange Mail
Type of item sent or received Mail
0 = High, 2 = Normal, 4 = Low 2
receiver’s post office is located
The GroupWise post office that the sender or recipient
belongs to
the user’s GroupWise Account page in ConsoleOne
3F429BA6.961 :
12 : 31746
Corporate
Te mp s
Foreign Address The user’s Exchange address or GroupWise address
(if the user was added to a non-GroupWise domain)
Number of Recipients The number of users 1
Number of Attachments The number of files attached to the message 0
Accounting Units The byte size of the message 2593
Corporate.Market
ing.LTanaka
The acct file can be imported into a word processor, spreadsheet, or database program for further
analysis.
Configuring the Exchange Gateway 83
Page 84

8.6 Establishing Gateway Administrators
A gateway administrator is any GroupWise user you assign to receive information and error
messages from the Exchange Gateway. The gateway does not require an administrator, but if you
want to define one, the administrator must either be a user who is associated with GroupWise or
with a GroupWise distribution list. There are several types of administrators that you can define for
the Exchange Gateway:
Administrator Type Description
Operator The Operator receives a message if the Exchange Gateway cannot
communicate with the GroupWise system.
Foreign Operator The Foreign Operator receives a message if the Exchange Gateway cannot
communicate with the Exchange system.
Postmaster The Postmaster receives bad message files if the /badmsg switch is in use.
See Section 9.5, “Notifying the Exchange Gateway Administrator about Bad
Messages,” on page 102.
Accountant The gateway keeps accounting records for every message it sends, unless
you turn the Accounting feature off. Accounting data for the previous day’s
activity is sent daily to the Accountant. For setup information, see Section 8.5,
“Setting Up Accounting,” on page 81.
novdocx (en) 6 April 2007
1 In ConsoleOne, browse to and select the Exchange Gateway object, then click Properties.
2 Click GroupWise > Gateway Administrators to display the Gateway Administrators page.
3 Click Add to display the Select Object dialog box, then select the user you want to define as an
administrator.
You can also select multiple users and/or distribution lists in the Select GroupWise Object
dialog box.
84 GroupWise 7 Gateway for Microsoft Exchange Installation and Administration Guide
Page 85

4 Click OK to return to the Gateway Administrators page and add the user to the Gateway
Administrators list.
5 In the Administrator Role box, select the type of administrator you want the user to be.
Operator
Accountant
Postmaster
Foreign Operator
6 Click OK to save the Exchange Gateway administrator list.
ConsoleOne passes the administrator information to the Exchange Gateway so that the
administrators start receiving the appropriate types of messages.
8.7 Enabling Message Status for Sent Items
Both GroupWise and Exchange can return status information to message senders. This lets senders
know if their messages have been delivered, opened, and so on. In order for message status
information to be returned to senders, you need to make sure that message status has been enabled.
Message status information is collected in the status correlation database (gwcorr.db), located by
default in the domain\wpgate\exchange directory.
novdocx (en) 6 April 2007
1 If you want to change the location of the status correlation database, use the /corr startup switch
in the Exchange Gateway startup file (exchange.cfg) to specify a different directory.
2 In ConsoleOne, browse to and right-click the Exchange Gateway object, then click Properties.
3 Click GroupWise > Optional Gateway Settings to display the Optional Gateway Settings page.
4 Fill in the following fields:
Configuring the Exchange Gateway 85
Page 86

Outbound Status Level: Outbound status refers to the status information returned to
GroupWise users for messages they send to Exchange users. Select Undelivered, Delivered,
Open, or Full (which is equivalent to selecting Undelivered, Delivered, and Open).
Correlation Enabled: Select Yes . Message correlation is used to map Exchange delivery, non-
delivery, and receipt reports to GroupWise status messages, and GroupWise status messages to
Exchange delivery, non-delivery, and receipt reports. For tracking purposes, each message
receives its own record in the correlation database
(domain\wpgate\exchange\gwcorr.db).
Correlation Age: Specify the number of days you want a message’s record to remain in the
correlation database. After a message’s record has been deleted, any status information
returned on the message is sent to the user as a new message rather than as status information
on the old message.
5 Click OK to save the changes.
ConsoleOne passes the status message information to the Exchange Gateway so that status
messages and correlation start immediately.
6 If you edited the exchange.cfg file in Step 1, stop and then start the Exchange Gateway so
that it reads the updated startup file.
novdocx (en) 6 April 2007
Exchange Gateway Web Console You can adjust these settings for the current gateway session on
the Optional Gateway Settings page.
8.8 Binding the Exchange Gateway to a Specific IP Address
You can now cause the Exchange Gateway to bind to a specified IP address when the server where it
runs uses multiple IP addresses. The specified IP address is associated with all ports used by the
gateway. Without an exclusive bind, the gateway binds to all IP addresses available on the server.
1 In ConsoleOne, browse to and right-click the Exchange Gateway object, then click Properties.
86 GroupWise 7 Gateway for Microsoft Exchange Installation and Administration Guide
Page 87

2 Click GroupWise > Network Address to display the Network Address page.
novdocx (en) 6 April 2007
3 Select Bind Exclusively to TCP/IP Address, then click OK to save your change.
Corresponding Startup Switches You can also use the /ip startup switch in the Exchange Gateway
startup file to establish an exclusive bind to the specified IP address.
Configuring the Exchange Gateway 87
Page 88

novdocx (en) 6 April 2007
88 GroupWise 7 Gateway for Microsoft Exchange Installation and Administration Guide
Page 89

9
Monitoring the Exchange Gateway
By monitoring the Exchange Gateway, you can determine whether or not its current configuration is
meeting the needs of the users it services. You have a variety of tools to help you monitor the
operation of the Exchange Gateway:
Section 9.1, “Using the Exchange Gateway Server Console,” on page 89
Section 9.2, “Using the Exchange Gateway Web Console,” on page 92
Section 9.3, “Using Exchange Gateway Log Files,” on page 97
Section 9.4, “Using SNMP Monitoring Programs,” on page 99
Section 9.5, “Notifying the Exchange Gateway Administrator about Bad Messages,” on
page 102
Section 9.6, “Understanding Exchange Gateway Error Messages,” on page 102
novdocx (en) 6 April 2007
9
9.1 Using the Exchange Gateway Server Console
The Exchange Gateway server console displays the gateway’s activity when it is running as an
application. If you run the Exchange Gateway as a Windows service, the server console does not
appear and you must use other monitoring alternatives, as described in Section 9.2, “Using the
Exchange Gateway Web Console,” on page 92 and Section 9.4, “Using SNMP Monitoring
Programs,” on page 99.
To properly administer the gateway as an application, you should understand the console and how it
works. The screen is divided into various areas.
Section 9.1.1, “Information Box,” on page 90
Section 9.1.2, “Status Box,” on page 90
Section 9.1.3, “Statistics Box,” on page 90
Section 9.1.4, “Log Message Box,” on page 91
Monitoring the Exchange Gateway
89
Page 90

Section 9.1.5, “Menu Summary,” on page 91
9.1.1 Information Box
The top portion of the console provides the following information about the gateway.
Domain.Gateway: The domain where the gateway is installed and the name of the gateway.
UpTime: The length of time the gateway has been running.
Description: The description you added when you configured the gateway, as described in
Section 6.2, “Providing Gateway Information,” on page 53.
9.1.2 Status Box
The Status box provides the following information:
Processing: If the gateway is running, this field displays a spinning bar. If there is no bar or if the
bar is stationary for an extended period, the gateway is not running.
®
GroupWise: Whether the gateway’s network connection to the GroupWise
Closed. It is normal for this field to briefly display Closed while the gateway is initializing. If the
link shows Closed for an extended period, a network failure, insufficient access rights, or an error in
setup fields could be the problem. Check for error messages in the Log Message box. For assistance
resolving error messages, see Appendix A, “Error and Informational Messages,” on page 117.
domain is Open or
novdocx (en) 6 April 2007
Other Link: The status of the gateway’s network connection to the Exchange system. Messages
can be sent or received if Other Link is Open. If it is Closed, the network connection has been
terminated. Check the status of the Exchange system.
Program: Where the gateway is in its current processing cycle (sending, receiving, or idle). You
can use the Gateway Time Settings page in ConsoleOne
information, see Section 10.1, “Adjusting the Gateway’s Send/Receive Cycle,” on page 103.
Log Level: The logging level the gateway is currently using. The level determines how much
information is displayed in the Logging box and written to the log file. You can set the default
logging level in ConsoleOne, as described in Section 9.3, “Using Exchange Gateway Log Files,” on
page 97. You can also change the log level for the current Exchange Gateway session, as described
in “Menu Summary” on page 91.
®
to adjust the processing cycle. For more
9.1.3 Statistics Box
The Statistics box displays the amount of incoming and outgoing gateway traffic. The four columns
display the cumulative totals and the snap shot totals. The four columns from left to right are:
outgoing message totals, snap shot of outgoing messages (the default snap shot interval is 10
minutes), incoming message totals, and snap shot of incoming messages.
The snap shot interval statistic can help you get a more accurate picture of the amount of recent
gateway traffic. For information about changing the snap shot interval, see Section 10.1, “Adjusting
the Gateway’s Send/Receive Cycle,” on page 103
The following types of status information are provided:
Normal: The number of normal incoming and outgoing messages the gateway has processed.
90 GroupWise 7 Gateway for Microsoft Exchange Installation and Administration Guide
Page 91

Status: The number of status messages the gateway has sent and received. The amount of status
message traffic depends in part on the outbound status level of the gateway. An outbound status
level set to Full causes more status messages than an outbound status level set to Undelivered. For
more information about setting the outbound status level, see Section 8.7, “Enabling Message Status
for Sent Items,” on page 85.
Passthru: The number of incoming and outgoing passthrough messages the gateway has processed.
Using the Exchange Gateway as a passthrough gateway between two GroupWise systems is not a
recommended way to connect GroupWise systems. There are better alternatives currently available.
See the GroupWise 6.5 Multi-System Administration Guide for preferred alternatives.
Conv Errors: The number of conversion errors for incoming and outgoing messages.
Comm Errors: The number of communications errors for incoming and outgoing messages.
Total Bytes: The total number of bytes for the incoming and outgoing messages.
9.1.4 Log Message Box
The Log Message box displays the Exchange Gateway’s activity. The amount and detail in this
display depends on the logging level you select. For more information, see Section 9.3, “Using
Exchange Gateway Log Files,” on page 97.
novdocx (en) 6 April 2007
For assistance with error messages that appear in the Log Message box, see Appendix A, “Error and
Informational Messages,” on page 117.
9.1.5 Menu Summary
At the top of the Exchange Gateway server console is a menu bar that provides the following
functionality:
Menu Item
File Exit F7 Stop the Exchange Gateway.
Configuration Gateway
Settings
Log View Log Files F9 Select a log file and view it in Notepad. See Section 9.3,
Log Settings F2 Override the default log settings for the current Exchange
Function
Key
F5 Display the gateway configuration settings from the
Function
Exchange Gateway object in Novell® eDirectory™. For
more information, see Chapter 6, “Configuring the
GroupWise Side of the Exchange Gateway,” on page 51
and various sections in Chapter 7, “Running the Exchange
Gateway,” on page 55.
“Using Exchange Gateway Log Files,” on page 97.
Gateway session. See Section 9.3, “Using Exchange
Gateway Log Files,” on page 97.
Actions Zero Status F8 Reset all statistics to zero.
Synchronize
Directories
Turn directory synchronization on or off. See Section 8.1,
“Enabling Directory Synchronization and Exchange of
Address Books,” on page 61.
Monitoring the Exchange Gateway 91
Page 92

9.2 Using the Exchange Gateway Web Console
The Exchange Gateway Web console enables you to monitor and control the Exchange Gateway
from any location where you have access to a Web browser and the Internet. This provides
substantially more flexible access than the Exchange Gateway server console, which can be
accessed only from the Windows server where the Exchange Gateway is running.
Section 9.2.1, “Setting Up the Exchange Gateway Web Console,” on page 92
Section 9.2.2, “Accessing the Exchange Gateway Web Console,” on page 93
Section 9.2.3, “Monitoring the Exchange Gateway from the Web Console,” on page 94
9.2.1 Setting Up the Exchange Gateway Web Console
After installation, you set up the Exchange Gateway Web console in ConsoleOne.
1 In ConsoleOne, browse to and right-click the Exchange Gateway object, then click Properties.
2 Click GroupWise > Network Address to display the Network Address page.
novdocx (en) 6 April 2007
3 In the HTTP Port field, provide a unique port number for communication between the
Exchange Gateway and your Web browser.
You might want to use a port number close to those used by the MTA and POA, for example,
7183.
4 Make a note of the HTTP port number. You need this information in order to access the
Exchange Gateway Web console.
5 Click Apply to save your changes on the Network Address page.
If you want to limit access to the Exchange Gateway Web console, you can provide a username
and password.
92 GroupWise 7 Gateway for Microsoft Exchange Installation and Administration Guide
Page 93

6 Click GroupWise > Optional Gateway Settings.
novdocx (en) 6 April 2007
7 In the HTTP Settings box:
7a In the HTTP User Name field, specify a unique username.
7b Click Set Password.
7c Type the password twice for verification.
7d Click Set Password.
Do not use an eDirectory username and password because the information passes over the
non-secure connection between your Web browser and the Exchange Gateway.
For convenience, use the same username and password for all GroupWise agents and
gateways that you plan to monitor from GroupWise Monitor. This saves you from
providing the username and password information as Monitor accesses each agent and
gateway.
8 Click OK to save the Exchange Gateway Web console settings.
ConsoleOne then notifies the Exchange Gateway to restart so the new settings can be put into
effect.
Corresponding Startup Switches: You could also use the /httpport, /httpuser, and /httppassword
startup switches in the Exchange Gateway startup file (gwexch.cfg) to enable and secure the
Exchange Gateway Web console. In addition, you can use the /httprefresh switch to control how
often the Exchange Gateway refreshes the information provided to your Web browser.
9.2.2 Accessing the Exchange Gateway Web Console
To monitor the Exchange Gateway from your Web browser, view the URL where the Exchange
Gateway is located by supplying the network address of the Windows server where the Gateway
runs and the port number as provided on the Network Address page in ConsoleOne.
Monitoring the Exchange Gateway 93
Page 94

Syntax:
http://IP_address_or_hostname:HTTP_port
Examples:
http://172.16.5.18:7176http://exchserver1:7176
9.2.3 Monitoring the Exchange Gateway from the Web Console
novdocx (en) 6 April 2007
The Exchange Gateway Web console provides several pages of information to help you monitor the
performance of the Exchange Gateway. The bar at the top of the Exchange Gateway Web console
displays the name of the Exchange Gateway and its post office. Below this bar appears the Exchange
Gateway Web console menu that lists the pages of information available in the Exchange Gateway
Web console.
Monitoring Gateway Status
When you first access the Gateway Web console, the Status page is displayed.
The information is the same as is displayed on the Gateway server console on the Windows server
where the gateway runs. For more information, see “Status Box” on page 90.
Checking Gateway Configuration
On the Exchange Gateway Web console menu, click Configuration to display the configuration
information stored on various property pages on the Exchange Gateway object in ConsoleOne.
94 GroupWise 7 Gateway for Microsoft Exchange Installation and Administration Guide
Page 95

novdocx (en) 6 April 2007
To change the log settings for the current gateway session, click Event Log Settings. All other
settings listed on the Configuration page must be changed in ConsoleOne.
Checking the Operating System Environment
On the Exchange Gateway Web console menu, click Environment to display information about the
operating system where the Exchange Gateway is running.
Viewing Gateway Log Files
On the Exchange Gateway Web console menu, click Log Files to display gateway log files.
Monitoring the Exchange Gateway 95
Page 96

Click Event Log Settings to change the log settings for the current Exchange Gateway session.
novdocx (en) 6 April 2007
For information about Exchange Gateway log files, see Section 9.3, “Using Exchange Gateway Log
Files,” on page 97.
Checking and Changing Gateway Time Settings
On the Exchange Gateway Web console menu, click Time Settings to display the settings listed on
the Time Settings page in ConsoleOne.
Modify the settings as needed, then click Submit to change them for the current Exchange Gateway
session. For information about the time settings, see Section 10.1, “Adjusting the Gateway’s Send/
Receive Cycle,” on page 103.
Checking and Changing Optional Gateway Settings
On the Exchange Gateway Web console menu, click Optional Gateway Settings to display the
settings listed on the Optional Gateway Settings page in ConsoleOne.
96 GroupWise 7 Gateway for Microsoft Exchange Installation and Administration Guide
Page 97

novdocx (en) 6 April 2007
Modify the settings as needed, then click Submit to change them for the current Exchange Gateway
session. For information about the optional gateway settings, see the following topics:
Section 8.1, “Enabling Directory Synchronization and Exchange of Address Books,” on
page 61
Section 8.5, “Setting Up Accounting,” on page 81
Section 8.7, “Enabling Message Status for Sent Items,” on page 85
Chapter 11, “Using Exchange Gateway Startup Switches,” on page 107
Changing Gateway Access Control
On the Exchange Gateway Web console menu, click Access Control to turn access control on and off
and to adjust the maximum message size for the current Exchange Gateway session.
For information about access control, see Section 8.4, “Controlling Gateway Access,” on page 73.
9.3 Using Exchange Gateway Log Files
Log files record all message routing data that appears in the Log Message box of the Exchange
Gateway server console. You can determine the level of information you want to log, as well as the
Monitoring the Exchange Gateway 97
Page 98

maximum age for log files and the maximum amount of disk space to be used for log files.
Examining log files is useful if you experience any problems with the Exchange Gateway, because
the log files record the exact route all messages take. If you have any problems that require
assistance from Novell Support (http://www.novell.com/support), it is likely that the technician who
helps you will request a copy of this file.
Log files are stored in the gateway’s 000.prc directory
(domain\wpgate\exchange\000.prc) and can be viewed from the Gateway server console
and the Web console. Log files are named mmddlog.nnn, where mmdd is the month and day and
nnn is an incrementing number, starting with 001.
1 In ConsoleOne, browse to and right-click the Exchange Gateway object, then click Properties.
2 Click GroupWise > Log Settings to display the Log Settings page.
novdocx (en) 6 April 2007
3 Fill in the following fields:
Log File Path: Select the path where the log file should be created. By default, log files are
stored in the domain\wpgate\exchange\000.prc directory.
Logging Level: Select the logging level you want. Gateway logging levels are hierarchical,
with Off as the lowest and Diagnostic as the highest.
Off: Disables logging.
Normal: Displays basic message routing information, providing a summary of gateway
activity. This is the default setting.
Verbo s e : Displays extra message routing details and message processing information.
Diagnostic: Displays all message routing and processing information. You should use
this logging level only when troubleshooting a problem with the gateway.
A new log file is created each day, and the files accumulate according to the following settings:
Max Log File Age: Specify the maximum number of days you want to save the log file before
the gateway deletes it. The default value is 7 days.
98 GroupWise 7 Gateway for Microsoft Exchange Installation and Administration Guide
Page 99

Max Log Disk Space: Specify the amount of disk space you want the limit to be for log files.
When the limit is reached, the gateway deletes the oldest file until the space occupied is under
the maximum allowable limit. The default value is 1024 KB.
If you set the limit to zero (0), there is no disk space limit for log files.
4 Click OK to save the log settings.
ConsoleOne passes the updated log settings to the Exchange Gateway so that the new log
settings are in force immediately.
Corresponding Startup Switches You could also use the /log, /loglevel, /logdays, and /logmax
startup switches in the Exchange Gateway startup file (gwexch.cfg) to control logging.
Exchange Gateway Web Console You can view the Exchange Gateway log files and change the
log settings for the current Exchange Gateway session by clicking the Log Settings link on the Log
Files page. You can also view and modify log settings at the Exchange Gateway server console on
the server where the gateway is running, as listed in “Menu Summary” on page 91.
9.4 Using SNMP Monitoring Programs
novdocx (en) 6 April 2007
You can monitor the Exchange Gateway from Novell ZENworks® for Servers or any other SNMP
management and monitoring program. When properly configured, the Exchange Gateway sends
SNMP traps to network management consoles for display along with other SNMP monitored
programs.
During installation, you had the opportunity to configure the Exchange Gateway for SNMP. If the
option was dimmed, then SNMP was not installed on the Windows server.
If you did not select SNMP support during installation, there is currently no way to add the
functionality short of uninstalling the Exchange Gateway and reinstalling it. See Section 7.4,
“Uninstalling the Exchange Gateway,” on page 58
Monitoring the Exchange Gateway 99
Page 100

To set up SNMP services for the Windows server, complete the following tasks:
Section 9.4.1, “Copying and Compiling the Exchange Gateway MIB File,” on page 100
Section 9.4.2, “Configuring the Exchange Gateway for SNMP Monitoring,” on page 100
9.4.1 Copying and Compiling the Exchange Gateway MIB File
An SNMP-enabled Exchange Gateway returns information contained in a Management Information
Base (MIB). The MIB is an ASCII data structure that defines the information gathered. It also
defines the properties that can be monitored and managed on the SNMP-enabled Exchange
Gateway. You can view the contents of the Exchange Gateway MIB for a description of the SNMP
variables available for it. The Exchange Gateway MIB is located in the
domain\wpgate\exchange directory.
Before you can monitor an SNMP-enabled Exchange Gateway, you must compile the ngwln.mib
file using your SNMP management program.
1 Copy the ngwln.mib file from the domain\wpgate\exchange directory to the location
required by your SNMP management program.
novdocx (en) 6 April 2007
ZENworks users can copy the ngwln.mib file to the \agents\snmp directory in the
GroupWise software distribution directory.
2 Compile or import the ngwln.mib file as required by your SNMP management program.
For example, to compile the ngwln.mib file for ZENworks:
2a In ConsoleOne, right-click the Site Server object, then click Properties > MIB Pool.
2b Click Modify Pool > Add.
2c Browse to and select the ngwln.mib file, then click OK.
2d Click Compile.
2e To make sure that the Windows server where the Exchange Gateway is running is
configured to send SNMP traps to the ZENworks Site Server, add the IP address or
hostname of the Site Server to the list of trap destinations.
From the Windows NT Control Panel, double-click Network, then click Services >
SNMP Service > Properties > Traps.
From the Windows 2000/2003 Control Panel, double-click Administrative Tools, then
click Services > SNMP Service > Properties > Traps.
Refer to your SNMP management program documentation for specific instructions.
3 Continue with “Configuring the Exchange Gateway for SNMP Monitoring” on page 100.
9.4.2 Configuring the Exchange Gateway for SNMP Monitoring
In order for SNMP monitoring programs to monitor the Exchange Gateway, the Exchange Gateway
must be configured with a network address and SNMP community string.
1 Browse to and right-click the Exchange Gateway object, then click Properties.
100 GroupWise 7 Gateway for Microsoft Exchange Installation and Administration Guide
 Loading...