

Page 1
Novell Confidential Manual (ENU) 21 December 2004
Novell
TM
Evolution
2.6
March 6, 2006
www.novell.com
USER GUIDE
Page 2

Novell Confidential Manual (ENU) 21 December 2004
Legal Notices
Novell, Inc. makes no representations or warranties with respect to the contents or use of this documentation, and specifically disclaims any express
or implied warranties of merchantability or fitness for any particular purpose. Further, Novell, Inc. reserves the right to revise this publication and to
make changes to its content, at any time, without obligation to notify any person or entity of such revisions or changes.
Further, Novell, Inc. makes no representations or warranties with respect to any software, and specifically disclaims any express or implied warranties
of merchantability or fitness for any particular purpose. Further, Novell, Inc. reserves the right to make changes to any and all parts of Novell software,
at any time, without any obligation to notify any person or entity of such changes.
Any products or technical information provided under this Agreement may be subject to U.S. export controls and the trade laws of other countries.
You agree to comply with all export control regulations and to obtain any required licenses or classification to export, re-export, or import deliverables.
You agree not to export or re-export to entities on the current U.S. export exclusion lists or to any embargoed or terrorist countries as specified in the
U.S. export laws. You agree to not use deliverables for prohibited nuclear, missile, or chemical biological weaponry end uses. Please refer to
www.novell.com/info/exports/ for more information on exporting Novell software. Novell assumes no responsibility for your failure to obtain any
necessary export approvals.
Copyright © 2005-2006 Novell, Inc. All rights reserved. No part of this publication may be reproduced, photocopied, stored on a retrieval system, or
transmitted without the express written consent of the publisher.
Novell, Inc. has intellectual property rights relating to technology embodied in the product that is described in this document. In particular, and without
limitation, these intellectual property rights may include one or more of the U.S. patents listed at http://www.novell.com/company/legal/patents/ and
one or more additional patents or pending patent applications in the U.S. and in other countries.
Novell, Inc.
404 Wyman Street, Suite 500
Waltham, MA 02451
U.S.A.
www.novell.com
Evolution User Guide
March 6, 2006
Online Documentation: To access the online documentation for this and other Novell products, and to get updates, see
www.novell.com/documentation.
Page 3

Novell Confidential Manual (ENU) 21 December 2004
Novell Trademarks
Evolution is a trademark of Novell, Inc.
GroupWise is a registered trademark of Novell, Inc. in the United States and other countries.
Novell is a registered trademark of Novell, Inc. in the United States and other countries.
Red Carpet is a registered trademark of Novell, Inc. in the United States and other countries.
SUSE is a registered trademark of SUSE LINUX AG, a Novell business.
Ximian is a registered trademark of Novell, Inc. in the United States and other countries.
ZENworks is a registered trademark of Novell, Inc. in the United States and other countries.
Third-Party Materials
All third-party trademarks are the property of their respective owners.
Page 4

Novell Confidential Manual (ENU) 21 December 2004
4 Evolution User Guide
Page 5

Novell Confidential Manual (ENU) 21 December 2004
Contents
About This Guide 9
1 Getting Started 11
Starting Evolution for the First Time . . . . . . . . . . . . . . . . . . . . . . . . . . . . . . . . . . . . . . . . . . . 11
Using the First-Run Assistant . . . . . . . . . . . . . . . . . . . . . . . . . . . . . . . . . . . . . . . . . . . . . 11
Using Evolution: An Overview . . . . . . . . . . . . . . . . . . . . . . . . . . . . . . . . . . . . . . . . . . . . . . 25
The Menu Bar . . . . . . . . . . . . . . . . . . . . . . . . . . . . . . . . . . . . . . . . . . . . . . . . . . . . . 26
The Shortcut Bar . . . . . . . . . . . . . . . . . . . . . . . . . . . . . . . . . . . . . . . . . . . . . . . . . . . 26
E-Mail . . . . . . . . . . . . . . . . . . . . . . . . . . . . . . . . . . . . . . . . . . . . . . . . . . . . . . . . . 27
The Calendar . . . . . . . . . . . . . . . . . . . . . . . . . . . . . . . . . . . . . . . . . . . . . . . . . . . . . 29
The Contacts Tool . . . . . . . . . . . . . . . . . . . . . . . . . . . . . . . . . . . . . . . . . . . . . . . . . . 29
Command Line Options . . . . . . . . . . . . . . . . . . . . . . . . . . . . . . . . . . . . . . . . . . . . . . . . . 30
2 Sending and Receiving E-Mail 33
Reading Mail . . . . . . . . . . . . . . . . . . . . . . . . . . . . . . . . . . . . . . . . . . . . . . . . . . . . . . . 33
Sorting the Message List . . . . . . . . . . . . . . . . . . . . . . . . . . . . . . . . . . . . . . . . . . . . . . . 33
Deleting Mail . . . . . . . . . . . . . . . . . . . . . . . . . . . . . . . . . . . . . . . . . . . . . . . . . . . . . 34
Undeleting Messages . . . . . . . . . . . . . . . . . . . . . . . . . . . . . . . . . . . . . . . . . . . . . . . . . 34
Checking for New Mail . . . . . . . . . . . . . . . . . . . . . . . . . . . . . . . . . . . . . . . . . . . . . . . . . . 34
Sharing Mailboxes with Other Mail Programs. . . . . . . . . . . . . . . . . . . . . . . . . . . . . . . . . . . . . 34
Using Evolution for News . . . . . . . . . . . . . . . . . . . . . . . . . . . . . . . . . . . . . . . . . . . . . . . 35
Working with Attachments and HTML Mail . . . . . . . . . . . . . . . . . . . . . . . . . . . . . . . . . . . . . . 35
Composing New E-Mail Messages . . . . . . . . . . . . . . . . . . . . . . . . . . . . . . . . . . . . . . . . . . . . 36
Unicode, ASCII, and Non-Latin Alphabets . . . . . . . . . . . . . . . . . . . . . . . . . . . . . . . . . . . . . . 37
Sending Composed Messages Later . . . . . . . . . . . . . . . . . . . . . . . . . . . . . . . . . . . . . . . . . 38
Working Offline . . . . . . . . . . . . . . . . . . . . . . . . . . . . . . . . . . . . . . . . . . . . . . . . . . . . 38
Attachments. . . . . . . . . . . . . . . . . . . . . . . . . . . . . . . . . . . . . . . . . . . . . . . . . . . . . . 39
Specifying Additional Recipients for E-Mail . . . . . . . . . . . . . . . . . . . . . . . . . . . . . . . . . . . . . . 39
Choosing Recipients Quickly . . . . . . . . . . . . . . . . . . . . . . . . . . . . . . . . . . . . . . . . . . . . . 39
Replying to E-Mail Messages . . . . . . . . . . . . . . . . . . . . . . . . . . . . . . . . . . . . . . . . . . . . . 40
Searching and Replacing with the Composer. . . . . . . . . . . . . . . . . . . . . . . . . . . . . . . . . . . . . 40
Enhancing Your E-Mail with HTML . . . . . . . . . . . . . . . . . . . . . . . . . . . . . . . . . . . . . . . . . . 40
Mail Send Options . . . . . . . . . . . . . . . . . . . . . . . . . . . . . . . . . . . . . . . . . . . . . . . . . . 42
Forwarding Mail . . . . . . . . . . . . . . . . . . . . . . . . . . . . . . . . . . . . . . . . . . . . . . . . . . . . 43
Tips for E-Mail Courtesy . . . . . . . . . . . . . . . . . . . . . . . . . . . . . . . . . . . . . . . . . . . . . . . 43
Sending Invitations by Mail . . . . . . . . . . . . . . . . . . . . . . . . . . . . . . . . . . . . . . . . . . . . . . . . 43
IMAP Subscriptions Manager. . . . . . . . . . . . . . . . . . . . . . . . . . . . . . . . . . . . . . . . . . . . . . . 44
Encryption . . . . . . . . . . . . . . . . . . . . . . . . . . . . . . . . . . . . . . . . . . . . . . . . . . . . . . . . 44
Making a GPG Encryption Key . . . . . . . . . . . . . . . . . . . . . . . . . . . . . . . . . . . . . . . . . . . . 45
Getting and Using GPG Public Keys . . . . . . . . . . . . . . . . . . . . . . . . . . . . . . . . . . . . . . . . . 46
Setting up GPG Encryption . . . . . . . . . . . . . . . . . . . . . . . . . . . . . . . . . . . . . . . . . . . . . . 46
Encrypting Messages . . . . . . . . . . . . . . . . . . . . . . . . . . . . . . . . . . . . . . . . . . . . . . . . . 46
Unencrypting a Received Message . . . . . . . . . . . . . . . . . . . . . . . . . . . . . . . . . . . . . . . . . . 47
S/MIME Encryption . . . . . . . . . . . . . . . . . . . . . . . . . . . . . . . . . . . . . . . . . . . . . . . . . . 47
3 Organizing Your E-Mail 49
Contents 5
Page 6

Novell Confidential Manual (ENU) 21 December 2004
Importing Your Old E-Mail . . . . . . . . . . . . . . . . . . . . . . . . . . . . . . . . . . . . . . . . . . . . . . . . . 49
Importing Single Files . . . . . . . . . . . . . . . . . . . . . . . . . . . . . . . . . . . . . . . . . . . . . . . . . 49
Importing Multiple Files . . . . . . . . . . . . . . . . . . . . . . . . . . . . . . . . . . . . . . . . . . . . . . . . 49
Sorting Mail with Column Headers . . . . . . . . . . . . . . . . . . . . . . . . . . . . . . . . . . . . . . . . . . . . 50
Using the Follow Up Feature. . . . . . . . . . . . . . . . . . . . . . . . . . . . . . . . . . . . . . . . . . . . . . 50
Getting Organized with Folders . . . . . . . . . . . . . . . . . . . . . . . . . . . . . . . . . . . . . . . . . . . . . . 51
Searching for Messages. . . . . . . . . . . . . . . . . . . . . . . . . . . . . . . . . . . . . . . . . . . . . . . . . . 51
Stopping Junk Mail (Spam) . . . . . . . . . . . . . . . . . . . . . . . . . . . . . . . . . . . . . . . . . . . . . . . . 52
Create Rules to Automatically Organize Mail . . . . . . . . . . . . . . . . . . . . . . . . . . . . . . . . . . . . . . . 52
Creating New Filter Rules . . . . . . . . . . . . . . . . . . . . . . . . . . . . . . . . . . . . . . . . . . . . . . . 53
Editing Filters . . . . . . . . . . . . . . . . . . . . . . . . . . . . . . . . . . . . . . . . . . . . . . . . . . . . . 55
Deleting Filters . . . . . . . . . . . . . . . . . . . . . . . . . . . . . . . . . . . . . . . . . . . . . . . . . . . . . 55
Using Search Folders . . . . . . . . . . . . . . . . . . . . . . . . . . . . . . . . . . . . . . . . . . . . . . . . . . . 55
Creating A Search Folder . . . . . . . . . . . . . . . . . . . . . . . . . . . . . . . . . . . . . . . . . . . . . . . 56
4 Evolution Contacts: the Address Book 59
Contacts and Cards . . . . . . . . . . . . . . . . . . . . . . . . . . . . . . . . . . . . . . . . . . . . . . . . . . . . 59
The Contact Editor . . . . . . . . . . . . . . . . . . . . . . . . . . . . . . . . . . . . . . . . . . . . . . . . . . . 59
Searching for Contacts . . . . . . . . . . . . . . . . . . . . . . . . . . . . . . . . . . . . . . . . . . . . . . . . . . 61
Organizing your Contacts . . . . . . . . . . . . . . . . . . . . . . . . . . . . . . . . . . . . . . . . . . . . . . . . . 61
Contacts Groups . . . . . . . . . . . . . . . . . . . . . . . . . . . . . . . . . . . . . . . . . . . . . . . . . . . . 62
Importing Contacts. . . . . . . . . . . . . . . . . . . . . . . . . . . . . . . . . . . . . . . . . . . . . . . . . . . 62
Creating a List of Contacts. . . . . . . . . . . . . . . . . . . . . . . . . . . . . . . . . . . . . . . . . . . . . . . 62
Grouping with Categories . . . . . . . . . . . . . . . . . . . . . . . . . . . . . . . . . . . . . . . . . . . . . . . 63
Selecting Your Default Contact List . . . . . . . . . . . . . . . . . . . . . . . . . . . . . . . . . . . . . . . . . . 63
LDAP: Shared Contact Groups on a Network . . . . . . . . . . . . . . . . . . . . . . . . . . . . . . . . . . . . . . . 63
Configuring Evolution to use LDAP . . . . . . . . . . . . . . . . . . . . . . . . . . . . . . . . . . . . . . . . . . 64
Send Me a Card: Adding New Cards Quickly . . . . . . . . . . . . . . . . . . . . . . . . . . . . . . . . . . . . . . . 64
5 Evolution Calendar 65
Ways of Looking at your Calendar . . . . . . . . . . . . . . . . . . . . . . . . . . . . . . . . . . . . . . . . . . . . 65
Scheduling With the Evolution Calendar . . . . . . . . . . . . . . . . . . . . . . . . . . . . . . . . . . . . . . . . . 66
Appointments . . . . . . . . . . . . . . . . . . . . . . . . . . . . . . . . . . . . . . . . . . . . . . . . . . . . . 66
Sending a Meeting Invitation. . . . . . . . . . . . . . . . . . . . . . . . . . . . . . . . . . . . . . . . . . . . . . 69
Accepting and Replying to a Meeting Request. . . . . . . . . . . . . . . . . . . . . . . . . . . . . . . . . . 70
Reading Responses to Meeting Requests. . . . . . . . . . . . . . . . . . . . . . . . . . . . . . . . . . . . . . . 70
Using the Free/Busy View . . . . . . . . . . . . . . . . . . . . . . . . . . . . . . . . . . . . . . . . . . . . . . . 70
Searching for Calendar Items . . . . . . . . . . . . . . . . . . . . . . . . . . . . . . . . . . . . . . . . . . . . . . . 72
Printing Displayed Items. . . . . . . . . . . . . . . . . . . . . . . . . . . . . . . . . . . . . . . . . . . . . . . . . . 72
Deleting Old Appointments and Meetings . . . . . . . . . . . . . . . . . . . . . . . . . . . . . . . . . . . . . . . . . 72
Delegating Meetings. . . . . . . . . . . . . . . . . . . . . . . . . . . . . . . . . . . . . . . . . . . . . . . . . . . . 72
Multiple Calendars, Web Calendars, and CalDAV . . . . . . . . . . . . . . . . . . . . . . . . . . . . . . . . . . . . 73
The Task List . . . . . . . . . . . . . . . . . . . . . . . . . . . . . . . . . . . . . . . . . . . . . . . . . . . . . . . 73
Creating a New Task List . . . . . . . . . . . . . . . . . . . . . . . . . . . . . . . . . . . . . . . . . . . . . . . 73
Creating a New Task . . . . . . . . . . . . . . . . . . . . . . . . . . . . . . . . . . . . . . . . . . . . . . . . . 73
Assigned Tasks . . . . . . . . . . . . . . . . . . . . . . . . . . . . . . . . . . . . . . . . . . . . . . . . . . . . 74
Memos. . . . . . . . . . . . . . . . . . . . . . . . . . . . . . . . . . . . . . . . . . . . . . . . . . . . . . . . . . . 75
The Memo list . . . . . . . . . . . . . . . . . . . . . . . . . . . . . . . . . . . . . . . . . . . . . . . . . . . . . 75
Configuring Time Zones . . . . . . . . . . . . . . . . . . . . . . . . . . . . . . . . . . . . . . . . . . . . . . . . . . 76
Marcus Bains Line. . . . . . . . . . . . . . . . . . . . . . . . . . . . . . . . . . . . . . . . . . . . . . . . . . . . . 76
6 Connecting to Exchange Servers 77
Evolution Exchange Features . . . . . . . . . . . . . . . . . . . . . . . . . . . . . . . . . . . . . . . . . . . . . . . 77
Adding Your Exchange Account to Evolution . . . . . . . . . . . . . . . . . . . . . . . . . . . . . . . . . . . . . . . 78
Exchange Server Settings . . . . . . . . . . . . . . . . . . . . . . . . . . . . . . . . . . . . . . . . . . . . . . . 78
6 Evolution User Guide
Page 7

Novell Confidential Manual (ENU) 21 December 2004
Standard Configuration Tool for Evolution Exchange . . . . . . . . . . . . . . . . . . . . . . . . . . . . . . . . . 78
Accessing the Exchange Server . . . . . . . . . . . . . . . . . . . . . . . . . . . . . . . . . . . . . . . . . . . . . 81
Settings Exclusive to Evolution Exchange . . . . . . . . . . . . . . . . . . . . . . . . . . . . . . . . . . . . . . . . 82
Access Delegation . . . . . . . . . . . . . . . . . . . . . . . . . . . . . . . . . . . . . . . . . . . . . . . . . . 82
Subscribe to Public Folders . . . . . . . . . . . . . . . . . . . . . . . . . . . . . . . . . . . . . . . . . . . . . . 84
Setting an Out of Office Message. . . . . . . . . . . . . . . . . . . . . . . . . . . . . . . . . . . . . . . . . . . 84
Scheduling Appointments with Free/Busy . . . . . . . . . . . . . . . . . . . . . . . . . . . . . . . . . . . . . . . . 85
7 Connecting to GroupWise 87
GroupWise Features . . . . . . . . . . . . . . . . . . . . . . . . . . . . . . . . . . . . . . . . . . . . . . . . . . . 87
GroupWise Terminology vs. Evolution Terminology . . . . . . . . . . . . . . . . . . . . . . . . . . . . . . . . . . . 88
Adding your GroupWise Account to Evolution . . . . . . . . . . . . . . . . . . . . . . . . . . . . . . . . . . . . . . 88
Creating a New GroupWise Account . . . . . . . . . . . . . . . . . . . . . . . . . . . . . . . . . . . . . . . . . 88
Changing an Existing Account to Work with GroupWise . . . . . . . . . . . . . . . . . . . . . . . . . . . . . . . 88
Scheduling Appointments with Free/Busy . . . . . . . . . . . . . . . . . . . . . . . . . . . . . . . . . . . . . . . . 91
Managing Sent Items . . . . . . . . . . . . . . . . . . . . . . . . . . . . . . . . . . . . . . . . . . . . . . . . . . . 91
Confirming Delivery of Items You’ve Sent . . . . . . . . . . . . . . . . . . . . . . . . . . . . . . . . . . . . . . 92
Displaying Sent Items . . . . . . . . . . . . . . . . . . . . . . . . . . . . . . . . . . . . . . . . . . . . . . . . . 92
Checking the Status of Your Items . . . . . . . . . . . . . . . . . . . . . . . . . . . . . . . . . . . . . . . . . . 92
Receiving Notification About Items You Send . . . . . . . . . . . . . . . . . . . . . . . . . . . . . . . . . . . . 93
Requesting a Reply for Items You Send . . . . . . . . . . . . . . . . . . . . . . . . . . . . . . . . . . . . . . . 93
Changing the Priority of an E-Mail . . . . . . . . . . . . . . . . . . . . . . . . . . . . . . . . . . . . . . . . . . 93
Delegating an Item . . . . . . . . . . . . . . . . . . . . . . . . . . . . . . . . . . . . . . . . . . . . . . . . . . 94
Giving Other People Access to Your Mailbox or Calendar . . . . . . . . . . . . . . . . . . . . . . . . . . . . . . . . 94
Receiving Proxy Rights . . . . . . . . . . . . . . . . . . . . . . . . . . . . . . . . . . . . . . . . . . . . . . . . 94
Assigning Proxy Rights to Another User . . . . . . . . . . . . . . . . . . . . . . . . . . . . . . . . . . . . . . . 94
Adding and Removing Proxy Names and Rights in Your Proxy List . . . . . . . . . . . . . . . . . . . . . . . . . 95
Managing Someone Else’s Mailbox or Calendar . . . . . . . . . . . . . . . . . . . . . . . . . . . . . . . . . . . 96
Marking an Item Private. . . . . . . . . . . . . . . . . . . . . . . . . . . . . . . . . . . . . . . . . . . . . . . . 97
Junk Mail Handling . . . . . . . . . . . . . . . . . . . . . . . . . . . . . . . . . . . . . . . . . . . . . . . . . . . . 97
Marking a Message As Junk Mail . . . . . . . . . . . . . . . . . . . . . . . . . . . . . . . . . . . . . . . . . . . 97
Marking a Message As Not Junk Mail. . . . . . . . . . . . . . . . . . . . . . . . . . . . . . . . . . . . . . . . . 97
Enabling or Disabling Your Junk Mail List. . . . . . . . . . . . . . . . . . . . . . . . . . . . . . . . . . . . . . . 97
Adding an E-Mail Address to Your Junk List . . . . . . . . . . . . . . . . . . . . . . . . . . . . . . . . . . . . . 98
Removing an E-Mail Address from Your Junk List . . . . . . . . . . . . . . . . . . . . . . . . . . . . . . . . . . 98
8 Connecting to Hula 99
9 Advanced Configuration 101
Working with Mail Accounts . . . . . . . . . . . . . . . . . . . . . . . . . . . . . . . . . . . . . . . . . . . . . . 103
Autocompletion . . . . . . . . . . . . . . . . . . . . . . . . . . . . . . . . . . . . . . . . . . . . . . . . . . . . . 104
Mail Preferences . . . . . . . . . . . . . . . . . . . . . . . . . . . . . . . . . . . . . . . . . . . . . . . . . . . . 104
General Mail Settings . . . . . . . . . . . . . . . . . . . . . . . . . . . . . . . . . . . . . . . . . . . . . . . . 104
HTML Mail Preferences . . . . . . . . . . . . . . . . . . . . . . . . . . . . . . . . . . . . . . . . . . . . . . . 105
Color Preferences. . . . . . . . . . . . . . . . . . . . . . . . . . . . . . . . . . . . . . . . . . . . . . . . . . 105
Mail Header Preferences . . . . . . . . . . . . . . . . . . . . . . . . . . . . . . . . . . . . . . . . . . . . . . 105
Junk Mail Preferences . . . . . . . . . . . . . . . . . . . . . . . . . . . . . . . . . . . . . . . . . . . . . . . 105
Automatic Contacts Preferences . . . . . . . . . . . . . . . . . . . . . . . . . . . . . . . . . . . . . . . . . . 105
Meetings & Tasks Preferences . . . . . . . . . . . . . . . . . . . . . . . . . . . . . . . . . . . . . . . . . . . 106
Composer Preferences . . . . . . . . . . . . . . . . . . . . . . . . . . . . . . . . . . . . . . . . . . . . . . . . . 106
General . . . . . . . . . . . . . . . . . . . . . . . . . . . . . . . . . . . . . . . . . . . . . . . . . . . . . . . 106
Signature . . . . . . . . . . . . . . . . . . . . . . . . . . . . . . . . . . . . . . . . . . . . . . . . . . . . . . 106
Spell Checking . . . . . . . . . . . . . . . . . . . . . . . . . . . . . . . . . . . . . . . . . . . . . . . . . . . 106
Calendar and Tasks Settings . . . . . . . . . . . . . . . . . . . . . . . . . . . . . . . . . . . . . . . . . . . . . . 106
General . . . . . . . . . . . . . . . . . . . . . . . . . . . . . . . . . . . . . . . . . . . . . . . . . . . . . . . 107
Display . . . . . . . . . . . . . . . . . . . . . . . . . . . . . . . . . . . . . . . . . . . . . . . . . . . . . . . 107
Contents 7
Page 8

Novell Confidential Manual (ENU) 21 December 2004
Alarms . . . . . . . . . . . . . . . . . . . . . . . . . . . . . . . . . . . . . . . . . . . . . . . . . . . . . . . . 107
Calendar and Free/Busy . . . . . . . . . . . . . . . . . . . . . . . . . . . . . . . . . . . . . . . . . . . . . . . 107
Certificates . . . . . . . . . . . . . . . . . . . . . . . . . . . . . . . . . . . . . . . . . . . . . . . . . . . . . . . 108
Contact Management . . . . . . . . . . . . . . . . . . . . . . . . . . . . . . . . . . . . . . . . . . . . . . . . . . 108
Creating a Contact . . . . . . . . . . . . . . . . . . . . . . . . . . . . . . . . . . . . . . . . . . . . . . . . . . 108
Creating an Address Book . . . . . . . . . . . . . . . . . . . . . . . . . . . . . . . . . . . . . . . . . . . . . . 108
10 Synchronizing Your Handheld Device 111
Enabling Synchronization . . . . . . . . . . . . . . . . . . . . . . . . . . . . . . . . . . . . . . . . . . . . . . . . 111
Selecting Conduits . . . . . . . . . . . . . . . . . . . . . . . . . . . . . . . . . . . . . . . . . . . . . . . . . . . 111
Synchronizing Information. . . . . . . . . . . . . . . . . . . . . . . . . . . . . . . . . . . . . . . . . . . . . . . . 112
A Migration from Outlook to Evolution 113
Migrating Local Outlook Mail Folders . . . . . . . . . . . . . . . . . . . . . . . . . . . . . . . . . . . . . . . . . . 113
B Quick Reference 115
Opening or Creating Items . . . . . . . . . . . . . . . . . . . . . . . . . . . . . . . . . . . . . . . . . . . . . . . 115
Mail Tasks . . . . . . . . . . . . . . . . . . . . . . . . . . . . . . . . . . . . . . . . . . . . . . . . . . . . . . . . 115
Calendar. . . . . . . . . . . . . . . . . . . . . . . . . . . . . . . . . . . . . . . . . . . . . . . . . . . . . . . . . 116
Address Book . . . . . . . . . . . . . . . . . . . . . . . . . . . . . . . . . . . . . . . . . . . . . . . . . . . . . . 116
C Known Bugs and Limitations 119
D Authors 121
Glossary 123
8 Evolution User Guide
Page 9

Novell Confidential Manual (ENU) 21 December 2004
About This Guide
This guide describes how to use and manage EvolutionTM 2.6.x client software. This guide is
intended for users and is divided into the following sections:
Chapter 1, “Getting Started,” on page 11
Chapter 2, “Sending and Receiving E-Mail,” on page 33
Chapter 3, “Organizing Your E-Mail,” on page 49
Chapter 4, “Evolution Contacts: the Address Book,” on page 59
Chapter 5, “Evolution Calendar,” on page 65
Chapter 6, “Connecting to Exchange Servers,” on page 77
Chapter 7, “Connecting to GroupWise,” on page 87
Chapter 8, “Connecting to Hula,” on page 99
Chapter 9, “Advanced Configuration,” on page 101
Chapter 10, “Synchronizing Your Handheld Device,” on page 111
Appendix A, “Migration from Outlook to Evolution,” on page 113
Appendix B, “Quick Reference,” on page 115
Appendix C, “Known Bugs and Limitations,” on page 119
Appendix D, “Authors,” on page 121
“Glossary” on page 123
Additional Documentation
You can find additional help in three places:
For information about command line options, open a terminal window and type evolution
--help.
®
For support, late-breaking news, and errata, visit the Novell
support.novell.com (http://support.novell.com).
support center at
In the Evolution interface, click Help > Contents.
Documentation Updates
For the most recent version of the Evolution 2.6 User Guide, see the Evolution Documentation
Web site (http://www.novell.com/documentation/ximian.html).
Documentation Conventions
In Novell documentation, a greater-than symbol (>) is used to separate actions within a step and
items in a cross-reference path.
About This Guide 9
Page 10

Novell Confidential Manual (ENU) 21 December 2004
A trademark symbol (®, TM, etc.) denotes a Novell trademark. An asterisk (*) denotes a third-party
trademark.
User Comments
We want to hear your comments and suggestions about this manual and the other documentation
included with this product. Please use the User Comment feature at the bottom of each page of the
online documentation, or go to www.novell.com/documentation/feedback.html and enter your
comments there.
10 Evolution User Guide
Page 11

Novell Confidential Manual (ENU) 21 December 2004
1 Getting Started
EvolutionTM makes the tasks of storing, organizing, and retrieving your personal information easy,
so you can work and communicate more effectively with others. It’s a highly evolved groupware
program, an integral part of the Internet-connected desktop.
Evolution can help you work in a group by handling e-mail, address, and other contact
information, and one or more calendars. It can do that on one or several computers, connected
directly or over a network, for one person or for large groups.
With Evolution, you can accomplish your most common daily tasks quickly. For example, it takes
only one or two clicks to enter appointment or contact information sent to you by e-mail, or to send
e-mail to a contact or appointment. People who get lots of e-mail will appreciate advanced features
like search folders, which let you save searches as though they were ordinary e-mail folders.
“Starting Evolution for the First Time” on page 11
“Using Evolution: An Overview” on page 26
Starting Evolution for the First Time
1 Start the Evolution client.
GNOME: Click Programs > Evolution.
KDE: Click the K menu > Office > More Programs > Evolution.
Command Line: Enter evolution.
Using the First-Run Assistant
The first time you run Evolution, it creates a directory called .evolution in your home directory,
where it stores all of its local data. Then, it opens a First-Run Assistant to help you set up e-mail
accounts and import data from other applications.
Using the first-run assistant takes two to five minutes.
Later on, if you want to change this account, or if you want to create a new one, click Edit >
Preferences, then click Mail Accounts. Select the account you want to change, then click Edit.
Alternately, add a new account by clicking Add. See “Mail Preferences” on page 104 for details.
The First-Run Assistant helps you provide the information Evolution needs to get started.
“Defining Your Identity” on page 12
“Receiving Mail” on page 12
“Receiving Mail Options” on page 15
“Sending Mail” on page 23
Getting Started 11
Page 12
Novell Confidential Manual (ENU) 21 December 2004
“Account Management” on page 25
“Time Zone” on page 25
Defining Your Identity
The Identity window is the first step in the assistant.
Receiving Mail
Here, you enter some basic personal information. You can define multiple identities later by
clicking Edit > Preferences, then clicking Mail Accounts.
When the First-Run Assistant starts, the Welcome page is displayed. Click Forward to proceed to
the Identity window.
1 Type your full name in the Full Name field.
2 Type your e-mail address in the E-Mail Address field.
3 (Optional) Select if this account is your default account.
4 (Optional) Type a reply to address in the Reply-To field.
Use this field if you want replies to e-mails sent to a different address.
5 (Optional) Type your organization name in the Organization field.
This is the company where you work, or the organization you represent when you send e-mail.
6 Click Forward.
The Receiving E-mail option lets you determine where you get your e-mail.
12 Evolution User Guide
Page 13
Novell Confidential Manual (ENU) 21 December 2004
You need to specify the type of server you want to receive mail with. If you are unsure about the
type of server to choose, ask your system administrator or ISP.
1 Select a server type in the Server Type list.
The following is a list of server types that are available:
Novell GroupWise: Select this option if you connect to Novell GroupWise
®
. Novell
GroupWise keeps e-mail, calendar, and contact information on the server. For configuration
instructions, see “Remote Configuration Options” on page 14.
Microsoft Exchange: Available only if you have installed the Connector for Microsoft*
Exchange. It allows you to connect to a Microsoft Exchange 2000 or 2003 server, which stores
e-mail, calendar, and contact information on the server. For configuration instructions, see
“Remote Configuration Options” on page 14.
IMAP: Keeps the e-mail on your server so you can access your e-mail from multiple systems.
For configuration instructions, see “Remote Configuration Options” on page 14.
IMAP4rev1: Keeps the e-mail on your server so you can access your e-mail from multiple
systems. For configuration instructions, see “Remote Configuration Options” on page 14.
POP: Downloads your e-mail to your hard disk for permanent storage, freeing up space on
the e-mail server. For configuration instructions, see “Remote Configuration Options” on
page 14.
USENET News: Connects to the news server and downloads a list of available news digests.
For configuration instructions, see “Remote Configuration Options” on page 14.
Local Delivery: Choose this option if you want to move e-mail from the spool (the location
where mail waits for delivery) and store it in your home directory. You need to provide the
path to the mail spool you want to use. If you want to leave e-mail in your system’s spool files,
choose the Standard Unix Mbox Spool option instead. For configuration instructions, see
“Local Configuration Options” on page 15.
Getting Started 13
Page 14

Novell Confidential Manual (ENU) 21 December 2004
MH Format Mail Directories: If you download your e-mail using mh or another MH-style
program, you should use this option. You need to provide the path to the mail directory you
want to use. For configuration instructions, see “Local Configuration Options” on page 15.
Maildir Format Mail Directories: If you download your e-mail using Qmail or another
maildir-style program, you should use this option. You need to provide the path to the mail
directory you want to use. For configuration instructions, see “Local Configuration Options”
on page 15.
Standard Unix Mbox Spool or Directory: If you want to read and store e-mail in the mail
spool on your local system, choose this option. You need to provide the path to the mail spool
you want to use. For configuration instructions, see “Local Configuration Options” on
page 15.
None: Select this if you do not plan to check e-mail with this account. If you select this, there
are no configuration options.
Remote Configuration Options
If you selected Novell GroupWise, IMAP, POP, or USENET News as your server, you need to
specify additional information.
1 Type the hostname of your e-mail server in the Hostname field.
If you don’t know the hostname, contact your administrator.
2 Type your username for the account in the Username field.
3 Select to use a secure (SSL) connection.
If your server supports secure connections, you should enable this security option. If you are
unsure if your server supports a secure connection, contact your system administrator.
4 Select your authentication type in the Authentication list.
or
Click Check for Supported Types to have Evolution check for supported types. Some servers
do not announce the authentication mechanisms they support, so clicking this button is not a
guarantee that available mechanisms actually work.
If you are unsure what authentication type you need, contact your system administrator.
5 Select if you want Evolution to remember your password.
6 Click Forward.
(Conditional) If you chose Microsoft Exchange as the server type, provide your username in the
Username field and your Outlook Web Access (OWA) URL in the OWA URL field. The URL and
the usernames should use the Outlook format.If the mailbox path is different from the username,
the OWA path should also include mailbox path, for example http://server name/exchange/mail
box path.
When you have finished, continue with Receiving Mail Options (page 15).
Local Configuration Options
If you selected Local Delivery, MH-Format Mail Directories, Maildir-Format Mail Directories, or
Standard Unix Mbox Spool or Directory, you must specify the path to the local files in the path
field. Continue with Receiving Mail Options.
14 Evolution User Guide
Page 15
Novell Confidential Manual (ENU) 21 December 2004
Receiving Mail Options
After you have selected a mail delivery mechanism, you can set some preferences for its behavior.
“Novell GroupWise Receiving Options” on page 15
“Microsoft Exchange Receiving Options” on page 16
“IMAP and IMAP4rev1 Receiving Options” on page 17
“POP Receiving Options” on page 18
“USENET News Receiving Options” on page 19
“Local Delivery Receiving Options” on page 20
“MH-Format Mail Directories Receiving Options” on page 21
“Maildir-Format Mail Directories Receiving Options” on page 21
“Standard Unix Mbox Spool or Directory Receiving Options” on page 22
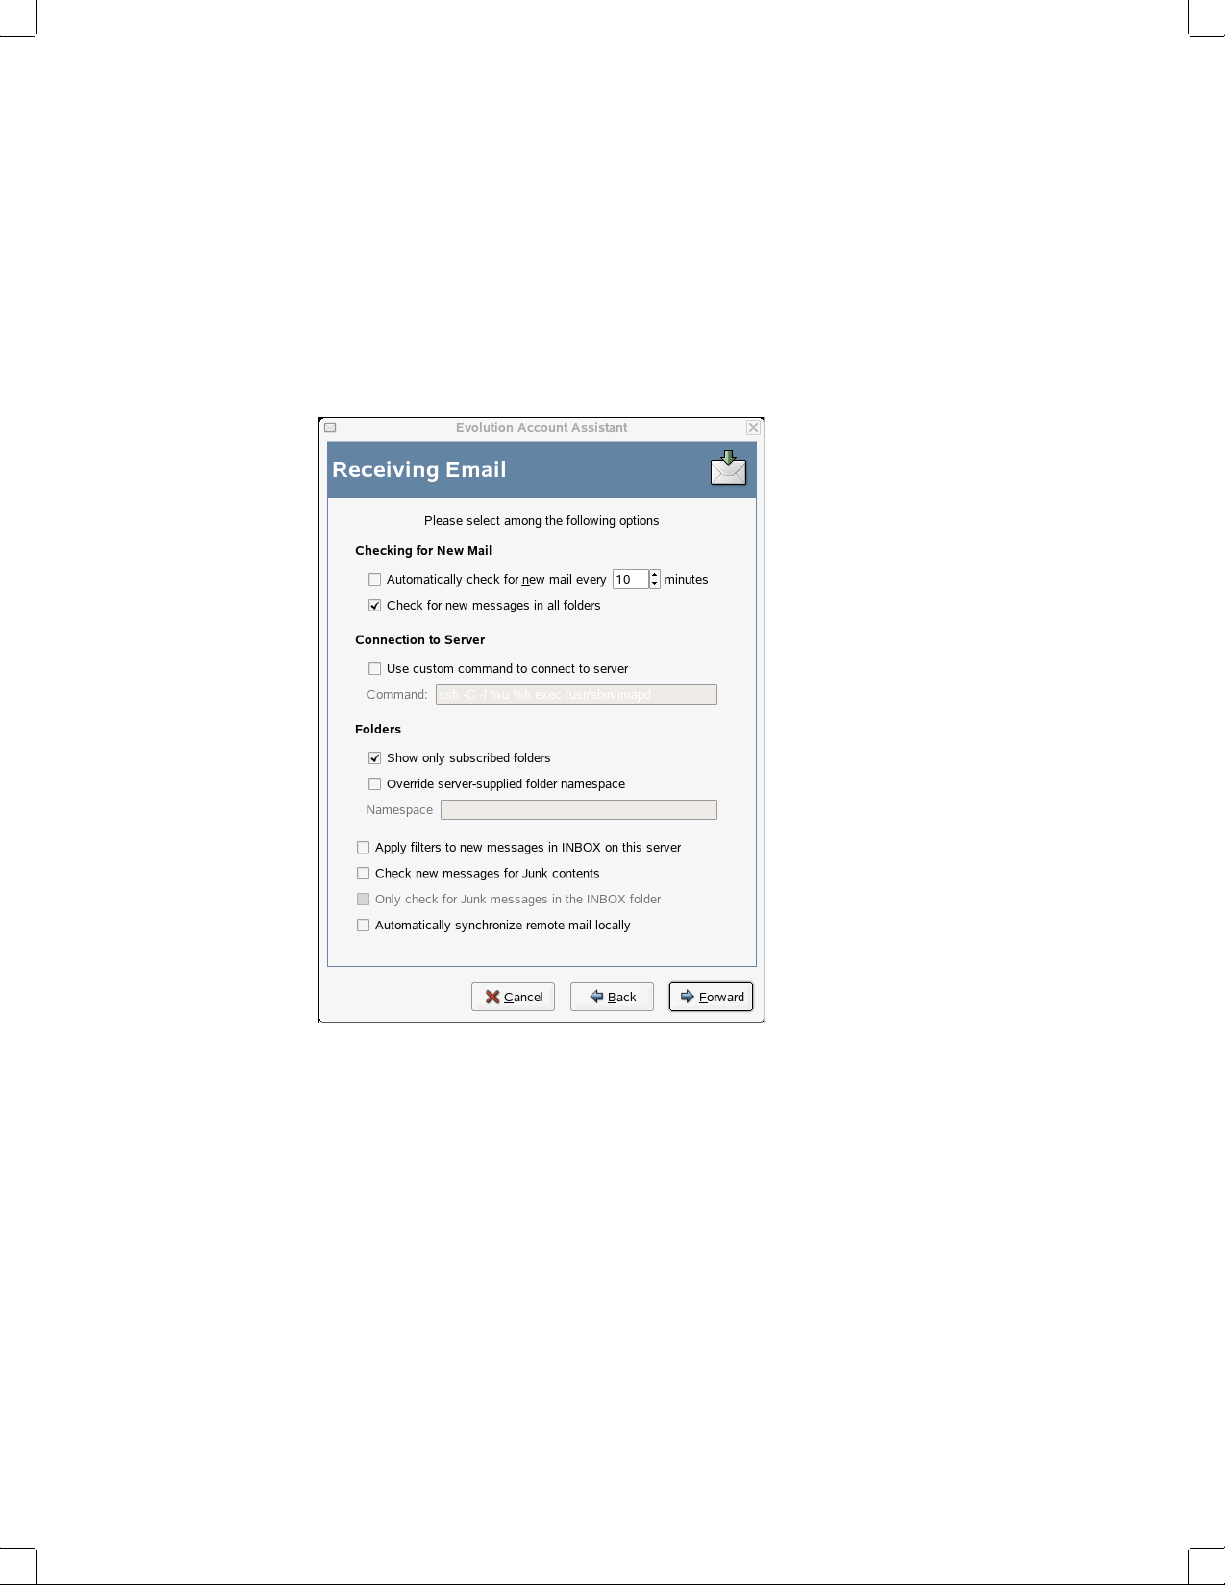
Novell GroupWise Receiving Options
If you select Novell GroupWise as your receiving server type, you need to specify the following
options:
1 Select if you want Evolution to automatically check for new mail.
If you select this option, you need to specify how often Evolution should check for new
messages.
2 Select if you want to check for new messages in all folders.
3 Select if you want to apply filters to new messages in the Inbox on the server.
For additional information on filtering, see “Creating New Filter Rules” on page 53.
4 Select if you want to check new messages for junk content.
Getting Started 15
Page 16
Novell Confidential Manual (ENU) 21 December 2004
For additional information on junk content, see “Junk Mail Preferences” on page 105.
5 Select if you want to only check for junk messages in the Inbox folder.
6 Select if you want to automatically synchronize remote mail locally.
7 Type your Post Office Agent SOAP port in the Post Office Agent SOAP Port field.
If you are unsure what your Post Office Agent SOAP port is, contact your system
administrator.
8 Click Forward.
When you have finished, continue with Sending Mail (page 23).
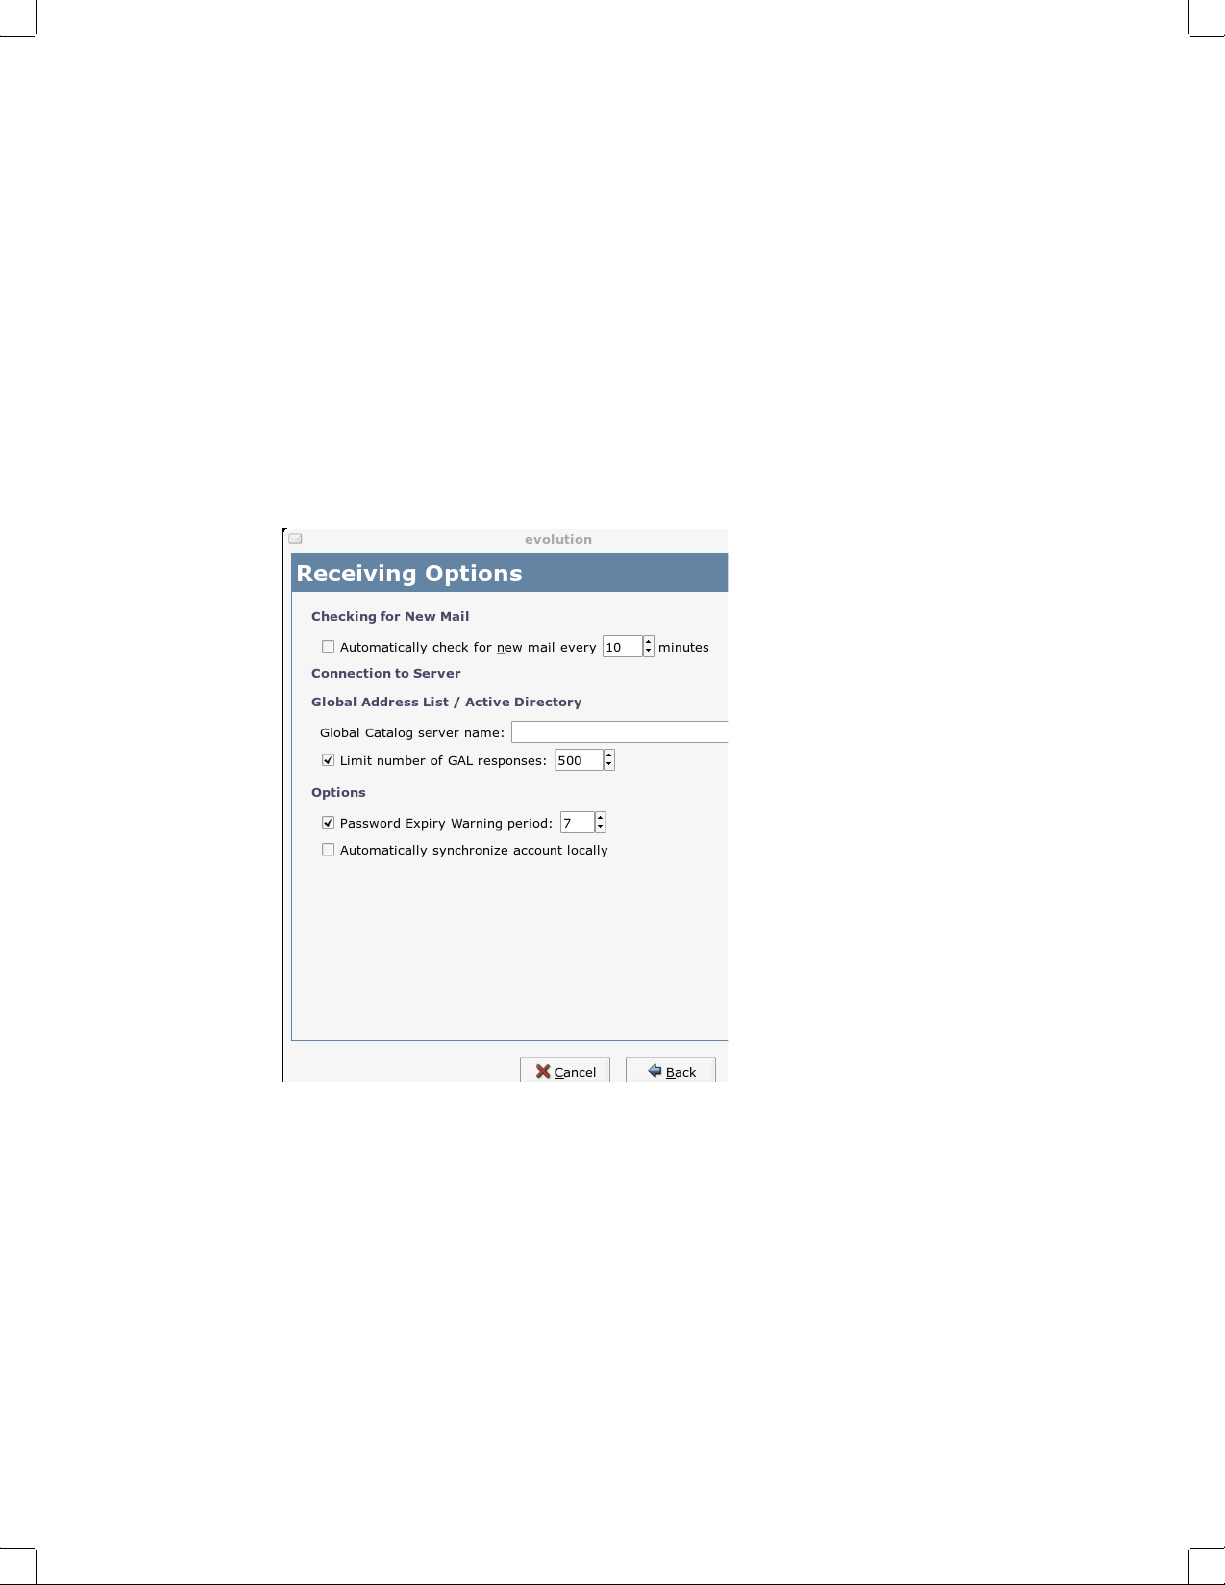
Microsoft Exchange Receiving Options
If you select Microsoft Exchange as your receiving server type, you need to specify the following
options:
1 Select if you want Evolution to automatically check for new mail.
If you select this option, you need to specify how often Evolution should check for new
messages.
2 Specify the Global Catalog server name in the Global Catalog Server Name field.
The Global Catalog Server contains the user information for users. If you are unsure what your
Global Catalog server name is, contact your system administrator.
3 Select if you want to limit the number of Global Address Lists (GAL).
The GAL contains a list of all e-mail addresses. If you select this option, you need to specify
the maximum number of responses.
4 Select if you want use a password expire warning time period.
16 Evolution User Guide
Page 17
Novell Confidential Manual (ENU) 21 December 2004
If you select this option, you need to specify how often Evolution should send the password
expire message.
5 Select if you want to automatically synchronize remote mail locally.
6 Click Forward.
When you have finished, continue with Sending Mail (page 23).
IMAP and IMAP4rev1 Receiving Options
If you select IMAP or IMAP4rev1 as your receiving server type, you need to specify the following
options:
1 Select if you want Evolution to automatically check for new mail.
If you select this option, you need to specify how often Evolution should check for new
messages.
2 Select if you want Evolution to use custom commands to connect to Evolution.
If you select this option, specify the custom command you want Evolution to use.
3 Select if you want Evolution to show only subscribed folders.
Subscribed folders are folders that you have chosen to receive mail from by subscribing to
them.
4 Select if you want Evolution to override server-supplied folder namespaces.
By choosing this option you can rename the folders that the server provides. If you select this
option, you need to specify the namespace to use.
Getting Started 17
Page 18
Novell Confidential Manual (ENU) 21 December 2004
5
Select if you want to apply filters to new messages in the Inbox.
For additional information on filtering, see “Creating New Filter Rules” on page 53.
6 Select if you want to check new messages for junk content.
For additional information on junk content, see “Junk Mail Preferences” on page 105.
7 Select if you want to check for junk messages in the Inbox folder.
8 Select if you want to automatically synchronize remote mail locally.
9 Click Forward.
When you have finished, continue with Sending Mail (page 23).
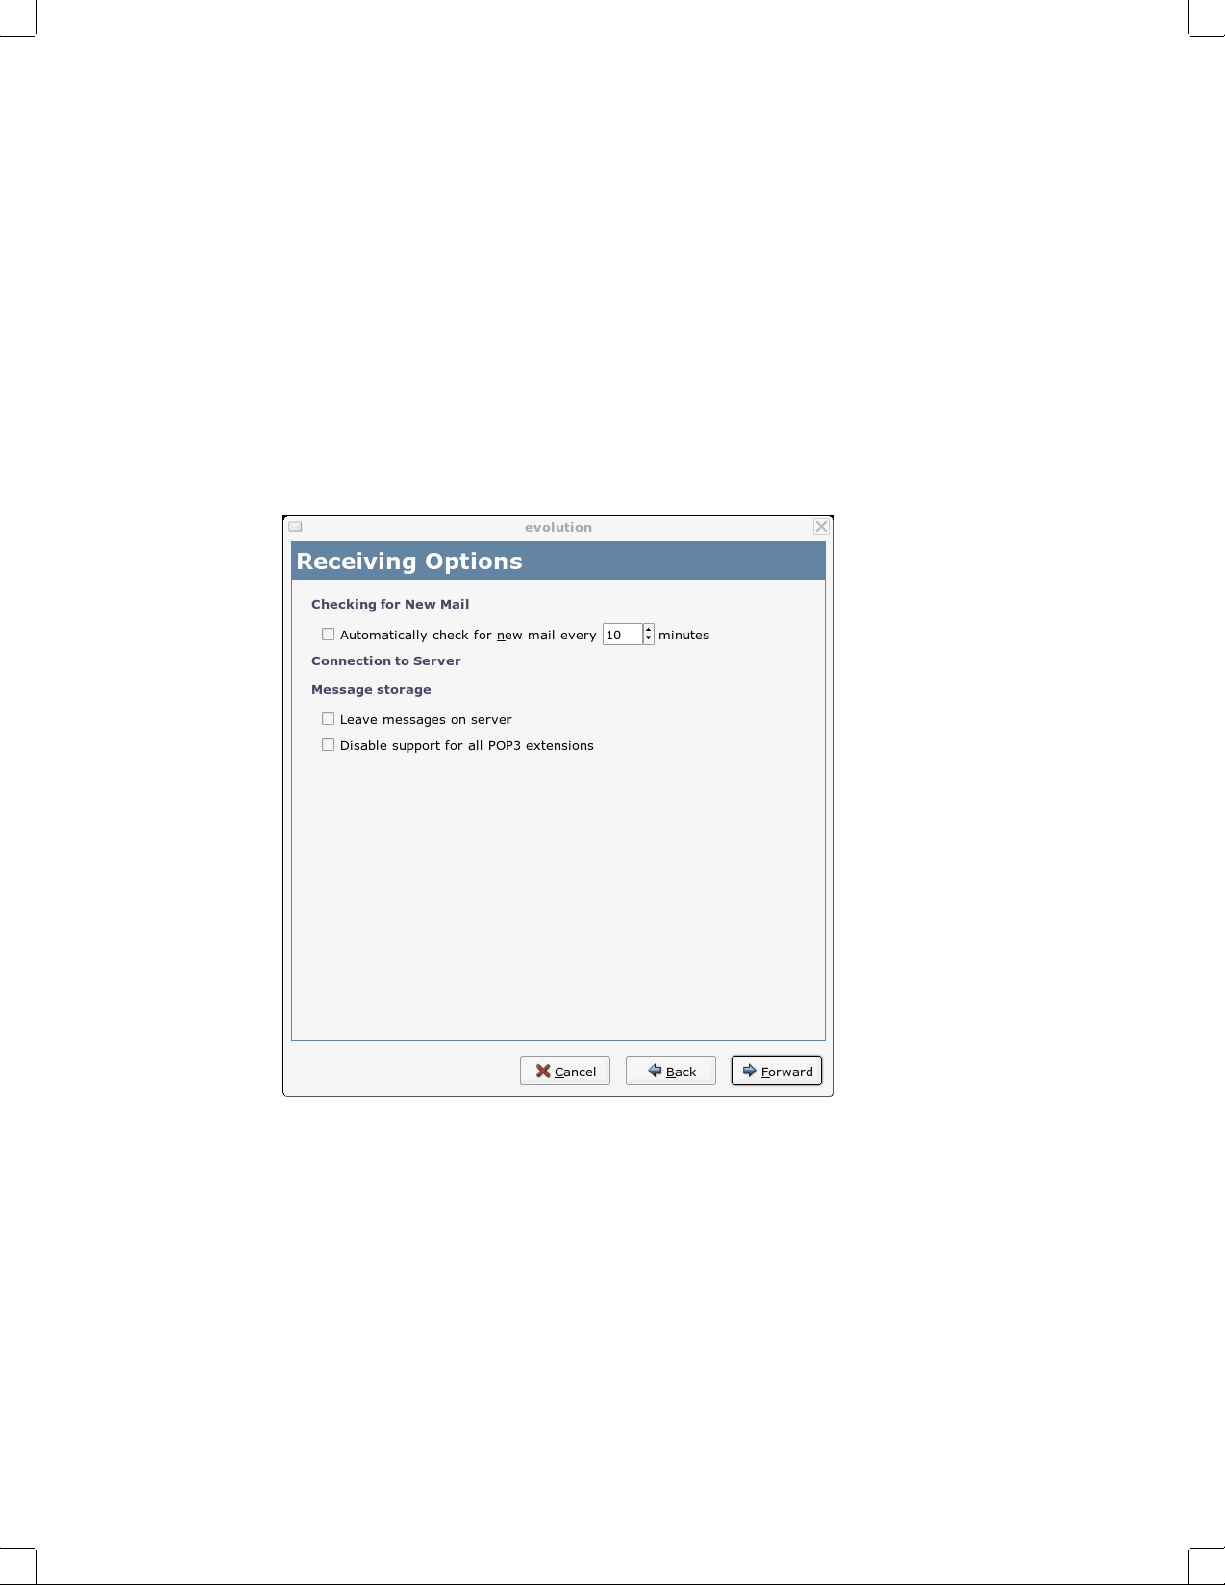
POP Receiving Options
If you select POP as your receiving server type, you need to specify the following options:
1 Select if you want Evolution to automatically check for new mail.
If you select this option, you need to specify how often Evolution should check for new
messages.
2 Select if you want to leave messages on the server.
3 Select if you want to disable support for all POP3 extensions (support for POP3).
4 Click Forward.
When you have finished, continue with Sending Mail (page 23).
18 Evolution User Guide
Page 19
Novell Confidential Manual (ENU) 21 December 2004
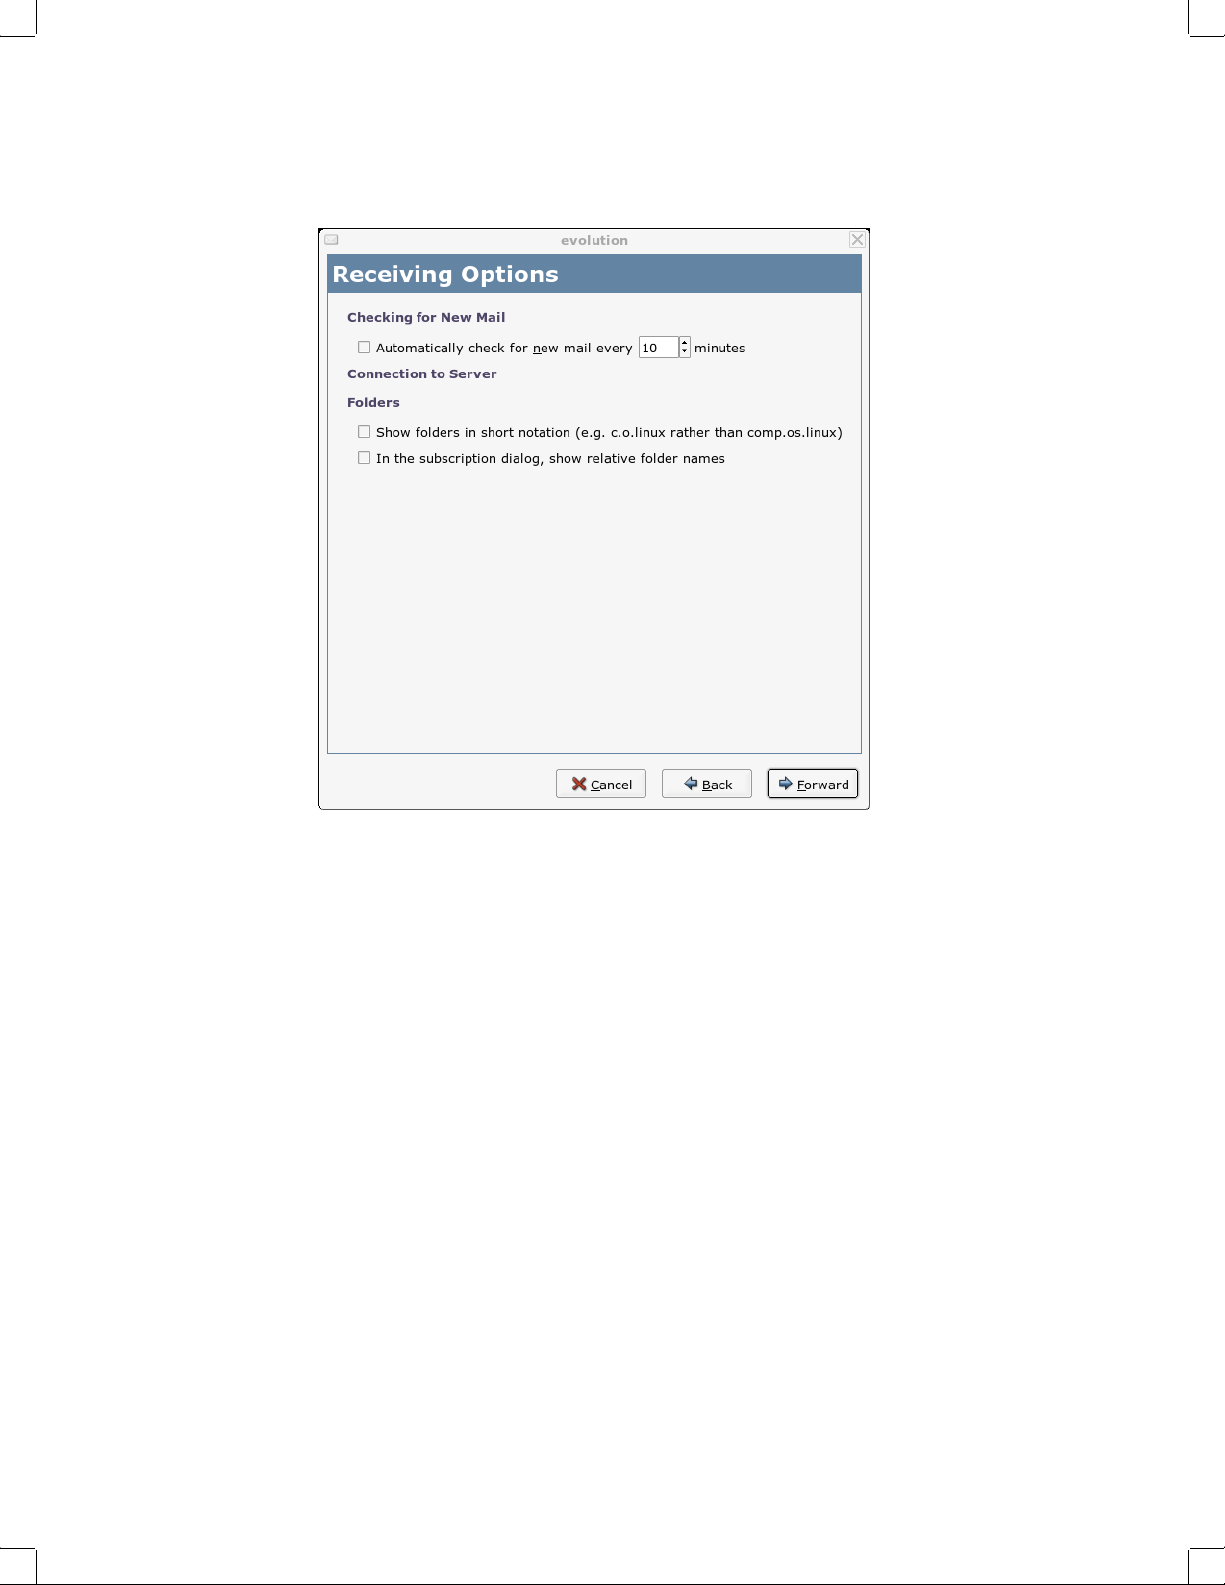
USENET News Receiving Options
If you select USENET News as your receiving server type, you need to specify the following
options:
1 Select if you want Evolution to automatically check for new mail.
If you select this option, you need to specify how often Evolution should check for new
messages.
2 Select if you want to show folders in short notation.
For example, comp.os.linux would appear as c.o.linux.
3 Select if you want to show relative folder names in the subscription dialog box.
If you select to show relative folder names in the subscription page, only the name of the
folder is displayed. For example the folder evolution.mail would appear as evolution.
4 Click Forward.
When you have finished, continue with Sending Mail (page 23).
Local Delivery Receiving Options
If you select Local Delivery as your receiving server type, you need to specify the following
options:
1 Select if you want Evolution to automatically check for new mail.
If you select this option, you need to specify how often Evolution should check for new
messages.
2 Click Forward.
Getting Started 19
Page 20
Novell Confidential Manual (ENU) 21 December 2004
When you have finished, continue with Sending Mail (page 23).
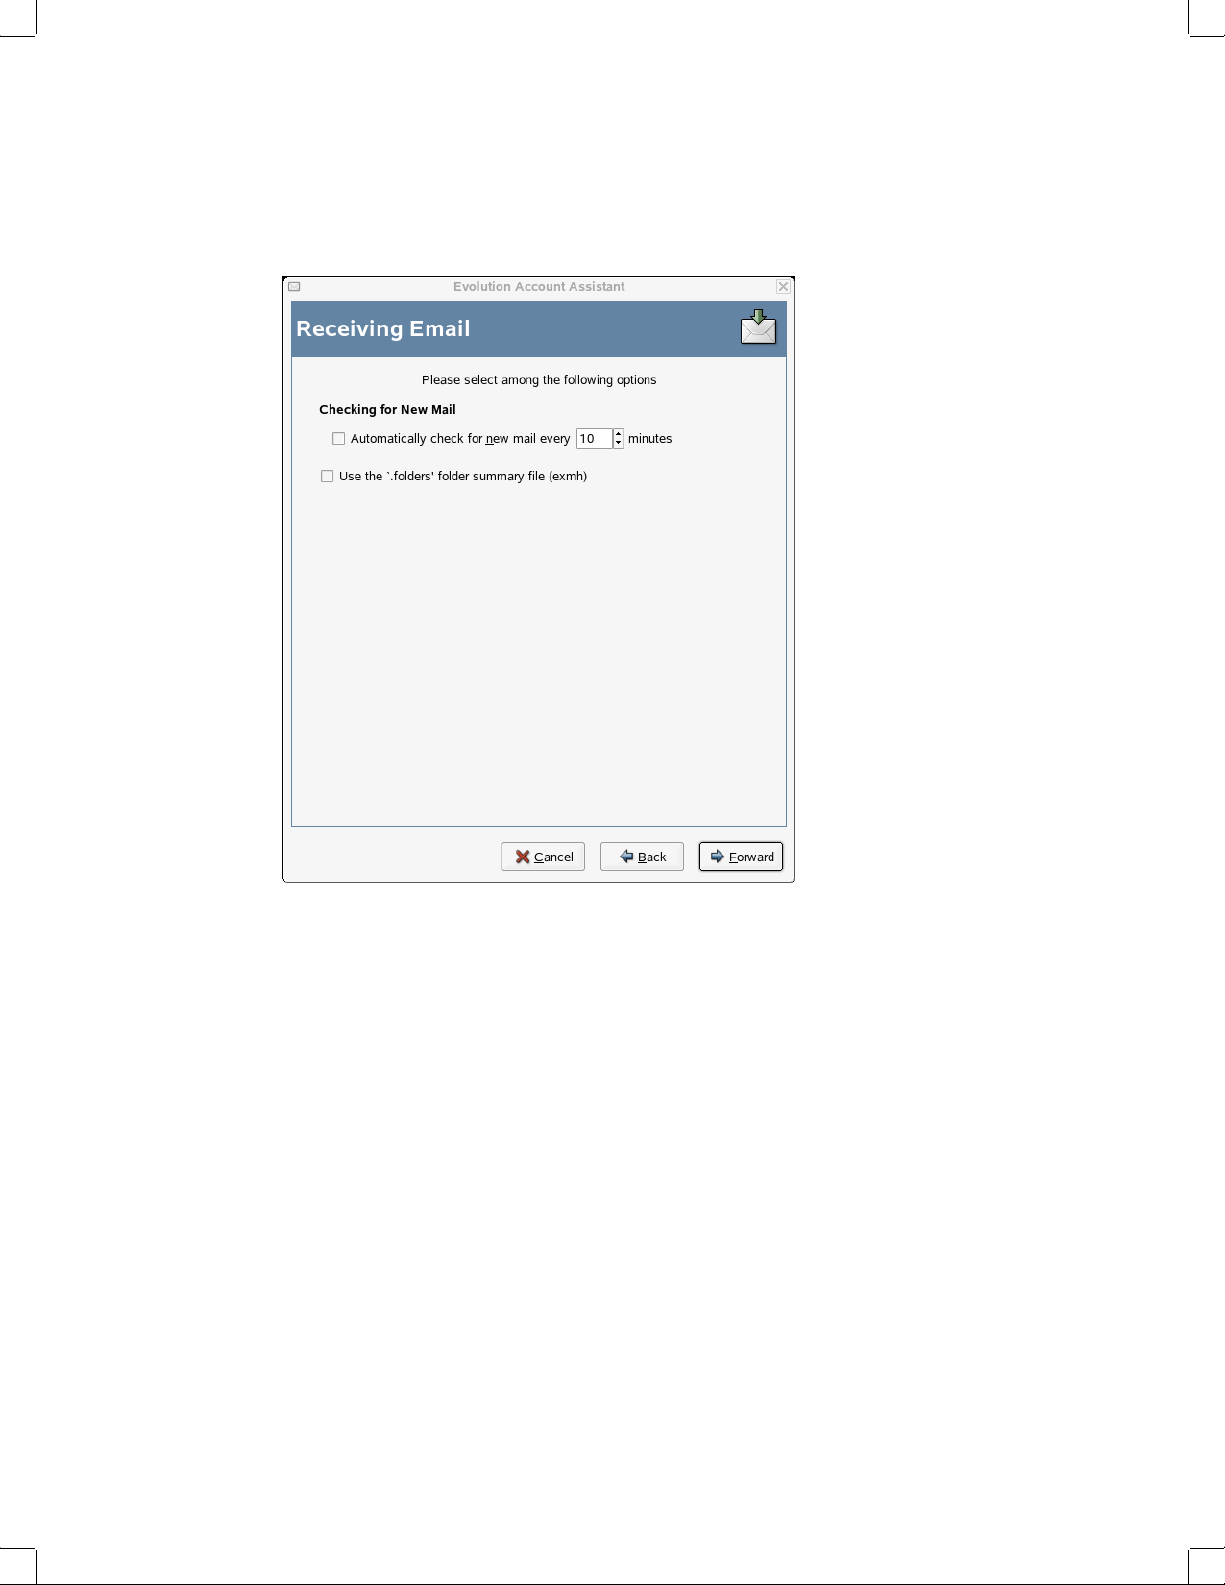
MH-Format Mail Directories Receiving Options
If you select MH-Format Mail Directories as your receiving server type, you need to specify the
following options:
1 Select if you want Evolution to automatically check for new mail.
If you select this option, you need to specify how often Evolution should check for new
messages.
2 Select if you want to user the .folders summary file.
3 Click Forward.
When you have finished, continue with Sending Mail (page 23).
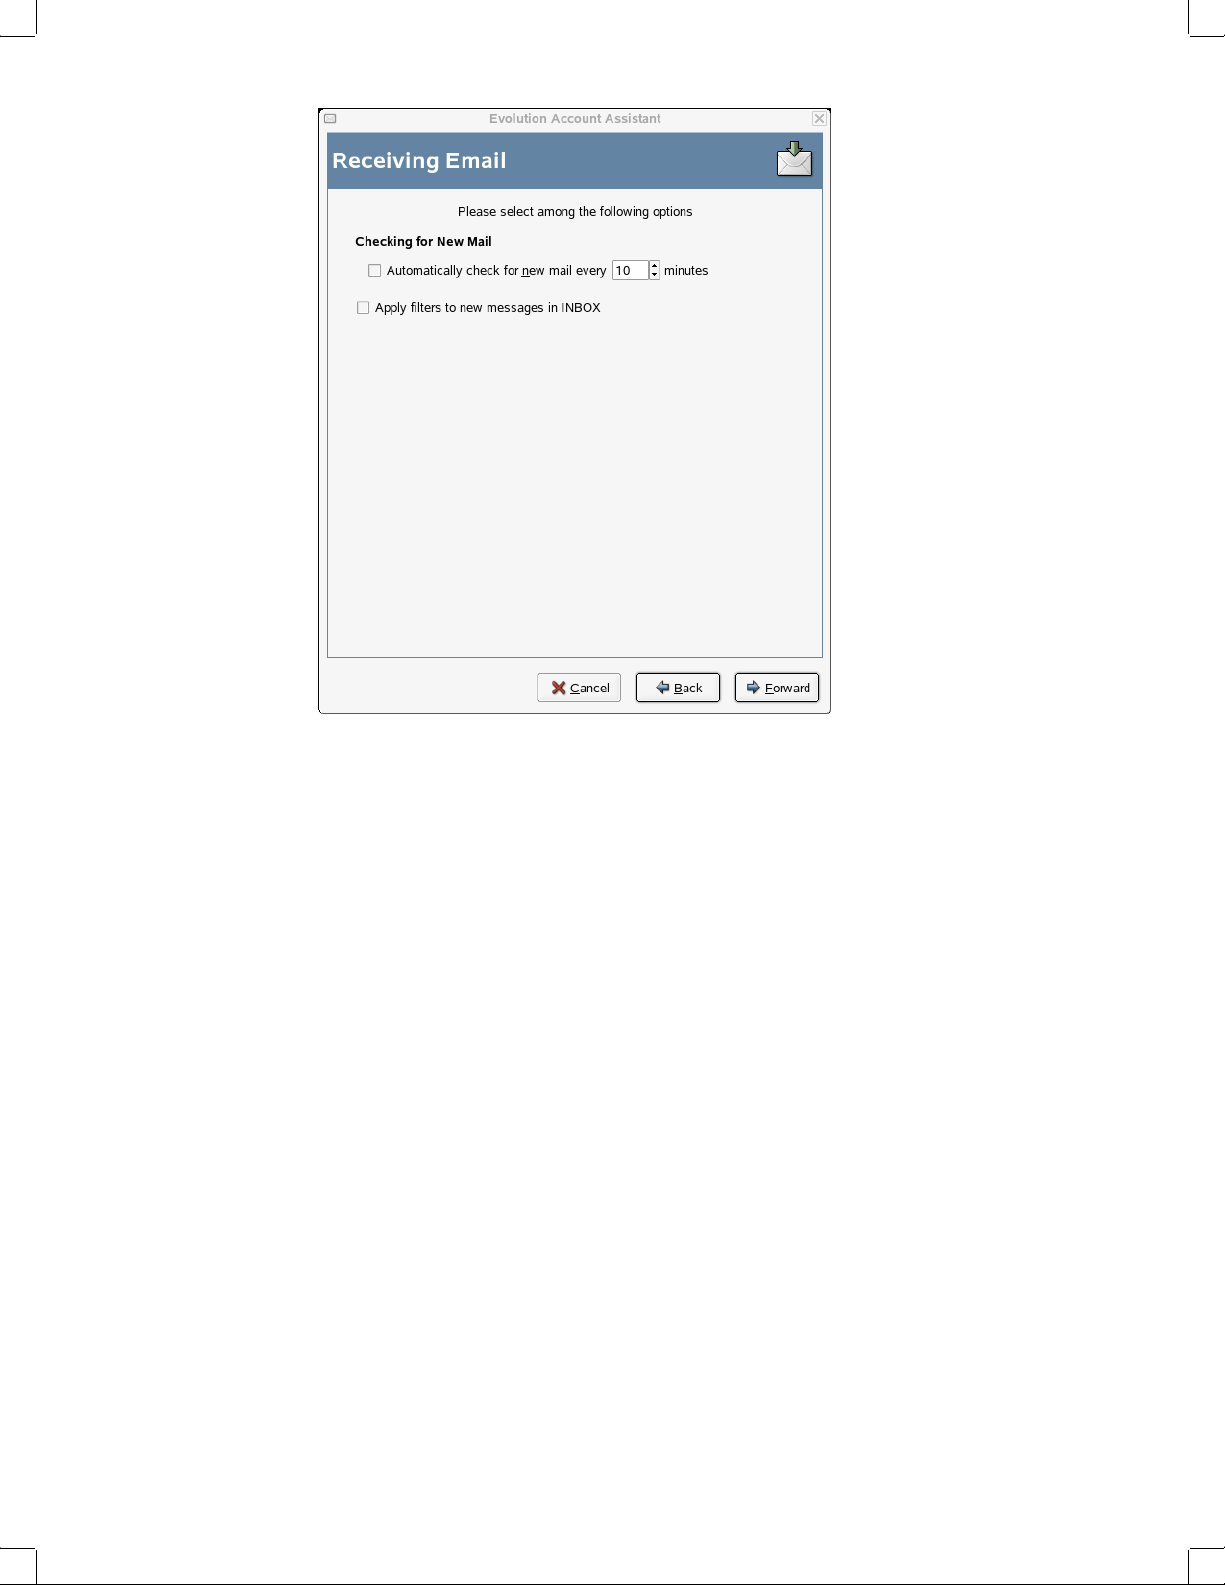
Maildir-Format Mail Directories Receiving Options
If you select Maildir-Format Mail Directories as your receiving server type, you need to specify
the following options:
20 Evolution User Guide
Page 21
Novell Confidential Manual (ENU) 21 December 2004
1
Select if you want Evolution to automatically check for new mail.
If you select this option, you need to specify how often Evolution should check for new
messages.
2 Select if you want to apply filters to new messages in the Inbox.
For additional information on filtering, see “Creating New Filter Rules” on page 53.
3 Click Forward.
When you have finished, continue with Sending Mail (page 23).
Standard Unix Mbox Spool or Directory Receiving Options
If you select Standard Unix Mbox Spool or Directory as your receiving server type, you need to
specify the following options:
Getting Started 21
Page 22

Novell Confidential Manual (ENU) 21 December 2004
Sending Mail
1
Select if you want Evolution to automatically check for new mail.
If you select this option, you need to specify how often Evolution should check for new
messages.
2 Select if you want to apply filters to new messages in the Inbox.
3 Select if you want to store status headers in Elm, Pine, and Mutt formats.
4 Click Forward.
When you have finished, continue with Sending Mail.
Now that you have entered information about how you plan to get mail, Evolution needs to know
about how you want to send it.
22 Evolution User Guide
Page 23
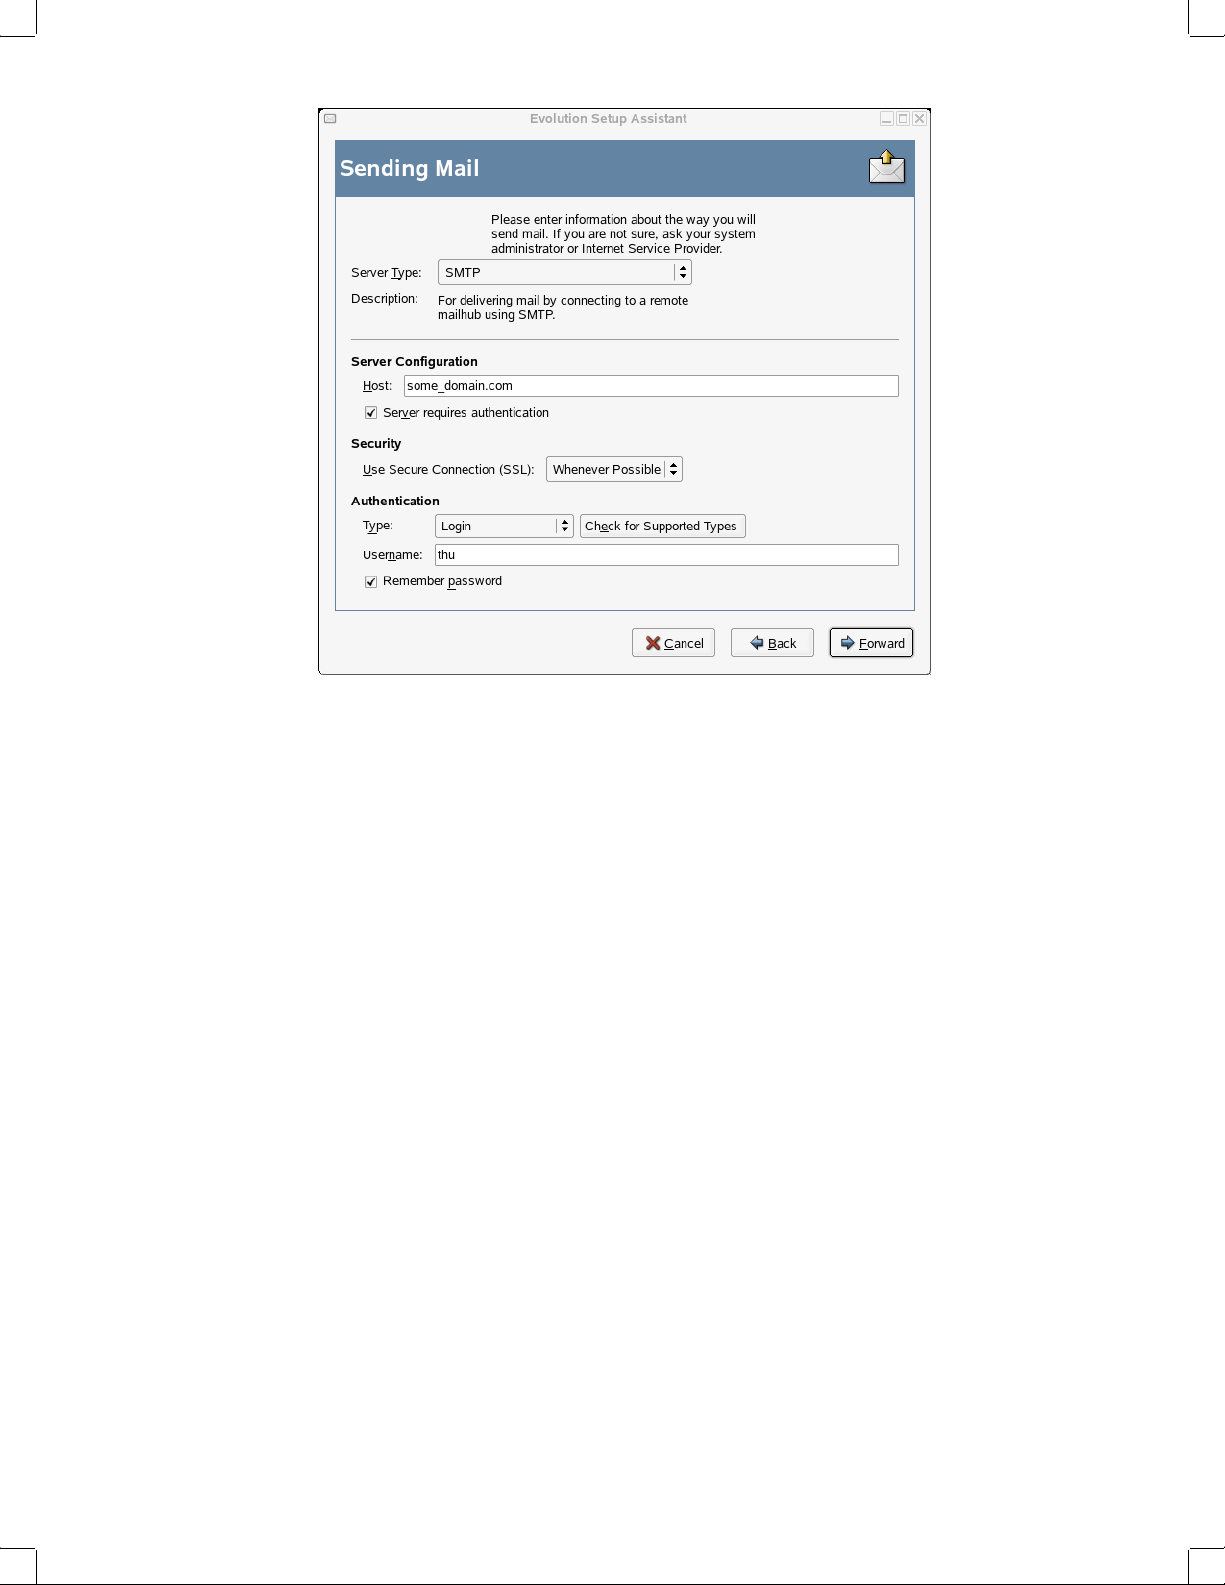
Novell Confidential Manual (ENU) 21 December 2004
1
Select a server type from the Server Type list.
The following server types are available:
Sendmail: Uses the Sendmail program to send mail from your system. Sendmail is more
flexible, but is not as easy to configure, so you should select this option only if you know how
to set up a Sendmail service.
SMTP: Sends mail using an outbound mail server. This is the most common choice for
sending mail. If you choose SMTP, there are additional configuration options. See “SMTP
Configuration” on page 24 for more information.
SMTP Configuration
1
Type the host address in the Host field.
If you are unsure what your host address is, contact your system administrator.
2 Select if your server requires authentication.
If you selected that your server requires authentication, you need to provide the following
information:
2a Select your authentication type in the Authentication list.
or
Click Check for Supported Types to have Evolution check for supported types. Some
servers do not announce the authentication mechanisms they support, so clicking this
button is not a guarantee that available mechanisms actually work.
2b Type your username in the Username field.
2c Select if you want Evolution to remember your password.
3 Select if you use a secure connection (SSL).
Getting Started 23
Page 24
Novell Confidential Manual (ENU) 21 December 2004
4
Click Forward.
Continue with Account Management.
Account Management
Now that you have finished the e-mail configuration process you need to give the account a name.
The name can be any name you prefer. Type your account name on the Name field, then click
Forward.
Continue with Time Zone.
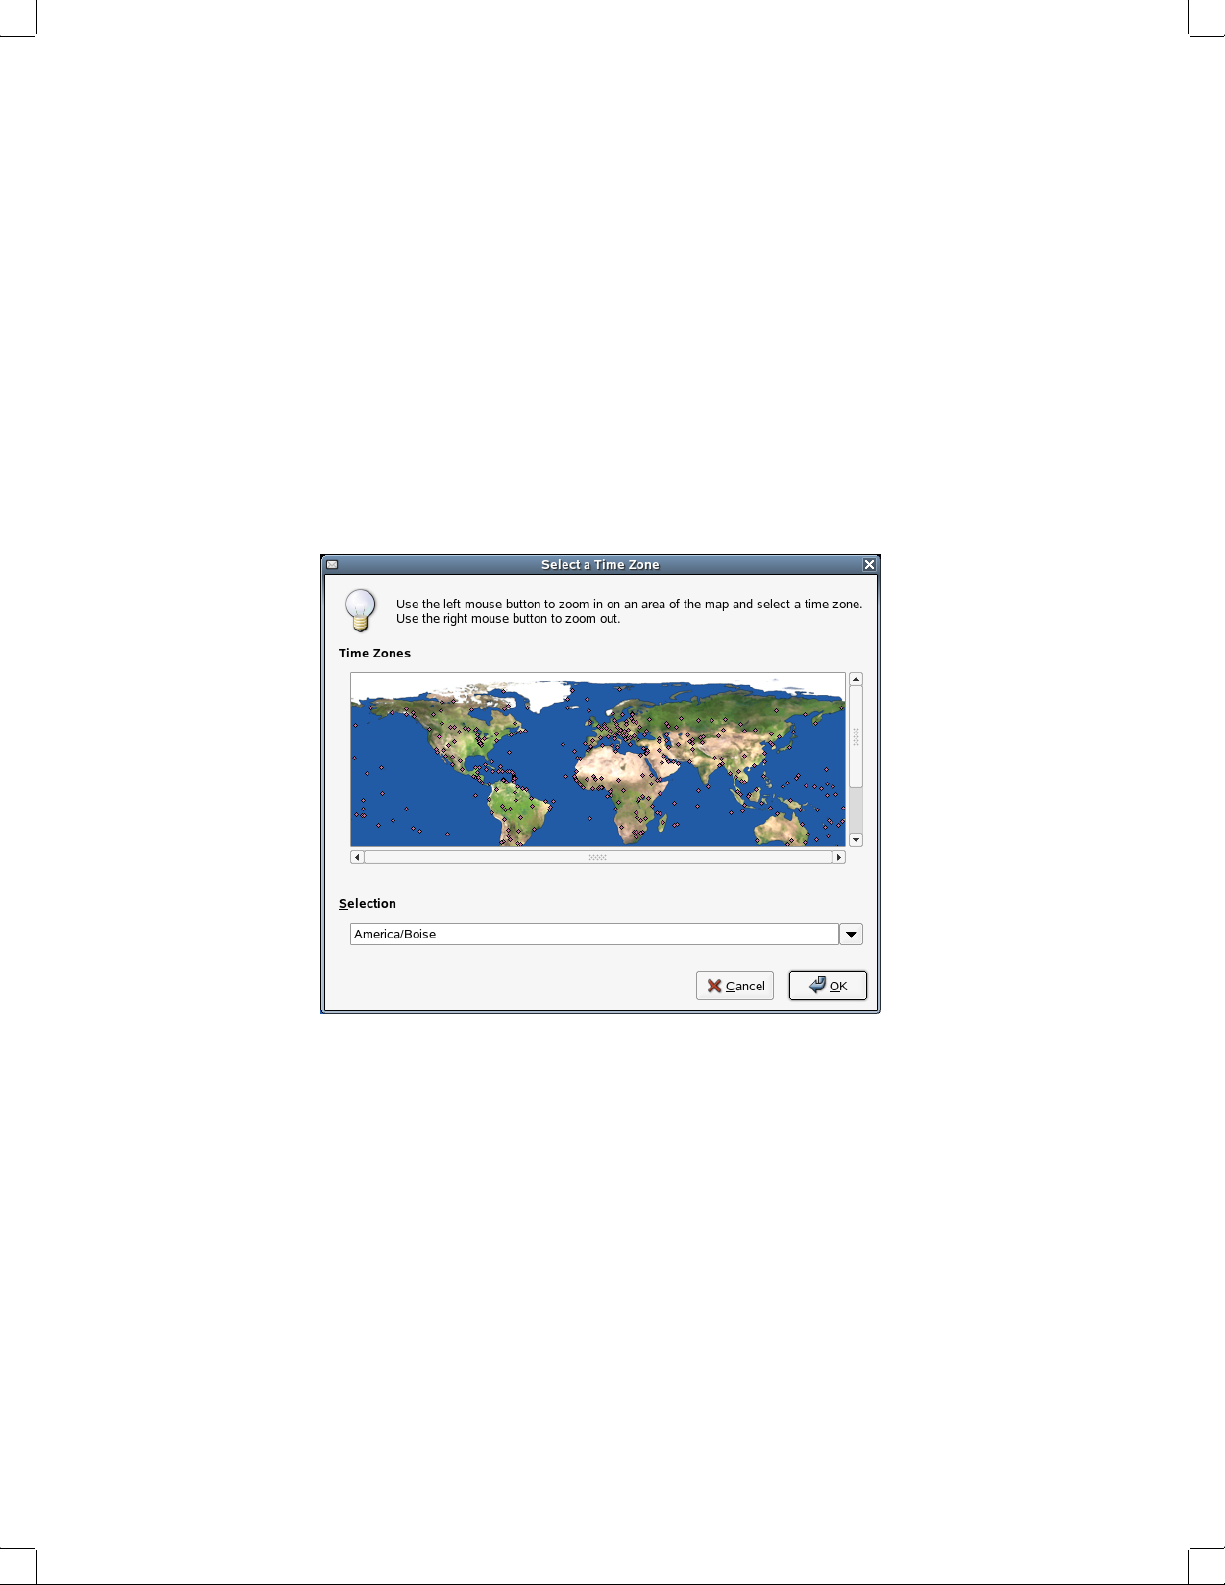
Time Zone
Select your time zone on the map.
1
or
Select from the time zone drop-down list.
2 Click OK, then click Apply.
Evolution opens with your new account created.
If you want to import e-mail from another e-mail client, continue with Importing Mail. If not, skip
to “Using Evolution: An Overview” on page 26.
Importing Mail (Optional)
After selecting your time zone, if Evolution finds e-mail or address files from another application,
it offers to import them. For a full description of the import feature, see “Importing Single Files”
on page 49.
Microsoft Outlook* and versions of Outlook Express after version 4 use proprietary formats that
Evolution cannot read or import. To import information, you might want to use the Export tool
under Windows*. See the instructions in “Migrating Local Outlook Mail Folders” on page 113.
24 Evolution User Guide
Page 25
Novell Confidential Manual (ENU) 21 December 2004
Before importing e-mail from Netscape*, make sure you have selected File > Compact All
Folders. If you don’t, Evolution will import and undelete the messages in your Trash folders.
TIP: Evolution uses standard file types for e-mail and calendar information, so you can copy those files from
your ~/.evolution directory. The file formats used are mbox for e-mail and iCal for calendar information.
Contacts files are stored in a database, but can be saved as a standard vCard*. To export contact data, open
your contacts tool and select the contacts you want to export (press Ctrl+A to select them all). Click File > Save
as VCard.
Using Evolution: An Overview
Now that the first-run configuration has finished, you’re ready to begin using Evolution. Here’s a
quick explanation of what’s happening in your main Evolution window.
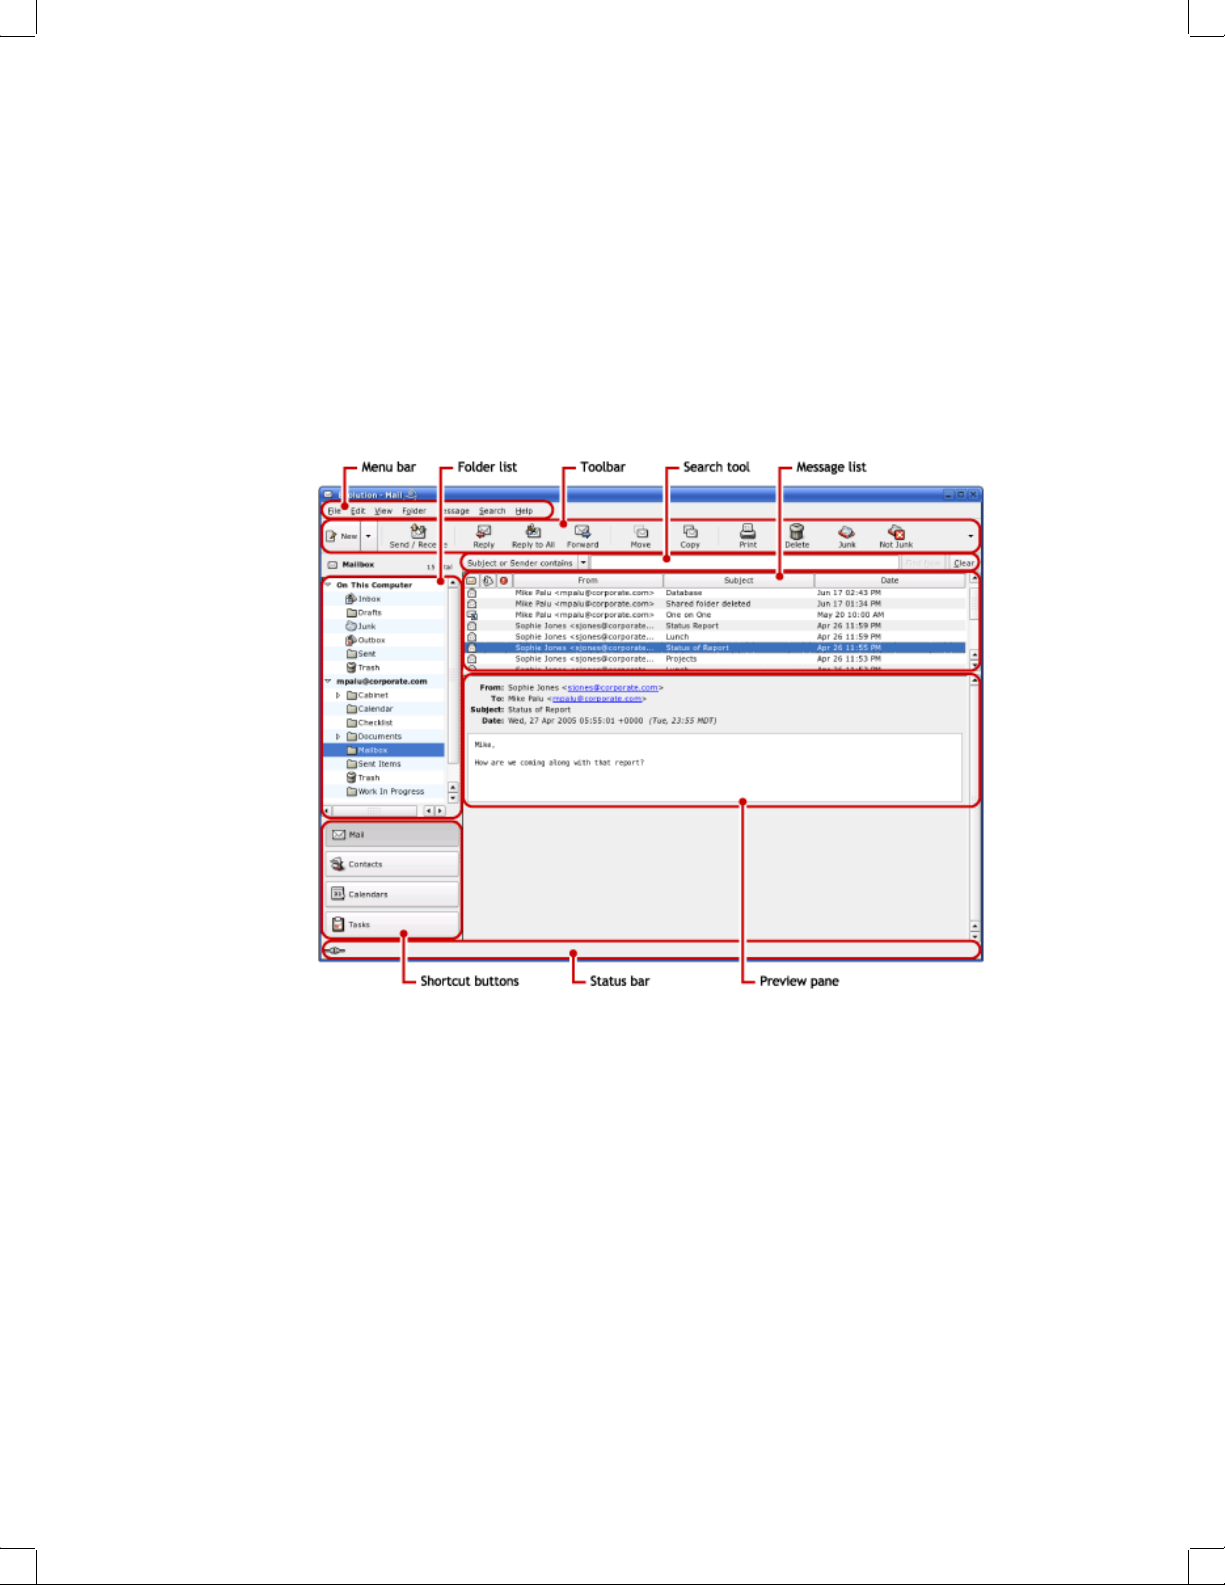
Menu Bar
The menu bar gives you access to most Evolution features. For additional information, see “The
Menu Bar” on page 27.
Folder List
The folder list gives you a list of the available folders for each account. To see the contents of a
folder, click the folder name and the contents are displayed in the e-mail list.
Toolbar
The toolbar gives you fast and easy access to the frequently used features in each component.
Search Tool
The search tool lets you search your e-mail, contacts, calendar, and tasks to easily find what you’re
looking for.
Getting Started 25
Page 26

Novell Confidential Manual (ENU) 21 December 2004
Message List
The message list displays a list of e-mail that you have received. To view an e-mail in the preview
pane, click the e-mail in the e-mail list.
Shortcut Buttons
The shortcut bar lets you switch between folders and between Evolution tools. At the bottom of
the shortcut bar there are buttons that let you switch tools, and above that is a list of all the available
folders for the current tool. If you have the Evolution Connector for Microsoft Exchange installed,
you have an Exchange button in addition to buttons for the other tools. For additional information,
see “The Shortcut Bar” on page 28.
Status Bar
The status bar periodically displays a message, or tells you the progress of a task. This most often
happens when you’re checking or sending e-mail. These progress queues are shown in the
previous figure. The Online/Offline indicator is here, too, in the lower left of the window.
Preview Pane
The Menu Bar
The preview pane displays the contents of the e-mail that is selected in the e-mail list.
The menu bar’s contents always provide all the possible actions for any given view of your data.
If you’re looking at your Inbox, most of the menu items relate to e-mail. Some content relates to
other components of Evolution and some, especially in the File menu, relates to the application as
a whole.
File: Anything related to a file or to the operations of the application is listed in this menu, such
as creating things, saving them to disk, printing them, and quitting the program itself.
Edit: Holds useful tools that help you edit text and move it around. Lets you access the settings
and configuration options in the Edit menu.
View: Lets you decide how Evolution should look. Some of the features control the appearance of
Evolution as a whole, and others the way a particular kind of information appears.
Folder: Holds actions that can be performed on folders. You can find things like copy, rename,
delete, and so on.
Message: Holds actions that can be applied to a message. If there is only one target for the action,
such as replying to a message, you can normally find it in the Message menu.
Search: Lets you search for messages, or for phrases within a message. You can also see previous
searches you have made. In addition to the Search menu, there is a text entry box in the toolbar
that you can use to search for messages. You can also create a search folder from a search.
Help: Opens the Evolution Help files.
The Shortcut Bar
The most important job for Evolutions is to give you access to your information and help you use
it quickly. One way it does that is through the shortcut bar, which is the column on the left side of
the main window. The buttons, such as Mail and Contacts, are the shortcuts. Above them is a list
of folders for the current Evolution tool.
26 Evolution User Guide
Page 27

Novell Confidential Manual (ENU) 21 December 2004
The folder list organizes your e-mail, calendars, contact lists, and task lists in a tree, similar to a
file tree. Most people find one to four folders at the base of the tree, depending on the tool and their
system configuration. Each Evolution tool has at least one folder, called On This Computer, for
local information. For example, the folder list for the e-mail tool shows any remote e-mail storage
you have set up, plus local folders and search folders, which are discussed in “Using Search
Folders” on page 55.
If you get large amounts of e-mail, you might want more folders than just your Inbox. You can
create multiple calendar, task, or contacts folders.
To create a new folder:
1 Click Folder > New.
2 Type the name of the folder in the Folder Name field.
3 Select the location of the new folder.
4 Click OK.
Folder Management
Right-click a folder or subfolder to display a menu with the following options:
Copy: Copies the folder to a different location. When you select this item, Evolution offers a
choice of locations to copy the folder to.
Move: Moves the folder to another location.
Mark Messages As Read: Marks all the messages in the folder as read.
New Folder: Creates another folder in the same location.
Delete: Deletes the folder and all its contents.
Rename: Lets you change the name of the folder.
Disable: Disables the account.
Properties: Checks the number of total and unread messages in a folder, and, for remote folders,
lets you select whether to copy the folder to your local system for offline operation.
You can also rearrange folders and messages by dragging and dropping them.
Any time new e-mail arrives in a e-mail folder, that folder label is displayed in bold text, along
with the number of new messages in that folder.
Evolution e-mail is like other e-mail programs in several ways:
It can send and receive e-mail in HTML or as plain text, and makes it easy to send and receive
multiple file attachments.
It supports multiple e-mail sources, including IMAP, POP3, and local mbox or mh spools and
files created by other e-mail programs.
It can sort and organize your e-mail in a wide variety of ways with folders, searches, and
filters.
It lets you guard your privacy with encryption.
Getting Started 27
Page 28
Novell Confidential Manual (ENU) 21 December 2004
However, Evolution has some important differences from other e-mail programs. First, it’s built to
handle very large amounts of e-mail. The junk e-mail, message filtering and searching functions
were built for speed and efficiency. There’s also the search folder, an advanced organizational
feature not found in some e-mail clients. If you get a lot of e-mail, or if you keep every message
you get in case you need to refer to it later, you’ll find this feature especially useful. Here’s a quick
explanation of what’s happening in your main Evolution e-mail window.
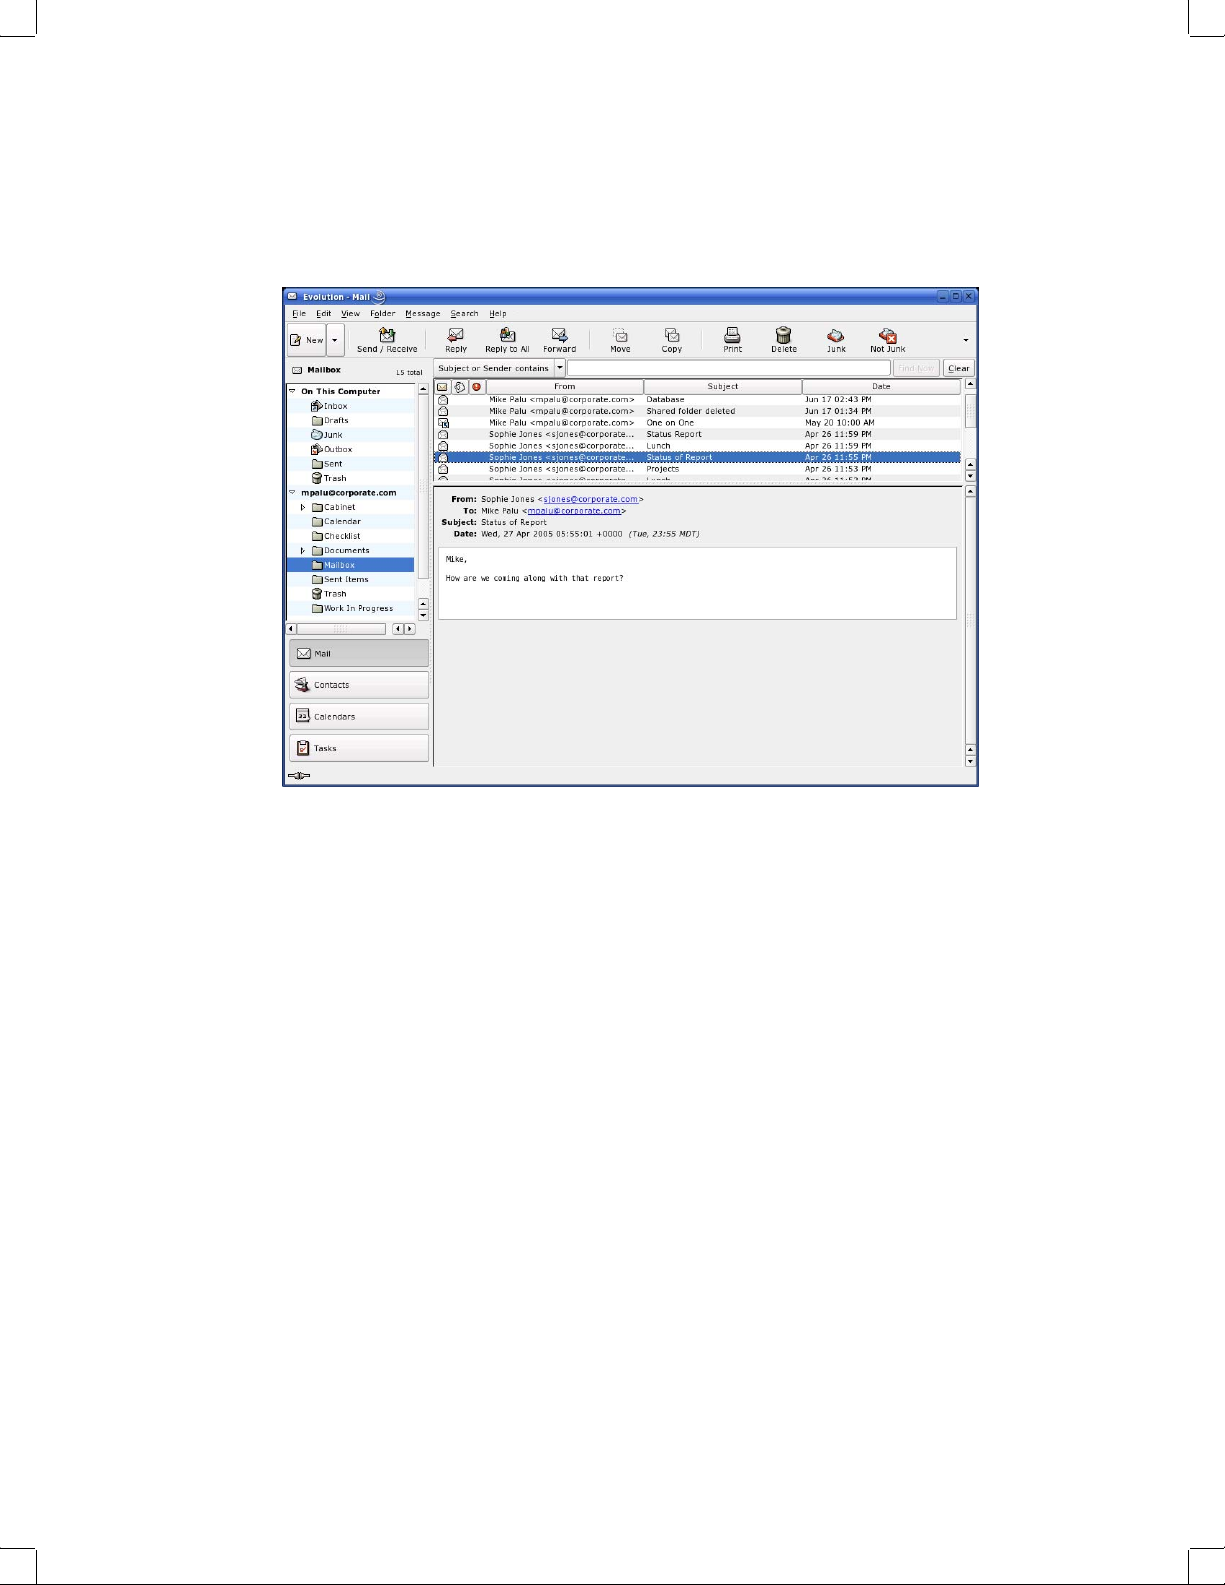
Message List
The message list displays all the e-mails that you have. This includes all your read and unread
messages, and e-mail that is flagged to be deleted.
Preview Pane
This is where your e-mail is displayed.
If you find the preview pane too small, you can resize the pane, enlarge the whole window, or
double-click the message in the message list to have it open in a new window. To change the size
of a pane, drag the divider between the two panes.
As with folders, you can right-click messages in the message list and get a menu of possible
actions, including moving or deleting them, creating filters or search folders based on them, and
marking them as junk mail.
Most of the e-mail-related actions you want to perform are listed in the Actions menu in the menu
bar. The most frequently used ones, like Reply and Forward, also appear as buttons in the toolbar.
Most of them are also located in the right-click menu and as keyboard shortcuts.
For an in-depth guide to the e-mail capabilities of Evolution, read Chapter 2, “Sending and
Receiving E-Mail,” on page 33.
28 Evolution User Guide
Page 29

Novell Confidential Manual (ENU) 21 December 2004
The Calendar
To begin using the calendar, click Calendar in the shortcut bar. By default, the calendar shows
today’s schedule on a ruled background. At the upper right, there’s a monthly calendar you can use
to switch days. Below that, there’s a Task list, where you can keep a list of tasks separate from your
calendar appointments.
Appointment List
The appointment list displays all your scheduled appointments.
Month Pane
The month pane is a small view of a calendar month. To display additional months, drag the
column border to the left. You can also select a range of days in the month pane to display a custom
range of days in the appointment list.
Task List
Tasks are distinct from appointments because they generally don’t have times associated with
them. You can see a larger view of your task list by clicking Tasks in the shortcut bar.
For more information about the calendar, see Chapter 5, “Evolution Calendar,” on page 65.
The Contacts Tool
The Evolution contacts tool can handle all of the functions of an address book or phone book.
However, it’s easier to update Evolution than it is to change an actual paper book, in part because
Evolution can synchronize with Palm OS* devices and use LDAP directories on a network.
Getting Started 29
Page 30
Novell Confidential Manual (ENU) 21 December 2004
Another advantage of the Evolution contacts tool is its integration with the rest of the application.
For example, you can right-click an e-mail address in Evolution mail to instantly create a contact
entry.
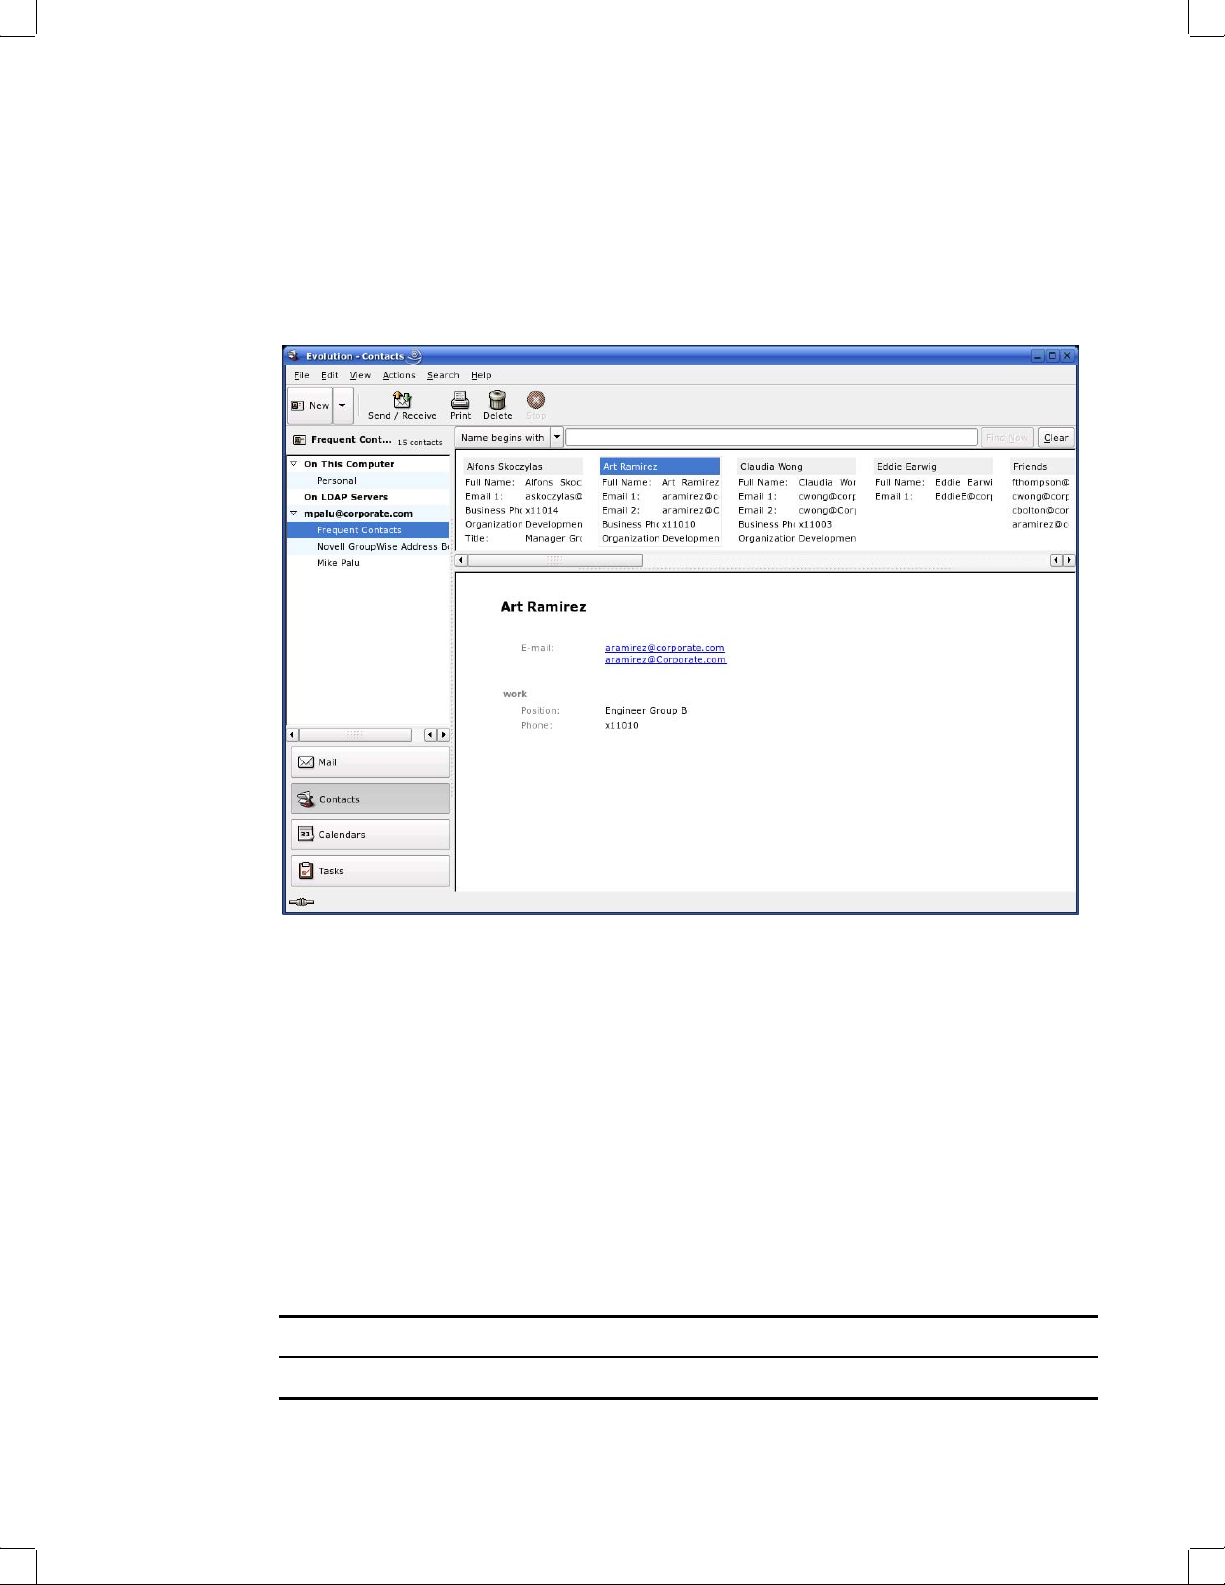
To use the contacts tool, click Contacts in the shortcut bar. By default, the display shows all your
contacts in alphabetical order, in a minicard view. You can select other views from the View menu,
and adjust the width of the columns by clicking and dragging the gray column dividers.
The contacts tool looks like this:
Contact list
The largest section of the contacts display shows a list of individual contacts. You can also search
the contacts in the same way that you search e-mail folders, using the search tool on the right side
of the toolbar.
For detailed instructions on how to use the address book, read Chapter 4, “Evolution Contacts: the
Address Book,” on page 59.
Command Line Options
Evolution has a number of command line options that you can use. You can find the full list by
entering the command man evolution or evolution --help. The most important
command line options are:
Command Description
evolution --offline Starts Evolution in offline mode.
30 Evolution User Guide
Page 31

Novell Confidential Manual (ENU) 21 December 2004
Command Description
evolution mailto:joe@somewhere.net Starts Evolution and begins composing a
message to the e-mail address listed.
evolution -c mail Starts Evolution in mail mode.
evolution -c calendar Starts Evolution in calendar mode.
evolution -c contacts Starts Evolution in contacts mode.
evolution --force-shutdown Forces every part of Evolution to shut down
immediately.
evolution ”%s” Makes Evolution your default e-mail handler for
your Web browser and in the GNOME* Control
Center.
Getting Started 31
Page 32

Novell Confidential Manual (ENU) 21 December 2004
32 Evolution User Guide
Page 33

Novell Confidential Manual (ENU) 21 December 2004
2 Sending and Receiving E-Mail
Reading Mail
This section, and Chapter 3, “Organizing Your E-Mail,” on page 49, provide you with an in-depth
guide to the capabilities of Evolution
your mail account, see “Mail Preferences” on page 104.
“Reading Mail” on page 33
“Checking for New Mail” on page 34
“Composing New E-Mail Messages” on page 37
“Sending Invitations by Mail” on page 44
“IMAP Subscriptions Manager” on page 44
“Encryption” on page 44
If you are not already viewing mail, switch to the mail tool by clicking the Mail shortcut button,
or press Ctrl+1. To read a message, select it in the message list; if you’d like to see it in its own
window, either double-click it, press Enter, or press Ctrl+O.
TIP: To read mail with the keyboard, you can click the Spacebar to page down while you’re reading an e-mail,
and press Backspace to page up in an e-mail.
Navigate the message list by using the arrow keys on the keyboard. To go to the next and previous unread
messages, press the period (.) or comma (,) keys. On most keyboards, these keys are also marked with the >
and < symbols, which is a convenient way to remember that they move you forward and backward in your
message list. You can also use the right square bracket (]) for the next unread message, and the left square
bracket ([) for the previous unread message.
TM
as a mail client. For information about how to customize
Sorting the Message List
Evolution helps you work by letting you sort your e-mail. To sort by sender, subject, or date, click
the bars with those labels at the top of the message list. The direction of the arrow next to the label
indicates the direction of the sort. Click again, to sort them in reverse order. For example, click
Date to sort messages by date from oldest to newest. Click again, and Evolution sorts the list from
newest to oldest. You can also right-click the message header bars to get a set of sorting options,
and to add or remove columns from the message list. You can find detailed instructions on how to
customize your message display columns in “Sorting Mail with Column Headers” on page 50.
To look at the complete headers for a message, click View > Message Display > Show Full
Headers. To see all message data, click View > Message Display > Show E-Mail Source.
You can also choose a threaded message view. Click View > Threaded Message List to turn the
threaded view on or off. When you select this option, Evolution groups the replies to a message
with the original, so you can follow the thread of a conversation from one message to the next.
Sending and Receiving E-Mail 33
Page 34
Novell Confidential Manual (ENU) 21 December 2004
Deleting Mail
After you read your mail, you might want to delete it. To delete a message, select it and press the
Delete key, click the Trash button, press Ctrl+D, or right-click the message, then click Delete.
When you press Delete or click the Trash button, your mail isn’t actually deleted, but is marked
for deletion. Your e-mail is recoverable until you have expunged your mail. When you expunge a
folder, you remove all the mail that you have marked for deletion.
To show deleted messages, click View > Hide Deleted Messages. You can also find deleted
messages in the your Trash folder.
To permanently erase all the deleted messages in a folder, click Folder > Expunge or press Ctrl+E.
Both local and IMAP Trash folders are actually search folders that display all messages you have
marked for later deletion. For more information about search folders, see “Using Search Folders”
on page 55. Because emptying your trash expunges the messages in your Trash folder, emptying
Trash is the same as expunging deleted mail from all your folders.
However, this is not true for the Trash folder on Exchange servers, which behaves just the same as
it does in Outlook. It is a normal folder with actual messages in it.
Undeleting Messages
You can undelete a message that has been deleted but not expunged. To undelete a message, select
the message, then press Ctrl+U, or click Edit > Undelete.
If you have marked a message for deletion, undeleting it unmarks it, and the message is removed
from the Trash folder. You cannot undelete messages that have been expunged.
Checking for New Mail
To check your mail, click Send/Receive in the toolbar. If you haven’t created any mail accounts
yet, the setup assistant asks you for the information it needs to check your e-mail. For information
on creating mail accounts, see “Starting Evolution for the First Time” on page 11.
If this is your first time checking mail, or you haven’t asked Evolution to store your password, you
are prompted for the password. Enter your password to download your e-mail.
If you get an error message instead of mail, you probably need to check your network settings. To
learn how to do that, see “Mail Preferences” on page 104, or ask your system administrator.
Sharing Mailboxes with Other Mail Programs
If you want to use Evolution and another e-mail client, such as Mutt, at the same time, use the
following procedure:
1 Download your mail in the other application as you would normally.
2 In Evolution, click Edit > Preferences, then click Mail Accounts. Select the account you want
to use to share mail and click Edit. Instead of Edit, you might want to create a new account
just for this source of mail by clicking New.
34 Evolution User Guide
Page 35

Novell Confidential Manual (ENU) 21 December 2004
3
Under the Receiving Mail tab, select the type of mail file that your other mail application uses,
then specify the full path to that location. A typical choice would be mbox files, with the path
/home/username/Mail/.
4 Click OK.
You can only use one mail client at a time. The mail files are locked by the mail program that is
currently using them, so the mail files can’t be accessed by any other mail program.
Using Evolution for News
USENET newsgroups are similar to mail, so it’s often convenient to read news and mail side by
side. You can add a news source, called an NNTP server, the same way you would a new e-mail
account, selecting USENET News as the source type. The news server appear as a remote mail
server, and each news group works like an IMAP folder. When you click Send/Receive, Evolution
also checks for news messages.
When you create a news group account, you are not subscribed to any groups. To subscribe to a
news group:
1 Click Folder > Subscriptions.
2 Select your NNTP account, select the groups you want to subscribe to, then click Subscribe.
3 Click Close.
Working with Attachments and HTML Mail
If someone sends you an attachment, Evolution displays a file icon at the end of the message to
which it’s attached. Text, including HTML formatting and embedded images, appears as part of
the message, rather than as a separate attachment. Attachments are also listed on the top bar of the
message. To view the attachments, click the arrow to expand the attachment window. To open an
attachment, double-click the it. Click the Save All button save all the attachments.
Saving or Opening Attachments
If you get an e-mail message with an attachment, Evolution can help you save the attachment or
open it with the appropriate applications.
Evolution shows a right-arrow icon, the number of attachments, and a Save or Save All button to
save all the attachments. Click the right-arrow icon to show the attachment bar.
To save an attachment to disk:
1 Click the down-arrow on the attachment icon, or right-click the attachment icon in the
attachment bar, then click Save As.
2 Select a location and name for the file.
3 Click OK.
To open an attachment using another application:
1 Click the down-arrow on the attachment icon or right-click the attachment icon in the
attachment bar
2 Select the application to open the attachment.
3 Click OK.
Sending and Receiving E-Mail 35
Page 36

Novell Confidential Manual (ENU) 21 December 2004
The options available for an attachment vary depending on the type of attachment and the
applications your system has installed. For example, attached word processor files can be opened
in OpenOffice.org or another word processor, and compressed archive files can be opened in the
File Roller application.
Inline Images in HTML Mail
When someone sends you HTML mail that includes an image in the body of the message (for
example, the welcome message in your Inbox), Evolution displays the image inside the message.
You can create messages like this by using the Insert Image tool in the message composer.
Alternately, just drag an image into the message composition area.
Some images are links in a message, rather than being part of the message. Evolution can
download those images from the Internet, but does not do so unless you request it. This is because
remotely hosted images can be slow to load and display, and can even be used by spammers to
track who reads the e-mail. Not automatically loading images helps protect your privacy.
To load the images for one message:
1 Click View > Load Images.
To set the default action for loading images:
1 Click Edit > Preferences, then click Mail Preference.
2 Click the HTML Mail tab.
3 Select one of the items: Never Load Images Off the Net, Load Images in Mail From Contacts,
or Always Load Images Off the Net.
4 Click Close.
If you use an HTTP proxy (as in many large organizations), Evolution must be able to find it
through the gnome-vfs subsystem before it can load images from the Internet.
To set your proxy in KDE:
1 Click the menu icon > System > Configuration > Yast.
2 Click Network Services, then click Proxy.
3 Specify your proxy settings (if you don’t know your proxy settings, contact your ISP or
system administrator).
4 Click Finish, then click Close.
To set your proxy in GNOME:
1 Click System > Administrative Settings (enter your root password if needed).
2 Click Network Services, then click Proxy.
3 Specify your proxy settings (if you don’t know your proxy settings, contact your ISP or
system administrator).
4 Click Finish, then click Close.
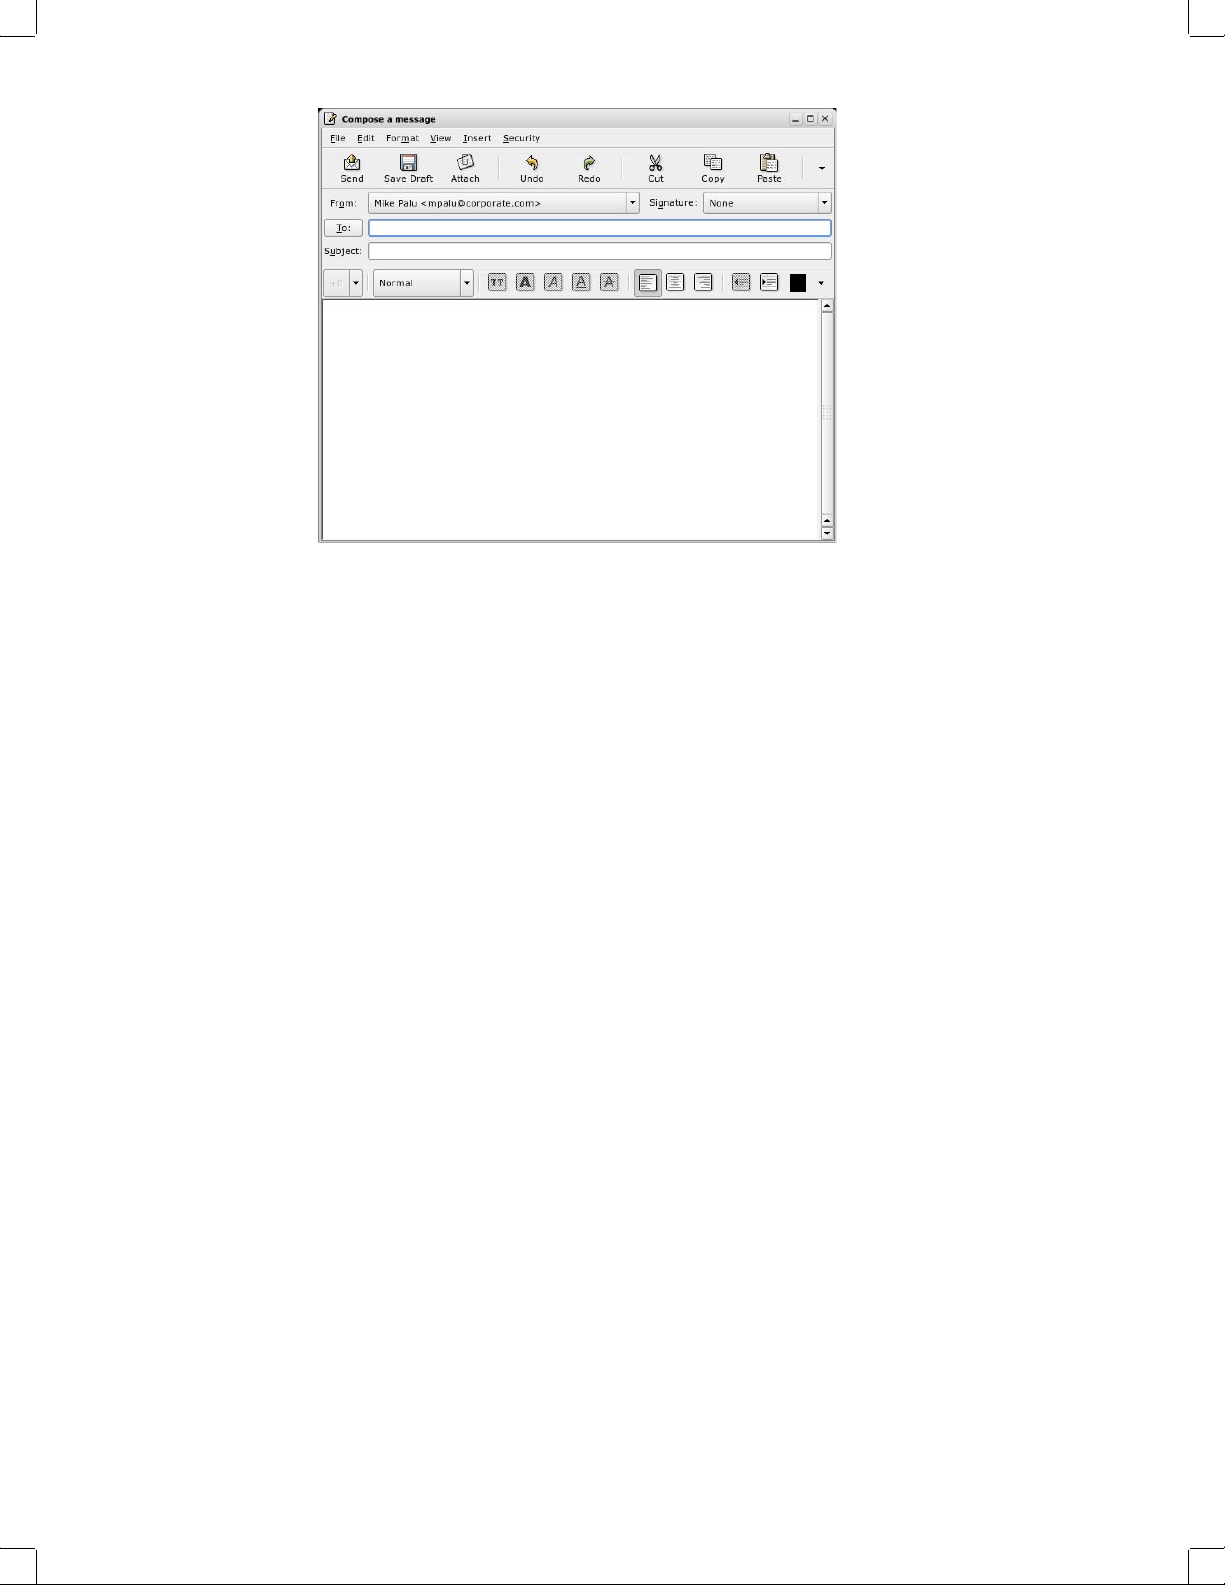
Composing New E-Mail Messages
You can start writing a new e-mail message by clicking File > New > Mail Message, by pressing
Ctrl+N when in the mailing tool, or by clicking New in the toolbar.
36 Evolution User Guide
Page 37
Novell Confidential Manual (ENU) 21 December 2004
Enter an address in the To field. If you want, enter a subject in the Subject field, and a message in
the box at the bottom of the window. After you have written your message, click Send.
This section contains the following topics:
“Unicode, ASCII, and Non-Latin Alphabets” on page 37
“Sending Composed Messages Later” on page 38
“Working Offline” on page 38
“Attachments” on page 39
“Specifying Additional Recipients for E-Mail” on page 39
“Choosing Recipients Quickly” on page 40
“Replying to E-Mail Messages” on page 40
“Searching and Replacing with the Composer” on page 40
“Enhancing Your E-Mail with HTML” on page 41
“Mail Send Options” on page 43
“Forwarding Mail” on page 43
“Tips for E-Mail Courtesy” on page 43
Unicode, ASCII, and Non-Latin Alphabets
If you want to write in a non-Latin alphabet while using a Latin keyboard, try selecting a different
input method in the message composer. Right-click in the message composition area and select an
input method from the Input Methods menu, then begin typing. The actual keys vary by language
and input style. For example, the Cyrillic input method uses transliterated Latin keyboard
combinations to get the Cyrillic alphabet, combining letters where necessary. “Zh” and “ya”
produce the appropriate single Cyrillic letters, and the single-quote (‘) produces a soft sign
character.
For greater language display capabilities, click Edit > Preferences, then select the character set
choices in the Mail Preferences and Composer Preferences sections. If you aren’t sure which one
Sending and Receiving E-Mail 37
Page 38

Novell Confidential Manual (ENU) 21 December 2004
to use, select UTF-8, which offers the greatest range of character displays for the greatest range of
languages.
Using Character Sets
A character set is a computer’s version of an alphabet. In the past, the ASCII character set was used
almost universally. However, it contains only 128 characters, meaning it is unable to display
characters in Cyrillic, Kanjii, or other non-Latin alphabets. To work around language display
problems, programmers developed a variety of methods, so many human languages now have their
own specific character sets, and items written in other character sets display incorrectly.
Eventually, standards organizations developed the UTF-8 Unicode* character set to provide a
single compatible set of codes for everyone.
Most e-mail messages state in advance which character set they use, so Evolution usually knows
what to display for a given binary number. However, if you find that messages are displayed as
rows of incomprehensible characters, try selecting a different character set in the mail settings
screen. If your recipients can’t read your messages, try selecting a different character set in the
composer options dialog box. For some languages, such as Turkish or Korean, it might work best
for you to select the language-specific character set. However, the best choice for most users is
UTF-8, which offers the widest range of characters for the widest range of languages.
Sending Composed Messages Later
Evolution normally sends mail as soon as you click Send. However, can save a message to be sent
later:
If you are offline when you click Send, Evolution adds your message to the Outbox queue.
The next time you connect to the Internet and send or receive mail, that message is sent.
Click File > Save Draft to store your messages in the drafts folder for later revision.
If you prefer to save your message as a text file, click File > Save As, then specify a filename.
Working Offline
Offline mode is a tool designed for use with remote mail storage systems like GroupWise®, IMAP
or Exchange, in situations where you are not connected to the network at all times. The tool keeps
a local copy of one or more folders to allow you to compose messages, storing them in your
Outbox to be sent the next time you connect.
POP mail downloads all messages to your local system, but other connections usually download
just the headers, and get the rest only when you want to read the message. Before you go offline,
Evolution downloads the unread messages from the folders you have chosen to store.
To mark a folder for offline use, right-click the folder, then click Properties. Click Copy Folder
Content Locally for Offline Operation.
Your connection status is shown by the small icon in the lower left border of the Evolution main
window. When you are online, it displays two connected cables. When you go offline, the cables
separate.
To cache your selected folders and disconnect from the network, click File > Work Offline, or click
the connection status icon in the lower left of the screen. When you want to reconnect, click File
> Work Online, or click the connection status icon again.
38 Evolution User Guide
Page 39

Novell Confidential Manual (ENU) 21 December 2004
Automatic Network State Handling
Evolution automatically understands the network state and acts accordingly. For instance,
Evolution switches to offline mode when the network goes down and automatically switches on
when the network is up again.
Attachments
To attach a file to your e-mail:
1 Click the Attach icon in the composer toolbar.
2 Select the file you want to attach.
3 Click OK.
You can also drag a file into the composer window. If you want to send it as an inline attachment,
right-click the attachment and click Properties, then select Automatic Display of Attachments.
When you send the message, a copy of the attached file goes with it. Be aware that large
attachments can take a long time to send and receive.
Specifying Additional Recipients for E-Mail
Evolution, like most e-mail programs, recognizes three types of addressee: primary recipients,
secondary recipients, and hidden (blind) recipients. The simplest way to direct a message is to put
the e-mail address or addresses in the To: field, which denotes primary recipients. Use the Cc: field
to send a message to secondary recipients.
Addresses on the Bcc: list are hidden from the other recipients of the message. You can use it to
send mail to large groups of people, especially if they don’t know each other or if privacy is a
concern. If your Bcc: field is absent, click View > Bcc Field.
If you frequently write e-mail to the same groups of people, you can create address lists in the
contacts tool, and then send them mail as though they have a single address. To learn how to do
that, see “Creating a List of Contacts” on page 62.
Evolution has the ability to let you specify the Reply-To in an e-mail. Using this, you can set up a
special Reply-To for an e-mail. To do this:
1 Open a compose window.
2 Open the Reply-To field by clicking View > Reply To.
3 Specify the address you want as the Reply-To address in the new Reply-To field.
4 Complete the rest of your message.
5 Click Send.
Choosing Recipients Quickly
If you have created address cards in the contacts tool, you can also type nicknames or other
portions of address data, and Evolution displays a drop-down list of possible address completions
from your contacts. If you type a name or nickname that can go with more than one card, Evolution
opens a dialog box to ask you which person you meant.
Sending and Receiving E-Mail 39
Page 40

Novell Confidential Manual (ENU) 21 December 2004
If Evolution does not complete addresses automatically, click Edit > Preferences, then click
Autocompletion. There, select the groups of contacts you want to use for address autocompletion
in the mailer.
Alternately, you can click the To:, Cc:, or Bcc: buttons to get a list of the e-mail addresses in your
contacts. Select addresses and click the arrows to move them into the appropriate address columns.
For more information about using e-mail with the contact manager and the calendar, see “Send Me
a Card: Adding New Cards Quickly” on page 64 and “Scheduling With the Evolution Calendar”
on page 66.
Replying to E-Mail Messages
To reply to a message, click the message to reply to in the e-mail list and click Reply, or right-click
within the message and select Reply to Sender. This opens the message composer. The To: and
Subject: fields are already filled, although you can alter them if you prefer. In addition, the full text
of the old message is inserted into the new message, either in grey with a blue line on one side (for
HTML display) or with the > character before each line (in plain text mode), to indicate that it’s
part of the previous message.
If you’re reading a message with several recipients, you can use Reply to All instead of Reply. If
there are large numbers of people in the Cc: or To: fields, this can save substantial amounts of time.
Using the Reply To All Feature
Susan sends an e-mail to a client and sends copies to Tim and to an internal company mailing list
of co-workers. If Tim wants to make a comment for all of them to read, he uses Reply to All, but
if he just wants to tell Susan that he agrees with her, he uses Reply. His reply does not reach anyone
that Susan put on her Bcc list, because that list is not shared with anyone.
If you subscribe to a mailing list, and want your reply to go just to the list, rather than to the sender,
select Reply to List instead of Reply or Reply to All.
Searching and Replacing with the Composer
The message composer makes several text searching features available to you.
Find: Enter a word or phrase, and Evolution finds it in your message.
Find Regex: You can search for a complex pattern of characters, called a regular expression or
“regex” in your composer window. If you’re not sure what a regular expression is, you should
ignore this feature.
Find Again: Select this item to repeat the last search you performed.
Replace: Find a word or phrase, and replace it with something else.
For all of these menu items, you can choose whether to search backwards in the document from
the point where your cursor is. You can also determine whether the search is to be case sensitive
in determining a match.
Enhancing Your E-Mail with HTML
Normally, you can’t set text styles or insert pictures in e-mail. However, most newer e-mail
programs can display images and text styles in addition to basic alignment and paragraph
formatting. They do this with HTML, just like Web pages do.
40 Evolution User Guide
Page 41

Novell Confidential Manual (ENU) 21 December 2004
Some people do not have HTML-capable mail clients, or prefer not to receive HTML-enhanced
mail because it is slower to download and display. Because of this, Evolution sends plain text
unless you explicitly ask for HTML.
Basic HTML Formatting
You can change the format of an e-mail message from plain text to HTML by choosing Format
HTML.
To send all your mail as HTML by default, set your mail format preferences in the mail
configuration dialog box. See “Composer Preferences” on page 106 for more information.
HTML formatting tools are located in the toolbar just above the space where you actually compose
the message. They also appear in the Insert and Format menus.
The icons in the toolbar are explained in tool-tips, which appear when you hold your mouse pointer
over the buttons. The buttons fall into five categories:
Headers and Lists: At the left edge of the toolbar, you can choose Normal for a default text style
or Header 1 through Header 6 for varying sizes of header from large (1) to tiny (6). Other styles
include preformat, to use the HTML tag for preformatted blocks of text, and three types of bullet
points for lists.
For instance, instead of using asterisks to mark a bulleted list, you can use the Bulleted List style
from the style drop-down list. Evolution uses different bullet styles, and handles word wrap and
multiple levels of indentation.
Text Styles: Use these buttons to determine the way your e-mail looks. If you have text selected,
the style applies to the selected text. If you do not have text selected, the style applies to whatever
you type next.
Button Description
TT Typewriter text, which is approximately the same as the Courier monospace
font.
Bold A Bolds the text.
Italic A Italicizes the text.
Underlined A Underlines the text.
Strike through A Marks a line through the text.
Alignment: Located next to the text style buttons, the three paragraph icons should be familiar to
users of most word processing software. The left most button aligns your text to the left, the center
button centers text, and the right button aligns the text to the right.
Indentation Rules: The button with the arrow pointing left decreases a paragraph’s indentation,
and the right arrow increases its indentation.
Color Selection: At the far right is the color section tool, where a box displays the current text
color. To choose a new color, click the arrow button to the right. If you have text selected, the color
applies to the selected text. If you do not have text selected, the color applies to whatever you type
next. You can select a background color or image by right-clicking the message background, then
selecting Style Page.
Sending and Receiving E-Mail 41
Page 42

Novell Confidential Manual (ENU) 21 December 2004
Advanced HTML Formatting
Under the Insert menu, there are several more items you can use to style your e-mail. To use these
and other HTML formatting tools, make sure you have enabled HTML mode by using Format
HTML.
Inserting a Link
Use the Insert a Link tool to put hyperlinks in your HTML messages. If you don’t want special link
text, you can just enter the address directly, and Evolution recognizes it as a link.
1 Select the text you want to link from.
2 Right-click in the text, then click Link.
3 Type the URL in the URL field.
4 Click Close.
Inserting an Image
Click Image.
1
2 Browse to and select the image file.
3 Click OK.
Inserting a Rule
You can insert a horizontal line into the text to help divide two sections:
1 Click Rule.
2 Select the length, thickness, and alignment.
3 Select Shaded if necessary.
4 Click Close.
Inserting a Table
You can insert a table into the text:
1 Click Table.
2 Select the number of rows and columns.
3 Select the type of layout for the table.
4 Select a background for the table.
To insert a picture for the background, click Browse and select the desired image.
5 Click Close.
Mail Send Options
You can set the following options when sending mails in Evolution.
Read Receipts: Evolution allows you to request a receipt for your sent messages to indicate when
your message is being viewed by the recipient. Receipts are useful when sending e-mail that is
time-sensitive. To request a receipt, click Insert > Request Read Receipt in the composer window.
42 Evolution User Guide
Page 43

Novell Confidential Manual (ENU) 21 December 2004
Prioritize Message: You can prioritize a message to be sent, so that the recipient sees its relative
importance. To prioritize a message, click Insert > Prioritize Message in the composer window.
Forwarding Mail
When you receive an e-mail, you can forward it to other individuals or groups that might be
interested. You can forward a message as an attachment to a new message (this is the default) or
you can send it inline as a quoted portion of the message you are sending. Attachment forwarding
is best if you want to send the full, unaltered message to someone else. Inline forwarding is best if
you want to send portions of a message, or if you have a large number of comments on different
sections of the message you are forwarding. Remember to note from whom the message came, and
whether you have removed or altered content.
To forward a message you are reading:
1 Click Forward on the toolbar.
or
If you prefer to forward the message inline instead of attached, click Actions > Forward Inline
from the menu.
2 Select an addressee as you would when sending a new message; the subject is already entered,
although you can alter it if you want.
3 Add your comments on the message in the composition frame, then click Send.
Attachments to a message you are forwarding are forwarded only when you send the original
message as an attachment. Inline messages do not forward any attachments.
Tips for E-Mail Courtesy
Don’t forward chain letters. If you must, watch out for hoaxes and urban legends, and make
sure the message doesn’t have multiple layers of greater-than signs, (>) indicating multiple
layers of careless in-line forwarding.
Always begin and close with a salutation. Say “please” and “thank you,” just like you do in
real life. You can keep your pleasantries short, but be polite.
WRITING IN CAPITAL LETTERS MEANS YOU’RE SHOUTING! Don’t write a whole
message in capital letters. It hurts people’s ears.
Check your spelling and use complete sentences. By default, Evolution puts a red line beneath
words it doesn’t recognize, as you type them.
Don’t send nasty e-mails (flames). If you get one, don’t write back.
When you reply or forward, include enough of the previous message to provide context.
Don’t send spam.
Sending Invitations by Mail
If you create an event in the calendar component, you can then send invitations to the attendee list
through the Evolution e-mail tool. The invitation card is sent as an attachment in iCal format.
When you receive an invitation, you have several options:
Sending and Receiving E-Mail 43
Page 44

Novell Confidential Manual (ENU) 21 December 2004
Accept: Indicates you will attend the meeting. When you click the OK button, the meeting is
entered into your calendar.
Tentatively Accept: Indicates you will probably attend the meeting. When you click the OK
button, the meeting is entered into your calendar, but is marked as tentative.
Decline: Indicates you are unable to attend the meeting. The meeting is not entered into your
calendar when you click OK, although your response is sent to the meeting host if you have
selected the RSVP option.
RSVP: Select this option if you want your response sent to the meeting organizers.
IMAP Subscriptions Manager
Because IMAP folders exist on the server, and opening them or checking them takes time, you
need fine-grained control over the way that you use IMAP folders. You use the IMAP
subscriptions manager to do this. If you prefer to have every mail folder displayed, you can select
that option as well. However, if you want to choose specific items in your mailbox, and exclude
others, you can use the subscription management tool to do that.
1 Select Folder > Subscriptions.
Encryption
2 If you have accounts on multiple IMAP servers, select the server where you want to manage
your subscriptions.
Evolution displays a list of available files and folders.
3 Select a file or folder by clicking it.
You should select at least the Inbox folder. Depending upon the way your IMAP server is
configured, the list of available files might include non-mail folders. If it does, you can ignore
them.
4 Click Subscribe to add a folder to the subscribed list.
5 When you have subscribed to the folders you want, close the window.
To protect and encode your e-mail transmissions, Evolution offers two encryption methods:
GPG Encryption
S/MIME Encryption
Evolution helps you protect your privacy by using GNU Privacy Guard (GPG), an implementation
of strong Public Key Encryption.
GPG uses two keys: public and private. You can give your public key to anyone you want to
receive encrypted messages, or put it on a public key server so that people can look it up before
contacting you. Your private key lets you decrypt any message encrypted with your public key.
Never give your private key to anyone.
Using encryption takes a bit of forethought. When you send a message that is encrypted, you must
encrypt it using your intended recipient’s public key. To receive an encrypted message, you must
make sure that the sender has your public key in advance. For signing messages, you encrypt the
signature with your private key, so only your public key can unlock it. When you send the message,
the recipient gets your public key and unlocks the signature, verifying your identity.
44 Evolution User Guide
Page 45

Novell Confidential Manual (ENU) 21 December 2004
Evolution does not support older versions of PGP, such as OpenPGP and Inline PGP.
You can use encryption in two different ways:
You can encrypt the entire message, so that nobody but the recipient can read it.
You can attach an encrypted signature to a plain text message, so that the recipient can read
the message without decrypting it, and needs decrypting only to verify the sender’s identity.
For example, suppose that Kevin wants to send an encrypted message to his friend Rachel. He
looks up her public key on a general key server, and then tells Evolution to encrypt the message.
The message now reads “@#$23ui7yr87#@!48970fsd.” When the information gets to Rachel, she
decrypts it using her private key, and it appears as plain text for her to read.
Making a GPG Encryption Key
Before you can get or send encrypted mail, you need to generate your public and private keys with
GPG. This procedure covers version 1.2.4 of GPG. If your version is different, these steps might
vary slightly. You can find out your version number by entering gpg --version.
1 Open a terminal and enter gpg --gen-key.
2 Select an algorithm, then press Enter.
or
To accept the default algorithm of DSA and ElGamal, press Enter (recommended).
3 Select a key length, then press Enter. To accept the default, 1024 bits, press Enter.
4 Enter how long your key should be valid for.
or
To accept the default of no expiration, press Enter, then press Y when you are prompted to
verify the selection.
5 Type your real name, then press Enter.
6 Type your e-mail address, then press Enter.
7 (Optional) Type a comment, then press Enter.
8 Review your selected user ID. If it is correct, press O.
9 Type a passphrase, then press Enter.
10 Move your mouse randomly to generate the keys.
After the keys are generated, you can view your key information by entering gpg --listkeys. You should see something similar to this:
------------------------- pub 1024D/32j38dk2 2001-06-20 you
<you@example.com> sub 1024g/289sklj3 2001-06-20 [expires: 2002-1114]
/home/you/.gnupg/pubring.gpg ---
GPG creates one list, or keyring, for your public keys and one for your private keys. All the public
keys you know are stored in the file ~/.gnupg/pubring.gpg. If you want to give other people your
key, send them that file.
If you want, you can upload your keys to a key server.
1 Check your public key ID with gpg--list-keys. It is the string after 1024D on the line beginning
with pub. In the example above, it is 32j38dk2.
Sending and Receiving E-Mail 45
Page 46

Novell Confidential Manual (ENU) 21 December 2004
2
Enter the command gpg --send-keys --keyserver wwwkeys.pgp.net
32j38dk2. Substitute your key ID for 32j38dk2. You need your password to do this.
Key servers store your public keys for you so that your friends can decrypt your messages. If you
choose not to use a key server, you can manually send your public key, include it in your signature
file, or put it on your own Web page. However, it’s easier to publish a key once, and then let people
download it from a central place when they want.
If you don’t have a key to unlock or encrypt a message, you can set your encryption tool to look it
up automatically. If it can’t find the key, an error message appears.
Getting and Using GPG Public Keys
To send an encrypted message, you need to use the recipient’s public key in combination with your
private key. Evolution handles the encryption, but you need to get the public key and add it to your
keyring.
To get public keys from a public key server, enter the command gpg --recv-keys --
keyserver wwwkeys.pgp.net keyid, substituting keyid for your recipient’s ID. You need
to enter your password, and the ID is automatically added to your keyring.
If someone sends you a public key directly, save it as a plain text file and enter the command gpg
filename to add it to your keyring.
Setting up GPG Encryption
1 Click Edit > Preferences, then click Mail Accounts.
2 Select the account you want to use securely, then click Edit.
3 Click the Security tab.
4 Specify your key ID in the PGP/GPG Key ID field.
5 Click OK.
6 Click Close.
Evolution requires that you know your key ID. If you don’t remember it, you can find it by typing
gpg --list-keys in a console window. Your key ID is an eight-character string with random
numbers and letters.
Encrypting Messages
To encrypt a single message:
1 Open a Compose a Message window.
2 Click Security > PGP Encrypt.
3 Compose your message, then click Send.
You can set Evolution to always sign your e-mail messages:
1 Click Edit > Preferences, then select Mail Accounts.
2 Select the mail account to encrypt, then click Edit.
3 Click the Security tab.
4 Select Always Sign Outgoing Messages When Using This Account.
46 Evolution User Guide
Page 47

Novell Confidential Manual (ENU) 21 December 2004
5
Click OK.
6 Click Close.
Unencrypting a Received Message
If you receive an encrypted message, you need to decrypt it before you read it. Remember, the
sender must have your public key before they can send you an encrypted message.
When you view the message, Evolution prompts you for your PGP password. Enter it, and the
unencrypted message is displayed.
S/MIME Encryption
S/MIME encryption also uses a key-based approach, but it has some significant advantages in
convenience and security. S/MIME uses certificates, which are similar to keys. The public portion
of each certificate is held by the sender of a message and by one of several certificate authorities,
who are paid to guarantee the identity of the sender and the security of the message. Evolution
already recognizes a large number of certificate authorities, so when you get a message with an S/
MIME certificate, your system automatically receives the public portion of the certificate and
decrypts or verifies the message.
S/MIME is used most often in corporate settings. In these cases, administrators supply certificates
that they have purchased from a certificate authority. In some cases, an organization can act as its
own certificate authority, with or without a guarantee from a dedicated authority such as VeriSign*
or Thawte*. In either case, the system administrator provides you with a certificate file.
If you want to use S/MIME independently, you can extract an identification certificate from your
Mozilla* or Netscape Web browser. See the Mozilla help for more information on security
certificates.
The certificate file is a password-protected file on your computer.
Adding a Signing Certificate
Click Edit > Preferences, then click Certificate.
1
2 Click Import.
3 Select the file to import, then click Open.
4 Click Close.
Similarly, you can add certificates that are sent to you independently of any authority by clicking
the Contact Certificates tab and using the same Import tool. You can also add new certificate
authorities, which have their own certificate files, in the same way.
Signing or Encrypting Every Message
After you have added your certificate, you can sign or encrypt a message by clicking Security > S/
MIME Sign or S/MIME Encrypt in the message composer.
To have every message signed or encrypted:
1 Click Edit > Preferences, then select the account to encrypt the messages in.
2 Click Edit, then click Security.
3 Click Select next to Signing Certificate and specify the path to your signing certificate.
Sending and Receiving E-Mail 47
Page 48

Novell Confidential Manual (ENU) 21 December 2004
or
Click Select next to Encryption Certificate and specify the path to your encryption certificate.
4 Select the appropriate options.
5 Click OK.
6 Click Close.
48 Evolution User Guide
Page 49

Novell Confidential Manual (ENU) 21 December 2004
3 Organizing Your E-Mail
Whether you only get a few e-mail messages a day, or you receive hundreds, you probably want
to sort and organize them. Evolution
Importing Your Old E-Mail
Evolution allows you to import old e-mail and contacts so that you don’t need to worry about
losing your old information.
Importing Single Files
Evolution can import the following types of files:
vCard (.vcf, .gcrd): The address book format used by the GNOME, KDE, and many other contact
management applications. You should be able to export to vCard format from any address book
application.
iCalendar or iCal (.ics): A format for storing calendar files. iCalendar is used by Palm OS
handhelds, Evolution, and Microsoft Outlook.
Evolution/Mozilla/Outlook CSV/Tab (.csv, .tab): CSV or Tab files saved using Evolution,
Microsoft Outlook and Mozilla.
Microsoft Outlook Express 4 (.mbx): The e-mail file format used by Microsoft Outlook Express
4. For other versions of Microsoft Outlook and Outlook Express, see the workaround described in
Step 1 on page 50.
TM
has the tools to help you do it.
LDAP Data Interchange Format (.LDIF): A standard data format for contact cards.
Berkley Mailbox (.mbox or null extension): The e-mail format used by Mozilla, Netscape,
Evolution, Eudora*, and many other e-mail clients.
To import your old e-mail:
1 Click File > Import.
2 Click Forward.
3 Select Import a Single File, then click Forward.
4 Select the file to import, then click Forward.
5 Click Import.
Importing Multiple Files
Evolution automates the import process for several applications it can recognize.
Organizing Your E-Mail 49
Page 50

Novell Confidential Manual (ENU) 21 December 2004
1
Click File > Import.
2 Click Forward.
3 Select Import Data and Settings From Older Programs, then click Forward.
Evolution searches for old mail programs and, if possible, imports the data from them.
Microsoft Outlook and versions of Outlook Express after version 4 use proprietary formats that
Evolution cannot read or import. One migration method that works well is to use the Outport
application. See outport.sourceforge.net (http://outport.sourceforge.net) for additional
information. You can also import data into another Windows mail client such as Mozilla.
1 While in Windows, import your .pst files into Mozilla Mail (or another mail program such as
Netscape or Eudora that uses the standard mbox format).
Mozilla and Netscape users need to click File > Compact > All Folders from within the
Netscape or Mozilla mail tool. Otherwise, Evolution imports and undeletes the messages in
your Trash folders.
2 Copy the files to the system or partition that Evolution is installed on.
3 Use the Evolution import tool to import the files.
For POP mail, filters are applied as messages are downloaded. For IMAP mail, filters are applied
to new messages when you open the Inbox folder. On Exchange servers, filters are not applied until
you select your Inbox folder and click Actions > Apply Filters, or press Ctrl+Y. To force your
filters to act on all messages in the folder, select the entire folder by pressing Ctrl+A, then apply
the filters by pressing Ctrl+Y.
Sorting Mail with Column Headers
The message list normally has columns to indicate whether a message has been read, whether it
has attachments, how important it is, and the sender, date, and subject. You can change the column
order, or add and remove columns by dragging and dropping them.
Right-click one of the column headers to get a list of options:
Sort Ascending: Sorts the messages top to bottom. Similarly, Sort Descending reverses the order,
and Unsort removes sorting from this column, reverting to the order of messages as they were
added to the folder.
Removing a Column: Remove this column from the display. You can also remove columns by
dragging the header off the list and letting it drop.
Adding a Column: When you select this item, a dialog box appears, listing the possible columns.
Drag the column you want into a space between existing column headers. A red arrow shows
where the column will be placed.
Best Fit: Automatically adjusts the widths of the columns for the most efficient use of space.
Customizing the Current View: Choose this item to pick a more complex sort order for
messages, or to choose which columns of information about your messages you want to display.
Using the Follow Up Feature
To make sure you don’t forget about a message, you can use the Follow Up feature.
1 Select one or more messages.
50 Evolution User Guide
Page 51

Novell Confidential Manual (ENU) 21 December 2004
2
Right-click one of the messages.
3 Click Mark for Follow Up.
A dialog box opens to allow you to set the type of flag and the due date.
The flag itself is the action you want to remind yourself about. Several are provided for you, such
as Call, Forward, and Reply, but you can enter your own note or action if you want. You can set a
deadline for the flag as well.
After you have added a flag, you can mark it as complete or remove it entirely by right-clicking
the message, then click either Flag Completed or Clear Flag.
When you read a flagged message, its flag status is displayed at the top, before the message
headers. An overdue message might tell you “Overdue: Call by April 07, 2003, 5:00 PM.”
Flags can help you organize your work in a number of ways. For example, you might add a Flag
Status column to your message list and sort that way. Alternately, you could create a search folder
that displays all your flagged messages, then clear the flags when you’re done, so the search folder
contains only messages with upcoming deadlines.
If you prefer a simpler way to remind yourself about messages, you can mark them as Important
by right-clicking the message, then click Mark Important.
Getting Organized with Folders
Evolution, like most other mail systems, stores mail in folders. You start out with a few mail
folders, such as Inbox, Outbox, and Drafts, but you can create as many as you like. Create new
folders by clicking Folder > New, or by right-clicking in the folder list and selecting New Folder.
When you click OK, your new folder appears in the folder view. You can then put messages in it
by dragging and dropping them, or by using the Move button in the toolbar. If you want to move
several messages at once, select the ones you want to move while holding down the Ctrl key, or
use Shift to select a range of messages. If you create a filter with the filter assistant, you can have
mail filed automatically.
NOTE: The Inbox folder on most IMAP servers cannot contain both subfolders and messages. When you
create additional folders on your IMAP mail server, branch them from the root of the IMAP account’s folder
tree, not from the Inbox. If you create subfolders in your Inbox folder, you lose the ability to read messages that
exist in your Inbox until you move the folders out of the way.
Searching for Messages
Most mail clients can search your messages for you, but Evolution does it faster than most because
of its automatic search index.
To start searching, type a word or phrase in the text area below the toolbar, and choose a search
type:
Subject or Sender Contains: Shows messages where the search text is in the subject line. It does
not search in the message body.
Subject Does Not Contain: Finds messages that do not contain the search text in the subject.
Sender Contains: Finds messages whose From: header contains a match for your search text.
Recipients Contain: Finds messages with the search text in the To: and Cc: headers.
Organizing Your E-Mail 51
Page 52

Novell Confidential Manual (ENU) 21 December 2004
Body Contains: Searches only in message text, not the subject lines.
Body Does Not Contain: Finds every e-mail message that does not have the search text in the
message body. It also show messages that have the search text in the subject line, if it is not also
in the body.
Body or Subject Contains: Searches message subjects and the messages themselves for the word
or phrase you’ve specified in the search field.
Message Contains: Searches the message body and all headers for the specified text.
Advanced Search: Invokes the advanced search dialog box.
When you’ve typed your search phrase, press Enter or click the Find Now button. Evolution shows
your search results in the message list.
For more complex search rules, select Advanced from the Search menu. You might want to create
a search folder instead; see “Using Search Folders” on page 55 for more detail.
When you have finished searching, go back to seeing all your messages by clicking the Clear
button, or by entering a blank search.
Stopping Junk Mail (Spam)
Evolution can check for junk mail for you. Evolution uses SpamAssassin* with trainable Bayesian
filters to perform the spam check. When the software detects mail that appears to be junk mail, it
will flag it and hide it from your view. Messages that are flagged as junk mail are displayed only
in the Junk folder.
The junk mail filter can learn which kinds of mail are legitimate and which are not if you train it.
When you first start using junk mail blocking, check the Junk folder to be sure that legitimate mail
doesn’t get flagged as junk mail. If good mail, is incorrectly flagged, remove it from the Junk
folder by right-clicking it and selecting Mark as Not Junk. If Evolution misses junk mail, rightclick the message, then click Mark as Junk. When you correct it, the filter can recognize similar
messages in the future, and becomes more accurate as time goes on.
To change your junk mail filtering preferences, click Edit > Preferences, then click Mail
Preferences. In the mail preferences tool, click the Junk tab for the following options:
Checking Incoming Mail for Junk: This option turns automatic junk mail filtering on or off.
Include Remote Tests: This option uses tests that require a network connection, such as checking
to see if a message is in a list of known junk messages, or if the sender or gateway are blacklisted
by anti-spam organizations. Remote tests add to the amount of time it takes to check for junk mail,
but increase accuracy. When you select this option, you do not need to do any additional setup to
make this work.
For additional junk mail settings, see “Receiving Mail Options” on page 15.
Create Rules to Automatically Organize Mail
Filters work very much like the mail room in a large company. Their purpose is to bundle, sort,
and distribute mail to the various folders. In addition, you can have multiple filters performing
multiple actions that might effect the same message in several ways. For example, your filters
could put copies of one message into multiple folders, or keep one copy and send one to another
person.
52 Evolution User Guide
Page 53

Novell Confidential Manual (ENU) 21 December 2004
Creating New Filter Rules
1 Click Edit > Message Filters.
2 Click Add.
3 Type a name for the filter in the Rule name field.
4 Define the criteria for the filter in the If section.
For each of the filter criteria, you must first select which parts of the message you want to
filter:
Sender: The sender’s address.
Recipient: The recipients of the message.
Subject: The subject line of the message.
Specific Header: Any header including custom ones.
If a message uses a header more than once, Evolution pays attention only to the first instance,
even if the message defines the header differently the second time. For example, if a message
declares the Resent-From: header as “engineering@example.com” and then restates it as
“marketing@example.com,” Evolution filters as though the second declaration did not occur.
To filter on messages that use headers multiple times, use a regular expression.
Message Body: Searches in the actual text of the message.
Expression: (For programmers only) Match a message according to an expression you write
in the Scheme language, used to define filters in Evolution.
Date Sent: Filters messages according to the date on which they were sent. First, choose the
conditions you want a message to meet, such as before a given time or after a given time. Then
choose the time. The filter compares the message’s time stamp to the system clock when the
filter is run, or to a specific time and date you choose from a calendar. You can also have it
look for a message within a range of time relative to the filter, such as two to four days ago.
Date Received: This works the same way as the Date Sent option, except that it compares the
time you received the message with the dates you specify.
Label: Messages can have labels of Important, Work, Personal, To Do, or Later. You can set
tables with other filters or by hand.
Score: Sets the message score to any whole number greater than 0. You can have one filter set
or change a message score, and then set up another filter to move the messages you have
scored. A message score is not based on anything in particular: it is simply a number you can
assign to messages so other filters can process them.
Size: Sorts based on the size of the message in kilobytes.
Status: Filters according to the status of a message. The status can be Replied To, Draft,
Important, Read, or Junk.
Flagged: Checks whether the message is flagged for follow-up.
Attachments: Creates a filter based on whether there is an attachment for the e-mail.
Mailing List: Filters based on the mailing list the message came from. This filter might miss
messages from some list servers, because it checks for the X-BeenThere header, which is used
to identify mailing lists or other redistributors of mail. Mail from list servers that do not set
X-BeenThere properly are not be caught by these filters.
Organizing Your E-Mail 53
Page 54

Novell Confidential Manual (ENU) 21 December 2004
Regex Match: If you know your way around a regex, or regular expression, this option allows
you to search for complex patterns of letters, so that you can find, for example, all words that
start with a and end with m, and are between six and fifteen letters long, or all messages that
declare a particular header twice. For information about how to use regular expressions, check
the man page for the grep command.
Source Account: Filters messages according the server you got them from. This is most
useful if you use multiple POP mail accounts.
Pipe to Program: Evolution can use an external command to process a message, then process
it based on the return value. Commands used in this way must return an integer. This is most
commonly used to add an external junk mail filter.
Junk Test: Filters based on the results of the junk mail test.
Select the Criteria for the Condition: If you want multiple criteria for this filter, click Add
Criterion and repeat step 4.
Select the Actions for the Filter in the Then Section: Select any of the following options.
Move to Folder: Moves the message into a folder you specify. Click Here to select the
destination folder.
Copy to Folder: Puts a copy of the message into a folder you specify. Click Here to select
the destination folder.
Delete: Marks the message for deletion. The message can be undeleted until you expunge
or empty the trash.
Stop Processing: Select this if you want to have all other filters ignore this message.
Assign Color: Marks the message with a color of your choice.
Assign Score: Assigns the message a numeric score.
Adjust Score: Changes the numeric score by the amount you set.
Set Status: Sets the status of the message. The status can be Replied To, Draft, Important,
Read, or Junk.
Unset Status: If the message has a status value, unsets it. If a status value is not set, it
does nothing.
Beep: Makes the system beep.
Play Sound: Select a sound file for Evolution to play.
Pipe to Program: Sends the message to a program of your choice. No return value is
expected. This feature can be used to create automatic Web postings from e-mail
messages or to perform additional message post processing not supported by Evolution.
Run Program: Evolution runs an application.
5 Click Add Action if you need multiple actions.
6 Click OK twice.
There is an easy shortcut for fast filter or search folder creation:
1 Right-click the message in the e-mail list.
2 Select one of the items under the Create Rule from the Message submenu.
Creating a rule based on a message opens the filter creation tool with some of the information
about the message already filled in for your convenience.
54 Evolution User Guide
Page 55

Novell Confidential Manual (ENU) 21 December 2004
If you have several filters that match a single message, they are all applied to the message in order,
unless one of the filters has the Stop Processing action. If you use that action in a filter, the
messages that it affects are not touched by other filters.
When you first open the Filters dialog box, you are shown the list of filters sorted in the order in
which they will be applied. You can move them up and down in the priority list by clicking the Up
and Down buttons.
Editing Filters
1 Click Edit > Message Filters.
2 Select the filter to edit, then click Edit.
3 Make the desired corrections, then click OK twice.
Deleting Filters
1 Click Edit > Message Filters.
2 Select the filter to remove, then click Remove.
3 Click OK.
Using Search Folders
If filters aren’t flexible enough, or you find yourself performing the same search again and again,
consider a search folder. Search folders are an advanced way of viewing your e-mail messages
within Evolution. If you get a lot of mail or often forget where you put messages, search folders
can help you keep things organized.
A search folder is really a hybrid of all the other organizational tools: it looks like a folder, it acts
like a search, and you set it up like a filter. In other words, a conventional folder actually contains
messages, but a search folder is a view of messages that might be in several different folders. The
messages it contains are determined on the fly using a set of criteria you choose in advance.
As messages that meet the search folder criteria arrive or are deleted, Evolution automatically
adjusts the search folder contents. When you delete a message, it is erased from the folder in which
it actually exists, as well as any search folders that display it.
Organizing Your E-Mail 55
Page 56
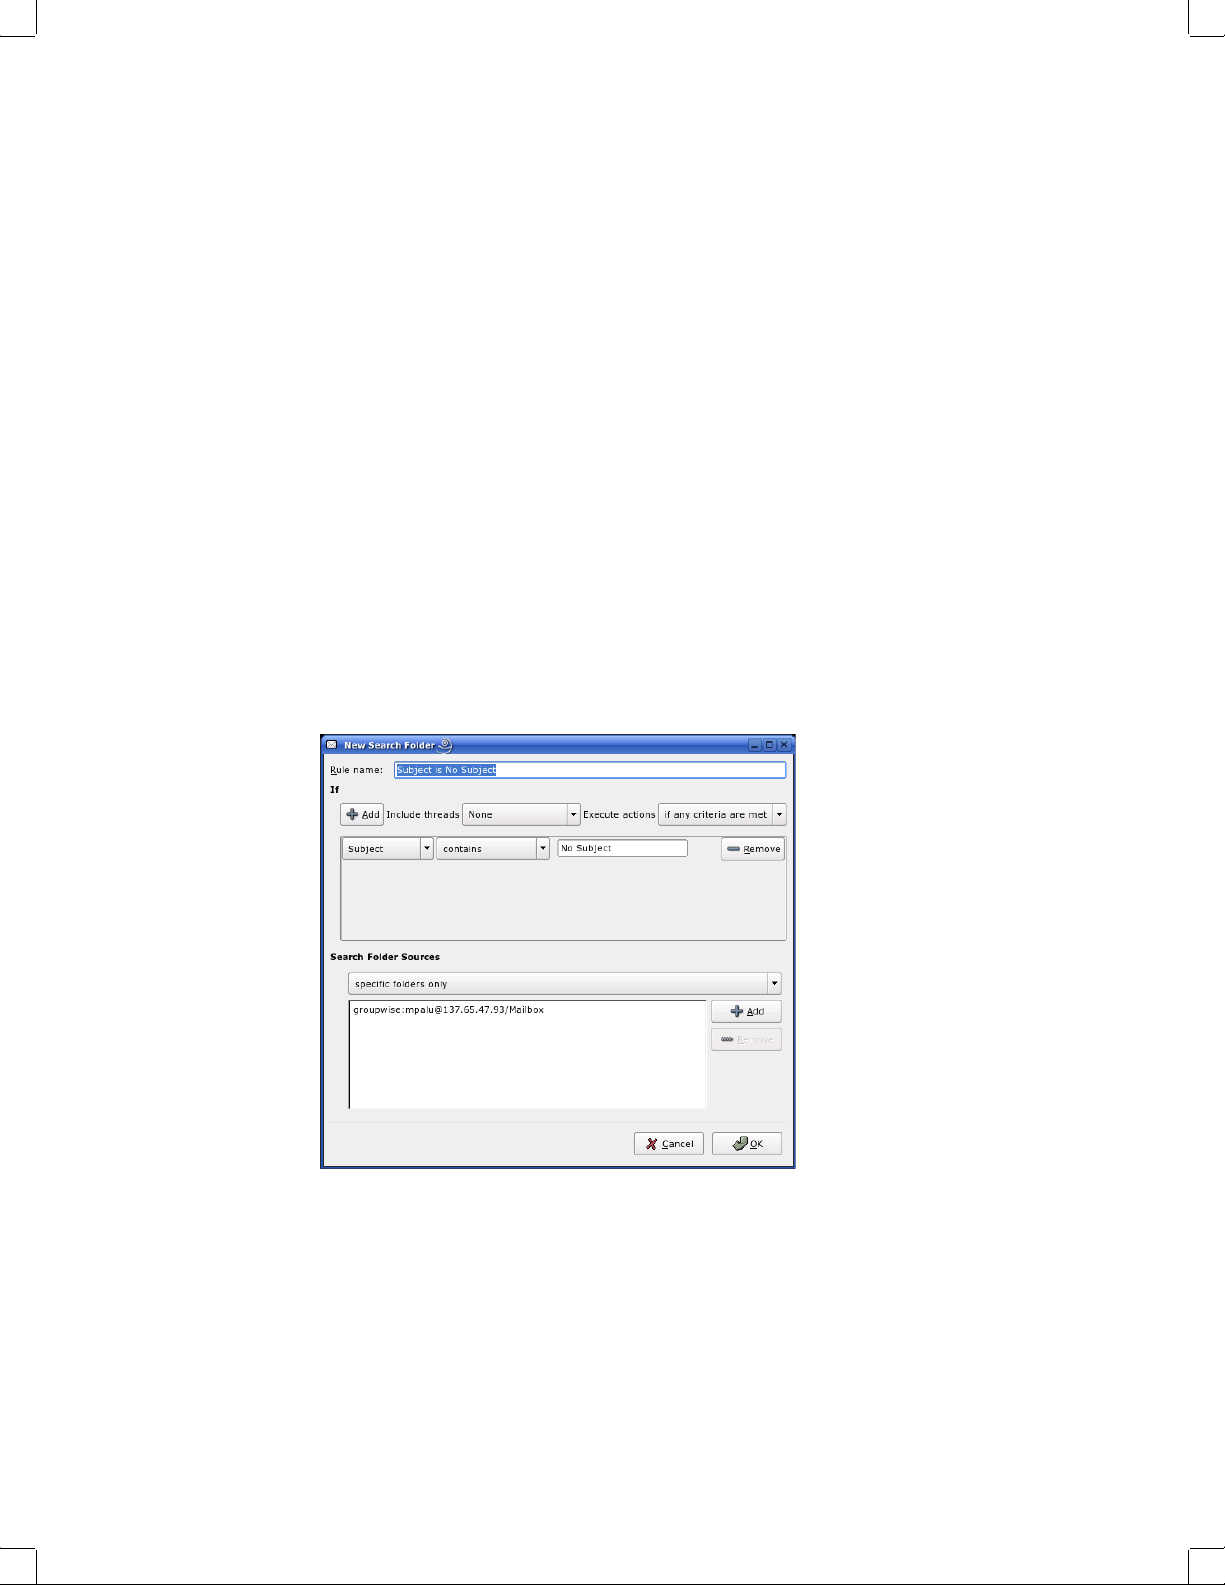
Novell Confidential Manual (ENU) 21 December 2004
The Unmatched Search Folder is the opposite of other search folders: it displays all messages that
do not appear in other search folders.
If you use remote e-mail storage like IMAP or Microsoft Exchange, and have created search
folders to search through them, the Unmatched Search Folder also searches the remote folders. If
you do not create any search folders that search remote mail stores, the Unmatched Search Folder
does not search in them either.
As an example of using folders, searches, and search folders, consider the following: To organize
his mailbox, Jim sets up a virtual folder for e-mail from his friend and co-worker Anna. He has
another search folder for messages that have novell.com in the address and Evolution in the subject
line, so he can keep a record of what people from work send him about Evolution. If Anna sends
him a message about anything other than Evolution, it only shows up in the “Anna” search folder.
When Anna sends him mail about the user interface for Evolution, he can see the message both in
the “Anna” search folder and in the “Internal Evolution Discussion” search folder.
Creating A Search Folder
1 Click Message > Create Rule, then select a search folder based on Subject, Sender, Recipient,
or Mailing List.
or
Click Search > Create Search Folder From Search.
2 Click Add.
3 Type the name of the search folder in the Rule Name field.
4 Select your search criteria. For each criterion, you must first select which of the following
parts of the message you want the search to examine. The criteria are similar to those for
filters.
Sender: Sender’s address.
Recipients: The recipients of the message.
Subject: The subject line of the message.
56 Evolution User Guide
Page 57

Novell Confidential Manual (ENU) 21 December 2004
Message Body: Searches in the actual text of the message.
Expression: (For programmers only) Match a message according to an expression you write
in the Scheme language used to define filters in Evolution.
Date Sent: Filters messages according to the date on which they were sent. First, choose the
conditions you want a message to meet, such as before a given time or after a given time. Then
choose the time. The filter compares the message’s time stamp to the system clock when the
filter is run, or to a specific time and date you choose from a calendar. You can also have it
look for a message within a range of time relative to the filter, such as two to four days ago.
Date Received: This works the same way as the Date Sent option, except that it compares the
time you received the message with the dates you specify.
Label: Messages can have labels of Important, Work, Personal, To Do, or Later. You can set
labels with other filters or manually.
Score: Sets the message score to any whole number greater than 0. You can have one filter set
or change a message score, and then set up another filter to move the messages you have
scored. A message score is not based on anything in particular: it is simply a number you can
assign to messages so other filters can process them.
Size: Sorts based on the size of the message in kilobytes.
Status: Filters according to the status of a message. The status can be Replied To, Draft,
Important, Read, or Junk.
Flagged: Checks whether the message is flagged for follow-up.
Attachments: Creates a filter based on whether there is an attachment for the e-mail.
Mailing List: Filters based on the mailing list the message came from. This filter might miss
messages from some list servers, because it checks for the X-BeenThere header, which is used
to identify mailing lists or other redistributors of mail. Mail from list servers that do not set
X-BeenThere properly are not be caught by these filters.
5 Select the folders where this search folder will search. Your options are:
Specific Folders Only: Uses individual folders for the search folder source.
With All Local Folders: Uses all local folders for the search folder source in addition to
individual folders that are selected.
With All Active Remote Folders: Remote folders are considered active if you are connected
to the server; you must be connected to your mail server for the search folder to include any
messages from that source in addition to individual folders that are selected.
With All Local and Active Remote Folders: Uses all local and active remote folders for the
search folder source in addition to individual folders that are selected.
6 Click OK.
Organizing Your E-Mail 57
Page 58

Novell Confidential Manual (ENU) 21 December 2004
58 Evolution User Guide
Page 59

Novell Confidential Manual (ENU) 21 December 2004
4 Evolution Contacts: the Address Book
This section shows you how to use the EvolutionTM contacts tool to organize any amount of contact
information, share addresses over a network, and save time with everyday tasks.
“Contacts and Cards” on page 59
“Searching for Contacts” on page 61
“Organizing your Contacts” on page 61
“LDAP: Shared Contact Groups on a Network” on page 63
“Send Me a Card: Adding New Cards Quickly” on page 64
To learn about configuring the contacts tool, see “Contact Management” on page 108.
Contacts and Cards
Contacts are the individuals you have chosen to add to your address book so you can keep track of
information about them and send e-mail to them. In Evolution, an individual contact is called a
card.
The Contact Editor
If you want to add or change cards, you use the contact editor. To change a card that already exists,
double-click it to open the contact editor window. If you want to create a new card, click the New
button in the toolbar to open the same window, with blank entry boxes for you to fill in.
Evolution Contacts: the Address Book 59
Page 60

Novell Confidential Manual (ENU) 21 December 2004
The contact editor window has three tabs:
Contact: Contains basic contact information.
Personal: Contains a more specific description of the person, including URLs for calendar and
free/busy information.
Mailing Address: Contains the individual’s mailing address.
You can also use Actions menu to find Forward Contact, which opens a new message with the card
already attached, and Send Message to Contact, which opens a new message to the contact’s e-mail
address.
From the Contact Editor toolbar, you can save and close, print, close, or delete the contact.
You can add cards from within an e-mail message or calendar appointment. In an open e-mail,
right-click any e-mail address or message, and click Create Card for this Address or Create Card
for this Sender from the menu.
Most of the items in the contact editor simply display the information you enter, but some of them
have additional features:
Full Name: Specify the name of your contact here. You can type a name into the Full Name field,
but you can also click the Full Name button to bring up a small dialog box with text boxes for first
and last names, titles like “Mr.” or “Her Excellency,” and suffixes like “Jr.” The Full Name field
60 Evolution User Guide
Page 61

Novell Confidential Manual (ENU) 21 December 2004
also interacts with the File Under box to help you organize your contacts and to handle multi-word
surnames.To see how it works, type a name in the Full Name field. As an example, we’ll use
Miguel de Icaza. You’ll notice that the File Under field also fills in, but in reverse: Icaza, Miguel
de. If you had entered John Q. Doe, the contacts editor would have correctly guessed that the entry
should be filed under “Doe, John Q.” However, Miguel’s surname, “de Icaza”, has two words, and
to sort it correctly you must enter de Icaza, Miguel in the File As entry.
Where: Select one of your address books as the location for this contact. You might not be able to
write to all available address books, especially those on a network.
Categories: Click the Categories button to select categories for this card. If you assign contact
categories, you can then search for contacts using those categories. For more information on
contact categories, see “Organizing your Contacts” on page 61.
Free/Busy and Calendar URLs: Click the Personal Information tab to enter Web addresses for
the contact. If the contact publishes Free/Busy or calendar data online, using a server other than
Exchange or GroupWise, you can specify the addresses for those servers here. After you do so,
you can check their schedules when creating appointments in the calendar.
Searching for Contacts
1 Select your search type in the search bar.
2 Specify your query.
3 Press Enter to begin the search.
For a more complex search, select Search Advanced and select criteria that describe your desired
contact:
1 Name the rule in the Rule Name field.
2 Set up your criteria in the If field.
3 Click Add Criterion to add additional criteria.
4 Click Search.
To show all your contacts, Click Clear in the search bar, press Shift+Ctrl+B, or search with an
empty query.
Organizing your Contacts
Just as you can search mail, you can search contacts. You can also create several individual address
books, or contact groups. Within a given contact group, you can have several categories of
contacts.
“Contacts Groups” on page 62
“Creating a List of Contacts” on page 62
“Grouping with Categories” on page 63
“Selecting Your Default Contact List” on page 63
“Configuring Evolution to use LDAP” on page 64
Evolution Contacts: the Address Book 61
Page 62

Novell Confidential Manual (ENU) 21 December 2004
Contacts Groups
The simplest way to organize contacts is to create additional address books. You can create a new
one by clicking File > New > Address Book. For contacts groups on your computer, you only need
to provide a name. For contacts on the network, you need to provide more information about the
contacts server you are trying to access.
To move a card from one group to another, just drag it from the main display of contacts. You
cannot change the contents of most network contact groups.
NOTE: Contacts groups are not the same as contact lists. A contacts group is like a folder or address book
full of contacts. A contact list is a single contact that contains other contacts, and is most often used to e-mail
several people at once.
Importing Contacts
You can import contacts from other contact management tools with the Import tool.
1 Click File > Import.
or
Mail yourself a contact as vCard attachment.
Currently VCF and LDIF are supported. CSV and TAB format files are supported from
Microsoft Outlook, Thunderbird, Mozilla, and Evolution.
Creating a List of Contacts
A contact list is a set of contacts with a single nickname that you create. When you send e-mail to
the nickname, it is sent to every member of the list. This differs from a network mailing list in that
it exists only on your computer as a convenience to you, rather than as an actual e-mail address
managed by a mailing list application on a server.
For example, you could create one card for each family member, then add those cards to a contact
list called “Family.” Then, instead of entering each person’s e-mail address individually, you can
send e-mail to “Family” and the message would go to all of them.
To create a list of contacts:
1 Open the list creation dialog box by clicking the New List button.
or
Click File > New > Contact List.
2 Specify a name for the list.
3 Specify the names or e-mail addresses of contacts.
or
Drag contacts from the main window into the list.
4 Choose whether you want to hide the e-mail addresses when you send a message to the list.
Unless it is a very small list, it is recommended that you leave the addresses hidden. This is
the same thing as using the “Bcc:” feature discussed in “Specifying Additional Recipients for
E-Mail” on page 39.
5 When you are finished, click OK.
62 Evolution User Guide
Page 63

Novell Confidential Manual (ENU) 21 December 2004
The list appears as a contact card, which you can use as you would any other card, including emailing the list to another person and sending e-mail to the list.
To mail the list, open a new e-mail and type the name you chose for the list. Evolution addresses
the message to the entire list when you send the message. You can also right-click the list’s address
card in the contacts tool and select Send Message to List.
Evolution cannot store contact lists on Microsoft Exchange servers.
Grouping with Categories
Anther way to group cards is to mark them as belonging to different categories. You can mark a
card as being in several categories or no category at all. For example, you put a friend’s card in the
“Business” category because he works with you, the “Friends” category because he’s a friend, and
the “Frequent” category because you call him often.
To mark a card as belonging to a category, click the Categories button at the lower right. In the
dialog box that appears, you can select as many or as few categories as you like.
If the master list of categories doesn’t suit you, you can add your own categories. Just specify the
new category’s name in the dialog box, then click Categories and select Edit Master Category List
in the window that appears.
Selecting Your Default Contact List
You can select one of your contact lists as your default contact list. To select your default contact
list, right-click the contact list to be your default contact list, then click default. All new contacts
are then added to your default contact list or to your selected contact list.
LDAP: Shared Contact Groups on a Network
The LDAP protocol was created to let users share contact information over a network by sharing
access to a central directory. LDAP allows a company to maintain a shared set of contact
information. Many companies keep a common LDAP address book for all their employees or for
client contacts.
To learn how to add a remote LDAP directory to your available contact folders, see “Contact
Management” on page 108. Remote groups of contacts appear under the On LDAP Servers item
in the shortcut bar. They work like a local folder of contact cards, with the following exceptions:
Network folders are only available when you are connected to the network. If you use a laptop
or have a modem connection, you might want to copy or cache some of the network directory.
You do this by dragging and dropping your desired contacts into the local contacts list.
You can also mark the network folder for offline usage. To mark the folder, right-click the
folder, then click Properties. Select Copy Folder Content Locally for Offline Operation.
To prevent excess network traffic, Evolution does not normally load data from the LDAP
server upon opening.
Depending on your server settings, you might not be able to edit all the fields in a contact
stored on an LDAP server. Some servers prohibit some or all changes, and others use a smaller
set of fields than Evolution allows. Check with your system administrator if you need different
settings.
Evolution Contacts: the Address Book 63
Page 64

Novell Confidential Manual (ENU) 21 December 2004
Configuring Evolution to use LDAP
For information about setting up Evolution to use LDAP, refer to “Contact Management” on
page 108.
Send Me a Card: Adding New Cards Quickly
When you get information about a person in the mail or in a calendar entry, you can add it to an
address card. To do so, right-click any e-mail address or e-mail message, and click Add Sender to
Contacts on the menu that appears. If the sender already exists, the Editor tab opens and you can
edit the detail. Evolution can also add cards from a hand-held device during HotSync* operation.
For more information, see Chapter 10, “Synchronizing Your Handheld Device,” on page 111.
64 Evolution User Guide
Page 65

Novell Confidential Manual (ENU) 21 December 2004
5 Evolution Calendar
This section shows you how to use the EvolutionTM Calendar to manage your schedule alone or in
conjunction with peers. To learn about importing calendar data, see “Importing Single Files” on
page 49, which covers the Import tool.
“Ways of Looking at your Calendar” on page 65
“Scheduling With the Evolution Calendar” on page 66
“Searching for Calendar Items” on page 72
“Printing Displayed Items” on page 72
“Deleting Old Appointments and Meetings” on page 72
“Delegating Meetings” on page 72
“Multiple Calendars, Web Calendars, and CalDAV” on page 73
“The Task List” on page 73
“Memos” on page 75
“Configuring Time Zones” on page 76
Ways of Looking at your Calendar
In Evolution, you can keep multiple calendars and overlay them one over the next. For example,
you might have a schedule of events for work, one for home, and one for your favorite sports team.
The shortcut bar lists those calendars, and you can select or deselect the boxes next to them to show
and hide the appointments in your calendar view. By hiding and showing different sets of
appointments, you can be sure to avoid conflicts, while keeping a minimum of clutter in your view.
Appointments for each calendar appear as a different color.
The toolbar offers you five different buttons that can show you different views of your calendar:
Day
Work Week
Week
Month
List
You can also select an arbitrary range of days in the small calendar at the upper right. To do this,
click and drag on the days that you want to view in your calendar.
Evolution Calendar 65
Page 66

Novell Confidential Manual (ENU) 21 December 2004
The Prev and Next buttons move you forward and back in your calendar pages. If you are using a
week or month view, you can move by week or month. To return to today’s listing, click the Today
button in the toolbar.
To visit calendar entries for a specific date, click Go To and select the date in the dialog box that
appears.
Scheduling With the Evolution Calendar
There are two types of events you can schedule with Evolution: appointments and meetings. An
appointment is an event you schedule for yourself only, and a meeting is an event that you schedule
multiple people for. You can also use the busy/free search for meetings to determine the
availability of invitees.
“Appointments” on page 66
“Sending a Meeting Invitation” on page 69
“Accepting and Replying to a Meeting Request” on page 70
“Reading Responses to Meeting Requests” on page 70
Appointments
In Evolution, an appointment is an event you schedule for yourself.
Creating Appointments
“Using the Free/Busy View” on page 70
“Publishing Calendar and Free/Busy Information Without a Groupware Server” on page 71
“Accessing Free/Busy Data Without a Groupware Server” on page 72
“Creating Appointments” on page 66
“Reminders” on page 67
“Classifications” on page 68
“Recurrence” on page 68
1
Click File > New > Appointment.
or
Click Calendars, then click New.
or
Double-click in a blank space in the calendar.
2 Select a calendar in the Calendar drop-down list. Type a brief summary of the appointment in
the Summary field.
3 Type a location for the appointment in the Location field.
4 To select this appointment as an all day event, click Options > All Day Event.
or
Click the All Day Event button on the toolbar.
5 If the event is an all day event, specify a starting and ending date.
66 Evolution User Guide
Page 67

Novell Confidential Manual (ENU) 21 December 2004
6
If the event is not an all day event, specify a starting and ending time.
7 Select For to specify the duration.
or
Select Until to specify the ending time of the event.
8 Type the time zone information in the Time Zone field.
or
Click the globe to customize the time zone.
To hide or show the Time Zone field, click View > Time Zone.
9 To show the time as busy, click Options > Show Time as Busy.
10 (Optional) Type a category in the Categories field. To show or hide the Categories field, click
Vie w > Categori es.
For more information on categories, see “Classifications” on page 68.
11 Type a description in the Description field.
12 To select an alarm for this appointment, click Alarm on the toolbar.
If you select an alarm, specify when and how you want the alarm to notify. For more
information on reminders, see “Reminders” on page 67.
13 (Optional) To add an attachment to the appointment, drag and drop the attachment into the
attachment bar.
or
Click the Attach button on the toolbar, or click Insert > Attachment and then browse to the
attachment.
14 (Optional) Select a classification (Public, Private, or Confidential) by clicking > Options >
Classifications.
15 (Optional) Click the Recurrence button on the toolbar.
or
Click Options > Recurrence, and specify whether you want the appointment to recur and how
often.
An All Day event appears at the top of a day’s appointment list, in the grey header under the date,
rather than inside. That makes it easy to have appointments that overlap and fit inside each other.
For example, a conference might be an All Day appointment, and the meetings at the conference
could be timed appointments. Appointments with specific starting and ending times can also
overlap. When they do they display as multiple columns in the day view of the calendar.
If you create calendar appointments that overlap, Evolution displays them side by side in your
calendar.
Reminders
You can have several Reminders for individual appointments, any time prior to the appointment
you schedule. You can have one reminder of each of the following types:
Display: A notification pops up on your screen to remind you of your appointment.
Audio: Your computer delivers a sound alarm.
Evolution Calendar 67
Page 68

Novell Confidential Manual (ENU) 21 December 2004
Program: You can run a program as a reminder. You can enter its name in the text field, or
find it with the Browse button.
Apart from the above notifications, the Evolution alarm icon blink in the notification area. To
pause the alarm or view the event, click the notification icon.
To create a reminder:
1 When creating an appointment, click Alarms on the toolbar, or click Options > Alarms.
2 Select the alarm for the event.
3 Select Customize to add or remove customized alarms for the event.
If you have stored reminders in a local calendar, they work from the moment you log in. However,
for reminders stored on an Exchange server, you must run Evolution at least once after logging in.
No matter where the reminders are stored, you can quit Evolution and still be reminded of an
upcoming appointment.
Classifications
If you are using a calendar on a Novell GroupWise® or Microsoft Exchange server, select a
classification for the appointment to determine who can view it. Public is the default category, and
a public appointment can be viewed by anyone on the calendar-sharing network. Private denotes
one level of security, and Confidential an even higher level. The different levels vary depending
on your server settings; check with your system administrator or adjust your delegation settings.
Recurrence
If you are using a Novell GroupWise or Microsoft Exchange server, other people on the server can
check your schedule to see if you are available at any given time. If you have an appointment that
is flexible or that you want to designate as Free rather than Busy time, select the Free box in the
Show Time As section. Normally, appointments display as Busy.
You can categorize appointments in the same way you can categorize contacts.
1 Type a category in the Categories field.
2 Select the check box next to each category that matches the appointment you are creating.
3 To show or hide Categories field, click View > Categories.
TIP: You can add a new category to your category list by clicking Edit Master Category List, then click Click
Here To Add A Category.
After you’ve selected your categories, click OK to assign these categories to the appointment. The
categories you selected are now listed in the text box to the right of the Categories button.
Appointments with categories appear with icons in the calendar display, and you can also search
for appointments by category. To display only the appointments in a particular category, select
Category Is in the search bar at the top of the calendar, and select a category.
The Recurrence tool button lets you describe repetition in appointments ranging from once every
day up to once every 100 years. You can then choose a time and date when the appointment stops
recurring, and, under Exceptions, pick individual days when the appointment does not recur. Make
your selections from left to right, and you form a sentence: “Every two weeks on Monday and
Friday until January 3, 2008” or “Every month on the first Friday for 12 occurrences.”
After you have finished settings, click the disk icon in the toolbar to save and close the
appointment editor window. If you want, you can alter an appointment summary in the calendar
68 Evolution User Guide
Page 69

Novell Confidential Manual (ENU) 21 December 2004
view by clicking it and typing. You can change other settings by right-clicking the appointment
then choosing Open, or double-clicking the appointment.
Sending a Meeting Invitation
In Evolution, a meeting is an event you schedule for multiple people. Evolution can be used to
schedule group meetings and help you manage responses to meeting requests.
When you create a meeting or group appointment, you can specify the attendees in several
categories, such as “chair” or “required.” When you save the meeting listing, each attendee is sent
an e-mail with the meeting information, which also gives them the option to respond.
If you don’t need to collect attendance information when you’re scheduling an event, and would
rather just announce the event, right-click the meeting and select Forward as iCalendar. This opens
a new e-mail message with the event notification attached as an announcement. Recipients can add
the event to their calendars with one click, but it won’t automatically send you e-mail about
whether they plan to attend.
To schedule a meeting:
1 Click File > New > Meeting.
2 If you have multiple e-mail accounts, select the one to use by selecting an item in the
Organizer field.
3 Select a calendar in the Calendar drop-down list.
4 Click Add to add the e-mail addresses of people you want to invite.
5 To remove an attendee from the list, select an attendee and press Delete.
6 To edit a field, select the field and click Edit.
7 Click View on the menu bar to show or hide the Type, Role, Status, and RSVP fields.
8 Type a brief summary of the meeting in the Summary field.
9 Type a location for the meeting in the Location field.
10 To select this meeting as an all day event, click the All Day Event button on the toolbar.
11 If the event is an all day event, specify a starting date and an ending date.
12 If the event is not an all day event, specify a starting time and an ending time.
13 Select For to specify the duration or select Until to specify the ending time of the event.
14 Type the time zone information in the Time Zone field.
or
Click the globe to customize the time zone.
To hide or show the Time Zone field, click View > Time Zone.
15 (Optional) To set an alarm for this meeting, click Alarms on the toolbar, then specify when
and how you want to the alarm to notify you.
For more information on reminders, see “Reminders” on page 67.
16 (Optional) To add an attachment to the appointment, drag and drop the attachment into the
attachment bar.
or
Evolution Calendar 69
Page 70

Novell Confidential Manual (ENU) 21 December 2004
Click the Attach button on the toolbar, or click Insert > Attachment and then browse to the
attachment.
17 (Optional) Select a classification (Public, Private, or Confidential) by clicking > Options >
Classifications.
18 (Optional) Click the Recurrence button on the toolbar.
or
Click Options > Recurrence, and specify whether you want the appointment to recur and how
often.
19 To query free/busy information for the attendees, click the Free/Busy button on the toolbar.
or
Click Options > Free/Busy.
20 Click Save to save the meeting.
An e-mail is sent out to all the recipients, inviting them to your event.
NOTE: A meeting can have only one organizer, and only the organizer can add participants. You can
designate yourself the organizer of the meeting, but if you are not the original organizer, you can create
confusion in the scheduling process. If you want to invite additional people to a meeting without changing the
organizer, it’s best to forward the first organizer’s message to the additional participants.
Accepting and Replying to a Meeting Request
Meeting requests are sent as iCal attachments. To view or respond to one, click the attachment icon
and view it inline in the mail window. All the details are shown about the event, including time
and dates. Then you can choose how to reply to the invitation. Your choices are:
Accept
Tentatively Accept
Decline
Click OK to send an e-mail to the organizer with your answer. The event is also added to your
calendar if you accept.
After you add the meeting to your calendar, you can make changes to the information, but if the
original organizer sends out another update, your changes might be overwritten.
Reading Responses to Meeting Requests
When you get a reply to a meeting invitation you sent, you can view it inline by clicking the
attachment and selecting View Inline. At the bottom, you can click OK to update your attendee list.
Using the Free/Busy View
In addition to the standard meeting scheduling tools, you can use the Free/Busy view to check
whether people are available in advance. The Free/Busy feature is normally a function of dedicated
groupware servers such as Microsoft Exchange and Novell Groupwise. However, you can also
publish Free/Busy information online, and access Free/Busy information published elsewhere. If
not everyone you collaborate with publishes Free/Busy data, you can still use iCal event
invitations to coordinate schedules with other people.
70 Evolution User Guide
Page 71

Novell Confidential Manual (ENU) 21 December 2004
To access the free/busy view:
1 Click File > New > Meeting.
2 Click Add to add the e-mail addresses of people you want to invite.
3 Click the Free/Busy button on the toolbar, or click Options > Free/Busy.
4 Adjust the meeting time, either by dragging the meeting borders or by using the Autopick
buttons to choose a time automatically, then click Save and Close. Attendees on an Exchange
server have the appointment updated automatically; others receive e-mail notification of any
change in plans.
Attendee List: The Attendee List shows the people who have been invited to the appointment.
Schedule Grid: The Schedule Grid shows the published Free/Busy information for the people you
have invited. This is where you compare schedules to find free time to schedule the appointment.
Individuals have visible scheduling information only if they use the same Novell GroupWise or
Microsoft Exchange server you do (that is, if they are in the same organization as you), or if they
publish free/busy information at a URL you can reach and you have entered that URL into their
contact cards using the contact editor.
Publishing Calendar and Free/Busy Information Without a Groupware Server
You can publish Calendar and Free/Busy information to a WebDAV, FTP server, or remote
machine through secure shell or other Web server with HTTP PUT support. Check with your
system administrator if you are not sure you have this functionality.
To set up Calendar or Free/Busy publishing:
1 Click Edit > Preferences, then click Calendar and Tasks.
2 Click the Calendar Publishing tab, click Add, then select the information you want to publish.
3 Select the frequency with which you want to upload data.
4 Select the calendars you want to display data for.
Evolution Calendar 71
Page 72

Novell Confidential Manual (ENU) 21 December 2004
5
Specify the publishing location for the upload server.
6 Type your username and password.
7 Click OK.
To immediately publish calendar information, go to the Calendar tool and click Actions > Publish
Calendar Information.
NOTE: Evolution allows you to specify a template to use when posting to the Free/Busy server.
Accessing Free/Busy Data Without a Groupware Server
If individuals give you a URL for Free/Busy data or for their Web calendar, you can enter it as part
of the contact information in the Contacts tool. Then, when you schedule a meeting with them,
Evolution looks up the schedule and displays it in the Free/Busy data.
Searching for Calendar Items
To start searching for various calendar items:
1 Type a word or phrase in the text area below the toolbar.
2 Chose a search type (Summary Contains, Description Contains, Category Contains, Location
Contains, and Any Field Contains)
3 Click Find Now to perform the search.
4 Press the Clear button to clear the active search.
Printing Displayed Items
To print the displayed calendar items, click File > Print.
Deleting Old Appointments and Meetings
Keeping a list of everything you did in the past eventually slows down your calendar. To delete
old events, click Actions > Purge, then enter the number of days of past events you want to keep.
Click OK to purge the items.
Delegating Meetings
Only attendees of a meeting can delegate a meeting.
1 In the Calendar, right-click the meeting you want to delegate.
2 Click Delegate.
3 Select the contacts you want to delegate the meeting to.
4 Click OK.
Each contact receives a copy of the meeting.
72 Evolution User Guide
Page 73

Novell Confidential Manual (ENU) 21 December 2004
Multiple Calendars, Web Calendars, and CalDAV
To create a new calendar, click File > New > Calendar. If the calendar is one you plan to store
locally, you need only provide a name and color. If it is a remote calendar, specify the name, color,
URL, and a refresh frequency. The refresh frequency determines how often Evolution checks to
see if the calendar has changed. If you are working with someone who publishes an online
calendar, you might want to check for updates every thirty minutes. On the other hand, if you have
displayed a sports team schedule in your calendar, you might not need to refresh it more than once
a week.
The icalshare.com Web site (http://icalshare.com) has an extensive list of shared online calendars,
including national and religious holidays, phases of the moon, sports, and local and regional
events.
®
Evolution 2.6 lets you view and manage calendars on remote CalDAV servers such as Hula
more information about Hula, see the Hula Project Web site (http://www.hula-project.org). The
procedure to create a CalDAV calendar source is similar to that of a remote Web calendar source.
You can view and create calendar events on CalDav accounts just like other calendars on
Evolution.
. For
The Task List
The Task List, located in the lower-right corner of the calendar, lets you keep a list of tasks
separate from your calendar appointments. You can use the list in a larger window by clicking the
Tasks button in the shortcut bar or in the folder tree.
Task Lists are more easily organized in the dedicated Tasks tool. Each task list is assigned a color,
and you can use the Tasks tool shortcut bar to hide and show task lists just like calendars. In the
calendar display task pad, tasks from all visible task lists appear, color coded by list.
“Creating a New Task List” on page 73
“Creating a New Task” on page 73
“Assigned Tasks” on page 74
Creating a New Task List
1 Click File > New > Task List.
2 Specify the name and color for the task list.
3 (Optional) If the task is an online list, specify the URL of the task list.
4 Click OK.
After you’ve added a task to your to-do list, its summary appears in the Summary section of the
task list. To view or edit a detailed description of an item, double-click it, or right-click it and select
Open. You can delete items by selecting them, then clicking Delete.
The list of tasks is sorted in a similar way to the list of e-mail messages in Evolution Mail. Click
once on a message header to change the direction and type of sorting, or right-click to add or
remove columns from the display.
Creating a New Task
1 Click New > Task.
Evolution Calendar 73
Page 74

Novell Confidential Manual (ENU) 21 December 2004
2
Select a group for the task.
3 Type a brief summary for the task in the Summary field.
4 (Optional) Specify a starting date and ending date for the task
5 (Optional) Specify a starting time and ending time for the task
6 Type the time zone information in the Time Zone field.
or
Click the globe to customize the time zone.
To hide or show the Time Zone field, click View > Time Zone.
7 (Optional) Type a category in the Categories field.
To show or hide the Categories field, click View > Categories.
8 Type a description for the task.
9 (Optional) Click Options > Classifications, then select a classification (as Public, Private or
Confidential) for the task.
10 (Optional) To specify a status for the task, click Options > Status Details.
Assigned Tasks
11 (Optional) To add an attachment to the task, drag and drop the attachment into the attachment
bar.
or
Click the Attach button on the toolbar, then browse to the attachment.
Evolution can be used to assign a task to multiple people.
When you assign a task, you can specify the attendees in several categories, such as “chair” or
“required.” When you save the task, each attendee is sent an e-mail with the task information,
which also gives them the option to respond.
To assign a new task:
1 Click File > New > Assigned Task.
2 If you have multiple e-mail accounts, select the one to use by selecting an item in the
Organizer field.
3 Select a group for the task.
4 Click Add, or press Insert key, or right click and then press Add to add the e-mail addresses
of people you want to assign the task.
5 To remove an attendee from the list, select an attendee, then press Delete.
6 To edit a field, select the field, then click Edit.
7 Click View on the menu bar to show or hide the Type, Role, Status, and RSVP fields.
8 Type a brief summary of the task in the Summary field.
9 (Optional) Specify a starting date and time, and a due date and time for the task.
10 Type the time zone information in the Time Zone field.
or
74 Evolution User Guide
Page 75

Novell Confidential Manual (ENU) 21 December 2004
Click the globe to customize the time zone.
To hide or show the Time Zone field, click View > Time Zone.
11 (Optional) Type a category in the Categories field.
To show or hide Categories field, click View > Categories.
12 Type a description for the task.
13 (Optional) To add an attachment to the assigned task, drag and drop the attachment into the
attachment bar.
or
Click the Attach button on the toolbar, then browse to the attachment.
14 (Optional) Click Options > Classifications, then select a classification (as Public, Private or
Confidential) for the task.
15 (Optional) To specify a status for the task, click Options > Status Details.
Memos
The Memo list
In Evolution, the Memos component lets you create, edit, and store journal entries without dates,
using the filesystem as a backend.
To create a new memo entry:
1 Click File > New > Memo.
2 Select a group in which you would create a memo entry.
3 (Optional) Type a category in the Categories field.
To show or hide Categories field, click View > Categories.
4 Type text for the memo in the Memo Content field.
5 (Optional) To add an attachment to the memo, drag and drop the attachment into the
attachment bar.
or
Click the Attach button on the toolbar, then browse to the attachment.
6 (Optional) Click Options > Classifications, then select a classification (as Public, Private or
Confidential) for the memo.
As with calendars and tasks, you can create multiple memo lists. Each memo list is assigned a
color, and you can use the Memos shortcut bar to hide and show memos.
To create a new memo list:
1 Click File > New > Memo List.
2 Type the group, name and color for the memo list.
3 Click OK.
Evolution Calendar 75
Page 76

Novell Confidential Manual (ENU) 21 December 2004
Configuring Time Zones
Evolution supports the use of time zones. If you share calendar files with friends or co-workers,
you might need to configure your time zone.
1 Click Edit > Preferences, then click Calendar and Tasks.
2 Click the icon next to the Time Zone field, then select your location.
Each red dot represents a major city.
3 Select a city, then click OK.
You can also configure time zone information specific to each appointment. To do that, simply
create a new appointment and click the globe to customize the time zone that the time exists in.
For example, if you live in New York but have a telephone meeting set for noon with someone in
California, you need to make sure that your schedules are coordinated. Setting time zones on a perappointment basis helps avoid that potential confusion.
Marcus Bains Line
The Marcus Bains Line is a marker to show the current date and time. This feature is now available
in the Evolution 2.6 calendar.
76 Evolution User Guide
Page 77

Novell Confidential Manual (ENU) 21 December 2004
6 Connecting to Exchange Servers
EvolutionTM Exchange for Microsoft Exchange allows Evolution clients to access accounts on
Microsoft Exchange 2000 and 2003 servers. Like Evolution, it is free software and is licensed
under the GPL.
“Evolution Exchange Features” on page 77
“Adding Your Exchange Account to Evolution” on page 78
“Accessing the Exchange Server” on page 81
“Settings Exclusive to Evolution Exchange” on page 82
“Scheduling Appointments with Free/Busy” on page 85
IMPORTANT: Evolution Exchange works only with Exchange 2000 and later, and requires that Outlook Web
Access be enabled. Each user needs a valid Microsoft Exchange server account, including a license.
Evolution Exchange Features
Evolution Exchange supports the following basic Microsoft Exchange features:
General
Remote Exchange Information Store: Allows you to access mail, address book
(including the Global Address List folder), calendars, and task folders on an Exchange
server from Evolution.
Palm Synchronization: Supported for Contacts and Calendars on Exchange.
Password Management: To change your password, go to Edit > Preferences and select
the Exchange account. Click the Exchange Settings tab, then click Change Password. If
your password has expired, Evolution asks you to change your password at startup.
Mail
Viewing Mail in Exchange Folders: Mail stored on the Exchange server is visible in the
Mail component in Evolution.
Sending E-mail via Exchange Protocols: If you use the Microsoft Exchange mail
transport protocol to send e-mail, make sure that the address you have entered as your email address is exactly the one that the Exchange server has on file. This might be
“yourname@exchange-server.example.com” rather than “yourname@example.com”.
Calendar
Meeting Requests/Proposal: Allows Evolution users to schedule meetings and view
attendee availability for other users (Evolution or Outlook users) on Exchange.
Adding iCalendar Meeting Requests to the Calendar: If you receive an iCalendar
meeting request and add it to your calendar, it is saved to your Exchange calendar.
Connecting to Exchange Servers 77
Page 78

Novell Confidential Manual (ENU) 21 December 2004
Contacts
Address Completion: Supported for your Exchange Contacts folder.
Adding vCards to the Address Book: If you receive a vCard attachment and click Save
in Address Book, it is saved to your Exchange address book. New Address Book entries
can be created on Exchange from received e-mail messages with a single click
Work Offline (disconnected mode).
To mark a folder for offline usage, right-click the folder, then click Properties. Click Copy
Folder Content Locally for Offline Operation. For more information, see “Working Offline”
on page 38.
The Recall Message function is not available.
Adding Your Exchange Account to Evolution
After you have installed Evolution Exchange, you need to set up access for your Exchange account
on both the Exchange server and within Evolution.
“Exchange Server Settings” on page 78
“Standard Configuration Tool for Evolution Exchange” on page 78
“Simple Configuration Tool for Evolution Exchange” on page 78
“Creating a New Exchange Account” on page 79
“Changing an Existing Account to Work with Exchange” on page 79
Exchange Server Settings
Check with your system administrator to ensure that:
You have a valid account on the Exchange server.
You are permitted to access the account with WebDAV. This is the default setting for the
Exchange server, so unless your system administrator has specifically turned it off, no
changes should be necessary.
®
The Novell
about checking to make sure that your Exchange server accepts connections from Evolution.
Web site Knowledgebase (http://support.novell.com) has additional information
Standard Configuration Tool for Evolution Exchange
When you know that your server is ready for you to connect, you are ready to add your Exchange
account to Evolution Exchange.
Simple Configuration Tool for Evolution Exchange
Evolution Exchange 2.6 comes with a simple account creation tool for Exchange accounts.
If you have no accounts configured, the simple account configuration assistant starts when you
start Evolution. It asks only for the Outlook Web Access URL, and your username and password.
Evolution Exchange determines the remaining information for you.
78 Evolution User Guide
Page 79

Novell Confidential Manual (ENU) 21 December 2004
If the simple account configuration tool does not run automatically, you need to create an account
manually. For more information on how to do this, see “Creating a New Exchange Account” on
page 79.
Creating a New Exchange Account
Click Edit > Preferences.
1
2 Click Add.
3 Create the account following the procedure in “Starting Evolution for the First Time” on
page 11. Remember to select Microsoft Exchange as server type in the Receiving Mail
section.
Only one Microsoft Exchange account can be configured in Evolution at a time.
Changing an Existing Account to Work with Exchange
If you have an existing e-mail account, and use the following procedure to configure it for
Evolution Exchange:
1 Click Edit > Preferences, then click Mail Accounts.
2 Select the account you want to convert, then click Edit.
3 Click the Identity tab, then change your e-mail address as needed.
4 Click the Receiving Mail tab, then select Microsoft Exchange as your server type.
Connecting to Exchange Servers 79
Page 80
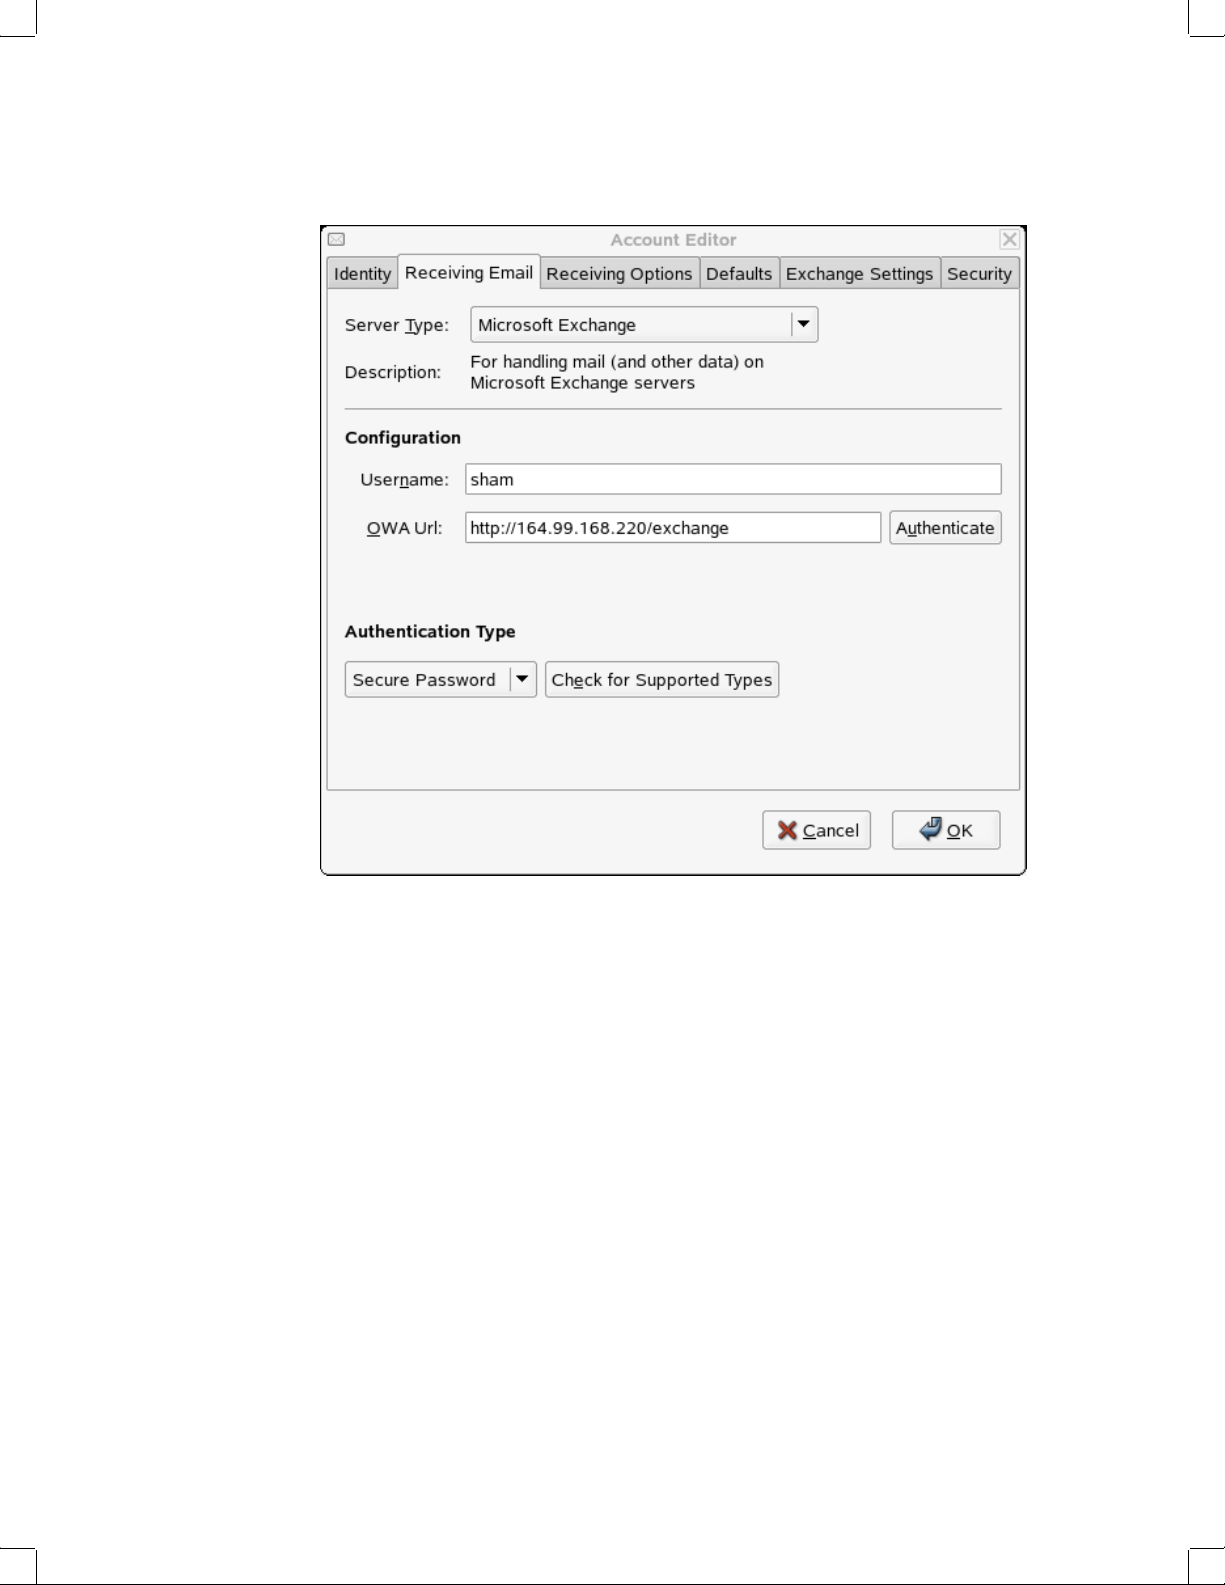
Novell Confidential Manual (ENU) 21 December 2004
5
Type your user name, and the OWA URL. Click Authenticate, then enter the password at the
prompt. The Exchange server authenticates your account.
6 Select your authentication method.
7 Click the Receiving Options tab, then specify how often to check for new mail, your Global
Catalog server name and whether to apply filters to messages in your Inbox, check for junk,
set a password expiry period, and any other settings you want to include.
80 Evolution User Guide
Page 81
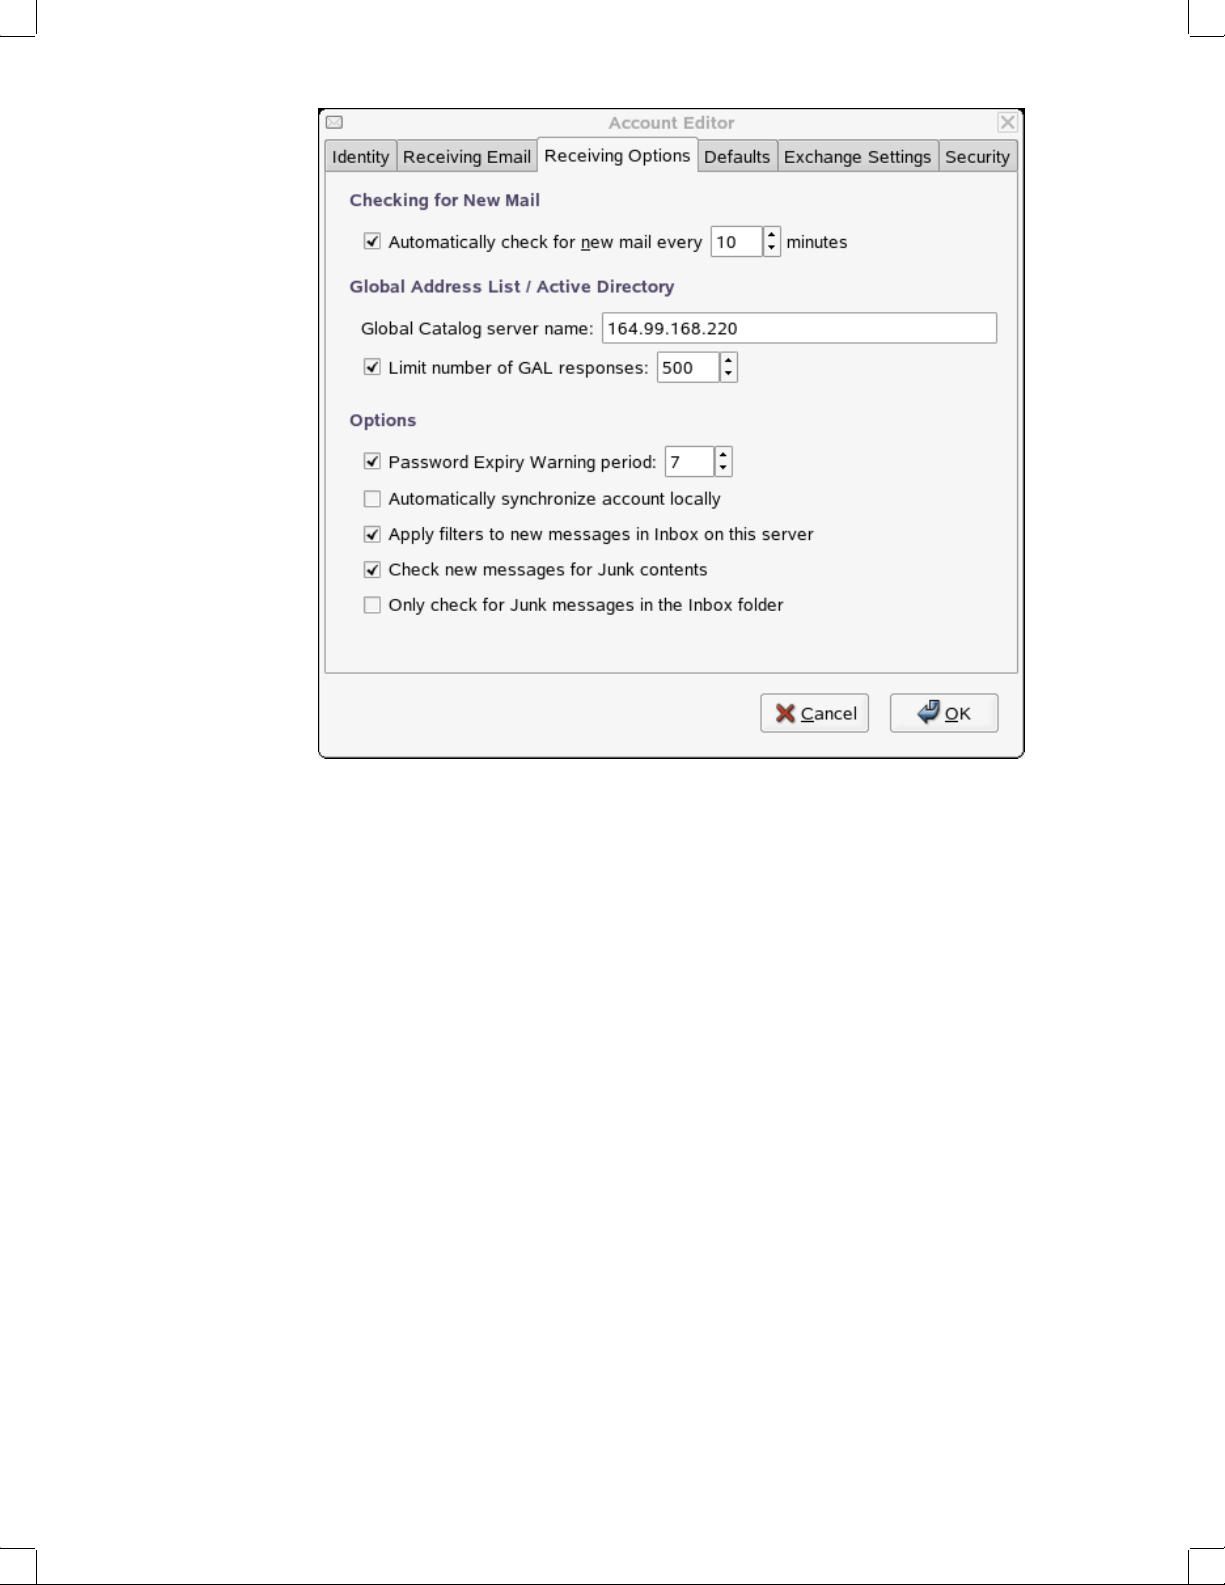
Novell Confidential Manual (ENU) 21 December 2004
Use the Defaults tab to define folders, send cc: or bcc: mails to certain IDs, and set options for
8
message receipts.
9 Use the Security tab to set PGP and s/MIME options.
10 Quit Evolution and restart it.
Changes to Evolution Exchange accounts configuration are not active until you have restarted
the application.
Accessing the Exchange Server
When you have installed Evolution Exchange, you can access public folders and perform certain
Exchange actions like delegation and password management, and subscribing to other user’s
calendars, tasks, and contact folders. You can also carry out any folder-related operations for
calendars, tasks, and contact folders, including adding, deleting, and renaming folders, and
selecting folder permissions. Use the regular Mail tool for mail, the Contacts tool for contacts, and
the Calendar tool for your schedule.
If you are using both an Exchange account and a local mail account, you should be aware that
whenever you save an e-mail address or appointment from an e-mail message, it is saved in your
Exchange contacts list or calendar, rather than in your local account. The same is true of
synchronization with Palm OS devices; tasks, appointments, and addresses from your Palm OS
device are synchronized in the Exchange folders rather than local folders.
To avoid unnecessary strain on the server, the Global Address List (GAL) appears empty until you
have searched for something in it.
Connecting to Exchange Servers 81
Page 82
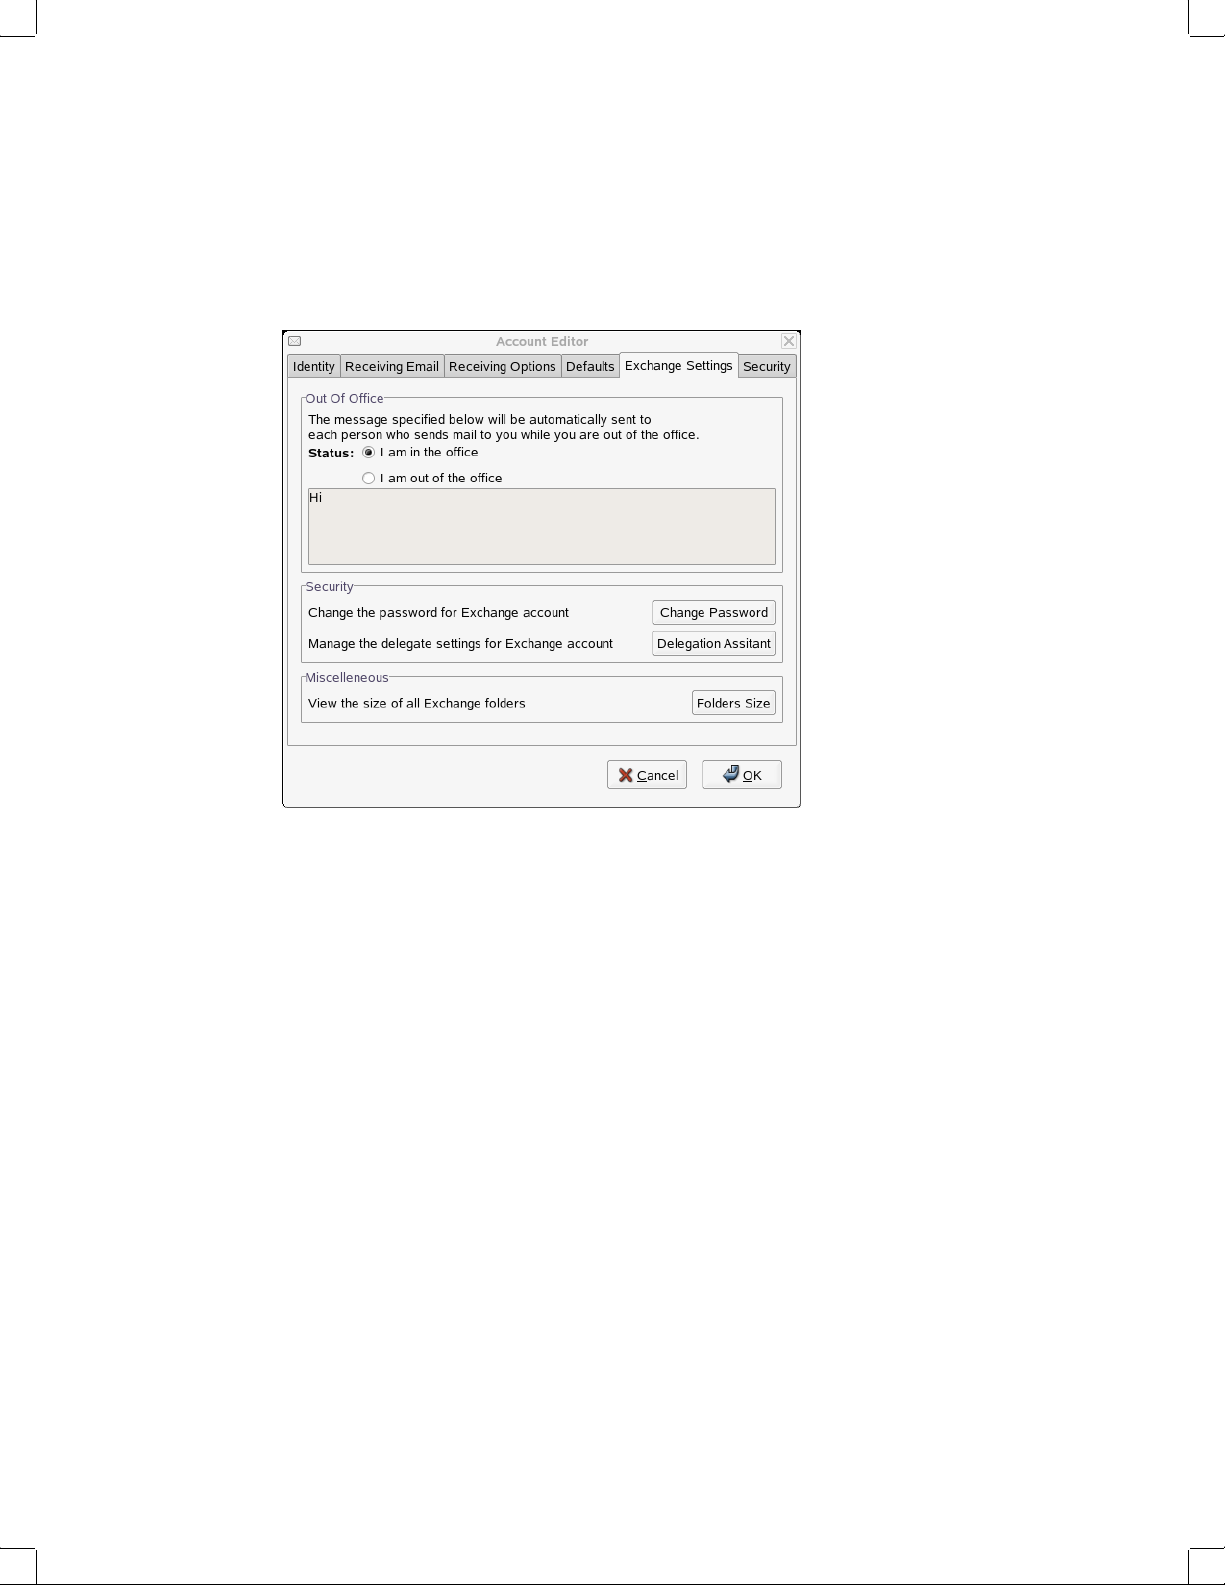
Novell Confidential Manual (ENU) 21 December 2004
Settings Exclusive to Evolution Exchange
There are some items in Evolution that are available only with Evolution Exchange, like
delegation and permissions handling, creation of “Out of Office” messages, and the option to
change password and view folder sizes.
“Access Delegation” on page 82
“Delegating Access to Others” on page 82
“Subscribe to Other Users’ Folders” on page 83
“Subscribe to Public Folders” on page 84
“Setting an Out of Office Message” on page 84
“Scheduling Appointments with Free/Busy” on page 85
Access Delegation
You can allow other people in your organization’s Global Address List to access your calendar,
address book, and messages, and they can let you manage theirs. Delegation allows people to do
anything from check on each other’s schedules to completely manage their personal information.
Delegating Access to Others
To add someone to your list of delegates:
1 Click Edit > Preferences, then click the Exchange Settings tab.
82 Evolution User Guide
Page 83
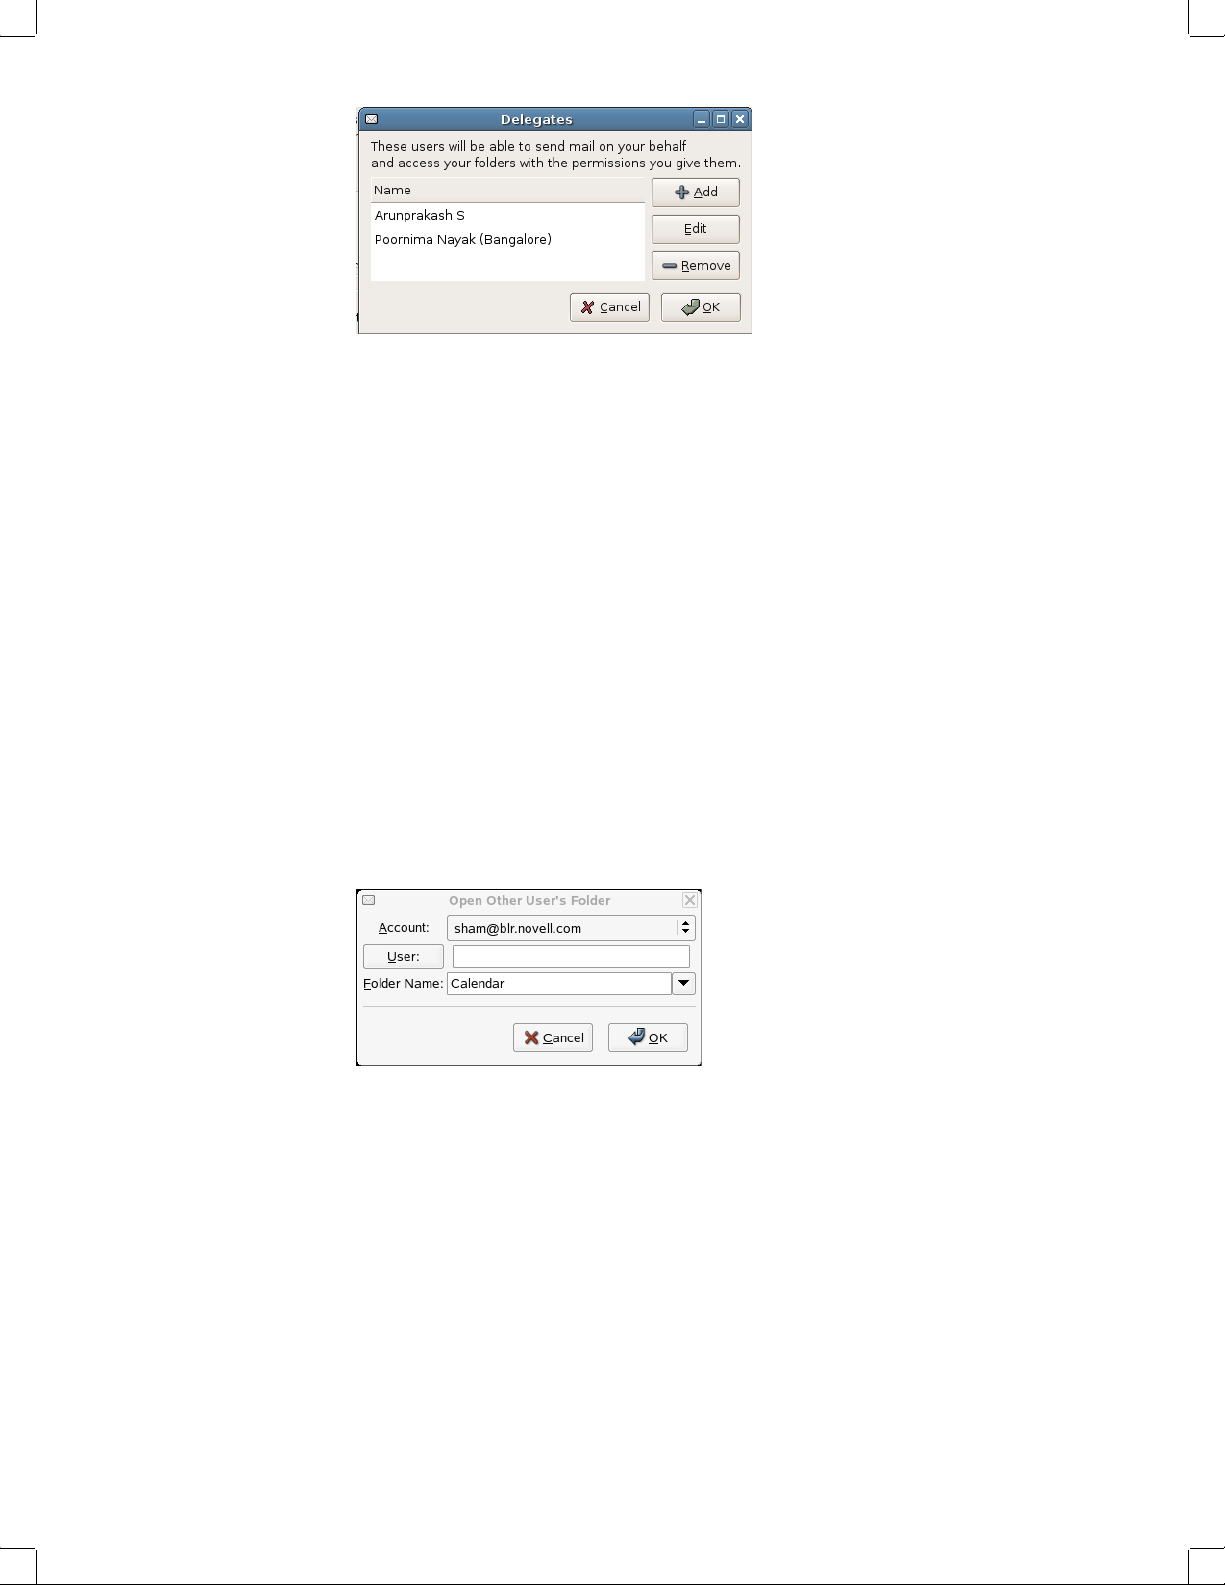
Novell Confidential Manual (ENU) 21 December 2004
2
Click Add, then search for a contact in the Global Address List.
Remember that the Global Address List (GAL) appears empty until you have searched for
something in it.
3 Select from the following access levels for each of the four types of folders:
None: Do not allow this person to access any folders of this type.
Reviewer (read-only): Allows the person to see items in this type of folder, but not create
new items or edit existing items.
Author (read, create): The delegate can view items in your folders, and can create new items,
but cannot change any existing items.
Editor (read, create, edit): The delegate can view, create, and change items in your folders.
4 Click OK.
Subscribe to Other Users’ Folders
To access the folders delegated to you:
1 Click File > Subscribe to Other User’s Folder.
2 Specify the e-mail address of the user who has delegated to you, or click User to select the
user from your address book.
3 Select the folder you want to open.
4 Click OK.
Folders delegated to you appear in your folder list inside a folder labeled with the name of its
owner. For example, if Martha Thompson delegates folders to you, you see a folder called Martha
Thompson’s Folders in the folder tree at the same level as your Personal Folders and Public
Folders.
If the folder fails to open properly, check with the folder owner to make sure that you have been
granted the correct access permissions.
Connecting to Exchange Servers 83
Page 84
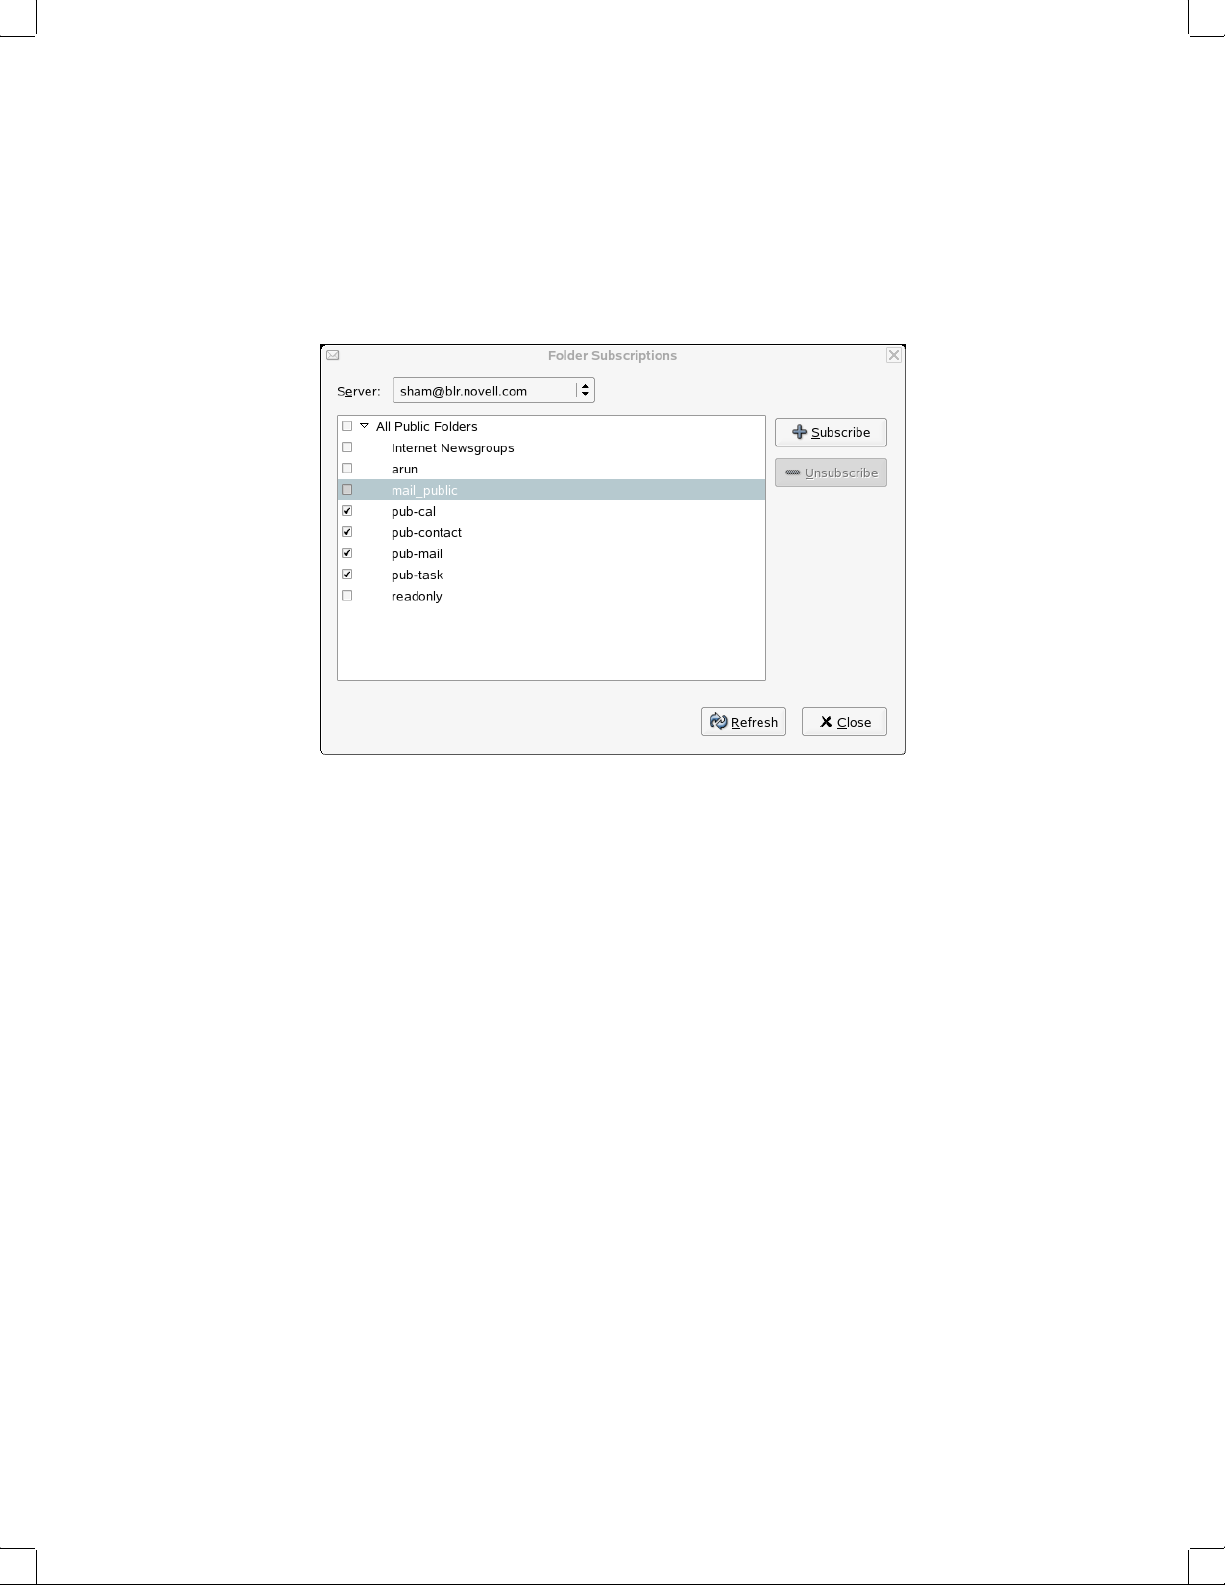
Novell Confidential Manual (ENU) 21 December 2004
Subscribe to Public Folders
You can subscribe to public folders available on the Exchange server.
1 Click Folder > Subscriptions.
2 Select the Exchange account.
3 Select the folders you want to subscribe to by selecting them or by clicking them and selecting
Subscribe.
4 Click OK.
The folders you have subscribed to appear on the left folder panel.
5 To view contents of a folder, click it.
Setting an Out of Office Message
An Out of Office message is an automatic reply that you can send as a reply to e-mails, explaining
why you aren’t immediately responding to their messages. For example, if you go on vacation for
a week and won’t access your e-mail, you can set an automatic reply so that people know that you
aren’t ignoring them.
1 Click Edit > Preferences > Mail Accounts.
2 Select the Exchange account, then click Edit.
3 Select the Exchange Settings tab. The top option allows you to set an Out of Office message.
4 Click I Am Currently Out of the Office.
5 Type a short message in the text field.
6 Click OK.
Your message is automatically sent to anyone who sends you mail until you return and click I Am
in the Office.
84 Evolution User Guide
Page 85
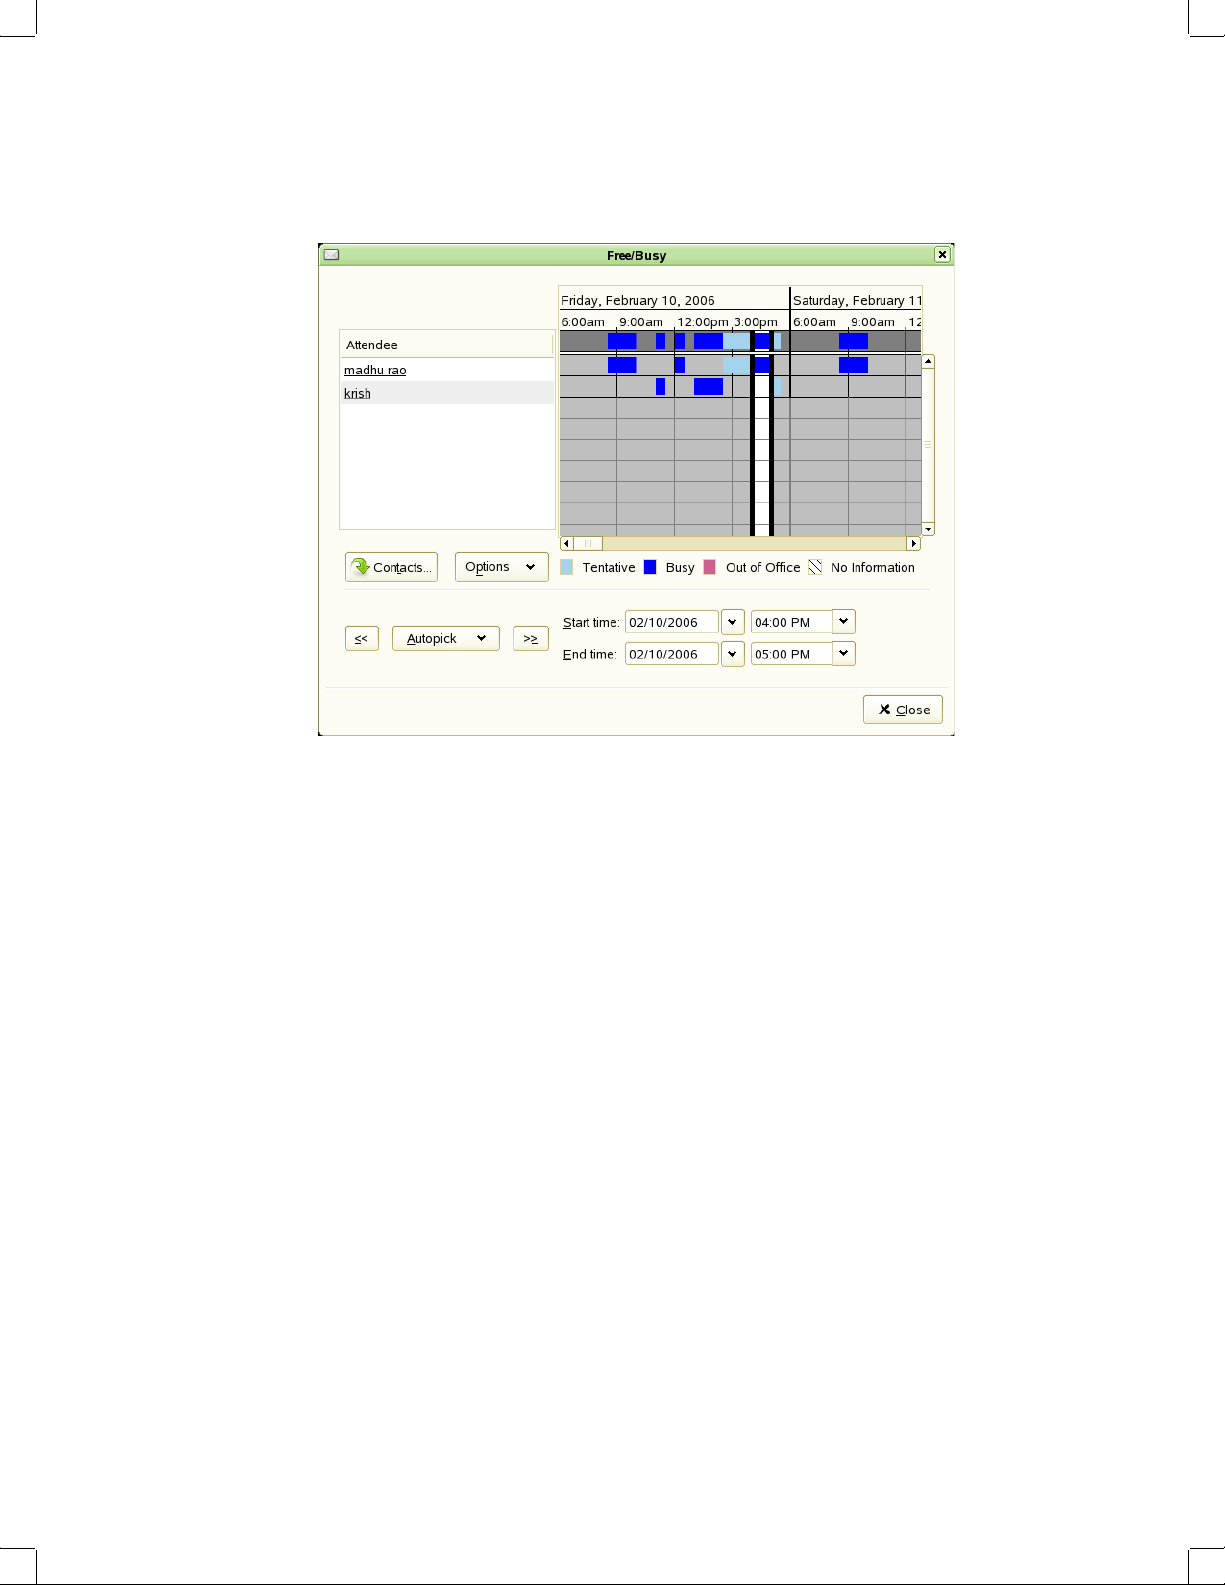
Novell Confidential Manual (ENU) 21 December 2004
Scheduling Appointments with Free/Busy
When you schedule a meeting with your calendar on the Exchange server, you can check when
other local Exchange users are busy according to their Exchange calendars.
Reminders for appointments in your Exchange calendar do not work until you have run Evolution
at least once after logging in. This is different from locally stored reminders, which work from the
moment you log in, regardless of whether you have run Evolution in the session.
1 Create a new appointment in the calendar.
2 Right-click the appointment, then select Schedule Meeting.
3 In the Invitations tab, add attendees by entering their e-mail addresses into the list, or by
selecting them from the Global Address List (GAL). Choose the GAL from the drop-down
list of address sources at the top of the dialog box.
4 Click Options, then click Update Free/Busy to check participant schedules and, if possible,
update the meeting in all participants’ calendars.
If meeting attendees are not available during the times you have scheduled a meeting, you can
“nudge” the meeting forward or backward to the nearest available time. To do so, just click the
arrows to the left or right of the Autopick button. The Autopick tool moves the meeting to the
nearest time during which all attendees are available. If you aren’t satisfied with those results, you
can drag the edges of the meeting time to the hours that you want to select.
Connecting to Exchange Servers 85
Page 86

Novell Confidential Manual (ENU) 21 December 2004
86 Evolution User Guide
Page 87

Novell Confidential Manual (ENU) 21 December 2004
7 Connecting to GroupWise
EvolutionTM 2.6 can access accounts on Novell® GroupWise® 7 system.
“Evolution Exchange Features” on page 77
“GroupWise Terminology vs. Evolution Terminology” on page 88
“Adding your GroupWise Account to Evolution” on page 88
“Scheduling Appointments with Free/Busy” on page 91
“Managing Sent Items” on page 91
“Giving Other People Access to Your Mailbox or Calendar” on page 94
“Junk Mail Handling” on page 97
GroupWise Features
Evolution connecting to GroupWise supports the following basic Novell GroupWise features:
Mail
Viewing mail and folders stored on the GroupWise system.
Sending mail from you GroupWise account.
Converting mail to a task or meeting.
Tracking the status of a message.
Marking a message as junk mail adds the sender to your GroupWise junk mail list.
Calendar
You can send and receive appointment and meeting requests. Allows Evolution users to
schedule meetings and view attendee availability for other users on GroupWise.
You can receive an iCalendar meeting request and add it to your GroupWise calendar.
Contacts
Address Completion is supported for your GroupWise address books, including the
corporate address book, the Frequent Contacts address book, and your personal address
book.
If you receive a vCard attachment and click Save in Address Book, it is saved to your
Personal address book. New Address Book entries can also be added to your personal
address book from received e-mail messages.
The GroupWise Personal Address book and Frequent Contacts address book are created
when you access your GroupWise account through the GroupWise client; they are not
created when accessing your GroupWise account with Evolution. The GroupWise system
address book is marked for offline use by default. This helps with performance.
Connecting to GroupWise 87
Page 88
Novell Confidential Manual (ENU) 21 December 2004
Proxy
You can assign Proxy access to other users.
You can view other users’ accounts through Proxy access.
There are, however, some features that are not available:
Resending items
Retracting items
Accepting appointments or meetings in offline mode
Archive
GroupWise Terminology vs. Evolution Terminology
GroupWise and Evolution sometimes uses different terminology for different types of items. The
following table compares GroupWise terminology to Evolution terminology.
GroupWise Evolution
Appointment Meeting
Posted Appointment Appointment
Reminder Note None; use a task
Discussion Note None; use an assigned task
Phone Message None; use a message
Checklist None; use a task
Adding your GroupWise Account to Evolution
“Creating a New GroupWise Account” on page 88
“Changing an Existing Account to Work with GroupWise” on page 88
Creating a New GroupWise Account
1 Click Edit > Preferences, then click Mail Accounts.
2 Click Add.
3 Create the account following the procedure in “Starting Evolution for the First Time” on
page 11.
Changing an Existing Account to Work with GroupWise
If you have an existing e-mail account, and want to convert it to use with GroupWise:
1 Click Edit > Preferences, then click Mail Accounts.
2 Select the account you want to convert, then click Edit.
3 Click the Identity tab.
88 Evolution User Guide
Page 89
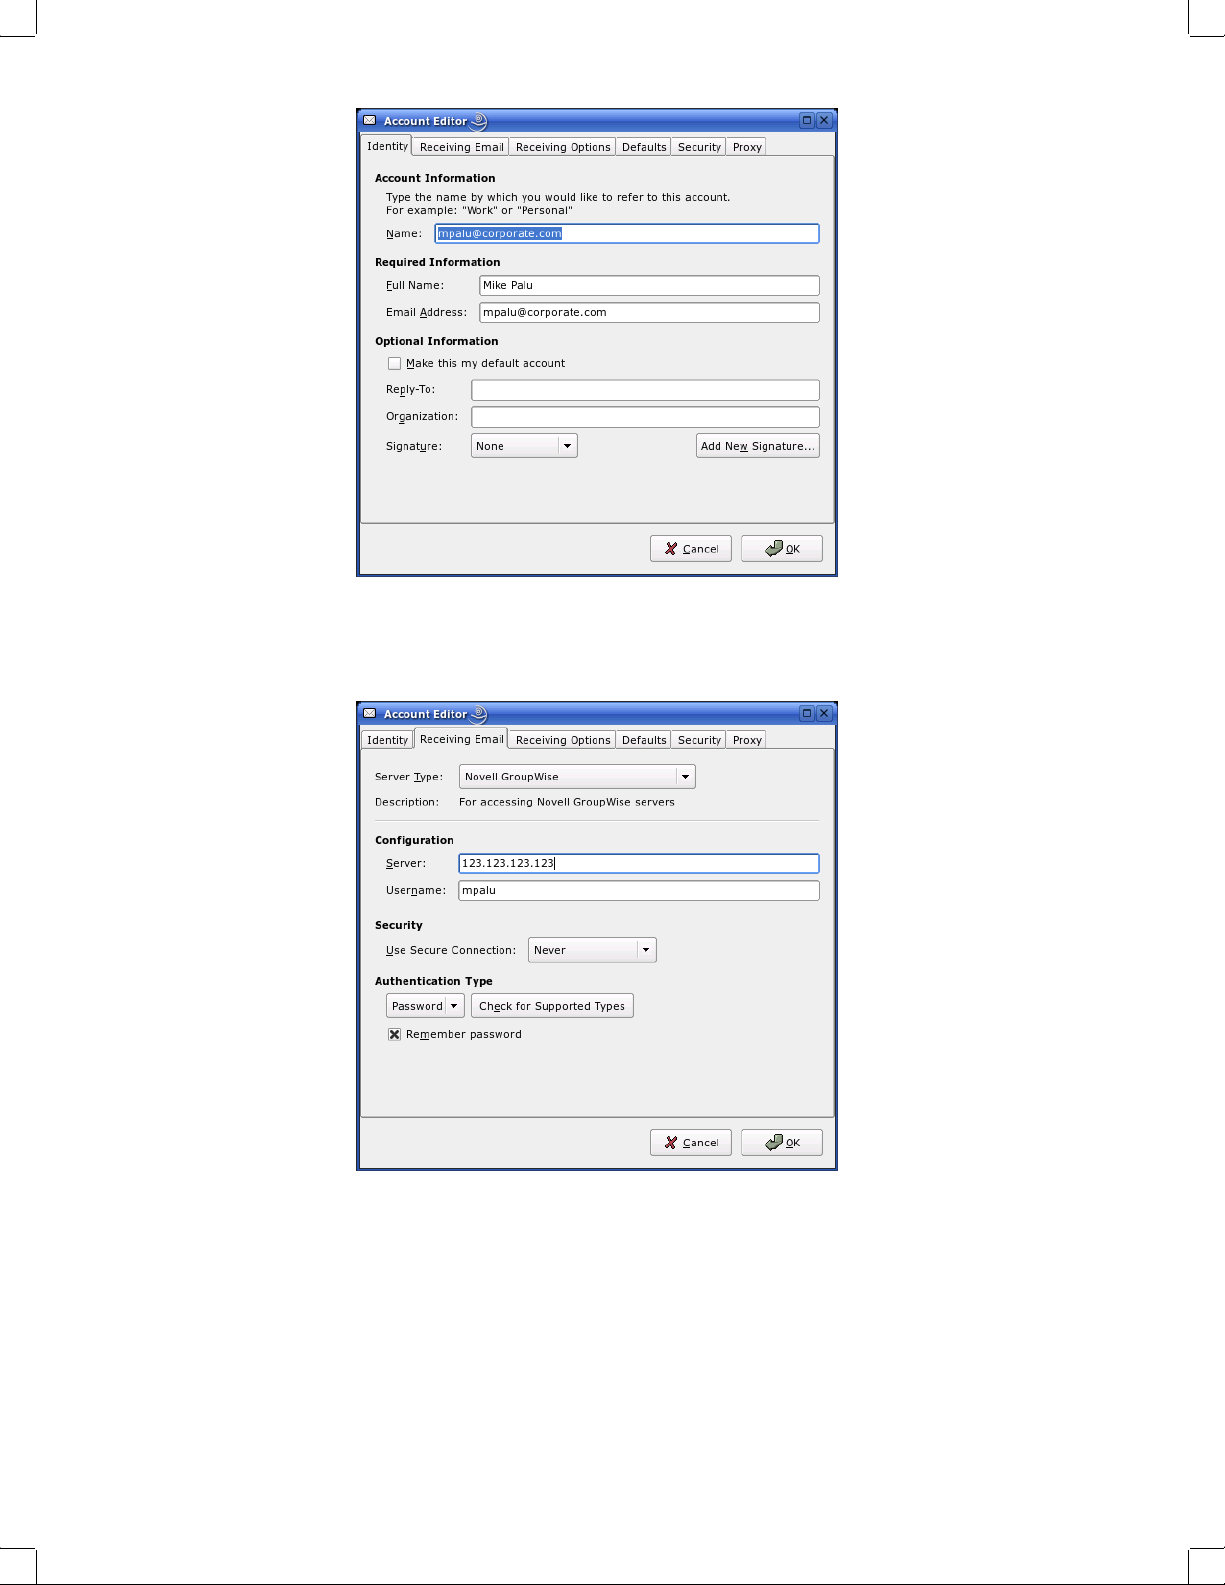
Novell Confidential Manual (ENU) 21 December 2004
Change your e-mail address as needed.
4
5 Click the Receiving Email tab, then select Novell GroupWise as your server type.
6 Type the name of your mail server, your user name, and select whether to use SSL.
7 Click the Receiving Options tab, then select if you want Evolution to automatically check for
new mail.
If you select this option, you need to specify how often Evolution should check for new
messages.
Connecting to GroupWise 89
Page 90

Novell Confidential Manual (ENU) 21 December 2004
8
Select if you want to check for new messages in all folders.
9 Select if you want to apply filters to new messages in the Inbox on the server.
For additional information on filtering, see “Creating New Filter Rules” on page 53.
10 Select if you want to check new messages for junk content.
For additional information on junk content, see “Junk Mail Preferences” on page 105.
11 Select if you want to only check for junk messages in the Inbox folder.
12 Select if you want to automatically synchronize your remote calendar and contacts locally.
13 Specify your Post Office Agent SOAP port in the Post Office Agent SOAP Port field.
If you are unsure what your Post Office Agent SOAP port is, contact your system
administrator.
14 (Optional) Click the Proxy tab, then click Add to add any Proxy users to your account.
15 Click OK, then click Close.
90 Evolution User Guide
Page 91

Novell Confidential Manual (ENU) 21 December 2004
Scheduling Appointments with Free/Busy
When you schedule a meeting with your calendar on GroupWise, you can check when other local
GroupWise users are busy according to their GroupWise calendars.
Reminders for appointments in your GroupWise calendar do not work until you have run
Evolution at least once after logging in. This is different from locally stored reminders, which work
from the moment you log in, regardless of whether you have run Evolution in the session.
1 Open a new appointment in the calendar.
2 Click Actions > Schedule Meeting.
3 Add attendees, either by entering their e-mail addresses into the list, or by clicking the Invite
Others button.
4 Click Options, then click Update Free/Busy to check participant schedules and, if possible,
update the meeting in all participants’ calendars.
If meeting attendees are not available during the times you have scheduled a meeting, you can
“nudge” the meeting forward or backward to the nearest available time. To do so, just click the
arrows to the left or right of the Autopick button. The Autopick tool moves the meeting to the
nearest time during which all attendees are available. If you aren’t satisfied with those results, you
can drag the edges of the meeting time to the hours that you want to select.
Managing Sent Items
“Confirming Delivery of Items You’ve Sent” on page 92
“Displaying Sent Items” on page 92
“Checking the Status of an Item” on page 92
“Receiving Notification About Items You Send” on page 93
Connecting to GroupWise 91
Page 92

Novell Confidential Manual (ENU) 21 December 2004
“Requesting a Reply for Items You Send” on page 93
IMPORTANT: You can manage your sent items for GroupWise e-mail only if the recipient is located on the
same GroupWise system as you.
Confirming Delivery of Items You’ve Sent
Evolution provides several ways for you to confirm that your item was delivered.
Track an Item You Sent
You can check the status in the Message Status window of an e-mail you’ve sent. For information,
see “Checking the Status of Your Items” on page 92.
Receive Notification When the Item is Opened or Deleted
You can receive notification when the recipient opens or deletes a message. For information, see
“Receiving Notification About Items You Send” on page 93.
Request a Reply
You can inform the recipient that you need a reply to an e-mail. Evolution adds a sentence to the
item stating that a reply is requested and changes the icon in the recipient’s Mailbox to a double
arrow. For information, see “Requesting a Reply for Items You Send” on page 93.
Displaying Sent Items
You might want to display items you previously sent. For example, you can read a sent e-mail.
1 Click the Sent Items folder in the Folder List.
All sent items reside in this folder unless you select a different folder for sent e-mail in the account
editor default settings.
Checking the Status of Your Items
Track Message Status lets you check the status of any e-mail you’ve sent. For example, you can
see when an e-mail was delivered and when the recipient opened or deleted the e-mail.
Checking the Status of an Item
1
Right-click an e-mail in your Sent Items folder, then click Track Message Status.
92 Evolution User Guide
Page 93

Novell Confidential Manual (ENU) 21 December 2004
Receiving Notification About Items You Send
1 In the Compose Message window, click Insert > Send Options.
2 In the Return Notification group box, specify the type of return receipt you want.
3 Click OK.
Requesting a Reply for Items You Send
1 In the Compose Message window, click Insert > Send Options.
2 Click Reply Requested, then specify when you want to receive the reply.
If you select When Convenient, then Reply Requested: When Convenient appears at the top
of the message. If you select Within x Days, then Reply Requested: By day month numeric
day time year appears at the top of the message.
3 Click OK.
Changing the Priority of an E-Mail
1 In the Compose Message window, click Insert > Send Options.
2 Select High Priority, Standard Priority, Low Priority, or Undefined.
The small icon next to an item in the Mailbox is red when the priority is high.
3 Click OK.
Connecting to GroupWise 93
Page 94

Novell Confidential Manual (ENU) 21 December 2004
Delegating an Item
1 In the Calendar, right-click the meeting or appointment you want to delegate.
2 Select Delegate, then select the contacts you want to delegate the meeting/appointment for.
3 Click OK.
Each contact gets a copy of the appointment or meeting.
Giving Other People Access to Your Mailbox or Calendar
Use Proxy to manage another user’s Mailbox and Calendar. Proxy lets you perform various
actions, such as reading, accepting, and declining items on behalf of another user, within the
restrictions the other user sets.
IMPORTANT: You can proxy for a user in a different post office or domain, as long as that person is in the
same GroupWise system. You cannot proxy for a user in a different GroupWise system.
This section contains the following topics:
“Receiving Proxy Rights” on page 94
“Assigning Proxy Rights to Another User” on page 94
“Adding and Removing Proxy Names and Rights in Your Proxy List” on page 95
“Managing Someone Else’s Mailbox or Calendar” on page 96
“Marking an Item Private” on page 97
Receiving Proxy Rights
Two steps must be completed before you can act as someone’s proxy. First, the person for whom
you plan to act as proxy must grant you rights in the Proxy List in Preferences. Second, you must
proxy to the user so you can access his or her Mailbox or Calendar.
Assigning Proxy Rights to Another User
Use the Proxy List in the Preferences Account Editor to give other users rights to proxy for you.
You can assign each user different rights to your calendaring and messaging information. If you
want to let users view specific information about your appointments when they do a Busy Search
on your Calendar, give them Read access for appointments. The following table describes the
rights you can grant to users:
This Right Lets your proxy do this
Read Read items you receive. Proxies cannot see your Contacts folder
with this or any other proxy right.
Write Create and send items in your name, including applying your
Subscribe to my alarms Receive the same alarms you receive. Receiving alarms is
Subscribe to my notifications Receive notification when you receive items. Receiving notifications
94 Evolution User Guide
signature if you have one defined. Assign categories to items, and
change the subject of items.
supported only if the proxy is on the same post office you are.
is supported only if the proxy is on the same post office you are.
Page 95

Novell Confidential Manual (ENU) 21 December 2004
This Right Lets your proxy do this
Modify options/rules/folders Change the options in your Mailbox. The proxy can edit any of your
Options settings, including the access given to other users. If the
proxy also has Mail rights, he or she can create or modify rules and
folders. This right allows a proxy to add, delete, and modify
categories.
Read items marked Private Read the items you marked Private. If you don’t give a proxy Private
rights, all items marked Private in your Mailbox are hidden from that
proxy.
Adding and Removing Proxy Names and Rights in Your Proxy List
1 Click Edit > Preferences, then click Mail Accounts.
2 Select the GroupWise account to edit, then click Edit.
3 Click the Proxy tab, then click Add.
4 To add a user to the list, type the name in the Name box or import the contact from Contact list.
5 Select the rights you want to give to the user.
6 Repeat Step 4 and Step 5 to assign rights to each user in the Proxy List.
7 Click OK, then click Close.
To delete a user from the Proxy List, select the user, then click Remove User.
Connecting to GroupWise 95
Page 96
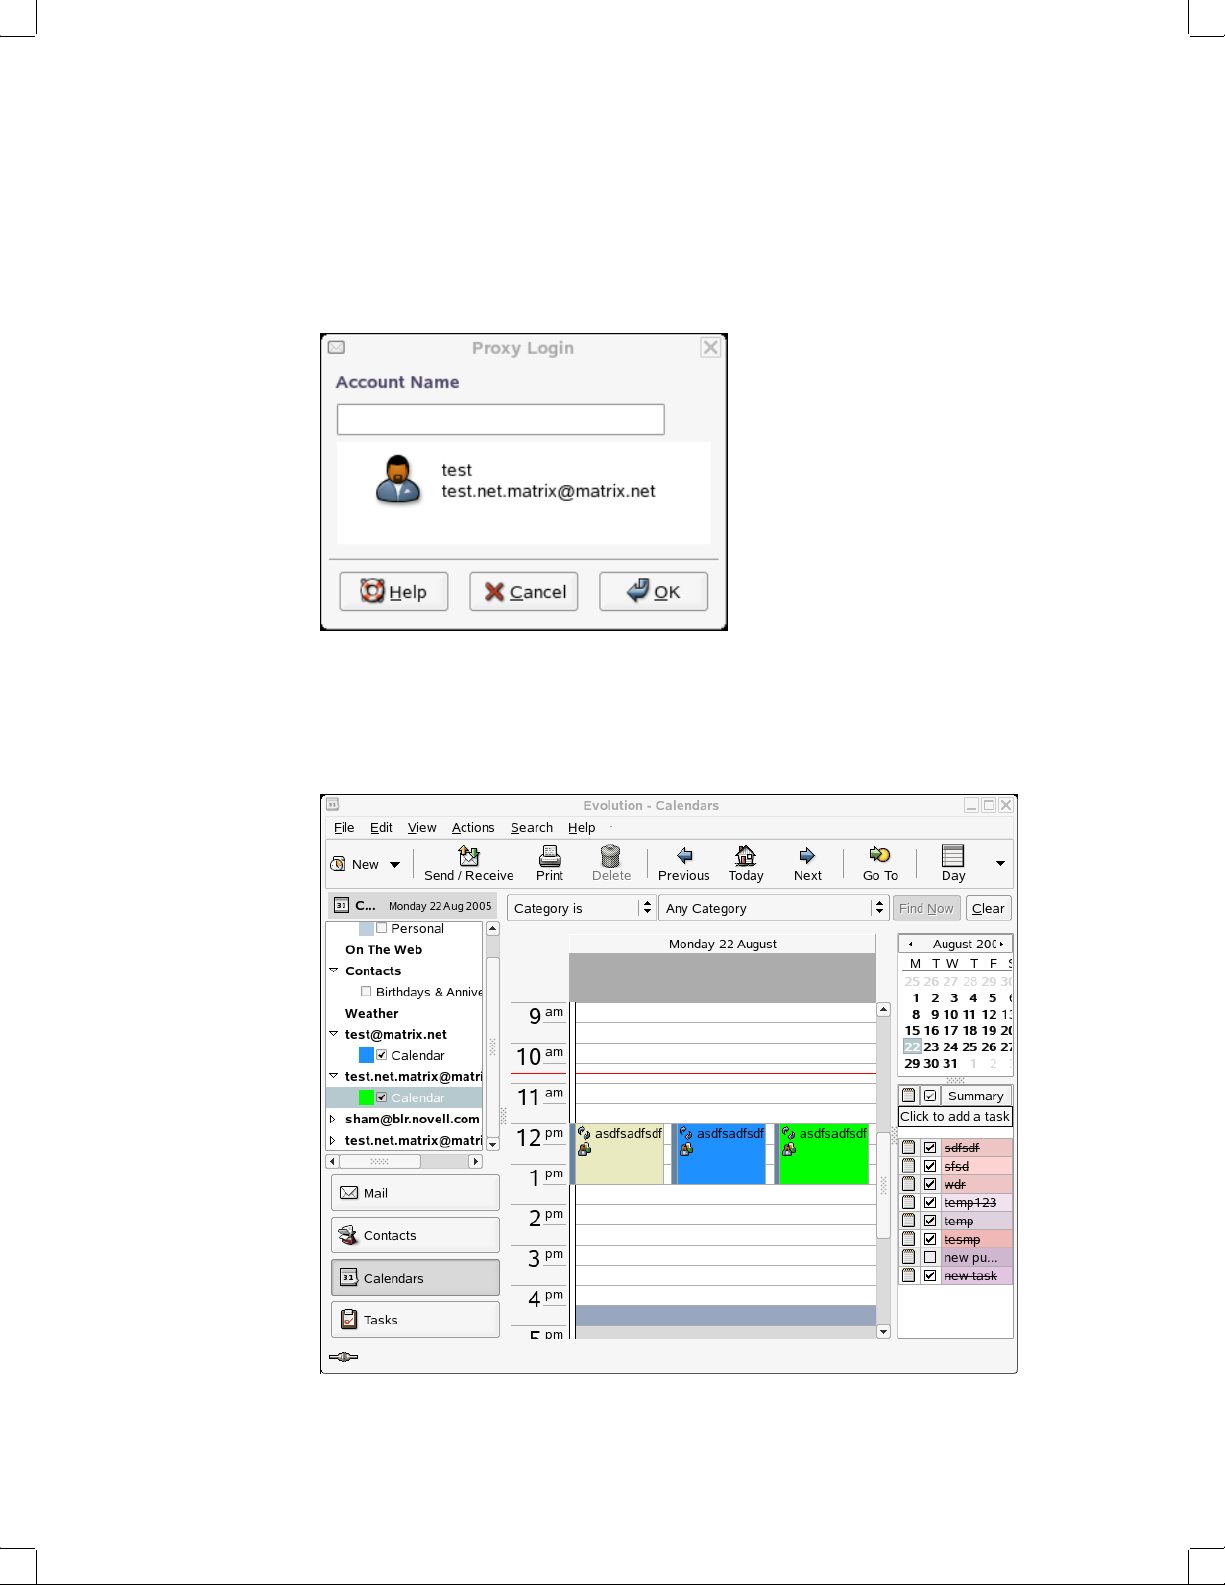
Novell Confidential Manual (ENU) 21 December 2004
Managing Someone Else’s Mailbox or Calendar
Before you can act as a proxy for someone, that person must give you proxy rights in his or her
Proxy List in Preferences. The amount of access you have depends on the rights you have been
given.
1 Right-click on the GroupWise account in the folder list.
2 Click Proxy Login.
3 Type the user name of the person who has given you Proxy access, or select from the list.
4 Click OK.
The user’s data appears in the respective components.
96 Evolution User Guide
Page 97

Novell Confidential Manual (ENU) 21 December 2004
You can set different colors to each user to distinguish between each users’ appointments.
You can also select whether to display the appointments of a particular user or not.
Marking an Item Private
You can limit a proxy’s access to individual items in your Mailbox or Calendar by marking items
Private.
When you mark an item Private, you prevent unauthorized proxies from opening it. Proxies cannot
access items marked Private unless you give them those rights in your Access List.
If you mark an item Private when you send it, neither your proxies nor the recipient’s proxies can
open the item without rights. If you mark an item Private when you receive it, it cannot be read by
your unauthorized proxies, but it can be read by the sender’s proxies. Appointments marked
Private display in Busy Search according to the status you selected when you accepted the
appointment.
1 In an open item, click Actions, then click Mark Private.
or
In your Calendar, click an item in the Appointments, Reminder Notes, or Tasks List, click
Actions, then click Mark Private.
Junk Mail Handling
Junk mail handling for GroupWise accounts is a little different then other junk mail handling.
When you mark an item as junk mail in GroupWise, the item is added to your junk list in the
GroupWise system. Because these settings are on the GroupWise system, your junk list follows
you from computer to computer.
“Marking a Message As Junk Mail” on page 98
“Marking a Message As Not Junk Mail” on page 98
“Enabling or Disabling Your Junk Mail List” on page 98
“Adding an E-Mail Address to Your Junk List” on page 98
“Removing an E-Mail Address from Your Junk List” on page 98
Marking a Message As Junk Mail
1 Select the message to mark as junk, then click the Junk icon.
The message is moved to your Junk Mail folder and the user is added to your junk list.
Marking a Message As Not Junk Mail
1 Select the message to mark as not junk in your Junk Mail folder.
2 Right-click the message, then click Mark as Not Junk.
The message is moved to your Mailbox folder and the name is removed from your junk list.
Enabling or Disabling Your Junk Mail List
1 Right-click a message, then click Junk Mail Settings.
Connecting to GroupWise 97
Page 98

Novell Confidential Manual (ENU) 21 December 2004
2
Select if you want to enable or disable junk mail handling.
3 Click OK.
Adding an E-Mail Address to Your Junk List
1 Right-click a message, then click Junk Mail Settings.
2 Type the e-mail address to block in the Email field.
3 Click Add, then click OK.
Removing an E-Mail Address from Your Junk List
1 Right-click a message, then click Junk Mail Settings.
2 Select the e-mail address to remove, then click Remove.
3 Click OK.
98 Evolution User Guide
Page 99

Novell Confidential Manual (ENU) 21 December 2004
8 Connecting to Hula
EvolutionTM supports mail connectivity to Hula® servers through IMAP and calendaring support
through CalDAV.
To add your Hula account to Evolution, you must create a new Hula account by performing the
following steps:
1 Click Edit, click Preferences, then click Mail Accounts.
2 In the Preferences window, click Add.
3 Follow the procedure explained in “Starting Evolution for the First Time” on page 11.
Connecting to Hula 99
Page 100

Novell Confidential Manual (ENU) 21 December 2004
100 Evolution User Guide
 Loading...