

Page 1

Novell Enhanced Smart Card Method Installation Guide
Novell
Enhanced Smart Card Method
novdocx (en) 6 April 2007
3.0.1
July 17, 2007
www.novell.com
INSTALLATION GUIDE
Page 2

Legal Notices
Novell, Inc. makes no representations or warranties with respect to the contents or use of this documentation, and
specifically disclaims any express or implied warranties of merchantability or fitness for any particular purpose.
Further, Novell, Inc. reserves the right to revise this publication and to make changes to its content, at any time,
without obligation to notify any person or entity of such revisions or changes.
Further, Novell, Inc. makes no representations or warranties with respect to any software, and specifically disclaims
any express or implied warranties of merchantability or fitness for any particular purpose. Further, Novell, Inc.
reserves the right to make changes to any and all parts of Novell software, at any time, without any obligation to
notify any person or entity of such changes.
Any products or technical information provided under this Agreement may be subject to U.S. export controls and the
trade laws of other countries. You agree to comply with all export control regulations and to obtain any required
licenses or classification to export, re-export or import deliverables. You agree not to export or re-export to entities
on the current U.S. export exclusion lists or to any embargoed or terrorist countries as specified in the U.S. export
laws. You agree to not use deliverables for prohibited nuclear, missile, or chemical biological weaponry end uses.
See the Novell International Trade Services Web page (http://www.novell.com/info/exports/) for more information
on exporting Novell software. Novell assumes no responsibility for your failure to obtain any necessary export
approvals.
novdocx (en) 6 April 2007
Copyright © 2007 Novell, Inc. All rights reserved. No part of this publication may be reproduced, photocopied,
stored on a retrieval system, or transmitted without the express written consent of the publisher.
Novell, Inc. has intellectual property rights relating to technology embodied in the product that is described in this
document. In particular, and without limitation, these intellectual property rights may include one or more of the U.S.
patents listed on theNovell Legal Patents Web page (http://www.novell.com/company/legal/patents/) and one or
more additional patents or pending patent applications in the U.S. and in other countries.
Novell, Inc.
404 Wyman Street, Suite 500
Waltham, MA 02451
U.S.A.
www.novell.com
Online Documentation: To access the latest online documentation for this and other Novell products, see
the Novell Documentation Web page (http://www.novell.com/documentation).
Page 3

Novell Trademarks
For Novell trademarks, see the Novell Trademark and Service Mark list (http://www.novell.com/company/legal/
trademarks/tmlist.html).
Third-Party Materials
All third-party trademarks are the property of their respective owners.
novdocx (en) 6 April 2007
Page 4

novdocx (en) 6 April 2007
Page 5

Contents
About This Guide 7
1Overview 9
2 Novell Enhanced Smart Card Method Installation 11
2.1 Minimum Requirements. . . . . . . . . . . . . . . . . . . . . . . . . . . . . . . . . . . . . . . . . . . . . . . . . . . . . . 11
2.1.1 eDirectory Server . . . . . . . . . . . . . . . . . . . . . . . . . . . . . . . . . . . . . . . . . . . . . . . . . . . 11
2.1.2 Client Workstations . . . . . . . . . . . . . . . . . . . . . . . . . . . . . . . . . . . . . . . . . . . . . . . . . . 11
2.2 Installing the Method . . . . . . . . . . . . . . . . . . . . . . . . . . . . . . . . . . . . . . . . . . . . . . . . . . . . . . . . 12
2.2.1 eDirectory Server - Method Installation . . . . . . . . . . . . . . . . . . . . . . . . . . . . . . . . . . . 12
2.2.2 Client Workstation Installation . . . . . . . . . . . . . . . . . . . . . . . . . . . . . . . . . . . . . . . . . . 15
3 Configuring the Client 21
novdocx (en) 6 April 2007
3.1 Disconnected Support . . . . . . . . . . . . . . . . . . . . . . . . . . . . . . . . . . . . . . . . . . . . . . . . . . . . . . . 21
3.2 Identity Plug-In (ID-Plugin) Functionality . . . . . . . . . . . . . . . . . . . . . . . . . . . . . . . . . . . . . . . . . 21
3.3 Custom Password Field Descriptor . . . . . . . . . . . . . . . . . . . . . . . . . . . . . . . . . . . . . . . . . . . . . 21
3.4 Smart Card Interface . . . . . . . . . . . . . . . . . . . . . . . . . . . . . . . . . . . . . . . . . . . . . . . . . . . . . . . . 22
3.5 Novell Client Single Sign-On . . . . . . . . . . . . . . . . . . . . . . . . . . . . . . . . . . . . . . . . . . . . . . . . . . 22
3.6 Novell Client Passive Mode Login . . . . . . . . . . . . . . . . . . . . . . . . . . . . . . . . . . . . . . . . . . . . . . 22
4 Configuring the Server 25
4.1 Trusted Root Certificate Containers . . . . . . . . . . . . . . . . . . . . . . . . . . . . . . . . . . . . . . . . . . . . 25
4.2 Certificate Revocation Checking . . . . . . . . . . . . . . . . . . . . . . . . . . . . . . . . . . . . . . . . . . . . . . . 25
4.2.1 OCSP Trusted Root Containers . . . . . . . . . . . . . . . . . . . . . . . . . . . . . . . . . . . . . . . . 26
4.2.2 CRL Trusted Root Containers . . . . . . . . . . . . . . . . . . . . . . . . . . . . . . . . . . . . . . . . . . 26
4.3 Certificate Validation . . . . . . . . . . . . . . . . . . . . . . . . . . . . . . . . . . . . . . . . . . . . . . . . . . . . . . . . 26
4.4 Certificate Matching . . . . . . . . . . . . . . . . . . . . . . . . . . . . . . . . . . . . . . . . . . . . . . . . . . . . . . . . . 26
4.5 Certificate Expiration Warning . . . . . . . . . . . . . . . . . . . . . . . . . . . . . . . . . . . . . . . . . . . . . . . . . 27
4.6 Card Removal Behavior. . . . . . . . . . . . . . . . . . . . . . . . . . . . . . . . . . . . . . . . . . . . . . . . . . . . . . 27
4.7 Check For Certificate Policy . . . . . . . . . . . . . . . . . . . . . . . . . . . . . . . . . . . . . . . . . . . . . . . . . . 27
5 Basic Configuration Requirements 29
5.1 Activating the Method . . . . . . . . . . . . . . . . . . . . . . . . . . . . . . . . . . . . . . . . . . . . . . . . . . . . . . . 29
5.2 Configuring Trusted Root Certificates . . . . . . . . . . . . . . . . . . . . . . . . . . . . . . . . . . . . . . . . . . . 29
5.3 Configuring Certificate Revocation Checking . . . . . . . . . . . . . . . . . . . . . . . . . . . . . . . . . . . . . 31
5.4 Configuring Users . . . . . . . . . . . . . . . . . . . . . . . . . . . . . . . . . . . . . . . . . . . . . . . . . . . . . . . . . . 32
5.4.1 Subject Name Matching . . . . . . . . . . . . . . . . . . . . . . . . . . . . . . . . . . . . . . . . . . . . . . 32
5.4.2 Certificate Matching. . . . . . . . . . . . . . . . . . . . . . . . . . . . . . . . . . . . . . . . . . . . . . . . . . 34
5.4.3 Temporary Certificates . . . . . . . . . . . . . . . . . . . . . . . . . . . . . . . . . . . . . . . . . . . . . . . 35
6 Troubleshooting 37
6.1 Method Tracing . . . . . . . . . . . . . . . . . . . . . . . . . . . . . . . . . . . . . . . . . . . . . . . . . . . . . . . . . . . . 37
6.1.1 Enabling Server Tracing . . . . . . . . . . . . . . . . . . . . . . . . . . . . . . . . . . . . . . . . . . . . . . 37
Contents 5
Page 6

6.1.2 Enabling Client Tracing . . . . . . . . . . . . . . . . . . . . . . . . . . . . . . . . . . . . . . . . . . . . . . . 37
6.2 Workstation Issues . . . . . . . . . . . . . . . . . . . . . . . . . . . . . . . . . . . . . . . . . . . . . . . . . . . . . . . . . . 37
6.2.1 Smart Card Issues . . . . . . . . . . . . . . . . . . . . . . . . . . . . . . . . . . . . . . . . . . . . . . . . . . . 38
6.2.2 Identity Plug-in Issues . . . . . . . . . . . . . . . . . . . . . . . . . . . . . . . . . . . . . . . . . . . . . . . . 38
6.2.3 Novell Client Single Sign-On Issues . . . . . . . . . . . . . . . . . . . . . . . . . . . . . . . . . . . . . 38
6.3 Method Configuration Issues . . . . . . . . . . . . . . . . . . . . . . . . . . . . . . . . . . . . . . . . . . . . . . . . . . 38
6.3.1 Method Activation. . . . . . . . . . . . . . . . . . . . . . . . . . . . . . . . . . . . . . . . . . . . . . . . . . . . 38
6.3.2 Certificate Validation Issues. . . . . . . . . . . . . . . . . . . . . . . . . . . . . . . . . . . . . . . . . . . . 39
7 Security Administrator’s Guide 41
7.1 Trusted Root Containers . . . . . . . . . . . . . . . . . . . . . . . . . . . . . . . . . . . . . . . . . . . . . . . . . . . . . 41
7.2 Certificate Validation/Revocation Checking . . . . . . . . . . . . . . . . . . . . . . . . . . . . . . . . . . . . . . . 41
7.3 Smart Card Enrollment eDirectory Attributes . . . . . . . . . . . . . . . . . . . . . . . . . . . . . . . . . . . . . . 41
7.4 Certificate Matching . . . . . . . . . . . . . . . . . . . . . . . . . . . . . . . . . . . . . . . . . . . . . . . . . . . . . . . . . 41
7.5 Restricting Authentication Methods . . . . . . . . . . . . . . . . . . . . . . . . . . . . . . . . . . . . . . . . . . . . . 41
7.6 Identity Plug-In . . . . . . . . . . . . . . . . . . . . . . . . . . . . . . . . . . . . . . . . . . . . . . . . . . . . . . . . . . . . . 42
7.7 Disconnected Login . . . . . . . . . . . . . . . . . . . . . . . . . . . . . . . . . . . . . . . . . . . . . . . . . . . . . . . . . 42
8 Novell Audit Integration 43
novdocx (en) 6 April 2007
A Silent Method Installation on Workstations 45
6 Novell Enhanced Smart Card Method Installation Guide
Page 7

About This Guide
This guide provides installation and configuration for the Novell Enhanced Smart Card Method. It is
written primarily for network administrators.
Chapter 1, “Overview,” on page 9
Chapter 2, “Novell Enhanced Smart Card Method Installation,” on page 11
Chapter 3, “Configuring the Client,” on page 21
Chapter 4, “Configuring the Server,” on page 25
Chapter 5, “Basic Configuration Requirements,” on page 29
Chapter 6, “Troubleshooting,” on page 37
Chapter 7, “Security Administrator’s Guide,” on page 41
Chapter 8, “Novell Audit Integration,” on page 43
Appendix A, “Silent Method Installation on Workstations,” on page 45
novdocx (en) 6 April 2007
Documentation Conventions
In Novell documentation, a greater-than symbol (>) is used to separate actions within a step and
items in a cross-reference path.
A trademark symbol (®, TM, etc.) denotes a Novell trademark. An asterisk (*) denotes a third-party
trademark.
When a single pathname can be written with a backslash for some platforms or a forward slash for
other platforms, the pathname is presented with a backslash. Users of platforms that require a
forward slash, such as Linux or UNIX, should use forward slashes as required by your software.
User Comments
We want to hear your comments and suggestions about this manual and the other documentation
included with this product. Please use the User Comment feature at the bottom of each page of the
online documentation, or go to www.novell.com/documentation/feedback.html and enter your
comments there.
Documentation Updates
For the most recent version of this documentation, see the Novell Enhanced Smart Card Method
Installation Guide (http://www.novell.com/documentation/ias/index.html?page=/documentation/
ias301/nescm_install/data/bookinfo.html).
About This Guide
7
Page 8

novdocx (en) 6 April 2007
8 Novell Enhanced Smart Card Method Installation Guide
Page 9

1
Overview
novdocx (en) 6 April 2007
1
The Novell® Enhanced Smart Card Method (NESCM) is a Novell Modular Authentication Services
(NMAS
authentication is a two-factor authentication technique: something you know (smart card PIN) and
something you have (smart card).
The login method consists of two components: the server module and the client module. The
appropriate modules are loaded during the authentication process by the NMAS server and client
components.
During authentication, the client module enumerates the certificates available on the attached smart
card and sends them to the server module. The server module chooses a certificate to use for
authentication based on the configuration and validation checks.
After selecting the login certificate, the server module generates a random challenge and sends it to
the client module to confirm that the user possesses the private key associated with the certificate.
The client module uses the smart card to sign the challenge and encrypt the result using RSA public/
private key encryption. Upon receiving the result, the server decrypts the data using the certificate's
public key and validates the challenge. If a valid certificate is not found or the challenge is not
validated, the login attempt fails.
The method supports disconnected or local Windows* workstation logins. Disconnected support
allows the smart card to be used for a local workstation login, when the eDirectory identity store
isn't available. This is useful in situations where network connectivity isn't always available, such as
for laptop users.
TM
) method that provides smart-card-based authentication to eDirectoryTM. Smart card
The method can also be configured to monitor the smart card reader device. Upon smart card
removal, the method can be configured to lock the workstation, log off the workstation, or take no
action.
Overview
9
Page 10

novdocx (en) 6 April 2007
10 Novell Enhanced Smart Card Method Installation Guide
Page 11

2
Novell Enhanced Smart Card
novdocx (en) 6 April 2007
Method Installation
This section describes the installation of the Novell® Enhanced Smart Card Method (NESCM).
Section 2.1, “Minimum Requirements,” on page 11
Section 2.2, “Installing the Method,” on page 12
2.1 Minimum Requirements
NESCM has the following minimum requirements:
Section 2.1.1, “eDirectory Server,” on page 11
Section 2.1.2, “Client Workstations,” on page 11
2.1.1 eDirectory Server
eDirectoryTM 8.7.3 IR9 or eDirectory 8.8 SP1 on one of the following platforms:
NetWare
Windows 2003 Server SP1 or later
Linux* SUSE
Red Hat* AS 4.0 Server 32-bit or 64-bit
®
6.5 SP6 or later
®
Linux Enterprise Server (SLES) 10 32-bit or 64-bit
2
2.1.2 Client Workstations
Novell Client
A smart card reader and appropriate smart card middleware must be installed and properly
configured on the workstation. The method should work with any Windows XP compliant PC/SC
middleware. It has been tested with the following:
Middleware:
Netsign* CAC version 5.5.71.0
Gemplus* version 3.2.2 and 4.2
ActivCard* Gold for CAC 3.01
ActivClient* 6.0 PKI Only
CryptoVision* cv act sc/interface 3.2.1
eToken* Run Time Environment 3.60
DataKey* CIP 4.07
TM
4.91 SP3 installed on Windows XP SP2
Novell Enhanced Smart Card Method Installation
11
Page 12

Smart Card Readers
SCM Microsystems* - SCR241 - PCMCIA
SCM Microsystems - SCR131 - Serial (RS232)
Cherry - G83-6759LPAUS-2 - USB Keyboard
Gemplus - GemPC433-SL - USB
Schlumberger - Reflex 72v2
Schlumberger - Reflex USB
SCM Microsystems – SCR531-USB
Precise Biometric 250 MC
ActivIdentity* USB Reader 2.0 and 3.0
Smart Cards
Axalto Access 64K CAC
Gemplus GemXpresso* CAC
Oberthur CosmopolIC V4 CAC
Schlumberger Access 32K V2 CAC
novdocx (en) 6 April 2007
Gemplus GemSAFE* SDK GPK16000
CryptoVision - CardOS M4.01a
Aladdin* - eToken PRO 64K
Oberthur CosmopolIC 64K V5.2 Fast ATR (PIV)
Web-Based Administration Using iManager
iManager version 2.6 SP2 with the NMAS plugin version 10.1.20061031
The NESCM iManager plug-in supports querying certificate information directly from smart cards.
This functionality is supported on Windows with the following browsers:
Firefox* 1.5x or later
Internet Explorer 6.0 SP2 or later
2.2 Installing the Method
Installation consists of installing the method on the eDirectory server and on the client
workstations.
2.2.1 eDirectory Server - Method Installation
The method is installed using iManager.
1 Log in to iManager as an Administrator.
12 Novell Enhanced Smart Card Method Installation Guide
Page 13
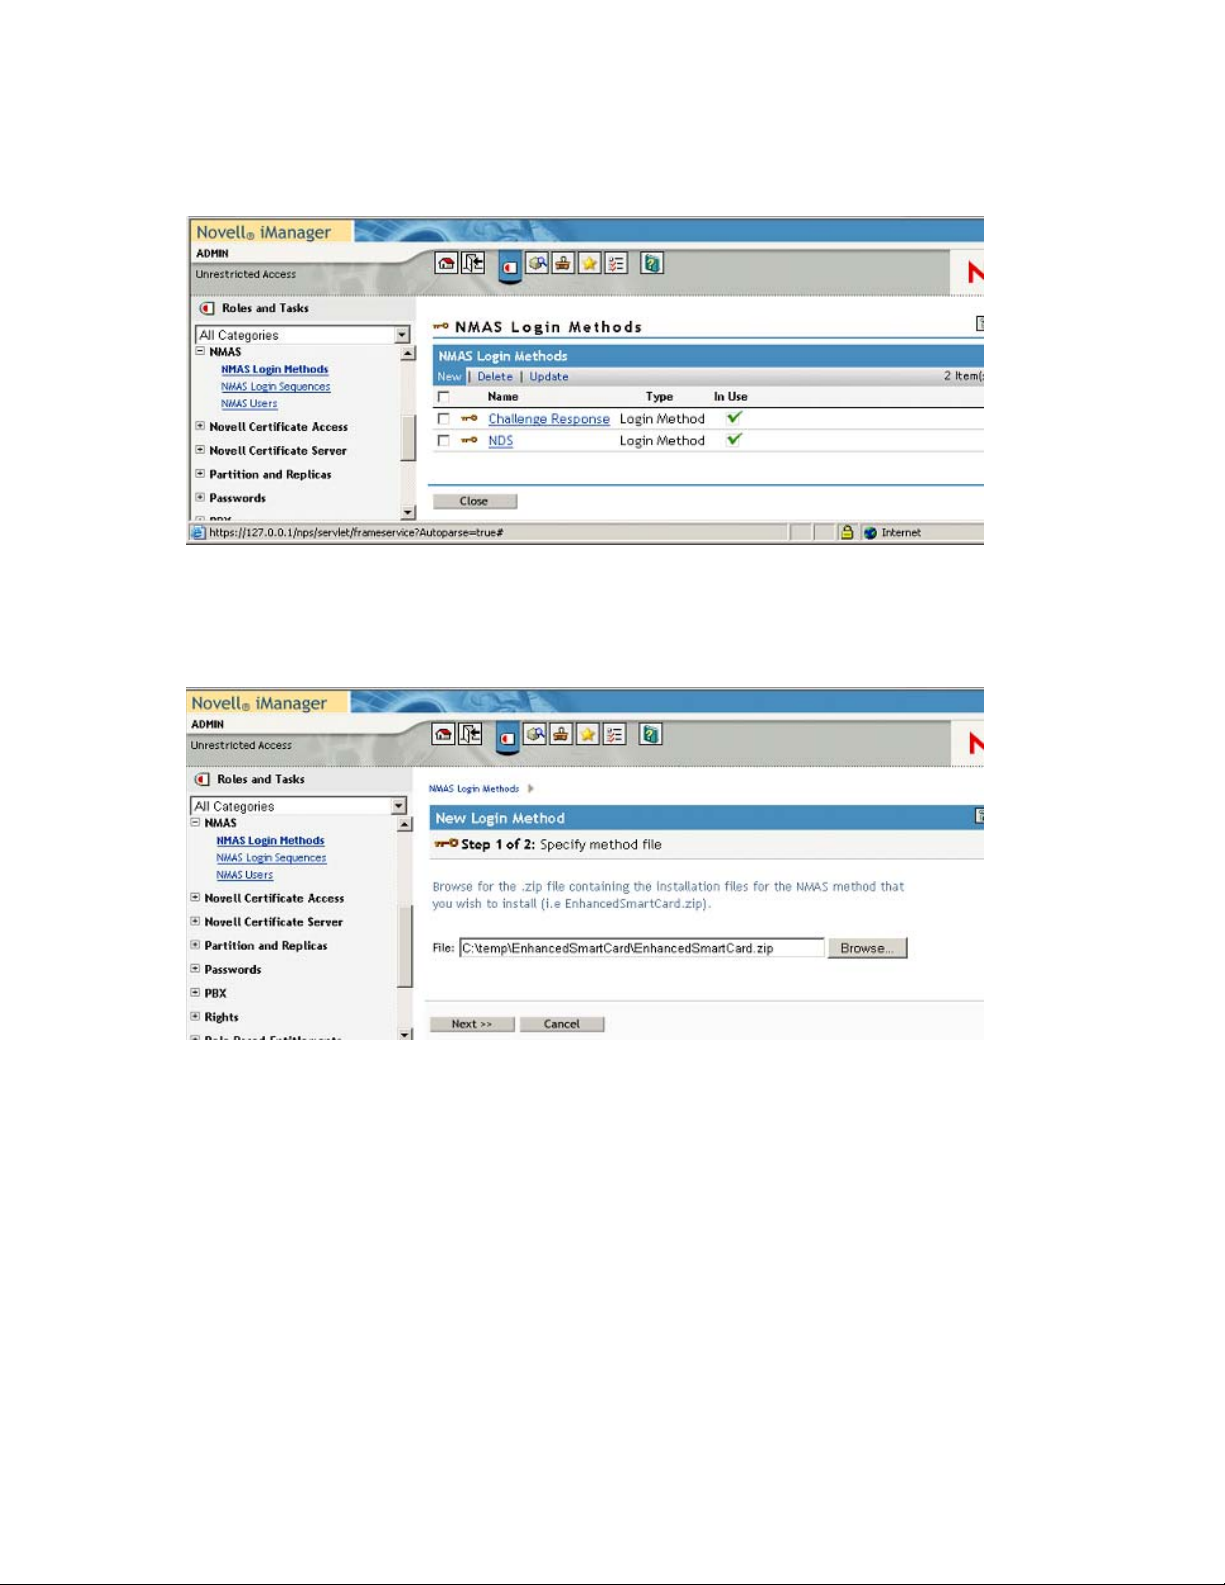
2 From Roles and Tasks, select NMAS > NMAS Login Methods, then select New.
Figure 2-1 New Login Method
3 Click Browse and select the EnhancedSmartCard.zip file that comes with the method.
This zip file contains the server components and the iManager components.
novdocx (en) 6 April 2007
Figure 2-2 Specify Method File
Novell Enhanced Smart Card Method Installation 13
Page 14
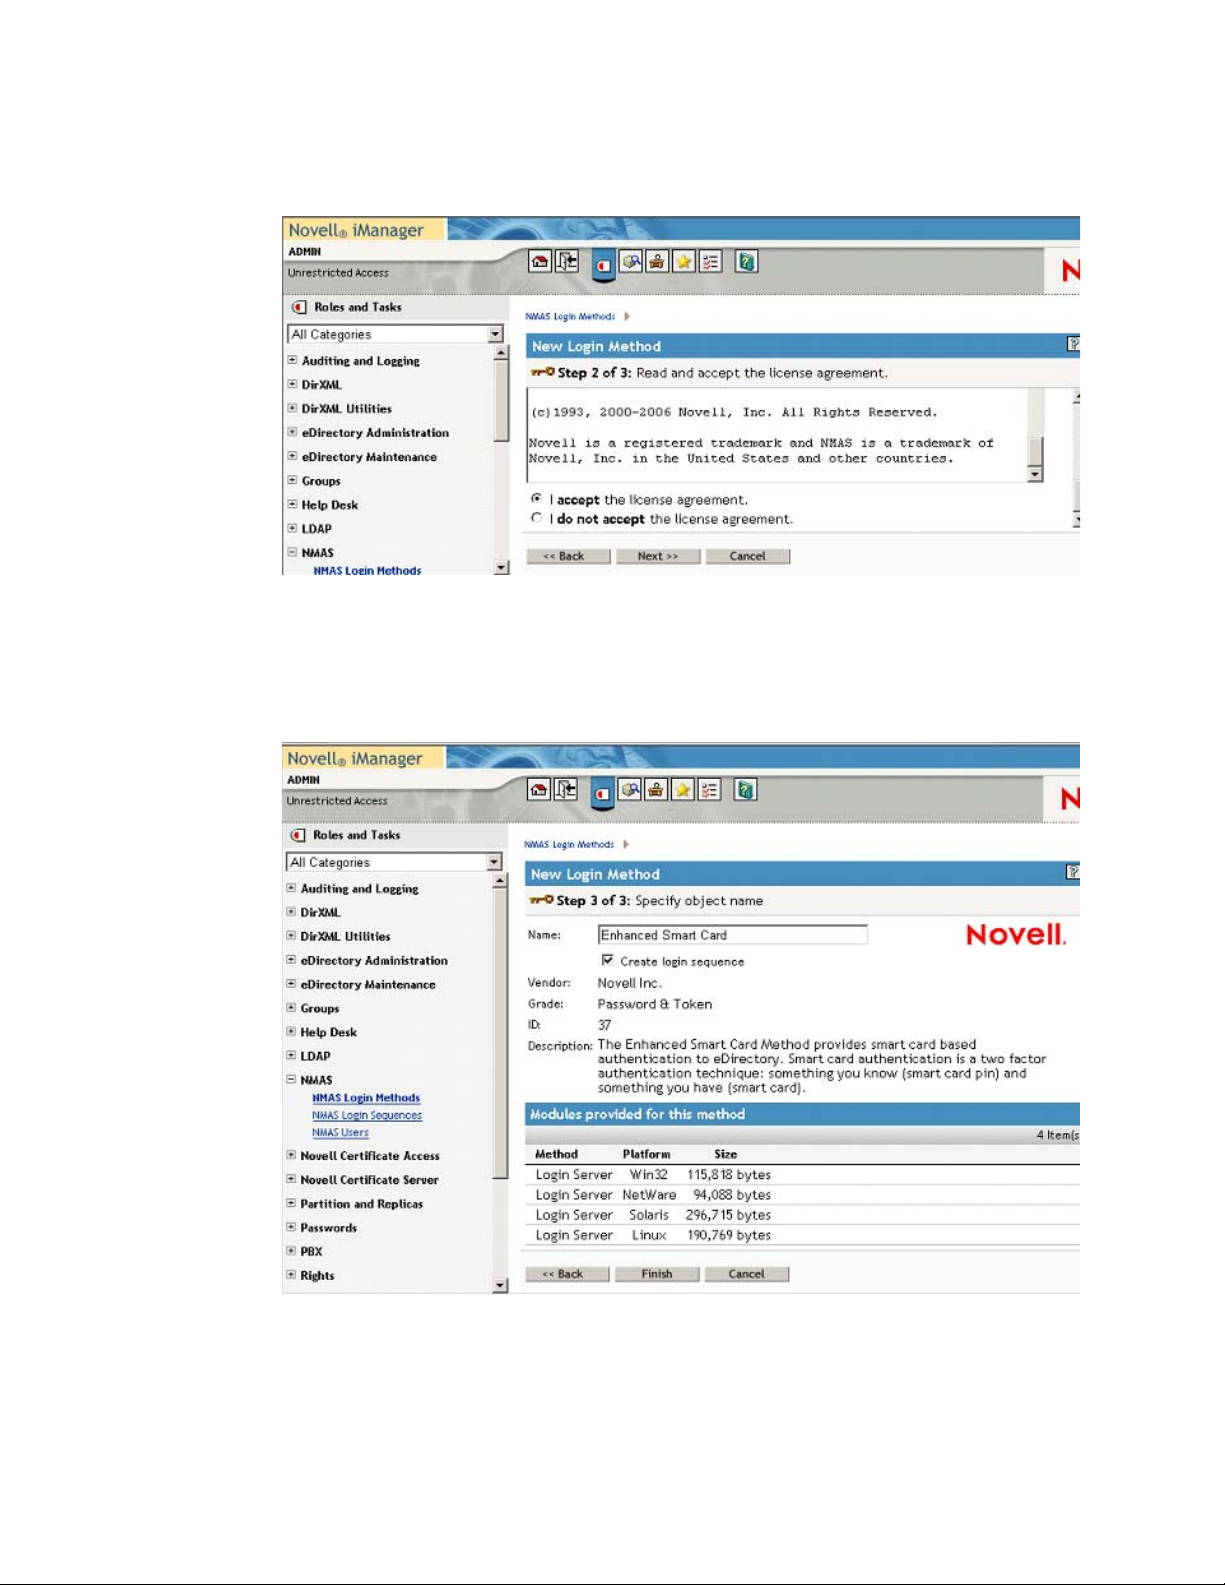
4 Read and accept the license agreement.
Figure 2-3 License Agreement
5 Review the method information and modify the values as needed.
novdocx (en) 6 April 2007
If you don’t change the name, the default name (Enhanced Smart Card) is used for the method
and login sequence name.
Figure 2-4 Review Screen
6 Click Finish.
14 Novell Enhanced Smart Card Method Installation Guide
Page 15

7 Review the installation summary page, then click Close.
Figure 2-5 Summary Screen
8 Restart iManager to ensure that the plug-in is enabled.
novdocx (en) 6 April 2007
2.2.2 Client Workstation Installation
The method must be installed on each workstation.
1 Log in to each workstation as an Administrator.
2 Run Setup.exe.
This installation program is located in the ...\enhancedsmartcard\client directory.
3 Review the Welcome Screen, then click Next.
Figure 2-6 Welcome Screen
Novell Enhanced Smart Card Method Installation 15
Page 16

4 Accept the License Agreement, then click Next.
Figure 2-7 License Agreement
novdocx (en) 6 April 2007
5 Choose whether you need disconnected support, then click Next.
Disconnected support allows you to log in to the workstation locally using the smart card.
Figure 2-8 Disconnected Support Page
16 Novell Enhanced Smart Card Method Installation Guide
Page 17

6 If you want ID Plugin support, select Yes and specify the LDAP server’s DNS name or IP
address, then click Next.
Figure 2-9 ID Plugin Support Page
novdocx (en) 6 April 2007
7 (Conditional) If you selected ID Plugin support, you must also specify the container to search
and the search timeout period, then click Next.
The ID Plugin will do a sub-tree search starting at the specified base.
Figure 2-10 ID Plugin Options Page
8 To use a custom password field description, select Customize password field description and
type the custom description, then click Next.
Novell Enhanced Smart Card Method Installation 17
Page 18

Use an ampersand (&) in the description to enable Windows’ Alt+letter functionality. In the
example below, Alt+P would place focus on the field labeled with the “PIN:” description.
Figure 2-11 Customized Password Field Description
novdocx (en) 6 April 2007
9 Select the communication interface the method will use to connect to the smart card, then click
Next.
PC/SC functionality is the preferred interface. Select PKCS#11 if you know the smart card
middleware does not integrate with the Windows PC/SC functionality. If you select PKCS#11,
you must also specify a name of the module that is to be used.
Figure 2-12 Smart Card Interfaces Page
10 Click Install.
You can distribute the method to each workstation automatically using tools such as Zenworks®.
See Appendix A, “Silent Method Installation on Workstations,” on page 45 for detailed information
about scripting the method install.
18 Novell Enhanced Smart Card Method Installation Guide
Page 19

Figure 2-13 Installation Screen
novdocx (en) 6 April 2007
Novell Enhanced Smart Card Method Installation 19
Page 20

novdocx (en) 6 April 2007
20 Novell Enhanced Smart Card Method Installation Guide
Page 21

3
Configuring the Client
The section provides information about the client configuration options which are selected during
the install. If you need to change the configuration after an install, remove and reinstall the method.
Section 3.1, “Disconnected Support,” on page 21
Section 3.2, “Identity Plug-In (ID-Plugin) Functionality,” on page 21
Section 3.3, “Custom Password Field Descriptor,” on page 21
Section 3.4, “Smart Card Interface,” on page 22
Section 3.5, “Novell Client Single Sign-On,” on page 22
Section 3.6, “Novell Client Passive Mode Login,” on page 22
3.1 Disconnected Support
novdocx (en) 6 April 2007
3
Disconnected support allows the smart card to be used for a local workstation login when
eDirectory
available, such as for laptop users. After a connected eDirectory login, the disconnected
functionality stores the local user name and password on the local machine for future disconnected
logins. The local account password is encrypted with a 128-bit AES key generated from the smart
card private key. This means that a successful connected login must have occurred before
disconnected functionality is available.
To perform a disconnected login, select the Novell Client
the local account name and smart card PIN. The previously stored local account information will be
decrypted using the smart card and passed on to Windows for the workstation login.
Disconnected support works best in situations where the local account and eDirectory account
names are synchronized. When the account names are synchronized, the user does not need to
remember different names for connected (eDirectory) and disconnected (local workstation) logins.
TM
isn't available. This is useful in situations where network connectivity isn't always
TM
Workstation only check box, then enter
3.2 Identity Plug-In (ID-Plugin) Functionality
The ID-Plugin functionality automatically looks up the user account based on the smart card's
certificate. In order to do this, the Identity Plug-in runs before the login and performs an LDAP
directory search for a user account match. When installing, you must specify the LDAP Server and
LDAP search base. The ID-Plugin does an LDAP subtree search starting at the specified search
base.
3.3 Custom Password Field Descriptor
Novell Client uses a default "password" string to label the password entry field. When using a smart
card, users enter the card's PIN, not a password, for login. To help eliminate confusion, a custom
string can be specified that is used instead of the default "password" string. For example, &PIN:
could be specified. The ampersand (&) in the description is used to enable the Windows Alt+letter
focus functionality.
Configuring the Client
21
Page 22

3.4 Smart Card Interface
The method can communicate with the smart card using PC/SC interfaces or PKCS#11 interfaces.
When using PC/SC interfaces, the smart card middleware vendor provides an MS CAPI provider.
The method can automatically detect and use the proper MS CAPI provider. PC/SC mode is the
recommended setting and should work with most smart card middleware on Windows.
If PC/SC communication is failing, you might want to try PKCS#11. When using PKCS#11, you
must specify the correct vendor PKCS#11 DLL. The library must be in the system path so it can be
loaded by the method. You might need to contact the middleware vendor for the specific PKCS#11
library name. Below is a table of common PKCS#11 libraries.
Table 3-1 Common Vendors and PKCS#11 Libraries
Vendor PKCS#11 Library Name
Active Card acpkcs211.dll
Netsign core32.dll
novdocx (en) 6 April 2007
GemPlus gclib.dll
eToken eTpkcs11.dll
CryptoVision cvP11.dll
Rainbow iKey ckdk201.dll (Only PCKS#11 mode is functional
for iKey devices)
3.5 Novell Client Single Sign-On
When using the smart card method, users enter the card's PIN for eDirectory login and are then
prompted to enter a password for the workstation login. Novell Client's Single Sign-On feature can
be used to automatically log into the workstation after the eDirectory login. This is accomplished by
securely storing the workstation credentials in eDirectory and using them for future logins.
When using Single Sign-On, Novell Client prompts for the workstation password the first time and
stores it in eDirectory. On subsequent logins, the user is not prompted for the workstation password.
This improves the user's login experience and is recommended for all advanced eDirectory
authentication methods.
3.6 Novell Client Passive Mode Login
Passive Mode Login is new functionality added to Novell Client 4.91 SP3. In passive mode, Novell
Client defers to the default MS GINA for the initial Windows login. After authentication to the
workstation, Novell Client attempts to authenticate to the Novell environment. The functionality
was added to Novell Client to allow environments that use Windows AD smart card authentication
to function correctly. It allows the smart card to be used to authenticate to AD and eDirectory.
In passive mode, the Windows user name used for workstation authentication is also used for
eDirectory authentication. In order to successfully authenticate, the user name must exist in
eDirectory, and the client's default location profile must be properly configured with the Tree and
Context information.
22 Novell Enhanced Smart Card Method Installation Guide
Page 23

To enable passive mode login, the following registry keys must be set:
[HKEY_LOCAL_MACHINE\SOFTWARE\Novell\NWGINA]
"PassiveMode"=dword:00000001
[HKEY_LOCAL_MACHINE\SOFTWARE\Novell\Login]
"PassiveModeNDSLogin"=dword:00000001
"PassiveModeNDSLoginSilent"=dword:00000000 or 00000001
"PassiveModeNDSLoginRequired"=dword:00000000 or 00000001
Registry Setting Descriptions:
PassiveMode: (0/1) default is 0
0 = normal mode
1 = passive mode
PassiveModeNDSLogin: (0/1) default is 0
0 = don't do Novell login
1 = do Novell login
novdocx (en) 6 April 2007
PassiveModeNDSLoginSilent: (0/1) default is 0
0 = report Novell login errors
1 = don't report Novell login errors
PassiveModeNDSLoginRequired: (0/1) default is 0
0 = don't require Novell login
1 = require Novell login
The following is additional information regarding the Novell Clients Passive Mode and the method:
If PassiveModeNDSLoginRequired set to True (1), the login experience requires a successful
Novell authentication in order to succeed.
Login scripts are not processed by NWGINA in passive mode. The workaround is to run them
after the GINA login. You can do this by placing a run entry in the registry or you can create an
entry in the startup file for Novell login:
[HKEY_LOCAL_MACHINE\SOFTWARE\Microsoft\Windows\CurrentVersion\R
un]
"nwscript=reg_expand_sz:loginw32.exe %username% /NA /CONT
In passive mode, the method's card monitoring functionality does not work when set to Lock
Workstation on card removal. This is because MSGINA (not NWGINA) is used for the
workstation Lock/Unlock functionality.
Configuring the Client 23
Page 24

novdocx (en) 6 April 2007
24 Novell Enhanced Smart Card Method Installation Guide
Page 25

4
Configuring the Server
The method is configured by using the iManager Smart Card Login plug-in. The method allows
administrators to configure settings for the whole tree, partitions, containers, or individual users.
The plug-in has the following options:
Global Settings: The global settings are used to specify policies for the whole tree. Options
configured globally apply to all user objects in the tree.
Container Settings: If the container object is a partition root, the settings are effective for all
user objects in the partition. If the container is not a partition root, the settings are effective only
for objects in the immediate container. The settings do not affect users in subcontainers below
the container.
User Settings: User settings apply to the individual User object.
Each setting is described below and identified as a global, container, or user level setting. Many
settings can be configured on all levels. Settings configured at lower levels in the directory hierarchy
override higher level configurations.
novdocx (en) 6 April 2007
4
Section 4.1, “Trusted Root Certificate Containers,” on page 25
Section 4.2, “Certificate Revocation Checking,” on page 25
Section 4.3, “Certificate Validation,” on page 26
Section 4.4, “Certificate Matching,” on page 26
Section 4.5, “Certificate Expiration Warning,” on page 27
Section 4.6, “Card Removal Behavior,” on page 27
Section 4.7, “Check For Certificate Policy,” on page 27
4.1 Trusted Root Certificate Containers
Configuration Level: Global
The list of trusted root containers used for certificate validation. During certificate validation, the
method builds the certificate chain. In order to be valid, the certificate chain must end with a trusted
root certificate. Trusted root certificates are stored in trusted root containers.
4.2 Certificate Revocation Checking
Configuration Level: Global
Certificate revocation checking is part of the certificate validation process. In order to be considered
valid, a certificate must not be revoked. The method supports On-Line Certificate Status Protocol
(OCSP) and Certificate Revocation List (CRL) checking. The type of revocation checking
performed is configured on a per trusted root container basis.
Configuring the Server
25
Page 26

If a trusted root container is not listed in the OCSP or CRL list, revocation checking is not
performed for certificates that chain to the trusted root container. If a trusted root container is listed
in both the OCSP and the CRL list, both types of revocation checks are performed.
Section 4.2.1, “OCSP Trusted Root Containers,” on page 26
Section 4.2.2, “CRL Trusted Root Containers,” on page 26
4.2.1 OCSP Trusted Root Containers
Certificates that chain to trusted root certificates in containers in this list use OCSP checking. An
OCSP responder URL can be specified for each container in the list. If specified, the responder URL
overrides OCSP information in a user's certificate.
An OCSP response is signed using the responder's certificate and the responder's certificate must be
trusted in order for the response to be considered valid. Place the OCSP responder's certificate in the
trusted root container to ensure that the certificate is trusted.
4.2.2 CRL Trusted Root Containers
novdocx (en) 6 April 2007
Certificates that chain to trusted root certificates in containers in this list use CRL checking. The
CRL distribution point information in the user certificate is used to retrieve the CRL. CRLs are
cached in memory on the server after retrieval. This improves the performance of future logins.
The Grace Period setting specifies the number of days after a CRL has expired to continue to treat it
as valid. This allows revocation checking to continue, if a new CRL cannot be retrieved from the
CRL Distribution Point. If a Grace Period is not specified and the CRL expiration date has passed,
all certificates are considered invalid until a new CRL can be retrieved from the distribution point.
4.3 Certificate Validation
Configuration Level: Global, Container, User
Certificate validation ensures that the user certificate used for login was issued by a trusted
Certificate Authority and has not been revoked. In order for certificate validation to work correctly,
the settings for trusted root containers and certificate verification must be properly configured.
The certificate chain validation and revocation checking can be enabled or disabled. However, under
normal operations there should be no reason to change the default settings.
4.4 Certificate Matching
Configuration Level: Global, Container, User
Certificate matching specifies what part of the certificate presented during login is matched to the
target user account. There are three options:
Subject Name: Subject name matching checks the subject name of the login certificate
against the subject names configured for the user object. Matching by a certificate subject name
is less restrictive than matching by a specific certificate.
Certificate: Certificate matching checks the login certificate against the list of certificates
configured for the user object. Certificate-based matching is more restrictive than subject name
matching because only a configured certificate can be used for login.
26 Novell Enhanced Smart Card Method Installation Guide
Page 27

No Matching: No matching means no part of the login certificate must be configured on the
target user account. Typically, this option would not be used for regular user accounts. A
potential use would be for guest accounts. A guest account could be configured as no matching,
and then anyone with a valid certificate could log in to the account.
4.5 Certificate Expiration Warning
Configuration Level: Global, Container, User
During login a user can be notified of an impending certificate expiration. This setting defines the
number of days in advance to notify the user of the upcoming certificate expiration. A value of zero
means no certificate expiration warnings are given.
4.6 Card Removal Behavior
Configuration Level: Global, Container, User
Card removal behavior defines the action taken when a user removes the smart card from the card
reader. There are three options:
novdocx (en) 6 April 2007
No Action: Nothing happens when the smart card is removed from the card reader.
Lock Workstation: The workstation is locked when the smart card is removed from the card
reader.
Forced Log Off: The user is logged out of the workstation when the smart card is removed
from the card reader. This setting should be used with caution because it can result in the user
losing work when the forced logout occurs.
4.7 Check For Certificate Policy
Configuration Level: Global, Container, User
A certificate policy is used to define a specific policy OID that must exist in a login certificate. If
enabled, login certificates must contain the specified policy OID to be considered valid. The policy
name and OID information are defined once globally. The check for policy setting can be enabled or
disabled throughout the directory hierarchy.
Configuring the Server 27
Page 28

novdocx (en) 6 April 2007
28 Novell Enhanced Smart Card Method Installation Guide
Page 29

5
Basic Configuration Requirements
After installing the method, it is important to use iManager to complete the configuration steps
outlined below. Completing these steps ensure that the method is properly configured.
Section 5.1, “Activating the Method,” on page 29
Section 5.2, “Configuring Trusted Root Certificates,” on page 29
Section 5.3, “Configuring Certificate Revocation Checking,” on page 31
Section 5.4, “Configuring Users,” on page 32
5.1 Activating the Method
novdocx (en) 6 April 2007
5
The method has a 90-day trial period. After the trial period, a valid license key must be entered to
activate the method. A license key can be obtained from your Novell
To enter a license key, click Smart Card Login > Global Setting. Click Activate Method and enter a
valid license key.
Figure 5-1 Activate Method Page
®
sales representative.
5.2 Configuring Trusted Root Certificates
The certificate validation process ensures that the login certificate has been issued by a trusted
Certificate Authority. This is accomplished by validating that the certificate chain ends with a
trusted root certificate. Trusted root certificates are stored in trusted root containers in eDirectory.
1 Create a trusted root container.
1a Select Novell Certificate Server > Create Trusted Root Container.
1b Specify the container name and location.
Basic Configuration Requirements
29
Page 30

1c Click OK.
Figure 5-2 Create Trusted Root Container Page
novdocx (en) 6 April 2007
2 Import trusted root certificates.
2a Select Novell Certificate Server > Create Trusted Root.
2b Provide a name, select the trusted root container created in Step 1, then select the
certificate to import.
2c Click OK.
Figure 5-3 Create Trusted Root Certificate Page
3 Add the trusted root container to the method's global settings.
3a Select Smart Card Login > Global Settings.
3b Click the plus sign button to add the trusted root container to the Trusted Root Certificate
Containers list.
30 Novell Enhanced Smart Card Method Installation Guide
Page 31

3c Click OK.
Figure 5-4 Search Containers Page
5.3 Configuring Certificate Revocation Checking
novdocx (en) 6 April 2007
Trusted root containers are automatically added to the OCSP and CRL certificate revocation
checking lists. Modify the lists as necessary and enable the proper revocation checking option.
In Figure 5-5 on page 32, both OCSP and CRL revocation checking are enabled. OCSP revocation
checking is performed for certificates chaining to the "abc_TrustedRoots" container. CRL checking
is performed for certificates chaining to the "xyz_TrustedRoots" container.
When using OCSP validation, the OCSP response is signed by the responder's certificate. In order
for the response to be considered valid, the responder's certificate must be trusted. Place the OCSP
responder's trusted root certificate in the trusted root container to identify it as trusted.
Basic Configuration Requirements 31
Page 32

Figure 5-5 Certificate Validation and Search Containers
novdocx (en) 6 April 2007
5.4 Configuring Users
User objects must be configured with the proper certificate information for login. Using iManager,
select Smart Card Login > User Settings.
The information required depends on the type of certificate matching used.
Section 5.4.1, “Subject Name Matching,” on page 32
Section 5.4.2, “Certificate Matching,” on page 34
Section 5.4.3, “Temporary Certificates,” on page 35
5.4.1 Subject Name Matching
The subject name from the login certificate is configured for the user object. This is done by
selecting Add and entering the subject name. The subject name can be entered directly, read from a
32 Novell Enhanced Smart Card Method Installation Guide
Page 33

smart card in an attached card reader, or read from a certificate file. DER and PEM certificate files
are supported.
Figure 5-6 Add Subject Name Page
novdocx (en) 6 April 2007
Figure 5-7 on page 33 is an example of a User object properly configured for subject name
matching:
Figure 5-7 Subject Name Matching Page
Basic Configuration Requirements 33
Page 34

5.4.2 Certificate Matching
The specific login certificate is configured for the User object. This is done by selecting Add and
entering the certificate. The certificate can be read from a smart card in an attached card reader, or
read from a certificate file. DER and PEM certificate files are supported.
Figure 5-8 Add a Certificate Page
novdocx (en) 6 April 2007
Below is an example of a User object properly configured for certificate matching:
34 Novell Enhanced Smart Card Method Installation Guide
Page 35

Figure 5-9 Certificate Matching Page
novdocx (en) 6 April 2007
5.4.3 Temporary Certificates
A temporary classification can be assigned to certificates or subject names. This is done by selecting
the temporary check box when adding the certificate information. This can be useful in situations
where a temporary smart card is assigned to an individual. A typical case might be when an
individual misplaces or forgets his or her regular smart card. In this situation, a temporary smart card
could be issued to the individual and configured for a short period of time.
A temporary certificate is valid until the the specified expiration date. When configured, the user is
only able to log in using the temporary certificate. If the user attempts a login using his normal
certificate, the login fails. After the temporary certificate expiration date passes, the user can log in
again using his regular certificate. Expired temporary certificate information is automatically
deleted from the User object.
Figure 5-10 on page 36 shows a User object configured with a temporary certificate subject name.
The regular information still exists for the user, but the temporary configuration will override it until
the expiration date:
Basic Configuration Requirements 35
Page 36

Figure 5-10 Temporary Certificate Subject Name Page
novdocx (en) 6 April 2007
36 Novell Enhanced Smart Card Method Installation Guide
Page 37

6
Troubleshooting
In order to successfully log in, the method and smart card must be properly configured. This section
describes common issues and techniques to help diagnose problems.
Section 6.1, “Method Tracing,” on page 37
Section 6.2, “Workstation Issues,” on page 37
Section 6.3, “Method Configuration Issues,” on page 38
6.1 Method Tracing
When diagnosing problems, it is often helpful to enable the method's trace functionality. The
method reports many problems and failures in the trace logs.
Section 6.1.1, “Enabling Server Tracing,” on page 37
Section 6.1.2, “Enabling Client Tracing,” on page 37
novdocx (en) 6 April 2007
6
6.1.1 Enabling Server Tracing
On the server, the method reports information to the NMASTM trace functionality, which is
integrated with eDirectory
the NMAS option in the trace configuration settings.
TM
's tracing. To turn on tracing, use the eDirectory iMonitor tool and select
6.1.2 Enabling Client Tracing
On the client, the method reports information to the NMAS Client trace functionality. To turn on
tracing, use the NMAS Client Configuration tool (ncc.exe).
The following example enables tracing:
ncc.exe -ta file=trace_file status=on mode=append
After turning tracing on, reboot the workstation to ensure that all processes use the new settings. The
trace messages are written to the specified file.
6.2 Workstation Issues
The following issues apply to workstations:
Section 6.2.1, “Smart Card Issues,” on page 38
Section 6.2.2, “Identity Plug-in Issues,” on page 38
Section 6.2.3, “Novell Client Single Sign-On Issues,” on page 38
Troubleshooting
37
Page 38

6.2.1 Smart Card Issues
If the login fails with an error message of No Certificates Found, the method failed to read the smart
card's certificates. Check the following items:
The smart card reader is installed and functional.
The smart card is configured with a valid certificate and associated private key.
Ensure that the smart card is not locked. Smart cards require a valid PIN to access them. Most
smart cards lock after 3 invalid PIN attempts.
The proper smart card middleware is installed and operational. Most middleware includes tools
for viewing the information on the smart card.
The method is properly configured to communicate with the middleware. During installation, a
smart card communication interface is selected. The recommended setting is PC/SC. If PC/SC
communication is failing, you may want to try PKCS#11. When using PKCS#11, you must
also specify the correct vendor library (DLL). The library must be in the system path so it can
be loaded by the method. You might need to contact the middleware vendor for the specific
PKCS#11 library name.
novdocx (en) 6 April 2007
6.2.2 Identity Plug-in Issues
Because the ID-Plugin searches the directory before the actual login, it requires anonymous browse
rights enabled in eDirectory. If the directory restricts anonymous browse, the Identity Plug-in does
not work.
6.2.3 Novell Client Single Sign-On Issues
The single sign-on functionality in Novell ClientTM 4.91 SP3 does not work correctly. The problem
has been identified and the Novell Client team is releasing a fix. Download and install the fix from
the Novell Support Web site (http://www.novell.com/support/supportcentral/
supportcentral.do?id=m1).
6.3 Method Configuration Issues
The following issues apply to method configuration:
Section 6.3.1, “Method Activation,” on page 38
Section 6.3.2, “Certificate Validation Issues,” on page 39
6.3.1 Method Activation
If a valid license key is not entered using iManager, the method stops functioning after the 90-day
trial period has expired. Enter a valid license key to enable the method.
38 Novell Enhanced Smart Card Method Installation Guide
Page 39

6.3.2 Certificate Validation Issues
If the method fails with an Invalid Certificate or Certificate Validation Failed message, the method
was unable to validate the certificate sent by the workstation. Check the following items:
The certificate on the smart card is not expired or has not been revoked by the issuing
Certificate Authority.
The method is properly configured with a trusted root container that contains a valid trusted
root certificate. See Section 5.2, “Configuring Trusted Root Certificates,” on page 29 for
information about configuring the trusted root container.
Certificate revocation checking is properly configured. See Section 5.3, “Configuring
Certificate Revocation Checking,” on page 31 for more information.
CRL and OCSP revocation checking requires connectivity to the CRL Distribution Point or
OCSP Responder. If the information is unavailable, the validation process fails.
When using OCSP validation, the OCSP response is signed by the responder's certificate. In
order for the response to be considered valid, the responder's certificate must be trusted. Place
the OCSP responder's trusted root certificate in the trusted root container to identify it as
trusted.
novdocx (en) 6 April 2007
Troubleshooting 39
Page 40

novdocx (en) 6 April 2007
40 Novell Enhanced Smart Card Method Installation Guide
Page 41

7
Security Administrator’s Guide
As with any system, good security requires proper configuration. This section lists
recommendations to ensure that the method functions properly.
7.1 Trusted Root Containers
These containers must include only certificates from trusted Certificate Authorities. Administration
of the certificates in these containers should be restricted.
7.2 Certificate Validation/Revocation Checking
Certificate validation should be enabled and revocation checking properly configured. If a CRL
Grace Period is used, the grace period should be limited to a few days. Do not use the CRL Grace
Period as a mechanism to work around a dysfunctional CRL infrastructure.
novdocx (en) 6 April 2007
7
7.3 Smart Card Enrollment eDirectory Attributes
Administration of the user attributes used for smart card authentication should be restricted to
administrators who are enrolling smart cards for users.
When matching by subject names, the attributes are:
sasAllowableSubjectNames
nclTmpCertSubject
nclTmpCertExpiration
When matching by certificates, the attributes are:
userCertificate
nclTmpCert
nclTmpCertExpTime
7.4 Certificate Matching
The certificate matching settings should be set to Subject Name matching or Certificate matching.
Certificate matching is more restrictive because it checks the login certificate against the list of
certificates configured for the user. The No Matching option should be used only in specific guest
account scenarios as described in the Section 5.4.2, “Certificate Matching,” on page 34.
7.5 Restricting Authentication Methods
Users can be restricted to using the smart card authentication method only. This is accomplished by
restricting the user to a specified NMAS
Guide (http://www.novell.com/documentation/nmas311/index.html)describes how to do this.
TM
authentication sequence. The NMAS Administration
Security Administrator’s Guide
41
Page 42

7.6 Identity Plug-In
The Identity Plug-in searches the directory using an anonymous LDAP clear text connection. This
should be a consideration when choosing whether to use the Identity Plug-in functionality.
7.7 Disconnected Login
The disconnected login functionality encrypts the password used to log in to the Windows local
account and stores it in the registry. The password is encrypted using a 128-bit AES key generated
by using the private key on the smart card. This should be a consideration when choosing whether to
use the disconnected login functionality.
novdocx (en) 6 April 2007
42 Novell Enhanced Smart Card Method Installation Guide
Page 43

8
Novell Audit Integration
The method can report login events to the Novell® Audit System. The smart card login events
include specific information about the certificate used for login (Serial Number, Subject Name,
Issuer, Expiration Date).
novdocx (en) 6 April 2007
8
In order to report audit events, the audit system must be installed and properly configured for
eDirectory
create a audit log application.
See the Novell Audit Documentation Web site (http://www.novell.com/documentation/
novellaudit20/index.html) for specifics on configuring audits and creating log applications.
TM
. The method includes an audit configuration file (esc_en.lsc), which is used to
Novell Audit Integration
43
Page 44

novdocx (en) 6 April 2007
44 Novell Enhanced Smart Card Method Installation Guide
Page 45

A
Silent Method Installation on
novdocx (en) 6 April 2007
Workstations
You can silently run the Novell® Enhanced Smart Card Method (NESCM) install by passing in
parameters from the command line.
Before silently installing the NESCM from a command line, you should become familiar with the
graphical install and its options.
Table A-1 lists the parameters that can be passed to the method install (setup.exe). The method
install is in the \nmasmethods\novell\enhancedsmartcard\client directory.
Parameters passed to setup.exe after the /s /v flags are wrapped in quotes with the /qn flag
first. For example:
setup.exe /s /v"/qn BOOL_PASSWORD_FIELD_DESC=0 DISCONNECT=1
REBOOT=0 SMARTCARD_INTERFACE=1"
This example uses the standard password field descriptor, turns disconnected support on, suppresses
the reboot, and specifies PC/SC as the smart card interface.
NOTE: You cannot use spaces in the PASSWORD_FIELD_DESC parameter on the command line.
If spaces are required in the password field descriptor, you need to set the following registry setting
manually:
A
HKEY_LOCAL_MACHINE\SOFTWARE\Novell\Login\Tab
Settings\Credentials\PasswordFieldDescription
Table A-1 Parameters for the Novell Enhanced Smart Card Method Installer
Parameter Required Description Value
ALLUSERS Yes Determines who can
install and uninstall this
program.
BOOL_PASSWORD_FIELD_DESC Yes Set to 1 for a custom
password field descriptor.
If set to true, then
PASSWORD_FIELD_DE
SC must be set to a
string.
DISCONNECT Yes Set to 1 for disconnected
support; otherwise, set to
0.
NULL for current user
only.
1 for Administrators.
2 for Administrators if
rights exist; otherwise,
for current user.
1 or 0
1 or 0
Silent Method Installation on Workstations
45
Page 46

Parameter Required Description Value
novdocx (en) 6 April 2007
PASSWORD_FIELD_DESC No Set to a string for a
custom password field
descriptor.
BOOL_PASSWORD_FIE
LD_DESC must be set to
1 for the custom string to
take effect. The password
field descriptor should be
less than 15 characters.
PKCS11LIBRARY No If
SMARTCARD_INTERFA
CE is set to 2, this value
must be specified.
REBOOT Yes Set to 1 for reboot or 0 to
suppress reboot.
SMARTCARD_INTERFACE Yes For PC/SC support, set to
1 and for PKCS#11
support, set to 2.
ID_PLUGIN_SUPPORT Yes Set to 1 for no support or
set to 2 for support.
ID_PLUGIN_LDAP_SEARCH_BASE No LDAP search base DN,
specified if
ID_PLUGIN_SUPPORT=
2
String
PKCS#11 DLL name
1 or 0
1 or 2
1 or 2
Example:
ou=users,o=novell
ID_PLUGIN_LDAP_SEARCH_TIMEOUT No LDAP search timeout
integer specified if
ID_PLUGIN_SUPPORT=
2
ID_PLUGIN_LDAP_SERVERS No Space-separated list of
LDAP servers, specified if
ID_PLUGIN_SUPPORT=
2
Example: 10
Example:
“123.45.123.45:389
123.45.123.46:389”
46 Novell Enhanced Smart Card Method Installation Guide
 Loading...