

Page 1

Novell eDirectory 8.8 Installation Guide
Novell
novdocx (en) 6 April 2007
eDirectory
8.8 SP1
INSTALLATION GUIDE
May 25, 2007
TM
www.novell.com
Page 2

Legal Notices
Novell, Inc. makes no representations or warranties with respect to the contents or use of this documentation, and
specifically disclaims any express or implied warranties of merchantability or fitness for any particular purpose.
Further, Novell, Inc. reserves the right to revise this publication and to make changes to its content, at any time,
without obligation to notify any person or entity of such revisions or changes.
Further, Novell, Inc. makes no representations or warranties with respect to any software, and specifically disclaims
any express or implied warranties of merchantability or fitness for any particular purpose. Further, Novell, Inc.
reserves the right to make changes to any and all parts of Novell software, at any time, without any obligation to
notify any person or entity of such changes.
Any products or technical information provided under this Agreement may be subject to U.S. export controls and the
trade laws of other countries. You agree to comply with all export control regulations and to obtain any required
licenses or classification to export, re-export, or import deliverables. You agree not to export or re-export to entities
on the current U.S. export exclusion lists or to any embargoed or terrorist countries as specified in the U.S. export
laws. You agree to not use deliverables for prohibited nuclear, missile, or chemical biological weaponry end uses.
Please refer to www.novell.com/info/exports/ for more information on exporting Novell software. Novell assumes no
responsibility for your failure to obtain any necessary export approvals.
Copyright © 2003-2006 Novell, Inc. All rights reserved. No part of this publication may be reproduced, photocopied,
stored on a retrieval system, or transmitted without the express written consent of the publisher.
novdocx (en) 6 April 2007
Novell, Inc. has intellectual property rights relating to technology embodied in the product that is described in this
document. In particular, and without limitation, these intellectual property rights may include one or more of the U.S.
patents listed at http://www.novell.com/company/legal/patents/ and one or more additional patents or pending patent
applications in the U.S. and in other countries.
Novell, Inc.
404 Wyman Street, Suite 500
Waltham, MA 02451
U.S.A.
www.novell.com
Online Documentation: To access the online documentation for this and other Novell products, and to get
updates, see www.novell.com/documentation.
Page 3

Novell Trademarks
Client32 is a trademark of Novell, Inc.
eDirectory is a trademark of Novell, Inc.
NetWare is a registered trademark of Novell, Inc., in the United States and other countries.
NetWare Core Protocol and NCP are trademarks of Novell, Inc.
NMAS is a trademark of Novell, Inc.
Novell is a registered trademark of Novell, Inc., in the United States and other countries.
Novell Client is a trademark of Novell, Inc.
Novell Directory Services and NDS are registered trademarks of Novell, Inc., in the United States and other
countries.
Ximiam is a registerd trademark of Novell, Inc., in the United States and other countries.
ZENworks is a registered trademark of Novell, Inc., in the United States and other countries.
Third-Party Materials
All third-party trademarks are the property of their respective owners.
This product includes software developed by the OpenSSL Project for use in the OpenSSL Toolkit (http://
www.openssl.org).
novdocx (en) 6 April 2007
Page 4

novdocx (en) 6 April 2007
Page 5

Contents
About This Book 9
1 Installing or Upgrading Novell eDirectory on NetWare 11
1.1 System Requirements . . . . . . . . . . . . . . . . . . . . . . . . . . . . . . . . . . . . . . . . . . . . . . . . . . . . . . . 11
1.1.1 Upgrade to eDirectory 8.8 . . . . . . . . . . . . . . . . . . . . . . . . . . . . . . . . . . . . . . . . . . . . . 11
1.1.2 Upgrade to eDirectory 8.8 SP2 . . . . . . . . . . . . . . . . . . . . . . . . . . . . . . . . . . . . . . . . . 11
1.2 Prerequisites . . . . . . . . . . . . . . . . . . . . . . . . . . . . . . . . . . . . . . . . . . . . . . . . . . . . . . . . . . . . . . 11
1.3 Hardware Requirements . . . . . . . . . . . . . . . . . . . . . . . . . . . . . . . . . . . . . . . . . . . . . . . . . . . . . 12
1.4 Forcing the Backlink Process to Run. . . . . . . . . . . . . . . . . . . . . . . . . . . . . . . . . . . . . . . . . . . . 13
1.5 Updating the eDirectory Schema for NetWare. . . . . . . . . . . . . . . . . . . . . . . . . . . . . . . . . . . . . 13
1.6 Disk Space Check on Upgrading to eDirectory SP2 or later . . . . . . . . . . . . . . . . . . . . . . . . . . 15
1.7 Installing or Upgrading Novell eDirectory on NetWare . . . . . . . . . . . . . . . . . . . . . . . . . . . . . . 15
1.7.1 Installing or Upgrading Novell eDirectory 8.8 on NetWare . . . . . . . . . . . . . . . . . . . . 15
1.7.2 Server Health Checks . . . . . . . . . . . . . . . . . . . . . . . . . . . . . . . . . . . . . . . . . . . . . . . . 16
1.7.3 Installing NMAS Server Software . . . . . . . . . . . . . . . . . . . . . . . . . . . . . . . . . . . . . . . 16
1.7.4 Installing NMAS Client Software . . . . . . . . . . . . . . . . . . . . . . . . . . . . . . . . . . . . . . . . 17
1.7.5 Installing into a Tree with Dotted Name Containers . . . . . . . . . . . . . . . . . . . . . . . . . 17
1.7.6 Unattended Upgrade to eDirectory 8.8 SP2 on Netware . . . . . . . . . . . . . . . . . . . . . 18
1.7.7 Remote Installation or Upgrade. . . . . . . . . . . . . . . . . . . . . . . . . . . . . . . . . . . . . . . . . 21
novdocx (en) 6 April 2007
2 Installing or Upgrading Novell eDirectory on Windows 23
2.1 System Requirements . . . . . . . . . . . . . . . . . . . . . . . . . . . . . . . . . . . . . . . . . . . . . . . . . . . . . . . 23
2.2 Prerequisites . . . . . . . . . . . . . . . . . . . . . . . . . . . . . . . . . . . . . . . . . . . . . . . . . . . . . . . . . . . . . . 23
2.3 Hardware Requirements . . . . . . . . . . . . . . . . . . . . . . . . . . . . . . . . . . . . . . . . . . . . . . . . . . . . . 25
2.4 Forcing the Backlink Process to Run. . . . . . . . . . . . . . . . . . . . . . . . . . . . . . . . . . . . . . . . . . . . 25
2.5 Updating the eDirectory Schema for Windows . . . . . . . . . . . . . . . . . . . . . . . . . . . . . . . . . . . . 26
2.6 Disk Space Check on Upgrading to eDirectory SP2 or later . . . . . . . . . . . . . . . . . . . . . . . . . . 26
2.7 Installing Novell eDirectory on Windows . . . . . . . . . . . . . . . . . . . . . . . . . . . . . . . . . . . . . . . . . 27
2.7.1 Installing or Updating Novell eDirectory 8.8 on Windows 2000 or Server 2003 . . . . 27
2.7.2 Server Health Checks . . . . . . . . . . . . . . . . . . . . . . . . . . . . . . . . . . . . . . . . . . . . . . . . 28
2.7.3 Communicating with eDirectory through LDAP . . . . . . . . . . . . . . . . . . . . . . . . . . . . . 29
2.7.4 Installing NMAS Server Software . . . . . . . . . . . . . . . . . . . . . . . . . . . . . . . . . . . . . . . 32
2.7.5 Installing NMAS Client Software . . . . . . . . . . . . . . . . . . . . . . . . . . . . . . . . . . . . . . . . 32
2.7.6 Installing into a Tree with Dotted Name Containers . . . . . . . . . . . . . . . . . . . . . . . . . 32
3 Installing or Upgrading Novell eDirectory on Linux 35
3.1 System Requirements . . . . . . . . . . . . . . . . . . . . . . . . . . . . . . . . . . . . . . . . . . . . . . . . . . . . . . . 35
3.2 Prerequisites . . . . . . . . . . . . . . . . . . . . . . . . . . . . . . . . . . . . . . . . . . . . . . . . . . . . . . . . . . . . . . 36
3.3 Hardware Requirements . . . . . . . . . . . . . . . . . . . . . . . . . . . . . . . . . . . . . . . . . . . . . . . . . . . . . 37
3.4 Forcing the Backlink Process to Run. . . . . . . . . . . . . . . . . . . . . . . . . . . . . . . . . . . . . . . . . . . . 38
3.5 Upgrading eDirectory. . . . . . . . . . . . . . . . . . . . . . . . . . . . . . . . . . . . . . . . . . . . . . . . . . . . . . . . 38
3.5.1 Server Health Checks . . . . . . . . . . . . . . . . . . . . . . . . . . . . . . . . . . . . . . . . . . . . . . . . 38
3.5.2 Upgrading on Linux Servers Other Than OES . . . . . . . . . . . . . . . . . . . . . . . . . . . . . 39
3.5.3 Upgrading Through ZENworks Linux Management on OES Linux SP2 . . . . . . . . . . 39
3.5.4 Upgrading the Tarball Deployment of eDirectory 8.8 . . . . . . . . . . . . . . . . . . . . . . . . 44
3.5.5 Upgrading Multiple Instances . . . . . . . . . . . . . . . . . . . . . . . . . . . . . . . . . . . . . . . . . . 45
3.5.6 Disk Space Check on Upgrading to eDirectory SP2 or later . . . . . . . . . . . . . . . . . . . 45
Contents 5
Page 6

3.6 Installing eDirectory . . . . . . . . . . . . . . . . . . . . . . . . . . . . . . . . . . . . . . . . . . . . . . . . . . . . . . . . . 46
3.6.1 Using SLP with eDirectory . . . . . . . . . . . . . . . . . . . . . . . . . . . . . . . . . . . . . . . . . . . . . 46
3.6.2 Installing NICI. . . . . . . . . . . . . . . . . . . . . . . . . . . . . . . . . . . . . . . . . . . . . . . . . . . . . . . 47
3.6.3 Using the nds-install Utility to Install eDirectory Components . . . . . . . . . . . . . . . . . . 49
3.6.4 Installing Through ZENworks Linux Management on OES Linux SP2 . . . . . . . . . . . 51
3.6.5 Nonroot User Installing eDirectory 8.8 . . . . . . . . . . . . . . . . . . . . . . . . . . . . . . . . . . . . 55
3.6.6 Using the ndsconfig Utility to Add or Remove the eDirectory Replica Server . . . . . . 57
3.6.7 Using ndsconfig to Configure Multiple Instances of eDirectory 8.8 . . . . . . . . . . . . . . 61
3.6.8 Using ndsconfig to Install a Linux Server into a Tree with Dotted Name Containers . 66
3.6.9 Using the nmasinst Utility to Configure NMAS . . . . . . . . . . . . . . . . . . . . . . . . . . . . . . 67
3.6.10 nonroot user SNMP configuration . . . . . . . . . . . . . . . . . . . . . . . . . . . . . . . . . . . . . . . 68
4 Installing or Upgrading Novell eDirectory on Solaris 69
4.1 System Requirements . . . . . . . . . . . . . . . . . . . . . . . . . . . . . . . . . . . . . . . . . . . . . . . . . . . . . . . 69
4.2 Prerequisites. . . . . . . . . . . . . . . . . . . . . . . . . . . . . . . . . . . . . . . . . . . . . . . . . . . . . . . . . . . . . . . 69
4.3 Hardware Requirements. . . . . . . . . . . . . . . . . . . . . . . . . . . . . . . . . . . . . . . . . . . . . . . . . . . . . . 71
4.4 Forcing the Backlink Process to Run . . . . . . . . . . . . . . . . . . . . . . . . . . . . . . . . . . . . . . . . . . . . 71
4.5 Upgrading eDirectory . . . . . . . . . . . . . . . . . . . . . . . . . . . . . . . . . . . . . . . . . . . . . . . . . . . . . . . . 71
4.5.1 Upgrading Multiple Instances. . . . . . . . . . . . . . . . . . . . . . . . . . . . . . . . . . . . . . . . . . . 72
4.5.2 Upgrading the Tarball Deployment of eDirectory 8.8 . . . . . . . . . . . . . . . . . . . . . . . . . 72
4.6 Installing eDirectory . . . . . . . . . . . . . . . . . . . . . . . . . . . . . . . . . . . . . . . . . . . . . . . . . . . . . . . . . 72
4.6.1 Server Health Checks . . . . . . . . . . . . . . . . . . . . . . . . . . . . . . . . . . . . . . . . . . . . . . . . 72
4.6.2 Using SLP with eDirectory . . . . . . . . . . . . . . . . . . . . . . . . . . . . . . . . . . . . . . . . . . . . . 73
4.6.3 Installing NICI. . . . . . . . . . . . . . . . . . . . . . . . . . . . . . . . . . . . . . . . . . . . . . . . . . . . . . . 74
4.6.4 Using the Nds-install Utility to Install eDirectory Components . . . . . . . . . . . . . . . . . . 75
4.6.5 Nonroot User Installing eDirectory 8.8 . . . . . . . . . . . . . . . . . . . . . . . . . . . . . . . . . . . . 77
4.6.6 Using the Ndsconfig Utility to Add or Remove the eDirectory Replica Server . . . . . . 79
4.6.7 Using ndsconfig to Configure Multiple Instances of eDirectory 8.8 . . . . . . . . . . . . . . 81
4.6.8 Using Ndsconfig to Install a Solaris Server into a Tree with Dotted Name Containers .
81
4.6.9 Using the Nmasinst Utility to Configure NMAS . . . . . . . . . . . . . . . . . . . . . . . . . . . . . 81
4.6.10 nonroot user SNMP configuration . . . . . . . . . . . . . . . . . . . . . . . . . . . . . . . . . . . . . . . 82
novdocx (en) 6 April 2007
5 Installing or Upgrading Novell eDirectory on AIX 83
5.1 System Requirements . . . . . . . . . . . . . . . . . . . . . . . . . . . . . . . . . . . . . . . . . . . . . . . . . . . . . . . 83
5.2 Prerequisites. . . . . . . . . . . . . . . . . . . . . . . . . . . . . . . . . . . . . . . . . . . . . . . . . . . . . . . . . . . . . . . 83
5.3 Hardware Requirements. . . . . . . . . . . . . . . . . . . . . . . . . . . . . . . . . . . . . . . . . . . . . . . . . . . . . . 84
5.4 Forcing the Backlink Process to Run . . . . . . . . . . . . . . . . . . . . . . . . . . . . . . . . . . . . . . . . . . . . 85
5.5 Upgrading eDirectory . . . . . . . . . . . . . . . . . . . . . . . . . . . . . . . . . . . . . . . . . . . . . . . . . . . . . . . . 85
5.5.1 Upgrading Multiple Instances. . . . . . . . . . . . . . . . . . . . . . . . . . . . . . . . . . . . . . . . . . . 86
5.5.2 Upgrading the Tarball Deployment of eDirectory 8.8 . . . . . . . . . . . . . . . . . . . . . . . . . 86
5.6 Installing eDirectory . . . . . . . . . . . . . . . . . . . . . . . . . . . . . . . . . . . . . . . . . . . . . . . . . . . . . . . . . 86
5.6.1 Server Health Checks . . . . . . . . . . . . . . . . . . . . . . . . . . . . . . . . . . . . . . . . . . . . . . . . 86
5.6.2 Using SLP with eDirectory . . . . . . . . . . . . . . . . . . . . . . . . . . . . . . . . . . . . . . . . . . . . . 87
5.6.3 Installing NICI. . . . . . . . . . . . . . . . . . . . . . . . . . . . . . . . . . . . . . . . . . . . . . . . . . . . . . . 87
5.6.4 Using the Nds-install Utility to Install eDirectory Components . . . . . . . . . . . . . . . . . . 89
5.6.5 Nonroot User Installing eDirectory 8.8 . . . . . . . . . . . . . . . . . . . . . . . . . . . . . . . . . . . . 91
5.6.6 Using the Ndsconfig Utility to Add or Remove the eDirectory Replica Server . . . . . . 93
5.6.7 Using ndsconfig to Configure Multiple Instances of eDirectory 8.8 . . . . . . . . . . . . . . 95
5.6.8 Using Ndsconfig to Install an AIX Server into a Tree with Dotted Name Containers . 95
5.6.9 Using the Nmasinst Utility to Configure NMAS . . . . . . . . . . . . . . . . . . . . . . . . . . . . . 95
5.6.10 nonroot user SNMP configuration . . . . . . . . . . . . . . . . . . . . . . . . . . . . . . . . . . . . . . . 96
6 Novell eDirectory 8.8 Installation Guide
Page 7

6 Installing or Upgrading Novell eDirectory on HP-UX 97
6.1 System Requirements . . . . . . . . . . . . . . . . . . . . . . . . . . . . . . . . . . . . . . . . . . . . . . . . . . . . . . . 97
6.2 Prerequisites . . . . . . . . . . . . . . . . . . . . . . . . . . . . . . . . . . . . . . . . . . . . . . . . . . . . . . . . . . . . . . 97
6.3 Hardware Requirements . . . . . . . . . . . . . . . . . . . . . . . . . . . . . . . . . . . . . . . . . . . . . . . . . . . . . 99
6.4 Forcing the Backlink Process to Run. . . . . . . . . . . . . . . . . . . . . . . . . . . . . . . . . . . . . . . . . . . . 99
6.5 Upgrading eDirectory. . . . . . . . . . . . . . . . . . . . . . . . . . . . . . . . . . . . . . . . . . . . . . . . . . . . . . . . 99
6.5.1 Upgrading Multiple Instances . . . . . . . . . . . . . . . . . . . . . . . . . . . . . . . . . . . . . . . . . 100
6.5.2 Upgrading the Tarball Deployment of eDirectory 8.8 . . . . . . . . . . . . . . . . . . . . . . . 100
6.6 Installing eDirectory . . . . . . . . . . . . . . . . . . . . . . . . . . . . . . . . . . . . . . . . . . . . . . . . . . . . . . . . 100
6.6.1 Server Health Checks . . . . . . . . . . . . . . . . . . . . . . . . . . . . . . . . . . . . . . . . . . . . . . . 101
6.6.2 Using OpenSLP for HP-UX . . . . . . . . . . . . . . . . . . . . . . . . . . . . . . . . . . . . . . . . . . . 101
6.6.3 Installing NICI . . . . . . . . . . . . . . . . . . . . . . . . . . . . . . . . . . . . . . . . . . . . . . . . . . . . . 102
6.6.4 Installing eDirectory Components . . . . . . . . . . . . . . . . . . . . . . . . . . . . . . . . . . . . . . 103
6.6.5 Nonroot User Installing eDirectory 8.8 . . . . . . . . . . . . . . . . . . . . . . . . . . . . . . . . . . 106
6.6.6 Using the Ndsconfig Utility to Add or Remove the eDirectory Replica Server. . . . . 107
6.6.7 Using ndsconfig to Configure Multiple Instances of eDirectory 8.8 . . . . . . . . . . . . . 109
6.6.8 Using Ndsconfig to Install an HP-UX Server into a Tree with Dotted Name Containers
109
6.6.9 Using the Nmasinst Utility to Configure NMAS . . . . . . . . . . . . . . . . . . . . . . . . . . . . 110
novdocx (en) 6 April 2007
7 Relocating the DIB 113
7.1 Linux and UNIX . . . . . . . . . . . . . . . . . . . . . . . . . . . . . . . . . . . . . . . . . . . . . . . . . . . . . . . . . . . 113
7.2 NetWare and Windows . . . . . . . . . . . . . . . . . . . . . . . . . . . . . . . . . . . . . . . . . . . . . . . . . . . . . 114
8 Upgrade Requirements of eDirectory 8.8 115
8.1 Reference Changes in 8.8 SP2 . . . . . . . . . . . . . . . . . . . . . . . . . . . . . . . . . . . . . . . . . . . . . . . 116
8.2 Upgrade Process in 8.8 SP2 . . . . . . . . . . . . . . . . . . . . . . . . . . . . . . . . . . . . . . . . . . . . . . . . . 117
8.3 Performing a Dry Run before Upgrading eDirectory . . . . . . . . . . . . . . . . . . . . . . . . . . . . . . . 119
8.3.1 Common Problems Encountered during the Upgrade Process. . . . . . . . . . . . . . . . 119
9 Configuring Novell eDirectory on Linux, Solaris, AIX, or HP-UX Systems 121
9.1 Configuration Utilities. . . . . . . . . . . . . . . . . . . . . . . . . . . . . . . . . . . . . . . . . . . . . . . . . . . . . . . 121
9.1.1 The ndsconfig Utility . . . . . . . . . . . . . . . . . . . . . . . . . . . . . . . . . . . . . . . . . . . . . . . . 121
9.1.2 Using the ldapconfig Utility to Configure the LDAP Server and LDAP Group Objects .
121
9.1.3 Using the nmasinst Utility to Configure Novell Modular Authentication Service . . . 122
9.2 Configuration Parameters . . . . . . . . . . . . . . . . . . . . . . . . . . . . . . . . . . . . . . . . . . . . . . . . . . . 122
9.3 Security Considerations. . . . . . . . . . . . . . . . . . . . . . . . . . . . . . . . . . . . . . . . . . . . . . . . . . . . . 126
10 Migrating to eDirectory 8.8 SP2 129
10.1 Migrating to eDirectory 8.8 SP2 While Upgrading the Operating System . . . . . . . . . . . . . . . 129
10.2 Migrating to eDirectory 8.8 SP2 Without Upgrading the Operating System . . . . . . . . . . . . . 131
11 Uninstalling Novell eDirectory 133
11.1 Uninstalling eDirectory on NetWare. . . . . . . . . . . . . . . . . . . . . . . . . . . . . . . . . . . . . . . . . . . . 133
11.1.1 Reinstalling eDirectory . . . . . . . . . . . . . . . . . . . . . . . . . . . . . . . . . . . . . . . . . . . . . . 133
11.2 Uninstalling eDirectory on Windows . . . . . . . . . . . . . . . . . . . . . . . . . . . . . . . . . . . . . . . . . . . 133
11.2.1 Uninstalling eDirectory, ConsoleOne, and SLP DA. . . . . . . . . . . . . . . . . . . . . . . . . 134
11.2.2 Uninstalling NICI . . . . . . . . . . . . . . . . . . . . . . . . . . . . . . . . . . . . . . . . . . . . . . . . . . . 134
Contents 7
Page 8

11.3 Uninstalling eDirectory on Linux, Solaris, or AIX . . . . . . . . . . . . . . . . . . . . . . . . . . . . . . . . . . 134
11.4 Uninstalling eDirectory on HP-UX . . . . . . . . . . . . . . . . . . . . . . . . . . . . . . . . . . . . . . . . . . . . . 135
A Linux, Solaris, AIX, and HP-UX Packages for Novell eDirectory 137
A.1 Package Name Specifications for HP-UX . . . . . . . . . . . . . . . . . . . . . . . . . . . . . . . . . . . . . . . 139
B Server Health Checks 141
B.1 Need for Health Checks . . . . . . . . . . . . . . . . . . . . . . . . . . . . . . . . . . . . . . . . . . . . . . . . . . . . . 141
B.2 Performing Health Checks . . . . . . . . . . . . . . . . . . . . . . . . . . . . . . . . . . . . . . . . . . . . . . . . . . . 141
B.2.1 With the Upgrade . . . . . . . . . . . . . . . . . . . . . . . . . . . . . . . . . . . . . . . . . . . . . . . . . . . 141
B.2.2 As a Standalone Utility . . . . . . . . . . . . . . . . . . . . . . . . . . . . . . . . . . . . . . . . . . . . . . . 141
B.3 Types of Health Checks . . . . . . . . . . . . . . . . . . . . . . . . . . . . . . . . . . . . . . . . . . . . . . . . . . . . . 142
B.3.1 Basic Server Health . . . . . . . . . . . . . . . . . . . . . . . . . . . . . . . . . . . . . . . . . . . . . . . . . 142
B.3.2 Partitions and Replica Health . . . . . . . . . . . . . . . . . . . . . . . . . . . . . . . . . . . . . . . . . . 143
B.4 Categorization of Health . . . . . . . . . . . . . . . . . . . . . . . . . . . . . . . . . . . . . . . . . . . . . . . . . . . . . 143
B.4.1 Normal . . . . . . . . . . . . . . . . . . . . . . . . . . . . . . . . . . . . . . . . . . . . . . . . . . . . . . . . . . . 143
B.4.2 Warning . . . . . . . . . . . . . . . . . . . . . . . . . . . . . . . . . . . . . . . . . . . . . . . . . . . . . . . . . . 143
B.4.3 Critical . . . . . . . . . . . . . . . . . . . . . . . . . . . . . . . . . . . . . . . . . . . . . . . . . . . . . . . . . . . 144
B.5 Log Files . . . . . . . . . . . . . . . . . . . . . . . . . . . . . . . . . . . . . . . . . . . . . . . . . . . . . . . . . . . . . . . . . 145
novdocx (en) 6 April 2007
C Configuring OpenSLP for eDirectory 147
C.1 Service Location Protocol. . . . . . . . . . . . . . . . . . . . . . . . . . . . . . . . . . . . . . . . . . . . . . . . . . . . 147
C.2 SLP Fundamentals . . . . . . . . . . . . . . . . . . . . . . . . . . . . . . . . . . . . . . . . . . . . . . . . . . . . . . . . . 147
C.2.1 Novell Service Location Providers . . . . . . . . . . . . . . . . . . . . . . . . . . . . . . . . . . . . . . 148
C.2.2 User Agents . . . . . . . . . . . . . . . . . . . . . . . . . . . . . . . . . . . . . . . . . . . . . . . . . . . . . . . 148
C.2.3 Service Agents . . . . . . . . . . . . . . . . . . . . . . . . . . . . . . . . . . . . . . . . . . . . . . . . . . . . . 149
C.3 Configuration Parameters. . . . . . . . . . . . . . . . . . . . . . . . . . . . . . . . . . . . . . . . . . . . . . . . . . . . 149
8 Novell eDirectory 8.8 Installation Guide
Page 9

About This Book
This Installation Guide describes how to install Novell® eDirectoryTM 8.8. It is intended for network
administrators, and contains the following sections:
Chapter 1, “Installing or Upgrading Novell eDirectory on NetWare,” on page 11
Chapter 2, “Installing or Upgrading Novell eDirectory on Windows,” on page 23
Chapter 3, “Installing or Upgrading Novell eDirectory on Linux,” on page 35
Chapter 4, “Installing or Upgrading Novell eDirectory on Solaris,” on page 69
Chapter 5, “Installing or Upgrading Novell eDirectory on AIX,” on page 83
Chapter 6, “Installing or Upgrading Novell eDirectory on HP-UX,” on page 97
Chapter 7, “Relocating the DIB,” on page 113
Chapter 8, “Upgrade Requirements of eDirectory 8.8,” on page 115
Chapter 9, “Configuring Novell eDirectory on Linux, Solaris, AIX, or HP-UX Systems,” on
page 121
novdocx (en) 6 April 2007
Chapter 10, “Migrating to eDirectory 8.8 SP2,” on page 129
Chapter 11, “Uninstalling Novell eDirectory,” on page 133
Appendix A, “Linux, Solaris, AIX, and HP-UX Packages for Novell eDirectory,” on page 137
Appendix B, “Server Health Checks,” on page 141
Appendix C, “Configuring OpenSLP for eDirectory,” on page 147
Audience
The guide is intended for network administrators.
Feedback
We want to hear your comments and suggestions about this manual and the other documentation
included with this product. Please use the User Comments feature at the bottom of each page of the
online documentation, or go to www.novell.com/documentation/feedback.html and enter your
comments there.
Documentation Updates
For the most recent version of the Novell eDirectory 8.8 Installation Guide, see the Novell
eDirectory 8.8 Documentation (http://www.novell.com/documentation/edir88/index.html) Web s i t e.
Additional Documentation
For documentation on managing and administering eDirectory, see the Novell eDirectory 8.8
Administration Guide (http://www.novell.com/documentation/edir88/index.html).
About This Book
9
Page 10

Documentation Conventions
In this documentation, a greater-than symbol (>) is used to separate actions within a step and items
within a cross-reference path.
®
A trademark symbol (
, TM, etc.) denotes a Novell trademark. An asterisk (*) denotes a third-party
trademark.
When a single pathname can be written with a backslash for some platforms or a forward slash for
other platforms, the pathname is presented with a backslash. Users of platforms that require a
forward slash, such as Linux* and UNIX*, should use forward slashes as required by your software.
novdocx (en) 6 April 2007
10 Novell eDirectory 8.8 Installation Guide
Page 11

1
Installing or Upgrading Novell
novdocx (en) 6 April 2007
eDirectory on NetWare
Use the following information to install or upgrade Novell® eDirectoryTM 8.8 on a NetWare® server:
Section 1.1, “System Requirements,” on page 11
Section 1.2, “Prerequisites,” on page 11
Section 1.3, “Hardware Requirements,” on page 12
Section 1.4, “Forcing the Backlink Process to Run,” on page 13
Section 1.5, “Updating the eDirectory Schema for NetWare,” on page 13
Section 1.6, “Disk Space Check on Upgrading to eDirectory SP2 or later,” on page 15
Section 1.7, “Installing or Upgrading Novell eDirectory on NetWare,” on page 15
1.1 System Requirements
System requirements vary depending on the version to which eDirectory is upgraded. The following
sections contain the system requirements for upgrading to eDirectory 8.8 and eDirectory 8.8 SP2.
1.1.1 Upgrade to eDirectory 8.8
1
You can upgrade to eDirectory 8.8 on the following version of NetWare:
NetWare 6.5 with Support Pack 3 or later (http://support.novell.com/filefinder/18197/
index.html)
Administrative rights to the eDirectory tree so you can modify the schema.
1.1.2 Upgrade to eDirectory 8.8 SP2
You can upgrade to eDirectory 8.8 SP2 on the following version of NetWare:
NetWare 6.5 with Support Pack 4 or later (http://support.novell.com/filefinder/18197/
index.html)
Administrative rights to the eDirectory tree so you can modify the schema.
For information on hardware requirements, see Section 1.3, “Hardware Requirements,” on page 12.
1.2 Prerequisites
IMPORTANT: Check the currently installed Novell and Third Party applications to determine if
eDirectory 8.8 is supported before upgrading your existing eDirectory environment. You can find
out the current status for Novell products in the TID - What Novell products are supported with
Installing or Upgrading Novell eDirectory on NetWare
11
Page 12

Novell eDirectory 8.8? (http://support.novell.com/cgi-bin/search/searchtid.cgi?10099872.htm) It is
also highly recommended to backup eDirectory prior to any upgrades.
If you are installing into an eDirectory tree that has NetWare and Windows servers, each
NetWare server must be running:
NetWare 5.1 with Support Pack 8 (http://support.novell.com/filefinder/9331/index.html)
or later
NetWare 6.0 with Support Pack 5 (http://support.novell.com/filefinder/13659/index.html)
or later
NetWare 6.5 with Support Pack 3 (http://support.novell.com/filefinder/18197/index.html)
or later
Each Windows server must be running eDirectory 8.7.3 or later.
(Conditional) NICI 2.7 and eDirectory 8.8 support key sizes up to 4096 bits. If you want to use
a 4 KB key size, every server must be upgraded to eDirectory 8.8. In addition, every
workstation using the management utilities, for example, iManager and ConsoleOne, must
have NICI 2.7 installed on it.
When you upgrade your Certificate Authority (CA) server to eDirectory 8.8, the key size will
not change; it will be 2 KB. The only way to create a 4 KB key size is recreate the CA on an
eDirectory 8.8 server. In addition, you would have to change the default from 2 KB to 4 KB for
the key size, during the CA creation.
novdocx (en) 6 April 2007
(Conditional) If you are upgrading a NetWare server as a nonadministrator user, ensure that you
have met the following prerequisites:
A NetWare server in the eDirectory 8.8 tree installed as the tree admin
Ensure that you have the following rights:
Supervisor rights to the container the server is being installed into.
All Attributes rights: read, compare, and write rights over the W0.KAP.Security object.
Entry rights: browse rights over Security container object.
All Attributes rights: read and compare rights over Security container object.
As a nonadministrator user, you can only upgrade a NetWare server.
(Conditional) If you are installing a secondary server into an existing tree as a nonadministrator
user, ensure that at least one of the servers in the tree has the same or higher eDirectory version
as that of the secondary being added as container admin. In case the secondary being added is
of later version, then the schema needs to be extended by the admin of the tree before adding
the secondary using container admin.
Configuring Static IP Address
Static IP address must be configured on the server for the eDirectory to perform efficiently.
Configuring eDirectory on the servers with DHCP address can lead to unpredictable results.
1.3 Hardware Requirements
Hardware requirements depend on the specific implementation of eDirectory.
For example, a base installation of eDirectory with the standard schema requires about 74 MB of
disk space for every 50,000 users. However, if you add a new set of attributes or completely fill in
12 Novell eDirectory 8.8 Installation Guide
Page 13

every existing attribute, the object size grows. These additions affect the disk space, processor, and
memory needed.
Two factors increase performance: more cache memory and faster processors.
For best results, cache as much of the DIB Set as the hardware allows.
eDirectory scales well on a single processor. However, Novell eDirectory 8.7 took advantage of
multiple processors. Adding processors improves performance in some areas—for example, logins
and having multiple threads active on multiple processors. eDirectory itself is not processor
intensive, but it is I/O intensive.
The following table illustrates typical system requirements for eDirectory for NetWare:
Objects Processor Memory Hard Disk
100,000 Pentium* III 450-700 MHz (single) 384 MB 144 MB
1 million Pentium III 450-700 MHz (dual) 2 GB 1.5 GB
10 million Pentium III 450-700 MHz (2 to 4) 2+ GB 15 GB
novdocx (en) 6 April 2007
Requirements for processors might be greater than the table indicates, depending upon additional
services available on the computer as well as the number of authentications, reads, and writes that
the computer is handling. Processes such as encryption and indexing can be processor intensive.
Of course, faster processors improve performance. Additional memory also improves performance
because eDirectory can then cache more of the directory into memory.
1.4 Forcing the Backlink Process to Run
Because the internal eDirectory identifiers change when upgrading to Novell eDirectory, the
backlink process must update backlinked objects for them to be consistent.
Backlinks keep track of external references to objects on other servers. For each external reference
on a server, the backlink process ensures that the real object exists in the correct location and verifies
all backlink attributes on the master of the replica. The backlink process occurs two hours after the
database is open and then every 780 minutes (13 hours). The interval is configurable from 2 minutes
to 10,080 minutes (7 days).
After migrating to eDirectory, we recommend that you force the backlink to run by issuing the
following commands from the server console. Running the backlink process is especially important
on servers that do not contain a replica.
1 At the server console, enter set dstrace=on.
2 Enter set dstrace=+blink.
3 Enter set dstrace=*b.
4 When the process is complete, enter set dstrace=off.
1.5 Updating the eDirectory Schema for NetWare
When upgrading a NetWare server to eDirectory 8.8, you might need to update the eDirectory
schema by running DSRepair on the server that has the master replica of the root partition.
Installing or Upgrading Novell eDirectory on NetWare 13
Page 14

IMPORTANT: If the master replica of the root partition resides on a Windows server, follow the
instructions in Section 2.5, “Updating the eDirectory Schema for Windows,” on page 26.
For an upgrade that needs a platform upgrate also, refer to Chapter 10, “Migrating to eDirectory 8.8
SP2,” on page 129.
To update the schema:
1 Copy the appropriate dsrepair.nlm file from the product CD (or downloaded and
expanded file) to the sys:\system directory of the server that contains the master replica of
the Tree partition.
2 At the server console of the master replica of the root partition, load dsrepair.nlm.
3 Select Advanced Options Menu > Global Schema Operations.
4 Enter the Administrator's name (for example, Admin.VMP) and password.
NOTE: In eDirectory 8.8 and later, you can have case sensitive passwords for all the utilities.
Refer to Novell eDirectory 8.8 What's New Guide (http://www.novell.com/documentation/
edir88/index.html) for more information.
novdocx (en) 6 April 2007
5 Select Post NetWare 5 Schema Update > Yes .
dsrepair.nlm updates the schema and posts the results to the dsrepair.log file.
Ignore errors associated with adding object classes. dsrepair.nlm is simply applying the
Post NetWare 5 Schema Update changes to each object.
6 Copy the appropriate patch version of dsrepair.nlm to each NetWare server in the
eDirectory tree.
Use the table in Step 1 as a reference. Having a correct version on each server ensures that the
schema needed for eDirectory is properly maintained when dsrepair.nlm is run in the
future.
If you use an earlier version of dsrepair.nlm and select Rebuild Operational Schema,
schema enhancements made by the Post NetWare 5 Schema Update will be lost. To resolve lost
schema enhancements, run dsrepair.nlm according to the following table.
If You Are Running dsrepair.nlm From
Here
A server that holds a writable replica of the
root partition
From any other server Select Advanced Options > Global Schema
Then
Reapply the Post NetWare 5 Schema Update to
your eDirectory tree.
Operations > Request Schema from Tree.
This action resynchronizes the schema from the root of the tree.
7 Close dsrepair.nlm before installing eDirectory on the server.
If dsrepair.nlm is loaded, the server might not restart.
14 Novell eDirectory 8.8 Installation Guide
Page 15

1.6 Disk Space Check on Upgrading to
eDirectory SP2 or later
When eDirectory server is upgraded from previous versions to eDirectory 8.8 SP2 or later, the disk
space check for the DIB upgrade would be performed. The free disk space necessary in the file
system, where the DIB resides would be equal to that of the DIB size. The messages of the disk
space check would be updated in the sys:\system\dscheck.log.
NOTE: The disk space check is required only during the DIB upgrade process. For more
information, refer to Chapter 8, “Upgrade Requirements of eDirectory 8.8,” on page 115.
1.7 Installing or Upgrading Novell eDirectory on
NetWare
This section contains the following information:
“Installing or Upgrading Novell eDirectory 8.8 on NetWare” on page 15
“Server Health Checks” on page 16
novdocx (en) 6 April 2007
“Installing NMAS Server Software” on page 16
“Installing NMAS Client Software” on page 17
“Installing into a Tree with Dotted Name Containers” on page 17
“Unattended Upgrade to eDirectory 8.8 SP2 on Netware” on page 18
“Remote Installation or Upgrade” on page 21
NOTE: Unattended Upgrade feature is supported only for SP2 release.
1.7.1 Installing or Upgrading Novell eDirectory 8.8 on NetWare
1 At the server console, enter nwconfig.nlm.
2 Select Product Options > Install a Product Not Listed.
3 Press F3 and specify the path to the NW directory where the installation program can find the
nds8.ips file.
If you downloaded eDirectory from the Web, enter the path to the NW directory you
extracted from the downloaded file (for example, sys:\edir\nw).
If you are installing from a CD, mount the CD as a volume and enter volume_name:NW
(for example, edir_88:NW).
For information on mounting a CD as a volume, see “CD-ROMs as Logical Volumes”
(http://www.novell.com/documentation/lg/nw6p/nss_enu/data/htxx7fd6.html) in the
Novell Storage Services Administration Guide.
4 Follow the on-screen prompts concerning license agreements, the Readme file, and tips.
5 Enter the administrator's login name (for example, Admin.VMP) and password.
Installing or Upgrading Novell eDirectory on NetWare 15
Page 16

IMPORTANT: This window might close before you enter this information. If it does, toggle
(Alt+Esc) to the screen and enter the information. Otherwise, the installation will not be
complete.
NOTE: In eDirectory 8.8 and later, you can have case sensitive passwords for all the utilities.
Refer to Novell eDirectory 8.8 What's New Guide (http://www.novell.com/documentation/
edir88/index.html) for more information.
6 In the LDAP Configuration screen, specify which LDAP ports to use, then click Next.
For more information, see “Communicating with eDirectory through LDAP” on page 29.
7 Select the NMAS
TM
login method you want to install, then click Next.
See “Installing NMAS Server Software” on page 16 and “Installing NMAS Client Software”
on page 17 for more information.
8 Click Finish to start the eDirectory installation.
9 To complete the installation, remove any diskettes or CDs when prompted, then click Yes to
restart the server.
novdocx (en) 6 April 2007
1.7.2 Server Health Checks
With eDirectory 8.8, when you upgrade eDirectory, a server health check is conducted by default to
ensure that the server is safe for the upgrade:
Section B.3.2, “Partitions and Replica Health,” on page 143
Based on the results obtained from the health checks, the upgrade will either continue or exit as
follows:
If all the health checks are successful, the upgrade will continue.
If there are minor errors, the upgrade will prompt you to continue or exit.
If there are critical errors, the upgrade will exit.
See Appendix B, “Server Health Checks,” on page 141 for a list of minor and critical error
conditions.
Skipping Server Health Checks
To skip server health checks, enter No when you are prompted to perform the health check.
For more information, see Appendix B, “Server Health Checks,” on page 141.
1.7.3 Installing NMAS Server Software
Novell Modular Authentication ServiceTM (NMAS) server components are installed automatically
when you run the eDirectory installation program. You will need to select the login methods you
want to install.
Select the login methods that you want to install into eDirectory by checking the appropriate check
boxes. When you select a login method, a description of the component appears in the Description
box. For more information on login methods, see “Managing Login and Post-Login Methods and
16 Novell eDirectory 8.8 Installation Guide
Page 17
Sequences” (http://www.novell.com/documentation/lg/nmas23/admin/data/a53vj9a.html) in the
Novell Modular Authentication Service Administration Guide.
Click Select All if you want to install all the login methods into eDirectory. Click Clear All if you
want to clear all selections.
The NDS login method is installed by default.
1.7.4 Installing NMAS Client Software
The NMAS client software must be installed on each client workstation where you want to use the
NMAS login methods.
1 At a Windows client workstation, insert the Novell eDirectory 8.8 CD.
2 From the NMAS directory, run nmasinstall.exe.
3 Select the NMAS Client Components checkbox.
Optionally, you can select the NICI checkbox if you want to install this component.
4 Click OK and follow the on-screen instructions.
5 Reboot the client workstation after the installation completes.
novdocx (en) 6 April 2007
1.7.5 Installing into a Tree with Dotted Name Containers
You can install a NetWare server into an eDirectory tree that has containers with dots in the names
(for example, O=novell.com or C=u.s.a). Using containers with dotted names requires that those
dots be escaped with the backslash character. To escape a dot, simply put a backslash in front of any
dot in a container name. For example:
O=novell\.com
You cannot start a name with a dot. For example, you cannot create a container named “.novell”
because it starts with a dot (‘.’).
IMPORTANT: If your tree has containers with dotted names, you must escape those names when
logging into utilities such as iMonitor, iManager, and DHost iConsole. For example, if your tree has
“novell.com” as the name of the O, enter username.novell\.com in the Username field when logging
in to iMonitor (see Figure 1-1).
Figure 1-1 iMonitor Login Screen
Installing or Upgrading Novell eDirectory on NetWare 17
Page 18
1.7.6 Unattended Upgrade to eDirectory 8.8 SP2 on Netware
The SPK for eDirectory 8.8 upgrade is provided with the Netware installation package. SPK has to
be inserted into the ConsoleOne “Server Software Packages” snap-in for customizing into local
environments. Once the Server Software Package ConsoleOne snap-in is installed, you can insert
this SPK in the ConsoleOne.
NOTE: Pre upgrade health check is not run during unattended upgrade, ensure you run dscheck.nlm
manually before starting the upgrade.
To perform this,
1 Import the applicable SPK into ConsoleOne.
2 To do this, right click on the Server Software Packages name space and select Insert New
Package (see Figure 1-2).
Figure 1-2 Adding the package into ConsoleOne
novdocx (en) 6 April 2007
An SPK has components and properties. To see the components, click on the SPK's expand
box. The properties include a description, requirements, and variables. The Support Pack SPKs
use variables, which is the only place where each site will need to make specific modifications.
18 Novell eDirectory 8.8 Installation Guide
Page 19

All of the SPK's components may use the SPK's variables. To see the variables, right click on
the SPK and select Properties (see Figure 1-3).
Figure 1-3 Editing the package properties
novdocx (en) 6 April 2007
3 Click on the Va ri ab le s tab to make the site-specific changes needed by the installation process
(see Figure 1-4).
Figure 1-4 Modifying the package variables
Edit and change the values of the two variables “user_id” and “pwd”.
user_id
administrator name that the install program will use to extend the tree.
pwd
password for the above username
These are the only two fields that need to be edited. Leave the values of rest of the variables as
defined.
WARNING: The installation source folders will be partially removed for security reasons. You
need to copy the installation source again in case you restart the installation on failures, e.g,
Disk Space unavailability errors.
Installing or Upgrading Novell eDirectory on NetWare 19
Page 20
Adding Upgrade Source to the SPK
The automated upgrade for eDirectory on Netware for ZFS environment is delivered as SPK along
with the source. The compiled CPK is not provided since the user is expected to provide values for
the variables containing administrator credentials. This SPK needs to be compiled to a CPK in the
customer site after providing values to these variables.
As mentioned earlier, the source is delivered along with the SPK and the source has to be attached to
the SPK before compiling the CPK. Steps for attaching the source to the SPK is given below:
1 Copy the source to the local machine and name the folder as “eDir88”. There are references to
this folder name inside the SPK and hence please use this suggested name.
2 Right click on the “Copying files” component and select Properties and browse to the Copy
File Tab.
3 Remove the file set (if given as a sample) by right clicking on the file group and choosing
Remove. Choose “Add File” by right clicking on the File Group as given below:
Figure 1-5 Adding the source to the SPK
novdocx (en) 6 April 2007
4 Then select the “eDir88” folder that contains the source files that are delivered along with the
SPK as given below:
Figure 1-6 Selecting the upgrade source
20 Novell eDirectory 8.8 Installation Guide
Page 21
Fully Automated Standalone Upgrade
Once the above changes are performed, compile the SPK to make a CPK using the right-click menu
option in the main component to compile (see Figure 1-7).
Figure 1-7 Compiling the SPK
novdocx (en) 6 April 2007
This CPK is ready to be imported into the Policy distributor to be used in the upgrade at all customer
sites.
IMPORTANT: This script contains the admin username and password in clear text in a temporary
file until the server is automatically restarted and used to start nwconfig again. Soon after the script
is called, this temporary file <NDS8.NCF> and the script files are deleted permanently from the
system.
1.7.7 Remote Installation or Upgrade
During Install or Upgrade, the Installer provides the following message and prompts for user input:
"Are you installing remotely through rconsole?"
"No-Local"
"Yes-Remote"
After prompting this message, the Installation typically continues in the XServer Console displaying
options to choose the NMAS methods to be installed, followed by configuration progress.
If you are performing the installation or upgrade from a remote terminal, you will not be able to
access the XServer Console to choose the NMAS methods to be installed. In this case, you could
choose "Yes-Remote", which by default installs all NMAS methods without any further indications
in the System Console.
NOTE: The Installer will restart the server once the installation is complete.
Installing or Upgrading Novell eDirectory on NetWare 21
Page 22

novdocx (en) 6 April 2007
22 Novell eDirectory 8.8 Installation Guide
Page 23

2
Installing or Upgrading Novell
novdocx (en) 6 April 2007
eDirectory on Windows
Use the following information to install or upgrade Novell® eDirectoryTM 8.8 on a Windows* 2000
or Windows Server 2003:
Section 2.1, “System Requirements,” on page 23
Section 2.2, “Prerequisites,” on page 23
Section 2.3, “Hardware Requirements,” on page 25
Section 2.4, “Forcing the Backlink Process to Run,” on page 25
Section 2.5, “Updating the eDirectory Schema for Windows,” on page 26
Section 2.6, “Disk Space Check on Upgrading to eDirectory SP2 or later,” on page 26
Section 2.7, “Installing Novell eDirectory on Windows,” on page 27
IMPORTANT: Novell eDirectory 8.8 lets you install eDirectory for Windows without the Novell
TM
Client
will use the existing Client. For more information, see “Installing or Updating Novell eDirectory 8.8
on Windows 2000 or Server 2003” on page 27.
2.1 System Requirements
. If you install eDirectory 8.8 on a machine already containing the Novell Client, eDirectory
2
One of the following:
Windows 2000 Server with Service Pack 4 or later, Windows 2000 Advanced Server with
Service Pack 4 or later
Windows Server 2003
IMPORTANT: Windows XP is not a supported Novell eDirectory 8.8 platform.
An assigned IP address.
A Pentium 200 with a minimum of 64 MB RAM (128 MB recommended) and a monitor color
palette set to a number higher than 16.
(Optional) One or more workstations running one of the following:
Novell Client for Windows 95/98 version 3.4
Novell Client for Windows 2000/XP version 4.9
Administrative rights to the Windows server and to all portions of the eDirectory tree that
contain domain-enabled User objects. For an installation into an existing tree, you need
administrative rights to the Tree object so that you can extend the schema and create objects.
2.2 Prerequisites
IMPORTANT: Check the currently installed Novell and Third Party applications to determine if
eDirectory 8.8 is supported before upgrading your existing eDirectory environment. You can find
Installing or Upgrading Novell eDirectory on Windows
23
Page 24

out the current status for Novell products in the TID - What Novell products are supported with
Novell eDirectory 8.8? (http://support.novell.com/cgi-bin/search/searchtid.cgi?10099872.htm) It is
also highly recommended to backup eDirectory prior to any upgrades.
Because NTFS provides a safer transaction process than a FAT file system provides, you can
install eDirectory only on an NTFS partition. Therefore, if you have only FAT file systems, do
one of the following:
Create a new partition and format it as NTFS.
Use Disk Administrator. Refer to Windows Server User Guide for more information.
Convert an existing FAT file system to NTFS, using the CONVERT command.
Refer to Windows Server User Guide for more information.
If your server only has a FAT file system and you forget or overlook this process, the
installation program prompts you to provide an NTFS partition.
(Conditional) NICI 2.7 and eDirectory 8.8 support key sizes up to 4096 bits. If you want to use
a 4 KB key size, every server must be upgraded to eDirectory 8.8. In addition, every
workstation using the management utilities, for example, iManager and ConsoleOne, must
have NICI 2.7 installed on it.
novdocx (en) 6 April 2007
When you upgrade your Certificate Authority (CA) server to eDirectory 8.8, the key size will
not change; it will be 2 KB. The only way to create a 4 KB key size is recreate the CA on an
eDirectory 8.8 server. In addition, you would have to change the default from 2 KB to 4 KB for
the key size, during the CA creation.
If you are upgrading to eDirectory 8.8, make sure you have the latest NDS and eDirectory
patches installed on all non-eDirectory 8.8 servers in the tree. You can get NDS and eDirectory
patches from the Novell Support (http://support.novell.com) Web site.
Make sure you have the latest Windows 2000 or 2003 Server Service Packs installed. The latest
updated Windows Service Pack needs to be installed after the installation of the Windows
SNMP service.
If you are upgrading from a previous version of eDirectory, it must be eDirectory 8.7 or later.
(Conditional) If you are installing a secondary server into an existing tree as a nonadministrator
user, ensure that you have the following rights:
Supervisor rights to the container the server is being installed into.
Supervisor rights to the partition where you want to add the server.
NOTE: This is required for adding the replica when the replica count is less than 3.
All Attributes rights: read, compare, and write rights over the W0.KAP.Security object.
Entry rights: browse rights over Security container object.
All Attributes rights: read and compare rights over Security container object.
(Conditional) If you are installing a secondary server into an existing tree as a nonadministrator
user, ensure that at least one of the servers in the tree has the same or higher eDirectory version
as that of the secondary being added as container admin. In case the secondary being added is
of later version, then the schema needs to be extended by the admin of the tree before adding
the secondary using container admin.
24 Novell eDirectory 8.8 Installation Guide
Page 25

Configuring Static IP Address
Refer to “Configuring Static IP Address” on page 12 for more information on configuring static IP
addresses.
2.3 Hardware Requirements
Hardware requirements depend on the specific implementation of eDirectory.
For example, a base installation of eDirectory with the standard schema requires about 74 MB of
disk space for every 50,000 users. However, if you add a new set of attributes or completely fill in
every existing attribute, the object size grows. These additions affect the disk space, processor, and
memory needed.
Two factors increase performance: more cache memory and faster processors.
For best results, cache as much of the DIB Set as the hardware allows.
eDirectory scales well on a single processor. However, Novell eDirectory 8.8 takes advantage of
multiple processors. Adding processors improves performance in some areas—for example, logins
and having multiple threads active on multiple processors. eDirectory itself is not processor
intensive, but it is I/O intensive.
novdocx (en) 6 April 2007
The following table illustrates typical system requirements for Novell eDirectory for Windows
2000:
Objects Processor Memory Hard Disk
10,000 Pentium III 450-700 MHz (single) 384 MB 144 MB
1 million Pentium III 450-700 MHz (dual) 2 GB 1.5 GB
10 million Pentium III 450-700 MHz (2 to 4) 2+ GB 15 GB
Requirements for processors might be greater than the table indicates, depending upon additional
services available on the computer as well as the number of authentications, reads, and writes that
the computer is handling. Processes such as encryption and indexing can be processor intensive.
2.4 Forcing the Backlink Process to Run
Because the internal eDirectory identifiers change when upgrading to eDirectory, the backlink
process must update backlinked objects for them to be consistent.
Backlinks keep track of external references to objects on other servers. For each external reference
on a server, the backlink process ensures that the real object exists in the correct location and verifies
all backlink attributes on the master of the replica. The backlink process occurs two hours after the
database is open and then every 780 minutes (13 hours). The interval is configurable from 2 minutes
to 10,080 minutes (7 days).
After migrating to eDirectory, we recommend that you force the backlink to run by completing the
following procedure. Running the backlink process is especially important on servers that do not
contain a replica.
1 Click Start > Settings > Control Panel > Novell eDirectory Services
Installing or Upgrading Novell eDirectory on Windows 25
Page 26

2 In the Services tab, select ds.dlm.
3 Click Configure.
4 In the Trigger tab, click Backlinker.
For more information about the backlink process, refer to the Novell eDirectory 8.8 Administration
Guide (http://www.novell.com/documentation/edir88/edir88/data/h0000005.html).
2.5 Updating the eDirectory Schema for
Windows
To install eDirectory 8.8 into an existing tree, you might need to update the eDirectory schema by
running DSRepair on the server that contains the master replica of the root partition.
IMPORTANT: If the master replica of the root partition resides on a NetWare server, follow the
instructions in Section 1.5, “Updating the eDirectory Schema for NetWare,” on page 13.
For an upgrade that needs a platform upgrate also, refer to Chapter 10, “Migrating to eDirectory 8.8
SP2,” on page 129.
novdocx (en) 6 April 2007
The eDirectory installation program checks the existing schema's version. If the schema has not
been upgraded, the installation program instructs you to run DSRepair and then discontinues.
1 Copy patches\dsrepair\ntnds8\dsrepair.dll from the product CD to the
directory where you installed eDirectory (for example, c:\novell\nds).
2 Click Start > Settings > Control Panel > Novell eDirectory Services.
3 Select dsrepair.dlm in the Service list.
4 Enter -ins in the Startup Parameters field, then click Start.
After the schema has been updated, the Status field next to the dsrepair.dlm service will
be blank.
5 To see the results of the schema update, select dsrepair.dlm, then click Start.
6 Click File > Open Log File > Open.
The last entry in the log file will contain the results of the schema update.
2.6 Disk Space Check on Upgrading to
eDirectory SP2 or later
When eDirectory server is upgraded from previous versions to eDirectory 8.8 SP2 or later, the disk
space check for the DIB upgrade would be performed. The free disk space necessary in the file
system, where the DIB resides would be equal to that of the DIB size. The messages of the disk
space check would be updated in the ni.log and <Install Path>/novell/nds/
ndscheck.log.
NOTE: The disk space check is required only during the DIB upgrade process. For more
information, refer to Chapter 8, “Upgrade Requirements of eDirectory 8.8,” on page 115.
26 Novell eDirectory 8.8 Installation Guide
Page 27

2.7 Installing Novell eDirectory on Windows
This section contains the following information:
“Installing or Updating Novell eDirectory 8.8 on Windows 2000 or Server 2003” on page 27
“Server Health Checks” on page 28
“Communicating with eDirectory through LDAP” on page 29
“Installing NMAS Server Software” on page 32
“Installing NMAS Client Software” on page 32
“Installing into a Tree with Dotted Name Containers” on page 32
2.7.1 Installing or Updating Novell eDirectory 8.8 on Windows
2000 or Server 2003
You can install eDirectory 8.8 for Windows without the Novell Client. If you install eDirectory 8.8
on a machine already containing the Novell Client, eDirectory will use the existing Client, or update
it if it is not the latest version.
novdocx (en) 6 April 2007
1 At the Windows server, log in as Administrator or as a user with administrative privileges.
2 To resolve tree names, make sure that SLP is correctly configured on your network and that
SLP DAs are stable.
For more information, see one of the following:
Appendix C, “Configuring OpenSLP for eDirectory,” on page 147
DHCP Options for Service Location Protocol (http://www.openslp.org/doc/rfc/
rfc2610.txt)
OpenSLP Documentation (http://www.openslp.org/#Documentation)
3 If you have Autorun turned off, run setup.bat from the Novell eDirectory 8.8 SP2 CD or
from the downloaded file.
The installation program checks for the following components before it installs eDirectory. If a
component is missing or is an incorrect version, the installation program automatically
launches an installation for that component.
NICI 2.7
For more information on the Novell International Cryptographic Infrastructure (NICI), see
the NICI 2.7 Administration Guide (http://www.novell.com/documentation/nici27x/
index.html).
You might have to reboot the server after the NICI installation. The eDirectory installation
will continue after the reboot.
Novell Client for Windows.
IMPORTANT: The Novell Client is updated automatically if you have an older version
of the Client already installed on the machine. For more information on the Client, see the
Novell Client for Windows (http://www.novell.com/documentation/lg/noclienu/
index.html) online documentation.
4 View the license agreement, then click I Accept.
5 Select a language for the installation, then click Next.
Installing or Upgrading Novell eDirectory on Windows 27
Page 28

6 Specify or confirm the installation path, then click Next.
7 Specify or confirm the DIB path, then click Next.
8 (New installations only) Select an eDirectory installation type, then click Next.
Install eDirectory into an Existing Tree incorporates this server into your eDirectory
network. The server can be installed into any level of your tree.
Create a New eDirectory Tree creates a new tree. Use this option if this is the first server
to go into the tree or if this server requires a separate tree. The resources available on the
new tree will not be available to users logged in to a different tree.
9 Provide information in the eDirectory Installation screen, then click Next.
If you are installing a new eDirectory server, specify a Tree name, Server object context,
and Admin name and password for the new tree.
If you are installing into an existing tree, specify the Tree name, Server object context, and
Admin name and password of the existing tree.
If you are upgrading an eDirectory server, specify the Admin password.
NOTE: In eDirectory 8.8 and later, you can have case sensitive passwords for all the
utilities. Refer to Novell eDirectory 8.8 What's New Guide (http://www.novell.com/
documentation/edir88/index.html) for more information.
novdocx (en) 6 April 2007
For information on using dots in container names, see “Installing into a Tree with Dotted Name
Containers” on page 32.
10 (New installations only) In the HTTP Server Port Configuration page, specify the ports to use
for the eDirectory administrative HTTP server, then click Next.
IMPORTANT: Make sure that the HTTP stack ports you set during the eDirectory installation
are different than the HTTP stack ports you have used or will use for Novell iManager. For
more information, see the Novell iManager 2.5 Administration Guide (http://www.novell.com/
documentation/imanager25/index.html).
11 (New installations only) In the LDAP Configuration page, specify which LDAP ports to use,
then click Next.
For more information, see “Communicating with eDirectory through LDAP” on page 29.
12 Select the NMAS
TM
login methods you want to install, then click Next.
See “Installing NMAS Server Software” on page 32 and “Installing NMAS Client Software”
on page 32 for more information.
13 Click Finish to complete the eDirectory installation.
2.7.2 Server Health Checks
With eDirectory 8.8, when you upgrade eDirectory, a server health check is conducted by default to
ensure that the server is safe for the upgrade.
Section B.3.2, “Partitions and Replica Health,” on page 143
Based on the results obtained from the health checks, the upgrade will either continue or exit as
follows:
If all the health checks are successful, the upgrade will continue.
28 Novell eDirectory 8.8 Installation Guide
Page 29

If there are minor errors, the upgrade will prompt you to continue or exit.
If there are critical errors, the upgrade will exit.
See Appendix B, “Server Health Checks,” on page 141 for a list of minor and critical error
conditions.
Skipping Server Health Checks
To skip server health checks, disable server health checks when prompted in the installation wizard
For more information, see Appendix B, “Server Health Checks,” on page 141.
2.7.3 Communicating with eDirectory through LDAP
When you install eDirectory, you must select a port that the LDAP server monitors so that it can
service LDAP requests. The following table lists options for various installations:
Installation Option Result
novdocx (en) 6 April 2007
eDirectory 8.8 Clear text (port 389) Selects port 389.
eDirectory 8.8 Encrypted (port 636) Selects port 636.
eDirectory 8.8 Require TLS for simple bind Keeps (on the LDAP Group object) a
parameter asked about during
installation.
Port 389, the Industry-Standard LDAP Clear-Text Port
The connection through port 389 is not encrypted. All data sent on a connection made to this port is
clear. Therefore, a security risk exists. For example, LDAP passwords can be viewed on a simple
bind request.
An LDAP Simple Bind requires only a DN and a password. The password is in clear text. If you use
port 389, the entire packet is in clear text. By default, this option is disabled during the eDirectory
installation.
Because port 389 allows clear text, the LDAP server services Read and Write requests to the
Directory through this port. This openness is adequate for environments of trust, where spoofing
doesn't occur and no one inappropriately captures packets.
To disallow clear passwords and other data, select the Require TLS for Simple Bind with Password
option during installation.
As the following figure illustrates, the page gives defaults of 389, 636, and Require TLS for Simple
Bind with Password.
Installing or Upgrading Novell eDirectory on Windows 29
Page 30
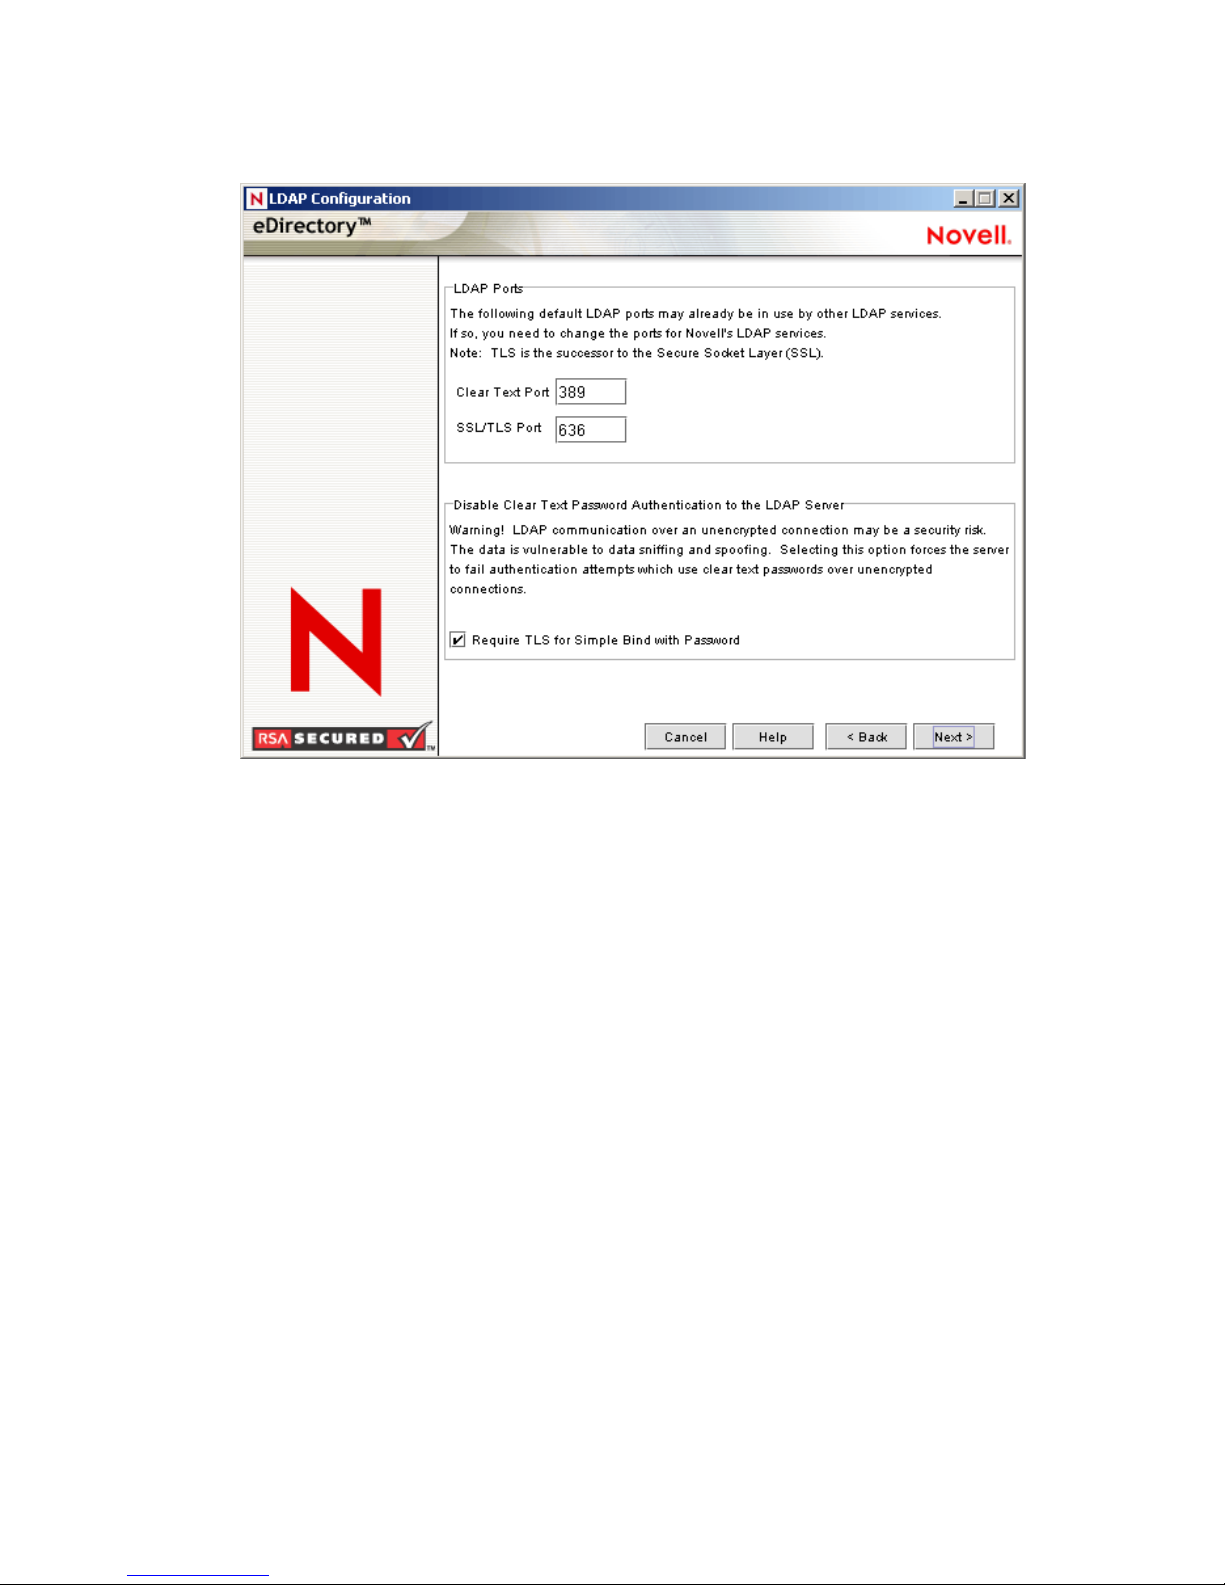
Figure 2-1 Defaults for the LDAP Configuration Screen
novdocx (en) 6 April 2007
Scenario: Require TLS for Simple Bind with Password Is Enabled: Olga is using a client that
asks for a password. After Olga enters a password, the client connects to the server. However, the
LDAP server does not allow the connection to bind to the server over the clear-text port. Everyone is
able to view Olga's password, but Olga is unable to get a bound connection.
The Require TLS for Simple Bind with Password discourages users from sending observable
passwords. If this setting is disabled (that is, not checked), users are unaware that others can observe
their passwords. This option, which does not allow the connection, only applies to the clear-text
port.
If you make a secure connection to port 636 and have a simple bind, the connection is already
encrypted. No one can view passwords, data packets, or bind requests.
Port 636, the Industry-Standard Secure Port
The connection through port 636 is encrypted. TLS (formerly SSL) manages the encryption. By
default, the eDirectory installation selects this port.
The following figure illustrates the selected port.
30 Novell eDirectory 8.8 Installation Guide
Page 31

Figure 2-2 LDAP Server Connections Page in iManager
novdocx (en) 6 April 2007
A connection to port 636 automatically instantiates a handshake. If the handshake fails, the
connection is denied.
IMPORTANT: This default selection might cause a problem for your LDAP server. If a service
already loaded on the host server (before eDirectory was installed) uses port 636, you must specify
another port.
Installations earlier than eDirectory 8.7 treated this conflict as a fatal error and unloaded
nldap.nlm. The eDirectory 8.7.3 onwards installation loads nldap.nlm, places an error
message in the dstrace.log file, and runs without the secure port.
Scenario: Port 636 Is Already Used: Your server is running Active Directory*. Active Directory
is running an LDAP program, which uses port 636. You install eDirectory. The installation program
detects that port 636 is already used and doesn't assign a port number for the Novell LDAP server.
The LDAP server loads and appears to run. However, because the LDAP server does not duplicate
or use a port that is already open, the LDAP server does not service requests on any duplicated port.
If you are not certain that port 389 or 636 is assigned to the Novell LDAP server, run the ICE utility.
If the Vendor Version field does not specify Novell, you must reconfigure LDAP Server for
eDirectory and select a different port.See “Verifying That The LDAP Server Is Running” in the
Novell eDirectory 8.8 Administration Guide for more information.
Scenario: Active Directory Is Running: Active Directory is running. Clear-text port 389 is open.
You run the ICE command to port 389 and ask for the vendor version. The report displays
Microsoft*. You then reconfigure the Novell LDAP server by selecting another port, so that the
eDirectory LDAP server can service LDAP requests.
Novell iMonitor can also report that port 389 or 636 is already open. If the LDAP server isn't
working, use Novell iMonitor to identify details. See “Verifying That The LDAP Server Is Running”
in the Novell eDirectory 8.8 Administration Guide for more information.
Installing or Upgrading Novell eDirectory on Windows 31
Page 32

2.7.4 Installing NMAS Server Software
Novell Modular Authentication ServiceTM (NMAS) server components are installed automatically
when you run the eDirectory installation program. You will need to select the login methods you
want to install.
Select the login methods that you want to install into eDirectory by checking the appropriate check
boxes. When you select a login method, a description of the component appears in the Description
box. For more information on login methods, see “Managing Login and Post-Login Methods and
Sequences” (http://www.novell.com/documentation/beta/nmas30/admin/data/a53vj9a.html) in the
Novell Modular Authentication Service Administration Guide.
Click Select All if you want to install all the login methods into eDirectory. Click Clear All if you
want to clear all selections.
The NDS login method is installed by default.
2.7.5 Installing NMAS Client Software
The NMAS client software must be installed on each client workstation where you want to use the
NMAS login methods.
novdocx (en) 6 April 2007
1 At a Windows client workstation, insert the Novell eDirectory 8.8 CD.
2 From the NMAS directory, run nmasinstall.exe.
3 Select the NMAS Client Components check box.
Optionally, you can select the NICI check box if you want to install this component.
4 Click OK, then follow the on-screen instructions.
5 Reboot the client workstation after the installation completes.
2.7.6 Installing into a Tree with Dotted Name Containers
You can install a Windows server into an eDirectory tree that has containers with dots in the names
(for example, O=novell.com or C=u.s.a). Using containers with dotted names requires that those
dots be escaped with the backslash character. To escape a dot, simply put a backslash in front of any
dot in a container name. See Figure 2-3 for an example.
You cannot start a name with a dot. For example, you cannot create a container named “.novell”
because it starts with a dot (‘.’).
32 Novell eDirectory 8.8 Installation Guide
Page 33

Figure 2-3 eDirectory Installation Information Screen
novdocx (en) 6 April 2007
IMPORTANT: If your tree has containers with dotted names, you must escape those names when
logging into utilities such as iMonitor, iManager, and DHost iConsole. For example, if your tree has
“novell.com” as the name of the O, enter username.novell\.com in the Username field when logging
in to iMonitor (see Figure 2-4).
Figure 2-4 iMonitor Login Screen
Installing or Upgrading Novell eDirectory on Windows 33
Page 34

novdocx (en) 6 April 2007
34 Novell eDirectory 8.8 Installation Guide
Page 35

3
Installing or Upgrading Novell
novdocx (en) 6 April 2007
eDirectory on Linux
Use the following information to install or upgrade Novell® eDirectoryTM 8.8 on a Linux* server:
Section 3.1, “System Requirements,” on page 35
Section 3.2, “Prerequisites,” on page 36
Section 3.3, “Hardware Requirements,” on page 37
Section 3.4, “Forcing the Backlink Process to Run,” on page 38
Section 3.5, “Upgrading eDirectory,” on page 38
Section 3.6, “Installing eDirectory,” on page 46
3.1 System Requirements
One of the following:
OES Linux SP2 32 bit
SUSE Linux Enterprise Server 8.x 32 bit
SUSE Linux Enterprise Server 9 32 bit (SP1, SP2 & SP3) and 64 bit (SP3) or later
SUSE Linux Enterprise Server 10 32 bit and 64 bit
3
NOTE: eDirectory 8.8 SP2 is supported on SLES 10 XEN virtualization service that runs
the SLES 10 guest OS. The following updates are available at https://update.novell.com
(https://update.novell.com).
SUSE-Linux-Enterprise-Server-X86_64-10-0-20061011-020434
SLES10-Updates
For registering and updating SUSE Linux Enterprise 10, refer to Registering SUSE Linux
Enterprise 10 with the Novell Customer Center (http://support.novell.com/techcenter/
articles/RegandUpdate_SLE10.html). After installating the latest update, ensure that the
minimum patch level of the installed update is 3.0.2_09763-0.8.
To determine the version of SUSE Linux you are running, see the /etc/SuSE-release file.
Red Hat Enterprise Linux ES & AS 3.0 32 bit
Ensure that the latest glibc patches are applied from Red Hat Errata (http://rhn.redhat.com/
errata) on Red Hat systems. The minimum required version of the glibc library is version
2.1.
Red Hat Enterprise Linux AS 4.0 32 and 64-bit
256 MB RAM minimum
90 MB of disk space for the eDirectory server
25 MB of disk space for the eDirectory administration utilities
74 MB of disk space for every 50,000 users
Ensure that gettext is installed
Installing or Upgrading Novell eDirectory on Linux
35
Page 36

NOTE: By default, gettext is not installed on the base install of SLES9, but is included in the
SLES9 install CD's. Ensure you install it before you run nds-install, or you will get messages
about it missing.
3.2 Prerequisites
IMPORTANT: Check the currently installed Novell and Third Party applications to determine if
eDirectory 8.8 is supported before upgrading your existing eDirectory environment. You can find
out the current status for Novell products in the TID - What Novell products are supported with
Novell eDirectory 8.8? (http://support.novell.com/cgi-bin/search/searchtid.cgi?10099872.htm). We
also highly recommend you to back up eDirectory before any upgrades.
(Conditional) NICI 2.7 and eDirectory 8.8 support key sizes up to 4096 bits. If you want to use
a 4 KB key size, every server must be upgraded to eDirectory 8.8. In addition, every
workstation using the management utilities, for example, iManager and ConsoleOne, must
have NICI 2.7 installed on it.
When you upgrade your Certificate Authority (CA) server to eDirectory 8.8, the key size will
not change; it will be 2 KB. The only way to create a 4 KB key size is recreate the CA on an
eDirectory 8.8 server. In addition, you would have to change the default from 2 KB to 4 KB for
the key size, during the CA creation.
novdocx (en) 6 April 2007
For more information, refer to Section 3.6.2, “Installing NICI,” on page 47.
SLP installed and configured
With eDirectory 8.8, SLP does not get installed as part of the eDirectory installation.
Only a root user can install SLP.
For more information on installing SLP, refer to “Using SLP with eDirectory” on page 46.
The Linux host enabled for multicast routing
To check if the host is enabled for multicast routing, enter the following command:
/bin/netstat -nr
The following entry should be present in the routing table:
224.0.0.0 0.0.0.0
If the entry is not present, log in as root and enter the following command to enable multicast
routing:
route add -net 224.0.0.0 netmask 240.0.0.0 dev interface
The interface could be a value such as eth0, hme0, hme1, or hme2, depending on the NIC that
is installed and used.
Network server time synchronized
Use Network Time Protocol's (NTP) xntpd to synchronize time across all network servers. If
you want to synchronize time on Linux, Solaris, AIX, or HP-UX systems with NetWare
servers, use timesync.nlm 5.09 or later.
compat-libstdc++ RPM
®
If the compat-libstdc++ RPM is not present on your host machine, install it. This RPM
contains libstdc++-libc6.1-1.so.2.
compat
36 Novell eDirectory 8.8 Installation Guide
Page 37

If the compat RPM is not present on your machine, install it. This RPM contains
libncurses.so.4.
For YaST based installation:
Install the java2 jre package. This contains libjava.so and libjvm.so.
(Conditional) If you are installing a secondary server, all the replicas in the partition that you
install the product on should be in the On state.
(Conditional) If you are installing a secondary server into an existing tree as a nonadministrator
user, ensure that you have the following rights:
Supervisor rights to the container the server is being installed into.
Supervisor rights to the partition where you want to add the server.
NOTE: This is required for adding the replica when the replica count is less than 3.
All Attributes rights: read, compare, and write rights over the W0.KAP.Security object.
Entry rights: browse rights over Security container object.
All Attributes rights: read and compare rights over Security container object.
(Conditional) If you are installing a secondary server into an existing tree as a nonadministrator
user, ensure that at least one of the servers in the tree has the same or higher eDirectory version
as that of the secondary being added as container admin. In case the secondary being added is
of later version, then the schema needs to be extended by the admin of the tree before adding
the secondary using container admin.
novdocx (en) 6 April 2007
Configuring Static IP Address
Refer to “Configuring Static IP Address” on page 12 for more information on configuring static IP
addresses.
3.3 Hardware Requirements
Hardware requirements depend on the specific implementation of eDirectory. Two factors increase
performance: more cache memory and faster processors. For best results, cache as much of the DIB
Set as the hardware allows.
eDirectory scales well on a single processor. However, Novell eDirectory 8.8 takes advantage of
multiple processors. Adding processors improves performance in some areas — for example, logins
— and having multiple threads active on multiple processors also improves performance. eDirectory
itself is not processor intensive, but it is I/O intensive.
The following table illustrates typical system requirements for eDirectory for Linux:
Objects Processor Memory Hard Disk
100,000 Pentium III 450-700 MHz (single) 384 MB 144 MB
1 million Pentium III 450-700 MHz (dual) 2 GB 1.5 GB
10 million Pentium III 450-700 MHz (2 to 4) 2+ GB 15 GB
Installing or Upgrading Novell eDirectory on Linux 37
Page 38

Requirements for processors might be greater than the table indicates, depending upon additional
services available on the computer as well as the number of authentications, reads, and writes that
the computer is handling. Processes such as encryption and indexing can be processor intensive.
3.4 Forcing the Backlink Process to Run
Because the internal eDirectory identifiers change when upgrading to Novell eDirectory, the
backlink process must update backlinked objects for them to be consistent.
Backlinks keep track of external references to objects on other servers. For each external reference
on a server, the backlink process ensures that the real object exists in the correct location and verifies
all backlink attributes on the master of the replica. The backlink process occurs two hours after the
database is open, and then every 780 minutes (13 hours). The interval is configurable from 2
minutes to 10,080 minutes (7 days).
After migrating to eDirectory, start the ndstrace process by issuing the ndstrace -l>log&
command, which runs the process at the background. You can force the backlink to run by issuing
the ndstrace -c set ndstrace=*B command from the ndstrace command prompt. Then
you can unload the ndstrace process by issuing the ndstrace -u command. Running the backlink
process is especially important on servers that do not contain a replica.
novdocx (en) 6 April 2007
3.5 Upgrading eDirectory
Section 3.5.1, “Server Health Checks,” on page 38
Section 3.5.2, “Upgrading on Linux Servers Other Than OES,” on page 39
Section 3.5.3, “Upgrading Through ZENworks Linux Management on OES Linux SP2,” on
page 39
Section 3.5.4, “Upgrading the Tarball Deployment of eDirectory 8.8,” on page 44
Section 3.5.5, “Upgrading Multiple Instances,” on page 45
Section 3.5.6, “Disk Space Check on Upgrading to eDirectory SP2 or later,” on page 45
3.5.1 Server Health Checks
With eDirectory 8.8, when you upgrade eDirectory, a server health check is conducted by default to
ensure that the server is safe for the upgrade:
Section B.3.2, “Partitions and Replica Health,” on page 143
Based on the results obtained from the health checks, the upgrade will either continue or exit as
follows:
If all the health checks are successful, the upgrade will continue.
If there are minor errors, the upgrade will prompt you to continue or exit.
If there are critical errors, the upgrade will exit.
See Appendix B, “Server Health Checks,” on page 141 for a list of minor and critical error
conditions.
38 Novell eDirectory 8.8 Installation Guide
Page 39

Skipping Server Health Checks
To skip server health checks, use nds-install -j or ndsconfig upgrade -j.
For more information, see Appendix B, “Server Health Checks,” on page 141.
3.5.2 Upgrading on Linux Servers Other Than OES
If you have eDirectory 8.5.x or 8.6.x, you have to first upgrade to eDirectory 8.7.x and then upgrade
to eDirectory 8.8.
To upgrade to eDirectory 8.8, use nds-install utility. this utility is located in the Setup directory of
the downloaded file for Linux platform. Enter the following command from Setup directory:
./nds-install
After the upgrade to eDirectory 8.8, the default location of the configuration files, data files, and log
files are changed to /etc/opt/novell/eDirectory/conf, /var/opt/novell/
eDirectory/data, and /var/opt/novell/eDirectory/log respectively.
The new directory /var/opt/novell/eDirectory/data uses a symbolic link to the /
var/nds directory.
novdocx (en) 6 April 2007
The old configuration file /etc/nds.conf is migrated to /etc/opt/novell/
eDirectory/conf directory. The old configuration file /etc/nds.conf and the old log files
under /var/nds are retained for reference.
NOTE: "ndsconfig upgrade" has to be run after nds-install, if upgrade of the DIB fails and ndsinstall asks to do so.
3.5.3 Upgrading Through ZENworks Linux Management on
OES Linux SP2
eDirectory 8.8 on OES Linux SP2 leverages ZENworks® Linux Management to provide easy
upgrade distribution and deployment using the oes-edir88 channel.
For more information on ZENworks Linux Management, refer to ZENworks Linux Management
(http://www.novell.com/products/zenworks/linuxmanagement/index.html).
For more information on registering and updating Novell Linux products, refer to Linux
Registration and Updates (http://support.novell.com/linux/registration/).
You can upgrade to eDirectory 8.8 on OES Linux SP2 using either of the following methods:
Through the Command Line Interface
Through the GUI
Through the Command Line Interface
To upgrade through ZENworks Linux Management through your terminal, complete the following
steps:
1 Stop the eDirectory server as follows:
Installing or Upgrading Novell eDirectory on Linux 39
Page 40

rcndsd stop or /etc/init.d/ndsd stop
2 Upgrade the packages.
2a Check if the Novell_Update_Server service exists as follows:
rug sl
2b (Conditional) If the service is not present, add it as follows:
rug sa URL_for_the_service
For example: rug sa https://update.novell.com/data
2c (Conditional) If the service is not activated, activate it as follows:
rug act -s service activation_code e-mail_address
For example: rug act -s 1 oes user@acme.com
NOTE: Use the same activation code that you use to get the OES updates.
2d Subscribe to the oes-edir88 channel.
rug sub oes-edir88
novdocx (en) 6 April 2007
NOTE: Ensure that oes-edir88 channel is the only active channel; if not, this can affect
the subsequent command by getting more updates than intended. You can verify active
channels with the rug ch command.
2e To upgrade to eDirectory 8.8 rpms, enter the following:
rug in --entire-channel oes-edir88
This command updates all the eDirectory 8.8 packages including nici, yast2-
edirectory, and novell-edirectory-install.
2f Unsubscribe from the oes-edir88 channel.
rug unsub oes-edir88
2g Subscribe to the oes channel.
rug sub oes
2h Download the 11148 patch.
rug pin patch-11148
This command installs the updated yast2-novell-common file that detects eDirectory 8.7.3
and eDirectory 8.8 versions appropriately. If you install any other eDirectory dependent
services from YaST, it demotes to lower eDirectory versions.
3 Export the paths.
You can export the paths either manually or using the ndspath script.
IMPORTANT: ndspath works only in sh and bash shells. In other shells, you need to set
the path manually or in your profile scripts.
For example, to export the paths using the ndspath script, enter the following from a command
line:
. /opt/novell/eDirectory/bin/ndspath
40 Novell eDirectory 8.8 Installation Guide
Page 41

NOTE: There is a space between the period and the path. To preserve the path settings
permanantly, you can create a /etc/bash.bashrc.local file and append the path . /
opt/novell/eDirectory/bin/ndspath to this file.
4 Run chkconfig -a ndsd.
5 To initialize NICI, enter the following:
ln -sf /var/opt/novell/nici /var/novell/nici
To ensure that NICI is set to server mode, enter the following:
/var/opt/novell/nici/set_server_mode
6 Run ndsconfig upgrade.
If you want to use ZENworks Linux Management server to upgrade from eDirectory 8.7.3 to
eDirectory 8.8 on multiple machines, put Step 1 into a pre-transaction script and Step 3 to Step 6
into a post-transaction script.
For more information on transactions, refer to the ZENworks Linux Management (http://
www.novell.com/documentation/zlm/index.html).
novdocx (en) 6 April 2007
Through the GUI
1 Stop the server as follows:
rcndsd stop or /etc/init.d/ndsd stop
2 Upgrade the packages.
2a Invoke ZENworks Linux Management (or Red Carpet)
1. Go to System > Configuration > Red Carpet
The Red Carpet screen is displayed.
2b Add a service.
1. Select Edit > Service.
2. (Conditional) In the dialog box that appears, if the Novell_Update_Server service is
not present, add it. Click Add Service and enter the service URL, for example, https:/
/update.novell.com/data.
2c (Conditional) If the service is not activated, activate it as follows:
1. Select File > Activate
2. Select the service name you had added.
3. Type the e-mail ID.
4. Type the activation code. For example, oes.
NOTE: Use the same activation code that you use to get the OES updates.
5. Click on the Activate button.
2d Subscribe to the channel.
1. Select Edit > Channel Subscription.
2. In the dialog box that appears, select oes-edir88.
3. Click Close.
Installing or Upgrading Novell eDirectory on Linux 41
Page 42

2e Apply the packages.
1. Click on the Available Software tab and select the oes-edir88 channel.
All the eDirectory packages are displayed.
2. Select all the packages.
3. Click on Mark for Installation.
4. Click on the Updates tab and select the nici, yast2-edirectory, and
novell-edirectory-install packages.
5. Click on Mark for Installation.
6. Click Run Now.
7. Click Continue to apply the packages.
2f Subscribe to the channel.
1. Select Edit > Channel Subscription.
2. In the dialog box that appears, select oes.
3. Click Close.
2g Apply the patch.
novdocx (en) 6 April 2007
1. Click on the Patches tab.
2. Scroll down to patch-11148.
3. Click on Mark for Installation.
4. Click Run Now.
5. Click Continue to apply the patch. This updates the yast2-novell-common file.
This command installs the updated yast2-novell-common file that detects eDirectory
8.7.3 and eDirectory 8.8 versions appropriately. If you install any other eDirectory
dependent services from YaST, it demotes to lower eDirectory versions.
3 Export the paths.
You can export the paths either manually or using the ndspath script.
For example, to export the paths using the ndspath script, enter the following from a command
line:
. /opt/novell/eDirectory/bin/ndspath
NOTE: There is a space between the period and the path. To preserve the path settings
permanantly, you can create a /etc/bash.bashrc.local file and append the path . /
opt/novell/eDirectory/bin/ndspath to this file.
4 Run chkconfig -a ndsd.
5 To initialize NICI, enter the following:
ln -sf /var/opt/novell/nici /var/novell/nici
To ensure that NICI is set to server mode, enter the following:
/var/opt/novell/nici/set_server_mode
6 Run ndsconfig upgrade.
If you want to use ZENworks Linux Management server to upgrade from eDirectory 8.7.3 to
eDirectory 8.8 on multiple machines, put Step 1 into a pre-transaction script and Step 3 to Step 6
into a post-transaction script.
42 Novell eDirectory 8.8 Installation Guide
Page 43

For more information on transactions, refer to the ZENworks Linux Management (http://
www.novell.com/documentation/zlm/index.html).
Configuring eDirectory 8.8 Through YaST After Upgrade
After upgrading the packages, configure eDirectory 8.8 as follows:
1 Click on Network Services in the YaST Control Center screen.
2 Select eDirectory.
This invokes the eDirectory configuration.
3 On the Upgrade eDirectory DIB screen, enter the required credentials and click Next.
Configuring eDirectory 8.8 Multiple Instances Through YaST After Upgrade
After upgrading eDirectory 8.8, to configure the eDirectory 8.8 server, complete the following
procedure:
1 Click on Network Services in the YaST Control Center screen.
2 Select eDirectory.
This invokes the eDirectory configuration.
3 Select Create Instance.
novdocx (en) 6 April 2007
4 Create the new instance in a new or existing tree.
To create the instance for a new tree do the following:
4a Select New Tree
4b Enter the name of the tree
4c Click Next
The eDirectory Configuration - New Tree Information screen is displayed.
4d Enter the admin name with context.
For example, cn=admin.o=novell
4e Enter the password and confirm it.
4f Click Next.
The eDirectory Configuration - Instance Information screen is displayed.
To add the instance to an existing tree, do the following:
4a Select Existing Tree.
4b Enter the name of the existing tree.
4c Click Next.
The eDirectory Configuration - Existing Tree Information screen is displayed.
4d Enter the hostname along with the NCP and secure LDAP port numbers.
4e Enter the admin FDN.
For example, cn=admin.o=novell
4f Enter the password.
4g Click Next
The eDirectory Configuration - Instance Information screen is displayed.
Installing or Upgrading Novell eDirectory on Linux 43
Page 44

5 Enter the instance details, such as, server context, server name, instance, dib, and configuration
locations.
6 Specify the NTP and SLP settings.
3.5.4 Upgrading the Tarball Deployment of eDirectory 8.8
If you want to upgrade the Tarball deployment from eDirectory 8.8 to eDirectory 8.8, perform the
following steps:
1 Download the tarball build.
2 Take backup of the following configuration files:
$NDSHOME/eDirectory/etc/opt/novell/eDirectory/conf/ndsimon.conf
$NDSHOME/eDirectory/etc/opt/novell/eDirectory/conf/ice.conf
$NDSHOME/eDirectory/etc/opt/novell/eDirectory/conf/ndsimonhealth.conf
$NDSHOME/eDirectory/etc/opt/novell/eDirectory/conf/ndssnmp/ndssnmp.cfg
$NDSHOME is the location where eDirectory is installed.
3 Perform disk space check using ndscheck -D --config-file conf_file_path
4 Run pre upgrade health check for the all instances using "ndscheck" and check the
ndscheck.log file for any errors before proceeding with the upgrade.
5 Stop all instances using "ndmanage".
6 Untar the tarball in the same location ($NDSHOME) where eDirectory is installed. By untaring
the tarball in the same location, we are overwriting the binaries and libraries.
7 Upgrade the following packages if necessary.
novdocx (en) 6 April 2007
Platform Command Packages
Linux rpm -Uvh <rpm name> novell-NOVLsubag-8.8.1-
2.i386.rpm
nici-2.7.0-0.01.i386.rpm
novell-NDSslp-8.8-1.i386.rpm
Solaris
AIX
HP-UX
Remove the older version using
"pkgrm <pkg name>
Install new version using "pkgadd -
d <pkg name>"
installp -acgXd <pkg name with full
path> <pkg name> all
swinstall -s <depot name with full
path> <pkg name>
NOVLsubag.pkg
NOVLniu0.pkg
NDSslp.pkg
NDS.NOVLsubag.8.8.1.0
NOVLniu0.2.7.0.0
NDS.NDSslp.8.8.1.0
NOVLsubag.depot
NOVLniu0.depot
8 Restore the configuration files.
9 Run the $NDSHOME/eDirectory/opt/novell/eDirectory/bin/ndspath for setting all environment
variables.
44 Novell eDirectory 8.8 Installation Guide
Page 45

10 Run “ndsconfig upgrade -j” for all instances. While running “ndsconfig upgrade” follow the
order in which the master replica is the first and followed by R/W and others.
3.5.5 Upgrading Multiple Instances
This section contains the following information:
“Root User has Multiple Instances” on page 45
“Non Root User's Instances” on page 45
“Order of Upgrade” on page 45
Root User has Multiple Instances
If you run nds-install after doing the package upgrade, it will prompt you asking “The DIB of all the
Novell eDirectory Server instances need to be upgraded. This may take long time to complete. If
you wish to perform the DIB upgrade parallely, you could do it manually (Refer the readme). Do
you wish to continue with the DIB upgrade for all the active instances one by one?”
If you select this, it will run “ndsconfig upgrade” for all the instances one by one. In case of larger
DIBs, you can select “no” here and run “ndsconfig upgrade” parallely in separate shells. It would
help reducing the time of each instances.
novdocx (en) 6 April 2007
Non Root User's Instances
If you have non root user's instances which are using root user's binaries, then before doing the
package upgrade you need to run “ndscheck” for all those instances and make sure that their health
is proper by referring ndscheck.log. If you run nds-install, it will stop all the instances including non
root user's instances. After doing the package upgrade, nds-install won't call “ndsconfig upgrade”
for non root user's instances. We need to run “ndsconfig upgrade” for all non root user's instances
manually. This will start those instances.
Order of Upgrade
While running “ndsconfig upgrade”, we need to follow the order in which master replica comes first
and then R/W or other replicas. Otherwise upgrade fails.
3.5.6 Disk Space Check on Upgrading to eDirectory SP2 or
later
When eDirectory server is upgraded from previous versions to eDirectory 8.8 SP2 or later, the disk
space check for the DIB upgrade would be performed. The free disk space necessary in the file
system, where the DIB resides would be equal to that of the DIB size. The messages of the disk
space check would be updated in the ndscheck.log located in the instance's specific log
directory. For default instance, /var/opt/novell/eDirectory/log/ndscheck.log.
NOTE: The disk space check is required only during the DIB upgrade process. For more
information, refer to Chapter 8, “Upgrade Requirements of eDirectory 8.8,” on page 115.
Installing or Upgrading Novell eDirectory on Linux 45
Page 46

3.6 Installing eDirectory
The following sections provide information about installing Novell eDirectory on Linux:
Section 3.6.1, “Using SLP with eDirectory,” on page 46
Section 3.6.2, “Installing NICI,” on page 47
Section 3.6.3, “Using the nds-install Utility to Install eDirectory Components,” on page 49
Section 3.6.4, “Installing Through ZENworks Linux Management on OES Linux SP2,” on
page 51
Section 3.6.5, “Nonroot User Installing eDirectory 8.8,” on page 55
Section 3.6.6, “Using the ndsconfig Utility to Add or Remove the eDirectory Replica Server,”
on page 57
Section 3.6.7, “Using ndsconfig to Configure Multiple Instances of eDirectory 8.8,” on page 61
Section 3.6.8, “Using ndsconfig to Install a Linux Server into a Tree with Dotted Name
Containers,” on page 66
Section 3.6.9, “Using the nmasinst Utility to Configure NMAS,” on page 67
novdocx (en) 6 April 2007
Section 3.6.10, “nonroot user SNMP configuration,” on page 68
3.6.1 Using SLP with eDirectory
In earlier releases of eDirectory, SLP was installed during the eDirectory install. But with eDirectory
8.8, you need to separately install SLP before proceeding with the eDirectory install.
If you plan to use SLP to resolve tree names, it should have been properly installed and configured
and the SLP DAs should be stable.
1 Install SLP by entering the following:
rpm -ivh SLP_rpm_file_name_with_path
The SLP RPM is present in the setup directory in the build. For example, if you have the
build in the /home/build directory, enter the following command:
rpm -ivh /home/build/Linux/Linux/setup/novell-NDSslp-8.820i386.rpm
2 Follow the onscreen instructions to complete the SLP installation.
3 Start SLP manually as follows:
/etc/init.d/slpuasa start
Similarly, when you uninstall the SLP package, you need to stop SLP manually, as follows:
/etc/init.d/slpuasa stop
If you don't want to (or cannot) use SLP, you can use the flat file hosts.nds to resolve tree names
to server referrals. The hosts.nds file can be used to avoid SLP multicast delays when SLP DA
is not present in the network.
46 Novell eDirectory 8.8 Installation Guide
Page 47

hosts.nds is a static lookup table used by eDirectory applications to search eDirectory partition
and servers. In the hosts.nds file, for each tree or server, a single line contains the following
information:
Tree/Server Name: Tree names end with a trailing dot (.).
Internet Address: This can be a DNS name or IP address.
Server Port: Optional, appended with a colon (:) to the Internet address.
The syntax followed in the hosts.nds file is as follows:
<[partition name.]tree name>. <host-name/ip-addr>[:<port>]
<server name> <dns-addr/ip-addr>[:<port]
For example:
# This is an example of a hosts.nds file:
# Tree name
Internet address
CORPORATE.
myserver.mycompany.com
novell.CORPORATE.
1.2.3.4:524
novdocx (en) 6 April 2007
# Server name
Internet address
CORPSERVER
myserver.mycompany.com
See the hosts.nds man page for more details.
If you decide to use SLP to resolve the tree name to determine if the eDirectory tree is advertised,
after eDirectory and SLP are installed, enter the following:
/usr/bin/slpinfo -s "ndap.novell///(svcname-ws==[treename or *])"
For example, to search for the services whose svcname-ws attribute match with the value
SAMPLE_TREE, enter the following command:
/usr/bin/slpinfo -s "ndap.novell///(svcname-ws==SAMPLE_TREE)/"
If you have a service registered with its svcname-ws attribute as SAMPLE_TREE, then the output
will be similar to the following:
service:ndap.novell:///SAMPLE_TREE
If you do not have a service registered with its svcname-ws attribute as SAMPLE_TREE, there will
be no output.
For more information, see Appendix C, “Configuring OpenSLP for eDirectory,” on page 147.
3.6.2 Installing NICI
NICI should be installed before you proceed with the eDirectory installation. Both root and nonroot
users can install NICI.
Installing or Upgrading Novell eDirectory on Linux 47
Page 48

Root User Installing NICI
To install NICI, complete the following procedure:
1 Enter the following command:
rpm -ivh nici_rpm_file_name_with_path
For example:
rpm -ivh nici-2.7.0-5.i386.rpm
2 Execute the following script:
/var/opt/novell/nici/set_server_mode
Nonroot User Installing NICI
Nonroot users can make use of the sudo utility to install NICI. Sudo (superuser do) allows a root
user to give certain users the ability to run some commands as root. A root user can do this by
editing the /etc/sudoers configuration file and adding appropriate entries in it.
For more information, refer to the sudo Website (http://www.sudo.ws).
novdocx (en) 6 April 2007
WARNING: sudo enables you to give limited root permissions to nonroot users. Therefore, we
strongly recommend you to understand the security implications before proceeding.
A root user needs to complete the following procedure to enable a nonroot user (for example, john)
to install NICI:
1 Log in as root.
2 Edit the /etc/sudoers configuration file using the visudo command.
NOTE: There is no space between vi and sudo in the command.
Make an entry with the following information:
Username hostname=(root) NOPASSWD: /bin/rpm
For example, to enable john to run /bin/rpm as root on the hostname lnx-2, type the following:
john lnx-2=(root) NOPASSWD: /bin/rpm
A nonroot user (john in the example) needs to do the following to install NICI:
1 Log in as john and execute the following command:
sudo rpm -ivh nici_rpm_file_name_with_path
For example:
sudo rpm -ivh /88/Linux/Linux/setup/nici-2.7.0-5.i386.rpm
2 Execute the following script:
sudo /var/opt/novell/nici/set_server_mode
NICI gets installed in the server mode.
48 Novell eDirectory 8.8 Installation Guide
Page 49

3.6.3 Using the nds-install Utility to Install eDirectory
Components
Use the nds-install utility to install eDirectory components on Linux systems. This utility is located
in the Setup directory of the downloaded file for the Linux platform. The utility adds the required
packages based on what components you choose to install.
IMPORTANT: If the ZENworks Linux Management client is installed and the daemon (rcd) is
running, then before running nds-install, stop the daemon using /etc/init.d/rcd stop.
1 Enter the following command at the setup directory:
./nds-install
To install eDirectory components, use the following syntax:
nds-install [-c component1 [-c component2]...] [-h] [--help] [-i]
[-j] [-u]
If you do not provide the required parameters in the command line, the nds-install utility will
prompt you for the parameters.
novdocx (en) 6 April 2007
The following table provides a description of the nds-install utility parameters:
nds-install Parameter Description
-c Specifies the component to be installed based on the packages
available. You can install more than one component by using the -c
option multiple times.
There are two components you can install: the eDirectory server and
the eDirectory administration utilities.
To install the server, enter -c server.
To install the administration utilities, enter -c admutils.
For example, to install Novell eDirectory Server packages, you would
enter the following command:
./nds-install -c server
-h or --help Displays help for nds-install.
-i Prevents the nds-install script from invoking the ndsconfig upgrade if a
DIB is detected at the time of the upgrade.
-j Jumps or overrides the health check option before installing
eDirectory. For more information about health checks, refer to
Appendix B, “Server Health Checks,” on page 141.
-u Specifies the option to use in an unattended install mode.
For unattended install to proceed, you need to enter at least the -c
option at the command line, or else the install will abort.
The installation program displays a list of eDirectory components that you can install.
2 Specify the option for the component you want to install.
Installing or Upgrading Novell eDirectory on Linux 49
Page 50

Based on the component you choose to install, the installation program proceeds to add the
appropriate RPMs or packages into the Linux system.The following table lists the packages
installed for each eDirectory component.
eDirectory Component Packages Installed Description
novdocx (en) 6 April 2007
eDirectory Server novell-NDSbase
novell-NDScommon
novell-NDSmasv
novell-NDSserv
novell-NDSimon
novell-NDSrepair
novell-NDSdexvnt
novell-NOVLsubag
novell-NOVLsnmp
novell-NOVLpkit
novell-NOVLpkis
novell-NOVLpkia
novell-NOVLembox
novell-NOVLlmgnt
novell-NOVLxis
novell-NLDAPsdk
novell-NLDAPbase
novell-NOVLsas
novell-NOVLntls
novell-NOVLnmas
novell-NOVLldif2dib
novell-NOVLncp
Administration Utilities novell-NOVLice
novell-NDSbase
novell-NLDAPbase
novell-NLDAPsdk
novell-NOVLpkia
novell-NOVLxis
novell-NOVLlmgnt
The eDirectory replica server is
installed on the specified server.
The Novell Import Conversion
Export and LDAP Tools
administration utilities are
installed on the specified
workstation.
3 If you are prompted, enter the complete path to the license file.
You will be prompted to enter the complete path to the license file only if the installation
program cannot locate the file in the default location (/var, the mounted license diskette, or
the current directory).
If the path you entered is not valid, you will be prompted to enter the correct path.
4 After the installation is complete, you need to update the following environment variables and
export them. You can either do it manually or use a script.
Manually export the environment variables
export LD_LIBRARY_PATH=/opt/novell/eDirectory/lib:/opt/
novell/eDirectory/lib/nds-modules:/opt/novell/
lib:$LD_LIBRARY_PATH
export PATH=/opt/novell/eDirectory/bin:/opt/novell/
eDirectory/sbin:$PATH
export MANPATH=/opt/novell/man:/opt/novell/eDirectory/
man:$MANPATH
50 Novell eDirectory 8.8 Installation Guide
Page 51

export TEXTDOMAINDIR=/opt/novell/eDirectory/share/
locale:$TEXTDOMAINDIR
Use the ndspath script to export the environment variables
If you do not want to export the paths manually, you can use the /opt/novell/
eDirectory/bin/ndspath script as follows:
Prefix the ndspath script to the utility and run the utility you want as follows:
/opt/novell/eDirectory/bin/ndspath
utility_name_with_parameters
Export the paths in the current shell as follows:
. /opt/novell/eDirectory/bin/ndspath
After entering the above command, run the utilities as you would normally do.
The path exporting instructions should be placed at the end of /etc/profile or ~/bashrc
or similar scripts. Therefore, whenever you log in or open a new shell, you can start
using the utilities directly.
You can use the ndsconfig utility to configure eDirectory Server after installation.
TM
Novell Modular Authentication Service (NMAS
) is installed as part of the server component. By
default, ndsconfig configures NMAS. You can also use the nmasinst utility to configure NMAS
server after installation. This must be done after configuring eDirectory with ndsconfig.
novdocx (en) 6 April 2007
For more information on the ndsconfig utility, see “The ndsconfig Utility” on page 121.
For more information on the nmasinst utility, see “Using the nmasinst Utility to Configure NMAS”
on page 67.
3.6.4 Installing Through ZENworks Linux Management on OES
Linux SP2
eDirectory 8.8 on OES Linux SP2 leverages ZENworks® Linux Management to provide easy install
distribution and deployment using the oes-edir88 channel.
For more information on ZENworks Linux Management, refer to ZENworks Linux Management
(http://www.novell.com/products/zenworks/linuxmanagement/index.html).
For more information on registering and updating Novell Linux products, refer to Linux
Registration and Updates (http://support.novell.com/linux/registration/).
You can install to eDirectory 8.8 on OES Linux SP2 using either of the following methods:
Through the Command Line Interface
Through the GUI
Through the Command Line Interface
To install through ZENworks Linux Management through your terminal, complete the following
steps:
1 Install the packages.
1a Check if the Novell_Update_Server service exists as follows:
Installing or Upgrading Novell eDirectory on Linux 51
Page 52

rug sl
1b (Conditional) If the service is not present, add it as follows:
rug sa URL_for_the_service
For example: rug sa https://update.novell.com/data
1c (Conditional) If the service is not activated, activate it as follows:
rug act -s service activation_code e-mail_address
For example: rug act -s 1 oes user@acme.com
NOTE: Use the same activation code that you use to get the OES updates.
1d Subscribe to the oes-edir88 channel.
rug sub oes-edir88
1e To install to eDirectory 8.8 rpms, enter the following:
rug in --entire-channel oes-edir88
This command installs all the eDirectory 8.8 packages including nici, yast2-
edirectory, and novell-edirectory-install.
1f Subscribe to the oes channel.
rug sub oes
1g Install the 11148 patch.
rug pin patch-11148
This command installs the updated yast2-novell-common file that detects eDirectory 8.7.3
and eDirectory 8.8 versions appropriately. If you install any other eDirectory dependent
services from YaST, it demotes to lower eDirectory versions.
novdocx (en) 6 April 2007
2 Export the paths.
You can export the paths either manually or using the ndspath script.
For example, to export the paths using the ndspath script, enter the following from a command
line:
. /opt/novell/eDirectory/bin/ndspath
NOTE: There is a space between the period and the path. To preserve the path settings
permanantly, you can create a /etc/bash.bashrc.local file and append the path . /
opt/novell/eDirectory/bin/ndspath to this file.
3 Run chkconfig -a ndsd
4 To initialize NICI, enter the following:
ln -sf /var/opt/novell/nici /var/novell/nici
To ensure that NICI is set to server mode, enter the following:
/var/opt/novell/nici/set_server_mode
If you want to use ZENworks Linux Management server to install eDirectory 8.8 on multiple
machines, put Step 1 into a pre-transaction script and Step 3 into a post-transaction script.
For more information on transactions, refer to the ZENworks Linux Management (http://
www.novell.com/documentation/zlm/index.html).
52 Novell eDirectory 8.8 Installation Guide
Page 53

Through the GUI
1 Install the packages.
1a Invoke ZENworks Linux Management (or Red Carpet)
1. Go to System > Configuration > Red Carpet
The Red Carpet screen is displayed.
1b Add a service.
1. Select Edit > Service.
2. (Conditional) In the dialog box that appears, if the Novell_Update_Server service is
not present, add it. Click Add Service and enter the service URL, for example, https:/
/update.novell.com/data.
1c (Conditional) If the service is not activated, activate it as follows:
1. Select File > Activate
2. Select the service name you had added.
3. Type the e-mail ID.
4. Type the activation code. For example, oes.
novdocx (en) 6 April 2007
NOTE: Use the same activation code that you use to get the OES updates.
5. Click on the Activate button.
1d Subscribe to the channel.
1. Select Edit > Channel Subscription.
2. In the dialog box that appears, select oes-edir88.
3. Click Close.
1e Apply the packages.
1. Click on the Available Software tab and select the oes-edir88 channel.
All the eDirectory packages are displayed.
2. Select all the packages.
3. Click on Mark for Installation.
4. Click on the Updates tab and select the nici, yast2-edirectory, and
novell-edirectory-install packages.
5. Click on Mark for Installation.
6. Click Run Now.
7. Click Continue to apply the packages.
1f Subscribe to the channel.
1. Select Edit > Channel Subscription.
2. In the dialog box that appears, select oes.
3. Click Close.
1g Apply the patch.
1. Click on the Patches tab.
2. Scroll down to patch-11148.
Installing or Upgrading Novell eDirectory on Linux 53
Page 54

3. Click on Mark for Installation.
4. Click Run Now.
5. Click Continue to apply the patch. This updates the yast2-novell-common file.
This command installs the updated yast2-novell-common file that detects eDirectory
8.7.3 and eDirectory 8.8 versions appropriately. If you install any other eDirectory
dependent services from YaST, it demotes to lower eDirectory versions.
2 Export the paths.
You can export the paths either manually or using the ndspath script.
For example, to export the paths using the ndspath script, enter the following from a command
line:
. /opt/novell/eDirectory/bin/ndspath
NOTE: There is a space between the period and the path. To preserve the path settings
permanantly, you can create a /etc/bash.bashrc.local file and append the path . /
opt/novell/eDirectory/bin/ndspath to this file.
3 Run chkconfig -a ndsd
novdocx (en) 6 April 2007
4 To initialize NICI, enter the following:
ln -sf /var/opt/novell/nici /var/novell/nici
To ensure that NICI is set to server mode, enter the following:
/var/opt/novell/nici/set_server_mode
If you want to use ZENworks Linux Management server to install eDirectory 8.8 on multiple
machines, put Step 1 into a pre-transaction script and Step 3 into a post-transaction script.
For more information on transactions, refer to the ZENworks Linux Management (http://
www.novell.com/documentation/zlm/index.html).
Configuring eDirectory 8.8 Through YaST After Upgrade
After installing the packages, configure eDirectory 8.8 as follows:
1 Click on Network Services in the YaST Control Center screen.
2 Select eDirectory.
This invokes the eDirectory configuration.
Configuring eDirectory 8.8 Multiple Instances Through YaST After Upgrade
After installing eDirectory 8.8, to configure the eDirectory 8.8 server, complete the following
procedure:
1 Click on Network Services in the YaST Control Center screen.
2 Select eDirectory.
This invokes the eDirectory configuration.
3 Select Create Instance.
4 Create the new instance in a new or existing tree.
To create the instance for a new tree do the following:
4a Select New Tree
54 Novell eDirectory 8.8 Installation Guide
Page 55

4b Enter the name of the tree
4c Click Next
The eDirectory Configuration - New Tree Information screen is displayed.
4d Enter the admin name with context.
For example, cn=admin.o=novell
4e Enter the password and confirm it.
4f Click Next.
The eDirectory Configuration - Instance Information screen is displayed.
To add the instance to an existing tree, do the following:
4a Select Existing Tree.
4b Enter the name of the existing tree.
4c Click Next.
The eDirectory Configuration - Existing Tree Information screen is displayed.
4d Enter the hostname along with the NCP and secure LDAP port numbers.
4e Enter the admin FDN.
novdocx (en) 6 April 2007
For example, cn=admin.o=novell
4f Enter the password.
4g Click Next
The eDirectory Configuration - Instance Information screen is displayed.
5 Enter the instance details, such as, server context, server name, instance, dib, and configuration
locations.
6 Specify the NTP and SLP settings.
3.6.5 Nonroot User Installing eDirectory 8.8
A nonroot user can install eDirectory 8.8 using the tarball.
Prerequisites
Ensure that NICI is installed.
For information on installing NICI, refer to Section 3.6.2, “Installing NICI,” on page 47.
Ensure that SNMP subagent is installed using the command "rpm --nodeps <path of snmp
subagent rpm>".
If you want to use SLP and SNMP, ensure that they are installed by the root user.
Write rights to the directory where you want to install eDirectory.
If you are a nonadministrator user, ensure that you have the appropriate rights as mentioned in
the Section 3.2, “Prerequisites,” on page 36 section.
Installing eDirectory
1 Go to the directory where you want to install eDirectory.
2 Untar the tar file as follows:
Installing or Upgrading Novell eDirectory on Linux 55
Page 56

tar xvf /tar_file_name
The etc, opt, and var directories are created.
3 Export the paths as follows:
Manually export the environment variables
export LD_LIBRARY_PATH=custom_location/eDirectory/opt/
novell/eDirectory/lib:custom_location/eDirectory/opt/novell/
eDirectory/lib/nds-modules:custom_location/eDirectory/opt/
novell/lib:/opt/novell/lib:/opt/novell/eDirectory/
lib:$LD_LIBRARY_PATH
export PATH=custom_location/eDirectory/opt/novell/
eDirectory/bin:custom_location/eDirectory/opt/novell/
eDirectory/sbin:/opt/novell/eDirectory/bin:$PATH
export MANPATH=custom_location/eDirectory/opt/novell/
man:custom_location/eDirectory/opt/novell/eDirectory/
man:$MANPATH
novdocx (en) 6 April 2007
export TEXTDOMAINDIR=custom_location/eDirectory/opt/novell/
eDirectory/share/locale:$TEXTDOMAINDIR
Use the ndspath script to export the environment variables
If you do not want to export the paths manually, you can use the custom_location/
eDirectory/opt/novell/eDirectory/bin/ndspath script as follows:
Prefix the ndspath script to the utility and run the utility you want as follows:
custom_location/eDirectory/opt/novell/eDirectory/bin/
ndspath utility_name_with_parameters
Go to the custom_location/eDirectory/opt/novell/eDirectory/
bin/ directory and export the paths in the current shell as follows:
. custom_location/eDirectory/opt/novell/eDirectory/bin/
ndspath
NOTE: Ensure that you enter the above command from the custom_location/
eDirectory/opt/ directory.
After entering the above command, run the utilities as you would normally do.
Call the script in your profile, bashrc, or similar scripts. Therefore, whenever you log
in or open a new shell, you can start using the utilities directly.
4 Configure eDirectory in the usual manner.
You can configure eDirectory in any of the following ways:
Use the ndsconfig utility as follows:
ndsconfig new -t treename -n server_context -a admin_FDN [-i]
[-S server_name] [-d path_for_dib] [-m module] [e] [-L
ldap_port] [-l SSL_port] [-o http_port] -O https_port] [-b
port_to_bind] [-B interface1@port1, interface2@port2,..] [-D
custom_location] [--config-file configuration_file]
For example:
56 Novell eDirectory 8.8 Installation Guide
Page 57

ndsconfig new -t mary-tree -n novell -a admin.novell -S linux1 d /home/mary/inst1/data -b 1025 -L 1026 -l 1027 -o 1028 -O 1029
-D /home/mary/inst1/var --config-file /home/mary/inst1/nds.conf
The port numbers you enter need to be in the range 1024 to 65535. Port numbers lesser
than 1024 are normally reserved for the super-user and standard applications. Therefore,
you cannot assume the default port 524 for any eDirectory applications.
This might cause the following applications to break:
The applications that don't have an option to specify the target server port.
The older applications that use NCP, and run as root for 524.
Use the ndsmanage utility to configure a new instance. For more information, refer to the
“Creating an Instance through ndsmanage” on page 63.
Follow the onscreen instructions to complete the configuration.
For more information, see Section 3.6.6, “Using the ndsconfig Utility to Add or Remove the
eDirectory Replica Server,” on page 57
3.6.6 Using the ndsconfig Utility to Add or Remove the
eDirectory Replica Server
novdocx (en) 6 April 2007
You must have Administrator rights to use the ndsconfig utility. When this utility is used with
arguments, it validates all arguments and prompts for the password of the user having Administrator
rights. If the utility is used without arguments, ndsconfig displays a description of the utility and
available options. This utility can also be used to remove the eDirectory Replica Server and change
the current configuration of eDirectory Server. For more information, see “The ndsconfig Utility” on
page 121.
Prerequisite for Configuring eDirectory in a Specific Locale
If you want to configure eDirectory in a specific locale, you need to export LC_ALL and LANG to
that particular locale before eDirectory configuration. For example, to configure eDirectory in the
Japanese locale, enter the following:
export LC_ALL=ja
export LANG=ja
Creating A New Tree
Use the following syntax:
ndsconfig new -t treename -n server context -a admin FDN [-i] [-S
server name] [-d path for dib] [-m module] [e] [-L ldap port] [-l SSL
port] [-o http port] -O https port] [-b port to bind] [-B
interface1@port1, interface2@port2,..] [-D custom_location] [--config-
file configuration_file]
A new tree is installed with the specified tree name and context.
There is a limitation on the number of characters in the tree_name, admin FDN and server context
variables. The maximum number of characters allowed for these variables is as follows:
tree_name: 32 characters
Installing or Upgrading Novell eDirectory on Linux 57
Page 58

admin FDN: 64 characters
server context: 64 characters
If the parameters are not specified in the command line, ndsconfig prompts you to enter values for
each of the missing parameters.
Or, you can also use the following syntax:
ndsconfig def -t treename -n server context -a admin FDN [-i] [-S
server name] [-d path for dib] [-m module] [-e] [-L ldap port] [-l SSL
port] [-o http port] -O https port] [-D custom_location] [--config-
file configuration_file]
A new tree is installed with the specified tree name and context. If the parameters are not specified
in the command line, ndsconfig takes the default value for each of the missing parameters.
For example, to create a new tree, you could enter the following command:
ndsconfig new -t corp-tree -n o=company -a cn=admin.o=company
Adding a Server into an Existing Tree
novdocx (en) 6 April 2007
Use the following syntax:
ndsconfig add -t treename -n server context -a admin FDN [-e] [-P LDAP
URL(s)][-L ldap port] [-l SSL port] [-o http port] -O https port] [-S
server name] [-d path for dib] [-p IP address:port] [-m module] [-b
port to bind] [-B interface1@port1, interface2@port2,..] [-D
custom_location] [--config-file configuration_file] [-E]
A server is added to an existing tree in the specified context. If the context that the user wants to add
the Server object to does not exist, ndsconfig creates the context and adds the server.
LDAP and security services can also be added after eDirectory has been installed into the existing
tree.
For example, to add a server into an existing tree, you could enter the following command:
ndsconfig add -t corp-tree -n o=company -a cn=admin.o=company -s
srv1
You can enable encrypted replication in the server you want to add using the -E option. For more
information on encrypted replication, refer to Novell eDirectory 8.8 Administration Guide (http://
www.novell.com/documentation/edir88/index.html).
Removing a Server Object And Directory Services From a Tree
Use the following syntax:
ndsconfig rm -a admin FDN
eDirectory and its database are removed from the server.
NOTE: The HTML files created using iMonitor will not be removed. You must manually remove
these files before removing eDirectory.
For example, to remove the eDirectory Server object and directory services from a tree, you could
enter the following command:
58 Novell eDirectory 8.8 Installation Guide
Page 59

ndsconfig rm -a cn=admin.o=company
ndsconfig Utility Parameters
novdocx (en) 6 April 2007
ndsconfig
Parameter
new Creates a new eDirectory tree. If the parameters are not specified in the command
def Creates a new eDirectory tree. If the parameters are not specified in the command
add Adds a server into an existing tree. Also adds LDAP and SAS services, after
rm Removes the Server object and directory services from a tree.
upgrade Upgrades eDirectory to a later version.
-i While configuring a new tree, ignores checking whether a tree of the same name
-S server
name
Description
line, ndsconfig prompts you to enter values for each of the missing parameters.
line, ndsconfig takes the default value for each of the missing parameters.
eDirectory has been configured in the existing tree.
exists. Multiple trees of the same name can exist.
Specifies the server name. The server name can also contain dots (for example,
novell.com). Because ndsconfig is a command line utility, using containers with dotted
names requires that those dots be escaped out, and the parameters containing these
contexts must be enclosed in double quotes.
For example, to install a new eDirectory tree on a UNIX server using “novell.com” as
the name of the O, use the following command:
ndsconfig new -a "admin.novell\\.com" -t novell_tree -n
"OU=servers.O=novell\\.com"
The Admin name and context and the server context parameters are enclosed in
double quotes, and only the '.' in novell.com is escaped using the '\\' (backslash)
character. You can also use this format when installing a server into an existing tree.
NOTE: You cannot start a name with a dot. For example, you cannot install a server
that has the name “.novell”, because it starts with a dot ('.').
-t treename The tree name to which the server has to be added. It can have a maximum of 32
characters. If not specified, ndsconfig takes the tree name from the n4u.nds.tree-name
parameter that is specified in the /etc/opt/novell/eDirectory/conf/nds.conf file. The
default treename is $LOGNAME-$HOSTNAME-NDStree.
-n server
context
-d path for
dib
-L ldap_port Specifies the TCP port number on the LDAP server. If the default port 389 is already in
Specifies the context of the server in which the server object is added. It can have a
maximum of 64 characters. If the context is not specified, ndsconfig takes the context
from the configuration parameter n4u.nds.server-context specified in the /etc/opt/
novell/eDirectory/conf/nds.conf file. The server context should be specified in the
typed form. The default context is org.
The directory path where the database files will be stored.
use, it prompts for a new port.
Installing or Upgrading Novell eDirectory on Linux 59
Page 60

novdocx (en) 6 April 2007
ndsconfig
Parameter
Description
-l ssl_port Specifies the SSL port number on the LDAP server. If the default port 636 is already in
use, it prompts for a new port.
-a admin
FDN
Specifies the fully distinguished name of the User object with Supervisor rights to the
context in which the server object and Directory services are to be created. The admin
name should be specified in the typed form. It can have a maximum of 64 characters.
The default admin name is admin.org.
-e Enables clear text passwords for LDAP objects.
-p
IP_Address:
port
-P IP
addresses or
interface
Configures the eDirectory server into an existing tree by specifying the IP address and
port number of a server hosting the tree. If this option is used, SLP is not used for tree
lookup.
Configures a list of IP addresses or interface names that LDAP should listen to. You
can enter a comma separated list of IP addresses or interface names. -P works in
conjunction with -l and -L.
names
-m
modulename
Specifies the module name to configure. While configuring a new tree, you can
configure only the ds module. After configuring the ds module, you can add the NMAS,
LDAP, SAS, SNMP, HTTP services, and Novell SecretStore (ss) using the add
command. If the module name is not specified, all the modules are installed.
-o Specifies the HTTP clear port number.
-O Specifies the HTTP secure port number.
-E Enables encrypted replication for the server you are trying to add.
-j Jumps or overrides the health check option before installing eDirectory.
-b port to
bind
Sets the default port number on which a particular instance should listen on. This sets
the default port number on n4u.server.tcp-port and n4u.server.udp-port. If an NCP port
is passed using the -b option, then it is assumed to be the default port and the TCP
and UDP params are updated accordingly.
NOTE: -b and -B are exclusively used.
-B
Specifies the port number along with the IP address or interface. For example:
interface1@p
ort1,
interface2@p
ort2,...
-B eth0@524
or
-B 100.1.1.2@524
NOTE: -b and -B are mutually exclusive.
--config-file
configuration
file
Specify the absolute path and file name to store the nds.conf configuration file. For
example, to store the configuration file in the /etc/opt/novell/eDirectory/
directory, enter --config-file /etc/opt/novell/eDirectory/
nds.conf.
-P <LDAP
URL(s)>
Allows the LDAP URLs to configure the LDAP interface on the LDAP Server object.
For example: -P ldap://1.2.3.4:1389,ldaps://1.2.3.4:1636
60 Novell eDirectory 8.8 Installation Guide
Page 61

novdocx (en) 6 April 2007
ndsconfig
Parameter
-D
path_for_dat
a
set valuelist Sets the value for the specified eDirectory configurable parameters. It is used to set
Description
Creates the data, dib, and log directories in the path mentioned.
the bootstrapping parameters before configuring a tree. When configuration
parameters are changed, ndsd needs to be restarted for the new value to take effect.
However, for some configuration paramters, ndsd need not be restarted.
These paramters are listed below:
n4u.nds.inactivity-synchronization-interval
n4u.nds.synchronization-restrictions
n4u.nds.janitor-interval
n4u.nds.backlink-interval
n4u.nds.drl-interval
n4u.nds.flatcleaning-interval
n4u.nds.server-state-up-threshold
n4u.nds.heartbeat-schema
n4u.nds.heartbeat-data
get help
paramlist
Use to view the help strings for the specified eDirectory configurable parameters. If the
parameter list is not specified, ndsconfig lists the help strings for all the eDirectory
configurable parameters.
set valuelist Sets the value for the specified eDirectory configurable parameters. It is used to set
the bootstrapping parameters before configuring a tree.
When configuration parameters are changed, ndsd needs to be restarted for the new
value to take effect.
get paramlist Use to view the current value of the specified eDirectory configurable parameters. If
the parameter list is not specified, ndsconfig lists all the eDirectory configurable
parameters.
3.6.7 Using ndsconfig to Configure Multiple Instances of
eDirectory 8.8
You can configure multiple instances of eDirectory 8.8 on a single host. For conceptual information
on multiple instances, see Multiple Instance Support in the Novell eDirectory 8.8 What's New Guide
(http://www.novell.com/documentation/edir88/edir88new/data/bqebx8t.html).
The method to configure multiple instance is similar to configuring a single instance multiple times.
Each instance should have unique instance identifiers, such as the following:
Different data and log file location
You can use the ndsconfig --config-file, -d, and -D options to do this.
Unique portnumber for the instance to listen to
You can use the ndsconfig -b and -B options to do this.
Installing or Upgrading Novell eDirectory on Linux 61
Page 62

NOTE: All the instances share the same server key (NICI).
You can also create a new instance using the ndsmanage utility. For more information, see “Creating
an Instance through ndsmanage” on page 63.
To list all the instances on a specific host and do other operations on them, you can use the
ndsmanage utility.
IMPORTANT: The install_location/etc/opt/novell/eDirectory/conf
directory contains some of the critical configuration information used for tracking and managing the
eDirectory instances running on your server. Do not remove any contents from this directory.
This sections explains the following:
“The ndsmanage Utility” on page 62
“Listing the Instances” on page 62
“Creating an Instance through ndsmanage” on page 63
“Performing Operations for a Specific Instance” on page 63
novdocx (en) 6 April 2007
The ndsmanage Utility
The ndsmanage utility enables you to do the following:
List the instances configured
Create a new instance
Do the following for a selected instance:
List the replicas on the server
Start the instance
Stop the instance
Run ndstrace for the instance
Deconfigure the instance
Start and Stop all instances
Listing the Instances
The following table describes how to list the eDirectory instances.
Table 3-1 ndsmanage Usage for Listing the Instances
Syntax Description
ndsmanage Lists all the instances configured by you.
ndsmanage -a|--all List instances of all the users who are using a particular installation of
ndsmanage username List the instances configured by a specific user
62 Novell eDirectory 8.8 Installation Guide
eDirectory.
Page 63

The following fields are displayed for every instance:
Configuration file path
Server FDN and port
Status (whether the instance is active or inactive)
NOTE: This utility lists all the instances configured for a single binary.
Refer to Figure 3-1 on page 63 for more information.
Creating an Instance through ndsmanage
To create a new instance through ndsmanage:
1 Enter the following command:
ndsmanage
If you have two instances configured, the following screen is displayed:
Figure 3-1 ndsmanage Utility Output Screen
novdocx (en) 6 April 2007
2 Enter c to create a new instance.
You can either create a new tree or add a server to an existing tree. Follow the instructions on
the screen to create a new instance.
Performing Operations for a Specific Instance
You can perform the following operations for every instance:
“Starting a Specific Instance” on page 63
“Stopping a Specific Instance” on page 64
“Deconfiguring an Instance” on page 64
Other than the ones listed above, you can also run ndstrace for a selected instance.
Starting a Specific Instance
To start an instance configured by you, do the following:
1 Enter the following:
ndsmanage
2 Select the instance you want to start.
Installing or Upgrading Novell eDirectory on Linux 63
Page 64

The menu expands to include the options you can perform on a specific instance.
Figure 3-2 ndsmanage Utility Output Screen with Instance Options
novdocx (en) 6 April 2007
3 Enter s to start the instance.
Alternatively, you can also enter the following at the command prompt:
ndsmanage start --config-file
configuration_file_of_the_instance_configured_by_you
Stopping a Specific Instance
To stop an instance configured by you, do the following:
1 Enter the following:
ndsmanage
2 Select the instance you want to stop.
The menu expands to include the options you can perform on a specific instance. For more
information, refer to ndsmanage Utility Output Screen with Instance Options (page 64).
3 Enter k to stop the instance.
Alternatively, you can also enter the following at the command prompt:
ndsmanage stop --config-file
configuration_file_of_the_instance_configured_by_you
Deconfiguring an Instance
To deconfigure an instance, do the following:
1 Enter the following:
ndsmanage
2 Select the instance you want to deconfigure.
The menu expands to include the options you can perform on a specific instance. For more
information, refer to ndsmanage Utility Output Screen with Instance Options (page 64).
3 Enter d to deconfigure the instance.
64 Novell eDirectory 8.8 Installation Guide
Page 65

Starting and Stopping All Instances
You can start and stop all the instances configured by you.
Starting all the Instances
To start all the instances configured by you, enter the following at the command prompt:
ndsmanage startall
To start a specific instance, refer to “Starting a Specific Instance” on page 63.
Stopping All Instances
To stop all the instances configured by you, enter the following at the command prompt:
ndsmanage stopall
To stop a specific instance, refer to “Stopping a Specific Instance” on page 64.
Example
novdocx (en) 6 April 2007
Mary wants to configure 2 trees on a single host machine.
Planning the Setup
Mary specifies the following instance identifiers.
Instance 1:
Port number the instance should listen on 1524
Configuration file path /home/maryinst1/nds.conf
DIB directory /home/mary/inst1/var
Instance 2:
Port number the instance should listen on 2524
Configuration file path /home/mary/inst2/nds.conf
DIB directory /home/mary/inst2/var
Configuring the Instances
To configure the instances based on the above mentioned instance identifiers, Mary must enter the
following commands.
Instance 1:
ndsconfig new -t mytree -n o=novell -a cn=admin.o=company -b 1524 D
/home/mary/inst1/var --config-file /home/mary/inst1/nds.conf
Instance 2:
Installing or Upgrading Novell eDirectory on Linux 65
Page 66

ndsconfig new -t corptree -n o=novell -a cn=admin.o=company -b 2524
-D
/home/mary/inst2/var --config-file /home/mary/inst2/nds.conf
NOTE: On UNIX/Linux, OS restricts sockets creation on the mounted file system. The same
restriction is applicable to NSS volumes. With eDirectory, its always recommended to have the
var directory on the local file system (-D option with ndsconfig) and DIB directory can be of
any file system (-d option with ndsconfig).
Invoking a Utility for an Instance
If Mary wants to run the ndstrace utility for instance 1 that is listening on port 1524, with its
configuration file in /home/mary/inst1/nds.conf location and its DIB file located in /
home/mary/inst1/var, then she can run the utility as follows:
ndstrace --config-file /home/mary/inst1/nds.conf
or
ndstrace -h 164.99.146.109:1524
If Mary does not specify the instance identifiers, the utility displays all the instances owned by Mary
and prompts her to select an instance.
novdocx (en) 6 April 2007
Listing the Instances
If Mary wants to know details about the instances in the host, she can run the ndsmanage utility.
To display all instances owned by Mary:
ndsmanage
To display all instances owned by John (username is john):
ndsmanage john
To display all instances of all users that are using a particular installation of eDirectory:
ndsmanage -a
3.6.8 Using ndsconfig to Install a Linux Server into a Tree with
Dotted Name Containers
You can use ndsconfig to install a Linux server into an eDirectory tree that has containers using
dotted names (for example, novell.com).
Because ndsconfig is a command line utility, using containers with dotted names requires that those
dots be escaped out, and the parameters containing these contexts must be enclosed in double
quotes. For example, to install a new eDirectory tree on a Linux server using “O=novell.com” as the
name of the O, use the following command:
ndsconfig new -a “admin.novell\.com” -t novell_tree -n “OU=servers.O=novell\.com”
The Admin name and context and the server context parameters are enclosed in double quotes, and
only the dot (’.’) in novell.com is escaped using the ’\’ (backslash) character.
You can also use this format when installing a server into an existing tree.
66 Novell eDirectory 8.8 Installation Guide
Page 67

NOTE: You should use this format when entering dotted admin name and context while using
utilities such as ndsrepair, ndsbackup, ndsmerge, ndslogin, and ldapconfig.
3.6.9 Using the nmasinst Utility to Configure NMAS
From eDirectory 8.7.3 onwards, by default, ndsconfig configures NMAS. You can also use nmasinst
on Linux, Solaris, AIX, and HP-UX systems to configure NMAS.
ndsconfig only configures NMAS and does not install the login methods. To install these login
methods, you can use nmasinst.
IMPORTANT: You must configure eDirectory with ndsconfig before you install the NMAS login
methods. You must also have administrative rights to the tree.
“Configuring NMAS” on page 67
“Installing Login Methods” on page 67
Configuring NMAS
novdocx (en) 6 April 2007
By default, ndsconfig configures NMAS. You can also use nmasinst for the same.
To configure NMAS and create NMAS objects in eDirectory, enter the following at the server
console command line:
nmasinst -i admin.context tree_name
nmasinst will prompt you for a password.
This command creates the objects in the Security container that NMAS needs, and installs the
LDAP extensions for NMAS on the LDAP Server object in eDirectory.
The first time NMAS is installed in a tree, it must be installed by a user with enough rights to create
objects in the Security container. However, subsequent installs can be done by container
administrators with read-only rights to the Security container. nmasinst will verify that the NMAS
objects exist in the Security container before it tries to create them.
nmasinst does not extend the schema. The NMAS schema is installed as part of the base eDirectory
schema.
Installing Login Methods
To install login methods using nmasinst, enter the following at the server console command line:
nmasinst -addmethod admin.context tree_name config.txt_path
The last parameter specifies the config.txt file for the login method that is to be installed. A
config.txt file is provided with each login method.
Here is an example of the -addmethod command:
nmasinst -addmethod admin.novell MY_TREE ./nmas-methods/novell/Simple
Password/config.txt
If the login method already exists, nmasinst will update it.
Installing or Upgrading Novell eDirectory on Linux 67
Page 68

For more information, see “Managing Login and Post-Login Methods and Sequences” (http://
www.novell.com/documentation/beta/nmas30/admin/data/a53vj9a.html) in the Novell Modular
Authentication Service Administration Guide.
3.6.10 nonroot user SNMP configuration
NICI and NOVLsubag should be installed as root user.
1 Root User Installing NICI. Refer to “Root User Installing NICI” on page 48
2 Root User Installing NOVLsubag.
To install NOVLsubag, complete the following procedure:
Enter the following command:
rpm -ivh --nodeps NOVLsubag_rpm_file_name_with_path
For example:
rpm -ivh --nodeps novell-NOVLsubag-8.8.1-5.i386.rpm
3 Export the paths as follows:
Manually export the environment variables.
export LD_LIBRARY_PATH=custom_location/opt/novell/
eDirectory/lib:custom_location/opt/novell/lib:/opt/novell/lib:/
opt/novell/eDirectory/lib:$LD_LIBRARY_PATH
novdocx (en) 6 April 2007
export PATH=/opt/novell/eDirectory/bin:$PATH
export MANPATH=/opt/novell/:$MANPATH
68 Novell eDirectory 8.8 Installation Guide
Page 69

4
Installing or Upgrading Novell
novdocx (en) 6 April 2007
eDirectory on Solaris
Use the following information to install or upgrade Novell® eDirectoryTM 8.8 on a Solaris* server:
Section 4.1, “System Requirements,” on page 69
Section 4.2, “Prerequisites,” on page 69
Section 4.3, “Hardware Requirements,” on page 71
Section 4.4, “Forcing the Backlink Process to Run,” on page 71
Section 4.5, “Upgrading eDirectory,” on page 71
Section 4.6, “Installing eDirectory,” on page 72
4.1 System Requirements
One of the following:
Solaris 10 on Sun SPARC
Solaris 9 on Sun SPARC
All latest recommended set of patches available on the SunSolve* Web page (http://
sunsolve.sun.com). If you do not update your system with the latest patches before installing
eDirectory, you will get the patchadd error.
128 MB RAM minimum
120 MB of disk space for the eDirectory server
4
32 MB of disk space for the eDirectory administration utilities
74 MB of disk space for every 50,000 users
4.2 Prerequisites
IMPORTANT: Check the currently installed Novell and Third Party applications to determine if
eDirectory 8.8 is supported before upgrading your existing eDirectory environment. You can find
out the current status for Novell products in the TID - What Novell products are supported with
Novell eDirectory 8.8? (http://support.novell.com/cgi-bin/search/searchtid.cgi?10099872.htm). We
also highly recommend you to back up eDirectory before any upgrades.
(Conditional) NICI 2.7 and eDirectory 8.8 support key sizes up to 4096 bits. If you want to use
a 4 KB key size, every server must be upgraded to eDirectory 8.8eDirectory 8.8. In addition,
every workstation using the management utilities, for example, iManager and ConsoleOne,
must have NICI 2.7 installed on it.
When you upgrade your Certificate Authority (CA) server to eDirectory 8.8, the key size will
not change; it will be 2 KB. The only way to create a 4 KB key size is recreate the CA on an
eDirectory 8.8 server. In addition, you would have to change the default from 2 KB to 4 KB for
the key size, during the CA creation.
Installing or Upgrading Novell eDirectory on Solaris
69
Page 70

The package containing NICI 2.7 is named NOVLniu0-2.7 on Solaris.
For more information, refer to Section 4.6.3, “Installing NICI,” on page 74.
SLP should be installed and configured.
With eDirectory 8.8, SLP does not get installed as part of the eDirectory installation.
If you are a root user, you need to install and configure SLP before proceeding with the
eDirectory installation.
If you are a nonroot user, SLP should be installed and configured before you proceed with the
eDirectory installation. A nonroot user cannot install SLP.
For more information on installing SLP, refer to “Using SLP with eDirectory” on page 73.
Enable the Solaris host for multicast routing.
To check if the host is enabled for multicast routing, enter the following command:
/bin/netstat -nr
The following entry should be present in the routing table:
224.0.0.0 host_IP_address
If the entry is not present, log in as root, and enter the following command to enable multicast
routing:
route add -net 224.0.0.0 -net 224.0.0.0 netmask 240.0.0.0 hme0
If you have more than one server in the tree, the time on all the network servers should be
synchronized.
novdocx (en) 6 April 2007
Use Network Time Protocol's (NTP) xntpd to synchronize time. If you want to synchronize
®
time on Linux, Solaris, AIX, or HP-UX systems with NetWare
servers, use timesync.nlm
5.09 or later.
(Conditional) If you are installing a secondary server, all the replicas in the partition that you
install the product on should be in the On state.
(Conditional) If you are installing a secondary server into an existing tree as a nonadministrator
user, ensure that you have the following rights:
Supervisor rights to the container the server is being installed into.
Supervisor rights to the partition where you want to add the server.
NOTE: This is required for adding the replica when the replica count is less than 3.
All Attributes rights: read, compare, and write rights over the W0.KAP.Security object.
Entry rights: browse rights over Security container object.
All Attributes rights: read and compare rights over Security container object.
(Conditional) If you are installing a secondary server into an existing tree as a nonadministrator
user, ensure that at least one of the servers in the tree has the same or higher eDirectory version
as that of the secondary being added as container admin. In case the secondary being added is
of later version, then the schema needs to be extended by the admin of the tree before adding
the secondary using container admin.
Configuring Static IP Address
Refer to “Configuring Static IP Address” on page 12 for more information on configuring static IP
addresses.
70 Novell eDirectory 8.8 Installation Guide
Page 71

4.3 Hardware Requirements
Hardware requirements depend on the specific implementation of eDirectory. Two factors increase
performance: more cache memory and faster processors. For best results, cache as much of the DIB
Set as the hardware allows.
eDirectory scales well on a single processor. However, Novell eDirectory 8.8 takes advantage of
multiple processors. Adding processors improves performance in some areas—for example, logins
and having multiple threads active on multiple processors. eDirectory itself is not processor
intensive, but it is I/O intensive.
The following table illustrates typical system requirements for Novell eDirectory for Solaris.
Objects Processor Memory Hard Disk
100,000 Sun* Enterprise 220 384 MB 144 MB
1 million Sun Enterprise 450 2 GB 1.5 GB
novdocx (en) 6 April 2007
10 million Sun Enterprise 4500 with multiple
processors
Requirements for processors might be greater than the table indicates, depending upon additional
services available on the computer as well as the number of authentications, reads, and writes that
the computer is handling. Processes such as encryption and indexing can be processor intensive.
2+ GB 15 GB
4.4 Forcing the Backlink Process to Run
Because the internal eDirectory identifiers change when upgrading to Novell eDirectory, the
backlink process must update backlinked objects for them to be consistent.
Backlinks keep track of external references to objects on other servers. For each external reference
on a server, the backlink process ensures that the real object exists in the correct location and verifies
all backlink attributes on the master of the replica. The backlink process occurs two hours after the
database is open, and then every 780 minutes (13 hours). The interval is configurable from 2
minutes to 10,080 minutes (7 days).
After migrating to eDirectory, start the ndstrace process by issuing the ndstrace -l>log&
command, which runs the process at the background. You can force the backlink to run by issuing
the ndstrace -c set ndstrace=*B command from the ndstrace command prompt. Then
you can unload the ndstrace process by issuing the ndstrace -u command. Running the backlink
process is especially important on servers that do not contain a replica.
4.5 Upgrading eDirectory
If you have eDirectory 8.5.x or 8.6.x, you have to first upgrade to eDirectory 8.7x and then upgrade
to eDirectory 8.8.
./nds-install
NOTE: Upgrade LUM to 2.1.2 if an older version is installed on the system.
Installing or Upgrading Novell eDirectory on Solaris 71
Page 72

After the upgrade to eDirectory 8.8, the default location of the configuration files, data files, and log
files are changed to /etc/opt/novell/eDirectory/conf, /var/opt/novell/
eDirectory/data, and /var/opt/novell/eDirectory/log respectively.
The new directory /var/opt/novell/eDirectory/data uses a symbolic link to the /
var/nds directory.
The old configuration file /etc/nds.conf is migrated to /etc/opt/novell/
eDirectory/conf directory. The old configuration file /etc/nds.conf is renamed to /
etc/nds.conf_pre88 and the old log files under /var/nds are retained for reference.
NOTE: “ndsconfig upgrade” has to be run after nds-install, if upgrade of the DIB fails and ndsinstall asks to do so.
4.5.1 Upgrading Multiple Instances
For information on Upgrading Multiple Instances, refer to Section 3.5.5, “Upgrading Multiple
Instances,” on page 45 in the Linux chapter.
novdocx (en) 6 April 2007
4.5.2 Upgrading the Tarball Deployment of eDirectory 8.8
For information on Upgrading the Tarball Deployment of eDirectory 8.8, refer to Section 3.5.4,
“Upgrading the Tarball Deployment of eDirectory 8.8,” on page 44 in the Linux chapter.
4.6 Installing eDirectory
The following sections provide information about installing Novell eDirectory on Solaris:
Section 4.6.1, “Server Health Checks,” on page 72
Section 4.6.2, “Using SLP with eDirectory,” on page 73
Section 4.6.3, “Installing NICI,” on page 74
Section 4.6.4, “Using the Nds-install Utility to Install eDirectory Components,” on page 75
Section 4.6.5, “Nonroot User Installing eDirectory 8.8,” on page 77
Section 4.6.6, “Using the Ndsconfig Utility to Add or Remove the eDirectory Replica Server,”
on page 79
Section 4.6.7, “Using ndsconfig to Configure Multiple Instances of eDirectory 8.8,” on page 81
Section 4.6.8, “Using Ndsconfig to Install a Solaris Server into a Tree with Dotted Name
Containers,” on page 81
Section 4.6.9, “Using the Nmasinst Utility to Configure NMAS,” on page 81
Section 4.6.10, “nonroot user SNMP configuration,” on page 82
4.6.1 Server Health Checks
With eDirectory 8.8, when you upgrade or install eDirectory, two server health checks are conducted
by default to ensure that the server is safe for the upgrade.
Section B.3.1, “Basic Server Health,” on page 142
72 Novell eDirectory 8.8 Installation Guide
Page 73

Section B.3.2, “Partitions and Replica Health,” on page 143
Based on the results obtained from the health checks, the upgrade will either continue or exit as
follows:
If all the health checks are successful, the upgrade will continue.
If there are minor errors, the upgrade will prompt you to continue or exit.
If there are critical errors, the upgrade will exit.
See Appendix B, “Server Health Checks,” on page 141 for a list of minor and critical error
conditions.
Skipping Server Health Checks
To skip server health checks, use nds-install -j or ndsconfig upgrade -j.
For more information, see Appendix B, “Server Health Checks,” on page 141.
4.6.2 Using SLP with eDirectory
novdocx (en) 6 April 2007
In earlier releases of eDirectory, SLP was installed during the eDirectory install. But with eDirectory
8.8, you need to separately install SLP before proceeding with the eDirectory install.
If you plan to use SLP to resolve tree names, it should have been properly configured and SLP DAs
should be stable.
1 To install SLP, enter the following:
pkgadd -d filename_and_absolute_path_of_NDSslp.pkg
The SLP package is present in the setup directory in the build. For example, if you have the
build in the /home/build directory, enter the following command:
pkgadd -d /home/build/Solaris/Solaris/setup/NDSslp.pkg
2 Follow the onscreen instructions to complete SLP installation.
3 Start SLP.
If you don't want to (or cannot) use SLP, you can use the flat file hosts.nds to resolve tree names to
server referrals. The hosts.nds file can be used to avoid SLP multicast delays when a SLP DA is not
present in the network.hosts.nds is a static lookup table used by eDirectory applications to search
eDirectory partition and servers. For more information on hosts.nds, refer to “Using SLP with
eDirectory” on page 46 and the hosts.nds manpage.
If you decide to use SLP to resolve the tree name to determine if the eDirectory tree is advertised,
after eDirectory and SLP are installed, enter the following:
/usr/bin/slpinfo -s "ndap.novell///(svcname-ws==[treename or *])"
For example, to search for the services whose svcname-ws attribute match with the value
SAMPLE_TREE, enter the following command:
/usr/bin/slpinfo -s "ndap.novell///(svcname-ws==SAMPLE_TREE)/"
If you have a service registered with its svcname-ws attribute as SAMPLE_TREE, then the output
will be similar to the following:
service:ndap.novell:///SAMPLE_TREE
Installing or Upgrading Novell eDirectory on Solaris 73
Page 74

If you do not have a service registered with its svcname-ws attribute as SAMPLE_TREE, there will
be no output.
For more information, see Appendix C, “Configuring OpenSLP for eDirectory,” on page 147.
4.6.3 Installing NICI
NICI should be installed before you proceed with the eDirectory installation. Both root and nonroot
users can install NICI, though the procedure to do so is different.
Root User Installing NICI
To install NICI, complete the following procedure:
1 Enter the following command:
pkgadd -d NICI_package_absolute_path_and_filename NOVLniu0
For example:
pkgadd -d /home/build/Solaris/Solaris/setup/NOVLniu0.pkg
NOVLniu0
2 Execute the following script:
/var/opt/novell/nici/set_server_mode
novdocx (en) 6 April 2007
Nonroot User Installing NICI
Nonroot users can make use of the sudo utility to install NICI. Sudo (superuser do) allows a root
user to give certain users the ability to run some commands as root. A root user can do this by
editing the /etc/sudoers configuration file and adding appropriate entries in it.
For more information, refer to the sudo Website (http://www.sudo.ws).
WARNING: sudo enables you to give limited root permissions to nonroot users. Therefore, we
strongly recommend you to understand the security implications before proceeding.
A root user needs to complete the following procedure to enable a nonroot user (for example, john)
to install NICI:
1 Log in as root.
2 Edit the /etc/sudoers configuration file using the visudo command.
NOTE: There is no space between vi and sudo in the command.
Make an entry with the following information:
Username hostname=(root) NOPASSWD: /usr/sbin/pkgadd
For example, to enable john to run /usr/sbin/pkgadd as root on the hostname sol-2, type
the following:
john sol-2=(root) NOPASSWD: /usr/sbin/pkgadd
A nonroot user (john in the example) needs to do the following to install NICI:
1 Log in as john and execute the following command:
74 Novell eDirectory 8.8 Installation Guide
Page 75

sudo pkgadd -d absolute_path_of_the_NICI_package NOVLniu0
For example:
sudo pkgadd -d /home/build/Solaris/Solaris/setup/NOVLniu0.pkg
NOVLniu0
2 Execute the following script:
sudo /var/opt/novell/nici/set_server_mode
NICI gets installed in the server mode.
4.6.4 Using the Nds-install Utility to Install eDirectory
Components
Use the nds-install utility to install eDirectory components on Solaris systems. This utility is located
in the Setup directory on the CD for the Solaris platform. The utility adds the required packages
based on what components you choose to install.
A nonroot user can install using only tarballs. For more information, refer to Section 4.6.5, “Nonroot
User Installing eDirectory 8.8,” on page 77.
novdocx (en) 6 April 2007
1 Enter the following command from the setup directory:
./nds-install
To install eDirectory components, use the following syntax:
nds-install [-c component1 [-c component2]...] [-h] [-i] [-j] [-u]
If you do not provide the required parameters in the command line, the nds-install utility will
prompt you for the parameters.
The following table provides a description of the nds-install utility parameters:
nds-install Parameter Description
-c Specifies the component to be installed based on the packages
available. You can install more than one component by using the -c
option multiple times.
There are two components you can install, the eDirectory server and
the eDirectory administration utilities. To install the server, enter -c nds.
To install the administration utilities, enter -c adminutils.
For example, to install Novell eDirectory Server packages, you would
enter the following command:
./nds-install -c server -n /var
-h Displays help for nds-install.
-i Prevents the nds-install script from invoking ndsconfig upgrade if a DIB
is detected at the time of the upgrade.
-j Jumps or overrides the health check option before installing
eDirectory. For more information about health checks, refer to
Appendix B, “Server Health Checks,” on page 141.
-u Specifies the option to use an unattended install mode.
Installing or Upgrading Novell eDirectory on Solaris 75
Page 76

The installation program displays a list of eDirectory components that you can install.
2 Specify the option for the component you want to install.
Based on the component you choose to install, the installation program proceeds to add the
appropriate RPMs or packages into the Solaris system. The following table lists the packages
installed for each eDirectory component.
eDirectory Component Packages Installed Description
novdocx (en) 6 April 2007
eDirectory Server NDSbase
NDScommon
NDSmasv
NDSserv
NDSimon
NDSrepair
NDSdexvnt
NOVLsubag
NOVLsnmp
NOVLpkit
NOVLpkis
NOVLpkia
NOVLembox
NOVLlmgnt
NOVLxis
NLDAPsdk
NLDAPbase
NOVLsas
NOVLntls
NOVLnmas
NOVLldif2dib
NOVLncp
Administration Utilities NOVLice
NDSbase
NLDAPbase
NLDAPsdk
NOVLpkia
NOVLxis
NOVLlmgnt
The eDirectory replica server is
installed on the specified server.
The Novell Import Conversion
Export and LDAP Tools
administration utilities are installed
on the specified workstation.
3 If you are prompted, enter the complete path to the license file.
You will be prompted to enter the complete path to the license file only if the installation
program cannot locate the file in the default location (/var, the mounted license diskette, or
the current directory).
If the path you entered is not valid, you will be prompted to enter the correct path.
You can use the ndsconfig utility to configure eDirectory Server after installation.
Novell Modular Authentication Service
component. By default, ndsconfig configures NMAS. By default, ndsconfig configures NMAS.
You can also use the nmasinst utility to configure NMAS server after installation. This must be
done after configuring eDirectory with ndsconfig.
For more information on the ndsconfig utility, see “The ndsconfig Utility” on page 121.
76 Novell eDirectory 8.8 Installation Guide
TM
(NMASTM) is installed as part of the server
Page 77

For more information on the nmasinst utility, see “Using the Nmasinst Utility to Configure
NMAS” on page 81.
4 After the installation is complete, you need to update the following environment variables and
export them as follows:
Manually export the environment variables
export LD_LIBRARY_PATH=/opt/novell/eDirectory/lib:/opt/
novell/eDirectory/lib/nds-modules:/opt/novell/
lib:$LD_LIBRARY_PATH
export PATH=/opt/novell/eDirectory/bin:/opt/novell/
eDirectory/sbin:$PATH
export MANPATH=/opt/novell/man:/opt/novell/eDirectory/
man:$MANPATH
export TEXTDOMAINDIR=/opt/novell/eDirectory/share/
locale:$TEXTDOMAINDIR
Use the ndspath script to export the environment variables
If you do not want to export the paths manually, you can use the /opt/novell/
eDirectory/bin/ndspath script as follows:
Prefix the ndspath script to the utility and run the utility you want as follows:
/opt/novell/eDirectory/bin/ndspath
utility_name_with_parameters
Export the paths in the current shell as follows:
. /opt/novell/eDirectory/bin/ndspath
After entering the above command, run the utilities as you would normally do.
Call the script in your profile, bashrc, or similar scripts. Therefore, whenever you log
in or open a new shell, you can start using the utilities directly.
novdocx (en) 6 April 2007
4.6.5 Nonroot User Installing eDirectory 8.8
A nonroot user can install eDirectory 8.8 using the tarball.
Prerequisites
Ensure that NICI is installed.
For information on installing NICI, refer to Section 4.6.3, “Installing NICI,” on page 74.
If you want to use SLP and SNMP, ensure that they are installed by the root user.
Write rights to the directory where you want to install eDirectory.
If you are a nonadministrator user, ensure that you have the appropriate rights as mentioned in
the Section 4.2, “Prerequisites,” on page 69 section.
Installing eDirectory
1 Go to the directory where you want to install eDirectory .
2 Untar the tar file as follows:
tar xvf /tar_file_name
Installing or Upgrading Novell eDirectory on Solaris 77
Page 78

3 Export the paths as follows:
Manually export the environment variables
export LD_LIBRARY_PATH=custom_location/eDirectory/opt/
novell/eDirectory/lib:custom_location/eDirectory/opt/novell/
eDirectory/lib/nds-modules:custom_location/eDirectory/opt/
novell/lib:/opt/novell/lib:/opt/novell/eDirectory/
lib:$LD_LIBRARY_PATH
export PATH=custom_location/eDirectory/opt/novell/
eDirectory/bin:custom_location/eDirectory/opt/novell/
eDirectory/sbin:/opt/novell/eDirectory/bin:$PATH
export MANPATH=custom_location/eDirectory/opt/novell/
man:custom_location/eDirectory/opt/novell/eDirectory/
man:$MANPATH
export TEXTDOMAINDIR=custom_location/eDirectory/opt/novell/
eDirectory/share/locale:$TEXTDOMAINDIR
Use the ndspath script to export the environment variables
novdocx (en) 6 April 2007
If you do not want to export the paths manually, you can use the custom_location/
eDirectory/opt/novell/eDirectory/bin/ndspath script as follows:
Prefix the ndspath script to the utility and run the utility you want as follows:
custom_location/eDirectory/opt/novell/eDirectory/bin/
ndspath utility_name_with_parameters
Go to the custom_location/eDirectory/opt/novell/eDirectory/
bin/ directory and export the paths in the current shell as follows:
. custom_location/eDirectory/opt/novell/eDirectory/bin/
ndspath
NOTE: Ensure that you enter the above command from the custom_location/
eDirectory/opt directory.
After entering the above command, run the utilities as you would normally do.
Call the script in your profile, bashrc, or similar scripts. Therefore, whenever you log
in or open a new shell, you can start using the utilities directly.
4 Configure eDirectory in the usual manner.
You can configure eDirectory in any of the following ways:
Use the ndsconfig utility as follows:
ndsconfig new -t treename -n server_context -a admin_FDN [-i]
[-S server_name] [-d path_for_dib] [-m module] [e] [-L
ldap_port] [-l SSL_port] [-o http_port] -O https_port] [-b
port_to_bind] [-B interface1@port1, interface2@port2,..] [-D
custom_location] [--config-file configuration_file]
For example:
ndsconfig new -t mary-tree -n novell -a admin.novell -S linux1 d /home/mary/inst1/data -b 1025 -L 1026 -l 1027 -o 1028 -O 1029
-D /home/mary/inst1/var --config-file /home/mary/inst1/nds.conf
78 Novell eDirectory 8.8 Installation Guide
Page 79

The port numbers you enter need to be in the range 1024 to 65535. Port numbers lesser
than 1024 are normally reserved for the super-user and standard applications. Therefore,
you cannot assume the default port 524 for any eDirectory applications.
This might cause the following applications to break:
The applications that don't have an option to specify the target server port.
The older applications that use NCP, and are run as root for 524.
Use the ndsmanage utility to configure a new instance. For more information, refer to the
“Creating an Instance through ndsmanage” on page 63.
Follow the onscreen instructions to complete the configuration.
For more information, see Section 4.6.6, “Using the Ndsconfig Utility to Add or Remove the
eDirectory Replica Server,” on page 79.
4.6.6 Using the Ndsconfig Utility to Add or Remove the
eDirectory Replica Server
You must have Administrator rights to use the ndsconfig utility. When this utility is used with
arguments, it validates all arguments and prompts for the password of the user having Administrator
rights. If the utility is used without arguments, ndsconfig displays a description of the utility and
available options. This utility can also be used to remove the eDirectory Replica Server and change
the current configuration of eDirectory Server. For more information, see “The ndsconfig Utility” on
page 121.
novdocx (en) 6 April 2007
Prerequisite for Configuring eDirectory in a Specific Locale
If you want to configure eDirectory in a specific locale, you need to export LC_ALL and LANG to
that particular locale before eDirectory configuration. For example, to configure eDirectory in the
Japanese locale, enter the following:
export LC_ALL=ja
export LANG=ja
Creating a New Tree
Use the following syntax:
ndsconfig new -t treename -n server context -a admin FDN [-i] [-S
server name] [-d path for dib] [-m module] [e] [-L ldap port] [-l SSL
port] [-o http port] -O https port] [-b port to bind] [-B
interface1@port1, interface2@port2,..] [-D custom_location] [--config-
file configuration_file]
A new tree is installed with the specified tree name and context.
There is a limitation on the number of characters in the tree_name, admin FDN and server context
variables. The maximum number of characters allowed for these variables is as follows:
tree_name: 32 characters
admin FDN: 64 characters
server context: 64 characters
Installing or Upgrading Novell eDirectory on Solaris 79
Page 80

If the parameters are not specified in the command line, ndsconfig prompts you to enter values for
each of the missing parameters.
Or, you can also use the following syntax:
ndsconfig def -t treename -n server context -a admin FDN [-i] [-S
server name] [-d path for dib] [-m module] [-e] [-L ldap port] [-l SSL
port] [-o http port] -O https port] [-D custom_location] [--config-
file configuration_file]
A new tree is installed with the specified tree name and context. If the parameters are not specified
in the command line, ndsconfig takes the default value for each of the missing parameters.
For example, to create a new tree, you could enter the following command:
ndsconfig new -t corp-tree -n o=company -a cn=admin.o=company
Adding a Server into an Existing Tree
Use the following syntax:
ndsconfig add -t treename -n server context -a admin FDN [-e] [-L ldap
port] [-l SSL port] [-o http port] -O https port] [-S server name] [-d
path for dib] [-p IP address:port] [-m module] [-b port to bind] [-B
interface1@port1, interface2@port2,..] [-D custom_location] [--config-
file configuration_file] [-E]
novdocx (en) 6 April 2007
A server is added to an existing tree in the specified context. If the context that the user wants to add
the Server object to does not exist, ndsconfig creates the context and adds the server.
LDAP and security services can also be added after eDirectory has been installed into the existing
tree.
For example, to add a server into an existing tree, you could enter the following command:
ndsconfig add -t corp-tree -n o=company -a cn=admin.o=company -s
srv1
You can enable encrypted replication in the server you want to add using the -E option. For more
information on encrypted replication, refer to Novell eDirectory 8.8 Administration Guide (http://
www.novell.com/documentation/edir88/index.html).
Removing a Server Object and Directory Services from a Tree
Use the following syntax:
ndsconfig rm -a admin FDN
eDirectory and its database are removed from the server.
NOTE: The HTML files created using iMonitor will not be removed. You must manually remove
these files before removing eDirectory.
For example, to remove the eDirectory Server object and directory services from a tree, you could
enter the following command:
ndsconfig rm -a cn=admin.o=company
80 Novell eDirectory 8.8 Installation Guide
Page 81

ndsconfig Utility Parameters
Refer to “ndsconfig Utility Parameters” on page 59 for more information.
4.6.7 Using ndsconfig to Configure Multiple Instances of
eDirectory 8.8
You can configure multiple instances of eDirectory 8.8 on a single host. For information on multiple
instances, refer to Section 3.6.7, “Using ndsconfig to Configure Multiple Instances of eDirectory
8.8,” on page 61 in the Linux chapter.
4.6.8 Using Ndsconfig to Install a Solaris Server into a Tree
with Dotted Name Containers
You can use ndsconfig to install a Solaris server into an eDirectory tree that has containers using
dotted names (for example, novell.com).
Because ndsconfig is a command line utility, using containers with dotted names requires that those
dots be escaped out, and the parameters containing these contexts must be enclosed in double
quotes. For example, to install a new eDirectory tree on a Solaris server using “O=novell.com” as
the name of the O, use the following command:
novdocx (en) 6 April 2007
ndsconfig new -a “admin.novell\.com” -t novell_tree -n
“OU=servers.O=novell\.com”
The Admin name and context and the server context parameters are enclosed in double quotes, and
only the dot (‘.’) in novell.com is escaped using the ‘\’ (backslash) character.
You can also use this format when installing a server into an existing tree.
NOTE: You should use this format when entering dotted admin name and context while using
utilities such as ndsrepair, ndsbackup, ndsmerge, ndslogin, and ldapconfig.
4.6.9 Using the Nmasinst Utility to Configure NMAS
For eDirectory 8.8, by default, ndsconfig configures NMAS. You can also use nmasinst on Linux,
Solaris, AIX, and HP-UX systems to configure NMAS.
ndsconfig only configures NMAS and does not install the login methods. To install these login
methods, you can use nmasinst.
IMPORTANT: You must configure eDirectory with ndsconfig before you install the NMAS login
methods. You must also have administrative rights to the tree.
“Configuring NMAS” on page 81
“Installing Login Methods” on page 82
Configuring NMAS
By default, ndsconfig configures NMAS. You can also use nmasinst for the same.
Installing or Upgrading Novell eDirectory on Solaris 81
Page 82

To configure NMAS and create NMAS objects in eDirectory, enter the following at the server
console command line:
nmasinst -i admin.context tree_name
nmasinst will prompt you for a password.
This command creates the objects in the Security container that NMAS needs, and installs the
LDAP extensions for NMAS on the LDAP Server object in eDirectory.
The first time NMAS is installed in a tree, it must be installed by a user with enough rights to create
objects in the Security container. However, subsequent installs can be done by container
administrators with read-only rights to the Security container. nmasinst will verify that the NMAS
objects exist in the Security container before it tries to create them.
nmasinst does not extend the schema. The NMAS schema is installed as part of the base eDirectory
schema.
Installing Login Methods
To install login methods using nmasinst, enter the following at the server console command line:
novdocx (en) 6 April 2007
nmasinst -addmethod admin.context tree_name config.txt_path
The last parameter specifies the config.txt file for the login method that is to be installed. A
config.txt file is provided with each login method.
Here is an example of the -addmethod command:
nmasinst -addmethod admin.novell MY_TREE ./nmas-methods/novell/Simple
Password/config.txt
If the login method already exists, nmasinst will update it.
For more information, see “Managing Login and Post-Login Methods and Sequences” (http://
www.novell.com/documentation/beta/nmas30/admin/data/a53vj9a.html) in the Novell Modular
Authentication Service Administration Guide.
4.6.10 nonroot user SNMP configuration
NICI and NOVLsubag should be installed as root user.
1 Root User Installing NICI. Refer to Section 4.6.3, “Installing NICI,” on page 74.
2 Install NOVLsubag as root.
3 Export the paths as follows:
Manually export the environment variables.
export LD_LIBRARY_PATH=custom_location/opt/novell/
eDirectory/lib:custom_location/opt/novell/lib:/opt/novell/lib:/
opt/novell/eDirectory/lib:$LD_LIBRARY_PATH
export PATH=/opt/novell/eDirectory/bin:$PATH
export MANPATH=/opt/novell/:$MANPATH
82 Novell eDirectory 8.8 Installation Guide
Page 83

5
Installing or Upgrading Novell
novdocx (en) 6 April 2007
eDirectory on AIX
Use the following information to install or upgrade Novell® eDirectoryTM 8.8 on an AIX* server:
Section 5.1, “System Requirements,” on page 83
Section 5.2, “Prerequisites,” on page 83
Section 5.3, “Hardware Requirements,” on page 84
Section 5.4, “Forcing the Backlink Process to Run,” on page 85
Section 5.5, “Upgrading eDirectory,” on page 85
Section 5.6, “Installing eDirectory,” on page 86
5.1 System Requirements
AIX 5L Version 5.2
All recommended AIX OS patches, available at the IBM* Tech Support (https://
techsupport.services.ibm.com/server/fixes) Web sit e
128 MB RAM minimum
190 MB of disk space for the eDirectory server
5
12 MB of disk space for the eDirectory administration utilities
74 MB of disk space for every 50,000 users
5.2 Prerequisites
IMPORTANT: Check the currently installed Novell and Third Party applications to determine if
eDirectory 8.8 is supported before upgrading your existing eDirectory environment. You can find
out the current status for Novell products in the TID - What Novell products are supported with
Novell eDirectory 8.8? (http://support.novell.com/cgi-bin/search/searchtid.cgi?10099872.htm). We
also highly recommend you to back up eDirectory before any upgrades.
Enable the AIX host for multicast routing.
See if the multicast routing daemon mrouted is running.
If it is not running, configure and start the multicast daemon mrouted.
See the “mrouted.conf File” section in the Files Reference book in AIX Documentation (http://
www16.boulder.ibm.com/pseries/en_US/infocenter/base/aix.htm) for an example
configuration file.
(Conditional) NICI 2.7 and eDirectory 8.8 support key sizes up to 4096 bits. If you want to use
a 4 KB key size, every server must be upgraded to eDirectory 8.8. In addition, every
workstation using the management utilities, for example, iManager and ConsoleOne, must
have NICI 2.7 installed on it.
Installing or Upgrading Novell eDirectory on AIX
83
Page 84

When you upgrade your Certificate Authority (CA) server to eDirectory 8.8, the key size will
not change; it will be 2 KB. The only way to create a 4 KB key size is recreate the CA on an
eDirectory 8.8 server. In addition, you would have to change the default from 2 KB to 4 KB for
the key size, during the CA creation.
The package containing NICI 2.7 is named NOVLniu0-2.7 on AIX. For more information,
refer to Section 5.6.3, “Installing NICI,” on page 87.
If you have more than one server in the tree, the time on all the network servers should be
synchronized.
Use Network Time Protocol's (NTP) xntpd.nlm to synchronize time. If you want to
synchronize time on Linux, Solaris, AIX, or HP-UX systems with NetWare® servers, use
timesync.nlm 5.09 or later.
(Conditional) If you are installing a secondary server, all the replicas in the partition that you
install the product on should be in the On state.
(Conditional) If you are installing a secondary server into an existing tree as a nonadministrator
user, ensure that you have the following rights:
Supervisor rights to the container the server is being installed into.
Supervisor rights to the partition where you want to add the server.
novdocx (en) 6 April 2007
NOTE: This is required for adding the replica when the replica count is less than 3.
All Attributes rights: read, compare, and write rights over the W0.KAP.Security object.
Entry rights: browse rights over Security container object.
All Attributes rights: read and compare rights over Security container object.
(Conditional) If you are installing a secondary server into an existing tree as a nonadministrator
user, ensure that at least one of the servers in the tree has the same or higher eDirectory version
as that of the secondary being added as container admin. In case the secondary being added is
of later version, then the schema needs to be extended by the admin of the tree before adding
the secondary using container admin.
Configuring Static IP Address
Refer to “Configuring Static IP Address” on page 12 for more information on configuring static IP
addresses.
5.3 Hardware Requirements
Hardware requirements depend on the specific implementation of eDirectory.
For example, a base installation of Novell eDirectory with the standard schema requires about 74
MB of disk space for every 50,000 users. However, if you add a new set of attributes or completely
fill in every existing attribute, the object size grows. These additions affect the disk space, processor,
and memory needed.
Two factors increase performance: more cache memory and faster processors.
For best results, cache as much of the DIB Set as the hardware allows.
eDirectory scales well on a single processor. However, eDirectory 8.8 takes advantage of multiple
processors. Adding processors improves performance in some areas—for example, logins and
84 Novell eDirectory 8.8 Installation Guide
Page 85

having multiple threads active on multiple processors. eDirectory itself is not processor intensive,
but it is I/O intensive.
The following table illustrates typical system requirements for Novell eDirectory for AIX.
Objects Processor Memory Hard Disk
100,000 RS/6000 344 MB 144 MB
1 Million RS/6000 2 GB 1.5 GB
10 Million RS/6000 2+ GB 15 GB
Requirements for processors might be greater than the table indicates, depending upon additional
services available on the computer as well as the number of authentications, reads, and writes that
the computer is handling. Processes such as encryption and indexing can be processor intensive.
5.4 Forcing the Backlink Process to Run
Because the internal eDirectory identifiers change when upgrading to Novell eDirectory, the
backlink process must update backlinked objects for them to be consistent.
novdocx (en) 6 April 2007
Backlinks keep track of external references to objects on other servers. For each external reference
on a server, the backlink process ensures that the real object exists in the correct location and verifies
all backlink attributes on the master of the replica. The backlink process occurs two hours after the
database is open, and then every 780 minutes (13 hours). The interval is configurable from 2
minutes to 10,080 minutes (7 days).
After migrating to eDirectory, start the ndstrace process by issuing the ndstrace -l>log&
command, which runs the process at the background. You can force the backlink to run by issuing
the ndstrace -c set ndstrace=*B command from the ndstrace command prompt. Then
you can unload the ndstrace process by issuing the ndstrace -u command. Running the backlink
process is especially important on servers that do not contain a replica.
5.5 Upgrading eDirectory
To upgrade to eDirectory 8.8 from eDirectory 8.7, 8.7.1, or 8.7.3, enter the following:
./nds-install
After the upgrade to eDirectory 8.8, the default location of the configuration files, data files, and log
files are changed to /etc/opt/novell/eDirectory/conf, /var/opt/novell/
eDirectory/data, and /var/opt/novell/eDirectory/log respectively.
The new directory /var/opt/novell/eDirectory/data uses a symbolic link to the /
var/nds directory.
The old configuration file /etc/nds.conf is migrated to /etc/opt/novell/
eDirectory/conf directory. The old configuration file /etc/nds.conf is renamed to /
etc/nds.conf_pre88 and the old log files under /var/nds are retained for reference.
NOTE: "ndsconfuiig upgrade" has to be run after nds-install, if upgrade of the DIB fails and ndsinstall asks to do so.
Installing or Upgrading Novell eDirectory on AIX 85
Page 86

5.5.1 Upgrading Multiple Instances
For information on Upgrading Multiple Instances, refer to Section 3.5.5, “Upgrading Multiple
Instances,” on page 45 in the Linux chapter.
5.5.2 Upgrading the Tarball Deployment of eDirectory 8.8
For information on Upgrading the Tarball Deployment of eDirectory 8.8, refer to Section 3.5.4,
“Upgrading the Tarball Deployment of eDirectory 8.8,” on page 44 in the Linux chapter.
5.6 Installing eDirectory
The following sections provide information about installing Novell eDirectory on AIX:
Section 5.6.1, “Server Health Checks,” on page 86
Section 5.6.2, “Using SLP with eDirectory,” on page 87
Section 5.6.3, “Installing NICI,” on page 87
Section 5.6.4, “Using the Nds-install Utility to Install eDirectory Components,” on page 89
novdocx (en) 6 April 2007
Section 5.6.5, “Nonroot User Installing eDirectory 8.8,” on page 91
Section 5.6.6, “Using the Ndsconfig Utility to Add or Remove the eDirectory Replica Server,”
on page 93
Section 5.6.7, “Using ndsconfig to Configure Multiple Instances of eDirectory 8.8,” on page 95
Section 5.6.8, “Using Ndsconfig to Install an AIX Server into a Tree with Dotted Name
Containers,” on page 95
Section 5.6.9, “Using the Nmasinst Utility to Configure NMAS,” on page 95
Section 5.6.10, “nonroot user SNMP configuration,” on page 96
5.6.1 Server Health Checks
With eDirectory 8.8, when you upgrade or install eDirectory, two server health checks are conducted
by default to ensure that the server is safe for the upgrade.
Section B.3.1, “Basic Server Health,” on page 142
Section B.3.2, “Partitions and Replica Health,” on page 143
Based on the results obtained from the health checks, the upgrade will either continue or exit as
follows:
If all the health checks are successful, the upgrade will continue.
If there are minor errors, the upgrade will prompt you to continue or exit.
If there are critical errors, the upgrade will exit.
See Appendix B, “Server Health Checks,” on page 141 for a list of minor and critical error
conditions.
Skipping Server Health Checks
To skip server health checks, use nds-install -j or ndsconfig upgrade -j.
86 Novell eDirectory 8.8 Installation Guide
Page 87

For more information, see Appendix B, “Server Health Checks,” on page 141.
5.6.2 Using SLP with eDirectory
In earlier releases of eDirectory, SLP was installed during the eDirectory install. But with eDirectory
8.8, you need to separately install SLP before proceeding with the eDirectory install.
If you plan to use SLP to resolve tree names, it should have been properly configured and SLP DAs
should be stable.
1 Install SLP using the following command:
installp -acgXd absolute_path_of_NDSslp_fileset NDS.NDSslp
The SLP fileset is present in the setup directory in the build. For example, if you have the build
in the /home/build directory, enter the following command:
installp -acgXd /home/build/Aix/Aix/setup/NDS.NDSslp
2 Follow the onscreen instructions to complete the SLP installation.
3 Start SLP.
novdocx (en) 6 April 2007
If you don't want to (or cannot) use SLP, you can use the flat file hosts.nds to resolve tree names to
server referrals. The hosts.nds file can be used to avoid SLP multicast delays when a SLP DA is not
present in the network.
hosts.nds is a static lookup table used by eDirectory applications to search eDirectory partition and
servers. For more information on hosts.nds, refer to “Using SLP with eDirectory” on page 46 and
the hosts.nds manpage.
If you decide to use SLP to resolve the tree name to determine if the eDirectory tree is advertised,
after eDirectory and SLP are installed, enter the following:
/usr/bin/slpinfo -s "ndap.novell///(svcname-ws==[treename or *])"
For example, to search for the services whose svcname-ws attribute match with the value
SAMPLE_TREE, enter the following command:
/usr/bin/slpinfo -s "ndap.novell///(svcname-ws==SAMPLE_TREE)/"
If you have a service registered with its svcname-ws attribute as SAMPLE_TREE, then the output
will be similar to the following:
service:ndap.novell:///SAMPLE_TREE
If you do not have a service registered with its svcname-ws attribute as SAMPLE_TREE, there will
be no output.
For more information, see Appendix C, “Configuring OpenSLP for eDirectory,” on page 147.
5.6.3 Installing NICI
NICI should be installed before you proceed with the eDirectory installation. Both root and nonroot
users can install NICI, though the procedure to do so is different.
Installing or Upgrading Novell eDirectory on AIX 87
Page 88

Root User Installing NICI
To install NICI, complete the following procedure:
1 Enter the following command:
installp -acgXd absolute_path_of_the_NICI_fileset NOVLniu0
For example:
installp -acgXd /home/build/AIX/AIX/setup/NOVLniu0.2.7.0.0
NOVLniu0
2 Execute the following script:
/var/opt/novell/nici/set_server_mode
Nonroot User Installing NICI
Nonroot users can make use of the sudo utility to install NICI. Sudo (superuser do) allows a root
user to give certain users the ability to run some commands as root. A root user can do this by
editing the /etc/sudoers configuration file and adding appropriate entries in it.
novdocx (en) 6 April 2007
For more information, refer to the sudo Website (http://www.sudo.ws).
WARNING: sudo enables you to give limited root permissions to nonroot users. Therefore, we
strongly recommend you to understand the security implications before proceeding.
A root user needs to complete the following procedure to enable a nonroot user (for example, john)
to install NICI:
1 Log in as root.
2 Edit the /etc/sudoers configuration file using the visudo command.
NOTE: There is no space between vi and sudo in the command.
Make an entry with the following information:
Username hostname=(root) NOPASSWD: /usr/sbin/installp
For example, to enable john to run /bin/rpm as root on the hostname aix-2, type the following:
john aix-2=(root) NOPASSWD: /usr/sbin/installp
A nonroot user (john in the example) needs to do the following to install NICI:
1 Log in as john and execute the following command:
sudo installp -acgXd absolute_path_of_the_NICI_fileset NOVLniu0
For example:
sudo installp -acgXd /home/build/AIX/AIX/setup/NOVLniu0.2.7.0.0
NOVLniu0
2 Execute the following script:
sudo /var/opt/novell/nici/set_server_mode
NICI gets installed in the server mode.
88 Novell eDirectory 8.8 Installation Guide
Page 89

5.6.4 Using the Nds-install Utility to Install eDirectory
Components
Use the nds-install utility to install eDirectory components on AIX systems. This utility is located in
the Setup directory on the CD for the AIX platform. The utility adds the required packages based on
what components you choose to install.
1 Enter the following command from the setup directory:
./nds-install
To install eDirectory components, use the following syntax:
nds-install [-c component1 [-c component2]...] [-h] [-i] [-j] [-u]
If you do not provide the required parameters in the command line, the nds-install utility will
prompt you for the parameters.
The following table provides a description of the nds-install utility parameters:
nds-install Parameter Description
novdocx (en) 6 April 2007
-c Specifies the component to be installed based on the packages
available. You can install more than one component by using the -c
option multiple times.
There are two components you can install, the eDirectory server and
the eDirectory administration utilities. To install the server, enter -c nds.
To install the administration utilities, enter -c adminutils.
For example, to install Novell eDirectory Server packages, you would
enter the following command:
./nds-install -c server -n /var
-h Displays help for nds-install.
-i Prevents the nds-install script from invoking ndsconfig upgrade if a DIB
is detected at the time of the upgrade.
-j Jumps or overrides the health check option before installing
eDirectory. For more information about health checks, refer to
Appendix B, “Server Health Checks,” on page 141.
-u Specifies the option to use an unattended install mode.
The installation program displays a list of eDirectory components that you can install.
2 Specify the option for the component you want to install.
Based on the component you choose to install, the installation program proceeds to add the
appropriate RPMs or packages into the AIX system. The following table lists the packages
installed for each eDirectory component.
Installing or Upgrading Novell eDirectory on AIX 89
Page 90

eDirectory Component Packages Installed Description
novdocx (en) 6 April 2007
eDirectory Server NDSbase
NDScommon
NDSmasv
NDSserv
NDSimon
NDSrepair
NDSdexvnt
NOVLsubag
NOVLsnmp
NOVLpkit
NOVLpkis
NOVLpkia
NOVLembox
NOVLlmgnt
NOVLxis
NLDAPsdk
NLDAPbase
NOVLsas
NOVLntls
NOVLnmas
NOVLldif2dib
NOVLncp
Administration Utilities NOVLice
NDSbase
NLDAPbase
NLDAPsdk
NOVLpkia
NOVLxis
NOVLlmgnt
The eDirectory replica server
is installed on the specified
server.
The Novell Import Conversion
Export and LDAP Tools
administration utilities are
installed on the specified
workstation.
3 If you are prompted, enter the complete path to the license file.
You will be prompted to enter the complete path to the license file only if the installation
program cannot locate the file in the default location (/var, the mounted license diskette, or
the current directory).
If the path you entered is not valid, you will be prompted to enter the correct path.
You can use the ndsconfig utility to configure eDirectory Server after installation.
Novell Modular Authentication Service
component. By default ndsconfig configures NMAS. You can also use the nmasinst utility to
configure NMAS server after installation. This must be done after configuring eDirectory with
ndsconfig.
For more information on the ndsconfig utility, see “The ndsconfig Utility” on page 121.
For more information on the nmasinst utility, see “Using the Nmasinst Utility to Configure
NMAS” on page 95.
4 After the installation is complete, you need to update the following environment variables and
export them as follows:
Manually export the environment variables
90 Novell eDirectory 8.8 Installation Guide
TM
(NMASTM) is installed as part of the server
Page 91

export LD_LIBRARY_PATH=/opt/novell/eDirectory/lib:/opt/
novell/eDirectory/lib/nds-modules:/opt/novell/lib:/opt/
novell/lib:/opt/novell/eDirectory/lib:$LD_LIBRARY_PATH
export LIBPATH=/opt/novell/eDirectory/lib:/opt/novell/
eDirectory/lib/nds-modules:/opt/novell/lib:/opt/novell/lib:/
opt/novell/eDirectory/lib:$LIBPATH
export PATH=/opt/novell/eDirectory/bin:/opt/novell/
eDirectory/sbin:$PATH
export MANPATH=/opt/novell/man:/opt/novell/eDirectory/
man:$MANPATH
export TEXTDOMAINDIR=/opt/novell/eDirectory/share/
locale:$TEXTDOMAINDIR
Use the ndspath script to export the environment variables
If you do not want to export the paths manually, you can use the /opt/novell/
eDirectory/bin/ndspath script as follows:
Prefix the ndspath script to the utility and run the utility you want as follows:
/opt/novell/eDirectory/bin/ndspath
utility_name_with_parameters
Export the paths in the current shell as follows:
. /opt/novell/eDirectory/bin/ndspath
After entering the above command, run the utilities as you would normally do.
Call the script in your profile, bashrc, or similar scripts. Therefore, whenever you log
in or open a new shell, you can start using the utilities directly.
novdocx (en) 6 April 2007
5.6.5 Nonroot User Installing eDirectory 8.8
A nonroot user can install eDirectory 8.8 using the tarball.
Prerequisites
Ensure that NICI is installed.
For information on installing NICI, refer to Section 5.6.3, “Installing NICI,” on page 87.
If you want to use SLP and SNMP, ensure that they are installed by the root user.
Write rights to the directory where you want to install eDirectory.
If you are a nonadministrator user, ensure that you have the appropriate rights as mentioned in
the Section 5.2, “Prerequisites,” on page 83 section.
Installing eDirectory
1 Go to the directory where you want to install eDirectory.
2 Untar the tar file as follows:
tar xvfp /tar_file_name
3 Export the paths as follows:
Manually export the environment variables
Installing or Upgrading Novell eDirectory on AIX 91
Page 92

export LD_LIBRARY_PATH=custom_location/eDirectory/opt/
novell/eDirectory/lib:custom_location/eDirectory/opt/novell/
eDirectory/lib/nds-modules:custom_location/eDirectory/opt/
novell/lib:/opt/novell/lib:/opt/novell/eDirectory/
lib:$LD_LIBRARY_PATH
export LIBPATH=custom_location/eDirectory/opt/novell/
eDirectory/lib:custom_location/eDirectory/opt/novell/
eDirectory/lib/nds-modules:custom_location/eDirectory/opt/
novell/lib:/opt/novell/lib:/opt/novell/eDirectory/
lib:$LIBPATH
export PATH=custom_location/eDirectory/opt/novell/
eDirectory/bin:custom_location/eDirectory/opt/novell/
eDirectory/sbin:/opt/novell/eDirectory/bin:$PATH
export MANPATH=custom_location/eDirectory/opt/novell/
man:custom_location/eDirectory/opt/novell/eDirectory/
man:$MANPATH
novdocx (en) 6 April 2007
export TEXTDOMAINDIR=custom_location/eDirectory/opt/novell/
eDirectory/share/locale:$TEXTDOMAINDIR
Use the ndspath script to export the environment variables
If you do not want to export the paths manually, you can use the custom_location/
eDirectory/opt/novell/eDirectory/bin/ndspath script as follows:
Prefix the ndspath script to the utility and run the utility you want as follows:
custom_location/eDirectory/opt/novell/eDirectory/bin/
ndspath utility_name_with_parameters
Go to the custom_location/eDirectory/opt/novell/eDirectory/
bin/ directory and export the paths in the current shell as follows:
. custom_location/eDirectory/opt/novell/eDirectory/bin/
ndspath
NOTE: Ensure that you enter the above command from the custom_location/
eDirectory/opt directory.
After entering the above command, run the utilities as you would normally do.
Call the script in your profile, bashrc, or similar scripts. Therefore, whenever you log
in or open a new shell, you can start using the utilities directly.
4 Configure eDirectory in the usual manner.
You can configure eDirectory in any of the following ways:
Use the ndsconfig utility as follows:
ndsconfig new -t treename -n server_context -a admin_FDN [-i]
[-S server_name] [-d path_for_dib] [-m module] [e] [-L
ldap_port] [-l SSL_port] [-o http_port] -O https_port] [-b
port_to_bind] [-B interface1@port1, interface2@port2,..] [-D
custom_location] [--config-file configuration_file]
For example:
92 Novell eDirectory 8.8 Installation Guide
Page 93

ndsconfig new -t mary-tree -n novell -a admin.novell -S linux1 d /home/mary/inst1/data -b 1025 -L 1026 -l 1027 -o 1028 -O 1029
-D /home/mary/inst1/var --config-file /home/mary/inst1/nds.conf
The port numbers you enter need to be in the range 1024 to 65535. Port numbers lesser
than 1024 are normally reserved for the super-user and standard applications. Therefore,
you cannot assume the default port 524 for any eDirectory applications.
This might cause the following applications to break:
The applications that don't have an option to specify the target server port.
The older applications that use NCP, and are run as root for 524.
Use the ndsmanage utility to configure a new instance. For more information, refer to the
“Creating an Instance through ndsmanage” on page 63.
Follow the onscreen instructions to complete the configuration.
For more information, see Section 5.6.6, “Using the Ndsconfig Utility to Add or Remove the
eDirectory Replica Server,” on page 93.
5.6.6 Using the Ndsconfig Utility to Add or Remove the
eDirectory Replica Server
novdocx (en) 6 April 2007
You must have Administrator rights to use the ndsconfig utility. When this utility is used with
arguments, it validates all arguments and prompts for the password of the user having Administrator
rights. If the utility is used without arguments, ndsconfig displays a description of the utility and
available options. This utility can also be used to remove the eDirectory Replica Server and change
the current configuration of eDirectory Server. For more information, see “The ndsconfig Utility” on
page 121.
Prerequisite for Configuring eDirectory in a Specific Locale
If you want to configure eDirectory in a specific locale, you need to export LC_ALL and LANG to
that particular locale before eDirectory configuration. For example, to configure eDirectory in the
Japanese locale, enter the following:
export LC_ALL=ja
export LANG=ja
Creating a New Tree
Use the following syntax:
ndsconfig new -t treename -n server context -a admin FDN [-i] [-S
server name] [-d path for dib] [-m module] [e] [-L ldap port] [-l SSL
port] [-o http port] -O https port]
A new tree is installed with the specified tree name and context.
There is a limitation on the number of characters in the tree_name, admin FDN and server context
variables. The maximum number of characters allowed for these variables is as follows:
tree_name: 32 characters
admin FDN: 64 characters
server context: 64 characters
Installing or Upgrading Novell eDirectory on AIX 93
Page 94

If the parameters are not specified in the command line, ndsconfig prompts you to enter values for
each of the missing parameters.
Or, you can also use the following syntax:
ndsconfig def -t treename -n server context -a admin FDN [-i] [-S
server name] [-d path for dib] [-m module] [-e] [-L ldap port] [-l SSL
port] [-o http port] -O https port]
A new tree is installed with the specified tree name and context. If the parameters are not specified
in the command line, ndsconfig takes the default value for each of the missing parameters.
For example, to create a new tree, you could enter the following command:
ndsconfig new -t corp-tree -n o=company -a cn=admin.o=company
Adding a Server into an Existing Tree
Use the following syntax:
ndsconfig add -t treename -n server context -a admin FDN [-e] [-L ldap
port] [-l SSL port] [-o http port] -O https port] [-S server name] [-d
path for dib] [-p IP address:port] [-m module] [-E]
novdocx (en) 6 April 2007
A server is added to an existing tree in the specified context. If the context that the user wants to add
the Server object to does not exist, ndsconfig creates the context and adds the server.
LDAP and security services can also be added after eDirectory has been installed into the existing
tree.
For example, to add a server into an existing tree, you could enter the following command:
ndsconfig add -t corp-tree -n o=company -a cn=admin.o=company -s
srv1
You can enable encrypted replication in the server you want to add using the -E option. For more
information on encrypted replication, refer to Novell eDirectory 8.8 Administration Guide (http://
www.novell.com/documentation/edir88/index.html).
Removing a Server Object and Directory Services from a Tree
Use the following syntax:
ndsconfig rm -a admin FDN
eDirectory and its database are removed from the server.
NOTE: The HTML files created using iMonitor will not be removed. You must manually remove
these files before removing eDirectory.
For example, to remove the eDirectory Server object and directory services from a tree, you could
enter the following command:
ndsconfig rm -a cn=admin.o=company
ndsconfig Utility Parameters
Refer to “ndsconfig Utility Parameters” on page 59 for more information.
94 Novell eDirectory 8.8 Installation Guide
Page 95

5.6.7 Using ndsconfig to Configure Multiple Instances of
eDirectory 8.8
You can configure multiple instances of eDirectory 8.8 on a single host. For information on multiple
instances, refer to Section 3.6.7, “Using ndsconfig to Configure Multiple Instances of eDirectory
8.8,” on page 61 in the Linux chapter.
5.6.8 Using Ndsconfig to Install an AIX Server into a Tree with
Dotted Name Containers
You can use ndsconfig to install an AIX server into an eDirectory tree that has containers using
dotted names (for example, novell.com).
Because ndsconfig is a command line utility, using containers with dotted names requires that those
dots be escaped out, and the parameters containing these contexts must be enclosed in double
quotes. For example, to install a new eDirectory tree on an AIX server using “O=novell.com” as the
name of the O, use the following command:
ndsconfig new -a “admin.novell\.com” -t novell_tree -n
“OU=servers.O=novell\.com”
novdocx (en) 6 April 2007
The Admin name and context and the server context parameters are enclosed in double quotes, and
only the dot (’.’) in novell.com is escaped using the ’\’ (backslash) character.
You can also use this format when installing a server into an existing tree.
NOTE: You should use this format when entering dotted admin name and context while using
utilities such as ndsrepair, ndsbackup, ndsmerge, ndslogin, and ldapconfig.
5.6.9 Using the Nmasinst Utility to Configure NMAS
For eDirectory 8.8, by default, ndsconfig configures NMAS. You can also use nmasinst on Linux,
Solaris, AIX, and HP-UX systems to configure NMAS.
Ndsconfig only configures NMAS and does not install the login methods. To install these login
methods, you can use nmasinst.
IMPORTANT: You must configure eDirectory with ndsconfig before you install the NMAS login
methods. You must also have administrative rights to the tree.
“Configuring NMAS” on page 95
“Installing Login Methods” on page 96
Configuring NMAS
By default, ndsconfig configures NMAS. You can also use nmasinst for the same.
To configure NMAS and create NMAS objects in eDirectory, enter the following at the server
console command line:
nmasinst -i admin.context tree_name
Installing or Upgrading Novell eDirectory on AIX 95
Page 96

nmasinst will prompt you for a password.
This command creates the objects in the Security container that NMAS needs, and installs the
LDAP extensions for NMAS on the LDAP Server object in eDirectory.
The first time NMAS is installed in a tree, it must be installed by a user with enough rights to create
objects in the Security container. However, subsequent installs can be done by container
administrators with the Read-only right to the Security container. nmasinst will verify that the
NMAS objects exist in the Security container before it tries to create them.
nmasinst does not extend the schema. The NMAS schema is installed as part of the base eDirectory
schema.
Installing Login Methods
To install login methods using nmasinst, enter the following at the server console command line:
nmasinst -addmethod admin.context tree_name config.txt_path
The last parameter specifies the config.txt file for the login method that is to be installed. A
config.txt file is provided with each login method.
novdocx (en) 6 April 2007
Here is an example of the -addmethod command:
nmasinst -addmethod admin.novell MY_TREE ./nmas-methods/novell/Simple
Password/config.txt
If the login method already exists, nmasinst will update it.
For more information, see “Managing Login and Post-Login Methods and Sequences” (http://
www.novell.com/documentation/beta/nmas30/admin/data/a53vj9a.html) in the Novell Modular
Authentication Service Administration Guide.
5.6.10 nonroot user SNMP configuration
NICI and NOVLsubag should be installed as root user.
1 Root User Installing NICI. Refer to Section 5.6.3, “Installing NICI,” on page 87.
2 Install NOVLsubag as root.
3 Export the paths as follows:
Manually export the environment variables.
export LD_LIBRARY_PATH=custom_location/opt/novell/
eDirectory/lib:custom_location/opt/novell/lib:/opt/novell/lib:/
opt/novell/eDirectory/lib:$LD_LIBRARY_PATH
export PATH=/opt/novell/eDirectory/bin:$PATH
export MANPATH=/opt/novell/:$MANPATH
96 Novell eDirectory 8.8 Installation Guide
Page 97

6
Installing or Upgrading Novell
novdocx (en) 6 April 2007
eDirectory on HP-UX
Use the following information to install or upgrade Novell® eDirectoryTM 8.8 on an HP-UX* server:
Section 6.1, “System Requirements,” on page 97
Section 6.2, “Prerequisites,” on page 97
Section 6.3, “Hardware Requirements,” on page 99
Section 6.4, “Forcing the Backlink Process to Run,” on page 99
Section 6.5, “Upgrading eDirectory,” on page 99
Section 6.6, “Installing eDirectory,” on page 100
NOTE: This release of eDirectory 8.8 supports only HP-UX 11.11. The documentation includes
HP-UX specific information. Support for HP-UX would be shortly available.
6.1 System Requirements
HP-UX 11.11 Operating System
Ensure that the OS is updated with the patch PHSS_26560. You can download this patch from
the HP IT Resource Center (http://www.itrc.hp.com) > maintenance and support for HP
products.
6
NOTE: If you have installed the patch PHSS_28436, we recommend that you uninstall it and
install patch PHSS_26560.
Ensure that the HP-UX 11.11 Quality Pack (GOLDQPK11.11) is installed. Download and
install it from HP Support Plus Quality Pack Bundles (http://www.software.hp.com/
SUPPORT_PLUS/qpk.html#N0.110).
PA-RISC 2.0 Processor
256 MB RAM minimum
300 MB of hard disk space
Ensure that gettext is installed. You can download it from The HP-UX Porting and Archive
Center (http://hpux.connect.org.uk/hppd/hpux/Gnu).
Ensure that libiconv is installed. You can download it from The HP-UX Porting and Archive
Center (http://hpux.connect.org.uk/hppd/hpux/Development/Libraries).
6.2 Prerequisites
IMPORTANT: Check the currently installed Novell and Third Party applications to determine if
eDirectory 8.8 is supported before upgrading your existing eDirectory environment. You can find
out the current status for Novell products in the TID - What Novell products are supported with
Installing or Upgrading Novell eDirectory on HP-UX
97
Page 98

Novell eDirectory 8.8? (http://support.novell.com/cgi-bin/search/searchtid.cgi?10099872.htm). We
also highly recommend you to back up eDirectory before any upgrades.
(Conditional) NICI 2.7 and eDirectory 8.8 support key sizes up to 4096 bits. If you want to use
a 4 KB key size, every server must be upgraded to eDirectory 8.8. In addition, every
workstation using the management utilities, for example, iManager and ConsoleOne, must
have NICI 2.7 installed on it.
When you upgrade your Certificate Authority (CA) server to eDirectory 8.8, the key size will
not change; it will be 2 KB. The only way to create a 4 KB key size is recreate the CA on an
eDirectory 8.8 server. In addition, you would have to change the default from 2 KB to 4 KB for
the key size, during the CA creation.
For more information, refer to Section 6.6.3, “Installing NICI,” on page 102.
Enable the Linux host for multicast routing.
On HP-UX systems, enter the following command:
/bin/netstat -nr
The following entry should be present in the routing table:
224.0.0.0 host_IP_address
If the entry is not present, log in as root and enter the following command to enable multicast
routing:
route add 224.0.0.0 host_IP_address or gateway
If you have more than one server in the tree, the time on all the network servers should be
synchronized.
Use Network Time Protocol's (NTP) xntpd to synchronize time. If you want to synchronize
time on Linux, Solaris, AIX, or HP-UX systems with NetWare® servers, use timesync.nlm
5.09 or later.
(Conditional) If you are installing a secondary server, all the replicas in the partition that you
install the product on should be in the On state.
novdocx (en) 6 April 2007
(Conditional) If you are installing a secondary server into an existing tree as a nonadministrator
user, ensure that you have the following rights:
Supervisor rights to the container the server is being installed into.
Supervisor rights to the partition where you want to add the server.
NOTE: This is required for adding the replica when the replica count is less than 3.
All Attributes rights: read, compare, and write rights over the W0.KAP.Security object.
Entry rights: browse rights over Security container object.
All Attributes rights: read and compare rights over Security container object.
(Conditional) If you are installing a secondary server into an existing tree as a nonadministrator
user, ensure that at least one of the servers in the tree has the same or higher eDirectory version
as that of the secondary being added as container admin. In case the secondary being added is
of later version, then the schema needs to be extended by the admin of the tree before adding
the secondary using container admin.
98 Novell eDirectory 8.8 Installation Guide
Page 99

Configuring Static IP Address
Refer to “Configuring Static IP Address” on page 12 for more information on configuring static IP
addresses.
6.3 Hardware Requirements
Hardware requirements depend on the specific implementation of eDirectory. Two factors increase
performance: more cache memory and faster processors. For best results, cache as much of the DIB
Set as the hardware allows.
eDirectory scales well on a single processor. However, Novell eDirectory 8.8 takes advantage of
multiple processors. Adding processors improves performance in some areas—for example, logins
and having multiple threads active on multiple processors. eDirectory itself is not processor
intensive, but it is I/O intensive.
The following table illustrates typical system requirements for Novell eDirectory for HP-UX.
Objects Processor Memory Hard Disk
novdocx (en) 6 April 2007
100,000 PA-RISC 2.0 384 MB 144 MB
1 million PA-RISC 2.0 2 GB 1.5 GB
10 million PA-RISC 2.0 2+ GB 15 GB
Requirements for processors might be greater than the table indicates, depending upon additional
services available on the computer as well as the number of authentications, reads, and writes that
the computer is handling. Processes such as encryption and indexing can be processor intensive.
6.4 Forcing the Backlink Process to Run
Because the internal eDirectory identifiers change when upgrading to Novell eDirectory, the
backlink process must update backlinked objects for them to be consistent.
Backlinks keep track of external references to objects on other servers. For each external reference
on a server, the backlink process ensures that the real object exists in the correct location and verifies
all backlink attributes on the master of the replica. The backlink process occurs two hours after the
database is open, and then every 780 minutes (13 hours). The interval is configurable from 2
minutes to 10,080 minutes (7 days).
After migrating to eDirectory, start the ndstrace process by issuing the ndstrace -l>log&
command, which runs the process at the background. You can force the backlink to run by issuing
the ndstrace -c SET DSTRACE=*B command from the ndstrace command prompt. Then you
can unload the ndstrace process by issuing the ndstrace -u command. Running the backlink
process is especially important on servers that do not contain a replica.
6.5 Upgrading eDirectory
You can upgrade to eDirectory 8.8 either through the nds-install utility or the swinstall utility.
Installing or Upgrading Novell eDirectory on HP-UX 99
Page 100

Using nds-install
To upgrate to eDirectory 8.8, enter the following:
./nds-install
Using swinstall
To upgrade to eDirectory 8.8 from eDirectory 8.7.1, or 8.7.3 complete the following steps:
1 Enter the following to stop the eDirectory server:
/sbin/init.d/ndsd stop
2 Backup the /etc/nds.conf file.
3 Remove the eDirectory 8.7.x packages using swremove. For more information about the
package names, refer to Section A.1, “Package Name Specifications for HP-UX,” on page 139.
4 Install the eDirectory 8.8 packages using swinstall and export the paths. For more information,
see “Installing eDirectory Components” on page 103.
5 Restore the nds.conf file you had backed up in the /etc directory.
6 Configure eDirectory as follows:
ndsconfig upgrade --config-file configuration_file_path
novdocx (en) 6 April 2007
After the upgrade to eDirectory 8.8, the default location of the configuration files, data files, and log
files are changed to /etc/opt/novell/eDirectory/conf, /var/opt/novell/
eDirectory/data, and /var/opt/novell/eDirectory/log respectively.
The new directory /var/opt/novell/eDirectory/data uses a symbolic link to the /
var/nds directory.
The old configuration file /etc/nds.conf is migrated to /etc/opt/novell/
eDirectory/conf directory. The old configuration file /etc/nds.conf is renamed to /
etc/nds.conf_pre88 and the old log files under /var/nds are retained for reference.
6.5.1 Upgrading Multiple Instances
For information on Upgrading Multiple Instances, refer to Section 3.5.5, “Upgrading Multiple
Instances,” on page 45 in the Linux chapter.
6.5.2 Upgrading the Tarball Deployment of eDirectory 8.8
For information on Upgrading the Tarball Deployment of eDirectory 8.8, refer to Section 3.5.4,
“Upgrading the Tarball Deployment of eDirectory 8.8,” on page 44 in the Linux chapter.
6.6 Installing eDirectory
The following sections provide information about installing Novell eDirectory on HP-UX:
Section 6.6.1, “Server Health Checks,” on page 101
Section 6.6.2, “Using OpenSLP for HP-UX,” on page 101
Section 6.6.3, “Installing NICI,” on page 102
Section 6.6.4, “Installing eDirectory Components,” on page 103
100 Novell eDirectory 8.8 Installation Guide
 Loading...