

Page 1

Administration Guide
Novell®
novdocx (en) 11 July 2008
AUTHORIZED DOCUMENTATION
eDirectory
8.8 SP3
July 31, 2008
TM
www.novell.com
Novell eDirectory 8.8 Administration Guide
Page 2

Legal Notices
Novell, Inc. makes no representations or warranties with respect to the contents or use of this documentation, and
specifically disclaims any express or implied warranties of merchantability or fitness for any particular purpose.
Further, Novell, Inc. reserves the right to revise this publication and to make changes to its content, at any time,
without obligation to notify any person or entity of such revisions or changes.
Further, Novell, Inc. makes no representations or warranties with respect to any software, and specifically disclaims
any express or implied warranties of merchantability or fitness for any particular purpose. Further, Novell, Inc.
reserves the right to make changes to any and all parts of Novell software, at any time, without any obligation to
notify any person or entity of such changes.
Any products or technical information provided under this Agreement may be subject to U.S. export controls and the
trade laws of other countries. You agree to comply with all export control regulations and to obtain any required
licenses or classification to export, re-export, or import deliverables. You agree not to export or re-export to entities
on the current U.S. export exclusion lists or to any embargoed or terrorist countries as specified in the U.S. export
laws. You agree to not use deliverables for prohibited nuclear, missile, or chemical biological weaponry end uses.
Please refer to www.novell.com/info/exports/ for more information on exporting Novell software. Novell assumes no
responsibility for your failure to obtain any necessary export approvals.
Copyright © 2006 Novell, Inc. All rights reserved. No part of this publication may be reproduced, photocopied,
stored on a retrieval system, or transmitted without the express written consent of the publisher.
novdocx (en) 11 July 2008
Novell, Inc. has intellectual property rights relating to technology embodied in the product that is described in this
document. In particular, and without limitation, these intellectual property rights may include one or more of the U.S.
patents listed at http://www.novell.com/company/legal/patents/ and one or more additional patents or pending patent
applications in the U.S. and in other countries.
Novell, Inc.
404 Wyman Street, Suite 500
Waltham, MA 02451
U.S.A.
www.novell.com
Online Documentation: To access the online documentation for this and other Novell products, and to get
updates, see www.novell.com/documentation.
Page 3

Novell Trademarks
Client32 is a trademark of Novell, Inc.
eDirectory is a trademark of Novell, Inc.
NetWare is a registered trademark of Novell, Inc., in the United States and other countries.
NetWare Core Protocol and NCP are trademarks of Novell, Inc.
NMAS is a trademark of Novell, Inc.
Novell is a registered trademark of Novell, Inc., in the United States and other countries.
Novell Client is a trademark of Novell, Inc.
Novell Directory Services and NDS are registered trademarks of Novell, Inc., in the United States and other
countries.
Ximiam is a registerd trademark of Novell, Inc., in the United States and other countries.
ZENworks is a registered trademark of Novell, Inc., in the United States and other countries.
Third-Party Materials
All third-party trademarks are the property of their respective owners.
This product includes software developed by the OpenSSL Project for use in the OpenSSL Toolkit (http://
www.openssl.org).
novdocx (en) 11 July 2008
Page 4

novdocx (en) 11 July 2008
Page 5

Contents
About This Guide 17
1 Understanding Novell eDirectory 19
1.1 Ease of Management through Novell iManager . . . . . . . . . . . . . . . . . . . . . . . . . . . . . . . . . . . . 20
1.1.1 Powerful Tree Structure. . . . . . . . . . . . . . . . . . . . . . . . . . . . . . . . . . . . . . . . . . . . . . . 20
1.1.2 Web-Based Management Utility . . . . . . . . . . . . . . . . . . . . . . . . . . . . . . . . . . . . . . . . 22
1.1.3 Single Login and Authentication . . . . . . . . . . . . . . . . . . . . . . . . . . . . . . . . . . . . . . . . 23
1.2 Object Classes and Properties. . . . . . . . . . . . . . . . . . . . . . . . . . . . . . . . . . . . . . . . . . . . . . . . . 23
1.2.1 List of Objects . . . . . . . . . . . . . . . . . . . . . . . . . . . . . . . . . . . . . . . . . . . . . . . . . . . . . . 23
1.2.2 Container Object Classes . . . . . . . . . . . . . . . . . . . . . . . . . . . . . . . . . . . . . . . . . . . . . 25
1.2.3 Leaf Object Classes. . . . . . . . . . . . . . . . . . . . . . . . . . . . . . . . . . . . . . . . . . . . . . . . . . 29
1.3 Context and Naming . . . . . . . . . . . . . . . . . . . . . . . . . . . . . . . . . . . . . . . . . . . . . . . . . . . . . . . . 42
1.3.1 Distinguished Name. . . . . . . . . . . . . . . . . . . . . . . . . . . . . . . . . . . . . . . . . . . . . . . . . . 43
1.3.2 Typeful Name . . . . . . . . . . . . . . . . . . . . . . . . . . . . . . . . . . . . . . . . . . . . . . . . . . . . . . 43
1.3.3 Name Resolution . . . . . . . . . . . . . . . . . . . . . . . . . . . . . . . . . . . . . . . . . . . . . . . . . . . . 44
1.3.4 Current Workstation Context . . . . . . . . . . . . . . . . . . . . . . . . . . . . . . . . . . . . . . . . . . . 44
1.3.5 Leading Period. . . . . . . . . . . . . . . . . . . . . . . . . . . . . . . . . . . . . . . . . . . . . . . . . . . . . . 44
1.3.6 Relative Naming . . . . . . . . . . . . . . . . . . . . . . . . . . . . . . . . . . . . . . . . . . . . . . . . . . . . 44
1.3.7 Trailing Periods . . . . . . . . . . . . . . . . . . . . . . . . . . . . . . . . . . . . . . . . . . . . . . . . . . . . . 45
1.3.8 Context and Naming on Linux and UNIX . . . . . . . . . . . . . . . . . . . . . . . . . . . . . . . . . . 45
1.4 Schema . . . . . . . . . . . . . . . . . . . . . . . . . . . . . . . . . . . . . . . . . . . . . . . . . . . . . . . . . . . . . . . . . . 45
1.4.1 Schema Management . . . . . . . . . . . . . . . . . . . . . . . . . . . . . . . . . . . . . . . . . . . . . . . . 46
1.4.2 Schema Classes, Attributes, and Syntaxes. . . . . . . . . . . . . . . . . . . . . . . . . . . . . . . . 46
1.4.3 Understanding Mandatory and Optional Attributes . . . . . . . . . . . . . . . . . . . . . . . . . . 50
1.4.4 Sample Schema . . . . . . . . . . . . . . . . . . . . . . . . . . . . . . . . . . . . . . . . . . . . . . . . . . . . 51
1.4.5 Designing the Schema. . . . . . . . . . . . . . . . . . . . . . . . . . . . . . . . . . . . . . . . . . . . . . . . 51
1.5 Partitions . . . . . . . . . . . . . . . . . . . . . . . . . . . . . . . . . . . . . . . . . . . . . . . . . . . . . . . . . . . . . . . . . 52
1.5.1 Partitions . . . . . . . . . . . . . . . . . . . . . . . . . . . . . . . . . . . . . . . . . . . . . . . . . . . . . . . . . . 52
1.5.2 Distributing Replicas for Performance . . . . . . . . . . . . . . . . . . . . . . . . . . . . . . . . . . . . 53
1.5.3 Partitions and WAN Links . . . . . . . . . . . . . . . . . . . . . . . . . . . . . . . . . . . . . . . . . . . . . 53
1.6 Replicas . . . . . . . . . . . . . . . . . . . . . . . . . . . . . . . . . . . . . . . . . . . . . . . . . . . . . . . . . . . . . . . . . . 55
1.6.1 Replica Types . . . . . . . . . . . . . . . . . . . . . . . . . . . . . . . . . . . . . . . . . . . . . . . . . . . . . . 56
1.6.2 Filtered Replicas . . . . . . . . . . . . . . . . . . . . . . . . . . . . . . . . . . . . . . . . . . . . . . . . . . . . 58
1.7 NetWare Bindery Emulation. . . . . . . . . . . . . . . . . . . . . . . . . . . . . . . . . . . . . . . . . . . . . . . . . . . 59
1.8 Server Synchronization in the Replica Ring. . . . . . . . . . . . . . . . . . . . . . . . . . . . . . . . . . . . . . . 59
1.9 Access to Resources . . . . . . . . . . . . . . . . . . . . . . . . . . . . . . . . . . . . . . . . . . . . . . . . . . . . . . . . 60
1.10 eDirectory Rights . . . . . . . . . . . . . . . . . . . . . . . . . . . . . . . . . . . . . . . . . . . . . . . . . . . . . . . . . . . 60
1.10.1 Trustee Assignments and Targets. . . . . . . . . . . . . . . . . . . . . . . . . . . . . . . . . . . . . . . 61
1.10.2 eDirectory Rights Concepts . . . . . . . . . . . . . . . . . . . . . . . . . . . . . . . . . . . . . . . . . . . . 61
1.10.3 Default Rights for a New Server . . . . . . . . . . . . . . . . . . . . . . . . . . . . . . . . . . . . . . . . 65
1.10.4 Delegated Administration. . . . . . . . . . . . . . . . . . . . . . . . . . . . . . . . . . . . . . . . . . . . . . 66
1.10.5 Administering Rights . . . . . . . . . . . . . . . . . . . . . . . . . . . . . . . . . . . . . . . . . . . . . . . . . 67
novdocx (en) 11 July 2008
2 Designing Your Novell eDirectory Network 73
2.1 eDirectory Design Basics . . . . . . . . . . . . . . . . . . . . . . . . . . . . . . . . . . . . . . . . . . . . . . . . . . . . . 73
2.1.1 Network Layout . . . . . . . . . . . . . . . . . . . . . . . . . . . . . . . . . . . . . . . . . . . . . . . . . . . . . 73
2.1.2 Organizational Structure . . . . . . . . . . . . . . . . . . . . . . . . . . . . . . . . . . . . . . . . . . . . . . 73
2.1.3 Preparing for eDirectory SP3 Design. . . . . . . . . . . . . . . . . . . . . . . . . . . . . . . . . . . . . 74
2.2 Designing the eDirectory Tree . . . . . . . . . . . . . . . . . . . . . . . . . . . . . . . . . . . . . . . . . . . . . . . . . 74
Contents 5
Page 6

2.2.1 Creating a Naming Standards Document . . . . . . . . . . . . . . . . . . . . . . . . . . . . . . . . . 74
2.2.2 Designing the Upper Layers of the Tree . . . . . . . . . . . . . . . . . . . . . . . . . . . . . . . . . . 77
2.2.3 Designing the Lower Layers of the Tree . . . . . . . . . . . . . . . . . . . . . . . . . . . . . . . . . . 79
2.3 Guidelines for Partitioning Your Tree. . . . . . . . . . . . . . . . . . . . . . . . . . . . . . . . . . . . . . . . . . . . 80
2.3.1 Determining Partitions for the Upper Layers of the Tree . . . . . . . . . . . . . . . . . . . . . . 80
2.3.2 Determining Partitions for the Lower Layers of the Tree . . . . . . . . . . . . . . . . . . . . . . 81
2.3.3 Determining Partition Size . . . . . . . . . . . . . . . . . . . . . . . . . . . . . . . . . . . . . . . . . . . . . 81
2.3.4 Considering Network Variables . . . . . . . . . . . . . . . . . . . . . . . . . . . . . . . . . . . . . . . . . 81
2.4 Guidelines for Replicating Your Tree . . . . . . . . . . . . . . . . . . . . . . . . . . . . . . . . . . . . . . . . . . . . 82
2.4.1 Workgroup Needs . . . . . . . . . . . . . . . . . . . . . . . . . . . . . . . . . . . . . . . . . . . . . . . . . . . 82
2.4.2 Fault Tolerance . . . . . . . . . . . . . . . . . . . . . . . . . . . . . . . . . . . . . . . . . . . . . . . . . . . . . 82
2.4.3 Determining the Number of Replicas. . . . . . . . . . . . . . . . . . . . . . . . . . . . . . . . . . . . . 83
2.4.4 Replicating the Tree Partition . . . . . . . . . . . . . . . . . . . . . . . . . . . . . . . . . . . . . . . . . . 83
2.4.5 Replicating for Administration . . . . . . . . . . . . . . . . . . . . . . . . . . . . . . . . . . . . . . . . . . 83
2.4.6 Meeting Bindery Services Needs for NetWare . . . . . . . . . . . . . . . . . . . . . . . . . . . . . 84
2.4.7 Managing WAN Traffic. . . . . . . . . . . . . . . . . . . . . . . . . . . . . . . . . . . . . . . . . . . . . . . . 84
2.5 Planning the User Environment . . . . . . . . . . . . . . . . . . . . . . . . . . . . . . . . . . . . . . . . . . . . . . . . 84
2.5.1 Reviewing Users' Needs . . . . . . . . . . . . . . . . . . . . . . . . . . . . . . . . . . . . . . . . . . . . . . 84
2.5.2 Creating Accessibility Guidelines. . . . . . . . . . . . . . . . . . . . . . . . . . . . . . . . . . . . . . . . 85
2.6 Designing eDirectory for e-Business . . . . . . . . . . . . . . . . . . . . . . . . . . . . . . . . . . . . . . . . . . . . 85
2.7 Understanding the Novell Certificate Server . . . . . . . . . . . . . . . . . . . . . . . . . . . . . . . . . . . . . . 86
2.7.1 Rights Required to Perform Tasks on Novell Certificate Server . . . . . . . . . . . . . . . . 86
2.7.2 Ensuring Secure eDirectory Operations on Linux, Solaris, and AIX Systems . . . . . . 87
2.8 Synchronizing Network Time . . . . . . . . . . . . . . . . . . . . . . . . . . . . . . . . . . . . . . . . . . . . . . . . . . 90
2.8.1 Synchronizing Time on NetWare Servers . . . . . . . . . . . . . . . . . . . . . . . . . . . . . . . . . 90
2.8.2 Synchronizing Time on Windows Servers . . . . . . . . . . . . . . . . . . . . . . . . . . . . . . . . . 91
2.8.3 Synchronizing Time on Linux, Solaris, or AIX Systems . . . . . . . . . . . . . . . . . . . . . . . 91
2.8.4 Verifying Time Synchronization . . . . . . . . . . . . . . . . . . . . . . . . . . . . . . . . . . . . . . . . . 92
novdocx (en) 11 July 2008
3 Managing Objects 93
3.1 General Object Tasks . . . . . . . . . . . . . . . . . . . . . . . . . . . . . . . . . . . . . . . . . . . . . . . . . . . . . . . 93
3.1.1 Browsing the eDirectory Tree . . . . . . . . . . . . . . . . . . . . . . . . . . . . . . . . . . . . . . . . . . 93
3.1.2 Creating an Object. . . . . . . . . . . . . . . . . . . . . . . . . . . . . . . . . . . . . . . . . . . . . . . . . . . 96
3.1.3 Modifying an Object's Properties . . . . . . . . . . . . . . . . . . . . . . . . . . . . . . . . . . . . . . . . 96
3.1.4 Copying Objects . . . . . . . . . . . . . . . . . . . . . . . . . . . . . . . . . . . . . . . . . . . . . . . . . . . . 96
3.1.5 Moving Objects . . . . . . . . . . . . . . . . . . . . . . . . . . . . . . . . . . . . . . . . . . . . . . . . . . . . . 97
3.1.6 Deleting Objects . . . . . . . . . . . . . . . . . . . . . . . . . . . . . . . . . . . . . . . . . . . . . . . . . . . . 97
3.1.7 Renaming Objects . . . . . . . . . . . . . . . . . . . . . . . . . . . . . . . . . . . . . . . . . . . . . . . . . . . 97
3.2 Managing User Accounts . . . . . . . . . . . . . . . . . . . . . . . . . . . . . . . . . . . . . . . . . . . . . . . . . . . . . 97
3.2.1 Creating and Modifying User Accounts . . . . . . . . . . . . . . . . . . . . . . . . . . . . . . . . . . . 98
3.2.2 Setting Up Optional Account Features . . . . . . . . . . . . . . . . . . . . . . . . . . . . . . . . . . . 99
3.2.3 Setting Up Login Scripts . . . . . . . . . . . . . . . . . . . . . . . . . . . . . . . . . . . . . . . . . . . . . 101
3.2.4 Login Time Restrictions for Remote Users . . . . . . . . . . . . . . . . . . . . . . . . . . . . . . . 102
3.2.5 Deleting User Accounts . . . . . . . . . . . . . . . . . . . . . . . . . . . . . . . . . . . . . . . . . . . . . . 103
3.3 Configuring Role-Based Services . . . . . . . . . . . . . . . . . . . . . . . . . . . . . . . . . . . . . . . . . . . . . 103
3.3.1 Defining RBS Roles . . . . . . . . . . . . . . . . . . . . . . . . . . . . . . . . . . . . . . . . . . . . . . . . . 105
3.3.2 Defining Custom RBS Tasks . . . . . . . . . . . . . . . . . . . . . . . . . . . . . . . . . . . . . . . . . . 107
3.4 Synchronization . . . . . . . . . . . . . . . . . . . . . . . . . . . . . . . . . . . . . . . . . . . . . . . . . . . . . . . . . . . 108
3.4.1 Features of Synchronization . . . . . . . . . . . . . . . . . . . . . . . . . . . . . . . . . . . . . . . . . . 109
3.4.2 Normal or Replica Synchronization . . . . . . . . . . . . . . . . . . . . . . . . . . . . . . . . . . . . . 110
3.4.3 Priority Sync. . . . . . . . . . . . . . . . . . . . . . . . . . . . . . . . . . . . . . . . . . . . . . . . . . . . . . . 112
4 Managing the Schema 121
4.1 Extending the Schema . . . . . . . . . . . . . . . . . . . . . . . . . . . . . . . . . . . . . . . . . . . . . . . . . . . . . . 121
4.1.1 Creating a Class . . . . . . . . . . . . . . . . . . . . . . . . . . . . . . . . . . . . . . . . . . . . . . . . . . . 122
6 Novell eDirectory 8.8 Administration Guide
Page 7

4.1.2 Deleting a Class. . . . . . . . . . . . . . . . . . . . . . . . . . . . . . . . . . . . . . . . . . . . . . . . . . . . 122
4.1.3 Creating an Attribute . . . . . . . . . . . . . . . . . . . . . . . . . . . . . . . . . . . . . . . . . . . . . . . . 123
4.1.4 Adding an Optional Attribute to a Class. . . . . . . . . . . . . . . . . . . . . . . . . . . . . . . . . . 123
4.1.5 Deleting an Attribute . . . . . . . . . . . . . . . . . . . . . . . . . . . . . . . . . . . . . . . . . . . . . . . . 123
4.1.6 Creating an Auxiliary Class . . . . . . . . . . . . . . . . . . . . . . . . . . . . . . . . . . . . . . . . . . . 124
4.1.7 Extending an Object with the Properties of an Auxiliary Class . . . . . . . . . . . . . . . . 124
4.1.8 Modifying an Object's Auxiliary Properties. . . . . . . . . . . . . . . . . . . . . . . . . . . . . . . . 125
4.1.9 Deleting Auxiliary Properties from an Object . . . . . . . . . . . . . . . . . . . . . . . . . . . . . . 125
4.2 Viewing the Schema . . . . . . . . . . . . . . . . . . . . . . . . . . . . . . . . . . . . . . . . . . . . . . . . . . . . . . . 125
4.2.1 Viewing Class Information . . . . . . . . . . . . . . . . . . . . . . . . . . . . . . . . . . . . . . . . . . . . 125
4.2.2 Viewing Attribute Information. . . . . . . . . . . . . . . . . . . . . . . . . . . . . . . . . . . . . . . . . . 126
4.3 Manually Extending the Schema . . . . . . . . . . . . . . . . . . . . . . . . . . . . . . . . . . . . . . . . . . . . . . 126
4.3.1 Extending the Schema on NetWare . . . . . . . . . . . . . . . . . . . . . . . . . . . . . . . . . . . . 126
4.3.2 Extending the Schema on Windows . . . . . . . . . . . . . . . . . . . . . . . . . . . . . . . . . . . . 126
4.3.3 Extending the Schema on Linux, Solaris, or AIX Systems . . . . . . . . . . . . . . . . . . . 127
4.4 Schema Flags Added in eDirectory 8.7 . . . . . . . . . . . . . . . . . . . . . . . . . . . . . . . . . . . . . . . . . 128
4.5 Using the eMBox Client to Perform Schema Operations . . . . . . . . . . . . . . . . . . . . . . . . . . . . 130
4.5.1 Using the DSSchema eMTool . . . . . . . . . . . . . . . . . . . . . . . . . . . . . . . . . . . . . . . . . 130
4.5.2 DSSchema eMTool Options . . . . . . . . . . . . . . . . . . . . . . . . . . . . . . . . . . . . . . . . . . 131
5 Managing Partitions and Replicas 133
novdocx (en) 11 July 2008
5.1 Creating a Partition . . . . . . . . . . . . . . . . . . . . . . . . . . . . . . . . . . . . . . . . . . . . . . . . . . . . . . . . 134
5.2 Merging a Partition . . . . . . . . . . . . . . . . . . . . . . . . . . . . . . . . . . . . . . . . . . . . . . . . . . . . . . . . . 134
5.3 Moving Partitions . . . . . . . . . . . . . . . . . . . . . . . . . . . . . . . . . . . . . . . . . . . . . . . . . . . . . . . . . . 135
5.4 Cancelling Create or Merge Partition Operations. . . . . . . . . . . . . . . . . . . . . . . . . . . . . . . . . . 137
5.5 Administering Replicas. . . . . . . . . . . . . . . . . . . . . . . . . . . . . . . . . . . . . . . . . . . . . . . . . . . . . . 137
5.5.1 Adding a Replica . . . . . . . . . . . . . . . . . . . . . . . . . . . . . . . . . . . . . . . . . . . . . . . . . . . 137
5.5.2 Deleting a Replica . . . . . . . . . . . . . . . . . . . . . . . . . . . . . . . . . . . . . . . . . . . . . . . . . . 138
5.5.3 Changing a Replica Type . . . . . . . . . . . . . . . . . . . . . . . . . . . . . . . . . . . . . . . . . . . . 139
5.6 Setting Up and Managing Filtered Replicas. . . . . . . . . . . . . . . . . . . . . . . . . . . . . . . . . . . . . . 140
5.6.1 Using the Filtered Replica Wizard . . . . . . . . . . . . . . . . . . . . . . . . . . . . . . . . . . . . . . 140
5.6.2 Defining a Partition Scope . . . . . . . . . . . . . . . . . . . . . . . . . . . . . . . . . . . . . . . . . . . . 141
5.6.3 Setting Up a Server Filter . . . . . . . . . . . . . . . . . . . . . . . . . . . . . . . . . . . . . . . . . . . . 142
5.7 Viewing Partitions and Replicas. . . . . . . . . . . . . . . . . . . . . . . . . . . . . . . . . . . . . . . . . . . . . . . 142
5.7.1 Viewing the Partitions on a Server. . . . . . . . . . . . . . . . . . . . . . . . . . . . . . . . . . . . . . 143
5.7.2 Viewing a Partition’s Replicas . . . . . . . . . . . . . . . . . . . . . . . . . . . . . . . . . . . . . . . . . 143
5.7.3 Viewing Information about a Partition . . . . . . . . . . . . . . . . . . . . . . . . . . . . . . . . . . . 143
5.7.4 Viewing Partition Hierarchy . . . . . . . . . . . . . . . . . . . . . . . . . . . . . . . . . . . . . . . . . . . 143
5.7.5 Viewing Information about a Replica . . . . . . . . . . . . . . . . . . . . . . . . . . . . . . . . . . . . 144
6 Novell eDirectory Management Utilities 145
6.1 Novell Import Conversion Export Utility . . . . . . . . . . . . . . . . . . . . . . . . . . . . . . . . . . . . . . . . . 145
6.1.1 Using the Novell iManager Import Convert Export Wizard . . . . . . . . . . . . . . . . . . . 146
6.1.2 Using the Command Line Interface . . . . . . . . . . . . . . . . . . . . . . . . . . . . . . . . . . . . . 152
6.1.3 Conversion Rules . . . . . . . . . . . . . . . . . . . . . . . . . . . . . . . . . . . . . . . . . . . . . . . . . . 171
6.1.4 LDAP Bulk Update/Replication Protocol . . . . . . . . . . . . . . . . . . . . . . . . . . . . . . . . . 179
6.1.5 Migrating the Schema between LDAP Directories. . . . . . . . . . . . . . . . . . . . . . . . . . 180
6.1.6 Improving the Speed of LDIF Imports . . . . . . . . . . . . . . . . . . . . . . . . . . . . . . . . . . . 180
6.2 Index Manager . . . . . . . . . . . . . . . . . . . . . . . . . . . . . . . . . . . . . . . . . . . . . . . . . . . . . . . . . . . . 182
6.2.1 Creating an Index . . . . . . . . . . . . . . . . . . . . . . . . . . . . . . . . . . . . . . . . . . . . . . . . . . 183
6.2.2 Deleting an Index. . . . . . . . . . . . . . . . . . . . . . . . . . . . . . . . . . . . . . . . . . . . . . . . . . . 183
6.2.3 Taking an Index Offline . . . . . . . . . . . . . . . . . . . . . . . . . . . . . . . . . . . . . . . . . . . . . . 184
6.2.4 Managing Indexes on Other Servers . . . . . . . . . . . . . . . . . . . . . . . . . . . . . . . . . . . . 184
6.2.5 Using the Novell Import Conversion Export Utility to Manage Indexes . . . . . . . . . . 184
Contents 7
Page 8

6.3 Predicate Data . . . . . . . . . . . . . . . . . . . . . . . . . . . . . . . . . . . . . . . . . . . . . . . . . . . . . . . . . . . . 187
6.3.1 Managing Predicate Data . . . . . . . . . . . . . . . . . . . . . . . . . . . . . . . . . . . . . . . . . . . . 187
6.4 eDirectory Service Manager. . . . . . . . . . . . . . . . . . . . . . . . . . . . . . . . . . . . . . . . . . . . . . . . . . 187
6.4.1 Using the eMBox Client Service Manager eMTool . . . . . . . . . . . . . . . . . . . . . . . . . 188
6.4.2 Using the Service Manager Plug-In to Novell iManager . . . . . . . . . . . . . . . . . . . . . 189
7 Offline Bulkload Utility 191
7.1 Using ldif2dib for Bulkloading. . . . . . . . . . . . . . . . . . . . . . . . . . . . . . . . . . . . . . . . . . . . . . . . . 191
7.2 Multiple Instances . . . . . . . . . . . . . . . . . . . . . . . . . . . . . . . . . . . . . . . . . . . . . . . . . . . . . . . . . 193
7.3 Tuning ldif2dib . . . . . . . . . . . . . . . . . . . . . . . . . . . . . . . . . . . . . . . . . . . . . . . . . . . . . . . . . . . . 193
7.3.1 Tuning the Cache . . . . . . . . . . . . . . . . . . . . . . . . . . . . . . . . . . . . . . . . . . . . . . . . . . 193
7.3.2 Transaction Size . . . . . . . . . . . . . . . . . . . . . . . . . . . . . . . . . . . . . . . . . . . . . . . . . . . 193
7.3.3 Index . . . . . . . . . . . . . . . . . . . . . . . . . . . . . . . . . . . . . . . . . . . . . . . . . . . . . . . . . . . . 194
7.3.4 Block Cache Percent . . . . . . . . . . . . . . . . . . . . . . . . . . . . . . . . . . . . . . . . . . . . . . . . 194
7.3.5 Check Point Interval. . . . . . . . . . . . . . . . . . . . . . . . . . . . . . . . . . . . . . . . . . . . . . . . . 194
7.4 Limitations . . . . . . . . . . . . . . . . . . . . . . . . . . . . . . . . . . . . . . . . . . . . . . . . . . . . . . . . . . . . . . . 194
7.4.1 Schema . . . . . . . . . . . . . . . . . . . . . . . . . . . . . . . . . . . . . . . . . . . . . . . . . . . . . . . . . . 194
7.4.2 ACL Templates . . . . . . . . . . . . . . . . . . . . . . . . . . . . . . . . . . . . . . . . . . . . . . . . . . . . 195
7.4.3 Options . . . . . . . . . . . . . . . . . . . . . . . . . . . . . . . . . . . . . . . . . . . . . . . . . . . . . . . . . . 195
7.4.4 Unsupported Platforms . . . . . . . . . . . . . . . . . . . . . . . . . . . . . . . . . . . . . . . . . . . . . . 195
7.4.5 Simple Password LDIF . . . . . . . . . . . . . . . . . . . . . . . . . . . . . . . . . . . . . . . . . . . . . . 195
7.4.6 Custom Classes. . . . . . . . . . . . . . . . . . . . . . . . . . . . . . . . . . . . . . . . . . . . . . . . . . . . 195
7.5 Caveats . . . . . . . . . . . . . . . . . . . . . . . . . . . . . . . . . . . . . . . . . . . . . . . . . . . . . . . . . . . . . . . . . 196
7.5.1 Duplicate Entries . . . . . . . . . . . . . . . . . . . . . . . . . . . . . . . . . . . . . . . . . . . . . . . . . . . 196
7.5.2 No Schema Checks . . . . . . . . . . . . . . . . . . . . . . . . . . . . . . . . . . . . . . . . . . . . . . . . . 196
7.5.3 Insufficient Space on Hard-Drive . . . . . . . . . . . . . . . . . . . . . . . . . . . . . . . . . . . . . . . 196
7.5.4 Forced Termination . . . . . . . . . . . . . . . . . . . . . . . . . . . . . . . . . . . . . . . . . . . . . . . . . 196
7.5.5 Terminal Resizing . . . . . . . . . . . . . . . . . . . . . . . . . . . . . . . . . . . . . . . . . . . . . . . . . . 196
novdocx (en) 11 July 2008
8 Using Novell iMonitor 2.4 197
8.1 System Requirements . . . . . . . . . . . . . . . . . . . . . . . . . . . . . . . . . . . . . . . . . . . . . . . . . . . . . . 198
8.1.1 Platforms . . . . . . . . . . . . . . . . . . . . . . . . . . . . . . . . . . . . . . . . . . . . . . . . . . . . . . . . . 198
8.1.2 eDirectory Versions That Can Be Monitored . . . . . . . . . . . . . . . . . . . . . . . . . . . . . . 198
8.2 Accessing iMonitor . . . . . . . . . . . . . . . . . . . . . . . . . . . . . . . . . . . . . . . . . . . . . . . . . . . . . . . . . 199
8.3 iMonitor Architecture . . . . . . . . . . . . . . . . . . . . . . . . . . . . . . . . . . . . . . . . . . . . . . . . . . . . . . . 199
8.3.1 Anatomy of an iMonitor Page . . . . . . . . . . . . . . . . . . . . . . . . . . . . . . . . . . . . . . . . . 199
8.3.2 Modes of Operation . . . . . . . . . . . . . . . . . . . . . . . . . . . . . . . . . . . . . . . . . . . . . . . . . 200
8.3.3 iMonitor Features Available on Every Page. . . . . . . . . . . . . . . . . . . . . . . . . . . . . . . 202
8.3.4 NetWare Remote Manager Integration . . . . . . . . . . . . . . . . . . . . . . . . . . . . . . . . . . 202
8.3.5 Configuration Files. . . . . . . . . . . . . . . . . . . . . . . . . . . . . . . . . . . . . . . . . . . . . . . . . . 202
8.4 iMonitor Features . . . . . . . . . . . . . . . . . . . . . . . . . . . . . . . . . . . . . . . . . . . . . . . . . . . . . . . . . . 205
8.4.1 Viewing eDirectory Server Health . . . . . . . . . . . . . . . . . . . . . . . . . . . . . . . . . . . . . . 206
8.4.2 Viewing Partition Synchronization Status . . . . . . . . . . . . . . . . . . . . . . . . . . . . . . . . 206
8.4.3 Viewing Server Connection Information . . . . . . . . . . . . . . . . . . . . . . . . . . . . . . . . . 207
8.4.4 Viewing Known Servers. . . . . . . . . . . . . . . . . . . . . . . . . . . . . . . . . . . . . . . . . . . . . . 207
8.4.5 Viewing Replica Information . . . . . . . . . . . . . . . . . . . . . . . . . . . . . . . . . . . . . . . . . . 208
8.4.6 Controlling and Configuring the DS Agent . . . . . . . . . . . . . . . . . . . . . . . . . . . . . . . . 208
8.4.7 Configuring Trace Settings . . . . . . . . . . . . . . . . . . . . . . . . . . . . . . . . . . . . . . . . . . . 209
8.4.8 Viewing Process Status Information . . . . . . . . . . . . . . . . . . . . . . . . . . . . . . . . . . . . 210
8.4.9 Viewing Agent Activity . . . . . . . . . . . . . . . . . . . . . . . . . . . . . . . . . . . . . . . . . . . . . . . 210
8.4.10 Viewing Traffic Patterns. . . . . . . . . . . . . . . . . . . . . . . . . . . . . . . . . . . . . . . . . . . . . . 211
8.4.11 Viewing Background Processes . . . . . . . . . . . . . . . . . . . . . . . . . . . . . . . . . . . . . . . 211
8.4.12 Viewing eDirectory Server Errors . . . . . . . . . . . . . . . . . . . . . . . . . . . . . . . . . . . . . . 211
8.4.13 Viewing DSRepair Information. . . . . . . . . . . . . . . . . . . . . . . . . . . . . . . . . . . . . . . . . 211
8.4.14 Viewing Agent Health Information . . . . . . . . . . . . . . . . . . . . . . . . . . . . . . . . . . . . . . 212
8 Novell eDirectory 8.8 Administration Guide
Page 9

8.4.15 Browsing Objects in Your Tree . . . . . . . . . . . . . . . . . . . . . . . . . . . . . . . . . . . . . . . . 212
8.4.16 Viewing Entries for Synchronization or Purging. . . . . . . . . . . . . . . . . . . . . . . . . . . . 213
8.4.17 Viewing Novell Nsure Identity Manager Details . . . . . . . . . . . . . . . . . . . . . . . . . . . . 213
8.4.18 Viewing the Synchronization Status of a Replica . . . . . . . . . . . . . . . . . . . . . . . . . . 213
8.4.19 Configuring and Viewing Reports . . . . . . . . . . . . . . . . . . . . . . . . . . . . . . . . . . . . . . 213
8.4.20 Viewing Schema, Class, and Attribute Definitions. . . . . . . . . . . . . . . . . . . . . . . . . . 215
8.4.21 Searching for Objects . . . . . . . . . . . . . . . . . . . . . . . . . . . . . . . . . . . . . . . . . . . . . . . 216
8.4.22 Using the Stream Viewer . . . . . . . . . . . . . . . . . . . . . . . . . . . . . . . . . . . . . . . . . . . . . 216
8.4.23 Clone DIB Set . . . . . . . . . . . . . . . . . . . . . . . . . . . . . . . . . . . . . . . . . . . . . . . . . . . . . 217
8.5 Ensuring Secure iMonitor Operations . . . . . . . . . . . . . . . . . . . . . . . . . . . . . . . . . . . . . . . . . . 221
9 Merging Novell eDirectory Trees 223
9.1 Merging eDirectory Trees. . . . . . . . . . . . . . . . . . . . . . . . . . . . . . . . . . . . . . . . . . . . . . . . . . . . 223
9.1.1 Prerequisites . . . . . . . . . . . . . . . . . . . . . . . . . . . . . . . . . . . . . . . . . . . . . . . . . . . . . . 224
9.1.2 Target Tree Requirements. . . . . . . . . . . . . . . . . . . . . . . . . . . . . . . . . . . . . . . . . . . . 224
9.1.3 Schema Requirements . . . . . . . . . . . . . . . . . . . . . . . . . . . . . . . . . . . . . . . . . . . . . . 224
9.1.4 Merging the Source into the Target Tree . . . . . . . . . . . . . . . . . . . . . . . . . . . . . . . . . 225
9.1.5 Partition Changes . . . . . . . . . . . . . . . . . . . . . . . . . . . . . . . . . . . . . . . . . . . . . . . . . . 225
9.1.6 Preparing the Source and Target Trees . . . . . . . . . . . . . . . . . . . . . . . . . . . . . . . . . 226
9.1.7 Synchronizing Time before the Merge. . . . . . . . . . . . . . . . . . . . . . . . . . . . . . . . . . . 226
9.1.8 Merging Two Trees . . . . . . . . . . . . . . . . . . . . . . . . . . . . . . . . . . . . . . . . . . . . . . . . . 227
9.1.9 Post-Merge Tasks . . . . . . . . . . . . . . . . . . . . . . . . . . . . . . . . . . . . . . . . . . . . . . . . . . 228
9.2 Grafting a Single Server Tree . . . . . . . . . . . . . . . . . . . . . . . . . . . . . . . . . . . . . . . . . . . . . . . . 229
9.2.1 Understanding Context Name Changes . . . . . . . . . . . . . . . . . . . . . . . . . . . . . . . . . 231
9.2.2 Preparing the Source and Target Trees . . . . . . . . . . . . . . . . . . . . . . . . . . . . . . . . . 232
9.2.3 Grafting the Source and Target Tree. . . . . . . . . . . . . . . . . . . . . . . . . . . . . . . . . . . . 234
9.3 Renaming a Tree . . . . . . . . . . . . . . . . . . . . . . . . . . . . . . . . . . . . . . . . . . . . . . . . . . . . . . . . . . 234
9.4 Using the eMBox Client to Merge Trees . . . . . . . . . . . . . . . . . . . . . . . . . . . . . . . . . . . . . . . . 235
9.4.1 Using the DSMerge eMTool . . . . . . . . . . . . . . . . . . . . . . . . . . . . . . . . . . . . . . . . . . 235
9.4.2 DSMerge eMTool Options . . . . . . . . . . . . . . . . . . . . . . . . . . . . . . . . . . . . . . . . . . . . 236
novdocx (en) 11 July 2008
10 Encrypting Data In eDirectory 239
10.1 Encrypted Attributes. . . . . . . . . . . . . . . . . . . . . . . . . . . . . . . . . . . . . . . . . . . . . . . . . . . . . . . . 239
10.1.1 Using Encryption Schemes . . . . . . . . . . . . . . . . . . . . . . . . . . . . . . . . . . . . . . . . . . . 240
10.1.2 Managing Encrypted Attributes Policies . . . . . . . . . . . . . . . . . . . . . . . . . . . . . . . . . 241
10.1.3 Accessing the Encrypted Attributes . . . . . . . . . . . . . . . . . . . . . . . . . . . . . . . . . . . . . 245
10.1.4 Viewing the Encrypted Attributes. . . . . . . . . . . . . . . . . . . . . . . . . . . . . . . . . . . . . . . 246
10.1.5 Encrypting and Decrypting Backup Data . . . . . . . . . . . . . . . . . . . . . . . . . . . . . . . . . 247
10.1.6 Cloning the DIB Fileset Containing Encrypted Attributes . . . . . . . . . . . . . . . . . . . . 247
10.1.7 Adding eDirectory 8.8 Servers to Replica Rings . . . . . . . . . . . . . . . . . . . . . . . . . . . 247
10.1.8 Backward Compatibility . . . . . . . . . . . . . . . . . . . . . . . . . . . . . . . . . . . . . . . . . . . . . . 247
10.1.9 Migrating to Encrypted Attributes. . . . . . . . . . . . . . . . . . . . . . . . . . . . . . . . . . . . . . . 248
10.1.10 Replicating the Encrypted Attributes . . . . . . . . . . . . . . . . . . . . . . . . . . . . . . . . . . . . 248
10.2 Encrypted Replication . . . . . . . . . . . . . . . . . . . . . . . . . . . . . . . . . . . . . . . . . . . . . . . . . . . . . . 248
10.2.1 Enabling Encrypted Replication. . . . . . . . . . . . . . . . . . . . . . . . . . . . . . . . . . . . . . . . 249
10.2.2 Adding a New Replica to a Replica Ring . . . . . . . . . . . . . . . . . . . . . . . . . . . . . . . . . 253
10.2.3 Synchronization and Encrypted Replication . . . . . . . . . . . . . . . . . . . . . . . . . . . . . . 258
10.2.4 Viewing the Encrypted Replication Status . . . . . . . . . . . . . . . . . . . . . . . . . . . . . . . . 258
10.3 Achieving Complete Security While Encrypting Data. . . . . . . . . . . . . . . . . . . . . . . . . . . . . . . 259
10.3.1 Encrypting Data in an All New Setup. . . . . . . . . . . . . . . . . . . . . . . . . . . . . . . . . . . . 259
10.3.2 Encrypting Data in an Existing Setup . . . . . . . . . . . . . . . . . . . . . . . . . . . . . . . . . . . 260
10.3.3 Conclusion . . . . . . . . . . . . . . . . . . . . . . . . . . . . . . . . . . . . . . . . . . . . . . . . . . . . . . . . 261
Contents 9
Page 10

11 Repairing the Novell eDirectory Database 263
11.1 Performing Basic Repair Operations . . . . . . . . . . . . . . . . . . . . . . . . . . . . . . . . . . . . . . . . . . . 264
11.1.1 Performing an Unattended Full Repair . . . . . . . . . . . . . . . . . . . . . . . . . . . . . . . . . . 264
11.1.2 Performing a Local Database Repair. . . . . . . . . . . . . . . . . . . . . . . . . . . . . . . . . . . . 266
11.1.3 Checking External References . . . . . . . . . . . . . . . . . . . . . . . . . . . . . . . . . . . . . . . . 267
11.1.4 Repairing a Single Object . . . . . . . . . . . . . . . . . . . . . . . . . . . . . . . . . . . . . . . . . . . . 267
11.1.5 Deleting Unknown Leaf Objects . . . . . . . . . . . . . . . . . . . . . . . . . . . . . . . . . . . . . . . 267
11.2 Viewing and Configuring the Repair Log File . . . . . . . . . . . . . . . . . . . . . . . . . . . . . . . . . . . . . 268
11.2.1 Opening the Log File . . . . . . . . . . . . . . . . . . . . . . . . . . . . . . . . . . . . . . . . . . . . . . . . 268
11.2.2 Setting Log File Options . . . . . . . . . . . . . . . . . . . . . . . . . . . . . . . . . . . . . . . . . . . . . 268
11.3 Performing a Repair in Novell iMonitor. . . . . . . . . . . . . . . . . . . . . . . . . . . . . . . . . . . . . . . . . . 269
11.4 Repairing Replicas . . . . . . . . . . . . . . . . . . . . . . . . . . . . . . . . . . . . . . . . . . . . . . . . . . . . . . . . . 269
11.4.1 Repairing All Replicas . . . . . . . . . . . . . . . . . . . . . . . . . . . . . . . . . . . . . . . . . . . . . . . 269
11.4.2 Repairing Selected Replicas . . . . . . . . . . . . . . . . . . . . . . . . . . . . . . . . . . . . . . . . . . 270
11.4.3 Repairing Time Stamps . . . . . . . . . . . . . . . . . . . . . . . . . . . . . . . . . . . . . . . . . . . . . . 270
11.4.4 Designating This Server As the New Master Replica . . . . . . . . . . . . . . . . . . . . . . . 271
11.4.5 Destroying the Selected Replica . . . . . . . . . . . . . . . . . . . . . . . . . . . . . . . . . . . . . . . 272
11.5 Repairing Replica Rings. . . . . . . . . . . . . . . . . . . . . . . . . . . . . . . . . . . . . . . . . . . . . . . . . . . . . 272
11.5.1 Repairing All Replica Rings . . . . . . . . . . . . . . . . . . . . . . . . . . . . . . . . . . . . . . . . . . . 272
11.5.2 Repairing the Selected Replica Ring . . . . . . . . . . . . . . . . . . . . . . . . . . . . . . . . . . . . 273
11.5.3 Sending All Objects to Every Server in the Ring . . . . . . . . . . . . . . . . . . . . . . . . . . . 273
11.5.4 Receiving All Objects from the Master to the Selected Replica. . . . . . . . . . . . . . . . 273
11.5.5 Removing This Server from the Replica Ring . . . . . . . . . . . . . . . . . . . . . . . . . . . . . 274
11.6 Maintaining the Schema. . . . . . . . . . . . . . . . . . . . . . . . . . . . . . . . . . . . . . . . . . . . . . . . . . . . . 274
11.6.1 Requesting Schema from the Tree . . . . . . . . . . . . . . . . . . . . . . . . . . . . . . . . . . . . . 275
11.6.2 Resetting the Local Schema . . . . . . . . . . . . . . . . . . . . . . . . . . . . . . . . . . . . . . . . . . 275
11.6.3 Performing a Post-NetWare 5 Schema Update. . . . . . . . . . . . . . . . . . . . . . . . . . . . 275
11.6.4 Performing Optional Schema Enhancements . . . . . . . . . . . . . . . . . . . . . . . . . . . . . 276
11.6.5 Importing Remote Schema . . . . . . . . . . . . . . . . . . . . . . . . . . . . . . . . . . . . . . . . . . . 276
11.6.6 Declaring a New Schema Epoch . . . . . . . . . . . . . . . . . . . . . . . . . . . . . . . . . . . . . . . 277
11.7 Repairing Server Network Addresses . . . . . . . . . . . . . . . . . . . . . . . . . . . . . . . . . . . . . . . . . . 277
11.7.1 Repairing All Network Addresses . . . . . . . . . . . . . . . . . . . . . . . . . . . . . . . . . . . . . . 277
11.7.2 Repairing a Server's Network Addresses . . . . . . . . . . . . . . . . . . . . . . . . . . . . . . . . 278
11.8 Performing Synchronization Operations . . . . . . . . . . . . . . . . . . . . . . . . . . . . . . . . . . . . . . . . 278
11.8.1 Synchronizing the Selected Replica on This Server . . . . . . . . . . . . . . . . . . . . . . . . 279
11.8.2 Reporting the Synchronization Status on This Server . . . . . . . . . . . . . . . . . . . . . . . 279
11.8.3 Reporting the Synchronization Status on All Servers . . . . . . . . . . . . . . . . . . . . . . . 279
11.8.4 Performing a Time Synchronization. . . . . . . . . . . . . . . . . . . . . . . . . . . . . . . . . . . . . 280
11.8.5 Scheduling an Immediate Synchronization . . . . . . . . . . . . . . . . . . . . . . . . . . . . . . . 281
11.9 Advanced DSRepair Options . . . . . . . . . . . . . . . . . . . . . . . . . . . . . . . . . . . . . . . . . . . . . . . . . 281
11.9.1 Running DSRepair on the eDirectory Server. . . . . . . . . . . . . . . . . . . . . . . . . . . . . . 281
11.9.2 DSRepair Command Line Options . . . . . . . . . . . . . . . . . . . . . . . . . . . . . . . . . . . . . 282
11.9.3 Using Advanced DSRepair Switches. . . . . . . . . . . . . . . . . . . . . . . . . . . . . . . . . . . . 284
11.10 Using the eMBox Client to Repair a Database. . . . . . . . . . . . . . . . . . . . . . . . . . . . . . . . . . . . 285
11.10.1 Using the DSRepair eMTool . . . . . . . . . . . . . . . . . . . . . . . . . . . . . . . . . . . . . . . . . . 285
11.10.2 DSRepair eMTool Options. . . . . . . . . . . . . . . . . . . . . . . . . . . . . . . . . . . . . . . . . . . . 286
novdocx (en) 11 July 2008
12 WAN Traffic Manager 289
12.1 Understanding WAN Traffic Manager . . . . . . . . . . . . . . . . . . . . . . . . . . . . . . . . . . . . . . . . . . 289
12.1.1 LAN Area Objects . . . . . . . . . . . . . . . . . . . . . . . . . . . . . . . . . . . . . . . . . . . . . . . . . . 291
12.1.2 WAN Traffic Policies . . . . . . . . . . . . . . . . . . . . . . . . . . . . . . . . . . . . . . . . . . . . . . . . 292
12.1.3 Limiting WAN Traffic . . . . . . . . . . . . . . . . . . . . . . . . . . . . . . . . . . . . . . . . . . . . . . . . 295
12.1.4 Assigning Cost Factors . . . . . . . . . . . . . . . . . . . . . . . . . . . . . . . . . . . . . . . . . . . . . . 297
12.2 WAN Traffic Manager Policy Groups . . . . . . . . . . . . . . . . . . . . . . . . . . . . . . . . . . . . . . . . . . . 298
12.2.1 1-3am.wmg . . . . . . . . . . . . . . . . . . . . . . . . . . . . . . . . . . . . . . . . . . . . . . . . . . . . . . . 298
10 Novell eDirectory 8.8 Administration Guide
Page 11

12.2.2 7am-6pm.wmg . . . . . . . . . . . . . . . . . . . . . . . . . . . . . . . . . . . . . . . . . . . . . . . . . . . . . 298
12.2.3 Costlt20.wmg . . . . . . . . . . . . . . . . . . . . . . . . . . . . . . . . . . . . . . . . . . . . . . . . . . . . . . 298
12.2.4 Ipx.wmg . . . . . . . . . . . . . . . . . . . . . . . . . . . . . . . . . . . . . . . . . . . . . . . . . . . . . . . . . . 299
12.2.5 Ndsttyps.wmg . . . . . . . . . . . . . . . . . . . . . . . . . . . . . . . . . . . . . . . . . . . . . . . . . . . . . 299
12.2.6 Onospoof.wmg. . . . . . . . . . . . . . . . . . . . . . . . . . . . . . . . . . . . . . . . . . . . . . . . . . . . . 310
12.2.7 Opnspoof.wmg. . . . . . . . . . . . . . . . . . . . . . . . . . . . . . . . . . . . . . . . . . . . . . . . . . . . . 311
12.2.8 Samearea.wmg . . . . . . . . . . . . . . . . . . . . . . . . . . . . . . . . . . . . . . . . . . . . . . . . . . . . 311
12.2.9 Tcpip.wmg . . . . . . . . . . . . . . . . . . . . . . . . . . . . . . . . . . . . . . . . . . . . . . . . . . . . . . . . 311
12.2.10 Timecost.wmg . . . . . . . . . . . . . . . . . . . . . . . . . . . . . . . . . . . . . . . . . . . . . . . . . . . . . 312
12.3 WAN Policy Structure. . . . . . . . . . . . . . . . . . . . . . . . . . . . . . . . . . . . . . . . . . . . . . . . . . . . . . . 312
12.3.1 Declaration Section . . . . . . . . . . . . . . . . . . . . . . . . . . . . . . . . . . . . . . . . . . . . . . . . . 312
12.3.2 Selector Section. . . . . . . . . . . . . . . . . . . . . . . . . . . . . . . . . . . . . . . . . . . . . . . . . . . . 314
12.3.3 Provider Section . . . . . . . . . . . . . . . . . . . . . . . . . . . . . . . . . . . . . . . . . . . . . . . . . . . 315
12.3.4 Construction Used within Policy Sections . . . . . . . . . . . . . . . . . . . . . . . . . . . . . . . . 315
13 Understanding LDAP Services for Novell eDirectory 321
13.1 Key Terms for LDAP Services . . . . . . . . . . . . . . . . . . . . . . . . . . . . . . . . . . . . . . . . . . . . . . . . 322
13.1.1 Clients and Servers . . . . . . . . . . . . . . . . . . . . . . . . . . . . . . . . . . . . . . . . . . . . . . . . . 322
13.1.2 Objects. . . . . . . . . . . . . . . . . . . . . . . . . . . . . . . . . . . . . . . . . . . . . . . . . . . . . . . . . . . 322
13.1.3 Referrals . . . . . . . . . . . . . . . . . . . . . . . . . . . . . . . . . . . . . . . . . . . . . . . . . . . . . . . . . 323
13.2 Understanding How LDAP Works with eDirectory . . . . . . . . . . . . . . . . . . . . . . . . . . . . . . . . . 324
13.2.1 Connecting to eDirectory from LDAP. . . . . . . . . . . . . . . . . . . . . . . . . . . . . . . . . . . . 325
13.2.2 Class and Attribute Mappings . . . . . . . . . . . . . . . . . . . . . . . . . . . . . . . . . . . . . . . . . 327
13.2.3 Enabling Nonstandard Schema Output . . . . . . . . . . . . . . . . . . . . . . . . . . . . . . . . . . 330
13.2.4 Syntax Differences. . . . . . . . . . . . . . . . . . . . . . . . . . . . . . . . . . . . . . . . . . . . . . . . . . 331
13.2.5 Supported Novell LDAP Controls and Extensions . . . . . . . . . . . . . . . . . . . . . . . . . . 332
13.3 Using LDAP Tools on Linux, Solaris, or AIX . . . . . . . . . . . . . . . . . . . . . . . . . . . . . . . . . . . . . 333
13.3.1 LDAP Tools . . . . . . . . . . . . . . . . . . . . . . . . . . . . . . . . . . . . . . . . . . . . . . . . . . . . . . . 334
13.4 Extensible Match Search Filter . . . . . . . . . . . . . . . . . . . . . . . . . . . . . . . . . . . . . . . . . . . . . . . 343
13.5 LDAP Transactions . . . . . . . . . . . . . . . . . . . . . . . . . . . . . . . . . . . . . . . . . . . . . . . . . . . . . . . . 345
13.5.1 Limitations . . . . . . . . . . . . . . . . . . . . . . . . . . . . . . . . . . . . . . . . . . . . . . . . . . . . . . . . 346
novdocx (en) 11 July 2008
14 Configuring LDAP Services for Novell eDirectory 349
14.1 Loading and Unloading LDAP Services for eDirectory. . . . . . . . . . . . . . . . . . . . . . . . . . . . . . 349
14.2 Verifying That the LDAP Server Is Loaded . . . . . . . . . . . . . . . . . . . . . . . . . . . . . . . . . . . . . . 350
14.3 Verifying That the LDAP Server Is Running. . . . . . . . . . . . . . . . . . . . . . . . . . . . . . . . . . . . . . 351
14.3.1 Scenarios. . . . . . . . . . . . . . . . . . . . . . . . . . . . . . . . . . . . . . . . . . . . . . . . . . . . . . . . . 351
14.3.2 Verifying That The LDAP Server Is Running . . . . . . . . . . . . . . . . . . . . . . . . . . . . . . 352
14.3.3 Verifying That A Device Is Listening . . . . . . . . . . . . . . . . . . . . . . . . . . . . . . . . . . . . 353
14.4 Configuring LDAP Objects . . . . . . . . . . . . . . . . . . . . . . . . . . . . . . . . . . . . . . . . . . . . . . . . . . . 354
14.4.1 Configuring LDAP Server and LDAP Group Objects on Linux, Solaris, AIX Systems. .
355
14.5 Refreshing the LDAP Server . . . . . . . . . . . . . . . . . . . . . . . . . . . . . . . . . . . . . . . . . . . . . . . . . 360
14.6 Authentication and Security . . . . . . . . . . . . . . . . . . . . . . . . . . . . . . . . . . . . . . . . . . . . . . . . . . 361
14.6.1 Requiring TLS for Simple Binds with Passwords. . . . . . . . . . . . . . . . . . . . . . . . . . . 361
14.6.2 Starting and Stopping TLS. . . . . . . . . . . . . . . . . . . . . . . . . . . . . . . . . . . . . . . . . . . . 362
14.6.3 Configuring the Server for TLS . . . . . . . . . . . . . . . . . . . . . . . . . . . . . . . . . . . . . . . . 362
14.6.4 Configuring the Client for TLS . . . . . . . . . . . . . . . . . . . . . . . . . . . . . . . . . . . . . . . . . 364
14.6.5 Exporting the Trusted Root . . . . . . . . . . . . . . . . . . . . . . . . . . . . . . . . . . . . . . . . . . . 364
14.6.6 Authenticating with a Client Certificate . . . . . . . . . . . . . . . . . . . . . . . . . . . . . . . . . . 365
14.6.7 Using Certificate Authorities from Third-Party Providers . . . . . . . . . . . . . . . . . . . . . 365
14.6.8 Creating and Using LDAP Proxy Users . . . . . . . . . . . . . . . . . . . . . . . . . . . . . . . . . . 365
14.6.9 Using SASL . . . . . . . . . . . . . . . . . . . . . . . . . . . . . . . . . . . . . . . . . . . . . . . . . . . . . . . 366
14.7 Using the LDAP Server to Search the Directory . . . . . . . . . . . . . . . . . . . . . . . . . . . . . . . . . . 369
Contents 11
Page 12

14.7.1 Setting Search Limits. . . . . . . . . . . . . . . . . . . . . . . . . . . . . . . . . . . . . . . . . . . . . . . . 369
14.7.2 Using Referrals . . . . . . . . . . . . . . . . . . . . . . . . . . . . . . . . . . . . . . . . . . . . . . . . . . . . 370
14.7.3 Searching Filtered Replicas. . . . . . . . . . . . . . . . . . . . . . . . . . . . . . . . . . . . . . . . . . . 377
14.8 Configuring for Superior Referrals . . . . . . . . . . . . . . . . . . . . . . . . . . . . . . . . . . . . . . . . . . . . . 378
14.8.1 Scenario: Superior Referrals in a Federated Tree . . . . . . . . . . . . . . . . . . . . . . . . . . 378
14.8.2 Creating a Nonauthoritative Area . . . . . . . . . . . . . . . . . . . . . . . . . . . . . . . . . . . . . . 379
14.8.3 Specifying Reference Data . . . . . . . . . . . . . . . . . . . . . . . . . . . . . . . . . . . . . . . . . . . 381
14.8.4 Updating Reference Information through LDAP . . . . . . . . . . . . . . . . . . . . . . . . . . . 382
14.8.5 Affected Operations . . . . . . . . . . . . . . . . . . . . . . . . . . . . . . . . . . . . . . . . . . . . . . . . . 382
14.8.6 Discovering Support for Superior References . . . . . . . . . . . . . . . . . . . . . . . . . . . . . 382
14.9 Persistent Search: Configuring for eDirectory Events . . . . . . . . . . . . . . . . . . . . . . . . . . . . . . 383
14.9.1 Managing Persistent Searches . . . . . . . . . . . . . . . . . . . . . . . . . . . . . . . . . . . . . . . . 383
14.9.2 Controlling Use of the Monitor Events Extended Operation . . . . . . . . . . . . . . . . . . 385
14.10 Getting Information about the LDAP Server. . . . . . . . . . . . . . . . . . . . . . . . . . . . . . . . . . . . . . 385
14.11 Auditing LDAP Events . . . . . . . . . . . . . . . . . . . . . . . . . . . . . . . . . . . . . . . . . . . . . . . . . . . . . . 387
15 Implementing the Service Location Protocol 389
15.1 Understanding SLP Components. . . . . . . . . . . . . . . . . . . . . . . . . . . . . . . . . . . . . . . . . . . . . . 389
15.1.1 User Agents . . . . . . . . . . . . . . . . . . . . . . . . . . . . . . . . . . . . . . . . . . . . . . . . . . . . . . . 389
15.1.2 Service Agents. . . . . . . . . . . . . . . . . . . . . . . . . . . . . . . . . . . . . . . . . . . . . . . . . . . . . 390
15.1.3 Directory Agents . . . . . . . . . . . . . . . . . . . . . . . . . . . . . . . . . . . . . . . . . . . . . . . . . . . 391
15.1.4 SLP Scopes . . . . . . . . . . . . . . . . . . . . . . . . . . . . . . . . . . . . . . . . . . . . . . . . . . . . . . . 393
15.2 How SLP Works . . . . . . . . . . . . . . . . . . . . . . . . . . . . . . . . . . . . . . . . . . . . . . . . . . . . . . . . . . . 394
15.2.1 SLP with a User Agent, Service Agent, and No Directory Agent. . . . . . . . . . . . . . . 394
15.2.2 SLP with a User Agent, Service Agent, and Directory Agent . . . . . . . . . . . . . . . . . 395
15.3 Understanding Local Mode . . . . . . . . . . . . . . . . . . . . . . . . . . . . . . . . . . . . . . . . . . . . . . . . . . 396
15.3.1 Central Repository . . . . . . . . . . . . . . . . . . . . . . . . . . . . . . . . . . . . . . . . . . . . . . . . . . 397
15.3.2 SLP Scopes . . . . . . . . . . . . . . . . . . . . . . . . . . . . . . . . . . . . . . . . . . . . . . . . . . . . . . . 397
15.3.3 Customized Scopes. . . . . . . . . . . . . . . . . . . . . . . . . . . . . . . . . . . . . . . . . . . . . . . . . 397
15.3.4 Proxy Scopes. . . . . . . . . . . . . . . . . . . . . . . . . . . . . . . . . . . . . . . . . . . . . . . . . . . . . . 397
15.3.5 Scalability and Performance . . . . . . . . . . . . . . . . . . . . . . . . . . . . . . . . . . . . . . . . . . 398
15.3.6 Private Mode . . . . . . . . . . . . . . . . . . . . . . . . . . . . . . . . . . . . . . . . . . . . . . . . . . . . . . 398
15.3.7 Filtering . . . . . . . . . . . . . . . . . . . . . . . . . . . . . . . . . . . . . . . . . . . . . . . . . . . . . . . . . . 398
15.4 Understanding Directory Mode . . . . . . . . . . . . . . . . . . . . . . . . . . . . . . . . . . . . . . . . . . . . . . . 398
15.4.1 How SLP Works in Directory Mode . . . . . . . . . . . . . . . . . . . . . . . . . . . . . . . . . . . . . 399
15.4.2 SLP eDirectory Objects . . . . . . . . . . . . . . . . . . . . . . . . . . . . . . . . . . . . . . . . . . . . . . 400
15.5 Novell’s Implementation of SLP . . . . . . . . . . . . . . . . . . . . . . . . . . . . . . . . . . . . . . . . . . . . . . . 401
15.5.1 Novell’s User Agents and Service Agents . . . . . . . . . . . . . . . . . . . . . . . . . . . . . . . . 402
15.5.2 The Novell Directory Agent . . . . . . . . . . . . . . . . . . . . . . . . . . . . . . . . . . . . . . . . . . . 406
15.5.3 Using the Novell Windows NT Directory Agent . . . . . . . . . . . . . . . . . . . . . . . . . . . . 407
15.5.4 Using the Service Location Protocol Directory Agent . . . . . . . . . . . . . . . . . . . . . . . 411
15.6 Setting Up SLP on Windows . . . . . . . . . . . . . . . . . . . . . . . . . . . . . . . . . . . . . . . . . . . . . . . . . 413
15.7 Setting Up SLP on NetWare . . . . . . . . . . . . . . . . . . . . . . . . . . . . . . . . . . . . . . . . . . . . . . . . . 413
15.7.1 Installing the NetWare SLP Directory Agent . . . . . . . . . . . . . . . . . . . . . . . . . . . . . . 413
15.7.2 Setting Up the NetWare Directory Agent Manually . . . . . . . . . . . . . . . . . . . . . . . . . 414
15.7.3 NetWare SLP Directory Agent Console Commands . . . . . . . . . . . . . . . . . . . . . . . . 414
15.8 Setting Up SLP on Linux or Solaris . . . . . . . . . . . . . . . . . . . . . . . . . . . . . . . . . . . . . . . . . . . . 417
15.8.1 User Agents and Service Agents. . . . . . . . . . . . . . . . . . . . . . . . . . . . . . . . . . . . . . . 418
15.8.2 Starting and Stopping the Daemon Process . . . . . . . . . . . . . . . . . . . . . . . . . . . . . . 419
15.8.3 Using the SLPINFO Diagnostic Utility . . . . . . . . . . . . . . . . . . . . . . . . . . . . . . . . . . . 419
15.8.4 eDirectory Interoperatability with OpenSLP on Linux and Solaris 8.0 SLP . . . . . . . 419
15.8.5 SLP V1- V2 Interoperatibility Issues . . . . . . . . . . . . . . . . . . . . . . . . . . . . . . . . . . . . 420
novdocx (en) 11 July 2008
16 Backing Up and Restoring Novell eDirectory 421
16.1 Checklist for Backing Up eDirectory. . . . . . . . . . . . . . . . . . . . . . . . . . . . . . . . . . . . . . . . . . . . 423
12 Novell eDirectory 8.8 Administration Guide
Page 13

16.2 Understanding Backup and Restore Services . . . . . . . . . . . . . . . . . . . . . . . . . . . . . . . . . . . . 425
16.2.1 About the eDirectory Backup eMTool . . . . . . . . . . . . . . . . . . . . . . . . . . . . . . . . . . . 425
16.2.2 What's Different about Backup and Restore in eDirectory 8.7.3? . . . . . . . . . . . . . . 426
16.2.3 Overview of How the Backup eMTool Does a Restore . . . . . . . . . . . . . . . . . . . . . . 428
16.2.4 Format of the Backup File Header. . . . . . . . . . . . . . . . . . . . . . . . . . . . . . . . . . . . . . 429
16.2.5 Format of the Backup Log File. . . . . . . . . . . . . . . . . . . . . . . . . . . . . . . . . . . . . . . . . 433
16.2.6 Using DSMASTER Servers as Part of Disaster Recovery Planning . . . . . . . . . . . . 434
16.2.7 Transitive Vectors and the Restore Verification Process. . . . . . . . . . . . . . . . . . . . . 435
16.2.8 Restore Verification Is Backward Compatible Only with eDirectory 8.5 or Later . . . 436
16.2.9 Preserving Rights When Restoring File System Data on NetWare . . . . . . . . . . . . . 436
16.3 Using Roll-Forward Logs . . . . . . . . . . . . . . . . . . . . . . . . . . . . . . . . . . . . . . . . . . . . . . . . . . . . 437
16.3.1 Issues to Be Aware of When Turning On Roll-Forward Logging . . . . . . . . . . . . . . . 438
16.3.2 Location of the Roll-Forward Logs. . . . . . . . . . . . . . . . . . . . . . . . . . . . . . . . . . . . . . 439
16.3.3 Backing Up and Removing Roll-Forward Logs . . . . . . . . . . . . . . . . . . . . . . . . . . . . 441
16.3.4 Cautionary Note: Removing eDirectory Also Removes the Roll-Forward Logs. . . . 441
16.4 Preparing for a Restore . . . . . . . . . . . . . . . . . . . . . . . . . . . . . . . . . . . . . . . . . . . . . . . . . . . . . 442
16.4.1 Prerequisites for Restoring . . . . . . . . . . . . . . . . . . . . . . . . . . . . . . . . . . . . . . . . . . . 442
16.4.2 Locating the Right Backup Files for a Restore . . . . . . . . . . . . . . . . . . . . . . . . . . . . 443
16.5 Using Novell iManager for Backup and Restore . . . . . . . . . . . . . . . . . . . . . . . . . . . . . . . . . . 444
16.5.1 Backing Up Manually with iManager . . . . . . . . . . . . . . . . . . . . . . . . . . . . . . . . . . . . 445
16.5.2 Configuring Roll-Forward Logs with iManager. . . . . . . . . . . . . . . . . . . . . . . . . . . . . 448
16.5.3 Restoring from Backup Files with iManager . . . . . . . . . . . . . . . . . . . . . . . . . . . . . . 450
16.6 Using the eMBox Client for Backup and Restore . . . . . . . . . . . . . . . . . . . . . . . . . . . . . . . . . . 454
16.6.1 Backing Up Manually with the eMBox Client . . . . . . . . . . . . . . . . . . . . . . . . . . . . . . 454
16.6.2 Doing Unattended Backups, Using a Batch File with the eMBox Client . . . . . . . . . 457
16.6.3 Configuring Roll-Forward Logs with the eMBox Client . . . . . . . . . . . . . . . . . . . . . . 460
16.6.4 Restoring from Backup Files with the eMBox Client . . . . . . . . . . . . . . . . . . . . . . . . 462
16.6.5 Backup and Restore Command Line Options . . . . . . . . . . . . . . . . . . . . . . . . . . . . . 465
16.7 Using DSBK . . . . . . . . . . . . . . . . . . . . . . . . . . . . . . . . . . . . . . . . . . . . . . . . . . . . . . . . . . . . . . 473
16.7.1 Using nlm on NetWare. . . . . . . . . . . . . . . . . . . . . . . . . . . . . . . . . . . . . . . . . . . . . . . 474
16.7.2 Using dsbk on Linux/AIX/Solaris . . . . . . . . . . . . . . . . . . . . . . . . . . . . . . . . . . . . . . . 474
16.7.3 Using dsbk on Windows . . . . . . . . . . . . . . . . . . . . . . . . . . . . . . . . . . . . . . . . . . . . . 475
16.8 Changes to Server-Specific Information Backup (NetWare Only) . . . . . . . . . . . . . . . . . . . . . 476
16.9 Recovering the Database If Restore Verification Fails. . . . . . . . . . . . . . . . . . . . . . . . . . . . . . 477
16.9.1 Cleaning Up the Replica Ring . . . . . . . . . . . . . . . . . . . . . . . . . . . . . . . . . . . . . . . . . 478
16.9.2 Repair the Failed Server and Readd Replicas to the Server . . . . . . . . . . . . . . . . . . 480
16.10 Scenarios for Backup and Restore . . . . . . . . . . . . . . . . . . . . . . . . . . . . . . . . . . . . . . . . . . . . 481
16.10.1 Scenario: Losing a Hard Drive Containing eDirectory in a Single-Server NetWork. 482
16.10.2 Scenario: Losing a Hard Drive Containing eDirectory in a Multiserver Environment 483
16.10.3 Scenario: Losing an Entire Server in a Multiple-Server Environment . . . . . . . . . . . 485
16.10.4 Scenario: Losing Some Servers in a Multiple-Server Environment . . . . . . . . . . . . . 486
16.10.5 Scenario: Losing All Servers in a Multiple-Server Environment. . . . . . . . . . . . . . . . 486
16.11 Backing Up and Restoring NICI . . . . . . . . . . . . . . . . . . . . . . . . . . . . . . . . . . . . . . . . . . . . . . . 488
16.11.1 UNIX . . . . . . . . . . . . . . . . . . . . . . . . . . . . . . . . . . . . . . . . . . . . . . . . . . . . . . . . . . . . 488
16.11.2 NetWare. . . . . . . . . . . . . . . . . . . . . . . . . . . . . . . . . . . . . . . . . . . . . . . . . . . . . . . . . . 490
16.11.3 Windows . . . . . . . . . . . . . . . . . . . . . . . . . . . . . . . . . . . . . . . . . . . . . . . . . . . . . . . . . 490
novdocx (en) 11 July 2008
17 SNMP Support for Novell eDirectory 493
17.1 Definitions and Terminology for SNMP . . . . . . . . . . . . . . . . . . . . . . . . . . . . . . . . . . . . . . . . . 493
17.2 Understanding SNMP Services . . . . . . . . . . . . . . . . . . . . . . . . . . . . . . . . . . . . . . . . . . . . . . . 494
17.3 eDirectory and SNMP . . . . . . . . . . . . . . . . . . . . . . . . . . . . . . . . . . . . . . . . . . . . . . . . . . . . . . 496
17.3.1 Benefits of SNMP Instrumentation on eDirectory . . . . . . . . . . . . . . . . . . . . . . . . . . 496
17.3.2 Understanding How SNMP Works with eDirectory . . . . . . . . . . . . . . . . . . . . . . . . . 496
17.4 Installing and Configuring SNMP Services for eDirectory . . . . . . . . . . . . . . . . . . . . . . . . . . . 499
17.4.1 Loading and Unloading the SNMP Server Module . . . . . . . . . . . . . . . . . . . . . . . . . 499
Contents 13
Page 14

17.4.2 Subagent Configuration . . . . . . . . . . . . . . . . . . . . . . . . . . . . . . . . . . . . . . . . . . . . . . 500
17.4.3 Setting Up SNMP Services for eDirectory . . . . . . . . . . . . . . . . . . . . . . . . . . . . . . . . 502
17.5 Monitoring eDirectory Using SNMP . . . . . . . . . . . . . . . . . . . . . . . . . . . . . . . . . . . . . . . . . . . . 508
17.5.1 Traps . . . . . . . . . . . . . . . . . . . . . . . . . . . . . . . . . . . . . . . . . . . . . . . . . . . . . . . . . . . . 508
17.5.2 Configuring Traps . . . . . . . . . . . . . . . . . . . . . . . . . . . . . . . . . . . . . . . . . . . . . . . . . . 522
17.5.3 Statistics . . . . . . . . . . . . . . . . . . . . . . . . . . . . . . . . . . . . . . . . . . . . . . . . . . . . . . . . . 532
17.6 Troubleshooting . . . . . . . . . . . . . . . . . . . . . . . . . . . . . . . . . . . . . . . . . . . . . . . . . . . . . . . . . . . 536
18 Maintaining Novell eDirectory 537
18.1 Improving eDirectory Performance . . . . . . . . . . . . . . . . . . . . . . . . . . . . . . . . . . . . . . . . . . . . 537
18.1.1 Distributing Memory between Entry and Block Caches . . . . . . . . . . . . . . . . . . . . . . 538
18.1.2 Using the Default Cache Settings . . . . . . . . . . . . . . . . . . . . . . . . . . . . . . . . . . . . . . 538
18.1.3 Tuning LDAP for eDirectory. . . . . . . . . . . . . . . . . . . . . . . . . . . . . . . . . . . . . . . . . . . 543
18.2 Improving eDirectory Performance on Linux, Solaris, and AIX Systems . . . . . . . . . . . . . . . . 545
18.2.1 Fine-Tuning the eDirectory Server. . . . . . . . . . . . . . . . . . . . . . . . . . . . . . . . . . . . . . 545
18.2.2 Optimizing eDirectory Cache. . . . . . . . . . . . . . . . . . . . . . . . . . . . . . . . . . . . . . . . . . 546
18.2.3 Tuning the Solaris OS for Novell eDirectory . . . . . . . . . . . . . . . . . . . . . . . . . . . . . . 549
18.3 Improving eDirectory Searches and Reads . . . . . . . . . . . . . . . . . . . . . . . . . . . . . . . . . . . . . . 550
18.4 Advanced Referral Costing . . . . . . . . . . . . . . . . . . . . . . . . . . . . . . . . . . . . . . . . . . . . . . . . . . 551
18.4.1 Improving Server-to-Server Connection . . . . . . . . . . . . . . . . . . . . . . . . . . . . . . . . . 552
18.4.2 Advantages of Referral Costing . . . . . . . . . . . . . . . . . . . . . . . . . . . . . . . . . . . . . . . . 554
18.4.3 Deploying ARC . . . . . . . . . . . . . . . . . . . . . . . . . . . . . . . . . . . . . . . . . . . . . . . . . . . . 555
18.4.4 Enabling Advanced Referral Costing . . . . . . . . . . . . . . . . . . . . . . . . . . . . . . . . . . . . 556
18.4.5 Tuning Advanced Referral Costing . . . . . . . . . . . . . . . . . . . . . . . . . . . . . . . . . . . . . 556
18.4.6 Monitoring Advanced Referral Costing . . . . . . . . . . . . . . . . . . . . . . . . . . . . . . . . . . 557
18.5 Improving Bulkload Performance . . . . . . . . . . . . . . . . . . . . . . . . . . . . . . . . . . . . . . . . . . . . . . 560
18.5.1 eDirectory Cache Settings . . . . . . . . . . . . . . . . . . . . . . . . . . . . . . . . . . . . . . . . . . . . 560
18.5.2 LBURP Transaction Size Setting. . . . . . . . . . . . . . . . . . . . . . . . . . . . . . . . . . . . . . . 561
18.5.3 Increasing the Number of Asynchronous Requests in ICE . . . . . . . . . . . . . . . . . . . 561
18.5.4 Increased Number of LDAP Writer Threads . . . . . . . . . . . . . . . . . . . . . . . . . . . . . . 562
18.5.5 Disabling Schema Validation in ICE . . . . . . . . . . . . . . . . . . . . . . . . . . . . . . . . . . . . 562
18.5.6 Disabling ACL Templates . . . . . . . . . . . . . . . . . . . . . . . . . . . . . . . . . . . . . . . . . . . . 563
18.5.7 Backlinker . . . . . . . . . . . . . . . . . . . . . . . . . . . . . . . . . . . . . . . . . . . . . . . . . . . . . . . . 564
18.5.8 Enabling/Disabling Inline Cache . . . . . . . . . . . . . . . . . . . . . . . . . . . . . . . . . . . . . . . 564
18.5.9 Increasing the LBURP Time Out Period . . . . . . . . . . . . . . . . . . . . . . . . . . . . . . . . . 565
18.6 Countering Memory Fragmentation . . . . . . . . . . . . . . . . . . . . . . . . . . . . . . . . . . . . . . . . . . . . 565
18.6.1 Enabling FLAIM Memory Pre-Allocation . . . . . . . . . . . . . . . . . . . . . . . . . . . . . . . . . 565
18.7 Keeping eDirectory Healthy . . . . . . . . . . . . . . . . . . . . . . . . . . . . . . . . . . . . . . . . . . . . . . . . . . 566
18.7.1 When to Perform Health Checks . . . . . . . . . . . . . . . . . . . . . . . . . . . . . . . . . . . . . . . 566
18.7.2 Health Check Overview . . . . . . . . . . . . . . . . . . . . . . . . . . . . . . . . . . . . . . . . . . . . . . 567
18.7.3 Checking eDirectory Health Using iMonitor . . . . . . . . . . . . . . . . . . . . . . . . . . . . . . . 567
18.7.4 For More Information . . . . . . . . . . . . . . . . . . . . . . . . . . . . . . . . . . . . . . . . . . . . . . . . 569
18.8 Resources for Monitoring . . . . . . . . . . . . . . . . . . . . . . . . . . . . . . . . . . . . . . . . . . . . . . . . . . . . 569
18.9 Upgrading Hardware or Replacing a Server . . . . . . . . . . . . . . . . . . . . . . . . . . . . . . . . . . . . . 569
18.9.1 Planned Hardware or Storage Device Upgrade without Replacing the Server . . . . 570
18.9.2 Planned Replacement of a Server. . . . . . . . . . . . . . . . . . . . . . . . . . . . . . . . . . . . . . 573
18.9.3 Server IP Address Changes . . . . . . . . . . . . . . . . . . . . . . . . . . . . . . . . . . . . . . . . . . 576
18.10 Restoring eDirectory after a Hardware Failure. . . . . . . . . . . . . . . . . . . . . . . . . . . . . . . . . . . . 576
novdocx (en) 11 July 2008
19 DHost iConsole Manager 577
19.1 What is DHost? . . . . . . . . . . . . . . . . . . . . . . . . . . . . . . . . . . . . . . . . . . . . . . . . . . . . . . . . . . . 578
19.2 Running DHost iConsole . . . . . . . . . . . . . . . . . . . . . . . . . . . . . . . . . . . . . . . . . . . . . . . . . . . . 578
19.2.1 Running DHost iConsole on NetWare . . . . . . . . . . . . . . . . . . . . . . . . . . . . . . . . . . . 579
19.2.2 Running DHost iConsole on Windows. . . . . . . . . . . . . . . . . . . . . . . . . . . . . . . . . . . 579
14 Novell eDirectory 8.8 Administration Guide
Page 15

19.2.3 Running DHost iConsole on Linux, Solaris, and AIX . . . . . . . . . . . . . . . . . . . . . . . . 579
19.3 Managing eDirectory Modules . . . . . . . . . . . . . . . . . . . . . . . . . . . . . . . . . . . . . . . . . . . . . . . . 580
19.3.1 Loading or Unloading Modules on NetWare . . . . . . . . . . . . . . . . . . . . . . . . . . . . . . 580
19.3.2 Loading or Unloading Modules on Windows . . . . . . . . . . . . . . . . . . . . . . . . . . . . . . 581
19.3.3 Loading or Unloading Modules on Linux, Solaris, and AIX . . . . . . . . . . . . . . . . . . . 581
19.4 Querying for DHost Information . . . . . . . . . . . . . . . . . . . . . . . . . . . . . . . . . . . . . . . . . . . . . . . 581
19.4.1 Viewing the Configuration Parameters . . . . . . . . . . . . . . . . . . . . . . . . . . . . . . . . . . 582
19.4.2 Viewing Protocol Information . . . . . . . . . . . . . . . . . . . . . . . . . . . . . . . . . . . . . . . . . . 582
19.4.3 Viewing Connection Properties . . . . . . . . . . . . . . . . . . . . . . . . . . . . . . . . . . . . . . . . 582
19.4.4 Viewing the Thread Pools Statistics . . . . . . . . . . . . . . . . . . . . . . . . . . . . . . . . . . . . 583
19.5 Process Stack . . . . . . . . . . . . . . . . . . . . . . . . . . . . . . . . . . . . . . . . . . . . . . . . . . . . . . . . . . . . 583
19.6 Setting the SAdmin Password . . . . . . . . . . . . . . . . . . . . . . . . . . . . . . . . . . . . . . . . . . . . . . . . 584
19.6.1 Setting the SAdmin Password on NetWare . . . . . . . . . . . . . . . . . . . . . . . . . . . . . . . 584
19.6.2 Setting the SAdmin Password on Windows. . . . . . . . . . . . . . . . . . . . . . . . . . . . . . . 584
19.6.3 Setting the SAdmin Password on Linux, Solaris, and AIX . . . . . . . . . . . . . . . . . . . . 585
20 The eDirectory Management Toolbox 587
20.1 Using the eMBox Command Line Client . . . . . . . . . . . . . . . . . . . . . . . . . . . . . . . . . . . . . . . . 588
20.1.1 Displaying the Command Line Help . . . . . . . . . . . . . . . . . . . . . . . . . . . . . . . . . . . . 588
20.1.2 Running the eMBox Command Line Client in Interactive Mode . . . . . . . . . . . . . . . 588
20.1.3 Running the eMBox Command Line Client in Batch Mode . . . . . . . . . . . . . . . . . . . 592
20.1.4 eMBox Command Line Client Options. . . . . . . . . . . . . . . . . . . . . . . . . . . . . . . . . . . 594
20.1.5 Establishing a Secure Connection with the eMBox Client . . . . . . . . . . . . . . . . . . . . 595
20.1.6 Finding Out eDirectory Port Numbers . . . . . . . . . . . . . . . . . . . . . . . . . . . . . . . . . . . 596
20.2 Using the eMBox Logger . . . . . . . . . . . . . . . . . . . . . . . . . . . . . . . . . . . . . . . . . . . . . . . . . . . . 597
20.2.1 Using the eMBox Logger Command Line Client . . . . . . . . . . . . . . . . . . . . . . . . . . . 598
20.2.2 Using the eMBox Logger Feature in Novell iManager . . . . . . . . . . . . . . . . . . . . . . . 598
novdocx (en) 11 July 2008
A NMAS Considerations 601
A.1 Setting Up a Security Container As a Separate Partition. . . . . . . . . . . . . . . . . . . . . . . . . . . . 601
A.2 Merging Trees with Multiple Security Containers. . . . . . . . . . . . . . . . . . . . . . . . . . . . . . . . . . 601
A.2.1 Product-Specific Operations to Perform prior to Tree Merge. . . . . . . . . . . . . . . . . . 602
A.2.2 Performing the Tree Merge . . . . . . . . . . . . . . . . . . . . . . . . . . . . . . . . . . . . . . . . . . . 605
A.2.3 Product-Specific Operations to Perform after the Tree Merge . . . . . . . . . . . . . . . . 605
B Novell eDirectory Linux and UNIX Commands and Usage 607
B.1 General Utilities . . . . . . . . . . . . . . . . . . . . . . . . . . . . . . . . . . . . . . . . . . . . . . . . . . . . . . . . . . . 607
B.2 LDAP-Specific Commands. . . . . . . . . . . . . . . . . . . . . . . . . . . . . . . . . . . . . . . . . . . . . . . . . . . 611
C Configuring OpenSLP for eDirectory 615
C.1 Service Location Protocol . . . . . . . . . . . . . . . . . . . . . . . . . . . . . . . . . . . . . . . . . . . . . . . . . . . 615
C.2 SLP Fundamentals. . . . . . . . . . . . . . . . . . . . . . . . . . . . . . . . . . . . . . . . . . . . . . . . . . . . . . . . . 615
C.2.1 Novell Service Location Providers . . . . . . . . . . . . . . . . . . . . . . . . . . . . . . . . . . . . . . 616
C.2.2 User Agents . . . . . . . . . . . . . . . . . . . . . . . . . . . . . . . . . . . . . . . . . . . . . . . . . . . . . . . 616
C.2.3 Service Agents. . . . . . . . . . . . . . . . . . . . . . . . . . . . . . . . . . . . . . . . . . . . . . . . . . . . . 617
C.3 Configuration Parameters . . . . . . . . . . . . . . . . . . . . . . . . . . . . . . . . . . . . . . . . . . . . . . . . . . . 617
Contents 15
Page 16

D How Novell eDirectory Works with DNS 619
E Configuring GSSAPI with eDirectory 621
E.1 Prerequisites . . . . . . . . . . . . . . . . . . . . . . . . . . . . . . . . . . . . . . . . . . . . . . . . . . . . . . . . . . . . . 621
E.1.1 Assumptions on Network Characteristics . . . . . . . . . . . . . . . . . . . . . . . . . . . . . . . . 622
E.1.2 Installing the Kerberos Plug-in for iManager . . . . . . . . . . . . . . . . . . . . . . . . . . . . . . 622
E.1.3 Adding Kerberos LDAP Extensions . . . . . . . . . . . . . . . . . . . . . . . . . . . . . . . . . . . . . 624
E.1.4 Exporting the Trusted Root Certificate. . . . . . . . . . . . . . . . . . . . . . . . . . . . . . . . . . . 625
E.2 Configuring the SASL-GSSAPI Method . . . . . . . . . . . . . . . . . . . . . . . . . . . . . . . . . . . . . . . . . 625
E.2.1 Merging eDirectory Trees Configured with SASL-GSSAPI Method. . . . . . . . . . . . . 626
E.3 Managing the SASL-GSSAPI Method . . . . . . . . . . . . . . . . . . . . . . . . . . . . . . . . . . . . . . . . . . 626
E.3.1 Extending the Kerberos Schema . . . . . . . . . . . . . . . . . . . . . . . . . . . . . . . . . . . . . . . 626
E.3.2 Managing the Kerberos Realm Object. . . . . . . . . . . . . . . . . . . . . . . . . . . . . . . . . . . 626
E.3.3 Managing a Service Principal . . . . . . . . . . . . . . . . . . . . . . . . . . . . . . . . . . . . . . . . . 628
E.3.4 Editing Foreign Principals . . . . . . . . . . . . . . . . . . . . . . . . . . . . . . . . . . . . . . . . . . . . 632
E.4 Creating a Login Sequence . . . . . . . . . . . . . . . . . . . . . . . . . . . . . . . . . . . . . . . . . . . . . . . . . . 632
E.5 How Does LDAP Use SASL-GSSAPI? . . . . . . . . . . . . . . . . . . . . . . . . . . . . . . . . . . . . . . . . . 632
E.6 Error Messages . . . . . . . . . . . . . . . . . . . . . . . . . . . . . . . . . . . . . . . . . . . . . . . . . . . . . . . . . . . 632
novdocx (en) 11 July 2008
F Security Considerations 633
F.1 LDAP Binds . . . . . . . . . . . . . . . . . . . . . . . . . . . . . . . . . . . . . . . . . . . . . . . . . . . . . . . . . . . . . . 633
F.2 Nessus Scan Results. . . . . . . . . . . . . . . . . . . . . . . . . . . . . . . . . . . . . . . . . . . . . . . . . . . . . . . 634
16 Novell eDirectory 8.8 Administration Guide
Page 17

About This Guide
This guide describes how to manage and configure Novell® eDirectoryTM 8.8.
Chapter 1, “Understanding Novell eDirectory,” on page 19
Chapter 2, “Designing Your Novell eDirectory Network,” on page 73
Chapter 3, “Managing Objects,” on page 93
Chapter 4, “Managing the Schema,” on page 121
Chapter 5, “Managing Partitions and Replicas,” on page 133
Chapter 6, “Novell eDirectory Management Utilities,” on page 145
Chapter 7, “Offline Bulkload Utility,” on page 191
Chapter 8, “Using Novell iMonitor 2.4,” on page 197
Chapter 9, “Merging Novell eDirectory Trees,” on page 223
Chapter 10, “Encrypting Data In eDirectory,” on page 239
Chapter 11, “Repairing the Novell eDirectory Database,” on page 263
novdocx (en) 11 July 2008
Chapter 12, “WAN Traffic Manager,” on page 289
Chapter 13, “Understanding LDAP Services for Novell eDirectory,” on page 321
Chapter 14, “Configuring LDAP Services for Novell eDirectory,” on page 349
Chapter 16, “Backing Up and Restoring Novell eDirectory,” on page 421
Chapter 17, “SNMP Support for Novell eDirectory,” on page 493
Chapter 18, “Maintaining Novell eDirectory,” on page 537
Chapter 19, “DHost iConsole Manager,” on page 577
Chapter 20, “The eDirectory Management Toolbox,” on page 587
Appendix A, “NMAS Considerations,” on page 601
Appendix B, “Novell eDirectory Linux and UNIX Commands and Usage,” on page 607
Appendix C, “Configuring OpenSLP for eDirectory,” on page 615
Appendix D, “How Novell eDirectory Works with DNS,” on page 619
Appendix E, “Configuring GSSAPI with eDirectory,” on page 621
Audience
The guide is intended for network administrators.
Feedback
We want to hear your comments and suggestions about this manual and the other documentation
included with this product. Please use the User Comments feature at the bottom of each page of the
online documentation, or go to www.novell.com/documentation/feedback.html and enter your
comments there.
About This Guide 17
Page 18

Documentation Updates
For the most recent version of this guide, see Novell eDirectory 8.8 Administration Guide (http://
www.novell.com/documentation/edir88/index.html).
Additional Documentation
For eDirectory installation instructions, see the Novell eDirectory 8.8 Installation Guide (http://
www.novell.com/documentation/edir88/index.html).
For documentation on the eDirectory management utility, see the Novell iManager 2.6
Administration Guide (http://www.novell.com/documentation/imanager26/index.html).
Documentation Conventions
In this documentation, a greater-than symbol (>) is used to separate actions within a step and items
within a cross-reference path.
®
A trademark symbol (
, TM, etc.) denotes a Novell trademark. An asterisk (*) denotes a third-party
trademark.
novdocx (en) 11 July 2008
When a single pathname can be written with a backslash for some platforms or a forward slash for
other platforms, the pathname is presented with a backslash. Users of platforms that require a
forward slash, such as Linux and UNIX*, should use forward slashes as required by your software.
18 Novell eDirectory 8.8 Administration Guide
Page 19
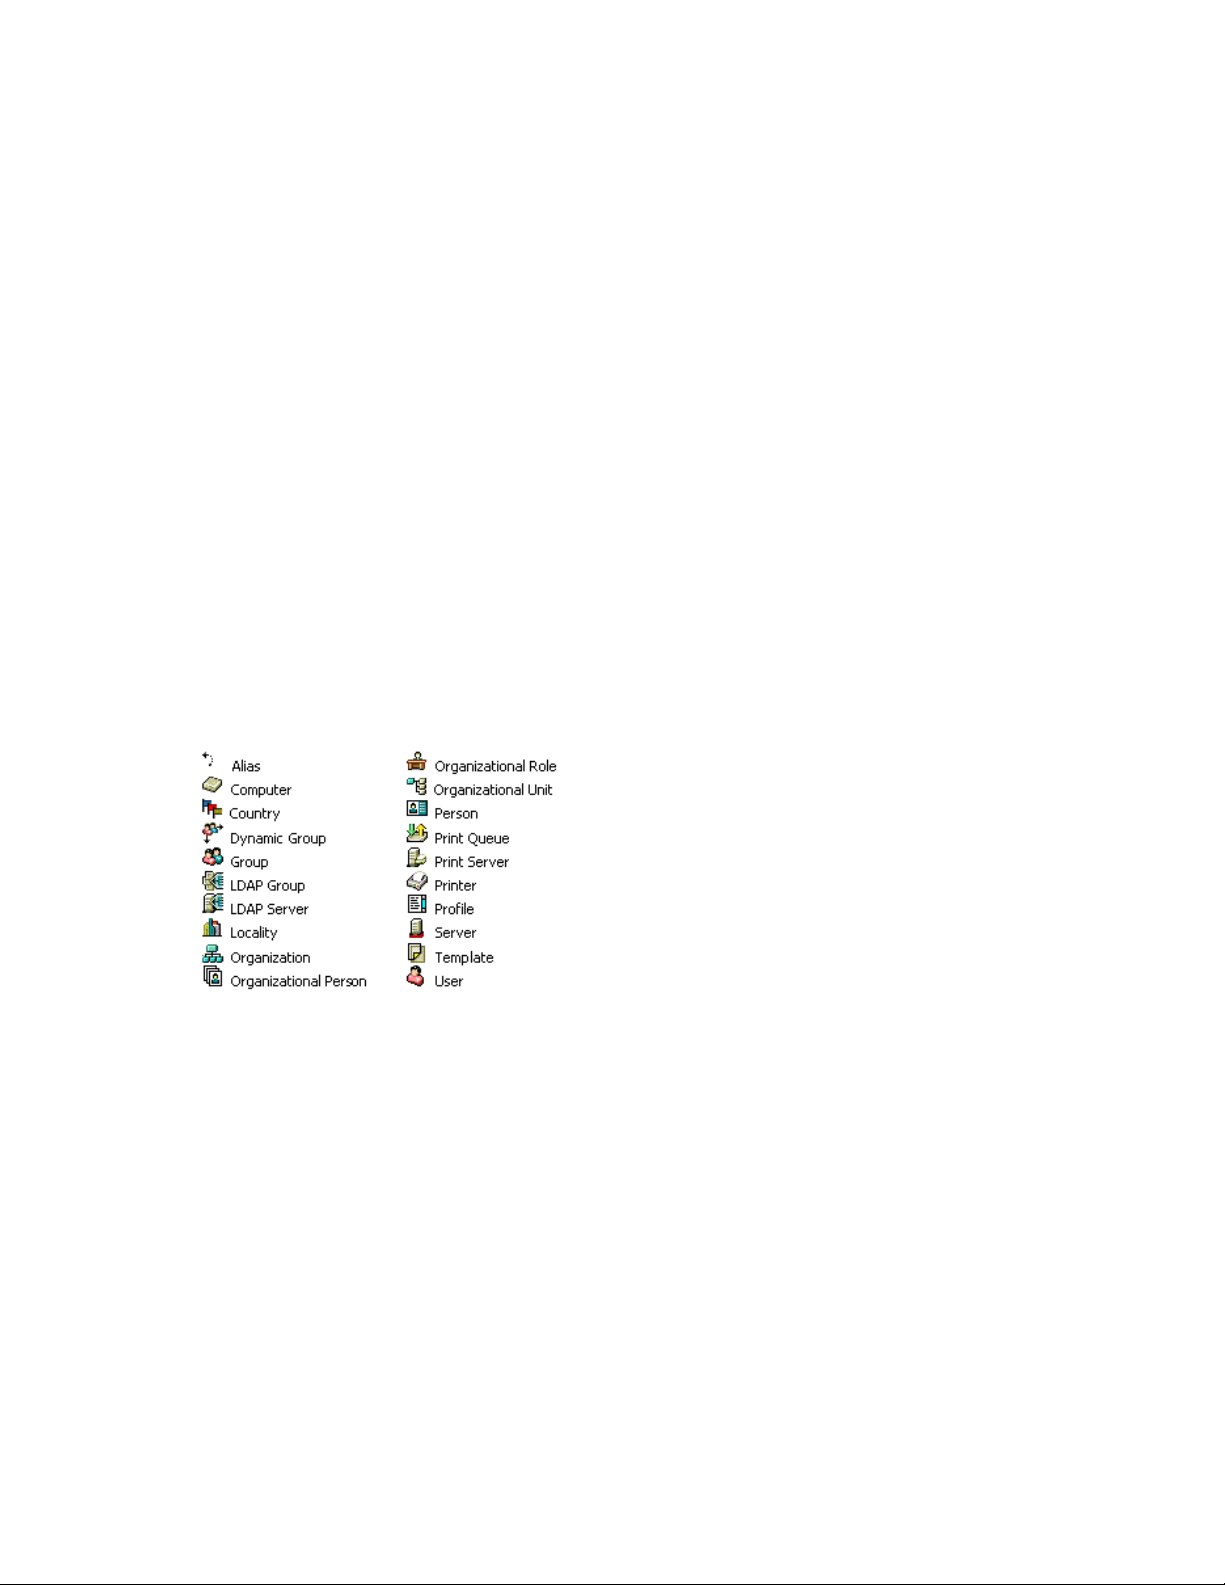
1
Understanding Novell eDirectory
In simplest terms, Novell® eDirectoryTM is a list of objects that represent network resources, such as
network users, servers, printers, print queues, and applications. Novell eDirectory is a highly
scalable, high-performing, secure directory service. It can store and manage millions of objects,
such as users, applications, network devices, and data. Novell eDirectory offers a secure identity
management solution that runs across multiple platforms, is internet-scalable, and extensible.
Novell eDirectory provides centralized identity management, infrastructure, Net-wide security, and
scalability to all types of applications running behind and beyond the firewall. Novell eDirectory
includes Web-based and wireless management capabilities, allowing you to access and manage the
directory and users, access rights, and network resources from a Web browser and a variety of
handheld devices.
Novell eDirectory natively supports the directory standard Lightweight Directory Access Protocol
(LDAP) 3 and provides support for TLS/SSL services based on the OpenSSL source code. For more
information on the eDirectory engine, see eDirectory Process Requests (http://developer.novell.com/
research/sections/netmanage/dirprimer/2002/august/p020801.htm).
novdocx (en) 11 July 2008
1
Figure 1-1 shows a few of the objects as viewed in the Novell iManager management utility.
Figure 1-1 eDirectory Objects in iManager
Some object classes might not be available, depending on the actual schema configured on the
eDirectory server and the operating system running eDirectory.
For more information on objects, see Section 1.2, “Object Classes and Properties,” on page 23.
If you have more than one eDirectory server on the network, the directory can be replicated on
multiple servers.
This chapter includes the following information:
Section 1.1, “Ease of Management through Novell iManager,” on page 20
Section 1.2, “Object Classes and Properties,” on page 23
Section 1.3, “Context and Naming,” on page 42
Section 1.4, “Schema,” on page 45
Section 1.5, “Partitions,” on page 52
Understanding Novell eDirectory
19
Page 20

Section 1.6, “Replicas,” on page 55
Section 1.7, “NetWare Bindery Emulation,” on page 59
Section 1.8, “Server Synchronization in the Replica Ring,” on page 59
Section 1.9, “Access to Resources,” on page 60
Section 1.10, “eDirectory Rights,” on page 60
1.1 Ease of Management through Novell iManager
Novell eDirectory allows for easy, powerful, and flexible management of network resources. It also
serves as a repository of user information for groupware and other applications. These applications
access your directory through the industry-standard Lightweight Directory Access Protocol
(LDAP).
eDirectory ease-of-management features include a powerful tree structure, an integrated
management utility, and single login and authentication.
Novell iManager lets you manage the directory and users, and access rights and network resources
within the directory, from a Web browser and a variety of handheld devices. The eDirectory plug-ins
to iManager give you access to basic directory management tasks, and to the eDirectory
management utilities you previously had to run on the eDirectory server, such as DSRepair,
DSMerge, and Backup and Restore.
novdocx (en) 11 July 2008
For more information, see the Novell iManager 2.6 Administration Guide (http://www.novell.com/
documentation/imanager26/index.html).
1.1.1 Powerful Tree Structure
Novell eDirectory organizes objects in a tree structure, beginning with the top Tree object, which
bears the tree's name.
®
Whether your eDirectory servers are running NetWare
resources can be kept in the same tree. You won’t need to access a specific server or domain to
create objects, grant rights, change passwords, or manage applications.
The hierarchical structure of the tree gives you great management flexibility and power. These
benefits primarily result from the following two features:
“Container Objects” on page 20
“Inheritance” on page 21
Container Objects
Container objects allow you to manage other objects in sets, rather than individually. There are three
common classes of container objects, as seen in Figure 1-2:
Figure 1-2 Common Classes of Container Objects
, Linux*, UNIX*, or Windows*, all
20 Novell eDirectory 8.8 Administration Guide
Page 21
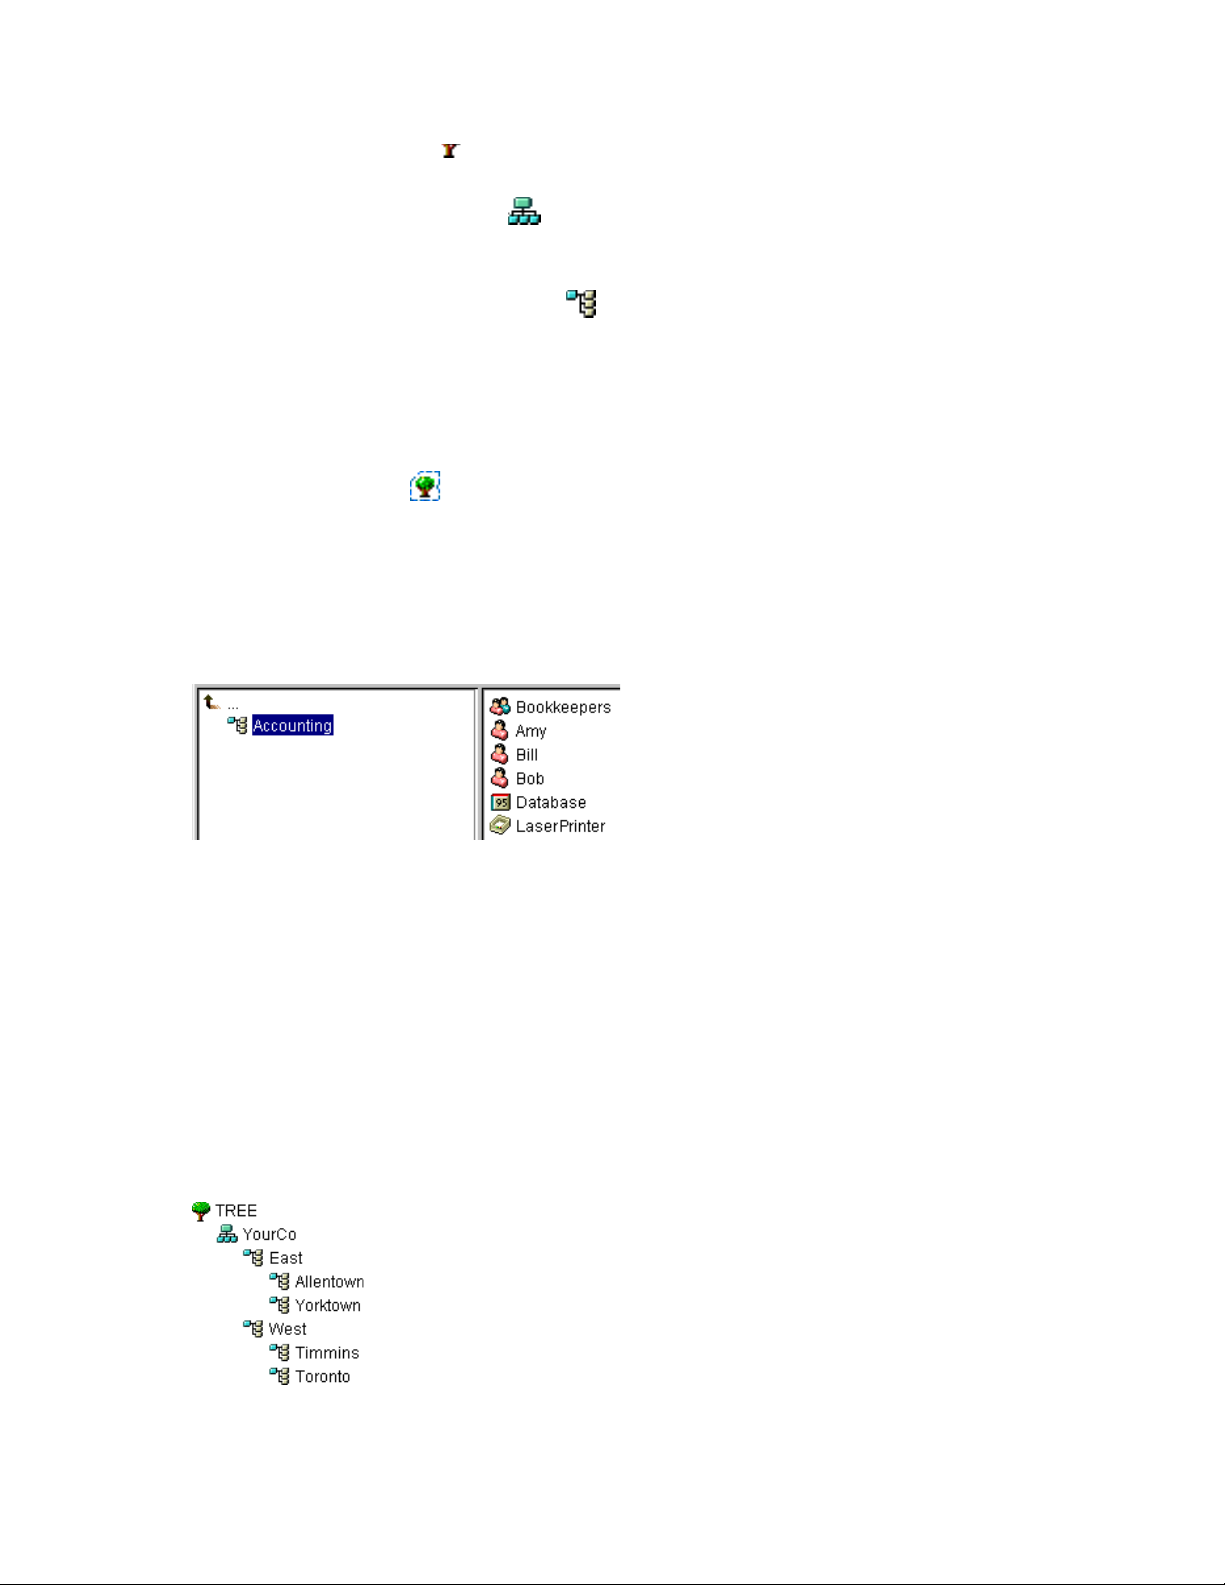
Description: Tree object icon The Tree object is the top container object in the tree. It usually
contains your company’s Organization object.
Description: Organization object icon Organization is normally the first container class under
the Tree object. The Organization object is typically named after your company. Small companies
keep management simple by having all other objects directly under the Organization object.
Description: Organizational Unit object icon Organizational Unit objects can be created under
the Organization to represent distinct geographical regions, network campuses, or individual
departments. You can also create Organizational Units under other Organizational Units to further
subdivide the tree.
Other classes of container objects are Country and Locality, which are typically used only in
multinational networks.
Description: Domain icon The Domain object can be created under the Tree object or under
Organization, Organizational Unit, Country, and Locality objects.
You can perform one task on the container object that applies to all objects within the container.
Suppose you want to give a user named Amy complete management control over all objects in the
Accounting container. (See Figure 1-3.)
novdocx (en) 11 July 2008
Figure 1-3 Container Object
To do this, right-click the Accounting object, select Trustees of This Object, then add Amy as a
trustee. Next, select the rights you want Amy to have, then click OK. Now Amy has rights to
manage the Database application, the Bookkeepers group, the LaserPrinter printer, and the users
Amy, Bill, and Bob.
Inheritance
Another powerful feature of eDirectory is rights inheritance. Inheritance means that rights flow
down to all containers in the tree. This allows you to grant rights with very few rights assignments.
For example, suppose you want to grant management rights to the objects shown in Figure 1-4 on
page 21.
Figure 1-4 Sample eDirectory Objects
Understanding Novell eDirectory 21
Page 22

You could make any of the following assignments:
If you grant a user rights to Allentown, the user can manage only objects in the Allentown
container.
If you grant a user rights to East, the user can manage objects in the East, Allentown, and
Yorktown c o n t a iners.
If you grant a user rights to YourCo, the user can manage any objects in any of the containers
shown.
For more information on assigning rights, see Section 1.10, “eDirectory Rights,” on page 60.
1.1.2 Web-Based Management Utility
iManager is a browser-based tool used for administering, managing, and configuring eDirectory
objects. iManager gives you the ability to assign specific tasks or responsibilities to users and to
present the user with only the tools (with the accompanying rights) necessary to perform those sets
of tasks.
To run iManager, you will need a workstation with Microsoft* Internet Explorer 6.0 SP1 or later
(recommended), Mozilla* 1.7 or later, or Mozilla Firefox* 0.9.2.
novdocx (en) 11 July 2008
IMPORTANT: While you might be able to access iManager through a Web browser not listed, we
do not guarantee full functionality.
You can use iManager to perform the following supervisory tasks:
Configure LDAP- and XML-based access to eDirectory
Create objects representing network users, devices, and resources
Define templates for creating new user accounts
Find, modify, move, and delete network objects
Define rights and roles to delegate administrative authority
Extend the eDirectory schema to allow custom object types and properties
Partition and replicate the eDirectory database across multiple servers
Run eDirectory management utilities such as DSRepair, DSMerge, and Backup and Restore
You can use iManager to perform other management functions based on plug-ins that have been
loaded into iManager. The following eDirectory plug-ins are installed with iManager 2.6:
eDirectory Backup and Restore
eDirectory Log Files
eDirectory Merge
eDirectory Repair
eDirectory Service Manager
eGuide Content
iManager Base Content
Import Convert Export Wizard
Index Management
22 Novell eDirectory 8.8 Administration Guide
Page 23

iPrint
LDAP
Universal Password Enforcement
Priority Sync
Encrypted Attributes
Encrypted Replication
NLS
NMAS
PKI/Certificate
Filtered Replica Configuration Wizard
SNMP
WAN Traffic Manager
For more information on installing, configuring, and running iManager, Novell iManager 2.6
Administration Guide (http://www.novell.com/documentation/imanager26/index.html).
novdocx (en) 11 July 2008
1.1.3 Single Login and Authentication
With eDirectory, users log in to a global directory, so you don’t need to manage multiple server or
domain accounts for each user, and you don’t need to manage trust relationships or pass-through
authentication among domains.
A security feature of the directory is authentication of users. Before a user logs in, a User object
must be created in the directory. The User object has certain properties, such as a name and
password.
When the user logs in, eDirectory checks the password against the one stored in the directory for
that user and grants access if they match.
1.2 Object Classes and Properties
The definition of each type of eDirectory object is called an object class. For instance, User and
Organization are object classes. Each class of object has certain properties. A User object, for
example, has First Name, Last Name, and many other properties.
The schema defines the object classes and properties, along with the rules of containment (what
containers can contain which objects). eDirectory ships with a base schema that you, or the
applications you use, can extend. For more information about schemas, see Section 1.4, “Schema,”
on page 45.
Container objects contain other objects and are used to divide the tree into branches, while leaf
objects represent network resources.
1.2.1 List of Objects
The following tables list eDirectory object classes. Added services can create new object classes in
eDirectory that are not listed below.
Understanding Novell eDirectory 23
Page 24
eDirectory Container Object Classes
novdocx (en) 11 July 2008
iManager Icon
Container Object
(Abbreviation)
Description
Tree Represents the beginning of your tree. For more
information, see “Tree” on page 25.
Country (C) Designates the countries where your network resides and
organizes other directory objects within the country. For
more information, see “Country” on page 28.
License Container (LC) Created automatically when you install a license certificate
or create a metering certificate using Novell Licensing
Services (NLS) technology. When an NLS-enabled
application is installed, it adds a License Container
container object to the tree and a License Certificate leaf
object to that container.
Organization (O) Helps you organize other objects in the directory. The
Organization object is a level below the Country object (if
you use the Country object). For more information, see
“Organization” on page 26.
Organizational Unit (OU) Helps you to further organize other objects in the directory.
The Organizational Unit object is a level below the
Organization object. For more information, see
“Organizational Unit” on page 27.
Domain (DC) Helps you to further organize other objects in the directory.
The Domain object can be created under the Tree object or
under Organization, Organizational Unit, Country, and
Locality objects. For more information, see “Domain” on
page 28.
eDirectory Leaf Object Classes
iManager Icon Leaf Object Description
AFP Server Represents an AppleTalk* Filing Protocol server that operates as a
node on your eDirectory network. It usually also acts as a NetWare
router to, and the AppleTalk server for, several Macintosh*
computers.
Alias Points to the actual location of an object in the directory. Any
directory object located in one place in the directory can also
appear to be in another place in the directory by using an Alias. For
more information, see “Alias” on page 40.
Application Represents a network application. Application objects simplify
administrative tasks such as assigning rights, customizing login
scripts, and launching applications.
Computer Represents a computer on the network.
Directory Map Refers to a directory in the file system. For more information, see
“Directory Map” on page 41.
24 Novell eDirectory 8.8 Administration Guide
Page 25
iManager Icon Leaf Object Description
Group Assigns a name to a list of User objects in the directory. You can
assign rights to the group instead of to each user; then the rights
transfer to each user in the group. For more information, see
“Group” on page 32.
License Certificate Use with NLS technology to install product license certificates as
objects in the database. License Certificate objects are added to the
Licensed Product container when an NLS-aware application is
installed.
Organizational Role Defines a position or role within an organization.
Print Queue Represents a network print queue.
Print Server Represents a network print server.
Printer Represents a network printing device.
Profile Represents a login script used by a group of users who need to
share common login script commands. The users don’t need to be
in the same container. For more information, see “Profile” on
page 42.
novdocx (en) 11 July 2008
Server Represents a server running any operating system. For more
information, see “Server” on page 29.
Template Represents standard User object properties that can be applied to
new User objects.
Unknown Represents an object for which iManager has no custom icon.
User Represents the people who use your network. For more
information, see “User” on page 31.
Volume Represents a physical volume on the network. For more
information, see “Volume” on page 30.
1.2.2 Container Object Classes
“Tree” on page 25
“Organization” on page 26
“Organizational Unit” on page 27
“Country” on page 28
“Domain” on page 28
Tree
Description: Tree object icon The Tree container, formerly [Root], is created when you first
install eDirectory on a server in your network. As the top-most container, it usually holds
Organization objects, Country objects, or Alias objects.
What Tree Represents
Tree represents the top of your tree.
Understanding Novell eDirectory 25
Page 26

Usage
Tree is used to make universal rights assignments. Because of inheritance, any rights assignments
you make to Tree as the target apply to all objects in the tree. See Section 1.10, “eDirectory Rights,”
on page 60. The [Public] trustee has the Browse right and Admin has the Supervisor right to Tree by
default.
Important Properties
The Tree object has a Name property, which is the tree name you supply when installing the
first server. The tree name is shown in the hierarchy of iManager.
Tree name cannot exceed 32 characters.
Organization
Description: Organization object icon An Organization container object is created when you first
install eDirectory on a server in your network. As the top-most container under Tree, it usually holds
Organizational Unit objects and leaf objects.
The User object named Admin is created by default in your first Organization container.
novdocx (en) 11 July 2008
What an Organization Object Represents
Normally the Organization object represents your company, although you can create additional
Organization objects under Tree. This is typically done for networks with distinct geographical
districts or for companies with separate eDirectory trees that have merged.
Usage
The way you use Organization objects in your tree depends on the size and structure of your
network. If the network is small, you should keep all leaf objects under one Organization object.
For larger networks, you can create Organizational Unit objects under the Organization to make
resources easier to locate and manage. For example, you can create Organizational Units for each
department or division in your company.
For networks with multiple sites, you should create an Organizational Unit for each site under the
Organization object. That way, if you have (or plan to have) enough servers to partition the
directory, you can do so logically along site boundaries.
For easy sharing of company-wide resources such as printers, volumes, or applications, create
corresponding Printer, Volume, or Application objects under the Organization.
26 Novell eDirectory 8.8 Administration Guide
Page 27

Important Properties
The most useful properties for Organization are listed below. Only the Name property is required.
For a complete list of properties, select an Organization object in iManager. To display a description
for each page of properties, click Help.
Name
Typically, the Name property is the same as your company’s name. Of course, you can shorten
it for simplicity. For instance, if the name of your company is Your Shoe Company, you might
use YourCo.
The Organization name becomes part of the context for all objects created under it.
Login Script
The Login Script property contains commands that are executed by any User objects directly
under the Organization. These commands are run when a user logs in.
Organization name can be 64 characters long.
Organizational Unit
novdocx (en) 11 July 2008
Description: Organizational Unit object icon You can create Organizational Unit (OU) container
objects to subdivide the tree. Organizational Units are created with iManager under an Organization,
Country, or another Organizational Unit.
Organizational Units can contain other Organizational Units and leaf objects such as User and
Application objects.
What an Organizational Unit Object Represents
Normally the Organizational Unit object represents a department, which holds a set of objects that
commonly need access to each other. A typical example is a set of Users, along with the Printers,
Volumes, and Applications that those Users need.
At the highest level of Organizational Unit objects, each Organizational Unit can represent each site
(separated by WAN links) in the network.
Usage
The way you use Organizational Unit objects in your tree depends on the size and structure of your
network. If the network is small, you might not need any Organizational Units.
For larger networks, you can create Organizational Unit objects under the Organization to make
resources easier to locate and manage. For example, you can create Organizational Units for each
department or division in your company. Remember that administration is easiest when you keep
User objects together in the Organizational Unit with the resources they use most frequently.
For networks with multiple sites, you can create an Organizational Unit for each site under the
Organization object. That way, if you have (or plan to have) enough servers to partition the
directory, you can do so logically along site boundaries.
Understanding Novell eDirectory 27
Page 28

Important Properties
The most useful properties for the Organizational Unit are listed below. Only the Name property is
required. For a complete list of properties, select an Organizational Unit object in iManager. To
display a description for each page of properties, click Help.
Name
Typically, the Name property is the same as the department name. Of course, you can shorten it
for simplicity. For instance, if the name of your department is Accounts Payable, you can
shorten it to AP.
The Organizational Unit name becomes part of the context for all objects created under it.
Login Script
The Login Script property contains commands that are executed by any User objects directly
under the Organizational Unit. These commands are run when a user logs in.
Organizational Unit name can be 64 characters long.
Country
novdocx (en) 11 July 2008
Description: Country object icon You can create Country objects directly under the Tree object
using iManager. Country objects are optional and required only for connection to certain X.500
global directories.
What a Country Object Represents
The Country object represents the political identity of its branch of the tree.
Usage
Most administrators do not create a Country object, even if the network spans countries, since the
Country object only adds an unnecessary level to the tree. You can create one or many Country
objects under the Tree object, depending on the multinational nature of your network. Country
objects can contain only Organization objects.
If you do not create a Country object and find that you need one later, you can always modify the
tree to add one.
Important Properties
The Country object has a two-letter Name property. Country objects are named with a standard
two-letter code such as US, UK, or DE.
Country name cannot exceed 2 characters.
Domain
Description: Domain icon You can create Domain objects directly under the Tree object using
iManager. You can also create them under Organization, Organization Unit, Country, and Location
objects.
What a Domain Object Represents
The Domain object represent DNS domain components. Domain objects let you use your Domain
Name System location of services resource records (DNS SRV) to locate services in your tree.
28 Novell eDirectory 8.8 Administration Guide
Page 29

Using Domain objects, a tree could look something like this:
DS=Novell.DC=Provo.DC=USA
In this example, all subcontainers are domains. You can also use Domain objects in a mixed tree,
such as:
DC=Novell.O=Provo.C=USA
Or
OU=Novell.DC=Provo.C=USA
Usually, the topmost Domain is the overall Tree, with subdomains under Tree. For example,
machine1.novell.com could be represented by DC=machine1.DC=novell.DC=com in a tree
representation. Domains give you a more generic way to set up an eDirectory tree. If all containers
and subcontainers are DC objects, users do not need to remember C, O, or OUs when searching for
objects.
Usage
NetWare 4 and 5 trees cannot have Domain objects at the top of the tree. With NetWare 4 and 5, the
NCP Server object can be placed in an Organization, Country, Organizational Unit, or Locality
container, but not in a Domain container. With NetWare 6, however, you can place Domain objects
at the top of the tree, and you can place the NCP Server object in a Domain container.
novdocx (en) 11 July 2008
For older installations of NetWare (such as NetWare 4), when you prepare the tree to install or
upgrade to NetWare 5 or later, the nds500.sch file will automatically run. After the first server is
installed into the tree, this file extends the schema to allow the Domain container to be created
anywhere and hold most directory objects.
Domain name can be 64 characters long.
1.2.3 Leaf Object Classes
“Server” on page 29
“Volume” on page 30
“User” on page 31
“Group” on page 32
“Nested Groups” on page 36
“Alias” on page 40
“Directory Map” on page 41
“Profile” on page 42
Server
Description: Server object icon A Server object is automatically created in the tree whenever
you install eDirectory on a server. The object class can be any server running eDirectory.
You can also create a Server object to represent a NetWare 2 or NetWare 3 bindery server.
Understanding Novell eDirectory 29
Page 30

What a Server Object Represents
The Server object represents a server running eDirectory or a bindery-based (NetWare 2 or NetWare
3) server.
Usage
The Server object serves as a reference point for replication operations. A Server object that
represents a bindery-based server allows you to manage the server’s volumes with iManager.
Important Properties
The Server object has a Network Address property, among others. The Network Address property
displays the protocol and address number for the server. This is useful for troubleshooting at the
packet level
For a complete list of properties, select a Server object in iManager. To display a description for
each page of properties, click Help.
Volume
novdocx (en) 11 July 2008
Description: Volume object icon When you create a physical volume on a server, a Volume object
is automatically created in the tree. By default, the name of the Volume object is the server’s name
with an underscore and the physical volume’s name appended (for example, YOSERVER_SYS).
Volume objects are supported only on NetWare. Linux and UNIX file system partitions cannot be
managed using Volume objects.
What a Volume Object Represents
A Volume object represents a physical volume on a server, whether it is a writable disk, a CD, or
other storage medium. The Volume object in eDirectory does not contain information about the files
and directories on that volume, although you can access that information through iManager. File and
directory information is retained in the file system itself.
Usage
In iManager, click the Vo lu m e icon to manage files and directories on that volume. iManager
provides information about the volume’s free disk space, directory entry space, and compression
statistics.
You can also create Volume objects in the tree for NetWare 2 and NetWare 3 volumes.
Important Properties
In addition to the required Name and Host Server properties, there are other important Volume
properties.
Name
This is the name of the Volume object in the tree. By default, this name is derived from the
name of the physical volume, though you can change the object name.
Host Server
This is the server that the volume resides on.
Ve r si o n
30 Novell eDirectory 8.8 Administration Guide
Page 31

This is the NetWare or eDirectory version of the server hosting the volume.
User
Description: User object icon A User object is required for logging in. When you install the first
server into a tree, a User object named Admin is created. Log in as Admin the first time.
You can use the following methods to create or import User objects:
iManager
For more information on iManager, see the Novell iManager 2.6 Administration Guide (http://
www.novell.com/documentation/imanager26/index.html).
Batches from database files
For more information on using batch files, see Section 2.2, “Designing the eDirectory Tree,” on
page 74.
NetWare upgrade utilities
For more information on upgrade utilities, including importing users from existing bindery
servers, see Section 2.2, “Designing the eDirectory Tree,” on page 74.
novdocx (en) 11 July 2008
What a User Object Represents
A User object represents a person who uses the network.
Usage
You should create User objects for all users who need to use the network. Although you can manage
User objects individually, you can save time by
Using Template objects to set default properties for most User objects. The Template applies
automatically to new Users you create (not to already existing ones).
Creating Group objects to manage sets of Users.
Assigning rights using the container objects as trustees when you want that assignment to apply
to all User objects in the container.
Selecting multiple User objects by using Shift+click or Ctrl+click. When you do, you can
change property values for all selected User objects.
Important Properties
User objects have over 80 properties. For a complete list of properties, select a User object in
iManager. To display a description for each page of properties, click Help.
The Login Name and Last Name properties are required. These and some of the most useful
properties are listed below.
Account Expiration Date lets you limit the life of a user account. After the expiration date, the
account is locked so the user cannot log in.
Account Disabled has a system-generated value that indicates a lock on the account so the user
cannot log in. The lock might occur if the account has expired or because the user has given too
many incorrect passwords in succession.
Force Periodic Password Changes lets you enhance security by requiring the user to change
passwords after a specified interval.
Understanding Novell eDirectory 31
Page 32

Group Memberships lists all the Group objects that include the User as a member.
Home Directory refers to a NetWare volume and file system path for the user’s own files. Most
administrators like to create such a directory so that a user’s working files can be kept on the
network.
The directory referred to in this property can be automatically created when you create the User
object.
Last Login is a system-generated property that lists the date and time that the user last logged
in.
Last Name, although required, is not used directly by eDirectory. Applications that take
advantage of the eDirectory name base can use this property, along with other identification
properties such as Given Name, Title, Location, and Fax Number.
Limit Concurrent Connections lets you set the maximum number of sessions a user can have on
the network at any given time.
Login Name is the name shown in iManager by the User icon. It is also the name supplied by
the user when logging in.
eDirectory does not require that login names be unique throughout the network, only in each
container. However, you might want to keep login names unique across the company to
simplify administration.
novdocx (en) 11 July 2008
Typically, login names are a combination of first and last names, such as STEVEJ or SJONES
for Steve Jones.
Login Script lets you create specific login commands for a User object. When a user logs in, the
container login script runs first. Then a profile login script runs if the User object has been
added to the membership list of a Profile object. Finally, the user login script runs (if one
exists).
You should put most of the login commands in container login scripts to save administrative
time. The user login script can be edited to manage unique exceptions to common needs.
Login Time Restrictions lets you set times and days when the user can log in.
Network Addresses contains system-generated values that list all the IPX
TM
and/or IP addresses
that the user is logged in from. These values are useful for troubleshooting network problems at
the packet level.
Require a Password lets you control whether the user must use a password. Other related
properties let you set common password constraints such as password length.
Rights to Files and Directories lists all rights assignments made for this user to the NetWare file
system. Using iManager, you can also check a user’s effective rights to files and directories,
which include those inherited from other objects.
Group
Description: Group object icon You can create Group objects to help you manage sets of User
objects.
What a Group Object Represents
A Group object represents a set of User objects.
32 Novell eDirectory 8.8 Administration Guide
Page 33

Usage
Container objects let you manage all User objects in that container, and Group objects are for
subsets within a container or in multiple containers.
Group objects have two main purposes:
They allow you to grant rights to a number of User objects at once.
They allow you to specify login script commands using the IF MEMBER OF syntax.
Static Groups
Static groups identify the member objects explicitly. Each member is assigned to the group
explicitly.
These groups provide a static list of members, as well as referential integrity between the members
list of the group and the members of attributes on an object. Group membership is managed
explicitly through the member attribute.
Dynamic Groups
novdocx (en) 11 July 2008
Dynamic groups use an LDAP URL to define a set of rules which, when matched by eDirectory
User objects, define the members of the group. Dynamic group members share a common set of
attributes as defined by the search filter specified in the URL. For more information on the LDAP
URL format, see RFC 2255 (http://www.ietf.org/rfc/rfc2255.txt).
Dynamic groups let you specify the criteria to be used for evaluating membership in a group. The
actual members of the group are dynamically evaluated by eDirectory, which lets you define the
group members in terms of a logical grouping and lets eDirectory automatically add and remove
group members. This solution is more scalable, reduces administrative costs, and can supplement
normal groups in LDAP to provide increased flexibility.
eDirectory lets you create a dynamic group when you want to automatically group users based on
any attribute, or when you want to apply ACLs to specific groups that contain matching DNs. For
example, you can create a group that automatically includes any DN that contains the attribute
Department=Marketing. If you apply a search filter for Department=Marketing, the search returns a
group including all DNs containing the attribute Department=Marketing. You can then define a
dynamic group from the search results based on this filter. Any User added to the directory who
matches the Department=Marketing criteria is automatically added to the group. Any User whose
Department is changed to another value (or who is removed from the directory) is automatically
removed from the group.
Dynamic groups are created in eDirectory by creating an object of type objectclass=dynamicGroup.
A static Group object can be converted into a dynamic group by associating an auxiliary class,
dynamicGroupAux, to the Group object. The dynamic group has the memberQueryURL attribute
associated with it.
A dgIdentity attribute can be set on the Dynamic Group object to the distinguished name of an entry,
whose credentials and rights should be used to expand the dynamic members of the group.
The groups are managed using the memberQueryURL. A typical memberQueryURL has a base DN,
a scope, a filter, and an optional extension. The base DN specifies the search base. Scope specifies
the levels below the base to search, and filter is the search filter based on which entries are selected
from within the specified scope.
Understanding Novell eDirectory 33
Page 34

NOTE: To address exceptions to the listing created by the memberQueryURL, dynamic groups also
allow for explicit inclusion and exclusion of users.
Dynamic groups can be created and managed through Novell iManager. You can access the
Dynamic Group management tasks by clicking the Dynamic Groups role on the Roles and Tasks
page.
You can also use LDAP commands to manage such groups. The most useful properties associated
with dynamic groups are dgIdentity and memberQueryURL.
Important Properties
The most useful properties of the Group object are Members and Rights to Files and Directories. For
a complete list of properties, select a Group object in iManager. To display a description for each
page of properties, click Help.
dgAllowDuplicates
Specifies whether or not duplicates are allowed while printing dynamic group members. The
default is TRUE.
dgIdentity
novdocx (en) 11 July 2008
This property holds the DN whose identity the dynamic group will use for authentication while
searching. The identity must be on the same partition as the dynamic group. The object
specified by dgldentity should have the necessary rights to do the search specified in the
memberQueryURL attribute.
For example, if memberQueryURL value is
“ldap:///o=nov??sub?(title=*)”
then dgldentity should have read/compare rights on the attribute title below the container
o=nov.
dgTimeout
This property specifies the maximum duration a server can take to read or compare a member
attribute before it times out. When the server exceeds this dgTimeout value, the -6016 error is
displayed.
memberQueryURL
This property defines the set of rules that match with the attributes of the group members.
memberQueryURL is a multivalued attribute according to its schema definition. Although
memberQueryURL is multivalued, eDirectory 8.6.1 servers used only the first value of
memberQueryURL.
For example:
An administrator creates a dynamic group, which has two memberQueryURL values:
“ldap:///o=nov??sub?cn=*”
“ldap:///o=org??sub?cn=*”
eDirectory 8.6.x servers use “ldap:///o=nov??sub?cn=*” to compute the members of the group.
They accept more than one query, but only read the first query.
34 Novell eDirectory 8.8 Administration Guide
Page 35

This limitation was overcome in eDirectory 8.7.3. eDirectory 8.7.3 servers compute the
members based on all the memberQueryURL values, and the set of members is the union of the
members computed using each of the memberQueryURL values.
In the above example, resultant members of the dynamic group are all entries under o=org and
o=nov, which have cn values.
member
This property lists all objects in the group. Rights assignments made to the Group object apply
to all members of that group. Adding values to the member property of a dynamic group will
add the static members to the dynamic group. This can be used for specific inclusion of
members.
excludedMember
The property holds the DNs that are specifically excluded from the membership list of the
dynamic group. This can be used to construct exclusion lists for dynamic groups.
excludedMember is used to exclude DNs from being dynamic members of a dynamic group.
Thus, a DN is a dynamic member of a dynamic group only if it is selected by the member
criteria specified by memberQueryURL and is not listed in excludedMember or explicitly
added to uniqueMember or member.
staticMember
novdocx (en) 11 July 2008
This property reads the static members of a dynamic group and also determines whether a DN
is a static member of a dynamic group. staticMember can find the dynamic groups in which a
DN is a static member alone and can also find which groups have dynamic members and no
static members.
To add this property to the existing dynamic groups, extend the schema using dgstatic.sch.
Upgrading a Dynamic Groups on Pre-eDirectory 8.6.1 Databases
Dynamic groups functionality requires some internal values stored on the Dynamic Group objects,
which are created either when a dynamic group is locally created or received as a part of
synchronization.
Although older servers can hold dynamic groups, they are unable to generate these values, because
dynamic groups were introduced in eDirectory 8.6.1.
In eDirectory 8.6.2, automatic upgrade of the Dynamic Group objects in a pre-8.6.1 database to
match a eDirectory 8.6.1 database was implemented.
Support for Additional Syntaxes in memberQueryURL
The memberQueryURL attribute can hold a search filter that the eDirectory server uses to compute
the members of a dynamic group.
In eDirectory 8.6.1, the syntaxes of attributes used in the filter were restricted only to the following
basic string types:
SYN_CE_STRING
SYN_CI_STRING
SYN_PR_STRING
SYN_NU_STRING
SYN_CLASS_NAME
Understanding Novell eDirectory 35
Page 36

SYN_TEL_NUMBER
SYN_INTEGER
SYN_COUNTER
SYN_TIME
SYN_INTERVAL
SYN_BOOLEAN
SYN_DIST_NAME
SYN_PO_ADDRESS
SYN_CI_LIST
SYN_FAX_NUMBER
SYN_EMAIL_ADDRESS
From eDirectory 8.7.3 onwards, the following additional attribute syntaxes are supported in a
memberQueryURL value:
SYN_PATH
novdocx (en) 11 July 2008
SYN_TIMESTAMP
SYN_TYPED_NAME
In both eDirectory 8.6.1 and eDirectory 8.7.x, binary syntaxes like SYN_OCTET_STRING and
SYN_NET_ADDRESS are not supported in the memberQueryURL search filters.
For more information, see How to Manage and Use Dynamic Groups in Novell eDirectory (http://
developer.novell.com/research/appnotes/2002/april/05/a020405.htm).
Nested Groups
Nested groups allow grouping of groups and provide a more structured form of grouping. An
attribute called groupMember is introduced to specify the nested groups whose members become
nested members of the containing nested group object. Group objects are specified statically in the
groupMember attribute. The group containing other groups is referred to as the containing group,
and the groups that are part of this group are referred to as contained groups. Currently, nesting is
allowed only for static groups (not dynamic groups). Nesting can have multiple levels upto 200.
IMPORTANT: Nesting is supported within the local server only. If a contained group is not found
on the local server, then its members are not listed as the nested members of the containing group.
36 Novell eDirectory 8.8 Administration Guide
Page 37

Figure 1-5 Nested Groups
novdocx (en) 11 July 2008
Creating Nested Groups
You can use LDAP tools to create the nested groups. A new auxiliary class, nestedGroupAux, along
with the structural class Group represents a nested group. This auxiliary class can be added to the
existing static group object to convert it into a nested group.
Both the contained and the containing group should be nested group objects. Only when the
contained group is a nested group, it can populate the groupMembership attribute (
groupMembership attribute not a part of static group) on it to specify the containing group. If the
contained groups are found to be static group objects or dynamic group objects, only the static
members of the static or dynamic group objects will be listed as nested members.
You can use LDIF files and LDAP tools to manage such groups. The most useful properties
associated with nested groups are groupMember and nestedConfig.
Nested Group Properties
member
By default, the members of a nested group include all the nested members. Therefore, the
member attribute listing always returns all the nested members, and the assertion on the
member attribute returns all the nested group objects. If the configuration is set to 1 (no
nesting), it refers only to the direct members.
groupMembership
groupMembership specifies the group that this object (generally a user object) belongs to. This
attribute is associated with the nestedGroupAux class, and it holds the DN of the nested group
of which this group is a group member. When associated with a group object, it indicates the
nested group of which this group is a member (specifically a groupMember). Similar to
member and groupMember, groupMembership lists all the nested groups of which this group
Understanding Novell eDirectory 37
Page 38

has a groupMembership via a nested relationship. The nestedConfig also applies to the
groupMembership attribute. For non-group member objects, the nestedConfig of individual
groups is used.
nestedConfig
nestedConfig sets the configuration of the nested group object. The configuration values
currently supported are 0 (nesting local server ) and 1 (no nesting). By default, it always nests
the local server. If only direct values such as member, groupMember, or groupMembership are
to be listed for the attribute, the configuration can be set to 1.
excludedMember
excludedMember is included as part of the nestedGroupAux class, but it is currently not used.
In future, it will indicate members that are to be excluded from nested members, analogous to
dynamic groups.
Nested Group Operations
1. One group can be a member of another group via the groupMember attribute. Both groups,
contained as well containing, must have the nested group auxiliary class associated with the
group object.
novdocx (en) 11 July 2008
dn: cn=finance,o=nov
objectclass: group
objectclass: nestedGroupAux
groupMember: cn=accounts,o=nov
member: cn=jim,o=nov
dn: cn=accounts,o=nov
objectclass: group
objectclass: nestedGroupAux
member: cn=allen,o=nov
member: cn=ESui,o=nov
member: cn=YLi,o=nov
2. Reading the member attribute of a nested group also causes the members of the contained
group to be returned if both the contained and the containing group are present locally on the
server:
dn: cn=finance,o=nov
member: cn=jim,o=nov
member: cn=allen,o=nov
member: cn=ESui,o=nov
member: cn=YLi,o=nov
38 Novell eDirectory 8.8 Administration Guide
Page 39

The same holds true for the groupMember attribute.
3. The reciprocal attribute to the member attribute is groupMembership. This implies that the
cn=allen,o=nov user object needs to possess the groupMembership attribute populated
with the cn=accounts,o=nov group DN. The groupMembership of the
cn=accounts,o=nov group needs to be populated with cn=finance,o=nov. On
reading the groupMembership attribute of the cn=allen,o=nov user object, both the groups
are returned.
dn: cn=allen,o=nov
groupMembership: cn=accounts,o=nov
groupMembership: cn=finance,o=nov
4. The ACLs can be assigned to a nested group and all the objects that are members of the nested
group will acquire the rights. In the assigned rights field, an additional nested ACL bit
(0x80000000) needs to be set in addition to the rights being assigned.
dn: cn=finance,o=nov
groupMember: cn=accounts,o=nov
novdocx (en) 11 July 2008
dn: cn=accounts,o=nov
member: cn=allen,o=nov
dn: ou=MyCo,o=nov
objectclass: Organizational Unit
ACL: 2147483650#entry#cn=finance,o=nov#[All Attributes Rights]
The rights value – 2147483650 (0x80000002) has nested ACL (0x80000000) and read rights
bit (0x00000002) set. So, the user object cn=allen,o=nov has been granted read rights on
all attributes of the MyCo object via the nested group cn=finance,o=nov.
5. Applications can use filter assertions on the member, groupMember, and groupMembership
attributes. In the above example, an assertion of member=cn=allen,o=nov would return
the following:
dn: cn=accounts,o=nov
dn: cn=finance,o=nov
An assertion of groupMembership=cn=finance,o=nov would return the following
objects:
dn: cn=allen,o=nov
dn: cn=jim,o=nov
dn: cn=ESui,o=nov
dn: cn=YLi,o=nov
dn: cn=accounts,o=nov
NOTE: There is no limit on the levels of nesting in any of the above cases. Loop detection in
nested groups is done while any of the above mentioned attributes are read.
Understanding Novell eDirectory 39
Page 40

Limitations
Nested relationships do not span beyond the local server; the objects, users, and groups
involved need to be locally present on the server.
No duplicate elimination is done in membership listing.
Nesting of dynamic groups is not supported.
Nested ACLs as well as the nesting semantics are not supported on older eDirectory servers
(version 8.8 SP1 and earlier).
Alias
Description: Alias object icon You can create an Alias object that points to another object in the
tree. An Alias object gives a user a local name for an object that lies outside their container.
When you rename a container, you have the option of creating an Alias in the former container’s
place that points to the new name. Workstations and login script commands that reference objects in
the container can still access the objects without having the container name updated.
What an Alias Object Represents
novdocx (en) 11 July 2008
An Alias object represents another object, which can be a container, User object, or any other object
in the tree. An Alias object does not carry trustee rights of its own. Any trustee authority you grant to
the Alias object applies to the object it represents. The Alias can be a target of a trustee assignment,
however.
Usage
Create an Alias object to make name resolution easier. Because object naming is simplest for objects
in the current context, you should create Alias objects there that point to any resources outside the
current context.
For example, suppose users log in and establish a current context in the South container as shown in
Figure 1-6, but need access to the Print Queue object named ColorQ in the North container.
Figure 1-6 Sample Containers
You can create an Alias object in the South container, as shown in Figure 1-7.
40 Novell eDirectory 8.8 Administration Guide
Page 41

Figure 1-7 Alias Object in eDirectory Container
The Alias object points to the original ColorQ object, so setting up printing for the users involves a
local object.
Important Properties
Alias objects have an Aliased Object property, which associates the Alias object with the original
object.
novdocx (en) 11 July 2008
Directory Map
Description: Directory Map object icon The Directory Map object is a pointer to a path in the
server file system. It allows you to make simpler references to directories.
If your network has no NetWare volumes, you cannot create Directory Map objects.
What a Directory Map Object Represents
A Directory Map object represents a directory on a NetWare volume. (An Alias object, on the other
hand, represents an object.)
Usage
Create a Directory Map object to make drive mapping simpler, particularly in login scripts. Using a
Directory Map object allows you to reduce complex file system paths to a single name.
Also, when you change the location of a file, you don’t need to change login scripts and batch files
to reference the new location. You only need to edit the Directory Map object. For example, suppose
you were editing the login script for the container South, shown in Figure 1-8.
Figure 1-8 Sample eDirectory Container
A command mapping drives to the Shared directory on volume sys: would look like the following:
MAP N:=sys.North.:Shared
If you created the Shared Directory Map object, the map command would be much simpler:
Understanding Novell eDirectory 41
Page 42

MAP N:=Shared
Important Properties
The Directory Map object has the following properties:
Name
Identifies the object in the directory (for example, Shared) and is used in MAP commands.
Vo l u m e
Contains the name of the Volume object that the Directory Map object references, such as
Sys.North.YourCo.
Path
Specifies the directory as a path from the root of the volume, such as
public\winnt\nls\english.
Profile
Description: Profile object icon Profile objects help you manage login scripts.
novdocx (en) 11 July 2008
What a Profile Object Represents
A Profile object represents a login script that runs after the container login script and before the user
login script.
Usage
Create a Profile object if you want login script commands to run for only selected users. The User
objects can exist in the same container or be in different containers. After you have created the
Profile object, you add the commands to its Login Script property. Then make the User objects
trustees of the Profile object and add the Profile object to their Profile Membership property.
Important Properties
The Profile object has two important properties:
Login Script
Contains the commands you want to run for users of the Profile.
Rights to Files and Directories
If you have INCLUDE statements in the login script, you need to give the Profile object rights
to the files included with the Rights to Files and Directories property.
1.3 Context and Naming
The context of an object is its position in the tree. It is nearly equivalent to a DNS domain.
You can see in the following figure that User Bob is in Organizational Unit Accounts, which is in
Organizational Unit Finance, which is in Organization YourCo.
42 Novell eDirectory 8.8 Administration Guide
Page 43

Figure 1-9 Sample eDirectory Container
Sometimes, however, you need to express the context of an object in an eDirectory utility. For
example, you could be setting up Bob’s workstation and need to supply a name context, as shown in
Figure 1-10 on page 43.
Figure 1-10 Novell Client NDS Page
novdocx (en) 11 July 2008
The context is specified as a list of containers separated by periods, between the object in question
and the top of the Tree. In the example above, User object Bob is in the container Accounts, which is
in the container Finance, which is in the container YourCo.
1.3.1 Distinguished Name
The distinguished name of an object is its object name with the context appended. For example, the
complete name of User object Bob is Bob.Accounts.Finance.YourCo.
1.3.2 Typeful Name
Sometimes typeful names are displayed in eDirectory utilities. Typeful names include the object
type abbreviations listed in the following table:
Object Class Type Abbreviation
All leaf object classes Common Name CN
Organization Organization O
Organizational Unit Organizational Unit OU
Country Country C
Locality Locality or State/Province L or S
Understanding Novell eDirectory 43
Page 44

In creating a typeful name, eDirectory uses the type abbreviation, an equal sign, and the object’s
name. For instance, Bob’s partial typeful name is CN=Bob. Bob’s complete typeful name is
CN=Bob.OU=Accounts.OU=Finance.O=YourCo. You can use typeful names interchangeably with
typeless names in eDirectory utilities.
1.3.3 Name Resolution
The process eDirectory uses to find an object’s location in the directory tree is called name
resolution. When you use object names in eDirectory utilities, eDirectory resolves the names
relative to either the current context or the top of the tree.
1.3.4 Current Workstation Context
Workstations have a context set when the networking software runs. This context relatively
identifies the location of the workstation in the network. For example, Bob’s workstation would be
set to the current context as follows:
Accounts.Finance.YourCo
novdocx (en) 11 July 2008
Current context is a key to understanding the use of leading periods, relative naming, and trailing
periods, discussed in the following sections.
1.3.5 Leading Period
Use a leading period to resolve the name from the top of the tree, no matter where the current
context is set. In the example below, the leading period tells the CX (Change Context) utility to
resolve the name relative to the top of the tree.
CX .Finance.YourCo
eDirectory interprets the command as “Change the context to the Finance container, which is in the
YourCo container, resolved from the top of the tree.”
1.3.6 Relative Naming
Relative naming means that names are resolved relative to the workstation’s current context, rather
than from the top of the tree. Relative naming never involves a leading period, since a leading period
indicates resolution from the top of the tree.
Suppose a workstation’s current context is set to Finance. (See Figure 1-11.)
Figure 1-11 Sample eDirectory Container
The relative object name of Bob is
Bob.Accounts
44 Novell eDirectory 8.8 Administration Guide
Page 45

eDirectory interprets the name as “Bob, which is in Accounts, resolved from the current context,
which is Finance.”
1.3.7 Trailing Periods
Trailing periods can be used only in relative naming. Therefore, you can’t use both a leading period
and a trailing period. A trailing period changes the container that eDirectory resolves the name from.
Each trailing period changes the resolution point one container toward the top of the tree. For
example, suppose you want to change your workstation’s current context from Timmins to
Allentown in the example in Figure 1-12 on page 45.
Figure 1-12 Sample eDirectory Container
novdocx (en) 11 July 2008
The proper CX command uses relative naming with trailing periods:
CX Allentown.East..
eDirectory interprets the command as “Change the context to Allentown, which is in East, resolved
from two containers up the tree from the current context.”
Similarly, if Bob is in the Allentown container and your workstation’s current context is Timmins,
then Bob’s relative name would be
Bob.Allentown.East..
1.3.8 Context and Naming on Linux and UNIX
When Linux and UNIX user accounts are migrated to eDirectory, the eDirectory context is not used
to name users.
1.4 Schema
Schema defines the types of objects that can be created in your tree (such as Users, Printers, and
Groups) and what information is required or optional at the time the object is created. Every object
has a defined schema class for that type of object.
The schema that originally shipped with the product is called the base schema. After the base
schema has been modified in any way—such as adding a new class or a new attribute—then it is
considered the extended schema.
Understanding Novell eDirectory 45
Page 46

You aren't required to extend the schema, but you have the ability to do so. The Schema role in
iManager lets you extend the schema to meet organizational needs. For example, you might want to
extend your schema if your organization requires special footwear for employees and you need to
keep track of employee shoe sizes. You might want to create a new attribute called Shoe Size and
then add it to the User class.
For more information, see Chapter 4, “Managing the Schema,” on page 121.
1.4.1 Schema Management
The Schema role in Novell iManager lets users who have the Supervisor rights to a tree customize
the schema of that tree. The Schema role, and its associated tasks, is available on the Roles and Task
page in iManager.
Use the Schema role to
View a list of all classes and attributes in the schema.
View information on an attribute such as its syntax and flags.
Extend the schema by adding a class or an attribute to the existing schema.
novdocx (en) 11 July 2008
Create a class by naming it and specifying attributes, flags, containers that it can be added to,
and parent classes that it can inherit attributes from.
Create an attribute by naming it and specifying its syntax and flags.
Add an optional attribute to an existing class.
Delete a class or attribute that is not used or that is obsolete.
1.4.2 Schema Classes, Attributes, and Syntaxes
“Classes” on page 46
“Attributes” on page 47
“Syntaxes” on page 47
Classes
A class is like a template for a directory object. A directory object is a class that has been filled in
with data. In other words:
CLASS + DATA = DIRECTORY OBJECT
Each class has a class name, an inheritance class (unless it is at the top of the class hierarchy), class
flags, and a group of attributes. Classes are named like directory objects (User, Printer, Queue,
Server, etc.), yet they are just structure, with no content.
An inheritance class is a class that is a starting point for defining other object classes. All of the
attributes of the inheritance class are inherited by the classes that come below it in the class
hierarchy.
A class hierarchy shows how a class is associated with its parent classes. This is a way of associating
similar classes and allowing attributes to be inherited. It also defines the types of containers the class
is valid in.
46 Novell eDirectory 8.8 Administration Guide
Page 47

When creating a new class, you can use the class hierarchy and the additional attributes available to
customize each class. You can specify an inheritance class (which allows the new class to inherit all
of the attributes and flags of a class higher in the hierarchy) and then customize the new class by
selecting one or more attributes to add to those that were inherited. The additional attributes can be
selected as mandatory, naming, or optional attributes.
You can also modify existing classes by adding optional attributes.
Attributes
Attributes are the data fields in the eDirectory database. For example, if a class is like a form, then
an attribute is one field on the form. When an attribute is created, it is named (such as surname or
employee number) and given a syntax type (such as string or number). From then on, it is available
in the attribute lists in Schema Manager.
Syntaxes
There are several syntax options to choose from. These are used to specify the type of data entered
for each attribute. The syntax can be specified only when an attribute is created. You cannot modify
it later. Available syntaxes include the following:
novdocx (en) 11 July 2008
Backlink
Used to keep track of other servers referring to an object. It is used for internal eDirectory
management purposes.
Boolean
Used by attributes whose values are True (represented as 1) or False (represented as 0). The
single-valued flag is set for this syntax type.
Case Exact String
Used by attributes whose values are Unicode strings that are case sensitive in comparison
operations. Two Case Exact Strings match when they are of the same length and their
corresponding characters, including case, are identical.
Case Ignore List
Used by attributes whose values are ordered sequences of Unicode strings that are not case
sensitive in comparisons operations. Two Case Ignore Lists match if the number of strings in
each is the same and all corresponding strings match (that is, they are the same length and their
corresponding characters are identical).
Case Ignore String
Used by attributes whose values are Unicode strings that are not case sensitive in comparison
operations. Two Case Ignore Strings match when they are of the same length and their
corresponding characters are identical in all respects except that of case.
Class Name
Used by attributes whose values are object class names. Two Class Names match when they are
of the same length and their corresponding characters are identical in all respects except that of
case.
Counter
Understanding Novell eDirectory 47
Page 48

Used by attributes whose values are incrementally modified numeric signed integers. Any
attribute defined using Counter is a single-valued attribute. This syntax differs from Integer in
that any value added to an attribute of this syntax is arithmetically added to the total, and any
value deleted is arithmetically subtracted from the total.
Distinguished Name
Used by attributes whose values are the names of objects in the eDirectory tree. Distinguished
Names (DN) are not case sensitive, even if one of the naming attributes is case sensitive.
E-mail Address
Used by attributes whose values are strings of binary information. eDirectory makes no
assumption about the internal structure of the content of this syntax.
Facsimile Telephone Number
Specifies a string that complies with the E.123 standard for storing international telephone
numbers and an optional bit string formatted according to recommendation T.20. Facsimile
Telephone Number values match when they are of the same length and their corresponding
characters are identical, except that all spaces and hyphen characters are ignored during
comparison.
Hold
Used by attributes that are accounting quantities, whose values are signed integers. This syntax
is an accounting quantity (which is an amount tentatively held against a subject’s credit limit,
pending completion of a transaction). The hold amount is treated similarly to the Counter
syntax, with new values added to or subtracted from the base total. If the evaluated hold
amount goes to 0, the Hold record is deleted.
Integer
Used by attributes represented as signed numeric values. Two Integer values match if they are
identical. The comparison for ordering uses signed integer rules.
Interval
Used by attributes whose values are signed numeric integers and represent intervals of time.
The Interval syntax uses the same representation as the Integer syntax. The Interval value is the
number of seconds in a time interval.
Net Address
novdocx (en) 11 July 2008
Represents a network layer address in the server environment. The address is in binary format.
For two values of Net Address to match, the type, length, and value of the address must match.
Numeric String
Used by attributes whose values are numerical strings as defined in the CCITT X.208 definition
of Numeric String. For two Numeric Strings to match, the strings must be the same length and
their corresponding characters must be identical. Digits (0...9) and space characters are the only
valid characters in the numeric string character set.
Object ACL
Used by attributes whose values represent Access Control List (ACL) entries. An Object ACL
value can protect either an object or an attribute.
Octet List
Describes an ordered sequence of strings of binary information or Octet String. An Octet List
matches a stored list if it is a subset of the stored list. For two Octet Lists to match, they must be
the same length, and the corresponding bit sequence (octet) must be identical.
48 Novell eDirectory 8.8 Administration Guide
Page 49

Octet String
Used by attributes whose values are strings of binary information not interpreted by eDirectory.
These octet strings are non-Unicode strings. For two octet strings to match, they must be the
same length, and the corresponding bit sequence (octet) must be identical.
Path
Attributes that represent a file system path contain all the information to locate a file on a
server. Two paths match when they are of the same length and their corresponding characters,
including case, are identical.
Postal Address
Used by attributes whose values are Unicode strings of postal addresses. An attribute value for
Postal Address is typically composed of selected attributes from the MHS Unformatted Postal
O/R Address Specification version 1 according to recommendation F.401. The value is limited
to six lines of 30 characters each, including a postal country name. Two postal addresses match
if the number of strings in each is the same and all corresponding strings match (that is, they are
the same length and their corresponding characters are identical).
Printable String
Used by attributes whose values are printable strings, as defined in CCITT X.208. The
printable character set consists of the following:
novdocx (en) 11 July 2008
Uppercase and lowercase alphabetic characters
Digits (0...9)
Space character
Apostrophe (’)
Left and right parentheses ( )
Plus sign (+)
Comma (,)
Hyphen (-)
Period (.)
Forward slash (/)
Colon (:)
Equals sign (=)
Question mark (?)
Two printable strings are equal when they are the same length and their corresponding
characters are the same. Case is significant.
Replica Pointer
Used by attributes whose values represent partition replicas. A partition of an eDirectory tree
can have replicas on different servers. The syntax has six components:
Server Name
Replica Type (master, secondary, read-only, subordinate reference)
Replica Number
Replica Root ID
Understanding Novell eDirectory 49
Page 50

Number of Address
Address Record
Stream
Represents arbitrary binary information. The Stream syntax provides a way to make an
eDirectory attribute out of a file on a file server. Login scripts and other stream attributes use
this syntax. The data stored in a stream file has no syntax enforcement of any kind. It is
completely arbitrary data, defined by the application that created and uses it.
Telephone Number
Used by attributes whose values are telephone numbers. The length of telephone number
strings must be between 1 and 32 characters. Two telephone numbers match when they are of
the same length and their corresponding characters are identical, except that all spaces and
hyphen characters are ignored during comparison.
Time
Used by attributes whose values are unsigned integers and represent time expressed in seconds.
Timestamp
Used by attributes whose values mark the time when a particular event occurred. When a
significant event occurs, an eDirectory server mints a new Timestamp value and associates the
value with the event. Every Timestamp value is unique within an eDirectory partition. This
provides a total ordering of events occurring on all servers holding replicas of a partition.
Typed Na me
Used by attributes whose values represent a level and an interval associated with an object.
This syntax names an eDirectory object and attaches two numeric values to it:
Level of the attribute indicative of its priority
Interval representing the number of seconds between certain events or the frequency of the
reference
Unknown
Used by attributes whose attribute definition has been deleted from the schema. This syntax
represents strings of binary information.
novdocx (en) 11 July 2008
1.4.3 Understanding Mandatory and Optional Attributes
Every object has a schema class that has been defined for that type of object, and a class is a group
of attributes organized in a meaningful way. Some of these attributes are mandatory and some are
optional.
Mandatory Attributes
A mandatory attribute is one that must be filled in when an object is being created. For example, if a
new user is being created using the User class, which has the employee number as a mandatory
attribute, then the new User object cannot be created without providing the employee number.
50 Novell eDirectory 8.8 Administration Guide
Page 51

Optional Attributes
An optional attribute is one that can be filled in if desired but can be left without content. For
example, if a new User object is being created using the User class, which has Other Names as an
optional attribute, then the new User object can be created with or without data provided for that
attribute, depending on whether the new user is known by other names.
An exception to the rule is when an optional attribute is used for naming, the attribute then becomes
mandatory.
1.4.4 Sample Schema
Figure 1-13 on page 51 is a sample of part of a schema, which might be similar to your base schema.
This figure shows information on the Organization class. Most of the information displayed on this
screen was specified when the class was created. Some of the optional attributes were added later.
Description: Extensions to the base schema object icon This icon is assigned to all classes and
attributes that are extensions to the base schema.
Figure 1-13 Class Information Page in iManager
novdocx (en) 11 July 2008
1.4.5 Designing the Schema
Designing your schema initially can save you time and effort in the long run. You can view the base
schema and determine if it will meet your needs or if modifications are required. If changes are
needed, use Schema Manager to extend the schema. See Section 4.1, “Extending the Schema,” on
page 121 and Section 4.2, “Viewing the Schema,” on page 125 for more information.
Understanding Novell eDirectory 51
Page 52

1.5 Partitions
A partition is a logical division of the eDirectory database. A directory partition forms a distinct unit
of data in the tree that stores directory information.
Partitioning allows you to take part of the directory off one server and put it on another server.
If you have slow or unreliable WAN links or your directory has so many objects that the server is
overwhelmed and access is slow, you should consider partitioning the directory. For a complete
discussion of partitions, see Chapter 5, “Managing Partitions and Replicas,” on page 133.
Each directory partition consists of a set of container objects, all the objects contained in them, and
data about those objects. eDirectory partitions don’t include any information about the file system or
the directories and files contained there.
Partitioning is done with Novell iManager. Partitions are identified in iManager by the following
partition icon (Description: partition icon ).
Figure 1-14 Replica View for a Server
novdocx (en) 11 July 2008
In the above example, the partition icon is next to the Tree object. This means it is the top-most
container in the partition. No partitions are shown by any other containers, so this partition is the
only one.
This is the default partitioning for eDirectory, keeping the entire directory together in one partition.
Notice in the example that the Replica View for Server1 is displayed. When you display the Replica
View for a server in iManager, any replicas held on that server are shown on the right. In this case,
Server1 holds a replica of the only partition. For more information, see Section 1.6, “Replicas,” on
page 55 and “Viewing Replicas on an eDirectory Server” on page 141.
1.5.1 Partitions
Partitions are named by their topmost container. In Figure 1-15 there are two partitions, named Tree
and Finance. Finance is called a child partition of Tree, because it was split off from Tree. Tree is
called the parent partition of Finance.
52 Novell eDirectory 8.8 Administration Guide
Page 53

Figure 1-15 Replica View for a Partition
You might create such a partition because the directory has so many objects that the server is
overwhelmed and access to eDirectory is slow. Creating the new partition allows you to split the
database and pass the objects in that branch to a different server.
The example above shows the Replica View for the Finance partition.When you display the Replica
View for a partition in iManager, any servers holding a replica of that partition are shown on the
right. In this case, Server1 holds a Read-Write replica of the Finance partition. For more
information, see “Viewing a Partition’s Replicas” on page 143.
novdocx (en) 11 July 2008
1.5.2 Distributing Replicas for Performance
In the preceding example, suppose that Server1 holds replicas of both the Tree partition and the
Finance partition. At this point, you haven’t gained any performance advantage from eDirectory
because Server1 still holds the entire directory (replicas of both partitions).
To gain the desired performance advantage, you need to move one of the replicas to a different
server. For instance, if you move the Tree partition to Server2, then Server2 holds all objects in the
Tree and YourCo containers. Server1 holds only objects in the Finance and Accounts containers.
The load on both Server1 and Server2 is less than it would be with no partitioning.
1.5.3 Partitions and WAN Links
Suppose your network spans two sites, a North site and a South Site, separated by a WAN link.
Three servers are at each site.
Figure 1-16 Sample eDirectory Containers
eDirectory performs faster and more reliably in this scenario if the directory is divided in two
partitions.
Understanding Novell eDirectory 53
Page 54

With a single partition, the replicas are either kept at one site or distributed between the two sites.
This proves unwieldy for two reasons:
If all replicas are kept on servers at the North site, for example, users at the South site encounter
delays when logging in or accessing resources. If the link goes down, users at the South site
can’t log in or access resources at all.
If replicas are distributed between sites, users can access the directory locally. However, server-
to-server synchronization of replicas happens over the WAN link, so there can be eDirectory
errors if the link is unreliable. Any changes to the directory are slow to propagate across the
WAN link.
The two-partition solution shown in Figure 1-17 on page 54 solves performance and reliability
problems over the WAN link.
Figure 1-17 Sample Partitions
novdocx (en) 11 July 2008
Replicas of the Tree partition are kept on servers at the North site. Replicas of the South partition are
kept on servers at the South site, as shown in Figure 1-18.
Figure 1-18 Sample Partitions, Severs, and Replicas
For each site, the objects that represent local resources are kept locally. Synchronization traffic
among servers also happens locally over the LAN, rather than over the slow, unreliable WAN link.
eDirectory traffic is generated over the WAN link, however, when a user or administrator accesses
objects at a different site.
54 Novell eDirectory 8.8 Administration Guide
Page 55

1.6 Replicas
A replica is a copy or an instance of a user-defined partition that is distributed to an eDirectory
server. If you have more than one eDirectory server on your network, you can keep multiple replicas
(copies) of the directory. That way, if one server or a network link to it fails, users can still log in and
use the remaining network resources (see Figure 1-19 on page 55).
Figure 1-19 eDirectory Replicas
Servers A and B
both hold replicas
of eDirectory.
When the link goes down,
users still have access to
Server A Server B
eDirectory on their
local servers.
User WorkstationsUser Workstations
novdocx (en) 11 July 2008
When the link is repaired, eDirectory
automatically synchronizes
the two replicas.
Each server can store more than 65,000 eDirectory replicas; however, only one replica of the same
user-defined partition can exist on the same server. For a complete discussion of replicas, see
Chapter 5, “Managing Partitions and Replicas,” on page 133.
We recommend that you keep three replicas for fault tolerance of eDirectory (assuming you have
three eDirectory servers to store them on). A single server can hold replicas of multiple partitions.
A replica server is a dedicated server that stores only eDirectory replicas. This type of server is
sometimes referred to as a DSMASTER server. This configuration is popular with some companies
that use many single-server remote offices. The replica server provides a place for you to store
additional replicas for the partition of a remote office location. (It can also be a part of your disaster
recovery planning, as described in “Using DSMASTER Servers as Part of Disaster Recovery
Planning” on page 434.)
eDirectory replication does not provide fault tolerance for the server file system. Only information
about eDirectory objects is replicated. You can get fault tolerance for file systems by using the
TM
Transaction Tracking System
(TTSTM), disk mirroring/duplexing, RAID, or Novell Replication
Services (NRS).
A master or read/write replica is required on NetWare servers that provide bindery services.
If users regularly access eDirectory information across a WAN link, you can decrease access time
and WAN traffic by placing a replica containing the needed information on a server that users can
access locally.
The same is true to a lesser extent on a LAN. Distributing replicas among servers on the network
means information is usually retrieved from the nearest available server.
Understanding Novell eDirectory 55
Page 56

1.6.1 Replica Types
eDirectory supports the types of replicas shown in the following figure:
Figure 1-20 Replica Types
“Master Replica” on page 56
“Read/Write Replica” on page 57
“Read-Only Replica” on page 57
“Filtered Read/Write Replica” on page 57
“Filtered Read-Only Replica” on page 57
“Subordinate Reference Replica” on page 58
Master Replica
novdocx (en) 11 July 2008
Description: Master Replica icon The master replica is a writable replica type used to initiate
changes to an object or partition. The master replica manages the following types of eDirectory
partition operations:
Adding replicas to servers
Removing replicas from servers
Creating new partitions in the eDirectory tree
Removing existing partitions from the eDirectory tree
Relocating a partition in the eDirectory tree
The master replica is also used to perform the following types of eDirectory object operations:
Adding new objects to the eDirectory tree
Removing, renaming, or relocating existing objects in the eDirectory tree
Authenticating objects to the eDirectory tree
Adding new object attributes to the eDirectory tree
Modifying or removing existing attributes
By default, the first eDirectory server on your network holds the master replica. There is only one
master replica for each partition at a time. If other replicas are created, they are read/write replicas
by default.
If you’re going to bring down the server holding a master replica for longer than a day or two, you
can make one of the read/write replicas the master. The original master replica automatically
becomes read/write.
A master replica must be available on the network for eDirectory to perform operations such as
creating a new replica or creating a new partition.
56 Novell eDirectory 8.8 Administration Guide
Page 57

Read/Write Replica
Description: Read-Write Replica icon eDirectory can access and change object information in a
read/write replica as well as the master replica. All changes are then automatically propagated to all
replicas.
If eDirectory responds slowly to users because of delays in the network infrastructure (such as slow
WAN links or busy routers), you can create a read/write replica closer to the users who need it. You
can have as many read/write replicas as you have servers to hold them, although more replicas cause
more traffic to keep them synchronized.
Read-Only Replica
Description: Read-Only Replica icon The read-only replica is a readable replica type used to
read information about all objects in a partition’s boundaries. Read-only replicas receive
synchronization updates from master and read/write replicas but don’t receive changes directly from
clients.
This replica type is not able to provide bindery emulation, but it does provide eDirectory tree fault
tolerance. If the master replica and all read/write replicas are destroyed or damaged, the read-only
replica can be promoted to become the new master replica.
novdocx (en) 11 July 2008
It also provides NDS Object Reads, Fault Tolerance (contains all objects within the Partition
boundaries), and NDS Directory Tree Connectivity (contains the Partition Root object).
A read-only replica should never be used to establish a security policy within a tree to restrict the
modification of objects, because the client can always access a read/write replica and still make
modifications. There are other mechanisms that exist in the directory for this purpose, such as using
an Inherited Rights Filter. For more information, see “Inherited Rights Filter (IRF)” on page 65.
Filtered Read/Write Replica
Description: Filtered Read-Write Replica icon Filtered read/write replicas contain a filtered set
of objects or object classes along with a filtered set of attributes and values for those objects. The
contents are limited to the types of eDirectory objects and properties specific in the host server's
replication filter. Users can read and modify the contents of the replica, and eDirectory can access
and change selected object information. The selected changes are then automatically propagated to
all replicas.
With filtered replicas, you can have only one filter per server. This means that any filter defined for
a server applies to all filtered replicas on that server. You can, however, have as many filtered
replicas as you have servers to hold them, although more replicas cause more traffic to keep them
synchronized.
For more information, see “Filtered Replicas” on page 58.
Filtered Read-Only Replica
Description: Filtered Read-Only icon Filtered read-only replicas contain a filtered set of objects
or object classes along with a filtered set of attributes and values for those objects. They receive
synchronization updates from master and read/write replicas but don’t receive changes directly from
clients. Users can read but not modify the contents of the replica. The contents are limited to the
types of eDirectory objects and properties specific in the host server's replication filter.
For more information, see “Filtered Replicas” on page 58.
Understanding Novell eDirectory 57
Page 58

Subordinate Reference Replica
Subordinate reference replicas are system-generated replicas that don’t contain all the object data of
a master or a read/write replica. Subordinate reference replicas, therefore, don’t provide fault
tolerance. They are internal pointers that are generated to contain enough information for eDirectory
to resolve object names across partition boundaries.
You can’t delete a subordinate reference replica; eDirectory deletes it automatically when it is not
needed. Subordinate reference replicas are created only on servers that hold a replica of a parent
partition but no replicas of its child partitions.
If a replica of the child partition is copied to a server holding the replica of the parent, the
subordinate reference replica is automatically deleted.
1.6.2 Filtered Replicas
Filtered replicas contain a filtered set of objects or object classes along with a filtered set of
attributes and values for those objects. For example, you might want to create a set of filtered
replicas on a single server that contains only User objects from various partitions in the eDirectory
tree. In addition to this, you can choose to include only a subset of the User objects’ data (for
example, Given Name, Surname, and Telephone Number).
novdocx (en) 11 July 2008
A filtered replica can construct a view of eDirectory data onto a single server. To do this, filtered
replicas let you create a scope and a filter. This results in an eDirectory server that can house a welldefined data set from many partitions in the tree.
The descriptions of the server’s scope and data filters are stored in eDirectory and can be managed
through the Server object in iManager.
A server hosting one of more filtered replicas has only a single replication filter. Therefore, all
filtered replicas on the server contain the same subset of information from their respective partitions.
The master partition replica of a filtered replica must be hosted on an eDirectory server running
eDirectory 8.5 or later.
Filtered replicas can
Reduce synchronization traffic to the server by reducing the amount of data that must be
replicated from other servers.
Reduce the number of events that must be filtered by Novell Identity Manager.
For more information on Novell Nsure Identity Manager, see the Novell Identity Manager 3.0.1
Administration Guide (http://www.novell.com/documentation/idm/index.html)
Reduce the size of the directory database.
Each replica adds to the size of the database. By creating a filtered replica that contains only
specific classes (instead of creating a full replica), you can reduce the size of your local
database.
For example, if your tree contains 10,000 objects but only a small percentage of those objects
are Users, you could create a filtered replica containing only the User objects instead of a full
replica containing all 10,000 objects.
Other than the ability to filter data stored in a local database, the filtered replica is like a normal
eDirectory replica and it can be changed back to a full replica at any time.
58 Novell eDirectory 8.8 Administration Guide
Page 59

NOTE: Filtered replicas by default will have the Organization and the Organizational Unit as
mandatory filters.
For more information on setting up and managing filtered replicas, see Section 5.6, “Setting Up and
Managing Filtered Replicas,” on page 140.
Allowing Local Logins to Filtered Replicas
To allow local logins to a Filtered Replica in addition to selecting the "Enable local login" in
iManager, we should also add the class ndsLoginProperties to the filter.
1.7 NetWare Bindery Emulation
Many applications, such as print servers and backup software, were written for NetWare versions
earlier than NetWare 4. These applications used the NetWare bindery instead of eDirectory for
network access and object manipulation.
The bindery is a flat database of objects such as Users, Groups, and Volumes known to a given
server. The bindery is server specific and server centric.
novdocx (en) 11 July 2008
Older NetWare client software (such as the NETX bindery shell) used a bindery login procedure in
which a user logged in to a specific server only. Access to multiple servers required multiple logins
using multiple user accounts.
eDirectory allows applications written for a bindery to function using bindery services. Bindery
services allows you to set an eDirectory context or a number of contexts (up to 12) as an eDirectory
server’s virtual bindery. The context you set is called the server’s bindery context.
Following are some important facts about bindery services:
To use bindery services, you must set a bindery context for the eDirectory server.
Not all objects map to bindery objects. Many objects, such as Alias objects, do not have a
bindery equivalent.
Most bindery applications have been upgraded to work with eDirectory. Check with your
application vendor to get the newest version.
Each eDirectory server with a bindery context must hold a master or read/write replica of the
partition that includes the bindery context.
1.8 Server Synchronization in the Replica Ring
When multiple servers hold replicas of the same partition, those servers are considered a replica
ring. Synchronization is the propagation of directory information from one replica to another, so the
information in each partition is consistent with the other. eDirectory automatically keeps those
servers synchronized. For more information, refer Section 3.4, “Synchronization,” on page 108
The following are the types of eDirectory synchronization:
Normal Synchronization or Replica Synchronization
Priority Sync
Understanding Novell eDirectory 59
Page 60

1.9 Access to Resources
eDirectory provides a basic level of network access security through default rights. You can provide
additional access control by completing the tasks outlined below.
Assigning rights
Each time a user attempts to access a network resource, the system calculates the user’s
effective rights to that resource. To ensure that users have the appropriate effective rights to
resources, you can make explicit trustee assignments, grant security equivalences, and filter
inherited rights.
To simplify the assignment of rights, you can create Group and Organizational Role objects,
then assign users to the groups and roles.
Adding login security
Login security is not provided by default. You can set up several optional login security
measures, including login passwords, login location and time restrictions, limits on concurrent
login sessions, intruder detection, and login disabling.
Setting up role-based administration
You can set up administrators for specific object properties and grant them rights to only those
properties. This allows you to create administrators with specific responsibilities that can be
inheritable to subordinates of any given container object. A role-based administrator can have
responsibilities over any specific properties, such as those that relate to employee information
or passwords.
See Installing RBS (http://www.novell.com/documentation/imanager25/imanager_admin_25/
data/am757mw.html#bu1rlq9) in the Novell iManager 2.5 Administration Guide for instruction
on setting up Role-Based Services.
You can also define roles in terms of the specific tasks that administrators can perform in rolebased administration applications. See Section 3.3, “Configuring Role-Based Services,” on
page 103 for more information.
novdocx (en) 11 July 2008
1.10 eDirectory Rights
When you create a tree, the default rights assignments give your network generalized access and
security. Some of the default assignments are as follows:
User Admin has the Supervisor right to the top of the tree, giving Admin complete control over
the entire directory. Admin also has the Supervisor right to the NetWare Server object, giving
complete control over any volumes on that server.
[Public] has the Browse right to the top of the tree, giving all users the right to view any objects
in the tree.
Objects created through an upgrade process such as a NetWare migration, printing upgrade, or
Windows user migration receive trustee assignments appropriate for most situations.
60 Novell eDirectory 8.8 Administration Guide
Page 61

1.10.1 Trustee Assignments and Targets
The assignment of rights involves a trustee and a target object. The trustee represents the user or set
of users that are receiving the authority. The target represents those network resources the users have
authority over.
If you make an Alias a trustee, the rights apply only to the object the alias represents. The Alias
object can be an explicit target, however.
A file or directory in the NetWare file system can also be a target, although file system rights
are stored in the file system itself, not in eDirectory.
NOTE: The [Public] trustee is not an object. It is a specialized trustee that represents any network
user, logged in or not, for rights assignment purposes.
[This] is a special type of trustee, that is defined to be an authenticated object, when its name
matches the entry being accessed. This helps the administrator to easily specify rights such as, every
user manages his own telephone number, with a single ACL at the top of the tree with [This] as a
trustee.
novdocx (en) 11 July 2008
1.10.2 eDirectory Rights Concepts
The following concepts can help you better understand eDirectory rights.
“Object (Entry) Rights” on page 61
“Property Rights” on page 62
“Effective Rights” on page 62
“How Effective Rights Are Calculated” on page 62
“Security Equivalence” on page 64
“Access Control List (ACL)” on page 65
“Inherited Rights Filter (IRF)” on page 65
Object (Entry) Rights
When you make a trustee assignment, you can grant object rights and property rights. Object rights
apply to manipulation of the entire object, while property rights apply only to certain object
properties. An object right is described as an entry right because it provides an entry into the
eDirectory database.
A description of each object right follows:
Supervisor includes all rights to the object and all of its properties.
Browse lets the trustee see the object in the tree. It does not include the right to see an object’s
properties.
Create applies only when the target object is a container. It allows the trustee to create new
objects below the container and also includes the Browse right.
Delete lets the trustee delete the target from the directory.
Rename lets the trustee change the name of the target.
Understanding Novell eDirectory 61
Page 62

Property Rights
When you make a trustee assignment, you can grant object rights and property rights. Object rights
apply to manipulation of the entire object, while property rights apply only to certain object
properties.
iManager gives you two options for managing property rights:
You can manage all properties at once when the [All Attributes Rights] item is selected.
You can manage one or more individual properties when the specific property is selected.
A description of each property right follows:
Supervisor gives the trustee complete power over the property.
Compare lets the trustee compare the value of a property to a given value. This right allows
searching and returns only a true or false result. It does not allow the trustee to actually see the
value of the property.
Read lets the trustee see the values of a property. It includes the Compare right.
Write lets the trustee create, change, and delete the values of a property.
novdocx (en) 11 July 2008
Add Self lets the trustee add or remove itself as a property value. It only applies to properties
with object names as values, such as membership lists or Access Control Lists (ACLs).
Effective Rights
Users can receive rights in a number of ways, such as explicit trustee assignments, inheritance, and
security equivalence. Rights can also be limited by Inherited Rights Filters and changed or revoked
by lower trustee assignments. The net result of all these actions—the rights a user can employ—are
called effective rights.
A user’s effective rights to an object are calculated each time the user attempts an action.
How Effective Rights Are Calculated
Each time a user attempts to access a network resource, eDirectory calculates the user’s effective
rights to the target resource using the following process:
1. eDirectory lists the trustees whose rights are to be considered in the calculation. These include
The user who is attempting to access the target resource.
The objects that the user is security equivalent to.
2. For each trustee in the list, eDirectory determines its effective rights as follows:
a. eDirectory starts with the inheritable rights that the trustee has at the top of the tree.
eDirectory checks the Object Trustees (ACL) property of the Tree object for entries that
list the trustee. If any are found and they are inheritable, eDirectory uses the rights
specified in those entries as the initial set of effective rights for the trustee.
b. eDirectory moves down a level in the branch of the tree that contains the target resource.
c. eDirectory removes any rights that are filtered at this level.
62 Novell eDirectory 8.8 Administration Guide
Page 63

eDirectory checks the ACL at this level for Inherited Rights Filters (IRFs) that match with
the right types (object, all properties, or a specific property) of the trustee’s effective
rights. If any are found, eDirectory removes from the trustee’s effective rights any rights
that are blocked by those IRFs.
For example, if the trustee’s effective rights so far include an assignment of Write All
Properties, but an IRF at this level blocks Write All Properties, the system removes Write
All Properties from the trustee’s effective rights.
d. eDirectory adds any inheritable rights that are assigned at this level, overriding as needed.
eDirectory checks the ACL at this level for entries that list the trustee. If any are found,
and they are inheritable, eDirectory copies the rights from those entries to the trustee’s
effective rights, overriding as needed.
For example, if the trustee’s effective rights so far include the Create and Delete object
rights but no property rights, and if the ACL at this level contains both an assignment of
zero object rights and an assignment of Write all properties for this trustee, then the
system replaces the trustee’s existing object rights (Create and Delete) with zero rights and
adds the new all property rights.
e. eDirectory repeats the filtering and adding steps (c and d above) at each level of the tree,
including at the target resource.
novdocx (en) 11 July 2008
f. eDirectory adds any noninheritable rights assigned at the target resource, overriding as
needed.
eDirectory uses the same process as in Step 2d above. The resulting set of rights
constitutes the effective rights for this trustee.
3. eDirectory combines the effective rights of all the trustees in the list as follows:
a. eDirectory includes every right held by any trustee in the list and excludes only those
rights that are missing from every trustee in the list. eDirectory does not mix right types.
For example, it does not add rights for a specific property to rights for all properties or
vice versa.
b. eDirectory adds rights that are implied by any of the current effective rights.
The resulting set of rights constitutes the user’s effective rights to the target resource.
Example
User DJones is attempting to access volume Acctg_Vol. (See Figure 1-21.)
Figure 1-21 Sample Trustee Rights
[Public] Browse object
(inheritable) [Public] Read
all prop (inheritable)
ACL
IRF Write all prop (n/a)
DJones Write all prop
DJones zero object
(inheritable) DJones zero
ACL
ACL
Understanding Novell eDirectory 63
Page 64

The following process shows how eDirectory calculates DJones’ effective rights to Acctg_Vol:
1. The trustees whose rights are to be considered in the calculation are DJones, Marketing, Tree,
and [Public].
This assumes that DJones doesn’t belong to any groups or roles and has not been explicitly
assigned any security equivalences.
2. The effective rights for each trustee are as follows:
DJones: Zero object, zero all properties
The assignment of zero all property rights at Acctg_Vol overrides the assignment of Write
all properties at Accounting.
Marketing: Zero all properties
The assignment of Write all properties at the top of the tree is filtered out by the IRF at
Accounting.
Tree: No rights
No rights are assigned for Tree anywhere in the pertinent branch of the tree.
[Public]: Browse object, Read all properties
These rights are assigned at the root and aren’t filtered or overridden anywhere in the
pertinent branch of the tree.
novdocx (en) 11 July 2008
3. Combining the rights from all these trustees results in the following:
DJones: Browse object, Read all properties
4. Adding the Compare all properties right that is implied by the Read all properties right, DJones
has the following final effective rights to Acctg_Vol:
DJones: Browse object, Read and Compare all properties
Blocking Effective Rights
Because of the way that effective rights are calculated, it is not always obvious how to block
particular rights from being effective for specific users without resorting to an IRF (an IRF blocks
rights for all users).
To block particular rights from being effective for a user without using an IRF, do either of the
following:
Ensure that neither the user nor any of the objects that the user is security equivalent to ever
gets assigned those rights, either at the target resource or at any level above the target resource
in the tree.
If the user or any object that the user is security equivalent to does get assigned those rights,
ensure that that object also has an assignment lower in the tree that omits those rights. Do this
for every trustee (associated with the user) that has the unwanted rights.
Security Equivalence
Security equivalence means having the same rights as another object. When you make one object
security equivalent to another object, the rights of the second object are added to the rights of the
first object when the system calculates the first object's effective rights.
For example, suppose you make User object Joe security equivalent to the Admin object. After you
create the security equivalence, Joe has the same rights to the tree and file system as Admin.
64 Novell eDirectory 8.8 Administration Guide
Page 65

There are three types of security equivalence:
Explicit: By assignment
Automatic: By membership in a group or role
Implied: Equivalent to all parent containers and the [Public] trustee
Security equivalence is effective only for one step. For example, if you make a third user security
equivalent to Joe in the example above, that user does not receive Admin rights.
Security equivalence is recorded in eDirectory as values in the User object’s Security Equal To
property.
When you add a User object as an occupant to an Organizational Role object, that User
automatically becomes security equivalent to the Organizational Role object. The same is true when
a User becomes a member of a Group role object.
Access Control List (ACL)
The Access Control List (ACL) is also called the Object Trustees property. Whenever you make a
trustee assignment, the trustee is added as a value to the Object Trustees (ACL) property of the
target.
novdocx (en) 11 July 2008
This property has strong implications for network security for the following reasons:
Anyone who has the Supervisor or Write right to the Object Trustees (ACL) property of an
object can determine who is a trustee of that object.
Any users with the Add Self right to the Object Trustees (ACL) property of an object can
change their own rights to that object. For example, they can grant themselves the Supervisor
right.
For these reasons, be careful giving Add Self rights to all properties of a container object. That
assignment makes it possible for the trustee to become Supervisor of that container, all objects in it,
and all objects in containers beneath it.
Inherited Rights Filter (IRF)
The Inherited Rights Filter allows you to block rights from flowing down the eDirectory Tree. For
more information on configuring this filter, see “Blocking Inherited Rights to an eDirectory Object
or Property” on page 70.
1.10.3 Default Rights for a New Server
When you install a new Server object into a tree, the following trustee assignments are made:
Default Trustees Default Rights
Admin (first eDirectory server in the tree) Supervisor object right to the Tree object.
Admin has the Supervisor object right to the NetWare
Server object, which means that Admin also has the
Supervisor right to the root directory of the file system
of any volumes on the server.
[Public] (first eDirectory server in the tree) Browse object right to the Tree object.
Understanding Novell eDirectory 65
Page 66

Default Trustees Default Rights
Tree The Tree Read property right to the Host Server Name
and Host Resource properties on all Volume objects.
This gives all objects access to the physical volume
name and physical server name.
Container objects Read and File Scan rights to sys: \public. This allows
User objects under the container to access NetWare
utilities in \public.
User objects If home directories are automatically created for users,
the users have the Supervisor right to those directories.
1.10.4 Delegated Administration
eDirectory lets you delegate administration of a branch of the tree, revoking your own management
rights to that branch. One reason for this approach is that special security requirements require a
different administrator with complete control over that branch.
novdocx (en) 11 July 2008
To delegate administration:
1 Grant the Supervisor object right to a container.
1a In Novell iManager, click the Roles and Tasks button Description: Roles and Tasks
button .
1b Click Rights > Modify Trustees.
1c Enter the name and context of the container object that you want to control access to, then
click OK.
1d Click Assigned Rights.
1e Click the Supervisor checkbox for the properties you want.
1f Click Done, then click OK.
2 Create an IRF on the container that filters the Supervisor and any other rights you want
blocked.
2a In Novell iManager, click the Roles and Tasks button Description: Roles and Tasks
button
2b Click Rights > Modify Inherited Rights Filter.
2c Specify the name and context of the object whose inherited rights filter you want to
modify, then click OK.
2d Edit the list of inherited rights filters as needed.
To edit the list of filters, you must have the Supervisor or Access Control right to the ACL
property of the object. You can set filters that block inherited rights to the object as a
whole, to all the properties of the object, and to individual properties.
NOTE: These filters won't block rights that are explicitly granted a trustee on this object,
since such rights aren't inherited.
2e Click OK.
66 Novell eDirectory 8.8 Administration Guide
Page 67

IMPORTANT: If you delegate administration to a User object and that object is subsequently
deleted, there are no objects with rights to manage that branch.
To delegate administration of specific eDirectory properties, such as Password Management, see
“Granting Equivalence” on page 68.
To delegate the use of specific functions in role-based administration applications, see Section 3.3,
“Configuring Role-Based Services,” on page 103.
1.10.5 Administering Rights
“Assigning Rights Explicitly” on page 67
“Granting Equivalence” on page 68
“Blocking Inherited Rights to an eDirectory Object or Property” on page 70
“Viewing Effective Rights to an eDirectory Object or Property” on page 70
Assigning Rights Explicitly
novdocx (en) 11 July 2008
When the default rights assignments in your eDirectory tree provide users with either too much or
not enough access to resources, you can create or modify explicit rights assignments. When you
create or modify a rights assignment, you start by selecting either the resource that you are
controlling access to or the trustee (the eDirectory object that possesses, or will possess, the rights).
TIP: To manage users' rights collectively rather than individually, make a group, role, or container
object the trustee. To restrict access to a resource globally (for all users), see “Blocking Inherited
Rights to an eDirectory Object or Property” on page 70.
“Controlling Access to Novell eDirectory by Resource” on page 67
“Controlling Access to Novell eDirectory by Trustee” on page 68
Controlling Access to Novell eDirectory by Resource
1 In Novell iManager, click the Roles and Tasks button Description: Roles and Tasks button .
2 Click Rights > Modify Trustees.
3 Specify the name and context of the eDirectory resource (object) that you want to control
access to, then click OK.
Choose a container if you want to control access to all the objects below it.
4 Edit the list of trustees and their rights assignments as needed.
4a To modify a trustee's rights assignment, select the trustee, click Assigned Rights, modify
the rights assignment as needed, then click Done.
4b To add an object as a trustee, click Add Trustee, select the object, click OK, click Assigned
Rights to assign the trustee's rights, then click Done.
When creating or modifying a rights assignment, you can grant or deny access to the
object as a whole, to all the properties of the object, and to individual properties.
4c To remove an object as a trustee, select the trustee, then click Delete Trustee.
Understanding Novell eDirectory 67
Page 68

The deleted trustee no longer has explicit rights to the object or its properties but might
still have effective rights through inheritance or security equivalence.
5 Click OK.
Controlling Access to Novell eDirectory by Trustee
1 In Novell iManager, click the Roles and Tasks button Description: Roles and Tasks button .
2 Click Rights > Rights to Other Objects.
3 Enter the name and context of the trustee (the object that possesses, or will possess, the rights)
whose rights you want to modify.
4 In the Context to Search From field, specify the part of the eDirectory tree to be searched for
eDirectory objects that the trustee currently has rights assignments to.
5 Click OK.
A screen appears showing the progress of the search. When the search is done, the Rights to
Other Objects page appears with the results of the search filled in.
6 Edit the trustee's eDirectory rights assignments as needed.
6a To add a rights assignment, click Add Object, select the object to control access to, click
OK, click Assigned Rights, assign the trustee's rights, then click Done.
6b To modify a rights assignment, select the object you want to control access to, click
Assigned Rights, modify the trustee's rights assignment as needed, then click Done.
When creating or modifying a rights assignment, you can grant or deny access to the
object as a whole, to all the properties of the object, and to individual properties.
novdocx (en) 11 July 2008
6c To remove a rights assignment, select the object you want to control access to, then click
Delete Object.
The trustee no longer has explicit rights to the object or its properties but might still have
effective rights through inheritance or security equivalence.
7 Click OK.
Granting Equivalence
A user who is security equivalent to another eDirectory object effectively has all the rights of that
object. A user is automatically security equivalent to the groups and roles that they belong to. All
users are implicitly security equivalent to the [Public] trustee and to each container above their User
objects in the eDirectory tree, including the Tree object. You can also explicitly grant a user security
equivalence to any eDirectory object.
NOTE: The tasks in this section allow you to delegate administrative authority through eDirectory
rights. If you have administration applications that use Role-Based Services (RBS) roles, you can
also delegate administrative authority by assigning users membership in those roles.
“Granting Security Equivalence by Membership” on page 69
“Granting Security Equivalence Explicitly” on page 69
“Setting Up an Administrator For an Object's Specific eDirectory Properties” on page 69
68 Novell eDirectory 8.8 Administration Guide
Page 69

Granting Security Equivalence by Membership
1 If you haven't already done so, create the group or role object that you want the users to be
security equivalent to.
See “Creating an Object” on page 96 for details.
2 Grant the group or role the eDirectory rights that you want the users to have.
See “Assigning Rights Explicitly” on page 67 for details.
3 Edit the membership of the group or role to include those users who need the rights of the
group or role.
For a Group object, use the Members property page.
In Novell iManager, click eDirectory Administration > Modify Object, specify the name
and context of a Group object, click OK, then click the Members tab.
For an Organizational Role object, use the Role Occupant field on the Role Occupant
property page.
In Novell iManager, click eDirectory Administration > Modify Object, specify the name
and context of an rbsRole object, click OK, then click Role Occupant on the General tab.
For an rbsRole object, use the Modify iManager Members page.
novdocx (en) 11 July 2008
In Novell iManager, click the Configure button Description: Configure button , click
Role Configuration > Modify iManager Roles, click the Modify Members button
Description: Modify Members button to the left of the role you want to modify, then use
the options on the Modify iManager Members page to add or remove members from a
role.
4 Click OK.
Granting Security Equivalence Explicitly
1 In Novell iManager, click the Roles and Tasks button Description: Roles and Tasks button .
2 Click eDirectory Administration > Modify Object.
3 Enter the name and context of the user or object that you want the user to be security equivalent
to, then click OK.
4 Click the Security tab, then grant the security equivalence as follows:
If you chose a user, click Security Equal To > enter the name and context of the object that
you want the user to be security equivalent to, press Enter, then click OK.
If you chose an object that you want the user to be security equivalent to, click Security
Equal to Me, enter the name and context of the user that you want the object to be security
equivalent to, press Enter, then click OK.
The contents of these two property pages are synchronized by the system.
5 Click OK.
Setting Up an Administrator For an Object's Specific eDirectory Properties
1 If you haven’t already done so, create the User, Group, Role, or Container object that you want
to make a trustee of the object's specific properties.
If you create a container as a trustee, all objects inside and below the container will have the
rights you grant. You must make the property inheritable or the container and its members will
not have rights below its level.
Understanding Novell eDirectory 69
Page 70

See “Creating an Object” on page 96 for information.
2 In Novell iManager, click the Roles and Tasks button Description: Roles and Tasks button .
3 Click Rights > Modify Trustees.
4 Specify the name and context of the highest-level container that you want the administrator to
manage, then click OK.
5 On the Modify Trustees page, click Add Trustee, select the object that represents the
administrator, then click OK.
6 Click Assigned Rights for the trustee you just added, then click Add Property.
7 Select the properties you want to add to the property list, then click OK.
8 For each property that the administrator will manage, assign the needed rights.
Be sure to select the Inheritable check box on each rights assignment.
9 Click Done, then click OK.
Blocking Inherited Rights to an eDirectory Object or Property
In eDirectory, rights assignments on containers can be inheritable or non-inheritable. In the NetWare
file system, all rights assignments on folders are inheritable. In both eDirectory and NetWare, you
can block such inheritance on individual subordinate items so that the rights aren’t effective on those
items, no matter who the trustee is. One exception is that the Supervisor right can’t be blocked in the
NetWare file system.
novdocx (en) 11 July 2008
1 In Novell iManager, click the Roles and Tasks button Description: Roles and Tasks button
2 Click Rights > Modify Inherited Rights Filter.
3 Specify the name and context of the object whose inherited rights filter you want to modify,
then click OK.
This displays a list of the inherited rights filters that have already been set on the object.
4 On the property page, edit the list of inherited rights filters as needed.
To edit the list of filters, you must have the Supervisor or Access Control right to the ACL
property of the object. You can set filters that block inherited rights to the object as a whole, to
all the properties of the object, and to individual properties.
NOTE: These filters won't block rights that are explicitly granted a trustee on this object,
because such rights aren't inherited.
5 Click OK.
Viewing Effective Rights to an eDirectory Object or Property
Effective rights are the actual rights users can exercise on specific network resources. They are
calculated by eDirectory based on explicit rights assignments, inheritance, and security equivalence.
You can query the system to determine a user’s effective rights to any resource.
1 In Novell iManager, click the Roles and Tasks button Description: Roles and Tasks button
2 Click Rights > View Effective Rights.
3 Enter the name and context of the trustee whose effective rights you want to view, then click
OK.
4 Choose from the following options:
70 Novell eDirectory 8.8 Administration Guide
Page 71

Option Description
Property Name Lists the properties that the trustee has effective rights to. The
properties are read from eDirectory and so are always shown in
English. Each item in the list is one of the following types:
[All Attributes Rights]-Represents all the properties of the object.
[Entry Rights]-Represents the object as a whole. Rights to this
item don’t imply any property rights, except in the case of
Supervisor.
Specific properties-These are specific properties that the trustee
has rights to individually. By default, only properties of this object
class are listed (see below).
Effective Rights Shows the trustee’s effective rights to the selected property, as
calculated by eDirectory.
Show All Properties in Schema Leave this check box deselected to show only the properties of
this object class.
novdocx (en) 11 July 2008
5 Click Done.
To show the properties of all classes defined in the eDirectory
schema, select this check box. The additional properties are
pertinent only if this object is a container, or if it has been
extended to include the properties of an auxiliary class. The
additional properties are shown without a bullet next to them.
Understanding Novell eDirectory 71
Page 72

novdocx (en) 11 July 2008
72 Novell eDirectory 8.8 Administration Guide
Page 73

2
Designing Your Novell eDirectory
novdocx (en) 11 July 2008
Network
The design of Novell® eDirectoryTM impacts virtually every network user and resource. A good
eDirectory design can enhance the performance and value of the entire network by making the
network more efficient, fault tolerant, secure, and scalable, and operable. This chapter provides
suggestions for designing your eDirectory network.
Section 2.1, “eDirectory Design Basics,” on page 73
Section 2.2, “Designing the eDirectory Tree,” on page 74
Section 2.3, “Guidelines for Partitioning Your Tree,” on page 80
Section 2.4, “Guidelines for Replicating Your Tree,” on page 82
Section 2.5, “Planning the User Environment,” on page 84
Section 2.6, “Designing eDirectory for e-Business,” on page 85
Section 2.7, “Understanding the Novell Certificate Server,” on page 86
Section 2.8, “Synchronizing Network Time,” on page 90
2.1 eDirectory Design Basics
An efficient eDirectory design is based on the network layout, organizational structure of the
company, and proper preparation.
2
If you are designing eDirectory for e-business, refer to Section 2.6, “Designing eDirectory for e-
Business,” on page 85.
2.1.1 Network Layout
The network layout is the physical setup of your network. To develop an efficient eDirectory SP3
design, you need to be aware of the following:
WAN links
Users that need remote access
Network resources (such as number of servers)
Network conditions (such as frequent power outages)
Anticipated changes to the network layout
2.1.2 Organizational Structure
The organizational structure of the company will influence the eDirectory SP3 design. To develop
an efficient eDirectory SP3 design you need
The organizational chart and an understanding of how the company operates.
Personnel who have the skills needed to complete the design and implementation of your
eDirectory SP3 tree.
Designing Your Novell eDirectory Network
73
Page 74

You will need to identify personnel who can do the following:
Maintain the focus and schedule of the eDirectory SP3 design
Understand eDirectory SP3 design, design standards, and security
Understand and maintain the physical network structure
Manage the internetwork backbone, telecommunications, WAN design, and router
placement
2.1.3 Preparing for eDirectory SP3 Design
Before you actually create the eDirectory SP3 design, you should
Set realistic expectations concerning scope and schedule.
Notify all users who will be affected by the design of your implementation of eDirectory SP3.
Review the information in “Network Layout” on page 73 and “Organizational Structure” on
page 73.
novdocx (en) 11 July 2008
2.2 Designing the eDirectory Tree
Designing the eDirectory SP3 tree is the most important procedure in the design and implementation
of a network. The design consists of the following tasks:
“Creating a Naming Standards Document” on page 74
“Designing the Upper Layers of the Tree” on page 77
“Designing the Lower Layers of the Tree” on page 79
2.2.1 Creating a Naming Standards Document
Using standard names such as object names makes your network more intuitive to both users and
administrators. Written standards can also specify how administrators set other property values, such
as telephone numbers and addresses.
Searching and browsing the directory rely greatly on the consistency of naming or property values.
The use of standard names also makes it easier for Novell Nsure Identity Manager to move data
between eDirectory and other applications. For more information on Novell Nsure Identity
Manager, see the Novell Identity Manager 3.0.1 Administration Guide (http://www.novell.com/
documentation/idm/index.html).
Naming Conventions
“Objects” on page 75
“Server Objects” on page 75
“Country Objects” on page 75
“Bindery Objects” on page 75
74 Novell eDirectory 8.8 Administration Guide
Page 75

Objects
The name must be unique in the container. For example, Debra Jones and Daniel Jones cannot
both be named DJONES if they are in the same container.
Special characters are allowed. However, plus signs (+), equals signs (=), and periods (.) must
be preceded by a backslash (\) if used. Additional naming conventions apply to Server and
Country objects, as well as to bindery services and multilingual environments.
Uppercase and lowercase letters, as well as underscores and spaces, are displayed as you first
entered them, but they aren’t distinguished. For example, Manager_Profile and MANAGER
PROFILE are considered identical.
If you use spaces, you must enclose the name in quotes when entering it on the command line
or in login scripts.
Server Objects
Server objects are automatically created when you install new servers.
You can create additional Server objects for existing NetWare
®
and Windows servers and for
eDirectory servers in other trees, but they are all treated as bindery objects.
novdocx (en) 11 July 2008
When creating a Server object, the name must match the physical server name, which
Is unique in the entire network.
Is from 2 to 47 characters long.
Contains only letters A-Z, numbers 0-9, hyphens (-), periods (.), and underscores (_).
Does not use a period as the first character.
Once named, the Server object cannot be renamed in Novell iManager. If you rename it at the
server, the new name automatically appears in iManager.
Country Objects
Country objects should follow the standard two-letter ISO country code.
For more information, see the ISO 3166 Code Lists (http://www.iso.ch/iso/en/prods-services/
iso3166ma/02iso-3166-code-lists/list-en1.html).
Bindery Objects
If the object is accessed from NetWare 2 or NetWare 3 through bindery services, the following
restrictions apply:
Spaces in the name are replaced with underscores
Names are truncated to 47 characters
The following characters are not allowed: slash (/), backslash (\), colon (:), comma (,), asterisk
(*), and question mark (?)
IMPORTANT: Bindery emulation is not supported on Linux, Solaris, or AIX platforms.
Designing Your Novell eDirectory Network 75
Page 76

Multilingual Considerations
If you have workstations running in different languages, you might want to limit object names to
characters that are viewable on all the workstations. For example, a name entered in Japanese cannot
contain characters that aren’t viewable in Western languages.
IMPORTANT: The Tree name should always be specified in English.
Sample Standards Document
The following is a sample document containing standards for some of the most frequently used
properties. You need to have standards only for those properties you use. Distribute the standards
document to all administrators responsible for creating or modifying objects.
Object Class | Property Standard Examples Rationale
novdocx (en) 11 July 2008
User | Login name First initial, middle initial (if
applicable), and last name
(all lowercase). Eight
characters maximum. All
common names are unique
in the company.
User | Last name Last name (normal
capitalization).
Telephone and fax
numbers
Multiple classes |
Location
Organization | Name The name of your company
Organizational Unit |
Name (based on
location)
Organizational Unit |
Name (based on
department)
Numbers separated by
hyphens.
Two-letter location code
(uppercase), hyphen, mail
stop.
for all trees.
Two- or three-letter location
code, all uppercase.
Department name or
abbreviation.
msmith, bjohnson Using unique names
company-wide is not
required by eDirectory but
helps avoid conflicts within
the same context (or
bindery context).
Smith Used for generating
mailing labels.
US: 123-456-7890
Other: 44-344123456
BA-C23 Used by interoffice mail
YourCo If you have separate trees,
ATL, CHI, CUP, LA,
BAT, BOS, DAL
Sales, Eng Short, standard names
Used by autodialing
software.
carriers.
a standard Organization
name allows for future
merging of trees.
Short, standard names are
used for efficient
searching.
make it easy to identify
which department the
container is servicing.
Group | Name Descriptive name. Project Managers Avoid extremely long
Directory Map | Name Contents of the directory
indicated by the Directory
Map.
76 Novell eDirectory 8.8 Administration Guide
names; some utilities will
not display them.
DOSAPPS Short, standard names
make it easy to identify
which department the
container is servicing.
Page 77

Object Class | Property Standard Examples Rationale
Profile | Name Purpose of the profile. MobileUser Short, standard names
make it easy to identify
which department the
container is servicing.
novdocx (en) 11 July 2008
Server | Name SERV, hyphen, department,
hyphen, unique number.
SERV-Eng-1 eDirectory requires server
names to be unique in the
tree.
2.2.2 Designing the Upper Layers of the Tree
You should carefully design the upper layers of the tree because changes to the upper layers affect
the rest of the tree, especially if your organization has WAN links. You want to design the top of the
tree so that few changes will be necessary.
Use the following eDirectory design rules to create your eDirectory tree:
Use a pyramid design.
Use one eDirectory tree with a unique name.
Create a single Organization object.
Create first-level Organizational Units that represent the physical network infrastructure.
Figure 2-1 depicts the eDirectory design rules.
Figure 2-1 eDirectory Design Rules
O=ACME
Geographic
(Regional)
Geographic
(Location)
Operational
Project/Department
OU=AMERC
OU=CHI
OU=PRV
OU=HR
OU=RECR
OU=PACRIM
OU=TKYO
OU=SALES
OU=PAY
OU=HKNG
OU=EUROPE
OU=LON
OU=PAR
To create the upper layers of the tree, see “Creating an Object” on page 96 and “Modifying an
Object's Properties” on page 96.
Using a Pyramid Design
With a pyramid-designed eDirectory, managing, initiating changes to large groups, and creating
logical partitions are easier.
Designing Your Novell eDirectory Network 77
Page 78

The alternative to the pyramid design is a flat tree that places all objects in the top layers of the tree.
eDirectory can support a flat tree design; however, a flat tree design can be more difficult to manage
and partition.
Using One eDirectory SP3 Tree with a Unique Name
A single tree works best for most organizations. By default, one tree is created. With one tree you
have single-user identity on the network, simpler administration of security, and single point of
management.
This recommendation for a single tree for business use does not preclude additional trees for testing
and development.
Some organizations, however, might need multiple trees because of legal, political, or corporate
issues. For example, an organization consisting of several autonomous organizations might need to
create several trees. If your organization needs multiple trees, consider using Novell Nsure Identity
Manager to simplify management. For more information on Novell Nsure Identity Manager, see the
Novell Identity Manager 3.0.1 Administration Guide (http://www.novell.com/documentation/idm/
index.html).
novdocx (en) 11 July 2008
When you name the tree, use a unique name that will not conflict with other tree names. Use a name
that is short and descriptive, such as EDL-TREE.
If two trees have the same name and are located on the same network, you might encounter the
following problems:
Updates going to the wrong tree
Resources disappearing
Rights disappearing
Corruption
You can change the tree name using the DSMERGE utility, but do so with caution. A tree name
change impacts the network because you need to reconfigure the clients to use the new tree name.
Creating a Single Organization Object
Generally, an eDirectory tree should have one Organization object. By default, a single Organization
object is created and named after your company. This allows you to configure changes that apply to
the whole company from a single location in the tree.
®
For example, you can use ZENworks
to create a Workstation Import Policy object in the
Organization object. In this policy, which affects the whole organization, you define how
Workstation objects are named when created in eDirectory.
In the Organization container, the following objects are created:
Admin
Server
Vo l u m e
Networks with only a Windows, Linux, Solaris, or AIX server running eDirectory have no
Volume objects.
78 Novell eDirectory 8.8 Administration Guide
Page 79

You might want to create multiple Organization objects if your company has the following needs:
It comprises multiple companies that do not share the same network.
It needs to represent separate business units or organizations.
It has a policy or other internal guidelines that dictate that organizations remain separate.
Creating Organizational Units That Represent the Physical Network
First-level Organizational Unit design is important because it affects the partitioning and efficiency
of eDirectory.
For networks that span more than one building or location using either a LAN or a WAN, the firstlevel Organizational Unit object design should be based on location. This allows you to partition
eDirectory in a way that keeps all objects in a partition at one location. It also provides a natural
place to make security and administrator assignments for each location.
2.2.3 Designing the Lower Layers of the Tree
You should design the lower layers of the tree based on the organization of network resources. You
have more freedom in designing the lower layers of an eDirectory tree than the upper layers because
lower-layer design affects only objects at the same location.
novdocx (en) 11 July 2008
To create the lower layers of the tree, see “Creating an Object” on page 96 and “Modifying an
Object's Properties” on page 96.
Determining Container, Tree, and Database Size
The number of lower-level container objects you create depends on the total number of objects in
your tree and your disk space and disk I/O speed limitations. eDirectory SP3 has been tested with
over 1 billion objects in a single eDirectory tree, so the only real limitations are disk space, disk I/O
speed, and RAM to maintain performance. Keep in mind that the impact of replication on a large
tree is significant.
A typical object in eDirectory SP3 is 3 to 5 KB in size. Using this object size, you can quickly
calculate disk space requirements for the number of objects you have or need. Keep in mind that the
object size will grow depending upon how many attributes are completed with data and what the
data is. If objects will hold binary large object (BLOB) data such as pictures, sounds, or biometrics,
the object size will subsequently grow.
The larger the partitions, the slower the replication cycles. If you are using products that require the
use of eDirectory SP3, such as ZENworks and DNS/DHCP services, the eDirectory objects created
by these products will affect the size of the containers they are located in. You might consider
placing objects that are for administration purposes only, such as DNS/DHCP, in their own partition
so user access is not affected with slower replication. Also, managing partitions and replicas will be
easier.
If you are interested, you can easily determine the size of your eDirectory SP3 database or the
Directory Information Base (DIB) Set.
For NetWare, download toolbox.nlm from the Novell Support Web site (http://
support.novell.com) to see the sys:_netware directory on your server.
Designing Your Novell eDirectory Network 79
Page 80

For Windows, look at the DIB Set at \novell\nds\dibfiles.
For Linux, Solaris, or AIX, look at the DIB Set in the directory you specified during
installation.
Deciding Which Containers to Create
In general, create containers for objects that have access needs in common with other eDirectory
objects. This lets you service many users with one trustee assignment or login script. You can create
containers specifically to make container login scripts more effective, or you can place two
departments in one container to make login script maintenance more feasible.
Keep users close to the resources they need to limit traffic over the network. For example, people
who work in the same department generally work near each other. They usually need access to the
same file system and they print to the same printers.
Exceptions to general workgroup boundaries are not hard to manage. If two workgroups use a
common printer, for instance, you can create an Alias object to the printer in one of the workgroups.
You can create Group objects to manage some User objects within a workgroup or User objects
across multiple workgroups. You can create Profile objects for subsets of users with unique login
script requirements.
novdocx (en) 11 July 2008
2.3 Guidelines for Partitioning Your Tree
When you partition eDirectory, you allow parts of the database to exist on several servers. With this
capability, you can optimize network use by distributing the eDirectory data processing and storage
load over multiple servers on the network. By default, a single partition is created. For more
information on partitions, refer to Section 1.5, “Partitions,” on page 52. For information on creating
partitions, refer to Chapter 5, “Managing Partitions and Replicas,” on page 133.
The following are guidelines for most networks. However, depending on the specific configuration,
hardware, and traffic throughput of the network, you might need to adjust some guidelines to fit
your needs.
2.3.1 Determining Partitions for the Upper Layers of the Tree
Just as you design your tree with a pyramid design, you will also partition with a pyramid design.
Your partition structure will have few partitions at the top of the tree and more partitions as you
move toward the bottom. Such a design creates fewer subordinate references than an eDirectory SP3
tree structure that has more partitions at the top than at the bottom.
This pyramid design can be achieved if you always create the partitions relatively close to the leaf
objects, particularly the users. (An exception is the partition created at the root of the tree during
installation.)
When designing the partitions for the upper layers, keep the following in mind:
Partition the top of the tree based on the WAN infrastructure. Place fewer partitions at the top
of the tree with more at the bottom.
You can create containers for each site separated by WAN links (placing each Server object in
its local container), then create a partition for each site.
In a network with WAN links, partitions should not span multiple locations.
80 Novell eDirectory 8.8 Administration Guide
Page 81

This design ensures that replication traffic between different sites is not unnecessarily
consuming WAN bandwidth.
Partition locally around the servers. Keep physically distant servers in separate partitions.
For more information on managing your WAN traffic, see Chapter 12, “WAN Traffic Manager,” on
page 289.
2.3.2 Determining Partitions for the Lower Layers of the Tree
When designing the partitions for the lower layers of the eDirectory tree, keep the following in
mind:
Define lower-layer partitions by organizational divisions, departments, and workgroups, and
their associated resources.
Partition so that all objects in each partition are at a single location. This ensures that updates to
eDirectory SP3 can occur on a local server.
2.3.3 Determining Partition Size
novdocx (en) 11 July 2008
With eDirectory, we recommend the following design limits for partition sizes:
Element Limit
Partition Size Unlimited Objects
Replica Directory Information Base (DIB) limited
to ITB
Total number of partitions in tree Unlimited
Number of child partitions per parent 150
Number of replicas per partition 50
Limited by replica DIB
Number of replicas per replica server 250
This change in design guidelines from NDS
®
6 and 7 is due to architectural changes in NDS 8.
These recommendations apply to distributed environments such as corporate enterprises. These
recommendations might not subsequently apply to e-business or applications.
Although typical e-business users require that all the data be stored on a single server, eDirectory
SP3 provides filtered replicas that can contain a subset of objects and attributes from different areas
of the tree. This allows for the same e-business needs without storing all the data on the server. For
more information, see “Filtered Replicas” on page 58.
2.3.4 Considering Network Variables
Consider the following network variables and their limitations when planning your partitions:
The number and speed of servers
Designing Your Novell eDirectory Network 81
Page 82

The speed of network infrastructure (such as network adapters, hubs, and routers)
The amount of network traffic
2.4 Guidelines for Replicating Your Tree
Creating multiple eDirectory partitions does not, by itself, increase fault tolerance or improve
performance of the directory; however, strategically using multiple replicas does. The placement of
replicas is extremely important for accessibility and fault tolerance. eDirectory SP3 data needs to be
available as quickly as possible and needs to be copied in several places to ensure fault tolerance.
For information on creating replicas, refer to Chapter 5, “Managing Partitions and Replicas,” on
page 133.
The following guidelines will help determine your replica placement strategy.
“Workgroup Needs” on page 82
“Fault Tolerance” on page 82
“Determining the Number of Replicas” on page 83
“Replicating the Tree Partition” on page 83
“Replicating for Administration” on page 83
“Meeting Bindery Services Needs for NetWare” on page 84
novdocx (en) 11 July 2008
“Managing WAN Traffic” on page 84
2.4.1 Workgroup Needs
Place replicas of each partition on servers that are physically close to the workgroup that uses the
information in that partition. If users on one side of a WAN link often access a replica stored on a
server on the other side, place a replica on servers on both sides of the WAN link.
Place replicas in the location of highest access by users, groups, and services. If groups of users in
two separate containers need access to the same object within another partition boundary, place the
replica on a server that exists in the container one level above the two containers holding the group.
2.4.2 Fault Tolerance
If a disk crashes or a server goes down, replicas on servers in other locations can still authenticate
users to the network and provide information on objects in partitions stored on the disabled server.
With the same information distributed on several servers, you are not dependent on any single server
to authenticate you to the network or to provide services (such as login).
To create fault tolerance, plan for three replicas for each partition if the directory tree has enough
servers to support that number. There should be at least two local replicas of the local partition.
There is no need to have more than three replicas unless you need to provide for accessibility of the
data at other locations, or you participate in e-business or other applications that need to have
multiple instances of the data for load balancing and fault tolerance.
You can have only one master replica. Additional replicas must be read/write, read-only, or filtered.
Most replicas should be read/write. They can handle object viewing, object management, and user
login, just as the master replica can. They send out information for synchronization when a change is
made.
82 Novell eDirectory 8.8 Administration Guide
Page 83

Read-only replicas cannot be written to. They allow object searching and viewing, and they are
updated when the replicas of the partition synchronize.
Do not depend on a subordinate reference or filtered replicas for fault tolerance. A subordinate
reference is a pointer and does not contain objects other than the partition root object. Filtered
replicas do not contain all objects within the partition.
eDirectory SP3 allows for an unlimited number of replicas per partition, but the amount of network
traffic increases as the number of replicas increase. Balance fault tolerance needs with network
performance needs.
You can store only one replica per partition on a server. A single server can store replicas of multiple
partitions.
Depending on your organization's disaster recovery plan, the major work of rebuilding the network
after a loss of a server or location can be done using partition replicas. If the location has only one
server, back up eDirectory SP3 regularly. (Some backup software does not back up eDirectory.)
Consider purchasing another server for fault tolerance replication.
2.4.3 Determining the Number of Replicas
novdocx (en) 11 July 2008
The limiting factor in creating multiple replicas is the amount of processing time and traffic required
to synchronize them. When a change is made to an object, that change is communicated to all
replicas in the replica ring. The more replicas in a replica ring, the more communication is required
to synchronize changes. If replicas must synchronize across a WAN link, the time cost of
synchronization is greater.
If you plan partitions for many geographical sites, some servers will receive numerous subordinate
reference replicas. eDirectory SP3 can distribute these subordinate references among more servers if
you create regional partitions.
2.4.4 Replicating the Tree Partition
The Tree partition is the most important partition of the eDirectory tree. If the only replica of this
partition becomes corrupted, users will experience impaired functionality on the network until the
partition is repaired or the eDirectory SP3 tree is completely rebuilt. You will also not be able to
make any design changes involving the Tree.
When creating replicas of the Tree partition, balance the cost of synchronizing subordinate
references with the number of replicas of the Tree partition.
2.4.5 Replicating for Administration
Because partition changes originate only at the master replica, place master replicas on servers near
the network administrator in a central location. It might seem logical to keep masters at remote sites;
however, master replicas should be where the partition operations will occur.
We recommend that major eDirectory SP3 operations, such as partitioning, be handled by one
person or group in a central location. This methodology limits errors that could have adverse effects
to eDirectory SP3 operations and provides for a central backup of the master replicas.
The network administrator should perform high-cost activities, such as creating a replica, at times
when network traffic is low.
Designing Your Novell eDirectory Network 83
Page 84

2.4.6 Meeting Bindery Services Needs for NetWare
If you are using eDirectory SP3 on NetWare and your users require access to a server through
bindery services, that server must contain a master or read/write replica that contains the bindery
context. The bindery context is set by the SET BINDERY CONTEXT statement in autoexec.ncf.
Users can access objects providing bindery services only if real objects exist on that server. Adding
a replica of a partition to the server adds real objects to the server and lets users with User objects in
that partition log in to the server with a bindery connection.
For more information on bindery services, refer to Section 1.7, “NetWare Bindery Emulation,” on
page 59.
2.4.7 Managing WAN Traffic
If users currently use a WAN link to access particular directory information, you can decrease access
time and WAN traffic by placing a replica containing the needed information on a server that users
can access locally.
If you are replicating the master replicas to a remote site or are forced to place replicas over the
WAN for accessibility or fault tolerance, keep in mind the bandwidth that will be used for
replication.
novdocx (en) 11 July 2008
Replicas should only be placed in nonlocal sites to ensure fault tolerance if you are not able to get
the recommended three replicas, increase accessibility, and provide centralized management and
storage of master replicas.
To control the replication of eDirectory SP3 traffic over WAN links, use WAN Manager. For more
information, see Chapter 12, “WAN Traffic Manager,” on page 289.
2.5 Planning the User Environment
After you have designed the basic structure of the eDirectory tree and have set up partitioning and
replication, you should plan the user environment to simplify management and increase access to
network resources. To create a user environment plan, review the users' needs and create
accessibility guidelines for each area.
2.5.1 Reviewing Users' Needs
When you review users' needs, consider the following:
Physical network needs, such as printers or file storage space
Evaluate if resources are shared by groups of users within a tree or shared by groups of users
from multiple containers. Also consider the physical resource needs of remote users.
Bindery services needs for NetWare users
Consider which applications are bindery-based and who uses them.
Application needs
Consider which applications and data files are needed by users, what operating systems exist,
and which groups or users need access to applications. Consider if the shared applications
should be manually or automatically launched by applications such as ZENworks.
84 Novell eDirectory 8.8 Administration Guide
Page 85

2.5.2 Creating Accessibility Guidelines
After you have gathered information about user needs, you should determine the eDirectory SP3
objects that you will use to create the users' environments. For example, if you create policy
packages or Application objects, you should determine how many you will create and where you
will allow them to be placed in the tree.
You should also determine how you will implement security to restrict user access. You should
identify any security precautions related to specific security practices. For example, you could warn
network administrators to avoid granting the eDirectory SP3 Supervisor right to Server objects
because this right is inherited by the file system.
2.6 Designing eDirectory for e-Business
If you use eDirectory SP3 for e-Business, whether you are providing a portal for services or sharing
data with another business, the recommendations already mentioned in this chapter might not apply
to you.
You might want to follow these suggested eDirectory e-business design guidelines instead:
novdocx (en) 11 July 2008
Create a tree with a limited number of containers.
This guideline depends on the applications you use and your implementation of eDirectory. For
example, a global deployment of a messaging server might require the more traditional
eDirectory design guidelines discussed earlier in this chapter. Or, if you are going to distribute
administration of users, you might create a separate Organizational Unit (OU) for each area of
administrative responsibility.
Maintain at least two partitions.
Maintain the default partition at the Tree level, and create a partition for the rest of the tree. If
you have created separate OUs for administrative purposes, create partitions for each of the
OUs.
If you are splitting the load over multiple servers, consider limiting the number of partitions,
but still maintain at least two for backup or disaster recovery.
Create at least three replicas of your tree for fault tolerance and load balancing.
Keep in mind that LDAP does not load balance itself. To balance the load on LDAP, consider
using Layer 4 switches.
Create a separate tree for e-Business. Limit the network resources, such as servers and printers,
included in the tree. Consider creating a tree that contains only User objects.
You can use Novell Identity Manager to link this user tree to your other trees that contain
network information. For more information, see the Novell Identity Manager 3.0.1 (http://
www.novell.com/documentation/idm/index.html).
Use auxiliary classes to customize your schema.
If a customer or application requires a User object that is different from the standard
inetOrgPerson, use auxiliary classes to customize your schema. Using auxiliary classes allows
application designers to change the attributes used in the class without needing to re-create the
tree.
Increase LDIF-import performance.
Designing Your Novell eDirectory Network 85
Page 86

When the Novell Import Conversion Export utility is used, eDirectory SP3 indexes each object
during the process. This can slow down the LDIF-import process. To increase the LDIF-import
performance, suspend all indexes from the attributes of the objects you are creating, use the
Novell Import Conversion Export utility, then resume indexing the attributes.
Implement globally unique common names (CN).
eDirectory allows the same CN in different containers. However, if you use globally unique
CNs, you can perform searches on CN without implementing logic for dealing with multiple
replies.
2.7 Understanding the Novell Certificate Server
Novell Certificate ServerTM allows you to mint, issue, and manage digital certificates by creating a
Security container object and an Organizational Certificate Authority (CA) object. The
Organizational CA object enables secure data transmissions and is required for Web-related
products such as NetWare Web Manager and NetWare Enterprise Web Server. The first eDirectory
SP3 server will automatically create and physically store the Security container object and
Organizational CA object for the entire eDirectory tree. Both objects are created and must remain at
the top of the eDirectory tree.
novdocx (en) 11 July 2008
Only one Organizational CA object can exist in an eDirectory SP3 tree. After the Organizational CA
object is created on a server, it cannot be moved to another server. Deleting and re-creating an
Organizational CA object invalidates any certificates associated with the Organizational CA.
IMPORTANT: Make sure that the first eDirectory server is the server that you intend to
permanently host the Organizational CA object and that the server will be a reliable, accessible, and
continuing part of your network.
If this is not the first eDirectory server on the network, the installation program finds and references
the eDirectory SP3 server that holds the Organizational CA object. The installation program
accesses the Security container and creates a Server Certificate object.
If an Organizational CA object is not available on the network, Web-related products will not
function.
2.7.1 Rights Required to Perform Tasks on Novell Certificate Server
To complete the tasks associated with setting up Novell Certificate Server, the administrator needs to
have rights as described in the following table.
Novell Certificate Server Task Rights Required
Base security setup for installing the first server into
a new tree or upgrading the first server in a tree
where there is no base security previously installed
Base security setup for installing subsequent servers Supervisor right on the server’s container
Creating the Organizational CA Supervisor right on the Security container
86 Novell eDirectory 8.8 Administration Guide
Supervisor right at the root of the tree
Supervisor right on the Security container
Supervisor right on the W0 object (located
inside the Security container)
Page 87

Novell Certificate Server Task Rights Required
Creating Server Certificate objects Supervisor right on the server’s container
Read right to the NDSPKI:Private Key attribute
on the Organizational CA’s object
The root administrator can also delegate the authority to use the Organizational CA by assigning the
following rights to subcontainer administrators. Subcontainer administrators require the following
rights to install Novell eDirectory SP3 with SSL security:
Read right to the NDSPKI:Private Key attribute on the Organizational CA’s object, located in
the Security container.
Supervisor right to the W0 object located in the Security container, inside the KAP object.
These rights are assigned to a group or a role, where all the administrative users are defined. For a
complete list of required rights to perform specific tasks associated with Novell Certificate Server,
refer to the Novell Certificate Server (http://www.novell.com/documentation/beta/crt30/index.html)
online documentation.
novdocx (en) 11 July 2008
2.7.2 Ensuring Secure eDirectory Operations on Linux, Solaris, and AIX Systems
eDirectory includes Public Key Cryptography Services (PKCS), which contains the Novell
Certificate Server that provides Public Key Infrastructure (PKI) services, Novell International
Cryptographic Infrastructure (NICI), and SAS*-SSL server.
The following sections provide information about performing secure eDirectory operations:
“Verifying Whether NICI Is Installed and Initialized on the Server” on page 87
“Initializing the NICI Module on the Server” on page 88
“Starting the Certificate Server (PKI Services)” on page 88
“Stopping the Certificate Server (PKI Services)” on page 89
“Creating an Organizational Certificate Authority Object” on page 89
“Creating a Server Certificate Object” on page 89
“Exporting an Organizational CA's Self-Signed Certificate” on page 89
For information about using external certificate authority, refer to the Novell Certificate Server
Administration Guide (http://www.novell.com/documentation/beta/crt30/index.html).
Verifying Whether NICI Is Installed and Initialized on the Server
Verify the following conditions, which indicate that the NICI module has been properly installed and
initialized:
The file /etc/nici.cfg exists
The directory /var/novell/nici exists
The file /var/novell/nici/primenici exists
Designing Your Novell eDirectory Network 87
Page 88

If these conditions are not met, follow the procedure in the next section, “Initializing the NICI
Module on the Server” on page 88.
Initializing the NICI Module on the Server
1 Stop the eDirectory SP3 server.
On Linux systems, enter
/etc/init.d/ndsd stop
On Solaris systems, enter
/etc/init.d/ndsd stop
On AIX systems, enter
/etc/ndsd stop
IMPORTANT: We recommend you to use ndsmanage to start and stop ndsd.
2 Verify whether the NICI package is installed.
On Linux systems, enter
rpm -qa | grep nici
novdocx (en) 11 July 2008
On Solaris systems, enter
pkginfo | grep NOVLniu0
On AIX systems, enter
lslpp -l | grep NOVLniu0
3 (Conditional) If the NICI package is not installed, install it now.
You will not be able to proceed if the NICI package is not installed.
4 Copy the .nfk file provided with the package to the /var/novell/nici directory.
Execute the /var/novell/nici/primenici program.
5 Start the eDirectory server.
On Linux systems, enter
/etc/init.d/ndsd start
On Solaris systems, enter
/etc/init.d/ndsd start
On AIX systems, enter
/etc/ndsd start
IMPORTANT: We recommend you to use ndsmanage to start and stop ndsd.
Starting the Certificate Server (PKI Services)
To start PKI services, enter
npki -1.
88 Novell eDirectory 8.8 Administration Guide
Page 89

Stopping the Certificate Server (PKI Services)
To stop PKI services, enter
npki -u.
Creating an Organizational Certificate Authority Object
1 Launch Novell iManager.
2 Log in to the eDirectory tree as an administrator with the appropriate rights.
To view the appropriate rights for this task, see Creating an Organizational CA (http://
www.novell.com/documentation/beta/crt30/crtadmin/data/fbgccghh.html) in the Novell
Certificate Server Administration Guide.
3 Click the Roles and Tasks button Description: Roles and Tasks button , click PKI Certificate
Management, then click Create Certificate Authority.
This opens the Create Organizational Certificate Authority Object Wizard. Follow the prompts
to create the object. For specific information on any of the wizard pages, click Help.
novdocx (en) 11 July 2008
NOTE: You can have only one Organizational CA for your eDirectory tree.
Creating a Server Certificate Object
Server Certificate objects are created in the container that holds the eDirectory Server object.
Depending on your needs, you might create a separate Server Certificate object for each
cryptography-enabled application on the server. Or you might create one Server Certificate object
for all applications used on that server.
NOTE: The terms Server Certificate Object and Key Material Object (KMO) are synonymous. The
schema name of the eDirectory object is NDSPKI:Key Material.
1 Launch Novell iManager.
2 Log in to the eDirectory tree as an administrator with the appropriate rights.
To view the appropriate rights for this task, see Creating Server Certificate Objects (http://
www.novell.com/documentation/beta/crt30/crtadmin/data/fbgcdhec.html) in the Novell
Certificate Server Administration Guide.
3 Click the Roles and Tasks button Description: Roles and Tasks button , click PKI Certificate
Management, then click Create Server Certificate.
This opens the Create Server Certificate Wizard. Follow the prompts to create the object. For
specific information on any of the wizard pages, click Help.
Exporting an Organizational CA's Self-Signed Certificate
A self-signed certificate can be used for verifying the identity of the Organizational CA and the
validity of a certificate signed by the Organizational CA.
From the Organizational CA’s property page, you can view the certificates and properties associated
with this object. From the Self-Signed Certificate property page, you can export the self-signed
certificate to a file for use in cryptography-enabled applications.
Designing Your Novell eDirectory Network 89
Page 90

The self-signed certificate that resides in the Organizational CA is the same as the Trusted Root
certificate in a Server Certificate object that has a certificate signed by the Organizational CA. Any
service that recognizes the Organizational CA’s self-signed certificate as a trusted root will accept a
valid user or server certificate signed by the Organizational CA.
1 In Novell iManager, click the Roles and Tasks button Description: Roles and Tasks button .
2 Click eDirectory Administration > Modify Object.
3 Specify the name and context of an Organizational Certificate Authority object, then click OK.
Organizational Certificate Authority objects are located in Security container.
4 Click the Certificates tab, then click Self-Signed Certificate.
5 Click Export.
This opens the Export Certificate Wizard. Follow the prompts to export the certificate. For
specific information on any of the wizard pages, click Help.
6 On the Export Certificate Summary page, click Save the Exported Certificate to a File.
The certificate is saved to a file and is available to be imported into a cryptography-enabled
application as the trusted root.
7 Click Close.
novdocx (en) 11 July 2008
Include this file in all command line operations that establish secure connections to eDirectory
2.8 Synchronizing Network Time
Time synchronization is a service that maintains consistent server time across the network. Time
synchronization is provided by the server operating system, not by eDirectory. eDirectory maintains
its own internal time to ensure the proper order of eDirectory SP3 packets, but it gets its time from
the server operating system.
This section focuses on integrating NetWare time synchronization with that of Windows, Linux,
Solaris, and AIX.
2.8.1 Synchronizing Time on NetWare Servers
In IP networks and mixed protocol networks, NetWare 5 servers communicate time with other
servers using IP. NetWare 5 servers use timesync.nlm and Network Time Protocol (NTP) to
accomplish this.
Time synchronization in NetWare 5 and 6 always uses timesync.nlm, whether servers are using IP
only, IPX
configured through timesync.nlm.
If your network also uses Windows, Linux, Solaris, or AIX, you should use NTP to synchronize the
servers because it is a standard to provide time synchronization.
TM
only, or both protocols. Timesync.nlm loads when a server is installed. NTP can be
For NetWare 3 and NetWare 4, third-party NTP time services are available.
For more information on time synchronization software, see The Network Time Protocol (http://
www.ntp.org) Web s ite.
90 Novell eDirectory 8.8 Administration Guide
Page 91

NTP
NTP functions as part of the UDP protocol suite, which is part of the TCP/IP protocol suite.
Therefore, a computer using NTP must have the TCP/IP protocol suite loaded. Any computers on
your network with Internet access can get time from NTP servers on the Internet.
NTP synchronizes clocks to the Universal Time Coordinated (UTC) standard, which is the
international time standard.
NTP introduces the concept of a stratum. A stratum-1 server has an attached accurate time piece
such as a radio clock or an atomic clock. A stratum-2 server gets time from a stratum-1 server, and
so on.
For NetWare 5 and 6 servers, you can load ntp.nlm to implement NTP time synchronization through
timesync.nlm. When NTP is configured with the timesync.nlm on an IP server, NTP becomes the
time source for both IP and IPX servers. In this case, IPX servers must be set to secondary servers.
For more information on time synchronization, see the Network Time Management Administration
Guide (http://www.novell.com/documentation/lg/nw65/time_enu/data/hl5k6r0y.html) and the
Network Time Protocol Administration Guide (http://www.novell.com/documentation/lg/nw65/ntp/
data/aizwub2.html).
novdocx (en) 11 July 2008
TIMESYNC.NLM
Timesync.nlm synchronizes time among NetWare servers. You can use timesync.nlm with an
external time source like an Internet NTP server. You can also configure Novell Client
workstations to update their clocks to servers running the timesync.nlm.
For more information on time synchronization, refer to the Network Time Management
Administration Guide (http://www.novell.com/documentation/lg/nw65/time_enu/data/
hl5k6r0y.html).
TM
2.8.2 Synchronizing Time on Windows Servers
For information on time synchronization for Windows 2000 servers, see Setting Time
Synchronization With Windows 2000 (http://www.netadmintools.com/art313.html) Web site.
2.8.3 Synchronizing Time on Linux, Solaris, or AIX Systems
You can use the xntpd Network Time Protocol (NTP) daemon to synchronize time on Linux, Solaris,
and AIX servers. xntpd is an operating system daemon that sets and maintains the system time-ofday in synchronism with Internet standard time servers.
For more information on running xntpd on AIX systems, see xntpd Daemon (http://
publibn.boulder.ibm.com/doc_link/en_US/a_doc_lib/cmds/aixcmds6/xntpd.htm) in the AIX
Commands Reference, Volume 6.
For more information on running xntpd on Solaris system, see http://docs.sun.com/?p=/doc/806-
0625/6j9vfim2v&a=view#xntpd-1m-indx-2 (http://docs.sun.com/?p=/doc/806-0625/
6j9vfim2v&a=view#xntpd-1m-indx-2).
For information on running ntpd on Linux systems, see ntpd - Network Time Protocol (NTP)
Daemon (http://www.eecis.udel.edu/~mills/ntp/html/ntpd.html).
Designing Your Novell eDirectory Network 91
Page 92

2.8.4 Verifying Time Synchronization
To verify that time is synchronized in the tree, run DSRepair from a server in the Tree that has at
least Read/Write rights to the Tree object.
NetWare
1 At the server console, load dsrepair.nlm.
2 Select Time Synchronization.
For help interpreting the log, click F1.
NOTE: The following command will help troubleshoot time synchronization issues:
set timesync debug=7
Windows
1 Click Start > Settings > Control Panel > Novell eDirectory Services.
novdocx (en) 11 July 2008
2 Click dsrepair.dlm > Start.
3 Click Repair > Time Synchronization.
Linux, Solaris, and AIX
1 Run the following command:
ndsrepair -T
92 Novell eDirectory 8.8 Administration Guide
Page 93

3
Managing Objects
Novell® eDirectoryTM 8.8 includes Novell iManager 2.6, a Web-based network management
application that lets you manage the objects in your eDirectory tree. To understand the features and
benefits of Novell iManager, see the Novell iManager 2.6 Administration Guide (http://
www.novell.com/documentation/imanager26/index.html).
Managing eDirectory objects involves creating, modifying, and manipulating objects. For example,
you might need to create user accounts and administer user rights. Use Novell iManager to:
Perform administration basics, such as browsing, creating, editing, and organizing objects.
Create user accounts, including specifying a user's login name and supplying other information
used by eDirectory
Administer rights (assign rights, grant equivalence, block inheritance, and view effective
rights). See “Administering Rights” on page 67 for more information.
Configure role-based administration (define administrator roles for specific administrative
applications through the role-based services object).
novdocx (en) 11 July 2008
3
This chapter contains information on the following topics:
Section 3.1, “General Object Tasks,” on page 93
Section 3.2, “Managing User Accounts,” on page 97
Section 3.3, “Configuring Role-Based Services,” on page 103
3.1 General Object Tasks
This section contains steps for basic tasks you will use when managing your eDirectory tree:
“Browsing the eDirectory Tree” on page 93
“Creating an Object” on page 96
“Modifying an Object's Properties” on page 96
“Copying Objects” on page 96
“Moving Objects” on page 97
“Deleting Objects” on page 97
“Renaming Objects” on page 97
3.1.1 Browsing the eDirectory Tree
The View Objects button (Description: View Objects button ) in Novell iManager lets you search
or browse for objects in your eDirectory tree. You can view the structure of your tree and right-click
objects to perform tasks. The tasks available depend on the type of object you select.
Managing Objects
93
Page 94

The eDirectory Object Selector page in Novell iManager also lets you search or browse for objects.
In most entry fields in Novell iManager, you can specify an object name and context, or you can
click the Object Selector button Description: Object Selector button to search or browse for the
object you want. Selecting an object in the eDirectory Object Selector page inserts the object and the
object's context into the entry field.
This section contains the following information:
“Using the View Object Button” on page 94
“Using the Object Selector Button” on page 95
Using the View Object Button
Use the techniques described below to locate the specific objects you want to manage.
“Using Browse” on page 94
“Using Search” on page 94
Using Browse
novdocx (en) 11 July 2008
1 In Novell iManager, click the View Obj ect s button Description: View Objects button .
2 Click Browse.
3 Use the following options to browse for an object:
Option Description
Lets you move down one level in the tree.
Lets you move up one level in the tree.
Context Lets you specify the name of the container whose contents you want to
view.
To use this option, specify the name of the container you want, then click
Apply.
Name Lets you specify the name of an object.
You can use an asterisk (*) as a wildcard character in this field. For
example, g* finds all objects starting with g, such as Germany or Greg,
and *te finds all entries ending in te, such as Kate or Corporate.
To use this option, type the name you want, then click Apply.
Type Lets you specify the type of object you want to search for. The default is
All Available Types.
To use this option, select an object type from the drop-down list, then
click Apply.
4 When you find the object you are looking for, right-click the object, then choose from the list of
available tasks to perform.
Using Search
1 In Novell iManager, click the View Obj ect s button Description: View Objects button .
94 Novell eDirectory 8.8 Administration Guide
Page 95

2 Click Search.
3 In the Context field, specify the name of the container you want to search in.
Click Search Sub-containers to include all subcontainers located within the current container in
the search.
4 In the Name field, specify the name of the object you want to search for.
You can use an asterisk (*) as a wildcard character in this field. For example, g* finds all
objects starting with g, such as Germany or Greg, and *te finds all entries ending in te, such as
Kate or Corporate.
5 Select the type of object you want to search for from the Ty pe drop-down list.
6 Click Search.
7 When you find the object you are looking for, right-click the object, then choose from the list of
available tasks to perform.
Using the Object Selector Button
Use the techniques described below to locate the specific objects you want to manage.
novdocx (en) 11 July 2008
“Using Browse” on page 95
“Using Search” on page 95
Using Browse
1 Click the Object Selector button Description: Object Selector button on an iManager
property page.
2 Click Browse.
3 Use the following options to browse for an object:
Option Description
Lets you move down one level in the tree.
Lets you move up one level in the tree.
Look In Specify the name of the container whose contents you want to
view, then click Apply.
Look for Objects Named Lets you specify the name of an object.
You can use an asterisk (*) as a wildcard character in this field.
For example, g* finds all objects starting with g, such as Germany
or Greg, and *te finds all entries ending in te, such as Kate or
Corporate.
To use this option, type the name you want, then click Apply.
Using Search
1 Click the Object Selector button Description: Object Selector button on an iManager
property page.
2 Click Search.
3 In the Start Search In field, specify the name of the container you want to search in.
Managing Objects 95
Page 96

Click Search Sub-containers to include all subcontainers located within the current container in
the search.
4 In the Search For Objects Named field, specify the name of the object you want to search for.
You can use an asterisk (*) as a wildcard character in this field. For example, g* finds all
objects starting with g, such as Germany or Greg, and *te finds all entries ending in te, such as
Kate or Corporate.
5 Click Search.
3.1.2 Creating an Object
1 In Novell iManager, click the Roles and Tasks button Description: Roles and Tasks button .
2 Click eDirectory Administration > Create Object.
3 Select an object from the list of available object classes, then click OK.
4 Specify the information requested, then click OK.
The information requested depends on the type of object you are creating. Click Description:
Help button for more information.
novdocx (en) 11 July 2008
5 Click OK.
3.1.3 Modifying an Object's Properties
1 In Novell iManager, click the Roles and Tasks button Description: Roles and Tasks button .
2 Click eDirectory Administration > Modify Object.
3 Specify the name and context of the object or objects you want to modify, then click OK.
4 Edit the property pages you want.
Click Description: Help button for more information on specific property pages.
5 Click OK.
3.1.4 Copying Objects
This option lets you create a new object with the same attribute values as an existing object, or copy
attribute values from one object to another.
1 In Novell iManager, click the Roles and Tasks button Description: Roles and Tasks button .
2 Click eDirectory Administration > Copy Object.
3 In the Object to Copy From field, specify the name and context of the object you want to copy.
4 Select one of the following options:
Create New Object and Copy Attribute Values
Copy Attribute Values to an Existing Object
5 If you want to copy access control list (ACL) rights to the object you are creating/modifying,
select Copy ACL Rights.
Copying ACL rights can take additional processing time depending upon your system and
networking environment.
6 Click OK.
96 Novell eDirectory 8.8 Administration Guide
Page 97

3.1.5 Moving Objects
1 In Novell iManager, click the Roles and Tasks button Description: Roles and Tasks button .
2 Click eDirectory Administration > Move Object.
3 In the Object Name field, specify the name and context of the object or objects you want to
move.
4 In the Move To field, specify the container you want to move the object or objects to.
5 If you want to create an Alias in the old location for each object being moved, select Create an
Alias in Place of Moved Object.
This allows any operations that are dependent on the old location to continue uninterrupted
until you can update those operations to reflect the new location.
6 Click OK.
3.1.6 Deleting Objects
1 In Novell iManager, click the Roles and Tasks button Description: Roles and Tasks button .
2 Click eDirectory Administration > Delete Object.
3 Specify the name and context of the object or objects you want to delete.
novdocx (en) 11 July 2008
4 Click OK.
3.1.7 Renaming Objects
1 In Novell iManager, click the Roles and Tasks button Description: Roles and Tasks button .
2 Click eDirectory Administration > Rename Object.
3 In the Object Name field, specify the name and context of the object you want to rename.
4 In the New Object Name field, specify the new name for the object.
Do not include the object's context in the New Object Name field.
5 If you want to create an Alias for the object being renamed, select Create an Alias in Place of
Renamed Object.
This allows any operations that are dependent on the old object name to continue uninterrupted
until you can update those operations to reflect the new name.
6 If you want to save the old object name, select Save Old Name.
This saves the old name as an additional (unofficial) value of the Name property. Saving the old
name lets users search for the object based on that name. After renaming the object, you can
view the old name in the Other Name field on the General Identification tab for that object.
7 Click OK.
3.2 Managing User Accounts
Setting up an eDirectory user account involves creating a User object and setting properties to
control login and the user’s network computing environment. You can use a template object to
facilitate these tasks.
Managing Objects 97
Page 98

You can create login scripts to cause users to be connected automatically to the files, printers, and
other network resources they need when they log in. If several users use the same resources, you can
put the login script commands in container and profile login scripts.
This section contains the following information:
“Creating and Modifying User Accounts” on page 98
“Setting Up Optional Account Features” on page 99
“Setting Up Login Scripts” on page 101
“Login Time Restrictions for Remote Users” on page 102
“Deleting User Accounts” on page 103
3.2.1 Creating and Modifying User Accounts
A user account is a User object in the eDirectory tree. A User object specifies a user’s login name
and supplies other information used by eDirectory to control the user's access to network resources.
This section contains the following information:
novdocx (en) 11 July 2008
“Creating a User Object” on page 98
“Modifying a User Account” on page 98
“Enabling a User Account” on page 98
“Disabling a User Account” on page 99
Creating a User Object
1 In Novell iManager, click the Roles and Tasks button Description: Roles and Tasks button .
2 Click Users > Create User.
3 Specify a user name and a last name for the user.
4 Specify a container to create the user in.
5 Specify any additional (optional) information you want, then click OK.
Click Description: Help button for more information on the available options.
6 Click OK.
Modifying a User Account
1 In Novell iManager, click the Roles and Tasks button Description: Roles and Tasks button .
2 Click Users > Modify User.
3 Specify the name and context of the User or Users you want to modify, then click OK.
4 Edit the property pages you want.
Click Description: Help button for more information on specific properties.
5 Click OK.
Enabling a User Account
1 In Novell iManager, click the Roles and Tasks button Description: Roles and Tasks button .
98 Novell eDirectory 8.8 Administration Guide
Page 99

2 Click Users > Enable Account.
3 Specify the name and context of the User, then click OK.
Disabling a User Account
1 In Novell iManager, click the Roles and Tasks button Description: Roles and Tasks button .
2 Click Users > Disable Account.
3 Specify the name and context of the User, then click OK.
3.2.2 Setting Up Optional Account Features
After creating a User object, you can set up the user’s network computing environment and
implement extra login security features.
Setting Up a User's Network Computing Environment
1 In Novell iManager, click the Roles and Tasks button Description: Roles and Tasks button .
2 Click Users > Modify User.
novdocx (en) 11 July 2008
3 Specify the name and context of the User or Users you want to modify, then click OK.
4 On the General tab, select the Environment page.
5 Fill in the property page.
Click Description: Help button for more information on specific properties.
6 Click OK.
Setting Up Extra Login Security for a User
1 In Novell iManager, click the Roles and Tasks button Description: Roles and Tasks button .
2 Click Users > Modify User.
3 Specify the name and context of the User or Users you want to modify, then click OK.
4 On the Restrictions tab, fill in the property pages you want.
Click Description: Help button for details on any page.
Managing Objects 99
Page 100

Page Description
Password Restrictions Sets up a login password.
novdocx (en) 11 July 2008
Login Restrictions
Enable or disable the account.
Limit the number of concurrent login sessions.
Set a login expiration and lockout date.
Time Restrictions Restricts the times when the user can be logged in. If you
set a restriction and the object is logged in when the
restricted time arrives, the system issues a five-minute
warning and then (after five minutes) logs the object out if it
isn’t logged out already.If the user will log in remotely, see
“Login Time Restrictions for Remote Users” on page 102.
Address Restrictions Restricts the network locations (workstations) that this user
can log in from. If you don’t set restrictions on this page, the
user can log in from any network location.
Account Balance Sets up an accounting of this user's server usage.
Intruder Lockout Lets you work with this account if it has been locked
because of intruder detection. To manage the intruder
detection setup, use the Intruder Detection property page of
the parent container.
5 Click OK.
Setting Up Intruder Detection for All Users in a Container
1 In Novell iManager, click the Roles and Tasks button Description: Roles and Tasks button .
2 Click eDirectory Administration > Modify Object.
3 Specify the name and context of a container object, then click OK.
4 On the General tab, select the Intruder Detection page.
5 Select from the following options:
100 Novell eDirectory 8.8 Administration Guide
 Loading...