


Novell eDirectory 8.8 What's New Guide
Novell
novdocx (ENU) 01 February 2006
eDirectory
8.8
WHAT'S NEW GUIDE
June 09, 2006
TM
www.novell.com

Legal Notices
Novell, Inc. makes no representations or warranties with respect to the contents or use of this documentation, and
specifically disclaims any express or implied warranties of merchantability or fitness for any particular purpose.
Further, Novell, Inc. reserves the right to revise this publication and to make changes to its content, at any time,
without obligation to notify any person or entity of such revisions or changes.
Further, Novell, Inc. makes no representations or warranties with respect to any software, and specifically disclaims
any express or implied warranties of merchantability or fitness for any particular purpose. Further, Novell, Inc.
reserves the right to make changes to any and all parts of Novell software, at any time, without any obligation to
notify any person or entity of such changes.
Any products or technical information provided under this Agreement may be subject to U.S. export controls and the
trade laws of other countries. You agree to comply with all export control regulations and to obtain any required
licenses or classification to export, re-export, or import deliverables. You agree not to export or re-export to entities
on the current U.S. export exclusion lists or to any embargoed or terrorist countries as specified in the U.S. export
laws. You agree to not use deliverables for prohibited nuclear, missile, or chemical biological weaponry end uses.
Please refer to www.novell.com/info/exports/ for more information on exporting Novell software. Novell assumes no
responsibility for your failure to obtain any necessary export approvals.
Copyright © 2005-2006 Novell, Inc. All rights reserved. No part of this publication may be reproduced, photocopied,
stored on a retrieval system, or transmitted without the express written consent of the publisher.
novdocx (ENU) 01 February 2006
Novell, Inc. has intellectual property rights relating to technology embodied in the product that is described in this
document. In particular, and without limitation, these intellectual property rights may include one or more of the U.S.
patents listed at http://www.novell.com/company/legal/patents/ and one or more additional patents or pending patent
applications in the U.S. and in other countries.
Novell, Inc.
404 Wyman Street, Suite 500
Waltham, MA 02451
U.S.A.
www.novell.com
Online Documentation: To access the online documentation for this and other Novell products, and to get
updates, see www.novell.com/documentation.

Novell Trademarks
Client32 is a trademark of Novell, Inc.
eDirectory is a trademark of Novell, Inc.
NetWare is a registered trademark of Novell, Inc., in the United States and other countries.
NetWare Core Protocol and NCP are trademarks of Novell, Inc.
NMAS is a trademark of Novell, Inc.
Novell is a registered trademark of Novell, Inc., in the United States and other countries.
Novell Client is a trademark of Novell, Inc.
Novell Directory Services and NDS are registered trademarks of Novell, Inc., in the United States and other
countries.
Ximiam is a registerd trademark of Novell, Inc., in the United States and other countries.
ZENworks is a registered trademark of Novell, Inc., in the United States and other countries.
Third-Party Materials
All third-party trademarks are the property of their respective owners.
This product includes software developed by the OpenSSL Project for use in the OpenSSL Toolkit (http://
www.openssl.org).
novdocx (ENU) 01 February 2006

novdocx (ENU) 01 February 2006

About This Guide
Welcome to Novell® eDirectoryTM 8.8. This guide introduces you to the new features in this product.
eDirectory 8.8 provides a host of new features and enhancements to further strengthen eDirectory's
leadership in the directory market.
This guide introduces the following:
• Chapter 1, “Install and Upgrade Enhancements,” on page 7
• Chapter 2, “Multiple Instances,” on page 21
• Chapter 3, “Authentication to eDirectory through SASL-GSSAPI,” on page 29
• Chapter 4, “Enforcing Case-Sensitive Universal Passwords,” on page 33
• Chapter 5, “Priority Sync,” on page 41
• Chapter 6, “Data Encryption,” on page 43
• Chapter 7, “Bulkload Performance,” on page 47
novdocx (ENU) 01 February 2006
• Chapter 8, “iManager ICE Plug-ins,” on page 49
• Chapter 9, “LDAP-Based Backup,” on page 53
• Chapter 10, “Managing Error Logging in eDirectory 8.8,” on page 55
• Chapter 11, “Offline Bulkload Utility: ldif2dib,” on page 65
• Chapter 12, “Miscellaneous,” on page 67
Audience
The guide is intended for network administrators.
Feedback
We want to hear your comments and suggestions about this manual and the other documentation
included with this product. Please use the User Comments feature at the bottom of each page of the
online documentation, or go to www.novell.com/documentation/feedback.html and enter your
comments there.
Documentation Updates
For the most recent version of this guide, see Novell eDirectory 8.8 What's New Guide (http://
www.novell.com/documentation/beta/edir88/edir88new/data/front.html).
Additional Documentation
For more information about eDirectory 8.8, refer to the following:
• Novell eDirectory 8.8 Installation Guide
• Novell eDirectory 8.8 Administration Guide
• Novell eDirectory 8.8 Troubleshooting Guide
5

These guides are available at Novell eDirectory 8.8 documentation Web site (http://
www.novell.com/documentation/edir88/index.html).
For information about the eDirectory management utility, refer to Novell iManager 2.5
Administration Guide (http://www.novell.com/documentation/imanager25/index.html).
Documentation Conventions
In this documentation, a greater-than symbol (>) is used to separate actions within a step and items
within a cross-reference path.
®
A trademark symbol (
, TM, etc.) denotes a Novell trademark. An asterisk (*) denotes a third-party
trademark.
When a single pathname can be written with a backslash for some platforms or a forward slash for
other platforms, the pathname is presented with a backslash. Users of platforms that require a
forward slash, such as Linux* and UNIX*, should use forward slashes as required by your software.
novdocx (ENU) 01 February 2006
6 Novell eDirectory 8.8 What's New Guide

1
Install and Upgrade
novdocx (ENU) 01 February 2006
Enhancements
This chapter discusses the new features and enhancements with the Novell® eDirectoryTM 8.8
installation and upgrade.
The following table lists the new features and specifies the platforms they are supported on.
Feature NetWare Linux UNIX Windows
Multiple package formats for installing eDirectory 8.8
Automatic deployment through Ximian
Management 2.2
Install and configure eDirectory through YaST
Custom location install for application files
Custom location install for data files
Custom location install for configuration files
Nonroot install
FHS compliance
®
ZENworks® Linux
1
LSB compliance
Server health checks
SecretStore integration
The following features are discussed in this chapter:
• Multiple Package Formats for Installing eDirectory 8.8 (page 8)
• Automatic Deployments (page 8)
• Installing and Configuring eDirectory Through YaST (page 10)
• Installing eDirectory 8.8 in a Custom Location (page 10)
• Nonroot Install (page 12)
• Standards Compliance (page 13)
• Server Health Checks (page 14)
• SecretStore Integration with eDirectory (page 19)
• Unattended Upgrade to eDirectory 8.8 SP1 on Netware (page 19)
Install and Upgrade Enhancements
7

1.1 Multiple Package Formats for Installing eDirectory 8.8
On Linux* and UNIX, you have an option to choose from various file formats while installing
eDirectory 8.8 on your host. The file formats are listed in the table below.
novdocx (ENU) 01 February 2006
Type of User and
Installation Location
Root user:
Default location RPM Package File-set Depot
Custom location Tarball Package and
Nonroot user:
Custom location Tarball Tarball Tarball Tarball
For more information on installing using tarballs, refer to the Novell eDirectory 8.8 Installation
Guide (http://www.novell.com/documentation/edir88/edirin88/data/a79kg0w.html#bs6a3gs).
Linux Solaris AIX HP-UX
Tarball Depot and tarball
tarball
1.2 Automatic Deployments
eDirectory 8.8 on Linux leverages ZENworks® Linux Management to provide easy upgrade
distribution and deployment. For more information, refer to ZENworks Linux Management (http://
www.novell.com/products/zenworks/linuxmanagement/index.html).
8 Novell eDirectory 8.8 What's New Guide
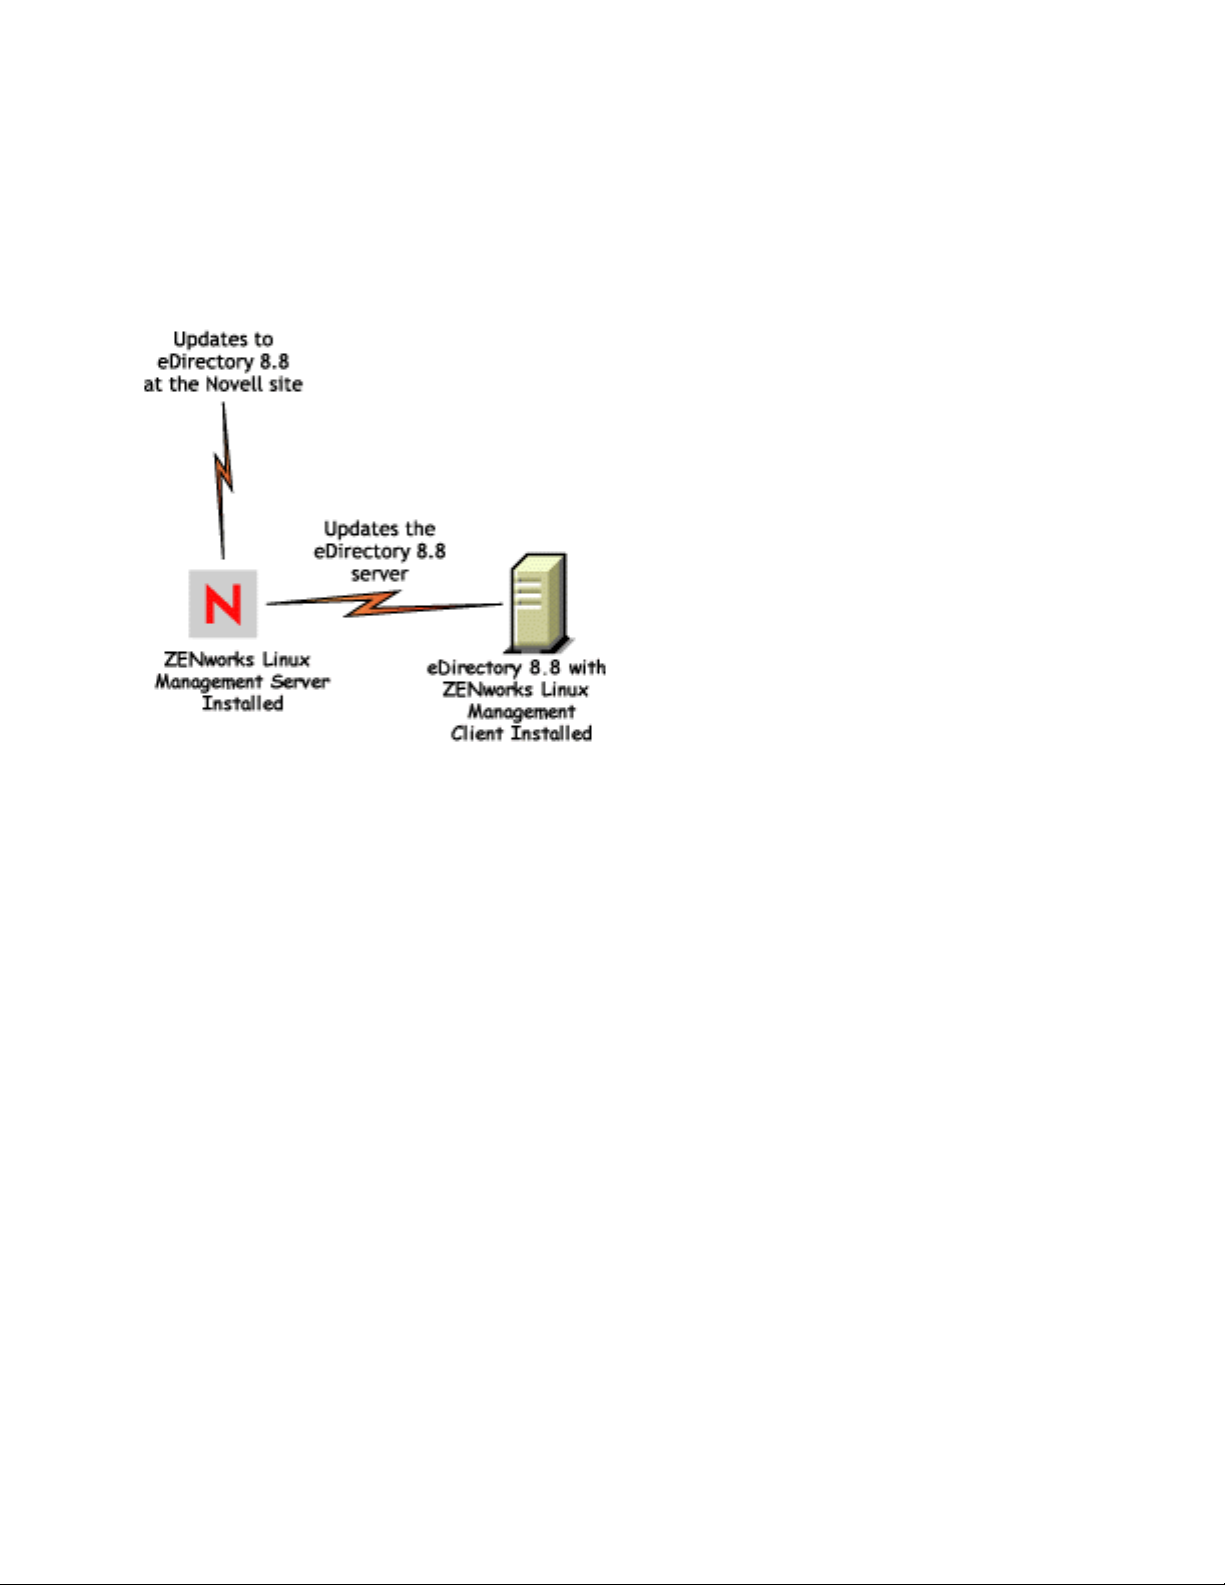
1.2.1 Upgrade Distributions
With eDirectory 8.8, you can subscribe to a specific feature that eDirectory offers and whenever
there is an update (upgrade or patch) to this feature on the Novell site, you will automatically get this
update.
Figure 1-1 Upgrade Distributions
novdocx (ENU) 01 February 2006
To facilitate this, you need to install the ZENworks Linux Management client on the host where
eDirectory 8.8 is present and subscribe to the ZENworks Linux Management server that would
inform you when there is an update.
Install and Upgrade Enhancements 9
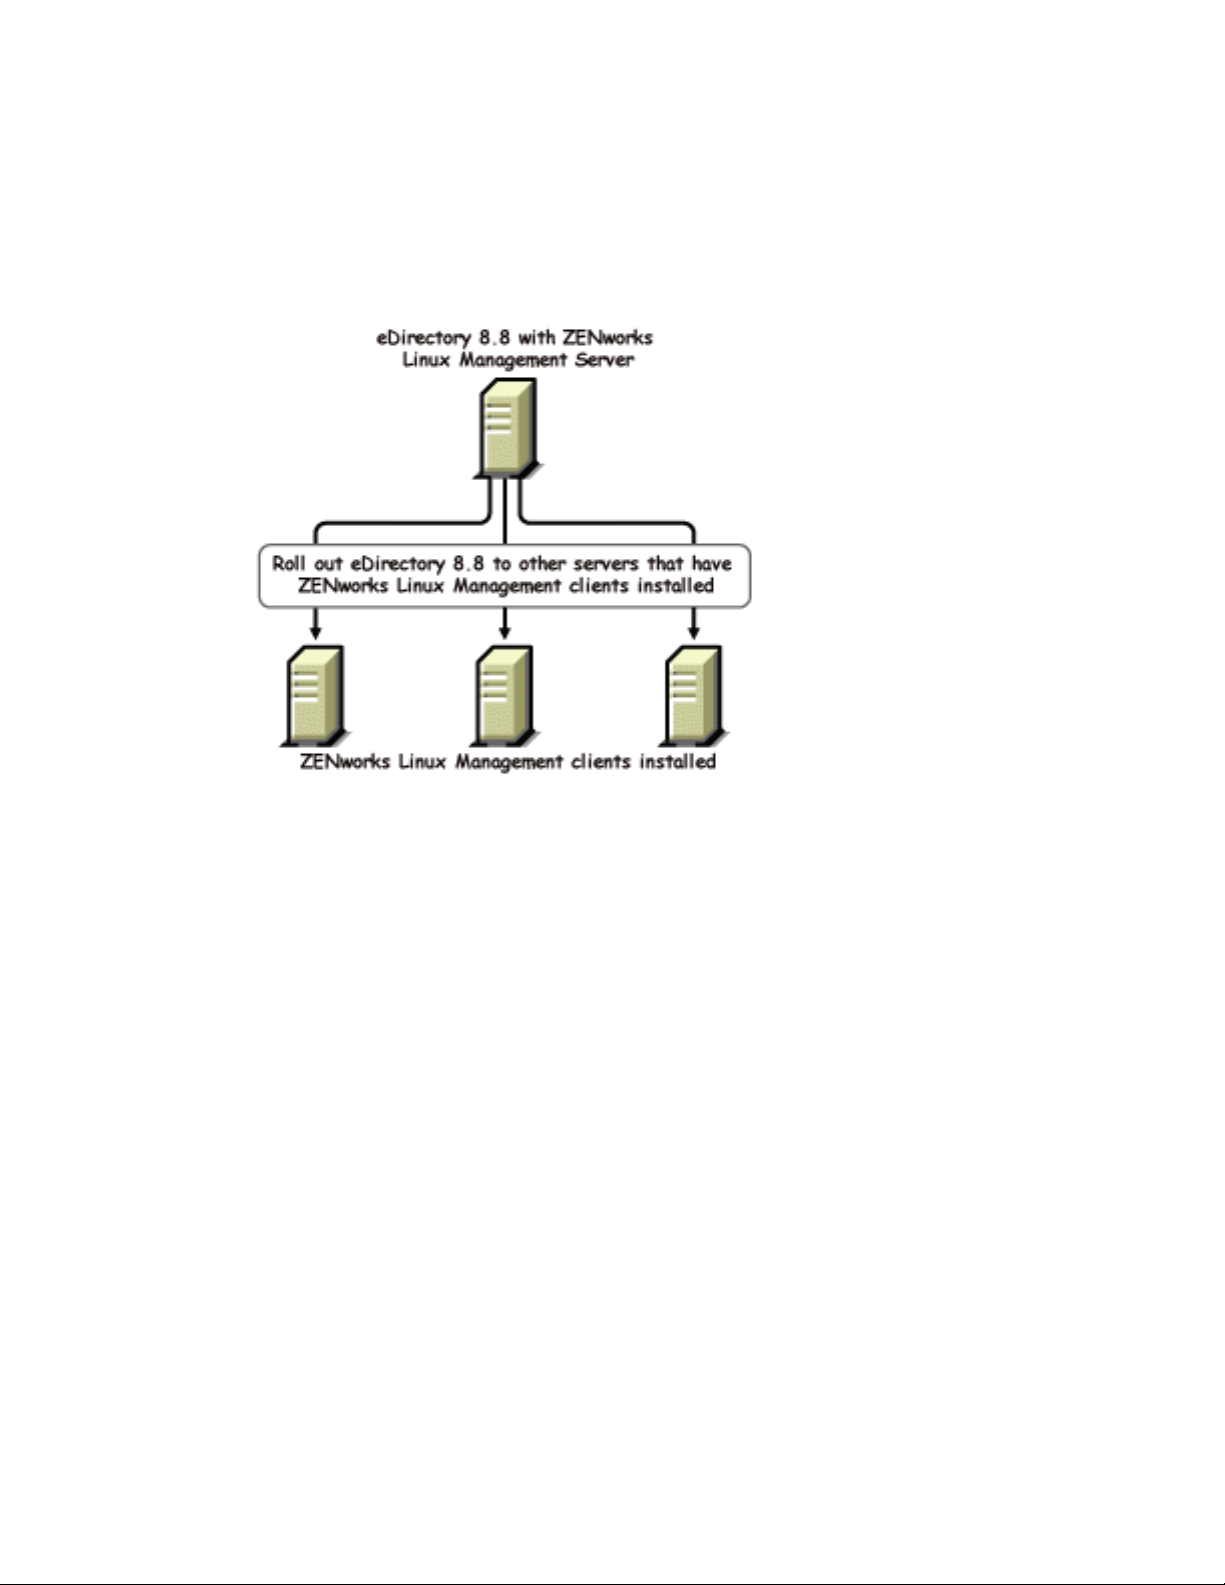
1.2.2 Easy Deployments
With eDirectory 8.8, you can install eDirectory on a host that has the ZENworks Linux Management
server installed and then roll it out to the other servers that have installed ZENworks Linux
Management clients.
Figure 1-2 eDirectory Distribution through RedCarpet
novdocx (ENU) 01 February 2006
1.3 Installing and Configuring eDirectory Through YaST
On SLES 9.1 or otherwise known as Open Enterprise Server (OES), you can install and configure
eDirectory 8.8 through YaST.
For more information on installing and configuring eDirectory through YaST, refer to the Novell
eDirectory 8.8 Installation Guide (http://www.novell.com/documentation/edir88/edirin88/data/
a79kg0w.html#bv1lxl8).
1.4 Installing eDirectory 8.8 in a Custom Location
eDirectory 8.8 gives you the flexibility to install the application, data, and configuration files in a
location of your choice.
One of the scenarios for installing eDirectory 8.8 in a custom location is when you already have an
earlier version of eDirectory installed on your host and you want to test eDirectory 8.8 before
upgrading to it. This way, you can have your existing eDirectory setup undisturbed and also test this
new version. You can then decide whether you want to retain your existing version or want to
upgrade to eDirectory 8.8.
10 Novell eDirectory 8.8 What's New Guide

NOTE: SLP and the SNMP subagent are installed in the default locations.
This section explains how to install the various files in a custom location:
• Section 1.4.1, “Specifying a Custom Location for Application Files,” on page 11
• Section 1.4.2, “Specifying a Custom Location for Data Files,” on page 11
• Section 1.4.3, “Specifying a Custom Location for Configuration Files,” on page 12
1.4.1 Specifying a Custom Location for Application Files
While installing eDirectory, you can install your application files in a location of your choice.
Linux and UNIX
To install eDirectory 8.8 in a custom location, you can use the Tarball installation file and untar
eDirectory 8.8 in a location of your choice.
NetWare
novdocx (ENU) 01 February 2006
You cannot specify a custom location for the application files on NetWare.
Windows
You were able to specify a custom location for the application files during the installation Wizard
even prior to eDirectory 8.8.
1.4.2 Specifying a Custom Location for Data Files
While configuring eDirectory, you can save the data files in a location of your choice. The data files
include the data, dib, and log directories.
Linux and UNIX
To configure the data files in a custom location, you can use either the -d or -D option of the
ndsconfig utility.
Option Description
-d custom_location Creates the DIB (the eDirectory database) directory in the path mentioned.
NOTE: This option was present prior to eDirectory 8.8 also.
-D custom_location Creates the data (contains data such as the pids and socket IDs), dib, and
log directories in the path mentioned.
NetWare
You cannot select a custom DIB path while upgrading eDirectory. On NetWare, eDirectory
installation is always an upgrade. Therefore, you cannot choose a custom DIB path on NetWare.
Install and Upgrade Enhancements 11

Windows
On Windows you would be prompted to enter the DIB path during the installation. Enter a path of
your choice.
1.4.3 Specifying a Custom Location for Configuration Files
While configuring eDirectory, you can select the path where you want to save your configuration
files.
Linux and UNIX
To configure the nds.conf configuration file to a different location, use the --config-file option of the
ndsconfig utility.
To install the other configuration files (such as modules.conf, ndsimon.conf, and
ice.conf) to a different location, do the following:
1 Copy all the configuration files to the new location.
2 Set the new location by entering the following:
novdocx (ENU) 01 February 2006
ndsconfig set n4u.nds.configdir custom_location
NetWare and Windows
You cannot specify a custom location for the configuration files on NetWare and Windows.
1.5 Nonroot Install
This feature enables a user who does not have the root privileges to install eDirectory 8.8 on Linux
and UNIX. If a root user installs eDirectory, a non-root user can use it.
This feature is not supported on NetWare and Windows.
IMPORTANT: A nonroot user cannot install SLP or the SNMP subagent.
Generally, there are two kinds of non-root users:
• A user who is not the root on the UNIX machine. For more information, see Section 1.5.1,
“Nonroot User,” on page 12.
• A user who is not the administrator for eDirectory. For more information, see Section 1.5.2,
“Nonadminstrator User,” on page 13.
1.5.1 Nonroot User
• “Nonroot User Who Installs eDirectory” on page 12
• “Nonroot User Who Configures eDirectory” on page 13
Nonroot User Who Installs eDirectory
This user is not a root on the host machine. The right for a nonroot user to install eDirectory is bound
by the right the user has on the host machine.
12 Novell eDirectory 8.8 What's New Guide

Nonroot User Who Configures eDirectory
This user is not a root on the host machine. The right for a nonroot user to configure eDirectory is
bound by the right the user has on the host machine.
1.5.2 Nonadminstrator User
This user is not the administrator of eDirectory. The right for a nonadministrator user to configure
eDirectory depends on the rights assigned to the user's object in eDirectory.
1.6 Standards Compliance
eDirectory 8.8 is compliant with the following standards:
• Section 1.6.1, “FHS Compliance,” on page 13
• Section 1.6.2, “LSB Compliance,” on page 14
1.6.1 FHS Compliance
novdocx (ENU) 01 February 2006
To avoid file conflicts with other product application files, eDirectory 8.8 follows the Filesystem
Hierarchy Standard (FHS). This feature is available only on Linux and UNIX.
eDirectory follows this directory structure only if you have chosen to install it in the default
location. If you have chosen a custom location, the directory structure would be custom_location/
default_path.
For example, if you choose to install in the eDir88 directory, the same directory structure would be
followed in the eDir88 directory, like the man pages would be installed in the /eDir88/opt/
novell/man directory.
The following table lists the change in the directory structure:
Types of Files Stored in the Directory Directory Name and Path
Executable binaries and static shell scripts /opt/novell/eDirectory/bin
Executable binaries for root use /opt/novell/eDirectory/sbin
Static or dynamic library binaries /opt/novell/eDirectory/lib
Configuration files /etc/opt/novell/eDirectory/conf
Read/Write, run-time dynamic data like the DIB /var/opt/novell/eDirectory/data
Log files /var/opt/novell/eDirectory/log
Linux and UNIX man pages /opt/novell/man
Export Environmental Variables
With the FHS implementation in eDirectory 8.8, you need to update the path environmental
variables and export them. This creates the following problems:
• You need to remember all the paths exported, so that whenever you open a shell, you need to
export these paths and start using the utilities.
Install and Upgrade Enhancements 13

• When you want to use more than one set of binary, you have to open more than one shell or
have to unset and set the paths to the different set of binaries frequently.
To resolve the above issue, you can use the /opt/novell/eDirectory/bin/ndspath
script as follows:
• Prefix the ndspath script to the utility and run the utility you want as follows:
custom_location/opt/novell/eDirectory/bin/ndspath
utility_name_with_parameters
• Export the paths in the current shell as follows:
. custom_location/opt/novell/eDirectory/bin/ndspath
• After entering the above command, run the utilities as you would normally do. Call the script in
your profile, bashrc, or similar scripts. Therefore, whenever you log in or open a new shell, you
can start using the utilities directly.
1.6.2 LSB Compliance
eDirectory 8.8 is now Linux Standard Base (LSB) compliant. LSB also recommends FHS
compliance. All the eDirectory packages in Linux are prefixed with novell. For example, NDSserv
is now novell-NDSserv.
novdocx (ENU) 01 February 2006
1.7 Server Health Checks
eDirectory 8.8 introduces server health checks that help you determine whether your server health is
safe before upgrading.
The server health checks run by default with every upgrade and occur before the actual package
upgrade. However, you can also run the diagnostic tool ndscheck (or dscheck on NetWare) to do the
health checks.
1.7.1 Need for Health Checks
In earlier releases of eDirectory, the upgrade did not check the health of the server before proceeding
with the upgrade. If the heath was unstable, the upgrade operation would fail and eDirectory would
be in an inconsistent state. In some cases, you probably could not roll back to the pre-upgrade
settings.
This new health check tool resolves this, letting you to ensure that your server is ready to upgrade.
1.7.2 What Makes a Server Healthy?
The server health check utility performs certain health checks to ensure that the tree is healthy. The
tree is declared healthy when all these health checks are completed successfully.
1.7.3 Performing Health Checks
You can perform server health checks in two ways:
• “With the Upgrade” on page 15
• “As a Standalone Utility” on page 15
14 Novell eDirectory 8.8 What's New Guide

NOTE: You need administrative rights to run the health check utility.
With the Upgrade
The health checks are run by default every time you upgrade eDirectory.
Linux and UNIX
Every time you upgrade, the health checks are run by default before the actual upgrade operation
starts.
To skip the default health checks, you can use the -j option with the nds-install utility.
NetWare and Windows
The server health checks happen as part of the installation wizard. You can enable or disable the
health checks when prompted to do so.
As a Standalone Utility
novdocx (ENU) 01 February 2006
You can run the server health checks as a standalone utility any time you want. The following table
explains the health check utilities.
Table 1-1 Health Check Utilities
Platform Utility Name
Linux and UNIX ndscheck
Syntax:
ndscheck -h hostname:port -a admin_FDN -F
logfile_path --config-file
configuration_file_name_and_path
NOTE: You can specify either -h or --config-file and not both of them.
NetWare dscheck
Windows ndscheck
1.7.4 Types of Health Checks
When you upgrade or run the ndscheck utility, the following types of health checks are done:
• Basic Server Health
• Partitions and Replica Health
If you run the ndscheck utility, the results from the health checks are displayed on the screen and
logged in to ndscheck.log (or dscheck.log on NetWare). For more information on log files,
refer to Section 1.7.6, “Log Files,” on page 18.
Install and Upgrade Enhancements 15

If the health checks are done as part of the upgrade, then after the health checks, based on the
criticality of the error, either you are prompted to continue the upgrade process or the process is
aborted. The details of the errors are described in Section 1.7.5, “Categorization of Health,” on
page 16.
Basic Server Health
This is the first stage of the health check.The health check utility checks for the following:
1. The eDirectory service is up. The DIB is open and able to read some basic tree information
such as the tree name.
2. The server is listening on the respective port numbers.
For LDAP, it gets the TCP and the SSL port numbers and checks if the server is listening on
these ports.
Similarly, it gets the HTTP and HTTP secure port numbers and checks if the server is listening
on these ports.
Partitions and Replica Health
novdocx (ENU) 01 February 2006
After checking the basic server health, the next step is to check the partitions and replica health as
follows:
1. Checks the health of the replicas of the locally held partitions.
2. Reads the replica ring of each and every partition held by the server and checks whether all
servers in the replica ring are up and all the replicas are in the ON state.
3. Checks the time synchronization of all the servers in the replica ring. This shows the time
difference between the servers.
1.7.5 Categorization of Health
Based on the errors found while checking the health of a server, there can be the three categories of
health. The status of the health checks is logged in to a logfile. For more information, refer to
Section 1.7.6, “Log Files,” on page 18.
The three categories of health Normal, War ni ng , and Critical.
Normal
The server health is normal when all the health checks were successful.
The upgrade proceeds without interruption.
Warning
The server health is in the warning category when minor errors are found while checking the health.
If the health check is run as part of the upgrade, you are prompted to either abort or continue.
Warnings normally occur in the following scenarios:
1. Server not listening on LDAP and HTTP ports, either normal or secure or both.
2. Unable to contact any of the nonmaster servers in the replica ring.
16 Novell eDirectory 8.8 What's New Guide
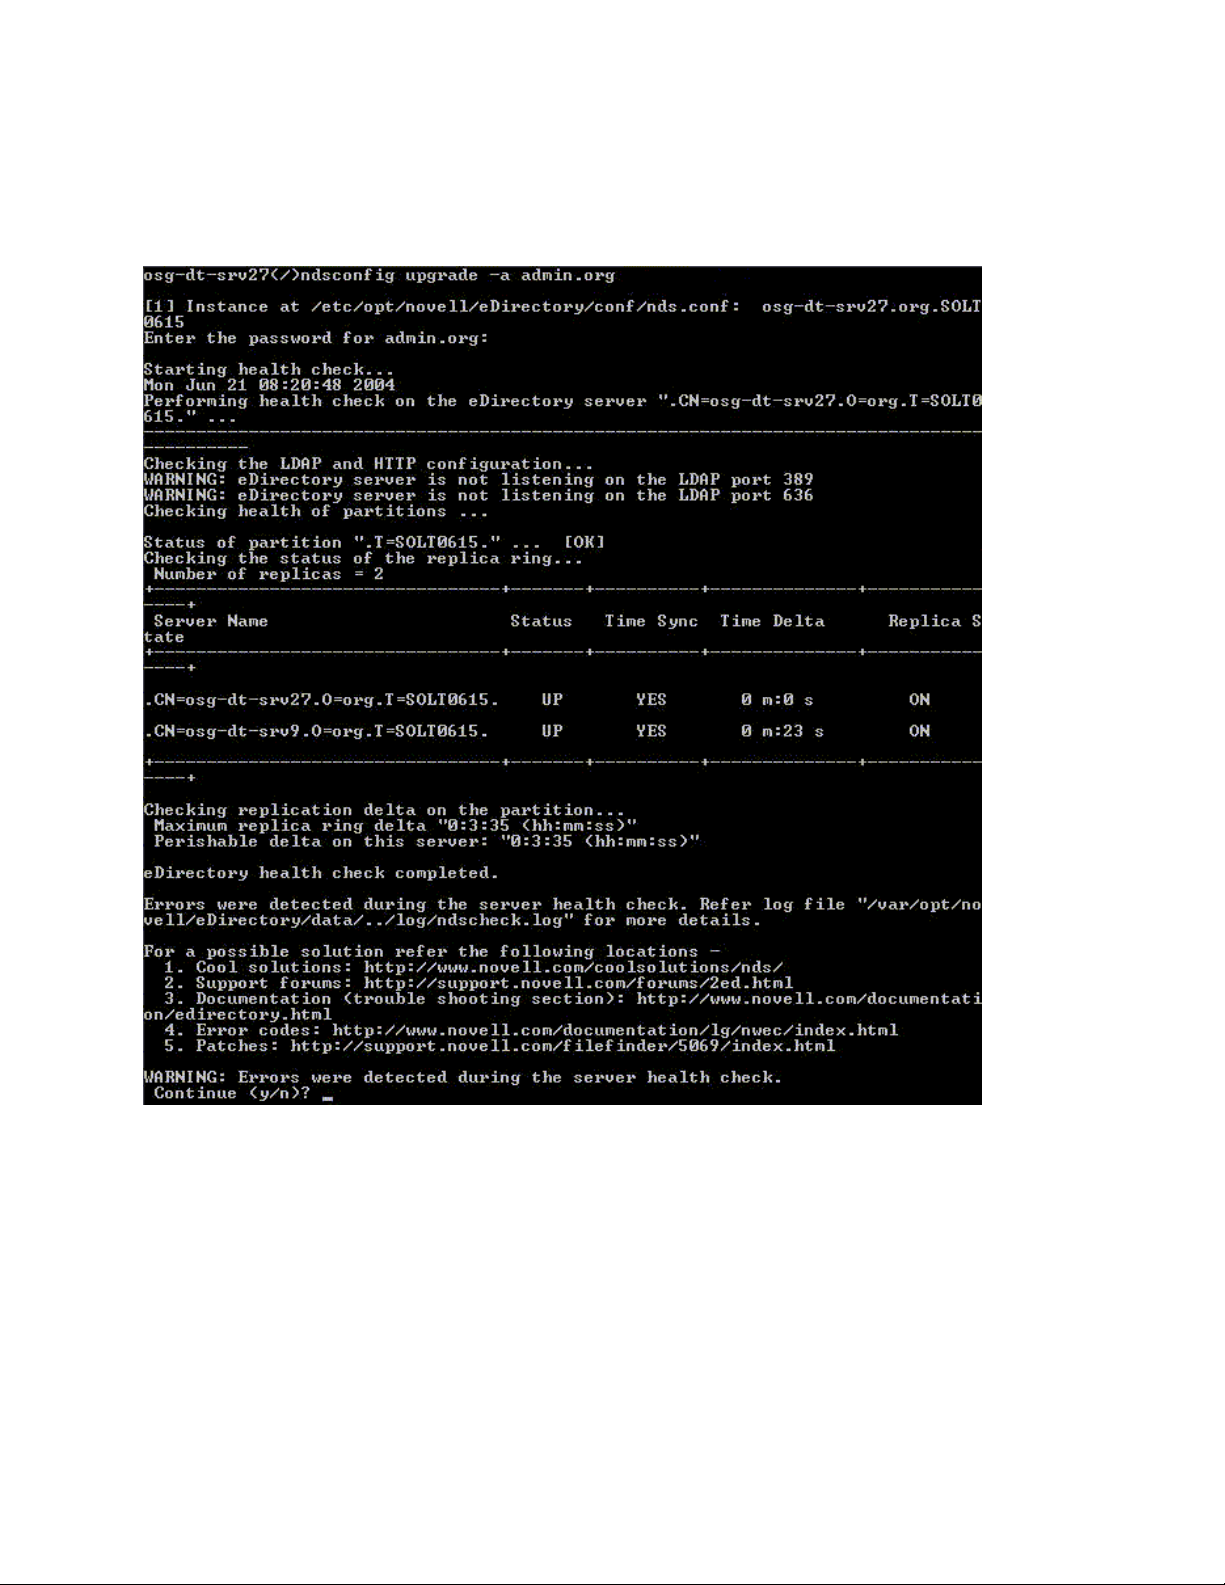
3. Servers in the replica ring are not in sync.
For more information, see the following figure.
Figure 1-3 Health Check with a Warning
novdocx (ENU) 01 February 2006
Critical
The server health is critical when critical errors were found while checking the health.
If the health check is run as part of the upgrade, the upgrade operation is aborted.
The critical state normally occurs in the following cases:
1. Unable to read or open the DIB. The DIB might be locked or corrupt.
2. Unable to contact all the servers in the replica ring.
3. Locally held partitions are busy.
4. Replica is not in the ON state.
Install and Upgrade Enhancements 17
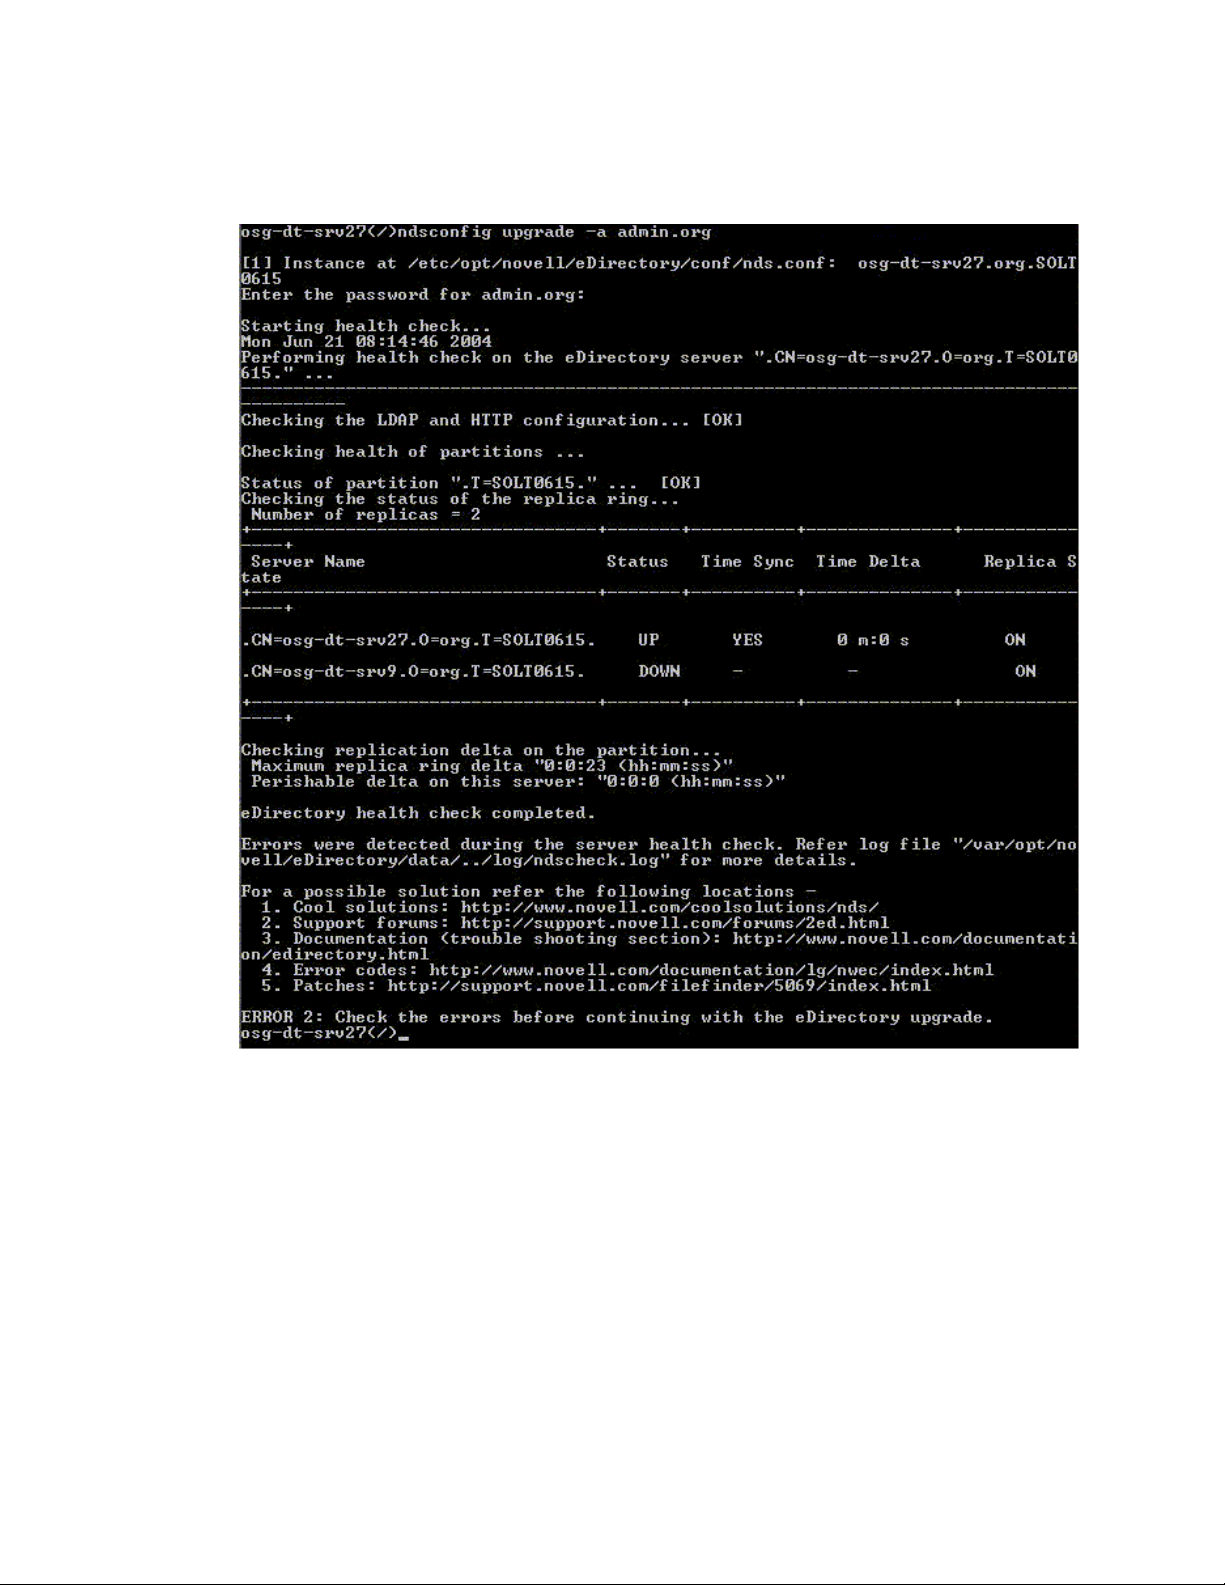
For more information, see the following figure.
Figure 1-4 Health Check with a Critical Error
novdocx (ENU) 01 February 2006
1.7.6 Log Files
Every server health check operation, whether it is run with the upgrade or as a standalone utility,
maintains the status of the health in a log file.
The content of the log file is similar to the messages displayed on the screen when the checks are
happening. For example, see Figure 1-3 and Figure 1-4 above.
The health check log file contains the following:
• Status of the health checks (normal, warning, or critical).
• URLs to the Novell support site.
The following table gives you the locations for the log file on the various platforms:
18 Novell eDirectory 8.8 What's New Guide

Table 1-2 Health Check Logfile Locations
Platform Logfile Name Logfile Location
Linux and UNIX ndscheck.log Depends on the location you specified with the
ndscheck -F utility.
If you did not use the -F option, the location of
the ndscheck.log file is determined by the
other options you used at the ndscheck
command line as follows:
1. If you used the -h option, the ndscheck.log
file is saved in the user’s home directory.
2. If you used the --config-file option, the
ndscheck.log file is saved in the server
instance’s log directory. You can also
select an instance from the multiple
instances list.
NetWare dscheck.log sys:\system
novdocx (ENU) 01 February 2006
Windows ndscheck.log install_directory
1.8 SecretStore Integration with eDirectory
eDirectory 8.8 gives you an option to configure Novell SecretStore® 3.4 during eDirectory
configuration. Prior to eDirectory 8.8, you had to manually install SecretStore.
SecretStore is a simple and secure password management solution. It enables you to use a single
authentication to eDirectory to access most UNIX, Windows, Web, and mainframe applications.
After you've authenticated to eDirectory, SecretStore-enabled applications store and retrieve the
appropriate login credentials. When you use SecretStore, you eliminate the need to remember or
synchronize all the multiple passwords required for accessing password-protected applications, Web
sites, and mainframes.
To configure SecretStore 3.4 along with eDirectory, you can do the following:
• Linux and UNIX:
Use the ndsconfig add -m ss parameter. Here, ss denotes SecretStore and is an
optional parameter. If you do not mention the module name, all the modules are installed.
• NetWare and Windows:
Installed by default with eDirectory installation.
For more information on the SecretStore usage, refer to the Novell SecretStore Administration Guide
(http://www.novell.com/documentation/secretstore33/index.html).
1.9 Unattended Upgrade to eDirectory 8.8 SP1 on Netware
Novell® ZENworks® Server Management provides the Server Software Packages component for
managing files and applications on your network. Using software packages, you can automate the
Install and Upgrade Enhancements 19

installation and upgrading of software on your servers. Software management is done by creating
Server Software Packages and distributing them using Tiered Electronic Distribution. You can
configure Server Software Packages so that a server must meet certain minimum requirements
before a package is installed on it.
The automated upgrade for eDirectory on Netware for ZFS environment is delivered as SPK along
with the source. SPK has to be inserted into the ConsoleOne “Server Software Packages” snap-in for
customizing into local environments. Once the Server Software Package ConsoleOne snap-in is
installed, you can insert this SPK in the ConsoleOne.
The compiled CPK is not provided since the user is expected to provide values for the variables
containing administrator credentials. This SPK needs to be compiled to a CPK in the customer site
after providing values to these variables.
For more information on this utility, refer to “Unattended Upgrade to eDirectory 8.8 SP1 on
Netware” of eDirectory 8.8 Installation Guide.
1.10 For More Information
Refer to the following for more information on any of the features discussed in this chapter:
novdocx (ENU) 01 February 2006
• Novell eDirectory 8.8 Installation Guide (http://www.novell.com/documentation/edir88/
edirin88/data/a2iii88.html)
• Novell eDirectory 8.8 Administration Guide (http://www.novell.com/documentation/edir88/
edir88/data/fbadjaeh.html#fbadjaeh)
• On Linux and UNIX: nds-install, ndsconfig, and ndscheck man pages
20 Novell eDirectory 8.8 What's New Guide

2
Multiple Instances
Traditionally, you could configure only one instance of Novell® eDirectoryTM on a single host. With
the multiple instances feature support in eDirectory 8.8, you can configure the following:
• Multiple instances of eDirectory on a single host
• Multiple trees on a single host
• Multiple replicas of the same tree or partition on a single host
eDirectory 8.8 also provides you with a utility (ndsmanage) to easily track the instances.
The following table lists the platforms that support the multiple instances:
Feature NetWare Linux UNIX Windows
Multiple instances support
novdocx (ENU) 01 February 2006
2
This chapter includes the following information:
• Section 2.2, “Sample Scenarios for Deploying Multiple Instances,” on page 21
• Section 2.3, “Using Multiple Instances,” on page 22
• Section 2.4, “Managing Multiple Instances,” on page 23
• Section 2.5, “Sample Scenario for Multiple Instances,” on page 27
2.1 Need for Multiple Instances
Multiple instances arose from the need to:
• Leverage high-end hardware by configuring more than one instance of eDirectory.
• Pilot your setup on a single host before investing on the required hardware.
2.2 Sample Scenarios for Deploying Multiple Instances
Multiple instances that belong to the same or multiple trees can be used in the following scenarios
effectively.
eDirectory in a Large Enterprise
• In large enterprises, you can provide load balancing and high availability of eDirectory
services.
For example, if you have three replica servers running LDAP services on ports 1524, 2524, and
3524, respectively, you can configure a new instance of eDirectory and provide a highavailability LDAP service on a new port 636.
• You can leverage high-end hardware across departments in an organization by configuring
multiple instances on a single host.
Multiple Instances
21

eDirectory in an Evaluation Setup
• Universities: Many enthusiasts (students) can evaluate eDirectory from the same host using
the multiple instances.
• Training for eDirectory administration:
• Participants can try out administration using the multiple instances.
• Instructors can use a single host to teach a class of students. Each student can have his
own tree.
2.3 Using Multiple Instances
eDirectory 8.8 makes it very easy for you to configure multiple instances. To effectively use
multiple instances, you need to plan the setup and then configure the multiple instances.
• Section 2.3.1, “Planning the Setup,” on page 22
• Section 2.3.2, “Configuring Multiple Instances,” on page 22
2.3.1 Planning the Setup
novdocx (ENU) 01 February 2006
To use this feature effectively, we recommend that you plan the eDirectory instances and ensure that
each instance has definite instance identifiers like the hostname, port number, or the configuration
file.
While configuring multiple instances, you need to ensure that you have planned for the following:
• Location of the configuration file
• Location of the variable data (like log files)
• Location of the DIB
•NCPTM interface, unique identifying port for every instance, and ports of other services (like
LDAP, LDAPS, HTTP, and HTTP secure port)
2.3.2 Configuring Multiple Instances
You can configure multiple instances of eDirectory using the ndsconfig utility. The following table
lists the ndsconfig options you need to include when configuring multiple instances.
As mentioned earlier, decide upon the various instance identifiers like the location of the
configuration files, DIB, and the port number before proceeding with the configuration.
NOTE: All the instances share the same server key (NICI).
Option Description
--config-file Specifies the absolute path and filename to store the nds.conf configuration
file.
For example, to store the configuration file in the /etc/opt/novell/
eDirectory/ directory, use --config-file /etc/opt/novell/eDirectory/nds.conf.
22 Novell eDirectory 8.8 What's New Guide

Option Description
-b Specifies the port number where the new instance should listen.
NOTE: -b and -B are exclusively used.
-B Specifies the port number along with the IP address or interface. For example:
-B eth0@524
or
-B 100.1.1.2@524
NOTE: -b and -B are exclusively used.
-D Creates the data, dib, and log directories in the path specified for the new
instance.
Using the above-mentioned options, you can configure a new instance of eDirectory.
novdocx (ENU) 01 February 2006
You can also configure a new instance using the ndsmanage utility. For more information, refer to
“Creating an Instance through ndsmanage” on page 24.
2.4 Managing Multiple Instances
This section includes the following information:
• Section 2.4.1, “The ndsmanage Utility,” on page 23
• Section 2.4.2, “Identifying a Specific Instance,” on page 26
• Section 2.4.3, “Invoking a Utility for a Specific Instance,” on page 26
2.4.1 The ndsmanage Utility
The ndsmanage utility enables you to do the following:
• List the instances configured
• Create a new instance
• Do the following for a selected instance:
• List the replicas on the server
• Start the instance
• Stop the instance
• Run ndstrace for the instance
• Deconfigure the instance
• Start and Stop all instances
Listing the Instances
The following table describes how to list the eDirectory instances.
Multiple Instances 23

Table 2-1 ndsmanage Usage for Listing the Instances
Syntax Description
ndsmanage Lists all the instances configured by you.
ndsmanage -a|--all List instances of all the users who are using a particular installation of
eDirectory.
novdocx (ENU) 01 February 2006
ndsmanage
username
List the instances configured by a specific user
The following fields are displayed for every instance:
• Configuration file path
• Server FDN and port
• Status (whether the instance is active or inactive)
NOTE: This utility lists all the instances configured for a single binary.
Refer to Figure 2-1 on page 24 for more information.
Creating an Instance through ndsmanage
To create a new instance through ndsmanage:
1 Enter the following command:
ndsmanage
If you have two instances configured, the following screen is displayed:
Figure 2-1 ndsmanage Utility Output Screen
2 Enter c to create a new instance.
You can either create a new tree or add a server to an existing tree. Follow the instructions on
the screen to create a new instance.
Performing Operations for a Specific Instance
You can perform the following operations for every instance:
• “Starting a Specific Instance” on page 25
24 Novell eDirectory 8.8 What's New Guide

• “Stopping a Specific Instance” on page 25
• “Deconfiguring an Instance” on page 26
Other than the ones listed above, you can also run ndstrace for a selected instance.
Starting a Specific Instance
To start an instance configured by you, do the following:
1 Enter the following:
ndsmanage
2 Select the instance you want to start.
The menu expands to include the options you can perform on a specific instance.
Figure 2-2 ndsmanage Utility Output Screen with Instance Options
novdocx (ENU) 01 February 2006
3 Enter s to start the instance.
Alternatively, you can also enter the following at the command prompt:
ndsmanage start --config-file
configuration_file_of_the_instance_configured_by_you
Stopping a Specific Instance
To stop an instance configured by you, do the following:
1 Enter the following:
ndsmanage
2 Select the instance you want to stop.
The menu expands to include the options you can perform on a specific instance. For more
information, refer to ndsmanage Utility Output Screen with Instance Options (page 25).
3 Enter k to stop the instance.
Alternatively, you can also enter the following at the command prompt:
Multiple Instances 25

ndsmanage stop --config-file
configuration_file_of_the_instance_configured_by_you
Deconfiguring an Instance
To deconfigure an instance, do the following:
1 Enter the following:
ndsmanage
2 Select the instance you want to deconfigure.
The menu expands to include the options you can perform on a specific instance. For more
information, refer to ndsmanage Utility Output Screen with Instance Options (page 25).
3 Enter d to deconfigure the instance.
Starting and Stopping All Instances
You can start and stop all the instances configured by you.
novdocx (ENU) 01 February 2006
Starting all the Instances
To start all the instances configured by you, enter the following at the command prompt:
ndsmanage startall
To start a specific instance, refer to “Starting a Specific Instance” on page 25.
Stopping All Instances
To stop all the instances configured by you, enter the following at the command prompt:
ndsmanage stopall
To stop a specific instance, refer to “Stopping a Specific Instance” on page 25.
2.4.2 Identifying a Specific Instance
While configuring multiple instances, you assign a hostname, port number, and a unique
configuration file path to every instance. This hostname and port number are the instance identifiers.
Most of the utilities have the -h hostname:port or --config-file configuration_file_location option
that enables you to specify a particular instance. See the man pages of the utilities for more
information.
2.4.3 Invoking a Utility for a Specific Instance
If you want to run a utility for a specific instance, you need to include the instance identifier in the
utility command. The instance identifiers are the path of the configuration file, and the hostname and
port number. You can use the --config-file configuration_file_location or the -h hostname:port to do
so.
If you do not include the instance identifiers in the command, the utility displays the various
instances you own and prompts you to select the instance you want to run the utility for.
26 Novell eDirectory 8.8 What's New Guide

For example, to run ndstrace for a specific utility using the --config-file option, you would enter the
following:
ndstrace --config-file configuration_filename_with_location
2.5 Sample Scenario for Multiple Instances
Mary is a nonroot user who wants to configure two trees on a single host machine for a single
binary.
2.5.1 Planning the Setup
Mary specifies the following instance identifiers.
• Instance 1:
Port number the instance should listen on 1524
Configuration file path /home/maryinst1/nds.conf
novdocx (ENU) 01 February 2006
DIB directory /home/mary/inst1/var
• Instance 2:
Port number the instance should listen on 2524
Configuration file path /home/mary/inst2/nds.conf
DIB directory /home/mary/inst2/var
2.5.2 Configuring the Instances
To configure the instances based on the above mentioned instance identifiers, Mary must enter the
following commands.
• Instance 1:
ndsconfig new -t mytree -n o=novell -a cn=admin.o=company -b 1524 D
/home/mary/inst1/var --config-file /home/mary/inst1/nds.conf
• Instance 2:
ndsconfig new -t corptree -n o=novell -a cn=admin.o=company -b 2524
-D
/home/mary/inst2/var --config-file /home/mary/inst2/nds.conf
2.5.3 Invoking a Utility for an Instance
If Mary wants to run the ndstrace utility for instance 1 that is listening on port 1524, with its
configuration file in /home/mary/inst1/nds.conf location and its DIB file located in /
home/mary/inst1/var, then she can run the utility as follows:
ndstrace --config-file /home/mary/inst1/nds.conf
Multiple Instances 27

or
ndstrace -h 164.99.146.109:1524
If Mary does not specify the instance identifiers, the utility displays all the instances owned by Mary
and prompts her to select an instance.
2.5.4 Listing the Instances
If Mary wants to know details about the instances in the host, she can run the ndsmanage utility.
• To display all instances owned by Mary:
ndsmanage
• To display all instances owned by John (username is john):
ndsmanage john
• To display all instances of all users that are using a particular installation of eDirectory:
ndsmanage -a
novdocx (ENU) 01 February 2006
2.6 For More Information
Refer to the following documents for more information about Multiple Instances Support:
• Novell eDirectory 8.8 Install Guide (http://www.novell.com/documentation/edir88/edirin88/
data/a79kg0w.html#bqs8mmt)
• For Linux and UNIX: ndsconfig and ndsmanage man pages
28 Novell eDirectory 8.8 What's New Guide

3
Authentication to eDirectory
novdocx (ENU) 01 February 2006
through SASL-GSSAPI
The SASL-GSSAPI mechanism for Novell® eDirectoryTM 8.8 enables you to authenticate to
eDirectory through LDAP using a Kerberos* ticket and without needing to enter the eDirectory user
password. The Kerberos ticket should be obtained by authenticating to a Kerberos server.
This feature is primarily useful for LDAP application users in environments that already have a
Kerberos infrastructure in place. Therefore, these users should be able to authenticate to the LDAP
server without providing a separate LDAP user password.
To facilitate this, eDirectory introduces the SASL-GSSAPI mechanism.
The current implementation of SASL-GSSAPI is compliant with RFC 2222 (http://www.ietf.org/rfc/
rfc2222.txt?number=2222) and supports only Kerberos v5 as the authentication mechanism.
This chapter includes the following information:
• Section 3.1, “Concepts,” on page 29
• Section 3.2, “How Does GSSAPI Work with eDirectory?,” on page 30
• Section 3.3, “Configuring GSSAPI,” on page 31
• Section 3.4, “How Does LDAP Use GSSAPI?,” on page 31
• Section 3.5, “Commonly Used Terms,” on page 32
3
3.1 Concepts
• Section 3.1.1, “What is Kerberos?,” on page 29
• Section 3.1.2, “What is SASL?,” on page 29
• Section 3.1.3, “What is GSSAPI?,” on page 30
3.1.1 What is Kerberos?
Kerberos is a standard protocol that provides a means of authenticating entities on a network. It is
based on a trusted third-party model. It involves shared secrets and uses symmetric key
cryptography.
For more information, refer to RFC 1510 (http://www.ietf.org/rfc/rfc1510.txt?number=1510).
For more information on Novell Kerberos KDC, refer to the Novell Kerberos KDC documentation
(http://www.novell.com/documentation/kdc/index.html).
3.1.2 What is SASL?
Simple Authentication and Security Layer (SASL) provides an authentication abstraction layer to
applications. It is a framework that authentication modules can be plugged into.
For more information, refer to RFC 2222 (http://www.ietf.org/rfc/rfc2222.txt?number=2222).
Authentication to eDirectory through SASL-GSSAPI
29

3.1.3 What is GSSAPI?
Generic Security Services Application Program Interface (GSSAPI) provides authentication and
other security services through a standard set of APIs. It supports different authentication
mechanisms; Kerberos v5 is the most common.
For more information on the GSS APIs, refer to RFC 1964 (http://www.ietf.org/rfc/
rfc1964.txt?number=1964).
This SASL-GSSAPI implementation is from section 7.2 of RFC 2222 (http://www.ietf.org/rfc/
rfc2222.txt?number=2222).
3.2 How Does GSSAPI Work with eDirectory?
The following diagram illustrates how GSSAPI works with an LDAP server.
Figure 3-1 How GSSAPI Works?
novdocx (ENU) 01 February 2006
In the above figure, the numbers denote the following:
1 An eDirectory user sends a request through an LDAP client to the Kerberos KDC (Key
Distribution Center) server for an initial ticket known as a ticket granting ticket (TGT).
A Kerberos KDC can be from MIT, Microsoft*, or Heimdal.
2 KDC responds to the LDAP client with a TGT.
3 The LDAP client sends the TGT back to the KDC and requests an LDAP service ticket.
4 KDC responds to the LDAP client with the LDAP service ticket.
5 The LDAP client does an ldap_sasl_bind to the LDAP server and sends the LDAP service
ticket.
30 Novell eDirectory 8.8 What's New Guide

6 The LDAP server validates the LDAP service ticket with the help of the GSSAPI mechanism
and, based on the result, sends back an ldap_sasl_bind success or failed to the LDAP client.
3.3 Configuring GSSAPI
1 The iManager plug-in for SASL-GSSAPI will not work if iManager is not configured to use
SSL/TLS connection to eDirectory. A secure connection is mandated to protect the realm's
master key and principal keys.
By default, iManager is usually configured for SSL/TLS connection to eDirectory. If you want
to configure the Kerberos Login Method for GSSAPI on a tree other than the one that hosts the
iManager configuration, you need to configure iManager for SSL/TLS connection to
eDirectory.
For information on configuring iManager with SSL/TLS connection to eDirectory, refer to the
iManager 2.5 Administration Guide (http://www.novell.com/documentation/lg/imanager20/
index.html?page=/documentation/lg/imanager20/imanager20/data/am4ajce.html#bow4dv4).
The iManager plug-in for SASL-GSSAPI (kerberosPlugin.npm) is available as a part of
both eDir_88_iMan25_Plugins.npm and eDir_88_iMan26_Plugins.npm files. Download the
NPMs from the Web (http://download.novell.com).
2 To use a Kerberos ticket to authenticate to an eDirectory server:
novdocx (ENU) 01 February 2006
2a Extend the Kerberos schema.
2b Create a Realm container.
2c Extract a Service Principal Key or Shared Key from KDC.
2d Create the LDAP Service Principal object.
2e Associate a Kerberos principal name with the User Object.
For information on the above steps, refer to the Configuring GSSAPI with eDirectory in
Novell eDirectory 8.8 Administration Guide (http://www.novell.com/documentation/
edir88/index.html?treetitl.html)
3.4 How Does LDAP Use GSSAPI?
After you configure GSSAPI, it is added along with the other SASL methods to the
supportedSASLMechanisms attribute in rootDSE. RootDSE (DSA [Directory System Agent]
Specific Entry) is an entry that is located at the root of the Directory Information Tree (DIT). For
more information, refer to the Novell eDirectory 8.8 Administration Guide (http://www.novell.com/
documentation/edir88/edir88/data/h0000007.html#a680dyc).
The LDAP server queries SASL for the installed mechanisms when it gets its configuration and
automatically supports whatever is installed. The LDAP server also reports the current supported
SASL mechanisms in its rootDSE by using the supportedSASLMechanisms attribute.
Therefore, when you configure GSSAPI, it becomes the default mechanism. However, to
specifically do an LDAP operation over the SASL GSSAPI mechanism, you can mention GSSAPI
at the command line.
For example, to do a search in OpenLDAP using the GSSAPI mechanism, you would enter the
following:
ldapsearch -Y GSSAPI -h 164.99.146.48 -b "" -s base
Authentication to eDirectory through SASL-GSSAPI 31

3.5 Commonly Used Terms
The following table defines the terminologies commonly used with Kerberos and GSSAPI.
Table 3-1 Kerberos/GSSAPI Terminology
Term Definition
novdocx (ENU) 01 February 2006
Key Distribution Center
(KDC)
Principal An entity (user or service instance) registered with the KDC.
Realm A domain or grouping of principals served by a set of KDCs.
Service Ticket (ST) A record containing client information, service information, and a
Ticket Granting Ticket
(TGT)
Kerberos server which authenticates users and issues tickets.
session key which is encrypted with the particular service principal’s
shared key
A type of ticket that the client can obtain additional Kerberos tickets
with.
32 Novell eDirectory 8.8 What's New Guide

4
Enforcing Case-Sensitive
novdocx (ENU) 01 February 2006
Universal Passwords
In Novell® eDirectoryTM 8.8, you can enable Universal Password and make your password casesensitive when you access the eDirectory 8.8 server through the following clients and utilities:
TM
• Novell Client
• Administration utilities upgraded to eDirectory 8.8
• Novell iManager 2.5 and later, except when it is running on Windows
You can use any version of LDAP SDK to have case-sensitive passwords.
The following table lists the platforms on which case-sensitive password feature is supported:
Feature NetWare Linux UNIX Windows
Enforcing case-sensitive Universal Password
NOTE: For this release, if you do not upgrade eDirectory on Netware to eDirectory 8.8, you will
not be able to have case-sensitive passwords for iManager login even though you upgrade iManager
to iManager 2.5.
4.9 and later
4
This chapter includes the following information:
• Section 4.1, “Need for Case-Sensitive Passwords,” on page 33
• Section 4.2, “How to Make Your Password Case-Sensitive,” on page 34
• Section 4.3, “Upgrading the Legacy Novell Clients and Utilities,” on page 35
• Section 4.4, “Preventing Legacy Novell Clients from Accessing eDirectory 8.8 Server,” on
page 36
4.1 Need for Case-Sensitive Passwords
Making the passwords case-sensitive adds to the security of the login to the directory. For example,
if you have a password aBc that is case-sensitive, all the trials of login with the combinations like
abc or Abc or ABC would fail.
In eDirectory 8.7.1 and 8.7.3, when you enabled Universal Password (http://www.novell.com/
documentation/nmas23/admin/data/allq21t.html), the password was case-sensitive only when you
logged in through Novell Client32
through other clients (for example, eDirectory SDK or iManager).
Now, in eDirectory 8.8 and later, you can make your passwords case-sensitive for all the clients that
are upgraded to eDirectory 8.8.
By enforcing the use of case-sensitive passwords, you can prevent the legacy Novell clients from
accessing the eDirectory 8.8 server. Refer to Section 4.4, “Preventing Legacy Novell Clients from
Accessing eDirectory 8.8 Server,” on page 36 for more information.
TM
. The password was not case-sensitive when you logged in
Enforcing Case-Sensitive Universal Passwords
33

4.2 How to Make Your Password Case-Sensitive
In eDirectory 8.8 and later, you can make your passwords case-sensitive for all the clients by
enabling Universal Password. Universal Password is disabled by default.
4.2.1 Prerequisites
By default LDAP and other server-side utilities use NDS login first and if this fails, use the Simple
Password login. For the case-sensitive password feature to work, the login needs to happen through
NMAS. Therefore, you need to set the environment variable NDSD_TRY_NMASLOGIN_FIRST
to true. This makes the case-sensitive password feature available.
Complete the following procedure to make the case-sensitive password feature available:
1 Set the environment variable
• Linux and UNIX:
Add the following in the ndsd script /etc/init.d/ndsd:
NDSD_TRY_NMASLOGIN_FIRST=true
export NDSD_TRY_NMASLOGIN_FIRST
•NetWare:
Add the following in the beginning of c:\nwserver\startup.ncf file:
env NDSD_TRY_NMASLOGIN_FIRST=true
•Windows:
Right-click My Computer and select Properties. In the Advanced tab click Environment
Variables. Under System Variables, add the variable and set the value to true.
novdocx (ENU) 01 February 2006
2 Restart the eDirectory server.
4.2.2 Making Your Password Case-Sensitive
1 Log in to eDirectory using the existing password.
In the case of fresh install, the existing password is the one that you set while configuring
eDirectory 8.8.
For example, your password is “novell”.
NOTE: This password is not case-sensitive.
2 Enable Universal Password.
For more information, refer to the Deploying Universal Password (http://www.novell.com/
documentation/nmas23/admin/data/allq21t.html).
3 Log out of eDirectory.
4 Log in to eDirectory using the existing password with the case you want.
The password you give now will be case-sensitive.
For example, you enter “NoVELL”.
Your password is now “NoVELL”. Therefore, “novell” or any alternate capitalization
combination other than “NoVELL” would be invalid.
34 Novell eDirectory 8.8 What's New Guide

If you are migrating to case-sensitive passwords, refer to Section 4.3.1, “Migrating to Case-
Sensitive Passwords,” on page 35.
Any new password you set will be case-sensitive depending on which level (object or partition) you
have enabled Universal Password.
4.2.3 Managing Case-Sensitive Passwords
You can manage the case sensitivity of your passwords by enabling or disabling Universal Password
through Novell iManager. For more information, refer to the Deploying Universal Password (http:/
/www.novell.com/documentation/nmas23/admin/data/allq21t.html).
4.3 Upgrading the Legacy Novell Clients and Utilities
The following are the latest versions of the Novell clients and utilities:
• Novell Client 4.9
• Administration utilities with eDirectory 8.8
novdocx (ENU) 01 February 2006
• Novell iManager 2.5 and later
The clients and utilities that are earlier than the above mentioned versions are legacy Novell clients.
You can have case-sensitive passwords for the legacy Novell clients after upgrading them to their
latest versions. eDirectory 8.8 makes the migration from your existing passwords to case-sensitive
passwords easy and flexible. Refer to Section 4.3.1, “Migrating to Case-Sensitive Passwords,” on
page 35 for more information.
In case you do not upgrade the legacy clients to their latest versions, these clients can be blocked
from using eDirectory 8.8 at the server level. Refer to Section 4.4, “Preventing Legacy Novell
Clients from Accessing eDirectory 8.8 Server,” on page 36 for more information.
4.3.1 Migrating to Case-Sensitive Passwords
Universal Password is disabled by default and, therefore, your existing passwords will not be
affected until you enable Universal Password in iManager. For step-by-step instruction, refer to
Section 4.2, “How to Make Your Password Case-Sensitive,” on page 34.
The following example explains the migration to case-sensitive passwords:
Login session 1: Universal Password is disabled by default.
• You log in using your existing password. For example, suppose your password is novell.
• This password is not case-sensitive. Therefore, both novell and Novell are valid passwords.
• After you log in, you enable Universal Password. Refer to Deploying Universal Password
(http://www.novell.com/documentation/nmas23/admin/data/allq21t.html).
Login session 2: Universal Password was enabled in the previous session.
• You log in using your existing password. For example, suppose you type the password as
noVell.
Enforcing Case-Sensitive Universal Passwords 35

• When Universal Password is enabled, this password becomes case-sensitive. So you must
remember how you typed the password this time.
Login session 3 and subsequent logins.
• If you log in using the password noVell, it is valid.
• If you log in using the password Novell (or any other version except noVell), it is invalid.
4.4 Preventing Legacy Novell Clients from Accessing eDirectory 8.8 Server
novdocx (ENU) 01 February 2006
In eDirectory 8.7.1 and 8.7.3, you were able to prevent the legacy Novell clients from setting or
changing the NDS
eDirectory 8.8 and verifying the passwords.
To allow or disallow the legacy Novell clients from using eDirectory 8.8, you need to configure
NDS login either through iManager or LDAP.
This section includes the following information:
• Section 4.4.1, “Need for Preventing Legacy Novell Clients from Accessing eDirectory 8.8
Server,” on page 36
• Section 4.4.2, “Managing NDS Login Configurations,” on page 36
• Section 4.4.3, “Partition Operations,” on page 40
• Section 4.4.4, “Enforcing Case-Sensitive Passwords in a Mixed Tree,” on page 40
®
password. With eDirectory 8.8, you can also prevent them from logging in to
4.4.1 Need for Preventing Legacy Novell Clients from Accessing eDirectory 8.8 Server
The passwords of the legacy Novell clients are not case-sensitive. Therefore, in eDirectory 8.8 and
later, when you want to enforce the use of case-sensitive passwords, you might need to block the
legacy clients from accessing the directory.
In versions earlier than Novell Client 4.9, Universal Password was not supported. This was because
login and password changes went straight to NDS password instead of to NMAS. Now, if you are
using Universal Password, changing passwords through legacy clients can create a problem called
“password drift”. This means that the NDS password and Universal Password are not synchronized.
To prevent this issue, one option is to block password changes from clients earlier than version 4.9.
Refer to the next section, Managing NDS Login Configurations, for more information on how to
block the legacy clients from accessing eDirectory 8.8 eDirectory 8.8 server.
4.4.2 Managing NDS Login Configurations
By configuring the NDS login, you can allow or disallow the legacy Novell clients from accessing
the eDirectory 8.8 server. You can manage NDS login configurations through Novell iManager 2.5
and LDAP.
In eDirectory 8.8 and later, you can configure the setting and changing of passwords through LDAP
as well as iManager.
36 Novell eDirectory 8.8 What's New Guide

This section includes information on the following:
• “NDS Configurations at Different Levels” on page 37
• “Managing NDS Configurations Through iManager” on page 38
• “Managing NDS Configurations Through LDAP” on page 39
• Section 4.4.4, “Enforcing Case-Sensitive Passwords in a Mixed Tree,” on page 40
NDS Configurations at Different Levels
You can configure NDS login at one or all the following levels:
• Partition level
• Object level
If you do not specify the configuration at any of the levels, NDS login configuration is enabled at all
the levels.
The object level configuration always overrides the partition level configuration. This is described in
the following table:
novdocx (ENU) 01 February 2006
Table 4-1 NDS Configuration
Configuration at Object Level Configuration at Partition Level Configuration
Not Specified Enabled Enabled
Enabled Not Specified Enabled
Not Specified Disabled Disabled
Disabled Not Specified Disabled
Enabled Enabled Enabled
Enabled Disabled Enabled
Disabled Enabled Disabled
Disabled Disabled Disabled
At all the levels (object and partition) you can configure NDS login for the following:
• Logging in to the directory using an NDS password or verifying the NDS password
• Setting a new password and changing the existing password
Logging In to the Directory or Verifying the NDS Password
Login/verify NDS password means:
• Logging in to the directory using an NDS password.
• Verifying the existing password in the directory.
Login/verify NDS password is enabled by default. When you disable the login/verify key, you will
not be able to log in to the latest version of eDirectory or verify the passwords. You can enable or
Enforcing Case-Sensitive Universal Passwords 37

disable login/verify NDS password at partition and object levels. If login/verify is disabled, you will
not be able to set or change NDS passwords.
You can configure login/verify NDS password through iManager and LDAP. For more information,
refer to “Managing NDS Configurations Through iManager” on page 38 and “Managing NDS
Configurations Through LDAP” on page 39.
Setting a New Password or Changing the NDS Password
Set/change an NDS password means
• Setting a new password for an object.
• Changing the existing password for an object.
Set/change NDS password is enabled by default. When you disable the set/change key, you will not
be able to set a new password or change the existing password in eDirectory. You can enable or
disable set/change NDS password at partition and object levels. If login/verify is disabled, you will
not be able to set/change passwords.
Earlier you were able to set/change of NDS passwords through LDAP only. Now you can do it
through iManager also. For more information, refer to “Managing NDS Configurations Through
iManager” on page 38 and “Managing NDS Configurations Through LDAP” on page 39.
novdocx (ENU) 01 February 2006
Managing NDS Configurations Through iManager
This section includes the following information:
• “Enabling/Disabling NDS Configuration for a Partition” on page 38
• “Enabling/Disabling NDS Configuration for an Object” on page 38
You can turn on the login/verify key or set/change key in NDS login configuration.
Enabling/Disabling NDS Configuration for a Partition
To enable NDS login for pre-eDirectory 8.8 clients:
1 In Novell iManager, click the Roles and Tasks button Description: Roles and Tasks Button .
2 Select NMAS > Universal Password Enforcement.
3 In the Universal Password Enforcement plug-in, select NDS Configuration for a Partition.
4 Follow the instructions in the NDS Configuration for a Partition wizard to configure the login
and password management at a partition level.
Help is available throughout the wizard.
Enabling/Disabling NDS Configuration for an Object
To enable NDS login for pre-eDirectory 8.8 clients:
1 In Novell iManager, click the Roles and Tasks button Description: Roles and Tasks Button .
2 Select NMAS > Universal Password Enforcement.
3 In the wizard, select NDS Configuration for an Object.
4 Follow the instructions in the NDS Configuration for an Object wizard to configure the login
and password management at an object level.
38 Novell eDirectory 8.8 What's New Guide

Help is available throughout the wizard.
Managing NDS Configurations Through LDAP
IMPORTANT: We strongly recommend you to use iManager for managing NDS configurations
and not LDAP.
You can manage NDS configurations through LDAP using an eDirectory attribute on a partition root
container or object. The attributes are a part of the schema in eDirectory 8.7.1 or later, and are not
supported on eDirectory 8.7 or earlier.
The method used by legacy clients to configure the NDS login configurations is called NDAP login
management and the method used for NDS password configurations is called NDAP password
management.
This section provides information on:
• “Enabling/Disabling NDS Configuration for a Partition” on page 39
• “Enabling/Disabling NDS Configurations for an Object” on page 39
novdocx (ENU) 01 February 2006
Enabling/Disabling NDS Configuration for a Partition
Login and Verify Password Management
Use the ndapPartitionLoginMgmt attribute to enable or disable NDS login and verify password
management for a partition.
ndapPartitionLoginMgmt Attribute Value Description
Not present or not specified NDAP login management is enabled.
0 NDAP login management is disabled.
1 NDAP login management is enabled.
Set and Change NDS Password
Use the ndapPartitionPasswordMgmt attribute to enable or disable the setting and changing of an
NDS password for a partition.
ndapPartitionPasswordMgmt Attribute
Val ue
Not present or not specified NDAP password management is enabled.
0 NDAP password management is disabled.
Description
1 NDAP password management is enabled.
Enabling/Disabling NDS Configurations for an Object
Login and Verify NDS Password
Use the ndapLoginMgmt attribute to enable or disable NDS login and verify management for an
object.
Enforcing Case-Sensitive Universal Passwords 39

ndapLoginMgmt Attribute Value Description
Not present or not specified NDAP login management depends on the configuration at
the partition level.
0 NDAP login management is disabled if it is disabled at the
partition level.
1 NDAP login management is enabled irrespective of the
configuration setting at the partition level.
Set and Change NDS Password
Use the ndapPasswordMgmt attribute to enable or disable the setting and changing of an NDS
password for an object.
ndapPasswordMgmt Attribute Value Description
Not present or not specified NDAP password management depends on the
configuration at the partition level.
novdocx (ENU) 01 February 2006
0 NDAP password management is disabled if it is disabled
at the partition level.
1 NDAP password management is enabled irrespective of
the configuration setting at the partition level.
4.4.3 Partition Operations
When you split a partition, the NDS configurations are not inherited by the child partition. When
you merge partitions, the NDS configurations of the parent are retained by the resultant partition.
4.4.4 Enforcing Case-Sensitive Passwords in a Mixed Tree
If a tree exists with an eDirectory 8.8 or later server and an eDirectory 8.7 or earlier server, and the
two servers share a partition, disabling NDS login configuration on that partition will have
unreliable results. The 8.8 server will enforce the setting, preventing legacy clients from accessing
the directory. However, the 8.7 server will not enforce the setting, so you can access the directory
through the 8.7 server.
4.5 For More Information
Refer to the following for more information on case-sensitive passwords:
• iManager online help
• Deploying Universal Password (http://www.novell.com/documentation/nmas23/admin/data/
allq21t.html)
40 Novell eDirectory 8.8 What's New Guide

5
Priority Sync
Priority Sync is a new feature in Novell® eDirectory 8.8TM that is complimentary to the current
synchronization process in eDirectory. Through Priority Sync, you can synchronize the modified
critical data, such as passwords, immediately.
You can sync your critical data through Priority Sync when you cannot wait for normal
synchronization. The Priority Sync process is faster than the normal synchronization process.
Priority Sync is supported only between two or more eDirectory 8.8 or later servers hosting the same
partition.
The following table lists the platforms that support the Priority Sync feature:
Feature List NetWare Linux UNIX Windows
Priority Sync
novdocx (ENU) 01 February 2006
5
This chapter includes the following information:
• Section 5.1, “Need for Priority Sync,” on page 41
• Section 5.2, “Using Priority Sync,” on page 42
5.1 Need for Priority Sync
Normal synchronization can take some time, during which the modified data would not be available
on other servers. For example, suppose that in your setup you have different applications talking to
the directory. You change your password on Server1. With normal synchronization, it is some time
before this change is synchronized with Server2. Therefore, a user would still be able to authenticate
to the directory through an application talking to Server2, using the old password.
Figure 5-1 Need for Priority Sync
SERVER 1
Server 1password has
changed from
Old to New
NORMAL SYNCHRONIZATION
IS YET TO HAPPEN
Server 2 -
still has the old
password
SERVER 2
Password
Changed
From
Old to New
USER USER
Log in Using
Old Password
Is Successful
Priority Sync
41

In large deployments, when the critical data of an object is modified, changes need to be
synchronized immediately. The Priority Sync process resolves this issue.
5.2 Using Priority Sync
To synchronize date modifications through Priority Sync, you need to do the following:
1. Enable Priority Sync, configure the number of threads, and Priority Sync the queue size
through Novell iMonitor.
2. Define Priority Sync policies by identifying the attributes that are critical through iManager.
3. Apply the Priority Sync policies to the partitions through iManager.
5.3 For More Information
Refer to the following for more information on Priority Sync:
• Novell eDirectory 8.8 Administration Guide (http://www.novell.com/documentation/edir88/
edir88/data/brp2di9.html#brp2z9z)
novdocx (ENU) 01 February 2006
• iManager and iMonitor online help
42 Novell eDirectory 8.8 What's New Guide

6
Data Encryption
In Novell® eDirectoryTM 8.8 and later, you can encrypt specific data when they are stored on the disk
and when they are transmitted between two or more eDirectory 8.8 servers. This provides greater
security for the confidential data.
The following table lists the platforms that support the data encryption feature:
Feature NetWare Linux UNIX Windows
Encrypted Attributes
Encrypted Replication
This chapter includes the following information:
• Section 6.1, “Encrypting Attributes,” on page 43
novdocx (ENU) 01 February 2006
6
• Section 6.2, “Encrypting Replication,” on page 44
6.1 Encrypting Attributes
eDirectory 8.8 enables you to encrypt sensitive data stored in the disk. Encrypted attributes is a
server-specific feature.
You can access encrypted attributes only over secure channels unless you choose to provide access
over clear text channels too. Refer to Section 6.1.3, “Accessing the Encrypted Attributes,” on
page 44 for more information.
This section includes the following information:
• Section 6.1.1, “Need for Encrytped Attributes,” on page 43
• Section 6.1.2, “How to Encrypt Attributes,” on page 44
• Section 6.1.3, “Accessing the Encrypted Attributes,” on page 44
The encrypted attributes feature is supported only on eDirectory 8.8 and later servers.
6.1.1 Need for Encrytped Attributes
Prior to eDirectory 8.8, data was stored in clear text on the disk. There was a need to protect the data
and provide access to the data only over secure channels.
You can use this feature in scenarios where you need to protect confidential data such as credit card
numbers of bank customers.
Data Encryption
43

6.1.2 How to Encrypt Attributes
You can encrypt attributes by creating and defining encrypted attributes policies and then applying
these policies to the servers. You can create, define, apply, and manage encrypted attributes policies
through iManager and LDAP.
1 Create and define an encrypted attribute policy:
1a Determine the attributes for encryption.
1b Determine the encryption scheme for the attributes.
2 Apply the encrypted attributes policy to a server.
6.1.3 Accessing the Encrypted Attributes
You can access the encrypted attributes only over secure channels like the LDAP SSL port or the
HTTP secure port. You can choose to provide access to the encrypted attributes through clear text
channels using the iManager plug-in. For more information, refer to the Novell eDirectory 8.8
Administration Guide (http://www.novell.com/documentation/edir88/index.html).
novdocx (ENU) 01 February 2006
6.2 Encrypting Replication
Encrypted replication refer to encrypting data that is transmitted between two or more eDirectory
8.8 servers.
Encrypted replication is complimentary to the normal synchronization in eDirectory.
This section includes the following information:
• Section 6.2.1, “Need for Encrypted Replication,” on page 44
• Section 6.2.2, “Enabling Encrypted Replication,” on page 45
NOTE: The encrypted replication feature is not supported on Netware®.
6.2.1 Need for Encrypted Replication
Prior to eDirectory 8.8, data was transmitted through the wire during replication in clear text. There
was a need to protect confidential data over the wire by encrypting it, especially if the replicas were
separated geographically and connected through the Internet.
This feature can be used in the following scenarios:
• If the directory servers are spread across geographical locations through WAN and the Internet
and there is a need to encrypt sensitive data on wire.
• If you want only some partitions of your tree to be protected, you can selectively indicate the
partitions holding the sensitive data to be encrypted for replication.
• If you require encrypted replication between specific replicas of a partition that contain
sensitive data.
• If you feel the network in your setup is hostile, you might want to protect sensitive data during
replication.
44 Novell eDirectory 8.8 What's New Guide

6.2.2 Enabling Encrypted Replication
You can enable encrypted replication using iManager. You can enable encrypted replication at the
partition level and replica level.
IMPORTANT: Before enabling encrypted replication, ensure that both source and destination
servers have the default certificates. If you have made any changes to the certificates, like renaming
them, encrypted replication fails.
6.3 For More Information
Refer to the following for more information on encrypting data in eDirectory:
• Novell eDirectory 8.8 Administration Guide (http://www.novell.com/documentation/edir88/
index.html)
• iManager and iMonitor online help
novdocx (ENU) 01 February 2006
Data Encryption 45

novdocx (ENU) 01 February 2006
46 Novell eDirectory 8.8 What's New Guide

7
Bulkload Performance
Novell® eDirectoryTM 8.8 provides you with enhancements to increase bulkload performance.
For information on increasing the bulkload performance, refer to the following sections of the
Novell eDirectory 8.8 Administration Guide:
• eDirectory Cache Settings
• LBURP Transaction Size Setting
• Increasing the Number of Asynchronous Requests in ICE
• Increased Number of LDAP Writer Threads
• Disabling Schema Validation in ICE
• Disabling ACL Templates
• Backlinker
• Enabling/Disabling Inline Cache
• Increasing the LBURP Time Out Period
• Offline Bulkload Using ldif2dib
novdocx (ENU) 01 February 2006
7
Bulkload Performance
47

novdocx (ENU) 01 February 2006
48 Novell eDirectory 8.8 What's New Guide

8
iManager ICE Plug-ins
Prior to Novell® eDirectoryTM 8.8, some of the Novell Import Conversion Export (ICE) utility
command line options did not have corresponding options in the iManager plug-in.
The following table lists the platforms that support this feature:
Feature NetWare Linux UNIX Windows
ICE iManager enhancements
The ICE wizard in iManager 2.5 with eDirectory 8.8 provides the following features:
• Add missing schema
• Compare schema
• Generate an order file
novdocx (ENU) 01 February 2006
8
8.1 Adding Missing Schema
In eDirectory 8.8, iManager provides you with options for adding missing schema to a server's
schema. This process involves comparing a source and a destination. If there is additional schema in
the source schema, this is added to the destination schema. The source can be either a file or an
LDAP server; the destination should be an LDAP server.
Through the ICE wizard in iManager, you can add the missing schema using the following options:
• Add Schema from a File
• Add Schema from a Server
8.1.1 Add Schema from a File
ICE can compare the schema in the source and destination. The source is a file or LDAP Server, and
the destination is an LDAP server. The source schema file can be in either the LDIF or SCH format.
Figure 8-1 Compare and Add the Schema from a File
Destination
server
Source
(file or Server)
Compare the schema
Add missing schema if there is
additional schema in the source
If you want to only compare the schema and not add the additional schema to the destination server,
select the Do Not Add but Compare option. In this case, the additional schema is not added to the
iManager ICE Plug-ins
49

destination server but the differences between the schema are available to you as a link at the end of
the operation.
Figure 8-2 Compare Schema and Add the Results to an Output File
Destination
server
novdocx (ENU) 01 February 2006
Source
(file or Server)
Add missing schema
to the output file
Compare the schema
Results onto
output
file
File
For more information, refer to the Novell eDirectory Management Utilities (http://www.novell.com/
documentation/edir88/edir88/data/a5hf8rg.html#a5hf8rg) chapter in the Novell eDirectory 8.8
Administration Guide.
8.1.2 Add Schema from a Server
The source and destination are LDAP servers.
If you want to only compare the schema and not add the additional schema to the destination server,
select the Do Not Add but Compare option. In this case, the additional schema is not added to the
destination server, but the differences between the schema are available to you as a link at the end of
the operation.
For more information, refer to the Novell eDirectory Management Utilities (http://www.novell.com/
documentation/edir88/edir88/data/a5hf8rg.html#a5hf8rg) chapter in the Novell eDirectory 8.8
Administration Guide.
8.2 Comparing the Schema
Using iManager, you can compare the schema between a source and a destination.The source can be
either a file or a server; the destination should be an LDIF file.
iManager compares the schema between a source and a destination and then stores the results in an
output file.
Through the ICE wizard in iManager, you can compare the schema using the following options:
• Compare Schema Files
• Compare Schema between a Server and a File
8.2.1 Compare Schema Files
The Compare Schema Files option compares the schema between a source file and a destination file
and then places the result in an output file. To add the missing schema to the destination file, apply
the records of the output file to the destination file.
50 Novell eDirectory 8.8 What's New Guide

For more information, refer to the Novell eDirectory Management Utilities (http://www.novell.com/
documentation/edir88/edir88/data/a5hf8rg.html#a5hf8rg) chapter in the Novell eDirectory 8.8
Administration Guide.
8.2.2 Compare Schema between a Server and a File
The Compare Schema between a Server and a File option compares the schema between a source
server and a destination file and then places the result in an output file. To add the missing schema to
the destination file, apply the records of the output file to the destination file.
For more information, refer to the Novell eDirectory Management Utilities (http://www.novell.com/
documentation/edir88/edir88/data/a5hf8rg.html#a5hf8rg) chapter in the Novell eDirectory 8.8
Administration Guide.
8.3 Generating an Order File
This option creates an order file for use with the delim handler to import data from a delimited data
file. The wizard helps you to create this order file that contains a list of attributes for a specific
object class.
novdocx (ENU) 01 February 2006
For more information, refer to the Novell eDirectory Management Utilities (http://www.novell.com/
documentation/edir88/edir88/data/a5hf8rg.html#a5hf8rg) chapter in the Novell eDirectory 8.8
Administration Guide.
8.4 For More Information
For more information on this feature, refer to the following:
• Novell eDirectory 8.8 Administration Guide (http://www.novell.com/documentation/edir88/
edir88/data/agwkqvb.html#agwkqvb).
• iMonitor online help.
iManager ICE Plug-ins 51

novdocx (ENU) 01 February 2006
52 Novell eDirectory 8.8 What's New Guide

9
LDAP-Based Backup
The LDAP-based backup feature is introduced with Novell® eDirectoryTM 8.8. This feature is used
to backup the attributes and attribute values one object at a time.
The following table lists the platforms that support this feature:
Feature NetWare Linux UNIX Windows
LDAP based-backup
This feature lets you perform an incremental backup wherein the object is backed up only if there
are changes to the object.
LDAP-based backup provides a set of interfaces for backup and restore of eDirectory objects
exposed through the LDAP Libraries for C through LDAP extended operations.
novdocx (ENU) 01 February 2006
9
For more information on LDAP Libraries for C SDK, refer to LDAP Libraries for C documentation.
(http://developer.novell.com/ndk/doc/cldap/ldaplibc/data/hevgtl7k.html).
For an example of how to do backup and restore of eDirectory objects through LDAP, refer to the
backup.c sample code (http://developer.novell.com/ndk/doc/samplecode/cldap_sample/extensions/
backup.c.html).
9.1 Need for LDAP Based Backup
The LDAP based backup tries to resolve the problems with the current backup and restore.
The problems that this feature resolves are:
• Gives a consistent interface using which any third party backup applications or developers can
backup eDirectory on all the supported platforms.
• Provides a backup solution to backup objects incrementally.
9.2 For More Information
For more information on this feature, refer to the following:
• LDAP Libraries for C (http://developer.novell.com/ndk/cldap.htm)
• Sample code: backup.c (http://developer.novell.com/ndk/doc/samplecode/cldap_sample/
extensions/backup.c.html)
LDAP-Based Backup
53

novdocx (ENU) 01 February 2006
54 Novell eDirectory 8.8 What's New Guide

10
Managing Error Logging in
novdocx (ENU) 01 February 2006
eDirectory 8.8
Many customers have reported that the error logging in Novell® eDirectoryTM does not help much in
identifying and resolving the common problems. Error logging is automatically started during
eDirectory installation.
This chapter consists of the following sections:
• Section 10.1, “Message Severity Levels,” on page 55
• Section 10.2, “Configuring Error Logging,” on page 56
• Section 10.3, “DSTrace Messages,” on page 60
• Section 10.4, “iMonitor Message Filtering,” on page 63
• Section 10.5, “SAL Message Filtering,” on page 63
10.1 Message Severity Levels
All the messages have a severity level attached to it that helps you determine how critical the
message is. The levels in decreasing order of severity are:
• Section 10.1.1, “Fatal,” on page 55
• Section 10.1.2, “Warning,” on page 55
• Section 10.1.3, “Error,” on page 56
10
• Section 10.1.4, “Information,” on page 56
• Section 10.1.5, “Debug,” on page 56
10.1.1 Fatal
A fatal message indicates a significant problem, such as loss of data or functionality.
Examples:
• If the eDirectory server fails to load system modules like NCPEngine and DSLoader while
loading modules, a fatal error is reported and logged.
• If the eDirectory server fails to bind on secure port 636, then a fatal error is reported and
logged.
10.1.2 Warning
A message that is not necessarily severe, but might be a possible cause for future problem.
Examples:
• Connection failures between any two servers in tree, resulting in server getting added to bad
address cache. Server can recover from this particular state by resetting the bad address cache.
Managing Error Logging in eDirectory 8.8
55

• If the LDAP client application does a bind and closes the connection without doing an unbind
then LDAP server should log warning with appropriate warning message.
• If the eDirectory server has consumed all the file descriptors and it has reached the Threshold
limit as result server is not able to process any incoming requests and respond it and leading to
failure of the application.
10.1.3 Error
A message that could be due to invalid operation, but which will not cause any problem.
Examples:
• When an client application tries to add a object for which attributes definition are not defined In
schema, then eDirectory server will report the ERR_NO_SUCH_ATTRIBUTE error.
• When an User tries to login with an invalid password, eDirectory server will report error
ERR_FAILED_AUTHENTICATION.
10.1.4 Information
novdocx (ENU) 01 February 2006
A message that describes successful completion of an operation or event in the eDirectory server.
Examples:
• When a module gets loaded/unloaded successfully, it may be appropriate to log an informative
message of the operation.
• When database cache configuration is changed, informative message should be logged on
successfully saving the configuration.
10.1.5 Debug
A message that contains information which will help developers in debugging a program.
Examples:
While doing a dynamic group search, display all the dynamic group members with information of
entry ID, partition ID, and DN of the members. This information will help in knowing that all
members are returned at the eDirectory level.
10.2 Configuring Error Logging
• Section 10.2.1, “Linux and UNIX,” on page 56
• Section 10.2.2, “Windows,” on page 57
• Section 10.2.3, “NetWare,” on page 58
10.2.1 Linux and UNIX
To configure the error logging settings for the server-side messages, you can use the n4u.server.loglevels and n4u.server.log-file parameters in the /etc/opt/novell/eDirectory/conf/
nds.conf configuration file.
56 Novell eDirectory 8.8 What's New Guide

Setting the Severity Level
The severity levels available are LogFatal, LogWarn, LogErr, LogInfo, and LogDbg levels (in
decreasing order of severity). For more information on the severity levels, refer to Section 10.1,
“Message Severity Levels,” on page 55.
By default, the severity level is set "LogFatal". So, only messages with severity level fatal will be
logged.
To set the severity level, use the n4u.server.log-levels parameter in the nds.conf file as follows:
n4u.server.log-levels=severity_level
For example:
• To set the severity level to LogInfo and above, type the following:
n4u.server.log-levels=LogInfo
With this configuration, messages with severity level LogInfo and above (that is, LogFatal,
LogWarn, and LogErr) will be logged into log file.
• To set the severity level to LogWarn and above, type the following:
n4u.server.log-levels=LogWarn
With this configuration, messages with severity level LogWarn and above (LogFatal) will be
logged into the log file.
novdocx (ENU) 01 February 2006
Specifying the Log File Name
To specify the location of the log file where the messages will be logged, use the n4u.server.log-file
parameter in the nds.conf file. By default, the messages are logged into the ndsd.log file.
For example, to log the messages to /tmp/edir.log, type in the following:
n4u.server.log-file=/tmp/edir.log
To log the messages in the system log, use the n4u.server.log-file parameter as follows:
n4u.server.log-file=syslog
Specifying the Log File Size
To specify the size of the log file, use the n4u.server.log-file-size parameter in the nds.conf file. The
maximum file limit can be 2 GB and the default file size is 1 MB. However, you can set the file size
to below 1 MB also.
This setting is not applicable to the ndsd.log file.
If the log file size reaches the specified limit, then logger overwrites the log file from the start.
10.2.2 Windows
• “Setting the Severity Level” on page 58
• “Specifying the Log File Name and Path” on page 58
• “Specifying the Log File Size” on page 58
Managing Error Logging in eDirectory 8.8 57

Setting the Severity Level
The severity levels available are LogFatal, LogWarn, LogErr, LogInfo, and LogDbg levels (in
decreasing order of severity). For more information on the severity levels, refer to Section 10.1,
“Message Severity Levels,” on page 55.
To set the severity level, do the following:
1 Click Start > Settings > Control Panel > Novell eDirectory Services
2 In the Services tab, select dhlog.dlm.
3 Enter the log level in the Startup Parameters box.
For example, to set the log level to LogErr and above, enter the following:
LogLevels=LogErr
4 Click Configure
5 In the ACS Config tab, click the plus sign of DHostLogger.
The LogLevel parameter is updated with the configured value.
Specifying the Log File Name and Path
novdocx (ENU) 01 February 2006
1 Click Start > Settings > Control Panel > Novell eDirectory Services
2 In the Services tab, select dhlog.dlm.
3 Enter the log file path in Startup Parameters as follows:
LogFile=file_path
For example, to set the log file path to /tmp/Err.log, enter the following in startup
parameters:
LogFile=/tmp/Err.log
4 Click Configure
5 In the ACS Config tab, click the plus sign of DHostLogger.
The LogFile parameter is updated with the configured value.
Specifying the Log File Size
1 Click Start > Settings > Control Panel > Novell eDirectory Services
2 In the Services tab, select dhlog.dlm.
3 Enter the log file path in Startup Parameters as follows:
LogSize=size
The default file size is 1 MB.
4 Click Configure
5 In the ACS Config tab, click the plus sign of DHostLogger.
The LogSize parameter is updated with the configured value.
10.2.3 NetWare
On NetWare, the DSLOG.NLM logs server-side messages. The server-side messages are logged to
sys:\system\ds.log.
58 Novell eDirectory 8.8 What's New Guide

NOTE: DSLOG.NLM is automatically up when DS is up. However, you can manually unload/load
DSLOG.NLM.
The severity levels available are LogFatal, LogWarn, LogErr, LogInfo, and LogDbg levels (in
decreasing order of severity). For more information on the severity levels, refer to Section 10.1,
“Message Severity Levels,” on page 55.
By default, the events tags and messages are logged in ds.log. The messages are logged in the
following format:
<event tag>: <time>: <severity level>: message
For example:
INIT: [2005/03/25 15:27:14] INFO: NDS Schema Upgrade Version: DIB
1, Code 1
PART: [2005/03/25 16:18:10] DEBUG: Merging partition root data
during partition join success
Configuring the Filters
novdocx (ENU) 01 February 2006
To configure the filters, enter the following syntax:
DSLOG options
The following table explains the dslog options:
Table 10-1 Dslog Option Description
Option Description
FILE ON Enable logging to log file.
By default, FILE is set to ON.
FILE OFF Disable logging to log file.
FMAX=size Specify maximum disk file size.
SLEVEL=value Specify error severity level.
By default, SLEVEL is set to LogFatal.
FNAME=name Specify disk file name.
By default the file name is ds.log.
For example:
• To enable logging, enter the following:
DSLOG FILE ON
• To disable logging, enter the following:
DSLOG FILE OFF
• To set the maximum file size to 10240 bytes, enter the following:
Managing Error Logging in eDirectory 8.8 59

DSLOG FMAX=10240
• To filter the debug messages and above, enter the following:
DSLOG SLEVEL=LOGDBG
• To specify the log file name, enter the following:
DSLOG FNAME=DS.LOG
For more information on the dslog option, see the online help. To do so, enter the following at the
command prompt:
help dslog
Viewing the Current Configuration
You can use the GET option to view the current configuration settings as follows:
DSLOG GET
For example, if you've enabled DSLOG and set the severity level to debug, the output is similar to
the following:
novdocx (ENU) 01 February 2006
DSLOG Configuration:DSLOG File is ON File Name: DS.LOGFile Size:
nnnnn(Max: nnnnnn). Severity Level: LOGDBG
10.3 DSTrace Messages
You can filter the trace messages based on the thread ID, connection ID, and severity of the
messages.
Once you specify a filter for the messages, only the messages that fit the filter are displayed on the
screen. All the other messages for the enabled tags will get logged into the ndstrace.log if the
file is set to ON.
Only one filter is applicable at a time. Filter has to be specified for each session of ndstrace.
By default, the severity level is set to INFO, this means that all the messages with severity level
more that INFO would be displayed. You can see the severity level by enabling the svty tag.
You can use iMonitor also to filter the trace messages. For more information, refer to Section 10.4,
“iMonitor Message Filtering,” on page 63.
10.3.1 NetWare, Linux, and UNIX
Complete the following procedure to filter the trace messages:
NOTE: In the commands below, change ndstrace to dstrace on NetWare.
1 Enable filtering with the following command:
ndstrace tag filter_value
To disable filtering, enter the following command:
ndstrace tag
60 Novell eDirectory 8.8 What's New Guide

Examples for enabling filtering:
• To enable filtering for thread ID 35, enter the following:
ndstrace thrd 35
• To enable filtering for severity level fatal, enter the following:
ndstrace svty fatal
Severity levels can be FATAL, WARN, ERR, INFO, and DEBUG.
• To enable filtering for connection ID 21, enter the following:
ndstrace conn 21
Examples for disabling filtering:
• To disable filtering based on thread ID, enter the following:
ndstrace thrd
• To disable filtering based on connection ID, enter the following:
ndstrace conn
• To disable filtering based on severity, enter the following:
ndstrace svty
novdocx (ENU) 01 February 2006
Figure 10-1 Sample Trace Message Screen With Filters
10.3.2 Windows
Complete the following procedure to filter the trace messages:
1 Select Start > Control Panel > Novell eDirectory Services
2 In the Services tab, select dstrace.dlm.
Managing Error Logging in eDirectory 8.8 61

3 Click Edit > Options in the Trace window.
The Novell eDirectory Trace Options dialog box is displayed.
Figure 10-2 Trace Options Screen on Windows
novdocx (ENU) 01 February 2006
4 Click on the Screen tab.
5 Select the filter option from the Filters group and enter the filter value.
You can filter the messages based on:
• Thread ID
• Connection ID
• Severity
Before selecting any of the filters, ensure that it is enabled under Trace Line Prefixes.
You can also disable the filtering by selecting None or unselecting the filter option.
NOTE: If you've selected Thread ID or Connection ID as your filter option and enter a value
that does not exist, then the messages won't be displayed on the screen. However, all the other
messages will still get logged to the ndstrace.log file.
62 Novell eDirectory 8.8 What's New Guide

10.4 iMonitor Message Filtering
You can filter the iMonitor trace messages based on the connection ID, thread ID, or error number.
To filter based on the connection ID and thread ID, ensure that you have enabled them in the Trace
Configuration tab.
For more information, refer to the iMonitor online help.
10.5 SAL Message Filtering
SAL has been enhanced to log extensive information on errors on demand. Function calls can be
traced with arguments in the debug builds.
10.5.1 Configuring the Severity Levels
You can use the SAL_LogLevels parameter to configure the severity levels for the SAL messages.
SAL_LogLevels is a comma separated list of desired log levels.
novdocx (ENU) 01 February 2006
The log levels are explained in the table below:
Table 10-2 SAL Message Filtering Parameters
Parameter Name Description
LogCrit Critical Messages.
This level is enabled by default. After a critical error is logged, the system shuts
down.
LogErr All Error messages.
The system continues to function, but the results are unpredictable.
LogWarn Warning messages.
This is just a warning given so that you are aware of some impending error.
LogInfo Informational messages.
LogDbg Debug messages used for debugging at the time of development.
These messages are compiled out from a release build to reduce the binary size.
LogCall Traces the function calls. These are subset of Debug messages.
LogAll Enables all the messages except LogCall.
A ’-’ at the beginning of a specific log level disables that level.
For example, to filter based on all the log levels, except LogInfo and LogDbg, enter the following:
export SAL_LogLevels=LogAll,-LogInfo,-LogDbg
Managing Error Logging in eDirectory 8.8 63

10.5.2 Setting the Log File Path
You can use the SAL_LogFile environment variable to specify the log file location. This can be a
valid file name with a valid path, or one of the following.
• Console: All messages will be logged to the console
• Syslog: In Linux and UNIX, the messages will go to the syslog. On NetWare and Windows,
messages are logged into a file with the name syslog. This is the default behavior for logging.
All critical errors are always logged to syslog unless it is disabled specifically.
novdocx (ENU) 01 February 2006
64 Novell eDirectory 8.8 What's New Guide

11
Offline Bulkload Utility: ldif2dib
ldif2dib is a new utility introduced with Novell eDirectory 8.8 for bulkloading data from LDIF files
to the eDirectory database.This is an offline utility and achieves faster bulkloads compared to the
other online tools.
The following table lists the platforms for which ldif2dib is supported.
Feature Solaris Linux AIX HP-UX Windows
ldif2dib
11.1 Need for ldif2dib
ldif2dib utility is needed when a large user database needs to be populated with entries from an
LDIF file. Online tools such as ice, ldapmodify are slower than ldif2dib in this respect, due to
overheads associated with online bulk load such as schema checking, protocol translation and access
control checks. ldif2dib allows for fast up time when a large user database needs to be populated and
when initial down time is not an issue.
novdocx (ENU) 01 February 2006
11
11.2 For More Information
For more information on this utility, refer to “Offline Bulkload Utility” of eDirectory 8.8
Administration Guide.
Offline Bulkload Utility: ldif2dib
65

novdocx (ENU) 01 February 2006
66 Novell eDirectory 8.8 What's New Guide

12
Miscellaneous
This chapter covers miscellaneous new features with Novell® eDirectoryTM 8.8.
• Section 12.1, “Security Object Caching,” on page 67
• Section 12.2, “Subtree Search Performance Improvement,” on page 67
• Section 12.3, “Localhost Changes,” on page 68
• Section 12.4, “256 File Handler on Solaris,” on page 68
• Section 12.5, “Memory Manager on Solaris,” on page 68
12.1 Security Object Caching
The security container is created off the root partition when the first server is installed in the tree and
holds information such as global data, security policies, and keys.
After universal password was introduced, whenever a user logged into eDirectory through NMAS
NMAS accessed the information in the security container to authenticate the login. When the
partition having the security container was not present locally, NMAS accessed the server, which
had this partition. This had an adverse impact on the performance of NMAS authentication. The
situation was worse in the scenarios where the server containing the partition having the security
container had to be accessed over WAN links.
®
novdocx (ENU) 01 February 2006
12
,
To resolve this, with eDirectory 8.8, the security container data is cached onto the local server.
Therefore, NMAS does not need to access the security container located on a different machine
whenever a user logs in, it can easily access it locally. This increases the performance. Adding the
partition having security container to local server improves the performance, but it might not be
feasible in scenarios where there are too many servers.
If the actual data in the security container changes on the server containing the security container
partition, the local cache is refreshed by a background process called backlinker. By default,
backlinker runs every thirteen hours and it pulls the modified data from remote server. In case, the
data needs to be synchronized immediately, you can schedule backlinker on the local server either
through iMonitor, ndstrace (Linux and UNIX), dstrace (Netware
more information, refer to the iMonitor online help or the ndstrace manpage.
The security object caching feature is enabled by default. If you do not want backlinker to cache any
data, remove CachedAttrsOnExtRef from the NCP server object.
®
), or ndscons (Windows). For
12.2 Subtree Search Performance Improvement
The eDirectory subtree search performance for a large tree with a significantly nested structure
remains flat irrespective of the base DN of the search. This has been resolved by using an
AncestorID attribute. The AncestorID attribute is a list of entryIDs of all ancestors, associated with
each entry. This AncestorID is used internally during the subtree search and therefore restricts the
scope of the search.
This attribute gets populated while adding an entry and after upgrade for all the entries in the DIB
and is repopulated for all the entries in the subtree after a subtree is moved. However, the subtree
search will not use the AncestorID attribute while populating the attribute after upgrade and subtree
Miscellaneous
67

move. Therefore, the subtree performance remains similar to pre-eDirectory 8.8 subtree search
performance.
To verify if AncestorIDs are updated after upgrade:
Once the AncestorIDs are populated, the NDS Object Upgrade version changes to 6 or more. You
can view this using iMonitor in the DIB History section of Agent Information.
To verify if AncestorIDs are updated after the subtree move operation:
While the AncestorIDs are being populated, the attribute UpdateInProgress in the Pseudo Server
object has the list of entry IDs of the partition Root of the subtree. Once the AncestorIDs are
populated, the attribute will not be present in the Pseudo Server.
ndsrepair updates the AncestorID attribute if it is invalid.
12.3 Localhost Changes
eDirectory 8.8 servers do not listen on loopback address. Utilities using localhost need to be
changed to hostname resolve or IP address.
novdocx (ENU) 01 February 2006
If any third party tool or utility resolves through localhost then that needs to be changed to resolve
through hostname or IP address and not through the localhost address.
12.4 256 File Handler on Solaris
Earlier, Solaris 2.x stdio streams implementation could use only a maximum of 256 file descriptors.
This was insufficient for eDirectory to function correctly. eDirectory 8.8 provides a stub library to
overcome this limit.
12.5 Memory Manager on Solaris
The earlier releases of eDirectory on Solaris used Geodesic*, a third-party product as the memory
manager. With this release, eDirectory 8.8 does not include any third-party memory allocators, but
makes use of the native memory manager.
This has no impact on the performance of eDirectory. In most cases, the performance either has
improved or remained the same as third-party allocators.
68 Novell eDirectory 8.8 What's New Guide
 Loading...