

Page 1

Novell®
www.novell.com
Policies in Designer 3.5
Designer for Identity Manager
novdocx (en) 13 May 2009
AUTHORIZED DOCUMENTATION
3.5
September 18, 2009
Policies in Designer 3.5
Page 2

Legal Notices
Novell, Inc. makes no representations or warranties with respect to the contents or use of this documentation, and
specifically disclaims any express or implied warranties of merchantability or fitness for any particular purpose.
Further, Novell, Inc. reserves the right to revise this publication and to make changes to its content, at any time,
without obligation to notify any person or entity of such revisions or changes.
Further, Novell, Inc. makes no representations or warranties with respect to any software, and specifically disclaims
any express or implied warranties of merchantability or fitness for any particular purpose. Further, Novell, Inc.
reserves the right to make changes to any and all parts of Novell software, at any time, without any obligation to
notify any person or entity of such changes.
Any products or technical information provided under this Agreement may be subject to U.S. export controls and the
trade laws of other countries. You agree to comply with all export control regulations and to obtain any required
licenses or classification to export, re-export or import deliverables. You agree not to export or re-export to entities on
the current U.S. export exclusion lists or to any embargoed or terrorist countries as specified in the U.S. export laws.
You agree to not use deliverables for prohibited nuclear, missile, or chemical biological weaponry end uses. See the
Novell International Trade Services Web page (http://www.novell.com/info/exports/) for more information on
exporting Novell software. Novell assumes no responsibility for your failure to obtain any necessary export
approvals.
novdocx (en) 13 May 2009
Copyright © 2009 Novell, Inc. All rights reserved. No part of this publication may be reproduced, photocopied,
stored on a retrieval system, or transmitted without the express written consent of the publisher.
Novell, Inc. has intellectual property rights relating to technology embodied in the product that is described in this
document. In particular, and without limitation, these intellectual property rights may include one or more of the U.S.
patents listed on the Novell Legal Patents Web page (http://www.novell.com/company/legal/patents/) and one or
more additional patents or pending patent applications in the U.S. and in other countries.
Novell, Inc.
404 Wyman Street, Suite 500
Waltham, MA 02451
U.S.A.
www.novell.com
Online Documentation: To access the latest online documentation for this and other Novell products, see
the Novell Documentation Web page (http://www.novell.com/documentation).
Page 3

Novell Trademarks
For Novell trademarks, see the Novell Trademark and Service Mark list (http://www.novell.com/company/legal/
trademarks/tmlist.html).
Third-Party Materials
All third-party trademarks are the property of their respective owners.
novdocx (en) 13 May 2009
Page 4

novdocx (en) 13 May 2009
4 Policies in Designer 3.5
Page 5

Contents
About This Guide 15
1Overview 17
1.1 Policies. . . . . . . . . . . . . . . . . . . . . . . . . . . . . . . . . . . . . . . . . . . . . . . . . . . . . . . . . . . . . . . . . . . 17
2 Using the Pre-Identity Manager 3.5 Policy Builder 19
3 Managing Policies with the Policy Builder 21
3.1 Accessing the Policy Builder . . . . . . . . . . . . . . . . . . . . . . . . . . . . . . . . . . . . . . . . . . . . . . . . . . 21
3.1.1 Model Outline View . . . . . . . . . . . . . . . . . . . . . . . . . . . . . . . . . . . . . . . . . . . . . . . . . . 21
3.1.2 Policy Flow View . . . . . . . . . . . . . . . . . . . . . . . . . . . . . . . . . . . . . . . . . . . . . . . . . . . . 22
3.1.3 Policy Set. . . . . . . . . . . . . . . . . . . . . . . . . . . . . . . . . . . . . . . . . . . . . . . . . . . . . . . . . . 22
3.2 Using the Policy Builder . . . . . . . . . . . . . . . . . . . . . . . . . . . . . . . . . . . . . . . . . . . . . . . . . . . . . . 23
3.3 Creating a Policy . . . . . . . . . . . . . . . . . . . . . . . . . . . . . . . . . . . . . . . . . . . . . . . . . . . . . . . . . . . 24
3.3.1 Accessing the Policy Set . . . . . . . . . . . . . . . . . . . . . . . . . . . . . . . . . . . . . . . . . . . . . . 24
3.3.2 Using the Policy Set. . . . . . . . . . . . . . . . . . . . . . . . . . . . . . . . . . . . . . . . . . . . . . . . . . 25
3.3.3 Using the Add Policy Wizard . . . . . . . . . . . . . . . . . . . . . . . . . . . . . . . . . . . . . . . . . . . 26
3.4 Creating a Rule . . . . . . . . . . . . . . . . . . . . . . . . . . . . . . . . . . . . . . . . . . . . . . . . . . . . . . . . . . . . 28
3.4.1 Creating a New Rule . . . . . . . . . . . . . . . . . . . . . . . . . . . . . . . . . . . . . . . . . . . . . . . . . 29
3.4.2 Using Predefined Rules . . . . . . . . . . . . . . . . . . . . . . . . . . . . . . . . . . . . . . . . . . . . . . . 31
3.4.3 Including an Existing Rule . . . . . . . . . . . . . . . . . . . . . . . . . . . . . . . . . . . . . . . . . . . . . 32
3.4.4 Importing a Policy From an XML File. . . . . . . . . . . . . . . . . . . . . . . . . . . . . . . . . . . . . 32
3.5 Creating an Argument . . . . . . . . . . . . . . . . . . . . . . . . . . . . . . . . . . . . . . . . . . . . . . . . . . . . . . . 33
3.6 Variable Selector . . . . . . . . . . . . . . . . . . . . . . . . . . . . . . . . . . . . . . . . . . . . . . . . . . . . . . . . . . . 35
3.6.1 Dynamic Variable Expansion. . . . . . . . . . . . . . . . . . . . . . . . . . . . . . . . . . . . . . . . . . . 36
3.6.2 Accessing the Variable Selector From the Conditions Tab . . . . . . . . . . . . . . . . . . . . 36
3.6.3 Accessing the Variable Selector From the Actions Tab. . . . . . . . . . . . . . . . . . . . . . . 37
3.6.4 Accessing the Variable Selector From the Argument Builder . . . . . . . . . . . . . . . . . . 38
3.6.5 XPath Expressions . . . . . . . . . . . . . . . . . . . . . . . . . . . . . . . . . . . . . . . . . . . . . . . . . . 39
3.7 Editing a Policy. . . . . . . . . . . . . . . . . . . . . . . . . . . . . . . . . . . . . . . . . . . . . . . . . . . . . . . . . . . . . 39
3.7.1 Actions and Menu Items in the Policy Builder . . . . . . . . . . . . . . . . . . . . . . . . . . . . . . 39
3.7.2 Keyboard Support . . . . . . . . . . . . . . . . . . . . . . . . . . . . . . . . . . . . . . . . . . . . . . . . . . . 41
3.7.3 Renaming a Policy. . . . . . . . . . . . . . . . . . . . . . . . . . . . . . . . . . . . . . . . . . . . . . . . . . . 41
3.7.4 Saving Your Work . . . . . . . . . . . . . . . . . . . . . . . . . . . . . . . . . . . . . . . . . . . . . . . . . . . 41
3.7.5 Policy Description . . . . . . . . . . . . . . . . . . . . . . . . . . . . . . . . . . . . . . . . . . . . . . . . . . . 42
3.8 Viewing the Policy in XML . . . . . . . . . . . . . . . . . . . . . . . . . . . . . . . . . . . . . . . . . . . . . . . . . . . . 42
novdocx (en) 13 May 2009
4 Using Additional Builders and Editors 45
4.1 Action Builder . . . . . . . . . . . . . . . . . . . . . . . . . . . . . . . . . . . . . . . . . . . . . . . . . . . . . . . . . . . . . . 45
4.1.1 Creating an Action . . . . . . . . . . . . . . . . . . . . . . . . . . . . . . . . . . . . . . . . . . . . . . . . . . . 45
4.1.2 Additional Options for the Action Builder . . . . . . . . . . . . . . . . . . . . . . . . . . . . . . . . . . 46
4.2 Actions Builder . . . . . . . . . . . . . . . . . . . . . . . . . . . . . . . . . . . . . . . . . . . . . . . . . . . . . . . . . . . . . 46
4.3 Argument Builder . . . . . . . . . . . . . . . . . . . . . . . . . . . . . . . . . . . . . . . . . . . . . . . . . . . . . . . . . . . 47
4.3.1 Launching the Argument Builder . . . . . . . . . . . . . . . . . . . . . . . . . . . . . . . . . . . . . . . . 49
4.3.2 Argument Builder Example . . . . . . . . . . . . . . . . . . . . . . . . . . . . . . . . . . . . . . . . . . . . 50
4.4 Condition Builder . . . . . . . . . . . . . . . . . . . . . . . . . . . . . . . . . . . . . . . . . . . . . . . . . . . . . . . . . . . 52
4.4.1 Creating a Condition . . . . . . . . . . . . . . . . . . . . . . . . . . . . . . . . . . . . . . . . . . . . . . . . . 52
Contents 5
Page 6

4.4.2 Additional Options for the Condition Builder . . . . . . . . . . . . . . . . . . . . . . . . . . . . . . . 52
4.5 Conditions Builder . . . . . . . . . . . . . . . . . . . . . . . . . . . . . . . . . . . . . . . . . . . . . . . . . . . . . . . . . . 53
4.6 Match Attribute Builder. . . . . . . . . . . . . . . . . . . . . . . . . . . . . . . . . . . . . . . . . . . . . . . . . . . . . . . 55
4.7 Action Argument Component Builder . . . . . . . . . . . . . . . . . . . . . . . . . . . . . . . . . . . . . . . . . . . . 57
4.8 Argument Value List Builder. . . . . . . . . . . . . . . . . . . . . . . . . . . . . . . . . . . . . . . . . . . . . . . . . . . 58
4.9 Named String Builder . . . . . . . . . . . . . . . . . . . . . . . . . . . . . . . . . . . . . . . . . . . . . . . . . . . . . . . . 58
4.10 Condition Argument Component Builder . . . . . . . . . . . . . . . . . . . . . . . . . . . . . . . . . . . . . . . . . 59
4.11 Pattern Builder . . . . . . . . . . . . . . . . . . . . . . . . . . . . . . . . . . . . . . . . . . . . . . . . . . . . . . . . . . . . . 60
4.12 String Builder . . . . . . . . . . . . . . . . . . . . . . . . . . . . . . . . . . . . . . . . . . . . . . . . . . . . . . . . . . . . . . 61
4.13 XPath Builder . . . . . . . . . . . . . . . . . . . . . . . . . . . . . . . . . . . . . . . . . . . . . . . . . . . . . . . . . . . . . . 62
4.14 Mapping Table Editor . . . . . . . . . . . . . . . . . . . . . . . . . . . . . . . . . . . . . . . . . . . . . . . . . . . . . . . . 62
4.14.1 Creating a Mapping Table Object . . . . . . . . . . . . . . . . . . . . . . . . . . . . . . . . . . . . . . . 62
4.14.2 Adding a Mapping Table Object to a Policy . . . . . . . . . . . . . . . . . . . . . . . . . . . . . . . . 64
4.14.3 Editing a Mapping Table Object. . . . . . . . . . . . . . . . . . . . . . . . . . . . . . . . . . . . . . . . . 65
4.14.4 Importing Data from a CSV File. . . . . . . . . . . . . . . . . . . . . . . . . . . . . . . . . . . . . . . . . 66
4.14.5 Exporting Data to a CSV File. . . . . . . . . . . . . . . . . . . . . . . . . . . . . . . . . . . . . . . . . . . 66
4.14.6 Testing a Mapping Table Object . . . . . . . . . . . . . . . . . . . . . . . . . . . . . . . . . . . . . . . . 67
4.15 Namespace Editor . . . . . . . . . . . . . . . . . . . . . . . . . . . . . . . . . . . . . . . . . . . . . . . . . . . . . . . . . . 67
4.15.1 Accessing Java Classes Using Namespaces . . . . . . . . . . . . . . . . . . . . . . . . . . . . . . 68
4.16 Local Variable Selector . . . . . . . . . . . . . . . . . . . . . . . . . . . . . . . . . . . . . . . . . . . . . . . . . . . . . . 69
novdocx (en) 13 May 2009
5 Using the XPath Builder 71
6 Defining Schema Map Policies 77
6.1 Using the Schema Map Editor . . . . . . . . . . . . . . . . . . . . . . . . . . . . . . . . . . . . . . . . . . . . . . . . . 78
6.1.1 Accessing the Schema Map Editor . . . . . . . . . . . . . . . . . . . . . . . . . . . . . . . . . . . . . . 78
6.1.2 Navigating the Schema Map Editor . . . . . . . . . . . . . . . . . . . . . . . . . . . . . . . . . . . . . . 79
6.1.3 Understanding the Schema Map Editor Toolbar . . . . . . . . . . . . . . . . . . . . . . . . . . . . 80
6.2 Editing a Schema Map Policy . . . . . . . . . . . . . . . . . . . . . . . . . . . . . . . . . . . . . . . . . . . . . . . . . 81
6.2.1 Adding or Deleting Classes and Attributes . . . . . . . . . . . . . . . . . . . . . . . . . . . . . . . . 81
6.2.2 Refreshing the Application Schema. . . . . . . . . . . . . . . . . . . . . . . . . . . . . . . . . . . . . . 85
6.2.3 Editing Items . . . . . . . . . . . . . . . . . . . . . . . . . . . . . . . . . . . . . . . . . . . . . . . . . . . . . . . 85
6.2.4 Sorting Schema Map Entries . . . . . . . . . . . . . . . . . . . . . . . . . . . . . . . . . . . . . . . . . . . 86
6.2.5 Managing the Schema. . . . . . . . . . . . . . . . . . . . . . . . . . . . . . . . . . . . . . . . . . . . . . . . 86
6.3 Testing Schema Map Policies . . . . . . . . . . . . . . . . . . . . . . . . . . . . . . . . . . . . . . . . . . . . . . . . . 86
6.4 Exporting and Importing with the Schema Map Editor . . . . . . . . . . . . . . . . . . . . . . . . . . . . . . . 87
6.4.1 Exporting a Schema Map Policy . . . . . . . . . . . . . . . . . . . . . . . . . . . . . . . . . . . . . . . . 87
6.4.2 Importing a Schema Map Policy . . . . . . . . . . . . . . . . . . . . . . . . . . . . . . . . . . . . . . . . 87
6.5 Accessing the Schema Map Policy in XML . . . . . . . . . . . . . . . . . . . . . . . . . . . . . . . . . . . . . . . 87
6.6 Additional Schema Map Policy Options . . . . . . . . . . . . . . . . . . . . . . . . . . . . . . . . . . . . . . . . . . 87
6.6.1 Outline View Additional Options . . . . . . . . . . . . . . . . . . . . . . . . . . . . . . . . . . . . . . . . 88
6.6.2 Policy Flow View Additional Options . . . . . . . . . . . . . . . . . . . . . . . . . . . . . . . . . . . . . 88
6.6.3 Policy Set View Additional Options . . . . . . . . . . . . . . . . . . . . . . . . . . . . . . . . . . . . . . 90
7 Controlling the Flow of Objects with the Filter 93
7.1 Using the Filter Editor. . . . . . . . . . . . . . . . . . . . . . . . . . . . . . . . . . . . . . . . . . . . . . . . . . . . . . . . 94
7.1.1 Accessing the Filter Editor . . . . . . . . . . . . . . . . . . . . . . . . . . . . . . . . . . . . . . . . . . . . . 94
7.1.2 Navigating the Filter Editor . . . . . . . . . . . . . . . . . . . . . . . . . . . . . . . . . . . . . . . . . . . . 96
7.1.3 Understanding the Filter Editor Toolbar . . . . . . . . . . . . . . . . . . . . . . . . . . . . . . . . . . . 97
7.2 Editing the Filter . . . . . . . . . . . . . . . . . . . . . . . . . . . . . . . . . . . . . . . . . . . . . . . . . . . . . . . . . . . . 98
7.2.1 Removing or Adding Classes and Attributes . . . . . . . . . . . . . . . . . . . . . . . . . . . . . . . 98
7.2.2 Modifying Multiple Attributes . . . . . . . . . . . . . . . . . . . . . . . . . . . . . . . . . . . . . . . . . . . 99
7.2.3 Copying an Existing Filter . . . . . . . . . . . . . . . . . . . . . . . . . . . . . . . . . . . . . . . . . . . . . 99
6 Policies in Designer 3.5
Page 7

7.2.4 Setting Default Values for Attributes . . . . . . . . . . . . . . . . . . . . . . . . . . . . . . . . . . . . . 99
7.2.5 Changing the Filter Settings . . . . . . . . . . . . . . . . . . . . . . . . . . . . . . . . . . . . . . . . . . . 99
7.3 Testing the Filter . . . . . . . . . . . . . . . . . . . . . . . . . . . . . . . . . . . . . . . . . . . . . . . . . . . . . . . . . . 104
7.4 Exporting and Importing Filter Files . . . . . . . . . . . . . . . . . . . . . . . . . . . . . . . . . . . . . . . . . . . . 104
7.4.1 Exporting a Filter File. . . . . . . . . . . . . . . . . . . . . . . . . . . . . . . . . . . . . . . . . . . . . . . . 104
7.4.2 Importing a Filter File . . . . . . . . . . . . . . . . . . . . . . . . . . . . . . . . . . . . . . . . . . . . . . . . 104
7.5 Adding Comments to Classes and Attributes. . . . . . . . . . . . . . . . . . . . . . . . . . . . . . . . . . . . . 104
7.6 Viewing the Filter in XML . . . . . . . . . . . . . . . . . . . . . . . . . . . . . . . . . . . . . . . . . . . . . . . . . . . . 105
7.7 Deploying the Filter . . . . . . . . . . . . . . . . . . . . . . . . . . . . . . . . . . . . . . . . . . . . . . . . . . . . . . . . 105
7.8 Additional Filter Options . . . . . . . . . . . . . . . . . . . . . . . . . . . . . . . . . . . . . . . . . . . . . . . . . . . . . 105
7.8.1 Outline View Additional Options . . . . . . . . . . . . . . . . . . . . . . . . . . . . . . . . . . . . . . . 105
7.8.2 Policy Flow View Additional Options . . . . . . . . . . . . . . . . . . . . . . . . . . . . . . . . . . . . 106
7.8.3 Policy Set View Additional Options . . . . . . . . . . . . . . . . . . . . . . . . . . . . . . . . . . . . . 107
8 Using Predefined Rules 109
8.1 Command Transformation - Create Departmental Container - Part 1 and Part 2 . . . . . . . . . 110
8.1.1 Creating a Policy . . . . . . . . . . . . . . . . . . . . . . . . . . . . . . . . . . . . . . . . . . . . . . . . . . . 110
8.1.2 Importing the Predefined Rule . . . . . . . . . . . . . . . . . . . . . . . . . . . . . . . . . . . . . . . . . 111
8.1.3 How the Rule Works . . . . . . . . . . . . . . . . . . . . . . . . . . . . . . . . . . . . . . . . . . . . . . . . 112
8.2 Command Transformation - Publisher Delete to Disable . . . . . . . . . . . . . . . . . . . . . . . . . . . . 113
8.2.1 Creating a Policy . . . . . . . . . . . . . . . . . . . . . . . . . . . . . . . . . . . . . . . . . . . . . . . . . . . 113
8.2.2 Importing the Predefined Rule . . . . . . . . . . . . . . . . . . . . . . . . . . . . . . . . . . . . . . . . . 113
8.2.3 How the Rule Works . . . . . . . . . . . . . . . . . . . . . . . . . . . . . . . . . . . . . . . . . . . . . . . . 114
8.3 Creation - Require Attributes . . . . . . . . . . . . . . . . . . . . . . . . . . . . . . . . . . . . . . . . . . . . . . . . . 114
8.3.1 Creating a Policy . . . . . . . . . . . . . . . . . . . . . . . . . . . . . . . . . . . . . . . . . . . . . . . . . . . 114
8.3.2 Importing the Predefined Rule . . . . . . . . . . . . . . . . . . . . . . . . . . . . . . . . . . . . . . . . . 115
8.3.3 How the Rule Works . . . . . . . . . . . . . . . . . . . . . . . . . . . . . . . . . . . . . . . . . . . . . . . . 116
8.4 Creation - Publisher - Use Template . . . . . . . . . . . . . . . . . . . . . . . . . . . . . . . . . . . . . . . . . . . 116
8.4.1 Creating a Policy . . . . . . . . . . . . . . . . . . . . . . . . . . . . . . . . . . . . . . . . . . . . . . . . . . . 116
8.4.2 Importing the Predefined Rule . . . . . . . . . . . . . . . . . . . . . . . . . . . . . . . . . . . . . . . . . 117
8.4.3 How the Rule Works . . . . . . . . . . . . . . . . . . . . . . . . . . . . . . . . . . . . . . . . . . . . . . . . 117
8.5 Creation - Set Default Attribute Value . . . . . . . . . . . . . . . . . . . . . . . . . . . . . . . . . . . . . . . . . . 117
8.5.1 Creating a Policy . . . . . . . . . . . . . . . . . . . . . . . . . . . . . . . . . . . . . . . . . . . . . . . . . . . 118
8.5.2 Importing the Predefined Rule . . . . . . . . . . . . . . . . . . . . . . . . . . . . . . . . . . . . . . . . . 118
8.5.3 How the Rule Works . . . . . . . . . . . . . . . . . . . . . . . . . . . . . . . . . . . . . . . . . . . . . . . . 119
8.6 Creation - Set Default Password . . . . . . . . . . . . . . . . . . . . . . . . . . . . . . . . . . . . . . . . . . . . . . 119
8.6.1 Creating a Policy . . . . . . . . . . . . . . . . . . . . . . . . . . . . . . . . . . . . . . . . . . . . . . . . . . . 119
8.6.2 Importing the Predefined Rule . . . . . . . . . . . . . . . . . . . . . . . . . . . . . . . . . . . . . . . . . 120
8.6.3 How the Rule Works . . . . . . . . . . . . . . . . . . . . . . . . . . . . . . . . . . . . . . . . . . . . . . . . 120
8.7 Event Transformation - Scope Filtering - Include Subtrees . . . . . . . . . . . . . . . . . . . . . . . . . . 121
8.7.1 Creating a Policy . . . . . . . . . . . . . . . . . . . . . . . . . . . . . . . . . . . . . . . . . . . . . . . . . . . 121
8.7.2 Importing the Predefined Rule . . . . . . . . . . . . . . . . . . . . . . . . . . . . . . . . . . . . . . . . . 121
8.7.3 How the Rule Works . . . . . . . . . . . . . . . . . . . . . . . . . . . . . . . . . . . . . . . . . . . . . . . . 122
8.8 Event Transformation - Scope Filtering - Exclude Subtrees . . . . . . . . . . . . . . . . . . . . . . . . . 122
8.8.1 Creating a Policy . . . . . . . . . . . . . . . . . . . . . . . . . . . . . . . . . . . . . . . . . . . . . . . . . . . 122
8.8.2 Importing the Predefined Rule . . . . . . . . . . . . . . . . . . . . . . . . . . . . . . . . . . . . . . . . . 123
8.8.3 How the Rule Works . . . . . . . . . . . . . . . . . . . . . . . . . . . . . . . . . . . . . . . . . . . . . . . . 124
8.9 Input or Output Transformation - Reformat Telephone Number from (nnn) nnn-nnnn to nnn-nnn-
nnnn . . . . . . . . . . . . . . . . . . . . . . . . . . . . . . . . . . . . . . . . . . . . . . . . . . . . . . . . . . . . . . . . . . . . 124
8.9.1 Creating a Policy . . . . . . . . . . . . . . . . . . . . . . . . . . . . . . . . . . . . . . . . . . . . . . . . . . . 124
8.9.2 Importing the Predefined Rule . . . . . . . . . . . . . . . . . . . . . . . . . . . . . . . . . . . . . . . . . 125
8.9.3 How the Rule Works . . . . . . . . . . . . . . . . . . . . . . . . . . . . . . . . . . . . . . . . . . . . . . . . 125
8.10 Input or Output Transformation - Reformat Telephone Number from nnn-nnn-nnnn to (nnn) nnn-
nnnn . . . . . . . . . . . . . . . . . . . . . . . . . . . . . . . . . . . . . . . . . . . . . . . . . . . . . . . . . . . . . . . . . . . . 125
8.10.1 Creating a Policy . . . . . . . . . . . . . . . . . . . . . . . . . . . . . . . . . . . . . . . . . . . . . . . . . . . 126
novdocx (en) 13 May 2009
Contents 7
Page 8

8.10.2 Importing the Predefined Rule . . . . . . . . . . . . . . . . . . . . . . . . . . . . . . . . . . . . . . . . . 126
8.10.3 How the Rule Works . . . . . . . . . . . . . . . . . . . . . . . . . . . . . . . . . . . . . . . . . . . . . . . . 127
8.11 Matching - Publisher Mirrored . . . . . . . . . . . . . . . . . . . . . . . . . . . . . . . . . . . . . . . . . . . . . . . . 127
8.11.1 Creating a Policy . . . . . . . . . . . . . . . . . . . . . . . . . . . . . . . . . . . . . . . . . . . . . . . . . . . 127
8.11.2 Importing the Predefined Rule . . . . . . . . . . . . . . . . . . . . . . . . . . . . . . . . . . . . . . . . . 128
8.11.3 How the Rule Works . . . . . . . . . . . . . . . . . . . . . . . . . . . . . . . . . . . . . . . . . . . . . . . . 128
8.12 Matching - Subscriber Mirrored - LDAP Format. . . . . . . . . . . . . . . . . . . . . . . . . . . . . . . . . . . 129
8.12.1 Creating a Policy . . . . . . . . . . . . . . . . . . . . . . . . . . . . . . . . . . . . . . . . . . . . . . . . . . . 129
8.12.2 Importing the Predefined Rule . . . . . . . . . . . . . . . . . . . . . . . . . . . . . . . . . . . . . . . . . 129
8.12.3 How the Rule Works . . . . . . . . . . . . . . . . . . . . . . . . . . . . . . . . . . . . . . . . . . . . . . . . 130
8.13 Matching - By Attribute Value. . . . . . . . . . . . . . . . . . . . . . . . . . . . . . . . . . . . . . . . . . . . . . . . . 130
8.13.1 Creating a Policy . . . . . . . . . . . . . . . . . . . . . . . . . . . . . . . . . . . . . . . . . . . . . . . . . . . 131
8.13.2 Importing the Predefined Rule . . . . . . . . . . . . . . . . . . . . . . . . . . . . . . . . . . . . . . . . . 131
8.13.3 How the Rule Works . . . . . . . . . . . . . . . . . . . . . . . . . . . . . . . . . . . . . . . . . . . . . . . . 132
8.14 Placement - Publisher Mirrored . . . . . . . . . . . . . . . . . . . . . . . . . . . . . . . . . . . . . . . . . . . . . . . 132
8.14.1 Creating a Policy . . . . . . . . . . . . . . . . . . . . . . . . . . . . . . . . . . . . . . . . . . . . . . . . . . . 133
8.14.2 Importing the Predefined Rule . . . . . . . . . . . . . . . . . . . . . . . . . . . . . . . . . . . . . . . . . 133
8.14.3 How the Rule Works . . . . . . . . . . . . . . . . . . . . . . . . . . . . . . . . . . . . . . . . . . . . . . . . 134
8.15 Placement - Subscriber Mirrored - LDAP Format. . . . . . . . . . . . . . . . . . . . . . . . . . . . . . . . . . 134
8.15.1 Creating a Policy . . . . . . . . . . . . . . . . . . . . . . . . . . . . . . . . . . . . . . . . . . . . . . . . . . . 134
8.15.2 Importing the Predefined Rule . . . . . . . . . . . . . . . . . . . . . . . . . . . . . . . . . . . . . . . . . 135
8.15.3 How the Rule Works . . . . . . . . . . . . . . . . . . . . . . . . . . . . . . . . . . . . . . . . . . . . . . . . 136
8.16 Placement - Publisher Flat . . . . . . . . . . . . . . . . . . . . . . . . . . . . . . . . . . . . . . . . . . . . . . . . . . . 136
8.16.1 Creating a Policy . . . . . . . . . . . . . . . . . . . . . . . . . . . . . . . . . . . . . . . . . . . . . . . . . . . 136
8.16.2 Importing the Predefined Rule . . . . . . . . . . . . . . . . . . . . . . . . . . . . . . . . . . . . . . . . . 137
8.16.3 How the Rule Works . . . . . . . . . . . . . . . . . . . . . . . . . . . . . . . . . . . . . . . . . . . . . . . . 137
8.17 Placement - Subscriber Flat - LDAP Format . . . . . . . . . . . . . . . . . . . . . . . . . . . . . . . . . . . . . 138
8.17.1 Creating a Policy . . . . . . . . . . . . . . . . . . . . . . . . . . . . . . . . . . . . . . . . . . . . . . . . . . . 138
8.17.2 Importing the Predefined Rule . . . . . . . . . . . . . . . . . . . . . . . . . . . . . . . . . . . . . . . . . 138
8.17.3 How the Rule Works . . . . . . . . . . . . . . . . . . . . . . . . . . . . . . . . . . . . . . . . . . . . . . . . 139
8.18 Placement - Publisher By Dept . . . . . . . . . . . . . . . . . . . . . . . . . . . . . . . . . . . . . . . . . . . . . . . 139
8.18.1 Creating a Policy . . . . . . . . . . . . . . . . . . . . . . . . . . . . . . . . . . . . . . . . . . . . . . . . . . . 140
8.18.2 Importing the Predefined Rule . . . . . . . . . . . . . . . . . . . . . . . . . . . . . . . . . . . . . . . . . 140
8.18.3 How the Rule Works . . . . . . . . . . . . . . . . . . . . . . . . . . . . . . . . . . . . . . . . . . . . . . . . 141
8.19 Placement - Subscriber By Dept - LDAP Format . . . . . . . . . . . . . . . . . . . . . . . . . . . . . . . . . . 142
8.19.1 Creating a Policy . . . . . . . . . . . . . . . . . . . . . . . . . . . . . . . . . . . . . . . . . . . . . . . . . . . 142
8.19.2 Importing the Predefined Rule . . . . . . . . . . . . . . . . . . . . . . . . . . . . . . . . . . . . . . . . . 142
8.19.3 How the Rule Works . . . . . . . . . . . . . . . . . . . . . . . . . . . . . . . . . . . . . . . . . . . . . . . . 143
novdocx (en) 13 May 2009
9 Testing Policies with the Policy Simulator 145
9.1 Accessing the Policy Simulator . . . . . . . . . . . . . . . . . . . . . . . . . . . . . . . . . . . . . . . . . . . . . . . 145
9.1.1 Outline View. . . . . . . . . . . . . . . . . . . . . . . . . . . . . . . . . . . . . . . . . . . . . . . . . . . . . . . 145
9.1.2 Policy Flow View . . . . . . . . . . . . . . . . . . . . . . . . . . . . . . . . . . . . . . . . . . . . . . . . . . . 146
9.1.3 Editors . . . . . . . . . . . . . . . . . . . . . . . . . . . . . . . . . . . . . . . . . . . . . . . . . . . . . . . . . . . 146
9.2 Creating an XDS Input Document . . . . . . . . . . . . . . . . . . . . . . . . . . . . . . . . . . . . . . . . . . . . . 146
9.2.1 Source . . . . . . . . . . . . . . . . . . . . . . . . . . . . . . . . . . . . . . . . . . . . . . . . . . . . . . . . . . . 148
9.2.2 Import an XDS Document . . . . . . . . . . . . . . . . . . . . . . . . . . . . . . . . . . . . . . . . . . . . 148
9.2.3 Use an Identity Vault Object As a Template . . . . . . . . . . . . . . . . . . . . . . . . . . . . . . 148
9.2.4 Use an Application Object As a Template . . . . . . . . . . . . . . . . . . . . . . . . . . . . . . . . 149
9.2.5 Clear All Parameters . . . . . . . . . . . . . . . . . . . . . . . . . . . . . . . . . . . . . . . . . . . . . . . . 149
9.2.6 Configuration Options . . . . . . . . . . . . . . . . . . . . . . . . . . . . . . . . . . . . . . . . . . . . . . . 149
9.2.7 Save the Input Document . . . . . . . . . . . . . . . . . . . . . . . . . . . . . . . . . . . . . . . . . . . . 150
9.2.8 Simulation Point. . . . . . . . . . . . . . . . . . . . . . . . . . . . . . . . . . . . . . . . . . . . . . . . . . . . 150
9.2.9 Operation . . . . . . . . . . . . . . . . . . . . . . . . . . . . . . . . . . . . . . . . . . . . . . . . . . . . . . . . . 151
9.2.10 Parameter and Value. . . . . . . . . . . . . . . . . . . . . . . . . . . . . . . . . . . . . . . . . . . . . . . . 151
9.2.11 Attributes . . . . . . . . . . . . . . . . . . . . . . . . . . . . . . . . . . . . . . . . . . . . . . . . . . . . . . . . . 152
8 Policies in Designer 3.5
Page 9

9.3 Using the Operation Data Editor . . . . . . . . . . . . . . . . . . . . . . . . . . . . . . . . . . . . . . . . . . . . . . 154
9.4 Using the Hex Editor . . . . . . . . . . . . . . . . . . . . . . . . . . . . . . . . . . . . . . . . . . . . . . . . . . . . . . . 155
9.4.1 Accessing the Hex Editor. . . . . . . . . . . . . . . . . . . . . . . . . . . . . . . . . . . . . . . . . . . . . 156
9.4.2 Importing Data into the Hex Editor. . . . . . . . . . . . . . . . . . . . . . . . . . . . . . . . . . . . . . 157
9.4.3 Inserting Data in the Hex Editor. . . . . . . . . . . . . . . . . . . . . . . . . . . . . . . . . . . . . . . . 157
9.4.4 Appending Data in the Hex Editor . . . . . . . . . . . . . . . . . . . . . . . . . . . . . . . . . . . . . . 158
9.4.5 Editing Data in the Hex Editor . . . . . . . . . . . . . . . . . . . . . . . . . . . . . . . . . . . . . . . . . 159
9.4.6 Reverting Changes in the Hex Editor . . . . . . . . . . . . . . . . . . . . . . . . . . . . . . . . . . . 161
9.4.7 Deleting Data in the Hex Editor . . . . . . . . . . . . . . . . . . . . . . . . . . . . . . . . . . . . . . . . 161
9.4.8 Moving the Cursor in the Hex Editor . . . . . . . . . . . . . . . . . . . . . . . . . . . . . . . . . . . . 162
9.4.9 Exporting Data from the Hex Editor. . . . . . . . . . . . . . . . . . . . . . . . . . . . . . . . . . . . . 162
9.5 Simulating a Policy. . . . . . . . . . . . . . . . . . . . . . . . . . . . . . . . . . . . . . . . . . . . . . . . . . . . . . . . . 163
9.6 Simulating Policies with Java Extensions . . . . . . . . . . . . . . . . . . . . . . . . . . . . . . . . . . . . . . . 168
10 Storing Information in Resource Objects 169
10.1 Generic Resource Objects . . . . . . . . . . . . . . . . . . . . . . . . . . . . . . . . . . . . . . . . . . . . . . . . . . . 169
10.1.1 Creating a Resource Object . . . . . . . . . . . . . . . . . . . . . . . . . . . . . . . . . . . . . . . . . . 169
10.1.2 Using a Generic Resource Object . . . . . . . . . . . . . . . . . . . . . . . . . . . . . . . . . . . . . . 170
10.2 Mapping Table Objects . . . . . . . . . . . . . . . . . . . . . . . . . . . . . . . . . . . . . . . . . . . . . . . . . . . . . 171
10.3 ECMAScript Objects . . . . . . . . . . . . . . . . . . . . . . . . . . . . . . . . . . . . . . . . . . . . . . . . . . . . . . . 171
10.4 Application Objects . . . . . . . . . . . . . . . . . . . . . . . . . . . . . . . . . . . . . . . . . . . . . . . . . . . . . . . . 171
10.5 Repository Objects . . . . . . . . . . . . . . . . . . . . . . . . . . . . . . . . . . . . . . . . . . . . . . . . . . . . . . . . . 171
10.6 Library Objects . . . . . . . . . . . . . . . . . . . . . . . . . . . . . . . . . . . . . . . . . . . . . . . . . . . . . . . . . . . . 171
10.6.1 Creating Library Objects . . . . . . . . . . . . . . . . . . . . . . . . . . . . . . . . . . . . . . . . . . . . . 172
10.6.2 Adding Policies to the Library Objects . . . . . . . . . . . . . . . . . . . . . . . . . . . . . . . . . . . 172
10.6.3 Using Policies in the Library Objects . . . . . . . . . . . . . . . . . . . . . . . . . . . . . . . . . . . . 173
novdocx (en) 13 May 2009
11 Using ECMAScript in Policies 175
11.1 Creating an ECMAScript Object. . . . . . . . . . . . . . . . . . . . . . . . . . . . . . . . . . . . . . . . . . . . . . . 175
11.2 Using the ECMAScript Editor . . . . . . . . . . . . . . . . . . . . . . . . . . . . . . . . . . . . . . . . . . . . . . . . . 176
11.2.1 Main Scripting Area . . . . . . . . . . . . . . . . . . . . . . . . . . . . . . . . . . . . . . . . . . . . . . . . . 176
11.2.2 Expression Builder. . . . . . . . . . . . . . . . . . . . . . . . . . . . . . . . . . . . . . . . . . . . . . . . . . 178
11.2.3 Functions and Variables . . . . . . . . . . . . . . . . . . . . . . . . . . . . . . . . . . . . . . . . . . . . . 180
11.2.4 Error Display . . . . . . . . . . . . . . . . . . . . . . . . . . . . . . . . . . . . . . . . . . . . . . . . . . . . . . 181
11.2.5 Shell Area . . . . . . . . . . . . . . . . . . . . . . . . . . . . . . . . . . . . . . . . . . . . . . . . . . . . . . . . 182
11.3 Examples of ECMAScripts with Policies . . . . . . . . . . . . . . . . . . . . . . . . . . . . . . . . . . . . . . . . 184
11.3.1 DirXML Script Policy Calling an ECMAScript Function . . . . . . . . . . . . . . . . . . . . . . 185
11.3.2 XSLT Policy Calling an ECMAScript Function at the Driver Level . . . . . . . . . . . . . . 186
11.3.3 XSLT Policy Calling an ECMAScript Function in the Style Sheet . . . . . . . . . . . . . . 187
12 Conditions 189
If Association. . . . . . . . . . . . . . . . . . . . . . . . . . . . . . . . . . . . . . . . . . . . . . . . . . . . . . . . . . . . . . . . . . . 190
If Attribute . . . . . . . . . . . . . . . . . . . . . . . . . . . . . . . . . . . . . . . . . . . . . . . . . . . . . . . . . . . . . . . . . . . . . 192
If Class Name . . . . . . . . . . . . . . . . . . . . . . . . . . . . . . . . . . . . . . . . . . . . . . . . . . . . . . . . . . . . . . . . . . 195
If Destination Attribute. . . . . . . . . . . . . . . . . . . . . . . . . . . . . . . . . . . . . . . . . . . . . . . . . . . . . . . . . . . . 198
If Destination DN. . . . . . . . . . . . . . . . . . . . . . . . . . . . . . . . . . . . . . . . . . . . . . . . . . . . . . . . . . . . . . . . 201
If Entitlement . . . . . . . . . . . . . . . . . . . . . . . . . . . . . . . . . . . . . . . . . . . . . . . . . . . . . . . . . . . . . . . . . . . 202
If Global Configuration Value . . . . . . . . . . . . . . . . . . . . . . . . . . . . . . . . . . . . . . . . . . . . . . . . . . . . . . 205
If Local Variable . . . . . . . . . . . . . . . . . . . . . . . . . . . . . . . . . . . . . . . . . . . . . . . . . . . . . . . . . . . . . . . . 207
If Named Password. . . . . . . . . . . . . . . . . . . . . . . . . . . . . . . . . . . . . . . . . . . . . . . . . . . . . . . . . . . . . . 211
If Operation . . . . . . . . . . . . . . . . . . . . . . . . . . . . . . . . . . . . . . . . . . . . . . . . . . . . . . . . . . . . . . . . . . . . 212
If Operation Attribute. . . . . . . . . . . . . . . . . . . . . . . . . . . . . . . . . . . . . . . . . . . . . . . . . . . . . . . . . . . . . 215
Contents 9
Page 10

If Operation Property. . . . . . . . . . . . . . . . . . . . . . . . . . . . . . . . . . . . . . . . . . . . . . . . . . . . . . . . . . . . . 219
If Password . . . . . . . . . . . . . . . . . . . . . . . . . . . . . . . . . . . . . . . . . . . . . . . . . . . . . . . . . . . . . . . . . . . . 221
If Source Attribute . . . . . . . . . . . . . . . . . . . . . . . . . . . . . . . . . . . . . . . . . . . . . . . . . . . . . . . . . . . . . . . 224
If Source DN . . . . . . . . . . . . . . . . . . . . . . . . . . . . . . . . . . . . . . . . . . . . . . . . . . . . . . . . . . . . . . . . . . . 226
If XML Attribute . . . . . . . . . . . . . . . . . . . . . . . . . . . . . . . . . . . . . . . . . . . . . . . . . . . . . . . . . . . . . . . . . 228
If XPath Expression . . . . . . . . . . . . . . . . . . . . . . . . . . . . . . . . . . . . . . . . . . . . . . . . . . . . . . . . . . . . . 230
13 Actions 233
Add Association . . . . . . . . . . . . . . . . . . . . . . . . . . . . . . . . . . . . . . . . . . . . . . . . . . . . . . . . . . . . . . . . 235
Add Destination Attribute Value . . . . . . . . . . . . . . . . . . . . . . . . . . . . . . . . . . . . . . . . . . . . . . . . . . . . 236
Add Destination Object . . . . . . . . . . . . . . . . . . . . . . . . . . . . . . . . . . . . . . . . . . . . . . . . . . . . . . . . . . . 238
Add Role . . . . . . . . . . . . . . . . . . . . . . . . . . . . . . . . . . . . . . . . . . . . . . . . . . . . . . . . . . . . . . . . . . . . . . 240
Add Source Attribute Value. . . . . . . . . . . . . . . . . . . . . . . . . . . . . . . . . . . . . . . . . . . . . . . . . . . . . . . . 242
Add Source Object . . . . . . . . . . . . . . . . . . . . . . . . . . . . . . . . . . . . . . . . . . . . . . . . . . . . . . . . . . . . . . 243
Append XML Element . . . . . . . . . . . . . . . . . . . . . . . . . . . . . . . . . . . . . . . . . . . . . . . . . . . . . . . . . . . . 244
Append XML Text . . . . . . . . . . . . . . . . . . . . . . . . . . . . . . . . . . . . . . . . . . . . . . . . . . . . . . . . . . . . . . . 246
Break. . . . . . . . . . . . . . . . . . . . . . . . . . . . . . . . . . . . . . . . . . . . . . . . . . . . . . . . . . . . . . . . . . . . . . . . . 248
Clear Destination Attribute Value . . . . . . . . . . . . . . . . . . . . . . . . . . . . . . . . . . . . . . . . . . . . . . . . . . . 249
Clear Operation Property . . . . . . . . . . . . . . . . . . . . . . . . . . . . . . . . . . . . . . . . . . . . . . . . . . . . . . . . . 250
Clear Source Attribute Value . . . . . . . . . . . . . . . . . . . . . . . . . . . . . . . . . . . . . . . . . . . . . . . . . . . . . . 251
Clear SSO Credential . . . . . . . . . . . . . . . . . . . . . . . . . . . . . . . . . . . . . . . . . . . . . . . . . . . . . . . . . . . . 252
Clone By XPath Expressions . . . . . . . . . . . . . . . . . . . . . . . . . . . . . . . . . . . . . . . . . . . . . . . . . . . . . . 253
Clone Operation Attribute . . . . . . . . . . . . . . . . . . . . . . . . . . . . . . . . . . . . . . . . . . . . . . . . . . . . . . . . . 254
Delete Destination Object . . . . . . . . . . . . . . . . . . . . . . . . . . . . . . . . . . . . . . . . . . . . . . . . . . . . . . . . . 255
Delete Source Object . . . . . . . . . . . . . . . . . . . . . . . . . . . . . . . . . . . . . . . . . . . . . . . . . . . . . . . . . . . . 256
Find Matching Object . . . . . . . . . . . . . . . . . . . . . . . . . . . . . . . . . . . . . . . . . . . . . . . . . . . . . . . . . . . . 257
For Each . . . . . . . . . . . . . . . . . . . . . . . . . . . . . . . . . . . . . . . . . . . . . . . . . . . . . . . . . . . . . . . . . . . . . . 260
Generate Event. . . . . . . . . . . . . . . . . . . . . . . . . . . . . . . . . . . . . . . . . . . . . . . . . . . . . . . . . . . . . . . . . 261
If . . . . . . . . . . . . . . . . . . . . . . . . . . . . . . . . . . . . . . . . . . . . . . . . . . . . . . . . . . . . . . . . . . . . . . . . . . . . 264
Implement Entitlement . . . . . . . . . . . . . . . . . . . . . . . . . . . . . . . . . . . . . . . . . . . . . . . . . . . . . . . . . . . 266
Move Destination Object. . . . . . . . . . . . . . . . . . . . . . . . . . . . . . . . . . . . . . . . . . . . . . . . . . . . . . . . . . 267
Move Source Object . . . . . . . . . . . . . . . . . . . . . . . . . . . . . . . . . . . . . . . . . . . . . . . . . . . . . . . . . . . . . 269
Reformat Operation Attribute . . . . . . . . . . . . . . . . . . . . . . . . . . . . . . . . . . . . . . . . . . . . . . . . . . . . . . 270
Remove Association . . . . . . . . . . . . . . . . . . . . . . . . . . . . . . . . . . . . . . . . . . . . . . . . . . . . . . . . . . . . . 272
Remove Destination Attribute Value . . . . . . . . . . . . . . . . . . . . . . . . . . . . . . . . . . . . . . . . . . . . . . . . . 273
Remove Role . . . . . . . . . . . . . . . . . . . . . . . . . . . . . . . . . . . . . . . . . . . . . . . . . . . . . . . . . . . . . . . . . . 274
Remove Source Attribute Value . . . . . . . . . . . . . . . . . . . . . . . . . . . . . . . . . . . . . . . . . . . . . . . . . . . . 276
Rename Destination Object . . . . . . . . . . . . . . . . . . . . . . . . . . . . . . . . . . . . . . . . . . . . . . . . . . . . . . . 277
Rename Operation Attribute . . . . . . . . . . . . . . . . . . . . . . . . . . . . . . . . . . . . . . . . . . . . . . . . . . . . . . . 278
Rename Source Object. . . . . . . . . . . . . . . . . . . . . . . . . . . . . . . . . . . . . . . . . . . . . . . . . . . . . . . . . . . 279
Send Email . . . . . . . . . . . . . . . . . . . . . . . . . . . . . . . . . . . . . . . . . . . . . . . . . . . . . . . . . . . . . . . . . . . . 280
Send Email from Template . . . . . . . . . . . . . . . . . . . . . . . . . . . . . . . . . . . . . . . . . . . . . . . . . . . . . . . . 282
Set Default Attribute Value . . . . . . . . . . . . . . . . . . . . . . . . . . . . . . . . . . . . . . . . . . . . . . . . . . . . . . . . 284
Set Destination Attribute Value . . . . . . . . . . . . . . . . . . . . . . . . . . . . . . . . . . . . . . . . . . . . . . . . . . . . . 286
Set Destination Password. . . . . . . . . . . . . . . . . . . . . . . . . . . . . . . . . . . . . . . . . . . . . . . . . . . . . . . . . 288
Set Local Variable. . . . . . . . . . . . . . . . . . . . . . . . . . . . . . . . . . . . . . . . . . . . . . . . . . . . . . . . . . . . . . . 289
Set Operation Association . . . . . . . . . . . . . . . . . . . . . . . . . . . . . . . . . . . . . . . . . . . . . . . . . . . . . . . . 291
Set Operation Class Name . . . . . . . . . . . . . . . . . . . . . . . . . . . . . . . . . . . . . . . . . . . . . . . . . . . . . . . . 292
Set Operation Destination DN. . . . . . . . . . . . . . . . . . . . . . . . . . . . . . . . . . . . . . . . . . . . . . . . . . . . . . 293
Set Operation Property . . . . . . . . . . . . . . . . . . . . . . . . . . . . . . . . . . . . . . . . . . . . . . . . . . . . . . . . . . . 294
Set Operation Source DN . . . . . . . . . . . . . . . . . . . . . . . . . . . . . . . . . . . . . . . . . . . . . . . . . . . . . . . . . 295
novdocx (en) 13 May 2009
10 Policies in Designer 3.5
Page 11

Set Operation Template DN . . . . . . . . . . . . . . . . . . . . . . . . . . . . . . . . . . . . . . . . . . . . . . . . . . . . . . . 296
Set Source Attribute Value . . . . . . . . . . . . . . . . . . . . . . . . . . . . . . . . . . . . . . . . . . . . . . . . . . . . . . . . 297
Set Source Password . . . . . . . . . . . . . . . . . . . . . . . . . . . . . . . . . . . . . . . . . . . . . . . . . . . . . . . . . . . . 299
Set SSO Credential. . . . . . . . . . . . . . . . . . . . . . . . . . . . . . . . . . . . . . . . . . . . . . . . . . . . . . . . . . . . . . 300
Set SSO Passphrase . . . . . . . . . . . . . . . . . . . . . . . . . . . . . . . . . . . . . . . . . . . . . . . . . . . . . . . . . . . . 301
Set XML Attribute . . . . . . . . . . . . . . . . . . . . . . . . . . . . . . . . . . . . . . . . . . . . . . . . . . . . . . . . . . . . . . . 302
Start Workflow. . . . . . . . . . . . . . . . . . . . . . . . . . . . . . . . . . . . . . . . . . . . . . . . . . . . . . . . . . . . . . . . . . 303
Status . . . . . . . . . . . . . . . . . . . . . . . . . . . . . . . . . . . . . . . . . . . . . . . . . . . . . . . . . . . . . . . . . . . . . . . . 305
Strip Operation Attribute . . . . . . . . . . . . . . . . . . . . . . . . . . . . . . . . . . . . . . . . . . . . . . . . . . . . . . . . . . 306
Strip XPath Expression . . . . . . . . . . . . . . . . . . . . . . . . . . . . . . . . . . . . . . . . . . . . . . . . . . . . . . . . . . . 307
Trace Message . . . . . . . . . . . . . . . . . . . . . . . . . . . . . . . . . . . . . . . . . . . . . . . . . . . . . . . . . . . . . . . . . 308
Veto. . . . . . . . . . . . . . . . . . . . . . . . . . . . . . . . . . . . . . . . . . . . . . . . . . . . . . . . . . . . . . . . . . . . . . . . . . 310
Veto If Operation Attribute Not Available . . . . . . . . . . . . . . . . . . . . . . . . . . . . . . . . . . . . . . . . . . . . . 311
While . . . . . . . . . . . . . . . . . . . . . . . . . . . . . . . . . . . . . . . . . . . . . . . . . . . . . . . . . . . . . . . . . . . . . . . . . 312
14 Noun Tokens 313
Text . . . . . . . . . . . . . . . . . . . . . . . . . . . . . . . . . . . . . . . . . . . . . . . . . . . . . . . . . . . . . . . . . . . . . . . . . . 314
Added Entitlement. . . . . . . . . . . . . . . . . . . . . . . . . . . . . . . . . . . . . . . . . . . . . . . . . . . . . . . . . . . . . . . 316
Association . . . . . . . . . . . . . . . . . . . . . . . . . . . . . . . . . . . . . . . . . . . . . . . . . . . . . . . . . . . . . . . . . . . . 317
Attribute. . . . . . . . . . . . . . . . . . . . . . . . . . . . . . . . . . . . . . . . . . . . . . . . . . . . . . . . . . . . . . . . . . . . . . . 318
Character . . . . . . . . . . . . . . . . . . . . . . . . . . . . . . . . . . . . . . . . . . . . . . . . . . . . . . . . . . . . . . . . . . . . . 319
Class Name . . . . . . . . . . . . . . . . . . . . . . . . . . . . . . . . . . . . . . . . . . . . . . . . . . . . . . . . . . . . . . . . . . . 320
Destination Attribute . . . . . . . . . . . . . . . . . . . . . . . . . . . . . . . . . . . . . . . . . . . . . . . . . . . . . . . . . . . . . 321
Destination DN . . . . . . . . . . . . . . . . . . . . . . . . . . . . . . . . . . . . . . . . . . . . . . . . . . . . . . . . . . . . . . . . . 323
Destination Name . . . . . . . . . . . . . . . . . . . . . . . . . . . . . . . . . . . . . . . . . . . . . . . . . . . . . . . . . . . . . . . 325
Document . . . . . . . . . . . . . . . . . . . . . . . . . . . . . . . . . . . . . . . . . . . . . . . . . . . . . . . . . . . . . . . . . . . . . 326
Entitlement . . . . . . . . . . . . . . . . . . . . . . . . . . . . . . . . . . . . . . . . . . . . . . . . . . . . . . . . . . . . . . . . . . . . 327
Generate Password . . . . . . . . . . . . . . . . . . . . . . . . . . . . . . . . . . . . . . . . . . . . . . . . . . . . . . . . . . . . . 328
Global Configuration Value . . . . . . . . . . . . . . . . . . . . . . . . . . . . . . . . . . . . . . . . . . . . . . . . . . . . . . . . 329
Local Variable . . . . . . . . . . . . . . . . . . . . . . . . . . . . . . . . . . . . . . . . . . . . . . . . . . . . . . . . . . . . . . . . . . 330
Named Password . . . . . . . . . . . . . . . . . . . . . . . . . . . . . . . . . . . . . . . . . . . . . . . . . . . . . . . . . . . . . . . 332
Operation . . . . . . . . . . . . . . . . . . . . . . . . . . . . . . . . . . . . . . . . . . . . . . . . . . . . . . . . . . . . . . . . . . . . . 334
Operation Attribute . . . . . . . . . . . . . . . . . . . . . . . . . . . . . . . . . . . . . . . . . . . . . . . . . . . . . . . . . . . . . . 335
Operation Property . . . . . . . . . . . . . . . . . . . . . . . . . . . . . . . . . . . . . . . . . . . . . . . . . . . . . . . . . . . . . . 337
Password . . . . . . . . . . . . . . . . . . . . . . . . . . . . . . . . . . . . . . . . . . . . . . . . . . . . . . . . . . . . . . . . . . . . . 338
Query . . . . . . . . . . . . . . . . . . . . . . . . . . . . . . . . . . . . . . . . . . . . . . . . . . . . . . . . . . . . . . . . . . . . . . . . 339
Removed Attribute . . . . . . . . . . . . . . . . . . . . . . . . . . . . . . . . . . . . . . . . . . . . . . . . . . . . . . . . . . . . . . 341
Removed Entitlement . . . . . . . . . . . . . . . . . . . . . . . . . . . . . . . . . . . . . . . . . . . . . . . . . . . . . . . . . . . . 342
Resolve . . . . . . . . . . . . . . . . . . . . . . . . . . . . . . . . . . . . . . . . . . . . . . . . . . . . . . . . . . . . . . . . . . . . . . . 343
Source Attribute . . . . . . . . . . . . . . . . . . . . . . . . . . . . . . . . . . . . . . . . . . . . . . . . . . . . . . . . . . . . . . . . 344
Source DN . . . . . . . . . . . . . . . . . . . . . . . . . . . . . . . . . . . . . . . . . . . . . . . . . . . . . . . . . . . . . . . . . . . . 345
Source Name . . . . . . . . . . . . . . . . . . . . . . . . . . . . . . . . . . . . . . . . . . . . . . . . . . . . . . . . . . . . . . . . . . 346
Time . . . . . . . . . . . . . . . . . . . . . . . . . . . . . . . . . . . . . . . . . . . . . . . . . . . . . . . . . . . . . . . . . . . . . . . . . 347
Unique Name . . . . . . . . . . . . . . . . . . . . . . . . . . . . . . . . . . . . . . . . . . . . . . . . . . . . . . . . . . . . . . . . . . 348
Unmatched Source DN . . . . . . . . . . . . . . . . . . . . . . . . . . . . . . . . . . . . . . . . . . . . . . . . . . . . . . . . . . . 351
XPath . . . . . . . . . . . . . . . . . . . . . . . . . . . . . . . . . . . . . . . . . . . . . . . . . . . . . . . . . . . . . . . . . . . . . . . . 352
novdocx (en) 13 May 2009
15 Verb Tokens 353
Base64 Decode . . . . . . . . . . . . . . . . . . . . . . . . . . . . . . . . . . . . . . . . . . . . . . . . . . . . . . . . . . . . . . . . 354
Base64 Encode. . . . . . . . . . . . . . . . . . . . . . . . . . . . . . . . . . . . . . . . . . . . . . . . . . . . . . . . . . . . . . . . . 355
Contents 11
Page 12

Convert Time . . . . . . . . . . . . . . . . . . . . . . . . . . . . . . . . . . . . . . . . . . . . . . . . . . . . . . . . . . . . . . . . . . 356
Escape Destination DN . . . . . . . . . . . . . . . . . . . . . . . . . . . . . . . . . . . . . . . . . . . . . . . . . . . . . . . . . . . 358
Escape Source DN . . . . . . . . . . . . . . . . . . . . . . . . . . . . . . . . . . . . . . . . . . . . . . . . . . . . . . . . . . . . . . 359
Join . . . . . . . . . . . . . . . . . . . . . . . . . . . . . . . . . . . . . . . . . . . . . . . . . . . . . . . . . . . . . . . . . . . . . . . . . . 360
Lowercase. . . . . . . . . . . . . . . . . . . . . . . . . . . . . . . . . . . . . . . . . . . . . . . . . . . . . . . . . . . . . . . . . . . . . 361
Map . . . . . . . . . . . . . . . . . . . . . . . . . . . . . . . . . . . . . . . . . . . . . . . . . . . . . . . . . . . . . . . . . . . . . . . . . . 362
Parse DN . . . . . . . . . . . . . . . . . . . . . . . . . . . . . . . . . . . . . . . . . . . . . . . . . . . . . . . . . . . . . . . . . . . . . 364
Replace All . . . . . . . . . . . . . . . . . . . . . . . . . . . . . . . . . . . . . . . . . . . . . . . . . . . . . . . . . . . . . . . . . . . . 366
Replace First. . . . . . . . . . . . . . . . . . . . . . . . . . . . . . . . . . . . . . . . . . . . . . . . . . . . . . . . . . . . . . . . . . . 367
Split . . . . . . . . . . . . . . . . . . . . . . . . . . . . . . . . . . . . . . . . . . . . . . . . . . . . . . . . . . . . . . . . . . . . . . . . . . 369
Substring. . . . . . . . . . . . . . . . . . . . . . . . . . . . . . . . . . . . . . . . . . . . . . . . . . . . . . . . . . . . . . . . . . . . . . 370
Uppercase. . . . . . . . . . . . . . . . . . . . . . . . . . . . . . . . . . . . . . . . . . . . . . . . . . . . . . . . . . . . . . . . . . . . . 372
XML Parse . . . . . . . . . . . . . . . . . . . . . . . . . . . . . . . . . . . . . . . . . . . . . . . . . . . . . . . . . . . . . . . . . . . . 373
XML Serialize . . . . . . . . . . . . . . . . . . . . . . . . . . . . . . . . . . . . . . . . . . . . . . . . . . . . . . . . . . . . . . . . . . 374
16 Pre-Identity Manager 3.5 Builders 375
16.1 Action Builder . . . . . . . . . . . . . . . . . . . . . . . . . . . . . . . . . . . . . . . . . . . . . . . . . . . . . . . . . . . . . 375
16.1.1 Creating an Action . . . . . . . . . . . . . . . . . . . . . . . . . . . . . . . . . . . . . . . . . . . . . . . . . . 375
16.1.2 Additional Options for the Action Builder . . . . . . . . . . . . . . . . . . . . . . . . . . . . . . . . . 375
16.2 Actions Builder . . . . . . . . . . . . . . . . . . . . . . . . . . . . . . . . . . . . . . . . . . . . . . . . . . . . . . . . . . . . 376
16.3 Argument Builder . . . . . . . . . . . . . . . . . . . . . . . . . . . . . . . . . . . . . . . . . . . . . . . . . . . . . . . . . . 377
16.3.1 Launching the Argument Builder . . . . . . . . . . . . . . . . . . . . . . . . . . . . . . . . . . . . . . . 378
16.3.2 Argument Builder Example . . . . . . . . . . . . . . . . . . . . . . . . . . . . . . . . . . . . . . . . . . . 379
16.4 Action Argument Component Builder . . . . . . . . . . . . . . . . . . . . . . . . . . . . . . . . . . . . . . . . . . . 381
16.5 Condition Builder . . . . . . . . . . . . . . . . . . . . . . . . . . . . . . . . . . . . . . . . . . . . . . . . . . . . . . . . . . 382
16.5.1 Creating a Condition . . . . . . . . . . . . . . . . . . . . . . . . . . . . . . . . . . . . . . . . . . . . . . . . 382
16.5.2 Additional Options for the Condition Builder . . . . . . . . . . . . . . . . . . . . . . . . . . . . . . 382
16.6 Condition Argument Component Builder . . . . . . . . . . . . . . . . . . . . . . . . . . . . . . . . . . . . . . . . 383
16.7 Match Attribute Builder . . . . . . . . . . . . . . . . . . . . . . . . . . . . . . . . . . . . . . . . . . . . . . . . . . . . . . 383
16.8 Named String Builder . . . . . . . . . . . . . . . . . . . . . . . . . . . . . . . . . . . . . . . . . . . . . . . . . . . . . . . 385
16.9 Pattern String Builder . . . . . . . . . . . . . . . . . . . . . . . . . . . . . . . . . . . . . . . . . . . . . . . . . . . . . . . 386
16.10 Argument Value List Builder. . . . . . . . . . . . . . . . . . . . . . . . . . . . . . . . . . . . . . . . . . . . . . . . . . 388
16.11 Namespace Editor . . . . . . . . . . . . . . . . . . . . . . . . . . . . . . . . . . . . . . . . . . . . . . . . . . . . . . . . . 388
16.11.1 Accessing Java Classes by Using Namespaces . . . . . . . . . . . . . . . . . . . . . . . . . . . 389
novdocx (en) 13 May 2009
17 Pre-Identity Manager 3.5 Conditions 391
If Association. . . . . . . . . . . . . . . . . . . . . . . . . . . . . . . . . . . . . . . . . . . . . . . . . . . . . . . . . . . . . . . . . . . 392
If Attribute . . . . . . . . . . . . . . . . . . . . . . . . . . . . . . . . . . . . . . . . . . . . . . . . . . . . . . . . . . . . . . . . . . . . . 393
If Class Name . . . . . . . . . . . . . . . . . . . . . . . . . . . . . . . . . . . . . . . . . . . . . . . . . . . . . . . . . . . . . . . . . . 395
If Destination Attribute. . . . . . . . . . . . . . . . . . . . . . . . . . . . . . . . . . . . . . . . . . . . . . . . . . . . . . . . . . . . 397
If Destination DN. . . . . . . . . . . . . . . . . . . . . . . . . . . . . . . . . . . . . . . . . . . . . . . . . . . . . . . . . . . . . . . . 399
If Entitlement . . . . . . . . . . . . . . . . . . . . . . . . . . . . . . . . . . . . . . . . . . . . . . . . . . . . . . . . . . . . . . . . . . . 400
If Global Configuration Value . . . . . . . . . . . . . . . . . . . . . . . . . . . . . . . . . . . . . . . . . . . . . . . . . . . . . . 402
If Local Variable . . . . . . . . . . . . . . . . . . . . . . . . . . . . . . . . . . . . . . . . . . . . . . . . . . . . . . . . . . . . . . . . 404
If Named Password. . . . . . . . . . . . . . . . . . . . . . . . . . . . . . . . . . . . . . . . . . . . . . . . . . . . . . . . . . . . . . 406
If Operation Attribute. . . . . . . . . . . . . . . . . . . . . . . . . . . . . . . . . . . . . . . . . . . . . . . . . . . . . . . . . . . . . 407
If Operation Property. . . . . . . . . . . . . . . . . . . . . . . . . . . . . . . . . . . . . . . . . . . . . . . . . . . . . . . . . . . . . 409
If Operation . . . . . . . . . . . . . . . . . . . . . . . . . . . . . . . . . . . . . . . . . . . . . . . . . . . . . . . . . . . . . . . . . . . . 411
If Password . . . . . . . . . . . . . . . . . . . . . . . . . . . . . . . . . . . . . . . . . . . . . . . . . . . . . . . . . . . . . . . . . . . . 413
If Source Attribute . . . . . . . . . . . . . . . . . . . . . . . . . . . . . . . . . . . . . . . . . . . . . . . . . . . . . . . . . . . . . . . 414
If Source DN . . . . . . . . . . . . . . . . . . . . . . . . . . . . . . . . . . . . . . . . . . . . . . . . . . . . . . . . . . . . . . . . . . . 416
12 Policies in Designer 3.5
Page 13

If XPath Expression . . . . . . . . . . . . . . . . . . . . . . . . . . . . . . . . . . . . . . . . . . . . . . . . . . . . . . . . . . . . . 417
18 Pre-Identity Manager 3.5 Actions 419
Add Association . . . . . . . . . . . . . . . . . . . . . . . . . . . . . . . . . . . . . . . . . . . . . . . . . . . . . . . . . . . . . . . . 421
Add Destination Attribute Value . . . . . . . . . . . . . . . . . . . . . . . . . . . . . . . . . . . . . . . . . . . . . . . . . . . . 422
Add Destination Object . . . . . . . . . . . . . . . . . . . . . . . . . . . . . . . . . . . . . . . . . . . . . . . . . . . . . . . . . . . 423
Add Source Attribute Value. . . . . . . . . . . . . . . . . . . . . . . . . . . . . . . . . . . . . . . . . . . . . . . . . . . . . . . . 424
Add Source Object . . . . . . . . . . . . . . . . . . . . . . . . . . . . . . . . . . . . . . . . . . . . . . . . . . . . . . . . . . . . . . 425
Append XML Element . . . . . . . . . . . . . . . . . . . . . . . . . . . . . . . . . . . . . . . . . . . . . . . . . . . . . . . . . . . . 426
Append XML Text . . . . . . . . . . . . . . . . . . . . . . . . . . . . . . . . . . . . . . . . . . . . . . . . . . . . . . . . . . . . . . . 427
Break. . . . . . . . . . . . . . . . . . . . . . . . . . . . . . . . . . . . . . . . . . . . . . . . . . . . . . . . . . . . . . . . . . . . . . . . . 428
Clear Destination Attribute Value . . . . . . . . . . . . . . . . . . . . . . . . . . . . . . . . . . . . . . . . . . . . . . . . . . . 429
Clear Operation Property . . . . . . . . . . . . . . . . . . . . . . . . . . . . . . . . . . . . . . . . . . . . . . . . . . . . . . . . . 430
Clear Source Attribute Value . . . . . . . . . . . . . . . . . . . . . . . . . . . . . . . . . . . . . . . . . . . . . . . . . . . . . . 431
Clear SSO Credential . . . . . . . . . . . . . . . . . . . . . . . . . . . . . . . . . . . . . . . . . . . . . . . . . . . . . . . . . . . . 432
Clone By XPath Expression . . . . . . . . . . . . . . . . . . . . . . . . . . . . . . . . . . . . . . . . . . . . . . . . . . . . . . . 433
Clone Operation Attribute . . . . . . . . . . . . . . . . . . . . . . . . . . . . . . . . . . . . . . . . . . . . . . . . . . . . . . . . . 434
Delete Destination Object . . . . . . . . . . . . . . . . . . . . . . . . . . . . . . . . . . . . . . . . . . . . . . . . . . . . . . . . . 435
Delete Source Object . . . . . . . . . . . . . . . . . . . . . . . . . . . . . . . . . . . . . . . . . . . . . . . . . . . . . . . . . . . . 436
Find Matching Object . . . . . . . . . . . . . . . . . . . . . . . . . . . . . . . . . . . . . . . . . . . . . . . . . . . . . . . . . . . . 437
For Each . . . . . . . . . . . . . . . . . . . . . . . . . . . . . . . . . . . . . . . . . . . . . . . . . . . . . . . . . . . . . . . . . . . . . . 438
Generate Event. . . . . . . . . . . . . . . . . . . . . . . . . . . . . . . . . . . . . . . . . . . . . . . . . . . . . . . . . . . . . . . . . 439
Implement Entitlement . . . . . . . . . . . . . . . . . . . . . . . . . . . . . . . . . . . . . . . . . . . . . . . . . . . . . . . . . . . 441
Move Destination Object. . . . . . . . . . . . . . . . . . . . . . . . . . . . . . . . . . . . . . . . . . . . . . . . . . . . . . . . . . 442
Move Source Object . . . . . . . . . . . . . . . . . . . . . . . . . . . . . . . . . . . . . . . . . . . . . . . . . . . . . . . . . . . . . 443
Reformat Operation Attribute Value . . . . . . . . . . . . . . . . . . . . . . . . . . . . . . . . . . . . . . . . . . . . . . . . . 444
Remove Association . . . . . . . . . . . . . . . . . . . . . . . . . . . . . . . . . . . . . . . . . . . . . . . . . . . . . . . . . . . . . 445
Remove Destination Attribute Value . . . . . . . . . . . . . . . . . . . . . . . . . . . . . . . . . . . . . . . . . . . . . . . . . 446
Remove Source Attribute Value . . . . . . . . . . . . . . . . . . . . . . . . . . . . . . . . . . . . . . . . . . . . . . . . . . . . 447
Rename Destination Object . . . . . . . . . . . . . . . . . . . . . . . . . . . . . . . . . . . . . . . . . . . . . . . . . . . . . . . 448
Rename Operation Attribute . . . . . . . . . . . . . . . . . . . . . . . . . . . . . . . . . . . . . . . . . . . . . . . . . . . . . . . 449
Rename Source Object. . . . . . . . . . . . . . . . . . . . . . . . . . . . . . . . . . . . . . . . . . . . . . . . . . . . . . . . . . . 450
Send Email . . . . . . . . . . . . . . . . . . . . . . . . . . . . . . . . . . . . . . . . . . . . . . . . . . . . . . . . . . . . . . . . . . . . 451
Send Email from Template . . . . . . . . . . . . . . . . . . . . . . . . . . . . . . . . . . . . . . . . . . . . . . . . . . . . . . . . 452
Set Default Attribute Value . . . . . . . . . . . . . . . . . . . . . . . . . . . . . . . . . . . . . . . . . . . . . . . . . . . . . . . . 453
Set Destination Attribute Value . . . . . . . . . . . . . . . . . . . . . . . . . . . . . . . . . . . . . . . . . . . . . . . . . . . . . 454
Set Destination Password. . . . . . . . . . . . . . . . . . . . . . . . . . . . . . . . . . . . . . . . . . . . . . . . . . . . . . . . . 455
Set Local Variable. . . . . . . . . . . . . . . . . . . . . . . . . . . . . . . . . . . . . . . . . . . . . . . . . . . . . . . . . . . . . . . 456
Set Operation Association . . . . . . . . . . . . . . . . . . . . . . . . . . . . . . . . . . . . . . . . . . . . . . . . . . . . . . . . 457
Set Operation Class Name . . . . . . . . . . . . . . . . . . . . . . . . . . . . . . . . . . . . . . . . . . . . . . . . . . . . . . . . 458
Set Operation Destination DN. . . . . . . . . . . . . . . . . . . . . . . . . . . . . . . . . . . . . . . . . . . . . . . . . . . . . . 459
Set Operation Property . . . . . . . . . . . . . . . . . . . . . . . . . . . . . . . . . . . . . . . . . . . . . . . . . . . . . . . . . . . 460
Set Operation Source DN . . . . . . . . . . . . . . . . . . . . . . . . . . . . . . . . . . . . . . . . . . . . . . . . . . . . . . . . . 461
Set Operation Template DN . . . . . . . . . . . . . . . . . . . . . . . . . . . . . . . . . . . . . . . . . . . . . . . . . . . . . . . 462
Set Source Attribute Value . . . . . . . . . . . . . . . . . . . . . . . . . . . . . . . . . . . . . . . . . . . . . . . . . . . . . . . . 463
Set Source Password . . . . . . . . . . . . . . . . . . . . . . . . . . . . . . . . . . . . . . . . . . . . . . . . . . . . . . . . . . . . 464
Set SSO Credential. . . . . . . . . . . . . . . . . . . . . . . . . . . . . . . . . . . . . . . . . . . . . . . . . . . . . . . . . . . . . . 465
Set SSO Passphrase . . . . . . . . . . . . . . . . . . . . . . . . . . . . . . . . . . . . . . . . . . . . . . . . . . . . . . . . . . . . 466
Set XML Attribute . . . . . . . . . . . . . . . . . . . . . . . . . . . . . . . . . . . . . . . . . . . . . . . . . . . . . . . . . . . . . . . 467
Status . . . . . . . . . . . . . . . . . . . . . . . . . . . . . . . . . . . . . . . . . . . . . . . . . . . . . . . . . . . .
Strip Operation Attribute . . . . . . . . . . . . . . . . . . . . . . . . . . . . . . . . . . . . . . . . . . . . . . . . . . . . . . . . . . 469
. . . . . . . . . . . . 468
novdocx (en) 13 May 2009
Contents 13
Page 14

Strip XPath . . . . . . . . . . . . . . . . . . . . . . . . . . . . . . . . . . . . . . . . . . . . . . . . . . . . . . . . . . . . . . . . . . . . 470
Trace Message . . . . . . . . . . . . . . . . . . . . . . . . . . . . . . . . . . . . . . . . . . . . . . . . . . . . . . . . . . . . . . . . . 471
Veto. . . . . . . . . . . . . . . . . . . . . . . . . . . . . . . . . . . . . . . . . . . . . . . . . . . . . . . . . . . . . . . . . . . . . . . . . . 472
Veto If Operation Attribute Not Available . . . . . . . . . . . . . . . . . . . . . . . . . . . . . . . . . . . . . . . . . . . . . 473
19 Pre-Identity Manager 3.5 Noun Tokens 475
Added Entitlement. . . . . . . . . . . . . . . . . . . . . . . . . . . . . . . . . . . . . . . . . . . . . . . . . . . . . . . . . . . . . . . 476
Association . . . . . . . . . . . . . . . . . . . . . . . . . . . . . . . . . . . . . . . . . . . . . . . . . . . . . . . . . . . . . . . . . . . . 477
Attribute. . . . . . . . . . . . . . . . . . . . . . . . . . . . . . . . . . . . . . . . . . . . . . . . . . . . . . . . . . . . . . . . . . . . . . . 478
Class Name . . . . . . . . . . . . . . . . . . . . . . . . . . . . . . . . . . . . . . . . . . . . . . . . . . . . . . . . . . . . . . . . . . . 479
Destination Attribute . . . . . . . . . . . . . . . . . . . . . . . . . . . . . . . . . . . . . . . . . . . . . . . . . . . . . . . . . . . . . 480
Destination DN . . . . . . . . . . . . . . . . . . . . . . . . . . . . . . . . . . . . . . . . . . . . . . . . . . . . . . . . . . . . . . . . . 481
Destination Name . . . . . . . . . . . . . . . . . . . . . . . . . . . . . . . . . . . . . . . . . . . . . . . . . . . . . . . . . . . . . . . 482
Entitlement . . . . . . . . . . . . . . . . . . . . . . . . . . . . . . . . . . . . . . . . . . . . . . . . . . . . . . . . . . . . . . . . . . . . 483
Global Configuration Value . . . . . . . . . . . . . . . . . . . . . . . . . . . . . . . . . . . . . . . . . . . . . . . . . . . . . . . . 484
Local Variable . . . . . . . . . . . . . . . . . . . . . . . . . . . . . . . . . . . . . . . . . . . . . . . . . . . . . . . . . . . . . . . . . . 485
Named Password . . . . . . . . . . . . . . . . . . . . . . . . . . . . . . . . . . . . . . . . . . . . . . . . . . . . . . . . . . . . . . . 486
Operation . . . . . . . . . . . . . . . . . . . . . . . . . . . . . . . . . . . . . . . . . . . . . . . . . . . . . . . . . . . . . . . . . . . . . 487
Operation Attribute . . . . . . . . . . . . . . . . . . . . . . . . . . . . . . . . . . . . . . . . . . . . . . . . . . . . . . . . . . . . . . 488
Operation Property . . . . . . . . . . . . . . . . . . . . . . . . . . . . . . . . . . . . . . . . . . . . . . . . . . . . . . . . . . . . . . 489
Password . . . . . . . . . . . . . . . . . . . . . . . . . . . . . . . . . . . . . . . . . . . . . . . . . . . . . . . . . . . . . . . . . . . . . 490
Removed Attribute . . . . . . . . . . . . . . . . . . . . . . . . . . . . . . . . . . . . . . . . . . . . . . . . . . . . . . . . . . . . . . 491
Removed Entitlements . . . . . . . . . . . . . . . . . . . . . . . . . . . . . . . . . . . . . . . . . . . . . . . . . . . . . . . . . . . 492
Source Attribute . . . . . . . . . . . . . . . . . . . . . . . . . . . . . . . . . . . . . . . . . . . . . . . . . . . . . . . . . . . . . . . . 493
Source DN . . . . . . . . . . . . . . . . . . . . . . . . . . . . . . . . . . . . . . . . . . . . . . . . . . . . . . . . . . . . . . . . . . . . 494
Source Name . . . . . . . . . . . . . . . . . . . . . . . . . . . . . . . . . . . . . . . . . . . . . . . . . . . . . . . . . . . . . . . . . . 495
Text . . . . . . . . . . . . . . . . . . . . . . . . . . . . . . . . . . . . . . . . . . . . . . . . . . . . . . . . . . . . . . . . . . . . . . . . . . 496
Unique Name . . . . . . . . . . . . . . . . . . . . . . . . . . . . . . . . . . . . . . . . . . . . . . . . . . . . . . . . . . . . . . . . . . 497
Unmatched Source DN . . . . . . . . . . . . . . . . . . . . . . . . . . . . . . . . . . . . . . . . . . . . . . . . . . . . . . . . . . . 499
XPath . . . . . . . . . . . . . . . . . . . . . . . . . . . . . . . . . . . . . . . . . . . . . . . . . . . . . . . . . . . . . . . . . . . . . . . . 500
novdocx (en) 13 May 2009
20 Pre-Identity Manager 3.5 Verb Tokens 501
Escape Destination DN . . . . . . . . . . . . . . . . . . . . . . . . . . . . . . . . . . . . . . . . . . . . . . . . . . . . . . . . . . . 502
Escape Source DN . . . . . . . . . . . . . . . . . . . . . . . . . . . . . . . . . . . . . . . . . . . . . . . . . . . . . . . . . . . . . . 503
Lowercase. . . . . . . . . . . . . . . . . . . . . . . . . . . . . . . . . . . . . . . . . . . . . . . . . . . . . . . . . . . . . . . . . . . . . 504
Parse DN . . . . . . . . . . . . . . . . . . . . . . . . . . . . . . . . . . . . . . . . . . . . . . . . . . . . . . . . . . . . . . . . . . . . . 505
Replace All . . . . . . . . . . . . . . . . . . . . . . . . . . . . . . . . . . . . . . . . . . . . . . . . . . . . . . . . . . . . . . . . . . . . 507
Replace First. . . . . . . . . . . . . . . . . . . . . . . . . . . . . . . . . . . . . . . . . . . . . . . . . . . . . . . . . . . . . . . . . . . 508
Substring. . . . . . . . . . . . . . . . . . . . . . . . . . . . . . . . . . . . . . . . . . . . . . . . . . . . . . . . . . . . . . . . . . . . . . 509
Uppercase. . . . . . . . . . . . . . . . . . . . . . . . . . . . . . . . . . . . . . . . . . . . . . . . . . . . . . . . . . . . . . . . . . . . . 510
14 Policies in Designer 3.5
Page 15

About This Guide
Novell® Identity Manager 3.6.1 is a data sharing and synchronization service that enables
applications, directories, and databases to share information. It links scattered information and
enables you to establish policies that govern automatic updates to designated systems when identity
changes occur.
Identity Manager provides the foundation for account provisioning, security, single sign-on, user
self-service, authentication, authorization, automated workflows, and Web services. It allows you to
integrate, manage, and control your distributed identity information so you can securely deliver the
right resources to the right people.
This guide provides detailed information on using Designer 3.0 for Identity Manager 3.6.1.
Chapter 1, “Overview,” on page 17
Chapter 3, “Managing Policies with the Policy Builder,” on page 21
Chapter 4, “Using Additional Builders and Editors,” on page 45
Chapter 5, “Using the XPath Builder,” on page 71
Chapter 6, “Defining Schema Map Policies,” on page 77
novdocx (en) 13 May 2009
Chapter 7, “Controlling the Flow of Objects with the Filter,” on page 93
Chapter 8, “Using Predefined Rules,” on page 109
Chapter 9, “Testing Policies with the Policy Simulator,” on page 145
Chapter 10, “Storing Information in Resource Objects,” on page 169
Chapter 11, “Using ECMAScript in Policies,” on page 175
Chapter 12, “Conditions,” on page 189
Chapter 13, “Actions,” on page 233
Chapter 14, “Noun Tokens,” on page 313
Chapter 15, “Verb Tokens,” on page 353
There are additional reference chapters for the pre-Identity Manager Policy Builder:
Chapter 2, “Using the Pre-Identity Manager 3.5 Policy Builder,” on page 19
Chapter 16, “Pre-Identity Manager 3.5 Builders,” on page 375
Chapter 17, “Pre-Identity Manager 3.5 Conditions,” on page 391
Chapter 18, “Pre-Identity Manager 3.5 Actions,” on page 419
Chapter 19, “Pre-Identity Manager 3.5 Noun Tokens,” on page 475
Chapter 20, “Pre-Identity Manager 3.5 Verb Tokens,” on page 501
Audience
This guide is intended for Identity Manager administrators.
About This Guide 15
Page 16

Feedback
We want to hear your comments and suggestions about this manual and the other documentation
included with this product. Please use the User Comments feature at the bottom of each page of the
online documentation, or go to www.novell.com/documentation/feedback.html and enter your
comments there.
Documentation Updates
For the most recent version of Policies in Designer, visit the Identity Manager Documentation Web
site (http://www.novell.com/documentation/idm35).
Additional Documentation
For documentation on using the Identity Manager drivers, see the Identity Manager Drivers
Documentation Web site (http://www.novell.com/documentation/idm36drivers/index.html).
For documentation on using Designer, see the Designer 3.0 for Identity Manager 3.6.1
Documentation Web site (http://www.novell.com/documentation/designer21/).
novdocx (en) 13 May 2009
Documentation Conventions
In Novell documentation, a greater-than symbol (>) is used to separate actions within a step and
items in a cross-reference path.
®
A trademark symbol (
, TM, etc.) denotes a Novell trademark. An asterisk (*) denotes a third-party
trademark.
When a single pathname can be written with a backslash for some platforms or a forward slash for
other platforms, the pathname is presented with a backslash. Users of platforms that require a
forward slash, such as Linux* or UNIX*, should use forward slashes as required by your software.
16 Policies in Designer 3.5
Page 17

1
Overview
Policies manage the data that is synchronizing between the Identity Vault and the remote data store.
The policies are stored in the policy sets (see “Understanding Types of Policies” in Understanding
Policies for Identity Manager 3.6.) Designer provides a wide set of tools for defining and debugging
policies to control how information flows from one system to another, and under what conditions.
The following sections explain how to use the tools that are provided to help manage the policies:
Chapter 3, “Managing Policies with the Policy Builder,” on page 21
Chapter 4, “Using Additional Builders and Editors,” on page 45
Chapter 5, “Using the XPath Builder,” on page 71
Chapter 6, “Defining Schema Map Policies,” on page 77
Chapter 7, “Controlling the Flow of Objects with the Filter,” on page 93
Chapter 8, “Using Predefined Rules,” on page 109
Chapter 9, “Testing Policies with the Policy Simulator,” on page 145
novdocx (en) 13 May 2009
1
Chapter 10, “Storing Information in Resource Objects,” on page 169
Chapter 11, “Using ECMAScript in Policies,” on page 175
This section also contains a detailed reference section to all of the elements in DirXML® Script. For
more information on DirXML Script, see “DirXML Script DTD” in the Identity Manager 3.6 DTD
Reference.
Chapter 12, “Conditions,” on page 189
Chapter 13, “Actions,” on page 233
Chapter 14, “Noun Tokens,” on page 313
Chapter 15, “Verb Tokens,” on page 353
There are also reference sections for the pre-Identity Manager Policy Builder:
Chapter 2, “Using the Pre-Identity Manager 3.5 Policy Builder,” on page 19
Chapter 16, “Pre-Identity Manager 3.5 Builders,” on page 375
Chapter 17, “Pre-Identity Manager 3.5 Conditions,” on page 391
Chapter 18, “Pre-Identity Manager 3.5 Actions,” on page 419
Chapter 19, “Pre-Identity Manager 3.5 Noun Tokens,” on page 475
Chapter 20, “Pre-Identity Manager 3.5 Verb Tokens,” on page 501
1.1 Policies
As part of understanding how policies work, it is important to understand the components of
policies.
Policies are made up of rules.
A rule is a set of conditions (see Chapter 12, “Conditions,” on page 189) that must be met
before a defined action (see Chapter 13, “Actions,” on page 233) occurs.
Overview
17
Page 18

Actions can have dynamic arguments that derive from tokens that are expanded at runtime.
Tokens are broken up into two classifications: nouns and verbs.
Noun tokens (see Chapter 14, “Noun Tokens,” on page 313) expand to values that are
derived from the current operation, the source or destination data stores, or some external
source.
Verb tokens (see Chapter 15, “Verb Tokens,” on page 353) modify the concatenated
results of other tokens that are subordinate to them.
Regular expressions (see “Regular Expressions”) and XPath 1.0 expressions (see “XPath 1.0
Expressions”) are commonly used in the rules to create the desired results for the policies.
A policy operates on an XDS document and its primary purpose is to examine and modify that
document.
An operation is any element in the XDS document that is a child of the input element and the
output element. The elements are part of the Novell
®
nds.dtd
; for more information, see
“NDS DTD” in the Identity Manager 3.6 DTD Reference.
An operation usually represents an event, a command, or a status.
The policy is applied separately to each operation. As the policy is applied to each operation in
turn, that operation becomes the current operation. Each rule is applied sequentially to the
current operation. All of the rules are applied to the current operation unless an action is
executed by a prior rule that causes subsequent rules to no longer be applied.
A policy can also get additional context from outside of the document and cause side effects
that are not reflected in the result document.
novdocx (en) 13 May 2009
18 Policies in Designer 3.5
Page 19

2
Using the Pre-Identity Manager 3.5
novdocx (en) 13 May 2009
Policy Builder
Designer contains two Policy Builders: the pre-Identity Manager 3.5 Policy Builder and the Identity
Manager 3.5 and Newer Policy Builder. The Policy Builders are similar except for the following:
You can enable and disable trace only at the driver level in the pre-Identity Manager 3.5 Policy
Builder.
The DirXML
These differences require two Policy Builders. For information on how to use both Policy Builders,
see Chapter 3, “Managing Policies with the Policy Builder,” on page 21, which documents the
Identity Manager 3.5 and Newer Policy Builder. The only difference is an additional icon that
enables and disables tracing on rules, actions, conditions, and tokens.
For a list of the DirXML Script elements for the pre-Identity Manager 3.5 Policy Builder:
Chapter 17, “Pre-Identity Manager 3.5 Conditions,” on page 391
Chapter 18, “Pre-Identity Manager 3.5 Actions,” on page 419
Chapter 19, “Pre-Identity Manager 3.5 Noun Tokens,” on page 475
Chapter 20, “Pre-Identity Manager 3.5 Verb Tokens,” on page 501
For a list of the DirXML Script elements for the Identity Manager 3.5 and Newer Policy Builder:
®
Script elements are different between the two builders.
2
Chapter 12, “Conditions,” on page 189
Chapter 13, “Actions,” on page 233
Chapter 14, “Noun Tokens,” on page 313
Chapter 15, “Verb Tokens,” on page 353
Using the Pre-Identity Manager 3.5 Policy Builder
19
Page 20

novdocx (en) 13 May 2009
20 Policies in Designer 3.5
Page 21

3
Managing Policies with the Policy
novdocx (en) 13 May 2009
Builder
The Policy Builder is a complete graphical interface for creating and managing the policies that
define the exchange of data between connected systems.
Section 3.1, “Accessing the Policy Builder,” on page 21
Section 3.2, “Using the Policy Builder,” on page 23
Section 3.3, “Creating a Policy,” on page 24
Section 3.4, “Creating a Rule,” on page 28
Section 3.5, “Creating an Argument,” on page 33
Section 3.6, “Variable Selector,” on page 35
Section 3.7, “Editing a Policy,” on page 39
Section 3.8, “Viewing the Policy in XML,” on page 42
3.1 Accessing the Policy Builder
There are two different Policy Builders included in Designer 3.0: one that works with the new policy
features for Identity Manager 3.5 and newer, and an older one that does not support these features.
The Policy Builder version is determined by the version of Identity Manager. To set the version of
Identity Manager:
3
1 Open a project in Designer.
2 Click the Outline tab, then select the Show Model Outline icon .
3 Right-click the server object, then click Properties.
4 Select the appropriate Identity Manager Version.
When the Identity Manager version is set to 3.5 or newer, the new Policy Builder is available. If the
version is set to anything other than 3.5, the old Policy Builder is available.
The Policy Builder can be accessed from the Model Outline view, from the Policy Flow view, or
from a policy set.
Section 3.1.1, “Model Outline View,” on page 21
Section 3.1.2, “Policy Flow View,” on page 22
Section 3.1.3, “Policy Set,” on page 22
3.1.1 Model Outline View
1 Open a project in Designer.
2 Click the Outline view, then select the Show Model Outline icon .
3 Double-click a policy listed in the Model Outline view or right-click and select Edit.
Managing Policies with the Policy Builder
21
Page 22
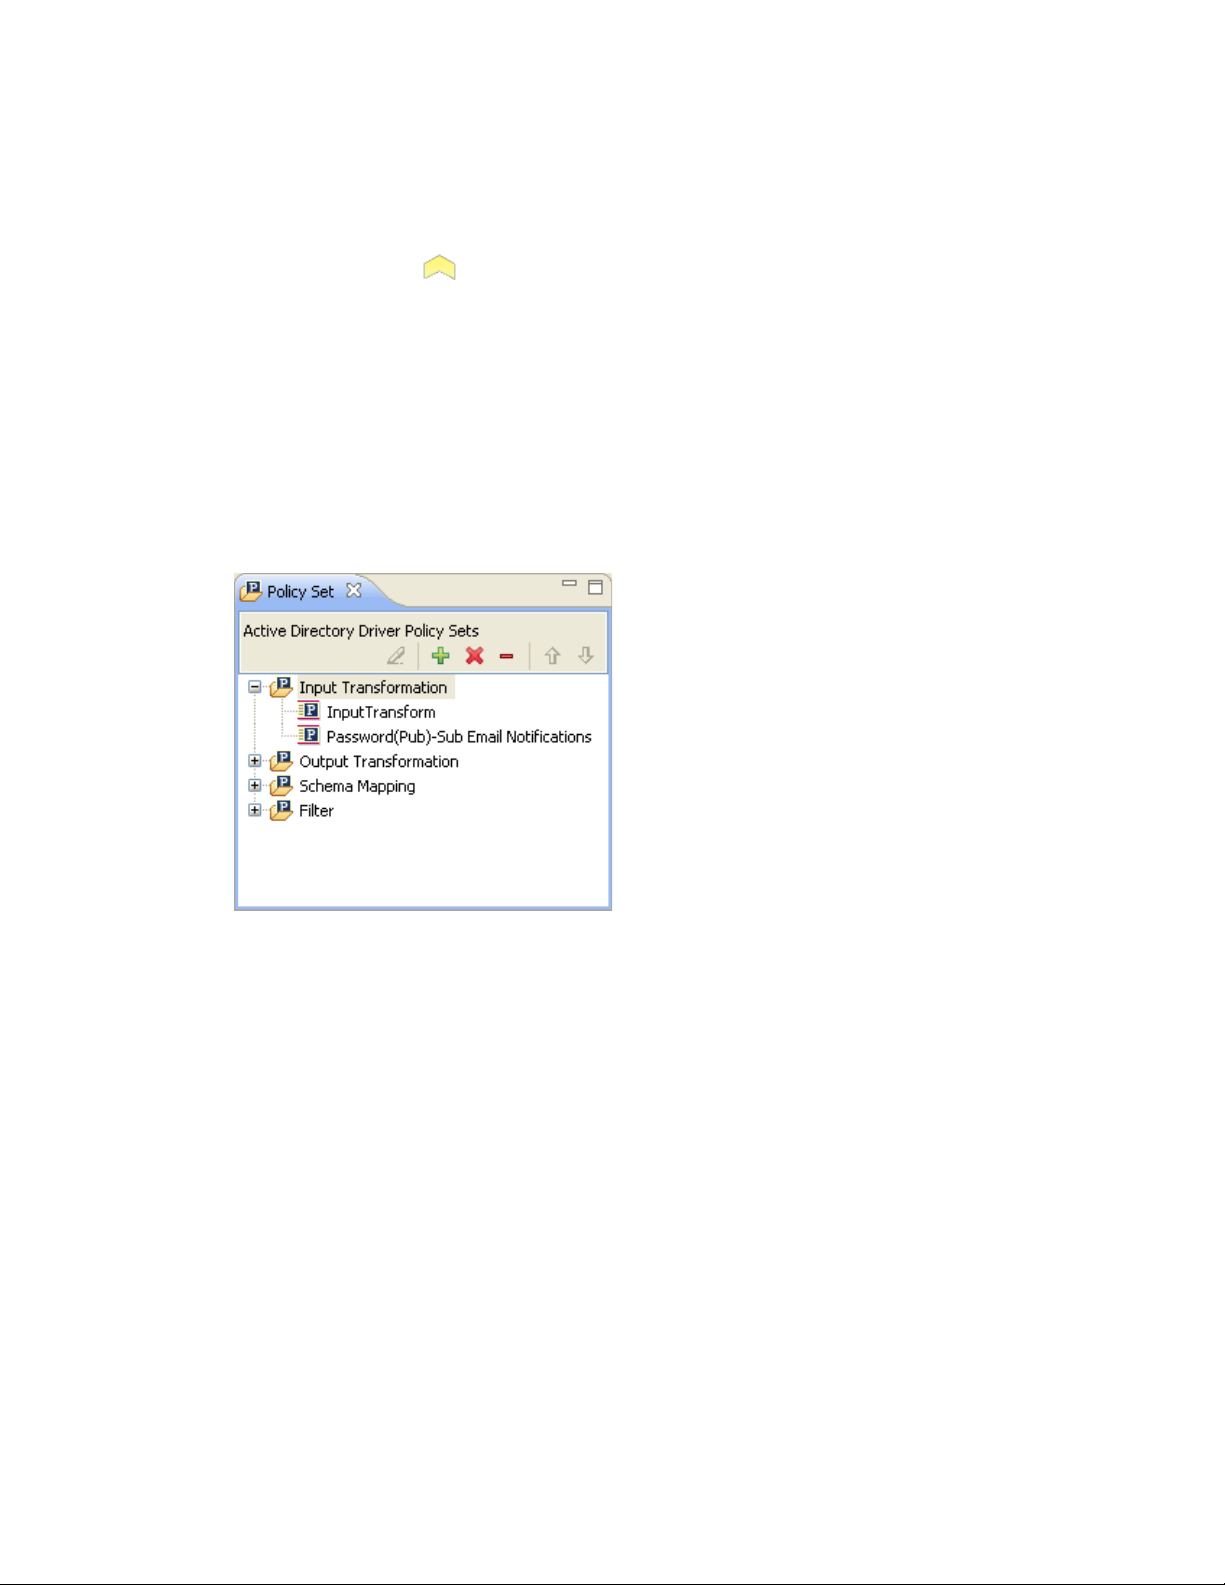
3.1.2 Policy Flow View
1 Open a project in Designer.
2 Select the Outline tab, then select the Show Policy Flow icon.
3 Double-click a policy in the Policy Flow view.
You can also right-click in the Policy Flow view, select Edit Policy, then select the policy you
want to edit.
3.1.3 Policy Set
1 Open a project in Designer.
2 Click the Outline view, then select the Show Model Outline icon.
3 Select the policy in the policy set, then click Edit the policy.
You can also right-click the policy in the policy set, then click Edit.
novdocx (en) 13 May 2009
To see all of the information in the Policy Builder window without scrolling, double-click the policy
tab so the Policy Builder fills the entire window. To minimize the window, double-click the policy
tab.
22 Policies in Designer 3.5
Page 23

Figure 3-1 Policy Builder Full Screen
novdocx (en) 13 May 2009
For information on using the Policy Builder, see Section 3.2, “Using the Policy Builder,” on
page 23.
3.2 Using the Policy Builder
The Policy Builder enables you to add, view, and delete the rules that make up a policy. You can also
use it to import and save policies and rules, and manage XML namespaces. The Policy Builder
contains the “Action Builder” on page 45 and the “Condition Builder” on page 52.
The following tips describe how to perform some common Policy Builder tasks:
Table 3-1 Common Policy Builder Tasks
Tasks Description
Disable Disables a policy, rule, condition, or action.
Enable Enables a policy, rule, condition, or action.
Disable Trace Disables tracing on a rule, condition, or action.
Enable Trace Enables tracing on a rule, condition, or action.
in the tool bar Enables DirXML Script tracing on the policy.
Edit Edits the name of a rule or edits the description of a
rule.
Delete Deletes a rule or a policy.
Browse Browses a list of values to use when populating a
field.
Managing Policies with the Policy Builder 23
Page 24

Tasks Description
Add a rule Adds a new rule or a predefined rule.
Import Imports a policy from a file.
Save to File Saves a policy to a file.
Deploy Deploys a policy to the Identity Vault.
Compare Compares the policy in the Policy Builder to an
existing policy in the Identity Vault.
Policy Simulator Launches the Policy Simulator and tests the
policies in the Policy Builder.
Edit Namespace Adds multiple XML namespaces to the rule or
policy.
XPath Builder Launches the XPath Builder to create XPath
expressions.
Expand Expands all of the rules in a policy.
novdocx (en) 13 May 2009
Collapse Collapses all of the rules in a policy.
Move up Moves a rule up in the policy.
Move down Moves a rule down in the policy.
Save Click the save icon in the tool bar, click File > Save,
or press Ctrl+S to save your work.
Policy Description Adds a comment to a policy or rule. Comments are
stored directly in the policy or rule, and can be as
long as necessary.
3.3 Creating a Policy
A policy sends data to the connected systems. A policy is created through the policy set.
Section 3.3.1, “Accessing the Policy Set,” on page 24
Section 3.3.2, “Using the Policy Set,” on page 25
Section 3.3.3, “Using the Add Policy Wizard,” on page 26
3.3.1 Accessing the Policy Set
1 Select a driver object from the Outline view in an open project.
24 Policies in Designer 3.5
Page 25
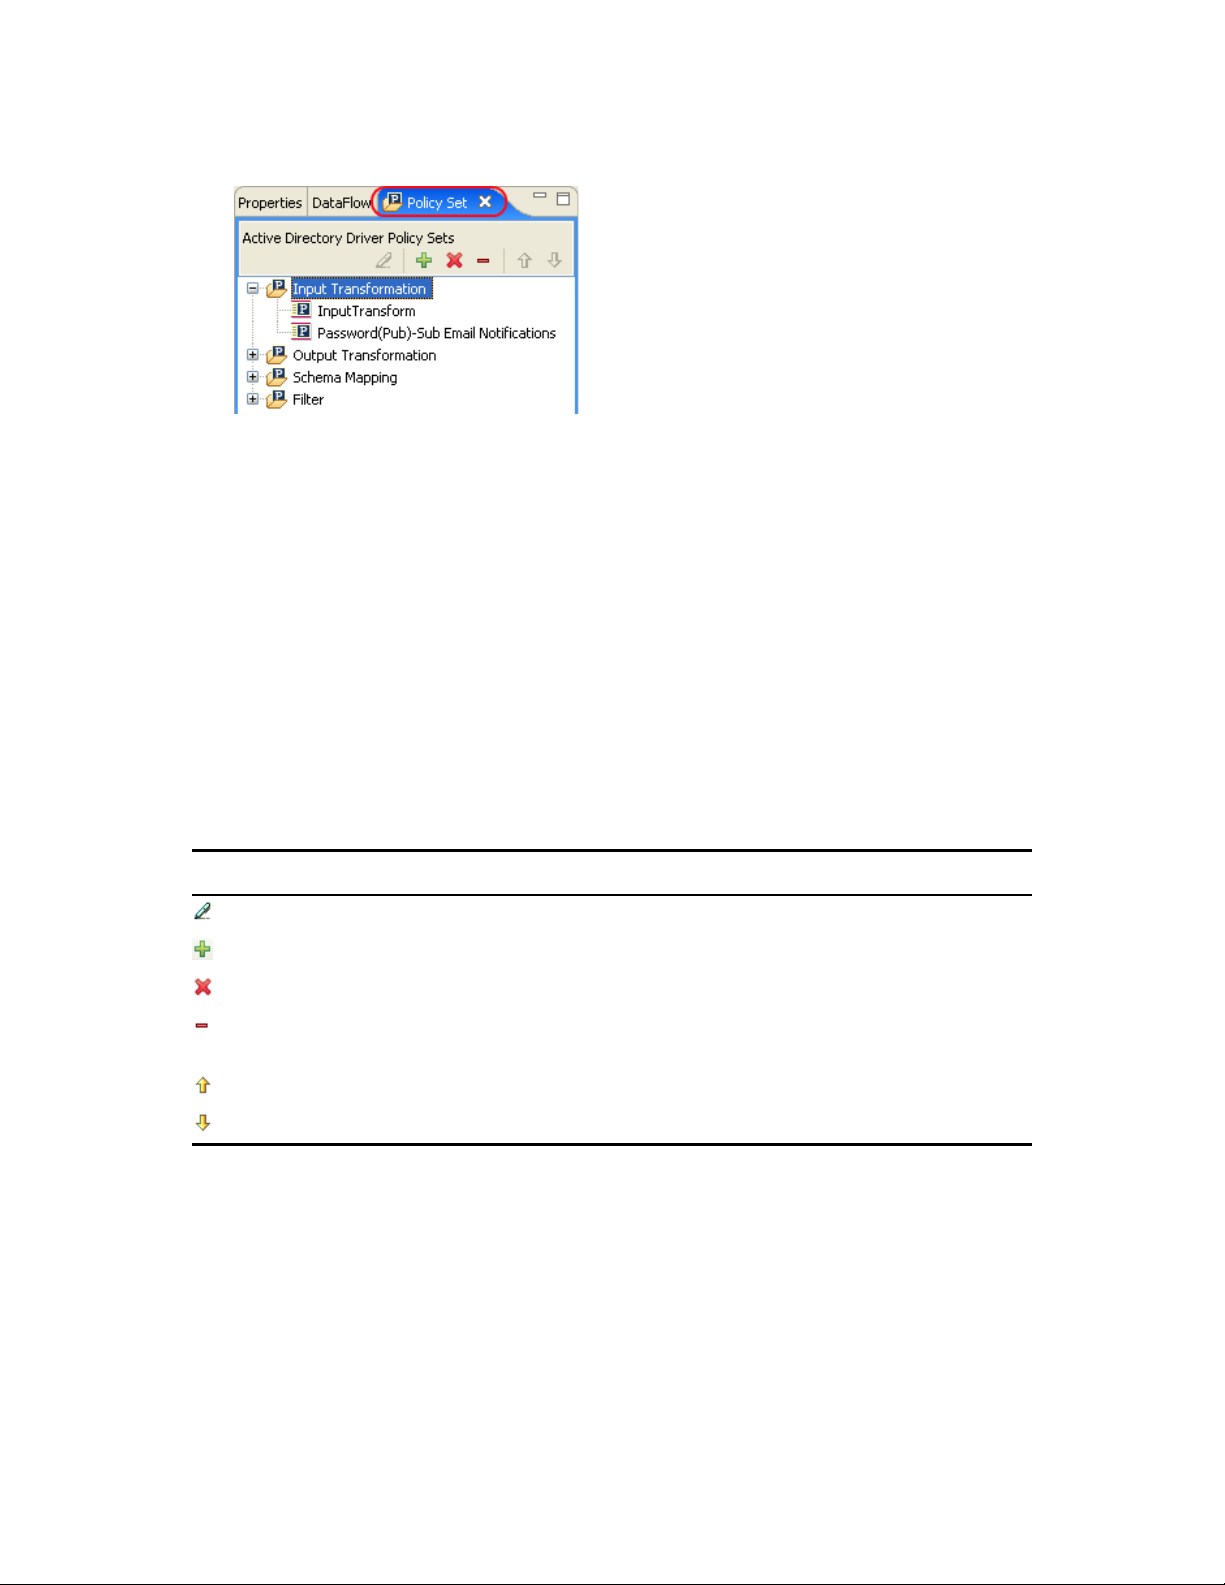
2 Select the Policy Set tab.
3.3.2 Using the Policy Set
The policy set contains a toolbar and a list of policies.
The policy list displays all the policies contained in the selected policy set. During a transformation,
the policies within the list are executed from top to bottom. The toolbar contains buttons and a dropdown menu that you can use to manage policies displayed in the list, including, editing, adding,
deleting, renaming, and changing the processing order of the policies.
novdocx (en) 13 May 2009
Policy Set Toolbar
The policy set displays a copy of the policy. The buttons on the toolbar are enabled or disabled
depending upon the item you have selected. The different icons are described below.
Table 3-2 Policy Set Toolbar
Operation Description
Edit the policy Launches the Policy Builder.
Create or add a new policy to the Policy Set Launches the Add Policy Wizard.
Remove and delete the selected policy Deletes the policy from the project.
Remove the selected policy from the Policy Set,
but do not delete it
Move the policy up the policy chain Moves the policy up in the processing order.
Move the policy down the policy chain Moves the policy down in the processing order.
Removes the policy from the selected policy set
object but doesn’t delete the policy.
Keyboard Support
You can move through the policy set with keystrokes as well as using the mouse. The supported
keystrokes are listed below.
Managing Policies with the Policy Builder 25
Page 26

Table 3-3 Keyboard Support
Keystroke Description
Up-arrow Moves the selected policy up in the processing
order.
Down-arrow Moves the selected policy down in the processing
order.
Delete Deletes the policy from the project.
Minus Removes the policy from the selected policy set,
but does not delete it.
Plus Launches the Add Policy Wizard.
Ctrl+Z Undoes the last operation.
Ctrl+Y Redoes the last operation.
3.3.3 Using the Add Policy Wizard
novdocx (en) 13 May 2009
The Add Policy Wizard launches when you click the Create or add a new policy to the Policy Set
icon in the toolbar. The Add Policy Wizard enables you to do the following:
“Creating a Policy” on page 26
“Copying a Policy” on page 27
“Linking to a Policy” on page 28
To launch the Add Policy Wizard:
1 Select a driver in the Outline view.
2 Select a policy set item in the policy set, then click Create or add a new policy to the Policy Set
.
Creating a Policy
1 In the Add Policy Wizard, select Create a new policy, then click Next.
You can also add a policy by right-clicking a policy set in the Policy Flow view, selecting Add
Policy, then selecting how to create the policy:
DirXML Script
XSLT
Link To Existing
Copy Existing
Schema Map (Only displayed, if the Schema Map policy set is selected.)
2 In the Create Policy dialog box, specify a policy name, then click Next.
Select Open Editor after creating object to automatically launch the Policy Builder after
creating the new policy.
26 Policies in Designer 3.5
Page 27
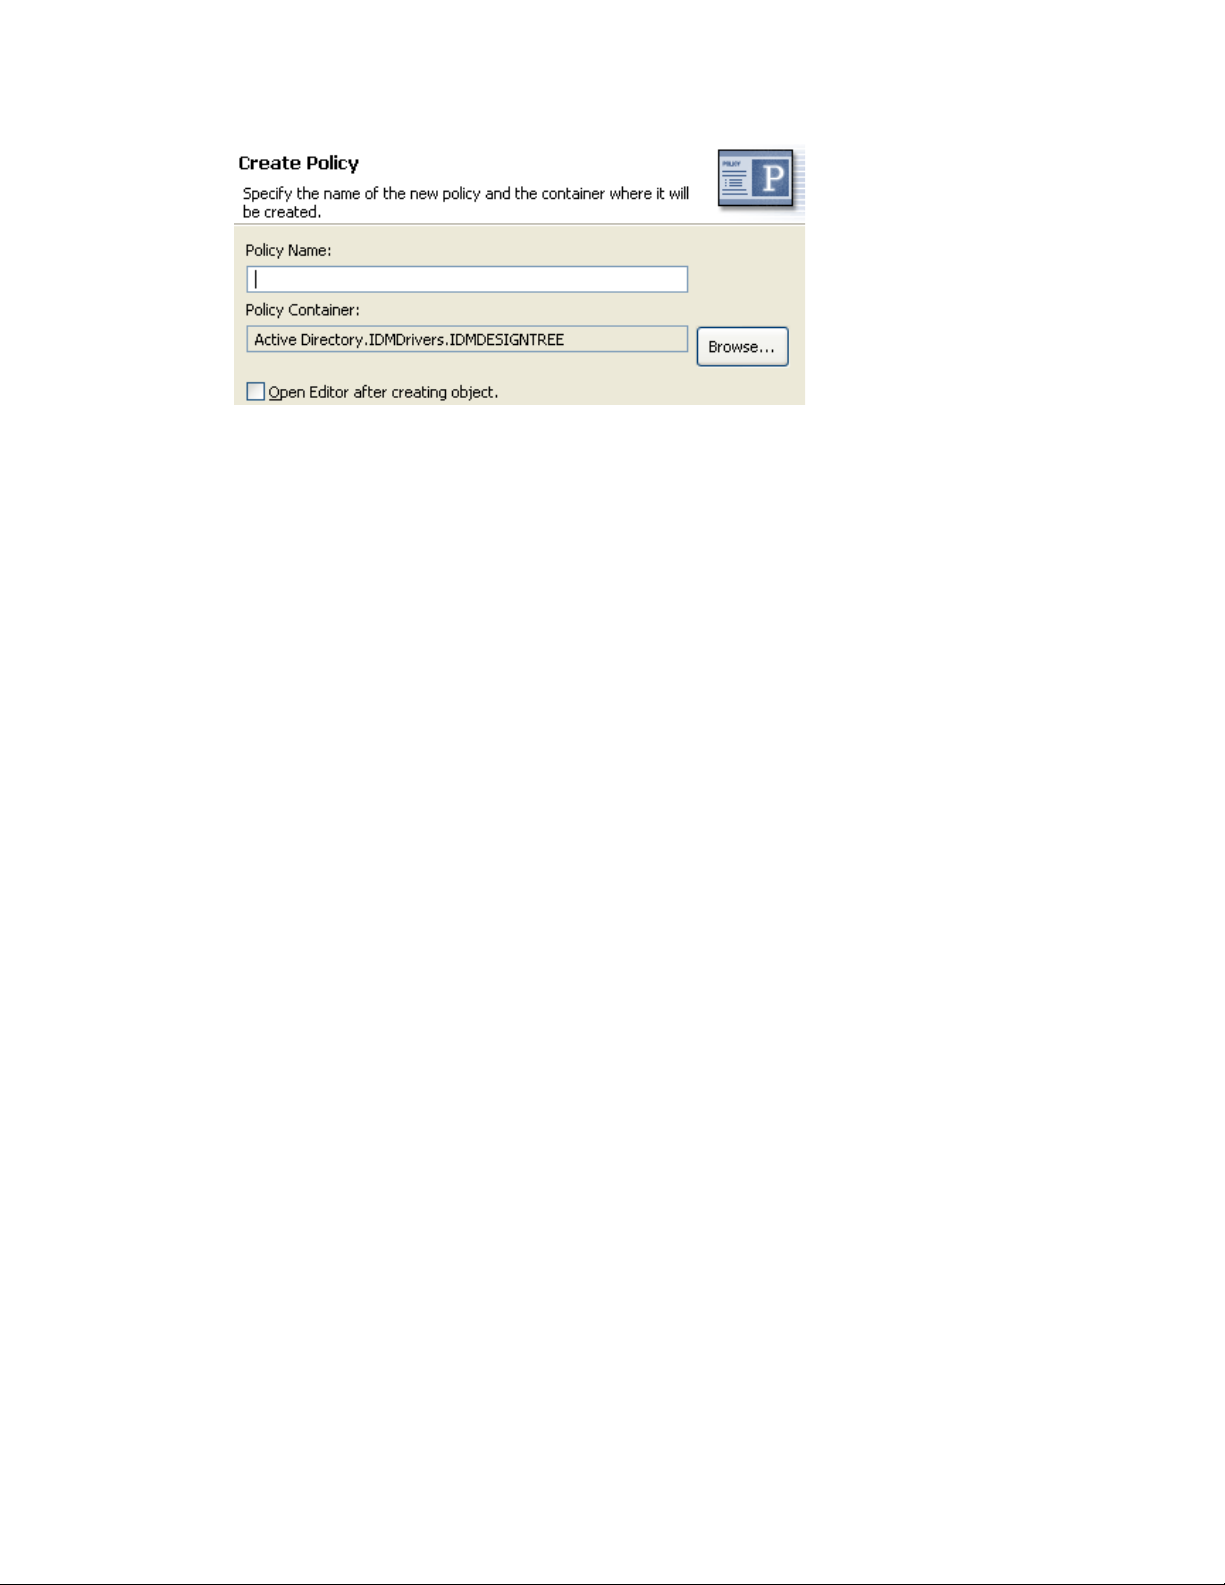
Accept the default container, or browse to and select the Driver, Publisher, or Subscriber object
where you want the policy to be created.
If a policy is not reused by multiple drivers, you typically create that policy under the driver or
channel that is using it.
This decision depends on how you want to organize the policies. By default, policies are placed
under the container object that is selected in the Outline tab when the Add Policy Wizard is
launched.
For example, if you move to a Publisher object in the Outline tab and then add a policy to a
policy set, the policy defaults to the Publisher container.
novdocx (en) 13 May 2009
You can change this setting if you want to create policies in a different container. For example,
you can set up a policy library, put all of the common policies under this driver, and then simply
reference the policies from the other drivers. That way, the policy is common. If you need to
change a policy, you need to do it only once.
3 In the Select Type dialog box, select the type of policy you want to implement, then click
Finish.
The policy type defaults to DirXML Script. You can select XSLT, if you don’t want to use
®
DirXML
Script.
If you create a Schema Map policy set, an additional option is available for Schema Map.
The new policy appears in the expanded policy set.
Copying a Policy
1 In the Add Policy Wizard, select Copy a policy, then click Next.
2 In the Create Policy dialog box, provide the necessary policy information, then click OK.
Specify a name for the new policy
Managing Policies with the Policy Builder 27
Page 28
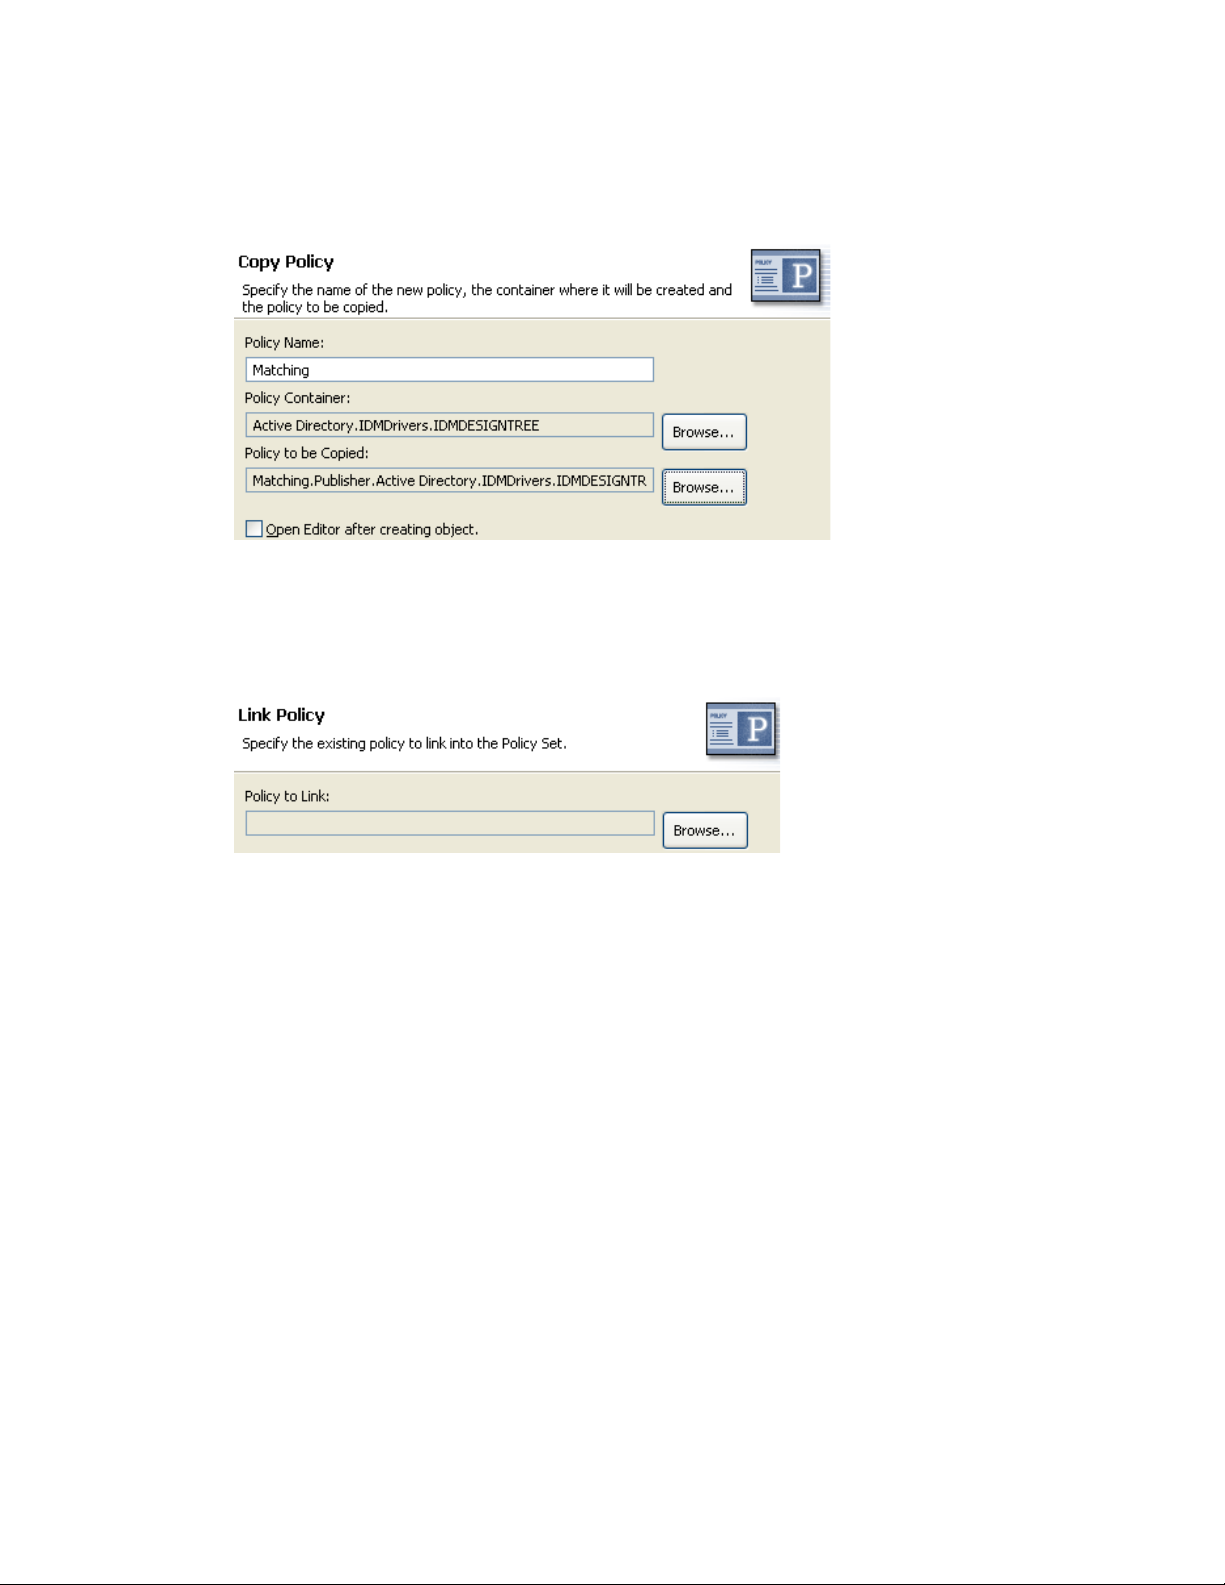
Accept the default container, or browse to and select the Driver, Publisher, or Subscriber
object where you want the policy to be created.
Browse to and select the policy you want to copy, then click Finish.
Linking to a Policy
novdocx (en) 13 May 2009
1 In the Add Policy Wizard, select Link a policy, then click Next.
2 In the Link Policy dialog box, click Browse to launch the model browser.
3 Browse to and select the Policy object you want to link into the policy set, then click OK.
Linking a policy into a policy set doesn’t create a new Policy object. Instead, it adds a reference
to an existing policy. This reference can be to any existing policy within the current Identity
Vault. It doesn’t need to be contained within the current Driver object, but the policy type must
be valid for the policy set that it is being linked to. For example, you can’t link a Schema Map
policy into an Input policy set.
Linking a policy into a policy set is not permitted when viewing all policies.
4 Click Finish to link to the selected policy.
3.4 Creating a Rule
A rule is a set of conditions that must be met before a defined action occurs. Rules are created from
condition groups, conditions, and actions.
Rules can be created in four different ways:
Section 3.4.1, “Creating a New Rule,” on page 29
Section 3.4.2, “Using Predefined Rules,” on page 31
Section 3.4.3, “Including an Existing Rule,” on page 32
Section 3.4.4, “Importing a Policy From an XML File,” on page 32
28 Policies in Designer 3.5
Page 29
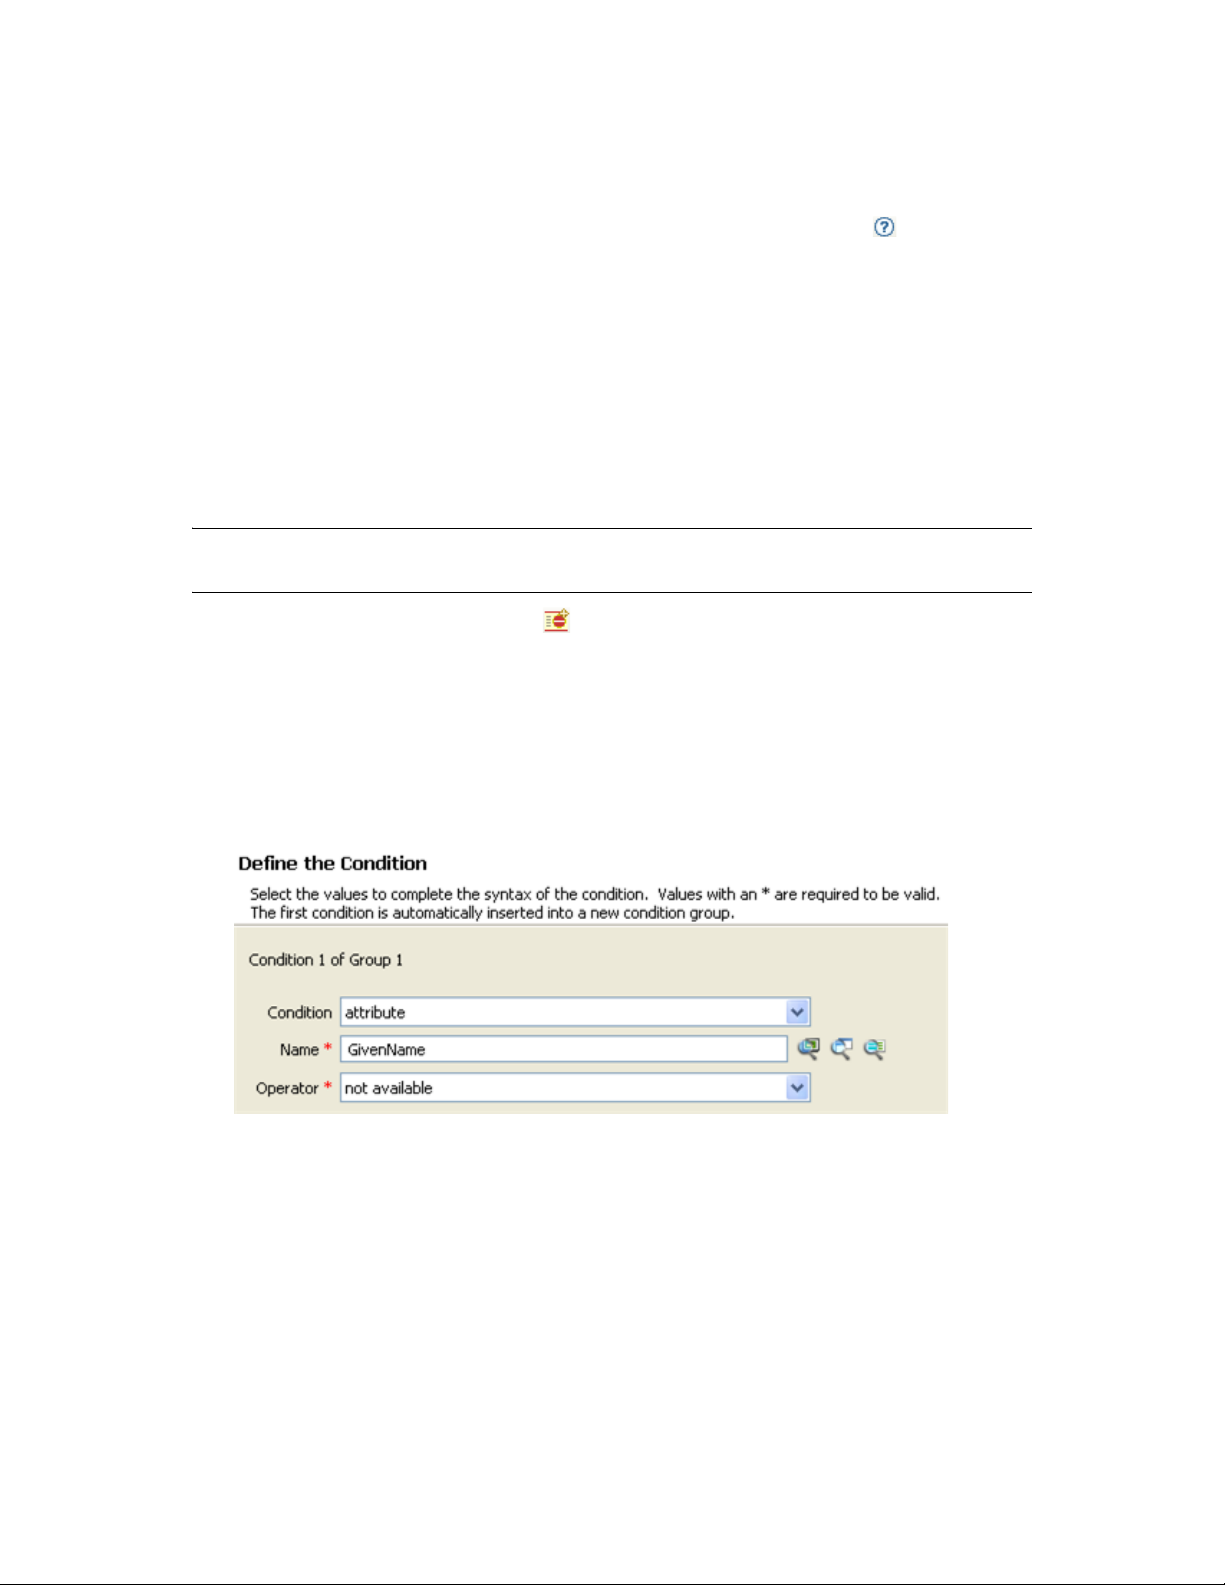
3.4.1 Creating a New Rule
When you create a rule, you create condition groups, conditions, and actions. Each rule is composed
of conditions, actions, and arguments. For more information, click the Help icon when creating
each item. The help files contain a definition and an example of the item being used.
“Creating a Rule” on page 29
“Creating a Conditional Group” on page 30
“Creating a Condition” on page 30
“Creating an Action” on page 31
Creating a Rule
Policy Builder includes a wizard to step you through the process of creating a rule.
NOTE: On any of the wizard dialog boxes, you can click Finish to exit the wizard and create a rule
with the details you have specified to that point.
novdocx (en) 13 May 2009
1 In Policy Builder toolbar, click Rule .
2 In the Name and Describe Rule dialog box, specify the name of the rule, then click Next.
3 In the Select the Condition Structure dialog box, select the rule’s condition structure, then click
Next.
You can choose OR Conditions, AND Groups or AND Conditions, OR Groups.
4 In the Define the Condition dialog box, select the condition you want, specify the appropriate
information, then click Next.
The icons next to the Name field let you browse the Identity Vault schema, the connected
application schema, or use the Variable Selector to select the appropriate information.
5 In the Continue Defining Conditions dialog box, select the appropriate option, then click Next.
If desired, you can define additional conditions or condition groups before proceeding. For this
example, there is only one condition.
Managing Policies with the Policy Builder 29
Page 30

6 In the Define the Action dialog box, select the action that you want, then click Next.
7 In the Continue Defining Actions dialog box, select the appropriate option, then click Next.
If desired, you can define additional actions before proceeding. For this example, there is only
one action.
8 In the Summary page, click Finish to create the rule.
You can expand or collapse the view of the rule by clicking the plus or minus sign.
novdocx (en) 13 May 2009
Creating a Conditional Group
1 In the Policy Builder, right-click the Conditions tab then click Append Condition Group.
You can also right-click the name of the Condition Group, then click New > Insert Condition
Group Before or Insert Condition Group After.
Change the condition for the Condition Groups by clicking the And/Or icon.
Creating a Condition
1 Right-click the condition, then click New > Insert Condition Before or Insert Condition After.
30 Policies in Designer 3.5
Page 31

You can change the condition by clicking the And/Or icon.
novdocx (en) 13 May 2009
Creating an Action
1 Right-click the action, then click New > Insert Action Before or Insert Action After.
3.4.2 Using Predefined Rules
Designer includes a list of predefined rules. You can import and use these rules as well as create
your own rules.
1 Right-click in the Policy Builder and select New > Predefined Rules > Insert Predefined Rule
Before or Insert Predefined Rule After.
See Chapter 8, “Using Predefined Rules,” on page 109 for more information.
Managing Policies with the Policy Builder 31
Page 32

3.4.3 Including an Existing Rule
Designer allows you to include the rules from another policy.
1 Right-click in the Policy Builder and click New > Include > Insert Include Before or Insert
Include After.
2 Click the Browse icon .
3 Browse to the policy you want to include, then click OK.
4 The field is now populated with the path to the policy. Click OK.
novdocx (en) 13 May 2009
The rule is a link to the original rule. You cannot edit the rule in this location. Access the
original rule to make changes.
3.4.4 Importing a Policy From an XML File
Rules and policies can be saved as XML files. If you have a file that contains a rule or a policy you
want to use, the Policy Builder allows you to import the file.
1 In the Policy Builder, right-click and select Import Policy from file.
2 Select one of the two options: Append the rules from the imported policy or Replace the rules
from the imported policy.
32 Policies in Designer 3.5
Page 33

3 Click the browse icon and select the file that contains the policy, then click Open.
4 Click OK.
3.5 Creating an Argument
The Argument Builder provides a dynamic graphical interface that enables you to construct complex
argument expressions for use within the Policy Builder. To access the Argument Builder, see
“Argument Builder” on page 47.
novdocx (en) 13 May 2009
Arguments are dynamically used by actions and are derived from tokens that are expanded at run
time.
Tokens are broken up into two classifications: nouns and verbs. Noun tokens expand to values that
are derived from the current operation, the source or destination data stores, or some external source.
Verb tokens modify the results of other tokens that are subordinate to them.
To define an expression, select one or more noun tokens (values, objects, variables, etc.), and
combine them with verb tokens (substring, escape, uppercase, and lowercase) to construct
arguments. Multiple tokens are combined to construct complex arguments.
Managing Policies with the Policy Builder 33
Page 34

Figure 3-2 Argument Builder
novdocx (en) 13 May 2009
For example, if you want the argument set to an attribute value, you select the attribute noun, then
select the attribute name:
1 Double-click Attribute in the list of noun tokens to add it to the Expression pane.
2 Browse to and select the attribute name in the Editor field.
You can browse the Identity Vault schema or the connected application schema.
34 Policies in Designer 3.5
Page 35

If you only want a portion of this attribute, you can combine the attribute token with the
substring token. The expression displays a substring length of 1 for the Given Name attribute
combined with the entire Surname attribute.
After you add a noun or verb, you can provide values in the editor, then immediately add another
noun or verb. You do not need to refresh the Expression pane to apply your changes; they appear
when the next operation is performed.
See “Noun Tokens” on page 313 and “Verb Tokens” on page 353 for a detailed reference on the
noun and verb tokens. See “Argument Builder” on page 47 for more information on the Argument
Builder.
3.6 Variable Selector
The variable selector provides a list of variables that you can select and insert into conditions,
actions, and tokens.
novdocx (en) 13 May 2009
Section 3.6.1, “Dynamic Variable Expansion,” on page 36
Section 3.6.2, “Accessing the Variable Selector From the Conditions Tab,” on page 36
Section 3.6.3, “Accessing the Variable Selector From the Actions Tab,” on page 37
Section 3.6.4, “Accessing the Variable Selector From the Argument Builder,” on page 38
Section 3.6.5, “XPath Expressions,” on page 39
Managing Policies with the Policy Builder 35
Page 36

3.6.1 Dynamic Variable Expansion
The variable selector allows for the use of dynamic variable expansion in conditions, actions, and
tokens. It is used when the writer of the DirXML script doesn’t know what value to enter during the
design phase, and wants the value to be populated dynamically when the code is run (for local
variables) or when the driver starts (for global variables). Dynamic variables are not used when the
policy needs to refer directly to the variable itself. Instead, they are used when the policy needs to
refer to the value of the variable.
Many actions support dynamic variable expansion in their attributes or content. Where supported, an
embedded reference of the form $variable-name$ is replaced with the value of the local variable
with the given name. An embedded reference of the form ~variable-name~ is replaced with the
value of the global variable name. $variable-name$ and ~variable-name~ must be legal variable
names. For information on what constitutes a legal XML name, see W3C Extensible Markup
Language (XML) (http://www.w3.org/TR/2006/REC-xml11-20060816/#sec-suggested-names).
If the given variable does not exist, the reference is replaced with the empty string. Where it is
desirable to use a single $ and not have it interpreted as a variable reference, use an additional $ as
an escape character (for example, You owe me $$100.00).
novdocx (en) 13 May 2009
NOTE: If the global variable doesn’t exist on the driver or driver set, the driver does not start.
3.6.2 Accessing the Variable Selector From the Conditions Tab
1 In the Policy Builder, double-click the Conditions tab.
For instructions on accessing the Policy Builder, see Section 3.1, “Accessing the Policy
Builder,” on page 21.
2 Select one of the following conditions:
If Attribute (page 192)
If Destination Attribute (page 198)
If Entitlement (page 202)
If Global Configuration Value (page 205)
If Local Variable (page 207)
If Named Password (page 211)
If Operation Attribute (page 215)
If Source Attribute (page 224)
3 Click the Launch variable browser icon next to the field where you want to insert a
dynamic variable.
4 Select the variable, then click OK.
Or, for conditions that don’t bring up the Launch variable browser icon:
1 Select one of the following operators:
Equal
Greater than
Less than
36 Policies in Designer 3.5
Page 37

Not equal
Not greater than
Not less than
2 Click the Launch variable browser icon next to the field where you want to insert the dynamic
variable.
3 Select the variable, then click OK.
3.6.3 Accessing the Variable Selector From the Actions Tab
1 In the Policy Builder, double-click the Actions tab.
For instructions on accessing the Policy Builder, see Section 3.1, “Accessing the Policy
Builder,” on page 21.
2 In the Do field, select one of the following options:
Add Destination Attribute Value (page 236)
Add Destination Object (page 238)
Add Role (page 240)
novdocx (en) 13 May 2009
Add Source Attribute Value (page 242)
Add Source Object (page 243)
Append XML Element (page 244)
Append XML Text (page 246)
Clear Destination Attribute Value (page 249)
Clear Source Attribute Value (page 251)
Clear SSO Credential (page 252)
Clone By XPath Expressions (page 253)
Clone Operation Attribute (page 254)
Delete Destination Object (page 255)
Delete Source Object (page 256)
Move Destination Object (page 267)
Move Source Object (page 269)
Reformat Operation Attribute (page 270)
Remove Destination Attribute Value (page 273)
Remove Role (page 274)
Remove Source Attribute Value (page 276)
Rename Destination Object (page 277)
Rename Operation Attribute (page 278)
Rename Source Object (page 279)
Send Email from Template (page 282)
Set Default Attribute Value (page 284)
Set Destination Attribute Value (page 286)
Managing Policies with the Policy Builder 37
Page 38

Set Destination Password (page 288)
Set Local Variable (page 289)Set Source Attribute Value (page 297)
Set Source Password (page 299)
Set SSO Credential (page 300)
Set SSO Passphrase (page 301)
Set XML Attribute (page 302)
Start Workflow (page 303)
Strip Operation Attribute (page 306)
Strip XPath Expression (page 307)
Veto If Operation Attribute Not Available (page 311)
3 Click the Launch variable browser icon next to the field where you want to insert the
dynamic variable.
4 Select the variable, then click OK.
3.6.4 Accessing the Variable Selector From the Argument
novdocx (en) 13 May 2009
Builder
1 In the Argument Builder, select one of the following noun tokens from the Nouns section:
Tex t (page 3 14)
Added Entitlement (page 316)
Attribute (page 318)
Destination Attribute (page 321)
Entitlement (page 327)
Generate Password (page 328)
Global Configuration Value (page 329)
Local Variable (page 330)
Named Password (page 332)
Operation Attribute (page 335)
Query (page 339)
Removed Attribute (page 341)
Removed Entitlement (page 342)
Source Attribute (page 344)
Time (page 347)
Unique Name (page 348)
XPath (page 352)
Or, select one of the following verb tokens from the Ver bs section:
Convert Time (page 356)
Map (page 362)
38 Policies in Designer 3.5
Page 39

2 Click the Launch variable browser icon next to the field where you want to insert the
dynamic variable.
3 Select the variable, then click OK.
3.6.5 XPath Expressions
Instead of using the DirXMLScript engine to perform the variable expansion, as is the case with
most variable expansion, XPath uses built in XPath functionality and the XSLT processor to do the
variable expansion.
For conditions, actions, and tokens that contain XPath expressions, a single $ sign at the beginning
of the policy denotes a dynamic variable, which is displayed in the Va l u e field. This is also true for
the XPath token in the Argument Builder, and for all actions that contain XPath. This is because in
order to maintain valid XPath, only one $ sign can be used.
The following procedure gives an example of using the variable selector with XPath expressions:
1 In the Policy Builder, click the Actions tab.
2 In the Do field, select the clone by XPath expressions option.
novdocx (en) 13 May 2009
3 After the Specify source XPath expression field, click the Launch variable browser icon .
4 Select an item and click OK.
Only one $ sign is displayed before the policy.
3.7 Editing a Policy
The Policy Builder allows you to create and edit policies. You can drag and drop rules, conditions
and actions. For additional operations, access the Policy Builder toolbar. To display a context menu,
right-click an item.
Section 3.7.1, “Actions and Menu Items in the Policy Builder,” on page 39
Section 3.7.2, “Keyboard Support,” on page 41
Section 3.7.3, “Renaming a Policy,” on page 41
Section 3.7.4, “Saving Your Work,” on page 41
Section 3.7.5, “Policy Description,” on page 42
3.7.1 Actions and Menu Items in the Policy Builder
The table contains a list of the different actions and menu items in the Policy Builder.
Table 3-4 Policy Builder Actions and Menu Items
Operation Description
Collapse All Collapses all expanded rules.
Compare Deployed Policy Compares the policy in the Policy Builder to an
existing policy in the Identity Vault.
Copy Copies the selected item to the Clipboard.
Managing Policies with the Policy Builder 39
Page 40

Operation Description
Copy and drop Select the item, press Ctrl, then drag the item.
Cut Cuts the selected item and copies it to the
Clipboard.
Delete Deletes the selected item.
Deploy Policy Deploys the policy into the Identity Vault.
Disable Displays a rule, condition, or action as disabled.
Disable Trace Disables trace on the rule.
DirXML Script Tracing Enables DirXML Script Tracing on the policy.
Drag and drop Enables you to select an item, then relocate it.
Select the item, then drag it to the new location.
Edit Enables you to edit the selected item. To open the
Rule Builder, select a rule, then click Edit.
Enable Displays a rule, condition, or action as enabled.
novdocx (en) 13 May 2009
Enable Trace Enables tracing on the rule.
Expand All Expands all the rules so that you can view the
conditions and actions of each rule.
Import Policy from file Imports a policy from the file system and appends it
to the policy, or replaces all the rules of the policy.
Launch Policy Simulator Launches the Policy Simulator.
Move and drop Enables you to select and move an item. Select the
item, then drag it.
Move down Moves the item down in the list of policies.
Move up Moves the item up in the list of policies.
New > Append Condition Group Creates a new condition group after a selected
item.
New > Include > Insert Include Before or Insert
Include After
New > Predefined Rule > Insert Predefined Rule
Before or Insert Predefined Rule After
New > Rule > Insert Rule Before or Insert Rule
After
Paste Pastes the contents of the Clipboard after the
Creates a new Include before or after the selected
item.
Inserts a predefined rule before or after the
selected item.
Creates a new rule before or after the selected
item.
selected item.
Preferences Enables you to change how the information is
Redo Redoes the previous action.
Select Click any item to select it.
Undo Undoes the previous action.
40 Policies in Designer 3.5
displayed.
Page 41

3.7.2 Keyboard Support
You can move through the Policy Builder with keystrokes as well as using the mouse. The supported
keystrokes are listed below.
Table 3-5 Keyboard Support in the Policy Builder
Keystroke Description
Ctrl+C Copies the selected item into the Clipboard.
Ctrl+X Cuts the selected item and adds it to the Clipboard.
Ctrl+V Pastes the contents of the Clipboard after the
selected item.
Delete Deletes the selected Item.
Left-arrow Collapses a rule node.
Right-arrow Expands a rule node.
novdocx (en) 13 May 2009
Up-arrow Navigates up.
Down-arrow Navigates down.
Ctrl+Z Undo
Ctrl+Y Redo
3.7.3 Renaming a Policy
1 In the Outline view, select the policy you want to rename.
2 Right-click and select Properties.
3 Change the name of the policy in the Policy Name field.
4 Click OK.
3.7.4 Saving Your Work
Do one of the following:
From the main menu, click File > Save (or Save All).
Close the editor by clicking the X in the editor’s tab.
Select Close from the main menu’s file menu.
Press Ctrl+S.
Managing Policies with the Policy Builder 41
Page 42

3.7.5 Policy Description
The description fields provide a place to add notes about the functionality of the policy. You can add
a description for the policy and you can add a description for the rule.
1 In the Policy Builder, click Policy Description.
novdocx (en) 13 May 2009
2 Provide a description of the policy.
3 Save the policy by pressing Ctrl+S.
To add a description to a rule:
1 Double-click the name of the rule.
2 Specify a description of the rule in the Description field.
3 Save the rule by pressing Ctrl+S.
3.8 Viewing the Policy in XML
Designer enables you to view, edit, and validate the XML by using an XML editor. Click the XML
Source or XML Tree tabs to access the XML editor. For more information about the XML editor, see
“The Novell XML Editor” in the Designer 3.0.1 for Identity Manager 3.6 Administration Guide.
42 Policies in Designer 3.5
Page 43

Figure 3-3 View Policy in XML
novdocx (en) 13 May 2009
Managing Policies with the Policy Builder 43
Page 44

novdocx (en) 13 May 2009
44 Policies in Designer 3.5
Page 45

4
Using Additional Builders and
novdocx (en) 13 May 2009
Editors
Although you define most arguments in the Argument Builder, there are several more builders and
editors that are used by the Condition editor and Action editor in the Policy Builder. Each builder
can recursively call anyone of the builders in the following list:
Section 4.1, “Action Builder,” on page 45
Section 4.2, “Actions Builder,” on page 46
Section 4.3, “Argument Builder,” on page 47
Section 4.4, “Condition Builder,” on page 52
Section 4.5, “Conditions Builder,” on page 53
Section 4.6, “Match Attribute Builder,” on page 55
Section 4.7, “Action Argument Component Builder,” on page 57
Section 4.8, “Argument Value List Builder,” on page 58
Section 4.9, “Named String Builder,” on page 58
Section 4.10, “Condition Argument Component Builder,” on page 59
Section 4.11, “Pattern Builder,” on page 60
Section 4.12, “String Builder,” on page 61
Section 4.13, “XPath Builder,” on page 62
Section 4.14, “Mapping Table Editor,” on page 62
4
Section 4.15, “Namespace Editor,” on page 67
Section 4.16, “Local Variable Selector,” on page 69
4.1 Action Builder
The Action Builder enables you to add, view, and delete the actions that make up a rule. Actions can
also contain other actions.
4.1.1 Creating an Action
1 In the Policy Builder, create a new rule or edit an existing rule.
2 Double-click the Actions tab to launch the Action Builder.
Using Additional Builders and Editors
45
Page 46

3 Select the desired action from the drop-down list, then click OK.
4.1.2 Additional Options for the Action Builder
There are additional options in the action builder to manage the actions. Right-click the action to see
the additional options.
Table 4-1 Action Builder Additional Options
novdocx (en) 13 May 2009
Option Description
New > Insert Action Before Adds a new action before the current action.
New > Insert Action After Adds a new action after the current action.
Edit Launches the Action Builder.
Move up Moves the selected action up in the order of execution.
Move down Moves the selected action down in the order of execution.
Cut Cuts the selected action and adds it to the clipboard.
Copy Copies the action to the clipboard.
Paste Pastes the action that is in the clipboard to the desired location in
the Action Builder.
Delete Deletes the selected action.
Undo Undoes the prior action.
Redo Redoes the prior action.
Preferences Allows you to set default functionality in the Policy Builder.
4.2 Actions Builder
The Actions Builder allows you to create an action inside of another action. To launch the Actions
Builder, select one of the following actions, then click the Edit the actions icon .
For Each (page 260)
Implement Entitlement (page 266)
If (page 264)
While (page 312)
46 Policies in Designer 3.5
Page 47

In the following example the add destination attribute value action is performed for each Group
entitlement that is being added in the current operation.
Figure 4-1 For Each Action
To define the action of the add destination attribute value, click the Edit the actions icon. This
launches the Actions Builder. In the Actions Builder, you define the desired action. In the following
example, the member attribute is added to the destination object for each added Group entitlement.
Figure 4-2 Actions Builder
novdocx (en) 13 May 2009
4.3 Argument Builder
The Argument Builder provides a dynamic graphical interface that enables you to construct complex
argument expressions for use within Rule Builder.
Using Additional Builders and Editors 47
Page 48

Figure 4-3 Argument Builder
novdocx (en) 13 May 2009
The Argument Builder consists of six separate sections:
Nouns: Contains a list of all of the available noun tokens. Double-click a noun token to add it to the
Expression pane. See “Noun Tokens” on page 313 for more information.
Ve rb s: Contains a list of all of the available verb tokens. Double-click a verb token to add it to the
Expression pane. See “Verb Tokens” on page 353 for more information.
Description: Contains a brief description of the selected noun or verb token. Click the Help icon to
launch additional help.
Expression: Contains the argument that is being built. Multiple noun and verb tokens can be added
to a single argument. Tokens can be arranged in different orders through the Expression pane.
Editor: Provide the values for the nouns and the verbs in the Editor pane.
To ol ba r: Allows you to manipulate the noun and verb tokens. See Table 4 -2 for a list of all of the
options in the toolbar.
Table 4-2 Argument Builder Toolbar Options
Option Description
Delete Deletes the selected token.
48 Policies in Designer 3.5
Page 49

Option Description
Cut Cuts the selected token to the Clipboard.
Copy Copies the selected token to the Clipboard.
Paste Pastes the token from the Clipboard into the Argument Builder.
Move Up Moves the selected token up.
Move Down Moves the selected token down.
Help Launches the help.
Append noun Appends a noun token to the end of the argument as a sibling token.
Insert noun Inserts a noun token into the argument.
novdocx (en) 13 May 2009
Append noun to child token
list
Insert noun at beginning of
child token list
Append verb Appends a verb token to the end of the argument as a sibling token.
Insert verb Inserts a verb token into the argument.
Append verb to child token
list
Insert verb at beginning of
child token list
Appends a noun token as a child token instead of as a sibling token.
Inserts a noun token into the argument as the first child in the token list
instead of as a sibling token.
Appends a verb token as a child token instead of as a sibling token.
Inserts a verb token into the argument as the first child in the token list
instead of as a sibling token.
You can select to trace each token or disable the tracing of the token in the Argument Builder. To
disable tracing:
1 Click the trace icon to disable tracing.
To enable tracing:
1 Click the disable trace icon to enable tracing.
Section 4.3.1, “Launching the Argument Builder,” on page 49
Section 4.3.2, “Argument Builder Example,” on page 50
4.3.1 Launching the Argument Builder
To launch the Argument Builder, select one of the following actions, then click the Edit the
arguments icon .
Add Association (page 235)
Add Destination Attribute Value (page 236)
Using Additional Builders and Editors 49
Page 50

Add Destination Object (page 238)
Add Source Attribute Value (page 242)
Append XML Text (page 246)
Clear Destination Attribute Value (page 249) (when the selected object is DN or Association)
Clear Source Attribute Value (page 251) (when the selected object is DN or Association)
Delete Destination Object (page 255) (when the selected object is DN or Association)
Delete Source Object (page 256) (when the selected object is DN or Association)
Find Matching Object (page 257)
For Each (page 260)
Move Destination Object (page 267)
Move Source Object (page 269)
Reformat Operation Attribute (page 270)
Remove Association (page 272)
Remove Destination Attribute Value (page 273)
Remove Source Attribute Value (page 276)
novdocx (en) 13 May 2009
Rename Destination Object (page 277) (when the selected object is DN or Association and
Enter String)
Rename Source Object (page 279) (when the selected object is DN or Association and Enter
String)
Set Destination Attribute Value (page 286) (when the selected object is DN or Association and
Enter Value Type is not structured)
Set Destination Password (page 288)
Set Local Variable (page 289)
Set Operation Association (page 291)
Set Operation Class Name (page 292)
Set Operation Destination DN (page 293)
Set Operation Property (page 294)
Set Operation Source DN (page 295)
Set Operation Template DN (page 296)
Set Source Attribute Value (page 297)
Set Source Password (page 299)
Set XML Attribute (page 302)
Status (page 305)
Trace Message (page 308)
4.3.2 Argument Builder Example
The following example creates an argument for a username from the first letter of the first name and
the entire last name:
1 Double-click Attribute from the list of nouns.
50 Policies in Designer 3.5
Page 51

2 Specify or select the Given Name attribute.
You can browse the Identity Vault attributes, the application attributes, or launch the variable
browser. For more information on the variable browser, see Section 3.6, “Variable Selector,” on
page 35.
3 Double-click Substring from the list of verbs.
novdocx (en) 13 May 2009
4 Type 1 in the Length field.
5 Select the Given Name attribute, then click the Move Down icon.
6 Double-click Attribute from the list of nouns.
7 In the Name field, specify or browse to the Surname attribute.
Using Additional Builders and Editors 51
Page 52

The argument takes the first character of the Given Name attribute and adds it to the Surname
attribute to build the desired value.
8 Click Finish to save the argument.
4.4 Condition Builder
The Condition Builder enables you to add, view, and delete the conditions that make up a rule. A
condition contains one or more conditions and one or more condition groups. The condition groups
contain two different condition structures, which define the logic of condition groups. The two
condition structures are:
OR Conditions, AND Groups
novdocx (en) 13 May 2009
AND Conditions, OR Groups
To create and customize a condition, see the following sections:
Section 4.4.1, “Creating a Condition,” on page 52
Section 4.4.2, “Additional Options for the Condition Builder,” on page 52
4.4.1 Creating a Condition
1 In the Policy Builder, create a new rule or edit an existing rule.
2 Double-click the Conditions tab to launch the Condition Builder.
3 Select the desired condition from the drop-down list, then click OK.
4.4.2 Additional Options for the Condition Builder
There are additional options in the condition builder to manage the conditions. Right-click the
condition to see the additional options.
52 Policies in Designer 3.5
Page 53

Table 4-3 Condition Builder Options
Option Description
New > Insert Condition Before Adds a condition before the current condition.
New > Insert Condition After Adds a condition after the current condition.
Edit Launches the Condition Builder.
Move up Moves the selected condition up in the order of execution.
Move down Moves the selected condition down in the order of execution.
Cut Cuts the select condition and adds it to the clipboard.
Copy Copies the condition and adds it to the clipboard.
Paste Pastes the condition that is in the clipboard in the desired
location in the Condition Builder.
Delete Deletes the selected condition.
Undo Undoes the prior action in the Condition Builder.
novdocx (en) 13 May 2009
Redo Redoes the prior action in the Condition Builder.
Preferences Allows you to set default functionality in the Policy Builder.
For additional information on the Condition Builder and the rules, see Section 3.4, “Creating a
Rule,” on page 28.
4.5 Conditions Builder
The Conditions Builder allows you to create a condition inside of an action. To launch the
Conditions Builder, select one of the following actions, then click the Edit the actions icon next
to the If conditions field.
If (page 264)
While (page 312)
1 In the Conditions Builder, browse to and select the desired condition.
2 Define the condition, then click OK.
Using Additional Builders and Editors 53
Page 54

The Conditions Builder has additional options that the Condition Builder. Right-click the Conditions
Builder.
Table 4-4 Conditions Builder Options
Option Description
New > Insert Condition Group Before Adds a condition group before the selected
condition group.
New > Insert Condition Group After Adds a condition group after the selected condition
group.
Append Conditions Appends a condition in the condition group.
Expand All Conditions Expands all conditions that are part of the selected
condition group.
Collapse All Conditions Collapses all conditions that are part of the selected
condition group.
Move up Moves the selected condition group up in the rule.
novdocx (en) 13 May 2009
Move down Moves the selected condition group down in the
rule.
Cut Cuts the selected condition group from the rule and
adds it to the clipboard.
Copy Copies the selected condition group and adds it to
the clipboard.
Paste Pastes the condition group from the clipboard into
the Conditions Builder.
Delete Deletes the selected condition or condition group.
Undo Undoes the prior action in the Conditions Builder.
Redo Redoes the prior action in the Condition Builder.
Preferences Allows you to set default functionality in the Policy
Builder.
If you have multiple conditions and conditions groups, the And/Or icons are tied together. If you
change the And/Or icon for the condition groups, it is changed for the conditions as well.
54 Policies in Designer 3.5
Page 55

Figure 4-4 Conditions Builder And/Or Icons
4.6 Match Attribute Builder
novdocx (en) 13 May 2009
The Match Attribute Builder enables you to select attributes and values used by the Find Matching
Object (page 257) action to determine if a matching object exists in a data store.
For example, if you wanted to match users based on a common name and a location:
1 Select the action of find matching object.
2 Select the scope of the search for the matching objects. Select from entry, subordinates, or
subtree.
3 Specify the DN of the starting point for the search.
4 Click the Edit match attributes icon to launch the Match Attribute Builder.
5 Click the Browse the Identity Vault attributes icon, the Browse application attributes icon, or
the Launch variable browser icon. For more information on the Launch variable browser icon,
see Section 3.6, “Variable Selector,” on page 35.
6 Browse to and select the desired attribute, then click OK.
Using Additional Builders and Editors 55
Page 56

novdocx (en) 13 May 2009
If you want to add more than one attribute, click the Append new item icon to add another line.
You can browse the Identity Vault schema or the connected system schema.
7 Click Finish.
The Match Attribute Builder also allows you to specify another value, instead of using the value
from the current object.
To use another value:
1 Launch the Match Attribute Builder, then select Other Value from the drop-down list.
2 Select the desired value type.
counter
dn
int
interval
octet
state
string
structured
56 Policies in Designer 3.5
Page 57

teleNumber
time
3 Specify the value, then click OK.
4.7 Action Argument Component Builder
To launch the Action Argument Component Builder, select one of the following actions when the
Select Value Type selection is structured, then click the Edit the components icon .
Add Destination Attribute Value (page 236)
Add Source Attribute Value (page 242)
Reformat Operation Attribute (page 270)
Remove Destination Attribute Value (page 273)
Remove Source Attribute Value (page 276)
Set Destination Attribute Value (page 286)
Set Source Attribute Value (page 297)
novdocx (en) 13 May 2009
Figure 4-5 Add Destination Attribute Value Action
1 Make sure the value type is set to structured, then click the Edit the components icon .
2 Create the value of the action component.
You can type the value, or click the Edit the arguments icon to create the value in the
Argument Builder.
3 Click Finish.
Using Additional Builders and Editors 57
Page 58

4.8 Argument Value List Builder
To launch the Argument Value List Builder, select the following action, then click the Edit the
arguments icon .
Set Default Attribute Value (page 284)
Figure 4-6 Set Default Attribute Value
1 Select the type of the value: counter, dn, int, interval, octet, state, string, structured,
teleNumber, time.
novdocx (en) 13 May 2009
2 Create the value of the list.
You can type the value, or click the Edit the arguments icon to create the value in the Argument
Builder.
3 Click Finish.
4.9 Named String Builder
To launch the Named String Builder, select one of the following actions, then click the Edit the
strings icon next to the Strings field.
Add Role (page 240)
58 Policies in Designer 3.5
Page 59

Generate Event (page 261)
Remove Role (page 274)
Send Email (page 280)
Send Email from Template (page 282)
Start Workflow (page 303)
1 Select the name of the string from the drop-down list.
novdocx (en) 13 May 2009
2 Create the value for the string by clicking the Edit the arguments icon to launch the Argument
Builder.
3 Click Finish.
For a Send Email action, the named strings correspond to the elements of the e-mail. A complete list
of possible values is contained in the help file corresponding to the action that launches the Named
String Builder.
4.10 Condition Argument Component Builder
To launch the Condition Argument Component Builder, select one of the following conditions, then
select the structured selection for Mode in order to see the Launch ArgComponent Builder icon .
If Attribute (page 192)
If Destination Attribute (page 198)
Using Additional Builders and Editors 59
Page 60

If Operation Attribute (page 215)
If Source Attribute (page 224)
Figure 4-7 If Attribute mode
1 Specify the name and value of the condition component.
novdocx (en) 13 May 2009
2 Click Finish.
4.11 Pattern Builder
You can launch the Pattern Builder from the Argument Builder editor when the Unique Name
(page 348) token is selected. The Argument Builder editor pane shows a Pattern field where you can
click to launch the Pattern Builder.
For information on how to access the Argument Builder, see “Launching the Argument Builder” on
page 49.
60 Policies in Designer 3.5
Page 61

Figure 4-8 Unique Name Token in the Argument Builder
novdocx (en) 13 May 2009
1 Click the Edit patterns icon to launch the Pattern Builder.
2 Specify the pattern or click the Edit the arguments icon to use the Argument Builder to
create the pattern.
3 Click Finish.
4.12 String Builder
The String Builder enables you to construct name/value pairs for use in certain actions, including Set
SSO Credential and Clear SSO Credential.
Using Additional Builders and Editors 61
Page 62

To open String Builder, select the Edit the Strings icon next to the appropriate field when
defining a new action or modifying an existing action. For example, The Set SSO Credential action
contains a Login Parameter Strings field for necessary login parameter strings. String Builder
allows you to create the appropriate strings.
In the String Builder, specify a name for each string you want to add to the action, then manually, or
using the Argument Builder, create the appropriate string value.
Figure 4-9 String Builder Example
novdocx (en) 13 May 2009
4.13 XPath Builder
The XPath Builder is a powerful tool that allows you to build and test an XPath expression against
any XML document. See “Using the XPath Builder” on page 71 for more information.
4.14 Mapping Table Editor
The Mapping Table editor allows you to create, edit, and manage mapping table objects. A mapping
table object is used by a policy to map a set of values to another set of corresponding values. After a
mapping table object is created, the Map (page 362) token maps the results of the specified tokens
from the values specified in the mapping table.
To use a mapping table object, the following steps must be completed:
1. Section 4.14.1, “Creating a Mapping Table Object,” on page 62
2. Section 4.14.2, “Adding a Mapping Table Object to a Policy,” on page 64
To edit a mapping table, see Section 4.14.3, “Editing a Mapping Table Object,” on page 65.
4.14.1 Creating a Mapping Table Object
A mapping table object can be created in a library, driver object, Publisher channel, or Subscriber
channel.
1 In the Outline view, right-click the location to create the mapping table, then select New >
Mapping Table.
2 Specify the name of the mapping table object, then click OK.
62 Policies in Designer 3.5
Page 63

Select Open the editor after creating the object to open the Mapping Table editor.
3 In the File Conflict message, click Ye s to save the project before opening the Mapping Table
editor.
4 In the Mapping Table editor, select column_new-1.
novdocx (en) 13 May 2009
5 Specify a column name and data type, then click Close.
Column names must be unique. The data type lets you specify if the column values are Case
Sensitive, Case Insensitive, or Numeric.
6 Select New Value to specify a cell value.
Using Additional Builders and Editors 63
Page 64

7 (Optional) To add another column, click the Add Column icon , then repeat Step 4 and
Step 5.
8 (Optional) To add another row, click the Add Row icon , then repeat Step 6.
9 Press Ctrl+S to save the mapping table object.
10 Continue with Section 4.14.2, “Adding a Mapping Table Object to a Policy,” on page 64.
4.14.2 Adding a Mapping Table Object to a Policy
1 Either create a policy to use the mapping table in, or select an existing policy to edit.
2 Launch the Argument Builder in the Policy Builder.
novdocx (en) 13 May 2009
For information on how to access the Argument Builder, see “Launching the Argument
Builder” on page 49.
3 Double-click Map from the list of verbs to add it to the expression panel.
4 In the Mapping Table DN field, browse to and select the mapping table object created in
Section 4.14.1, “Creating a Mapping Table Object,” on page 62, then click OK.
64 Policies in Designer 3.5
Page 65

5 Select whether the mapping table DN is set relative to the policy or not.
6 Select the source column name by clicking the Browse icon.
novdocx (en) 13 May 2009
7 Select the destination column name by clicking the Browse icon.
The mapping table can be used in any manner at this point. In this example, the OU attribute is
populated with the value derived from the mapping table.
4.14.3 Editing a Mapping Table Object
Designer provides the following options to edit the mapping table:
Table 4-5 Editing Options for the Mapping Table Editor
Option Description
Undo Add Column Undoes the last action performed in the table.
Redo Add Column Redoes the action that was undone.
Add Column Inserts a column to the mapping table.
Add Row Inserts a row to the mapping table.
Using Additional Builders and Editors 65
Page 66

Option Description
Delete Column Deletes a column from the mapping table.
Delete Row Deletes a row from the mapping table.
Move Row Up Moves the selected row up in the mapping table.
Move Row Down Moves the selected row down in the mapping table.
Move Column Left Moves the selected column left in the mapping
table.
Move Column Right Moves the selected column right in the mapping
table.
The Mapping Table Editor also supports keyboard shortcuts for several of its operations:
Table 4-6 Keyboard Shortcuts for the Mapping Table Editor
Keyboard Shortcut Description
novdocx (en) 13 May 2009
Ctrl+Shift+Insert Insert a column to the right of the current column.
Ctrl+Shift+Delete Delete the current column. You are prompted to confirm the deletion.
Ctrl+Shift+C Rename the current column. Opens the Column Edit dialog box.
Alt+Insert Insert a row below the current row.
Alt+Delete Delete the current row. You are prompted to confirm the deletion.
Ctrl+Up Arrow Navigate up one row.
Ctrl+Down Arrow Navigate down one row.
Ctrl+Left Arrow Navigate left one column.
Ctrl+Right Arrow Navigate right one column.
4.14.4 Importing Data from a CSV File
The Mapping Table editor allows you to import data that is stored in a CSV file. It then populates the
table with the information in the CSV file. To import a CSV:
1 In an empty Mapping Table, select Import From CSV file .
2 Browse to and select the CSV file, then click Open.
3 Click Ye s to overwrite your existing data.
4 Press Ctrl+S to save the data in the table.
4.14.5 Exporting Data to a CSV File
The Mapping Table editor allows you to export data to a CSV file. To export data to a CSV file:
1 When the data in the Mapping Table is ready to export, select Export To CSV File .
66 Policies in Designer 3.5
Page 67

2 Click Ye s to save this editor’s changes and continue.
3 Specify a name and location for the CSV file, then click Save.
4.14.6 Testing a Mapping Table Object
You can use the Policy Simulator to test the functionality of the mapping table. The Policy Simulator
tests the mapping table by testing the policy that is using the mapping table. For more information,
see Chapter 9, “Testing Policies with the Policy Simulator,” on page 145.
4.15 Namespace Editor
The Policy Builder enables you to use multiple XML namespaces within your XML documents.
You launch the Namespace editor when you access the following DirXML Script elements in the
Policy Builder:
Append XML Element (page 244)
Append XML Text (page 246)
Clone By XPath Expressions (page 253)
Set XML Attribute (page 302)
novdocx (en) 13 May 2009
Strip XPath Expression (page 307)
XPath (page 352)
1 Click the Edit the policy’s namespace definitions icon.
2 Specify the namespace prefix.
3 Specify the URI.
Using Additional Builders and Editors 67
Page 68

4 Do not select Java Extension.
novdocx (en) 13 May 2009
You can also access Java* classes through XPath by using XML namespaces. To create a namespace
for a Java class, specify the namespace prefix in the Name field, the class name in the URI field, and
select the Java Extension check box.
4.15.1 Accessing Java Classes Using Namespaces
Novell provides several Identity Manager Java classes that can be called by using XPath expressions
from the Policy Builder. The following links open Javadoc references for these Java classes:
com.novell.nds.dirxml.driver.XdsQueryProcessor (http://developer.novell.com/documentation/
dirxml/dirxmlbk/api/com/novell/nds/dirxml/driver/XdsQueryProcessor.html)
com.novell.nds.dirxml.driver.XdsCommandProcessor (http://developer.novell.com/
documentation/dirxml/dirxmlbk/api/com/novell/nds/dirxml/driver/
XdsCommandProcessor.html)
com.novell.nds.dirxml.driver.DNConverter (http://developer.novell.com/documentation/
dirxml/dirxmlbk/api/com/novell/nds/dirxml/driver/DNConverter.html)
The Java Developer Kit (JDK*) also provides several useful classes, such as java.lang.String, and
java.lang.System. References for these classes are available with the JDK.
68 Policies in Designer 3.5
Page 69

novdocx (en) 13 May 2009
For additional information on using XPath and the Novell Java classes listed above, consult the
DirXML
dirxmlfaq.html).
®
Driver Developer Kit (http://developer.novell.com/documentation/dirxml/dirxmlbk/ref/
4.16 Local Variable Selector
Policies use local variables and they have different scopes. A local variable is defined for a specific
policy or it is defined for a driver. If a local variable scope is set to driver, then any policy in the
driver can use this variable.
The Policy Builder contains a Local Variable Selector that allows you to select any local variables
that have been defined for use in the selected policy.
Figure 4-10 Local Variable Selector
The Local Variable Selector is accessed through the following actions, conditions, and tokens:
If Local Variable (page 207)
Set Local Variable (page 289)
Local Variable (page 330)
The Local Variable Selector displays three tabs:
Using Additional Builders and Editors 69
Page 70

Figure 4-11 Error Variables
novdocx (en) 13 May 2009
Policy Scope: Lists any local variables with a scope of policy.
Driver Scope: Lists any local variables with a scope of driver.
Error Variables: Lists local variables that are set, if an error is encountered during the execution of
the policy that contains the following actions:
Clear SSO Credential (page 252)
Set SSO Credential (page 300)
Set SSO Passphrase (page 301)
Send Email (page 280)
Send Email from Template (page 282)
Start Workflow (page 303)
70 Policies in Designer 3.5
Page 71

5
Using the XPath Builder
The XPath Builder is a powerful tool that allows you to build and test an XPath expression against
any XML document. You can test different expressions against an XDS document and modify the
XDS document while testing the expression. For more information about XPath expression, see
“XPath 1.0 Expressions” in Understanding Policies for Identity Manager 3.6.
Figure 5-1 XPath Builder
novdocx (en) 13 May 2009
5
To use the XPath Builder:
1 In the Policy Builder, select any of the following conditions or actions, then click the Launch
XPath Builder icon .
If XPath Expression (page 230)
Append XML Element (page 244)
Append XML Text (page 246)
Clone By XPath Expressions (page 253)
Set XML Attribute (page 302)
Strip XPath Expression (page 307)
2 Select Import to browse to and select the XDS document to test.
Using the XPath Builder
71
Page 72

Designer comes with sample event files you can use to test the XPath expression against. The
files are located in the plug-in
com.novell.designer.idm.policy_version\simulation
where version is the current version of Designer. The events are Add, Association, Delete,
Instance, Modify, Move, Query, Rename, and Status.
novdocx (en) 13 May 2009
,
3 Double-click the folder to display the available events. Each event has different files you can
select. For example, if you select Add you have three options:
OrganizationalUnit.xml
User.xml
4 Select a file, then click Open.
The input document is now displayed in the XPath Context Selector view. The XML Source tab
allows you to use an XML source editor to edit the imported document, or an XML document
from another editor can be copied and pasted into the source view. If you change the document,
click Save As to save the changed document.
72 Policies in Designer 3.5
, and
User.xml
. The file indicates the event. If you select
, it is an Add event for a User object.
Organization.xml
,
Page 73

novdocx (en) 13 May 2009
If you want to see the XDS document without scrolling, click the Hide XPath Details icon . To
see the XPath Expression and Results windows, click Show XPath Details icon.
5 Select the current position in the document from which you want to start building your XPath
expression.
Using the XPath Builder 73
Page 74

novdocx (en) 13 May 2009
The XPath context that you have selected is displayed in the XPath Selected Context as shown.
6 Select Generic or Unique.
Generic searches the entire XML document to match the specified XPath expression. It returns
results for each instance of the XPath expression. In this example, the XPath expression is “/
nds/input/add”. It searches the entire XML document for each instance of add.
Unique searches the XML document until it finds a match and then stops. The unique XPath
expression is “/nds/input[1]/add[1]”. It searches for the first instance of add and then stops. You
can specify which instance you want to use by selecting the next instance of the XPath element
in the XML Context Selector.
7 Specify an XPath expression in the XPath Expression field.
74 Policies in Designer 3.5
Page 75

NOTE: Using the keystroke combination Ctrl+Space+3, /, [, or ( triggers code completion. The
expression is evaluated up until the cursor location, and insertable elements are shown in a
drop-down box.
novdocx (en) 13 May 2009
The results of your XPath expression appear in the Results text area below.
If the XPath editor does not evaluate the expression, click the Evaluate XPath expression icon
to force the XPath Builder to evaluate the expression.
8 (Optional) Click the ECMA Expression Editor icon to use a valid ECMAScript expression
instead of an XPath expression.
9 When you are finished building and testing an XPath expression, click OK to close the XPath
Builder.
The text displayed in the XPath Expression is placed into the policy that you are editing.
Using the XPath Builder 75
Page 76

novdocx (en) 13 May 2009
76 Policies in Designer 3.5
Page 77

6
Defining Schema Map Policies
Schema Map policies map class names and attribute names between the Identity Vault namespace
and the application namespace. All documents passed between the Metadirectory engine and the
application shim in either direction on either channel are passed through the Schema Map policy.
There is one Schema Map policy per driver.
Figure 6-1 The Schema Map Editor
novdocx (en) 13 May 2009
6
NOTE: The Schema Map editor is for creating and managing schema map policies. If you want to
manage the actual schema on the Identity Vault or Application, use the Manage Schema tool, which
is accessible by clicking the pull-down menu , then selecting Manage Identity Vault Schema
or Manage Application Schema .
For more information, see “Managing the Schema” in the Designer 3.0.1 for Identity Manager 3.6
Administration Guide.
This section includes the following topics:
Section 6.1, “Using the Schema Map Editor,” on page 78
Section 6.2, “Editing a Schema Map Policy,” on page 81
Section 6.3, “Testing Schema Map Policies,” on page 86
Section 6.4, “Exporting and Importing with the Schema Map Editor,” on page 87
Defining Schema Map Policies
77
Page 78

Section 6.5, “Accessing the Schema Map Policy in XML,” on page 87
Section 6.6, “Additional Schema Map Policy Options,” on page 87
6.1 Using the Schema Map Editor
The Schema Map editor allows you to edit the Schema Map policies. This section includes the
following topics:
Section 6.1.1, “Accessing the Schema Map Editor,” on page 78
Section 6.1.2, “Navigating the Schema Map Editor,” on page 79
Section 6.1.3, “Understanding the Schema Map Editor Toolbar,” on page 80
6.1.1 Accessing the Schema Map Editor
There are three different ways to access the Schema Map editor in Designer:
Outline View To open the Schema Map editor from the Outline view:
novdocx (en) 13 May 2009
1 In an open project, click the Outline tab.
2 Click Show Model Outline .
3 Expand the driver where you want to manage the schema map policy.
4 Double-click the Schema Map icon to launch the Schema Map editor.
You can also right-click the icon, then select Edit.
Policy Flow View To open the Schema Map editor from the Policy Flow view:
1 In an open project, click the Outline tab.
2 Click Show Policy Flow .
3 Double-click the Schema Mapping object, select the Schema Mapping policy, then click Edit to
launch the Schema Map Editor.
You can also right-click the Schema Mapping object, then select Edit Policy to launch the
Schema Map Editor.
Policy Set View To open the Schema Map editor from the Policy Set view:
1 In an open project, click the Outline tab.
2 Click the Show Model Outline icon.
78 Policies in Designer 3.5
Page 79

3 In the Outline view, select the appropriate driver object.
4 In the Policy Set view, open the Schema Mapping folder, then double-click the Schema
Mapping policy to launch the Schema Map editor.
You can also right-click the Schema Mapping policy, then click Edit to launch the Schema Map
editor.
6.1.2 Navigating the Schema Map Editor
novdocx (en) 13 May 2009
The Schema Map Editor uses standard point-and-click navigation. However, it also provides
keyboard-based navigation options as described in Table 6-1.
NOTE: The Schema Map Editor lets you order the list of mapped classes and attributes
alphabetically (ascending or descending.) To do so, click either the gray Identity Vault header or the
gray application datastore header that appears above the list of mapped classes. If you first select a
class mapping and then click one of the headers, only the attributes within the class mapping are
ordered.
Table 6-1 Schema Map Editor Keyboard Support
Keystroke Description
Up-arrow Moves the cursor up in the Schema Map editor.
Down-arrow Moves the cursor down in the Schema Map editor.
Left-arrow Collapses the information displayed
Right-arrow Expands the information displayed.
Insert Adds a class.
Ctrl+Insert Adds an attribute.
Delete Deletes the selected items.
Enter Opens edit mode for the currently selected field.
Press Enter a second time to commit the change in
Schema Map editor.
Esc Exits the edit mode.
Defining Schema Map Policies 79
Page 80

6.1.3 Understanding the Schema Map Editor Toolbar
The Schema Map editor includes a toolbar that provides access to the following features. Several of
these features, along with an option to Edit a selected mapping, is also available from a drop-
down menu by right-clicking in the Schema Map editor.
Tool Description
Insert Identity Vault Class launches a dialog box from which you can add a new ID Vault
class, and its associated attributes, to the schema map. For more information, see “Adding
an Identity Vault Class or Attribute” on page 81.
Insert Identity Vault Attribute launches a dialog box from which you can add additional
attributes to an existing ID Vault class in the schema map. For more information, see
“Adding an Identity Vault Class or Attribute” on page 81.
Insert Application Class launches a dialog box from which you can add a new Application
class, and its associated attributes, to the schema map. For more information, see “Adding
an Application Class or Attribute” on page 83.
Insert Application Attribute launches a dialog box from which you can add additional
attributes to an existing Application class in the schema map. For more information, see
“Adding an Application Class or Attribute” on page 83.
novdocx (en) 13 May 2009
Insert Class Row adds an empty class row to the schema map. You can then populate the
class fields manually or by selecting from the drop-down menu of available classes.
Insert Attribute Row adds an empty attribute row to the selected class in the schema map.
You can then populate the attribute fields manually or by selecting from the drop-down
menu of available attributes.
Delete deletes the selected class or attribute mappings from the schema map.
Clear All Items deletes all class and attribute entries from the schema map.
Synchronize with the Filter Editor instructs the Schema Map editor to update the Filter
policy with any schema mappings you have added in the Schema Map editor. The Schema
Map editor does not synchronize deleted entries to the Filter policy.
For more information about filter policies and the Filter editor, see Chapter 7, “Controlling
the Flow of Objects with the Filter,” on page 93.
Launch Policy Simulator launches the Policy Simulator. For more information, see
Chapter 9, “Testing Policies with the Policy Simulator,” on page 145.
Help launches the context-sensitive help for the Schema Map editor.
80 Policies in Designer 3.5
Page 81

Tool Description
The pull-down menu opens a secondary menu of schema map editor tools, including the
following:
Save to File exports the current schema map to an XML file.
Import from File imports a schema map from a previously saved XML file.
Manage Identity Vault Schema launches the Manage Schema tool. For more
information, see “Managing the Schema” in the Designer 3.0.1 for Identity Manager 3.6
Administration Guide.
Manage Application Schema launches the Manage Schema tool. For more information,
see “Managing the Schema” in the Designer 3.0.1 for Identity Manager 3.6
Administration Guide.
Refresh Application Schema queries a live application for its current schema. This lets
you update the application schema in Designer as it changes on the live system.
6.2 Editing a Schema Map Policy
The Schema Map editor allows you to create and edit schema map policies. This section includes the
following topics:
novdocx (en) 13 May 2009
Section 6.2.1, “Adding or Deleting Classes and Attributes,” on page 81
Section 6.2.2, “Refreshing the Application Schema,” on page 85
Section 6.2.3, “Editing Items,” on page 85
Section 6.2.4, “Sorting Schema Map Entries,” on page 86
Section 6.2.5, “Managing the Schema,” on page 86
For information about exporting and importing a schema map policy, see Section 6.4, “Exporting
and Importing with the Schema Map Editor,” on page 87.
6.2.1 Adding or Deleting Classes and Attributes
There are three types of classes or attributes you can add to a schema map. The process for adding
each type of class or attribute varies.
When you add or remove a class or attribute in the Schema Map policy, Designer updates relevant
filters at the same time. For more information about filters, see Chapter 7, “Controlling the Flow of
Objects with the Filter,” on page 93.
“Adding an Identity Vault Class or Attribute” on page 81
“Adding an Application Class or Attribute” on page 83
“Adding a Non-class-specific Attribute Mapping” on page 84
“Deleting a Class or Attribute Mapping” on page 85
Adding an Identity Vault Class or Attribute
You can both add new Identity Vault classes and attributes to a schema map, and add additional
Identity Vault attributes to an existing class mapping.
Defining Schema Map Policies 81
Page 82

To add a new Identity Vault class and attributes to a schema map:
1 In the Schema Map Editor, select Insert Identity Vault Class .
You can also right-click in the Schema Map editor, then click Insert Identity Vault Class.
2 In the Select Identity Vault Class and its Attributes page, select a class and the relevant class
attributes to add to the schema map, then click OK.
Use Shift+click and Ctrl+click to select multiple attributes, if desired.
novdocx (en) 13 May 2009
3 In the Schema Map Editor, double-click each class and attribute you added to the schema map,
then specify the appropriate Application class (or attribute) to which you want to map it.
You can either select the class or attribute name from the drop-down list, or type it in the field
manually.
4 To save the schema map changes, select File > Save.
82 Policies in Designer 3.5
Page 83

To add additional Identity Vault attributes to an existing class mapping:
1 In the Schema Map Editor, select a class mapping, then select Add Identity Vault Attributes .
You can also right-click in the Schema Map editor, then select Insert Identity Vault Attributes.
2 In the Select ID Vault Attributes page, select the desired attributes to add to the class mapping,
then click OK.
Use Shift+click and Ctrl+click to select multiple attributes, if desired.
3 In the Schema Map Editor, double-click each attribute you added to the schema map, then
specify the appropriate Application attribute to which you want to map it.
You can either select the attribute from the drop-down list, or type it in the field manually.
novdocx (en) 13 May 2009
4 To save the schema map changes, select File > Save.
Adding an Application Class or Attribute
You can both add new Application classes and attributes to a schema map, and add additional
Application attributes to an existing class mapping.
IMPORTANT: To view an application’s schema classes and attributes, the driver must be able to
retrieve the schema information from a live application environment. This occurs automatically
when a driver starts (right-click the driver, then select Live > Start Driver). However, you can
refresh the application schema at any time by selecting Refresh Application Schema .
To add a new Attribute class and attributes to a schema map:
1 In the Schema Map Editor, select Insert Application Class .
You can also right-click in the Schema Map editor, then click Insert Application Class.
2 In the Select Application Class and its Attributes page, select a class and the relevant class
attributes to add to the schema map, then click OK.
Use Shift+click and Ctrl+click to select multiple attributes, if desired.
3 In the Schema Map Editor, double-click each class and attribute you added to the schema map,
then specify the appropriate Application class (or attribute) to which you want to map it.
You can either select the class or attribute name from the drop-down list, or type it in the field
manually.
Defining Schema Map Policies 83
Page 84

4 To save the schema map changes, select File > Save.
To add additional Application attributes to an existing class mapping:
1 In the Schema Map Editor, select a class mapping, then select Insert Application Attributes .
You can also right-click in the Schema Map editor, then select Insert Identity Vault Attributes.
2 In the Select App Attributes page, select the desired attributes to add to the class mapping, then
click OK.
Use Shift+click and Ctrl+click to select multiple attributes, if desired.
3 In the Schema Map Editor, double-click each attribute you added to the schema map, then
specify the appropriate Identity Vault attribute to which you want to map it.
You can either select the attribute from the drop-down list, or type it in the field manually.
novdocx (en) 13 May 2009
4 To save the schema map changes, select File > Save.
Adding a Non-class-specific Attribute Mapping
Sometimes an attribute mapping doesn’t apply to a specific class. In this case you can define the
attribute mapping in the Non-class-specific container.
To add a non-class-specific attribute mapping:
1 Select the Non-class-specific Mapping entry in the Schema Map Editor.
2 Add the appropriate attribute mapping using one of the methods described previously.
For more information, see “Adding an Identity Vault Class or Attribute” on page 81 and
“Adding an Application Class or Attribute” on page 83.
84 Policies in Designer 3.5
Page 85

Deleting a Class or Attribute Mapping
If you do not want an Identity Vault class or an attribute to be mapped to an Application class or
attribute, the best practice is to completely remove the class or the attribute from the Schema Map
policy. To remove multiple classes or attributes at the same time, use Ctrl-click or Shift-click to
select more than one class or attribute at a time.
novdocx (en) 13 May 2009
You can add or remove attributes and classes from the Schema Map policy in the following ways:
Select the classes or attributes you want to remove, then right-click and select Delete.
Select the classes or attributes you want to remove, then click Delete in the Schema Map
editor toolbar.
Select the classes or attributes you want to remove, then press the Delete key.
You can also delete all classes and attributes at once by selecting Clear All Items .
6.2.2 Refreshing the Application Schema
If you have modified the schema in the application, these changes need to be reflected in the Schema
Map policy. To make the new schema available, click the toolbar pull-down menu, then select
Refresh Application Schema .
Refreshing the application schema requires a connection to the live application because the
application driver must be able to query the application for the updated schema.
6.2.3 Editing Items
To edit a mapping, double-click the selected row. An in-place editor appears, allowing you to edit
the mapping.
Defining Schema Map Policies 85
Page 86

Figure 6-2 In-line Edits in the Schema Map Editor
novdocx (en) 13 May 2009
6.2.4 Sorting Schema Map Entries
The Schema Map editor allows you to sort entries in ascending/descending order by clicking on the
column heading. Click the Identity Vault heading to sort entries based on Identity Vault items. Click
the connected system heading to sort entries based on connected system items.
6.2.5 Managing the Schema
Designer allows you to manage the Identity Vault schema and any connected system's schema. You
can import the schema, modify it, and deploy the changed schema back into the Identity Vault or the
Application.
To manage the Identity Vault schema, click the pull-down menu , then select Manage Identity
Vault Schema . This opens the Manage Schema tool and displays information about the classes
and attributes in the Identity Vault schema.
To manage the Application schema, click the pull-down menu , then select Manage Application
Schema . This opens the Manage Schema tool and displays information about the classes and
attributes in the Application schema.
For more information about how to manage the schema, see “Managing the Schema” in the
Designer 3.0.1 for Identity Manager 3.6 Administration Guide.
6.3 Testing Schema Map Policies
Designer comes with a tool called the Policy Simulator. It allows you to test your policies without
implementing them in a production environment. You can launch the Policy Simulator through the
Schema Map editor to test your policy after you have modified it.
86 Policies in Designer 3.5
Page 87

To access the Policy Simulator and test the Schema Map policy:
1 Click the Launch Policy Simulator icon in the toolbar.
2 Select To Identity Vault or From Identity Vault as the simulation point of the Schema Map
policy.
For more information on the Policy Simulator, see Chapter 9, “Testing Policies with the Policy
Simulator,” on page 145.
6.4 Exporting and Importing with the Schema Map Editor
Designer allows you to export a schema map policy document to an XML file. It also allows you to
Import an XML file from a particular point on the file system to the Schema Map Editor.
6.4.1 Exporting a Schema Map Policy
Schema Map policies can be exported from the editor and saved as an XML file located in the file
system.
novdocx (en) 13 May 2009
1 In the Schema Map editor, click the pull-down menu , then select Save to File .
2 Specify a filename and location where you want to export your schema map policy, then click
Save.
6.4.2 Importing a Schema Map Policy
The Exported policies which were saved as XML files on the file system can be re-imported to the
Schema Map editor. This functionality saves you the effort of redoing the class or attribute mappings
again. To import a schema map policy:
1 In the Schema Map editor, click the pull-down menu , then select Import from File .
2 In the Import a Schema Map File dialog box, browse to the schema file you want to import,
then click Open.
Specify whether you want to append the imported schema mappings to the existing schema
map, or replace the existing schema map with the imported schema map.
6.5 Accessing the Schema Map Policy in XML
Designer enables you to view, edit, and validate the XML by using an XML editor. Click the XML
Source tab or the XML Tree tab to access the XML editor. For more information about the XML
editor, see “The Novell XML Editor” in the Designer 3.0.1 for Identity Manager 3.6 Administration
Guide.
6.6 Additional Schema Map Policy Options
When you right-click a Schema Map policy, there are multiple options presented in the Outline
view, the Policy Flow view, and the Policy Set view.
Section 6.6.1, “Outline View Additional Options,” on page 88
Defining Schema Map Policies 87
Page 88

Section 6.6.2, “Policy Flow View Additional Options,” on page 88
Section 6.6.3, “Policy Set View Additional Options,” on page 90
6.6.1 Outline View Additional Options
There are additional options to manage the Schema Map policy in the Outline view. Right-click the
Schema Map policy in the Outline view to see the additional options.
Table 6-2 Schema Map Policy Options in the Outline View
Option Description
Edit Launches the Schema Map editor. For more
information, see Section 6.2, “Editing a Schema
Map Policy,” on page 81.
Copy Creates a copy of the Schema Map policy.
novdocx (en) 13 May 2009
Save As Saves the Schema Map policy as a
Simulate Tests the Schema Map policy. For more
information, see Section 6.3, “Testing Schema Map
Policies,” on page 86.
Export to Configuration File Saves the Schema Map policy as a
Live > Deploy Deploys the Schema Map policy into the Identity
Vault. For more information, see “Deploying a
Policy to an Identity Vault” in the Designer 3.0.1 for
Identity Manager 3.6 Administration Guide.
Live > Compare Compares the Schema Map policy in Designer to
the Schema Map policy in the Identity Vault. For
more information, see “Using the Compare Feature
When Deploying” in the Designer 3.0.1 for Identity
Manager 3.6 Administration Guide.
Open With > Designer Built-in Editor Launches the Schema Map editor.
Open With > Novell XML Editor Launches the XML editor. For more information,
see “The Novell XML Editor” in the Designer 3.0.1
for Identity Manager 3.6 Administration Guide.
Open With > Text Editor Launches the text editor.
Delete Deletes the selected Schema Map policy.
.xml
.xml
file.
file.
Properties Allows you to rename the Schema Map policy.
6.6.2 Policy Flow View Additional Options
There are additional options to manage the Schema Map policy in the Policy Flow view. Right-click
the Schema Map policy in the Policy Flow view to see the additional options.
88 Policies in Designer 3.5
Page 89

Table 6-3 Enter Table Title Here
Option Description
Add Policy > DirXML Script Adds a new Schema Map policy by using DirXML®
Script.
Add Policy > XSLT Adds a new Schema Map policy by using XSLT.
Add Policy > Schema Map Adds a new Schema Map policy containing no
information.
Add Policy > Link to Existing Allows you to browse and select an existing
Schema Map policy to link to the current Schema
Map policy.
Add Policy > Copy Existing Allows you to browse to and select an existing
Schema Map policy to copy to the current Schema
Map policy.
Edit Policy > Schema Map Launches the Schema Map editor. For more
information, see Section 6.2, “Editing a Schema
Map Policy,” on page 81.
novdocx (en) 13 May 2009
DirXML Script Tracing Enables DirXML Script tracing on the Schema Map
policy.
Simulate Tests the Schema Map policy. For more
information, see Section 6.3, “Testing Schema Map
Policies,” on page 86.
Live > Import Imports and existing Schema Map policy from the
Identity Vault. For more information, see “Importing
Channels, Policies, and Schema Items from the
Identity Vault” in the Designer 3.0.1 for Identity
Manager 3.6 Administration Guide.
Live > Deploy Deploys the selected Schema Map policy into the
Identity Vault. For more information, see “Deploying
a Policy to an Identity Vault” in the Designer 3.0.1
for Identity Manager 3.6 Administration Guide.
Live > Compare Compares the selected Schema Map policy to a
Schema Map policy in the Identity Vault. For more
information, see “Using the Compare Feature
When Deploying” in the Designer 3.0.1 for Identity
Manager 3.6 Administration Guide.
Live > Driver Configuration > Import Attribute Allows you to import attributes from the Identity
Vault and compare the attributes from the Identity
Vault to what is in Designer. For more information,
see “Importing Channels, Policies, and Schema
Items from the Identity Vault” in the Designer 3.0.1
for Identity Manager 3.6 Administration Guide.
Live > Driver Configuration > Deploy Attributes Allows you to deploy attributes from Designer into
the Identity Vault and compare the attributes from
Designer with the attributes in the Identity Vault. For
more information, see “Deploying a Policy to an
Identity Vault” in the Designer 3.0.1 for Identity
Manager 3.6 Administration Guide.
Defining Schema Map Policies 89
Page 90

Option Description
Live > Driver Configuration > Compare Attributes Allows you to compare attributes from the selected
Schema Map policy to attributes in the Identity
Vault. For more information, see “Using the
Compare Feature When Deploying” in the Designer
3.0.1 for Identity Manager 3.6 Administration
Guide.
Live > Driver Status Displays the status of the driver.
Live > Start Driver Starts the driver.
Live > Stop Driver Stops the driver.
Live > Restart Driver Restarts the driver.
Delete All Set Policies Deletes all policies in the selected policy set.
Remove All Set Policies Removes all policies from the selected policy set,
but does not delete the existing policies.
novdocx (en) 13 May 2009
6.6.3 Policy Set View Additional Options
There are additional options to manage the Schema Map policy in the Policy Set view. Right-click
the Schema Map policy in the Policy Set view to see the additional options.
Table 6-4 Policy Set View Options
Option Description
Edit Launches the Schema Map editor. For more
information, see Section 6.2, “Editing a Schema
Map Policy,” on page 81.
Copy Creates a copy of the Schema Map policy.
.xml
Save As Saves the Schema Map policy as a
Simulate Tests the Schema Map policy. For more
information, see Section 6.3, “Testing Schema Map
Policies,” on page 86.
Remove Removes the Schema Map policy from the policy
set, but does not delete the Schema Map policy
from the Identity Vault.
Link to Existing Policy Allows you to browse to another Schema Map
policy and link it into the existing policy.
file.
Move up Moves the Schema Map policy up in the execution
Move down Moves the Schema Map policy down in the
Export to Configuration File Saves the Schema Map policy as a
90 Policies in Designer 3.5
order of the policy.
execution order of the policy.
.xml
file.
Page 91

Option Description
Live > Deploy Deploys the Schema Map policy into the Identity
Vault.
Live > Compare Compares the Schema Map policy in Designer to
the Schema Map policy in the Identity Vault.
Delete Deletes the selected Schema Map policy.
Properties Allows yo to rename the Schema Map policy.
novdocx (en) 13 May 2009
Defining Schema Map Policies 91
Page 92

novdocx (en) 13 May 2009
92 Policies in Designer 3.5
Page 93

7
Controlling the Flow of Objects
novdocx (en) 13 May 2009
with the Filter
The Filter editor allows you to manage the filter. In the Filter editor, you define how each class and
attribute should be handled by the Publisher and Subscriber channels.
Figure 7-1 The Filter Editor
7
When information is synchronized between connected systems, the connected system can receive
the changes or just be notified that a change has occurred. Designer displays this information in the
Policy Flow view as Sync and Notify filters.
If a filter is set to Sync, then the objects modifications are automatically synchronized to the
connected system. If the filter is set to Notify, then the object modification is reported to the
metadirectory engine, but the object is not automatically synchronized. For more information, see
Section 7.2.5, “Changing the Filter Settings,” on page 99.
This section includes the following topics:
Section 7.1, “Using the Filter Editor,” on page 94
Controlling the Flow of Objects with the Filter
93
Page 94

Section 7.2, “Editing the Filter,” on page 98
Section 7.3, “Testing the Filter,” on page 104
Section 7.4, “Exporting and Importing Filter Files,” on page 104
Section 7.5, “Adding Comments to Classes and Attributes,” on page 104
Section 7.6, “Viewing the Filter in XML,” on page 105
Section 7.7, “Deploying the Filter,” on page 105
Section 7.8, “Additional Filter Options,” on page 105
7.1 Using the Filter Editor
The Filter editor allows you to edit filter policies. This section includes the following topics:
Section 7.1.1, “Accessing the Filter Editor,” on page 94
Section 7.1.2, “Navigating the Filter Editor,” on page 96
Section 7.1.3, “Understanding the Filter Editor Toolbar,” on page 97
novdocx (en) 13 May 2009
7.1.1 Accessing the Filter Editor
The Filter editor allows you to edit the filter. There are three different ways to access the Filter
editor:
“Model Outline View” on page 94
“Policy Flow View” on page 95
“Policy Set View” on page 96
Model Outline View
1 In the Outline view, select the Show Model Outline icon .
2 In the Model Outline, open the driver for which you want to manage a filter.
94 Policies in Designer 3.5
Page 95

novdocx (en) 13 May 2009
3 Double-click the Filter object (or right-click it and select Edit) to launch the Filter editor.
Policy Flow View
1 In the Outline view, select the Show Policy Flow icon.
Controlling the Flow of Objects with the Filter 95
Page 96

novdocx (en) 13 May 2009
2 In the Policy Flow, double-click the Sync icon or the Notify objects (or Right-click and select
Edit Policy > Filter) to launch the Filter editor.
Policy Set View
1 Double-click the filter object in the Policy Set view.
7.1.2 Navigating the Filter Editor
The Filter Editor uses standard point-and-click navigation. However, it also provides keyboardbased navigation options as described in Table 7-1.
96 Policies in Designer 3.5
Page 97

NOTE: The Filter Editor lets you order the classes/attributes as needed:
Click the header bar above the class/attribute list to switch between ascending and descending
order. This sorts both the classes and the attributes within the classes.
Click and drag individual classes or attributes to create a custom order.
Table 7-1 Filter Editor Keyboard Support
Keystroke Description
Up-arrow Moves the cursor up in the Filter editor.
Down-arrow Moves the cursor down in the Filter editor.
Left-arrow Collapses the information displayed.
Right-arrow Expands the information displayed.
Insert Adds a class.
novdocx (en) 13 May 2009
Ctrl+Insert Adds an attribute.
Delete Deletes the selected items.
Esc Exits the edit mode.
Ctrl+A Selects all classes and attributes in the Filter editor.
7.1.3 Understanding the Filter Editor Toolbar
The Filter editor includes a toolbar that provides access to the following features. Each of these
features, along with options to Undo and Redo recent actions, is also available from a dropdown menu by right-clicking in the Filter Editor.
Tool Description
Add Attributes opens the Schema Browser so you can select attributes from the selected
class to add to the filter policy. For more information, see “Adding an Attribute” on page 99.
Add Classes opens the Schema Browser so you can select classes from the Identity Vault
schema to add to the filter policy. For more information, see “Adding a Class” on page 98.
Delete deletes the selected attributes and classes from the filter policy.
Default Attribute Settings lets you define default values for all attributes added to the filter
policy. For more information, see Section 7.2.4, “Setting Default Values for Attributes,” on
page 99.
Copy an Existing Filter lets you copy the filter policy from another Designer object. For more
information, see Section 7.2.3, “Copying an Existing Filter,” on page 99.
Import Filter imports an existing filter policy from a previously saved XML file. For more
information, see Section 7.4.2, “Importing a Filter File,” on page 104.
Export Filter saves the current filter policy to an XML file. For more information, see
Section 7.4.1, “Exporting a Filter File,” on page 104.
Controlling the Flow of Objects with the Filter 97
Page 98

Tool Description
Deploy Filter deploys the filter policy to a live Identity Manager environment. For more
information, see Section 7.7, “Deploying the Filter,” on page 105.
Expand All expands all Class/Attribute groups in the filter policy.
Collapse All collapses all Class/Attribute groups in the filter policy.
Clear Filter deletes all class and attribute entries from the filter policy.
Launch Policy Simulator launches the Policy Simulator. For more information, see
Chapter 9, “Testing Policies with the Policy Simulator,” on page 145.
Help launches the context-sensitive help for the Filter editor.
7.2 Editing the Filter
The Filter editor allows you to create and edit the filter. It provides the following primary tasks:
novdocx (en) 13 May 2009
Section 7.2.1, “Removing or Adding Classes and Attributes,” on page 98
Section 7.2.2, “Modifying Multiple Attributes,” on page 99
Section 7.2.3, “Copying an Existing Filter,” on page 99
Section 7.2.4, “Setting Default Values for Attributes,” on page 99
Section 7.2.5, “Changing the Filter Settings,” on page 99
7.2.1 Removing or Adding Classes and Attributes
By removing or adding classes and attributes, you determine the objects that synchronize between
the connected data store and the Identity Vault.
“Removing a Class or Attribute” on page 98
“Adding a Class” on page 98
“Adding an Attribute” on page 99
Removing a Class or Attribute
If you do not want a class or an attribute to synchronize, the best practice is to completely remove
the class or the attribute from the filter. To remove attributes and classes from the filter, do one of the
following:
Right-click the class or attribute you want to remove, then select Delete.
Select the class or attribute you want to remove, then click Delete .
Click Clear Filter to delete all classes and attributes from the filter.
Adding a Class
1 Click Add Classes .
You can also right-click in the Filter editor, then select Add Classes.
98 Policies in Designer 3.5
Page 99

2 Browse and select the class you want to add, then click OK.
3 Change the options to synchronize the information.
4 To save the changes, click File > Save.
Adding an Attribute
1 Click Add Attributes .
You can also right-click in the Filter editor, then select Add Attribute.
2 Browse and select the attribute you want to add, then click OK.
3 Change the options to synchronize the information.
4 To save the changes, click File > Save.
7.2.2 Modifying Multiple Attributes
The Filter editor allows you to modify more than one attribute at a time. Press the Ctrl key and select
multiple attributes; when the option changes, it is changed for all of the selected attributes.
novdocx (en) 13 May 2009
7.2.3 Copying an Existing Filter
You can copy an existing filter from another driver and use it in the driver you are currently working
with.
1 Click Copy an Existing Filter .
You can also right-click in the Filter editor, then select Copy an Existing Filter.
2 Browse to and select the filter object you want to copy, then click OK.
If you have more than one Identity Vault in your project, you can copy filters from the other
Identity Vaults. When you are browsing to select the other object, you can browse to the other
Identity Vault and use a filter stored there.
7.2.4 Setting Default Values for Attributes
You can define the default values for new attributes when they are added to the filter.
1 Click Default Attribute Settings .
2 Select the options you want new attributes to have, then click OK.
7.2.5 Changing the Filter Settings
The Filter editor gives you the option of changing how information is synchronized between the
Identity Vault and the connected system. The filter has different settings for classes and attributes.
1 In the Filter editor, select a class.
Controlling the Flow of Objects with the Filter 99
Page 100

novdocx (en) 13 May 2009
2 Change the filter settings for the selected class.
See Table 7-2 on page 101 for information on each of the class settings available in the Filter
Editor.
3 In the Filter Editor, select an attribute.
100 Policies in Designer 3.5
 Loading...