

Page 1
Guide
Novell®
Novell Customer Center
novdocx (en) 24 March 2009
AUTHORIZED DOCUMENTATION
2.3
April 8, 2009
www.novell.com
Novell Customer Center User Guide
Page 2

Legal Notices
Novell, Inc., makes no representations or warranties with respect to the contents or use of this documentation, and
specifically disclaims any express or implied warranties of merchantability or fitness for any particular purpose.
Further, Novell, Inc., reserves the right to revise this publication and to make changes to its content, at any time,
without obligation to notify any person or entity of such revisions or changes.
Further, Novell, Inc., makes no representations or warranties with respect to any software, and specifically disclaims
any express or implied warranties of merchantability or fitness for any particular purpose. Further, Novell, Inc.,
reserves the right to make changes to any and all parts of Novell software, at any time, without any obligation to
notify any person or entity of such changes.
Any products or technical information provided under this Agreement may be subject to U.S. export controls and the
trade laws of other countries. You agree to comply with all export control regulations and to obtain any required
licenses or classification to export, re-export or import deliverables. You agree not to export or re-export to entities on
the current U.S. export exclusion lists or to any embargoed or terrorist countries as specified in the U.S. export laws.
You agree to not use deliverables for prohibited nuclear, missile, or chemical biological weaponry end uses. See the
Novell International Trade Services Web page (http://www.novell.com/info/exports/) for more information on
exporting Novell software. Novell assumes no responsibility for your failure to obtain any necessary export
approvals.
novdocx (en) 24 March 2009
Copyright © 2004-2009 Novell, Inc. All rights reserved. No part of this publication may be reproduced, photocopied,
stored on a retrieval system, or transmitted without the express written consent of the publisher.
Novell, Inc., has intellectual property rights relating to technology embodied in the product that is described in this
document. In particular, and without limitation, these intellectual property rights may include one or more of the U.S.
patents listed on the Novell Legal Patents Web page (http://www.novell.com/company/legal/patents/) and one or
more additional patents or pending patent applications in the U.S. and in other countries.
Novell, Inc.
404 Wyman Street, Suite 500
Waltham, MA 02451
U.S.A.
www.novell.com
Online Documentation: To access the latest online documentation for this and other Novell products, see
the Novell Documentation Web page (http://www.novell.com/documentation).
Page 3

Novell Trademarks
For a list of Novell trademarks, see the Novell Trademark and Service Mark list (http://www.novell.com/company/
legal/trademarks/tmlist.html).
Third-Party Materials
All third-party trademarks are the property of their respective owners.
novdocx (en) 24 March 2009
Page 4

novdocx (en) 24 March 2009
4 Novell Customer Center User Guide
Page 5

Contents
About This Guide 7
1 Introducing Novell Customer Center 9
1.1 System Requirements . . . . . . . . . . . . . . . . . . . . . . . . . . . . . . . . . . . . . . . . . . . . . . . . . . . . . . . . 9
1.2 Who Should Use Novell Customer Center?. . . . . . . . . . . . . . . . . . . . . . . . . . . . . . . . . . . . . . . 10
1.3 Key Features and Benefits. . . . . . . . . . . . . . . . . . . . . . . . . . . . . . . . . . . . . . . . . . . . . . . . . . . . 10
1.3.1 Key Features and Benefits for Purchasers . . . . . . . . . . . . . . . . . . . . . . . . . . . . . . . . 11
1.3.2 Key Features and Benefits for IT Managers . . . . . . . . . . . . . . . . . . . . . . . . . . . . . . . 11
1.3.3 Key Features and Benefits for System Administrators . . . . . . . . . . . . . . . . . . . . . . . 11
1.4 Future Enhancements . . . . . . . . . . . . . . . . . . . . . . . . . . . . . . . . . . . . . . . . . . . . . . . . . . . . . . . 11
1.5 You Are in Control of Collected Data . . . . . . . . . . . . . . . . . . . . . . . . . . . . . . . . . . . . . . . . . . . . 12
2 Administering Your Novell Customer Center Account 13
novdocx (en) 24 March 2009
2.1 Managing Your Account. . . . . . . . . . . . . . . . . . . . . . . . . . . . . . . . . . . . . . . . . . . . . . . . . . . . . . 13
2.1.1 Creating an Account . . . . . . . . . . . . . . . . . . . . . . . . . . . . . . . . . . . . . . . . . . . . . . . . . 13
2.1.2 Logging In to Novell Customer Center. . . . . . . . . . . . . . . . . . . . . . . . . . . . . . . . . . . . 15
2.1.3 Managing Account Information . . . . . . . . . . . . . . . . . . . . . . . . . . . . . . . . . . . . . . . . . 16
2.1.4 Receiving Notifications . . . . . . . . . . . . . . . . . . . . . . . . . . . . . . . . . . . . . . . . . . . . . . . 18
2.2 Working with Organizations . . . . . . . . . . . . . . . . . . . . . . . . . . . . . . . . . . . . . . . . . . . . . . . . . . . 19
2.2.1 How Organizations Are Created for You . . . . . . . . . . . . . . . . . . . . . . . . . . . . . . . . . . 20
2.2.2 Belonging to Multiple Organizations . . . . . . . . . . . . . . . . . . . . . . . . . . . . . . . . . . . . . 20
2.2.3 Updating Organization Address Information . . . . . . . . . . . . . . . . . . . . . . . . . . . . . . . 20
2.2.4 Viewing Another Organization . . . . . . . . . . . . . . . . . . . . . . . . . . . . . . . . . . . . . . . . . . 22
2.2.5 Requesting Access to an Organization’s Account . . . . . . . . . . . . . . . . . . . . . . . . . . . 22
2.3 Working with Users . . . . . . . . . . . . . . . . . . . . . . . . . . . . . . . . . . . . . . . . . . . . . . . . . . . . . . . . . 23
2.3.1 Viewing User Information. . . . . . . . . . . . . . . . . . . . . . . . . . . . . . . . . . . . . . . . . . . . . . 24
2.3.2 Adding an Organization Administrator or an Organization User to an Organization . 25
2.3.3 Removing Users from an Organization . . . . . . . . . . . . . . . . . . . . . . . . . . . . . . . . . . . 26
2.3.4 Editing a User . . . . . . . . . . . . . . . . . . . . . . . . . . . . . . . . . . . . . . . . . . . . . . . . . . . . . . 28
2.4 Managing User Groups . . . . . . . . . . . . . . . . . . . . . . . . . . . . . . . . . . . . . . . . . . . . . . . . . . . . . . 29
2.4.1 Viewing User Groups. . . . . . . . . . . . . . . . . . . . . . . . . . . . . . . . . . . . . . . . . . . . . . . . . 29
2.4.2 Creating, Editing, or Deleting a User Group . . . . . . . . . . . . . . . . . . . . . . . . . . . . . . . 30
2.4.3 Adding Users to a Group . . . . . . . . . . . . . . . . . . . . . . . . . . . . . . . . . . . . . . . . . . . . . . 31
2.4.4 Removing Users from a Group . . . . . . . . . . . . . . . . . . . . . . . . . . . . . . . . . . . . . . . . . 33
3 Managing Products and Systems 35
3.1 Managing Products and Subscriptions. . . . . . . . . . . . . . . . . . . . . . . . . . . . . . . . . . . . . . . . . . . 35
3.1.1 Managing Products and Subscriptions . . . . . . . . . . . . . . . . . . . . . . . . . . . . . . . . . . . 36
3.1.2 Creating a Product or Subscription Group. . . . . . . . . . . . . . . . . . . . . . . . . . . . . . . . . 51
3.1.3 Adding a Product or Subscription to a Group . . . . . . . . . . . . . . . . . . . . . . . . . . . . . . 52
3.1.4 Setting User Entitlements for a Subscription . . . . . . . . . . . . . . . . . . . . . . . . . . . . . . . 53
3.1.5 Restricting Activation Rights for a Subscription . . . . . . . . . . . . . . . . . . . . . . . . . . . . . 55
3.1.6 Downloading Patches and Updates. . . . . . . . . . . . . . . . . . . . . . . . . . . . . . . . . . . . . . 56
3.2 Managing Systems. . . . . . . . . . . . . . . . . . . . . . . . . . . . . . . . . . . . . . . . . . . . . . . . . . . . . . . . . . 58
3.2.1 Viewing Your Installed Systems . . . . . . . . . . . . . . . . . . . . . . . . . . . . . . . . . . . . . . . . 58
3.2.2 Activating a System . . . . . . . . . . . . . . . . . . . . . . . . . . . . . . . . . . . . . . . . . . . . . . . . . . 59
3.2.3 Moving a System to a New Subscription . . . . . . . . . . . . . . . . . . . . . . . . . . . . . . . . . . 60
3.2.4 Placing Systems in Groups . . . . . . . . . . . . . . . . . . . . . . . . . . . . . . . . . . . . . . . . . . . . 61
Contents 5
Page 6

3.2.5 Viewing Information About a System. . . . . . . . . . . . . . . . . . . . . . . . . . . . . . . . . . . . . 63
3.2.6 Editing System Properties . . . . . . . . . . . . . . . . . . . . . . . . . . . . . . . . . . . . . . . . . . . . . 64
3.2.7 Downloading Patches and Updates. . . . . . . . . . . . . . . . . . . . . . . . . . . . . . . . . . . . . . 66
3.3 Monitoring Contract History . . . . . . . . . . . . . . . . . . . . . . . . . . . . . . . . . . . . . . . . . . . . . . . . . . . 68
3.4 Viewing an Organization’s Order History . . . . . . . . . . . . . . . . . . . . . . . . . . . . . . . . . . . . . . . . . 69
3.5 Working with Quotes . . . . . . . . . . . . . . . . . . . . . . . . . . . . . . . . . . . . . . . . . . . . . . . . . . . . . . . . 70
3.5.1 Viewing Details about a Quote . . . . . . . . . . . . . . . . . . . . . . . . . . . . . . . . . . . . . . . . . 71
3.5.2 Accepting a Quote . . . . . . . . . . . . . . . . . . . . . . . . . . . . . . . . . . . . . . . . . . . . . . . . . . . 72
3.5.3 Requesting Help . . . . . . . . . . . . . . . . . . . . . . . . . . . . . . . . . . . . . . . . . . . . . . . . . . . . 74
4 Managing Maintenance Support Benefits 77
A Documentation Updates 79
A.1 April 8, 2009 . . . . . . . . . . . . . . . . . . . . . . . . . . . . . . . . . . . . . . . . . . . . . . . . . . . . . . . . . . . . . . . 79
A.2 February 4, 2008 . . . . . . . . . . . . . . . . . . . . . . . . . . . . . . . . . . . . . . . . . . . . . . . . . . . . . . . . . . . 79
A.3 April 24, 2007 . . . . . . . . . . . . . . . . . . . . . . . . . . . . . . . . . . . . . . . . . . . . . . . . . . . . . . . . . . . . . . 79
A.4 March 14, 2007 . . . . . . . . . . . . . . . . . . . . . . . . . . . . . . . . . . . . . . . . . . . . . . . . . . . . . . . . . . . . 79
A.5 September 14, 2006. . . . . . . . . . . . . . . . . . . . . . . . . . . . . . . . . . . . . . . . . . . . . . . . . . . . . . . . . 79
novdocx (en) 24 March 2009
6 Novell Customer Center User Guide
Page 7

About This Guide
This guide is designed to introduce you to the main features of Novell® Customer Center and show
you how to configure it to meet your personal needs and preferences.
This guide contains the following sections:
Chapter 1, “Introducing Novell Customer Center,” on page 9
Chapter 2, “Administering Your Novell Customer Center Account,” on page 13
Chapter 3, “Managing Products and Systems,” on page 35
Chapter 4, “Managing Maintenance Support Benefits,” on page 77
Appendix A, “Documentation Updates,” on page 79
Audience
This guide is intended for the people responsible for purchasing and maintaining Novell products for
an organization.
novdocx (en) 24 March 2009
Feedback
We want to hear your comments and suggestions about this manual and the other documentation
included with this product. Please use the User Comments feature at the bottom of each page of the
online documentation, or go to the Novell Documentation Feedback site (http://www.novell.com/
documentation/feedback.html) and enter your comments there.
Documentation Updates
For the latest version of this documentation, see the Novell Documentation Web site (http://
www.novell.com/documentation/ncc).
Documentation Conventions
In Novell documentation, a greater-than symbol (>) is used to separate actions within a step and
items in a cross-reference path.
®
A trademark symbol (
trademark.
, TM, etc.) denotes a Novell trademark. An asterisk (*) denotes a third-party
About This Guide 7
Page 8

novdocx (en) 24 March 2009
8 Novell Customer Center User Guide
Page 9

1
Introducing Novell Customer
novdocx (en) 24 March 2009
Center
Novell® Customer Center is an online tool that makes it easier for you to manage your business and
technical interactions with Novell. From one location, you can do the following:
Review the status of supported Novell products, subscriptions, and services
Obtain support
Get Linux* updates and patches
The core functionality and data of the Novell Customer Care and SUSE® Linux portals have been
consolidated into the Novell Customer Center. Novell Customer Center brings together Novell
customer information to provide an overview of contracts, licenses, subscriptions, and product
entitlements. As a result, you can better manage your subscriptions, ensure licensing compliance,
and simplify patch acquisition and update processes.
Currently, you can use Novell Customer Center to manage the following products:
SUSE Linux Enterprise Desktop 10
SUSE Linux Enterprise Server 10
Although customers can see information about many Novell products within Novell Customer
Center, the activation, registration, and subscription management features presented in this guide are
only enabled for the products listed above. Novell plans to add additional management features and
supported products in the future.
1
This section includes the following information:
Section 1.1, “System Requirements,” on page 9
Section 1.2, “Who Should Use Novell Customer Center?,” on page 10
Section 1.3, “Key Features and Benefits,” on page 10
Section 1.4, “Future Enhancements,” on page 11
Section 1.5, “You Are in Control of Collected Data,” on page 12
1.1 System Requirements
You can access Novell Customer Center with any Internet browser that supports Asynchronous
JavaScript* and XML (AJAX), XHTML, and CSS. This includes the following:
Firefox* 1.0 and later
Internet Explorer* 5.0 and later
Opera* 7.6 and later
Netscape* 7.1 and later
Safari* 1.2 and later
Introducing Novell Customer Center
9
Page 10

NOTE: In order to download the DVD images for SUSE Linux Enterprise Server and SUSE Linux
Enterprise Desktop, you must use Firefox 1.5 or later, a download manager if using other browsers,
or wget version 1.10. Only Firefox 1.5 or later supports file downloads over 2 GB.
1.2 Who Should Use Novell Customer Center?
Novell Customer Center focuses on the following people:
Purchasers of SUSE Linux Enterprise products
IT managers
System administrators
Resellers
However, anyone responsible for purchasing, installing, or updating SUSE Linux products can
benefit from Novell Customer Center if they are given access rights by an Organization
Administrator, who is the administrative user of the account or another user with the same rights. If
you do not know who this user is, contact your internal support organization.
novdocx (en) 24 March 2009
Novell Customer Center defines five types of users:
Organization Administrators control rights for the entire organization. They can add users,
groups, and other administrators, and they have administrative rights to all subscriptions for
that organization.
Group Administrators have administrative rights within a group of subscriptions that was
created by the Organization Administrator.
Organization Users have limited organization-level access to view all data and perform
limited actions.
Group Users have limited group-level access to view all data and perform all actions for the
specified group.
Entitled Users have activated a system by using a subscription owned by the organization or
have been granted rights to other subscriptions by a Group or Organization Administrator. User
access to the site is limited to information about that particular system unless the Group or
Organization Administrator grants rights to other subscriptions or systems.
To access Novell Customer Center, you need a Novell Login account. To see information about your
account or subscription, you either need to register the product or ask an Organization Administrator
to give you access to the information about the organization. For information about logging on to
your account and managing information, see Section 2.1, “Managing Your Account,” on page 13.
1.3 Key Features and Benefits
When you install a SUSE Linux Enterprise product such as SUSE Linux Enterprise Server or SUSE
Linux Enterprise Desktop, the install process provides an opportunity to automatically register the
system with Novell Customer Center. Registering helps you lower your product maintenance cost by
providing the following features:
An overview of supported products in an organization
Patches and updates for shipping Linux products from Novell
An order history for Novell products, subscriptions, and services
10 Novell Customer Center User Guide
Page 11

You can work more productively
You can lower system management costs
You can make better business decisions
Entitlement visibility for new SUSE Linux Enterprise products
An overview of your Linux subscription renewal status
Subscription renewals from Novell or its partners
You can access this information about any SUSE Linux Enterprise product you have purchased.
1.3.1 Key Features and Benefits for Purchasers
If you are responsible for purchasing Novell products, Novell Customer Center helps you do the
following:
Review purchases
Renew subscriptions
See entitlements
novdocx (en) 24 March 2009
Review expiration dates
1.3.2 Key Features and Benefits for IT Managers
If you are an IT manager, Novell Customer Center helps you do the following:
Compare active server licenses
Make licensing adjustments
Register products automatically
1.3.3 Key Features and Benefits for System Administrators
If you are a system administrator, Novell Customer Center helps you do the following:
Monitor status of installed systems
View operating system information
View subscription information and licensing costs
1.4 Future Enhancements
Novell Customer Center will be expanded in the future to provide even more features and benefits.
Some of the enhancements planned for the future include the following:
Tools to help plan purchases
Synchronization of renewal dates
Additional notification management
Integrated Xen* virtual image awareness
Integration with Novell Support
Introducing Novell Customer Center 11
Page 12

1.5 You Are in Control of Collected Data
When you register systems in Novell Customer Center, only information about each system you
register is collected. No additional data is collected. This data is stored securely and used by Novell
to support you as a customer. Nobody else, including your sales representative, can view this
information unless you give them access.
novdocx (en) 24 March 2009
12 Novell Customer Center User Guide
Page 13

2
Administering Your Novell
novdocx (en) 24 March 2009
Customer Center Account
After you have created an account in Novell® Customer Center and are specified as an Organization
Administrator, you can add and manage users and control their access to your information.
This section includes the following topics:
Section 2.1, “Managing Your Account,” on page 13
Section 2.2, “Working with Organizations,” on page 19
Section 2.3, “Working with Users,” on page 23
Section 2.4, “Managing User Groups,” on page 29
2.1 Managing Your Account
Novell Customer Center provides the following account management tasks:
Section 2.1.1, “Creating an Account,” on page 13
Section 2.1.2, “Logging In to Novell Customer Center,” on page 15
Section 2.1.3, “Managing Account Information,” on page 16
Section 2.1.4, “Receiving Notifications,” on page 18
2
2.1.1 Creating an Account
You must have a Novell Login account to log in to Novell Customer Center. A Novell Login account
provides access to several Novell services, including Novell Customer Center.
You might already have a Novell Customer Center account under the following circumstances:
You have installed a system without an activation code or downloaded an evaluation activation
code. The first time you install a supported product and choose to register it with Novell
Customer Center without an activation code, an account is created for the e-mail address you
enter during the registration process. Any additional products you register for that e-mail
address or download when logged in are automatically added to your account.
You are listed as the contact on a sales order to Novell. Your account is created in the
organization representing the company on the order.
You are added as an entitled user or Organization Administrator by another Organization
Administrator. Your account is registered as a member of that organization.
NOTE: You can be a member of multiple organizations, including the one that was created when
you created your Novell account and any others that you are added to by that organization’s
administrator or automatically assigned to you based on a purchase.
If you do not have an account, you must create one the first time you log in to Novell Customer
Center.
Administering Your Novell Customer Center Account
13
Page 14
To create a Novell Login account:
1 Go to the Novell Customer Center Login Web page (http://www.novell.com/center).
2 Click Create New, which is to the right of the account login fields.
novdocx (en) 24 March 2009
14 Novell Customer Center User Guide
Page 15
3 Fill in the required information and click Create Login.
Your Novell Login account is created.
After you have a Novell Login Account, you can log in to Novell Customer Center.
novdocx (en) 24 March 2009
2.1.2 Logging In to Novell Customer Center
1 Go to the Novell Customer Center Login Web page (http://www.novell.com/center).
2 Enter your Novell Login name and password.
You must have a Novell Login account to be able to access Novell Customer Center. If you do
not have an account, click Create New and follow the instructions in Section 2.1.1, “Creating
an Account,” on page 13.
3 Click Login.
Administering Your Novell Customer Center Account 15
Page 16
novdocx (en) 24 March 2009
This screen shows you a snapshot of your products and subscriptions, systems, order history,
and alerts. On the left is a list of menu items you’ll use to navigate within Novell Customer
Center. Click Customer Center Home at the top of the menu list to return to the home page.
There are four areas of information:
My Products. This area gives you an overview of your purchased products and
subscriptions. For more information, see Section 3.1, “Managing Products and
Subscriptions,” on page 35.
Systems. This area gives you an overview of your systems. For more information, see
Section 3.2, “Managing Systems,” on page 58.
Order Tracking. This area shows you the number of deliveries that are pending and your
recent orders. For more information, see Section 3.4, “Viewing an Organization’s Order
History,” on page 69.
Alerts. This area shows you if you have subscriptions to renew or moves to approve. For
more information, see “Monitoring Product and Subscription Renewals” on page 39.
You can click each heading for more detailed information, or you can use the menu on the left
to navigate Novell Customer Center.
2.1.3 Managing Account Information
Your personal account information includes details such as your name and contact information. This
information is stored as part of your Novell Login account.
To edit your account information:
1 Log in to Novell Customer Center as described in Section 2.1.2, “Logging In to Novell
Customer Center,” on page 15.
16 Novell Customer Center User Guide
Page 17
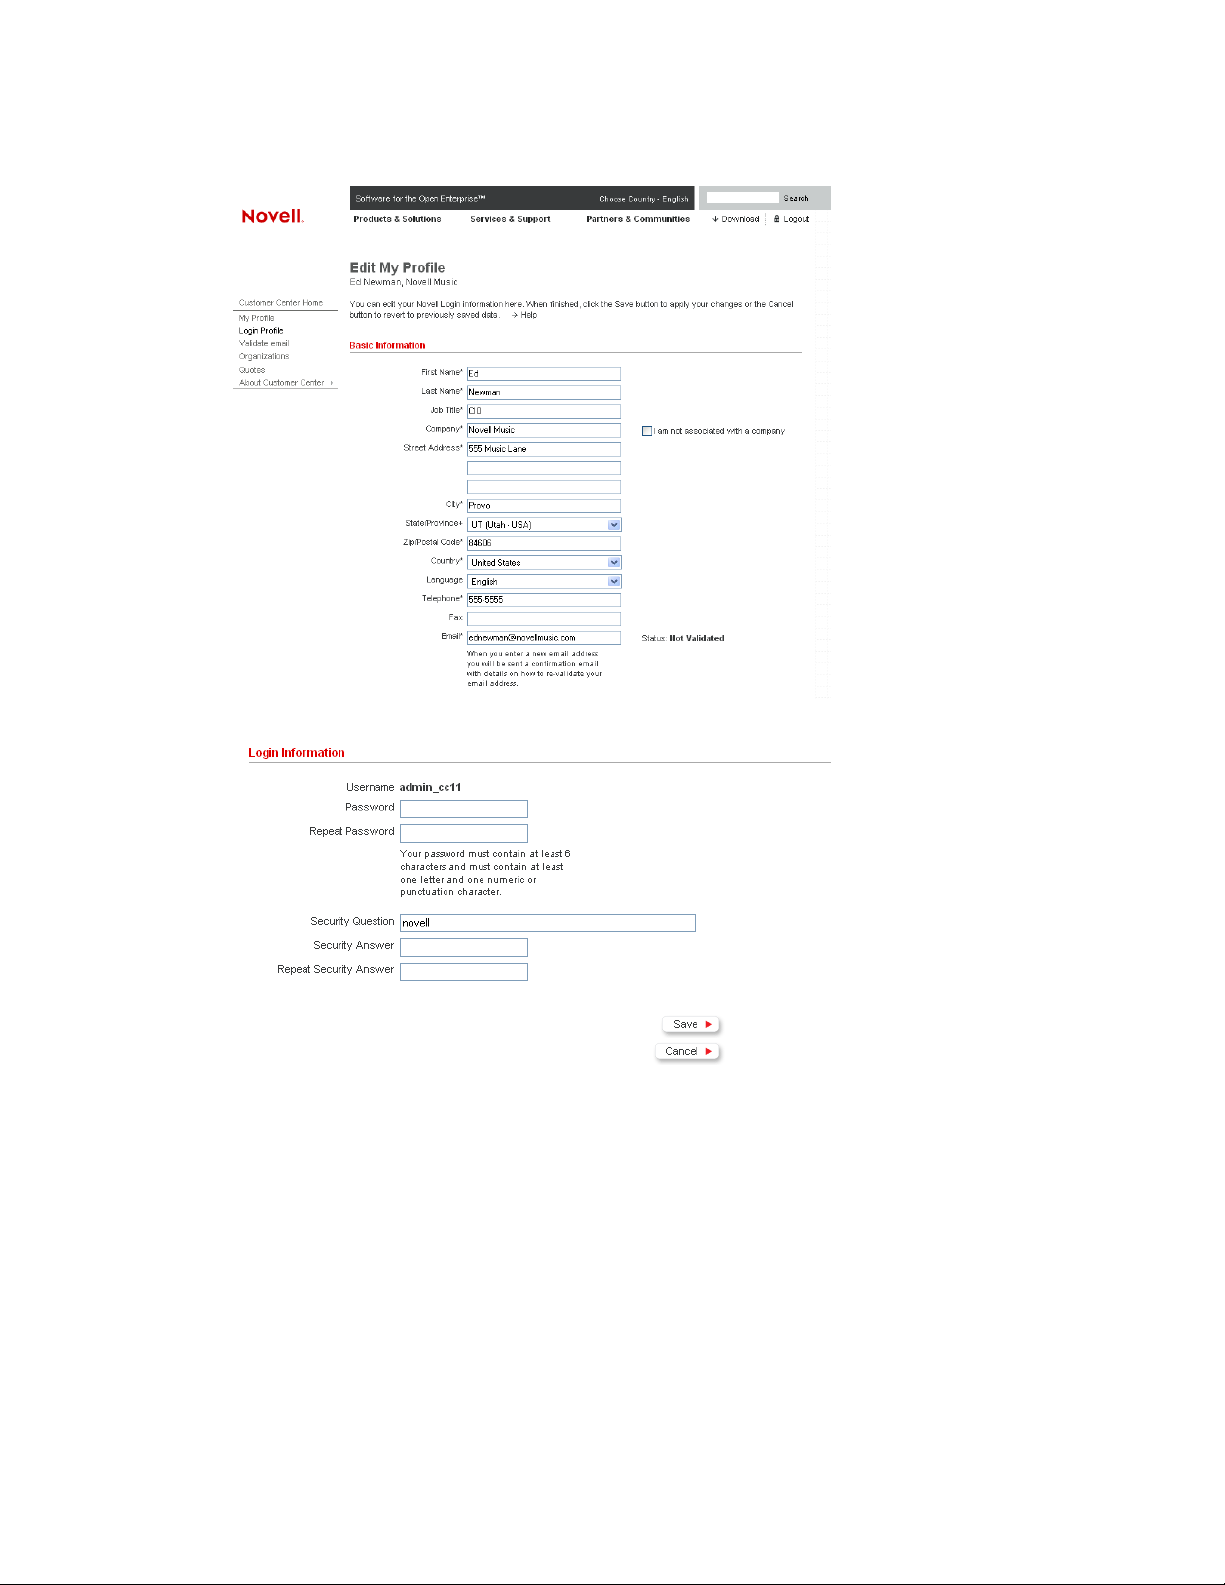
2 Click My Profile > Login Profile in the left navigation frame.
novdocx (en) 24 March 2009
3 Edit your information as desired.
The Status message next to the e-mail field lets you know if the e-mail address has been
validated. To validate an e-mail address, click Validate e-mail in the left navigation frame, then
follow the instructions. You can also click My Profile > Validate e-mail in the left navigation
frame on the home page.
4 Click Save.
Administering Your Novell Customer Center Account 17
Page 18
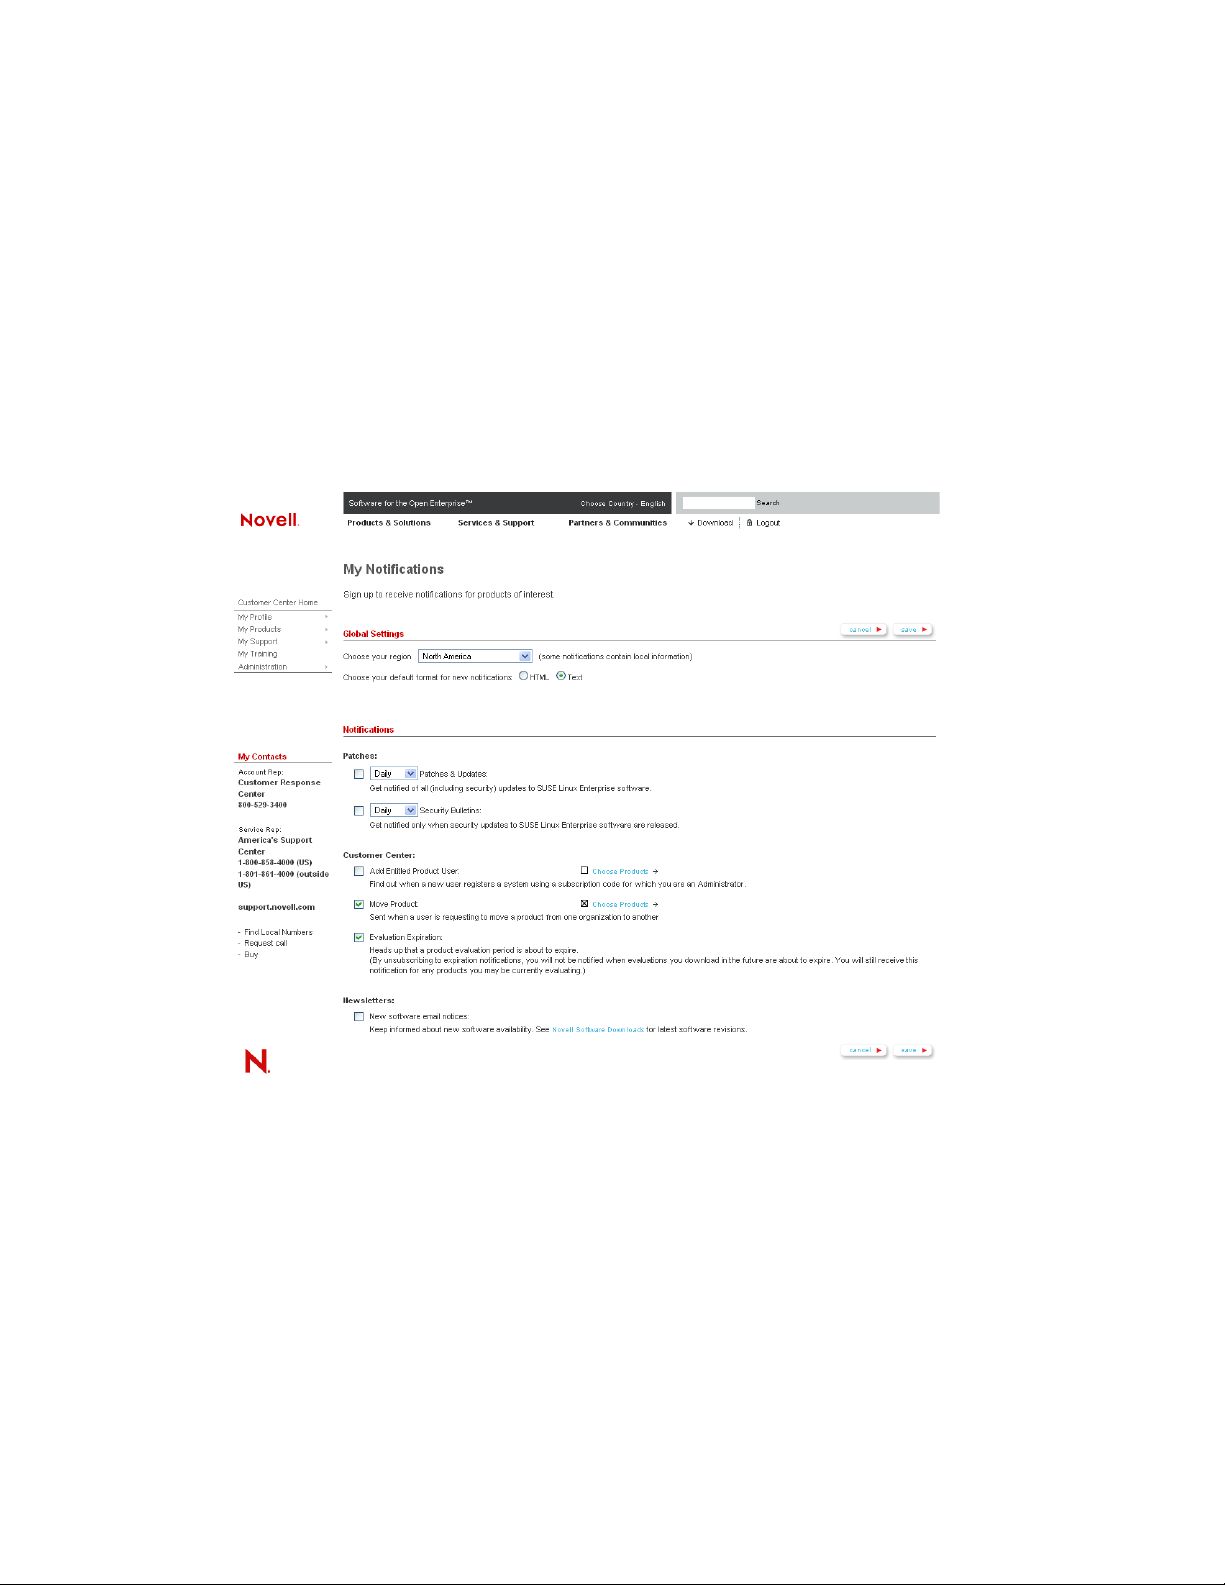
2.1.4 Receiving Notifications
You can receive notifications for patch availability, certain actions within Novell Customer Center,
and new software availability. This section includes information on the following tasks:
“Selecting Notifications” on page 18
“Selecting Notifications Based on Products” on page 19
Selecting Notifications
1 Log in to Novell Customer Center as described in Section 2.1.2, “Logging In to Novell
Customer Center,” on page 15.
2 Click My Profile > Notifications in the left navigation frame.
novdocx (en) 24 March 2009
3 Fill in the required information.
Global Settings. Select your region and format for the notification.
Notifications. Select which notifications you want to receive and how often.
Patches. Select whether you want to receive patch notifications and security bulletins and
how often you want to receive them.
Customer Center. Selecting one of these options allows you to receive notifications for all
products for organizations in which you are an organization administrator. Select whether
you want to receive notifications when
An entitled product user is added. You can also monitor the addition of entitled users
to specific products. See “Selecting Notifications Based on Products” on page 19.
18 Novell Customer Center User Guide
Page 19
A request to access a locked product is made. You can also monitor these types of
request by product. See “Selecting Notifications Based on Products” on page 19.
A request to move a product. You can also monitor move requests by product. See
“Selecting Notifications Based on Products” on page 19.
A product evaluation is about to expire.
A product is about to expire.
Newsletters. Select whether you want to receive e-mail notices of new software availability.
Click Novell Software Downloads for latest software revisions.
4 Click Save.
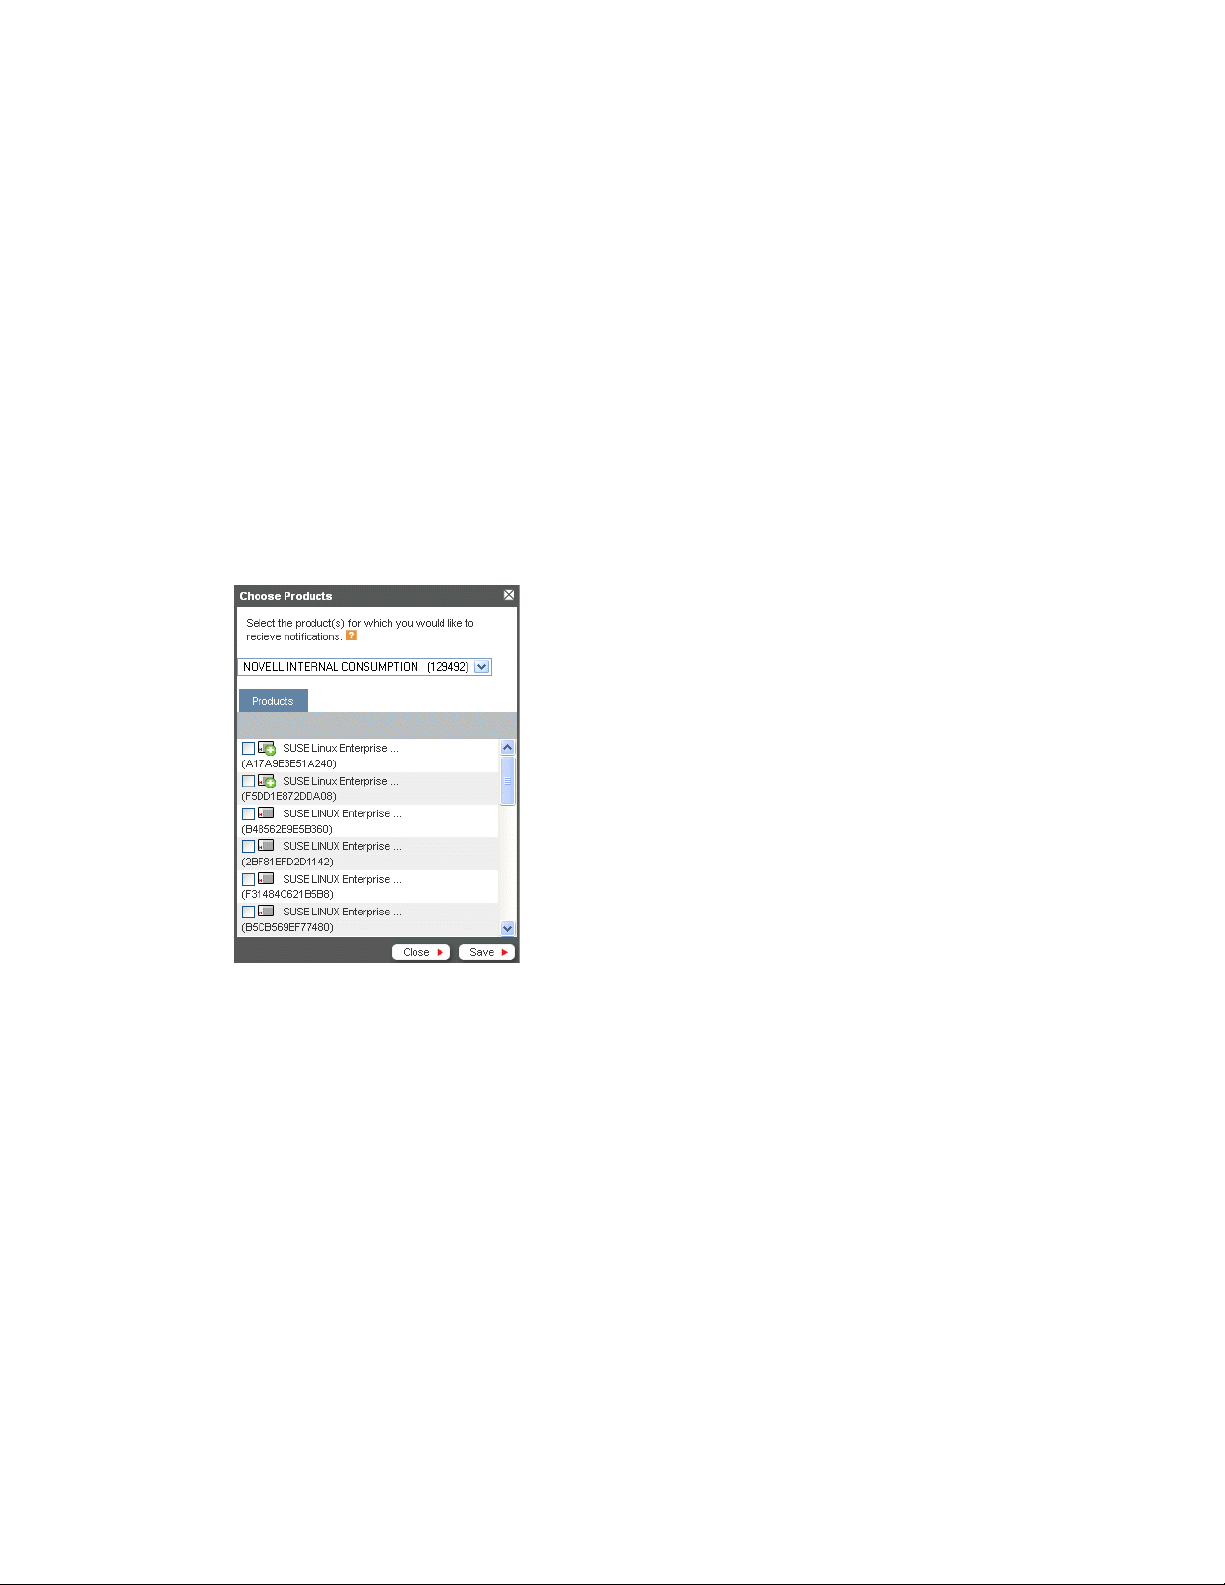
Selecting Notifications Based on Products
1 Open the Notifications page as described in “Selecting Notifications” on page 18.
2 After you have selected one of the notification choices that allow product-specific notification,
click Choose Products.
novdocx (en) 24 March 2009
3 Select an organization from the drop-down menu.
4 Select the products you want to monitor.
5 Click Save.
6 Click Save on the My Notifications page.
2.2 Working with Organizations
If you are an Organization Administrator, you can specify who has access to information about
products, subscriptions, and other services that are listed for your organization. For information on
adding organization administrators, see Section 2.3.2, “Adding an Organization Administrator or an
Organization User to an Organization,” on page 25.
The following sections provide more information:
Section 2.2.1, “How Organizations Are Created for You,” on page 20
Section 2.2.2, “Belonging to Multiple Organizations,” on page 20
Administering Your Novell Customer Center Account 19
Page 20

Section 2.2.3, “Updating Organization Address Information,” on page 20
Section 2.2.4, “Viewing Another Organization,” on page 22
Section 2.2.5, “Requesting Access to an Organization’s Account,” on page 22
2.2.1 How Organizations Are Created for You
In Novell Customer Center, accounts are placed into organizations. For example, an organization
can represent a company and contain the systems and subscriptions registered to that company.
When you create a Novell Login account, you are added to a company’s organization if either of the
following is true:
The subscription was purchased under a Novell contract (xLA) tied to that company
An Organization Administrator added you as an Entitled User, a Group Administrator, or an
Organization Administrator
An organization is created for you if you
Register an evaluation product
Purchase an OEM or Red Box product and install it
Don’t enter a code upon registration
novdocx (en) 24 March 2009
2.2.2 Belonging to Multiple Organizations
A user can be associated with multiple organizations in Novell Customer Center. This is useful, for
example, if a reseller needs to use a single Novell Customer Center login to view and manage
information for multiple customers.
A user’s role and access to information changes when switching to a different organization, based on
the user’s assigned roles in that organization. For information about the available roles, see
Section 1.2, “Who Should Use Novell Customer Center?,” on page 10.
For information about how to switch to another organization, see Section 2.2.4, “Viewing Another
Organization,” on page 22.
2.2.3 Updating Organization Address Information
To change the address information for an organization:
1 Log in to Novell Customer Center as described in Section 2.1.2, “Logging In to Novell
Customer Center,” on page 15.
2 Click Administration > Organizations in the left navigation frame.
3 Select an organization.
20 Novell Customer Center User Guide
Page 21
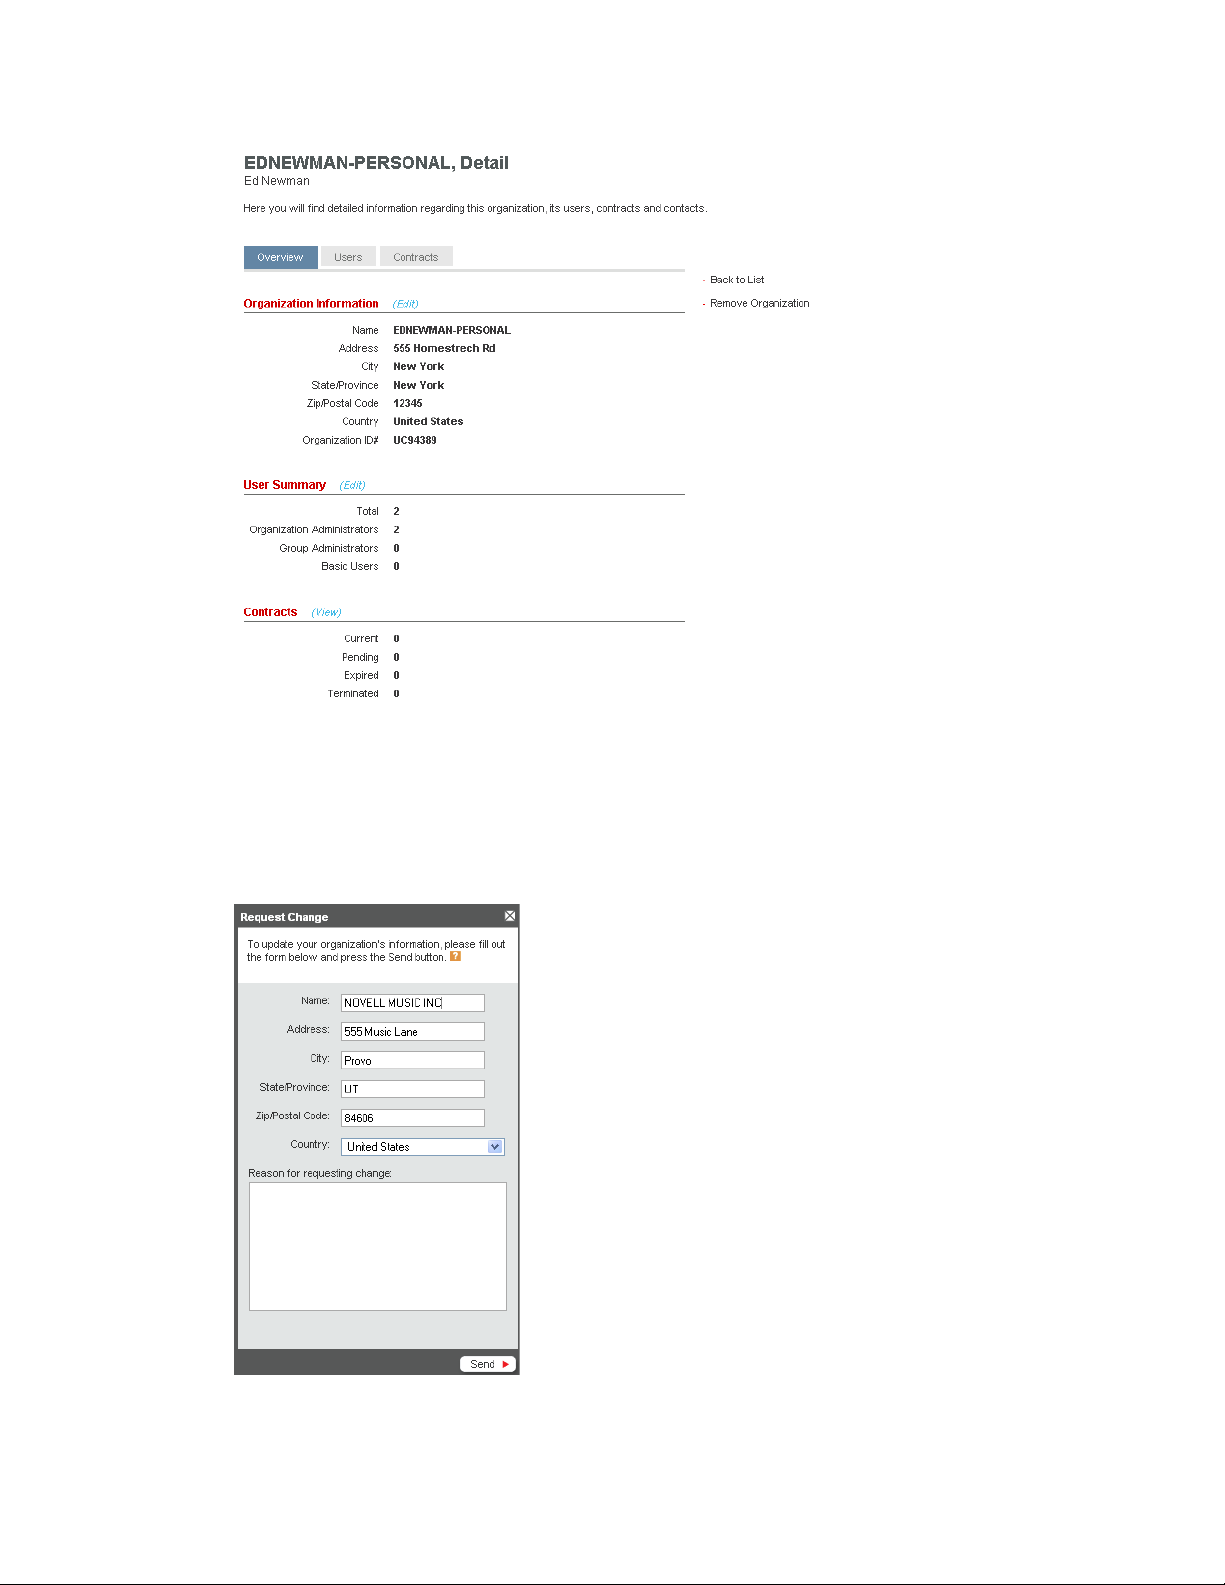
novdocx (en) 24 March 2009
4 Click Edit or Request Change next to the Organization Information heading.
Whether you see Request Change or Edit depends on the way your account was created. When
you click the Request Change link and change your organization information, your changes are
submitted to the appropriate team at Novell for review prior to being displayed in Novell
Customer Center. When you click Edit, your changes are made directly.
5 Fill in the form with the new information, then click Save (or Send).
Administering Your Novell Customer Center Account 21
Page 22

2.2.4 Viewing Another Organization
1 Log in to Novell Customer Center as described in Section 2.1.2, “Logging In to Novell
Customer Center,” on page 15.
novdocx (en) 24 March 2009
If you are a member of only one organization, the name of the organization appears on the
Novell Customer Center home page, above the information for that organization. In this case,
you cannot view another organization.
If you are a member of multiple organizations, a drop-down menu allows you to select the
organization you want to view.
2 Select the organization you want to view from the drop-down menu.
The new page shows the information for the selected organization. Your role and access to
information in this organization changes based on your assigned rights for this organization.
NOTE: You can switch to another organization from within several Novell Customer Center pages.
For example, if you are viewing the systems for one of your organizations, you can use the dropdown menu on the Systems page to switch to the system information for another organization.
2.2.5 Requesting Access to an Organization’s Account
1 Log in to Novell Customer Center as described in Section 2.1.2, “Logging In to Novell
Customer Center,” on page 15.
2 If you are a member of more than one organization, select Request Access Form from the
organization drop-down list on any page showing the Select an Organization to Manage field.
or
22 Novell Customer Center User Guide
Page 23
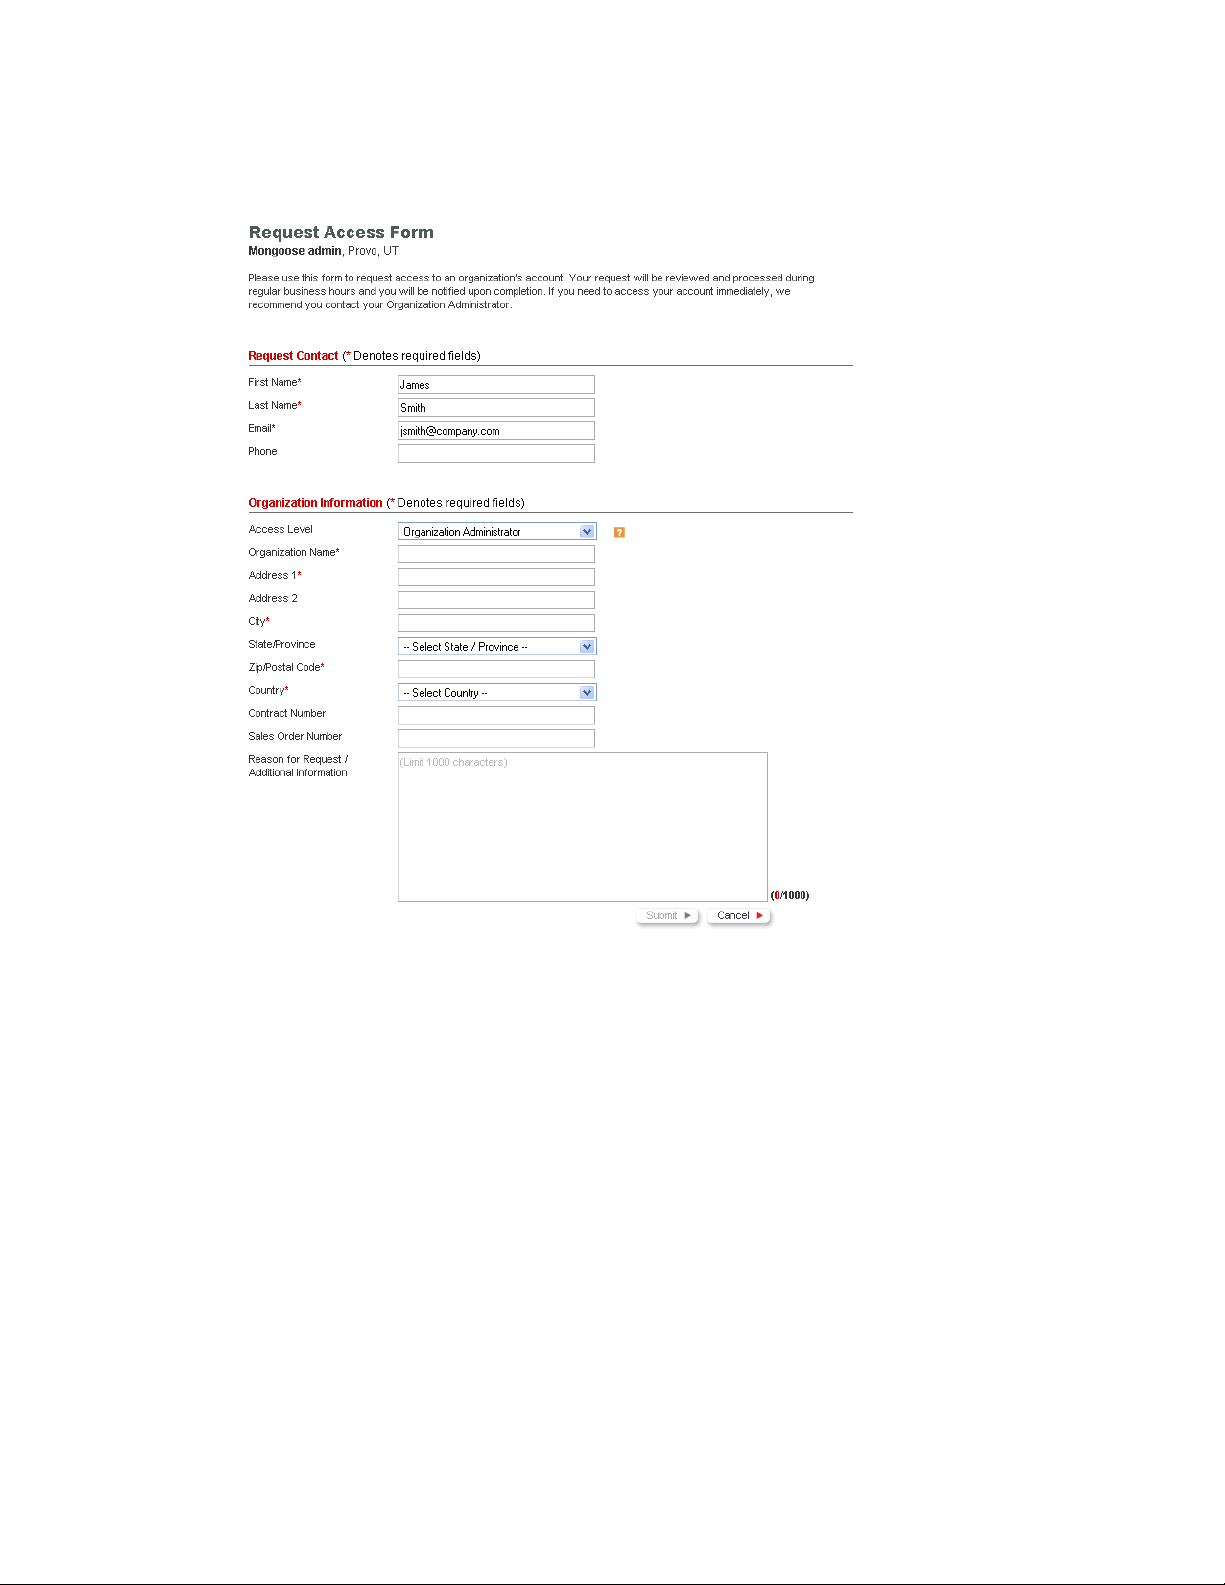
If you are a member of only one organization, click Administration > Organization in the left
navigation frame, then select Click here to request access to an organization.
novdocx (en) 24 March 2009
3 Fill in the fields.
Fields marked with an asterisk are required.
4 Click Submit.
The request is submitted and you are notified by e-mail if access has been granted.
2.3 Working with Users
In many organizations, more than one person needs access to system information. For example, the
organization’s purchasers and IT administrators might also need information about the
organization’s account.
Novell Customer Center defines five types of users:
Organization Administrators control rights for the entire organization. They can add users,
groups, and other administrators, and they have administrative rights to all subscriptions for
that organization.
Administering Your Novell Customer Center Account 23
Page 24
Group Administrators have administrative rights within a group of subscriptions that was
created by the Organization Administrator.
Organization Users have limited organization-level access to view all data and perform
limited actions.
Group Users have limited group-level access to view all data and perform all actions for the
specified group.
Entitled Users have activated a system by using a subscription owned by the organization or
have been granted rights to other subscriptions by a Group or Organization Administrator. User
access to the site is limited to information about that particular system unless the Group or
Organization Administrator grants rights to other subscriptions or systems.
This section describes the following tasks:
Section 2.3.1, “Viewing User Information,” on page 24
Section 2.3.2, “Adding an Organization Administrator or an Organization User to an
Organization,” on page 25
Section 2.3.3, “Removing Users from an Organization,” on page 26
Section 2.3.4, “Editing a User,” on page 28
novdocx (en) 24 March 2009
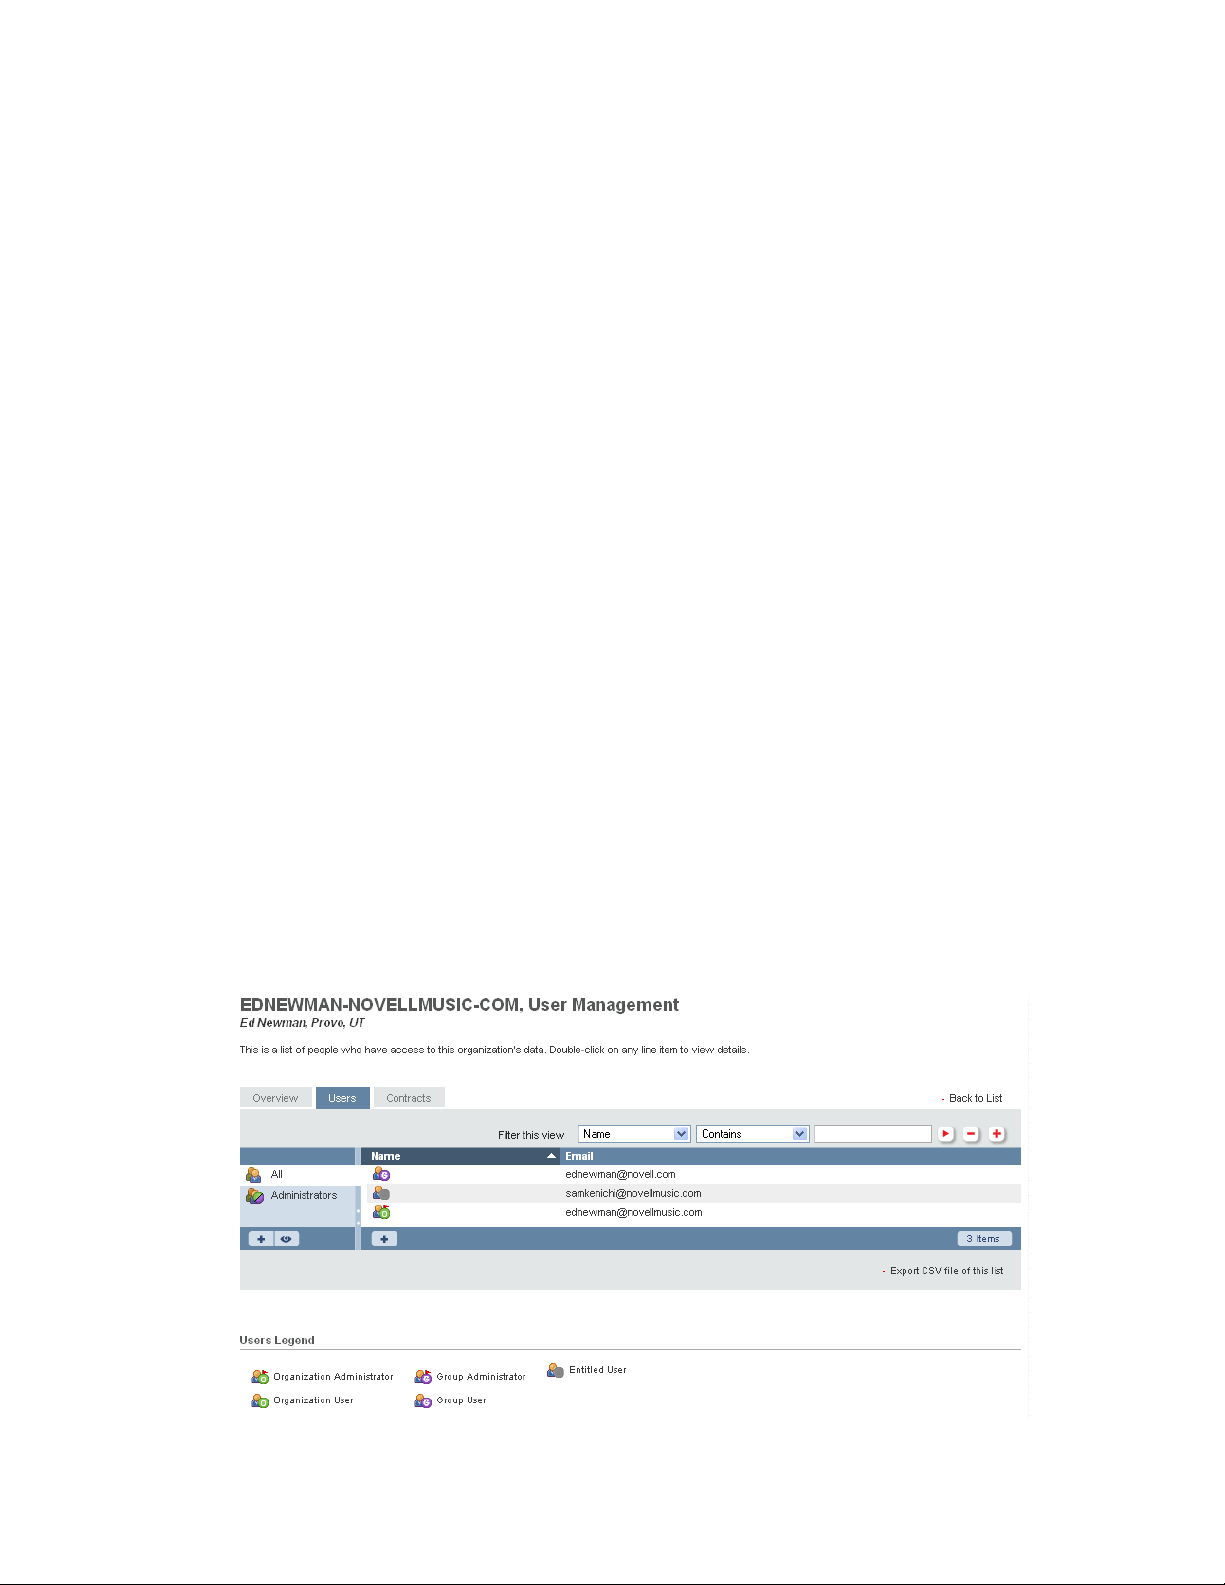
2.3.1 Viewing User Information
Only Organization Administrators or Organizational Users can see information about all users.
To view the Users page:
1 Log in to Novell Customer Center as described in Section 2.1.2, “Logging In to Novell
Customer Center,” on page 15.
2 Click Administration > Organizations in the left navigation frame. (This menu item is available
only to Organization Administrators).
3 Select an organization.
4 Click the Users tab.
24 Novell Customer Center User Guide
Page 25

5 (Optional) Use the filter to search for specific content, or click the column heading to reorder
the list. The icon to the right of the filter fields applies the filter; the icon clears it.
6 (Optional) Click Export CSV file of this list to create a CSV file.
2.3.2 Adding an Organization Administrator or an Organization User to an Organization
Novell Customer Center enables you to give access to your organization’s information to anyone
you choose. This can include co-workers, other interested people in your company, your Novell
sales representatives, or resellers.
NOTE: You can add any user who has an e-mail address. However, to access Novell Customer
Center, each user must have a Novell Login account using the e-mail address you have assigned.
Users can create a Novell Login account the first time they access Novell Customer Center, as
described in Section 2.1.2, “Logging In to Novell Customer Center,” on page 15.
To add an Organization Administrator or Organization User:
novdocx (en) 24 March 2009
1 Log in to Novell Customer Center as described in Section 2.1.2, “Logging In to Novell
Customer Center,” on page 15.
2 Click Administration > Organizations in the left navigation frame.
3 (Optional) Use the filter to search for specific content, or click the column heading to reorder
the list. The icon to the right of the filter fields applies the filter; the icon clears it.
4 In the Organization column, double-click the organization to which you want to add users.
5 Click the Users tab.
Administering Your Novell Customer Center Account 25
Page 26

6 Click the Add User button under the Name column.
novdocx (en) 24 March 2009
7 Specify the user’s e-mail address and select Organization Administrator or Organization User.
8 Click Add.
The new user name appears in the user list, represented by the icon for that type of user. If the
user doesn’t have a Novell account, the new user is listed by e-mail only.
2.3.3 Removing Users from an Organization
To remove users who should no longer have access to your organization’s information:
1 Log in to Novell Customer Center as described in Section 2.1.2, “Logging In to Novell
Customer Center,” on page 15.
2 Click Administration > Organizations in the left navigation frame.
26 Novell Customer Center User Guide
Page 27

3 (Optional) Use the filter to search for specific content, or click the column heading to reorder
the list. The icon to the right of the filter fields applies the filter; the icon clears it.
4 Double-click the organization containing the users you want to remove.
5 Click the Users tab.
novdocx (en) 24 March 2009
6 Select the user you want to remove.
7 Click the Remove icon under the Name column.
8 Click Ye s to confirm that you want to remove the user or click No to cancel.
The removed user is no longer a part of your organization and can no longer access any
information about it.
Administering Your Novell Customer Center Account 27
Page 28

2.3.4 Editing a User
1 Log in to Novell Customer Center as described in Section 2.1.2, “Logging In to Novell
Customer Center,” on page 15.
2 Click Administration > Organizations in the left navigation frame.
3 (Optional) Use the filter to search for specific content, or click the column heading to reorder
the list. The icon to the right of the filter fields applies the filter; the icon clears it.
novdocx (en) 24 March 2009
4 Double-click the organization which contains the users you want to edit.
5 Click the Users tab.
6 Double-click the user you want to edit.
28 Novell Customer Center User Guide
Page 29

7 From the drop-down list, select Organization Administrator, Organization User, or Entitled
User, then click Save.
2.4 Managing User Groups
You can create and edit groups to manage users, making it easier to handle large numbers of users
and administrators. Changes to the group name are reflected immediately within the Novell
Customer Center site.
This section contains the following information:
novdocx (en) 24 March 2009
Section 2.4.1, “Viewing User Groups,” on page 29
Section 2.4.2, “Creating, Editing, or Deleting a User Group,” on page 30
Section 2.4.3, “Adding Users to a Group,” on page 31
Section 2.4.4, “Removing Users from a Group,” on page 33
2.4.1 Viewing User Groups
1 Log in to Novell Customer Center as described in Section 2.1.2, “Logging In to Novell
Customer Center,” on page 15.
2 Click Administration > Organizations in the left navigation frame.
3 (Optional) Use the filter to search for specific content, or click the column heading to reorder
the list. The icon to the right of the filter fields applies the filter; the icon clears it.
4 Double-click the organization containing the groups you want to view.
5 Click the Users tab.
Administering Your Novell Customer Center Account 29
Page 30

novdocx (en) 24 March 2009
NOTE: The left column lists the groups in your organization. If this column does not appear in
your view, click the View icon to display the column. You can toggle between showing and
hiding the Groups column by clicking the Vie w icon while that column is visible.
2.4.2 Creating, Editing, or Deleting a User Group
1 Log in to Novell Customer Center as described in Section 2.1.2, “Logging In to Novell
Customer Center,” on page 15.
2 Click Administration > Organizations in the left navigation frame.
3 (Optional) Use the filter to search for specific content, or click the column heading to reorder
the list. The icon to the right of the filter fields applies the filter; the icon clears it.
4 Double-click the organization where you want to create a group.
5 Click the Users tab.
30 Novell Customer Center User Guide
Page 31

novdocx (en) 24 March 2009
6 Click the Add icon under the Groups column.
7 Type a name for the group, then click Add.
The new name appears in the list of groups. After the group is created, you can do the
following:
Change the group name by selecting the group and clicking the Edit icon.
Delete the group by selecting the group and clicking the Remove icon.
Groups created by default (All and Administrators) cannot be deleted.
2.4.3 Adding Users to a Group
1 Log in to Novell Customer Center as described in Section 2.1.2, “Logging In to Novell
Customer Center,” on page 15.
2 Click Administration > Organizations in the left navigation frame.
Administering Your Novell Customer Center Account 31
Page 32

3 (Optional) Use the filter to search for specific content, or click the column heading to reorder
the list. The icon to the right of the filter fields applies the filter; the icon clears it.
4 Double-click the organization containing the group where you want to add users.
5 Click the Users tab.
novdocx (en) 24 March 2009
6 Click the group name.
7 Click the Add icon under the Name column.
8 Type the e-mail address of the user and select Organization Administrator or Organization
User.
32 Novell Customer Center User Guide
Page 33

If the user already exists in your organization, click All in the groups list, then select the user
name and drag it to the group name. This opens the view for the group you moved the user to.
You then double-click the user name and make that user an Organization Administrator.
9 Click Add.
The new user name appears in the user list, represented by the icon for that type of user. If the
user doesn’t have a Novell account, the new user is listed by e-mail only.
2.4.4 Removing Users from a Group
1 Log in to Novell Customer Center as described in Section 2.1.2, “Logging In to Novell
Customer Center,” on page 15.
2 Click Administration > Organizations in the left navigation frame.
novdocx (en) 24 March 2009
3 (Optional) Use the filter to search for specific content, or click the column heading to reorder
the list. The icon to the right of the filter fields applies the filter; the icon clears it.
4 Double-click the organization containing the group where you want to remove users.
5 Click the Users tab.
6 Click the group name.
7 Select the user you want to delete, then click the Remove icon.
Administering Your Novell Customer Center Account 33
Page 34

novdocx (en) 24 March 2009
The selected user is no longer listed in the group.
IMPORTANT: Selecting a user in a group and clicking the icon removes the user from both
the group and the organization. If you don’t want to delete the user from the organization, move
that user to a different group or click the icon.
34 Novell Customer Center User Guide
Page 35

3
Managing Products and Systems
Novell® Customer Center gives you a single location from which you can manage your products
and subscriptions, view and manage your installed systems, and perform various other actions that
help you manage your Novell product accounts.
Additional information is available in the following sections:
Section 3.1, “Managing Products and Subscriptions,” on page 35
Section 3.2, “Managing Systems,” on page 58
Section 3.3, “Monitoring Contract History,” on page 68
Section 3.4, “Viewing an Organization’s Order History,” on page 69
Section 3.5, “Working with Quotes,” on page 70
3.1 Managing Products and Subscriptions
novdocx (en) 24 March 2009
3
The home page provides access to information about your purchased products and product
subscriptions.
Figure 3-1 Home Page
This page helps you determine which products and subscriptions are current and which ones need to
be updated. See the following sections for more information:
Section 3.1.1, “Managing Products and Subscriptions,” on page 36
Managing Products and Systems
35
Page 36

Section 3.1.2, “Creating a Product or Subscription Group,” on page 51
Section 3.1.3, “Adding a Product or Subscription to a Group,” on page 52
Section 3.1.4, “Setting User Entitlements for a Subscription,” on page 53
Section 3.1.5, “Restricting Activation Rights for a Subscription,” on page 55
Section 3.1.6, “Downloading Patches and Updates,” on page 56
3.1.1 Managing Products and Subscriptions
The Products and Subscriptions portion of Novell Customer Center enables you to easily manage
your products and subscriptions. The following tasks are available:
“Getting Your Activation Code from an xLA Purchase” on page 36
“Activating a Retail or OEM Purchased Product or Subscription” on page 36
“Viewing Basic Information About Your Product or Subscription” on page 37
“Monitoring Product and Subscription Renewals” on page 39
“Creating Subscription Compliance Reports” on page 40
“Renewing a Subscription” on page 41
“Editing a Description of Your Product or Subscription” on page 42
novdocx (en) 24 March 2009
“Managing the Entitled Users of a Product or Subscription” on page 44
“Managing the Details of the Systems Where the Product Is Installed” on page 46
“Manually Adding Systems without Internet Access” on page 48
“Moving a Product Subscription to Another Organization” on page 49
Getting Your Activation Code from an xLA Purchase
When you purchase a subscription, it is automatically added to the Products and Subscriptions list in
Novell Customer Center. The primary contact on the order receives an e-mail upon purchase. Click
the URL in the e-mail and follow the instructions on the page to get your activation code and/or
download media. At this point, you can use Novell Customer Center to manage your subscription as
described in this section.
Activating a Retail or OEM Purchased Product or Subscription
If you use the activation code during install, the product or subscription is activated. If you want
installation support, you can activate the product or subscription as follows:
1 Log in to Novell Customer Center as described in Section 2.1.2, “Logging In to Novell
Customer Center,” on page 15.
2 Click My Products > Activate Product in the left navigation frame.
36 Novell Customer Center User Guide
Page 37

3 Choose the organization from the drop-down list.
4 Type the activation code, then click Activate.
Viewing Basic Information About Your Product or Subscription
You can view basic information about your product or subscription, including the following:
The number of users of each type who can access information about that product subscription.
The number of systems that are activated for this product subscription (SUSE
®
Linux
Enterprise Desktop 10 only).
novdocx (en) 24 March 2009
Information about media, patches, and downloads, if any.
To view basic information about your product subscription:
1 Log in to Novell Customer Center as described in Section 2.1.2, “Logging In to Novell
Customer Center,” on page 15.
2 Click My Products > Products in the left navigation frame.
Managing Products and Systems 37
Page 38

novdocx (en) 24 March 2009
3 (Optional) Use the filter to search for specific content, or click the column heading to reorder
the list. The icon to the right of the filter fields applies the filter; the icon clears it.
4 Click a product family to expand the list.
5 Double-click a product or subscription in the list.
6 Click Product Details.
38 Novell Customer Center User Guide
Page 39

novdocx (en) 24 March 2009
Monitoring Product and Subscription Renewals
You can monitor when products and subscriptions need to be renewed by using the Novell Customer
Center Alerts feature.
1 Log in to Novell Customer Center as described in Section 2.1.2, “Logging In to Novell
Customer Center,” on page 15.
If a product or subscription needs to be renewed, it is listed in the Alerts box.
2 Click the alert message for more information.
Managing Products and Systems 39
Page 40

novdocx (en) 24 March 2009
NOTE: You can also check for products or subscriptions that need renewing by navigating to the
Products and Subscriptions list page and using the filter to find those items that need to be renewed.
See “Viewing Basic Information About Your Product or Subscription” on page 37.
Creating Subscription Compliance Reports
Organization Administrators and Group Administrators can create reports that show the compliance
of systems installed under a selected subscription.
1 Log in to Novell Customer Center as described in Section 2.1.2, “Logging In to Novell
Customer Center,” on page 15.
2 Click My Products > Products in the left navigation frame.
40 Novell Customer Center User Guide
Page 41

novdocx (en) 24 March 2009
3 Click Export CSV file of this list, which is in the bottom right corner of the screen, and save the
file to your hard drive or open it with a spreadsheet application.
Renewing a Subscription
When a subscription nears its expiration date, Novell Customer Center notifies all entitled users who
have access to the subscription. To avoid losing access to updates and patches, you should renew the
subscription before it expires; however, you can also renew an expired subscription and regain
access to patches and updates.
1 Log in to Novell Customer Center as described in Section 2.1.2, “Logging In to Novell
Customer Center,” on page 15.
2 Click My Products > Products in the left navigation frame.
Managing Products and Systems 41
Page 42

novdocx (en) 24 March 2009
3 Locate the subscription you want to renew.
Use the filter to search for specific content, or click the column heading to reorder the list. The
icon to the right of the filter fields applies the filter; the icon clears it.
4 Click the detail icon.
5 In the Action column for the subscription, click Renew.
If there is no Renew link, you do not need to renew the subscription at this time.
What happens next depends on how you purchased the subscription. You might see a window where
you can enter your credit card information to purchase directly from Novell. Or, you might be
redirected to your reseller so you can renew through them. In either case, follow the on-screen
instructions to complete the transaction. If you receive a new activation code as a result of the
renewal process, you need to go to the Systems area and move all the systems from the old code to
the new one in order to retain patch and update service.
Editing a Description of Your Product or Subscription
If you don’t want to use the descriptions that are automatically entered when you register a product,
you can enter your own product description.
To enter or edit a description:
1 Log in to Novell Customer Center as described in Section 2.1.2, “Logging In to Novell
Customer Center,” on page 15.
2 Click My Products > Products in the left navigation frame.
42 Novell Customer Center User Guide
Page 43

novdocx (en) 24 March 2009
3 (Optional) Use the filter to search for specific content, or click the column heading to reorder
the list. The icon to the right of the filter fields applies the filter; the icon clears it.
4 Click a product family to expand the list.
5 Double-click a product or subscription in the list.
Managing Products and Systems 43
Page 44

novdocx (en) 24 March 2009
6 In the Custom Name field, type or edit a description of the product or subscription.
7 Click Save.
The new description prepends the default name for that product or subscription in the Products
and Subscriptions list. The default name remains, enclosed in parentheses.
Managing the Entitled Users of a Product or Subscription
Group and Organization Administrators can manage which users have access to information about a
selected product.
1 Log in to Novell Customer Center as described in Section 2.1.2, “Logging In to Novell
Customer Center,” on page 15.
2 Click My Products > Products in the left navigation frame.
44 Novell Customer Center User Guide
Page 45

novdocx (en) 24 March 2009
3 (Optional) Use the filter to search for specific content, or click the column heading to reorder
the list. The icon to the right of the filter fields applies the filter; the icon clears it.
4 Click a product family to expand the list.
5 Double-click a product subscription in the list.
6 Click User Access.
Managing Products and Systems 45
Page 46

novdocx (en) 24 March 2009
7 (Optional) To add a user to the Entitled Users list, click the Add icon, type the e-mail
address of the user you want to add, then click Add. You can click add multiple users to add
more than one user at a time.
8 (Optional) To delete a user from the list, click the user’s entry in the list, click the Remove
icon, then click Ye s to confirm that you want to delete the user.
9 (Optional) Select Restrict activation rights to this list if you want to restrict rights so only the
listed users can activate systems.
Managing the Details of the Systems Where the Product Is Installed
A system is any device that consumes a Novell activation code that is registered in Novell Customer
Center. You can view and edit information for the systems installed under this product or
subscription.
1 Log in to Novell Customer Center as described in Section 2.1.2, “Logging In to Novell
Customer Center,” on page 15.
2 Click My Products > Systems in the left navigation frame.
46 Novell Customer Center User Guide
Page 47

novdocx (en) 24 March 2009
3 (Optional) Use the filter to search for specific content, or click the column heading to reorder
the list. The icon to the right of the filter fields applies the filter; the icon clears it.
4 Double-click the system you want to view or edit.
This page that appears shows a variety of information about the system and the product or
subscription.
NOTE: Currently, system information is available only for SUSE® Linux Enterprise Server 10
and SUSE Linux Enterprise Desktop 10.
Managing Products and Systems 47
Page 48

novdocx (en) 24 March 2009
5 (Optional) Edit the properties for the selected system under the heading System Properties.
You can edit the name and description of the system and details about where the system is
located.
6 (Conditional) If you choose to edit the information (Step 5), edit the information as desired,
then click Save.
Manually Adding Systems without Internet Access
1 Log in to Novell Customer Center as described in Section 2.1.2, “Logging In to Novell
Customer Center,” on page 15.
2 Click My Products > Systems in the left navigation frame.
48 Novell Customer Center User Guide
Page 49

3 (Optional) Use the filter to search for specific content, or click the column heading to reorder
the list. The icon to the right of the filter fields applies the filter; the icon clears it.
4 Click the icon.
novdocx (en) 24 March 2009
5 Type the required information, then click Register System.
Moving a Product Subscription to Another Organization
If responsibility for a retail purchase, OEM purchase, or evaluation product or subscription shifts to
another organization, you can move the product or subscription from the first organization to the
other one.
NOTE: You cannot move a subscription purchased under a contract.
To move a product or subscription to another location:
1 Log in to Novell Customer Center as described in Section 2.1.2, “Logging In to Novell
Customer Center,” on page 15.
2 Click My Products > Products in the left navigation frame.
Managing Products and Systems 49
Page 50

novdocx (en) 24 March 2009
3 Click a product family to expand the list.
4 Click a product or subscription in the list.
5 Click the Move icon.
6 Select the company from the drop-down menu, or select Other and specify the e-mail address
of the Organization Administrator who manages the new organization for the product or
subscription, then click Move.
If you specify the e-mail address to select the Organization Administrator, the Organization
Administrator must approve the move before the change is carried out.
NOTE: You can also move a product or subscription by double-clicking the product or subscription
and clicking Move Subscription.
50 Novell Customer Center User Guide
Page 51

3.1.2 Creating a Product or Subscription Group
You can place your products or subscriptions into groups and assign a user in each group as the
Group Administrator. As a Group Administrator, you can add Group Users. Using groups makes it
easier to provide customized information to specific groups of users. For example, you might want
the members of an IT administrators group to have access to different information than your
software purchasers group.
To create a product or subscription group:
1 Log in to Novell Customer Center as described in Section 2.1.2, “Logging In to Novell
Customer Center,” on page 15.
2 Click My Products > Products in the left navigation frame.
Any existing groups appear in the left column, in the blue shaded area.
novdocx (en) 24 March 2009
3 Click the Add icon under the group list.
Managing Products and Systems 51
Page 52

4 Type a name for the group.
5 In the box provided, type the e-mail address of the user, select Group Administrator or Group
User, then click Add New.
novdocx (en) 24 March 2009
You can add additional users by repeating the process for each person you want to add,
indicating whether that user should be a Group Administrator or Group User, and clicking Add
New.
6 Click Save.
The new group appears in the left column.
NOTE: You can edit the group name or add more users by clicking the group name and
clicking the Edit icon.
3.1.3 Adding a Product or Subscription to a Group
1 Log in to Novell Customer Center as described in Section 2.1.2, “Logging In to Novell
Customer Center,” on page 15.
2 Click My Products > Products in the left navigation frame.
52 Novell Customer Center User Guide
Page 53

novdocx (en) 24 March 2009
3 Click the group where the subscription currently exists, or click All.
4 Drag the subscription and drop it onto the name of the group you want to place it in.
TIP: Use Shift+click and Ctrl+click to select multiple items.
3.1.4 Setting User Entitlements for a Subscription
Users can be set up with different entitlements for each of an organization’s subscriptions. Users can
be entitled to the following:
Patches and updates for a subscription
Installation assistance
To set user entitlements:
1 Log in to Novell Customer Center as described in Section 2.1.2, “Logging In to Novell
Customer Center,” on page 15.
2 Click My Products > Products in the left navigation frame.
Managing Products and Systems 53
Page 54

novdocx (en) 24 March 2009
3 (Optional) Use the filter to search for specific content, or click the column heading to reorder
the list. The icon to the right of the filter fields applies the filter; the icon clears it.
4 Click a product family to expand the list.
5 Double-click a product or subscription in the list.
6 Click User Access.
7 Double-click the user whose entitlements you want to set.
54 Novell Customer Center User Guide
Page 55

8 Select the entitlements you want to give that user, then click Save.
3.1.5 Restricting Activation Rights for a Subscription
To allow only a specified set of users in your organization to activate products for a subscription:
1 Log in to Novell Customer Center as described in Section 2.1.2, “Logging In to Novell
Customer Center,” on page 15.
2 Click My Products > Products in the left navigation frame.
novdocx (en) 24 March 2009
3 (Optional) Use the filter to search for specific content, or click the column heading to reorder
the list. The icon to the right of the filter fields applies the filter; the icon clears it.
4 Click a product family to expand the list.
5 Double-click a product or subscription in the list.
6 Click User Access.
Managing Products and Systems 55
Page 56

novdocx (en) 24 March 2009
7 Select the box labeled Restrict activation rights to this list on the bottom right of the screen.
Only the users in that list can install products by using the activation code for this subscription.
TIP: If your users are organized into groups, you can create a group containing the users who are
permitted to activate products, then restrict activation rights to only the users in that group.
3.1.6 Downloading Patches and Updates
1 Log in to Novell Customer Center as described in Section 2.1.2, “Logging In to Novell
Customer Center,” on page 15.
2 Click My Products > Products in the left navigation frame.
56 Novell Customer Center User Guide
Page 57

novdocx (en) 24 March 2009
3 (Optional) Use the filter to search for specific content, or click the column heading to reorder
the list. The icon to the right of the filter fields applies the filter; the icon clears it.
4 Click a product family to expand the list.
5 Double-click the product you want to patch or upgrade.
6 Check the Downloads section to see if patches or upgrades are available.
7 Click Patches & Updates if downloads are available.
8 Download the patch or update for the selected product.
Managing Products and Systems 57
Page 58

3.2 Managing Systems
The Systems area of Novell Customer Center is where you view and manage information about
individual installations of Novell products. A system is any device that consumes a Novell
activation code that is registered in Novell Customer Center.
The following tasks are available:
Section 3.2.1, “Viewing Your Installed Systems,” on page 58
Section 3.2.2, “Activating a System,” on page 59
Section 3.2.3, “Moving a System to a New Subscription,” on page 60
Section 3.2.4, “Placing Systems in Groups,” on page 61
Section 3.2.5, “Viewing Information About a System,” on page 63
Section 3.2.6, “Editing System Properties,” on page 64
Section 3.2.7, “Downloading Patches and Updates,” on page 66
3.2.1 Viewing Your Installed Systems
novdocx (en) 24 March 2009
A system is automatically created when a product is registered with Novell Customer Center during
installation, even if the product didn’t use an activation code during registration. If you are an
administrator, Novell Customer Center lists all systems registered to your organization and shows
whether those systems need to be activated. If you are not an administrator, you see only your own
installations.
To view the registered systems:
1 Log in to Novell Customer Center as described in Section 2.1.2, “Logging In to Novell
Customer Center,” on page 15.
2 Click My Products > Systems in the left navigation frame to display the Systems Information
page.
58 Novell Customer Center User Guide
Page 59

novdocx (en) 24 March 2009
3 (Optional) Use the filter to search for specific content, or click the column heading to reorder
the list. The icon to the right of the filter fields applies the filter; the icon clears it.
3.2.2 Activating a System
If a system is registered without an activation code during installation, it is listed in Novell
Customer Center as needs activation under the Systems section. You can activate a system at any
time after installation by entering the system’s activation code in Novell Customer Center.
1 Log in to Novell Customer Center as described in Section 2.1.2, “Logging In to Novell
Customer Center,” on page 15.
2 Click My Products > Systems in the left navigation frame.
Managing Products and Systems 59
Page 60

3 (Optional) Use the filter to search for specific content, or click the column heading to reorder
the list. The icon to the right of the filter fields applies the filter; the icon clears it.
4 Click the system you want to activate, then click the Key icon.
novdocx (en) 24 March 2009
5 Select a subscription from the list or type your activation code in the box.
You can search for a subscription in the list by entering a subscription name in the
Subscriptions field and clicking Find.
6 Click Activate.
3.2.3 Moving a System to a New Subscription
1 Log in to Novell Customer Center as described in Section 2.1.2, “Logging In to Novell
Customer Center,” on page 15.
2 Click My Products > Systems in the left navigation frame.
60 Novell Customer Center User Guide
Page 61

3 (Optional) Use the filter to search for specific content, or click the column heading to reorder
the list. The icon to the right of the filter fields applies the filter; the icon clears it.
4 Click the system you want to move, then click the icon.
novdocx (en) 24 March 2009
5 Select the subscription or type the activation code for a subscription you want to move the
systems to.
You can search for a subscription in the list by entering a subscription name in the
Subscriptions field and clicking Find.
6 Click Move.
3.2.4 Placing Systems in Groups
If your organization contains many systems, it is easier to manage those systems if they are in
groups. For example, you might create groups for different departments, different groups of users, or
different products.
To create a group:
1 Log in to Novell Customer Center as described in Section 2.1.2, “Logging In to Novell
Customer Center,” on page 15.
2 Click My Products > Systems.
The left column of the Systems list shows the currently available groups. By default, there is
one group, All.
Managing Products and Systems 61
Page 62

novdocx (en) 24 March 2009
3 Click the Add icon under the list of groups.
4 Type the new group name, then click Add.
The newly created group appears in the list.
To move a system to a group:
1 Log in to Novell Customer Center as described in Section 2.1.2, “Logging In to Novell
Customer Center,” on page 15.
2 Click My Products > Systems in the left navigation frame.
The Systems Information page appears. The left column of the Systems list shows the currently
available groups. The other columns show information about each installed system.
62 Novell Customer Center User Guide
Page 63

novdocx (en) 24 March 2009
3 Select the name of the system you want to move, then drag it to the name of the group you want
to move it to.
You can Shift+click or Ctrl+click to select multiple systems.
The system is moved to the selected group and that group’s contents display.
3.2.5 Viewing Information About a System
You can view information about any installed system, including general system information, system
properties, the system’s product subscriptions, and information about available downloads.
1 Log in to Novell Customer Center as described in Section 2.1.2, “Logging In to Novell
Customer Center,” on page 15.
2 Click My Products > Systems in the left navigation frame.
Managing Products and Systems 63
Page 64

3 (Conditional) If your systems are organized in groups, click the name of the group containing
the system whose information you want to view.
4 (Optional) Use the filter to search for specific content, or click the column heading to reorder
the list. The icon to the right of the filter fields applies the filter; the icon clears it.
5 Double-click the desired system.
The Information page for the selected system opens.
novdocx (en) 24 March 2009
3.2.6 Editing System Properties
You can store useful information about each system in the system’s properties page. The information
you can store includes the system name, a description of the system, and details about where the
system is located.
To edit system properties:
1 Log in to Novell Customer Center as described in Section 2.1.2, “Logging In to Novell
Customer Center,” on page 15.
2 Click My Products > Systems in the left navigation frame.
64 Novell Customer Center User Guide
Page 65

novdocx (en) 24 March 2009
3 (Conditional) If your systems are organized in groups, click the name of the group that contains
the system you want to edit.
4 Double-click the desired system.
Managing Products and Systems 65
Page 66

novdocx (en) 24 March 2009
5 Edit the properties as desired, then click Save.
To manually add systems to a subscription that aren’t connected to the Internet, see “Manually
Adding Systems without Internet Access” on page 48.
3.2.7 Downloading Patches and Updates
1 Log in to Novell Customer Center as described in Section 2.1.2, “Logging In to Novell
Customer Center,” on page 15.
2 Click My Products > Systems in the left navigation frame.
66 Novell Customer Center User Guide
Page 67

novdocx (en) 24 March 2009
3 (Optional) Use the filter to search for specific content, or click the column heading to reorder
the list. The icon to the right of the filter fields applies the filter; the icon clears it.
4 Double-click the system you want to patch or upgrade.
Managing Products and Systems 67
Page 68

novdocx (en) 24 March 2009
5 Click Patches & Updates in the Downloads section.
If there aren’t any patches or updates available, the Patches & Updates link is not visible.
6 Follow the on-screen instructions to download the patch or upgrade for the selected system.
3.3 Monitoring Contract History
Novell Customer Center tracks the history of an organization’s contracts.
To view your organization’s contract history:
1 Log in to Novell Customer Center as described in Section 2.1.2, “Logging In to Novell
Customer Center,” on page 15.
2 Click Administration > Organization in the left navigation frame.
68 Novell Customer Center User Guide
Page 69

3 Double-click the organization that has the contract you want to monitor.
4 Click the Contracts tab.
You can see the contract type, number, expiration date, status, whether the contract has been
tagged for automatic renewal, and the discount level.
novdocx (en) 24 March 2009
3.4 Viewing an Organization’s Order History
Novell Customer Center logs your organization’s orders for Novell products, subscriptions, quotes
from Novell, and services.
To view your organization’s order history:
1 Log in to Novell Customer Center as described in Section 2.1.2, “Logging In to Novell
Customer Center,” on page 15.
2 Click Administration > Order Tracking in the left navigation frame.
Managing Products and Systems 69
Page 70

novdocx (en) 24 March 2009
3 (Optional) Use the filter to search for specific content, or click the column heading to reorder
the list. The icon to the right of the filter fields applies the filter; the icon clears it.
4 Double-click the order to view additional information about it.
Order information includes contract orders placed under any associated purchase order given to
Novell and the date when the order reached Novell. The table also lists any line items
associated with the order and information about how they were delivered.
3.5 Working with Quotes
1 Click Administration > Quotes in the left navigation pane to display the My Quotes page.
70 Novell Customer Center User Guide
Page 71

This page shows the quotes you’ve received from Novell along with the following information and
options:
Select an Organization to Manage. Use the list to select which organization you want to
manage.
Filter this view. Use these fields to arrange the list of quotes.
Quote ID. The ID number for the quote.
Date Created. The date the quote was made.
Customer Name. The name of the customer.
Status. The status of the process: New, Pending Accept, Pending Reject, and Pending Help.
Amount. The amount quoted.
The following sections provide more information:
Section 3.5.1, “Viewing Details about a Quote,” on page 71
Section 3.5.2, “Accepting a Quote,” on page 72
Section 3.5.3, “Requesting Help,” on page 74
novdocx (en) 24 March 2009
3.5.1 Viewing Details about a Quote
1 Log in to Novell Customer Center as described in Section 2.1.2, “Logging In to Novell
Customer Center,” on page 15.
2 Click Administration > Quotes in the left navigation frame.
3 Double-click a quote.
Use this page to select purchase options or submit a request.
Managing Products and Systems 71
Page 72

3.5.2 Accepting a Quote
1 Log in to Novell Customer Center as described in Section 2.1.2, “Logging In to Novell
Customer Center,” on page 15.
novdocx (en) 24 March 2009
2 Click Administration > Quotes in the left navigation frame.
3 Double-click a quote.
72 Novell Customer Center User Guide
Page 73

4 Click Purchase Options.
You have the option to pay by PO number or credit card.
novdocx (en) 24 March 2009
5 Select your payment type: invoice or credit card.
If you select Invoice, specify your PO number in the PO# field.
If you select Credit Card, specify your billing and shipping information along with your
credit card details.
6 Click Review Order.
Managing Products and Systems 73
Page 74

novdocx (en) 24 March 2009
7 Review your order and click Submit Order. If you want to make changes, click Back to Quote
in the upper right corner.
Your order is sent to processing. You will be notified by e-mail when your order is complete.
3.5.3 Requesting Help
1 Log in to Novell Customer Center as described in Section 2.1.2, “Logging In to Novell
Customer Center,” on page 15.
2 Click Administration > Quotes in the left navigation frame.
74 Novell Customer Center User Guide
Page 75

3 Double-click a quote.
novdocx (en) 24 March 2009
4 Click Questions/Adjustments.
Managing Products and Systems 75
Page 76

5 Specify any questions or requests you might have and click Send, or click Close to cancel.
The status changes to Pending Help, and a Novell Representative will either update the quote
or contact the user.
novdocx (en) 24 March 2009
76 Novell Customer Center User Guide
Page 77

4
Managing Maintenance Support
novdocx (en) 24 March 2009
Benefits
When you purchase maintenance with your Novell® product, you are entitled to a certain level of
support from Novell.
For more information about using Novell Customer Center (NCC) to manage support and training
contacts, as well as general information about how to access technical support and training benefits,
see How to Manage Maintenance Support Benefits (http://support.novell.com/programs/
maintenancehelp.html).
For information about using the new electronic service request (SR) system through Novell
Customer Center, see Novell Customer Center - Electronic Service Request (http://
support.novell.com/selfserv/help_ncc.html).
4
Managing Maintenance Support Benefits
77
Page 78

novdocx (en) 24 March 2009
78 Novell Customer Center User Guide
Page 79

A
Documentation Updates
novdocx (en) 24 March 2009
A
This section contains information on documentation content changes that were made in this guide
after the initial release of Novell
on updates to the documentation.
The documentation was updated on the following dates:
Section A.1, “April 8, 2009,” on page 79
Section A.2, “February 4, 2008,” on page 79
Section A.3, “April 24, 2007,” on page 79
Section A.4, “March 14, 2007,” on page 79
Section A.5, “September 14, 2006,” on page 79
®
Customer Center. The information can help you to keep current
A.1 April 8, 2009
Added Chapter 4, “Managing Maintenance Support Benefits,” on page 77.
A.2 February 4, 2008
Updated graphics and content throughout.
A.3 April 24, 2007
Added Section 2.2.5, “Requesting Access to an Organization’s Account,” on page 22.
A.4 March 14, 2007
Added Section 3.5, “Working with Quotes,” on page 70.
A.5 September 14, 2006
Substantial editing, reorganization, and additional content throughout.
Documentation Updates
79
Page 80

novdocx (en) 24 March 2009
80 Novell Customer Center User Guide
 Loading...