

Page 1

Novell Client for Linux 1.2 Administration Guide
Novell
ClientTM for Linux
novdocx (ENU) 01 February 2006
1.2
July 26, 2006
www.novell.com
ADMINISTRATION GUIDE
Page 2

Legal Notices
Novell, Inc. makes no representations or warranties with respect to the contents or use of this documentation, and
specifically disclaims any express or implied warranties of merchantability or fitness for any particular purpose.
Further, Novell, Inc. reserves the right to revise this publication and to make changes to its content, at any time,
without obligation to notify any person or entity of such revisions or changes.
Further, Novell, Inc. makes no representations or warranties with respect to any software, and specifically disclaims
any express or implied warranties of merchantability or fitness for any particular purpose. Further, Novell, Inc.
reserves the right to make changes to any and all parts of Novell software, at any time, without any obligation to
notify any person or entity of such changes.
Any products or technical information provided under this Agreement may be subject to U.S. export controls and the
trade laws of other countries. You agree to comply with all export control regulations and to obtain any required
licenses or classification to export, re-export, or import deliverables. You agree not to export or re-export to entities
on the current U.S. export exclusion lists or to any embargoed or terrorist countries as specified in the U.S. export
laws. You agree to not use deliverables for prohibited nuclear, missile, or chemical biological weaponry end uses.
Please refer to www.novell.com/info/exports/ for more information on exporting Novell software. Novell assumes no
responsibility for your failure to obtain any necessary export approvals.
Copyright © 2005-2006 Novell, Inc. All rights reserved. No part of this publication may be reproduced, photocopied,
stored on a retrieval system, or transmitted without the express written consent of the publisher.
novdocx (ENU) 01 February 2006
Novell, Inc. has intellectual property rights relating to technology embodied in the product that is described in this
document. In particular, and without limitation, these intellectual property rights may include one or more of the U.S.
patents listed at http://www.novell.com/company/legal/patents/ and one or more additional patents or pending patent
applications in the U.S. and in other countries.
Novell, Inc.
404 Wyman Street, Suite 500
Waltham, MA 02451
U.S.A.
www.novell.com
Online Documentation: To access the online documentation for this and other Novell products, and to get
updates, see www.novell.com/documentation.
Page 3

Novell Trademarks
For Novell trademarks, see the Novell Trademark and Service Mark list (http://www.novell.com/company/legal/
trademarks/tmlist.html).
Third-Party Materials
All third-party trademarks are the property of their respective owners.
novdocx (ENU) 01 February 2006
Page 4

novdocx (ENU) 01 February 2006
Page 5

Contents
About This Guide 7
1What’s New 9
2 Understanding the Novell Client for Linux 11
2.1 Understanding How the Novell Client for Linux Differs from the Novell Client for Windows 2000/
XP . . . . . . . . . . . . . . . . . . . . . . . . . . . . . . . . . . . . . . . . . . . . . . . . . . . . . . . . . . . . . . . . . . . . . . 11
2.2 Understanding the Novell Client for Linux Virtual File System. . . . . . . . . . . . . . . . . . . . . . . . . 12
2.2.1 Understanding When the Virtual File System Kernel Module Needs to Be Compiled 12
3 Configuring the Novell Client for Linux 15
3.1 Using the Novell Client Configuration Wizard . . . . . . . . . . . . . . . . . . . . . . . . . . . . . . . . . . . . . 15
3.1.1 Configuring Login Settings . . . . . . . . . . . . . . . . . . . . . . . . . . . . . . . . . . . . . . . . . . . . 16
3.1.2 Configuring Map Settings . . . . . . . . . . . . . . . . . . . . . . . . . . . . . . . . . . . . . . . . . . . . . 17
3.1.3 Configuring Protocol Settings . . . . . . . . . . . . . . . . . . . . . . . . . . . . . . . . . . . . . . . . . . 18
3.1.4 Configuring Tray Application Settings . . . . . . . . . . . . . . . . . . . . . . . . . . . . . . . . . . . . 19
3.1.5 Configuring File Browser Settings . . . . . . . . . . . . . . . . . . . . . . . . . . . . . . . . . . . . . . . 19
3.1.6 Configuring OpenSLP Settings . . . . . . . . . . . . . . . . . . . . . . . . . . . . . . . . . . . . . . . . . 21
3.2 Using Configuration Files to Preconfigure the Novell Client . . . . . . . . . . . . . . . . . . . . . . . . . . 22
novdocx (ENU) 01 February 2006
4 Managing Login 25
4.1 Setting Up Integrated Login . . . . . . . . . . . . . . . . . . . . . . . . . . . . . . . . . . . . . . . . . . . . . . . . . . . 25
4.1.1 Installing and Enabling CASA . . . . . . . . . . . . . . . . . . . . . . . . . . . . . . . . . . . . . . . . . . 25
4.1.2 Configuring Integrated Login . . . . . . . . . . . . . . . . . . . . . . . . . . . . . . . . . . . . . . . . . . . 26
4.1.3 Managing System Wide Integrated Login Settings . . . . . . . . . . . . . . . . . . . . . . . . . . 27
4.2 Setting Up Login Scripts . . . . . . . . . . . . . . . . . . . . . . . . . . . . . . . . . . . . . . . . . . . . . . . . . . . . . 28
4.3 Setting Up Login Restrictions . . . . . . . . . . . . . . . . . . . . . . . . . . . . . . . . . . . . . . . . . . . . . . . . . 28
4.4 Using OpenSLP to Simplify Login . . . . . . . . . . . . . . . . . . . . . . . . . . . . . . . . . . . . . . . . . . . . . . 29
4.4.1 Setting Up SLP . . . . . . . . . . . . . . . . . . . . . . . . . . . . . . . . . . . . . . . . . . . . . . . . . . . . . 29
4.4.2 Troubleshooting SLP Configuration . . . . . . . . . . . . . . . . . . . . . . . . . . . . . . . . . . . . . 30
5 Managing File Security 31
5.1 Checking File or Folder Rights . . . . . . . . . . . . . . . . . . . . . . . . . . . . . . . . . . . . . . . . . . . . . . . . 31
5.2 Changing Trustee Rights . . . . . . . . . . . . . . . . . . . . . . . . . . . . . . . . . . . . . . . . . . . . . . . . . . . . . 33
5.3 Adding a Trustee . . . . . . . . . . . . . . . . . . . . . . . . . . . . . . . . . . . . . . . . . . . . . . . . . . . . . . . . . . . 33
5.4 Removing a Trustee . . . . . . . . . . . . . . . . . . . . . . . . . . . . . . . . . . . . . . . . . . . . . . . . . . . . . . . . 34
5.5 Combining Multiple Trustees . . . . . . . . . . . . . . . . . . . . . . . . . . . . . . . . . . . . . . . . . . . . . . . . . . 34
6 Security Considerations 37
6.1 Security Features. . . . . . . . . . . . . . . . . . . . . . . . . . . . . . . . . . . . . . . . . . . . . . . . . . . . . . . . . . . 37
6.2 Known Security Threats. . . . . . . . . . . . . . . . . . . . . . . . . . . . . . . . . . . . . . . . . . . . . . . . . . . . . . 38
6.3 Security Characteristics . . . . . . . . . . . . . . . . . . . . . . . . . . . . . . . . . . . . . . . . . . . . . . . . . . . . . . 38
6.3.1 Identification and Authentication . . . . . . . . . . . . . . . . . . . . . . . . . . . . . . . . . . . . . . . . 39
6.3.2 Authorization and Access Control . . . . . . . . . . . . . . . . . . . . . . . . . . . . . . . . . . . . . . . 39
5
Page 6

6.3.3 Roles . . . . . . . . . . . . . . . . . . . . . . . . . . . . . . . . . . . . . . . . . . . . . . . . . . . . . . . . . . . . . 39
6.3.4 Security Auditing . . . . . . . . . . . . . . . . . . . . . . . . . . . . . . . . . . . . . . . . . . . . . . . . . . . . 39
6.4 New and Modified Files . . . . . . . . . . . . . . . . . . . . . . . . . . . . . . . . . . . . . . . . . . . . . . . . . . . . . . 39
6.4.1 Configuration Files . . . . . . . . . . . . . . . . . . . . . . . . . . . . . . . . . . . . . . . . . . . . . . . . . . . 40
6.4.2 PAM Login Files . . . . . . . . . . . . . . . . . . . . . . . . . . . . . . . . . . . . . . . . . . . . . . . . . . . . . 40
6.4.3 User Profile Startup Files . . . . . . . . . . . . . . . . . . . . . . . . . . . . . . . . . . . . . . . . . . . . . . 41
6.4.4 KDE and GNOME Desktop Startup Files. . . . . . . . . . . . . . . . . . . . . . . . . . . . . . . . . . 41
6.4.5 Installation Files . . . . . . . . . . . . . . . . . . . . . . . . . . . . . . . . . . . . . . . . . . . . . . . . . . . . . 42
6.5 Other Security Considerations . . . . . . . . . . . . . . . . . . . . . . . . . . . . . . . . . . . . . . . . . . . . . . . . . 42
A Compiling the Novell Client Virtual File System Kernel Module 43
A.1 Installing the Required Packages . . . . . . . . . . . . . . . . . . . . . . . . . . . . . . . . . . . . . . . . . . . . . . . 43
A.2 Compiling the Novell Client Virtual File System Kernel Module . . . . . . . . . . . . . . . . . . . . . . . . 44
A.2.1 Compiling the Novell Client Virtual File System Kernel Module After a Kernel
Update . . . . . . . . . . . . . . . . . . . . . . . . . . . . . . . . . . . . . . . . . . . . . . . . . . . . . . . . . . . . 44
A.2.2 Compiling the Novell Client Virtual File System Kernel Module on Workstations Running
a Custom Kernel . . . . . . . . . . . . . . . . . . . . . . . . . . . . . . . . . . . . . . . . . . . . . . . . . . . . 45
B The Novell Client for Linux Commands 47
novdocx (ENU) 01 February 2006
B.1 Shell Commands . . . . . . . . . . . . . . . . . . . . . . . . . . . . . . . . . . . . . . . . . . . . . . . . . . . . . . . . . . . 47
B.2 GUI Utilities. . . . . . . . . . . . . . . . . . . . . . . . . . . . . . . . . . . . . . . . . . . . . . . . . . . . . . . . . . . . . . . . 48
B.3 Using the Novell Client for Linux Man Pages . . . . . . . . . . . . . . . . . . . . . . . . . . . . . . . . . . . . . . 48
C Documentation Updates 51
C.1 July 26, 2006 . . . . . . . . . . . . . . . . . . . . . . . . . . . . . . . . . . . . . . . . . . . . . . . . . . . . . . . . . . . . . . 51
C.2 December 23, 2005 . . . . . . . . . . . . . . . . . . . . . . . . . . . . . . . . . . . . . . . . . . . . . . . . . . . . . . . . . 51
6 Novell Client for Linux 1.2 Administration Guide
Page 7

About This Guide
This guide describes how to configure the Novell® ClientTM for Linux software.
• Chapter 1, “What’s New,” on page 9
• Chapter 2, “Understanding the Novell Client for Linux,” on page 11
• Chapter 3, “Configuring the Novell Client for Linux,” on page 15
• Chapter 4, “Managing Login,” on page 25
• Chapter 5, “Managing File Security,” on page 31
• Chapter 6, “Security Considerations,” on page 37
• Appendix A, “Compiling the Novell Client Virtual File System Kernel Module,” on page 43
• Appendix B, “The Novell Client for Linux Commands,” on page 47
• Appendix C, “Documentation Updates,” on page 51
novdocx (ENU) 01 February 2006
Audience
This guide is intended for network administrators.
Feedback
We want to hear your comments and suggestions about this manual and the other documentation
included with this product. Please use the User Comments feature at the bottom of each page of the
online documentation, or go to www.novell.com/documentation/feedback.html and enter your
comments there.
Documentation Updates
For the latest version of this documentation, see the Novell Client online documentation (http://
www.novell.com/documentation/linux_client/index.html) Web site.
Additional Documentation
For information on installing the Novell Client for Linux, see the “Novell Client for Linux 1.2
Installation Quick Start”
For information on the Novell Client tray application, see the Novell Client for Linux 1.2 User
Guide.
For information on login scripts, see the Novell Login Scripts Guide.
Documentation Conventions
In this documentation, a greater-than symbol (>) is used to separate actions within a step and items
within a cross-reference path.
A trademark symbol (
trademark.
®
, TM, etc.) denotes a Novell trademark. An asterisk (*) denotes a third-party
7
Page 8

novdocx (ENU) 01 February 2006
8 Novell Client for Linux 1.2 Administration Guide
Page 9

1
What’s New
The following are new features added to the Novell® ClientTM for Linux 1.2:
• The ability to edit login scripts from an option on the tray application menu.
novdocx (ENU) 01 February 2006
1
User authentication and access control are enforced (that is, users must be logged in to edit
their personal login scripts). eDirectory
when administrators do not want their users to be able to edit their personal login scripts. An
administrator can also configure the Novell Client for Linux to disallow the Edit Login Script
option so it is not displayed on the on the tray application menu.
For more information, see “Editing Your Login Script” in the Novell Client for Linux User
Guide.
• An integrated login feature that allows login profiles to be stored for use by subsequent
network login operations.
This functionality makes use of CASA (Common Authentication Services Adapter) for
persistent storage of credentials for a given realm. The overall concept is that if the Novell
Client for Linux 1.2 or later and CASA 1.6 or later are installed on the workstation, users can
have their eDirectory connections, login scripts, and startup drive mappings run when they
initially log in to the workstation. This authentication does not replace the workstation login; it
currently just augments it with eDirectory functionality.
Users must run the normal Novell Login from the tray application menu and save their
Novell Login settings. After saving the Novell Login settings, the next time the same user logs
in to the workstation, eDirectory authentication is automatic and the user’s login script runs at
startup.
For more information, see Section 4.1, “Setting Up Integrated Login,” on page 25.
TM
access control is enforced as well, which is useful
What’s New
9
Page 10

novdocx (ENU) 01 February 2006
10 Novell Client for Linux 1.2 Administration Guide
Page 11

2
Understanding the Novell Client
novdocx (ENU) 01 February 2006
for Linux
The Novell® ClientTM for Linux* software allows users of Linux workstations to access and use all
of the services available on servers running Novell eDirectory
power, ease of use, manageability, and security of eDirectory to Linux workstations. The Novell
Client for Linux fully supports NetWare
workstation, including security, file, and print services through Novell iPrint.
This section contains the following information:
• Section 2.1, “Understanding How the Novell Client for Linux Differs from the Novell Client
for Windows 2000/XP,” on page 11
• Section 2.2, “Understanding the Novell Client for Linux Virtual File System,” on page 12
®
, OES, and eDirectory services and utilities on a Linux
2.1 Understanding How the Novell Client for
Linux Differs from the Novell Client for Windows
2000/XP
Using the Novell Client for Linux differs in a few ways from using the Novell Client for Windows*.
For users and network administrators who are familiar with the Novell Client for Windows,
knowing these differences can help the transition to Linux run more smoothly.
TM
. The Novell Client brings the full
2
Installation and Upgrades
• The Novell Client for Linux can be installed and upgraded using either YaST or an installation
script. For more information, see the “Novell Client for Linux 1.2 Installation Quick Start”
• There is no Automatic Client Upgrade available on Linux.
• The Client Configuration Wizard lets you set up a configuration file that can be used to
preconfigure workstations during installation. For more information, see Section 3.2, “Using
Configuration Files to Preconfigure the Novell Client,” on page 22.
Logging In
• When a user logs in to a local workstation and then opens a remote SSH session and logs in as
the same user, the network resources that user has rights to are available to the user.
TM
• The Novell Client for Linux can use the NMAS
NMAS login is not integrated in to the Novell Client for Linux login screen, so the default
login sequence cannot be set in the Novell Client Login screen.
• The Novell Client for Linux uses OpenSLP, whereas the Novell Client for Windows uses
Novell’s implementation of SLP. The network administrator must set up OpenSLP before users
can look up trees, contexts, and servers using the Browse buttons in the Novell Client Login
window. If OpenSLP is not set up, the user must enter a username, tree, and context to connect
to the network. See Chapter 4, “Managing Login,” on page 25 for more information.
login method to authenticate. However, the
Understanding the Novell Client for Linux
11
Page 12

Because Linux uses OpenSLP, the implementation is different and the user’s experience is
different. For more information, see Section 4.4, “Using OpenSLP to Simplify Login,” on
page 29.
• The Novell Client for Linux does not use the Dynamic Local User or Location Profiles that are
available in Windows.
User Interface
Both a graphical user interface and command line utilities are available to complete client actions
such as mapping drives, setting trustee rights, and copying files.
Login Scripts
Novell has ported the vast majority of login script functionality to the Linux platform. This means
that the login scripts you create in your network can be used for both Windows users and Linux
users with very little difference in functionality.
Some differences do exist, however. For example, mapped drives are implemented by creating
symbolic links and search drives are not available on Linux. Other small differences are created by
the inherent difference between Windows and Linux. All the differences and issues are listed in the
Novell Login Scripts Guide.
novdocx (ENU) 01 February 2006
2.2 Understanding the Novell Client for Linux
Virtual File System
The Novell Client for Linux differs from previous Novell Clients to enable it to work on the Linux
platform. In Windows, the Novell Client loads a single binary that works on multiple operating
system platforms without modifications. The Novell Client for Linux has a Virtual File System that
consists of a kernel module (novfs.ko) that runs as part of the Linux kernel and a daemon
(novfsd) that runs in the user space. Both components must be running on the workstation for the
client to connect to the network.
The daemon can run on any of the supported Linux platforms without modification. The kernel
module, however, is dependent on the kernel version and must be compiled to match the kernel on
the workstation. When the Novell Client is installed, it compiles the kernel module during the
installation process. If this process fails, the kernel module cannot load. It attempts to recompile
when the workstation is restarted.
2.2.1 Understanding When the Virtual File System Kernel
Module Needs to Be Compiled
The following is a list of the instances when you must compile the Novell Client Virtual File System
Kernel Module (novfs.ko):
• You installed the Novell Client and received an error message. This generally occurs because
all the required packages are not installed on a workstation. You must install these packages,
compile the Novell Client Virtual File System Kernel Module (novfs.ko), and restart the
workstation. See “System Requirements” in the Novell Client for Linux Installation Quick Start
for more information.
• You have previously compiled the Novell Client Virtual File System Kernel Module
(novfs.ko) and then made changes to the kernel.
12 Novell Client for Linux 1.2 Administration Guide
Page 13

• You have a custom kernel of any of the supported versions.
®
• Kernel updates are automatically pushed to the workstation via Red Carpet
.
In all of these instances, you must recompile the Novell Client Virtual File System Kernel Module
(novfs.ko) to ensure that it is compatible with the Linux kernel version on your workstation.
However, when later shipping versions of SLED are provided by Novell, the Novell Client Virtual
File System Kernel Module (novfs.ko) is installed and you do not need to recompile it because
the module is included in the kernel.
For more information, see Appendix A, “Compiling the Novell Client Virtual File System Kernel
Module,” on page 43.
NOTE: If you patch the kernel for any reason, you must make sure that you have the required
packages that correspond to the kernel patch. For a list of the required packages, see “System
Requirements” in the Novell Client for Linux Installation Quick Start. The Novell Client for Linux
then recompiles when the workstation is restarted. Without the corresponding packages, the
recompile fails.
Under certain conditions, your version of novfs.ko could be rolled back when you install a new
kernel module. For example, if you download and install a patched version of novfs.ko, and then
later install an SLED 10 update to your kernel, the Novell Client Virtual File System Kernel Module
patch might be overwritten. You should then reinstall the novfs.ko patch and recompile the
kernel in order to ensure that the kernel module and the kernel are compiled.
novdocx (ENU) 01 February 2006
Understanding the Novell Client for Linux 13
Page 14

novdocx (ENU) 01 February 2006
14 Novell Client for Linux 1.2 Administration Guide
Page 15
3
Configuring the Novell Client for
novdocx (ENU) 01 February 2006
Linux
This section explains two ways that you can configure the Novell® ClientTM for Linux settings on a
workstation. Both methods let you configure the file browser, protocol, login, tray application, and
SLP configuration settings available to Novell Client users.
• Using the Novell Client Configuration Wizard (page 15)
• Using Configuration Files to Preconfigure the Novell Client (page 22)
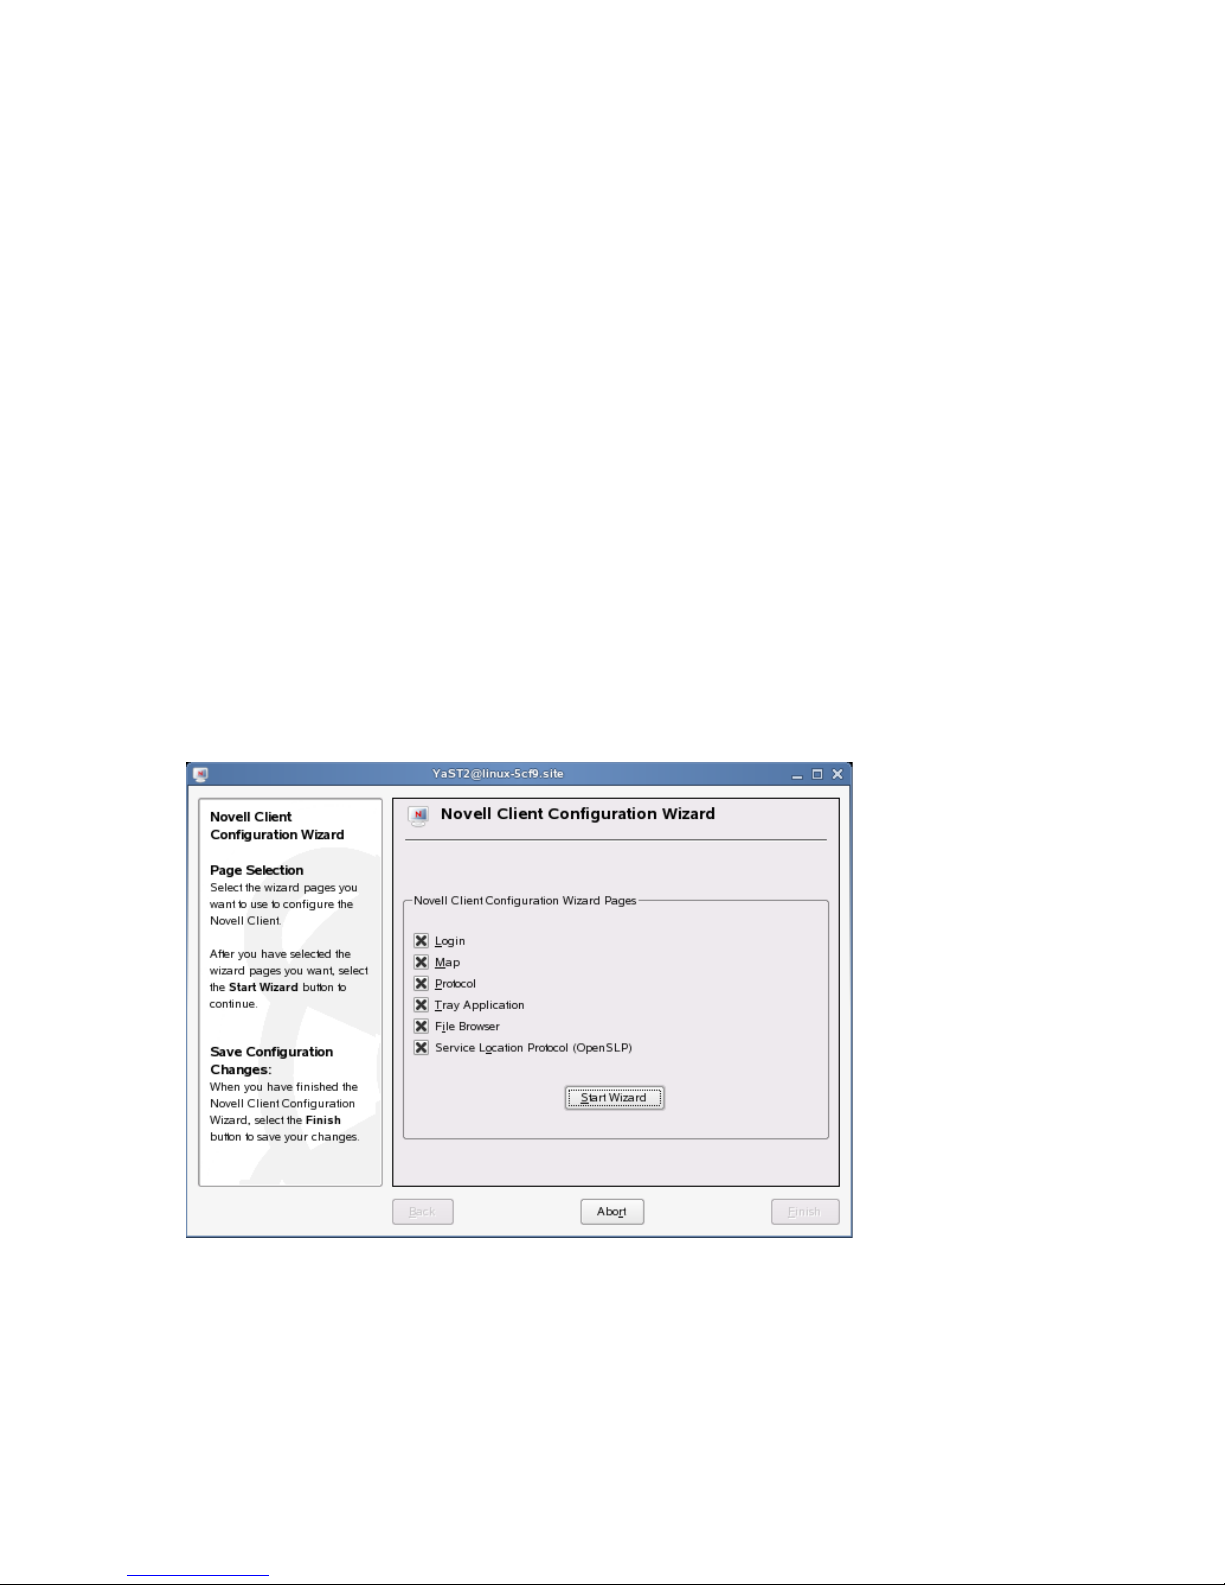
3.1 Using the Novell Client Configuration Wizard
The Novell Client for Linux includes a Novell Client Configuration Wizard to simplify the process
of configuring your Novell Client.
1 Launch the Novell Client Configuration Wizard using either of the following methods:
• In the Novell Client tray application, click System Settings.
• In YaST, click Network Services > Novell Client.
2 Select the Client Configuration Wizard pages that contain the settings you want to configure.
3
You can configure the following settings:
• Login
• Map
• Protocol
• Tray Application
Configuring the Novell Client for Linux
15
Page 16
• File Browser
• Service Location Protocol (OpenSLP)
3 Click Start Wizard.
4 Follow the instructions in the left panel to configure Novell Client settings.
5 Click Finish.
6 Restart the workstation to ensure that the settings take effect.
7 If you made changes to the Protocol Settings page or the Service Location Protocol (OpenSLP)
Settings page, reboot the machine for those changes to take effect.
Any changes you make to the Novell Client settings are written to a set of configuration (.conf)
files in the /etc/opt/novell/ncl directory. These files are then used by the Novell Client.
IMPORTANT: When the Novell Client software is uninstalled, these settings are not saved.
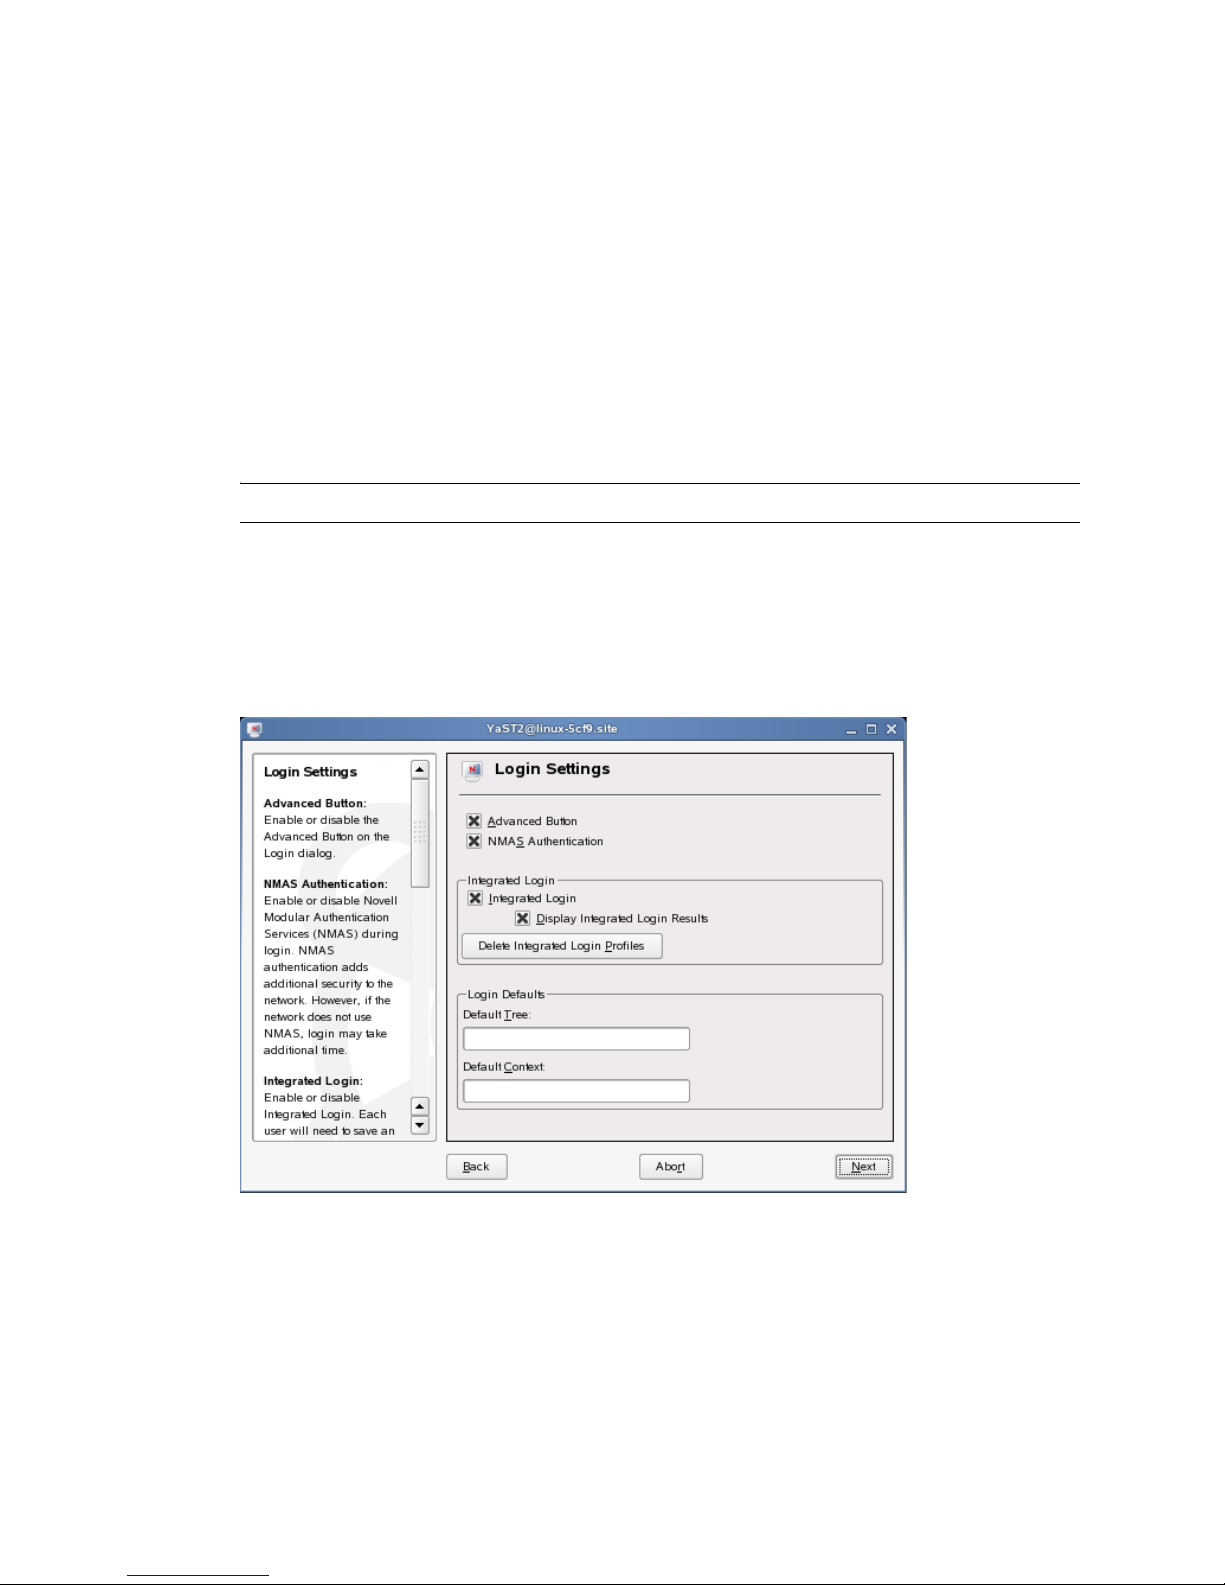
3.1.1 Configuring Login Settings
Use the Login Settings page in the Novell Client Configuration Wizard to configure the settings
available to users in the Novell Login dialog box.
novdocx (ENU) 01 February 2006
Figure 3-1 Login Settings Page
This page contains the following options:
• Advanced Button: Enables or disables the Advanced button in the Login dialog box. This
option is selected by default.
• NMAS Authentication: Enables or disables Novell Modular Authentication Services
TM
(NMAS
) during login. NMAS authentication can add additional security to the network, but
if the network does not use NMAS, login might take additional time, so you can disable NMAS
authentication by disabling this setting. This option is selected by default.
16 Novell Client for Linux 1.2 Administration Guide
Page 17

• Integrated Login: Enables the integrated login feature for the entire system. This is set by the
administrator and cannot be overridden by the user.
• Display Integrated Login Results: When this option is disabled, all login scripts are run
silently and the script results window is not displayed, but login scripts are still processed.
• Delete Integrated Login Profiles: Removes the existing login profiles for all users on this
workstation.
• Default Tree: Specify the default tree that Login attempts to log in to. This setting is
overridden by the Login Dialog Tree history.
• Default Context: Specify the default context that Login attempts to log in to. This setting is
overridden by the Login Dialog Context history.
For more information on using the Novell Login dialog box, see “Logging In to the Network” in the
Novell Client for Linux User Guide.
3.1.2 Configuring Map Settings
Use the Map Settings page in the Novell Client Configuration Wizard to specify the directory on the
local workstation where symbolic links to network resources are created and to select the first letter
to use when creating these links.
novdocx (ENU) 01 February 2006
Figure 3-2 Map Settings Page
This page contains the following options:
• Map Link Default Location: Specify the path to the directory where Map creates symbolic
links to network resources. A value of %HOME (the default) causes Map to create symbolic
links in the user’s home directory.
• First Network Drive: Select the first letter for Map to use when creating symbolic links to
network resources. This setting is used in commands such a Map *1 or Map next.
Configuring the Novell Client for Linux 17
Page 18

3.1.3 Configuring Protocol Settings
Use the Protocol Settings page in the Novell Client Configuration Wizard to determine the level of
enhanced security support, select the providers to perform name resolution, and enable the Client to
obtain configuration information from your DHCP server.
Figure 3-3 Protocol Settings Page
novdocx (ENU) 01 February 2006
This page contains the following options:
• Name Resolution Providers: Select the providers to perform name resolution. Domain Name
®
System also uses the /etc/hosts file. NetWare
TM
contained in the active NCP
TM
eDirectory
and Bindery names.
connections. Service Location Protocol queries SLP for
Core ProtocolTM uses information
• NCP Signature Level: Specify the level of enhanced security support. Enhanced security
includes the use of a message digest algorithm and a per connection/per request session state.
The values are as follows:
0=Disabled1=Enabled but not preferred2=Preferred3=Required
Changing the value of this setting to 2 or 3 increases security but decreases performance.
• Dynamic Host Configuration Protocol (DHCP): If a DHCP server is set up on your network,
the DHCP server can inform the Novell Client of network-specific configuration information.
This information is made available when a user click the Tree, Context, or Server buttons on
the eDirectory tab of the Novell Login dialog box.
If you make changes to the Protocol Settings page, you must reboot the workstation for those
changes to take effect.
18 Novell Client for Linux 1.2 Administration Guide
Page 19

3.1.4 Configuring Tray Application Settings
Use the Tray Application Settings page in the Novell Client Configuration Wizard to automatically
launch the Novell Client Tray Application when the desktop starts and to determine which options
are available to users on the Tray Application menu.
Figure 3-4 Tray Application Settings Page
novdocx (ENU) 01 February 2006
This page contains the following options:
• Launch Tray Application: Select this option to automatically launch the Novell Client Tray
Application.
• Tray Application Menu Options: Enables or disables the options available to users on the
Tray Application menu.
For more information, see “Using the Novell Client Tray Application” in the Novell Client.for Linux
User Guide.
3.1.5 Configuring File Browser Settings
Use the File Browser Settings page in the Novell Client Configuration Wizard to specify which
Novell Client options are available to users when they right-click Novell file system directories or
Configuring the Novell Client for Linux 19
Page 20

files in a file manager, and which tabs are available on the Novell File, Folder, and Volume
Properties pages.
Figure 3-5 File Browser Settings Page
novdocx (ENU) 01 February 2006
This page contains the following options:
• Navigation Panel Icon (KDE only): Enables or disables the File Browser Navigation Panel
icon. This icon is displayed only in KDE.
• Novell Properties: Enables or disables the Novell Properties menu option when users right-
click a Novell file system directory or file in a file manager.
•Purge Novell Files: Enables or disables the Purge Novell Files menu option when users right-
click a Novell file system directory or file in a file manager.
• Salvage Novell Files: Enables or disables the Salvage Novell Files menu option when users
right-click a Novell file system directory or file in a file manager.
• File and Folder Information: Enables or disables the File Information and Folder
Information tabs on the File and Folder Properties pages (available when users right-click a
Novell file system directory or file in a file manager and then click Novell Properties).
• Novell Rights: Enables or disables the Novell Rights tab on the File and Folder Properties
pages (available when users right-click a Novell file system directory or file in a file manager
and then click Novell Properties).
• Volume Information: Enables or disables the Volume Information tab on the Volume
Properties page (available when users right-click a Novell file system volume in a file manager
and then click Novell Properties).
• Volume Statistics: Enables or disables the Volume Statistics tab on the Volume Properties page
(available when users right-click a Novell file system volume in a file manager and then click
Novell Properties).
20 Novell Client for Linux 1.2 Administration Guide
Page 21

3.1.6 Configuring OpenSLP Settings
Use the Service Location Protocol (OpenSLP) Settings page in the Novell Client Configuration
Wizard to specify where and how the Client requests network services.
In an IP-only network, the Novell Client needs a way to resolve the eDirectory tree, context and
server names to an actual IP address of an eDirectory server that can provide authentication. On a
simple LAN, the client can send an IP broadcast to discover this information, but on a multisite
WAN, the SLP scope and Directory Agents must be listed.
Figure 3-6 Service Location Protocol (OpenSLP) Settings Page
novdocx (ENU) 01 February 2006
This page contains the following options:
•Scope List: Specify the scopes that a user agent (UA) or service agent (SA) is allowed when
making requests or registering, or the scopes that a directory agent (DA) must support.
• Directory Agent List: Specify the specific DAs that UA and SA agents must use. If this
setting is not used, dynamic DA discovery is used to determine which DAs to use.
•Broadcast Only: Select this option to use broadcasting instead of multicasting. This setting is
not usually necessary because OpenSLP automatically uses broadcasting if multicasting is
unavailable.
SLP is designed to use IP multicasting; however, if any SLP Agent does not implement IP
multicasting, then all Agents must use broadcasting to reach that Agent. If a DA does not
support multicasting, we recommend using the Directory Agent List to configure that Directory
Agent rather than using this option.
If the network does not contain a DA, IP servers must use their own SAs to specify the services
that are available. If the SA does not support multicasting and if there are any services
advertised by that SA that are needed by the UA on this machine, then use the Broadcast Only
option.
Broadcasting has the disadvantage of being limited to the local LAN segment.
Configuring the Novell Client for Linux 21
Page 22

•Maximum Results: Specify a 32-bit integer giving the maximum number of results to
accumulate and return for a synchronous request before the time-out, or the maximum number
of results to return through a callback if the request results are reported asynchronously.
If you make changes to the Service Location Protocol (OpenSLP) Settings page, you must reboot
the workstation for those changes to take effect.
For more information, see Section 4.4, “Using OpenSLP to Simplify Login,” on page 29, SLP
Fundamentals (http://www.novell.com/documentation/edir873/qsedir873/data/aksciti.html), and the
OpenSLP (http://www.openslp.com) Web site.
3.2 Using Configuration Files to Preconfigure
the Novell Client
The Novell Client for Linux allows you to apply preconfigured client settings contained in one or
more configuration (.conf) files. This option works similar to the unattend file that can be used to
configure the Novell Client for Windows (see Creating the Configuring File (http://
www.novell.com/documentation/noclienu/noclienu/data/bu01sei.html#hn62kppa) in the Novell
Client for Windows Installation and Administration Guide for more information).
novdocx (ENU) 01 February 2006
Preconfiguring the Novell Client for Linux requires the novell-client-conf.spec file and
the make_novell-client-conf_rpm Bash script located in the /add-on/novell-
client-conf subdirectory in the directory where you unarchived the Client download file.
1 Create the preconfigured settings using the Novell Client Configuration Wizard.
See Section 3.1, “Using the Novell Client Configuration Wizard,” on page 15.
2 Copy the appropriate .conf files to the /add-on/novell-client-conf directory.
Depending on the settings you preconfigured, copy one or more of the following files:
Conf File Path and Name Configuration Settings
/etc/opt/novell/ncl/file_browser.conf File browser settings
/etc/opt/novell/ncl/login.conf Login settings
/etc/novell/ncl/map.conf Map settings
/etc/opt/novell/ncl/protocol.conf Protocol settings
/etc/opt/novell/ncl/tray_app.conf Novell Client Tray Application settings
/etc/slp.conf SLP configuration settings
3 Run the make_novell-client-conf_rpm script to create a novell-client-conf-
version_number.platform.rpm file (for example, novell-client-conf-
1.0.0-0.i586.rpm) using all of the .conf files contained in the /add-on/novellclient-conf directory.
3a Make sure you are the root user.
3b Enter the following in a terminal:
bash make_novell-client-conf_rpm
22 Novell Client for Linux 1.2 Administration Guide
Page 23

4 Install the preconfigured settings contained in novell-client-conf-
version_number.platform.rpm using one of the following methods:
• Install manually in a terminal: Enter rpm -i novell-client-conf-
version_number.platform.rpm in a terminal.
• Install using the ncl_install script: When you launch the ncl_install script (located
in /opt/novell/ncl/bin or in the directory where you unarchived the Client
download file), it looks for novell-client-conf-
version_number.platform.rpm in the /add-on/novell-client-conf
directory and adds it to the list of RPMs it installs as part of the Client.
• Install with the Novell Client using YaST: Add the location of the newly created
novell-client-conf-version_number.platform.rpm to the list of
installation sources in YaST (add a local directory in the Installation Source option and
point it to the directory containing novell-client-conf-
version_number.platform.rpm). When the YaST install runs, novell-
client-conf-version_number.platform.rpm is added as one of the RPMs in
the Novell Client selection.
The Novell Client configuration settings on a workstation can be updated at any time
using the YaST method.
novdocx (ENU) 01 February 2006
The .conf files contained in the RPM are copied to the /etc/opt/novell/ncl
directory, overwriting the files of the same name that already exist there. The installation then
copies the slp.conf file to the /etc directory, overwriting that file as well.
TIP: Backup copies of the existing files are made in the same directory so that you can revert
to the old files if you need to.
Configuring the Novell Client for Linux 23
Page 24

novdocx (ENU) 01 February 2006
24 Novell Client for Linux 1.2 Administration Guide
Page 25

4
Managing Login
You can customize the client login environment with the following tasks to suit your network and
have greater control over what users can access during login:
• Section 4.1, “Setting Up Integrated Login,” on page 25
• Section 4.2, “Setting Up Login Scripts,” on page 28
• Section 4.3, “Setting Up Login Restrictions,” on page 28
• Section 4.4, “Using OpenSLP to Simplify Login,” on page 29
For more information, see “Logging In to the Network” and “Logging Out of a Network Location
(Server or Tree)” in the Novell Client for Linux User Guide.
4.1 Setting Up Integrated Login
novdocx (ENU) 01 February 2006
4
The Novell® ClientTM for Linux 1.2 provides a single, synchronized login to the SUSE® Linux
desktop and the NetWare
resources they are authorized to use.
IMPORTANT: The integrated login feature is not available if you log in as the root user, and the
integrated login feature does not work if a workstation is set up to not ask for a password in the
display manager greeter.
For integrated login to work, the Novell Common Authentication Services Adapter (CASA) must be
installed and enabled. CASA is a common authentication and security package that provides a set of
libraries for application and service developers to enable single sign-on to an enterprise network.
®
network. Users enter their name and password only once to access all the
4.1.1 Installing and Enabling CASA
CASA is installed by default with SLED 10, but it is not enabled. CASA is not installed or enabled
by default with SUSE Linux 10.1.
Installing CASA
1 Launch the YaST Control Center.
SLED 10 GNOME: Click Computer > More Applications > YaST Control Center.
SUSE Linux 10.1 GNOME: Click Desktop > YaST.
KDE: Click the menu button > System > YaST (Control Center).
2 If you are not logged in as root, type the root password, then click Continue.
3 Click Software in the left column, then click Software Management in the right column.
4 Click Search in the Filter drop-down list.
5 Type casa in the Search field, then click Search.
6 Select the casa packages for installation.
Managing Login
25
Page 26

7 Click Accept to install all of the selected packages.
YaST displays the progress of the package installation.
8 (Conditional) If a message informs you that other package selections have been made to
resolve dependencies, click Continue.
9 (Conditional) If a message prompts you to insert a SUSE Linux CD, put the CD in the CD
drive, then click OK.
10 After all the packages have been installed, click Close to close the YaST Control Center.
Enabling CASA
1 Launch the YaST Control Center.
SLED 10 GNOME: Click Computer > More Applications > YaST Control Center.
SUSE Linux 10.1 GNOME: Click Desktop > YaST.
KDE: Click the menu button > System > YaST (Control Center).
2 Click Security and Users in the left column, then click CASA in the right column.
3 Click Configure CASA, then click OK.
novdocx (ENU) 01 February 2006
4 Click Finish to close the CASA Configuration Wizard.
4.1.2 Configuring Integrated Login
1 Use one of the following methods to open the Novell Login dialog box:
•Click > Novell Login.
• SLED 10 GNOME: Click Computer > More Applications > Novell Login.
• SUSE Linux 10.1 GNOME: Click Applications > Applications > Novell Login.
•KDE: Click the menu button > Applications > Novell Login.
2 Enter your username and password, then click Advanced.
3 Specify the tree, context, and server information for the server you want to connect to.
26 Novell Client for Linux 1.2 Administration Guide
Page 27

4 Click the Startup tab, then select Run Novell Client Login at Session Startup.
novdocx (ENU) 01 February 2006
5 Select Save Profile after the successful login to save the Novell Login dialog settings to be used
for all subsequent session logins.
You must have the User Name and Password fields and the Tree and Context fields on the
eDirectory tab filled out for this to be saved.
IMPORTANT: An integrated login does not happen at the next session startup without a saved
profile.
6 (Optional) Click Load Profile to populate all fields in the dialog based on the saved settings.
7 (Optional) Click Clear Profile to remove the profile settings.
8 Click OK to log in to the server specified in Step 3.
4.1.3 Managing System Wide Integrated Login Settings
1 Launch the Novell Client Configuration Wizard using either of the following methods:
•Click > System Settings.
• In YaST, click Network Services > Novell Client.
2 Select Login, then click Start Wizard.
3 On the Login Settings page, select or deselect Integrated Login.
This enables or disables the integrated login feature for the entire system. This is set by the
administrator and cannot be overridden by the user.
4 Select Display Integrated Login Results to display the Integrated Login Script Results window
when the user desktop is launched.
Managing Login 27
Page 28

If this option is disabled, all login scripts are run silently and the Integrated Login Script
Results window is not displayed, but login scripts are still processed.
5 Select Delete Integrated Login Profiles if you want remove the existing login profiles for all
users on this workstation.
6 Click Finish.
4.2 Setting Up Login Scripts
When a user successfully logs in to the network, one or more login scripts are executed that
automatically set up the workstation environment. Login scripts are similar to batch files and are
executed by Novell Login. You can use login scripts to map drives to Novell file system volumes
and directories, display messages, set environment variables, and execute programs or menus.
Login scripts were originally created for use with the Novell Client for Windows. However, the
Novell Client for Linux can take advantage of the majority of the functionality available in
Windows. This means that the login scripts you created for Windows workstations can also be used
with Linux workstations without modification, so you need to administer only one set of login
scripts.
novdocx (ENU) 01 February 2006
Because login scripts are very flexible and dynamic, offer a high degree of customization, and are
cross-platform, you should customize the scripts to optimize workstation login to your network. For
more information on setting up login scripts, see the Novell Login Scripts Guide.
4.3 Setting Up Login Restrictions
Login restrictions are limitations on user accounts that control access to the network. These
restrictions can be set by an administrator in Novell iManager for each user’s eDirectory
object and include the following:
• Requiring a password
You can specify its minimum length, whether it must be changed and how often, whether it
must be unique, and whether the user can change it.
• Setting the number of logins with an expired password and the number of incorrect login
attempts allowed
When a user violates login restrictions by entering an incorrect password or exceeding the
number of logins with an expired password, the account is disabled and no one can log in using
that username. This prevents unauthorized users from logging in.
• Setting account limits such as an account balance or expiration date
• Limiting disk space for each user by specifying the maximum blocks available for each user on
a volume
• Specifying the number of simultaneous connections a user can have
• Specifying (by node address) which workstations users can log in on
TM
User
• Restricting the times when users can log in (you can assign all users the same hours or you can
restrict users individually)
For specific information on setting these restrictions, see the online help located in Novell iManager.
28 Novell Client for Linux 1.2 Administration Guide
Page 29

4.4 Using OpenSLP to Simplify Login
The service location protocol (SLP) was developed so that networking applications such as the
Novell Client for Linux could discover the existence, location, and configuration of networked
services in enterprise networks. Without SLP, users must supply the hostname or network address of
the service that they want to access.
Because SLP makes the existence, location, and configuration of certain services known to all
clients in the local network, the Novell Client for Linux can use the information distributed to
simplify login. For the Novell Client, having SLP set up allows users to see the trees, contexts, and
servers available to them when they use the Novell Client for Linux Login screen. When they click
the Browse button, a list of available trees, contexts, or servers appears and they can select the
appropriate ones. For example, instead of remembering an IP address or DNS name for a server,
users can select the server’s name from a list of available servers.
SLP must be activated and set up on your Novell servers in order for the Novell Client to take
advantage of it. For more information, see “SLP Services in the Network” in the SUSE LINUX
Enterprise Server 9 Administration Guide (http://www.novell.com/documentation/oes/
index.html?page=/documentation/oes/sles_admin/data/sec-net-slp.html#sec-net-slp).
novdocx (ENU) 01 February 2006
SLP is not set up by default on Linux workstations. The Novell Client for Linux includes a Novell
Client Configuration Wizard to simplify the process of configuring your SLP and other Novell
Client configuration options. The Novell Client Configuration Wizard provides only basic SLP
configuration because this is all that is required by the client. However, if other applications on your
workstation require more advanced settings, you can modify the /etc/slp.conf file to set
advanced settings.
For more information on advanced SLP configuration, see the OpenSLP Web site (http://
www.openslp.org). In addition, the /usr/share/doc/packages/openslp directory
contains documentation on SLP, including a README.SuSE file containing the SUSE
details, several RFCs, and two introductory HTML documents (An Introduction to SLP and
OpenSLP User’s Guide). RFC 2609 details the syntax of the service URLs used and RFC 2610
details DHCP via SLP.
®
LINUX
4.4.1 Setting Up SLP
1 Launch the Novell Client Configuration Wizard using either of the following methods:
•Click > System Settings.
• In YaST, click Network Services > Novell Client.
2 Select Service Location Protocol (OpenSLP), then click Start Wizard.
3 Specify the following SLP information for your network:
•Scope List: Specify the scopes that a user agent (UA) or service agent (SA) is allowed
when making requests or registering, or the scopes that a directory agent (DA) must
support.
• Directory Agent List: Specify the specific DAs that UA and SA agents must use. If this
setting is not used, dynamic DA discovery is used to determine which DAs to use.
•Broadcast Only: Select this option to use broadcasting instead of multicasting. This
setting is not usually necessary because OpenSLP automatically uses broadcasting if
multicasting is unavailable.
Managing Login 29
Page 30

SLP is designed to use IP multicasting; however, if any SLP Agent does not implement IP
multicasting, then all Agents must use broadcasting to reach that Agent. If a DA does not
support multicasting, we recommend using the Directory Agent List to configure that
Directory Agent rather than using this option.
If the network does not contain a DA, IP servers must use their own SAs to specify the
services that are available. If the SA does not support multicasting and if there are any
services advertised by that SA that are needed by the UA on this machine, then use the
Broadcast Only option.
Broadcasting has the disadvantage of being limited to the local LAN segment.
•Maximum Results: Specify a 32-bit integer giving the maximum number of results to
accumulate and return for a synchronous request before the time-out, or the maximum
number of results to return through a callback if the request results are reported
asynchronously.
4 Complete the Novell Client Configuration Wizard.
5 Restart the workstation.
4.4.2 Troubleshooting SLP Configuration
novdocx (ENU) 01 February 2006
If users cannot see a list of available trees, contexts, and servers when they use the Novell Client for
Linux Login screen, use slptool, located in /usr/bin, to troubleshoot your SLP configuration.
After you start slpd (located in /usr/sbin), you should be able to issue a query for SLP service
agents using the following command:
slptool findsrvs service:service-agent
This should display a list of the hosts that are running slpd, which indicates that OpenSLP is
successfully installed and working. If you do not get a list, OpenSLP is not installed correctly or is
not working. See Section 4.4.1, “Setting Up SLP,” on page 29 for more information.
30 Novell Client for Linux 1.2 Administration Guide
Page 31

5
Managing File Security
Novell® Open Enterprise Server (OES) and NetWare® networks restrict access to network files and
folders based on user accounts. For example, a user connected to the network using the
Administrator account can delete or rename a file that other users can only open and edit.
The Novell file system keeps track of the rights that users have to files and directories on the
network. When users try to access any file on the network, Novell File Services (NFS) either grants
access or prohibits certain things that users can do with the file.
It is important to note that Linux file rights do not correlate with NFS file rights. When you copy a
file from a Linux workstation to a Novell server, the only right that is preserved is the Read-Only
attribute. This also occurs if you copy files from one server to another using any method other than
NCOPY at the command terminal.
For more information on the specific rights on NetWare and OES servers, see “File Services” (http:/
/www.novell.com/documentation/oes/implgde/data/filesvcs.html) in the Novell OES Planning and
Implementation Guide.
novdocx (ENU) 01 February 2006
5
For additional information on file system attributes, see the File Systems Management Guide for
OES (http://www.novell.com/documentation/oes/stor_filesys/data/hn0r5fzo.html).
Rights are granted and revoked by creating trustee assignments. For more information, see Section
5.2, “Changing Trustee Rights,” on page 33.
This section explains the following:
• Checking File or Folder Rights (page 31)
• Changing Trustee Rights (page 33)
• Combining Multiple Trustees (page 34)
5.1 Checking File or Folder Rights
1 In a file manager, right-click a Novell file system directory or file.
2 Do one of the following:
•GNOME: Click Novell Properties.
•KDE: Click Actions > Novell Properties.
Managing File Security
31
Page 32

3 Click the Novell Rights tab.
novdocx (ENU) 01 February 2006
4 View the information.
The Tru stees list shows the users or groups that have been granted rights to work with this file
or folder. The trustees rights to the folder also apply to all the files and subfolders it contains
unless the rights are explicitly redefined at the file or subfolder level.
The rights that each trustee has are shown by check marks under the letters. If you are viewing
the properties of multiple files, the trustees and rights shown are the combined trustees and
rights for all the files.
Effective Rights displays your rights for this file or folder. Users can receive rights in a number
of ways, such as explicit trustee assignments, inheritance, and security equivalence (see
eDirectory Rights Concepts (http://www.novell.com/documentation/edir873/edir873/data/
fbachifb.html) in the Novell eDirectory 8.7.3 Administration Guide for more information).
Rights can also be limited by Inherited Rights Filters and changed or revoked by lower trustee
assignments. The net result of all these actions—the rights a user can employ—are called
effective rights.
5 To view a list of rights and filters inherited by this file or directory, click Inherited Rights and
filters.
All rights assignments on directories are inheritable. You can block such inheritance on
individual subordinate items so that the rights aren’t effective on those items, no matter who the
trustee is. One exception is that the Supervisor right can’ be blocked.
6 Click OK.
32 Novell Client for Linux 1.2 Administration Guide
Page 33

5.2 Changing Trustee Rights
The assignment of rights involves a trustee and a target object. The trustee represents the user or set
of users that are receiving the authority. The target represents those network resources the users have
authority over. You must have the Access Control right to change trustee assignments.
1 In a file manager, right-click a Novell file system directory or file.
2 Do one of the following:
•GNOME: Click Novell Properties.
•KDE: Click Actions > Novell Properties.
3 Click the Novell Rights tabbed page.
4 In the Trustees list, select the trustee whose rights you want to change.
5 Select or deselect the rights you want to assign for this trustee.
For each trustee in the list, there is a set of eight check boxes, one for each right that can be
assigned. If a check box is selected, the trustee has that right. The following rights can be set
for each trustee:
novdocx (ENU) 01 February 2006
•Read: For a directory, grants the right to open files in the directory and read the contents
or run the programs. For a file, grants the right to open and read the file.
• Write: For a directory, grants the right to open and change the contents of files in the
directory. For a file, grants the right to open and write to the file.
•Erase: Grants the right to delete the directory or file.
•Create: For a directory, grants the right to create new files and directories in the directory.
For a file, grants the right to create a file and to salvage a file after it has been deleted.
• Modify: Grants the right to change the attributes or name of the directory or file, but does
not grant the right to change its contents (changing the contents requires the Write right).
•File Scan: Grants the right to view directory and file names in the file system structure,
including the directory structure from that file to the root directory.
• Access Control: Grants the right to add and remove trustees for directories and files and
modify their trustee assignments and Inherited Rights Filters.
• Supervisor: Grants all rights to the directory or file and any subordinate items. The
Supervisor right can’ be blocked by an Inherited Rights Filter. Users with this right can
grant or deny other users rights to the directory or file.
6 Click OK.
Trustee assignments override inherited rights. To change an Inherited Rights Filter, click Inherited
Rights and filters.
5.3 Adding a Trustee
When you add a trustee to a Novell file system directory or file, you grant a user (the trustee) rights
to that directory or file.You must have the Access Control right to add a trustee.
1 In a file manager, right-click the Novell file or directory that you want to add a trustee to.
2 Do one of the following:
•GNOME: Click Novell Properties.
Managing File Security 33
Page 34

•KDE: Click Actions > Novell Properties.
3 Click the Novell Rights tab.
4 In the tree diagram, locate the eDirectoryTM user object that you want to add as a trustee, then
click Add.
5 Set the rights for this user by selecting the boxes under the letters on the right of the Trustees
list.
The following rights can be set for each trustee:
•Read: For a directory, grants the right to open files in the directory and read the contents
or run the programs. For a file, grants the right to open and read the file.
• Write: For a directory, grants the right to open and change the contents of files in the
directory. For a file, grants the right to open and write to the file.
•Erase: Grants the right to delete the directory or file.
•Create: For a directory, grants the right to create new files and directories in the directory.
For a file, grants the right to create a file and to salvage a file after it has been deleted.
•Modify: Grants the right to change the attributes or name of the directory or file, but does
not grant the right to change its contents (changing the contents requires the Write right).
•File Scan: Grants the right to view directory and file names in the file system structure,
including the directory structure from that file to the root directory.
novdocx (ENU) 01 February 2006
• Access Control: Grants the right to add and remove trustees for directories and files and
modify their trustee assignments and Inherited Rights Filters.
• Supervisor: Grants all rights to the directory or file and any subordinate items. The
Supervisor right can’t be blocked by an Inherited Rights Filter. Users with this right can
grant or deny other users rights to the directory or file.
6 Click OK.
5.4 Removing a Trustee
When you remove a trustee of a Novell file system directory or file, you delete a user’s rights to that
directory or file. You must have the Access Control right to remove a trustee.
1 In a file manager, right-click the Novell file or directory whose trustee you want to remove.
2 Do one of the following:
•GNOME: Click Novell Properties.
•KDE: Click Actions > Novell Properties.
3 Click the Novell Rights tab.
4 In the Trustees list, select the trustee you want to remove.
5 Click Remove, then click OK.
5.5 Combining Multiple Trustees
As an administrator, you might need to apply the same trustee assignments to a group of selected
files. You can combine trustee assignments by selecting the Combine multiple Trustees option on the
Novell Rights page.
34 Novell Client for Linux 1.2 Administration Guide
Page 35

For example, Kim is a trustee of FILEA and FILEB. Kim has Read, File Scan, and Access Control
rights for FILEA and Read and File Scan rights for FILEB. Nancy has Read and File Scan rights for
FILEA.
If you give a new user named Michael the Read, Write, and File Scan rights for both FILEA and
FILEB and, at the same time, you want to give similar trustee rights for Kim and Nancy, you would
select Combine Multiple Trustees. The following would then be true:
• Kim has Read and File Scan rights to both FILEA and FILEB. Her Access Control right is lost
because the combined rights are based on the rights given to Michael.
• Nancy has Read and File Scan rights to both FILEA and FILEB. She has gained Read and File
Scan rights to FILEB because the combined rights are based on the rights given to Michael.
• Michael has Read, Write, and File Scan rights to both FILEA and FILEB.
To combine multiple trustees:
1 In a file manager, select all the Novell files or directories that you want to combine rights for.
2 Right-click the files or directories, then select one of the following:
•GNOME: Click Novell Properties.
•KDE: Click Actions > Novell Properties.
novdocx (ENU) 01 February 2006
3 Click the Novell Rights tab.
4 Click Combine multiple Trustees, then click OK.
Managing File Security 35
Page 36

novdocx (ENU) 01 February 2006
36 Novell Client for Linux 1.2 Administration Guide
Page 37

6
Security Considerations
This section contains the following topics:.
• Section 6.1, “Security Features,” on page 37
• Section 6.2, “Known Security Threats,” on page 38
• Section 6.3, “Security Characteristics,” on page 38
• Section 6.4, “New and Modified Files,” on page 39
• Section 6.5, “Other Security Considerations,” on page 42
6.1 Security Features
The following table contains a summary of the Novell® ClientTM for Linux security features:
Table 6-1 Novell Client for Linux Security Features
novdocx (ENU) 01 February 2006
6
Feature Yes/No Details
Users are authenticated Yes GUI and command line login utilities support
authentication of NCPTM and LDAP
connections via user authentication into
eDirectory
supported via RSA and LDAP authentication
is supported via SSL and Simple Bind
protocol.
Servers, devices, and/or services are
authenticated
Access to information is controlled Yes The product’s Virtual File System (VFS)
Roles are used to control access No No explicit use of roles is included in this
Logging and/or security auditing is done No Security logging and auditing features are not
Yes Connections to servers are authenticated via
user-supplied credentials. No device
authentication is supported directly by the
Client.
component (located in Linux Kernel space) is
the gatekeeper for enforcement of access
controls to Novell file systems.
product. eDirectory alias objects can be
created, but this is not considered true rolebased access and is not specifically supported
or administered through this product.
supplied by nor supported by this product.
TM
. NCP protocol authentication is
Data on the wire is encrypted by default No No wire encryption is supplied by this product.
Data stored is encrypted No This product does not provide long-term
storage of data.
Security Considerations
37
Page 38

Feature Yes/No Details
novdocx (ENU) 01 February 2006
Passwords, keys, and any other
authentication materials are stored
encrypted
Security is on by default Yes There are no configuration options to enable
FIPS 140-2 compliant No This product currently uses the ATB
Yes Passwords and other authentication materials
in temporary storage are encrypted to prevent
in-memory scanners.
or disable with the exception of packet
signing. Packet signing is enabled by default.
(authentication toolbox) instead of Novell’s
NICI product. Therefore, this product is not
FIPS 140-2 compliant because ATB itself is
not FIPS-compliant.
6.2 Known Security Threats
The following section provides a list of known security threats for the Novell Client for Linux, an
indication of how difficult it would be to exploit the threat, and what the consequences would be for
a customer.
Table 6-2 Known Security Threats
Description Consequence Likelihood Difficulty
Repetitive password cracking
attempts
Intruder detection lockout Low Hard
“Stale” passwords Password expiration, grace login
enforcement
Attempted access out-of-hours or
from unauthorized locations
Port scanners Unsuccessful pass of Nessus scans;
Man-in-the-middle attacks NCP request sequencing, packet signing Low Hard
Wire frame examination and
manipulation
Memory scanning for sensitive
data
Date/Time and Location restrictions at login Medium Easy
possible port hijacking
Same protections as with other Novell
products utilizing NCP and RSA-based
authentication
All buffers containing sensitive data
(passwords) are short-term in nature and
are zeroed and/or freed immediately after
use.
High Hard
Medium Possible
Low Hard
Low Hard
6.3 Security Characteristics
• Section 6.3.1, “Identification and Authentication,” on page 39
• Section 6.3.2, “Authorization and Access Control,” on page 39
• Section 6.3.3, “Roles,” on page 39
• Section 6.3.4, “Security Auditing,” on page 39
38 Novell Client for Linux 1.2 Administration Guide
Page 39

6.3.1 Identification and Authentication
This product uses X-Tier to authenticate users via user identity information stored in eDirectory and
resource authorization and access control provided by eDirectory. The product takes a user name
and password supplied directly by the user and transfers that information to X-Tier for use within its
supported authentication mechanisms (via X-Tier’s plug-in authentication module architecture). If
configured to do so, this product will authenticate (using PAM NAM (LUM)) to eDirectory through
SSL and LDAP Simple Bind Protocol.
This product does not itself authenticate to another product, system or service. No portion of this
product authenticates to another.
6.3.2 Authorization and Access Control
This product allows the protections supplied by eDirectory for access control to be fully realized for
those resources that are contained within eDirectory. Access to resources is protected based on user
identity (as stored within eDirectory). The VFS, Daemon, and X-Tier work together to compare
ACLs for a given file system path or object retrieved from eDirectory to the identity and session
scope established for the identity that owns a given connection.
novdocx (ENU) 01 February 2006
The VFS acts as a proxy to the local file system (via redirection of its local mount point) to make
such decisions for network-based file system paths or objects.
6.3.3 Roles
This product does not define or manage roles. It simply makes use of roles that have already been
defined elsewhere and treats role access privileges in the same way as any user identity.
Because the product has a VFS module running in the kernel, it does not require root access for
users to create mount points (as do NCPFS and other similar open source offerings to date). The
product does not require use of SETUID for any of its operations.
6.3.4 Security Auditing
No security auditing is performed by this product.
6.4 New and Modified Files
The following sections describe the files that are added or modified during the installation of the
Novell Client for Linux.
• Section 6.4.1, “Configuration Files,” on page 40
• Section 6.4.2, “PAM Login Files,” on page 40
• Section 6.4.3, “User Profile Startup Files,” on page 41
• Section 6.4.4, “KDE and GNOME Desktop Startup Files,” on page 41
• Section 6.4.5, “Installation Files,” on page 42
Security Considerations 39
Page 40

6.4.1 Configuration Files
Table 6-3 New and Modified Configuration Files
File New Modified Description
novdocx (ENU) 01 February 2006
$HOME/.novell/ncl/
StartupLogin.conf
$HOME/.novell/ncl/
MapDrives.conf
/etc/opt/novell/ncl/
login.conf
X Local user autologin configuration file. All fields in the
Novell Login dialog box (except the password) are
stored in this file.
This user configuration file specifies the drive mapping
to run at startup. Integrated login is not required, but
credentials must be saved or the login dialog box is
displayed to get the password at desktop startup.
Optional global configuration file that overrides
defaults. This file is modified only by the root user,
normally with YaST using the Novell Client
Configuration Wizard for the login page (click the
Novell Tray icon, select System Settings, and start the
Login Wizard).
6.4.2 PAM Login Files
Table 6-4 New and Modified PAM Login Files
File New Modified Description
/lib/security/
pam_ncl_autologin.so
X This file queries CASA credentials, verifies if
autologin is allowed, verifies the user with
credentials, then authenticates.
/etc/pam.d/xdm X PAM configuration file for the X Display Manager
/etc/pam.d/gdm X PAM configuration file for the GNOME Display
/etc/pam.d/kdm X PAM configuration file for the KDE Display
/etc/pam.d/sshd X PAM configuration file for SSH login.
A “required” authentication module is added for each of the above GUI logins. The added text is
auth required pam_ncl_autologin.so, which is be added after the
pam_micasa.so module (if it exists).
Authentication is not added for the two console login authentication files, /etc/pam.d/login
and /etc/pam.d/sshd. This modification is done at install time and is removed at uninstall
time.
IMPORTANT: For the root user, no tree authentication is performed, no automatic login scripts are
run, and no drives are mapped. Therefore, the pam_ncl_autologin.so module always returns
SUCCESSFUL, having done nothing for the root user.
40 Novell Client for Linux 1.2 Administration Guide
login.
Manager login.
Manager login.
Page 41

6.4.3 User Profile Startup Files
Table 6-5 New and Modified User Profile Startup Files
File New Modified Description
novdocx (ENU) 01 February 2006
/etc/profile.d/novell-nclautologin.sh
/opt/novell/ncl/bin/
ncl_autologin.desktop
X This script determines if the desktop is GNOME
or KDE, then installs (or removes) the session
startup file ($HOME/.kde/Autostart/
ncl_autologin.desktop or $HOME/
.gnome2/session-manual) for that Display
Manager.
This file is copied to $HOME/.kde/Autostart
and runs ncl_autologin.
6.4.4 KDE and GNOME Desktop Startup Files
Table 6-6 New or Modified Desktop Startup Files
File New Modified Description
$HOME/.kde/Autostart/
ncl_autologin.desktop
$HOME/.gnome2/sessionmanual
/opt/novell/ncl/bin/
ncl_autologin
X KDE startup for ncl_autologin.
X GNOME startup for ncl_autologin.
X Validates and run nwlogin or gnwlogin.
/opt/novell/ncl/bin/
nwlogin
/opt/novell/ncl/bin/
gnwlogin
This existing file silently authenticates and
processes scripts.
X GUI for authentication, processing scripts, and
saving settings. This file adds a new tab (called
Startup) to the Novell Login dialog box which
allows users to save their current login settings
for use during the next system startup to
automatically log in the user.
When the user clicks Clear Profile on the Startup
tab, the $HOME/.novell/ncl/
StartupLogin.conf file is deleted.
When the user clicks Save Current Profile, the
settings are used to authenticate the user (but not
run login scripts). If authentication is successful
(CASA stores those credentials), the current
settings are written to StartupLogin.conf.
Security Considerations 41
Page 42

6.4.5 Installation Files
Table 6-7 New Installation Files
File New Modified Description
novdocx (ENU) 01 February 2006
/opt/novell/ncl/bin/
delete_login_profiles
/opt/novell/ncl/bin/
login_cfg_pam
/opt/novell/ncl/bin/
login_ucfg_pam
X Run from YaST to purge all profiles.
X Inserts pam_ncl_autologin into PAM file.
X Removes pam_ncl_autologin from PAM file.
6.5 Other Security Considerations
• If root is compromised, all network access could also be compromised. For example, if a
malicious entity gets root access, it might be able to steal user credentials and authenticate to
the network with those credentials.
42 Novell Client for Linux 1.2 Administration Guide
Page 43

A
Compiling the Novell Client Virtual
novdocx (ENU) 01 February 2006
File System Kernel Module
If you have updated the kernel on your workstation, you must compile the Novell® ClientTM Vir t ual
File System Kernel Module so that it works with the updated kernel. Compiling the Novell Client
Virtual File System Module kernel requires the following steps:
1. Ensure that the right packages are installed on your workstation so that the kernel module can
be compiled.
See Section A.1, “Installing the Required Packages,” on page 43.
2. (Conditional) Install the Novell Client software so that the kernel module pieces are on the
workstation.
See the “Novell Client for Linux 1.2 Installation Quick Start.”
NOTE: If you installed the Novell Client for Linux and the installation failed, you do not need
to repeat this step.
3. Compile the Novell Client Virtual File System Kernel Module.
See Section A.2, “Compiling the Novell Client Virtual File System Kernel Module,” on
page 44.
4. Restart the workstation.
A
A.1 Installing the Required Packages
If you want to use the precompiled Novell Client for Linux Virtual File System provided with the
distribution, make sure the following packages are installed on your workstation before you install
the Novell Client for Linux:
• novfs-kmp-default
• novfs-kmp-smp or novfs-kmp-bigsmp (depending on your kernel)
If you want to compile the Novell Client for Linux Virtual File System from sources provided with
the Novell Client for Linux 1.2, make sure the following packages are installed on your workstation
before you install the Novell Client for Linux:
•gcc
•kernel-source
•make
To install the required packages:
1 Launch the YaST Control Center.
SLED 10 GNOME: Click Computer > More Applications > System > YaST.
SUSE Linux 10.1 GNOME: Click Desktop > YaST.
Compiling the Novell Client Virtual File System Kernel Module
43
Page 44

KDE: Click the menu button > System > YaST.
2 If you are not logged in as root, type the root password, then click Continue.
3 Click Software in the left column, then click Software Management in the right column.
4 Click Search in the Filter drop-down list.
5 Type the name of the package you want to install in the Search field, then click Search.
6 Select the package for installation.
7 Repeat Step 5 and Step 6 for each package that you want to install.
8 Click Accept to install all of the selected packages.
YaST displays the progress of the package installation.
9 (Conditional) If a message informs you that other package selections have been made to
resolve dependencies, click Continue.
10 (Conditional) If a message prompts you to insert a SUSE
drive, then click OK.
11 After all the packages have been installed, click Close to close the YaST Control Center.
®
Linux CD, put the CD in the CD
novdocx (ENU) 01 February 2006
A.2 Compiling the Novell Client Virtual File
System Kernel Module
Depending on whether or not you have a standard kernel that has been updated or a custom kernel
that needs to have the Novell Client Virtual File System Kernel Module added, the steps for
compiling the module differ.
• Section A.2.1, “Compiling the Novell Client Virtual File System Kernel Module After a Kernel
Update,” on page 44
• Section A.2.2, “Compiling the Novell Client Virtual File System Kernel Module on
Workstations Running a Custom Kernel,” on page 45
A.2.1 Compiling the Novell Client Virtual File System Kernel
Module After a Kernel Update
If you have updated the kernel on the workstation, you must compile the Novell Client Virtual File
System Kernel Module so that it works with the updated kernel.
1 In a terminal, log in as root.
2 Enter the following command:
cd /opt/novell/ncl/src/novfs
3 Enter the following command:
./mk_novfs
The Novell Client Virtual File System Kernel Module is updated to match your updated kernel.
44 Novell Client for Linux 1.2 Administration Guide
Page 45

A.2.2 Compiling the Novell Client Virtual File System Kernel
Module on Workstations Running a Custom Kernel
If you have a custom kernel on the workstation, you must compile the Novell Client Virtual File
System kernel module so that it works with the custom kernel.
1 In a terminal, log in as root.
2 Unpack the /proc/config.gz file and copy the resulting config to the new name /usr/
src/linux/.config.
3 In the /usr/src/linux directory, enter the following command:
make
TIP: You might also need to enter make -C /usr/src/linux-obj/i386/$i
SUBDIRS=$PWD clean. The easiest way to do this is to copy the mk_novfs script and
change the BUILD_TYPE to “clean.”
4 In the /opt/novell/ncl/src/novfs directory, enter the following command:
./m
novdocx (ENU) 01 February 2006
The Novell Client Virtual File System Module is updated to match your custom kernel.
Compiling the Novell Client Virtual File System Kernel Module 45
Page 46

novdocx (ENU) 01 February 2006
46 Novell Client for Linux 1.2 Administration Guide
Page 47

B
The Novell Client for Linux
novdocx (ENU) 01 February 2006
Commands
The Novell® ClientTM for Linux provides a set of command line utilities that let you start and stop
the Novel Client daemon, install and uninstall the Novell Client for Linux, load the Novell Client for
Linux tray application, list active connections for the currently logged-in user, copy files and
directories to and from Novell file systems, display or modify the attributes of files and directories
on Novell file systems, log a user in to or out of a Novell file server or eDirectory
file system to a remote file system on a Novell file server, and display or modify a user’s trustee
assignments or inherited rights filter for volumes, directories, or files.
The utilities are located in the /opt/novell/ncl/bin directory, and include the following:
• Section B.1, “Shell Commands,” on page 47
• Section B.2, “GUI Utilities,” on page 48
B.1 Shell Commands
Table B-1 The Novell Client for Linux Shell Commands
Utility Description Syntax
TM
tree, map a local
B
ncl_tray Loads the Novell Client for
Linux tray application and
allows customization of the
tray interface.
nwconnections Lists active connections for the
currently logged-in user.
nwcopy Copies files and directories to
and from Novell file systems.
nwflag Displays or modifies the
attributes of files and
directories on Novell file
systems.
nwlogin Logs a user in to a Novell file
server or an eDirectory tree.
nwlogout Logs the user out of a Novell
or eDirectory tree.
ncl_tray basic_options Qt_options
KDE_options
nwconnections [--] [-v] [-h]
nwcopy flags -p source_path -t
target_path
nwflag {-a|-n} {-w|-e eDir
object|+|- attr modifier} [-s] [-
d|-f] [--] [-v] [-h] URI1 {URI2}
{URI3} ...
nwlogin [-u string] [-p string] [-t
string] [-c string] [-s string] [r] [-L path] [-P path] [-2 string]
[-3 string] [-4 string] [-5 string]
[--] [-v] [-h]
nwlogout {-s string|-t string} [-f]
[--] [-v] [-h]
The Novell Client for Linux Commands
47
Page 48

Utility Description Syntax
novdocx (ENU) 01 February 2006
map Creates a mapping (mount)
from a local file system to a
remote file system on a Novell
file server.
map -d drive -s server -v volume -f
filespec
or
map options | parameters
drive:=path |
local_path:=remote_path
nwrights Displays or modifies a user’s
trustee assignments or
inherited rights filter for
volumes, directories, or files.
nwrights flags -r +|-rights_list -o
user_or_group_object -p
network_path
B.2 GUI Utilities
Table B-2 The Novell Client for Linux GUI Utilities
Utility Description
gnwconnections Displays the Novell Connections dialog box, which lets you see what servers and
trees you are logged in to, refresh connections, set a specific tree as your
primary connection, or log out of a tree or server. For more information on using
this dialog box, see “Viewing Your Network Connections” in the Novell Client for
Linux User Guide.
gnwlogin Displays the Novell Login dialog box. For more information on using this dialog
box, see “Logging In to the Network” in the Novell Client for Linux User Guide.
gnwservers Displays a dialog box showing the servers you are logged in to
gnwtrees Displays a dialog box showing the eDirectory trees you are logged in to.
B.3 Using the Novell Client for Linux Man Pages
Each of the utilities has a man page associated with it that contains information on the utility, such as
a definition, usage, and samples. There is a known bug related to the manpath environment variable
on both SUSE
provided for convenience until the manpath bug is resolved. You should use the ncl_man
command (instead of the traditional man command) to view NCL-related man pages. To do this,
enter the following in a terminal the first time you want to view a Novell Client for Linux man page:
/opt/novell/ncl/bin/ncl_man
This modifies the manpath to allow the Novell Client man pages to be displayed.You can then
access the man page for a specific Novell Client for Linux utility by entering the following:
ncl_man utility_name
For example:
ncl_man ncl_tray
®
Linux Enterprise Desktop and SUSE Linux. The ncl_man utility has been
48 Novell Client for Linux 1.2 Administration Guide
Page 49

In the man pages, use the PgUp and PgDn keys to move up and down. Use the Home and End keys
to move between the beginning and the end of a document. To exit a man page, press q. You can
learn more about the man command by entering man man in a terminal window.
You can also enter utility_name --help in a terminal window to access a help page for the
utility.
novdocx (ENU) 01 February 2006
The Novell Client for Linux Commands 49
Page 50

novdocx (ENU) 01 February 2006
50 Novell Client for Linux 1.2 Administration Guide
Page 51

C
Documentation Updates
novdocx (ENU) 01 February 2006
C
This section contains information on documentation content changes made in this guide since the
initial release of the Novell
updates to the documentation.
The documentation was updated on the following dates:
• Section C.1, “July 26, 2006,” on page 51
• Section C.2, “December 23, 2005,” on page 51
®
ClientTM for Linux. The information will help you keep current on
C.1 July 26, 2006
• Removed Novell Linux Desktop 9 and SUSE® Linux 10.0 as supported platforms.
• Added SUSE Linux Enterprise Desktop 10 and SUSE Linux 10.1 as supported platforms.
•Added Section 4.1, “Setting Up Integrated Login,” on page 25.
C.2 December 23, 2005
• Page design reformatted to comply with revised Novell documentation standards.
Documentation Updates
51
 Loading...