

Page 1

Novell AppArmor
www.novell.com2.0.1
November29,2006 Novell AppArmor Administration Guide
Page 2

Novell AppArmor Administration Guide
Copyright © 2006 Novell, Inc.
Permission is granted to copy, distribute and/or modify this document under the terms of the GNU
Free Documentation License, Version 1.2 or any later version published by the Free Software Foundation; with the Invariant Section being this copyright notice and license. A copy of the license is included in the section entitled “GNU Free Documentation License”.
Novell, the Novell logo, the N logo, openSUSE, SUSE, and the SUSE “geeko” logo are registered
trademarks of Novell, Inc. in the United States and other countries. * Linux is a registered trademark
of Linus Torvalds. All other third party trademarks are the property of their respective owners.
All information found in this book has been compiled with utmost attention to detail. However, this
does not guarantee complete accuracy.Neither Novell, Inc., SUSE LINUX Products GmbH, the authors,
nor the translators shall be held liable for possible errors or the consequences thereof.
Page 3

Contents
About This Guide v
1 Immunizing Programs 9
1.1 Introducing the AppArmor Framework . . . . . . . . . . . . . . . . 10
1.2 Determining Programs to Immunize . . . . . . . . . . . . . . . . . 12
1.3 Immunizing Cron Jobs . . . . . . . . . . . . . . . . . . . . . . . 13
1.4 Immunizing Network Applications . . . . . . . . . . . . . . . . . . 13
2 Prole Components and Syntax 19
2.1 Breaking a Novell AppArmor Prole into Its Parts . . . . . . . . . . . 19
2.2 #include Statements . . . . . . . . . . . . . . . . . . . . . . 21
2.3 Capability Entries (POSIX.1e) . . . . . . . . . . . . . . . . . . . . 22
3 Building and Managing Proles With YaST 23
3.1 Adding a Prole Using the Wizard . . . . . . . . . . . . . . . . . . 25
3.2 Manually Adding a Prole . . . . . . . . . . . . . . . . . . . . . 32
3.3 Editing Proles . . . . . . . . . . . . . . . . . . . . . . . . . . 33
3.4 Deleting a Prole . . . . . . . . . . . . . . . . . . . . . . . . . 38
3.5 Updating Proles from Log Entries . . . . . . . . . . . . . . . . . . 39
3.6 Managing Novell AppArmor and Security Event Status . . . . . . . . . 40
4 Building Proles via the Command Line 45
4.1 Checking the AppArmor Module Status . . . . . . . . . . . . . . . 45
4.2 Building Novell AppArmor Proles . . . . . . . . . . . . . . . . . . 47
4.3 Adding or Creating a Novell AppArmor Prole . . . . . . . . . . . . 48
4.4 Editing a Novell AppArmor Prole . . . . . . . . . . . . . . . . . . 48
Page 4

4.5 Deleting a Novell AppArmor Prole . . . . . . . . . . . . . . . . . 48
4.6 Two Methods of Proling . . . . . . . . . . . . . . . . . . . . . . 49
4.7 Pathnames and Globbing . . . . . . . . . . . . . . . . . . . . . . 68
4.8 File Permission Access Modes . . . . . . . . . . . . . . . . . . . . 69
4.9 Important Filenames and Directories . . . . . . . . . . . . . . . . . 73
5 Proling Your Web Applications Using ChangeHat 75
5.1 Apache ChangeHat . . . . . . . . . . . . . . . . . . . . . . . . 76
5.2 Conguring Apache for mod_apparmor . . . . . . . . . . . . . . . 83
6 Managing Proled Applications 87
6.1 Monitoring Your Secured Applications . . . . . . . . . . . . . . . . 87
6.2 Conguring Security Event Notication . . . . . . . . . . . . . . . . 88
6.3 Conguring Reports . . . . . . . . . . . . . . . . . . . . . . . . 91
6.4 Reacting to Security Event Rejections . . . . . . . . . . . . . . . . 110
6.5 Maintaining Your Security Proles . . . . . . . . . . . . . . . . . 111
7 Support 113
7.1 Updating Novell AppArmor Online . . . . . . . . . . . . . . . . . 113
7.2 Using the Man Pages . . . . . . . . . . . . . . . . . . . . . . . 113
7.3 For More Information . . . . . . . . . . . . . . . . . . . . . . 115
7.4 Troubleshooting . . . . . . . . . . . . . . . . . . . . . . . . . 116
7.5 Reporting Bugs for AppArmor . . . . . . . . . . . . . . . . . . . 117
A Background Information on AppArmor Proling 119
B GNU Licenses 121
B.1 GNU General Public License . . . . . . . . . . . . . . . . . . . . 121
B.2 GNU Free Documentation License . . . . . . . . . . . . . . . . . 129
Glossary 139
Page 5

About This Guide
Novell® AppArmor is designed to provide easy-to-use application security for both
servers and workstations. Novell AppArmor is an access control system that lets you
specify per program which les the program may read, write, and execute. AppArmor
secures applications by enforcing good application behavior without relying on attack
signatures, so can prevent attacks even if they are exploiting previously unknown vulnerabilities.
Novell AppArmor consists of:
• A library of AppArmor proles for common Linux* applications describing what
les the program needs to access.
• A library of AppArmor prole foundation classes (prole building blocks) needed
for common application activities, such as DNS lookup and user authentication.
• A tool suite for developing and enhancing AppArmor proles, so that you can
change the existing proles to suit your needs and create new proles for your own
local and custom applications.
• Several specially modied applications that are AppArmor enabled to provide enhanced security in the form of unique subprocess connement, including Apache
and Tomcat.
• The Novell AppArmor–loadable kernel module and associated control scripts to
enforce AppArmor policies on your openSUSE™ system.
This guide covers the following topics:
Immunizing Programs
Describes the operation of Novell AppArmor and describes the types of programs
that should have Novell AppArmor proles created for them.
Prole Components and Syntax
Introduces the prole components and syntax.
Building and Managing Proles With YaST
Describes how to use the AppArmor YaST modules to build, maintain and update
proles.
Page 6

Building Proles via the Command Line
Describes how to use the AppArmor command line tools to build, maintain and
update proles.
Proling Your Web Applications Using ChangeHat
Enables you to create subproles for the Apache Web server that allow you to
tightly conne small sections of Web application processing.
Managing Proled Applications
Describes how to perform Novell AppArmor prole maintenance, which involves
tracking common issues and concerns.
Support
Indicates support options for this product.
Glossary
Provides a list of terms and their denitions.
1 Feedback
We want to hear your comments and suggestions about this manual and the other documentation included with this product. Please use the User Comments feature at the
bottom of each page of the online documentation and enter your comments there.
2 Documentation Conventions
The following typographical conventions are used in this manual:
• /etc/passwd: lenames and directory names
• placeholder: replace placeholder with the actual value
• PATH: the environment variable PATH
• ls, --help: commands, options, and parameters
• user: users or groups
vi Novell AppArmor Administration Guide
Page 7

•
Alt, Alt + F1: a key to press or a key combination; keys are shown in uppercase as
on a keyboard
•
File, File → Save As: menu items, buttons
•
Dancing Penguins (Chapter Penguins, ↑Reference): This is a reference to a chapter
in another book.
3 Source Code
The source code of openSUSE is publicly available. To download the source code,
proceed as outlined under http://www.novell.com/products/suselinux/
source_code.html. If requested we send you the source code on a DVD. We need
to charge a $15 or €15 fee for creation, handling and postage. To request a DVD of the
source code, send an e-mail to sourcedvd@suse.de [mailto:sourcedvd@suse
.de] or mail the request to:
SUSE Linux Products GmbH
Product Management openSUSE
Maxfeldstr. 5
D-90409 Nürnberg
Germany
About This Guide vii
Page 8

Page 9

Immunizing Programs
Novell® AppArmor provides immunization technologies that protect applications from
the inherent vulnerabilities they possess. After installing Novell AppArmor, setting up
Novell AppArmor proles, and rebooting the computer, your system becomes immunized because it begins to enforce the Novell AppArmor security policies. Protecting
programs with Novell AppArmor is referred to as immunizing.
Novell AppArmor sets up a collection of default application proles to protect standard
Linux services. In order to protect other applications, use the Novell AppArmor tools
to create proles for the applications that you want protected. This chapter introduces
the philosophy of immunizing programs. Proceed to Chapter 2, Prole Components
and Syntax (page 19), Chapter 3, Building and Managing Proles With YaST (page 23),
or Chapter 4, Building Proles via the Command Line (page 45) if you are ready to
build and manage Novell AppArmor proles.
Novell AppArmor provides streamlined access control for network services by specifying
which les each program is allowed to read, write, and execute. This ensures that each
program does what it is supposed to do and nothing else. Novell AppArmor quarantines
programs to protect the rest of the system from being damaged by a compromised
process.
Novell AppArmor is a host intrusion prevention, or mandatory access control scheme.
Previously, access control schemes were centered around users because they were built
for large timeshare systems. Alternatively, modern network servers largely do not permit
users to log in, but instead provide a variety of network services for users, such as Web,
mail, le, and print. Novell AppArmor controls the access given to network services
and other programs to prevent weaknesses from being exploited.
1
Immunizing Programs 9
Page 10

TIP: Background Information for Novell AppArmor
To get a more in-depth overview of AppArmor and the overall concept behind
it, refer to Appendix A, Background Information on AppArmor Proling
(page 119).
1.1 Introducing the AppArmor Framework
The following section provides you with a very basic understanding of what is happening
“behind the scenes” (and under the hood of the YaST interface) when you run AppArmor.
An AppArmor prole is a plain text le containing path entries and access permissions,
see Section 2.1, “Breaking a Novell AppArmor Prole into Its Parts” (page 19) for a
detailed reference prole. The directives contained in this text le are then enforced
by the AppArmor routines to quarantine the process/program.
The following tools interact in the building and enforcement of AppArmor proles and
policies:
aa-unconned
aa-unconned detects any application running on your system that listens for network connections and is not protected by an AppArmor prole. Refer to Section
“aa-unconned—Identifying Unprotected Processes” (page 67) for detailed infor-
mation on this tool.
aa-autodep
aa-autodep creates a basic skeleton of a prole that needs to be eshed out before
it is put to productive use. The resulting prole is loaded and put into complain
mode, reporting any behavior of the application that is not (yet) covered by AppArmor rules. Refer to Section “aa-autodep—Creating Approximate Proles”
(page 52) for detailed information on this tool.
aa-genprof
aa-genprof generates a basic prole and asks you to rene this prole by executing
the application and thus generating log events that need to be taken care of by
10 Novell AppArmor Administration Guide
Page 11

AppArmor policies. You will be guided through a series of questions to deal with
the log events that have been triggered during the application's execution. After
the prole has been generated, it gets loaded and put into enforce mode. Refer to
Section “aa-genprof—Generating Proles” (page 55) for detailed information on
this tool.
aa-logprof
aa-logprof interactively scans and reviews the log entries generated by an application
that is conned by an AppArmor prole in complain mode. It assists you in generating new entries in the prole concerned. Refer to Section “aa-logprof—Scanning
the System Log” (page 61) for detailed information on this tool.
aa-complain
aa-complain toggles the mode of an AppArmor prole from enforce to complain.
Exceptions to rules set in a prole are logged, but the prole is not enforced. Refer
to Section “aa-complain—Entering Complain or Learning Mode” (page 53) for
detailed information on this tool.
aa-enforce
aa-enforce toggles the mode of an AppArmor prole form complain to enforce.
Exceptions to rules set in a prole are logged, but not permitted—the prole is
enforced. Refer to Section “aa-enforce—Entering Enforce Mode” (page 54) for
detailed information on this tool.
Once a prole has been built and is loaded, there are two ways in which it can get processed:
complain
In complain mode, violations of AppArmor prole rules, such as the proled program accessing les not permitted by the prole, are detected. The violations are
permitted, but also logged. To improve the prole, turn complain mode on, run the
program through a suite of tests to generate log events that characterize the program's
access needs, then postprocess the log with the AppArmor tools (YaST or aa-logprof) to transform log events into improved proles.
enforce
In enforce mode, violations of AppArmor prole rules, such as the proled program
accessing les not permitted by the prole, are detected. The violations are logged
and not permitted. The default is for enforce mode to be enabled. To log the violations only, but still permit them, use complain mode. Enforce toggles with complain
mode.
Immunizing Programs 11
Page 12

1.2 Determining Programs to Immunize
Now that you have familiarized yourself with AppArmor, start selecting the applications
to build proles for. Programs that need proling are those that mediate privilege. The
following programs have access to resources that the person using the program does
not have, so they grant the privilege to the user when used:
cron Jobs
Programs that are run periodically by cron. Such programs read input from a variety
of sources and can run with special privileges, sometimes with as much as root
privilege. For example, cron can run /usr/sbin/logrotate daily to rotate,
compress or even mail system logs. For instructions for nding these types of
programs, refer to Section 1.3, “Immunizing Cron Jobs” (page 13).
Web Applications
Programs that can be invoked through a Web browser, including CGI Perl scripts,
PHP pages, and more complex Web applications. For instructions for nding these
types of programs, refer to Section 1.4.1, “Immunizing Web Applications”
(page 15).
Network Agents
Programs (servers and clients) that have open network ports. User clients, such as
mail clients and Web browsers mediate privilege. These programs run with the
privilege to write to the user's home directory and they process input from potentially hostile remote sources, such as hostile Web sites and e-mailed malicious
code. For instructions for nding these types of programs, refer to Section 1.4.2,
“Immunizing Network Agents” (page 17).
Conversely, unprivileged programs do not need to be proled. For instance, a shell
script might invoke the cp program to copy a le. Because cp does not have its own
prole, it inherits the prole of the parent shell script, so can copy any les that the
parent shell script's prole can read and write.
12 Novell AppArmor Administration Guide
Page 13

1.3 Immunizing Cron Jobs
To nd programs that are run by cron, inspect your local cron conguration. Unfortunately, cron conguration is rather complex, so there are numerous les to inspect.
Periodic cron jobs are run from these les:
/etc/crontab
/etc/cron.d/*
/etc/cron.daily/*
/etc/cron.hourly/*
/etc/cron.monthly/*
/etc/cron.weekly/*
For root's cron jobs, edit the tasks with crontab -e and list root's cron tasks
with crontab -l. You must be root for these to work.
Once you nd these programs, you can use the Add Prole Wizard to create proles
for them. Refer to Section 3.1, “Adding a Prole Using the Wizard” (page 25).
1.4 Immunizing Network Applications
An automated method for nding network server daemons that should be proled is to
use the aa-unconned tool. You can also simply view a report of this information in
the YaST module (refer to Section “Application Audit Report” (page 97) for instructions).
The aa-unconned tool uses the command netstat -nlp to inspect your open ports
from inside your computer, detect the programs associated with those ports, and inspect
the set of Novell AppArmor proles that you have loaded. aa-unconned then reports
these programs along with the Novell AppArmor prole associated with each program
or reports “none” if the program is not conned.
NOTE
If you create a new prole, you must restart the program that has been proled
to have it be effectively conned by AppArmor.
Immunizing Programs 13
Page 14

Below is a sample aa-unconned output:
2325 /sbin/portmap not confined
3702❶ /usr/sbin/sshd❷ confined
by '/usr/sbin/sshd❸ (enforce)'
4040 /usr/sbin/ntpd confined by '/usr/sbin/ntpd (enforce)'
4373 /usr/lib/postfix/master confined by '/usr/lib/postfix/master (enforce)'
4505 /usr/sbin/httpd2-prefork confined by '/usr/sbin/httpd2-prefork (enforce)'
5274 /sbin/dhcpcd not confined
5592 /usr/bin/ssh not confined
7146 /usr/sbin/cupsd confined by '/usr/sbin/cupsd (complain)'
The rst portion is a number. This number is the process ID number (PID) of the
❶
listening program.
The second portion is a string that represents the absolute path of the listening
❷
program
The nal portion indicates the prole conning the program, if any.
❸
NOTE
aa-unconned requires root privileges and should not be run from a shell
that is conned by an AppArmor prole.
aa-unconned does not distinguish between one network interface and another, so it
reports all unconned processes, even those that might be listening to an internal LAN
interface.
Finding user network client applications is dependent on your user preferences. The
aa-unconned tool detects and reports network ports opened by client applications, but
only those client applications that are running at the time the aa-unconned analysis is
performed. This is a problem because network services tend to be running all the time,
while network client applications tend only to be running when the user is interested
in them.
Applying Novell AppArmor proles to user network client applications is also dependent
on user preferences. Therefore, we leave proling of user network client applications
as an exercise for the user.
To aggressively conne desktop applications, the aa-unconned command supports a
paranoid option, which reports all processes running and the corresponding App-
14 Novell AppArmor Administration Guide
Page 15

Armor proles that might or might not be associated with each process. The user can
then decide whether each of these programs needs an AppArmor prole.
If you have new or modied proles, you can submit them to the apparmor-general@forge.novell.com [mailto:apparmor-general@forge.novell.com]
mailing list along with a use case for the application behavior that you exercised. The
AppArmor team reviews and may submit the work into openSUSE. We cannot guarantee
that every prole will be included, but we make a sincere effort to include as much as
possible so that end users can contribute to the security proles that ship in openSUSE.
1.4.1 Immunizing Web Applications
To nd Web applications, investigate your Web server conguration. The Apache Web
server is highly congurable and Web applications can be stored in many directories,
depending on your local conguration. openSUSE, by default, stores Web applications
in /srv/www/cgi-bin/. To the maximum extent possible, each Web application
should have an Novell AppArmor prole.
Once you nd these programs, you can use the AppArmor Add Prole Wizard to create
proles for them. Refer to Section 3.1, “Adding a Prole Using the Wizard” (page 25).
Because CGI programs are executed by the Apache Web server, the prole for Apache
itself, usr.sbin.httpd2-prefork for Apache2 on openSUSE, must be modied
to add execute permissions to each of these programs. For instance, adding the line
/srv/www/cgi-bin/my_hit_counter.pl rpx grants Apache permission to
execute the Perl script my_hit_counter.pl and requires that there be a dedicated
prole for my_hit_counter.pl. If my_hit_counter.pl does not have a dedicated prole associated with it, the rule should say
/srv/www/cgi-bin/my_hit_counter.pl rix to cause my_hit_counter
.pl to inherit the usr.sbin.httpd2-prefork prole.
Some users might nd it inconvenient to specify execute permission for every CGI
script that Apache might invoke. Instead, the administrator can grant controlled access
to collections of CGI scripts. For instance, adding the line
/srv/www/cgi-bin/*.{pl,py,pyc} rix allows Apache to execute all les
in /srv/www/cgi-bin/ ending in .pl (Perl scripts) and .py or .pyc (Python
scripts). As above, the ix part of the rule causes Python scripts to inherit the Apache
prole, which is appropriate if you do not want to write individual proles for each
Python script.
Immunizing Programs 15
Page 16

NOTE
If you want the subprocess connement module (apache2-mod-apparmor)
functionality when Web applications handle Apache modules (mod_perl and
mod_php), use the ChangeHat features when you add a prole in YaST or at
the command line. To take advantage of the subprocess connement, refer to
Section 5.1, “Apache ChangeHat” (page 76).
Proling Web applications that use mod_perl and mod_php requires slightly different
handling. In this case, the “program” is a script interpreted directly by the module
within the Apache process, so no exec happens. Instead, the Novell AppArmor version
of Apache calls change_hat() using a subprole (a “hat”) corresponding to the
name of the URI requested.
NOTE
The name presented for the script to execute might not be the URI, depending
on how Apache has been congured for where to look for module scripts. If
you have congured your Apache to place scripts in a different place, the different names appear in log le when Novell AppArmor complains about access
violations. See Chapter 6, Managing Proled Applications (page 87).
For mod_perl and mod_php scripts, this is the name of the Perl script or the PHP
page requested. For example, adding this subprole allows the localtime.php page
to execute and access the local system time:
/usr/bin/httpd2-prefork {
# ...
^/cgi-bin/localtime.php {
/etc/localtime r,
/srv/www/cgi-bin/localtime.php r,
/usr/lib/locale/** r,
}
}
If no subprole has been dened, the Novell AppArmor version of Apache applies the
DEFAULT_URI hat. This subprole is basically sufcient to display an HTML Web
page. The DEFAULT_URI hat that Novell AppArmor provides by default is the following:
16 Novell AppArmor Administration Guide
Page 17

/usr/sbin/suexec2 ixr,
/var/log/apache2/** rwl,
/home/*/public_html/** r,
/srv/www/htdocs/** r,
/srv/www/icons/*.{gif,jpg,png} r,
/usr/share/apache2/** r,
To use a single Novell AppArmor prole for all Web pages and CGI scripts served by
Apache, a good approach is to edit the DEFAULT_URI subprole.
1.4.2 Immunizing Network Agents
To nd network server daemons and network clients (such as fetchmail, Firefox, amaroK
or Banshee) that should be proled, you should inspect the open ports on your machine,
consider the programs that are answering on those ports, and provide proles for as
many of those programs as possible. If you provide proles for all programs with open
network ports, an attacker cannot get to the le system on your machine without passing
through a Novell AppArmor prole policy.
Scan your server for open network ports manually from outside the machine using a
scanner, such as nmap, or from inside the machine using the netstat --inet -n
-p command. Then inspect the machine to determine which programs are answering
on the discovered open ports.
TIP
Refer to the man page of the netstat command for a detailed reference of
all possible options.
Immunizing Programs 17
Page 18

Page 19

Prole Components and
Syntax
This chapter explains the components and syntax of Novell® AppArmor proles. You
are ready to build Novell AppArmor proles after you select the programs to prole.
For help with this, refer to Section 1.2, “Determining Programs to Immunize” (page 12).
To start building AppArmor proles with YaST, proceed to Chapter 3, Building and
Managing Proles With YaST (page 23). To build proles using the AppArmor com-
mand line interface, proceed to Chapter 4, Building Proles via the Command Line
(page 45).
2.1 Breaking a Novell AppArmor
Prole into Its Parts
Novell AppArmor prole components are called Novell AppArmor rules. Currently
there are two main types of Novell AppArmor rules, path entries and capability entries.
Path entries specify what the process can access in the le system and capability entries
provide a more ne-grained control over what a conned process is allowed to do
through other system calls that require privileges. Includes are a type of meta rule or
directives that pull in path and capability entries from other les.
The easiest way of explaining what a prole consists of and how to create one is to
show the details of a sample prole. Consider, for example, the following shortened
prole for the program /usr/lib/postfix/flush (for the complete version, refer
to /etc/apparmor.d/usr.lib.postfix.flush):
2
Prole Components and Syntax 19
Page 20

# profile to confine postfix/flush❶
#include <tunables/global>❷
/usr/lib/postfix/flush❸
{❹
#include <abstractions/base>❺
...
capability setgid❻,
...
/usr/lib/postfix/flush rix,
/{var/spool/postfix/,}❼deferred r,
...
/{var/spool/postfix/,}flush rwl,
...
/{var/spool/postfix/,}incoming r,
...
/{var/spool/postfix/,}public/qmgr w,
/etc/mtab❽ r,
/etc/postfix/main.cf r,
/etc/postfix/virtual.db r,
@{HOME}❾/.forward r,
/proc/stat r,
/proc/sys/kernel/ngroups_max r,
/var/spool/postfix/pid/unix.flush rw,
}
A comment naming the program that is conned by this prole. Always precede
❶
comments like this with the # sign.
This loads a le containing variable denitions.
❷
The absolute path to the program that is conned.
❸
The curly braces ({}) serve as a container for include statements of other proles
❹
as well as for path and capability entries.
This directive pulls in components of Novell AppArmor proles to simplify pro-
❺
les.
Capability entry statements enable each of the 29 POSIX.1e draft capabilities.
❻
The curly braces ({}) make this rule apply to the path both with and without the
❼
content enclosed by the braces.
A path entry specifying what areas of the le system the program can access. The
❽
rst part of a path entry species the absolute path of a le (including regular
expression globbing) and the second part indicates permissible access modes (r
for read, w for write, and x for execute). A whitespace of any kind (spaces or tabs)
can precede pathnames or separate the pathname from the access modes. Spaces
20 Novell AppArmor Administration Guide
Page 21

between the access mode and the trailing comma is optional. A comprehensive
overview of the access modes available can be found in Section 4.8, “File Permis-
sion Access Modes” (page 69).
This variable expands to a value that can be changed without changing the entire
❾
prole.
TIP: Using Variables in Proles
With the current AppArmor tools, variables as presented in the above example
can only be used when manually editing and maintaining a prole.
A typical example when variables come in handy are network scenarios in which
user home directories are not mounted in the standard location /home/
username, but under a custom location. Find the variable denitions for this
use case (@{HOME} and @{HOMEDIRS}) in the /etc/apparmor.d/
tunables/home le.
When a prole is created for a program, the program can access only the les, modes,
and POSIX capabilities specied in the prole. These restrictions are in addition to the
native Linux access controls.
Example: To gain the capability CAP_CHOWN, the program must have both access
to CAP_CHOWN under conventional Linux access controls (typically, be a root-owned
process) and have the capability chown in its prole. Similarly, to be able to write to
the le /foo/bar the program must have both the correct user ID and mode bits set
in the les attributes (see the chmod and chown man pages) and have /foo/bar
w in its prole.
Attempts to violate Novell AppArmor rules are recorded in /var/log/audit/
audit.log if the audit package is installed or otherwise in /var/log/messages.
In many cases, Novell AppArmor rules prevent an attack from working because necessary les are not accessible and, in all cases, Novell AppArmor connement restricts
the damage that the attacker can do to the set of les permitted by Novell AppArmor.
2.2 #include Statements
#include statements are directives that pull in components of other Novell AppArmor
proles to simplify proles. Include les fetch access permissions for programs. By
Prole Components and Syntax 21
Page 22

using an include, you can give the program access to directory paths or les that are
also required by other programs. Using includes can reduce the size of a prole.
By default, AppArmor adds /etc/apparmor.d to the path in the #include
statement. AppArmor expects the include les to be located in /etc/apparmor.d.
Unlike other prole statements (but similar to C programs), #include lines do not
end with a comma.
To assist you in proling your applications, Novell AppArmor provides two classes of
#includes: abstractions and program chunks.
2.2.1 Abstractions
Abstractions are #includes that are grouped by common application tasks. These
tasks include access to authentication mechanisms, access to name service routines,
common graphics requirements, and system accounting. Files listed in these abstractions
are specic to the named task. Programs that require one of these les usually require
some of the other les listed in the abstraction le (depending on the local conguration
as well as the specic requirements of the program). Find abstractions in /etc/
apparmor.d/abstractions.
2.2.2 Program Chunks
The program-chunks directory (/etc/apparmor.d/program-chunks) contains
some chunks of proles that are specic to program suites and not generally useful
outside of the suite, thus are never suggested for use in proles by the prole wizards
(aa-logprof and aa-genprof). Currently program chunks are only available for the
postx program suite.
2.3 Capability Entries (POSIX.1e)
Capabilities statements are simply the word capability followed by the name of
the POSIX.1e capability as dened in the capabilities(7) man page.
22 Novell AppArmor Administration Guide
Page 23

Building and Managing
Proles With YaST
There are two three ways you can build and manage Novell® AppArmor, depending
on whether you want to work in a graphical user environment or whether you prefer
the less resource consuming text or command line based approach:
Graphical YaST Interface
The graphical YaST interface to AppArmor was designed to provide the most
convenient access to AppArmor. It is most suitable for use with a high bandwidth
connection or working on a local machine. A detailed description is given below.
Text-based YaST Interface (ncurses)
The ncurses interfaces to YaST AppArmor offers the same functionality as the
graphical interface while consuming less resources and bandwidth. It is not described
separately, since it works similar as the graphical interface. A general introduction
into use and navigation of the YaST ncurses interface can be found in Chapter 4,
YaST in Text Mode (↑Reference).
AppArmor Command Line
AppArmor offers a purely command line-based interface which can be used to
control AppArmor from a terminal window or via remote connections. It is described
in more detail in Chapter 4, Building Proles via the Command Line (page 45).
Start YaST from the main menu and enter your root password when prompted for it.
Alternatively, start YaST by opening a terminal window, logging in as root, and entering yast2.
3
Building and Managing Proles With YaST 23
Page 24
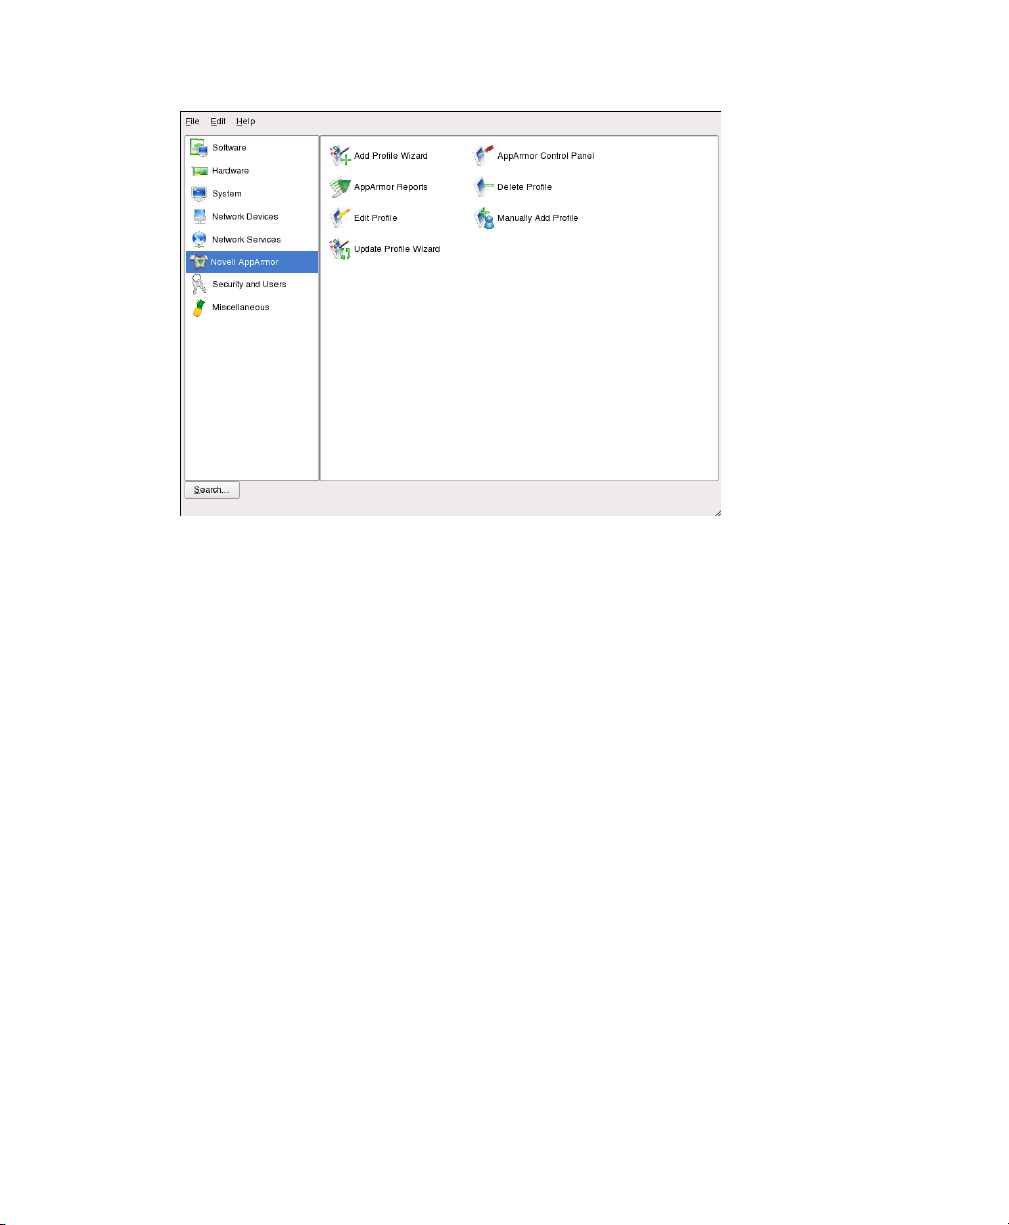
If Novell AppArmor is not available, try installing or reinstalling the Novell AppArmor
software. The right frame shows the Novell AppArmor options:
Add Prole Wizard
For detailed steps, refer to Section 3.1, “Adding a Prole Using the Wizard”
(page 25).
Manually Add Prole
Add a Novell AppArmor prole for an application on your system without the help
of the wizard. For detailed steps, refer to Section 3.2, “Manually Adding a Prole”
(page 32).
Edit Prole
Edits an existing Novell AppArmor prole on your system. For detailed steps, refer
to Section 3.3, “Editing Proles” (page 33).
Delete Prole
Deletes an existing Novell AppArmor prole from your system. For detailed steps,
refer to Section 3.4, “Deleting a Prole” (page 38).
Update Prole Wizard
For detailed steps, refer to Section 3.5, “Updating Proles from Log Entries”
(page 39).
24 Novell AppArmor Administration Guide
Page 25
AppArmor Reports
For detailed steps, refer to Section 6.3, “Conguring Reports” (page 91).
AppArmor Control Panel
For detailed steps, refer to Section 3.6, “Managing Novell AppArmor and Security
Event Status” (page 40).
3.1 Adding a Prole Using the Wizard
The Add Prole Wizard is designed to set up Novell AppArmor proles using the
Novell AppArmor proling tools, aa-genprof (Generate Prole) and aa-logprof (Update
Proles from Learning Mode Log File). For more information about these tools, refer
to Section 4.6.3, “Summary of Proling Tools” (page 52).
Stop the application before proling it to ensure that the application start-up is
1
included in the prole. To do this, make sure that the application or daemon is
not running.
For example, enter /etc/init.d/PROGRAM stop in a terminal window
while logged in as root, replacing PROGRAM with the name of the program to
prole.
Start YaST and select Novell AppArmor → Add Prole Wizard.
2
Building and Managing Proles With YaST 25
Page 26
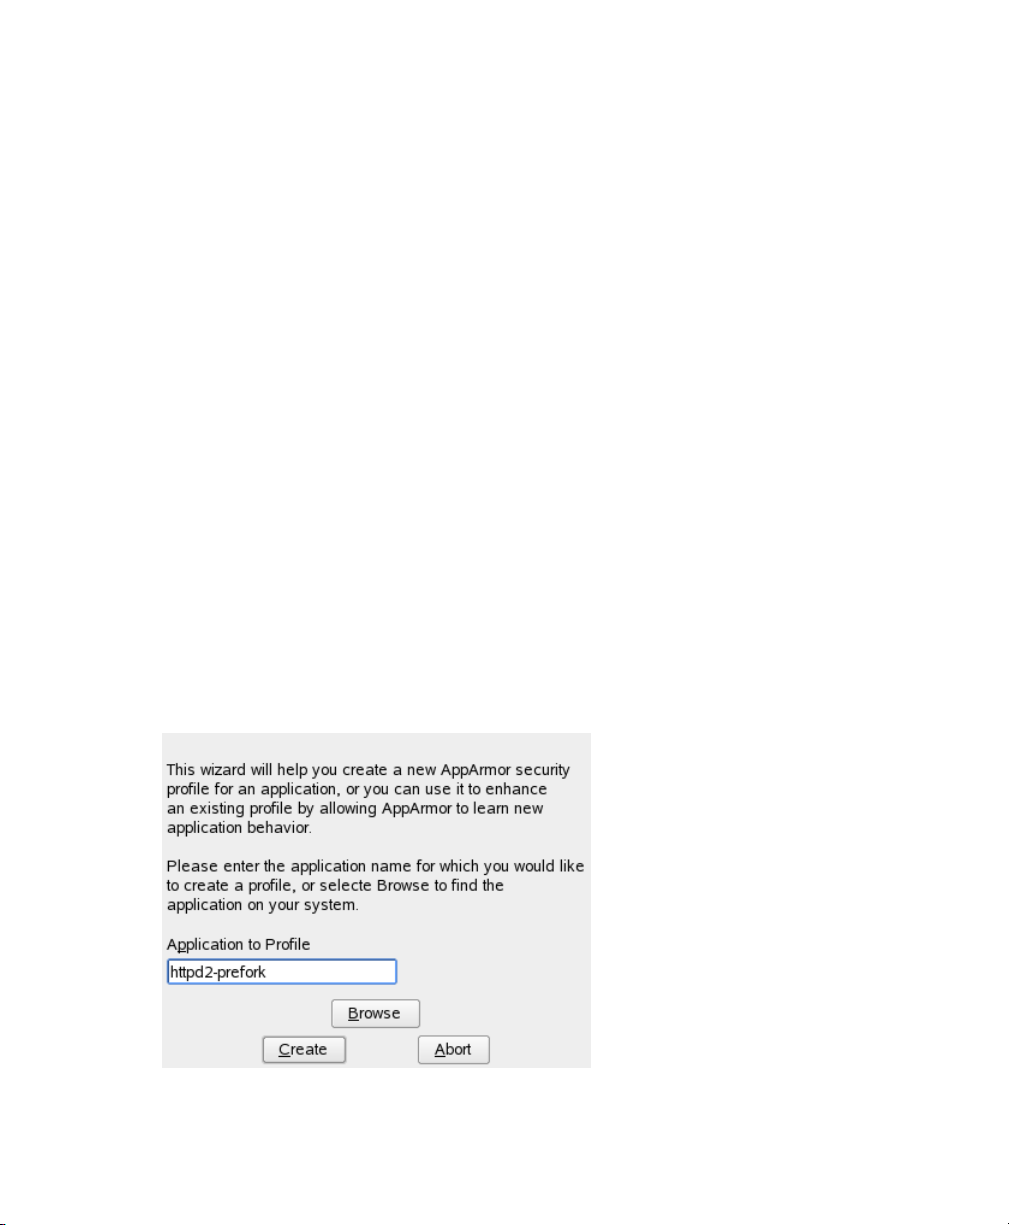
Enter the name of the application or browse to the location of the program.
3
Click Create. This runs a Novell AppArmor tool named aa-autodep, which per-
4
forms a static analysis of the program to prole and loads an approximate prole
into Novell AppArmor module. For more information about aa-autodep, refer to
Section “aa-autodep—Creating Approximate Proles” (page 52).
The AppArmor Prole Wizard window opens.
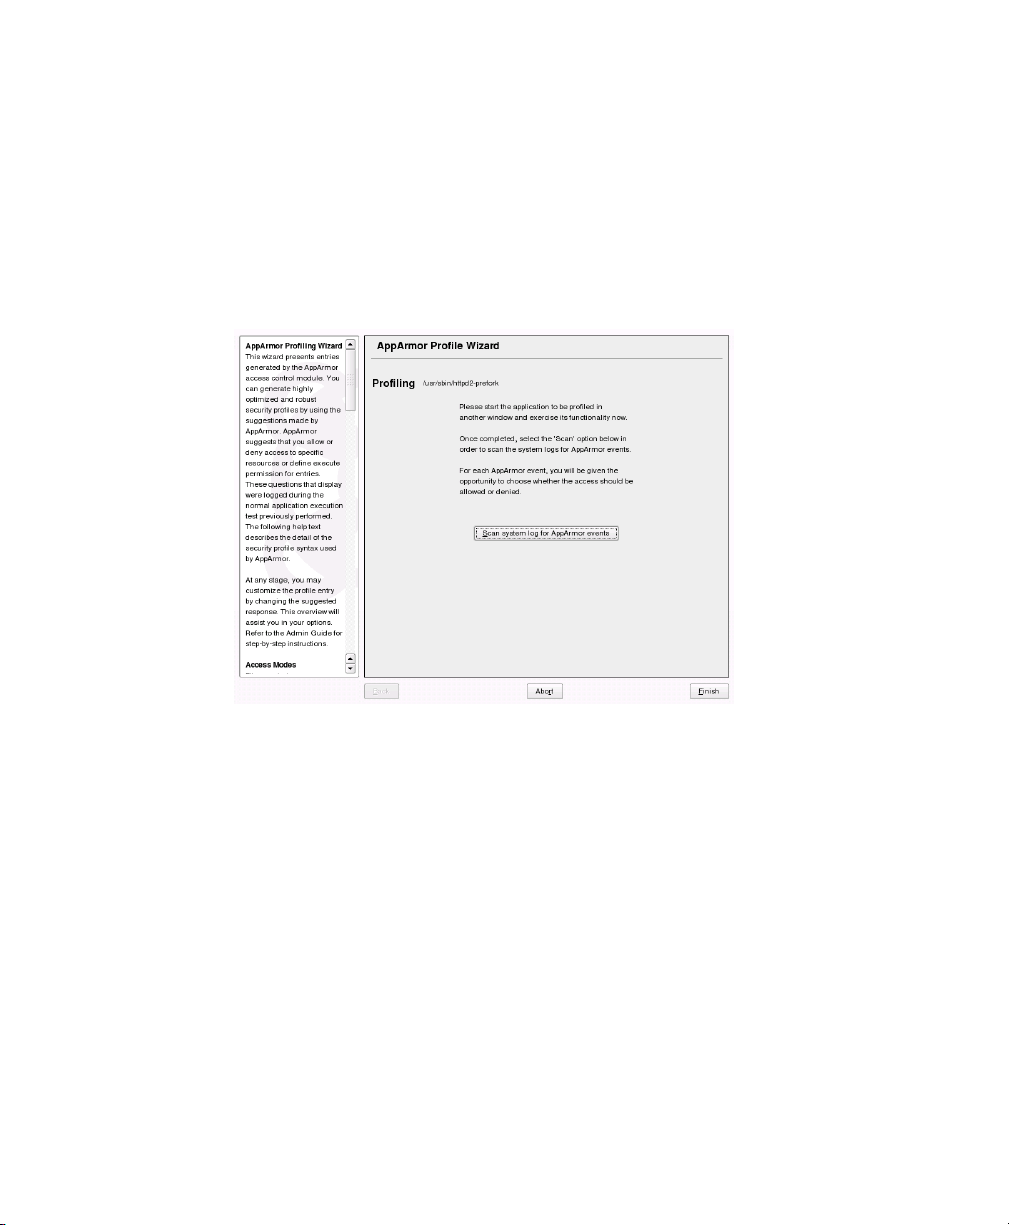
In the background, Novell AppArmor also sets the prole to learning mode. For
more information about learning mode, refer to Section “aa-complain—Entering
Complain or Learning Mode” (page 53).
Run the application to prole.
5
Perform as many of the application functions as possible so learning mode can
6
log the les and directories to which the program requires access to function
properly. Be sure to include restarting and stopping the program in the exercised
functions. AppArmor needs to handle these events as well as any other program
function.
Click Scan system log for AppArmor events to parse the learning mode log les.
7
This generates a series of questions that you must answer to guide the wizard in
generating the security prole.
26 Novell AppArmor Administration Guide
Page 27

If requests to add hats appear, proceed to Chapter 5, Proling Your Web Appli-
cations Using ChangeHat (page 75).
The questions fall into two categories:
• A resource is requested by a proled program that is not in the prole (see
Figure 3.1, “Learning Mode Exception: Controlling Access to Specic Resources” (page 28)). Allow or deny access to a specic resource.
• A program is executed by the proled program and the security domain
transition has not been dened (see Figure 3.2, “Learning Mode Exception:
Dening Execute Permissions for an Entry” (page 28)). Dene execute
permissions for an entry.
Each of these cases results in a series of questions that you must answer to add
the resource to the prole or to add the program into the prole. The following
two gures show an example of each case. Subsequent steps describe your options
in answering these questions.
NOTE: Varying Processing Options
Not all of the options introduced below are always present. The options
displayed depend on the type of entry processed.
Building and Managing Proles With YaST 27
Page 28
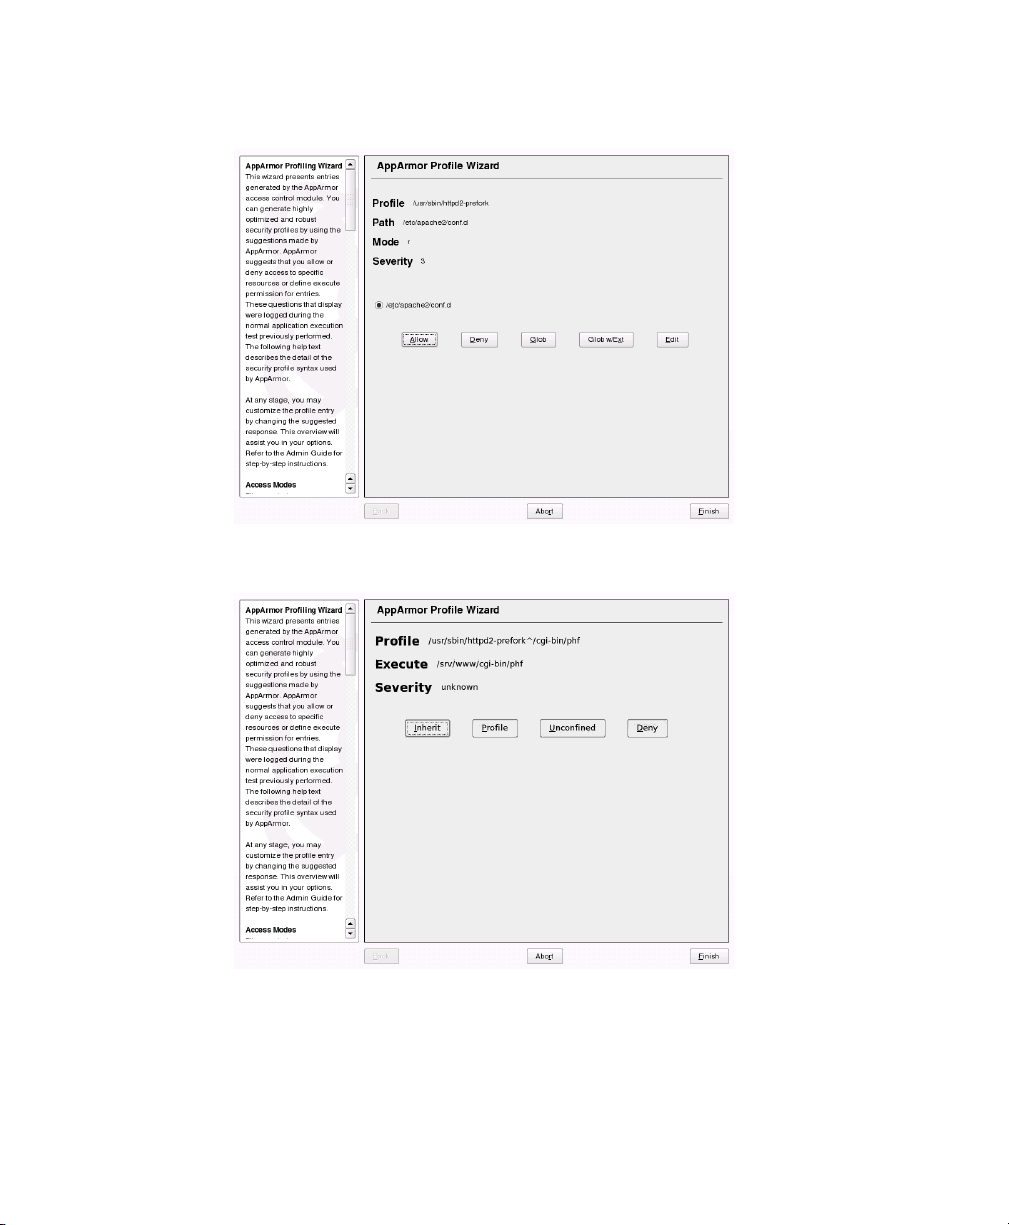
Figure 3.1
Learning Mode Exception: Controlling Access to Specic Resources
Figure 3.2
The Add Prole Wizard begins suggesting directory path entries that have been
8
accessed by the application you are proling (as seen in Figure 3.1, “Learning
Mode Exception: Controlling Access to Specic Resources” (page 28)) or re-
Learning Mode Exception: Dening Execute Permissions for an Entry
28 Novell AppArmor Administration Guide
Page 29

quires you to dene execute permissions for entries (as seen in Figure 3.2,
“Learning Mode Exception: Dening Execute Permissions for an Entry”
(page 28)).
• For Figure 3.1: Learning Mode Exception: Controlling Access to Specic
Resources: From the following options, select the one that satises the request
for access, which could be a suggested include, a particular globbed version
of the path, or the actual pathname. Note that all of these options are not always available.
#include
The section of a Novell AppArmor prole that refers to an include le.
Include les give access permissions for programs. By using an include,
you can give the program access to directory paths or les that are also
required by other programs. Using includes can reduce the size of a
prole. It is good practice to select includes when suggested.
Globbed Version
Accessed by clicking Glob. For information about globbing syntax, refer
to Section 4.7, “Pathnames and Globbing” (page 68).
Actual Pathname
Literal path that the program needs to access to run properly.
After you select a directory path, process it as an entry into the Novell AppArmor prole by clicking Allow or Deny. If you are not satised with the
directory path entry as it is displayed, you can also Glob or Edit it.
The following options are available to process the learning mode entries and
build the prole:
Allow
Grant the program access to the specied directory path entries. The
Add Prole Wizard suggests le permission access. For more information
about this, refer to Section 4.8, “File Permission Access Modes”
(page 69).
Deny
Click Deny to prevent the program from accessing the specied paths.
Building and Managing Proles With YaST 29
Page 30

Glob
Clicking this modies the directory path (by using wild cards) to include
all les in the suggested directory. Double-clicking it grants access to
all les and subdirectories beneath the one shown.
For more information about globbing syntax, refer to Section 4.7,
“Pathnames and Globbing” (page 68).
Glob w/Ext
Modify the original directory path while retaining the lename extension.
A single click causes /etc/apache2/file.ext to become /etc/
apache2/*.ext, adding the wild card (asterisk) in place of the lename. This allows the program to access all les in the suggested directories that end with the .ext extension. When you double-click it, access
is granted to all les (with the particular extension) and subdirectories
beneath the one shown.
Edit
Edit the highlighted line. The new (edited) line appears at the bottom of
the list.
Abort
Abort aa-logprof, losing all rule changes entered so far and leaving all
proles unmodied.
Finish
Close aa-logprof, saving all rule changes entered so far and modifying
all proles.
Click Allow or Deny for each learning mode entry. These help build the
Novell AppArmor prole.
NOTE
The number of learning mode entries corresponds to the complexity
of the application.
• For Figure 3.2: Learning Mode Exception: Dening Execute Permissions
for an Entry: From the following options, select the one that satises the re-
30 Novell AppArmor Administration Guide
Page 31

quest for access. For detailed information about the options available, refer
to Section 4.8, “File Permission Access Modes” (page 69).
Inherit
Stay in the same security prole (parent's prole).
Prole
Require a separate prole to exist for the executed program. When selecting this option, also select whether AppArmor should sanitize the
environment when switching proles by removing certain environment
variables that can modify the execution behavior of the child process.
Unless these variables are absolutely required to properly execute the
child process, always choose the more secure, sanitized option.
Unconned
Execute the program without a security prole. When prompted, let
AppArmor sanitize the environment to avoid adding security risks by
inheriting certain environment variables from the parent process.
WARNING
Unless absolutely necessary, do not run unconned. Choosing
the Unconned option executes the new program without any
protection from AppArmor.
Deny
Click Deny to prevent the program from accessing the specied paths.
Abort
Abort aa-logprof, losing all rule changes entered so far and leaving all
proles unmodied.
Finish
Close aa-logprof, saving all rule changes entered so far and modifying
all proles.
Repeat the previous steps if you need to execute more functionality of the appli-
9
cation.
Building and Managing Proles With YaST 31
Page 32

When you are done, click Finish. In the following pop-up, click Yes to exit the
Prole Creation Wizard. The prole is saved and loaded into the Novell App-
Armor module.
3.2 Manually Adding a Prole
Novell AppArmor enables you to create a Novell AppArmor prole by manually adding
entries into the prole. Select the application for which to create a prole then add entries.
Start YaST and select Novell AppArmor → Manually Add Prole.
1
Browse your system to nd the application for which to create a prole.
2
When you nd the application, select it and click Open. A basic, empty prole
3
appears in the Novell AppArmor Prole Dialog window.
In the AppArmor Prole Dialog window, you can add, edit, or delete Novell
4
AppArmor prole entries by clicking the corresponding buttons and referring to
Section 3.3.1, “Adding an Entry” (page 35), Section 3.3.2, “Editing an Entry”
(page 37), or Section 3.3.3, “Deleting an Entry” (page 38).
32 Novell AppArmor Administration Guide
Page 33

When you are nished, click Done.
5
3.3 Editing Proles
Novell AppArmor enables you to manually edit Novell AppArmor proles by adding,
editing, or deleting entries. To edit a prole, proceed as follows:
Start YaST and select Novell AppArmor → Edit Prole.
1
From the list of proled applications, select the prole to edit.
2
Click Next. The AppArmor Prole Dialog window displays the prole.
3
Building and Managing Proles With YaST 33
Page 34

In the AppArmor Prole Dialog window, you can add, edit, or delete Novell
4
AppArmor prole entries by clicking the corresponding buttons and referring to
Section 3.3.1, “Adding an Entry” (page 35), Section 3.3.2, “Editing an Entry”
(page 37), or Section 3.3.3, “Deleting an Entry” (page 38).
When you are nished, click Done.
5
In the pop-up that appears, click Yes to conrm your changes to the prole and
6
reload the AppArmor prole set.
TIP: Syntax Checking in AppArmor
AppArmor contains a syntax check that will notify you of any syntax errors in
proles you are trying to process with the YaST AppArmor tools. Should an
error occur, edit the respective prole manually as root and reload the prole
set with the rcapparmor reload command.
34 Novell AppArmor Administration Guide
Page 35

3.3.1 Adding an Entry
The Add Entry option can be found in Section 3.2, “Manually Adding a Prole”
(page 32) or Section 3.3, “Editing Proles” (page 33). When you select Add Entry, a
drop-down list displays the types of entries you can add to the Novell AppArmor prole.
From the list, select one of the following:
File
In the pop-up window, specify the absolute path of a le, including the type of access permitted. When nished, click OK.
You can use globbing if necessary. For globbing information, refer to Section 4.7,
“Pathnames and Globbing” (page 68). For le access permission information, refer
to Section 4.8, “File Permission Access Modes” (page 69).
Directory
In the pop-up window, specify the absolute path of a directory, including the type
of access permitted. You can use globbing if necessary. When nished, click OK.
For globbing information, refer to Section 4.7, “Pathnames and Globbing”
(page 68). For le access permission information, refer to Section 4.8, “File Per-
mission Access Modes” (page 69).
Building and Managing Proles With YaST 35
Page 36

Capability
In the pop-up window, select the appropriate capabilities. These are statements that
enable each of the 32 POSIX.1e capabilities. Refer to Section 2.1, “Breaking a
Novell AppArmor Prole into Its Parts” (page 19) for more information about
capabilities. When nished making your selections, click OK.
36 Novell AppArmor Administration Guide
Page 37

Include
In the pop-up window, browse to the les to use as includes. Includes are directives
that pull in components of other Novell AppArmor proles to simplify proles.
For more information, refer to Section 2.2, “#include Statements” (page 21).
Hat
In the pop-up window, specify the name of the subprole (hat) to add to your current
prole and click Create Hat. For more information, refer to Chapter 5, Proling
Your Web Applications Using ChangeHat (page 75).
3.3.2 Editing an Entry
When you select Edit Entry, the le browser pop-up window opens. From here, you
can edit the selected entry.
Building and Managing Proles With YaST 37
Page 38

In the pop-up window, specify the absolute path of a le, including the type of access
permitted. You can use globbing if necessary. When nished, click OK.
For globbing information, refer to Section 4.7, “Pathnames and Globbing” (page 68).
For le access permission information, refer to Section 4.8, “File Permission Access
Modes” (page 69).
3.3.3 Deleting an Entry
To delete an entry in a given prole, select Delete Entry. Novell AppArmor removes
the selected prole entry.
3.4 Deleting a Prole
Novell AppArmor enables you to delete a Novell AppArmor prole manually. Simply
select the application for which to delete a prole then delete it as follows:
Start YaST and select Novell AppArmor → Delete Prole.
1
Select the prole to delete.
2
Click Next.
3
38 Novell AppArmor Administration Guide
Page 39

In the pop-up that opens, click Yes to delete the prole and reload the AppArmor
4
prole set.
3.5 Updating Proles from Log Entries
The Novell AppArmor prole wizard uses aa-logprof, the tool that scans log les and
enables you to update proles. aa-logprof tracks messages from the Novell AppArmor
module that represent exceptions for all proles running on your system. These exceptions represent the behavior of the proled application that is outside of the prole
denition for the program. You can add the new behavior to the relevant prole by
selecting the suggested prole entry.
Start YaST and select Novell AppArmor → Update Prole Wizard.
1
Running Update Prole Wizard (aa-logprof) parses the learning mode log les.
This generates a series of questions that you must answer to guide aa-logprof to
generate the security prole. The exact procedure is the same as with creating a
new prole. Refer to Step 7 (page 26) in Section 3.1, “Adding a Prole Using
the Wizard” (page 25) for details.
Building and Managing Proles With YaST 39
Page 40

When you are done, click Finish. In the following pop-up, click Yes to exit the
2
Add Prole Wizard. The prole is saved and loaded into the Novell AppArmor
module.
3.6 Managing Novell AppArmor and Security Event Status
You can change the status of Novell AppArmor by enabling or disabling it. Enabling
Novell AppArmor protects your system from potential program exploitation. Disabling
Novell AppArmor, even if your proles have been set up, removes protection from
your system. You can determine how and when you are notied when system security
events occur.
NOTE
For event notication to work, you must set up a mail server on your system
that can send outgoing mail using the single mail transfer protocol (SMTP),
such as postx or exim.
To congure event notication or change the status of Novell AppArmor, perform the
following steps:
Start YaST and select Novell AppArmor → Novell AppArmor Control Panel.
1
40 Novell AppArmor Administration Guide
Page 41

From the AppArmor Conguration screen, determine whether Novell AppArmor
2
and security event notication are running by looking for a status message that
reads enabled or congure the mode of individual proles.
• To change the status of Novell AppArmor, continue as described in Sec-
tion 3.6.1, “Changing Novell AppArmor Status” (page 41).
• To change the mode of individual proles, continue as described in Sec-
tion 3.6.2, “Changing the Mode of Individual Proles” (page 42).
• To congure security event notication, continue as described in Section 6.2,
“Conguring Security Event Notication” (page 88).
3.6.1 Changing Novell AppArmor Status
When you change the status of Novell AppArmor, set it to enabled or disabled. When
Novell AppArmor is enabled, it is installed, running, and enforcing the Novell AppArmor
security policies.
Start YaST and select Novell AppArmor → AppArmor Control Panel.
1
Building and Managing Proles With YaST 41
Page 42

In the Enable Novell AppArmor section of the window, click Congure. The
2
Enable AppArmor dialog box opens.
Enable Novell AppArmor by selecting Enabled or disable Novell AppArmor by
3
selecting Disabled. Then click OK.
Click Done in the AppArmor Conguration window.
4
Click File → Quit in the YaST Control Center.
5
3.6.2 Changing the Mode of Individual
Proles
AppArmor can apply proles in two different modes. In complain or learning mode,
violations of AppArmor prole rules, such as the proled program accessing les not
permitted by the prole, are detected. The violations are permitted, but also logged.
This mode is convenient for developing proles and is used by the AppArmor tools for
generating proles. Loading a prole in enforce mode enforces the policy dened in
the prole as well as reports policy violation attempts to syslogd.
YaST's Prole Mode dialog allows you to view and edit the mode of currently loaded
AppArmor proles. This feature is useful to determine the status of your system during
prole development. During the course of systemic proling (see Section 4.6.2, “Sys-
temic Proling” (page 50)), you can utilize this tool to adjust and monitor the scope
of the proles that you are learning behavior for.
To edit an application's prole mode, proceed as follows:
Start YaST and select Novell AppArmor → AppArmor Control Panel.
1
In the Congure Prole Mode section, select Congure.
2
Select the prole whose mode you want to change.
3
42 Novell AppArmor Administration Guide
Page 43

Select Toggle Mode to either set this prole to complain mode or to enforce
4
mode.
Apply your settings and leave YaST with Done.
5
To change the mode of all proles, use Set All to Enforce or Set All to Complain.
TIP: Listing the Proles Available
By default, only active proles are listed, i.e. any prole that has a matching
application installed on your system. Should you want to set up a prole before
installing the respective application, click Show All Proles and select the prole
you want to congure from the list that appears.
Building and Managing Proles With YaST 43
Page 44

Page 45

Building Proles via the
Command Line
Novell® AppArmor provides the ability to use a command line interface rather than a
graphical interface to manage and congure your system security. Track the status of
Novell AppArmor, create, delete or modify Novell AppArmor proles using the Novell
AppArmor command line tools.
TIP: For More Information
Before starting to manage your proles using the AppArmor command line
tools, check out the general introduction to AppArmor given in Chapter 1,
Immunizing Programs (page 9) and Chapter 2, Prole Components and Syntax
(page 19).
4.1 Checking the AppArmor Module Status
The AppArmor module can be in any one of three states:
Unloaded
The AppArmor module is not loaded into the kernel.
4
Running
The AppArmor module is loaded into the kernel and is enforcing Novell AppArmor
program policies.
Building Proles via the Command Line 45
Page 46

Stopped
The AppArmor module is loaded into the kernel, but no policies are enforced.
Detect the state of the AppArmor module by inspecting /sys/kernel/security/
apparmor/profiles. If cat
/sys/kernel/security/apparmor/profiles reports a list of proles,
Novell AppArmor is running. If it is empty and returns nothing, AppArmor is stopped.
If the le does not exist, AppArmor is unloaded.
You can load and unload the AppArmor module with the standard Linux module
commands, such as modprobe, insmod, lsmod, and rmmod, but this approach is
not recommended. Instead, it is recommended to manage Novell AppArmor through
the script rcapparmor, which can perform the following operations:
rcapparmor start
Behavior depends on the AppArmor module state. If it was unloaded, start loads
the module and starts it, putting it in the running state. If it was stopped, start
causes the module to rescan the Novell AppArmor proles usually found in /etc/
apparmor.d and puts the module in the running state. If the module was already
running, start reports a warning and takes no action.
rcapparmor stop
Stops the AppArmor module if it was running by removing all proles from kernel
memory, effectively disabling all access controls, putting the module into the
stopped state. If the AppArmor module was either unloaded or already stopped,
stop tries to unload the proles again, but nothing happens.
rcapparmor restart
Causes AppArmor module to rescan the proles in /etc/apparmor.d without
unconning running processes. Freshly created proles are enforced and recently
deleted ones are removed from the /etc/apparmor.d directory.
rcapparmor kill
Unconditionally removes the AppArmor module from the kernel. This is unsafe,
because unloading modules from the Linux kernel is unsafe. This command is
provided only for debugging and emergencies when the module might have to be
removed.
46 Novell AppArmor Administration Guide
Page 47

WARNING
Novell AppArmor is a powerful access control system and it is possible to
lock yourself out of your own machine to the point where you have to
boot the machine from a rescue medium (such as CD 1 of openSUSE) to
regain control.
To prevent such a problem, always ensure that you have a running, unconned, root login on the machine being congured when you restart the
AppArmor module. If you damage your system to the point where logins
are no longer possible (for example, by breaking the prole associated
with the SSH daemon), you can repair the damage using your running root
prompt then restart the AppArmor module.
4.2 Building Novell AppArmor Proles
The AppArmor module prole denitions are stored in the /etc/apparmor.d directory as plain text les. For a detailed description of the syntax of these les, refer
to Chapter 2, Prole Components and Syntax (page 19).
All les in the /etc/apparmor.d directory are interpreted as proles and are
loaded as such. Renaming les in that directory is not an effective way of preventing
proles from being loaded. You must remove proles from this directory to effectively
prevent them from being read and evaluated.
You can use a text editor, such as vim, to access and make changes to these proles.
The following options contain detailed steps for building proles:
Adding or Creating Novell AppArmor Proles
Refer to Section 4.3, “Adding or Creating a Novell AppArmor Prole” (page 48)
Editing Novell AppArmor Proles
Refer to Section 4.4, “Editing a Novell AppArmor Prole” (page 48)
Deleting Novell AppArmor Proles
Refer to Section 4.5, “Deleting a Novell AppArmor Prole” (page 48)
Building Proles via the Command Line 47
Page 48

4.3 Adding or Creating a Novell
AppArmor Prole
To add or create a Novell AppArmor prole for an application, you can use a systemic
or stand-alone proling method, depending on your needs. Learn more about these two
approaches in Section 4.6, “Two Methods of Proling” (page 49).
4.4 Editing a Novell AppArmor Prole
The following steps describe the procedure for editing a Novell AppArmor prole:
If you are not currently logged in as root, enter su in a terminal window.
1
Enter the root password when prompted.
2
Go to the prole directory with cd /etc/apparmor.d/.
3
Enter ls to view all proles currently installed.
4
Open the prole to edit in a text editor, such as vim.
5
Make the necessary changes then save the prole.
6
Restart Novell AppArmor by entering rcapparmor restart in a terminal
7
window.
4.5 Deleting a Novell AppArmor
Prole
The following steps describe the procedure for deleting a Novell AppArmor prole.
If you are not currently logged in as root, enter su in a terminal window.
1
Enter the root password when prompted.
2
48 Novell AppArmor Administration Guide
Page 49

Go to the Novell AppArmor directory with cd /etc/apparmor.d/.
3
Enter ls to view all the Novell AppArmor proles that are currently installed.
4
Delete the prole with rm profilename.
5
Restart Novell AppArmor by entering rcapparmor restart in a terminal
6
window.
4.6 Two Methods of Proling
Given the syntax for Novell AppArmor proles in Chapter 2, Prole Components and
Syntax (page 19), you could create proles without using the tools. However, the effort
involved would be substantial. To avoid such a hassle, use the Novell AppArmor tools
to automate the creation and renement of proles.
There are two ways to approach Novell AppArmor prole creation. Tools are available
for both methods.
Stand-Alone Proling
A method suitable for proling small applications that have a nite run time, such
as user client applications like mail clients. For more information, refer to Sec-
tion 4.6.1, “Stand-Alone Proling” (page 50).
Systemic Proling
A method suitable for proling large numbers of programs all at once and for
proling applications that may run for days, weeks, or continuously across reboots,
such as network server applications like Web servers and mail servers. For more
information, refer to Section 4.6.2, “Systemic Proling” (page 50).
Automated prole development becomes more manageable with the Novell AppArmor
tools:
Decide which proling method suits your needs.
1
Perform a static analysis. Run either aa-genprof or aa-autodep, depending on the
2
proling method chosen.
Enable dynamic learning. Activate learning mode for all proled programs.
3
Building Proles via the Command Line 49
Page 50

4.6.1 Stand-Alone Proling
Stand-alone prole generation and improvement is managed by a program called aagenprof. This method is easy because aa-genprof takes care of everything, but is limited
because it requires aa-genprof to run for the entire duration of the test run of your program (you cannot reboot the machine while you are still developing your prole).
To use aa-genprof for the stand-alone method of proling, refer to Section “aa-gen-
prof—Generating Proles” (page 55).
4.6.2 Systemic Proling
This method is called systemic proling because it updates all of the proles on the
system at once, rather than focusing on the one or few targeted by aa-genprof or standalone proling.
With systemic proling, prole construction and improvement are somewhat less automated, but more exible. This method is suitable for proling long-running applications
whose behavior continues after rebooting or a large number of programs all at once.
Build a Novell AppArmor prole for a group of applications as follows:
Create proles for the individual programs that make up your application.
1
Although this approach is systemic, Novell AppArmor only monitors those programs with proles and their children. To get Novell AppArmor to consider a
program, you must at least have aa-autodep create an approximate prole for it.
To create this approximate prole, refer to Section “aa-autodep—Creating Ap-
proximate Proles” (page 52).
Put relevant proles into learning or complain mode. Activate learning
2
or complain mode for all proled programs by entering aa-complain
/etc/apparmor.d/* in a terminal window while logged in as root. This
functionality is also available through the YaST Prole Mode module, see Sec-
tion 3.6.2, “Changing the Mode of Individual Proles” (page 42).
When in learning mode, access requests are not blocked even if the prole dictates
that they should be. This enables you to run through several tests (as shown in
Step 3 (page 51)) and learn the access needs of the program so it runs properly.
With this information, you can decide how secure to make the prole.
50 Novell AppArmor Administration Guide
Page 51

Refer to Section “aa-complain—Entering Complain or Learning Mode” (page 53)
for more detailed instructions for using learning or complain mode.
Exercise your application. Run your application and exercise its functional-
3
ity. How much to exercise the program is up to you, but you need the program
to access each le representing its access needs. Because the execution is not
being supervised by aa-genprof, this step can go on for days or weeks and can
span complete system reboots.
Analyze the log. In systemic proling, run aa-logprof directly instead of letting
4
aa-genprof run it (as in stand-alone proling). The general form of aa-logprof
is:
aa-logprof [ -d /path/to/profiles ] [ -f /path/to/logfile ]
Refer to Section “aa-logprof—Scanning the System Log” (page 61) for more
information about using aa-logprof.
Repeat Steps 3-4. This generates optimum proles. An iterative approach
5
captures smaller data sets that can be trained and reloaded into the policy engine.
Subsequent iterations generate fewer messages and run faster.
Edit the proles. You might want to review the proles that have been gen-
6
erated. You can open and edit the proles in /etc/apparmor.d/ using vim.
Return to enforce mode. This is when the system goes back to enforcing the
7
rules of the proles, not just logging information. This can be done manually by
removing the flags=(complain) text from the proles or automatically by
using the aa-enforce command, which works identically to the
aa-complain command, except it sets the proles to enforce mode. This
functionality is also available through the YaST Prole Mode module, see Sec-
tion 3.6.2, “Changing the Mode of Individual Proles” (page 42).
To ensure that all proles are taken out of complain mode and put into enforce
mode, enter aa-enforce /etc/apparmor.d/*.
Rescan all proles. To have Novell AppArmor rescan all of the proles and
8
change the enforcement mode in the kernel, enter rcapparmor restart.
Building Proles via the Command Line 51
Page 52

4.6.3 Summary of Proling Tools
All of the Novell AppArmor proling utilities are provided by the apparmor-utils
RPM package and are stored in /usr/sbin. The following sections introduce each
tool.
aa-autodep—Creating Approximate Proles
This creates an approximate prole for the program or application selected. You can
generate approximate proles for binary executables and interpreted script programs.
The resulting prole is called “approximate” because it does not necessarily contain
all of the prole entries that the program needs to be properly conned by Novell
AppArmor. The minimum aa-autodep approximate prole has at least a base include
directive, which contains basic prole entries needed by most programs. For certain
types of programs, aa-autodep generates a more expanded prole. The prole is generated by recursively calling ldd(1) on the executables listed on the command line.
To generate an approximate prole, use the aa-autodep program. The program argument
can be either the simple name of the program, which aa-autodep nds by searching
your shell's path variable, or it can be a fully qualied path. The program itself can be
of any type (ELF binary, shell script, Perl script, etc.). aa-autodep generates an approximate prole to improve through the dynamic proling that follows.
The resulting approximate prole is written to the /etc/apparmor.d directory using
the Novell AppArmor prole naming convention of naming the prole after the absolute
path of the program, replacing the forward slash (/) characters in the path with period
(.) characters. The general form of aa-autodep is to enter the following in a terminal
window when logged in as root:
aa-autodep [ -d /path/to/profiles ] [program1 program2...]
If you do not enter the program name or names, you are prompted for them.
/path/to/profiles overrides the default location of /etc/apparmor.d,
should you keep proles in a location other than the default.
To begin proling, you must create proles for each main executable service that is
part of your application (anything that might start without being a child of another
program that already has a prole). Finding all such programs depends on the application
in question. Here are several strategies for nding such programs:
52 Novell AppArmor Administration Guide
Page 53

Directories
If all of the programs you want to prole are in a directory and there are no other
programs in that directory, the simple command aa-autodep
/path/to/your/programs/* creates nominal proles for all programs in
that directory.
ps command
You can run your application and use the standard Linux ps command to nd all
processes running. Then manually hunt down the location of these programs and
run the aa-autodep program for each one. If the programs are in your path, aa-autodep nds them for you. If they are not in your path, the standard Linux command
find might be helpful in nding your programs. Execute find / -name
'*foo*' -print to determine an application's path (*foo* being an example
application).
aa-complain—Entering Complain or Learning Mode
The complain or learning mode tool (aa-complain) detects violations of Novell AppArmor prole rules, such as the proled program accessing les not permitted by the
prole. The violations are permitted, but also logged. To improve the prole, turn
complain mode on, run the program through a suite of tests to generate log events that
characterize the program's access needs, then postprocess the log with the Novell
AppArmor tools to transform log events into improved proles.
Manually activating complain mode (using the command line) adds a ag to the top of
the prole so that /bin/foo becomes /bin/foo flags=(complain). To use
complain mode, open a terminal window and enter one of the following lines as root:
• If the example program (program1) is in your path, use:
aa-complain [program1 program2 ...]
• If the program is not in your path, specify the entire path as follows:
aa-complain /sbin/program1
• If the proles are not in /etc/apparmor.d, use the following to override the
default location:
aa-complain /path/to/profiles/ program1
Building Proles via the Command Line 53
Page 54

• Specify the prole for program1 as follows:
aa-complain /etc/apparmor.d/sbin.program1
Each of the above commands activates the complain mode for the proles or programs
listed. If the program name does not include its entire path, aa-complain searches $PATH
for the program. So, for instance, aa-complain /usr/sbin/* nds proles associated with all of the programs in /usr/sbin and put them into complain mode.
aa-complain /etc/apparmor.d/* puts all of the proles in /etc/apparmor
.d into complain mode.
TIP: Toggling Prole Mode with YaST
YaST offers a graphical front-end for toggling complain and enforce mode. See
Section 3.6.2, “Changing the Mode of Individual Proles” (page 42) for refer-
ence.
aa-enforce—Entering Enforce Mode
The enforce mode detects violations of Novell AppArmor prole rules, such as the
proled program accessing les not permitted by the prole. The violations are logged
and not permitted. The default is for enforce mode to be enabled. To log the violations
only, but still permit them, use complain mode. Enforce toggles with complain mode.
Manually activating enforce mode (using the command line) adds a ag to the top of
the prole so that /bin/foo becomes /bin/foo flags=(enforce). To use
enforce mode, open a terminal window and enter one of the following lines as root.
• If the example program (program1) is in your path, use:
aa-enforce [program1 program2 ...]
• If the program is not in your path, specify the entire path, as follows:
aa-enforce /sbin/program1
• If the proles are not in /etc/apparmor.d, use the following to override the
default location:
aa-enforce/path/to/profiles/program1
54 Novell AppArmor Administration Guide
Page 55

• Specify the prole for program1 as follows:
aa-enforce /etc/apparmor.d/sbin.program1
Each of the above commands activates the enforce mode for the proles and programs
listed.
If you do not enter the program or prole names, you are prompted to enter one.
/path/to/profiles overrides the default location of /etc/apparmor.d.
The argument can be either a list of programs or a list of proles. If the program name
does not include its entire path, aa-enforce searches $PATH for the program.
TIP: Toggling Prole Mode with YaST
YaST offers a graphical front-end for toggling complain and enforce mode. See
Section 3.6.2, “Changing the Mode of Individual Proles” (page 42) for refer-
ence.
aa-genprof—Generating Proles
aa-genprof is Novell AppArmor's prole generating utility. It runs aa-autodep on the
specied program, creating an approximate prole (if a prole does not already exist
for it), sets it to complain mode, reloads it into Novell AppArmor, marks the log, and
prompts the user to execute the program and exercise its functionality. Its syntax is as
follows:
aa-genprof [ -d /path/to/profiles ]program
If you were to create a prole for the the Apache Web server program httpd2-prefork,
you would do the following as root:
Enter rcapache2 stop.
1
Next, enter aa-genprof httpd2-prefork.
2
Now aa-genprof does the following:
• Resolves the full path of httpd2-prefork based on your shell's path variables.
You can also specify a full path. On openSUSE, the default full path is /usr/
sbin/httpd2-prefork.
Building Proles via the Command Line 55
Page 56

• Checks to see if there is an existing prole for httpd2-prefork. If there is one,
it updates it. If not, it creates one using the aa-autodep program described in
Section 4.6.3, “Summary of Proling Tools” (page 52).
• Puts the prole for this program into learning or complain mode so that
prole violations are logged but are permitted to proceed. A log event looks
like this (check /var/log/audit/audit.log):
type=APPARMOR msg=audit(1145623282.763:447): PERMITTING r access to
/usr/lib/apache2/mod_setenvif.so (httpd2-prefork(5312) profile
/usr/sbin/httpd2-prefork active /usr/sbin/httpd2-prefork)
If you are not running the audit daemon, the AppArmor events are logged
to /var/log/messages:
Apr 21 14:43:27 figwit kernel: audit(1145623407.898:449): PERMITTING
r access to /usr/lib/apache2/mod_setenvif.so (httpd2-prefork(5425)
profile /usr/sbin/httpd2-prefork active /usr/sbin/httpd2-prefork)
They also can be viewed using the dmesg command:
audit(1145623407.898:449): PERMITTING r access to
/usr/lib/apache2/mod_setenvif.so (httpd2-prefork(5425) profile
/usr/sbin/httpd2-prefork active /usr/sbin/httpd2-prefork)
• Marks the log with a beginning marker of log events to consider. For example:
Sep 13 17:48:52 figwit root: GenProf: e2ff78636296f16d0b5301209a04430d
When prompted by the tool, run the application to prole in another terminal
3
window and perform as many of the application functions as possible. Thus, the
learning mode can log the les and directories to which the program requires
access in order to function properly. For example, in a new terminal window,
enter rcapache2 start.
Select from the following options, which are available in the aa-logprof terminal
4
window after you have executed the program functionality:
•
S runs aa-logprof against the system log from where it was marked when aa-
genprof was started and reloads the prole. If system events exist in the log,
Novell AppArmor parses the learning mode log les. This generates a series
of questions that you must answer to guide aa-genprof in generating the security prole.
56 Novell AppArmor Administration Guide
Page 57

•
F exits the tool and returns to the main menu.
NOTE
If requests to add hats appear, proceed to Chapter 5, Proling Your Web
Applications Using ChangeHat (page 75).
Answer two types of questions:
5
• A resource is requested by a proled program that is not in the prole (see
Example 4.1, “Learning Mode Exception: Controlling Access to Specic
Resources” (page 57)).
• A program is executed by the proled program and the security domain
transition has not been dened (see Example 4.2, “Learning Mode Exception:
Dening Execute Permissions for an Entry” (page 59)).
Each of these categories results in a series of questions that you must answer to
add the resource to the prole or to add the program into the prole. The following
shows examples of each one. Subsequent steps describe your options in answering
these questions.
• Dealing with execute accesses is complex. You must decide how to proceed
with this entry regarding which execute permission type to grant to this entry:
Example 4.1
Reading log entries from /var/log/audit/audit.log.
Updating AppArmor profiles in /etc/apparmor.d.
Profile: /usr/sbin/xinetd
Program: xinetd
Execute: /usr/lib/cups/daemon/cups-lpd
Severity: unknown
[(I)nherit] / (P)rofile / (U)nconfined / (D)eny / Abo(r)t / (F)inish
inherit (ix)
Learning Mode Exception: Controlling Access to Specic Resources
The child inherits the parent's prole, running with the same access
controls as the parent. This mode is useful when a conned program
needs to call another conned program without gaining the permissions
of the target's prole or losing the permissions of the current prole.
This mode is often used when the child program is a helper application,
Building Proles via the Command Line 57
Page 58

such as the /usr/bin/mail client using the less program as a pager
or the Mozilla Web browser using the Acrobat program to display PDF
les.
prole (px)
The child runs using its own prole, which must be loaded into the kernel. If the prole is not present, attempts to execute the child fail with
permission denied. This is most useful if the parent program is invoking
a global service, such as DNS lookups or sending mail via your system's
MTA.
Choose the prole with clean exec (Px) option to scrub the environment
of environment variables that could modify execution behavior when
passed on to the child process.
unconned (ux)
The child runs completely unconned without any Novell AppArmor
prole applied to the executed resource.
Choose the unconned with clean exec (Ux) option to scrub the environment of environment variables that could modify execution behavior
when passed on to the child process. This option introduces a security
vulnerability that could be used to exploit AppArmor. Only use it as a
last resort.
mmap (m)
This permission denotes that the program running under the prole can
access the resource using the mmap system call with the ag
PROT_EXEC. This means that the data mapped in it can be executed.
You are prompted to include this permission if it is requested during a
proling run.
Deny
Prevents the program from accessing the specied directory path entries.
Novell AppArmor then moves on to the next event.
Abort
Aborts aa-logprof, losing all rule changes entered so far and leaving all
proles unmodied.
58 Novell AppArmor Administration Guide
Page 59

Finish
Closes aa-logprof, saving all rule changes entered so far and modifying
all proles.
• The example below shows Novell AppArmor suggesting directory path entries
that have been accessed by the application you are proling. It might also
require you to dene execute permissions for entries.
Example 4.2
Adding /bin/ps ix to profile.
Profile: /usr/sbin/xinetd
Path: /etc/hosts.allow
New Mode: r
[1 - /etc/hosts.allow]
[(A)llow] / (D)eny / (N)ew / (G)lob / Glob w/(E)xt / Abo(r)t /
(F)inish
Novell AppArmor provides one or more pathnames or includes. By entering
the option number, select from one or more of the options then proceed to
the next step.
NOTE
All of these options are not always presented in the Novell AppArmor
menu.
#include
Learning Mode Exception: Dening Execute Permissions for an Entry
This is the section of a Novell AppArmor prole that refers to an include
le, which procures access permissions for programs. By using an include, you can give the program access to directory paths or les that
are also required by other programs. Using includes can reduce the size
of a prole. It is good practice to select includes when suggested.
Globbed Version
This is accessed by selecting Glob as described in the next step. For information about globbing syntax, refer to Section 4.7, “Pathnames and
Globbing” (page 68).
Building Proles via the Command Line 59
Page 60

Actual Path Name
This is the literal path to which the program needs access so that it can
run properly.
After you select the pathname or include, you can process it as an entry into
the Novell AppArmor prole by selecting Allow or Deny. If you are not
satised with the directory path entry as it is displayed, you can also Glob
it.
The following options are available to process the learning mode entries and
to build the prole:
Select Enter
Allows access to the selected directory path.
Allow
Allows access to the specied directory path entries. Novell AppArmor
suggests le permission access. For more information, refer to Sec-
tion 4.8, “File Permission Access Modes” (page 69).
Deny
Prevents the program from accessing the specied directory path entries.
Novell AppArmor then moves on to the next event.
New
Prompts you to enter your own rule for this event, allowing you to
specify whatever form of regular expression you want. If the expression
you enter does not actually satisfy the event that prompted the question
in the rst place, Novell AppArmor asks you for conrmation and lets
you reenter the expression.
Glob
Select either a specic path or create a general rule using wild cards that
match a broader set of pathnames. To select any of the offered paths
enter the number that is printed in front of the paths then decide how to
proceed with the selected item.
For more information about globbing syntax, refer to Section 4.7,
“Pathnames and Globbing” (page 68).
60 Novell AppArmor Administration Guide
Page 61

Glob w/Ext
This modies the original directory path while retaining the lename
extension. For example, /etc/apache2/file.ext becomes /etc/
apache2/*.ext, adding the wild card (asterisk) in place of the lename. This allows the program to access all les in the suggested directory that end with the .ext extension.
Abort
Aborts aa-logprof, losing all rule changes entered so far and leaving all
proles unmodied.
Finish
Closes aa-logprof, saving all rule changes entered so far and modifying
all proles.
To view and edit your prole using vim, enter vim
6
/etc/apparmor.d/profilename in a terminal window.
Restart AppArmor and reload the prole set including the newly created one
7
using the rcapparmor restart command.
aa-logprof—Scanning the System Log
aa-logprof is an interactive tool used to review the learning or complain mode output
found in the log entries under /var/log/audit/audit.log or /var/log/
messages (if auditd is not running) and generate new entries in Novell AppArmor
security proles.
When you run aa-logprof, it begins to scan the log les produced in learning or complain
mode and, if there are new security events that are not covered by the existing prole
set, it gives suggestions for modifying the prole. The learning or complain mode traces
program behavior and enters it in the log. aa-logprof uses this information to observe
program behavior.
If a conned program forks and executes another program, aa-logprof sees this and
asks the user which execution mode should be used when launching the child process.
The execution modes ix, px, Px, ux, and Ux are options for starting the child process.
If a separate prole exists for the child process, the default selection is px. If one does
Building Proles via the Command Line 61
Page 62

not exist, the prole defaults to ix. Child processes with separate proles have aa-autodep
run on them and are loaded into AppArmor, if it is running.
When aa-logprof exits, proles are updated with the changes. If the AppArmor module
is running, the updated proles are reloaded and, if any processes that generated security events are still running in the null-complain-prole, those processes are set to run
under their proper proles.
To run aa-logprof, enter aa-logprof into a terminal window while logged in as
root. The following options can be used for aa-logprof:
aa-logprof -d /path/to/profile/directory/
Species the full path to the location of the proles if the proles are not located
in the standard directory, /etc/apparmor.d/.
aa-logprof -f /path/to/logfile/
Species the full path to the location of the log le if the log le is not located in
the default directory, /var/log/audit/audit.log or /var/log/
messages (if auditd is not running).
aa-logprof -m "string marker in logfile"
Marks the starting point for aa-logprof to look in the system log. aa-logprof ignores
all events in the system log before the specied mark. If the mark contains spaces,
it must be surrounded by quotes to work correctly. For example:
aa-logprof -m"17:04:21"
or
logprof -m e2ff78636296f16d0b5301209a04430d
aa-logprof scans the log, asking you how to handle each logged event. Each question
presents a numbered list of Novell AppArmor rules that can be added by pressing the
number of the item on the list.
By default, aa-logprof looks for proles in /etc/apparmor.d/ and scans the log
in /var/log/messages. In many cases, running aa-logprof as root is enough
to create the prole.
However, there might be times when you need to search archived log les, such as if
the program exercise period exceeds the log rotation window (when the log le is
62 Novell AppArmor Administration Guide
Page 63

archived and a new log le is started). If this is the case, you can enter zcat -f `ls
-1tr /var/log/messages*` | aa-logprof -f -.
aa-logprof Example 1
The following is an example of how aa-logprof addresses httpd2-prefork accessing the
le /etc/group. [] indicates the default option.
In this example, the access to /etc/group is part of httpd2-prefork accessing name
services. The appropriate response is 1, which includes a predened set of Novell
AppArmor rules. Selecting 1 to #include the name service package resolves all of
the future questions pertaining to DNS lookups and also makes the prole less brittle
in that any changes to DNS conguration and the associated name service prole
package can be made just once, rather than needing to revise many proles.
Profile: /usr/sbin/httpd2-prefork
Path: /etc/group
New Mode: r
[1 - #include <abstractions/nameservice>]
2 - /etc/group
[(A)llow] / (D)eny / (N)ew / (G)lob / Glob w/(E)xt / Abo(r)t / (F)inish
Select one of the following responses:
Select Enter
Allows access to the selected directory path.
Allow
Allows access to the specied directory path entries. Novell AppArmor suggests
le permission access. For more information about this, refer to Section 4.8, “File
Permission Access Modes” (page 69).
Deny
Prevents the program from accessing the specied directory path entries. Novell
AppArmor then moves on to the next event.
New
Prompts you to enter your own rule for this event, allowing you to specify whatever
form of regular expression you want. If the expression you enter does not actually
satisfy the event that prompted the question in the rst place, Novell AppArmor
asks you for conrmation and lets you reenter the expression.
Building Proles via the Command Line 63
Page 64

Glob
Select either a specic path or create a general rule using wild cards that matches
on a broader set of pathnames. To select any of the offered paths, enter the number
that is printed in front of the paths then decide how to proceed with the selected
item.
For more information about globbing syntax, refer to Section 4.7, “Pathnames and
Globbing” (page 68).
Glob w/Ext
This modies the original directory path while retaining the lename extension.
For example, /etc/apache2/file.ext becomes /etc/apache2/*.ext,
adding the wild card (asterisk) in place of the lename. This allows the program
to access all les in the suggested directory that end with the .ext extension.
Abort
Aborts aa-logprof, losing all rule changes entered so far and leaving all proles
unmodied.
Finish
Closes aa-logprof, saving all rule changes entered so far and modifying all proles.
aa-logprof Example 2
In an example from proling vsftpd, see this question:
Profile: /usr/sbin/vsftpd
Path: /y2k.jpg
New Mode: r
[1 - /y2k.jpg]
(A)llow / [(D)eny] / (N)ew / (G)lob / Glob w/(E)xt / Abo(r)t / (F)inish
Several items of interest appear in this question. First, note that vsftpd is asking for a
path entry at the top of the tree, even though vsftpd on openSUSE serves FTP les from
/srv/ftp by default. This is because httpd2-prefork uses chroot and, for the portion
of the code inside the chroot jail, Novell AppArmor sees le accesses in terms of the
chroot environment rather than the global absolute path.
The second item of interest is that you might want to grant FTP read access to all JPEG
les in the directory, so you could use Glob w/Ext and use the suggested path of
64 Novell AppArmor Administration Guide
Page 65

/*.jpg. Doing so collapses all previous rules granting access to individual .jpg les
and forestalls any future questions pertaining to access to .jpg les.
Finally, you might want to grant more general access to FTP les. If you select Glob
in the last entry, aa-logprof replaces the suggested path of /y2k.jpg with /*. Alternatively, you might want to grant even more access to the entire directory tree, in which
case you could use the New path option and enter /**.jpg (which would grant access
to all .jpg les in the entire directory tree) or /** (which would grant access to all
les in the directory tree).
The above deal with read accesses. Write accesses are similar, except that it is good
policy to be more conservative in your use of regular expressions for write accesses.
Dealing with execute accesses is more complex. You must decide which execute permissions to grant:
inherit (ix)
The child inherits the parent's prole, running with the same access controls as the
parent. This mode is useful when a conned program needs to call another conned
program without gaining the permissions of the target's prole or losing the permissions of the current prole. This mode is often used when the child program is a
helper application, such as the /usr/bin/mail client using the less program
as a pager or the Mozilla Web browser using the Acrobat program to display PDF
les.
prole (px)
The child runs using its own prole, which must be loaded into the kernel. If the
prole is not present, attempts to execute the child fail with permission denied.
This is most useful if the parent program is invoking a global service, such as DNS
lookups or sending mail via your system's MTA.
Choose the prole with clean exec (Px) option to scrub the environment of environment variables that could modify execution behavior when passed on to the child
process.
unconned (ux)
The child runs completely unconned without any Novell AppArmor prole applied
to the executed resource.
Choose the unconned with clean exec (Ux) option to scrub the environment of
environment variables that could modify execution behavior when passed on to
Building Proles via the Command Line 65
Page 66

the child process. This option introduces a security vulnerability that could be used
to exploit AppArmor. Only use it as a last resort.
mmap (m)
This permission denotes that the program running under the prole can access the
resource using the mmap system call with the ag PROT_EXEC. This means that
the data mapped in it can be executed. You are prompted to include this permission
if it is requested during a proling run.
In the following example, the /usr/bin/mail mail client is being proled and aalogprof has discovered that /usr/bin/mail executes /usr/bin/less as a helper
application to “page” long mail messages. Consequently, it presents this prompt:
/usr/bin/nail -> /usr/bin/less
(I)nherit / (P)rofile / (U)nconfined / (D)eny
TIP
The actual executable le for /usr/bin/mail turns out to be /usr/bin/
nail, which is not a typographical error.
The program /usr/bin/less appears to be a simple one for scrolling through text
that is more than one screen long and that is in fact what /usr/bin/mail is using
it for. However, less is actually a large and powerful program that makes use of many
other helper applications, such as tar and rpm.
TIP
Run less on a tar le or an RPM le and it shows you the inventory of these
containers.
You do not want to automatically run rpm when reading mail messages (that leads directly to a Microsoft* Outlook–style virus attack, because rpm has the power to install
and modify system programs) and so, in this case, the best choice is to use Inherit. This
results in the less program executed from this context running under the prole for
/usr/bin/mail. This has two consequences:
• You need to add all of the basic le accesses for /usr/bin/less to the prole
for /usr/bin/mail.
66 Novell AppArmor Administration Guide
Page 67

• You can avoid adding the helper applications, such as tar and rpm, to the /usr/
bin/mail prole so that when /usr/bin/mail runs /usr/bin/less in
this context, the less program is far less dangerous than it would be without Novell
AppArmor protection.
In other circumstances, you might instead want to use the Prole option. This has two
effects on aa-logprof:
• The rule written into the prole uses px, which forces the transition to the child's
own prole.
• aa-logprof constructs a prole for the child and starts building it, in the same way
that it built the parent prole, by ascribing events for the child process to the child's
prole and asking the aa-logprof user questions.
Finally, you might want to grant the child process very powerful access by specifying
Unconned. This writes Ux into the parent prole so that when the child runs, it runs
without any Novell AppArmor prole being applied at all, but the environment is
cleaned of some environment variables, which can alter execution behavior, before the
child inherits it. Running unconned means running with no protection and should
only be used when absolutely required.
aa-unconned—Identifying Unprotected Processes
The aa-unconfined command examines open network ports on your system,
compares that to the set of proles loaded on your system, and reports network services
that do not have Novell AppArmor proles. It requires root privilege and that it not
be conned by a Novell AppArmor prole.
aa-unconned must be run as root to retrieve the process executable link from the
/proc le system. This program is susceptible to the following race conditions:
• An unlinked executable is mishandled
• A process that dies between netstat(8) and further checks is mishandled
Building Proles via the Command Line 67
Page 68

NOTE
This program lists processes using TCP and UDP only. In short, this program is
unsuitable for forensics use and is provided only as an aid to proling all network-accessible processes in the lab.
4.7 Pathnames and Globbing
Globbing (or regular expression matching) is when you modify the directory path using
wild cards to include a group of les or subdirectories. File resources can be specied
with a globbing syntax similar to that used by popular shells, such as csh, bash, and
zsh.
*
**
Substitutes for any number of characters, except
/.
Example: An arbitrary number of path elements,
including entire directories.
Substitutes for any number of characters, including /.
Example: an arbitrary number of path elements,
including entire directories.
Substitutes for any single character, except /.?
Substitutes for the single character a, b, or c[abc]
Example: a rule that matches
/home[01]/*/.plan allows a program to
access .plan les for users in both /home0
and /home1.
Substitutes for the single character a, b, or c.[a-c]
68 Novell AppArmor Administration Guide
Page 69

{ab,cd}
Expand to one rule to match ab and one rule to
match cd.
Example: a rule that matches
/{usr,www}/pages/** to grant access to
Web pages in both /usr/pages and /www/
pages.
4.8 File Permission Access Modes
File permission access modes consist of combinations of the following nine modes:
Read moder
Write modew
Discrete prole execute modepx
Discrete prole execute mode—clean execPx
Unconstrained execute modeux
Unconstrained execute mode—clean execUx
Inherit execute modeix
Allow PROT_EXEC with mmap(2) callsm
Link model
Read Mode (r)
Allows the program to have read access to the resource. Read access is required
for shell scripts and other interpreted content and determines if an executing process
can core dump or be attached to with ptrace(2) (ptrace(2) is used by utilities
such as strace(1), ltrace(1), and gdb(1)).
Building Proles via the Command Line 69
Page 70

Write Mode (w)
Allows the program to have write access to the resource. Files must have this permission if they are to be unlinked (removed).
Discrete Prole Execute Mode (px)
This mode requires that a discrete security prole is dened for a resource executed
at a Novell AppArmor domain transition. If there is no prole dened, the access
is denied.
WARNING: Using the Discrete Prole Execute Mode
px does not scrub the environment of variables such as LD_PRELOAD. As
a result, the calling domain may have an undue amount of inuence over
the callee.
Incompatible with Ux, ux, Px, and ix.
Discrete Prole Execute Mode (Px)—Clean Exec
Px allows the named program to run in px mode, but AppArmor invokes the Linux
kernel's unsafe_exec routines to scrub the environment, similar to setuid programs. See ld.so(8) for some information about setuid and setgid environment
scrubbing.
Incompatible with Ux, ux, px, and ix.
Unconstrained Execute Mode (ux)
Allows the program to execute the resource without any Novell AppArmor prole
applied to the executed resource. Requires listing execute mode as well.
This mode is useful when a conned program needs to be able to perform a privileged operation, such as rebooting the machine. By placing the privileged section
in another executable and granting unconstrained execution rights, it is possible to
bypass the mandatory constraints imposed on all conned processes. For more information about what is constrained, see the apparmor(7) man page.
WARNING: Using Unconstrained Execute Mode (ux)
Use ux only in very special cases. It enables the designated child processes
to be run without any AppArmor protection. ux does not scrub the environment of variables such as LD_PRELOAD. As a result, the calling domain
70 Novell AppArmor Administration Guide
Page 71

may have an undue amount of inuence over the callee. Use this mode
only if the child absolutely must be run unconned and LD_PRELOAD must
be used. Any prole using this mode provides negligible security. Use at
your own risk.
This mode is incompatible with Ux, px, Px, and ix.
Unconstrained Execute Mode (Ux)—Clean Exec
Ux allows the named program to run in ux mode, but AppArmor invokes the Linux
kernel's unsafe_exec routines to scrub the environment, similar to setuid programs. See ld.so(8) for some information about setuid and setgid environment
scrubbing.
WARNING: Using Unconstrained Execute Mode (Ux)
Use Ux only in very special cases. It enables the designated child processes
to be run without any AppArmor protection. Use this mode only if the
child absolutely must be run unconned. Use at your own risk.
Incompatible with ux, px, Px, and ix.
Inherit Execute Mode (ix)
ix prevents the normal AppArmor domain transition on execve(2) when the
proled program executes the named program. Instead, the executed resource inherits the current prole.
This mode is useful when a conned program needs to call another conned program without gaining the permissions of the target's prole or losing the permissions
of the current prole. There is no version to scrub the environment because ix
executions do not change privileges.
Incompatible with Ux, ux, Px, and px. Implies m.
Allow Executable Mapping (m)
This mode allows a le to be mapped into memory using mmap(2)'s PROT_EXEC
ag. This ag marks the pages executable. It is used on some architectures to provide nonexecutable data pages, which can complicate exploit attempts. AppArmor
uses this mode to limit which les a well-behaved program (or all programs on
architectures that enforce nonexecutable memory access controls) may use as li-
Building Proles via the Command Line 71
Page 72

braries, to limit the effect of invalid -L ags given to ld(1) and LD_PRELOAD,
LD_LIBRARY_PATH, given to ld.so(8).
Link Mode
The link mode mediates access to hard links. When a link is created, the target le
must have the same access permissions as the link created (with the exception that
the destination does not need link access).
When choosing one of the Ux or Px le permission access modes, take into account
that the following environment variables are removed from the environment before the
child process inherits it. As a consequence, applications or processes relying on any of
these variables do not work anymore if the prole applied to them carries Ux or Px
ags:
• GCONV_PATH
• GETCONF_DIR
• HOSTALIASES
• LD_AUDIT
• LD_DEBUG
• LD_DEBUG_OUTPUT
• LD_DYNAMIC_WEAK
• LD_LIBRARY_PATH
• LD_ORIGIN_PATH
• LD_PRELOAD
• LD_PROFILE
• LD_SHOW_AUXV
• LD_USE_LOAD_BIAS
• LOCALDOMAIN
72 Novell AppArmor Administration Guide
Page 73

• LOCPATH
• MALLOC_TRACE
• NLSPATH
• RESOLV_HOST_CONF
• RES_OPTIONS
• TMPDIR
• TZDIR
4.9 Important Filenames and Directories
The following list comprises the most important les and directories used by the AppArmor framework. Should you intend to manage and troubleshoot your proles manually, make sure you know about these les and directories:
/sys/kernel/security/apparmor/profiles
Virtualized le representing the currently loaded set of proles.
/etc/apparmor/
Location of AppArmor conguration les.
/etc/apparmor.d/
Location of proles, named with the convention of replacing the / in pathnames
with . (not for the root /) so proles are easier to manage. For example, the prole
for the program /usr/sbin/ntpd is named usr.sbin.ntpd.
/etc/apparmor.d/abstractions/
Location of abstractions.
/etc/apparmor.d/program-chunks/
Location of program chunks.
Building Proles via the Command Line 73
Page 74

/proc/*/attr/current
Check this le to review the connement status of a process and the prole that is
used to conne the process. The ps auxZ command retrieves this information
automatically.
74 Novell AppArmor Administration Guide
Page 75

Proling Your Web
Applications Using ChangeHat
A Novell® AppArmor prole represents the security policy for an individual program
instance or process. It applies to an executable program, but if a portion of the program
needs different access permissions than other portions, the program can “change hats”
to use a different security context, distinctive from the access of the main program.
This is known as a hat or subprole.
ChangeHat enables programs to change to or from a hat within a Novell AppArmor
prole. It enables you to dene security at a ner level than the process. This feature
requires that each application be made “ChangeHat aware” meaning that it is modied
to make a request to the Novell AppArmor module to switch security domains at arbitrary
times during the application execution. Two examples for ChangeHat aware applications
are the Apache Web server and Tomcat.
A prole can have an arbitrary number of subproles, but there are only two levels: a
subprole cannot have further sub-subproles. A subprole is written as a separate
prole and named as the containing prole followed by the subprole name, separated
by a ^. Subproles must be stored in the same le as the parent prole.
NOTE: For More Information
For more information, see the change_hat man page.
5
Proling Your Web Applications Using ChangeHat 75
Page 76

5.1 Apache ChangeHat
Novell AppArmor provides a mod_apparmor module (package
apache2-mod_apparmor) for the Apache program. This module makes the Apache
Web server ChangeHat aware. Install it along with Apache.
When Apache is ChangeHat aware, it checks for the following customized Novell
AppArmor security proles in the order given for every URI request that it receives.
• URI-specic hat (for example, ^phpsysinfo-dev/templates/classic/
images/bar_left.gif)
• DEFAULT_URI
• HANDLING_UNTRUSTED_INPUT
NOTE: Apache Conguration
If you install apache2-mod_apparmorwithout Novell AppArmor, make sure
that the Apache load module has a command in the conguration le that
loads the mod_apparmor module by adding the following line to your Apache
conguration le:
LoadModule change_hat_module modules/mod_change_hat.so
5.1.1 Managing ChangeHat Aware
Applications
As with most of the Novell AppArmor tools, you can use two methods for managing
ChangeHat, YaST or the command line interface. Manage ChangeHat aware applications
is much more exible at the command line, but the process is also more complicated.
Both methods allow you to manage the hats for your application and populate them
with prole entries.
The following steps are a demonstration that adds hats to an Apache prole using YaST.
In the Add Prole Wizard, the Novell AppArmor proling utilities prompt you to create
new hats for distinct URI requests. Choosing to create a new hat allows you to create
individual proles for each URI. You can create very tight rules for each request.
76 Novell AppArmor Administration Guide
Page 77

If the URI that is processed does not represent signicant processing or otherwise does
not represent a signicant security risk, safely select Use Default Hat to process this
URI in the default hat, which is the default security prole.
This example creates a new hat for the URI phpsysinfo-dev and its subsequent
accesses. Using the proling utilities, delegate what to add to this new hat. The resulting
hat becomes a tight-security container that encompasses all the processing on the server
that occurs when the phpsysinfo-dev URI is passed to the Apache Web server.
The URI runs the application phpsysinfo (refer to http://phpsysinfo
.sourceforge.net for more information). The phpsysinfo-dev package is
assumed to be installed in /srv/www/htdocs/phpsysinfo-dev in a clean (new)
install of openSUSE and AppArmor.
Once phpsysinfo-dev is installed, you are ready to add hats to the Apache
1
prole. From the Novell AppArmor GUI, select Add Prole Wizard.
In Application to Prole, enter httpd2-prefork.
2
Click Create Prole.
3
Proling Your Web Applications Using ChangeHat 77
Page 78

Restart Apache by entering rcapache2 restart in a terminal window.
4
Restart any program you are proling at this point.
Open http://localhost/phpsysinfo-dev/ in a Web browser window.
5
The browser window should display network usage and system information.
NOTE: Data Caching
To ensure that this request is processed by the server and you do not
review cached data in your browser, refresh the page. To do this, click
the browser Refresh button to make sure that Apache processes the request for the phpsysinfo-dev URI.
Click Scan System Log for Entries to Add to Proles. Novell AppArmor
6
launches the aa-logprof tool, which scans the information learned in the
previous step. It begins to prompt you with prole questions.
aa-logprof rst prompts with Add Requested Hat or Use Default Hat because it
7
noticed that the phpsysinfo-dev URI was accessed. Select Add Requested
Hat.
78 Novell AppArmor Administration Guide
Page 79

Click Allow.
8
Choosing Add Requested Hat in the previous step creates a new hat in the prole
and species that the results of subsequent questions about the script's actions
are added to the newly created hat rather than the default hat for this application.
In the next screen, Novell AppArmor displays an external program that the script
executed. You can specify that the program should run conned by the phpsysinfo-dev hat (choose Inherit), conned by a separate prole (choose Prole), or
that it should run unconned or without any security prole (choose Unconned).
For the case of the Prole option, a new prole is created for the program if one
does not already exist.
NOTE: Security Considerations
Selecting Unconned can create a signicant security hole and should
be done with caution.
Proling Your Web Applications Using ChangeHat 79
Page 80

Select Inherit for the /bin/bash path. This adds /bin/bash/ (accessed
a
by Apache) to the phpsysinfo-dev hat prole with the necessary permissions.
Click Allow.
b
The remaining questions prompt you to generate new hats and add entries to your
9
prole and its hats. The process of adding entries to proles is covered in detail
in the Section 3.1, “Adding a Prole Using the Wizard” (page 25).
When all proling questions are answered, click Finish to save your changes
and exit the wizard.
The following is an example phpsysinfo-dev hat.
80 Novell AppArmor Administration Guide
Page 81

Example 5.1
^phpsysinfo {
#include <abstractions/base>
/bin/df ix,
/bin/bash ix,
/dev/tty rw,
/etc/SuSE-release r,
/etc/fstab r,
/etc/hosts r,
/etc/mtab r,
/proc/** r,
/sbin/lspci ix,
/srv/www/htdocs/sysinfo/** r,
/sys/bus/pci/devices r,
/sys/devices/** r,
/usr/bin/who ix,
/usr/share/pci.ids r,
/var/log/apache2/{access,error}_log w,
/var/run/utmp r,
}
Example phpsysinfo-dev Hat
NOTE: Hat and Parent Prole Relationship
The prole ^phpsysinfo-dev is only valid in the context of a process running
under the parent prole httpd2-prefork.
5.1.2 Adding Hats and Entries to Hats
When you use the Edit Prole dialog (for instructions, refer to Section 3.3, “Editing
Proles” (page 33)) or when you add a new prole using Manually Add Prole (for
instructions, refer to Section 3.2, “Manually Adding a Prole” (page 32)), you are
given the option of adding hats (subproles) to your Novell AppArmor proles. Add
a ChangeHat subprole from the AppArmor Prole Dialog window as in the following.
Proling Your Web Applications Using ChangeHat 81
Page 82

From the AppArmor Prole Dialog window, click Add Entry then select Hat.
1
The Enter Hat Name dialog box opens:
Enter the name of the hat to add to the Novell AppArmor prole. The name is
2
the URI that, when accessed, receives the permissions set in the hat.
Click Create Hat. You are returned to the AppArmor Prole Dialog screen.
3
After adding the new hat, click Done.
4
82 Novell AppArmor Administration Guide
Page 83

NOTE: For More Information
For an example of an Novell AppArmor prole, refer to Example 5.1, “Example
phpsysinfo-dev Hat” (page 81).
5.2 Conguring Apache for
mod_apparmor
Apache is congured by placing directives in plain text conguration les. The main
conguration le is usually httpd.conf. When you compile Apache, you can indicate
the location of this le. Directives can be placed in any of these conguration les to
alter the way Apache behaves. When you make changes to the main conguration les,
you need to start or restart Apache so the changes are recognized.
5.2.1 Virtual Host Directives
Virtual host directives control whether requests that contain trailing pathname information following an actual lename or that refer to a nonexistent le in an existing directory are accepted or rejected. For Apache documentation on virtual host directives, refer
to http://httpd.apache.org/docs-2.2/mod/core.html
#virtualhost.
The ChangeHat-specic conguration keyword is AADefaultHatName. It is used
similarly to AAHatName, for example, AADefaultHatName
My_Funky_Default_Hat.
The conguration option is actually based on a server directive, which enables you to
use the keyword outside of other options, setting it for the default server. Virtual hosts
are considered internally within Apache to be separate “servers,” so you can set a default
hat name for the default server as well as one for each virtual host, if desired.
When a request comes in, the following steps reect the sequence in which
mod_apparmor attempts to apply hats.
1. A location or directory hat as specied by the AAHatName keyword
Proling Your Web Applications Using ChangeHat 83
Page 84

2. A hat named by the entire URI path
3. A default server hat as specied by the AADefaultHatName keyword
4. DEFAULT_URI (if none of those exist, it goes back to the “parent” Apache hat)
5.2.2 Location and Directory Directives
Location and directory directives specify hat names in the program conguration le
so the program calls the hat regarding its security. For Apache, you can nd documentation about the location and directory directives at http://httpd.apache.org/
docs-2.0/sections.html.
The location directive example below species that, for a given location,
mod_apparmor should use a specic hat:
<Location /foo/> AAHatName MY_HAT_NAME </Location>
This tries to use MY_HAT_NAME for any URI beginning with /foo/ (/foo/, /foo/
bar, /foo/cgi/path/blah_blah/blah, etc.).
The directory directive works similarly to the location directive, except it refers to a
path in the le system as in the following example:
<Directory "/srv/www/www.immunix.com/docs">
# Note lack of trailing slash
AAHatName immunix.com
</Directory>
Example: The program phpsysinfo is used to illustrate a location directive in the
following example. The tarball can be downloaded from http://phpsysinfo
.sourceforge.com.
After downloading the tarball, install it into /srv/www/htdocs/sysinfo.
1
Create /etc/apache2/conf.d/sysinfo.conf and add the following
2
text to it:
<Location "/sysinfo">
AAHatName sysinfo
</Location>
The following hat should then work for phpsyinfo:
84 Novell AppArmor Administration Guide
Page 85

^sysinfo {
#include <abstractions/base>
/bin/df ix,
/bin/bash ix,
/dev/tty rw,
/etc/SuSE-release r,
/etc/fstab r,
/etc/hosts r,
/etc/mtab r,
/proc/** r,
/sbin/lspci ix,
/srv/www/htdocs/sysinfo/** r,
/sys/bus/pci/devices r,
/sys/devices/** r,
/usr/bin/who ix,
/usr/share/pci.ids r,
/var/log/apache2/{access,error}_log w,
/var/run/utmp r,
}
Reload Novell AppArmor proles by entering rcapparmor restart at a
3
terminal window as root.
Restart Apache by entering rcapache2 restart at a terminal window as
4
root.
Enter http://hostname/sysinfo/ into a browser to receive the system
5
information that phpsysinfo delivers.
Locate conguration errors by going to /var/log/audit/audit.log or
6
running dmesg and looking for any rejections in the output.
Proling Your Web Applications Using ChangeHat 85
Page 86

Page 87

Managing Proled
Applications
After creating proles and immunizing your applications, openSUSE™ becomes more
efcient and better protected if you perform Novell® AppArmor prole maintenance,
which involves analyzing log les and rening your proles as well as backing up your
set of proles and keeping it up-to-date. You can deal with these issues before they
become a problem by setting up event notication by e-mail, running periodic reports,
updating proles from system log entries by running the aa-logprof tool through YaST,
and dealing with maintenance issues.
6.1 Monitoring Your Secured Applications
Applications that are conned by Novell AppArmor security proles generate messages
when applications execute in unexpected ways or outside of their specied prole.
These messages can be monitored by event notication, periodic report generation, or
integration into a third-party reporting mechanism.
For reporting and alerting, AppArmor uses a userspace daemon
(/usr/sbin/aa-eventd). This daemon monitors log trafc, sends out notications,
and runs scheduled reports. It does not require any end user conguration and it is
started automatically as part of the security event notication through the YaST AppArmor Control Panel or by the conguration of scheduled reports in the YaST AppArmor
Reports module.
6
Managing Proled Applications 87
Page 88

Apart from transparently enabling and disabling aa-eventd via the YaST modules, you
can manually toggle its status with the rcaaeventd init script. The AppArmor event
daemon is not required for proper functioning of the proling process (such as enforcement or learning). It is just required for reporting.
Find more details on security event notication in Section 6.2, “Conguring Security
Event Notication” (page 88) and on scheduled reports in Section 6.3, “Conguring
Reports” (page 91).
6.2 Conguring Security Event
Notication
Security event notication is a Novell AppArmor feature that informs you when systemic
Novell AppArmor activity occurs. Activate it by selecting a notication frequency
(receiving daily notication, for example). Enter an e-mail address, so you can be notied via e-mail when Novell AppArmor security events occur. Select one of the following
notication types:
Terse
Terse notication summarizes the total number of system events without providing
details. For example:
sun@example.com has had 29 security events since Mon May 22 16:32:38 2006
Summary Notication
Summary notication displays the logged Novell AppArmor security events and
lists the number of individual occurrences, including the date of the last occurrence.
For example:
AppArmor: PERMITTING access to capability ’setgid’ (httpd2-prefork(6347)
profile /usr/sbin/httpd2-prefork active /usr/sbin/httpd2-prefork) 2 times,
the latest at Sat Oct 9 16:05:54 2004.
Verbose Notication
Verbose notication displays unmodied, logged Novell AppArmor security events.
It tells you every time an event occurs and writes a new line in the verbose log.
These security events include the date and time the event occurred, when the application prole permits and rejects access, and the type of le permission access that
is permitted or rejected. Verbose notication also reports several messages that the
88 Novell AppArmor Administration Guide
Page 89

aa-logprof tool (see Section “aa-logprof—Scanning the System Log” (page 61))
uses to interpret proles. For example:
type=APPARMOR msg=audit(1148308355.074:198): REJECTING w access to
/var/log/apache2/error_log (httpd2-prefork(5173) profile
/usr/sbin/httpd2-prefork active /usr/sbin/httpd2-prefork)
NOTE
You must set up a mail server that can send outgoing mail using the SMTP
protocol (for example, postx or exim) for event notication to work.
In the Enable Security Event Notication section of the AppArmor Conguration
1
window, click Congure.
In the Security Event Notication window, enable Terse, Summary, or Verbose
2
event notication.
In each applicable notication type section, enter the e-mail addresses of
a
those who should receive notication in the eld provided. If notication
is enabled, you must enter an e-mail address. Separate multiple e-mail addresses with commas.
For each notication type enabled, select the frequency of notication.
b
Managing Proled Applications 89
Page 90

Select a notication frequency from the following options:
• Disabled
• 1 minute
• 5 minutes
• 10 minutes
• 15 minutes
• 30 minutes
• 1 hour
• 1 day
• 1 week
For each selected notication type, select the lowest severity level for which
c
a notication should be sent. Security events are logged and the notications
are sent at the time indicated by the interval when events are equal to or
greater than the selected severity level. If the interval is 1 day, the notication
is sent daily, if security events occur.
NOTE: Severity Levels
Novell AppArmor sends out event messages for things that are in
the severity database and above the level that you select. Severity
levels are numbered 1 through 10, 10 being the most severe security
incident. The /etc/severity.db le denes the severity level of
potential security events. The severity levels are determined by the
importance of different security events, such as certain resources
accessed or services denied.
Click OK.
3
Click Done in the Novell AppArmor Conguration window.
4
90 Novell AppArmor Administration Guide
Page 91

Click File → Quit in the YaST Control Center.
5
After conguring security event notication, read the reports and determine whether
events require follow up. Follow up may include the procedures outlined in Section 6.4,
“Reacting to Security Event Rejections” (page 110).
6.3 Conguring Reports
Novell AppArmor's reporting feature adds exibility by enhancing the way users can
view security event data. The reporting tool performs the following:
• Creates on-demand reports
• Exports reports
• Schedules periodic reports for archiving
• E-mails periodic reports
• Filters report data by date
• Filters report data by other options, such as program name
Using reports, you can read important Novell AppArmor security events reported in
the log les without manually sifting through the messages only useful to the aa-logprof
tool. Narrow down the size of the report by ltering by date range or program name.
You can also export an html or csv le.
The following are the three types of reports available in Novell AppArmor:
Executive Security Summary
A combined report, consisting of one or more security incident reports from one
or more machines. This report can provide a single view of security events on
multiple machines. For more details, refer to Section “Executive Security Summary”
(page 100).
Application Audit Report
An auditing tool that reports which application servers are running and whether
the applications are conned by AppArmor. Application servers are applications
Managing Proled Applications 91
Page 92

that accept incoming network connections. For more details, refer to Section “Ap-
plication Audit Report” (page 97).
Security Incident Report
A report that displays application security for a single host. It reports policy violations for locally conned applications during a specic time period. You can edit
and customize this report or add new versions. For more details, refer to Section
“Security Incident Report” (page 98).
To use the Novell AppArmor reporting features, proceed with the following steps:
Open YaST → Novell AppArmor.
1
In Novell AppArmor, click AppArmor Reports. The AppArmor Security Event
2
Reports window appears. From the Reports window, select an option and proceed
to the respective section for instructions:
View Archive
Displays all reports that have been run and stored in /var/log/
apparmor/reports-archived/. Select the report you want to see in
detail and click View. For View Archive instructions, proceed to Section 6.3.1,
“Viewing Archived Reports” (page 93).
92 Novell AppArmor Administration Guide
Page 93

Run Now
Produces an instant version of the selected report type. If you select a security incident report, it can be further ltered in various ways. For Run Now
instructions, proceed to Section 6.3.2, “Run Now: Running On-Demand
Reports” (page 101).
Add
Creates a scheduled security incident report. For Add instructions, proceed
to Section 6.3.3, “Adding New Reports” (page 104).
Edit
Edits a scheduled security incident report.
Delete
Deletes a scheduled security incident report. All stock or canned reports
cannot be deleted.
Back
Returns you to the Novell AppArmor main screen.
Abort
Returns you to the Novell AppArmor main screen.
Next
Performs the same function as the Run Now button.
6.3.1 Viewing Archived Reports
View Reports enables you to specify the location of a cumulation of reports from one
or more systems, including the ability to lter by date or names of programs accessed
and display them all together in one report.
From the AppArmor Security Event Report window, select View Archive.
1
Managing Proled Applications 93
Page 94

Select the report type to view. Toggle between the different types: SIR (Security
2
Incident Report), App Aud (Application Audit), and ESS (Executive Security
Summary).
You can alter the directory location of the archived reports in Location of Archived
3
Reports. Select Accept to use the current directory or select Browse to nd a new
report location. The default directory is /var/log/apparmor/
reports-archived.
To view all the reports in the archive, select View All. To view a specic report,
4
select a report le listed in the Report eld then select View.
For Application Audit and Executive Security Summary reports, proceed to Step
5
9 (page 96).
The Report Conguration Dialog opens for Security Incident reports.
6
94 Novell AppArmor Administration Guide
Page 95

The Report Conguration dialog enables you to lter the reports selected in the
7
previous screen. Enter the desired lter details. The elds are:
Date Range
To display reports for a certain time period, select Filter By Date Range.
Enter the start and end dates that dene the scope of the report.
Program Name
When you enter a program name or pattern that matches the name of the binary executable of the program of interest, the report displays security events
that have occurred for a specic program.
Prole Name
When you enter the name of the prole, the report displays the security
events that are generated for the specied prole. You can use this to see
what is being conned by a specic prole.
PID Number
PID number is a number that uniquely identies one specic process or
running program (this number is valid only during the lifetime of that process).
Managing Proled Applications 95
Page 96

Severity
Select the lowest severity level for security events to include in the report.
The selected severity level and above are then included in the reports.
Detail
A source to which the prole has denied access. This includes capabilities
and les. You can use this eld to report the resources to which proles
prevent access.
Access Type
The access type describes what is actually happening with the security event.
The options are PERMITTING, REJECTING, or AUDITING.
Mode
The Mode is the permission that the prole grants to the program or process
to which it is applied. The options are all (all modes without ltering), r
(read), w (write), l (link),x (execute), and m (mmap).
Export Type
Enables you to export a CSV (comma separated values) or HTML le. The
CSV le separates pieces of data in the log entries with commas using a
standard data format for importing into table-oriented applications. You can
enter a path for your exported report by typing the full path in the eld provided.
Location to Store Log
Enables you to change the location at which to store the exported report. The
default location is /var/log/apparmor/reports-exported. When
you change this location, select Accept. Select Browse to browse the le
system.
To see the report, ltered as desired, select Next. One of the three reports displays.
8
Refer the following sections for detailed information about each type of report.
9
• For the application audit report, refer to Section “Application Audit Report”
(page 97).
• For the security incident report, refer to Section “Security Incident Report”
(page 98).
96 Novell AppArmor Administration Guide
Page 97

• For the executive summary report, refer to Section “Executive Security
Summary” (page 100).
Application Audit Report
An application audit report is an auditing tool that reports which application servers
are running and whether they are conned by AppArmor.
The following elds are provided in an application audit report:
Host
The machine protected by AppArmor for which the security events are reported.
Date
The date during which security events occurred.
Program
The name and path of the executing process.
Prole
The absolute name of the security prole that is applied to the process.
Managing Proled Applications 97
Page 98

PID
A number that uniquely identies one specic process or running program (this
number is valid only during the lifetime of that process).
State
This eld reveals whether the program listed in the program eld is conned. If it
is not conned, you might consider creating a prole for it.
Type
This eld reveals the type of connement the security event represents. It says either
complain or enforce. If the application is not conned (state), no type of connement
is reported.
Security Incident Report
A security incident report displays security events of interest to an administrator. The
SIR reports policy violations for locally conned applications during the specied time
period. It also reports policy exceptions and policy engine state changes. These two
types of security events are dened as follows:
Policy Exceptions
When an application requests a resource that is not dened within its prole, a security event is triggered. A report is generated that displays security events of interest
to an administrator. The SIR reports policy violations for locally conned applications during the specied time period. The SIR reports policy exceptions and policy
engine state changes.
Policy Engine State Changes
Enforces policy for applications and maintains its own state, including when engines
start or stop, when a policy is reloaded, and when global security feature are enabled
or disabled.
98 Novell AppArmor Administration Guide
Page 99

The elds in the SIR report have the following meanings:
Host
The machine protected by AppArmor for which the security events are reported.
Date
The date during which security events occurred.
Program
The name of the executing process.
Prole
The absolute name of the security prole that is applied to the process.
PID
A number that uniquely identies one specic process or running program (this
number is valid only during the lifetime of that process).
Severity
Severity levels of events are reported from the severity database. The severity
database denes the importance of potential security events and numbers them 1
through 10, 10 being the most severe security incident. The severity levels are de-
Managing Proled Applications 99
Page 100

termined by the threat or importance of different security events, such as certain
resources accessed or services denied.
Mode
The mode is the permission that the prole grants to the program or process to
which it is applied. The options are r (read), w (write), l (link), and x (execute).
Detail
A source to which the prole has denied access.This includes capabilities and les.
You can use this eld to report the resources to which the prole prevents access.
Access Type
The access type describes what is actually happening with the security event. The
options are PERMITTING, REJECTING, or AUDITING.
Executive Security Summary
A combined report consisting of one or more high-level reports from one or more machines. This report can provide a single view of security events on multiple machines
if each machine's data is copied to the report archive directory, which is /var/log/
apparmor/reports-archived. One line of the ESS report represents a range of
SIR reports.
100 Novell AppArmor Administration Guide
 Loading...