

Page 1

Novell AppArmor
www.novell.com
1.2 09/29/2005
Powered by
Immunix
Administration
Guide
Page 2

Novell AppArmor Powered by Immunix 1.2 Administration Guide
Legal Notices
Novell, Inc. makes no representations or warranties with respect to the contents or use of this documentation, and specically disclaims any express or implied warranties of merchantability or tness
for any particular purpose. Further, Novell, Inc. reserves the right to revise this publication and to
make changes to its content, at any time, without obligation to notify any person or entity of such revisions or changes.
Further, Novell, Inc. makes no representations or warranties with respect to any software, and
specically disclaims any express or implied warranties of merchantability or tness for any particular
purpose. Further, Novell, Inc. reserves the right to make changes toany and all parts of Novell software,
at any time, without any obligation to notify any person or entity of such changes.
You may not use, export, or re-export this product in violation of any applicable laws or regulations
including, without limitation, U.S. export regulations or the laws of the country in which you reside.
Copyright © 2000 - 2004, 2005 Novell, Inc. All rights reserved. No part of this publication may be
reproduced, photocopied, stored on a retrieval system, or transmitted without the express written
consent of the publisher.
Novell, Inc. has intellectual property rights relating to technology embodied in the product that is
described in this document. In particular, and without limitation, these intellectual property rights
may include one or more of the U.S. patents listed at http://www.novell.com/company/
legal/patents/ and one or more additional patents or pending patent applications in the U.S.
and in other countries.
Novell, Inc.
404 Wyman Street, Suite 500
Waltham, MA 02451
U.S.A.
www.novell.com
Online Documentation: To access the online documentation for this and other Novell products, and
to get updates, see www.novell.com/documentation.
Novell Trademarks
AppArmor is a registered trademark of Novell, Inc. in the United States and other countries.
Immunix is a trademark of Novell, Inc. in the United States and other countries.
Novell is a registered trademark of Novell, Inc. in the United States and other countries.
SUSE is a registered trademark of SUSE LINUX Products GmbH, a Novell business.
Page 3

Third-Party Materials
All third-party trademarks are the property of their respective owners.
THIS SOFTWARE IS PROVIDED BY THE COPYRIGHT HOLDERS AND CONTRIBUTORS
"AS IS" AND ANY EXPRESS OR IMPLIED WARRANTIES, INCLUDING, BUT NOT LIMITED
TO, THE IMPLIED WARRANTIES OF MERCHANTABILITY AND FITNESS FOR A PARTICULAR PURPOSE ARE DISCLAIMED. IN NO EVENT SHALL INTEL OR CONTRIBUTORS BE
LIABLE FOR ANY DIRECT, INDIRECT, INCIDENTAL, SPECIAL, EXEMPLARY, OR CONSEQUENTIAL DAMAGES(INCLUDING, BUT NOT LIMITED TO, PROCUREMENT OF SUBSTITUTE GOODS OR SERVICES; LOSS OF USE, DATA, OR PROFITS; OR BUSINESS INTERRUPTION) HOWEVER CAUSED AND ON ANY THEORY OF LIABILITY, WHETHER IN CONTRACT, STRICT LIABILITY, OR TORT (INCLUDING NEGLIGENCE OR OTHERWISE)
ARISING IN ANY WAY OUT OF THE USE OF THIS SOFTWARE, EVEN IF ADVISED OF THE
POSSIBILITY OF SUCH DAMAGE.
Page 4

Page 5

Contents
Introduction to Novell AppArmor vii
1 Immunizing Programs 13
2 Selecting Programs to Immunize 15
2.1 Immunize Programs That Grant Privilege . . . . . . . . . . . . . . . 15
2.2 Inspect Open Ports to Immunize Programs . . . . . . . . . . . . . . 16
3 Building Novell AppArmor Proles 21
3.1 Prole Components and Syntax . . . . . . . . . . . . . . . . . . . 21
3.2 Building and Managing Novell AppArmor Proles . . . . . . . . . . . 24
3.3 Building Novell AppArmor Proles with the YaST GUI . . . . . . . . . . 26
3.4 Building Novell AppArmor Proles Using the Command Line Interface . . 49
3.5 Two Methods of Proling . . . . . . . . . . . . . . . . . . . . . . 54
3.6 Pathnames and Globbing . . . . . . . . . . . . . . . . . . . . . . 73
3.7 File Permission Access Modes . . . . . . . . . . . . . . . . . . . . 74
4 Managing Proled Applications 77
4.1 Monitoring Your Secured Applications . . . . . . . . . . . . . . . . 77
4.2 Setting Up Event Notication . . . . . . . . . . . . . . . . . . . . 78
4.3 Reports . . . . . . . . . . . . . . . . . . . . . . . . . . . . . 81
4.4 Reacting to Security Events . . . . . . . . . . . . . . . . . . . . 102
4.5 Maintaining Your Security Proles . . . . . . . . . . . . . . . . . 103
5 Proling Your Web Applications Using ChangeHat Apache 105
5.1 Apache ChangeHat . . . . . . . . . . . . . . . . . . . . . . . . 106
Page 6

5.2 Apache Conguration for mod_change_hat . . . . . . . . . . . . . 113
6 Support 117
6.1 Updating Novell AppArmor Online . . . . . . . . . . . . . . . . . 117
6.2 Using the Man Pages . . . . . . . . . . . . . . . . . . . . . . . 117
6.3 For More Information . . . . . . . . . . . . . . . . . . . . . . 119
6.4 Troubleshooting . . . . . . . . . . . . . . . . . . . . . . . . . 119
6.5 Support for SUSE Linux . . . . . . . . . . . . . . . . . . . . . . 121
6.6 Reporting Bugs for AppArmor . . . . . . . . . . . . . . . . . . . 126
Glossary 129
vi
Page 7

Introduction to Novell AppArmor
Novell® AppArmor Powered by Immunix is designed to provide easy-to-use application
security for both servers and workstations. Novell AppArmor is an access control system
that lets you specify per program which les the program may read, write, and execute.
AppArmor secures applications by enforcing good application behavior without relying
on attack signatures, so can prevent attacks even if they are exploiting previously unknown vulnerabilities.
Novell AppArmor consists of:
• A library of AppArmor proles for common Linux* applications describing what
les the program needs to access.
• A library of AppArmor prole foundation classes (prole building blocks) needed
for common application activities, such as DNS lookup and user authentication.
• A tool suite for developing and enhancing AppArmor proles, so that you can
change the existing proles to suit your needs and create new proles for your own
local and custom applications.
• Several specially modied applications that are AppArmor enabled to provide enhanced security in the form of unique subprocess connement, including Apache.
• The Novell AppArmor–loadable kernel module and associated control scripts to
enforce AppArmor policies on your SUSE® Linux system.
NOTE
Some distributions of SUSE Linux include a version of AppArmor that enforce
policies for a limited set of programs. These policies can be modied to suit
your particular environment using the included AppArmor tool set. To create
AppArmor proles for additional programs, an upgrade to the full version of
AppArmor is required.
Page 8

1 Documentation Conventions
The following typographical conventions are used in this manual:
Menu Items, Field Names, and Screen Titles in GUIs
When using GUIs, eld names, menu and screen titles, and eld values are shown
as File.
Keys
Key names are listed as they appear on your keyboard, as in Enter and Esc .
Command
Linux commands (and other operating system commands, when used) are represented this way. This style should indicate to you that you can type the word
or phrase on the command line and press Enter to run the command.
Example 1
To use ls to view the contents in the current directory, enter ls in a terminal
window.
Filename
Filenames, directory names, paths, and RPM package names are represented this
way. This style should indicate that a particular le or directory exists by that name
on your Linux system.
Placeholders
Replace placeholder with the actual value that matches your setup.
Examples, Notes, and Warnings
Examples use Example: when appropriate. Notes and pertinent information are
shown with a Note or Warning ag, as in:
NOTE
Notes highlight information that might help better understand previous
paragraphs. Warnings provide important information that might seriously
affect the integrity of the product or your data.
Command Environment
viii
Page 9

Computer Output
When you see text in this style, it indicates text displayed by the computer
on the command line. You see responses to typed commands, error messages, and
interactive prompts for your input during scripts or programs shown this way.
Example 2
Use the ls command to display the contents of a directory:
$ ls
Desktop about.html logs
Mail backupfiles mail
Trademarks
A trademark symbol (®, etc.) denotes a Novell trademark. An asterisk (*) denotes
a third-party trademark.
Computer Output
2 Understanding This Guide
Immunizing Programs
Describes operation of Novell AppArmor Powered by Immunix.
Selecting Programs to Immunize
Describes the types of programs that should have Novell AppArmor proles created
for them.
Building Novell AppArmor Proles
Describes how to use the Novell AppArmor tools to immunize your own programs
and third-party programs that you may have installed on your SUSE Linux system.
It also helps you to add, edit, or delete proles that have been created for your applications.
Managing Proled Applications
Describes how to perform Novell AppArmor prole maintenance, which involves
tracking common issues and concerns.
Proling Your Web Applications Using ChangeHat Apache
Enables you to create subproles for the Apache Web server that allow you to
tightly conne small sections of Web application processing.
Introduction to Novell AppArmor ix
Page 10

Support
Indicates support options for this product.
Glossary
Provides a list of terms and their denitions.
3 Getting Started with Novell
AppArmor
Novell AppArmor Powered by Immunix (Novell AppArmor) provides you with technologies to protect your applications from their own vulnerabilities by creating Novell
AppArmor proles for applications on your SUSE Linux system.
3.1 Launching Novell AppArmor through the YaST GUI
SUSE Linux offers the utility YaST. Using YaST, you can launch the Novell AppArmor
interface. This is the recommended method for a novice Linux user. For the other
available methods, refer to Section 3.2, “Building and Managing Novell AppArmor
Proles” (page 24).
To start YaST, select System → Control Center (YaST) from the SUSE menu.
•
YaST is launched as shown in Section 3.2, “Novell AppArmor Basics” (page x),
below. You can refer to this section to navigate in Novell AppArmor.
NOTE
Alternately, you can launch the YaST GUI by opening a terminal window then
entering yast2 while logged in as root.
3.2 Novell AppArmor Basics
Novell AppArmor enables you to manage proles through a simple user interface.
x
Page 11
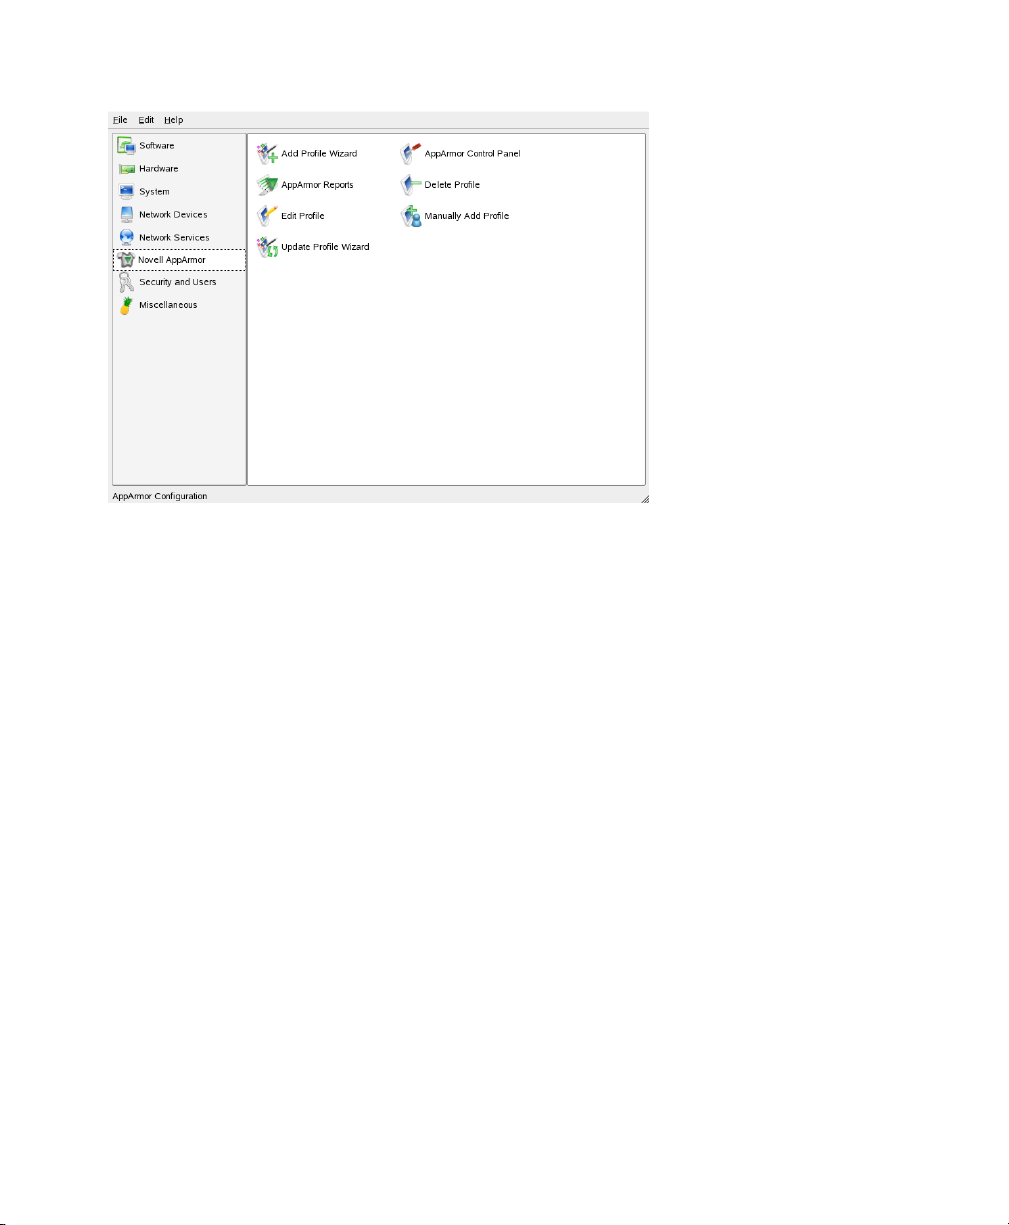
In the YaST Control Center, click Novell AppArmor in the left pane. The right from
then shows the different Novell AppArmor conguration option. Select the appropriate
Novell AppArmor conguration option by clicking the corresponding icon.
Depending on the conguration option you select, refer to one of the following locations
in this guide:
Add Prole Wizard
For detailed steps, refer to Section 3.3.1, “Adding a Prole Using the Wizard”
(page 27).
AppArmor Reports
For detailed steps, refer to Section 4.3, “Reports” (page 81).
Edit Prole
Edit an existing Novell AppArmor prole on your system. For detailed steps, refer
to Section 3.3.3, “Editing a Prole” (page 39).
Update Prole Wizard
For detailed steps, refer to Section 3.3.5, “Updating Proles from Syslog Entries”
(page 42).
Introduction to Novell AppArmor xi
Page 12

AppArmor Control Panel
For detailed steps, refer to Section 3.3.6, “Managing Novell AppArmor and Secu-
rity Event Status” (page 47).
Delete Prole
Delete an existing Novell AppArmor prole from your system. For detailed steps,
refer to Section 3.3.4, “Deleting a Prole” (page 41).
Manually Add Prole
Add a Novell AppArmor prole for an application on your system without the help
of the wizard. For detailed steps, refer to Section 3.3.2, “Manually Adding a Prole”
(page 34).
xii
Page 13

Immunizing Programs
Novell® AppArmor provides immunization technologies that protect SUSE Linux applications from the inherent vulnerabilities they possess. After installing Novell AppArmor, setting up Novell AppArmor proles and rebooting the computer, your system
becomes immunized because it begins to enforce the Novell AppArmor security policies.
Protecting programs with Novell AppArmor is referred to as immunizing.
Novell AppArmor sets up a collection of default application proles to protect standard
Linux services. To protect other applications, use the Novell AppArmor tools to create
proles for the applications that you want protected. This chapter introduces you to the
philosophy of immunizing programs. Proceed to Chapter 3, Building Novell AppArmor
Proles (page 21) if you are ready to build and manage Novell AppArmor proles.
Novell AppArmor provides streamlined access control for network services by specifying
which les each program is allowed to read, write, and execute. This ensures that each
program does what it is supposed to do and nothing else.
Novell AppArmor is host intrusion prevention, or a mandatory access control scheme,
that is optimized for servers. Previously, access control schemes were centered around
users because they were built for large timeshare systems. Alternatively, modern network
servers largely do not permit users to log in, but instead provide a variety of network
services for users, such as Web, mail, le, and print. Novell AppArmor controls the
access given to network services and other programs to prevent weaknesses from being
exploited.
1
Immunizing Programs 13
Page 14

Page 15

Selecting Programs to Immunize
Novell® AppArmor quarantines programs to protect the rest of the system from being
damaged by a compromised process. You should inspect your ports to see which programs should be proled (refer to Section 2.2, “Inspect Open Ports to Immunize Pro-
grams” (page 16)) and prole all programs that grant privilege (Section 2.1, “Immunize
Programs That Grant Privilege” (page 15)).
2.1 Immunize Programs That Grant Privilege
Programs that need proling are those that mediate privilege. The following programs
have access to resources that the person using the program does not have, so they grant
the privilege to the user when used:
cron jobs
Programs that are run periodically by cron. Such programs read input from a variety
of sources and can run with special privileges, sometimes with as much as root
privilege. For example, cron can run /usr/bin/updatedb daily to keep the
locate database up to date with sufcient privilege to read the name of every le
in the system. For instructions for nding these types of programs, refer to Sec-
tion 2.2.1, “Immunizing Cron Jobs” (page 18).
2
Web Applications
Programs that can be invoked through a Web browser, including CGI Perl scripts,
PHP pages, and more complex Web applications. For instructions on nding these
Selecting Programs to Immunize 15
Page 16

types of programs, refer to Section 2.2.2, “Immunizing Web Applications”
(page 18).
Network Agents
Programs (servers and clients) that have open network ports. User clients such as
mail clients and Web browsers, surprisingly, mediate privilege. These programs
run with the privilege to write to the user's home directories and they process input
from potentially hostile remote sources, such as hostile Web sites and e-mailed
malicious code. For instructions on nding these types of programs, refer to Sec-
tion 2.2.3, “Immunizing Network Agents” (page 20).
Conversely, unprivileged programs do not need to be proled. For instance, a shell
script might invoke the cp program to copy a le. Because cp does not have its own
prole, it inherits the prole of the parent shell script, so can copy any les that the
parent shell script's prole can read and write.
2.2 Inspect Open Ports to Immunize Programs
An automated method for nding network server daemons that should be proled is to
use the unconned tool. You can also simply view a report of this information in the
YaST GUI (refer to Section “Application Audit Report” (page 88) for instructions).
16
The unconned tool uses the command netstat -nlp to inspect your open ports
from inside your computer, detect the programs associated with those ports, and inspect
the set of Novell AppArmor proles that you have loaded. Unconned then reports
these programs along with the Novell AppArmor prole associated with each program,
or reports “none” if the program is not conned.
NOTE
If you create a new prole, you must restart the program that has been proled
for unconned to detect and report the new proled state.
Below is a sample unconned output:
2325 /sbin/portmap not confined
3702❶ /usr/sbin/sshd❷ confined by '/usr/sbin/sshd❸ (enforce)'
4040 /usr/sbin/ntpd confined by '/usr/sbin/ntpd (enforce)'
Page 17

4373 /usr/lib/postfix/master confined by '/usr/lib/postfix/master (enforce)'
4505 /usr/sbin/httpd2-prefork confined by '/usr/sbin/httpd2-prefork (enforce)'
5274 /sbin/dhcpcd not confined
5592 /usr/bin/ssh not confined
7146 /usr/sbin/cupsd confined by '/usr/sbin/cupsd (complain)'
The rst portion is a number. This number is the process ID number (PID) of the
❶
listening program.
The second portion is a string that represents the absolute path of the listening
❷
program
The nal portion indicates the prole conning the program, if any.
❸
NOTE
Unconned requires root privileges and should not be run from a shell that is
conned by an AppArmor prole.
Unconned does not distinguish between one network interface and another, so it reports
all unconned processes, even those that might be listening to an internal LAN interface.
Finding user network client applications is dependent on your user preferences. The
unconned tool detects and reports network ports opened by client applications, but
only those client applications that are running at the time the unconned analysis is
performed. This is a problem because network services tend to be running all the time,
while network client applications tend only to be running when the user is interested
in them.
Applying Novell AppArmor proles to user network client applications is also dependent
on user preferences, and Novell AppArmor is intended for servers rather than workstations. Therefore, we leave proling of user network client applications as an exercise
for the user.
To aggressively conne desktop applications, the unconned command supports a
paranoid option, which reports all processes running and the corresponding AppArmor
proles that might or might not be associated with each process. The unconned user
can then decide whether each of these programs needs an AppArmor prole.
Additional proles can be traded with other users and with the Novell® security development team on the user mailing list at http://mail.wirex.com/mailman/
listinfo/immunix-users.
Selecting Programs to Immunize 17
Page 18

2.2.1 Immunizing Cron Jobs
To nd programs that are run by cron, you need to inspect your local cron conguration.
Unfortunately, cron conguration is rather complex, so there are numerous les to inspect. Periodic cron jobs are run from these les:
/etc/crontab
/etc/cron.d/*
/etc/cron.daily/*
/etc/cron.hourly/*
/etc/cron.monthly/*
/etc/cron.weekly/*
For root's cron jobs, you can edit the tasks with crontab -e and list root's cron tasks
with crontab -l. You must be root for these to work.
Once you nd these programs, you can use the Add Prole Wizard to create proles
for them. Refer to Section 3.3.1, “Adding a Prole Using the Wizard” (page 27).
2.2.2 Immunizing Web Applications
To nd Web applications, you should investigate your Web server conguration. The
Apache Web server is highly congurable and Web applications can be stored in many
directories, depending on your local conguration. SUSE Linux,by default, stores Web
applications in /srv/www/cgi-bin/. To the maximum extent possible, each Web
application should have an Novell AppArmor prole.
18
Once you nd these programs, you can use the AppArmor Add Prole Wizard to create
proles for them. Refer to Section 3.3.1, “Adding a Prole Using the Wizard” (page 27).
CGI Programs and Subprocess Connement in Web
Applications
Because CGI programs are executed by the Apache Web server, the prole for Apache
itself usr.sbin.httpd2-prefork (for Apache2 on SUSE Linux) must be modied
to add execute permissions to each of these programs. For instance, adding the line
/srv/www/cgi-bin/my_hit_counter.pl rpx grants Apache permission to
execute the Perl script my_hit_counter.pl and requires that there be a dedicated
prole for my_hit_counter.pl. If my_hit_counter.pl does not have a ded-
Page 19

icated prole associated with it, the rule should say
/srv/www/cgi-bin/my_hit_counter.pl rix to cause my_hit_counter
.pl to inherit the usr.sbin.httpd2-prefork prole.
Some users might nd it inconvenient to specify execute permission for every CGI
script that Apache might invoke. Instead, the administrator can grant controlled access
to collections of CGI scripts. For instance, adding the line
/srv/www/cgi-bin/*.{pl,py,pyc} rix allows Apache to execute all les
in /srv/www/cgi-bin/ ending in .pl (Perl scripts) and .py or .pyc (Python
scripts). As above, the ix part of the rule causes the Python scripts to inherit the Apache
prole, which is appropriate if you do not want to write individual proles for each
Python script.
NOTE
If you want the subprocess connement module (mod_change_hat) functionality when Web applications handle Apache modules (mod_perl and mod
_php), use the ChangeHat features when you add a prole in YaST or at the
command line. To take advantage of the subprocess connement, refer to
Section 5.1, “Apache ChangeHat” (page 106).
Proling Web applications that use mod_perl and mod_php require slightly different
handling. In this case, the “program” is a script interpreted directly by the module
within the Apache process, so no exec happens. Instead, the Novell AppArmor version
of Apache calls change_hat() naming a subprole (a “hat”) corresponding to the
name of the URI requested.
NOTE
The name presented for the script to execute might not be the URI, depending
on how Apache has been congured for where to look for module scripts. If
you have congured your Apache to place scripts in a different place, the different names appear in syslog when Novell AppArmor complains about access
violations. See Chapter 4, Managing Proled Applications (page 77).
For mod_perl and mod_php scripts, this is the name of the Perl script or the PHP
page requested. For example, adding this subprole allows the localtime.php page to
execute and access the local system time:
Selecting Programs to Immunize 19
Page 20

/usr/sbin/httpd2-prefork^/cgi-bin
localtime.php {
/etc/localtime r,
/srv/www/cgi-bin/localtime.php r,
/usr/lib/locale/** r,
}
If no subprole has been dened, the Novell AppArmor version of Apache applies the
DEFAULT_URI hat. This subprole is basically sufcient to display an HTML Web
page. The DEFAULT_URI hat that Novell AppArmor provides by default is the following:
/usr/sbin/suexec2 ixr,
/var/log/apache2/** rwl,
/home/*/public_html/** r,
/srv/www/htdocs/** r,
/srv/www/icons/*.{gif,jpg,png} r,
/usr/share/apache2/** r,
If you want a single Novell AppArmor prole for all Web pages and CGI scripts served
by Apache, a good approach is to edit the DEFAULT_URI subprole.
2.2.3 Immunizing Network Agents
To nd network server daemons that should be proled, you should inspect the open
ports on your machine, consider the programs that are answering on those ports, and
provide proles for as many of those programs as possible. If you provide proles for
all programs with open network ports, an attacker cannot get to the le system on your
machine without passing through a Novell AppArmor prole policy.
20
Scan your server for open network ports manually from outside the machine using a
scanner, such as nmap, or from inside the machine using netstat. Then inspect the machine to determine which programs are answering on the discovered open ports.
Page 21

Building Novell AppArmor Proles
This chapter explains how to build and manage Novell® AppArmor proles. You are
ready to build Novell AppArmor proles after you select the programs to prole. For
help with this, refer to Chapter 2, Selecting Programs to Immunize (page 15).
3.1 Prole Components and Syntax
This section details the syntax or makeup of Novell AppArmor proles. An example
illustrating this syntax is presented in Section 3.1.1, “Breaking a Novell AppArmor
Prole into Its Parts” (page 21).
3.1.1 Breaking a Novell AppArmor Prole
into Its Parts
Novell AppArmor prole components are called Novell AppArmor rules. Currently
there are two main types of Novell AppArmor rules, path entries and capability entries.
Path entries specify what the process can access in the le system and capability entries
provide a more ne-grained control over what a conned process is allowed to do
through other system calls that require privileges. Includes are a type of meta rule or
directives that pull in path and capability entries from other les.
3
The easiest way of explaining what a prole consists of and how to create one is to
show the details of a sample prole. Consider, for example, the following prole for
the program /sbin/klogd:
Building Novell AppArmor Proles 21
Page 22

# profile to confine klogd❶
/sbin/klogd ❷
{❸
#include <abstractions/base>❹
capability sys_admin,❺
/boot/* r❻,
/proc/kmsg r,
/sbin/klogd r,
/var/run/klogd.pid lw,
}
A comment naming the program that is conned by this prole. Always precede
❶
comments like this with the # sign.
The absolute path to the program that is conned.
❷
The curly braces {} serve as a container for include statements of other proles
❸
as well as for path and capability entries.
This directive pulls in components of Novell AppArmor proles to simplify pro-
❹
les.
Capability entry statements enable each of the 29 POSIX.1e draft capabilities.
❺
A path entry specifying what areas of the le system the program can access. The
❻
rst part of a path entry species the absolute path of a le (including regular
expression globbing) and the second part indicates permissible access modes (r
for read, w for write, and x for execute). A white space of any kind (spaces or
tabs) can precede pathnames or separate the pathname from the access modes.
White space between the access mode and the trailing comma is optional.
22
When a prole is created for a program, the program can access only the les, modes,
and POSIX capabilities specied in the prole. These restrictions are in addition to the
native Linux access controls.
Example: To gain the capability CAP_CHOWN, the program must have both access
to CAP_CHOWN under conventional Linux access controls (typically, be a root-owned
process) and have capability chown in its prole. Similarly, to be able to write to the
le /foo/bar the program must have both the correct user ID and mode bits set in
the les attributes (see the chmod and chown man pages) and have /foo/bar w in
its prole.
Attempts to violate Novell AppArmor rules are recorded in syslog. In many cases,
Novell AppArmor rules prevent an attack from working because necessary les are not
Page 23

accessible and, in all cases, Novell AppArmor connement restricts the damage that
the attacker can do to the set of les permitted by Novell AppArmor.
3.1.2 #include
#include statements are directives that pull in components of other Novell AppArmor proles to simplify proles. Include les fetch access permissions for programs. By using an include, you can give the program access to directory paths or les that are also required by other programs. Using includes can reduce the size of a prole.
By default, the #include statement appends /etc/subdomain.d/, which is
where it expects to nd the include le, to the beginning of the pathname. Unlike other
prole statements (but similar to C programs), #include lines do not end with a
comma.
To assist you in proling your applications, Novell AppArmor provides two classes of
#includes, abstractions, and program chunks.
Abstractions
Abstractions are #includes that are grouped by common application tasks. These
tasks include access to authentication mechanisms, access to name service routines,
common graphics requirements, and system accounting. Files listed in these abstractions
are specic to the named task; programs that require one of these les usually require
some of the other les listed in the abstraction le (depending on the local conguration
as well as the specic requirements of the program). Abstractions can be found in
/etc/subdomain.d/abstractions/.
Program Chunks
Program chunks are access controls for specic programs that a system administrator
might want to control based on local site policy. Each chunk is used by a single program.
These are provided to ease local-site modications to policy and updates to policy
provided by Novell AppArmor. Administrators can modify policy in these les to suit
their own needs and leave the program proles unmodied, simplifying the task of
merging policy updates from Novell AppArmor into enforced policy at each site.
Building Novell AppArmor Proles 23
Page 24

The access restrictions in the program chunks are typically very liberal and are designed
to allow your users access to their les in the least intrusive way possible while still
allowing system resources to be protected. An exception to this rule is the postfix*
series of program chunks. These proles are used to help abstract the location of the
postx binaries. You probably do not want to reduce the permissions in the postfix*
series. Programchunks can be found in /etc/subdomain.d/program-chunks/
.
3.1.3 Capability Entries (POSIX.1e)
Capabilities statements are simply the word “capability” followed by the name of the
POSIX.1e capability as dened in the capabilities(7) man page.
3.2 Building and Managing Novell
AppArmor Proles
There are three ways you can build and manage Novell AppArmor proles, depending
on the type of computer environment you prefer. You can use the graphical YaST interface (YaST GUI), the text-based YaST ncurses mode (YaST ncurses), or the command
line interface. All three options are effective for creating and maintaining proles while
offering need-based options for users.
24
The command line interface requires knowledge of Linux commands and using terminal
windows. All three methods use specialized Novell AppArmor tools for creating the
proles so you do not need to do it manually, which would be quite time consuming.
3.2.1 Using the YaST GUI
To use the YaST GUI for building and managing Novell AppArmor proles, refer to
Section 3.3, “Building Novell AppArmor Proles with the YaST GUI” (page 26).
Page 25

3.2.2 Using YaST ncurses
YaST ncurses can be used for building and managing Novell AppArmor proles and
is better suited for users with limited bandwidth connections to their server. Access
YaST ncurses by typing yast while logged in to a terminal window or console as root.
YaST ncurses has the same features as the YaST GUI.
Refer to the instructions in Section 3.3, “Building Novell AppArmor Proles with the
YaST GUI” (page 26) to build and manage Novell AppArmor proles in YaST
ncurses, but be aware that the screens look different but function similarly.
3.2.3 Using the Command Line Interface
The command line interface requires knowledge of Linux commands and using terminal
windows. To use the command line interface for building and managing Novell AppArmor proles, refer to Section 3.4, “Building Novell AppArmor Proles Using the
Command Line Interface” (page 49).
The command line interface offers access to a few tools that are not available using the
other Novell AppArmor managing methods:
complain
Sets proles into complain mode. Set it back to enforce mode when you want the
system to begin enforcing the rules of the proles, not just logging information.
For more information about this tool, refer to Section “Complain or Learning Mode”
(page 58).
enforce
Sets proles back to enforce mode and the system begins enforcing the rules of
the proles, not just logging information. For more information about this tool,
refer to Section “Enforce Mode” (page 59).
unconned
Performs a server audit to nd processes that are running and listening for network
connections then reports whether they are proled.
autodep
Generates a prole skeleton for a program and loads it into the Novell AppArmor
module in complain mode.
Building Novell AppArmor Proles 25
Page 26
3.3 Building Novell AppArmor
Proles with the YaST GUI
Open the YaST GUI displays from the SUSE menu with System → YaST → Novell
AppArmor. Novell AppArmor opens in the YaST interface as shown below:
NOTE
You can also access the YaST GUI by opening a terminal window, logging in as
root, and entering yast2.
26
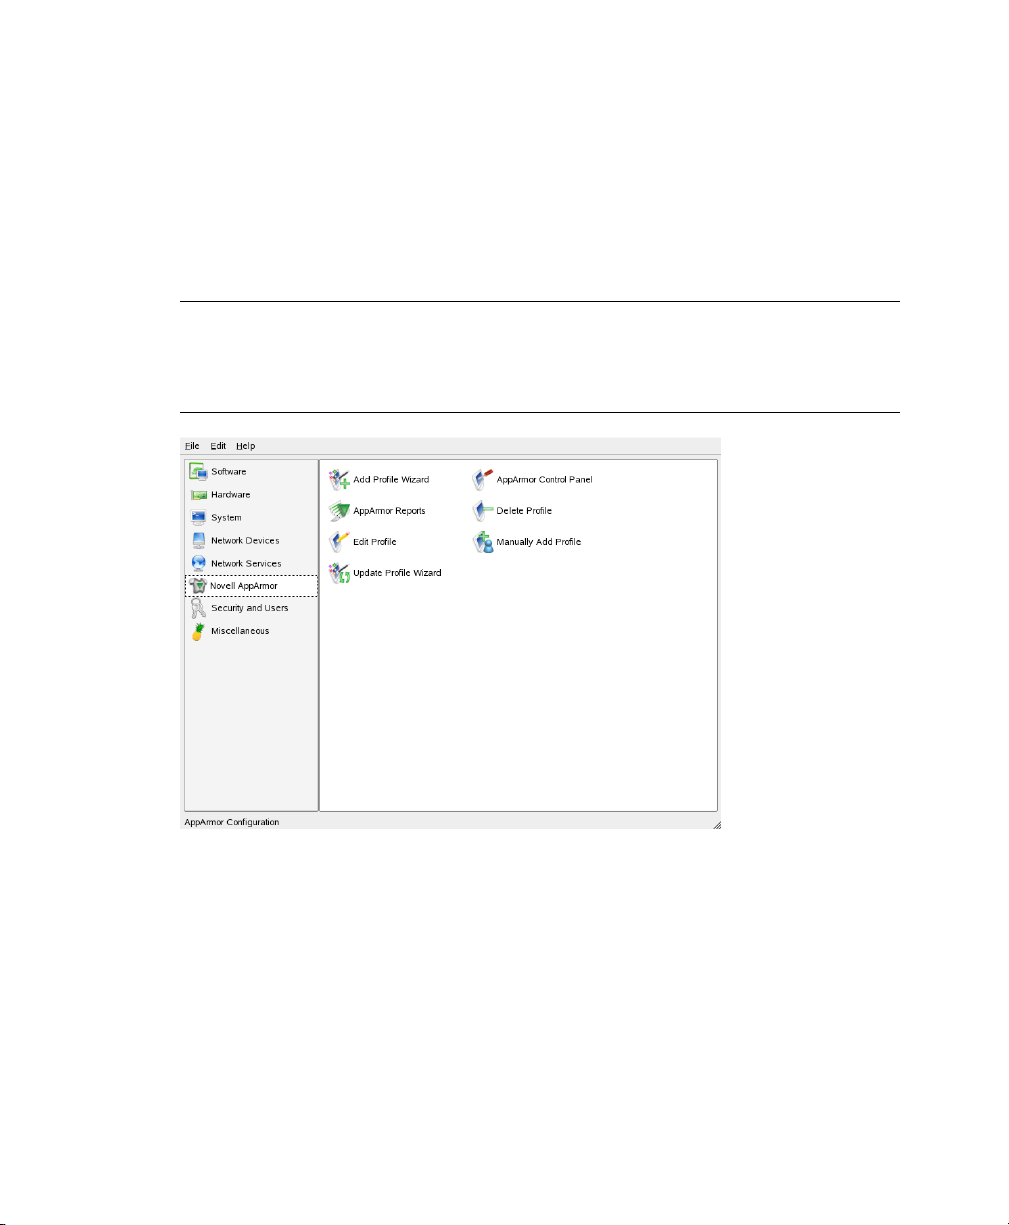
In the right frame, yousee several Novell AppArmor option icons. If Novell AppArmor
does not display in the left frame of the YaST window or if the Novell AppArmor icons
do not display, you might want to reinstall Novell AppArmor. The following actions
are available from Novell AppArmor.
Click one of the following Novell AppArmor icons and proceed to the section referenced
below:
Page 27

Add Prole Wizard
For detailed steps, refer to Section 3.3.1, “Adding a Prole Using the Wizard”
(page 27).
Manually Add Prole
Add a Novell AppArmor prole for an application on your system without the help
of the wizard. For detailed steps, refer to Section 3.3.2, “Manually Adding a Prole”
(page 34).
Edit Prole
Edits an existing Novell AppArmor prole on your system. For detailed steps, refer
to Section 3.3.3, “Editing a Prole” (page 39).
Delete Prole
Deletes an existing Novell AppArmor prole from your system. For detailed steps,
refer to Section 3.3.4, “Deleting a Prole” (page 41).
Update Prole Wizard
For detailed steps, refer to Section 3.3.5, “Updating Proles from Syslog Entries”
(page 42).
AppArmor Reports
For detailed steps, refer to Section 4.3, “Reports” (page 81).
AppArmor Control Panel
For detailed steps, refer to Section 3.3.6, “Managing Novell AppArmor and Secu-
rity Event Status” (page 47).
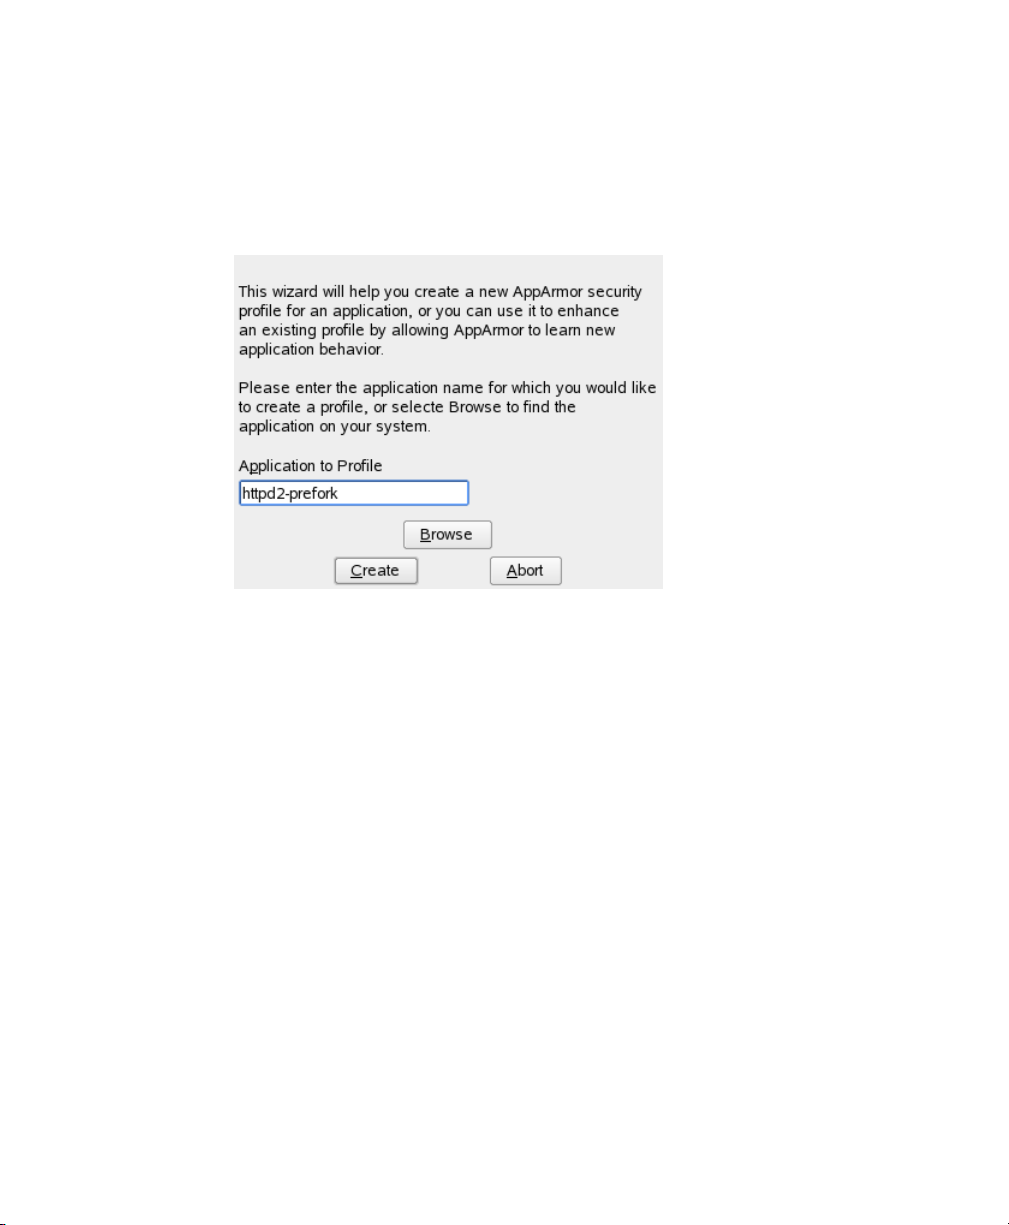
3.3.1 Adding a Prole Using the Wizard
The Add Prole Wizard is designed to set up Novell AppArmor proles using the
Novell AppArmor proling tools, genprof (Generate Prole) and logprof (Update
Proles From Learning Mode Log File). For more information about these tools, refer
to Section 3.5.3, “Summary of Proling Tools” (page 56).
Stop the application before proling it to ensure that the application start-up is
1
included in the prole. To do this, make sure that the application or daemon is
not running prior to proling it.
Building Novell AppArmor Proles 27
Page 28
For example, enter /etc/init.d/PROGRAM stop in a terminal window
while logged in as root, replacing PROGRAM is the name of the program to prole.
If you have not done so already, in the YaST GUI, click Novell AppArmor →
2
Add Prole Wizard.
Enter the name of the application or browse to the location of the program.
3
28
Click Create. This runs a Novell AppArmor tool named autodep, which performs
4
a static analysis of the program to prole and loads an approximate prole into
Novell AppArmor module. For more information about autodep, refer to Section
“autodep” (page 57).
The AppArmor Proling Wizard window opens.
Page 29
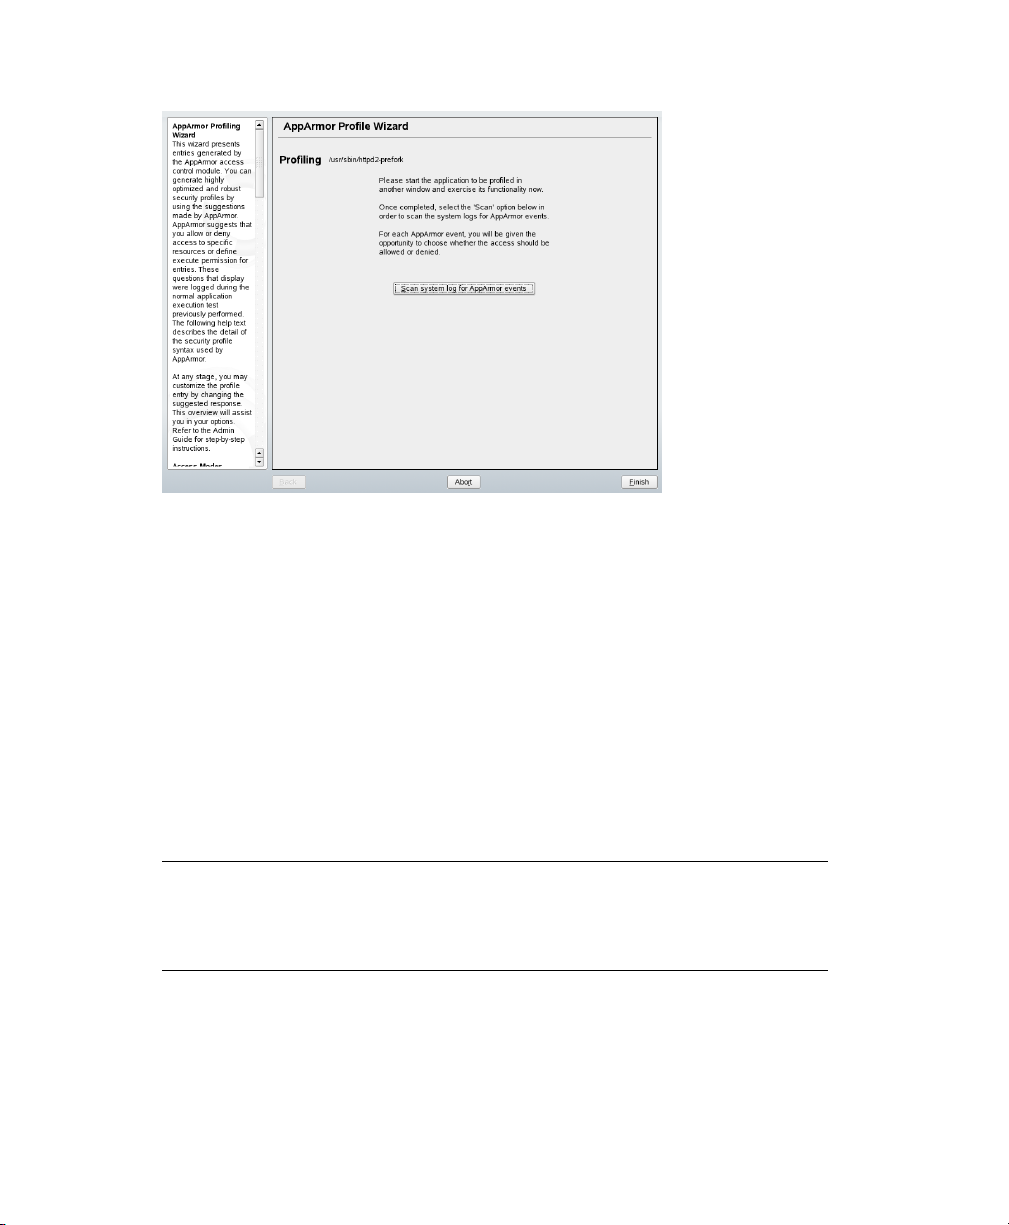
In the background, Novell AppArmor also sets the prole to learning mode. For
more information about learning mode, refer to Section “Complain or Learning
Mode” (page 58).
Run the application that is being proled.
5
Perform as many of the application functions as possible so learning mode can
6
log the les and directories to which the program requires access to function
properly.
Click Scan System Log for Entries to Add to Prole to parse the learning mode
7
log les. This generates a series of questions that you must answer to guide the
wizard in generating the security prole.
NOTE
If requests to add hats appear, proceed to Chapter 5, Proling Your Web
Applications Using ChangeHat Apache (page 105).
The questions fall into two categories:
Building Novell AppArmor Proles 29
Page 30
• A resource is requested by a proled program that is not in the prole (see
Figure 3.1, “Learning Mode Exception: Controlling Access to Specic Resources” (page 30)). The learning mode exception requires you to allow or
deny access to a specic resource.
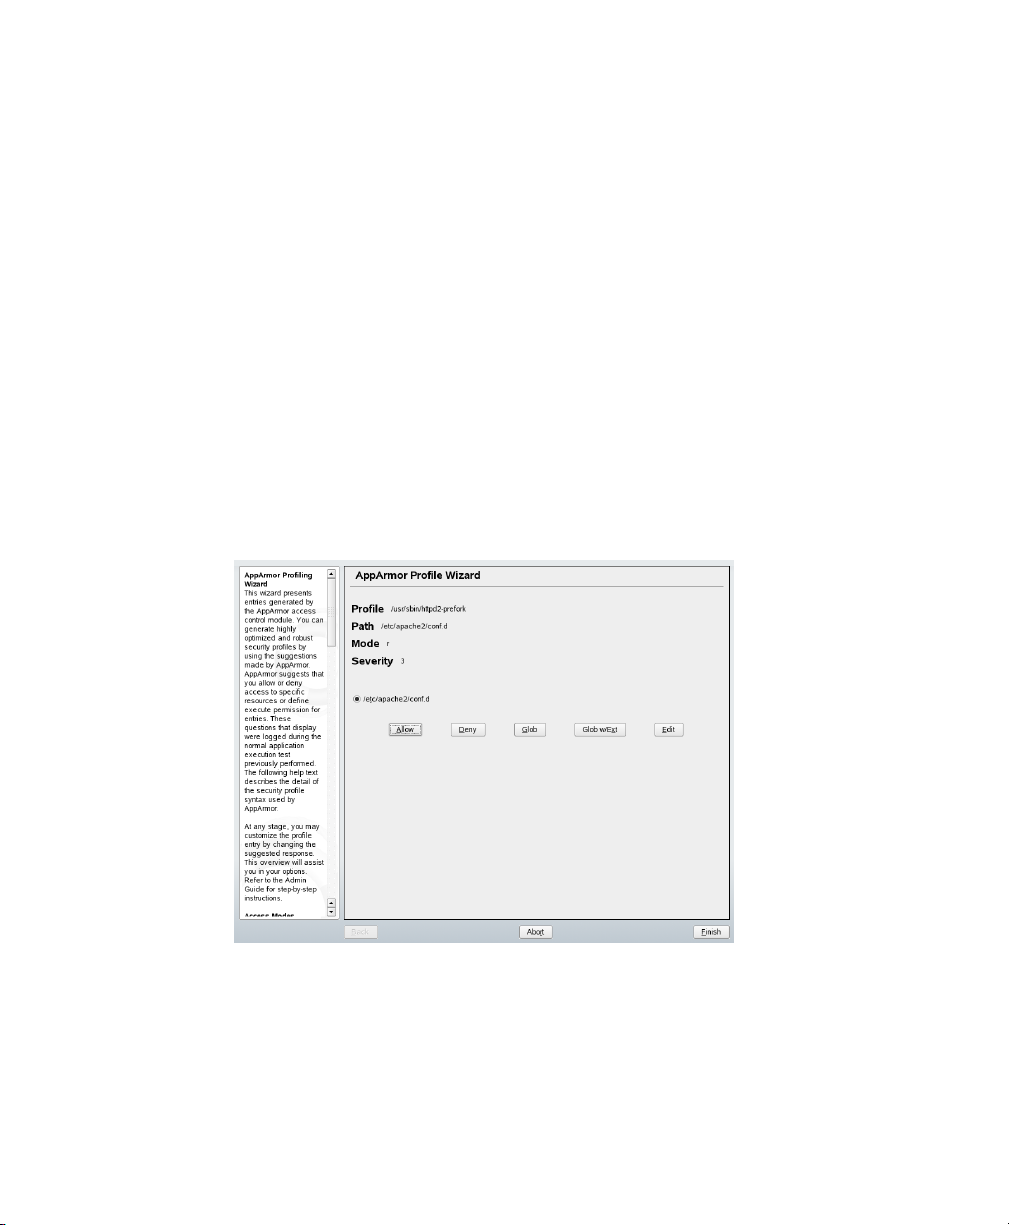
• A program is executed by the proled program and the security domain
transition has not been dened (see Figure 3.2, “Learning Mode Exception:
Dening Execute Permissions for an Entry” (page 31)). The learning mode
exception requires you to dene execute permissions for an entry.
Each of these cases results in a series of questions that you must answer to add
the resource to the prole or to add the program into the prole. The following
two gures show an example of each case. Subsequent steps describe your options
in answering these questions.
The AppArmor Proling Wizard window opens.
Figure 3.1
Learning Mode Exception: Controlling Access to Specic Resources
30
Page 31

Figure 3.2
The Add Prole Wizard begins suggesting directory path entries that have been
8
accessed by the application you are proling (as seen in Figure 3.1, “Learning
Mode Exception: Controlling Access to Specic Resources” (page 30)) or requir-
ing you to dene execute permissions for entries (as seen in Figure 3.2, “Learning
Mode Exception: Dening Execute Permissions for an Entry” (page 31)).
Learning Mode Exception: Dening Execute Permissions for an Entry
For Figure 3.1, “Learning Mode Exception: Controlling Access to Specic
a
Resources”: From the following options, select the one that satises the re-
quest for access, which could be a suggested include, a particular globbed
version of the path, or the actual pathname. Note that all of these options
are not always available.
#include
The section of a Novell AppArmor prole that refers to an include le.
Include les procure access permissions for programs. By using an include, you can give the program access to directory paths or les that
are also required by other programs. Using includes can reduce the size
of a prole. It is good practice to select includes when suggested.
Building Novell AppArmor Proles 31
Page 32

Globbed Version
Accessed by clicking Glob as described in the next step. For information
about globbing syntax, refer to Section 3.6, “Pathnames and Globbing”
(page 73).
Actual Pathname
Literal path that the program needs access to so that it can run properly.
For Figure 3.2, “Learning Mode Exception: Dening Execute Permissions
b
for an Entry”: From the following options, select the one that satises the
request for access.
Inherit
Stay in the same security prole (parent's prole).
Prole
Requires that a separate prole exists for the executed program.
Unconned
Executes the program without a security prole.
WARNING
Unless absolutely necessary, do not run unconned. Choosing
the Unconned option executes the new program without any
protection from AppArmor.
32
After you select a directory path, you need to process it as an entry into the
9
Novell AppArmor prole by clicking Allow or Deny. If you are not satised with
the directory path entry as it is displayed, you can also Glob or Edit it.
The following options are available to process the learning mode entries and to
build the prole:
Allow
Grants the program access to the specied directory path entries. The Add
Prole Wizard suggests le permission access. For more information about
this, refer to Section 3.7, “File Permission Access Modes” (page 74).
Page 33

Deny
Click Deny to prevent the program from accessing the specied directory
path entries.
Glob
Clicking this modies the directory path (by using wild cards) to include all
les in the suggested entry directory. Double-clicking it grants access to all
les and subdirectories beneath the one shown.
For more information about globbing syntax, refer to Section 3.6, “Pathnames
and Globbing” (page 73).
Glob w/Ext
Modies the original directory path while retaining the lename extension.
A single click causes /etc/apache2/file.ext to become /etc/
apache2/*.ext, adding the wild card (asterisk) in place of the le name.
This allows the program to access all les in the suggested directories that
end with the .ext extension. When you double-click it, access is granted
to all les (with the particular extension) and subdirectories beneath the one
shown.
Edit
Enables editing of the highlighted line. The new (edited) line appears at the
bottom of the list.
Abort
Aborts logprof, dumping all rule changes entered so far and leaving all proles unmodied.
Finish
Closes logprof, saving all rule changes entered so far and modifying all
proles.
Click Allow or Deny for each learning mode entry. These help build the Novell
AppArmor prole.
NOTE
The number of learning mode entries corresponds to the complexity of
the application.
Building Novell AppArmor Proles 33
Page 34

Repeat the previous steps if you need to execute more functionality of your application.
When you are done, click Finish. In the following pop-up, click Yes to exit the
Prole Creation Wizard. The prole is saved and loaded into the Novell AppArmor module.
3.3.2 Manually Adding a Prole
Novell AppArmor enables you to create a Novell AppArmor prole by manually adding
entries into the prole. You simply need to select the application for which to create a
prole, then add entries.
To add a prole, open YaST → Novell AppArmor. The Novell AppArmor interface
1
opens.
In Novell AppArmor, click Manually Add Prole (see Figure 3.3, “Manually
2
Adding a Prole: Select Application” (page 34)).
34
Figure 3.3
Browse your system to nd the application for which to create a prole.
3
When you nd the prole, select it and click Open. A basic, empty prole appears
4
in the Novell AppArmor Prole Dialog window.
Manually Adding a Prole: Select Application
Page 35

In the AppArmor Prole Dialog window, you can add, edit, or delete Novell
5
AppArmor prole entries by clicking the corresponding buttons and referring to
the following sections: Section “Adding an Entry” (page 35), Section “Editing
an Entry” (page 38), or Section “Editing an Entry” (page 38).
When you are nished, click Done.
6
Adding an Entry
This section explains the Add Entry option that can be found in Section 3.3.2, “Manu-
ally Adding a Prole” (page 34) or Section 3.3.3, “Editing a Prole” (page 39). When
you select Add Entry, a drop-down list displays the types of entries you can add to the
Novell AppArmor prole.
From the list, select one of the following:
•
File
In the pop-up window, specify the absolute path of a le, including the type
of access permitted. When nished, click OK.
Building Novell AppArmor Proles 35
Page 36

You can use globbing if necessary. For globbing information, refer to Sec-
tion 3.6, “Pathnames and Globbing” (page 73). For le access permission
information, refer to Section 3.7, “File Permission Access Modes” (page 74).
Directory
In the pop-up window, specify the absolute path of a directory, including
the type of access permitted. You can use globbing if necessary. When nished, click OK.
For globbing information, refer to Section 3.6, “Pathnames and Globbing”
(page 73). For le access permission information, refer to Section 3.7, “File
Permission Access Modes” (page 74).
36
Page 37

Capability
In the pop-up window, select the appropriate capabilities. These are statements that enable each of the 32 POSIX.1e capabilities. Refer to Section 3.1.1,
“Breaking a Novell AppArmor Prole into Its Parts” (page 21) for more
information about capabilities. When nished making your selections, click
OK.
Include
In the pop-up window, browse to the les to use as includes. Includes are
directives that pull in components of other Novell AppArmor proles to
simplify proles. For more information, refer to Section 3.1.2, “#include”
(page 23).
Building Novell AppArmor Proles 37
Page 38

Editing an Entry
This section explains the Edit Entry option that can be found in Section 3.3.2, “Manu-
ally Adding a Prole” (page 34) or Section 3.3.3, “Editing a Prole” (page 39). When
you select Edit Entry, the le browser pop-up window opens. From here, you can edit
the selected entry.
In the pop-up window, specify the absolute path of a le, including the type of access
permitted. You can use globbing if necessary. When nished, click OK.
For globbing information, refer to Section 3.6, “Pathnames and Globbing” (page 73).
For le access permission information, refer to Section 3.7, “File Permission Access
Modes” (page 74).
38
Page 39

Deleting an Entry
This section explains the Delete Entry option that can be found in the Section 3.3.2,
“Manually Adding a Prole” (page 34) or Section 3.3.3, “Editing a Prole” (page 39).
When you select an entry then select Delete Entry, Novell AppArmor removes the
prole entry that you have selected.
3.3.3 Editing a Prole
Novell AppArmor enables you to manually edit Novell AppArmor proles by adding,
editing, or deleting entries. You simply need to select the prole then add, edit, or delete
entries. To edit a prole, follow these steps:
Open YaST → Novell AppArmor.
1
In Novell AppArmor, click Edit Prole. The Edit Prole—Choose Prole to
2
Edit window opens.
Building Novell AppArmor Proles 39
Page 40

From the list of proled programs, select the prole to edit.
3
Click Next. The AppArmor Prole Dialog window displays the prole.
4
40
Page 41

In the AppArmor Prole Dialog window, you can add, edit, or delete Novell
5
AppArmor prole entries by clicking the corresponding buttons and referring to
the following sections: Section “Adding an Entry” (page 35), Section “Editing
an Entry” (page 38), or Section “Deleting an Entry” (page 39).
When you are nished, click Done.
6
In the pop-up that appears, click Yes to conrm your changes to the prole.
7
3.3.4 Deleting a Prole
Novell AppArmor enables you to delete a Novell AppArmor prole manually. You
simply need to select the application for which to delete a prole then delete it as follows:
Open the YaST → Novell AppArmor. The Novell AppArmor interface displays.
1
In Novell AppArmor, click Delete Prole icon. The Delete Prole—Choose
2
Prole to Delete window opens.
Select the prole to delete.
3
Click Next.
4
Building Novell AppArmor Proles 41
Page 42

In the pop-up that opens, click Yes to delete the prole.
5
3.3.5 Updating Proles from Syslog Entries
The Novell AppArmor Prole wizard uses logprof, the tool that scans log les and
enables you to update proles. logprof tracks messages from the Novell AppArmor
module that represent exceptions for all proles running on your system. These exceptions represent the behavior of the proled application that is outside of the prole
denition for the program. You can add the new behavior to the relevant prole by
selecting the suggested prole entry.
Open YaST → Novell AppArmor. The Novell AppArmor interface displays.
1
In Novell AppArmor, click Update ProleWizard. The AppArmor ProleWizard
2
window displays.
42
Running the Update Prole Wizard (logprof) parses the learning mode log les.
This generates a series of questions that you must answer to guide logprof to
generate the security prole.
The questions fall into two categories:
Page 43

• A resource is requested by a proled program that is not in the prole (see
Figure 3.4, “Learning Mode Exception: Controlling Access to Specic Resources” (page 43)).
• A program is executed by the proled program and the security domain
transition has not been dened (see Figure 3.5, “Learning Mode Exception:
Dening Execute Permissions for an Entry” (page 44)).
Each of these cases results in a question that you must answer that enables you
to add the resource or program into the prole. The following two gures show
an example of each case. Subsequent steps describe your options in answering
these questions.
Figure 3.4
Learning Mode Exception: Controlling Access to Specic Resources
Building Novell AppArmor Proles 43
Page 44

Figure 3.5
logprof begins suggesting directory path entries that have been accessed by the
3
application you are proling (as seen in Figure 3.4, “Learning Mode Exception:
Controlling Access to Specic Resources” (page 43)) or requiring you to dene
execute permissions for entries (as seen in Figure 3.5, “Learning Mode Exception:
Dening Execute Permissions for an Entry” (page 44)).
Learning Mode Exception: Dening Execute Permissions for an Entry
44
For Figure 3.4, “Learning Mode Exception: Controlling Access to Specic
a
Resources” (page 43): From the following options, select the one that satis-
es the request for access, which could be a suggested include, a particular
globbed version of the path, or the actual pathname. Note that all of these
options are not always available.
#include
The section of a Novell AppArmor prole that refers to an include le.
Include les fetch access permissions for programs. By using an include,
you can give the program access to directory paths or les that are also
required by other programs. Using includes can reduce the size of a
prole. It is good practice to select includes when suggested.
Page 45

Globbed Version
Accessed by clicking Glob as described in the next step. For information
about globbing syntax, refer to Section 3.6, “Pathnames and Globbing”
(page 73).
Actual Pathname
This is the literal path to which the program needs access so that it can
run properly.
For Figure 3.5, “Learning Mode Exception: Dening Execute Permissions
b
for an Entry” (page 44): Select the one that satises the request for access
by choosing one of the following:
Inherit
stay in the same security prole (parent's prole)
Prole
requires that a separate prole exists for the executed program
Unconned
program executed without a security prole
WARNING
Unless absolutely necessary, do not run unconned. Choosing
the Unconned option executes the new program without any
protection from AppArmor.
After you select a directory path, you need to process it as an entry into the
4
Novell AppArmor prole by clicking Allow or Deny. If you are not satised with
the directory path entry as it is displayed, you can also Glob or Edit it.
The following options are available to process the learning mode entries and to
build the prole:
Allow
Grant the program access to the specied directory path entries. The Prole
Creation Wizard suggests le permission access. For more information about
this, refer to Section 3.7, “File Permission Access Modes” (page 74).
Building Novell AppArmor Proles 45
Page 46

Deny
Click Deny to prevent the program from accessing the specied directory
path entries.
Glob
Clicking this modies the directory path (by using wild cards) to include all
les in the suggested entry directory. Double-clicking it grants access to all
les and subdirectories beneath the one shown.
For more information about globbing syntax, refer to Section 3.6, “Pathnames
and Globbing” (page 73).
Glob w/Ext
Modify the original directory path while retaining the lename extension.
A single click causes /etc/apache2/file.ext to become /etc/
apache2/*.ext, adding the wild card (asterisk) in place of the lename.
This allows the program to access all les in the suggested directories that
end with the .ext extension. When you double-click it, access is granted
to all les (with the particular extension) and subdirectories beneath the one
shown.
Edit
Enable editing of the highlighted line. The new (edited) line appears at the
bottom of the list.
46
Abort
Abort logprof, dumping all rule changes entered so far and leaving all proles
unmodied.
Finish
Close logprof, saving all rule changes entered so far and modifying all proles.
Click Allow or Deny for each learning mode entry. These help build the Novell
AppArmor prole.
NOTE
The number of learning mode entries corresponds to the complexity of
the application.
Page 47

Repeat the previous steps if you need to execute more functionality of your application.
When you are done, click Finish. In the following pop-up, click Yes to exit the
Prole Creation Wizard. The prole is saved and loaded into the Novell AppArmor module.
3.3.6 Managing Novell AppArmor and Security Event Status
Novell AppArmor enables you to change the status of Novell AppArmor and congure
event notication.
Changing Novell AppArmor Status
You can change the status of Novell AppArmor by enabling or disabling it. Enabling
Novell AppArmor protects your system from potential program exploitation. Disabling Novell AppArmor, even if your proles have been set up, removes protection
from your system.
Conguring Event Notication
You can determine how and when you are notied when system security events
occur.
NOTE
You must set up a mail server on your SUSE Linux server that can send
outgoing mail using the single mail transfer protocol (smtp). For example,
postx or exim, in order for event notication to work.
To either congure event notication or change the status of Novell AppArmor, perform
the following steps:
When you click Novell AppArmor Control Panel, the Novell AppArmor Congu-
1
ration window appears as shown below:
Building Novell AppArmor Proles 47
Page 48

From the AppArmor Conguration screen, determine whether Novell AppArmor
2
and security event notication are running by looking for a status message that
reads enabled.
• To change the status of Novell AppArmor, continue as described in Section
“Changing Novell AppArmor Status” (page 48).
• To congure security event notication, continue as described in Sec-
tion 4.2.2, “Conguring Security Event Notication” (page 79).
Changing Novell AppArmor Status
When you change the status of Novell AppArmor, you set it to enable or disable. When
Novell AppArmor is enabled, it is installed, running and enforcing the Novell AppArmor
security policies.
To enable Novell AppArmor, open YaST → Novell AppArmor. The Novell
1
AppArmor main menu opens.
In the Novell AppArmor main menu, click AppArmor Control Panel. The App-
2
Armor Conguration window appears.
48
Page 49

In the Enable Novell AppArmor section of the window, click Congure. The
3
Enable Novell AppArmor dialog box opens.
Enable Novell AppArmor by selecting Enable or disable Novell AppArmor by
4
selecting Disable. Then click OK.
Click Done in the AppArmor Conguration window.
5
Click File → Quit in the YaST Control Center.
6
3.4 Building Novell AppArmor
Proles Using the Command Line
Interface
Novell AppArmor provides the ability to use a command line interface rather than the
GUI to manage and congure your system security.
Building Novell AppArmor Proles 49
Page 50

3.4.1 Checking the SubDomain Module Status
The SubDomain module can be in any one of three states:
Unloaded
The SubDomain module is not loaded into the kernel.
Running
The SubDomain module is loaded into the kernel and is enforcing Novell AppArmor
program policies.
Stopped
The SubDomain module is loaded into the kernel, but there are no policies being
enforced.
You can detect which of the three states that the SubDomain module is in by inspecting
/subdomain/profiles. If cat /subdomain/profiles reports a list of
proles, Novell AppArmor is running. If it is empty and returns nothing, SubDomain
is stopped. If the le does not exist, SubDomain is unloaded.
The SubDomain module can be loaded and unloaded with the standard Linux module
commands such as modprobe, insmod, lsmod, and rmmod, but this approach is
not recommended. Instead, it is recommended to manage Novell AppArmor through
the script rcsubdomain, which can perform the following operations:
50
rcsubdomain start
Has different behaviors depending on the SubDomain module state. If it was unloaded, start loads the module and starts it, putting it in the running state. If it
was stopped, then start causes the module to rescan the Novell AppArmor proles
usually found in /etc/subdomain.d and puts the module in the running state.
If the module was already running, start reports a warning and takes no action.
rcsubdomain stop
Stops SubDomain module (if it was running) by removing all proles from kernel
memory, effectively disabling all access controls, putting the module into the
stopped state. If the SubDomain module was either unloaded or already stopped,
stop tries to unload the proles again, but nothing happens.
Page 51

rcsubdomain restart
Causes SubDomain module to rescan the proles usually found in /etc/
subdomain.d without unconning running processes, adding new proles, and
removing any proles that had been deleted from /etc/subdomain.d.
rcsubdomain kill
Unconditionally removes the SubDomain module from the kernel. This is unsafe,
because unloading modules from the Linux kernel is unsafe. This command is
provided only for debugging and emergencies when the module might have to be
removed.
NOTE
Novell AppArmor is a powerful access control system and it is possible to
lock yourself out of your own machine to the point where you have to
boot the machine from rescue media (such as CD 1 of SUSE Linux) to regain
control.
To prevent such a problem, always ensure that you have a running, unconned, root login on the machine being congured when you restart the
SubDomain module. If you damage your system to the point where logins
are no longer possible (for example, by breaking the prole associated
with the SSH daemon), you can repair the damage using your running root
prompt and restarting the SubDomain module.
3.4.2 Building Novell AppArmor Proles
The SubDomain module prole denitions are stored in the directory /etc/
subdomain.d/ as plain text les.
WARNING
All les in the /etc/subdomain.d/ directory are interpreted as proles and
are loaded as such. Renaming les in that directory is not an effective way of
preventing proles from being loaded. You must remove proles from this directory to manage them effectively.
Building Novell AppArmor Proles 51
Page 52

You can use a text editor, such as vim, to access and make changes to these proles.
The following options contain detailed steps for building proles:
Adding or Creating Novell AppArmor Proles
Refer to Section 3.4.3, “Adding or Creating a Novell AppArmor Prole” (page 52)
Editing Novell AppArmor Proles
Refer to Section 3.4.4, “Editing a Novell AppArmor Prole” (page 53)
Deleting Novell AppArmor Proles
Refer to Section 3.4.5, “Deleting a Novell AppArmor Prole” (page 53)
Use vim to view and edit your prole by typing vim at a terminal window. To enable
syntax coloring when you edit a Novell AppArmor prole in vim, use the commands
:syntax on then :set syntax=subdomain. For more information about vim
and syntax coloring, refer to Section “Subdomain.vim” (page 71).
NOTE
After making changes to a prole, use the rcsubdomain restart command,
described in the previous section. This command causes the Novell AppArmor
to reread the proles. For a detailed description of the syntax of these les,
refer to Chapter 3, Building Novell AppArmor Proles (page 21).
52
3.4.3 Adding or Creating a Novell
AppArmor Prole
To add or ceate a Novell AppArmor prole for an application, you can use a systemic
or stand-alone proling method, depending on your needs.
Stand-Alone Proling
Suitable for proling small applications that have a nite run time, such as user
client applications like mail clients. Refer to Section 3.5.1, “Stand-Alone Proling”
(page 54).
Systemic Proling
Suitable for proling large numbers of programs all at once and for proling applications that might run for days, weeks, or continuously across reboots, such as
Page 53

network server applications like Web servers and mail servers. Section 3.5.2,
“Systemic Proling” (page 55).
3.4.4 Editing a Novell AppArmor Prole
The following steps describe the procedure for editing a Novell AppArmor prole. To
better understand what makes up a prole, refer to Section 3.1, “Prole Components
and Syntax” (page 21).
If you are not currently signed in as root, type su in a terminal window.
1
Enter the root password when prompted.
2
To go to the directory, enter cd /etc/subdomain.d/.
3
Enter ls to view all proles currently installed.
4
Open the prole to edit in a text editor, such as vim.
5
Make the necessary changes, then save the prole.
6
Restart Novell AppArmor by entering rcsubdomain restart in a terminal
7
window.
3.4.5 Deleting a Novell AppArmor Prole
The following steps describe the procedure for deleting a Novell AppArmor prole.
If you are not currently signed in as root, enter su in a terminal window.
1
Enter the root password when prompted.
2
To go to the Novell AppArmor directory, enter cd /etc/subdomain.d/.
3
Enter ls to view all the Novell AppArmor proles that are currently installed.
4
Delete the prole exiting prole with rm profilename.
5
Building Novell AppArmor Proles 53
Page 54

Restart Novell AppArmor by entering rcsubdomain restart in a terminal
6
window.
3.5 Two Methods of Proling
Given the syntax for Novell AppArmor proles in Section 3.1, “Prole Components
and Syntax” (page 21), you could create proles without using the tools. However, the
effort involved would be substantial. To avoid such a hassle, use the Novell AppArmor
tools to automate the creation and renement of proles.
There are two ways to approach creating Novell AppArmor proles, along with tools
to support both methods.
Stand-Alone Proling
A method suitable for proling small applications that have a nite run time, such
as user client applications like mail clients. For more information, refer to Sec-
tion 3.5.1, “Stand-Alone Proling” (page 54).
Systemic Proling
A method suitable for proling large numbers of programs all at once and for
proling applications that may run for days, weeks, or continuously across reboots,
such as network server applications like Web servers and mail servers. For more
information, refer to Section 3.5.2, “Systemic Proling” (page 55).
54
Automated prole development becomes more manageablewith the Novell AppArmor
tools:
Decide which proling method suits your needs.
1
Perform a static analysis. Run either genprof or autodep, depending on the pro-
2
ling method you have chosen.
Enable dynamic learning. Activate learning mode for all proled programs.
3
3.5.1 Stand-Alone Proling
Stand-alone prole generation and improvement is managed by a program called genprof. This method is easy because genprof takes care of everything, but is limited because
Page 55

it requires genprof to run for the entire duration of the test run of your program (you
cannot reboot the machine while you are still developing your prole).
To use genprof for the stand-alone method of proling, refer to Section “genprof”
(page 60).
3.5.2 Systemic Proling
This method is called systemic proling because it updates all of the proles on the
system at once, rather than focusing on the one or few being targeted by genprof or
standalone proling.
With systemic proling, building and improving proles are somewhat less automated,
but more exible. This method is suitable for proling long-running applications whose
behavior continues after rebooting or a large numbers of programs to prole all at once.
Build a Novell AppArmor prole for a group of applications as follows:
Create proles for the individual programs that make up your application.
1
Even though this approach is systemic, Novell AppArmor still only monitors
those programs with proles and their children. Thus, to get Novell AppArmor
to consider a program, you must at least have autodep create an approximate
prole for it. To create this approximate prole, refer to Section “autodep”
(page 57).
Put relevant proles into learning or complain mode. Activate learning
2
or complain mode for all proled programs by entering complain
/etc/subdomain.d/* in a terminal window while logged in as root.
When in learning mode, access requests are not blocked even if the prole dictates
that they should be. This enables you to run through several tests (as shown in
Step 3 (page 55)) and learn the access needs of the program so it runs properly.
With this information, you can decide how secure to make the prole.
Refer to Section “Complain or Learning Mode” (page 58) for more detailed instructions for using learning or complain mode.
Exercise your application. Run your application and exercise its functional-
3
ity. How much to exercise the program is up to you, but you need the program
to access each le representing its access needs. Because the execution is not
Building Novell AppArmor Proles 55
Page 56

being supervised by genprof, this step can go on for days or weeks and can span
complete system reboots.
Analyze the log. In systemic proling, run logprof directly instead of letting
4
genprof run it (as in stand-alone proling). The general form of logprof is:
logprof [ -d /path/to/profiles ] [ -f /path/to/logfile ]
Refer to Section “logprof” (page 65) for more information about using logprof.
Repeat Steps 3-4. This generates optimum proles. An iterative approach
5
captures smaller data sets that can be trained and reloaded into the policy engine.
Subsequent iterations generate fewer messages and run faster.
Edit the proles. You might want to review the proles that have been gen-
6
erated. You can open and edit the proles in /etc/subdomain.d/ using
vim. For help using vim to its fullest capacity, refer to Section “Subdomain.vim”
(page 71).
Return to “enforce” mode. This is when the system goes back to enforcing
7
the rules of the proles, not just logging information. This can be done manually
by removing the flags=(complain) text from the proles or automatically
by using the enforce command, which works identically to the complain command, but sets the proles to enforce mode.
56
To ensure that all proles are taken out of complain mode and put into enforce
mode, enter enforce /etc/subdomain.d/*.
Rescan all proles. To have Novell AppArmor rescan all of the proles and
8
change the enforcement mode in the kernel, enter /etc/init.d/subdomain
restart.
3.5.3 Summary of Proling Tools
All of the Novell AppArmor proling utilities are provided by the subdomain-utils
RPM package and most are stored in /usr/sbin. The following sections introduce
each tool.
Page 57

autodep
This creates an approximate prole for the program or application you are autodepping.
You can generate approximate proles for binary executables and interpreted script
programs. The resulting prole is called “approximate” because it does not necessarily
contain all of the prole entries that the program needs to be properly conned by
Novell AppArmor. The minimum autodep approximate prole has at least a base include
directive, which contains basic prole entries needed by most programs. For certain
types of programs, autodep generates a more expanded prole. The prole is generated
by recursively calling ldd(1) on the executables listed on the command line.
To generate an approximate prole, use the autodep program. The program argument
can be either the simple name of the program, which autodep nds by searching your
shell's path variable, or it can be a fully qualied path. The program itself can be of any
type (ELF binary, shell script, Perl script, etc.) and autodep generates an approximate
prole, to be improved through the dynamic proling that follows.
The resulting approximate prole is written to the /etc/subdomain.d directory
using the Novell AppArmor prole naming convention of naming the prole after the
absolute path of the program, replacing the forward slash (/) characters in the path with
period (.) characters. The general form of autodep is to enter the following in a terminal
window when logged in as root:
autodep [ -d /path/to/profiles ] [program1 program2...]
If you do not enter the program name or names, you are prompted for them.
/path/to/profiles overrides the default location of /etc/subdomain.d.
To begin proling, you must create proles for each main executable service that is
part of your application (anything that might start without being a child of another
program that already has a prole). Finding all such programs depends on the application
in question. Here are several strategies for nding such programs:
Directories
If all of the programs you want to prole are in a directory and there are no other
programs in that directory, the simple command autodep
/path/to/your/programs/* creates nominal proles for all programs in
that directory.
Building Novell AppArmor Proles 57
Page 58

ps command
You can run your application and use the standard Linux ps command to nd all
processes running. You then need to manually hunt down the location of these
programs and run the autodep program for each one. If the programs are in your
path, autodep nds them for you. If they are not in your path, the standard Linux
command locate might be helpful in nding your programs. If locate does
not work (it is not installed by default on SUSE Linux), use find . -name
'*foo*' -print.
Complain or Learning Mode
The complain or learning mode tool detects violations of Novell AppArmor prole
rules, such as the proled program accessing les not permitted by the prole. The violations are permitted, but also logged. To improve the prole, turn complain mode
on, run the program through a suite of tests to generate log events that characterize the
program's access needs then postprocess the log with the Novell AppArmor tools to
transform log events into improved proles.
Manually activating the complain mode (using the command line) adds a ag to the
top of the prole so that /bin/foo becomes /bin/foo flags=(complain).
To use complain mode, open a terminal window and enter one of the following lines
as a root user.
58
• If the example program (program1) is in your path, use:
complain [program1 program2 ...]
• If the program is not in your path, specify the entire path as follows:
complain /sbin/program1
• If the proles are not in /etc/subdomain.d, type the following to override the
default location:
complain /path/to/profiles/ program1
• Specify the prole for program1, as follows:
complain /etc/subdomain.d/sbin.program1
Page 59

Each of the above commands activates the complain mode for the proles/programs
listed. The command can list either programs or proles. If the program name does not
include its entire path, then complain searches $PATH for the program. So, for instance,
complain /usr/sbin/* nds proles associated with all of the programs in
/usr/sbin and put them into complain mode, and complain
/etc/subdomain.d/* puts all of the proles in /etc/subdomain.d into
complain mode.
Enforce Mode
The enforce mode tool detects violations of Novell AppArmor prole rules, such as
the proled program accessing les not permitted by the prole. The violations are
logged and not permitted. The default is for enforce mode to be turned on. Turn complain
mode on when you want the Novell AppArmor proles to control the access of the
program that is proled. Enforce toggles with complain mode.
Manually activating enforce mode (using the command line) adds a ag to the top of
the prole so that /bin/foo becomes /bin/foo flags=(enforce). To use
enforce mode, open a terminal window and enter one of the following lines as a root
user.
• If the example program (program1) is in your path, use:
enforce [program1 program2 ...]
• If the program is not in your path, specify the entire path, as follows:
enforce /sbin/program1
• If the proles are not in /etc/subdomain.d, use the following to override the
default location:
enforce /path/to/profiles/program1
• Specify the prole for program1, as follows:
enforce /etc/subdomain.d/sbin.program1
Each of the above commands activates the enforce mode for the proles and programs
listed.
Building Novell AppArmor Proles 59
Page 60

If you do not enter the program or prole names, you are prompted to enter one.
/path/to/profiles overrides the default location of /etc/subdomain.d.
The argument can be either a list of programs or a list of proles. If the program name
does not include its entire path, enforce searches $PATH for the program. For instance,
enforce /usr/sbin/* nds proles associated with all of the programs in /usr/
sbin and puts them into enforce mode. enforce /etc/subdomain.d/* puts
all of the proles in /etc/subdomain.d into enforce mode.
genprof
genprof (or Generate Prole) is Novell AppArmor's prole generating utility. It runs
autodep on the specied program, creating an approximate prole (if a prole does not
already exist for it), sets it to complain mode, reloads it into Novell AppArmor, marks
the syslog, and prompts the user to execute the program and exercise its functionality.
Its syntax is as follows:
genprof [ -d /path/to/profiles ]program
If you were to create a prole for the the Apache Web server program httpd2-prefork,
you would do the following in a root shell:
Enter rcapache2 stop.
1
60
Next, enter genprof httpd2-prefork.
2
Now genprof does the following:
• Resolves the full path of httpd2-prefork based on your shell's path variables.
You can also specify a full path. On SUSE Linux, the full path is /usr/
sbin/httpd2-prefork.
• Checks to see if there is an existing prole for httpd2-prefork. If there is one,
it updates it. If not, it creates one using the autodep program described in
Section 3.5.3, “Summary of Proling Tools” (page 56).
NOTE
There is a naming convention relating the full path of a program to
its prole lename so that the various Novell AppArmor proling
Page 61

tools can consistently manipulate them. The convention is to replace
a forward slash (/) with period (.) so that the prole for /usr/
sbin/httpd2-prefork is stored in /etc/subdomain.d/usr
.sbin.httpd2-prefork.
• Puts the prole for this program into learning or complain mode so that
prole violations are logged but are permitted to proceed. A log event looks
like this:
Oct 9 15:40:31 SubDomain: PERMITTING r access to
/etc/apache2/httpd.conf (httpd2-prefork(6068) profile
/usr/sbin/httpd2-prefork active /usr/sbin/httpd2-prefork)
• Marks syslog with a beginning marker of log events to consider. Example:
Sep 13 17:48:52 h2o root: GenProf: e2ff78636296f16d0b5301209a04430d
When prompted by the tool, run the application to prole in another terminal
3
window and perform as many of the application functions as possible so learning
mode can log the les and directories to which the program requires access in
order to function properly. For example, in a new terminal window, enter
rcapache2 start.
Select from the following options, which can be used after you have executed
4
the program functionality:
• S runs logprof against the system log from where it was marked when genprof was started and reloads the prole.
If system events exist in the log, Novell AppArmor parses the learning mode
log les. This generates a series of questions that you must answer to guide
genprof in generating the security prole.
• F exits the tool and returns to the main menu.
NOTE
If requests to add hats appear, proceed to Chapter 5, Proling Your Web
Applications Using ChangeHat Apache (page 105).
Building Novell AppArmor Proles 61
Page 62

Answer two types of questions:
5
• A resource is requested by a proled program that is not in the prole (see
Example 3.1, “Learning Mode Exception: Controlling Access to Specic
Resources” (page 62)).
• A program is executed by the proled program and the security domain
transition has not been dened (see Example 3.2, “Learning Mode Exception:
Dening Execute Permissions for an Entry” (page 63)).
Each of these categories results in a series of questions that you must answer to
add the resource to the prole or to add the program into the prole. The following
two gures show an example of each one. Subsequent steps describe your options
in answering these questions.
Example 3.1
Reading log entries from /var/log/messages.
Updating subdomain profiles in /etc/subdomain.d.
Profile: /usr/sbin/xinetd
Execute: /usr/sbin/vsftpd
[(I)nherit] / (P)rofile / (U)nconfined / (D)eny / Abo(r)t / (F)inish)
Learning Mode Exception: Controlling Access to Specic Resources
Dealing with execute accesses is complex. You must decide which of the three
kinds of execute permissions to grant the program:
inherit (ix)
The child inherits the parent's prole, running with the same access controls
as the parent. This mode is useful when a conned program needs to call
another conned program without gaining the permissions of the target's
prole or losing the permissions of the current prole. This mode is often
used when the child program is a helper application, such as the
/usr/bin/mail client using the less program as a pager or the Mozilla
Web browser using the Acrobat program to display PDF les.
prole (px)
The child runs using its own prole, which must be loaded into the kernel.
If the prole is not present, attempts to execute the child fails with permission
denied. This is most useful if the parent program is invoking a global service,
such as DNS lookups or sending mail via your system's MTA.
62
Page 63

unconned (ux)
The child runs completely unconned without any Novell AppArmor prole
being applied to the executed resource.
Example 3.2
Adding /bin/ps ix to profile.
Profile: /usr/sbin/xinetd
Path: /etc/hosts.allow
New Mode: r
[1 - /etc/hosts.allow]
[(A)llow] / (D)eny / (N)ew / (G)lob / Glob w/(E)xt / Abo(r)t / (F)inish
Learning Mode Exception: Dening Execute Permissions for an Entry
The above menu shows Novell AppArmor suggesting directory path entries that
have been accessed by the application you are proling. It might also require
you to dene execute permissions for entries.
Novell AppArmor provides one or more pathnames or includes. By clicking the
option number, select from one or more of the following options, then proceed
to the next step.
NOTE
All of these options are not always presented in the Novell AppArmor
menu.
#include
This is the section of a Novell AppArmor prole that refers to an include
le, which procures access permissions for programs. By using an include,
you can give the program access to directory paths or les that are also required by other programs. Using includes can reduce the size of a prole. It
is good practice to select includes when suggested.
Globbed Version
This is accessed by clicking Glob as described in the next step. For information about globbing syntax, refer to Section 3.6, “Pathnames and Globbing”
(page 73).
Building Novell AppArmor Proles 63
Page 64

Actual Path Name
This is the literal path to which the program needs access so that it can run
properly.
After you select the pathname or include, you can process it as an entry into the
6
Novell AppArmor prole by clicking Allow or Deny. If you are not satised with
the directory path entry as it is displayed, you can also Glob or Edit it.
The following options are available to process the learning mode entries and to
build the prole:
Press Enter
Allows access to the selected directory path.
Allow
Allows access to the specied directory path entries. Novell AppArmor
suggests le permission access. For more information, refer to Section 3.7,
“File Permission Access Modes” (page 74)
Deny
Prevents the program from accessing the specied directory path entries.
Novell AppArmor then moves on to the next event.
New
Prompts you to enter your own rule for this event, allowing you to specify
whatever form of regular expression you want. If the expression you enter
does not actually satisfy the event that prompted the question in the rst
place, Novell AppArmor asks you for conrmation and lets you reenter the
expression.
64
Glob
Clicking this modies the directory path (by using wild cards) to include all
les in the suggested entry directory. Double-clicking it grants access to all
les and subdirectories beneath the one shown.
For more information on globbing syntax, refer to Section 3.6, “Pathnames
and Globbing” (page 73).
Glob w/Ext
Clicking this modies the original directory path while retaining the lename
extension. For example, /etc/apache2/file.ext becomes /etc/
Page 65

apache2/*.ext, adding the wild card (asterisk) in place of the lename.
This allows the program to access all les in the suggested directory that
end with the .ext extension. Double-clicking it grants access to all les
(with the particular extension) and subdirectories beneath the one shown.
Edit
Lets you edit the selected line. The new edited line appears at the bottom of
the list.
Abort
Aborts logprof, dumping all rule changes entered so far and leaving all proles unmodied.
Finish
Closes logprof, saving all rule changes entered so far and modifying all
proles.
To view and edit your prole using vim, enter vim
7
/etc/subdomain.d/profilename in a terminal window. To enablesyntax
coloring when you edit a Novell AppArmor prole in vim, use the commands
:syntax on then :set syntax=subdomain. For more information about
about vim and syntax coloring, refer to Section “Subdomain.vim” (page 71).
logprof
logprof is an interactive tool used to review the learning or complain mode output found
in the syslog entries then generate new entries in Novell AppArmor security proles.
When you run logprof, it begins to scan the log les produced in learning or complain
mode and, if there are new security events that are not covered by the existing prole
set, it gives suggestions for modifying the prole. The learning or complain mode traces
program behavior and enters it in syslog. logprof uses this information to observe program behavior.
If a conned program forks and execs another program, logprof sees this and asks the
user which execution mode should be used when launching the child process. The following execution modes are options for starting the child process: ix, px, and ux. If a
separate prole exists for the child process, the default selection is px. If one does not
exist, the prole defaults to ix. Child processes with separate proles have autodep run
on them and are loaded into Novell AppArmor, if it is running.
Building Novell AppArmor Proles 65
Page 66

When logprof exits, proles are updated with the changes. If the SubDomain module
is running, the updated proles are reloaded and if any processes that generated security
events are still running in the null-complain-prole, those processes are set to run under
their proper proles.
To run logprof, enter logprof into a terminal window while logged in as root. The
following options can also be used for logprof:
logprof -d /path/to/profile/directory/
Species the full path to the location of the proles if the proles are not located
in the standard directory, /etc/subdomain.d/.
logprof -f /path/to/logfile/
Species the full path to the location of the log le if the log le is not located in
the default directory, /var/log/messages.
logprof -m "string marker in logfile"
Marks the starting point for logprof to look in the system log. logprof ignores all
events in the system log before the specied mark is seen. If the mark contains
spaces, it must be surrounded with quotes to work correctly. Example: logprof
-m e2ff78636296f16d0b5301209a04430d
logprof scans the log, asking you how to handle each logged event. Each question
presents a numbered list of Novell AppArmor rules that can be added by pressing the
number of the item on the list.
66
By default, logprof looks for proles in /etc/subdomain.d/ and scans the log in
/var/log/messages so, in many cases, running logprof as root is enough to
create the prole.
However, there might times when you need to search archived log les, such as if the
program exercise period exceeds the log rotation window (when the log le is archived
and a new log le is started). If this is the case, you can enter zcat -f `ls -1tr
/var/log/messages*` | logprof -f -.
logprof Example 1
Following is an example of how logprof addresses httpd2-prefork accessing the le
/etc/group. The example uses [] to indicate the default option.
Page 67

In this example, the access to /etc/group is part of httpd2-prefork accessing name
services. The appropriate response is 1, which pulls in a predened set of Novell
AppArmor rules. Selecting 1 to #include the name service package resolves all of
the future questions pertaining to DNS lookups and also makes the prole less brittle
in that any changes to DNS conguration and the associated nameservice prole
package can be made just once, rather than needing to revise many proles.
Profile: /usr/sbin/httpd2-prefork
Path: /etc/group
New Mode: r
[1 - #include <abstractions/nameservice>]
2 - /etc/group
[(A)llow] / (D)eny / (N)ew / (G)lob / Glob w/(E)xt / Abo(r)t / (F)inish
Select one of the following responses:
Press Enter
Allows access to the selected directory path.
Allow
Allows access to the specied directory path entries. Novell AppArmor suggests
le permission access. For more information about this, refer to Section 3.7, “File
Permission Access Modes” (page 74).
Deny
Prevents the program from accessing the specied directory path entries. Novell
AppArmor then moves on to the next event.
New
Prompts you to enter your own rule for this event, allowing you to specify whatever
form of regular expression you want. If the expression you enter does not actually
satisfy the event that prompted the question in the rst place, Novell AppArmor
asks you for conrmation and lets you reenter the expression.
Glob
Clicking this modies the directory path (by using wild cards) to include all les
in the suggested entry directory. Double-clicking it grants access to all les and
subdirectories beneath the one shown.
For more information about globbing syntax, refer to Section 3.6, “Pathnames and
Globbing” (page 73).
Building Novell AppArmor Proles 67
Page 68

Glob w/Ext
Clicking this modies the original directory path while retaining the lename extension. For example, /etc/apache2/file.ext becomes /etc/apache2/
*.ext, adding the wild card (asterisk) in place of the lename. This allows the
program to access all les in the suggested directory that end with the .ext extension. Double-clicking it grants access to all les (with the particular extension) and
subdirectories beneath the one shown.
Edit
Lets you edit the selected line. The new edited line appears at the bottom of the
list.
Abort
Aborts logprof, dumping all rule changes entered so far and leaving all proles
unmodied.
Finish
Closes logprof, saving all rule changes entered so far and modifying all proles.
logprof Example 2
In an example from proling vsftpd, we see this question:
Profile: /usr/sbin/vsftpd
Path: /y2k.jpg
New Mode: r
68
[1 - /y2k.jpg]
(A)llow / [(D)eny] / (N)ew / (G)lob / Glob w/(E)xt / Abo(r)t / (F)inish
Several items of interest appear in this question. First, note that vsftpd is asking for a
path entry at the top of the tree, even though vsftpd on SUSE Linux serves FTP les
from /srv/ftp by default. This is because httpd2-prefork uses chroot and, for the
portion of the code inside the chroot jail, Novell AppArmor sees le accesses in terms
of the chroot environment rather than the global absolute path.
The second item of interest is that you might want to grant FTP read access to all of
the JPEG les in the directory, so you could use Glob w/Ext and use the suggested path
of /*.jpg. Doing so collapses all previous rules granting access to individual .jpg
les and forestalls any future questions pertaining to access to .jpg les.
Page 69

Finally, you might want to grant more general access to FTP les. If you select Glob
in the last entry, logprof replaces the suggested path of /y2k.jpg with /*. Or you
might want to grant even more access to the entire directory tree, in which case you
could use the New path option and enter /**.jpg (which would grant access to all
.jpg les in the entire directory tree) or /** (which would grant access to all les in
the directory tree).
The above deal with read accesses. Write accesses are similar, except that it is good
policy to be more conservative in your use of regular expressions for write accesses.
Dealing with execute accesses is more complex. You must decide which of the three
kinds of execute permissions to grant:
Inherit (ix)
The child inherits the parent's prole, running with the same access controls as the
parent. This mode is useful when a conned program needs to call another conned
program without gaining the permissions of the target's prole or losing the permissions of the current prole. This mode is often used when the child program is a
helper application, such as the /usr/bin/mail client using the less program
as a pager or the Mozilla Web browser using the Acrobat program to display PDF
les.
prole (px)
The child runs using its own prole, which must be loaded into the kernel. If the
prole is not present, attempts to execute the child fails with permission denied.
This is most useful if the parent program is invoking a global service, such as DNS
lookups or sending mail via your system's MTA.
unconned (ux)
The child runs completely unconned without any Novell AppArmor prole applied
to the executed resource.
In the following example, the /usr/bin/mail mail client is being proled and
logprof has discovered that /usr/bin/mail executes /usr/bin/less as a helper
application to “page” long mail messages. Consequently, it presents this prompt:
/usr/bin/nail -> /usr/bin/less
(I)nherit / (P)rofile / (U)nconstrained / (D)eny
Building Novell AppArmor Proles 69
Page 70

TIP
The actual executable le for /usr/bin/mail turns out to be /usr/bin/
nail, which is not a typographical error.
The program /usr/bin/less appears to be a simple one for scrolling through text
that is more than one screen long and that is in fact what /usr/bin/mail is using
it for. However, less is actually a large and powerful program that makes use of many
other helper applications, such as tar and rpm.
TIP
Run less on a tar ball or an RPM le and it shows you the inventory of these
containers.
You do not want to automatically run rpm when reading mail messages (that leads directly to a Microsoft* Outlook–style virus attacks, because rpm has the power to install
and modify system programs) and so, in this case, the best choice is to use Inherit. This
results in the less program executed from this context running under the prole for
/usr/bin/mail. This has two consequences:
• You need to add all of the basic le accesses for /usr/bin/less to the prole
for /usr/bin/mail.
70
• You can avoid adding the helper applications, such as tar and rpm, to the /usr/
bin/mail prole so that when /usr/bin/mail runs /usr/bin/mail/
less in this context, the less program is far less dangerous than it would be without
Novell AppArmor protection.
In other circumstances, you might instead want to use the Prole option. This has two
effects on logprof:
• The rule written into the prole is px, which forces the transition to the child's own
prole.
• logprof constructs a prole for the child and starts building it, in the same way that
it built the parent prole, by ascribing events for the child process to the child's
prole and asking the logprof user questions as above.
Page 71

Finally, you might want to grant the child process very powerful access by specifying
Unconned. This writes ux into the parent prole so that when the child runs, it runs
without any Novell AppArmor prole being applied at all. This means running with
no protection and should only be used when absolutely required.
Subdomain.vim
A syntax coloring le for the vim text editor highlights various features of an Novell
AppArmor prole with colors. Using vim and the Novell AppArmor syntax mode for
vim, you can see the semantic implications of your proles with color highlighting.
Use vim to view and edit your prole by typing vim at a terminal window.
To enable the syntax coloring when you edit a Novell AppArmor prole in vim, use
the commands :syntax on then :set syntax=subdomain. Alternatively, you
can place these lines in your ~/.vimrc le:
syntax on
set modeline
set modelines=5
When you enable this feature, vim colors the lines of the prole for you:
Blue
#include lines that pull in other Novell AppArmor rules and comments that
begin with #
White
Ordinary read access lines
Brown
Capability statements and complain ags
Yellow
Lines that grant write access
Green
Lines that grant execute permission (either ix or px)
Red
Lines that grant unconned access (ux)
Building Novell AppArmor Proles 71
Page 72

Red background
Syntax errors that are not loading properly into the SubDomain modules
NOTE
There is a security risk when using these lines in your .vimrc le, because it
causes vim to trust the syntax mode presented in les you are editing. It might
enable an attacker to send you a le to open with vim that might do something
unsafe.
Use the subdomain.vim and vim man pages and the :help syntax from within
the vim editor for further vim help about syntax highlighting. The Novell AppArmor
syntax is stored in /usr/share/vim/current/syntax/subdomain.vim.
Unconned
The unconfined command examines open network ports on your system, compares that to the set of proles loaded on your system, and reports network services that do not have Novell AppArmor proles. It requires root privilege and that it not be conned by a Novell AppArmor prole.
unconned must be run as root to retrieve the process executable link from the proc
le system. This program is susceptible to the following race conditions:
72
• An unlinked executable is mishandled
• An executable started before a Novell AppArmor prole is loaded does not appear
in the output, despite running without connement
• A process that dies between netstat(8) and further checks is mishandled
NOTE
This program lists processes using TCP and UDP only. In short, this program is
unsuitable for forensics use and is provided only as an aid to proling all network-accessible processes in the lab.
For more information about the science and security of Novell AppArmor, refer to the
following papers:
Page 73

SubDomain: Parsimonious Server Security by Crispin Cowan, Steve Beattie, Greg
Kroah-Hartman, Calton Pu, Perry Wagle, and Virgil Gligor
Describes the initial design and implementation of Novell AppArmor. Published
in the proceedings of the USENIX LISA Conference, December 2000, New Orleans,
LA.
This paper is now out of date, describing syntax and features that are different from
the current Novell AppArmor product. This paper should be used only for scientic
background and not for technical documentation.
Defcon Capture the Flag: Defending Vulnerable Code from Intense Attack by Crispin
Cowan, Seth Arnold, Steve Beattie, Chris Wright, and John Viega
A good guide to strategic and tactical use of Novell AppArmor to solve severe security problems in a very short period of time. Published in the Proceedings of the
DARPA Information Survivability Conference and Expo (DISCEX III), April 2003,
Washington, DC.
3.6 Pathnames and Globbing
Globbing (or regular expression matching) is when you modify the directory path using
wild cards to include a group of les or subdirectories. File resources can be specied
with a globbing syntax similar to that used by popular shells, such as csh, bash, and
zsh.
*
**
Substitutes for any number of characters, except
/.
Example: An arbitrary number of path elements,
including entire directories.
Substitutes for any number of characters, including /.
Example: an arbitrary number of path elements,
including entire directories.
Substitutes for any single character, except /.?
Building Novell AppArmor Proles 73
Page 74

Substitutes for the single character a, b, or c[abc]
Example: a rule that matches
/home[01]/*/.plan allows a program to
access .plan les for users in both /home0
and /home1.
Substitutes for the single character a, b, or c.[a-c]
{ab,cd}
Expand to one rule to match ab and one rule to
match cd.
Example: A rule that matches
/{usr,www}/pages/** to grant access to
Web pages in both /usr/pages and /www/
pages.
3.7 File Permission Access Modes
File permission access modes consist of combinations of the following six modes:
read moder
write modew
discrete prole execute modepx
unconstrained execute modeux
inherit execute modeix
74
link model
Page 75

3.7.1 Read Mode
Allows the program to have read access to the resource. Read access is required for
shell scripts and other interpreted content and determines if an executing process can
core dump or be attached to with ptrace(2) (ptrace(2) is used by utilities such
as strace(1), ltrace(1), and gdb(1)).
3.7.2 Write Mode
Allows the program to have write access to the resource. Files must have this permission
if they are to be unlinked (removed).
3.7.3 Discrete Prole Execute Mode
This mode requires that a discrete security prole is dened for a resource executed at
a Novell AppArmor domain transition. If there is no prole dened, the access is denied.
Incompatible with inherit and unconstrained execute entries.
3.7.4 Unconstrained Execute Mode
Allows the program to execute the resource without any Novell AppArmor prole being
applied to the executed resource. Requires listing execute mode as well. Incompatible
with inherit and discrete prole execute entries.
This mode is useful when a conned program needs to be able to perform a privileged
operation, such as rebooting the machine. By placing the privileged section in another
executable and granting unconstrained execution rights, it is possible to bypass the
mandatory constraints imposed on all conned processes. For more information about
what is constrained, see the subdomain(7) man page.
3.7.5 Inherit Execute Mode
Prevents the normal Novell AppArmor domain transition on execve(2) when the
proled program executes the resource. Instead, the executed resource inherits the
current prole. Incompatible with unconstrained and discrete prole execute entries.
Building Novell AppArmor Proles 75
Page 76

This mode is useful when a conned program needs to call another conned program
without gaining the permissions of the target’s prole or losing the permissions of the
current prole. This mode is infrequently used.
3.7.6 Link Mode
The link mode mediates access to symlinks and hardlinks and the privilege to unlink
(or delete) les. When a link is created, the le that is linked to must have the same
access permissions as the link created (with the exception that the destination does not
have to have link access).
76
Page 77

Managing Proled Applications
After creating proles and immunizing your applications, SUSE Linux becomes more
efcient and better protected if you perform Novell AppArmor prole maintenance,
which involves tracking common issues and concerns. You can deal with common issues
and concerns before they become a problem by setting up event notication by e-mail,
running periodic reports, updating proles from system log entries (which is essentially
running the logprof tool through YaST), and dealing with maintenance issues. Instructions for performing each of these tasks are available:
• Section 4.1, “Monitoring Your Secured Applications” (page 77)
• Section 4.5, “Maintaining Your Security Proles” (page 103).
4.1 Monitoring Your Secured Applications
Applications that are conned by Novell AppArmor security proles generate messages
when applications execute in unexpected ways or outside of their specied prole.
These messages can be monitored by event notication, generating periodic reports,
or integration into a third-party reporting mechanism. The following sections provide
details for using these features and nding additional resources.
4
• Section 4.2, “Setting Up Event Notication” (page 78)
• Section 4.3, “Reports” (page 81)
Managing Proled Applications 77
Page 78

• Section 4.4, “Reacting to Security Events” (page 102)
4.2 Setting Up Event Notication
Security event notication is an Novell AppArmor feature that informs a specied email recipient when systemic Novell AppArmor activity occurs. This feature is currently
available via YaST.
When you enter an e-mail address, you are notied via e-mail when Novell AppArmor
security events occur. You can enable three types of notications, which are:
Terse
Terse notication summarizes the total number of system events without providing
details. For example:
dhcp-101.up.wirex.com has had 10 security events since Tue Oct 12 11:10:00
2004
Summary Notication
The summary notication displays the logged Novell AppArmor security events
and lists the number of individual occurrences, including the date of the last occurrence. For example:
SubDomain: PERMITTING access to capability ’setgid’ (httpd2-prefork(6347)
profile /usr/sbin/httpd2-prefork active /usr/sbin/httpd2-prefork) 2 times,
the latest at Sat Oct 9 16:05:54 2004.
78
Verbose Notication
The verbose notication displays unmodied, logged Novell AppArmor security
events. It tells you every time an event occurs and writes a new line in the verbose
log. These security events include the date and time the event occurred, when the
application prole permits and rejects access, and the type of le permission access
that is permitted or rejected. Verbose notication also reports several messages
that the logprof tool (see Section “logprof” (page 65)) uses to interpret proles.
For example:
Oct 9 15:40:31 SubDomain: PERMITTING r access to /etc/apache2/httpd.conf
(httpd2-prefork(6068) profile /usr/sbin/httpd2-prefork active
/usr/sbin/httpd2-prefork)
Page 79

NOTE
To congure event notication, refer to Section 4.2.2, “Conguring Security
Event Notication” (page 79). After conguring security event notication,
read the reports and determine whether events require follow up. Follow up
may include the procedures outlined in Section 4.4.1, “Receiving a Security
Event Rejection” (page 102).
4.2.1 Severity Level Notication
You can set up Novell AppArmor to send you event messages for things that are in the
severity database and above the level that you select.These are numbered one through
ten, ten being the most severe security incident. The severity.db le denes the
severity level of potential security events. The severity levels are determined by the
importance of different security events, such as certain resources accessed or services
denied.
4.2.2 Conguring Security Event
Notication
Security event notication is a Novell AppArmor feature that informs you when systemic
Novell AppArmor activity occurs. When you select a notication frequency (receiving
daily notication, for example), you activate the notication. You are required to enter
an e-mail address, so you can be notied via e-mail when Novell AppArmor security
events occur.
NOTE
You must set up a mail server on your SUSE Linux that can send outgoing mail
using the SMTP protocol (for example, postx or exim) for event notication
to work.
In the Enable Security Event Notication section of the AppArmor Conguration
1
window, click Congure.
Managing Proled Applications 79
Page 80

In the Security Event Notication window, you have the option to enable Terse,
2
Summary, or Verbose event notication, which are dened in Section 4.2.1,
“Severity Level Notication” (page 79). To be sent a notication e-mail outlining
recent Novell AppArmor security events, determine your notication type preference.
In each applicable notication type section, enter the e-mail addresses of those
3
who should receive notication in the eld provided. If notication is enabled,
you must enter an e-mail address. Otherwise you receive an error message. Separate multiple e-mail addresses with commas.
For each notication type that you would like enabled, select the frequency of
4
notication.
Select a notication frequency from the following options:
• Disabled
• 1 minute
• 5 minutes
• 10 minutes
80
Page 81

• 15 minutes
• 30 minutes
• 1 hour
• 1 day
• 1 week
For each selected notication type, select the lowest severity level for which a
5
notication should be sent. Security events are logged and the notications are
sent at the time indicated by the interval when events are equal to or greater than
the selected severity level. If the interval is 1 day, the notication is sent daily,
if security events occur. Refer to Section 4.2.1, “Severity Level Notication”
(page 79) for more information about severity levels.
Click OK.
6
Click Done in the Novell AppArmor Conguration window.
7
Click File → Quit in the YaST Control Center.
8
4.3 Reports
Novell AppArmor's reporting feature adds exibility by enhancing the way users can
view security event data. The reporting tool performs the following:
• Creates on-demand reports
• Exports reports
• Schedules periodic reports for archiving
• E-mails periodic reports
• Filters report data by date
• Filters report data by other options, such as program name
Managing Proled Applications 81
Page 82

Using reports, you can read important Novell AppArmor security events reported in
the log les without manually sifting through the cumbersome messages only useful
to the logprof tool. You can narrow down the size of the report by ltering by date
range or program name. You can also export an html or csv le.
The following are the three types of reports available in Novell AppArmor:
Executive Security Summary
A combined report, consisting of one or more security incident reports from one
or more machines. This report can provide a single view of security events on
multiple machines. For more details, refer to Section “Executive Security Summary”
(page 91).
Application Audit Report
An auditing tool that reports which application servers are running and whether
the applications are conned by AppArmor. Application servers are applications
that accept incoming network connections. For more details, refer to Section “Ap-
plication Audit Report” (page 88).
Security Incident Report
A report that displays application security for a single host. It reports policy violations for locally conned applications during a specic time period. You can edit
and customize this report or add new versions. For more details, refer to Section
“Security Incident Report” (page 89).
82
To use the Novell AppArmor reporting features, proceed with the following steps:
To run reports, open YaST → Novell AppArmor. The Novell AppArmor interface
1
opens.
Page 83

In Novell AppArmor, click AppArmor Reports. The AppArmor Security Event
2
Reports window appears. From the Reports window, select an option and proceed
to the section for instructions:
View Archive
Displays all reports that have been run and stored in /var/log/
apparmor/reports-archived/. Select the report you want to see in
Managing Proled Applications 83
Page 84

detail and click View. For View Archive instructions, proceed to Section 4.3.1,
“Viewing Archived Reports” (page 84).
Run Now
Produces an instant version of the selected report type. If you select a security incident report, it can be further ltered in various ways. For Run Now
instructions, proceed to Section 4.3.2, “Run Now: Running On-Demand
Reports” (page 93).
Add
Creates a scheduled security incident report. For Add instructions, proceed
to Section 4.3.3, “Adding New Reports” (page 95).
Edit
Edits a scheduled security incident report.
Delete
Deletes a scheduled security incident report. All stock or canned reports
cannot be deleted.
Back
Returns you to the Novell AppArmor main screen.
Abort
Returns you to the Novell AppArmor main screen.
84
Next
Performs the same function as the Run Now button.
4.3.1 Viewing Archived Reports
View Reports enables you to specify the location of a cumulation of reports from one
or more systems, including the ability to lter by date or names of programs accessed
and display them all together in one report.
From the AppArmor Security Event Report window, select View Archive.
1
Page 85

Select the report type to view. Toggle between the different types (SIR (Security
2
Incident Report), App Aud (Application Audit), and ESS (Executive Security
Summary).
You can alter the directory location of the archived reports in Location of Archived
3
Reports. Select Accept to use the current directory or select Browse to nd a new
report location. The default directory is /var/log/apparmor/
reports-archived/.
To view all the reports in the archive, select View All. To view a specic report,
4
select a report le listed in the Report eld, then select View.
For Application Audit and Executive Security Summary reports, proceed to Step
5
9 (page 87).
The Report Conguration Dialog opens for Security Incident reports.
6
Managing Proled Applications 85
Page 86

The Report Conguration dialog enables you to lter the reports selected in the
7
previous screen. Enter the desired lter details. The elds are:
Date Range
To display reports for a certain time period, select Filter By Date Range.
Enter the start and end dates that dene the scope of the report.
Program Name
When you enter a program name or pattern that matches the name of the binary executable of the program of interest, the report displays security events
that have occurred for a specic program.
Prole Name
When you enter the name of the prole, the report displays the security
events that are generated for the specied prole. You can use this to see
what is being conned by a specic prole.
PID Number
PID Number is a number that uniquely identies one specic process or
running program (this number is valid only during the lifetime of that process).
86
Page 87

Severity Level
Select the lowest severity level for security events to include in the report.
The selected severity level and above are then included in the reports.
Detail
A source to which the prole has denied access. This includes capabilities
and les. You can use this eld to report the resources to which proles
prevent access.
Access Type
The access type describes what is actually happening with the security event.
The options are: PERMITTING, REJECTING, or AUDITING.
Mode
The Mode is the permission that the prole grants to the program or process
to which it is applied. The options are: r (read) w (write) l (link) x (execute).
Export Type
Enables you to export a CSV (comma separated values) or HTML le. The
CSV le separates pieces of data in the log entries with commas using a
standard data format for importing into table-oriented applications. You can
enter a pathname for your exported report by typing the full pathname in the
eld provided.
Location to Store Log
Enables you to change the location that the exported report is store. The default location is /var/log/apparmor/reports-exported. When
you change this location, select Accept. Select Browse to browse the le
system.
To see the report, ltered as desired, select Next. One of the three reports displays.
8
Refer the following sections for detailed information about each type of report.
9
• For the application audit report, refer to Section “Application Audit Report”
(page 88).
• For the security incident report, refer to Section “Security Incident Report”
(page 89).
Managing Proled Applications 87
Page 88

• For the executive summary report, refer to Section “Executive Security
Summary” (page 91).
Application Audit Report
An auditing tool that reports which application servers are running and whether they
are conned by AppArmor. Application servers are applications that accept incoming
network connections. This report provides the host machine’s IP address, the date the
application audit report ran, the name and path of the unconned program or application
server, the suggested prole or a placeholder for a prole for an unconned program,
the process ID number, the state of the program (conned or unconned), and the type
of connement that the prole is performing (enforce or complain).
The following screen represents an application audit report:
88
The following are denitions for the elds in the application audit report:
Host
The machine protected by AppArmor for which the security events are being reported.
Page 89

Date
The date during which security events occurred.
Program
The name of the executing process.
Prole
The absolute name of the security prole that is applied to the process.
PID
Process ID number is a number that uniquely identies one specic process or
running program (this number is valid only during the lifetime of that process).
State
This eld reveals whether the program listed in the program eld is conned. If it
is not conned, you might consider creating a prole for it.
Type
This eld reveals the type of connement the security event represents. It says either
complain or enforce. If the application is not conned (state), no type of connement
is reported.
Security Incident Report
A report that displays security events of interest to an administrator. The SIR reports
policy violations for locally conned applications during the specied time period. The
SIR reports policy exceptions and policy engine state changes. These two types of security events are dened as follows:
Policy Exceptions
When an application requests a resource that is not dened within its prole, a security event is triggered. A report is generated that displays security events of interest
to an administrator. The SIR reports policy violations for locally conned applications during the specied time period. The SIR reports policy exceptions and policy
engine state changes.
Policy Engine State Changes
Enforces policy for applications and maintains its own state, including when engines
start or stop, when a policy is reloaded, and when global security feature are enabled
or disabled.
Managing Proled Applications 89
Page 90

The following screen represents an SIR report:
The following are denitions for the elds in the SIR report:
Host
The machine protected by AppArmor for which the security events are being reported.
90
Date
The date during which security events occurred.
Program
The name of the executing process.
Prole
The absolute name of the security prole that is applied to the process.
PID
Process ID number is a number that uniquely identies one specic process or
running program (this number is valid only during the lifetime of that process).
Page 91

Severity
Severity levels of events are reported from the severity database. The severity
database denes the importance of potential security events and numbers them one
through ten, ten being the most severe security incident. The severity levels are
determined by the threat or importance of different security events, such as certain
resources accessed or services denied.
Mode
The mode is the permission that the prole grants to the program or process to
which it is applied. The options are r (read), w (write), l (link), and x (execute).
Detail
A source to which the prole has denied access.This includes capabilities and les.
You can use this eld to report the resources to which the prole prevents access.
Access Type
The access type describes what is actually happening with the security event. The
options are PERMITTING, REJECTING, or AUDITING.
Executive Security Summary
A combined report consisting of one or more high-level reports from one or more machines. This report can provide a single view of security events on multiple machines
if each machine's data is copied to the reports archive directory, which is /var/log/
apparmor/reports-archived. This report provides the host machine's IP address,
the start and end dates of the polled events, total number of rejects, total number of
events, average of severity levels reported, and the highest severity level reported. One
line of the ESS report represents a range of SIR reports.
The following screen represents an executive security summary:
Managing Proled Applications 91
Page 92

The following are denitions for the elds in the executive security summary:
Host
The machine protected by AppArmor for which the security events are being reported.
Start Date
The rst date in a range of dates during which security events are reported.
End Date
The last date in a range of dates during which security events are reported.
Num of Rejects
In the date range given, the total number of security events that are rejected access
attempts.
Num of Events
In the date range given, the total number of security events.
Avg Severity
This is the average of the severity levels reported in the date range given. Unknown
severities are disregarded in this gure.
92
Page 93

High Severity
This is the severity of the highest severity event reported in the date range given.
4.3.2 Run Now: Running On-Demand Reports
The Run Now report feature enables you to instantly extract report information from
the Novell AppArmor event logs without waiting for scheduled events. Return to the
beginning of this section if you need help navigating to the main report screen (see
Section 4.3, “Reports” (page 81)). Perform the following steps to run a report from the
list of reports:
Select the report to run instantly from the list of reports in the Schedule Reports
1
window.
Select Run Now or Next. The next screen depends on which report you selected
2
in the previous step. For Application Audit and Executive Security Summary reports, proceed to Step 6 (page 95).
The Report Conguration Dialog displays for security incident reports.
3
Managing Proled Applications 93
Page 94

The Report Conguration Dialog enables you to lter the reports selected in the
4
previous screen. Enter the desired lter details. The following lter options are
available:
Date Range
To limit reports to a certain time period, select Filter By Date Range. Enter
the start and end dates that determine the scope of the report.
Program Name
When you enter a program name or pattern that matches the name of the binary executable for the program of interest, the report displays security events
that have occurred for the specied program only.
Prole Name
When you enter the name of the prole, the report displays the security
events that are generated for the specied prole. You can use this to see
what is being conned by a specic prole.
PID Number
Process ID number is a number that uniquely identies one specic process
or running program (this number is valid only during the lifetime of that
process).
Severity Level
Select the lowest severity level for security events to include in the report.
The selected severity level and above are included in the reports.
94
Detail
A source to which the prole has denied access. This includes capabilities
and les. You can use this eld to report the resources to which proles
prevent access.
Access Type
The access type describes what is actually happening with the security event.
The options are PERMITTING, REJECTING, or AUDITING.
Mode
The mode is the permission that the prole grants to the program or process
to which it is applied. The options are r (read), w (write), l (link), and x
(execute).
Page 95

Export Type
Enables you to export a CSV (comma separated values) or HTML le. The
CSV le separates pieces of data in the log entries with commas using a
standard data format for importing into table-oriented applications. You can
enter a pathname for your exported report by typing in the full pathname in
the eld provided.
Location to Store Log
Enables you to change the location that the exported report is stored. The
default location is /var/log/apparmor/reports-exported. When
you change this location, select Accept. Select Browse to browse the le
system.
To see the report, ltered as desired, select Next. One of the three reports displays.
5
Refer the following sections for detailed information about each type of report.
6
• For the application audit report, refer to Section “Application Audit Report”
(page 88).
• For the recurity incident report, refer to Section “Security Incident Report”
(page 89).
• For the executive summary report, refer to Section “Executive Security
Summary” (page 91).
4.3.3 Adding New Reports
Adding new reports enables you to create a scheduled security incident report that displays Novell AppArmor security events according to your preset lters. When a report
is set up in Schedule Reports, it periodically launches a report of Novell AppArmor
security events that have occurred on the system.
You can congure a daily, weekly, monthly, or hourly report to run for a specied period. You can set the report to display rejections for certain severity levels or to lter
by program name, prole name, severity level, or denied resources. This report can be
exported to an HTML (Hypertext Markup Language) or CSV (Comma Separated Values)
le format.
Managing Proled Applications 95
Page 96

NOTE
Return to the beginning of this section if you need help navigating to the main
report screen (see Section 4.3, “Reports” (page 81)).
To add a new scheduled security incident report, proceed as follows:
Click Add to create a new security incident report. The rst page of Add Scheduled
1
SIR opens.
96
Fill in the elds with the following ltering information, as necessary:
2
Report Name
Specify the name of the report. Use names that easily discern one report from
the next.
Day of Month
Select any day of the month to activate monthly ltering in reports. If you
select All, monthly ltering is not performed.
Day of Week
Select the day of the week on which to schedule weekly reports, if desired.
If you select ALL, weekly ltering is not performed. If monthly reporting is
selected, this eld defaults to ALL.
Page 97

Hour and Minute
Select the time. This species the hour and minute that you would like the
reports to run. If you do not change the time, selected reports runs at midnight.
If neither month nor day of week are selected, the report runs daily at the
secied time.
E-Mail Target
You have the ability to send the scheduled security incident report via e-mail
to up to three recipients. Just enter the e-mail addresses for those who require
the security incident information.
Export Type
This option enables you to export a CSV (comma separated values) or HTML
le. The CSV le separates pieces of data in the log entries with commas
using a standard data format for importing into table-oriented applications.
You can enter a pathname for your exported report by typing in the full
pathname in the eld provided.
Location to Store Log
Enables you to change the location that the exported report is stored. The
default location is /var/log/apparmor/reports-exported. When
you change this location, select Accept. Select Browse to browse the le
system.
Click Next to proceed to the second page of Add Scheduled SIR.
3
Fill in the elds with the following ltering information, as necessary:
4
Managing Proled Applications 97
Page 98

Program Name
You can specify a program name or pattern that matches the name of the
binary executable for the program of interest. The report displays security
events that have occurred for the specied program only.
Prole Name
You can specify the name of the prole for which the report should display
security events. You can use this to see what is being conned by a specic
prole.
PID Number
Process ID number is a number that uniquely identies one specic process
or running program (this number is valid only during the lifetime of that
process).
Detail
A source to which the prole has denied access. This includes capabilities
and les. You can use this eld to create a report of resources to which
proles prevent access.
Severity
Select the lowest severity level of security events to include in the report.
The selected severity level and above are included in the reports.
98
Access Type
The access type describes what is actually happening with the security event.
The options are PERMITTING, REJECTING, or AUDITING.
Mode
The mode is the permission that the prole grants to the program or process
to which it is applied. The options are r (read), w (write), l (link), and x
(execute).
Click Save to save this report. Novell AppArmor returns to the Scheduled Reports
5
main window where the newly scheduled report appears in the list of reports.
4.3.4 Editing Reports
From the AppArmor Reports screen, you can select and edit a report. The stock reports
cannot be edited or deleted.
Page 99

NOTE
Return to the beginning of this section if you need help navigating to the main
report screen (see Section 4.3, “Reports” (page 81)).
Perform the following steps to run a report from the list of reports:
From the list of reports in the Schedule Reports window, select the report to edit.
1
Click Edit to edit the security incident report. The rst page of the Edit Scheduled
2
SIR displays.
Enter the following ltering information, as necessary:
3
Day of Month
Select any day of the month to activate monthly ltering in reports. If you
select All, monthly ltering is not performed.
Day of Week
Select the day of the week on which to schedule the weekly reports. If you
select All, weekly ltering is not performed. If monthly reporting is selected,
this defaults to All.
Hour and Minute
Select the time. This species the hour and minute that you would like the
reports to run. If you do not change the time, selected report runs at midnight.
If neither the day of the month nor day of the week is selected, the report
runs daily at the specied time.
Managing Proled Applications 99
Page 100

E-Mail Target
You have the ability to send the scheduled security incident report via e-mail
to up to three recipients. Just enter the e-mail addresses for those who require
the security incident information.
Export Type
This option enables you to export a CSV (comma separated values) or HTML
le. The CSV le separates pieces of data in the log entries with commas
using a standard data format for importing into table-oriented applications.
You can enter a pathname for your exported report by typing the full pathname in the eld provided.
Location to Store Log
Enables you to change the location where the exported report is stored. The
default location is /var/log/apparmor/reports-exported. When
you change this location, select Accept. Select Browse to browse the le
system.
Click Next to proceed to the next Edit Scheduled SIR page. The second page of
4
Edit Scheduled Reports opens.
100
Fill in the elds with the following ltering information, as necessary:
5
Program Name
You can specify a program name or pattern that matches the name of the
binary executable for the program of interest. The report displays security
events that have occurred for the specied program only.
 Loading...