

Page 1
Messaging - (n.) A verbal, written, or
recorded communication sent by one
person to another. (v.) Send
a message to, especially by email.
Architects - (n.) People responsible for
the invention or realization of
something. (v.) Design and make
a program or system.
One Stop Email Shop - Applications
that enable organizations of all sizes
Your One Stop Email Shop
to truly leverage the power of their
messaging infrastructure.
www.gwtools.com
Novell GroupWise 6.5 Quick Reference Card
GroupWise Main Window:
GroupWise¨ 6.5 Main Window is your primary work area and consists of five different
sections: Toolbar, Folder and Item List Headers, Folder List Box, Item List Box,
and the QuickViewer.
Toolbar Provides quick access
to frequently used
tools. To include the
tools you need most,
right-click the Toolbar
and choose Customize
Toolbar...
Folder List Box Header -
Choose your desired
access mode, open
your Archive or Backup
mailboxes, or gain
Proxy access to other
users mailboxes.
Item List Box Header Specifies the folder
to which the items
displayed belong.
Specifically categorized
items can be selected
using the Show
drop down selector.
iewer
QuickV
Displays the contents of
a selected item.
-
Context Sensitive Toolbar - Direct access
to actions commonly associated with
the selected message.
Folder List Box:
Mailbox - All incoming items
are placed in your Mailbox as
they are received.
Sent Items - Copies of all sent
items are kept in this folder.
Contacts - Gives you direct
access to one of your Address
Books.
Calendar - Opens your calendar
to display all calendar items
for the specified day, week,
or month.
Checklist - Items moved into
this folder can be prioritized
and checked off once completed.
Documents - Contains both
personal and shared documents
that have been stored within
GroupWise.
Primary Toolbar:
Quick and easy access to the most frequently used tools.
Work In Progress - Place items
in this folder that you have begun
work on, but want to finish later.
Cabinet - Default
location for creating personal
or shared folders.
Find Results Folder - Created
using pre-defined or custom
search criteria.
Shared Folder - Place items that
need to be shared with other
GroupWise users.
Personal Folder - Folders created
to store and organize personal
content and messages.
Junk Mail - Items that are
marked as Junk Mail are
automatically placed here
upon receipt.
Trash - By default, deleted
items are stored in your Trash
for 7 days.
ABCDE
A - Open the Address Book
B - Display the Proper ties of the selected item or folder
C - Print your GroupWise Calendar
D - Find any item in GroupWise (Ctrl + F)
E - Create and send a New Mail message (Ctrl + M)
F - Schedule a new group Appointment (Ctrl + Shift + A)
G - Assign a Task to another GroupWise user (Ctrl + Shift + T)
1
FGHIJKLM
H - Create a new GroupWise Document (Ctrl + D).
I - View Main Window as Details
J - View Discussion Thread
K - View Main Window as Calendar
L - Toggle the QuickV iewer on/of f (Ctrl +Q).
M - Open a GroupWise Calendar view.
Page 2
Sending email:
Creating a new email message:
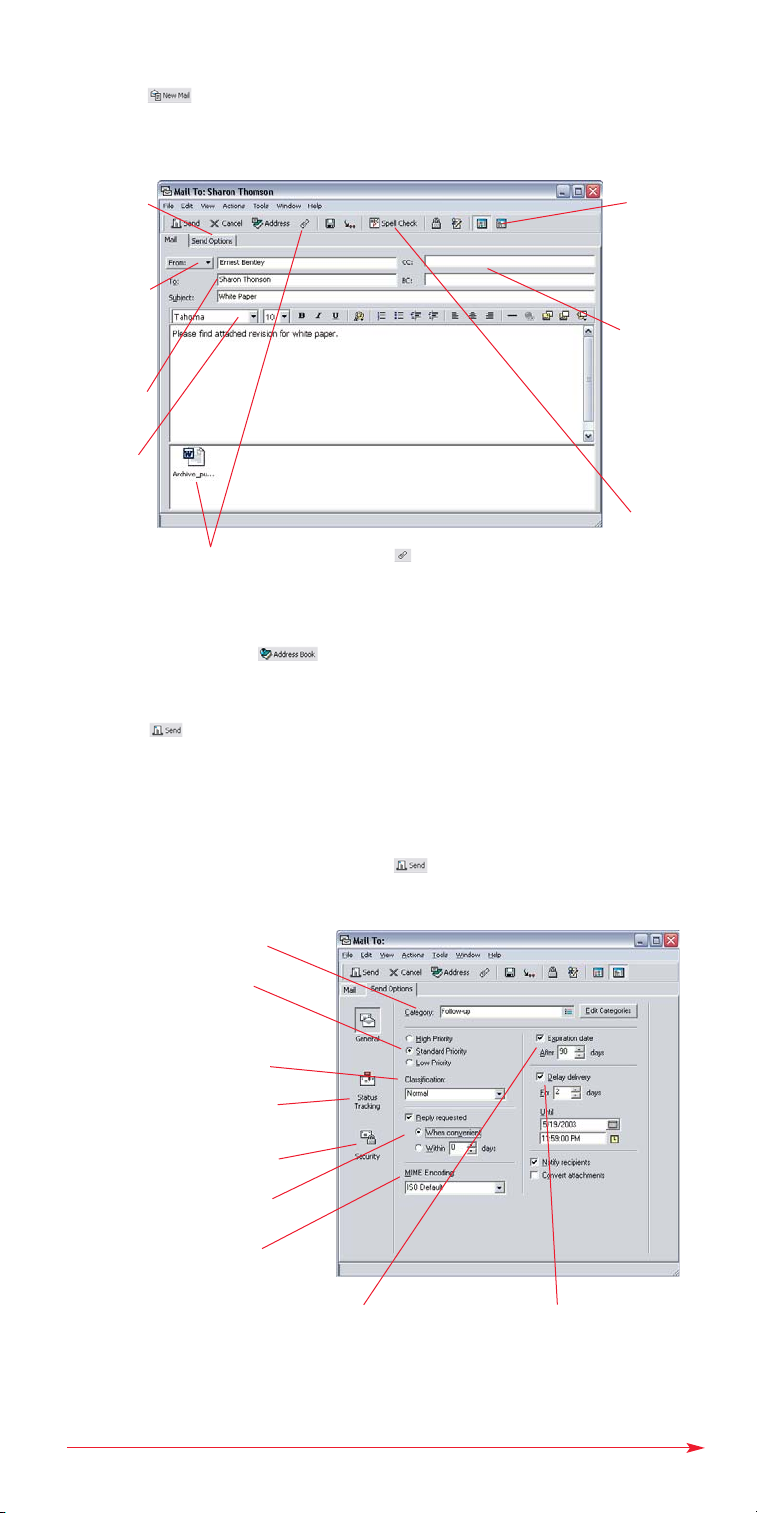
1) Click the icon on the Toolbar or choose File > New > Mail (Ctrl + M).
Note: You can choose the view by clicking the down-arrow on the right side
of the New Mail button.
Advanced control
of the Send
Options for this
message.
Send the message
from your account
or from a user’s
account to which
you have Proxy
access.
Recipient names
are entered in the
To field.
Message text
Toolbar allows
you to improve
the appearance
of your message
(HTML only).
To attach files, click the Attach icon ( ) on the Toolbar and select the
file to be attached; click OK. Repeat until all files have been attached.
Attached files or messages appear in the Attachment Window.
messages using
allows graphics
and more design
or a blind copy (BC),
Spell check your
2) Enter the recipients name in the To field. You can also open the Address
Selector by clicking the button on the toolbar.
3) Move to the Subject field by pressing the Tab key on your keyboard and type
a descriptive subject for the new message.
4) Move to the Message area and type the details of your message.
5) Click the button on the Toolbar.
Compose
HTML or Plain
Text. HTML
capabilities.
Send a carbon
copy (CC),
of the message
to another user.
Other recipients
cannot see that
a BC was sent.
message.
Advanced Send Options:
1) While creating a new message, click on the Send Options tab.
2) Select desired Send Option(s).
3) Finish composing your message and click .
Category - Categorize your items
as you send them out.
Priority - In the recipients’
mailboxes, High priority items
appear red, Standard priority
items appear black, and Low
priority items appear gray.
Classification - Inform recipients
of the nature of the message.
Status Tracking - Define how much
information is repor ted on this item
in the Sent Items folder.
Security - Enable Encr yption and/or
Digital Signatures for this message.
Reply Requested - When enabled,
requests a reply before the
recipient can delete the item.
MIME Encoding - Only modify
if recipients outside of your
GroupWise system have problems
seeing/accessing attachments
you have sent.
Expiration Date - Removes
message from the recipients’
mailboxes after a defined
period of time.
a specified number of days or
Until a defined date and time.
Delay Delivery - Delays
message delivery for
2
Page 3
Managing Messages:
Sent Items Folder:
Keeps a copy of every item you send out. You can perform various actions
on your sent items.
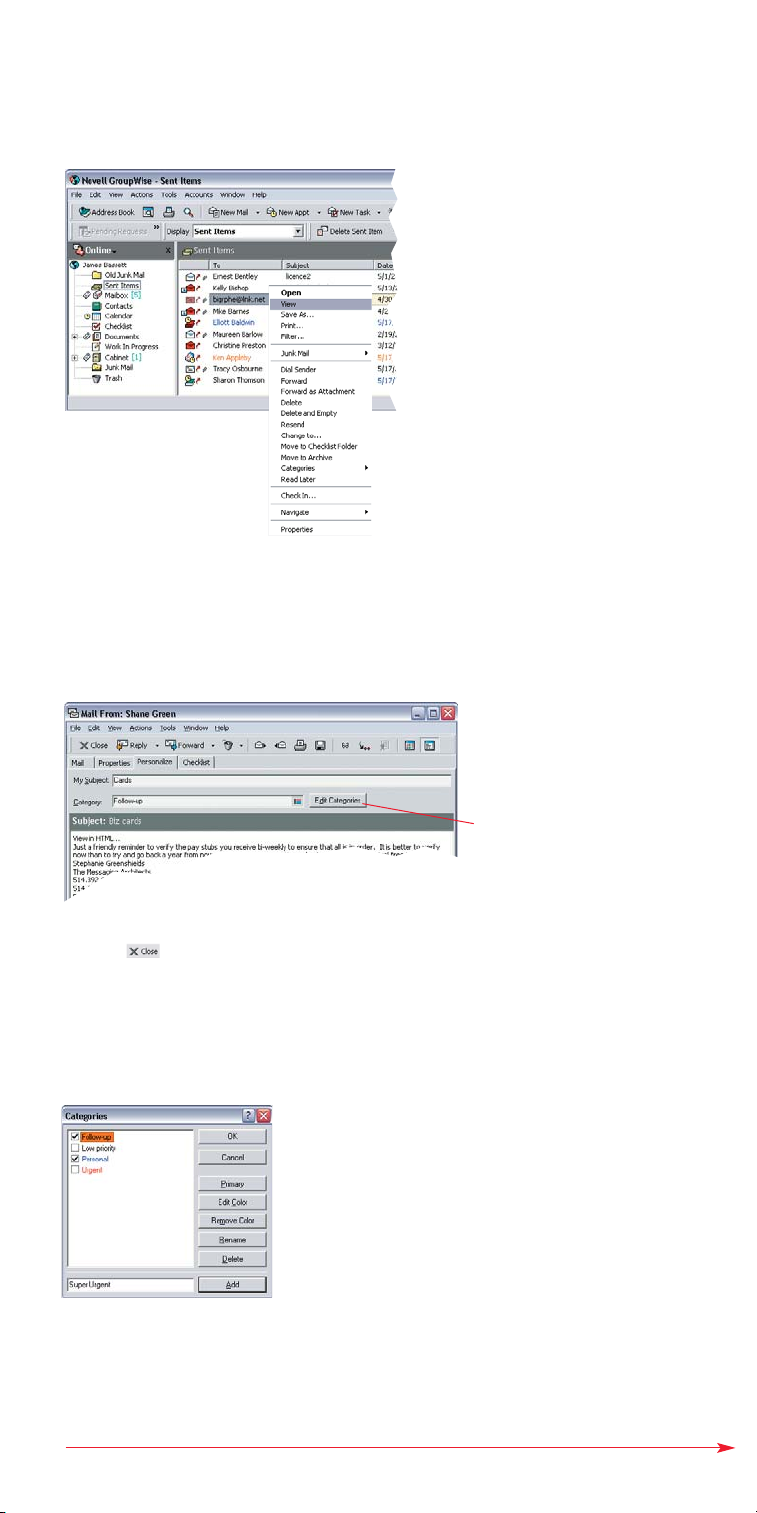
1) Click on the Sent Items folder in the Folder List Box and perform the desired action.
Open: Displays the sent item properties or content.
View: Opens the GroupWise viewer to display
the sent item.
Save As: Saves the message and/or attachments
outside of GroupWise.
Print: Prints the message and/or attachments.
Filter: Enables the Filter to see only items similar
to the one highlighted (e.g., same name, subject
and/or date).
Junk Mail: Enables Junk Mail Handling.
Forward/For ward as Attachment: Forwards the
highlighted item to another recipient.
Delete/Delete and Empty: Moves the highlighted
item to the Trash or deletes it from the system
altogether.
Resend: Resends the item with the necessary
changes, including forgotten attachments,
corrected spelling, etc.
Change to: Changes the type and resends the item.
Move to Checklist Folder: Moves the item
to the Checklist folder.
Move to Archive: Archives the item.
Categorize: Classifies the item in a pre-defined
or a custom created Category.
Read Later: Marks the item as unread.
Personalizing GroupWise Items:
With GroupWise 6.5 you can personalize the subject of received items
so that it is displayed in all folders.
1) Open the item you wish to personalize by double-clicking it.
2) Select the Personalize tab.
You can categorize items fr
within this window.
(See Categorizing GroupW
Items below).
om
ise
3) Type a new subject in the My Subject field.
4) Click to save the personalized changes on the item.
Categorizing GroupWise Items:
Categorize your items to improve how your information is organized.
You can assign a category to any item type, including documents and contacts.
In addition to the pre-defined categories, you can create other categories to fit your own
specific needs.
To Categorize an item in any folder:
1) Right-click the item and choose
Categories.
2) From the cascading menu, select
the desired category.
To create your own categories:
1) Right-click the item and choose Categories.
2) From the cascading menu, select More.
3) Enter the new category name.
4) Click the Add button.
5) Select Edit Color to choose a color
for your new category.
6) Click OK to save, and begin using
the new category.
3
Managing Messages, continued on page 4...
Page 4
Finding Items in your GroupWise Mailbox:
The Find feature lets you quickly locate items in your
Mailbox, a folder, or a library using the search criteria
you have specified.
Using the Find option:
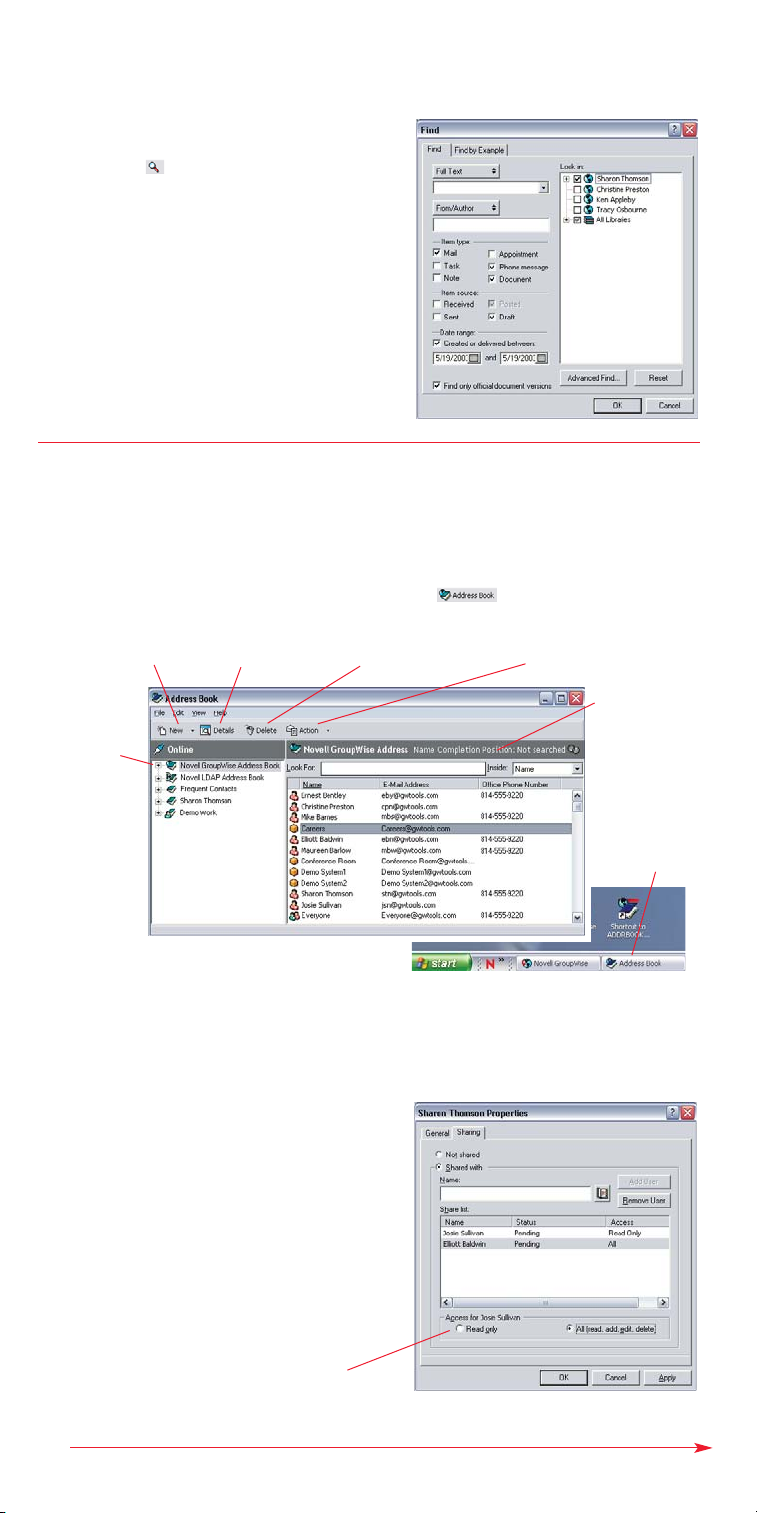
1) Click the button on the Toolbar.
2) Specify the criteria you want to use for
your search. For specific text, select the
Full Text field; select Subject field for
Subject searches. For specific names,
use the From or To fields. Search for items
based on Item type or source. Optionally,
specify a Date range to search. Specify
search areas: your mailbox, a Proxy’s
mailbox, and/or a GroupWise Library.
3) Click OK. GroupWise places results
of the search in the GroupWise
Find Results folder and opens it.
Address Book:
The GroupWise 6.5 Address Book can be used to manage your business and
personal contacts. In addition to the automatically created address books (Novell
GroupWise Address Book, Frequent Contacts, and your own named book), you can
create as many personal address books as you need.
1) To open the GroupWise Address Book, click the icon on the Toolbar.
Creates New contacts in
the active Address Book.
GroupWise
Address Books:
(System,
Frequent Contacts,
Personal, and
Shared).
Shows Details
about the selected
contact.
Creating a Personal Address Book:
1) Open the Address Book.
2) Select File > New Book.
3) Define a name for the new address book.
4) Click OK.
Sharing a Personal Address Book:
1) Open the Address Book.
2) Follow the steps for Creating
a Personal Address Book.
3) Right-click the new/existing address book.
4) Select the Sharing tab,
and choose Shared with.
5) To change the access rights, highlight
the user and select desired rights.
6) Click OK to accept the sharing of this
address book.
Deletes the contact
from your Personal
Address Book(s).
Perfor ms Actions
(Email, Appointment, Task, Note)
on a selected contact.
Name Completion
indicator: Shows the
status of the name
completion settings
for this address
book.
You can use the
Address Book applet
as your Personal
Information Manager
by keeping it active
on your desktop.
Select the desired
rights you wish to
grant the user.
4
Address Book, continued on page 5...
Page 5
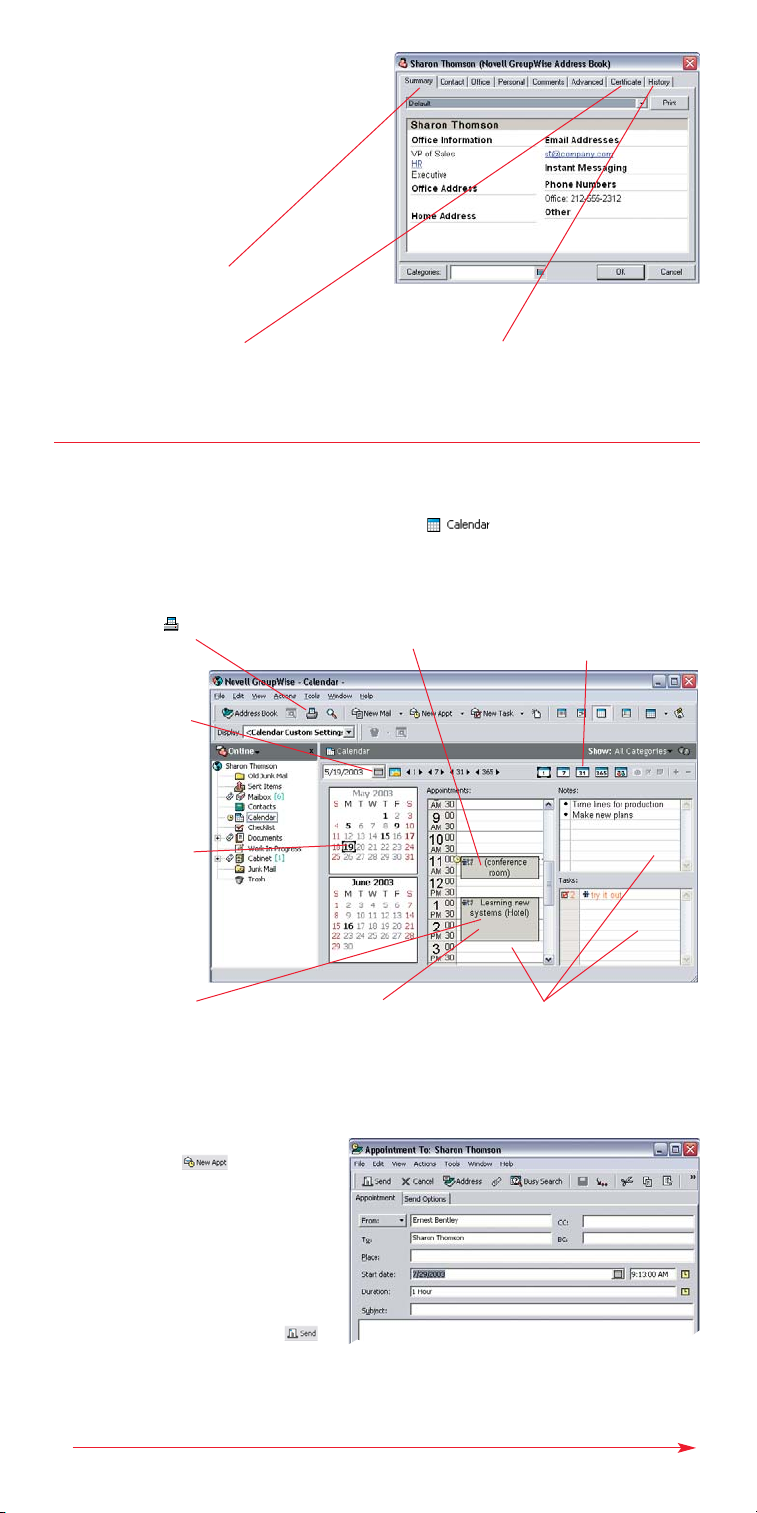
Updating Personal Contact Information:
1) Open the Address Book.
2) Select a personal address book.
3) Double-click the Contact you
wish to modify.
4) Select the specific tab
you wish to update.
5) Click OK to accept
the updated information
Select the tab you
wish
to update.
The Certificate tab displays
all associated security
certificates for this contact.
The History tab displays your interactions
with the selected contact (only available
from the Contacts tab in the Main Window).
Calendaring & Task Management:
Calendar:
1) To display your GroupWise Calendar, click the icon
in the Folder List Box.
Print Calendar ()
to get a hard-copy of
your calendar.
Use the Navigation
Toolbar to find
and display
specific dates.
Click on any date to
display the calendar
for that day.
Right-click any item to
perfor m actions on it.
Select the Calendar view you
want: Day, Week, Month, Year,
or Multi-User.
To reschedule an appointment,
just drag it to the updated
date or time.
Schedule Group Appointments:
1) Click on the button
on the T
oolbar.
2) Enter the recipient
name(s) in the To field.
Type the meeting location
3)
in the Place field.
Enter the
4)
Enter the
5)
t date
Star
and time.
Duration for the meeting.
6) Type a Subject and message for
the appointment, then click
5
Double-click any
existing item to open
it and view details.
Double-click any item area
to create a new Appointment,
Task, or Note.
.
Calendaring & Task Management, continued on page 6...
Page 6
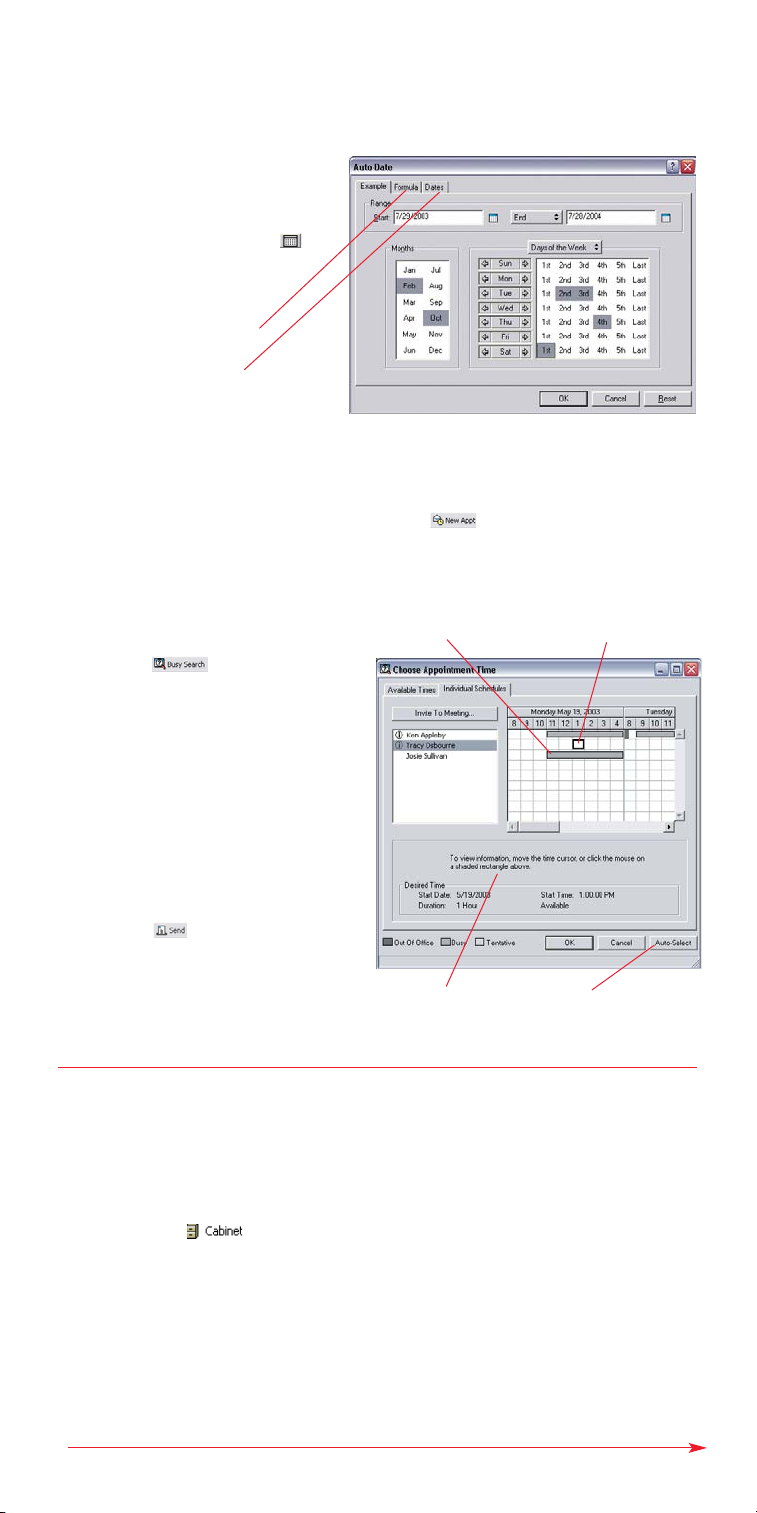
Recurring Appointments, Tasks & Notes:
Use Auto-Date to schedule recurring appointments, tasks, and reminder notes.
Auto-Dates can occur on the same day every week (e.g., every Monday), the same
day(s) of the month (e.g., the 14th and last day), or any other defined series of
dates. You can also use Auto-Date to schedule irregular or infrequent events,
such as holidays.
1) Select New Mail,
New Appointment, or New Task
button on the Toolbar.
2) Select the start date icon
in the Start Date field.
3) Click on Select Recurring at
the bottom of the window.
Formula - Define a formula that
produces the desired dates.
Dates - Select the desired
dates of the recurring item
in the display calendar.
Performing a Busy Search:
When scheduling group appointments, GroupWise gives you the ability to search
other users’ calendars to find time blocks available for all desired attendees.
1) Schedule a group appointment by clicking the button on the Toolbar.
2) Enter the recipients name(s) in the To field.
3) Type the location where the meeting will be held in the Place field.
4) Enter the target Star t date and time
Time slots that users
have already booked in
their calendars.
Appointment time selector:
drag to select desired time
for your appointment.
5) Click the button on the
Toolbar. When the Choose
Appointment Time dialog box
displays, you can:
Manually find a time when everyone
is available by dragging the time
selector to the desired time.
or
Click the Auto Select button
to select the time automatically.
6) Click OK to have the selected
time updated in the
Appointment To dialog box.
7) Complete your appointment
and click .
If you have Proxy access
rights to the user’s calendar,
user’s appointment details
are displayed here.
Auto Select chooses the
earliest time slot that all
users are available.
Shared Folders:
Items placed in a GroupWise Shared Folder are instantly available to ever yone
with access to that folder: users can share messages, appointments, notes, tasks,
files/documents, and participate in Discussions.
Creating a Shared Folder:
1) Right-click on and select New Folder.
2) Select Shared Folder and click Next.
3) Give your new folder a Name and, if desired, a Description , then click Next .
4) In the Name field, enter the name(s) of the person you wish to share the folder
with and click Add User. Repeat until all users have been added
to the Share list.
5) By default, all users are granted Read and Add rights. To grant or take away
rights for a particular user, highlight the user and select/deselect
the specific rights for that user.
6
Shared Folders, continued on page 7...
Page 7
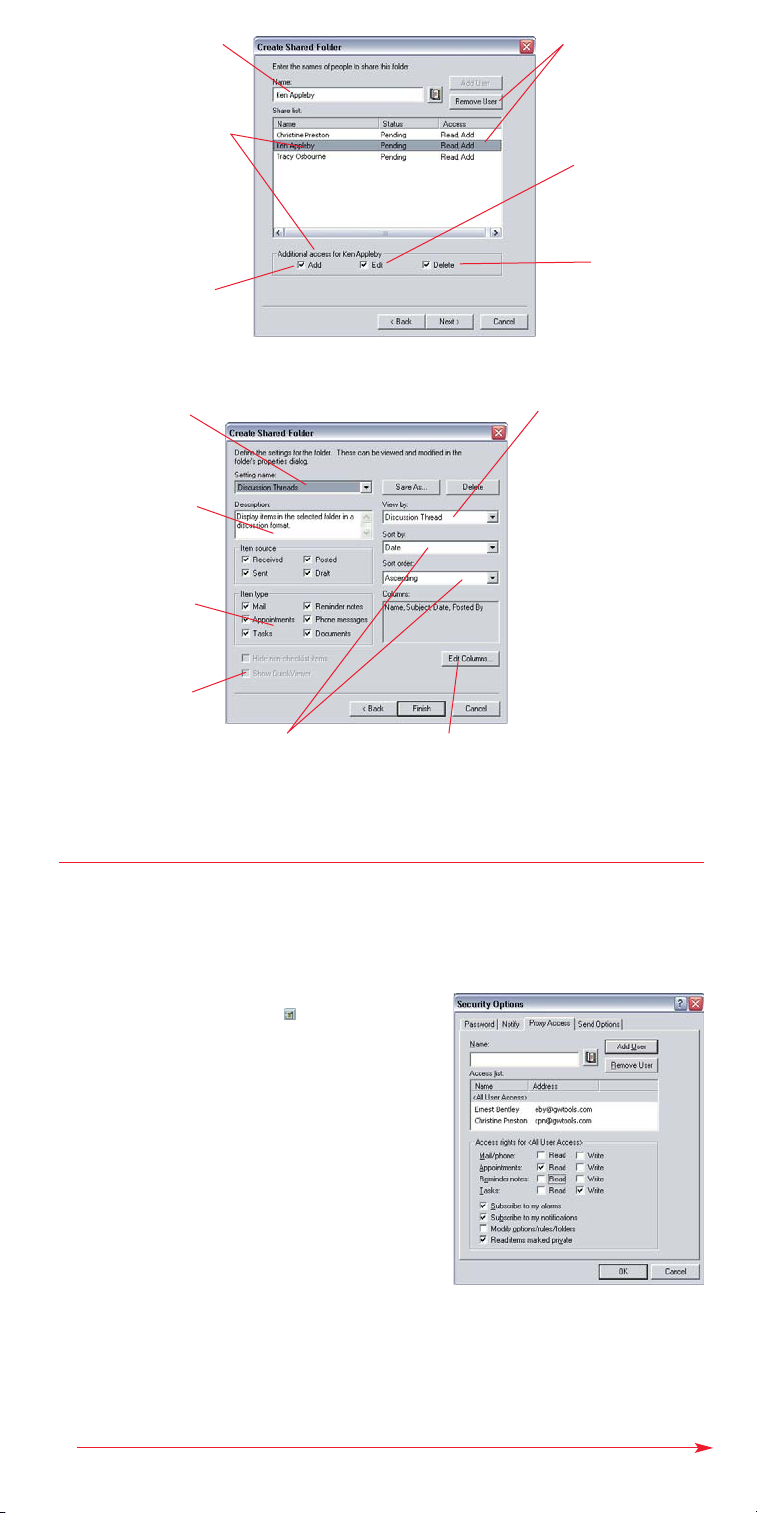
Enter the name of each
user who will have access
to the shared folder.
To grant additional rights or
take away rights for a user,
highlight the user and
select/deselect the specific
rights for that user.
Add rights allows the
user to place new items
into the shared folder.
To Remove a user from
the Share list, highlight
that user and click
Remove User.
Edit rights allows the
user to modify an
item placed in the
shared folder.
Delete rights
allows the user to
delete an item
from the shared
6) Define the default view settings for the shared folder. After the folder
is created in their mailboxes, individual users can modify their own view rights.
Setting name is
automatically
selected.
Type a Description
for the display
setting (optional).
Select Item types
to be displayed.
Select desired
View by settings:
Calendar - Folder contents
display in calendar format.
Checklist - Items display
in a checklist format with
checklist features enabled.
Discussion Thread - Items
are sorted by topic
and date.
Details - Standard item
list display.
folder.
Turn QuickViewer
on or off.
Define the criteria
for sorting the
item list.
Choose the columns
and the order in which
they will be displayed.
7) Click Finish to complete the creation of the new shared folder.
8) GroupWise sends a Shared Folder Notification item to the recipients
and automates the creation of the folder in their respective mailboxes.
Proxy:
The Proxy feature allows you to access another user's GroupWise account or enables
others to access your GroupWise account.
Establishing an Access List to give users access to your mailbox:
1) Select Tools > Options from the Menu Bar.
2) Double-click the Security ( ) icon.
3) Select the Proxy Access tab.
4) In the Name field type the name of the
person you want to have Proxy rights
and click to add user to the Access List.
5) Select the users and check the boxes
that correspond to the access rights
you want to give to the selected user.
Repeat Steps 4-5 until you have
added all users and granted them
the respective rights.
6) To remove proxy rights from a particular user, select that
user and click Remove User.
7) When finished modifying rights, click OK.
8) To remove all proxy rights from a particular
, select that user and choose
user
9) When Finished modifying rights, click OK.
Remove User.
NOTE: Rights granted to the All User Access entr
y in the
Access List
will give the marked rights to all users in your entire GroupWise system.
7
Proxy, continued on page 8...
Page 8
Accessing another userÕs account through Proxy:
Before you can act as a proxy for another user, you must be added to that
individual’s Access List that grants you Proxy rights to his/her mailbox.
To proxy into another userÕs account:
1) Select File > Proxy .
2) Enter the person’s name that you
want to access.
3) Click OK.
or
4) Click the Folder List header drop down list
and select the name of the person whose
Mailbox you want to access.
Header drop
down list.
Sending a new item from a Proxy account:
In GroupWise 6.5, you can send a new item from your
mailbox either from your account or from a proxy account
without having to change the view. In the From field
of the item, select the name that will display
as the sender of the item.
To order additional GroupWise¨ 6.5 Quick Reference Cards or if you need more
information, please call: 1-866-GWS-0101 (288)
Essential GroupWise Productivity Tools
ANTI-SPAM & ANTI-VIRUS MESSAGING FIREWALL
www.gwtools.com/nospam
EMAIL STORAGE MANAGEMENT
www.gwtools.com/backup
MOBILE MESSAGING
www.gwtools.com/gomobile
INTELLIGENT FAX GATEWAY
www.gwtools.com/smartfax
REAL-TIME WEB PUBLISHING
www.gwtools.com/goweb
LEARNING & SUPPORT SYSTEM
www.gwtools.com/learn
8
© 2003 The Messaging Architects. All rights reserved. Novell® and GroupWise ® are registered trademarks of Novell, Inc.
www.gwtools.com
 Loading...