

Page 1
Page 2

Page 3
Tic TALK
Copyright info
Page 4

Contents
Welcome ................................................................................... 7
TicTALK Overview..................................................................... 8
Registration ............................................................................. 12
Device basics .......................................................................... 13
Battery .........................................................................................................13
Control button operation ..............................................................................14
Turn your phone ON/OFF............................................................................15
Display screens............................................................................................16
Status bars, icons, and indicators ................................................................ 17
Backlight ......................................................................................................19
Device operations.................................................................... 20
2 Contents
Page 5

Power-save mode........................................................................................ 20
Auto-sleep mode..........................................................................................21
Menus.......................................................................................................... 21
Web configuration interface ..................................................... 24
Device management.................................................................................... 24
Log on to web site........................................................................................28
Numbers ......................................................................................... 29
Calendar Events...............................................................................31
To Do List......................................................................................... 32
Settings ............................................................................................ 33
Fun Stuff...........................................................................................38
Contents 3
Page 6

Notes .............................................................................................. 40
Home .............................................................................................. 41
Find Device.................................................................................... 41
Set date and time............................................................................ 42
Full update........................................................................................42
Using your TicTALK applications............................................. 43
Features and applications............................................................................ 44
Make a Phone-ANYTIME call ...................................................................... 44
Make a Phone-RESTRICT call .................................................................... 45
Answer an incoming call.............................................................................. 45
4 Contents
Page 7

End a call..................................................................................................... 46
Make an EMERGENCY CALL..................................................................... 46
Switch to handset mode during a call .......................................................... 47
Switch to headset mode...............................................................................48
Adjust the volume during a call .................................................................... 48
View calendar events...................................................................................49
Check your To Do list...................................................................................50
Read and respond to a text message .......................................................... 51
View your missed calls.................................................................................52
View photos ................................................................................................. 52
Use your stopwatch ..................................................................................... 52
Listen to a tune ............................................................................................53
Play Match It................................................................................................ 53
Play Magic 8 ................................................................................................ 54
Play the Hangman game ............................................................................. 54
View countdown timers................................................................................ 55
Contents 5
Page 8

Set your display contrast..............................................................................56
Select your watch face option ...................................................................... 56
Troubleshooting....................................................................... 57
Customer Care........................................................................ 58
Battery Safety Precautions .......................................................................... 58
RF exposure ................................................................................................ 58
Legal Information..................................................................... 60
Limited Warranty ..................................................................... 61
Warranty Exclusive Remedy........................................................................ 61
6 Contents
Page 9

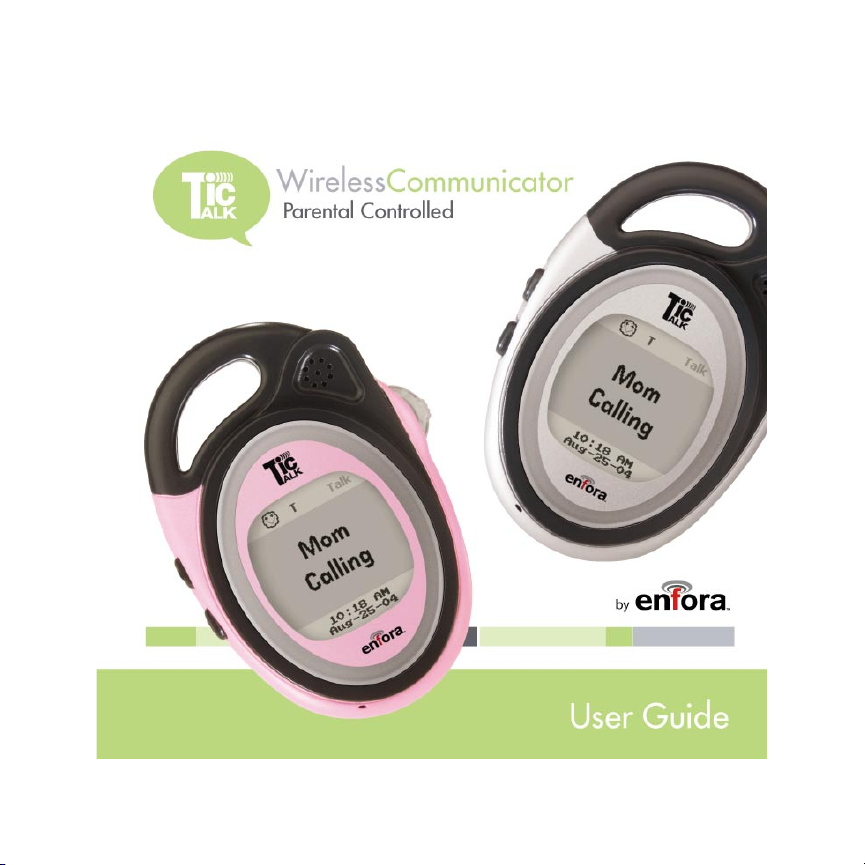
Welcome
Thank you for buying the TicTALK phone. Get ready to use your TicTALK
phone by learning about the features and controls described in this TicTALK
User Manual.
See the “Web configuration interface” section to set up your phone numbers
and special features. The web application is where you authorize and manage
the use of your TicTALK phone.
Your TicTALK Quick Start Guide provides basic instructions for making your
first call, once you have your network connection.
Here’s what you’ll find in
the box:
• TicTALK phone
• USB cable charger
• Power supply
• TicTALK Quick Start Guide
• TicTALK User Manual
• Product CD
Welcome 7
Page 10
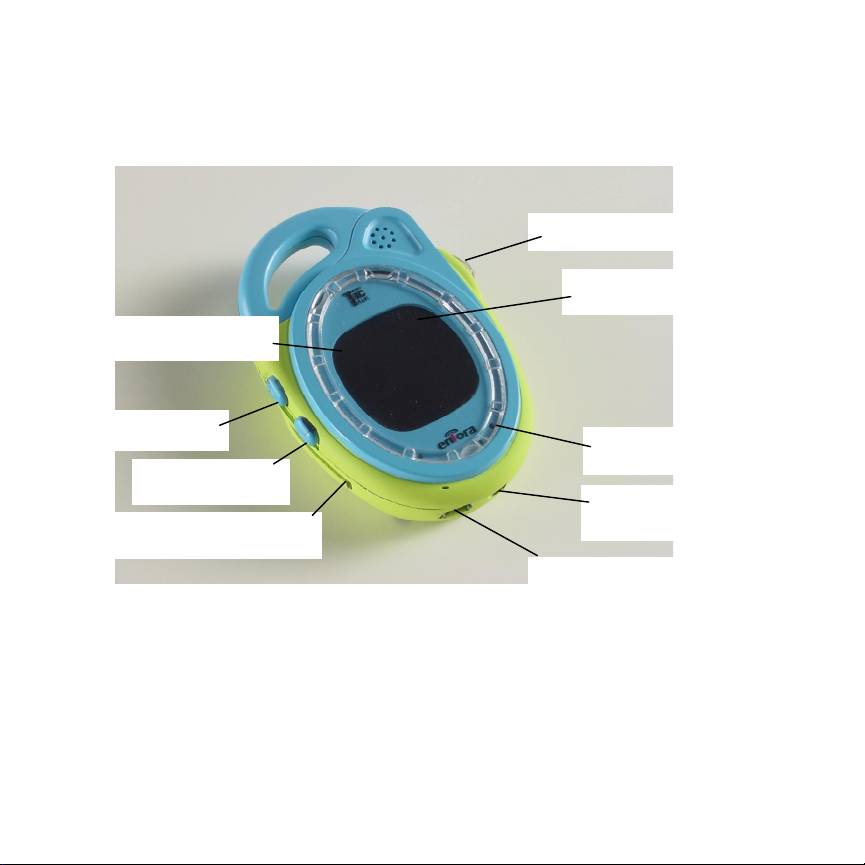
TicTALK Overview
Battery indicator face (BIF)
SCROLL/SELECT switch
Signal strength indicator
Push button A
Push button B
Recessed reset switch
8 TicTALK Overview
Ring of lights (optional)
Headset jack
Accessory connector
Page 11

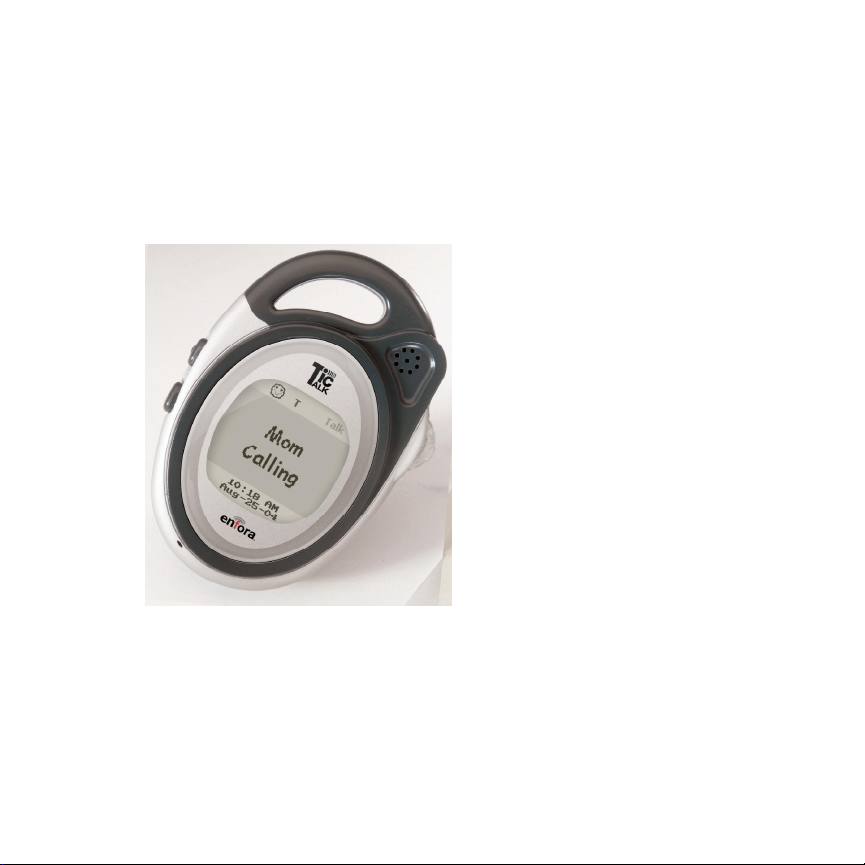
Your TicTALK phone
The default mode for your TicTALK phone is speakerphone. During a call, you
can press SELECT to switch to HANDSET mode.
When you plug a universal 2.5-mm headset into your phone, it automatically
switches to HEADSET mode.
Push button A
• Press to turn your phone on.
• Press and hold 2 seconds to turn your phone off.
• When your phone is in power save or auto-sleep mode, a short press
wakes it up.
• In a call, two short presses ends your call and hangs up your phone.
• When your phone is on, a short press allows you to navigate back one
menu level.
• While your phone is turned on, a short press resets the backlight timer ten
seconds.
Push button B
• A short press while your phone is ON returns you to the top level menu.
• In the top level menu, a short press puts your phone in power-save mode.
SCROLL/SELECT switch
• The 3-way rocker switch allows you to SCROLL UP or DOWN and
SELECT actions or highlighted items on the menu screens.
TicTALK Overview 9
Page 12

• The LED in the SCROLL/SELECT switch provides a short flash every 5
seconds for any type of alert or incoming call until you acknowledge and
clear the alert.
Recessed reset switch
• The device recessed reset switch is located on the left side below the push
buttons. Use a pen tip or similar item to press the switch. When you press
to reset your phone, this operation also turns your phone OFF.
Battery strength indicator (BIF)
• In the top status bar of the display screen, BIF provides information about
your battery power.
Signal strength indicator
• On the right side of the top status bar, the
strength. A dimmed icon indicates a weaker signal. If no icon displays, the
network is unavailable.
icon indicates signal
Microphone
• The microphone transmits your voice during a call.
Speaker
• The speaker enables you to hear voice calls and audible alerts.
Vibrate motor
• Your TicTALK phone vibrates for any type of alert or incoming call.
10 TicTALK Overview
Page 13

Headset jack
• The headset jack provides the connection for a universal 2.5-mm headset.
Accessories jack
• The accessories jack provides connection for charging your battery.
Ring of lights (optional)
• If you have this option installed, an incoming call activates your ring of
lights flashing around the display.
LCD display
• Your TicTALK phone features a 16 level monochrome (transflective FSTN)
display with 128x128 pixel resolution.
USB cable
• The ‘mini B’ USB connector is used for charging the battery and for
providing power to the phone when connected to the wall mount power
supply or PC.
Power supply
• Use the power supply provided to charge the phone at your wall outlet
when a PC is not available.
TicTALK Overview 11
Page 14

Registration
Your Subscriber Identity Module (SIM) card is configured and installed at the
store before you leave. Also, your Web Account registration is completed at the
store.
12 Registration
Page 15

Device basics
Battery
Your TicTALK comes with a built-in rechargeable Lithium Ion battery. The
battery is partially charged, but we recommend you fully charge your new
battery before you use your TicTALK phone for the first time.
WARNING:
Only use the USB cable provided with your TicTALK to charge your
battery, or you risk damaging your device.
You can plug the USB cable into your PC to charge your battery, or you
can use it with the power supply provided to charge at a wall outlet.
Charge the battery at your wall outlet
Plug the USB cable that comes with your TicTALK into the power supply
1
provided.
Then, plug the power supply into the wall outlet.
2
Plug the USB cable into the accessory connector of your TicTALK phone.
3
NOTE:
Your display shows the battery level while it is charging, even if the
phone is off.
Device basics 13
Page 16

Control button operation
OPERATION CONTROL BUTTON ACTION
ON/OFF Press and hold PUSH BUTTON A for 2 seconds
WAKE UP from power save or
sleep mode
BACK one menu level in submenu
BACKLIGHT ON
(Reset timer 10 seconds)
END CALL and hang up 2 short presses on PUSH BUTTON A.
ANSWER incoming call
Cancel ALERT (vibrate, LED flash,
audible)
BACK TO TOP menu from
submenu
Enter POWER-SAVE mode from
top-level menu
SCROLL UP or DOWN to highlight
menu item
Volume adjust
(ONLY during a call)
SELECT
highlighted menu item
Speakerphone/handset
(ONLY during a call)
Short press PUSH BUTTON A.
(To operate phone,
adequate signal strength.
Press ANY button.
Short press PUSH BUTTON B.
Push SCROLL/SELECT switch up or down.
Press SCROLL/SELECT switch (press in).
icon must indicate
14 Device basics
Page 17
Turn your phone ON/OFF
Turn your phone ON
Press and hold PUSH BUTTON A.
1
After a few seconds, the backlight turns on.
2
Then the Welcome screen displays with a greeting to your device name.
3
If the Calendar Events application is enabled in your web application, your
4
screen displays today’s events.
SCROLL DOWN to view any expired Countdown timers for today, if this
5
application is enabled.
Press SELECT to go to the top-level menu.
6
NOTE:
Before using your phone, look for the icon in the top status bar
to ensure your signal strength is adequate. You may need to move to
another location to get a stronger signal.
And, check your battery charge as shown by the shaded area on BIF’s
smiley face.
Turn your phone OFF
Press and hold push button A for two seconds until the goodbye screen
1
displays.
Release push button A.
2
NOTE:
If you press and hold push button A for more than two seconds, your
TicTALK turns OFF, and back ON again.
Device basics 15
Page 18
Display screens
The TicTALK display screens provide:
• Information about the status of your device
• Name of incoming caller
• Balance of time remaining for the month for RESTRICTED calls
• Notice of messages from home or from friends
• Notice of appointments and calendar events
• Time and date
• Menus for selecting features and applications
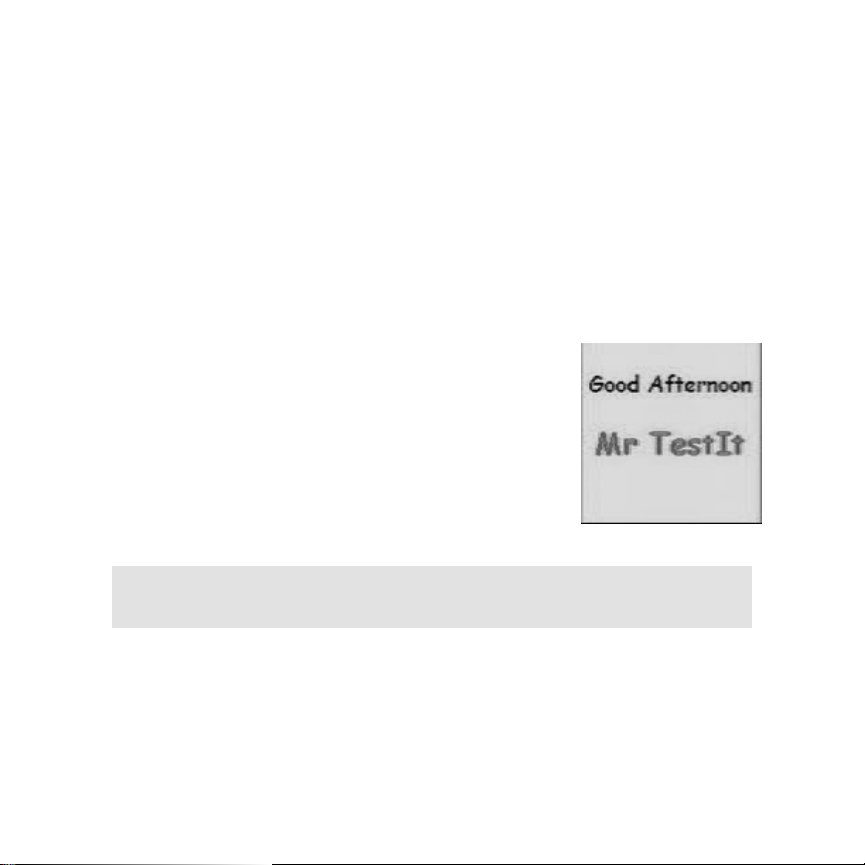
Welcome screen
When you turn on your phone, or wake it up, the
backlight comes on and your welcome screen displays
a two second TicTALK logo followed by a two second
greeting displaying your device name.
NOTE:
Set up your device name (up to twelve characters) in the web
configuration interface.
Today’s events and countdowns
After the welcome screen, your phone displays the following:
• Calendar events for the current day, if any
16 Device basics
Page 19
• Countdown timers that expire today, if any
SCROLL UP or DOWN to navigate from the events list to the countdown timer
list.
After reviewing your events and countdowns for the current day, press SELECT
to go to your top-level menu and begin normal operation.
Status bars, icons, and indicators
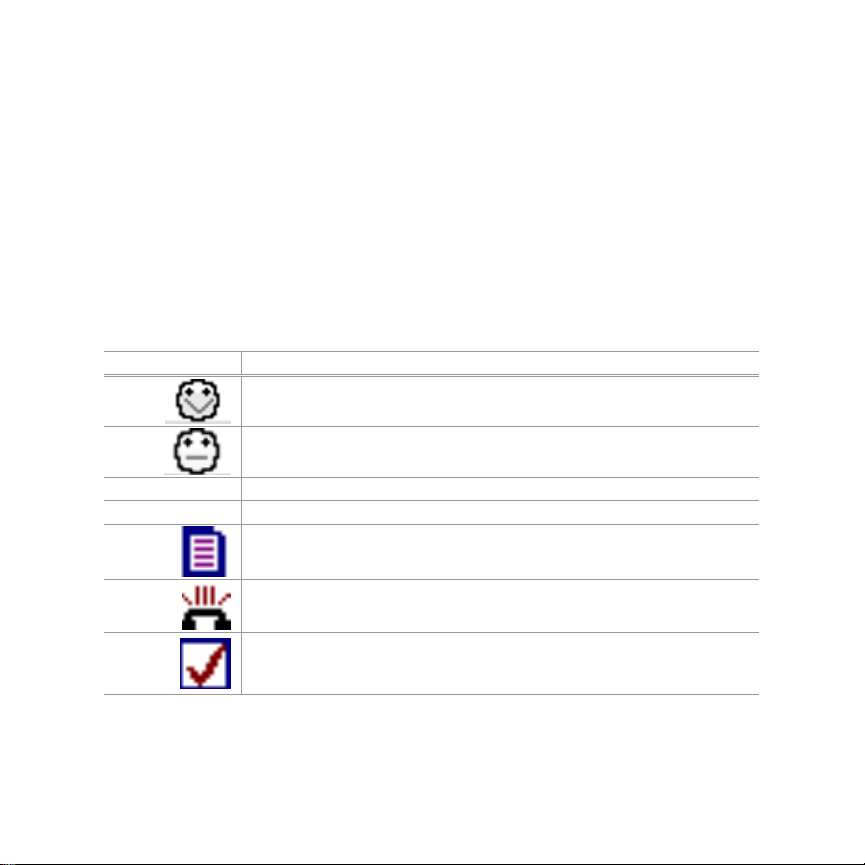
Icons and indicators description
ICONS DESCRIPTION
BIF-fully charged.
BIF-half discharged.
BIF-time to recharge.
BIF-charging.
Visible when you have an unread note.
Action: go to Messages > Notes.
Visible when you have a missed call.
Action: go to Messages > Missed Calls.
Visible when you have an unread task.
Action: go to Organizer > To Do List to view your To Do list and clear
alert icon.
Device basics 17
Page 20
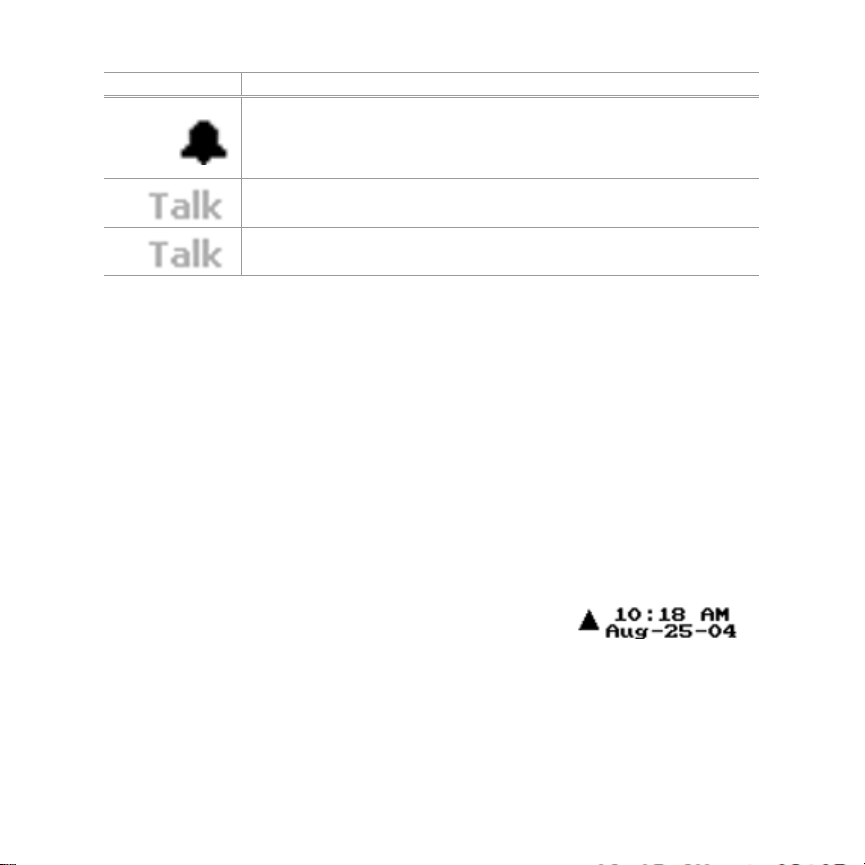
ICONS DESCRIPTION
Visible when you are within 15 minutes of a calendar event start time
or a countdown timer is expired.
Action: go to Organizer > Calendar > Today’s date to view events and
clear alert icon. Or go to Fun Stuff > Countdown Timer to read list.
Signal strength indicator-dark color indicates good signal.
Signal strength indicator-light color indicates poor signal
(When signal is absent, TALK icon is not visible.)
Top status bar
In the top-level menu, and in most of your screens, the icons and indicators in
the top status bar display information about your TicTALK.
• Battery charge
• Text messages
• To Do items
• Missed calls
• Appointments or calendar events
• Expired countdown timers
• Signal strength
Bottom status bar
The Bottom Status Bar is displayed on most screens. The bottom status bar
has the following features:
• Time and date
18 Device basics
Page 21

• Scroll Arrows indicate the option to SCROLL UP or DOWN to other menu
screens.
Backlight
The backlight illuminates your TicTALK display when you turn the device ON.
While the backlight is ON, ANY button press resets the backlight timer for ten
seconds. If no button is pressed for ten seconds while your phone is ON, the
backlight turns OFF.
When the backlight turns OFF, the phone screen remains unchanged if no
button is pressed for ten more seconds. After this ten-second period if you are
not in an active call, the display turns OFF and the phone goes into power-save
mode.
Turn backlight ON when not in a call:
Short press PUSH BUTTON A.
NOTE:
Remember to use a SHORT press on PUSH BUTTON A to turn your
backlight ON.
A long press turns your phone OFF.
Device basics 19
Page 22

Device operations
Power-save mode
Your TicTALK phone goes into power-save mode when it is on but not in an
active call and no button is pushed for a period of twenty seconds. In power-
save mode, the screen displays the current time in a digital or analog clock face
configurable in the Utility > Display menu on the phone.
You can manually set your phone to power-save mode by pressing PUSH
BUTTON B from the top-level menu.
Respond to an incoming call in power-save mode
An incoming call alert automatically wakes up the phone from power-save. This
operation is the same as when your phone is ON.
Respond to a non-call alert in power-save mode
While in power-save mode all alerts other than incoming calls require you to
first turn ON your phone before you perform the required action to clear the
alert.
First press PUSH BUTTON A to wake up your phone.
1
Press ANY button to acknowledge the alert (vibrate/LED flash/audible.)
2
20 Device operations
Page 23

Perform required action to clear status bar icon alert.
3
Auto-sleep mode
In the web application, go to Settings > Device Power Settings to set the time
your TicTALK wakes up and goes to sleep, or powers down, each day. In the
auto-sleep mode, your TicTALK phone is turned off and no alerts can be
activated.
Wake up from the auto-sleep mode
Short press PUSH BUTTON A to turn ON your phone and resume operation.
Menus
The TicTALK menus provide access to the applications that are authorized
from the web configuration interface. With the menus displayed, SCROLL to a
menu item to highlight. SELECT the highlighted item to see submenus and
details or to initiate an action, such as make a call.
If an application is disabled in the web configuration interface, that application
does not appear in your phone menu until it is enabled again. If no balance of
time remains for your monthly allocation for calls to and from Restricted
numbers, Phone-RESTRICT does not appear in your menu.
Device operations 21
Page 24

Organizer
• Calendar
• To Do List
Phone-ANYTIME
• Mom
• Dad
• Grandpa
• EMERGENCY CALL
Phone-RESTRICT
• John
• Kim
• Jim
• Michael
Messages
• Missed calls
• Notes
Fun Stuff
• Photo
• Stopwatch
• Games
22 Device operations
Page 25

• Tunes
• Countdown timers
Utilities
• Display Settings
Device operations 23
Page 26

Web configuration interface
Device management
At the TicTALK web configuration interface screen, click on the configuration
icons to navigate to the settings windows. You can enable or disable functions,
or set a window of time to automatically disable for a period each day.
Information entered in the web configuration interface displays in red until this
data is updated on the TicTALK device.
Management options:
These are some of your device control options in the web interface:
• Add and delete names and phone numbers
• Add and delete items for Calendar Events, Countdowns, To Do List
• Enable/disable audible alert or specify daily quiet time to disable
• Enable/disable RESTRICTED calls and other applications
• Allocate minutes per month for RESTRICTED calls
• Specify daily quiet time for RESTRICTED calls
24 Web configuration interface
Page 27

• Interact with phone user by calls, text messages and status information
Device status shown on your web site
Your web application displays the following status information and text
messages received from the device:
• Balance of minutes remaining for RESTRICTED calls
• To Do items checked off as they are completed
• Text messages and responses
• Battery charge status
• Synchronization
Synchronization
The stoplight icon in your web application tells you if your device is
synchronized with the most recent data on the web site.
• Green light indicates web site is fully synchronized with device.
• Yellow light indicates some data on the web site is not synchronized with
device.
• Red light indicates web site has not communicated with the device in a
while.
After entering new data on the web site, the stoplight icon changes to yellow.
New data entered in the web site displays in red until the device is updated.
Synchronize web site and device:
Verify your phone is turned ON before updating.
1
Web configuration interface 25
Page 28

In the web application, go to Settings > Parental Controls. Click on the
2
Full Update icon.
Allow a minute or two for the device to receive new data.
3
Refresh your web page to see the green light verifying the update.
4
Configuration icons
Configuration Icons Device Control
Add and Delete:
Numbers
Calendar Events
To Do List
Settings
Fun Stuff
• Anytime Phone Numbers (1-12)
• Restricted Phone Numbers (1-10)
Add and Delete:
• Events and appointments that appear on the device calendar
(1-40)
Add and delete:
• Items on the To Do List (1-10)
• View items checked off at the device as they are completed
Set up and manage applications:
• Device Settings, ID, audible tones
• Parental Controls
• Alerts
• Power Settings
• My Account
Add and delete:
• Items for Countdown Timers
• Words for the Hangman game
26 Web configuration interface
Page 29

Configuration Icons Device Control
Send and receive:
• Text Messages with a response
• Text Messages without a response
Notes
Home
Find Device
Set date and time
Full update
Navigate back to the top level menu
Activate device alerts at highest volume for 20 seconds
Set device date and time
Update settings and authorizations on the TicTALK phone
when it is turned on
Web configuration interface 27
Page 30

Log on to web site
To set up and manage features and applications for your TicTALK phone, log
onto the web configuration interface:
Go to web site: http://t-mobile.mytictalk.com
1
Enter your provided USER ID and PASSWORD.
2
Click the LOGIN button. The Welcome screen appears displaying
3
information about your TicTALK.
28 Web configuration interface
Page 31

Numbers
In the Numbers window, you can set up and manage the lists of names and
numbers for Phone-ANYTIME (1-12) and for
Phone-RESTRICT (1-10).
ANYTIME numbers list
Add and delete ANYTIME numbers.
Add an ANYTIME number
Click the Numbers icon to see the
1
ANYTIME phone numbers list.
Enter the new name and phone number in
2
the fields beside the ADD button.
Then, click . The new name and
3
number appear in the list.
Delete an ANYTIME number:
Click in one or more boxes beside the
1
name or names to be deleted.
Click to delete checked items.
2
Web configuration interface 29
Page 32

NOTE:
The EMERGENCY CALL number is already entered and always appears
on the device at the bottom of the ANYTIME phone numbers list.
The device ANYTIME phone numbers list with a maximum of twelve
entries displays the EMERGENCY CALL number as the thirteenth listing.
RESTRICTED numbers list
Add and delete numbers in your RESTRICTED phone numbers list for calls
with the following restrictions:
• You can enable/disable RESTRICTED calls in the web application.
• Set the allocation of minutes for current month.
• Set time periods to enable RESTRICTED calls for weekdays and
weekends.
Add a RESTRICTED number:
Click Numbers icon to see RESTRICTED Phone Numbers list.
1
Enter the new name and phone number in the open fields beside the ADD
2
button. (Enter numbers with no dashes, as shown.)
Then, click the ADD button. The new name and number appear in the list.
3
Go to Settings/Device Settings. Enter monthly allocation of minutes for
4
calls to and from Phone-Restrict numbers.
Click on the clock icon to set the times to allow calls to and from
5
Restricted numbers.
NOTE:
The balance of allotted minutes remaining for the month for calls to and
from Restricted numbers is displayed in the Device Settings window on
the web configuration interface and on the device in the Phone-Restrict
menu.
30 Web configuration interface
Page 33

Delete a RESTRICTED number:
Click in one or more boxes beside the names to be deleted.
1
Click to delete the checked items.
2
Calendar Events
The Calendar Events application enables you to set up events and
appointments to display on the TicTALK phone calendar. Fifteen minutes
before the start time of an event, your TicTALK phone activates an alert.
Your calendar ranges from January 1, 2000, through December 31, 2099. You
can list as many as six events for a single day with detailed information and up
to forty items total.
Add a calendar event:
Enter calendar event name (up to 12 characters)
1
in the fields next to ADD.
Click the date and time icons to see the calendar
2
and the clock.
Scroll in the calendar to the event day and click on
3
that day. Your date appears in the ADD field.
Use drop down list to select start and end times.
4
Click OK on the clock to enter the start and end
times.
Web configuration interface 31
Page 34

Enter event details (up to 15 characters).
5
Then, click . Your new event displays in your
6
calendar events window.
Delete an event
Click in one or more boxes beside the events to be deleted.
1
Click to delete checked items.
2
Copy an event:
Click the Copy icon next to an event to duplicate the information for that
1
event in the ADD fields below.
Change the information as necessary.
2
Click
3
To Do List
In the To Do List you can maintain a list of tasks and chores to be completed
and send new tasks to your device user as needed. You can maintain up to ten
items on your list, delete items, and add more as necessary.
The phone user is alerted to this new item when the To Do list is updated on
the device.
32 Web configuration interface
Page 35

When the phone user checks off a completed task in the
To Do menu on the phone, that complete status update
displays in the web window.
Add a To Do item
In the field beside the button, enter item name
1
(up to twelve characters). Click
The list displays the new item name and the date
2
of entry.
.
Delete a To Do item
Click to place a check mark in box beside item or items to be deleted.
1
Click to delete selected items.
2
Settings
Use the pull down menu to setup and manage these TicTALK settings:
• Device Settings
• Parental Controls
• Device Alerts
• Device Power Settings
• My Account
Web configuration interface 33
Page 36

Device Settings
Select Device Settings from the pull down menu.
Enter your Device Name in the field provided. The device name is
1
displayed on the device in the welcome screen and in the goodbye
screen.
Enter number of minutes allocated monthly for calls to and from
2
RESTRICTED numbers. (Balance remaining shows below monthly
allocation.)
34 Web configuration interface
Page 37

Enter time period during weekdays to enable RESTRICTED calls.
3
Enter time period during weekends to enable RESTRICTED calls.
4
Click SAVE
5
Parental Controls
Select Parental Controls from the pull down menu.
Review the feature options and choose enable ON or OFF for each feature.
Web configuration interface 35
Page 38

Device Alerts
Select Alerts from the Show Me pull down menu.
1
Choose audible alert on/off options:
2
Select audible alerts always on, or alerts always off, or always on with
3
exceptions.
For the audible alerts always on with exceptions, click the clock icon
4
to enter the time settings for weekday and weekend days.
Click SAVE.
5
36 Web configuration interface
Page 39

Device Power Settings
You can use the auto-sleep feature to specify the time each day you want your
TicTALK to go to sleep and the time you want it to wake up.
Enable/disable the Auto Sleep feature
1
If enabled, specify the time you want the TicTALK to wake up and the
2
time you want it to go to sleep each day.
Web configuration interface 37
Page 40

Fun Stuff
Countdowns
Your Fun Stuff/Countdowns feature lets the you keep track of the months,
days, hours, and minutes remaining until an important date arrives. Enter up to
ten dates to countdown within the date range of the calendar, January 1, 2000,
through December 31, 2099.
Add a Countdown item
Enter the item name (up to 12
1
characters)
Click the calendar icon to open
2
the calendar
Use scroll arrows at top of calendar to
3
scroll to the year, month, and day of
your event
Click on the event day in the calendar
4
to enter the new date in the field
5
38 Web configuration interface
Click . New countdown item
appears in list.
Page 41

Delete a Countdown item
Click in the box beside the item to select
1
Click to delete the selected items
2
Games
Enter up to twenty word choices to play the Hangman game on the device.
Photos
Photos are installed with software on device.
Tunes
Tunes are installed on device at factory.
Web configuration interface 39
Page 42

Notes
Enter text messages up to eighty characters to the device user. You have the
option of entering up to four possible responses for the device user to choose.
When the device user responds to the message with a response, you can read
the response at the bottom of this web page.
40 Web configuration interface
Page 43

Home
Click on the Home icon to return to the top-level menu screen.
Find Device
Your TicTALK includes a feature to help you locate the device if it is misplaced
or lost. When the Find Device command is issued from the Settings > Parental
Controls window, it activates the following alerts on the device for fifteen
seconds:
• Audible tone in speakerphone mode at highest volume
• Vibrate
• Flashing LED
• LOST splash screen
Web configuration interface 41
Page 44

Set date and time
The TicTALK phone uses the time and date setting of the computer running the
web application. Click on this icon in the Parental Controls window to
synchronized the phone with the PC date and time.
Full update
In the Parental Controls window, click on the Full update icon to synchronize
the phone and PC.
Verify your TicTALK phone is turned ON.
1
Then click the Full Update icon on the Parental Controls Settings page to
2
synchronize the web site and the phone.
Refresh you screen.
3
The green stoplight on your web page indicates the new data is updated
4
on the phone, and the phone and the web application are synchronized.
42 Web configuration interface
Page 45

Using your TicTALK applications
The TicTALK phone talks back and forth with your web interface to keep you in
touch with your home where your phone features are managed.
You can use your TicTALK in the default mode as a speakerphone or in
handset mode or with a headset. You may be alerted to a call or message with
flashing lights, a vibrating motor, and an audible tone, according to your phone
setup on your web interface. Your TicTALK phone enables you to:
• Stay connected to your family and friends by phone calls and messages
• See your calendar of events and tasks
• Play games and tunes, and other Fun Stuff
The following procedures will help you learn to use your TicTALK phone
applications.
Using your TicTALK applications 43
Page 46

Features and applications
TicTALK applications Function
Calendar
Organizer
Phone-Anytime
Phone-Restrict
Messages
Fun Stuff
Utilities
Calendar Events
To Do List
Call a number on your Anytime phone list
Call a number on your Restricted phone list, if enabled
View a list of Missed calls
Read and respond to text messages
With and without responses
Photo
Stopwatch
Games
Tunes
Countdowns
Display Settings
Make a Phone-ANYTIME call
You can call, and receive calls from, the names on your ANYTIME list---
ANYTIME, without restriction.
In the top-level menu, SCROLL DOWN to highlight
1
Phone-ANYTIME. Press SELECT to view your
ANYTIME names list.
SCROLL UP or DOWN to highlight the name you
2
want to call. Press SELECT to call.
To end call, short press PUSH BUTTON A.
3
44 Using your TicTALK applications
Page 47

Make a Phone-RESTRICT call
NOTE:
If you do not see this feature in your display, the RESTRICTED phone
numbers feature is disabled, or allocated minutes are expired, or your
phone is not communicating properly with the web configuration
interface.
Your Phone-RESTRICT feature allows you to call names on your
RESTRICTED list with certain limitations. Remember these limitations:
• RESTRICTED calls are enabled only for certain periods of the day.
• You have an allocation of minutes each month for RESTRICTED calls.
When you are in a RESTRICTED call within one minute of time expiring,
your phone alerts you. When you time is expired, your call is terminated.
In top level Organizer menu, SCROLL DOWN to highlight Phone-
1
RESTRICT.
Press SELECT to view your RESTRICTED names list.
2
SCROLL UP or DOWN to highlight the name you want to call. Press
3
SELECT to call.
To end call, short press PUSH BUTTON A.
4
Answer an incoming call
When your phone is ON or in power save mode, an incoming call activates the
following alerts:
Using your TicTALK applications 45
Page 48

• Your TicTALK displays the name of the caller, your phone vibrates, and
the LED flashes every five seconds until you press ANY button to
acknowledge.
• Your phone sounds an audible ring tone, if enabled at that time.
• And if you have the Ring of Lights option, the lights flash around your
display.
• Press ANY button to answer.
End a call
• Two short presses on PUSH BUTTON A ends call and hangs up your
phone.
Make an EMERGENCY CALL
NOTE:
Your phone automatically overrides any disable settings if you need to
make an EMERGENCY CALL.
• The EMERGENCY CALL number is at the bottom of your ANYTIME
Phone Numbers list.
• If you need to place an EMERGENCY CALL, your phone remains
unblocked to allow any incoming calls for one hour
• A notification message automatically goes to the contact set up in the Web
Configuration Interface.
In the top level menu, SCROLL DOWN to highlight Phone-ANYTIME.
1
Press SELECT.
SCROLL DOWN to highlight EMERGENCY CALL and press SELECT.
2
46 Using your TicTALK applications
Page 49

Your TicTALK phone asks you to confirm your EMERGENCY CALL by
3
selecting YES or NO. SELECT YES to call.
To end call and hang up your phone, short press PUSH BUTTON A twice.
4
NOTE:
Be sure to stay on the line for assistance, if directed by the operator.
Switch to handset mode during a call
Speakerphone or handset mode
Your TicTALK phone provides three modes of operation: speakerphone
(default mode), handset, and headset mode. During a call, you can switch from
speakerphone to handset mode by pressing SELECT. The next call defaults to
speakerphone mode.
Handset mode
During a call, press SELECT to switch from the speakerphone, the default
mode, to handset mode.
Using your TicTALK applications 47
Page 50

Switch to headset mode
Headset mode
When you plug a standard 2.5 mm headset into the headset jack on your
phone, your phone detects the headset is installed and automatically switches
to headset.
Adjust the volume during a call
During a call, press SCROLL UP or DOWN to adjust the volume.
Organizer
SELECT the Organizer application in the top level menu to see these
submenus:
• Calendar
• To Do
Calendar
The highlighted days on your calendar indicate days
with appointments and events. Up to six events or appointments can be listed
on a single day, as many as forty items total.
48 Using your TicTALK applications
Page 51

NOTE:
Your TicTALK alerts you fifteen minutes before an appointment or event
start time by vibrating, LED flashing, and audible alerts, if enabled. Press
ANY button to clear these alerts.
An alert icon displays in the status bar. Clear the status bar alert
when you navigate to the event in your calendar submenu.
Scroll through the days of the month on your calendar to view appointments
and events.
Calendar scrolling operation:
• Your cursor starts on the current day.
• Scrolling up or down moves your cursor through the days of the month,
skipping the days with no appointments or events.
• Scrolling beyond the last appointment for the month changes the display to
the next calendar month.
• And scrolling back before the first appointment for the month changes the
calendar to the previous month.
View calendar events
On the TicTALK device calendar, days with upcoming events appear
highlighted.
SELECT Organizer on the menu.
1
Then, SELECT Calendar to view the monthly calendar. Days with events
2
are highlighted.
Using your TicTALK applications 49
Page 52

SCROLL UP or DOWN to a highlighted day and press SELECT to view a
3
list of all events for that day.
SCROLL UP or DOWN to highlight an event. SELECT to view the details.
4
Check your To Do list
Your To Do list can include as many as ten items. Your phone alerts you when
it is updated with a new To Do item sent from the web interface.
NOTE:
When you get a new To Do item, your TicTALK activates a vibrate alert,
an LED flash, and an audible beep, if enabled at that time.
Press any button to clear the vibrate, LED flash, and audible alerts. Clear
the status bar alert by going to your To Do list to see your new item.
View To Do list
SELECT Organizer in the top-level menu.
1
Then, SCROLL DOWN to highlight To Do. SELECT
2
to view your To Do list.
Check off a To Do item when completed
When you complete a task, check that item off your list and
automatically update the web site.
SCROLL UP or DOWN to highlight the completed
1
item in your To Do list. SELECT item.
In Complete dialog screen, SELECT Yes.
2
50 Using your TicTALK applications
Page 53

To Do list shows completed item crossed out.
3
Your TicTALK phone sends an update showing your completed item to
4
the web interface.
Messages > Notes
Read and respond to a text message
Press any button to clear the vibrate/LED flashing alert (and auditory, if
1
enabled)
SELECT Messages from the menu, and then SELECT Notes to view.
2
Clear the icon alert by viewing the first fifteen characters of the message
3
and the time and date sent.
Press SELECT to view the entire message.
4
If a response is required, SCROLL to your chosen response and SELECT
5
to send.
Messages > Missed
Calls
Using your TicTALK applications 51
Page 54

View your missed calls
The Missed Calls icon displays in the top status bar and clears when
you view the list of missed calls.
SCROLL DOWN to highlight Messages > Missed Calls to view list of calls.
1
To return a call from the missed calls list: SCROLL to highlight a call on
2
the list. Press SELECT to return call.
Fun Stuff
View photos
SELECT Photo from the Fun Stuff menu.
1
SCROLL through the photo list to highlight a photo
2
installed on your device.
SELECT to view.
3
Use your stopwatch
SELECT Stopwatch from the Fun Stuff menu.
1
Press SELECT to start and stop your stopwatch.
2
SCROLL DOWN enables you to take up to four lap
3
times.
SCROLL UP clears the time and the lap count.
4
52 Using your TicTALK applications
Page 55

Listen to a tune
A selection of tunes is installed on your TicTALK at the factory.
SCROLL through the selections on your display.
1
SELECT highlighted item to play your tune.
2
Press PUSH BUTTON A to stop a tune.
3
Games
SELECT Fun Stuff, and then SELECT Games to see your choices, if this
feature is enabled from the web application at this time.
Play Match It
The game begins displaying one circle and increases to seven circles, each
with a number from one to five. The player matches the circles. If successful,
the difficulty increases and the number of circles increases by one. If
unsuccessful, the difficulty decreases and the number of circles decreases by
one.
Using your TicTALK applications 53
Page 56

Play Magic 8
The player asks a question and the 8 ball spins while it is “thinking.” Twelve
responses are randomly presented.
Play the Hangman game
There are twenty-five word choices in your Hangman game. Your display
indicates the number of letters in a word (up to twelve) as you attempt to spell
out the word one letter at a time.
Try to recognize the word as soon as you can. If
you run out of chances this time, the correct word
displays on your screen briefly, and the game
restarts with a new word. Try again.
SCROLL UP or DOWN through the letters of
1
the alphabet.
Press SELECT to choose the highlighted letter.
2
If you choose correctly, your letter is displayed with your other correct choices.
If you make an incorrect letter selection, a body part is added to the hangman.
54 Using your TicTALK applications
Page 57

View countdown timers
Your countdown timers let you know how many months, days, hours, and
minutes there are until the date arrives for an important event. Your list can
include up to ten items. When the day arrives, it displays on your TicTALK
screen.
SELECT Fun Stuff > Countdown Timer.
1
SCROLL DOWN to highlight item on your list. SELECT to view time
2
remaining.
Using your TicTALK applications 55
Page 58

Utility
Set your display contrast
SCROLL UP or DOWN to adjust
1
your display contrast.
Press SELECT to save your settings.
2
Select your watch face option
You can choose a digital or an analog clock face that displays when your
phone goes into power-save mode.
In the top-level menu, SCROLL DOWN to
1
highlight Utility. SELECT.
SCROLL DOWN to highlight Display. SELECT.
2
SCROLL DOWN to highlight Watch Face.
3
SELECT.
SCROLL to highlight the digital clock or the analog clock
4
option.
SELECT YES. SAVE your setting.
5
56 Using your TicTALK applications
Page 59

Troubleshooting
Troubleshooting 57
Page 60

Customer Care
Battery Safety Precautions
For the safe use of lithium ion batteries always follow the instructions provided
below. Improper handling of lithium ion batteries may result in injury or damage
from electrolyte leakage, heating, ignition, or explosion.
RF exposure
Tests for SAR are conducted using standard operating positions specified by
the FCC with the device transmitting at its highest certified power level in all
tested frequency bands. Although the SAR is determined at the highest
certified power level, the actual SAR level of the device while operation can be
well below the maximum value. This is because the device is designed to
operate at multiple power levels so as to use only the power required to reach
the network. In general, the closer you are to a wireless base station antenna,
the lower the power output. Before a device model is available fro sale to the
public, it must be tested and certified to the FCC that it does not exceed the
limit established by the government-adopted requirement for safe exposure.
The tests are performed in positions and locations (e.g., at the ear and worn on
the body) as required by the FCC for each model. (Body-worn measurements
may differ among device models, depending upon available accessories and
58 Customer Care
Page 61

FCC requirements.) While there may be differences between the SAR levels of
various devices and at various positions, they all meet the government
requirement for safe exposure. For body worn operation, to maintain
compliance with FCC RF exposure guidelines, use only accessories that
contain no metallic components and provide a separation distance of 2.5cm (1
inch) to the body. Use of other accessories may violate FCC RF exposure
guidelines and should be avoided.
Customer Care 59
Page 62

Legal Information
60 Legal Information
Page 63

Limited Warranty
Seller (“Seller” shall be defined as T Mobile and/or the relevant authorized
reseller or distributor of the T Mobile Wireless product or the
reseller/distributor’s warranty fulfillment partner, as applicable) warrants only to
the original buyer/end-customer (“Customer”) that this wireless device and
accessories (“Product”) will be free from defects in workmanship and material
for one (1) year from the date of purchase by Customer.
Warranty Exclusive Remedy
If the Product is deemed by Seller to be defective in workmanship or material
during the warranty period and the Product has been returned at Customer’s
expense to Seller or Seller’s designated repair center, the Product will be
repaired or replaced, at Seller’s option, at no charge. Customer will be required
to show valid “proof-of-purchase” (proof of date of sale, lease or rental.)
Reconditioned replacement devices, components, parts or materials may be
used for replacement or repair. Data in the memory of the device may be lost
during repair.
THIS LIMITED WARRANTY DOES NOT COVER AND IS VOID WITH
RESPECT TO THE FOLLOWING:
Limited Warranty 61
Page 64

• Cosmetic damage
• Products, which have been repaired, maintained or modified (including the
antenna) by anyone other than AWS or an AWS-approved repair facility, or
that have been improperly installed.
• Damage to and faults with the LCD display due to damage caused by
Customer.
• Equipment, components and accessories not manufactured, supplied or
authorized by AWS.
• Failures or defects caused by misuse, abuse, accidents, physical damage,
abnormal operation, improper handling or storage, neglect alterations,
unauthorized installation, removal or repairs, failure to follow instructions,
exposure to fire, water or excessive moisture or dampness, floods or
extreme changes in climate or temperature, acts of God, riots, acts or
terrorism, spills of food or liquids, viruses, or other software flaws
introduced into the product, or other acts which are not the fault of AWS
and which the Product is not specified to tolerate, including damage
caused by mishandling or blown fuses.
• Products which have had warranty stickers, electronic serial number
and/or serial number label removed, altered, rendered illegible or
fraudulently applied to other equipment.
• Signal reception problems (unless caused by defects in material or
workmanship.)
• Products operated outside published maximum ratings.
• Performance of the Products when used in combination with other
products or equipment (including, without limitation, software, accessories,
media, supplies or consumables) not manufactured, supplied or authorized
by AWS.
• Consumables (such as fuses.)
62 Limited Warranty
Page 65

• Payments for labor or service to representatives or service centers not
authorized to perform product maintenance by AWS.
This warranty does not cover consumer education, instruction, installation or
removal, set up adjustments, problems related to service(s) provided by a
carrier or other service provider, and/or signal reception problems.
This warranty is valid only for Products purchased and used in the United
States.
Limited Warranty 63
 Loading...