

Novatel Sprint mifi 4082 User Manual


©2011 Sprint. SPRINT and the logo are registered
trademarks of Sprint. Other marks are the property of their
respective owners.
www.sprint.com
User Guide
MiFi® 3G/4G Mobile Hotspot
by Novatel Wireless
Browser Interface


Table of Contents
Introduction. . . . . . . . . . . . . . . . . . . . . . . . . . . . . . . . . . . .i
Your Device. . . . . . . . . . . . . . . . . . . . . . . . . . . . . . . . . . . .i
Getting More Information . . . . . . . . . . . . . . . . . . . . . . .i
Section 1: Your Device’s Browser Interface. . . . . . 1
1A. Interface Basics . . . . . . . . . . . . . . . . . . . . . . . . . 2
The Browser Interface . . . . . . . . . . . . . . . . . . . . . . . . . . . . 2
Opening the Browser Interface . . . . . . . . . . . . . . . . . . . . 2
Initial Connection and Setup . . . . . . . . . . . . . . . . . . 2
LED States . . . . . . . . . . . . . . . . . . . . . . . . . . . . . . . . . 3
Login to the Browser Interface . . . . . . . . . . . . . . . . 7
The Landing Page . . . . . . . . . . . . . . . . . . . . . . . . . . . . . . . 7
The Navigation Bar . . . . . . . . . . . . . . . . . . . . . . . . . . 8
The Status Icons . . . . . . . . . . . . . . . . . . . . . . . . . . . . 8
Settings Menu Bar . . . . . . . . . . . . . . . . . . . . . . . . . . 8
The MiFi Administration Section . . . . . . . . . . . . . . . 8
MiFi Administration Screen . . . . . . . . . . . . . . . . . . . 9
Tip: Looking for something? If you don’t see it in the headings
listed here, try the Index on page 67.

Section 2: Interface Settings. . . . . . . . . . . . . . . . . . 11
2A. Applications Menu . . . . . . . . . . . . . . . . . . . . . . 12
The Applications Menu . . . . . . . . . . . . . . . . . . . . . . . . . .12
File Sharing . . . . . . . . . . . . . . . . . . . . . . . . . . . . . . . 13
The MiFi Home Settings Screen . . . . . . . . . . . . . 14
2B. Wi-Fi Menu . . . . . . . . . . . . . . . . . . . . . . . . . . . . . 16
The Wi-Fi Menu . . . . . . . . . . . . . . . . . . . . . . . . . . . . . . . . 16
Wi-Fi Status . . . . . . . . . . . . . . . . . . . . . . . . . . . . . . . 17
MAC Filter . . . . . . . . . . . . . . . . . . . . . . . . . . . . . . . . 19
Settings . . . . . . . . . . . . . . . . . . . . . . . . . . . . . . . . . . 21
2C. WWAN Menu . . . . . . . . . . . . . . . . . . . . . . . . . . . 26
The WWAN Menu . . . . . . . . . . . . . . . . . . . . . . . . . . . . . .26
The WWAN Status Screen . . . . . . . . . . . . . . . . . . 27
3G . . . . . . . . . . . . . . . . . . . . . . . . . . . . . . . . . . . . . . . 29
4G . . . . . . . . . . . . . . . . . . . . . . . . . . . . . . . . . . . . . . . 31
Settings . . . . . . . . . . . . . . . . . . . . . . . . . . . . . . . . . . 33
2D. Router Menu . . . . . . . . . . . . . . . . . . . . . . . . . . . . 35
The Router Menu . . . . . . . . . . . . . . . . . . . . . . . . . . . . . . .35
Port Filtering . . . . . . . . . . . . . . . . . . . . . . . . . . . . . . 36
Port Forwarding . . . . . . . . . . . . . . . . . . . . . . . . . . . . 38
TCP/IP . . . . . . . . . . . . . . . . . . . . . . . . . . . . . . . . . . . 40
Settings . . . . . . . . . . . . . . . . . . . . . . . . . . . . . . . . . . 42
2E. System Menu . . . . . . . . . . . . . . . . . . . . . . . . . . 43
The System Menu . . . . . . . . . . . . . . . . . . . . . . . . . . . . . . 43
Status . . . . . . . . . . . . . . . . . . . . . . . . . . . . . . . . . . . . 44
GPS . . . . . . . . . . . . . . . . . . . . . . . . . . . . . . . . . . . . . 45
Backups . . . . . . . . . . . . . . . . . . . . . . . . . . . . . . . . . . 47
Software Update . . . . . . . . . . . . . . . . . . . . . . . . . . . 48
Power Management . . . . . . . . . . . . . . . . . . . . . . . . 50
Password . . . . . . . . . . . . . . . . . . . . . . . . . . . . . . . . . 52
Settings . . . . . . . . . . . . . . . . . . . . . . . . . . . . . . . . . . 52
Section 3: Troubleshooting . . . . . . . . . . . . . . . . . . .55
3A. Common Problems and Solutions . . . . . . . 56
Overview . . . . . . . . . . . . . . . . . . . . . . . . . . . . . . . . . 56
Problems and Solutions . . . . . . . . . . . . . . . . . . . . 56
Section 4: Reference . . . . . . . . . . . . . . . . . . . . . . . . . 61
4A. Glossary . . . . . . . . . . . . . . . . . . . . . . . . . . . . . . . 62
Index . . . . . . . . . . . . . . . . . . . . . . . . . . . . . . . . . . . . . . . 67

i
Introduction
This User Guide explains the use of the browser
interface that allows you to configure your device as
well as access its many features.
Section 1: Your Device’s Browser Interface
Section 2: Interface Settings
Section 3: Troubleshooting
Section 4: Reference
Your Device
Thank you for purchasing a MiFi® 3G/4G Mobile
Hotspot by Novatel Wireless. This device offers more
freedom than ever before. No wires, no cables, no
software — configure it through your Web browser.
Getting More Information
This guide describes the browser interface that allows
you to configure your device. For information about
setting up your device on your Sprint account, device
maintenance and care, etc., consult the printed “
Get
Started” guide that came with your device.

Section 1
Your Device’s Browser
Interface

21A. Interface Basics
The Browser Interface (page 2)
Opening the Browser Interface (page 2)
The Landing Page (page 7)
The Browser Interface
Your device uses a browser interface to configure itself.
The browser interface lets you:
Customize your landing page interface.
View the status of aspects of your network.
Set up wireless security, including MAC and port
filtering and port forwarding.
Use GPS technology to search for stores, restaurants,
and other locations in your area.
Opening the Browser Interface
Initial Connection and Setup
1. Click Start and type Power Options in the Start
Search box, and then click Power Options.
2. Click Change plan settings under the selected plan.
3. Click Change advanced power settings.
4. Expand Wireless Adapter Settings, and then
expand
Power Saving Mode. Next to On Battery,
select
Maximum Performance, and then click OK.
When you press the power button:
Your device comes on and the power LED lights up.
A solid green LED indicates the device is in service
and ready to connect to the 3G network. A solid blue
LED indicates the device is in service and ready to
connect to the 4G network.
1A. Interface Basics
Important: Set the wireless network adapter power options to
maximize your device’s performance.
Note: The battery should be fully charged before using your
device for the first time.
1A. Interface Basics 3
Interface Basics
LED States
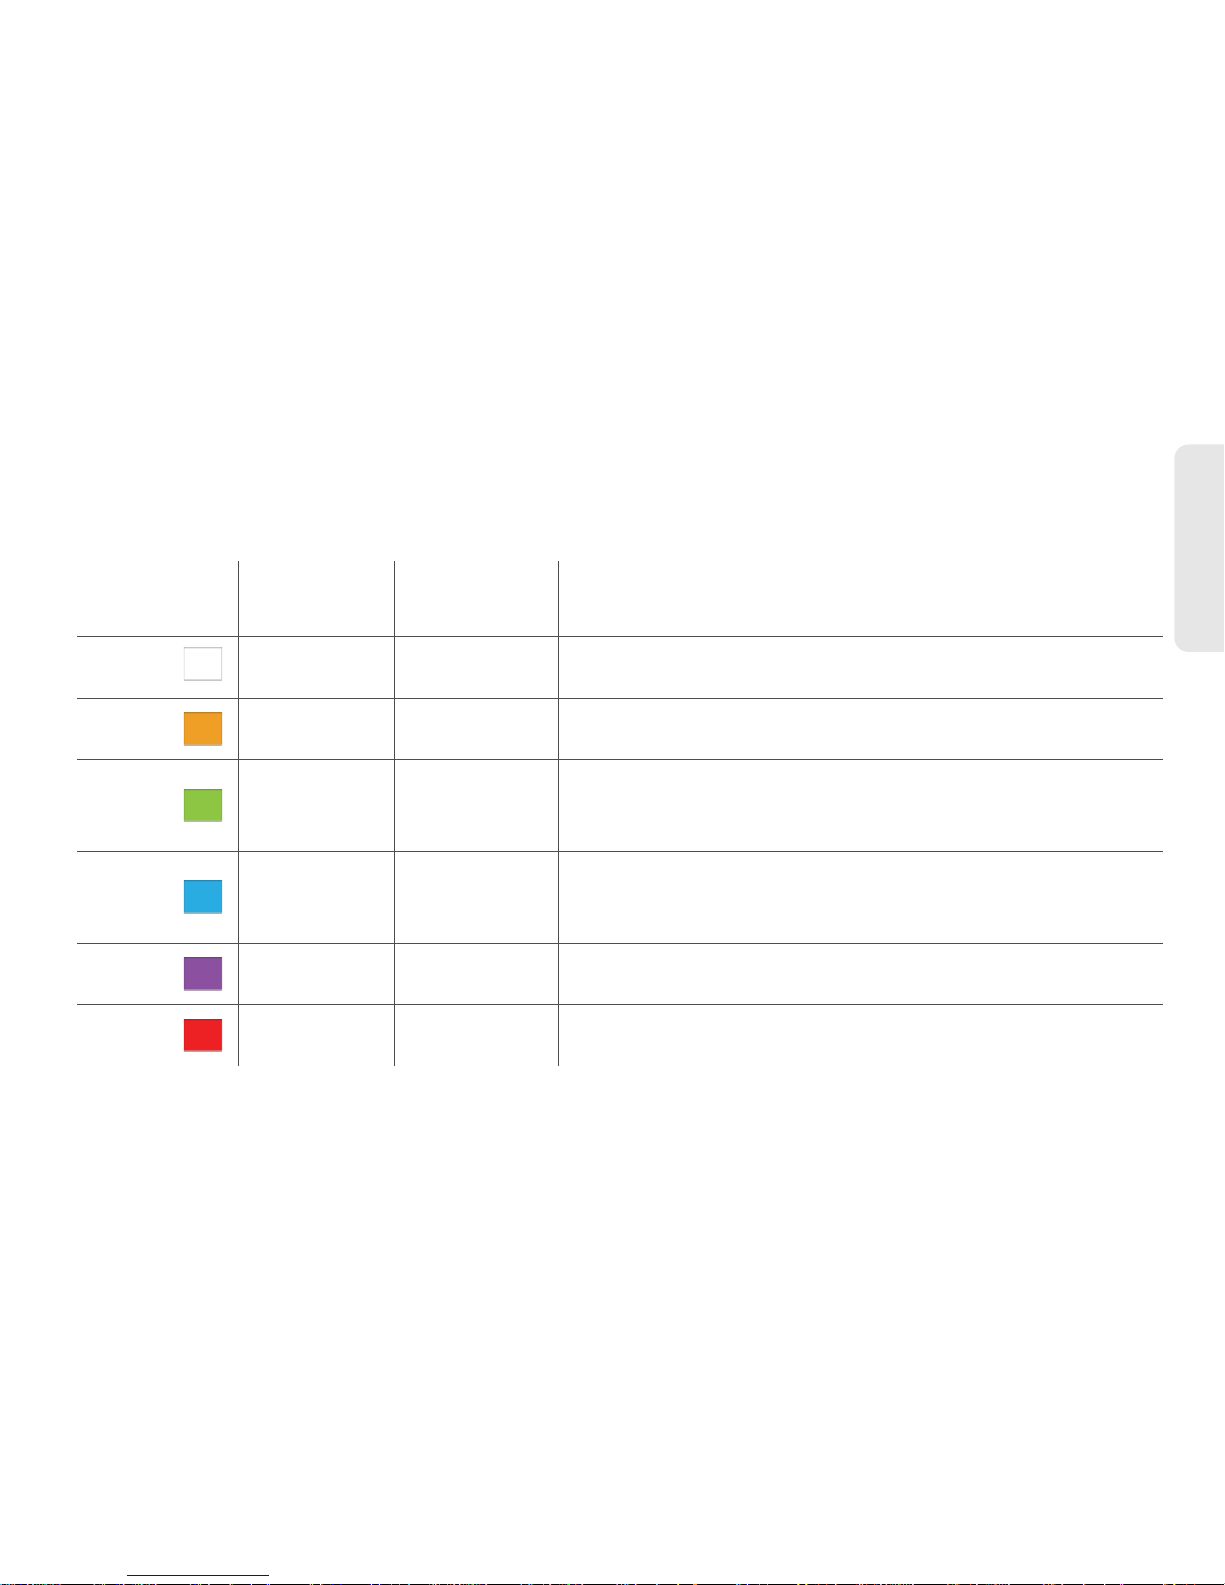
The MiFi device LED provides valuable information about the state of the device and its connection.
Power/Connection LED
LED Color
Power
Connection
Status Description
No
Light
No Power
—
Device is powered off
Amber
Connected to
power
Flashing:
Device is powered on; no 3G or 4G service is available (out of
coverage area)
Green
Connected to
power
Flashing:
Solid:
Device is powered on and connected to 3G; blink rate
corresponds to connection speed
Device is powered on; 3G service is available but not connected
Blue
Connected to
power
Flashing:
Solid:
Device is powered on and connected to 4G; blink rate
corresponds to connection speed
Device is powered on; 4G service is available but not connected
Purple
Connected to
power
Flashing: Device is powered on; firmware is being uploaded
Red
Connected to
power
Flashing: Device error
41A. Interface Basics
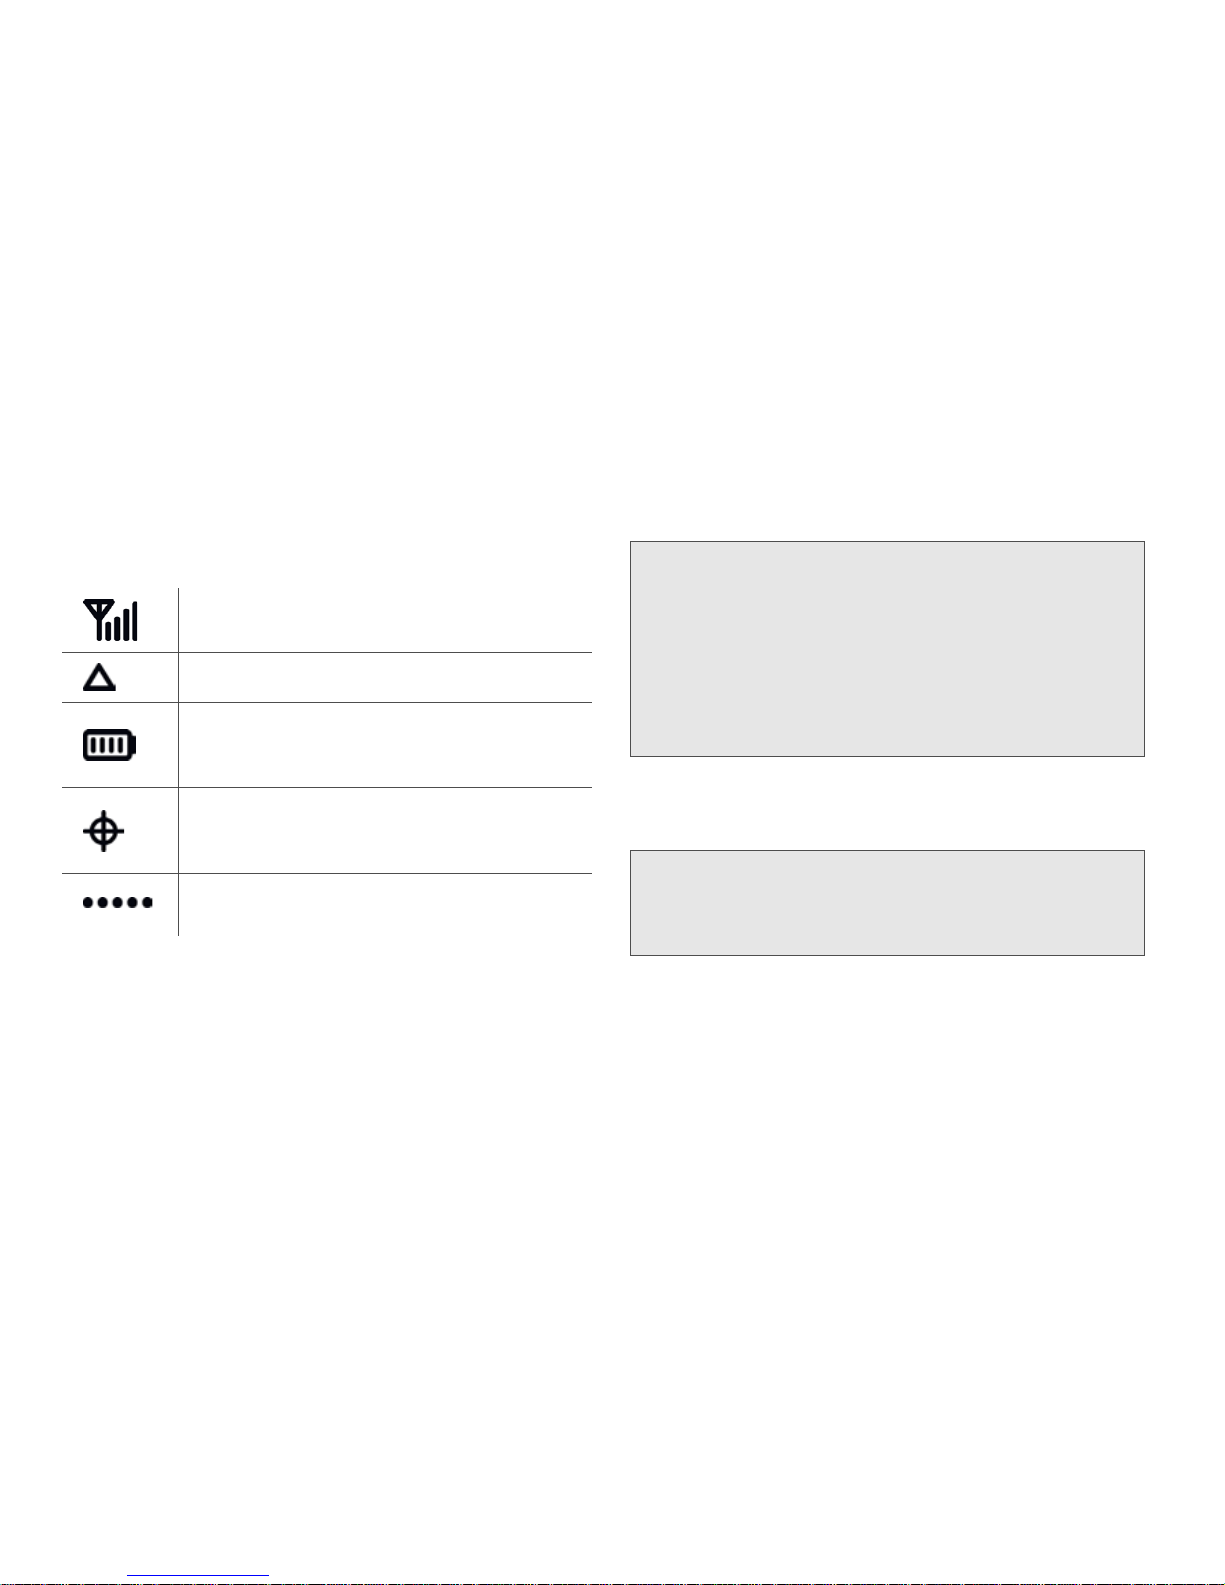
Status Panel Display
The status panel display is located on the right side of
the front of the MiFi device. When the device is
powered on, the icons display current device status
information.
How to Connect to Your Device
1. Use your normal Wi-Fi manager on your computer
to locate the
MiFi 4082 wireless network.
2. If multiple wireless networks are found, highlight
“
Sprint MiFi4082 xyz” (where “xyz” is a three-digit
number unique to your device).
3. Click Connect.
4. If this is your first time connecting to the device,
from your computer's Web browser, enter
http://mifi.mlp into the address window and press
the
Enter or Return key.
Mobile Broadband network signal strength.
Roaming status.
Battery life; this icon indicates the amount of
battery life remaining, and also indicates
when the device is connected to power.
GPS status. This icon indicates whether the
device has a GPS fix and also indicates
when the device is searching for a GPS fix.
Connection status; displays a dot for each
WiFi device connected to your device.
Tip: The steps to connect to a Wi-Fi network vary depending
on your operating system and whether you use the native
application or third-party software.
Generally, you click an icon (often in the Windows
notification area or
System Preferences > Network on a
Mac) where you can select “View Available Wireless
Networks.” If you are unfamiliar with wireless networking
on your computer, consult your computer help system.
Tip: If more than one MiFi device is active nearby, your unit
can by identified by the last three digits of its SSID
(network name). When you set up security for your
network, the network name will change.

1A. Interface Basics 5
Interface Basics
The MiFi Setup Wizard will start.
5. Enter the default password (“admin”) into the Login
password box and click
Next.
An onscreen wizard will launch and guide you
through the initial setup for your device.
6. Click Next.
Tip: You can use either of these addresses to connect:
• http://mifi.mlp
• http://192.168.1.1
Important:
• Be sure to record both the administrative password
and the network key that you create using the initial
setup wizard.
• If you cancel the wizard, your network will be left
unsecure (open). The wizard will relaunch every time
you start the browser interface.

61A. Interface Basics
7.
Select I accept this agreement to approve the GPS
Privacy Consent Agreement and click
Next.
8. Create a new administrative password, enter it into
both boxes, and click
Next.
This is the password you will use to enter the
browser interface in the future.
9. Click Finish to accept and save your setup.
The connection will close and the Wi-Fi device
will restart.
Note: When you reconnect, the network name (SSID) will be
different. The word “Secure” will have been added to
the end. For example, if the network name was “
Sprint
MiFi4082 1A3
” the first time you connected, it will now
be “
Sprint MiFi4082 1A3 Secure.”
1A. Interface Basics 7
Interface Basics
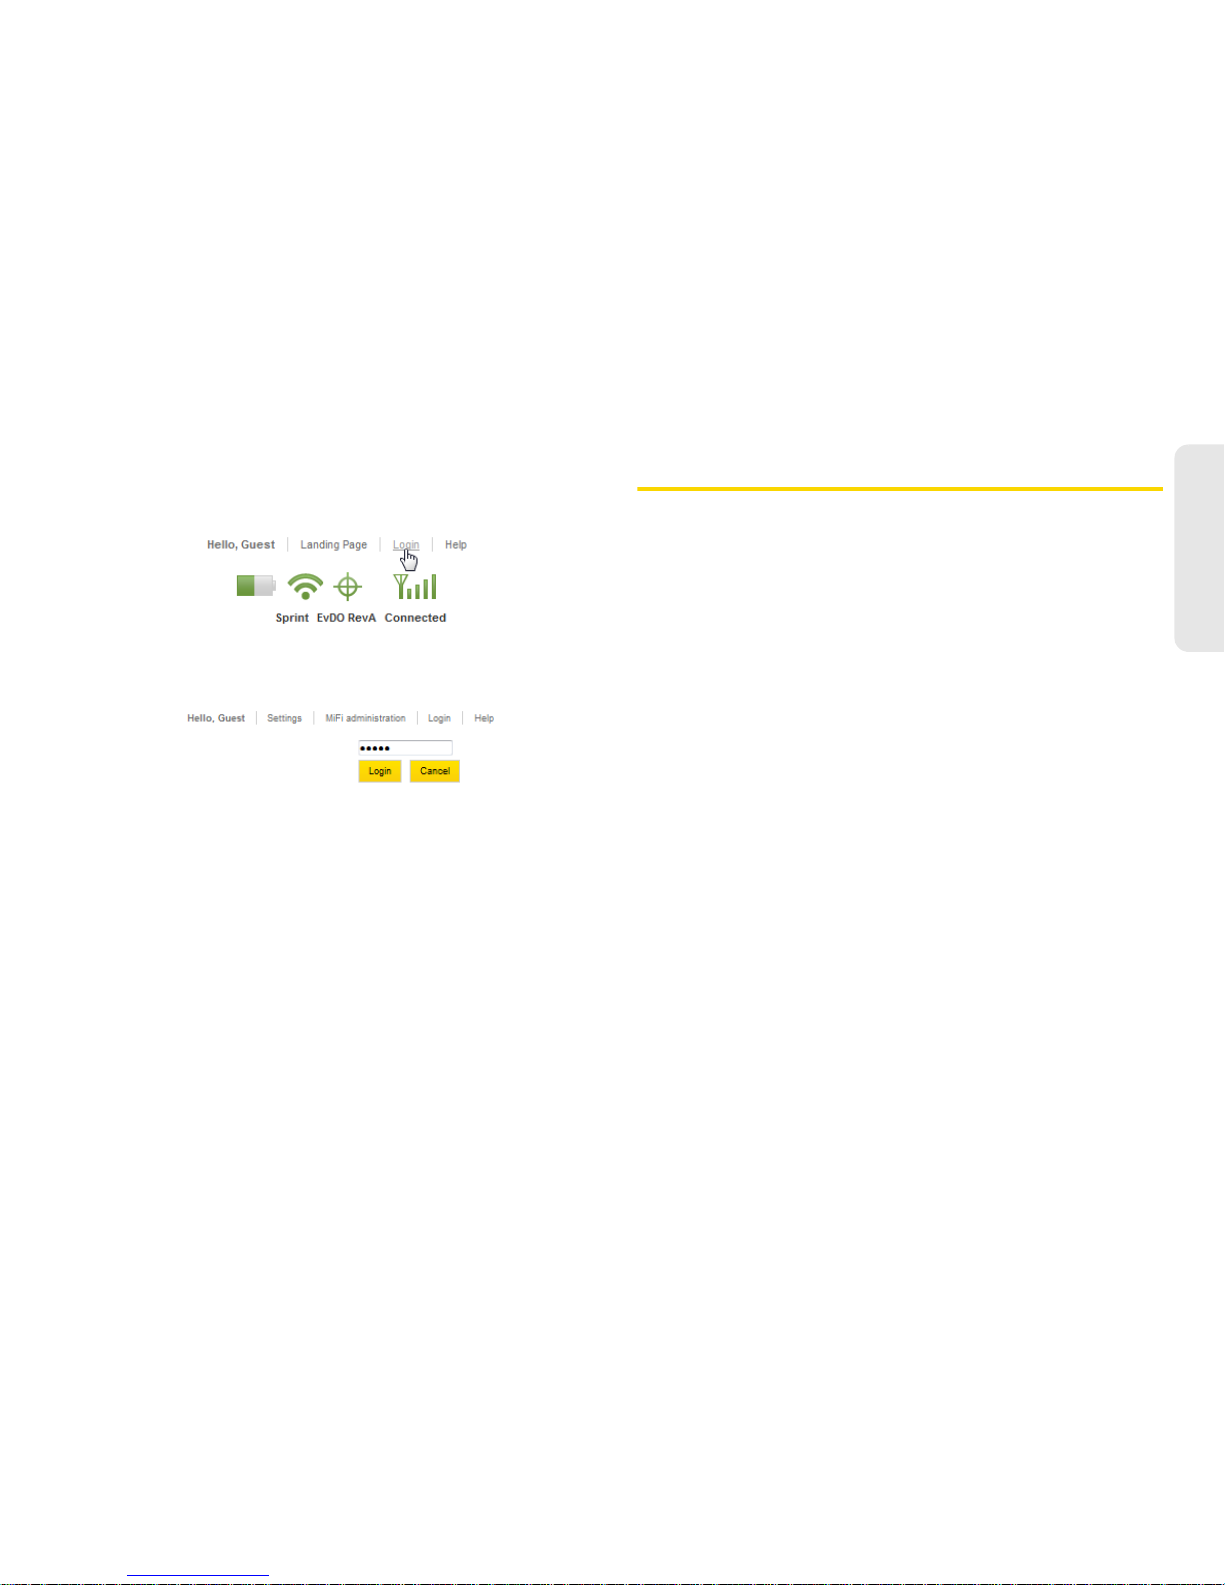
Login to the Browser Interface
1. Click Login on the upper right corner of the screen.
2. Enter your new administrative password and
click
Login.
3. The landing page will open. Click Connect.
The Landing Page
The landing page is the first screen you see after
logging in to the browser interface. It is the main point
of entry for all your work in the browser interface. The
landing page is where guests can see and interact with
widgets (“mini-applications” that display specific
information). They can drag and drop widgets around
the screen and arrange them as they like; each guest’s
browser stores the widget locations.

81A. Interface Basics
The Navigation Bar
The navigation bar is at the top of the landing page in
the browser interface. The navigation buttons change
according to the page you visit.
The Status Icons
Located below the navigation bar, at the top right
corner of the window, status icons tell you about
battery life, microSD card status, Wi-Fi strength,
roaming status, GPS status, mobile broadband network
strength, and connection status.
Settings Menu Bar
The Settings section contains a menu bar to help you
configure your device. Except for the MiFi
administration menu tab, each menu bar tab has a
submenu with several additional items available.
The MiFi Administration Section
The MiFi administration tab takes you to the MiFi
Administration screen, which is the basic Internet
connection and Wi-Fi status page that guest users can
access.

1A. Interface Basics 9
Interface Basics
MiFi Administration Screen
The MiFi Administration screen is divided into two
sections:
Internet Connection Summary
Wi-Fi Summary
Click the small square next to a section title to expand
or collapse that section.
Internet Connection Summary
The Internet connection summary section displays:
Time Connected — the duration of the current
connection.
Data Received — the number of bytes received.
Data Transmitted — the number of bytes transmitted.
IP Address — the current Internet protocol address of
the device.
Subnet Mask — the current subnet mask address.

10 1A. Interface Basics
Wi-Fi Summary
The Wi-Fi Summary section displays:
Profile — the profile currently in use.
Network Name (SSID) — the network name (also
known as the SSID).
Security — the security method in use.
Connected Devices — the number of users currently
connected to the device.
IP Address — the IP Address for the wireless browser
interface.
Subnet Mask —the subnet mask for the wireless
browser interface.
To change Wi-Fi settings, use the Wi-Fi menu. (See
“The Wi-Fi Menu” on page 16.)
Note: A maximum of five users can connect at one time.

Section 2
Interface Settings

12 2A. Applications Menu
The Applications Menu (page 12)
The Applications menu allows you to view the status of
and select the policy for your VPN, to view the status of
your microSD card, to enable file sharing, and to
configure your landing page.
The Applications Menu
The Applications menu is divided into two sections:
File Sharing — use to view the status of your microSD
card and enable file sharing.
MiFi home settings — use to configure the landing
page and widgets.
2A. Applications Menu

2A. Applications Menu 13
Applications Menu
File Sharing
Click File Sharing in the Applications menu to check
the total space and available space on your microSD
card and to enable file sharing.
The File Sharing Screen
The File Sharing screen is divided into two sections:
microSD Card Status
Configuration
microSD Card Status
The microSD Card Status section displays the following:
microSD Card – shows whether your microSD card is
available or not available.
Tota l Spa ce – total KB of space on your
microSD card.
Available Space – total KB of available space on your
microSD card.

14 2A. Applications Menu
Configuration
The Configuration section displays the following:
Enable File Sharing – check to allow guests to
share information.
Share Name – shows the name of the shared folder.
Authentication – allows you to add password security
for file sharing.
Click
Apply to save your File Sharing configuration
settings.
MiFi Home Settings
Click MiFi home settings in the Applications menu to
select landing page and widget configuration options.
The MiFi Home Settings Screen
The MiFi home settings screen is divided into
two sections:
Landing Page Configuration
Widget Configuration

2A. Applications Menu 15
Applications Menu
Landing Page Configuration
The Landing Page Configuration section displays the
following:
Get Widget Data in advance when the MiFi is on –
allows you to set conditions under which widget data
is collected.
How often should your MiFi update the widgets? –
allows you to set the amount of time between widget
updates.
Widget Configuration
The Widget Configuration section displays the
following:
Widget Columns – allows you to select the number of
columns displayed on the landing page.
Widget configuration table – shows the names of the
available widgets, allows you to select which widgets
are enabled, and allows you to select who can view
the enabled widgets.
Click
Apply to save your landing page and widget
configuration settings.

16 2B. Wi-Fi Menu
The Wi-Fi Menu (page 16)
The Wi-Fi menu allows you to work with profiles,
set MAC filters, and view status information for the
Wi-Fi network.
The Wi-Fi Menu
The Wi-Fi menu is divided into three sections:
Status — use to view network profile information and
see who is connected to the device. You can also
retrieve your network key from this screen.
MAC Filter — use to allow only certain devices to
connect to your device and to manage your Trusted
Client List.
Settings — use to configure your Wi-Fi access
point profile.
2B. Wi-Fi Menu

2B. Wi-Fi Menu 17
Wi-Fi Menu
Status
Click Status in the Wi-Fi menu to view your network
profile information and to view the profile of clients
connected to your device.
The Wi-Fi Status Screen
The Wi-Fi Status screen is divided into two sections:
Wi-Fi Network
Wi-Fi Connected Devices
Wi-Fi Network
The Wi-Fi Network section displays the following:
Current Profile — open or secure.
Network Name (SSID) — name of the network you are
connected to.
Clients Allowed — the maximum number of clients
that can connect to your device at the same time.
Clients Connected — the number of clients currently
connected to your device.
Channel — the radio channel that the device is using.
802.11 Mode — the type of wireless networking you
are currently using.
Security — the type of security the profile is using.

18 2B. Wi-Fi Menu
Encryption — shows the type of encryption for the
security type in use.
Network Key — passcode or password used to
access the network. The required format varies by
type of security.
Wi-Fi Connected Devices
The Wi-Fi Connected Devices section displays the
following:
IP Address
IP Type
Hostname
MAC Address
Date/Time
Click Refresh to update the information on the clients
that are connected to your device.
Tip: Some Wi-Fi clients become confused if the security is
changed and the network name is not. If you change
security settings and do not get asked for the new
network key when you try to reconnect, delete the existing
“old” network name from your “Preferred Networks” list.
Then you can reconnect using the new network name.
Important: Record your network key.
 Loading...