

Novatel 2352, 2372 User Manual

The world’s rst intelligent mobile hotspot.
User Guide

Please save this User Guide to your computer’s hard drive for future reference.
© 2009. Novatel Wireless, Inc. All rights reserved. MiFi, the MiFi logo, Novatel Wireless, and the Novatel Wireless logo are all trademarks of
Novatel Wireless, Inc. All other trademarks are the property of their respective owners.
PN 90025989_R1_071509

Table of Contents
About this Guide . . . . . . . . . . . . . . . . . . . . . . . . . . . . . . . . . . . . . . . . . . . . . . . . . . . . . . . . . . . . . . . . . . . . . . . . . . . . 1
Getting Started . . . . . . . . . . . . . . . . . . . . . . . . . . . . . . . . . . . . . . . . . . . . . . . . . . . . . . . . . 2
MiFi Overview . . . . . . . . . . . . . . . . . . . . . . . . . . . . . . . . . . . . . . . . . . . . . . . . . . . . . . . . . . . . . . . . . . . . . . . . . . . . . . . 3
Power Sources for MiFi. . . . . . . . . . . . . . . . . . . . . . . . . . . . . . . . . . . . . . . . . . . . . . . . . . . . . . . . . . . . . . . . . . . 4
LED States. . . . . . . . . . . . . . . . . . . . . . . . . . . . . . . . . . . . . . . . . . . . . . . . . . . . . . . . . . . . . . . . . . . . . . . . . . . . . . . 5
Power Button/Connection LED . . . . . . . . . . . . . . . . . . . . . . . . . . . . . . . . . . . . . . . . . . . . . . . . . . . . . . . 5
WiFi LED . . . . . . . . . . . . . . . . . . . . . . . . . . . . . . . . . . . . . . . . . . . . . . . . . . . . . . . . . . . . . . . . . . . . . . . . . . . . . 5
Install SIM Card and Battery . . . . . . . . . . . . . . . . . . . . . . . . . . . . . . . . . . . . . . . . . . . . . . . . . . . . . . . . . . . . . . . . . . 6
Battery Tips. . . . . . . . . . . . . . . . . . . . . . . . . . . . . . . . . . . . . . . . . . . . . . . . . . . . . . . . . . . . . . . . . . . . . . . . . . . . . . 7
Initial Connection and Setup — Overview . . . . . . . . . . . . . . . . . . . . . . . . . . . . . . . . . . . . . . . . . . . . . . . . . . . . 8
WiFi Mode Setup . . . . . . . . . . . . . . . . . . . . . . . . . . . . . . . . . . . . . . . . . . . . . . . . . . . . . . . . . . . . . . . . . . . . . . . . . . . . 9
Set Up a WiFi Connection . . . . . . . . . . . . . . . . . . . . . . . . . . . . . . . . . . . . . . . . . . . . . . . . . . . . . . . . . . . . . . . . 9
Set Up Wireless Security . . . . . . . . . . . . . . . . . . . . . . . . . . . . . . . . . . . . . . . . . . . . . . . . . . . . . . . . . . . . . . . . 13
Change the Administrative Password . . . . . . . . . . . . . . . . . . . . . . . . . . . . . . . . . . . . . . . . . . . . . . . . 13
Establish a Secure Profile . . . . . . . . . . . . . . . . . . . . . . . . . . . . . . . . . . . . . . . . . . . . . . . . . . . . . . . . . . . . 14
USB Mode Setup . . . . . . . . . . . . . . . . . . . . . . . . . . . . . . . . . . . . . . . . . . . . . . . . . . . . . . . . . . . . . . . . . . . . . . . . . . . 16
System Requirements. . . . . . . . . . . . . . . . . . . . . . . . . . . . . . . . . . . . . . . . . . . . . . . . . . . . . . . . . . . . . . . . . . . 16
Windows Setup and Connection . . . . . . . . . . . . . . . . . . . . . . . . . . . . . . . . . . . . . . . . . . . . . . . . . . . . . . . . 17
Mac Setup and Connection . . . . . . . . . . . . . . . . . . . . . . . . . . . . . . . . . . . . . . . . . . . . . . . . . . . . . . . . . . . . . 20
Install the Software . . . . . . . . . . . . . . . . . . . . . . . . . . . . . . . . . . . . . . . . . . . . . . . . . . . . . . . . . . . . . . . . . 20
Configure Your Profile. . . . . . . . . . . . . . . . . . . . . . . . . . . . . . . . . . . . . . . . . . . . . . . . . . . . . . . . . . . . . . . 21
Connect to the Network . . . . . . . . . . . . . . . . . . . . . . . . . . . . . . . . . . . . . . . . . . . . . . . . . . . . . . . . . . . . 23
Mac Configuration Troubleshooting . . . . . . . . . . . . . . . . . . . . . . . . . . . . . . . . . . . . . . . . . . . . . . . . . 24
Using MiFi and Sharing Files . . . . . . . . . . . . . . . . . . . . . . . . . . . . . . . . . . . . . . . . . . . . 28
Using MiFi in WiFi Mode . . . . . . . . . . . . . . . . . . . . . . . . . . . . . . . . . . . . . . . . . . . . . . . . . . . . . . . . . . . . . . . . . . . . 29
Setting Up a Temporary Hotspot . . . . . . . . . . . . . . . . . . . . . . . . . . . . . . . . . . . . . . . . . . . . . . . . . . . . . . . . 30
Using MiFi in USB Mode. . . . . . . . . . . . . . . . . . . . . . . . . . . . . . . . . . . . . . . . . . . . . . . . . . . . . . . . . . . . . . . . . . . . . 32
Using microSDHC Cards with MiFi — File Sharing . . . . . . . . . . . . . . . . . . . . . . . . . . . . . . . . . . . . . . . . . . . . 34
Insert the microSDHC Card. . . . . . . . . . . . . . . . . . . . . . . . . . . . . . . . . . . . . . . . . . . . . . . . . . . . . . . . . . . . . . 34
Access Your Files from MiFi . . . . . . . . . . . . . . . . . . . . . . . . . . . . . . . . . . . . . . . . . . . . . . . . . . . . . . . . . . . . . . 35
Share Files on Your MiFi . . . . . . . . . . . . . . . . . . . . . . . . . . . . . . . . . . . . . . . . . . . . . . . . . . . . . . . . . . . . . . . . . 36
Accessing MiFi’s Features . . . . . . . . . . . . . . . . . . . . . . . . . . . . . . . . . . . . . . . . . . . . . . . 37
Interface Basics . . . . . . . . . . . . . . . . . . . . . . . . . . . . . . . . . . . . . . . . . . . . . . . . . . . . . . . . . . . . . . . . . . . . . . . . . . . . . 39
Open the Browser Interface . . . . . . . . . . . . . . . . . . . . . . . . . . . . . . . . . . . . . . . . . . . . . . . . . . . . . . . . . . . . . 39
The Home Page. . . . . . . . . . . . . . . . . . . . . . . . . . . . . . . . . . . . . . . . . . . . . . . . . . . . . . . . . . . . . . . . . . . . . . . . . 40
The Menu Bar. . . . . . . . . . . . . . . . . . . . . . . . . . . . . . . . . . . . . . . . . . . . . . . . . . . . . . . . . . . . . . . . . . . . . . . 40
Home Page Sections . . . . . . . . . . . . . . . . . . . . . . . . . . . . . . . . . . . . . . . . . . . . . . . . . . . . . . . . . . . . . . . . 41

WiFi Configuration. . . . . . . . . . . . . . . . . . . . . . . . . . . . . . . . . . . . . . . . . . . . . . . . . . . . . . . . . . . . . . . . . . . . . . . . . . 42
WiFi Menu Options . . . . . . . . . . . . . . . . . . . . . . . . . . . . . . . . . . . . . . . . . . . . . . . . . . . . . . . . . . . . . . . . . . . . . 42
WiFi Status . . . . . . . . . . . . . . . . . . . . . . . . . . . . . . . . . . . . . . . . . . . . . . . . . . . . . . . . . . . . . . . . . . . . . . . . . . . . . 43
Opening the Page . . . . . . . . . . . . . . . . . . . . . . . . . . . . . . . . . . . . . . . . . . . . . . . . . . . . . . . . . . . . . . . . . . 43
WiFi Status Page Sections . . . . . . . . . . . . . . . . . . . . . . . . . . . . . . . . . . . . . . . . . . . . . . . . . . . . . . . . . . . 44
WiFi Profiles . . . . . . . . . . . . . . . . . . . . . . . . . . . . . . . . . . . . . . . . . . . . . . . . . . . . . . . . . . . . . . . . . . . . . . . . . . . . 46
Opening the Page . . . . . . . . . . . . . . . . . . . . . . . . . . . . . . . . . . . . . . . . . . . . . . . . . . . . . . . . . . . . . . . . . . 46
WiFi Profiles Page . . . . . . . . . . . . . . . . . . . . . . . . . . . . . . . . . . . . . . . . . . . . . . . . . . . . . . . . . . . . . . . . . . . 46
Choosing a Profile . . . . . . . . . . . . . . . . . . . . . . . . . . . . . . . . . . . . . . . . . . . . . . . . . . . . . . . . . . . . . . . . . . 47
Setting Security . . . . . . . . . . . . . . . . . . . . . . . . . . . . . . . . . . . . . . . . . . . . . . . . . . . . . . . . . . . . . . . . . . . . 48
Setting Up a Temporary Hotspot . . . . . . . . . . . . . . . . . . . . . . . . . . . . . . . . . . . . . . . . . . . . . . . . . . . . 49
Mac Filter. . . . . . . . . . . . . . . . . . . . . . . . . . . . . . . . . . . . . . . . . . . . . . . . . . . . . . . . . . . . . . . . . . . . . . . . . . . . . . . 51
Opening the Page . . . . . . . . . . . . . . . . . . . . . . . . . . . . . . . . . . . . . . . . . . . . . . . . . . . . . . . . . . . . . . . . . . 51
Finding the MAC Address . . . . . . . . . . . . . . . . . . . . . . . . . . . . . . . . . . . . . . . . . . . . . . . . . . . . . . . . . . . 51
Using MAC Filter . . . . . . . . . . . . . . . . . . . . . . . . . . . . . . . . . . . . . . . . . . . . . . . . . . . . . . . . . . . . . . . . . . . . 52
WiFi Settings . . . . . . . . . . . . . . . . . . . . . . . . . . . . . . . . . . . . . . . . . . . . . . . . . . . . . . . . . . . . . . . . . . . . . . . . . . . 53
Opening the Page . . . . . . . . . . . . . . . . . . . . . . . . . . . . . . . . . . . . . . . . . . . . . . . . . . . . . . . . . . . . . . . . . . 53
WiFi Settings Page . . . . . . . . . . . . . . . . . . . . . . . . . . . . . . . . . . . . . . . . . . . . . . . . . . . . . . . . . . . . . . . . . . 53
Internet Configuration . . . . . . . . . . . . . . . . . . . . . . . . . . . . . . . . . . . . . . . . . . . . . . . . . . . . . . . . . . . . . . . . . . . . . . 54
Internet Menu . . . . . . . . . . . . . . . . . . . . . . . . . . . . . . . . . . . . . . . . . . . . . . . . . . . . . . . . . . . . . . . . . . . . . . . . . . 54
Internet Status. . . . . . . . . . . . . . . . . . . . . . . . . . . . . . . . . . . . . . . . . . . . . . . . . . . . . . . . . . . . . . . . . . . . . . . . . . 55
Opening the Page . . . . . . . . . . . . . . . . . . . . . . . . . . . . . . . . . . . . . . . . . . . . . . . . . . . . . . . . . . . . . . . . . . 55
Internet Status Page Sections . . . . . . . . . . . . . . . . . . . . . . . . . . . . . . . . . . . . . . . . . . . . . . . . . . . . . . . 56
Internet Profiles . . . . . . . . . . . . . . . . . . . . . . . . . . . . . . . . . . . . . . . . . . . . . . . . . . . . . . . . . . . . . . . . . . . . . . . . 58
Opening the Page . . . . . . . . . . . . . . . . . . . . . . . . . . . . . . . . . . . . . . . . . . . . . . . . . . . . . . . . . . . . . . . . . . 58
Internet Profiles Page . . . . . . . . . . . . . . . . . . . . . . . . . . . . . . . . . . . . . . . . . . . . . . . . . . . . . . . . . . . . . . . 58
SIM. . . . . . . . . . . . . . . . . . . . . . . . . . . . . . . . . . . . . . . . . . . . . . . . . . . . . . . . . . . . . . . . . . . . . . . . . . . . . . . . . . . . . 60
Opening the Page . . . . . . . . . . . . . . . . . . . . . . . . . . . . . . . . . . . . . . . . . . . . . . . . . . . . . . . . . . . . . . . . . . 60
SIM Page . . . . . . . . . . . . . . . . . . . . . . . . . . . . . . . . . . . . . . . . . . . . . . . . . . . . . . . . . . . . . . . . . . . . . . . . . . . 60
Internet Diagnostics . . . . . . . . . . . . . . . . . . . . . . . . . . . . . . . . . . . . . . . . . . . . . . . . . . . . . . . . . . . . . . . . . . . . 61
Opening the Page . . . . . . . . . . . . . . . . . . . . . . . . . . . . . . . . . . . . . . . . . . . . . . . . . . . . . . . . . . . . . . . . . . 61
Internet Diagnostics Page Sections . . . . . . . . . . . . . . . . . . . . . . . . . . . . . . . . . . . . . . . . . . . . . . . . . . 62
Internet Settings . . . . . . . . . . . . . . . . . . . . . . . . . . . . . . . . . . . . . . . . . . . . . . . . . . . . . . . . . . . . . . . . . . . . . . . . 63
Opening the Page . . . . . . . . . . . . . . . . . . . . . . . . . . . . . . . . . . . . . . . . . . . . . . . . . . . . . . . . . . . . . . . . . . 63
Internet Settings Page . . . . . . . . . . . . . . . . . . . . . . . . . . . . . . . . . . . . . . . . . . . . . . . . . . . . . . . . . . . . . . 63
Router Configuration . . . . . . . . . . . . . . . . . . . . . . . . . . . . . . . . . . . . . . . . . . . . . . . . . . . . . . . . . . . . . . . . . . . . . . . 64
Router Menu . . . . . . . . . . . . . . . . . . . . . . . . . . . . . . . . . . . . . . . . . . . . . . . . . . . . . . . . . . . . . . . . . . . . . . . . . . . 64
Port Filtering . . . . . . . . . . . . . . . . . . . . . . . . . . . . . . . . . . . . . . . . . . . . . . . . . . . . . . . . . . . . . . . . . . . . . . . . . . . 65
Opening the Page . . . . . . . . . . . . . . . . . . . . . . . . . . . . . . . . . . . . . . . . . . . . . . . . . . . . . . . . . . . . . . . . . . 65
Port Filtering Page . . . . . . . . . . . . . . . . . . . . . . . . . . . . . . . . . . . . . . . . . . . . . . . . . . . . . . . . . . . . . . . . . . 66
Port Forwarding . . . . . . . . . . . . . . . . . . . . . . . . . . . . . . . . . . . . . . . . . . . . . . . . . . . . . . . . . . . . . . . . . . . . . . . . 68
Opening the Page . . . . . . . . . . . . . . . . . . . . . . . . . . . . . . . . . . . . . . . . . . . . . . . . . . . . . . . . . . . . . . . . . . 68
Port Forwarding Page. . . . . . . . . . . . . . . . . . . . . . . . . . . . . . . . . . . . . . . . . . . . . . . . . . . . . . . . . . . . . . . 69

TCP/IP. . . . . . . . . . . . . . . . . . . . . . . . . . . . . . . . . . . . . . . . . . . . . . . . . . . . . . . . . . . . . . . . . . . . . . . . . . . . . . . . . . 70
Opening the Page . . . . . . . . . . . . . . . . . . . . . . . . . . . . . . . . . . . . . . . . . . . . . . . . . . . . . . . . . . . . . . . . . . 70
TCP/IP Page . . . . . . . . . . . . . . . . . . . . . . . . . . . . . . . . . . . . . . . . . . . . . . . . . . . . . . . . . . . . . . . . . . . . . . . . 70
Router Settings . . . . . . . . . . . . . . . . . . . . . . . . . . . . . . . . . . . . . . . . . . . . . . . . . . . . . . . . . . . . . . . . . . . . . . . . . 71
Opening the Page . . . . . . . . . . . . . . . . . . . . . . . . . . . . . . . . . . . . . . . . . . . . . . . . . . . . . . . . . . . . . . . . . . 71
Router Settings Page . . . . . . . . . . . . . . . . . . . . . . . . . . . . . . . . . . . . . . . . . . . . . . . . . . . . . . . . . . . . . . . . 71
System Configuration. . . . . . . . . . . . . . . . . . . . . . . . . . . . . . . . . . . . . . . . . . . . . . . . . . . . . . . . . . . . . . . . . . . . . . . 72
System Menu. . . . . . . . . . . . . . . . . . . . . . . . . . . . . . . . . . . . . . . . . . . . . . . . . . . . . . . . . . . . . . . . . . . . . . . . . . . 72
System Status . . . . . . . . . . . . . . . . . . . . . . . . . . . . . . . . . . . . . . . . . . . . . . . . . . . . . . . . . . . . . . . . . . . . . . . . . . 73
Opening the Page . . . . . . . . . . . . . . . . . . . . . . . . . . . . . . . . . . . . . . . . . . . . . . . . . . . . . . . . . . . . . . . . . . 73
System Status Page . . . . . . . . . . . . . . . . . . . . . . . . . . . . . . . . . . . . . . . . . . . . . . . . . . . . . . . . . . . . . . . . . 74
Backup/Restore. . . . . . . . . . . . . . . . . . . . . . . . . . . . . . . . . . . . . . . . . . . . . . . . . . . . . . . . . . . . . . . . . . . . . . . . . 76
Opening the Page . . . . . . . . . . . . . . . . . . . . . . . . . . . . . . . . . . . . . . . . . . . . . . . . . . . . . . . . . . . . . . . . . . 76
Backup/Restore Page . . . . . . . . . . . . . . . . . . . . . . . . . . . . . . . . . . . . . . . . . . . . . . . . . . . . . . . . . . . . . . . 76
File Sharing. . . . . . . . . . . . . . . . . . . . . . . . . . . . . . . . . . . . . . . . . . . . . . . . . . . . . . . . . . . . . . . . . . . . . . . . . . . . . 78
Opening the Page . . . . . . . . . . . . . . . . . . . . . . . . . . . . . . . . . . . . . . . . . . . . . . . . . . . . . . . . . . . . . . . . . . 78
File Sharing Page . . . . . . . . . . . . . . . . . . . . . . . . . . . . . . . . . . . . . . . . . . . . . . . . . . . . . . . . . . . . . . . . . . . 78
Power Management . . . . . . . . . . . . . . . . . . . . . . . . . . . . . . . . . . . . . . . . . . . . . . . . . . . . . . . . . . . . . . . . . . . . 80
Opening the Page . . . . . . . . . . . . . . . . . . . . . . . . . . . . . . . . . . . . . . . . . . . . . . . . . . . . . . . . . . . . . . . . . . 80
Power Management Page. . . . . . . . . . . . . . . . . . . . . . . . . . . . . . . . . . . . . . . . . . . . . . . . . . . . . . . . . . . 80
Password. . . . . . . . . . . . . . . . . . . . . . . . . . . . . . . . . . . . . . . . . . . . . . . . . . . . . . . . . . . . . . . . . . . . . . . . . . . . . . . 81
Opening the Page . . . . . . . . . . . . . . . . . . . . . . . . . . . . . . . . . . . . . . . . . . . . . . . . . . . . . . . . . . . . . . . . . . 81
Password Page . . . . . . . . . . . . . . . . . . . . . . . . . . . . . . . . . . . . . . . . . . . . . . . . . . . . . . . . . . . . . . . . . . . . . 81
System Settings . . . . . . . . . . . . . . . . . . . . . . . . . . . . . . . . . . . . . . . . . . . . . . . . . . . . . . . . . . . . . . . . . . . . . . . . 82
Opening the Page . . . . . . . . . . . . . . . . . . . . . . . . . . . . . . . . . . . . . . . . . . . . . . . . . . . . . . . . . . . . . . . . . . 82
System Settings Page . . . . . . . . . . . . . . . . . . . . . . . . . . . . . . . . . . . . . . . . . . . . . . . . . . . . . . . . . . . . . . . 82
Troubleshooting . . . . . . . . . . . . . . . . . . . . . . . . . . . . . . . . . . . . . . . . . . . . . . . . . . . . . . . 83
Overview. . . . . . . . . . . . . . . . . . . . . . . . . . . . . . . . . . . . . . . . . . . . . . . . . . . . . . . . . . . . . . . . . . . . . . . . . . . . . . . . . . . 84
Common Problems and Solutions. . . . . . . . . . . . . . . . . . . . . . . . . . . . . . . . . . . . . . . . . . . . . . . . . . . . . . . . . . . 85
Using the Master Reset Button . . . . . . . . . . . . . . . . . . . . . . . . . . . . . . . . . . . . . . . . . . . . . . . . . . . . . . . . . . . . . . 89
Product Specifications and Regulatory Information . . . . . . . . . . . . . . . . . . . . . . 90
Product Specifications . . . . . . . . . . . . . . . . . . . . . . . . . . . . . . . . . . . . . . . . . . . . . . . . . . . . . . . . . . . . . . . . . . . . . . 91
Regulatory . . . . . . . . . . . . . . . . . . . . . . . . . . . . . . . . . . . . . . . . . . . . . . . . . . . . . . . . . . . . . . . . . . . . . . . . . . . . . . . . . 92
Safety Hazards. . . . . . . . . . . . . . . . . . . . . . . . . . . . . . . . . . . . . . . . . . . . . . . . . . . . . . . . . . . . . . . . . . . . . . . . . . . . . . 94
Proper Battery Use and Disposal . . . . . . . . . . . . . . . . . . . . . . . . . . . . . . . . . . . . . . . . . . . . . . . . . . . . . . . . . . . . 95
Limited Warranty and Liability . . . . . . . . . . . . . . . . . . . . . . . . . . . . . . . . . . . . . . . . . . . . . . . . . . . . . . . . . . . . . . 96
Glossary. . . . . . . . . . . . . . . . . . . . . . . . . . . . . . . . . . . . . . . . . . . . . . . . . . . . . . . . . . . . . . . 97
Glossary . . . . . . . . . . . . . . . . . . . . . . . . . . . . . . . . . . . . . . . . . . . . . . . . . . . . . . . . . . . . . . . . . . . . . . . . . . . . . . . . . . . . 98

Congratulations on purchasing a broadband modem by Novatel
Wireless!
This modem operates over high-speed networks enabling you to connect at high speeds to
the Internet or your corporate Intranet, and access your email while you are away from the
office.
Patents and licenses
Licensed by QUALCOMM Incorporated under one or more of the following Patents:
4,901,307 5,490,165 5,056,109
5,504,773 5,101,501
5,506,865 5,109,390 5,511,073
5,228,054 5,535,239
5,267,261 5,544,196 5,267,262
5,568,483 5,337,338
5,600,754 5,414,796 5,657,420
5,416,797 5,659,569
5,710,784 5,778,338
Software License
Proprietary Rights Provisions:
The software drivers provided with this product are copyrighted by Novatel Wireless and/or Novatel Wireless’
suppliers. And although copyrighted, the software drivers are unpublished and embody valuable trade
secrets proprietary to Novatel Wireless and/or Novatel Wireless’ suppliers. The disassembly, decompilation,
and/or Reverse Engineering of the software drivers for any purpose is strictly prohibited by international law.
The copying of the software drivers, except for a reasonable number of back-up copies is strictly prohibited
by international law. It is forbidden by international law to provide access to the software drivers to any
person for any purpose other than processing the internal data for the intended use of the software drivers.
U. S. Government Restricted Rights Clause
The software drivers are classified as “Commercial Computing device Software” and the U.S. Government is
acquiring only “Restricted Rights” in the software drivers and their Documentation. U.S. Government Export
Administration Act Compliance Clause:
It is forbidden by US law to export, license or otherwise transfer the software drivers or Derivative Works
to any country where such transfer is prohibited by the United States Export Administration Act, or any
successor legislation, or in violation of the laws of any other country.
FCC ID: MBZNRM-MIFI2352
MBZNRM-MIFI2352
IC ID: 3229A-MIFI2352
3229A-MIFI2372
Please visit www.novatelwireless.com for the latest information about your device.

About this Guide
Thank you for purchasing the MiFi Mobile Hotspot. You can securely connect virtually
any WiFi enabled device to MiFi for a total mobile Internet experience. Surf the Web,
download files and music, share photos, manage e-mail, and more.
In addition you can use MiFi in USB modem mode (tethered modem) by plugging it
into a USB port on your computer.
This User Guide outlines the steps necessary to install, configure, and use all the
features of MiFi.
This guide is separated into 6 chapters:
Getting Started — This chapter describes the parts and features of MiFi and
1
guides you through initial set up and connection. In addition it describes the
LED states and their meanings.
Using MiFi and Sharing Files — This chapter takes you through daily use of MiFi
2
and some of the features you may use often such as the temporary hotspot and
accessing files on the microSDHC card.
Accessing MiFi’s Features — This chapter describes the menus in MiFi’s browser
3
interface and how to use its features.
Troubleshooting — This chapter provides troubleshooting information
4
including how to reset MiFi to its factory default state.
Product Specifications and Regulatory Information — This chapter provides
5
product specifications and regulatory information for MiFi.
Glossary — This chapter contains a glossary of technical terms concerning MiFi.
6
1

1
Getting Started
MiFi Overview
Install SIM Card and Battery
Initial Connection and Setup — Overview
WiFi Mode Setup
USB Mode Setup
Use the information in this chapter to learn about your product’s
components and features and to install and set up the device.
MiFi Overview
The Novatel Wireless MiFi Intelligent Mobile Hotspot (models 2352 / 2372) (MiFi) allows you more
freedom than ever before. No wires, no cables, just access to your data when you need it. Plus it can
simultaneously support up to five WiFi enabled devices, depending on your setup.
You can securely connect virtually any WiFi enabled device to MiFi for a total mobile Internet
experience. Surf the Web, download files and music, share photos, manage e-mail, and more.
In addition you can use MiFi in USB modem mode (tethered modem) by plugging it into a USB port
on your computer.
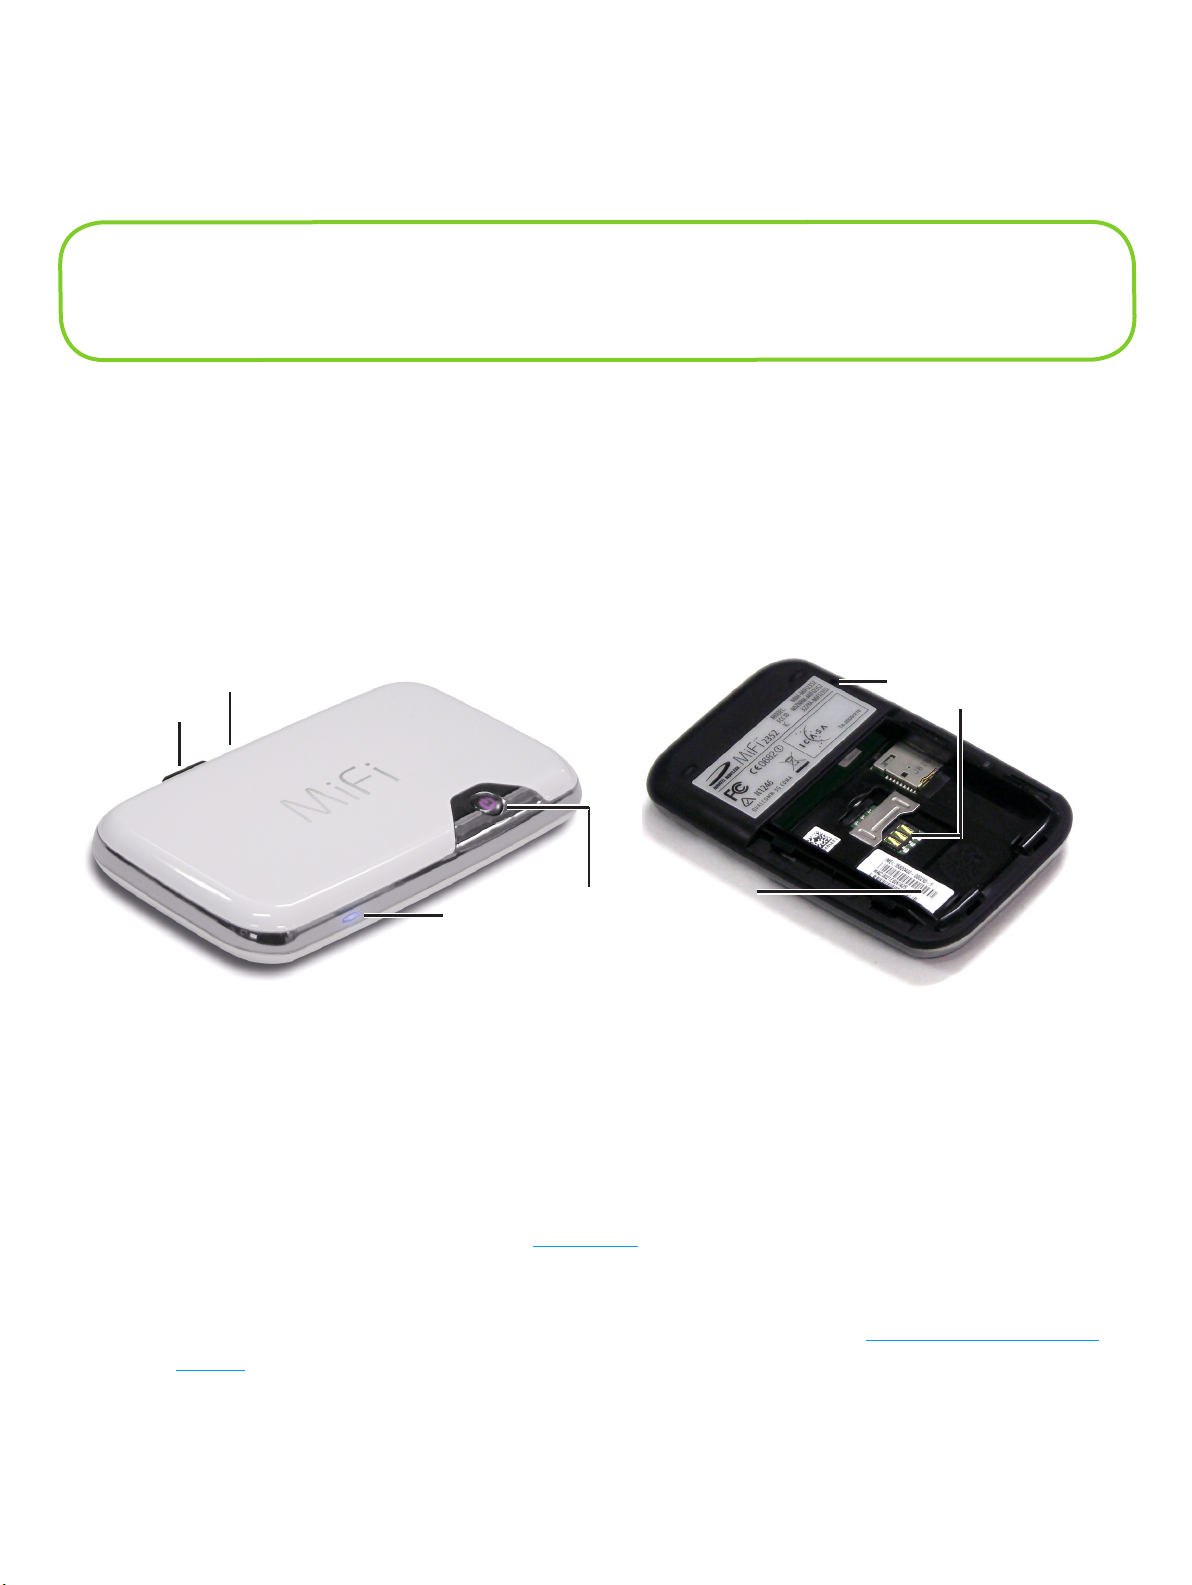
➏
➐
➊
➋
➍
➎
➌
➊ microUSB Port — The AC charger, USB cable and optional car charger connect here.
➋ microSDHC Slot — Removable memory storage slot supports microSDHC cards up to 16 GB
(microSDHC card not included).
➌ WiFi LED — Indicates WiFi connection status.
➍ Power Button / Connection LED — Powers on and off the device. The LED provides
connection and battery status. [See LED States (page 10).]
➎ Battery / SIM compartment — The battery and SIM card are placed here.
➏ Master Reset Button — Resets device to factory default settings. [See Using the Master Reset
Button (page 90).]
➐ SIM Card Slot — The SIM card is inserted here.
3

Power Sources for MiFi
Your device will work from its battery or when plugged into a power source.
• Battery — The battery will last for up to four hours. Charge the battery by plugging in the AC
adapter or optional car charger. While the battery is charging the Power/Connection LED will
flash amber. When the battery is fully charged, it will be solid amber.
• Wall power or car charger — Use the device by plugging it into either a wall socket or a
vehicle using the optional car charger accessory. The MiFi battery will charge while it is
plugged in.
• USB power from a computer — Use the device as a USB modem while plugged into the USB
port of a computer using the supplied USB cable. The battery will charge while it is plugged
in. Charging the battery through the USB port is slower than charging it with AC or vehicle
power.
NOTE:
You cannot use the MiFi wirelessly while it is plugged
into a USB port.
4

LED States
The Power Button/Connection LED and the WiFi LED provide valuable status information about
MiFi.
Power Button/Connection LED
Power States
No Light No Power Device is powered off
RED
AMBER
* Red or Amber will flash alternately with the color of the connection state.
Error Alternate
Battery Alternate
Connection States
GREEN GPRS /
EDGE
BLUE
UMTS Flashing:
Flashing*:
Solid:
Flashing*:
Solid:
Flashing:
Solid:
Solid:
Low battery
Device error [See Common Problems and
Solutions
Battery charging
Battery fully charged
GPRS/EDGE service is available
Connected to a network using GPRS/EDGE
UMTS service is available
Connected to a network using UMTS
(page 86).]
VIOLET
HSPA Flashing:
Solid:
HSPA service is available
Connected to a network using HSPA
WiFi LED
No Light No WiFi WiFi is off or disabled (MiFi plugged into USB
port)
BLUE
WiFi Flashing:
Solid:
On and connected
On with no users connected
5
Install SIM Card and Battery
Before connecting MiFi to your computer for the first time you must insert the SIM card, and then
insert and charge the battery.
IMPORTANT: The battery must be fully charged (for a minimum of four hours) before using
MiFi the first time. After the initial use and set up, you may use the device with the battery, AC
mains charger, car charger, or USB power.
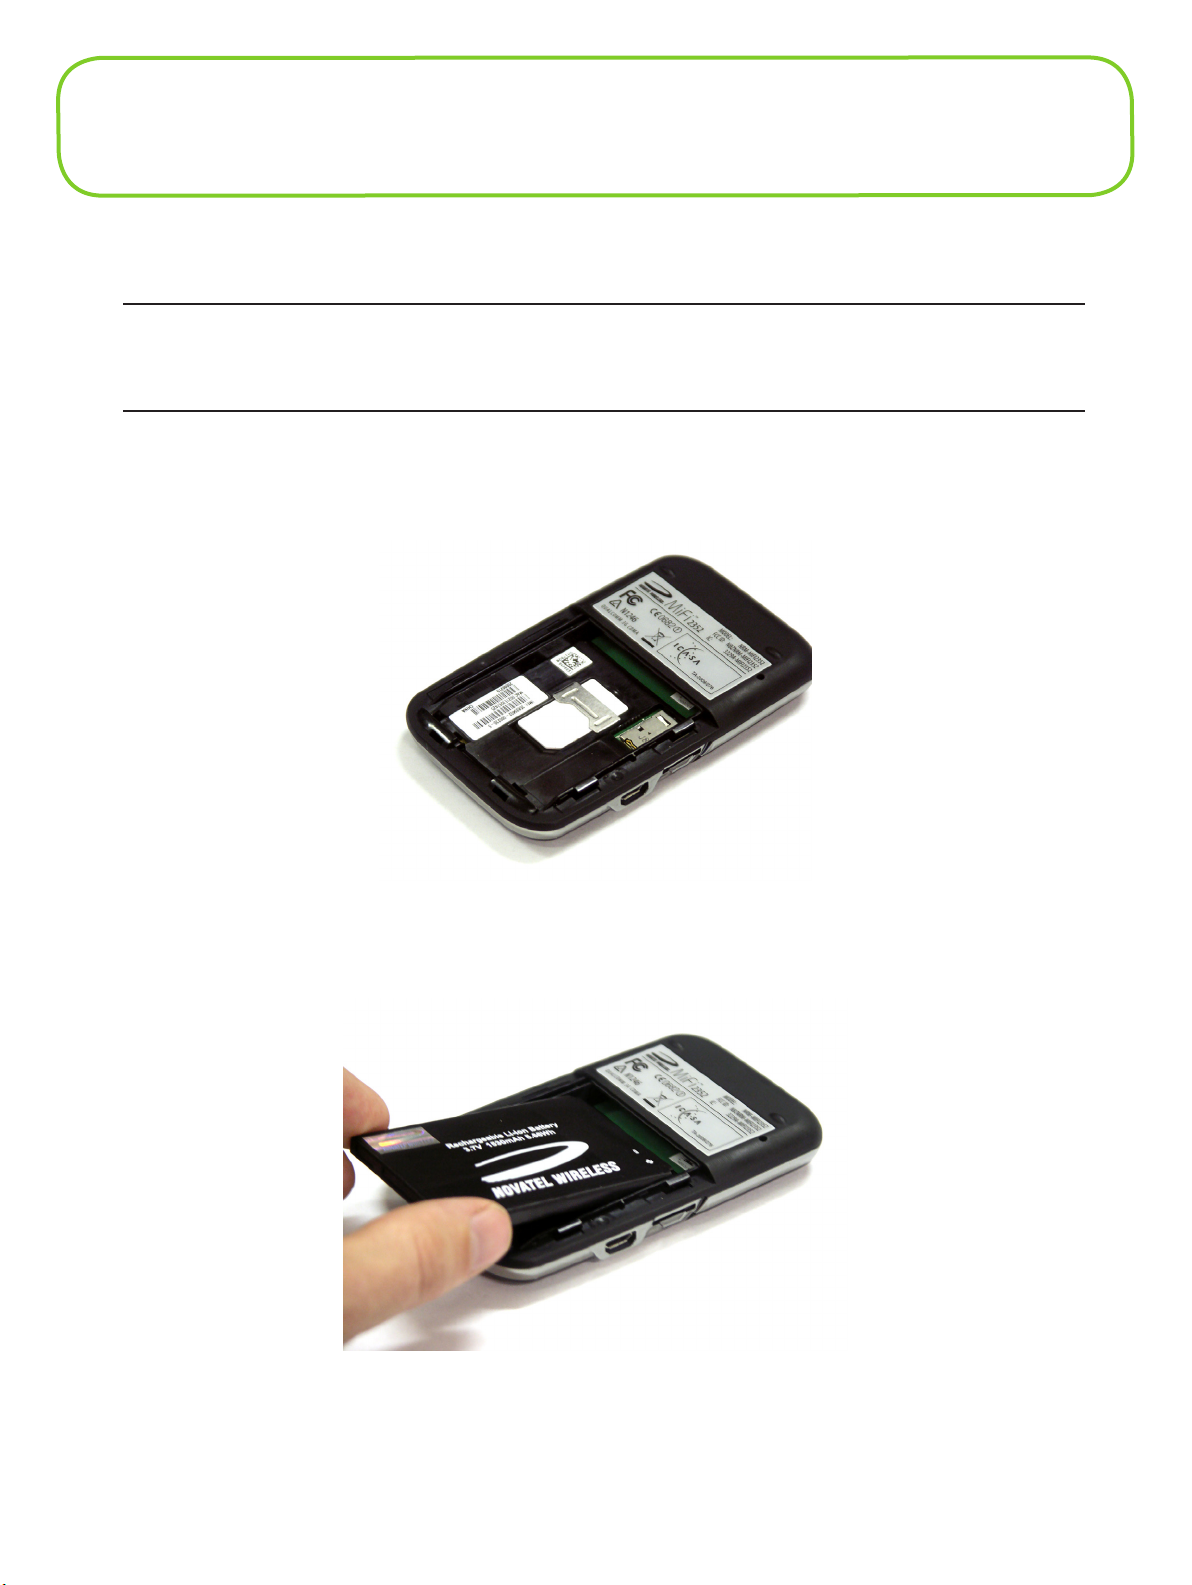
➊ Slide open the door at the bottom of the device.
➋ Insert the SIM card into the SIM slot as shown.
➌ Now, insert the battery, lining up the contact points as shown and replace the door on the
device.
➍ Connect the wall charger to MiFi and charge for a minimum of 4 hours before use. The
power button LED will flash amber while the device is charging and glow solid amber once
charging is complete.
6

Battery Tips
WARNING ! Use only batteries and chargers with your device that have been approved by your
service provider or by Novatel Wireless. The failure to use approved batteries and chargers may
increase the risk that your device will overheat, catch fire, or explode, resulting in serious bodily
injury, death, or property damage.
• It normally takes at least 4 hours to fully charge the battery.
• When using battery power, the device lasts up to 4 hours (when connected to a single device
only).
• The battery will discharge more rapidly as additional devices access MiFi.
• Battery life depends on the network, signal strength, temperature, features, and accessories
you use.
• Your device will also work with the approved car charger.
• If MiFi is connected to a computer using a USB data cable, the battery will charge. However,
the device will not function in WiFi mode while connected to a computer.
• New batteries or batteries stored for a long time may take more time to charge.
• When charging your battery, keep it near room temperature.
• Some batteries perform best after several full charge and discharge cycles.
• When storing your battery, keep it uncharged in a cool, dark, dry place.
• Never expose batteries to temperatures below –10°C (14°F) or above 45°C (113°F). Leaving
the battery in a hot vehicle may degrade long-term performance of Li-Ion batteries.
• It is normal for batteries to gradually wear down and require longer charging times. If you
notice a change in your battery life, it is probably time to purchase a new battery.
IMPORTANT: Whenever you work with either the battery or the SIM card, ensure that MiFi is
not connected to any device or power source with a USB cable or power cord.
7

Initial Connection and Setup — Overview
IMPORTANT: You will need the Access Point Name (APN) from your service provider plus
any username, password, or other information they may have given you. If you do not have this
information, contact your service provider before attempting to set up MiFi.
You have two connection options when using MiFi.
WiFi Mode
In WiFi mode you use MiFi as an access point or hotspot. You can connect any 802.11 b/g wireless
device to MiFi. You can establish a secure profile so that others cannot use MiFi unless you allow
them. You can also establish temporary settings to allow up to five devices to connect with MiFi
without you having to give them your security settings. [See WiFi Mode Setup (page 9).]
USB Modem Mode
In USB Modem mode, you connect MiFi directly to a computer and use it as a modem (also known
as a tethered modem). In this mode, WiFi is disabled. To use MiFi as a USB modem, you must install
software and drivers. [See USB Mode Setup (page 16).]
This section contains the following information:
• WiFi Mode Setup
• USB Mode Setup
8
WiFi Mode Setup
To properly set up your device for WiFi mode, you need to do both of the following tasks:
• Set Up a WiFi Connection
• Set Up Wireless Security
IMPORTANT: You will need the Access Point Name (APN) from your service provider plus any
username, password, or other information they may have given you.
Set Up a WiFi Connection
Setting up the WiFi connection requires two steps:
• Connect to MiFi
• Configure MiFi for your service provider
NOTE:
➤ The battery should be fully charged before using MiFi the first time.
➤ To connect in WiFi Mode, MiFi must be powered with a charged battery or
with an AC mains or car charger. When MiFi is connected to your computer
with the USB cable, WiFi is disabled.
Connect to MiFi:
➊ Press the power button.
MiFi powers on and starts up. When the power LED is solid amber and the WiFi LED solid
blue, the device is ready to connect.
➋ Use your normal WiFi manager on your computer to locate the MiFi wireless network.
Tip!
The steps to connect to a WiFi network vary depending
on your operating system and whether you use the native
application or third-party software.
9
➌ If multiple wireless networks are found, highlight the one that has MiFi_2352 / MiFi_2372 in its
name.
➍ Click Connect.
The WiFi LED will flash to show connected status.
Configure MiFi for your service provider:
IMPORTANT:
(and user name and password, if required). Be sure you have and follow those instructions.
Your network service provider should have given you instructions with your APN
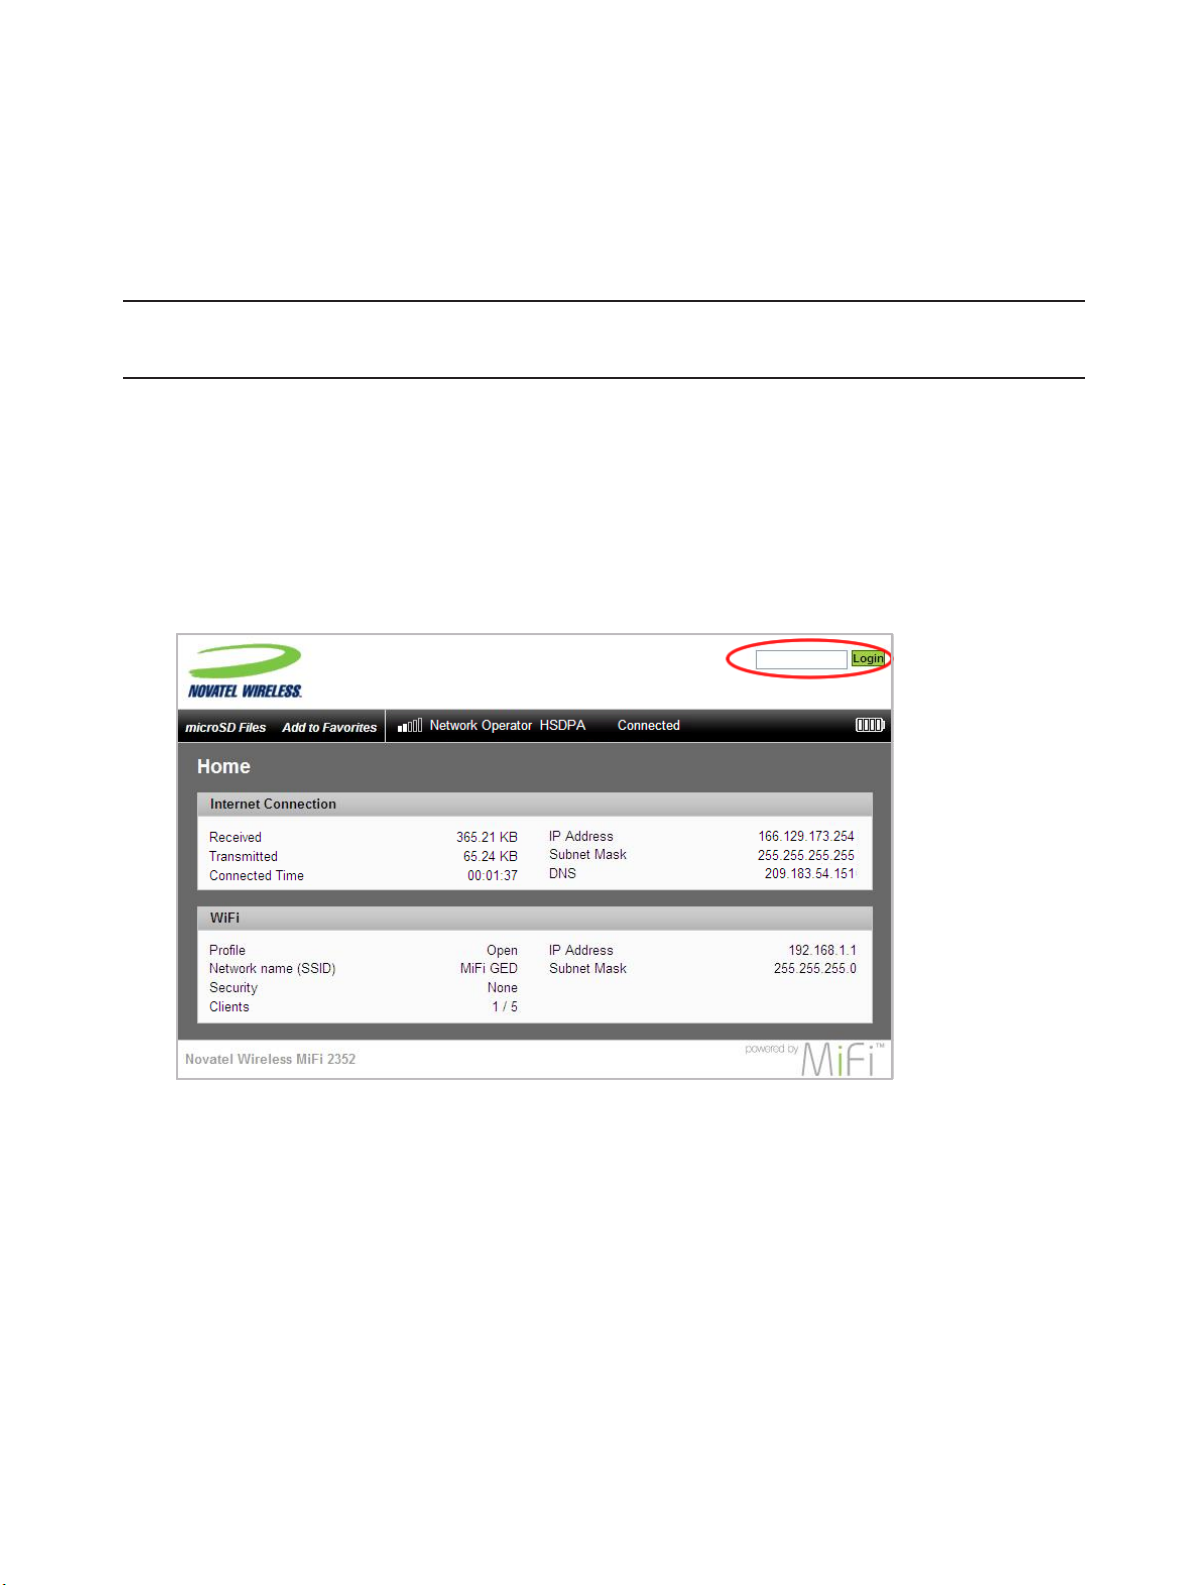
➊ From your computer’s Web browser, enter http://www.mifi (or http://192.168.1.1) into the
address bar and press the Enter or Return key.
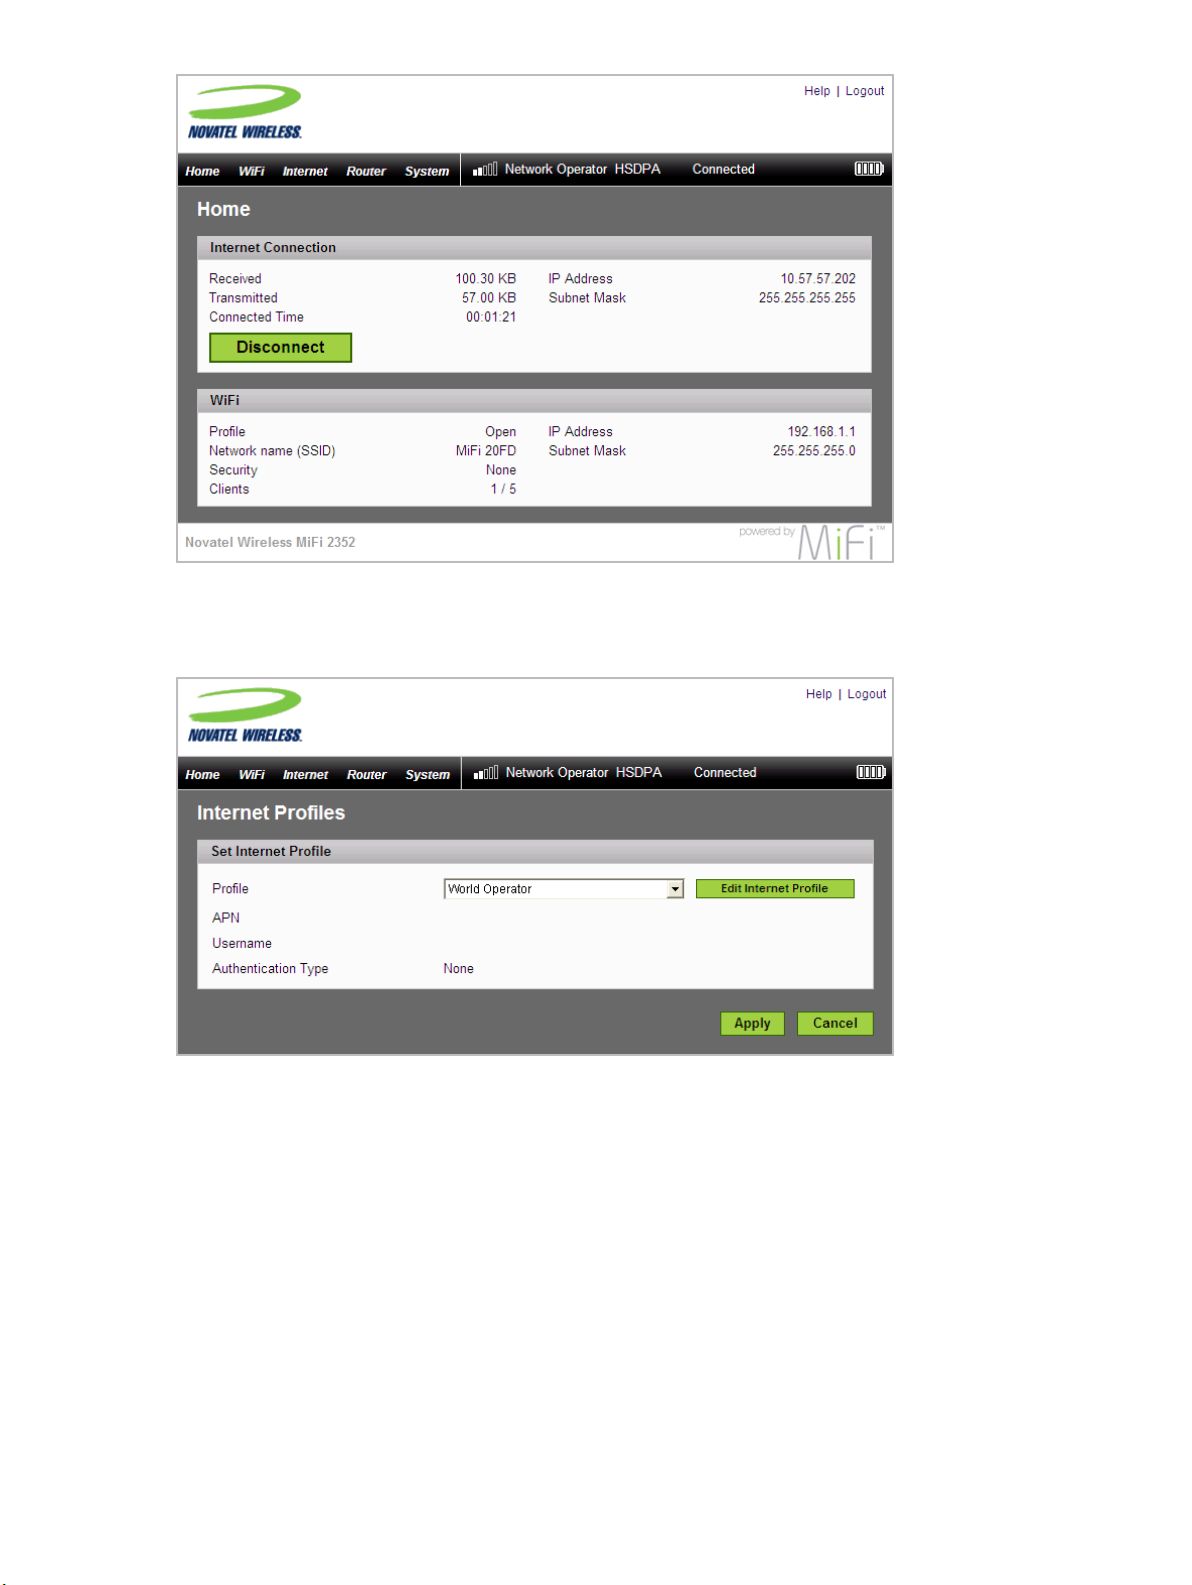
MiFi’s Home page will open. This is the login page to the browser interface and also provides
access to your microSDHC card.
Windows only: You can click Add to Favorites to bookmark the page in your browser for easier
access.
➋ Enter “admin” into the Login window in the upper right corner of the window and click Login.
The Home page for the browser interface will open.
10
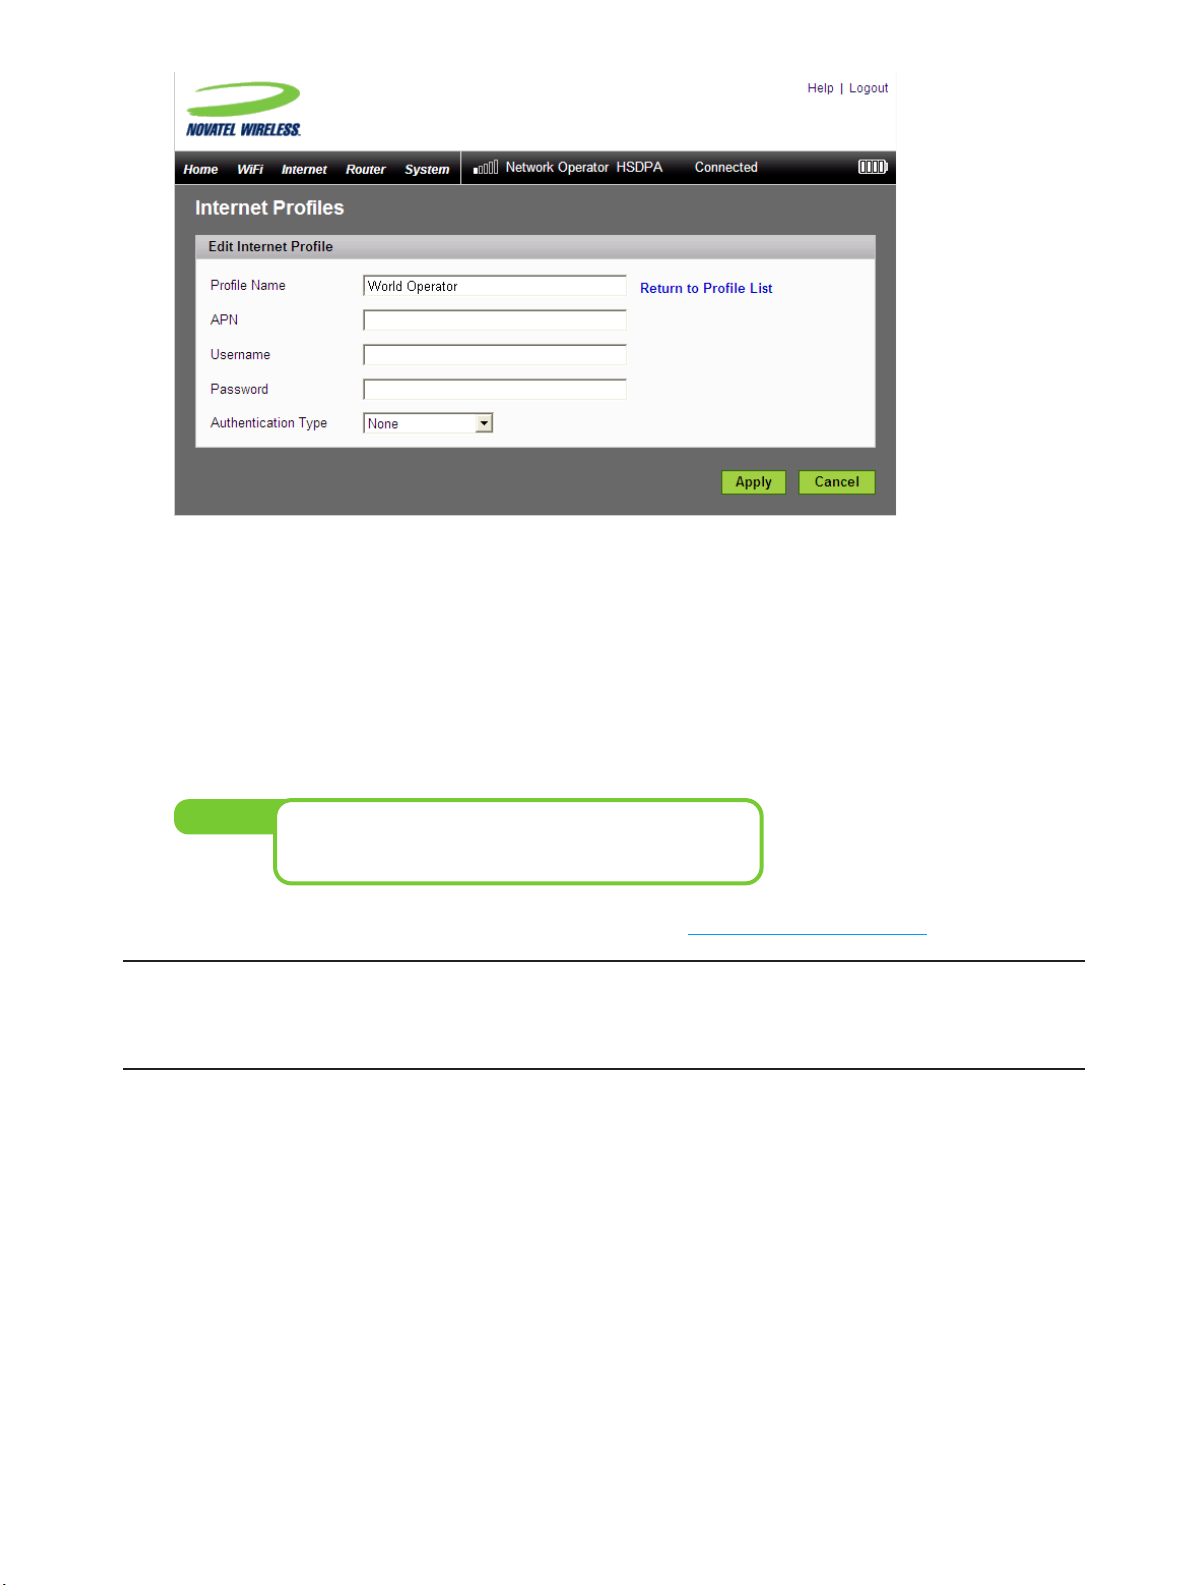
➌ Select Internet > Internet Profiles.
The Internet Profiles – Set Internet Profiles page will open.
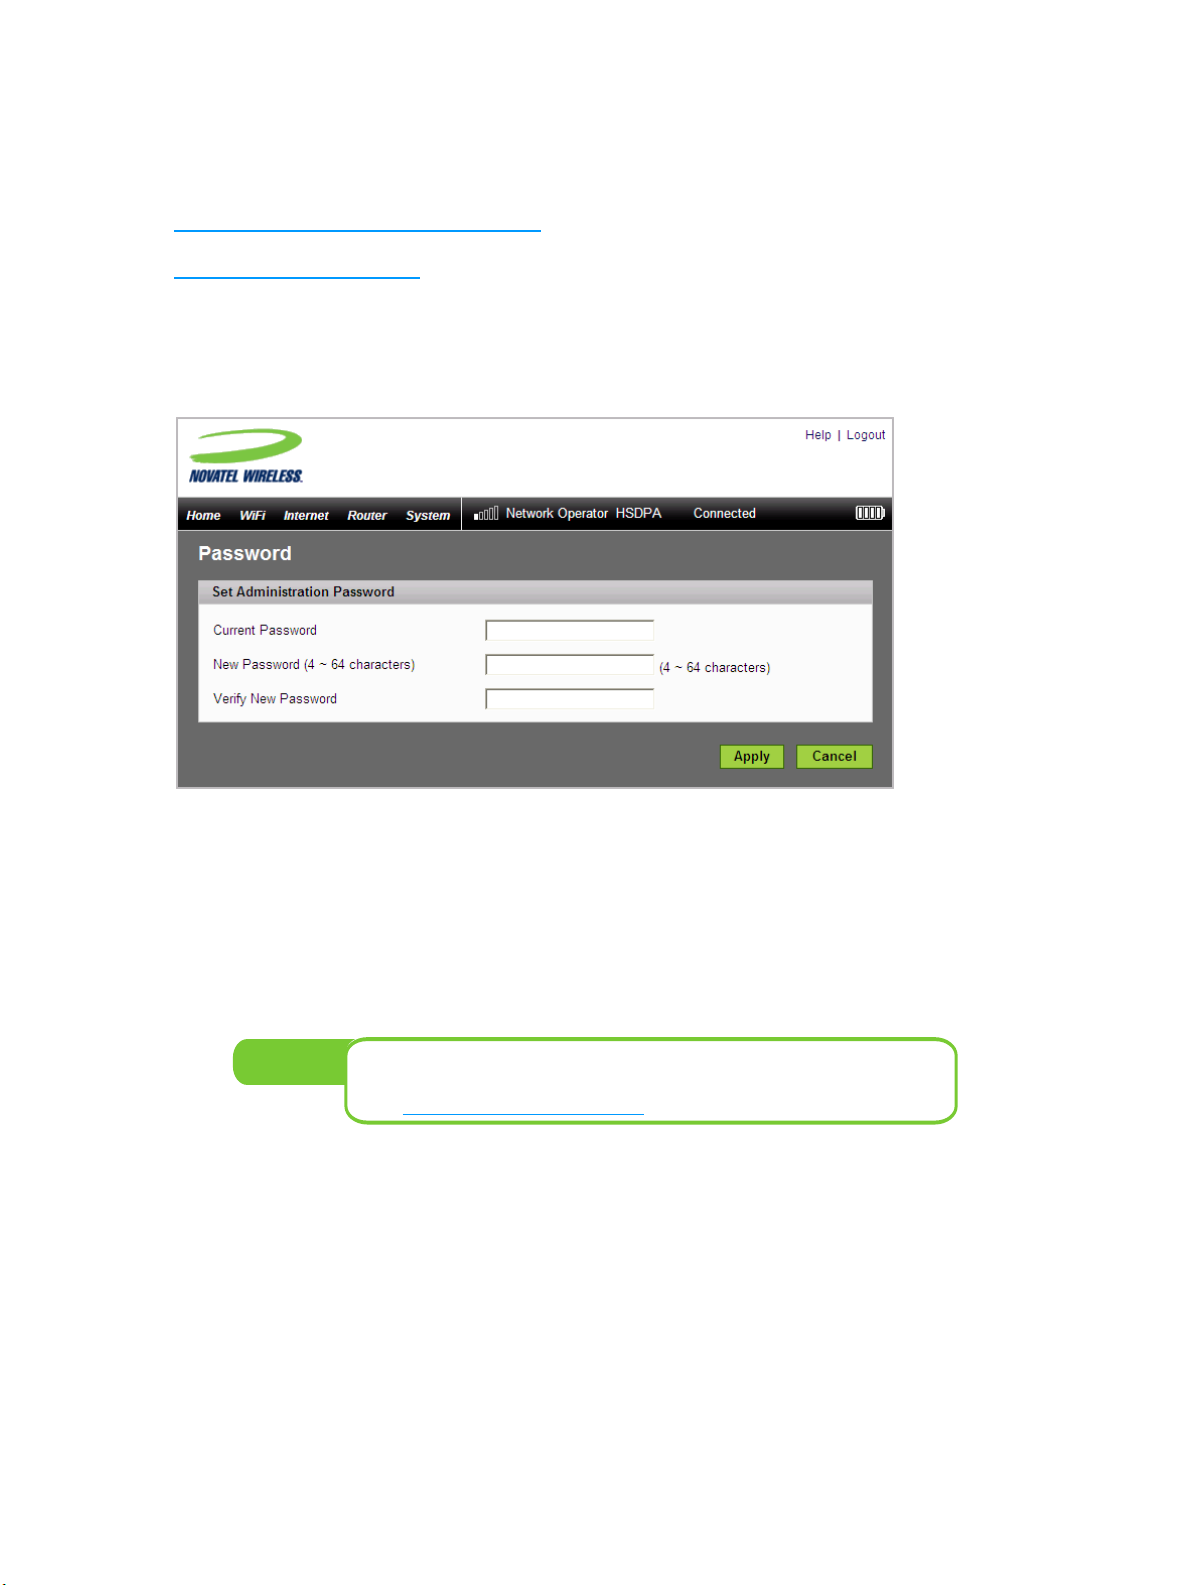
➍ Select the profile for your provider from the Profile list and click the Edit Internet Profile button.
The Internet Profiles – Edit Profile page will open.
11
➎ If desired, change the Profile Name to something more descriptive, for example My MiFi.
➏ Enter the APN, Username, Password and other information you were given by your service
provider.
➐ Click Apply.
➑ Click the Return to Profile List link.
➒ Click Apply on the Internet Profiles – Set Internet Profile screen.
Tip!
You may want to set Autoconnect to have your MiFi
connect to the network whenever it is powered on. [See
(page 63).]
➓ Set up wireless security for your MiFi network. [See Set Up Wireless Security (page 13).]
WARNING ! It is highly recommended that you set up security for your MiFi at this time. If
you do not configure security for your wireless network, data on your network will be easily
accessible to others.
12
Set Up Wireless Security
Using security with your wireless network is very important. Novatel Wireless recommends that you
set up security immediately by following these procedures:
• Change the Administrative Password
• Establish a Secure Profile
Change the Administrative Password
➊ Choose System > Password from the menu bar.
➋ Type “admin” into the Current Password field.
➌ Select a new administrative password and enter it into both New Password fields.
➍ Click Apply.
This will be the new administrative password that you use when you login to the browser
interface.
NOTE:
Be sure to record the new password. You will have to reset the device
using the Master Reset button if you lose the administrative password.
[See Using the Master Reset Button
(page 90).]
13
Establish a Secure Profile
You can use WEP (64- or 128-bit), WPA-PSK, WPA2-PSK, or WPA/WPA2 mixed mode security.
IMPORTANT: Record your network key.
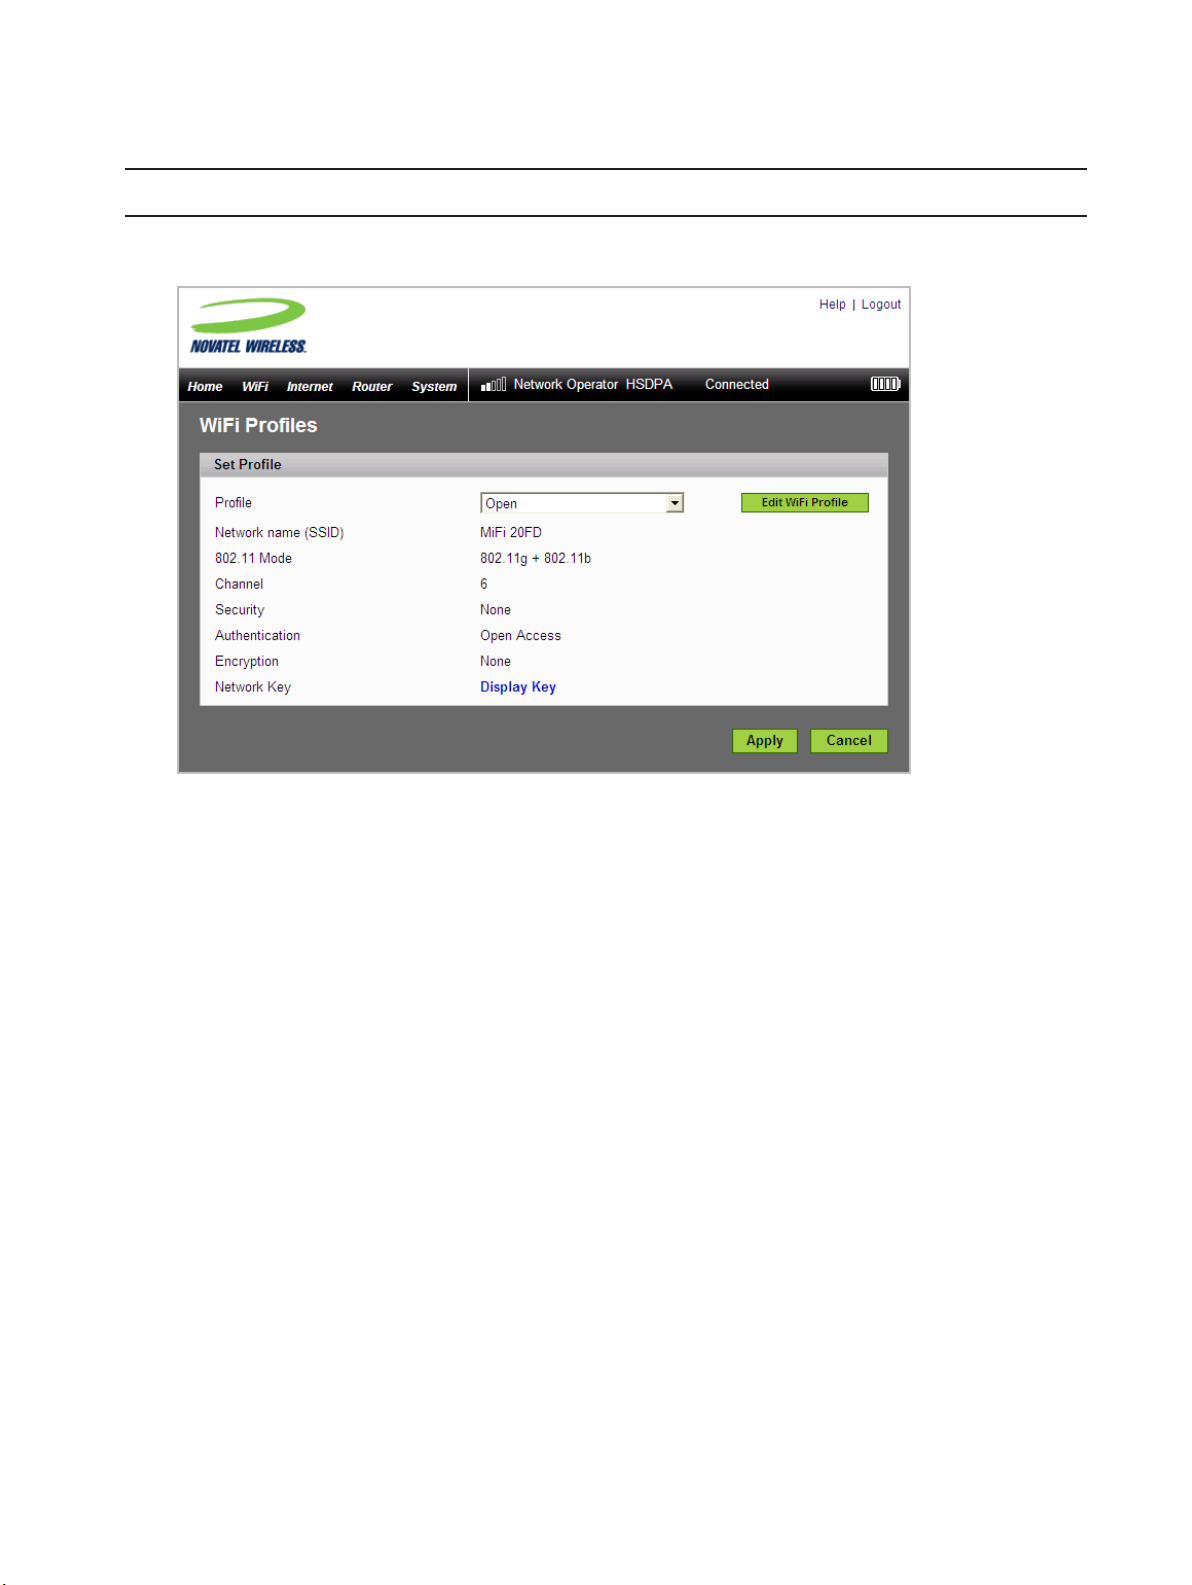
➊ Choose WiFi > WiFi Profiles from the menu bar.
➋ From the Profile list, select Secure and click the Edit WiFi Profile button.
The Edit WiFi Profile page will open.
14
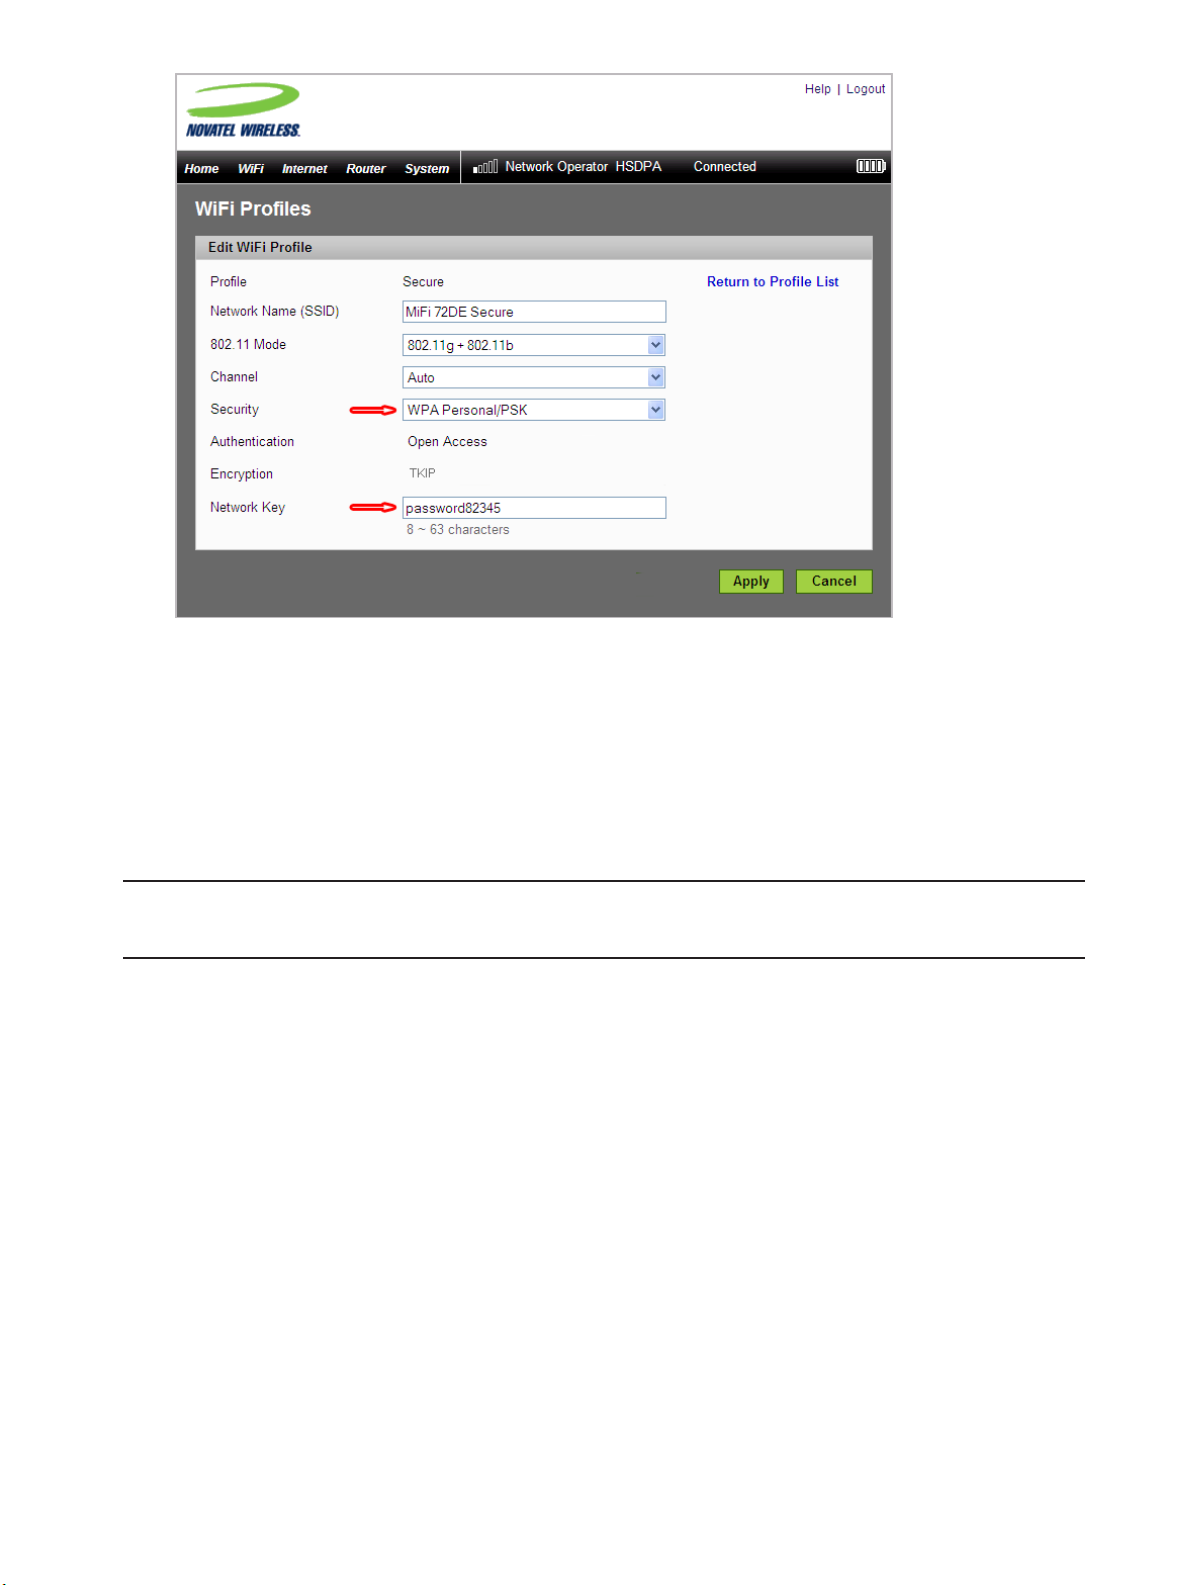
➌ Choose the type of security you want to use from the Security list.
➍ Type the Network Key you want to use in the box.
➎ Click Apply.
➏ Click the Return to Profile List link.
➐ Click Apply on the WiFi Profiles – Set Profile page to begin using the Secure profile.
IMPORTANT: Your wireless connection will be disabled at this point. You must reconnect with
the new network key you just established.
15

USB Mode Setup
To use MiFi in USB mode, you must install the software and drivers that are contained in the MiFi
device.
IMPORTANT: You will need the Access Point Name (APN) from your service provider plus any
username, password, or other information they may have given you.
This section contains the following information:
• System Requirements
• Windows Setup and Connection
• Mac Setup and Connection
System Requirements
• Windows® XP, Vista
• Mac OS® X (10.4.7+)
• Linux® (2.4, 2.6)
• 100 MB hard drive space
• 128 MB Ram
• USB 2.0 port
[Visit www.novatelwireless.com for configuration details.]
16
Windows Setup and Connection
A complete user guide for the MobiLink 3 software is available from the Novatel Wireless website at
www.novatelwireless.com/support.
This section contains information on installing the software, configuring your new profile, and
connecting to the network.
Install the software and configure the profile:
➊ Turn on your computer and close all open applications.
➋ Use the microUSB cable to attach MiFi to a USB 2.0 port on your computer. MiFi will turn on
automatically.
NOTE:
Only the connection LED on the power button will light.
WiFi is disabled in USB mode.
➌ The MobiLink software and MiFi drivers will install.
➍ Follow any onscreen instructions.
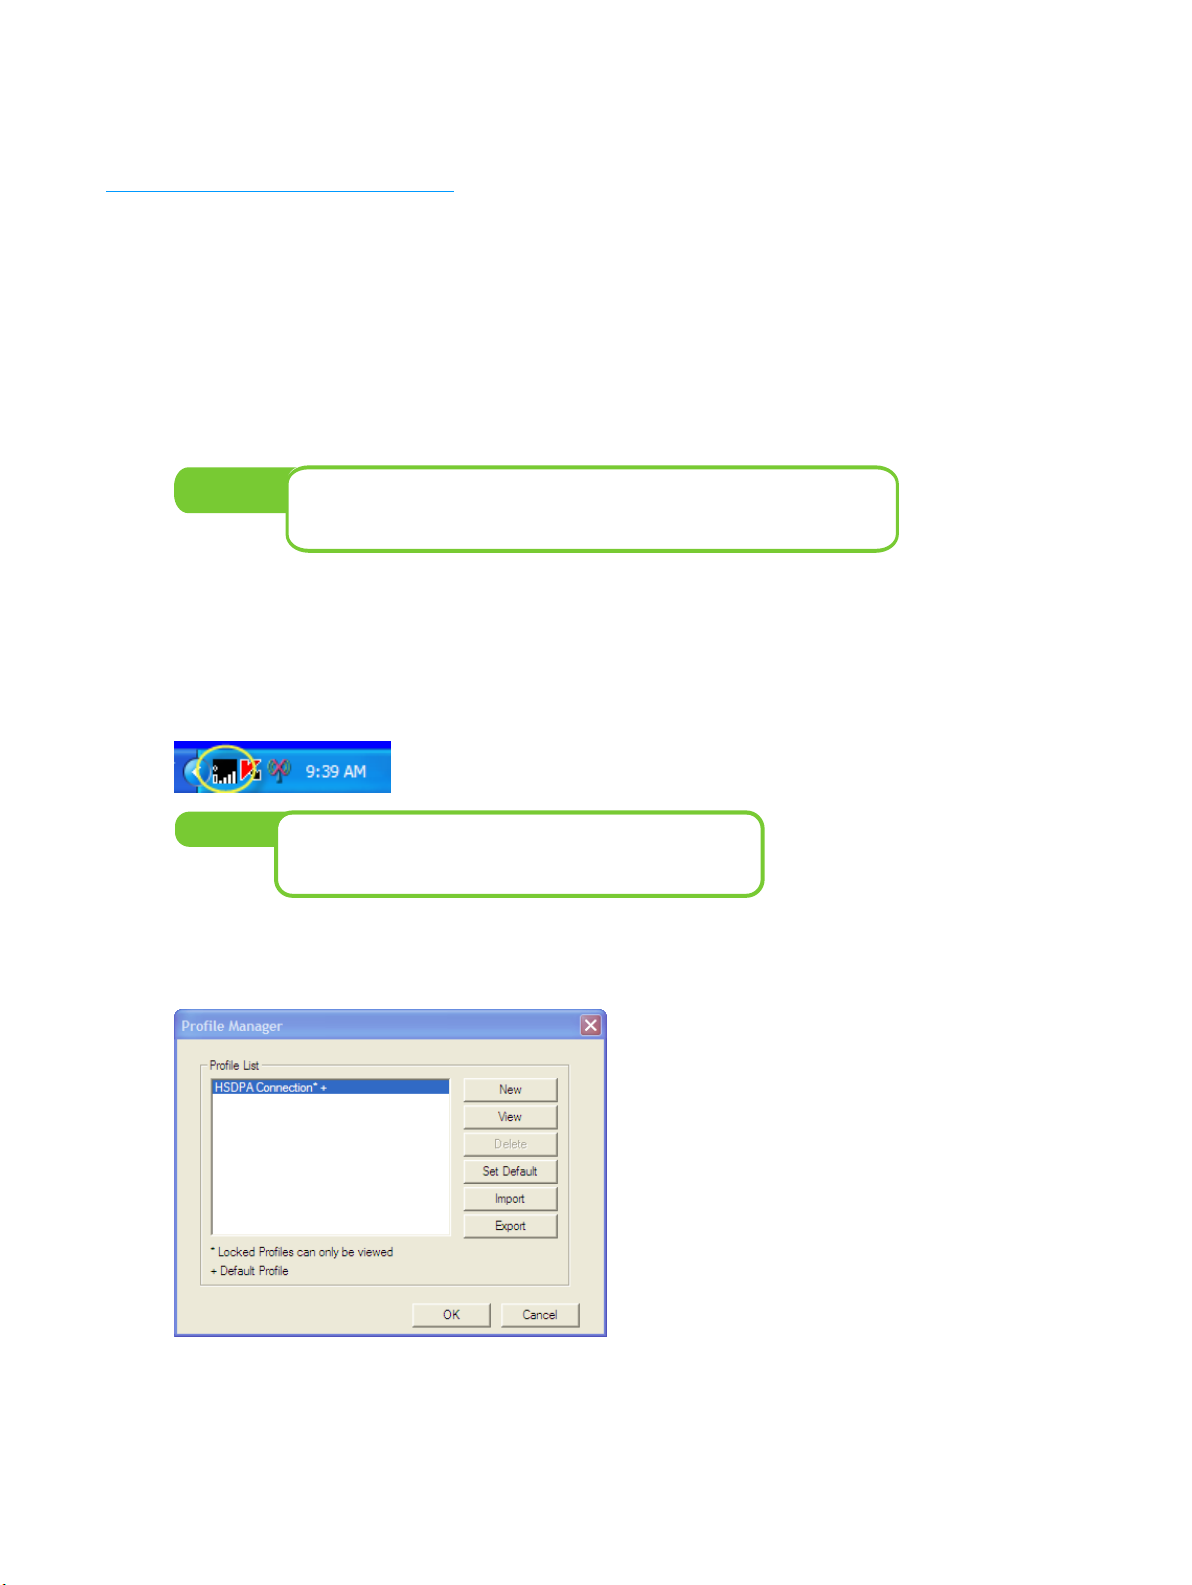
The MobiLink icon will appear in the Windows notification area (also referred to as the system
tray).
NOTE:
If the system tray icon is not present, double-click the
MobiLink desktop shortcut to launch the software.
➎ Right-click the icon and select Settings > Profile Manager.
The Profile Manager window will open.
17
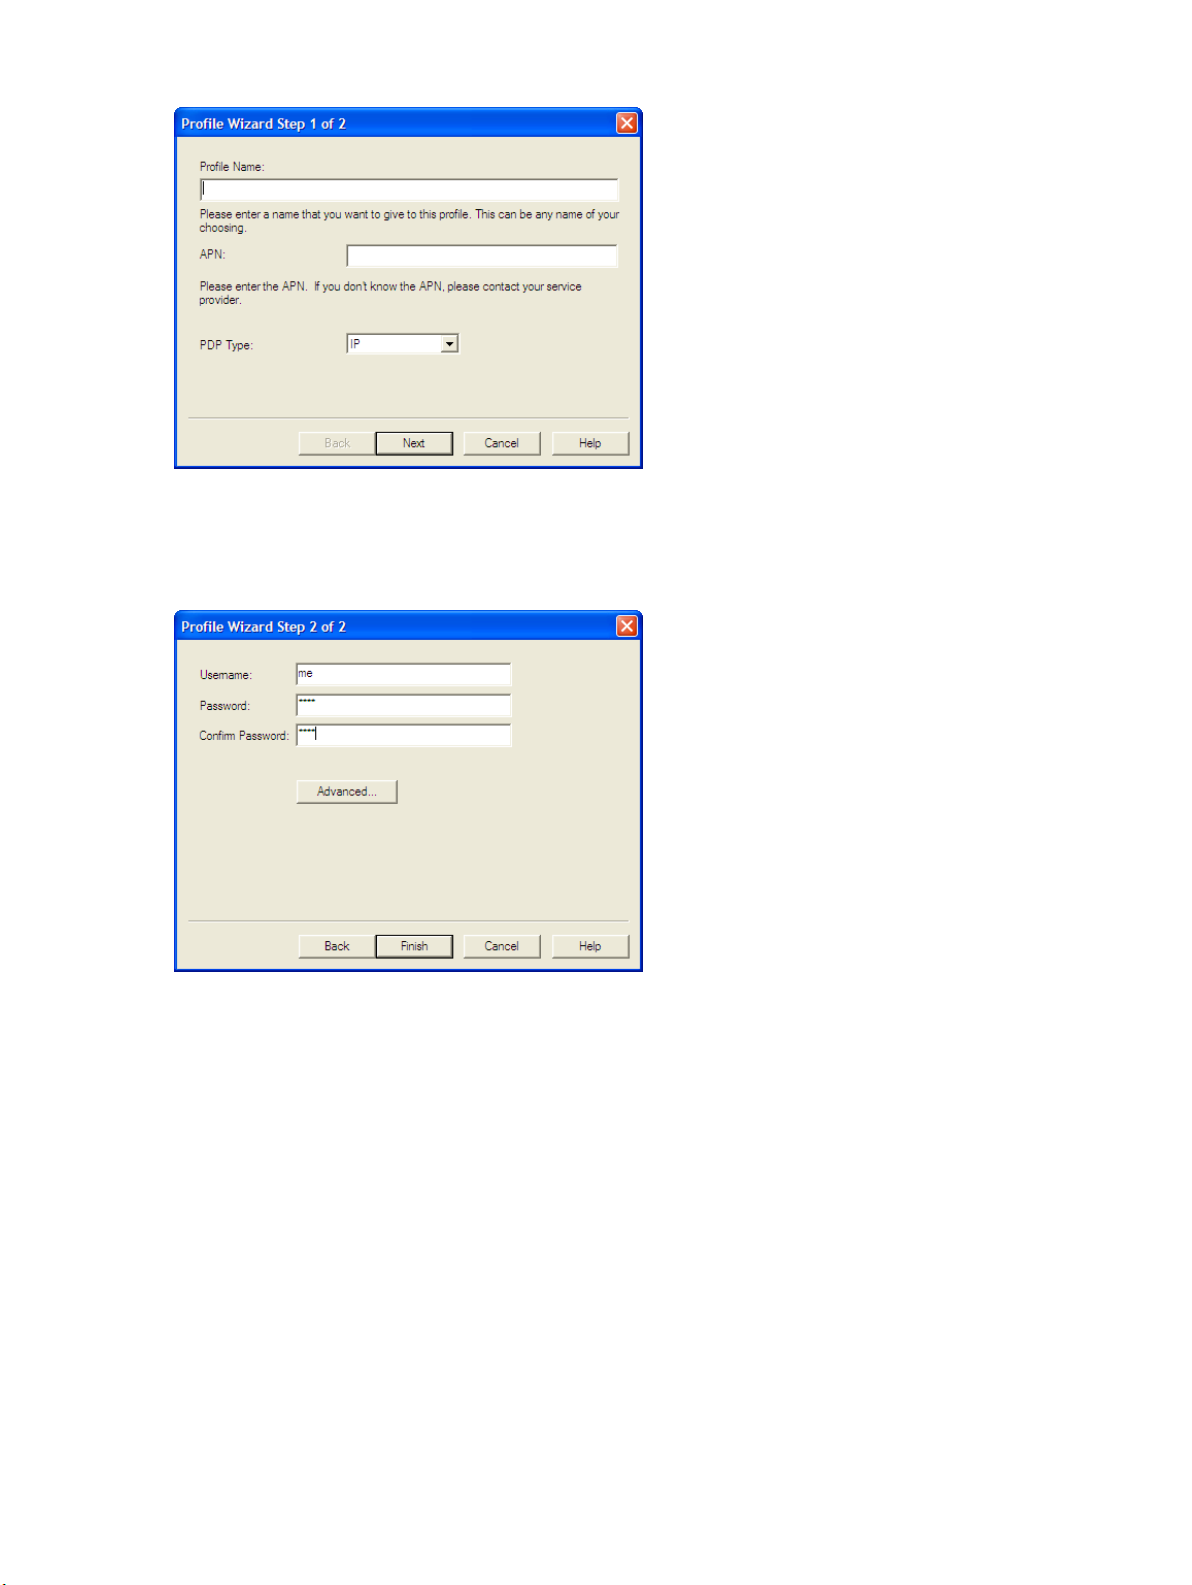
➏ Click New to start the Profile Manager wizard.
➐ Enter a simple name for the new profile (for example, My MiFi Connection).
➑ Enter the Access Point Name (APN) that you received from your service provider and click
Next.
➒ Enter your Username and Password (received from your service provider), if required, and
click Finish.
18
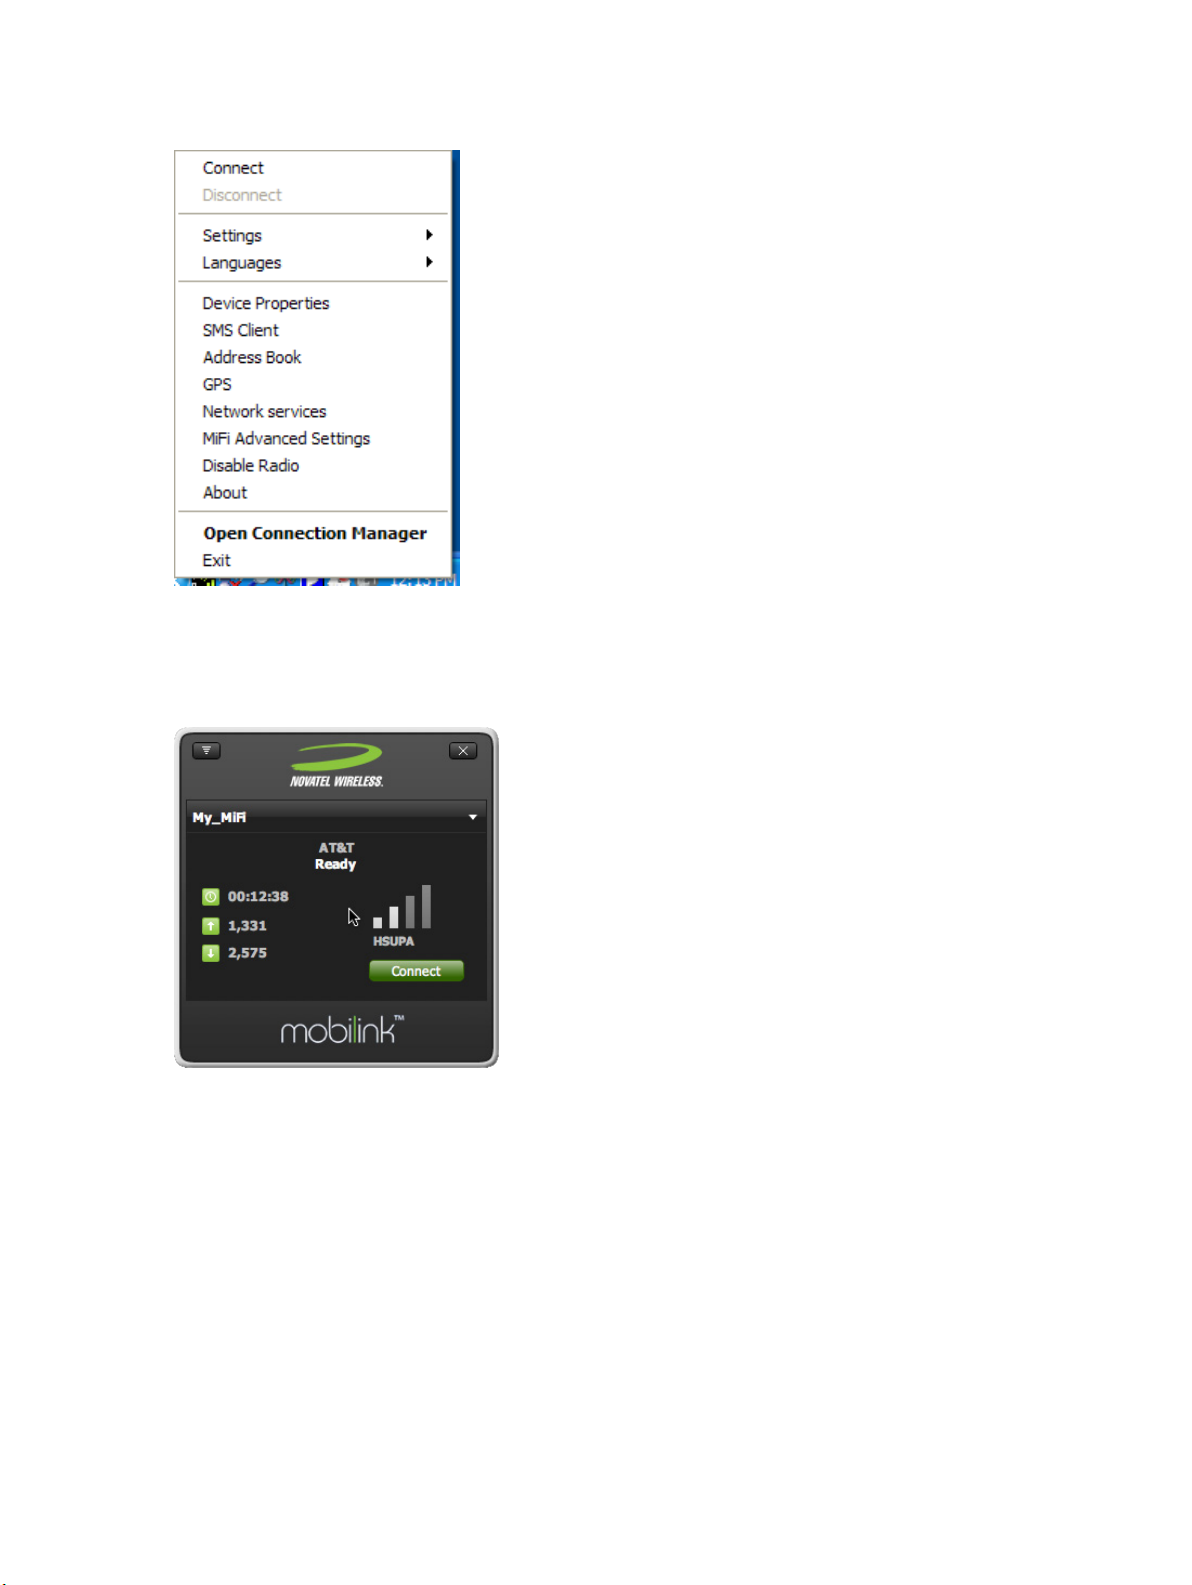
Connect to the network:
➊ Right-click the system tray icon again and select Connect.
– Or –
➊ To see network and connection status also, right-click the system tray icon and select Open
Connection Manager.
➋ Click Connect.
When Ready changes to Connected, you have successfully connected to the network and can
browse the Internet, check e-mail, or any other activities you require.
19
Mac Setup and Connection
This section contains information on installing the software, configuring your new profile, and
connecting to the network. Most of the information is the same between OS X v10.4+ and OS X
v10.5+. Differences are noted where they occur.
Install the Software
➊ Turn on your computer and close all open applications.
NOTE:
You will need to restart your Mac to complete the
installation.
➋ Use the microUSB cable to attach MiFi to a USB port on your Mac. MiFi will turn on
automatically.
NOTE:
Only the LED on the power button will light.
WiFi is disabled in USB Modem mode.
➌ A welcome window will open showing the installer package.
➍ Open Installer.pkg to load the drivers and MobiLink 3 software onto your Mac.
➎ Follow the onscreen instructions and restart the Mac when requested.
20
Configure Your Profile
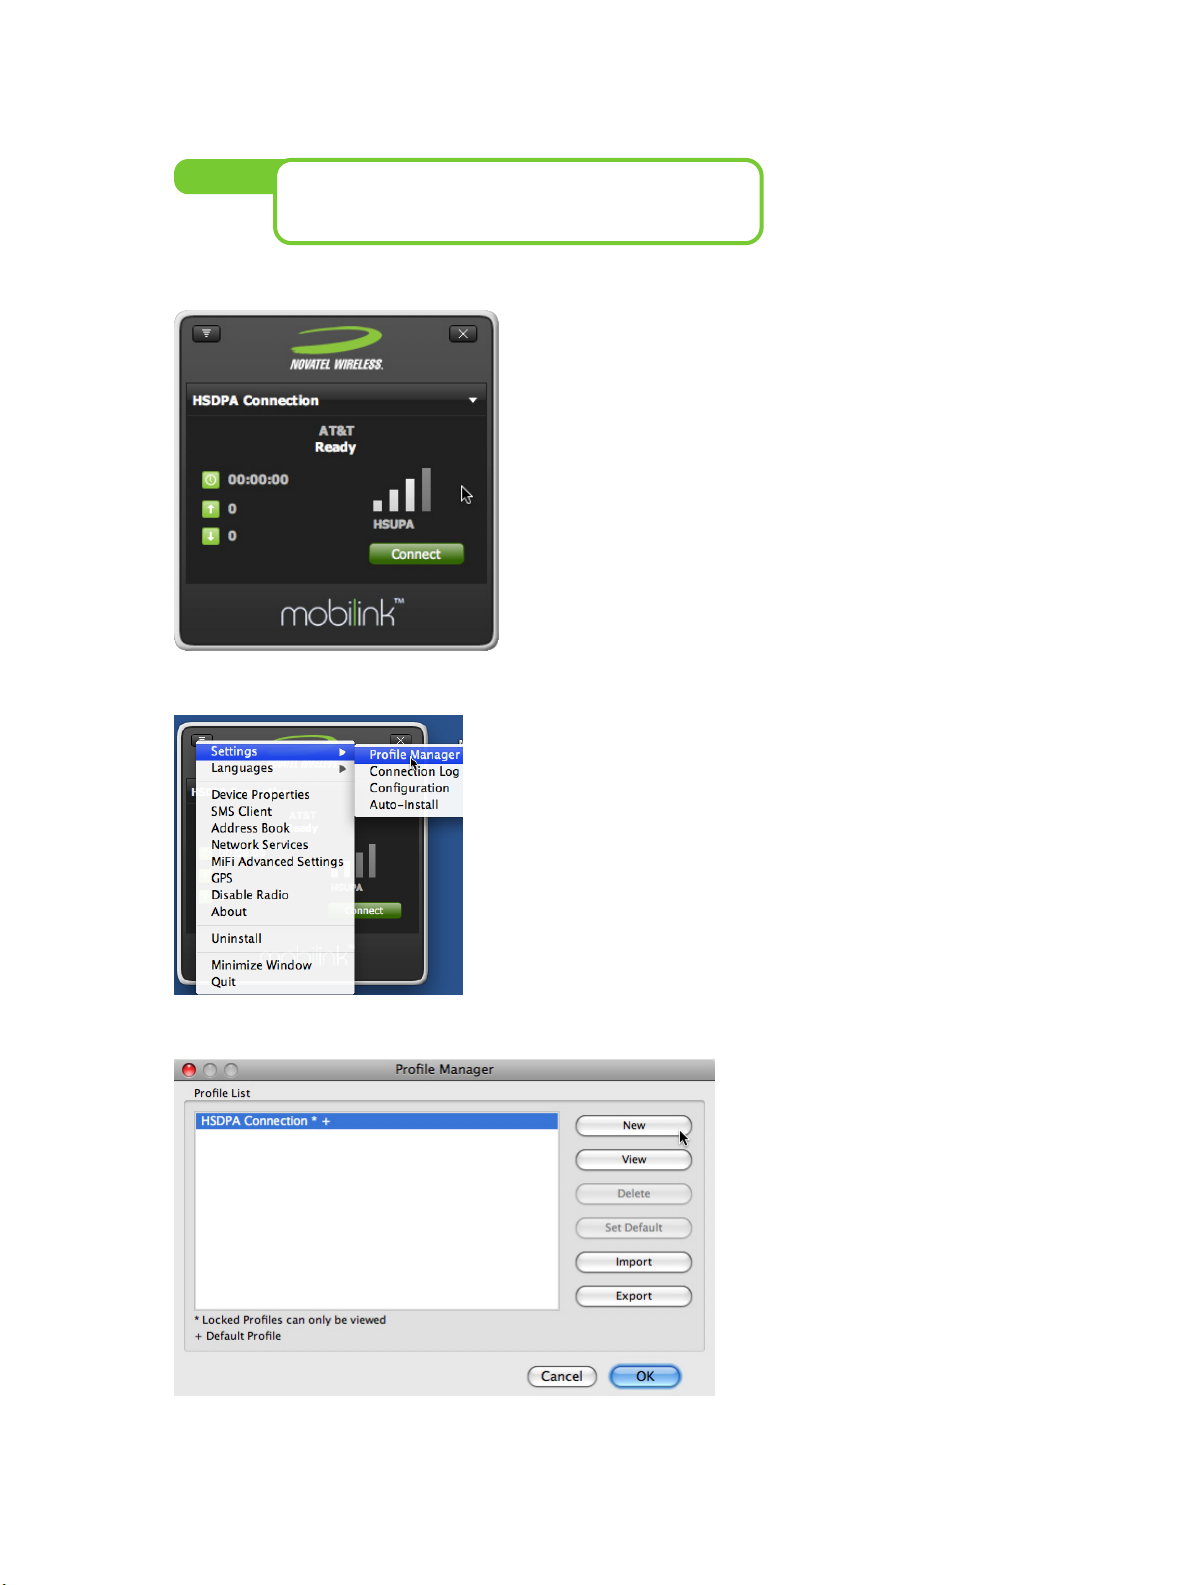
➊ Launch MobiLink 3 from Applications > MobiLink 3 > MobiLink3.
Tip!
The Connection Manager will open.
You may want to place MobiLink3 in your Dock as you
will use it to Connect and Disconnect from the network.
➋ From the Connection Manager menu, select Settings>Profile Manager.
The Profile Manager window will open.
➌ Click New.
21
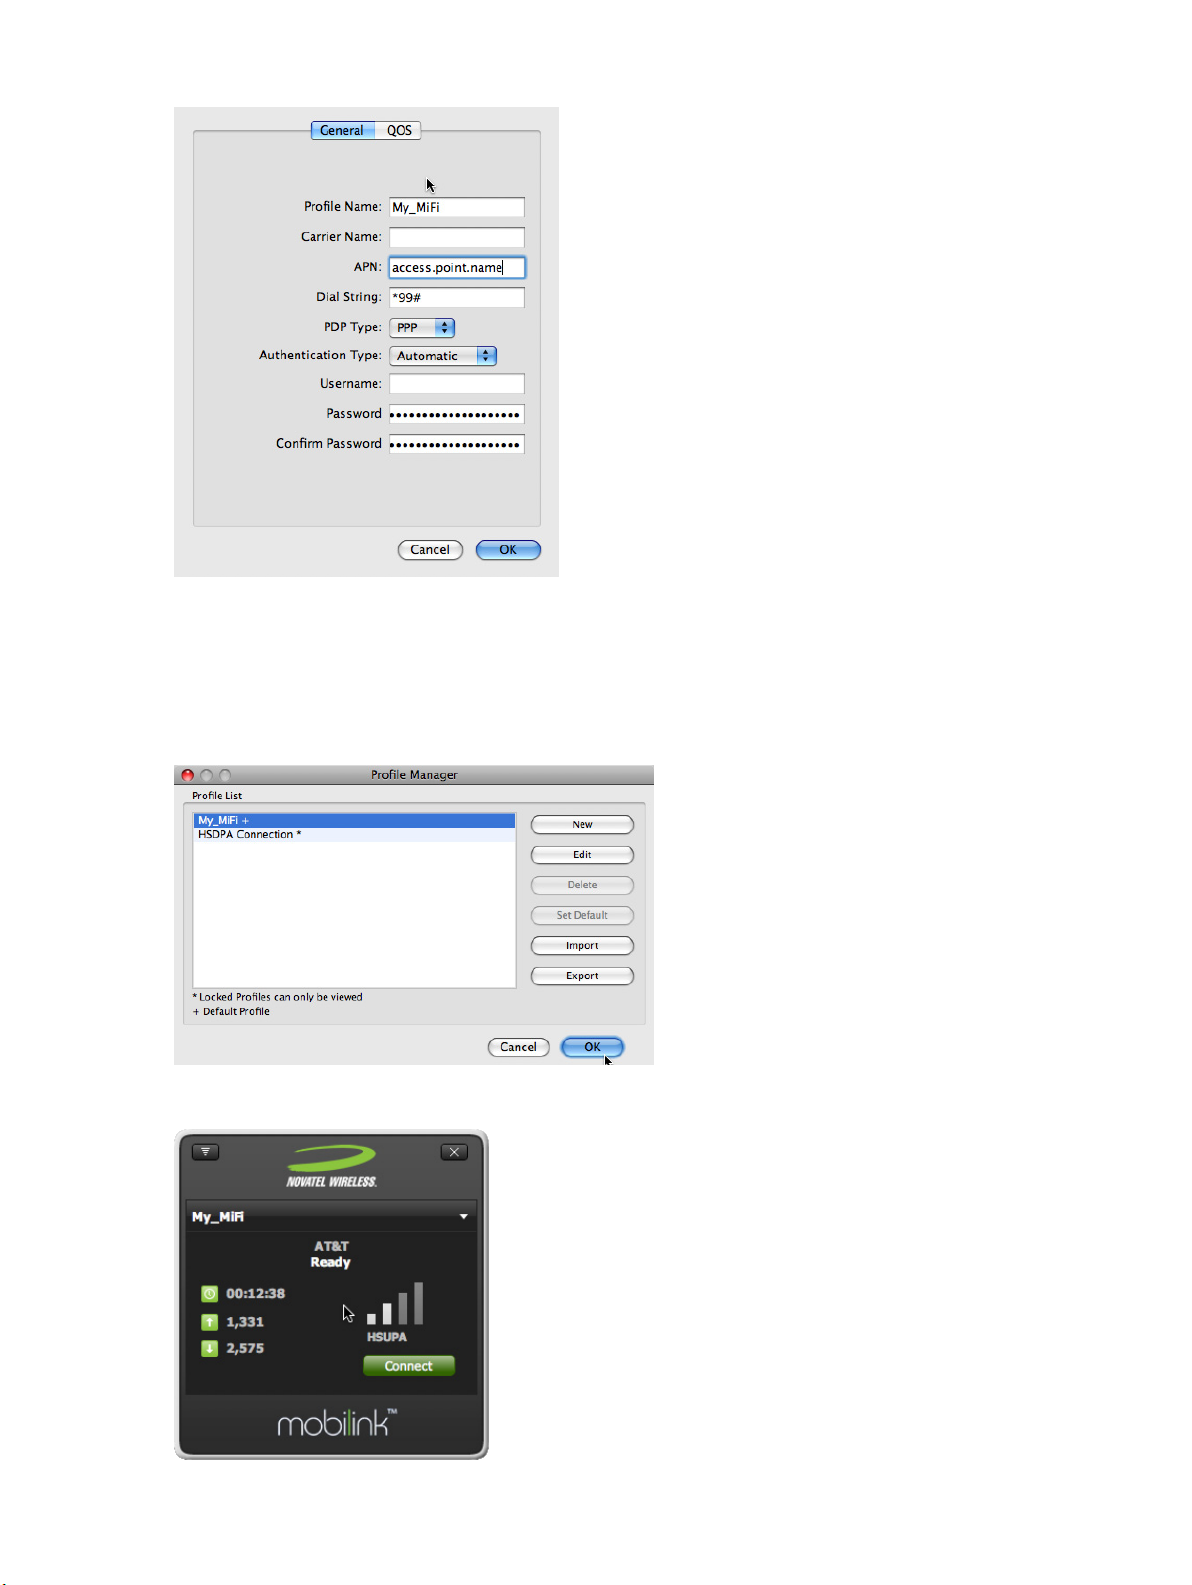
The General tab for the New Profile window will open.
➍ Enter a name for your connection, the APN, and any user name or password you received
from your network service provider and click OK.
➎ A dialog will open asking if you want to make this the default profile. Click Yes.
The Profile Manager screen shows the new profile as the default.
➏ Click OK to close the Profile Manager and return to the main Connection Manager window.
You are ready to connect to the network.
22
Connect to the Network
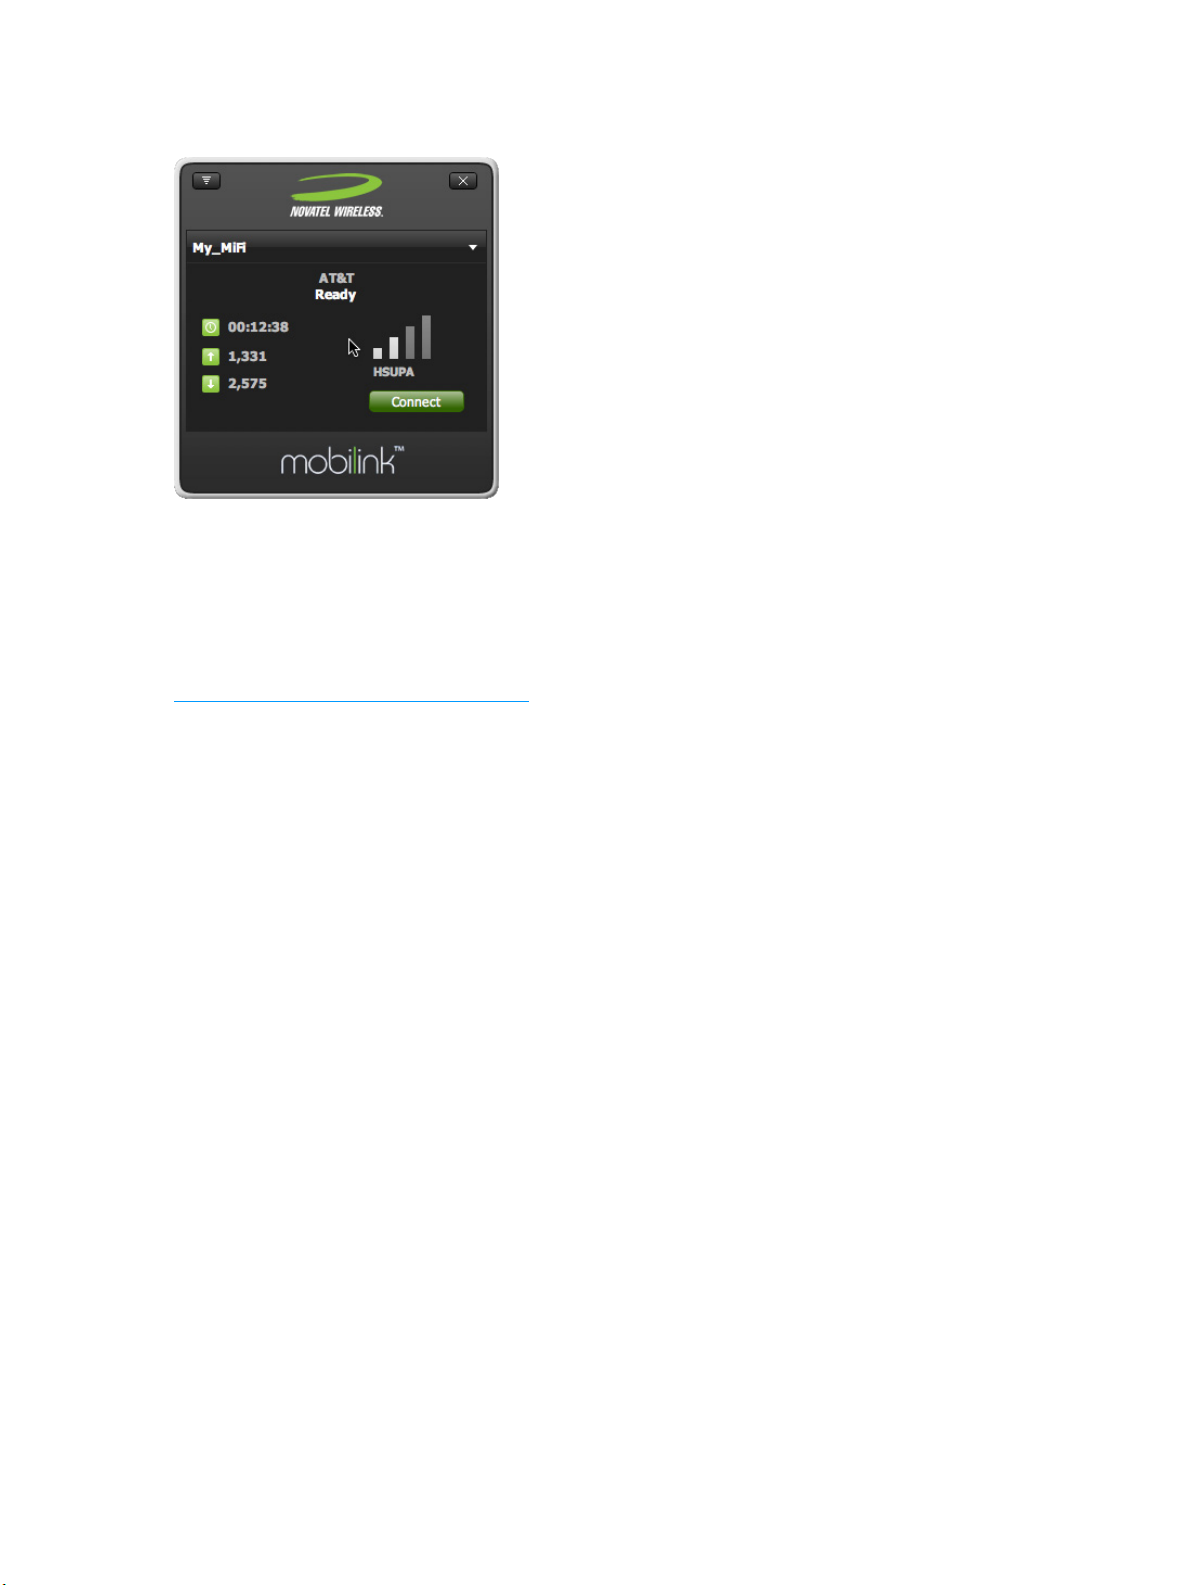
➊ Launch MobiLink.
➋ When the status reads Ready, click Connect.
When Ready changes to Connected, you have successfully connected to the network and can
browse the Internet, check e-mail, or any other activities you require.
If you have trouble connecting, check the Mac Configuration Troubleshooting section. [See
Mac Configuration Troubleshooting
(page 24).]
23
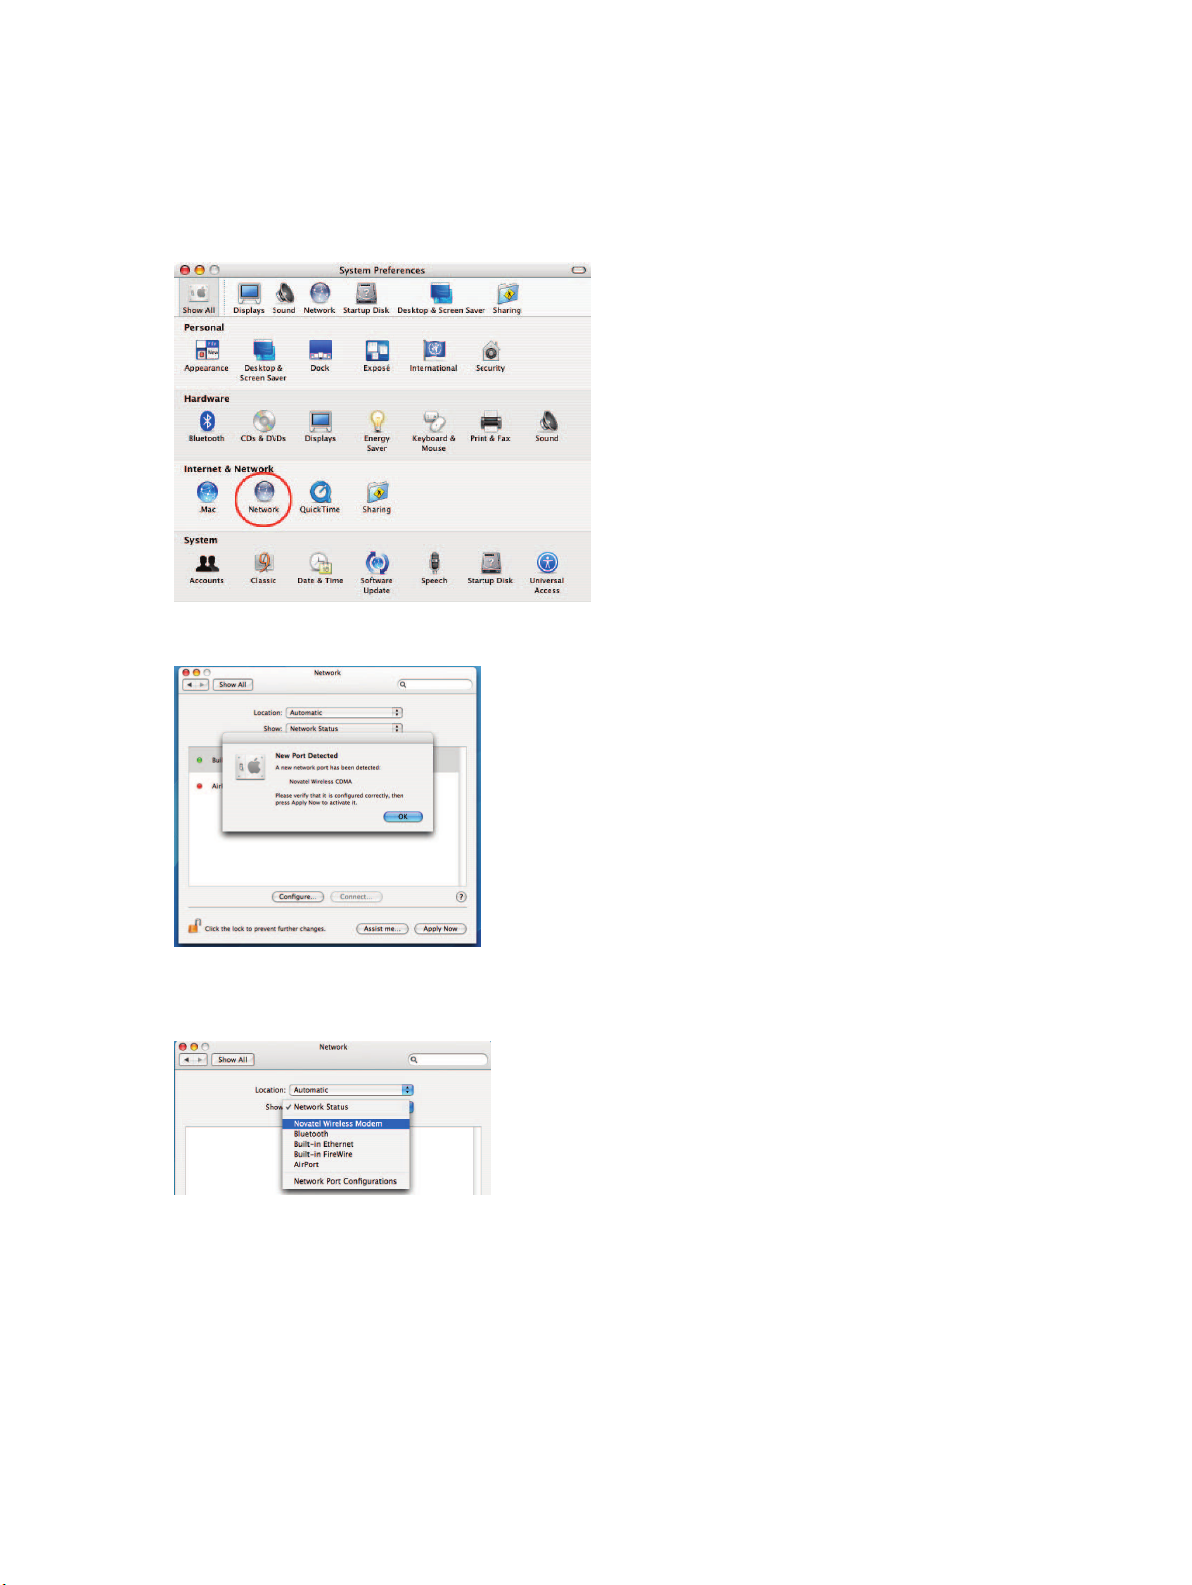
Mac Configuration Troubleshooting
If you cannot connect, check these configuration items.
OS X v10.4+
➊ Launch System Preferences and select Network.
➋ A New Port dialog may appear. If so, select OK, then Apply Now.
➌ From the Show menu, select Novatel Wireless Modem (may have HSUPA, HSPA, or HSDPA in the
name).
24
 Loading...