

Page 1
«NOVATEK-ELECTRO» Ltd
Intelligent industrial electronics
Astronomical time relay
REV – 225
OPERATING MANUAL
Quality control system on the production complies with requirements ISO 9001:2008
Dear customer,
Company NOVATEK-ELECTRO LTD. thanks you for purchasing our products.
You will be able to use properly the product after carefully studying the Operating Manual.
Keep the Operating Manual throughout the service life of the product.
Review the Operating manual before using the unit.
www.novatek-electro.com
Page 2
~ 2 ~
REV-225
NOVATEK-ELECTRO
ATTENTION! ALL REQUIREMENTS OF THIS OPERATING MANUAL ARE COMPULSORY TO BE MET!
WARNING! – DEVICE TERMINALS AND INTERNAL COMPONENTS ARE UNDER POTENTIALLY
LETHAL VOLTAGE
TO ENSURE THE PRODUCT SAFE OPERATION IT IS STRICTLY FORBIDDEN THE FOLLOWING:
TO CARRY OUT MOUNTING WORKS AND MAINTENANCE WITHOUT DISCONNECTING THE DEVICE
FROM THE MAINS;
TO OPEN AND REPAIR THE DEVICE INDEPENDENTLY;
TO OPERATE THE DEVICE WITH MECHANICAL DAMAGES OF THE CASE.
IT IS NOT ALLOWED WATER PENETRATION ON TERMINALS AND INTERNAL ELEMENTS OF THE
DEVICE.
During operation and maintenance the regulatory document requirements must be met, namely:
Regulations for Operation of Consumer Electrical Installations;
Safety Rules for Operation of Consumer Electrical Installations;
Occupational Safety when in Operation of Electrical Installations
Installation, adjustment and maintenance of the device must be performed by qualified personnel having
studied this Operating Manual.
In compliance with the requirements of this Operating Manual and regulations the device is safe for use.
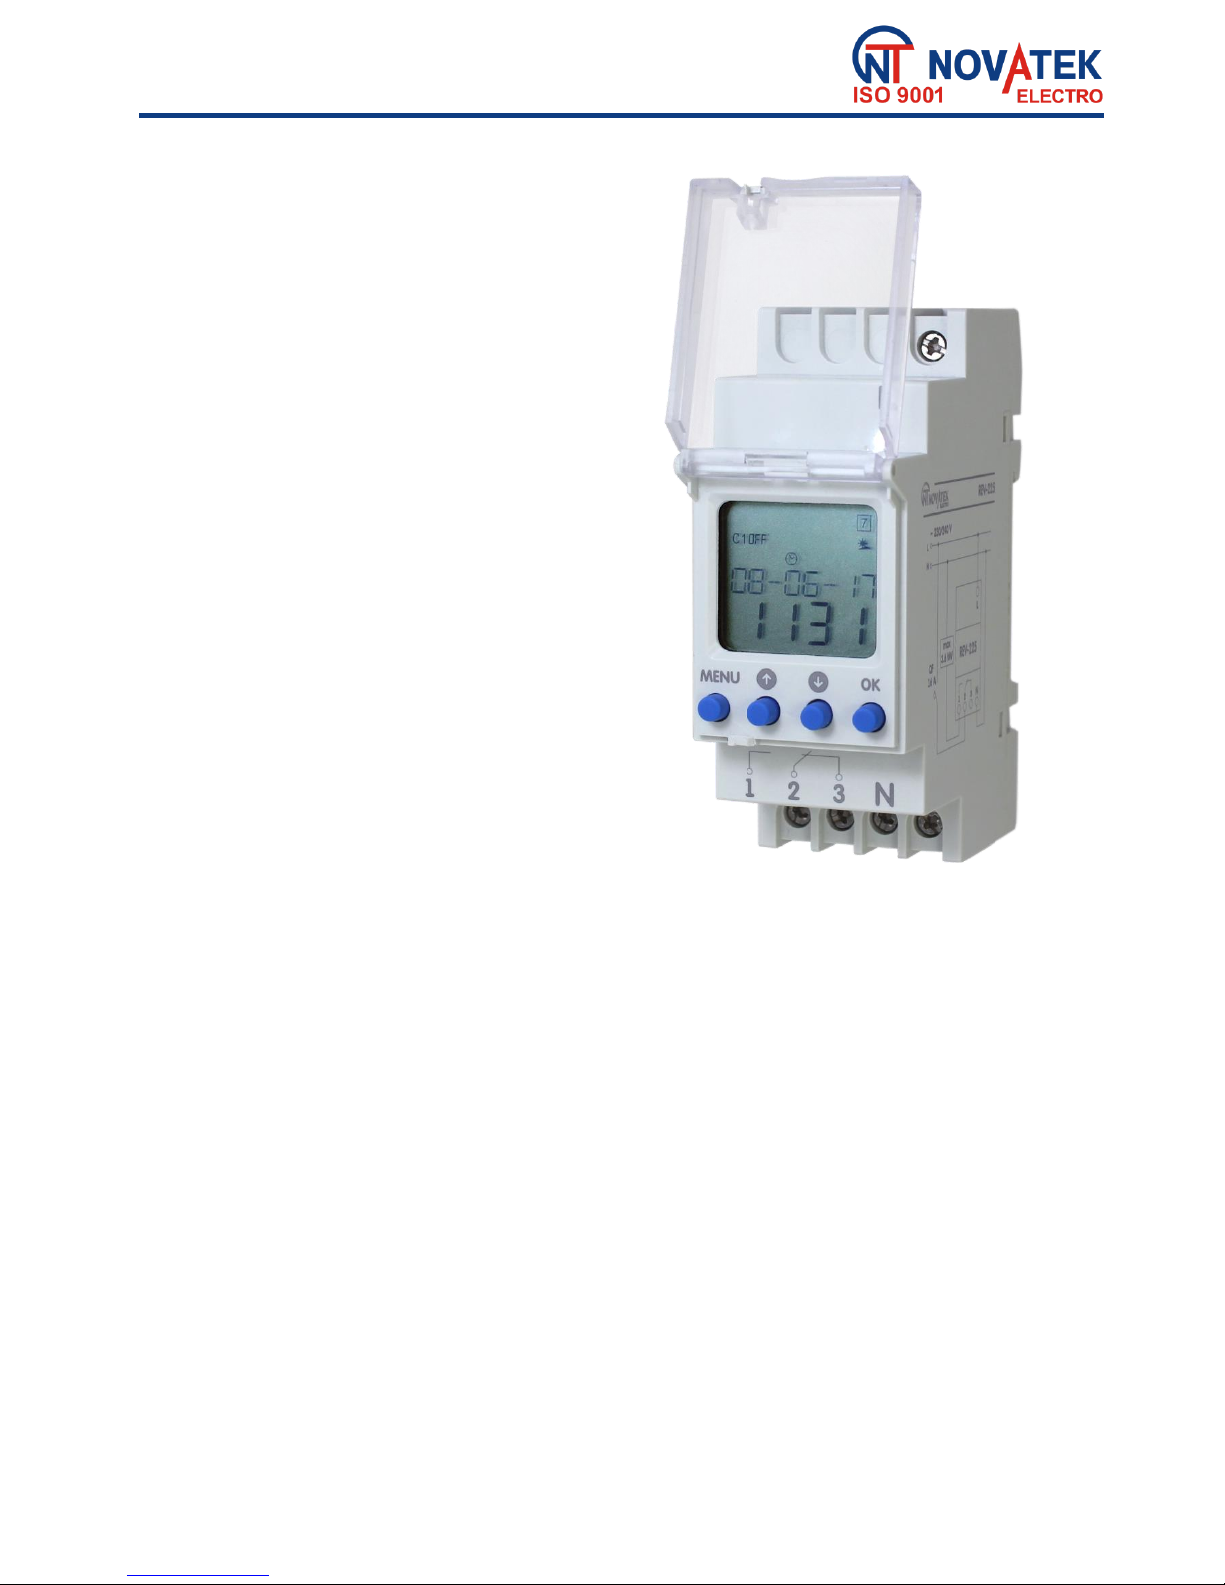
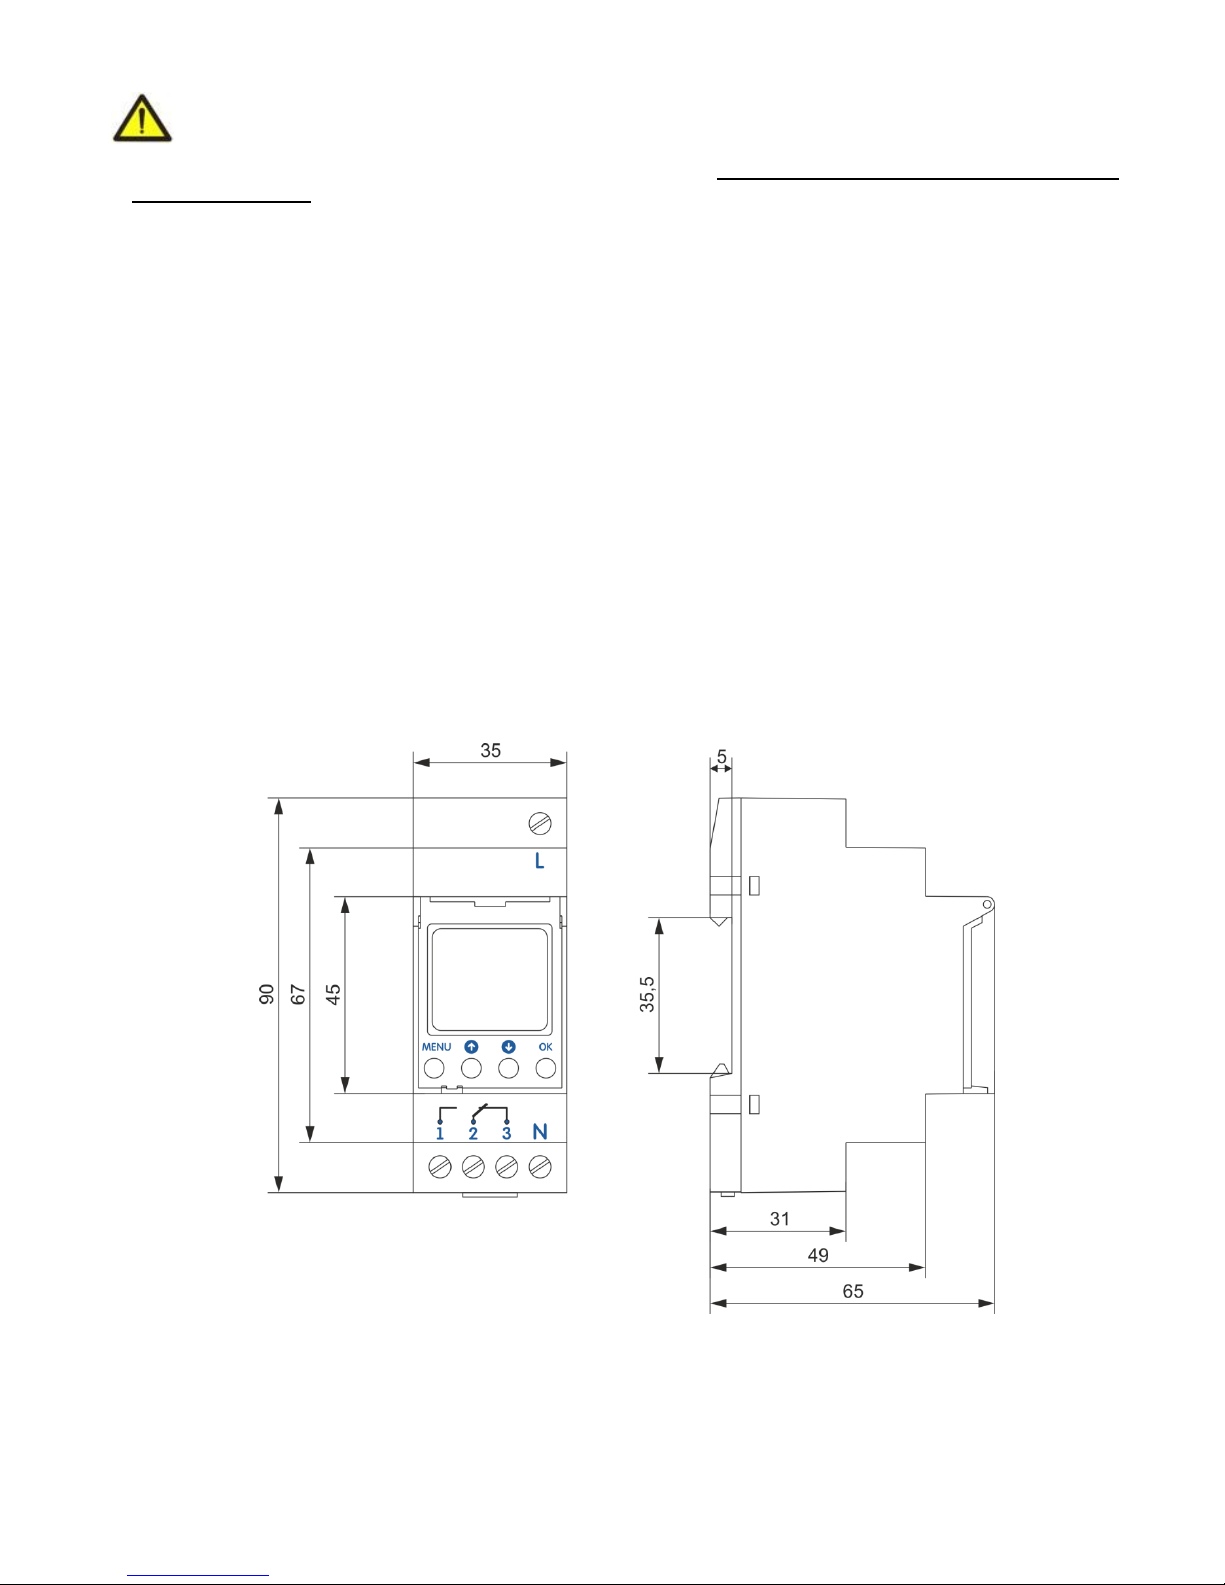
Figure 1 – REV-225 visual appearance and setting dimensions
Page 3

~ 3 ~
NOVATEK-ELECTRO
REV-225
The present Operating Manual is intended for familiarization with the design, safety requirements, operation and
maintenance procedure of the astronomical time relay REV-225 (hereinafter referred to as “the device”, “REV-225”).
REV-225 complies with the requirements of the following international standards:
EN 60947-1; EN 60947-6-2; EN 55011; IEC 61000-4-2.
Harmful substances in quantities exceeding the maximum permissible concentrations are not available.
Terms and abbreviations:
Display – LCD display
1 APPLICATION
REV-225 is a microprocessor-based device designed to be operated in automatic control systems with reference
to the astronomical time (sunrise / sunset).
The sunrise and sunset times are automatically calculated by REV-225 based on the coordinates entered and
the current time that allows controlling the lighting without using the external sensors.
There is the program setting that allows switching off the load at night (night break).
The built-in power supply unit (lithium battery) provides keeping the operation of the real-time clock and the
device in the event of mains power supply failure.
Features of REV-225:
– Digital time relay with astronomical program;
– The power supply unit is designed to operate for 3 years (lithium battery);
– Sealable front panel cover;
– Adjustment using four buttons;
– Automatic switching to summer / winter time;
– Liquid crystal display;
– Operation mode for days off;
– One channel;
– Double module mounted on 35 mm DIN rail.
1.1 REV-225 visual appearance and overall dimensions
REV-225 visual appearance and overall dimensions are shown at figure 1.
1.2 Operating Conditions
REV-225 is designed for operation in the following conditions:
– Ambient temperature: from minus 35 to +55°С;
– Atmospheric pressure: from 84 to 106.7 kPa;
– Relative air humidity (at temperature of +40°С) no more 50%.
If the temperature of the device after transportation or storage is different from the temperature of the
environment in which its operation is assumed, then before connecting to the mains keep the unit in operation
conditions for two hours (because on the unit elements condensation may be available).
ATTENTION! The unit is not intended for use:
- in conditions of significant vibration and shocks;
- in high humidity conditions;
- in corrosion environments with content in the air of acids, alkalis, etc., as well as severe contamination (grease,
oil, dust, etc.).
2. TECHNICAL CHARACTERISTICS
Table 1- Main Technical Specifications
Item
Value
Operating supply voltage ( ), V
230 ± 10 %
Voltage when maintaining serviceability, V
130 - 280
Power line frequency, Hz
50 – 60
Rower consumption (from AC supply source 230 V), W, not more
1,3
Number of channels
1
Program
astronomical
Operation modes
Automatic
Manual
Weekends
Transition to summer/winter time
yes
Allowable time deviation
≤ 1 s/day at 20°C
Lithium battery service life
3 years
Page 4
~ 4 ~
REV-225
NOVATEK-ELECTRO
Number and type of contacts
1, C/O
Weight, kg, not more then
0,11
Overall dimensions H x B x L, mm
90х65х36
Purpose of device
Control and distribution
equipment
Typical operation
Continued
Protection rating of device
ІР20
Electric shock protection class
II
Climatic version
NC3.1
Allowable soil level
III
Overvoltage category
II
Nominal voltage of insulation, V
450
Nominal impulse withstanding voltage, kV
2,5
Connecting plugs cross section of conductors, mm2
1 – 4
Tightening torque of terminal screws, N*m
0,5
Standard 35 mm DIN rail mounting
Operating position - arbitrary
Table 2 – Characteristics for the REV-225 output terminals
Maximal current at
U~=250V
Max. power
Maximal Current at UDC=24V
cosφ = 1
16 А
4000 VА
384 W
Commutation durability of contacts
– mechanical service durability, times, not less
– electric durability 16 А 250 V АС, times, not less
1 000 000
100 000
3. INTENDED USE
3.1. Preparation for operation
3.1.1. Preparation for connection:
– Unpack the product (we recommend to keep the original packing for the entire warranty period of the product
operation);
– Check the product for damage after transportation; in case of such damages detection, contact the supplier or
manufacturer;
– Carefully study the Operating Manual (pay special attention to the connection diagram to power the device);
– If you have any questions regarding the installation of the product, please contact the manufacturer by
telephone number indicated at the end of this Operating Manual.
3.1.2 Device connection
ATTENTION!
OUTPUT CONTACTS OF LOAD RELAY ARE NOT DESIGNED FOR LOAD COMMUTATION IN CASE OF
SHORT CIRCUITS. THEREFORE THEY SHOULD BE PROTECTED BY AUTOMATIC CIRCUIT BREAKERS
(FUSES) WITH TRIPPING CURRENT NOT EXCEEDING 16 A OF CLASS B.
ATTENTION! ALL CONNECTIONS MUST BE PERFORMED WHEN THE PRODUCT IS DE-ENERGIZED.
Error when performing the installation works may damage the product and connected devices.
To ensure the reliability of electrical connections you should use flexible (stranded) wires with insulation for voltage
of no less than 450 V, the ends of which it is necessary to be striped of insulation for 5±0.5 mm and tightened with
bootlaces. The cross-section of the wire for connecting the protected equipment depends on the current (power) of
the load. For example, at current 10A - is not less 1 mm2.
Wires fastening should exclude mechanical damage, twisting and abrasion of the wire insulation.
IT IS NOT ALLOWED TO LEAVE EXPOSED PORTIONS OF WIRE PROTRUDING BEYOND THE TERMINAL
BLOCK.
For reliable contact it is necessary to perform tightening of screws of removable terminal block with the force
specified in Table 1.
When reducing the tightening torque, the junction point is heated, terminal block may be melted and wire cane burn. If
you increase the tightening torque, it is possible to have thread failure of terminal block screws or the compression of the
connected wires.
To improve operational properties of the device it is recommended to install the fuse or its analogue for
1 A current in power supply circuit for REV-225.
3.1.2.1 Connect REV-225 according to the diagram indicated in Fig. 2.
ATTENTION! LOAD TERMINALS ARE DESIGNED FOR MAXIMUM VOLTAGE OF 300 V;
Page 5

~ 5 ~
NOVATEK-ELECTRO
REV-225
TO AVOID THE ELECTRIC BREAKDOWN OF INSULATION, DO NOT CONNECT THE VOLTAGE
SOURCES OF MORE THAN SPECIFIED VALUE.
Figure 2 – Connection diagram of REV-225
3.1.2.2 Energize the device.
3.2 Device operation
3.2.1 Controls and display symbols
The appearance of the display is shown in Fig. 3.
The device is controlled using the buttons located on the front panel of the device.
Symbol legend:
- Days of the week Monday, Tuesday, ...
Sunday;
– Load is ON;
– Load is OFF;
– Automatic mode;
– Manual mode;
– Holiday mode (Weekends);
– Sunrise;
– Sunset;
– Winter time;
– Summer time;
– Program setting
Figure 3 – The appearance of the display
MENU button – it is used to open the main menu When the buttons and are pressed simultaneously,
and return to the main menu the device switches to manual mode.
(UP) button – it is used to move up the menu OK button is used to confirm the action.
items or increase the value of the parameter.
(DOWN) button – it is used to move the menu
items down or reduce the value of the parameter.
FU – fuse for current of 1 А.
Page 6

~ 6 ~
REV-225
NOVATEK-ELECTRO
3.2.2 First switching on
Fig. 4 shows the diagram of the first switching on setting.
Figure 4 – Diagram of the first switching on setting
1) Press MENU button –the screen will be display the device name for 2 seconds;
2) Select the desired language with / buttons and press ОК button;
3) Select adequate year with / buttons and press ОК button;
4) Select adequate month with / buttons and press ОК button;
5) Select adequate day with / buttons and press ОК button;
6) Select adequate hour with / buttons and press ОК button;
7) Select adequate minute with / buttons and press ОК button.
Note – If the settings were not ended and not operated by buttons for 2 minutes, device will return to «ENGLISH»
menu, and backlight is switched off. Pressing any buttons can switch on display and backlight.
3.2.3 Main menu
To enter the main menu, press the MENU
button. After that, the symbol “Prog” appears
on the display;
If you do not press the buttons for two
minutes, the REV-225 will automatically exit
the settings menu;
Use / buttons to select the desired
menu.
Figure 5 – Diagram view of main menu
– Nightbreak setting menu;
– Astronomical setting menu;
– Date and time setting menu;
– Holiday mode setting menu;
– Language setting menu;
– End settings and exit;
– Astro times displaying menu;
– Astro offset setting menu;
– Geographical position setting menu;
– Time setting menu;
– Date setting menu;
– Summer/winter setting menu.
3.2.4 Astro time setting and display
Astronomical time setting « »
Page 7

~ 7 ~
NOVATEK-ELECTRO
REV-225
1) Select menu «ASTRO» and press ОК button;
2) Select menu «TIMES» and press ОК button, displaying the sunrise time;
3) Press ОК button and displaying the sunset time;
4) Exit from the setting by pressing MENU button.
Figure 6 - Astronomical time setting diagram
Note: The sunrise and sunset times are calculated automatically based on the entered coordinates (Setting of the
geographical location position “ “)
Offset time setting « »
The user sets the offset time relative to the time of sunrise and sunset.
Every day REV-225 calculates the real time of sunrise and sunset according to the geographic location settings,
sums this time with the offset time, then the obtained time is compared with the current time and if the time obtained
is more than or equal to the current time, the REV-225 will switch the load on or off.
Fig. 7 shows the diagram of the time offset setting.
Figure 7 – Time offset setting diagram
For setting time offset:
– Select menu «ASTRO» and press ОК button;
– Select menu «OFFSET» and press ОК button;
– Select the offset time of sunrise with buttons / and press ОК button. Offset range is ±2h.
– Select the offset time of sunset with / and press ОК button. Offset range is ±2h.
– Exit from the setting by pressing MENU.
Notes:
– Long press button more then 0.5s, increase the numerical value quickly;
– Long press button more then 0.5s, decrease the numerical value quickly;
Setting of the geographic location « »
The user specifies the coordinates of REV-225 location (it is used to calculate the time of sunrise and sunset):
latitude, longitude and time zone.
Fig. 8 shows the diagram of the geographic location setting.
For setting of latitude necessary :
– Select menu«ASTRO» and press ОК button;
– Select menu «POSITION» and press ОК button;
– Select menu
«LATITUDE»
and press ОК button;
– Select menu «SOUTH» ore «NORTH» and press ОК button. «SOUTH» - south latitude, «NORTH» north latitude;
– Set latitude degree value with / buttons and press ОК button;
– Set latitude minute value with / buttons and press ОК button;
– Exit from the menu
«LATITUDE»
setting by pressing MENU button.
For setting of longitude necessary :
–
Select parameter menu «
LONGITUD
» and press ОК button;
– Select parameter menu«EAST» ore «WEST» and press ОК button. «EAST» - east longitude, «WEST» -
west longitude;
– Set longitude degree value with / buttons and press ОК button;
Page 8

~ 8 ~
REV-225
NOVATEK-ELECTRO
– Set longitude minute value with / buttons and press ОК button;
– Exit from the «LONGITUD
» menu
setting by pressing MENU button.
Figure 8 – Geographic location diagram
For setting of time zone necessary:
–
Select «
T-ZONE
» menu to set time zone and press ОК button;
– Select required time zone with / buttons and press ОК button. Time zone is -12 ~ +12;
– Exit from «T-ZONE» the setting by pressing MENU button.
3.2.5 Time and date setting
Time setting
Fig. 9 shows the diagram of the time setting.
For setting time necessary:
– Select menu «DAT/TIME» and press ОК button;
– Select menu «TIME» and press ОК button;
– Choose adequate hour with / and press ОК button. Adjusting range: 0 – 23;
– Choose adequate minute with / and press ОК button. Adjusting range: 0 – 59;
– Exit from menu«TIME» the setting by pressing MENU button.
Figure 9 - Time setting diagram
Notes:
– Long press button more then 0.5s, increase the numerical value quickly;
Page 9

~ 9 ~
NOVATEK-ELECTRO
REV-225
– Long press button more then 0.5s, decrease the numerical value quickly;
Date setting
Fig. 10 shows the diagram of the date setting.
Figure 10 – Date setting diagram
For setting date necessary:
– Select menu «DAT/TIME» and press ОК button;
– Select menu «DATE» and press ОК button;
– Choose adequate year with / and press ОК button; Adjusting range is 2010 – 2095;
– Choose adequate month with / and press ОК button;
– Choose adequate day with / and press ОК button;
– Exit from the «DATE» setting by pressing MENU button.
Notes:
– Long press button more then 0.5s, increase the numerical value quickly;
– Long press button more then 0.5s, decrease the numerical value quickly;
Summer/winter time setting
Fig. 11 shows the diagram of the summer/winter time setting.
Figure 11 - Summer/winter time setting diagram
For setting of summer/winter mode necessary:
– Select menu «DAT/TIME» and press ОК button;
– Select menu «SU-WI» and press ОК button;
Display
Function
Summer switching
Winter switching
Europe sum/win
Last Sunday in March
Last Sunday in October
U.S.A sum/win
Second Sunday in March
First Sunday in November
Free sum/win
Freely programmed
Freely programmed
No sum/win
None
None
Page 10

~ 10 ~
REV-225
NOVATEK-ELECTRO
– Select the required summer/winter mode with / and press ОК button.
When select menu «FREE+IH» necessary:
Set the start month of summer time and press ОК button;
Set the start day of summer time and press ОК button;
Set the start month of winter time and press ОК button;
Set the start day of winter time and press ОК button;
–
Exit from the «SU-WI»
setting by pressing MENU button.
3.2.6 Holiday mode (weekends) setting
Fig. 12 shows the diagram of holiday setting.
For setting mode necessary:
– Select menu «HOLIDAY» and press ОК button;
– Select menu «ON» to activate holiday mode and press ОК button, symbol « » will be show at display.
For setting this mode menu necessary:
Set the start year of holiday with / and press ОК button;
Set the start month of holiday with / and press ОК button;
Set the start day of holiday with / and press ОК button;
Set the end year of holiday with / and press ОК button;
Set the end month of holiday with / and press ОК button;
Set the end day of holiday with / and press ОК button, return to «HOLIDAY» menu;
Exit from the «HOLIDAY» mode press MENU button;
– Select menu «OFF» to deactivate «HOLIDAY» mode and press ОК button;
– Exit from the «HOLIDAY» setting press MENU button.
Figure 12 – «HOLIDAY» setting diagram
3.2.7 Night break mode setting («NIGHT-BR»)
For setting mode necessary:
– Select menu «NIGHT-BR» and press ОК button;
– Ending time of a night break mode, select «C1-OFF» menu and press ОК button:
Set the adequate hours with / and press ОК button;
Set the adequate minute with / and press ОК button;
Return to «C1-OFF» sub-menu. Exit from the setting by pressing MENU button.
– Starting time of a night break mode, select «C1-ON» menu and press ОК button:
Set the adequate hours with / and press ОК button;
Set the adequate minute with / and press ОК button;
Return to «C1-ON» sub-menu. Exit from the setting by pressing MENU button.
– End the «NIGHT-BR» setting and exit.
Notes:
– Long press button more then 0.5s, increase the numerical value quickly;
Page 11

~ 11 ~
NOVATEK-ELECTRO
REV-225
– Long press button more then 0.5s, decrease the numerical value quickly;
Figure 13 – Night break mode setting diagram
Exampls of setting «NIGHT-BR» mode
3.2.8 Language setting
For setting of language necessary:
– Select «LANGUAGE» menu and press ОК button;
– Select the desired language and press ОК button;
– Exit from the setting by pressing MENU button.
3.2.9 Reset to factory settings
Press the four buttons: MENU, , , OK - simultaneously for 3 seconds to reset automatically. The device
was restored to factory settings. After terminations 3 seconds device name will be displayed.
4 DEVICE OPERATION
After adjustment, the device will turn on and off the load according to the set parameters, while the symbol “ ”
(automatic mode) will be lit on the display.
If the user needs to invert forcefully the load state, it is necessary simultaneously to press and buttons,
Page 12

~ 12 ~
REV-225
NOVATEK-ELECTRO
and the symbol “ ” (manual control) will appear on the display. To return to automatic operation, you should press
and buttons again.
During the operation of the device, when the time of the night break comes (the setting is described in it. 3.2.7),
the load of the device is disconnected until the time of the night break is switched off.
If the user has set the period of the days off (the setting is described in it. 3.2.6.), then when the days off period
comes, the device will go to the blocked state (the symbol “ ” appears on the display), the program will stop and
the device will be disconnected.
At the end of the days off period, the device will return to normal state and the main program will start.
5 MAINTENANCE
5.1 Safety precautions
THE TERMINALS AND THE PRODUCT INTERNAL ELEMENTS CONTAINS POTENTIALLY LETHAL VOLTAGE.
DURING MAINTENANCE IT IS NECESSARY TO DISABLE THE REV-225 AND CONNECTED DEVICES FROM
THE MAINS
5.2 Maintenance of the device must be performed by qualified service personnel.
5.3 Recommended frequency of maintenance is every six months.
5.4 Maintenance procedure:
1) Check the connection reliability of the wires, if necessary, clamp with the force specified in Table 1;
2) Visually check the integrity of the housing, in case of detection of cracks and damages to remove the device
from service and send for repair;
3) If necessary, wipe with cloth the front panel and the product housing.
Do not use abrasives and solvents for cleaning.
6 SERVICE LIFE AND MANUFACTURER'S GUARANTEE
6.1 The service life of REV-225 is 10 years. After the end of this period, please, contact the manufacturer.
6.2 The storing period is 3 years.
6.3 Warranty period of the unit operation is 5 years from the date of sale.
During the warranty period the Manufacturer is responsible for free repair of the unit, if the Consumer has
complied with the requirements of this Operating Manual.
ATTENTION! IF THE UNIT HAS BEEN OPERATED WITH VIOLATION OF THE REQUIREMENTS OF THIS
OPERATING MANUAL, THE MANUFACTURER HAS THE RIGHT TO REFUSE WARRANTY SERVICE.
6.4 Warranty service is performed at the place of purchase or by the Manufacturer of the product.
6.5 Post-warranty service is performed by the Manufacturer at current rates.
6.6 Before sending for repair, the unit should be packed in the original or other packaging excluding mechanical
damage.
7 SHIPPING AND STORING
REV-225 should be kept in the original packing in indoors premises with temperature from -45 up to +60 C and
relative humidity not more than 80 % with absence of vapors in the air which are harmful for packing and details of the
device.
 Loading...