

Page 1
C
F
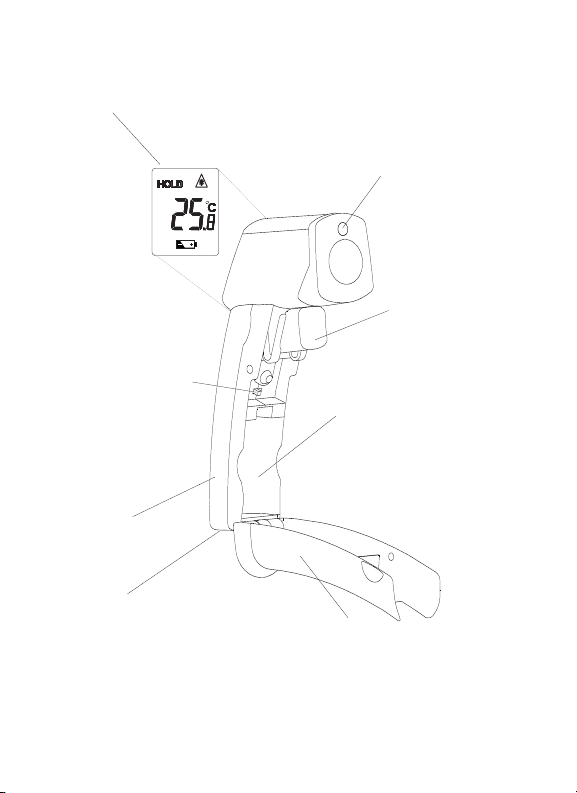
• Display
• °C/°F Switch
• Serial Number Label
• Wrist Strap Connection
• Laser (in units with laser)
• Trigger
• Battery Compartment
• Battery Cover
Page 2
English
R
T
E
Target
2
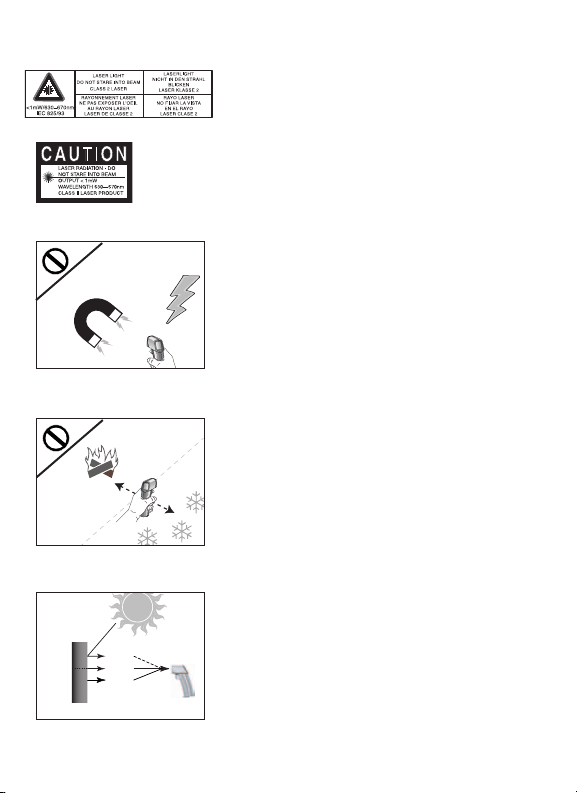
Warning
(units with laser sighting)
Do not point laser directly at eye or indirectly off
reflective surfaces.
Cautions
All models should be protected from the following,
▲ EMF (electro-magnetic fields) from arc welders,
induction heaters
▲ Static electricity
▲ Thermal shock (caused by large or abrupt ambi-
ent temperature changes—allow 30 minutes for
unit to stabilize before use)
▲ Do not leave the unit on or near objects of high
temperature
Introduction
We are confident you will find many uses for your
handheld noncontact thermometer. Compact, rugged,
and easy to use—just aim, pull the trigger, and read
current surface temperatures in less than a second.
You can safely measure surface temperatures of hot,
hazardous, or hard-to-reach objects without contact.
How it Works
Infrared thermometers measure the surface temperature of an object. The unit’s optics sense emitted (E),
reflected (R), and transmitted (T) energy, which is
collected and focused onto a detector. The unit’s
electronics translate the information into a temperature
reading which is displayed on the unit. In units with a
laser, the laser is used for aiming purposes only.
Page 3

How to Operate the Unit
C
9v
Battery
F
+
-
°C/°F and Battery
Pull open the unit’s handle using the finger indents
near the trigger to access the C/F switch or to
insert/remove the battery. To toggle between °C and
°F, push the switch (A). Insert the 9v battery positive
side first into the battery compartment. NOTE: The
battery door is detachable.
Operating the Unit
To measure a temperature, point unit at object and
pull the trigger. Be sure to consider distance-to-spot
size ratio and field of view. If the unit is equipped
with a laser, use the laser only for aiming. See How
to Accurately Measure Temperatures.
Display
The backlit LCD displays the current temperature in
Celsius or Fahrenheit. The unit will hold the reading
for 7 seconds after trigger is released; the word HOLD
appears. The presence of the battery icon indicates a
low battery (B).
English
A
B
3
Page 4

English
Yes
How to Accurately Measure
Temperature
Locating a Hot Spot
To find a hot spot aim the thermometer outside the
area of interest, then scan across with an up and
down motion until you locate the hot spot.
Field of View
Make sure that the target is larger than the unit’s spot
size. The smaller the target, the closer you should be
to it. When accuracy is critical, make sure the target
is at least twice as large as the spot size.
Distance & Spot Size
No
As the distance (D) from the object increases, the
spot size (S) of the area measured by the unit
becomes larger.
Reminders
■ Not recommended for use in measuring shiny or
polished metal surfaces (stainless steel, aluminum, etc.). See Emissivity.
■ The unit cannot measure through transparent sur-
faces such as glass. It will measure the surface
temperature of the glass instead.
■ Steam, dust, smoke, etc., can prevent accurate
measurement by obstructing the unit’s optics.
4
Page 5

English
Emissivity
Most organic materials and painted or oxidized surfaces have an emissivity of 0.95
(pre-set in the unit). Inaccurate readings will result from measuring shiny or
polished metal surfaces. To compensate, cover the surface to be measured with
masking tape or flat black paint. Allow time for the tape to reach the same temperature as the the material underneath it. Measure the temperature of the tape or painted surface.
Maintenance
Lens Cleaning: Blow off loose particles using clean compressed air. Gently brush
remaining debris away with a camel's hair brush. Carefully wipe the surface with a
moist cotton swab. The swab may be moistened with water. NOTE: DO NOT use
solvents to clean the plastic lens.
Case Cleaning: Use soap and water on a damp sponge or soft cloth. NOTE: DO
NOT submerge the unit in water.
Troubleshooting
CCooddee PPrroobblleemm AAccttiioonn
– – – (on display) Target temperature Select target within specifications
Battery icon appears Possible low battery Check and/or replace battery
Blank display Possible dead battery Check and/or replace battery
Laser doesn’t work Low or dead battery Replace battery
is over or under range
5
Page 6

English
CE Certification
This instrument conforms to the following standards:
EN 61326-1 Electromagnetic Emissions and Susceptibility
•
• EN 61010-1 General Safety
• EN 60825-1 Laser Safety
Between approximately 250Mhz and 800 Mhz at 3V/m, the instrument may not meet its stated
accuracy.
Warranty
Oakton warrants this product to be free from defects in material and workmanship under
normal use and service for a period of one year from date of purchase, except as hereinafter
provided. This warranty extends only to the original purchaser (a purchase from Oakton or
Oakton-licensed distributors is an original purchase).
This warranty shall not apply to batteries. The warranty shall not apply to any product
which has been subject to misuse, neglect, accident, or abnormal conditions of operation
or storage. In the event of failure under warranty, return this product to the distributor or
retailer from whom it was purchased for replacement or repair. Purchaser’s exclusive
remedy under warranty shall be replacement, repair, or refund of the purchase price.
The foregoing warranty is in lieu of all other warranties, expressed or implied, including
but not limited to any implied warranty of merchantability, fitness, or adequacy for any
particular purpose or use. Oakton shall not be liable for any special, incidental, or
consequential damages, whether in contract, tort, or otherwise.
6
 Loading...